© 2009 Sony Corporation
4-133-627-13(1)
GPS Unit Kit/
Kit d’unité GPS
Operating Instructions
Mode d’emploi
GPS-CS3KA
GB
FR
2
To reduce fire or shock hazard, do
not expose the unit to rain or
moisture.
If you have any questions about this product, you
may call:
Sony Customer Information Center
1-800-222-SONY (7669)
The number below is for the FCC related matters
only.
[ Regulatory Information
[ CAUTION
You are cautioned that any changes or
modifications not expressly approved in this
manual could void your authority to operate this
equipment.
[ Note:
This equipment has been tested and found to
comply with the limits for a Class B digital
device, pursuant to Part 15 of the FCC Rules.
These limits are designed to provide reasonable
protection against harmful interference in a
residential installation. This equipment generates,
uses, and can radiate radio frequency energy and,
if not installed and used in accordance with the
instructions, may cause harmful interference to
radio communications. However, there is no
guarantee that interference will not occur in a
particular installation. If this equipment does
cause harmful interference to radio or television
reception, which can be determined by turning the
equipment off and on, the user is encouraged to
try to correct the interference by one or more of
the following measures:
– Reorient or relocate the receiving antenna.
– Increase the separation between the equipment
and receiver.
– Connect the equipment into an outlet on a
circuit different from that to which the receiver
is connected.
– Consult the dealer or an experienced radio/TV
technician for help.
The supplied interface cable must be used with the
equipment in order to comply with the limits for a
digital device pursuant to Subpart B of Part 15 of
FCC Rules.
This Class B digital apparatus complies with
Canadian ICES-003.
English
WARNING
For Customers in the U.S.A.
Declaration of Conformity
Trade Name: SONY
Model No.: GPS-CS3
Responsible Party: Sony Electronics Inc.
Address:16530 Via Esprillo,
San Diego, CA 92127 U.S.A.
Telephone No.: 858-942-2230
This device complies with Part 15 of the FCC
Rules. Operation is subject to the following
two conditions: (1) This device may not cause
harmful interference, and (2) this device must
accept any interference received, including
interference that may cause undesired
operation.
For Customers in Canada
3
Hereby, Sony Corporation, declares that this GPS-
CS3 GPS unit is in compliance with the essential
requirements and other relevant provisions of the
Directive 1999/5/EC.
For details, please access the following URL:
http://www.compliance.sony.de/
This product has been tested and found compliant
with the limits set out in the EMC regulation for
using connection cables shorter than 3 meters (9.8
feet).
[ Disposal of Old Electrical &
Electronic Equipment (Applicable
in the European Union and other
European countries with separate
collection systems)
This symbol on the product or on its packaging
indicates that this product shall not be treated as
household waste. Instead it shall be handed over
to the applicable collection point for the recycling
of electrical and electronic equipment. By
ensuring this product is disposed of correctly, you
will help prevent potential negative consequences
for the environment and human health, which
could otherwise be caused by inappropriate waste
handling of this product. The recycling of
materials will help to conserve natural resources.
For more detailed information about recycling of
this product, please contact your local Civic
Office, your household waste disposal service or
the shop where you purchased the product.
For Customers in Europe
GB

4
Table of contents
Read this first
What you can do with the GPS unit kit ......................................................5
Displaying images where they were taken and the route you traveled on a
map ...........................................................................................................6
Checking the included items .................................................................... 8
Identifying the parts ..................................................................................9
Menu screen ........................................................................................... 11
Step 1 Recording the traveled route
Inserting a battery ...................................................................................14
Recording a GPS log ..............................................................................16
Formatting the internal memory ..............................................................19
Step 2 Applying the recording positioning
information to images
Installing the supplied software ..............................................................20
Applying positioning information to images with the GPS unit
(Matching) ...............................................................................................22
Applying positioning information to the images on a computer/Importing
the GPS log .............................................................................................26
Step 3 Displaying the image on a map
Viewing the image and the location where you recorded an image on a
map/Viewing the route you traveled .......................................................30
Troubleshooting
Troubleshooting ......................................................................................32
Error messages .......................................................................................34
Additional information
GPS .........................................................................................................36
Precautions .............................................................................................37
Specifications .........................................................................................41

5
Read this first
R
ea
d
thi
s
fi
rs
t
What you can do
with the GPS unit kit
The GPS-CS3KA GPS unit kit enables
you to:
– Apply positioning information to
image data
– Display images on a map of the
shooting locations
– Display the route you traveled on a
map
– Send e-mails with images displayed
on a map of the shooting locations
x
Components of the GPS
unit kit
The GPS unit kit consists of a GPS unit,
and three sets of application software:
“PMB,” “GPS Image Tracker,” and
“PMB Launcher.”
GPS unit
The GPS unit records the travel route as
a “GPS log,” a log of serial positioning
information. The GPS unit records the
current positioning information about
every 15 seconds in the “GPS log.”
You can also apply positioning
information to image data using the GPS
unit.
PMB
This software enables you to view and
manage the images recorded by digital
still cameras and Sony digital video
camera recorders. Using the Map View
feature of PMB, you can display images
which have positioning information
recorded by the GPS unit and
incorporated in the image data by GPS
Image Tracker, on a map. Thanks to this
feature, you can easily determine where
you took the image, and check the route
you traveled while recording images.
GPS Image Tracker
This software enables you to import the
“GPS log” (serial positioning
information recorded) from the GPS unit
to a computer, incorporate the
positioning information in the image data
recorded by digital still cameras and
Sony digital video camera recorders, and
store them together.
PMB Launcher
If you select an operation on the PMB
Launcher, the software required for the
operation starts automatically.
x
Matching positioning
information to individual
images
The GPS unit and GPS Image Tracker
match date and time information
recorded with the image data and that of
the GPS log, and pair positioning
information from the GPS log with
image data that has the same date and
time information as that of the GPS log
(Matching).
• Since the GPS unit records positioning
information about every 15 seconds, the
positioning information applied to the image
may not be exactly the same as that where
the image was actually taken.
• The GPS unit records Greenwich Mean Time
(GMT) as the time information.
Notes

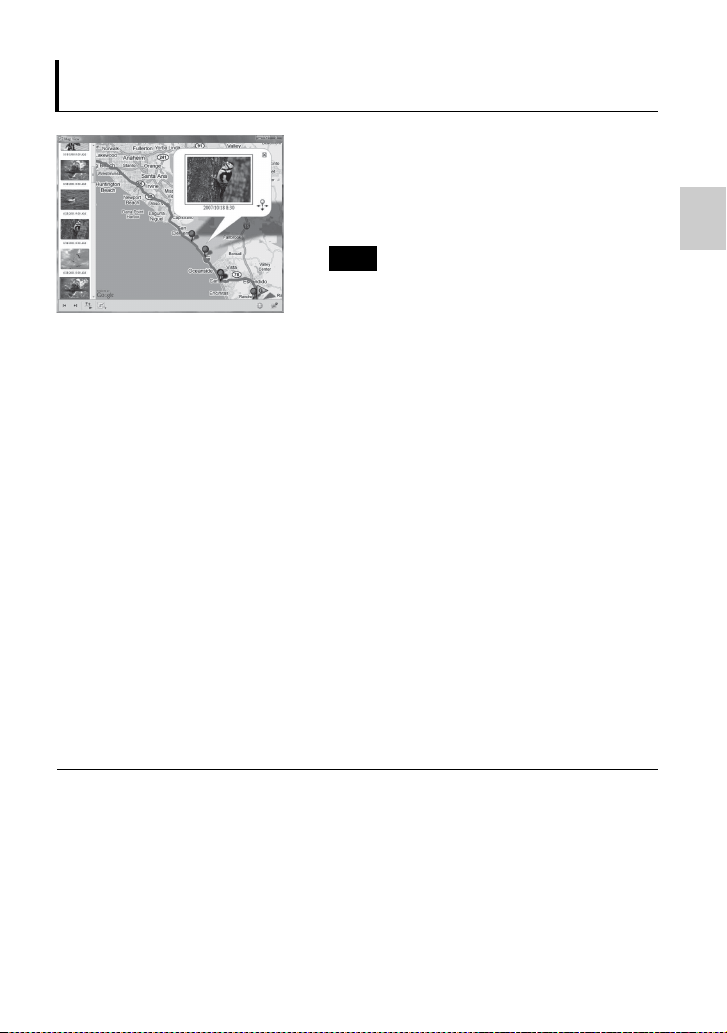
6
Displaying images where they were taken
and the route you traveled on a map
Step 1
Recording the traveled route
, See page 14.
1 Insert an LR6/HR6 (size AA) battery (sold separately)
into the GPS unit, and turn it on.
Make sure that the triangulating symbol ( to )
appears on the LCD screen. Turn on the GPS unit
outdoors.
2 When you use the GPS unit for the first time, the
[Time Zone] screen appears. Select the time
difference using V/v based on GMT, then press
ENTER.
See page 17 on the GMT time difference for each
country/region.
3 Set the correct time on your camera.
Refer to the operating instructions of the camera.
4 Carry the GPS unit and the camera together.
Step
2
Applying the recording positioning
information to images
, See page 20.
1 Insert the “Memory Stick Duo” media or the SD
memory card that contains the recorded images into
the GPS unit.
2 Press MENU, then select [Matching] t [Start].
When the GPS unit has applied the positioning
information to the images, [Complete] appears.
3 Install the supplied software (GPS Image Tracker,
PMB, and PMB Launcher) on your computer.
• You may apply positioning information to images using
the supplied GPS Image Tracker (p. 26).
• If you are using media other than “Memory Stick Duo”
media or SD memory cards, see page 26.
• When you want to adjust or change the location of the
images on a map, refer to the GPS Image Tracker Help.
7
Read this first
Step 3
Displaying the images on a map
, See page 30.
1 Insert the “Memory Stick Duo” media or the SD
memory card that contains the images with
positioning information into the camera, and connect
the camera to the computer.
PMB starts automatically.
2 Import the images.
If GPS Image Tracker is opened, close GPS Image
Tracker after importing the images.
3 Start PMB Launcher, and click “Display Images on
the Map with Map View.”
The images and the location where you shot them will
be displayed on the map.
• To use the world map, the computer needs to be
connected to the Internet. The online map and the aerial
photomap are powered by Google Maps.
• You can use network services and Google Earth using the supplied PMB. See the
PMB support page for more information.
• You can use the GPS unit as a GPS logger. Using GPS Image Tracker, import the
GPS log that was recorded by the GPS unit while you were carrying the GPS unit
that was turned on, and connected to a computer. Then, the route you traveled will be
displayed on a map, using PMB.
Note
8
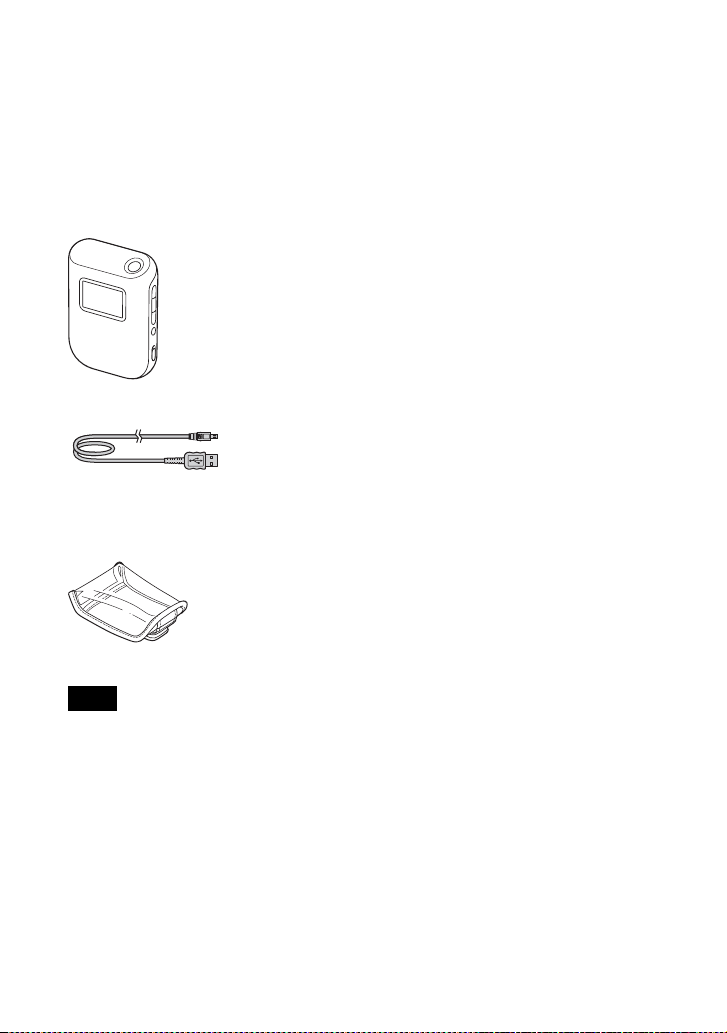
Checking the
included items
Make sure you have following items
included with your GPS unit.
The number in parenthesis indicates the
number of that item supplied.
• GPS unit (GPS-CS3) (1)
• USB cable (1)
• CD-ROM “GPS Unit Application
Software” (1)
• Carrying case (1)
• Set of printed documentation
Neither LR6 (size AA) alkaline batteries nor
HR6 (size AA) Nickel-Metal Hydride batteries
are supplied with the GPS unit.
Note
9
Read this first
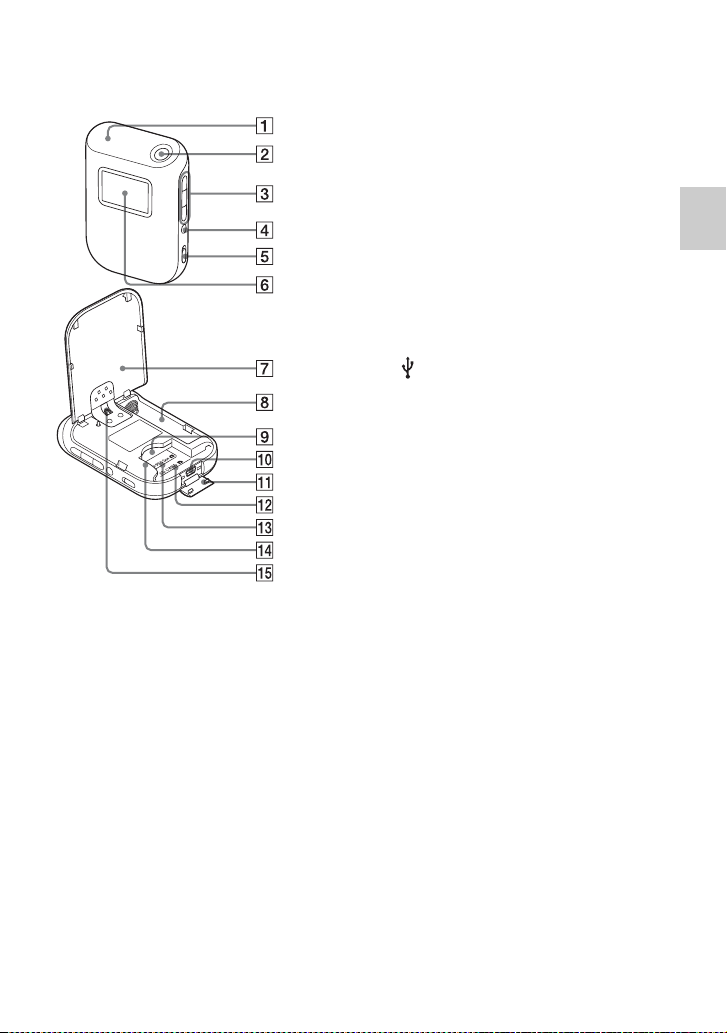
Identifying the parts
x
GPS unit
A Antenna
B 1 (power) button (p. 11, 16)
C V/ENTER/v buttons (p. 11)
D MENU button (p. 11)
E HOLD switch (p. 13)
F LCD screen
G Battery cover (p. 14)
H Battery compartment (p. 14)
I “Memory Stick Duo” media/SD card
slot (p. 22)
J (USB) jack (p. 28)
K USB jack cover (p. 28)
L Position marker for SD memory card
(p. 22)
M Position marker for “Memory Stick
Duo” media (p. 22)
N Card guide (p. 22)
O Strap attaching part
• No strap is supplied.
10
x
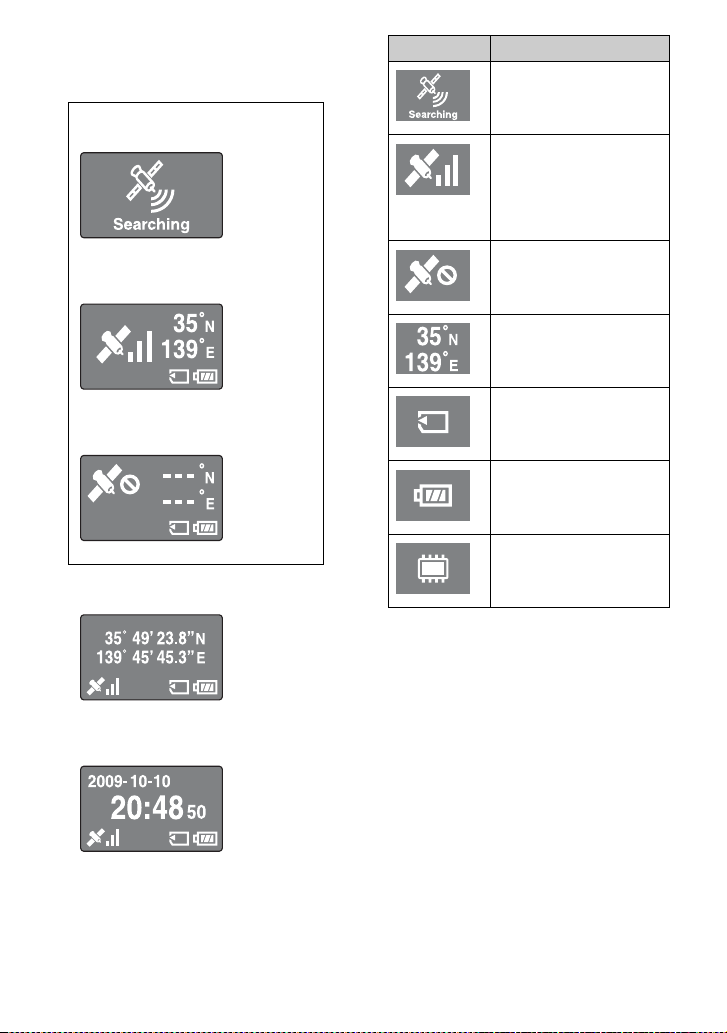
LCD screen
GPS status display
• If you do not operate the GPS unit for about
10 seconds, the backlight of the LCD screen
will go out. Press ENTER to turn it on again.
• The GPS unit does not show the date and
time until it receives a GPS radio signal.
There may be some discrepancies in the
displayed time, depending on the condition
under which you are using the GPS unit.
Searching for satellites
Triangulating
Unable to triangulate
Coordinates display
Clock display
Icons Meanings
Searching for GPS satellites.
• Looking for radio signals
from GPS satellites.
The GPS unit is acquiring
positioning information,
triangulating, and recording
GPS signals. Bars on the
right show the signal
strength.
Unable to receive GPS
signals. Unable to acquire
positioning information.
Latitude (N/S) and longitude
(E/W)
One of “Memory Stick Duo”
media or SD memory cards
is inserted.
Remaining battery power
Internal memory capacity is
low.
11
Read this first
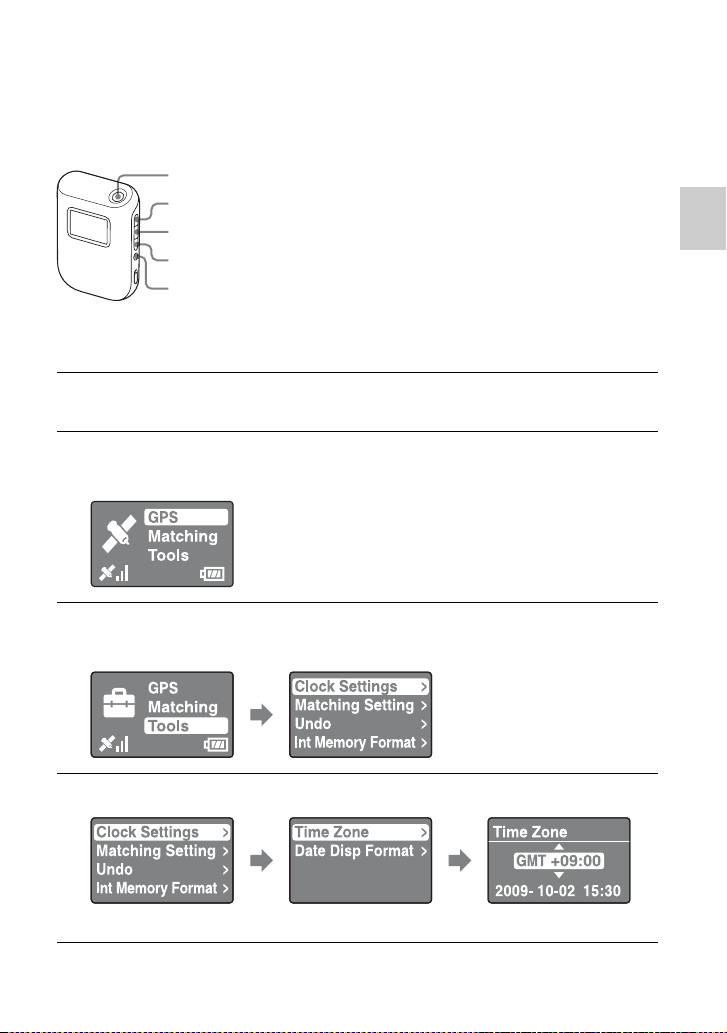
Menu screen
x
Operating the GPS unit
Operate the GPS unit using the menu displayed on the LCD screen, by pressing the
buttons on the side of the GPS unit.
Example: To set [Time Zone]
1
Hold the 1 (power) button down.
2
Press MENU.
The top menu appears.
3
Press V/v to select the item, then press ENTER.
The sub menu appears.
4
Repeat the operation in step 3 to select the desired setting.
The GPS unit does not show the date and time until it receives a GPS radio signal.
1 (power) button
V button
ENTER button
v button
MENU button
ENTER
ENTER ENTER
12
x
Menu list
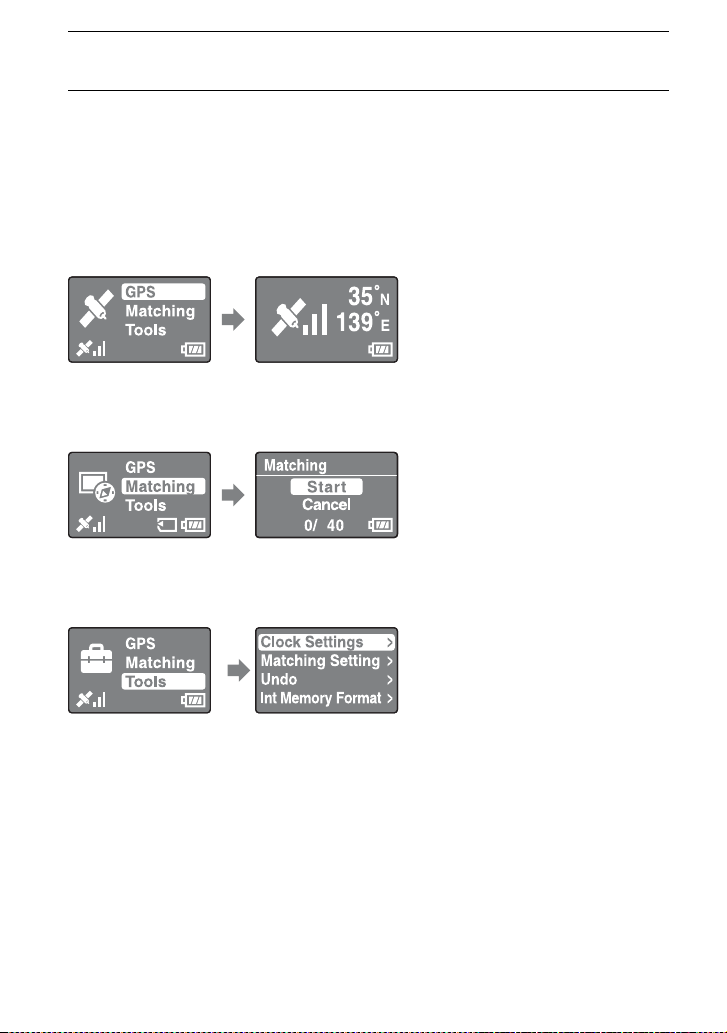
The top menu appears when you press MENU.
The GPS unit has three types of menu mode.
[GPS] mode screen
Triangulates and records the GPS log (p. 16).
The screen appears differently according to the status of the current triangulation.
[Matching] mode screen
Applies positioning information to images (p. 23).
[Tools] mode screen
Changes the settings of the GPS unit.
x [Clock Settings]
Sets the items related to the time settings.
[Time Zone]: Sets the time difference between Greenwich Mean Time (GMT) and the
time in the place you use the GPS unit.
[Date Disp Format]: Sets the order of year, month, and date to be displayed.
x [Matching Setting]
Selects [Matching] or [Quick Matching] (p. 25).
x [Undo]
Deletes the positioning information from the images that you applied positioning
information to using the GPS unit most recently (p. 25).
5
Press MENU repeatedly to return to the top menu.
13
Read this first
x [Int Memory Format]
Formats the internal memory of the GPS unit (p. 19).
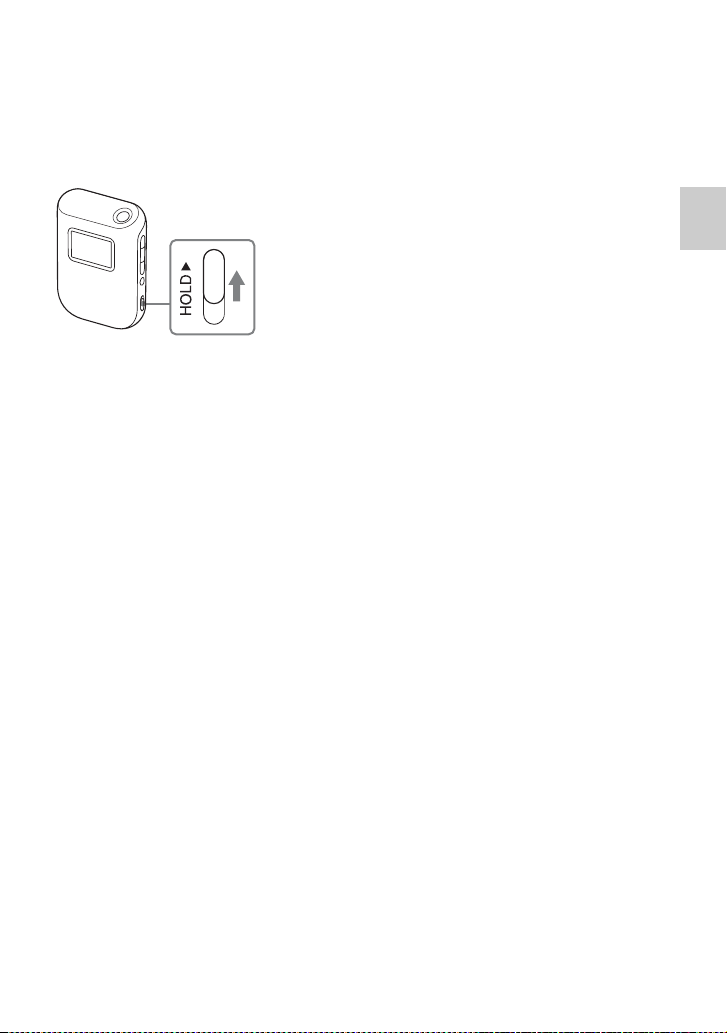
To prevent triangulation from being interrupted
You can prevent the button of the GPS unit from being pressed accidentally in a bag,
etc., during triangulation.
Slide the HOLD switch up.
To operate the GPS unit again, slide the HOLD switch down.
14
St
ep
1R
ecor
di
n
g
th
e
t
rave
l
e
d
rou
t
e
Inserting a battery
You can use one of the following batteries.
• LR6 (size AA) alkaline battery
• HR6 (size AA) Nickel-Metal Hydride battery (recommended)
The battery life of an LR6 (size AA) alkaline battery is shorter at temperatures lower than 25 °C
(77 °F). It is recommended that you use a Nickel-Metal Hydride battery.
x
Removing the battery
After making sure that the GPS unit is turned off, hold the GPS unit with the battery
cover up, and then remove the battery.
Be sure not to drop the battery.
Note
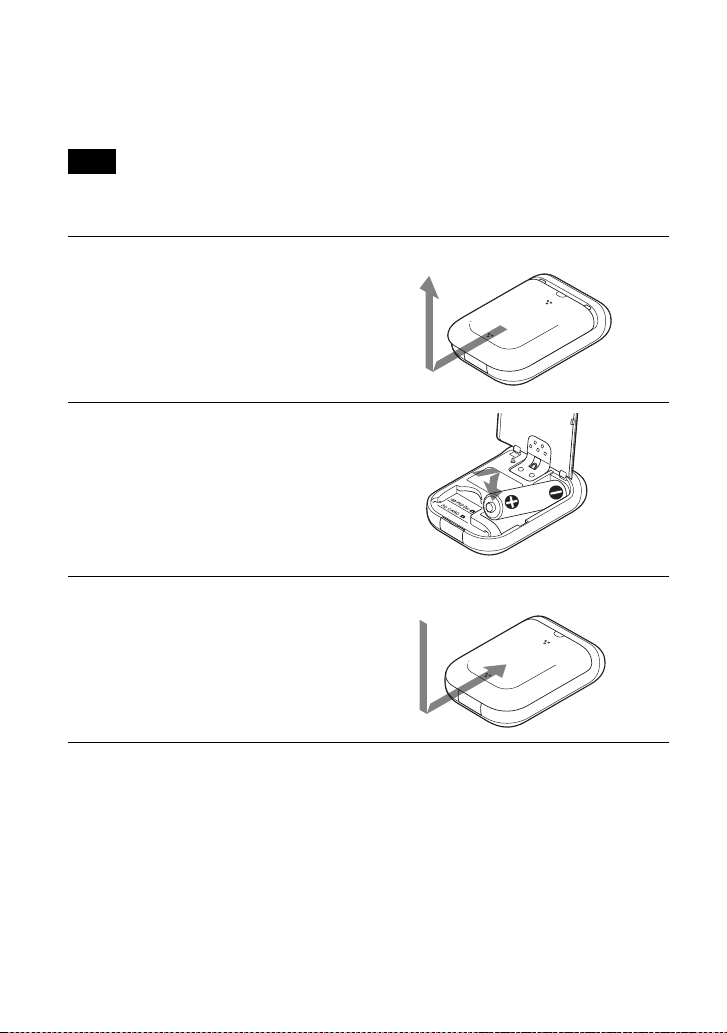
1
Open the battery cover.
• If the GPS unit is already turned on, make
sure that you turn it off before opening the
battery cover.
2
Observe the e/E marks on the
battery compartment, and insert
the battery with the correct
polarity.
• Insert the E side first as shown to the right.
3
Close the battery cover.

15
Step 1 Recording the traveled route
x
Battery life
• The battery life may differ from the above depending on the operation or the environmental
condition. The battery life is shorter when “Memory Stick Duo” media/SD memory card is
inserted.
• Sony alkaline batteries and Nickel-Metal Hydride batteries are recommended.
• The battery life will be noticeably shorter at low temperatures.
• You cannot use manganese batteries with the GPS unit.
If you mishandle the battery, there is a danger of leakage or explosion. Be sure to observe the
following.
• Insert the battery with the correct polarity e/E.
• Do not charge a dry battery.
• Remove the battery when you do not intend to use the GPS unit for a long time. Otherwise, it may
result in leakage from the battery.
(When triangulating at 25 °C (77 °F) without “Memory Stick Duo” media/SD memory card inserted)
LR6 (size AA) Sony alkaline battery (sold
separately)
HR6 (size AA) Sony Nickel-Metal Hydride battery
(sold separately)
about 15 hours about 16 hours
Note

16
Recording a GPS log
The GPS log data from when the GPS unit is turned on to when the GPS unit is turned
off, or to when the mode is switched from [GPS] to another mode ([Matching] or
[Tools]), are recorded as one log file. When the GPS unit is turned on again, or the mode
is switched to [GPS], the GPS log data is recorded as a new log file.
1
In an open sky environment, direct the antenna upward, and
hold the 1 (power) button down.
The GPS unit turns on, and the GPS triangulation status appears on the LCD
screen.
Wait for about several minutes at the same location, until the GPS unit starts
triangulating.
If the GPS unit cannot triangulate after five minutes, you may be in a location
where the radio signals from GPS satellites cannot reach.
The GPS unit records the location about every 15 seconds automatically during
triangulation.
2
Set the time difference from GMT with [Time Zone].
When you use the GPS unit for the first time, the [Time Zone] screen appears.
If the [Time Zone] screen does not appear, press MENU, then select [Tools] t
[Clock Settings] t [Time Zone].
When you use the GPS unit in other countries/regions, set the time difference to
the appropriate country/region.
• Adjust the time difference based on Greenwich Mean Time (GMT). See “World
time difference” (p. 17) for more information on the time difference.
• After the GPS unit starts triangulating, the clock is displayed on the [Time
Zone] screen (p. 11).
• When you do not know the time difference for where you are, press V/v on the
[Time Zone] screen until the clock display at the bottom of the screen shows the
time of the region/country.
3
Check the date and time setting on your camera.
The positioning information and the image data are matched to each other based
on their time information (p. 5). Therefore, if the date and time setting of the
camera is incorrect, the recorded image and the recorded location will not match
correctly. Refer to the operating instructions of your camera for setting the clock
of your camera.
• You can refer to the clock display of the GPS unit when setting the clock of the
camera.
17
Step 1 Recording the traveled route
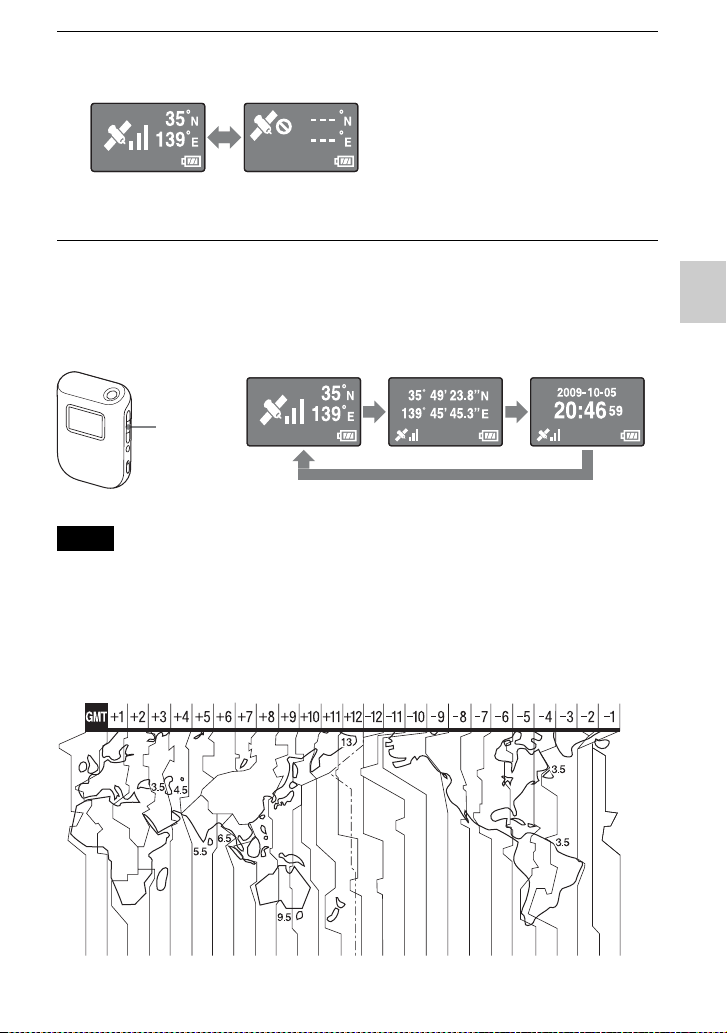
Checking the current location and current time
Press ENTER repeatedly while triangulation is successful.
The screen display will change as follows.
• Even if you press ENTER when the GPS unit is unable to triangulate, the GPS unit will not display
the coordinates of the current location.
• The GPS unit does not show the date and time until it receives a GPS signal. There may be some
discrepancies in the displayed time, depending on the condition under which you are using the
GPS unit.
x
World time difference
4
Check the triangulation status, and carry the GPS unit.
• Press ENTER to display the triangulation status.
Notes
Triangulating
successfully
Unable to
triangulate
Current
coordinates
Current date and
time
ENTER

18
Inappropriate locations for acquiring GPS data
You may not record a GPS log at locations or in situations where the radio signals from
GPS satellites do not reach the GPS unit. For example,
• In tunnels, indoors, or under the shade of buildings.
• Between tall buildings or at narrow streets surrounded by buildings.
• In underground locations, locations surrounded by dense trees, or under an elevated
bridge.
• In locations where magnetic fields are generated, such as near high voltage cables.
• Near devices that generate radio signals of the same frequency band as those of the
GPS unit, near 1.5 GHz band mobile telephones, etc.
• You are not supposed to turn the GPS unit on and off when you are about to press the shutter on
your camera. On the contrary, keep the power of the GPS unit turned on while you carry the GPS
unit together with the camera, and while you record images. Unless the GPS unit is triangulating
when you record images, the GPS unit does not record GPS logs to be matched with the images.
• When the GPS unit is left with the power on, the GPS unit enters [GPS] mode and starts
triangulating automatically. This may result in creation of an unexpected GPS log.
• You can delete unnecessary GPS logs, using GPS Image Tracker, after importing them to the
computer. Refer to the GPS Image Tracker Help for information on deleting a GPS log.
• If several GPS logs are created due to turning the GPS unit on/off, etc., you can merge them using
GPS Image Tracker, after importing them to the computer. Note that you cannot divide merged
GPS logs. Refer to the GPS Image Tracker Help for information on merging GPS logs.
x
Turning off the GPS unit
Hold the 1 (power) button down.
x
Resetting the settings
If the GPS unit starts unsteady operation, reset the settings of the GPS unit.
While holding the MENU button down, hold the 1 (power) button down.
The settings of the GPS unit are reset.
Notes

19
Step 1 Recording the traveled route
Formatting the internal memory
The GPS unit can record multiple GPS logs totaling up to about 3 months. (Recording
duration differs depending on the condition under which you are using the GPS unit.)
When the internal memory is full, the following message appears.
You can format the internal memory using the menu. When formatted, all data in the
internal memory is cleared, and cannot be recovered. It takes about 15 seconds for
formatting.
1
Press MENU during triangulation.
2
Press V/v to select [Tools], and press ENTER.
3
Press V/v to select [Int Memory Format], and press ENTER.
4
Press V/v to select [Start], and press ENTER.
5
When [Complete] appears, press ENTER.

20
St
ep
2A
pp
lyi
n
g
th
e recor
di
n
g
pos
iti
on
i
n
g
i
n
f
orma
ti
on
t
o
i
ma
g
es
Installing the supplied software
By installing the supplied software on your computer, you can import images to your
computer, apply positioning information to images, and display them on a map.
This section describes the operation with the English version of screen contents.
x
Recommended computer environment
The following environment is recommended for using the supplied software.
GPS Image Tracker and PMB
OS (pre-installed): Microsoft Windows XP SP3/Windows Vista* SP1
* 64-bit editions is also supported.
CPU/Memory: Intel Pentium III 500 MHz or faster/256 MB or more (Intel Pentium III
800 MHz or faster/512 MB or more is recommended)
Hard Disk: Disk space required for installation – approximately 500 MB
Display: 1024 × 768 dots or more
• To operate movies, you need a computer system environment that supports PMB supplied with
Sony digital still cameras or Sony digital video camera recorders.
Notes on connecting the GPS unit to a computer
• Operations are not guaranteed for all the recommended computer environments
mentioned above.
• If you connect two or more USB devices to a single computer at the same time, some
devices, including your camera, may not operate, depending on the types of USB
devices you are using.
• Operations are not guaranteed when using a USB hub.
• When your computer resumes from suspended or sleep mode, communication
between the GPS unit and your computer may not recover at the same time.
• Log on to a computer as Administrator.
Notes on PMB
Check the following before installing the supplied software.
• When handling the movies recorded with Sony digital still cameras or some of Sony
digital video camera recorders, you need to install PMB supplied with the respective
model additionally.
• Be aware of the following when installing PMB supplied with Sony digital still
cameras or Sony digital video camera recorders (hereinafter collectively called
“cameras”).
– When the version of PMB supplied with the cameras is older than that of supplied
with this kit, first install PMB supplied with the cameras, and then install PMB
using the CD-ROM supplied with this kit.
– When the version of PMB supplied with the cameras is equivalent to that of
supplied with this kit or later, first install PMB using the CD-ROM supplied with
this kit, and then install PMB supplied with the cameras. By doing this, extra
functions will be added.
21
Step 2 Applying the recording positioning information to images
Install the software in the following procedures.
x
Installing GPS Image Tracker and PMB
1
Turn on your computer, and insert the supplied CD-ROM
into the CD-ROM drive.
The screen to select the Setup Language appears.
• For Windows Vista, the AutoPlay screen appears. Select “Run Setup.exe.” and
follow the instruction that appears on the screen to proceed with the installation.
• If the installation does not start, click [Start] t [My Computer], then double-
click the (SONYPICTUTIL) icon.
2
Select the desired language, then click [Next].
The “License Agreement” screen appears.
3
Read the agreement carefully. If you accept the terms of this
agreement, click the radio button next to [I accept the terms
of the license agreement] and then click [Next].
The screen that shows the completion of the installation preparation appears.
4
Confirm the installation setting and click [Install].
5
Follow the instructions on the screen to complete the
installation.
• When the restarting confirmation message appears, restart the computer by
following the instructions on the screen.
• The installation screen of the software may appear depending on the system
environment of your computer. Follow the instruction to proceed with the
installation.
6
Remove the CD-ROM after the installation is complete.
22
Applying positioning information to images
with the GPS unit (Matching)
Using the GPS unit, you can apply the positioning information to JPEG format (.jpg of
extension) still images recorded on “Memory Stick Duo” media or SD memory cards.
You can display the images that have positioning information applied with the GPS unit
at the recording points on a map. If you import GPS logs from the GPS unit, you can also
display the route you traveled on a map.
See ““Memory Stick Duo” media/SD memory cards” (p. 38) on the type of “Memory
Stick Duo” media/SD memory cards you can use with the GPS unit.
• When you use the GPS unit, you can apply positioning information only to JPEG format images.
However, you cannot apply positioning information to the following types of image, even if they
are of JPEG format. Also, you cannot apply positioning information to movies.
– Images that do not conform to DCF
– Images that were recorded while the GPS unit was not recording a GPS log
– JPEG files in a format earlier than Exif 2.1
• Use a new or fully charged battery for matching operations. (A Nickel-Metal Hydride battery is
recommended.) Do not use a battery with a low capacity remaining. If the battery capacity
becomes low during matching, the GPS unit may not apply positioning information to all images.
• The battery duration will be shorter in low temperatures.
• Images that have already been applied the positioning information, irrespective of on this GPS unit
or on other devices, will be excluded automatically.
• You may not be able to apply positioning information to images processed on a computer.
x
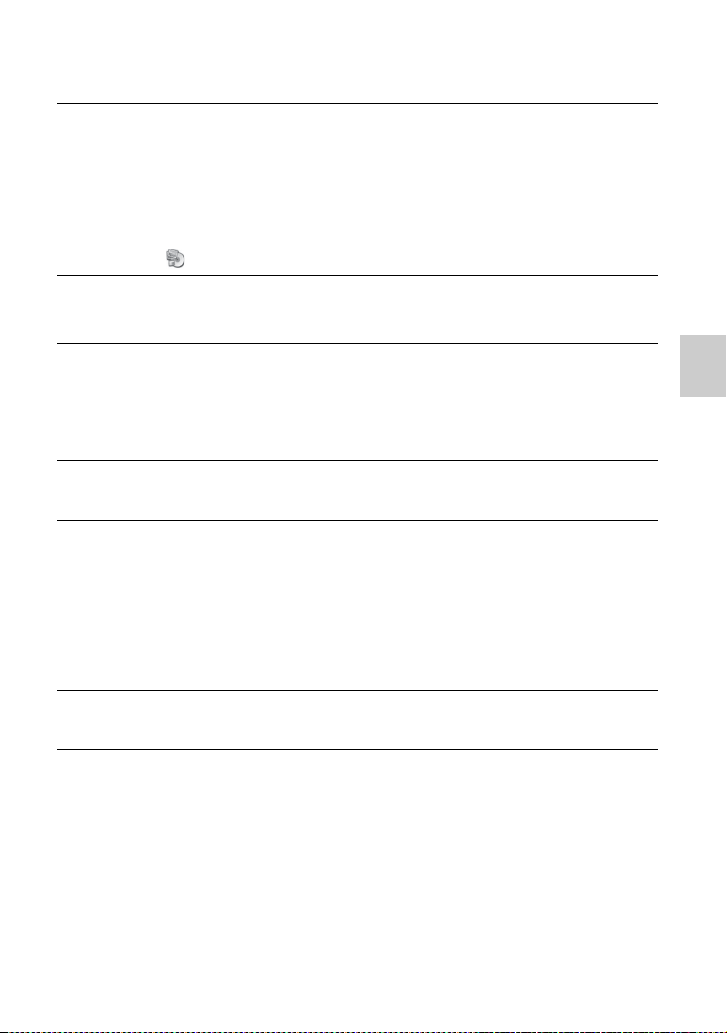
Inserting the “Memory Stick Duo” media/SD memory card with
images stored into the GPS unit
Insert the “Memory Stick Duo” media/SD memory card along the card guide fully into
the end until it aligns with the position marker.
Notes
Position marker for
“Memory Stick Duo” media
“Memory Stick Duo” media
Position marker for
SD memory card
SD memory card
23
Step 2 Applying the recording positioning information to images
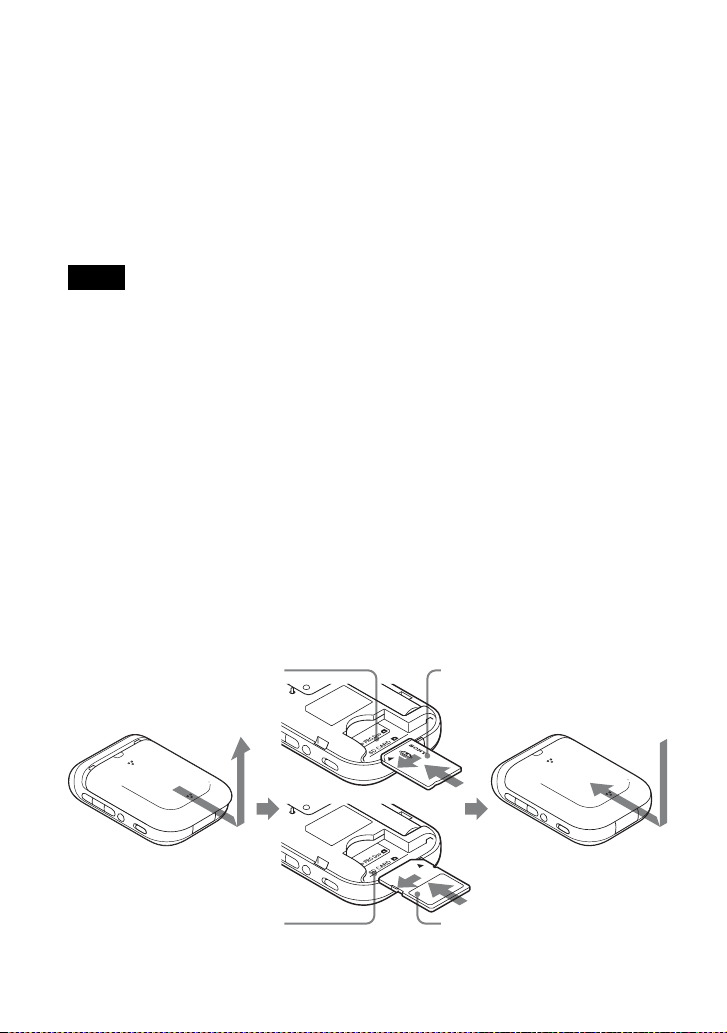
Correct position of “Memory Stick Duo” media
Insert the “Memory Stick Duo” media until it aligns with the position marker.
• Be sure to close the battery cover. If the battery cover is open, you cannot operate the GPS unit.
• Do not open the battery cover during Matching/Undo operation.
To remove the “Memory Stick Duo” media/SD memory card
While holding the “Memory Stick Duo” media/SD memory card down with your thumb
or finger, slide it out.
x
Applying the positioning information to images
You can match a maximum of 60 images in one session. If the size of an image is more
than 13 MB, the number of images you can match in one session will be fewer.
Notes
1
Turn on the GPS unit, and insert the “Memory Stick Duo”
media/SD memory card (p. 22).
2
Close the battery cover.
You can operate the GPS unit.
Position marker for “Memory Stick Duo” media
24
The more images there are, the more time it takes for matching. It is recommended that you match
images and data frequently.
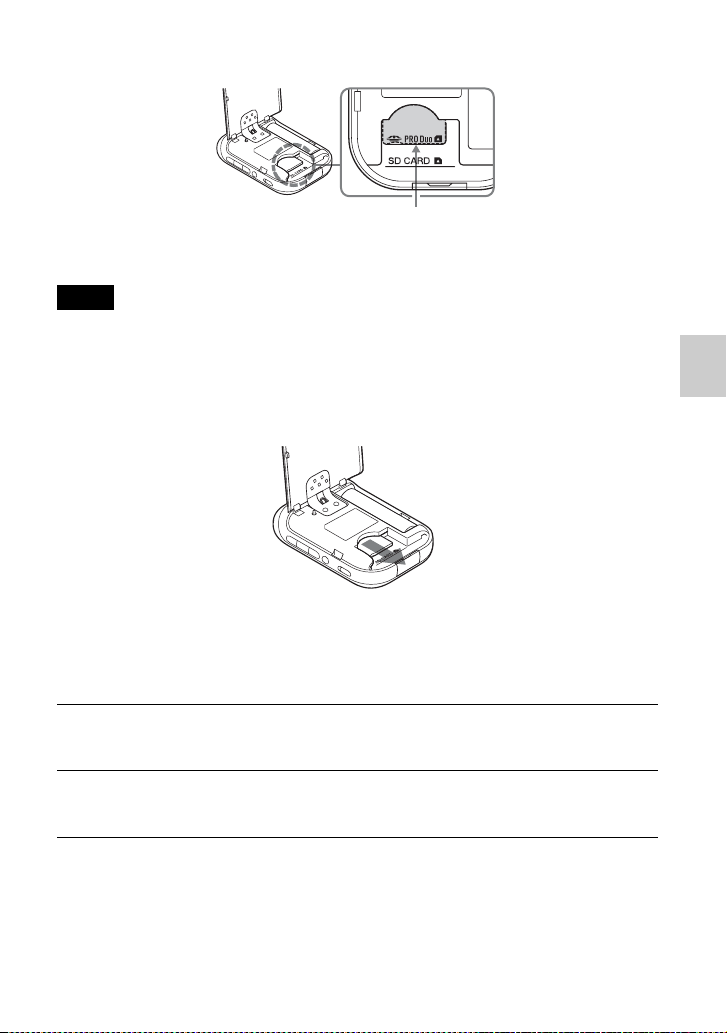
3
Press MENU, select [Matching], and press ENTER.
The GPS unit starts scanning the images that can be matched with positioning
information. When there are many images, it will take longer time for scanning.
• To stop scanning, press ENTER.
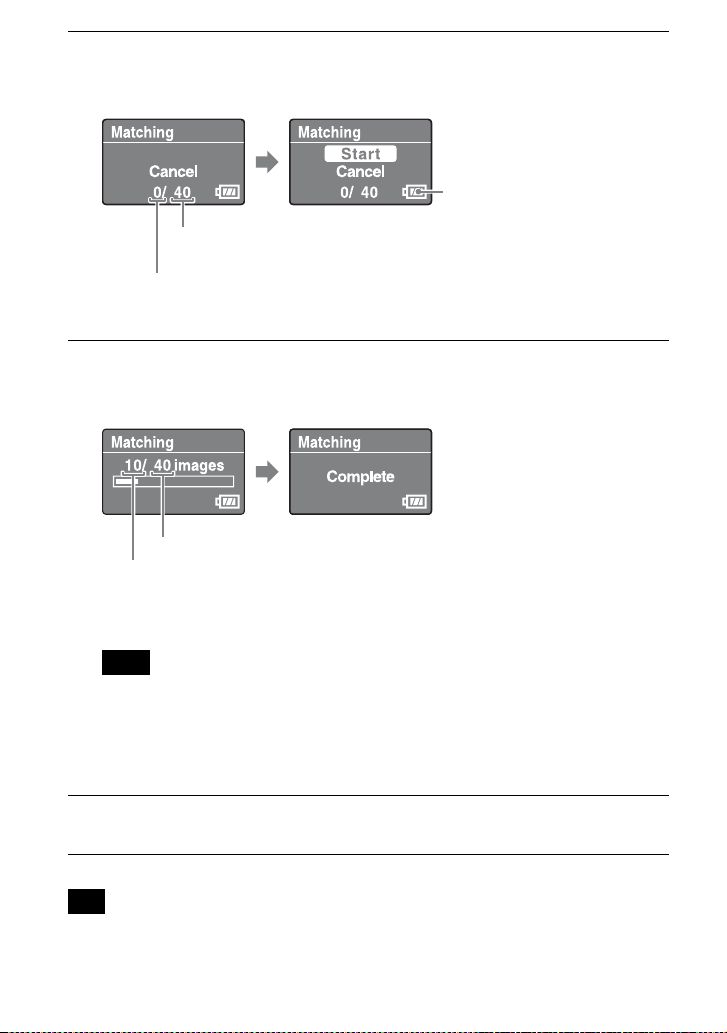
4
Select [Start] and press ENTER.
The GPS unit starts the matching operation. When completed, [Complete]
appears.
* You can match a maximum of 60 images in one session. When there are more than 60 images
that can be matched on the GPS unit, 60 is displayed.
Be sure that you do not perform the following during a matching operation. The image data
may be damaged. If you want to do one of the following operations, stop the current matching
operation.
• open the battery cover
• turn off the GPS unit
• disconnect the USB cable
5
Remove the “Memory Stick Duo” media/SD memory card.
Tip
Battery power remaining
Total number of images
that can be matched.
Number of matched images
Number of images to be matched*
Number of images being matched
Note

25
Step 2 Applying the recording positioning information to images
To match more than 60 images
Before step 5, repeat steps 3 and 4.
To stop matching
Press MENU during matching. On the [STOP] screen displayed, select [OK], and press
ENTER. The GPS unit returns to the menu screen.
• The GPS unit may display [cancelling] and continue matching even if you press MENU. If this
happens, wait for a while until the GPS unit stops matching.
• If you want to continue matching, select [Cancel] on the [STOP] screen and press ENTER.
To delete the positioning information from matched images (Undo)
1 Insert the “Memory Stick Duo” media/SD memory card with the previously
matched images into the GPS unit.
2 Press MENU.
3 Select [Tools] t [Undo] t [Start].
• To cancel the operation, select [Cancel].
4 Press ENTER.
• Using the Undo function, you can delete the positioning information only once from the images
that were matched most recently.
• If you process the matched images on a computer or camera, you may not be able to delete the
positioning information from the images using the Undo function.
• If you set [Matching Setting] to [Quick Matching], you can match faster than when using
[Matching]. However, you cannot use the Undo function with the images.
• [Matching] is selected as the default setting. To change the matching method, press MENU, select
[Tools] t [Matching Setting] t [Matching] or [Quick Matching].
Notes
Tips

26
Applying positioning information to the
images on a computer/Importing the GPS log
You can apply positioning information to the images imported to a computer using GPS
Image Tracker.
• You do not need to apply positioning information to images that have already been matched with
the GPS unit.
• GPS Image Tracker is compatible with files in the following file formats.
– JPEG files (compatible with Exif 2.1 or later)
– Movie files taken with a Sony digital still camera or Sony digital video camera recorder
– Sony RAW files (Program compatible with RAW files from the following camera models.)
– SRF: DSC-F828/V3
– SR2: DSC-R1
– ARW: DSLR-A100
– ARW2.0: DSLR-A200/A300/A350/A700
– ARW2.1: DSLR-A900
You can confirm whether the movie file format is compatible with GPS Image Tracker by clicking
[Help] t [About PMB] and click [Supported Formats] in the About PMB window of PMB.
x
Importing images to your computer
Using PMB, import the images to which you want to apply positioning information.
Notes
Tip
1
Connect the camera and your computer.
PMB starts, and the window used to import images appears.
If the window does not appear, double-click (PMB) on the computer screen.
• You may start PMB by clicking [Start] t [All Programs] t [Sony Picture
Utility] t [PMB].
• For details, refer to the operating instructions of the camera.
2
Click [OK].
Images are imported automatically from the camera to the computer.
27
Step 2 Applying the recording positioning information to images
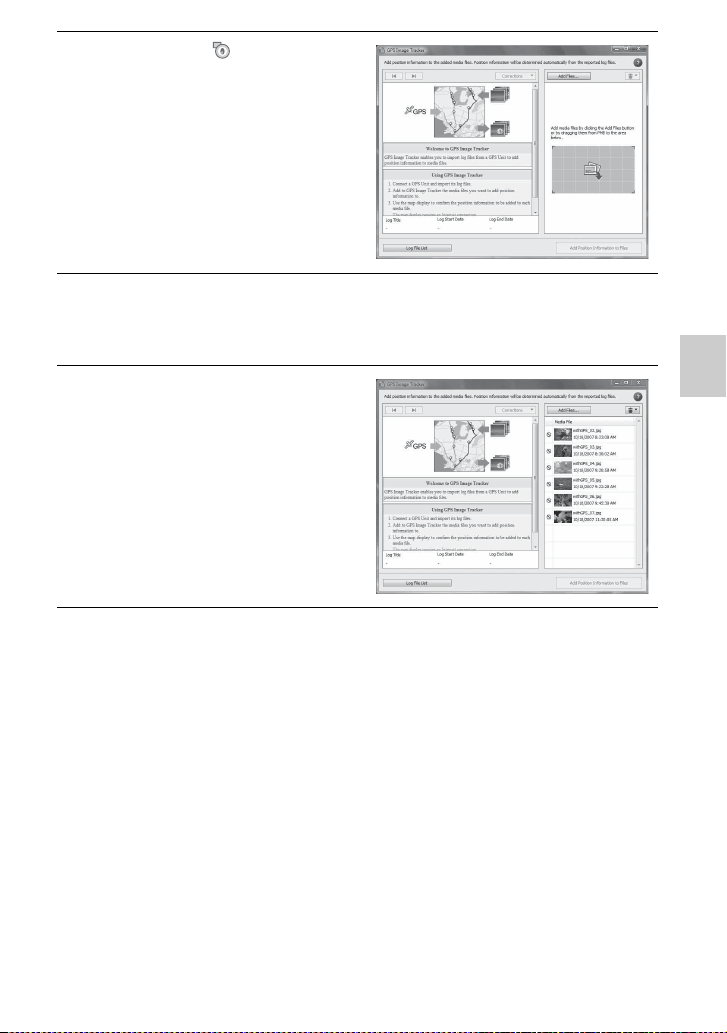
3
Double-click (GPS Image
Tracker) on the computer
screen to start GPS Image
Tracker.
• You may start GPS Image Tracker by
clicking [Start] t [All Programs] t
[Sony Picture Utility] t [GPS Image
Tracker].
4
Select images to which you want to apply positioning
information using PMB.
• For details, refer to the PMB Guide.
5
Drag-and-drop the selected
images to the image file list
on the right side of the main
window of GPS Image
Tracker.
The images are imported to GPS Image
Tracker.
• For details, refer to the GPS Image
Tracker Help.

28
x
Importing a GPS log
• Be sure that you turn off the GPS unit before connecting it with the computer. Otherwise, the files
may be broken.
• The Windows Explorer screen shot of the contents of the removable disk may appear when the
GPS unit is connected to your computer, be sure not to touch the data in the GPS folder.
• Before displaying GPS logs that you have newly imported from the GPS unit to GPS Image
Tracker using Map View, be sure that you close GPS Image Tracker before starting Map View.
• The GPS unit becomes the USB communication mode even if the HOLD switch is activated.
• The 1 (power) button does not work in the USB communication mode. When the GPS unit is
disconnected from the computer, the GPS unit is turned off automatically.
1
Open the USB jack cover,
and connect the GPS unit
and your computer with the
supplied USB cable.
The Log File Import window appears
(USB communication mode).
If the window does not appear, double-
click (GPS Image Tracker) on the
computer screen. (You may start GPS
Image Tracker by clicking [Start] t
[All Programs] t [Sony Picture
Utility] t [GPS Image Tracker].)
• For details, refer to the GPS Image
Tracker Help.
2
Click [OK].
All available GPS logs are imported to your computer.
3
When the GPS logs have
been imported, disconnect
the GPS unit from the
computer.
1 Double-click on the task-tray.
2 Click (USB Mass Storage
Device) t [Stop].
3 Confirm the device on the
confirmation window, then click
[OK].
4 Click [Close].
Notes
Double-click here.
29
Step 2 Applying the recording positioning information to images
x
Applying positioning information to images
To apply positioning information to a specific image
1 Double-click the image to which you want to apply positioning information on
the list on the right of the GPS Image Tracker screen.
2 Click [Add].
Positioning information is applied to the selected image, and then the image is saved
and removed from the list.
• You cannot save images set to read-only. Reset the read-only attribute of the files, and then import
them to GPS Image Tracker again.
• Even if you click [Create Copies...] to save images, you cannot duplicate and save movie files.
When the computer is connected to the Internet, the tracks recorded by the GPS logs will appear on
the map of the main window. (Even if the computer is not connected to the Internet, the GPS logs are
imported correctly.)
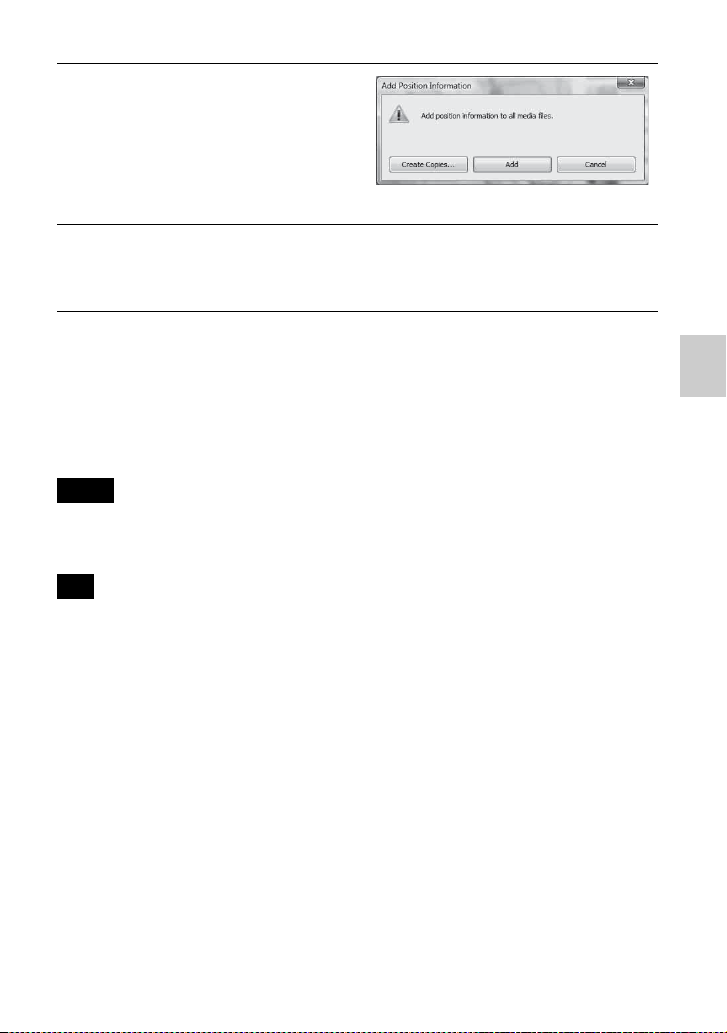
1
Click [Add Position
Information to Files] at the
lower right of the GPS Image
Tracker screen.
The [Add Position Information] dialog
box appears.
2
Click [Add] or [Create Copies...].
The positioning information is applied to all the image files in the list, and then
the image files are saved and removed from the list.
Notes
Tip
30
St
ep
3Di
sp
l
a
yi
n
g
th
e
i
ma
g
e on a map
Viewing the image and the location where
you recorded an image on a map/Viewing the
route you traveled
Using the “Map View” function of PMB, you can display the location where you
recorded the image that has positioning information on a map. In addition, using the
GPS unit as a GPS logger, you can display the route you traveled on a map.
1
Close GPS Image Tracker, if it is open.
2
Connect your computer to the Internet.
3
Start PMB.
x When images have been imported to the computer
Double-click (PMB) on the computer screen.
x When importing images to the computer
Connect the camera and the computer using a USB cable. (If the computer has a
memory card slot, you may insert the “Memory Stick Duo” media/SD memory
card directly into the computer.)
PMB starts, and the window used to import images appears. If the window does
not appear, double-click (PMB) on the computer screen.
• You may start PMB by clicking [Start] t [All Programs] t [Sony Picture
Utility] t [PMB].
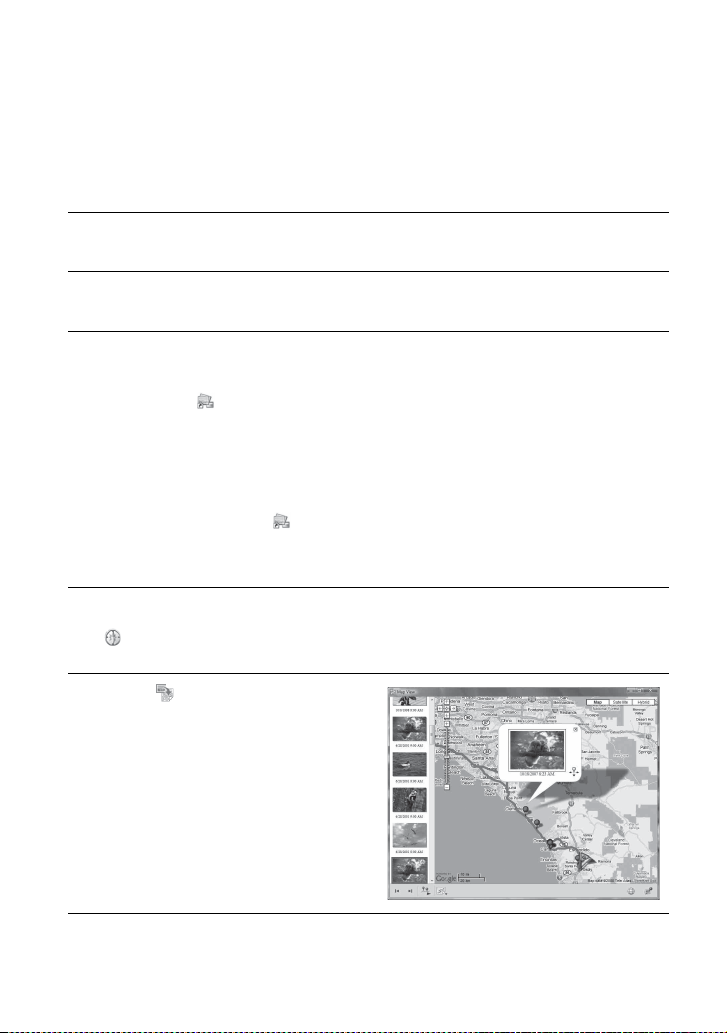
4
Select the image you want to display on the map.
appears at the upper right of the thumbnail of images having positioning
information.
5
Click of the image
operation buttons of PMB.
“Map View” appears. You can check
the location where images were taken,
and the path of GPS logs imported to
GPS Image Tracker on the map. In
addition, you can create your own map
and send the map with the relevant
images by e-mail.
• For details, refer to the PMB Guide.

31
Step 3 Displaying the image on a map
• When you have matched the images and positioning information using the GPS unit, import the
GPS logs to the computer (p. 28).
• If you have not imported the log file of the same date as the images selected on GPS Image
Tracker, the tracks will not be displayed.
• Be sure that you close GPS Image Tracker before starting PMB. Otherwise, any editing, etc., you
did on GPS Image Tracker will not be attributed to the images.
Notes

32
T
rou
bl
es
h
oo
ti
n
g
Troubleshooting
If you run into any problem using the GPS unit, use the following table to troubleshoot
the problem. If the problem persists, contact your Sony dealer or local authorized Sony
service facility.
You press the 1 (power) button, but the GPS unit does not turn on.
• This may be caused by a bad battery contact.
t Open the battery cover and re-insert the battery.
• You may be using a battery with low remaining power.
t Replace the battery with a new one.
• The battery may not be inserted correctly.
t Insert the battery correctly referring to “Inserting a battery” (p. 14).
Unable to operate the buttons on the GPS unit.
• Slide down the HOLD switch (p. 13).
• There may be something wrong with the GPS unit.
t While holding the MENU button down, hold the 1 (power) button down. The screen
indicators go out, and the GPS unit is reset. (Note that all setting information recorded will
be deleted when the GPS unit is reset.) If the problem persists, remove the battery, and
insert it again.
No GPS logs are recorded.
• You may have been using the GPS unit in locations where the GPS unit could not triangulate.
t Use the GPS unit in an open-air location, avoiding locations such as in tunnels,
underground, indoors, locations surrounded by tall buildings, under trees, etc.
• You cannot record a GPS log while the GPS unit is connected to a computer.
• You imported the GPS logs to the computer.
t In the default setting, the GPS logs in the GPS unit are deleted after they are imported to
the computer by GPS Image Tracker. (You can change the setting on GPS Image
Tracker.)
The GPS unit cannot receive radio signals from GPS satellites.
• You may be in a location where the radio signals from GPS satellites cannot reach.
t Use the GPS unit in an open-air location, avoiding locations such as in tunnels,
underground, indoors, locations surrounded by tall buildings, under trees, etc.
It takes an excessively long time to receive radio signals from GPS satellites.
• It may take a long time to triangulate the location, depending on the positions of the closest
GPS satellites.
t For details, read “GPS” on page 36.
• It takes a long time to triangulate the location because the current location cannot be
determined if you are moving around.
t Stay still until the GPS unit can triangulate the location.

33
Troubleshooting
The GPS unit is not recognized by the computer.
• If you connected the GPS unit and your computer with the USB cable before you started the
computer, the computer may not recognize the GPS unit.
t Disconnect the USB cable from the GPS unit and the computer, and restart your
computer, then connect the GPS unit again.
Unable to apply the positioning information to images using the GPS unit.
• The battery power may not be sufficient.
t Replace the battery with a new one. Or, use a fully charged battery.
• You may not be able to apply positioning information in low temperatures, because the
battery is consumed more quickly at low temperatures.
• Make sure that the “Memory Stick Duo” media/SD memory card is inserted correctly (p. 22).
• The free capacity of the “Memory Stick Duo” media/SD memory card may not be sufficient.
t Delete unnecessary data from the “Memory Stick Duo” media/SD memory card using a
camera. Or, apply positioning information to images using the computer.
• Make sure that the battery cover is closed.
The images are not displayed at the correct location.
• The GMT time difference set on the GPS unit and that on the camera were not the same at the
time the images were recorded.
t Correct the location using GPS Image Tracker.
• The GPS unit records the positioning information once about every 15 seconds. As the
locations between the recorded positioning information are obtained through calculation, the
images recorded while moving at high speed may not be displayed at the correct location.
The GPS unit does not recognize the “Memory Stick Duo” media/SD memory
card.
• Make sure that the “Memory Stick Duo” media/SD memory card is inserted correctly (p. 22).
• The “Memory Stick Duo” media/SD memory card may not be compatible with the GPS unit.
t Use compatible “Memory Stick Duo” media/SD memory cards with the GPS unit (p. 38).
The GPS unit performance is unstable.
• Use a new or fully charged battery.
• Format the internal memory (p. 19).
• While holding the MENU button down, hold the 1 (power) button down. The screen
indicators go out, and the GPS unit is reset. (Note that all setting information recorded will be
deleted when the GPS unit is reset.) If the problem persists, remove the battery, and insert it
again.
Some JPEG files in the “Memory Stick Duo” media/SD memory card cannot be
opened.
• If the power is turned off or the battery cover is opened and closed during Matching/Undo
operation, files named *****.JPG (* represents a number) or DUMMY.JPG are left in the
“Memory Stick Duo” media/SD memory card. These files do not affect the recorded image
files, however, you can delete these files on a computer, if you prefer.
34
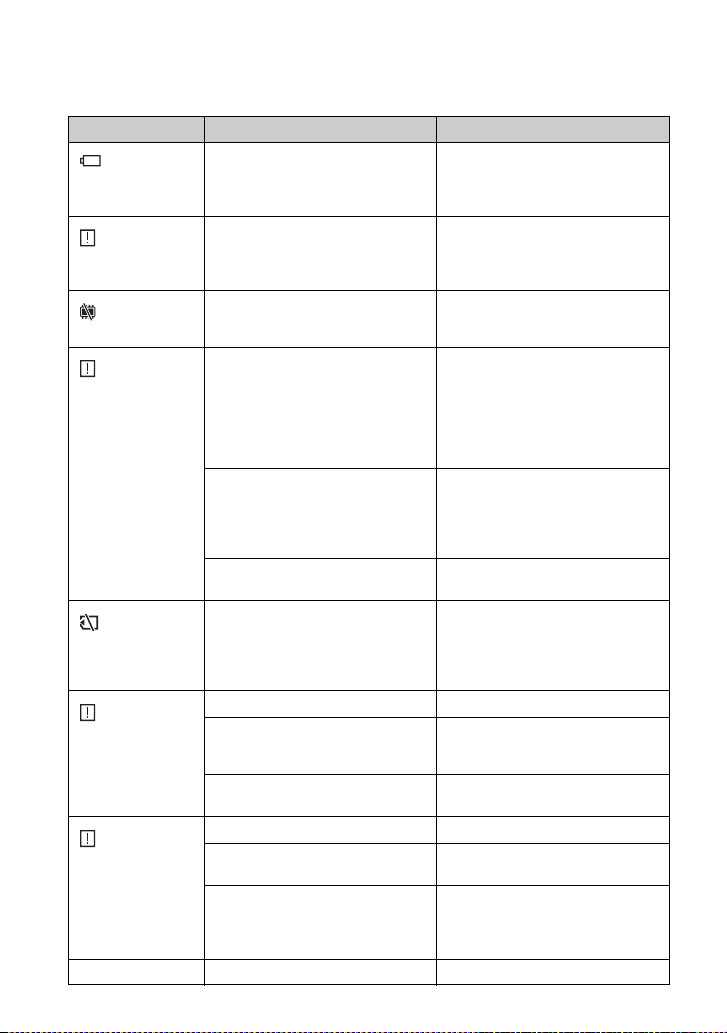
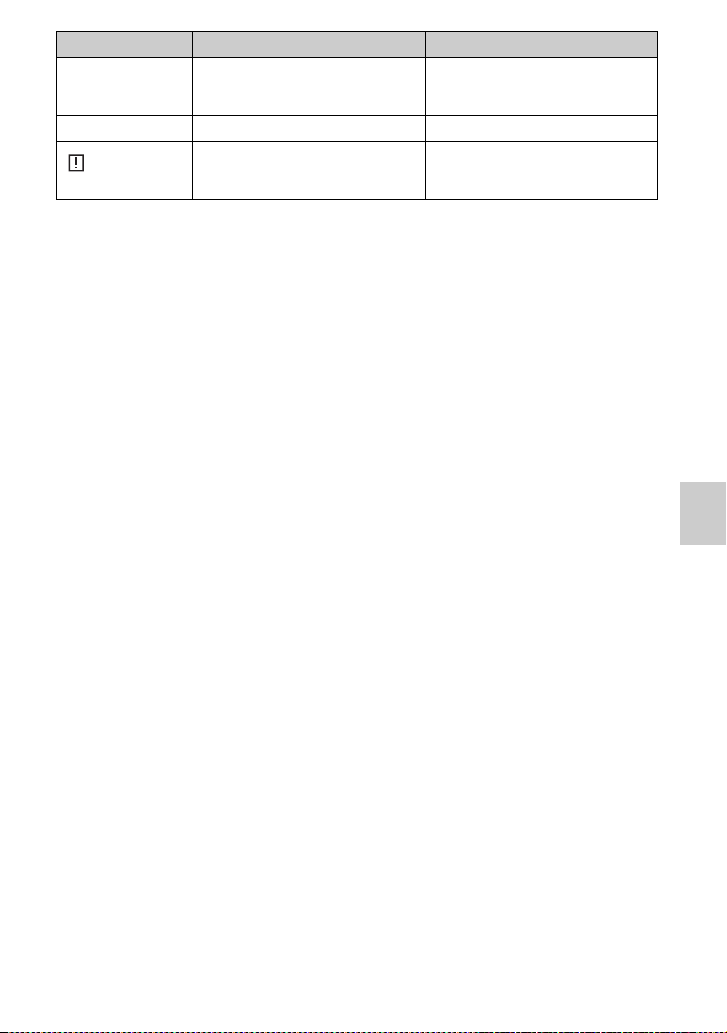
Error messages
The following messages appear on the LCD screen.
Error message Meaning Countermeasure
Low Battery
The battery capacity is insufficient. • Replace the alkaline battery with a
new one.
• Charge the Nickel-Metal Hydride
battery.
Int Memory Error
There is something wrong with the
internal memory.
Format the internal memory (p. 19).
All content will be lost. If the error
message does not disappear, consult
your Sony dealer.
Int Memory Full
The internal memory is full, so the
GPS unit cannot record GPS logs.
Format the internal memory (p. 19).
All content will be lost.
Memory Card Error
• Writing may be prohibited on the
“Memory Stick Duo” media/SD
memory card.
• The GPS unit may not be
compatible with the “Memory Stick
Duo” media/SD memory card you
are using.
Check the “Memory Stick Duo”
media/SD memory card.
There is something wrong with the
“Memory Stick Duo” media/SD
memory card.
Eject the “Memory Stick Duo” media/
SD memory card from the GPS unit,
and insert it again. If the error message
does not disappear, consult your Sony
dealer.
The “Memory Stick Duo” media/SD
memory card is not inserted correctly.
Insert it correctly (p. 22).
Memory Card Full
The “Memory Stick Duo” media/SD
memory card is full, so matching
cannot be carried out.
Delete unnecessary data from the
“Memory Stick Duo” media/SD
memory card. Or, apply the
positioning information to the images
using your computer.
Matching Error
The battery cover is open. Close the battery cover.
There are no images to be matched. Insert the “Memory Stick Duo” media/
SD memory card that contains the
images to be matched.
There are no GPS logs to use to match
the images.
Check the time difference setting.
Undo Error
The battery cover is open. Close the battery cover.
[Quick Matching] was selected. You cannot undo images that were
matched with [Quick Matching].
The “Memory Stick Duo” media/SD
memory card you inserted is not the
one that you used for matching the last
time.
“Undo” is possible only with the
“Memory Stick Duo” media/SD
memory card that was used to match
most recently.
Hold The HOLD function is activated. Cancel the HOLD function (p. 13).
35
Troubleshooting
Insert Card You tried to undo matching without
inserting the “Memory Stick Duo”
media/SD memory card.
Insert the “Memory Stick Duo” media/
SD memory card, and press ENTER.
Cover Open The battery cover is open. Close the battery cover.
Error
An error other than one of those above
has occurred.
Turn on the GPS unit again. If the
error message does not disappear,
consult your Sony dealer.
Error message Meaning Countermeasure

36
Additi
ona
l
i
n
f
orma
ti
on
GPS
The GPS (Global Positioning System) is
a system that calculates geographical
location from highly accurate US space
satellites. This system allows you to
pinpoint your exact location on the earth.
x
On error
Error caused by the position of
GPS satellites
The GPS unit automatically triangulates
your current location when the GPS unit
receives radio signals from 3 or more
GPS satellites.
The triangulating error allowed by the
GPS satellites is about 10 m (30 feet).
Depending on the environment of the
location you are in, the triangulation
error may be greater. In this case, your
actual location may not match the
location on the map based on the GPS
information.
Error during the triangulation
process
The GPS unit acquires positioning
information about every 15 seconds
during triangulation.
There can be a slight time difference
between when the positioning
information is acquired and when images
are taken. The supplied software (GPS
Image Tracker) calculates the position
where such images were taken based on
the path between the two positions from
which it acquires the positioning
information, therefore, the actual
recording location may not match
exactly the location on the map based on
the GPS information.

37
Additional information
Precautions
When using the GPS unit, please keep
the following in mind.
Battery
No batteries are supplied.
• An LR6 (size AA) alkaline battery or
an HR6 (size AA) Nickel-Metal
Hydride battery is necessary for
recording log data with the GPS unit.
Purchase a battery before using the
GPS unit.
• You cannot use manganese batteries.
Notes on a Nickel-Metal Hydride
battery
• Charge the Nickel-Metal Hydride
battery before using the GPS unit for
the first time. Refer to the instructions
supplied with the battery on charging.
• The battery can be charged even if it is
not completely discharged. Also, even
if the battery is not fully charged, you
can use the partially charged capacity
of the battery as is.
• If you do not intend to use the battery
for a long time, use up the existing
charge and remove it from the GPS
unit, then store it in a cool, dry place.
This is to maintain the battery’s
functions.
Recorded data on the GPS unit
If you remove the battery while using the
GPS unit, the log data may be damaged.
Be sure to replace the battery with a new
one after you turn the power off.
Compensation for damaged log
data will not be made
If positioning information (GPS log) is
not recorded properly due to malfunction
of the recording memory or the system,
compensation for damaged log data or
images with positioning information will
not be made.
Use and storage
• Before you use the GPS unit, make
sure that the GPS unit works properly
by checking its operation.
• Do not shake or strike the GPS unit
hard. In addition to malfunctions and
an inability to record the log, this may
cause recorded data breakdown.
• The GPS unit is neither dust-proof, nor
splash-proof, nor water-proof.
• Neither use nor store the GPS unit in
the following places.
– In an extremely hot, cold or humid
place
In places such as in a car parked in
the sun, the GPS unit body may
become deformed and this may
cause a malfunction.
– In places near a heater
The GPS unit may become
discolored or deformed, and this
may cause a malfunction.
– Near strong magnetic place
– In sandy or dusty places
Be careful not to let sand or dust get
into the GPS unit. This may cause
the GPS unit to malfunction, and in
some cases this malfunction cannot
be repaired.
Carrying the GPS unit
Do not sit on a chair etc., with the GPS
unit in the back pocket of your pants or
skirt, as this may cause a malfunction or
damage of the GPS unit.
Cleaning the GPS unit
Cleaning the GPS unit surface
Clean the GPS unit surface with a soft
cloth slightly moistened with water, then
wipe the surface with a dry cloth. Do not
use the following as they may damage
the finish or the casing.
38
• Chemical products such as thinner,
benzine, alcohol, disposable cloths,
insect repellent, sunscreen or
insecticide, etc.
• Do not touch the GPS unit with the
above on your hand.
• Do not leave the GPS unit in contact
with rubber or vinyl for a long time.
x
“Memory Stick Duo” media/
SD memory cards
Types of “Memory Stick Duo”
media (sold separately) you
can use with the GPS unit
Using “Memory Stick PRO
Duo” media with “Memory
Stick” media compatible
equipment
Be sure to insert “Memory Stick PRO
Duo” media into a “Memory Stick Duo”
media adaptor (sold separately).
Types of SD memory card you
can use with the GPS unit
You can use the following types of SD
memory card with the GPS unit (as of
October, 2008).
• SD memory card
*1
• miniSD card, microSD card (An
adaptor is necessary.)
*2
• SDHC memory card
*3
We do not guarantee proper operations
for all types of SD memory cards.
Especially, there are some cards that
consumes power a lot. If you use these
cards for Matching/Undo operation, the
power may be turned off on the way, or
the number of images available may be
less than expected. It is recommended to
use other types of cards.
*1
The GPS unit has been demonstrated as
operable with an SD memory card with a
capacity of 2 GB or smaller.
*2
Some commercially available card adaptors
have projected terminals on the rear. This
type of adaptor may not work properly with
the GPS unit.
*3
The GPS unit has been demonstrated as
operable with an SDHC memory card with
a capacity of 8 GB or less.
Data reading/recording that requires
copyright protection cannot be
performed.
Sony shall assume no responsibility
for any accidental or consequential
damages or loss of the recorded
contents which may be caused by use
or malfunction of the GPS unit.
Backup recommendations
To avoid potential risk of data loss
caused by accidental operation or
malfunction of the GPS unit, we
recommend that you save a backup
copy of your data.
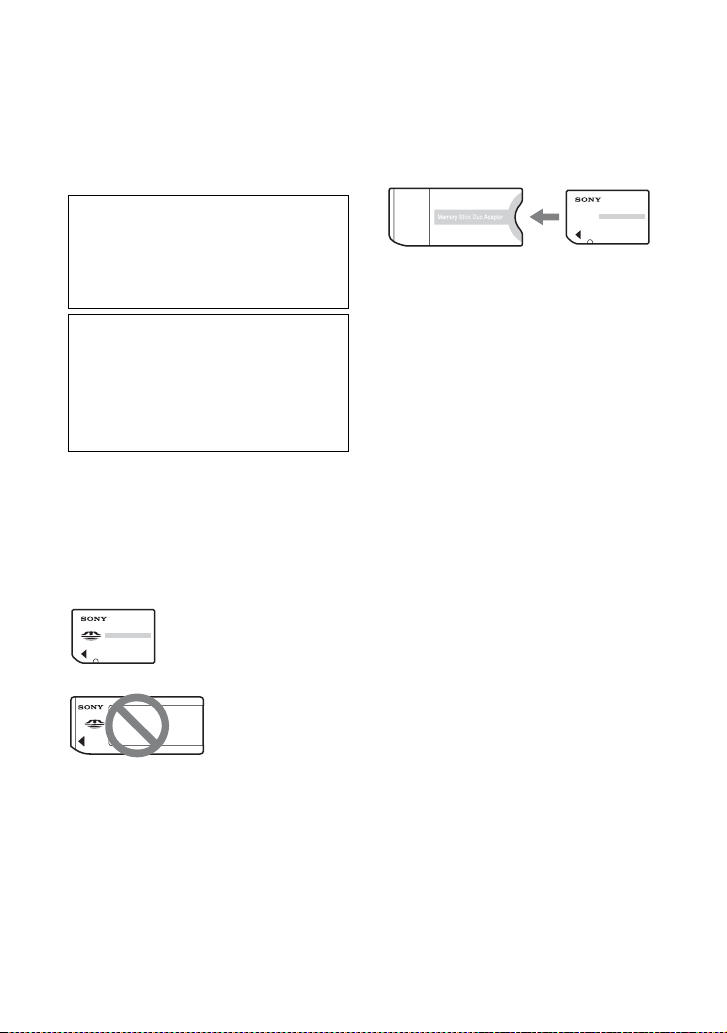
“Memory Stick
Duo” media: This
size can be used
with the GPS unit.
“Memory Stick”
media: You cannot
use it in the GPS
unit.
“Memory Stick Duo”
media adaptor
39
Additional information
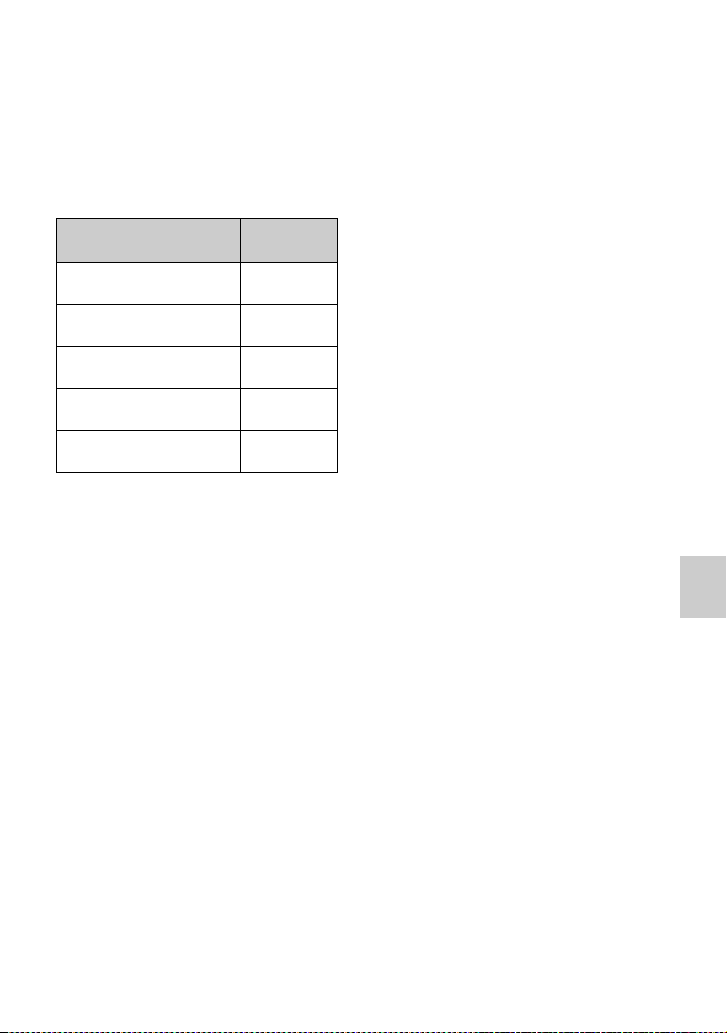
“Memory Stick Duo” media
“Memory Stick Duo” media are
compact, portable IC recording media
with a large data capacity. You can use
only “Memory Stick Duo” media shown
below with the GPS unit.
However, we do not guarantee the
operation of all types of “Memory Stick
Duo” media on the GPS unit.
*1
The GPS unit does not support
“MagicGate” technology.
*2
The GPS unit does not support 8-bit parallel
data transfer but it supports 4-bit parallel
data transfer the same as with “Memory
Stick PRO Duo” media.
• “Memory Stick PRO Duo” media
formatted by a computer (Windows
OS/Mac OS) does not have guaranteed
compatibility with the GPS unit.
• Data read/write speed may vary
depending on the combination of the
“Memory Stick PRO Duo” media and
the “Memory Stick PRO Duo” media
compliant product you use.
• Be careful not to apply excessive force
when writing on a memo area on
“Memory Stick PRO Duo” media.
• Do not attach a label or the like on
“Memory Stick PRO Duo” media or a
“Memory Stick Duo” media adaptor.
Notes on using a “Memory
Stick Duo” media adaptor (sold
separately)
• When using “Memory Stick Duo”
media with a “Memory Stick” media
compliant device, be sure to insert
“Memory Stick Duo” media into a
“Memory Stick Duo” media adaptor.
Otherwise, “Memory Stick Duo”
media may not be removed from the
“Memory Stick” media compliant
device.
• When inserting “Memory Stick Duo”
media into a “Memory Stick Duo”
media adaptor, make sure that you
insert “Memory Stick Duo” media
facing in the correct direction, then
insert it all the way in. If “Memory
Stick Duo” media is not inserted
properly, it may not work correctly.
Also, if you force “Memory Stick
Duo” media into the “Memory Stick
Duo” media adaptor in the wrong
direction, it may be damaged.
• When inserting “Memory Stick Duo”
media attached to a “Memory Stick
Duo” media adaptor into a “Memory
Stick” media compliant device, make
sure that you insert “Memory Stick
Duo” media facing in the correct
direction. Note that improper use may
cause a malfunction.
• Do not insert a “Memory Stick Duo”
media adaptor without “Memory Stick
Duo” media attached into a “Memory
Stick” media compliant device. Doing
so may result in malfunctions of the
unit.
Notes on using “Memory Stick
PRO Duo” media (sold
separately)
The maximum memory capacity of
“Memory Stick PRO Duo” media that
can be used with the GPS unit is 16 GB.
Types of “Memory Stick
Duo” media
Compatibility
“Memory Stick Duo” media
(without “MagicGate”)
a
“Memory Stick Duo” media
(with “MagicGate”)
a
*1
“MagicGate Memory Stick
Duo” media
a
*1
“Memory Stick PRO Duo”
media
a
*1
“Memory Stick PRO-HG
Duo” media
a
*1*2

40
Notes on using “Memory Stick
Micro” media (sold separately)
• The GPS unit is compatible with
“Memory Stick Micro” media (M2).
M2 is the abbreviation for the
“Memory Stick Micro” media.
• To use “Memory Stick Micro” media
with the GPS unit, you need a Duo-
sized M2 Adaptor. Insert “Memory
Stick Micro” media into the Duo-sized
M2 Adaptor, and then insert the
adaptor into the “Memory Stick Duo”
media slot. If you insert “Memory
Stick Micro” media into the GPS unit
without using a Duo-sized M2
Adaptor, you might not be able to
remove it from the GPS unit.
Notes on using “Memory Stick
Duo” media/SD memory cards
• Make sure that you insert “Memory
Stick Duo” media/SD memory cards
into the “Memory Stick Duo” media/
SD memory card slot in the correct
direction. Wrong insertion will cause a
malfunction of the GPS unit.
• When inserting “Memory Stick Duo”
media/SD memory cards, do not try to
insert them forcibly as this could
damage “Memory Stick Duo” media/
SD memory cards and/or the GPS unit.
• Do not insert any objects other than
“Memory Stick Duo” media/SD
memory cards into the “Memory Stick
Duo” media/SD memory card slot.
Doing so will cause a malfunction of
the GPS unit.
• Do not remove “Memory Stick Duo”
media/SD memory cards or turn off
the GPS unit while the GPS unit is
reading, writing, or accessing data.
Otherwise, that data may be rendered
unreadable or be erased.
• We recommend that you save a
backup of important data.
• When you carry or store “Memory
Stick Duo” media/SD memory cards,
put them in the case supplied.
• Do not touch the terminals of
“Memory Stick Duo” media/SD
memory cards with your hand or a
metal object.
• Do not strike, bend, or drop “Memory
Stick Duo” media/SD memory cards.
• Do not disassemble or modify
“Memory Stick Duo” media/SD
memory cards.
• Do not expose “Memory Stick Duo”
media/SD memory cards to water.
• Do not use or store “Memory Stick
Duo” media/SD memory cards under
the following conditions:
– Locations beyond the required
operational limits, including such as
the hot interior of a car parked in the
sun in the summer, the outdoors
exposed to direct sunlight, or a
place near a heater
– Humid locations with corrosive
substances present
– Locations subject to static
electricity or electrical noise
• Keep “Memory Stick Duo” media/SD
memory cards out of the reach of
small children. There is danger that a
child might swallow them.
• Not every “Memory Stick Duo”
media/SD memory cards are
guaranteed.

41
Additional information
Specifications
Power
LR6 (size AA) alkaline battery or HR6 (size AA)
Nickel-Metal Hydride battery × 1 (Power is
supplied from the USB bus power while in the
USB connection.)
Power consumption
Approx. 0.15 W (during continuous triangulating
when operating on a battery)
Operating time on a battery (When used at
25 °C (77 °F))
Approx. 15 hours (during continuous
triangulating when using an LR6 (size AA)
Sony alkaline battery),
Approx. 16 hours (during continuous
triangulating when using an HR6 (size AA)
Sony Nickel-Metal Hydride battery)
Operating time may differ depending on the
situation or the environmental condition.
Receiving frequency
1575.42 MHz (L1 band, C/A code)
Receiving method
20-channel parallel tracking
Receiving sensitivity
–159 dBm or less (while tracking)
Interface
USB 2.0 Hi-Speed
Memory capacity
Approx. 1 GB (GPS logs recording area: about
128 MB. The rest is used by the system.)
Logging interval
Approx. 15 seconds
Operating temperatures
Approx. 0 to 40 °C (32 to 104 °F)
Storage temperature
Approx. –20 to +60 °C (–4 to +140 °F)
Dimensions
Approx. 57 mm × 80 mm × 23 mm (2 1/4 × 3 1/4
× 29/32 inches) (w/h/d, excluding the
projecting parts)
Mass
Approx. 70 g (2.5 oz) (excluding a battery)
Supported image format
GPS unit
• JPEG (compatible with Exif 2.1 or later, MPF
Baseline)
GPS Image Tracker/PMB
• JPEG (compatible with Exif 2.1 or later, MPF
Baseline)
• Movie file taken with Sony digital still camera
or Sony digital video camera recorder (PMB
supplied with your Sony digital still camera or
Sony digital video camera recorder should be
installed to your computer.)
• Sony RAW files (Program compatible with
RAW files from the following models.)
– SRF: DSC-F828/V3
– SR2: DSC-R1
– ARW: DSLR-A100
– ARW2.0: DSLR-A200/A300/A350/A700
– ARW2.1: DSLR-A900
This unit or software may not operate properly
with some images that have the file format listed
above.
Included items
GPS unit (GPS-CS3) (1)
USB cable (1)
CD-ROM “GPS Unit Application Software” (1)
Carrying case (1)
Set of printed documentation
Design and specifications are subject to
change without notice.
License
TNKernel real time kernel
Copyright . 2004, 2006 Yuri Tiomkin
All rights reserved.
Permission to use, copy, modify, and distribute
this software in source and binary forms and
its documentation for any purpose and without
fee is hereby granted, provided that the above
copyright notice appear in all copies and that
both that copyright notice and this permission
notice appear in supporting documentation.
Trademarks
• Google and Google Earth are registered
trademarks of Google Inc.
• Microsoft, Windows are either registered
trademarks or trademarks of Microsoft
Corporation in the United States and/or other
countries.
• , “Memory Stick”, ,
“Memory Stick Duo”, ,
“MagicGate”, ,

42
“Memory Stick PRO”, ,
“Memory Stick PRO Duo”,
, “Memory Stick
PRO-HG Duo”, ,
“Memory Stick PRO-HG Duo (Mark2)”,
, “Memory Stick Micro”, and
are trademarks or
registered trademarks of Sony Corporation.
• Pentium is a trademark or registered
trademark of Intel Corporation.
• In addition, system and product names used
in this manual are, in general, trademarks or
registered trademarks of their respective
developers or manufacturers. However, the
™ or ® marks are not used in all cases in this
manual.
• The online maps and the aerial photomaps
are powered by Google Maps.

43
Additional information

2
Afin de réduire les risques
d’incendie ou de décharge
électrique, n’exposez pas cet
appareil à la pluie ou à l’humidité.
Pour toute question au sujet de cet appareil,
appeler :
Sony Centre d’information à la clientèle
1-800-222-SONY (7669)
Le numéro ci-dessous concerne seulement les
questions relevant de la Commission fédérale des
communications des États-Unis (FCC).
[ Information réglementaire
[ AVERTISSEMENT
Par la présente, vous êtes avisé du fait que tout
changement ou toute modification ne faisant pas
l’objet d’une autorisation expresse dans le présent
manuel pourrait annuler votre droit d’utiliser
l’appareil.
[ Note
L’appareil a été testé et est conforme aux
exigences d’un appareil numérique de Classe B,
conformément à la Partie 15 de la réglementation
de la FCC.
Ces critères sont conçus pour fournir une
protection raisonnable contre les interférences
nuisibles dans un environnement résidentiel.
L’appareil génère, utilise et peut émettre des
fréquences radio; s’il n’est pas installé et utilisé
conformément aux instructions, il pourrait
provoquer des interférences nuisibles aux
communications radio.
Cependant, il n’est pas possible de garantir que
des interférences ne seront pas provoquées dans
certaines conditions particulières. Si l’appareil
devait provoquer des interférences nuisibles à la
réception radio ou à la télévision, ce qui peut être
démontré en allumant et éteignant l’appareil, il est
recommandé à l’utilisateur d’essayer de corriger
cette situation par l’une ou l’autre des mesures
suivantes :
– Réorienter ou déplacer l’antenne réceptrice.
– Augmenter la distance entre l’appareil et le
récepteur.
– Brancher l’appareil dans une prise ou sur un
circuit différent de celui sur lequel le récepteur
est branché.
– Consulter le détaillant ou un technicien
expérimenté en radio/téléviseurs.
Le câble d’interface fourni doit être utilisé avec
l’appareil pour que celui-ci soit conforme aux
critères régissant les appareils numériques,
conformément à la sous-partie B de la Partie 15 de
la réglementation de la FCC.
Cet appareil numérique de la classe b est
conforme à la norme NMB-003 du Canada.
Français
AVERTISSEMENT
À l’intention des clients aux É.-U.
Déclaration de conformité
Nom commercial : SONY
No de modèle : GPS-CS3
Responsable : Sony Electronics Inc.
Adresse : 16530 Via Esprillo,
San Diego, CA 92127 É.-U.
No de téléphone : 858-942-2230
Cet appareil est conforme à la Partie 15 de la
réglementation de la FCC des États-Unis. Son
utilisation est sujette aux deux conditions
suivantes : (1) Cet appareil ne doit pas générer
d’interférences nuisibles et (2) il doit être en
mesure d’accepter toute interférence reçue, y
compris les interférences pouvant générer un
fonctionnement indésirable.
Pour les utilisateurs au Canada

3
Par la présente, Sony Corporation déclare que
cette GPS-CS3 unité GPS est conforme aux
exigences essentielles et aux autres dispositions
de la directive 1999/5/CE.
Pour plus d’informations, visitez le site
http://www.compliance.sony.de/
Cet appareil a été testé et jugé conforme aux
limites établies par la directive EMC visant
l’utilisation de câbles de connexion de moins de 3
mètres.
[ Traitement des appareils
électriques et électroniques en
fin de vie (Applicable dans les
pays de l’Union Européenne et
aux autres pays européens
disposant de systèmes de
collecte sélective)
Ce symbole, apposé sur le produit ou sur son
emballage, indique que ce produit ne doit pas être
traité avec les déchets ménagers. Il doit être remis
à un point de collecte approprié pour le recyclage
des équipements électriques et électroniques. En
s’assurant que ce produit est bien mis au rebut de
manière appropriée, vous aiderez à prévenir les
conséquences négatives potentielles pour
l’environnement et la santé humaine. Le recyclage
des matériaux aidera à préserver les ressources
naturelles. Pour toute information supplémentaire
au sujet du recyclage de ce produit, vous pouvez
contacter votre municipalité, votre déchetterie ou
le magasin où vous avez acheté le produit.
Note pour les clients européens
FR

4
Table des matières
A lire en premier
Ce que vous pouvez faire avec le kit GPS ...............................................5
Affichage des images à l'endroit de la prise de vue et de l'itinéraire
parcouru sur la carte ................................................................................6
Vérification des articles inclus ..................................................................8
Identification des pièces ...........................................................................9
Écran du menu .......................................................................................11
Étape 1 Enregistrement de l'itinéraire parcouru
Insertion d'une batterie ........................................................................... 14
Enregistrement d'un journal GPS ............................................................16
Formatage de la mémoire interne ...........................................................19
Étape 2 Application des informations de
positionnement enregistrées aux images
Installation du logiciel fourni ...................................................................20
Application des informations de positionnement aux images à l'aide de
l'unité GPS (Matching) ............................................................................22
Application des informations de positionnement aux images d'un
ordinateur/Importation du journal GPS ...................................................26
Étape 3 Affichage d'image sur une carte
Affichage de l'image et du lieu de la prise de vue sur une carte/Affichage
de l'itinéraire parcouru ............................................................................30
Dépannage
Dépannage .............................................................................................32
Messages d'erreur ..................................................................................34
Informations complémentaires
GPS .........................................................................................................36
Précautions .............................................................................................37
Spécifications .........................................................................................41

5
A lire en premier
A
li
re en prem
i
er
Ce que vous pouvez
faire avec le kit GPS
Le kit GPS GPS-CS3KA vous permet :
– d'appliquer des informations de
positionnement à des données d'image
– d'afficher des images sur une carte des
sites de prise de vue
– d'afficher la route parcourue sur une
carte
– d'envoyer des e-mails avec les images
affichées sur une carte des sites de
prise de vue
x
Composants du kit GPS
Le kit GPS se compose d'un unite GPS et
de trois ensembles de logiciel
d'application : « PMB », « GPS Image
Tracker » et « PMB Launcher ».
Unite GPS
L'unité GPS enregistre l'itinéraire dans
un « Journal GPS », journal contenant les
informations de positionnement série.
L'unité GPS enregistre les informations
du positionnement actuel environ toutes
les 15 secondes dans le « Journal GPS ».
Vous pouvez également appliquer les
informations de positionnement à des
données d'image à l'aide du GPS.
PMB
Ce logiciel vous permet d'afficher et de
gérer les images enregistrées à l'aide
d'appareils photo numériques et de
caméscopes numériques Sony. La
fonction Affichage Plan de PMB vous
permet d'afficher sur une carte les images
ayant des informations de
positionnement qui ont été enregistrées
par l'unité GPS et intégrées dans les
données d'image par GPS Image Tracker.
Grâce à cette fonction, vous pouvez
facilement déterminer l'endroit où vous
avez pris la photo, et vérifier l'itinéraire
que vous avez suivi en enregistrant ces
images.
GPS Image Tracker
Ce logiciel vous permet d'importer le
« Journal GPS » (enregistrement des
informations de positionnement série) de
l'unité GPS vers un ordinateur, d'intégrer
les informations de positionnement à des
données d'image enregistrées par des
appareils photo numériques et des
caméscopes numériques Sony et de les
stocker.
PMB Launcher
Si vous sélectionnez une opération sur le
PMB Launcher, le logiciel requis pour
l'opération démarre automatiquement.
x
Association d'informations
à des images individuelles
L'unité GPS et le GPS Image Tracker
font correspondre les informations de
date et d'heure enregistrées aux données
d'image et à celles du journal GPS et
associent les informations de
positionnement du journal GPS aux
données d'image qui ont les mêmes
informations de date et d'heure que celles
du journal GPS (Matching).
• Puisque l'unité GPS enregistre les
informations de positionnement environ
toutes les 15 secondes, les informations de
positionnement appliquées à l'image risquent
de différer légèrement de celles de la prise de
vue réelle.
• L'unité GPS s'appuie sur le temps universel
(GMT) pour enregistrer les informations de
temps.
Remarques
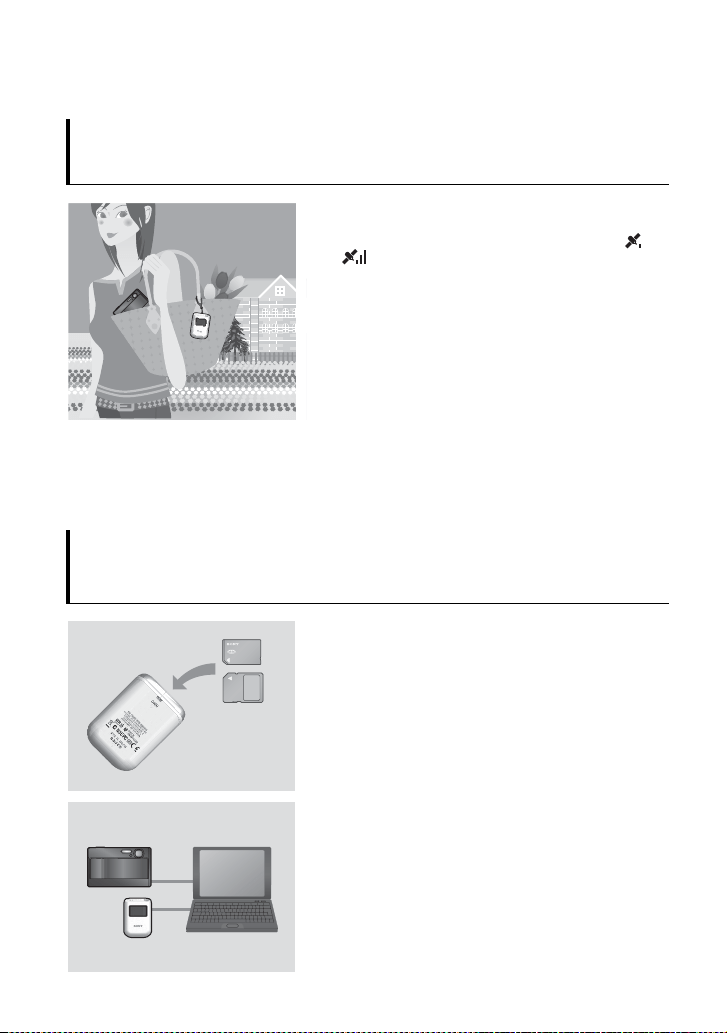
6
Affichage des images à l'endroit de la prise
de vue et de l'itinéraire parcouru sur la carte
Étape 1
Enregistrement de l'itinéraire parcouru
, Reportez-vous à la
page
14.
1 Insérez une pile de type AA LR6/HR6 (vendue
séparément) dans l'unité GPS puis allumez-le.
Assurez-vous que le symbole de triangulation ( à
) s'affiche sur l'écran LCD. Mettez l'unité GPS
sous tension en extérieur.
2 Quand vous utilisez l'unité GPS pour la première
fois, l'écran [Time Zone] apparaît. Sélectionnez le
fuseau horaire à l'aide des touches V/v en vous
basant sur le temps universel, et appuyez sur
ENTER.
Reportez-vous à la page 18 pour connaître le fuseau
horaire en temps universel de chaque pays/région.
3 Réglez la bonne heure sur votre appareil photo.
Reportez-vous au mode d’emploi de l'appareil photo.
4 Transportez l'unité GPS et l'appareil photo
ensemble.
Étape
2
Application des informations de
positionnement enregistrées aux images
, Reportez-vous à la
page
20.
1 Insérez le « Memory Stick Duo » ou la carte mémoire
SD qui contient les images enregistrées dans l'unité
GPS.
2 Appuyez sur MENU, puis sélectionnez [Matching]
t [Start].
Quand l'unité GPS a appliqué les informations de
positionnement aux images, [Complete] apparaît.
3 Installez le logiciel fourni (GPS Image Tracker,
PMB et PMB Launcher) sur votre ordinateur.
• Vous pouvez appliquer les informations de
positionnement aux images à l'aide du GPS Image
Tracker fourni (p. 26).
• Si vous utilisez un support autre que le « Memory Stick
Duo » ou les cartes mémoire SD, reportez-vous à la page
26.
• Pour régler ou modifier l'emplacement des images sur
une carte, reportez-vous à la section GPS Image Tracker
Aide.
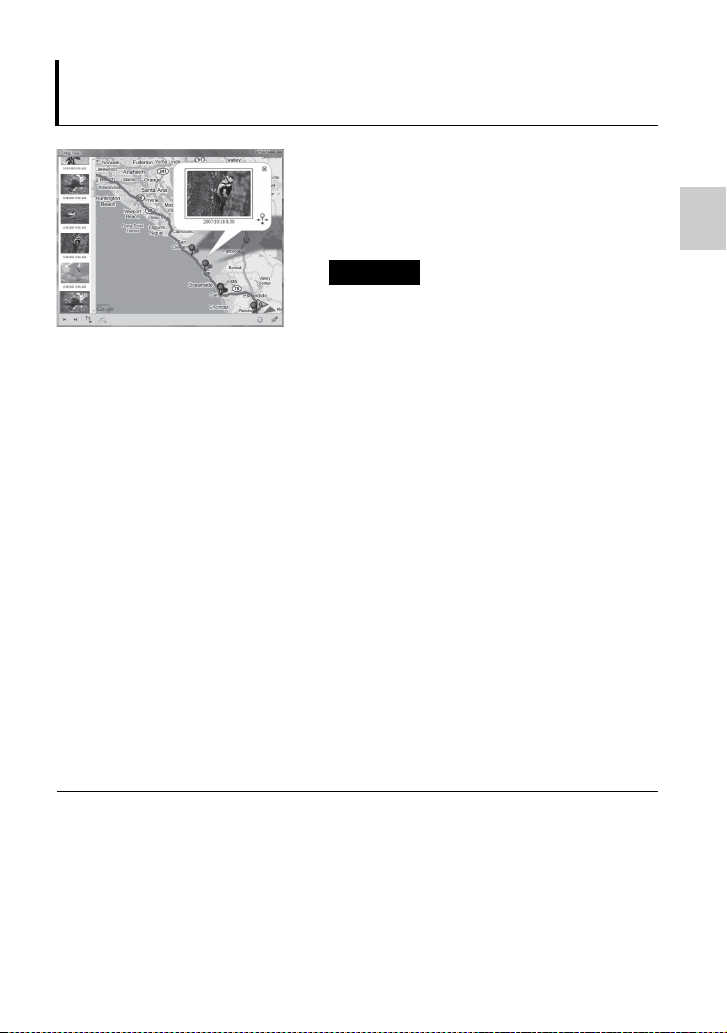
7
A lire en premier
Étape 3
Affichage des images sur une carte
, Reportez-vous à la
page
30.
1 Insérez le « Memory Stick Duo » ou la carte mémoire
SD qui contient les images avec les informations de
positionnement dans l'appareil photo, puis raccordez
l'appareil photo à l'ordinateur.
PMB démarre automatiquement.
2 Importez les images.
Si GPS Image Tracker est ouvert, fermez-le une fois
l'importation des images terminées.
3 Démarrez PMB Launcher puis cliquez sur
« Afficher les images sur la carte à l’aide de
l’Affichage Carte ».
Les images et le lieu de la prise de vue s'affichent sur
la carte.
• Pour utiliser la carte du monde, l'ordinateur doit pouvoir
se connecter à Internet. La carte en ligne et la carte
photographique aérienne sont développées par Google
Maps.
• Vous pouvez utiliser les services réseau et Google Earth à l'aide du PMB fourni.
Pour plus d'informations, reportez-vous à la page de support de PMB.
• Vous pouvez utiliser l'unité GPS comme un enregistreur chronologique GPS. À
l'aide de GPS Image Tracker, importez le journal GPS qui a été enregistré par l'unité
GPS lors de son transport alors qu'elle était allumée et raccordée à un ordinateur.
L'itinéraire parcouru s'affiche ensuite sur une carte à l'aide de PMB.
Remarque
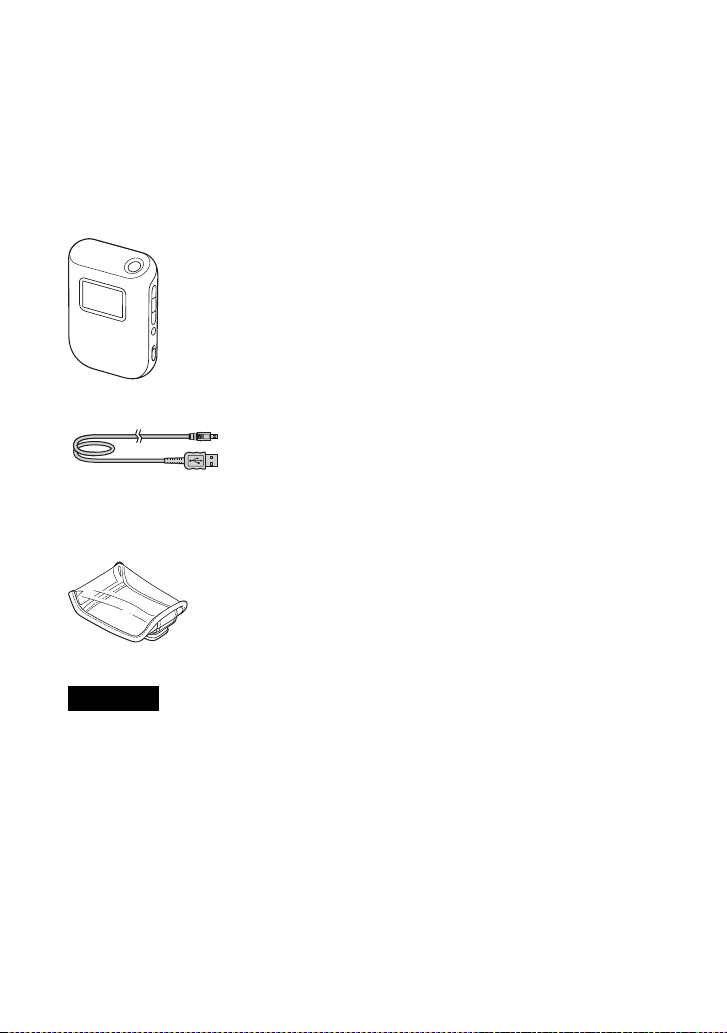
8
Vérification des
articles inclus
Assurez-vous que votre unite GPS
dispose des options suivantes.
Le nombre entre parenthèses indique le
nombre d'élément fourni.
• Unite GPS (GPS-CS3) (1)
•Câble USB (1)
• CD-ROM « GPS Unit Application
Software » (1)
• Étui de transport (1)
• Jeu de documents imprimés
Aucune pile alcaline LR6 (type AA) ou
batterie au nickel-métal-hydrure HR6 (type
AA) n'est fournie avec l'unité GPS.
Remarque
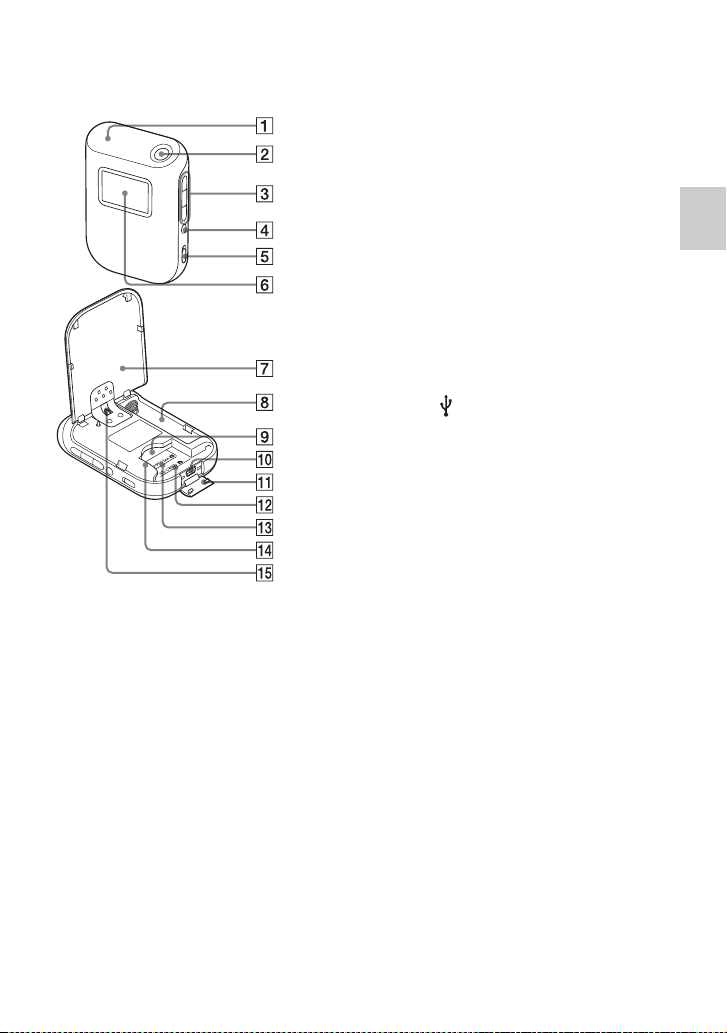
9
A lire en premier
Identification des pièces
x
Unite GPS
A Antenne
B Touche 1 (touche de marche/arrêt)
(p. 11, 16)
C Touches V/ENTER/v (p. 11)
D Touche MENU (p. 11)
E Commutateur HOLD (p. 13)
F Écran LCD
G Cache de protection de la batterie
(p. 14)
H Compartiment de la batterie (p. 14)
I Emplacement carte SD/« Memory
Stick Duo » (p. 22)
J Prise (USB) (p. 28)
K Cache de la prise USB (p. 28)
L Repère de position pour la carte
mémoire SD (p. 22)
M Repère de position pour « Memory
Stick Duo » (p. 22)
N Guide de la carte (p. 22)
O Pièce de fixation de la sangle
• Aucune sangle n'est fournie.
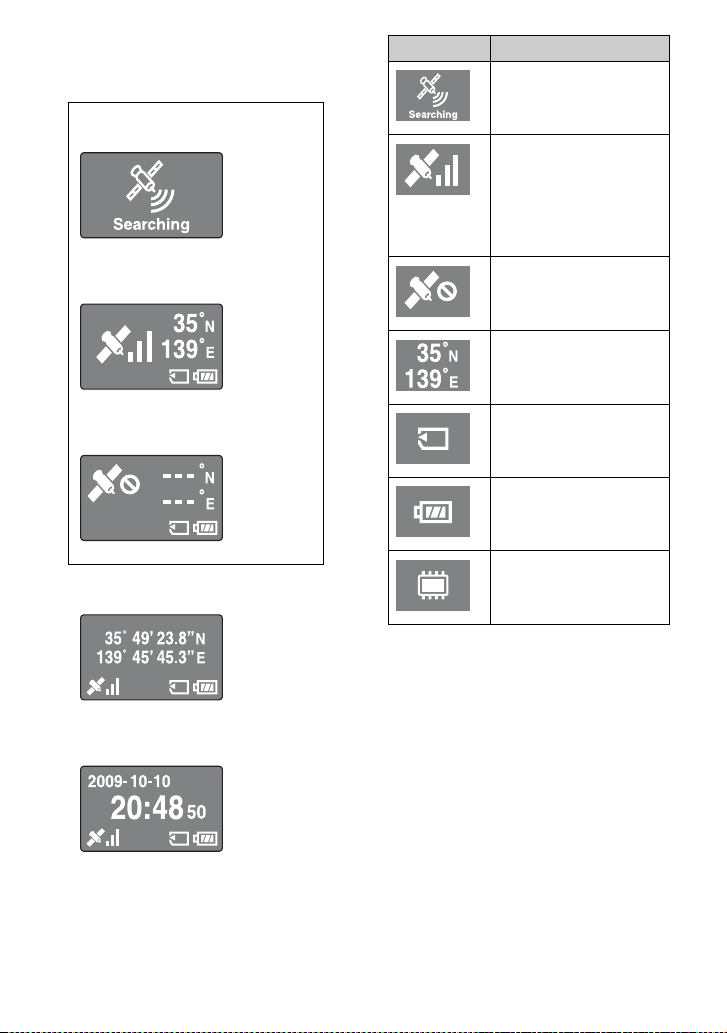
10
x
Écran LCD
Affichage du statut du GPS
• Si vous n'utilisez pas l'unité GPS pendant
environ 10 secondes, le rétroéclairage de
l'écran LCD s'éteint. Appuyez sur ENTER
pour l'allumer de nouveau.
• L'unité GPS n'affiche pas de date ni d'heure
tant qu'elle ne reçoit pas de signal radio GPS.
Il peut y avoir des différences dans l'heure
affichée, selon les conditions d'utilisation de
votre unite GPS.
Recherche de satellites
Triangulation
Triangulation impossible
Affichage des coordonnées
Affichage de l'horloge
Icônes Significations
Recherche de satellites GPS.
• Recherche des signaux
radio des satellites GPS.
L'unité GPS obtient les
informations de
positionnement, triangule
puis enregistre les signaux
GPS. Les barres qui se
trouvent sur la droite
indiquent la force du signal.
Réception des signaux GPS
impossible. Obtention des
informations de
positionnement impossible.
Latitude (N/S) et longitude
(E/W)
Un « Memory Stick Duo »
ou une carte mémoire SD est
inséré.
Autonomie de la batterie
La capacité de la mémoire
interne est basse.
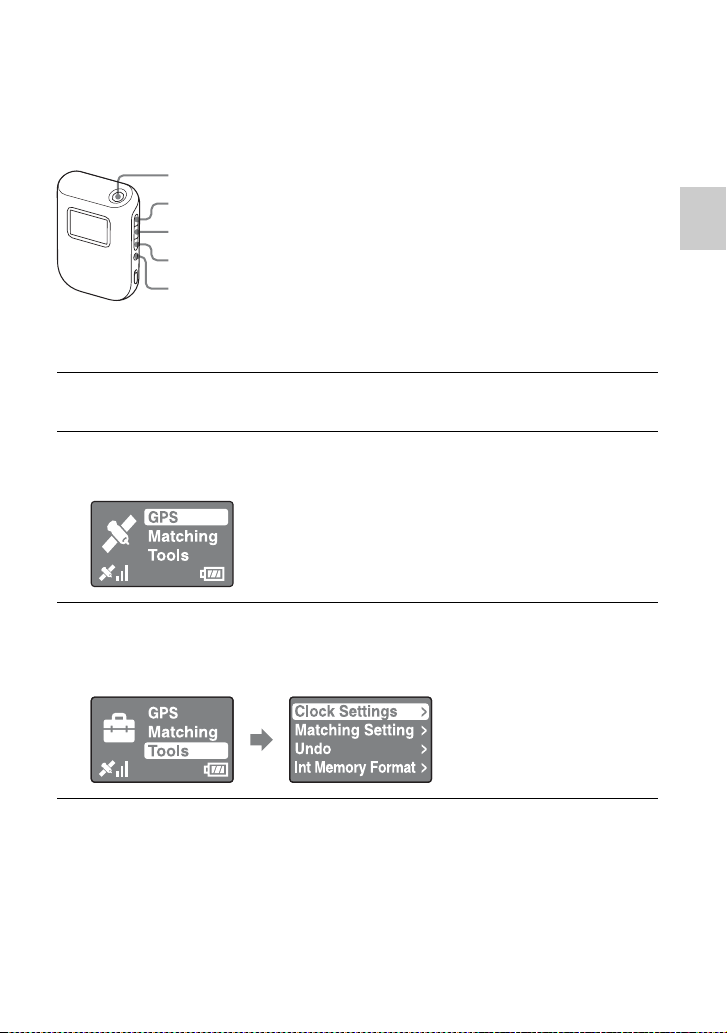
11
A lire en premier
Écran du menu
x
Fonctionnement de l'unité GPS
Le menu affiché sur l'écran LCD vous permet de faire fonctionner l'unité GPS, en
appuyant sur les touches qui se trouvent sur le côté de l'unité GPS.
Par exemple : Pour définir un [Time Zone]
1
Maintenez la touche 1 (touche de marche/arrêt) enfoncée.
2
Appuyez sur MENU.
Le menu principal apparaît.
3
Appuyez sur V/v pour sélectionner l'élément, puis appuyez
sur ENTER.
Le sous-menu apparaît.
Touche 1 (touche de marche/arrêt)
Touche V
Touche ENTER
Touche v
Touche MENU
ENTER
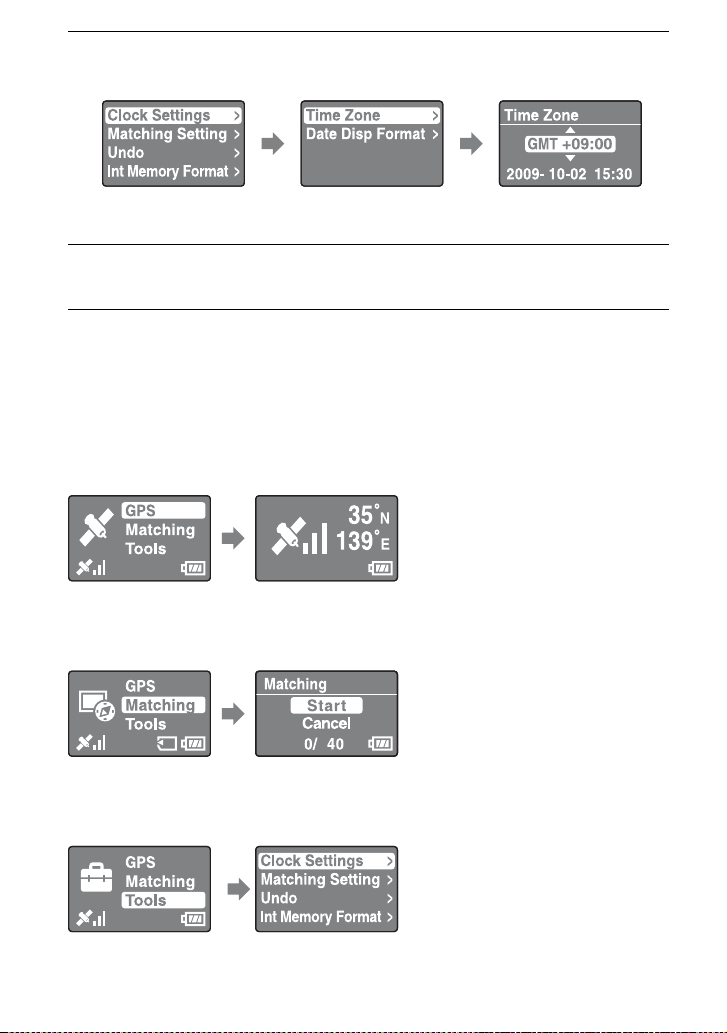
12
x
Liste des options du menu
Le menu principal apparaît quand vous appuyez sur MENU.
L'unité GPS propose trois types de mode de menu.
Écran mode [GPS]
Permet la triangulation et l'enregistrement du journal GPS (p. 16).
L'écran apparaît différemment en fonction du statut de la triangulation actuelle.
Écran mode [Matching]
Permet d'appliquer des informations de positionnement aux images (p. 23).
Écran mode [Tools]
Permet de modifier les paramètres de l'unité GPS.
4
Répétez la procédure de l'étape 3 pour sélectionner le
paramètre de votre choix.
L'unité GPS n'affiche pas de date ni d'heure tant qu'elle ne reçoit pas de signal
radio GPS.
5
Appuyez sur MENU plusieurs fois pour revenir au menu
principal.
ENTER ENTER
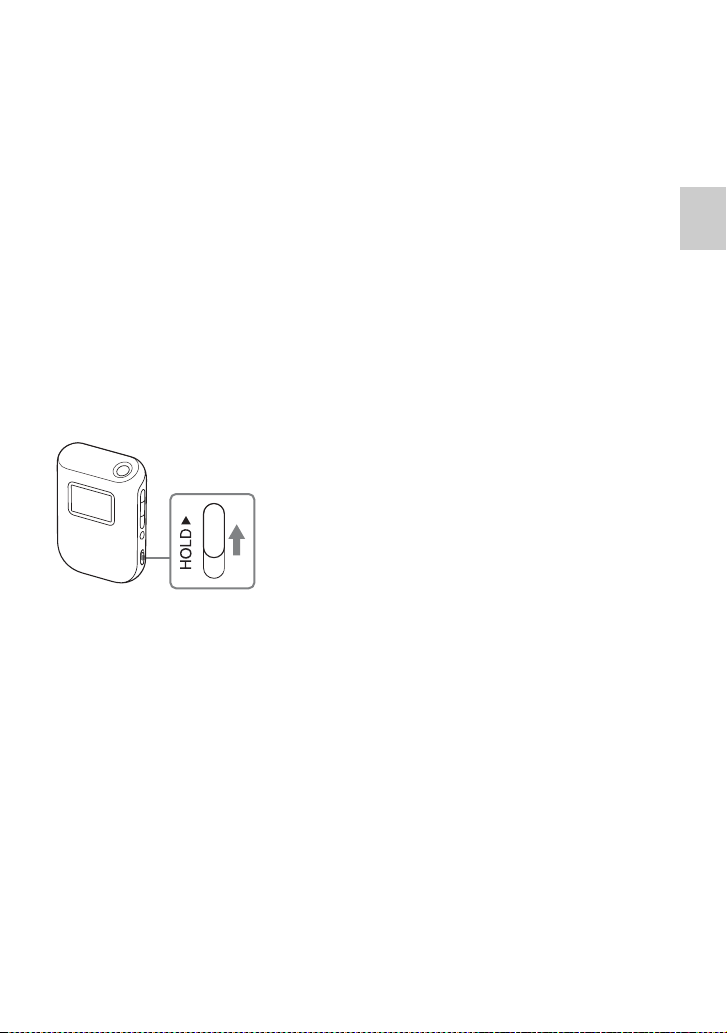
13
A lire en premier
x [Clock Settings]
Définit les éléments liés aux paramètres de temps.
[Time Zone]: Définit le décalage entre l'heure universelle et l'heure réelle de l'endroit où
vous utilisez l'unité GPS.
[Date Disp Format]: Définit l'ordre de l'affichage de l'année, du mois et du jour.
x [Matching Setting]
Sélectionne [Matching] ou [Quick Matching] (p. 25).
x [Undo]
Supprime les informations de positionnement des images que vous avez appliquées pour
utiliser des informations plus récentes de l'unité GPS (p. 25).
x [Int Memory Format]
Formate la mémoire interne de l'unité GPS (p. 19).
Pour éviter toute interruption de la triangulation
Vous pouvez éviter que la touche de l'unité GPS ne soit appuyée accidentellement dans
un sac, etc., pendant la triangulation.
Faites coulisser le commutateur HOLD vers le haut.
Pour pouvoir utiliser de nouveau l'unité GPS, faites glisser le commutateur HOLD vers
le bas.
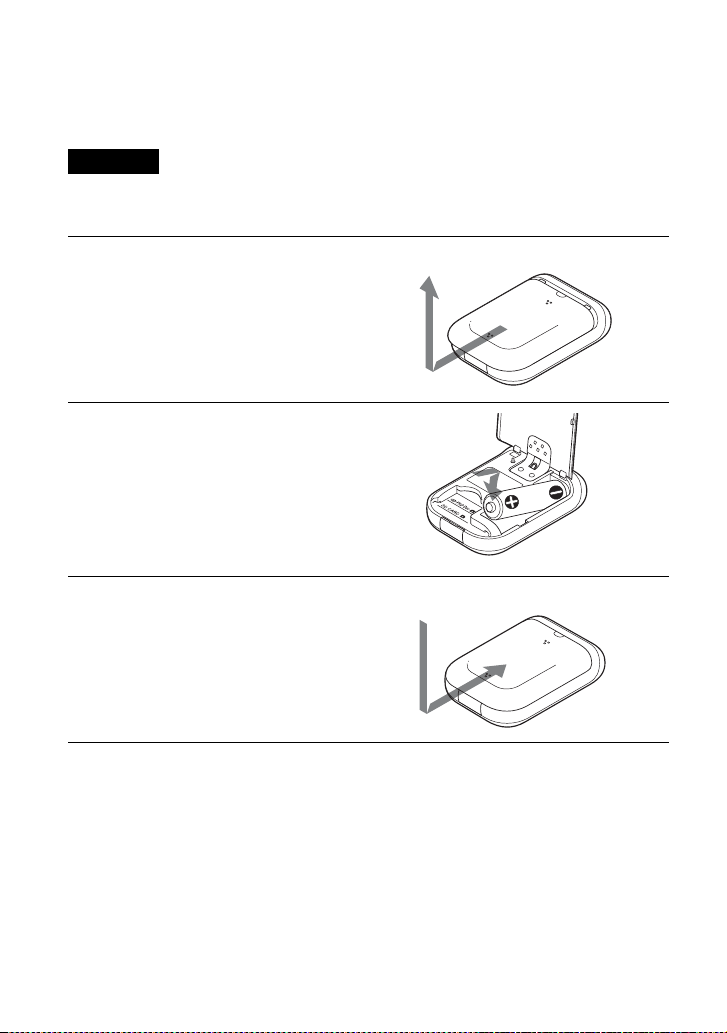
14
Ét
ape
1E
nre
gi
s
t
remen
t
d
e
l'iti
n
é
ra
i
re parcouru
Insertion d'une batterie
Vous pouvez utiliser une des batteries suivantes.
• Pile alcaline LR6 (type AA)
• Batterie au nickel-métal-hydrure HR6 de type AA (recommandé)
L'autonomie d'une pile alcaline (type AA) LR6 est plus courte à des températures inférieures à 25 °C
(77 °F). Nous vous recommandons d'utiliser une batterie au nickel-métal-hydrure.
x
Retrait de la batterie
Après vous être assuré(e) que l'unité GPS est hors tension, tenez-la en plaçant le cache
de protection de la batterie vers le haut, puis retirez la batterie.
Veillez à ne pas laisser tomber la batterie.
Remarque
1
Ouvrez le cache de protection de
la batterie.
• Si l'unité GPS est déjà sous tension, veillez
à la mettre hors tension avant d'ouvrir le
cache de protection de la batterie.
2
Insérez la batterie en respectant
les polarités indiquées par les
signes e/E dans le
compartiment de la batterie.
• Insérez le côté E en premier comme
indiqué à droite.
3
Fermez le cache de protection
de la batterie.

15
Étape 1 Enregistrement de l'itinéraire parcouru
x
Autonomie de la batterie
• L'autonomie de la batterie peut varier en fonction des conditions d'utilisation et de
l'environnement. L'autonomie est raccourcie quand un « Memory Stick Duo » ou une carte
mémoire SD est inséré.
• Il est recommandé d'utiliser des piles alcalines et des batteries au nickel-métal-hydrure Sony.
• De même, elle est nettement plus courte à des températures basses.
• N'utilisez pas de batterie au manganèse avec l'unité GPS.
Une mauvaise manipulation de la batterie risque d'entraîner des fuites ou une explosion. Veillez à
respecter les consignes suivantes.
• Insérez la batterie en respectant les polarités e/E.
• Ne chargez pas de batterie sèche.
• Retirez la batterie quand vous envisagez de ne pas utiliser l'unité GPS pendant une longue période.
Sinon, cela pourrait entraîner une fuite de la batterie.
(Lors de la triangulation à 25 °C (77 °F) sans « Memory Stick Duo »/carte mémoire SD inséré)
Pile alcaline Sony LR6 (type AA) (vendue
séparément)
Batterie au nickel-métal-hydrure Sony HR6 (type
AA) (vendue séparément)
environ 15 heures environ 16 heures
Remarque

16
Enregistrement d'un journal GPS
Les données du journal GPS, à compter de la mise sous tension de l'unité GPS jusqu'à sa
mise hors tension, ou jusqu'à ce que le mode [GPS] soit basculé sur un autre mode
([Matching] ou [Tools]), sont enregistrées comme un fichier journal. Quand l'unité GPS
est de nouveau allumée, ou que le mode est basculé sur [GPS], les données du journal
GPS sont enregistrées comme un nouveau fichier journal.
1
Dans un environnement à ciel ouvert, dirigez l'antenne vers
le haut, et maintenez la touche 1 (touche de marche/arrêt)
enfoncée.
L'unité GPS s'allume et le statut de la triangulation GPS s'affiche sur l'écran LCD.
Patientez quelques minutes au même endroit, jusqu'à ce que l'unité GPS démarre
la triangulation.
Si la triangulation ne démarre pas au bout de 5 minutes, il se peut que vous soyez
dans un endroit où la réception des signaux radio des satellites GPS est
impossible.
L'unité GPS enregistre la position environ toutes les 15 secondes
automatiquement pendant la triangulation.
2
Définissez le fuseau horaire en fonction du temps universel
à l'aide de [Time Zone].
Quand vous utilisez l'unité GPS pour la première fois, l'écran [Time Zone]
apparaît.
Si l'écran [Time Zone] n'apparaît pas, appuyez sur MENU, puis sélectionnez
[Tools] t [Clock Settings] t [Time Zone].
Quand vous utilisez l'unité GPS dans d'autres pays/régions, définissez le fuseau
horaire approprié à ce pays ou à cette région.
• Réglez le fuseau horaire en vous basant sur le temps universel. Pour plus
d'informations sur les fuseaux horaires, reportez-vous à la section “Décalages
horaires dans le monde” (p. 18).
• Une fois que l'unité GPS a démarré la triangulation, l'horloge s'affiche sur
l'écran [Time Zone] (p. 12).
• Si vous ne connaissez pas le fuseau horaire de l'endroit où vous êtes, appuyez
sur V/v dans l'écran [Time Zone] jusqu'à ce que l'horloge affichée en bas de
l'écran indique l'heure de la région ou du pays.
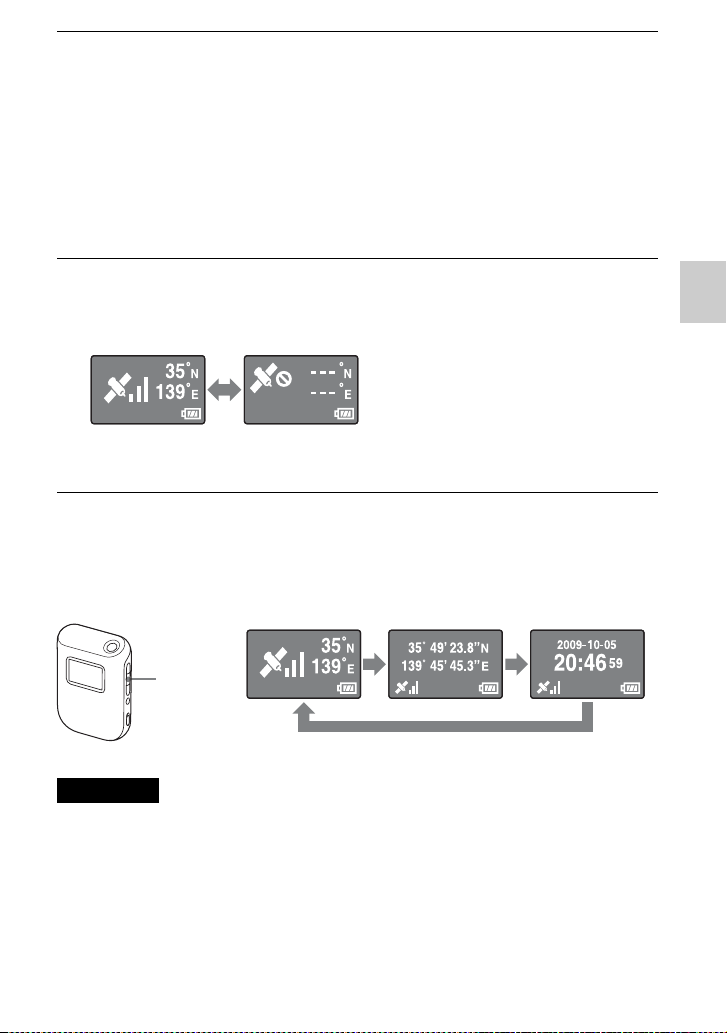
17
Étape 1 Enregistrement de l'itinéraire parcouru
Vérification de la position actuelle et de l'heure actuelle
Appuyez plusieurs fois sur ENTER quand la triangulation s'est terminée correctement.
L'affichage de l'écran est modifié comme suit.
• Même si vous appuyez sur ENTER quand la triangulation est impossible, l'unité GPS n'affiche pas
les coordonnées de la position actuelle.
• L'unité GPS n'affiche pas de date ni d'heure tant qu'elle ne reçoit pas de signal GPS. Il peut y avoir
des différences dans l'heure affichée, selon les conditions d'utilisation de votre unite GPS.
3
Vérifiez les paramètres de date et d'heure de votre appareil
photo.
Les informations de positionnement et les données d'image sont associées les
unes aux autres selon leurs informations de temps (p. 5). Par conséquent, si les
paramètres de date et d'heure de l'appareil photo sont incorrects, l'image
enregistrée et le lieu enregistré ne seront pas correctement associés. Pour régler
l'horloge de votre appareil photo, consultez le mode d'emploi de votre appareil
photo.
• Vous pouvez vous reporter à l'horloge de votre unite GPS quand vous réglez
celle de votre appareil photo.
4
Vérifiez le statut de la triangulation puis transportez l'unité
GPS.
• Appuyez sur ENTER pour afficher le statut de la triangulation.
Remarques
La triangulation
s'est déroulée
correctement
Triangulation
impossible
Coordonnées
actuelles
Date et heure
actuelles
ENTER
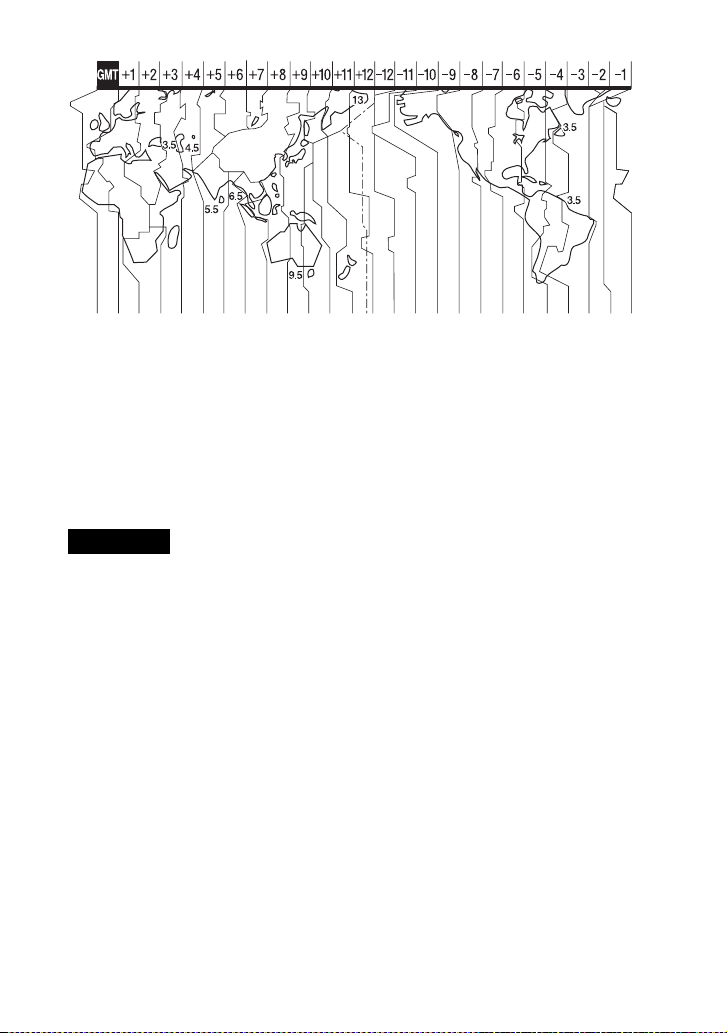
18
x
Décalages horaires dans le monde
Emplacements inappropriés à la réception de données GPS
Il est possible que vous ne puissiez pas enregistrer de journal GPS dans des lieux ou des
situations où les signaux radio des satellites GPS n'atteignent pas l'unité GPS. Par exemple,
• Dans les tunnels, en intérieur ou à l’ombre des immeubles.
• Entre des immeubles hauts ou dans des rues étroites entourées d'immeubles.
• Dans les métros, des emplacements entourés d'arbres ou sous un pont élevé.
• Dans des endroits où des champs magnétiques sont générés, tels que près de câbles
haute tension.
• Près d'appareils générant des signaux radio à la même fréquence que l'unité GPS, près
des téléphones mobiles de 1,5 GHz, etc.
• Vous n'êtes pas censé allumer puis éteindre l'unité GPS quand vous êtes sur le point d'appuyer sur
l'obturateur de votre appareil photo. Au contraire, laissez votre unite GPS sous tension quand vous
la transportez avec l'appareil photo, et quand vous prenez des photos. Sauf si votre unite GPS
effectue une triangulation quand vous prenez des photos, elle n'enregistre pas de journaux GPS à
associer avec les images.
• Quand l'unité GPS reste allumée, elle passe en mode [GPS] et démarre la triangulation
automatiquement. Cela peut entraîner la création d'un journal GPS imprévu.
• Vous pouvez supprimer les journaux GPS inutiles à l'aide de l'option GPS Image Tracker, après les
avoir importés dans votre ordinateur. Pour plus d'informations sur la suppression d'un journal GPS,
reportez-vous à la section GPS Image Tracker Aide.
•
Si plusieurs journaux GPS sont créés en raison de la mise sous/hors tension de l'unité GPS, etc., vous
pouvez les fucionner à l'aide de l'option GPS Image Tracker, après les avoir importés sur votre ordinateur.
Notez cependant que vous ne pouvez pas diviser des journaux GPS fusionnés. Pour plus d'informations sur
la fusion de plusieurs journaux GPS, reportez-vous à la section GPS Image Tracker Aide.
x
Mise hors tension de l'unité GPS
Maintenez la touche 1 (touche de marche/arrêt) enfoncée.
x
Réinitialisation des réglages
Si l'unité GPS devient instable, réinitialisez les réglages de l'unité GPS.
Tout en maintenant la touche MENU enfoncée, appuyez sur la touche 1 (touche de
marche/arrêt) et maintenez-la enfoncée.
Les réglages de l'unité GPS sont réinitialisés.
Remarques
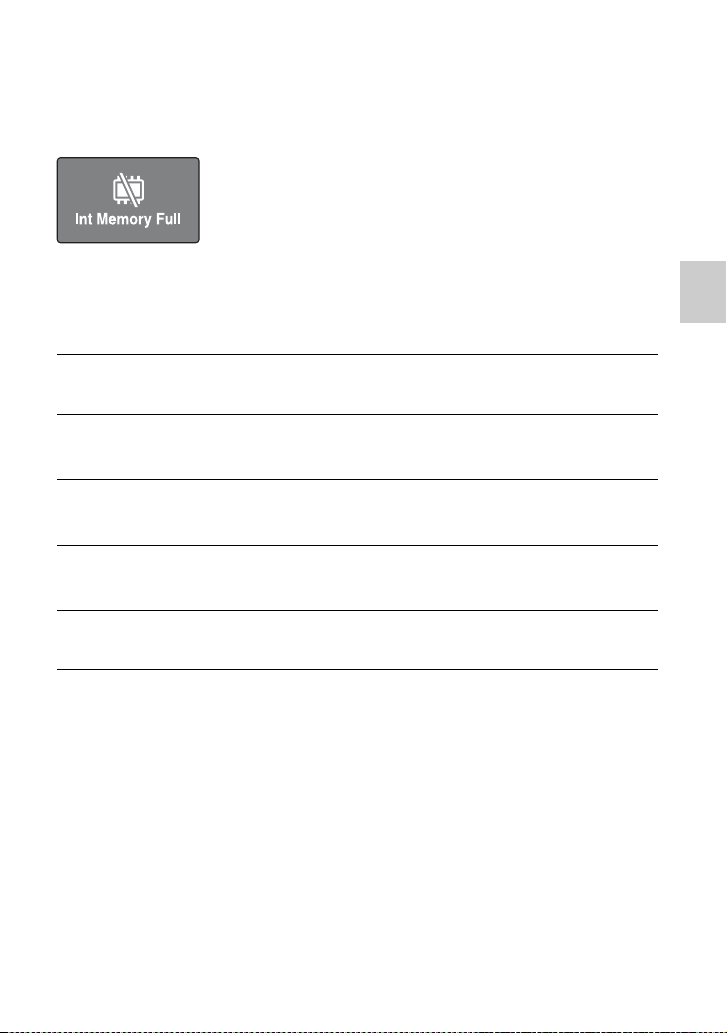
19
Étape 1 Enregistrement de l'itinéraire parcouru
Formatage de la mémoire interne
L'unité GPS permet d'enregistrer plusieurs journaux GPS à hauteur de 3 mois environ.
(La durée d'enregistrement varie selon les conditions d'utilisation de l'unité GPS.) Quand
la mémoire interne est pleine, le message suivant apparaît.
Vous pouvez formater la mémoire interne à l'aide du menu. Une fois formatée, toutes les
données qui se trouvent dans la mémoire interne sont supprimées et vous ne pourrez plus
les récupérer. Le formatage prend environ 15 secondes.
1
Appuyez sur MENU pendant la triangulation.
2
Appuyez sur V/v pour sélectionner [Tools], et appuyez sur
ENTER.
3
Appuyez sur V/v pour sélectionner [Int Memory Format], et
appuyez sur ENTER.
4
Appuyez sur V/v pour sélectionner [Start], et appuyez sur
ENTER.
5
Lorsque [Complete] apparaît, appuyez sur ENTER.

20
Ét
ape
2A
pp
li
ca
ti
on
d
es
i
n
f
orma
ti
ons
d
e pos
iti
onnemen
t
enre
gi
s
t
r
é
es aux
i
ma
g
es
Installation du logiciel fourni
L'installation du logiciel fourni sur votre ordinateur vous permet d'importer des images
sur votre ordinateur, d'appliquer des informations de positionnement aux images et de
les afficher sur une carte.
Cette section décrit le fonctionnement avec la version anglaise des contenus d'écran.
x
Environnement informatique recommandé
Nous vous recommandons d'utiliser le logiciel fourni dans l'environnement suivant.
GPS Image Tracker et PMB
SE (préinstallé): Microsoft Windows XP SP3/Windows Vista* SP1
* les éditions 64 bits sont également prises en charge.
Unité centrale/Mémoire: Intel Pentium III 500 MHz ou plus/256 Mo minimum (Intel
Pentium III 800 MHz ou plus/512 Mo minimum recommandé)
Disque dur: espace disque requis pour l'installation, environ 500 Mo
Affichage: 1024 × 768 points minimum
• Pour visualiser les films, l'environnement du système de votre ordinateur doit prendre en charge le
PMB fourni avec les appareils photo numériques Sony ou les caméscopes numériques Sony.
Remarques sur le raccordement de l'unité GPS à un ordinateur
• Le fonctionnement n'est pas garanti pour tous les environnements informatiques
recommandés susmentionnés.
• Si vous raccordez plusieurs appareils USB en même temps à un seul ordinateur,
certains d'entre eux, notamment votre appareil photo, risquent de ne pas fonctionner
en fonction du type d'appareil USB utilisé.
• Le fonctionnement n'est pas garanti quand vous utilisez un concentrateur multiport
USB.
• Quand votre ordinateur repart d'un mode veille ou d'un mode interrompu, la
communication entre l'unité GPS et votre ordinateur risque de ne pas reprendre en
même temps.
• Connectez-vous à l'ordinateur en tant qu'administrateur.
Remarques sur PMB
Vérifiez les éléments suivants avant d'installer le logiciel fourni.
• Pour utiliser des films enregistrés avec des appareils photo numériques Sony ou
certains caméscopes numériques Sony, vous devez installer le PMB fourni en plus
avec le modèle respectif.
• Notez les informations suivantes quand PMB est fourni avec les appareils photo
numériques Sony ou les caméscopes numériques Sony (appelés ci-après « appareils
photos »).
– Quand la version du PMB fourni avec les appareils photos est antérieure à celle
fournie avec ce kit, commencez par installer le PMB fourni avec les appareils
photo, puis installez le PMB à l'aide du CD-ROM fourni avec ce kit.
– Quand la version du PMB fourni avec les appareils photos est la même version, ou
ultérieure, que celle fournie avec ce kit, commencez par installer le PMB à l'aide du
CD-ROM fourni avec ce kit, puis installez le PMB fourni avec les appareils photo.
De cette manière, les fonctions supplémentaires seront ajoutées.
21
Étape 2 Application des informations de positionnement enregistrées aux images
Installez le logiciel en procédant comme suit.
x
Installation de GPS Image Tracker et de PMB
1
Allumez votre ordinateur puis insérez le CD-ROM fourni
dans le lecteur.
L'écran de sélection de Setup Language apparaît.
• Pour Windows Vista, l'écran AutoPlay apparaît. Sélectionnez « Run
Setup.exe. » puis suivez les instructions qui apparaîssent à l'écran pour
poursuivre l'installation.
• Si le programme d'installation ne démarre pas, cliquez sur [Start] t [My
Computer] (Poste de travail), puis double-cliquez sur l'icône
(SONYPICTUTIL).
2
Sélectionnez la langue de votre choix, puis cliquez sur
[Next] (Suivant).
L'écran « License Agreement » (Contrat de licence) apparaît.
3
Lisez attentivement le contrat. Si vous acceptez les
conditions de ce contrat, cochez la case d'option située en
regard de [I accept the terms of the license agreement]
(J’accepte les termes du contrat de licence) puis cliquez sur
[Next] (Suivant).
L'écran indiquant l'exécution de la préparation de l'installation apapraît.
4
Confirmez les paramètres de l'installation puis cliquez sur
[Install] (Installer).
5
Suivez les instructions à l’écran pour terminer l'installation.
• Quand le message de confirmation de redémarrage apparaît, redémarrez
l'ordinateur en suivant les instructions affichées à l'écran.
• L'écran d'installation du logiciel apparaît parfois selon l'environnement système
de votre ordinateur. Suivez les instructions pour terminer l'installation.
6
Retirez le CD-ROM une fois l'installation terminée.
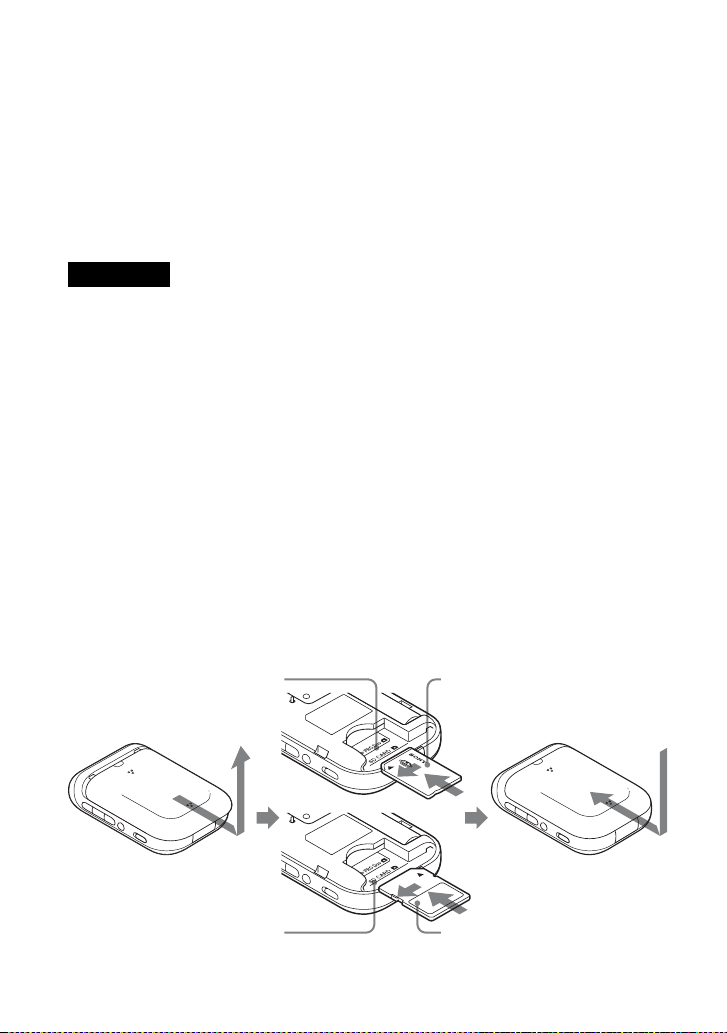
22
Application des informations de positionnement
aux images à l'aide de l'unité GPS (Matching)
Grâce à l'unité GPS, vous pouvez appliquer les informations de positionnement aux
images fixes au format JPEG (.jpg d'extension) enregistrées sur un « Memory Stick
Duo » ou des cartes mémoire SD.
Vous pouvez afficher sur une carte les images qui possèdent des informations de positionnement
appliquées à l'aide de l'unité GPS aux points d'enregistrement. Si vous importez des journaux
GPS depuis l'unité GPS, vous pouvez également afficher l'itinéraire parcouru sur une carte.
Pour connaître les types de « Memory Stick Duo »/cartes mémoire SD que vous pouvez
utiliser avec l'unité GPS, reportez-vous à la section « « Memory Stick Duo »/carte
mémoire SD » (p. 38).
• Quand vous utilisez l'unité GPS, vous pouvez appliquer les informations de positionnement
uniquement aux images au format JPEG. Toutefois, il n'est pas possible d'appliquer des
informations de positionnement aux types d'image suivants, même si elles sont au format JPEG.
De même, les informations de positionnement ne peuvent pas être appliquées aux films.
– Images non conformes à la norme DCF
– Images enregistrées alors que l'unité GPS n'enregistrait pas de journal GPS
– JPEG Fichiers JPEG dans un format antérieur à Exif 2.1
• Utilisez une nouvelle batterie, ou une batterie en pleine charge pour les opérations d'association.
(Nous vous recommandons d'utiliser une batterie au nickel-métal-hydrure.) N'utilisez pas de
batterie qui ne dispose que d'une faible capacité. Si la capacité de la batterie s'affaiblit au cours de
l'association, l'unité GPS risque de ne pas appliquer les informations de positionnement à toutes les
images.
• L'autonomie de la batterie est plus courte à des températures basses.
• Les images auxquelles ont déjà été appliquées les informations de positionnement, que ce soit sur
cette unité GPS ou sur d'autres appareils, seront exclues automatiquement.
• Vous risquez de ne pas pouvoir appliquer les informations de positionnement aux images traitées
sur un ordinateur.
x
Insertion du « Memory Stick Duo » ou de la carte mémoire SD
contenant des images dans l'unité GPS
Insérez complètement le « Memory Stick Duo » ou la carte mémoire SD dans le guide
de la carte jusqu'au repère de position.
Remarques
Repère de position pour
« Memory Stick Duo »
« Memory Stick Duo »
Repère de position pour
la carte mémoire SD
Carte mémoire SD
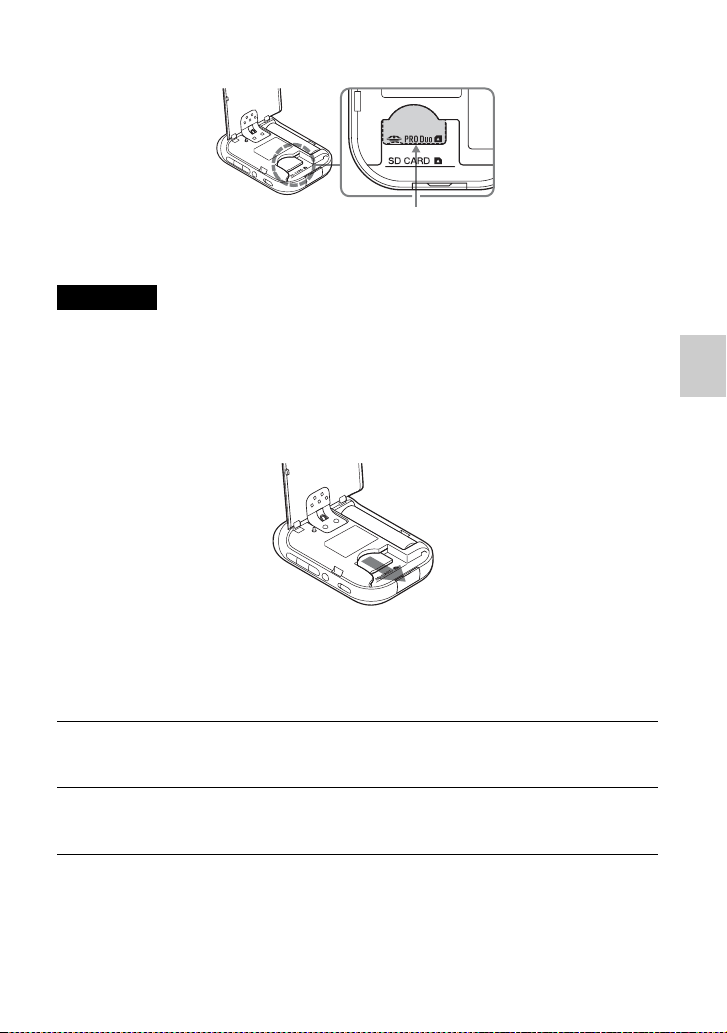
23
Étape 2 Application des informations de positionnement enregistrées aux images
Position correcte du « Memory Stick Duo »
Insérez le « Memory Stick Duo » jusqu'à ce qu'il s'aligne sur le repère de position.
• Veillez à fermer le cache de protection de la batterie. Si le cache de la batterie est ouvert, l'unité
GPS ne fonctionne pas.
• N’ouvrez pas le cache de protection de la batterie pendant l'opération Association/Undo.
Pour retirer le « Memory Stick Duo » ou la carte mémoire SD
Tout en maintenant le « Memory Stick Duo » ou la carte mémoire SD vers le bas avec
un doigt, faites-le ou la glisser vers l'extérieur.
x
Application des informations de positionnement aux images
Vous pouvez associer un maximum de 60 images en une session. Si la taille de l'image
dépasse 13 Mo, le nombre d'images pouvant être associées en une session est inférieur.
Remarques
1
Allumez l'unité GPS puis insérez le « Memory Stick
Duo » ou la carte mémoire SD (p. 22).
2
Fermez le cache de protection de la batterie.
L'unité GPS est prête à fonctionner.
Repère de position pour « Memory Stick Duo »
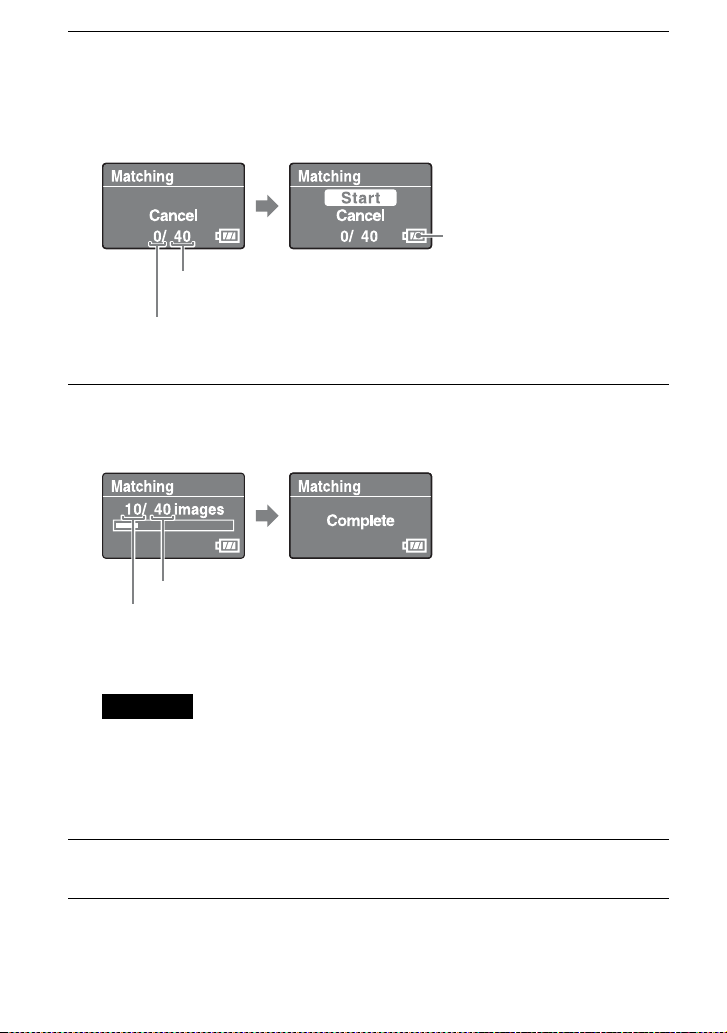
24
3
Appuyez sur MENU, sélectionnez [Matching] et appuyez sur
ENTER.
L'unité GPS démarre le balayage des images pouvant être associées aux
informations de positionnement. Le balayage risque de prendre du temps si le
nombre d'images est élevé.
• Pour arrêter le balayage, appuyez sur ENTER.
4
Sélectionnez [Start] et appuyez sur ENTER.
L'unité GPS démarre l'opération d'association. Une fois terminée, [Complete]
apparaît.
* Vous pouvez associer un maximum de 60 images en une session. Quand l'unité GPS possède
plus de 60 images pouvant être associées, 60 images s'affichent.
Veillez à ne pas effectuer les opérations suivantes au cours d'une opération d'association. Les
données d'image peuvent être endommagées. Pour effectuer l'une des opérations suivantes,
arrêtez l'opération d'association en cours.
• ouvrir le cache de protection de la batterie
• mettre l'unité GPS hors tension
• déconnecter le câble USB
5
Retirez le « Memory Stick Duo » ou la carte mémoire SD.
Autonomie de la batterie
Nombre total d'images
pouvant être associées.
Nombre d'images associées
Nombre d'images à associer*
Nombre d'images étant associées
Remarque
25
Étape 2 Application des informations de positionnement enregistrées aux images
Plus l'appareil comporte d'images, plus l'association sera longue. Nous vous recommandons
d'associer fréquemment les images et les données.
Pour associer plus de 60 images
Avant l'étape 5, répétez les étapes 3 et 4.
Pour arrêter l'association
Appuyez sur MENU pendant l'association. Dans l'écran [STOP] qui s'ouvre,
sélectionnez [OK] et appuyez sur ENTER. L'unité GPS revient à l'écran du menu.
• Il se peut que l'unité GPS affiche [cancelling] et poursuive l'association même si vous avez appuyé
sur MENU. Dans ce cas, patientez quelques instants jusqu'à ce que l'unité GPS arrête l'association.
• Pour poursuivre l'association, sélectionnez [Cancel] dans l'écran [STOP] et appuyez sur ENTER.
Pour supprimer les informations de positionnement des images
associées (Undo)
1 Insérez le « Memory Stick Duo » ou la carte mémoire SD contenant les
images précédemment associées dans l'unité GPS.
2 Appuyez sur MENU.
3 Sélectionnez [Tools] t [Undo] t [Start].
• Pour annuler l'opération, sélectionnez [Cancel].
4 Appuyez sur ENTER.
• À l'aide de la fonction Undo, vous ne pouvez supprimer les informations de positionnement qu'une
seule fois des images associées en dernier.
• Si vous avez traité les images associées sur un ordinateur ou un appareil photo, vous risquez de ne
pas pouvoir supprimer les informations de positionnement des images avec la fonction Undo.
• Si vous définissez [Matching Setting] sur [Quick Matching], l'opération d'association est plus
rapide qu'avec [Matching]. Toutefois, vous ne pouvez pas utiliser la fonction Undo sur les images.
• [Matching] est sélectionné comme paramètre par défaut. Pour modifier la méthode d'association,
appuyez sur MENU, sélectionnez [Tools] t [Matching Setting] t [Matching] ou [Quick
Matching].
Conseils
Remarques
Conseils

26
Application des informations de
positionnement aux images d'un ordinateur/
Importation du journal GPS
Vous pouvez appliquer des informations de positionnement à des images importées sur
un ordinateur à l'aide de GPS Image Tracker.
• Il n'est pas nécessaire d'appliquer les informations de positionnement aux images qui ont déjà été
associées avec l'unité GPS.
• GPS Image Tracker est compatible avec les fichiers aux formats suivants :
– fichiers JPEG (compatibles avec Exif 2.1 ou ultérieur)
– fichiers de films pris avec un appareil photo numérique Sony ou un caméscope numérique Sony
– Sony fichiers RAW (programme compatible avec les fichiers RAW provenant des modèles
d'appareils photo ci-dessous.)
– SRF: DSC-F828/V3
– SR2: DSC-R1
– ARW: DSLR-A100
– ARW2.0: DSLR-A200/A300/A350/A700
– ARW2.1: DSLR-A900
Vous pouvez confirmer si le format du fichier du film est compatible avec GPS Image Tracker en
cliquant sur [Aide] t [À propos de PMB] puis sur [Formats pris en charge] dans la fenêtre À
propos de PMB de PMB.
x
Importation d’images sur votre ordinateur
PMB vous permet d'importer des images que vous souhaitez associer à des informations
de positionnement.
Remarques
Conseils
1
Raccordez l'appareil photo à votre ordinateur.
PMB démarre et la fenêtre d'importation d'images s'ouvre.
Si cette fenêtre ne s'affiche pas, double-cliquez sur (PMB) sur l'écran de
l'ordinateur.
• Vous pouvez lancer PMB en cliquant sur [Start] t [All Programs] (Tous les
programmes) t [Sony Picture Utility] t [PMB].
• Pour des informations détaillées, reportez-vous au mode d’emploi de l'appareil
photo.
2
Cliquez sur [OK].
Les images sont importées automatiquement de l'appareil photo sur l'ordinateur.
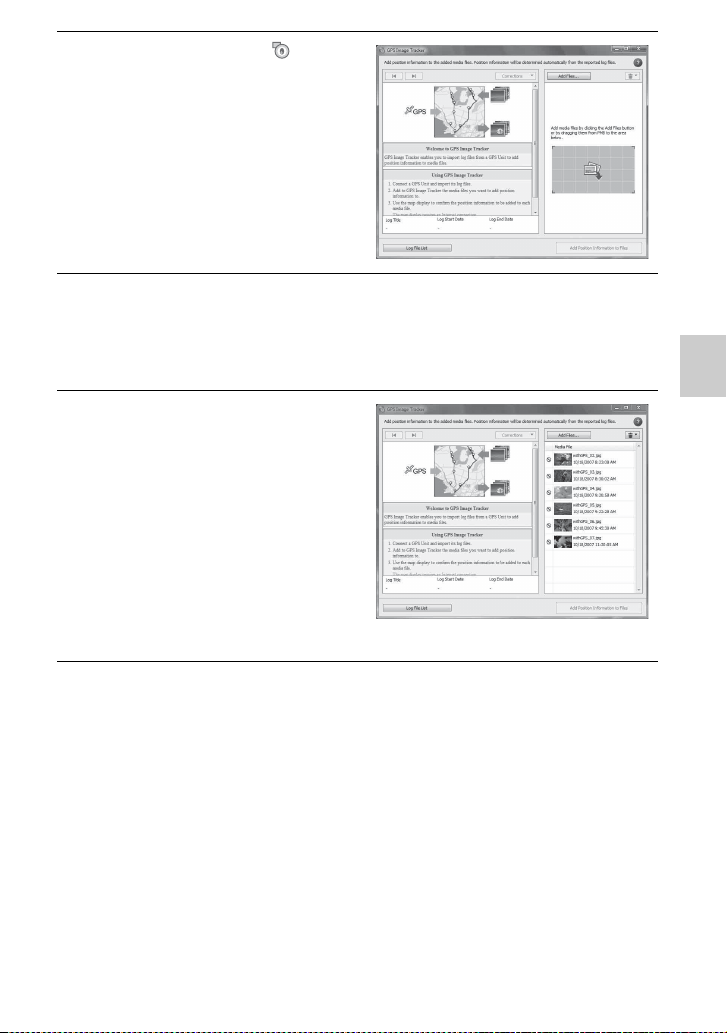
27
Étape 2 Application des informations de positionnement enregistrées aux images
3
Double-cliquez sur (GPS
Image Tracker) sur l'écran de
l'ordinateur pour lancer GPS
Image Tracker.
• Vous pouvez lancer GPS Image
Tracker en cliquant sur [Start] t [All
Programs] (Tous les programmes) t
[Sony Picture Utility] t [GPS Image
Tracker].
4
Sélectionnez les images auxquelles vous souhaitez
appliquer des informations de positionnement à l'aide de
PMB.
• Pour plus d’informations, reportez-vous au Manuel de PMB.
5
Glissez-déposez les images
sélectionnées dans la liste du
fichier d'images qui se trouve
sur la droite de la fenêtre
principale de GPS Image
Tracker.
Les images sont importées dans GPS
Image Tracker.
• Pour plus d’informations, reportez-
vous à la section GPS Image Tracker
Aide.
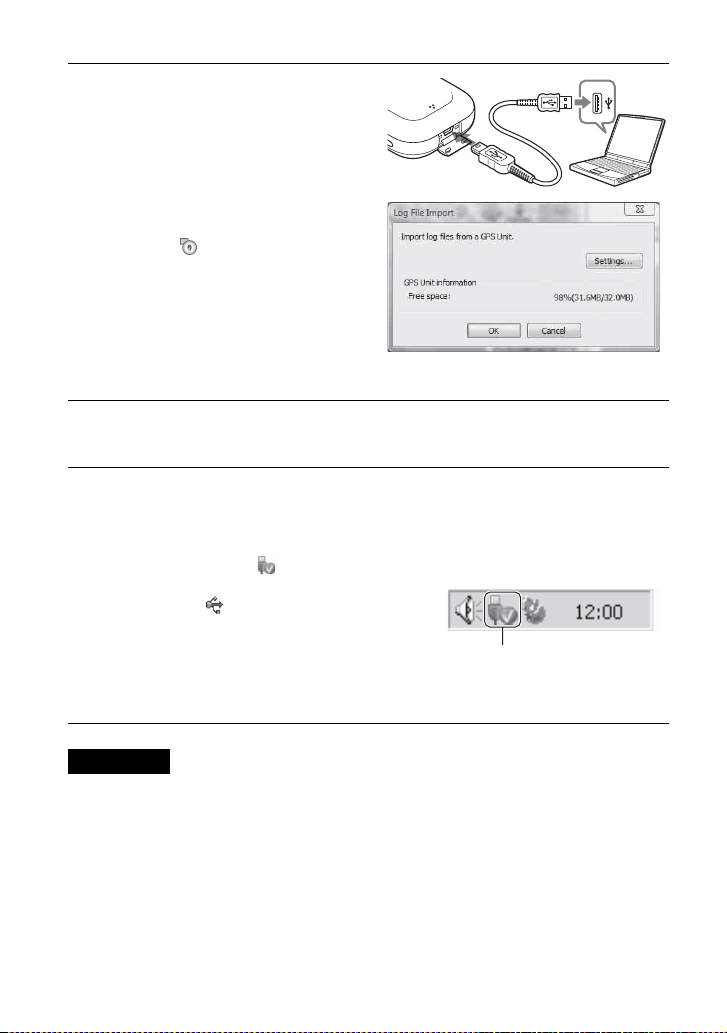
28
x
Importation d'un journal GPS
• Assurez-vous d'avoir mis l'unité GPS hors tension avant de la raccorder à l'ordinateur. Dans le cas
contraire, les fichiers risquent d'être corrompus.
• La capture d'écran Windows Explorer du contenu du disque amovible peut apparaître quand l'unité
GPS est connectée à votre ordinateur, assurez-vous de ne pas toucher les données qui se trouvent
dans le dossier GPS.
• Avant d'afficher les journaux GPS récemment importés de l'unité GPS sur GPS Image Tracker à
l'aide de Affichage Plan, veillez à bien fermer GPS Image Tracker avant de lancer Affichage Plan.
• L'unité GPS passe en mode de communication USB, même si le commutateur HOLD est activé.
• La touche 1 (touche de marche/arrêt) est inopérante en mode de communication USB. Lorsque
l'unité GPS est débranchée de l'ordinateur, l'unité GPS est mise hors tension automatiquement.
1
Ouvrez le cache de la prise
USB puis raccordez l'unité
GPS et votre ordinateur à
l'aide du câble USB fourni.
La fenêtre Log File Import s'ouvre
(mode de communication USB).
Si cette fenêtre ne s'affiche pas, double-
cliquez sur (GPS Image Tracker) sur
l'écran de l'ordinateur. (Vous pouvez
lancer GPS Image Tracker en cliquant
sur [Start]
t
[All Programs] (Tous les
programmes)
t
[Sony Picture Utility]
t
[GPS Image Tracker].)
•
Pour plus d’informations, reportez-vous
à la section GPS Image Tracker Aide.
2
Cliquez sur [OK].
Tous les journaux GPS disponibles sont importés sur votre ordinateur.
3
Une fois les journaux GPS
importés, déconnectez l'unité
GPS de l'ordinateur.
1 Double-cliquez sur sur la grille
des tâches.
2 Cliquez sur (USB Mass Storage
Device = Périphérique de stockage
de masse USB) t [Stop] (Arrêter).
3
Confirmez l'appareil dans la fenêtre de
confirmation, puis cliquez sur [OK].
4 Cliquez sur [Close] (Fermer).
Remarques
Double-cliquez ici.
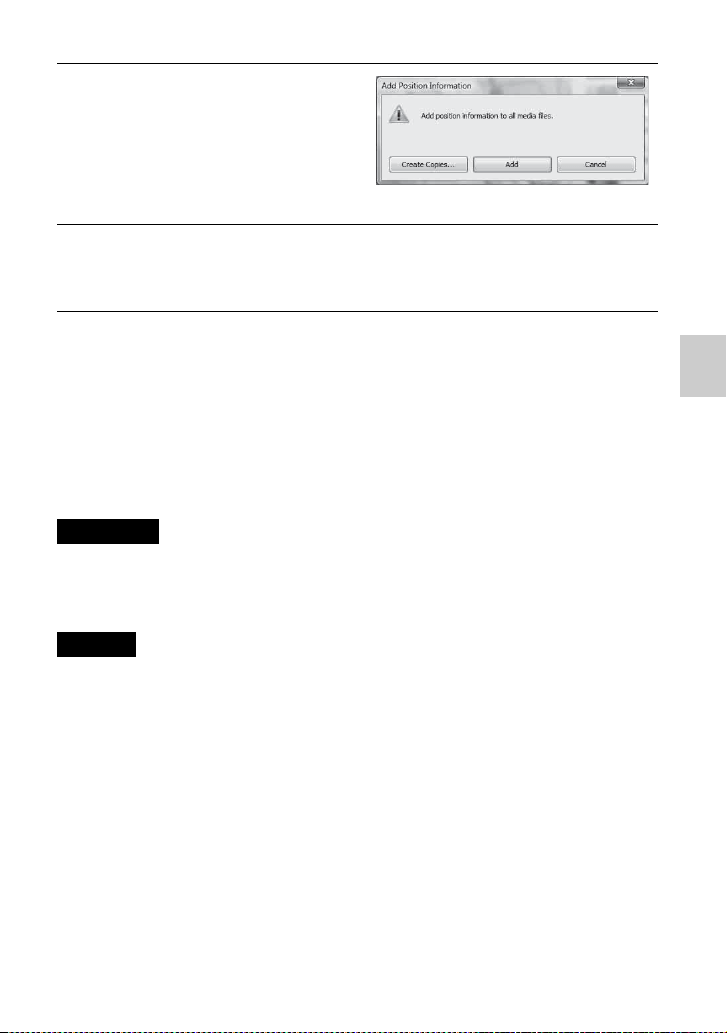
29
Étape 2 Application des informations de positionnement enregistrées aux images
x
Application d'informations de positionnement aux images
Pour appliquer des informations de positionnement à une image
donnée
1 Double-cliquez sur l'image à laquelle vous souhaitez appliquer des
informations de positionnement dans la liste qui se trouve à droite de l'écran
GPS Image Tracker.
2 Cliquez sur [Ajouter].
Les informations de positionnement sont appliquées à l'image sélectionnée puis
l'image est sauvegardée et supprimée de la liste.
• Il n'est pas possible de sauvegarder des images définies sur lecture seule. Redéfinissez l'attribut de
lecture seule des fichiers puis importez-les de nouveau dans GPS Image Tracker.
• Même si vous cliquez sur [Création de copies...] pour sauvegarder les images, vous ne pouvez pas
dupliquer et sauvegarder les fichiers de films.
Quand l'ordinateur est connecté à Internet, les routes enregistrées par les journaux GPS apparaissent
sur la carte de la fenêtre principale. (Même si l'ordinateur n'est pas connecté à Internet, les journaux
GPS sont importés correctement.)
1
Cliquez sur [Ajouter des
coordonnées aux fichiers] en
bas à droite de l'écran GPS
Image Tracker.
La boîte de dialogue [Ajouter des
coordonnées] apparaît.
2
Cliquez sur [Ajouter] ou [Création de copies...].
Les informations de positionnement s'appliquent à tous les fichiers d'images de la
liste, puis ils sont sauvegardés et supprimés de la liste.
Remarques
Conseils
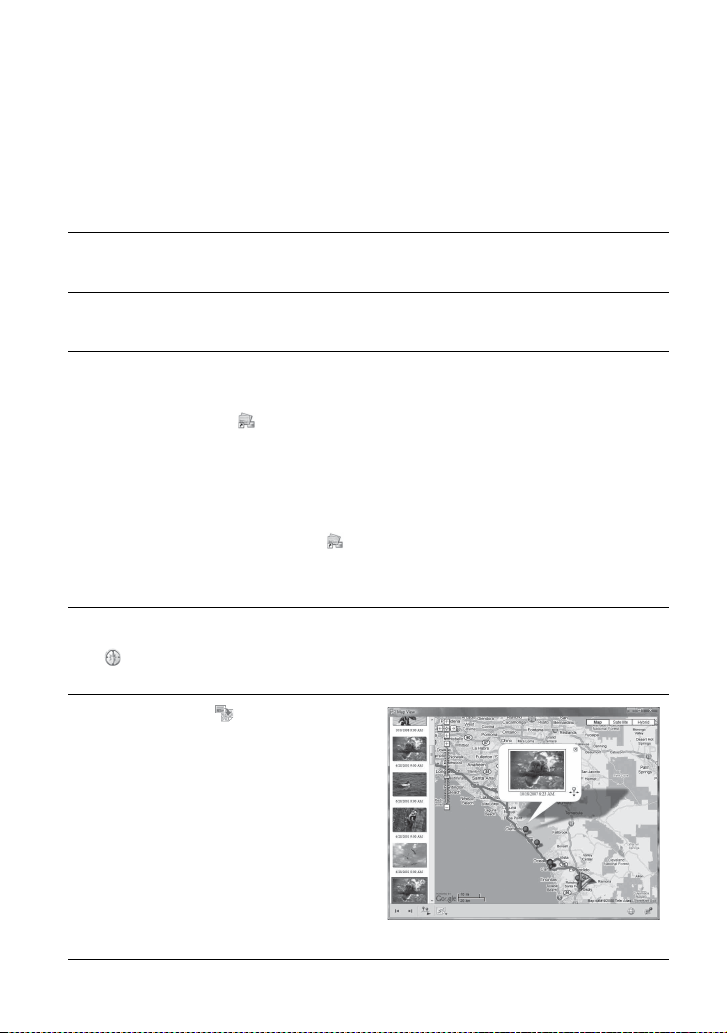
30
Ét
ape
3Affi
c
h
a
g
e
d'i
ma
g
e sur une car
t
e
Affichage de l'image et du lieu de la prise de
vue sur une carte/Affichage de l'itinéraire
parcouru
À l'aide de la fonction « Affichage Plan » de PMB, vous pouvez afficher sur une carte le
lieu de prise de vue de l'image qui possède des informations de positionnement. De plus,
en utilisant l'unité GPS comme un enregistreur chronologique GPS, vous pouvez
afficher l'itinéraire parcouru sur une carte.
1
Fermez GPS Image Tracker, s'il est ouvert.
2
Connectez votre ordinateur à Internet.
3
Lancez PMB.
x Quand les images ont été importées sur l'ordinateur
Double-cliquez sur (PMB) sur l'écran de l'ordinateur.
x Lors de l'importation d'images sur l'ordinateur
Connectez l'appareil photo à l'ordinateur à l'aide d'un câble USB. (Si l'ordinateur
est doté d'un emplacement pour carte mémoire, vous pouvez insérer le « Memory
Stick Duo » ou la carte mémoire SD directement dans l'ordinateur.)
PMB démarre et la fenêtre d'importation d'images s'ouvre. Si cette fenêtre ne
s'affiche pas, double-cliquez sur (PMB) sur l'écran de l'ordinateur.
• Vous pouvez lancer PMB en cliquant sur [Start] t [All Programs] (Tous les
programmes) t [Sony Picture Utility] t [PMB].
4
Sélectionnez l'image que vous voulez afficher sur la carte.
apparaît en haut à droite de la miniature des images possédant des
informations de positionnement.
5
Cliquez sur des touches
d'opération d'image de PMB.
« Affichage Plan » apparaît. Vous
pouvez vérifier le lieu de prise de vue
des images ainsi que le chemin des
journaux GPS importés dans GPS
Image Tracker sur la carte. En outre,
vous pouvez créer votre propre carte et
l'envoyer avec les images associées par
e-mail.
• Pour plus d’informations, consultez le
Manuel de PMB.

31
Étape 3 Affichage d'image sur une carte
• Une fois les images et les informations de positionnement associées à l'aide de l'unité GPS,
importez les journaux GPS sur l'ordinateur (p. 28).
• Si vous n'avez pas importé le fichier journal de la même date que les images sélectionnées dans
GPS Image Tracker, les routes ne s'afficheront pas.
• Veillez à fermer GPS Image Tracker avant de lancer PMB. Sinon, toute modification, etc.,
effectuée dans GPS Image Tracker ne sera pas attribuée aux images.
Remarques

32
Dé
panna
g
e
Dépannage
Si vous rencontrez un problème pendant l’utilisation de votre unite GPS, utilisez le
tableau suivant pour essayer d’y remédier. Si le problème persiste, contactez votre
vendeur Sony ou votre centre de service après-vente Sony agréé.
Vous appuyez sur la touche 1 (touche de marche/arrêt), mais l'unité GPS ne
s'allume pas.
• Ceci peut être dû à un mauvais contact de la batterie.
t Ouvrez le cache de protection de la batterie puis réinsérez la batterie.
• Il se peut que la batterie utilisée dispose d'une faible autonomie.
t Remplacez la batterie par une neuve.
• La batterie n'est peut-être pas insérée correctement.
t Insérez la batterie correctement conformément aux instructions “Insertion d'une batterie”
(p. 14).
Les touches de l'unité GPS sont inopérantes.
• Faites coulisser le commutateur HOLD vers le bas (p. 13).
• Il se peut qu'un problème soit survenu avec l'unité GPS.
t Tout en maintenant la touche MENU enfoncée, appuyez sur la touche 1 (touche de
marche/arrêt) puis maintenez-la enfoncée. Les indicateurs s'éteignent, et l'unité GPS est
réinitialisée. (Toutes les informations enregistrées relatives au réglage sont supprimées à
la réinitialisation de l'unité GPS.) Si le problème persiste, retirez la batterie puis insérez-la
de nouveau.
Aucun journal GPS n'est enregistré.
• Il se peut que vous ayez utilisé l'unité GPS dans des lieux où la triangulation était impossible.
t Utilisez l'unité GPS en plein air, en évitant les endroits tels que les tunnels, le métro, en
intérieur, les endroits entourés d'immeubles, sous des arbres, etc.
• Il est impossible d'enregistrer un journal GPS quand l'unité GPS est raccordée à un ordinateur.
• Vous avez importé les journaux GPS sur un ordinateur.
t Par défaut, les journaux GPS de l'unité GPS sont supprimés une fois qu'ils ont été
importés sur un ordinateur par GPS Image Tracker. (Vous pouvez modifier ce paramètre
dans GPS Image Tracker.)
L'unité GPS ne reçoit pas les signaux radio des satellites GPS.
• Il se peut que vous soyez dans un endroit où la réception des signaux radio des satellites GPS
est impossible.
t Utilisez l'unité GPS en plein air, en évitant les endroits tels que les tunnels, le métro, en
intérieur, les endroits entourés d'immeubles, sous des arbres, etc.
La réception des signaux radio des satellites GPS est extrêmement lente.
•
La triangulation d'un lieu est parfois longue, selon les positions des satellites GPS les plus proches.
t Pour plus d'informations, consultez la section “GPS”, page 36.
• La durée nécessaire à la triangulation de la position est importante car la position actuelle ne
peut pas être déterminée si vous vous déplacez.
t Ne bougez pas avant que l'unité GPS ait triangulé la position.

33
Dépannage
L'unité GPS n'est pas reconnue par l'ordinateur.
• Si vous avez raccordé l'unité GPS à votre ordinateur à l'aide du câble USB avant de démarrer
l'ordinateur, il est possible que l'ordinateur ne reconnaisse pas l'unité GPS.
t Débranchez le câble USB de l'unité GPS et de l'ordinateur, puis redémarrez votre
ordinateur et branchez de nouveau l'unité GPS.
L'application des informations de positionnement aux images à l'aide de l'unité
GPS est impossible.
• L'autonomie de la batterie est peut-être insuffisante.
t Remplacez la batterie par une neuve. ou utilisez une batterie en pleine charge.
• Vous risquez de ne pas pouvoir appliquer les informations de positionnement à des
températures basses car la batterie se décharge plus rapidement.
•
Assurez-vous que le « Memory Stick Duo » ou la carte mémoire SD est inséré correctement (p. 22).
•
L'espace disponible sur le « Memory Stick Duo » ou la carte mémoire SD est peut-être insuffisant.
t Supprimez les données inutiles du « Memory Stick Duo » de la carte mémoire SD à l'aide
d'un appareil photo. Vous pouvez également appliquer les informations de positionnement
aux images à l'aide de l'ordinateur.
• Assurez-vous que le cache de protection de la batterie est bien fermé.
Les images ne s'affichent pas au bon endroit.
• Le fuseau horaire définit sur l'unité GPS et celui de l'appareil photo étaient différents au
moment de la prise de vue.
t Corrigez le lieu à l'aide de GPS Image Tracker.
• L'unité GPS enregistre les informations de positionnement une fois toutes les 15 secondes
environ. Étant donné que les positions entre les informations de positionnement enregistrées
sont obtenues par calcul, il est possible que les images enregistrées lors d'un déplacement à
grande vitesse ne s'affichent pas au bon endroit.
L'unité GPS ne reconnaît pas le « Memory Stick Duo » ou la carte mémoire SD.
• Assurez-vous que le « Memory Stick Duo » ou la carte mémoire SD est inséré correctement
(p. 22).
•
Le « Memory Stick Duo » ou la carte mémoire SD n'est peut-être pas compatible avec l'unité GPS.
t Utilisez un « Memory Stick Duo » ou une carte mémoire SD compatible avec l'unité GPS
(p. 38).
Les performances de l'unité GPS sont instables.
• Utilisez une batterie en peine charge ou une batterie neuve.
• Formatez la mémoire interne (p. 19).
• Tout en maintenant la touche MENU enfoncée, appuyez sur la touche 1 (touche de marche/
arrêt) puis maintenez-la enfoncée. Les indicateurs s'éteignent, et l'unité GPS est réinitialisée.
(Toutes les informations enregistrées relatives au réglage sont supprimées à la réinitialisation
de l'unité GPS.) Si le problème persiste, retirez la batterie puis insérez-la de nouveau.
Il est impossible d'ouvrir certains fichiers JPEG situés sur le « Memory Stick
Duo »/la carte mémoire SD.
• Si l'unité est hors tension ou si vous ouvrez puis fermez le cache de protection de la batterie
pendant l'opération Association/Undo, les fichiers intitulés *****.JPG (* représentant un
numéro) ou DUMMY.JPG restent sur le « Memory Stick Duo »/la carte mémoire SD. Ces
fichiers n'affectent pas les fichiers d'image enregistrés, mais vous pouvez les supprimer à
partir d'un ordinateur, si vous préférez.
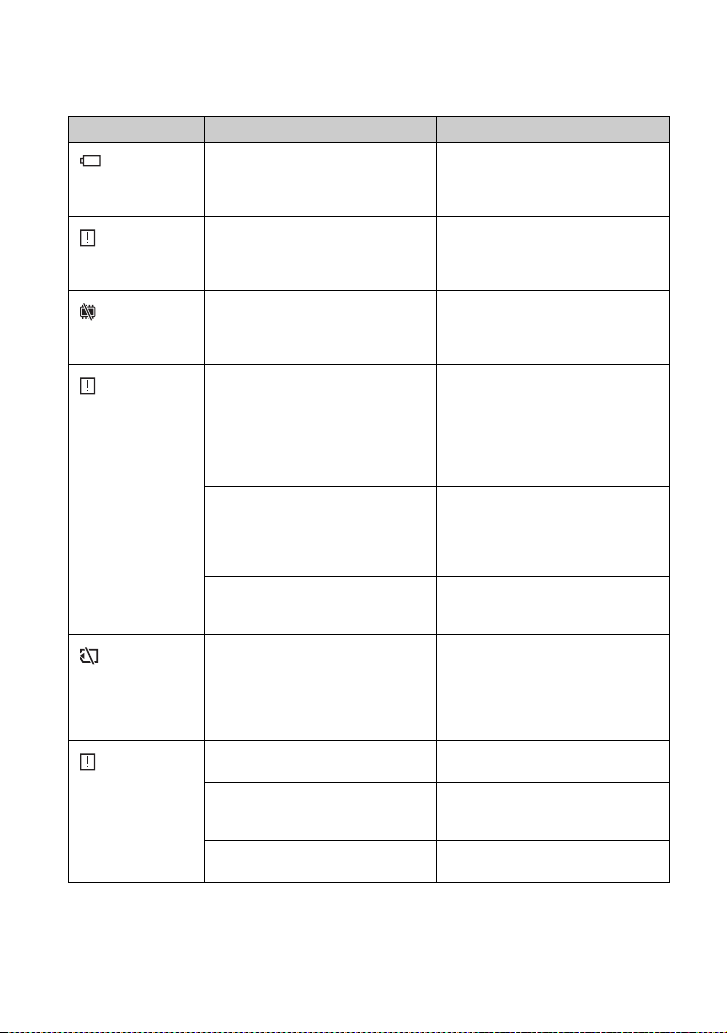
34
Messages d'erreur
Les messages suivants s'affichent sur l'écran LCD.
Message d'erreur Signification Mesure de prévention
Low Battery
La capacité de la batterie est
insuffisante.
• Remplacez la pile alcaline par une
neuve.
• Chargez la batterie au nickel-métal-
hydrure.
Int Memory Error
Il s’est produit un problème avec la
mémoire interne.
Formatez la mémoire interne (p. 19).
Le contenu sera entièrement perdu. Si
le message d'erreur ne disparaît pas,
contactez votre revendeur Sony.
Int Memory Full
La mémoire interne est pleine, par
conséquent l'unité GPS n'est pas en
mesure d'enregistrer les journaux
GPS.
Formatez la mémoire interne (p. 19).
Le contenu sera entièrement perdu.
Memory Card Error
• L'écriture peut être interdite sur le
« Memory Stick Duo » ou la carte
mémoire SD.
• L'unité GPS n'est peut-être pas
compatible avec le « Memory Stick
Duo » ou la carte mémoire SD que
vous utilisez.
Vérifiez le « Memory Stick Duo » ou
la carte mémoire SD.
Il s’est produit un problème avec le
« Memory Stick Duo » ou la carte
mémoire SD.
Éjectez le « Memory Stick Duo » ou la
carte mémoire SD de l'unité GPS puis
réinsérez-le/la. Si le message d'erreur
ne disparaît pas, contactez votre
revendeur Sony.
Le « Memory Stick Duo » ou la carte
mémoire SD n'est pas insérée
correctement.
Insérez-le/la correctement (p. 22).
Memory Card Full
Le « Memory Stick Duo » ou la carte
mémoire SD est pleine, par
conséquent l'opération d'association ne
s'effectue pas.
Supprimez les données inutiles du
« Memory Stick Duo » ou de la carte
mémoire SD. Vous pouvez également
appliquer les informations de
positionnement aux images à l'aide de
votre ordinateur.
Matching Error
Le cache de protection de la batterie
est ouvert.
Fermez le cache de protection de la
batterie.
Aucune image n'existe pour être
associée.
Insérez le « Memory Stick Duo » ou la
carte mémoire SD qui contient les
images à associer.
Aucun journal GPS n'existe pour être
utilisé pour l'association d'images.
Vérifiez le paramètre de décalage
horaire.
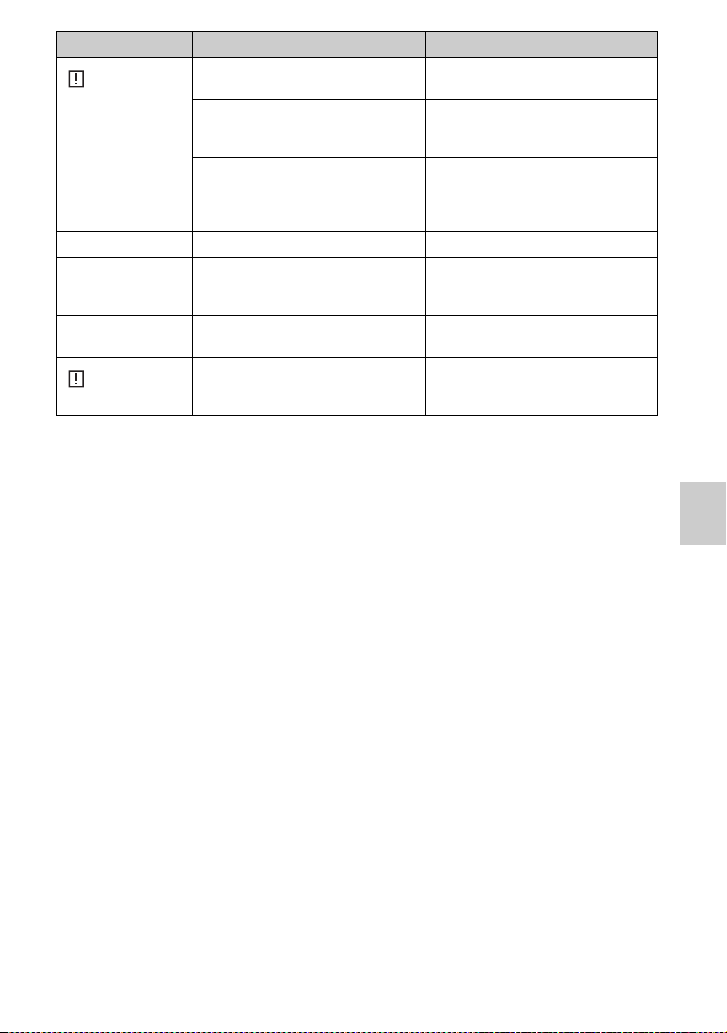
35
Dépannage
Undo Error
Le cache de protection de la batterie
est ouvert.
Fermez le cache de protection de la
batterie.
[Quick Matching] a été sélectionné. Il est impossible d'annuler des images
qui ont été associées avec [Quick
Matching].
Le « Memory Stick Duo » ou la carte
mémoire SD inséré(e) n'est pas celui
ou celle que vous avez utilisé(e) pour
l'association la dernière fois.
La fonction « Undo » est possible
uniquement avec le « Memory Stick
Duo » ou la carte mémoire SD que
vous avez utilisé(e) en dernier.
Hold La fonction HOLD est activée. Annulez la fonction HOLD (p. 13).
Insert Card Vous avez essayé d'annuler
l'association sans insérer le « Memory
Stick Duo » ou la carte mémoire SD.
Insérez le « Memory Stick Duo » ou la
carte mémoire SD, et appuyez sur
ENTER.
Cover Open Le cache de protection de la batterie
est ouvert.
Fermez le cache de protection de la
batterie.
Error
Une erreur autre que celles décrites ci-
dessus s'est produite.
Remettez l'unité GPS sous tension. Si
le message d'erreur ne disparaît pas,
contactez votre revendeur Sony.
Message d'erreur Signification Mesure de prévention

36
I
n
f
orma
ti
ons comp
lé
men
t
a
i
res
GPS
GPS (Global Positioning System) est un
système qui calcule la position
géographique à partir de satellites
spatiaux américains de haute précision.
Ce système vous permet de localiser
votre position exacte sur la terre.
x
A propos des erreurs
Erreur causée par la position
des satellites GPS
L'unité GPS triangule automatiquement
votre position actuelle lorsqu'elle reçoit
des signaux radio de 3 satellites GPS ou
plus.
L'erreur de triangulation autorisée par les
satellites GPS est d'environ 10 m (30
pieds). Selon, l'environnement de votre
position, l'erreur de triangulation peut
être supérieure. Dans ce cas, votre
position actuelle peut ne pas
correspondre à la position de la carte
basée sur les informations GPS.
Erreur lors de la procédure de
triangulation
L'unité GPS obtient des informations de
positionnement environ toutes les 15
secondes pendant la triangulation.
Il peut exister un léger décalage entre le
moment où les informations de
positionnement sont obtenues et la prise
de vue des images. Le logiciel fourni
(GPS Image Tracker) calcule la position
de l'endroit où ces images sont prises en
se basant sur le chemin entre les deux
positions qui fournit les informations de
positionnement. Par conséquent, la
position d'enregistrement réelle peut ne
pas correspondre exactement à la
position sur la carte basée sur les
informations GPS.

37
Informations complémentaires
Précautions
Quand vous utilisez l'unité GPS, notez
bien les éléments suivants.
Batterie
Aucune batterie n'est fournie.
• Une pile alcaline LR6 (type AA) ou
une batterie au nickel-métal-hydrure
HR6 (type AA) est requise pour
l'enregistrement des données de journal
avec l'unité GPS. Achetez une batterie
avant d'utiliser l'unité GPS.
• N'utilisez pas de piles au manganèse.
Remarques relatives à la batterie
au nickel-métal-hydrure
• Chargez la batterie au nickel-métal-
hydrure avant d'utiliser l'unité GPS
pour la première fois. Pour plus
d'informations sur le chargement,
reportez-vous aux instructions
fournies avec la batterie.
• La batterie peut être chargée même si
elle n'est pas entièrement déchargée.
De même, si la batterie n'est pas
entièrement chargée, vous pouvez
l'utiliser même avec une capacité
partiellement chargée.
• Si vous envisagez de ne pas utiliser la
batterie pendant une longue période,
utilisez la charge existante jusqu'au
bout puis retirez la batterie de l'unité
GPS et stockez-la dans un endroit frais
et sec. Vous pourrez ainsi conserver
les fonctions de la batterie.
Données enregistrées sur
l'unité GPS
Si vous retirez la batterie pendant
l'utilisation de l'unité GPS, les données de
journal risquent d'être endommagées.
Veillez à remplacer la batterie par une
nouvelle après avoir éteint l'appareil.
Aucune compensation relative aux
données endommagées ne sera
accordée
Si les informations de positionnement
(journal GPS) ne sont pas correctement
enregistrées en raison d'un mauvais
fonctionnement de la mémoire
d'enregistrement ou du système, aucune
compensation relative aux images avec
informations de positionnement ou aux
données de journal endommagées ne sera
accordée.
Utilisation et stockage
• Avant d'utiliser l'unité GPS, assurez-
vous qu'elle fonctionne correctement.
• Évitez de secouer ou de heurter
brutalement l'unité GPS. Outre un
mauvais fonctionnement et une
incapacité d'enregistrer le journal, cela
peut endommager les données
enregistrées.
• L'unité GPS n'est pas étanche aux
poussières, ni étanche aux projections,
ni imperméable.
• N'utilisez ou ne stockez jamais l'unité
GPS dans les endroits suivants.
– Dans des endroits extrêmement
chauds, froids ou humides
Dans des endroits tels qu'une
voiture garée en plein soleil, le
boîtier de l'unité GPS peut se
déformer et entraîner un mauvais
fonctionnement.
– À proximité d'une source de chaleur
L'unité GPS risque la décoloration
ou la déformation, qui risque
d'entraîner un mauvais
fonctionnement.
– À proximité de forts champs
magnétiques
– Dans des endroits poussiéreux ou
sableux
Évitez de faire pénétrer du sable ou
de la poussière dans l'unité GPS.
Cela risque d'engendrer un mauvais
fonctionnement de l'unité GPS, et
dans certains cas ce mauvais
fonctionnement est irréversible.
Transport de l'unité GPS
Évitez de vous asseoir sur une chaise,
etc., avec l'unité GPS dans la poche
arrière de votre pantalon ou de votre
jupe, au risque d'endommager ou
d'entraîner un mauvais fonctionnement
de l'unité GPS.
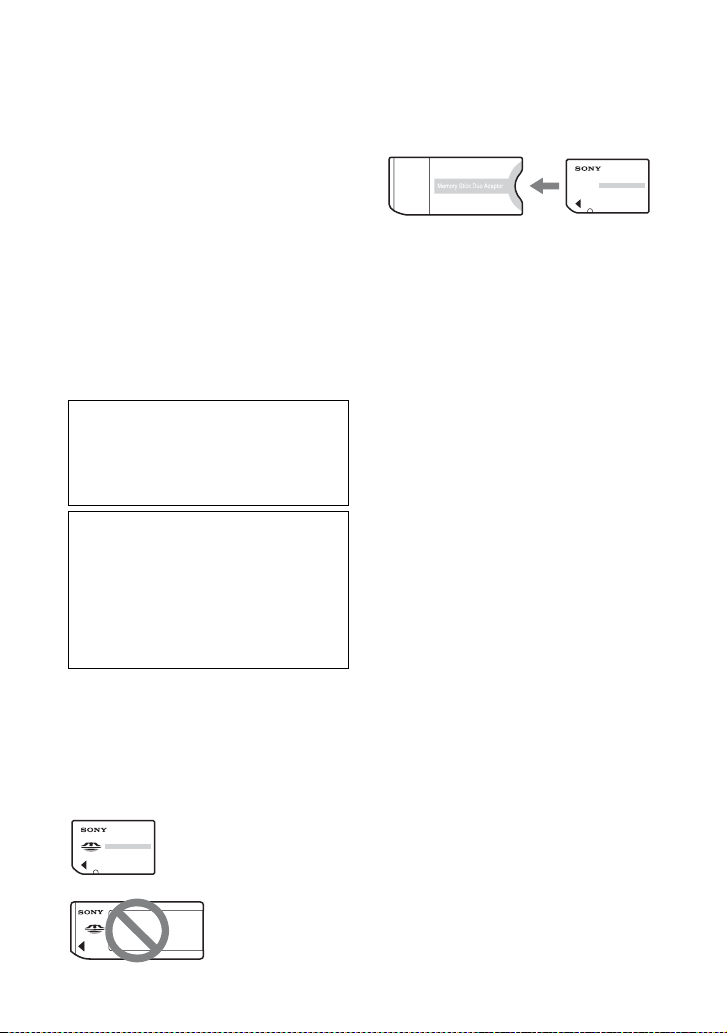
38
Nettoyage de l'unité GPS
Nettoyage de la surface de l'unité
GPS
Nettoyez la surface de l'unité GPS avec
un chiffon doux légèrement humidifié,
puis essuyez la surface avec un chiffon
sec. N'utilisez pas les produits suivants
au risque d'endommager la surface ou le
boîtier.
• Les produits chimiques tels que des
diluants, de l'essence, de l'alcool, des
lingettes jetables, des répulsifs, du
filtre solaire ou de l'insecticide, etc.
• Ne touchez pas l'unité GPS avec les
substances décrites ci-dessus sur les
mains.
• Ne laissez pas l'unité GPS en contact
avec des objets en caoutchouc ou en
vinyle pendant une longue période.
x
« Memory Stick Duo »/carte
mémoire SD
Types de « Memory Stick Duo »
(vendus séparément) pouvant
être utilisés avec l'unité GPS
Utilisation du « Memory Stick
PRO Duo » avec des appareils
compatibles « Memory Stick »
Veillez à insérer le « Memory Stick PRO
Duo » dans un adaptateur « Memory
Stick Duo » (vendu séparément).
Types de carte mémoire SD
pouvant être utilisés l'unité GPS
Les types de carte mémoire SD suivants
peuvent être utilisés avec l'unité GPS (à
partir d'octobre 2008).
• Carte mémoire SD
*1
• Carte miniSD, Carte microSD (un
adaptateur est requis)
*2
• Carte mémoire SDHC
*3
Le bon fonctionnement de tous ces types
de carte mémoire SD n'est cependant pas
garanti.
Certaines cartes, en particulier, consomment
beaucoup d'énergie. Si vous utilisez ces
cartes pour l'opération Association/Undo, il
est possible que l'unité se mette hors tension
soudainement ou bien que le nombre
d'images disponibles soit inférieur au
nombre attendu. Il est recommandé d'utiliser
d'autres types de cartes.
*1
Le fonctionnement de l'unité GPS avec une
carte mémoire SD d'une capacité de 2 Go
maximum a été confirmé.
*2
Certains adaptateurs de carte disponibles sur
le marché sont dotés de bornes projetées à
l'arrière. Ce type d'adaptateur risque de ne pas
fonctionner correctement avec l'unité GPS.
*3
Le fonctionnement de l'unité GPS avec une
carte mémoire SDHC d'une capacité de 8
Go maximum a été confirmé.
La lecture/l'enregistrement de données
accompagnées d'une protection de droits
d'auteur n'est pas possible.
« Memory Stick Duo »
Les supports « Memory Stick Duo » sont
des supports d’enregistrement à circuit
intégré portables et compacts d’une
Sony n'est en aucun cas responsable des
dommages et pertes, accidentels ou
indirects, de contenus enregistrés
découlant de l'utilisation ou du mauvais
fonctionnement de l'unité GPS.
Recommandations de sauvegarde
Pour éviter tout risque de perte
découlant d'une mauvaise manipulation
ou d'un mauvais fonctionnement
accidentel de l'unité GPS, nous vous
recommandons d'effectuer une copie de
sauvegarde de vos données.
« Memory Stick
Duo »: cette taille
peut être utilisée
avec l'unité GPS.
« Memory Stick »:
vous ne pouvez pas
l'utiliser avec l'unité
GPS.
Adaptateur « Memory
Stick Duo »
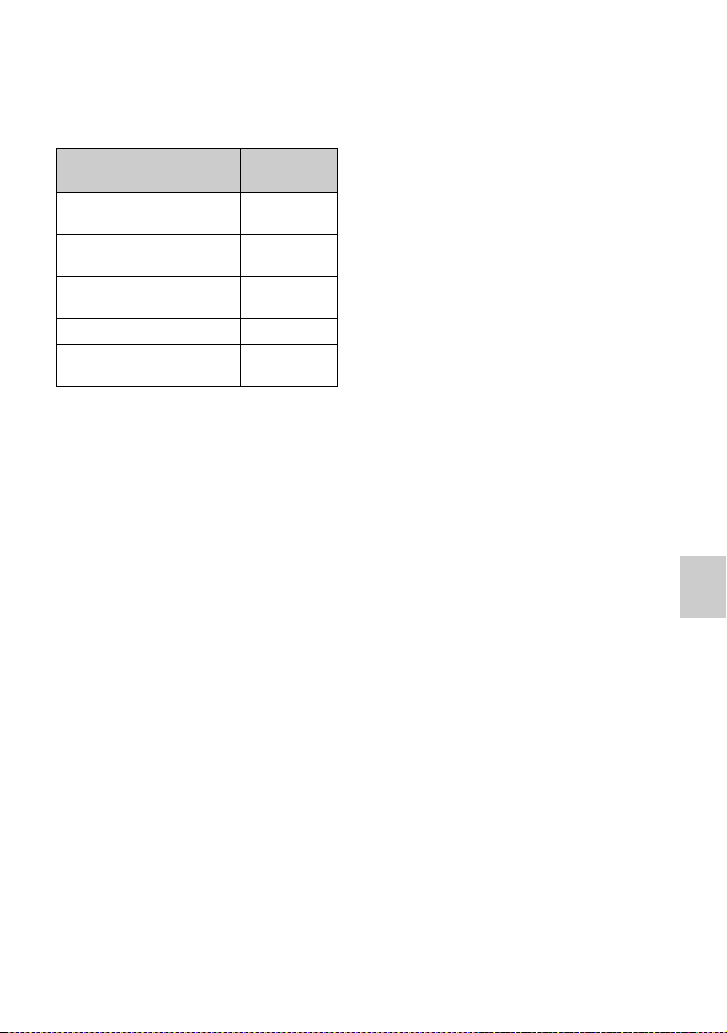
39
Informations complémentaires
grande capacité. Vous pouvez utiliser
uniquement le « Memory Stick Duo »
présenté ci-dessous avec l'unité GPS.
Cependant, le fonctionnement de tous les
types de « Memory Stick Duo » n’est pas
garanti sur l'unité GPS.
*1
L'unité GPS ne prend pas en charge la
technologie « MagicGate ».
*2
L'unité GPS ne prend pas en charge le
transfert de données parallèle 8 bits.
Cependant elle prend en charge le transfert
de données parallèle 4 bits comme avec le
« Memory Stick PRO Duo ».
• La compatibilité d’un « Memory Stick
PRO Duo » formaté par un ordinateur
(Windows OS/Mac OS) n’est pas
garantie avec votre unite GPS.
• La vitesse de lecture et d’écriture des
données peut varier en fonction du
« Memory Stick PRO Duo » et du
produit compatible « Memory Stick
PRO Duo » que vous utilisez.
• Prenez garde à ne pas exercer une
force excessive lors de l’écriture d’une
zone mémoire sur un « Memory Stick
PRO Duo ».
• N’apposez pas d’étiquette ou d’autre
objet similaire sur un « Memory Stick
PRO Duo » ou un adaptateur
« Memory Stick Duo ».
Remarques sur l'utilisation
d'un adaptateur « Memory
Stick Duo » (vendu
séparément)
• Lorsque vous utilisez un « Memory
Stick Duo » avec un appareil compatible
« Memory Stick », veillez à insérer le
« Memory Stick Duo » dans un
adaptateur pour « Memory Stick Duo ».
Sinon, vous risquez de ne pas pouvoir
retirer le « Memory Stick Duo » de
l'appareil compatible « Memory Stick ».
• Quand vous insérez un « Memory
Stick Duo » dans un adaptateur
« Memory Stick Duo », veillez à
l'insérer dans le bon sens, puis insérez-
le à fond. Si le « Memory Stick Duo »
n'est pas bien inséré, il risque de ne pas
fonctionner correctement. En outre, si
vous insérez le « Memory Stick Duo »
dans l’adaptateur pour « Memory
Stick Duo » en forçant, vous risquez
de l’endommager.
• Quand vous insérez le « Memory Stick
Duo » fixé sur un adaptateur
« Memory Stick Duo » dans un
appareil compatible« Memory Stick »,
assurez-vous d'insérer le « Memory
Stick Duo » dans le bon sens. Notez
qu’une mauvaise utilisation peut
entraîner un dysfonctionnement.
• N’insérez pas un adaptateur pour
« Memory Stick Duo » dépourvu de
« Memory Stick Duo » dans un appareil
compatible « Memory Stick ». Ceci
pourrait provoquer un
dysfonctionnement de l’appareil.
Remarques sur l'utilisation d'un
« Memory Stick PRO Duo »
(vendu séparément)
La capacité maximale d’un « Memory
Stick PRO Duo » pouvant être utilisé sur
votre unite GPS est de 16 Go.
Types de « Memory Stick
Duo »
Compatibilité
« Memory Stick Duo » (sans
« MagicGate »)
a
« Memory Stick Duo » (avec
« MagicGate »)
a
*1
« MagicGate Memory Stick
Duo »
a
*1
« Memory Stick PRO Duo » a
*1
« Memory Stick PRO-HG
Duo »
a
*1*2

40
Remarques sur l'utilisation
d'un « Memory Stick Micro »
(vendu séparément)
• L'unité GPS est compatible avec
« Memory Stick Micro » (M2). M2 est
l'abréviation de « Memory Stick Micro ».
• Pour utiliser le « Memory Stick Micro »
avec l'unité GPS, vous avez besoin d'un
adaptateur M2 Duo. Insérez un
« Memory Stick Micro » dans
l'adaptateur M2 Duo, puis insérez
l'adaptateur dans l'emplacement
« Memory Stick Duo ». Si vous insérez
le « Memory Stick Micro » dans l'unité
GPS sans utiliser d'adaptateur M2 Duo,
vous risquez de ne pas pouvoir le retirer
de l'unité GPS.
Remarques sur l'utilisation du
« Memory Stick Duo » ou de la
carte mémoire SD
• Assurez-vous d'insérer des « Memory
Stick Duo »/cartes mémoire SD dans
l'emplacement de « Memory Stick
Duo »/carte mémoire SD, dans le bon
sens. Une mauvaise insertion peut
entraîner un mauvais fonctionnement
de l'unité GPS.
• Lors de l'insertion de « Memory Stick
Duo »/cartes mémoire SD, évitez de
forcer car vous risquez d'endommager
le« Memory Stick Duo »/les cartes
mémoire SD et/ou l'unité GPS.
• N'insérez aucun autre objet qu'un
« Memory Stick Duo » ou des cartes
mémoire SD dans l'emplacement de
« Memory Stick Duo »/carte mémoire
SD. Une telle insertion peut entraîner
un mauvais fonctionnement de l'unité
GPS.
• Ne retirez pas le « Memory Stick Duo »
ou les cartes mémoire SD ou n'éteignez
pas l'unité GPS quand cette dernière est
en cours de lecture, d'écriture ou
d'accès aux données. Sinon, ces
données risquent de devenir illisibles
ou d'être supprimées.
• Nous vous recommandons d'effectuer
une sauvegarde des données
importantes.
• Quand vous transportez ou stockez le
« Memory Stick Duo » ou les cartes
mémoire SD, placez-les dans l'étui
fourni.
• Évitez de toucher les bornes du
« Memory Stick Duo » ou des cartes
mémoire SD avec vos mains ou un
objet métallique.
• Évitez de heurter, de plier ou de faire
tomber le « Memory Stick Duo »ou les
cartes mémoire SD.
• Ne démontez pas et ne modifiez pas le
« Memory Stick Duo » ou les cartes
mémoire SD.
• Conservez le « Memory Stick Duo »
ou les cartes mémoire SD à l'abri de
l'eau.
• N'utilisez pas ou ne stockez pas le
« Memory Stick Duo » ou les cartes
mémoire SD dans les conditions
suivantes :
– Emplacements au-delà des limites
de fonctionnement requises,
notamment l'intérieur surchauffé
d'un véhicule garé en plein soleil,
l'été, en extérieur exposé aux rayons
directs du soleil ou à proximité
d'une source de chaleur
– Lieux humides présentant des
substances corrosives
– Lieux propices à l'électricité
statique ou aux parasites d'origine
électrique
• Ne laissez pas le « Memory Stick Duo »
ou les cartes mémoire SD à la portée des
jeunes enfants. Un enfant risquerait de
les avaler.
• Tous les « Memory Stick Duo »/toutes
les cartes mémoire SD ne sont pas
garantis.

41
Informations complémentaires
Spécifications
Alimentation
Pile alcaline LR6 (type AA) ou batterie au nickel-
métal-hydrure HR6 (type AA) × 1
(l'alimentation provient de l'alimentation bus
USB s'il s'agit d'une connexion USB.)
Consommation d’énergie
Environ 0,15 W (pendant la triangulation continue
lors du fonctionnement sur batterie)
Durée de fonctionnement sur batterie
(utilisation à 25 °C (77 °F))
Environ 15 heures (pendant la triangulation
continue avec une pile alcaline LR6 (type
AA) Sony),
Environ 16 heures (pendant la triangulation
continue avec une batterie au nickel-métal-
hydrure HR6 (type AA) Sony)
Fréquence de réception
1575,42 MHz (bande L1, code C/A)
Méthode de réception
Suivi parallèle 20 chaînes
Sensibilité de la réception
–159 dBm maximum (lors du suivi)
Interface
USB 2.0 Hi-Speed
Capacité mémoire
Environ 1 Go (zone d'enregistrement des journaux
GPS : environ 128 Mo. Le reste est utilisé par
le système.)
Intervalle de connexion
Environ 15 secondes
Température de fonctionnement
Environ 0 à 40 °C (32 à 104 °F)
Température de stockage
Environ –20 à +60 °C (–4 à +140 °F)
Dimensions
Environ 57 mm × 80 mm × 23 mm (2 1/4 × 3 1/4
× 29/32 pouces) (l/h/p, parties saillantes non
comprises)
Poids
Environ 70 g (2,5 oz) (batterie exclue)
Format d'image pris en charge
Unite GPS
• JPEG (compatible avec Exif 2.1 ou ultérieur,
MPF Baseline)
GPS Image Tracker/PMB
• JPEG (compatible avec Exif 2.1 ou ultérieur,
MPF Baseline)
• Les fichiers de film pris à l'aide d'un appareil
photo numérique Sony ou d'un caméscope
numérique Sony (PMB est fourni avec votre
appareil photo numérique Sony ou votre
caméscope numérique Sony et doit être installé
sur votre ordinateur.)
• Sony Fichier RAW (programme compatible
avec les fichiers RAW provenant des modèles
suivants.)
– SRF: DSC-F828/V3
– SR2: DSC-R1
– ARW: DSLR-A100
– ARW2.0: DSLR-A200/A300/A350/A700
– ARW2.1: DSLR-A900
L'appareil ou le logiciel risque de ne pas
fonctionner correctement avec certaines images
ayant le format de fichier répertorié ci-dessus.
Articles inclus
Unite GPS (GPS-CS3) (1)
Câble USB (1)
CD-ROM « GPS Unit Application Software » (1)
Étui de transport (1)
Jeu de documents imprimés
La conception et les spécifications peuvent
être modifiées sans préavis.
Licence
TNKernel real time kernel
Copyright . 2004, 2006 Yuri Tiomkin
All rights reserved.
Permission to use, copy, modify, and distribute
this software in source and binary forms and
its documentation for any purpose and without
fee is hereby granted, provided that the above
copyright notice appear in all copies and that
both that copyright notice and this permission
notice appear in supporting documentation.
Marques commerciales
• Google et Google Earth sont des marques
déposées de Google Inc.
• Microsoft, Windows sont des marques
commerciales ou des marques déposées de
Microsoft Corporation aux États-Unis et/ou
dans d'autres pays.
• , « Memory Stick », ,
« Memory Stick Duo », ,

42
« MagicGate », ,
« Memory Stick PRO »,
, « Memory Stick PRO
Duo », , « Memory
Stick PRO-HG Duo »,
, « Memory Stick
PRO-HG Duo (Mark2) », ,
« Memory Stick Micro » et
sont des marques
commerciales ou des marques déposées de
Sony Corporation.
• Pentium est une marque commerciale ou une
marque déposée de Intel Corporation.
• En outre, les noms de système et de produit
utilisés dans le présent manuel sont, en règle
générale, des marques commerciales ou des
marques déposées de leurs développeurs ou
fabricants respectifs. Toutefois, les signes ™
ou ® ne sont pas toujours utilisés dans le
présent manuel.
• Les cartes en ligne et les cartes
photographiques aériennes sont développées
par Google Maps.


Printed in Japan
Printed on 70% or more recycled paper using VOC (Volatile
Organic Compound)-free vegetable oil based ink.
Imprimé sur papier recyclé à 70 % ou plus avec de l’encre à base
d’huile végétale sans COV (composés organiques volatils).