SRV 9790BK
EN
ROBOTIC VACUUM CLEANER
Translation of the original manual
SRV 9790BK
A
1 2 3
4
5
6
7
8
9
10
11
13
12
14
15
16
17
18
19
20
A
24
21
23
22
25
26
27
B
1
2
3
4
5
6
7
8 9 10 11
12
13
14
15
C
1
2
3
4
5
6
7
8
9
D1 D2
E F
G1 G2
G3 G4 G5
H1 H2
I1 I2
I3 I4
I5
L M
J K
N1 N2
N3
O P1
P2 P3

– 1 –
12/2024
2024, .
EN Robotic Vacuum Cleaner
Important Safety Instructions
READ CAREFULLY AND STORE FOR FUTURE USE.
• This appliance may be only used by children aged 8
years and older and by persons with physical, sensory or
mental impairments or lack of experience and knowledge,
if they are supervised or have been instructed on the safe
use of the appliance and understand the potential hazards.
• Children must not play with the appliance. Cleaning and
maintenance must not be performed by unsupervised
children.
• If the power cord of the collection station is damaged,
have it replaced in aprofessional service centre in order
to prevent adangerous situation. It is forbidden to use the
appliance with adamaged power cord or collection station.
• Prior to cleaning or maintenance, always disconnect the
appliance from the power socket and turn it off using the
main power switch.
• The appliance must only be used with the collection
container supplied with the appliance.
WARNING:
Do not use the collection container to charge batteries or
appliances that are not designed for this purpose.
Connect the collection station only to apower socket
withaprotective contact.
ROBOTIC VACUUM CLEANER
– 2 –
12/2024
2024, .
Electrical Safety
• Before connecting the power cord plug to apower socket, make sure that the input voltage indicated on the rating plate matches the electrical
voltage in the socket.
• Only connect the power cord plug to aproperly grounded socket. Do not use an extension cord.
• Do not disconnect the power cord plug from the socket by pulling on the power cord. This could damage the plug or the socket. Disconnect the
power cord plug from the power socket by pulling the plug.
• Do not place the power cord over sharp objects. Make sure that the power cord does not hang over the edge of the table or touch aheated or hot
surface.
• Keep the power cord dry.
• Do not connect or disconnect the power cord to or from the power socket with wet hands.
• Do not uncover the electronic parts of the robotic vacuum cleaner or its battery. They do not contain any components repairable by the user. Have
the appliance serviced by qualified persons.
• To avoid any injury by electrical shock, do not spray water or immerse the robotic vacuum cleaner, collection station and power cord in water or
other liquids.
• Do not use the robotic vacuum cleaner when it is not working correctly, if it has been damaged or has been submerged in water.
• To avoid the danger of injury by electrical shock, do not repair the robotic vacuum cleaner yourself or make any adjustments to it. All repairs should
be carried out by an authorised service centre. Tampering with the robotic vacuum cleaner during the warranty period may void the warranty.
• Prior to cleaning or maintenance, always disconnect the robotic vacuum cleaner from the power socket and turn it off using the main power switch.
Safety in Use
• This robotic vacuum cleaner is designed for use in households, offices and similar types of areas. Do not use it in industrial surroundings or outdoors.
• The robotic vacuum cleaner is not intended for vacuuming water and, therefore, must not be used in damp or wet areas, for example in laundries,
bathrooms or around swimming pools. If it were to come into contact with water, the internal electronics of the vacuum cleaner would be destroyed.
• Do not use the robotic vacuum cleaner to vacuum the following items:
– smouldering cigarettes, burning or flammable items, matches or ash;
– water and other liquids;
– sharp items, for example splinters, needles, pins, etc.;
– flour, wall plaster and other building materials;
– larger pieces of paper or plastic bags, which can easily block the suction opening.
• Do not expose the robotic vacuum cleaner to direct sunlight and do not place it near an open fire or appliances that are asource of heat.
• Do not use the robotic vacuum cleaner on narrow raised surfaces such as tables, wardrobes, etc. If the vacuum cleaner does not have sufficient
space for manoeuvring, it may fall and be damaged.
• Only use the robotic vacuum cleaner with original accessories from the manufacturer.
• Ensure that the robotic vacuum cleaner has adust filter correctly installed in the dust container before use.
• Before putting the robotic vacuum cleaner into operation, check that the entry door into your flat or house is closed. From the floor surfaces remove
clothing, paper, toys, power or extension cords and other items that the vacuum cleaner could suck in or catch. Lift curtains and drapes that reach to
the floor so that they do not get caught in the vacuum cleaner.
• Do not place any items on to the robotic vacuum cleaner and do not step or sit on it.
• If the robotic vacuum cleaner is running, watch out for children and household pets.
• When the robotic vacuum cleaner is running, ensure that the air outlet openings are not covered and that the suction opening is not blocked.
Otherwise, the robotic vacuum cleaner may be damaged.
• Follow the cleaning andmaintenance instructions provided inthis user manual.
• Do not press or attempt to lift the cover of the laser navigation module. Otherwise the module may be damaged.
Laser
• The laser sensor meets the laser safety class according to standard EN 60825-1.
• When using, handling or performing maintenance tasks on the robotic vacuum cleaner with alaser sensor, always adhere to the following
instructions:
– Prior to any handling, switch off the robotic vacuum cleaner using the main power switch.
– Do not point the laser beam at people.
– Do not look into the direct or reflected beam of the laser.
– Modifications or repairs of the laser sensor that are not performed by an authorised service centre are forbidden.
Warning:
Failure to follow the instructions for use and maintenance given in this user manual can lead to hazardous irradiation!
. . . . . . . . . . . . . . . . . . . . . . . . . . . . . . . . . . . . . . . . . . . . . . . . . . . . . . . . . . . . . . . . . . . . . . . . . . . . . . . . . . . . . . . . . . . . . . . . . . . . . . . . . . . . . . . . . . . . . . . . . . . . . . . . . . . . . . . . . . . . . . .
EXPLANATION OF SYMBOLS PLACES ON THE PRODUCT OR IN THE ACCOMPANYING DOCUMENTATION
This product meets all the basic requirements of the applicable EU directives.
This symbol on products or original documents means that used electric or electronic products must not be added to ordinary municipal
waste.
– 3 –
12/2024
2024, .
DISPOSAL OF BATTERIES
Prior to disposing of the product or handing it over at aspecialised collection facility, it is necessary to ensure that the battery is removed.
Before removing the battery, it is necessary to start the vacuum cleaner and wait until it is completely flat. The battery contains
environmentally damaging substances and therefore does not belong in standard household waste. Their correct disposal will be
performed by the respective collection facility.
DISPOSAL OF USED BATTERIES
Batteries contain environmentally damaging compounds and therefore do not belong in standard municipal waste. Take used batteries for
proper disposal at adesignated battery collection point.
. . . . . . . . . . . . . . . . . . . . . . . . . . . . . . . . . . . . . . . . . . . . . . . . . . . . . . . . . . . . . . . . . . . . . . . . . . . . . . . . . . . . . . . . . . . . . . . . . . . . . . . . . . . . . . . . . . . . . . . . . . . . . . . . . . . . . . . . . . . .
– 4 –
12/2024
2024, .
• Thank you for purchasing our SENCOR product; we hope it will serve
to your satisfaction.
• Before using this appliance, please familiarise yourself with the user
manual, even if you are already familiar with using similar types of
appliances. Use the appliance only as described in this user manual.
Keep the manual for future reference.
• It is recommended to keep the original packaging, packing material,
receipt and confirmation of the extent of the seller'sliability or warranty
certificate at least for the duration of the legal right of defective
performance or quality guarantee. When transporting the appliance,
we recommend packaging it again in the original box provided by the
manufacturer.
. . . . . . . . . . . . . . . . . . . . . . . . . . . . . . . . . . . . . . . . . . . . . . . . . . . . . . . . . . . . . . . . . . . .
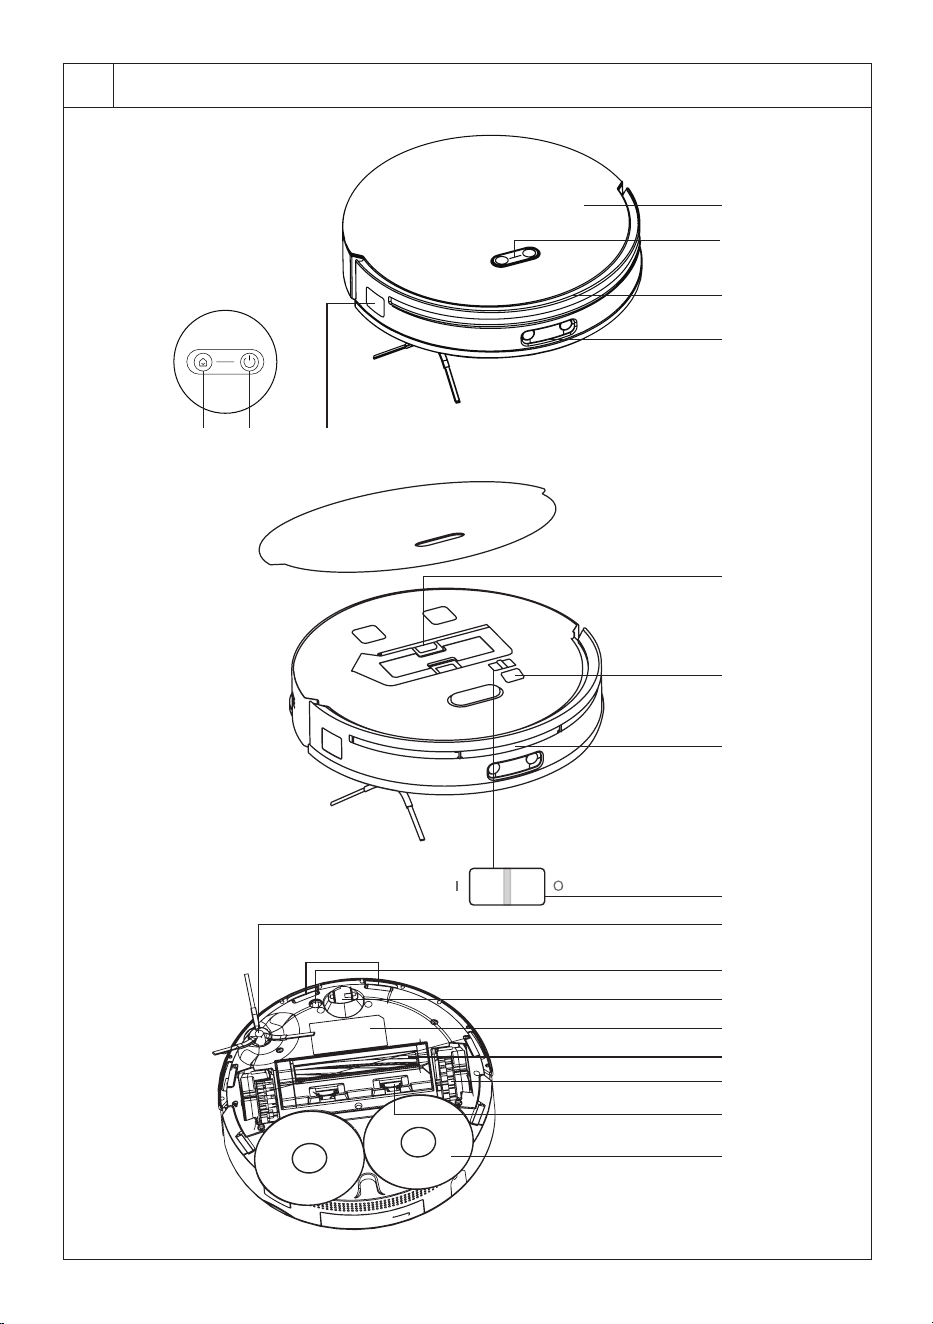
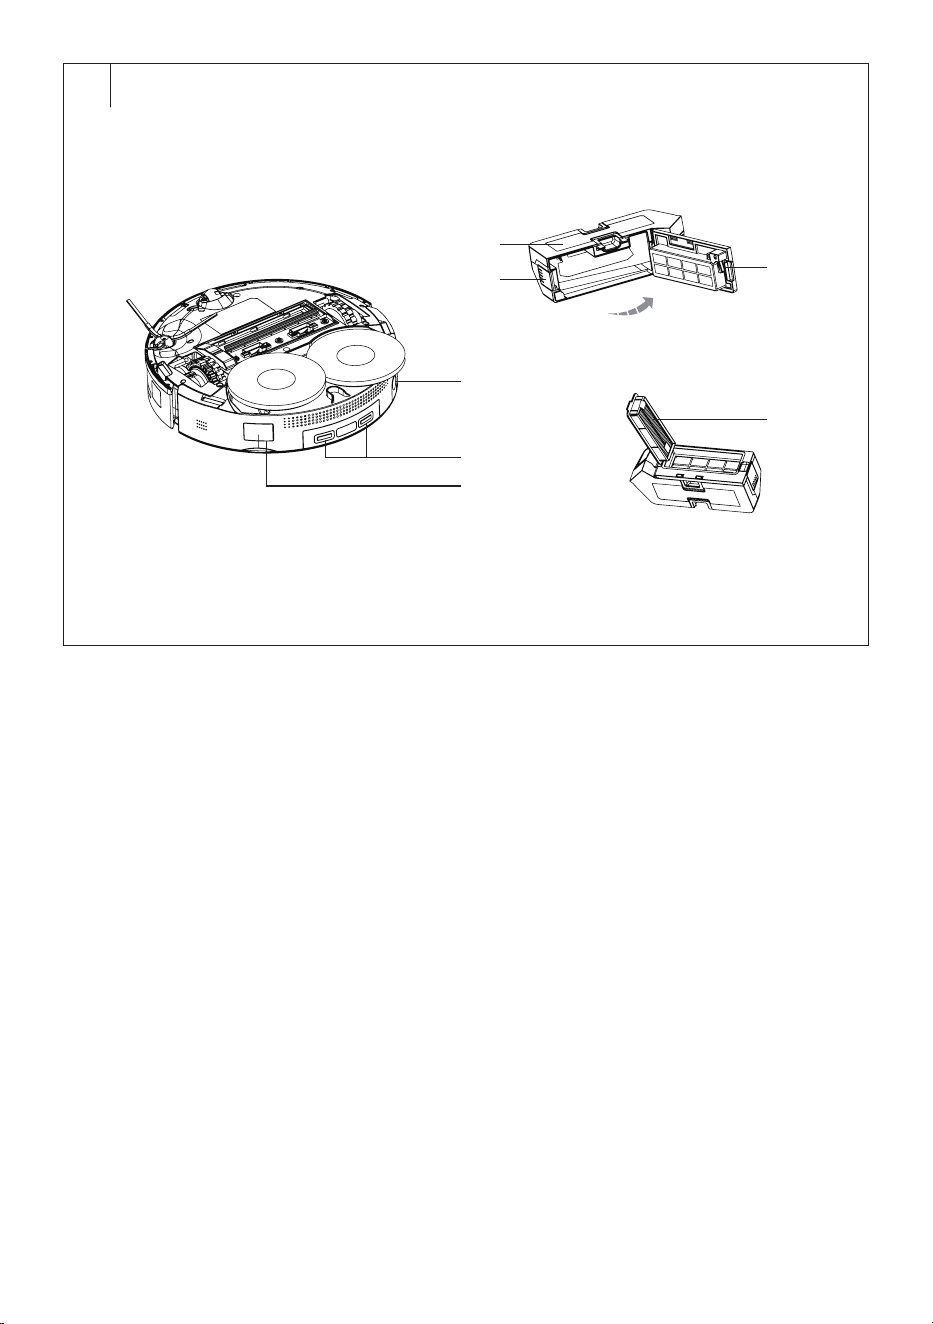
DESCRIPTION OF THE ROBOTIC VACUUM CLEANER
A1 button (return to the
collection station)
A2 button (start/stop cleaning)
A3 Sensor for movement along
the wall
A4 Magnetic top cover
A5 Wi-Fi indicator
A6 Bumper
A7 Laser obstacle detection
sensor
A8 Dust container release button
A9 Port for service purposes
A10 Laser distance sensor
A11 Main power switch
A12 Side brush
A13 Anti-fall sensors
A14 Ultrasound sensors
A15 Front swivel wheel
A16 Bottom cover
A17 Rotary brush
A18 Castor
A19 Locks to release the central
brush cover
A20 Mopping sleeve holders
A21 Water tank filler opening
A22 Charging connectors
A23 Dust container emptying
opening
A24 Dust container
A25 Dust container lock
A26 HEPA filter presence detector
A27 HEPA filter
. . . . . . . . . . . . . . . . . . . . . . . . . . . . . . . . . . . . . . . . . . . . . . . . . . . . . . . . . . . . . . . . . . . .
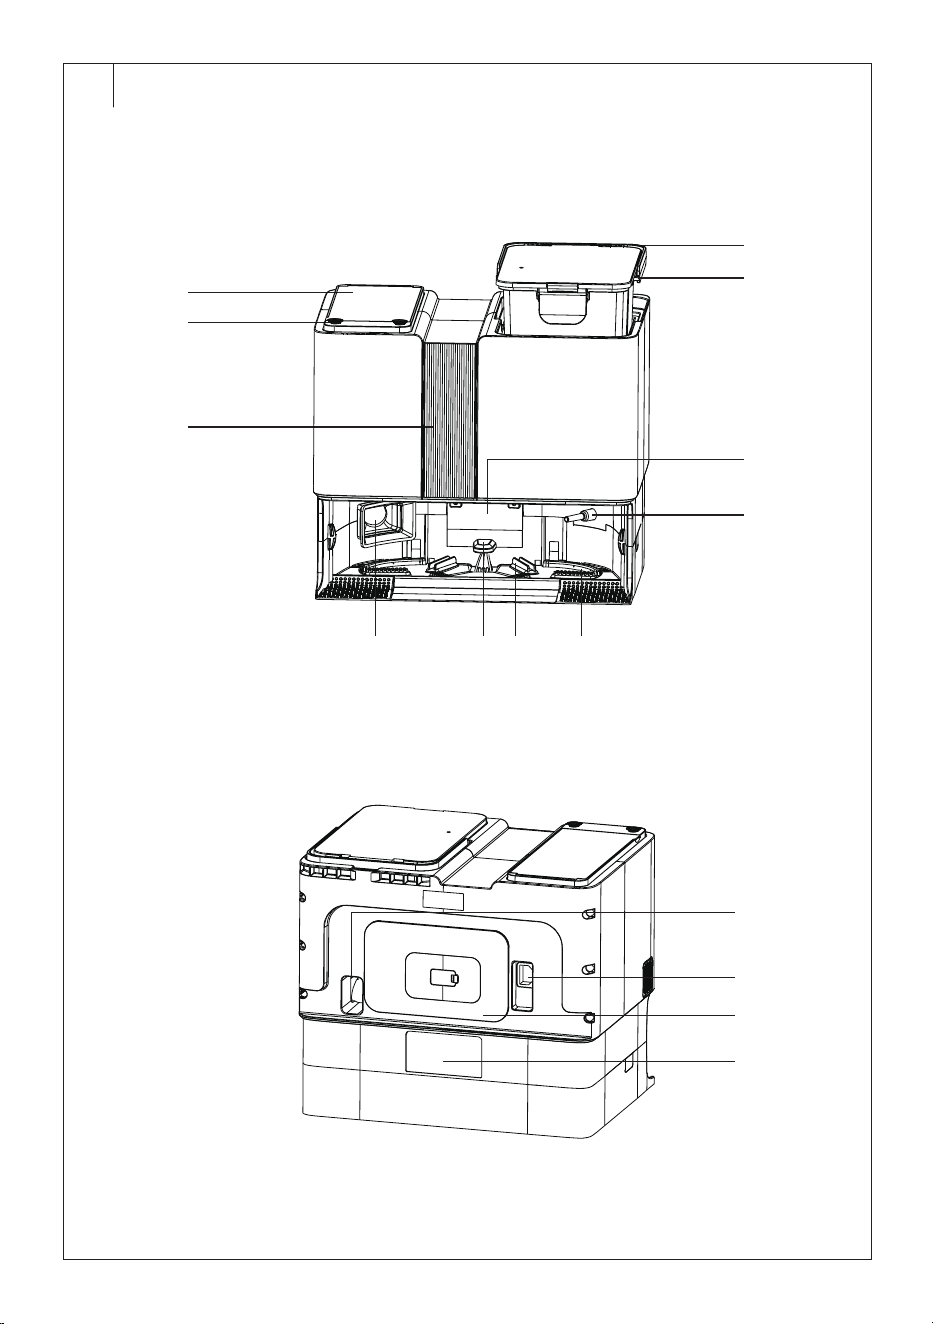
DESCRIPTION OF THE COLLECTION STATION
B1 Dust container
B2 Control panel
B3 Collection station backlight
B4 Water tank (separate
compartments for clean
and dirty water )
B5 Water tank handle
B6 Signal transmitter
B7 Clean water/dirty water
discharge nozzle
B8 Suction opening
B9 Groove filter
B10 Charging contacts
B11 Robotic vacuum cleaner
compartment
B12 Port for service purposes
B13 Socket for connecting the
power cord
B14 Power cord holder
B15 Handle for carrying the
collection station
. . . . . . . . . . . . . . . . . . . . . . . . . . . . . . . . . . . . . . . . . . . . . . . . . . . . . . . . . . . . . . . . . . . .
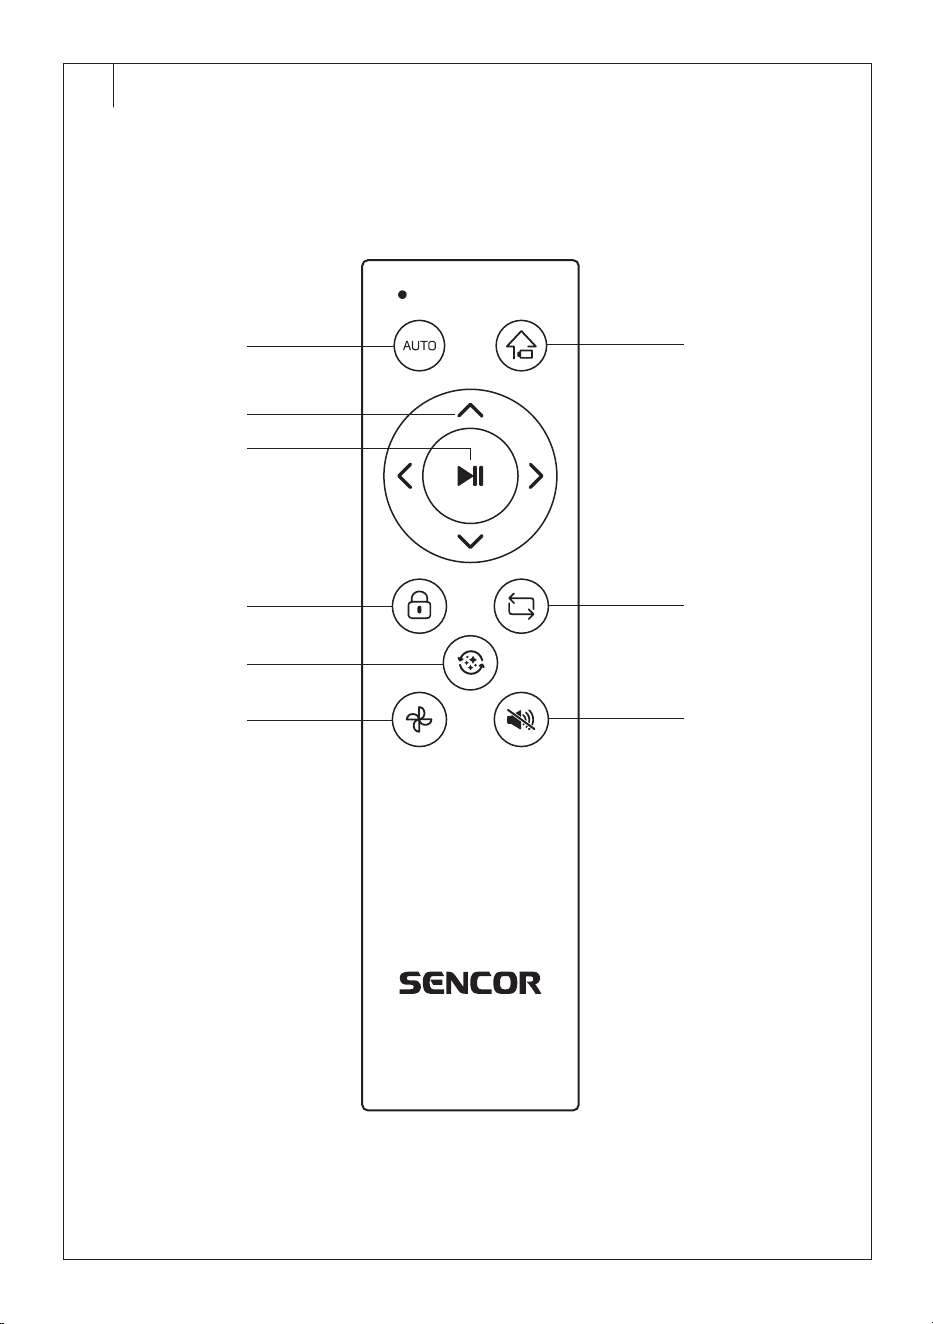
REMOTE CONTROL DESCRIPTION
C1 AUTO button to start
automatic cleaning
C2 Directional buttons
C3 button to start/stop
cleaning
C4 button to activate/
deactivate child lock
C5 button to switch on
cleaning of the robotic
vacuum cleaner compartment
C6 button to adjust suction
power
C7 button to return to the
collection station
C8 button to switch cleaning
modes
C9 button to switch the voice
message on/off
. . . . . . . . . . . . . . . . . . . . . . . . . . . . . . . . . . . . . . . . . . . . . . . . . . . . . . . . . . . . . . . . . . . .
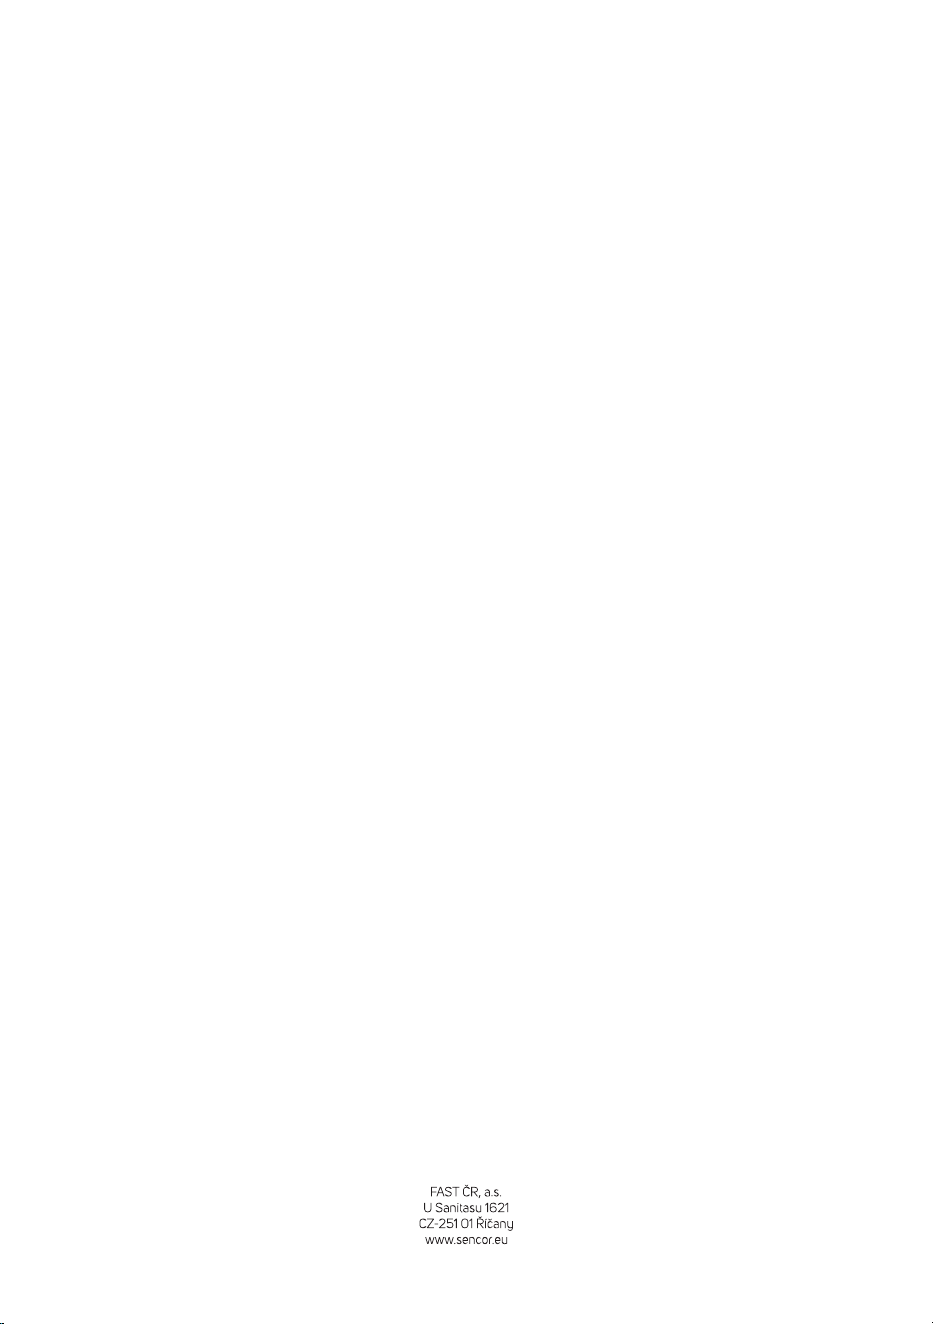
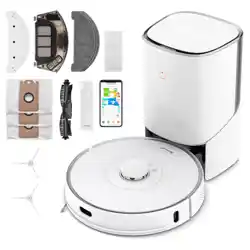
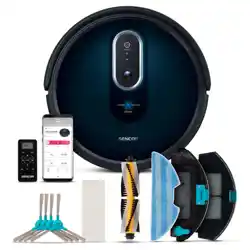
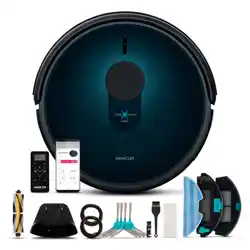
INCLUDED CONTENTS
Robotic vacuum cleaner
Collection station
Remote control
Mopping sleeve (3 pairs: 1 pair installed on the vacuum cleaner; 2 spare
pairs)
HEPA filter (2 pieces: 1 filter installed on the vacuum cleaner; 1 spare
HEPA filter)
Side rotary brush (2 pieces: 1 installed on the vacuum cleaner; 1 spare
side rotary brush)
Dust bag (3 pieces)
Cleaning brush
AAA batteries for remote control (2 pieces)
Power cord of the collection station
. . . . . . . . . . . . . . . . . . . . . . . . . . . . . . . . . . . . . . . . . . . . . . . . . . . . . . . . . . . . . . . . . . . .
PURPOSE OF USE AND FEATURES OF THE ROBOTIC VACUUM
CLEANER
• The robotic vacuum cleaner is intended for cleaning various types
of hard floors such as wooden or laminate floating floors, tiles, vinyl,
etc. and carpets with alow pile height. While vacuuming, it effectively
combines various routes to optimally clean the entire floor area.
• The suction opening effectively removes hair, animal hair, etc. Side
rotary brush sweeps dirt from hard-to-reach areas along walls and
furniture and from corners. The motorised rubber castors protect
sensitive floors against scratching and can travel over threshold strips
up to aheight of 2 cm and ride on to a2 cm high carpet. The mopping
sleeves will rise to aheight of 1.5 cm when the robotic vacuum cleaner
is moved to the carpet.
• The suspended bumper enables the vacuum cleaner to dampen the
approach to an obstacle and to efficiently clean around it. The laser
sensor in the front bumper prevents the robotic vacuum cleaner from
colliding with obstacles. Safe operation in rooms with stairs is made
possible by the bottom anti-stair-fall sensors.
• The remote control is used for convenient operation, which allows the
vacuum cleaner to be switched on and off, put into automatic cleaning
mode, select an operating mode or send the robotic vacuum cleaner to
the collection station.
• The vacuum cleaner is equipped with GYRO MAPPING function
(orientation in space), which can identify the space geometry of,
aroom in which it is cleaning, thereby the vacuum cleaner is able to
better clean the floor. The vacuum cleaner is also equipped with laser
navigation by means of which it maps out each room and then starts
to clean it systematically. Both functions are built-in and cannot be
affected in any way.
. . . . . . . . . . . . . . . . . . . . . . . . . . . . . . . . . . . . . . . . . . . . . . . . . . . . . . . . . . . . . . . . . . . .
ROBOTIC VACUUM CLEANER CLEANING MODES
Automatic Cleaning Mode
• The robotic vacuum cleaner efficiently cleans the maximum area
of the room and returns to the charging station when the cleaning is
completed. It always chooses the most optimal cleaning route.
• In the automatic cleaning mode, the robotic vacuum cleaner vacuums
and mops the floor in apreset mode. It regularly drives to the
collection station when it detects afull dust container or empty water
tank. At this point, it interrupts cleaning, locates the collection station,
parks in it and empties the contents of the dust container or fills the
tank. Abrief cleaning of the mopping sleeves usually takes place
before the tank is filled. It will then return to the point where cleaning
was interrupted and resume cleaning.
Note:
The process of emptying the dust container is ashort-term
noisier activity. However, this is anormal occurrence and is
nothing to be concerned about. When pumping water into
the robotic vacuum cleaner tank, the sound of the pump is
heard. This is again anormal occurrence.
EN
Robotic Vacuum Cleaner
User Manual
– 5 –
12/2024
2024, .
Mopping Mode
The robotic vacuum cleaner will only mop the area of the room without
vacuuming. It is important that there is sufficient water in the water tank at
the collection station.
Simultaneous Vacuuming and Mopping Mode
In this mode, the robotic vacuum cleaner will vacuum and mop the room
area at the same time.
Vacuuming and Subsequent Mopping Mode
In this mode, the robotic vacuum cleaner will first vacuum the room area
and then start mopping the cleaned area.
Note:
Other cleaning modes (e.g. cleaning of aselected room,
selected zone, etc.) can be set in the application. You can
also set the water refill interval or the water flow rate in the
application.
Note:
Prior to starting the robotic vacuum cleaner, always check
that it is fully charged and that all obstacles, foreign objects,
cables, etc. have been removed from the area.
. . . . . . . . . . . . . . . . . . . . . . . . . . . . . . . . . . . . . . . . . . . . . . . . . . . . . . . . . . . . . . . . . . . .
PREPARING THE ROBOTIC VACUUM CLEANER
• Take the robotic vacuum cleaner and all its accessories out of the
packaging. Check that you have taken out all the parts.
• Check the robotic vacuum cleaner and its accessories for damage.
• Remove protective foils and advertising labels from the robotic
vacuum cleaner and all accessories.
Installing the Side Rotary Brush
• The side rotary brush is designed for smooth floor surfaces and
ensures efficient cleaning in corners and along walls and furniture.
• Turn the vacuum cleaner upside down. Fit the rotary brush on the
pin provided and secure it with ascrew using ascrewdriver. Turn the
vacuum cleaner back over.
• When using the vacuum cleaner to clean rooms with carpets, remove
the rotary brush. To remove it, proceed in the reverse sequence.
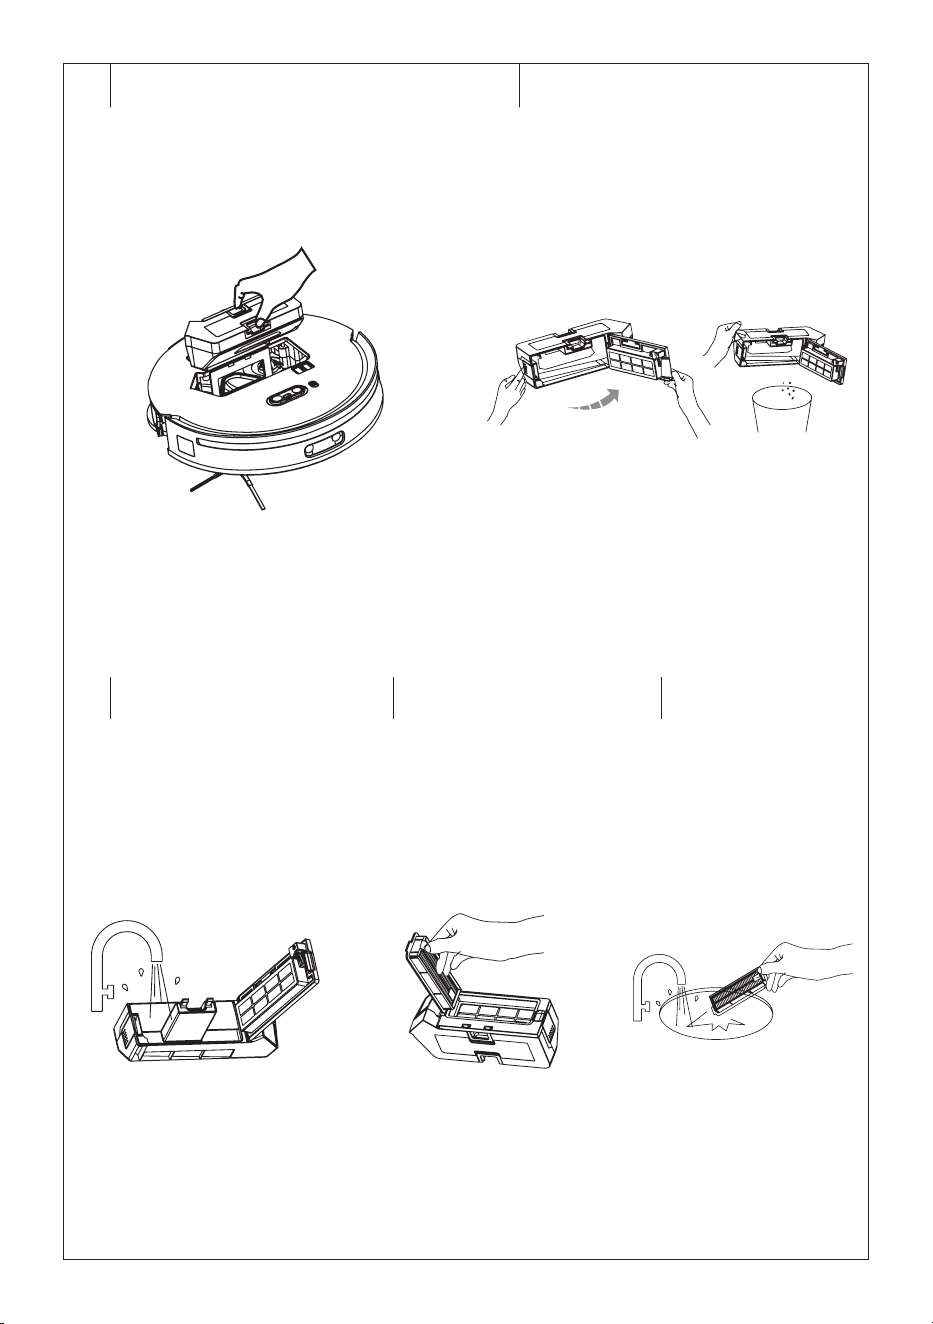
Preparing the Robotic Vacuum Cleaner Only for Vacuuming
1. When using the robotic vacuum cleaner only for vacuuming, before
using it, ensure that the dust container is inserted in the vacuum
cleaner and that it is empty.
2. In order to be able to remove the dust container, remove the
magnetic top cover. Press the dust container release button and pull
the dust container out of the vacuum cleaner – see Figure D1.
3. Place the dust container in the robotic vacuum cleaner – see Figure
D1 until you hear aclick. This indicates that the dust container is
correctly secured in the vacuum cleaner. Replace the magnetic top
cover.
4. Check that adust bag is installed in the collection station.
Preparing the Robotic Vacuum Cleaner for Vacuuming and Mopping the
Floor
1. Put the mopping sleeves on to the holders – see Figure D2.
We recommend soaking and rinsing out the sleeves slightly
before putting them on. This speeds up the soaking process and
subsequent mopping of the floor.
2. Remove the water tank from the collection station. Open the tank
cover and pour clean cold water into the clean water compartment
of the tank up to the MAX line marked there. Close the cover and put
the tank back into the collection station.
Note:
Water tank is provided with two compartments - the first for
clean water (marked by the icon) and the second for dirty
water (marked by the icon).
Note:
For mopping, we recommend using clean water. We do not
recommend using cleaning agent. It could foam excessively
and thus worsen the dripping of water on the sleeve or
cause smudges on the floor after it has dried.
Warning:
When filling the clean water compartment, always
observe the maximum water line. Water must not
exceed this line, otherwise serious damage to the
product may occur.
Warning:
Do not use the robotic vacuum cleaner to vacuum
and mop door mats, runners, etc. Before vacuuming
carpets, it is necessary to remove the mopping
sleeve.
. . . . . . . . . . . . . . . . . . . . . . . . . . . . . . . . . . . . . . . . . . . . . . . . . . . . . . . . . . . . . . . . . . . .
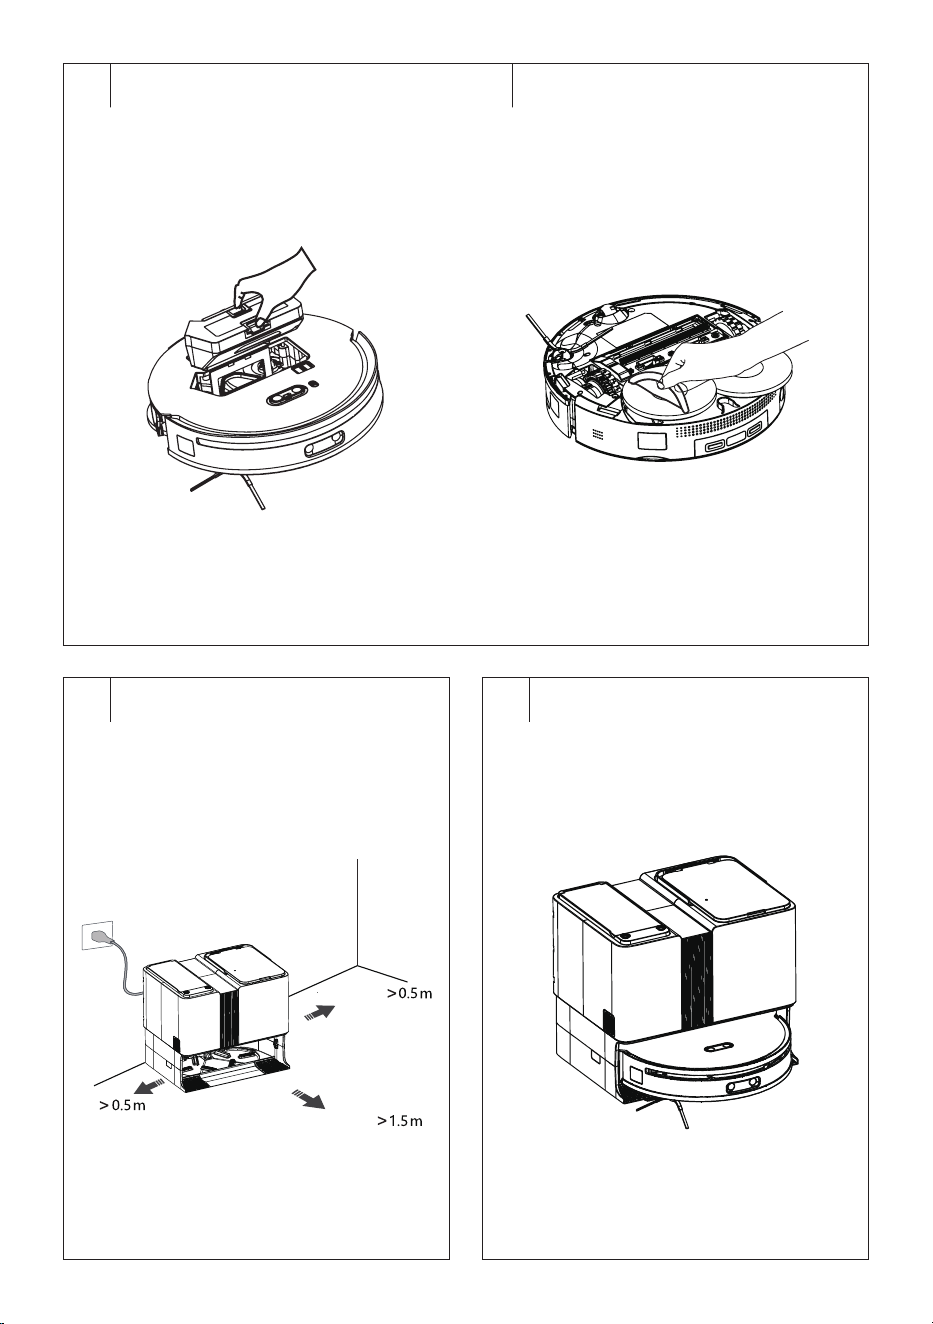
LOCATION OF THE COLLECTION STATION
• The collection station is used toautomatically recharge the battery
and the vacuum cleaner must have good access to it.
• Place the collection station against awall on ahard, horizontal anddry
surface withinreach of the power socket – see Figure E. Ensure that
there are no steps or obstacles within 0.5 m to the left and right and
1.5 m in front of the station that would prevent the vacuum cleaner
from locating the collection station and parking successfully.
• Plug the fork of the power cord of the collection station into apower
socket. Position the power cord so that it will not get tangled in the
rotary brushes of the vacuum cleaner.
• If you are going to store the vacuum cleaner, disconnect the collection
station from the power socket and store it in adry, clean and cool place.
. . . . . . . . . . . . . . . . . . . . . . . . . . . . . . . . . . . . . . . . . . . . . . . . . . . . . . . . . . . . . . . . . . . .
CHARGING THE ROBOTIC VACUUM CLEANER
The vacuum cleaner can be charged in the collection station, which the
vacuum cleaner automatically seeks out when it has finished cleaning.
Always make sure that the main power switch of the vacuum cleaner is in
the “I” (on) position.
Charging the Vacuum Cleaner for the First Time
• Before first use, it is necessary to fully charge the robotic vacuum
cleaner. Allow the robotic vacuum cleaner to charge for up to 12 hours.
• Unpack the vacuum cleaner and remove all packaging material and
foam protectors. Switch the main power switch of the vacuum cleaner
to the “I” /(on) position and wait for the button light to come on .
• Grasp the vacuum cleaner and manually insert it into the collection
container so that the charging contacts on the bottom of the vacuum
cleaner are connected to the charging contacts of the collection
station – see Figure F. Once the contacts are connected, the charging
process will begin. There are icons on the control panel of the
collection station that show the charging status of the robotic vacuum
cleaner. As the robotic vacuum cleaner is charging, they will gradually
flash until they all light up, indicating that the robotic vacuum cleaner
is fully charged.
Automatic Charging
• The robotic vacuum cleaner utilises the automatic charging function
whenever it finishes cleaning and in cases, where during operation, it
detects low power on the battery. The robotic vacuum cleaner starts
actively searching for acollection station. It is thus important that it is
always connected to apower source and is freely accessible for the
vacuum cleaner so that it can dock in it.
• The robotic vacuum cleaner can be sent to be charged also by pressing
the charging button directly on the vacuum cleaner, in the application
or on the remote control. In such acase, the operation of the robotic
vacuum cleaner will stop and it will seek out the collection station.
• After docking in the collection station, the charging cycle will
commence. Acomplete charge takes approximately 7 hours. The
actual charging time depends on the power level of the battery at the
start of the charging process.
• Full charge ensures up to 200 minutes of operation.
• In the event that the charging contacts are disconnected during
the charging cycle, the vacuum cleaner will move away from the
collection station and then re-dock itself to resume the charging
process, unless it is prevented from doing so by an obstacle.
• In the event of apower outage, the charging cycle will be interrupted
and will continue after the power supply is renewed.
– 6 –
12/2024
2024, .
• In the event that the maximum charging current is exceeded, the
charging process will be automatically interrupted.
• If the robotic vacuum cleaner is completely discharged, e.g. due to the
vacuum cleaner being unable to locate the collection station or dock in
it, it must be manually positioned.
. . . . . . . . . . . . . . . . . . . . . . . . . . . . . . . . . . . . . . . . . . . . . . . . . . . . . . . . . . . . . . . . . . . .
CONTROLLING THE VACUUM CLEANER USING ITS BUTTONS
The buttons on the vacuum cleaner are used for basic control. For
advanced control, use the remote control or operate your robotic vacuum
cleaner via the mobile application. You will find more information further
in the user manual.
Switching the Robotic Vacuum Cleaner On/Off
• The top cover must be removed before switching the robotic vacuum
cleaner on or off. Reattach this one afterwards.
• Switch the main power switch to the “I” (on) position to switch on the
robotic vacuum cleaner. The robotic vacuum cleaner will switch to the
stand-by mode.
• Switch the main power switch to the “0” (off) position to switch off the
robotic vacuum cleaner.
Starting Automatic Cleaning
• While the robotic vacuum cleaner is in stand-by mode, press the
button and the robotic vacuum cleaner will start automatic cleaning.
When it is complete, it will return to the collection station.
Manual Ending Automatic Cleaning
• If you need to manually end the automatic cleaning, press and hold
the button for 3 seconds and the automatic cleaning will end. To
return the robotic vacuum cleaner to the collection station, press the
button.
Charging
• Press the button briefly if you need to send the robotic vacuum
cleaner for charging. This will end the currently running cleaning
process and the vacuum cleaner will start seeking out the collection
station, where it will dock.
Restoring Factory Default
• While the robotic vacuum cleaner is instand-by mode, press andhold
the button for 10 seconds and factory default will occur.
. . . . . . . . . . . . . . . . . . . . . . . . . . . . . . . . . . . . . . . . . . . . . . . . . . . . . . . . . . . . . . . . . . . .
OPERATION USING THE REMOTE CONTROL
• Push down the latch of the cover on the rear side of the remote control
to release it and remove the cover.
• Insert two type AAA (1.5 V) batteries into the remote control. When
inserting the batteries ensure the correct polarity as shown inside the
battery compartment. Put the cover back on and click it into place.
• In the event that the batteries are flat, replace them with new ones. Do
not combine various types of batteries or new and old batteries.
• The signal range of the remote control is approximately 6 m.
• When replacing batteries, first remove the flat batteries and then insert
the new ones.
Note:
Never combine flat and new batteries nor various types of
batteries.
Starting Automatic Cleaning
• Press the AUTO button and the robotic vacuum cleaner will start
andbegin automatic cleaning.
• After completing it, it will return to the collection station.
Charging
• Press the button briefly if you need to send the robotic vacuum
cleaner for charging. This will end the currently running cleaning
process and the vacuum cleaner will start seeking out the collection
station, where it will dock.
Starting/Stopping the Robotic Vacuum Cleaner
• Press the button to start the robotic vacuum cleaner.
• While the vacuum cleaner is running, press the button to stop its
operation. Press the button again to resume operation.
Robotic Vacuum Cleaner Movement
The directional buttons are used to manually move the robotic vacuum
cleaner. However, it is important that the robotic vacuum cleaner is not
in operation.
• The button is used to move forward.
• The button is used to turn the robotic vacuum cleaner by 180°.
• The button is used to turn the robotic vacuum cleaner by 90° to the
left and move it to the left.
• The button is used to turn the robotic vacuum cleaner by 90° to the
right and move it to the right.
Child Lock
• Press the button to activate the child lock. The controls on the
robotic vacuum cleaner andon the collection station will be locked
andwill not be active.
• Press the button again to cancel the child lock and the controls
on the robotic vacuum cleaner and the collection station will be active
again.
Selecting the Cleaning Mode
• Press the button repeatedly to select the desired cleaning mode:
mopping mode – simultaneous vacuuming and mopping mode –
vacuuming and subsequent mopping mode.
• Press the button to start cleaning.
Cleaning the Collection Station
• Press the button and the robotic vacuum cleaner will leave the
collection station so that you can clean it according to the message
and with the cleaning brush. Follow the instructions in “Cleaning the
Robotic Vacuum Cleaner Compartment”.
• When cleaning is complete, press the button to return the robotic
vacuum to the collection station.
Setting the Suction Power
• Adjust the suction power according to the type of floor covering and
the level of dirtiness. Press the button repeatedly to adjust the
desired suction power.
Muting Voice Messages
• Press the button to immediately mute the voice messages. Press
he button again to restore the volume of the messages.
. . . . . . . . . . . . . . . . . . . . . . . . . . . . . . . . . . . . . . . . . . . . . . . . . . . . . . . . . . . . . . . . . . . .
CONTROL VIA BUTTONS ON THE COLLECTION STATION
button
Press briefly to start automatic cleaning. When the robotic vacuum
cleaner is in operation, abrief press interrupts the operation of the robotic
vacuum cleaner. Press again briefly to resume operation of the robotic
vacuum cleaner.
Press and hold for 3 seconds to exit the current mode.
Button
When the robotic vacuum cleaner is running, abrief press of the button
will stop the operation of the robotic vacuum cleaner and it will park into
the collection station. When the robotic vacuum cleaner is in the collection
station, abrief press of abutton causes it to leave the collection station.
Press and hold the button for 3 seconds to start cleaning the collection
station.
Child Lock
Press andhold the and buttons simultaneously for 6 seconds to
activate the child lock. The controls on the robotic vacuum cleaner andon
the collection station will be locked andwill not be active.
Press and hold the and buttons simultaneously for 6 seconds to
cancel the child lock. The controls on the robotic vacuum cleaner and on
the collection station will be active again.
Icon
The icon lights up when the clean water compartment is empty. Water
needs to be refilled.
Icon
The icon lights up when the dirty water compartment is full. The dirty
water needs to be poured out.
– 7 –
12/2024
2024, .
Icon
The icon lights up when the dust bag is full. The dust bag needs to be
replaced.
Icons
The icons show the charging status of the robotic vacuum cleaner. As the
robotic vacuum cleaner is charging, they will gradually flash until they all
light up, indicating that the robotic vacuum cleaner is fully charged.
. . . . . . . . . . . . . . . . . . . . . . . . . . . . . . . . . . . . . . . . . . . . . . . . . . . . . . . . . . . . . . . . . . . .
CONTROLLING THE VACUUM CLEANER USING THE MOBILE
APPLICATION
• The robotic vacuum cleaner can be controlled via the Sencor HOME
application.
• Download the application to your smartphone, register and control
your robotic vacuum cleaner via the application.
• If you already have the application installed, add the robotic vacuum
cleaner to your devices.
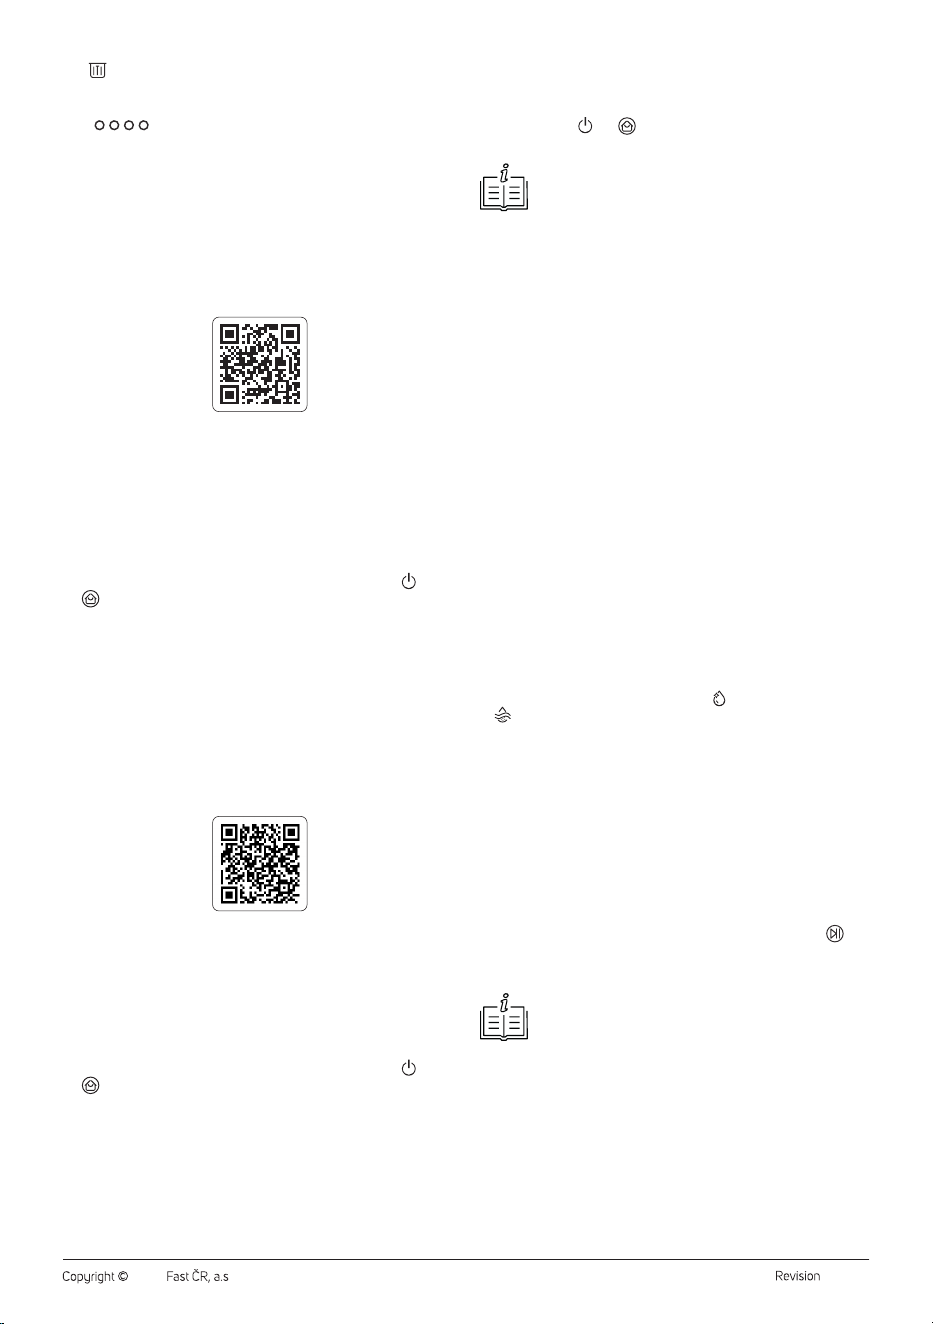
Adding the Robotic Vacuum Cleaner to the Device List via aQR Code
• The robotic vacuum cleaner can also be added to the Sencor HOME
application using the QR code provided below. On the home screen
of the application, click on the “+” icon and on the Add device screen,
click on the “–” icon in the top right hand corner.
• After scanning the QR code, you will be prompted to select aWi-Fi
network. Select the network, enter your password andclick “Next”.
• You will be prompted toreset the device. Press and hold the and
buttons for 5 seconds. When the Wi-Fi indicator flashes, the
robotic vacuum cleaner is ready forpairing. Instructions can also be
found on the application screen.
• In the application, confirm that the Wi-Fi indicator is flashing and click
“Next”.
• Click on “Connect”. Then in the Wi-Fi settings on your mobile device
connect the Wi-Fi to the robotic vacuum cleaner. Then return to the
application and wait until the pairing of the robotic vacuum cleaner is
complete.
• In the device list on the main screen, click on the icon of the robotic
vacuum cleaner to enter control interface.
QR Code for Adding the Control Panel of the Robotic Vacuum Cleaner to
the Application Sencor HOME
Manually Adding the Robotic Vacuum Cleaner to the Device List
• On the home page, click on “Add Device” or the “+” in the top right
corner, and then click on "Add Device".
• Ascreen with appliance categories and alist of appliances will appear.
• Click on “Robotic vacuum cleaners” and select the robotic vacuum
cleaner model from the list of products.
• On the next screen, you will be prompted toselect aWi-Fi network.
Select the network, enter your password andclick “Next”.
• You will be prompted toreset the device. Press and hold the and
buttons for 5 seconds. When the Wi-Fi indicator flashes, the
robotic vacuum cleaner is ready forpairing. Instructions can also be
found on the application screen.
• In the application, confirm that the Wi-Fi indicator is flashing and click
“Next”.
• Click on “Connect”. Then in the Wi-Fi settings on your mobile device
connect the Wi-Fi to the robotic vacuum cleaner. Then return to the
application and wait until the pairing of the robotic vacuum cleaner is
complete.
• In the device list on the main screen, click on the icon of the robotic
vacuum cleaner to enter control interface.
Wi-Fi Reset
Press and hold the and buttons for 5 seconds. The Wi-Fi indicator
will flash.
Note:
We recommend that you turn off mobile data in your
mobile phone'ssettings when connecting to Wi-Fi.
Robotic Vacuum Cleaner Functions
The list below shows the most important functions of the robotic vacuum
cleaner that can only be set in the application.
– cleaning scheduling
– all map work, including setting restricted areas and virtual walls
– activation/deactivation of power boost on carpet
– frequency of mop cleaning and water refills
– choice of language for voice messages
– switching the collection station backlight off/on
– mop drying setting
. . . . . . . . . . . . . . . . . . . . . . . . . . . . . . . . . . . . . . . . . . . . . . . . . . . . . . . . . . . . . . . . . . . .
COLLECTION STATION
Dust Container
• The collection station is equipped with adust bag into which the
robotic vacuum cleaner empties the contents of the dust container
after the cleaning is completed, or if it detects that the dust container
is full. In this case, the robotic vacuum cleaner locates the collection
station and backs up to it so that the opening in the dust container is
aligned with the suction opening at the bottom of the collection station.
Once contact is made, both openings open and pressure sucks the
contents of the container into the dust bag. The openings are then
closed and the robotic vacuum cleaner will start charging or continue
cleaning.
• To ensure proper operation of the collection station, make sure it is
connected to power.
Water Tank
• The collection station is also equipped with awater tank. There are
two compartments – one for clean water andone for dirty water
. If you select one of the mopping modes, refill the clean water
compartment (see the section “Preparing the Robotic Vacuum
Cleaner for Vacuuming and Mopping the Floor” above). Clean water
is pumped through the nozzle into the water tank inside the vacuum
cleaner. When the robotic vacuum cleaner detects alow water level in
the tank, it interrupts mopping, locates the collection station and parks
there to refill the water tank. Abrief cleaning of the mopping sleeves
occurs and then water is pumped into the tank. This is anormal
occurrence. The frequency of soaking can be set in the application.
Collection Station Backlight
• When the robotic vacuum cleaner is parked in the collection station, or
when it is in operation, the backlight will always be white.
• When the robotic vacuum cleaner is incorrectly parked or shows
afault, the backlight will still be white, but the button backlight
will be lit red.
• When the collection station shows afault, the backlight will still be red.
Note:
In the application it is possible to switch off the backlight of
the collection station, however, the red backlight cannot be
switched off when afault is indicated.
What to do if the robot vacuum cleaner disconnects from the station
Under normal circumstances, the robot vacuum cleaner and the docking
station are automatically connected via Wi-Fi. If the signal is lost, the robot
vacuum cleaner may disconnect from the docking station. In this case, the
docking station flashes and it is not possible to vacuum, clean or dry the
mops. You will need to connect the robot vacuum cleaner and the docking
station manually. Proceed as follows:
1. Place the robot vacuum cleaner inside the docking station.
2. Remove the dust bag.
3. Press and hold the start/pause button on the docking station until
the station beeps.
– 8 –
12/2024
2024, .
4. Put the bag back in.
5. Wait approximately 20 seconds until the light on the docking station
control panel stops flashing and becomes steady. You can check
whether the station can control the robot vacuum cleaner with the
button on the docking station. If everything works, the connection
between the docking station and the robot vacuum cleaner has been
successfully restored.
. . . . . . . . . . . . . . . . . . . . . . . . . . . . . . . . . . . . . . . . . . . . . . . . . . . . . . . . . . . . . . . . . . . .
STANDBY MODE
The robotic vacuum cleaner automatically switches to standby mode
after 10 minutes of inactivity. All controls on the robotic vacuum cleaner
and on the collection station will go out. Press any button to cancel the
standby mode and the robotic vacuum cleaner will be active.
If the robotic vacuum cleaner is not charging, it will automatically switch
off after 12 hours of being put into standby mode.
. . . . . . . . . . . . . . . . . . . . . . . . . . . . . . . . . . . . . . . . . . . . . . . . . . . . . . . . . . . . . . . . . . . .
“DO NOT DISTURB” MODE
The “Do Not Disturb” mode is disabled by default. You can adjust or
switch off this mode directly in the mobile application. If this mode is on,
the vacuum cleaner will not start the scheduled cleaning at the set time.
. . . . . . . . . . . . . . . . . . . . . . . . . . . . . . . . . . . . . . . . . . . . . . . . . . . . . . . . . . . . . . . . . . . .
RESET OF THE ROBOTIC VACUUM CLEANER
If the robotic vacuum cleaner does not respond to button presses or
cannot be switched off, switch the main power switch to “0” (off). Wait for
amoment and then switch the main power switch to the “I” (on) position.
. . . . . . . . . . . . . . . . . . . . . . . . . . . . . . . . . . . . . . . . . . . . . . . . . . . . . . . . . . . . . . . . . . . .
FACTORY RESET
If the robotic vacuum cleaner does not respond to button presses even
after areset, afactory reset will be required. Press andhold the button
for 10 seconds while the vacuum cleaner is on and in an active state (not
in standby mode). An audible message will sound to indicate that the
factory reset has begun and the system will perform the reset.
Afactory reset will erase the settings you have made and therefore you
will need to reschedule cleaning, log into Wi-Fi, etc.
. . . . . . . . . . . . . . . . . . . . . . . . . . . . . . . . . . . . . . . . . . . . . . . . . . . . . . . . . . . . . . . . . . . .
CLEANING AND MAINTENANCE
• Before cleaning, always switch the robotic vacuum cleaner off and
switch the main power switch to the “0” (off) position.
• Never use abrasive cleaners, thinners, etc. for cleaning.
• When cleaning, follow the instructions given here.
• Neglecting cleaning and maintenance may negatively affect
the working order of the vacuum cleaner and lead to its reduced
performance.
Warning:
To prevent electric shock, do not immerse the robotic
vacuum cleaner, the collection station or its power
cord in water or other liquids. Do not expose any part
to dripping or spraying water.
Robotic Vacuum Cleaner Maintenance Table
The table below shows the recommended maintenance and possible
replacement of the individual parts of the robotic vacuum cleaner. The
frequency of maintenance depends on the frequency of use and the
amount of dust and dirt that the robotic vacuum cleaner vacuums.
Robotic vacuum cleaner part Maintenance frequency Replacement
Front swivel wheel
As required --
Dust container in arobotic vacuum cleaner
As required --
Rotary brush
Every 2 weeks Every 6 to 12 months
Side brush
Every month Every 3 to 6 months
HEPA filter
Every 2 weeks Every 6 to 12 months
Mopping sleeve
After each use Every 3 to 6 months
Sensors
Every month --
Castors
Every month --
Robotic vacuum cleaner charging contacts
Every month --
Charging contacts of the collection station, body of the collection
station
Every month --
Robotic vacuum cleaner compartment andgroove filter
As required --
Water tank
After each use
Dust bag
Replacement when it is full.
. . . . . . . . . . . . . . . . . . . . . . . . . . . . . . . . . . . . . . . . . . . . . . . . . . . . . . . . . . . . . . . . . . . .
ROBOTIC VACUUM CLEANER
Emptying the Dust Container
On the SRV 9790BK model, the container is automatically emptied
into the dust collection container both after every use and also during
the cleaning process when the vacuum cleaner detects the maximum
amount of dirt and dust in the container.
Cleaning the Dust Container
1. In order to be able to remove the dust container, remove the
magnetic top cover. Press the dust container release button and pull
the dust container out of the vacuum cleaner – see Figure G1.
2. Press the lock on the side of the container to release the cover – see
Figure G2; andempty the remaining contents of the container into
the bin. We recommend that this is done outside the living area.
3. Rinse the dust container with clean water, wipe with aslightly
dampened sponge and wipe dry with aclean cloth – see Figure G3.
Allow to dry freely.
4. Press the HEPA filter fuse – see Figure G4; andremove it.
5. There is afoam filter under the HEPA filter. Remove it as well.
Carefully tap out the HEPA filter and the foam filter – see Figure G5.
To avoid damaging the filter, do not touch the surface of the filter with
your hands or clean it with abrush or other objects.
6. Leave the dust container open to dry completely, including filters,
before placing it back into the robotic vacuum cleaner.
7. Place the dust container in the robotic vacuum cleaner until you hear
aclick. This indicates that the dust container is correctly secured in
the vacuum cleaner. Replace the magnetic top cover.
Warning:
Prior to inserting the filter into the dust container and
closing the cover, always ensure that all the parts
are clean and completely dry. Otherwise, the robotic
vacuum cleaner may be damaged.
Cleaning the Mopping Sleeves
The mopping sleeves are cleaned each time the water tank is refilled and
then briefly dried after cleaning is complete.
For athorough cleaning, proceed as follows:
– 9 –
12/2024
2024, .
1. Remove the mopping sleeves from theholders of the robotic
vacuum cleaner – see Figure H1.
2. Wipe the mopping sleeve holders using alightly dampened sponge
and wipe dry using aclean wiping cloth.
3. Hand wash the mopping sleeve in lukewarm water with asmall
amount of fine washing powder, wring it out by hand and allow it to
dry naturally – see Figure H2. Do not wash the mopping sleeve in
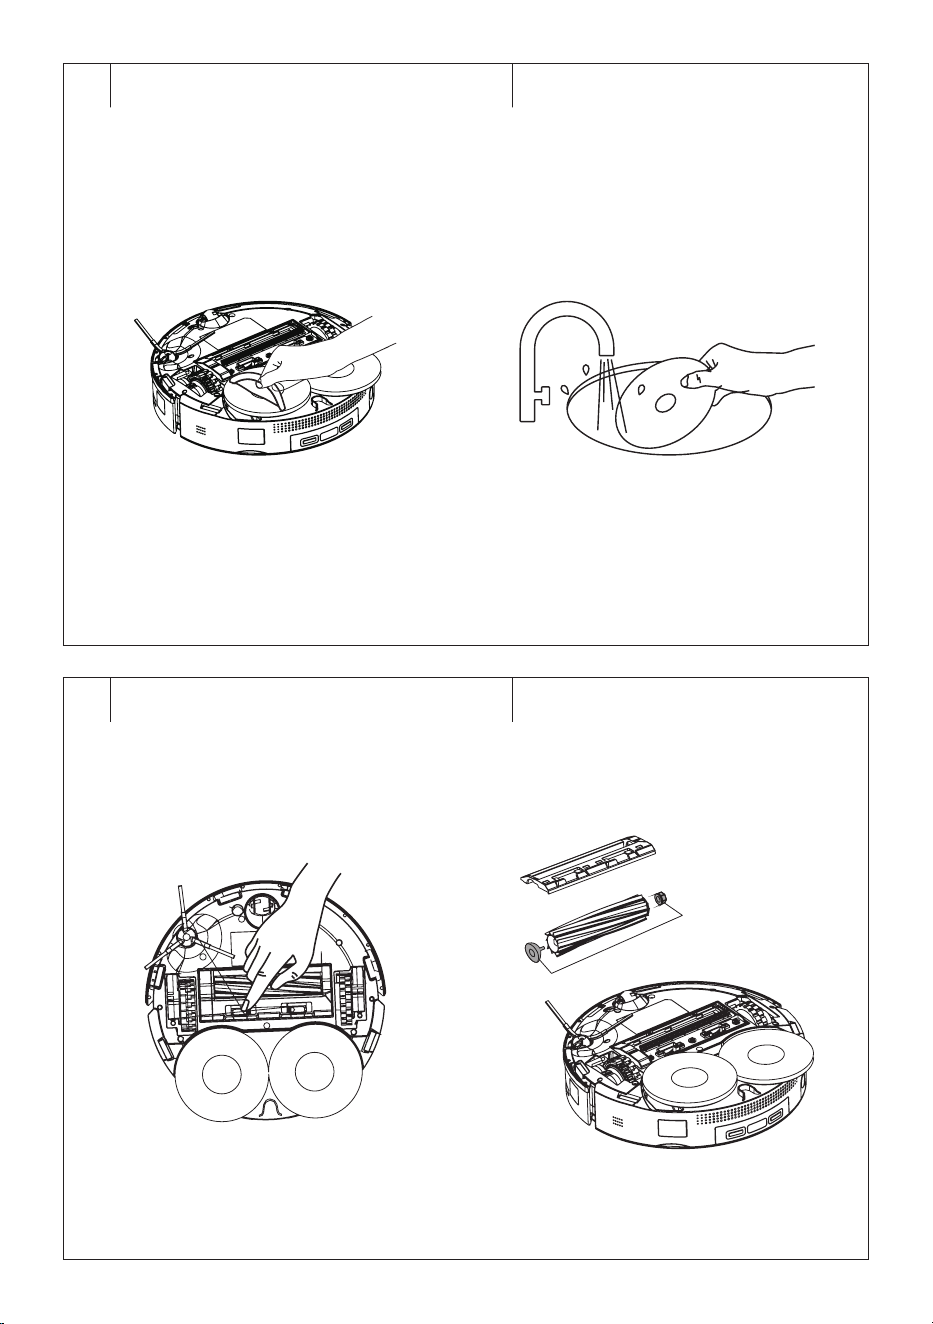
awashing machine or dry it in aclothes dryer.
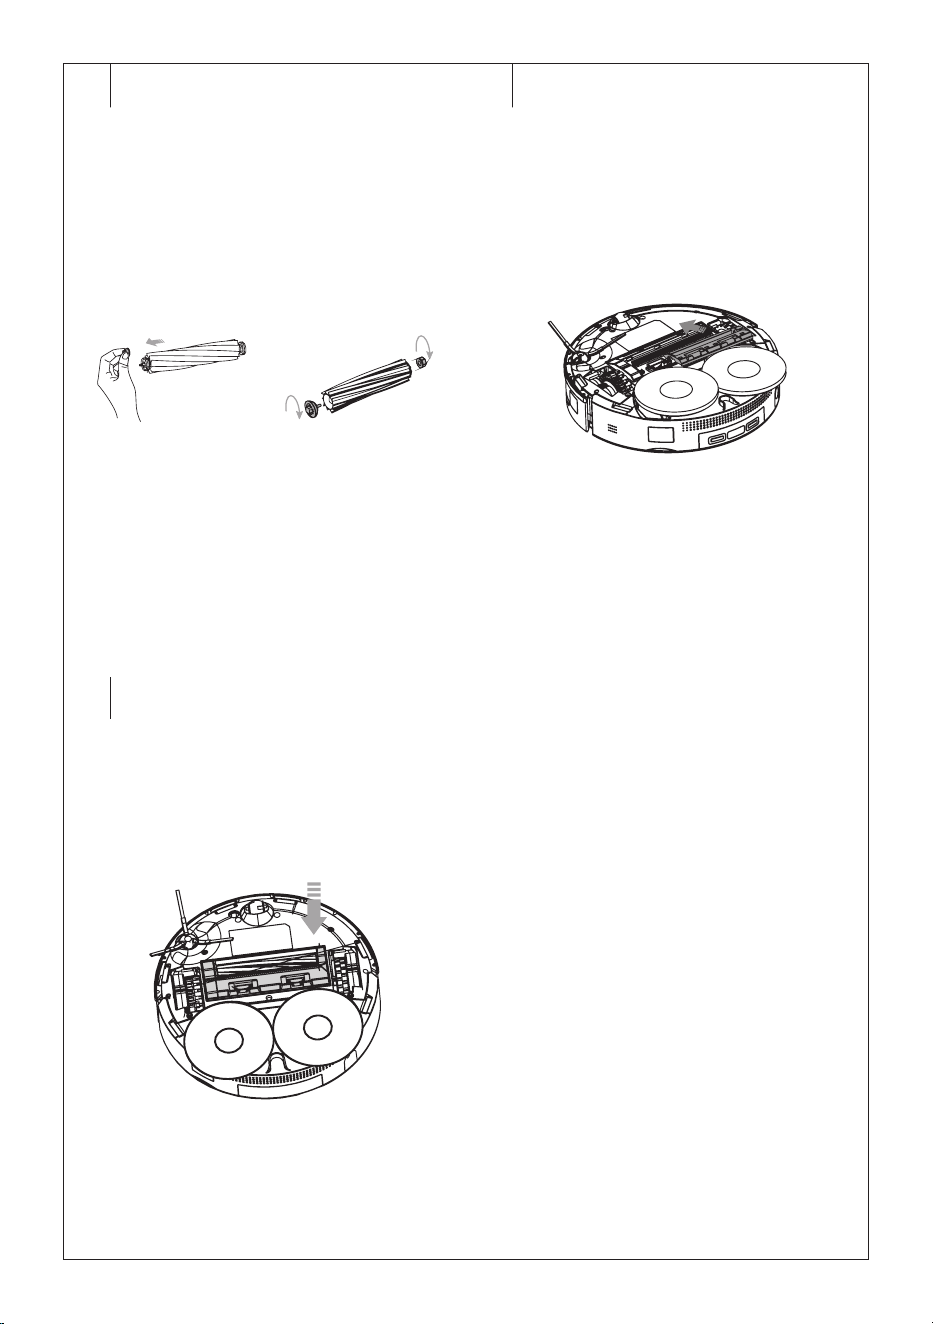
Cleaning the Central Rotary Brush
It is recommended to clean the central rotary brush regularly, at least
once every 2 weeks, to ensure that the suction power of the robotic
vacuum cleaner remains constant. Hair and lint on the brush can reduce
the performance of the robotic vacuum cleaner as well as its efficiency.
1. Turn the robotic vacuum cleaner upside down.
2. Press the locks of the central rotary brush cover – see Figure I1;
and remove the cover and then the rotary brush from the vacuum
cleaner – see Figure I2.
3. Use adry wiping cloth to clean out the area in which the rotary
brush is housed. Check and clean out the suction opening. Dirt and
dust that accumulates around the suction opening may reduce the
suction power of the vacuum cleaner.
4. Remove the bearing from the rotary brush and unscrew the caps on
both sides – see Figure I3. Remove hair and lint and other dirt from
the rotary brush. If necessary, wipe the rotary brush with aslightly
dampened sponge. Allow to dry freely. Do not immerse the rotary
brush in water or other liquids for cleaning.
5. Screw the caps back on and replace the bearing.
6. Place the rotary brush back into the vacuum cleaner – see Figure I4.
7. Replace the cover – see Figure I5. And make sure the three
protrusions on the cover fit properly into the openings in the vacuum
cleaner body.
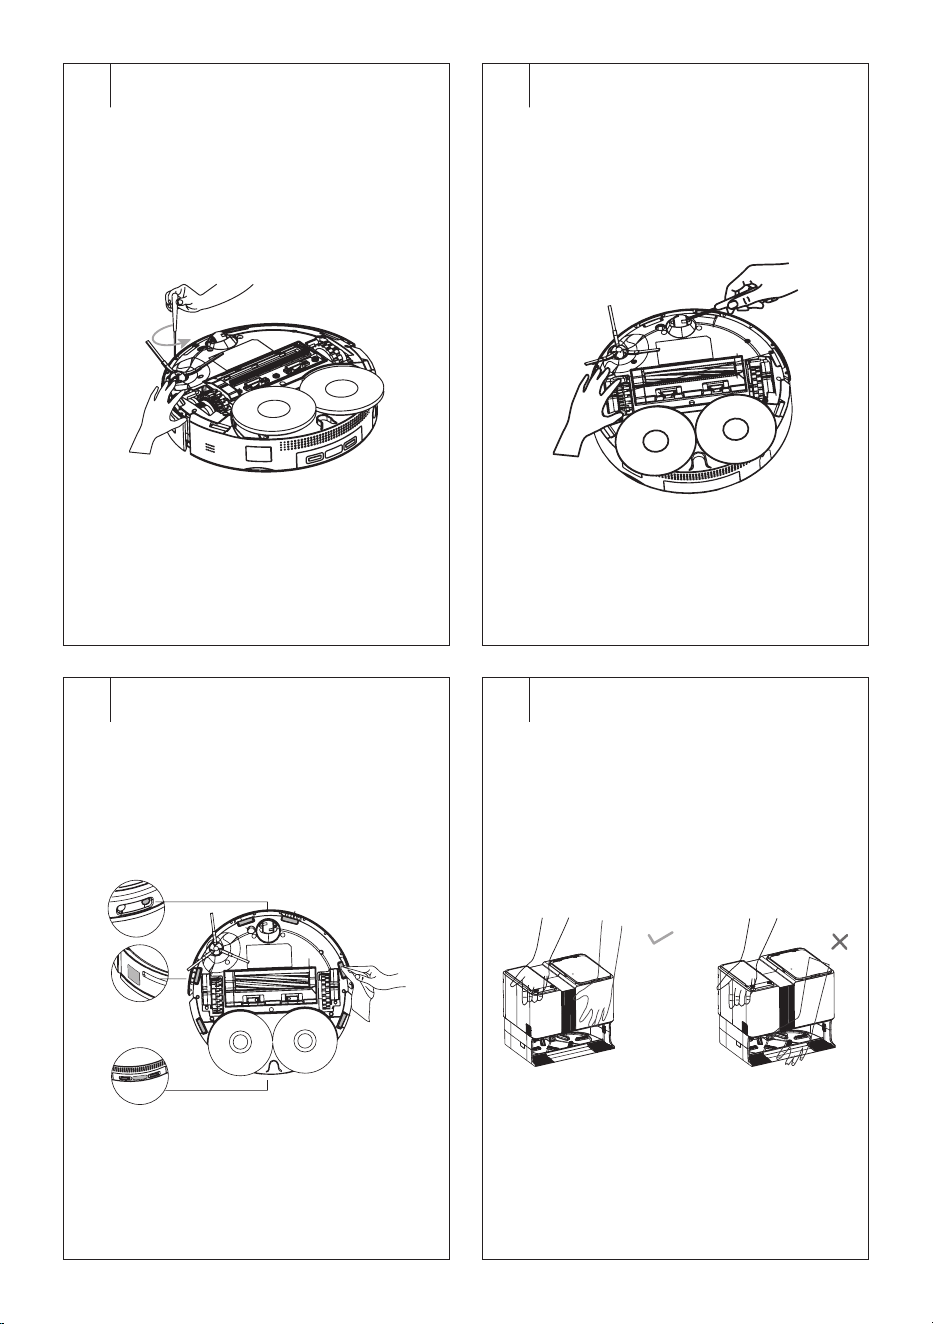
Cleaning the Side Rotary Brush
1. Loosen the screw of the side rotary brush using ascrewdriver – see
Picture J.
2. Take the side rotary brush out of the vacuum cleaner by pulling it
upwards.
3. Remove any dust and dirt from the location where the brush was
mounted.
4. Remove all dust and dirt from the brush. If necessary you may wash
the brush under running water. If the bristles were deformed while
the vacuum cleaner was running, dip them in warm water to allow
them to return to their original shape. Allow the brushes to dry before
reattaching to the vacuum cleaner.
5. Insert the side rotary brush into the robotic vacuum cleaner and
secure with the screw.
Cleaning the Central Swivel Wheel
1. Carefully release the central swivel wheel using asmall screwdriver
or other flat tool – see Figure K.
2. Rinse the wheel under the water and wipe dry. Wipe the wheel
holder with aslightly dampened sponge and then wipe dry.
3. Place the wheel on the holder and push slightly until you hear
aclick. Make sure the wheel turns freely.
Cleaning the Castors
Wipe the castors with aslightly dampened sponge and then wipe dry.
Cleaning the Sensors
The sensors on the robotic vacuum cleaner are important for its proper
control and safe operation. It is therefore important that you clean them
regularly andkeep them ingood condition.
There are several sensors on the robotic vacuum cleaner – see Figure L.
Wipe the sensors using asoft dry wiping cloth or cotton swab.
Cleaning the Outer Surface of the Robotic Vacuum Cleaner
Regularly wipe the surface of the vacuum cleaner using asoft dry wiping
cloth.
Replacing the Side Brush
During the use of the robotic vacuum cleaner, the side brush wears out.
After acertain period of time it needs to be replaced with anew one. To
order anew brush, please contact your vendor or an authorised service
centre. The wear status can also be monitored via the mobile application.
1. Loosen the screw of the side rotary brush using ascrewdriver
2. Take the old side rotary brush out of the vacuum cleaner by pulling it
upwards.
3. Insert the new side rotary brush into the robotic vacuum cleaner and
secure with the screw.
. . . . . . . . . . . . . . . . . . . . . . . . . . . . . . . . . . . . . . . . . . . . . . . . . . . . . . . . . . . . . . . . . . . .
COLLECTION STATION
Cleaning the Collection Station
Clean the outer surface of the collection station using asoft dry cloth.
Carrying the Collection Station
If you need to move the collection station, always make sure that the
power cord is disconnected from the power socket.
Grasp the collection station with one hand by the handle at the rear of the
collection station and with the other hand grasp the front of the collection
station approximately below the water tank – see figure M. Never lift it by
the bottom plate.
Cleaning the Water Tank
We recommend cleaning and emptying the water tank after each use.
1. Remove the water tank from the collection station.
2. Open the cover and pour the water out of both compartments.
3. Pour some clean water into the dirty water compartment, close the
cover and shake the water tank gently. Then open the cover and
pour out the water.
4. Wipe both compartments dry with aclean cloth.
5. Put the water tank back into the collection station.
Note:
Do not use cleaning agents to mop the floor. Corrosion of
the pipes in the robotic vacuum cleaner and the collection
station may occur. Do not use hot water to avoid deforming
the water tank.
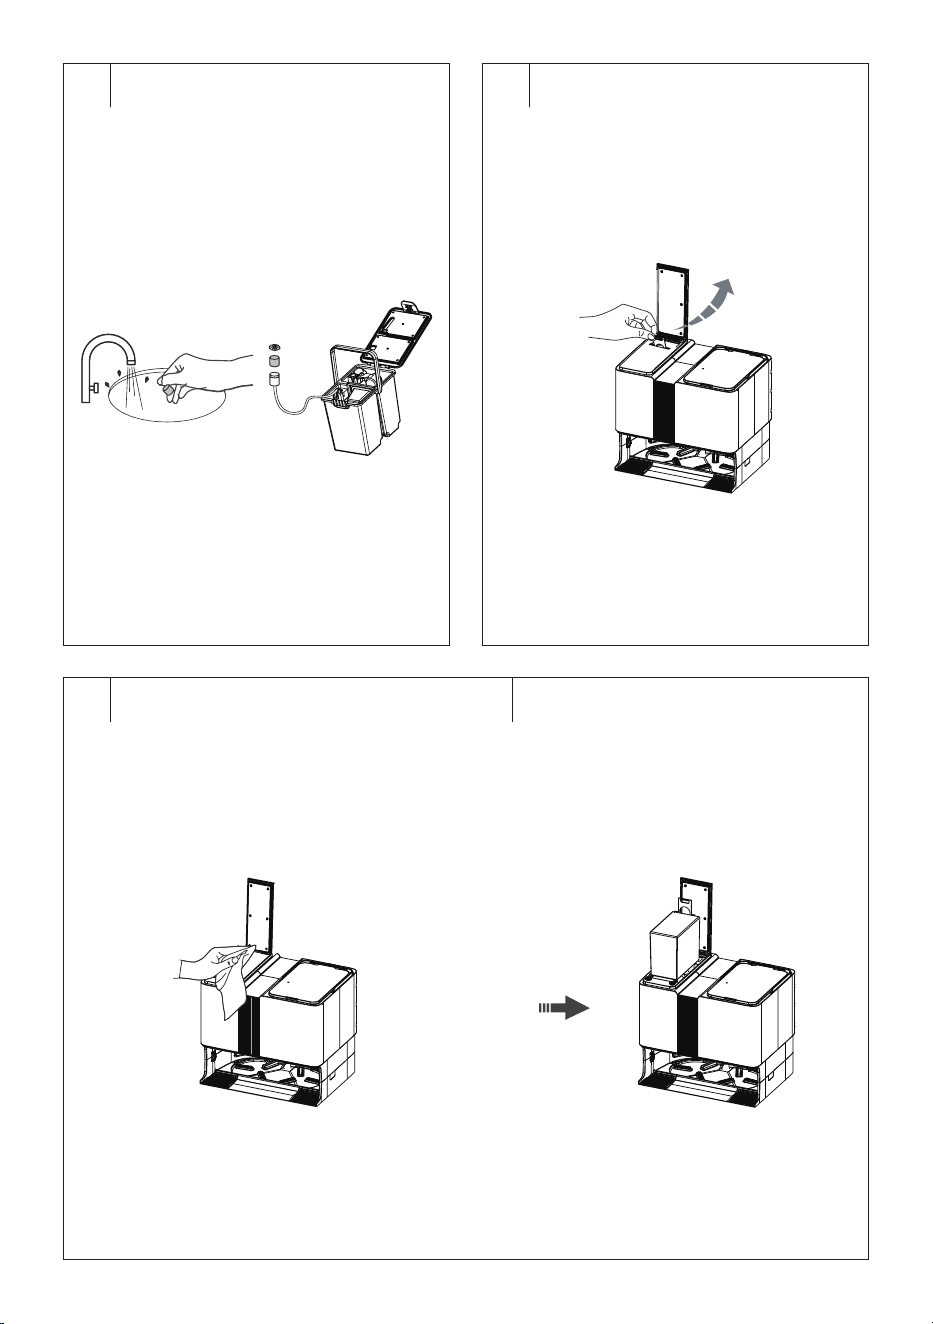
Cleaning the Water Tank Filter
1. Remove the water tank and open the cover.
2. Pull out the suction head and carefully remove the cover – see
Figure O.
3. Remove the filter and wash it with clean water. Shake it out and
insert it back into the head.
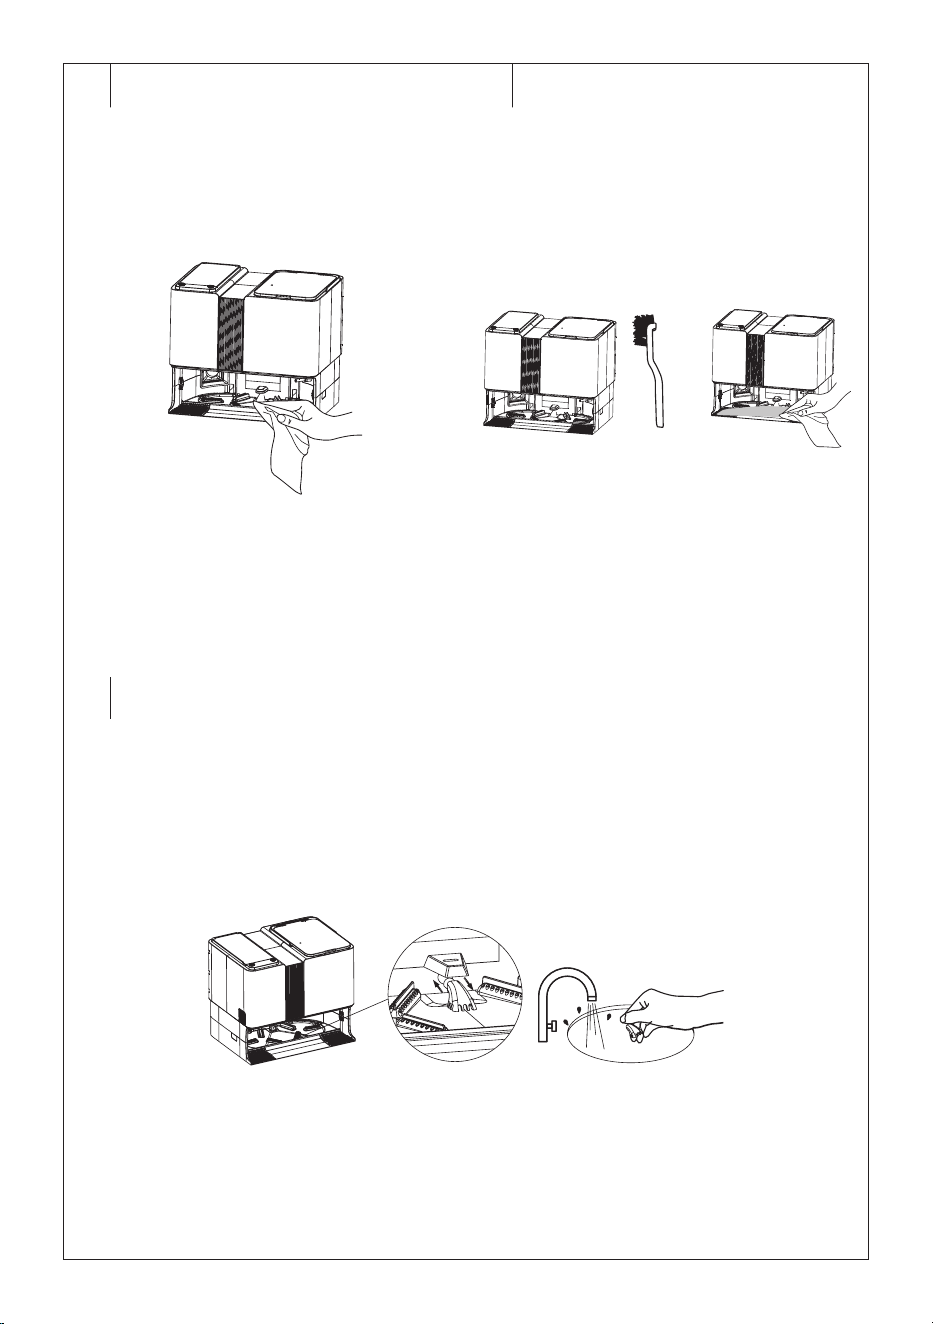
Cleaning the Charging Contacts
Wipe the charging contacts in the collection station with adry cloth – see
Figure N1.
Cleaning the Robotic Vacuum Cleaner Compartment
Clean the bottom of the robotic vacuum cleaner compartment, which
is equipped with grooves and agroove filter, using the cleaning brush
provided, and then wipe dry with aclean cloth.
1. Press the button on the remote control or on the collection station to
switch on the cleaning of the robotic vacuum cleaner compartment.
2. The robotic vacuum cleaner leaves the collection station.
3. Asmall amount of water is pumped into the compartment. Use the
cleaning brush to clean the grooves – see Figure N2.
4. After afew minutes, the water is drained into the dirty water
compartment.
5. Pull the groove filter out ofthe robotic vacuum cleaner compartment
– see Figure N3.
6. Wash the groove filter with clean water and wipe dry.
7. Put the groove filter back in place.
8.
When cleaning is complete, press the button on the remote control or
on the collection station to return the robotic vacuum cleaner to the
collection station.
Replacing the Dust Bag
If the dust bag is full, the icon will light up on the collection station
display. The dust bag needs to be replaced. When replacing it, proceed
as follows:
1. Open the cover of the collection station.
2. Grasp the bag holder and gently pull it upwards – see Figure P1.
This will close the dust bag inlet opening and keep dust and dirt
safely contained in the dust bag.
3. Dispose of the used dust bag in standard communal waste.
4. Wipe the inner space where the bag is located with adry cloth – see
Figure P2.
5. Place the new dust bag into the collection container – see Figure
P3. It is important that the inlet opening in the bag is aligned with the
outlet opening in the inner space of the collection container.
6. Close the cover.

– 10 –
12/2024
2024, .
. . . . . . . . . . . . . . . . . . . . . . . . . . . . . . . . . . . . . . . . . . . . . . . . . . . . . . . . . . . . . . . . . . . .
REPLACING THE BATTERY
Replacement battery model number: SRX 9701.
In the event that you need to replace the battery, proceed as follows:
1. Make sure the vacuum cleaner is switched off and the main power
switch is in position “0” (off). Turn the vacuum cleaner upside down.
2. Using ascrewdriver, loosen the screws of the lower battery cover,
remove them and carefully remove the cover.
3. Disconnect the battery connector and remove the battery from the
inside of the vacuum cleaner.
4. Connect the new battery and insert it into the internal area. The
battery can only be connected in one way. The connector is coded
and cannot be turned around.
5. Put on the cover and secure it in place using the screws. Turn the
vacuum cleaner back to the operating position.
6. Place the vacuum cleaner into the collection station and allow the
battery to charge to full capacity.
Note:
The robotic vacuum cleaner is supplied with the battery
already inserted.
. . . . . . . . . . . . . . . . . . . . . . . . . . . . . . . . . . . . . . . . . . . . . . . . . . . . . . . . . . . . . . . . . . . .
LONG-TERM STORAGE
• When not using the vacuum cleaner for an extended period of time,
do the following:
• Clean the vacuum cleaner as described in chapter CLEANING AND
MAINTENANCE.
• Disconnect the collection station from the power socket. Store the
vacuum cleaner with all its accessories in adry, clean and cool place.
• It is recommended to charge the vacuum cleaner every 3 months as
this will extend the lifetime of the built-in battery.
• Remove the battery from the remote control.
. . . . . . . . . . . . . . . . . . . . . . . . . . . . . . . . . . . . . . . . . . . . . . . . . . . . . . . . . . . . . . . . . . . .
TROUBLESHOOTING
Robotic Vacuum Cleaner Error Message
The button flashes red and awarning sounds. Follow the instructions
given by the robotic vacuum cleaner or displayed in the application.
Note:
In an error condition, if the robotic vacuum cleaner does not
record any activity within 10 minutes, it will automatically
switch to standby mode.
When you place the robotic vacuum cleaner in the
collection station in an error state, you end the cleaning
operation in progress.
Collection Station Error Message
The collection station backlight turns red and awarning sounds. Follow
the instructions given by the robotic vacuum cleaner or displayed in the
application.
Problem Cause Solution
The vacuum cleaner is not
charging itself.
The charging contacts are not touching. Check that the contacts are touching when inserting the
vacuum cleaner into the charging station.
The charging station is disconnected from the
power source.
Insert the power adapter into apower socket and keep the
charging station permanently connected.
The vacuum cleaner is stuck in
asingle location.
The vacuum cleaner has become entangled in
wires/cables lying on the ground, in curtains or
other foreign objects on the carpet.
The vacuum cleaner will always attempt to free itself on
its own, however, we recommend to remove it by hand
from the stuck location.
The vacuum cleaner returned
to the charging station without
completing the cleaning process.
The vacuum cleaner detected alow battery charge
level and automatically returned to the charging
station to recharge.
This is anormal occurrence. Allow the vacuum cleaner
to recharge.
The vacuum cleaner does not
perform the cleaning process
automatically as scheduled.
The vacuum cleaner is not switched on and cannot
perform the cleaning process as scheduled.
Swich on the vacuum cleaner.
The vacuum cleaner is in the “Do Not Disturb”
mode.
The vacuum cleaner battery is almost flat. Allow the vacuum cleaner to recharge.
The vacuum cleaner has become stuck or is
blocked by aforeign object.
Switch off the vacuum cleaner, empty out the dust
container. Turn the vacuum cleaner upside down and
remove dust and dirt from the castors and brushes.
The remote control doesn't work.
(Recommended distance is 5 m.)
Batteries are flat. Replace the batteries in the remote control.
The vacuum cleaner battery is almost flat. Allow the vacuum cleaner to recharge.
The remote signal receiver on the vacuum cleaner
or the signal transmitter on the remote control is
blocked or soiled.
Wipe the signal receiver and transmitter using aclean
wiping cloth.
The remote control signal is being interfered with
by another device in its vicinity.
Do not use the remote control in the vicinity of devices
with an infrared signal.
Dirt remains on the floor after
cleaning is finished.
The central rotary brush is blocked. Clean out the central rotary brush and move the robotic
vacuum cleaner into an open area.
The side rotary brush is blocked. Clean out the side rotary brush and move the robotic
vacuum cleaner into an open area.
The mopping sleeves are dirty. Remove the mopping sleeves andwash them inyour
hand or replace them with new ones.
It is not possible to switch on the
vacuum cleaner.
The battery is flat. Allow the battery to fully recharge.
The vacuum cleaner has problems
with movement on the floor.
Front swivel wheel is blocked. Clean out the front swivel wheel and move the robotic
vacuum cleaner into an open area.
– 11 –
12/2024
2024, .
Problem Cause Solution
The vacuum cleaner will seek out
the collection station but does not
dock in it.
The charging station is blocked or is too far away, it
is not connected to apower source; foreign objects
are caught on the mop sleeve holder or the mop
sleeve is rolled up.
Place the charging station into an open area and place
the robotic vacuum cleaner into its vicinity and turn it on;
insert the plug of the power adapter into apower socket;
clean out the mop sleeve holder and straighten out the
mop sleeve.
The vacuum cleaner is not
behaving normally.
Internal fault. Switch off the robotic vacuum cleaner and then switch it
on again and start it. If the problem persists, switch off the
vacuum cleaner and contact an authorised service centre.
Abnormal sounds are made during
the cleaning process.
Aforeign object has become stuck to the central
rotary brush, side rotary brush or on the central
swivel wheel.
Switch off the robotic vacuum cleaner and remove the
foreign object.
The water tank does not release
water into the sleeve or is only
releasing asmall amount of water.
There is an insufficient amount of water in the
water tank; the sleeve is excessively soiled; the
holder is not inserted.
Refill the water tank with water; clean the sleeve;
correctly insert the mop sleeve holder.
The water tank is releasing too
much water.
The water tank is not in its place; the water outlet is
set to maximum.
Check that the water tank is properly inserted; adjust the
water outlet using the application.
It is not possible to connect to the
application.
Abnormal Wi-Fi network, incorrect Wi-Fi password
or abnormal behaviour of the application.
Check whether the robotic vacuum cleaner is within
range of the Wi-Fi network; enter the correct password or
reset the Wi-Fi; download and install the latest version of
the application.
The vacuum cleaner is not able to
return to the collection station after
intensive cleaning.
The robotic vacuum cleaner creates anew map or
the distance is too large.
After intensive cleaning or moving for along distance,
the robotic vacuum cleaner generates anew map. If the
collection station is too far away, it is possible that the
robotic vacuum cleaner will not be able to find it. Put
the robotic vacuum cleaner into the cleaning station
manually.
The backlight of the collection
station flashes red.
The dust bag is not inserted. Insert the dust bag.
The water tank is not inserted or not inserted
correctly.
Insert the water tank.
The clean water compartment is empty. Refill the water in the clean water compartment.
The dirty water compartment is full. Empty the dirty water compartment.
Excessive noise is heard when
emptying the dust container, or
the container does not empty
completely.
The suction opening, internal pipe or filter is
blocked or dirty.
Remove the cause of the blockage and clean these parts.
Insufficient self-cleaning of the
mopping sleeve.
The mopping sleeve is not fitted correctly. Fit the mopping sleeve correctly.
Dust container cannot be emptied
in the dust collection container.
The dust bag is not inserted. Insert the dust bag.
The cover of the dust bag section is not closed. Close the cover of the dust bag section.
You have selected the “mopping” mode. The vacuum cleaner does not vacuum in this mode.
The robotic vacuum cleaner does
not mop the floor after vacuuming.
If the robotic vacuum cleaner is not switched on
from the collection station or the collection station
is not on the map in the application, the robotic
vacuum cleaner will not be able to return to the
collection station to pump water into the tank and
start mopping the floor.
Start the robotic vacuum cleaner whenever it is parked at
the collection station. Make sure the collection station is
on the map in the application.
The clean water compartment is empty. Refill the water in the clean water compartment.
The robot vacuum cleaner cannot
be controlled by the docking
station.
There is a signal failure between the robot vacuum
cleaner and the docking station.
1. Place the robot vacuum cleaner inside the docking
station.
2. Remove the dust bag.
3. Press and hold the start/pause button on the
docking station until the station beeps.
4. Put the bag back in.
5. Wait approximately 20 seconds until the light on
the docking station control panel stops flashing and
becomes steady. You can check whether the station
can control the robot vacuum cleaner with the
button on the docking station. If everything works,
the connection between the docking station and
the robot vacuum cleaner has been successfully
restored.

– 12 –
12/2024
2024, .
Problem Cause Solution
The dirty water cannot be pumped
out/dirty water leaks from the
robot vacuum cleaner.
The suction port is blocked. 1 Place the station on a hard and level floor.
2. Check that the mop is installed correctly.
3. Start manual pumping in the app and check that the
pump is working (you will hear the pump sound).
4. The suction port filter may be clogged. Clean the
suction port filter.
5. Check that the dirty water tank is installed in place.
5.1 Check that the dirty water tank lid is closed tightly.
5.2 Make sure that the dirty water tank is installed
tightly (manually press the dirty water tank when
dirty water can be pumped out).
6. Remove the dirty water container and check that the
rubber seal is in place.
. . . . . . . . . . . . . . . . . . . . . . . . . . . . . . . . . . . . . . . . . . . . . . . . . . . . . . . . . . . . . . . . . . . .
TECHNICAL SPECIFICATIONS
Robotic vacuum cleaner
Power input of the robotic vacuum cleaner ................................20 V 2.25 A
Rated power .............................................................................................................72 W
Battery ........................................................................... Li-ion / 14.4 V/ 5,200 mAh
Dimensions .............................................................................. 330 × 330 × 86mm
Weight ..................................................................................................................3.92 kg
Operating time per single charge ...............................................................200 min
Dust container capacity ..................................................................................300 ml
Water tank capacity ............................................................................................ 80 ml
Laser sensor class ..........................................................................................................I
Charging time .................................................................................................. < 7 hours
Collection station
Input voltage ............................................................................................220–240 V~
Input frequency............................................................................................50–60 Hz
Output voltage ......................................................................................20 V 2.25 A
Rated power (Auto-wash state) ........................................................................ 35 W
Rated power (Auto-empty state) ................................................................... 600 W
Dimensions ............................................................................ 375 × 280 × 325mm
Original consumable accessories
SRX 9701 Battery
SRX 9702 Mopping sleeves
SRX 9703 Side rotary brush
SRX 9704 HEPA filter
SRX 9709 Dust bag
. . . . . . . . . . . . . . . . . . . . . . . . . . . . . . . . . . . . . . . . . . . . . . . . . . . . . . . . . . . . . . . . . . . .
INSTRUCTIONS AND INFORMATION ON DISPOSAL OF USED
PACKAGING MATERIAL
Dispose of used packaging material in the designated waste disposal area
determined by the municipality.
DISPOSAL OF USED ELECTRICAL AND ELECTRONIC EQUIPMENT
For proper disposal and recycling of these products, deliver them to
designated collection points. Alternatively, in some European Union states
or other European countries the products can be returned to the local
retailer when buying an equivalent new product. By properly disposing of
this product, you help preserve valuable natural resources and contribute
to preventing potential negative impacts on the environment and human
health resulting from improper waste disposal. For further details, contact
your local authorities or the nearest collection point. Fines may be
imposed for improper disposal of this type of waste in accordance with
national regulations.
For Business Entities in European Union States
If you want to dispose of electric or electronic devices, ask your retailer or
supplier for the necessary information.
Disposal in Other Countries Outside the European Union
To dispose of this product elsewhere, request necessary information on
the correct disposal method from local authorities or your retailer.
. . . . . . . . . . . . . . . . . . . . . . . . . . . . . . . . . . . . . . . . . . . . . . . . . . . . . . . . . . . . . . . . . . . .
Amendments to text and technical parameters are reserved.