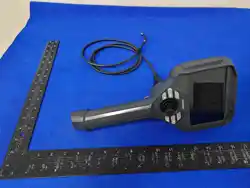
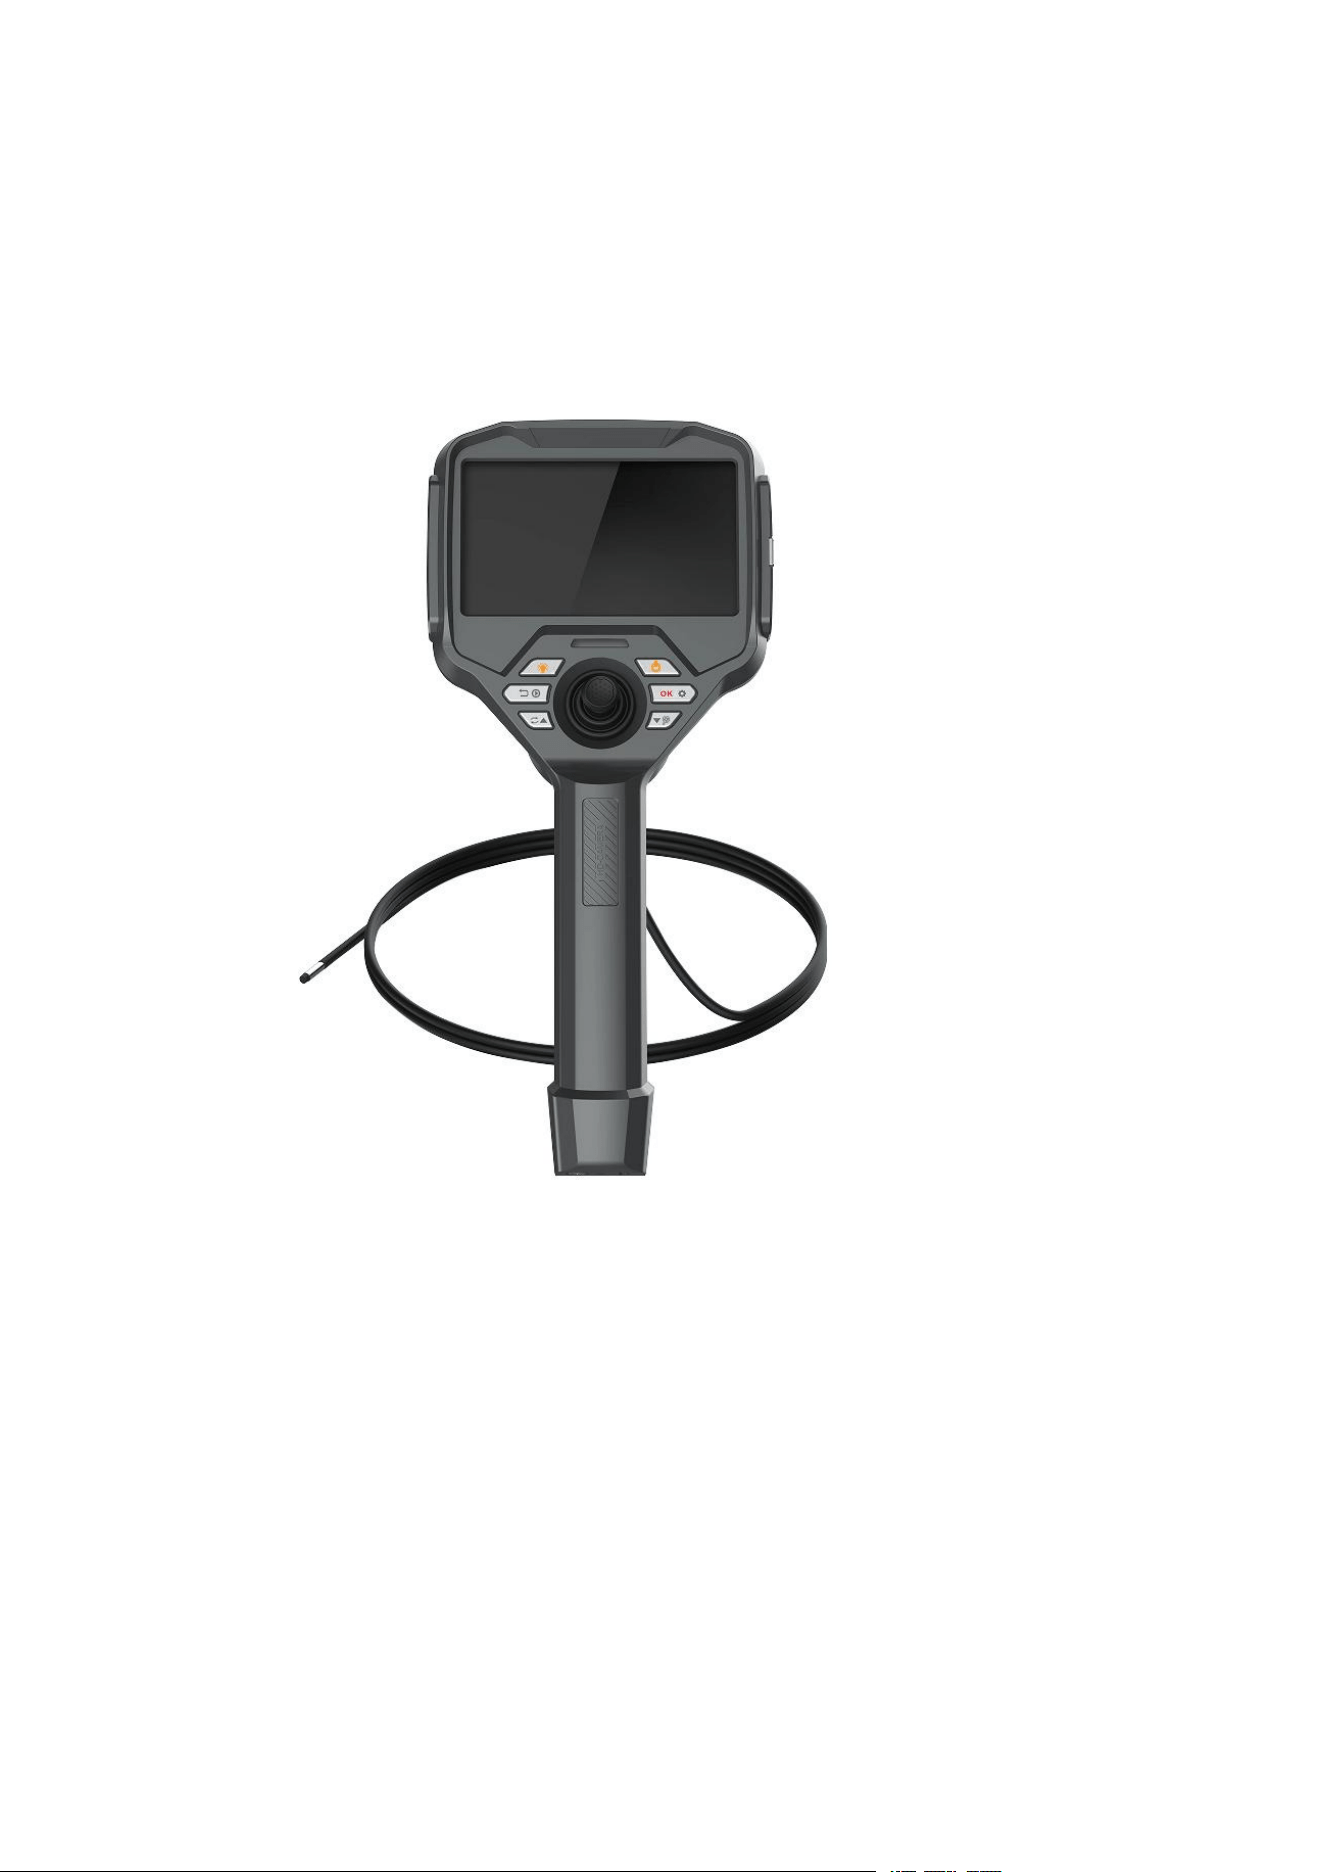
USER MANUAL
Model:GT
e: Please read this user manual carefully before operating the instrument.
GT Industrial Touch Screen Endoscope
Xuzhou Weipuss Optoelectronic Technology Co., Ltd.

1
User Instructions
Please read this User Manual carefully before operating the instrument.
DANGER
• It is strictly prohibited to use this instrument to inspect human bodies and
animals.
• It is strictly prohibited to use or store the instrument in explosive, strong
electromagnetic field environments or places with flammable gases.
• Do not operate when the inspected object is electrified.
WARNING
• Unauthorized disassembly or modification of the instrument will void the
warranty and maintenance service provided by Maiteks Company.
• Do not allow any liquid other than water to contact the insertion tube, otherwise
the insertion tube may be damaged.
• Make sure to turn off the power before placing the instrument into the carrying
case.
• Do not directly touch the lens of the insertion tube during operation. Contacting
the lens after use in a high-temperature environment may cause burns.
• Immediately stop using the instrument and turn off the power if smoke or
abnormal noise is observed.
• Do not stare directly at the light emitted from the front end of the insertion tube
at close range to avoid eye damage from strong light.
• Immediately stop using the instrument and turn off the power if any abnormality
is felt during angle adjustment operation.
CAUTIONS
• Do not use the instrument beyond the operating temperature range.
• Do not excessively bend, twist or fold the insertion tube.
• Only use the power adapter supplied by Maiteks Company.
• Do not force the insertion tube out when removing it from the inspected object,
and comply with the following requirements:
○ Do not withdraw the insertion tube from the inspected object when the
angle is locked or the angle part is bent.
○ If the insertion tube gets stuck during withdrawal, gently rotate the joystick

2
and withdraw the tube after it is straightened.
• After operation, reset the bent front lens of the insertion tube. Do not keep the
lens fixed in a single direction for a long time, as this will keep the instrument under
high load and shorten its service life.
• Pay attention to the following points when operating the front end of the
insertion tube:
○ Avoid severe impact or strong pulling on the front end of the insertion tube.
○ Prevent severe impact or excessive bending of the angle bending part,
otherwise the glass lens and precision components at the front end and bending
part of the insertion tube will be damaged.
• Clean the lens with alcohol or acetone before use to avoid dirt accumulation,
corrosion and deformation.
• Do not apply force if any abnormality is felt during angle bending operation, so
as to prevent damage to the insertion tube or inspected object.
• Do not allow metal objects or foreign matter to enter the host through interfaces
or other openings, which may cause malfunction or electric shock.
• Do not strongly impact, squeeze or scratch the LCD screen with hard or sharp
objects, otherwise cracks or scratches will appear on the screen.
• Do not cover the host with plastic bags or other objects during use, as internal
overheating may damage the instrument.
• Align the red dot direction when operating the quick video connector, and do not
apply force blindly.
• Do not store the instrument in the following environments to avoid damage:
○ Environments with high temperature, high humidity, heavy dust or particles.
○ Places with direct sunlight or radiation.
○ Places containing halide gas.
Battery Handling Instructions
Comply with the following danger, warning and caution rules when handling the
battery. Failure to do so may cause battery leakage, overheating, smoking, explosion,
electric shock and burns.
DANGER
1. Only use the dedicated battery and battery charger designed for this instrument
for lithium-ion battery operation.
2. Do not install the battery with reversed electrodes.

3
3. Do not connect battery electrodes with metal objects, nor carry or store the
battery together with metal items.
4. Do not throw the battery into fire or heat it, otherwise explosion may occur.
5. Do not attempt to open or modify the battery, otherwise fire or explosion
hazards may arise.
6. Do not immerse the battery in fresh water or salt water, or expose it to moisture.
7. Do not charge the battery near open flames or direct sunlight, otherwise fire or
explosion may occur.
8. Do not pierce, strongly impact or compress the battery, otherwise fire or
explosion may occur. Do not drop, throw or subject the battery to violent impact.
9. Remove the battery only when the device is placed on a stable surface. An
unstable placement may cause the battery to fall, leading to explosion and fire.
WARNING
1. Do not use non-original batteries for this instrument. The applicable battery
model is 18650 protected 3.6V lithium battery.
2. Do not attempt to charge non-dedicated batteries for this instrument.
3. Stop using batteries with abnormalities such as liquid leakage, discoloration or
deformation, and apply for maintenance immediately.
4. If battery liquid contacts skin or clothes, rinse immediately with clean tap water
to avoid skin injury. Seek medical attention if necessary.
5. Do not deform the battery compartment or place foreign objects inside it.
6. Do not cover the battery charger with clothes or cushions during charging.
CAUTIONS
1. Do not use or store the battery in high-temperature environments, such as direct
sunlight, enclosed cars under sunlight or near heating equipment.
2. The battery will heat up after long-term operation. Do not remove the battery
immediately after use to avoid scalding hands.
3. Keep the battery out of reach of children.
4. Do not store the battery in humid, leaking, extreme high or low temperature
environments.
5. Do not touch battery electrodes with wet hands.
6. Charge the battery before first use or reuse after long-term idle storage.
7. Remove the battery from the instrument if it will not be used for a long time, to
prevent battery leakage or heat accumulation which may cause fire or personal injury.
Tips:

4
1. Use the battery correctly. Improper use may cause liquid leakage and overheating
damage. Install the battery in the correct direction when replacing.
2. Battery performance decreases as ambient temperature drops. The performance
will recover when the temperature returns to normal.
3. Recycle waste batteries in accordance with local regulations.
4. Recommended temperature range for lithium-ion battery operation:
Discharging (instrument operation): 0°C to 40°C
Charging: 0°C to 40°C
Storage: -20
℃
to 50
℃
5. Operation beyond the above temperature range will reduce battery performance
and service life. Always remove the battery from the instrument for long-term storage.
6. The battery is a consumable part.
7. Due to power differences between individual batteries after long-term use, it is
recommended to fully charge 18650 lithium batteries with a dedicated base charger.

5
TABLE OF CONTENTS
User Instructions-------------------------------------------------------------------------------------1
1. Product Description------------------------------------------------------------------------------6
2. Product Features---------------------------------------------------------------------------------6
3. Product Functions and Diagrams------------------------------------------------------------7
4. Pre-use Preparation and Inspection--------------------------------------------------------12
5. Borescope Angle Operation Method (Optional)-----------------------------------------14
6. Interface Description----------------------------------------------------------------------------15
7. Button Function Instructions------------------------------------------------------------------15
8. Touch Screen System Operation Instructions--------------------------------------------16
■ Preview Mode-------------------------------------------------------------------------------------16
■ Photo Capture-------------------------------------------------------------------------------------17
■ Video Recording----------------------------------------------------------------------------------17
■ Light Adjustment ---------------------------------------------------------------------------------17
■ Settings---------------------------------------------------------------------------------------------17
■ Image Flip------------------------------------------------------------------------------------------17
■ Image Zoom---------------------------------------------------------------------------------------17
■ Screen Lock---------------------------------------------------------------------------------------17
■ Simulated Scale----------------------------------------------------------------------------------17
■ Host Button Menu Settings--------------------------------------------------------------------18
9. Instrument Storage and Maintenance------------------------------------------------------18
10. Troubleshooting Guide-----------------------------------------------------------------------20
11. Additional Cautions----------------------------------------------------------------------------20
Appendix 1: Product Warranty-------------------------------------------------------------------22

6
1. Product Description
The GTGS4-2 industrial touch screen borescope is a multi-purpose visual inspection
instrument. It adopts optional joystick control, supporting 360° omnidirectional
bending and rotation (two-way / non-directional optional) for on-site real-time photo
and video recording. Equipped with a high-definition image sensor, it delivers clear
and smooth images, and features a 5-inch high-definition LCD touch screen with
vivid and bright colors.
Main Applications:
1.1 Industrial field: Applied to quality inspection of pipelines, heat exchange devices,
cooling systems, transmission devices, hydraulic castings, pumps and valve castings.
It is used for early quality control of welding and casting defects such as internal
welds, surface finish, deep holes, blind holes, staggered holes, sand inclusions and
burrs in pipelines and cavities.
1.2 Police field: Applied to security inspection, investigation, hidden danger
troubleshooting and criminal evidence collection.
2. Product Features
• Compact, portable and handheld design with simple operation and convenient
maintenance, improving working efficiency.
• Adjustable lens with optional joystick control, supporting 360° rotation and dead-
angle-free observation (two-way / non-directional optional).
• Equipped with high-definition probe sensor to present clear and smooth full-
scene images.
• Standard 5-inch high-definition LCD touch screen with high brightness, high
image quality and multi-times digital zoom function.
• Adopts high-brightness lighting source with low power consumption and long
service life.
• Supports multi-functional operations including photo capture, video recording,
image and video playback, brightness and clarity adjustment, and system menu
setting.
• The insertion tube is made of tungsten wire mesh (coated plastic tube /
gooseneck tube optional) with rotatable and quick-replaceable pipeline. It features
wear resistance, waterproof performance and acid and alkali corrosion resistance.
7
3. Product Functions and Diagrams
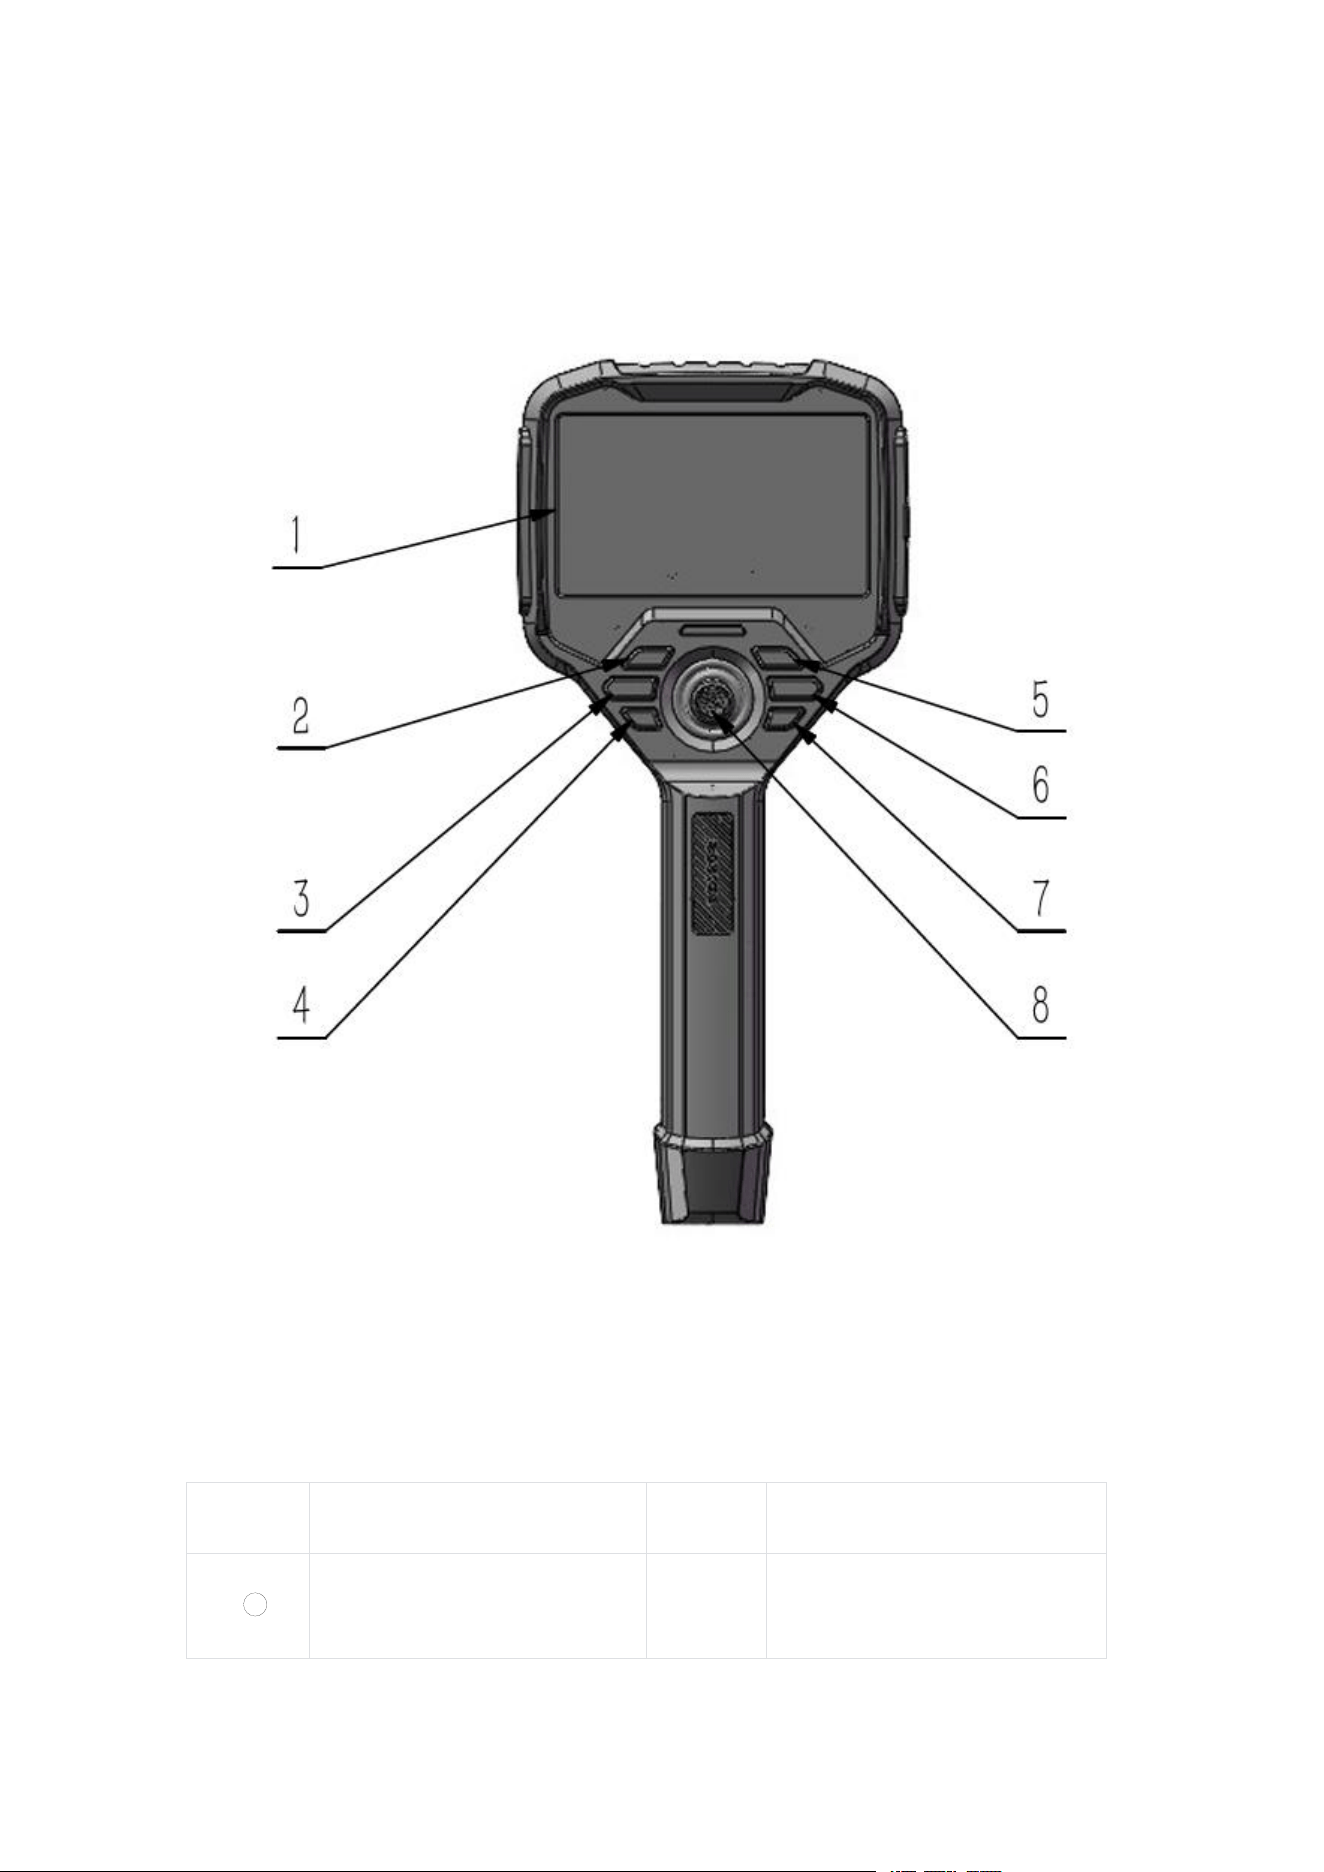
(Figure 1: Front Button Layout of Host)
No.
Name
No.
Name
1
5-inch Touch Screen
Display
○
5
Power On/Off Key

8
2
Brightness Adjustment Key
(Long press for
infrared/white light
switching, optional)
○
6
Menu/OK Confirm Key (Long
press to turn on fill light)
3
Short press to return / Long
press to enter playback
interface
⑦
Short press for down
function in menu interface /
cyclic zoom in preview
interface
4
Short press for up function
in menu interface / 90°
cyclic image rotation in
preview interface
⑧
Joystick (Optional)
9
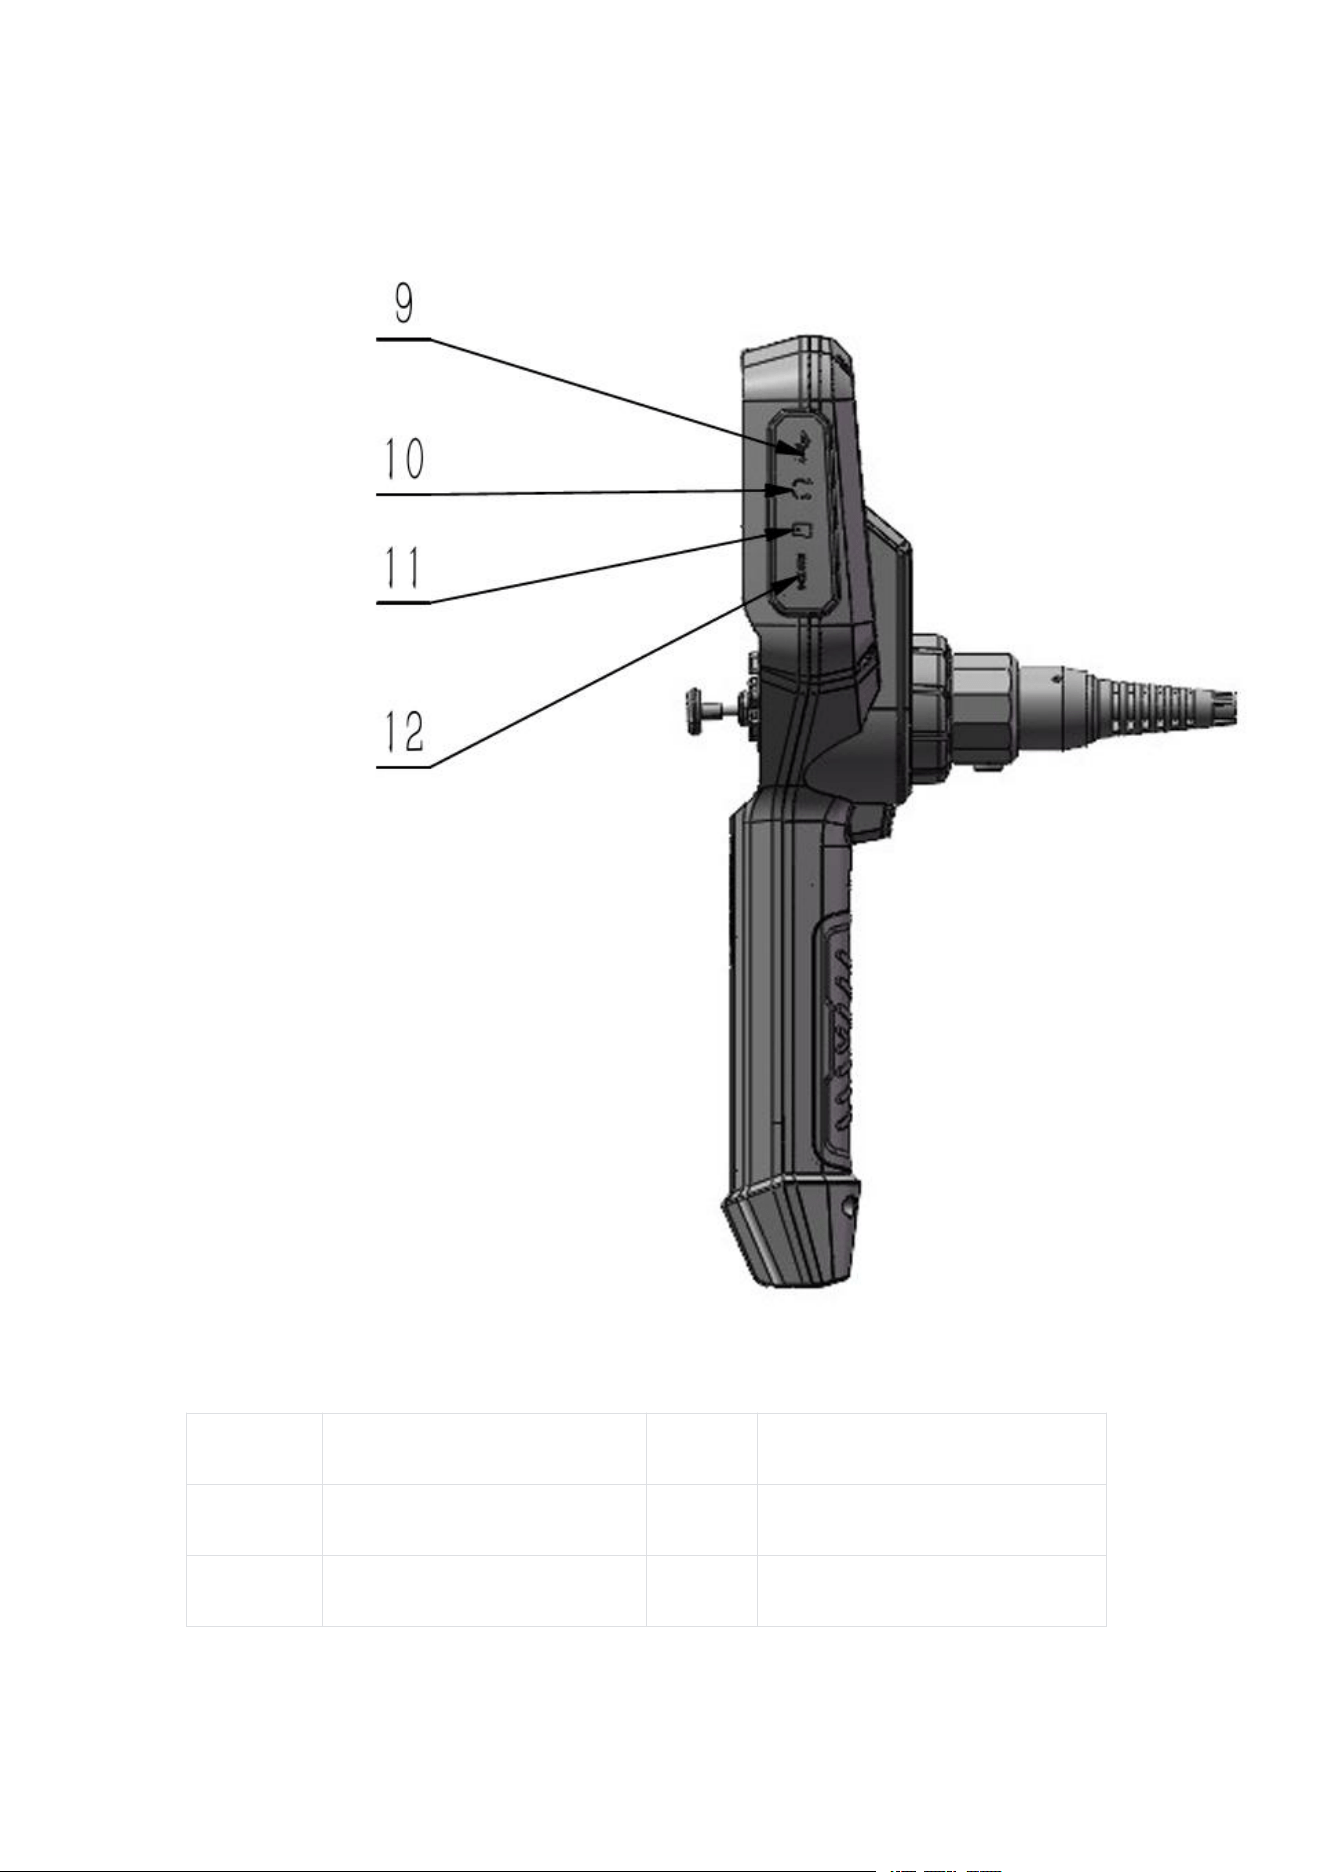
(Figure 2: Side Button Layout of Host)
No.
Name
No.
Name
⑨
MINI USB Interface
⑪
TF Card Slot
⑩
Reserved Headphone Port
○
12
HDMI Output Interface
10
(Figure 3: Touch Screen Component Layout)
No.
Name
No.
Name
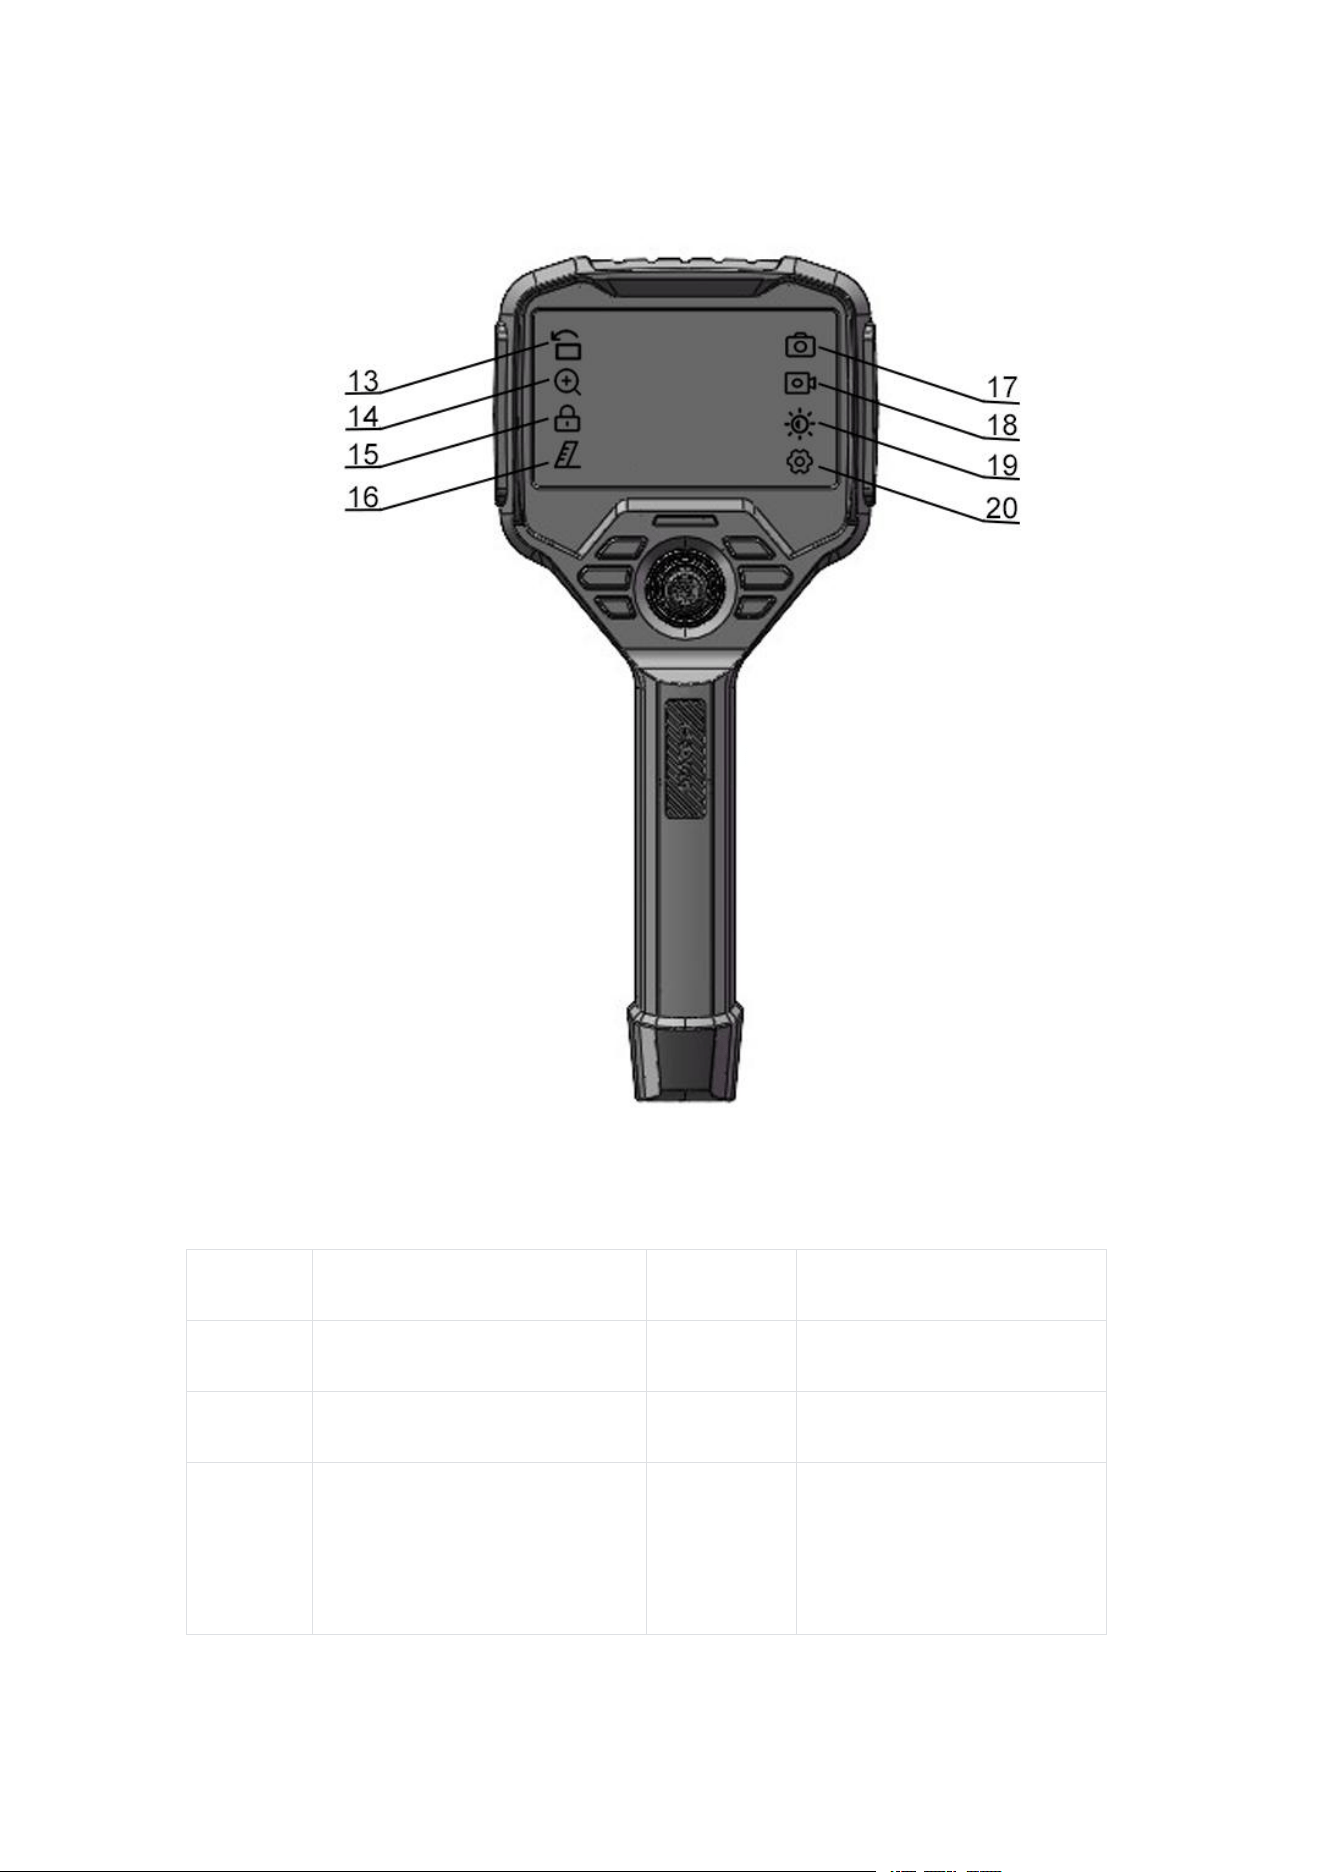
⑬
Image Flip Key
⑰
Photo Capture Key
⑭
Image Zoom Key
⑱
Video Recording Key
⑮
Screen Lock Key
⑲
Light Adjustment Key
(Long press for
infrared/white light
switching)
11
⑯
Simulated Scale Key
○
20
Function Setting Key
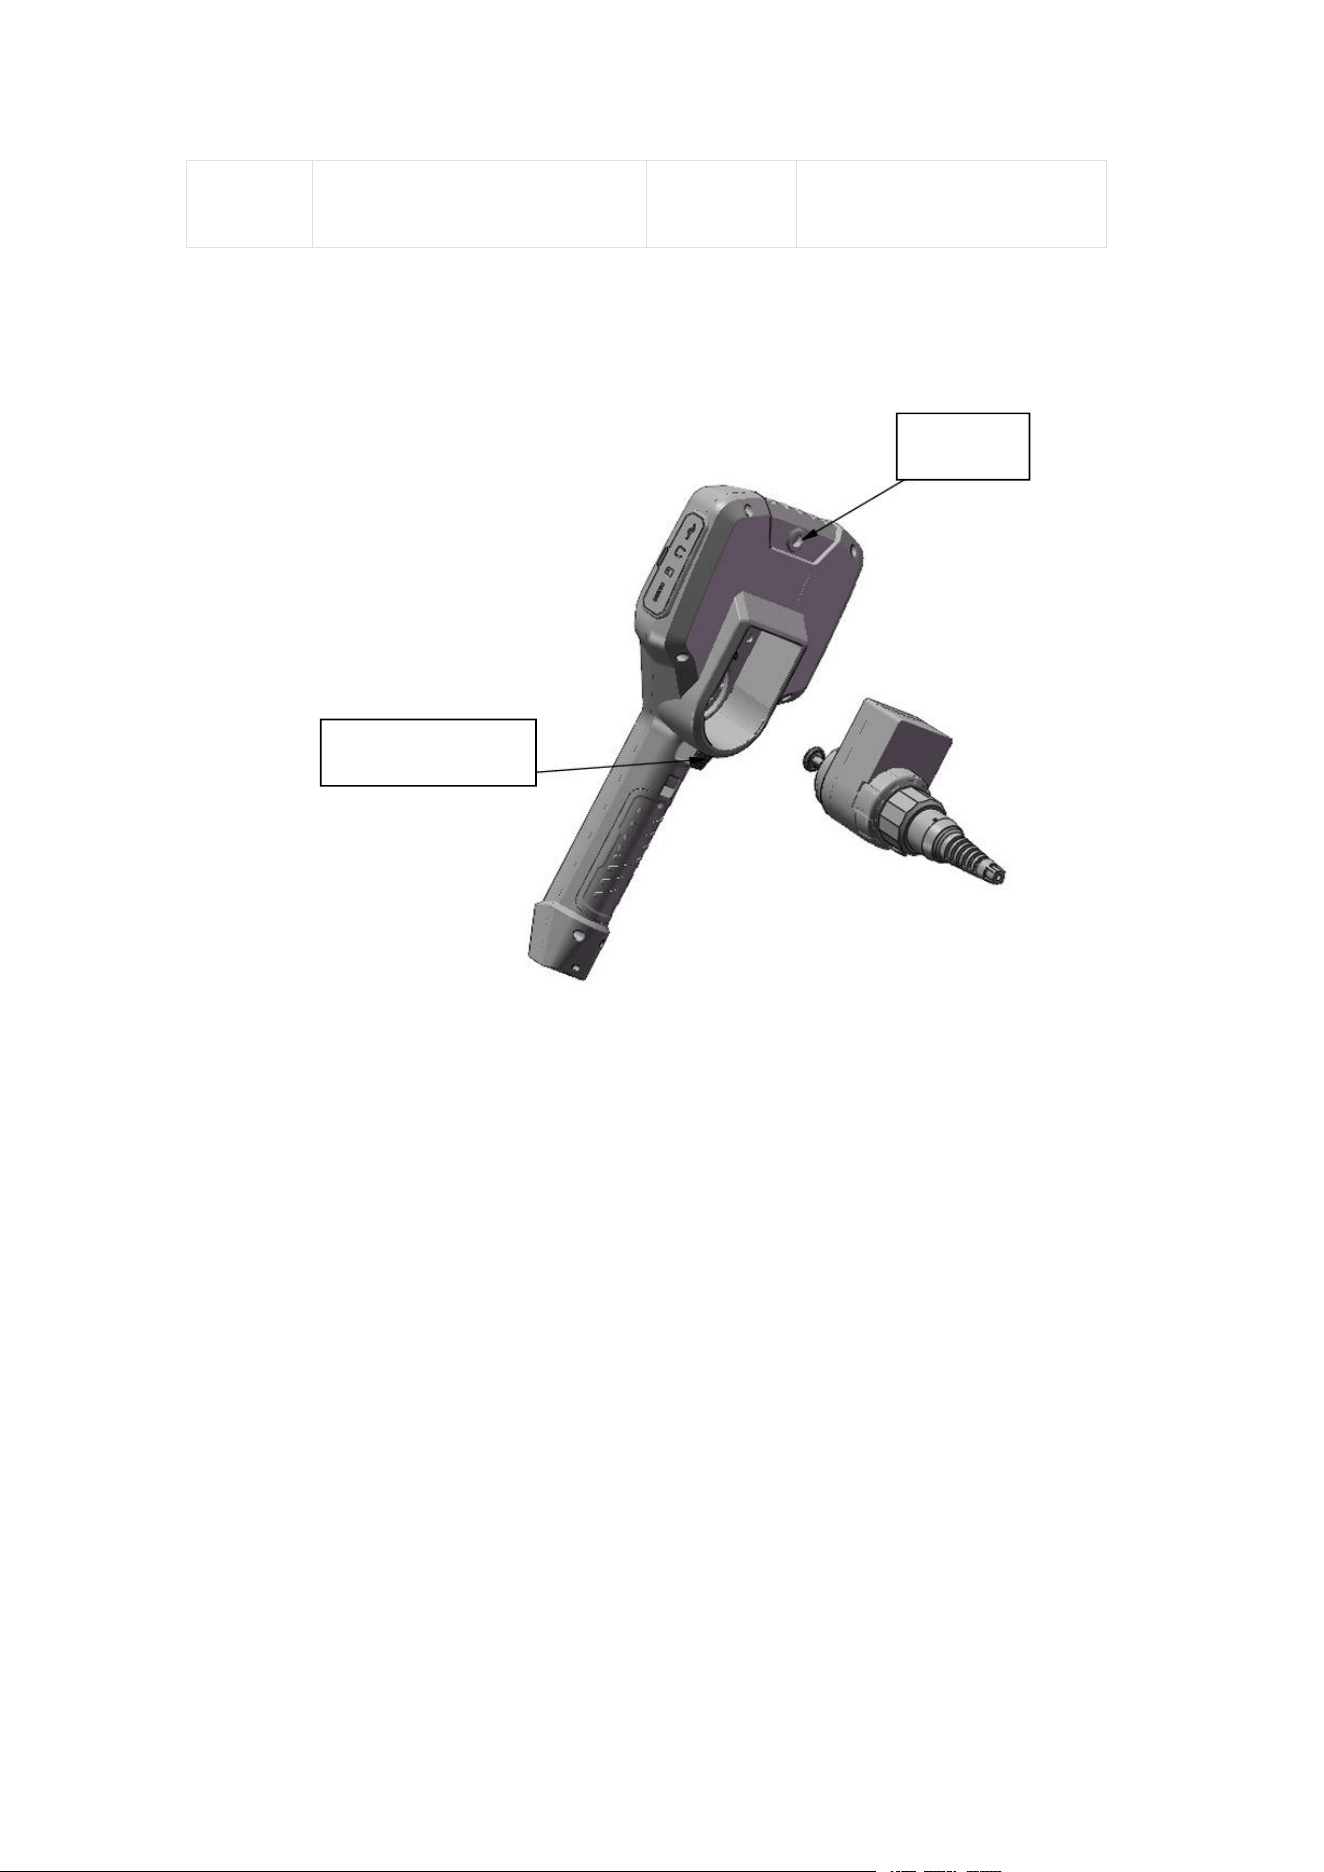
Long press the handle setting key to turn on the fill light; short press for photo
capture and long press for video recording in preview interface, long press again to
exit recording.
(Figure 4: Host Schematic Diagram 4)
Light
Photo / Video
12
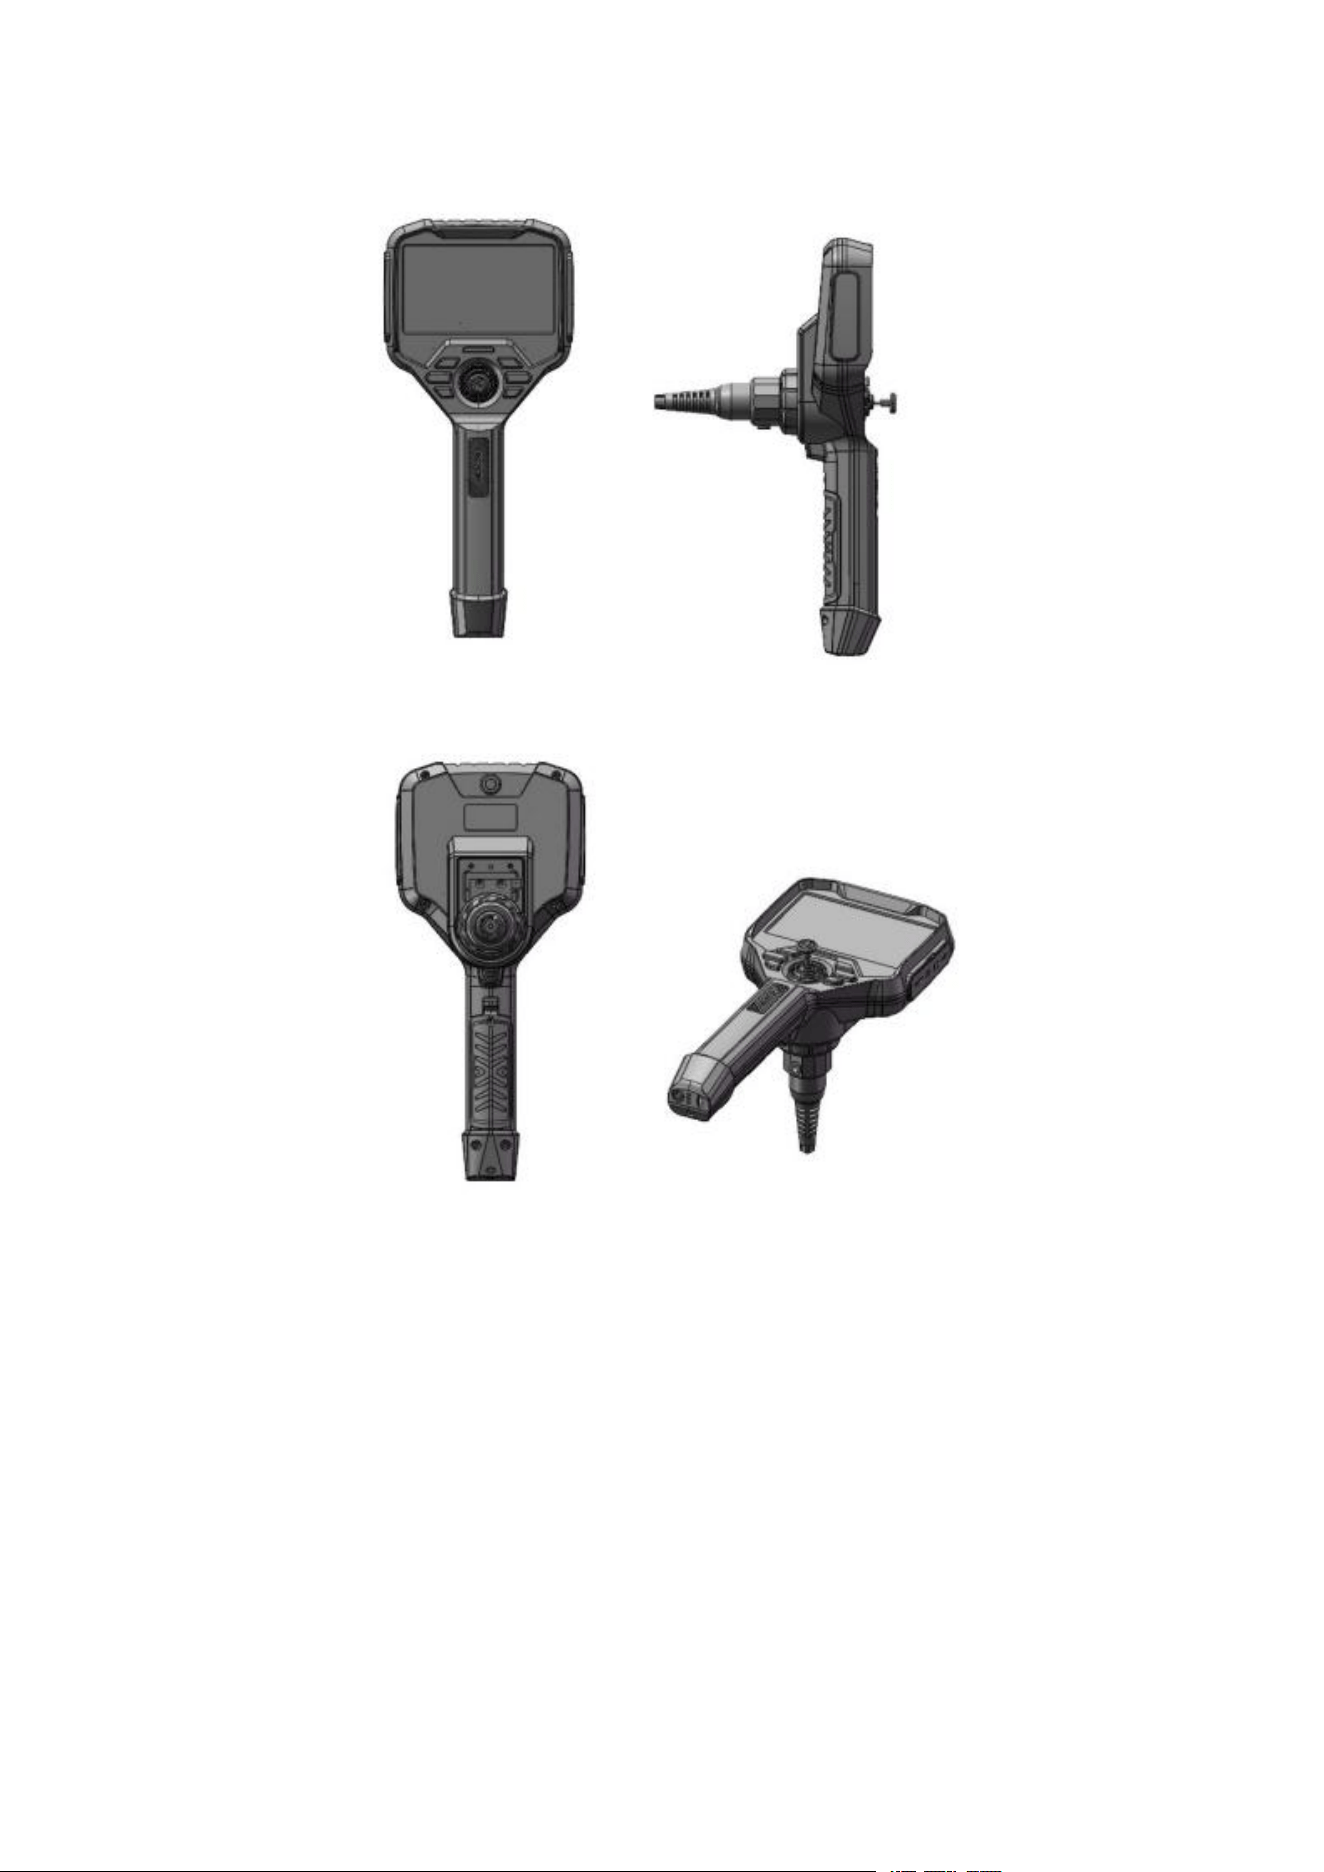
(Figure 5: Front, Side and Back Schematic Diagram of Host)
4. Pre-use Preparation, Inspection and Hidden
Functions
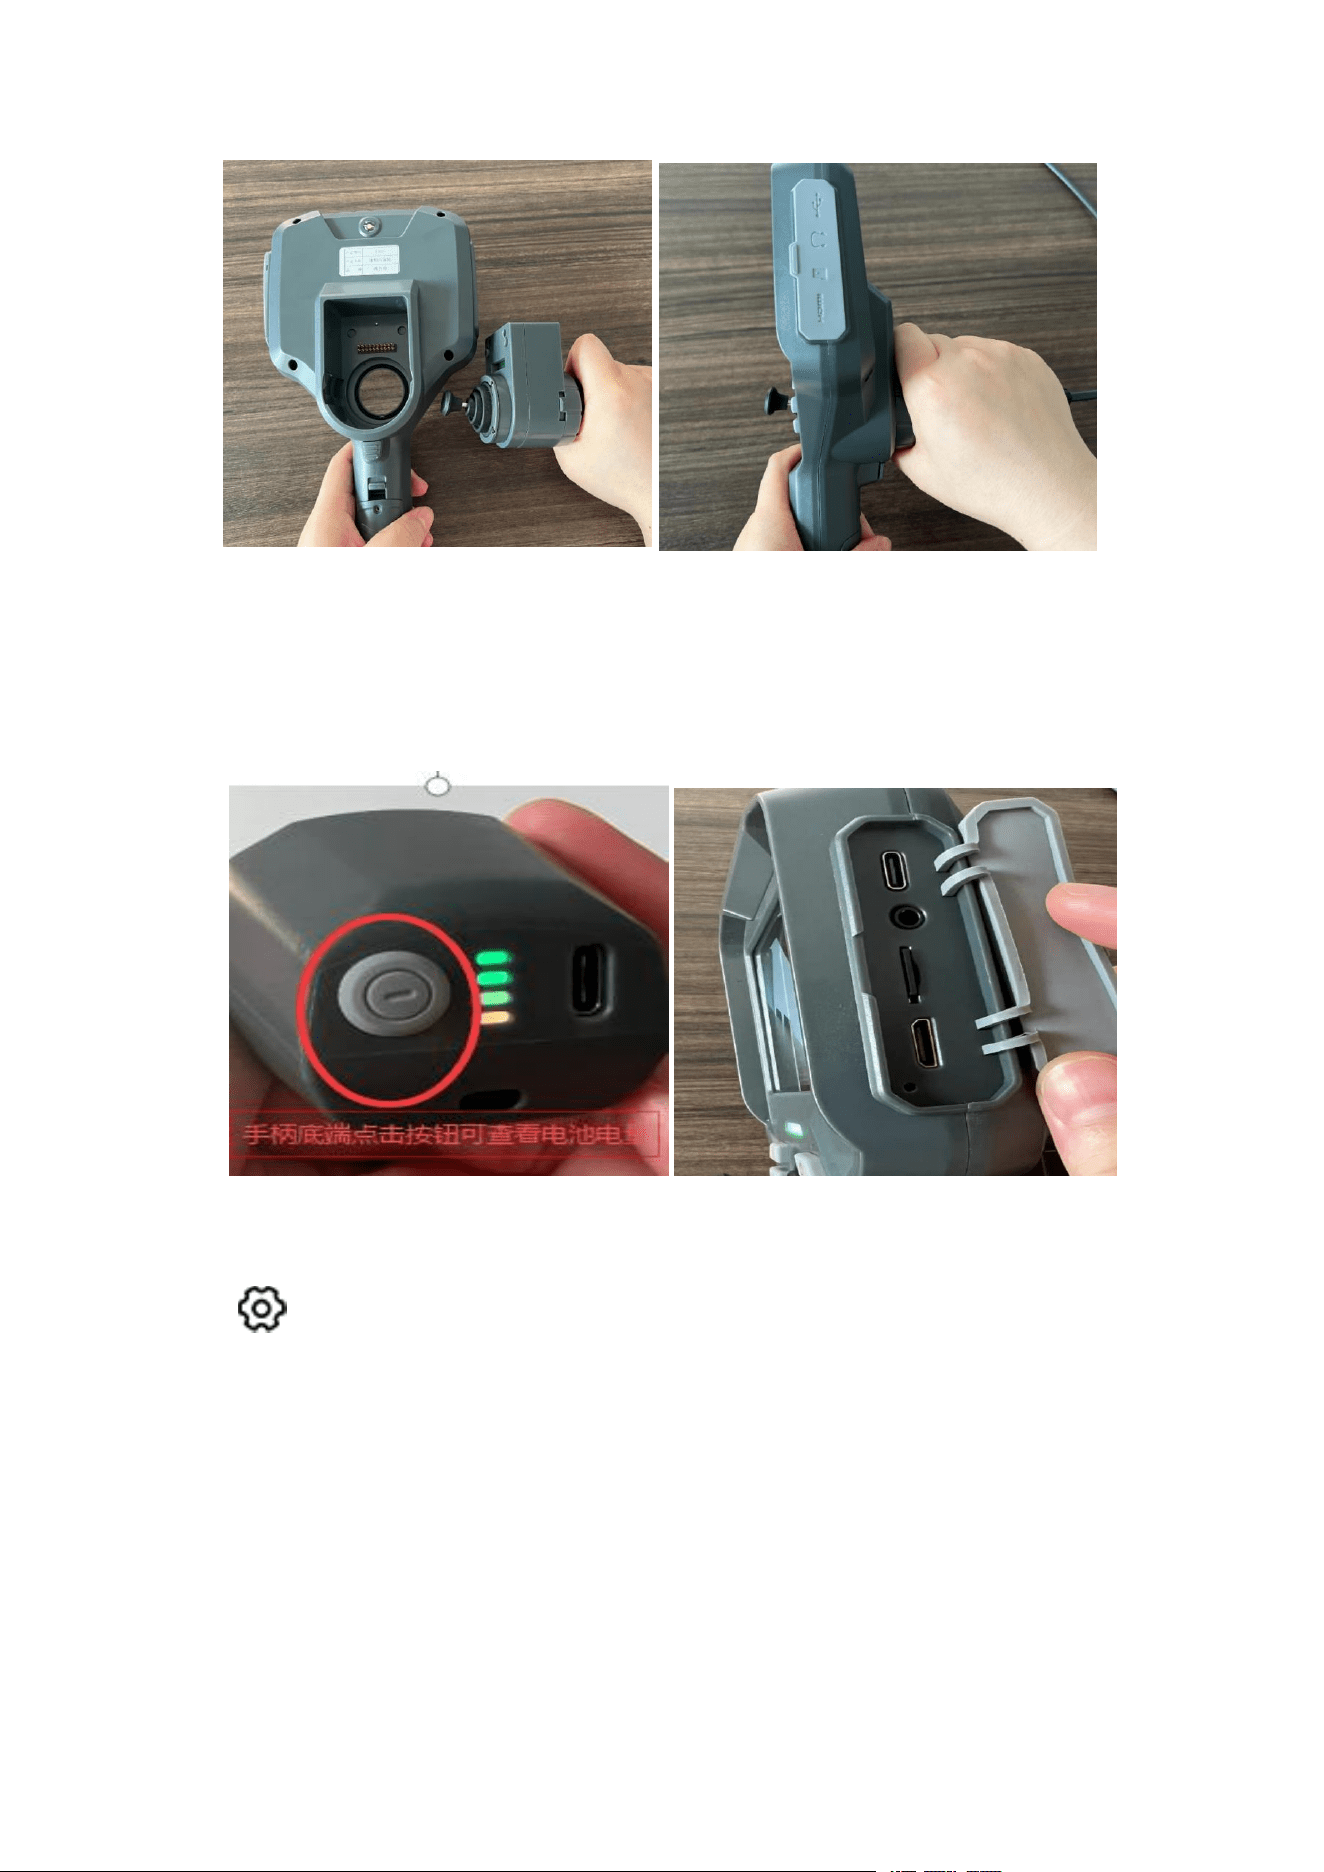
4.1 This product is a split pluggable borescope with multi-purpose functions. First
inspect the equipment for defects or damage before use, then install the equipment
and battery accessories. Align the interface during installation, fix it with a rotating
buckle after tight connection.
13
4.2 As a split pluggable device, install the battery and TF memory card in advance
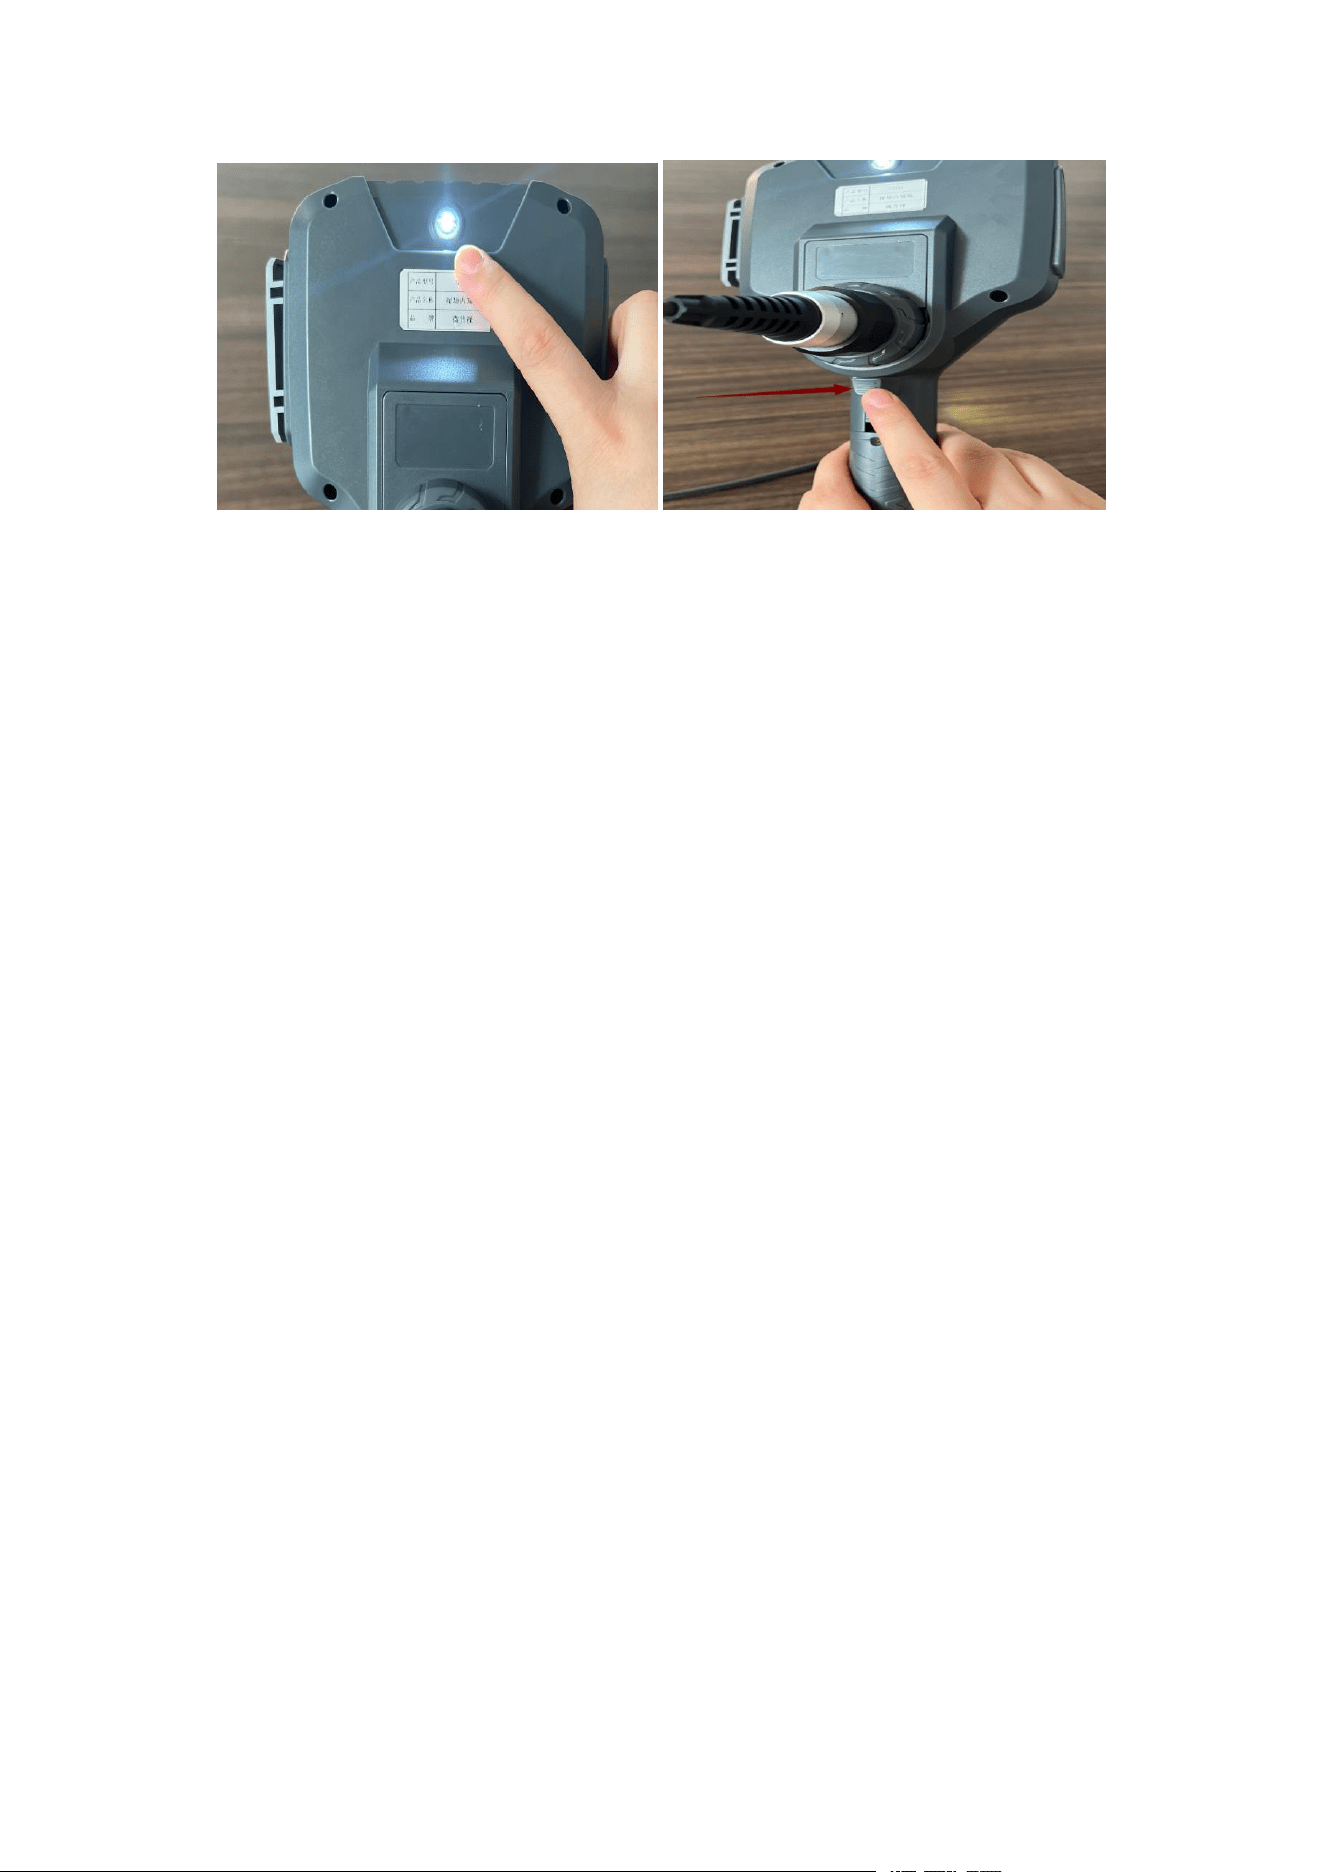
after equipment inspection to facilitate photo and video recording. Press the button at
the bottom of the handle after battery installation to check the battery level via
indicator lights, then insert the TF card into the slot.
4.3 Short press the menu key to enter the setting state; long press the setting
key to turn on/off the auxiliary fill light (on the back of the host). In addition to the
touch screen keys, the reverse side of the handle is equipped with convenient
recording keys: short press for photo capture, long press to start/stop video recording.
14
4.4 Borescope Access and Storage
① Taking out the borescope: Take out the host signal line, probe end and insertion
hose first, then the operating part when opening the package.
② Storing the borescope: Place the operating part first, then the main hose, probe
end and host signal line during storage.
4.5 Inspection of Borescope and Accessories
Inspect all components before each use. Stop using the instrument and contact
professional technical personnel of our company if any minor defects or
abnormalities are found.
① Insertion hose inspection: Visually check the surface of the insertion hose for
damage or defects.
② Bending part inspection (optional): Push the joystick in all directions to confirm the
bending part can bend smoothly to the maximum angle, and visually inspect the
outer surface for defects.
Bending Joystick Inspection (Optional)
Slowly push the joystick up, down, left and right with your thumb to bend the probe at
continuous angles. Do not bend to a large angle at one time. Stop pushing when the
joystick reaches the limit to avoid damage. Do not keep the joystick pressed for a
long time to maintain a large bending angle.
③
Check the host signal line for cracks, distortion, compression or other damage.
④ Check the tightness of signal plug connection to ensure safe and normal operation
of the supporting driver.
5. Borescope Angle Operation Method (Optional)
Battery Level Detection
This instrument adopts replaceable rechargeable lithium batteries. Charge the

15
battery in time when the power is low.
① The battery icon on the screen displays the real-time power level after power-on
(full grid for sufficient power).
② The battery icon flashes to remind low power when the power is insufficient.
③ The instrument will automatically shut down when the battery is exhausted.
Angle Operation (Optional)
Ensure the insertion hose is fully stretched and unfolded before probe bending
operation; do not bend or coil the hose during operation.
Push the joystick with your right thumb to bend the probe up, down, left and right for
observation. Immediately stop operation if the bending control mechanism fails or
abnormal operation is detected. Reset the joystick to the middle position, then slowly
withdraw the borescope while observing.
Do not force bending if abnormal resistance is felt when operating the joystick.
Always operate the joystick slowly.
Shutdown and Storage
Reset the probe to a horizontal straight state after use. Long press the power
key to shut down the instrument, then place it into the dedicated safety box.
6. Interface Environment Description
According to professional usage scenarios, the instrument is equipped with three
operation modes to maximize convenience: Preview Mode, Menu Mode and
Playback Mode.
7. Button Function Instructions
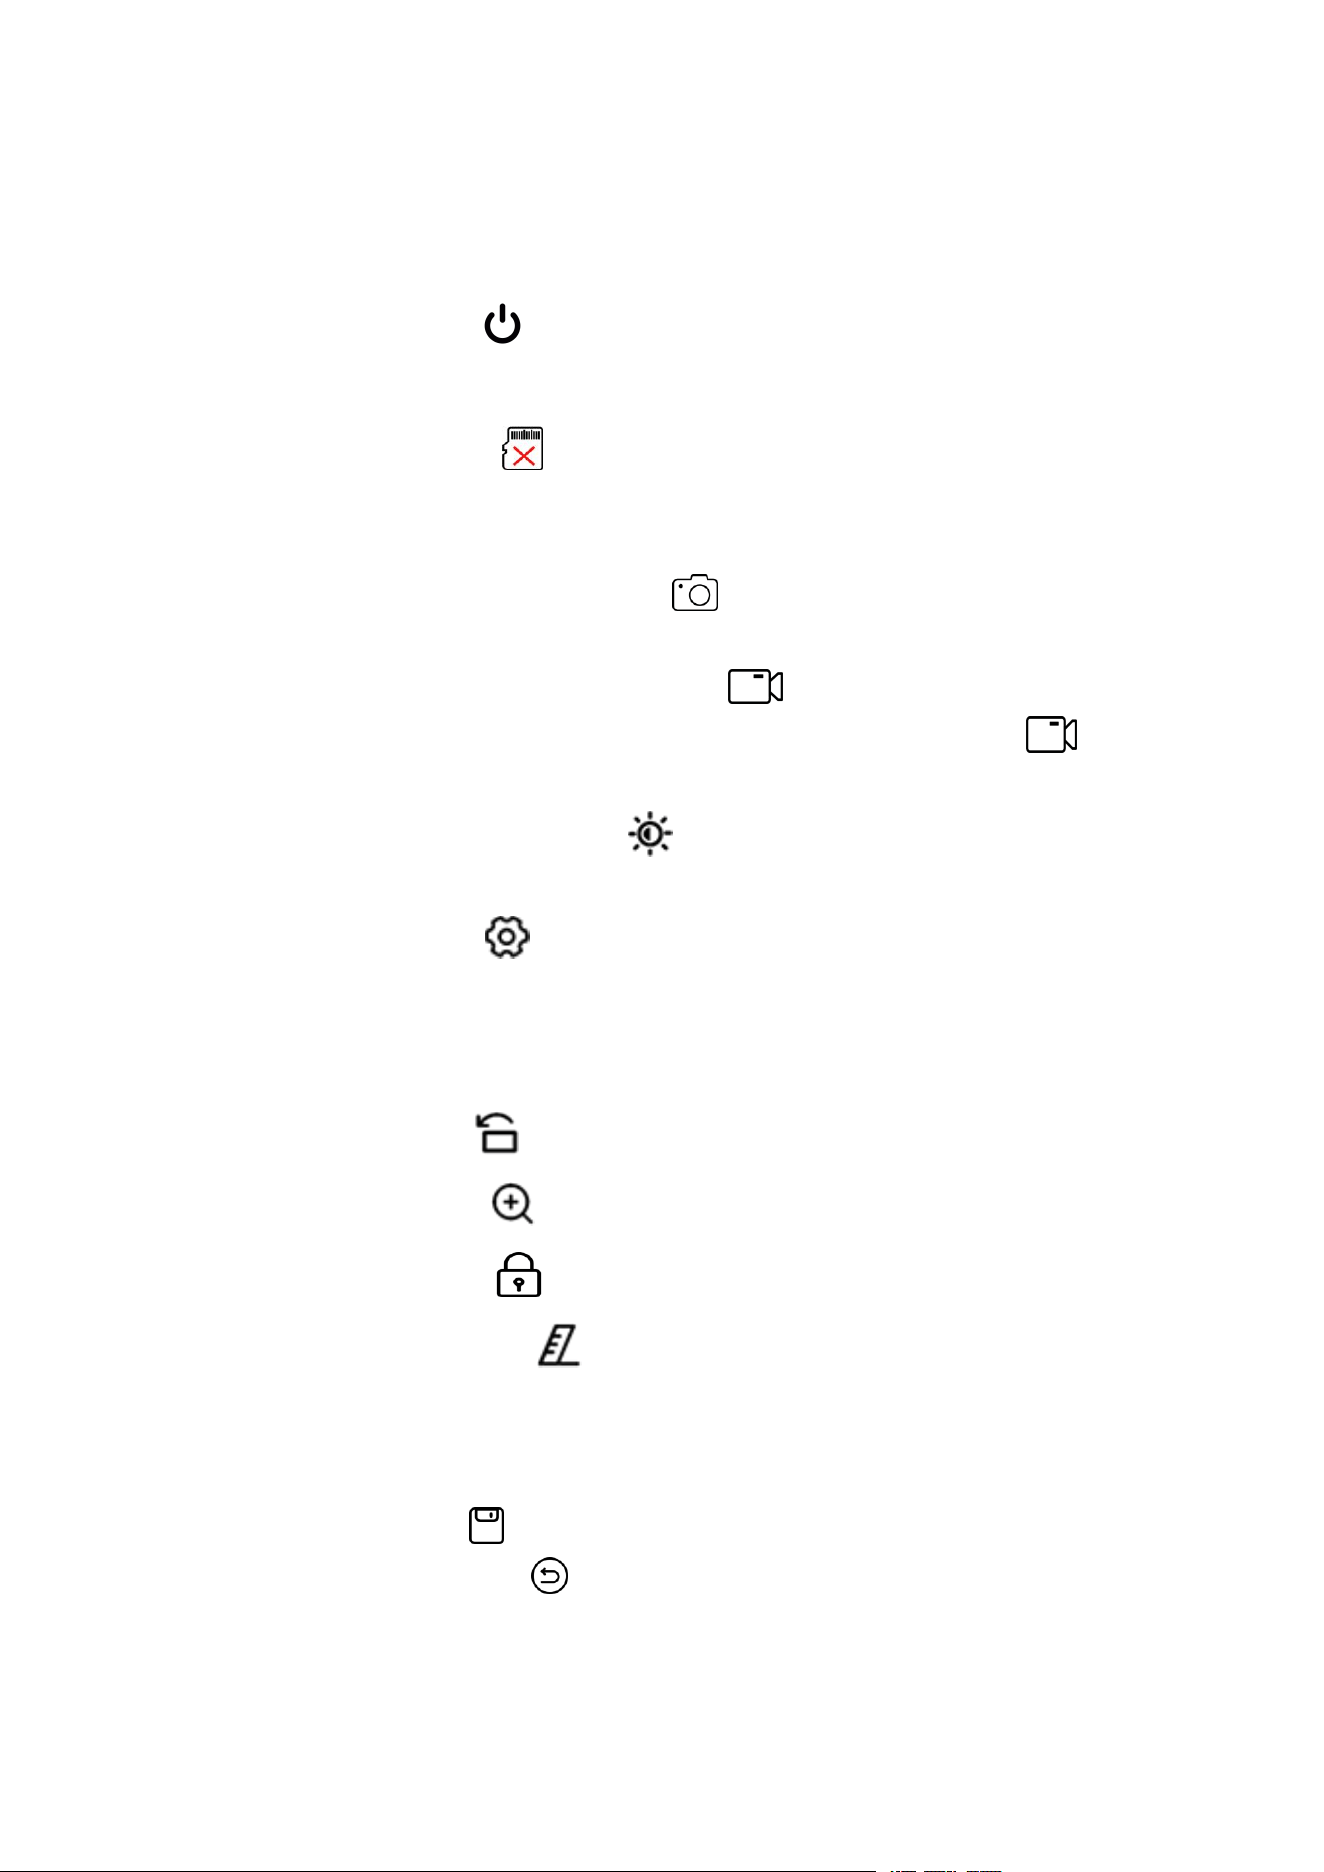
Each button has different functional definitions in different modes for humanized and
convenient operation. The function comparison table is as follows:
Button
Preview Mode
Menu Mode
Dimming Mode
Power Switch
Power On/Off
Power On/Off
/
Rotation/Up Key ↑
Image Rotation
Up Selection
/
Zoom/Down Key ↓
Image Zoom
Down Selection
/
Setting/OK Key
Enter Settings
OK Confirm
/
16
8. System Operation Instructions
Preview Mode
Long press the power key to turn on the device. The system will enter the
preview interface 3 seconds after the boot screen. The screen displays real-time
images and status information including time & date, TF card insertion status and
battery level. A no-card icon will be displayed if no TF card is inserted; do not hot-
swap the TF card.
Right Touch Screen Keys (Top to Bottom):
• Photo Capture: Short press the photo key to capture images. A fleeting camera
icon indicates successful capture.
• Video Recording: Short press the recording key in preview mode to start
recording (flashing red dot indicator and recording time display). Press again to
stop recording and return to preview mode automatically.
• Light Adjustment: Short press the key to adjust light brightness (8-level
adjustable) for optimal illumination and image clarity.
• Setting Key: Short press to enter the menu setting interface.
All files are named with the shooting timestamp for easy query. Note: The device has
no built-in storage; a TF card must be inserted before photo/video recording.
Left Touch Screen Keys (Top to Bottom):
• Image Flip: Short press to flip the captured image by 360° for viewing.
• Image Zoom: Short press to zoom the image up to 8 times.
• Screen Lock: Short press to freeze the real-time screen image.
• Simulated Scale: Short press to measure the size of inspected objects.
Host Button Menu Settings
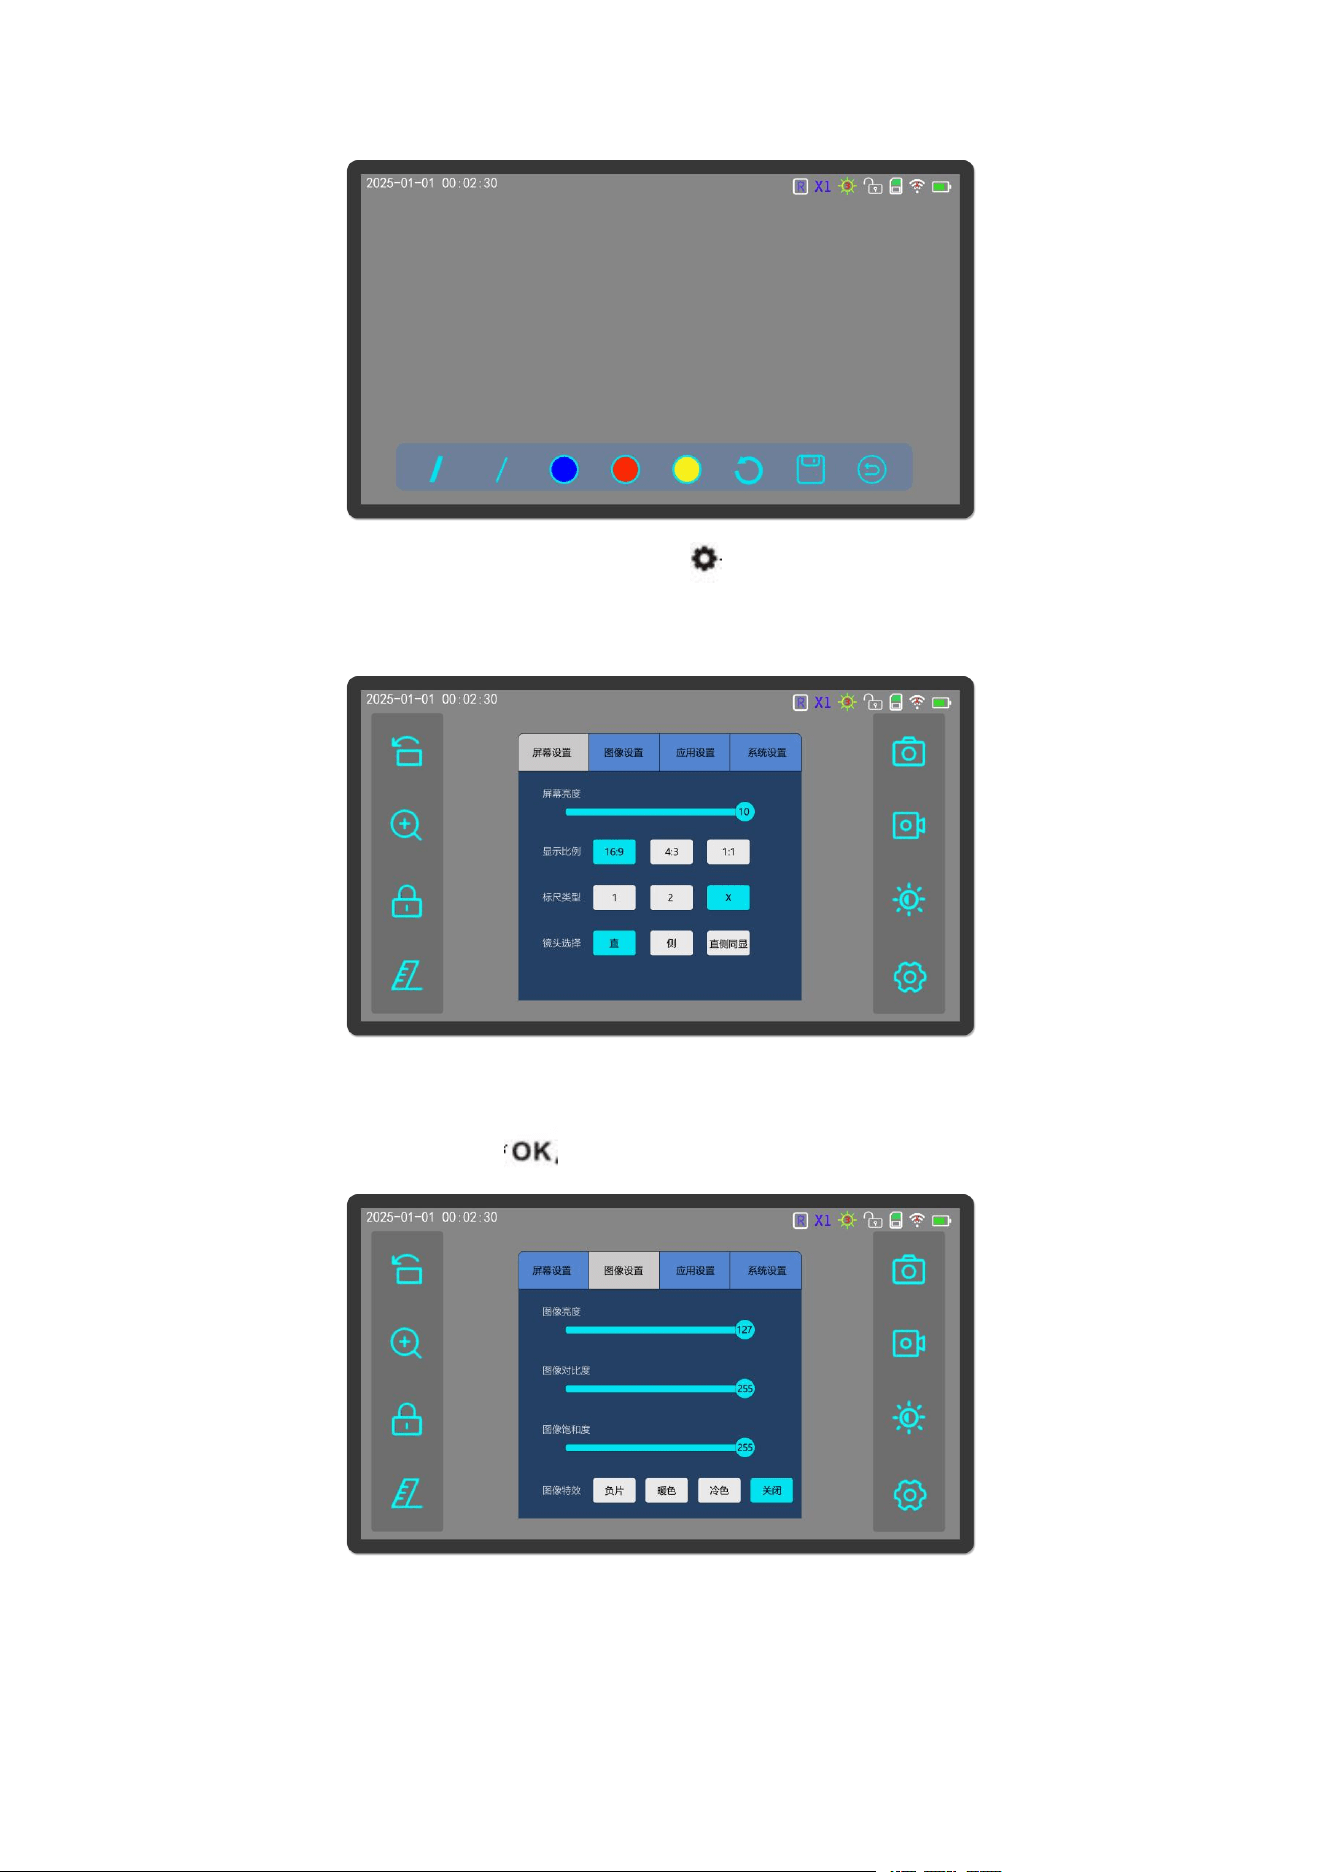
1.Touch and hold the screen for 3 seconds to enter the screen editing interface.
Short press the save key to confirm editing, press the edit key / to modify
content, and press the exit key to quit editing. The upper right corner displays
status prompts including battery level, WIFI, TF card, screen lock, brightness level,
zoom multiple and mirror mode.
17
2. Screen Settings: Enter the system menu in preview mode to adjust screen
brightness, display ratio and scale type via up/down ▲/▼keys, and confirm with
the OK key.
3. Image Settings: Enter the image setting interface in preview mode to adjust
image brightness, contrast, saturation and special effects via up/down keys, and
confirm with the OK key .
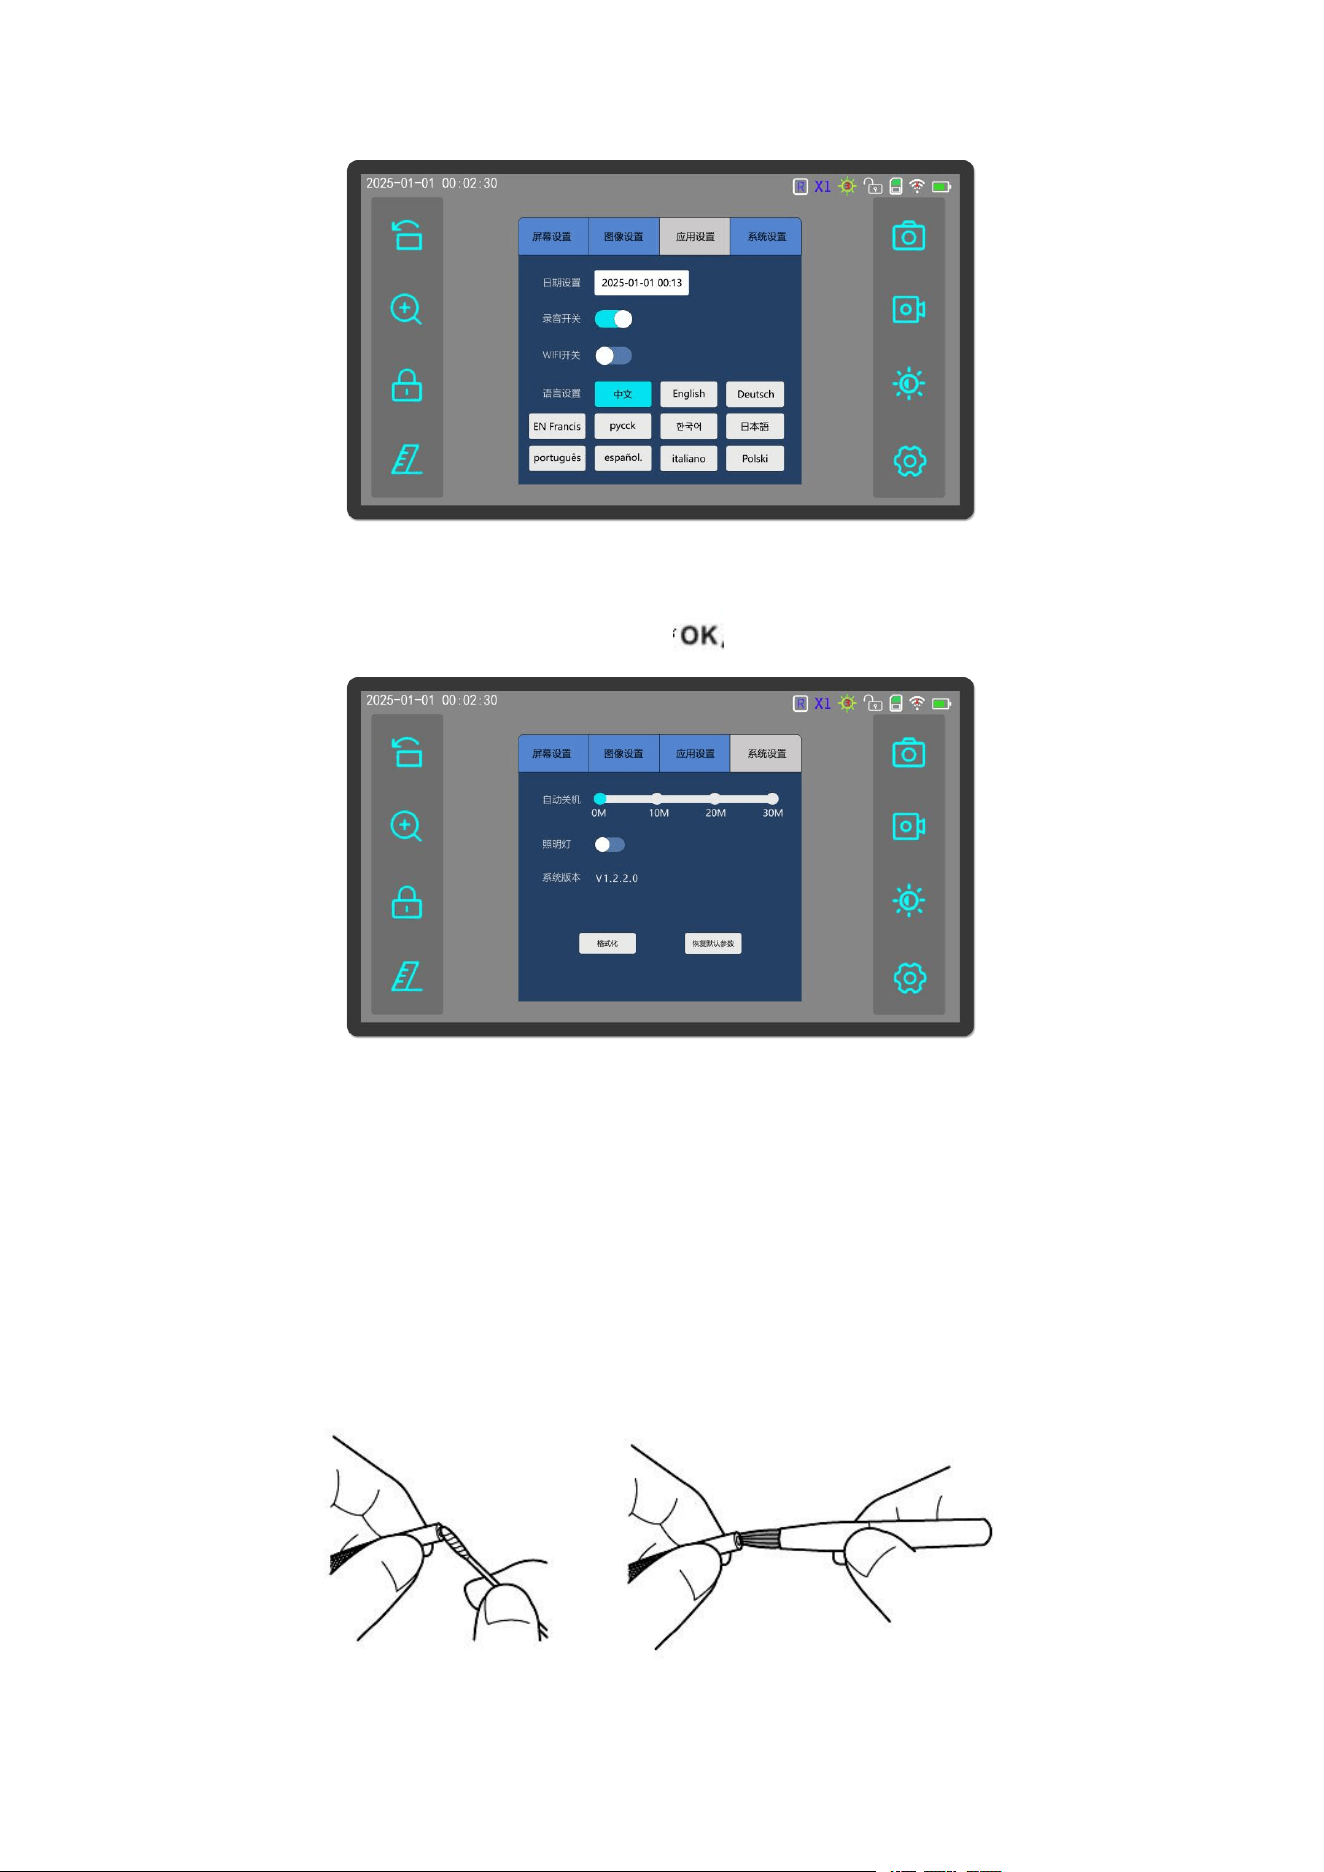
4. Function Settings: Enter the function setting interface to adjust time, language,
volume and WIFI status via up/down keys, and confirm with the OK key.
18
5
.
System Settings: Enter the system setting interface to set auto-shutdown, view
software version, format storage, upgrade software and restore factory settings
via up/down keys, and confirm with the key.
9. Instrument Storage and Maintenance
9.1 Borescope Hose Cleaning
1. Wipe foreign matter on the insertion tube with a dust-free cloth.
2. If the insertion tube is contaminated with waste water or engine oil, clean in the
following order: ① Wipe with dust-free cloth; ② Clean with neutral detergent and
dust-free cloth;
③
Wipe with clean water and dust-free cloth;
④
Dry thoroughly with
dust-free cloth.
Cautions:

19
• Clean thoroughly with dust-free cloth to extend the service life of the insertion tube.
• Do not flush the lens directly with tap water to avoid equipment damage.
• Store the instrument horizontally at room temperature in a clean and dry
environment.
• Handle with care and avoid collision during storage.
• Check instrument functions regularly during long-term idle storage.
9.2 Instrument Storage Requirements
Store the instrument in a clean, dry, well-ventilated and constant-temperature
environment, avoiding direct sunlight, high temperature, high humidity and X-ray
radiation. Keep the insertion hose straight during storage; if coiled, do not coil tighter
than the original factory packaging state.
Warning:
• Place the instrument out of children’s reach and operate only after mastering usage
rules.
• Do not store in high-temperature, high-humidity, high-vibration, high-dust, polluted
or corrosive environments.
Screen and Host Cleaning
Wipe fingerprints and stains on the LCD screen, host and operating handle with a
dust-free cloth. Caution: Do not clean the instrument directly with tap water.
9.3 Instrument Reassembly and Storage Sequence
Reassembly sequence: Operating handle → Host
Cautions:
• Follow the correct storage sequence to avoid insertion tube damage.
• Place the insertion tube gently into the box without bending or extrusion.
• Fasten the box buckle firmly to prevent accidental opening during handling.
• Use the original dedicated safety box for storage.
9.4 General Storage Cautions
• Store under normal room temperature and humidity conditions.
• Turn off the power before packing and storage.
• Place the instrument on a clean, dry and stable plane.
Danger: Do not violently bend, pull, twist or squeeze the signal line to avoid line
breakage, fire or electric shock hazards.

20
10. Troubleshooting Guide
Fault Phenomenon
Possible Causes
Solutions
Blurred image
Dirty objective lens
Clean the objective lens
surface
Water droplets in the field
of view
Stop use and send to the
company for
maintenance
Abnormal probe bending
Bending angle below
standard value / joystick
backlash / abnormal
resistance / failure to lock
/ damaged bending
sheath
Stop forced operation
and send to the company
for adjustment and
maintenance
System failure
Abnormal power supply
Check battery level,
power supply voltage and
fuse integrity
LCD fails to power on
Dead battery
Charge or replace the
battery
Video playback failure /
garbled text
Unsupported video
format / incorrect
language setting
Convert to supported
video format / reset
system language
File upload/download
failure
Faulty USB cable or
interface
Replace USB cable or
change computer USB
interface
Failed to save recording
files
No TF card inserted / TF
card full / TF card bad
sectors
Insert or format the TF
card
Stop use and send to the company for maintenance if faults cannot be eliminated by
the above methods. The company shall not be liable for damage caused by
unauthorized private maintenance.
11. Additional Operation Cautions
1. Keep the hose stretched during operation; avoid bending, knotting, falling or
extruding the probe and hose.

21
2. Do not aim the working probe at strong light (above 100,000 Lux) to prevent
camera damage.
3. Turn off the light via the brightness key when not in use to save battery power.
4. Charge the instrument regularly every 1-2 months during long-term idle storage
to avoid battery loss and damage.
5. Ensure the TF card is inserted when browsing files or formatting the card.
6. Avoid rapid movement of the probe during shooting to prevent blurred images
and mosaic distortion.
7. Do not press the panel with hard objects or nails to avoid surface damage.
8. Insert and pull out TF card and USB cable horizontally without forced shaking.
9. Turn off the power after use to prevent battery exhaustion.
10. Restart the device to recover from system abnormality or crash.
11. Test photo and video functions formally before official use, and confirm file
integrity after shooting. The company shall not be liable for accidental file loss or
damage.
Do not disassemble or repair privately if faults cannot be judged; contact professional
electricians or return to the factory for maintenance. The product specifications in the
manual are subject to technical upgrade changes without prior notice.

22
Appendix 1: Product Warranty
1. Free repair service is provided for equipment failures caused by normal use within
one year from the purchase date with valid warranty.
2. The company provides 24-hour after-sales response via phone, QQ or on-site
service; minor faults will be resolved within 48 hours.
3. Free warranty is invalid under the following conditions:
• Failures caused by violation of operation specifications and steps in the manual.
• Damage caused by non-compliant storage and maintenance.
• Damage caused by violent operation or external force impact (falling, collision,
etc.).
• Unauthorized disassembly, modification or private maintenance.
• Damage caused by non-compliant power connection and system wiring errors.
• Damage caused by natural disasters and irresistible external forces.
4. Paid maintenance at cost price is provided for equipment beyond the warranty
period.
5. No replacement for lost warranty certificates; the warranty period is calculated
based on the factory number and production date.
6. Altered, manually filled or unsealed warranty certificates are invalid.

23
FCC Caution.
This device complies with part 15 of the FCC Rules. Operation is subject to the following two
conditions:
(1) This device may not cause harmful interference, and
(2) this device must accept any interference received, including interference that may cause
undesired operation.
Any Changes or modifications not expressly approved by the party responsible for compliance
could void the user's authority to operate the equipment.
Note: This equipment has been tested and found to comply with the limits for a Class B digital
device, pursuant to part 15 of the FCC Rules. These limits are designed to provide reasonable
protection against harmful interference in a residential installation. This equipment generates uses
and can radiate radio frequency energy and, if not installed and used in accordance with the
instructions, may cause harmful interference to radio communications. However, there is no
guarantee that interference will not occur in a particular installation. If this equipment does cause
harmful interference to radio or television reception, which can be determined by turning the
equipment off and on, the user is encouraged to try to correct the interference by one or more of
the following measures:
-Reorient or relocate the receiving antenna.
-Increase the separation between the equipment and receiver.
-Connect the equipment into an outlet on a circuit different from that to which the receiver is
connected.
-Consult the dealer or an experienced radio/TV technician for help.
The device has been evaluated to meet general RF exposure requirement. The device can be
used in portable exposure condition without restriction.