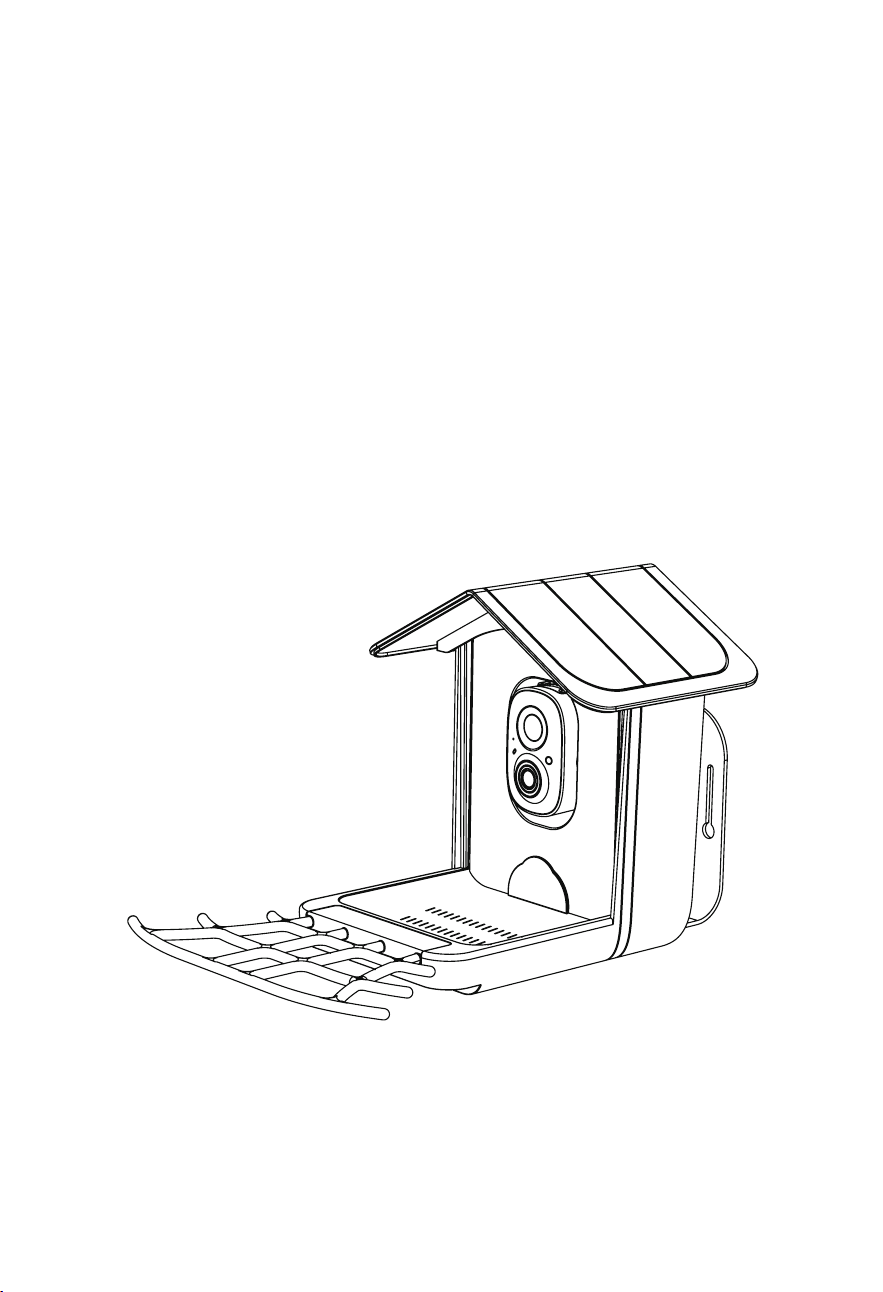
User Manual of
Smart Bird Feeder

This equipment has been tested and found to comply with
the limits for a Class B digital device, pursuant to part
15 of the FCC rules. These limits are designed to provide
reasonable protection against harmful interference in a
residential installation. This equipment generates, uses
and can radiate radio frequency energy and, if not installed
and used in accordance with the instructions, may cause
harmful interference to radio communications. However,
there is no guarantee that interference will not occur in a
particular installation. If this equipment does cause harmful
interference to radio or television reception, which can be
determined by turning the equipment o and on, the user is
encouraged to try to correct the interference by one or more
of the following measures:
-Reorient or relocate the receiving antenna.
-Increase the separation between the equipment and receiver.
-Connect the equipment into an outlet on a circuit dierent
from that to which the receiver is connected.
-Consult the dealer or an experienced radio/TV technician for
help.
To assure continued compliance, any changes or
modications not expressly approved by the party.
Responsible for compliance could void the user’s authority
to operate this equipment. (Example- use only shielded
interface cables when connecting to computer or peripheral
devices).
This equipment complies with Part 15 of the FCC Rules.
Operation is subject to the following two conditions:
(1) This device may not cause harmful interference, and
(2) This device must accept any interference received,
including interference that may cause undesired operation.
FCC Radiation Exposure Statement:
The equipment complies with FCC Radiation exposure limits
set forth for uncontrolled enviroment. This equipment should
be installed and operated with minimum distance 20cm
between the radiator and your body.
FCC Warning

Catalog
Contents�������������������������������������������� 01
ProductDiagram���������������������������������� 03
HowtoAssembleSmartBirdFeeder�������� 04
HowtoSetuptheCamera��������������������� 07
Installation����������������������������������������� 25
HowtoAddBirdSeed��������������������������� 37
CleaningandMaintenance��������������������� 39
HowtoDoBirdAIRecognition���������������� 40
FAQ��������������������������������������������������� 42
01
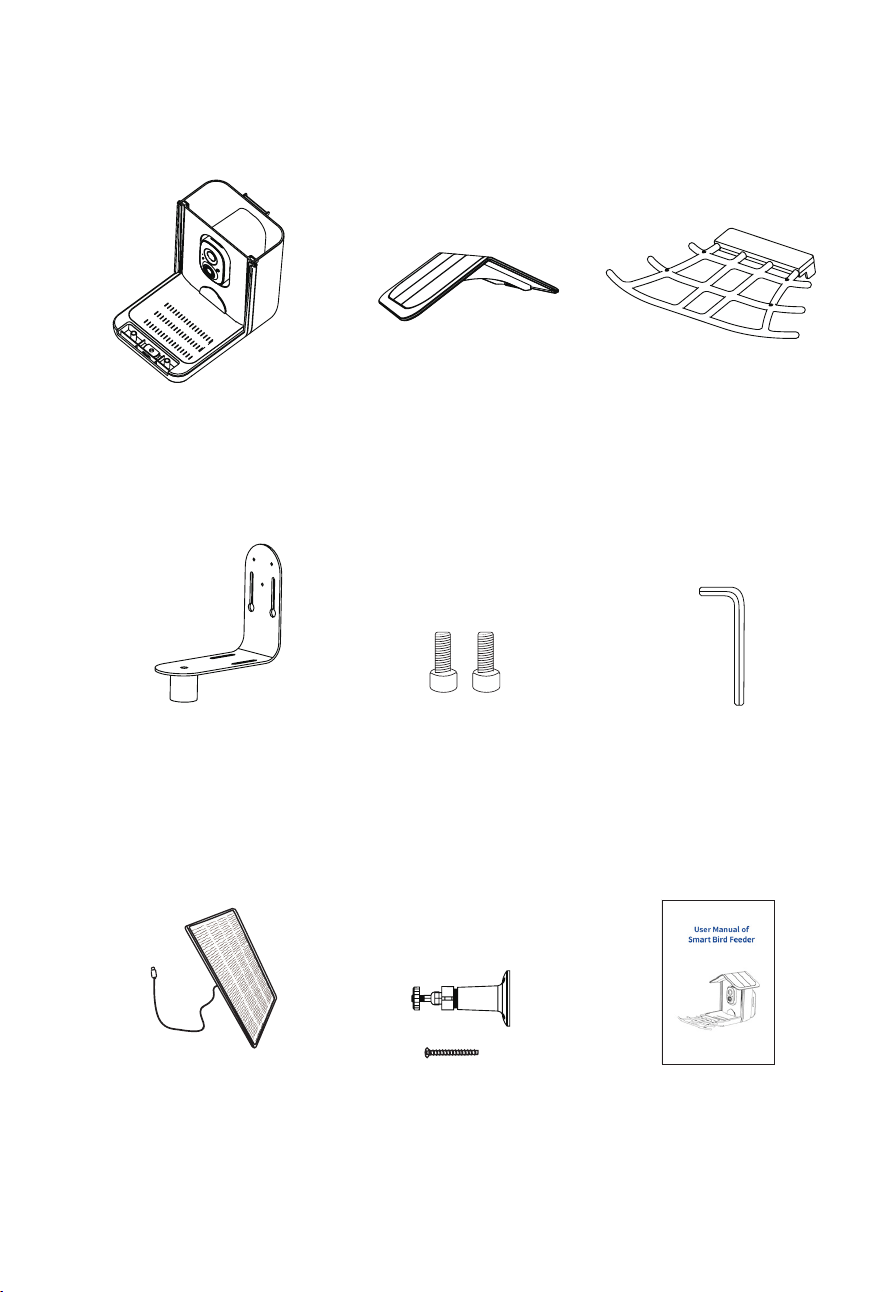
Contents
Feeder Cover *1Bird Seed Container*1
(Camera and Bird Seed
OutletValve include)
Mounting bracket*1
Bird Perch*1
Bracket Screws*2 Bracket Screwdriver*1
Manual*1Solar bracket screws*3
Solar PanelKit*1
X3
3W Solar Panel*1
02
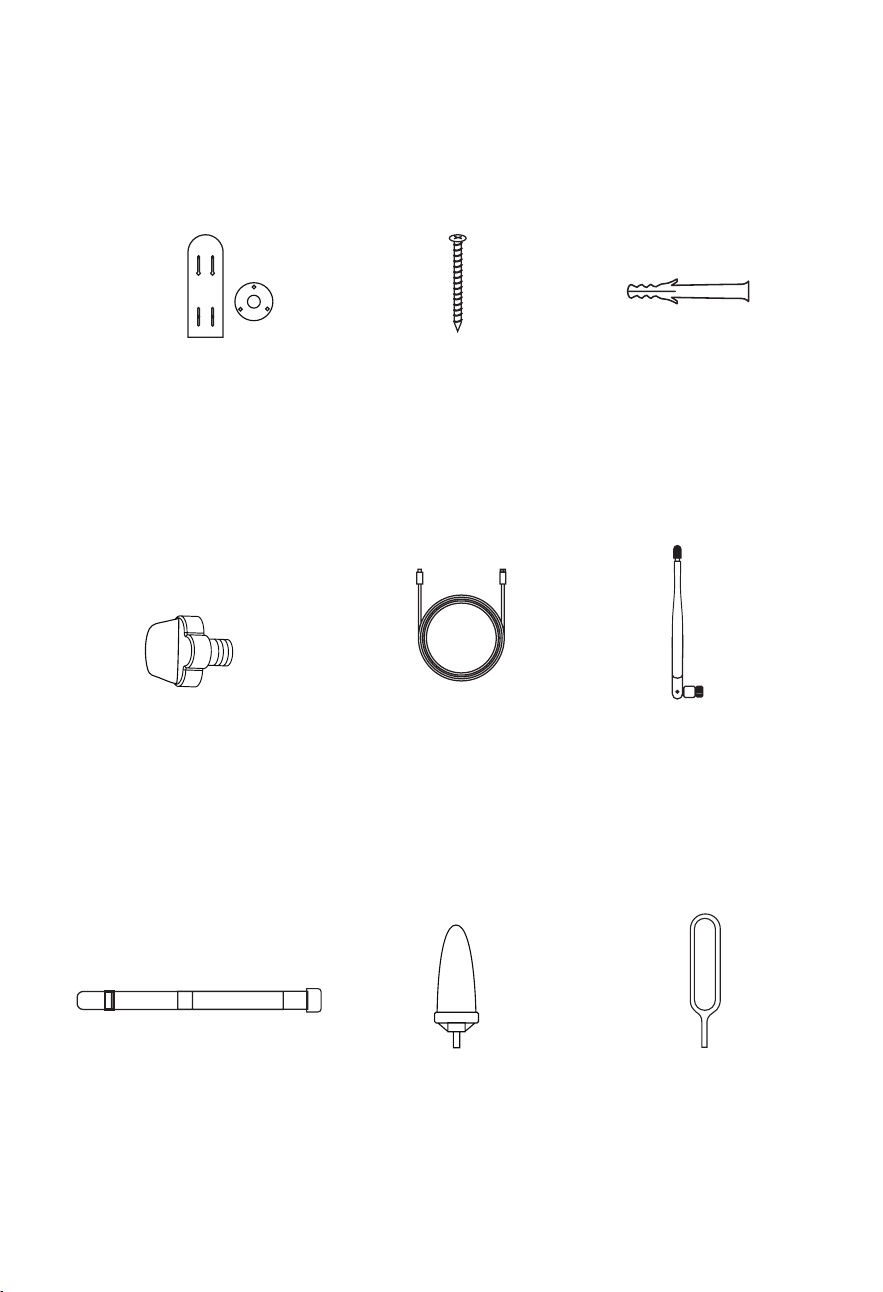
Bracket Screws*4
External Antenna*1Type-C Power Cable*1
Ejector Pin*1
Anchors*4
Strap*1
Drilling Template Sticker*1
Solar Bracket Positioning Sticker*1
Thumb Screws*3
Fruit Holder*4
03
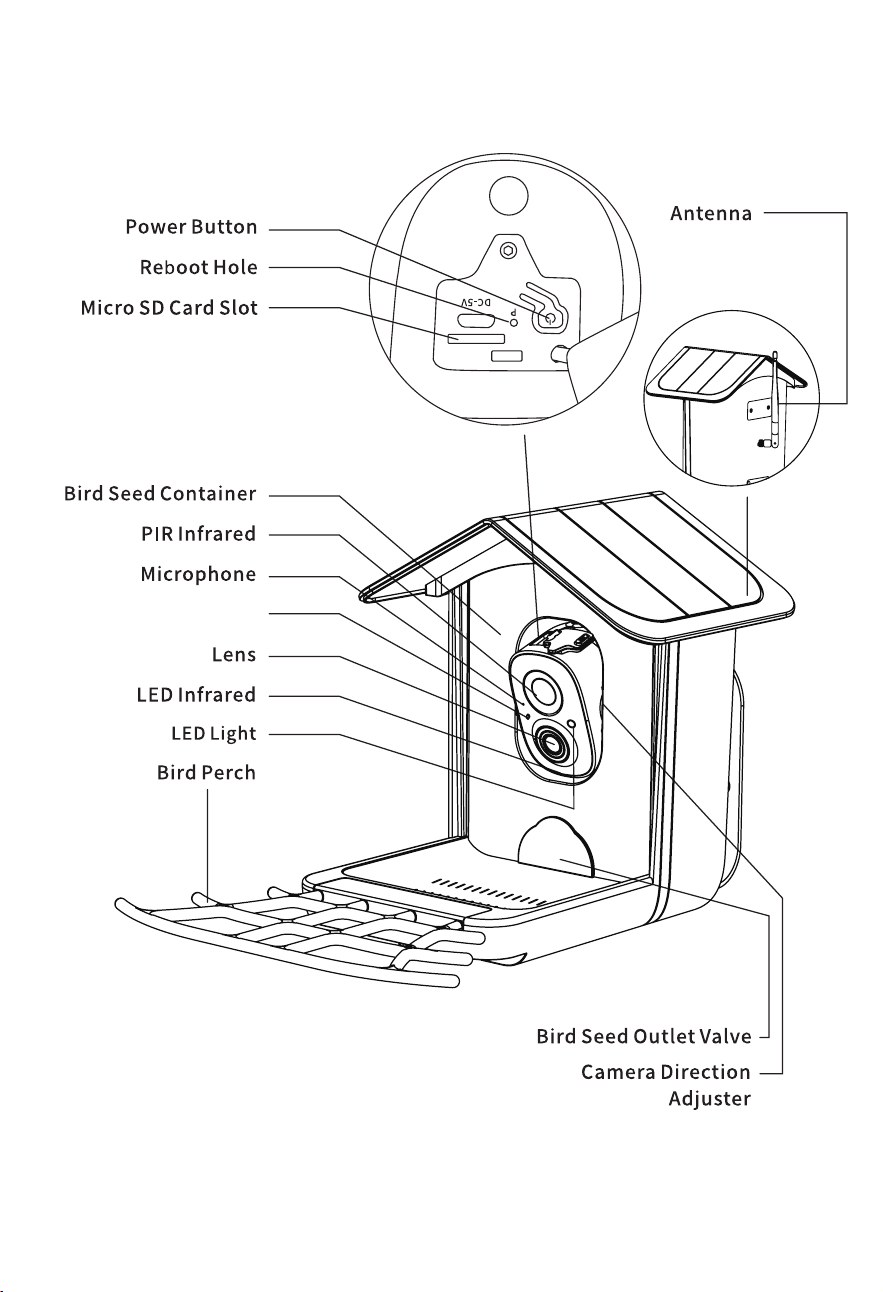
Product Diagram
Indicator Light
04
How to Assemble Smart Bird Feeder
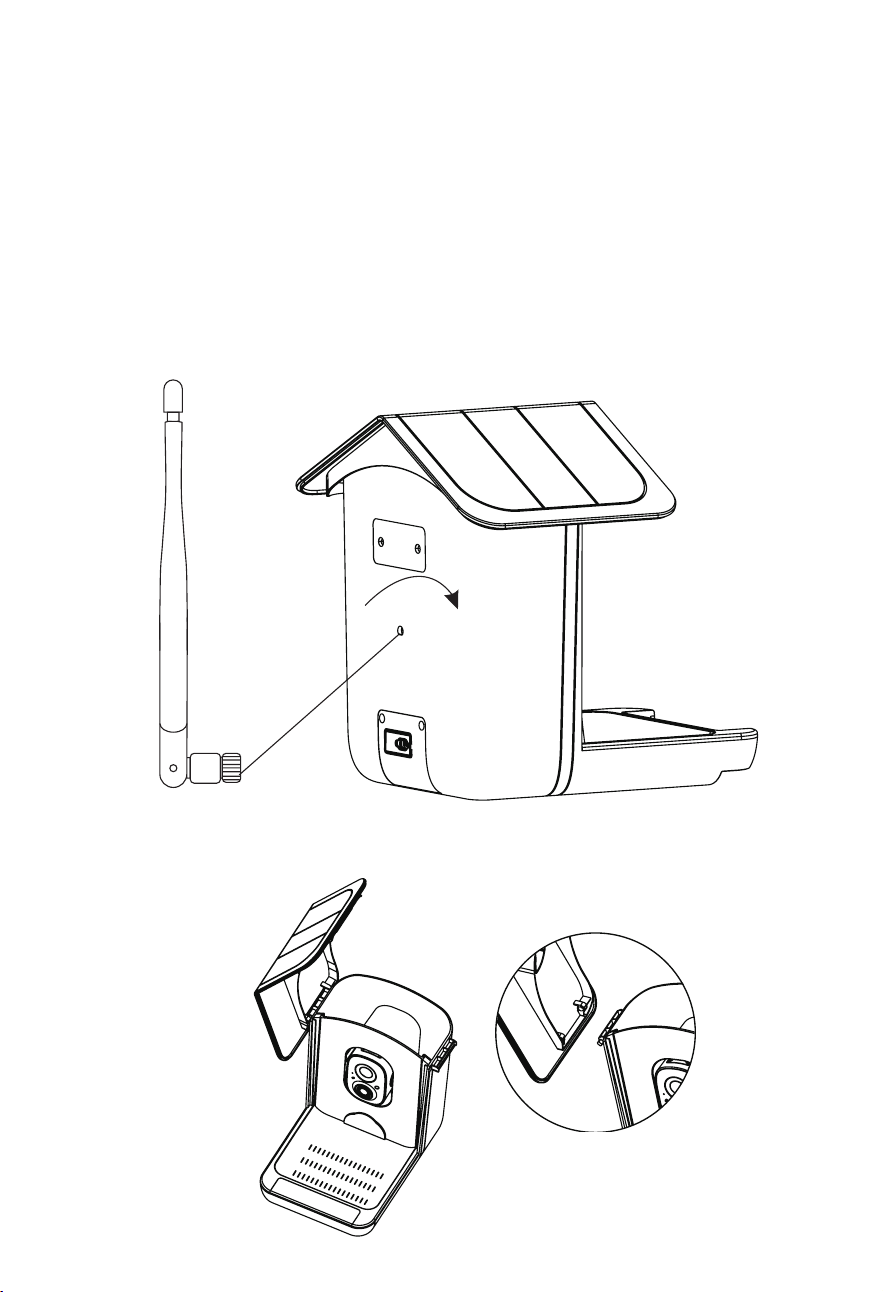
1.Assemble the base
2.Assemble Feeder Cover
Step 1.
Insert the antenna into the hole in the middle of the
back of the bird seed container and twist it tight.
Note:
lf the antenna is disconnected or not attached properly,
the app will not be able to connect to the smart bird feeder.
05
Step 1.
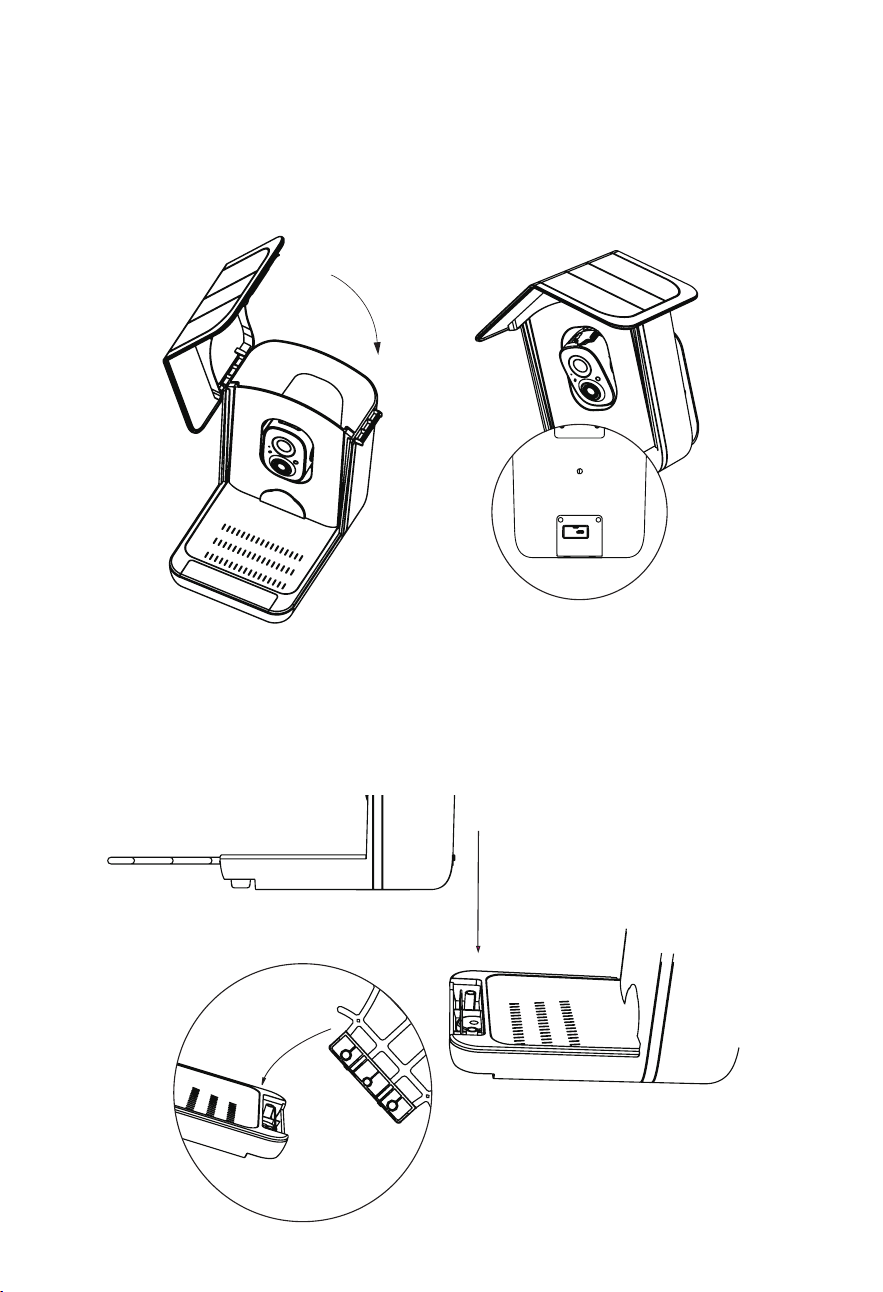
Align the feeder cover with the roof of bird seed
container and gently put it down, then fasten the buckle on
the right side of the cover to the bird seed container. You hear
a clicking sound which indicates that the cover is securely
mounted.
Step 1.
Install the bird perch in front of the base.
3. Assemble the Bird Perch
06
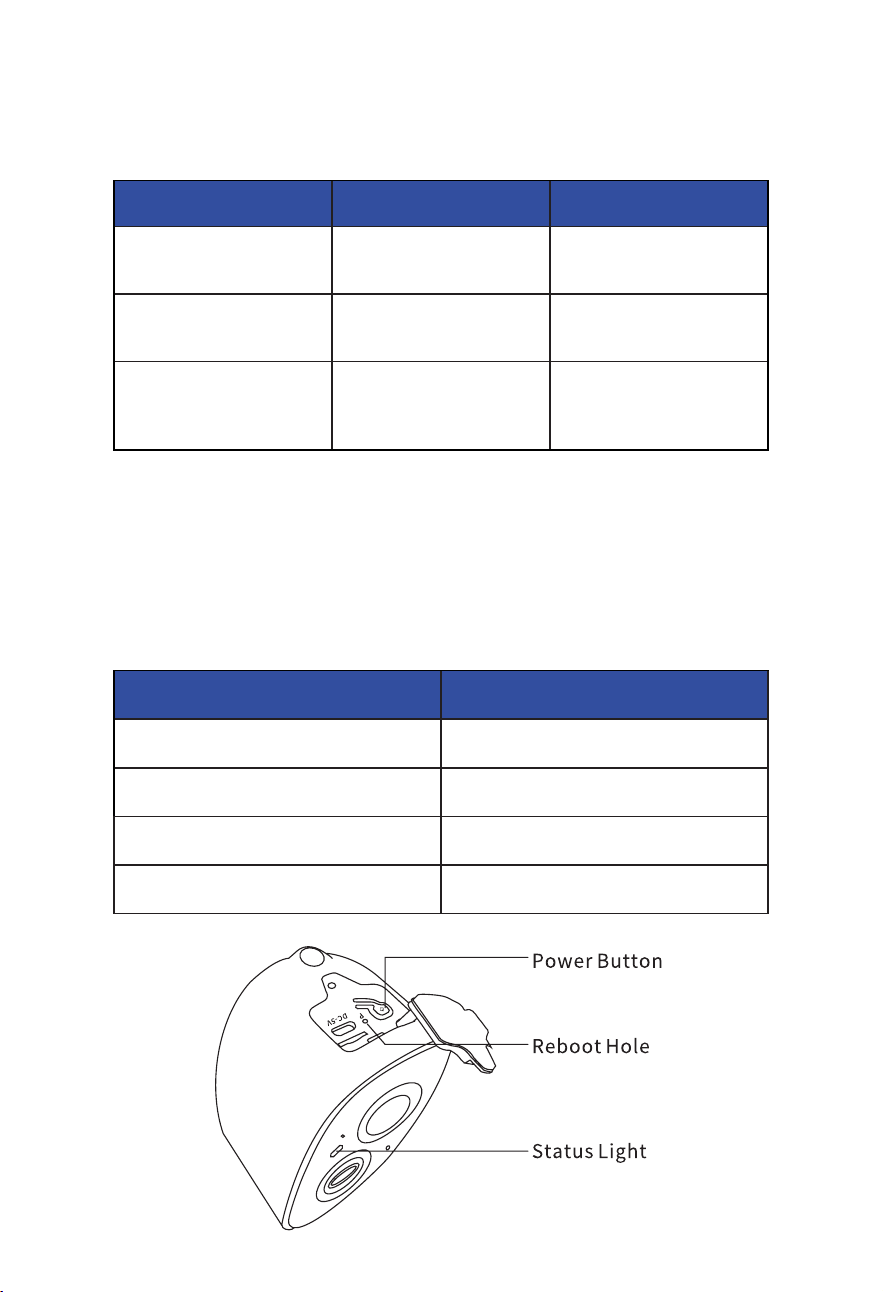
Smart bird feeder Camera comes with a built-in card slot that
supports up to 128GB MicroSD card. Insert the card into the
camera before you assemble the whole unit.
Step 1:
Gently rotate the camera down to the bottom.
step 2:
Open the top silicone plug. Insert the MicroSD card.
Make Sure to plug it in the right direction.
Step 3:
Finally, cover the silicone plug.
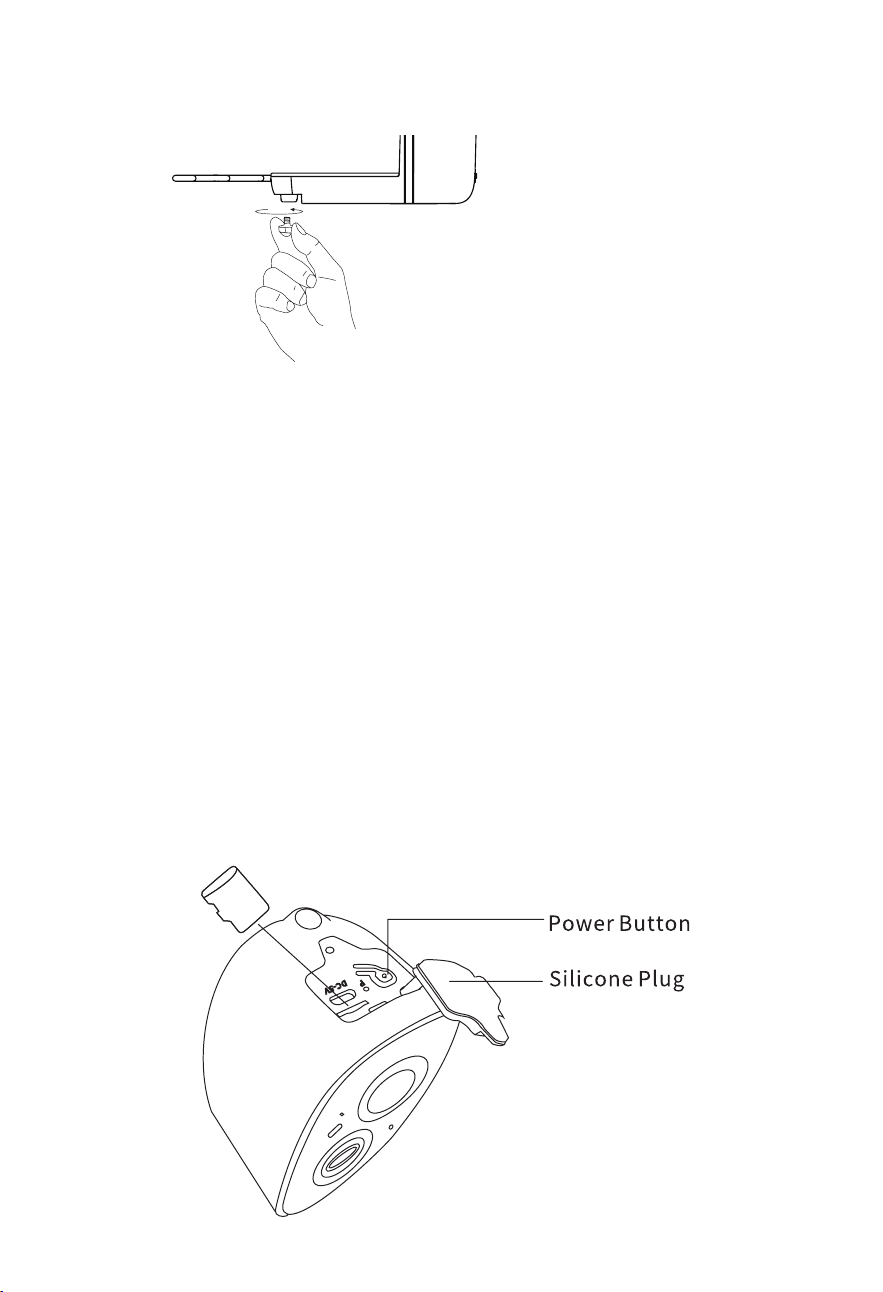
Step 2.
Use one of the provided thumb screws to x the bird
perch
4. Insert Micro SD Card into Camera
Note:
The SD card is not included, and it is not necessary. You
can use the feeder without it.
07
1.How To Turn On & O The Camera
2.Indicator Light Status
Note:
Reboot hole is used to restart the camera without
changing the settings. You could use the ejector pin in the
package to insert into the reboot hole and press and hold to
reboot.
Mode Status
Working mode Blue
Sleep Mode O
Charging mode Yellow
Fully charged mode Green
Operation Status
Turn On the Camera
Long press the power
button for 3s
Startup sound
Light: Solid Blue
Turn O the Camera
Long press the
power button for 3s
Shutdown sound
Light: O
Enter the Network
Conguration Mode
Double click the
power button
Sound: Ding Dong
Ding Dong
Light: Solid Blue
How to Set up the Camera
08
3.Camera Specications
Mode Status
MODEL G02
Camera Lens M12,f:3.3mm, F2.0, 200W
Viewing Angle
Vertical: 85°
Diagonal: 168° Horizontal: 135°
Minimum Illumination 0.01Lux
Video Compression Method H.264
Lighting Frequency 50Hz, 60Hz
Image Frame Rate 15fps
Image Resolution Max. 1920 X 1080P
Infrared Night Vision Distance 22.97ft
Video Bit Rate Adaptive
Wi-Fi 2.4G WiFi
Supporting Agreement
TCP/IP、UDP/IP、DHCP、
TMP、MUTP
09
Item Specication
Storage Media
Micro SD card
(up to 128GB, not include)
Battery Capacity 5000mAh
Standby Time 1 Year
Charging Voltage DV 5V+-5% 1.5A
Charging Time 8~10 hours
Waterproof Level IP65
Shutdown Power
Consumption
0.32mW
Standby Power Consumption 1.68mW
Working Power Consumption
during the Day
0.88W
Working Temperature -10° ~45° C
Storage Environment -20° ~60° C
Certicate
CE, FCC, RoHs, WEEE,
MSDS, UN38.3, UL62368, BattG
10
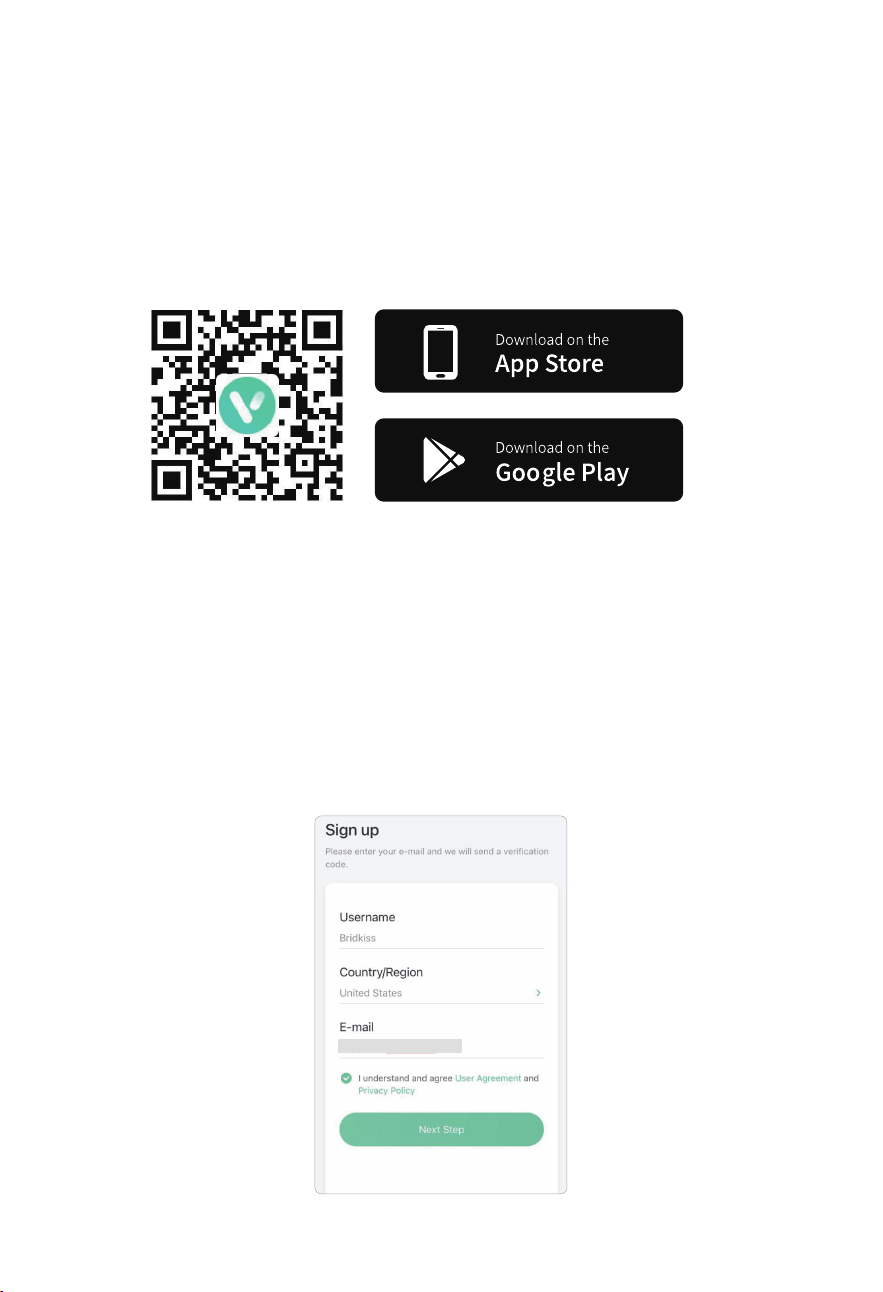
4.1.
Scan the QR code below or search"VicoHome" on APP
Store or Google Play Store to download and install the app.
4.2.
Open the link to download and install
the App: https://www.vicohome.io/download/
5.1.
Open the app and input your username,country,email
address.Check and agree to the UserAgreement then click
'NextStep'. For a better experience, allow all permissions to
avoid missing any notications.)
4.Download and Install the VicoHome App
5.Sign up
Note:
The most up-to-date information can be found
through the APP.
11
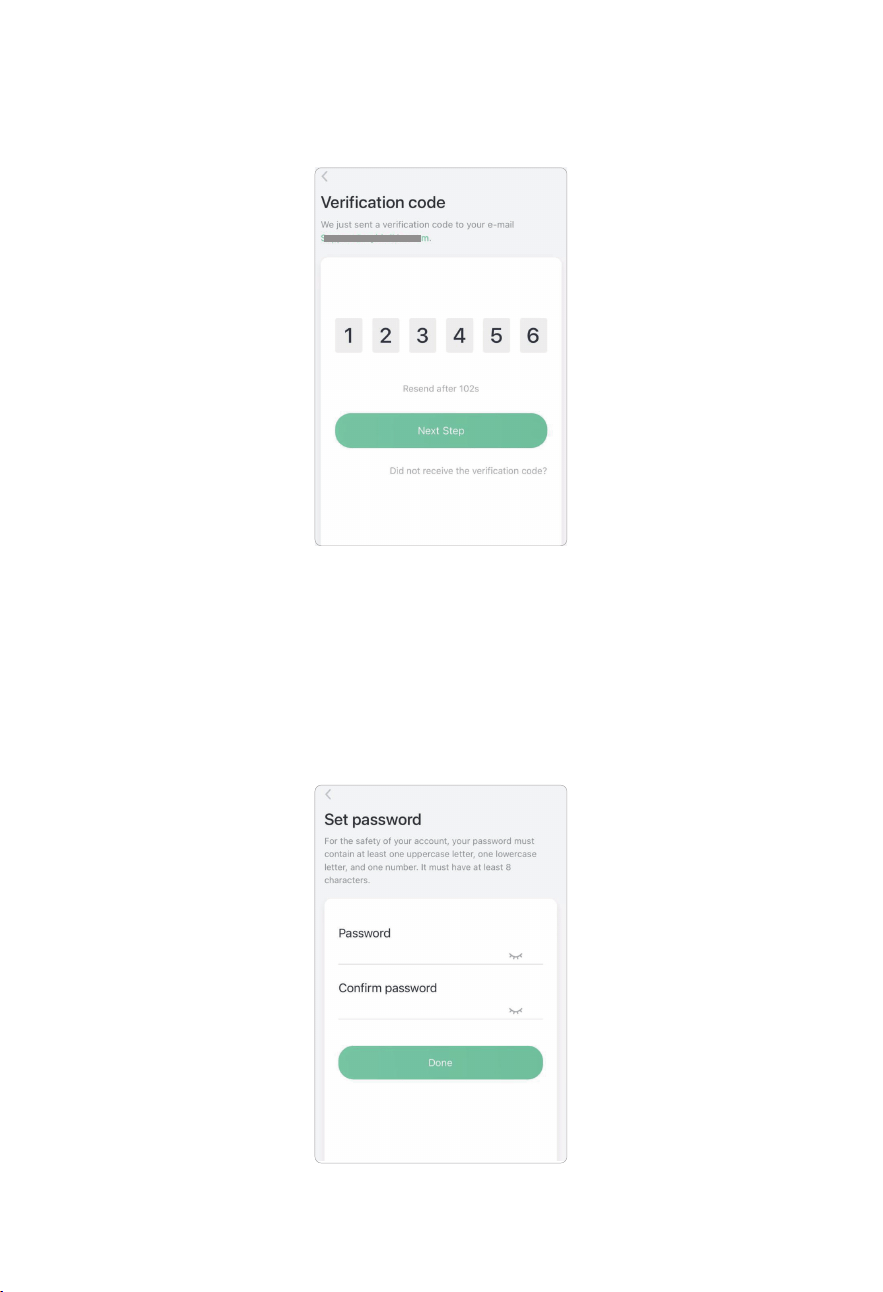
5.2.
You will get an email with a verication code for account
conrmation. Enter it to go to the next step.
5.3.
Set the login password and conrm the login password.
Then tap "Next Step". (For your account's safety, the
password needs to be a combination of at least 8 characters
and upper and lower case letters.)
12
6.Add the Camera
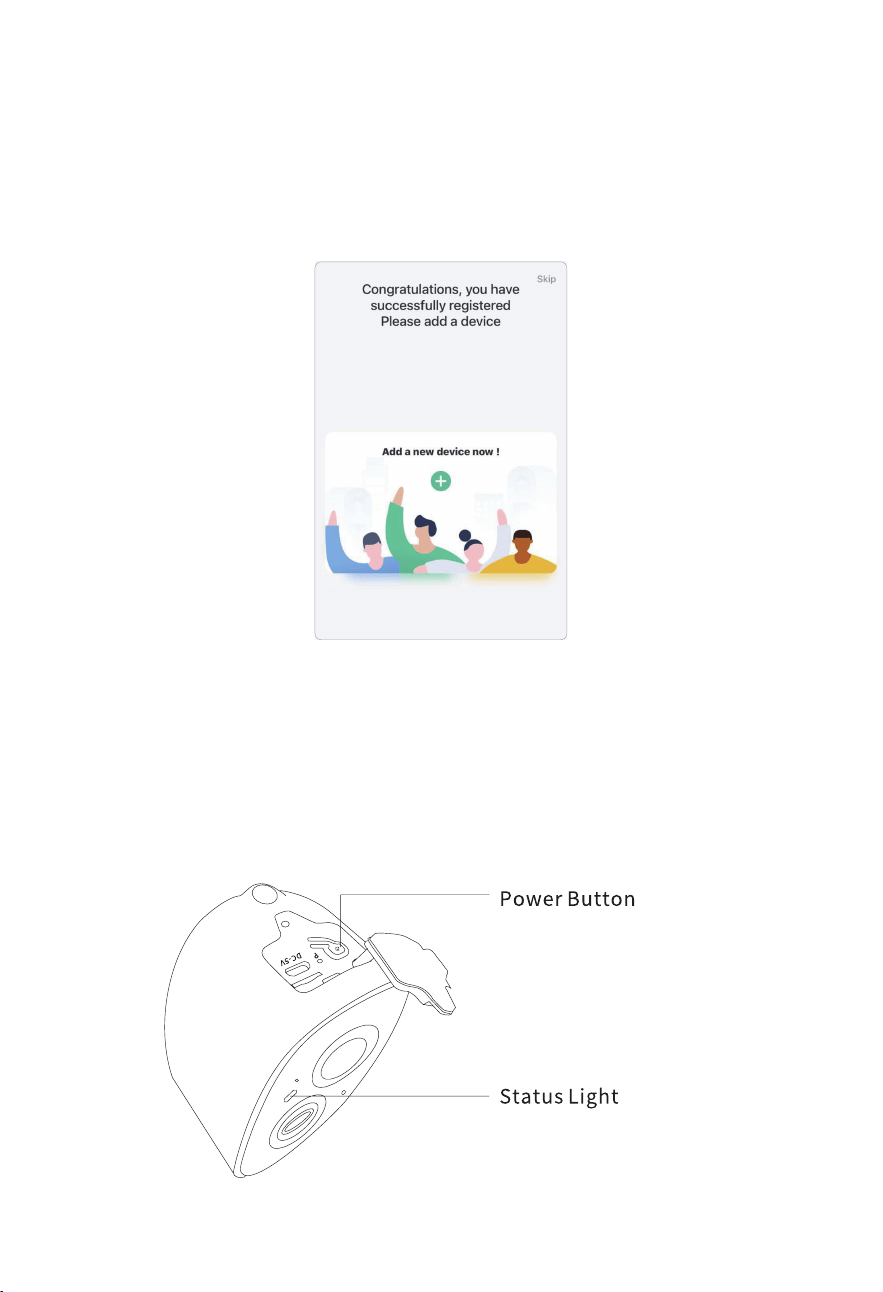
6.1.
Click "Add a new device now"on the VicoHome APP.
6.2.
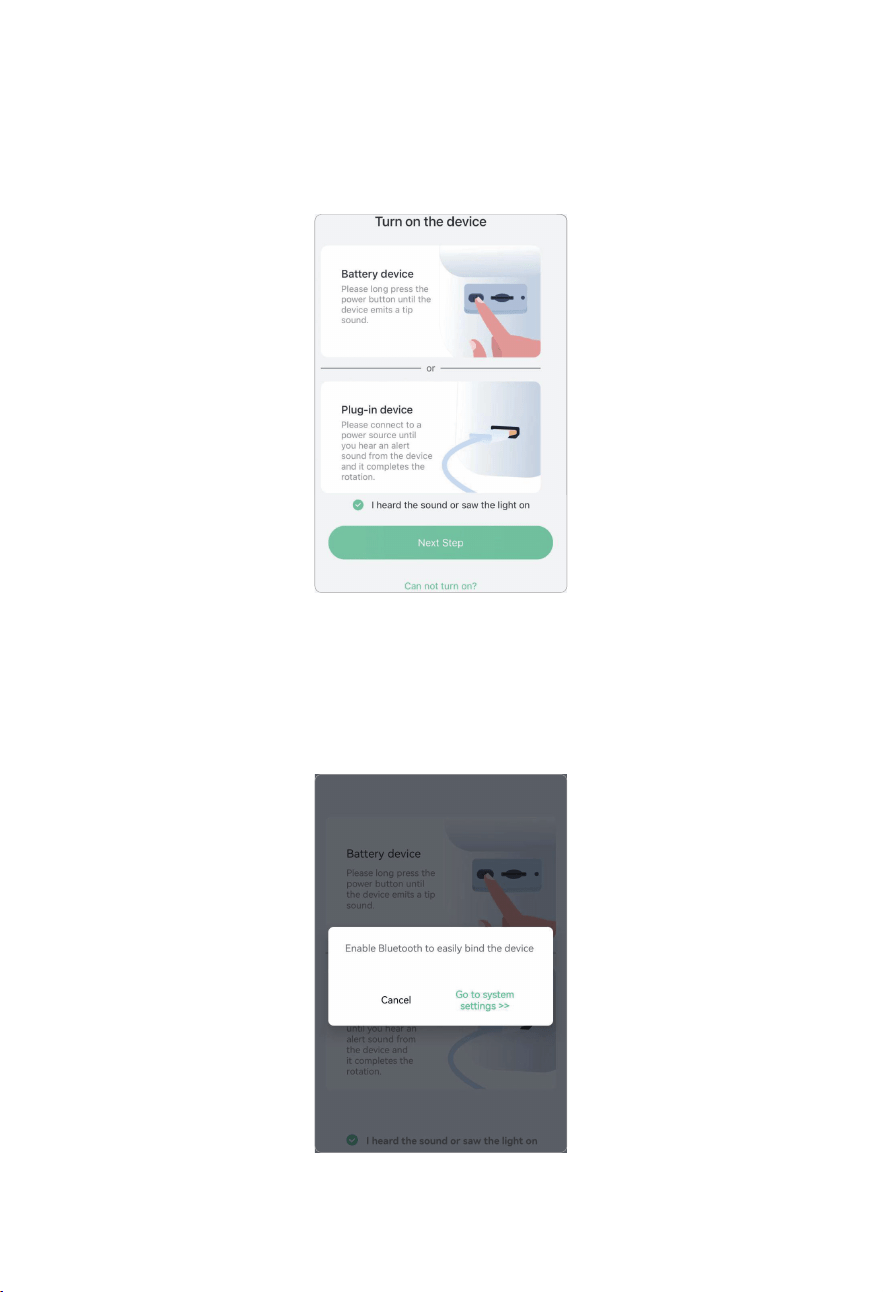
Follow the instructions on the APP to turn on the camera:
Long press the power button of the camera for 3s to turn on
the camera. Then the status light in the front of the camera
will be solid blue. Double click the power button to enter
network conguration mode after the prompt tone.
Note:
The most up-to-date information can be found
through the APP.
13
6.3.
Make sure your camera is ringing the sound of ding dong
ding dong, after hearing the sound, tick "I heard the sound or
saw the light on"on APP. Then click "Next Step".
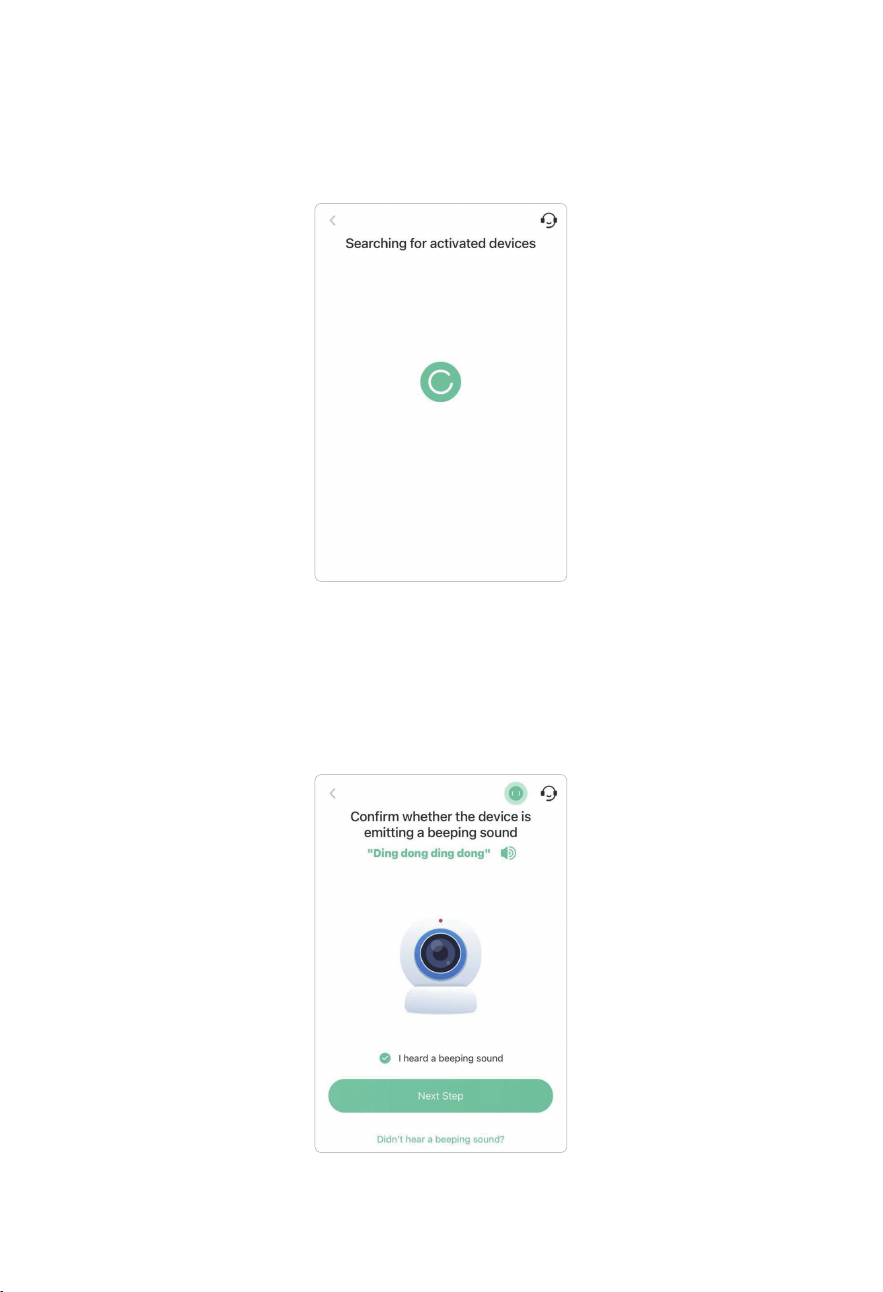
6.4.
For quick connection, please follow the instructions to
open the Bluetooth settings.
14
6.5.
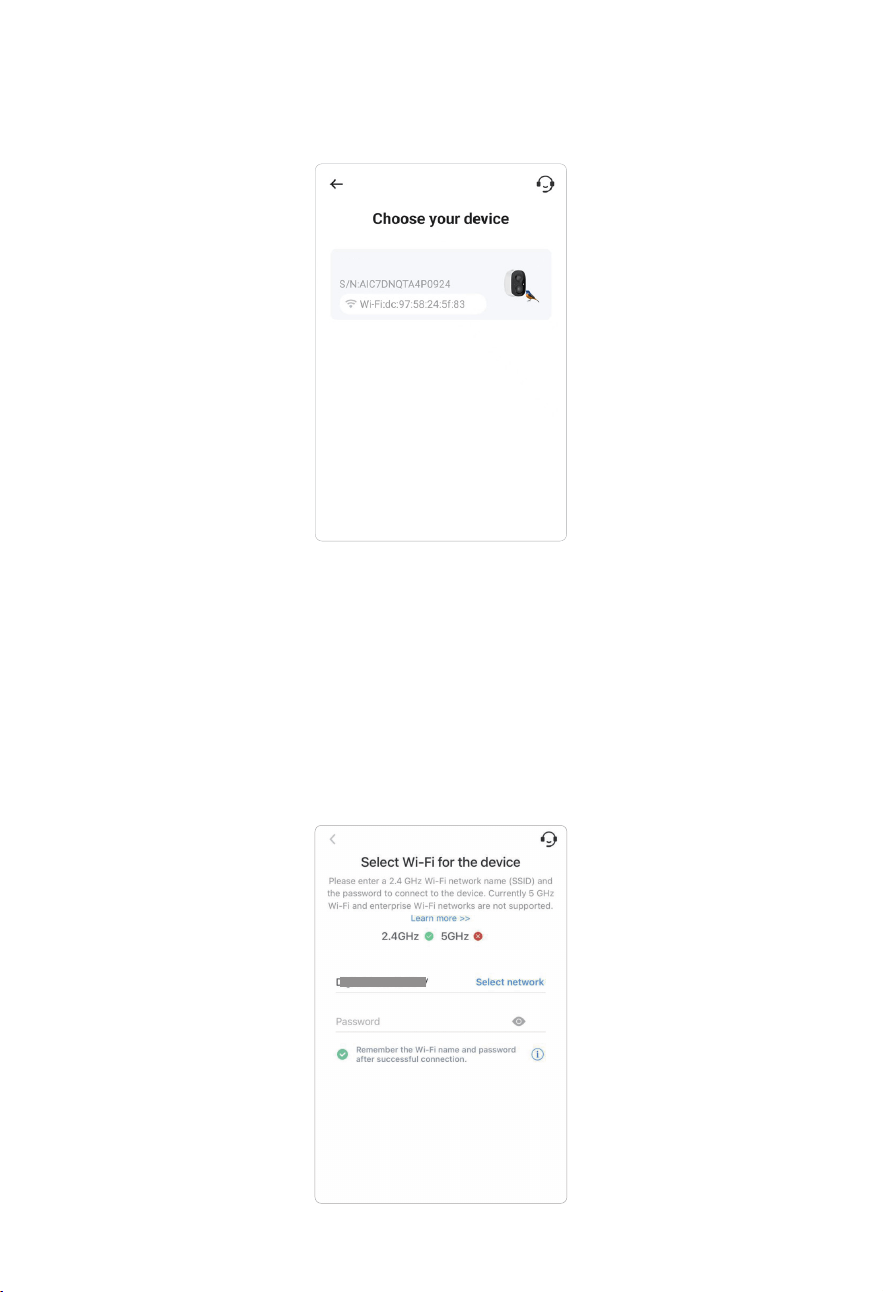
At this point, the phone enters the state of searching for
camera.
6.6.
After hearing "ding dong ding dong", tick "I heard the
beeping sound". Then click“Next Step”.
15
6.7.
Select the camera you need to connect.
6.8.
Enter the WiFi name and WiFi password you want to
connect to, tick "remember the Wi-Fi name and password
after successful connection" and click "Next Step" . ( Note:
The camera only supports 2.4GHz WiFi network with stronger
wall penetration capability)
G02
16
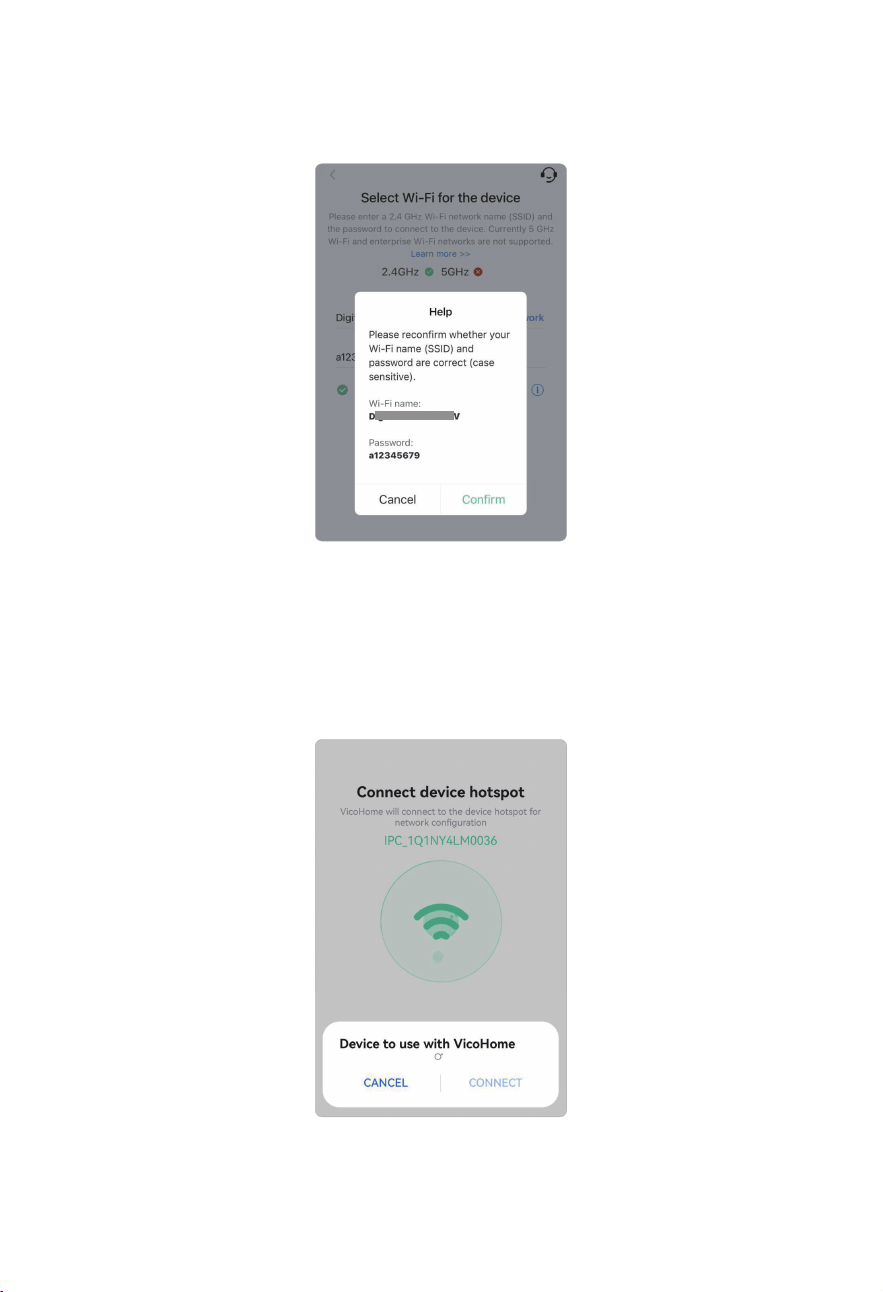
6.9.
Conrm the WiFi name and password.
6.10.
Click"Connect"
17
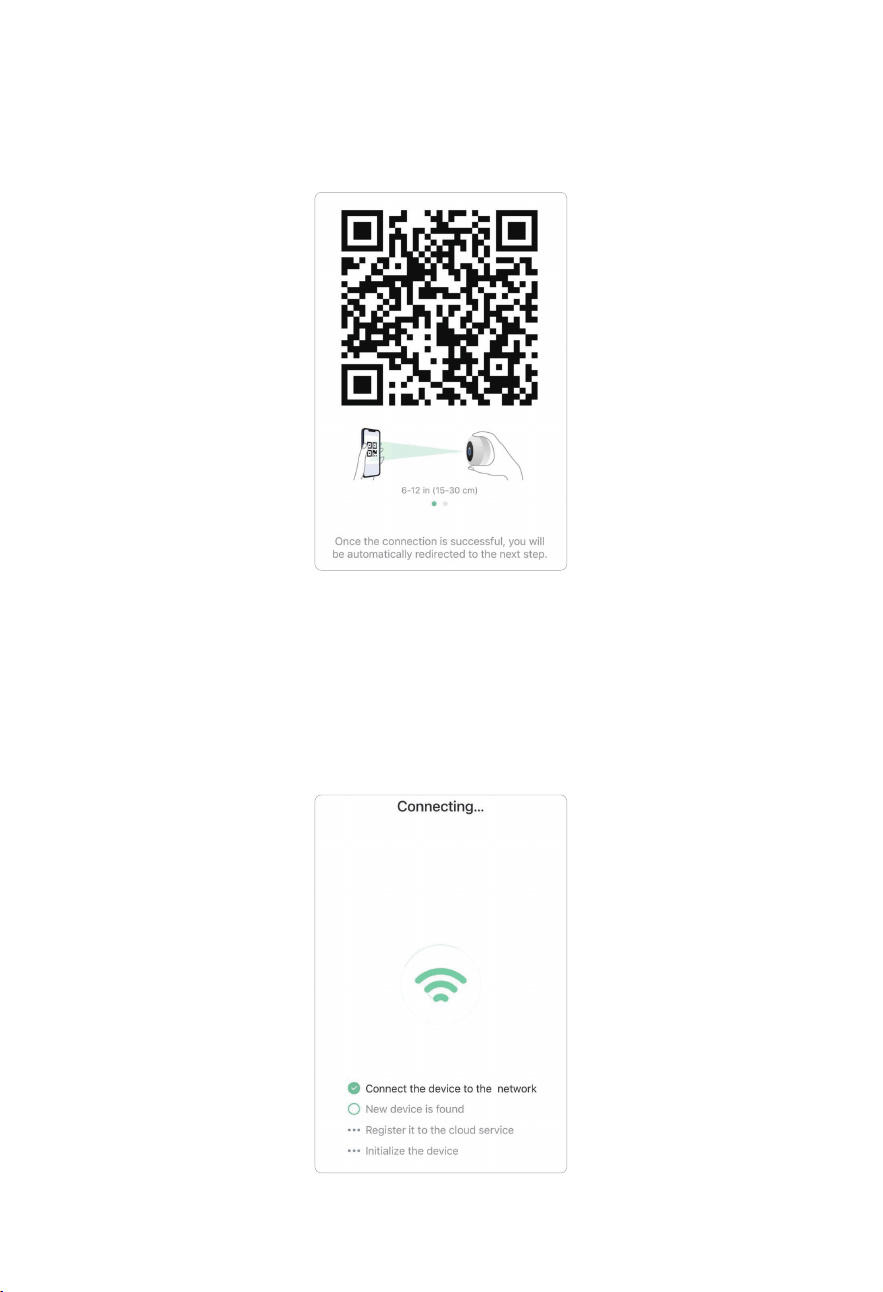
Note:
If the camera cannot be searched by Bluetooth, a QR
code will appear, point the QR code at the len of the camera to
connect.
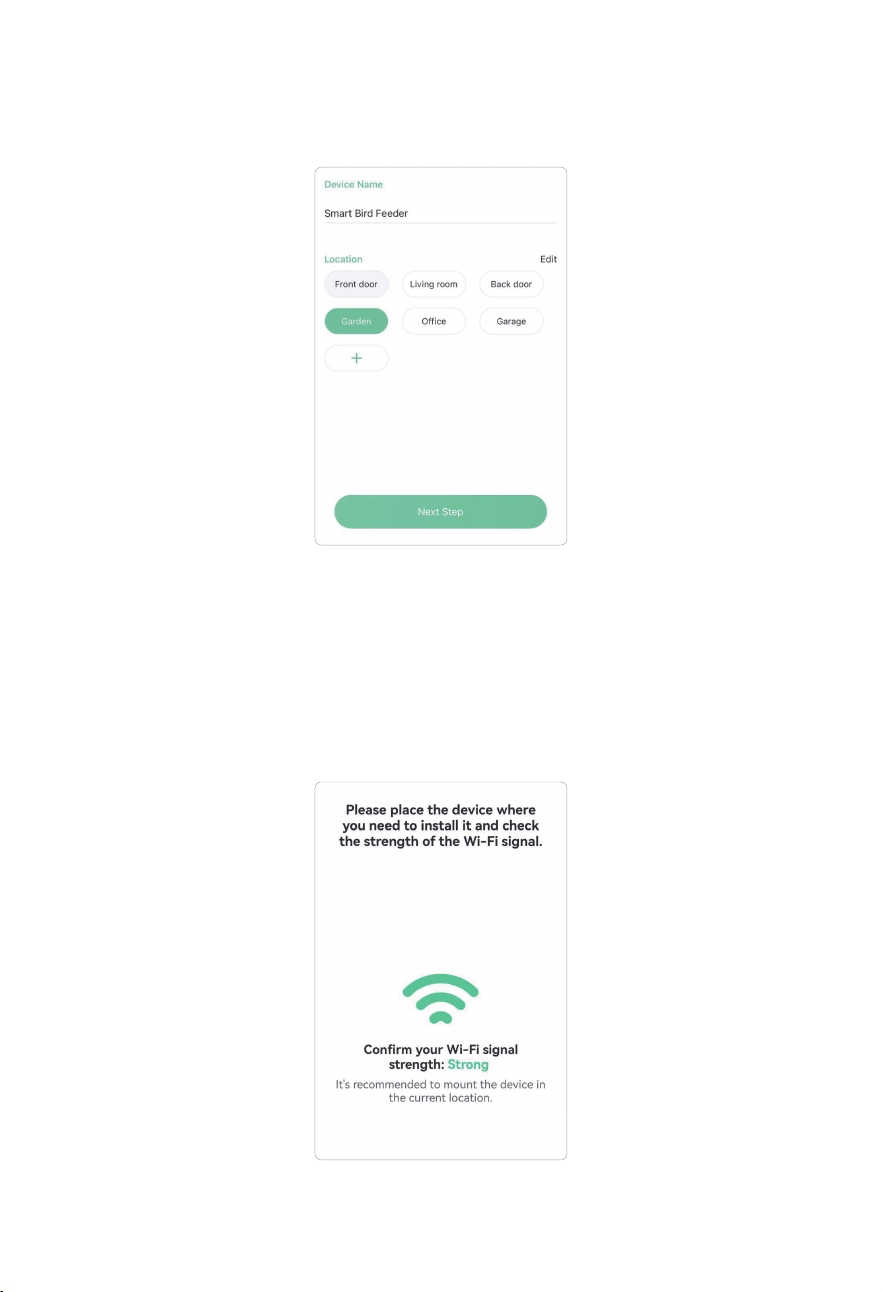
6.11.
When connecting, please wait patiently for 15 seconds,
and then you will hear a sound "WiFi Connected".
18
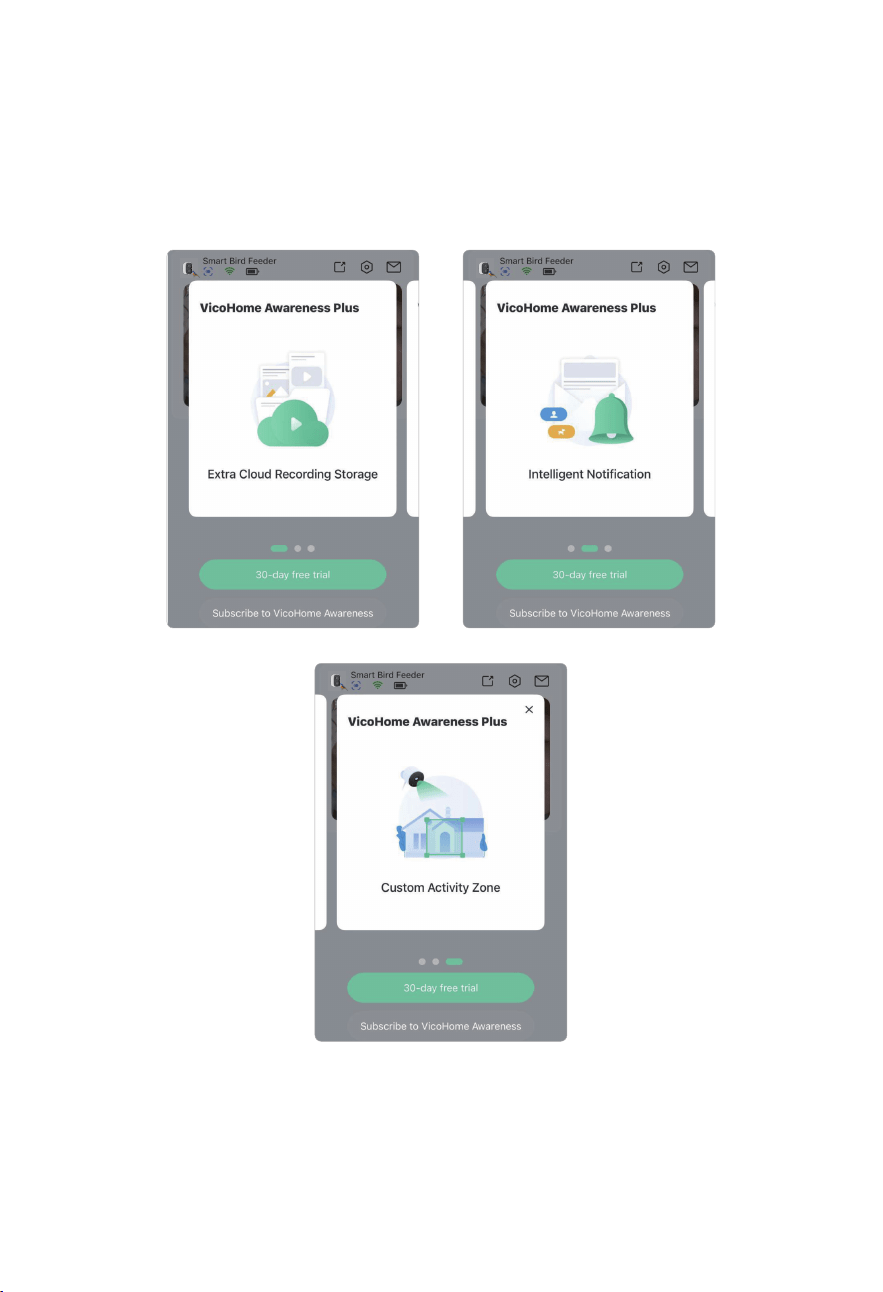
6.12.
Then set a name and location for Smart bird feeder .
6.13.
Finally, you will be informed of the current wi network
status. When the signal is weak, adjust the router or bird
feeder position in time.
19
6.14.
When you complete the connection, the following
message will appear, you can get free cloud storage for 30
days to try. After 30 days, you can subscribe to the cloud
storage package that suits you.

20
7.1.
When you hear the "Wi-Fi Password Error", please check
whether the Wi-Fi password you entered in the App is correct;
7.2.
When you hear the "Authentication error", please ensure
that your Wi-Fi network is not an enterprise-level network,
and the device supports only the network with the security
level below WPA-2;
7.3.
When you hear the "Wi-Fi not found", please check
whether you select or enter the correct Wi-Fi name, and place
the device near the Wi-Fi router and ensure that the router is
powered on. Please note that 5Ghz Wi-Fi cannot be searched
by the device;
7.4.
When you hear the "Retrieving IP timeout," it indicates
that the number of devices connected to the router is reaching
the maximum. Please remove some of the connected devices
that are not commonly used or restart the router to clear
the unconnected devices. You may even need to contact the
router administrator.
7.5.
When you hear the "Cloud service connection fail",it is
common on the condition of network disconnection or that
the selected router in your home is a local area network
server. Please ensure that the network connection is normal,
and try to temporarily turn o the rewall to connect again.
7.Possible problems with binding:
21
You can use this feature when you need to use the camera
with other family members or friends. Only the admin user
who has bound the camera for the rst time can share and set
up the camera, while other members can only view the live
video or video playback feature of the camera.
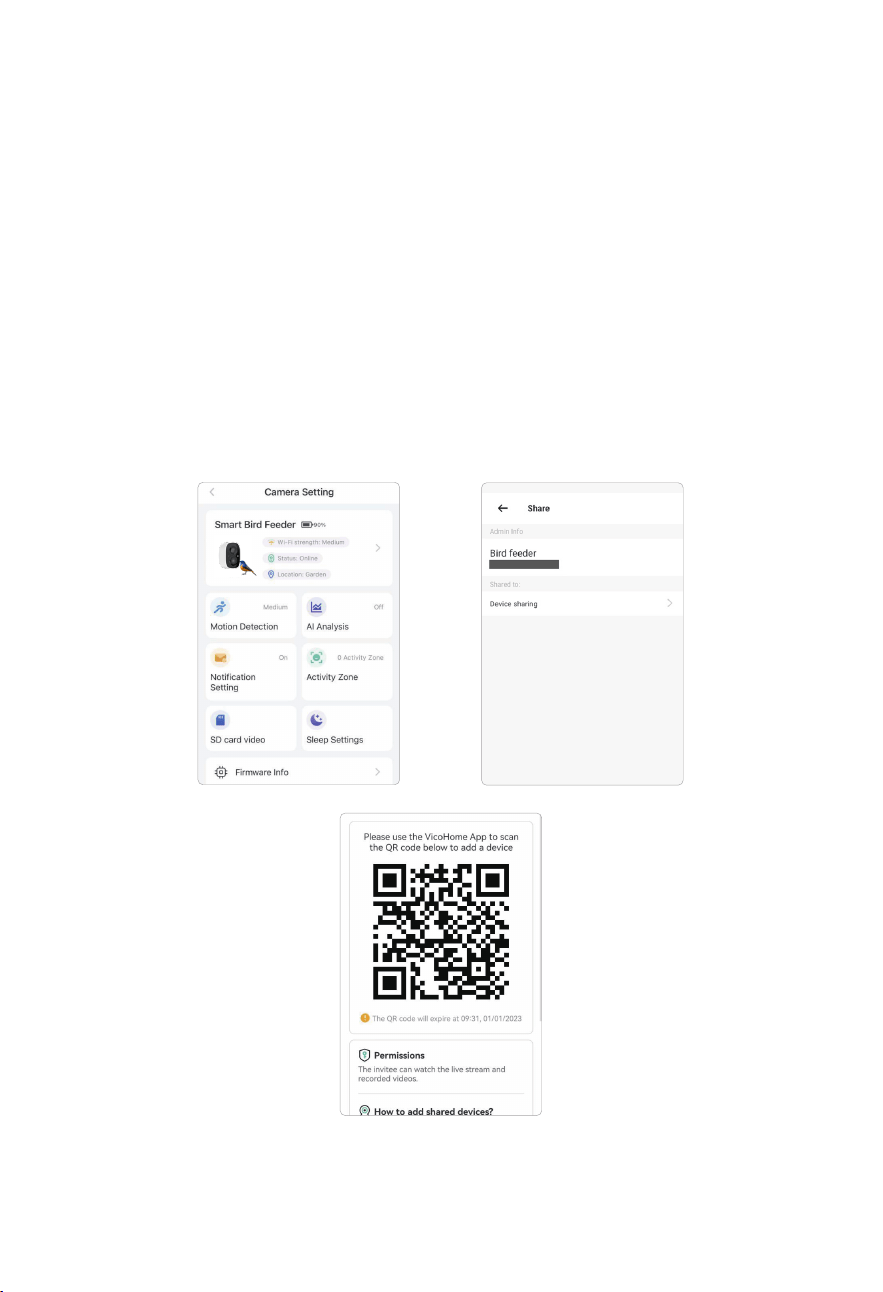
8.Share the camera
8.1.
For admin user of the camera, nd the camera you wish to
share on the app homepage or camera settings screen, then
click the share button and enter the Share page. Click "Device
Sharing" to generate a shared QR code.
22
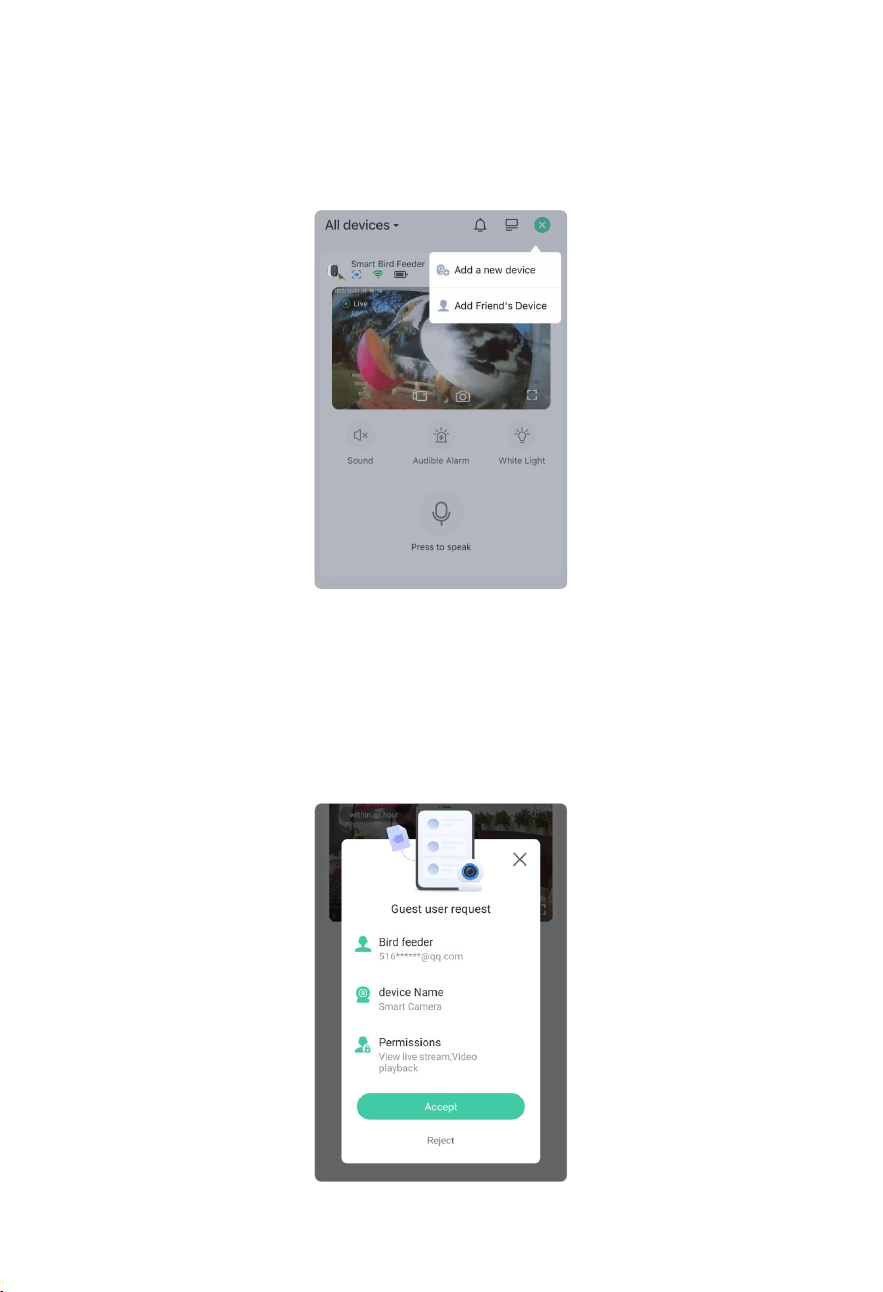
8.2.
For users who need to be shared with, click "+" on the
homepage and select "Add Friend's Device" to enter the scan
code page.
8.3.
After the shared user successfully scans the QR code on
the admin user's mobile phone, the admin user will receive a
conrmation notication, then click "Accept" to complete the
camera sharing.
23
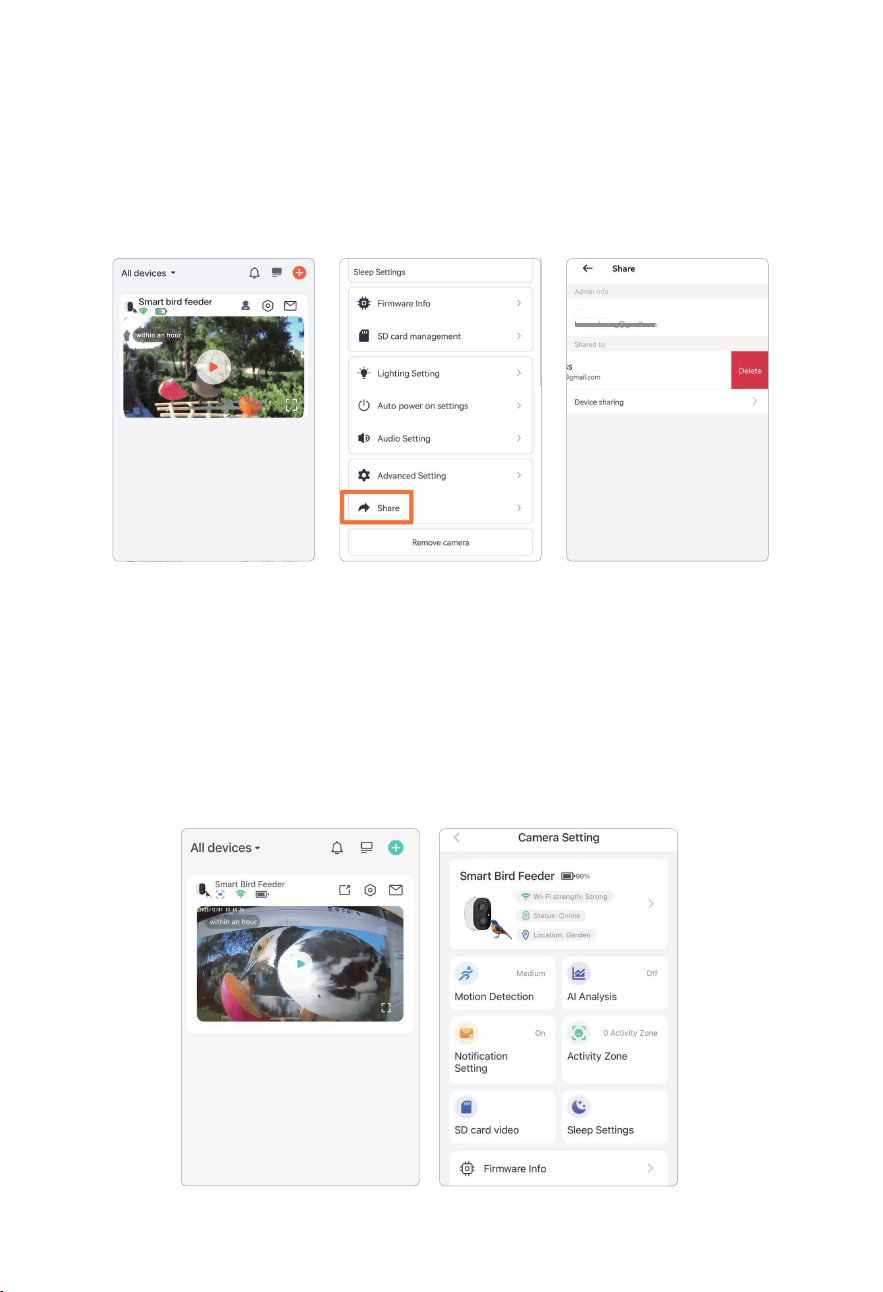
If you want to delete shared friend devices, please go to the
sharing page and select the friend account you want to delete,
and then swipe left, you will nd the delete button, just click
it.
10.1.Check Battery Level
After connected, please check the battery level of the camera
to make sure it is fully charged before installing it in the yard.
App will also remind you to charge your camera when the
battery is low.
9.How to delete the shared Camera
10.How to Charge the Camera
24
10.2.Charge the camera
There are two ways to charge it
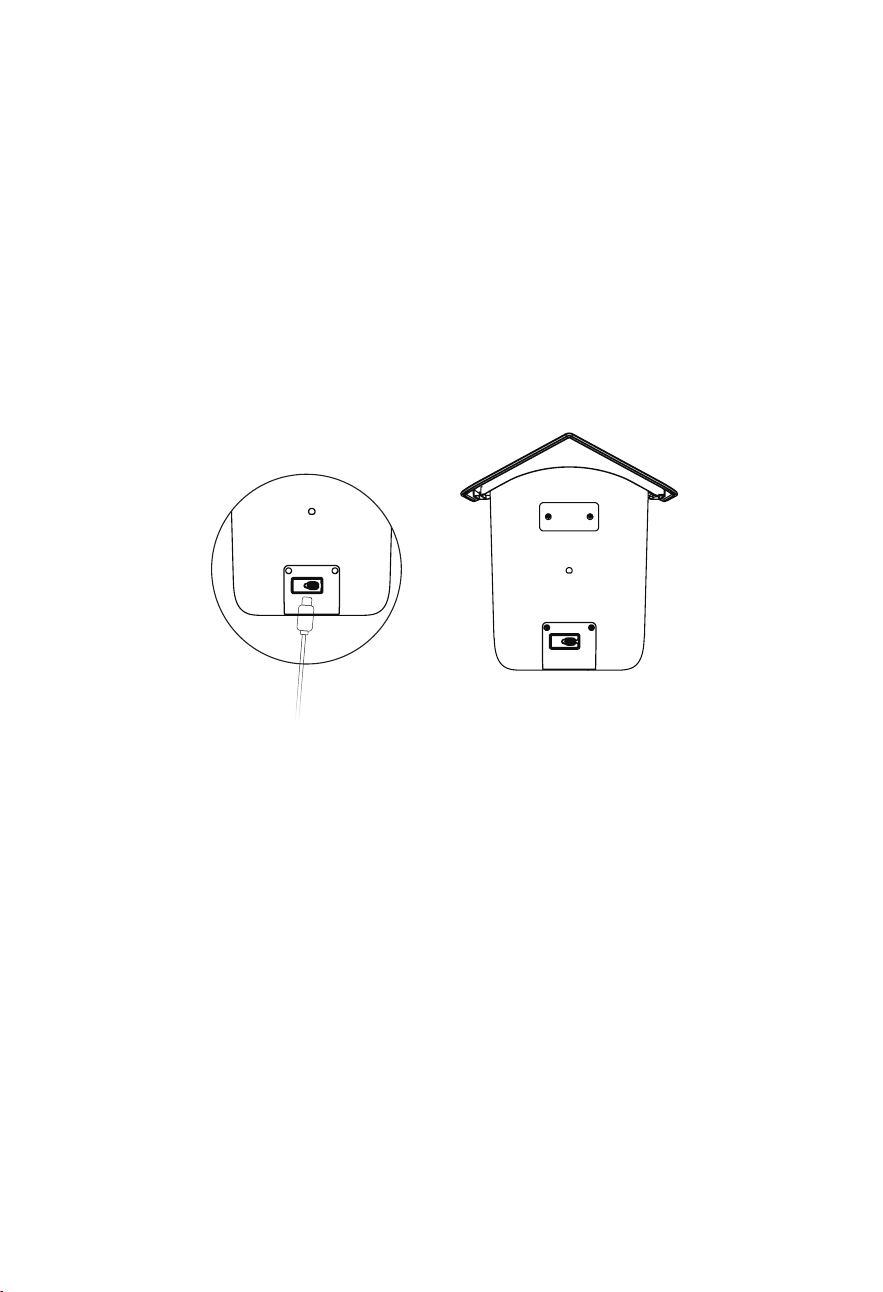
10.2.1.Indoor Charging:
If you need to charge after installation, please don't move the
camera and the base, just remove the birdseed container, the
charging port is in the middle of the right side of the birdseed
container. Please use the TypeC cable to plug into the 5V/1.5A
charging adapter to charge the camera.
10.2.2.
Outdoor charging: You can directly use the equipped
solar panel to connect to the charging port in the middle of
the right side of the bird seed container.
Note:
During charging, the camera's indicator light is solid
yellow, and when the camera is fully charged, the indicator
light will turn solid green. It will take ten hours to fully charge
the camera.charging adapter to charge the camera.

25
1.1.
Keep Smart bird feeder Feeder and all accessories out of
reach of children and pets.
1.2.
Make sure the camera has been fully charged (DC5V /
1.5A).
1.3.
Working temperature: -10° C to 40° C (14° F to 104° F)
Working relative humidity: 0-95%
1.4.
Please do not expose the camera lens to direct sunlight.
1.5.
The camera has an IP65 waterproong, which supports
working properly under rains or snows. But it can not be
soaked in water.
Note:
1.1.Smart bird feeder Feeder Cam only works with 2.4GHz Wi-
Fi.
1.2.Strong lights may interfere with the device's ability to scan
QR code.
1.3.Avoid placing the device behind furniture or near
microwaves products. Try to keep it within range of your Wi-
Fi signal.
1.4.Please check the signal of the camera again before
installing it on the shelf to ensure that the signal is good
enough. Avoid removing the camera after installation due to
weak signal.
Installation
1.Before Installation
26
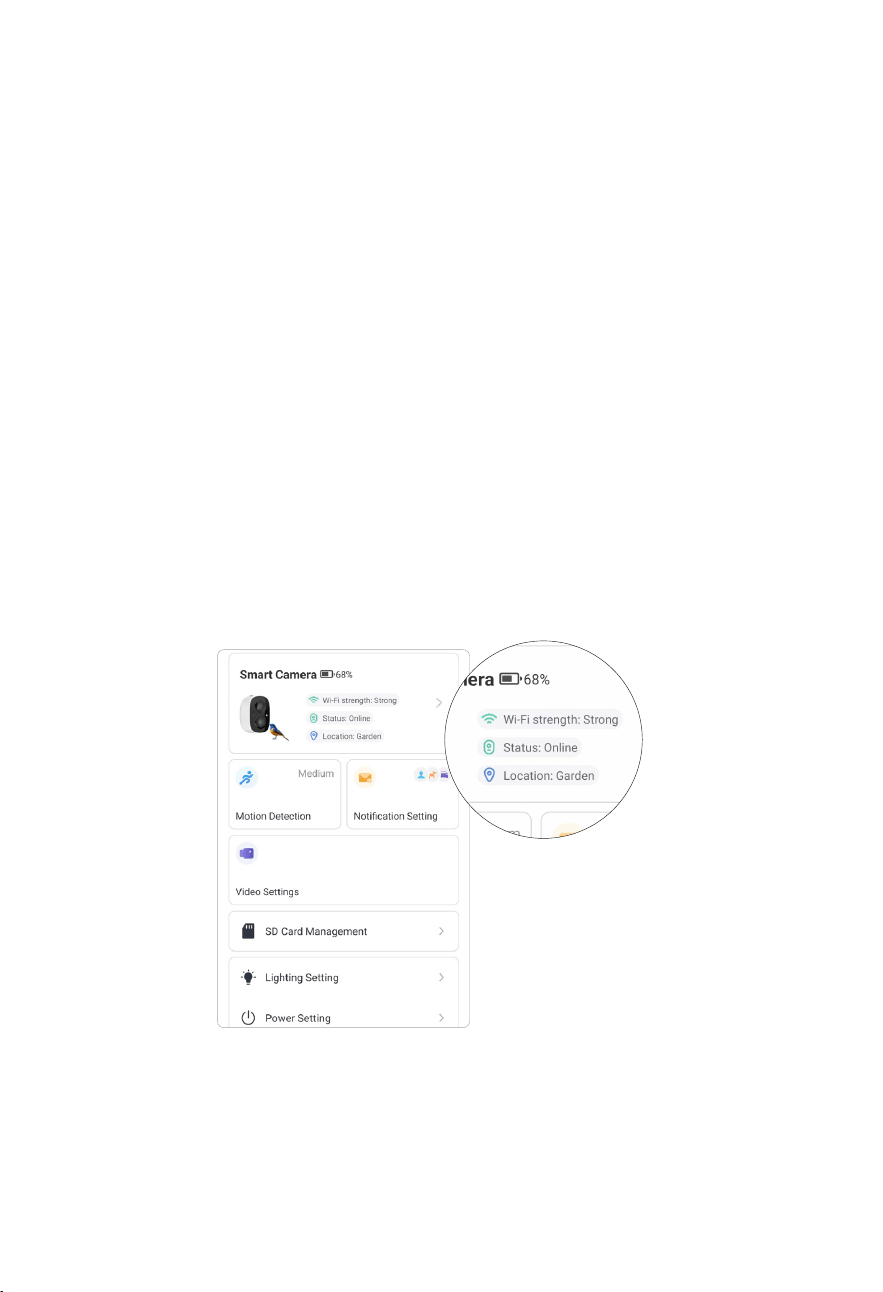
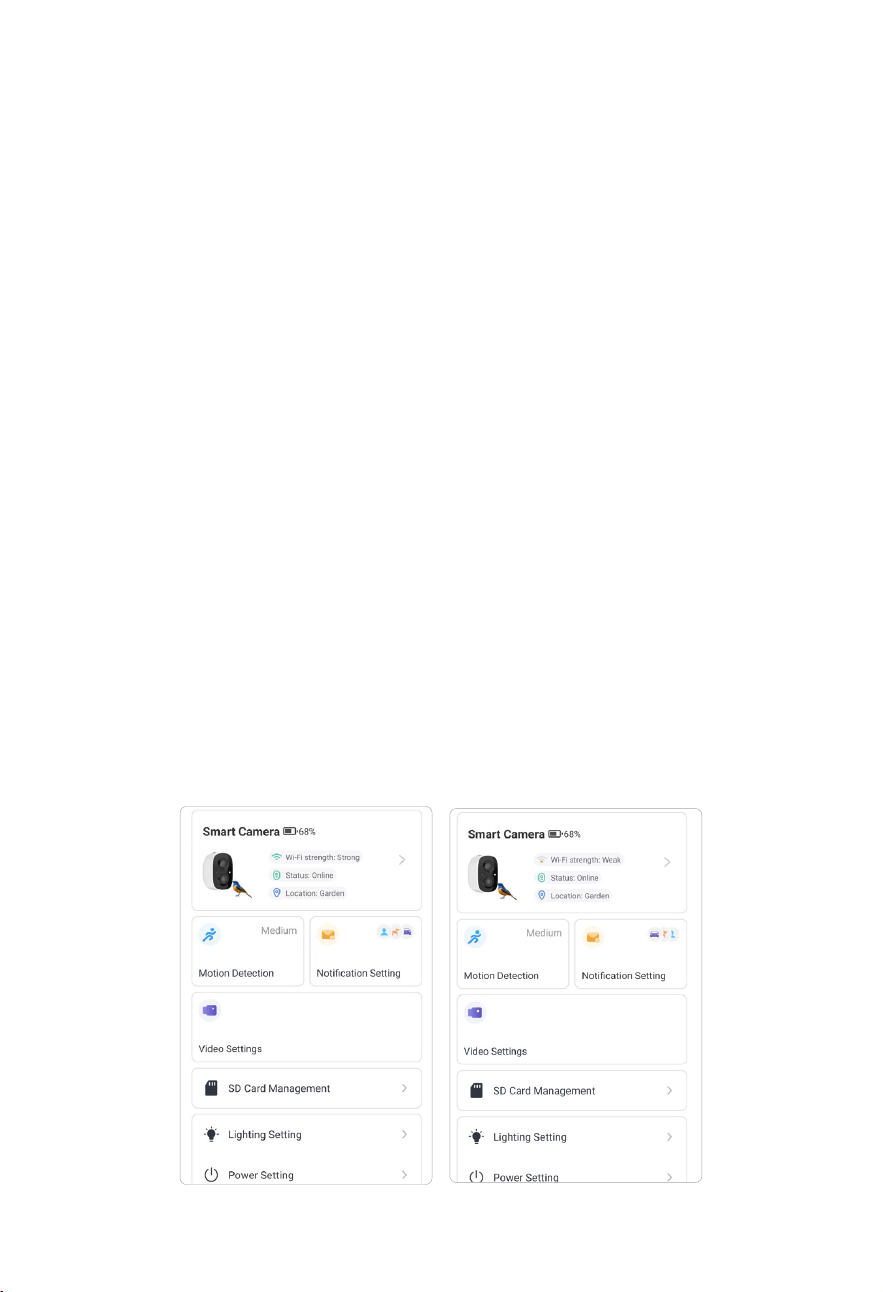
2.1.Find a Position with good Signal
Please install the camera in a position where its view is not
blocked and ensure that it is within the coverage of the Wi-
Fi network. Do check if the WIFI signal strength in the yard is
enough. You can detect the WIFI signal strength through APP.
When the camera is added to the APP, the signal strength of
the camera will be displayed (click the settings on the right
side of the camera on the Home Page to check the signal
strength.) When the signal strength is Strong, this position is
a good place to install.
Note:
Check the following things before you drill holes in
your wall: Smart bird feeder smart bird feeder has been
successfully added to your VicoHome App and is able to
stream video.
Note:
It is generally not recommended to have more than
two walls between bird feeders and routers.
2.During Installation
27
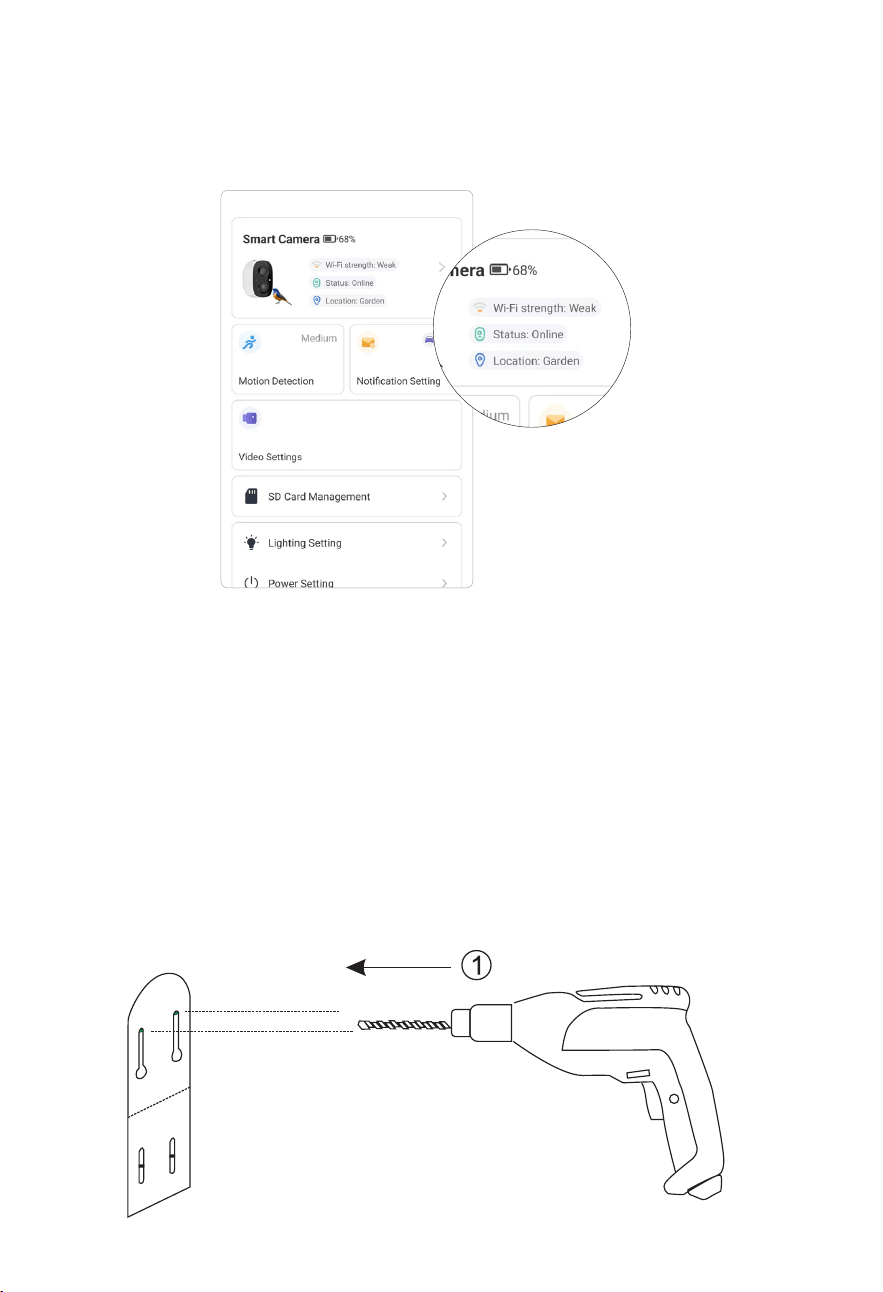
When the signal strength is Medium, it is necessary to check
whether the real-time video works smoothly (also can check
whether the time is continuous during real-time).
When the signal strength is Weak, do not install it in this
position.
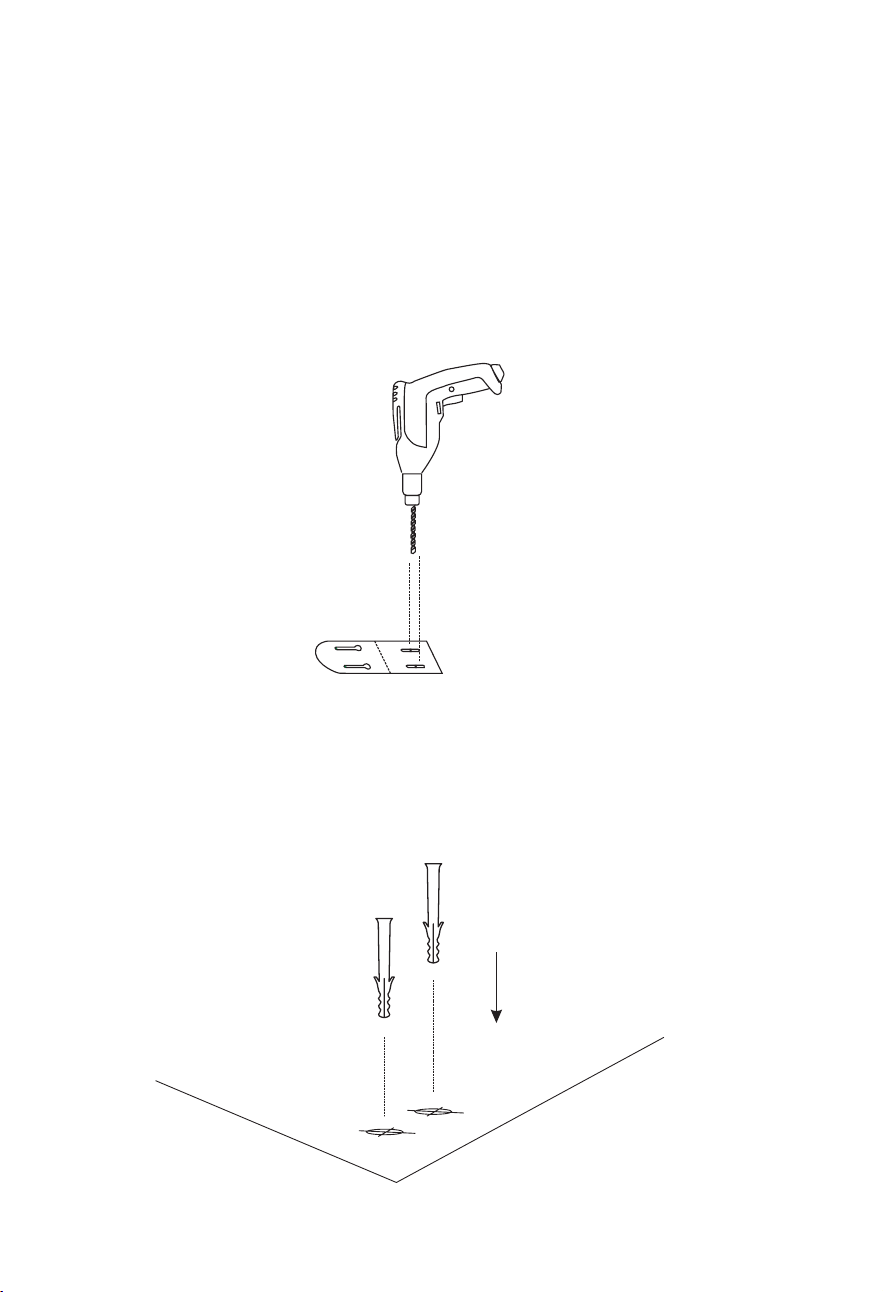
2.2.Wall Installation:
Step 1:
1. First mark the location of the holes on the wall by using the
included drilling template stickers. Then use drill bit (5/16",
8mm) to drill two holes.
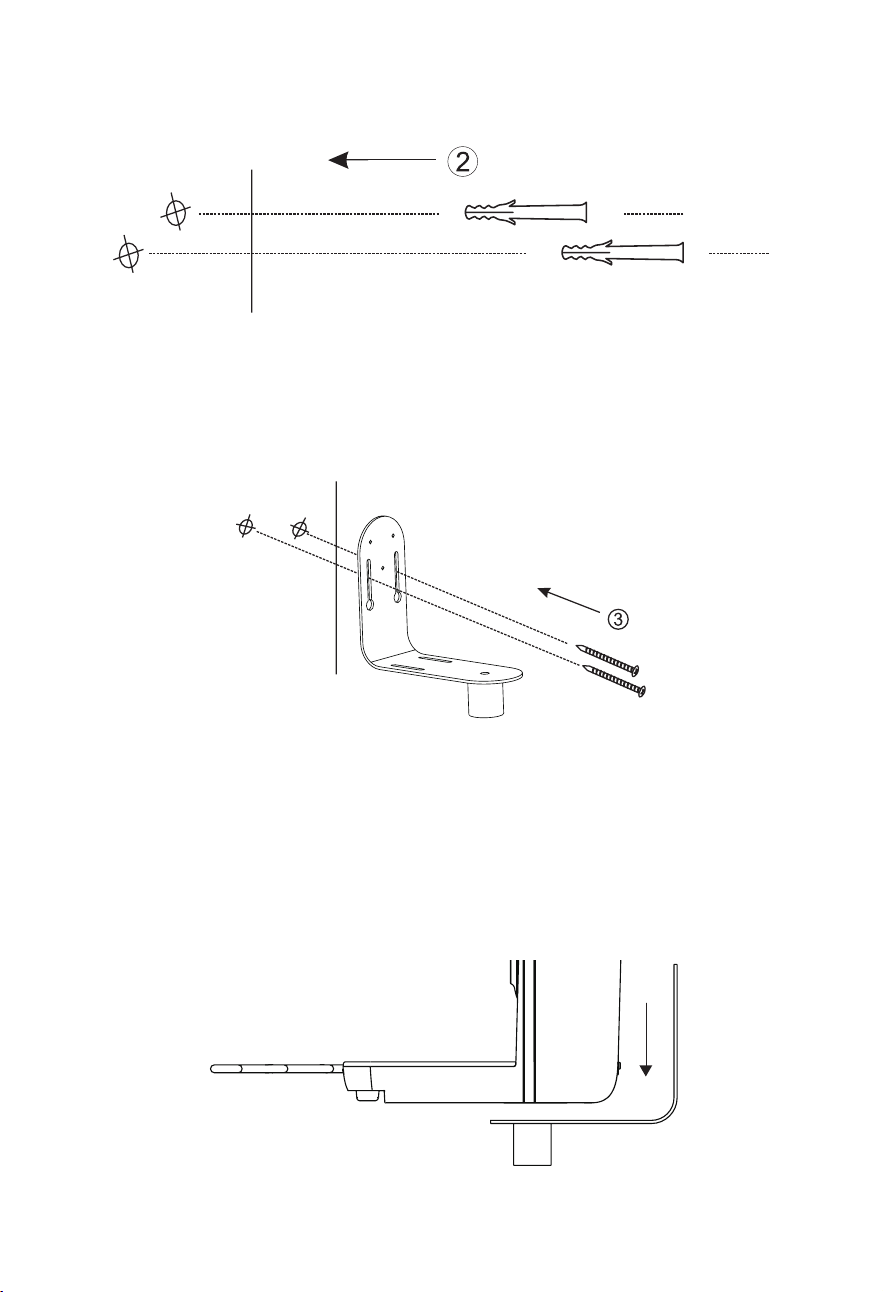
28
2. Install two anchors to x the bracker screws.
3. Install the Smart bird feeder Feeder Bracket on your wall
with the two bracket screws provided.
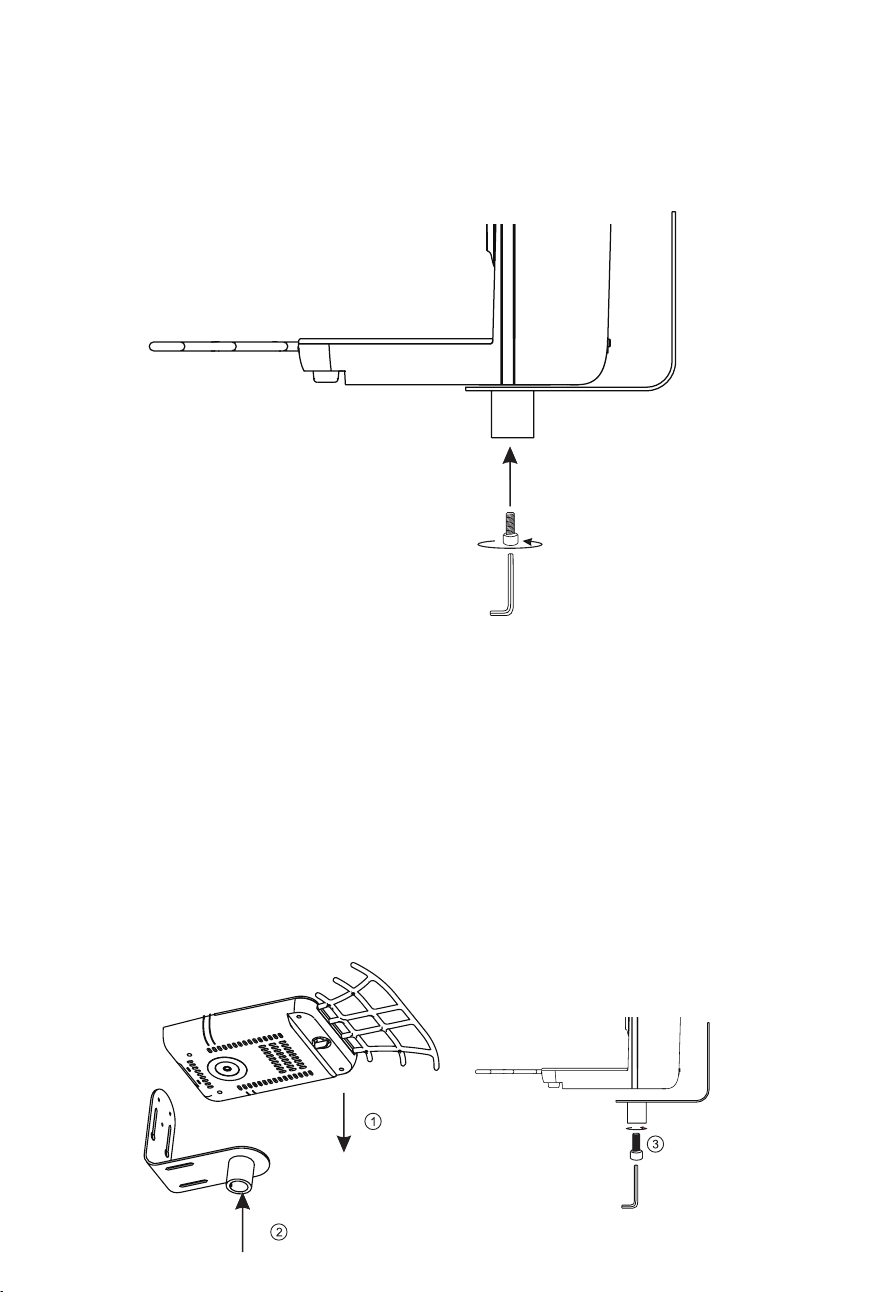
Step 2:
Attach the base to the mounting bracket (there are silicone
gaskets attached to the Mounting Bracket to prevent wear of
the mounting bracket and base.)
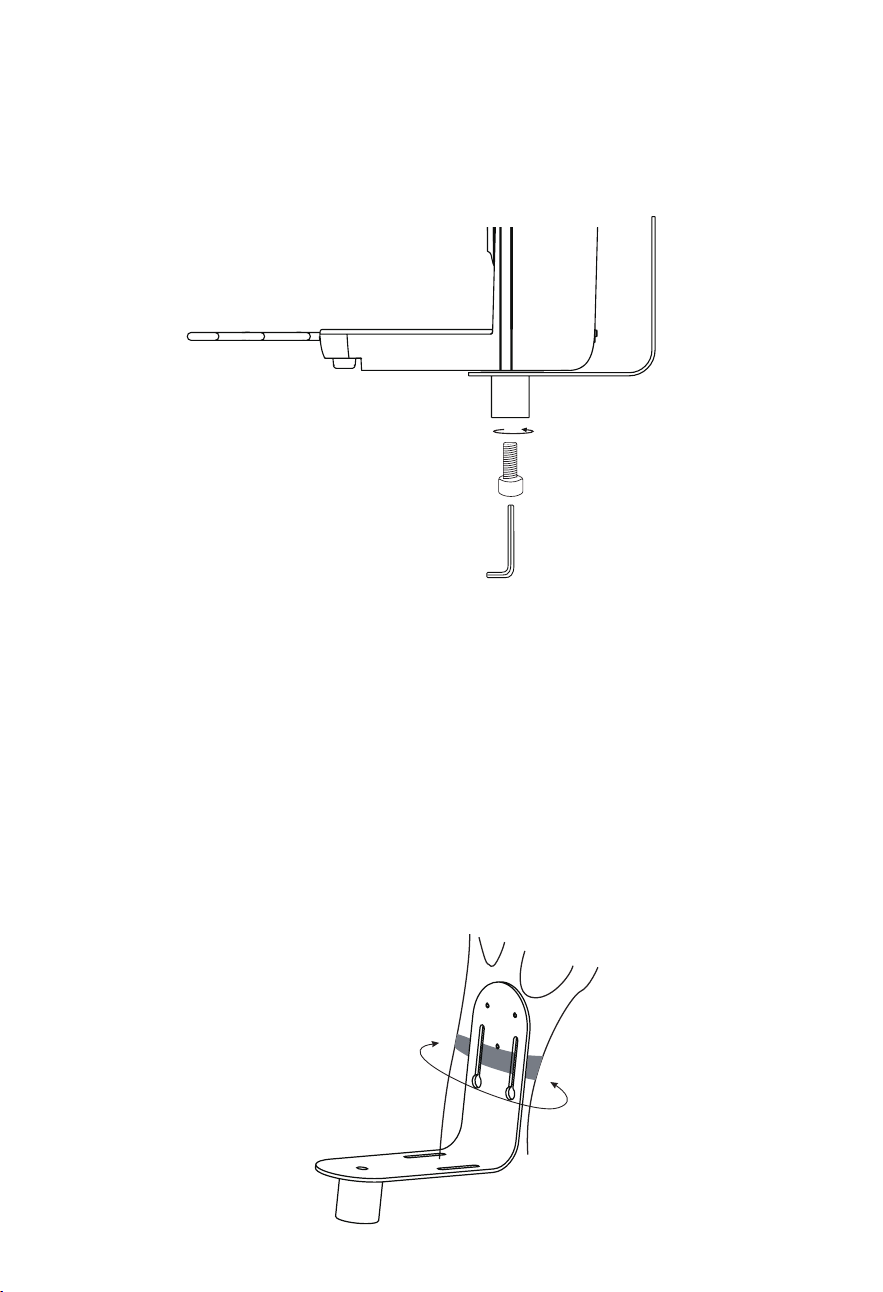
29
Step 3:
Screw in the bottom of the interface between the bird seed
container and the mounting bracket.
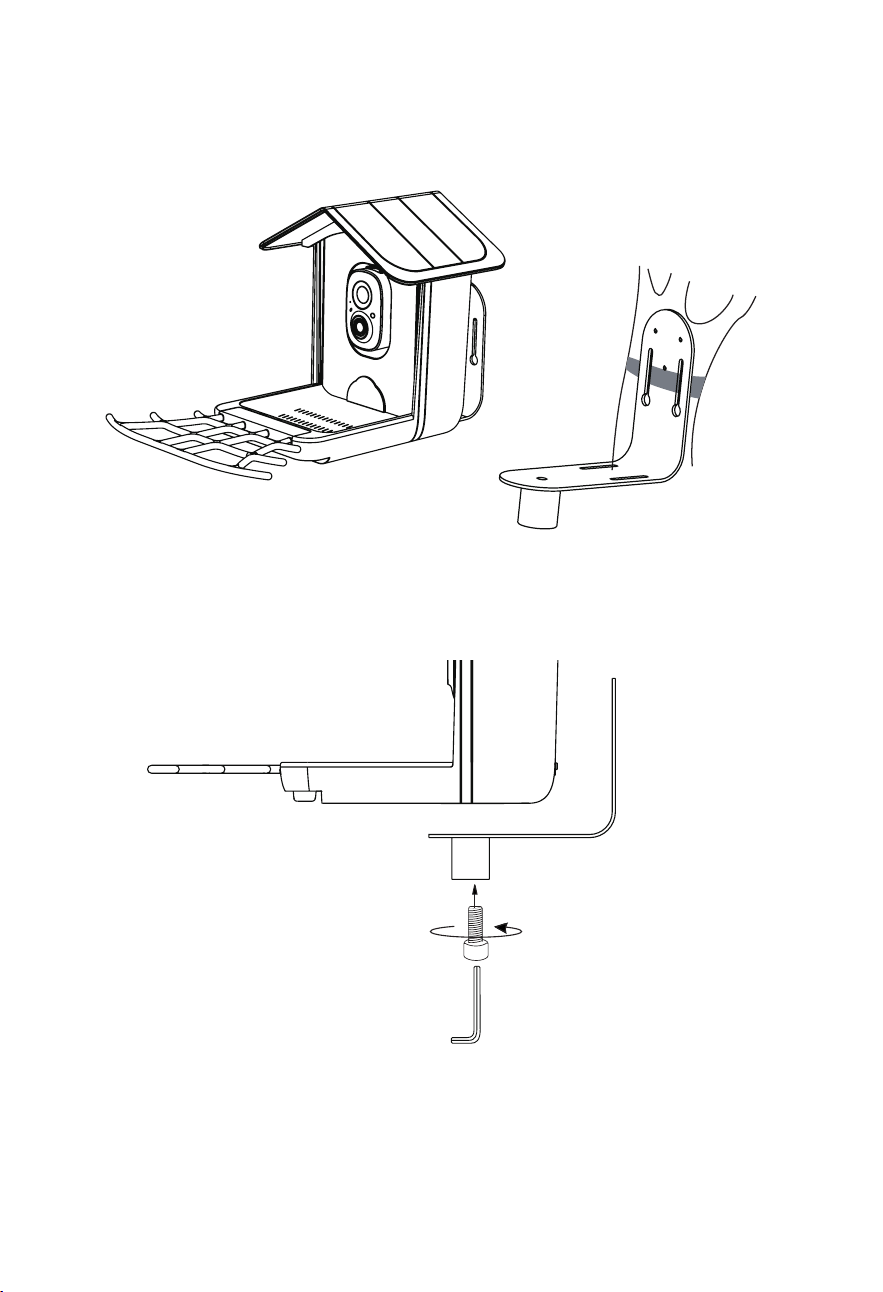
2.3.Tree Installation:
Step 1:
Wrap the Smart bird feeder Feeder Bracket around the tree
with a strap.
Note:
Once installed, you can rotate the smart bird feeder
based on background, the eld of view, and light intensity
to get the best angle; the mounting bracket and base should
screw well, so they don't wobble when birds y or the wind
blows.
30
Step 2:
Attach the Smart bird feeder Feeder bottom to the mounting
bracket.
Step 3:
Screw in the bottom of the interface between the bird seed
container and the mounting bracket.
Note:
Once installed, you can rotate the smart bird feeder
based on background, the eld of view, and light intensity
to get the best angle; the mounting bracket and base should
screw well, so they don't wobble when birds y or the wind
blows.
31
2.4.Stand Installation:
Step 1:
The Smart bird feeder Feeder can be placed steadily on a at
surface, but for stability, we recommend that the backplane is
installed and xed on a at surface. Use the provided drilling
template Sticker to mark the position of holes on at surface.
Use drill bit (5/16", 8mm) to drill two holes.
Step 2:
Install two anchors to x the bracket screws.
32
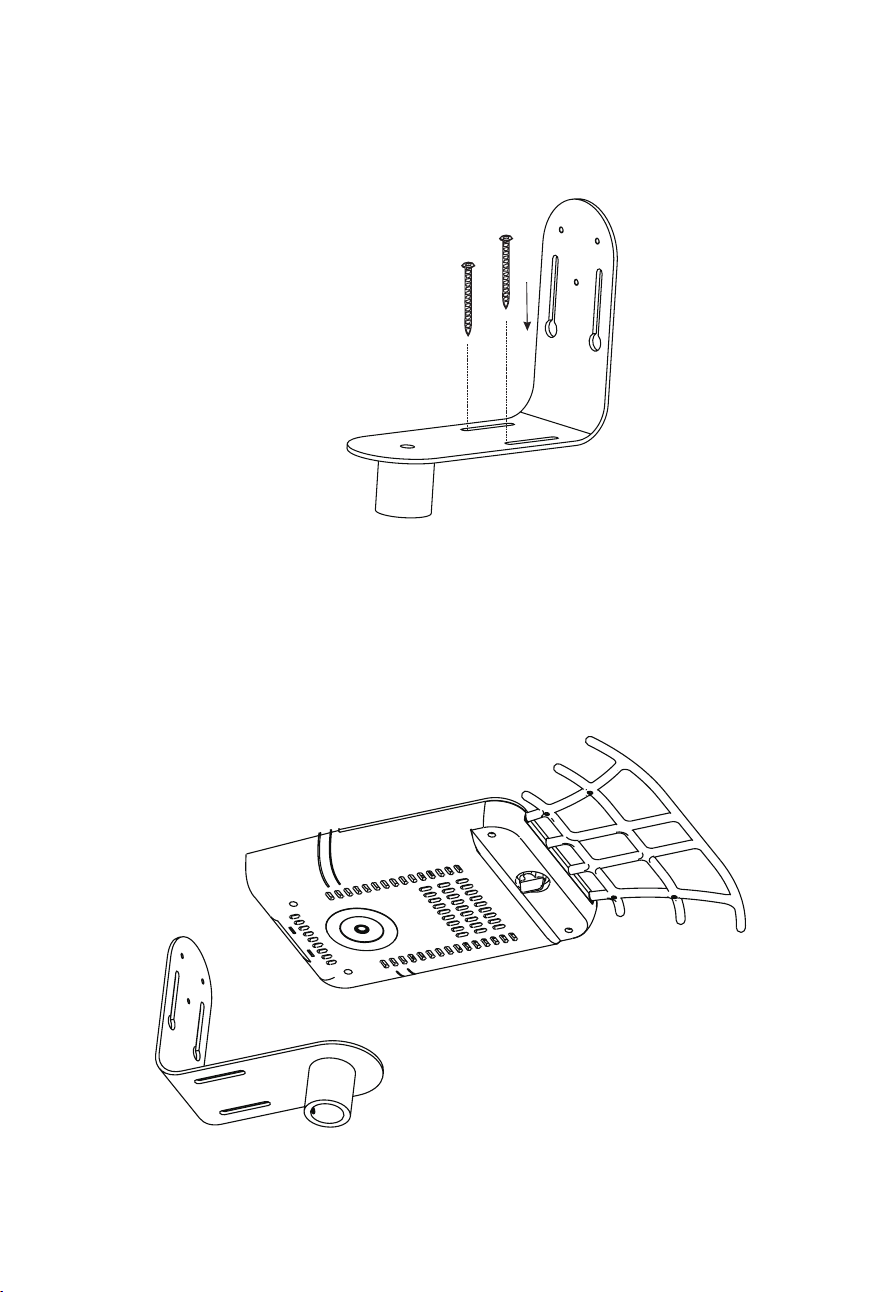
Step 3:
Install the Smart bird feeder Feeder Bracket on your wall with
the two bracket screws provided.
Step 4:
Attach the base to the mounting bracket (there are silicone
gaskets attached to the Mounting Bracket to prevent wear of
the mounting bracket and base.)
33
Step 5:
Screw in the bottom of the interface between the bird seed
container and the mounting bracket.
2.5.Pole installation
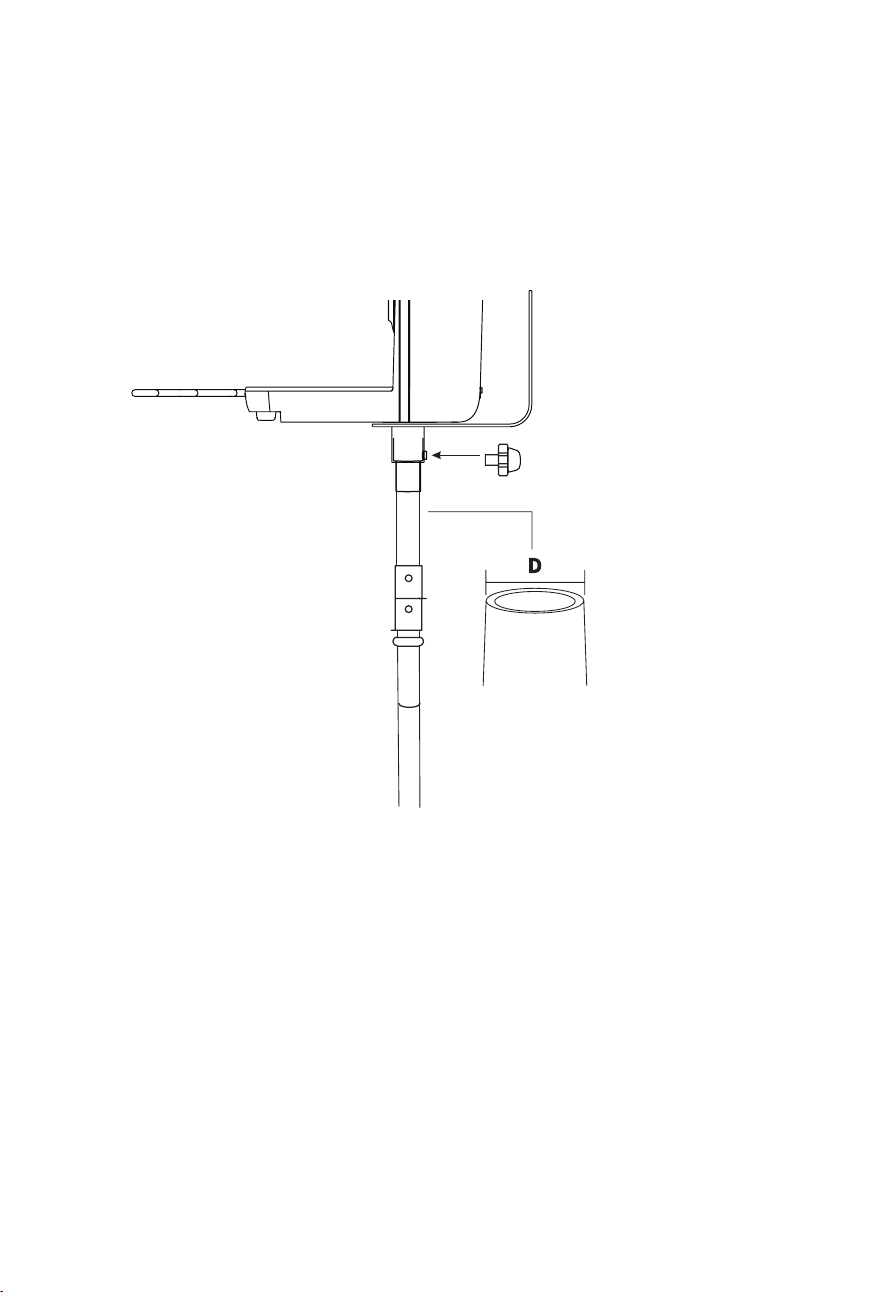
Step 1:
Put the silicone gasket on the mounting bracket, then attach
the Smart bird feeder Feeder bottom to the mounting bracket.
Note:
Once installed, you can rotate the smart bird feeder
based on background, the eld of view, and light intensity
to get the best angle; the mounting bracket and base should
screw well, so they don't wobble when birds y or the wind
blows.
34
Step 2:
First insert the pole on the ground, then place the bird feeder
on the pole, and nally tighten the screws.
2.6.Use fruit holder
We are equipped with 6 fruit holders that are designed for
birds. You can insert oranges, apples, or other types of fruit on
it to attract more birds.
Note:
It ts any standard-sized birdhouse pole, with a 1"/
2.5cm diameter. Please note that the pole itself is not included
in the package.
Note:
Once installed, you can rotate the smart bird feeder
based on background, the eld of view, and light intensity
to get the best angle; the mounting bracket and base should
screw well, so they don't wobble when birds y or the wind
blows.
inner Diameter(D)
Max.097in/Max.ø25.5mm
35
Step 1:
Screw the fruit holder onto the Bird Perch, it needs to
be tightened so that it will not fall.
Step 2:
Insert fruit on fruit holder.
2.7. Install solar panel
Step 1:
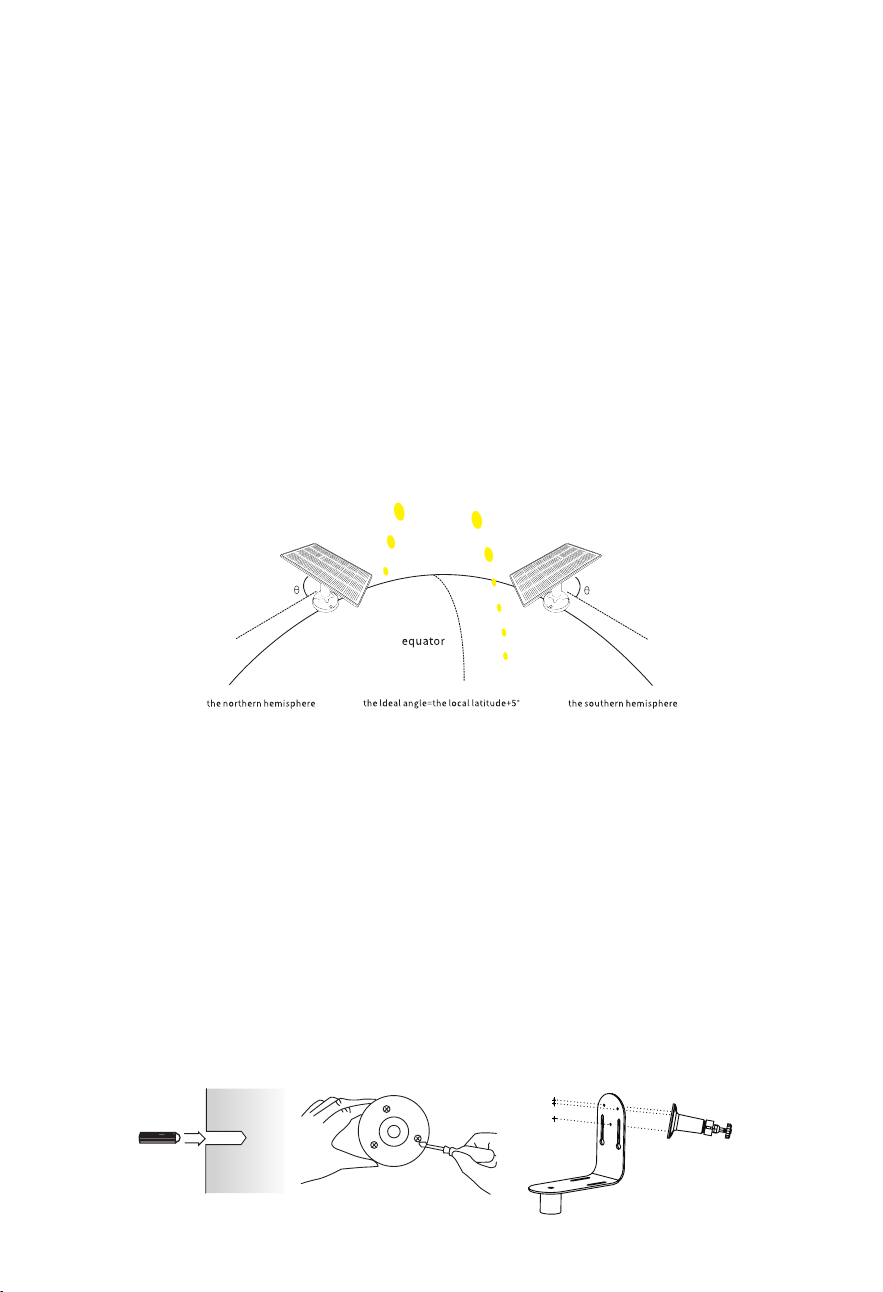
Please select a position with the most sunlight throughout
the year for your solar panel. The solar panel only needs a
few hours to direct sunlight to suciently power your camera
daily. The amount of energy that the solar panel can produce
is aected by the weather conditions, seasonal changes,
geographic locations, etc.
Step 2:
A:Connect the solar panel bracket to the Bird cage bracket
with screws.
B:Use the drilling tool to punch holes in the wall or tree
according to the hole distance of the base. It is recommended
to mark the holes on the wall or tree before drilling with the
drilling template sticker. Screw the anchors into the holes,
and then connect the solar panel bracket to the anchors
with screws to complete the xing. (Drilling template sticker,
anchors, and screws used here are all in the Solar Panel Kit)
36
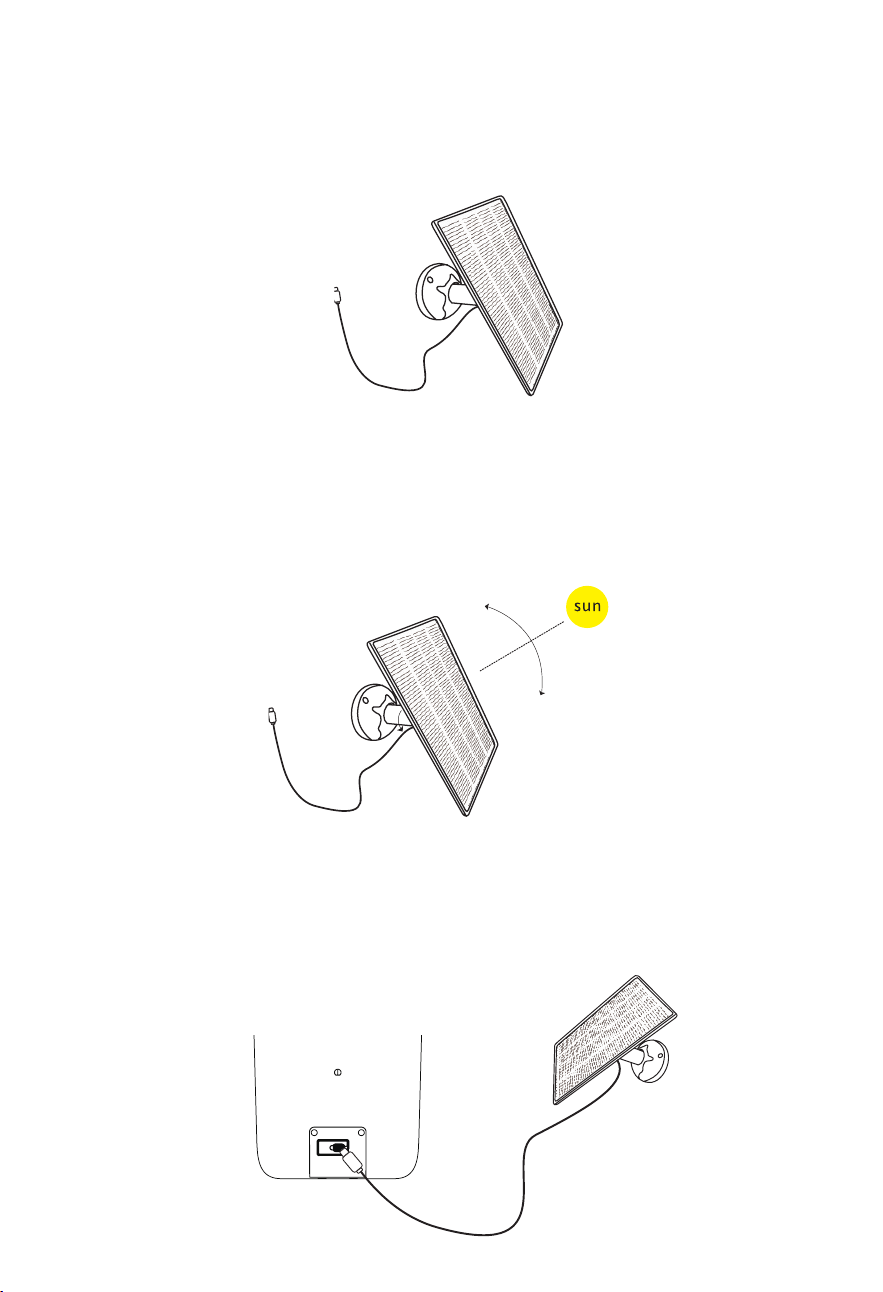
Step 3:
Slot the solar panel into the bracket and make sure it's secure.
Step 4:
Loosen the adjusting control on the bracket and adjust the
angle of the solar panel to make it receive direct sunlight, and
then re-tighten the adjusting control to secure your setting.
Step 5:
Connect the solar panels to the charging port of the bird
feeder with the equipped 3-meter long Tpye-C charging cable.
37
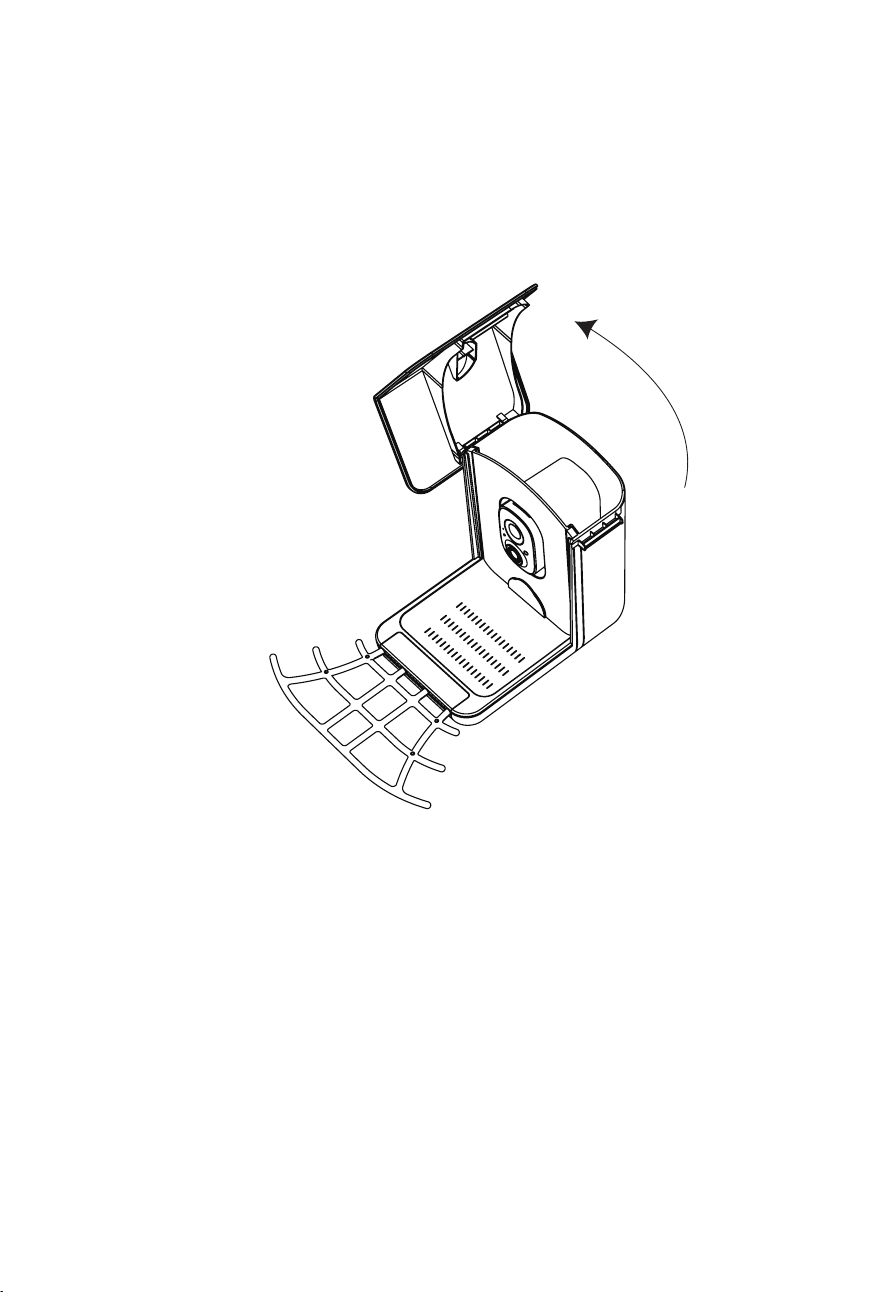
Step1:
Open the catch on the left side of the bird seed container and
gently lift the feeder cover upwards.
Step2:
There is a bird seed outlet valve placed in the seed outlet of
the bird seed container, please take it out after loading the
seeds,and putit inside the feeder cover(like the position
shown in the picture,you can also move the seed outlet valve
after installing the smart bird feeder in the yard to prevent
the seed from leaking out duringinstallation).
How to Add Bird Seed
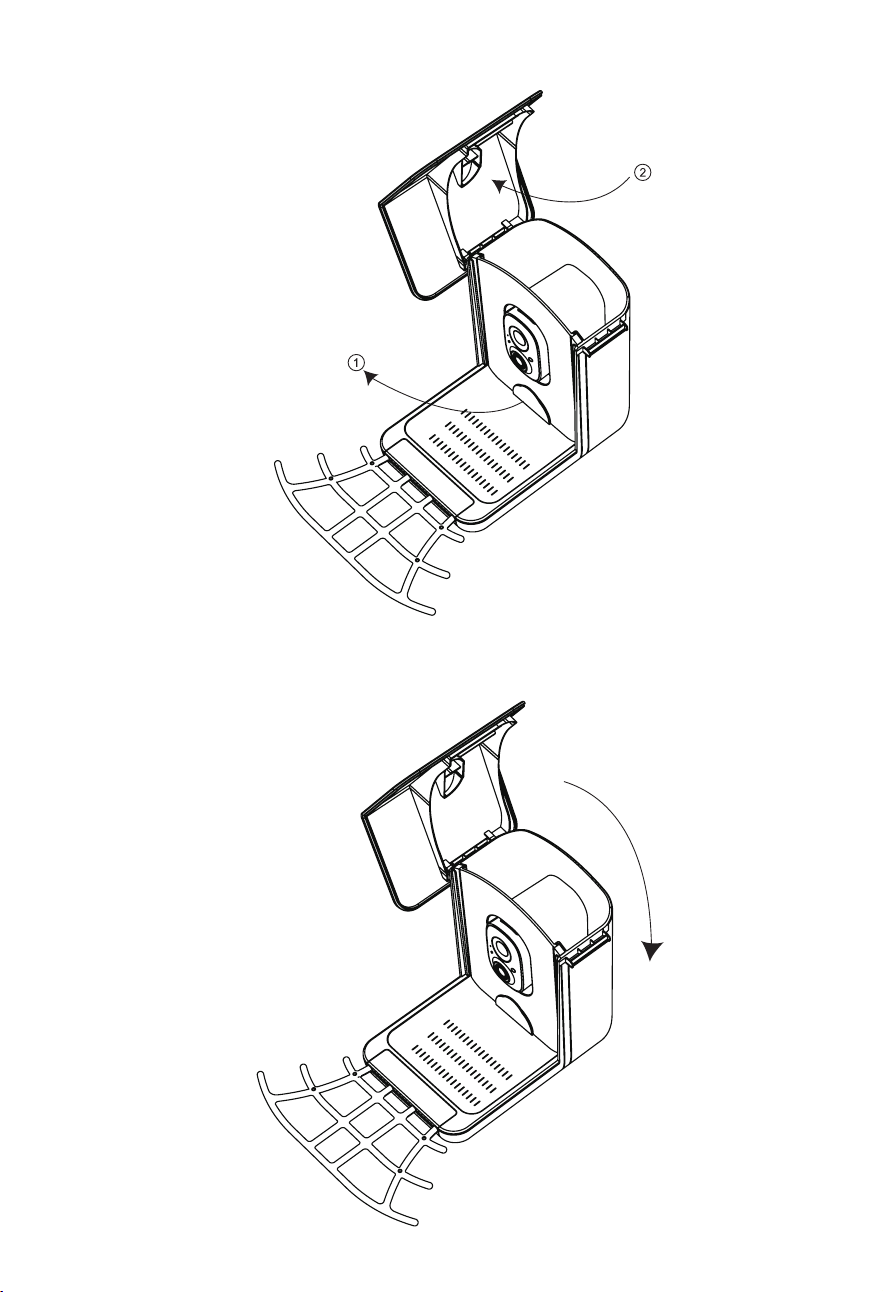
38
Step3:
Finally, close the feeder cover.

39
Cleaning and Maintenance
Smart bird feeder is designed with the safety and comfort of
our feathered friends in mind and is incredibly easy to clean.
Cleaning your feeder is the most eective and most important
step towards preventing the spread of avian diseases. We
recommend cleaning the feeder once a week with a brush and
a mild disinfectant.
1. Cleaning camera len: Add a drop or two of lens cleaning
uid or rubbing alcohol to a microber cloth or a cleaning
wipe, then wipe the lens gently to remove ngerprints, oil,
smudges, dirt, and dust.
2. Cleaning base: After removing the bird seed container, wash
it directly with water, you can use a soft brush to clean the
extra seeds and dirt.
3. Cleaning the inside of the bird seed container: Use a silicone
measuring cup to ll it with water and import clean water
from the bird seed inlet on the top. Let the water ow out
naturally and let it dry.
4. Other: If the feeder cover, bird perch, mounting bracket,
solar panel, and other parts of the bird seed container get
dirty, rinse them gently with water and wipe them with a
clean cloth.
40
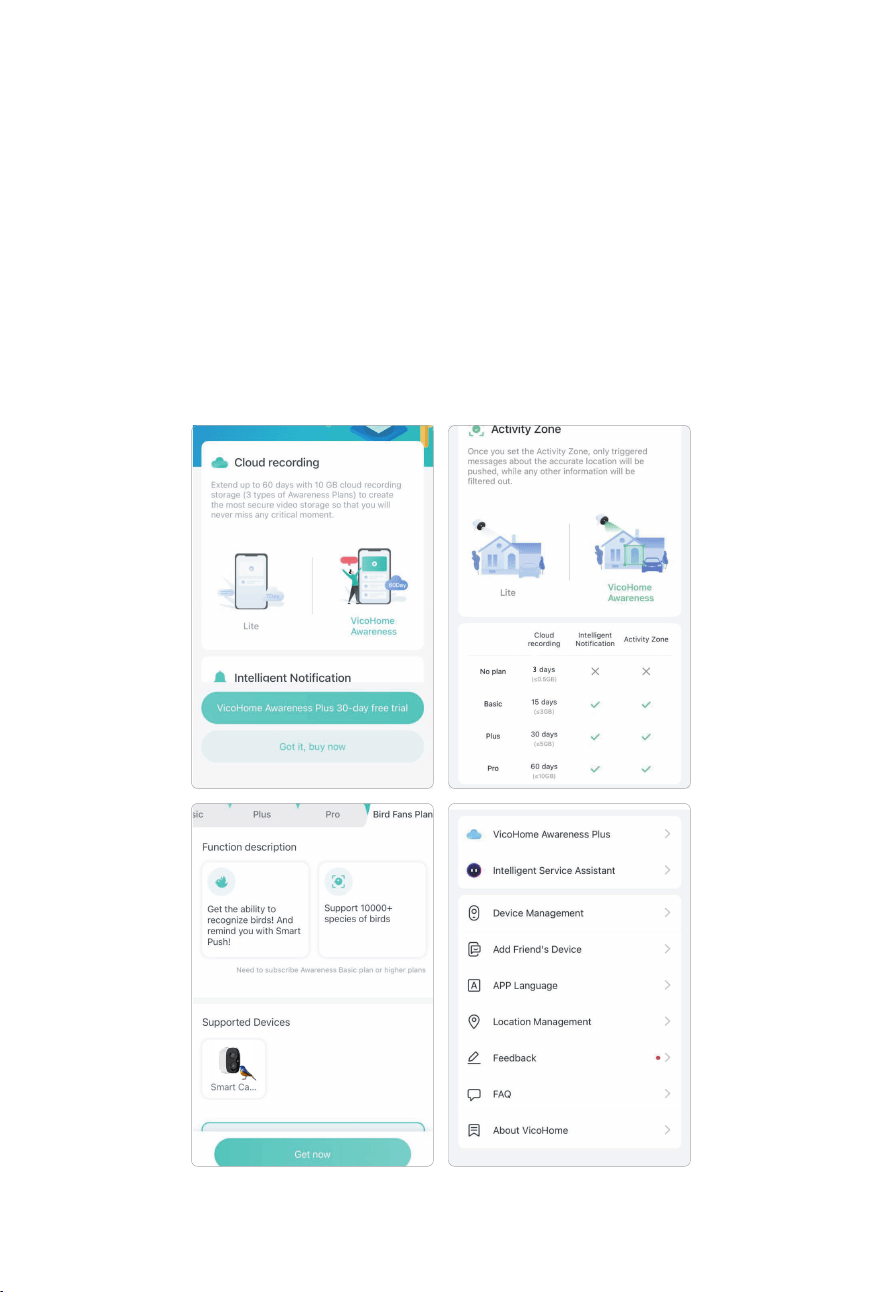
How to Do Bird AI Recognition
1.
Click "User" in the lower right corner of the APP, and
then click "VicoHome Awareness Plus" to get "VicoHome
Awareness Plus 30- day free trial", You will receive one month
of free premium membership and access to the bird Fans plan,
then you will identify 10,000+ birds from this bird fans plan.
Note:
The information actually displayed on the APP prevails
Monthly subscription is required after the 30-day free trail.
41
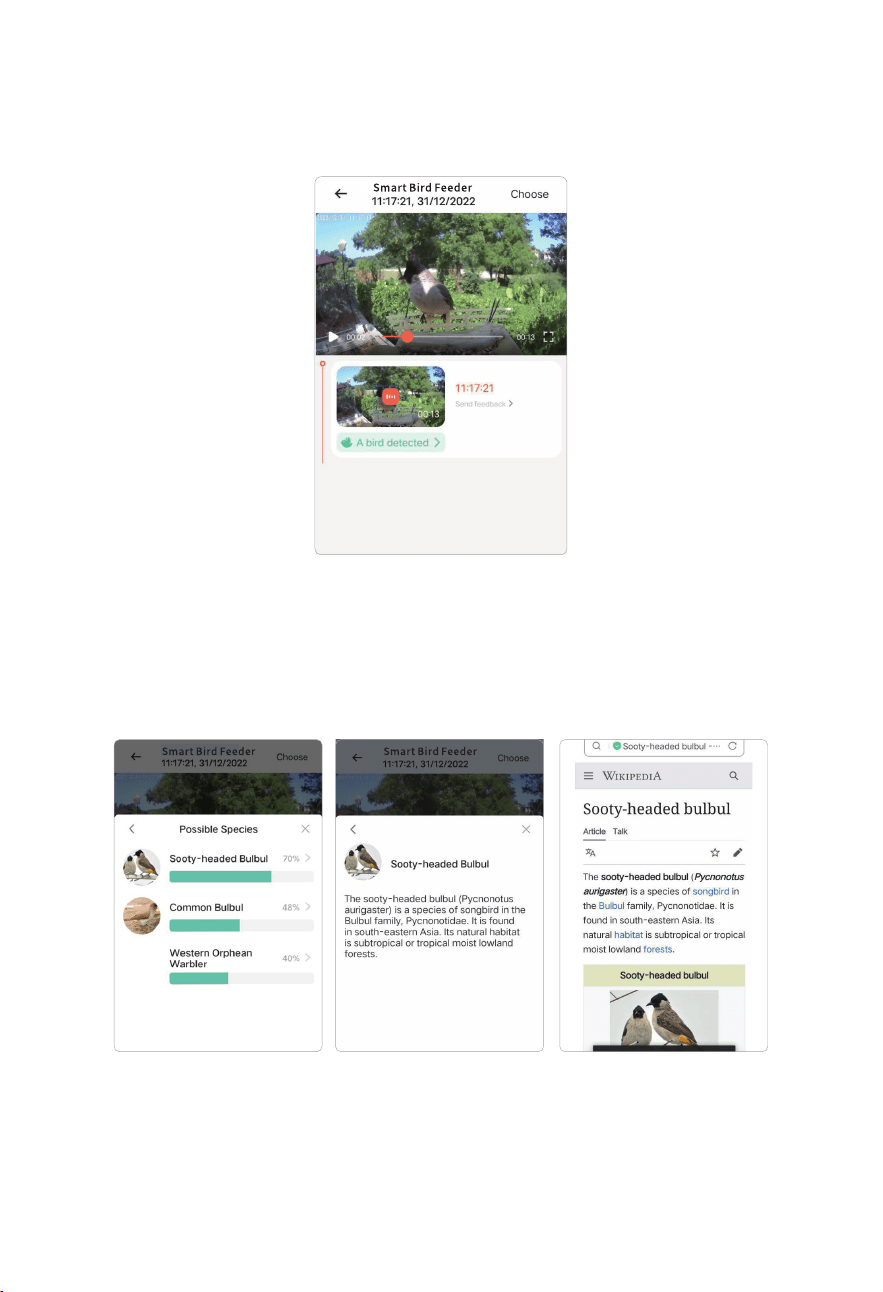
2.After that, when the camera detects a bird, it will notify you
that a bird detected.
3.Click on "A bird detected" to identify the bird breed.

42
FAQ
Q:How should I solve problem when using the app ?
A: When the app fails,it may be a internet connection
problem. You can try restarting the app or internet
connection. If the problem with app still exists, please
contact us via the VicoHome app.
Q:Will the camera show red lights when night vision is
activated?
A: The built-in infrared lamp beads make the camera only
show some dim red lights when night vision is activated, but
the image quality is still clear under no light environment.
Q:Can I use it without an SD card?
A: Smart bird feeder can work normally without a SD card, and
the captured videos will be stored in the cloud. Dierent cloud
packages have dierent storage time and storage capacity.
Q:Will I have to pay a monthly subscription to use the
app?
A: We provide 3 day free cloud storage, if you need a more
advanced storage package, you can check the package price
in the APP.
Q:How canlidentify birds ?
A:The smart bird feeder will start shooting when the bird
arrives,and then you can watch the video through the
mobile app,and the information in the video will prompt you
to identify what kind of bird it is.

43
Q:What is the maximum length of recording time?
A: If you set the duration as "Auto", when someone occurs in
the view of the camera, it will start recording a video for up to
3 minutes with monthly subscription.
Q:How to quickly view videos by category?
A: Click the icon in the upper left corner of the "Library" page
to start ltering videos by category. Select the category you
want to see and then click "Save" to view the video playbacks.
Q: How to prevent seeds from getting wet when it
rains?
A: We are equipped with a silicone cover for the Bird Seed
Outlet, which can keep the grain from excessive moisture
when it rains.
Q:Does the camera support 5.0Ghz WiFi?
A: No, currently only 2.4GHz WiFi is supported.
44
Q:Can the camera beused without Wi-Fi ?
A:No,the camera must be connected to WiFi when the app is
set up. If you want to use Smart bird feeder in a place without
Wi-Fi,you can use the hotspot of your mobile phone rst,
let smart bird feeder connect to it. and then take it outdoors
or in the wild.Bird Al recognition doesn't work without the
lnternet.
Q:Can the app check the signal strength of the
camera ?
A:You can check the signal strength through the app.when the
camera is added to the app,the signal strength of the camera
will be displayed(click thee settings on the right side of the
camera on the Home Page to check the signal strength.)
When the signal streng this Strong,this position is good for
installing the bird feeder.
When the signal strength is Medium,it is necessary to check
whether the real-time video works smoothly.
When the signal strength is Weakdo not installitin this
position.