DE Thermo-Hygrometer
Gebrauchsanweisung .................... 3
EN Thermo hygrometer
Instructions for use ......................17
FR Thermo-hygromètre
Mode d’emploi ............................31
ES Termohigrómetro
Instrucciones de uso ...................46
IT Termoigrometro
Istruzioni per l’uso .......................61
TR Termo-higrometre
Kullanım kılavuzu ......................... 75
RU Термогигрометр
Инструкция поприменению .....89
PL Termohigrometr
Instrukcja obsługi ......................104
HM 22

2

3
DEUTSCH
Lesen Sie diese Gebrauchsanweisung
aufmerksam durch, bewahren Sie sie für
späteren Gebrauch auf, machen Sie sie an-
deren Benutzern zugänglich und beachten
Sie die Hinweise.
Inhaltsverzeichnis
1. Zum Kennenlernen .......................... 3
2. Lieferumfang..................................... 3
3. Zeichenerklärung .............................. 4
4. Bestimmungsgemäßer Gebrauch ..... 5
5. Warn- und Sicherheitshinweise ........ 6
6. Gerätebeschreibung ......................... 8
7. Inbetriebnahme .............................. 10
7.1 Batterien einlegen ..................... 10
7.2 Datum / Uhrzeit /
Temperatureinheit einstellen ..... 11
7.3 Auf Werkseinstellung
zurücksetzen ............................. 12
8. Anwendung .................................... 12
8.1 Standard-Modus ...................... 12
8.2 Timer ......................................... 13
9. Reinigung und Pflege ..................... 14
10. Was tun bei Problemen? .............. 14
11. Entsorgung ................................... 15
12. Technische Angaben .................... 16
13. Garantie ........................................ 16
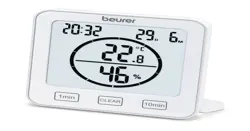
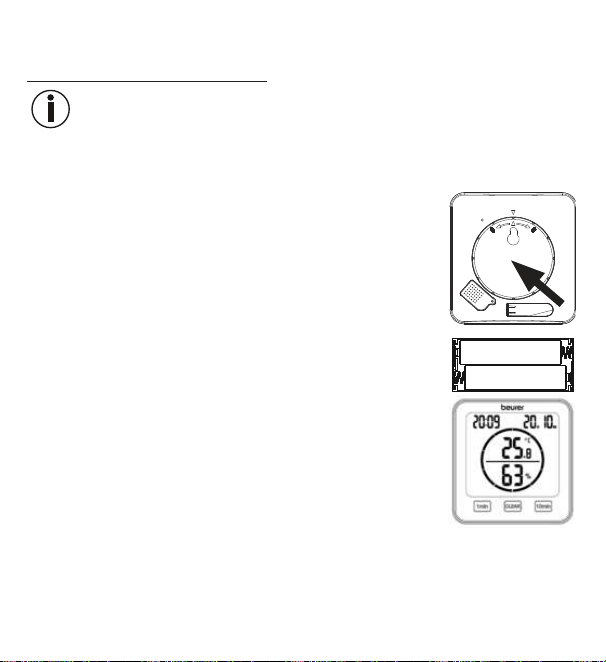
1. Zum Kennenlernen
Mit dem Thermo-Hygrometer HM 22 können Sie die aktuelle Raumtemperatur und
relative Luftfeuchtigkeit messen und am Display ablesen. Zusätzlich besitzt das Ther-
mo-Hygrometer einen Timer, mit dem Sie eine Kurzzeitmessung einstellen können.
Durch seine handliche Größe können Sie das Thermo-Hygrometer überall auf-
stellen. Auf der Rückseite des Thermo-Hygrometers befindet sich eine Aufhänge-
vorrichtung, mit der Sie das Gerät an der Wand befestigen können.
2. Lieferumfang
1 x Thermo-Hygrometer, 2 x AAA Batterien, 1 x Diese Gebrauchsanweisung
4
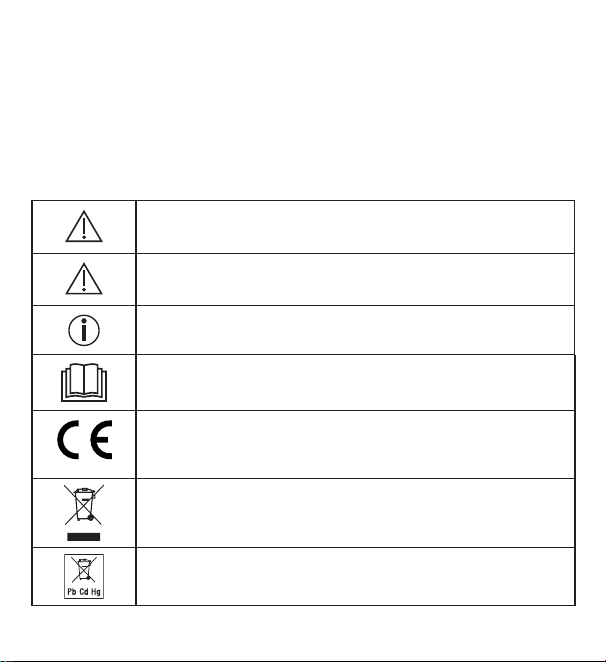
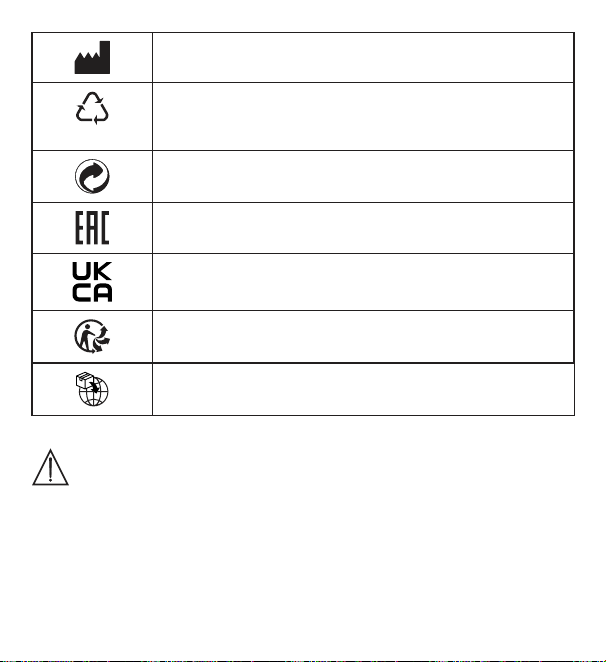
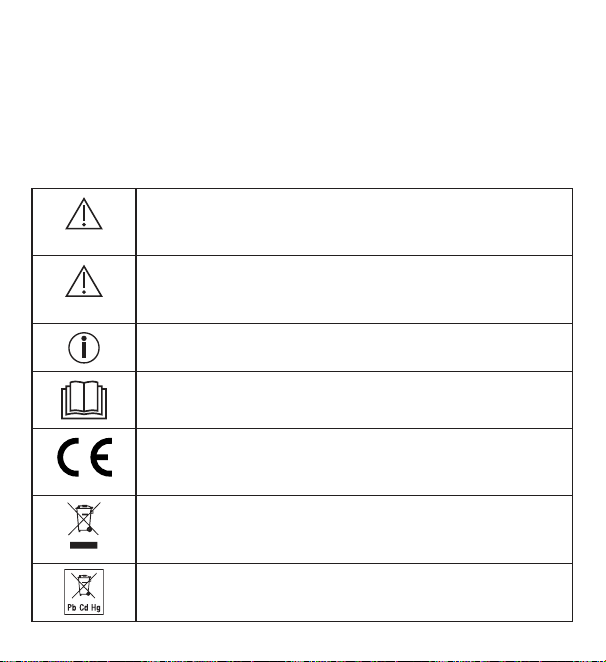
3. Zeichenerklärung
Auf dem Gerät, in der Gebrauchsanweisung, auf der Verpackung und auf dem
Typschild des Geräts werden folgende Symbole verwendet:
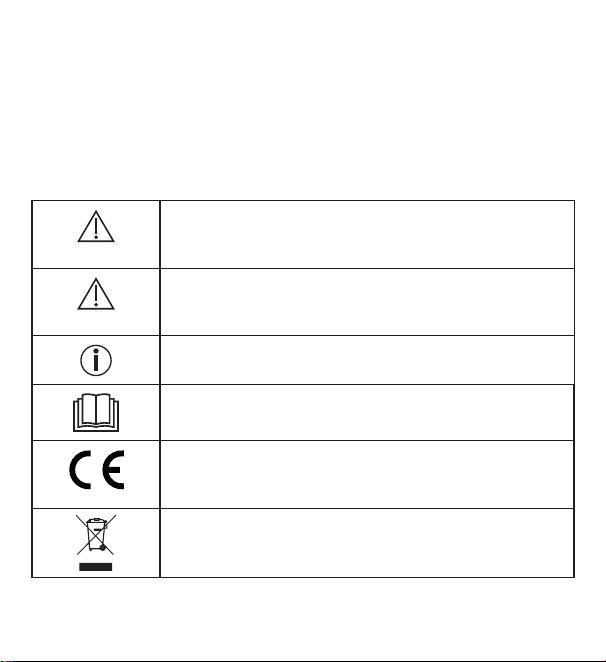
WARNUNG
Warnhinweis auf Verletzungsgefahren oder Gefahren für Ihre
Gesundheit
ACHTUNG
Sicherheitshinweis auf mögliche Schäden an Gerät/Zubehör
Hinweis
Hinweis auf wichtige Informationen
Anweisung lesen
CE-Kennzeichnung
Dieses Produkt erfüllt die Anforderungen der geltenden euro-
päischen und nationalen Richtlinien
Entsorgung gemäß Elektro- und Elektronik-Altgeräte EG-
Richtlinie WEEE (Waste Electrical and Electronic Equipment)
Schadstoffhaltige Batterien nicht im Hausmüll entsorgen
Hersteller
B
A
Kennzeichnung zur Identifikation des Verpackungsmaterials.
A = Materialabkürzung, B = Materialnummer:
1-7 = Kunststoffe, 20-22 = Papier und Pappe

5
Verpackungskomponenten trennen und entsprechend der
kommunalen Vorschriften entsorgen.
Die Produkte entsprechen nachweislich den Anforderungen
der Technischen Regelwerke der EAWU
Konformitätsbewertungszeichen für Großbritannien
Produkt und Verpackungskomponenten trennen und entspre-
chend der kommunalen Vorschriften entsorgen.
Importeur Symbol
4. Bestimmungsgemäßer Gebrauch
WARNUNG
Das Gerät ist ausschließlich zur Messung von Luftfeuchtigkeit und Raum-
temperatur bestimmt.
Das Gerät ist nur für den privaten Gebrauch bestimmt. Verwenden Sie das
Gerät ausschließlich für den Zweck, für den es entwickelt wurde und auf die in
dieser Gebrauchsanweisung angegebene Art und Weise. Jeder unsachgemäße
Gebrauch kann gefährlich sein! Der Hersteller haftet nicht für Schäden, die
durch unsachgemäßen oder falschen Gebrauch verursacht wurden.
6
5. Warn- und Sicherheitshinweise
WARNUNG
•
Halten Sie Kinder von Verpackungsmaterial fern. Es besteht Ersti-
ckungsgefahr.
•
Das Gerät ist kein Spielzeug. Bewahren Sie es außerhalb der Reich-
weite von Kindern auf.
•
Sie dürfen das Gerät keinesfalls öffnen oder reparieren, da sonst
eine einwandfreie Funktion nicht mehr gewährleistet ist. Bei Nicht-
beachtung erlischt die Garantie.
•
Wenden Sie sich bei Reperaturen an den Kundenservice oder an
einen autorisierten Händler.
•
Halten Sie das Gerät von offenen Flammen (z.B. Kerzen) fern.
•
Tauchen Sie das Gerät niemals in Wasser oder andere Flüssigkeiten.
•
Betreiben Sie das Gerät nie unter einer Abdeckung, wie z.B. Decke
oder Kissen.
•
Verwenden Sie das Gerät nicht im Freien.
Hinweise zum Umgang mit Batterien
WARNUNG
•
Wenn Flüssigkeit aus einer Batteriezelle mit Haut oder Augen in
Kontakt kommt, die betroffene Stelle mit Wasser auswaschen und
ärztliche Hilfe aufsuchen.
•
Verschluckungsgefahr! Kleinkinder könnten Batterien verschlu-
cken und daran ersticken. Daher Batterien für Kleinkinder uner-
reichbar aufbewahren!
7
•
Auf Polaritätskennzeichen Plus (+) und Minus (-) achten.
•
Wenn eine Batterie ausgelaufen ist, Schutzhandschuhe anziehen
und das Batteriefach mit einem trockenen Tuch reinigen.
•
Schützen Sie Batterien vor übermäßiger Wärme.
•
Explosionsgefahr! Keine Batterien ins Feuer werfen.
•
Batterien dürfen nicht geladen oder kurzgeschlossen werden.
•
Bei längerer Nichtbenutzung des Geräts die Batterien aus dem
Batteriefach nehmen.
•
Verwenden Sie nur denselben oder einen gleichwertigen Batterietyp.
•
Immer alle Batterien gleichzeitig auswechseln.
•
Keine Akkus verwenden!
•
Keine Batterien zerlegen, öffnen oder zerkleinern.
ACHTUNG
•
Schützen Sie das Gerät vor Stößen, Feuchtigkeit, Staub, Chemikali-
en, starken Temperaturschwankungen, direkter Sonneneinstrahlung,
Spritzwasser, Sand und zu nahen Wärmequellen (Öfen oder Heizkörper).
•
Legen Sie keine Gegenstände auf dem Gerät ab.
•
Reinigen Sie das Gerät mit einem feuchten Tuch. Benutzen Sie keine
scharfen Reingungsmittel.
•
Verwenden und lagern Sie das Gerät in einer Umgebungstemperatur
zwischen -10°C bis 50°C. Höhere oder niedrigere Temperaturen
können das Gerät beschädigen.
•
Bei wechselnder Umgebung benötigt das Gerät 10 Minuten, um sichere
Messwerte zu liefern.
•
Ziehen Sie vor der ersten Inbetriebnahme die Schutzfolie des Displays ab.
8
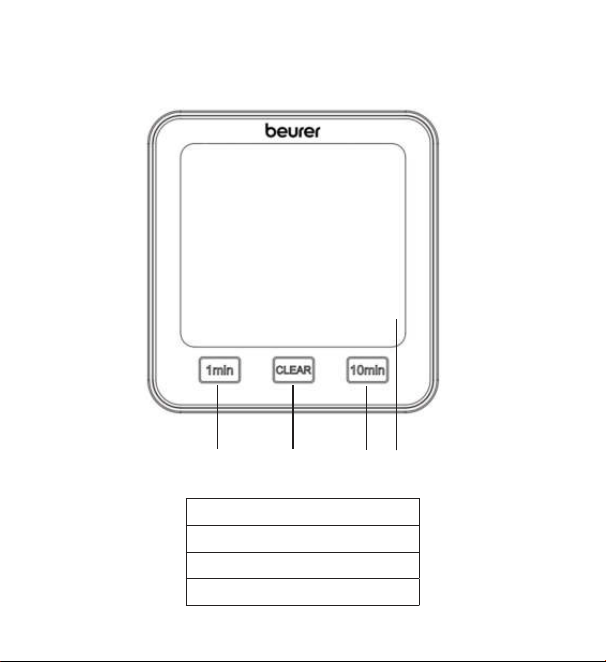
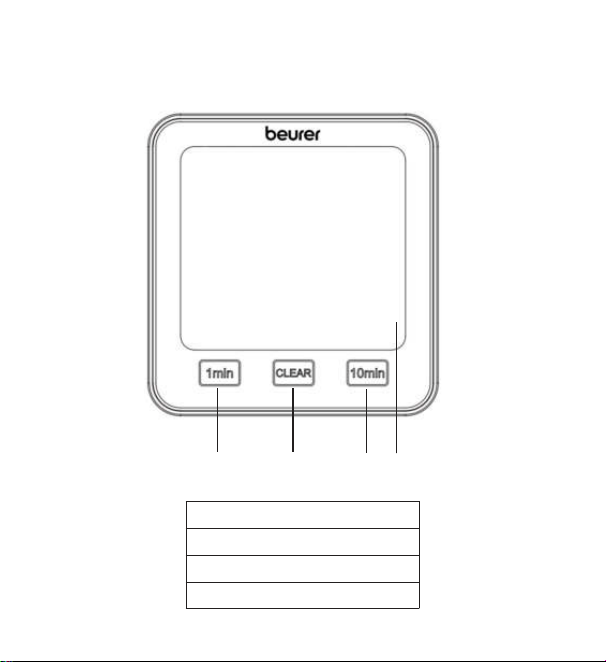
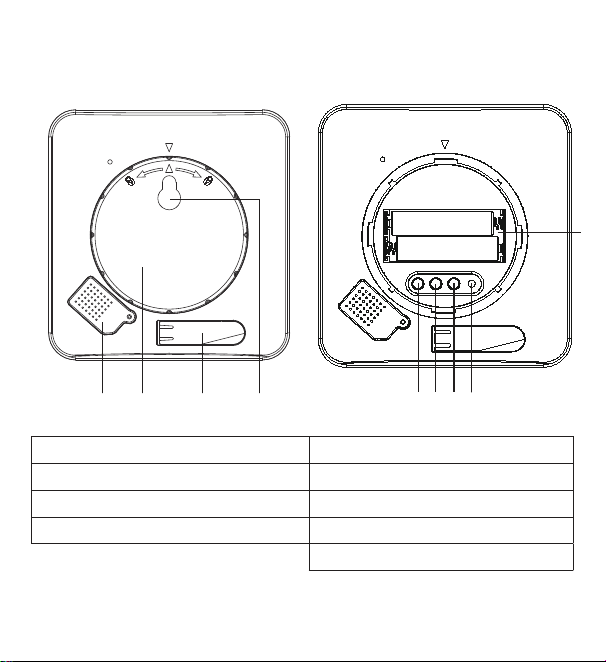
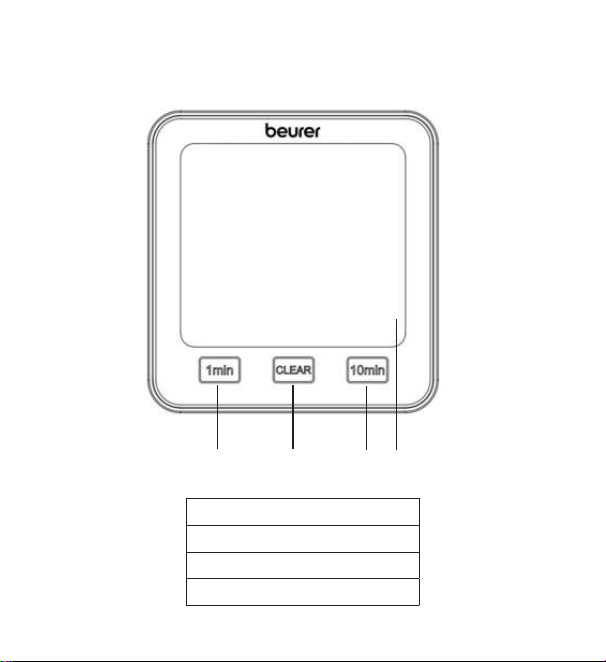
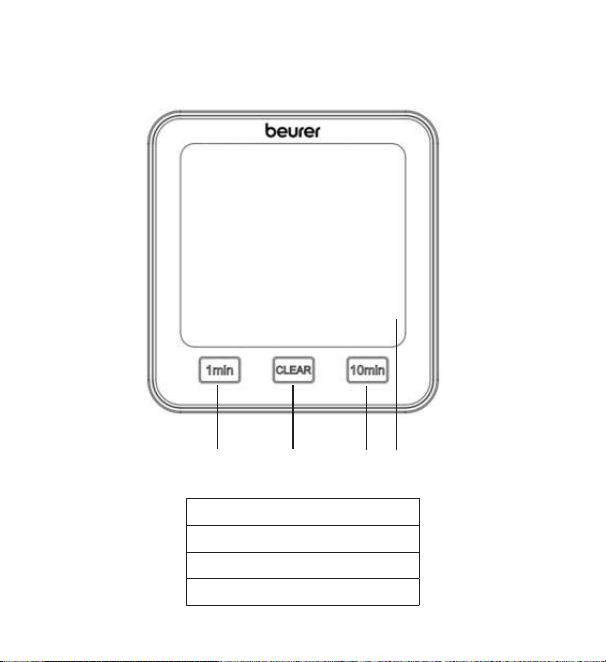
6. Gerätebeschreibung
Vorderseite
1
2
3
4
1 [1 min]-Taste
2 [CLEAR]-Taste
3 [10 min]-Taste
4 Display

9
Rückseite
TIME DOWN RESETUP/CF
1
5
6
7
8
3
9
2
4
1 Sensoren-Abdeckung 5 [TIME]-Taste
2 Batteriefach-Abdeckung 6 [UP/CF]-Taste
3 Ausklappbarer Standfuß 7 [DOWN]-Taste
4 Aufhängevorrichtung 8 [RESET]-Taste
9 Batteriefach

10
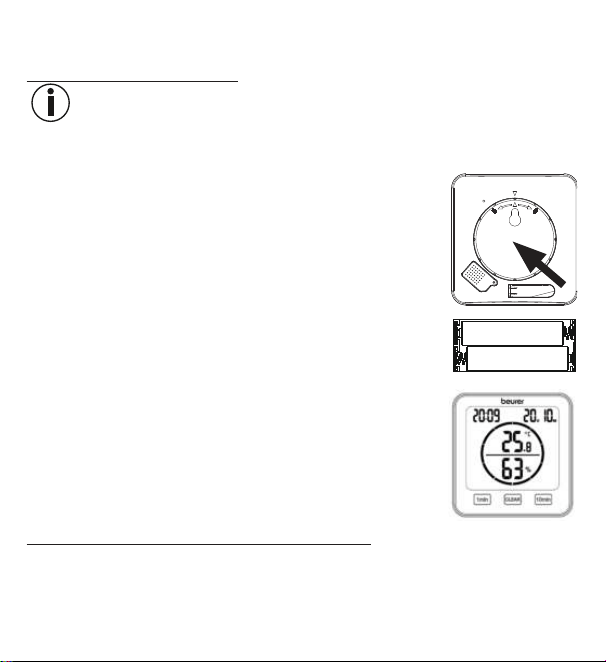
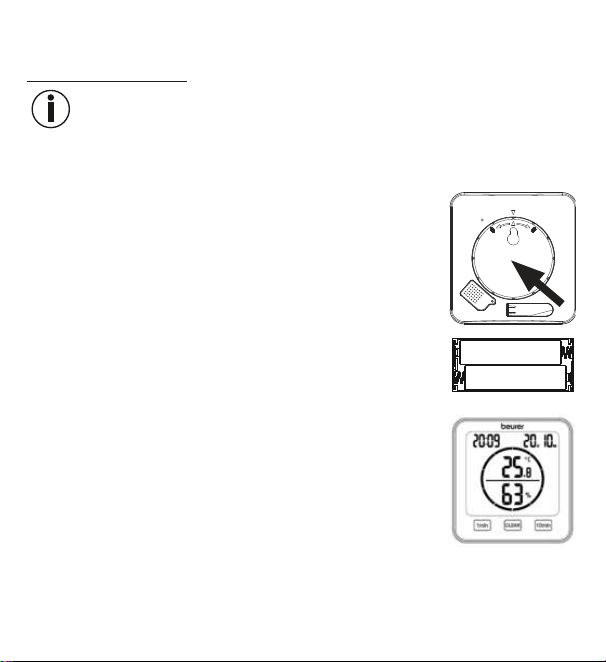
7. Inbetriebnahme
7.1 Batterien einlegen
Hinweis
Bevor Sie das Thermo-Hygrometer in Betrieb nehmen können, müssen Sie
zuerst zwei AAA-Batterien (im Lieferumfang enthalten) in das Batteriefach
einlegen. Gehen Sie dazu wie folgt vor:
1. Auf der Rückseite des Thermo-Hygrometers befindet sich
eine runde Batteriefach-Abdeckung. Drehen Sie die Batte-
riefach-Abdeckung gegen den Uhrzeigersinn auf. Nehmen
Sie nun die Batteriefach-Abdeckung ab.
2. Legen Sie die zwei im Lieferumfang enthaltenen AAA-Bat-
terien in das Batteriefach ein. Achten Sie beim Einlegen
der Batterien auf die korrekte Polung (+/-), wie sie im Bat-
teriefach abgebildet ist. Sobald die Batterien korrekt ein-
gelegt sind, erscheinen auf dem Display alle Anzeigen für
3 Sekunden. Anschließend wechselt das Thermo-Hygro-
meter automatisch in den Standard Modus.
3.
Bevor Sie die Batteriefach-Abdeckung wieder aufsetzen, müssen Sie zuerst
Datum und Uhrzeit einstellen. Befolgen Sie dazu die Anweisungen im nächs-
ten Abschnitt.

11
7.2 Datum / Uhrzeit / Temperatureinheit einstellen
1.
Um zwischen 12- und 24-Stundenmodus zu wechseln, drücken Sie die [TIME]-
Taste. Um zwischen Celsius (°C) und Fahrenheit (°F) zu wechseln, drücken Sie
die [UP/CF]-Taste.
2. Die Reihenfolge im Einstellungsmenü lautet:
Jahr -> Monat -> Tag -> Stunde -> Minute
Um in das Einstellungsmenü zu gelangen, halten Sie die [TIME]-Taste für
3Sekunden gedrückt. Im Display beginnt die Jahreszahl zu blinken.
3.
Stellen Sie mit den [UP/CF] / [DOWN]-Tasten das aktuelle Jahr ein. Bestätigen Sie mit der
[TIME]-Taste. Im Display blinkt nun der Monat.
4. Stellen Sie nun auf dieselbe Weise nacheinander Monat, Tag, Stunde und Mi-
nute mit den
[UP/CF] / [DOWN]-Tasten
ein und bestätigen Sie jeweils mit der
[TIME]-Taste.
Wenn Sie im Einstellungsmenü 7 Sekunden lang keine Taste drücken, wird
das Einstellungsmenü automatisch verlassen.
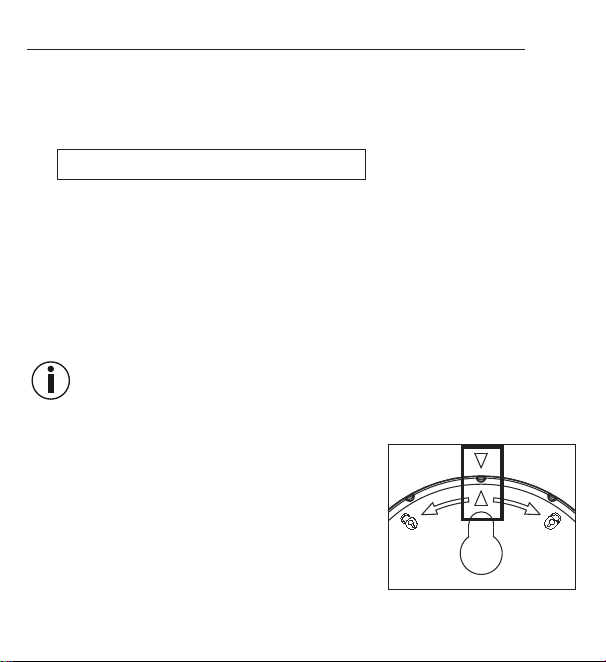
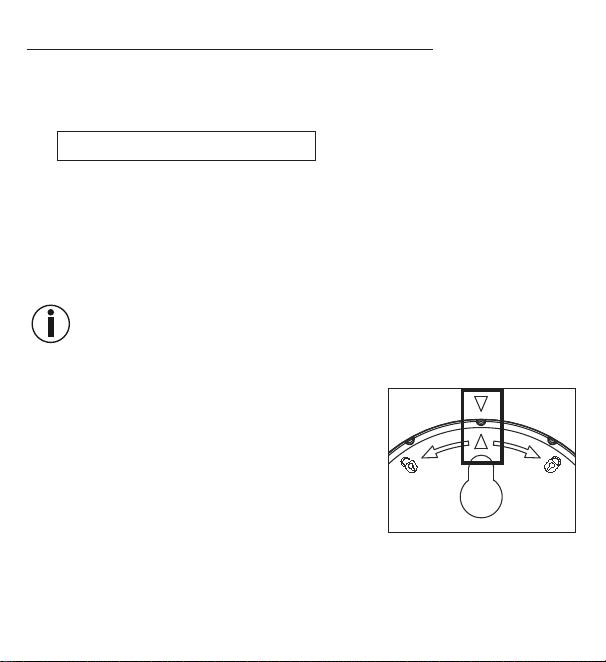
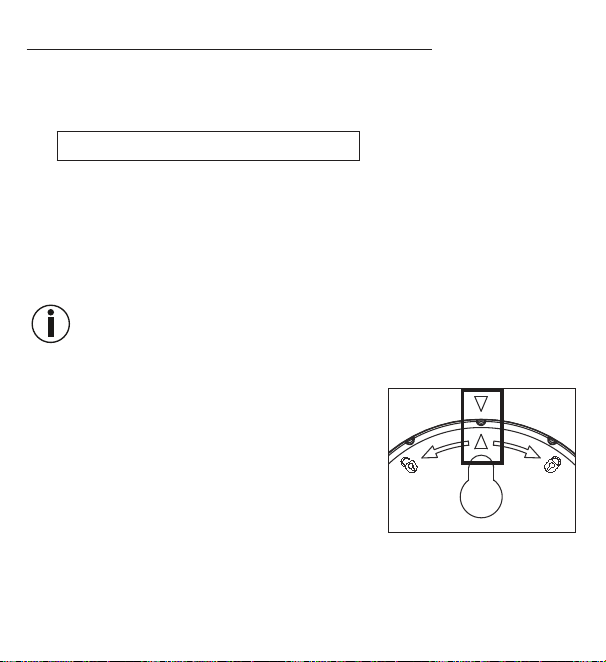
5. Setzen Sie die Batteriefach-Abdeckung wieder auf das Batteriefach
.
6.
Drehen Sie die Batteriefach-Abdeckung im Uhrzei-
gersinn fest zu, bis sie spürbar einrastet. Achten
Sie darauf, dass die Pfeilmarkierungen des Ge-
räts und der Batteriefach-Abdeckung übereinan-
der liegen.
7.
Sie können das Gerät mit Hilfe des ausklappba-
ren Standfußes als Standgerät verwenden oder
mit Hilfe der Aufhängevorrichtung (befindet sich auf der Geräterückseite) an
einer Wand montieren.

12
7.3 Auf Werkseinstellung zurücksetzen
Um das Datum und die Uhrzeit auf die Werkseinstellung zurückzusetzen, drücken
Sie mit einem spitzen Gegenstand kurz die [RESET]-Taste.
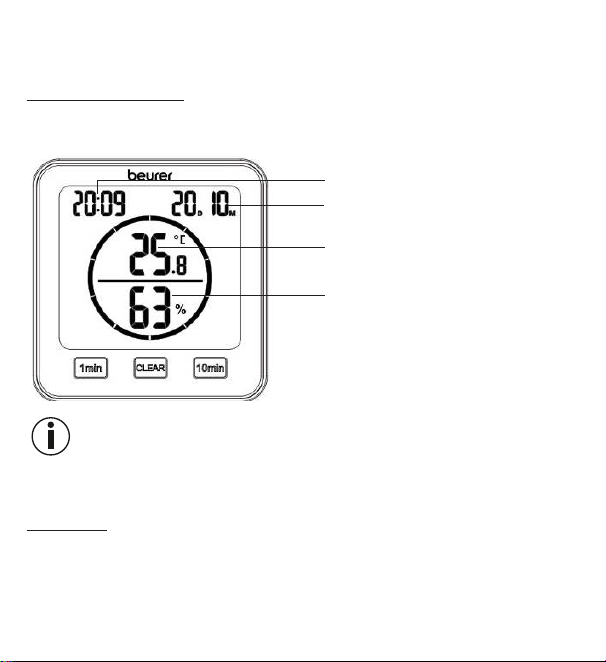
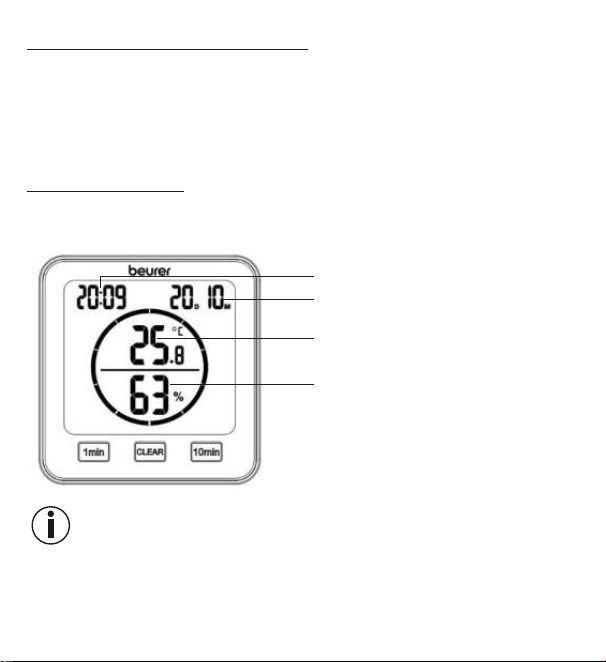
8. Anwendung
Das Thermo-Hygrometer besitzt einen Standard-Modus und einen Timer.
8.1 Standard-Modus
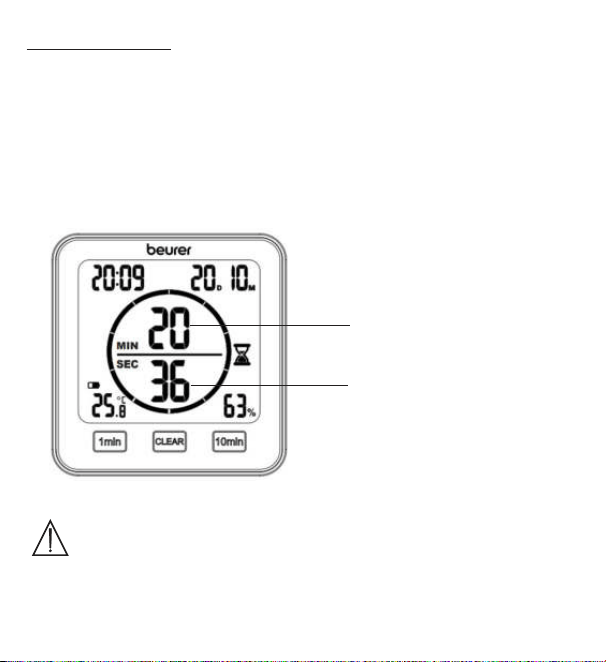
Wenn Sie am Thermo-Hygrometer keine Taste drücken, wird Ihnen auf dem
Display automatisch der Standard-Modus angezeigt.
Uhrzeit
Datum
(D = Tag, M = Monat)
Raumtemperatur
Relative Luftfeuchtigkeit
Hinweis
Nach Inbetriebnahme kann es 10 Minuten dauern, bis die korrekte Temperatur
und Luftfeuchtigkeit angezeigt werden.

13
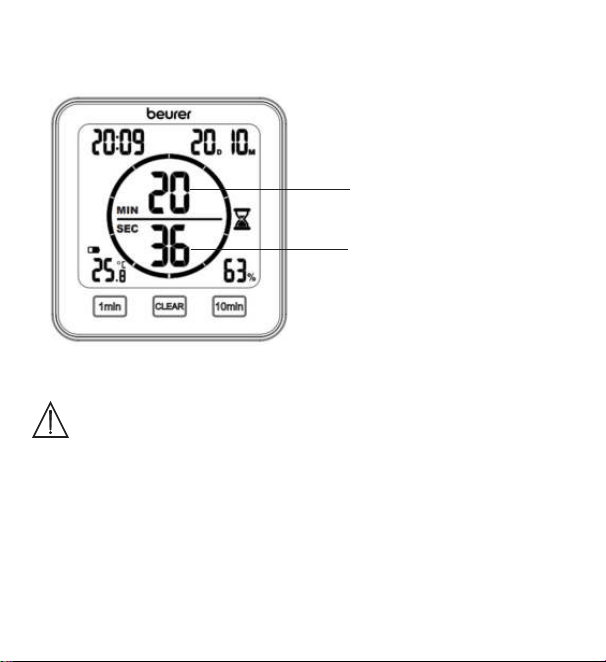
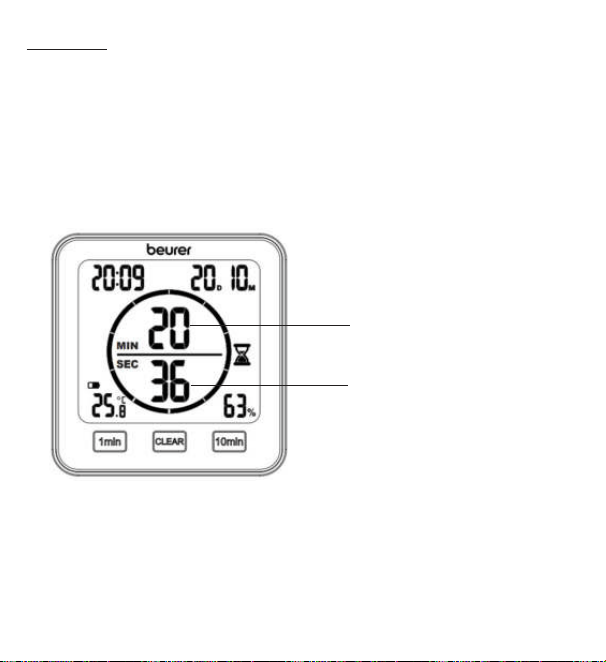
8.2 Timer
Sie können am Thermo-Hygrometer auch einen Timer von bis zu 99 Minuten
einstellen.
1.
Um den Timer zu starten, stellen Sie mit der [1 min]-Taste und der [10 min]-Taste
Ihre gewünschte Timer-Dauer ein. In der Mitte des Displays erscheint die einge-
stellte Timer-Dauer. Wenn Sie für 3 Sekunden keine Taste drücken, startet der
Timer automatisch mit einem Piepton. Nach Ablauf des Timers ertönt erneut
ein Pieptoton. Um den Piepton auszuschalten, drücken Sie die
[CLEAR]-Taste.
2. Um einen Timer vorzeitig zu beenden, drücken Sie die [CLEAR]-Taste.
Verbleibende Minuten des
Timers
Verbleibende Sekunden
des Timers
14
9. Reinigung und Pflege
ACHTUNG
•
Reinigen Sie das Gerät mit einem feuchten Tuch. Benutzen Sie
keine scharfen Reinigungsmittel oder harte Bürsten!
•
Es darf keinesfalls Flüssigkeit in das Gerät eindringen.
•
Wenn Sie das Gerät längere Zeit nicht verwenden, empfehlen wir
Ihnen, es in der Originalverpackung in trockener Umgebung und
ohne Beschwerung aufzubewahren.
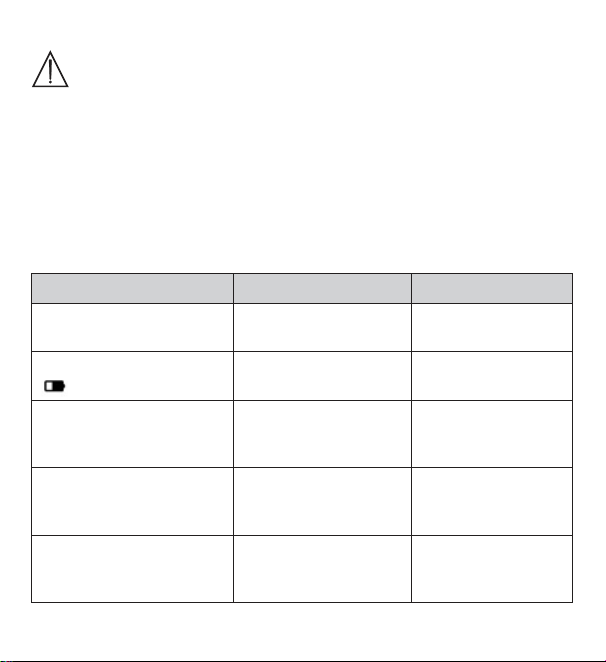
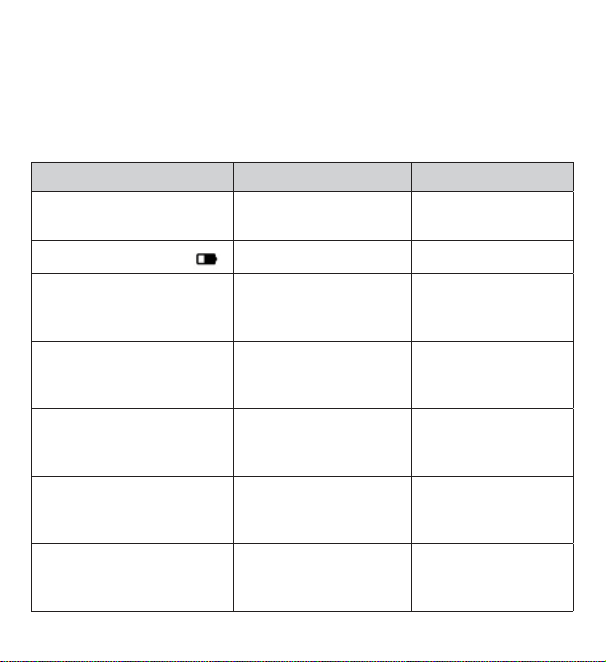
10. Was tun bei Problemen?
Problem Mögliche Ursache Behebung
Gerät lässt sich nicht
einschalten
Batterien leer
Neue Batterien
einlegen
Auf dem Display erscheint
Batterien fast leer
Neue Batterien
einlegen
Gerät lässt sich nicht
einschalten, trotz neuer
Batterien
Das Gerät ist defekt
Kontaktieren Sie den
Kundendienst
Auf dem Display erscheint
LL.L
Raumtemperatur unter
-10°C (14°F)
Raumtemperatur
liegt außerhalb des
Messbereichs
Auf dem Display erscheint
HH.H.
Raumtemperatur über
50°C (122°F)
Raumtemperatur
liegt außerhalb des
Messbereichs
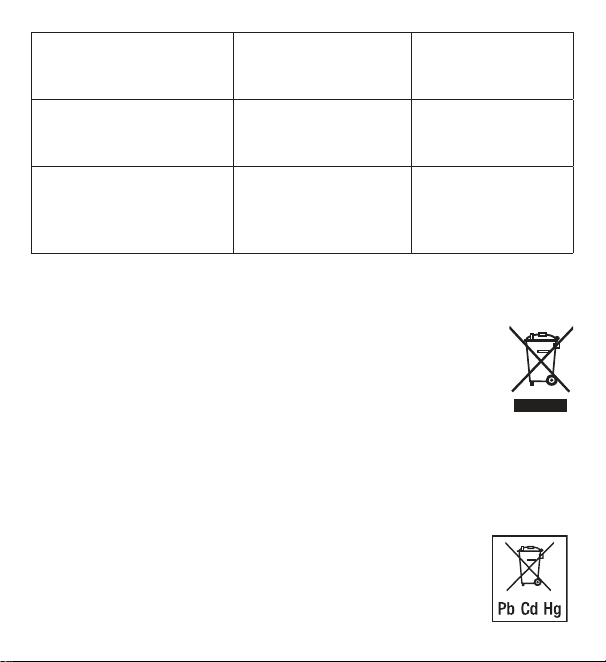
15
Auf dem Display erscheint
LL
Relative Luftfeuchtig-
keit unter 20 %
Relative Luftfeuchtig-
keit liegt außerhalb
des Messbereichs
Auf dem Display erscheint
HH
Relative Luftfeuchtig-
keit über 95 %
Relative Luftfeuchtig-
keit liegt außerhalb
des Messbereichs
Gerät zeigt keine oder
falsche Temperatur und
relative Luftfeuchtigkeit
Wechselnde Umgebung
Nach Inbetriebnahme
kann es 10 Minuten
dauern bis korrekte Da
-
ten angezeigt werden
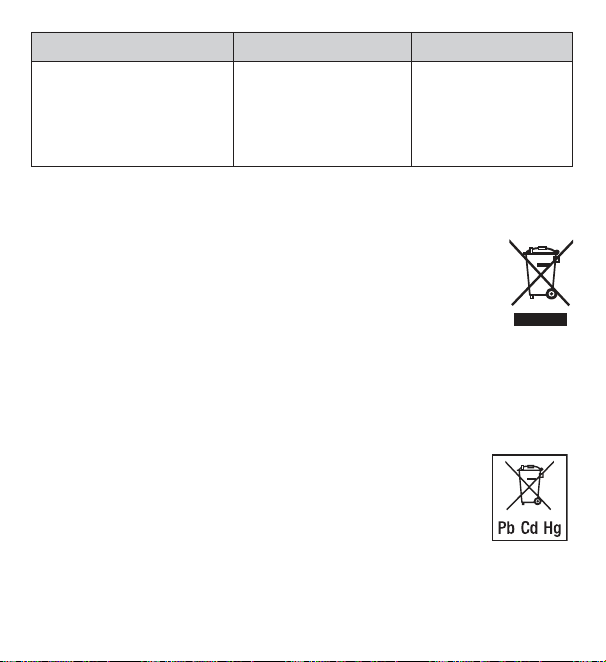
11. Entsorgung
Im Interesse des Umweltschutzes darf das Gerät am Ende seiner Lebensdauer
nicht mit dem Hausmüll entsorgt werden. Die Entsorgung kann über
entsprechende Sammelstellen in Ihrem Land erfolgen. Entsorgen Sie
das Gerät gemäß der Elektro- und Elektronik Altgeräte EG-Richtlinie –
WEEE (Waste Electrical and Electronic Equipment).
Bei Rückfragen wenden Sie sich an die für die Entsorgung zuständige
kommunale Behörde.
Batterie Entsorgung
Die verbrauchten, vollkommen entladenen Batterien müssen Sie über speziell ge-
kennzeichnete Sammelbehälter, Sondermüllannahmestellen oder über den Elektro-
händler entsorgen. Sie sind gesetzlich dazu verpflichtet, die Batterien zu entsorgen.
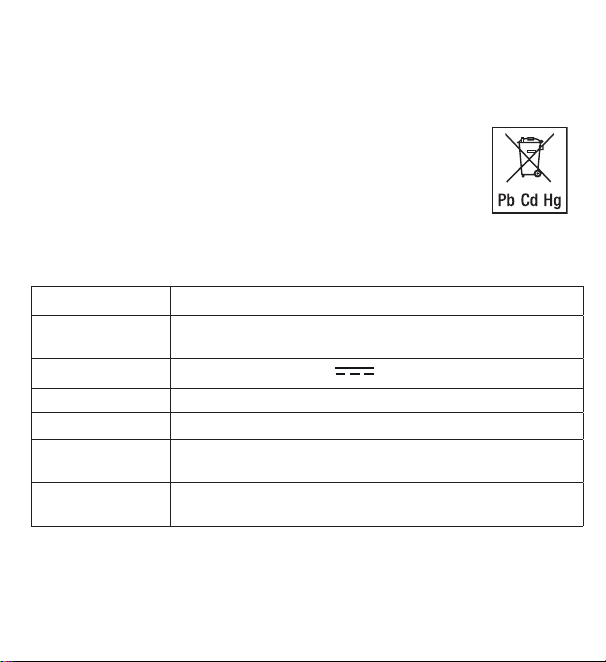
Diese Zeichen finden Sie auf schadstoffhaltigen Batterien:
Pb = Batterie enthält Blei,
Cd = Batterie enthält Cadmium,
Hg = Batterie enthält Quecksilber.
16
12. Technische Angaben
Typ HM 22
Artikelnummer
678.04
Versorgung 2 x 1,5 V
Batterie AAA LR03
Gewicht 135 g (ohne Batterien)
Maße 110 x 105 x 29,5 mm
Messbereich
Temperatur
-10 bis 50 °C (14 bis 122 °F)
Messbereich
Feuchtigkeit
20 bis 95 % relative Luftfeuchtigkeit
13. Garantie
Nähere Informationen zur Garantie und den Garantiebedingungen finden Sie im
mitgelieferten Garantie-Faltblatt.
Irrtum und Änderungen vorbehalten

17
ENGLISH
Read these instructions for use carefully and
keep them for later use; be sure to make
them accessible to other users and observe
the information they contain.
1. Getting to know your device
Using the HM 22 thermo hygrometer, you can measure the current room temperature
and relative humidity and read them from the display. In addition, the thermo
hygrometer has a timer which you can set.
Due to its handy size, you can set up the thermo hygrometer anywhere. There
is a mounting fixture on the back of the thermo hygrometer that you can use to
attach the device to the wall.
Table of contents
1. Getting to know your device ......... 17
2. Included in delivery......................... 18
3. Signs and symbols ......................... 18
4. Proper use ...................................... 19
5. Warnings and safety notes ............. 20
6. Device description .......................... 22
7. Initial use ........................................ 24
7.1 Inserting the batteries ............... 24
7.2 Setting the date/time/temperature
unit ............................................ 24
7.3 Resetting to factory settings ..... 25
8. Usage ............................................. 26
8.1 Standard mode ......................... 26
8.2 Timer ......................................... 26
9. Cleaning and maintenance ............. 27
10. What if there are problems? ......... 28
11. Disposal ........................................ 29
12. Technical specifications ............... 30
13. Warranty/service ........................... 30
18
2. Included in delivery
1 x thermo hygrometer
2 x AAA batteries
1 x set of these instructions for use
3. Signs and symbols
The following symbols are used on the device, in these instructions for use, on
the packaging and on the type plate for the device:
WARNING
Warning notice indicating a risk of injury or damage to health
IMPORTANT
Safety note indicating possible damage to the device/accessory
Product information
Note on important information
Read the instructions
CE labelling
This product satisfies the requirements of the applicable
European and national directives
Disposal in accordance with the Waste Electrical and
Electronic Equipment EC Directive – WEEE
Do not dispose of batteries containing harmful substances
with household waste

19
Manufacturer
B
A
Marking to identify the packaging material.
A = Material code, B = Material number:
1-7 = Plastics, 20-22 = Paper and cardboard
Separate the packaging elements and dispose of them in
accordance with local regulations.
The products demonstrably meet the requirements of the
Technical Regulations of the EAEU
United Kingdom Conformity Assessed Mark
Separate the product and packaging elements and dispose of
them in accordance with local regulations.
Importer symbol
4. Proper use
WARNING
The device is solely intended for measuring humidity and room temperature.
The device is intended for private use only. Use the device for the purpose it was
developed for only and in the manner specified in these instructions for use. Any
form of improper use can be dangerous! The manufacturer is not liable for damage
resulting from improper or incorrect use.
20
5. Warnings and safety notes
WARNING
•
Keep packaging material away from children. There is the risk of
suffocation.
•
The device is not a toy. Keep out of the reach of children.
•
Under no circumstances should you open or repair the device
yourself, as faultless functionality can no longer be guaranteed
thereafter. Failure to comply will invalidate the warranty.
•
For repairs, please contact Customer Services or an authorised
retailer.
•
Keep the device away from naked flames (e.g. candles).
•
Never submerge the device in water or other liquids.
•
Never use the device underneath a cover, such as a blanket or
pillow.
•
Do not use the device outside.
Notes on handling batteries
WARNING
•
If your skin or eyes come into contact with battery fluid, rinse the
affected area with water and seek medical assistance.
•
Choking hazard! Small children may swallow and choke
on batteries. Therefore, store batteries out of the reach of small
children.
•
Observe the plus (+) and minus (-) polarity signs.

21
•
If a battery has leaked, put on protective gloves and clean the
battery compartment with a dry cloth.
•
Protect batteries from excessive heat.
•
Risk of explosion! Do not throw batteries into a fire.
•
Do not charge or short-circuit batteries.
•
If the device is not to be used for a long period of time, remove the
batteries from the battery compartment.
•
Use identical or equivalent battery types only.
•
Always replace all batteries at the same time.
•
Do not use rechargeable batteries.
•
Do not disassemble, open or crush the batteries.
IMPORTANT
•
Protect the device from knocks, damp, dust, chemicals, significant
fluctuations in temperature, direct sunlight, splashes, and sand,
and ensure that sources of heat are at a sufficient distance (ovens
or heaters).
•
Do not place any objects on top of the device.
•
Clean the device with a damp cloth. Do not use any abrasive
cleaning products.
•
Use and store the device at an ambient temperature between -10°C
and 50°C. Higher or lower temperatures may damage the device.
•
In a changing environment the device requires 10 minutes to deliver
a reliable measurement.
•
Before using the device for the first time, remove the protective
film from the display.
22
6. Device description
Front
1
2
3
4
1 [1 min] button
2 [CLEAR] button
3 [10 min] button
4 Display
23
Rear
TIME DOWN RESETUP/CF
1
5
6
7
8
3
9
2
4
1 Sensor cover 5 [TIME] button
2 Battery compartment lid 6 [UP/CF] button
3 Fold-out stand 7 [DOWN] button
4 Mounting fixture 8 [RESET] button
9 Battery compartment
24
7. Initial use
7.1 Inserting the batteries
Note
Before you can use the thermo hygrometer, you first have to insert two AAA
batteries (included in delivery) into the battery compartment. Proceed as follows:
1. A round battery compartment lid is located on the rear of
the thermo hygrometer. Twist the battery compartment lid
anti-clockwise. Now remove the battery compartment lid.
2.
Insert the two AAA batteries included in delivery into the
battery compartment. When inserting the batteries, pay
attention to the correct polarity (+/-), as shown in the battery
compartment. As soon as the batteries are correctly inserted,
all display elements appear on the display for 3 seconds. The
thermo hygrometer then automatically switches to standard
mode.
3.
Before you replace the battery compartment lid, you
first have to set the date and time. To do so, follow the
instructions in the following section.
7.2 Setting the date/time/temperature unit
1.
To switch between the 12 and 24-hour modes, press the [TIME] button. To
switch between Celsius (°C) and Fahrenheit (°F), press the [UP/CF] button.

25
2. The order in the settings menu is:
Year -> Month -> Day -> Hour -> Minute
To access the settings menu, press and hold the [TIME] button for 3
seconds. The year starts to flash in the display.
3.
Set the current year using the [UP/CF]/[DOWN] buttons. Confirm using the
[TIME] button. The month now flashes in the display.
4.
Now set the month, day, hour and minute one after the other in the same manner
using the [UP/CF]/[DOWN] buttons and confirm each using the [TIME] button.
If you do not press any buttons for 7 seconds in the settings menu,
you will automatically exit the settings menu.
5. Place the battery compartment lid back on the battery compartment.
6. To close the battery compartment lid, twist it in a
clockwise direction until you feel it click firmly into
place. Make sure that the arrow markings of the
device and the battery compartment lid line up.
7. You can use the fold-out stand to create a stand-
alone device or you can mount it on the wall using
the mounting fixture (on the back of the device).
7.3 Resetting to factory settings
To reset the date and time to factory settings, briefly press the [RESET] button
using a pointed object.
26
8. Usage
The thermo hygrometer has a standard mode and a timer mode.
8.1 Standard mode
If you do not press any buttons on the thermo hygrometer, the standard mode is
automatically shown on the display.
Time
Date (D = day, M = month)
Room temperature
Relative humidity
Note
After initial use, it may take 10 minutes until the correct temperature and humidity
are displayed.
8.2 Timer
You can also set a timer of up to 99 minutes on the thermo hygrometer.
1.
In order to start the timer, set your desired timer duration using the [1 min]
button and the [10 min] button. The set timer duration appears in the centre
of the display. If you do not press any buttons for 3 seconds, the timer starts
27
automatically with a beep. A beep sounds again when the timer elapses. To
switch o the beep, press the [CLEAR] button.
2. In order to end a timer early, press the [CLEAR] button.
Remaining minutes on
the timer
Remaining seconds on
the timer
9. Cleaning and maintenance
IMPORTANT
•
Clean the device with a damp cloth. Do not use any abrasive
cleaning products or hard brushes.
•
Under no circumstances may liquid enter the device.
•
If you do not plan to use the device for a long period of time, we
recommend that you store it in the original packaging in a dry
environment, ensuring it is not weighed down by additional items.

28
10. What if there are problems?
Problem Possible cause Solution
Device will not switch on Flat batteries Insert new batteries
appears on the
display
Batteries almost flat Insert new batteries
The device will not switch
on although new batteries
have been inserted
The device is faulty
Contact Customer
Services
LL.L appears on the
display
Room temperature
below -10°C (14°F)
Room temperature
is outside the
measurement range
HH.H. appears on the
display
Room temperature
above 50°C (122°F)
Room temperature
is outside the
measurement range
LL appears on the display
Relative humidity below
20%
Relative humidity
is outside the
measurement range
HH appears on the display
Relative humidity above
95%
Relative humidity
is outside the
measurement range
Device displays an
incorrect temperature and
relative humidity or does
not display them at all
Changing environment
After initial use, it
may take 10minutes
until the correct data
is displayed
29
11. Disposal
For environmental reasons, do not dispose of the device in household waste at the
end of its service life. Dispose of the device at a suitable local collection or recycling
point in your country. Dispose of the device in accordance with EC
Directive – WEEE (Waste Electrical and Electronic Equipment).
If you have any questions, please contact the local authorities
responsible for waste disposal.
Battery disposal
Empty, completely flat batteries must be disposed of through specially designated
collection boxes, recycling points or electronics retailers. You are legally required
to dispose of the batteries.
The codes below are printed on batteries containing harmful substances:
Pb = battery contains lead,
Cd = battery contains cadmium,
Hg = battery contains mercury.
30
12. Technical specifications
Type HM 22
Item number 678.04
Supply 2 x 1.5 V AAA LR03 battery
Weight 135 g (without batteries)
Dimensions 110 x 105 x 29.5 mm
Temperature
measurement range
-10 to 50°C (14 to 122°F)
Humidity measurement
range
20 to 95% relative humidity
13. Warranty/service
Further information on the guarantee and guarantee conditions can be found in
the guarantee leaflet supplied.
Subject to errors and changes

31
FRANÇAIS
Lisez attentivement ce mode d’emploi,
conservez-le pour un usage ultérieur, met-
tez-le à disposition des autres utilisateurs et
suivez les consignes qui y figurent.
1. Familiarisation avec l’appareil
Le thermo-hygromètre HM 22 vous permet de mesurer la température ambiante ac-
tuelle et l’humidité relative et la consulter sur l’écran. En outre, le thermo-hygromètre
est équipé d’un minuteur vous permettant de régler une mesure sur un temps court.
Sa taille compacte pratique vous permet de poser le thermo-hygromètre partout.
L’arrière du thermo-hygromètre est équipé d’un système d’accrochage qui vous
permet de fixer l’appareil au mur.
Table des matières
1. Familiarisation avec l’appareil ........ 31
2. Contenu .......................................... 32
3. Symboles utilisés ............................ 32
4. Utilisation conforme aux
recommandations ........................... 33
5. Consignes d’avertissement et de mise
en garde ............................................. 34
6. Description de l’appareil ................. 37
7. Mise en service ............................... 39
7.1 Insérer les piles ......................... 39
7.2 Réglage de la date/ de l’heure /
de l’unité de température .......... 40
7.3 Repasser aux réglages d’usine ...41
8. Utilisation ........................................ 41
8.1 Mode Standard ......................... 41
8.2 Minuteur.................................... 42
9. Nettoyage et entretien .................... 43
10. Que faire en cas de problèmes?.. 43
11. Élimination .................................... 44
12. Caractéristiques techniques ......... 45
13. Garantie ........................................ 45

32
2. Contenu
1x thermo-hygromètre
2x piles AAA
1xmode d’emploi
3. Symboles utilisés
Les symboles suivants sont utilisés sur le mode d’emploi, sur l’emballage et sur
la plaque signalétique de l’appareil :
AVERTISSEMENT
Ce symbole vous avertit des risques de blessures ou des
dangers pour votre santé
ATTENTION
Ce symbole vous avertit des éventuels dommages au
niveau de l’appareil ou d’un accessoire
Information sur le produit
Indication d’informations importantes
Lire les consignes
Signe CE
Ce produit répond aux exigences des directives euro-
péennes et nationales en vigueur
Élimination conformément à la directive européenne
WEEE (Waste Electrical and Electronic Equipment) relative
aux déchets d’équipements électriques et électroniques
33
Ne pas jeter les piles à substances nocives avec les
déchets ménagers
Fabricant
B
A
Étiquette d’identification du matériau d’emballage.
A = Abréviation de matériau, B = Référence de matériau:
1 – 7 = plastique, 20 – 22 = papier et carton
Séparer les composants d’emballage et les éliminer
conformément aux prescriptions communales.
Les produits sont complètement conformes aux exi-
gences des règlements techniques de l’UEEA.
Marquage de conformité UKCA
Séparer le produit et les composants d’emballage et les
éliminer conformément aux prescriptions communales.
Symbole de l’importateur
4. Utilisation conforme aux recommandations
AVERTISSEMENT
L’appareil est conçu exclusivement pour mesurer l’humidité de l’air et la tem-
pérature ambiante.

34
L’appareil est conçu uniquement pour un usage personnel. N’utilisez l’appareil
qu’aux fins pour lesquelles il a été conçu et conformément aux indications
données par ce mode d’emploi. Toute utilisation inappropriée peut être dan-
gereuse! Le fabricant ne peut être tenu pour responsable des dommages
causés par une utilisation inappropriée ou non conforme.
5. Consignes d’avertissement et de mise en garde
AVERTISSEMENT
•
Conservez les emballages hors de la portée des enfants. Ils pour-
raient s’étouffer.
•
L’appareil n’est pas un jouet. Tenez-le hors de portée des enfants.
•
Vous ne devez en aucun cas ouvrir ou réparer l’appareil; le bon
fonctionnement de l’appareil ne serait plus assuré. Le non-respect
de cette consigne annulerait la garantie.
•
Pour toute réparation, adressez-vous au service client ou à un re-
vendeur agréé.
•
Maintenez l’appareil à l’écart des flammes ouvertes (p. ex. bougies).
•
N’immergez jamais l’appareil dans de l’eau ou d’autres liquides.
•
N’utilisez jamais l’appareil dans un endroit couvert, sous une cou-
verture ou des coussins par exemple.
•
N’utilisez pas l’appareil en plein air.
35
Remarques relatives aux piles
AVERTISSEMENT
•
Si du liquide de la cellule de pile entre en contact avec la peau ou les
yeux, rincer la zone touchée avec de l’eau et consulter un médecin.
•
Risque d’ingestion! Les enfants en bas âge pourraient avaler
des piles et s’étouffer. Conserver les piles hors de portée des en
-
fants en bas âge!
•
Respecter les signes de polarité plus (+) et moins (-).
•
Si une pile a coulé, enfiler des gants de protection et nettoyer le
compartiment à piles avec un chiffon sec.
•
Protéger les piles d’une chaleur excessive.
•
Risque d’explosion! Ne pas jeter les piles dans le feu.
•
Les piles ne doivent être ni rechargées ni court-circuitées.
•
En cas de non-utilisation prolongée de l’appareil, retirer les piles
du compartiment à piles.
•
Utiliser uniquement des piles identiques ou équivalentes.
•
Toujours remplacer toutes les piles simultanément.
•
Ne pas utiliser de batteries rechargeables!
•
Ne pas démonter, ouvrir ou casser les piles.
ATTENTION
•
Protégez l’appareil contre les coups, l’humidité, la poussière, les
produits chimiques, les fortes variations de température, les rayons
directs du soleil, les éclaboussures, le sable et les sources de cha
-
leur trop proches (four ou radiateur).

36
•
Ne posez aucun objet sur l’appareil.
•
Nettoyez l’appareil à l’aide d’un chiffon humide. N’utilisez pas de
produits nettoyants abrasifs.
•
Utilisez et conservez l’appareil à une température comprise entre
-10°C et 50°C. Des températures plus basses ou plus élevées
pourraient endommager l’appareil.
•
Si les conditions ambiantes sont changeantes, il faut compter
10minutes avant que l’appareil fournisse des mesures fiables.
•
Avant la première mise en service, retirez le film de protection de
l’écran.
37
6. Description de l’appareil
Face avant
1
2
3
4
1 Touche [1 min]
2 Touche [CLEAR]
3 Touche [10 min]
4 Écran

38
Face arrière
TIME DOWN RESETUP/CF
1
5
6
7
8
3
9
2
4
1 Couvercle du capteur 5 Touche [TIME]
2 Couvercle du compartiment
à piles
6 Touche [UP/CF]
3 Pied déployable 7 Touche [DOWN]
4 Système d’accrochage 8 Touche [RESET]
9 Compartiment à piles
39
7. Mise en service
7.1 Insérer les piles
Remarque
Avant de pouvoir mettre en service le thermo-hygromètre, vous devez d’abord
insérer deux piles AAA (fournies) dans le compartiment à piles. Pour ce faire, pro-
cédez comme suit:
1.
Un couvercle rond du compartiment à piles se trouve à
l’arrière du thermo-hygromètre. Tournez le couvercle du
compartiment à piles dans le sens inverse des aiguilles
d’une montre. Retirez le couvercle du compartiment à piles.
2. Insérez les deux piles AAA fournies dans le compartiment
à piles. Lors de l’insertion des piles, assurez-vous de bien
respecter la polarité (+/-) indiquée dans le compartiment.
Dès que les piles sont correctement insérées, tous les af-
fichages apparaissent à l’écran pendant 3secondes. Puis
le thermo-hygromètre passe automatiquement au mode
Standard.
3. Avant de remettre le couvercle du compartiment à piles, vous devez d’abord
régler la date et l’heure. Pour cela, suivez les instructions de la section suivante.
40
7.2 Réglage de la date/ de l’heure / de l’unité de température
1.
Pour basculer entre le mode 12 heures et 24 heures, appuyez sur la touche
[TIME]. Pour basculer entre Celsius (°C) et Fahrenheit (°F), appuyez sur la touche
[UP/CF].
2. L’ordre dans le menu de réglage est:
Année -> Mois -> Jour -> Heure-> Minutes
Pour accéder au menu de configuration, appuyez sur la touche [TIME] et
maintenez-la enfoncée pendant environ 3secondes. L’année commence à
clignoter à l’écran.
3. Utilisez les touches [UP/CF] / [DOWN] pour régler l’année actuelle. Confirmez
avec la touche [TIME] Le mois clignote alors à l’écran.
4. De la même manière, réglez successivement le mois, le jour, l’heure et les mi-
nutes avec les touches [UP/CF] / [DOWN] et confirmez à chaque fois avec la
touche [TIME].
Si vous n’appuyez sur aucune touche pendant 7 secondes dans le menu
de réglage, celui-ci se ferme automatiquement.
5. Remettez le couvercle sur le compartiment à piles.
6.
Tournez le couvercle du compartiment à pile dans
le sens des aiguilles d’une montre jusqu’à ce qu’il
s’enclenche. Assurez-vous que les flèches de l’ap-
pareil et du couvercle du compartiment à piles
sont alignées.
7.
Vous pouvez placer l’appareil sur une surface
plane à l’aide du pied déployable ou le poser au
mur grâce au système d’accrochage au dos de l’appareil.
41
7.3 Repasser aux réglages d’usine
Pour réinitialiser la date et l’heure aux réglages d’usine, utilisez un objet pointu
pour appuyer sur la touche [RESET].
8. Utilisation
Le thermo-hygromètre possède un mode Standard et un minuteur.
8.1 Mode Standard
Si vous n’appuyez sur aucune touche du thermo-hygromètre, le mode Standard
s’affiche automatiquement à l’écran.
Heure
Date (D = jour, M = mois)
Température ambiante
Humidité relative de l'air
Remarque
Après la mise en service, il peut falloir 10 minutes jusqu’à ce que la température
et l’humidité de l’air correctes s’affichent.

42
8.2 Minuteur
Vous pouvez aussi régler un minuteur de jusqu’à 99minutes sur le thermo-hy-
gromètre.
1. Pour démarrer le minuteur, utilisez la touche [1 min] et la touche [10 min] pour
régler la durée de minuteur souhaitée. La durée de minuteur réglée s’ache au
milieu de l’écran. Si vous n’appuyez sur aucune touche pendant 3secondes, le
minuteur démarre automatiquement avec un bip. Un autre bip retentit lorsque
le temps est écoulé. Pour désactiver le signal sonore, appuyez sur la touche
[CLEAR].
2. Pour arrêter un minuteur avant la fin, appuyez sur la touche [CLEAR].
Minutes restantes du
minuteur
Secondes restantes du
minuteur
43
9. Nettoyage et entretien
ATTENTION
•
Nettoyez l’appareil à l’aide d’un chiffon humide. N’utilisez ni
détergent dur ni brosse dure!
•
En aucun cas, un liquide ne doit pénétrer dans l’appareil.
•
Si vous n’utilisez pas l’appareil pendant une période prolongée,
nous vous recommandons de le ranger dans on emballage
d’origine sans rien poser dessus.
10. Que faire en cas de problèmes?
Problème Cause possible Solution
Il est impossible d’allumer
l’appareil
Piles vides
Insérer de nouvelles
piles
s’affiche à l’écran
Piles presque vides
Insérer de nouvelles
piles
Il est impossible d’allumer
l’appareil malgré les piles
neuves
L’appareil est
défectueux
Contacter le service
client
LL.L s’affiche à l’écran
Température ambiante
inférieure à -10°C
(14°F)
La température
ambiante est en
dehors de la plage
de mesure
44
Problème Cause possible Solution
HH.H. s’affiche à l’écran
Température ambiante
supérieure à 50°C
(122°F)
La température
ambiante est en
dehors de la plage
de mesure
LL s’affiche à l’écran
Humidité relative infé-
rieure à 20 %
L’humidité relative
est en dehors de la
plage de mesure
HH s’affiche à l’écran
Humidité relative supé-
rieure à 95 %
L’humidité relative
est en dehors de la
plage de mesure
L’appareil ne montre pas
de température et d’humi-
dité relative ou des valeurs
erronées
Environnement variable
Après la mise en
service, il peut falloir
10minutes jusqu’à
ce que des données
correctes s’affichent
11. Élimination
Dans l’intérêt de la protection de l’environnement, l’appareil ne doit pas être jeté
avec les ordures ménagères à la fin de sa durée de service. L’élimination
doit se faire par le biais des points de collecte compétents dans votre
pays. Éliminez l’appareil conformément à la directive européenne –
WEEE (Waste Electrical and Electronic Equipment) relative aux appareils
électriques et électroniques usagés.
Pour toute question, adressez-vous aux collectivités locales respon-
sables de l’élimination et du recyclage de ces produits.
45
Élimination des piles
Les piles usagées et complètement déchargées doivent être mises au rebut dans
des conteneurs spéciaux ou aux points de collecte réservés à cet usage ou bien
déposées chez un revendeur d’appareils électriques. L’élimination des piles est
une obligation légale qui vous incombe.
Ces pictogrammes se trouvent sur les piles à substances
nocives:
Pb = pile contenant du plomb,
Cd = pile contenant du cadmium,
Hg = pile contenant du mercure.
12. Caractéristiques techniques
Type HM 22
Référence de
l’article
678.04
Alimentation 2piles AAA LR03 1,5V
Poids 135 g (sans les piles)
Dimensions 110x105x29,5 mm
Plage de mesure
de la température
-10 à 50 °C (14 à 122 °F)
Plage de mesure
de l’humidité
20 à 95 % d’humidité relative
13. Garantie
Pour plus d’informations sur la garantie et les conditions de garantie, consultez
la fiche de garantie fournie.
Sous réserve d’erreurs et de modifications

46
ESPAÑOL
Lea detenidamente estas instrucciones de
uso, consérvelas para su futura utilización,
póngalas a disposición de otros usuarios y
respete las indicaciones.
1. Información general
El termohigrómetro HM 22 le permite medir la temperatura ambiente actual y la hu-
medad relativa del aire y leer los valores en la pantalla. Además, el termohigrómetro
cuenta con un temporizador con el que podrá ajustar una medición de tiempo corto.
Su tamaño compacto permite colocarlo en cualquier lugar. En la parte trasera del
termohigrómetro hay una anilla para colgar con la que podrá sujetar el aparato
en la pared.
Índice
1. Información general ....................... 46
2. Artículos suministrados .................. 47
3. Explicación de los símbolos ........... 47
4. Uso correcto ................................... 48
5. Indicaciones de advertencia y de
seguridad ........................................ 49
6. Descripción del aparato ................. 52
7. Puesta en funcionamiento .............. 54
7.1 Inserción de las pilas ................ 54
7.2 Ajuste de fecha, hora y unidad de
temperatura ............................... 55
7.3 Reposición a la configuración de
fábrica ....................................... 56
8. Utilización ....................................... 56
8.1 Modo estándar ......................... 56
8.2 Temporizador ............................ 57
9. Limpieza y cuidado ........................ 57
10. Resolución de problemas ............. 58
11. Eliminación ................................... 59
12. Datos técnicos .............................. 60
13. Garantía ........................................ 60
47
2. Artículos suministrados
1x termohigrómetro
2x pilas AAA
1x estas instrucciones de uso
3. Explicación de los símbolos
En el aparato, en las instrucciones de uso, en el embalaje y en la placa de carac-
terísticas del aparato se utilizan los siguientes símbolos:
ADVERTENCIA
Indicación de advertencia sobre peligro de lesiones u otros
peligros para la salud
ATENCIÓN
Indicación de seguridad sobre posibles daños del aparato o
de los accesorios
Información sobre el producto
Indicación de información importante
Leer las instrucciones
Marcado CE
Este producto cumple los requisitos de las directivas euro-
peas y nacionales vigentes.
Eliminación según la Directiva europea sobre residuos de
aparatos eléctricos y electrónicos (RAEE)
48
No desechar con la basura doméstica pilas que contengan
sustancias tóxicas
Fabricante
B
A
Etiquetado para identificar el material de embalaje.
A = abreviatura del material, B = número de material:
1-7 = plásticos, 20-22 = papel y cartón
Separe los componentes del envase y elimínelos conforme
a las disposiciones municipales.
Está demostrado que los productos cumplen los requisitos
de las normas técnicas de la Unión Económica Euroasiática.
Marcado UKCA (Conformidad Evaluada del Reino Unido,
por sus siglas en inglés)
Separe el producto y los componentes del envase y elimí-
nelos conforme a las disposiciones municipales.
Símbolo del importador
4. Uso correcto
ADVERTENCIA
El aparato está destinado exclusivamente a la medición de la humedad relativa
y de la temperatura ambiente.

49
Este aparato solo está destinado al uso privado. Utilícelo exclusivamente para
el fin para el que ha sido diseñado y del modo indicado en estas instrucciones
de uso. ¡Todo uso inadecuado puede ser peligroso! Por lo tanto, el fabrican-
te declina toda responsabilidad por daños debidos a un uso inadecuado o
incorrecto.
5. Indicaciones de advertencia y de seguridad
ADVERTENCIA
•
No deje el material de embalaje al alcance de los niños. Existe
peligro de asfixia.
•
Este aparato no es un juguete. Manténgalo fuera del alcance de
los niños.
•
No debe abrir ni reparar el aparato bajo ningún concepto; en caso
contrario, ya no se garantizará su correcto funcionamiento. El in
-
cumplimiento de esta disposición anula la garantía.
•
Diríjase al servicio de atención al cliente o a un distribuidor autori-
zado para llevar a cabo las reparaciones.
•
Mantenga el aparato alejado de llamas abiertas (p.ej., velas).
•
No sumerja nunca el aparato en agua ni en ningún otro líquido.
•
No use nunca el aparato si está cubierto, p.ej., por una manta o
un cojín.
•
No utilice el aparato al aire libre.
50
Indicaciones para la manipulación de pilas
ADVERTENCIA
•
En caso de que el líquido de una pila entre en contacto con la piel
o los ojos, lave la zona afectada con agua y busque asistencia
médica.
•
¡Peligro de asfixia! Los niños pequeños podrían tragarse las
pilas y asfixiarse. ¡Guarde las pilas fuera del alcance de los niños
pequeños!
•
Respete los símbolos más (+) y menos (-) que indican la polaridad.
•
Si se derrama el líquido de una pila, póngase guantes protectores
y limpie el compartimento de las pilas con un paño seco.
•
Proteja las pilas de un calor excesivo.
•
¡Peligro de explosión! No arroje las pilas al fuego.
•
Las pilas no se pueden cargar ni cortocircuitar.
•
Si no va a utilizar el aparato durante un periodo de tiempo prolon-
gado, retire las pilas de su compartimento.
•
Utilice únicamente el mismo tipo de pila o uno equivalente.
•
Cambie siempre todas las pilas a la vez.
•
¡No utilice pilas recargables!
•
No despiece, abra ni triture las pilas.
51
ATENCIÓN
•
Proteja el aparato de golpes, humedad, polvo, sustancias químicas,
fuertes cambios de temperatura, la luz directa del sol, salpicaduras de
agua, arena y la cercanía de fuentes de calor (hornos o radiadores).
•
No coloque objetos sobre el aparato.
•
Limpie el aparato con un paño húmedo. No utilice productos de
limpieza corrosivos.
•
Utilice y conserve el aparato a una temperatura ambiente de entre
-10°C y 50°C. Temperaturas superiores o inferiores pueden dañarlo.
•
Cuando se cambia su ubicación, el aparato necesita 10 minutos
para facilitar valores de medición seguros.
•
Antes de ponerlo en funcionamiento por primera vez, retire la lámina
protectora de la pantalla.
52
6. Descripción del aparato
Parte delantera
1
2
3
4
1 Botón [1 min]
2 Botón [CLEAR]
3 Botón [10 min]
4 Pantalla

53
Parte trasera
TIME DOWN RESETUP/CF
1
5
6
7
8
3
9
2
4
1 Tapa de sensor 5 Botón [TIME]
2 Tapa del compartimento de
las pilas
6 Botón [UP/CF]
3 Pie de apoyo abatible 7 Botón [DOWN]
4 Anilla para colgar 8 Botón [RESET]
9 Compartimento de las
pilas

54
7. Puesta en funcionamiento
7.1 Inserción de las pilas
Nota
Para poder poner en funcionamiento el termohigrómetro deberá insertar dos
pilas AAA (incluidas en los artículos suministrados) en el compartimento de las
pilas. Proceda para ello del siguiente modo:
1.
En la parte trasera del termohigrómetro hay una tapa re-
donda del compartimento de las pilas. Gire la tapa en el
sentido contrario a las agujas del reloj para abrirla. Retire
la tapa.
2.
Coloque en el compartimento de las pilas las dos pilas AAA
suministradas. Al colocar las pilas respete la polaridad (+/-),
tal como se indica en el compartimento. En cuanto las pilas
se colocan correctamente, en la pantalla aparecen todas
las indicaciones durante 3 segundos. A continuación, el
termohigrómetro pasa automáticamente al modo estándar.
3.
Antes de volver a colocar la tapa del compartimento de las pilas deberá ajustar
la fecha y la hora. Siga para ello las instrucciones que se dan en el siguiente
apartado.
55
7.2 Ajuste de fecha, hora y unidad de temperatura
1. Para cambiar entre el modo de 12 y de 24 horas, pulse el botón [TIME]. Para
cambiar entre Celsius (°C) y Fahrenheit (°F), pulse el botón [UP/CF].
2. Este es el orden en el menú de ajuste:
año-> mes -> día -> hora -> minuto
Para acceder al menú de ajuste, mantenga pulsado el botón [TIME] durante
3 segundos. En la pantalla empieza a parpadear el año.
3. Ajuste el año actual con los botones [UP/CF]/[DOWN]. Confirme con el botón
[TIME]. En la pantalla parpadea ahora el mes.
4.
Ajuste del mismo modo sucesivamente el mes, el día, la hora y los minutos con
los botones [UP/CF]/[DOWN] y confirme respectivamente con el botón [TIME].
Si no pulsa ningún botón durante 7 segundos en el menú de ajuste, saldrá
automáticamente del mismo.
5. Vuelva a colocar la tapa del compartimento de las pilas.
6. Ciérrela girándola en el sentido de las agujas del
reloj hasta que encaje. Asegúrese de que las mar-
cas de flecha del aparato coincidan con las de
la tapa.
7. Puede utilizar el aparato como aparato autónomo
con el pie de apoyo abatible o montarlo en una
pared usando la anilla para colgar (situada en la
parte trasera del aparato).

56
7.3 Reposición a la configuración de fábrica
Para reponer la fecha y la hora a los ajustes de fábrica, pulse brevemente con un
objeto afilado el botón [RESET].
8. Utilización
El termohigrómetro dispone de un modo estándar y un temporizador.
8.1 Modo estándar
Si no pulsa ningún botón del termohigrómetro, en la pantalla se mostrará auto-
máticamente el modo estándar.
Hora
Fecha (D = día, M = mes)
Temperatura ambiente
Humedad relativa del aire
Nota
Tras ponerlo en marcha, pueden pasar 10 minutos hasta que se muestren la
temperatura y la humedad ambiental correctas.
57
8.2 Temporizador
También puede ajustar en el termohigrómetro un temporizador de hasta 99
minutos.
1.
Para iniciar el temporizador, ajuste la duración que desee con el botón [1 min] y
el botón [10 min]. La duración ajustada aparece en el centro de la pantalla. Si no
pulsa ningún botón durante 3 segundos, el temporizador se iniciará automática-
mente con un pitido. Una vez transcurrido el tiempo ajustado en el temporizador,
volverá a sonar un pitido. Para desactivar el pitido, pulse el botón [CLEAR].
2. Para finalizar el temporizador antes de tiempo, pulse el botón [CLEAR].
Minutos restantes del
temporizador
Segundos restantes del
temporizador
9. Limpieza y cuidado
ATENCIÓN
•
Limpie el aparato con un paño húmedo. ¡No utilice productos
abrasivos ni cepillos duros para la limpieza!
58
•
Bajo ningún concepto deben penetrar líquidos en el aparato.
•
Si no va a utilizar el aparato durante un periodo de tiempo pro-
longado, le recomendamos que lo guarde en su embalaje original
en un ambiente seco y sin soportar cargas.
10. Resolución de problemas
Problema Posible causa Solución
El aparato no se enciende Pilas gastadas Colocar pilas nuevas
En la pantalla aparece
Pilas casi gastadas Colocar pilas nuevas
El aparato no se enciende
a pesar de las pilas nuevas
El aparato está
defectuoso
Póngase en contacto
con el servicio de
atención al cliente
En la pantalla aparece
LL.L
Temperatura ambiente
inferior a -10°C (14°F)
La temperatura am-
biente está fuera del
rango de medición
En la pantalla aparece
HH.H
Temperatura ambiente
superior a 50°C
(122°F)
La temperatura am-
biente está fuera del
rango de medición
En la pantalla aparece
LL
Humedad relativa del
aire inferior al 20%
La humedad relativa
del aire está fuera del
rango de medición
En la pantalla aparece
HH
Humedad relativa del
aire superior al 95%
La humedad relativa
del aire está fuera del
rango de medición
59
Problema Posible causa Solución
El aparato muestra
una temperatura o una
humedad relativa del aire
incorrectas o no muestra
ninguna
Entorno cambiante
Tras ponerlo en mar-
cha, pueden pasar
10 minutos hasta
que se muestren los
datos correctos
11. Eliminación
A fin de preservar el medio ambiente, cuando el aparato llegue al final de su vida
útil no lo deseche con la basura doméstica. Lo puede desechar en los
puntos de recogida adecuados disponibles en su zona. Deséchelo
según la Directiva europea sobre residuos de aparatos eléctricos y
electrónicos (RAEE).
Para más información, póngase en contacto con la autoridad municipal
competente en materia de eliminación de residuos.
Eliminación de las pilas
Las pilas usadas y completamente descargadas deben desecharse en contenedo-
res de recogida señalados de forma especial, los puntos de recogida de residuos
especiales o entregándolas a un distribuidor de equipos electrónicos. Los usuarios
están obligados por ley a desechar las pilas correctamente.
Estos símbolos se encuentran en pilas que contienen sustan-
cias tóxicas:
Pb: la pila contiene plomo,
Cd: la pila contiene cadmio,
Hg: la pila contiene mercurio.
60
12. Datos técnicos
Tipo HM 22
Referencia 678.04
Alimentación 2 pilas de 1,5 V AAA LR03
Peso 135 g (sin pilas)
Dimensiones 110 x 105 x 29,5 mm
Rango de medición
de temperatura
-10 a 50°C (14 a 122°F)
Rango de medición
de humedad
Humedad relativa del aire del 20 al 95 %
13. Garantía
Encontrará más información sobre la garantía y sus condiciones en el folleto
de garantía suministrado.
Salvo errores y modificaciones

61
ITALIANO
Leggere attentamente le presenti istruzio-
ni per l'uso, conservarle per impieghi futuri,
renderle accessibili ad altri utenti e attenersi
alle indicazioni.
1. Introduzione
Con il termoigrometro HM 22 è possibile misurare la temperatura ambiente attuale
e l'umidità relativa dell'aria e visualizzarle sul display. Inoltre, il termoigrometro è
dotato di un timer che consente di impostare una misurazione a breve termine.
Grazie alla dimensione che lo rende maneggevole, il termoigrometro può essere
posizionato ovunque. Sul lato posteriore del termoigrometro è presente una
predisposizione per il fissaggio a parete.
Indice
1. Introduzione ................................... 61
2. Fornitura ......................................... 62
3. Spiegazione dei simboli .................. 62
4. Uso conforme ................................. 63
5. Avvertenze e indicazioni di
sicurezza ......................................... 64
6. Descrizione dell'apparecchio ......... 66
7. Messa in funzione ........................... 68
7.1 Inserimento delle batterie ......... 68
7.2 Impostazione di data/ora/unità di
temperatura ............................... 69
7.3 Ripristino delle impostazioni di
fabbrica ..................................... 70
8. Utilizzo ............................................ 70
8.1 Modalità standard ..................... 70
8.2 Timer ......................................... 71
9. Pulizia e cura .................................. 72
10. Che cosa fare in caso di problemi? .. 72
11. Smaltimento ................................. 73
12. Dati tecnici .................................... 74
13. Garanzia/Assistenza ..................... 74

62
2. Fornitura
1x termoigrometro
2x batterie AAA
1x Le presenti istruzioni per l'uso
3. Spiegazione dei simboli
I seguenti simboli sono utilizzati nelle istruzioni per l’uso, sull’imballo e sulla
targhetta dell’apparecchio:
AVVERTENZA
Avvertimento di pericolo di lesioni o di pericoli per la salute
ATTENZIONE
Indicazione di sicurezza per possibili danni all'apparecchio/
agli accessori
Informazioni sul prodotto
Indicazione di informazioni importanti
Leggere le istruzioni
Marchio CE
Il presente prodotto soddisfa i requisiti delle direttive euro-
pee e nazionali vigenti
Smaltimento secondo la direttiva europea sui rifiuti di appa-
recchiature elettriche ed elettroniche (RAEE)
Non smaltire le batterie contenenti sostanze tossiche insie-
me ai rifiuti domestici
63
Produttore
B
A
Etichetta di identificazione del materiale di imballaggio.
A = abbreviazione del materiale, B = codice materiale:
1-7 = plastica, 20-22 = carta e cartone
Separare i componenti dell’imballaggio e smaltirli secondo
le norme comunali.
I prodotti sono comprovatamente conformi ai requisiti delle
normative tecniche dell'UEE.
Marchio UKCA (valutazione di conformità nel Regno Unito)
Separare il prodotto e i componenti dell'imballaggio e smal-
tirli secondo le norme comunali.
Simbolo importatore
4. Uso conforme
AVVERTENZA
Questo apparecchio è destinato esclusivamente alla misurazione dell'umidità
dell'aria e della temperatura ambiente.
Questo apparecchio è concepito unicamente per l'uso privato. Utilizzare l'appa-
recchio solo per lo scopo per il quale è stato concepito e come descritto nelle
presenti istruzioni per l'uso. Qualsiasi uso non conforme comporta un pericolo!
Il produttore non risponde di danni causati da un uso improprio o non conforme.
64
5. Avvertenze e indicazioni di sicurezza
AVVERTENZA
•
Tenere lontani i bambini dal materiale d'imballaggio. Pericolo di
soffocamento.
•
Questo apparecchio non è un giocattolo. Tenerlo fuori dalla portata
dei bambini.
•
Non aprire o riparare l'apparecchio per non comprometterne il fun-
zionamento corretto. In caso contrario la garanzia decade.
•
Per le riparazioni rivolgersi all'Assistenza clienti o a un rivenditore
autorizzato.
•
Tenere l'apparecchio lontano da fiamme libere (ad es. candele).
•
Non immergere mai l'apparecchio in acqua o altri liquidi.
•
Non coprire l'apparecchio durante l'uso, ad esempio con una co-
perta o un cuscino.
•
Non utilizzare l'apparecchio all'aperto.
Indicazioni sull'uso delle batterie
AVVERTENZA
•
Se il liquido di una batteria viene a contatto con la pelle o con gli
occhi, sciacquare le parti interessate con acqua e consultare un
medico.
•
Pericolo di ingestione! I bambini potrebbero ingerire le batterie
e soffocare. Tenerle quindi lontano dalla portata dei bambini.
•
Prestare attenzione alla polarità positiva (+) e negativa (-).
65
•
In caso di fuoriuscita di liquido dalle batterie, indossare guanti pro-
tettivi e pulire il vano batterie con un panno asciutto.
•
Proteggere le batterie dal caldo eccessivo.
•
Pericolo di esplosione! Non gettare le batterie nel fuoco.
•
Le batterie non devono essere ricaricate o mandate in cortocircuito.
•
Qualora l'apparecchio non dovesse essere utilizzato per un periodo
prolungato, rimuovere le batterie dal relativo vano.
•
Utilizzare solo tipologie di batterie uguali o equivalenti.
•
Sostituire sempre tutte le batterie contemporaneamente.
•
Non utilizzare batterie ricaricabili!
•
Non smontare, aprire o frantumare le batterie.
ATTENZIONE
•
Proteggere l'apparecchio da urti, umidità, polvere, prodotti chimi-
ci, forti sbalzi di temperatura, irraggiamento solare diretto, spruzzi
d'acqua, sabbia e fonti di calore troppo vicine (forni, caloriferi).
•
Non posizionare oggetti sull'apparecchio.
•
Pulire l'apparecchio con un panno umido. Non utilizzare detergenti
corrosivi.
•
Utilizzare e conservare l'apparecchio a una temperatura ambiente
compresa tra -10°C e 50°C. Temperature superiori o inferiori pos
-
sono danneggiare l'apparecchio.
•
In caso di cambio di ambiente, è necessario attendere 10 minuti
prima di poter ottenere risultati di misurazione attendibili.
•
Prima della prima messa in funzione, rimuovere la pellicola protettiva
dal display.

66
6. Descrizione dell'apparecchio
Vista anteriore
1
2
3
4
1 Pulsante [1 min]
2 Pulsante [CLEAR]
3 Pulsante [10 min]
4 Display

67
Vista posteriore
TIME DOWN RESETUP/CF
1
5
6
7
8
3
9
2
4
1 Coperchio dei sensori 5 Pulsante [TIME]
2 Coperchio del vano batterie 6 Pulsante [UP/CF]
3 Supporto apribile 7 Pulsante [DOWN]
4 Predisposizione per fissaggio 8 Pulsante [RESET]
9 Vano batterie
68
7. Messa in funzione
7.1 Inserimento delle batterie
Indicazione
Prima di mettere in funzione il termoigrometro, è necessario inserire le due
batterie AAA in dotazione nell'apposito vano. Procedere come descritto di
seguito:
1.
Sul lato posteriore del termoigrometro è presente un coper-
chio rotondo per il vano batterie. Ruotare il coperchio del
vano batterie in senso antiorario. A questo punto rimuove-
re il coperchio.
2. Inserire nel vano le due batterie AAA fornite in dotazione.
Prestare attenzione a rispettare la corretta polarità (+/-),
come indicato nel vano batterie. Una volta inserite corret-
tamente le batterie, tutti gli indicatori verranno visualizzati
sul display per 3 secondi. Il termoigrometro passa quindi
automaticamente alla modalità standard.
3. Prima di riposizionare il coperchio del vano batterie, è necessario impostare la
data e l'ora. A tal fine attenersi alle indicazioni riportate nella prossima sezione.
69
7.2 Impostazione di data/ora/unità di temperatura
1.
Per commutare tra le modalità 12 ore e 24 ore, premere il pulsante [TIME].
Per commutare tra Celsius (°C) e Fahrenheit (°F), premere il pulsante [UP/CF].
2. L'ordine nel menu delle impostazioni è:
Anno -> Mese -> Giorno -> Ora -> Minuto
Per accedere al menu delle impostazioni, tenere premuto il pulsante [TIME]
per 3 secondi. L'anno inizia a lampeggiare sul display.
3.
Impostare l'anno attuale con i pulsanti [UP/CF] / [DOWN]. Confermare con il
pulsante [TIME]. Sul display lampeggia il mese.
4.
Impostare nello stesso modo mese, giorno, ora e minuti con i pulsanti [UP/CF] /
[DOWN] e confermare di volta in volta con il pulsante [TIME].
Se non si preme alcun pulsante per 7 secondi nel menu delle
impostazioni, si esce automaticamente dal menu.
5. Riposizionare il coperchio sul vano batterie.
6.
Ruotare il coperchio del vano batterie in senso ora
-
rio fino a sentire lo scatto in posizione. Assicurarsi
che il contrassegno della freccia sull'apparecchio
si trovi in corrispondenza di quello riportato sul
coperchio del vano batterie.
7. È possibile posizionare l'apparecchio su una su-
perficie tramite il supporto apribile oppure mon-
tarlo a parete utilizzando l'apposita predisposizione (sul retro dell'apparecchio).

70
7.3 Ripristino delle impostazioni di fabbrica
Per ripristinare le impostazioni di fabbrica di data e ora, premere brevemente il
pulsante [RESET] con un oggetto appuntito.
8. Utilizzo
Il termoigrometro possiede una modalità standard e un timer.
8.1 Modalità standard
Se non si preme alcun pulsante sul termoigrometro, sul display viene visualizzata
automaticamente la modalità standard.
Ora
Data (D = giorno, M = mese)
Temperatura ambiente
Umidità relativa dell'aria
Indicazione
Dopo la messa in funzione, potrebbero essere necessari 10 minuti per visualizza-
re la temperatura e l'umidità corrette.
71
8.2 Timer
Sul termoigrometro è inoltre possibile impostare un timer fino a 99 minuti.
1. Per avviare il timer, utilizzare il pulsante [1 min] e il pulsante [10 min] per impo-
stare la durata del timer desiderata. La durata del timer impostata viene visua-
lizzata al centro del display. Se non si preme alcun pulsante per 3 secondi, il
timer si avvia automaticamente con un segnale acustico. Allo scadere del tempo
viene di nuovo emesso un segnale acustico. Per disattivare il segnale acustico,
premere il pulsante [CLEAR].
2. Per disattivare anticipatamente il timer, premere il pulsante [CLEAR].
Minuti rimanenti del timer
Secondi rimanenti del timer
72
9. Pulizia e cura
ATTENZIONE
•
Pulire l'apparecchio con un panno umido. Non utilizzare deter-
genti corrosivi o spazzole dure!
•
Non deve in nessun caso penetrare liquido nell'apparecchio.
•
Se l'apparecchio non viene usato per lunghi periodi, si consiglia
di conservarlo nell'imballo originale in un ambiente asciutto e
senza sovrapporvi carichi.
10. Che cosa fare in caso di problemi?
Problema Possibile causa Soluzione
Non è possibile
accendere l'apparecchio
Batterie scariche Inserire batterie nuove
Sul display compare
Batterie quasi scariche Inserire batterie nuove
L'apparecchio non si
accende, nonostante le
batterie nuove
L'apparecchio è
difettoso
Contattare il Servizio
clienti
Sul display compare
LL.L
Temperatura ambiente
inferiore a -10°C (14°F)
La temperatura
ambiente è al di
fuori dell'intervallo di
misurazione
73
Problema Possibile causa Soluzione
Sul display compare
HH.H.
Temperatura ambiente
superiore a 50°C (122°F)
La temperatura
ambiente è al di
fuori dell'intervallo di
misurazione
Sul display compare
LL
Umidità relativa dell'aria
inferiore al 20%
L'umidità relativa
dell'aria è al di fuori
dell'intervallo di misu-
razione
Sul display compare
HH
Umidità relativa dell'aria
superiore al 95%
L'umidità relativa
dell'aria è al di fuori
dell'intervallo di misu-
razione
L'apparecchio non visua-
lizza o visualizza in modo
errato la temperatura e
l'umidità relativa dell'aria
Cambio di ambiente
Dopo la messa in
funzione, potrebbero
essere necessari
10minuti per una
corretta visualizzazio-
ne dei dati
11. Smaltimento
A tutela dell'ambiente, al termine del suo ciclo di vita, l'apparecchio non deve es-
sere smaltito nei rifiuti domestici, ma conferito negli appositi centri di
raccolta. Smaltire l'apparecchio secondo la direttiva europea sui rifiuti
di apparecchiature elettriche ed elettroniche (RAEE).
In caso di dubbi, rivolgersi alle autorità comunali competenti per lo
smaltimento.
74
Smaltimento delle batterie
Smaltire le batterie esauste e completamente scariche presso gli appositi punti di
raccolta, i punti di raccolta per rifiuti tossici o i negozi di elettronica. Lo smaltimento
delle batterie è un obbligo di legge.
Sulle batterie contenenti sostanze tossiche sono riportati i
seguenti simboli:
Pb = batteria contenente piombo,
Cd = batteria contenente cadmio,
Hg = batteria contenente mercurio.
12. Dati tecnici
Tipo HM 22
Codice articolo 678.04
Alimentazione 2 batterie da 1,5 V
AAA LR03
Peso 135 g (senza batterie)
Dimensioni 110 x 105 x 29,5 mm
Intervallo di misurazione
temperatura:
da -10 a 50 °C (da 14 a 122 °F)
Intervallo di misurazione
dell'umidità
dal 20 al 95% di umidità relativa dell'aria
13. Garanzia/Assistenza
Per ulteriori informazioni sulla garanzia e sulle condizioni di garanzia, consulta-
re la scheda di garanzia fornita.
Salvo errori e modifiche
75
TÜRKÇE
Bu kullanım kılavuzunu dikkatle okuyun, ile-
ride kullanmak üzere saklayın, diğer kulla-
nıcıların erişebilmesini sağlayın ve içindeki
yönergelere uyun.
1. Ürün özellikleri
HM 22 termo-higrometre ile, bulunduğunuz mekandaki sıcaklığı ve bağıl hava ne-
mini ölçebilir ve değerleri cihazın ekranından okuyabilirsiniz. Termo-higrometrede
ayrıca, kısa süreli ölçümler ayarlamanıza olanak veren bir zamanlayıcı mevcuttur.
Küçük boyutları sayesinde termo-higrometreyi her yerde kullanabilirsiniz. Ter-
mo-higrometrenin arka tarafında, cihazı duvara sabitlemek için kullanabileceğiniz
bir asma deliği mevcuttur.
İçindekiler
1. Ürün özellikleri ............................... 75
2. Teslimat kapsamı ............................ 76
3. İşaretlerin açıklaması ...................... 76
4. Amacına uygun kullanım ................ 77
5. Uyarılar ve güvenlik yönergeleri ...... 78
6. Cihaz açıklaması ............................. 80
7. İlk çalıştırma .................................... 82
7.1 Pillerin takılması ........................ 82
7.2 Tarih, saat, sıcaklık birimi ayarı . 83
7.3 Fabrika ayarlarına geri alma ...... 84
8. Kullanım .......................................... 84
8.1 Standart mod ............................ 84
8.2 Zamanlayıcı............................... 85
9. Temizlik ve bakım ........................... 86
10. Sorunların giderilmesi ................... 86
11. Bertaraf etme ................................ 87
12. Teknik veriler ................................. 88
13. Garanti .......................................... 88
76
2. Teslimat kapsamı
1x adet termo-higrometre
2x adet AAA pil
1x adet kullanım kılavuzu
3. İşaretlerin açıklaması
Cihazın üzerinde, kullanım kılavuzunda, ambalajında ve model etiketinde aşağıda-
ki simgeler kullanılmıştır:
UYARI
Yaralanma tehlikelerine veya sağlığınızla ilgili tehlikelere yönelik
uyarı
DİKKAT
Cihazda ve aksesuarlarda meydana gelebilecek hasarlara
yönelik güvenlik uyarısı
Ürün bilgisi
Önemli bilgilere yönelik uyarı
Talimatı okuyun
CE işareti
Bu ürün gerekli Avrupa direktiflerinin ve ulusal direktiflerin
gerekliliklerini karşılar.
Elektrikli ve elektronik atık cihazlarla ilgili AB direktifine (WEEE
- Waste Electrical and Electronic Equipment) uygun şekilde
bertaraf edilmelidir
Zararlı madde içeren piller evsel atıklarla birlikte bertaraf
edilmemelidir

77
Üretici
B
A
Ambalaj malzemesinin tanımlanması için kullanılan işaret.
A = malzeme kısaltması, B = malzeme numarası:
1-7 = plastikler, 20 -22 = kâğıt ve karton
Ambalaj bileşenlerini ayırın ve belediyenin kurallarına uygun
olarak bertaraf edin.
Ürünler, AEB’nin belirlediği teknik kuralların gerektirdiği şartlara
kesin bir şekilde uymaktadır.
Birleşik Krallık İçin Uygunluk Değerlendirmesi Yapıldı İşareti
Ürünü ve ambalaj bileşenlerini ayırın ve belediyenin kurallarına
uygun olarak bertaraf edin.
İthalatçı simgesi
4. Amacına uygun kullanım
UYARI
Cihaz sadece hava nemi ve oda sıcaklığı ölçümü için tasarlanmıştır.
Cihaz sadece kişisel kullanım için tasarlanmıştır. Cihazı sadece geliştirilme
amacına uygun ve bu kullanım kılavuzunda belirtilen şekilde kullanın. Usulüne
uygun olmayan her türlü kullanım tehlikeli olabilir! Usulüne uygun olmayan
ve yanlış kullanım sonucu oluşan hasarlardan üretici firma sorumlu değildir.
78
5. Uyarılar ve güvenlik yönergeleri
UYARI
•
Çocukları ambalaj malzemesinden uzak tutun. Boğulma tehlikesi
vardır.
•
Bu cihaz oyuncak değildir. Cihazı çocukların ulaşamayacağı bir
yerde saklayın.
•
Cihazı kesinlikle sökmeyin veya onarmaya çalışmayın, aksi halde
kusursuz çalışması garanti edilemez. Bu husus dikkate alınmadığı
takdirde garanti geçerliliğini yitirir.
•
Onarım için müşteri hizmetlerine veya yetkili bir satıcıya başvurun.
•
Cihazı açık alev kaynaklarından (örn. mumlar) uzak tutun.
•
Cihazı asla suyun veya diğer sıvıların içine sokmayın.
•
Cihazı battaniye veya yastık gibi nesnelerle örterek kullanmayın.
•
Cihazı dışarıda kullanmayın.
Pillerin kullanımıyla ilgili bilgiler
UYARI
•
Pilden sızan sıvı cilt veya gözlerle temas ettiğinde, ilgili yeri suyla
yıkayın ve bir doktora başvurun.
•
Nefes borusuna kaçma tehlikesi! Piller çocukların nefes bo-
rusuna kaçabilir ve boğulmalarına neden olabilir. Bu nedenle pilleri
küçük çocukların erişmeyeceği bir yerde saklayın!
•
Artı (+) ve eksi (-) kutup işaretlerine dikkat edin.

79
•
Bir pil aktığında koruyucu eldiven giyin ve pil bölmesini kuru bir
bezle temizleyin.
•
Pilleri aşırı ısıya karşı koruyun.
•
Patlama tehlikesi! Piller ateşe atılmamalıdır.
•
Piller şarj edilmemeli veya kısa devre yaptırılmamalıdır.
•
Cihaz uzun süre kullanılmayacaksa pilleri pil bölmesinden çıkarın.
•
Sadece aynı tip veya eşdeğer piller kullanın.
•
Her zaman tüm pilleri aynı anda değiştirin.
•
Şarj edilebilir pil kullanmayın!
•
Pilleri parçalarına ayırmayın, açmayın veya ezmeyin.
DİKKAT
•
Cihazı darbelerden, nemden, tozdan, kimyasallardan, aşırı sıcaklık
değişikliklerinden, doğrudan gelen güneş ışığından, sıçrayan su-
dan, kumdan ve çok yakın ısı kaynaklarından (soba veya kalorifer
radyatörü) koruyun.
•
Cihazın üzerine herhangi bir cisim koymayın.
•
Cihazı nemli bir bezle temizleyin. Agresif temizlik maddeleri kul-
lanmayın.
•
Cihazı -10°C ile 50°C arasındaki ortam sıcaklıklarında kullanın veya
saklayın. Daha yüksek veya düşük sıcaklıklar cihaza zarar verebilir.
•
Ortam değişikliği durumunda, cihazın güvenilir ölçüm sonuçları ve-
rebilmesi için 10 dakika geçmesi gerekir.
•
İlk kullanımdan önce ekrandaki koruyucu folyoyu çıkarın.
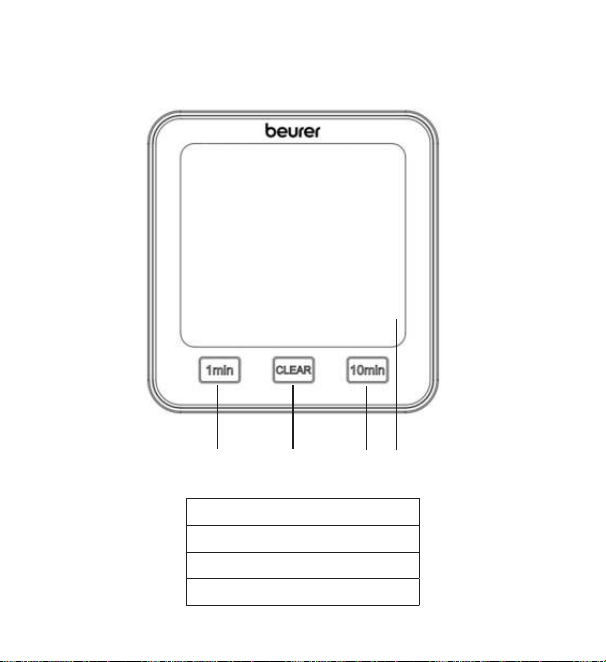
80
6. Cihaz açıklaması
Ön taraf
1
2
3
4
1 [1 min] tuşu
2 [CLEAR] tuşu
3 [10 min] tuşu
4 Ekran

81
Arka taraf
TIME DOWN RESETUP/CF
1
5
6
7
8
3
9
2
4
1 Sensör kapağı 5 [TIME] tuşu
2 Pil bölmesi kapağı 6 [UP/CF] tuşu
3 Açılır-kapanır ayak 7 [DOWN] tuşu
4 Asma deliği 8 [RESET] tuşu
9 Pil bölmesi
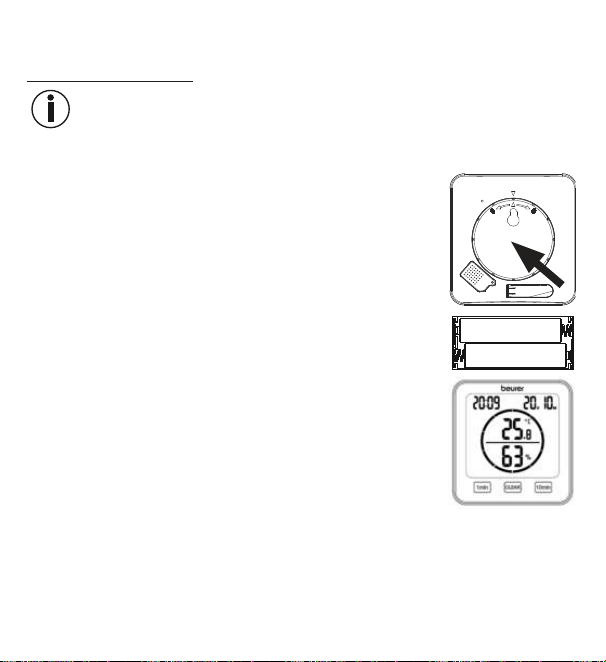
82
7. İlk çalıştırma
7.1 Pillerin takılması
Not
Termo-higrometreyi çalıştırabilmek için önce iki adet AAA pili (teslimat kapsamına
dahildir) pil bölmesine yerleştirmeniz gerekir. Bunun için aşağıdakileri yapın :
1. Termo-higrometrenin arka tarafında yuvarlak bir pil bölme-
si kapağı mevcuttur. Pil bölmesi kapağını saat yönünün ak-
sine döndürün. Şimdi pil bölmesi kapağını çıkarın.
2. Teslimat kapsamındaki iki adet AAA pili pil bölmesine yer-
leştirin. Pilleri yerleştirirken kutupların pil bölmesinde göste-
rilen işaretlerle (+/-) aynı yönde olmasına dikkat edin. Piller
doğru yerleştirildiğinde ekrandaki tüm göstergeler 3 saniye
yanar. Ardından termo-higrometre otomatik olarak standart
moda geçiş yapar.
3. Pil bölmesi kapağını tekrar yerleştirmeden önce tarihi ve saati ayarlamanız ge-
rekir. Bunun için sonraki bölümde yer alan talimatları uygulayın.

83
7.2 Tarih, saat, sıcaklık birimi ayarı
1.
12 saat modu ve 24 saat modu arasında geçiş yapmak için [TIME] tuşuna
basın. Santigrat (°C) ve Fahrenheit (°F) arasında geçiş yapmak için [UP/CF]
tuşuna basın.
2. Ayar menüsündeki sıralama şöyledir:
Yıl -> Ay -> Gün -> Saat -> Dakika
Ayar menüsüne erişmek için [TIME] tuşunu 3 saniye basılı tutun. Ekranda yıl
yanıp sönmeye başlar.
3.
[UP/CF] / [DOWN] tuşlarını kullanarak geçerli yılı ayarlayın. [TIME] tuşu ile onay
-
layın. Ekranda şimdi ay yanıp söner.
4.
[UP/CF] / [DOWN] tuşlarını kullanarak aynı şekilde ay, gün, saat ve dakika ayar-
larını da yapın ve her bir ayarı [TIME] tuşu ile onaylayın.
Ayar menüsündeyken 7 dakika boyunca hiçbir tuşa basmazsanız ayar
menüsünden otomatik olarak çıkılır.
5. Pil bölmesi kapağını tekrar pil bölmesine takın.
6. Pil bölmesinin kapağını saat yönünde döndürerek
hissedilir şekilde yerine oturmasını sağlayın. Ciha-
zın ve pil bölmesi kapağının ok işaretlerinin aynı
hizaya gelmesine dikkat edin.
7. Cihazı açılır-kapanır ayağı sayesinde bağımsız bir
cihaz olarak kullanabilir veya asma deliği (cihazın
arka tarafında bulunur) yardımıyla duvara monte
edebilirsiniz.
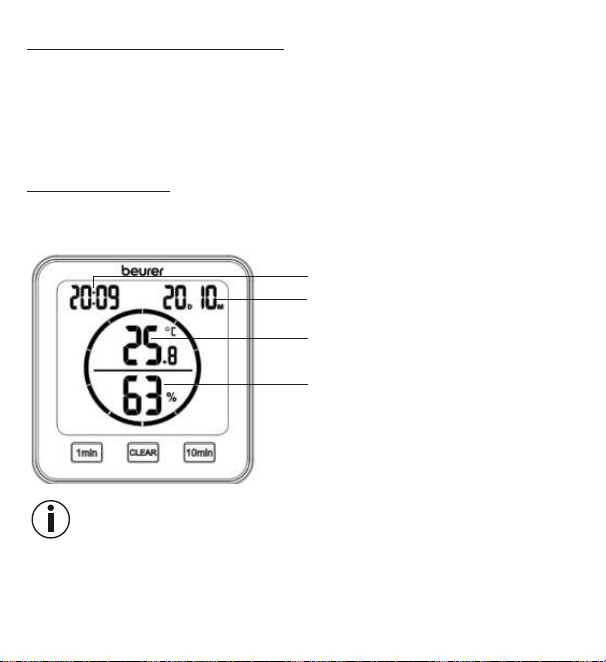
84
7.3 Fabrika ayarlarına geri alma
Tarihi ve saati fabrika ayarlarına geri almak için sivri uçlu bir nesne ile [RESET]
tuşuna kısa süre basın.
8. Kullanım
Termo-higrometrede bir standart mod ve bir zamanlayıcı mevcuttur.
8.1 Standart mod
Termo-higrometrede herhangi bir tuşa basmazsanız ekranda otomatik olarak
Standart mod gösterilir.
Saat
Tarih (D = Gün, M = Ay)
Oda sıcaklığı
Bağıl hava nemi
Not
Cihaz çalıştırıldıktan sonra doğru sıcaklığı ve nemi göstermesi 10 dakika kadar
sürebilir.
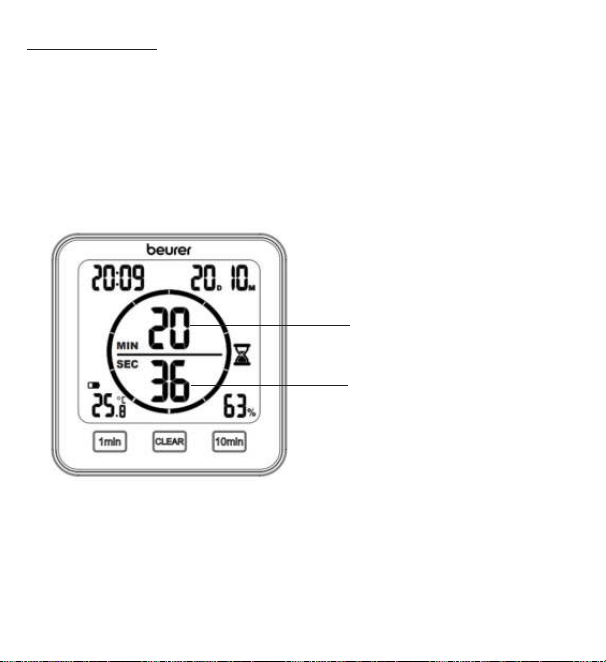
85
8.2 Zamanlayıcı
Termo-higrometrede 99 dakikaya kadar ayarlayabileceğiniz bir zamanlayıcı
mevcuttur.
1. Zamanlayıcıyı başlatmak için [1 min] tuşu ve [10 min] tuşu ile istediğiniz süreyi
ayarlayın. Ayarladığınız zamanlayıcı süresi ekranın ortasında gösterilir. 3 saniye
boyunca hiçbir tuşa basmazsanız zamanlayıcı bir bip sesi ile birlikte otomatik
olarak çalışmaya başlar. Zamanlayıcının süresi bittiğinde bir bip sesi duyulur.
Bip sesini kapatmak için [CLEAR] tuşuna basın.
2. Zamanlayıcıyı daha erken sonlandırmak için [CLEAR] tuşuna basın.
Dakika olarak kalan
zamanlayıcı süresi
Saniye olarak kalan
zamanlayıcı süresi
86
9. Temizlik ve bakım
DİKKAT
•
Cihazı nemli bir bezle temizleyin. Agresif temizlik maddeleri ya da
sert fırçalar kullanmayın!
•
Cihaza kesinlikle su girmemelidir.
•
Cihazı uzun süre kullanmayacaksanız, orijinal ambalajı içinde,
kuru bir ortamda ve üzerinde ağırlık olmadan saklamanızı öneririz.
10. Sorunların giderilmesi
Sorun Olası neden Çözüm
Cihaz
açılmıyor
Piller boşalmış Yeni piller yerleştirin
Ekranda
görünüyor
Piller boşalmak üzere Yeni piller yerleştirin
Yeni piller takılmış olmasına
rağmen cihaz açılmıyor
Cihaz arızalı
Müşteri hizmetlerine
danışın
Ekranda
LL.L görünüyor
Oda sıcaklığı -10°C
(14°F) altında
Oda sıcaklığı ölçüm
aralığının dışında
Ekranda
HH.H. görünüyor
Oda sıcaklığı 50°C
(122°F) üzerinde
Oda sıcaklığı ölçüm
aralığının dışında
Ekranda
LL görünüyor
Bağıl nem %20 altında
Bağıl nem ölçüm
aralığının dışında
87
Sorun Olası neden Çözüm
Ekranda HH görünüyor
Bağıl nem %95
üzerinde
Bağıl nem ölçüm
aralığının dışında
Cihaz sıcaklık veya nem
değeri göstermiyor veya
hatalı gösteriyor
Ortam değişikliği
Cihaz çalıştırıldıktan
sonra doğru verilerin
gösterilmesi 10 daki-
ka kadar sürebilir
11. Bertaraf etme
Çevreyi korumak için, kullanım ömrü dolan cihaz evsel atıklarla beraber bertaraf
edilmemelidir. Cihaz, ülkenizdeki uygun atık toplama merkezleri aracı-
lığıyla bertaraf edilebilir. Cihazı, elektrikli ve elektronik hurda cihazlarla
ilgili AB direktifine (WEEE - Waste Electrical and Electronic Equipment)
uygun şekilde bertaraf edin.
Bertaraf etme ile ilgili sorularınızı, ilgili yerel makamlara iletebilirsiniz.
Pillerin bertaraf edilmesi
Kullanılmış, tamamen boşalmış piller özel işaretli toplama kutularına atılarak, özel atık
toplama yerlerine veya elektrikli cihaz satıcılarına teslim edilerek bertaraf edilmelidir.
Pillerin bertaraf edilmesi, yasal olarak sizin sorumluluğunuzdadır.
Bu işaretler, zararlı madde içeren pillerin üzerinde bulunur:
Pb = Pil kurşun içerir,
Cd = Pil kadmiyum içerir,
Hg = Pil cıva içerir.
88
12. Teknik veriler
Tip HM 22
Ürün numarası 678.04
Güç kaynağı 2 x 1,5 V AAA LR03 pil
Ağırlık 135 g (piller hariç)
Ölçüler 110 x 105 x 29,5 mm
Sıcaklık ölçüm aralığı -10 ila 50°C (14 ila 122°F)
Nem ölçüm aralığı %20 – 95 bağıl hava nemi
13. Garanti
Garanti ve garanti koşulları ile ilgili ayrıntılı bilgileri cihazla birlikte verilen garanti
broşüründe bulabilirsiniz.
Hata ve değişiklik hakkı saklıdır

89
РУССКИЙ
Внимательно прочитайте данную инструк-
цию поприменению, сохраните еедля по
-
следующего использования, предоставьте
другим пользователям возможность сней
ознакомиться иследуйте ееуказаниям.
1. Ознакомительная информация
Термогигрометр HM22 измеряет температуру иотносительную влажность
воздуха в помещении. Полученные значения отображаются на дисплее.
Дополнительно термогигрометр оснащен таймером, при помощи которого
Выможете настроить кратковременное измерение.
Благодаря небольшим размерам термогигрометр можно установить
влюбом месте. Собратной стороны термогигрометра имеется приспосо-
бление для подвешивания, при помощи которого прибор можно закрепить
настене.
Содержание
1. Ознакомительная информация .. 89
2. Комплект поставки ....................... 90
3. Пояснения ксимволам ................. 90
4. Использование поназначению ... 92
5. Предупреждения иуказания
потехнике безопасности ................. 92
6. Описание прибора ........................ 95
7. Подготовка кработе ..................... 97
7.1 Установка батареек ................ 97
7.2 Настройка даты/времени/
единицы измерения ................ 98
7.3 Сброс назаводские
настройки ................................. 99
8. Применение ................................... 99
8.1 Стандартный режим ............... 99
8.2 Таймер.................................... 100
9. Очистка иуход ............................ 101
10. Что делать при возникновении
проблем? ................................... 101
11. Утилизация ................................ 102
12. Технические характеристики ... 103
13. Гарантия/сервисное
обслуживание ........................... 103
90
2. Комплект поставки
1x термогигрометр
2x батарейки типа ААА
1x инструкция поприменению
3. Пояснения ксимволам
На приборе, в инструкции по применению, на упаковке и фирменной та-
бличке прибора используются следующие символы.
ПРЕДУПРЕЖДЕНИЕ
Предупреждает об опасности травмирования или ущер-
ба для здоровья
ВНИМАНИЕ
Указывает на возможные повреждения прибора/при-
надлежностей
Информация об изделии
Обращает внимание на важную информацию
Прочтите инструкцию
Знак СЕ
Это изделие соответствует требованиям действующих
европейских инациональных директив.
Утилизация прибора всоответствии сдиректи-
вой ЕСпоотходам электрического иэлектронного
оборудования— WEEE (Waste Electrical and Electronic
Equipment).
91
Неутилизируйте батарейки вместе сбытовым мусором:
они содержат токсичные вещества.
Производитель
B
A
Маркировка для идентификации упаковочного мате-
риала.
A= сокращенное обозначение материала, B= номер
материала:
1-7= пластик, 20-22= бумага и картон
Удалите элементы упаковки иутилизируйте их всоот-
ветствии сместными предписаниями.
Продукция гарантированно соответствует требованиям
нормативно-технической документации ЕАЭС.
Знак соответствия требованиям Великобритании
Снимите упаковку сизделия иутилизируйте ее всоот-
ветствии сместными предписаниями.
Символ импортера
92
4. Использование поназначению
ПРЕДУПРЕЖДЕНИЕ
Прибор предназначен исключительно для измерения влажности воздуха
итемпературы воздуха впомещении.
Прибор предназначен исключительно для частного использования.
Используйте прибор только вцелях, для которых онбыл разработан,
итолько таким способом, который описан вданной инструкции попри-
менению. Любое применение непоназначению может быть опасным!
Производитель ненесет ответственности заущерб, вызванный неквали-
фицированным или ненадлежащим использованием прибора.
5. Предупреждения иуказания потехнике безопасности
ПРЕДУПРЕЖДЕНИЕ
•
Недавайте упаковочный материал детям. Существует опас-
ность удушения.
•
Этот прибор непредназначен для игр! Храните его вне преде-
лов досягаемости детей.
•
Нивкоем случае неоткрывайте прибор инеремонтируйте
его самостоятельно, поскольку надежность его работы вэтом
случае негарантируется. Несоблюдение этих требований ведет
кпотере гарантии.
•
Для ремонта обратитесь всервисную службу или кофициаль-
ному дистрибьютору.
93
•
Держите прибор подальше ототкрытого пламени (например,
свечей).
•
Никогда непогружайте прибор вводу или другие жидкости.
•
Ненакрывайте прибор вовремя использования, например
одеялом или подушкой.
•
Неиспользуйте прибор вне помещения.
Указания пообращению сбатарейками
ПРЕДУПРЕЖДЕНИЕ
•
При попадании жидкости изэлемента батарейки накожу или
вглаза необходимо промыть соответствующий участок боль
-
шим количеством воды иобратиться кврачу.
•
Опасность проглатывания! Маленькие дети могут прогло-
тить батарейки иподавиться ими. Поэтому батарейки необхо-
димо хранить внедоступном для детей месте!
•
Обращайте внимание наобозначение полярности: плюс (+)
иминус (–).
•
Если батарейка потекла, очистите отсек для батареек сухой
салфеткой, предварительно надев защитные перчатки.
•
Защищайте батарейки отперегрева.
•
Опасность взрыва! Небросайте батарейки вогонь.
•
Незаряжайте батарейки инедопускайте ихкороткого замы-
кания.
•
Если прибор длительное время неиспользуется, извлеките
изнего батарейки.
94
•
Используйте батарейки только одного типа или равноценных
типов.
•
Всегда заменяйте все батарейки сразу.
•
Неиспользуйте аккумуляторы!
•
Неразбирайте, неоткрывайте инеразбивайте батарейки.
ВНИМАНИЕ
•
Предохраняйте прибор отударов, влажности, пыли, химикатов,
сильных колебаний температуры, прямых солнечных лучей,
брызг, песка инеустанавливайте его вблизи источников тепла
(печей или радиаторов отопления).
•
Ничего неставьте наприбор.
•
Очищайте прибор влажной салфеткой. Неиспользуйте едкие
чистящие средства.
•
Используйте ихраните прибор при температуре от–10до50°C.
Более высокие или более низкие температуры могут привести
кповреждению прибора.
•
При меняющихся условиях окружающей среды прибор начнет
передавать точные результаты измерений через 10 минут.
•
Перед первым использованием снимите сэкрана защитную
пленку.

95
6. Описание прибора
Передняя сторона
1
2
3
4
1 Кнопка [1мин]
2 Кнопка [CLEAR]
3 Кнопка [10мин]
4 Дисплей
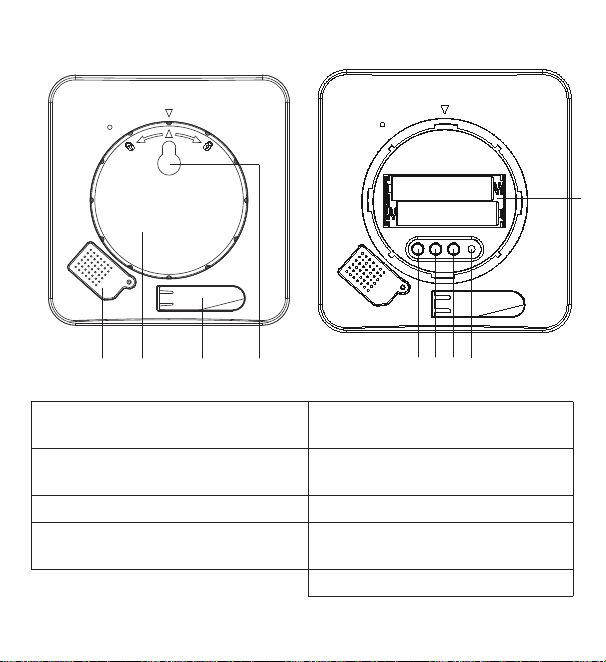
96
Обратная сторона
TIME DOWN RESETUP/CF
1
5
6
7
8
3
9
2
4
1 Защитная крышка для
датчиков
5 Кнопка [TIME]
2 Крышка отсека для
батареек
6 Кнопка [UP/CF]
3 Откидная подставка 7 Кнопка [DOWN]
4 Приспособление для
подвешивания
8 Кнопка [RESET]
9 Отсек для батареек
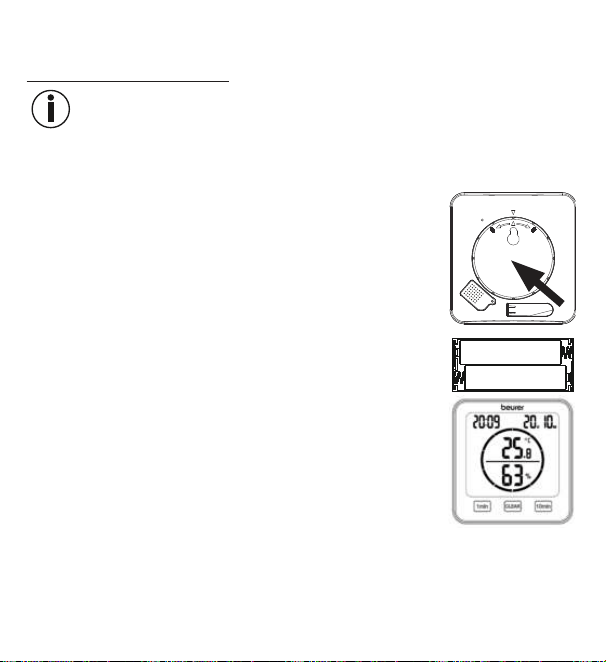
97
7. Подготовка кработе
7.1 Установка батареек
Указание
Перед вводом термогигрометра вэксплуатацию сначала необходимо
вставить две батарейки AAA (входят вкомплект поставки) вотсек для
батареек. Для этого выполните следующие действия.
1. Собратной стороны термогигрометра находится кру-
глая крышка отсека для батареек. Поверните крышку
отсека для батареек против часовой стрелки. Теперь
снимите крышку отсека для батареек.
2.
Вставьте две батарейки AAA, входящие вкомплект
поставки, вотсек для батареек. При установке бата-
реек соблюдайте полярность (+/-), указанную вотсеке
для батареек. Если батарейки вставлены правильно,
надисплее на3секунды загорятся все индикаторы.
Затем термогигрометр автоматически перейдет встан-
дартный режим работы.
3.
Перед тем как снова закрыть крышку отсека для батареек, настройте дату
ивремя. Для этого следуйте указаниям вследующем разделе.

98
7.2 Настройка даты/времени/единицы измерения
1. Для переключения между 12-часовым и24-часовым режимом отображе-
ния времени нажмите кнопку [TIME]. Для переключения между градусами
Цельсия (°C) иФаренгейта (°F) нажмите кнопку [UP/CF].
2. Вменю настройки задана следующая последовательность:
год -> месяц -> день -> часы -> минуты
Чтобы попасть вменю настроек, удерживайте нажатой кнопку [TIME]
втечение 3секунд. Надисплее начнет мигать число для обозначения
года.
3.
При помощи кнопок [UP/CF] / [DOWN] установите текущий год. Для под-
тверждения нажмите кнопку [TIME]. Затем надисплее замигает месяц.
4.
Таким жеобразом поочереди спомощью кнопок [UP/CF] / [DOWN] установи-
те месяц, день, часы иминуты инажмите кнопку [TIME] для подтверждения.
Если Вывтечение 7секунд ненажимаете никакие кнопки вменю
настроек, оно автоматически закрывается.
5. Вновь установите наместо крышку отсека для батареек.
6.
Поворачивайте крышку отсека для батаре-
ек почасовой стрелке дослышимого щелч-
ка. Следите затем, чтобы стрелки наприбо-
ре икрышке отсека для батареек совпадали
друг сдругом.
7.
Выможете использовать прибор, установив
его наоткидную подставку или прикрепив его
настену спомощью приспособления для подвешивания (собратной сто-
роны прибора).
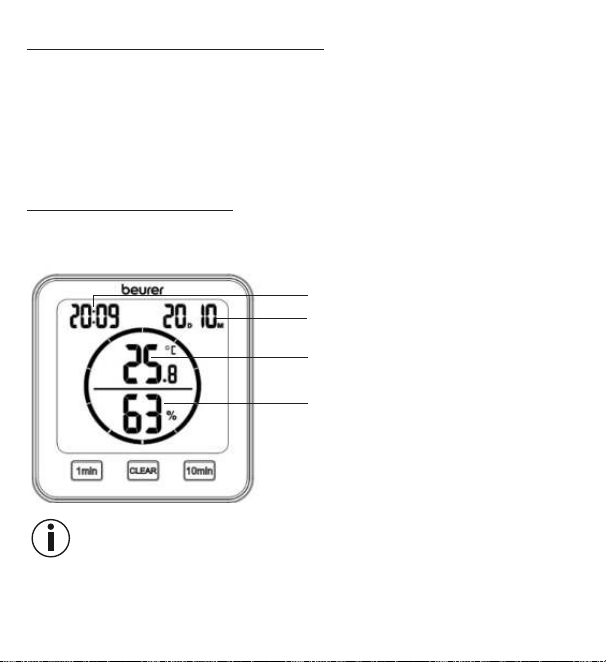
99
7.3 Сброс назаводские настройки
Для сброса даты ивремени назаводские настройки при помощи острого
предмета коротко нажмите накнопку [RESET].
8. Применение
Термогигрометр может работать встандартном режиме или врежиме
таймера.
8.1 Стандартный режим
Если Выненажимаете никакие кнопки натермогигрометре, надисплее
автоматически отображается стандартный режим работы.
Время
Дата (D= день, M= месяц)
Температура впомещении
Относительная влажность
воздуха
Указание
После ввода вэксплуатацию прибору может потребоваться до10минут,
чтобы отобразить корректное значение температуры ивлажности воздуха.
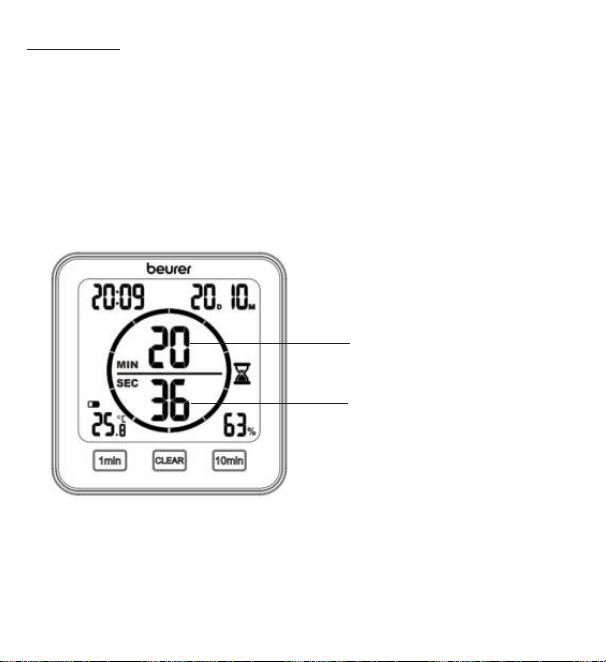
100
8.2 Таймер
Вытакже можете настроить натермогигрометре таймер вдиапазоне
до99минут.
1.
Для запуска таймера при помощи кнопок [1мин] и[10мин] установите же-
лаемое время. Вцентре дисплея появится установленное время таймера.
Если втечение 3секунд Выненажмете ниодну кнопку, таймер подаст зву
-
ковой сигнал изапустится автоматически. Поистечении установленного
времени таймер вновь подаст звуковой сигнал. Для выключения звукового
сигнала нажмите кнопку [CLEAR].
2. Для досрочного отключения таймера нажмите кнопку [CLEAR].
Оставшиеся минуты
таймера
Оставшиеся секунды
таймера
101
9. Очистка иуход
ВНИМАНИЕ
•
Очищайте прибор влажной салфеткой. Неиспользуйте абра-
зивные чистящие средства или жесткие щетки!
•
Недопускайте попадания жидкости внутрь прибора.
•
Если прибор неиспользуется длительное время, рекомен-
дуется хранить его всухом месте воригинальной упаковке.
При этом неследует класть наприбор какие-либо предметы.
10. Что делать при возникновении проблем?
Проблема Возможные причины Меры поустранению
Прибор не
включается.
Батарейки разряжены.
Вставьте новые
батарейки.
Надисплее отображается
символ
.
Батарейки почти раз-
ряжены.
Вставьте новые
батарейки.
Прибор невключается,
несмотря нановые бата-
рейки.
Прибор неисправен.
Обратитесь всер-
висную службу.
Надисплее отображается
надпись
LL.L.
Температура воздуха
впомещении ниже
-10°C(14°F).
Температура воз-
духа впомещении
запределами диапа-
зона измерения.
Надисплее отображается
надпись
HH.H.
Температура воздуха
впомещении выше
50°C(122°F).
Температура воз-
духа впомещении
запределами диапа-
зона измерения.
102
Проблема Возможные причины Меры поустранению
Надисплее отображается
надпись
LL.
Относительная влаж-
ность воздуха ниже
20%.
Относительная
влажность воздуха
запределами диапа-
зона измерения.
Надисплее отображается
надпись
HH.
Относительная влаж-
ность воздуха выше
95%.
Относительная
влажность воздуха
запределами диапа-
зона измерения.
Прибор неотобража-
ет температуру или
влажность воздуха или
отображает неправильные
значения.
Меняющиеся условия.
После ввода вэкс-
плуатацию прибору
может потребо-
ваться до10минут,
чтобы отобразить
корректные зна-
чения.
11. Утилизация
Вцелях охраны окружающей среды поокончании срока службы прибора
запрещается утилизировать его вместе сбытовыми отходами. Ути-
лизация должна производиться через соответствующие пункты
сбора встране использования изделия. Прибор следует утилизи-
ровать согласно Директиве ЕСоботходах электрического иэлек-
тронного оборудования— WEEE (Waste Electrical and Electronic
Equipment).
При возникновении вопросов обращайтесь вместную коммунальную службу,
ответственную заутилизацию отходов.
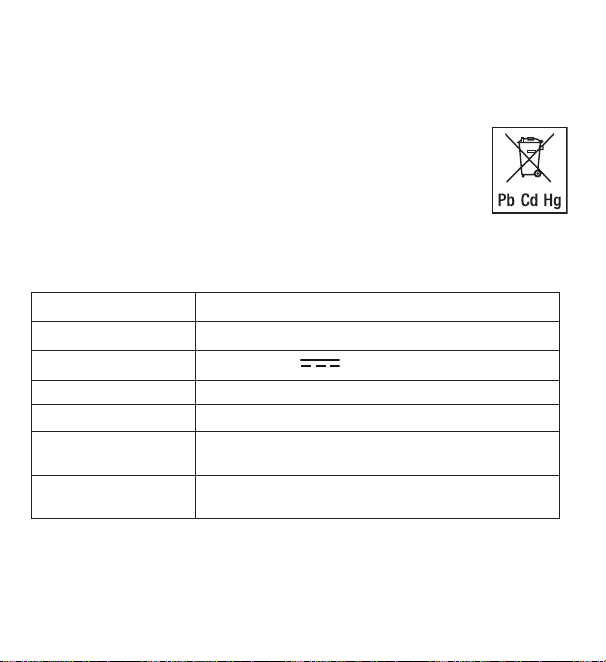
103
Утилизация батареек
Утилизируйте использованные иполностью разряженные батарейки вкон-
тейнеры соспециальной маркировкой, сдавайте впункты приема спецотхо-
дов или вмагазины электрооборудования. Закон обязывает Вас обеспечить
надлежащую утилизацию батареек.
Следующие знаки предупреждают оналичии вбатарейках
токсичных веществ:
Pb=свинец;
Cd=кадмий;
Hg=ртуть.
12. Технические характеристики
Тип HM22
Артикул 678.04
Электропитание 2шт. по1,5В
, батарейки AAA, LR03
Масса 135г(без батареек)
Размеры 110x105x29,5мм
Диапазон измерения
температуры
от-10 до50°C(от14 до122°F)
Диапазон измерения
влажности
относительная влажность воздуха от20 до95%
13. Гарантия/сервисное обслуживание
Более подробную информацию о гарантии и гарантийных условиях см. в
прилагаемом гарантийном листе.
Изготовитель оставляет засобой право навнесение изменений инеисключает наличия неточностей.

104
POLSKI
Należy dokładnie przeczytać izachować ni-
niejszą instrukcję obsługi, przechowywać ją
wmiejscu dostępnym dla innych użytkowni-
ków iprzestrzegać podanych wniej wska-
zówek.
1. Informacje ogólne
Termohigrometr HM 22 umożliwia zmierzenie względnej wilgotności oraz aktualnej
temperatury powietrza wpomieszczeniu oraz odczytanie wyników na wyświetlaczu.
Dodatkowo termohigrometr posiada minutnik, za pomocą którego można ustawić
krótki pomiar czasu.
Dzięki poręcznym rozmiarom termohigrometr można umieścić wdowolnym miej-
scu. Ztyłu termohigrometru znajduje się urządzenie zawieszające, za pomocą
którego można przymocować przyrząd do ściany.
Spis treści
1. Informacje ogólne ........................ 104
2. Zawartość opakowania ................ 105
3. Objaśnienie symboli ..................... 105
4. Użytkowanie zgodne
zprzeznaczeniem ......................... 106
5. Ostrzeżenia iwskazówki dotyczące
bezpieczeństwa ............................ 107
6. Opis urządzenia ............................ 110
7. Pierwsze włączenie ...................... 112
7.1 Wkładanie baterii .................... 112
7.2 Ustawianie daty / godziny /
jednostki temperatury ............. 113
7.3 Przywracanie ustawień
fabrycznych ............................. 114
8. Zastosowanie ............................... 114
8.1 Tryb standardowy ................... 114
8.2 Minutnik .................................. 115
9. Czyszczenie ikonserwacja ........... 116
10. Postępowanie wprzypadku
problemów.................................. 116
11. Utylizacja .................................... 117
12. Dane techniczne ......................... 118
13. Gwarancja .................................. 118
105
2. Zawartość opakowania
1 xtermohigrometr
2 x baterie AAA
1 xinstrukcja obsługi
3. Objaśnienie symboli
Na urządzeniu, w instrukcji obsługi, na opakowaniu i tabliczce znamionowej
urządzenia zastosowano następujące symbole:
OSTRZEŻENIE
Wskazówka ostrzegająca przed niebezpieczeństwem
odniesienia obrażeń lub zagrożenia zdrowia.
UWAGA
Zasada bezpieczeństwa odnosząca się do ewentualnych
uszkodzeń urządzenia/akcesoriów.
Informacja o produkcie
Wskazówka z ważnymi informacjami.
Należy przeczytać instrukcję
Oznakowanie CE
Niniejszy produkt spełnia wymagania obowiązujących dyrek-
tyw europejskich ikrajowych.
Utylizacja zgodnie zdyrektywą WE wsprawie zużytych urzą-
dzeń elektrycznych ielektronicznych – WEEE (ang. Waste
Electrical and Electronic Equipment)
106
Baterii zawierających szkodliwe substancje nie należy wyrzu-
cać zodpadami zgospodarstwa domowego
Producent
B
A
Oznakowanie identyfikujące materiał opakowaniowy.
A = skrót nazwy materiału, B = numer materiału:
1-7 = tworzywa sztuczne, 20-22 = papier i tektura
Oddzielić elementy opakowania i zutylizować je zgodnie z
lokalnymi przepisami.
Produkty spełniają wymogi przepisów technicznych obowią-
zujących wEuroazjatyckiej Unii Gospodarczej
Oznaczenie zgodności z wymogami w Wielkiej Brytanii
Oddzielić produkt i elementy opakowania i zutylizować je
zgodnie z lokalnymi przepisami.
Symbol importera
4. Użytkowanie zgodne zprzeznaczeniem
OSTRZEŻENIE
Urządzenie jest przeznaczone wyłącznie do pomiaru wilgotności powietrza
itemperatury pokojowej.

107
Urządzenie przeznaczone jest wyłącznie do użytku prywatnego. Urządzenie
może być używane wyłącznie do celu, wjakim zostało zaprojektowane iwspo-
sób określony wniniejszej instrukcji obsługi. Nieprawidłowe użycie może być
niebezpieczne! Producent nie ponosi odpowiedzialności za szkody wynikające
zniewłaściwego użytkowania urządzenia.
5. Ostrzeżenia iwskazówki dotyczące bezpieczeństwa
OSTRZEŻENIE
•
Opakowanie przechowywać wmiejscu niedostępnym dla dzieci.
Istnieje ryzyko uduszenia.
•
Urządzenie nie służy do zabawy! Należy je przechowywać poza
zasięgiem dzieci.
•
Wżadnym wypadku nie wolno samodzielnie otwierać ani napra-
wiać urządzenia, gdyż może to zaburzyć jego prawidłowe działanie.
Nieprzestrzeganie skutkuje utratą gwarancji.
•
Wcelu dokonania naprawy należy się skontaktować zdziałem ob-
sługi klienta lub autoryzowanym sprzedawcą.
•
Urządzenie należy trzymać zdala od otwartego ognia (np. świe-
czek).
•
Nigdy nie zanurzać urządzenia wwodzie ani innych cieczach.
•
Urządzenia nie należy używać pod przykryciem, np. pod kocem
lub poduszką.
•
Nie należy używać urządzenia na wolnym powietrzu.

108
Wskazówki dotyczące postępowania zbateriami
OSTRZEŻENIE
•
Jeśli dojdzie do kontaktu elektrolitu ze skórą lub oczami, należy
przemyć podrażnione miejsca wodą iskontaktować się zlekarzem.
•
Niebezpieczeństwo połknięcia! Małe dzieci mogą połknąć
baterie iudusić się nimi. Dlatego należy przechowywać baterie
wmiejscach niedostępnych dla dzieci!
•
Należy zwrócić uwagę na znaki polaryzacji plus (+) iminus (-).
•
Jeśli zbaterii wyciekł elektrolit, należy założyć rękawice ochronne
iwyczyścić komorę baterii suchą szmatką.
•
Baterie należy chronić przed nadmiernym działaniem wysokiej tem-
peratury.
•
Zagrożenie wybuchem! Nie wrzucać baterii do ognia.
•
Nie ładować ani nie zwierać baterii.
•
Wprzypadku niekorzystania zurządzenia przez dłuższy czas należy
wyjąć baterie zkomory.
•
Używać wyłącznie baterii jednego typu lub równoważnych.
•
Zawsze należy wymieniać jednocześnie wszystkie baterie.
•
Nie używać akumulatorów!
•
Nie rozmontowywać, nie otwierać ani nie rozdrabniać baterii.

109
UWAGA
•
Urządzenie należy chronić przed wstrząsami, wilgocią, kurzem,
chemikaliami, dużymi wahaniami temperatury, bezpośrednim pro-
mieniowaniem słonecznym, kroplami wody, piaskiem iznajdującymi
się zbyt blisko źródłami ciepła (np. piecem lub grzejnikiem).
•
Na urządzeniu nie należy kłaść żadnych przedmiotów.
•
Urządzenie należy czyścić zwilżoną ściereczką. Nie należy stoso-
wać żadnych silnych środków czyszczących.
•
Zurządzenia można korzystać wtemperaturze otoczenia wynoszą-
cej od -10°Cdo 50°C. Ten sam zakres temperatur dotyczy prze-
chowywania. Wyższa lub niższa temperatura może spowodować
uszkodzenie urządzenia.
•
Jeśli środowisko ulegnie zmianie, wskazania urządzenia są miaro-
dajne po ok. 10 minutach.
•
Przed pierwszym użyciem należy zdjąć folię ochronną zwyświe-
tlacza.

110
6. Opis urządzenia
Przód
1
2
3
4
1 Przycisk [1 min]
2 Przycisk [CLEAR]
3 Przycisk [10 min]
4 Wyświetlacz
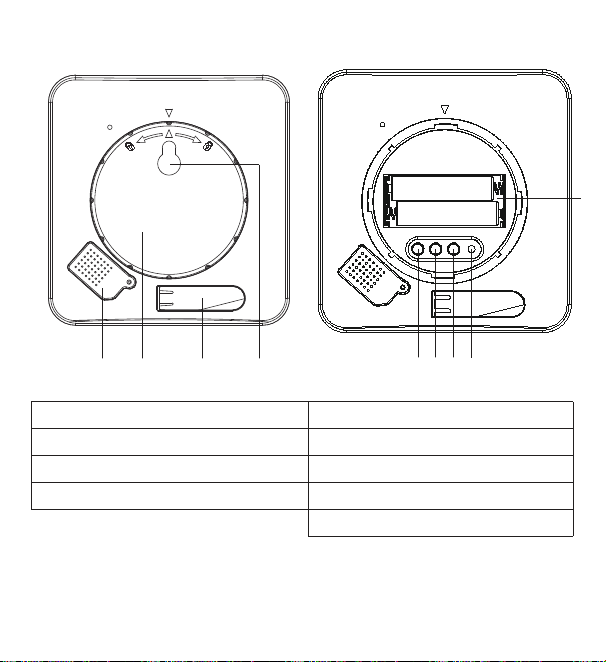
111
Tył
TIME DOWN RESETUP/CF
1
5
6
7
8
3
9
2
4
1 Osłona czujników 5 Przycisk [TIME]
2 Pokrywa komory baterii 6 Przycisk [UP/CF]
3 Rozkładana nóżka 7 Przycisk [DOWN]
4 Uchwyt do zawieszenia 8 Przycisk [RESET]
9 Komora baterii

112
7. Pierwsze włączenie
7.1 Wkładanie baterii
Wskazówka
Przed włączeniem termohigrometru należy najpierw włożyć dwie baterie AAA
(dostarczone zurządzeniem) do komory baterii. Wtym celu wykonać
następujące czynności:
1.
Ztyłu termohigrometru znajduje się okrągła pokrywa ko-
mory baterii. Otworzyć pokrywę komory baterii, przekręca-
jąc nią wlewo. Następnie zdjąć pokrywę komory baterii.
2. Włożyć dwie dostarczone wzestawie baterie AAA do ko-
mory baterii. Podczas wkładania baterii zwrócić uwagę na
poprawność przyporządkowania biegunów (+/–) zgodnie
zoznaczeniami umieszczonymi wprzegrodzie. Po prawi-
dłowym włożeniu baterii przez 3 sekundy wyświetlacz bę-
dzie pokazywał wszystkie wskazania. Następnie termohi-
grometr automatycznie przełączy się wtryb standardowy.
3.
Przed ponownym założeniem pokrywy baterii należy najpierw ustawić datę igo-
dzinę. Postępować zgodnie zinstrukcjami zawartymi wnastępnym rozdziale.
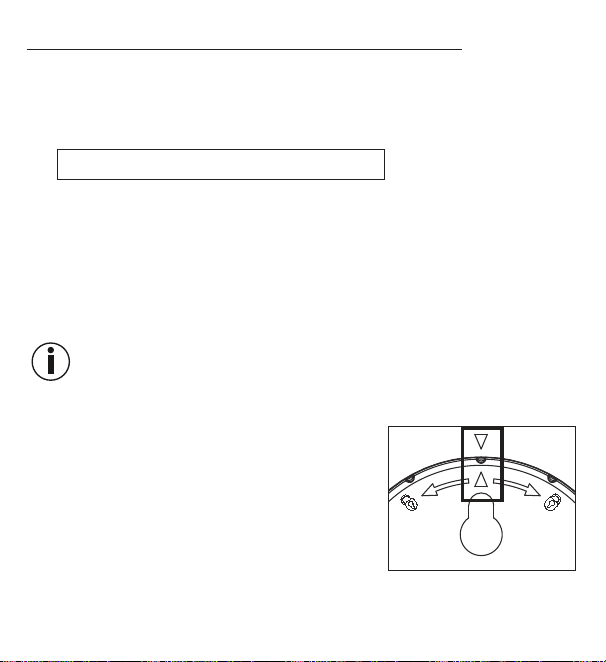
113
7.2 Ustawianie daty / godziny / jednostki temperatury
1. Aby przełączyć się między trybem 12- i24-godzinnym, należy nacisnąć przy-
cisk [TIME]. Aby przełączyć się między skalą Celsjusza (°C) iFahrenheita (°F),
należy nacisnąć przycisk [UP/CF].
2. Kolejność wmenu ustawień jest następująca:
Rok -> Miesiąc -> Dzień -> Godzina -> Minuta
Aby wejść do menu ustawień, należy wcisnąć iprzytrzymać przycisk [TIME]
przez 3 sekundy. Na wyświetlaczu zacznie migać liczba roku.
3.
Za pomocą przycisków [UP/CF] / [DOWN] ustawić aktualny rok. Zatwierdzić
przyciskiem [TIME]. Na wyświetlaczu miga teraz miesiąc.
4. Ustawić miesiąc, dzień, godzinę iminuty wten sam sposób za pomocą przy-
cisków [UP/CF] / [DOWN] ipotwierdzić każde ustawienie za pomocą przyci-
sku [TIME].
Jeśli przez 7 sekund nie zostanie naciśnięty żaden klawisz wmenu
ustawień, nastąpi automatyczne wyjście zmenu ustawień.
5. Założyć pokrywę komory baterii zpowrotem na komorę baterii.
6.
Dokręcić pokrywę komory baterii zgodnie zru-
chem wskazówek zegara, aż zatrzaśnie się na
swoim miejscu. Upewnić się, że oznaczenia strza-
łek urządzenia ipokrywy komory baterii są do-
pasowane.
7. Urządzenie można postawić na rozkładanej pod-
stawce lub zamontować na ścianie za pomocą
systemu zawieszającego (znajdującego się ztyłu urządzenia).

114
7.3 Przywracanie ustawień fabrycznych
Aby przywrócić datę igodzinę do ustawień fabrycznych, należy krótko nacisnąć
przycisk [RESET] ostro zakończonym przedmiotem.
8. Zastosowanie
Termohigrometr ma standardowy tryb pracy iminutnik.
8.1 Tryb standardowy
Jeśli nie zostanie naciśnięty żaden przycisk na termohigrometrze, na wyświetla-
czu pojawi się automatycznie tryb standardowy.
Godzina
Data (D= dzień, M= miesiąc)
Temperatura pokojowa
Względna wilgotność powietrza
Wskazówka
Po uruchomieniu może minąć 10 minut, zanim wyświetli się odpowiednia tempe-
ratura iwilgotność.

115
8.2 Minutnik
Na termohigrometrze można również ustawić minutnik na czas do 99 minut.
1.
Aby uruchomić minutnik, użyć przycisku [1 min] iprzycisku [10 min], aby ustawić
żądany czas odliczania minutnika. Ustawiony czas odliczania minutnika pojawia
się na środku wyświetlacza. Jeżeli przez 3 sekundy nie zostanie naciśnięty żaden
przycisk, minutnik uruchomi się automatycznie, wydając sygnał dźwiękowy. Po
upływie czasu na minutniku rozlega się ponownie sygnał dźwiękowy. Aby wyłą-
czyć sygnał dźwiękowy, należy nacisnąć przycisk [CLEAR].
2. Aby wcześniej zakończyć działanie minutnika, należy nacisnąć
przycisk[CLEAR].
Pozostałe minuty
minutnika
Pozostałe sekundy
minutnika
116
9. Czyszczenie ikonserwacja
UWAGA
•
Urządzenie należy czyścić zwilżoną ściereczką. Nie należy
stosować silnych środków czyszczących ani szczotki otwardym
włosiu!
•
Wżadnym wypadku do urządzenia nie powinna dostać się ciecz.
•
Nieużywane przez dłuższy czas urządzenie należy przechowywać
woryginalnym opakowaniu wsuchym miejscu, nie kładąc na nim
żadnych przedmiotów.
10. Postępowanie wprzypadku problemów
Problem Możliwa przyczyna Rozwiązanie
Urządzenie nie daje się
włączyć
Zużyte baterie Włożyć nowe baterie
Na wyświetlaczu pojawia
się
Baterie prawie wyczer-
pane
Włożyć nowe baterie
Nie można włączyć urzą-
dzenia pomimo włożenia
nowych baterii
Urządzenie jest uszko-
dzone
Skontaktować się
zdziałem obsługi
klienta
Na wyświetlaczu pojawia
się
LL.L
Temperatura pokojowa
poniżej -10°C(14°F)
Temperatura poko-
jowa poza zakresem
pomiarowym
Na wyświetlaczu pojawia
się
HH.H
Temperatura pokojowa
ponad 50°C(122°F)
Temperatura poko-
jowa poza zakresem
pomiarowym

117
Problem Możliwa przyczyna Rozwiązanie
Na wyświetlaczu pojawia
się
LL
Względna wilgotność
powietrza poniżej 20%
Względna wilgotność
powietrza poza zakre-
sem pomiarowym
Na wyświetlaczu pojawia
się
HH
Względna wilgotność
powietrza ponad 95%
Względna wilgotność
powietrza poza zakre-
sem pomiarowym
Przyrząd nie wykazuje
żadnej lub wykazuje niewła-
ściwą wartość temperatury
iwilgotności względnej
Zmienne warunki
otoczenia
Po uruchomieniu
może minąć 10 minut
zanim zostaną wy-
świetlone prawidłowe
dane.
11. Utylizacja
Wzwiązku zwymogami wzakresie ochrony środowiska nie należy wyrzucać urzą-
dzenia po zakończeniu eksploatacji wraz zodpadami domowymi. Na-
leży je oddać do utylizacji wodpowiednim punkcie zbiórki. Urządzenie
należy zutylizować zgodnie zdyrektywą WE ozużytych urządzeniach
elektrycznych ielektronicznych – WEEE (ang. Waste Electrical and
Electronic Equipment).
Wrazie pytań zwrócić się do właściwej lokalnej instytucji odpowie-
dzialnej za utylizację.
Utylizacja baterii
Zużyte, całkowicie rozładowane baterie należy wyrzucić do specjalnie oznakowa-
nych pojemników zbiorczych, przekazać do punktów zbiórki odpadów specjalnych
lub do sklepu ze sprzętem elektrycznym. Użytkownik jest zobowiązany do utylizacji
baterii zgodnie zprzepisami.
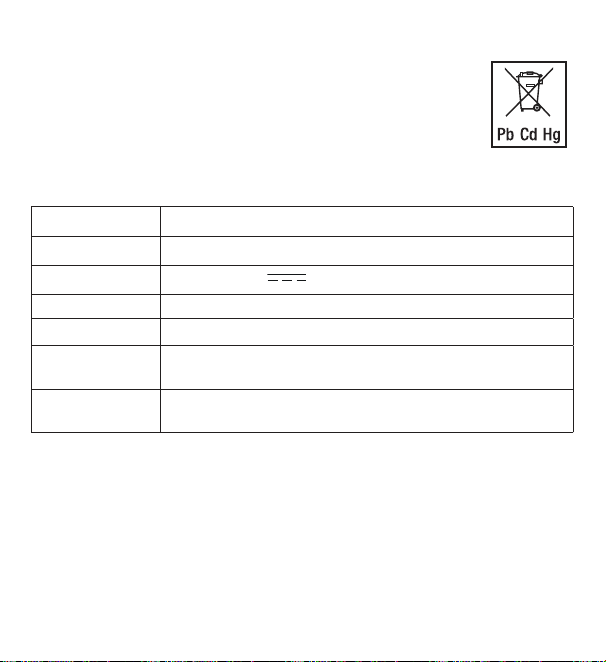
118
Na bateriach zawierających szkodliwe związki znajdują się następujące
oznaczenia:
Pb = bateria zawiera ołów,
Cd = bateria zawiera kadm,
Hg = bateria zawiera rtęć.
12. Dane techniczne
Typ HM 22
Numer artykułu. 678.04
Zasilanie 2 baterie 1,5V
AAA LR03
Masa 135g(bez baterii)
Wymiary 110 x105 x29,5mm
Zakres pomiaru
temperatury
od -10 do 50°C(od 14 do 122°F)
Zakres pomiaru
wilgotności
od 20 do 95% względna wilgotność powietrza
13. Gwarancja
Szczegółowe informacje na temat gwarancji i warunków gwarancji znajdują się
w załączonej ulotce gwarancyjnej.
Zastrzega się prawo do pomyłek izmian

119

120
678.04_HM22_2022-08-09_02_IM1_BEU
Beurer GmbH
•
Söflinger Straße 218
•
89077 Ulm, Germany
www.beurer.com
•
www.beurer-gesundheitsratgeber.com
•
www.beurer-healthguide.com
UK importer Address:
Beurer UK Ltd., Suite 16, Stonecross Place, Yew Tree Way, WA3 2SH
Golborne, United Kingdom
