SOUTH
Point to
NORTH
Lock
Quick Start Guide
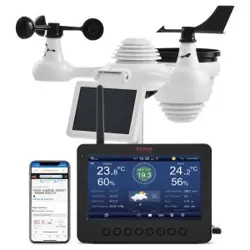
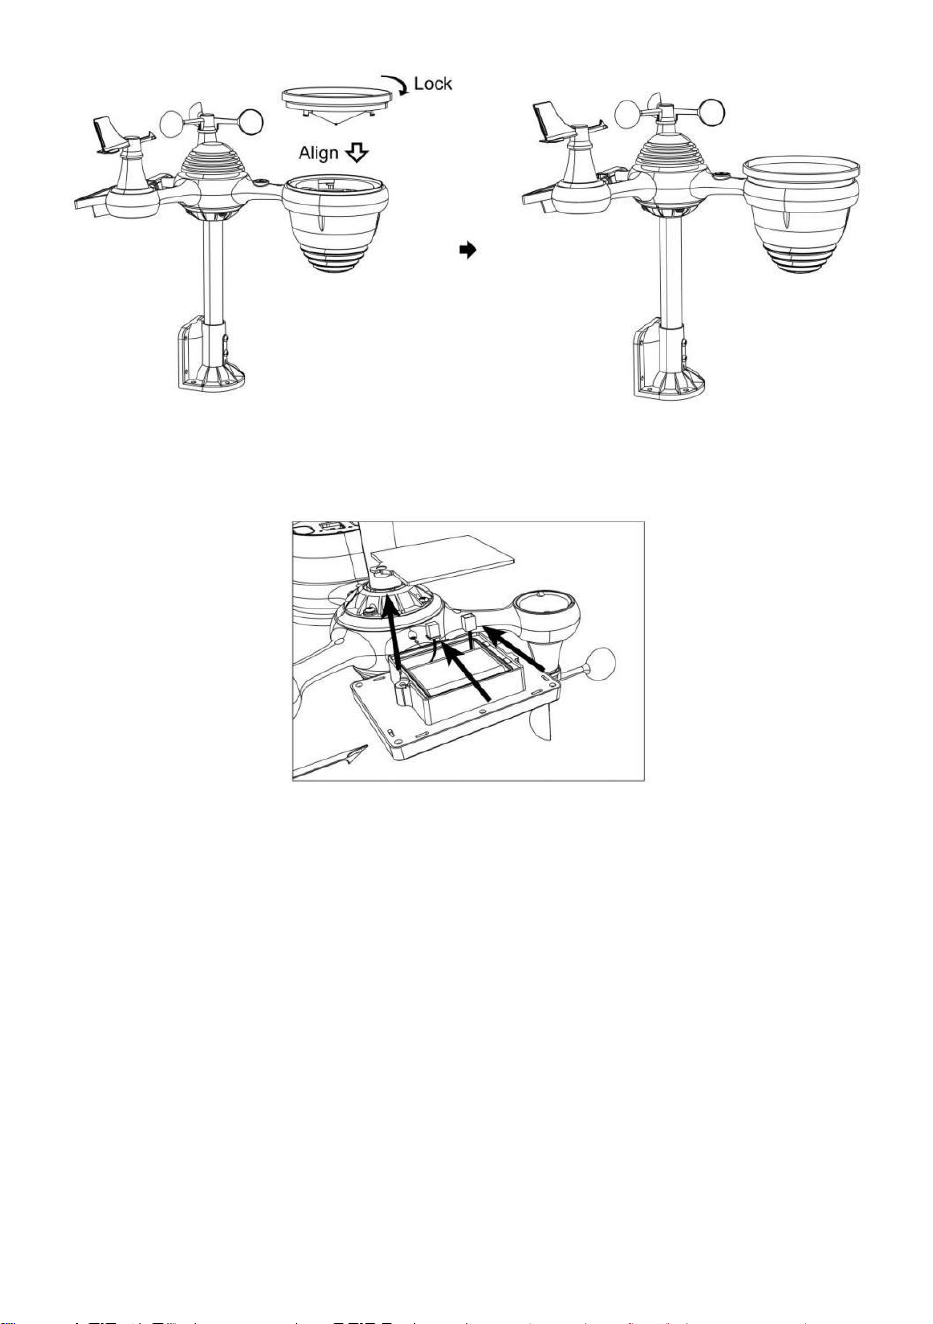
⑤SETTING UP RAIN COLLECTOR
Insert the funnel in the rain collector and lock it in place.
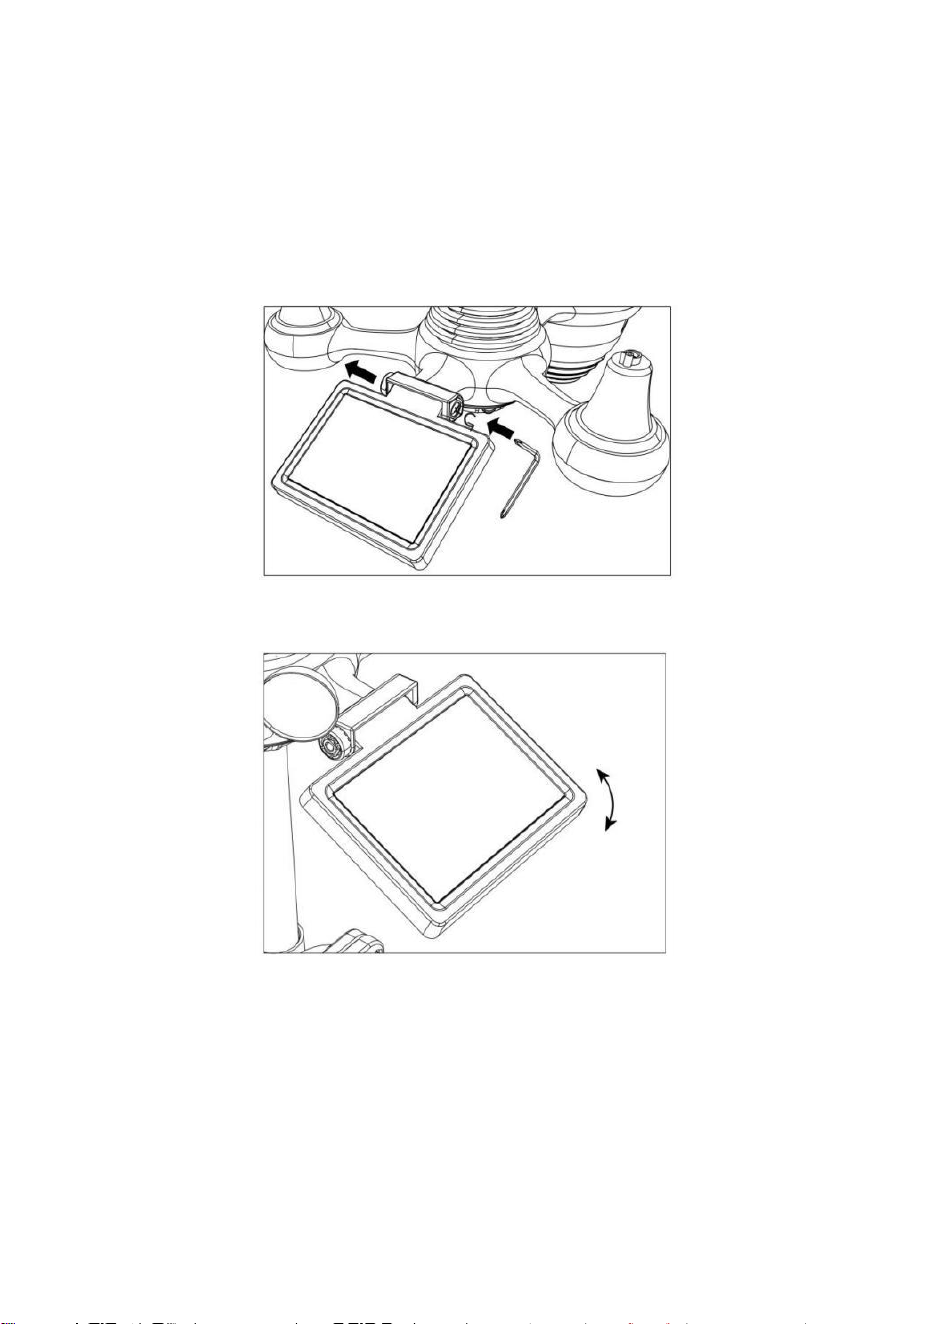
⑥INSTALLING THE BATTERIES
Unscrew the battery door at the bottom. Connect the cable ofthe rechargeable battery pack.
Adjust the connected cables so they fit comfortably in the compartment.
Close and fasten the battery door.
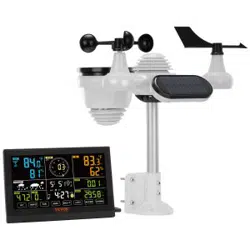
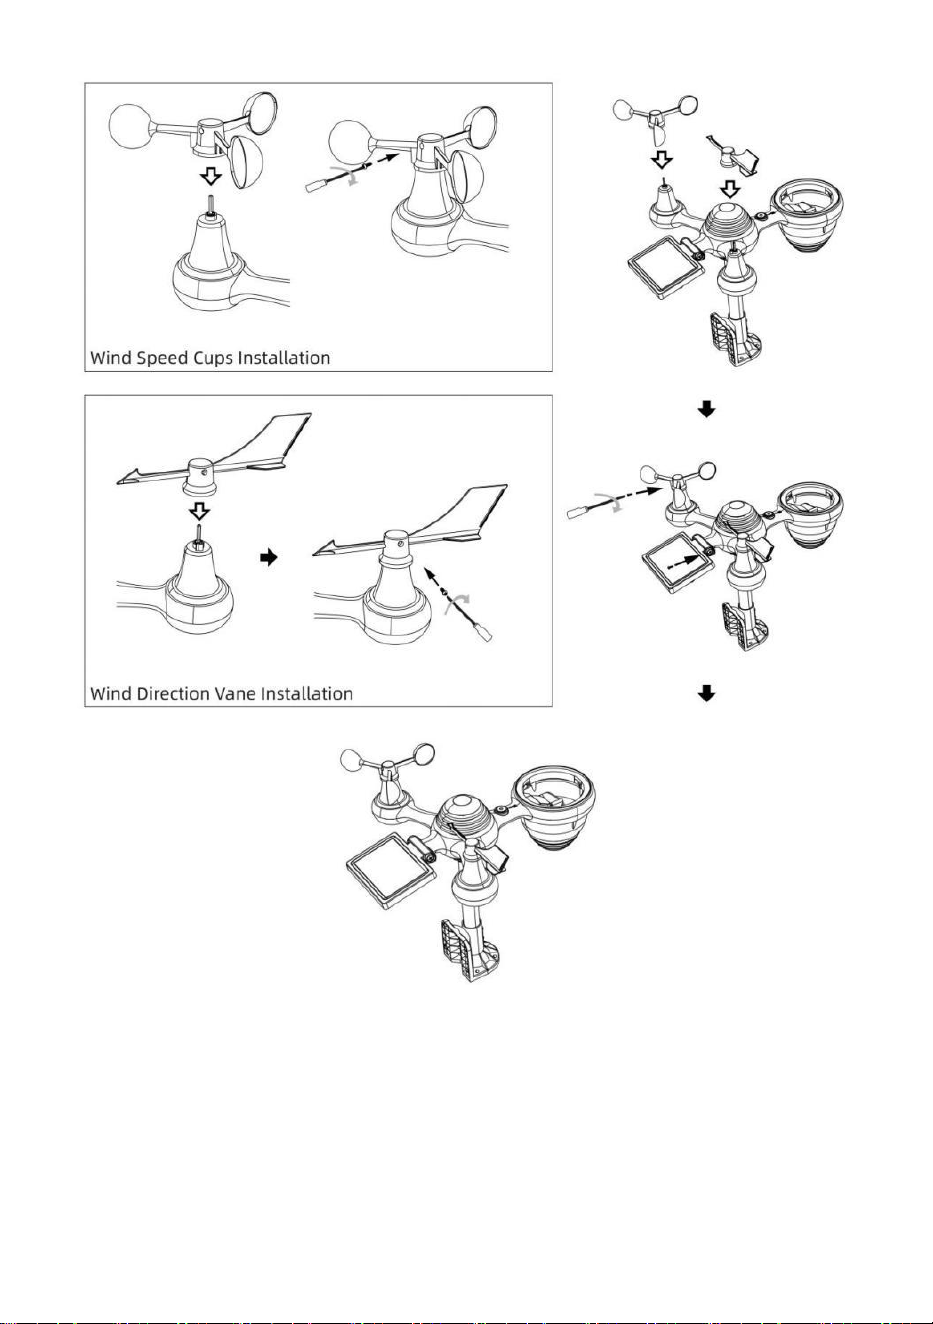
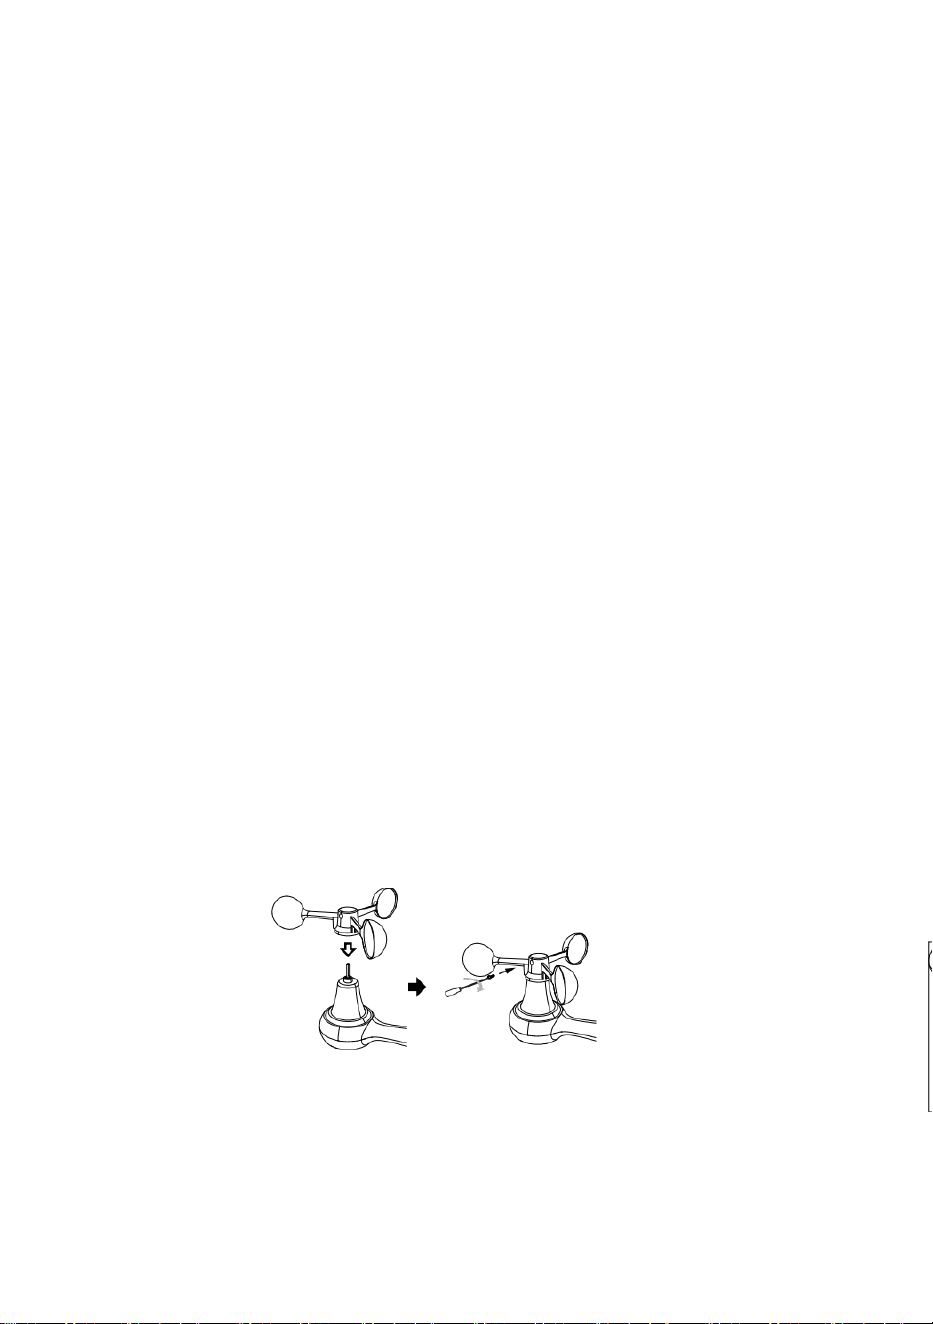
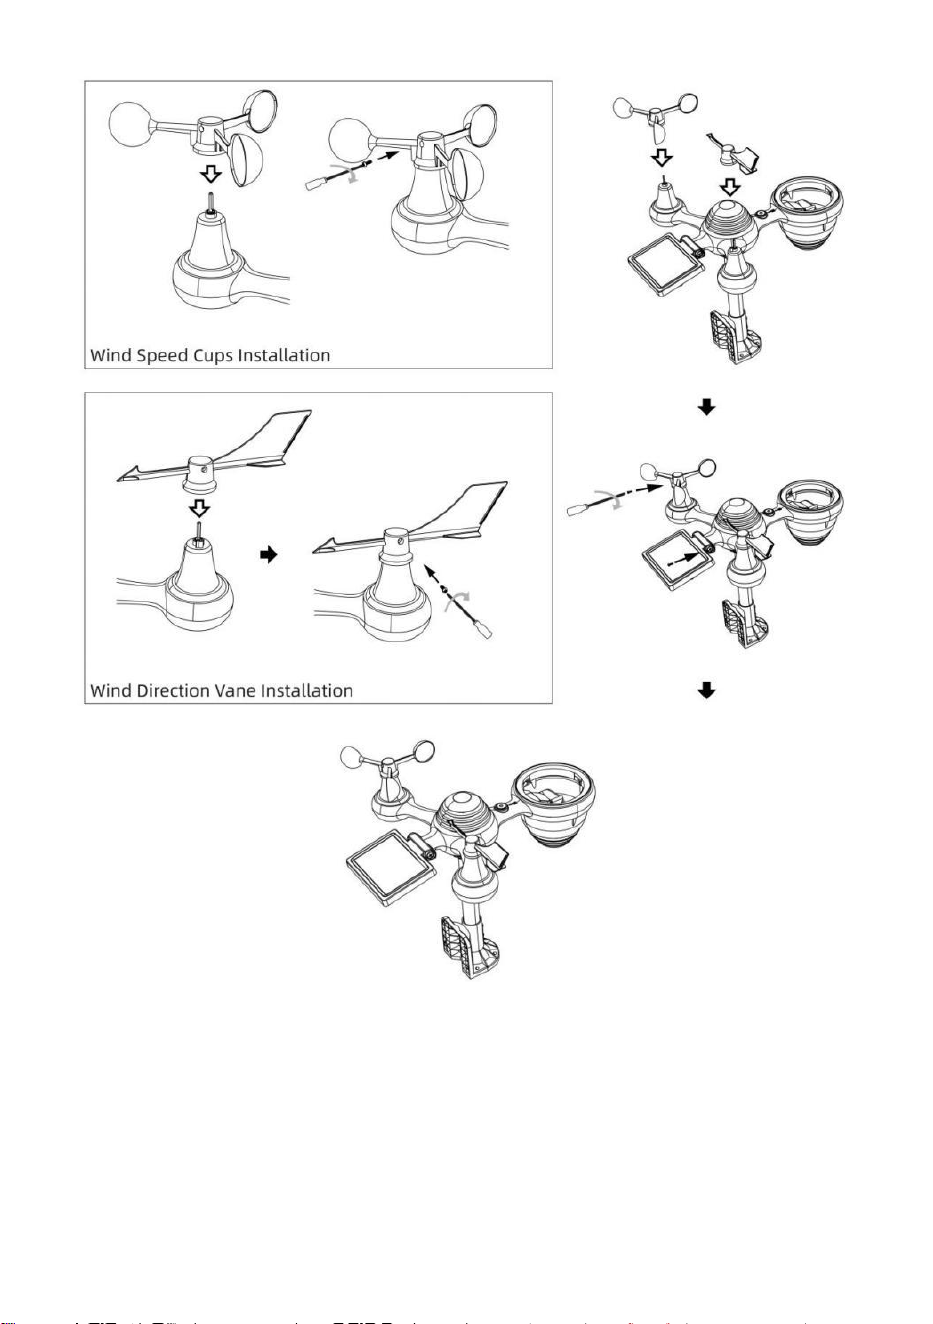
③INSTALLING WIND SPEED CUPS
Align the screw holes in the wind speed cups with the flat, vertical side ofthe metal rod.
Insert the wind speed cups in the metal rod and screw on tight to lock it in place.
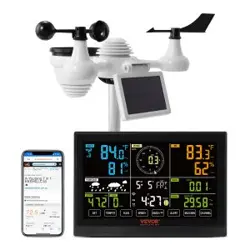
Push the gear inward and tighten the screw.
Point to
Point to
Point to
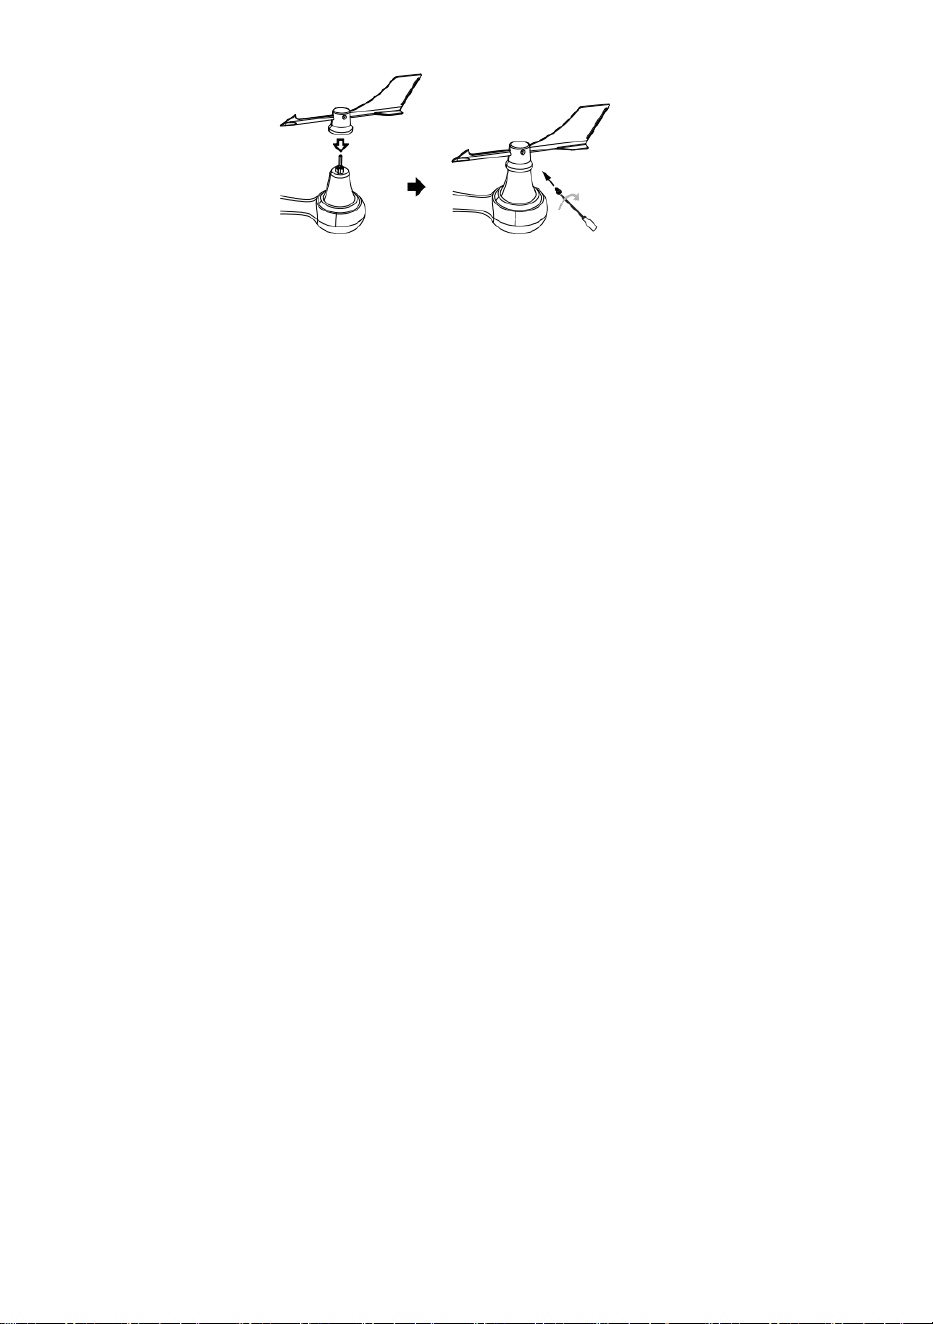
④INSTALLING WIND DIRECTION VANE
Align the screw holes in the wind direction vane with the flat, vertical side ofthe metal rod.
Insert the wind direction vane in the metal rod and screw on tight to lock it in place.
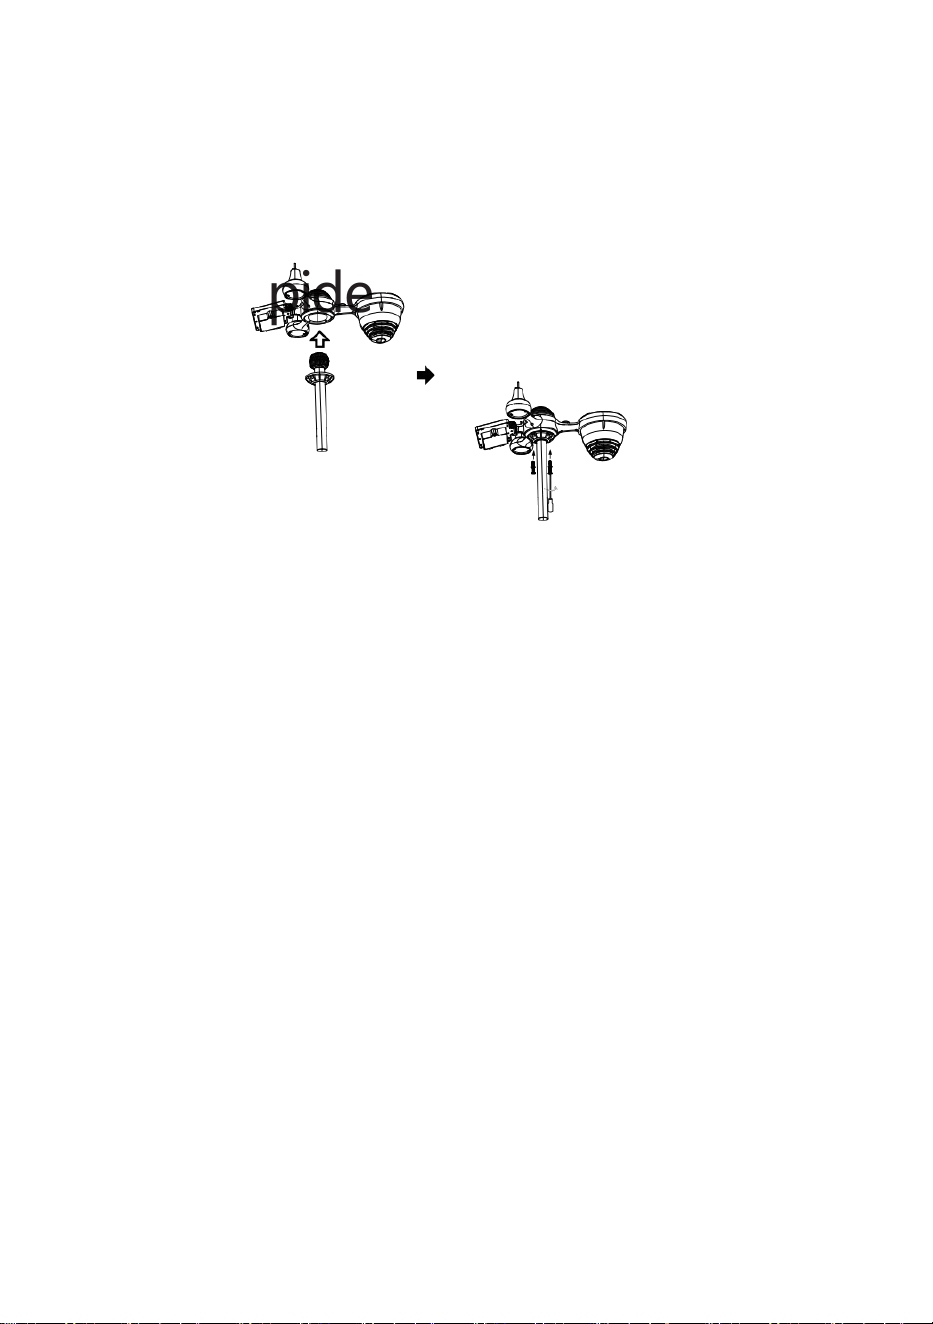
②INSTALLING THE MOUNTING BRACKET
Secure the sensor onto a mounting bracket (included) using the screws (included).
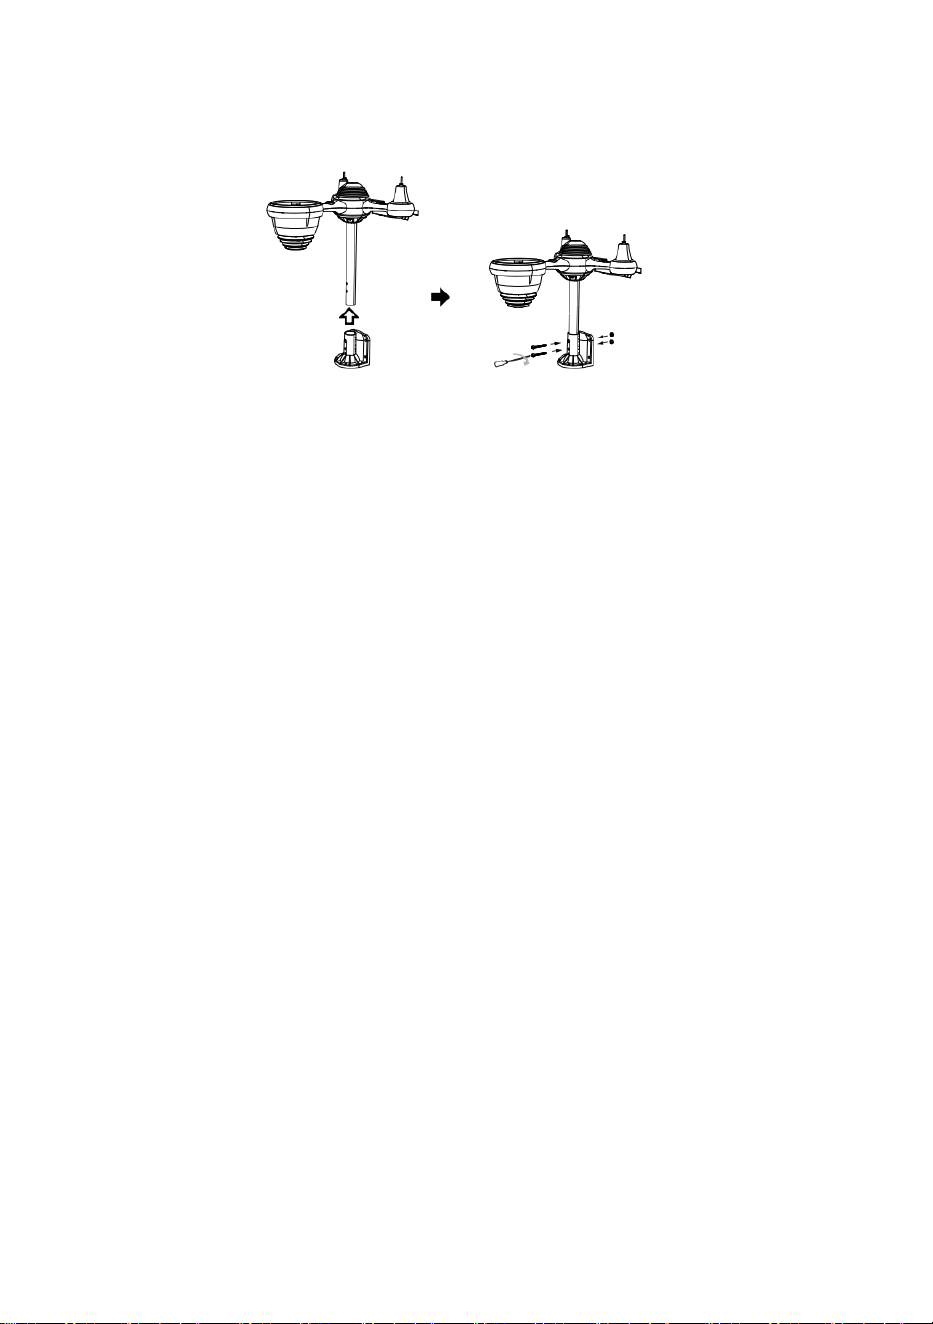
①INSTALLING THE MOUNTING POLE
Secure the sensor onto a mounting pole (included) using the screws (included).
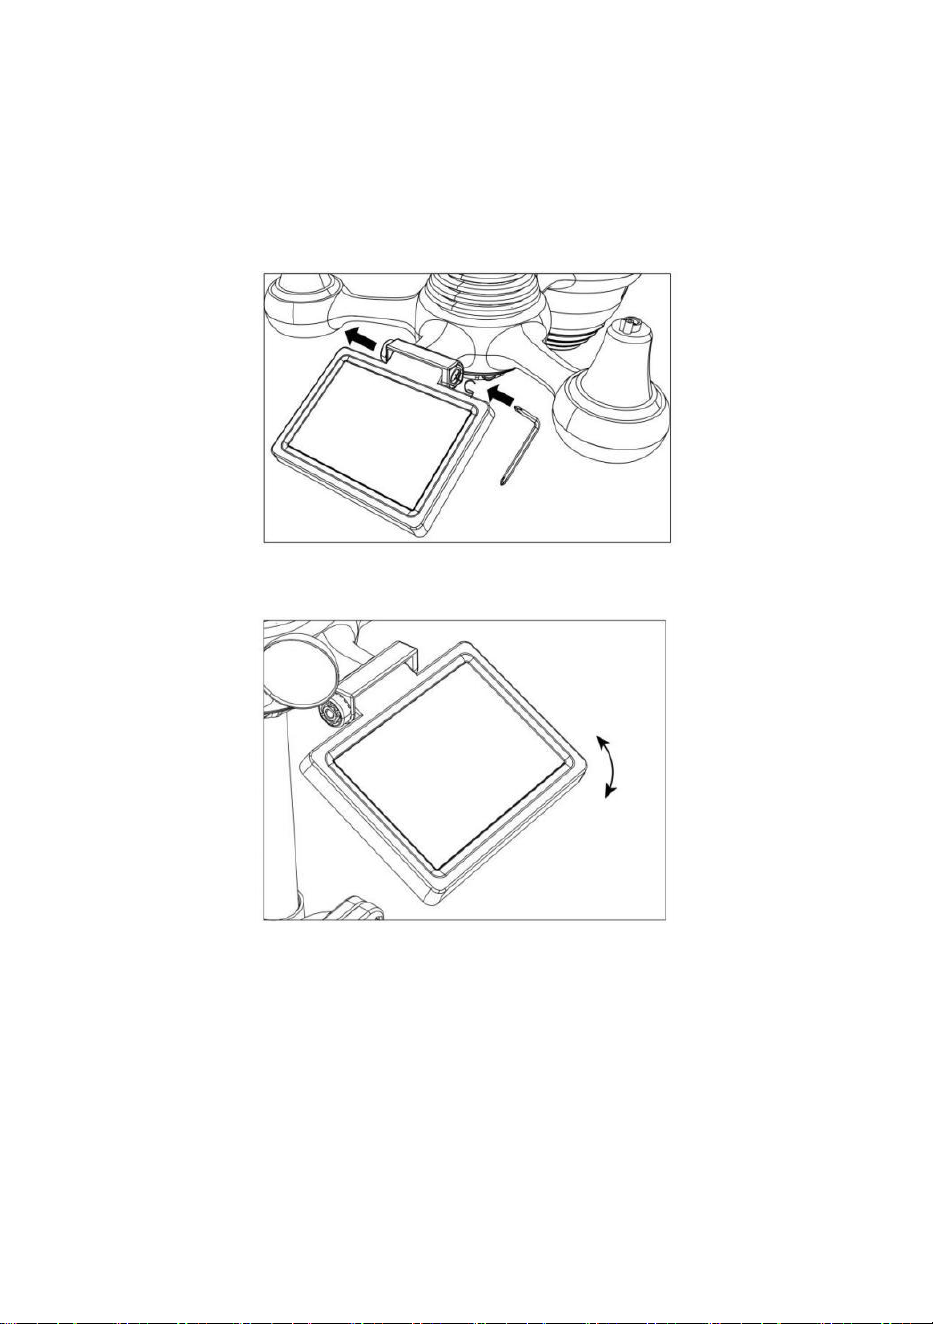
⑦ADJUSTING THE SOLAR CELL
Loosen the screw at the joint. Adjust the vertical angle of the solar cell.
Point to
SOUTH
Point to
NORTH
NORTH
Align
SOUTH

The
bubble
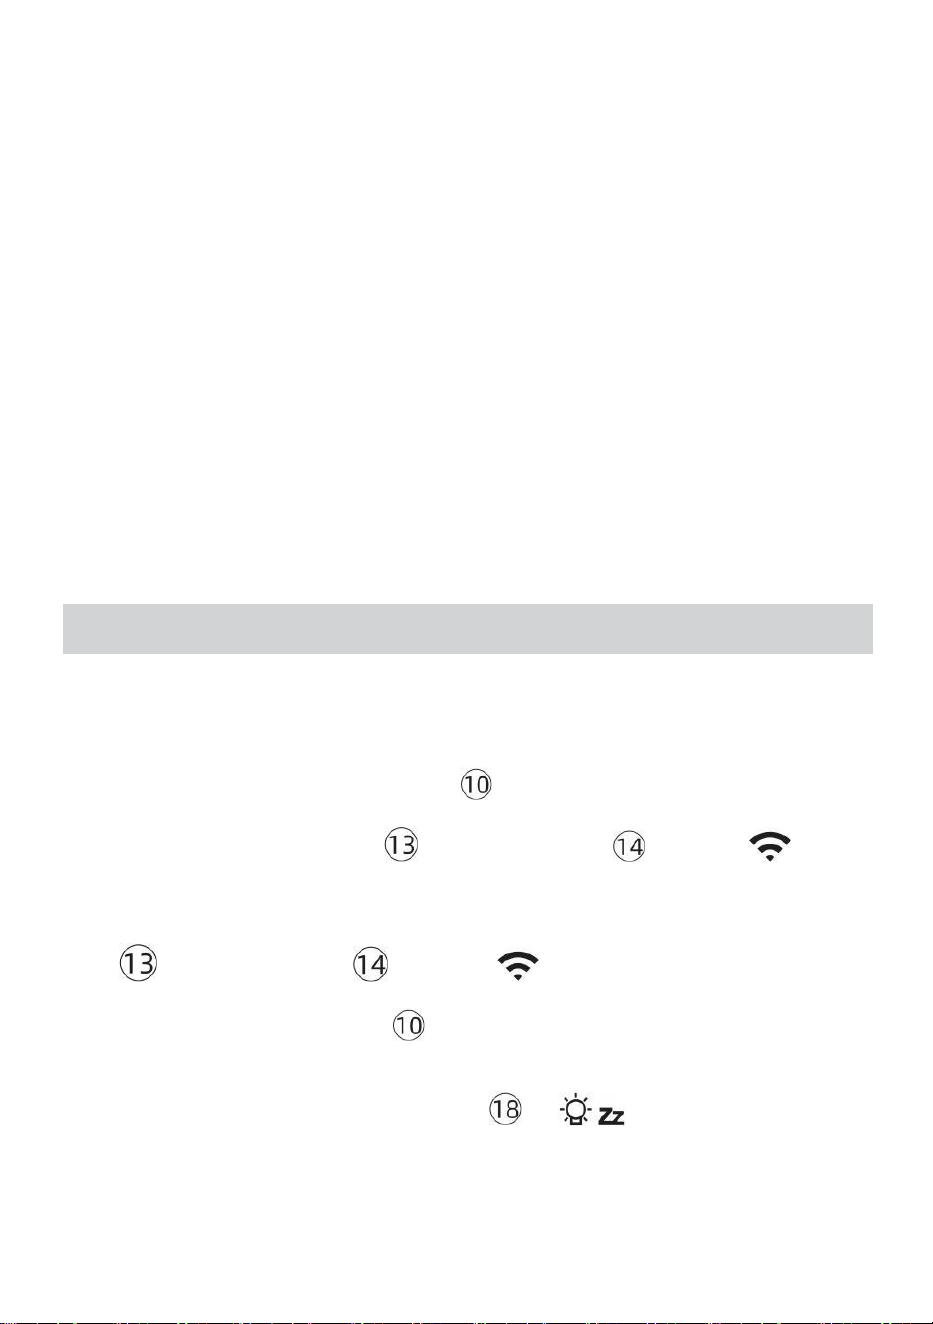
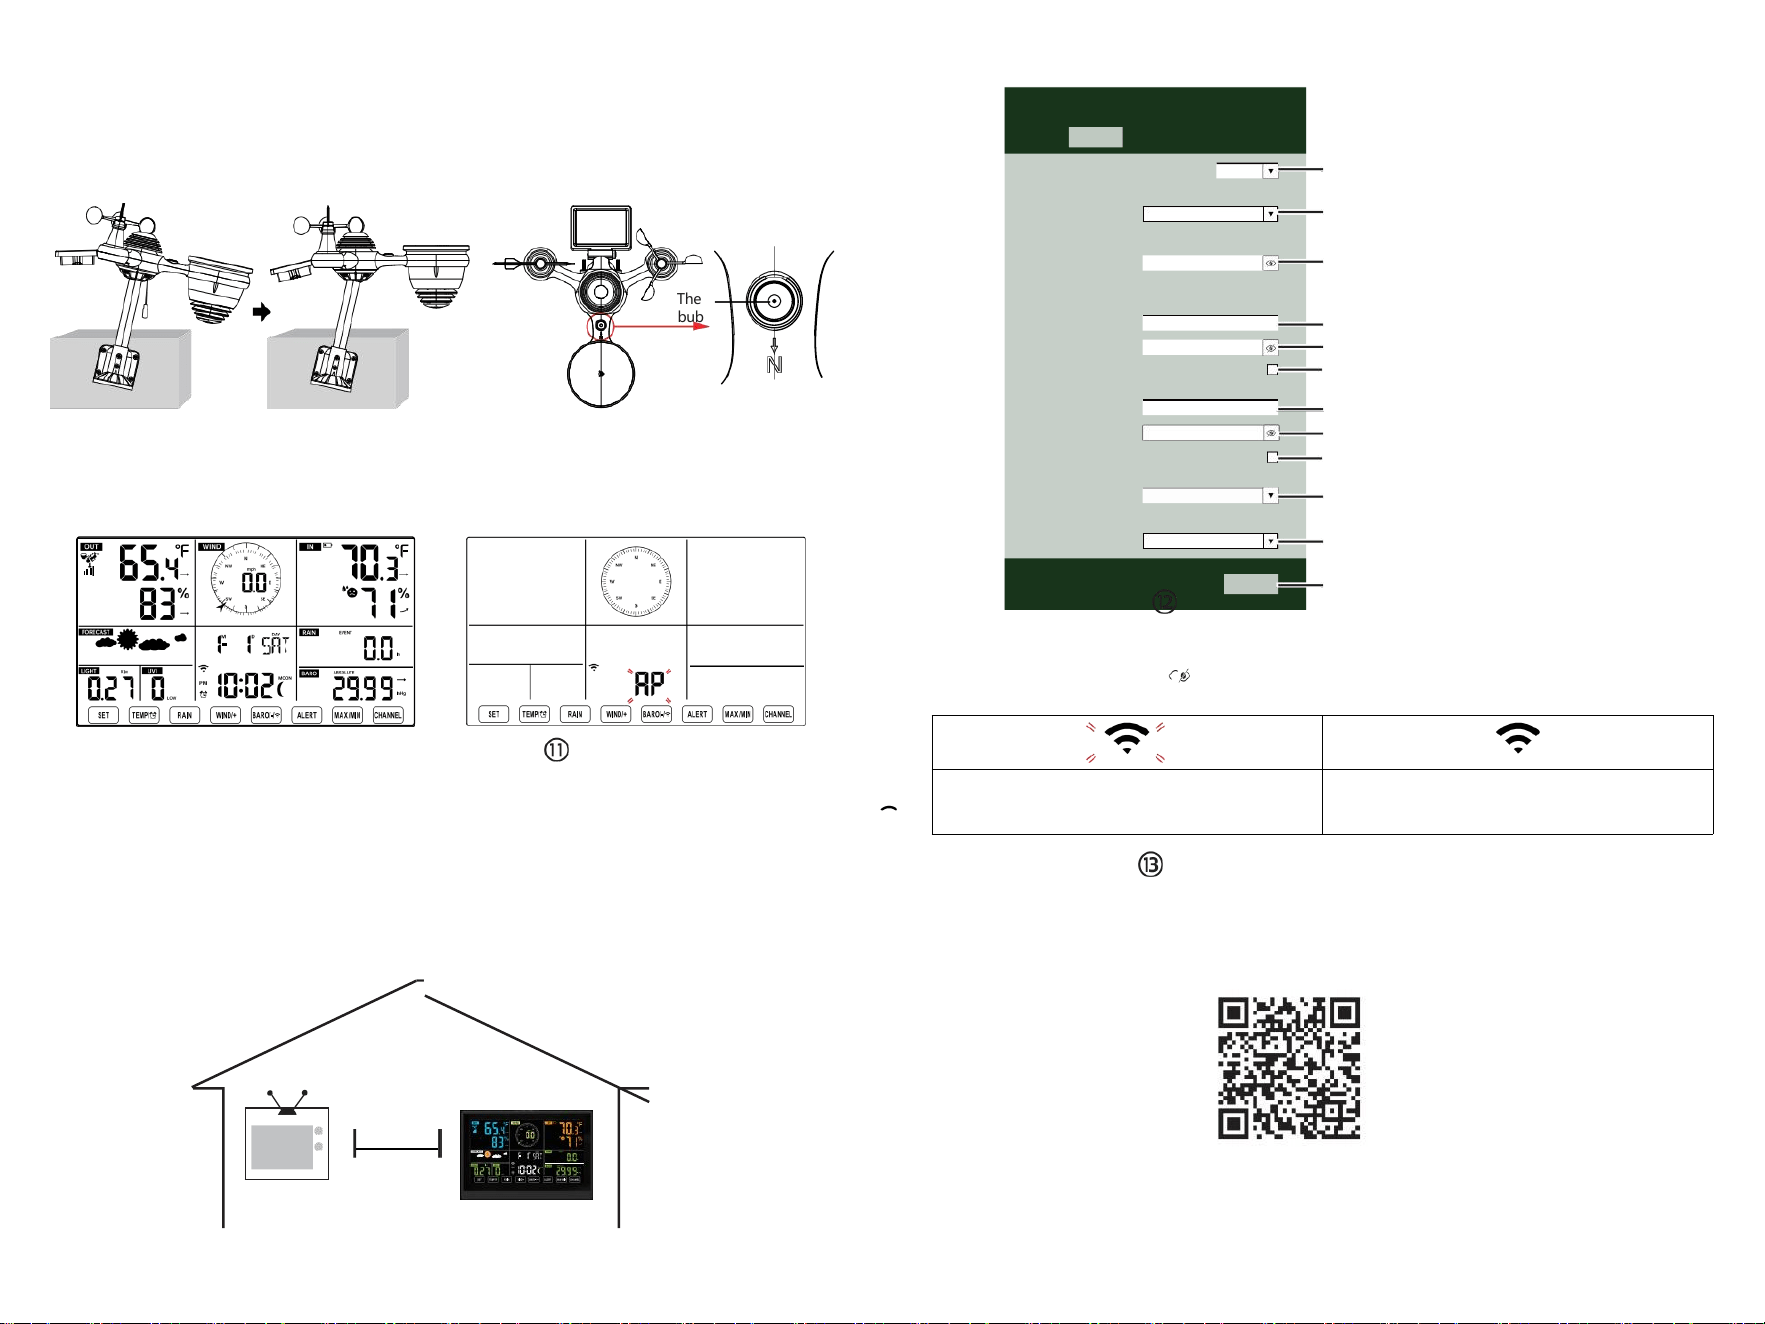
⑩POWERING UP
THE WEATHER STATION
Plug the power adapter into
the weather station.
Once the weather station is turned on,
it will automatically enter pairing mode.
SETTING UP
WI-FICONNECTION
Press and hold
BARO/-/
button over
3 seconds to enter AP mode.
Open your Wi-Fi network settings on PC
or smartphone. Locate the weather station
SSID (WWS-XXXXXX) from the list.
Tap on the SSID to connect.
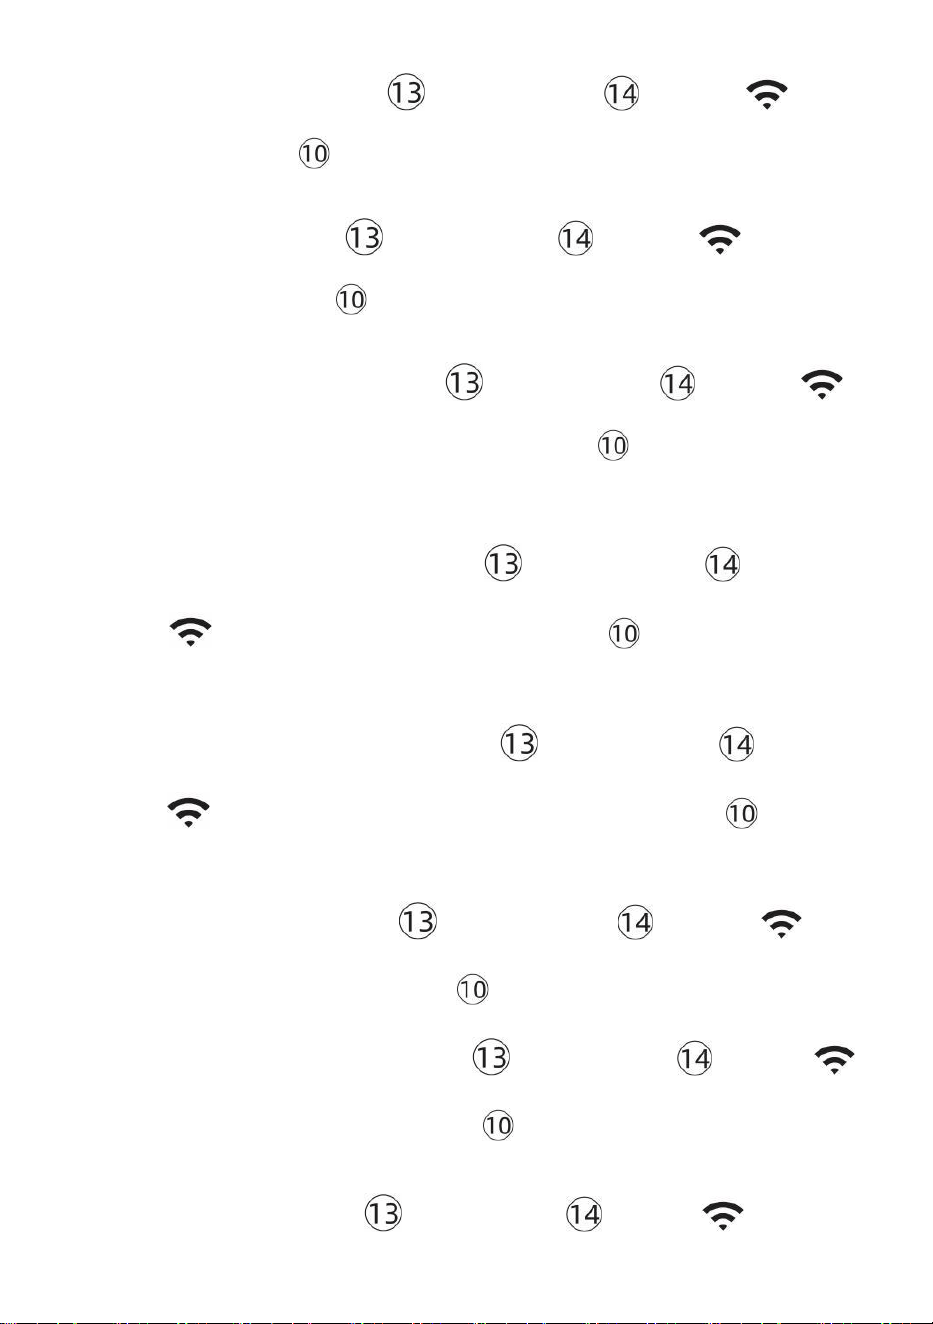
AT
LEAST
(.9 m)
APART
To prevent wireless interference, place both units at least 3 ft (.9 m) away
from electronic devices (TV, computer, microwave, radio, etc.).
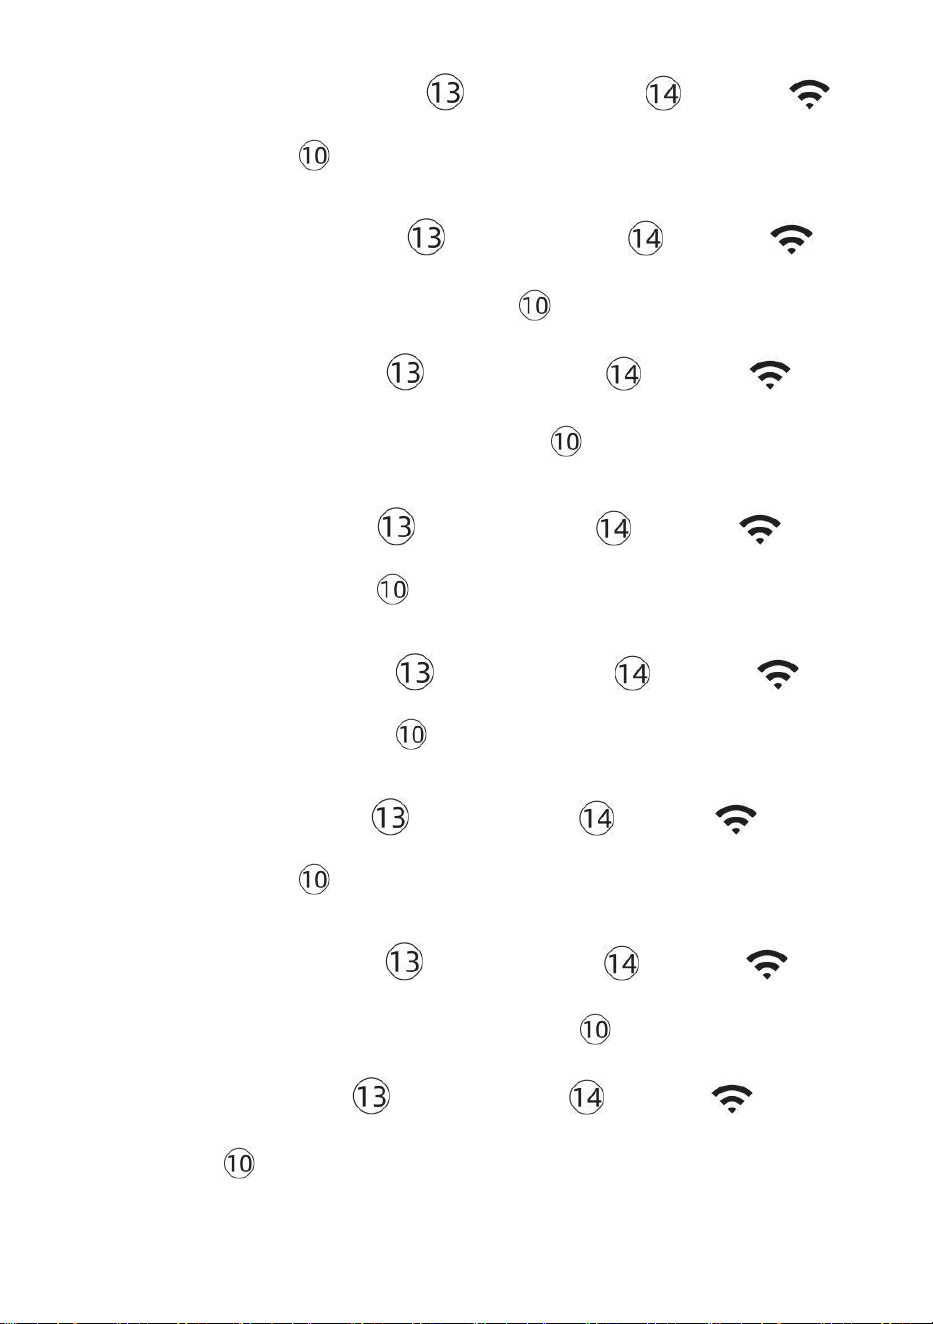
SETTINGS
SETUP ADVANCED
Language:
Wi-Fi Router Setup
Router 12345
Select the menu and choose your 2.4GHz WIFI Router
Password
Weather Server Setup
WeatherUnderground
Station ID
Station Key
Upload wunderground.com
WeatherCloud
Station ID
Station Key
Upload weatherCloud.net
Time Zone Setup
Time Zone
Time Server Setup
Server URL
Firmware Version: 1.0.1
time.windows.com
a7d 9d 2a27 9 fbbafa
**********
**********
**********
Apply
KCACANTI9
English
Router
+0.00
Flashing: the weather station is attempting
to connect to your wireless router
Solid: the weather station has been
connected to your wireless router.
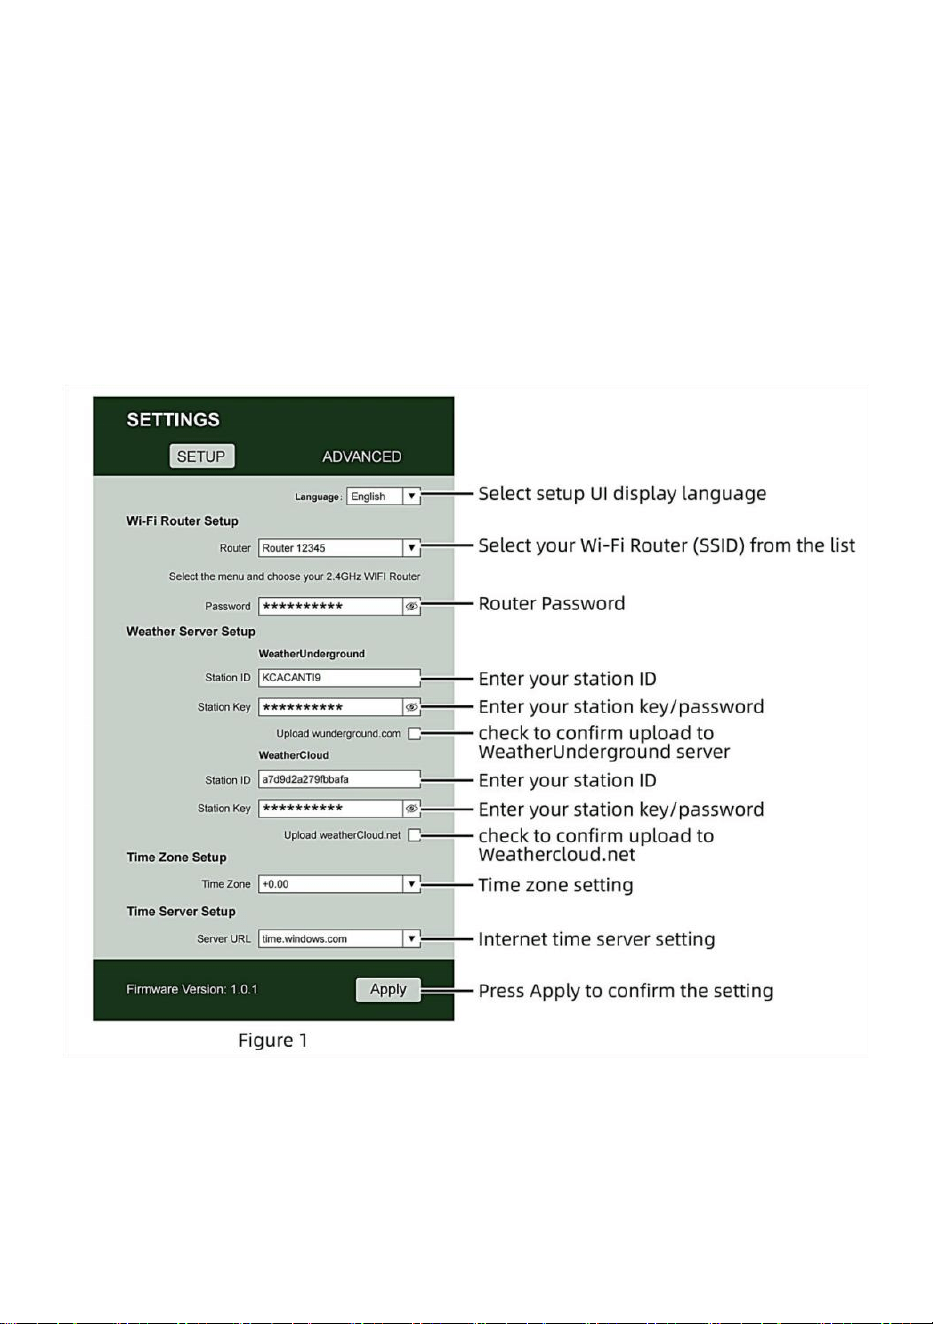
Select setup UI display language
Select your Wi-Fi Router (SSID) from the list
Router Password
Enter your station ID
Enter your station key/password
check to confirm upload to
WeatherUnderground server
Enter your station ID
Enter your station key/password
check to confirm upload to
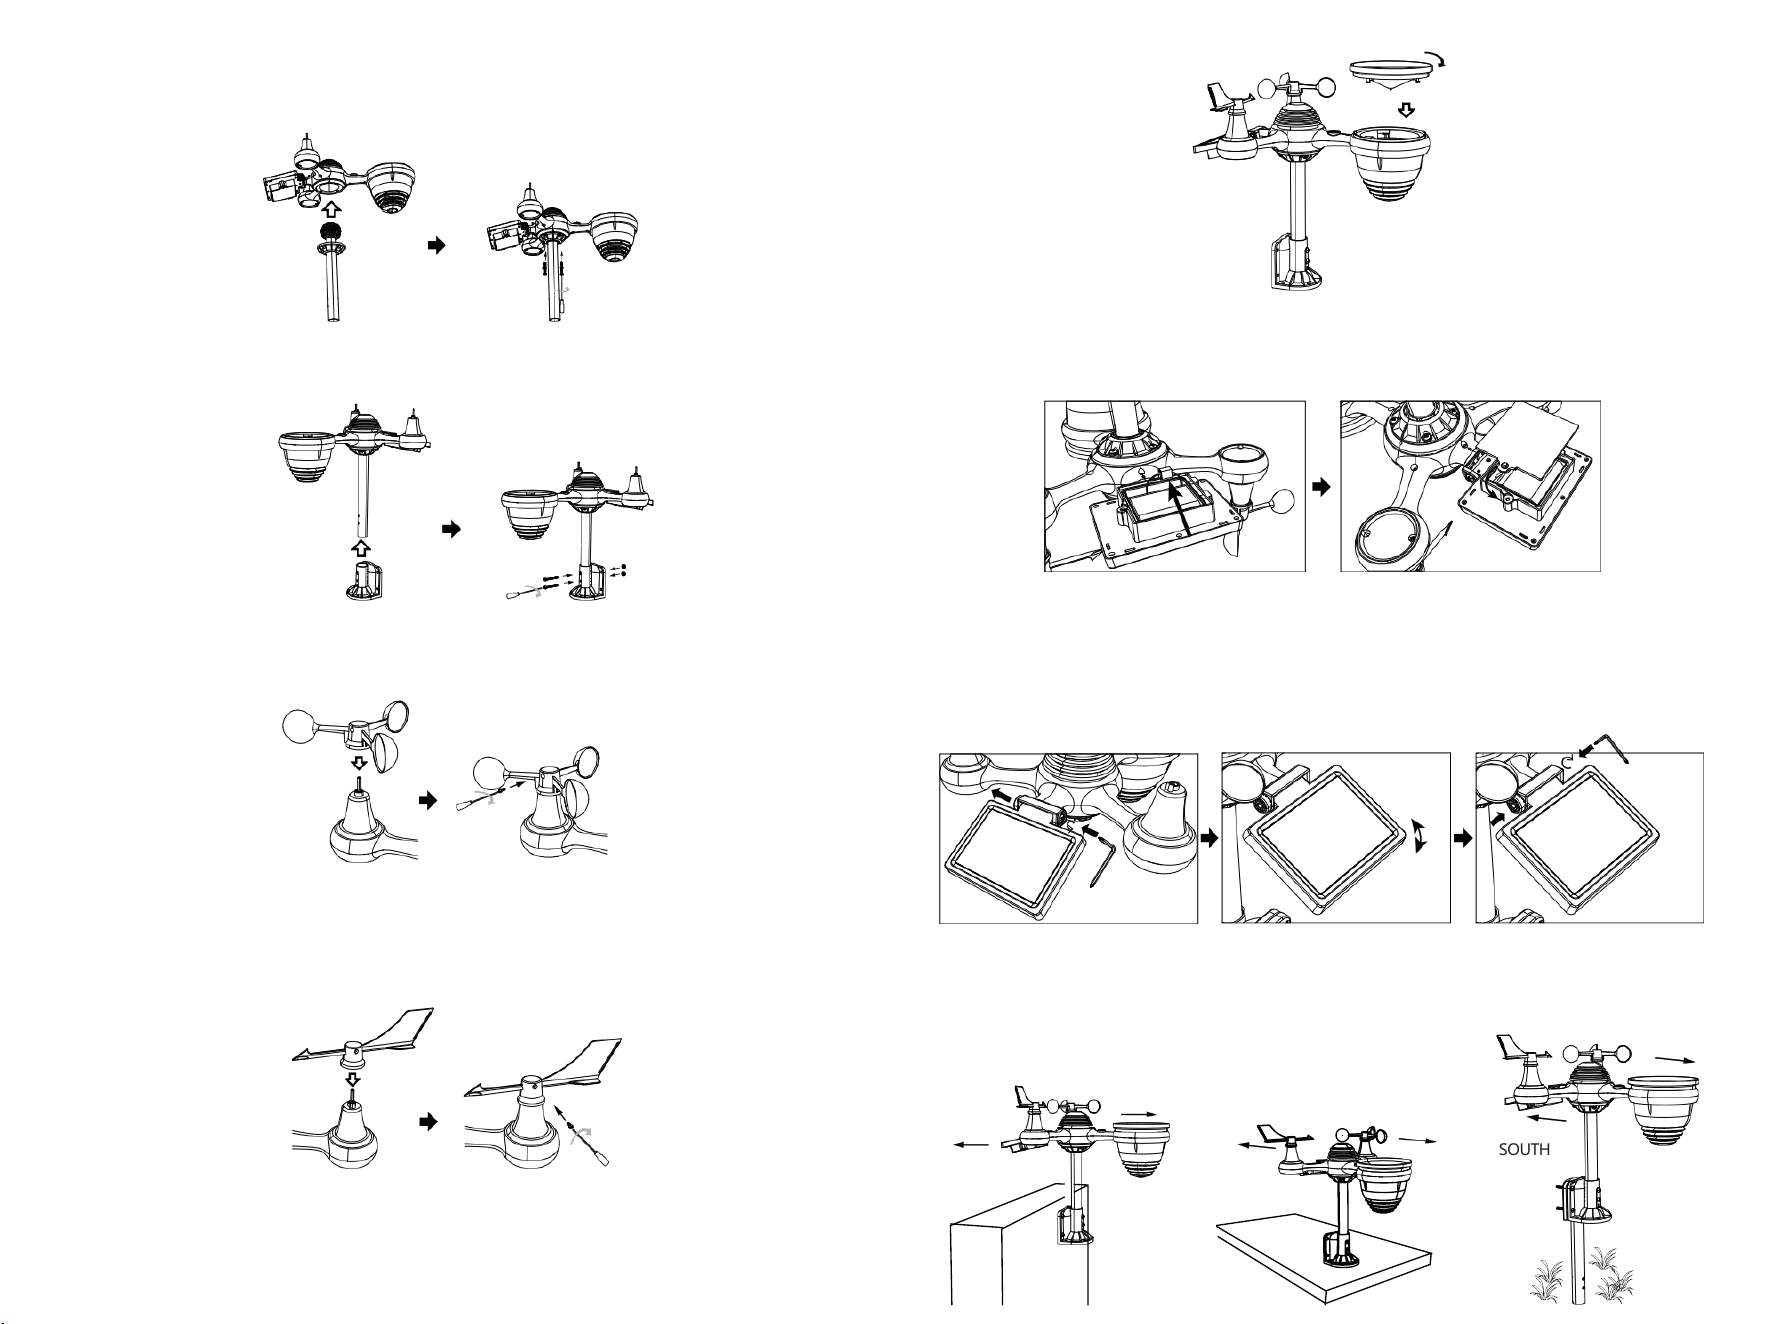
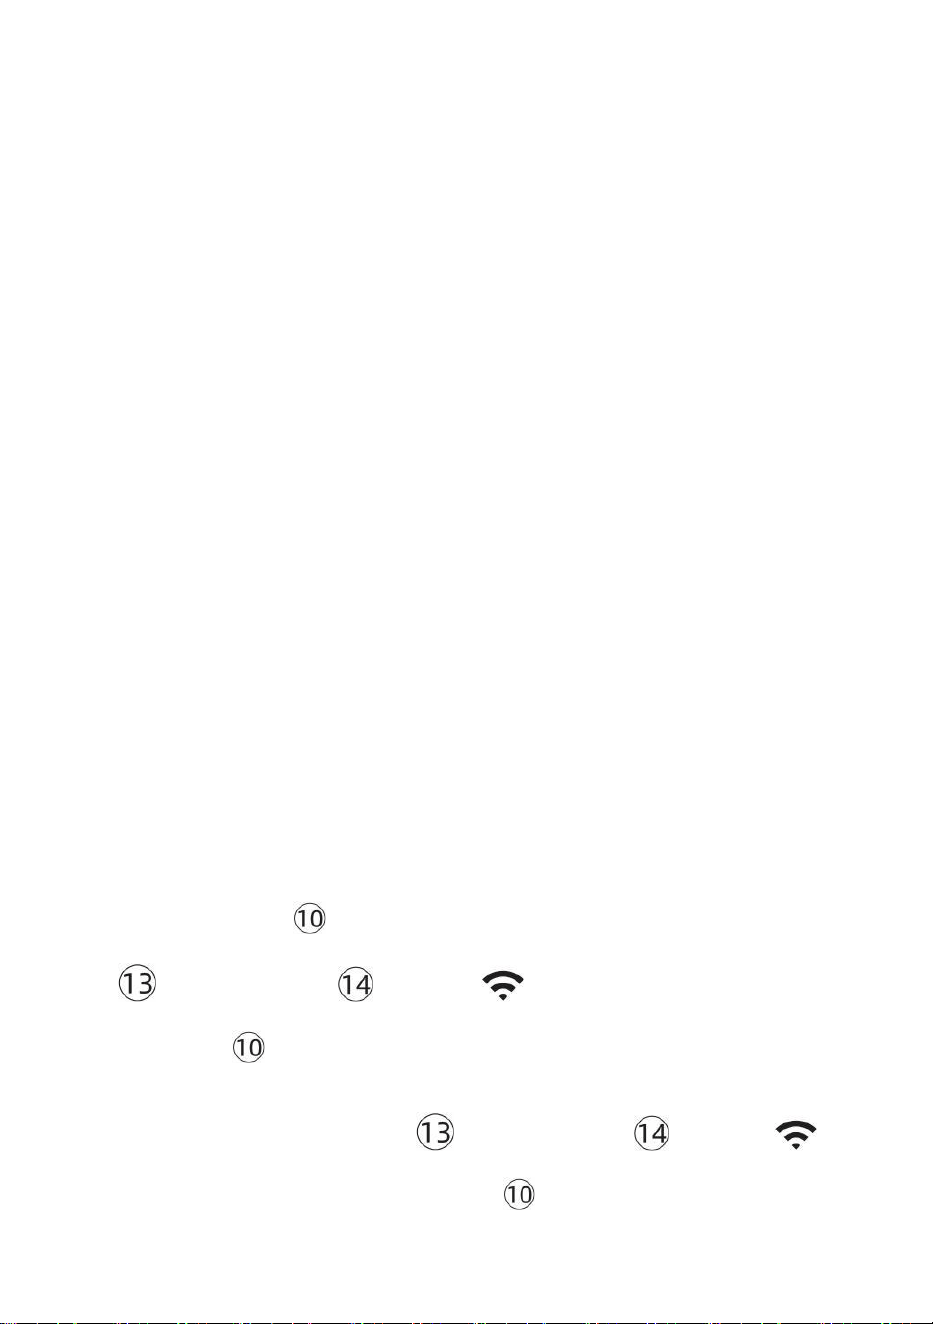
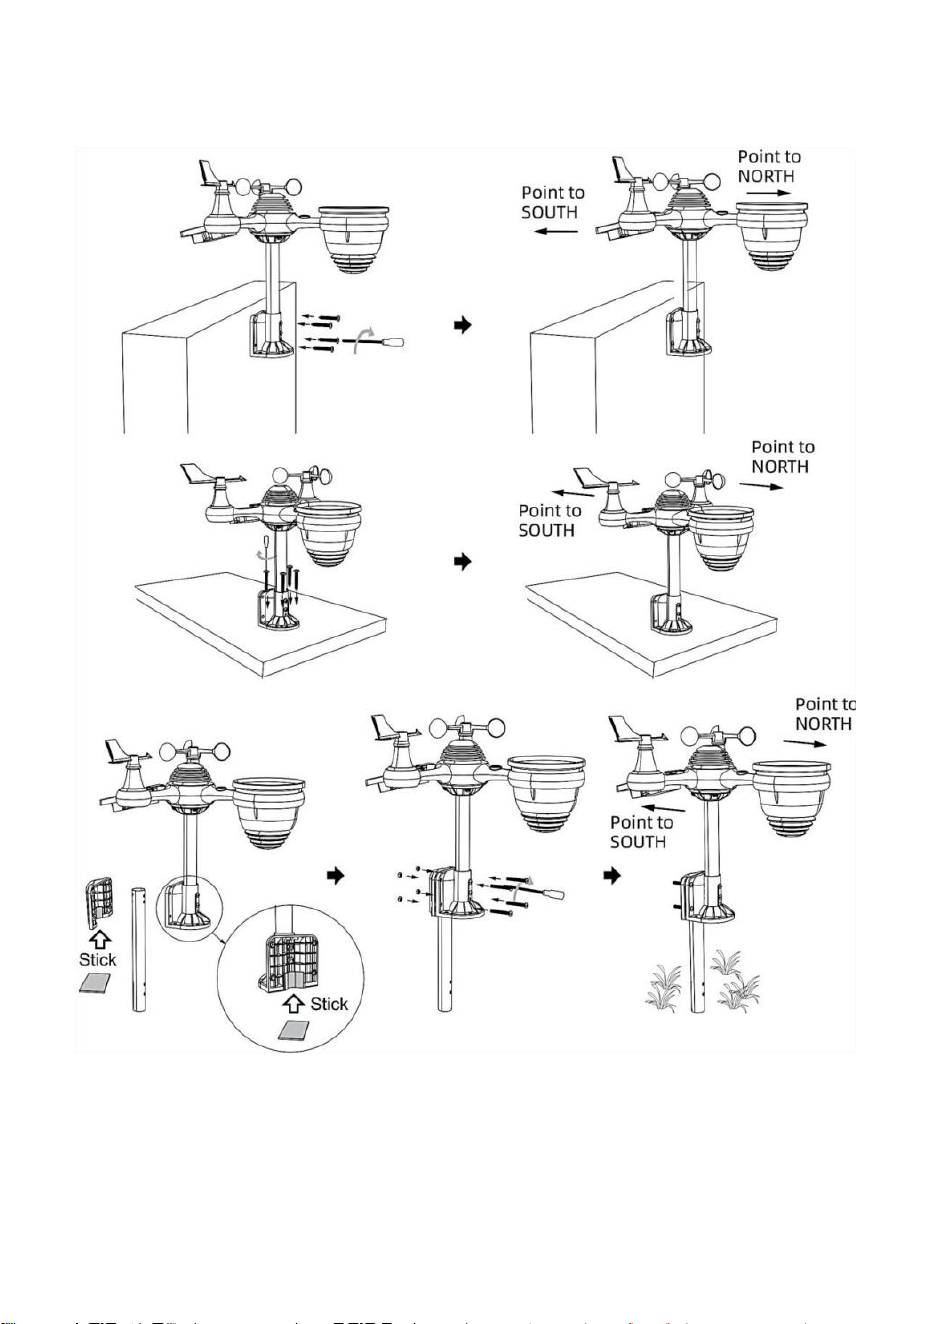
⑧MOUNTING THE WIRELESS 7-IN-1 OUTDOOR SENSOR
Various options to install. Make sure the rain collector faces north and
the solar panel faces south before fastening the screws (included).
If you are a user located in the Southern Hemisphere,
please reverse the direction.
ENTER SETUP INTERFACE
Enter the following address into the web browser address bar:
http://192.168.1.1 to access the setup interface.
Please click to check your password before clicking APPLY.
⑨ADJUSTING THE 7-IN-1 WIRELESS SENSOR LEVEL
Use the bubble level indicator to make sure the wireless outdoor sensor is completely level.
Weathercloud.net
Time zone setting
Internet time server setting
Press Apply to confirm the setting
Please scan the QR code or visit https://youtu.be/LESE8poieYY to see a video on how to use it.
WI-FI CONNECTION STATUS
TV
3
feet

Technical Support and E-Warranty Certificate www.vevor.com/support
METEOROLOGICAL STATION
MODEL:YT60234
We continue to be committed to provide you tools with competitive price.
"Save Half", "Half Price" or any other similar expressions used by us only represents an
estimate of savings you might benefit from buying certain tools with us compared to the major
top brands and doses not necessarily mean to cover all categories of tools offered by us. You
are kindly reminded to verify carefully when you are placing an order with us if you are
actually saving half in comparison with the top major brands.


- 3 -
METEOROLOGICAL
STATION
MODEL:YT60234
NEED HELP? CONTACT US!
Have product questions? Need technical support? Please feel free to
contact us:
CustomerService@vevor.com
This is the original instruction, please read all manual instructions
carefully before operating. VEVOR reserves a clear interpretation of our
user manual. The appearance of the product shall be subject to the
product you received. Please forgive us that we won't inform you again if
there are any technology or software updates on our product.

SAFETYPRECAUTIONS
- 4 -
WARNING! Please read and understand all safety precautions, operating
instructions, and care/maintenance instructions before operating this
appliance. Keep this manual for future reference.
This product is not a toy. Keep out of the reach of children.
This product is designed for use in the home only as an indication of
weather conditions.
This product is not to be used for medical purposes or for public
information.
Do not clean the unit with abrasive or corrosive materials.
Do not place the appliance near open flames or heat sources. Fire,
electric shock, product damage, or injury might occur.
Only use fresh new batteries in the product. Do not mix new and old
batteries together.
Do not disassemble, alter, or modify the product.
Only use attachments or accessories with this product specified by the
manufacturer.
Do not submerge the unit in water. Dry the product with a soft cloth if
liquid spills on it.
Do not subject the unit to excessive force, shock, duct, extreme
temperature, or humidity.
Do not cover or block the ventilation holes with any objects.
This weather station of this product is intended to be used indoors
only.
This product is only suitable for mounting at a height less than 6.6 ft. (2
m).
Do not tamper with the unit’ s internal components. Tampering with the
product will void the warranty.
Batteries are not included. When inserting batteries, make sure that
the positive and negative polarities match with the markings in the
compartment.
Do not mix standard, alkaline, and rechargeable batteries together.
Leaving a battery exposed to extremely high temperatures in the
surrounding environment can result in an explosion or leakage of
flammable liquid or gas.
Leaving a battery exposed to extremely low air pressure in the
surrounding environment can result in an explosion or leakage of
flammable liquid or gas.

TIPS FOR SENSORSITE SELECTION
- 5 -
Rain collector must be cleaned every few months.
Sensor should be installed at least 5’ (1.5 m) away from any building or
structure.
Choose a location in an open space under direct sunlight with no
obstructions.
The sensor should remain in the line of sight and within 492’ (150 m) of
the weather station for consistent, steady transmission.
Keep your sensor and weather station away from household
appliances that operate on the same frequency. The console and
sensor should be at least 3’ -7’ (1 - 2 m) away from such interferences.
PRODUCTFEATURES
Colorful and big digit display with super bright backlight.
9 functional buttons: SET, TEMP/ALARM, RAIN, WIND/+, BARO/-/ ,
ALERT, MAX/MIN, CHANNEL, LIGHT/ SNOOZE
Time automatically sychronizes to the internet.
Alarm with snooze function.
Daylight Saving Time (DST) function.
Time zone: GMT ±12.
Moon Phase.
Indoor & outdoor temperature (°C/°F) & humidity readings with trend.
Hourly, Daily, Weekly, Monthly, Total rainfall and Rainfall rate in the
past hour.
Average wind speed, gust wind speed and wind direction displays.
Absolute and relative Barometric pressure displays with trend.
Light intensity and UV index display.
Weather index display : Feel likes, Wind Chill, Heat index, Dew point.
Weather Forecasting.
Max/Min reading.
Weather alert settings.
Upload weather data to Weather Underground and/or Weathercloud
via a Wi-Fi router.
4-level brightness of the backlight.
- 6 -
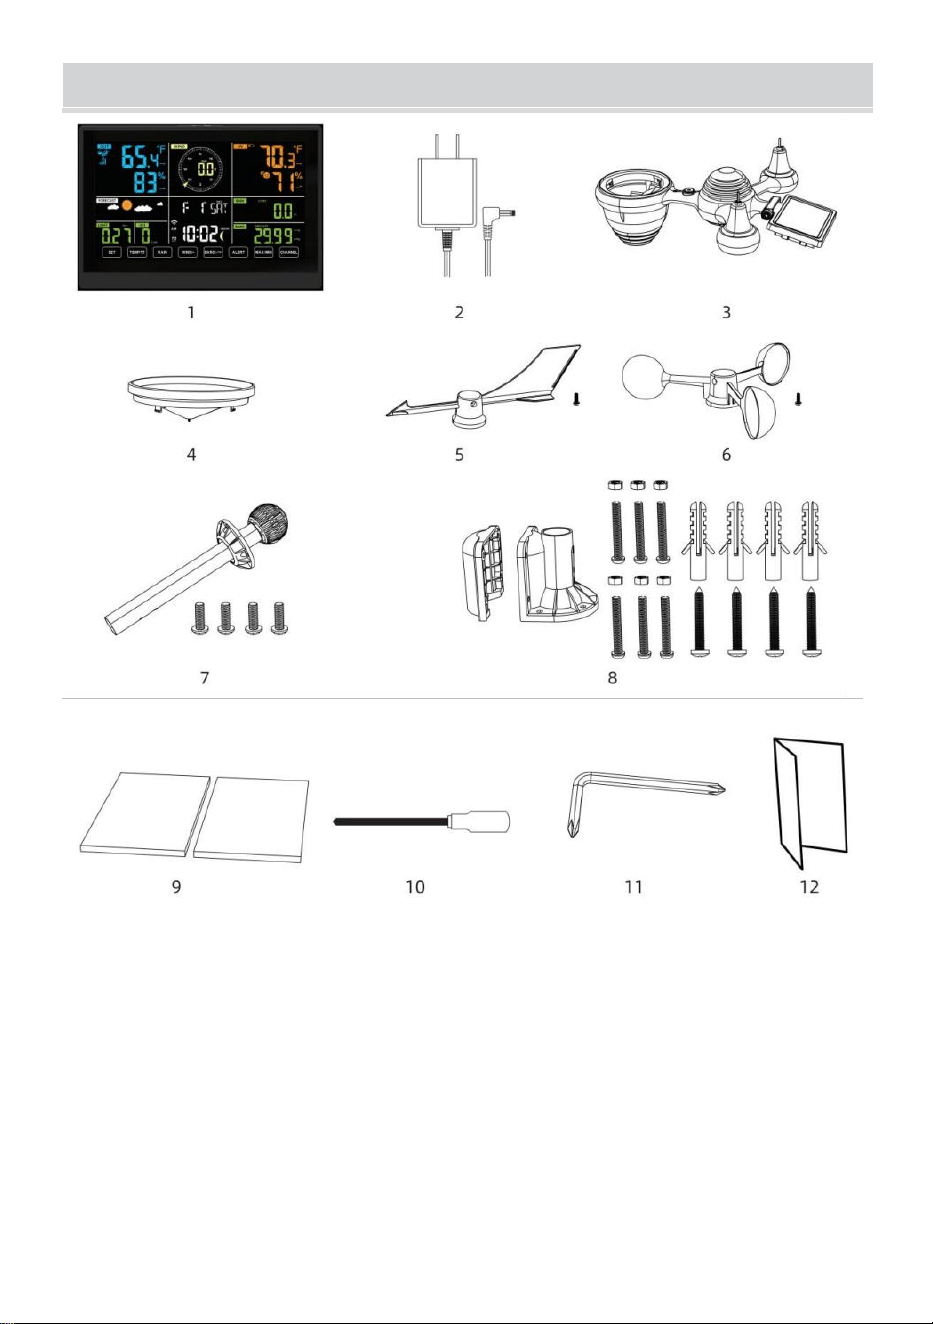
PACKAGECONTENTS
1 Weather station
2 Adapter
3 Wireless 7-in-1 outdoor sensor
4 Funnel
5 Wind direction vane with 1 screw
6 Wind speed cups with 1 screw
7 Mounting pole with 4 screws
8 Mounting brackets with 6 screws
9 Rubber pads X 2
10 Screwdriver 1
11 Screwdriver 2
12 User guide
NOTE: 4 extra screws for wind direction vane and wind speed cups.
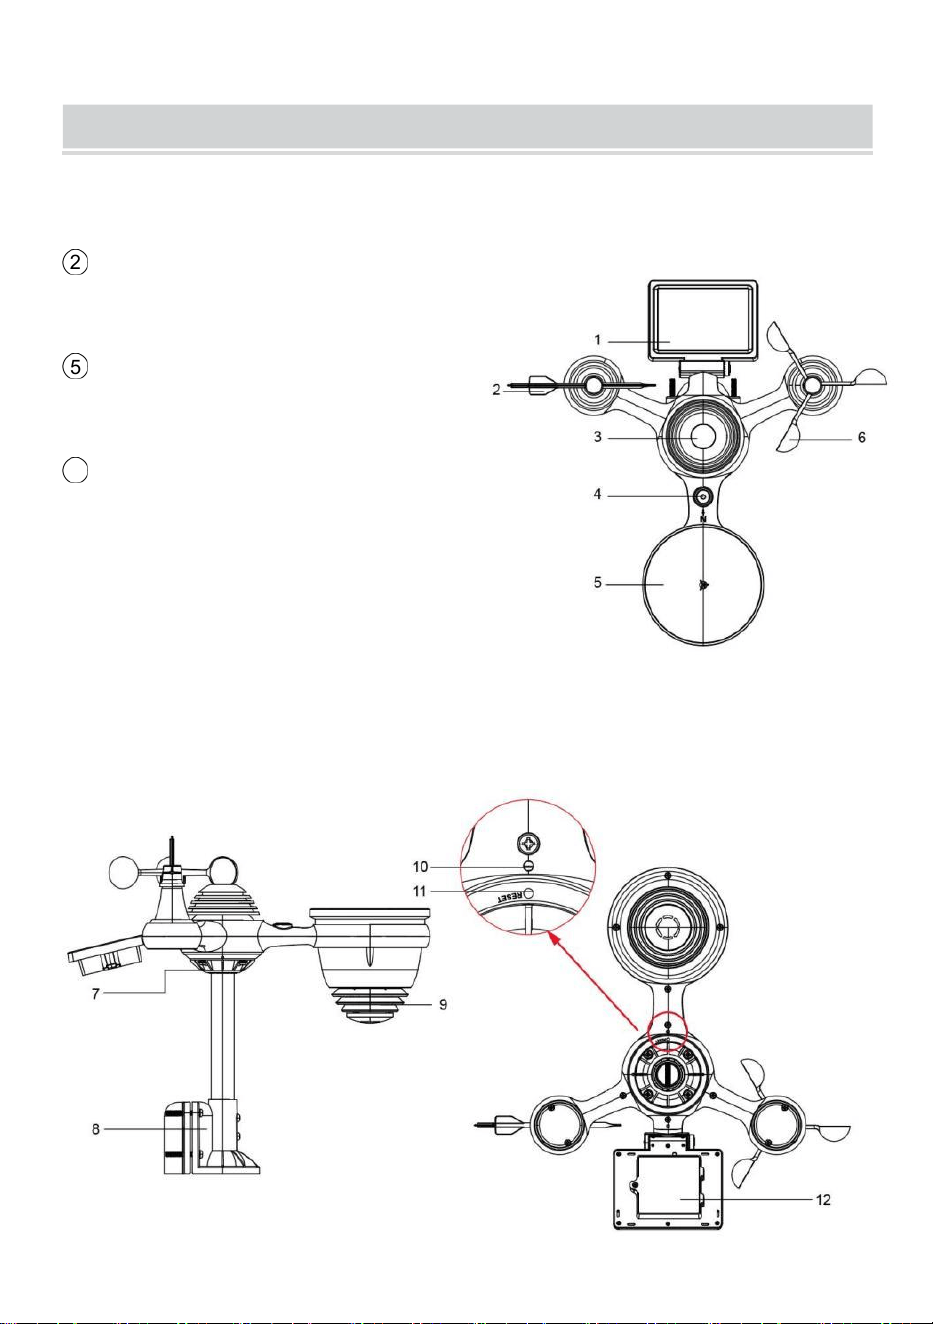
PRODUCT OVERVIEW
- 7 -
WIRELESS 7-IN-1 OUTDOOR SENSOR
1
Solar panel
2 Wind direction vane
3
UV/light sensor
4
Bubble level gradienter
5 Rain collector
6 Wind speed cups
7 Mounting pole
8
Mounting brackets
9
Hygro-thermo sensor
10 LED: Flashes when the unit
transmits a reading
⑪
RESET button
⑫
Battery door

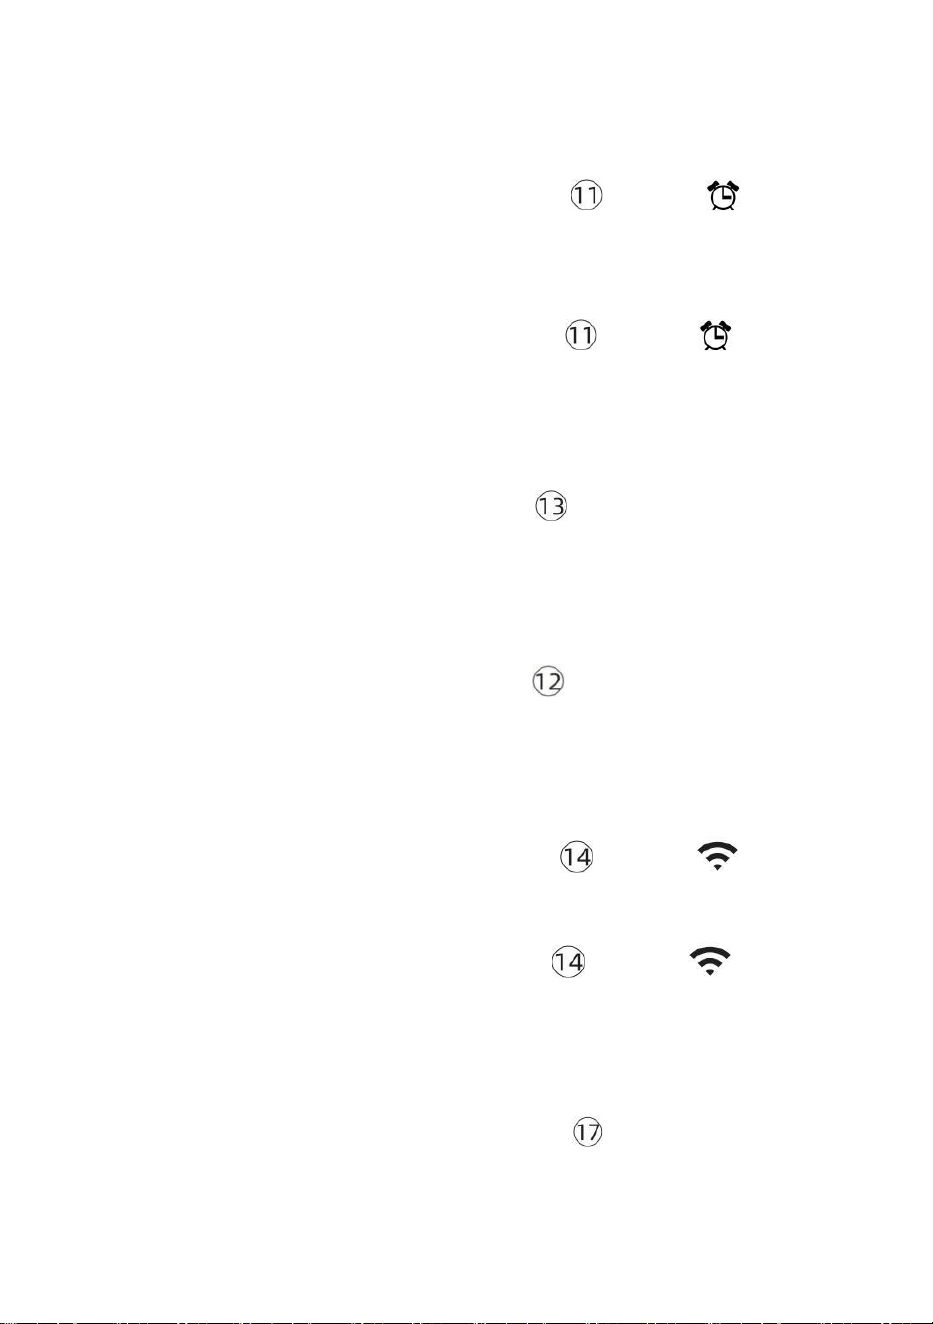
WEATHERSTATION
- 8 -

- 9 -
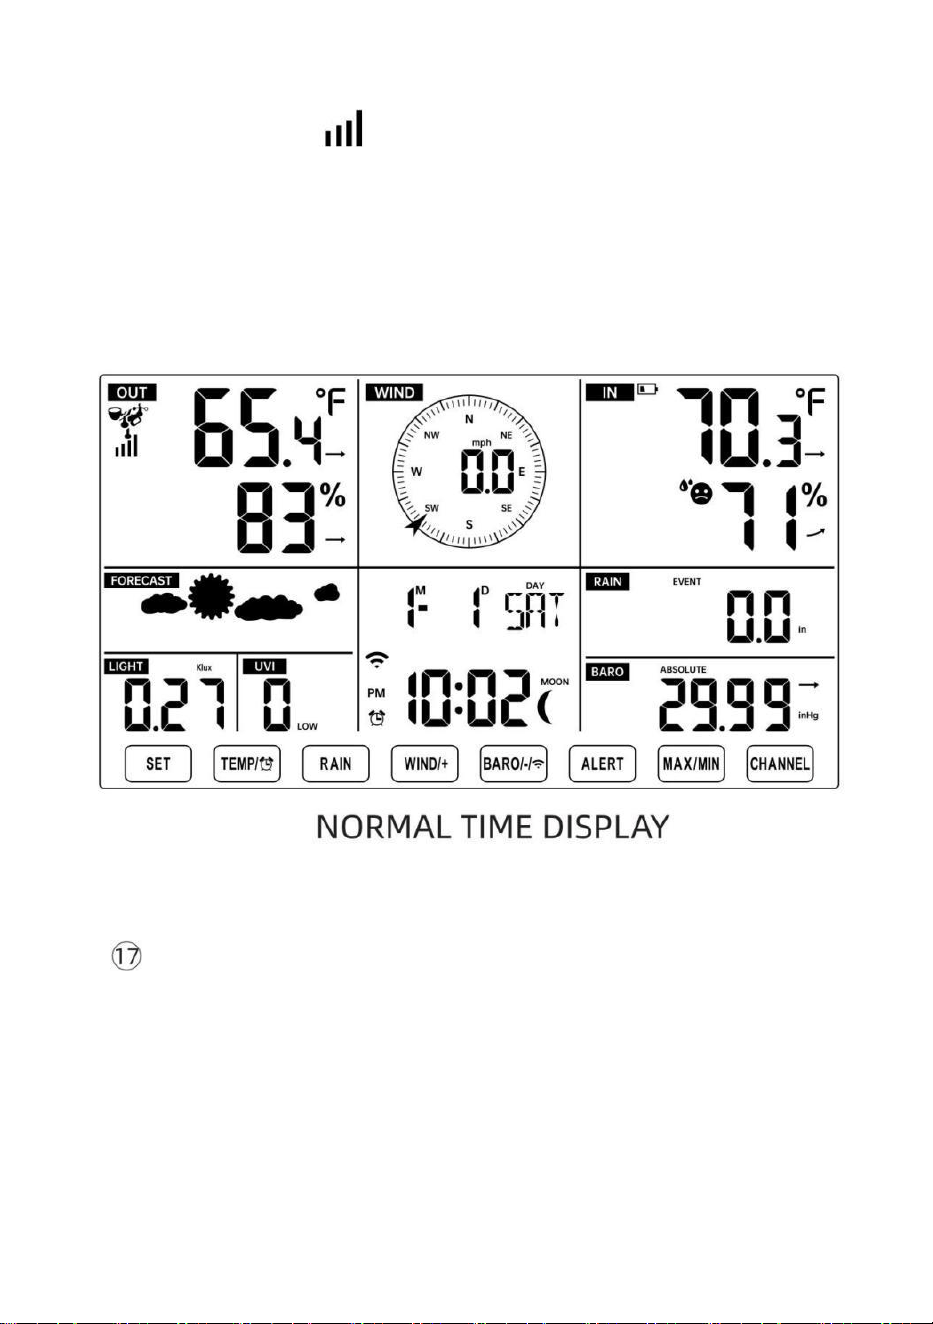
1 Outdoor temperature/humidity reading, weather index
2 Wind direction & speed
3
Indoor temperature/humidity reading
4 Weather forecast
5 Time & date, moon phase, Weekday
6 Light intensity
7
UV index
8 Rain
9 Barometer
10 SET button
11 TEMP/ (ALARM) button
12 RAIN button
13 WIND/+ button
14 BARO/-/ (Wi-Fi) button
15 ALERT button
16 MAX/MIN button
17 CHANNEL button
18
LIGHT/ SNOOZE button
19
Battery compartment (3.6 V Ni-MH rechargeable battery pack)
SETTING UP THE WIRELESS 7-IN-1 OUTDOORSENSOR
The wireless 7-in-1 outdoor sensor measures wind speed, wind direction,
rainfall, UV, light intensity, temperature, and humidity.
INSTALLING THE MOUNTING POLE AND BRACKET

- 10 -
● Secure the sensor onto a mounting pole and bracket (included) using the
screws (included).
INSTALLING WIND SPEED CUPS AND WIND DIRECTION VANE
● Align the screw holes in the wind speed cups with the flat, vertical side of
the metal rod.
● Insert the wind speed cups in the metal rod and screw them on tight to
lock it in place.
● Align the screw holes in the wind direction vane with the flat, vertical side
of the metal rod.
● Insert the wind direction vane in the metal rod and screw them on tight to
lock it in place.
- 11 -
SETTING UP RAIN COLLECTOR
● Align the notches on the funnel with the lock grooves inside the rain
collector.
● Insert the funnel in the rain collector and screw them on tight to lock it in
place.

- 12 -
INSTALLING THE BATTERIES
● Unscrew the battery door at the bottom of the 7-in-1 outdoor sensor
using screwdriver 1.
● Connect the cable of the rechargeable battery pack (included) to the
cable located in the battery compartment.

- 13 -
Adjust the connected cables so they fit comfortably in the compartment.
Then, insert the battery pack into the compartment.
Close and fasten the battery door back on the compartment.
- 14 -
ADJUSTING THE SOLAR CELL
● Loosen the screw at the joint so the gear on the other side of the joint
pushes out. The solar cell should now be in an unlocked position.
● Adjust the vertical angle of the solar cell to get the most optimal usage
out of the solar cell depending on your location.
● Push the gear inward and tighten the screw until the gears lock in place.

- 15 -
When adjusting the solar cell set it to an angle closest to your latitude. View
chart below to get an idea of how you should angle your solar cell.
Latitude Proximity
Solar Cell Angle Selection
If your location is close to 84°
84°
If your location is close to 63°
63°
If your location is close to 42°
42°
If your location is close to 21°
21°
If your location is close to 0°
0°
MOUNTING THE WIRELESS 7-IN-1 OUTDOOR SENSOR
Pick a location for the 7-in-1 outdoor sensor that is open with no
obstructions.
Tighten the mounting brackets to a surface/wall using four tapping
screws (included), or tighten the mounting pole to your existing
mounting pole with four φ5 Bolts and M5 Nuts assembly.
Add rubber pads onto the mounting bracket before fastening the
mounting bracket on the sensor.
Make sure the rain collector faces north and the solar panel faces
south before fastening the screws (included).
Please ensure that the sensor is fixed particularly tightly, otherwise
windy conditions cause the transmitter to shake and thus misread the

- 16 -
rainfall data.
POINTING THE WIRELESS 7-IN-1 OUTDOOR SENSOR TO SOUTH
(OPTIONAL)
The outdoor wireless weather sensor is calibrated to be pointed north for
maximum accuracy. However, for your convenience, if you are a user
located in the Southern Hemisphere, you can use the sensor with the rain

- 17 -
collector pointing south.
1.) Mount and install the wireless weather sensor with the rain collector
pointing South, instead of North. (Please refer to MOUNTING THE
WIRELESS 7-IN-1 OUTDOOR SENSOR.)
2.) Select "STH" for south hemisphere in the clock setting mode. (Please
refer to "setting the clock")
NOTE: Changing the hemisphere setting will automatically switch the
direction of the moon phases on display.
Pointing the wireless weather sensor toward the south will allow
maximum sunlight on the solar panel, especially during the winter
season in the Southern Hemisphere.
ADJUSTING THE 7-IN-1 WIRELESS SENSOR LEVEL
● Use the bubble level indicator to make sure the wireless outdoor sensor
is completely level. If the sensor is not level, the gain gauge, UV and Light
intensity will not measure properly.
● To adjust the level of wireless outdoor sensor, loose the screws of the
mounting pole. Adjust the level of the wireless outdoor sensor in order to
make sure the bubble is in the center of the bubble level indicator.
● Tighten the screw of the mounting pole again.

- 18 -
SETTING UPTHEWEATHERSTATION
POWERING UP THE WEATHER STATION
● Plug the power adapter into the power jack located in the back of the
weather station. Insert 3 new AAA alkaline batteries (not included) for
backup.
● Once the weather station is turned on, it will automatically enter pairing
mode.
PAIRING THE WIRELESS 7-IN-1 SENSOR
● Once your weather station powers on, it should automatically search for
and connect to the wireless sensors. If the weather station does not
connect within the first 5 minutes, refer to the following section,
- 19 -
“RE-PAIRING SENSOR”.
● You will see the icon of an antenna scrolling in the temperature and
humidity (outdoor) section of the display.
● Once the pairing process completes, the antenna icon will appear solid
(not flashing), and the readings for outdoor temperature and humidity, wind
speed, wind direction, UV, light intensity, and rainfall will appear in their
designated sections of the LCD display
RE-PAIRING SENSOR
● If the connection fails or the weather station is reset, then press and hold
the
【
CHANNEL
】
button over 2 seconds to enter pairing mode, and the
weather station will re-register all the sensors that have already been
registered to it before, (i.e., the weather station will not lose the connection
of the sensors that you’d paired up before.)

SETUPINSTRUCTION
- 20 -
SETTING UP WI-FI CONNECTION AND WEATHER SERVER
CONNECTION
Press and hold 【BARO/-/ 】 button over 3 seconds, the weather
station LCD display will show the letter “AP” that it has entered Access
Point (AP) mode. At this time it will be ready for the Wi-Fi settings to be
adjusted.
Use your smartphone, tablet, or computer to connect to the weather
station via Wi-Fi by following these steps:
On PC, open your Wi-Fi network settings. On Android™ or iOS
devices, go to settings menu and then select Connections/WI-FI to
open the network settings.
Locate the weather station SSID from the list. It should appear as
WWS-XXXXXX (where all the X’s are integers) in the list. Tap on the
SSID to connect. This step will take several seconds.
Once you are connected to the weather station, open up your internet
or mobile web browser, and enter the following address into the
- 21 -
address bar: http://192.168.1.1 to access the weather station web
interface. (Make sure to include the http:// or else the web browser
may interpret the address as a search query). We recommend using
the latest version of reputable web browsers.
Enter the following information into the web-interface (Figure 1). Make
sure all of the information is entered prior to selecting Save. If you
choose not to upload Wunderground.com, or upload weathercloud.net,
leave the check boxes unchecked.
NOTE :
Time zone Setup (default : 0h). To automatically set the time display
to your time-zone, change the time zone in Time server setup section
of the SETUP page from ‘0:00’ (default) to your time zone (e.g.+1:00
- 22 -
for Germany).
5.) If all of the information you entered is correct, press “Apply” to confirm
(Figure 1). If it does not, check your web interface information again.
NOTES:
When the Wi-Fi setup is complete, your computer or mobile device
will return to the default Wi-Fi connection. If it does not, simply open
your device’s wireless network settings and manually reconnect.
While in AP mode, you can press and hold the 【BARO/-/ 】
button over 3 seconds to exit AP mode. The weather station will
simply restore the previous AP settings.
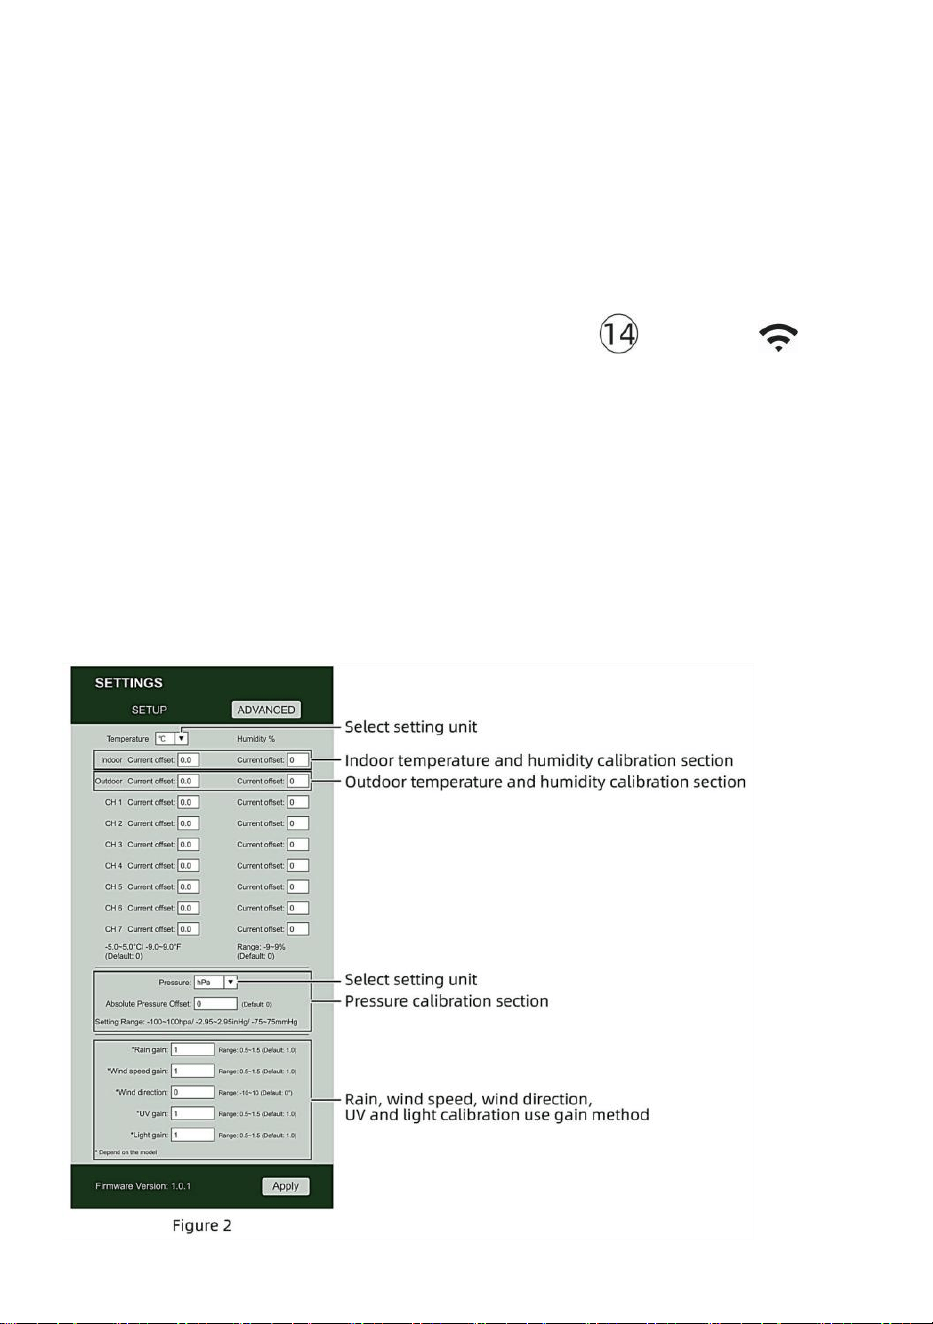
CALIBRATION
Once you are connected via Wi-Fi to the weather station and have opened
the setting page at http://192.168.1.1, clicking “ADVANCED” will open the
following page (Figure 2).
- 23 -
1) You may enter or change the offset and gain values for different
measurement parameters.
2) Once you have completed your calibrations, press the “APPLY” button.
3) The current offset value will update to show the value that you entered
(instead of the default value). If you want to change the value, you can enter a
new value in the box beside the number (as in step 1). To update the value
again, press “APPLY” button .
NOTE:
We do not recommend calibration of most values with the exception of
Relative Pressure, which must be correctly calibrated to reflect your
distance above sea level to account for altitude effects.
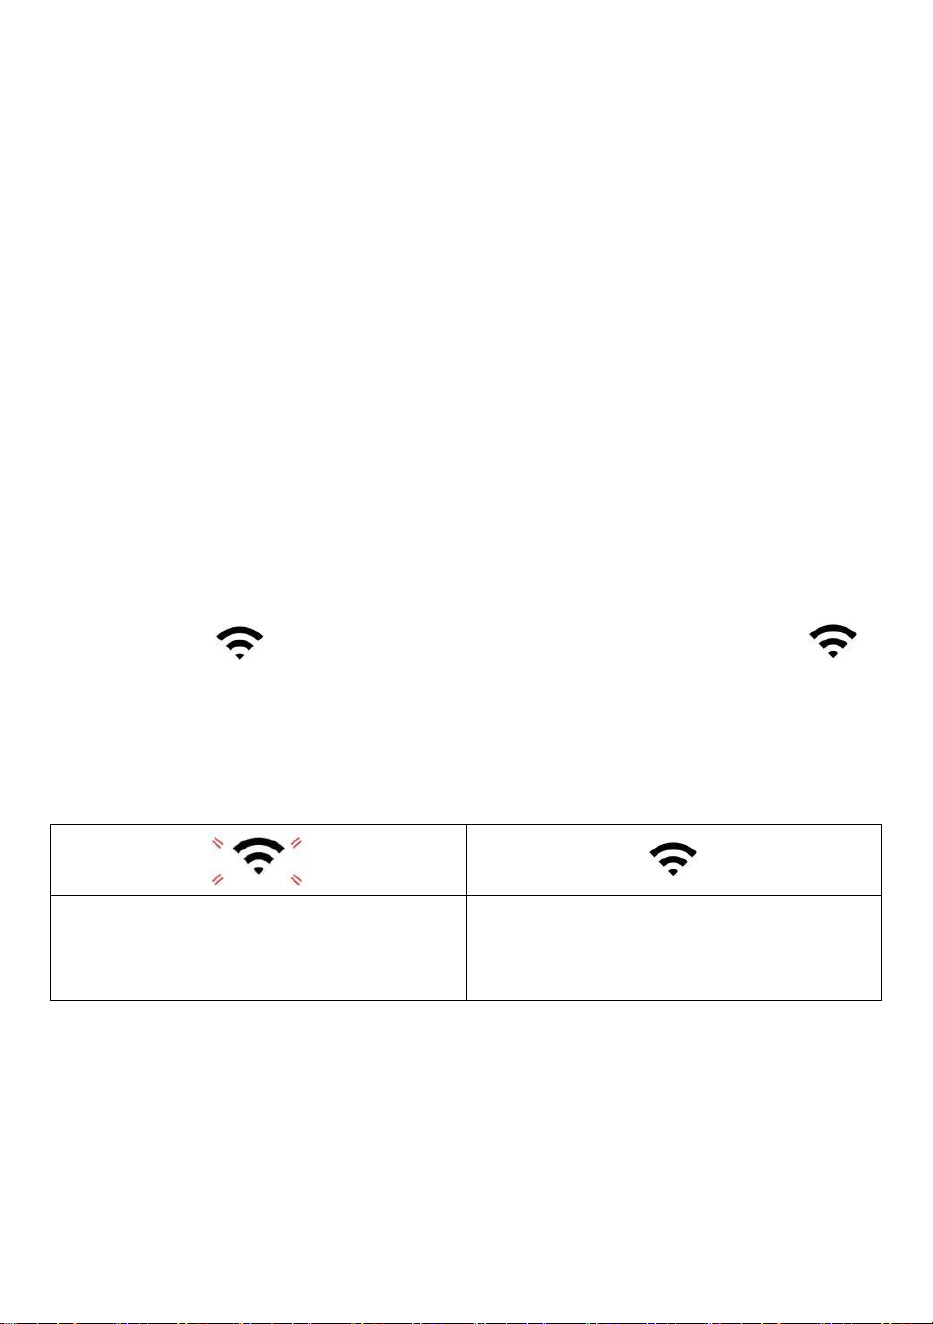
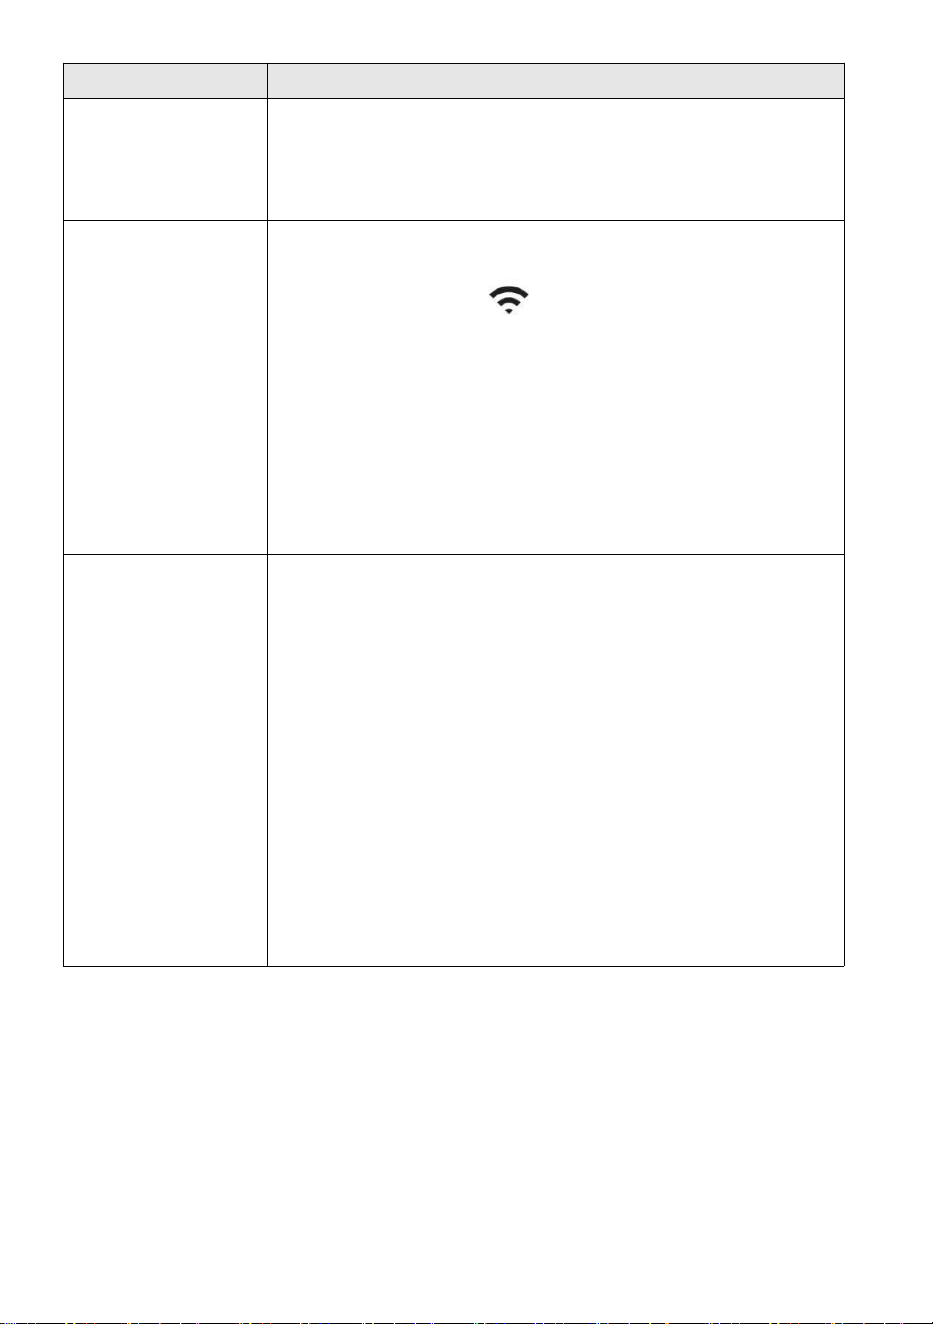
WI-FI CONNECTION STATUS
When the weather station successfully connects to your Wi-Fi router, the
Wi-Fi signal
will appear on the LCD display. If the Wi-Fi signal
is not stable or the weather station is trying to connect to the router, the
icon will flash. If the icon disappears, it means the weather station is not
connected to the Wi-Fi router.
Flashing: the weather station is
attempting to connect to your wireless
router.
Solid: the weather station has been
connected to your wireless router.
NOTE:
If you own a dual band router (2.4GHz and 5.0GHz), make sure you connect
to the 2.4GHz band, otherwise it will fail to connect the weather station to
Wi-Fi.
- 24 -
TIME SERVER CONNECTION STATUS
After the weather station has connected to the internet, it will attempt to
connect to the internet time server to obtain the UTC time. Once the
connection succeeds and the weather station’s time has been updated.
The icon “SYNC” will appear on the LCD.
To display the correct time for your specific time zone, you will need to
change the time zone in the CLOCK setting mode from 00 (default) to your
time zone (eg. -5 for EST). If you don’t know your time zone, you can look it
up online.
NOTE:
The time will automatically synchronize to the internet per hour.
CREATEANDSYNCYOURWEATHERSERVERACCOUN
CREATE WEATHER UNDERGROUND ACCOUNT
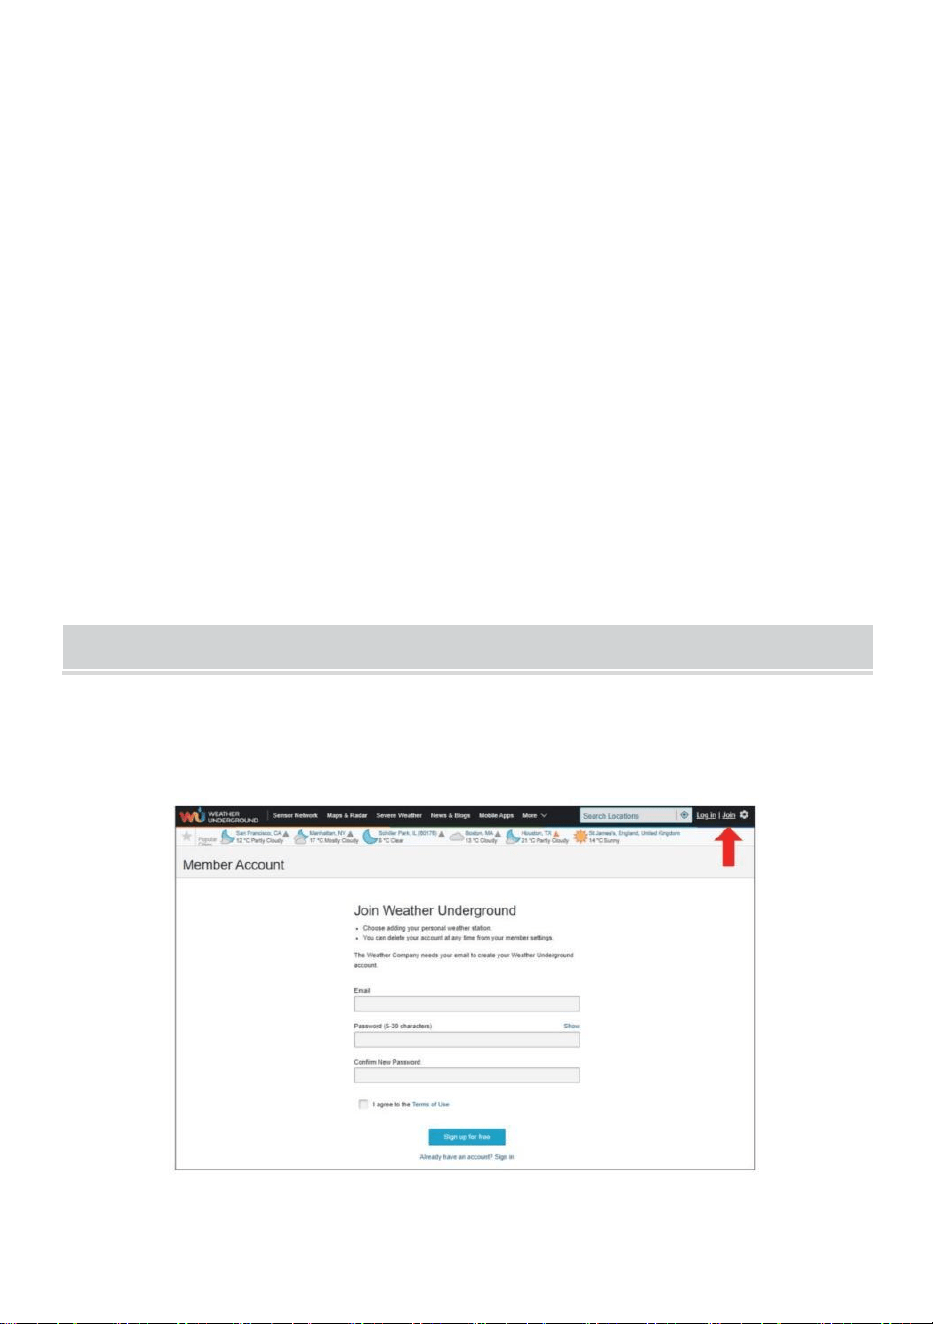
1.) Visit: https://Wunderground.com, and select the “Join” in the upper
right and corner and create a Free Account.
- 25 -
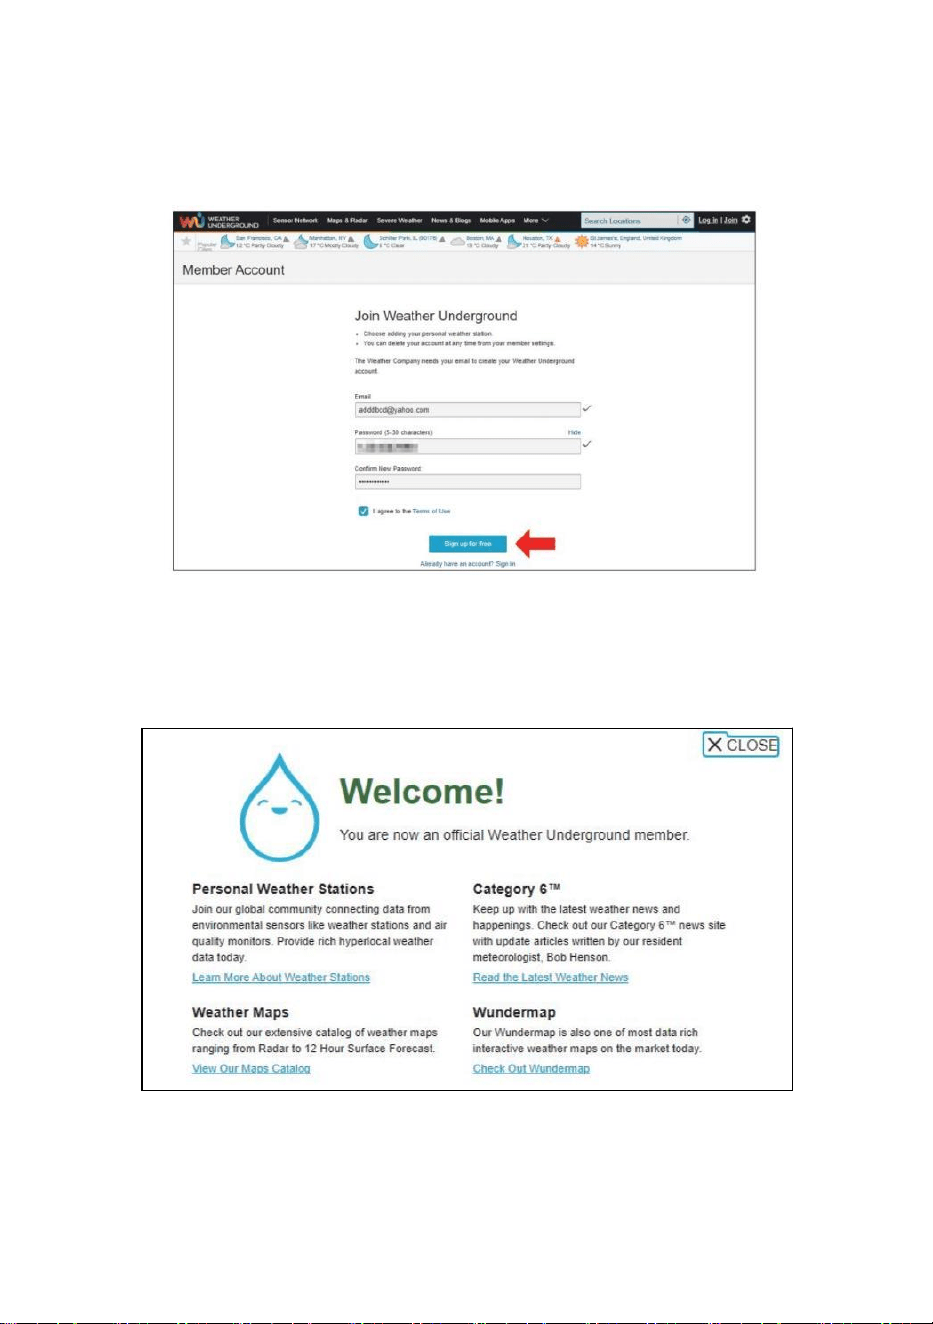
2.) Enter a Username, Email and Password (It is your Login
password for the website not your email password. So no privacy will
be exposed). Click Sign up for free.
3.) After registration is done successfully, it will be shown below the
message.
- 26 -
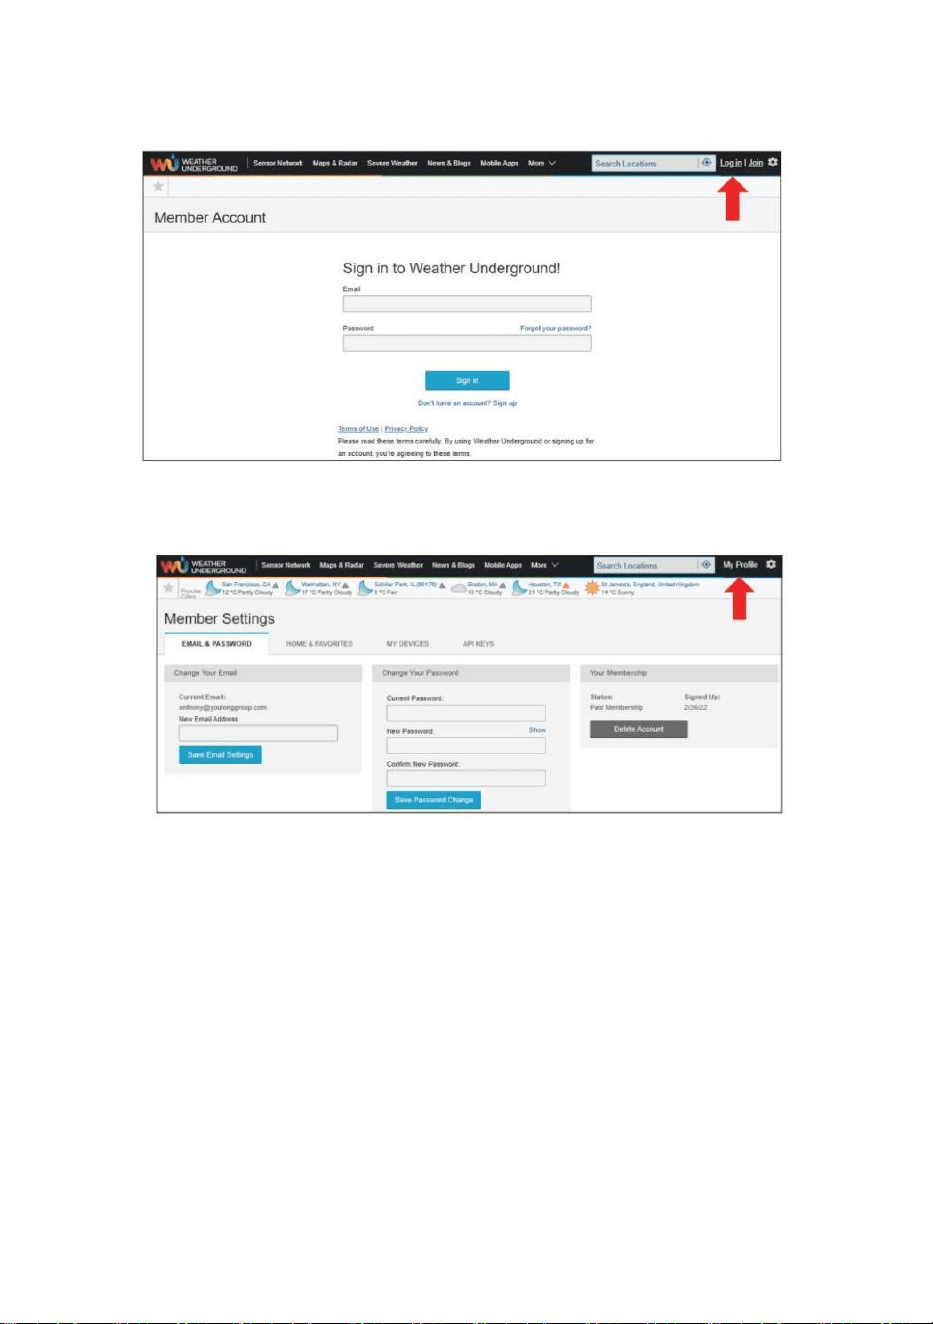
4.) Click “Login” and enter the email address and password you just
registered.
5.) Click “My profile ” and enter Member settings.

- 27 -
6.) Click “Update home location ”.
7.) Click “My Devices”, and click “Add New Device”.
- 28 -
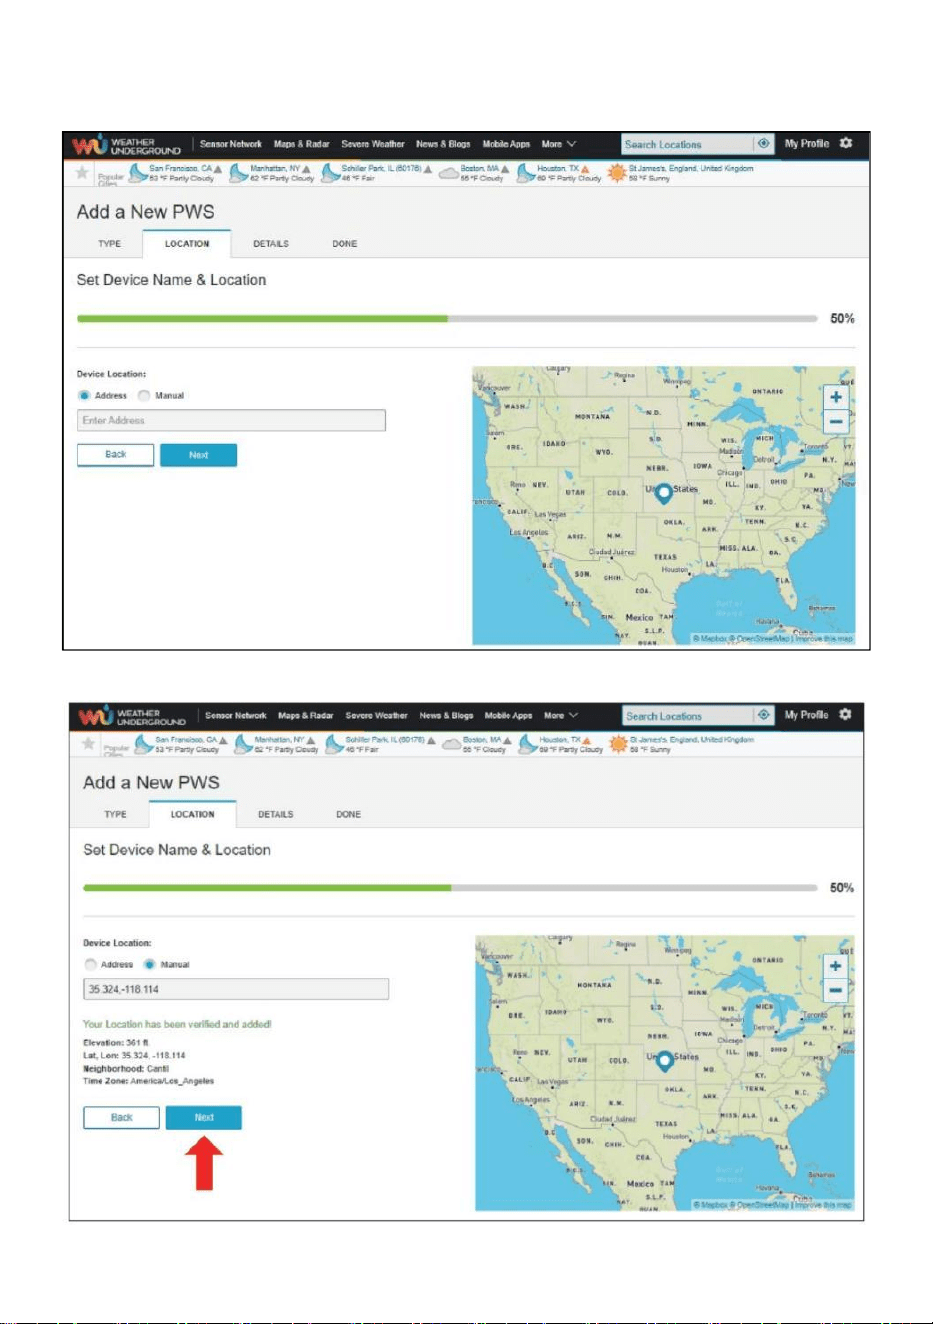
8.) Select address by inputting an address or select Manual to position
your address automatically. Then click “Next”.
- 29 -
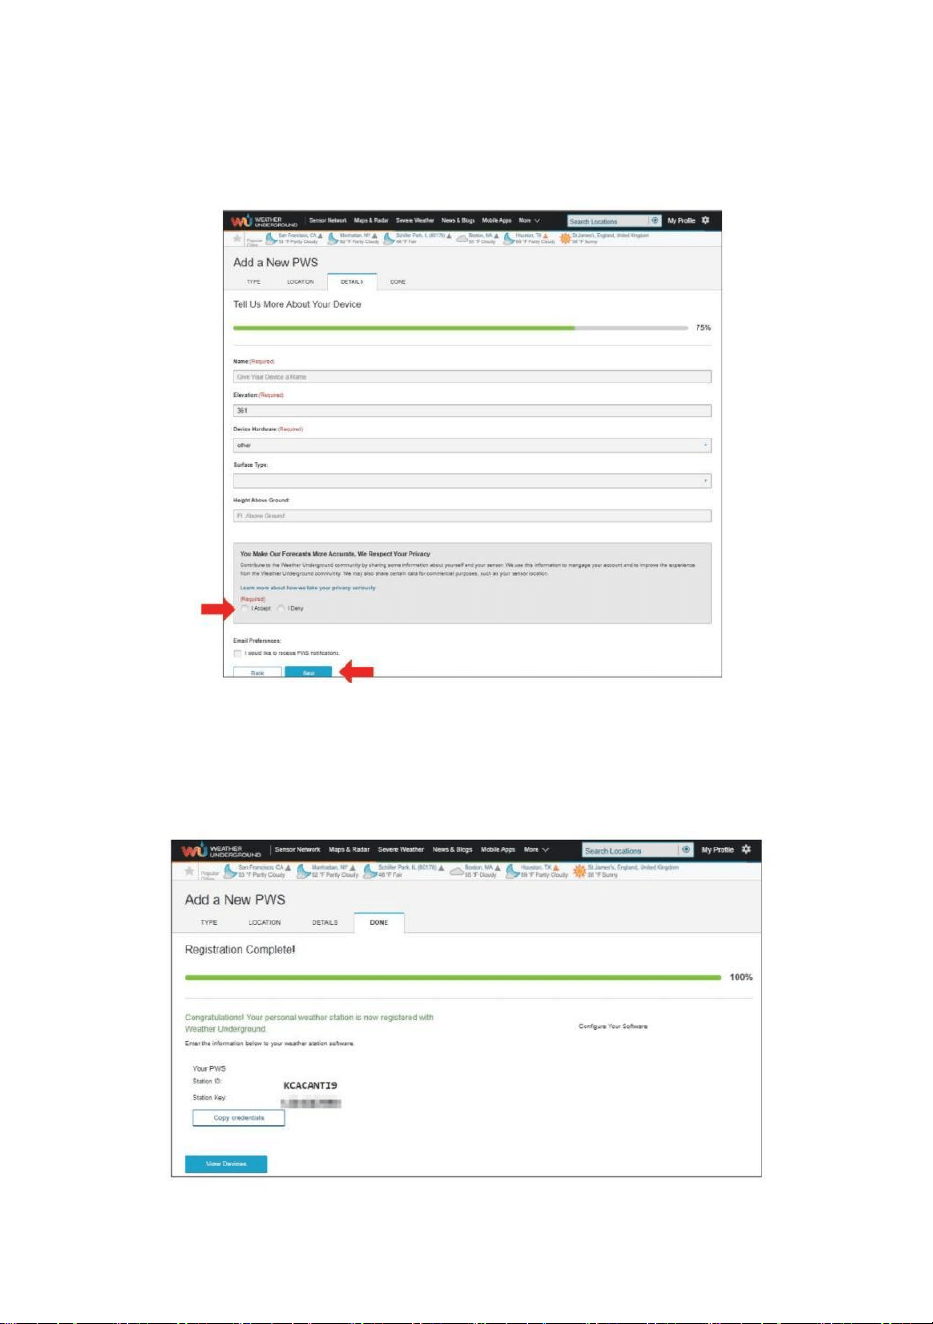
9.) Enter the weather information. Blanks with red (required) must be
filled in.
NOTE:
You can select “other” of the Device Hardware.
10.) Once complete this session, click “I Accept” and “Next”.
11.) After registering successfully, please record your Weather
Underground ID and Key information for later setup use.
- 30 -
12.) As shown below, registration is done successfully.
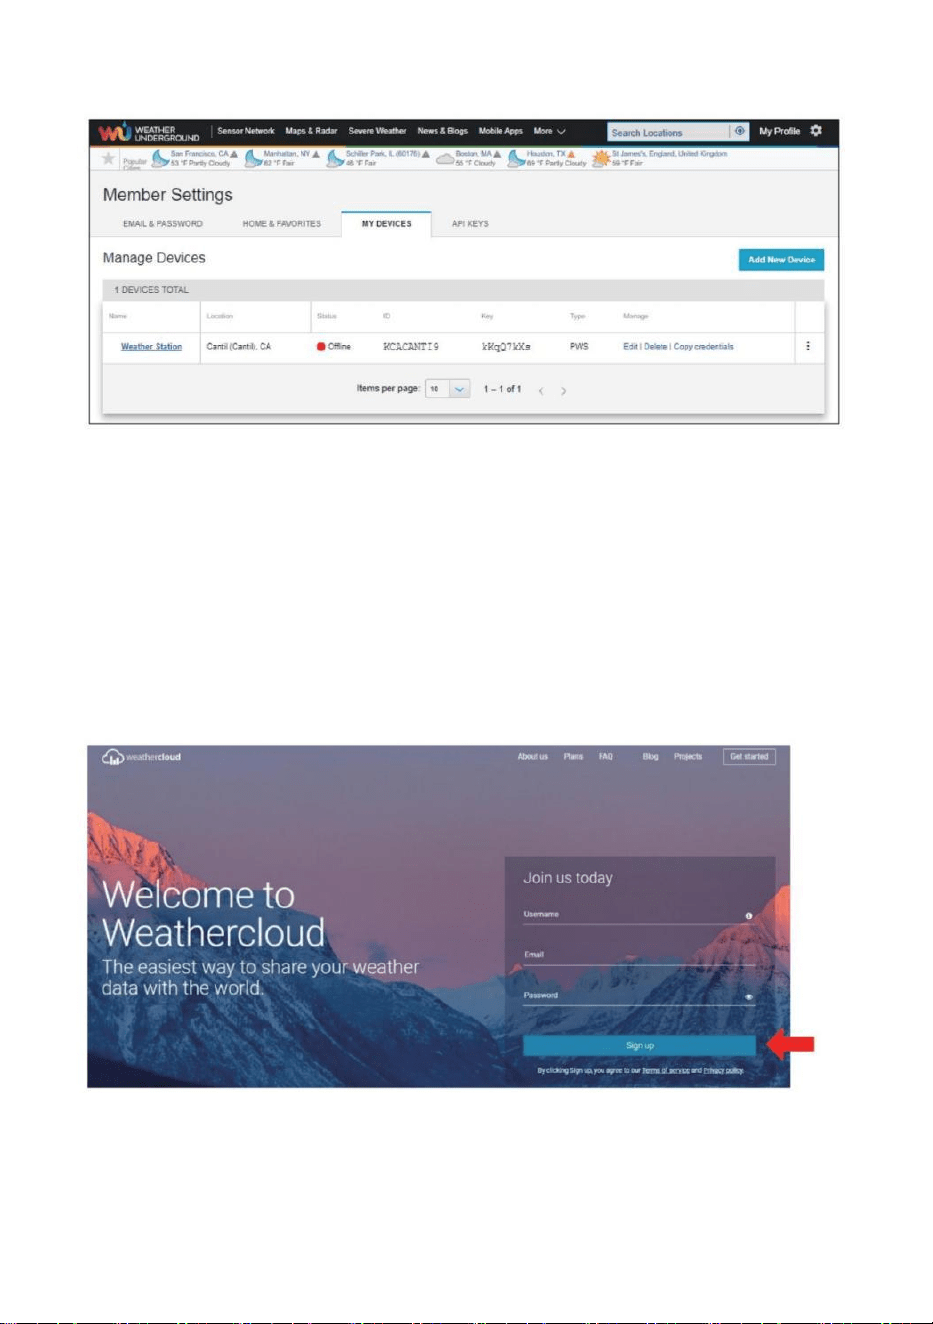
CREATE YOUR WEATHERCLOUD ACCOUNT
1.) Visit Weathercloud website at https://weathercloud.net/, and enter
a Username, Email and Password and click “Sign up”. Following the
instructions to create an account.
NOTE: This is best done on a computer desktop or laptop.
(It is your Login password for the website not your email password. So no
privacy will be exposed).
2.) When it is successful, an email will be received in your registered
mailbox.
3.) Open your mail and log in to the web address in the mail. Click
“Activate your Weathercloud account ”.
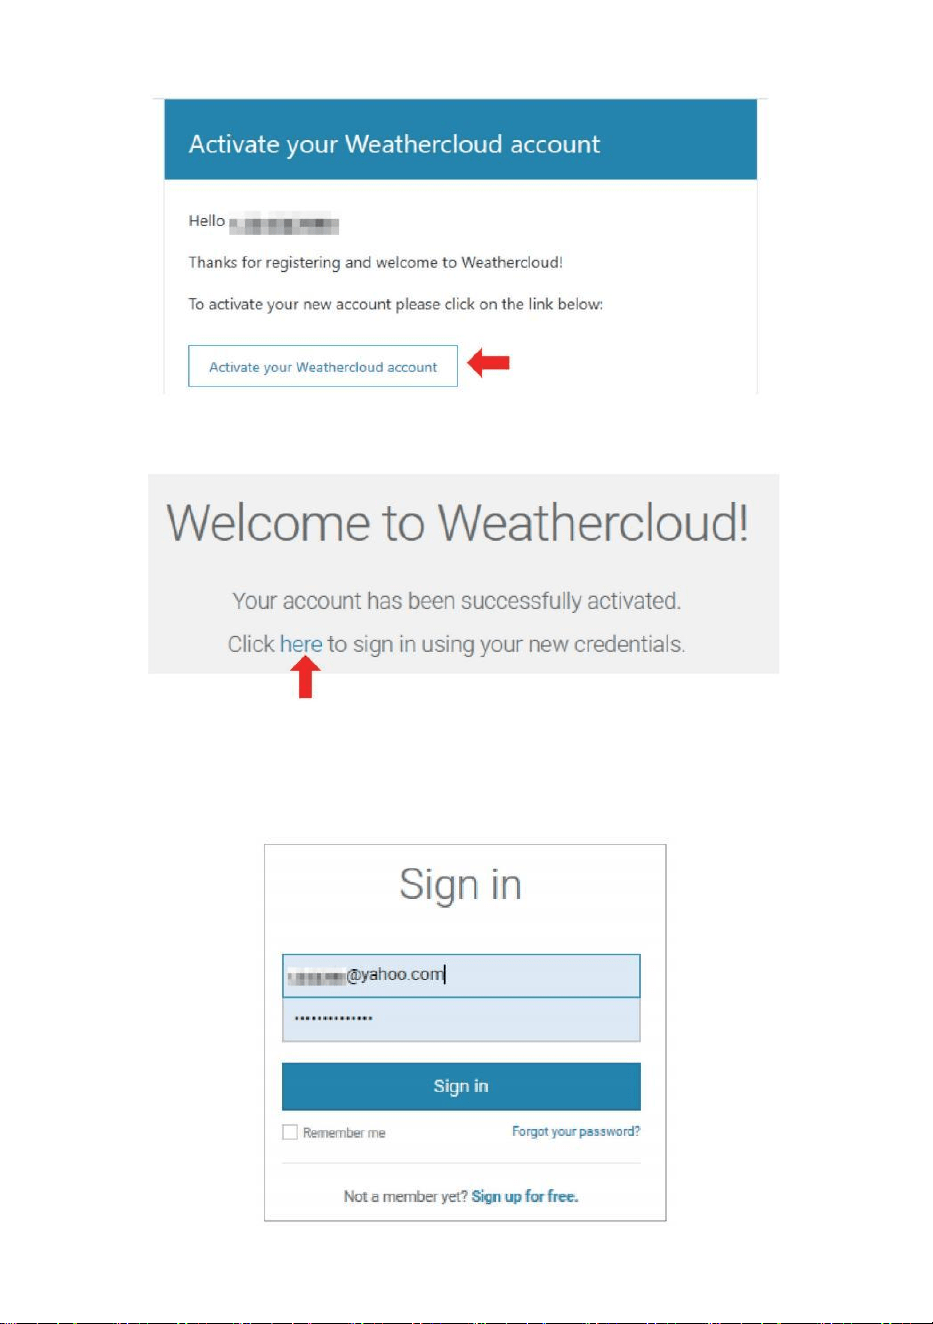
- 31 -
4.) Click “ here ” to enter the homepage of the Weathercloud website.
5.) Enter the email address and password you just registered to enter the
Weathercloud website.
- 32 -
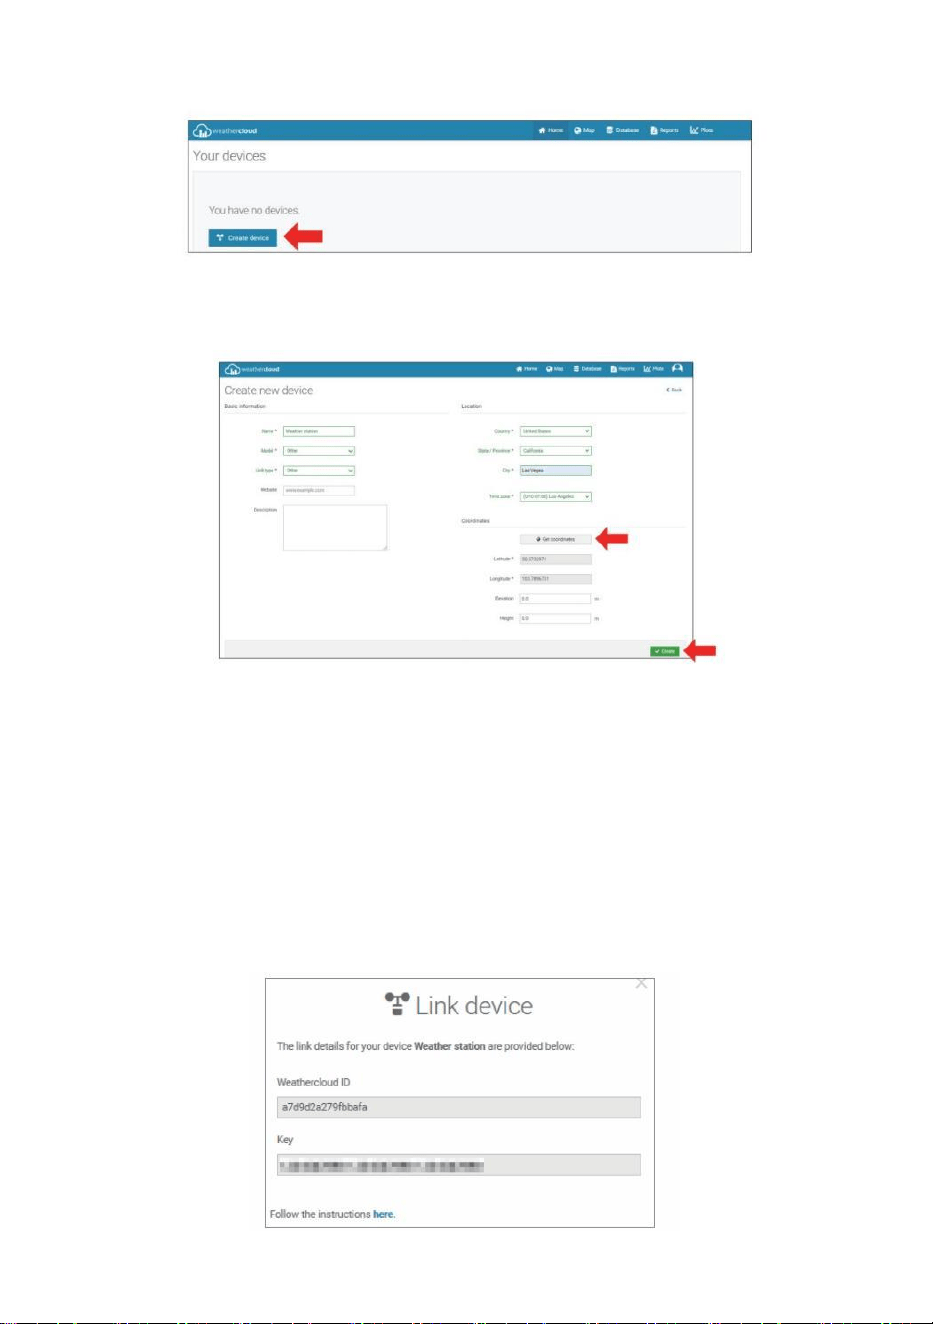
6.) Click “Create device ” to add a weather station device.
7.) Enter all the requested information into the Create New Device
page. Blanks with red *must be filled in.
NOTE:
You can select “other” of the Model number and Link type in the above
blanks. Click “Get coordinates” to identify your location on the map, then
click “Done” to confirm.
8.) Once you have completed this section, click “Create”.
9.) After registering successfully, please record your Weathercloud ID
and Key information for later setup use.
- 33 -
VIEW YOUR WEATHER DATA IN WEATHER UNDERGROUND
To view your weather station data live via PC or mobile web browser,
visit http://www.wunderground. com, and then enter the Station ID you
were provided during account setup in the search box. Your weather data
will show up on the next page.
VIEW YOUR WEATHER DATA IN WEATHERCLOUD
1.) To view your weather station data live via PC or mobile web browser,
visit http://www.weathercloud.net and sign into the account you created.
2.) Click on the tab at the top of the page titled Devices.
3.) Click on the Settings menu at the top right of the page, and select the
option View.
4.) Click on either Current, Wind or Evolution to view your weather station’s
data.
OPERATING INSTRUCTIONS
CLOCK
Setting the Clock
In Normal time display, press and hold 【 SET】 over 2 seconds to enter time
setting mode. Press and release 【WIND/+】 and 【BARO/-/ 】 to
adjust the values.
Hold 【WIND/+】 and 【BARO/-/ 】 over 2 seconds to adjust the
values rapidly. Press and release 【SET】to confirm and move to the next item.
To exit the setting mode at any time, press 【 LIGHT/SNOOZE】
button.
- 34 -
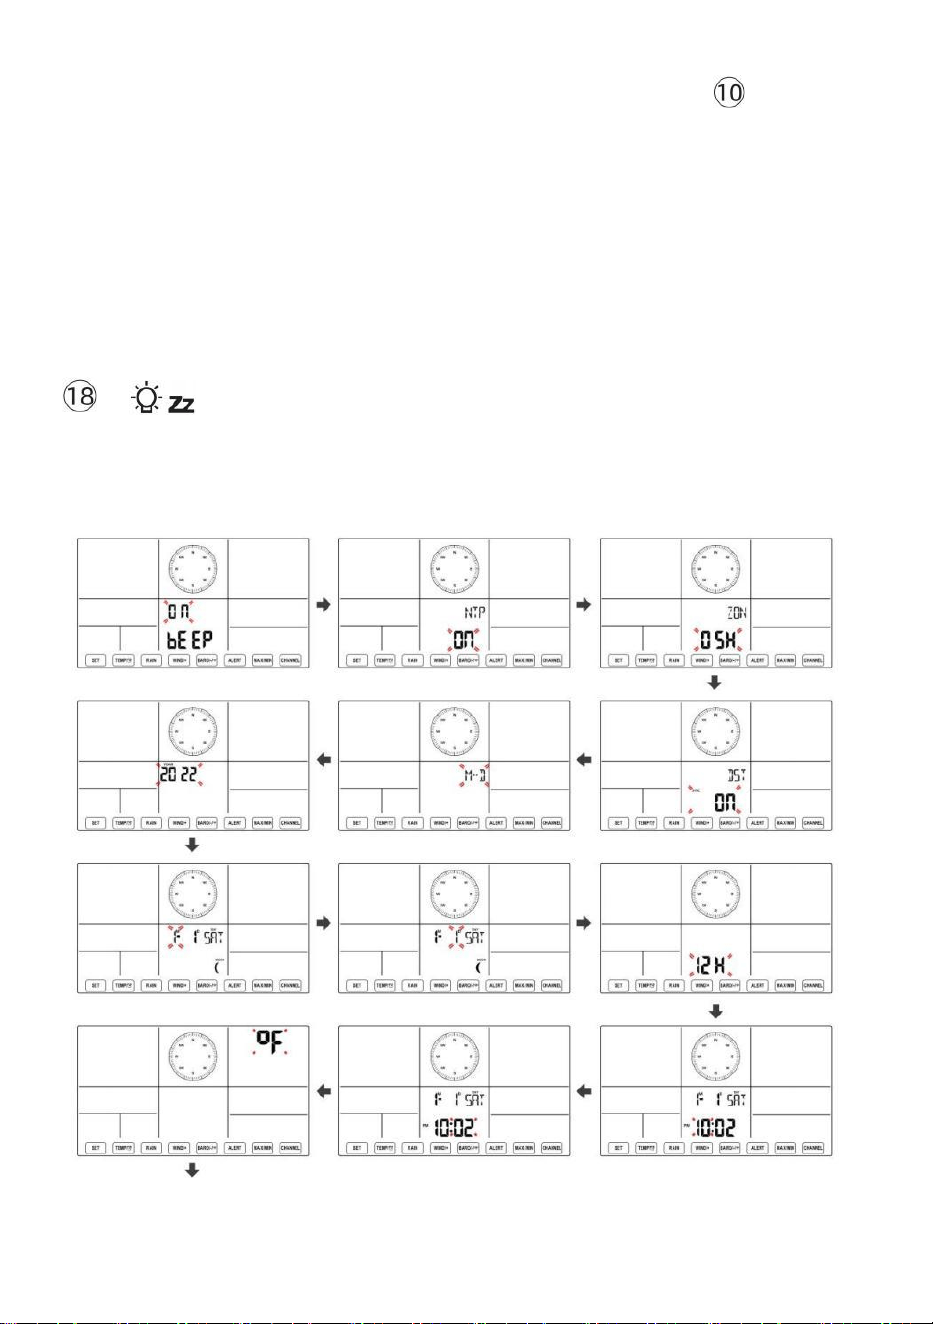
Setting Order
1. BEEP On/Off
2. NTP On/Off
3. Time Zone
4. DST On/Off
5. M-D/D-M Date Format
6. Year
7. Month
8. Day
9. 12/24 Hour Format
10. Hour 11. Minute
12. Temperature Unit
13. Pressure Unit
14. Relative Pressure Calibration
15. Light Intensity Unit
16. Rainfall Unit
17. Wind Speed Unit
18. Hemisphere
19. End of setting
1.) Press and hold 【SET】 button entering the settings. Beep ON flashes.
Press 【WIND/+】 or 【BARO/-/ 】to change between Beep on and
Beep off . Press 【SET】 to select NTP on/off .
2.) When NTP ON flashes, press 【WIND/+】 or 【BARO/-/ 】to
change between NTP on and NTP off . Press 【SET】 to select time zone.
- 35 -
3.) When Time Zone flashes, press 【WIND/+】 or 【BARO/-/ 】
to set time zone. Press 【SET】 to select DST on/off .
4.) When DST ON flashes, press 【WIND/+】 or 【BARO/-/ 】to
change between DST on and DST off . Press 【SET】 to select date format.
5.) When M--D flashes, press 【WIND/+】 or 【BARO/-/ 】】to
switch between M-D and D-M date format. Press 【SET】 to select year.
6.) When year flashes, press 【WIND/+】 or 【BARO/-/ 】 to
adjust the calendar year. Press 【SET】 to select month.
7.) When month flashes, press 【WIND/+】 or 【BARO/-/ 】 to
adjust the calendar month. Press 【SET】 to select day.
8.) When Day flashes, press 【WIND/+】 or 【BARO/-/ 】to adjust
the calendarday. Press 【SET】 to select 12/24-hour format.
9.) When 12 H flashes, press 【WIND/+】 or 【BARO/-/ 】to
change between 12 hour and 24 hour format. Press 【SET】 to select hour.
10.) When hour flashes, press 【WIND/+】 or 【BARO/-/ 】to adjust
the hour. Press 【SET】 to select minute.
- 36 -
11.) When minute flashes, press 【WIND/+】 or 【BARO/-/ 】 to
adjust the minute. Press 【SET】 to select temperature unit.
12.) When ℉ flashes, press 【WIND/+】 or 【BARO/-/ 】to change
between ℉ and ℃ . Press 【SET】 to select pressure unit.
13.) When pressure unit flashes, press 【WIND/+】 or 【BARO/-/ 】
to change between hPa, inHg and mmHg. Press 【SET】 to select relative
pressure calibration.
14.) When Relative Pressure flashes, press 【WIND/+】 or
【BARO/-/ 】to adjust the relative pressure. Press 【SET】 to select Light
intensity unit.
15.) When Light intensity unit flashes, press 【WIND/+】 or
【BARO/-/ 】 to change unit between Klux, fc and w/m2 . Press 【SET】 to
select rainfall unit.
16.) When Rain unit flashes, press 【WIND/+】 or 【BARO/-/ 】to
change unit between in and mm. Press 【SET】 to select windspeed unit.
17.) When Wind speed unit flashes, press 【WIND/+】 or 【BARO/-/ 】
to change unit between in and mm. Press 【SET】 to select hemisphere.
18.) When NTH flashes, press 【WIND/+】 or 【BARO/-/ 】to change
- 37 -
hemisphere between NTH (northern) and STH (southern). Press 【SET】 to
save and exit the setting. It will return to the normal mode display.
NOTE: If there is no valid operation within 20 seconds, it will automatically
return to the normal display mode from the setting mode. While adjusting
settings, you can press
LIGHT/SNOOZE】 button to return to normal display mode.
【

- 38 -
- 39 -
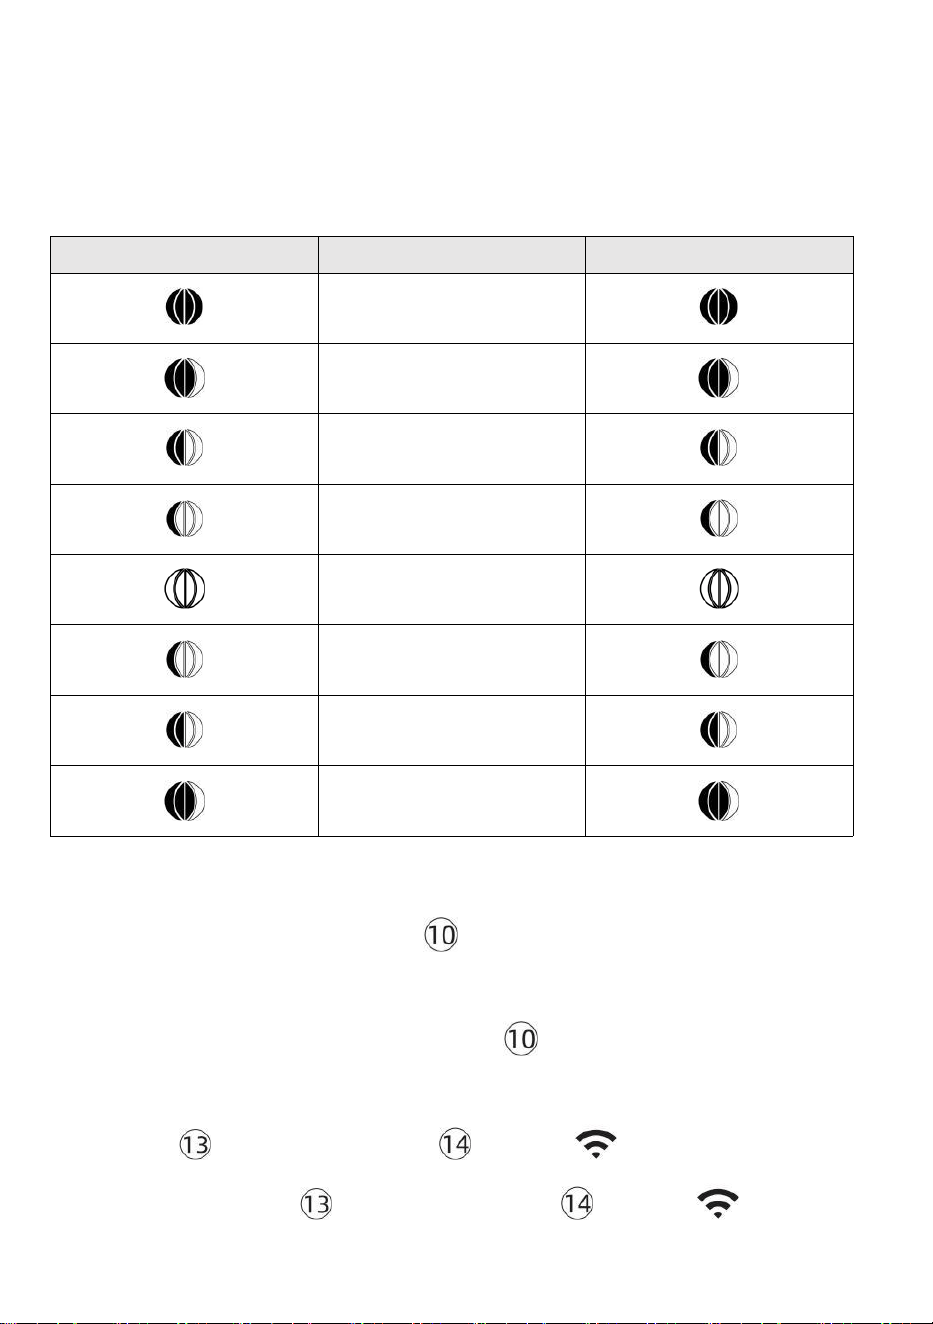
Moon Phase
The display console calculates the moon phase according to your time,
date, and time zone. The table below explains the corresponding phases
and their icons for both the Northern and Southern hemispheres.
Northern Hemisphere Icons
Moon Phase
Southern Hemisphere Icons
New Moon
Waxing Crescent Moon
First Quarter Moon
Waxing Gibbous Moon
Full Moon
Waning Gibbous Moon
Third Quarter Moon
Waning Crescent Moon
Setting the Alarm
● In normal time display, press 【SET】button to switch display alarm
time (alarm time mode).
● In alarm time display, press and hold
【
SET
】
button over 2 seconds
to enter alarm setting mode. Hour of alarm starts to flash.
● Press 【WIND/+】 button or 【BARO/-/ 】 button to set required
alarm hours. Hold 【WIND/+】 button or 【BARO/-/ 】 button to

- 40 -
adjust alarm hours quickly.
● Press 【SET】button to select minute of Alarm. Minute of alarm
starts to flash.
● Press 【WIND/+】 button or 【BARO/-/ 】 button to set required
alarm minutes. Hold 【WIND/+】 button or 【BARO/-/ 】 button to
adjust alarm minutes quickly.
● Press 【SET】 button to save all settings and exit to normal display
mode.
NOTE: If there is no valid operation within 20 seconds, it will automatically
return to the normal display mode from the setting mode. While adjusting
settings, you can press
【 LIGHT/SNOOZE】 button to return to normal display mode.
Deactivate/Activate Alarm
● In alarm time display, press
off .
【TEMP/
】button to select the Alarm on or
- 41 -
● If the alarm is on, its corresponding alarm icon will be shown on the
display.
● When the alarm is ringing, press any buttons except 【
容 z
LIGHT/SNOOZE】 button to stop the alarm signal. It is not necessary to reactivate
the alarm. It will ring again this time next day.
Snooze Function
When the alarm rings, press 【 LIGHT/SNOOZE】 button to pause the
alarm. The snooze indicator icon
z2
keep flashing. The alarm will resume after
5 minutes.
TEMPERATURE
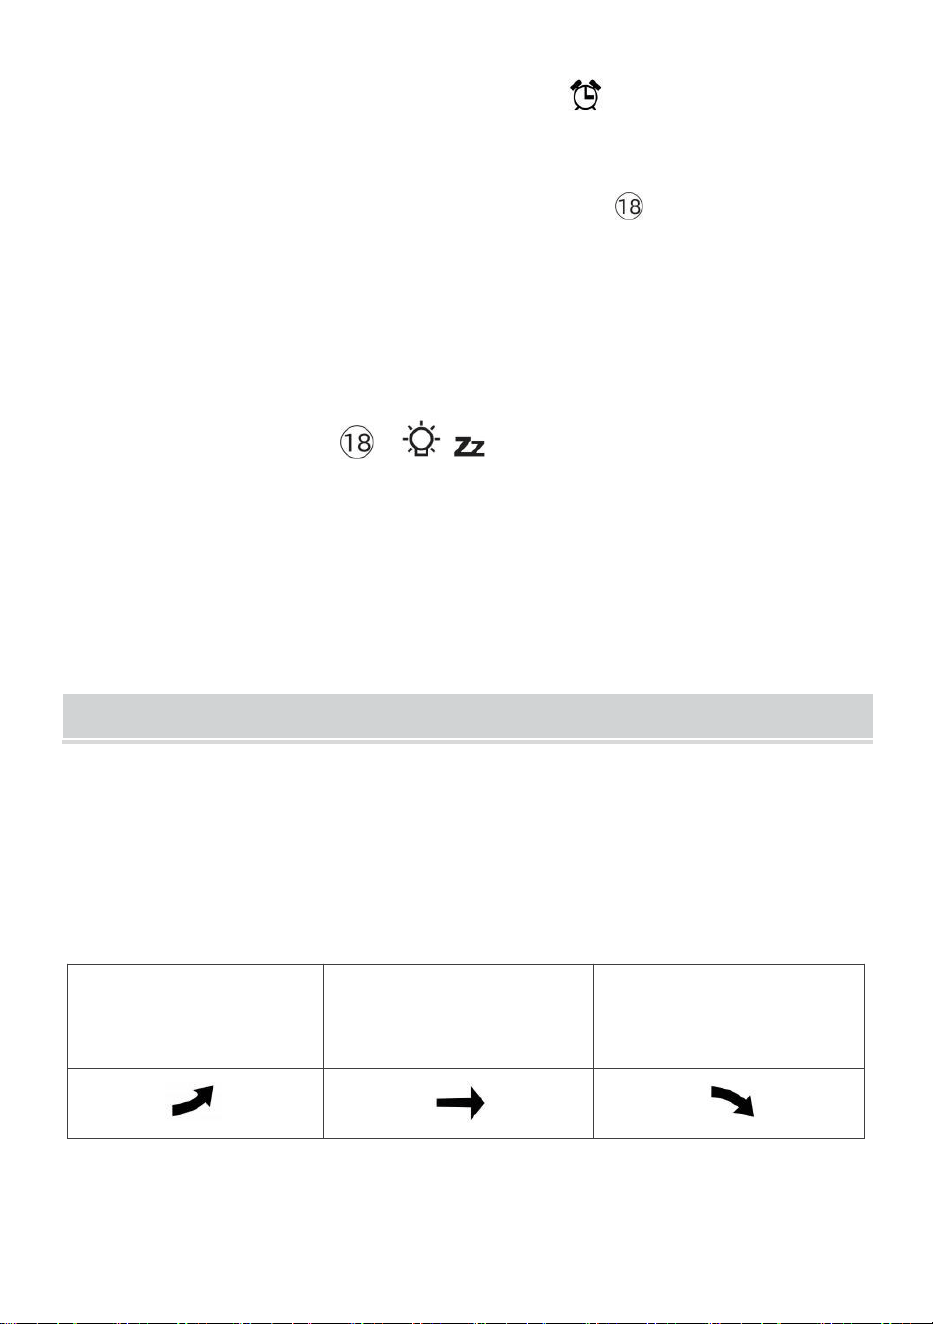
Temperature/Humidity Trend
Tendency arrows allow you to quickly determine of temperature and
humidity are rising and falling in a one-hour update period.
Temperature Trend
Temperature has
risen > 1°C/2°F in the past
hour
Temperature has not
changed more than
1°C/2° F in the past hour
Temperature has
fallen < 1°C/2° F in the past
hour
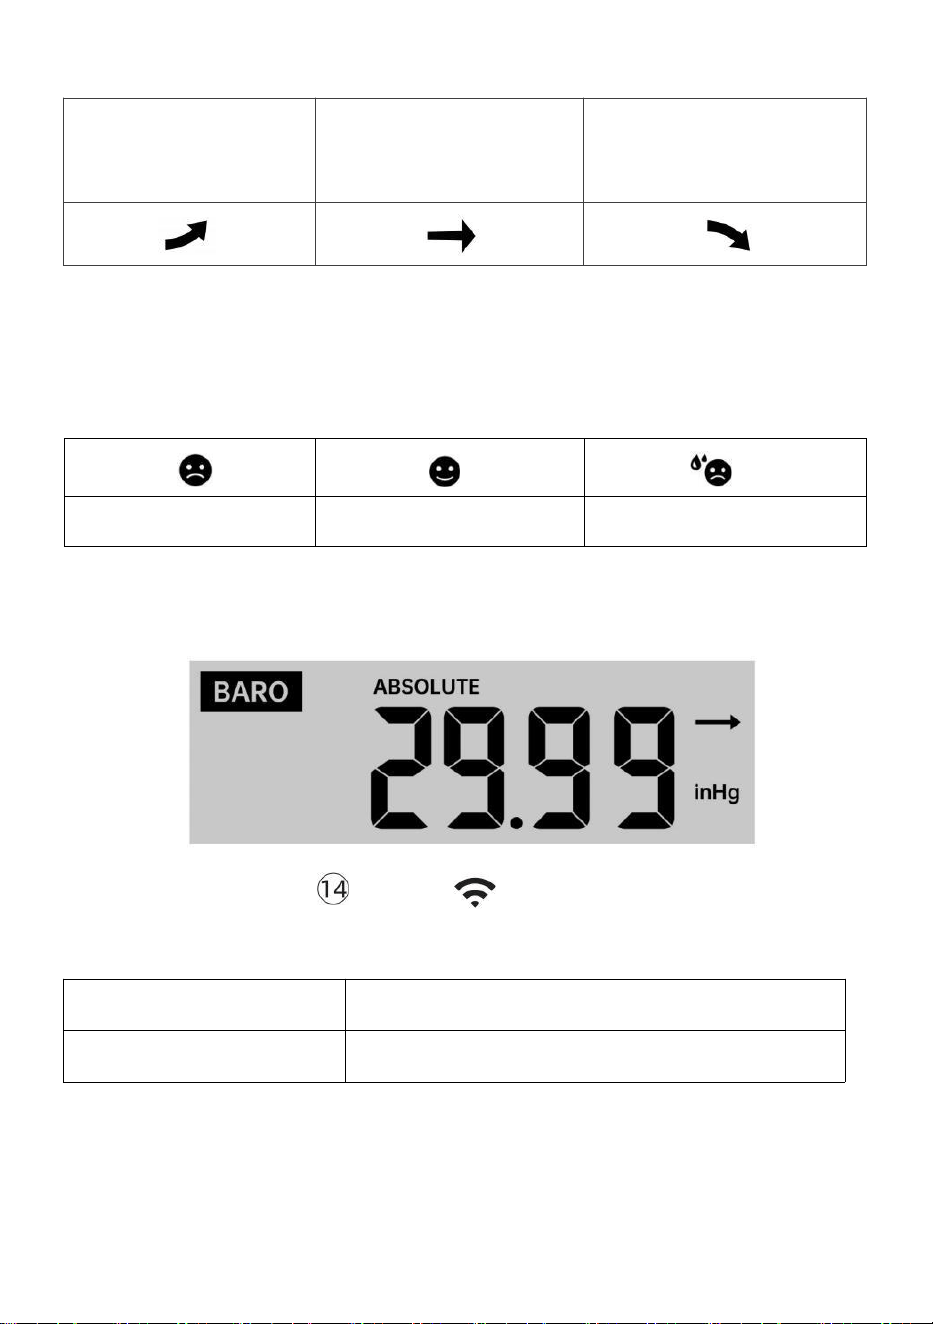
Humidity Trend
- 42 -
Humidity has
risen > 3% in
the past hour
Humidity has not
changed more than 3% in
the past hour
Humidity has
fallen < 3% in
the past hour
Indoor Comfort Index
The indoor comfort displays a pictural representation based on the indoor
air temperature and humidity levels to determine the approximate comfort
level.
Too cold
Comfortable
Too hot
PRESSURE
Barometer Pressure Display
In normal mode, press
and relative pressure.
【BARO/-/ 】 button switch between absolute
Absolute
The absolute atmospheric pressure of your location.
Relative
The relative atmospheric pressure is based on the sea level.
Pressure Trend
Tendency arrows allow you to quickly determine if pressure is rising or
falling in a one-hour update period.
- 43 -
Pressure has
risen > 2hpa/0.06inHg in
the past hour
Pressure has not changed
more than 2hpa/0.06inHg
in the past hour
Pressure has
fallen > 2hpa/0.06inHg in
the past hour
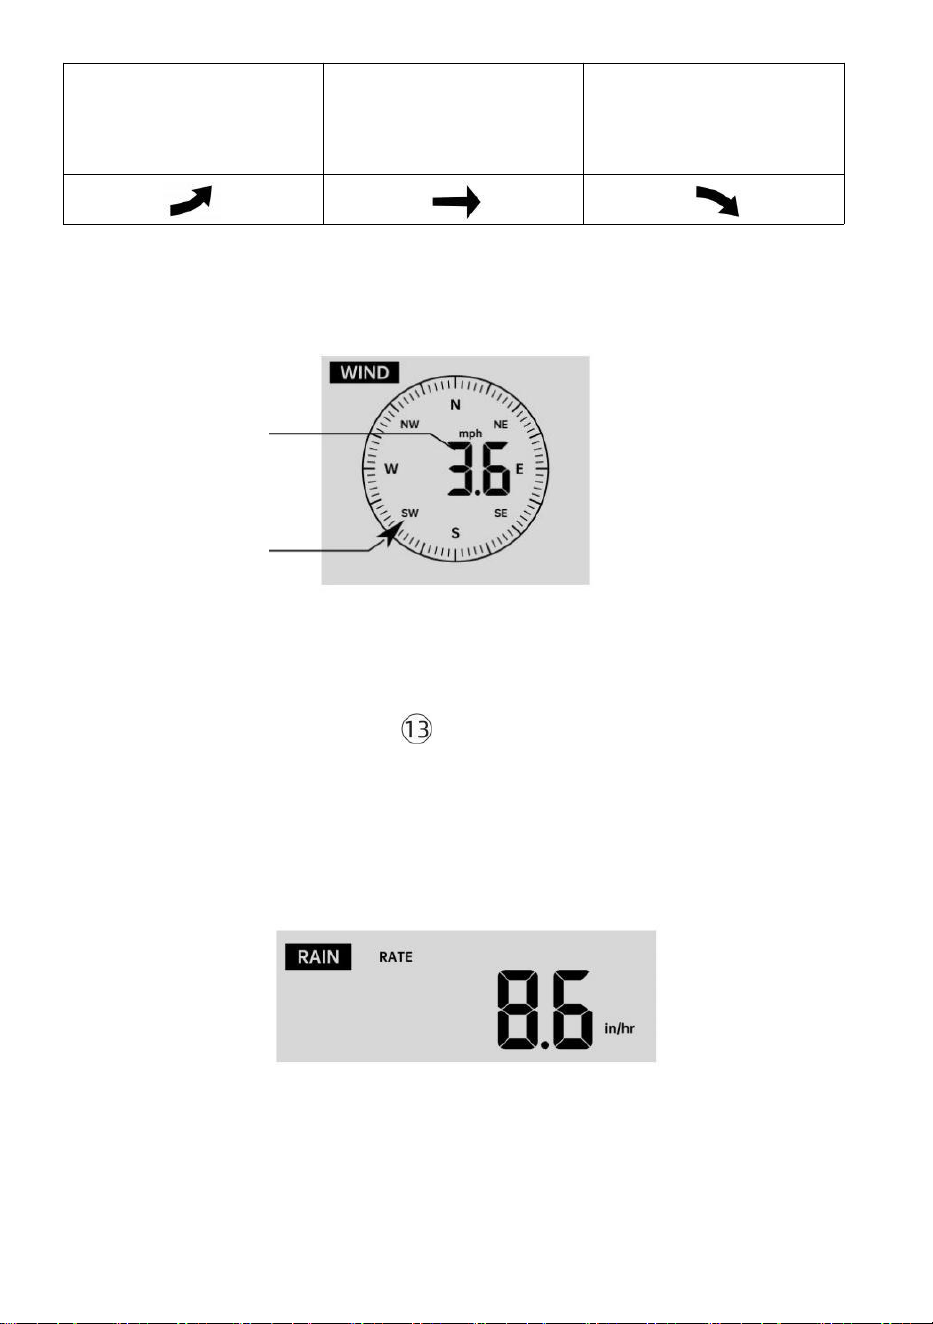
WIND
Wind Display
Average/gust
wind speed
Real time wind
direction indicator
Selecting Wind Display Mode
In normal display mode, press
【WIND/+】button to switch between
current average wind speed, gust wind speed and wind direction.
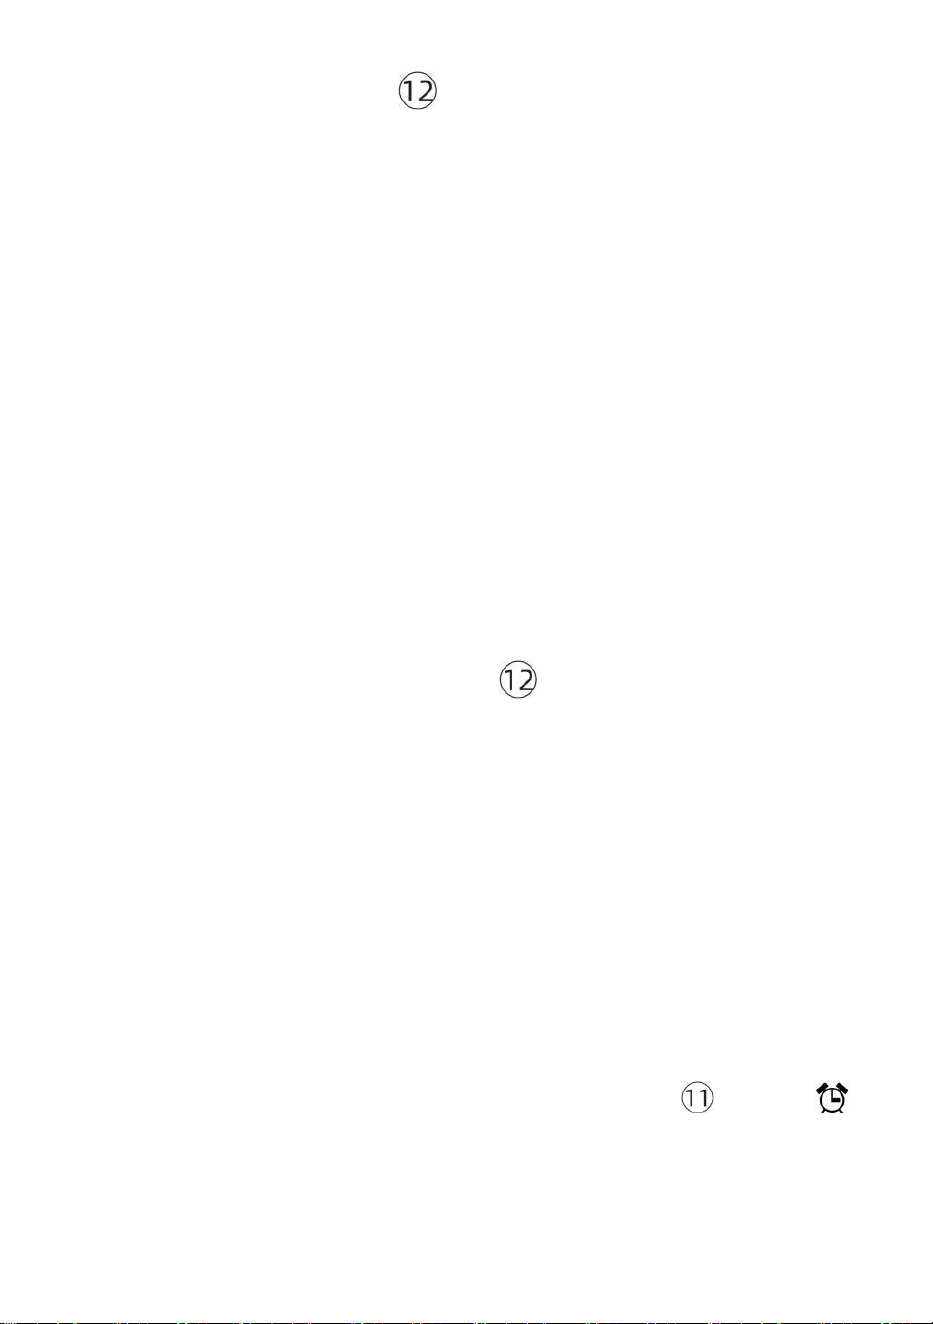
RAIN
Rainfall Display
The Rainfall shows information regarding the rainfall and rain rate.
Select the Rainfall Display Mode
- 44 -
【RAIN】 button to switch between Rain
Rate, Rain Event, Rain Hourly, Rain Daily, Rain Weekly, Rain Monthly and
Rain Total.
Increments of Rain Definition
Rain Rate : current rainfall rate in the past hour.
Rain event : continuous rain, and resets to zero if rainfall accumulation is
less than 10mm (0.039 in) in a 24-hour period.
Daily Rain : Total rainfall since midnight (00:00)
Weekly Rain : Total rainfall for the current calendar week, and resets on
Sunday morning at midnight (Sunday thru Saturday)
Monthly Rain : Total rainfall for the current calendar month, and reset on
the first day of the Month.
Total Rain : Total rainfall since the last reset.
Reset the Total Rainfall Record
In normal display mode, press and hold 【RAIN】 button over 2
seconds to reset the rain record.
NOTE:
Resetting the weekly rain also resets the daily rain.
Resetting the monthly rain also resets the daily and weekly rain.
Resetting the total rain also resets the monthly, weekly and daily rain.
WEATHER
Weather Index
When reading the Weather Index display, you can press 【TEMP/ 】
button to cycle through different weather indexes in the following order:
Feels Like > Heat Index > Wind Chill
In normal display mode, press

- 45 -
Feels Like
The Feels Like temperature index determines what temperature it actually
feels like outside, taking into account factors like wind speed, pressure,
temperature and humidity.
Wind Chill
Wind Chill is determined by a combination of the wireless weather sensor’s
temperature and wind speed data.
NOTE: Only when the temperature is below 50℉(10℃) and the wind
speed is over 4.8km/h (3mph), will display the wind chill value,
otherwise it will display “ --.-“.
Heat Index
The Heat Index is determined by the wireless weather sensor’s
temperature and humidity readings.
Dew Point
The dew point is the temperature at which a given parcel of humidity air
must be cooled, at constant barometric pressure, for water vapor to
condense into water. The condensed water is called dew. The dew point is
a saturation temperature.
The Dew Point temperature is determined by the temperature and humidity
data from the wireless weather sensor.
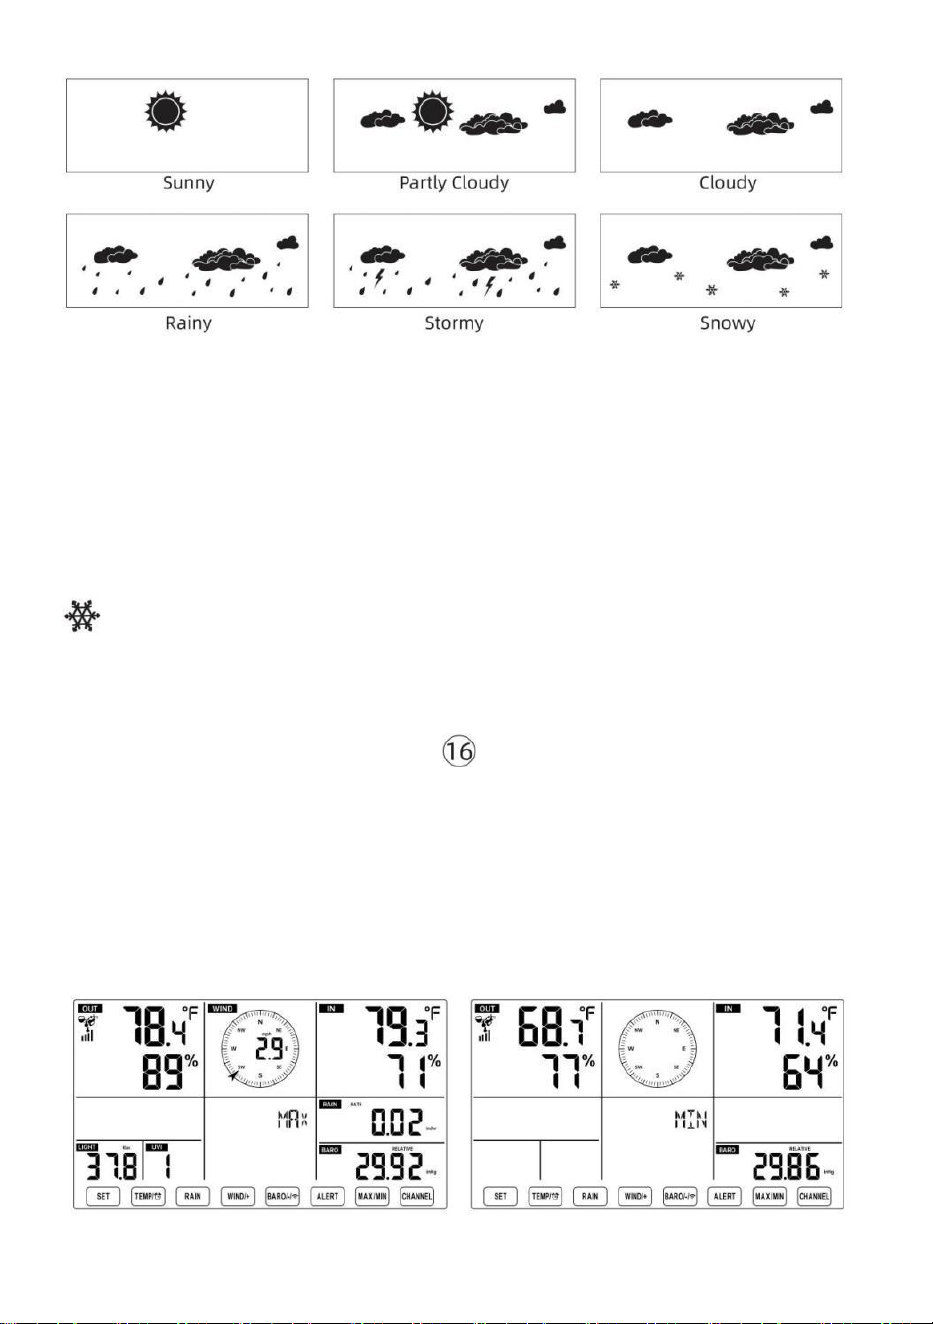
Weather Forecast
The built-in barometer can notice atmospheric pressure changes, and
based on the data collected, can predict the weather conditions.
There are 6 weather icons --- Sunny, Partly Cloudy, Cloudy, Rainy, Stormy
and Snowy.
- 46 -
NOTE:
The accuracy of a general pressure-based forecast is about 65-70%.
Forecasts are not guaranteed.
It may not necessarily reflect the current situation.
Ice Alert
When outdoor temperature is lower than 1℃/33.8℉, the snowflake icon
will appear on the LCD display.
MAX/MIN
● In normal display mode, press 【MAX/MIN】button switching
between maximum and minimum value.
NOTE: If there is no valid operation within 10 seconds, it will
automatically return to the normal display mode.
- 47 -
To View the Accumulated MAX/MIN
● Display Feel like, Wind Chill, Heat Index, Dew Point Max/Min Values
1.) When the max values are displayed, press
【TEMP/
】 button to
interchange viewing the Outdoor temperature → Feel like → Wind Chill →
Heat Index → Dew Point → Outdoor temperature.
2.) When the min values are displayed, press 【TEMP/ 】 button to
interchange viewing the outdoor temperature → Feel like → Wind Chill →
Heat Index → Dew Point → Outdoor temperature.
● Display Wind Speed, Wind Gust Max Values
When the max values are displayed, press
【WIND/+】button to
interchange viewing between the AVERAGE and GUST wind speeds.
● Display Rain Rate, Daily Rain, Weekly Rain and Monthly Rain Max
Values
When the max values are displayed, press 【RAIN】button to
interchange viewing Rain Rate → Daily Rain → Weekly Rain → Monthly
Rain.
● Display Absolute and Relative pressure Max/Min Values
1.) When the max values are displayed, press 【BARO/-/ 】 button to
interchange viewing between Absolute and Relative pressure.
2.) When the min values are displayed, press 【BARO/-/ 】 button to
interchange viewing between Absolute and Relative pressure.
● Display indoor and other channels sensor temperature & humidity
Max/Min values
1.) When the max values are displayed, press 【CHANNEL】button to
interchange viewing indoor and paired outdoor sensor(s) temperature and
humidity.
- 48 -
2.) When the min values are displayed, press
【CHANNEL】 button to
interchange viewing indoor and paired outdoor sensor(s) temperature and
humidity.
NOTE: If other channel sensors were paired, it could show the other
channel’s max/min temperature and humidity values. If other channel
sensors were not paired, it would only show current indoor max/min
temperature and humidity values.
To Clear the MAX/MIN Data Record
● To clear the max value, press and hold
【
MAX/MIN
】
button over 2
seconds while max values are displayed.
● To clear the min value, press and hold
【
MAX/MIN
】
button over 2
seconds while min values are displayed.
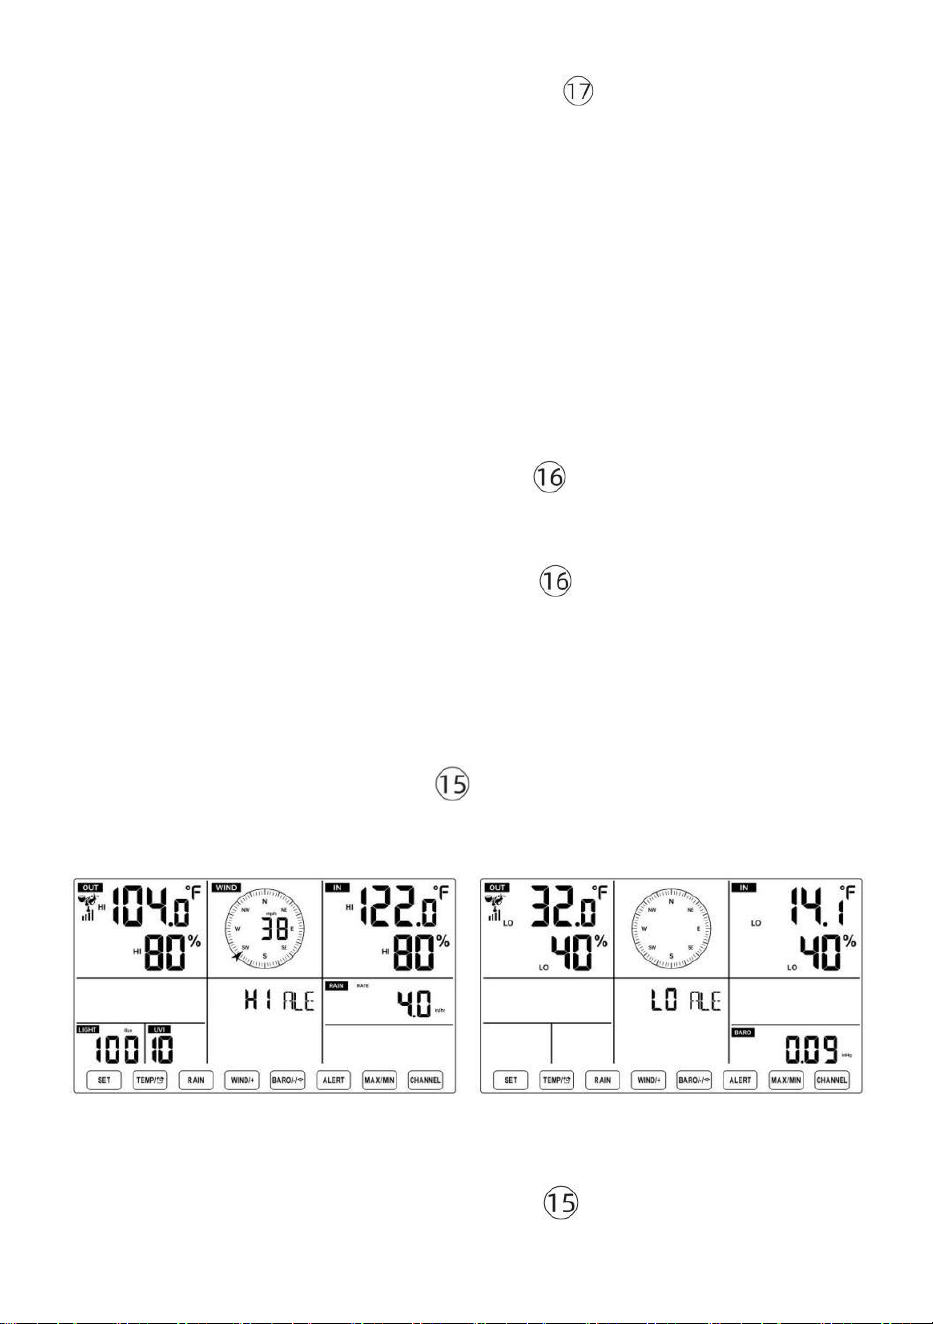
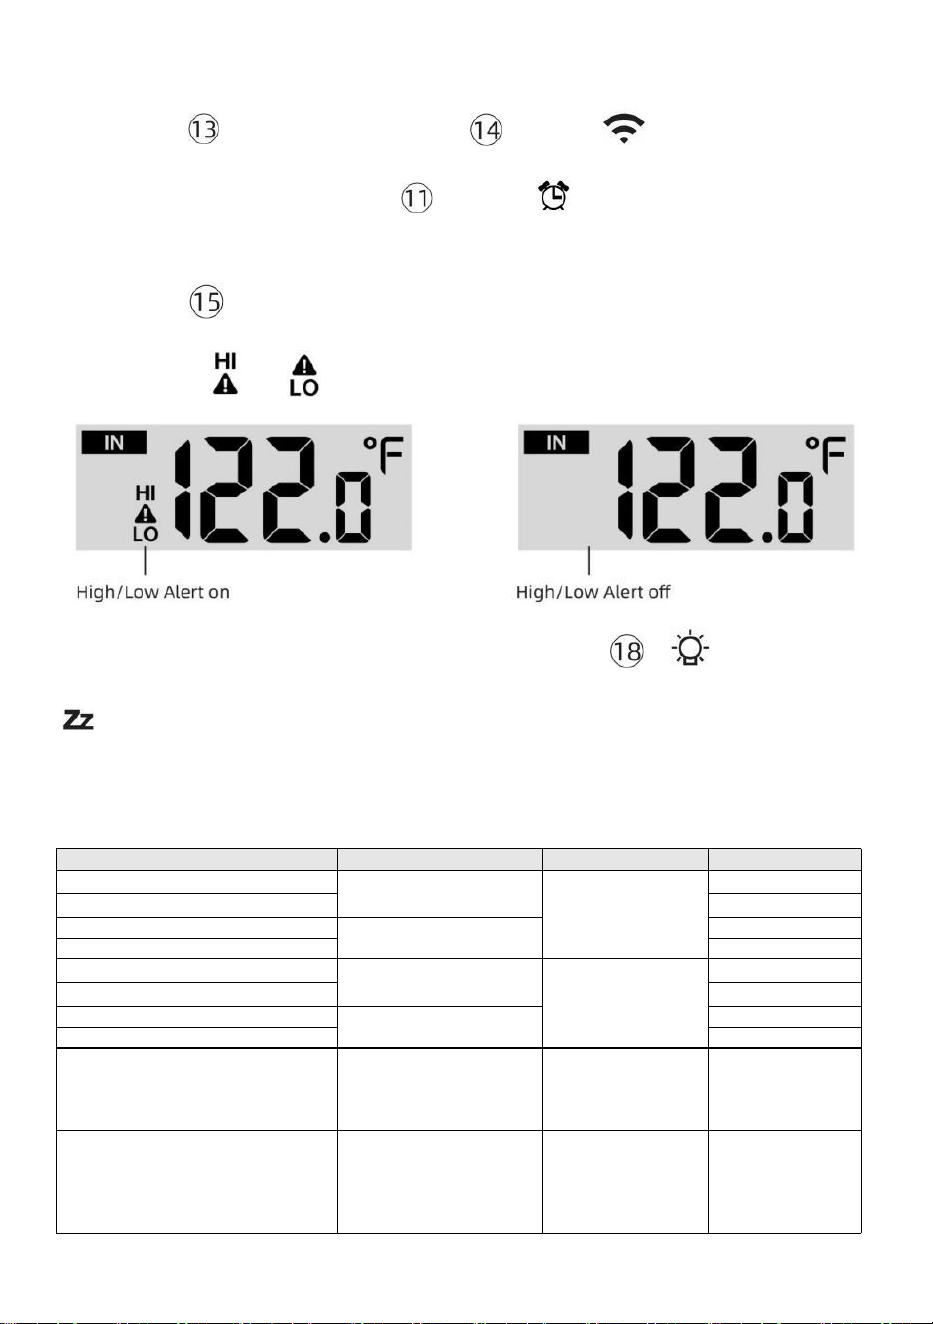
HI/LO ALERT SETTING
To View the Alert Setting
● In normal display mode, press 【ALERT】 button switching between
Hi alert and Low alert setting value.
To Set the Alert
● In normal display mode, press and hold 【ALERT】button over 2
- 49 -
seconds to enter the alert setting mode.
● Press 【WIND/+】button and 【BARO/-/ 】button to adjust the
value up or down, then press
alert.
【TEMP/
】 button to turn on/off the
● Press
【
ALERT
】
button to confirm and jump to next setting.
● The icon or will display when the alert is on.
● To exit the alert setting mode at any time, press 【
LIGHT/SNOOZE】button. The Hi/Lo alert setting order is shown below:
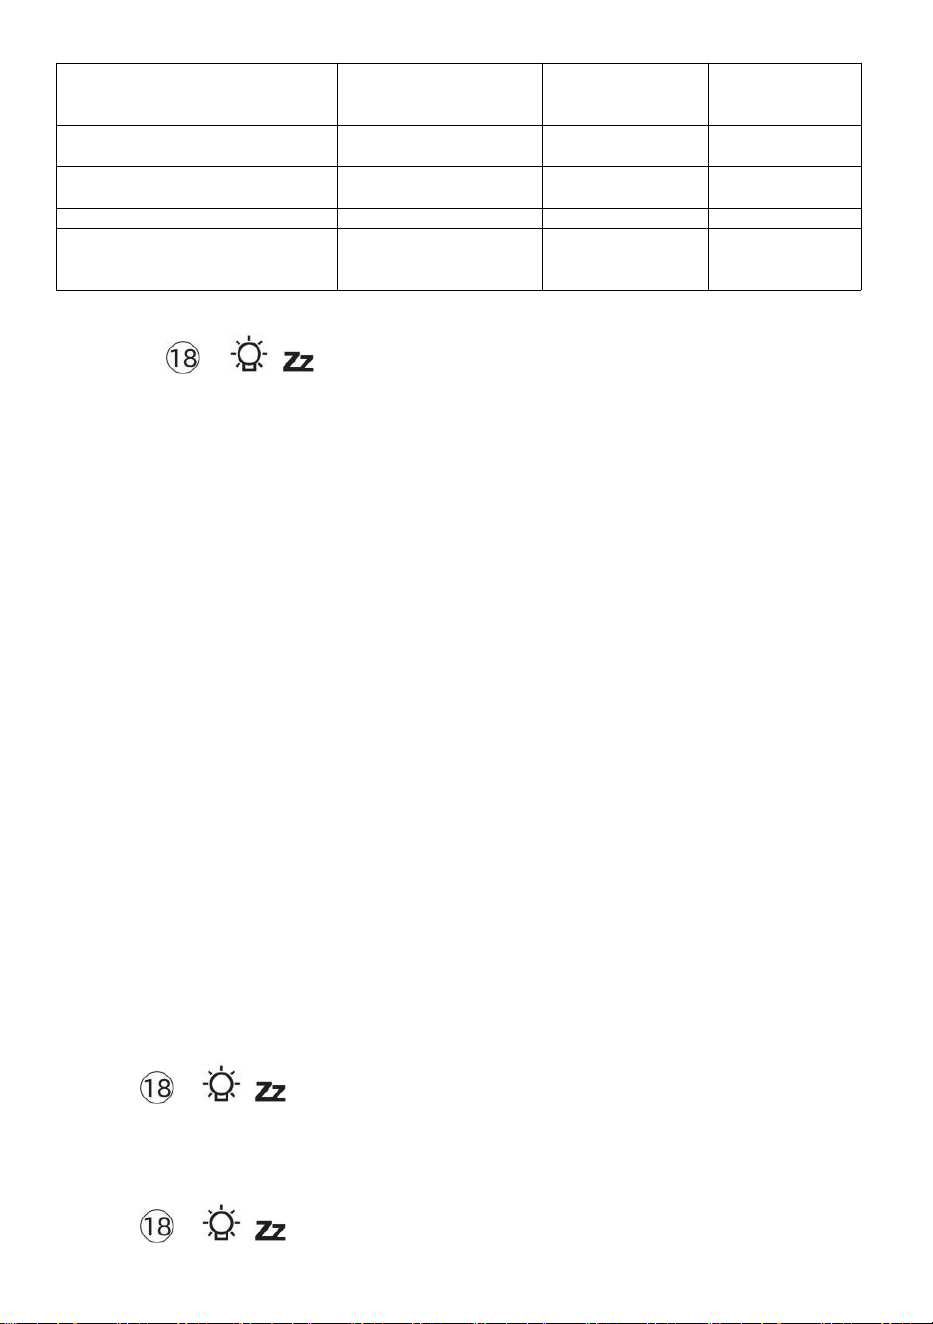
Alert Setting Order
Setting Range
Display Section
Default
Indoor Temperature Hi Alert
-14.1℉–122℉
(-9.9℃–50℃)
Indoor
temperature &
Humidity
Outdoor
temperature &
Humidity
Wind Speed
122℉(50℃)
Indoor Temperature Lo Alert
14.1℉(-9.9℃)
Indoor Humidity Hi Alert
1%–99%
-40℉–158℉
(-40℃–70℃)
80%
Indoor Humidity Lo Alert
Outdoor Temperature Hi Alert
40%
104℉(40℃)
Outdoor Temperature Lo Alert
32℉(0℃)
Outdoor Humidity Hi Alert
1%–99%
0–50m/s
2–180 km/h
1–111mph
1–97 knots 0-60 bft
80%
Outdoor Humidity Lo Alert
High Average Wind Speed Alert
40%
17m/s
62km/h
38mph
33 knots 20bft
High Wind Gust alert
0–50m/s
2–180 km/h
1–111mph
1–97 knots
0-60 bft
Wind Speed
17m/s
62km/h
38mph
33 knots 20bft
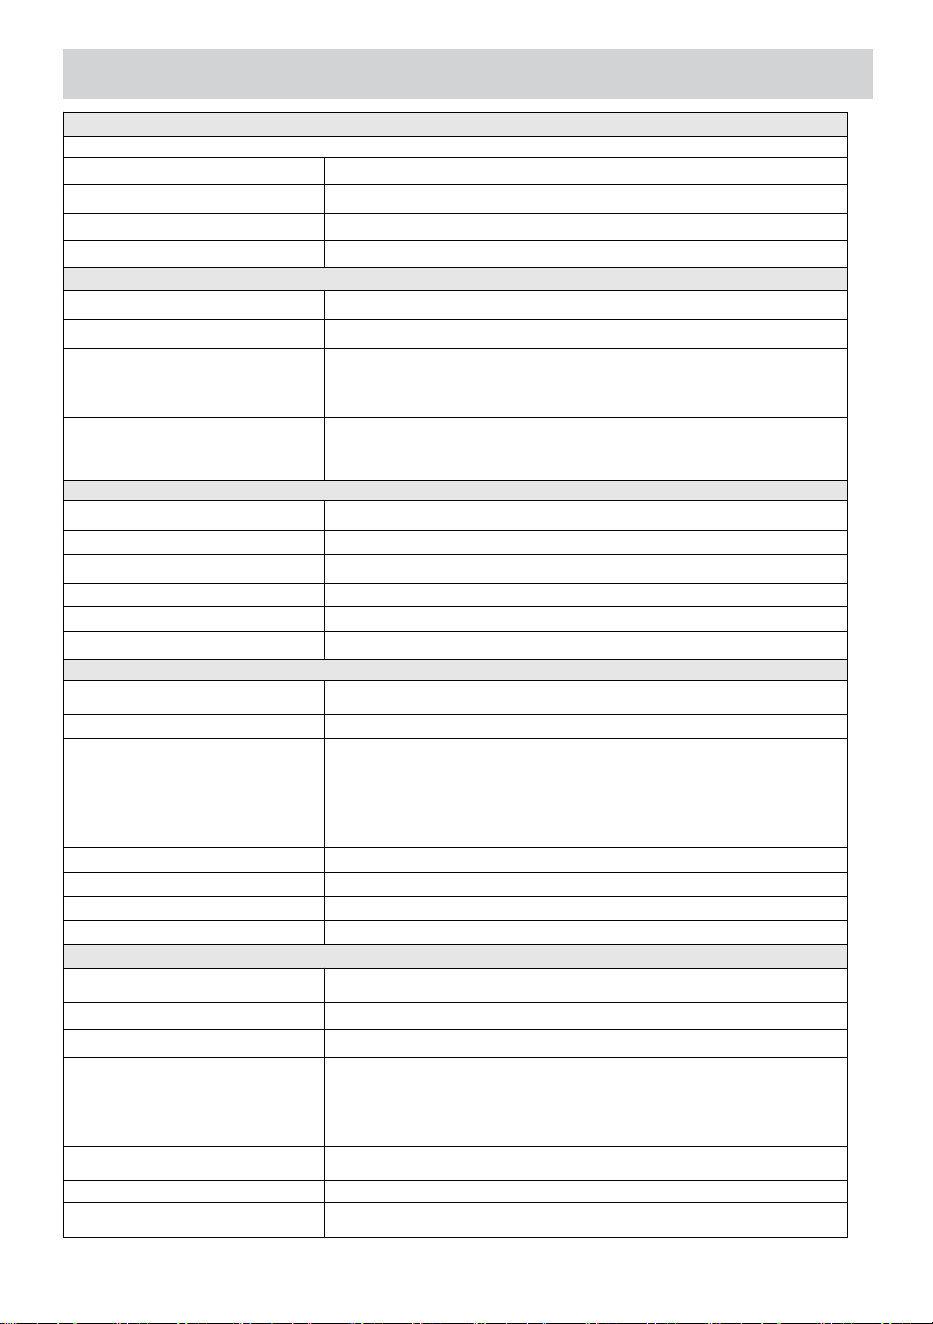
- 50 -
Pressure Drop Alert
1 hpa–10hpa
0.03~0.3 inHg
0.7~7.5mmHg
Barometer drop
3hpa
0.09inHg
2.2mmHg
High Rain Rate alert
1mm/hr–1000mm/hr
(0.04 in/hr–39 in/hr)
Rainfall Rate
101mm/hr
(4 in/hr)
High Daily Rain alert
1mm–1000mm
(0.03 in–39.37 in)
Rainfall Rate
101mm
(4 in)
UV index High Alert
1-15
UV Index
10
Light Intensity High Alert
1 Klux–200.0 Klux
7-1580 W/M²
0-185Kfc
Light Intensity
100 Klux
790 W/M²
92 Kfc
To Silence the Hi/Lo Alert Alarm
Press the 【 LIGHT/SNOOZE】button on top of the display
console to silence the alarm, or it will automatically turn off after one
minute.
NOTE: Once the alert is triggered, the alarm will sound for one minute
and the associated alert icon and weather readings will flash.
If the alert alarm automatically shuts off after one minute instead of
being manually shut off, the associated alert icon and readings will
continue flashing until the reading is out of the alert range.
The weather alert alarm will go off once the readings fall into alert
range again.
BACKLIGHT
Display Backlight
With DC Adapter
The backlight can only be continuously on when the DC adapter is
permanently on. When the DC adapter is disconnected, the backlight can
be temporarily turned on.
Press 【 LIGHT/SNOOZE】button to adjust the backlight
brightness, High, Low and Off.
Without DC Adapter
Press 【 LIGHT/SNOOZE】button temporarily turn on the

- 51 -
backlight for 15 seconds.
LOW BATTERY INDICATOR
If the low battery indicator icon is displayed in the outdoor temperature and
humidity section or the corresponding CH section of the LCD console
display, this indicates that the batteries in your wireless weather sensor(s)
are running low and should be replaced. Make sure to replace all batteries
at the same time.
FACTORY RESTART
If there is malfunction, the Factory Restart is a great way to return your
station to "out of the box" condition.
1.) Remove all power (batteries and DC adapter) from outdoor sensors
and weather station.
2.) Follow the operation “SETTING UP THE WEATHER STATION” to
start the pair the sensor.
CARE AND MAINTENANCE
1.) Clean the rain gauge every 3 months. Rotate the funnel
counterclockwise and lift to expose the rain gauge mechanisms, and clean
with a damp cloth. Remove any dirt, debris, and insects. If bug infestation
is an issue, spray the sensor lightly with insecticide.

- 52 -
2.) Clean the Light Intensity/ UV sensor and solar panel every 3 months
with damp cloth.
3.) When replacing the batteries, apply a corrosion preventive compound
on the battery terminals.
- 53 -
SPECIFICATION
WEATHERSTATION
General Specifi cations
Dimension
7.5 x 5 x 1.1inch (191.6 x 127 x 28.8mm)
Power source
AC-DC 5V, 1A adapter (included)
Battery
3 x AAA battery ( not included)
Support sensors
1 x 7-in-1 sensor ( included)
Wi- Fi Communication Specifications
Wi- Fi Standard
802. 11 b/g/n
Wi- Fi operation frequency
2.4GHz
Supported devices for
setup UI
Build- in Wi- Fi with WAP mode smart device, including
laptops, computers, smart phones and smart pads
Recommend web browser
for setup UI
Latest Version of any web browser that supports HTML 5
Time Function Specifications
Time display
HH: MM
Hour format
12 hour or 24 hour
Date display
DD/MM or MM/DD
Time synchronization method
Synchronizes with atomic clock
Time zones
GMT±12
DST
ON/OFF
Barometer Display & Function Specifications
Barometer units
hPa, inHg and mmHg
Measuring range
600 – 1100 hPa (relative setting range 930 – 1050hPa)
Accuracy
700 -1100 hPa±5 hPa/600 -696 hPa±8 hPa
20.67 – 32.48 inHg±0.15 inHg/17.72 -20.55inHg ±0.24 inHg
525 -825 mmHg±3.8 mmHg/450 -522 mmHg±6 mmHg
Typical at 77℉ (25℃)
Weather forecast
Sunny, Partly Cloudy, Cloudy, Rainy, Stormy and Snowy
Display mode
Current
Memory mode
Daily Max/ Min
Alert
Pressure change alert
Indoor/ Outdoor Temperature Display & Function Specifications
Temperature unit
℃ and ℉
Indoor Display range
-14.1℉ – 122℉(-9.9℃ – 50℃)
Outdoor Display range
-40℉ – 158℉(-40℃ – 70℃)
In/Out accuracy
50– 122℉ ± 1.8℉ / 10 – 50℃ ± 1℃
-4 - 50℉ ±2.7℉ / -20 – 10℃ ± 1.5℃
others : ±3.6℉ / ±2℃
Display mode
Current
Memory mode
Daily Max/ Min
Alert
High/ Low temperature alert
- 54 -
Indoor/ Outdoor Humidity Display & Function Specifications
Humidity unit
%
Display range
1 – 99%
In/Out accuracy
40 – 80% RH ± 5% RH @77℉(25℃)
Others : ± 8% RH @77℉(25℃)
Display mode
Current
Memory mode
Daily Max/ Min
Alert
High/ Low humidity alert
Wind Speed and Direction Display & Function Specifications
Wind Speed unit
mph, m/s, km/h, knots
Display range
0 -112mph, 50m/s, 180km/h, 97 knots
Speed accuracy
<5m/s: ±0.5m/s, >5m/s : ±10% (whichever is greater)
Display mode
Gust/ Average
Memory mode
Daily Gust/Average
Alert
High Wind Speed Alert (Gust/Average)
Wind direction
16 directions
Rain Display & Function Specifications
Unit of rainfall
mm, in
Range of rainfall
0 – 12999mm (0 – 511.7 in)
Accuracy of rainfall
±7%
Display mode
Current
Memory mode
Daily Max
Rainfall display mode
Hourly/ Daily/ Weekly/ Monthly/ Total Rainfall
Alert
High Daily Rainfall alert
UV Index Display & Function Specifications
Display range
0 - 16
Display mode
Current
Memory mode
Daily Max
Alert
High UVI alert
Light Intensity Display & Function Specifications
- 55 -
Light Intensity unit
Klux, Kfc and W/m
2
Display range
0 – 200 Klux
Display mode
Current
Memory mode
Daily Max
Alert
High Light intensity alert
Weather Index Display & Function Specifi cations
Weather Index mode
Feels like, wind chill, heat index and dew point
Display mode
Current
Memory mode
Daily Max/min
WIRELESS 7-IN-1OUTDOOR SENSOR
Dimensions
16 x 13.8 x 14.4 inch (408 x 396 x 367 mm)
Main power
3.6V Ni-MH rechargeable battery pack
Backup power
Solar power
Weather data
temperature, humidity, wind speed, wind direction, rainfall, UVI
and light intensity
RF frequency
915MHz
RF transmission range
492ft (150m)
Transmission interval
Every 20 secondsfor UV、 light intensity、 wind speed、
temperature, humidity and rain data and wind direction data
Operation temp
-40℉ to 140℉/ 40℃ to 60℃
Additional tools required for
sensor
Yes
- 56 -
TROUBLESHOOTING
Problem
Solution
Wireless sensor does
not communicate the
weather station
The wireless sensor may have initiated properly, and the data is
registered by the weather station as invalid, and the weather
station must be reset.
With an open-ended paperclip, press the RESET button for 3
seconds to complete the display of the voltage. LED will flash
every 20 seconds.
If LED does not flash every 20 seconds, take out the batteries and
wait 5 minute, while covering the solar panel to drain the voltage.
Put batteries back in and resync the weather station and resync
the weather station (Refer to Page 18 RE-PAIRING SENSOR) with
the wireless sensor about 10 feet (3m) away .
The LED of the wireless sensor will flash every 20 seconds. If the
LED is still not flashing every 20 seconds, replace the new
batteries in the wireless sensor.
If the batteries were recently replaced, check the polarity. If the
wireless sensor is flashing every 20 seconds, proceed to the next
step.
There may be a temporary loss of communication due to reception
loss related to interference or other location factors,
Or batteries may have been changed in the wireless sensor and the
weather station has not been reset. The solution may be as simple as
powering down and up the weather station (remove DC power and
batteries), wait 30 seconds, and reinsert DC power and batteries) .
Indoor and Outdoor
temperature do not
agree
Allow up to one hour for the wireless sensors to stabilize due to
signal filtering. The indoor and outdoor temperature sensors
should agree within ±4℉ (±2℃) (the sensor accuracy is ±2℉ (±1℃)
Use the calibration feature to match the indoor and outdoor
temperature to a known source.
Temperature sensor
reads too high in the
daytime
Make certain that the wireless sensor is not too close to heat
generating sources or strictures, such as buildings, pavement,
walls, or air conditioning units.
- 57 -
Problem
Solution
Rain gauge reports
rain when it is not
raining.
An unstable mounting solution (sway in the mounting pole) may
result in the tipping bucket incorrectly incrementing rainfall. Make sure
you have a stable, level mounting solution. (Refer to page 16
ADJUSTING THE 7-IN-1 WIRELESS SENSOR LEVEL)
Wi-Fi does not display
on the weather
station
Check your router for problems.
1.) Check Wi-Fi symbol on the display. If wireless connectivity is
successful, the Wi-Fi icon will be displayed in the time filed.
2.) Make sure your modem Wi-Fi settings are correct (network
name, and password)
3.) Make sure the weather station is plugged into DC power. The
weather station will not connect to Wi-Fi when powered by batteries
only.
4.) The console only supports and connects to 2.4GHz routers. If
your own a 5GHz router, and it is a dual band router, you will
need to disable the 5Ghz band, and enable the 2.4GHz band.
5.) The weather does not support guest networks.
Data not reporting to
www.wunder
ground.com or
www.weather
cloud.net
1.) Confirm your password or key is correct. It is the password you
registered on Wunderground.com.
Wunderground.com. Your underground.com password cannot begin
with non-alphanumeric characters (a limitation of
Wunderground.com, not the station). For example, $worknet is not a
valid password, but worknet$ is valid)
2.) Confirm your station ID is correct. The station ID is all caps, and
the most common issue is substituting and O for a 0 (or vice versa).
Example, KCAPHOEM12, not KCAPH0EM12.
3.) Make sure the data and time are correct on the weather station.
If incorrect, you may be reporting old data, not real time data.
4.) Make sure your time zone is set properly. If incorrect, you may
be reporting old data, not real time data.
5.) Check your router firewall settings. The weather station sends
data via Port 80.

FCCSTATEMENT
- 58 -
This device complies with part 15 of the FCC Rules. Operation is subject to
the following two conditions:
1. This device may NOT cause harmful interference.
2. This device must accept any interference received, including
interference that may cause undesired operation.
NOTE:
This equipment has been tested and found to comply with the limits for a
Class B digital device, pursuant to Part 15 of the FCC Rules. These limits are
designed to provide reasonable protection against harmful interference in a
residential installation. This equipment generates — and can radiate — radio
frequency energy and, if not installed and used in accordance with the
instructions, may cause harmful interference to radio communications.
However, there is no guarantee that interference will not occur in a
particular installation.
If the equipment does not cause harmful interference to radio or television
reception, which can be determined by turning the equipment off and on,
the user is encouraged to try to correct the interference by one or more of
the following measures:
Reorient or relocate the receiving antenna.
Increase the separation between the equipment and the receiver.
Connect the equipment into an outlet on a circuit different from that to
which the receiver is connected.
Consult the dealer or an experienced radio/TV technician for help.
WARNING: Changes or modifications to this unit not expressly approved by
the party responsible for compliance could void the user’s authority to
operate the equipment.
Made In China


V
e
r
r
o
u
i
l
l
a
g
e
Guide de démarrage
rapide
⑤
M
I
S
E
E
N
P
L
A
C
E
D
U
C
O
L
L
E
①INSTALLING THE MOUNTING POLE
Secure the sensor onto a mounting pole (included) using the screws (included).

C
T
E
U
R
D
E
P
L
U
I
E
O
U
I
n
s
é
r
e
z
l
’
e
n
t
o
n
n
o
i
r
d
a
n
s
l

e
r
é
c
u
p
é
r
a
t
e
u
r
d
e
p
l
u
i
e
e
t
v
e
r
r
o
u
i
l
l
e
z
-
l
e
e
n
p
l
a
c
e
.
⑥
I
N
S
T
A
L
L
A
T
I
O
N
D
E
S
P
I
L
E
S
D
é
v
i
s
s
e
②INSTALLING THE MOUNTING BRACKET
Secure the sensor onto a mounting bracket (included) using the screws (included).

z
l
e
c
o
u
v
e
r
c
l
e
d
e
l
a
b
a
t
t
e
r
i
e
e
n
b
a
s
.
C
o
n
n
e
c
t
e
z
l
e
c
â
b
l
e

d
e
l
a
b
a
t
t
e
r
i
e
r
e
c
h
a
r
g
e
a
b
l
e
.
A
j
u
s
t
e
z
l
e
s
c
â
b
l
e
s
c
o
n
n
e
c
t
é
s

p
o
u
r
q
u
'
i
l
s
s
'
a
d
a
p
t
e
n
t
c
o
n
f
o
r
t
a
b
l
e
m
e
n
t
l
e
c
o
m
p
a
r
t
i
m
e
n
t
.
F
e
r
m
e
r
e
t
a
t
t
a
c
h
e
r
l
a
p
o
r
t
e
d
e
l
a
b
a
t
t
e
r
i
e
.
③INSTALLATION DES COUPELLES DE VITESSE
DU VENT
Alignez les trous de vis dans les coupelles de vitesse du vent avec les plat, côté vertical
dela tige métallique.
Insérez les coupelles de vitesse du vent dans la tige métallique et vissez fermement
pour le verrouiller en place.
P
o
u
s
s
e
z
l
'
e
n
g
r
e
n
a
g
e
v
e
r
s
l
'
i
n
t
é
r
i
e
u
r
e
t
s
e
r
r
e
z

-
l
e
d
i
x
f
o
i
s
.
l
a
v
i
s
.
I
n
d
i
q
u
e
r
à
I
n
d
i
q
u
e
r
à
I
n
d
i
q
u
e
Point to
SOUTH

r
à
④INSTALLATION DE L'AIGUE DE DIRECTION DU
VENT
Alignez les trous de vis de la girouette de direction du vent avec le plat, verticale côté dela
tige métallique.
Insérez la girouette dans la tige métallique et vissez-la fermement. pour le verrouiller
en place.
The
bubble
⑩MISE SOUS TENSION
LA STATION
MÉTÉOROLOGIQUE
Branchez l'adaptateur secteur sur
la météo gare.
Une fois la station météorologique installée
allumé,
il entrera automatiquement en mode
d'appairage.
MISE EN PLACE
CONNEXION WI-FI
Appuyez et maintenez enfoncé le bouton
BARO/-/
3 secondes pour entrer Mode AP.
Ouvrez les paramètres de votre réseau Wi- Fi sur PC
station météo
SSID (WWS-XXXXXX) de la liste .
Appuyez sur le SSID à connecter.
À
MOINS
(.9 m)
À PART
Pour éviter les interférences sans fil, placez les deux unités à au moins 3 pieds ( 0,9 m) de distance.
des appareils électroniques (télévision, ordinateur, micro-ondes, radio, etc.).
SETTINGS
SETUP ADVANCED
Language:
Wi-Fi Router Setup
Router 12345
Select the menu and choose your 2.4GHz WIFI Router
Password
Weather Server Setup
WeatherUnderground
Station ID
Station Key
Upload wunderground.com
WeatherCloud
Station ID
Station Key
Upload weatherCloud.net
Time Zone Setup
Time Zone
Time Server Setup
Server URL
Firmware Version: 1.0.1
time.windows.com
a7d 9d 2a27 9 fbbafa
**********
**********
**********
Apply
KCACANTI9
English
Router
+0.00
Flashing: the weather station is attempting
to connect to your wireless router
Solid: the weather station has been
connected to your wireless router.
Select setup UI display language
Select your Wi-Fi Router (SSID) from the list
Router Password
Enter your station ID
Enter your station key/password
check to confirm upload to
WeatherUnderground server
Enter your station ID
Enter your station key/password
check to confirm upload to
⑧MOUNTING THE WIRELESS 7-IN-1 OUTDOOR SENSOR
Various options to install. Make sure the rain collector faces north and
the solar panel faces south before fastening the screws (included).
If you are a user located in the Southern Hemisphere,
please reverse the direction.
ENTER SETUP INTERFACE
Enter the following address into the web browser address bar:
http://192.168.1.1 to access the setup interface.
Please click to check your password before clicking
APPLY.
⑨ADJUSTING THE 7-IN-1 WIRELESS SENSOR LEVEL
Use the bubble level indicator to make sure the wireless outdoor sensor is completely level.
Weathercloud.net
Time zone setting
Internet time server setting
Press Apply to confirm the setting
Please scan the QR code or visit https://youtu.be/LESE8poieYY to see a video on how to use it.
WI-FI CONNECTION STATUS
TV
3
feet

Support technique et Certificat de garantie électronique
www.vevor.com/support
STATION MÉTÉOROLOGIQUE
MODÈLE : YT60234
Nous continuons à nous engager à vous fournir des outils compétitifs prix.
"Sauvegarder Moitié", "Moitié Prix " ou toute autre expression similaire utilisée par nous
seulement représente un
estimation des économies que vous pourriez réaliser en achetant certains outils chez nous
par rapport aux principaux
les meilleures marques et les doses pas nécessairement signifie couvrir tous catégories des
outils proposés par nous. Toi
sont nous vous rappelons de bien vouloir vérifier attentivement lorsque vous êtes passer
une commande avec nous si tu sont
en fait, je sauve la moitié par rapport aux plus grandes marques.


- 3 -
METEOROLOGICAL
STATION
MODÈLE : YT60234
BESOIN DE L'AIDE? CONTACT NOUS!
Avoir produit Des questions ? Besoin technique soutien? S'il te plaît
sentir gratuit à
contact nous:
ServiceClient@vevor.com
C'est l'original instruction, s'il vous plaît lisez tout manuel instructions
soigneusement avant de l'utiliser. VEVOR se réserve une interprétation
claire de notre manuel d'utilisation. L'apparence du produit doit être
soumis à la
produit vous reçu. S'il te plaît, pardonne nous que nous ne le ferons pas
je vous informe à nouveau s'il existe une technologie ou un logiciel
mises à jour sur notre produit.

SAFETYPRECAUTIONS
- 4 -
AVERTISSEMENT! Veuillez lire et comprendre toutes les précautions de
sécurité, les instructions d'utilisation et les instructions
d'entretien/maintenance avant d'utiliser cet appareil
appareil. Conservez ce manuel pour référence ultérieure.
Ceci produit est pas un jouet. Garder dehors de la portée de enfants.
Ceci produit est conçu pour utiliser dans le maison seulement
comme un indication de conditions météorologiques.
Ceci produit est ne pas être utilisé pour médical fins ou pour
publique information.
Faire ne nettoyez pas l'appareil avec des produits abrasifs ou
corrosif matériels.
Faire pas placer l'appareil à proximité de flammes nues ou de
sources de chaleur. Incendie, choc électrique, dommages au
produit ou blessure pourrait se produire.
Seulement utiliser frais nouveau piles dans le produit. Faire pas
mélanger nouveau et vieux piles ensemble.
Faire ne pas démonter, ltrer ou modifier le produit.
Seulement utiliser des pièces jointes ou accessoires avec ce produit
spécifié par le fabricant.
Faire ne pas immerger l'appareil dans l'eau. Séchez le produit avec
un doux tissu si déversements de liquide sur il.
Faire ne soumettez pas l'appareil à une force excessive, à des
chocs, canal, température extrême ou humidité .
Faire ne pas couvrir ni bloquer la ventilation trous avec des objets.
Cette station météo de ceci produit est destiné à être utilisé à
l'intérieur seulement.
Ce produit est seulement convient pour montage à un hauteur
moins que 6,6 pieds (2 m).
Ne pas altérer les composants internes de l'appareil. Altération des le
produit annulera la garantie.
Piles sont pas compris. Quand insertion piles, faire bien sûr que le
positif et négatif les polarités correspondent à la marquages dans
le compartiment.
fais pas mélanger standard, alcalin, et rechargeable piles
ensemble.
Laisser un batterie exposée à des conditions extrêmement des
températures élevées dans l' environnement environnant
peuvent entraîner une explosion ou fuite de liquide inflammable
ou du gaz.

SAFETYPRECAUTIONS
- 4 -
Laisser un batterie exposée à des conditions extrêmes basse
pression d'air dans l' environnement environnant peut entraîner
une explosion ou fuite de liquide inflammable ou du gaz.

TIPS FOR SENSORSITE SELECTION
- 5 -
Le collecteur de pluie doit être nettoyé tous les peu mois.
Le capteur doit être installé à au moins 5' (1,5 m) loin de n'importe
lequel bâtiment ou structure.
choisis un emplacement dans un ouvrir espace sous direct
soleil avec Non Obstacles.
Le capteur doit rester dans le ligne de visée et à moins de 492' (1 50
m) de la station météorologique pour une transmission constante et
régulière .
Gardez votre capteur et votre station météo loin de la maison
appareils fonctionnant sur la même fréquence. La console et
le capteur doit mesurer au moins 3' -7' (1 - 2 m) loin depuis tel
interférences .
CARACTÉRISTIQUESDUPRODUIT
Coloré et grand écran à chiffres avec super luminosité rétroéclairage.
9 fonctionnel boutons: RÉGLAGE, TEMPÉRATURE / ALARME,
PLUIE, VENT/+, BARO/-/ , ALERTE, MAX/MIN, CANAL, LUMIÈRE/
SNOOZE
Le temps se synchronise automatiquement avec Internet.
Alarme avec fonction snooze.
heure d'été (DS T).
Fuseau horaire: GMT ±12.
Lune Phase.
Température intérieure et extérieure (°C/°F) et humidité lectures avec
tendance.
Horaire, quotidien, hebdomadaire , Pluviométrie mensuelle, totale
et Précipitations taux en le passé heure.
Vitesse moyenne du vent, rafales de vent vitesse et le vent direction
affiche.
Absolu et relatif Barométrique affichages de pression avec s'orienter.
Intensité lumineuse et UV indice afficher .
Indice météo afficher : Sentir aime, le vent Froideur, Chaleur indice,
Rosée indiquer.
Prévision météo.
Max/Min en lisant.
Paramètres d'alerte météo.
Télécharger la météo données sur la météo Souterrain et /ou
Weathercloud via un Wi-Fi routeur.
4 niveaux luminosité du rétroéclairage t.

- 6 -
CONTENUDUCOLIS
1 station météo
2 Adaptateur
Capteur extérieur sans fil 7 en 1
4 Entonnoir
5 Girouette de direction du vent avec 1 vis
6 tasses de vitesse du vent avec 1 vis
7 Montage poteau avec 4 vis
8 Montage supports avec 6 vis
9 Caoutchouc tampons X 2
10 Tournevis 1
11 Tournevis 2
12 Guide d'utilisation

REMARQUE : 4 vis supplémentaires pour la girouette de direction du
vent et les coupelles de vitesse du vent.
PRODUCT OVERVIEW
- 7 -
SANS FIL 7 EN 1
1 Solaire panneau
2
Girouette de direction du vent
3 Capteur UV/lumière
4 Niveau à bulle gradienteur
5 Collecteur de pluie
6
Coupes de vitesse du vent
7 Montage pôle
8 Montage parenthèses
9 Capteur hygro-thermique
10 DIRIGÉ: Clignote lorsque
l'appareil transmet un en lisant
⑪ Bouton RESET
⑫ Couvercle de la batterie

WEATHERSTATION
- 8 -

- 9 -
1 Température/humidité extérieure lecture, météo indice
2 Direction du vent et vitesse
3
Lecture de la température/humidité intérieure
4 Prévisions météorologiques
5 Heure et date, lune phase, Nous sommes en fête
6 Lumière intensité
7
UV indice
8 Pluie
9 Baromètre
10 ENSEMBLE bouton
11 TEMP/ Bouton (ALARME)
12 Bouton PLUIE
13 Bouton WIND/+
14 BARO/-/ (Wi-Fi) bouton
15 Bouton ALERTE
16 Bouton MAX/MIN
17 Bouton CANAL
18
LUMIÈRE/SNOOZE bouton
19
Compartiment à piles (3,6 V Ni-MH rechargeable batterie paquet)
PARAMÈTRE CAPTEUR EXTÉRIEUR SANS FIL 7 EN 1
Le capteur extérieur sans fil 7 en 1 mesure la vitesse et la direction du
vent , précipitations, UV, intensité lumineuse , température et humidité.
INSTALLATION DU MONTAGE PÔLE ET SUPPORT

- 10 -
● Fixez le capteur sur un poteau de montage et support (inclus ) à l'aide
des vis ( incluses ).
INSTALLATION DES COUPELLES DE VITESSE DU VENT ET DES
AILETTES DE DIRECTION DU VENT
● Alignez les trous de vis dans les coupelles de vitesse du vent avec les
plat, verticale côté de le métal tige.
● Insérez les coupelles de vitesse du vent dans le métal tige et va les
faire foutre sur serré à verrouillage il dans lieu.
● Alignez les trous de vis de la girouette de direction du vent avec la
surface plate et verticale. côté du métal tige.
● Insérer la girouette de direction du vent dans le métal tige et vissez-les
fermement pour verrouillage il dans lieu.
- 11 -
PARAMÈTRE COLLECTEUR DE PLUIE ASCENDANT
● Alignez les encoches de l'entonnoir avec les rainures de
verrouillage à l'intérieur le pluie collectionneur.
● Insérer l'entonnoir dans le collecteur de pluie et vissez-les serré à
verrouillage il dans lieu.
- 12 -
INSTALLATION DU PILES
● Dévissez le couvercle de la batterie au bas de la Capteur extérieur
7 en 1 en utilisant un tournevis 1.
● Connectez le câble de la batterie rechargeable bloc-piles (compris)
au câble situé dans la batterie compartiment.

- 13 -
Ajustez les câbles connectés afin qu'ils s'adaptent confortablement au
compartiment. Alors, insérer la batterie dans le compartiment.
Fermer et attacher le batterie porte dos sur le compartiment.
- 14 -
CELLULE SOLAIRE
● Desserrez la vis au joint donc l'engrenage de l'autre côté de la
articulation pousse vers l'extérieur. La cellule solaire devrait maintenant
être dans un déverrouillé position.
● Ajustez l'angle vertical de la cellule solaire pour obtenir le le plus
optimal utilisation de la cellule solaire en fonction de votre emplacement.
● Poussez l'engrenage vers l'intérieur et serrez la vis jusqu'à ce que le
engrenages verrouillage dans lieu.

- 15 -
Lors du réglage de la cellule solaire, réglez-la sur un angle le plus proche
de votre latitude . tableau ci-dessous pour avoir une idée de comment tu
devrait angle ton solaire cellule.
Latitude Proximité
Cellule solaire Sélection d'angle
Si votre emplacement est fermer
à 84°
84°
Si votre emplacement est fermer
à 63°
63°
Si votre emplacement est
fermer jusqu'à 42°
42°
Si votre emplacement est fermer
à 21°
21°
Si votre emplacement est fermer
à 0°
0°
MONTAGE DU CAPTEUR EXTÉRIEUR SANS FIL 7 -IN-1
Choisissez un emplacement pour le capteur extérieur 7 en 1 qui
est ouvrir avec Non Obstacles.
Serrez le montage crochets à un surface/mur en utilisant quatre
vis autotaraudeuses (inclus), ou serrez le montage pôle à votre
existant
montage pôle avec quatre φ5 Boulons et M5 Assemblage d'écrous.
Ajouter tampons en caoutchouc sur le montage support avant
fixation le montage support sur le capteur.

- 15 -
Assurez-vous que le collecteur de pluie est orienté vers le nord et
que le solaire panneau fait face au sud avant fixation le vis ( inclu
ses ).
S'il vous plaît assurer que le capteur est fixé particulièrement
fermement, sinon, les conditions venteuses font trembler l'émetteur
et donc mal lire le
- 16 -
données pluviométriques.
CAPTEUR EXTÉRIEUR SANS FIL 7 EN 1 VERS LE SUD
(FACULTATIF)
Le capteur météo sans fil extérieur est calibré pour être pointu au nord
pour précision maximale. Cependant, pour votre commodité, si vous
êtes un utilisateur
situé dans le sud Hémisphère, tu peux utiliser le capteur avec le pluie

- 17 -
collecteur pointant vers le sud.
1.) Montez et installez le capteur météo sans fil avec le collecteur de
pluie pointant vers le sud, au lieu du Nord. (Veuillez vous référer à
MONTAGE DU
7 EN 1 SANS FIL POUR L'EXTÉRIEUR CAPTEUR .)
2.) Sélectionnez « STH » pour l'hémisphère sud dans le horloge
paramètre mode. (S'il te plaît se référer à « réglage de l'horloge »)
REMARQUE : la modification du réglage de l'hémisphère changera
automatiquement l' direction des phases de la lune sur afficher.
Orienter le capteur météorologique sans fil vers le sud permettra
un ensoleillement maximal sur le panneau solaire, en particulier
pendant la saison hivernale dans le sud Hémisphère.
CAPTEUR SANS FIL 7 EN 1 NIVEAU
● Utiliser la bulle niveau indicateur pour s'assurer que le capteur extérieur
sans fil est complètement de niveau. Si le capteur n'est pas niveau, le
gagner jauge, UV et Lumière l'intensité sera pas mesurer correctement.
● Pour régler le niveau du capteur extérieur sans fil, desserrez les vis du
montage pôle. Réglez le niveau du capteur extérieur sans fil afin de
assurez-vous que la bulle est au centre de la bulle niveau en dictateur.
● Serrez la vis de fixation pôle contre n.

- 18 -
PARAMÈTRE MONTERLASTATIONMÉTÉO
ALIMENTATION MONTER LA STATION MÉTÉO
● Branchez l'adaptateur secteur sur l'alimentation jack situé dans le
dos de la station météo. Insérer 3 nouveau Piles alcalines AAA (non
incluses) pour la sauvegarde.
● Une fois la station météo est allumé, il entrera automatiquement
appariement mode.
APPAIRAGE DU CAPTEUR SANS FIL 7 EN 1
● Une fois votre station météo allumée, elle devrait automatiquement
recherche pour et se connecter aux capteurs sans fil. Si la station météo
ne fonctionne pas

- 18 -
connectez-vous dans les 5 premiers minutes, reportez-vous à la section
suivante,

- 19 -
«« RÉAPPAIRAGE DU CAPTEUR ».
● Vous verrez l'icône d'une antenne défilant dans la section
température et humidité (extérieur) de l'écran.
● Une fois l'appairage le processus est terminé, l'icône de l'antenne
apparaîtra apparaître solide (ne clignote pas) et les relevés de
température et d'humidité extérieures, de vent vitesse, direction du vent,
UV, lumière l'intensité et les précipitations apparaîtront dans leur
sections désignées de l' écran LCD
RE-APPAIRAGE DU CAPTEUR
● Si la connexion échoue ou si la station météo est réinitialisé, puis
appuyez sur et prise le
【
CANAL
】
Appuyez sur le bouton pendant 2
secondes pour entrer en mode de couplage, puis sur le bouton
la station météo va réenregistrer tous les capteurs qui ont déjà a été
enregistré auparavant , (c'est-à-dire que la station météorologique pas
perdre le connexion des capteurs que vous avez appairés en haut avant.)

SETUPINSTRUCTION
- 20 -
PARAMÈTRE CONNEXION WI-FI ET SERVEUR MÉTÉO
CONNEXION
Appuyez et maintenez 【 BARO/-/ 】 bouton sur r 3 secondes,
la météo gare L'écran LCD affichera la lettre « AP » qui il est entré
Accéder
Point (AP) mode. À ce moment-là, il le fera être prêt pour les
paramètres Wi-Fi à être ajusté.
Utilisez votre smartphone, tablette ou ordinateur pour vous
connecter à la station météo via Wi-Fi en suivant ces étapes :
Sur PC, ouvrir votre Wi-Fi réseau paramètres. Sur Androïde™ ou
iOS
appareils, allez dans le menu des paramètres, puis sélectionnez
Connexions /WI-FI à ouvrir le réseau paramètres.
Localisez le SSID de la station météo dans la liste. Il devrait
apparaître comme

SETUPINSTRUCTION
- 20 -
WWS-XXXXXX (où tous les X sont des entiers) dans le liste.
Robinet sur le SSID pour se connecter. Cette étape prendra
quelques secondes.
Une fois que vous sont connectés à la météo gare, ouvrir en haut
ton Internet ou Web mobile navigateur, et entrez l'adresse suivante
dans le

- 21 -
barre d'adresse: http://192.168.1.1 pour accéder à l'interface Web
de la station météo . (Assurez-vous de inclure le http:// ou sinon le
web navigateur peut interpréter l'adresse comme une requête de
recherche). Nous recommander en utilisant la dernière version d'un
site Web réputé navigateurs.
Entrez les informations suivantes information dans l'interface Web
(Figure 1). Faire bien sûr toutes les informations est entré avant de
sélectionner Enregistrer. Si tu
choisissez de ne pas télécharger Wunderground.com ou de
télécharger weathercloud.net, laissez les cases à cocher non coché.
NOTE :
Configuration du fuseau horaire (par défaut ) : 0h). Pour régler
automatiquement l'affichage de l'heure sur votre fuseau horaire,

- 21 -
modifiez le fuseau horaire dans la section Configuration du serveur
de temps de la page CONFIGURATION de « 0:00 » (par défaut) à
votre fuseau horaire (par exemple +1:00
- 22 -
pour Allemagne ).
5.) Si toutes les informations que vous avez saisies sont correctes,
appuyez sur « Appliquer » à confirmer (Chiffre 1). Si ce n'est pas le cas,
vérifiez votre site Web. interface i nformation à nouveau.
REMARQUES :
Une fois la configuration Wi-Fi terminée, votre ordinateur ou votre
mobile appareil
reviendra à la connexion Wi-Fi par défaut. Si c'est le cas pas,
simplement ouvrez les paramètres de réseau sans fil de votre
appareil et manuellement reconnecter.
Alors que en mode AP, vous pouvez appuyer et tenir le
【
BA
RO/-/
】
Appuyez sur le bouton pendant 3 secondes pour
quitter le mode AP. La station météo restaurera simplement les
paramètres AP précédents.
ÉTALONNAGE
Une fois que vous êtes connecté via Wi-Fi à la station météo et que vous
avez ouvert le paramètre page à http://192.168.1.1 , en cliquant sur «
AVANCÉ » , vous ouvrirez la fenêtre suivante page (Figure 2).
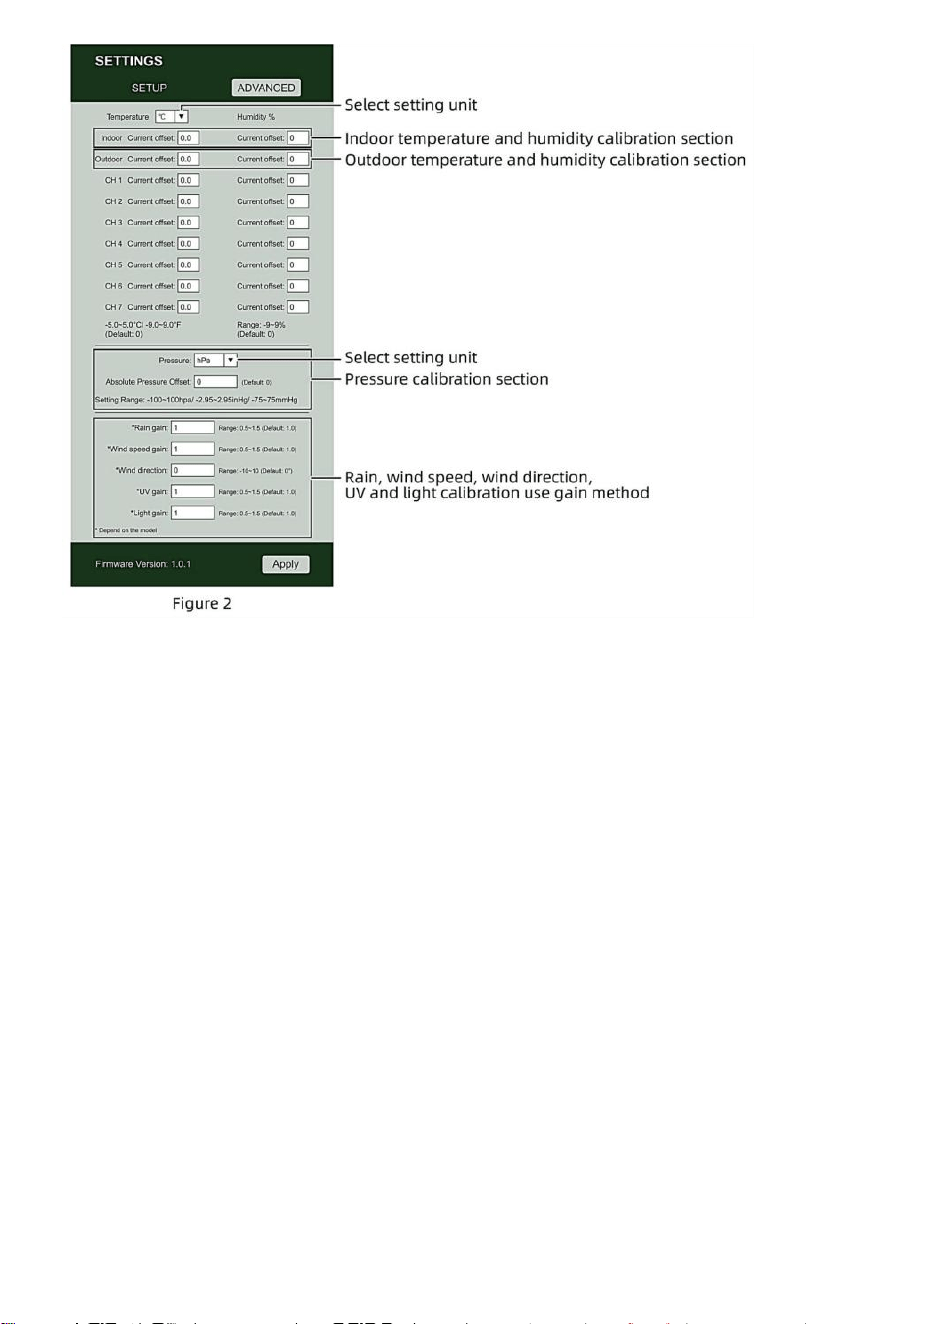
- 22 -
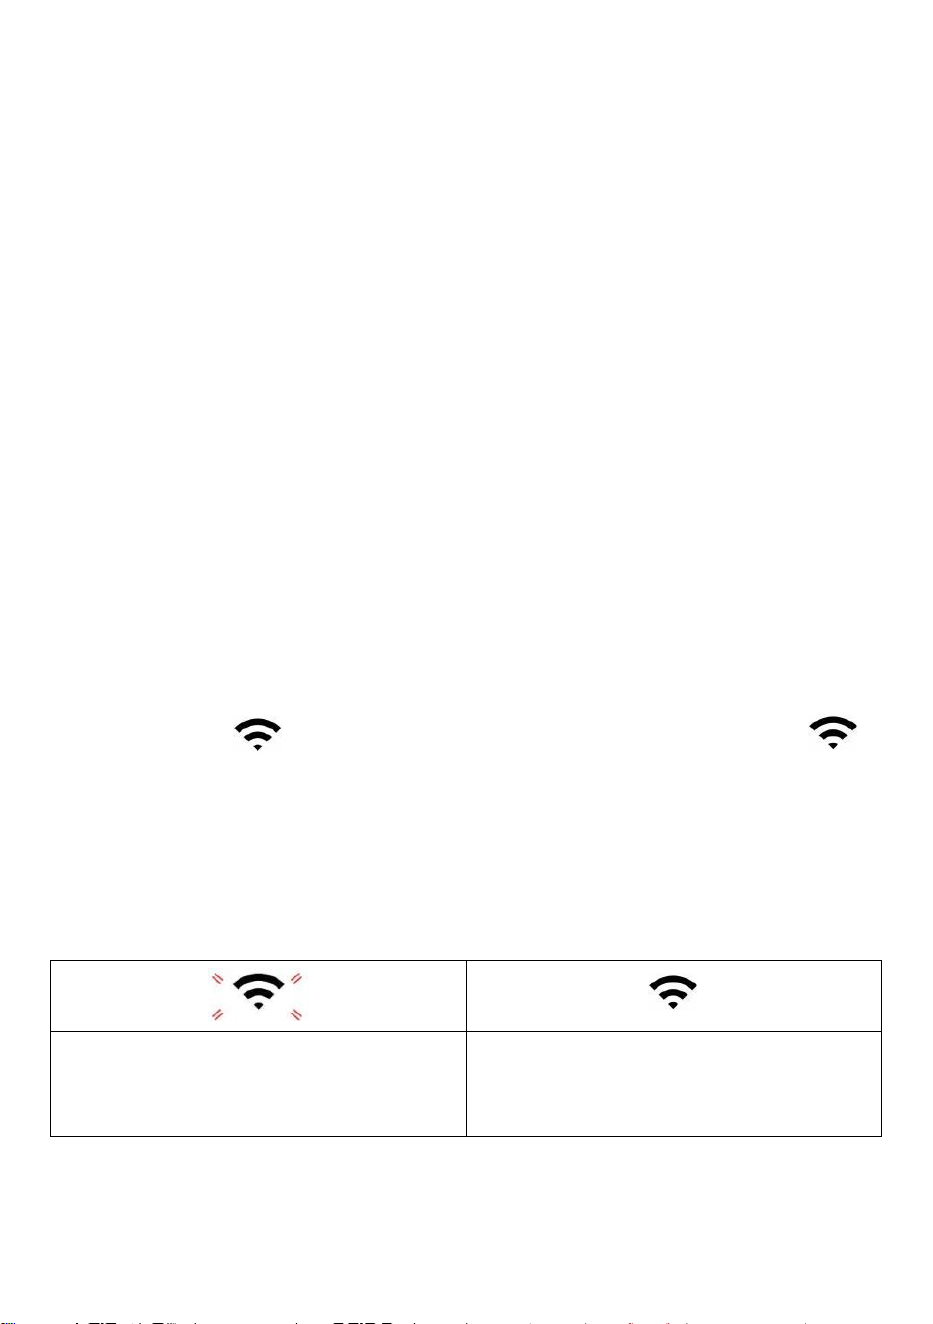
- 23 -
1) Vous pouvez entrer ou changement le compenser et gagner
valeurs pour différent mesures paramètre s.
2) Une fois que vous avoir terminé votre librations de calibrage , presse le
"APPLIQUER" bouton.
3) Le courant valeur de décalage volonté mise à jour à montrer le valeur que toi
entré
( plutôt de le défaut valeur ). Si toi vouloir à changement le valeur , vous peut
entrer un nouveau valeur dans le boîte à côté de le numéro ( comme dans
étape 1). À mise à jour le valeur encore , presse " APPLIQUER " bouton .
NOTE :
Nous faisons pas recommande l'étalonnage de la plupart des valeurs
à l'exception de Relatif La pression, qui doit être correctement calibré
pour refléter votre
distance au dessus de la mer niveau pour tenir compte de l'altitude effets.
ÉTAT DE LA CONNEXION WI-FI
Lorsque la station météo se connecte avec succès à votre routeur Wi-Fi, le
Signal Wi-Fi
apparaîtra sur l'écran LCD afficher . Si le signal
Wi-Fi
est pas stable ou la station météo essaie de se connecter au routeur, le
l'icône clignotera. Si l'icône disparaît, il signifie que la station météo est
non connecté au routeur Wi-Fi .
Clignotant : le météo gare
est tenter à connecter à ton sans fil
routeur.
Solide : la station météo a a été
connecté à votre réseau sans fil
routeur.
NOTE :

- 23 -
Si toi propre un double groupe routeur (2,4 GHz et 5,0 GHz ), faire bien sûr
toi se connecter au 2,4 GHz groupe, sinon il ne parviendra pas à connecter
la station météo à
Wifi .
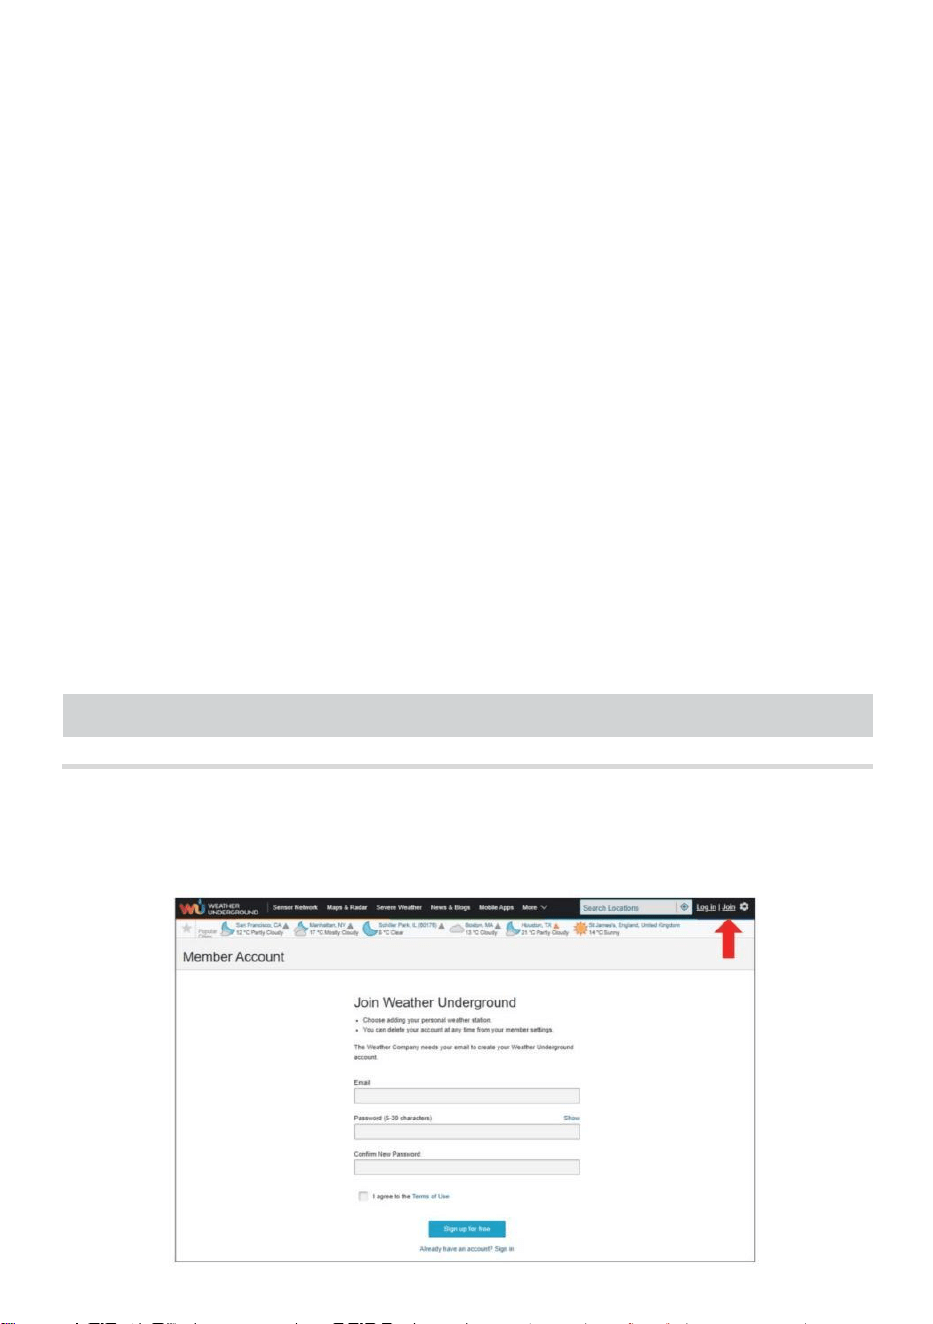
- 24 -
ÉTAT DE CONNEXION AU SERVEUR DE TEMPS
Une fois la station météo connectée à Internet, elle volonté tentative se
connecter au serveur de temps Internet pour obtenir l'UTC temps. Une
fois le
la connexion réussit et l' heure de la station météo a été mis à jour. Le
icône « SYNC » apparaîtra sur le Écran LCD.
Pour afficher l'heure correcte pour votre fuseau horaire spécifique, vous
devez besoin de
changer le fuseau horaire dans le réglage CLOCK mode à partir de 00
(par défaut) à votre fuseau horaire (par exemple -5 pour EST). Si tu ne
connais pas ton fuseau horaire , tu peux le regarder en ligne.
NOTE :
L'heure sera automatiquement synchronisée avec la Internet par heure.
CRÉEZ ETSYNCHRONISEZVOTRECOMPTEWEATHER
SERVER
CRÉER LA MÉTÉO COMPTE SOUTERRAIN
1.) Visitez : https://Wunderground.com, et sélectionnez « Rejoindre »
dans le supérieur droit et coin et créer un Gratuit Compte.

- 25 -
2.) Entrez un Nom d'utilisateur, E-mail et Mot de passe (Il est ton Se
connecter
mot de passe du site Web et non votre mot de passe de messagerie.
Donc non la vie privée sera être exposé). Cliquez Signe disponible
gratuitement .
3.) Une fois l'enregistrement terminé avec succès, ce sera être
montré ci -dessous le message.

- 26 -
4.) Cliquez sur « Connexion » et entrez l' adresse e-mail et mot de passe
tu viens de inscrit.
5.) Cliquez sur « Mon profil » " et entrez Membre paramètres.
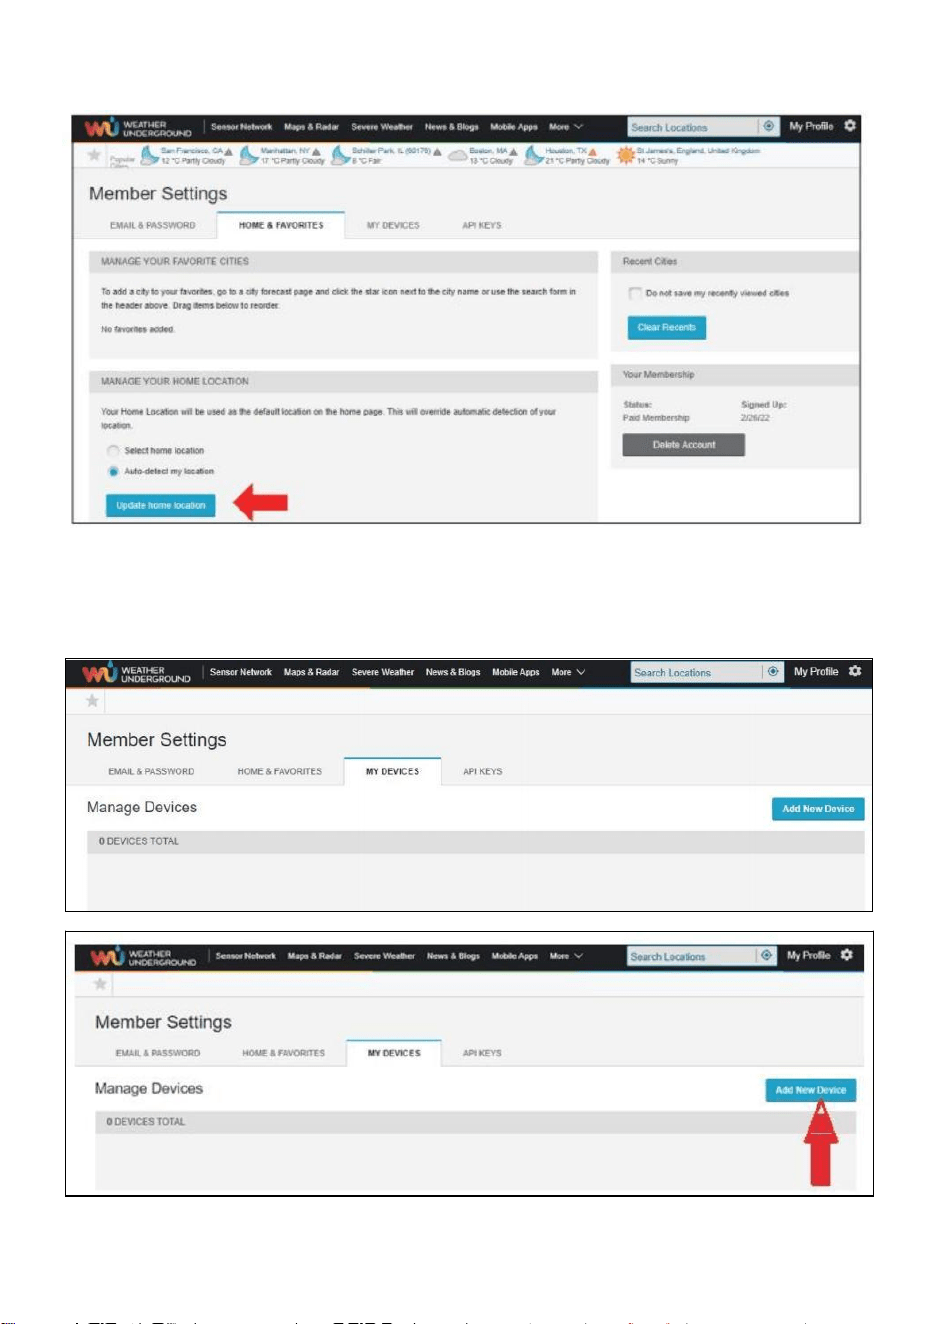
- 27 -
6.) Cliquez sur « Mettre à jour » maison emplacement " .
7.) Cliquez sur « Mon Appareils”, et cliquez sur « Ajouter » Nouveau
Appareil".

- 28 -
8.) Sélectionnez l'adresse en saisissant un adresse ou sélectionnez
Manuel à position
votre adresse automatiquement . Cliquez ensuite sur «Suivant ".

- 29 -
9.) Entrez les informations météo. Les espaces vides avec du rouge
(obligatoire) doivent être rempli dans.
NOTE :
Toi peut sélectionnez « autre » de le Appareil Matériel .
10.) Une fois cette session terminée, cliquez sur «J'accepte » et
«Suivant ". 11.) Après vous être enregistré avec succès, s'il te
plaît enregistrez votre météo Souterrain ID et Informations clés
pour une configuration ultérieure utiliser.
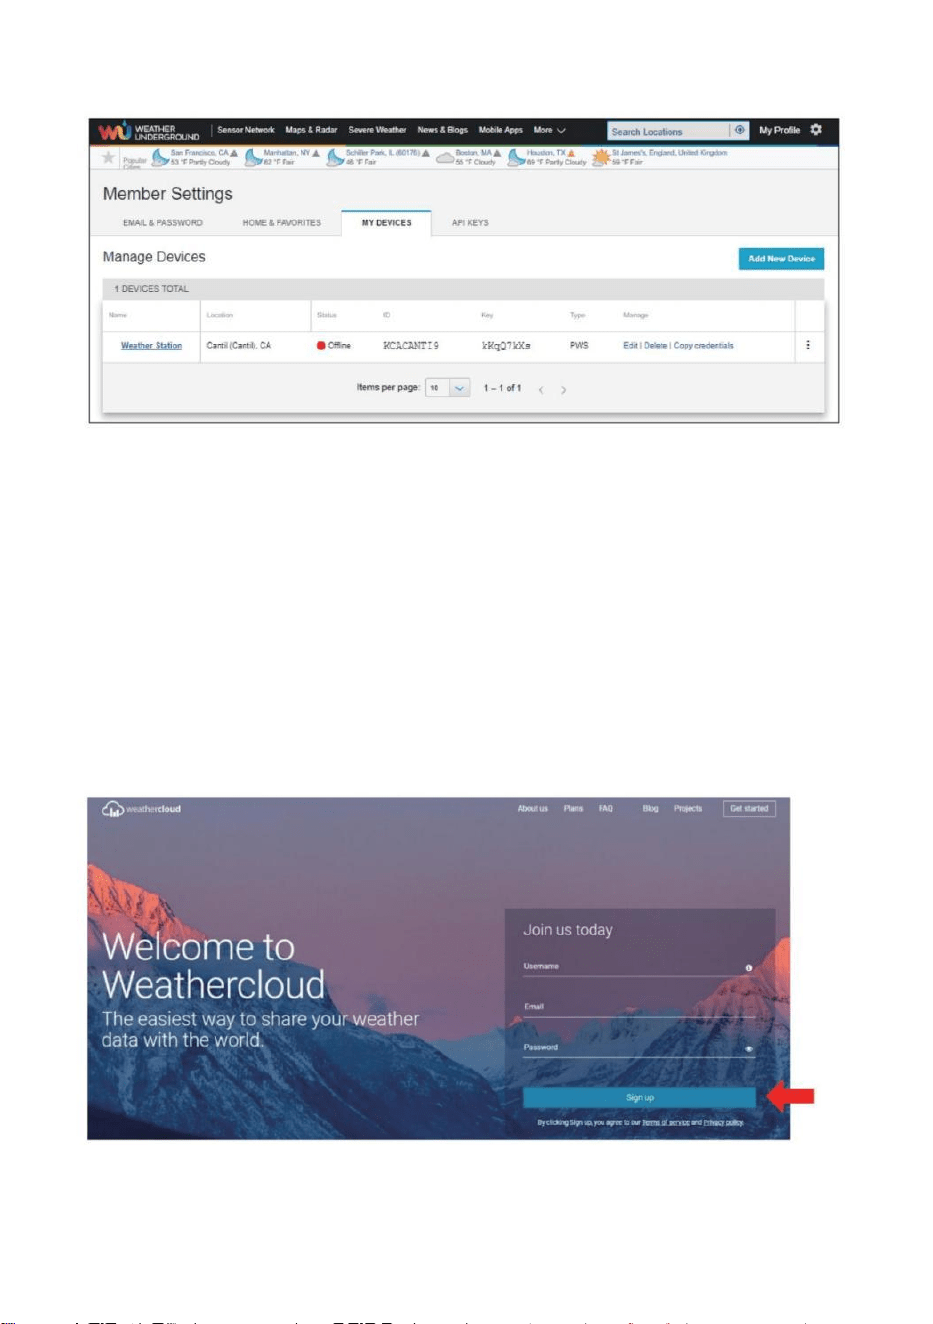
- 30 -
12.) Comme indiqué ci-dessous, inscription est fait avec succès.
CRÉEZ VOTRE COMPTE WEATHERCLOUD
1.) Visitez le site Web de Weathercloud à l'adresse https://weather
cloud.net/, et entrez un Nom d'utilisateur, Courriel et Entrez votre mot
de passe et cliquez sur « S'inscrire ». Suite à la
instructions pour créer un compte.
REMARQUE : Ceci il est préférable de le faire sur un ordinateur bureau ou
ordinateur portable.
(Il est ton Se connecter mot de passe pour le site web pas ton email mot
de passe. Donc Non la vie privée sera exposé).
2.) Quand il est réussi, un le courrier électronique sera être reçu dans
ton enregistré boîte aux lettres.

- 30 -
3.) Ouvrez votre courrier et connectez-vous dans le web adresse
dans le mail. Cliquez « Activer ton Nuage météorologique
compte ".
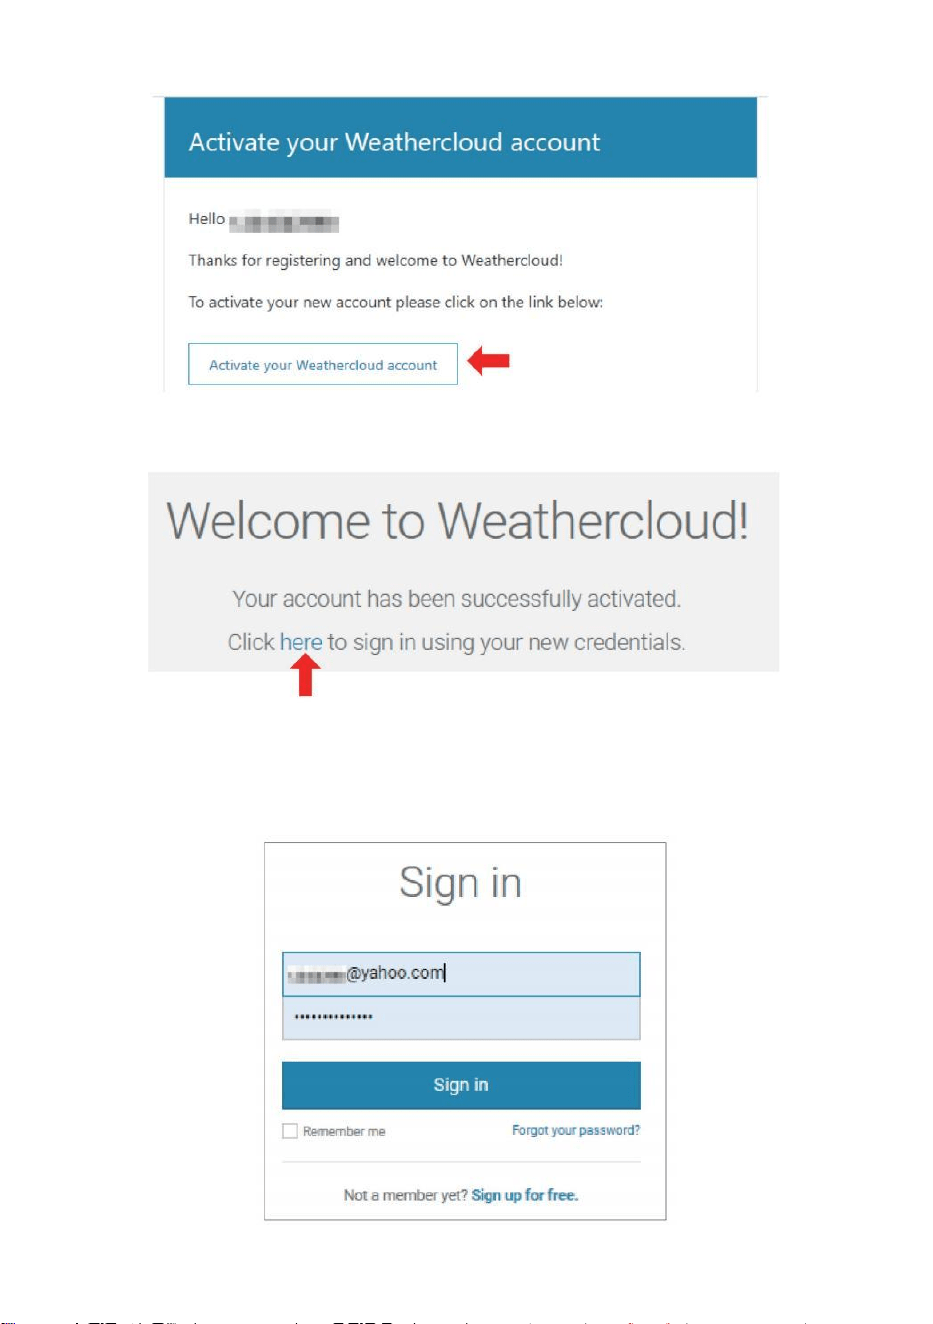
- 31 -
4.) Cliquez sur « ici " pour entrer dans le page d'accueil du site Web
Weathercloud. 5.) Saisissez l'adresse e-mail et le mot de passe que
vous venez d'enregistrer pour accéder au Site Web de Weathercloud.

- 32 -
6.) Cliquez sur « Créer un appareil » pour ajouter une station météo.
7.) Entrez tous les demandé information dans le Créer Nouveau
Appareil page. Les blancs avec du rouge *doivent être rempli dans.
NOTE :
Toi peut sélectionnez « autre » de le Modèle nombre et Lien taper dans le
au-dessus des blancs. Cliquez « Obtenir les coordonnées » pour identifier
votre emplacement sur le carte, le clic « Terminé » à confirmer .
8.) Une fois que vous ont terminé ce section , cliquez sur « Créer ».
9.) Après vous être enregistré avec succès, veuillez enregistrez votre
Weathercloud IDENTIFIANT et Informations clés pour une configuration
ultérieure utiliser.
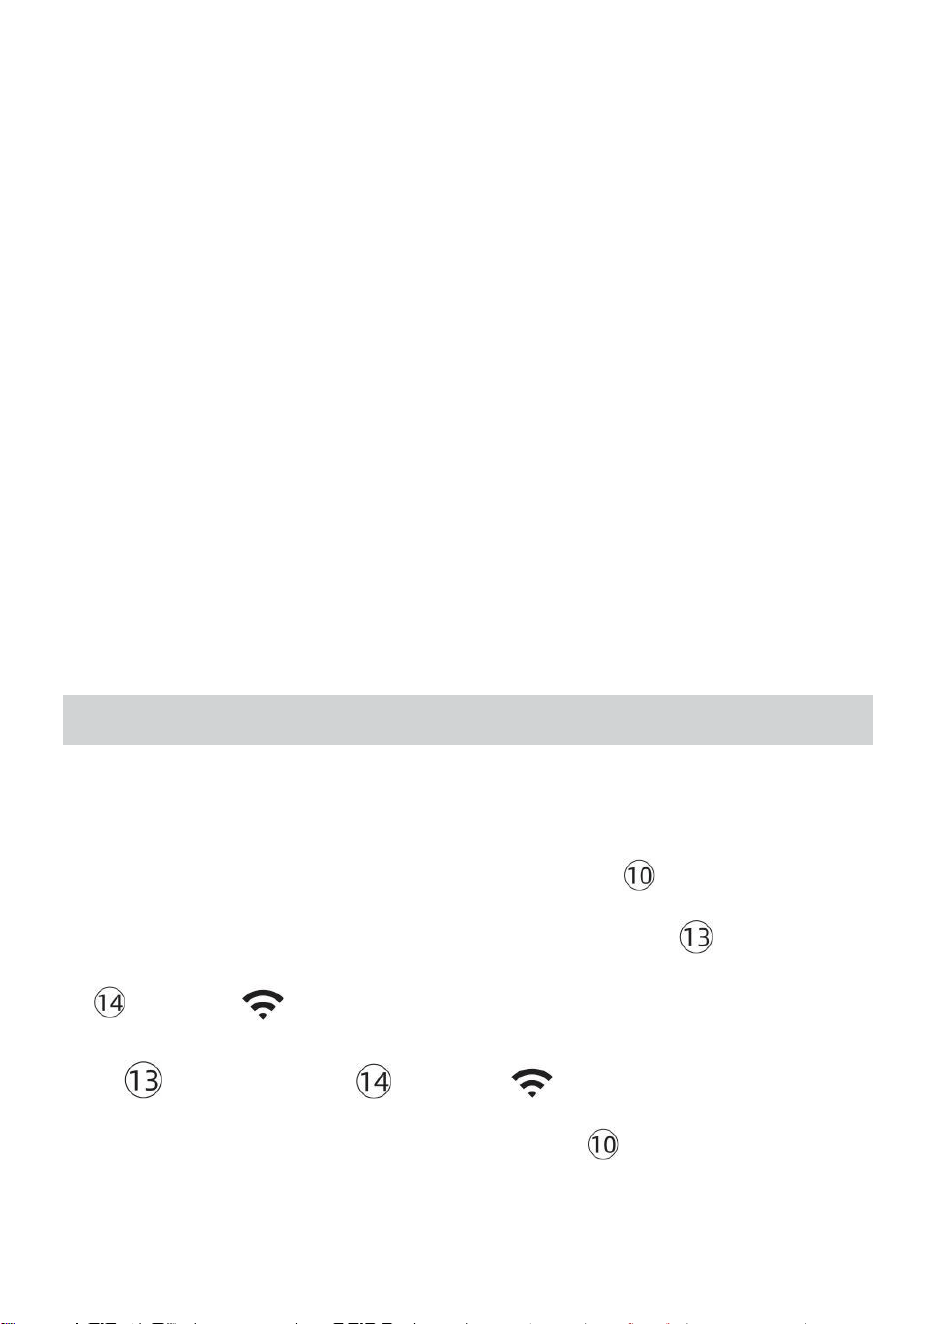
- 33 -
CONSULTEZ VOTRE MÉTÉO DONNÉES SUR LA MÉTÉO
SOUTERRAIN
Pour visualiser les données de votre station météo en direct via Web PC
ou mobile navigateur,
visite http://www.wunderground.com, puis entrez dans la Station ID
qui vous a été fourni lors de la configuration du compte dans le recherche
boîte. Vos données météo apparaîtra sur le suivant page.
CONSULTEZ VOTRE MÉTÉO DONNÉES DANS WEATHERCLOUD
1.) Pour afficher les données de votre station météo en direct via PC ou
mobile Web navigateur, visite http://www.weathercloud.net et
connectez -vous au compte que vous avez créé. 2.) Cliquez sur l'onglet
en haut de la page intitulée Appareils.
3.) Cliquez sur le menu Paramètres en haut droit de la page, et
sélectionner le option Afficher.
4.) Cliquez sur Actuel, Vent ou Évolution pour afficher les données de
votre station météo. données.
MODED'EMPLOI
HORLOGE
Réglage de la Horloge
Dans Normale temps afficher , appuyer sur et prise 【 SET 】 sur 2
secondes à entrer réglage de l'heure mode . Presse et libérer 【 VENT /+ 】
et 【 BARO // 】 à ajuster les valeurs.
Prise 【 VENT /+ 】 et 【 BARO // 】 plus de 2 secondes à
ajuster les valeurs rapidement . Appuyez sur et libérer 【 SET 】 à
confirmer et se déplacer à le suivant article.
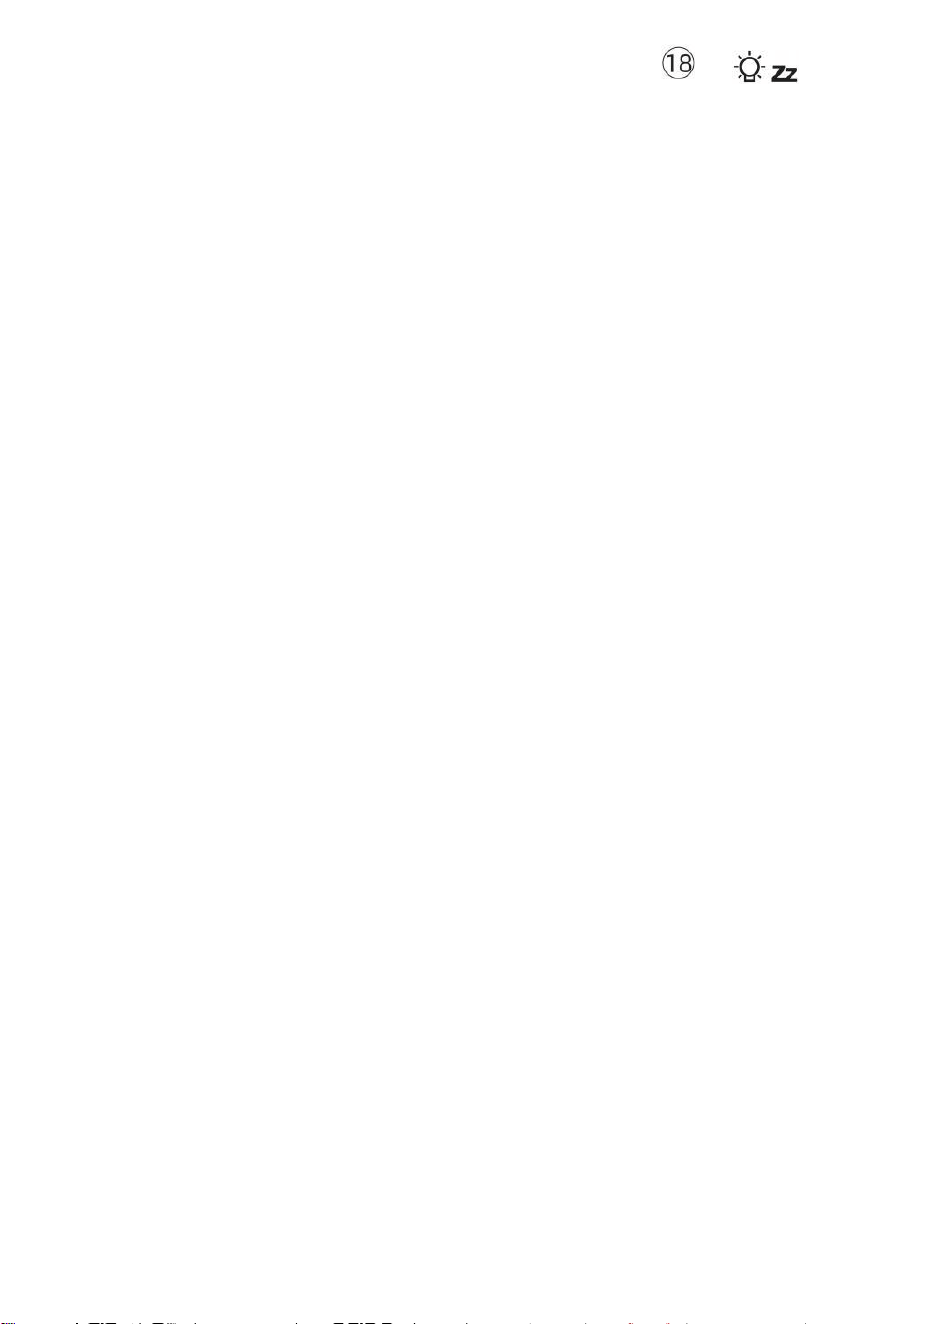
- 33 -
À sortie le paramètre mode à n'importe lequel temps , presse 【
】 LUMIÈRE / SNOOZE bouton .
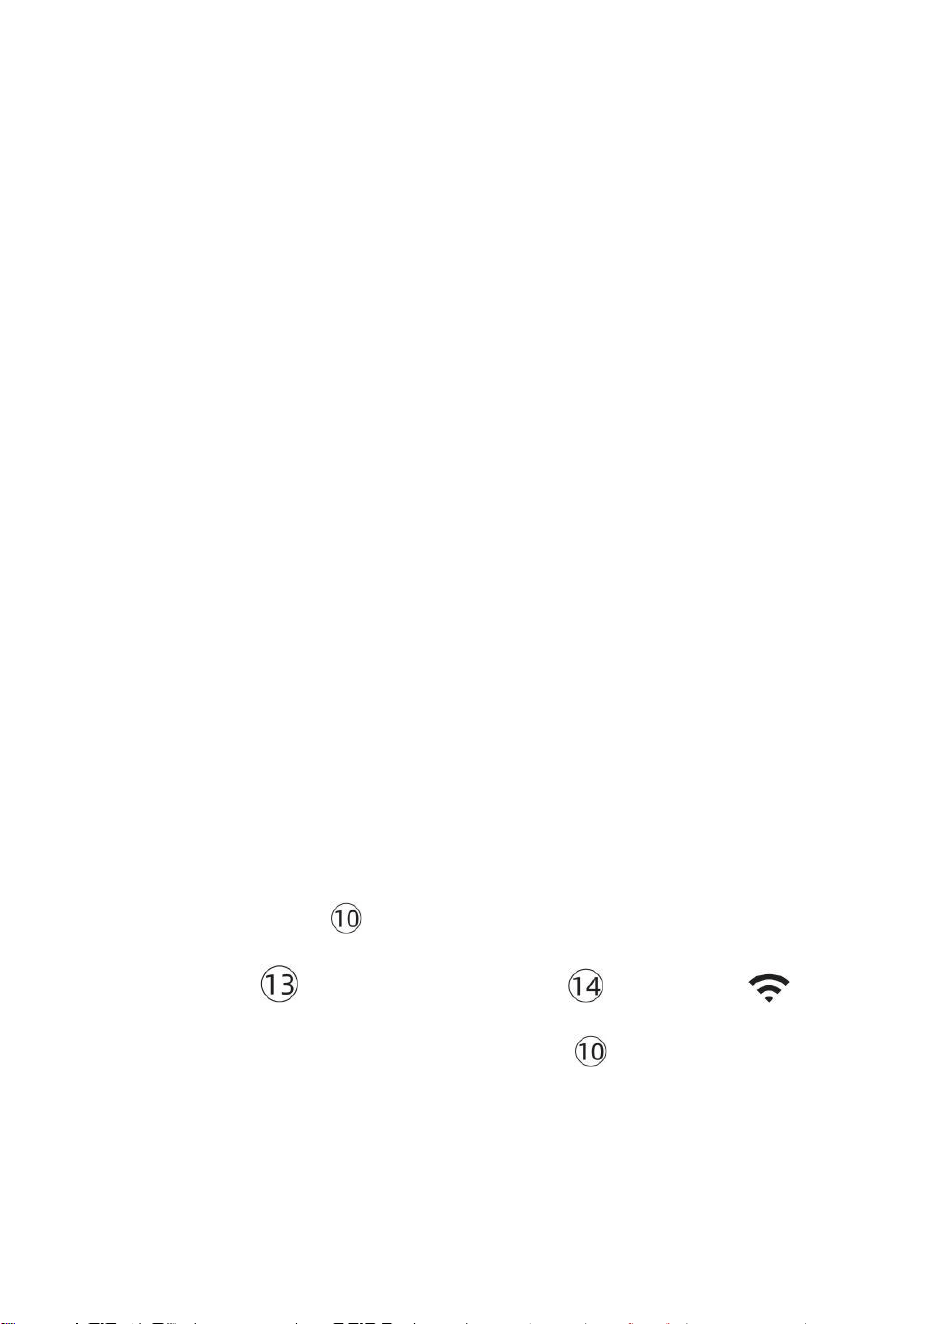
- 34 -
Paramètre Commande
1. BIP Marche /Arrêt
2. NTP Marche /Arrêt
3. Heure Zone
4. Heure d'été Marche /Arrêt
5. MD/D- M Date Format
6. Année
7. Mois
8. Jour
9. 24/12 Heure Format
10. Heure 11. Minute
12. Température Unité
13. Pression Unité
14. Relatif Pression Étalonnage
15. Lumière Intensité Unité
16. Précipitations Unité
17. Le vent Vitesse Unité
18. Hémisphère
19. Fin de paramètre
1.) Appuyez sur et prise Bouton 【 SET 】 entrer le paramètres . Bip ON
clignote . Appuyez sur 【 VENT /+ 】 ou 【 BARO // 】 à
changement entre Bip sur et bip ou . Presse 【 ENSEMBLE 】 à
sélectionner NTP activé / désactivé.
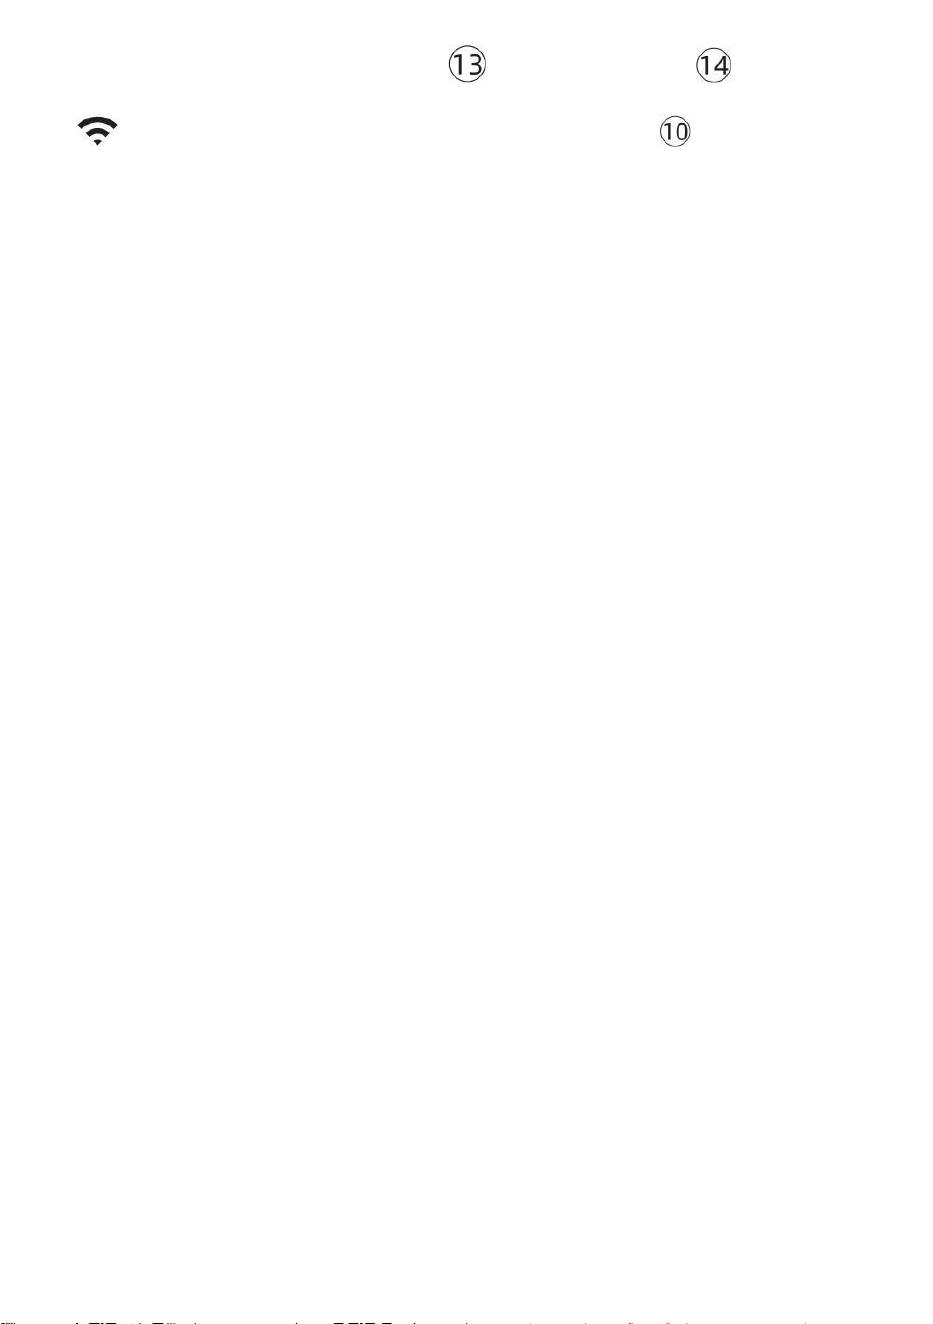
- 34 -
2.) Quand NTP ON clignote , presse 【 VENT /+ 】 ou 【 BARO
// 】 à changement entre NTP sur et NTP ou . Presse 【 ENSEMBLE
】 à sélectionner temps zone .
- 35 -
3.) Quand Temps Zone clignote , presse 【 VENT /+ 】 ou 【 BARO
// 】 à ensemble temps zone . Presse 【 ENSEMBLE 】 à sélectionner
Heure d'été activé / désactivé .
4.) Quand Heure d'été ON clignote , presse 【 VENT /+ 】 ou 【 BA
RO // 】 à changement entre Heure d'été sur et Heure d'été ou . Presse
【 SET 】 à sélectionner date format . 5.) Quand M --D clignote , presse
【 VENT /+ 】 ou 【 BARO // 】】 à changer entre M - D et D - M
date format . Presse 【 ENSEMBLE 】 à sélectionner année .
6.) Quand année clignote , presse 【 VENT /+ 】 ou 【 BARO
// 】 à ajuster le calendrier année . Presse 【 ENSEMBLE 】 à
sélectionner mois .
7.) Quand les mois clignotent , presse 【 VENT /+ 】 ou 【 BARO
// 】 ajuster le calendrier mois . Presse 【 ENSEMBLE 】 à
sélectionner jour .
8.) Quand Le jour clignote , appuyez sur 【 VENT /+ 】 ou 【 BARO
// 】 à ajuster le jour du calendrier . Presse 【 SET 】 à sélectionner
12/24 heures format .
- 35 -
9.) Quand 12 H clignote , presse 【 VENT /+ 】 ou 【 BARO //
】 changer entre 12 heure et 24 heure format . Presse 【 ENSEMBLE 】 à
sélectionner heure . 10.) Quand l'heure clignote , appuyez sur 【 VENT /+ 】
ou 【 BARO // 】 à ajuster le heure . Appuyez sur 【 ENSEMBLE
】 à sélectionner minute .
- 36 -
11.) Quand les minutes clignotent , presse 【 VENT /+ 】 ou 【 BAR
O // 】 ajuster le minute . Presse 【 ENSEMBLE 】 à sélectionner
température unité .
12.) Quand °F clignote , appuyez sur 【 VENT /+ 】 ou 【 BARO
// 】 à changement entre °F et °C . Presse 【 ENSEMBLE 】 à
sélectionner pression unité .
13.) Quand pression l' unité clignote , appuyez sur 【 VENT /+ 】 ou 【
BARO / -/ 】 à changement entre hPa , inHg et mmHg . Presse 【 E
NSEMBLE 】 à sélectionner étalonnage de la pression relative .
14.) Quand Relatif La pression clignote , presse 【 VENT /+ 】 ou
【 BARO // 】 à ajuster le relatif pression . Appuyez sur 【 SET 】 à
sélectionner Intensité lumineuse unité.
15.) Quand Lumière intensité l' unité clignote , presse 【 VENT /+ 】 ou
【 BARO // 】 à changement unité entre Klux Klub , FC et avec m2 . Appuyez
sur 【 SET 】 pour sélectionner précipitations unité.
16.) Quand Pluie l' unité clignote , presse 【 VENT /+ 】 ou 【 BARO
// 】 changer unité entre dans et mm . Presse 【 ENSEMBLE 】 à
sélectionner vitesse du vent unité . 17.) Quand Vent vitesse l' unité clignote ,
- 36 -
appuyez sur 【 VENT /+ 】 ou 【 BARO /-/ 】 à changement unité
entre dans et mm . Presse 【 ENSEMBLE 】 à sélectionner hémisphère .
18.) Quand NTH clignote , appuyez sur 【 VENT /+ 】 ou 【 BARO //
】 à changement
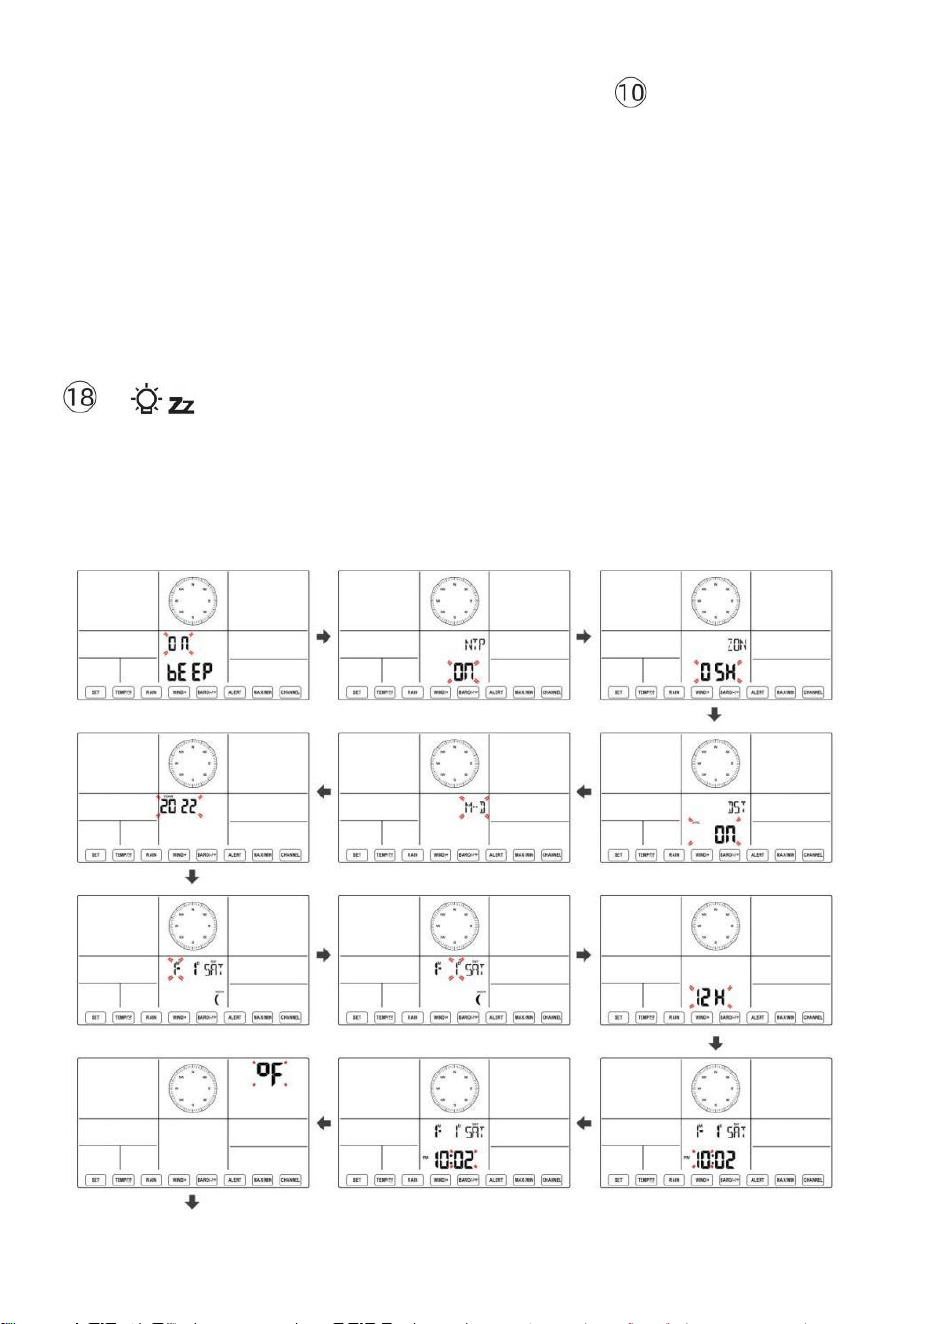
- 37 -
hémisphère entre NTH ( nord ) et STH ( sud ). Presse 【 ENSEMBLE 】
pour enregistrer et quitter le paramètre. Ce sera retour à le normale mode afficher .
NOTE: S'il y a est aucune opération valide dans les 2 0 secondes, ça se
fera automatiquement retour à la affichage normal mode à partir du
réglage mode. Pendant le réglage paramètres, vous pouvez presse
】 LUMIÈRE/SNOOZE bouton pour revenir à l'affichage normal
mode.
【

- 38 -
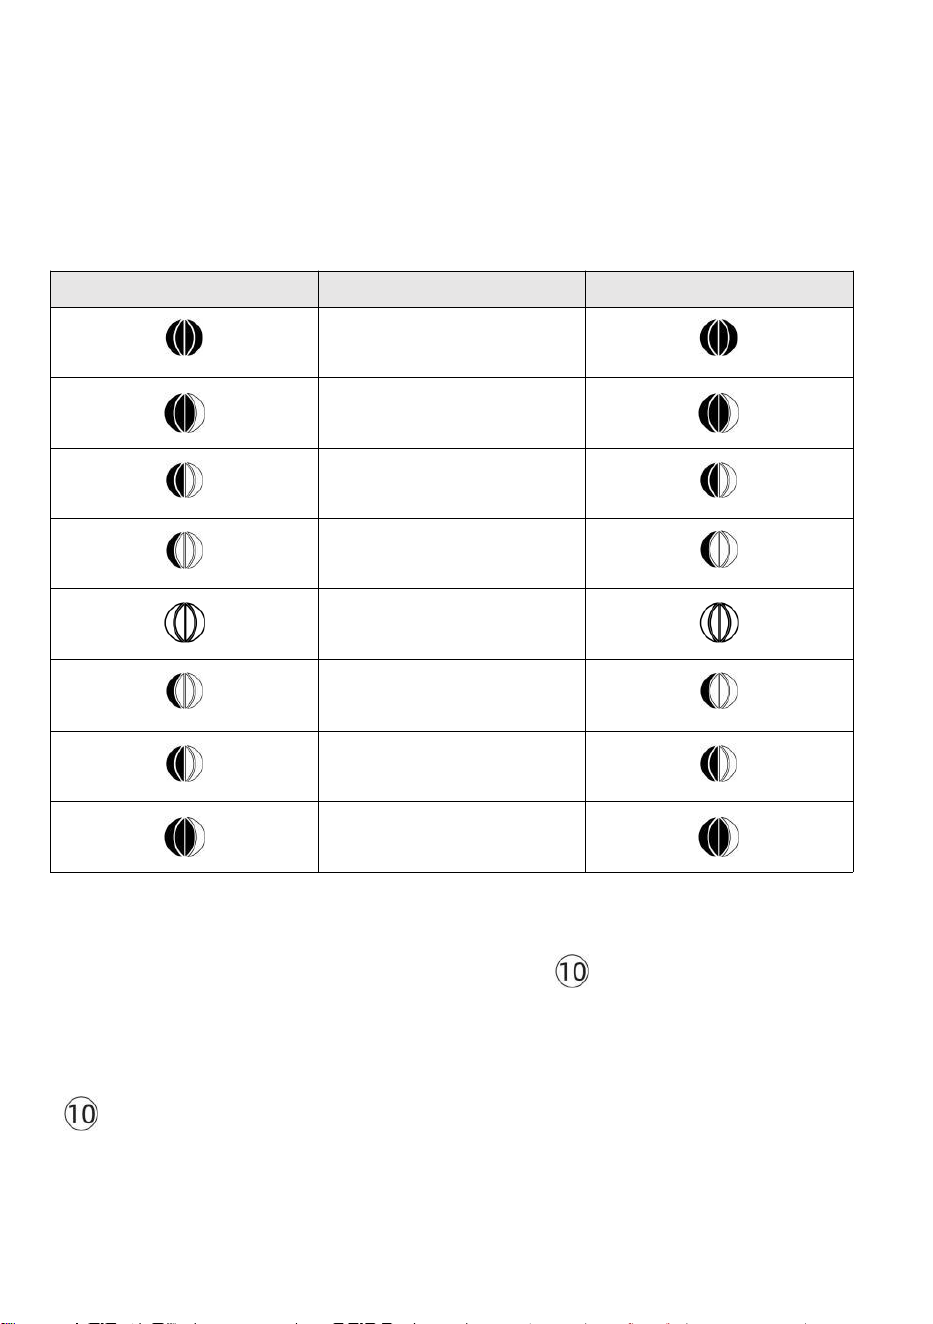
- 39 -
Lune Phase
La console d'affichage calcule la phase de la lune selon ton heure,
date et fuseau horaire. Le tableau ci-dessous explique les
correspondant phases et leurs icônes pour les deux Nord et Sud
hémisphères.
Nord Icônes de l'hémisphère
Lune Phase
Hémisphère sud Icônes
Nouveau Lune
Croissant de lune Lune
Premier trimestre Lune
Gibbeuse croissante Lune
Complet Lune
Lune gibbeuse décroissante
Lune
Troisième trimestre Lune
Croissant décroissant Lune
Réglage de l'alarme
● En affichage normal de l'heure, appuyez sur
【
SET
】
bouton pour
changer l'affichage de l'heure de l'alarme (heure de l'alarme mode).
● Dans l'affichage de l'heure de l'alarme, maintenez enfoncée la touche d
【
SET
】
Appuyez sur le bouton pendant 2 secondes pour accéder au
mode de réglage de l'alarme. L’heure de l’alarme commence à clignoter.
- 39 -
● Presse 【 VENT/+ 】 bouton ou 【 BARO/-/ 】 bouton pour
définir le requis heures d'alarme. Prise 【 VENT/+ 】 bouton ou 【
BARO/-/ 】 bouton pour
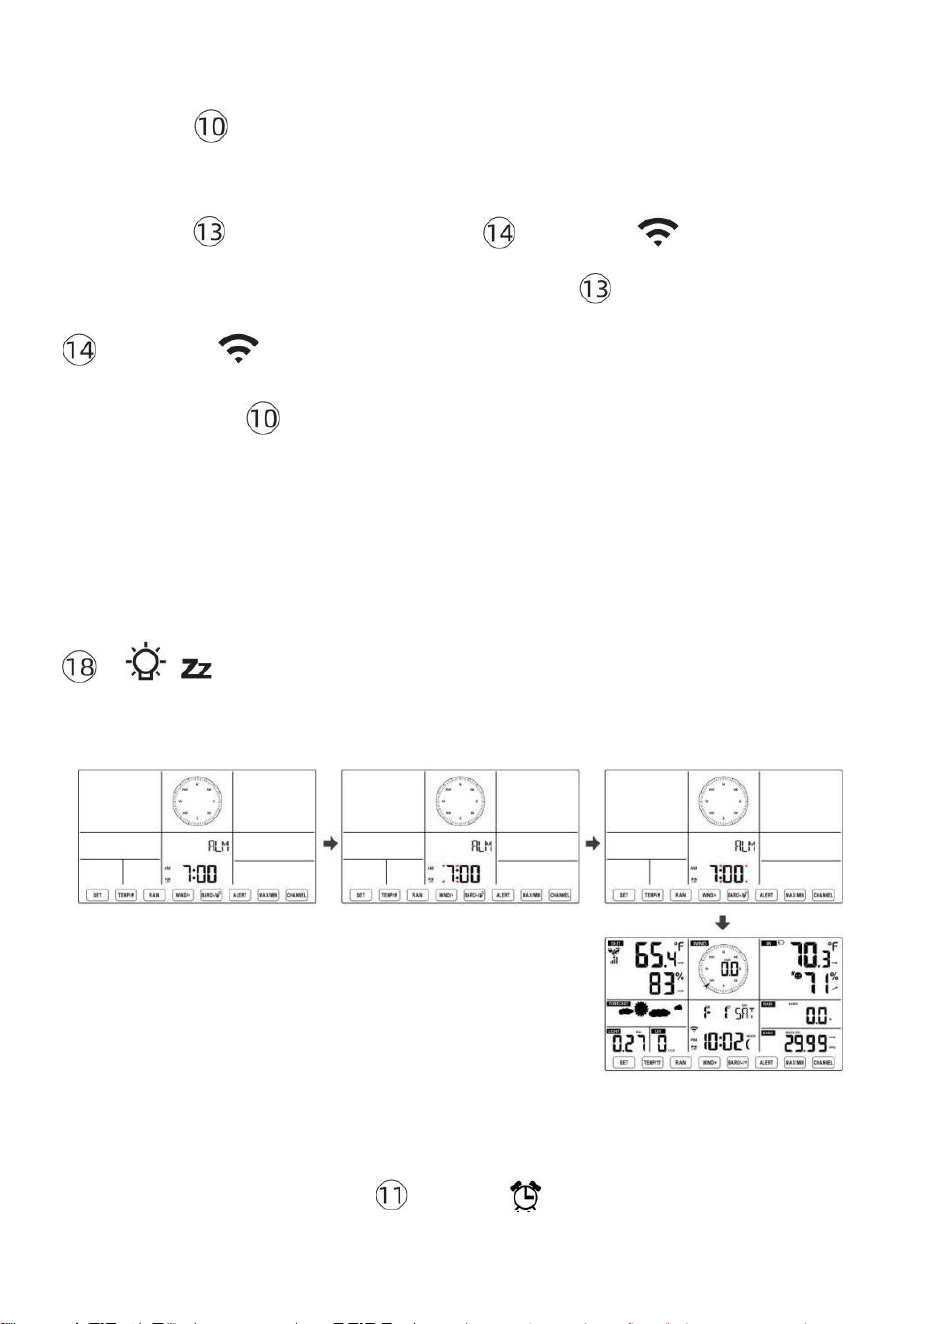
- 40 -
régler les heures d'alarme rapidement.
● Presse 【 SET 】 bouton pour sélectionner minute de Alarme.
Minute d'alarme commence à clignoter.
● Presse 【 VENT/+ 】 bouton ou 【 BARO/-/ 】 bouton pour
définir le requis minutes de l'alarme. Maintenez 【 VENT/+ 】 bouton ou
【 BARO/-/ 】 bouton pour régler les minutes de l'alarme rapidement.
● Appuyez sur 【 SET 】 bouton pour enregistrer tous les
paramètres et quitter affichage normal mode.
NOTE: S'il y a est aucune opération valide dans les 2 0 secondes, ça se
fera automatiquement retour à la affichage normal mode à partir du
réglage mode. Pendant le réglage paramètres, vous pouvez presse
【 】 LUMIÈRE / SNOOZE bouton à retour à normale afficher
mode .
Désactiver/Activer l'alarme
● Dans alarme temps afficher ,
appuyer sur désactivé .
【 TEMPÉR
ATURE /
】 bouton à sélectionner le
Alarme sur ou
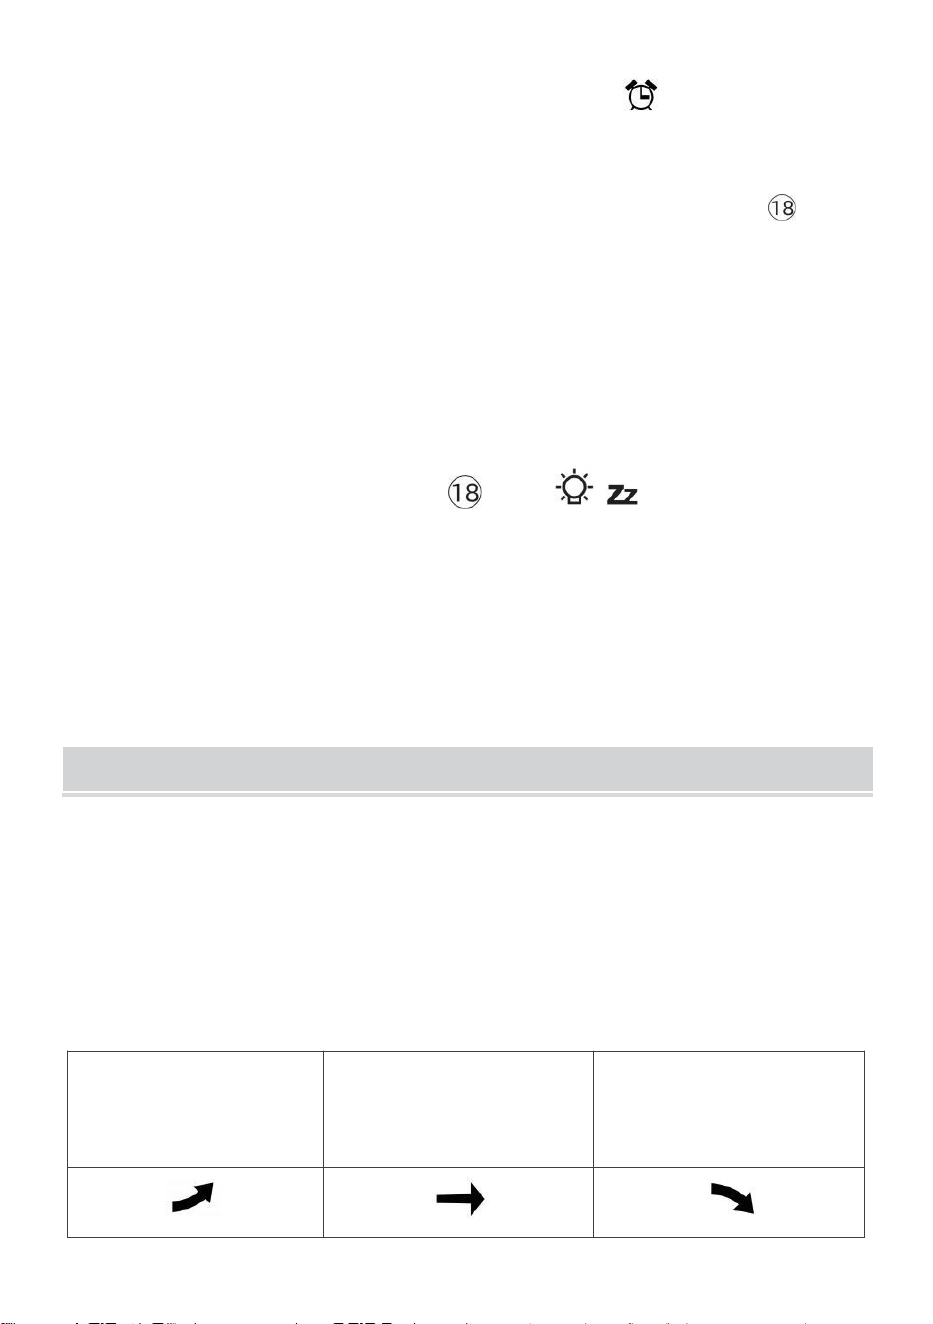
- 41 -
● Si le alarme est sur , c'est correspondant alarme icône volonté être
montré sur l' affichage.
● Quand le alarme est sonnerie , presse n'importe lequel boutons sauf 【
E
nfant j
】 LUMIÈRE/SNOOZE bouton pour arrêter le signal d'alarme. Il est pas
nécessaire à réactiver l'alarme. Ce sera sonne encore une fois temps suivant jour.
Somnoler Fonction
Quand le alarme anneaux , presse 【 LUMIÈRE / RAPPEL
D'ALARME 】 bouton à pause l'
alarme . Le somnoler indicateur icône
z 2
continue de clignoter . alarme volonté CV après
5 minutes .
TEMPÉRATURE
Tendance de la température/humidité
Les flèches de tendance vous permettent de déterminer
rapidement la température et l'humidité monte et descend dans un
une heure mise à jour période .
Tendance de la température
Température a
ressuscité > 1°C/2° F dans le
passé
heure
Température a pas
modifié plus que
1°C/2° F dans le passé heure
Température a
déchu < 1°C/2° F dans le passé
heure

- 41 -
Tendance de l'humidité

- 42 -
Humidité
s'est levé >
3% dans le
passé heure
Humidité a pas
modifié plus que 3% dans
le passé heure
Humidité est
tombé < 3%
dans le passé
heure
Confort intérieur Indice
Le le confort intérieur affiche une pictural représentation basée sur la
température de l'air intérieur et niveaux d'humidité pour déterminer le
confort approximatif niveau.
Aussi froid
Confortable
Aussi chaud
PRESSION
Pression barométrique Afficher
En temps normal
mode, presse et
pression relative.
【 BARO/-/ 】 interrupteur à bouton entre
absolu
Absolu
La pression atmosphérique absolue de votre emplacement.
Relatif
La pression atmosphérique relative est basé sur le mer
niveau.
Tendance de la pression

- 42 -
Les flèches de tendance vous permettent de déterminer rapidement si
pression e est soulèvement ou chute dans une mise à jour d'une
heure période.
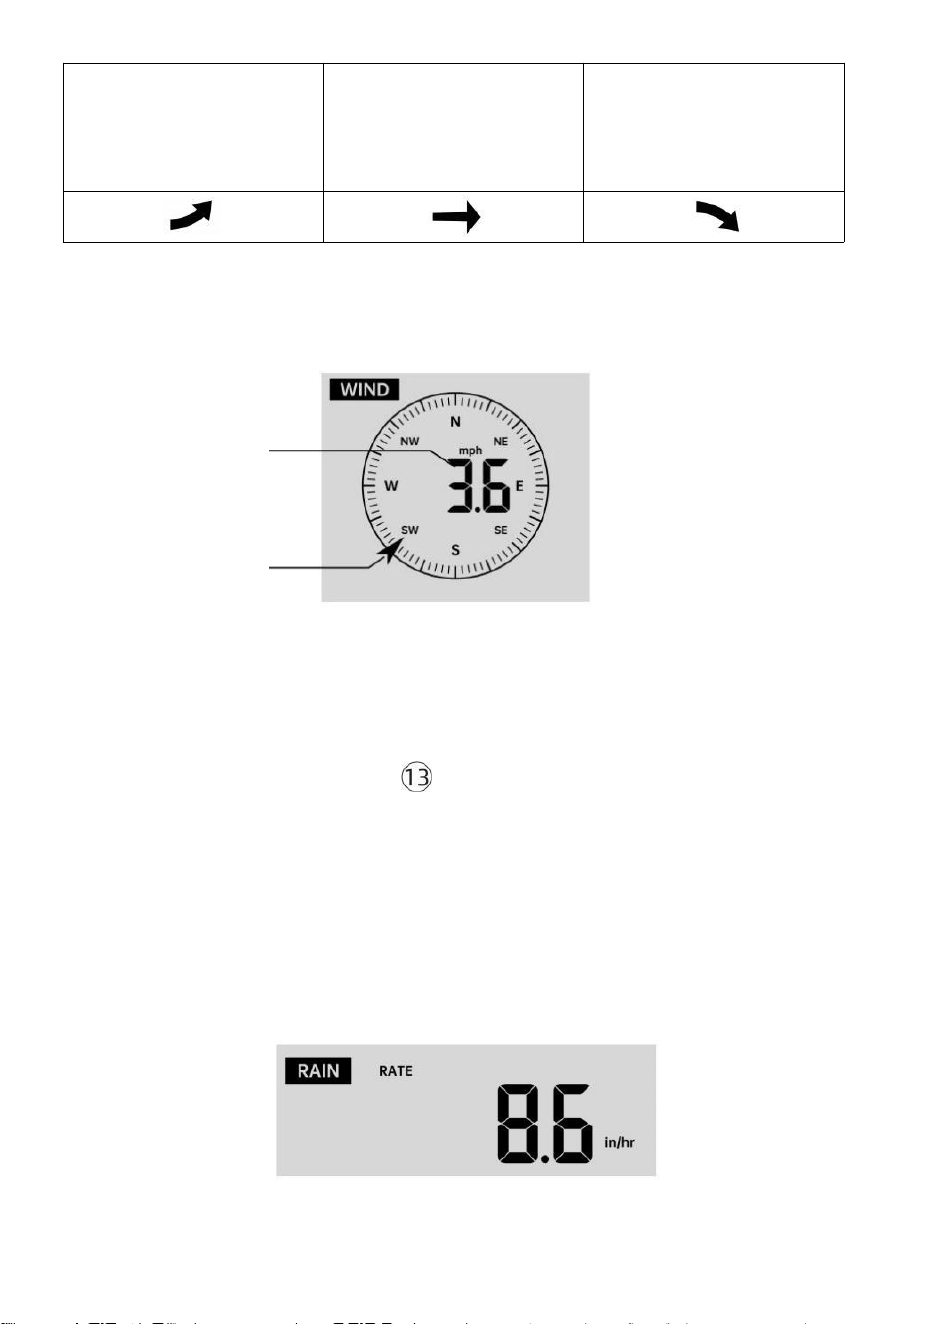
- 43 -
La pression a
augmentation >
2hpa/0,06inHg dans
le passé heure
La pression a pas changé
plus de 2hpa/0,06inHg
dans le passé heure
Pression a
chute > 2hpa/0,06inHg dans
le passé heure
VENT
Vent Afficher
Moyenne/raf
ale vent
vitesse
Vent en temps réel
indicateur de direction
Sélection du mode d'affichage du vent
En affichage normal mode,
presse
【
WIND/+
】
pour basculer entre
vitesse moyenne actuelle du vent, vitesse des rafales et direction du
vent.
PLUIE
Affichage des précipitations

- 43 -
Le Les précipitations montrent information concernant les précipitations
et taux de pluie .
Sélectionnez le Affichage des précipitations Mode
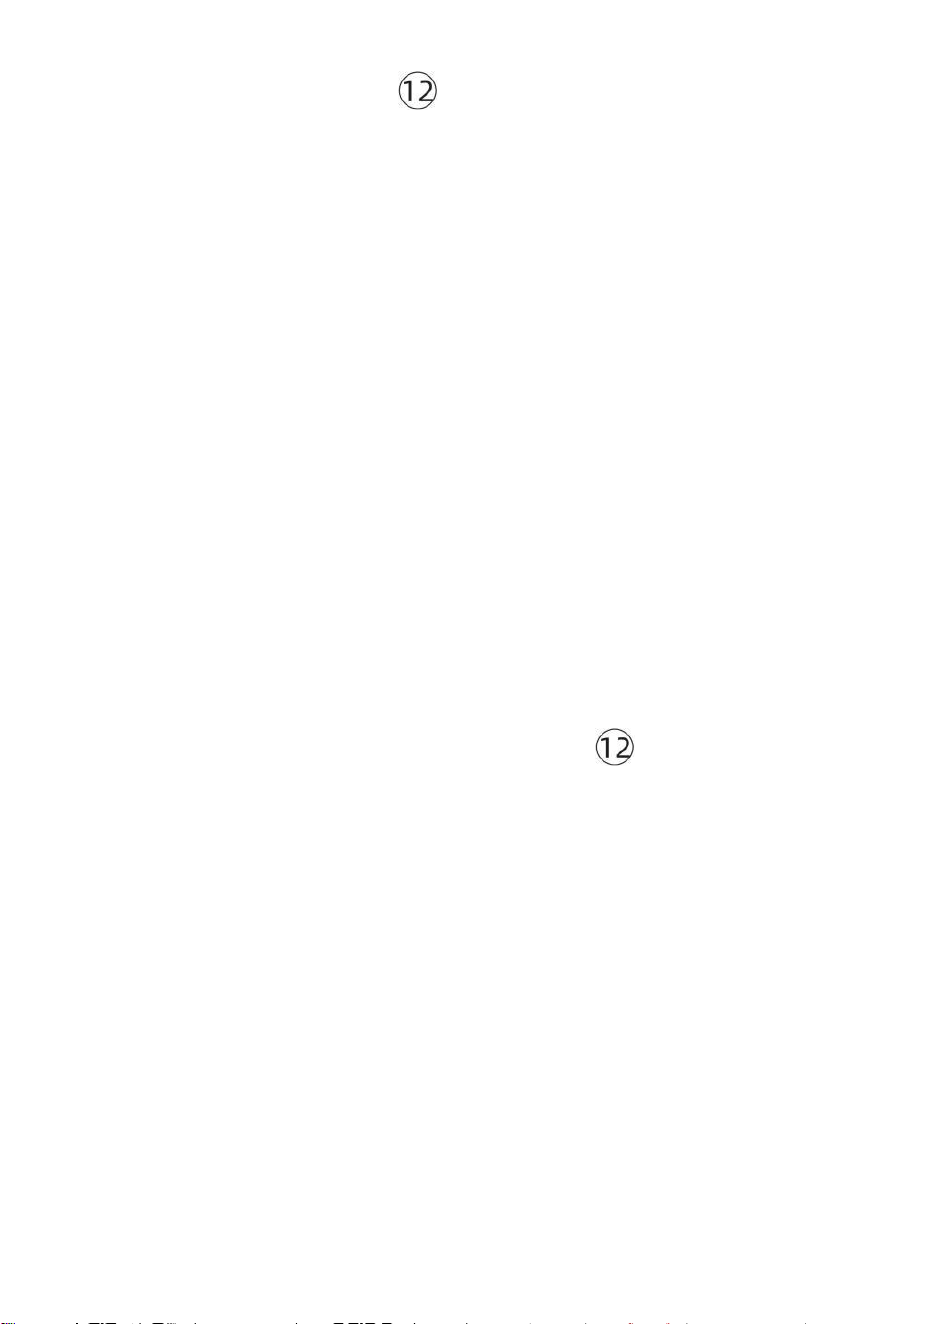
- 44 -
【 RAIN 】 pour basculer entre Pluie
Taux, Pluie Événement, Pluie Toutes les heures, Pluie Tous les jours,
Pluie hebdomadaire, Pluie Mensuel et Pluie totale.
Augmentations de pluie Définition
Pluie Taux : actuel précipitations taux i n le passé heure.
Événement pluvieux : pluie continue, et se réinitialise à zéro si chute de
pluie accumulation est
moins que 10 mm (0,039 po) dans un 24 heures période.
Pluie quotidienne : Précipitations totales depuis minuit (0 0:00)
Hebdomadaire Pluie : Précipitations totales pour la semaine calendaire
en cours et réinitialisables sur Dimanche matin à minuit
(Du dimanche au Samedi)
Mensuel Pluie : Précipitations totales pour le mois calendaire en cours,
et réinitialiser sur le premier jour de la Mois.
Total Pluie : Précipitations totales depuis le dernier réinitialiser.
Réinitialiser le total Record de précipitations
En affichage normal mode, appuyez et maintenez
【
PLUIE
】
bouton sur 2 secondes pour réinitialiser le pluie enregistrer .
NOTE:
La réinitialisation de la pluie hebdomadaire réinitialise également la
tous les jours pluie.
Réinitialisation de la pluie mensuelle également réinitialise le
quotidien et l'hebdomadaire pluie.
La réinitialisation de la pluviométrie totale réinitialise également les
précipitations mensuelles, hebdomadaires et tous les jours pluie.
MÉTÉO
Indice météorologique
In normal display mode, press
- 44 -
En lisant la météo Affichage de l'index, vous pouvez appuyer sur 【 TE
MPÉRATURE/ 】
bouton pour parcourir les différents indices météorologiques dans
l'ordre suivant : Sentiments J'aime > Chaleur Index > Vent Froideur

- 45 -
Sentiments Comme
Le Sentiments L'indice de température détermine la température
ressentie à l'extérieur, en tenant compte de facteurs comme la vitesse du
vent, pression, température et humidité .
Refroidissement éolien
Le refroidissement éolien est déterminé par une combinaison des
données de température et de vitesse du vent du capteur météorologique
sans fil .
REMARQUE : Uniquement lorsque la température est inférieure à
50 ℉ (10 ℃ ) et la vitesse du vent est supérieure à 4,8 km/h (3
mph), affichera la valeur du refroidissement éolien,
sinon il affichera « --.-«.
Chaleur Indice
Le Chaleur L'indice est déterminé par le capteur météo sans fil
température et humidité lectures.
Rosée Indiquer
Le point de rosée est la température à laquelle une température donnée
colis de humidité air
doit être refroidi, à température barométrique constante pression, pour
que la vapeur d'eau
se condensent en eau. L'eau condensée est appelée rosée. d indiquer
est une température de saturation.
La rosée La température ponctuelle est déterminée par la température et
données d'humidité provenant du capteur météo sans fil .
Prévisions météorologiques
Le baromètre intégré peut remarquer les changements de pression
atmosphérique et, en fonction des données collectées, peut prédire
la météo conditions.
Il y a 6 icônes météo --- Ensoleillé, Partiellement Nuageux, Nuageux,
Pluvieux, Orageux et Neigeux.
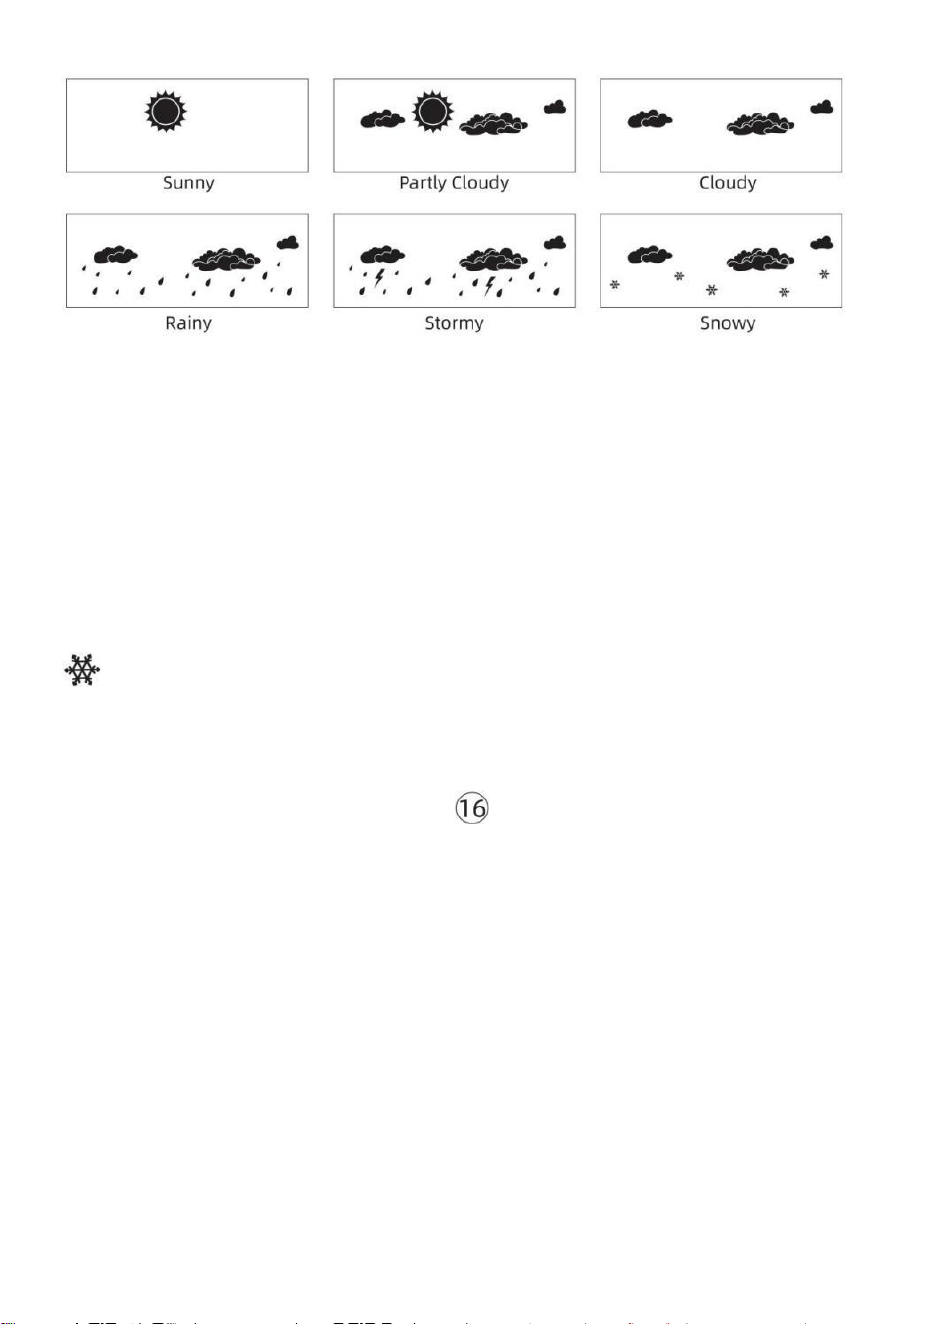
- 46 -
NOTE:
La précision d'une prévision basée sur la pression générale il s'agit
de 65-70%. Les prévisions ne sont pas garanti.
Ce n'est peut-être pas le cas reflètent nécessairement la actuel
situation.
Glace Alerte
Lorsque la température extérieure est inférieur à 1 ℃ /33,8 ℉ , l'icône
du flocon de neige
apparaîtra sur le Écran LCD afficher.
MAX/MIN
● En affichage normal mode, presse Bouton de commutation
【
MAX/MIN
】
entre valeur maximale et minimale.
NOTE: S'il y a est aucune opération valide dans 10
secondes, il reviendra automatiquement à l' affichage
normal mode.

- 46 -
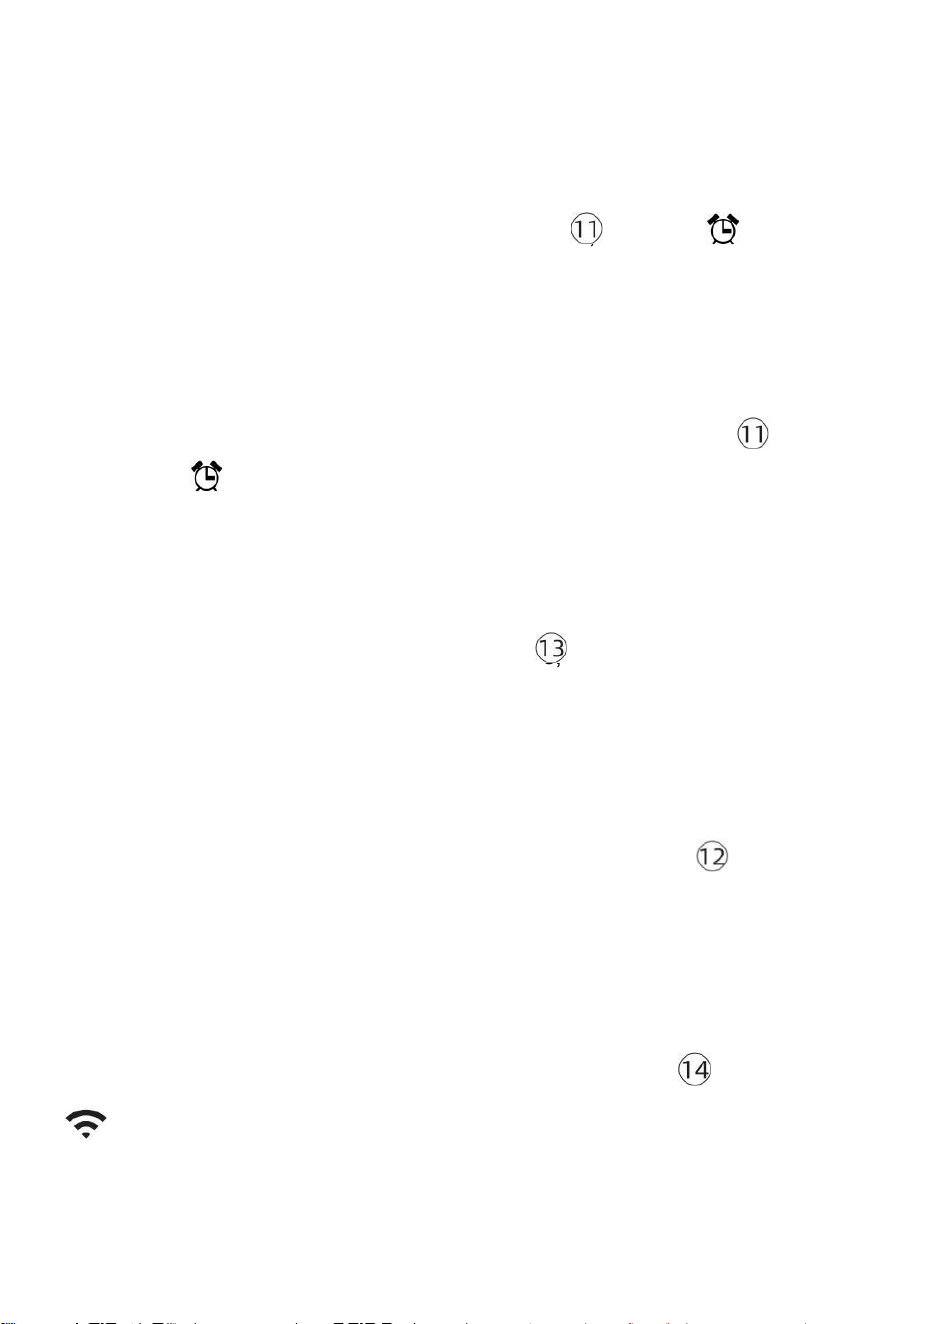
- 47 -
Pour voir le MAX/MIN accumulé
● Afficher Sentir comme, le refroidissement éolien, Chaleur Indice,
Rosée Valeurs max/min des points
1.) Lorsque les valeurs maximales sont affichées,
presse
【 TEMPÉR
ATURE /
】 bouton
pour
échange de visualisation de la température extérieure → Envie de →
Refroidissement éolien → Chaleur Index → Rosée Point → Température
extérieure.
2.) Lorsque les valeurs minimales sont affichées , appuyez sur 【 TEM
PÉRATURE/ 】 bouton pour
température extérieure → Envie de → Refroidissement éolien → Chaleur
Index → Rosée Point → Température extérieure.
● Afficher la vitesse du vent, les rafales de vent Valeurs maximales
Lorsque les valeurs maximales sont affichées,
presse
Bouton
【
WIND/+
】
pour
visualisation des échanges entre les Vitesses du vent MOYENNES et
RAFALES. ● Afficher Pluie Taux, Tous les jours Pluie,
hebdomadaire Pluie et Mensuel Pluie Max Valeurs
Lorsque les valeurs maximales sont affichées, appuyez sur Bouton 【
PLUIE
】
pour
visualisation des échanges Pluie Évaluer → Tous les jours Pluie →
Hebdomadaire Pluie → Mensuel Pluie.
● Afficher l'absolu et Relatif pression Valeurs max /min
1.) Lorsque les valeurs maximales sont affichées, presse 【 BARO/-/
】 bouton pour visualisation des échanges entre Absolu et Relatif
pression.

- 47 -
2.) Lorsque les valeurs minimales sont affichées, appuyez sur 【 BARO
/-/ 】 bouton à
visualisation des échanges entre Absolu et Relatif pression.
● Afficher capteur de température et de canaux intérieurs et autres
humidité Valeurs Max/Min
1.) Lorsque les valeurs maximales sont affichées, presse Bouton
【
C
ANAL 】 pour
visualisation des échanges température et capteur(s) intérieur(s) et
extérieur(s) appariés humidité.

- 48 -
2.) Lorsque les valeurs minimales sont affichées,
presse
【 CANAL 】 bouton
pour
visualisation des échanges température et capteur(s) intérieur(s) et
extérieur(s) appariés humidité.
NOTE: Si d'autres capteurs de canal étaient couplés, cela pourrait
afficher le valeurs de température et d'humidité max/min des
autres canaux . Si autre canal les capteurs n'étaient pas jumelé, il ne
montrerait que le courant max/min intérieur température et valeurs
d'humidité.
Pour effacer le MAX/MIN Données
Enregistrer
● Pour effacer la valeur maximale ,
presse et prise
Bouton 【 MAX/MIN 】
sur r 2
secondes pendant les valeurs maximales
sont affichées.
● Pour effacer la valeur minimale ,
presse et prise
Bouton 【 MAX/MIN 】 sur
2
secondes pendant les valeurs minimales
sont affichées.
Salut/Basse PARAMÈTRES D'ALERTE
Pour voir le Paramètre d'alerte
● En mode d'affichage normal, appuyez sur 【 ALERT 】 bouton de
commutation entre Salut alerte et Alerte basse paramètre valeur.

- 48 -
Pour définir l'alerte
● En affichage normal mode, appuyez sur et prise Bouton 【 ALERTE
】 sur 2
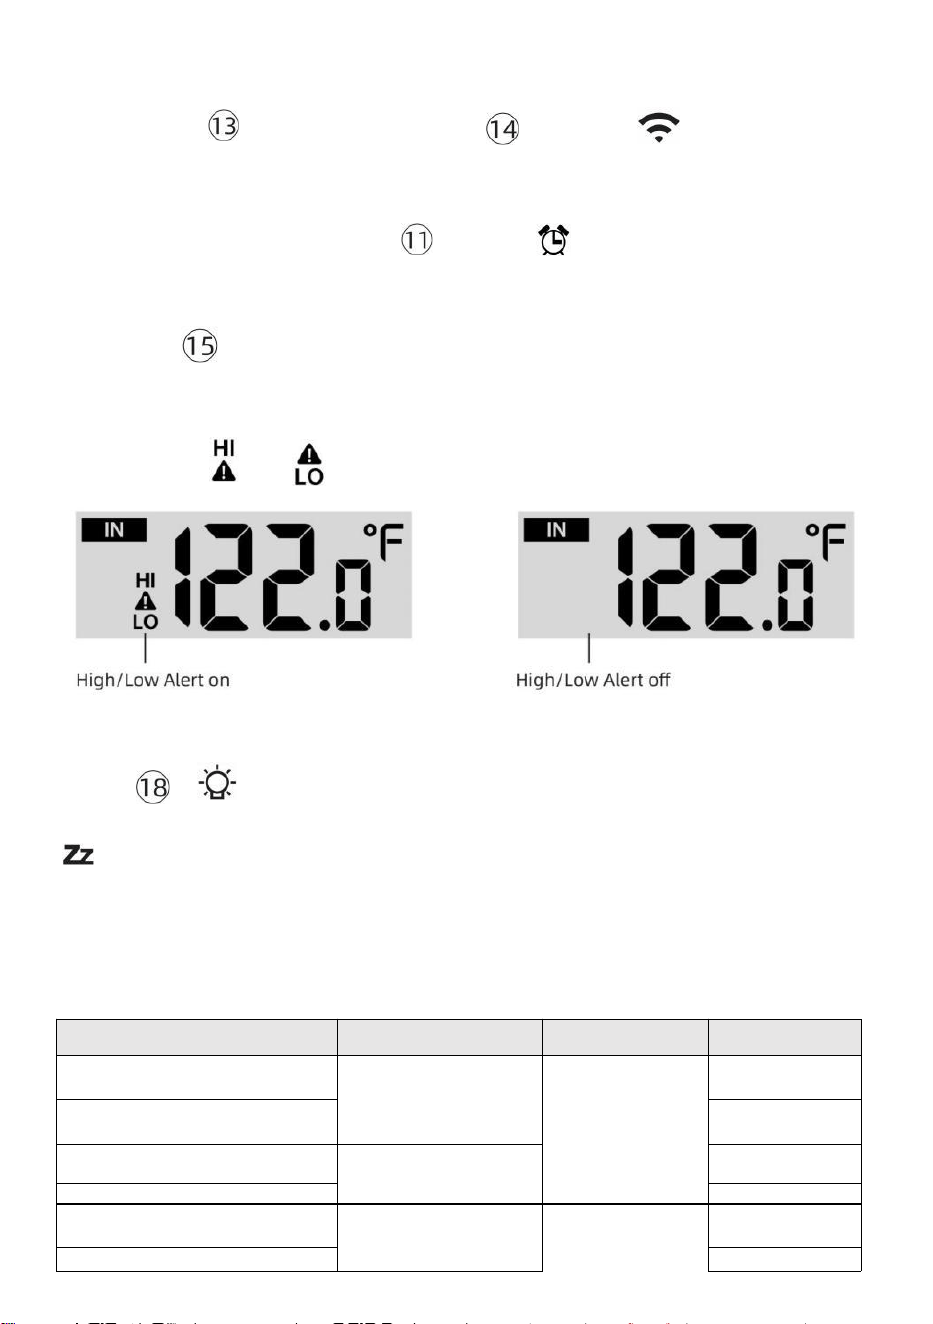
- 49 -
secondes pour accéder au paramètre d'alerte mode.
● Presse Bouton【 WIND/+ 】 et 【 BARO/-/ 】 appuyez sur le
bouton pour régler le
valeur vers le haut ou vers le
bas, alors presse alerte.
【 TEMPÉR
ATURE /
】 bouton pour
allumer/éteindre le
● Presse Bouton
【
ALERTE
】
pour confirmer et saut à suivant
paramètre.
● Le icône ou s'affichera lorsque l'alerte est sur.
● Pour quitter le paramètre d'alerte mode à n'importe lequel temps,
presse 【
Bouton LIGHT/SNOOZE
】 . Le
L’ordre de réglage des alertes Hi/Lo
est affiché ci-dessous:
Alerte Paramètre
Commande
Paramètre Gamme
Section
d'affichage
Défaut
Température intérieure Salut
Alerte
-14.1 ℉ –122
℉ (-9,9 ℃ –
50 ℃ )
Intérieur
température &
Humidité
De plein air
température &
Humidité
122 ℉ (50 ℃ )
Température intérieure Lo
Alerte
14.1 ℉ (-9,9 ℃
)
Humidité intérieure Salut
Alerte
1%–99%
-40 ℉ –158
℉ (-40 ℃ –
70 ℃ )
80%
Intérieur Alerte de faible
humidité Température
extérieure Salut Alerte
40%
104 ℉ (40 ℃ )
Température extérieure Lo
32 ℉ (0 ℃ )

- 49 -
Vitesse du vent
Alerte
Humidité extérieure Salut
Alerte
1%–99%
0–50 m/s
2–180 km/h
1 à 111 mph
1–97 noeuds 0-60 bft
80%
Humidité extérieure Lo Alerte
Haut Vitesse moyenne du vent
Alerte
40%
17
m/s
62km/h
38 mph
33 noeuds 20bft
Rafales de vent violentes
alerte
0–50 m/s
2–180 km/h
1 à 111 mph
1–97 noeuds
0-60 bft
Vitesse du vent
17 m/s
62km/h
38 mph
33 noeuds 20bft
- 50 -
Alerte de chute de pression
1 hpa–10hpa
0,03 à 0,3
poHg 0,7 à
7,5 mmHg
Chute du
baromètre
3hpa
0,09
poHg 2,2
mmHg
Haut Pluie Alerte de taux
1 mm/h à 1 000
mm/h (0,04 po/h–
39 en/h)
Précipitations
Taux
101 mm/h
(4 en/h)
Haut Tous les jours Alerte
pluie
1 mm à 1 000
mm (0,03 po–
39,37 dans)
Précipitations
Taux
101
mm (4
dans)
Indice UV Haut Alerte
1-15
UV Indice
10
Lumière Intensité Haut Alerte
1 Klux–200,0 Klux
7-1580 W/M²
0-185Kfc
Lumière Intensité
100 Klux
790 W/M²
92 KFC
Pour faire taire le Hi/Lo Alerte Alarme
Appuyez sur le 【 LIGHT/SNOOZE 】 bouton en haut de
la console d'affichage pour faire taire l'alarme, ou elle s'arrêtera
automatiquement tourner après un minute.
REMARQUE : une fois l'alerte déclenchée, l'alarme retentira pendant
une minute et l'alerte associée L'icône et les relevés météo
clignoteront.
Si l'alarme d'alerte s'éteint automatiquement après une minute au
lieu d' être désactivé manuellement, l' alerte associée icône et les
lectures seront continuez à clignoter jusqu'à ce que la lecture soit
dehors de la alerte gamme.
L'alarme d'alerte météo se déclenchera une fois que les relevés
chuteront dans alerte portée à nouveau.
RÉTROÉCLAIRAGE
Rétroéclairage de l'écran
Avec DC Adaptateur
Le le rétroéclairage ne peut être continuellement allumé lorsque le
Adaptateur CC est
allumé en permanence. Lorsque le L' adaptateur CC est déconnecté, le
rétroéclairage peut être temporairement activé.
- 50 -
Presse
【
LIGHT/SNOOZE
】
bouton pour régler le
rétroéclairage
luminosité, Haut, bas et
Désactivé. Sans DC
Adaptateur
Presse Lebouton【 LIGHT/SNOOZE 】 allume
temporairement l'appareil

- 51 -
rétroéclairage pour 15 secondes.
INDICATEUR DE BATTERIE FAIBLE
Si l'icône de l'indicateur de batterie faible est affiché dans le température
extérieure et la section humidité ou la section CH correspondante de
l'écran LCD console
afficher, ceci indique que les piles de votre/vos capteur(s) météo sans fil
sont faibles et devraient être remplacé. Assurez-vous de remplacer
tous piles en même temps.
REDÉMARRAGE DE L'USINE
S'il y a est un dysfonctionnement, le Usine Redémarrage est un
excellent moyen de retourner votre station pour « sortir de la état de la
boîte".
1.) Supprimer tout alimentation (piles et Adaptateur CC) à partir de
capteurs extérieurs et station météo.
2.) Suivez l'opération « RÉGLAGE « MONTER LA STATION MÉTÉO »
à commencer la paire la capteur.
SOINS ET ENTRETIEN
1.) Nettoyez le pluviomètre tous les 3 mois. Tourner l'entonnoir
dans le sens inverse des aiguilles d'une montre et soulevez pour exposer
le pluviomètre mécanismes, et faire le ménage avec un chiffon humide.
Retirez toute la saleté, les débris et insectes. Si bogue l'infestation est un
problème, vaporisez le capteur légèrement avec insecticide.

- 52 -
2.) Nettoyez le Lumière Intensité/ Capteur UV et panneau solaire tous
les 3 mois avec de l'humidité tissu.
3.) Lors du remplacement des piles, appliquez un produit anticorrosion
préventif composé sur les bornes de la batterie.
- 53 -
SPÉCIFICATION
MÉTÉO GARE
Général Spécification cations
Dimension
7,5 x 5 x 1.1 pouce (191,6 x 127 x 28,8 mm)
Pouvoir source
AC-DC 5 V, Adaptateur 1A (compris)
Batterie
3 x AAA batterie ( pas compris)
Soutien capteurs
1 x 7 en 1 capteur ( compris)
Wi- Communication Fi Spécifications
Wi-Fi Standard
802. 11 b/g/n
Wi-Fi opération fréquence
2,4 GHz
Appareils pris en
charge pour
installation Interface
utilisateur
Intégré Wi-Fi avec WAP mode intelligent appareil , y
compris ordinateurs portables, ordinateurs, téléphones
intelligents et tablettes intelligentes
Recommander Web
navigateur pour installation
Interface utilisateur
Dernier Version de n'importe lequel Web navigateur que prend
en charge HTML 5
Temps Spécifications fonctionnelles
Temps afficher
HH: MM
Format horaire
12 heures ou 24 heures heure
Date afficher
JJ/MM ou MM/JJ
Temps méthode de
synchronisation
Synchronise avec atomique horloge
Temps zones
GMT±12
Heure d'été
MARCHE/ARRÊT
Spécifications de l'affichage et des fonctions du baromètre
Unités du baromètre
hPa, inHg et mmHg
Plage de mesure
600 – 1100 hPa (réglage relatif gamme 930 – 1050 hPa)
Précision
700 -1100 hPa±5 hPa/600 -696 hPa±8 hPa
20,67 – 32,48 inHg±0. 15 inHg/ 17,72 -20,55 pouces de
mercure ±0,24 inHg 525 -825 mmHg±3,8 mmHg /450 -522
mmHg±6 mmHg Typique à 77 ℉ (25 ℃ )
Météo prévision
Ensoleillé, En partie Nuageux, Nuageux , Pluvieux, Orageux et
Neigeux
Afficher mode
Actuel
Mémoire mode
Tous les jours Max/ Min
Alerte
Pression changement alerte
Intérieur/ Spécifications de l'affichage et des fonctions de la température extérieure
Unité de température
°C et °F
Intérieur Afficher gamme
-14,1 ℉ – 122 ℉ (-9,9 ℃ – 50 ℃ )
De plein air Afficher gamme
-40 ℉ – 158 ℉ (-40 ℃ – 70 ℃ )
Dans/ Dehors précision
50– 122 ℉ ± 1,8 ℉ / 10 – 50 ℃ ± 1
℃ -4 - 50 ℉ ±2,7 ℉ / -20 – 10 ℃ ±
1,5 ℃ autres : ±3,6 ℉ / ±2 ℃
- 53 -
Afficher mode
Actuel
Mémoire mode
Tous les jours Max/ Min
Alerte
Haut/Bas température alerte
- 54 -
Intérieur/ Deplein air Humidité Afficher & Fonction Caractéristiques
Humidité unité
%
Afficher gamme
1 – 99%
Dans/Dehors précision
40 – 80% HR ± 5% HR à 25 ℃ (77
℉) Autres : ± 8% RH à 25 °C (77
°F)
Afficher mode
Actuel
Mémoire mode
Tous les jours Max/ Min
Alerte
Haut/Bas humidité alerte
Affichage de la vitesse et de la direction du vent & Fonction Caractéristiques
Vent Vitesse unité
mph, MS, km/h, noeuds
Afficher gamme
0 -112 mph, 50 m/s, 180 km/h, 97 noeuds
Précision de la vitesse
< 5 m/s : ±0,5 m/s, >5 m/s : ±10% (quel que soit est plus
grand)
Afficher mode
Rafale/ Moyenne
Mémoire mode
Tous les jours Rafales/Moyenne
Alerte
Haut Vent Vitesse Alerte ( Rafale / Moyenne )
Vent direction
16 instructions
Affichage de pluie et Fonction Caractéristiques
Unité de précipitations
mm, dans
Gamme de précipitations
0 – 12999 mm (0 – 511,7 dans)
Précision de précipitations
±7%
Afficher mode
Actuel
Mémoire mode
Tous les jours Max
Précipitations afficher mode
Horaire/ Tous les jours/ Hebdomadaire/ Mensuel/ Total
Précipitations
Alerte
Haut Tous les jours Précipitations alerte
Spécifications de l'affichage et des fonctions de l'indice UV
Afficher gamme
0 - 16
Afficher mode
Actuel
Mémoire mode
Tous les jours Max
- 54 -
Alerte
Haut UVI alerte
Intensité lumineuse Spécifications d'affichage et de fonctionnement

- 55 -
Lumière Intensité unité
Le Klux Klan, KFC et F/
m2
Afficher gamme
0 – 200 Klux
Afficher mode
Actuel
Mémoire mode
Tous les jours Max
Alerte
Haut Lumière intensité alerte
de l'index météo et spécifications des fonctions
Indice météorologique mode
On dirait du vent froid, de la chaleur indice et rosée indiquer
Mode d'affichage
Actuel
Mode mémoire
Max/min quotidien
SON EXTÉRIEUR SANS FIL 7 EN 1
Dimensions
16 x 13,8 x 14,4 pouces (408 x 396 x 367 mm)
Puissance principale
3,6 V Ni-MH rechargeable pack de batterie
Alimentation de secours
Énergie solaire
Données météorologiques
température, humidité, vent vitesse, vent direction,
précipitations, UVI et l'intensité lumineuse
RF fréquence
915 MHz
de transmission RF
492 pieds (150m)
Intervalle de transmission
Chaque20 secondes pour les UV , l'intensité lumineuse , la
vitesse du vent , données de température, d'humidité , de
pluie et de vent données de direction
Température de fonctionnement
-40 ℉ jusqu'à 140 ℉ / 40 ℃ jusqu'à 60 ℃
Outils supplémentaires
requis pour capteur
Oui
- 56 -
DÉPANNAGE
Problème
Solution
Sans fil capteur fait
pas communiquer le
météo gare
Le sans fil capteur peut avoir initié correctement, et le
données est inscrit par le météo gare comme invalide, et le
météo
gare doit être réinitialiser.
Avec une question ouverte trombone, appuyez sur le
RÉINITIALISER bouton pendant 3 secondes à complet le
afficher de le tension . DIRIGÉ volonté clignoter tous les 20
secondes.
Si DIRIGÉ fait ne clignote pas tous les 20 secondes, sortir le piles
et attendez 5 minute, alors que revêtement le solaire panneau à
vidange la tension.
Mettre piles dos dans et resynchroniser le météo gare et
resynchroniser la station météo (Se référer à Page 18
CA PT EU R ANN U L A I RE RE-PAI ) avec le sans fil capteur à
propos 10 pieds (3m) loin .
Le La LED du capteur sans fil s'allume flash chaque 20
secondes. Si la LED est toujours pas clignotant chaque 20
secondes, remplacer le nouveau
piles dans le sans fil capteur.
Si le les piles étaient récemment remplacé, vérifier le polarité. Si le
sans fil capteur est clignotant chaque 20 secondes, procéder à le
suivant étape.
Là peut être un temporaire perte de communication exigible à
réception perte en rapport à ingérence ou autre emplacement
facteurs,
Ou piles peut avoir a été modifié dans le sans fil capteur et le météo
gare a pas a été réinitialiser. Le solution peut être aussi simple
comme alimenter vers le bas et en haut le météo gare ( retirer DC
pouvoir et piles), attendez 30 secondes, et réinsérer DC pouvoir
et piles).
Intérieur et De plein
air température
faire pas accepter
Permettre jusqu'à un heure pour le sans fil capteurs à stabiliser
exigible à
signal filtrage. Le intérieur et de plein air température capteurs
devrait être conforme à ±4 ℉ (±2 ℃ ) (la précision du capteur est de ±2
℉ (±1 ℃ )
Utiliser le étalonnage fonctionnalité à correspondre à la
intérieur et de plein air température à un connu source.
Capteur de température
lit aussi haut dans le
jour
Faire certain que le capteur sans fil est pas aussi fermer à chaleur
générateur sources ou des sténoses, tel comme bâtiments, trottoir,
murs, ou air conditionnement unités.
- 57 -
Problème
Solution
Pluviomètre
rapports il pleut
quand il est pas
il pleut.
Une solution de montage instable (balancement) dans le montage pôle)
peut
résultat dans le godet basculant de manière incorrecte augmentation
des précipitations. Faire bien sûr vous avez un niveau stable montage
solution. (Se référer à page 16
RÉGLAGE DU CAPTEUR SANS FIL 7 EN 1 ( LEVEL)
Le Wi-Fi fait ne pas
afficher sur la météo
gare
Vérifiez si votre routeur présente des problèmes.
1.) Vérifiez le symbole Wi-Fi sur l' écran. Si la connectivité sans
fil est réussie, l' icône Wi-Fi volonté être affiché dans le
temps déposé. 2.) Assurez-vous que les paramètres Wi-Fi de
votre modem sont corrects (réseau nom, et mot de passe)
3.) Assurez-vous que la station météo est branché dans
Alimentation CC. La station météo ne se connectera pas au Wi -Fi
lorsque alimenté par piles uniquement.
4.) La console uniquement prend en charge et se connecte à 2,4
GHz routeurs. Si votre propre 5GHz routeur, et il est un double l
groupe routeur, tu vas
il faut désactiver la bande 5 GHz et activer le 2,4 GHz bande.
5.) Le temps ne pas soutien invité réseaux.
Données non
rapport à
www.wunder
ground.com
ou
www.weatherc
loud.net
1.) Confirmez votre mot de passe ou votre clé est correct. Il est le
mot de passe toi inscrit sur Wunderground.com.
Wunderground.com. Votre mot de passe underground .com ne peut
pas commencer par des caractères non alphanumériques (un
limitation de
Wunderground.com, pas la station ). Par exemple, $worknet est ce
n'est pas un mot de passe valide, mais travail knet$ est valide)
2.) Confirmez votre station L'identification est correcte. La station
L'ID est tous casquettes, et le problème le plus courant est le
remplacement et O pour un 0 (ou vice versa). Exemple,
KCAPHOEM12, pas KCAPH0EM12.
3.) Assurez-vous que les données et l'heure sont correctes sur la
station météo. Si c'est incorrect, vous peut être signaler des
données anciennes, pas réel temps données.
4.) Assurez-vous de votre fuseau horaire est correctement réglé.
Si c'est incorrect, vous peut signaler des données anciennes, pas
réel données temporelles.
5.) Vérifiez votre paramètres du pare-feu du routeur. La météo
gare envoie des données via Port 80.

FCCSTATEMENT
- 58 -
Cet appareil est conforme à la partie 15 des règles de la FCC.
Fonctionnement est sujet aux deux conditions suivantes :
1. Cet appareil peut NE PAS causer de dommages interférence .
2. Cet appareil doit accepter n'importe quel ingérence reçu, y
compris interférence qui peut provoquer un fonctionnement
indésirable.
NOTE :
Cet équipement a ont été testés et jugés conformes aux limites pour un
Classe Appareil numérique B, conformément à Partie 15 des Règles de la
FCC. Celles-ci limites sont conçu pour fournir des informations raisonnables
protection contre nocif j'interfère dans un Résidentiel installation. Cet
équipement génère — et peut rayonner — radio énergie de fréquence et,
sinon installé et utilisé conformément à le
instructions, peut causer nocif interférence à communications radio .
Cependant, il y a aucune garantie que les interférences ne se
produit pas dans un installation particulière.
Si l'équipement ne cause pas de dommages nocifs interférence à
réception radio ou télévision , qui peut être déterminée en éteignant
l'équipement et sur, l'utilisateur est encouragé à essayer de corriger le
ingérence par un ou plus de ce qui suit mesures:
Réorienter ou déplacer le récepteur antenne.
Augmenter la séparation entre l'équipement et le récepteur.
Connectez le équipement dans un sortie sur un circuit différent de
que à dont le récepteur est connecté.
Consultez le revendeur ou un expérimenté radio/télévision
technicien pour aide.
AVERTISSEMENT : Les changements ou modifications apportés à ce unité
pas expressément approuvé par la fête responsable de la conformité
pourrait annuler la autorité de l'utilisateur à
faire fonctionner l'équipement.

FCCSTATEMENT
- 58 -
Fait En Chine


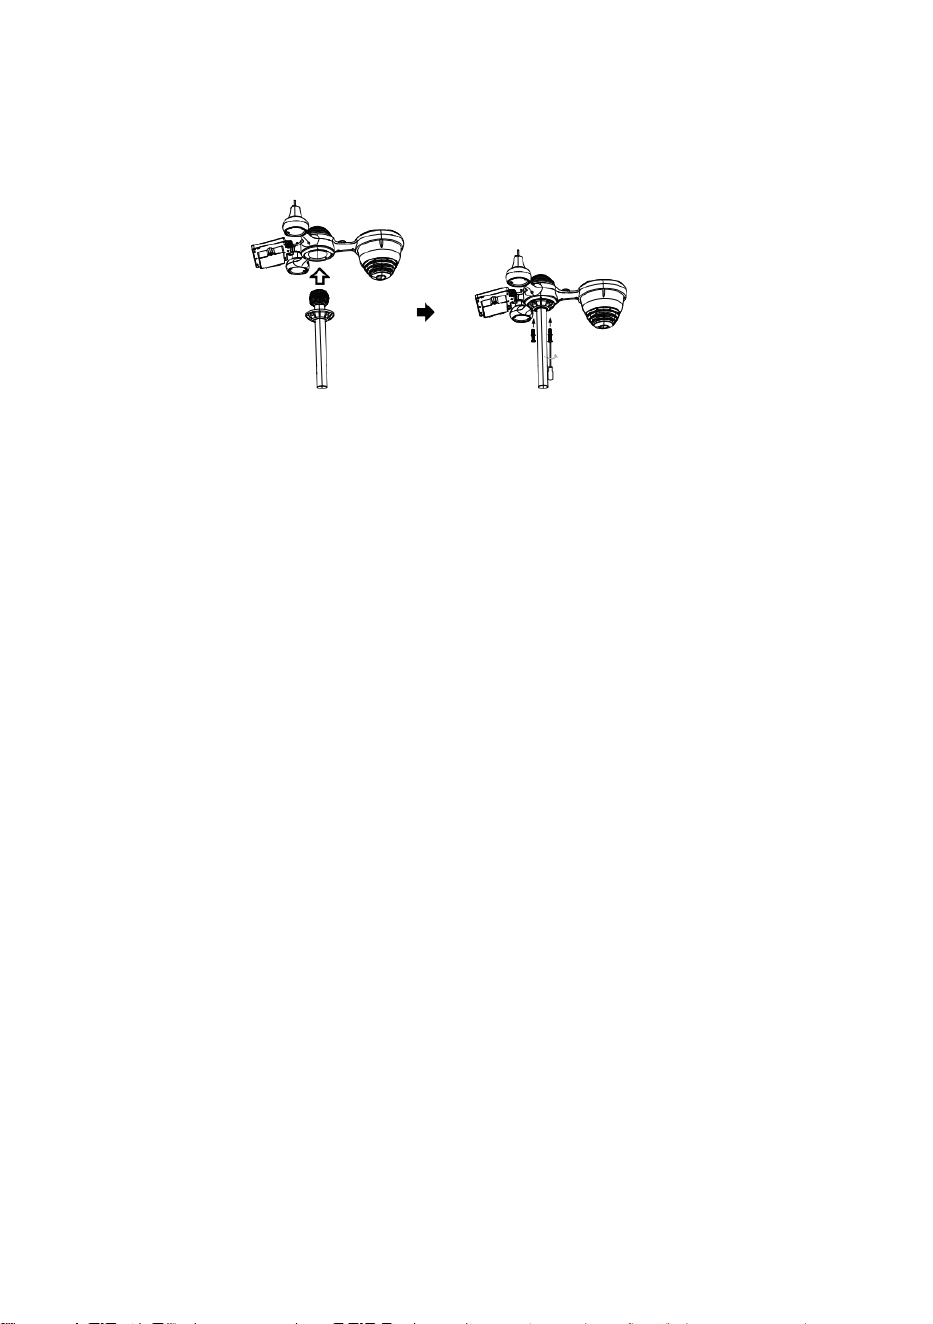
S
p
e
r
r
e
n
Kurzanleitung
⑤
E
I
N
R
I
C
H
T
U
N
G
D
E
R
R
A
I
N
C
O
L
L
E
①INSTALLING THE MOUNTING POLE
Secure the sensor onto a mounting pole (included) using the screws (included).

C
T
O
D
E
R
D
e
n
T
r
i
c
h
t
e
r
i
n
d
e
n
R
e
g
e
n
s
a
m
m
l
e
r
e
i
n
s
e
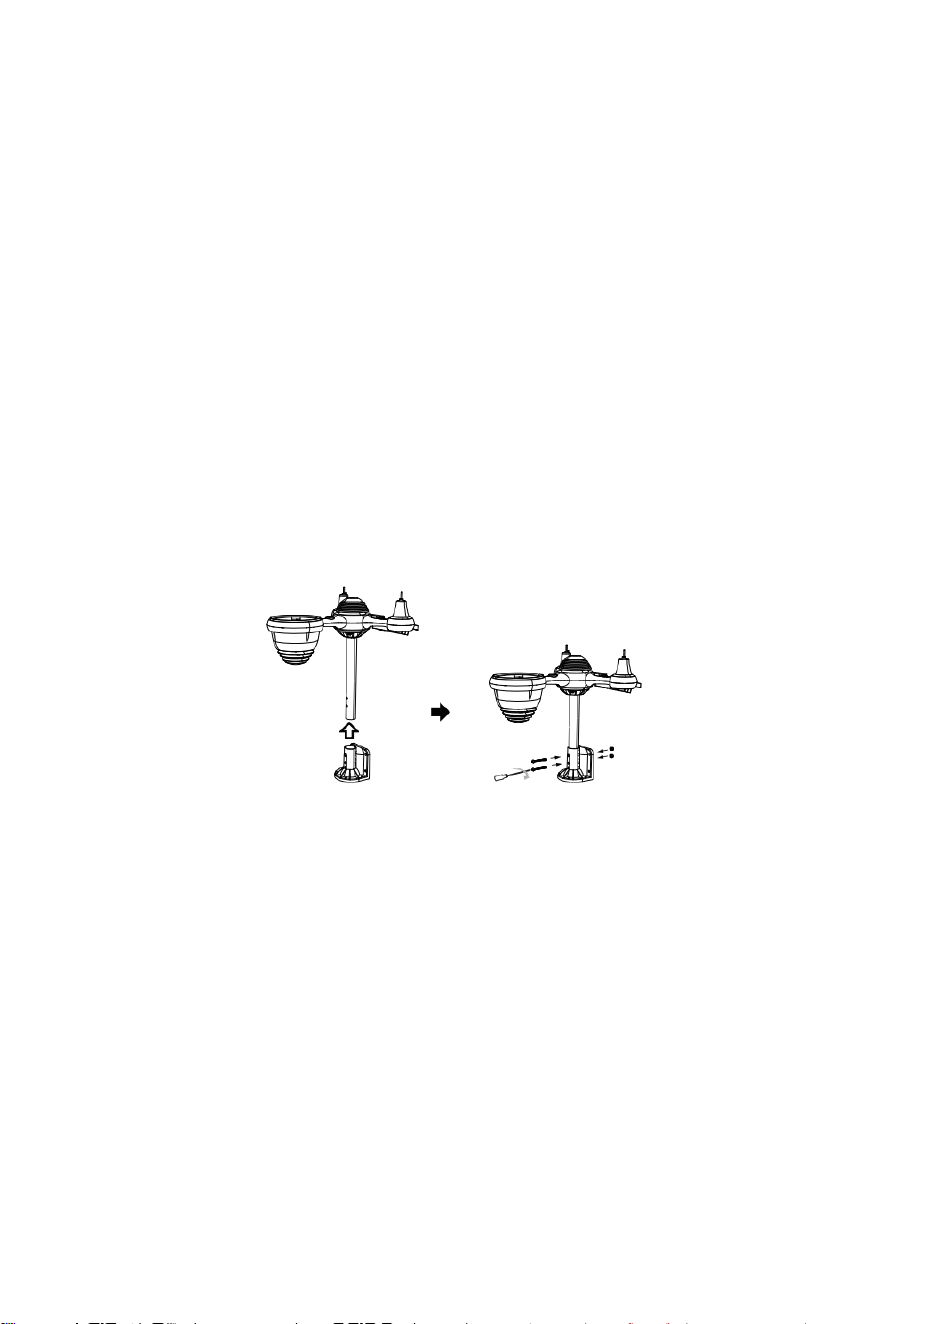
t
z
e
n
u
n
d
v
e
r
r
i
e
g
e
l
n
.
⑥
I
N
S
T
A
L
L
I
E
R
E
N
D

E
R
B
A
T
T
E
R
I
E
N
S
c
h
r
a
u
b
e
n
S
i
e
d
a
s
B
a
t
t
e
r
i
e
f
a
c
h
a
n
d
e
r
②INSTALLING THE MOUNTING BRACKET
Secure the sensor onto a mounting bracket (included) using the screws (included).

U
n
t
e
r
s
e
i
t
e
a
b
.
S
c
h
l
i
e
ß
e
n
S
i
e
d
a
s
K
a
b
e
l
d
e
s
d
e
s
A
k
k
u
p
a
c
k

s
.
P
a
s
s
e
n
S
i
e
d
i
e
a
n
g
e
s
c
h
l
o
s
s
e
n
e
n
K
a
b
e
l
s
o
a
n
,
d
a
s
s
s
i
e
b
e
q

u
e
m
h
i
n
e
i
n
p
a
s
s
e
n
d
a
s
F
a
c
h
.
S
c
h
l
i
e
ß
e
n
u
n
d
b
e
f
e
s
t
i
g
e
n
d
a
s
B
a
t
t
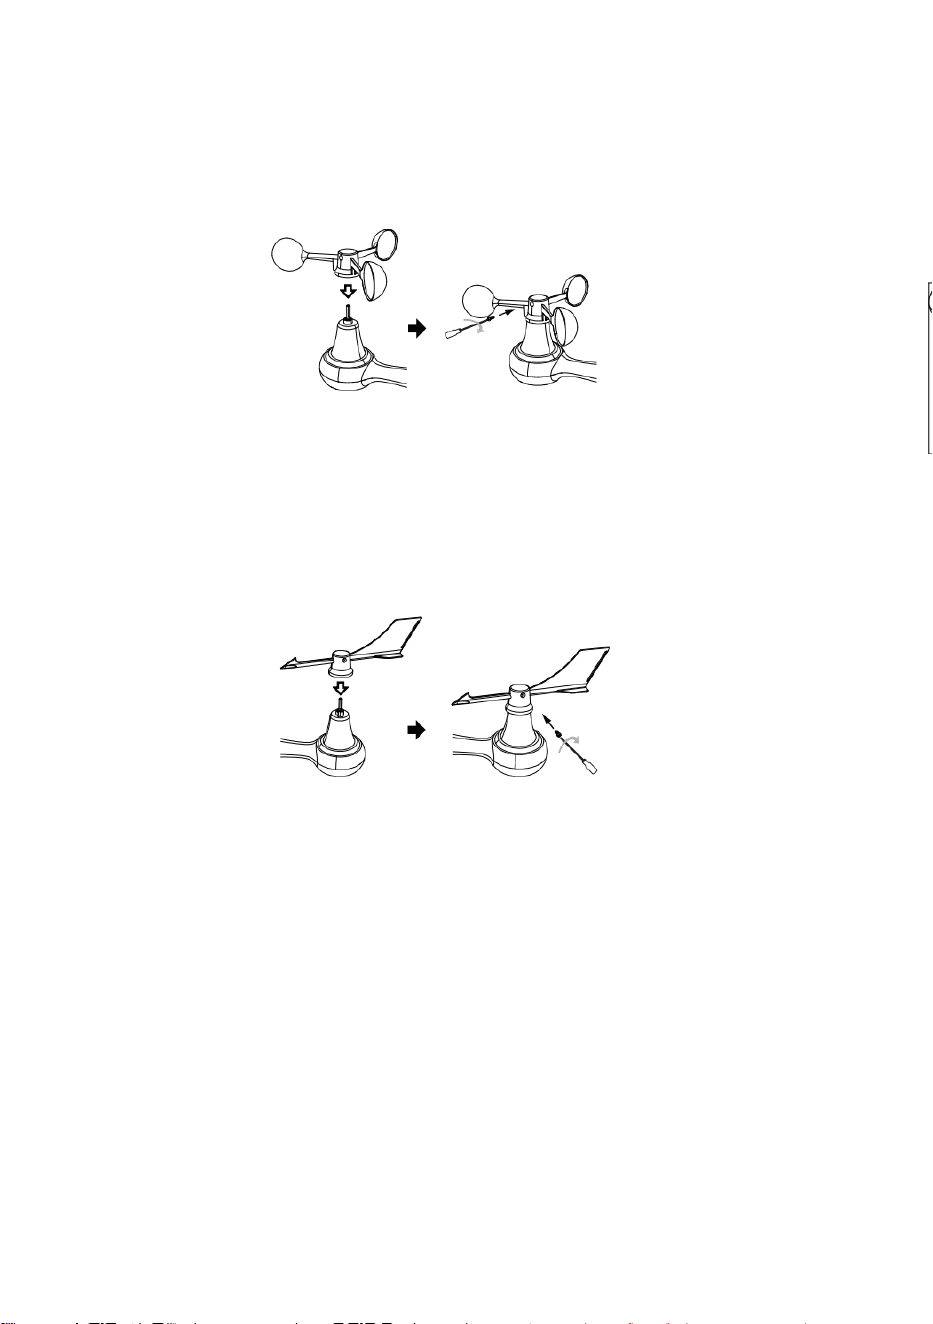
e
r
i
e
f
a
c
h
.
③INSTALLATION VON
WINDGESCHWINDIGKEITSBECHERN
Richten Sie die Schraubenlöcher in den Windgeschwindigkeitsbechern mit den
Wohnung, vertikale Seite von die Metallstange.
Die Windgeschwindigkeitsbecher in die Metallstange stecken und festschrauben um
es an seiner Stelle zu verriegeln.
D
r
ü
c
k
e
n
S
i
e
d
a
s
Z
a
h
n
r
a
d
n

a
c
h
i
n
n
e
n
u
n
d
z
i
e
h
e
n
S
i
e
e
s
f
e
s
t
.
d
i
e
S
c
h
r
a
u
b
e
.

P
u
n
k
t
Z
u
P
u
n
k
t
Z
u
P
u
n
k
t
Z
u
④INSTALLATION DES WINDRICHTUNGSV ANES
Richten Sie die Schraubenlöcher in der Windrichtungsfahne mit den Wohnung, Vertikale
Seite von die Metallstange.
Die Windrichtungsfahne in die Metallstange stecken und festschrauben um es an
seiner Stelle zu verriegeln.
Point to
SOUTH
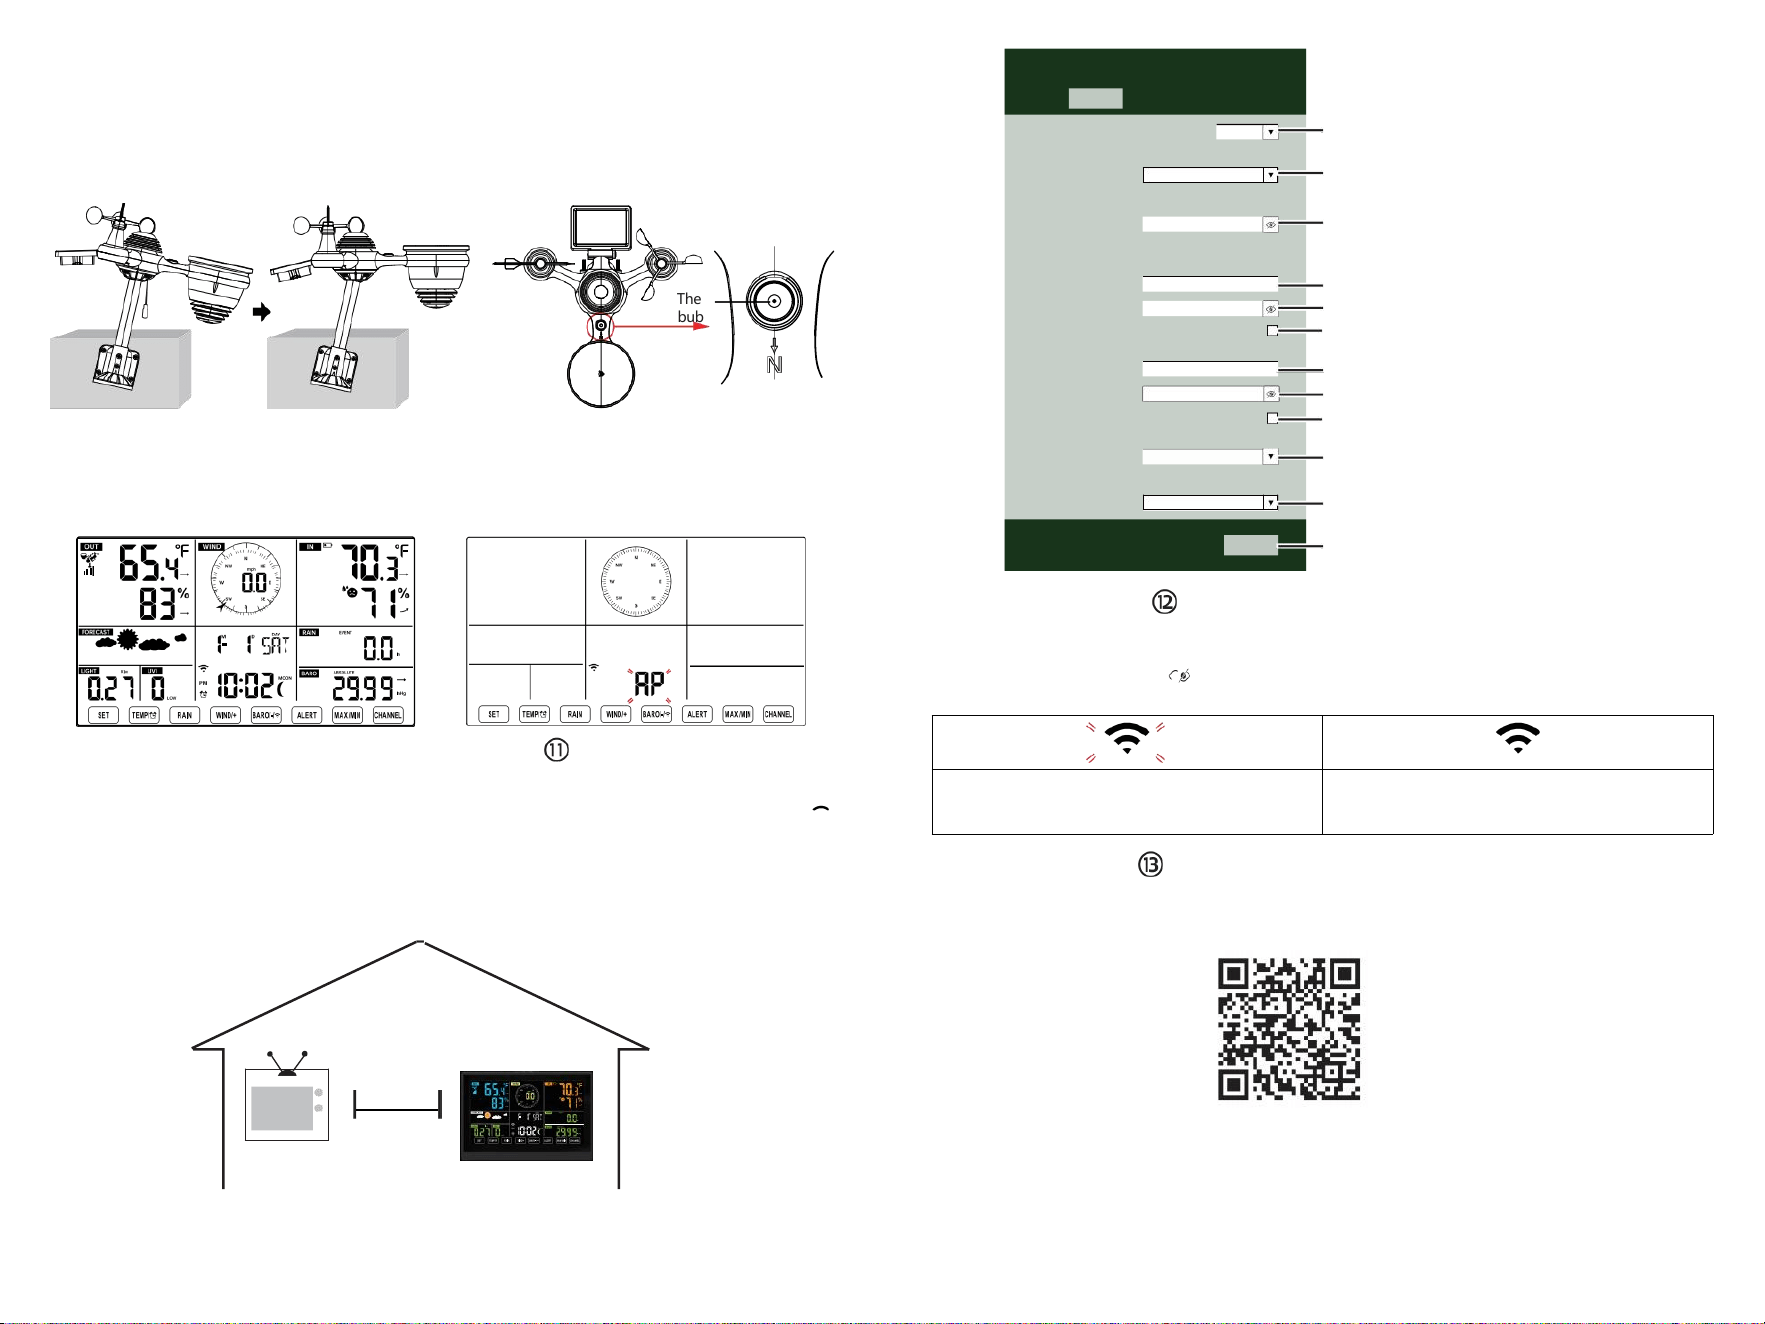
The
bubble
⑩EINSCHALTEN
DIE WETTERSTATION
Stecken Sie das Netzteil in
Das Wetter Station.
Sobald die Wetterstationeingeschaltet,
Es wechselt automatisch in den
Kopplungsmodus.
EINRICHTEN
WLAN-VERBINDUNG
Drücken und halten Sie die Taste
BARO/-/
3 Sekunden zur Eingabe AP-Modus.
Einstellungen Ihres WLAN-Netzwerks auf dem PC
oder Smartphone. Finden Sie die Wetterstation
SSID (WWS-XXXXXX) aus der Liste .
Tippen Sie auf die SSID Zu verbinden.
BEI
AM WENIGSTEN
(.9 m)
AUSEINANDER
Um Funkstörungen zu vermeiden, platzieren Sie beide Geräte mindestens 3 Fuß ( 0,9 m) voneinander entfernt.
von elektronischen Geräten (Fernseher, Computer, Mikrowelle, Radio usw.).
SETTINGS
SETUP ADVANCED
Language:
Wi-Fi Router Setup
Router 12345
Select the menu and choose your 2.4GHz WIFI Router
Password
Weather Server Setup
WeatherUnderground
Station ID
Station Key
Upload wunderground.com
WeatherCloud
Station ID
Station Key
Upload weatherCloud.net
Time Zone Setup
Time Zone
Time Server Setup
Server URL
Firmware Version: 1.0.1
time.windows.com
a7d 9d 2a27 9 fbbafa
**********
**********
**********
Apply
KCACANTI9
English
Router
+0.00
Flashing: the weather station is attempting
to connect to your wireless router
Solid: the weather station has been
connected to your wireless router.
Select setup UI display language
Select your Wi-Fi Router (SSID) from the list
Router Password
Enter your station ID
Enter your station key/password
check to confirm upload to
WeatherUnderground server
Enter your station ID
Enter your station key/password
check to confirm upload to
⑧MOUNTING THE WIRELESS 7-IN-1 OUTDOOR SENSOR
Various options to install. Make sure the rain collector faces north and
the solar panel faces south before fastening the screws (included).
If you are a user located in the Southern Hemisphere,
please reverse the direction.
ENTER SETUP INTERFACE
Enter the following address into the web browser address bar:
http://192.168.1.1 to access the setup interface.
Please click to check your password before clicking
APPLY.
⑨ADJUSTING THE 7-IN-1 WIRELESS SENSOR LEVEL
Use the bubble level indicator to make sure the wireless outdoor sensor is completely level.
Weathercloud.net
Time zone setting
Internet time server setting
Press Apply to confirm the setting
Please scan the QR code or visit https://youtu.be/LESE8poieYY to see a video on how to use it.
WI-FI CONNECTION STATUS
TV
3
feet

Technischer Support und E-Garantie- Zertifikat www.vevor.com/support
METEOROLOGISCHE STATION
MODELL:YT60234
Wir sind weiterhin bestrebt, bieten Ihnen Werkzeuge mit wettbewerbsfähigen Preis.
"Speichern Halb", "Halber Preis " oder andere ähnliche Ausdrücke von uns nur
repräsentiert ein
Schätzung der Ersparnisse, die Sie durch den Kauf bestimmter Werkzeuge bei uns
gegenüber den großen Herstellern erzielen können.
Top-Marken und Dosen nicht unbedingt bedecken alle Kategorien der angebotenen
Werkzeuge von uns. Sie
Sind Bitte überprüfen Sie sorgfältig, wenn Sie eine Bestellung aufgeben mit uns wenn du
Sind
tatsächlich sparen die Hälfte im Vergleich zu den Top-Großmarken.


- 3 -
METEOROLOGICAL
STATION
MODELL:YT60234
BRAUCHEN HILFE? KONTAKT UNS!
Haben Produkt Fragen? Brauchen technisch Unterstützung? Bitte
fühlen frei Zu
Kontakt uns:
Kundenservice@vevor.com
Dies ist das Original Anweisung, bitte alles lesen Handbuch
Anweisungen
sorgfältig vor dem Betrieb. VEVOR behält sich eine klare Auslegung
unserer Bedienungsanleitung vor. Das Aussehen des Produkts soll
unterliegen dem
Produkt Sie erhalten. Bitte verzeihen Sie uns, dass wir nicht informiere
euch nochmal wenn es Technologien oder Software gibt Updates auf
unserer Produkt.

SAFETYPRECAUTIONS
- 4 -
WARNUNG! Bitte lesen Sie und Verstehen Sie alle
Sicherheitsvorkehrungen, Bedienungsanweisungen und Pflege-
/Wartungsanweisungen, bevor Sie dieses Gerät in Betrieb nehmen.
Gerät. Bewahren Sie dieses Handbuch zum späteren Nachschlagen auf.
Dies Produkt Ist nicht A Spielzeug. Halten aus der Reichweite von
Kinder.
Dies Produkt ist konzipiert für verwenden In Die heim nur als ein
Anzeige von Wetterbedingungen.
Dies Produkt Ist nicht zu Sei verwendet für Medizin Zwecke
oder für öffentlich Information.
Tun Reinigen Sie das Gerät nicht mit Scheuermitteln oder ätzend
Materialien.
Tun nicht Stellen Sie das Gerät in der Nähe von offenen Flammen
oder Wärmequellen. Feuer, Stromschlag, Produktschaden oder
Verletzung könnte geschehen.
Nur frisch verwenden neu Batterien In Die Produkt. Tun nicht
mischen neu Und alt Batterien zusammen.
Tun zerlegen, a ltern oder modifizieren Sie das Produkt.
Nur Anhänge verwenden oder Zubehör mit Das Produkt angegeben
von Die Hersteller.
Tun Tauchen Sie das Gerät nicht in in Wasser. Trocknen Sie die
Produkt mit einem weich Tuch Wenn verschüttete Flüssigkeiten An
Es.
Tun Setzen Sie das Gerät keiner übermäßigen Kraft, Stößen,
Leitung, extremen Temperaturen oder Feuchtigkeit .
Tun Die Belüftung nicht abdecken oder blockieren Löcher mit
beliebigen Gegenständen.
Diese Wetterstation davon Produkt Ist beabsichtigt Sei gebraucht
drinnen nur.
Dieses Produkt Ist nur geeignet für Montage bei einem Höhe
weniger als 6,6 Fuß. (2 M).
Manipulieren Sie nicht die internen Komponenten des Geräts. Produkt
führt zum Erlöschen der Garantie.
Batterien Sind nicht enthalten. Wann Einfügen Batterien, machen
Sicher Das das Positive und Negativ Polaritäten stimmen mit den
Markierungen im Fach.
Ich nicht mischen Standard, alkalisch, Und wiederaufladbar
Batterien zusammen.

SAFETYPRECAUTIONS
- 4 -
Hinterlassen eines Batterie, die extremen Hohe Temperaturen
in der Umgebung können eine Explosion zur Folge haben oder
Leckage von brennbare Flüssigkeit oder Gas.
Hinterlassen eines Batterie, die extremer Hitze ausgesetzt ist
niedriger Luftdruck In die Umgebung kann eine Explosion zur
Folge haben oder Leckage von brennbare Flüssigkeit oder Gas.

TIPS FOR SENSORSITE SELECTION
- 5 -
Regensammler müssen muss alle wenige Monate.
Der Sensor sollte Sei installiere bei mindestens 5' (1,5 M) weg von
beliebig Gebäude oder Struktur.
Wählen Sie A Standort In ein offen Raum unter direkt
Sonnenlicht mit NEIN Hindernisse.
Der Sensor sollte im Sichtlinie und innerhalb von 492' (1 50 m) der
Wetterstation für eine konstante, stabile Übertragung .
Bewahren Sie Ihren Sensor und Ihre Wetterstation außerhalb der
Reichweite von Haushaltsgegenständen auf.
Geräte, die auf derselben Frequenz laufen. Die Konsole und
Der Sensor sollte mindestens 3' -7' (1 - 2 m) weg aus solch Störungen .
PRODUKTMERKMALE
Bunt und Große Ziffernanzeige mit superheller
Hintergrundbeleuchtung.
9 funktional Tasten: EINSTELLEN, TEMP./ALARM , REGEN,
WIND/+, BARO/-/ , ALARM, MAX/MIN, KANAL, LICHT/ SCHLAF
Die Zeit wird automatisch mit dem Internet synchronisiert.
Wecker mit Schlummerfunktion.
Sommerzeitfunktion (DS T).
Zeitzone: GMT ±12.
Mond Phase.
Innen- und Außentemperatur (°C/°F) und Luftfeuchtigkeit Messwerte
mit Trend.
Stündlich, Täglich, Wöchentlich, Monatlicher Gesamtniederschlag
und Niederschlagsmenge bewerten Die Vergangenheit Stunde.
Durchschnittliche Windgeschwindigkeit, Böenwind Geschwindigkeit
und Wind Richtung wird angezeigt.
Absolute und relativ Barometrisch Druckanzeigen mit Trend.
Lichtintensität und UV Index Anzeige .
Wetterindex Anzeige : Fühlen mag, Wind Kühlen, Hitze Index, Tau
Punkt.
Wettervorhersage.
Max/Min Lektüre.
Wetterwarneinstellungen.
Wetter hochladen Daten zu Wetter Unter Tage und /oder
Weathercloud über ein WLAN Router.
4-stufig Helligkeit der Hintergrundbeleuchtung t.

- 6 -
PACKUNGSINHALT
1 Wetterstation
2 Adapter
3 Kabelloser 7-in-1- Außensensor
4 Trichter
5 Windrichtungsfahne mit 1 Schraube
6 Windgeschwindigkeitsbecher mit 1 Schraube
7 Montage Stange mit 4 Schrauben
8 Montage Halterungen mit 6 Schrauben
9 Gummi Pads x 2
10 Schraubendreher 1
11 Schraubendreher 2
12 Benutzerhandbuch
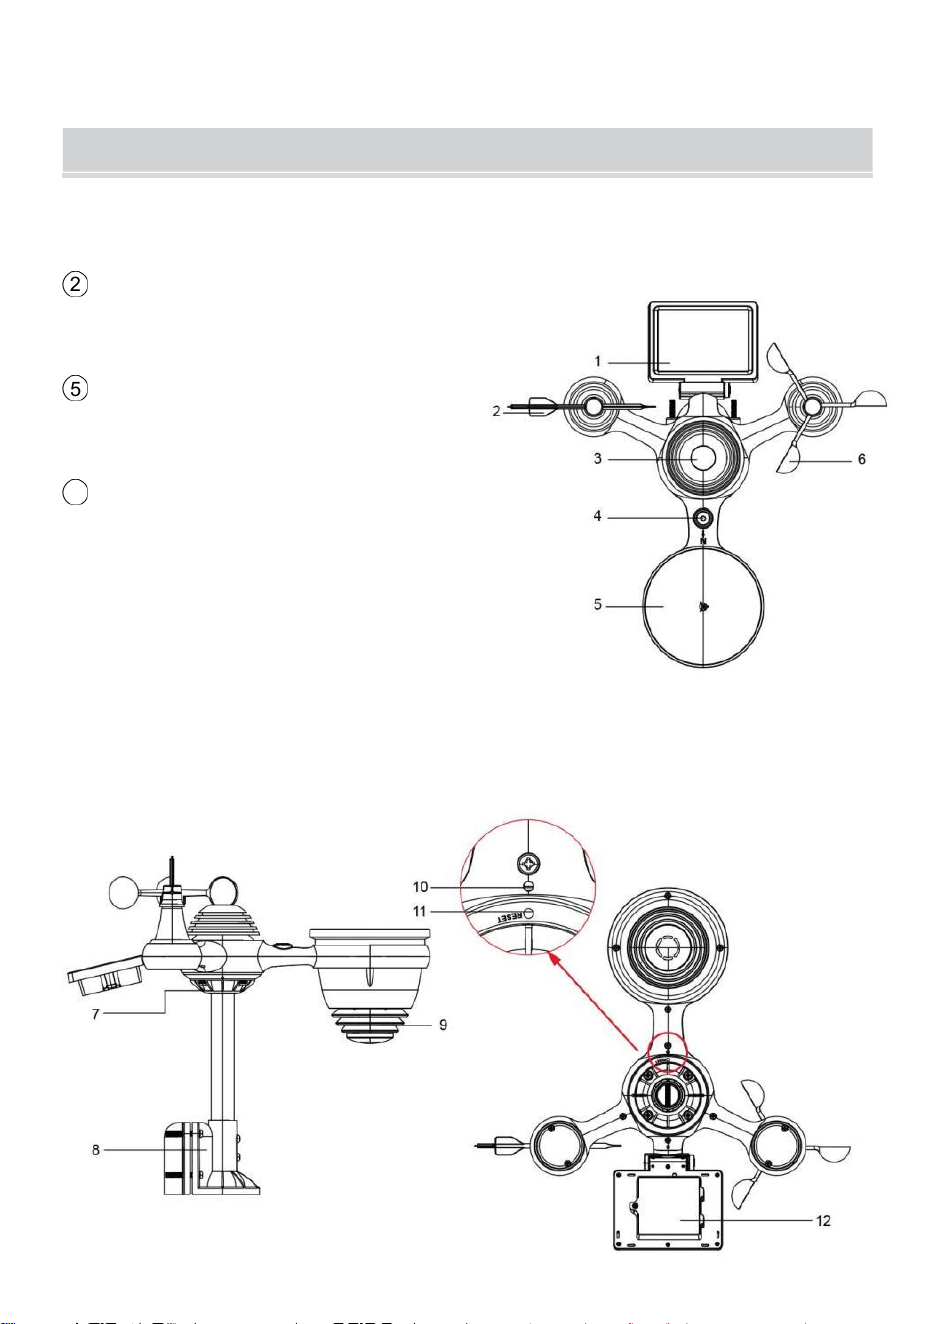
HINWEIS: 4 zusätzliche Schrauben für Windrichtungsfahne und
Windgeschwindigkeitsbecher.
PRODUCT OVERVIEW
- 7 -
DRAHTLOSER 7-IN-1- AUSSENSENSOR
1 Solar Bedienfeld
2
Windrichtungsfahne
3 UV-/Lichtsensor
4 Wasserwaage Farbverlauf
5 Regensammler
6
Windgeschwindigkeitsbecher
7 Montage Pole
8 Montage Klammern
9 Hygro-Thermo-Sensor
10 LEDs: Blinkt, wenn das
Gerät überträgt eine Lektüre
⑪ RESET-Taste
⑫ Batteriefach

WEATHERSTATION
- 8 -
- 9 -
1 Außentemperatur/Luftfeuchtigkeit Lesen , Wetter Index
2 Windrichtung & Geschwindigkeit
3
Innentemperatur-/Luftfeuchtigkeitsanzeige
4 Wettervorhersage
5 Uhrzeit & Datum, Mond Phase, Wir ekday
6 Licht Intensität
7
UV Index
8 Regen
9 Barometer
10 SATZ Taste
11 TEMP/ (ALARM)-Taste
12 RAIN-Taste
13 WIND/+-Taste
14 BARO/-/ (W-lan) Taste
15 ALERT-Taste
16 MAX/MIN-Taste
17 CHANNEL-Taste
18
LICHT/ SCHLAF Taste
19
Batteriefach (3,6 V Ni-MH wiederaufladbar Batterie Pack)
EINSTELLUNG UP DERDRAHTLOSE 7-IN-1-AUSSENSENSOR
Der kabellose 7-in-1 Außensensor misst Windgeschwindigkeit,
Windrichtung , Niederschlagsmenge, UV, Lichtintensität , Temperatur
und Luftfeuchtigkeit.
INSTALLATION DER MONTAGE POLE UND HALTERUNG

- 10 -
● Befestigen Sie den Sensor an einer Montagestange und Halterung
(inklusive ) mit den Schrauben ( im Lieferumfang enthalten ).
INSTALLATION VON WINDGESCHWINDIGKEITSBECHERN UND
WINDRICHTUNGSFAHNEN
● Richten Sie die Schraubenlöcher in den Windgeschwindigkeitsbechern
mit den Wohnung, Vertikale Seite von Die Metall Stange.
● Setzen Sie die Windgeschwindigkeitsbecher in das Metall ein Stange
Und scheiß auf sie An eng Zu sperren Es In Ort.
● Richten Sie die Schraubenlöcher in der Windrichtungsfahne mit den
flachen, vertikalen Seite des Metalls Stange.
● Setzen Sie die Windrichtungsfahne ein im Metall und schrauben Sie
diese fest an sperren Es In Ort.

- 11 -
EINSTELLUNG UP-REGENSAMMLER
● Richten Sie die Kerben am Trichter mit den Verriegelungsnuten aus
innen Die Regen Kollektor.
● Den Trichter einsetzen in den Regensammler und schrauben Sie diese
eng Zu sperren Es In Ort.

- 12 -
INSTALLATION DER BATTERIEN
● Schrauben Sie das Batteriefach an der Unterseite des 7-in-1
Außensensor mit einem Schraubendreher 1.
● Schließen Sie das Kabel des Akkus an Akku (im Lieferumfang
enthalten) zur Kabel befindet sich in der Batterie Fach.

- 13 -
Passen Sie die angeschlossenen Kabel so an, dass sie bequem in das
Fach passen. Dann, Setzen Sie den Akku ein in die Fach.
Schließen und befestigen Die Batterie Tür zurück An Die Fach.

- 14 -
Justierung der Solarzelle
● Lösen Sie die Schraube an der Gelenk, so dass das Zahnrad auf der
anderen Seite der gemeinsam nach außen drückt. Die Solarzelle sollte
nun Sei In ein entsperrt Position.
● Passen Sie den vertikalen Winkel der Solarzelle an, um die optimalste
Nutzung der Solarzelle abhängig von Ihrer Standort.
● Drücken Sie das Zahnrad nach innen und ziehen Sie die Schraube fest,
bis Die Getriebe sperren In Ort.
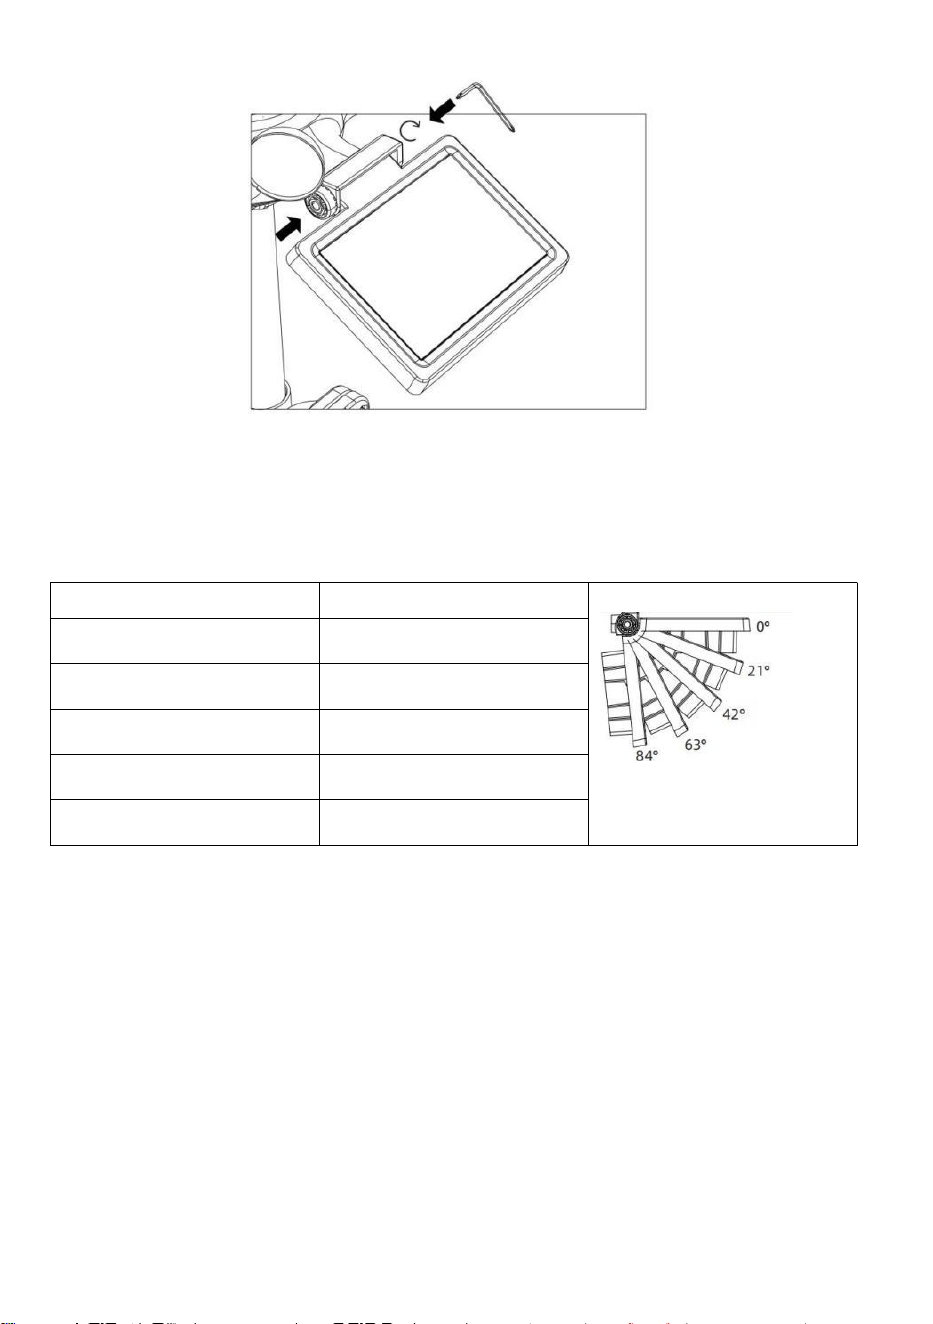
- 15 -
Stellen Sie die Solarzelle beim Justieren auf einen Winkel ein, der Ihrem
Breitengrad am nächsten kommt . Ansicht Diagramm unten, um einen
Eindruck zu bekommen von wie du sollen Winkel dein Solar- Zelle.
Breitengrad-Nähe
Solarzelle Winkelauswahl
Wenn Ihr Standort schließen Zu
84°
84°
Wenn Ihr Standort schließen Zu
63°
63°
Wenn Ihr Standort schließen bis
42°
42°
Wenn Ihr Standort schließen Zu
21°
21°
Wenn Ihr Standort schließen Zu
0°
0°
MONTAGE DES DRAHTLOSEN 7-I N-1-AUSSENSENSORS
Wählen Sie einen Standort für den 7-in-1-Außensensor, der Ist
öffnen mit NEIN Hindernisse.
Den Montage Klammern zu einem Oberfläche/Wand mit vier
Blechschrauben (im Lieferumfang enthalten) oder ziehen Sie die
Befestigungsschrauben fest an Ihre vorhandene
Montage Pol mit vier φ5 Bolzen und BMW M5 Montage der Muttern.
Hinzufügen Gummipads auf Die Montage Halterung vor
Befestigung Die Montage Halterung am Sensor.

- 15 -
Stellen Sie sicher, dass der Regensammler nach Norden zeigt
und die Solar- Bedienfeld ist nach Süden ausgerichtet vor
Befestigung Die Schrauben ( im Lieferumfang enthalten ).
Bitte sicherstellen Das Die Sensor Ist behoben insbesondere dicht,
Andernfalls kann es bei Wind zu Erschütterungen des Senders und
damit zu Fehlmessungen kommen.

- 16 -
Niederschlagsdaten.
DEN DRAHTLOSEN 7-IN-1- AUSSENSENSOR NACH SÜDEN
AUSRICHTEN (OPTIONAL)
Der Funk-Wettersensor für den Außenbereich ist kalibriert auf spitz
Norden für maximale Genauigkeit. Zu Ihrer Bequemlichkeit Wenn Sie
ein Benutzer sind

- 16 -
befindet sich im südlichen Hemisphäre, können Sie Verwenden Sie den
Sensor mit dem Regen

- 17 -
Kollektor zeigt nach Süden.
1.) Den Funk- Wärmesensor mit dem Regensammler nach Süden
zeigend, anstelle von Norden. (Bitte beachten Sie MONTAGE DES
DRAHTLOSER 7- IN- 1- OUTDOOR SENSOR .)
2.) Wählen Sie "STH" für die südliche Hemisphäre in Die Uhr Einstellung
Modus. (Bitte siehe „Uhr einstellen“)
HINWEIS: Durch Ändern der Hemisphäreneinstellung wird
automatisch die Richtung der Mondphasen An Anzeige.
Wenn Sie den drahtlosen Wettersensor nach Süden ausrichten,
erhalten Sie maximale Sonneneinstrahlung auf das Solarpanel,
insbesondere während der Wintersaison im Süden. Hemisphäre.
EINSTELLEN DES 7-IN-1- DRAHTLOSSENSORS EBENE
● Verwenden Sie die Blase Ebene Anzeige, um sicherzustellen, dass der
drahtlose Außensensor ist völlig eben. Wenn der Sensor nicht Ebene, Die
gewinnen Messgerät, UV Und Licht Intensität wird nicht richtig messen .
● Um die Höhe des drahtlosen Außensensors anzupassen, lösen Sie
die Schrauben der Montage Pole. Passen Sie den Pegel des drahtlosen
Außensensors an, um Stellen Sie sicher, dass die Blase Ist in der Mitte
der Blase Ebene im Indikator.
● Die Schraube der Halterung festziehen nochmal die Stange .

- 18 -
EINSTELLUNG HOCHZURWETTERSTATION
Stromversorgung HOCH ZUR WETTERSTATION
● Stecken Sie das Netzteil in die Steckdose Jack Lage In Die zurück
der Wetterstation. Einsatz 3 neu AAA-Alkalibatterien (nicht im
Lieferumfang enthalten) zur Sicherung.
● Sobald die Wetterstation ist eingeschaltet, es wird automatisch
Paarung Modus.
KOPPELN DES DRAHTLOSEN 7-IN-1-SENSORS
● Sobald Ihre Wetterstation eingeschaltet ist, sollte sie automatisch
suchen für die drahtlosen Sensoren und stellen Sie eine Verbindung mit
ihnen her. Wenn die Wetterstation nicht
verbinden innerhalb der ersten 5 finden Sie im folgenden Abschnitt.
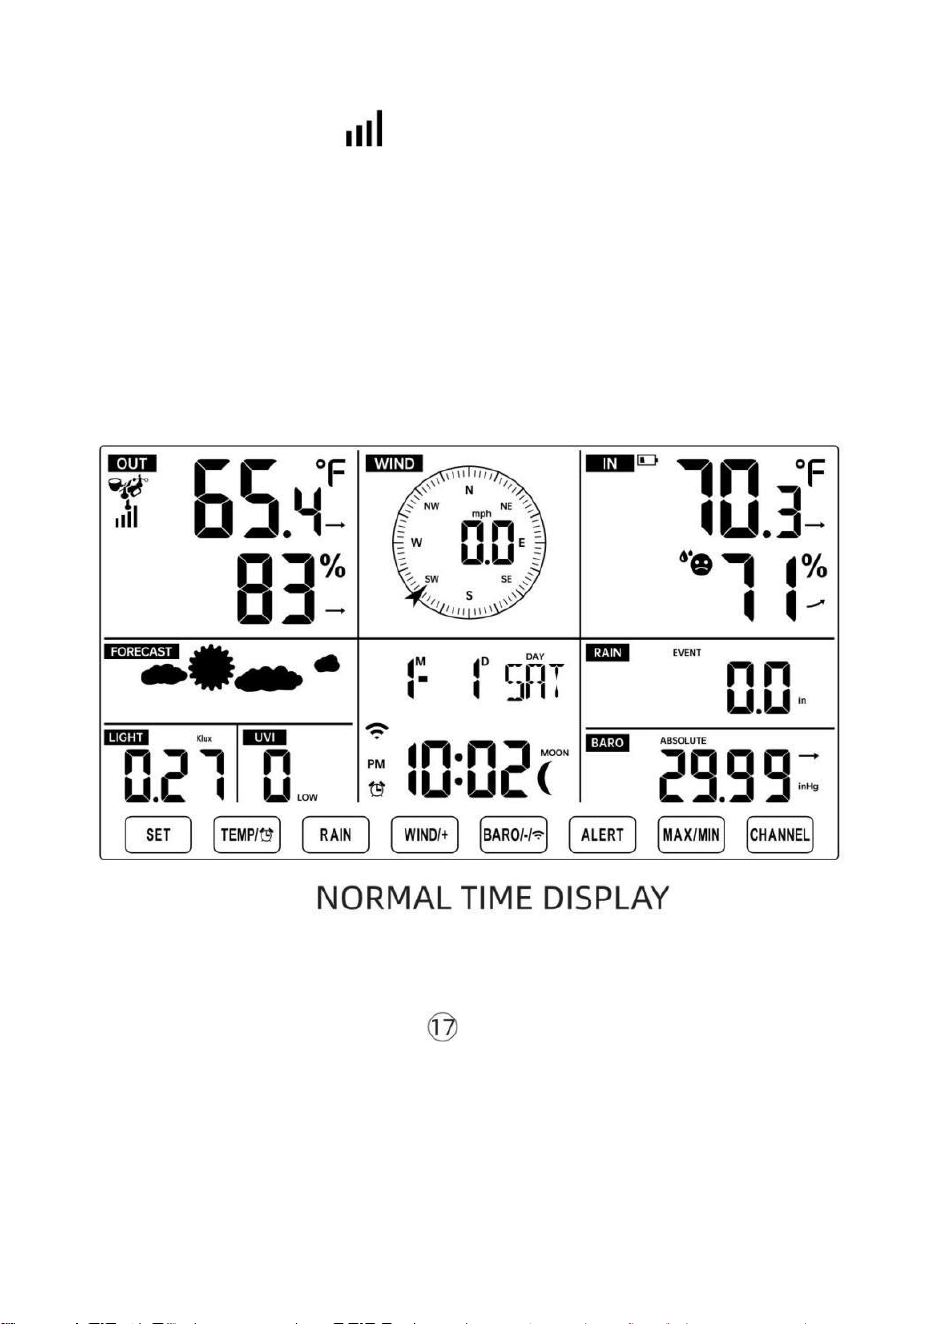
- 19 -
„SENSOR NEU KOPPELN“.
● Sie sehen das Symbol einer Antenne, die im Abschnitt
„Temperatur und Luftfeuchtigkeit (Außenbereich) “ der Anzeige scrollt.
● Sobald die Paarung Vorgang abgeschlossen ist, wird das
Antennensymbol erscheinen dauerhaft (nicht blinkend) und die Messwerte
für Außentemperatur und Luftfeuchtigkeit, Wind Geschwindigkeit,
Windrichtung, UV, Licht Intensität und Niederschlag werden erscheinen In
ihre
bestimmte Bereiche des LCD-Displays
SENSOR NEU KOPPELN
● Wenn die Verbindung fehlschlägt oder die Wetterstation zurückgesetzt
wird, drücken Sie und halten Die
【
CHANNEL
】
Taste länger als 2
Sekunden gedrückt halten, um in den Pairing-Modus zu wechseln, und die
Wetterstation wird Registrieren Sie alle Sensoren erneut, die bereits
gewesen
zuvor registriert wurde (d. h. die Wetterstation wird nicht verlieren Die
Verbindung der Sensoren, die Sie gekoppelt haben hoch vor.)
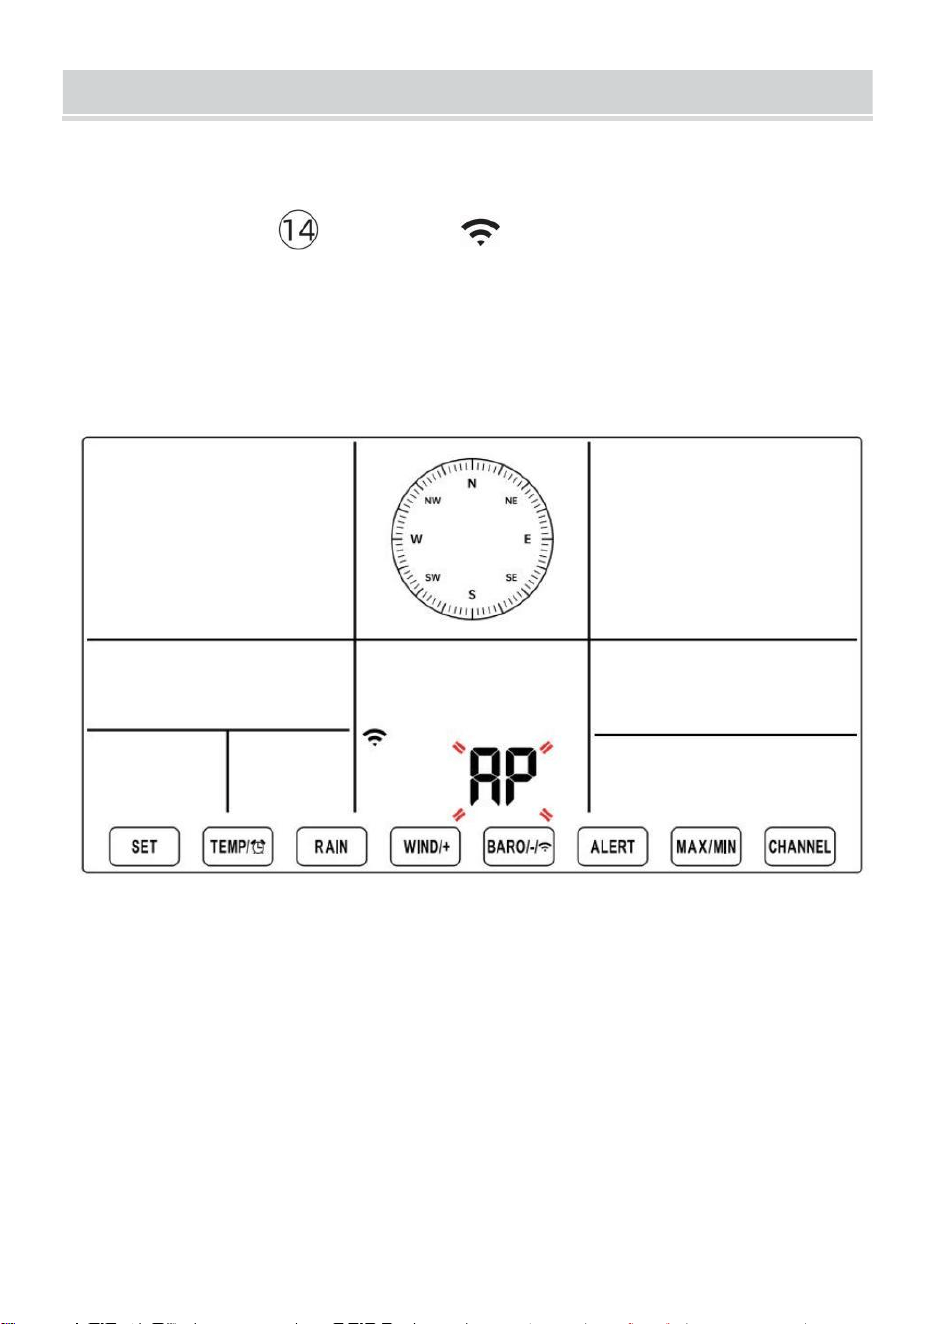
SETUPINSTRUCTION
- 20 -
EINSTELLUNG UP WI-FI-VERBINDUNG UND WIR ATHER
SERVER VERBINDUNG
Drücken und halten 【 BARO/-/ 】 Taste länger als 3 Sekunden
gedrückt halten, wird das Wetter Station Auf dem LCD-Display erscheint
der Buchstabe „AP“, der Es ist eingetreten Zugang
Punkt (AP) Modus. Zu diesem Zeitpunkt wird es Sei bereit für die Wi-Fi
- Einstellungen Sei angepasst.
Stellen Sie mit Ihrem Smartphone, Tablet oder Computer per WLAN
eine Verbindung zur Wetterstation her, indem Sie die folgenden
Schritte ausführen:
Ein Computer, offen Ihr WLAN Netzwerk k Einstellungen. An Android
™ oder iOS
Geräte, gehen Sie zum Einstellungsmenü und wählen Sie dann
Verbindungen /WLAN Zu öffne das Netzwerk Einstellungen.
Suchen Sie in der Liste nach der SSID der Wetterstation. Es sollte
erscheinen als

SETUPINSTRUCTION
- 20 -
WWS-XXXXXX (wobei alle X ganze Zahlen sind) in der Liste.
Klopfen An die SSID zum Verbinden. Dieser Schritt dauert einige
Sekunden.
Sobald Sie sind verbunden Zu Das Wetter Station, offen hoch dein
Internet oder mobiles Web Browser und geben Sie die folgende
Adresse in Die
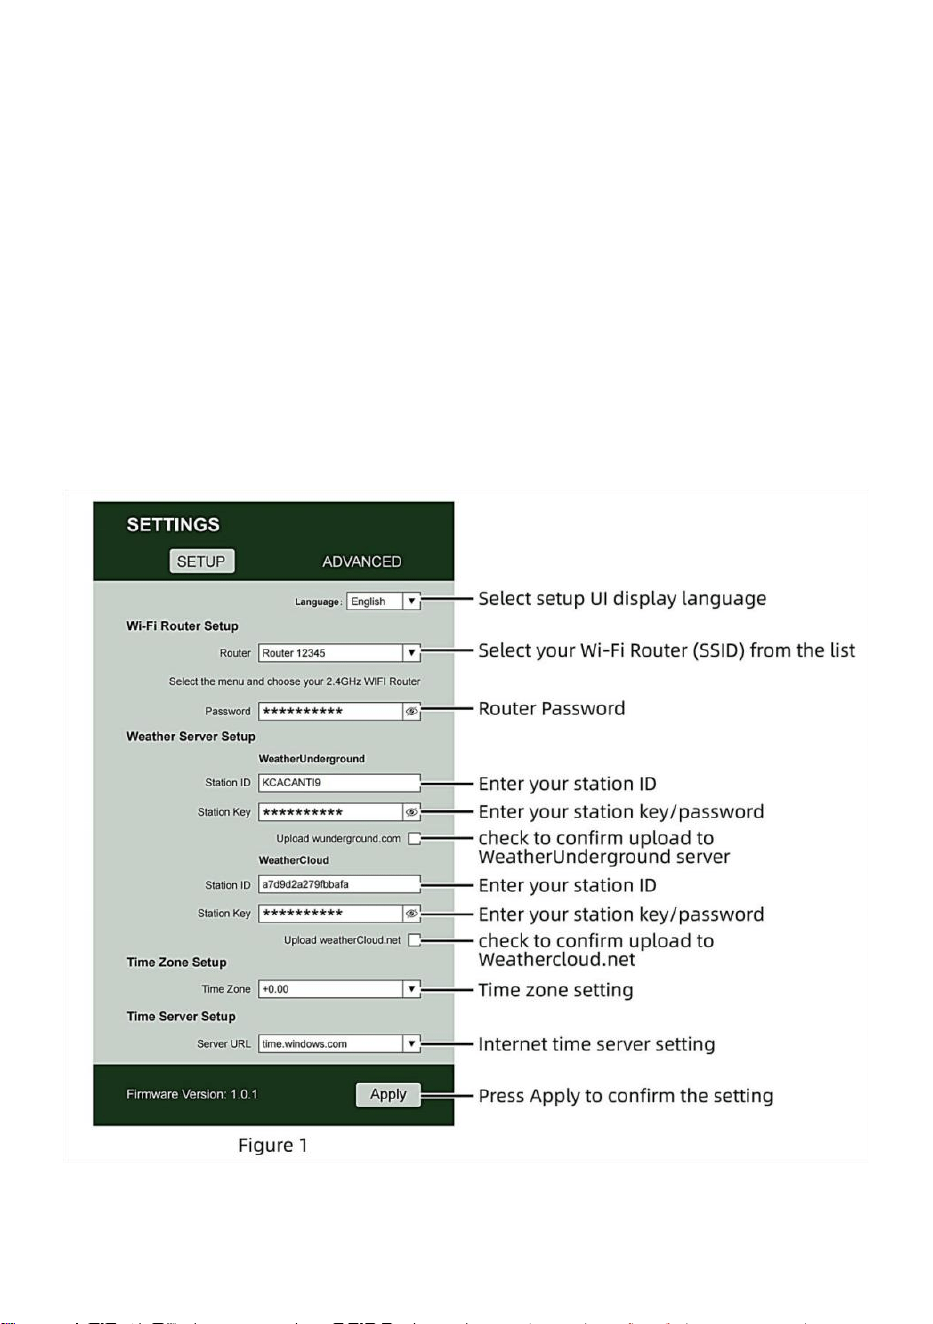
- 21 -
Adressleiste: http://192.168.1.1, um auf die Weboberfläche der
Wetterstation zuzugreifen . (Stellen Sie sicher, Fügen Sie http:// ein,
sonst das Web Browser kann die Adresse als Suchanfrage
interpretieren). Wir empfehlen mit der neuesten Version von
seriösen Web Browser.
Geben Sie Folgendes ein Information in die Weboberfläche
(Abbildung 1). Machen sicher alle Informationen wird eingegeben
bevor Sie Speichern auswählen. Wenn du
Wählen Sie, Wunderground.com nicht hochzuladen oder
weathercloud.net hochzuladen, Lassen Sie die Kontrollkästchen
deaktiviert.
NOTIZ :

- 21 -
Zeitzonen-Setup ( Standard : 0h). Um die Zeitanzeige automatisch
auf Ihre Zeitzone einzustellen, ändern Sie die Zeitzone im Abschnitt
Zeitserver-Setup der SETUP-Seite von „0:00“ (Standard) auf Ihre
Zeitzone (z. B. +1:00
- 22 -
für Deuschland ).
5.) Wenn alle von Ihnen eingegebenen Informationen korrekt sind,
Drücken Sie „ Übernehmen “ Zu bestätigen (Figur 1). Wenn nicht,
überprüfen Sie Ihre Web Schnittstelle Informationen noch einmal.
HINWEISE:
Wenn die Wi-Fi-Einrichtung abgeschlossen ist, wird Ihr Computer
oder Mobilgerät Gerät
wird zur Standard -WLAN-Verbindung zurückgekehrt. Wenn das der
Fall ist nicht, einfach Öffnen Sie die WLAN-Einstellungen Ihres
Geräts und erneut verbinden.
Während Im AP-Modus können Sie drücken und halten Sie
die 【 BARO/-/ 】 Taste länger als 3 Sekunden gedrückt,
um den AP-Modus zu verlassen. Die Wetterstation stellt einfach
die vorherigen AP-Einstellungen wieder her.
KALIBRIERUNG
Sobald Sie über WLAN mit der Wetterstation verbunden sind und öffnete
die Einstellung Seite unter http://192.168.1.1 , klicken Sie auf „
ADVANCED “ (Erweitert) und Sie werden folgendes sehen : Seite
(Abbildung 2).

- 22 -
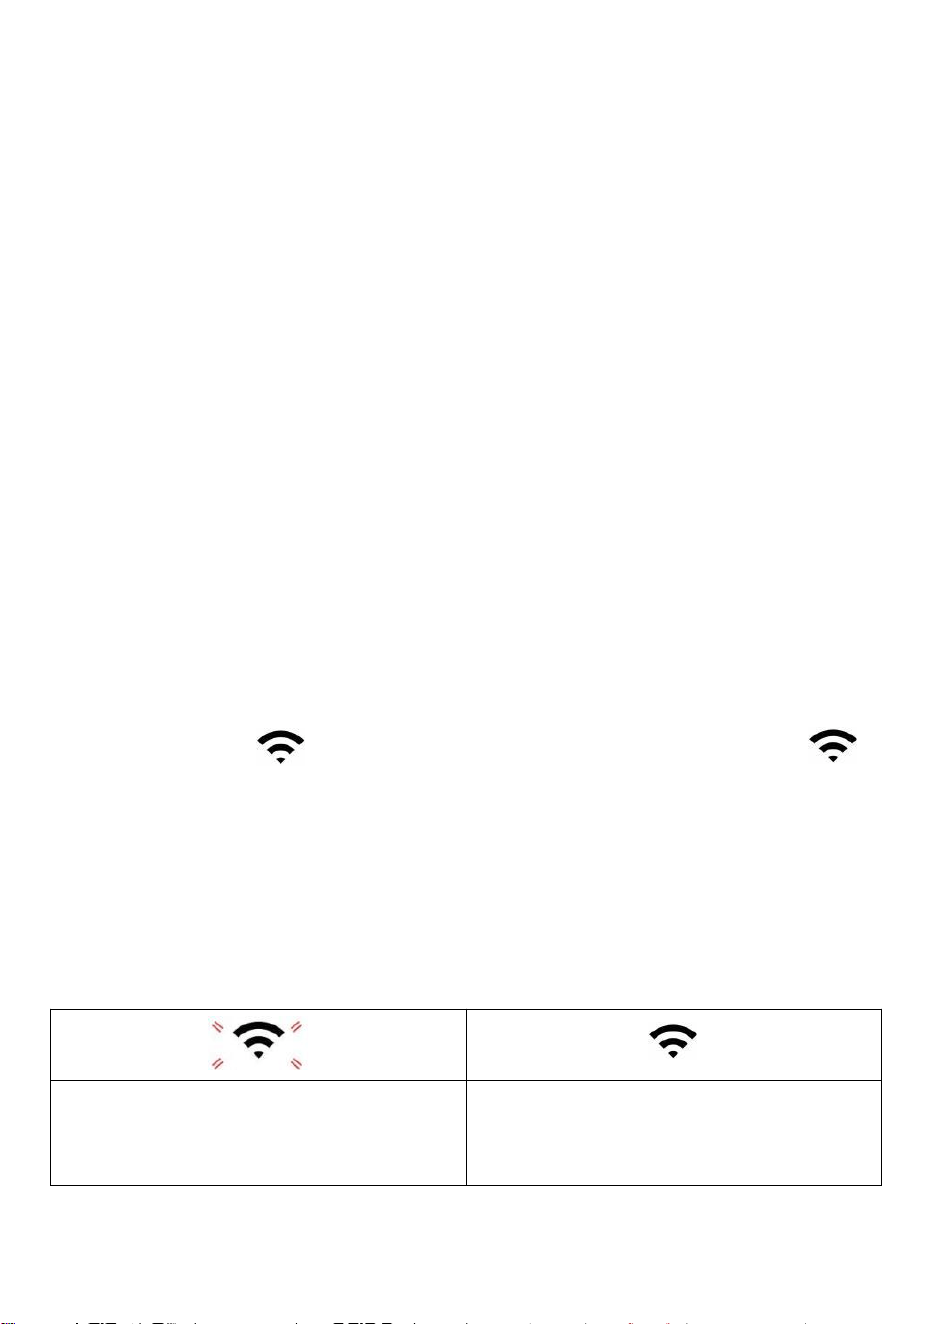
- 23 -
1) Sie können eingeben oder ändern Die Versatz Und gewinnen
Werte für anders Messung Parameter s.
2) Sobald Sie haben abgeschlossen Kalibrierungen , drücken Die "ANWENDEN"
Taste.
3) Der aktuelle Offsetwert Wille aktualisieren Zu zeigen Die Wert Das Du
eingegeben
( stattdessen von Die Standard Wert ). Wenn Du wollen Zu ändern Die Wert ,
Sie dürfen eingeben ein neues Wert In Die Kasten neben Die Nummer ( als In
Schritt 1). Zu aktualisieren Die Wert wieder , drücken " ANWENDEN " Taste .
NOTIZ :
Wir tun nicht empfehlen die Kalibrierung der meisten Werte mit
Ausnahme von Relativ Druck, der muss richtig kalibriert sein, um Ihre
Entfernung über dem Meeresspiegel Niveau zur Berücksichtigung der Höhe
Effekte.
WLAN-VERBINDUNGSSTATUS
Wenn die Wetterstation erfolgreich eine Verbindung zu Ihrem WLAN -
Router herstellt,
WLAN-
Signal
wird auf dem LCD angezeigt Anzeige . Wenn
das WLAN-Signal
Ist nicht stabil oder die Wetterstation versucht, eine Verbindung zum
Router, der Das Symbol blinkt. Wenn das Symbol verschwindet, Es
bedeutet, dass die Wetterstation nicht mit dem WLAN- Router
verbunden.
Blinkt: Die Wetter Bahnhof
Ist Versuch Zu verbinden Zu dein
kabellos Router.
Solide: die Wetterstation hat
gewesen mit Ihrem drahtlosen
Router.

- 23 -
NOTIZ :
Wenn Du eigen A Dual Band Router (2,4 GHz Und 5,0 GHz ), machen Sicher
Du Verbindung zum 2,4 GHz Band, sonst es wird keine Verbindung
zwischen der Wetterstation und
W - lan .
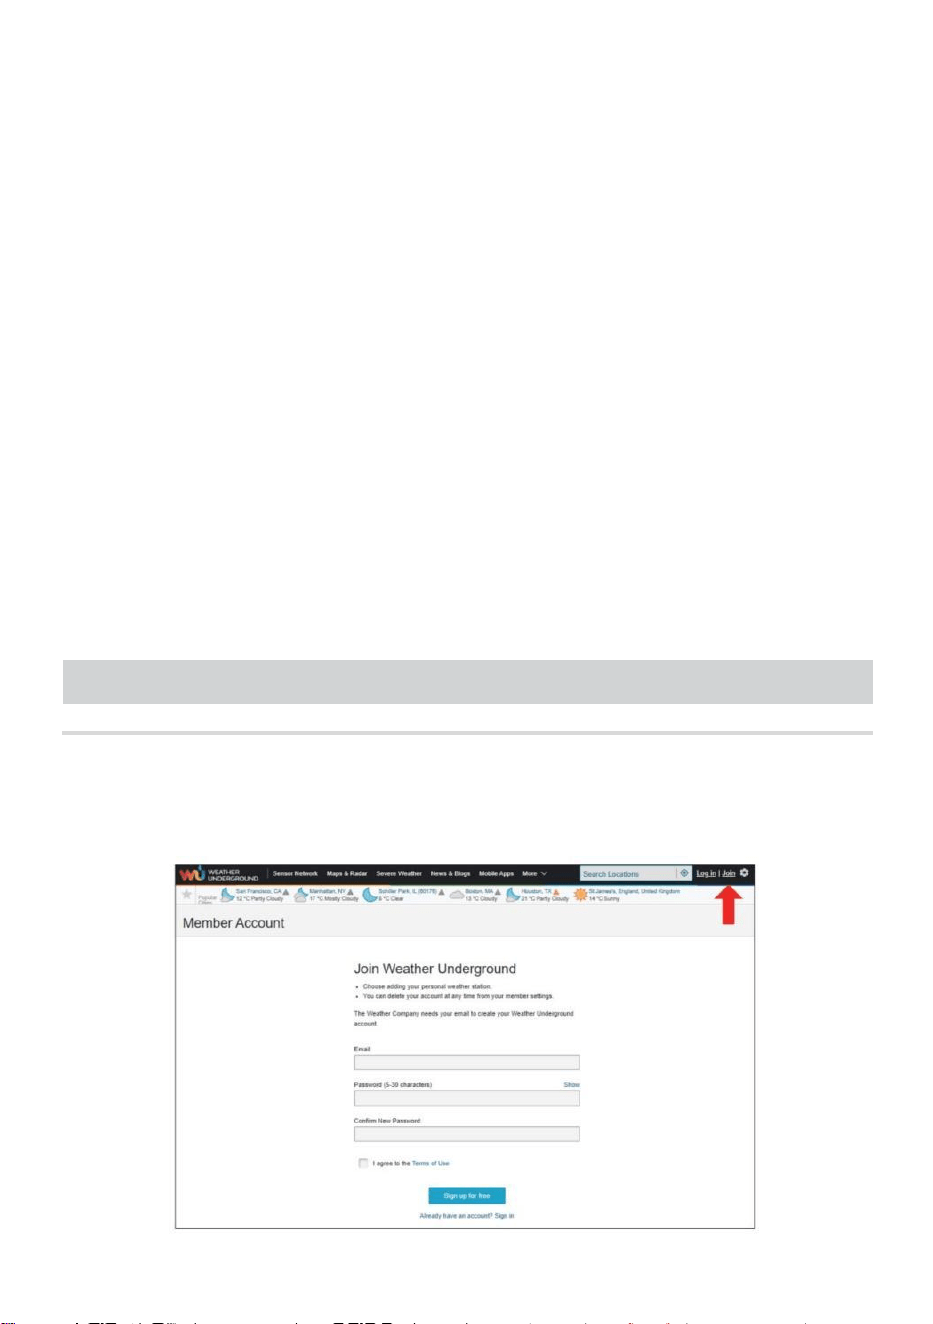
- 24 -
ZEITSERVER-VERBINDUNGSSTATUS
Nachdem die Wetterstation eine Verbindung zum Internet hergestellt
hat , Wille versuchen um eine Verbindung zum Internet-Zeitserver
herzustellen und die UTC zu erhalten Zeit. Einmal Die
Verbindung erfolgreich ist und die Uhrzeit der Wetterstation aktualisiert.
Der Symbol „SYNC“ erscheint auf dem LCD-Anzeige.
Zeit für Ihre Zeitzone anzuzeigen , müssen Sie müssen
die Zeitzone ändern in der Einstellung UHR Modus ab 00 (Standard) zu
Ihrem Zeitzone (z. B. -5 für EST). Wenn Sie kennen Ihre Zeitzone nicht ?
Dann können Sie nachschauen online.
NOTIZ :
Die Uhrzeit wird automatisch mit der Internet pro Stunde.
ERSTELLENUNDSYNCHRONISIERENSIEIHR
WETTERSERVER-KONTO
WETTER ERSTELLEN UNTERGRUNDKONTO
1.) Besuchen Sie: https://Wunderground.com, und wählen Sie
„Beitreten“ im obere rechts und Ecke und erstellen A Frei Konto.
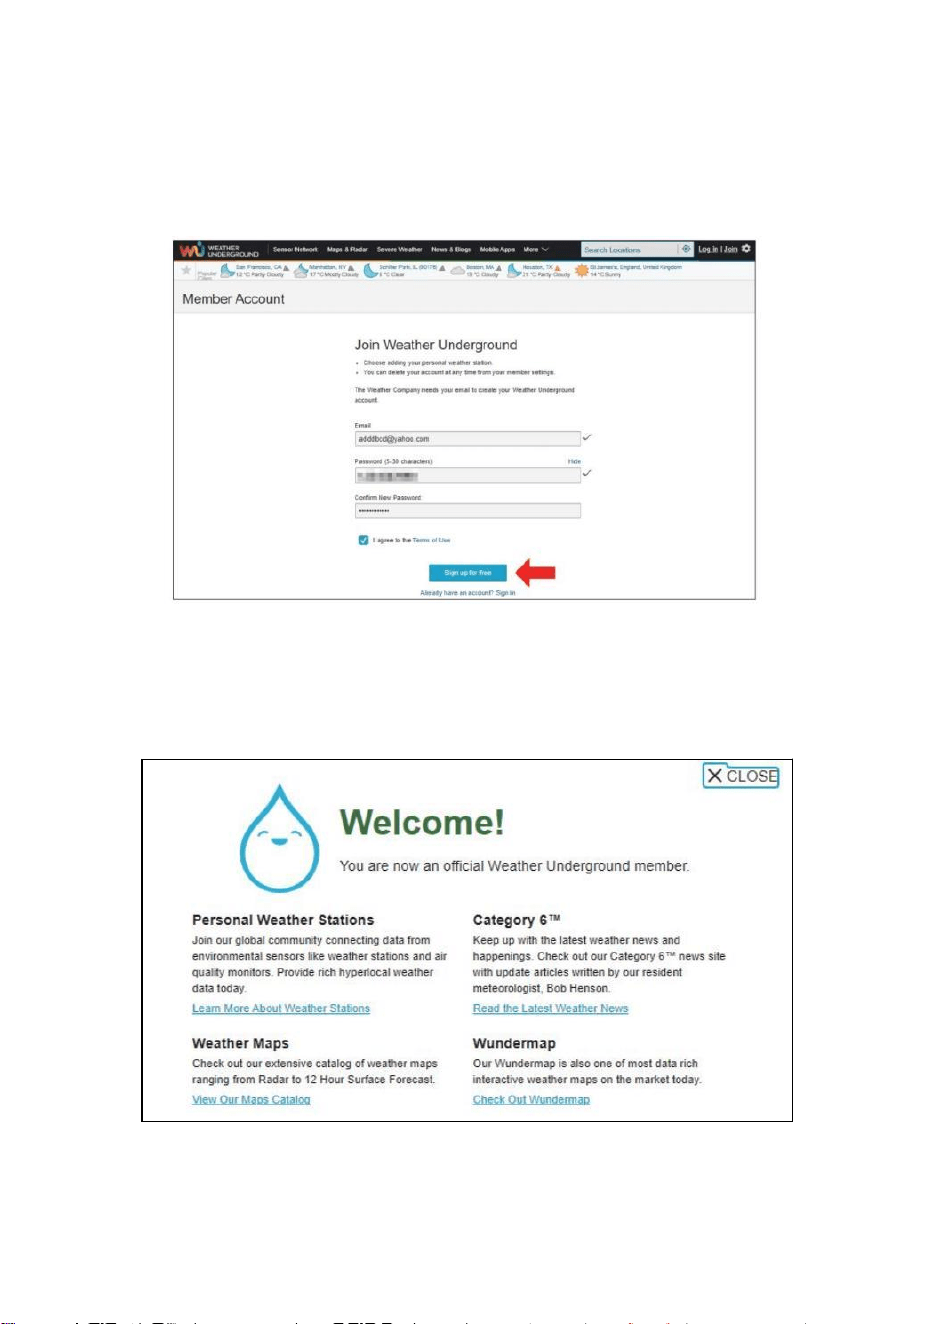
- 25 -
2.) Geben Sie ein Wir sind Name, E-Mail Und Passwort (Es ist Ihr Login
Passwort für die Website, nicht Ihr E-Mail-Passwort. Also nein
Privatsphäre wird ausgesetzt sein). Klicken Sie auf Zeichen kostenlos
anmelden .
3.) Nach der Registrierung erfolgreich, es wird Sei gezeigt unten
Die Nachricht.

- 26 -
4.) Klicken Sie auf „Anmelden“ und geben Sie die E-Mail-Adresse ein
und Passwort du hast gerade eingetragen.
5.) Klicken Sie auf „Mein Profil ” und geben Sie ein Mitglied Einstellungen.

- 27 -
6.) Klicken Sie auf „Aktualisieren heim Standort ” .
7.) Klicken Sie auf „Mein Geräte", Und Klicken Sie auf „Hinzufügen Neu
Gerät".

- 28 -
8.) Adresse durch Eingabe eines Adresse oder wählen Sie Handbuch Zu
Position
Ihre Adresse automatisch . Klicken Sie dann auf „Nächste ".

- 29 -
9.) Geben Sie die Wetterinformationen ein. Felder mit roter
Markierung (Pflichtfeld) müssen Sei gefüllt In.
NOTIZ :
Du dürfen Wählen Sie „ andere “ von Die Gerät Hardware .
10.) Wenn Sie diese Sitzung abgeschlossen haben, klicken Sie
auf „ Ich akzeptiere “ und „ Nächste " . 11.) Nach erfolgreicher
Registrierung Bitte zeichnen Sie Ihr Wetter Unter Tage ID und
Wichtige Informationen für die spätere Einrichtung verwenden.

- 30 -
12.) Wie gezeigt unten, Registrierung ist erfolgreich durchgeführt.
ERSTELLEN SIE IHR WEATHERCLOUD-KONTO
1.) Besuchen Sie die Weathercloud-Website unter https://weather
cloud.net/, und geben Sie ein A Benutzername, E-Mail und Geben Sie
das Passwort ein und klicken Sie auf „ Anmelden “. Im Anschluss an die
Anweisungen zum Erstellen eines Kontos.
HINWEIS: Diese erfolgt am besten auf A Computer Desktop-Computer
oder Laptop.
(Es ist Ihr Login Passwort für die Website nicht deine E-Mail Passwort.
NEIN Privatsphäre wird ausgesetzt).
2.) Wann Es ist erfolgreich, ein E-Mail wird Sei erhalten in Ihrem
registriert Postfach.

- 30 -
3.) Öffnen Sie Ihre E-Mail und melden Sie sich an im Netz
Adresse In Die Mail. Klicken „ Aktivieren dein Wetterwolke
Konto “.
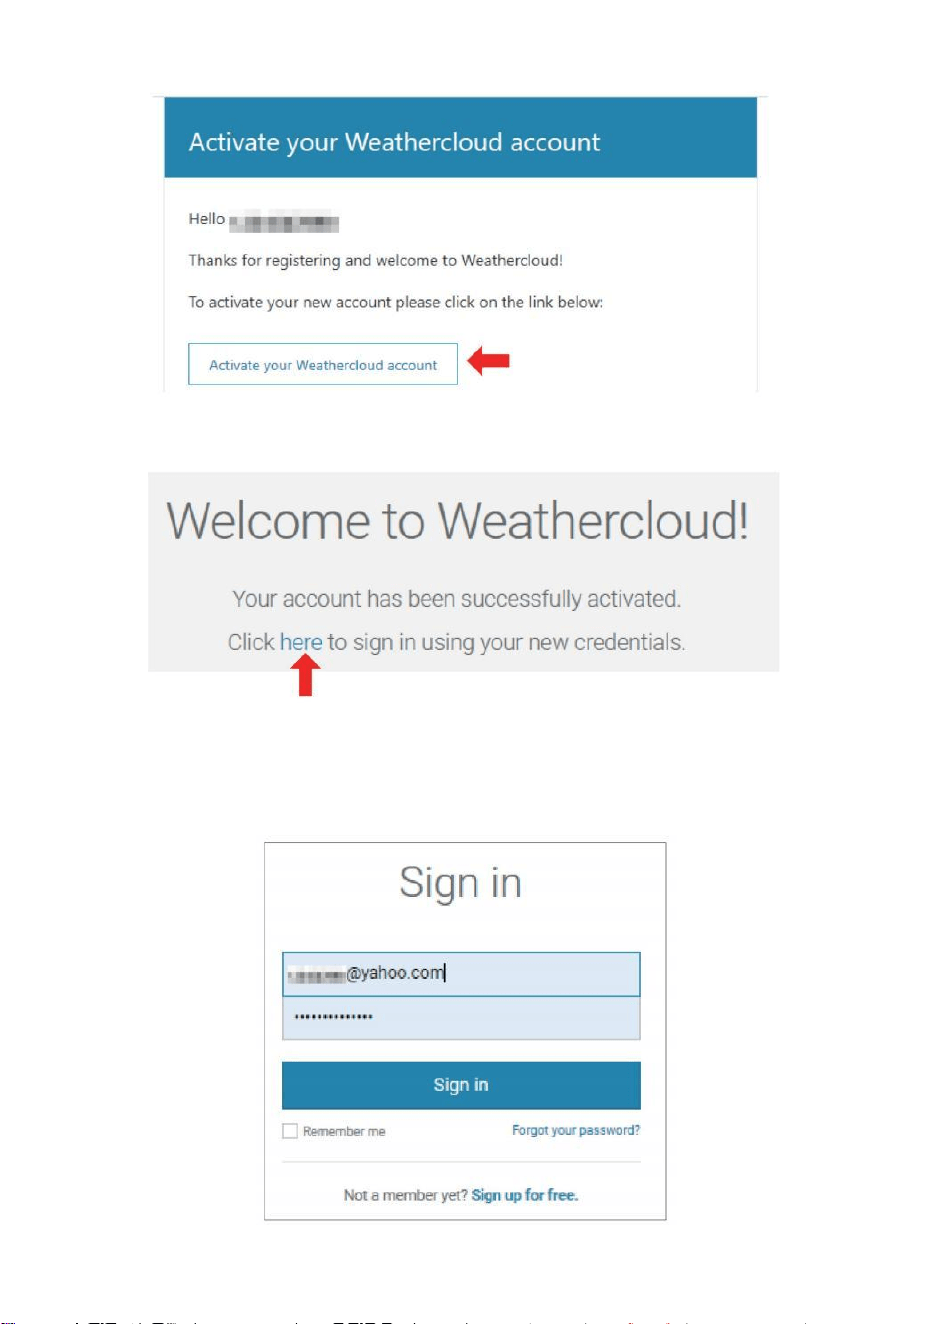
- 31 -
4.) Klicken Sie auf „ hier ” um die Homepage der Weathercloud -
Website. 5.) Geben Sie die E-Mail-Adresse und das Passwort ein, mit
dem Sie sich gerade registriert haben, um den Weathercloud-Website.
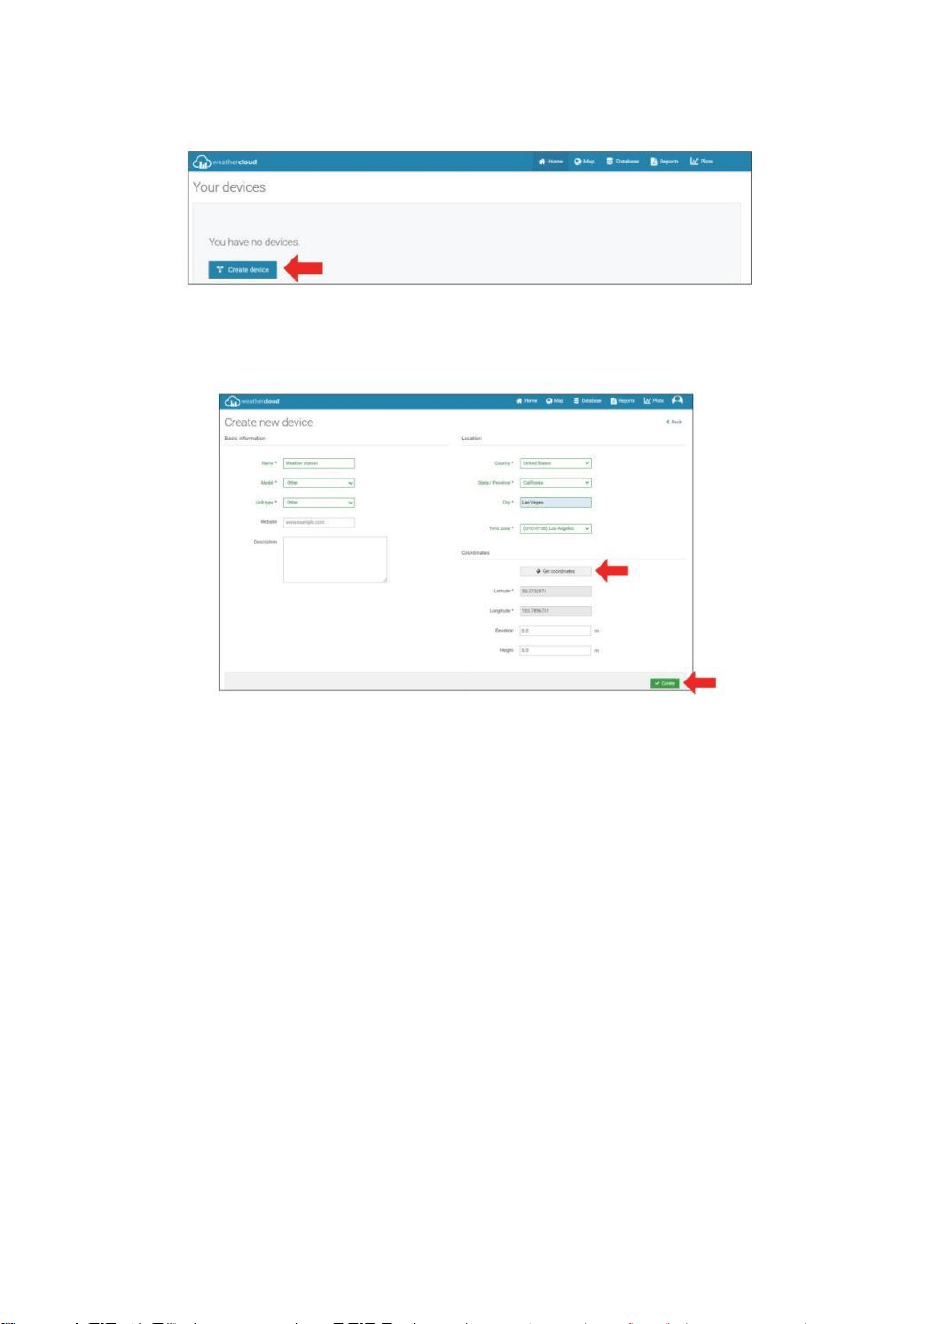
- 32 -
6.) Klicken Sie auf „ Gerät erstellen “, um ein Wetterstationsgerät
hinzuzufügen .
7.) Geben Sie alle angefordert Information in die Erstellen Neu
Gerät Seite. Leerzeichen mit rotem *müssen ausgefüllt werden In.
NOTIZ :
Du dürfen Wählen Sie „ andere “ von Die Modell Nummer Und Link Typ In
Die über Leerzeichen. Klicken Sie auf „Koordinaten abrufen“ zur
Identifizierung Ihres Lage auf Die Karte, dann klick „ Fertig “ für
bestätigen .
8.) Sobald Sie habe abgeschlossen Das Abschnitt , Klicken Sie auf „
Erstellen “.
9.) Nach erfolgreicher Registrierung zeichnen Sie Ihre Weathercloud auf
AUSWEIS Und Wichtige Informationen zur späteren Einrichtung
verwenden.

- 32 -
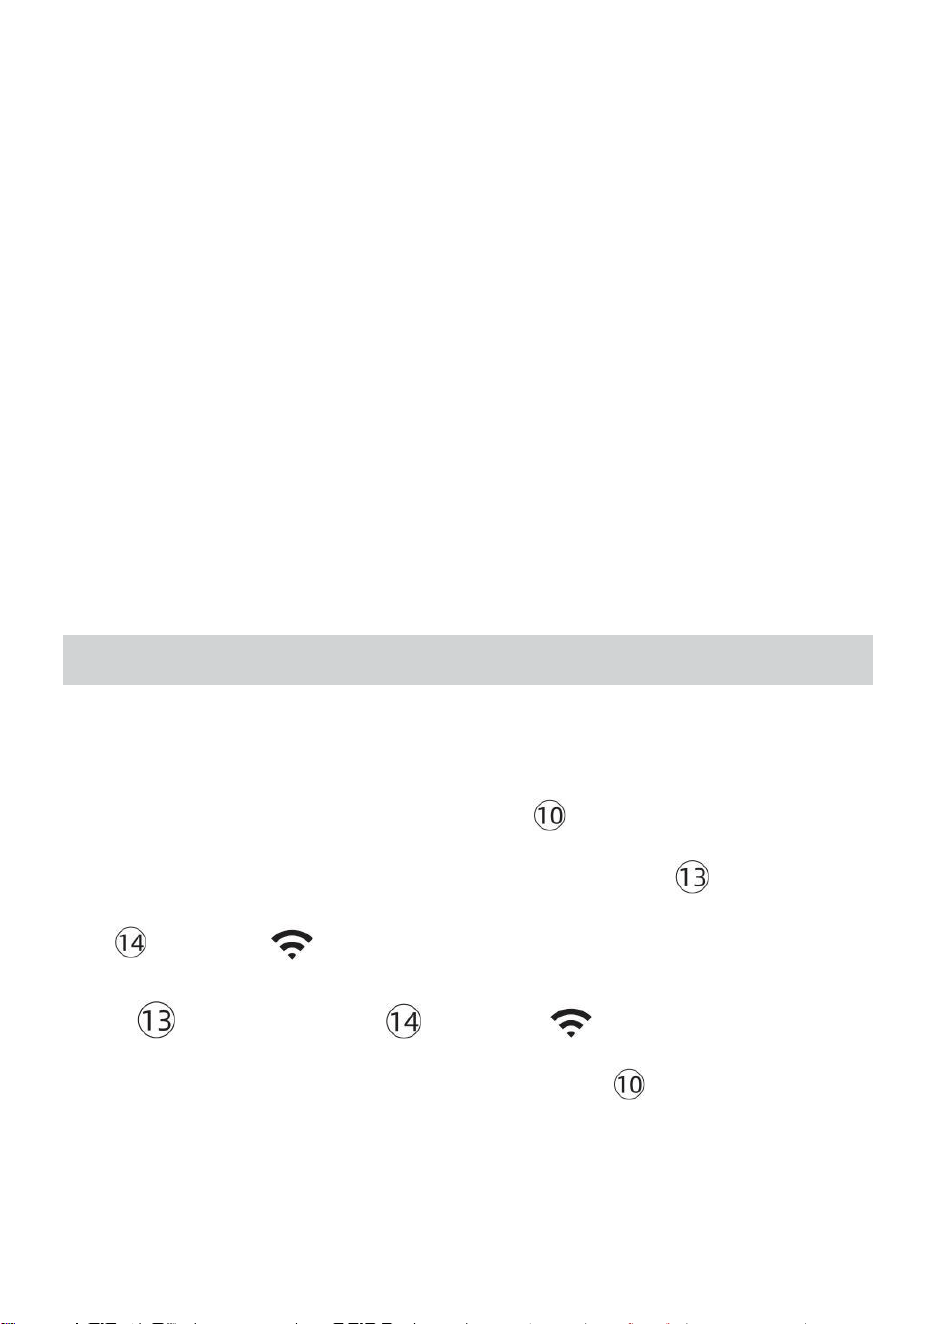
- 33 -
Sehen Sie sich Ihr Wetter an DATEN ZUM WETTER UNTERIRDISCH
Zur Live-Ansicht der Daten Ihrer Wetterstation über PC oder mobiles
Internet Browser,
besuchen http://www.wunderground. com, und geben Sie dann die
Station ID, die Sie bei der Kontoeinrichtung erhalten haben, im suchen
Box. Ihre Wetterdaten wird auftauchen An Die nächste Seite.
Sehen Sie sich Ihr Wetter an DATEN IN WEATHERCLOUD
1.) So zeigen Sie die Daten Ihrer Wetterstation an live über PC oder
Mobile Web Browser, besuchen http://www.weathercloud.net und
melden Sie sich bei dem von Ihnen erstellten Konto an. 2.) Klicken Sie
auf die Registerkarte oben im Seite mit dem Titel Geräte.
3.) Klicken Sie oben auf das Menü „Einstellungen“ rechts vom Seite,
Und wählen Die Option Anzeigen.
4.) Klicken Sie auf Current, Wind oder Evolution, um die Daten.
BEDIENUNGSANLEITUNG
UHR
Einstellen der Uhr
In Normal Zeit anzeigen , drücken Und halten 【 SET 】 über 2 Sekunden
Zu eingeben Zeiteinstellung -Modus . Drücken Und freigeben 【 WIND /+ 】
Und 【 BARO /-/ 】 Zu Passen Sie die Werte an.
Halten 【 WIND /+ 】 und 【 BARO /-/ 】 über 2 Sekunden Zu
anpassen die Werte schnell . Drücken Sie Und freigeben 【 SET 】 auf
bestätigen Und bewegen Zu Die nächste Artikel.

- 33 -
Zu Ausfahrt Die Einstellung Modus bei beliebig Zeit , drücken 【
LICHT / SCHLAFFUNKTION 】 Taste .
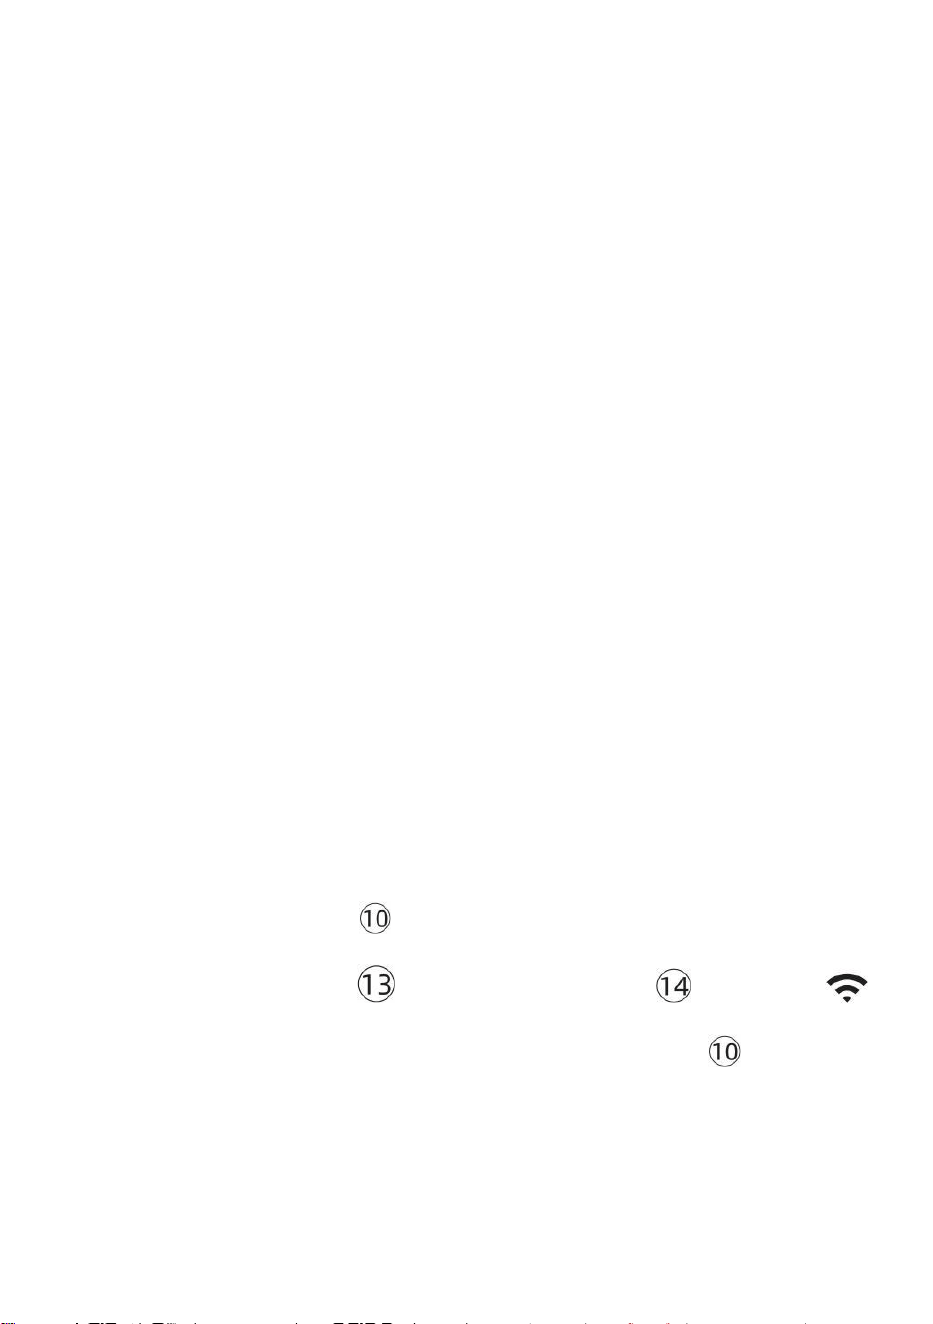
- 34 -
Einstellung Befehl
1. PIEP Ein /Aus
2. NTP Ein /Aus
3. Zeit Zone
4. Sommerzeit Ein /Aus
5. MD/D- M Datum Format
6. Jahr
7. Monat
8. Tag
9. 24.12. Stunde Format
10. Stunde 11. Minute
12. Temperatur Einheit
13. Druck Einheit
14. Relativ Druck Kalibrierung
15. Licht Intensität Einheit
16. Niederschlagsmenge Einheit
17. Wind Geschwindigkeit Einheit
18. Hemisphäre
19. Ende von Einstellung
1.) Drücken Sie Und halten 【 SET 】 -Taste Eingabe Die Einstellungen .
Signalton ON blinkt . Drücken Sie 【 WIND /+ 】 oder 【 BARO /-/
】 Zu ändern zwischen Signalton An und Piepton o ff . Drücken 【 SATZ 】
Zu wählen NTP ein /aus .
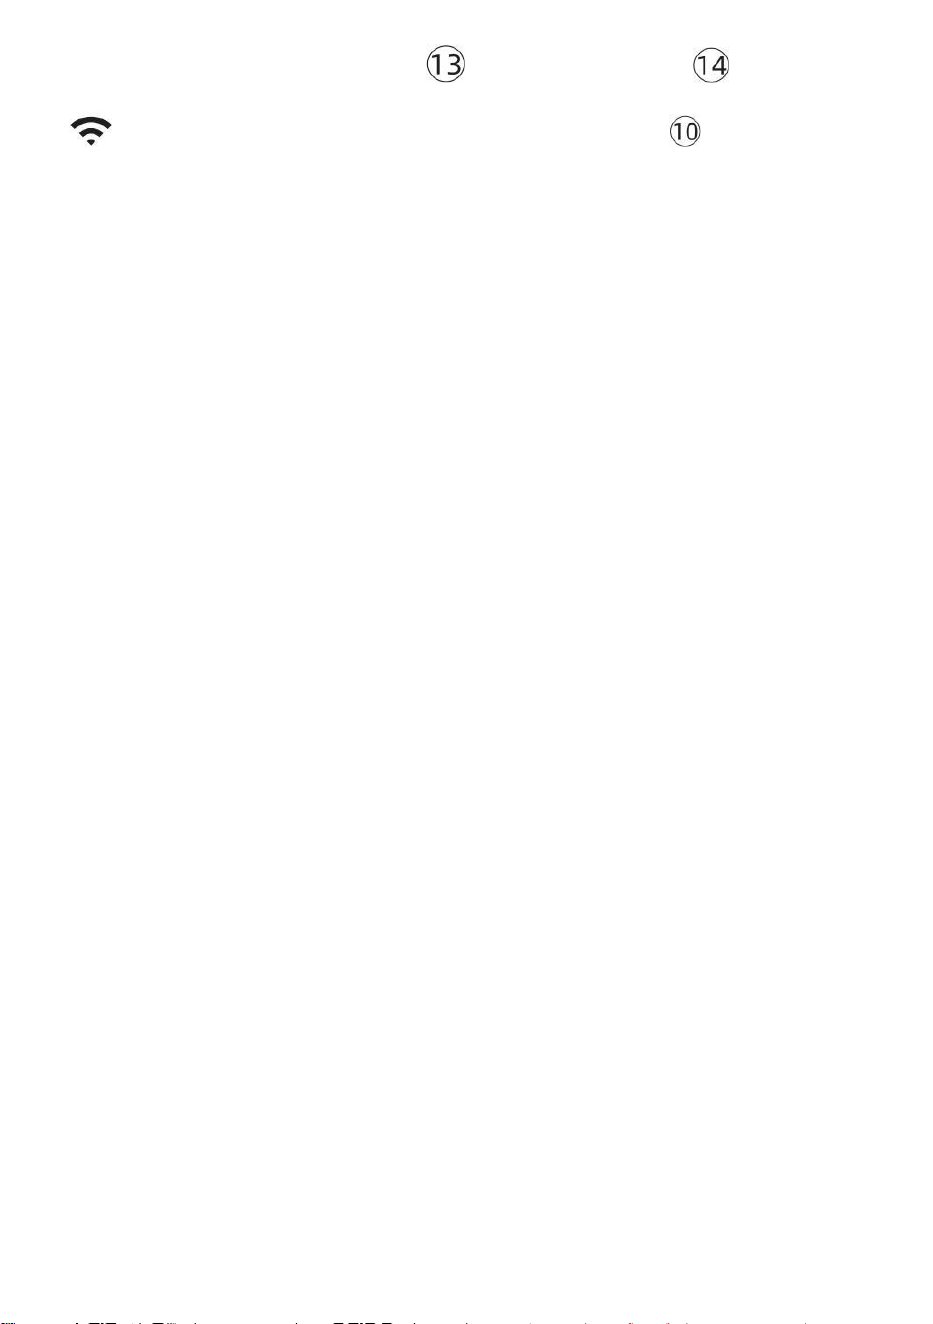
- 34 -
2.) Wann NTP ON blinkt , drücken 【 WIND /+ 】 oder 【 BARO /-
/ 】 Zu ändern zwischen NTP An Und NTP o ff . Drücken 【 SATZ 】
Zu wählen Zeit Zone .
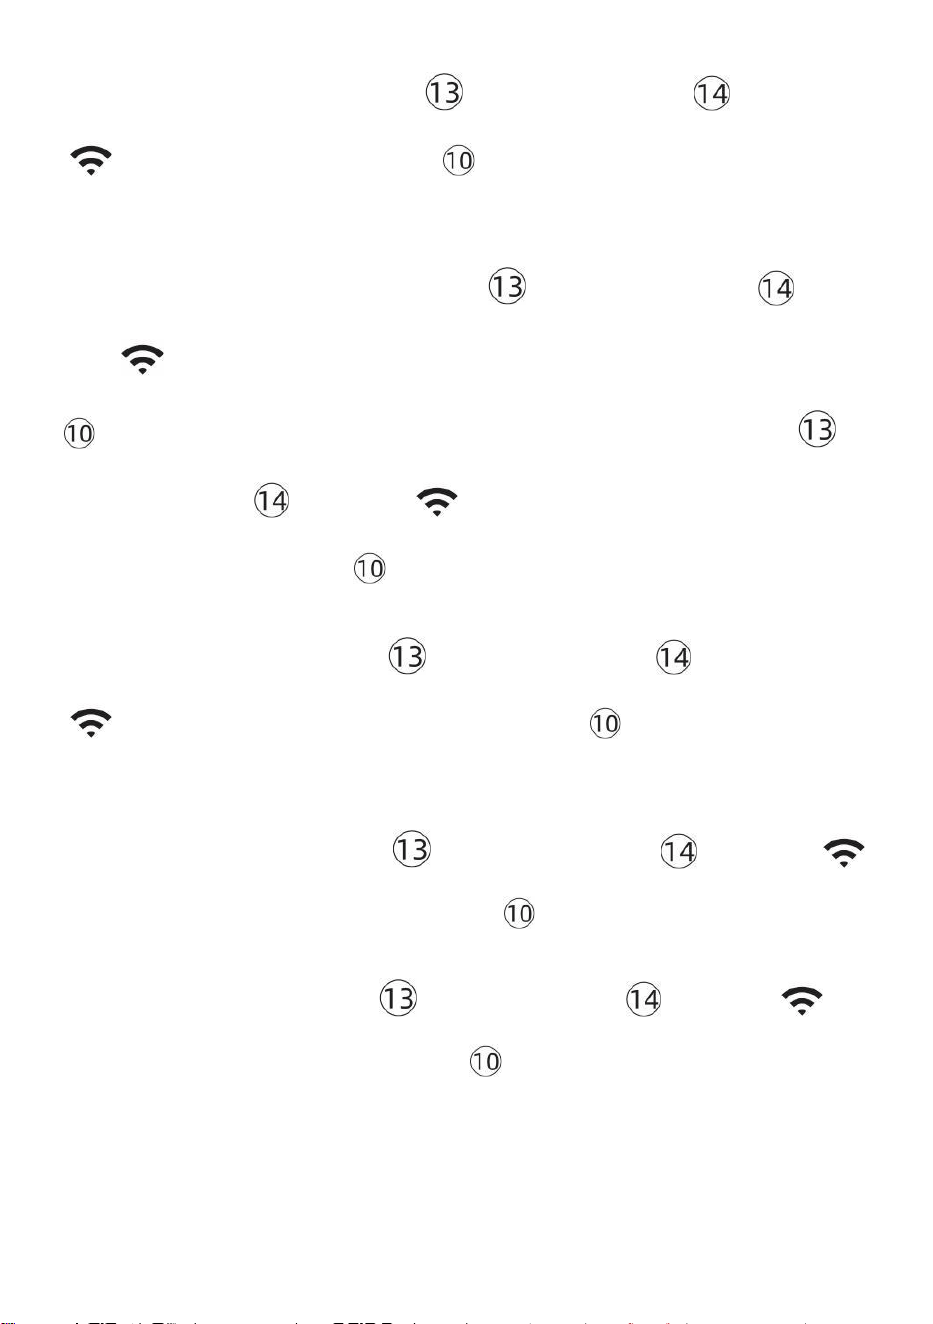
- 35 -
3.) Wann Zeit Zone blinkt , drücken 【 WIND /+ 】 oder 【 BARO /-
/ 】 Zu Satz Zeit Zone . Drücken 【 SATZ 】 Zu wählen Sommerzeit
ein /aus .
4.) Wann Sommerzeit ON blinkt , drücken 【 WIND /+ 】 oder 【 BA
RO /-/ 】 Zu ändern zwischen Sommerzeit An Und Sommerzeit o ff . Drücken
【 SET 】 auf wählen Datum Format . 5.) Wann M --D blinkt , drücken 【
WIND /+ 】 oder 【 BARO /-/ 】】 Zu schalten zwischen M - D Und D
- M Datum Format . Drücken 【 SATZ 】 Zu wählen Jahr .
6.) Wann Jahr blinkt , drücken 【 WIND /+ 】 oder 【 BARO /-
/ 】 Zu anpassen Die Kalender Jahr . Drücken 【 SATZ 】 Zu wählen
Monat .
7.) Wann Monat blinkt , drücken 【 WIND /+ 】 oder 【 BARO /-/
】 anpassen Die Kalender Monat . Drücken 【 SATZ 】 Zu wählen Tag .
8.) Wann Tag blinkt , drücken 【 WIND /+ 】 oder 【 BARO /-/ 】
Zu Passen Sie die Kalendertag . Drücken 【 SET 】 auf wählen 12/24
Stunden Format .
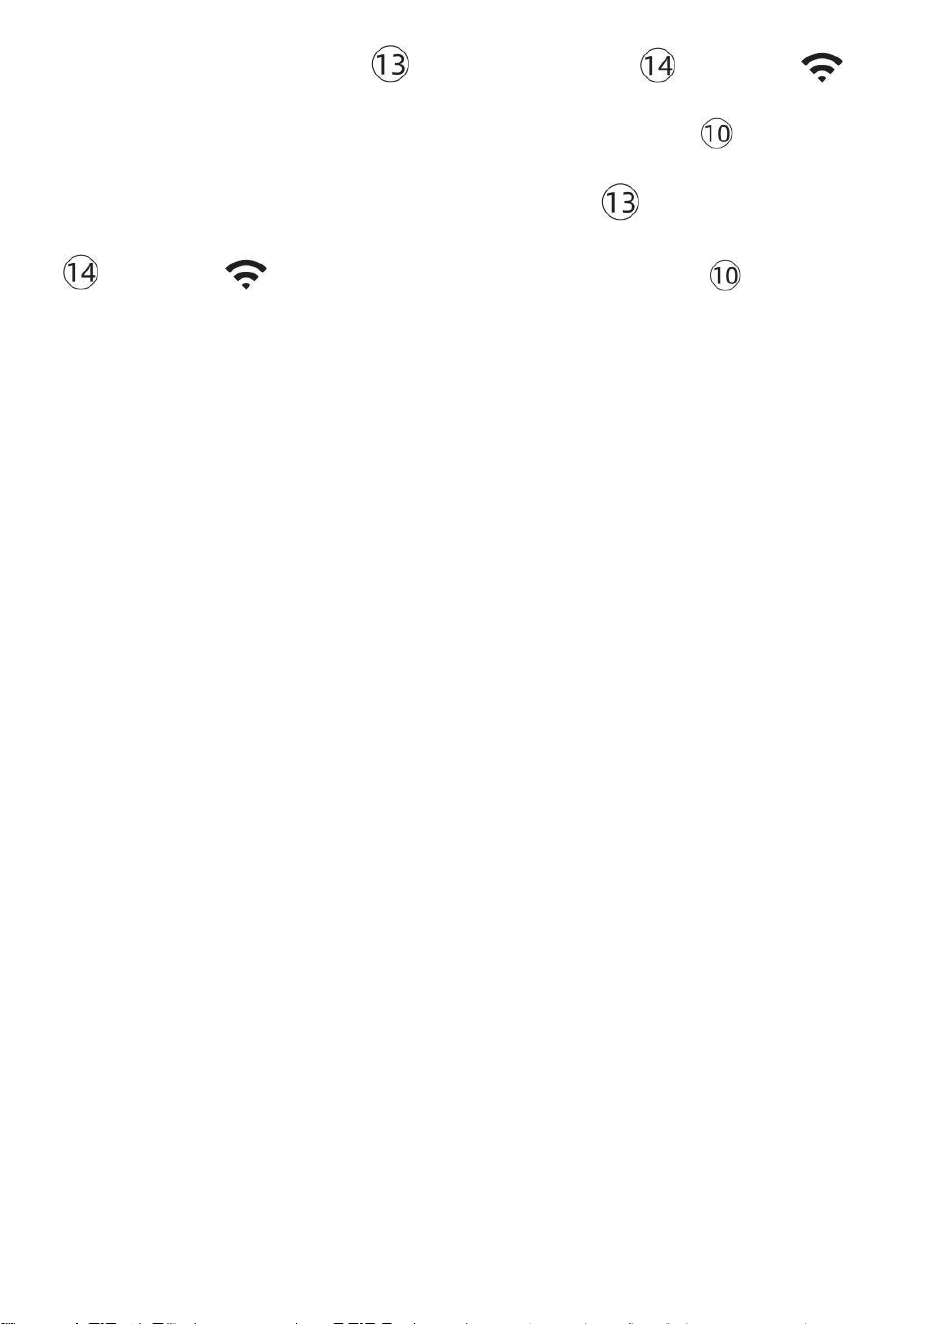
- 35 -
9.) Wann 12 H blinkt , drücken 【 WIND /+ 】 oder 【 BARO /-/
】 ändern zwischen 12 Stunde und 24 Stunde Format . Drücken 【 SATZ 】
Zu wählen Stunde . 10.) Wann Stunde blinkt , drücken 【 WIND /+ 】 oder
【 BARO /-/ 】 Zu Passen Sie die Stunde . Drücken Sie 【 SATZ 】
Zu wählen Minute .
- 36 -
11.) Wann Minute blinkt , drücken 【 WIND /+ 】 oder 【 BARO /-
/ 】 anpassen Die Minute . Drücken 【 SATZ 】 Zu wählen
Temperatur Einheit .
12.) Wann ℉ blinkt , drücken 【 WIND /+ 】 oder 【 BARO /-/
】 Zu ändern zwischen ℉ Und ℃ . Drücken 【 SATZ 】 Zu wählen Druck
Einheit .
13.) Wann Druck Einheit blinkt , drücken Sie 【 WIND /+ 】 oder 【 BAR
O / -/ 】 Zu ändern zwischen hPa , inHg Und mmHg . Drücken 【 SA
TZ 】 Zu wählen Relativdruckkalibrierung .
14.) Wann Relativ Druck blinkt , drücken 【 WIND /+ 】 oder
【 BARO /-/ 】 Zu anpassen Die relativ Druck . Drücken Sie 【 SET 】
auf wählen Lichtintensität Einheit.
15.) Wann Licht Intensität Einheit blinkt , drücken 【 WIND /+ 】 oder
【 BARO /-/ 】 Zu ändern Einheit zwischen Klux , fc Und w /m2 . Drücken Sie
【 SET 】 zu wählen Niederschlagsmenge Einheit.
16.) Wann Regen Einheit blinkt , drücken 【 WIND /+ 】 oder 【 BAR
O /-/ 】 ändern Einheit zwischen In Und mm . Drücken 【 SATZ 】 Zu
wählen Windgeschwindigkeit Einheit . 17.) Wann Wind Geschwindigkeit Einheit
- 36 -
blinkt , drücken Sie 【 WIND /+ 】 oder 【 BARO /-/ 】 Zu ändern
Einheit zwischen In Und mm . Drücken 【 SATZ 】 Zu wählen Hemisphäre .
18.) Wann NTH blinkt , drücken 【 WIND /+ 】 oder 【 BARO /-/
】 Zu ändern
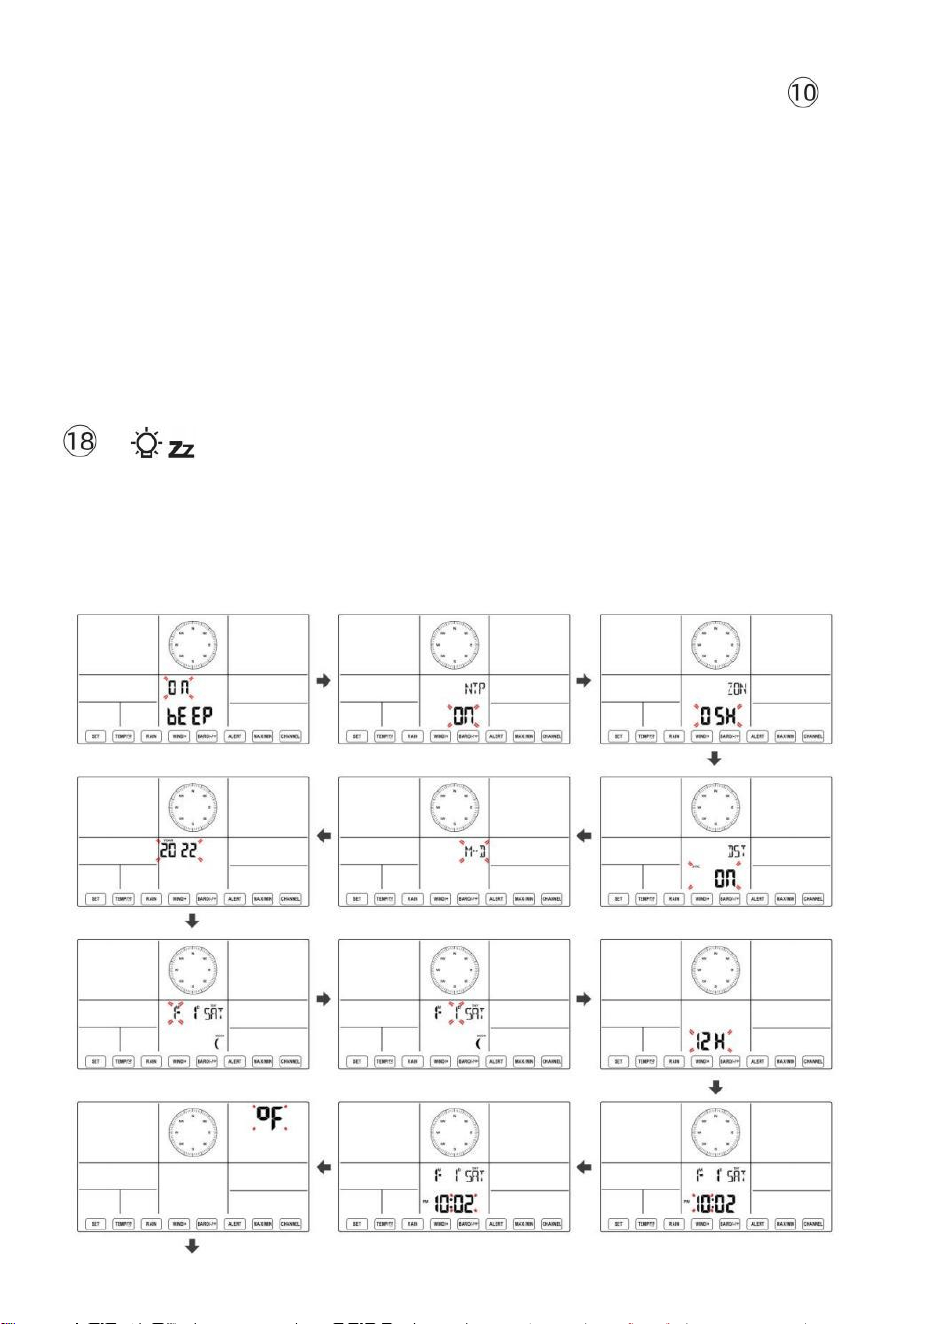
- 37 -
Hemisphäre zwischen NTH ( nördlich ) und STH ( südlich ). Drücken Sie 【
SATZ 】 , um die Einstellung zu speichern und zu verlassen. Es wird zurück zu
Die Normal Modus Anzeige .
NOTIZ: Wenn es Ist keine gültige Operation innerhalb von 2 0 Sekunden,
es wird automatisch zurück zur Normale Anzeige Modus aus der
Einstellung Modus. Beim Einstellen Einstellungen können Sie Presse
LICHT/SCHLummerfunktion 】 Taste, um Zurück zur
Normalanzeige Modus.
【

- 38 -
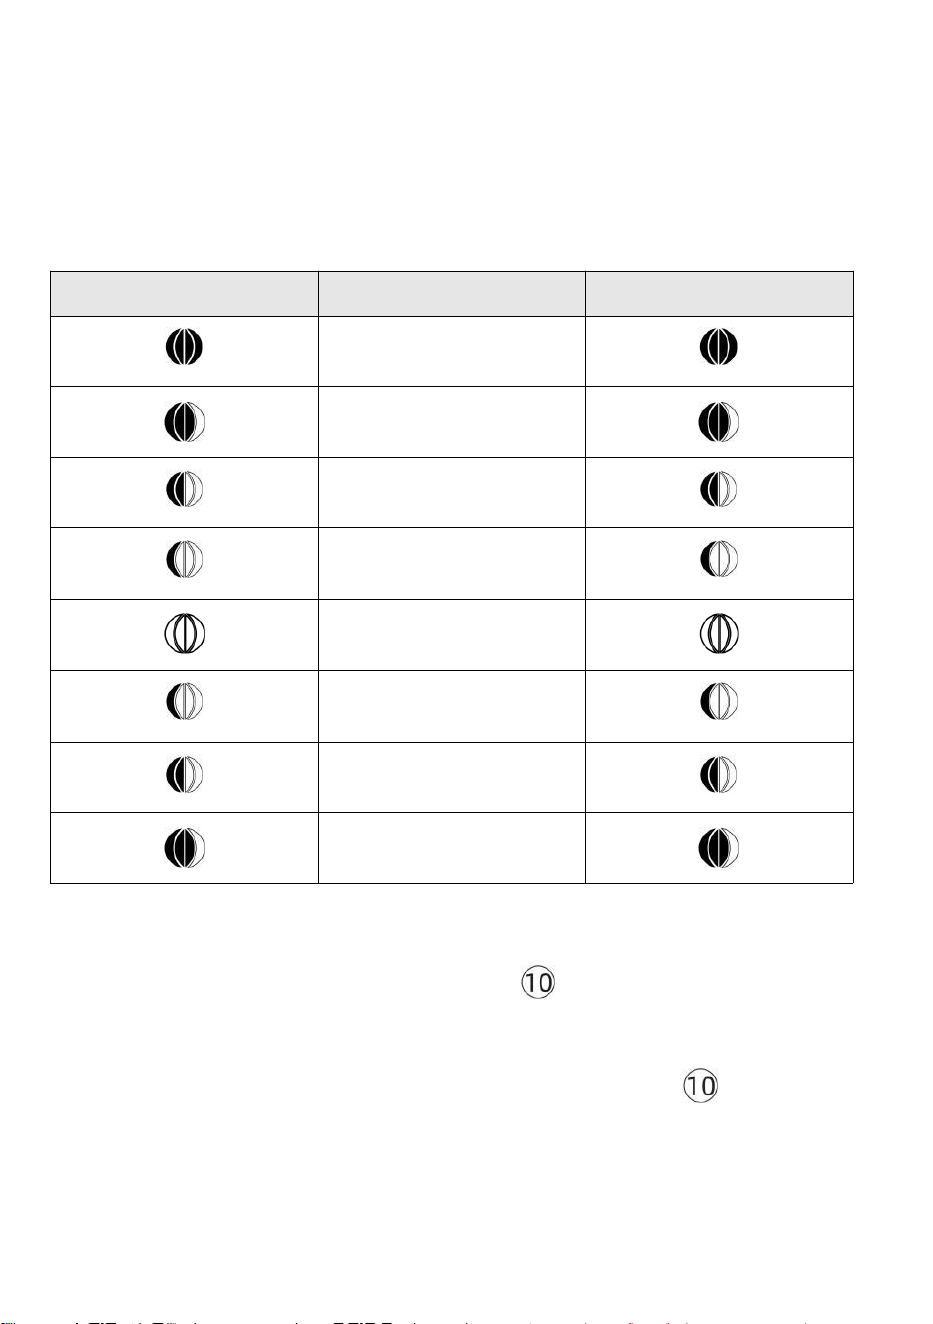
- 39 -
Mond Phase
Die Anzeigekonsole berechnet die Mondphase entsprechend dein
Uhrzeit, Datum und Zeitzone. Die folgende Tabelle erläutert die
entsprechend Phasen und ihre Symbole für die Nord- und Süd
Hemisphären.
Nördlich
Hemisphärensymbole
Mond Phase
Südliche Hemisphäre
Symbole
Neu Mond
Zunehmender Mond Mond
Erstes Viertel Mond
Zunehmender
Dreiviertelmond Mond
Voll Mond
Abnehmender
Dreiviertelmond Mond
Drittes Viertel Mond
Abnehmender Halbmond
Mond
Einstellen des Alarms
● Drücken Sie in der normalen Zeitanzeige
【
SET
】
Taste zum
Umschalten der Anzeige Alarmzeit (Alarmzeit Modus).
● Halten Sie in der Alarmzeitanzeige 【 SET 】 gedrückt . Taste länger
als 2 Sekunden gedrückt halten, um in den Alarmeinstellungsmodus zu
wechseln. Die Weckzeit beginnt zu blinken.

- 39 -
● Drücken 【 WIND/+ 】 Taste oder 【 BARO/-/ 】 Taste zum
Einstellen der gewünschten Weckzeiten. Halten 【 WIND/+ 】 Taste
oder 【 BARO/-/ 】 Taste, um
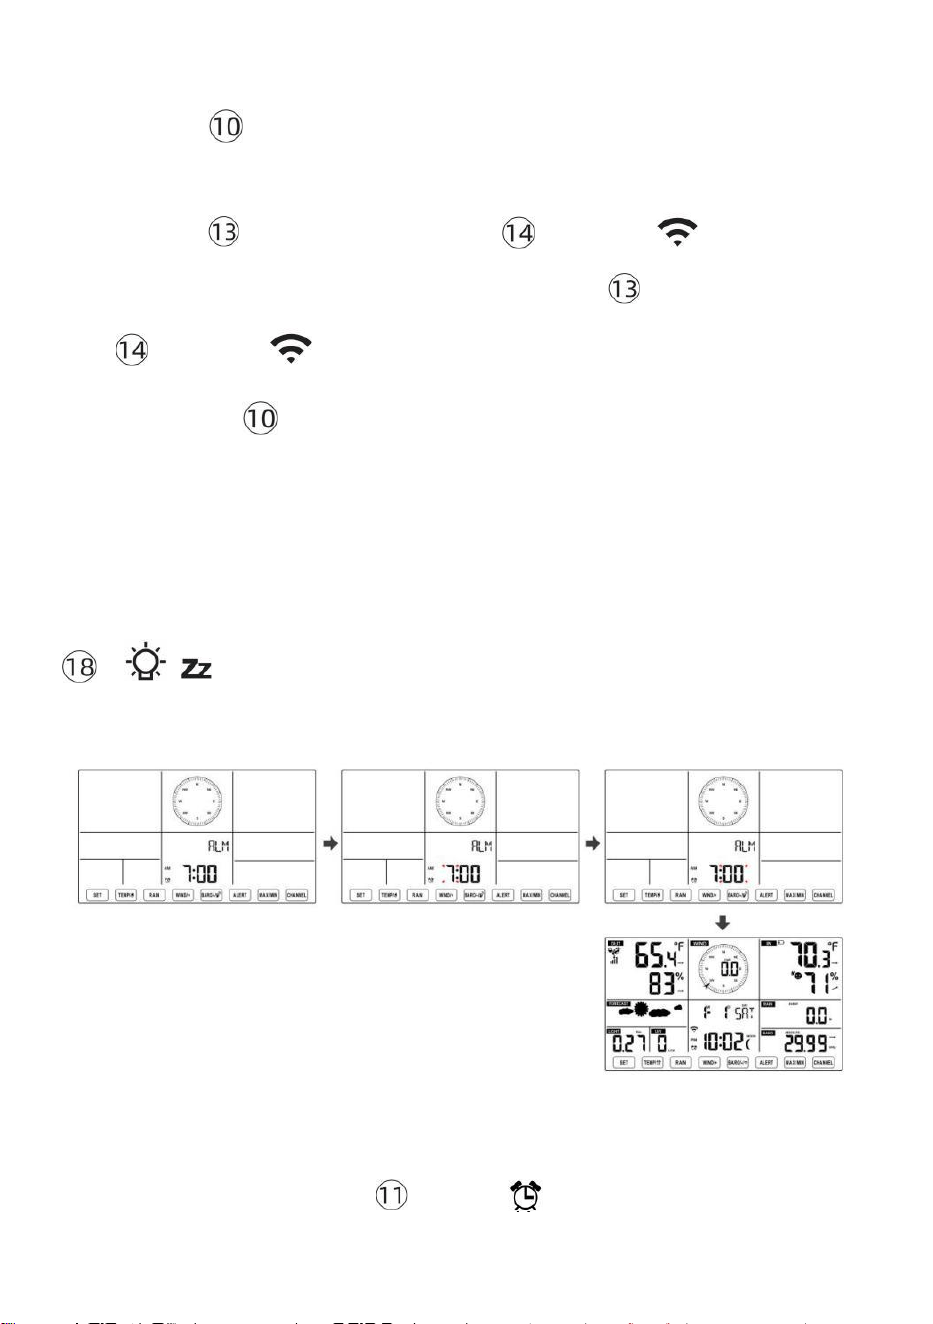
- 40 -
Weckzeiten anpassen schnell.
● Drücken 【 SET 】 Taste zur Auswahl Minute von Alarm.
Minute des Alarms beginnt zu blinken.
● Drücken 【 WIND/+ 】 Taste oder 【 BARO/-/ 】 Taste zum
Einstellen der gewünschten Alarmminuten. Halten 【 WIND/+ 】 Taste
oder 【 BARO/-/ 】 Taste, um Alarmminuten anpassen schnell.
● Drücken Sie 【 SET 】 , um alle Einstellungen zu speichern und zu
beenden. Normale Anzeige Modus.
NOTIZ: Wenn es Ist keine gültige Operation innerhalb von 2 0 Sekunden,
es wird automatisch zurück zur Normale Anzeige Modus aus der
Einstellung Modus. Beim Einstellen Einstellungen können Sie Presse
【 LICHT / SCHLAFFUNKTION 】 Taste Zu zurückkehren Zu
Normal Anzeige -Modus .
Alarm deaktivieren/aktivieren
● In Alarm Zeit anzeigen ,
drücken aus .
【 TEMPER
ATUR /
】 Taste Zu wählen Die Alarm
An oder
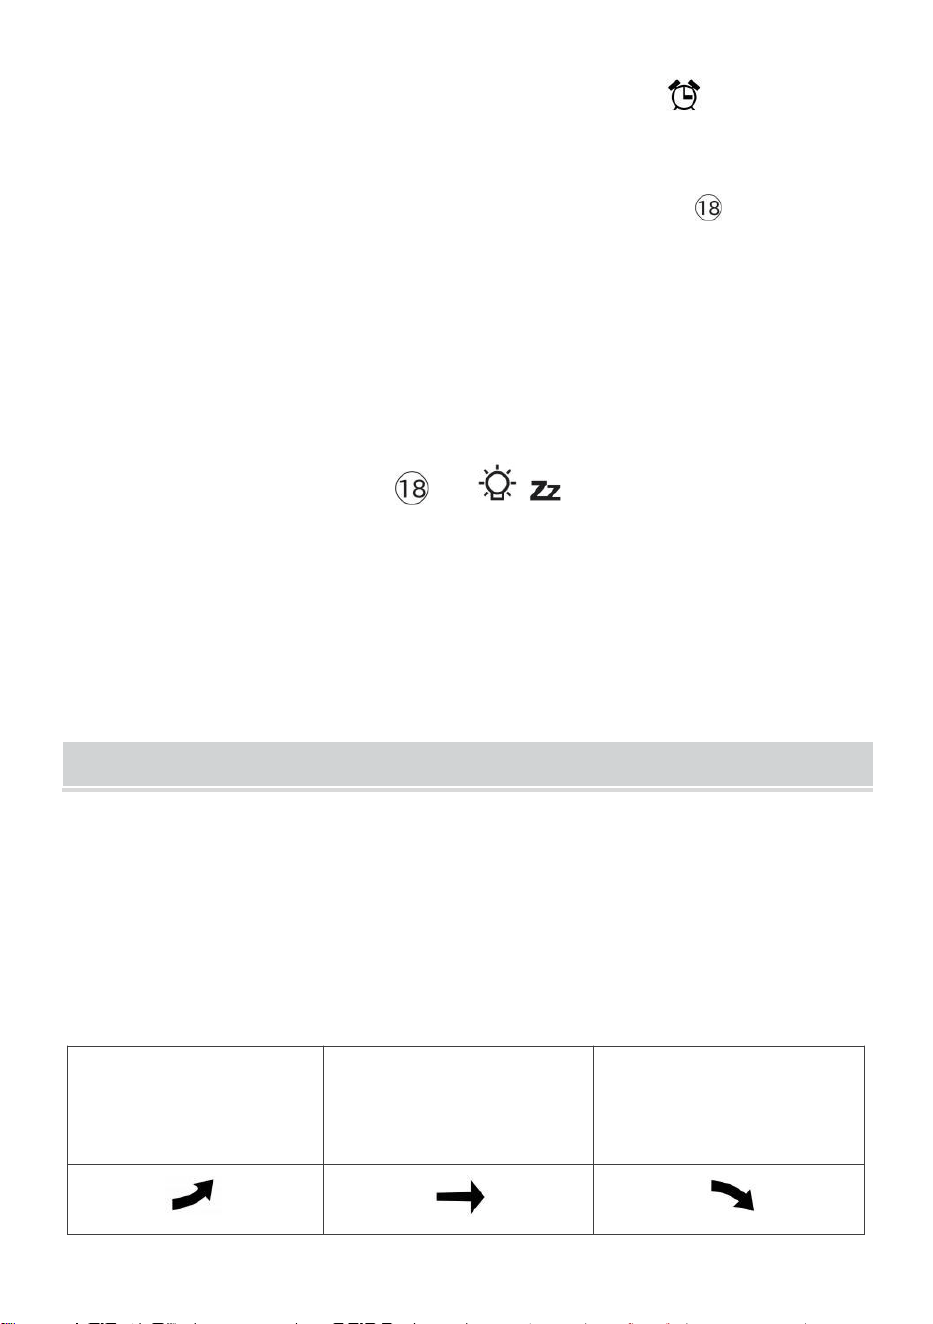
- 41 -
● Wenn Die Alarm Ist An , es ist entsprechend Alarm Symbol Wille Sei
gezeigt An auf dem Display.
● Wann Die Alarm Ist Klingeln , drücken beliebig Tasten außer 【
容 z
LICHT/SCHLummerfunktion 】 Taste, um das Alarmsignal zu stoppen. Es Ist nicht
notwendig, um reaktivieren der Alarm. Es wird ruf das nochmal an Zeit nächste
Tag.
Schlummern Funktion
Wann Die Alarm Ringe , drücken 【 LICHT / SCHLAF 】 Taste Zu
Pause der
Alarm . Die dösen Indikator Symbol
z 2
blinkt weiter . Die Alarm
Wille wieder aufnehmen
nach
5
Minuten .
TEMPERATUR
Temperatur-/Feuchtigkeitstrend
Tendenzpfeile ermöglichen eine schnelle Temperaturbestimmung
Und Luftfeuchtigkeit steigt und fällt in einem eine Stunde
aktualisieren Zeitraum .
Temperaturtrend
Temperatur hat
auferstanden > 1°C/2° F In Die
Vergangenheit
Stunde
Temperatur hat nicht
geändert mehr als
1°C/2° F In Die Vergangenheit
Stunde
Temperatur hat
gefallen < 1°C/2° F In Die
Vergangenheit
Stunde

- 41 -
Luftfeuchtigkeitstrend
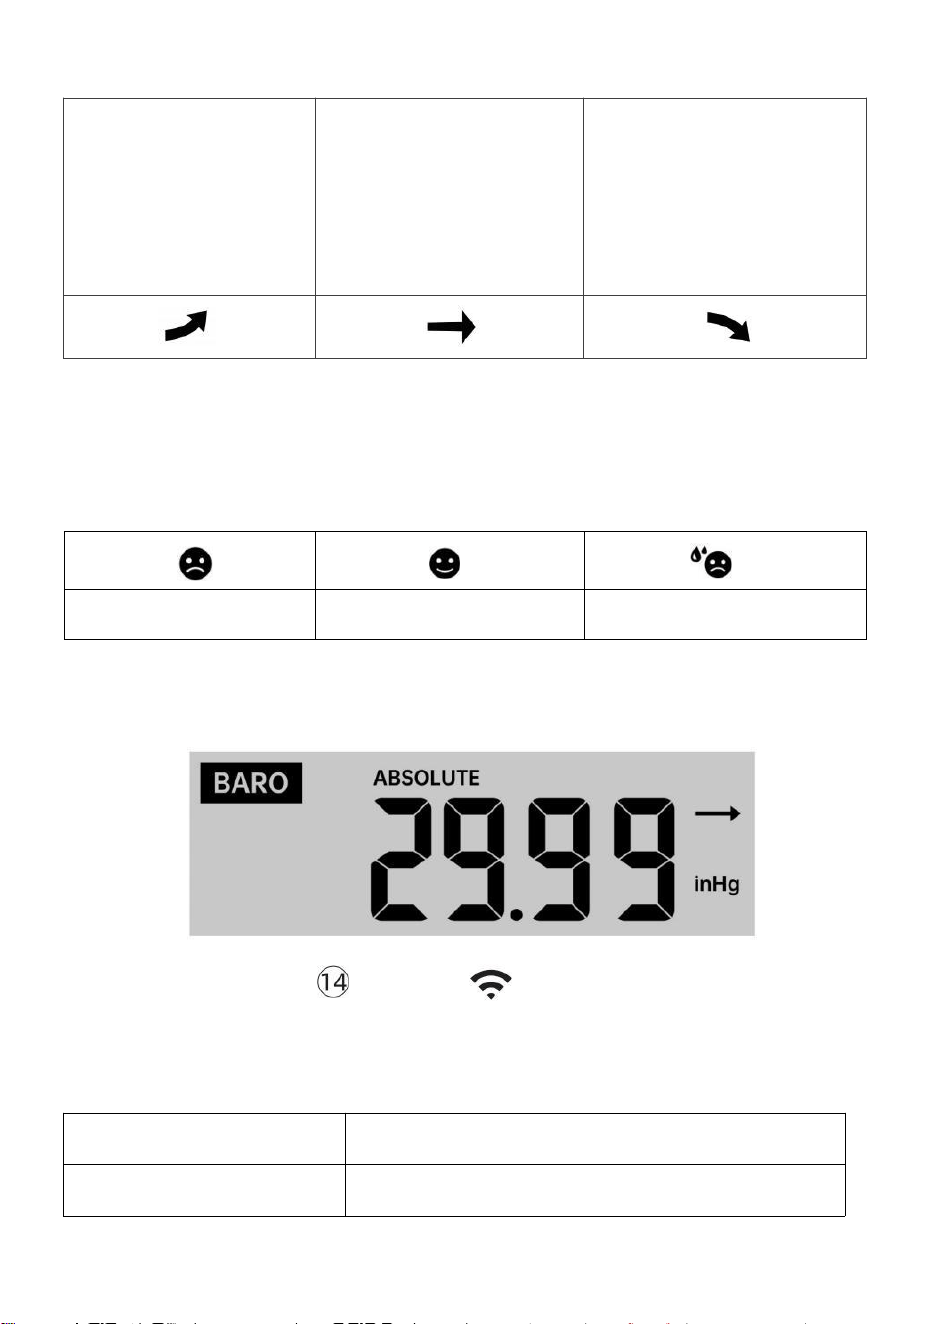
- 42 -
Luftfeuchtigk
eit ist
gestiegen >
3 % im
Vergangenhe
it Stunde
Luftfeuchtigkeit hat nicht
geändert mehr als 3 % In
Die Vergangenheit Stunde
Luftfeuchtigk
eit ist gefallen
< 3 % im
Vergangenhei
t Stunde
Komfort im Innenbereich Index
Der Der Komfort im Innenbereich zeigt eine bildlich Darstellung auf
Grundlage der Raumlufttemperatur und Luftfeuchtigkeitswerte zur
Bestimmung des ungefähren Komforts Ebene.
Zu kalt
Komfortabel
Zu heiß
DRUCK
Barometerdruck Anzeige
Im Normalfall Modus,
drücken Und relativer
Druck.
【 BARO/-/ 】 Druckschalter zwischen
absoluten
Absolute
Der absolute Luftdruck Ihres Standorts.
Relativ
Der relative Luftdruck beträgt bezogen auf Die Meer Ebene.

- 42 -
Drucktrend
Tendenzpfeile ermöglichen eine schnelle Ermittlung wenn Druck e Ist
Aufstand oder fallen in einem einstündigen Update Zeitraum.
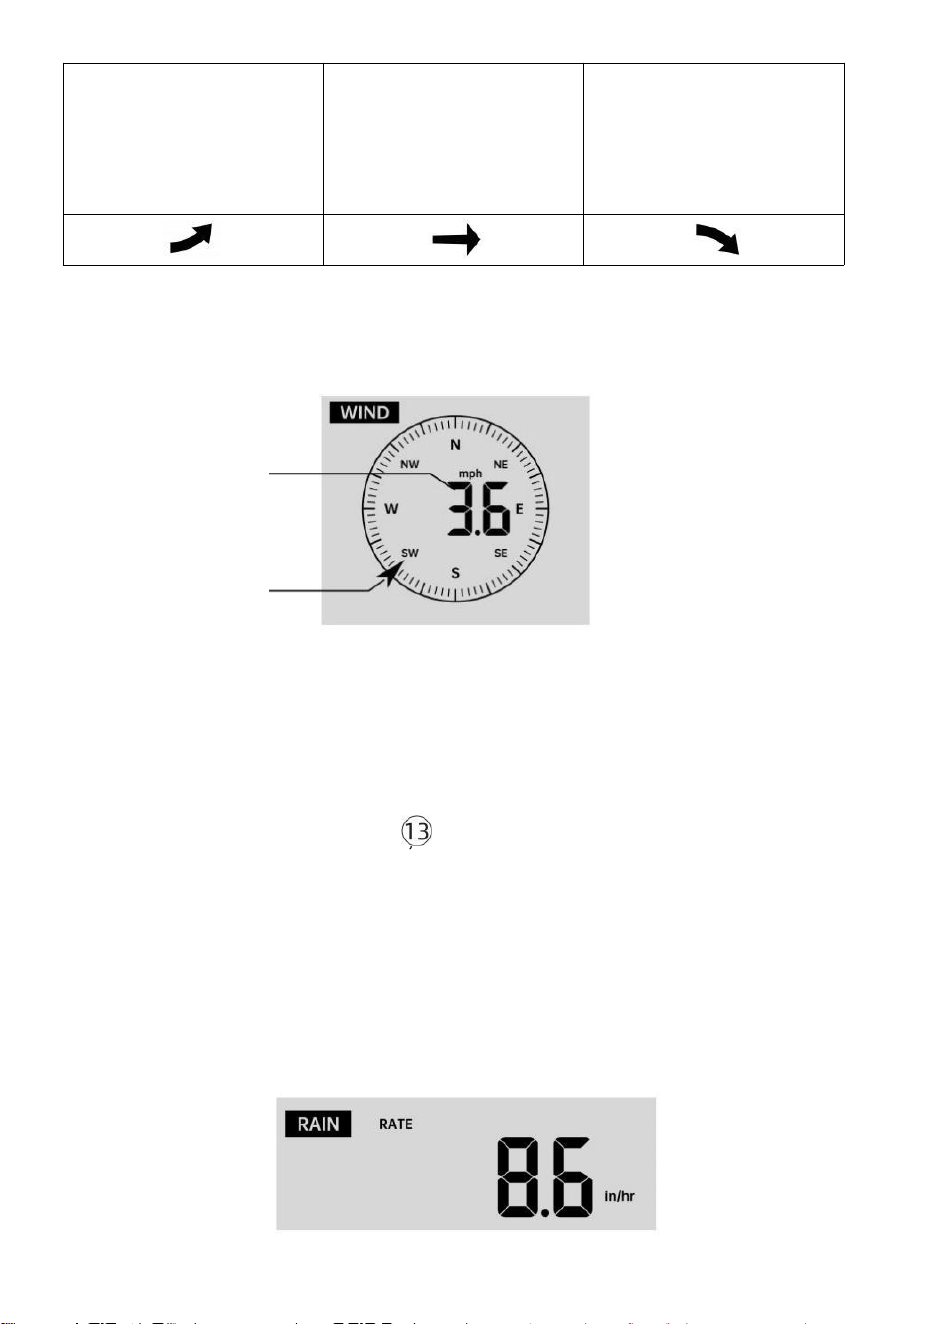
- 43 -
Der Druck hat
Anstieg > 2 hPa/0,06 inHg In
die Vergangenheit
Stunde
Der Druck hat nicht
geändert mehr als 2
hPa/0,06 inHg
in der Vergangenheit
Stunde
Druck hat
gefallen > 2 hPa/0,06 inHg In
die Vergangenheit
Stunde
WIND
Wind Anzeige
Durchschnitt/
Böen Wind
Geschwindi
gkeit
Echtzeit-Wind
Fahrtrichtungsanzeiger
Auswählen des Windanzeigemodus
In der normalen Anzeige Modus,
drücken
【
WIND/+
】
Taste zum
Umschalten zwischen
aktuelle durchschnittliche Windgeschwindigkeit,
Böenwindgeschwindigkeit und Windrichtung .
REGEN
Niederschlagsanzeige

- 43 -
Der Niederschlag zeigt Information über die Niederschläge und
Regenrate .
Wählen Sie die Niederschlagsanzeige Modus
- 44 -
【 RAIN 】 Taste zum Umschalten zwischen Regen
Rate, Regen Ereignis, Regen Stündlich, Regen Täglich, Regen
wöchentlich, Regen Monatlich und Gesamtniederschlag.
Regenmengen Defini tion
Regen Rate : aktuell Niederschlagsmenge Rate im Vergangenheit Stunde.
Regenereignis : Dauerregen, und wird zurückgesetzt auf null Wenn
Regen fällt Akkumulation Ist
weniger als 10 mm (0,039 Zoll) In A 24 Stunden Zeitraum.
Täglicher Regen : Gesamtniederschlagsmenge seit Mitternacht (0 0:00)
Wöchentlich Regen : Gesamtniederschlagsmenge für die aktuelle
Kalenderwoche und Rücksetzer An Sonntagmorgen um
Mitternacht (Sonntag bis Samstag)
Monatlich Regen : Gesamtniederschlagsmenge für den aktuellen
Kalendermonat, Und zurücksetzen An der erste Tag des
Monat.
Gesamt Regen : Gesamtniederschlagsmenge seit dem zuletzt
zurücksetzen.
Gesamtsumme zurücksetzen Niederschlagsrekord
In der normalen Anzeige Modus, drücken und halten
【
REGEN
】 Knopf über 2 Sekunden, um die Regen aufzeichnen .
NOTIZ:
Das Zurücksetzen des wöchentlichen Regens setzt auch den täglich
Regen.
Zurücksetzen des monatlichen Regens setzt die täglichen und
wöchentlichen Regen.
Durch das Zurücksetzen der Gesamtniederschlagsmenge werden
auch die monatlichen, wöchentlichen und täglich Regen.
WETTER
Wetterindex
In normal display mode, press
- 44 -
Beim Lesen des Wetters Indexanzeige, können Sie drücken 【 TEMPER
ATUR / 】
Taste zum Durchlaufen verschiedener Wetterindizes in der folgenden
Reihenfolge: Fühlt sich an Gefällt mir > Hitze Index > Wind Kühlen

- 45 -
Fühlt sich an Wie
Der Fühlt sich an Wie der Temperaturindex bestimmt, wie hoch die
Temperatur draußen tatsächlich ist, unter Berücksichtigung von Faktoren
wie Windgeschwindigkeit, Druck, Temperatur und Feuchtigkeit .
Windchill
Der Windchill-Wert wird durch eine Kombination der Temperatur- und
Windgeschwindigkeitsdaten des drahtlosen Wettersensors bestimmt .
unter 50 ℉ (10 ℃ ) liegt und Die Windgeschwindigkeit liegt über
4,8 km/h (3 mph), wird der Windchill-Wert angezeigt,
ansonsten es wird angezeigt „ --.-“.
Hitze Index
Der Hitze Der Index wird durch den drahtlosen Wettersensor
bestimmt Temperatur und Luftfeuchtigkeit Messwerte.
Tau Punkt
Der Taupunkt ist die Temperatur, bei der ein gegebener Paket von
Luftfeuchtigkeit Luft
muss gekühlt werden, bei konstantem barometrischen Druck, damit
Wasserdampf
kondensieren zu Wasser. Das kondensierte Wasser wird Tau genannt.
tau Punkt Ist eine Sättigungstemperatur.
Der Tau Die Punkttemperatur wird durch die Temperatur bestimmt und
Luftfeuchtigkeitsdaten vom drahtlosen Wettersensor .
Wettervorhersage
Der eingebautes Barometer kann Änderungen des Luftdrucks
erkennen und auf Grundlage der erfassten Daten das Wetter
vorhersagen können Bedingungen.
Es gibt 6 Wettersymbole --- Sonnig, Teilweise Wolkig, Wolkig, Regnerisch,
Stürmisch Und Schneebedeckt.
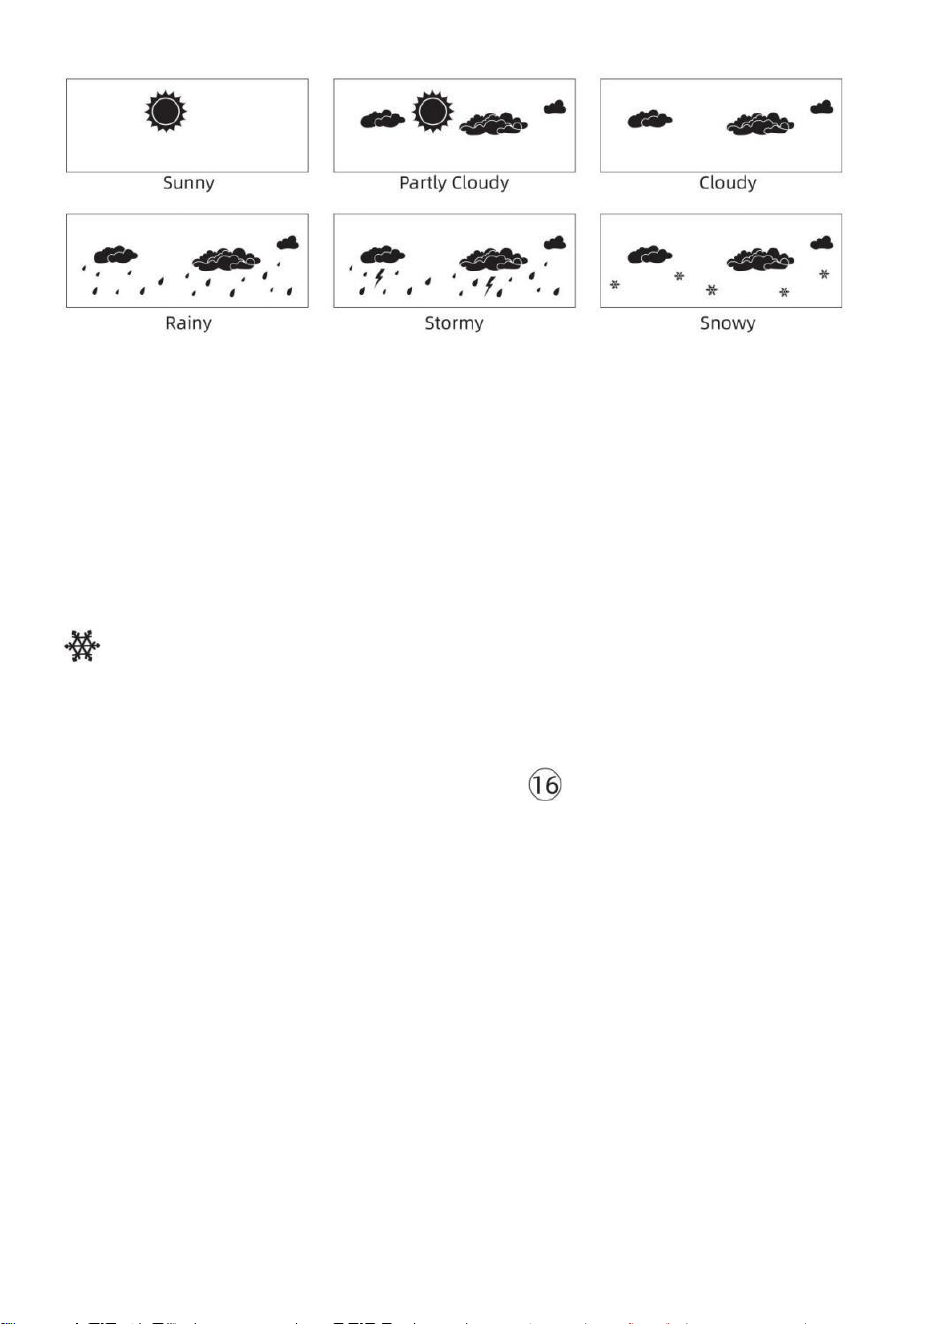
- 46 -
NOTIZ:
Die Genauigkeit einer allgemeinen druckbasierten Prognose
handelt von 65-70 %. Prognosen sind nicht garantiert.
Es kann nicht spiegeln notwendigerweise die aktuell Situation.
Eis Alarm
Bei einer Außentemperatur von niedriger als 1 ℃ /33,8 ℉ , das
Schneeflockensymbol
erscheint auf der LCD Anzeige.
MAX/MIN
● In der normalen Anzeige Modus, drücken
【
MAX/MIN
】
Tastenumschaltung zwischen Maximal- und Minimalwert.
NOTIZ: Wenn es Ist keine gültige Operation innerhalb 10
Sekunden, es wird automatisch zur normalen Anzeige
zurückgekehrt Modus.

- 46 -
- 47 -
Zum Anzeigen der Kumuliertes MAX/MIN
● Anzeige Fühlen wie Windchill, Hitze Index, Tau Punkt-Maximal-
/Mindestwerte
1.) Wenn die Maximalwerte angezeigt werden,
drücken
【 TEMPER
ATUR /
】 Taste,
um
Austausch Anzeige der Außentemperatur → Lust auf → Windchill →
Hitze Inhaltsverzeichnis → Tau Punkt → Außentemperatur.
2.) Wenn die Min-Werte angezeigt werden , drücken Sie 【 TEMPERAT
UR / 】 Taste, um
Austausch Anzeige der Außentemperatur → Lust auf → Windchill →
Hitze Inhaltsverzeichnis → Tau Punkt → Außentemperatur.
● Anzeige Windgeschwindigkeit, Windböen Maximalwerte
Wenn die Maximalwerte angezeigt werden,
drücken
【
WIND/+
】
Taste zum
Austauschansicht zwischen den DURCHSCHNITTLICHE und BÖEN-
Windgeschwindigkeiten. ● Anzeige Regen Rate, Täglich Regen,
wöchentlich Regen und Monatlich Regen Max Werte
Wenn die Maximalwerte angezeigt werden, drücken Sie
【
RAIN
】
Taste zum
Austauschansicht Regen Bewerten → Täglich Regen → Wöchentlich
Regen → Monatlich Regen.
● Anzeige Absolut und Relativ Druck Max- /Min-Werte
1.) Wenn die Maximalwerte angezeigt werden, drücken 【 BARO/-/
】 Taste, um Austauschansicht zwischen Absolut und Relativ e Druck.
2.) Wenn die Min-Werte angezeigt werden, drücken Sie 【 BARO/-/
】 Taste zum
Austauschansicht zwischen Absolut und Relativ e Druck.

- 47 -
● Anzeige Innen- und andere Kanäle Sensor Temperatur &
Luftfeuchtigkeit Max-/Min-Werte
1.) Wenn die Maximalwerte angezeigt werden, drücken 【 CHANNEL
】 Taste zum
Austauschansicht Innen- und gekoppelte Außensensoren Temperatur
und Luftfeuchtigkeit.
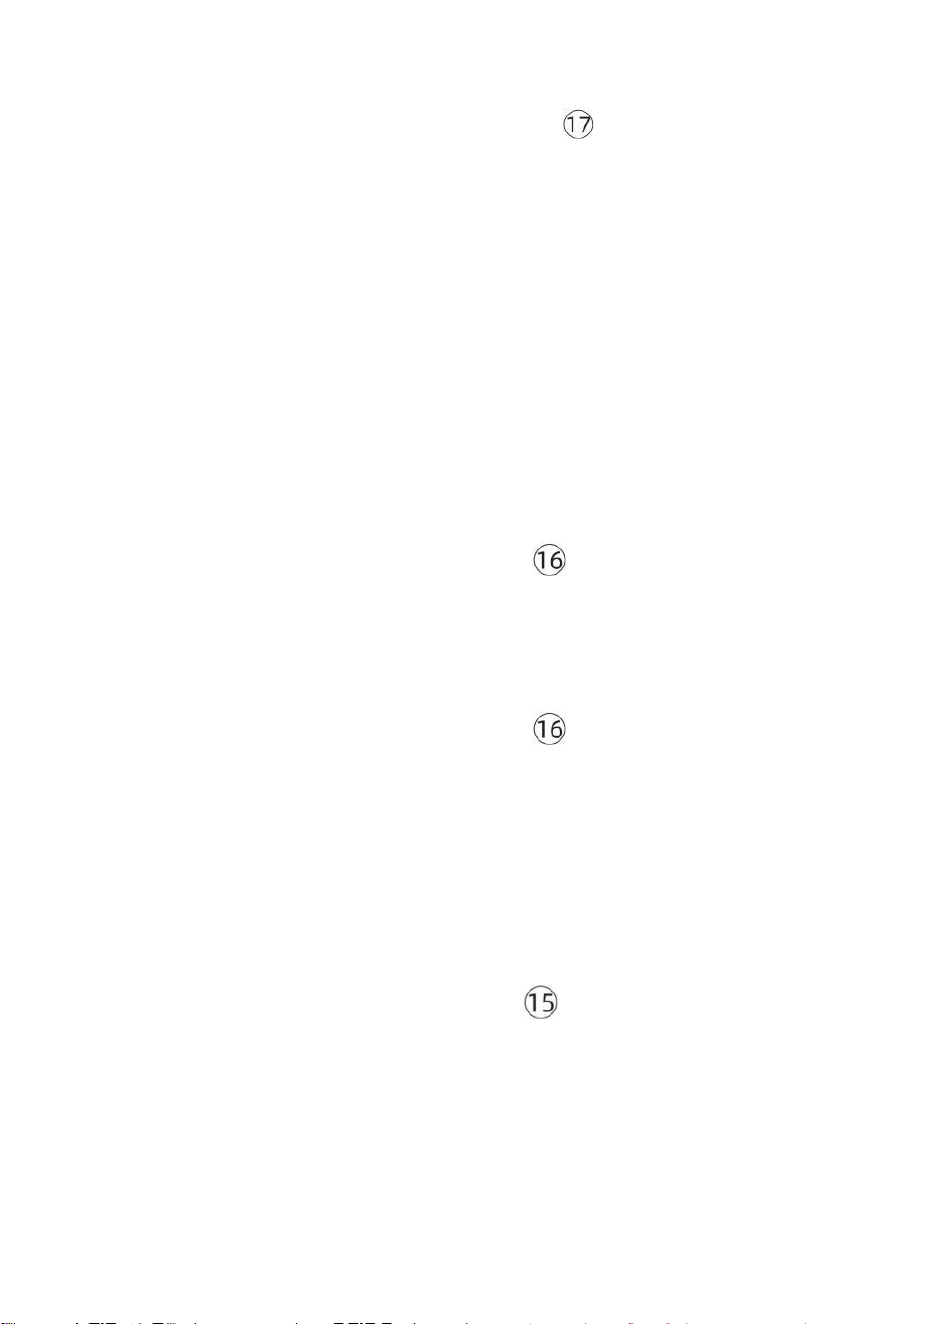
- 48 -
2.) Wenn die Min-Werte angezeigt werden,
drücken
【 KANAL 】 Taste, um
Austauschansicht Innen- und gekoppelte Außensensoren Temperatur
und Luftfeuchtigkeit.
NOTIZ: Wenn andere Kanalsensoren gekoppelt wurden, könnte es
sein, dass die maximalen/minimalen Temperatur- und
Feuchtigkeitswerte anderer Kanäle . Wenn ein anderer Kanal
Sensoren waren nicht gepaart, es werden nur die aktuellen innen
max/min Temperatur und Luftfeuchtigkeitswerte.
So löschen Sie die MAX/MIN Daten
Aufzeichnen
● Um den Maximalwert zu löschen ,
drücken Und halten
【
MAX/MIN
】
Taste
über 2
Sekunden, während Es werden
Maximalwerte angezeigt.
● Um den Mindestwert zu löschen ,
drücken Und halten
【
MAX/MIN
】
Taste über
2
Sekunden, während Es werden Min-Werte
angezeigt.
HOCH/NIEDRIG ALARMEINSTELLUNGEN
Zum Anzeigen der Alarmeinstellung
● Drücken Sie im normalen Anzeigemodus
【
ALERT
】
Taste zum
Umschalten zwischen Hallo Alarm und Niedrige Alarmstufe Einstellung
Wert.
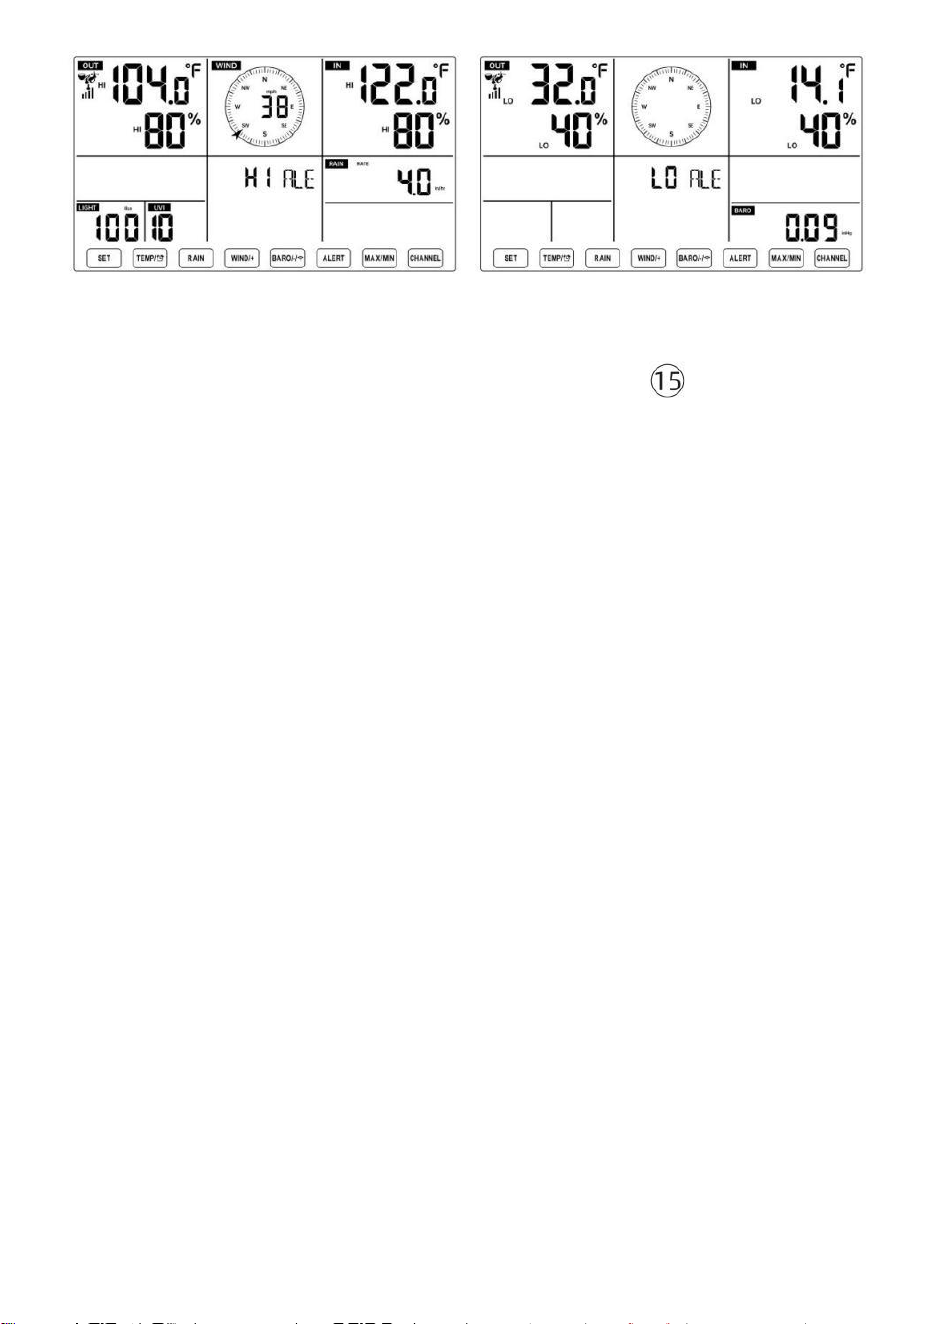
- 48 -
So stellen Sie den Alarm ein
● In der normalen Anzeige Modus, drücken und halten 【 ALERT 】
Taste über 2
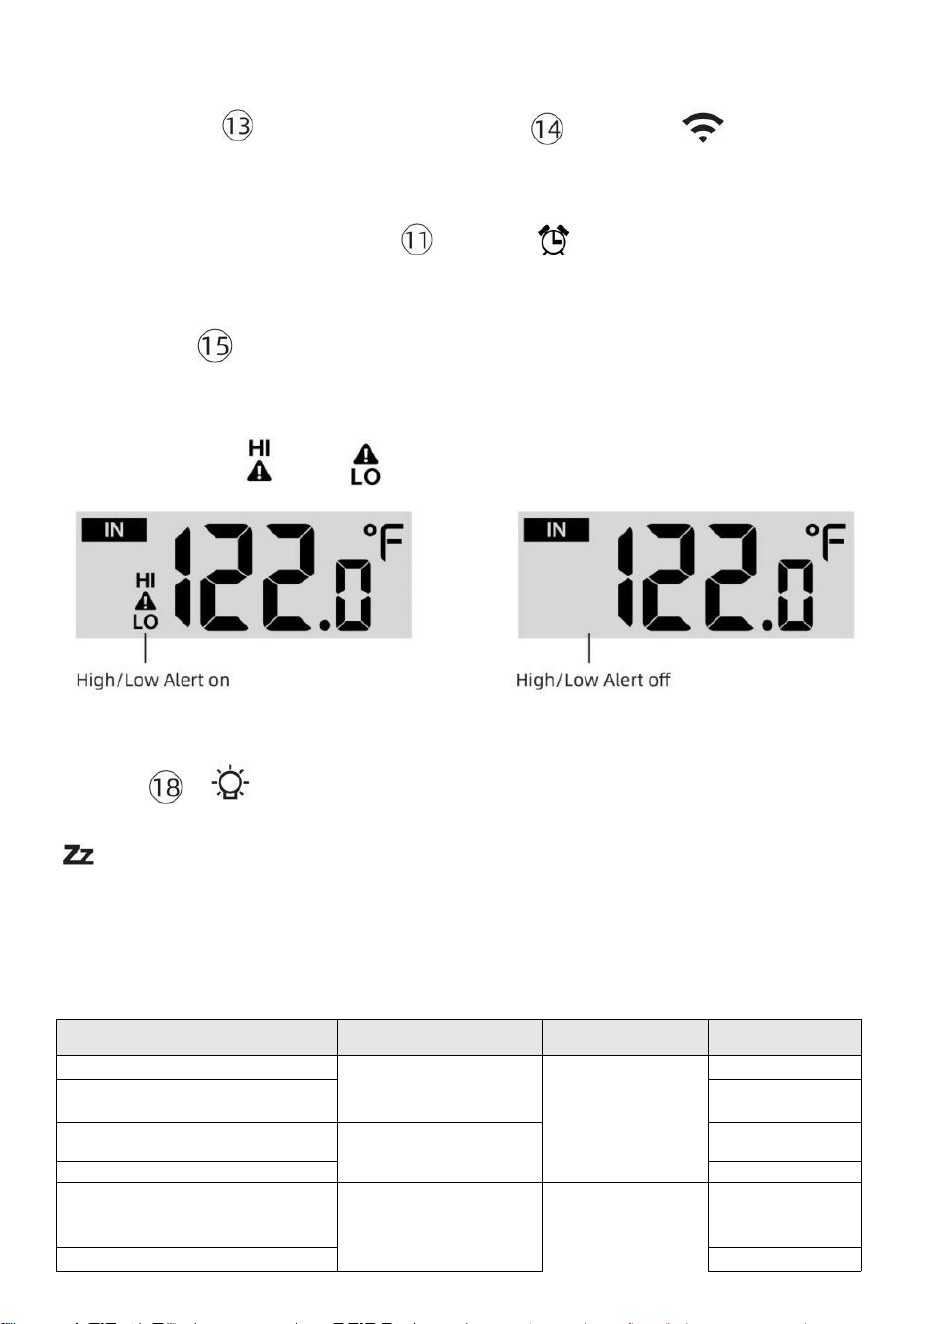
- 49 -
Sekunden, um die Alarmeinstellung einzugeben Modus.
● Drücken 【 WIND/+ 】 Taste und 【 BARO/-/ 】 Taste zum
Einstellen der
Wert nach oben oder unten,
dann Presse Alarm.
【 TEMPER
ATUR /
】 Taste zum Ein-
/Ausschalten des
● Drücken
【
ALERT
】
Taste zur Bestätigung Und springen Zu
nächste Einstellung.
● Der Symbol oder wird angezeigt, wenn der Alarm Ist An.
● So verlassen Sie die Alarmeinstellung Modus bei beliebig Zeit,
drücken 【
LIGHT/SNOOZE
】
-Taste. Die Die Einstellungsreihenfolge für den
Hoch-/Tiefalarm wird angezeigt unten:
Alarm Einstellung Befehl
Einstellung
Reichweite
Anzeigebereich
Standard
Innentemperatur Hallo Alarm
-14.1 ℉ –122
℉ (-9,9 ℃ –
50 ℃ )
Innenbereich
Temperatur &
Luftfeuchtigkei
t
Im Freien
Temperatur &
Luftfeuchtigkei
t
122 ℉ (50 ℃ )
Innentemperatur Lo Alarm
14.1 ℉ (-9,9 ℃
)
Luftfeuchtigkeit im
Innenbereich Hallo Alarm
1 % – 99
% -40 ℉ –
158 ℉ (-40
℃ –70 ℃ )
80 %
Innenbereich Alarm bei
niedriger Luftfeuchtigkeit
Außentemperatur Hallo
Alarm
40 %
104 ℉ (40 ℃ )
Außentemperatur Lo Alarm
32 ℉ (0 ℃ )

- 49 -
Windgeschwindi
gkeit
Luftfeuchtigkeit im Freien
Hallo Alarm
1 % – 99 %
0–50 m/s
2–180 km/h
1–111 Meilen pro
Stunde
1–97 Knoten 0-60 bft
80 %
Luftfeuchtigkeit im Freien Lo
Alarm
Hoch Durchschnittliche
Windgeschwindigkeit Alarm
40 %
17
m/s
62km/h
38 Meilen
pro Stunde
33 Knoten 20bft
Starke Windböen Alarm
0–50 m/s
2–180 km/h
1–111 Meilen pro
Stunde
1–97 Knoten
0-60 bft
Windgeschwindi
gkeit
17 m/s
62km/h
38 Meilen
pro Stunde
33 Knoten 20bft

- 50 -
Druckabfall-Alarm
1 hpa–10hpa
0,03 bis 0,3
ZollHg 0,7 bis
7,5 mmHg
Barometer-
Absturz
3hpa
0,09
ZollHg
2,2
mmHg
Hoch Regen Kursalarm
1 mm/h – 1000
mm/h (0,04
Zoll/Std.–39
Zoll/Std.)
Niederschlagsm
enge Rate
101
mm/Std.
(4
Zoll/Std.)
Hoch Täglich
Regenwarnung
1 mm bis 1000
mm (0,03 Zoll–
39,37 In)
Niederschlagsm
enge Rate
101
mm (4
In)
UV-Index Hoch Alarm
1-15
UV Index
10
Licht Intensität Hoch Alarm
1 Klux–200,0 Klux
7-1580 W/M²
0-185 Kfc
Licht Intensität
100 Klux
790 W/M²
92 KFC
So schalten Sie den Hi/Lo-Modus stumm Alarm
Drücken Sie die
【
LIGHT/SNOOZE
】
Taste oben auf
der Anzeigekonsole, um den Alarm stumm zu schalten, oder er wird
automatisch drehen aus nach einem Minute.
HINWEIS: Sobald der Alarm ausgelöst wird, ertönt der Alarm eine
Minute lang und die zugehörige Warnung Symbol und Wetterwerte
blinken.
Wenn der Alarm nach einer Minute automatisch abgeschaltet wird
Anstatt manuell abgeschaltet zu werden, wird der zugehörige
Alarm Symbol und Lesungen werden blinkt weiter, bis der
Messwert aus der Alarm Reichweite.
Der Wetteralarm wird ausgelöst, sobald die Messwerte fallen
hinein Alarm wieder im Bereich.
HINTERGRUNDBELEUCHTUNG
Display-Hintergrundbeleuchtung
Mit Gleichstrom Adapter
Der Hintergrundbeleuchtung kann nur leuchtet dauerhaft, wenn die
Gleichstromadapter Ist
dauerhaft eingeschaltet. Wenn die Wenn der D C-Adapter abgetrennt ist,
Hintergrundbeleuchtung kann vorübergehend eingeschaltet sein.

- 50 -
Drücken
【
LIGHT/SNOOZE
】
Taste zum Einstellen der
Hintergrundbeleuchtung
Helligkeit, Hoch, Tief und Aus.
Ohne Gleichstrom Adapter
Drücken
【
LIGHT/SNOOZE
】
Taste schaltet das
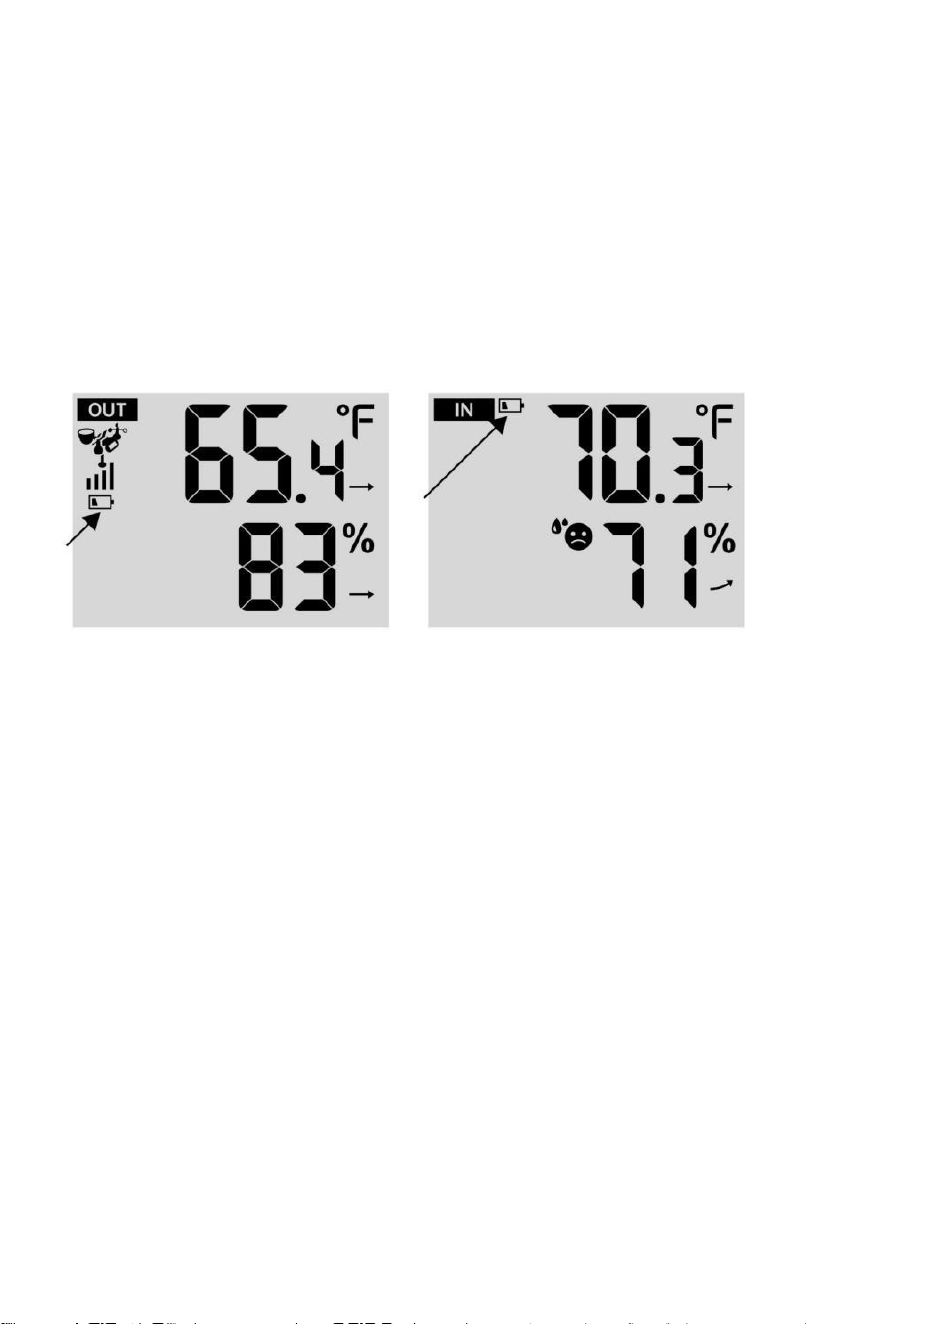
- 51 -
Hintergrundbeleuchtung für 15 Sekunden.
ANZEIGE FÜR NIEDRIGEN BATTERIESTAND
Wenn das Symbol für die Anzeige eines niedrigen Batteriestandes wird
angezeigt im Außentemperatur und Luftfeuchtigkeitsbereich oder der
entsprechende CH-Bereich des LCD Konsole
Anzeige, diese zeigt an, dass die Batterien in Ihrem drahtlosen
Wettersensor/Ihren drahtlosen Wettersensoren sind knapp und sollten Sei
ersetzt. Stellen Sie sicher, ersetzen alle Batterien gleichzeitig.
NEUSTART IM WERK
Wenn es ist eine Fehlfunktion, Fabrik Neustart ist eine großartige
Möglichkeit, Ihre Station zu "aus dem Zustand der "Box".
1.) Alle entfernen Stromversorgung (Batterien und DC-Adapter) von
Außensensoren und Wetterstation.
2.) Folgen Sie der Operation „SETTING UP THE WEATHER
STATION“ zu Starten Sie das Paar die Sensor.
PFLEGE UND WARTUNG
1.) Reinigen Sie den Regenmesser alle 3 Monate. Drehen der Trichter
gegen den Uhrzeigersinn drehen und anheben, um den Regenmesser
freizugeben Mechanismen, Und sauber mit einem feuchten Tuch.
Entfernen Sie Schmutz, Ablagerungen und Insekten. Wenn Insekt Befall
ist ein Problem, sprühen Sie den Sensor leicht mit Insektizid.

- 52 -
2.) Reinigen Sie die Licht Intensität/ UV-Sensor und Solarpanel alle 3
Monate mit Feuchtigkeit Tuch.
3.) Beim Auswechseln der Batterien ist ein Korrosionsschutz
vorbeugend Verbindung an den Batterieklemmen.
- 53 -
SPEZIFIKATION
WETTERSTATION
Allgemein Spezifi Kationen
Dimension
7,5 x 5 x 1.1 Zoll (191,6 x 127 x 28,8 mm)
Leistung Quelle
Wechselstrom und Gleichstrom 5 V, 1A-Adapter (im
Lieferumfang enthalten)
Batterie
3 x AAA Batterie ( nicht enthalten)
Unterstützung Sensoren
1 X 7-in-1 Sensor ( enthalten)
WLAN Fi-Kommunikation Spezifikationen
W-lan Standard
802. 11 b/g/N
W-lan Betrieb Frequenz
2,4 GHz
Unterstützte Geräte
für aufstellen
Benutzeroberfläche
Eingebaut W-lan mit WAP Modus schlau Gerät ,
einschließlich Laptops, Computer, Smartphones und
Smartpads
Empfehlen Web Browser
für aufstellen
Benutzeroberfläche
Letzte Version von beliebig Web Browser Das unterstützt
HTML 5
Zeit Funktionsspezifikationen
Zeit Anzeige
HH: MM
Stundenformat
12 Stunden oder 24 Stunde
Datum Anzeige
TT/MM oder MM/TT
Zeit Synchronisationsmethode
Synchronisiert mit atomar Uhr
Zeit Zonen
GMT±12
Sommerzeit
EIN/AUS
Barometeranzeige und Funktionsspezifikationen
Barometereinheiten
hPa, inHg Und mmHg
Messbereich
600 – 1100 hPa (relative Einstellung Baureihe 930 – 1050 hPa)
Genauigkeit
700 -1100 hPa±5 hPa/600 -696 hPa±8 hPa
20,67 – 32,48 inHg±0. 15 inHg/ 17,72 -20,55 inHg ±0,24
inHg 525 -825 mmHg±3,8 mmHg /450 -522 mmHg±6
mmHg Typisch bei 77 ℉ (25 ℃ )
Wetter Vorhersage
Sonnig, Teilweise Wolkig, Wolkig , Regnerisch, Stürmisch Und
Schneebedeckt
Anzeige Modus
Aktuell
Erinnerung Modus
Täglich Max/ Mindest
Alarm
Druck ändern Alarm
Innenbereich/ Außentemperaturanzeige und Funktionsspezifikationen
Temperatureinheit
℃ Und ℉
Innenbereich Anzeige
Reichweite
-14,1 ℉ – 122 ℉ (-9,9 ℃) – 50 ℃ )
Im Freien Anzeige Reichweite
-40 ℉ – 158 ℉ (-40 ℃ – 70 ℃ )
In/Aus Genauigkeit
50– 122 ℉ ± 1,8 ℉ / 10 – 50 ℃ ± 1
℃ -4 50 ℉ ±2,7 ℉ / -20 – 10 ℃ ±
1,5 ℃ andere : ±3,6 ℉ / ±2 ℃

- 53 -
Anzeige Modus
Aktuell
Erinnerung Modus
Täglich Max/ Mindest
Alarm
Hoch/Niedrig Temperatur Alarm
- 54 -
Innenbereich/ ImFreien Luftfeuchtigkeit Anzeige & Funktion Technische Daten
Luftfeuchtigkeit Einheit
%
Anzeige Reichweite
1 – 99 %
In/Aus Genauigkeit
40 – 80 % relative Luftfeuchtigkeit ±
5 % RH bei 25 °C (77 °F) Andere : ±
8 % ABSCHNITT HR-V @77℉(25℃)
Anzeige Modus
Aktuell
Erinnerung Modus
Täglich Max/ Mindest
Alarm
Hoch/Niedrig Luftfeuchtigkeit Alarm
Anzeige von Windgeschwindigkeit und -richtung und Funktion Technische Daten
Wind Geschwindigkeit Einheit
Meilen pro Stunde, MS, km/h, Knoten
Anzeige Reichweite
0 -180 km/h, 50 m/s, 180km/h, 97 Knoten
Geschwindigkeitsgenauigkeit
<5 m/s: ±0,5 m/s, >5 m/s: ±10 % (je nachdem, ist größer)
Anzeige Modus
Böe/ Durchschnitt
Erinnerung Modus
Täglich Böen/Durchschnitt
Alarm
Hoch Wind Geschwindigkeit Alarm ( Böen / Durchschnitt )
Wind Richtung
16 Wegbeschreibung
Regenanzeige & Funktion Technische Daten
Einheit von
Niederschlagsmenge
mm, In
Reichweite von
Niederschlagsmenge
0 – 12999 mm (0 – 511,7 In)
Genauigkeit von
Niederschlagsmenge
±7 %
Anzeige Modus
Aktuell
Erinnerung Modus
Täglich Max
Niederschlagsmenge Anzeige
Modus
Stündlich/ Täglich/ Wöchentlich/ Monatlich/ Gesamt
Niederschlagsmenge
Alarm
Hoch Täglich Niederschlagsmenge Alarm
UV-Index-Anzeige und Funktionsspezifikationen
Anzeige Reichweite
0 - 16
Anzeige Modus
Aktuell
- 54 -
Erinnerung Modus
Täglich Max
Alarm
Hoch UVI Alarm
Lichtintensität Anzeige- und Funktionsspezifikationen
- 55 -
Licht Intensität Einheit
Klux, Kfc und W/
m²
Anzeige Reichweite
0 – 200 Klux
Anzeige Modus
Aktuell
Erinnerung Modus
Täglich Max
Alarm
Hoch Licht Intensität Alarm
Wetterindex Anzeige- und Funktionsspezifikationen
Wetterindex Modus
Fühlt sich an wie Windchill, Hitze Index Und Tau Punkt
Anzeigemodus
Aktuell
Speichermodus
Tägliches Maximum/Mindest
DRAHTLOSER 7-IN-1- AUSSENSENSOR
Maße
16 x 13,8 x 14,4 Zoll (408 x 396 x 367 mm)
Netzstromversorgung
3,6 V Ni-MH wiederaufladbar Akkupack
Notstromversorgung
Solarstrom
Wetterdaten
Temperatur, Luftfeuchtigkeit, Wind Geschwindigkeit, Wind
Richtung, Niederschlagsmenge, UVI und Lichtintensität
RF Frequenz
915 MHz
HF- Übertragungsreichweite
492 Fuß (150 m)
Übertragungsintervall
Jeder 20 Sekunden für UV , Lichtintensität ,
Windgeschwindigkeit , Temperatur-, Feuchtigkeits- und
Niederschlagsdaten sowie Wind Richtungsdaten
Betriebstemperatur
-40 ℉ bis 140 ℉ / 40 ℃ bis 60 ℃
Zusätzliche Werkzeuge
erforderlich für Sensor
Ja
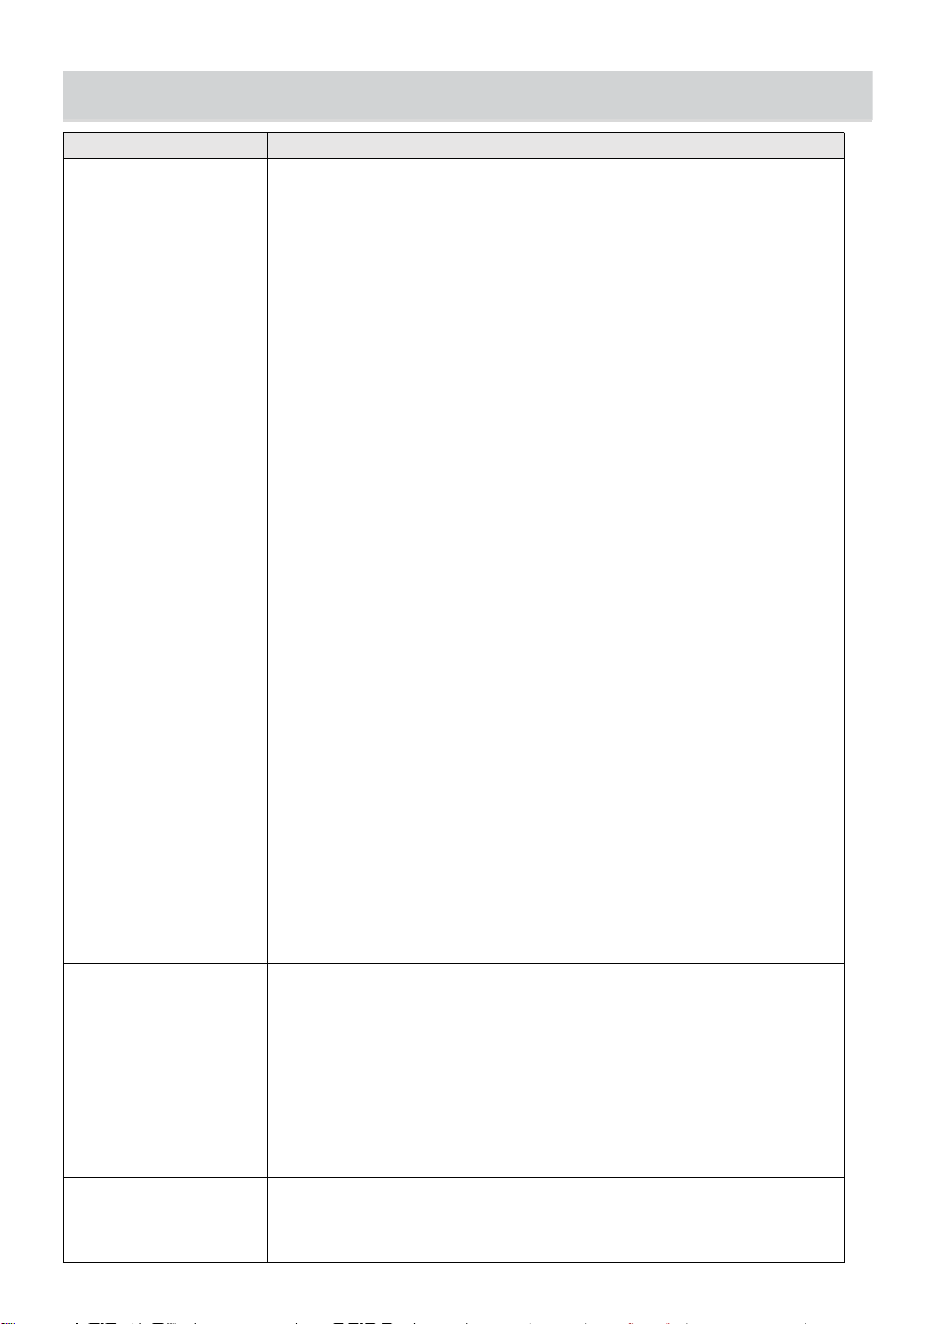
- 56 -
FEHLERBEHEBUNG
Problem
Lösung
Kabellos Sensor tut
nicht kommunizieren
Die Wetter Station
Der kabellos Sensor Mai haben initiiert richtig, Und Die Daten
Ist eingetragen von Die Wetter Station als ungültig, Und Die
Wetter
Station muss Sei zurücksetzen.
Mit ein offenes Büroklammer, Drücken Sie die
ZURÜCKSETZEN Taste 3 Sekunden lang Zu vollständig Die
Anzeige von Die Stromspannung . LED Wille blinkt alle 20
Sekunden.
Wenn LED tut nicht alle 20 Sekunden, Mitnahme Die Batterien
Und Warten 5 Minute, während Abdeckung Die Solar- Bedienfeld
Zu Abfluss die Spannung.
Setzen Batterien zurück In Und erneut synchronisieren Die
Wetter Station Und die Wetterstation neu synchronisieren (Siehe
Seite 18 RE-PAI RING SENSOR) mit das kabellose Sensor um 10
Füße (3 m) weg .
Der Die LED des Funksensors leuchtet Blitz jeder 20 Sekunden.
Wenn die LED Ist Trotzdem nicht blinkend jeder 20 Sekunden,
ersetzen Sie die neu
Batterien In Die kabellos Sensor.
Wenn Die Batterien waren kürzlich ersetzt, überprüfen Sie die
Polarität. Wenn die
kabellos Sensor Ist blinkend jeder 20 Sekunden, fortfahren Zu
Die nächste Schritt.
Dort Mai Sei A vorübergehend Verlust der Kommunikation fällig Zu
Rezeption Verlust verwandt Zu Interferenz oder andere Standort
Faktoren,
Oder Batterien Mai haben gewesen geändert In Die kabellos Sensor
und die Wetter Station hat nicht gewesen zurücksetzen. Der
Lösung Mai Sei so einfach als Stromversorgung runter Und hoch Die
Wetter Station (entfernen Gleichstrom Leistung Und Batterien),
Warten 30 Sekunden, Und erneut einfügen Gleichstrom Leistung
Und Batterien).
Innenbereich Und
Im Freien
Temperatur Tun
nicht zustimmen
Erlauben bis zu einem Stunde für die kabellos Sensoren Zu
stabilisieren fällig Zu
Signal Filterung. Der innen Und im Freien Temperatur Sensoren
℉ übereinstimmen (±2 ℃ ) (die Sensorgenauigkeit beträgt ±2 ℉ (±1 ℃
)
Verwenden Die Kalibrierung Besonderheit Zu entsprechen
dem innen Und im Freien Temperatur Zu A bekannt
Quelle.
Temperatursensor
liest auch hoch In Die
Tageszeit
Machen Stellen Sie sicher, dass der drahtlose Sensor Ist nicht zu
schließen Zu Hitze
Generierung Quellen oder Strikturen, solch als Gebäude, Bürgersteig,
Wände, oder Luft Konditionierung Einheiten.

- 56 -
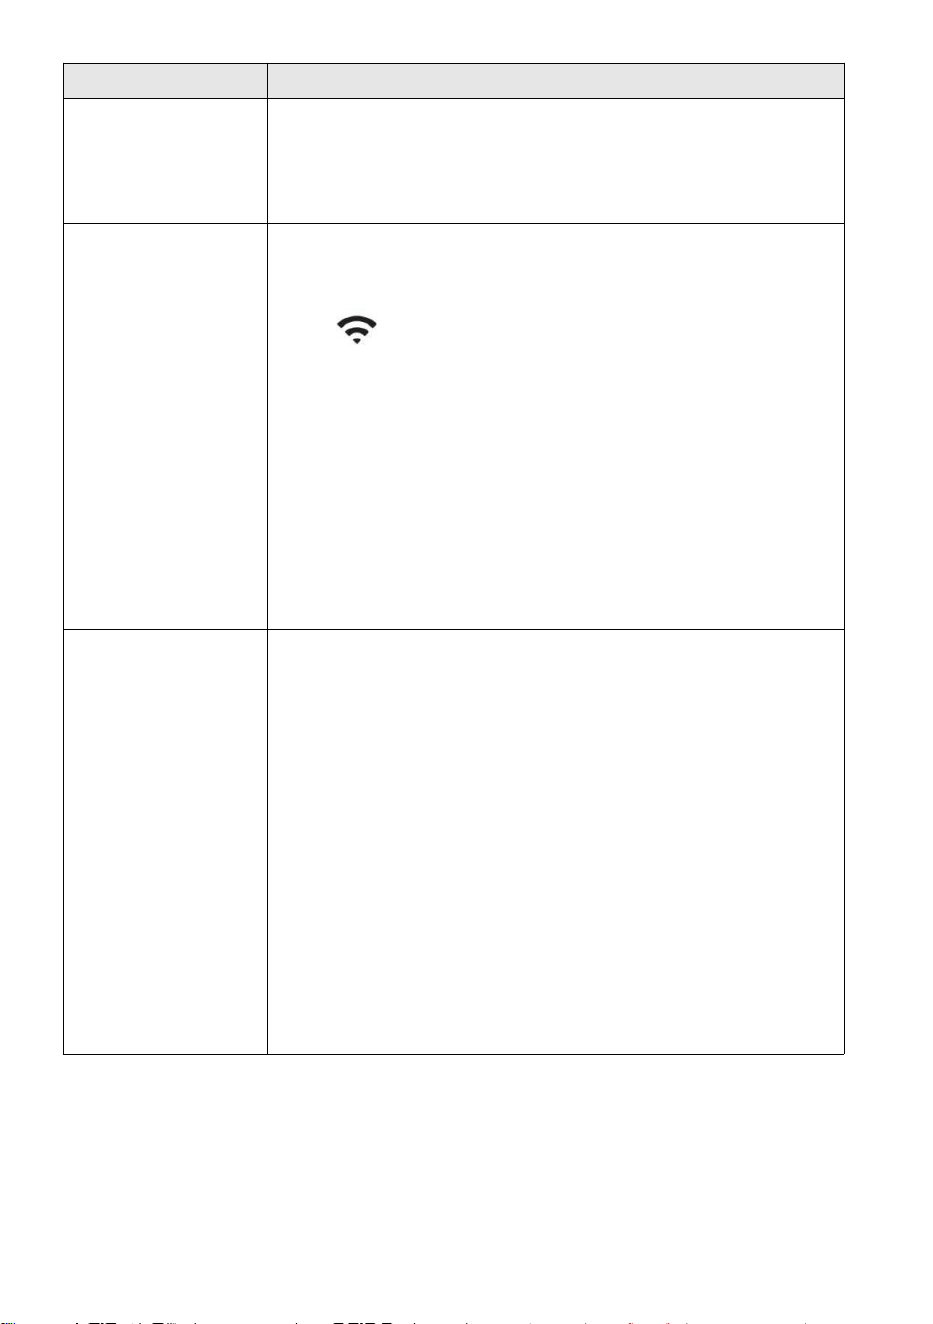
- 57 -
Problem
Lösung
Regenmesser
Berichte Regen,
wenn Es Ist nicht
es regnet.
Eine instabile Montagelösung (Schwingen im Montage Pole) Mai
führen dazu, dass der Kippbehälter falsch zunehmender
Niederschlag. Machen Sicher Sie haben eine stabile, ebene Montage
Lösung. (Siehe Seite 16
EINSTELLEN DES 7-IN-1-DRAHTLOSSENSOR-PEGELS )
WLAN funktioniert
nicht anzeigen vom
Wetter
Station
Überprüfen Sie Ihren Router auf Probleme.
1.) Überprüfen Sie das Wi-Fi-Symbol auf dem Display. Wenn
die drahtlose Verbindung erfolgreich ist, wird das Wi- Fi-
Symbol Wille angezeigt werden in der eingereichten Zeit. 2.)
Stellen Sie sicher, dass die WLAN- Einstellungen Ihres Modems
korrekt sind (Netzwerk Name und Passwort)
3.) Stellen Sie sicher, dass die Wetterstation eingesteckt hinein
Gleichstrom. Die Wetterstation verbindet sich nicht mit dem WLAN,
wenn angetrieben nur mit Batterien .
4.) Nur die Konsole unterstützt Und verbindet sich mit 2,4 GHz
Router. Wenn Ihr eigenes 5GHz Router und Es ist ein duales l
Band Router, werden Sie
müssen Sie das 5GHz-Band deaktivieren und aktivieren Die
2,4 GHz Band. 5.) Das Wetter nicht Unterstützung Gast
Netzwerke.
Daten nicht
Berichterstattung Zu
www.wunder
ground.com
oder
www.weatherc
loud.net
1.) Bestätigen Sie Ihr Passwort oder Ihren Schlüssel ist richtig. Es
ist das Passwort Du auf Wunderground.com registriert.
Wunderground.com. Ihr Passwort für Underground .com darf nicht
mit nicht-alphanumerischen Zeichen beginnen (ein Begrenzung der
Wunderground.com, nicht die Station ). Beispielsweise ist $worknet
kein gültiges Passwort, aber Arbeit knet$ ist gültig)
2.) Bestätigen Sie Ihren Sender ID ist korrekt. Die Station ID ist alle
Kappen, und das häufigste Problem ist die Ersetzung Und O für A 0
(oder umgekehrt). Beispiel, KCAPHOEM12, nicht KCAPH0EM12.
3.) Stellen Sie sicher, dass Datum und Uhrzeit auf der
Wetterstation korrekt sind. Wenn falsch, Vielleicht Meldung alter
Daten, nicht real Zeit Daten.
4.) Stellen Sie sicher, dass Ihre Zeitzone richtig eingestellt ist.
Wenn falsch, Mai alte Daten melden, nicht real Zeitdaten.
5.) Überprüfen Sie Ihre Router-Firewall-Einstellungen. Das Wetter
Station sendet Daten über Port 80.

FCCSTATEMENT
- 58 -
Dieses Gerät entspricht Teil 15 der FCC-Regeln. Betrieb Ist Thema unter
den folgenden beiden Bedingungen :
1. Dieses Gerät kann NICHT schädlich Störungen .
2. Dieses Gerät muss alle Interferenz erhalten, einschließlich
Störungen, die kann zu unerwünschtem Betrieb führen.
NOTIZ :
Dieses Gerät hat wurde getestet und entspricht den Grenzwerte für A
Klasse B digitales Gerät, gemäß Teil 15 der FCC-Regeln. Diese Grenzen Sind
konzipiert für bieten angemessene Schutz vor schädlich Störungen in
einem Wohnen Diese Anlage erzeugt — und kann ausstrahlen – Radio
Frequenzenergie und wenn nicht installiert und gebraucht in
Übereinstimmung mit Die
Anweisungen, kann verursachen schädlich Eingriffe in Funkkommunikation .
Es gibt jedoch keine Garantie, dass Störungen werden nicht
vorkommen in A bestimmte Installation.
Wenn das Gerät keine schädlichen Eingriffe in Radio- oder
Fernsehempfang , der bestimmt werden kann durch Ausschalten des
Gerätes und An, Der Benutzer wird aufgefordert, zu versuchen, die
Interferenz von eins oder mehr von die folgende Maßnahmen:
Neuausrichtung oder Standortwechsel des Empfangsgeräts Antenne.
Erhöhen Sie den Abstand zwischen dem Gerät und dem Empfänger.
Verbinden Sie die Ausrüstung hinein ein Auslauf An A Schaltung
anders als Das Zu der Empfänger Ist verbunden.
Konsultieren Sie die Händler oder ein erfahren Radio/Fernsehen
Techniker für helfen.
ACHTUNG: Änderungen oder Modifikationen an dieser Einheit nicht
ausdrücklich genehmigt von die Party verantwortlich sind , kann die
Einhaltung der Berechtigung des Benutzers,
das Gerät bedienen.

FCCSTATEMENT
- 58 -
Gemacht In China


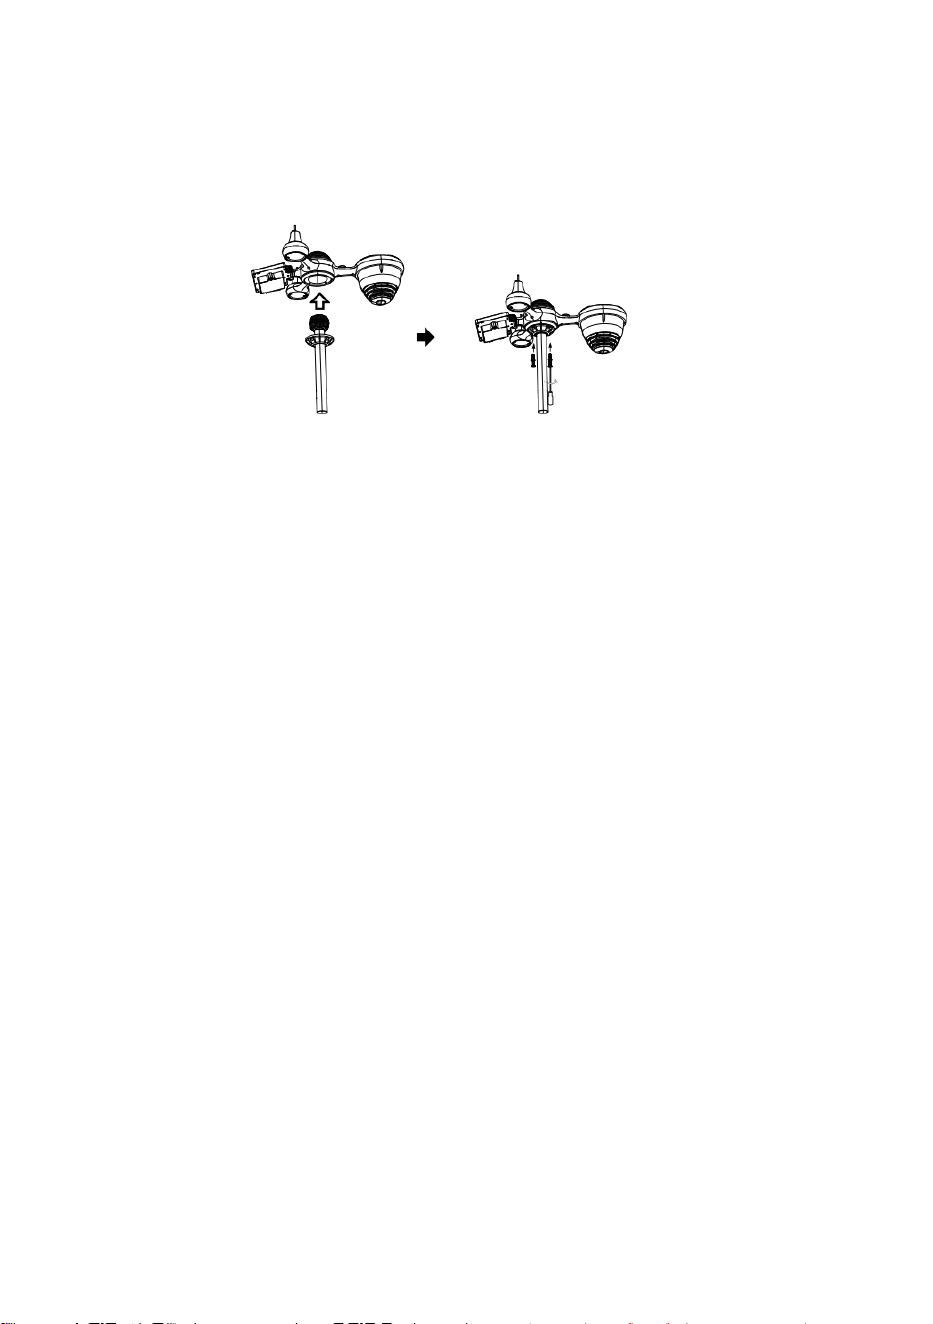
S
e
r
r
a
t
u
r
a
Guida rapida
⑤
I
M
P
O
S
T
A
Z
I
O
N
E
D
E
L
R
A
C
C
O
G
L
I
①INSTALLING THE MOUNTING POLE
Secure the sensor onto a mounting pole (included) using the screws (included).

T
O
R
E
P
I
O
G
G
I
A
O
I
n
s
e
r
i
r
e
l
'
i
m
b
u
t
o
n
e
l
c
o
l
l
e
t
t

o
r
e
d
e
l
l
'
a
c
q
u
a
p
i
o
v
a
n
a
e
b
l
o
c
c
a
r
l
o
i
n
p
o
s
i
z
i
o
n
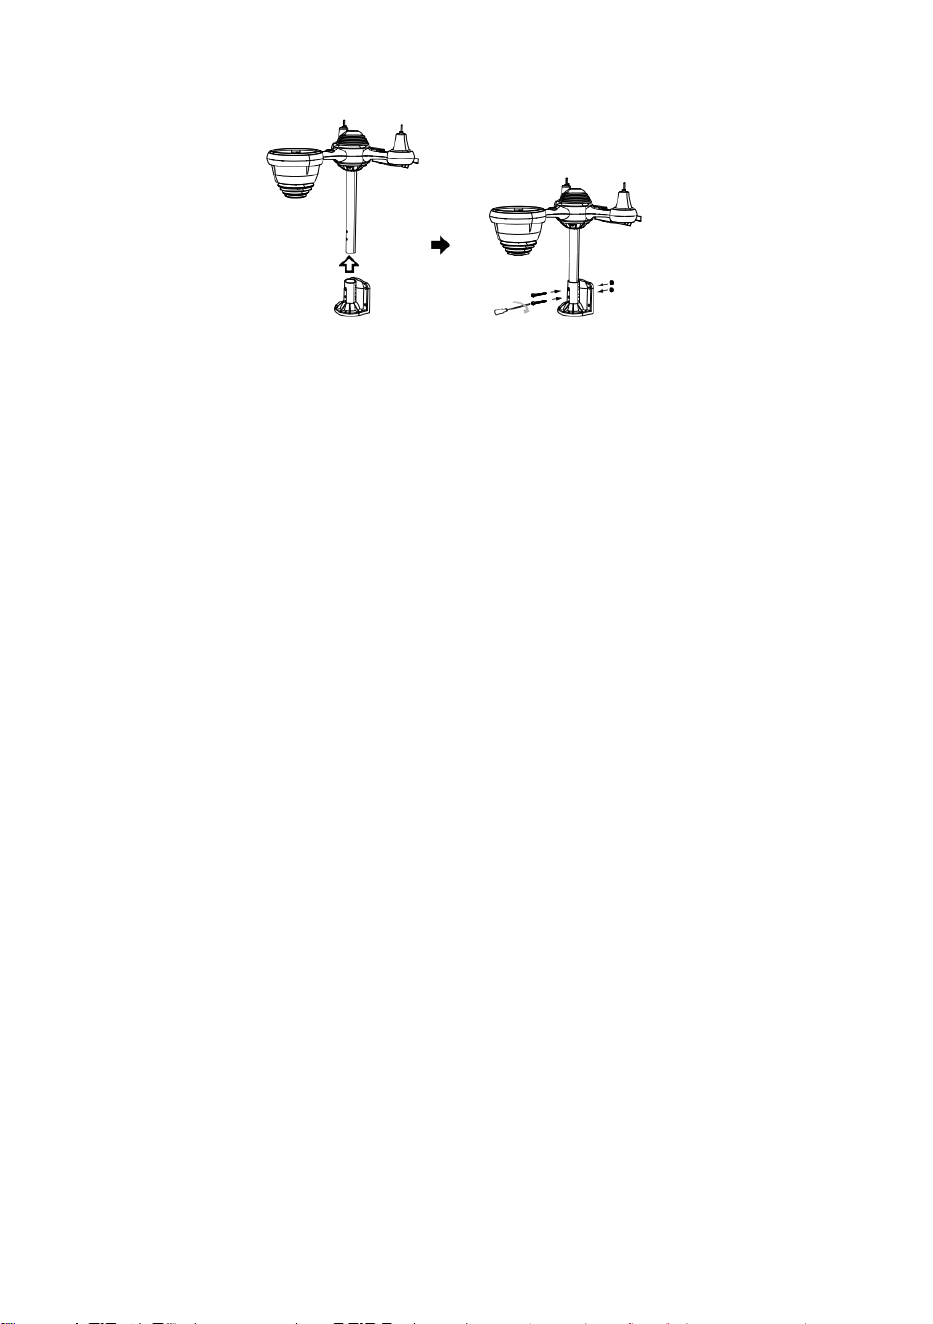
e
.
⑥
I
N
S
T
A
L
L
A
Z
I
O
N
E
D
E
L
L
E
B
A
T
T
E
R
I
E

S
v
i
t
a
r
e
l
o
s
p
o
r
t
e
l
l
o
d
e
l
l
a
b
a
t
t
e
r
i
a
i
n
b
a
s
s
o
.
C
o
l
l
e
g
a
r
e
②INSTALLING THE MOUNTING BRACKET
Secure the sensor onto a mounting bracket (included) using the screws (included).

i
l
c
a
v
o
d
i
i
l
p
a
c
c
o
b
a
t
t
e
r
i
a
r
i
c
a
r
i
c
a
b
i
l
e
.
R
e
g
o
l
a
r
e
i
c
a
v
i

c
o
l
l
e
g
a
t
i
i
n
m
o
d
o
c
h
e
s
i
a
d
a
t
t
i
n
o
c
o
m
o
d
a
m
e
n
t
e
l
o
s
c
o
m
p
a
r
t

i
m
e
n
t
o
.
C
h
i
u
d
e
r
e
e
f
i
s
s
a
r
e
l
o
s
p
o
r
t
e
l
l
o
d
e
l
l
a
b
a
t
t
e
r
i
a
.

③INSTALLAZIONE DELLE TAZZE PER LA
VELOCITÀ DEL VENTO
Allineare i fori delle viti nelle tazze della velocità del vento con Piatto, lato verticale Di la
barra di metallo.
Inserire le tazze della velocità del vento nell'asta metallica e avvitare saldamente per
bloccarlo in posizione.
S
p
i
n
g
e
r
e
l
'
i
n
g
r
a
n
a
g
g
i
o
v
e
r
s
o
l
'
i

n
t
e
r
n
o
e
s
t
r
i
n
g
e
r
e
l
a
v
i
t
e
.
P
u
n
t
o
A
P
u
n
t
o
A
P
u
n
t
o
Point to
SOUTH

A
④INSTALLAZIONE DELLA PALETTA DIREZIONALE
DEL VENTO
Allineare i fori delle viti nella banderuola della direzione del vento con Piatto, verticale lato
Dila barra di metallo.
Inserire la banderuola direzionale nell'asta metallica e avvitarla saldamente per
bloccarlo in posizione.
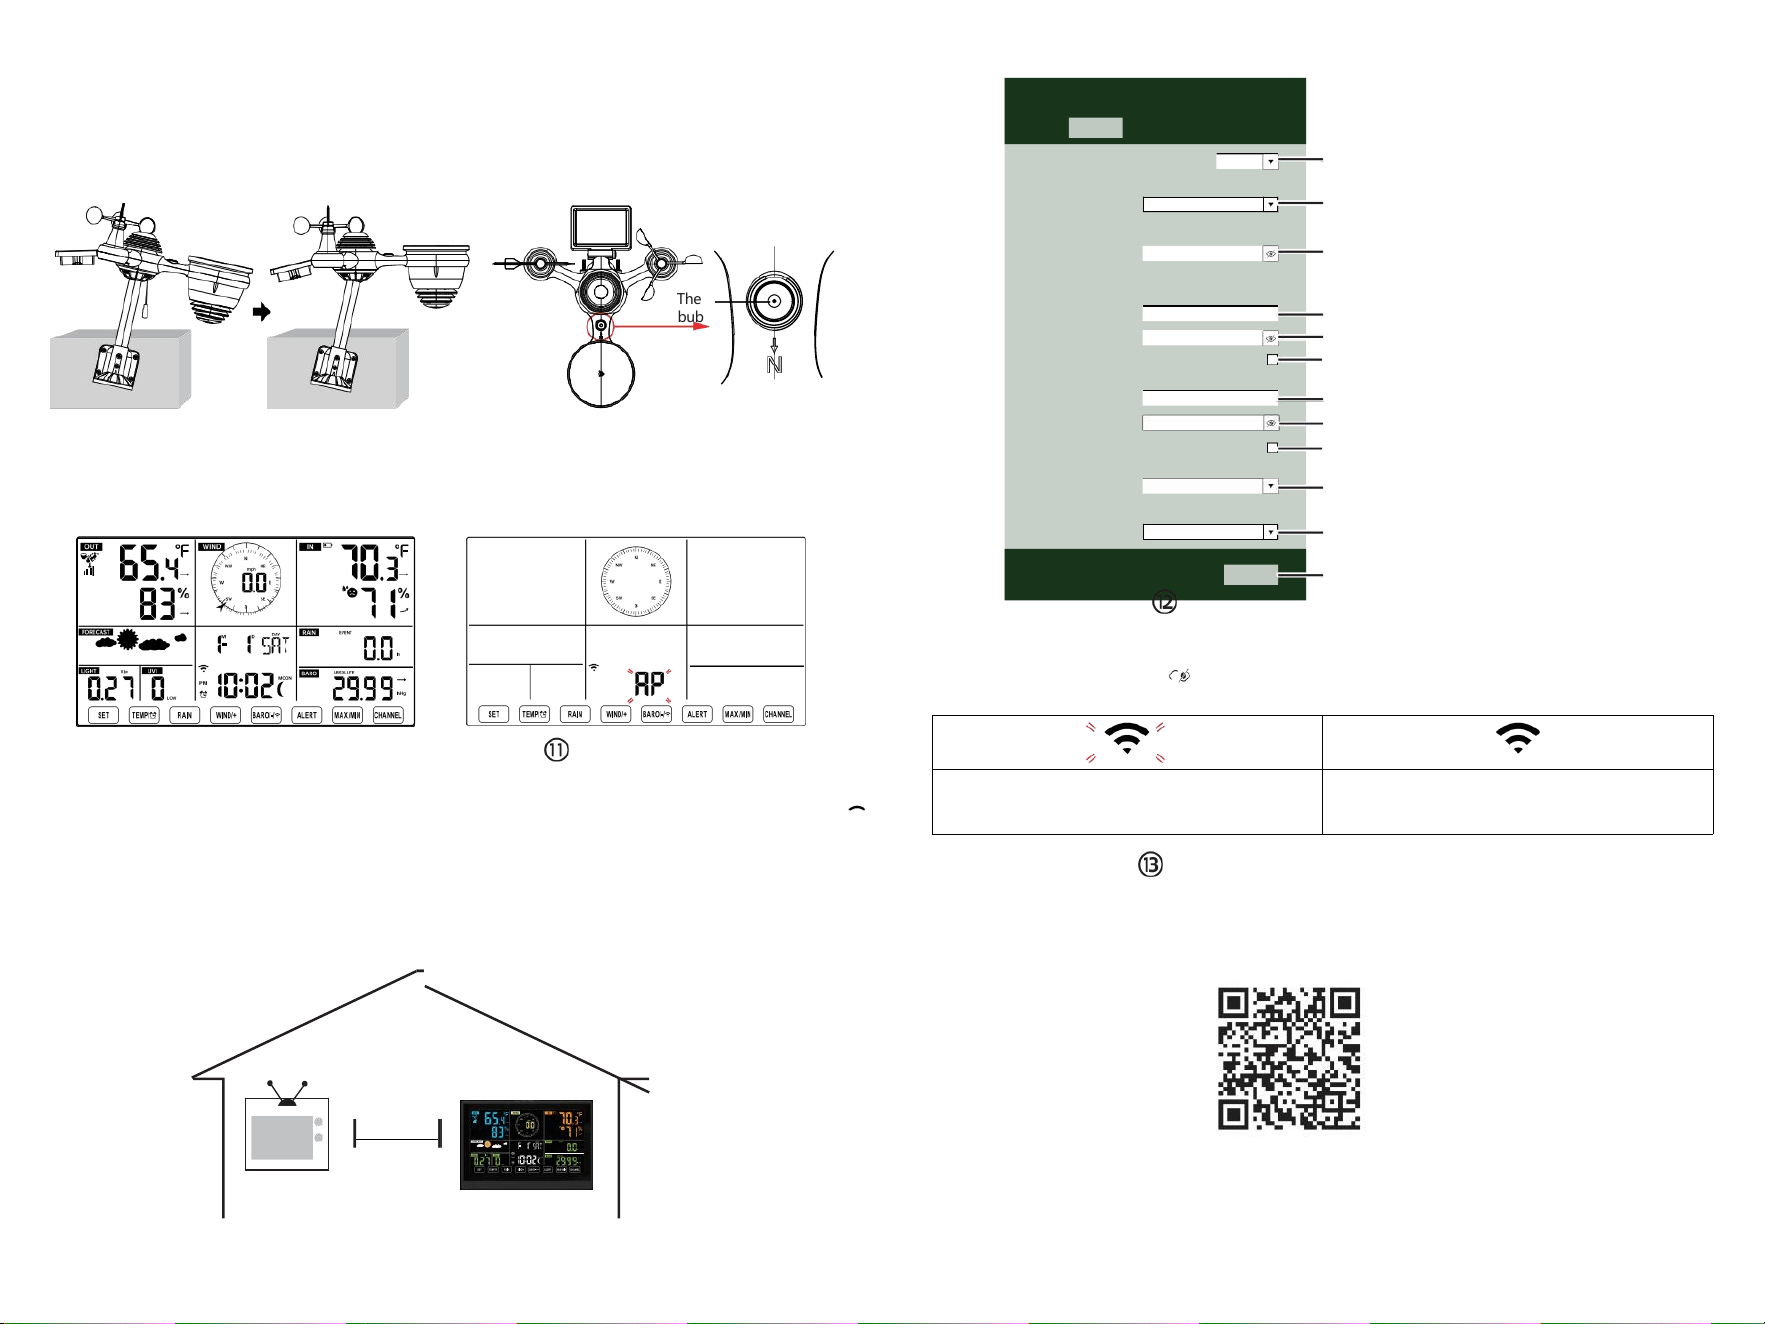
The
bubble
⑩ACCENSIONE
LA STAZIONE METEO
Collegare l'adattatore di alimentazione
a
il tempo stazione.
Una volta che la stazione meteorologica è
acceso,
entrerà automaticamente in modalità di
associazione.
IMPOSTAZIONE
CONNESSIONE WI-FI
Premere e tenere premuto il pulsante
BARO/-/
3 secondi per entrare Modalità AP.
impostazioni della tua rete Wi-Fi sul PC
stazione meteo
SSID (WWS-XXXXXX) dall'elenco .
Tocca l'SSID A collegare.
A
MENO
(0,9 metri)
A PARTE
Per evitare interferenze wireless, posizionare entrambe le unità ad almeno 3 piedi ( 0,9 m) di distanza
da dispositivi elettronici (TV, computer, microonde, radio, ecc.).
SETTINGS
SETUP ADVANCED
Language:
Wi-Fi Router Setup
Router 12345
Select the menu and choose your 2.4GHz WIFI Router
Password
Weather Server Setup
WeatherUnderground
Station ID
Station Key
Upload wunderground.com
WeatherCloud
Station ID
Station Key
Upload weatherCloud.net
Time Zone Setup
Time Zone
Time Server Setup
Server URL
Firmware Version: 1.0.1
time.windows.com
a7d 9d 2a27 9 fbbafa
**********
**********
**********
Apply
KCACANTI9
English
Router
+0.00
Flashing: the weather station is attempting
to connect to your wireless router
Solid: the weather station has been
connected to your wireless router.
Select setup UI display language
Select your Wi-Fi Router (SSID) from the list
Router Password
Enter your station ID
Enter your station key/password
check to confirm upload to
WeatherUnderground server
Enter your station ID
Enter your station key/password
check to confirm upload to
⑧MOUNTING THE WIRELESS 7-IN-1 OUTDOOR SENSOR
Various options to install. Make sure the rain collector faces north and
the solar panel faces south before fastening the screws (included).
If you are a user located in the Southern Hemisphere,
please reverse the direction.
ENTER SETUP INTERFACE
Enter the following address into the web browser address bar:
http://192.168.1.1 to access the setup interface.
Please click to check your password before clicking
APPLY.
⑨ADJUSTING THE 7-IN-1 WIRELESS SENSOR LEVEL
Use the bubble level indicator to make sure the wireless outdoor sensor is completely level.
Weathercloud.net
Time zone setting
Internet time server setting
Press Apply to confirm the setting
Please scan the QR code or visit https://youtu.be/LESE8poieYY to see a video on how to use it.
WI-FI CONNECTION STATUS
TV
3
feet

Supporto tecnico e Certificato di garanzia elettronica
www.vevor.com/support
STAZIONE METEOROLOGICA
MODELLO:YT60234
Continuiamo ad impegnarci per fornirti strumenti competitivi prezzo.
"Salva Metà", "Metà prezzo " o altre espressioni simili utilizzate di noi soltanto
rappresenta UN
la stima del risparmio che potresti ottenere acquistando determinati utensili con noi rispetto ai
principali
marche top e dosi non necessariamente significa coprire Tutto categorie di strumenti offerti di
noi. Tu
Sono si ricorda gentilmente di verificare attentamente quando si è effettuare un ordine
con noi se tu Sono
effettivamente risparmiando la metà rispetto ai marchi più importanti.


- 3 -
METEOROLOGICAL
STATION
MODELLO:YT60234
BISOGNO AIUTO? CONTATTO NOI!
Avere prodotto domande? Bisogno tecnico supporto? Per favore
Tatto gratuito A
contatto noi:
Servizio Clienti@vevor.com
Questo è l'originale istruzione, per favore leggi tutto manuale istruzioni
accuratamente prima di operare. VEVOR si riserva una chiara
interpretazione del nostro manuale utente. L'aspetto del prodotto deve
essere soggetto al
prodotto tu ricevuto. Per favore perdonami noi che non lo faremo
informarti di nuovo se ci sono tecnologie o software aggiornamenti sul
nostro prodotto.

SAFETYPRECAUTIONS
- 4 -
AVVERTIMENTO! Per favore leggi e comprendere tutte le precauzioni di
sicurezza, le istruzioni operative e le istruzioni per la cura/manutenzione
prima di utilizzare questo
apparecchio. Conservare questo manuale per riferimento futuro.
Questo prodotto È non UN giocattolo. Mantenere fuori del raggiungere
bambini.
Questo prodotto è progettato per utilizzo In IL casa soltanto COME
UN indicazione Di condizioni meteorologiche.
Questo prodotto È non a Essere usato per medico scopi o per
pubblico informazioni.
Fare non pulire l'unità con prodotti abrasivi o corrosivo materiali.
Fare non posizionare l'apparecchio vicino a fiamme libere o fonti di
calore. Incendio, scosse elettriche, danni al prodotto o lesioni
Potrebbe verificarsi.
solo utilizzare fresco nuovo batterie In IL prodotto. Fare non
mescolare nuovo E vecchio batterie insieme.
Fare non smontare, filtrare o modificare il prodotto.
solo utilizzare gli allegati o accessori con Questo prodotto specificato
di IL produttore.
Fare non immergere l'unità in acqua. Asciugare il prodotto con un
morbido stoffa Se fuoriuscite di liquidi SU Esso.
Fare non sottoporre l'unità a forza eccessiva, urti, condotto,
temperatura o umidità estreme .
Fare non coprire o bloccare la ventilazione buchi con oggetti di
qualsiasi tipo.
Questa stazione meteorologica di questo prodotto È destinato a
Essere usato al chiuso soltanto.
Questo prodotto È soltanto adatto per montaggio a un altezza meno
di 6,6 piedi (2 M).
Non manomettere i componenti interni dell'unità. La manomissione dei
prodotto invaliderà la garanzia.
Batterie Sono non incluso. Quando inserimento batterie, Fare
Sicuro Quello il positivo e negativo le polarità corrispondono a
marcature nel scomparto.
faccio non mescolare standard, alcalino, E ricaricabile batterie
insieme.
Lasciando un batteria esposta a condizioni estreme le alte
temperature nell'ambiente circostante possono provocare
un'esplosione O perdita di liquido infiammabile o gas.

SAFETYPRECAUTIONS
- 4 -
Lasciando un batteria esposta a condizioni estreme bassa
pressione dell'aria In l' ambiente circostante può provocare
un'esplosione O perdita di liquido infiammabile o gas.

TIPS FOR SENSORSITE SELECTION
- 5 -
Il collettore di pioggia deve essere pulito ogni pochi mesi.
sensore dovrebbe Essere installare ed a almeno 5' (1.5 M)
lontano da Qualunque edificio O struttura.
Scegli UN posizione In UN aprire spazio Sotto diretto luce
solare con NO ostruzioni.
Il sensore dovrebbe rimanere nel linea di vista e entro 492' (1 50 m)
della stazione meteorologica per una trasmissione costante e
costante .
Tieni il sensore e la stazione meteorologica lontano dalla casa
elettrodomestici che operano sulla stessa frequenza. La console e
il sensore dovrebbe essere almeno 3' -7' (1 - 2 m) via da come
interferenze .
CARATTERISTICHEDELPRODOTTO
Colorato e display a cifre grandi con super luminoso retroilluminazione.
9 funzionale pulsanti: IMPOSTA, TEMP / ALLARME, PIOGGIA,
VENTO/+, BARO/-/ , AVVISO, MAX/MIN, CANALE, LUCE/ SONNO
Il tempo si sincronizza automaticamente con Internet.
Sveglia con funzione snooze.
ora legale (DS T).
Fuso orario: GMT ±12.
Luna Fase.
Temperatura interna ed esterna (°C/°F) e umidità letture con tendenza.
Orario, giornaliero, settimanale , Mensile, Pioggia totale e Piovosità
tasso in IL passato ora.
Velocità media del vento, raffica di vento velocità e vento direzione
visualizza.
Assoluto e relativo Barometro display della pressione con tendenza.
Intensità luminosa e UV indice dispiegarsi .
Indice meteo display : Tatto piace, Vento Freddo, Calore indice,
Rugiada punto.
Previsioni del tempo.
Massimo/minimo lettura.
Impostazioni di allerta meteo.
Carica meteo dati a Meteo Metropolitana e /o Weathercloud tramite
Wi-Fi router.
4 livelli luminosità della retroilluminazione t.

- 6 -
CONTENUTODELLACONFEZIONE
1 Stazione meteorologica
2 Adattatore
Sensore esterno wireless 7 in 1
4 Imbuto
5 Banderuola direzione vento con 1 vite
6 tazze per la velocità del vento con 1 sc riavvolto
7 Montaggio palo con 4 viti
8 Montaggio staffe con 6 viti
9 Gomma pastiglie X 2
10 Cacciavite 1
11 Cacciavite 2
12 Guida utente
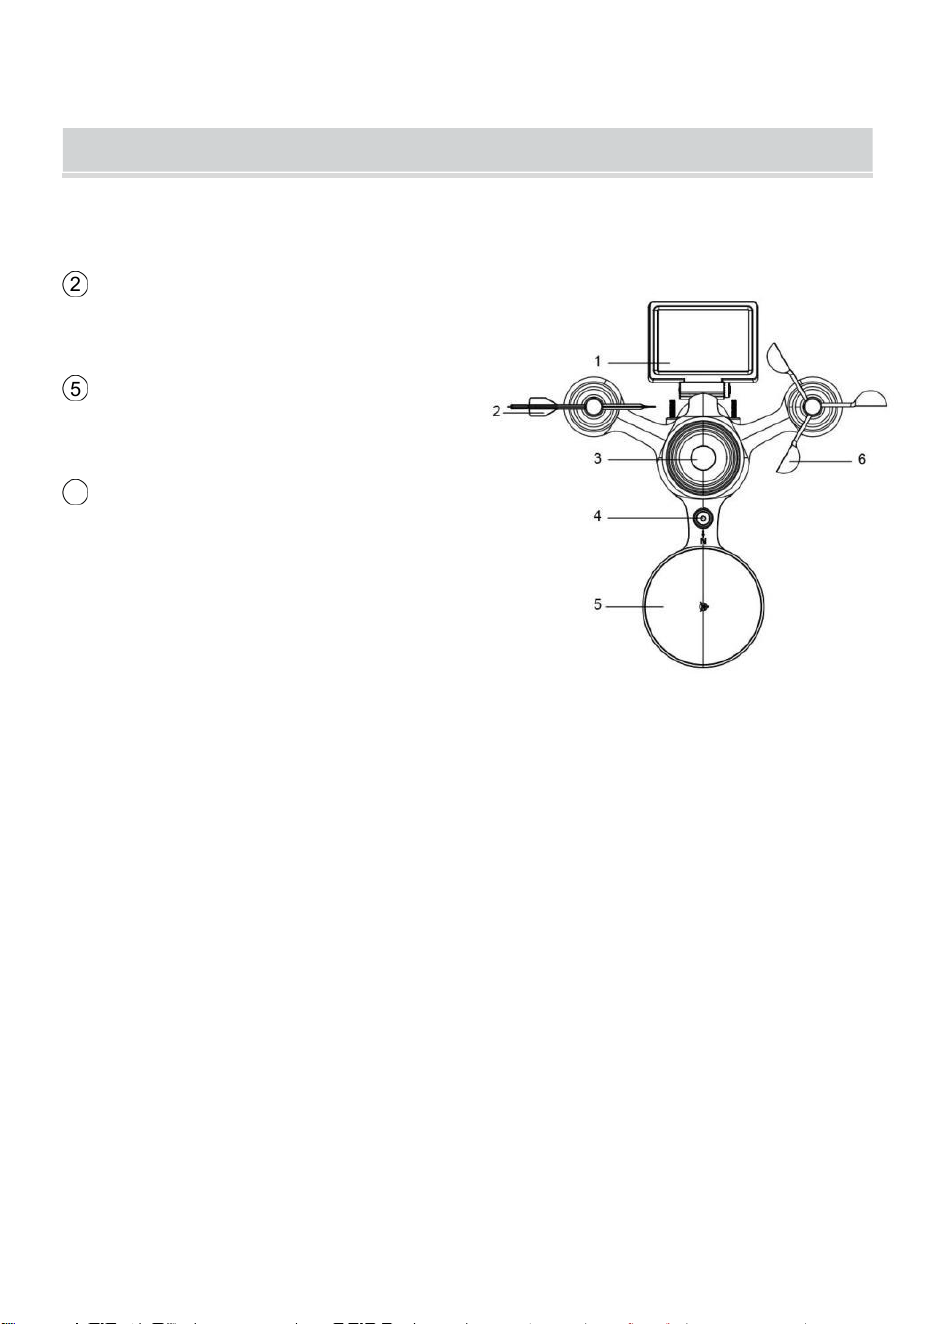
NOTA: 4 viti extra per la banderuola di direzione del vento e le tazze
della velocità del vento.
PRODUCT OVERVIEW
- 7 -
SENSORE ESTERNO WIRELESS 7 IN 1
1 Solare pannello
2
Banderuola direzione vento
3 Sensore UV/luce
4 Livella a bolla Gradiente
5 Collettore di pioggia
6
Tazze per la velocità del vento
7 Montaggio palo
8 Montaggio parentesi
9 Sensore igro-termo
10 GUIDATO: Lampeggia
quando l'unità trasmette un
lettura
⑪
Pulsante RESET
⑫
Sportello della batteria

NOTA: 4 viti extra per la banderuola di direzione del vento e le tazze
della velocità del vento.
PRODUCT OVERVIEW
- 7 -
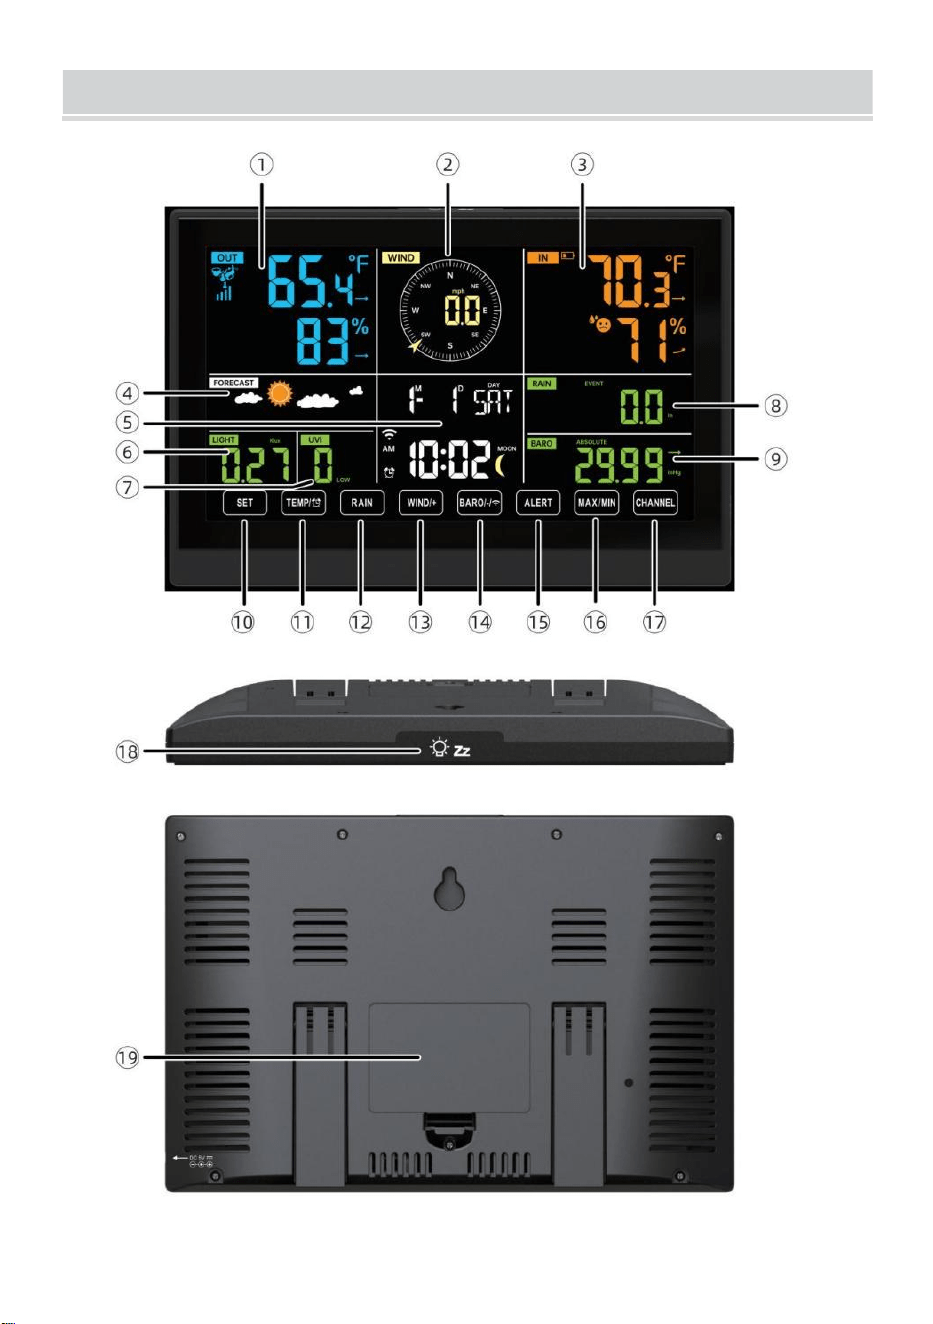
WEATHERSTATION
- 8 -
- 9 -
1 Temperatura/umidità esterna lettura, meteo indice
2 Direzione del vento e velocità
3
Lettura della temperatura/umidità interna
4 Previsioni del tempo
5 Ora e data, luna fase, Noi ekday
6 Luce intensità
7
raggi UV indice
8 Pioggia
9 Barometro
10 IMPOSTATO pulsante
11 TEMPORALE/ Pulsante (ALLARME)
12 Pulsante PIOGGIA
13 Pulsante WIND/+
14 BARO/-/ (Wifi) pulsante
15 Pulsante di AVVISO
16 Pulsante MAX/MIN
17 Pulsante CANALE
18
LUCE/SONNO pulsante
19
Vano batteria (3,6V Ni-MH ricaricabile batteria pacchetto)
COLLOCAMENTO UP IL SENSORE ESTERNOWIRELESS 7 IN
1
Il sensore esterno wireless 7 in 1 misura la velocità del vento, la
direzione del vento , piovosità, UV, intensità luminosa , temperatura e
umidità.

- 9 -
INSTALLAZIONE DEL MONTAGGIO PALO E STAFFA

- 10 -
● Fissare il sensore su un palo di montaggio e parentesi (incluso )
utilizzando le viti ( incluse ).
INSTALLAZIONE DI COPPE PER LA VELOCITÀ DEL VENTO E DI
BANDIERE PER LA DIREZIONE DEL VENTO
● Allineare i fori delle viti nelle tazze della velocità del vento con Piatto,
verticale lato Di IL metallo asta.
● Inserire le tazze della velocità del vento nel metallo asta E fanculo loro
SU stretto A serratura Esso In posto.
● Allineare i fori delle viti nella banderuola della direzione del vento con la
parte piatta e verticale lato del metallo asta.
● Inserire la banderuola direzione vento nel metallo asta e avvitarli
saldamente serratura Esso In posto.

- 11 -
COLLOCAMENTO COLLETTORE DI PIOGGIA VERSO L'ALTO
● Allineare le tacche sull'imbuto con le scanalature di bloccaggio
dentro IL piovere collettore.
● Inserire l'imbuto nel collettore dell'acqua piovana e avvitarli stretto A
serratura Esso In posto.

- 12 -
INSTALLAZIONE DEL BATTERIE
● Svitare lo sportello della batteria nella parte inferiore del Sensore
esterno 7 in 1 usando il cacciavite 1.
● Collegare il cavo della batteria ricaricabile pacco batteria (incluso) al
cavo situato nella batteria scomparto.

- 13 -
Regolare i cavi collegati in modo che si adattino comodamente al vano.
Poi, inserire il pacco batteria dentro il scomparto.
Chiudi e fissare IL batteria porta Indietro SU IL scomparto.

- 14 -
REGOLAZIONE DELLA CELLA SOLARE
● Allentare la vite in giunto in modo che l'ingranaggio sia dall'altro lato
del giunto spinge fuori. La cella solare dovrebbe ora Essere In UN
sbloccato posizione.
● Regolare l'angolo verticale della cella solare per ottenere l' il più
ottimale utilizzo della cella solare a seconda del tuo posizione.
● Spingere l'ingranaggio verso l'interno e stringere la vite fino a quando IL
ingranaggi serratura In posto.

- 15 -
Quando si regola la cella solare, impostarla su un angolo il più vicino
possibile alla propria latitudine . Visualizza tabella qui sotto per avere
un'idea Di come tu Dovrebbe angolo tuo solare cella.
Latitudine Prossimità
Cella solare Selezione
dell'angolo
Se la tua posizione è vicino A
84°
84°
Se la tua posizione è vicino A
63°
63°
Se la tua posizione è vicino a
42°
42°
Se la tua posizione è vicino A
21°
21°
Se la tua posizione è vicino A 0°
0°
MONTAGGIO DEL SENSORE ESTERNO WIRELESS 7-I N-1
Scegli una posizione per il sensore esterno 7 in 1 che È aprire
con NO ostruzioni.
Stringere il montaggio parentesi a un superficie/parete usando
quattro viti autofilettanti (incluso), oppure stringere il montaggio
palo al tuo esistente
montaggio palo con quattro φ5 Bulloni e La M5 Assemblaggio dei dadi.
Aggiungi cuscinetti in gomma su IL montaggio parentesi Prima
fissaggio IL montaggio staffa sul sensore.

- 15 -
Assicurarsi che il collettore dell'acqua piovana sia rivolto a nord e
solare pannello si affaccia a sud Prima fissaggio IL viti ( incluse ).
Per favore garantire Quello IL sensore È fisso particolarmente
strettamente, altrimenti le condizioni ventose causano la vibrazione
del trasmettitore e quindi la lettura errata
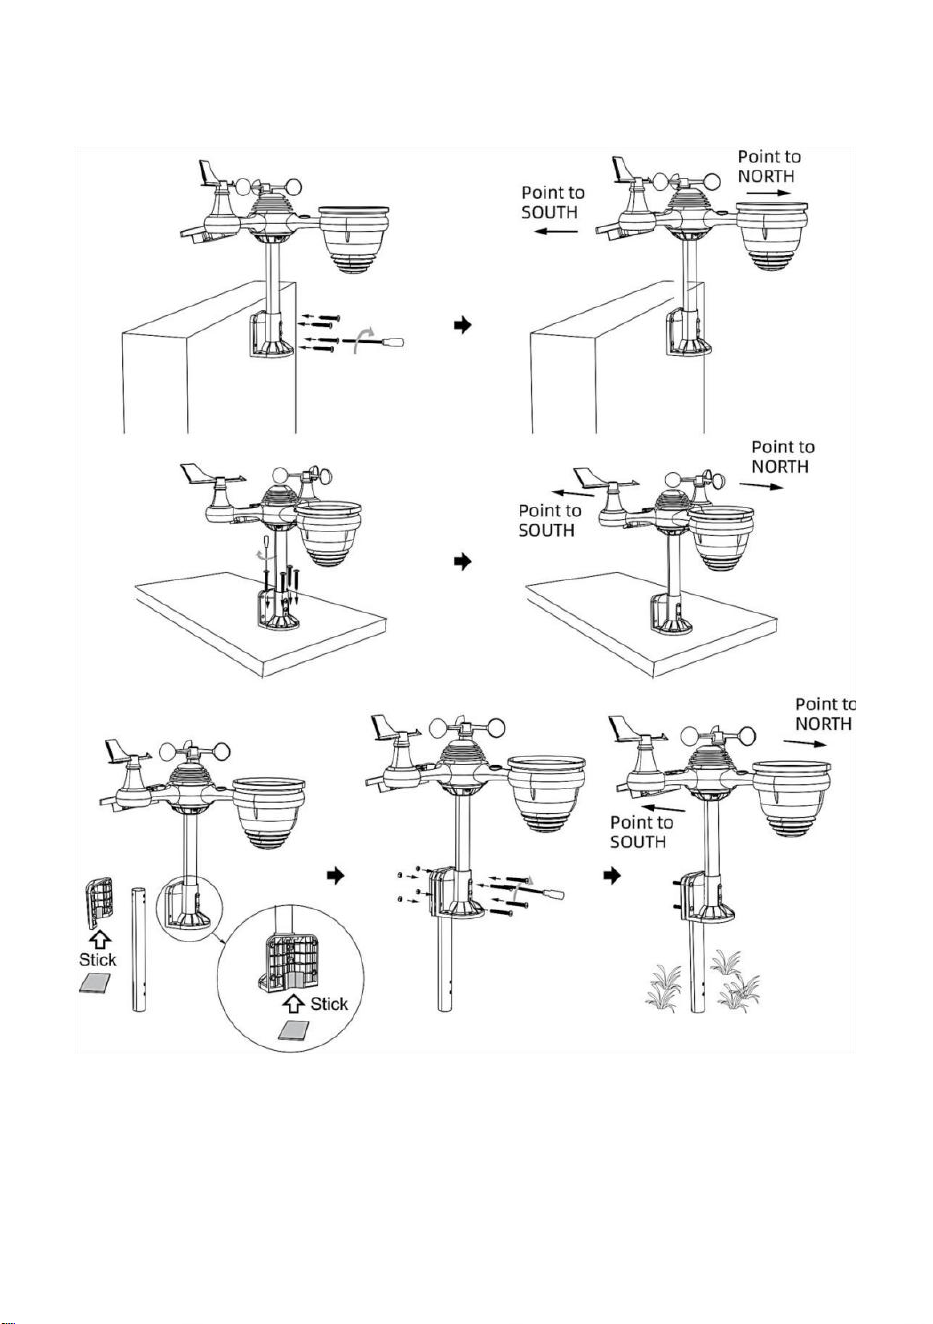
- 16 -
dati sulle precipitazioni.
PUNTAMENTO DEL SENSORE ESTERNO WIRELESS 7 IN 1
VERSO SUD (OPZIONALE)
Il sensore meteorologico wireless esterno è calibrato per essere
appuntito nord per massima precisione. Tuttavia, per vostra comodità,
se sei un utente
situato nel sud Emisfero, puoi utilizzare il sensore con il piovere

- 17 -
collettore puntato verso sud.
1.) Montare e installare il sensore meteo wireless con il collettore di
pioggia indicando verso sud, invece di Nord. (Fare riferimento a
MONTAGGIO DEL
WIRELESS 7- IN- 1 PER ESTERNI SENSORE .)
2.) Selezionare "STH" per l'emisfero sud IL orologio collocamento
modalità. (Per favore fare riferimento a "impostazione dell'orologio")
NOTA: la modifica dell'impostazione dell'emisfero cambierà
automaticamente direzione delle fasi lunari SU display.
Puntando il sensore meteorologico wireless verso sud si
consentirà la massima luce solare sul pannello solare, soprattutto
durante la stagione invernale nel sud Emisfero.
SENSORE W IRELESS 7 IN 1 LIVELLO
● Usa la bolla livello indicatore per assicurarsi che il sensore esterno
wireless è completamente livellato. Se il sensore non è livello, IL
guadagno misura, UV E Leggero l'intensità sarà non misurare
correttamente.
● Per regolare il livello del sensore esterno wireless, allentare le viti del
montaggio palo. Regolare il livello del sensore esterno wireless per
assicurati che la bolla È al centro della bolla livello nell'indicatore .
● Stringere la vite del montaggio palo di nuovo n.

- 18 -
COLLOCAMENTO SUPERLASTAZIONEMETEO
ALIMENTAZIONE SU PER LA STAZIONE METEO
● Collegare l'adattatore di alimentazione alla presa di corrente cricco
situato In IL Indietro della stazione meteorologica. Inserisci 3 nuovo
Batterie alcaline AAA (non incluse) di riserva.
● Una volta che la stazione meteorologica è acceso, entrerà
automaticamente abbinamento modalità.
ABBINAMENTO DEL SENSORE WIRELESS 7 IN 1
● Una volta accesa la stazione meteorologica, dovrebbe
automaticamente ricerca per connettersi ai sensori wireless. Se la
stazione meteorologica non
connettiti entro i primi 5 minuti, fare riferimento alla sezione seguente,

- 19 -
“RI-PARAZIONE DEL SENSORE”.
● Vedrai l'icona di un'antenna che scorre nella sezione temperatura e
umidità (esterna) del display.
● Una volta effettuato l'abbinamento una volta completato il processo,
l'icona dell'antenna apparirà apparire fisso (non lampeggiante) e le letture
per la temperatura esterna e l'umidità, il vento velocità, direzione del vento,
UV, luce intensità e precipitazioni appariranno In loro
sezioni designate del display LCD
RI-PARAZIONE DEL SENSORE
● Se la connessione fallisce o la stazione meteorologica viene ripristinato,
quindi premere e Presa IL Pulsante
【
CHANNEL
】
per oltre 2 secondi
per entrare in modalità di associazione e il
stazione meteorologica registrare nuovamente tutti i sensori che sono già
stati stato
registrato ad esso prima, (vale a dire, la stazione meteorologica sarà non
perdere IL collegamento dei sensori che hai abbinato su Prima.)
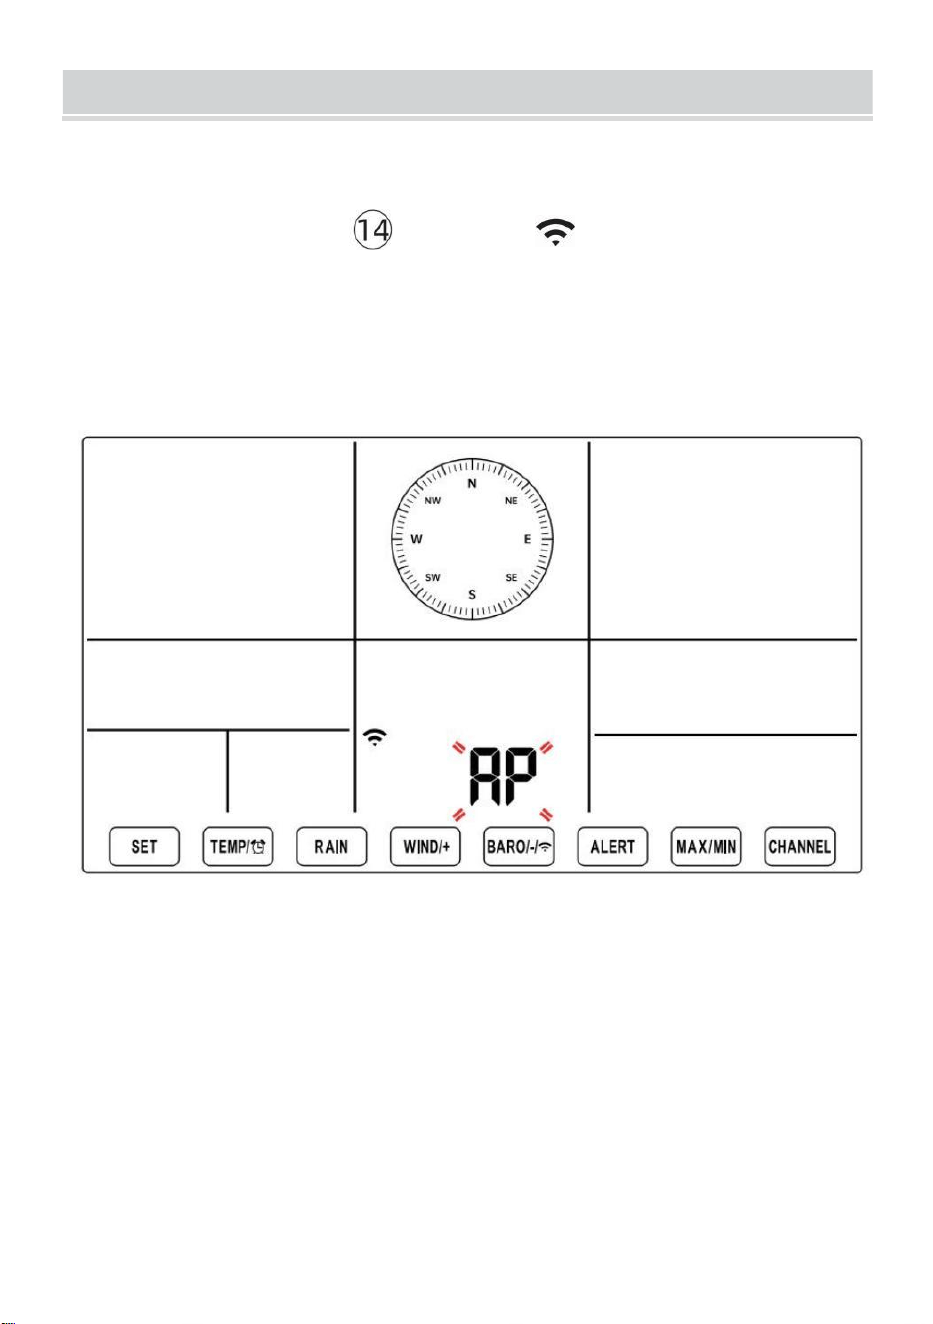
SETUPINSTRUCTION
- 20 -
COLLOCAMENTO ATTIVA LA CONNESSIONE WI-FI E
SERVER ATHER CONNESSIONE
Premere e tenere premuto 【 BARO/-/ 】 pulsante per 3 secondi,
il meteo stazione Il display LCD mostrerà la lettera "AP" che Esso è
entrato Accesso
Punto (AP) modalità. In questo momento sarà Essere pronto per le
impostazioni Wi- Fi Essere aggiustato.
Utilizza il tuo smartphone, tablet o computer per connetterti alla
stazione meteorologica tramite Wi-Fi seguendo questi passaggi:
Su PC, aprire il tuo Wi-Fi rete impostazioni. SU Android™ O iOS
dispositivi, vai al menu impostazioni e poi seleziona Connessioni
/WI-FI A aprire la rete impostazioni.
Individuare l'SSID della stazione meteorologica dall'elenco. Dovrebbe
apparire COME
WWS-XXXXXX (dove tutte le X sono numeri interi) in lista.
Rubinetto SU l' SSID per connettersi. Questo passaggio
richiederà diversi secondi.

SETUPINSTRUCTION
- 20 -
Una volta che tu sono collegati A il tempo stazione, aprire su tuo
Internet o web mobile browser e inserisci il seguente indirizzo in IL

- 21 -
barra degli indirizzi: http://192.168.1.1 per accedere all'interfaccia
web della stazione meteorologica . (Assicurati di in clude http:// o
altro la rete il browser potrebbe interpretare l'indirizzo come una
query di ricerca). consigliare utilizzando l'ultima versione del web
affidabile browser.
Inserisci quanto segue informazione nell'interfaccia web (Figura 1).
Fare certo tutte le informazioni è inserito prima di selezionare Salva.
Se tu
scegliere di non caricare Wunderground.com o caricare
weathercloud.net, lasciare le caselle di controllo non selezionato.
NOTA :
Impostazione fuso orario ( predefinito : 0h). Per impostare
automaticamente la visualizzazione dell'ora sul tuo fuso orario,

- 21 -
modifica il fuso orario nella sezione Impostazione server orario della
pagina SETUP da '0:00' (predefinito) al tuo fuso orario (ad esempio
+1:00
- 22 -
per Germania ).
5.) Se tutte le informazioni inserite sono corrette, premere “ Applica ” A
confermare (Figura 1). In caso contrario, controlla il tuo sito web
interfaccia di nuovo informazioni .
NOTE:
Una volta completata la configurazione Wi-Fi, il computer o il
cellulare dispositivo
tornerà alla connessione Wi-Fi predefinita. Se lo fa non,
semplicemente apri le impostazioni di rete wireless del tuo
dispositivo e manualmente ricollegare.
Mentre in modalità AP, puoi premere e tenere il
【
BARO/-/
】
pulsante per oltre 3 secondi per uscire dalla modalità AP.
La stazione meteorologica ripristinerà semplicemente le
impostazioni AP precedenti.
CALIBRAZIONE
Una volta che sei connesso tramite Wi-Fi alla stazione meteorologica e
hai ha aperto l'impostazione pagina a http://192.168.1.1 , cliccando su “
AVANZATE ” si aprirà quanto segue pagina (Figura 2).

- 22 -
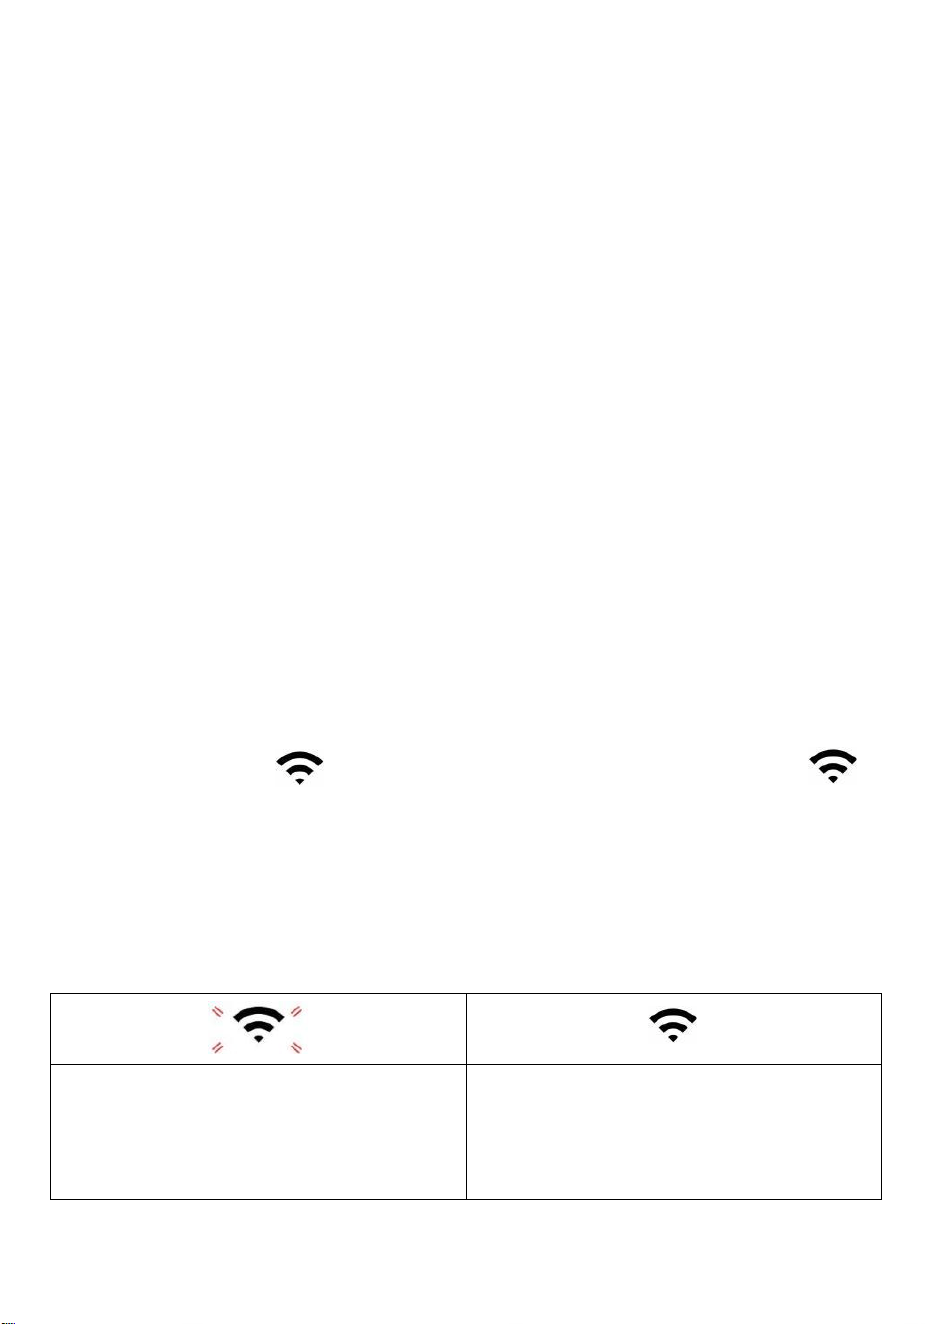
- 23 -
1) Puoi entrare O modifica IL offset E guadagno valori per diverso
misurazione parametro s.
2) Una volta che tu Avere completato il tuo ca librazioni, premere IL "FARE
DOMANDA A" pulsante.
3) La corrente valore di offset Volere aggiornamento A spettacolo IL valore Quello
Voi entrato
( Invece Di IL predefinito valore ). Se Voi Volere A modifica IL valore , tu
Potere entrare un nuovo valore In IL scatola accanto IL numero ( come In fare
un passo 1) A aggiornamento IL valore ancora , premere " FARE DOMANDA
A " pulsante .
NOTA :
Noi lo facciamo non consiglia la calibrazione della maggior parte dei
valori, ad eccezione Di Relativo Pressione, che dovere essere
calibrato correttamente per riflettere il tuo
distanza sopra il mare livello per tenere conto dell'altitudine effetti.
STATO DELLA CONNESSIONE WI-FI
Quando la stazione meteorologica si connette correttamente al router Wi-Fi,
Segnale Wi-
Fi
apparirà sul display LCD visualizzare . Se il
segnale Wi-Fi
È non stabile o la stazione meteorologica sta tentando di connettersi al
router, il l'icona lampeggerà. Se l'icona scompare, Esso significa che la
stazione meteorologica è non connesso al router Wi-Fi .
Lampeggiante: IL tempo
atmosferico stazione di s È
tentando A collegare A tuo senza
fili router.
Solido: la stazione meteorologica
ha stato connesso al tuo wireless
router.

- 23 -
NOTA :
Se Voi Proprio UN doppio banda router (2,4 GHz) E 5,0 GHz ), Fare Sicuro
Voi connettersi ai 2,4 GHz banda, altrimenti non riuscirà a connettere la
stazione meteorologica a
Wifi .
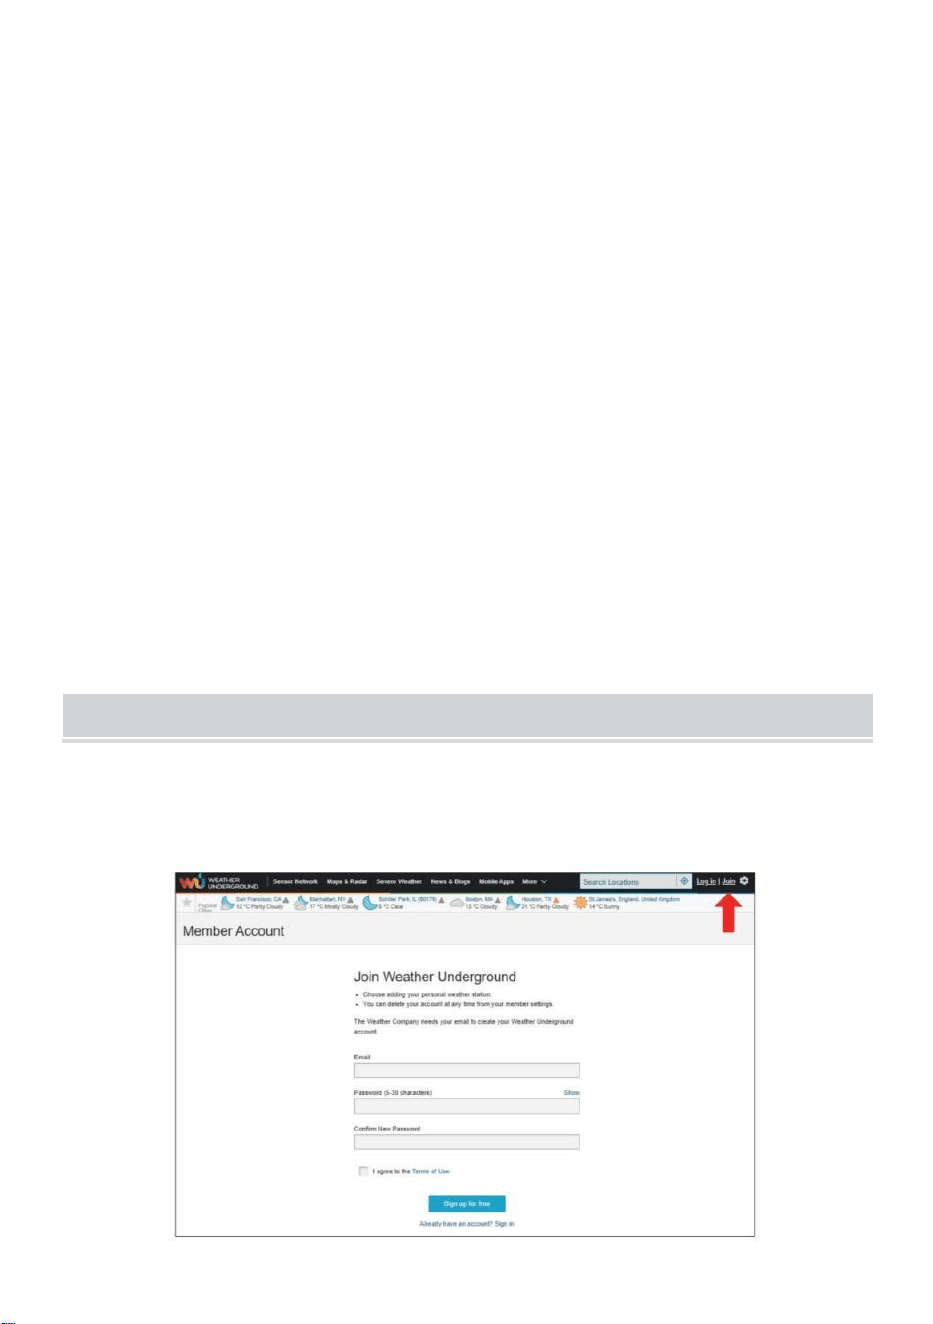
- 24 -
STATO DELLA CONNESSIONE AL TIME SERVER
Dopo che la stazione meteorologica si è connessa a Internet, è Volere
tentativo per connettersi al server orario di Internet per ottenere l'ora
UTC tempo. Una volta IL
la connessione riesce e l' ora della stazione meteorologica è stata
aggiornato. IL icona "SYNC" apparirà sul LCD.
Per visualizzare l'ora corretta per il tuo fuso orario specifico, dovrai bisogno
di
cambiare il fuso orario nell'impostazione OROLOGIO modalità da 00
(predefinita) al tuo fuso orario (ad esempio -5 per EST). Se non conosci il
tuo fuso orario , puoi cercarlo online.
NOTA :
L'ora verrà sincronizzata automaticamente con Internet all'ora.
CREAESINCRONIZZA ILTUOACCOUNTDELSERVERMETEO
CREA METEO CONTO SOTTERRANEO
1.) Visita: https://Wunderground.com e seleziona "Unisciti" nel
superiore a destra e all'angolo e crea UN Gratuito Account.
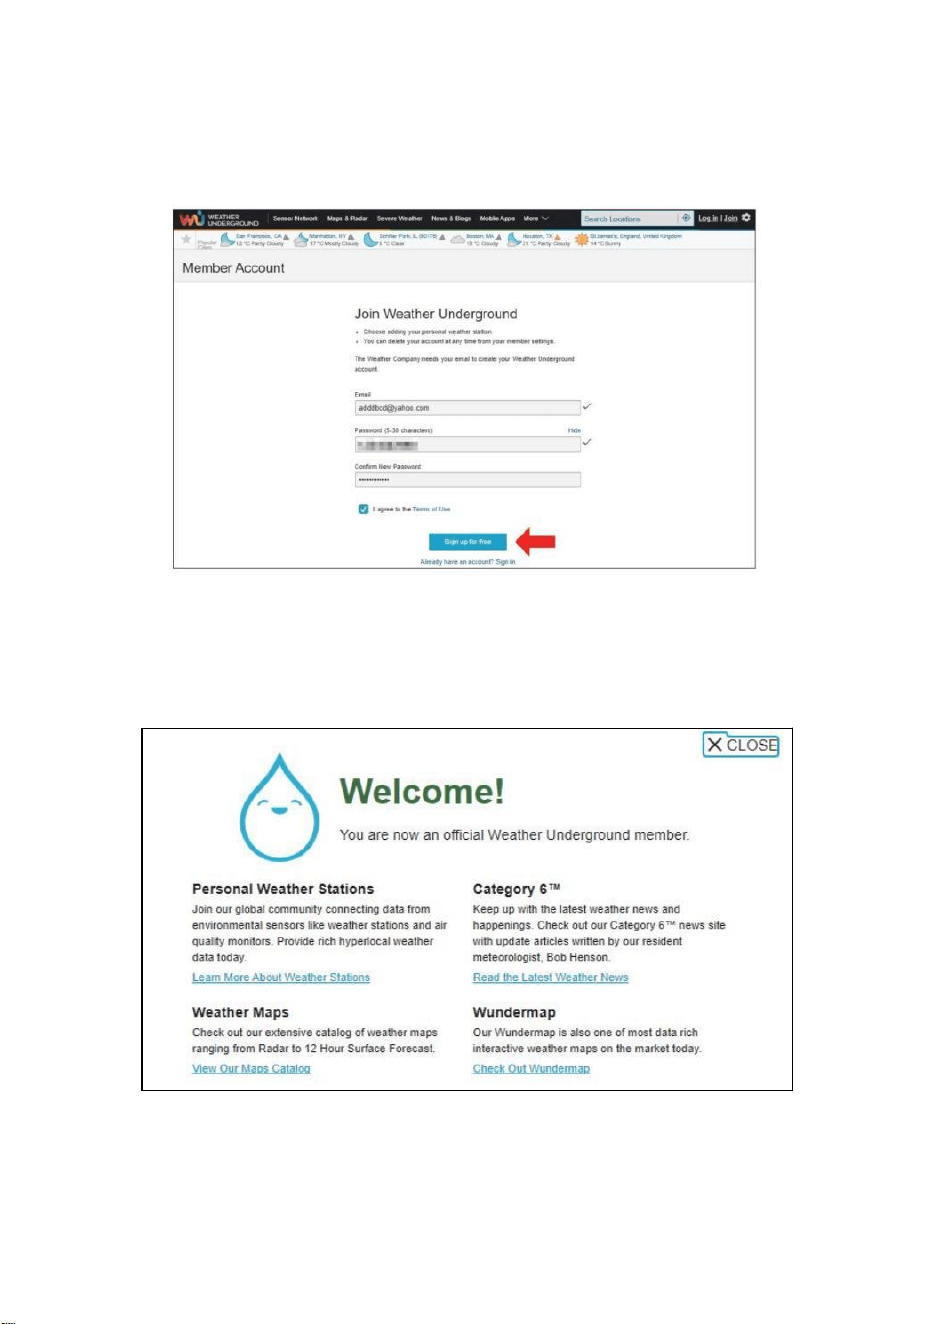
- 25 -
2.) Inserisci un Nome utente , E-mail E Password (Esso è tuo Login
password per il sito web non la password della tua email. Quindi no
la privacy sarà essere esposto). Clicca Cartello gratuitamente .
3.) Dopo aver effettuato la registrazione con successo, lo farà Essere
mostrato sotto IL messaggio.

- 26 -
4.) Fare clic su "Accedi" e immettere l' indirizzo e-mail e password tu solo
registrato.
5.) Fai clic su "Il mio profilo" " e inserisci Membro impostazioni.

- 27 -
6.) Fare clic su "Aggiorna" casa posizione ” .
7.) Fare clic su "Il mio Dispositivi", E fare clic su "Aggiungi" Nuovo
Dispositivo".

- 28 -
8.) Selezionare l'indirizzo immettendo un indirizzo o seleziona Manuale A
posizione
il tuo indirizzo alleato automatico . Quindi fai clic “Prossimo ".
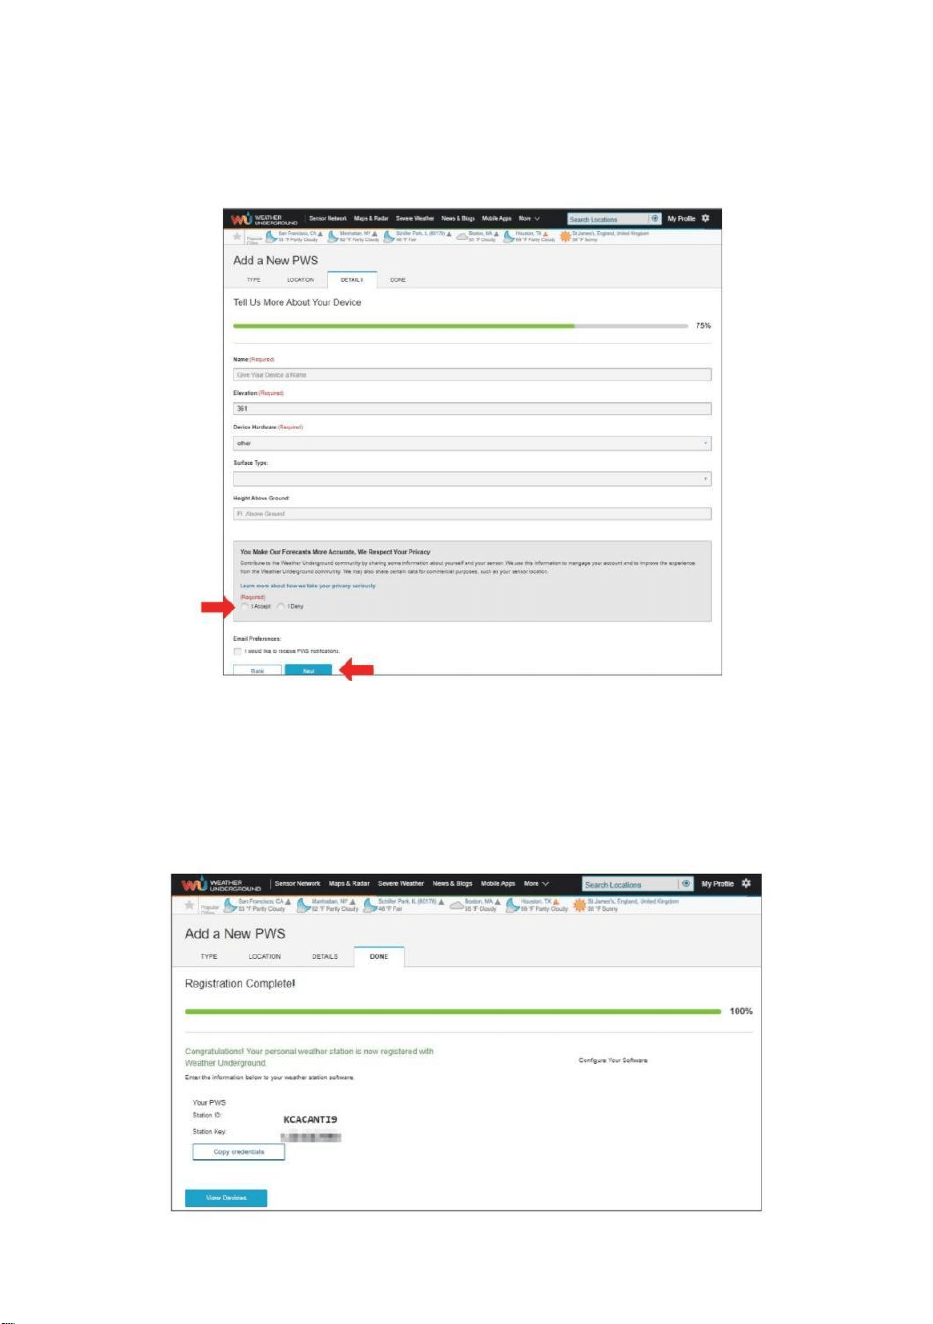
- 29 -
9.) Inserisci le informazioni meteo. Gli spazi vuoti con il rosso
(obbligatorio) devono Essere riempito In.
NOTA :
Voi Potere seleziona " altro " di IL Dispositivo Attrezzatura .
10.) Una volta completata questa sessione, fare clic su "Accetto
” e “ Prossimo " . 11.) Dopo la registrazione avvenuta con
successo, Per favore registra il tuo meteo Metropolitana ID e
Informazioni chiave per la configurazione successiva utilizzo.

- 30 -
12.) Come mostrato sotto, registrazione è stato eseguito con successo.
CREA IL TUO ACCOUNT WEATHERCLOUD
1.) Visita il sito web di Weathercloud all'indirizzo https://weather
cloud.net/, e inserisci UN Nome utente, E-mail e Password e clicca su "
Iscriviti ". Seguendo il
istruzioni per creare un account.
NOTA: Questo è meglio farlo su UN computer tavolozza O computer
portatile.
(Esso è tuo Login password per il sito web non la tua email password.
Quindi NO la privacy sarà esposto).
2.) Quando Esso ha successo, UN la posta elettronica sarà Essere
ricevuto nel tuo r egistrato casella di posta.

- 30 -
3.) Apri la tua posta e accedi nel web indirizzo In IL posta. Clic "
Attivare tuo Nuvola del tempo account ”.

- 31 -
4.) Fare clic su " qui "per entrare nel homepage del sito Weathercloud.
5.) Inserisci l'indirizzo email e la password che hai appena registrato per
accedere Sito web Weathercloud.
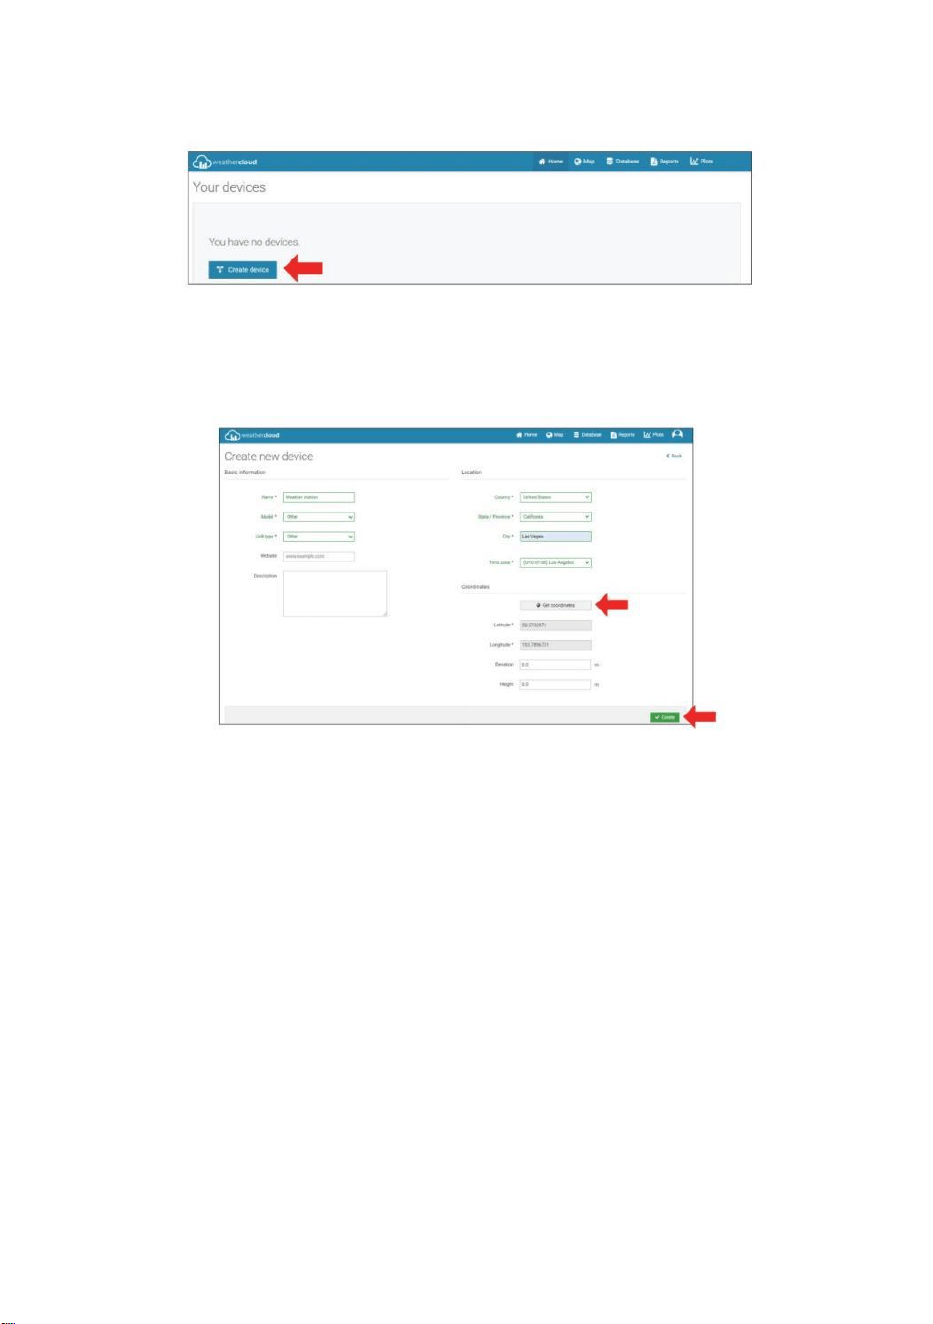
- 32 -
6.) Fare clic su " Crea dispositivo " per aggiungere un dispositivo
stazione meteorologica.
7.) Inserisci tutti i richiesto informazioni dentro il Creare Nuovo
Dispositivo pagina. Gli spazi vuoti con * rosso devono essere riempito
In.
NOTA :
Voi Potere seleziona " altro " di IL Modello numero E Collegamento tipo In
IL sopra gli spazi vuoti. Clicca “Ottieni coordinate” per identificare il tuo
posizione su IL mappa, poi clicca " Fatto " a confermare .
8.) Una volta che tu hanno completato Questo sezione , fare clic su "
Crea ".
9.) Dopo aver effettuato la registrazione con successo, per favore
registra il tuo Weathercloud ID E Informazioni chiave per la
configurazione successiva utilizzo.
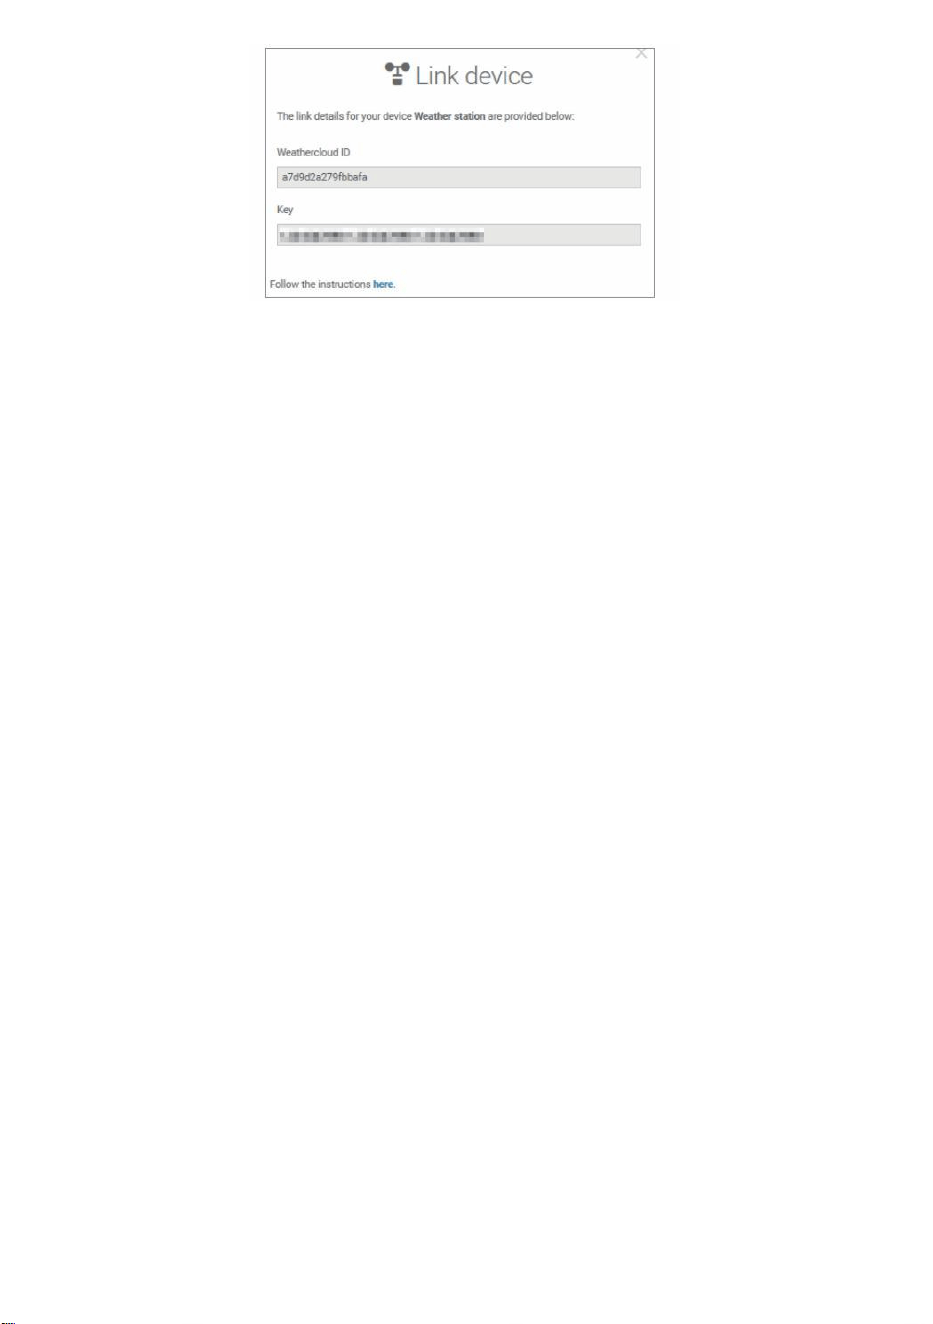
- 32 -

- 33 -
GUARDA IL TUO METEO DATI METEO METROPOLITANA
Per visualizzare i dati della tua stazione meteorologica in tempo reale
tramite PC o web mobile navigatore,
visita http://www.wunderground.com, quindi entra nella Stazione ID
che ti è stato fornito durante la configurazione dell'account in ricerca box.
I tuoi dati meteo si presenterà SU IL Prossimo pagina.
GUARDA IL TUO METEO DATI IN WEATHERCLOUD
1.) Per visualizzare i dati della stazione meteorologica vivere tramite Per
PC O mobile rete browser, visita http://www.weathercloud.net e accedi
all'account che hai creato. 2.) Fare clic sulla scheda in alto pagina
intitolata Dispositivi.
3.) Fare clic sul menu Impostazioni in alto a destra del pagina, E
selezionare IL opzione Visualizza.
4.) Fai clic su Corrente, Vento o Evoluzione per visualizzare la stazione
meteorologica dati.
ISTRUZIONI PERL'USO
OROLOGIO
Impostazione del Orologio
In Normale tempo visualizzare , premere E Presa 【 SET 】 oltre 2 secondi
A entrare impostazione del tempo modalità . Premere E pubblicazione 【 VENT
O /+ 】 E 【 BARO /-/ 】 A regolare i valori.
Presa 【 VENTO /+ 】 e 【 BARO /-/ 】 oltre 2 secondi A
regolare i valori rapidamente . Premere E pubblicazione 【 IMPOSTA 】 per
confermare E mossa A IL Prossimo articolo.
- 33 -
A Uscita IL collocamento modalità A Qualunque tempo , premere 【
LUCE / DORMIRE 】 pulsante .
- 34 -
Collocamento Ordine
1. SEGNALE ACUSTICO Acceso /Spento
2. NTP Acceso /Spento
3. Tempo Zona
4. Ora legale Acceso /Spento
5. MD/D- M Data Formato
6. Anno
7. Mese
8. Giorno
9. 24/12 Ora Formato
10. Ora 11. Minuto
12. Temperatura Unità
13. Pressione Unità
14. Relativo Pressione Calibrazione
15. Leggero Intensità Unità
16. Piovosità Unità
17. Vento Velocità Unità
18. Emisfero
19. FINE Di collocamento
1.) Premere E Presa Pulsante 【 SET 】 entrare IL impostazioni . Segnale
acustico ON lampeggia . Premere 【 VENTO /+ 】 o 【 BARO /-/
】 A modifica fra Segnale acustico SU e bip spento . Premere 【 IMPOSTA
TO 】 A selezionare NTP acceso /spento .

- 34 -
2.) Quando NTP ON lampeggia , premere 【 VENTO /+ 】 O 【 BA
RO /-/ 】 A modifica fra NTP SU E NTP spento . Premere 【 IMPOSTA
TO 】 A selezionare tempo zona .
- 35 -
3.) Quando Tempo Zona lampi , premere 【 VENTO /+ 】 O 【 BAR
O /-/ 】 A impostato tempo zona . Premere 【 IMPOSTATO 】 A
selezionare Ora legale acceso /spento .
4.) Quando Ora legale ON lampeggia , premere 【 VENTO /+ 】 O
【 BARO /-/ 】 A modifica fra Ora legale SU E Ora legale spento .
Premere 【 IMPOSTA 】 per selezionare data formato . 5.) Quando M --D
lampeggia , premere 【 VENTO /+ 】 O 【 BARO /-/ 】】 A
interruttore fra M - D E D - M data formato . Premere 【 IMPOSTATO 】 A
selezionare anno .
6.) Quando anno lampi , premere 【 VENTO /+ 】 O 【 BARO /-
/ 】 A regolare IL calendario anno . Premere 【 IMPOSTATO 】 A
selezionare mese .
7.) Quando il mese lampeggia , premere 【 VENTO /+ 】 O 【 BARO /
-/ 】 per aggiustare IL calendario mese . Premere 【 IMPOSTATO 】
A selezionare giorno .
8.) Quando Il giorno lampeggia , premere 【 VENTO /+ 】 o 【 BARO /-
/ 】 A regolare il giorno di calendario . Premere 【 IMPOSTA 】 per
selezionare 12/24 ore formato .
- 35 -
9.) Quando 12 H lampeggia , premere 【 VENTO /+ 】 O 【 BARO /-
/ 】 cambiare fra 12 ora e 24 ora formato . Premere 【 IMPOSTATO 】
A selezionare ora . 10.) Quando l' ora lampeggia , premere 【 VENTO /+ 】
o 【 BARO /-/ 】 A regolare il ora . Premere 【 IMPOSTATO 】 A
selezionare minuto .
- 36 -
11.) Quando lampi minuti , premere 【 VENTO /+ 】 O 【 BARO /-
/ 】 per aggiustare IL minuto . Premere 【 IMPOSTATO 】 A
selezionare temperatura unità .
12.) Quando ℉ lampeggia , premere 【 VENTO /+ 】 o 【 BARO /-
/ 】 A modifica fra ℉ E ℃ . Premere 【 IMPOSTATO 】 A selezionare
pressione unità .
13.) Quando pressione l' unità lampeggia , premere 【 VENTO /+ 】 o 【
BARO / -/ 】 A modifica fra hPa , inHg E mmHg . Premere 【 IMPOS
TATO 】 A selezionare calibrazione della pressione relativa .
14.) Quando Relativo La pressione lampeggia , premere 【 VENTO /+ 】 O
【 BARO /-/ 】 A regolare IL relativo pressione . Premere 【 IMPOSTA
】 per selezionare Intensità luminosa unità.
15.) Quando Leggero intensità l' unità lampeggia , premere 【 VENTO /+ 】
O
【 BARO /-/ 】 A modifica unità fra Klux , fc E la /m2 . Premere 【 IMPOS
TA 】 selezionare piovosità unità.
16.) Quando Piovere l' unità lampeggia , premere 【 VENTO /+ 】 O 【
BARO /-/ 】 cambiare unità fra In E mm . Premere 【 IMPOSTATO 】 A
- 36 -
selezionare velocità del vento unità . 17.) Quando Vento velocità l' unità
lampeggia , premere 【 VENTO /+ 】 O 【 BARO /-/ 】 A modifica
unità fra In E mm . Premere 【 IMPOSTATO 】 A selezionare emisfero .
18.) Quando NTH lampeggia , premere 【 VENTO /+ 】 O 【 BARO /-
/ 】 A modifica
- 37 -
emisfero fra NTH ( settentrionale ) e STH ( meridionale ). Premere 【 IMPO
STATO 】 per salvare e uscire dall'impostazione. Lo farà tornare a IL normale
modalità visualizzare .
NOTA: Se c'è È nessuna operazione valida entro 2 0 secondi, verrà
automaticamente tornare al visualizzazione normale modalità
dall'impostazione modalità. Durante la regolazione impostazioni, puoi
premere
LUCE/SONNO 】 pulsante per torna alla visualizzazione normale
modalità.
【
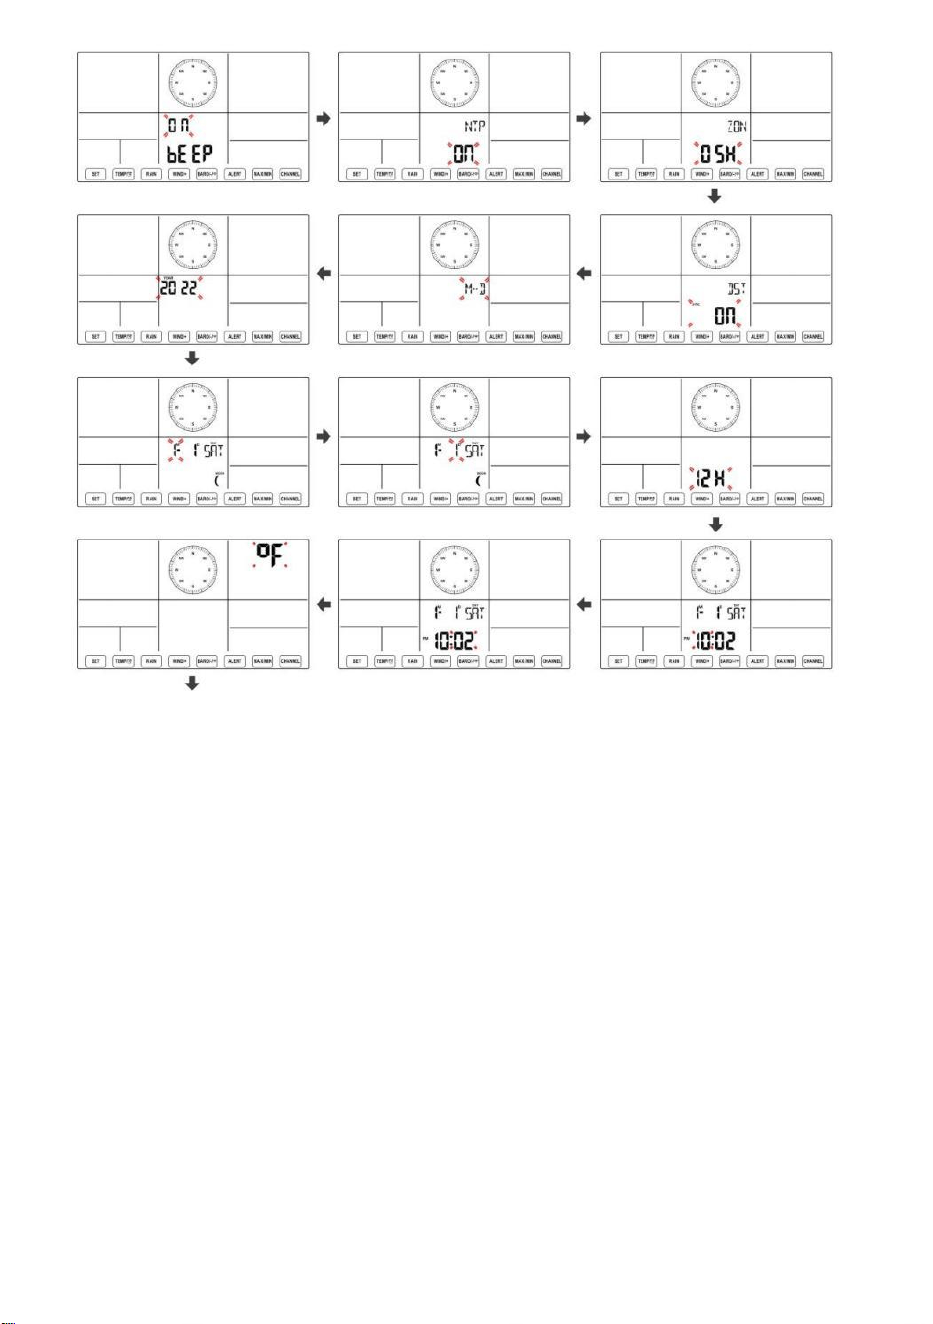
- 37 -
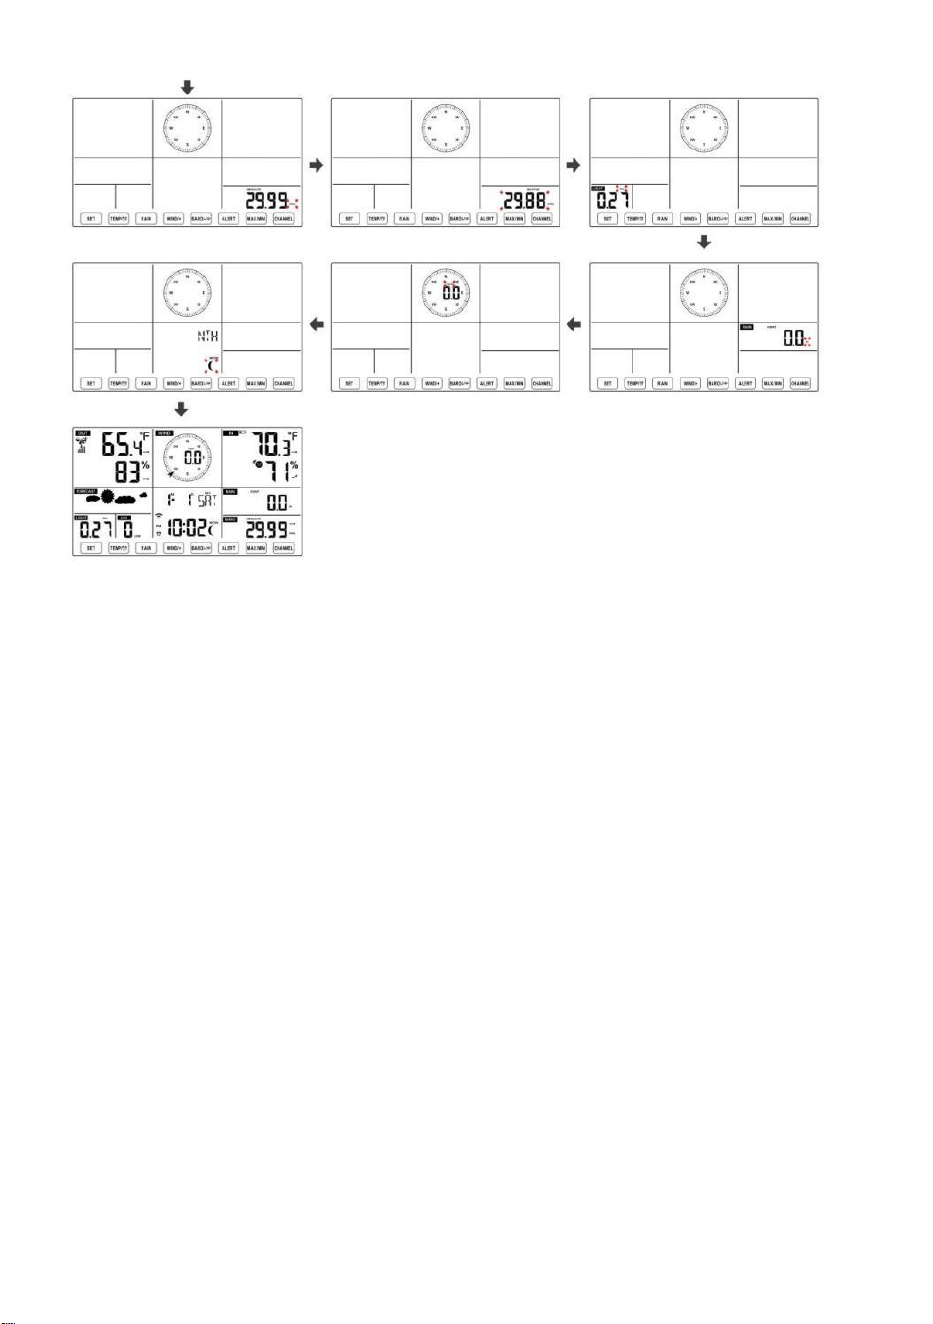
- 38 -
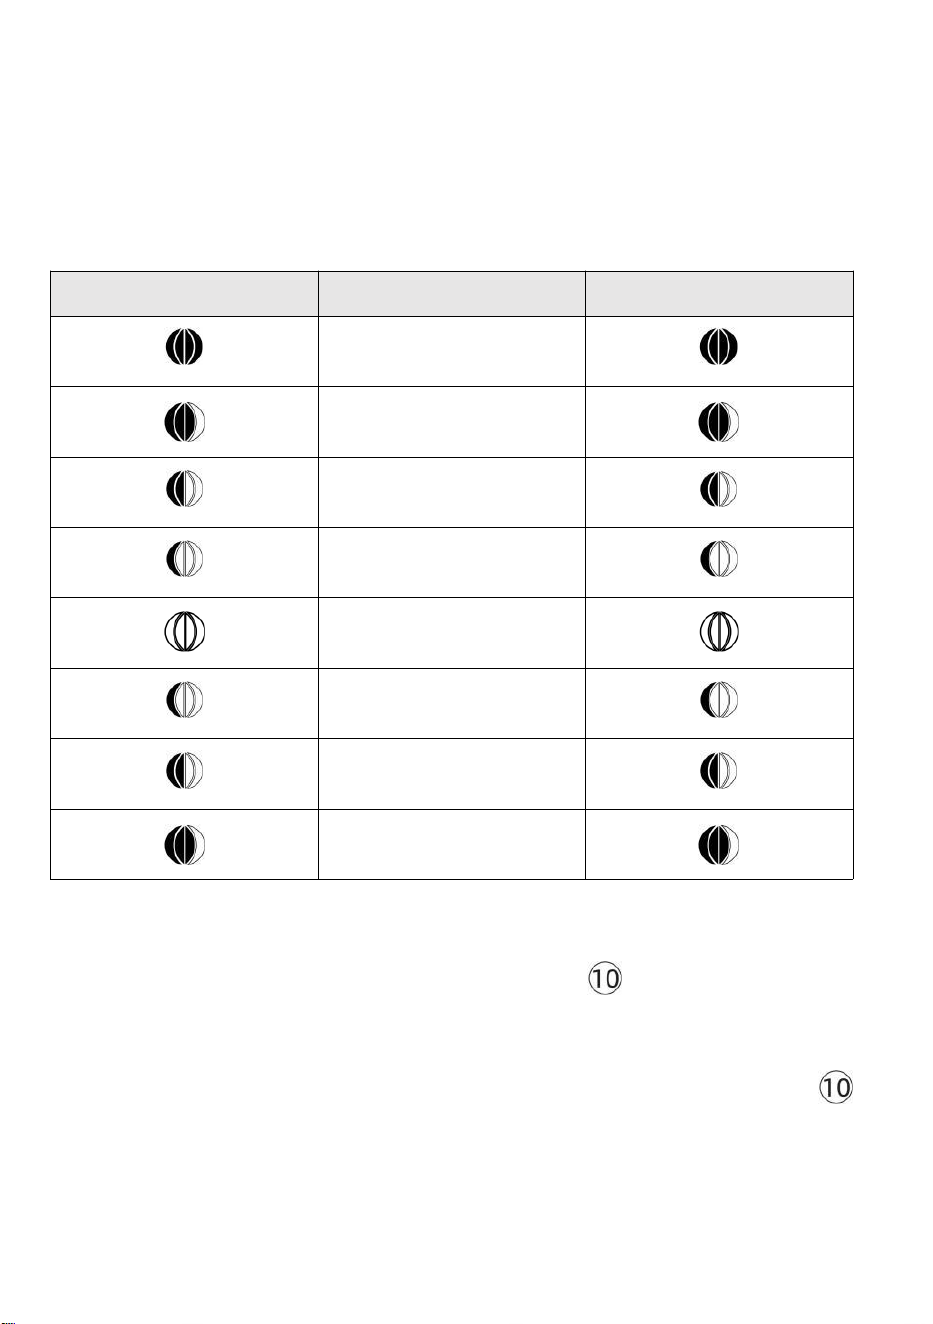
- 39 -
Luna Fase
La console di visualizzazione calcola la fase lunare secondo quanto
detto tuo ora, data e fuso orario. La tabella seguente spiega il
corrispondente fasi e le relative icone per entrambe le Settentrionale e
Meridionale emisferi.
Settentrionale Icone
dell'emisfero
Luna Fase
Emisfero australe Icone
Nuovo Luna
Mezzaluna crescente Luna
Primo trimestre Luna
Gibbosa crescente Luna
Pieno Luna
Gibbosa calante Luna
Terzo trimestre Luna
Mezzaluna calante Luna
Impostazione della sveglia
● Nella visualizzazione normale dell'ora, premere Pulsante 【 SET 】
per
cambiare l'ora della sveglia visualizzata (ora della sveglia modalità).
● Nella visualizzazione dell'ora della sveglia, premere e tenere premuto
【
SET
】
pulsante per oltre 2 secondi per accedere alla modalità di
impostazione della sveglia. L'ora della sveglia inizia a lampeggiare.
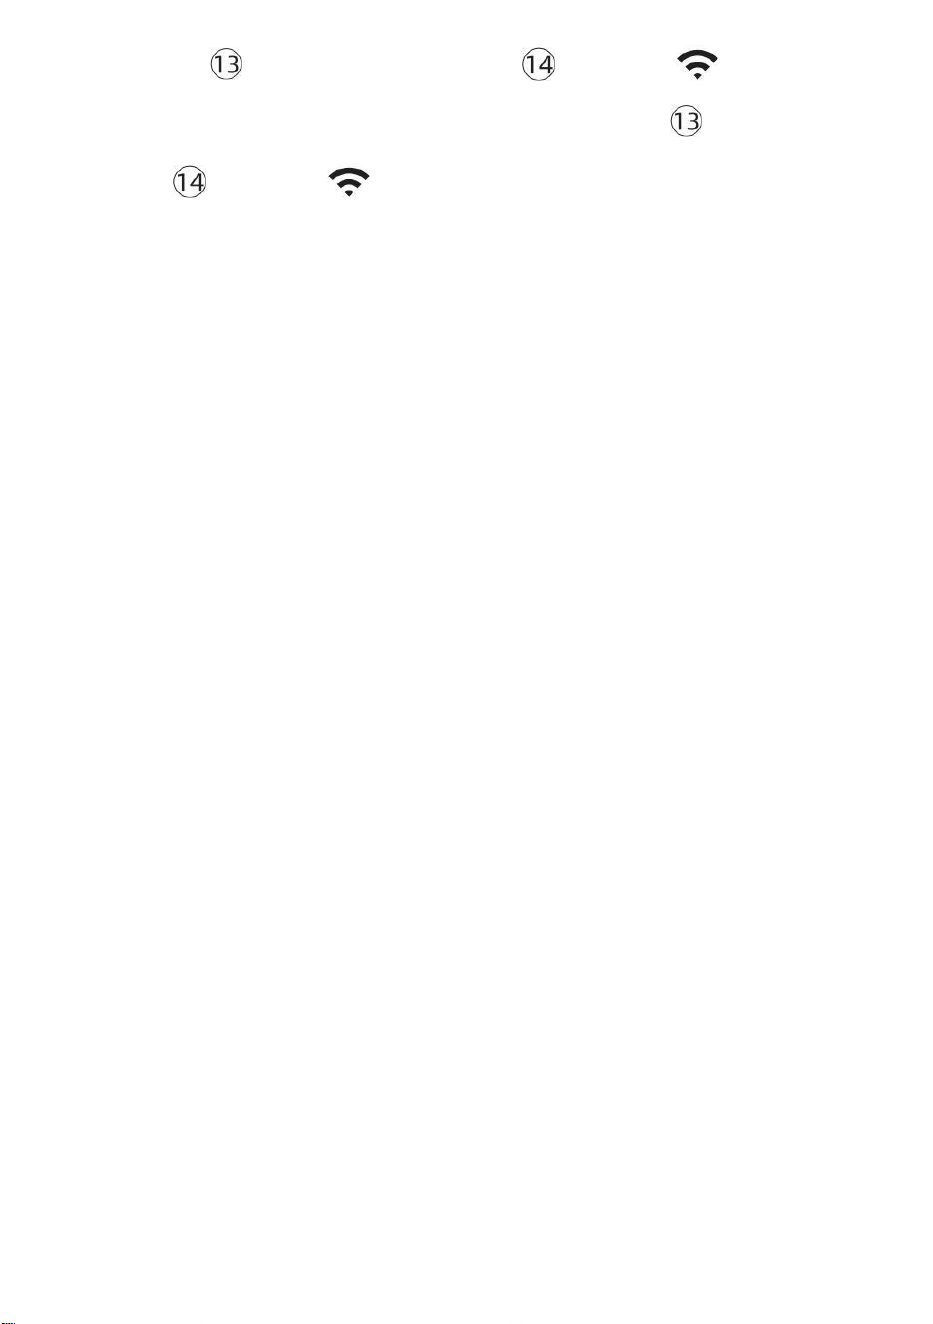
- 39 -
● Premere 【 VENTO/+ 】 pulsante o 【 BARO/-/ 】 pulsante
per impostare i requisiti richiesti orari di sveglia. Presa 【 VENTO/+ 】
pulsante o 【 BARO/-/ 】 pulsante per
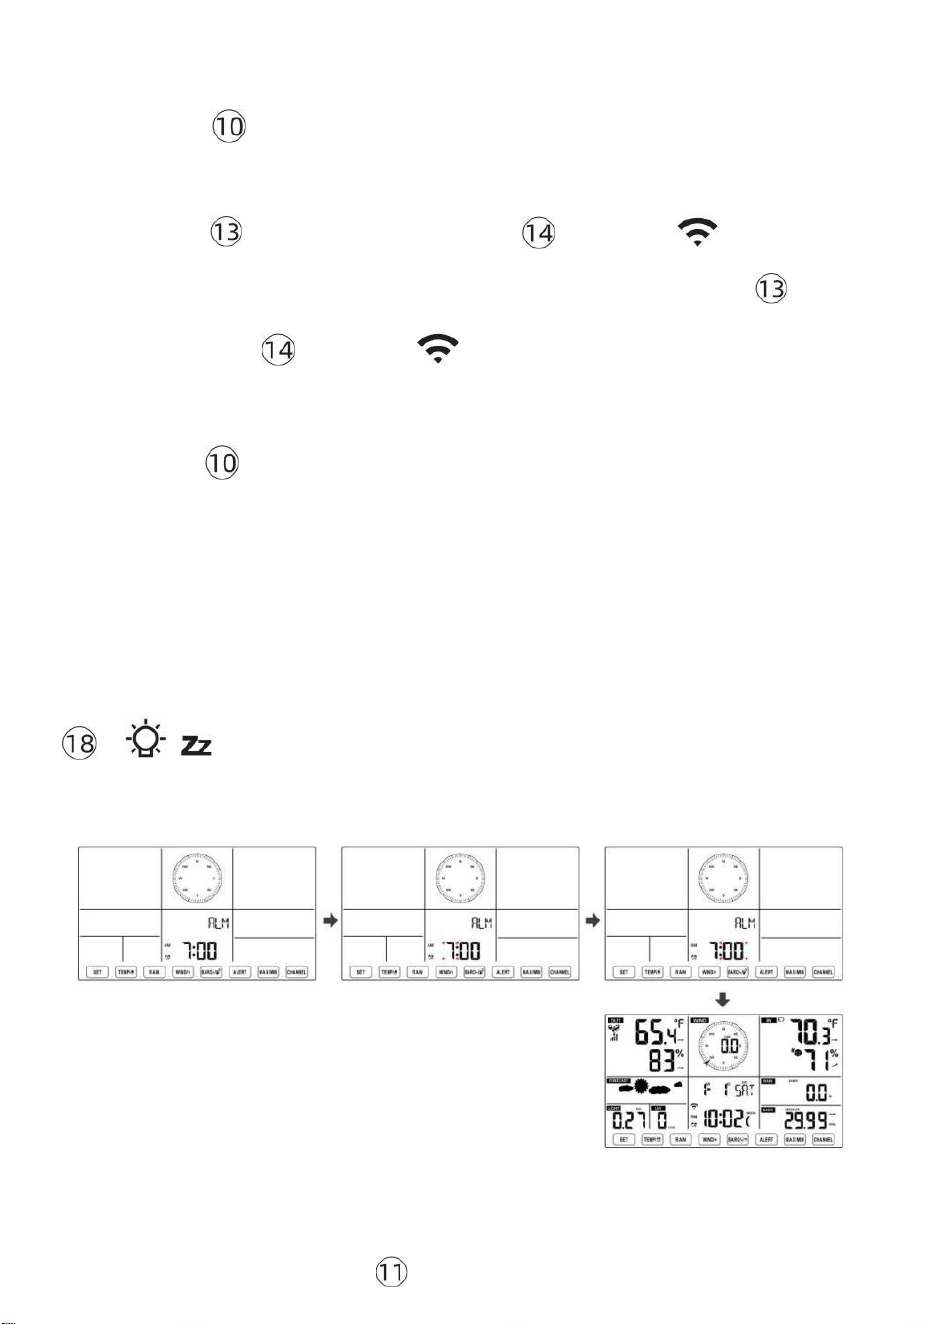
- 40 -
regola l'orario della sveglia velocemente.
● Premere Pulsante 【 SET 】 per selezionare minuto di Allarme.
Minuto di allarme inizia a lampeggiare.
● Premere 【 VENTO/+ 】 pulsante o 【 BARO/-/ 】 pulsante
per impostare i requisiti richiesti minuti di allarme. Tieni premuto 【 VEN
TO/+ 】 pulsante o 【 BARO/-/ 】 pulsante per regola i minuti della
sveglia velocemente.
● Premere
【
SET
】
pulsante per salvare tutte le impostazioni e
uscire visualizzazione normale modalità.
NOTA: Se c'è È nessuna operazione valida entro 2 0 secondi, verrà
automaticamente tornare al visualizzazione normale modalità
dall'impostazione modalità. Durante la regolazione impostazioni, puoi
premere
【 LUCE / DORMIRE 】 pulsante A ritorno A normale display
modalità .
Disattiva/Attiva Allarme
● Nel
allarme
tempo visualizzare , premere
spento .

- 40 -
【 TEMP /
】 pulsante A selezionare IL
Allarme SU O
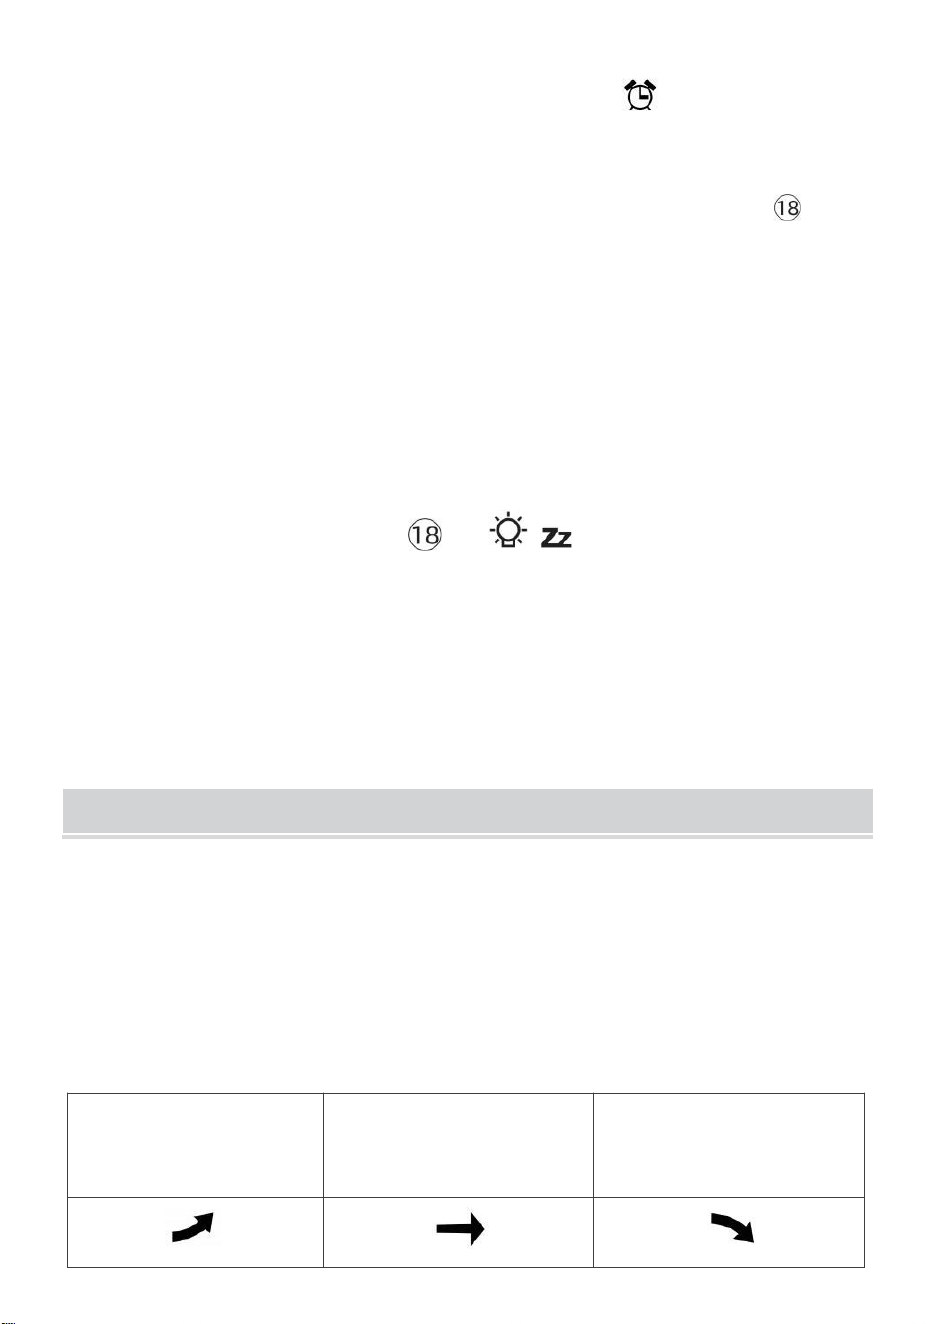
- 41 -
● Se IL allarme È SU , suo corrispondente allarme icona Volere Essere
mostrato SU lo schermo.
● Quando IL allarme È squillando , premere Qualunque pulsanti tranne 【
I
ndietro lo
LUCE/SONNO 】 pulsante per interrompere il segnale di allarme. Esso È non
necessario per riattivare l'allarme. Lo farà suona di nuovo questo tempo Prossimo
giorno.
Posticipare Funzione
Quando IL allarme anelli , premere 【 LUCE / SNOOZE 】 pulsante
A pausa l'
allarme . posticipare indicatore icona
z 2
continua a lampeggiare .
Il allarme Volere riprendere dopo
le 5 minuti .
TEMPERATURA
Tendenza temperatura/umidità
Le frecce di tendenza consentono di determinare rapidamente la
temperatura E l'umidità aumenta e diminuisce in un un'ora
aggiornamento periodo .
Tendenza della temperatura
Temperatura ha
risorto > 1°C/2° F In IL passato
ora
Temperatura ha non
cambiato più di
1°C/2° F In IL passato ora
Temperatura ha
caduto < 1°C/2° F In IL passato
ora

- 41 -
Tendenza umidità
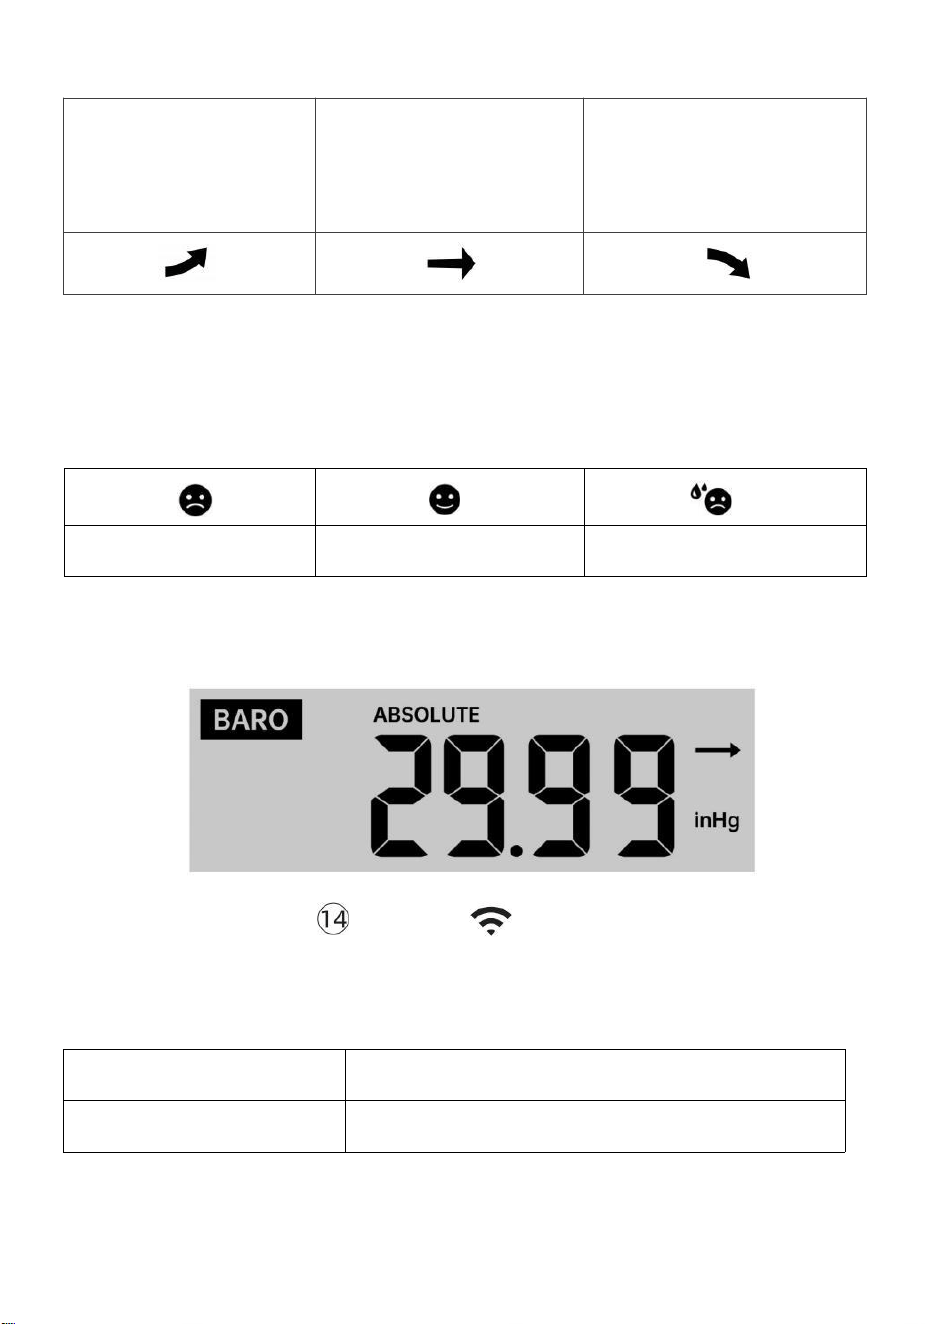
- 42 -
Umidità è
aumentato >
3% nel
passato ora
Umidità ha non
cambiato più di 3% In
IL passato ora
Umidità è
caduto < 3%
nel passato
ora
Comfort interno Indice
IL il comfort interno mostra un pittorico rappresentazione basata sulla
temperatura dell'aria interna e livelli di umidità per determinare il comfort
approssimativo livello.
Pure Freddo
Comodo
Pure caldo
PRESSIONE
Pressione del barometro Mostrare
In condizioni normali
modalità, premere E
pressione relativa.
【 BARO/-/ 】 interruttore a pulsante essere
assoluto
Assoluto
La pressione atmosferica assoluta della tua posizione.
Relativo
La pressione atmosferica relativa è basato su IL mare livello.
Tendenza della pressione

- 42 -
Le frecce di tendenza consentono di determinare rapidamente se la
pressione È in aumento O cadente in un aggiornamento di un'ora
periodo.

- 43 -
La pressione ha
aumentato > 2hpa/0,06inHg
In
il passato ora
La pressione ha non
cambiato più di
2hpa/0,06inHg
nel passato ora
Pressione ha
caduto > 2hpa/0,06inHg In
il passato ora
VENTO
Vento Display
Media/raffica
vento
velocità
Vento in tempo reale
indicatore di direzione
Selezione della modalità di visualizzazione del vento
In visualizzazione normale
modalità, premere
【
WIND/+
】
per passare tra
velocità media attuale del vento, velocità delle raffiche di vento e
direzione del vento.
PIOVERE
Visualizzazione delle precipitazioni

- 43 -
IL Spettacoli di pioggia informazioni per quanto riguarda le precipitazioni
e tasso di pioggia .
Selezionare il Visualizzazione delle precipitazioni Modalità
- 44 -
【 RAIN 】 per passare tra Piovere
Valutare, Piovere Evento, Piovere Ogni ora, Piovere Quotidiano,
Pioggia settimanale, Piovere Mensile e Pioggia totale.
Incrementi di pioggia Definizione
Piovere Valutare : attuale piovosità tasso nel passato ora.
Evento di pioggia : pioggia continua, e si ripristina a zero Se pioggia
caduta accumulo È
meno di 10 mm (0,039 pollici) In UN 24 ore periodo.
Pioggia giornaliera : Pioggia totale Da mezzanotte (0 0:00)
Settimanale Piovere : Pioggia totale per la settimana corrente del
calendario e reimposta SU Domenica mattina a
mezzanotte (da domenica a Sabato)
Mensile Piovere : Pioggia totale per il mese solare corrente, E reset SU
il primo giorno del Mese.
Totale Piovere : Pioggia totale dall ' scorso reset.
Reimposta il totale Record di pioggia
In visualizzazione normale modalità, premere e tenere premuto
【 PIOVERE 】 pulsante sopra 2 secondi per reimpostare il piovere
documentazione .
NOTA:
La reimpostazione della pioggia settimanale reimposta anche la
quotidiano piovere.
Reimpostare anche la pioggia mensile reimposta il giornaliero e il
settimanale piovere.
La reimpostazione della pioggia totale reimposta anche quella
mensile, settimanale e quotidiano piovere.
TEMPO ATMOSFERICO
Indice Meteo
In normal display mode, press
- 44 -
Quando si legge il Meteo Visualizzazione dell'indice, è possibile
premere 【 TEMP/ 】
pulsante per scorrere i diversi indici meteorologici nel seguente ordine:
Sente Mi piace > Calore Indice > Vento Freddo

- 45 -
Sente Come
IL Sente L'indice di temperatura simile determina la temperatura
effettivamente percepita all'esterno, tenendo conto di fattori come la
velocità del vento, pressione, temperatura e umidità .
Vento gelido
Il Wind Chill è determinato da una combinazione dei dati relativi alla
temperatura e alla velocità del vento rilevati dal sensore meteorologico
wireless .
NOTA: solo quando la temperatura è bassa 50 ℉ (10 ℃ ) e la
velocità del vento è superiore a 4,8 km/h (3 mph), verrà visualizzato
il valore del wind chill,
Altrimenti verrà visualizzato " --.-".
Calore Indice
IL Calore L'indice è determinato dal sensore meteorologico
wireless temperatura e umidità letture.
Rugiada Punto
Il punto di rugiada è la temperatura alla quale un dato pacco Di umidità
aria
deve essere raffreddato, a pressione barometrica costante pressione, per
il vapore acqueo
condensare in acqua. L'acqua condensata è chiamata rugiada. La
rugiada punto È una temperatura di saturazione.
La rugiada La temperatura del punto è determinata dalla temperatura e
dati di umidità dal sensore meteorologico wireless .
Previsioni del tempo
IL barometro incorporato può notare i cambiamenti della pressione
atmosferica e, in base ai dati raccolti, è possibile prevedere il meteo
condizioni.
Ci sono 6 icone meteo --- Soleggiato, Parzialmente Nuvoloso, Nuvoloso,
Piovoso, Tempestoso E Nevoso.

- 46 -
NOTA:
previsione generale basata sulla pressione riguarda 65-70%. Le
previsioni non sono garantito.
Potrebbe non riflettono necessariamente il attuale situazione.
Ghiaccio Attenzione
Quando la temperatura esterna è inferiore a 1 ℃ /33,8 ℉ , l'icona del
fiocco di neve
apparirà sul LCD display.
Massimo/minimo
● In visualizzazione normale modalità, premere Pulsante di
commutazione
【
MAX/MIN
】
fra valore massimo e minimo.
NOTA: Se c'è È nessuna operazione ID valida entro 10
secondi, tornerà automaticamente alla visualizzazione
normale modalità.

- 46 -
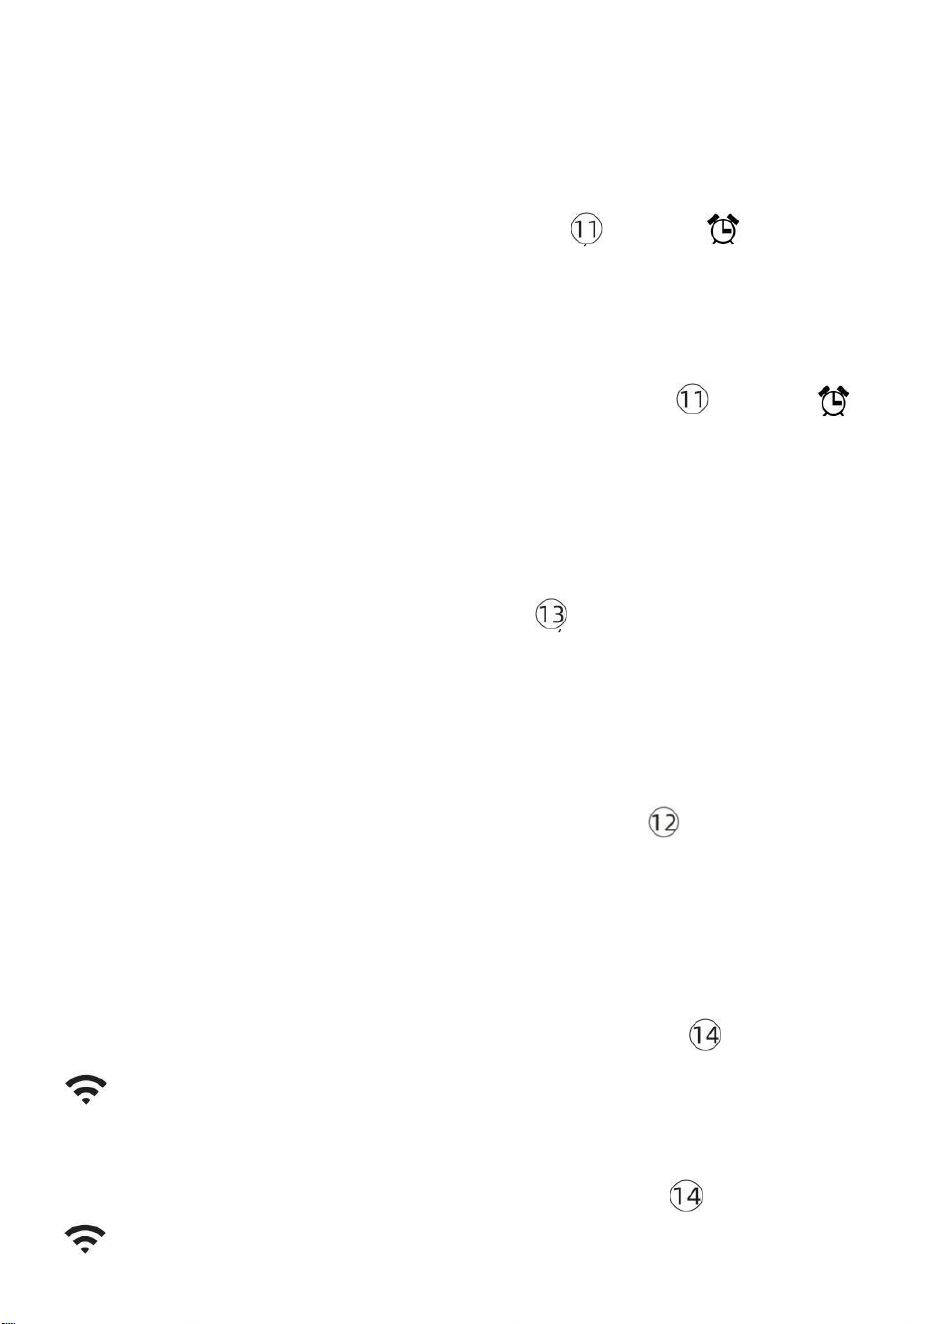
- 47 -
Per visualizzare il MAX/MIN accumulato
● Display Tatto come il vento gelido, Calore Indice, Rugiada Punti Valori
Max/Min
1.) Quando vengono visualizzati i valori massimi,
premere
【 TEMP /
】 pulsante
per
scambio visualizzazione della temperatura esterna → Mi sento come →
Vento gelido → Calore Indice → Rugiada Punto → Temperatura esterna.
2.) Quando vengono visualizzati i valori minimi , premere 【 TEMP/
】 pulsante per
temperatura esterna → Mi sento come → Vento Freddo → Calore Indice
→ Rugiada Punto → Temperatura esterna.
● Visualizza velocità del vento, raffica di vento Valori massimi
Quando vengono visualizzati i valori massimi ,
premere
Pulsante
【
WIND/+
】
per
visualizzazione di scambio tra il Velocità del vento MEDIA e RAFFICA.
● Display Piovere Valutare, Quotidiano Pioggia, Settimanale Pioggia
e Mensile Piovere Massimo Valori
Quando vengono visualizzati i valori massimi, premere Pulsante
【
PI
OGGIA 】 per
visualizzazione di scambio Piovere Valuta → Quotidiano Pioggia →
Settimana Pioggia → Mensile Piovere.
● Visualizza assoluto e Relativo pressione Valori Max /Min
1.) Quando vengono visualizzati i valori massimi, premere 【 BARO/-/
】 pulsante per visualizzazione di scambio fra Assoluto e Relativo
pressione.
2.) Quando vengono visualizzati i valori minimi, premere 【 BARO/-/
】 pulsante per

- 47 -
visualizzazione di scambio fra Assoluto e Relativo pressione.
● Display sensore temperatura interna e altri canali & umidità
Valori Max/Min
1.) Quando vengono visualizzati i valori massimi, premere Pulsante 【
CANALE 】 per
visualizzazione di scambio sensore (i) interno(i) e esterno(i)
accoppiato(i) temperatura e umidità.
- 48 -
2.) Quando vengono visualizzati i valori minimi,
premere
【 CANALE 】 pulsante
per
visualizzazione di scambio sensore (i) interno(i) e esterno(i)
accoppiato(i) temperatura e umidità.
NOTA: Se fossero associati altri sensori di canale , potrebbe
mostrare valori massimi/minimi di temperatura e umidità degli
altri canali . Se altro canale i sensori non erano accoppiato,
mostrerebbe solo la corrente interno max/min temperatura e valori
di umidità.
Per cancellare il MAX/MIN Dati
Documentazione
● Per cancellare il valore massimo ,
premere E Presa
Pulsante 【 MAX/MIN 】
sopra 2
secondi mentre vengono visualizzati i
valori massimi.
● Per cancellare il valore minimo ,
premere E Presa
Pulsante【 MAX/MIN 】 sopra
2
secondi mentre vengono visualizzati i
valori minimi.
ALTO/BASSO IMPOSTAZIONE DI AVVISO
Per visualizzare il Impostazione avviso
● In modalità di visualizzazione normale, premere 【 ALERT 】
pulsante di commutazione tra Ciao, attenzione e Allerta bassa
collocamento valore.

- 48 -
Per impostare l'avviso
● In visualizzazione normale modalità, premere e Presa Pulsante 【 AL
ERT 】 sopra 2
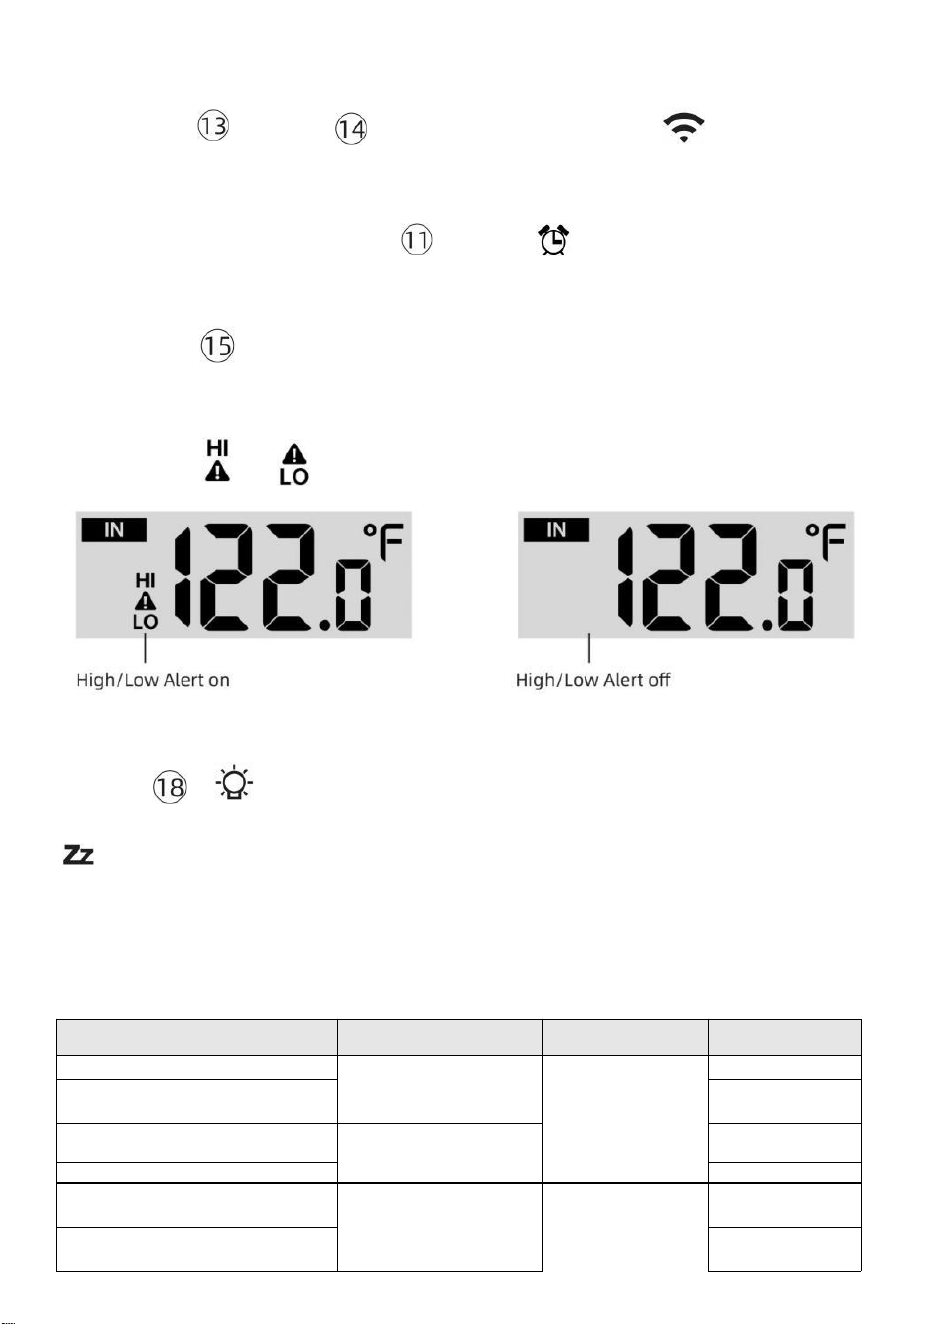
- 49 -
secondi per accedere alle impostazioni di avviso modalità.
● Premere Pulsante 【 WIND/+ 】 e【 BARO/-/ 】 premere per
regolare il
valore su o giù, allora
premere attento.
【 TEMP /
】 pulsante per
accendere/spegnere il
● Premere Pulsante
【
ALERT
】
per confermare E salto A Prossimo
collocamento.
● IL icona O verrà visualizzato quando l'avviso È SU.
● Per uscire dalle impostazioni di avviso modalità a Qualunque tempo,
premere 【
LIGHT/SNOOZE
】
. Il Viene visualizzato l'ordine di impostazione degli
avvisi Hi/Lo sotto:
Attenzione Collocamento
Ordine
Collocamento
Allineare
Sezione di
visualizzazione
Predefinito
Temperatura interna Ciao Al ert
-14.1 ℉ –122
℉ (-9,9 ℃ –
50 ℃ )
Al chiuso
temperatura e
Umidità
All'aperto
temperatura e
Umidità
122 ℉ (50 ℃ )
Temperatura interna Lo
Attenzione
14.1 ℉ (-9,9 ℃
)
Umidità interna CIAO
Attenzione
1%–99%
-40 ℉ –158
℉
Temperatura
ambiente (-
80%
Al chiuso Avviso di umidità
bassa Temperatura
esterna Ciao, attenzione
40%
104 ℉ (40 ℃ )
Temperatura esterna Lo
Attenzione
32 ℉ (0 ℃ )

- 49 -
Velocità del
vento
40 ℃ –70
℃ )
Umidità esterna CIAO
Attenzione
1%–99%
0–50 m/s
2–180 km/h
1–111 mph
1–97 nodi 0-60 BFT-B
80%
Umidità esterna Lo Attenzione
Alto Velocità media del vento
Attenzione
40%
17m/s
62 km/h
38 miglia
orarie
33 nodi 20bft
Raffica di vento forte
allertare
0–50 m/s
2–180 km/h
1–111 mph
1–97 nodi
Da 0 a 60 BFT-B
Velocità del
vento
17m/s
62 km/h
38 miglia
orarie
33 nodi 20bft
- 50 -
Avviso di caduta di
pressione
1 hpa–10hpa
0,03~0,3
pollici di
mercurio da
0,7 a 7,5
mmHg
Caduta del
barometro
3hpa
0,09
pollici di
mercurio
2,2
mmHg
Alto Piovere Avviso di tariffa
1 mm/ora–1000
mm/ora (0,04
pollici/ora–39
pollici/ora)
Piovosità
Valutare
101mm/or
a (4
pollici/or
a)
Alto Quotidiano Allerta
pioggia
Da 1 mm a
1000 mm (0,03
pollici–39,37 In)
Piovosità
Valutare
101mm
(4 In)
Indice UV Alto Attenzione
1-15
UV Indice
10
Leggero Intensità Alto
Attenzione
1Klux–200,0 Klux
7-1580 W/M²
Da 0 a 185 Kfc
Leggero Intensità
100 Klux
790 W/M²
92 Il KFC
Per mettere a tacere l'Hi/Lo Allarme di allerta
Premere il Pulsante
【
LIGHT/SNOOZE
】
sulla parte
superiore della console del display per silenziare l'allarme, altrimenti
si spegnerà automaticamente giro spento dopo uno minuto.
NOTA: una volta attivato l'avviso, l'allarme suonerà per un minuto e
l'avviso associato l'icona e le letture meteo lampeggeranno.
Se l'allarme di avviso si spegne automaticamente dopo un minuto
invece di essere spento manualmente, l' avviso associato icona e
le letture saranno continuare a lampeggiare finché la lettura non è
fuori del allertare allineare.
L'allarme di allerta meteo si attiverà una volta che le letture
scenderanno in allertare di nuovo la gamma.
RETROILLUMINAZIONE
Retroilluminazione dello schermo
Con corrente continua Adattatore
IL la retroilluminazione può solo essere continuamente acceso quando il
Adattatore CC È
permanentemente acceso. Quando il L'adattatore D C è scollegato, il
la retroilluminazione può essere temporaneamente attivato.
- 50 -
Premere Pulsante
【
LIGHT/SNOOZE
】
per regolare la
retroilluminazione
luminosità, Alto, Basso e
Spento. Senza corrente
continua Adattatore
Premere Ilpulsante【 LIGHT/SNOOZE 】 accende
temporaneamente il

- 51 -
retroilluminazione per 15 secondi.
INDICATORE DI BATTERIA SCARICA
Se l'icona dell'indicatore di batteria scarica viene visualizzato nel
temperatura esterna e la sezione umidità o la corrispondente sezione CH
del display LCD consolle
mostra, questo indica che le batterie nel/i sensore/i meteo wireless
stanno finendo e dovrebbero Essere sostituito. Assicurati di sostituire
Tutto batterie allo stesso tempo.
RIAVVIO FABBRICA
Se c'è è un malfunzionamento, il Fabbrica Ricomincia è un ottimo
modo per restituire il tuo stazione a "fuori dal condizione "scatola".
1.) Rimuovi tutto potenza (batterie e Adattatore CC) dai sensori esterni
e stazione meteorologica.
2.) Seguire l’operazione “IMPOSTAZIONE SU PER LA STAZIONE
METEO” per inizia la coppia sensore.
CURA E MANUTENZIONE
1.) Pulire il pluviometro ogni 3 mesi. Ruotare l'imbuto
in senso antiorario e sollevare per esporre il pluviometro meccanismi, E
pulito con un panno umido. Rimuovere qualsiasi sporcizia, detriti e insetti.
Se insetto l'infestazione è un problema, spruzzare il sensore leggermente
con insetticida.
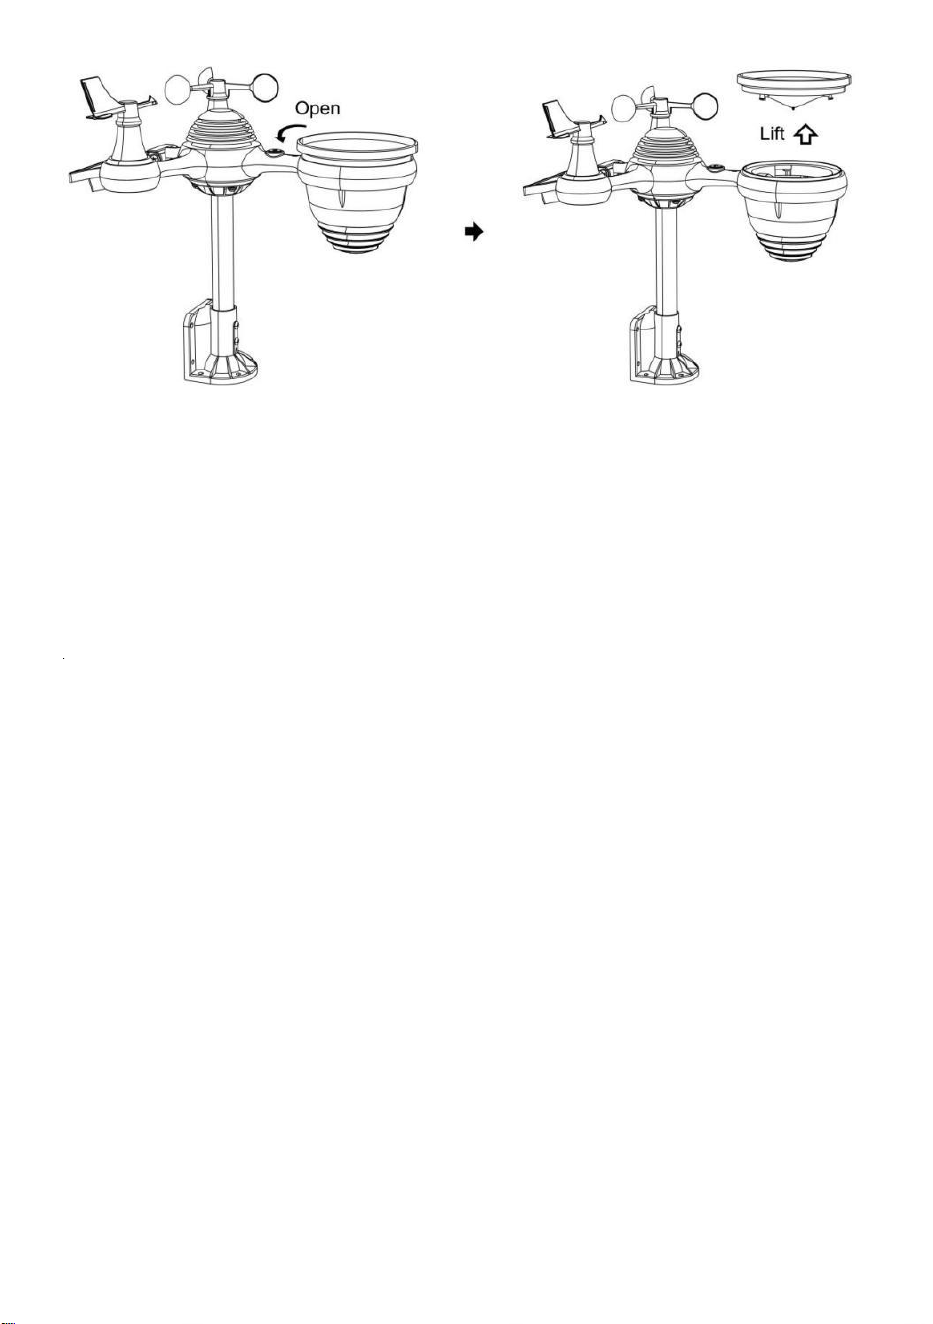
- 52 -
2.) Pulisci il Leggero Intensità/ Sensore UV e pannello solare ogni 3
mesi con umidità stoffa.
3.) Quando si sostituiscono le batterie, applicare un prodotto
anticorrosione preventivo composto sui terminali della batteria.
- 53 -
SPECIFICHE
TEMPO ATMOSFERICOSTAZIONE
Generale Specifica cationi
Dimensione
7,5x5x 1.1 pollice (191,6 x 127 volte 28,8 mm)
Energia fonte
Corrente alternata-corrente continua 5V, Adattatore 1A (incluso)
Batteria
3 xAAA batteria ( non incluso)
Supporto sensori
1 X 7 in 1 sensore (incluso)
Wi- Comunicazione Fi Specifiche
Wifi Standard
802. 11 b/g/N
Wifi operazione frequenza
2,4 GHz
Dispositivi supportati
per impostare
Interfaccia utente
Costruire-in Wifi con Indirizzo modalità accorto
dispositivo , incluso computer portatili, computer,
smartphone e cuscinetti intelligenti
Consiglia rete navigatore
per impostare Interfaccia
utente
Ultimo Versione Di Qualunque rete navigatore Quello supporta
Codice HTML 5
Tempo Specifiche della funzione
Tempo display
S.H.: MM
Formato orario
12 ore o 24 ora
Data display
GG/MM o MM/GG
Tempo metodo di
sincronizzazione
Sincronizza con atomico orologio
Tempo zone
Ora solare ± 12
Oralegale
ACCESO/SPENTO
Specifiche del display e delle funzioni del barometro
Unità del barometro
hPa, inHg E mmHg
Campo di misura
600 – 1100 hPa (impostazione relativa gamma 930 – Pressione
atmosferica (bar)
Precisione
700 -1100 hPa±5 hPa/600 -696 hPa±8 hPa
20.67 – 32.48 inHg±0. 15 polliciHg/ 17.72 -20,55 pollici di
mercurio ±0,24 pollici di mercurio 525 -825 mmHg±3,8 mmHg
/450 -522 mmHg±6 mmHg Tipico a 77 gradi Celsius (25
℃ )
Tempo atmosferico previsione
Soleggiato, In parte Nuvoloso, Nuvoloso , Piovoso, Tempestoso
E Nevoso
Display modalità
Attuale
Memoria modalità
Quotidiano Massimo/ Minimo
Attenzione
Pressione modifica allertare
Interno/ Specifiche della visualizzazione e delle funzioni della temperatura esterna
Unità di temperatura
℃ E ℉
Al chiuso Display allineare
-14,1 °F – 122 ℉ (-9,9 ℃ – 50 ℃ )
All'aperto Display allineare
-40 ℉ – 158 ℉ (-40 ℃ – 70 ℃ )
In/Fuori precisione
50– 122 ℉ ± 1,8 °F / 10 – 50 ℃ ±
1 ℃ -4 - 50 ℉ ±2,7 °F / -20 – 10
℃ ± 1,5 ℃ altri : ±3,6 °F / ±2 ℃
- 53 -
Display modalità
Attuale
Memoria modalità
Quotidiano Massimo/ Minimo
Attenzione
Alto/Basso temperatura allertare
- 54 -
Interno/ All'aperto Umidità Display & Funzione Specifiche
Umidità unità
%
Display allineare
1 – 99%
In/Fuori precisione
40 – 80% UR ± 5% UR @77℉(25℃)
Altri : ± 8% RH @77℉(25℃)
Display modalità
Attuale
Memoria modalità
Quotidiano Massimo/ Minimo
Attenzione
Alto/Basso umidità allertare
Visualizzazione della velocità e della direzione del vento e Funzione su Specifiche
Vento Velocità unità
miglia orarie, SM, km/h, nodi
Display allineare
0 -112 mph, 50 m/s, 180 km/h, 97 nodi
Precisione della velocità
<5m/s: ±0,5 m/s, >5m/s : ±10% (qualunque sia è maggiore)
Display modalità
Raffica/ Media
Memoria modalità
Quotidiano Raffica/Media
Attenzione
Alto Vento Velocità Attenzione ( Raffica / Media )
Vento direzione
16 indicazioni
Visualizzazione della pioggia e Funzione Specifiche
Unità Di piovosità
mm, In
Allineare Di piovosità
0 – 12999mm (0 – 511.7 In)
Precisione Di piovosità
±7%
Display modalità
Attuale
Memoria modalità
Quotidiano Massimo
Piovosità display modalità
Ogni ora/ Quotidiano/ Settimanale/ Mensile/ Totale Piovosità
Attenzione
Alto Quotidiano Piovosità allertare
Specifiche di visualizzazione e funzione dell'indice UV
Display allineare
0 - 16
Display modalità
Attuale
Memoria modalità
Quotidiano Massimo
Attenzione
Alto UVI allertare
Intensità della luce Specifiche di visualizzazione e funzione
- 55 -
Leggero Intensità unità
Klux, KFC e W/
m2
Display allineare
Da 0 a 200 Klux
Display modalità
Attuale
Memoria modalità
Quotidiano Massimo
Attenzione
Alto Leggero intensità allertare
Specifiche di visualizzazione e funzione dell'indice meteorologico
Indice Meteo modalità
Sembra vento freddo, caldo indice E rugiada punto
Modalità di visualizzazione
Attuale
Modalità memoria
Max/min giornaliero
SENSORE ESTERNO WIRELESS 7-IN-1
Dimensioni
16 volte 13,8 volte 14,4 pollici (408 x 396 x 367 mm)
Potenza principale
3,6 V Ni-MH ricaricabile pacco batteria
Alimentazione di backup
Energia solare
Dati meteo
temperatura, umidità, vento velocità, vento direzione,
piovosità, UVI e intensità luminosa
RF frequenza
915 MHz
Campo di trasmissione RF
492 piedi (150 metri)
Intervallo di trasmissione
Ogni 20secondi per UV 、 intensità della luce 、 velocità del
vento 、 dati di temperatura, umidità e pioggia e vento
dati di direzione
Temperatura di funzionamento
-40 ℉ a 140 ℉ / 40 ℃ a 60 ℃
Strumenti aggiuntivi
necessari per sensore
SÌ
- 56 -
RISOLUZIONEDEI PROBLEMI
Problema
Soluzione
Senza fili sensore fa
non comunicare IL
tempo atmosferico
stazione
IL senza fili sensore Maggio Avere iniziato correttamente, E IL
dati È registrato di IL tempo atmosferico stazione COME non
valido, E IL tempo atmosferico
stazione dovere Essere reset.
Con un aperto graffetta per fogli, premere il RIIMPOSTARE
pulsante per 3 secondi A completare IL display Di IL voltaggio
. GUIDATO Volere lampeggiare ogni 20 secondi.
Se GUIDATO fa non lampeggiare ogni 20 secondi, portare fuori IL
batterie E Aspettare 5 minuto, Mentre coprente IL solare pannello
A drenare la tensione.
Mettere batterie Indietro In E risincronizzare IL tempo atmosferico
stazione E risincronizzare la stazione meteo (Fare riferimento a
Pagina 18 RIPARAZIONE SENSORE ANELLO) con la radio senza
fili sensore Di 10 piedi (3 minuti) lontano .
IL Il LED del sensore wireless lampeggiare ogni 20 secondi. Se il
LED È Ancora non lampeggiante ogni 20 secondi, sostituire il
nuovo
batterie In IL senza fili sensore.
Se IL le batterie erano recentemente sostituito, controllare il polarità.
Se il
senza fili sensore È lampeggiante ogni 20 secondi, procedere A
IL Prossimo fare un passo.
Là Maggio Essere UN temporaneo perdita di comunicazione
dovuto A ricezione perdita imparentato A interferenza O altro
posizione fattori,
O batterie Maggio Avere stato cambiato In IL senza fili sensore e il
tempo atmosferico stazione ha non stato reset. IL soluzione Maggio
Essere come semplice COME alimentazione giù E su IL tempo
atmosferico stazione (rimuovere corrente continua energia E
batterie), Aspettare 30 secondi, E reinserire corrente continua
energia E batterie).
Al chiuso E
All'aperto
temperatura Fare
non Essere
d'accordo
Permettere fino a uno ora per il senza fili sensori A stabilizzare
dovuto A
segnale filtraggio. IL al chiuso E all'aperto temperatura sensori
dovrebbe concordare entro ±4 ℉ (±2 ℃ ) (la precisione del sensore è
±2 ℉ (±1 ℃ )
Utilizzo IL calibrazione caratteristica A abbinare il al chiuso
E all'aperto temperatura A UN conosciuto fonte.
Sensore di temperatura
legge anche alto In IL
giorno
Fare certo che il sensore wireless È non pure vicino A Calore
generando fonti O restrizioni, come COME edifici, pavimentazione,
muri, O aria condizionata unità.
- 57 -
Problema
Soluzione
Pluviometro
relazioni pioggia
quando Esso È
non
pioggia.
Una soluzione di montaggio instabile (oscillazione nel montaggio palo)
Maggio
causare il ribaltamento non corretto del secchio aumento delle
precipitazioni. Fare Sicuro hai una posizione stabile e livellata
montaggio soluzione. (Fare riferimento a pagina 16
REGOLAZIONE DEL LIVELLO DEL SENSORE WIRELESS 7 IN 1 )
Il Wi-Fi fa non
visualizzare sul meteo
stazione
Controlla se ci sono problemi nel router .
1.) Controllare il simbolo Wi-Fi sul display. Se la connettività
wireless è riuscita, l' icona Wi-Fi Volere essere visualizzato
nel tempo archiviato. 2.) Assicurati che le impostazioni Wi-Fi del
tuo modem siano corrette (rete nome e password)
3.) Assicurati che la stazione meteorologica sia collegato in
Alimentazione CC. La stazione meteorologica non si collegherà al
Wi -Fi quando alimentato solo tramite batterie .
4.) Solo la console supporta E si collega a 2.4GHz router. Se il
tuo 5GHz router e Esso è una doppia l banda router, lo farai
è necessario disattivare la banda 5Ghz e abilitarla IL 2,4 GHz
banda. 5.) Il tempo fa non supporto ospite reti.
Dati non
segnalazione A
www.meraviglia
ground.com o
www.weatherc
loud.net
1.) Conferma la tua password o chiave è corretto. Esso è il
password Voi registrato su Wunderground.com.
Wunderground.com. La tua password underground .com non può
iniziare con caratteri non alfanumerici (a limitazione di
Wunderground.com, non la stazione ). Ad esempio, $worknet è non è
una password valida, ma lavorare $ è valido)
2.) Conferma la tua stazione L'ID è corretto. La stazione L'ID è
Tutto tappi, e il problema più comune è la sostituzione E Lo per UN
0 (o viceversa). Esempio, KCAPHOEM12, non Italiano:
3.) Assicuratevi che i dati e l'ora sulla stazione meteorologica siano
corretti. Se non è corretto, tu Forse segnalazione di dati vecchi, non
reale tempo dati.
4.) Assicurati del tuo fuso orario sia impostato correttamente. Se
non è corretto, tu Maggio segnalare dati vecchi, non vero dati
temporali.
5.) Controlla il tuo impostazioni del firewall del router. Il meteo
stazione invia dati tramite Porta 80.

FCCSTATEMENT
- 58 -
Questo dispositivo è conforme alla parte 15 delle Norme FCC. Operazione
È soggetto alle due condizioni seguenti :
1. Questo dispositivo può NON causare danni interferenza .
2. Questo dispositivo deve accettare qualsiasi interferenza
ricevuto, compreso interferenza che potrebbe causare un
funzionamento indesiderato.
NOTA :
Questa attrezzatura ha sono stati testati e ritenuti conformi alle limiti per UN
Classe B dispositivo digitale, ai sensi di Parte 15 del Norme FCC. Queste
limiti Sono progettato per fornire ragionevole protezione contro dannoso
interferenza in un Residenziale installazione. Questa apparecchiatura
genera — e può irradiare — radio energia di frequenza e, se non installato e
usato secondo IL
istruzioni, può causare dannoso interferenza a comunicazioni radio .
Tuttavia, c'è nessuna garanzia che l'interferenza sarà non si
verifica in UN installazione particolare.
Se l'apparecchiatura non provoca effetti nocivi interferenza a ricezione
radiofonica o televisiva , che può essere determinata spegnendo
l'apparecchiatura e SU, l'utente è incoraggiato a provare a correggere il
interferenza di uno O Di più Di il seguente misure:
Riorientare o riposizionare la ricezione antenna.
Aumentare la separazione tra l'apparecchiatura e il ricevitore.
Collegare il attrezzatura in UN presa SU UN circuito diverso da
Quello A che il ricevitore È collegato.
Consultare il rivenditore O UN esperto radio/televisione tecnico per
aiuto.
ATTENZIONE: Cambiamenti o modifiche a questo unità non espressamente
approvato di la festa responsabile della conformità potrebbe invalidare la
l'autorità dell'utente a
azionare l'attrezzatura.

FCCSTATEMENT
- 58 -
Fatto In Cina


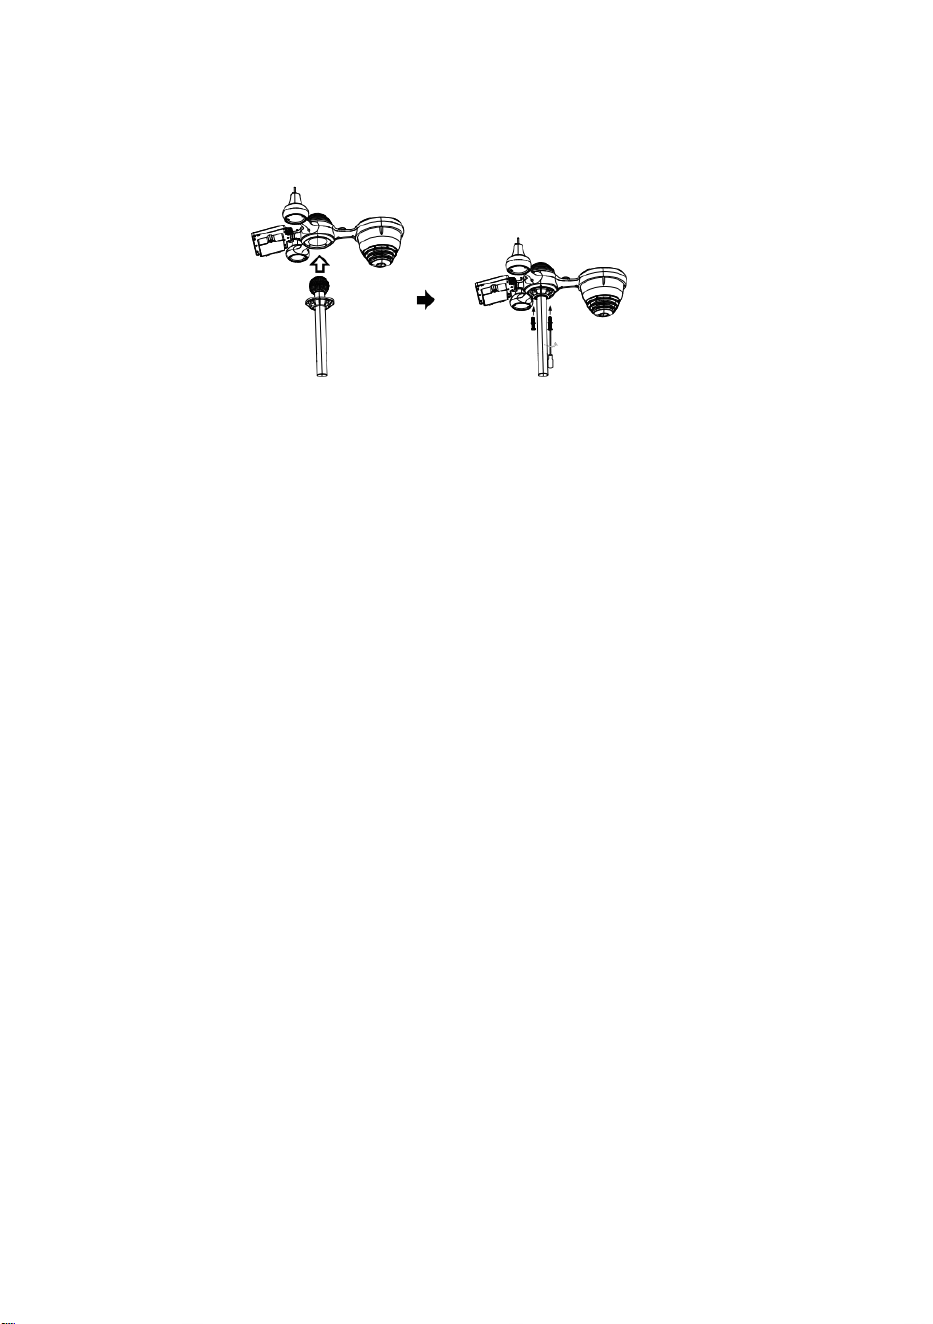
C
e
r
r
a
r
Guía de inicio rápido
⑤
I
N
S
T
A
L
A
C
I
Ó
N
D
E
L
S
I
S
T
E
M
A
D
E
①INSTALLING THE MOUNTING POLE
Secure the sensor onto a mounting pole (included) using the screws (included).

R
E
C
O
G
I
D
A
D
E
L
L
U
V
I
A
O
I
n
s
e
r
t
e
e
l
e
m
b
u
d
o
e
n

e
l
c
o
l
e
c
t
o
r
d
e
l
l
u
v
i
a
y
b
l
o
q
u
é
e
l
o
e
n
s
u
l
u
g
a
r
.
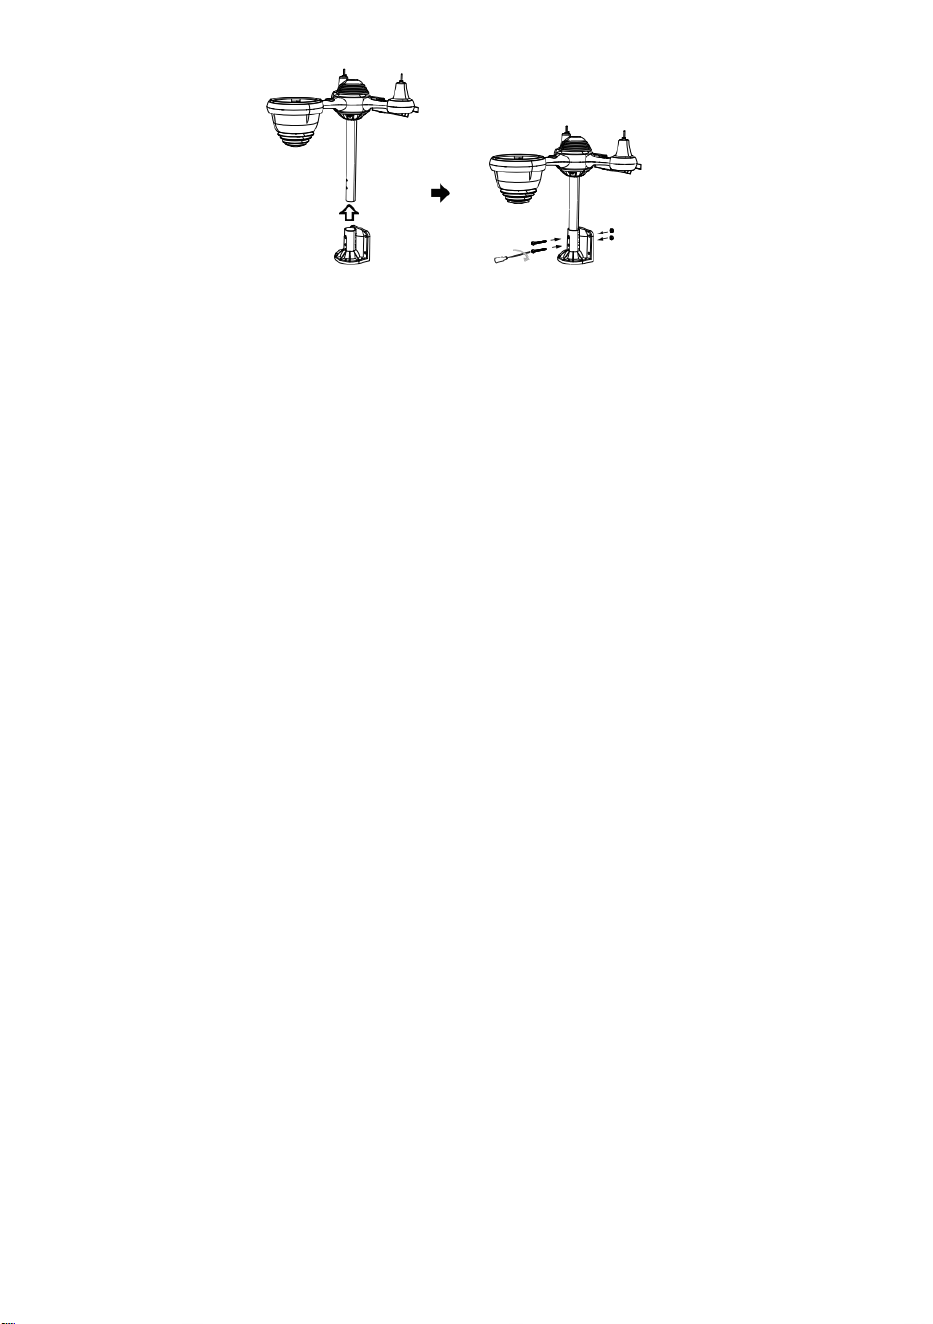
⑥
I
N
S
T
A
L
A
C
I
Ó
N
D
E
L
A
S
B
A
T
E
R
Í
A
S
D
e
s
a
t
②INSTALLING THE MOUNTING BRACKET
Secure the sensor onto a mounting bracket (included) using the screws (included).

o
r
n
i
l
l
e
l
a
t
a
p
a
d
e
l
a
b
a
t
e
r
í
a
e
n
l
a
p
a
r
t
e
i
n
f
e
r
i
o
r
.
C
o
n
e

c
t
e
e
l
c
a
b
l
e
d
e
l
a
b
a
t
e
r
í
a
.
L
a
b
a
t
e
r
í
a
r
e
c
a
r
g
a
b
l
e
.
A
j
u
s
t

e
l
o
s
c
a
b
l
e
s
c
o
n
e
c
t
a
d
o
s
p
a
r
a
q
u
e
e
n
c
a
j
e
n
c
ó
m
o
d
a
m
e
n
t
e
.
E
l

c
o
m
p
a
r
t
i
m
e
n
t
o
.
C
e
r
r
a
r
y
s
u
j
e
t
a
r
l
a
p
u
e
r
t
a
d
e
l
a
b
a
t
e
r
í
a
.

③INSTALACIÓN DE COPAS DE VELOCIDAD DEL
VIENTO
Alinee los orificios de los tornillos en los vasos de velocidad del viento con los
departamento, lado vertical de La varilla de metal.
Inserte las copas de velocidad del viento en la varilla de metal y atorníllelas
firmemente. para bloquearlo en su lugar.
E
m
p
u
j
e
e
l
e
n
g
r
a
n
a
j
e
h
a
c
i
a
a
d
e
n
t
r

o
y
a
p
r
i
é
t
e
l
o
d
i
e
z
v
e
c
e
s
.
E
l
t
o
r
n
i
l
l
o
.
P
u
n
t
o
a
Point to
SOUTH

P
u
n
t
o
a
P
u
n
t
o
a
④INSTALACIÓN DE LA ALETA DE DIRECCIÓN DEL
VIENTO
Alinee los orificios de los tornillos en la veleta de dirección del viento con los
departamento, vertical lado deLa varilla de metal.
Inserte la veleta de dirección del viento en la varilla de metal y atorníllela firmemente.
para bloquearlo en su lugar.

The
bubble
⑩ENCENDIENDO
LA ESTACIÓN
METEOROLÓGICA
Conecte el adaptador de corriente a
El clima estación.
Una vez que la estación meteorológica esté
encendido,
Entrará automáticamente en el modo de
emparejamiento.
CONFIGURACIÓN
CONEXIÓN WI-FI
Mantenga presionado el botón
BARO/-/
3 segundos para entrar Modo AP.
la configuración de su red Wi-Fi en PC
o teléfono inteligente. Localice la estación meteorológica
SSID (WWS-XXXXXX) de la lista .
Toque el SSID a conectar.
EN
EL MENOS
(0,9 metros)
APARTE
Para evitar interferencias inalámbricas, coloque ambas unidades al menos a 3 pies ( 0,9 m) de distancia.
de dispositivos electrónicos (TV, computadora, microondas, radio, etc.).
SETTINGS
SETUP ADVANCED
Language:
Wi-Fi Router Setup
Router 12345
Select the menu and choose your 2.4GHz WIFI Router
Password
Weather Server Setup
WeatherUnderground
Station ID
Station Key
Upload wunderground.com
WeatherCloud
Station ID
Station Key
Upload weatherCloud.net
Time Zone Setup
Time Zone
Time Server Setup
Server URL
Firmware Version: 1.0.1
time.windows.com
a7d 9d 2a27 9 fbbafa
**********
**********
**********
Apply
KCACANTI9
English
Router
+0.00
Flashing: the weather station is attempting
to connect to your wireless router
Solid: the weather station has been
connected to your wireless router.
Select setup UI display language
Select your Wi-Fi Router (SSID) from the list
Router Password
Enter your station ID
Enter your station key/password
check to confirm upload to
WeatherUnderground server
Enter your station ID
Enter your station key/password
check to confirm upload to
⑧MOUNTING THE WIRELESS 7-IN-1 OUTDOOR SENSOR
Various options to install. Make sure the rain collector faces north and
the solar panel faces south before fastening the screws (included).
If you are a user located in the Southern Hemisphere,
please reverse the direction.
ENTER SETUP INTERFACE
Enter the following address into the web browser address bar:
http://192.168.1.1 to access the setup interface.
Please click to check your password before clicking
APPLY.
⑨ADJUSTING THE 7-IN-1 WIRELESS SENSOR LEVEL
Use the bubble level indicator to make sure the wireless outdoor sensor is completely level.
Weathercloud.net
Time zone setting
Internet time server setting
Press Apply to confirm the setting
Please scan the QR code or visit https://youtu.be/LESE8poieYY to see a video on how to use it.
WI-FI CONNECTION STATUS
TV
3
feet

Soporte técnico y Certificado de garantía electrónica
www.vevor.com/support
ESTACIÓN METEOROLÓGICA
MODELO:YT60234
Seguimos comprometidos con Proporcionarle herramientas con ventajas
competitivas. precio.
"Ahorrar Mitad", "mitad de precio " o cualquier otra expresión similar utilizada por a
nosotros solo representa un
Estimación de los ahorros que podría obtener al comprar ciertas herramientas con nosotros
en comparación con las principales
Las mejores marcas y dosis no necesariamente significa cubrir todo Categorías de
herramientas ofrecidas por Nosotros. Tú
son Le recordamos que debe verificar cuidadosamente cuando esté Realizar un pedido
con a nosotros si usted son
realmente ahorrando la mitad en comparación con las principales marcas
principales.

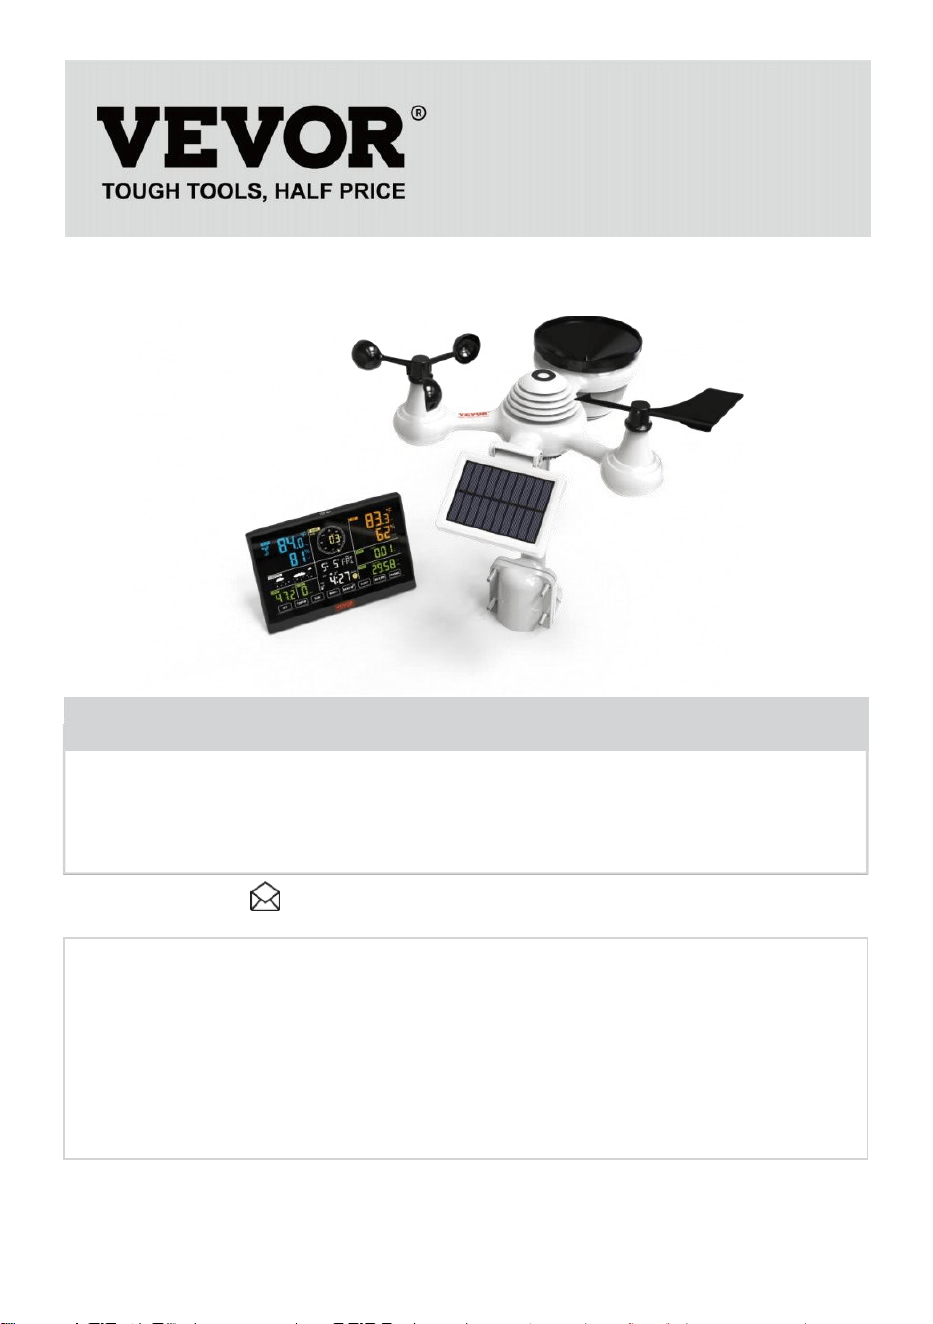
- 3 -
METEOROLOGICAL
STATION
MODELO:YT60234
NECESIDAD ¿AYUDA? CONTACTO ¡A
NOSOTROS!
Tener producto ¿preguntas? Necesidad técnico ¿apoyo? Por favor
sentir gratis a
contacto a nosotros:
Servicio de atención al cliente@vevor.com
Este es el original instrucción, Por favor lea todo manual instrucciones
con cuidado antes de operar. VEVOR se reserva una interpretación
clara de nuestro manual de usuario. La apariencia del producto debe
estar sujeto a la
producto tu recibió. Por favor perdona nosotros que no lo haremos
informarle nuevamente Si hay alguna tecnología o software
actualizaciones sobre nuestro producto.

SAFETYPRECAUTIONS
- 4 -
¡ADVERTENCIA! Por favor lea y Comprenda todas las precauciones de
seguridad, instrucciones de funcionamiento e instrucciones de
cuidado/mantenimiento antes de operar este
aparato. Conserve este manual para futuras consultas.
Esto producto es no a juguete. Mantener afuera del alcance de niños.
Esto producto está diseñado para usar en el hogar solo como un
indicación de Condiciones climáticas.
Esto producto es No a ser utilizado para médico Propósitos o
para público información.
Hacer No limpie la unidad con productos abrasivos o corrosivo
materiales.
Hacer no Coloque el aparato cerca de llamas abiertas o fuentes
de calor. Incendio, descarga eléctrica, daño al producto o lesión.
podría ocurrir.
Solamente utilizar fresco nuevo Baterías en el producto. Hacer no
mezcla nuevo y viejo Baterías juntas.
Hacer No desmonte, filtre ni modifique el producto.
Solamente utilizar archivos adjuntos o accesorios con este producto
especificado por el fabricante.
Hacer No sumerja la unidad en agua. Secar el producto con una
suave paño si derrames de líquidos en él.
Hacer No someta la unidad a una fuerza excesiva, golpes,
conducto, temperatura extrema , o humedad .
Hacer No cubra ni bloquee la ventilación agujeros con cualquier
objeto.
Esta estación meteorológica De esto producto es destinado a ser
usado dentro solo.
Este producto es solo Adecuado para montaje en un altura menos
que 6,6 pies. (2 metro).
No manipule los componentes internos de la unidad. La
manipulación de los componentes internos de la unidad puede
provocar daños. El producto anulará la garantía.
Baterías son no incluido. Cuando insertando baterías, hacer
seguro eso lo positivo y negativo Las polaridades coinciden con
las Marcas en el compartimiento.
yo
no mezcla estándar, alcalino, y recargable Baterías juntos.
Dejando un batería expuesta a condiciones extremadamente
Las altas temperaturas en el ambiente circundante pueden
Resultar en una explosión o Fuga de líquido inflamable o gas.

SAFETYPRECAUTIONS
- 4 -
Dejando un batería expuesta a condiciones extremas baja
presión de aire en El entorno circundante puede Resultar en una
explosión o Fuga de líquido inflamable o gas.

TIPS FOR SENSORSITE SELECTION
- 5 -
El colector de lluvia debe ser limpiado cada pocos meses.
El sensor debe ser instalar ed en Al menos 5' (1.5 metro) lejos de
cualquier edificio o estructura.
Elige a ubicación en un abierto espacio bajo directo luz del sol
con No obstrucciones.
El sensor debe permanecer en el línea de visión y dentro de 492' (1 50
m) de la estación meteorológica para una transmisión constante y
uniforme .
Mantenga el sensor y la estación meteorológica lejos del hogar.
aparatos que funcionan en la misma frecuencia. La consola y
El sensor debe estar al menos a 3' -7' (1 - 2 m) lejos de semejante
interferencias .
CARACTERÍSTICASDELPRODUCTO
Colorido y Pantalla de dígitos grandes con súper brillo. iluminar
desde el fondo.
9 funcional botones: CONFIGURAR, TEMPERATURA /ALARMA,
LLUVIA, VIENTO/+, BARO/-/ , ALERTA, MÁXIMO/MÍN, CANAL,
LUZ/ DORMIR
El tiempo se sincroniza automáticamente con Internet.
Alarma con función de repetición.
de horario de verano (DS T).
Zona horaria: GMT ±12.
Luna Fase.
Temperatura interior y exterior (°C/°F) y humedad Lecturas con
tendencia.
Por hora, por día, por semana, Precipitación mensual total y
Lluvia tasa en el pasado hora.
Velocidad media del viento, ráfagas de viento velocidad y el viento
dirección muestra.
Absoluto y relativo Barométrica pantallas de presión con tendencia.
Intensidad de la luz y Ultravioleta índice mostrar .
Índice meteorológico mostrar : Sentir Me gusta el viento Enfriar, Calor
índice, Rocío punto.
Pronóstico del tiempo.
Máx./Mín. lectura.
Configuración de alerta meteorológica.
Subir el tiempo Datos sobre el tiempo Subterráneo y /o
Weathercloud a través de una red wifi enrutador.

TIPS FOR SENSORSITE SELECTION
- 5 -
4 niveles brillo de la luz de fondo.

- 6 -
CONTENIDODELPAQUETE
1 estación meteorológica
2 Adaptador
sensores inalámbricos para exteriores 7 en 1
4 Embudo
5 Veleta de dirección del viento con 1 tornillo
6 tazas de velocidad del viento con 1 tornillo
7 Montaje poste con 4 tornillos
8 Montaje soportes con 6 tornillos
9 Goma Almohadillas X 2
10 Destornillador 1
11 Destornillador 2
12 Guía del usuario

NOTA: 4 tornillos adicionales para la veleta de dirección del viento y
las copas de velocidad del viento.
PRODUCT OVERVIEW
- 7 -
SENSOR EXTERIOR INALÁMBRICO 7 EN 1
1 Solar panel
2
Veleta de dirección del viento
3 Sensor de luz/UV
4 Nivel de burbuja degradador
5 Colector de lluvia
6
Copas de velocidad del viento
7 Montaje polo
8 Montaje soportes
9 Sensor higro-termo
10 CONDUJO: Parpadea
cuando la unidad transmite una
lectura
⑪
Botón RESET
⑫
Puerta de la batería

NOTA: 4 tornillos adicionales para la veleta de dirección del viento y
las copas de velocidad del viento.
PRODUCT OVERVIEW
- 7 -
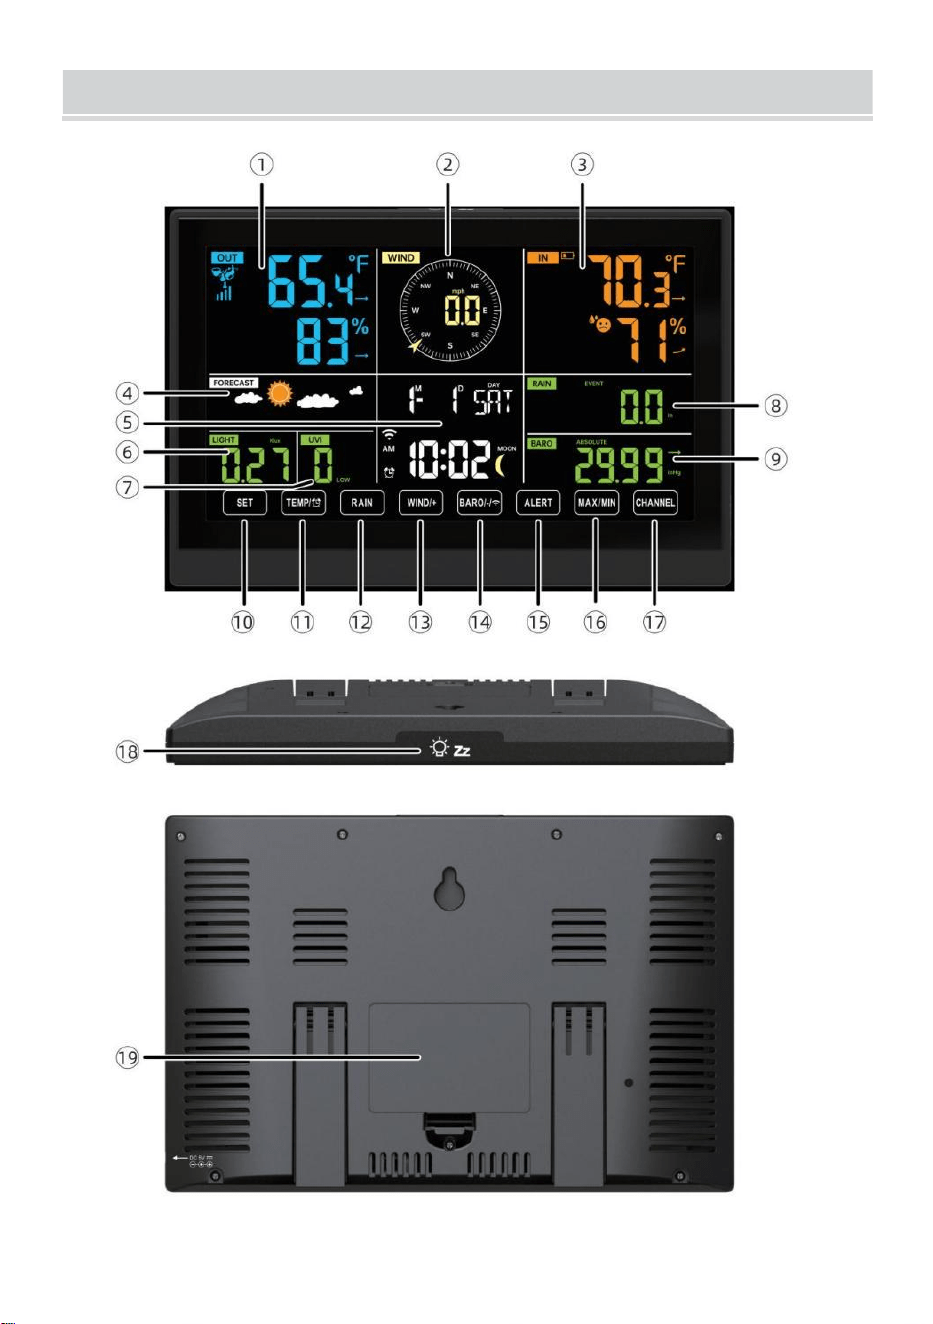
WEATHERSTATION
- 8 -
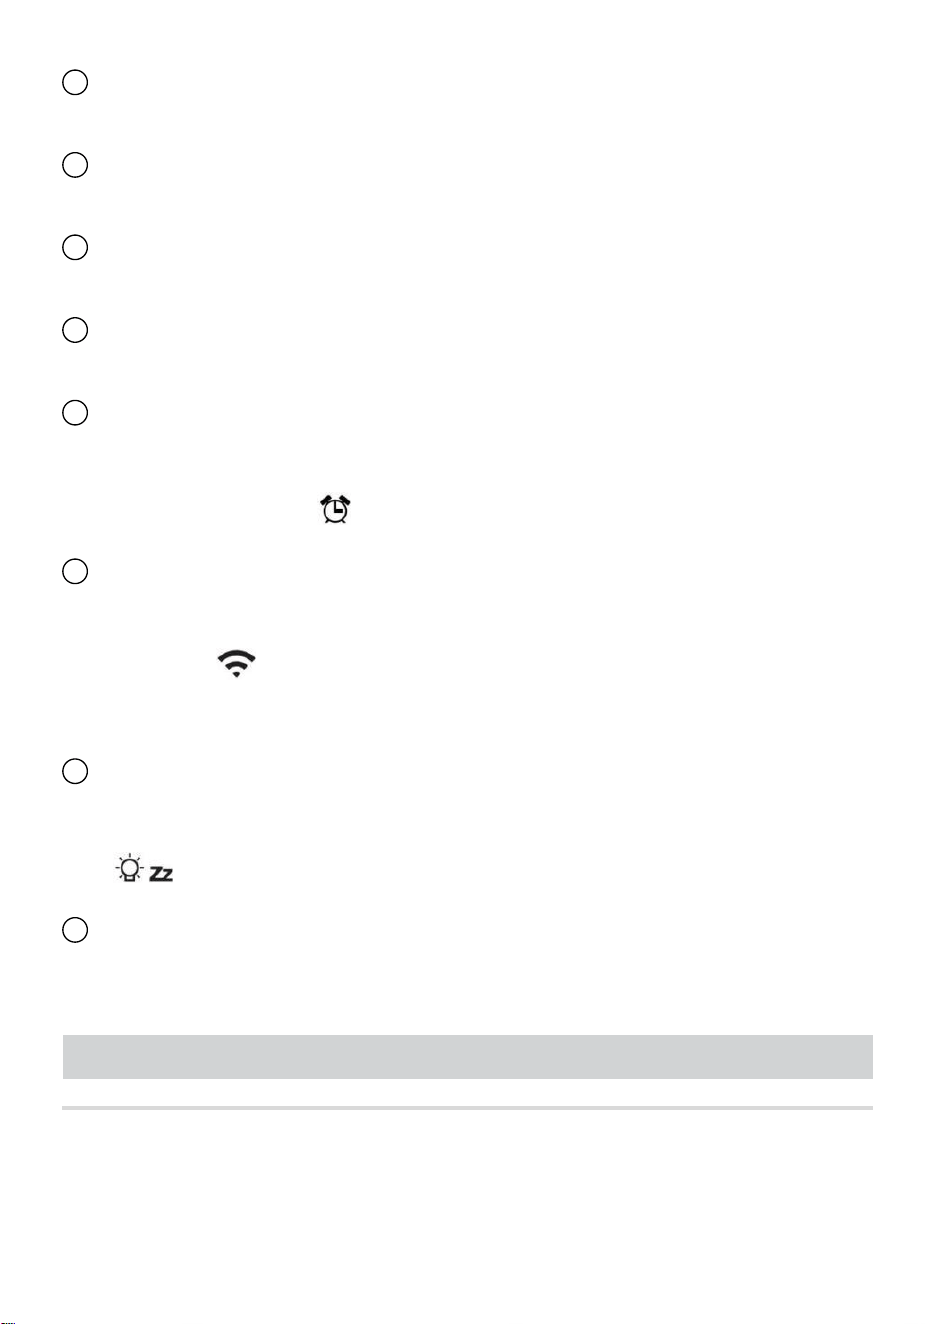
- 9 -
1 Temperatura/humedad exterior lectura, clima índice
2 Dirección del viento y velocidad
3
Lectura de temperatura/humedad interior
4 Pronóstico del tiempo
5 Hora y fecha, luna fase, Nosotros de lunes a viernes
6 luz intensidad
7
ultravioleta índice
8 Lluvia
9 Barómetro
10 COLOCAR botón
11 TEMPERATURA/ Botón (ALARMA)
12 Botón LLUVIA
13 Botón WIND/+
14 BARO/-/ (Wi-Fi) botón
15 Botón de ALERTA
16 Botón MAX/MIN
17 Botón CANAL
18
LUZ/ DORMIR botón
19
Compartimento de la batería (3,6 V Batería de níquel-metal hidruro
(NiMH) recargable batería embalar)
CONFIGURACIÓN SENSOR INALÁMBRICO PARA
EXTERIORES7 EN 1
El sensor inalámbrico para exteriores 7 en 1 mide la velocidad y la
dirección del viento , lluvia, UV, intensidad de la luz , temperatura y
humedad.

- 9 -
INSTALACIÓN DEL MONTAJE POLO Y SOPORTE

- 10 -
● Fije el sensor en un poste de montaje y soporte (incluido ) utilizando los
tornillos ( incluidos ).
INSTALACIÓN DE COPAS DE VELOCIDAD DEL VIENTO Y ALETAS
DE IONES DE DIRECCIÓN DEL VIENTO
● Alinee los orificios de los tornillos en los vasos de velocidad del viento
con los departamento, vertical lado de el metal vara.
● Inserte las copas de velocidad del viento en el metal. vara y Que les
jodan en ajustado a cerrar él en lugar.
● Alinee los orificios de los tornillos en la veleta de dirección del viento con
la superficie plana y vertical. lado del metal vara.
● Insertar la veleta de dirección del viento En el metal varilla y atornillarlos
firmemente a cerrar él en lugar.
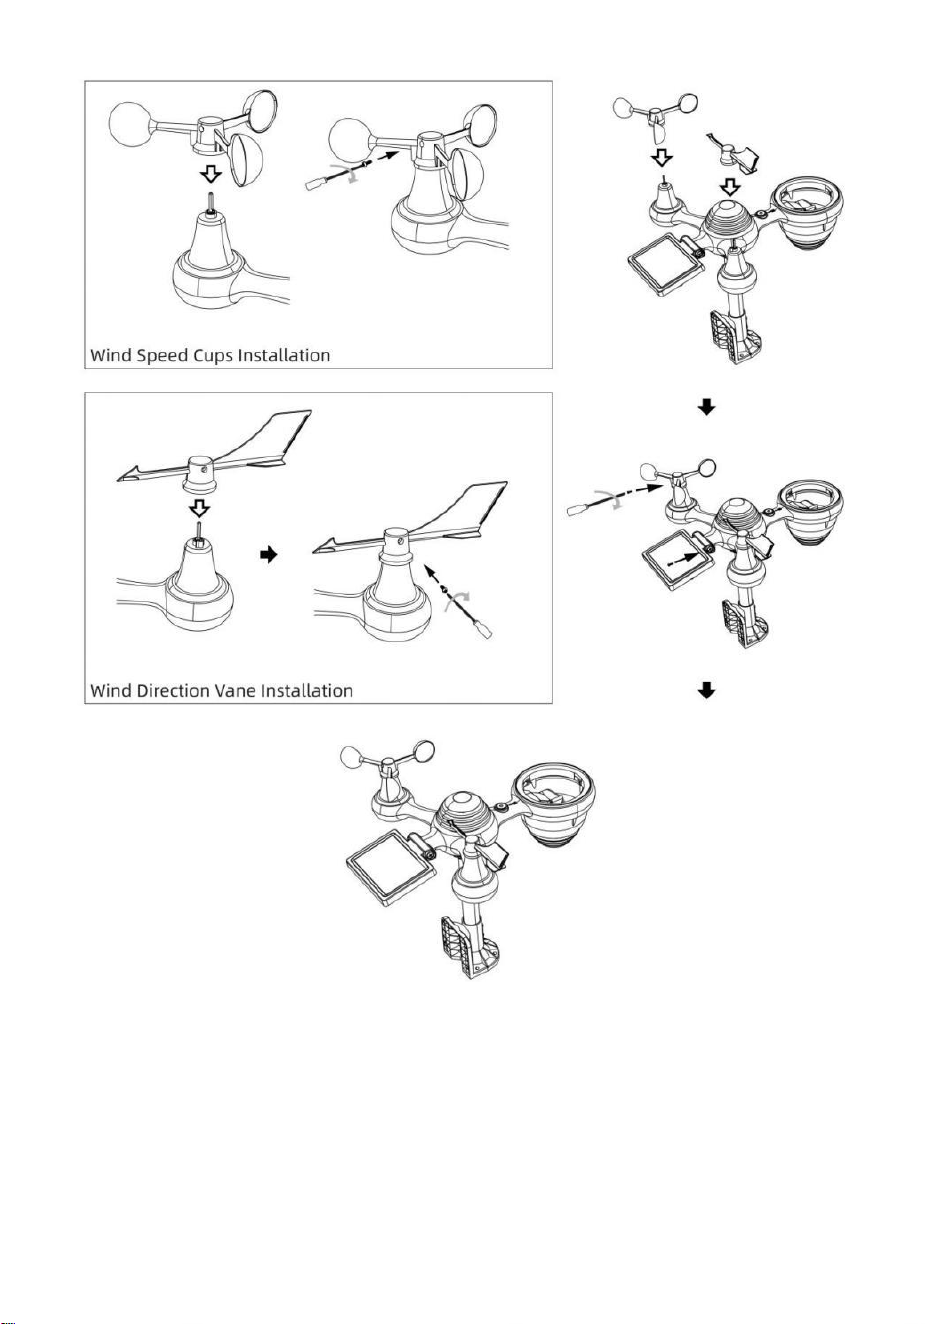
- 11 -
CONFIGURACIÓN COLECTOR DE LLUVIA HACIA ARRIBA
● Alinee las muescas del embudo con las ranuras de bloqueo.
adentro el lluvia coleccionista.
● Insertar el embudo En el colector de lluvia y atornillarlos ajustado a
cerrar él en lugar.
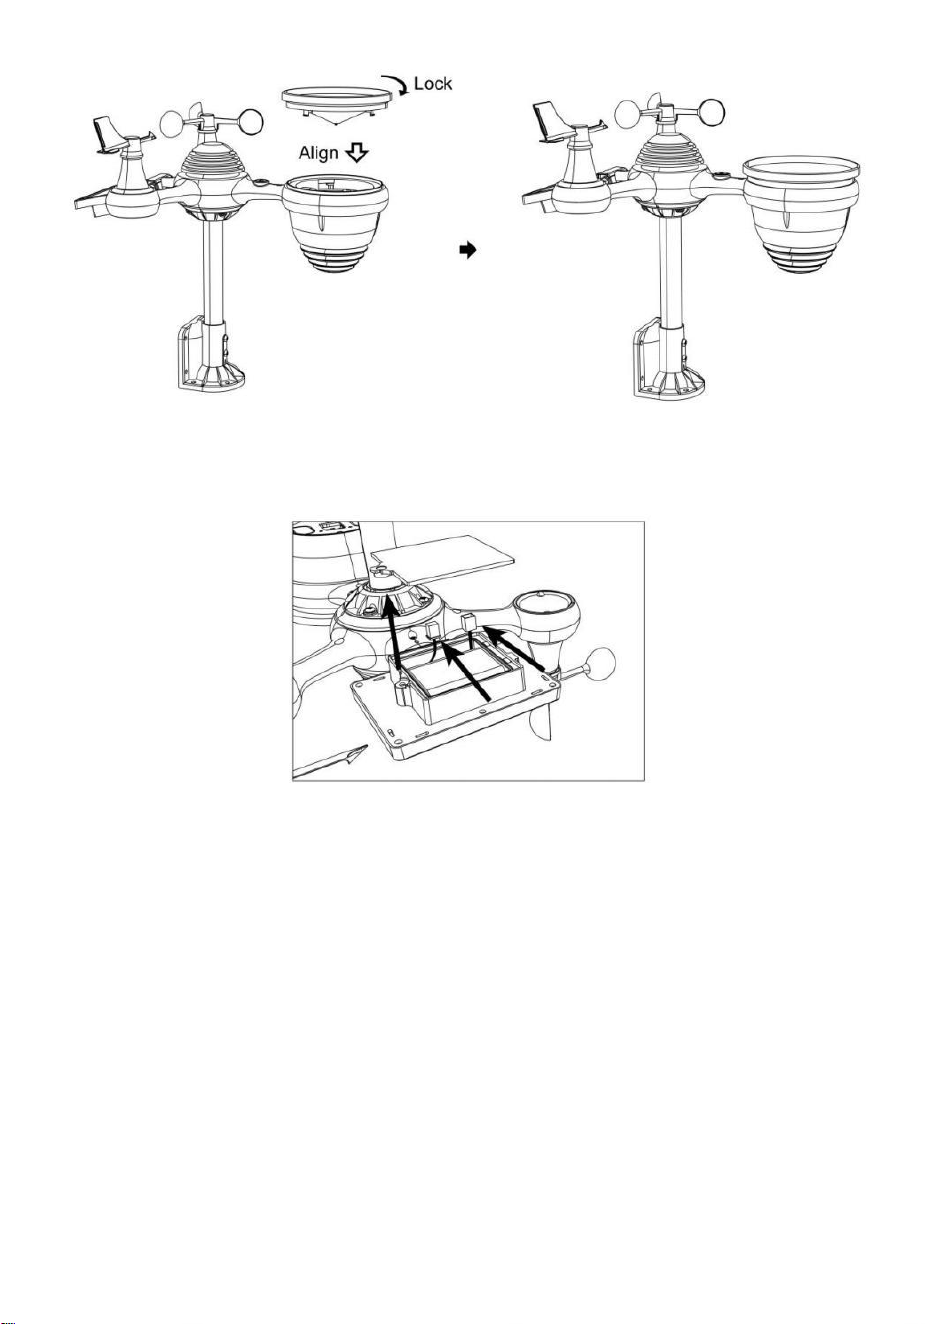
- 12 -
INSTALACIÓN DEL BATERÍAS
● Desatornille la tapa de la batería en la parte inferior de la Sensor
exterior 7 en 1 usando un destornillador 1.
● Conecte el cable de la batería recargable. Paquete de batería
(incluido) hacia cable Ubicado en la batería compartimiento.
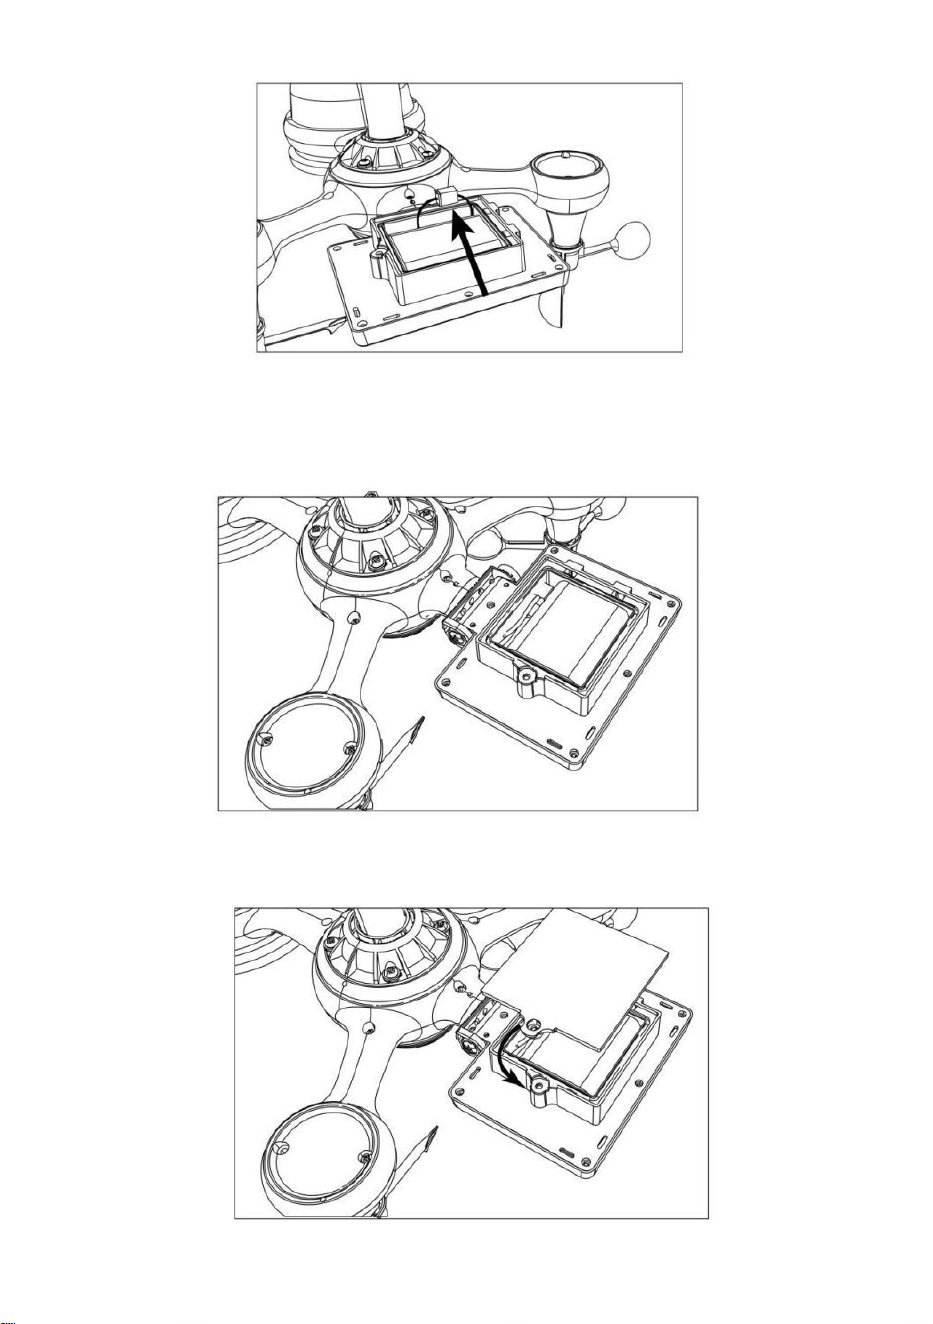
- 13 -
Ajuste los cables conectados para que encajen cómodamente en el
compartimento. Entonces, Inserte la batería dentro del compartimiento.
Cerrar y sujetar el batería puerta atrás en el compartimiento.

- 14 -
AJUSTE DE LA CÉLULA SOLAR
● Afloje el tornillo en la junta para que el engranaje esté en el otro lado
del articulación empuja hacia afuera. La célula solar ahora debería ser
en un desbloqueado posición.
● Ajuste el ángulo vertical de la celda solar para obtener la más óptimo
Uso de la célula solar según su ubicación.
● Empuje el engranaje hacia adentro y apriete el tornillo hasta que el
Engranajes cerrar en lugar.

- 15 -
Al ajustar la celda solar, colóquela en un ángulo lo más cercano posible a
su latitud . Ver Cuadro a continuación para tener una idea de Cómo tú
debería ángulo su solar celúla.
Proximidad de latitud
Célula solar Selección de
ángulo
Si tu ubicación es cerca a 84°
84°
Si tu ubicación es cerca a 63°
63°
Si tu ubicación es cerca hasta
42°
42°
Si tu ubicación es cerca a 21°
21°
Si tu ubicación es cerca a 0°
0°
MONTAJE DEL SENSOR EXTERIOR INALÁMBRICO 7-I N-1
Elija una ubicación para el sensor exterior 7 en 1 que es
abrir con No obstrucciones.
Apriete el montaje corchetes a un superficie/pared usando cuatro
tornillos de rosca (incluido), o apriete el montaje polo a su
existente
montaje poste con cuatro φ5 Pernos y M5 Montaje de tuercas.
Agregar almohadillas de goma sobre el montaje soporte antes
fijación el montaje soporte en el sensor.

- 15 -
Asegúrese de que el colector de lluvia esté orientado hacia el
norte y solar panel mira hacia el sur antes fijación el Tornillos ( in
cluidos ).
Por asegurar eso el sensor es fijado particularmente
estrechamente, De lo contrario, las condiciones de viento hacen que
el transmisor se sacuda y, por lo tanto, lea mal la señal.

- 16 -
datos de precipitaciones
SENSOR EXTERIOR INALÁMBRICO 7 EN 1 HACIA EL SUR
(OPCIONAL)
El sensor meteorológico inalámbrico para exteriores está calibrado para
ser puntiagudo al norte para Máxima precisión. Sin embargo, para su
comodidad, Si eres un usuario
Ubicado en el sur Hemisferio, tu puedes Utilice el sensor con el lluvia

- 17 -
colector apuntando al sur.
1.) Monte e instale el sensor meteorológico inalámbrico con el colector
de lluvia apuntando hacia el sur, en lugar de Norte. (Consulte
MONTAJE DEL
7 EN 1 INALÁMBRICO PARA EXTERIORES Sensores .)
2.) Seleccione "STH" para el hemisferio sur en el reloj configuración
modo. (Por favor Consulte "Configuración del reloj")
NOTA: Al cambiar la configuración del hemisferio, se cambiará
automáticamente el dirección de las fases de la luna en mostrar.
Apuntar el sensor meteorológico inalámbrico hacia el sur
permitirá que la máxima luz solar llegue al panel solar,
especialmente durante la temporada de invierno en el sur.
Hemisferio.
SENSOR INALÁMBRICO 7 EN 1 NIVEL
● Utilice la burbuja nivel Indicador para asegurarse de que el sensor
exterior inalámbrico Está completamente nivelado. Si el sensor no está
nivel, el ganar indicador, Ultravioleta y Luz La intensidad será no medir
adecuadamente
● Para ajustar el nivel del sensor exterior inalámbrico, afloje los tornillos
del montaje polo. Ajuste el nivel del sensor exterior inalámbrico para
Asegúrese de que la burbuja es En el centro de la burbuja nivel en
indicador.
● Apriete el tornillo de montaje. polo de nuevo n.

- 18 -
CONFIGURACIÓN ENCIMADE LAESTACIÓN
METEOROLÓGICA
ALIMENTACIÓN ENCIMA DE LA ESTACIÓN METEOROLÓGICA
● Conecte el adaptador de corriente a la toma de corriente. Jacobo
situado en el atrás de la estación meteorológica. Insertar 3 nuevo
Pilas alcalinas AAA (no incluidas) como respaldo.
● Una vez que la estación meteorológica está encendido, Entrará
automáticamente emparejamiento modo.
EMPAREJAMIENTO DEL SENSOR INALÁMBRICO 7 EN 1
● Una vez que su estación meteorológica se encienda, debería
automáticamente buscar para y conectarse a los sensores inalámbricos.
Si la estación meteorológica no

- 18 -
Conéctate dentro de los primeros 5 minutos, consulte la siguiente sección,
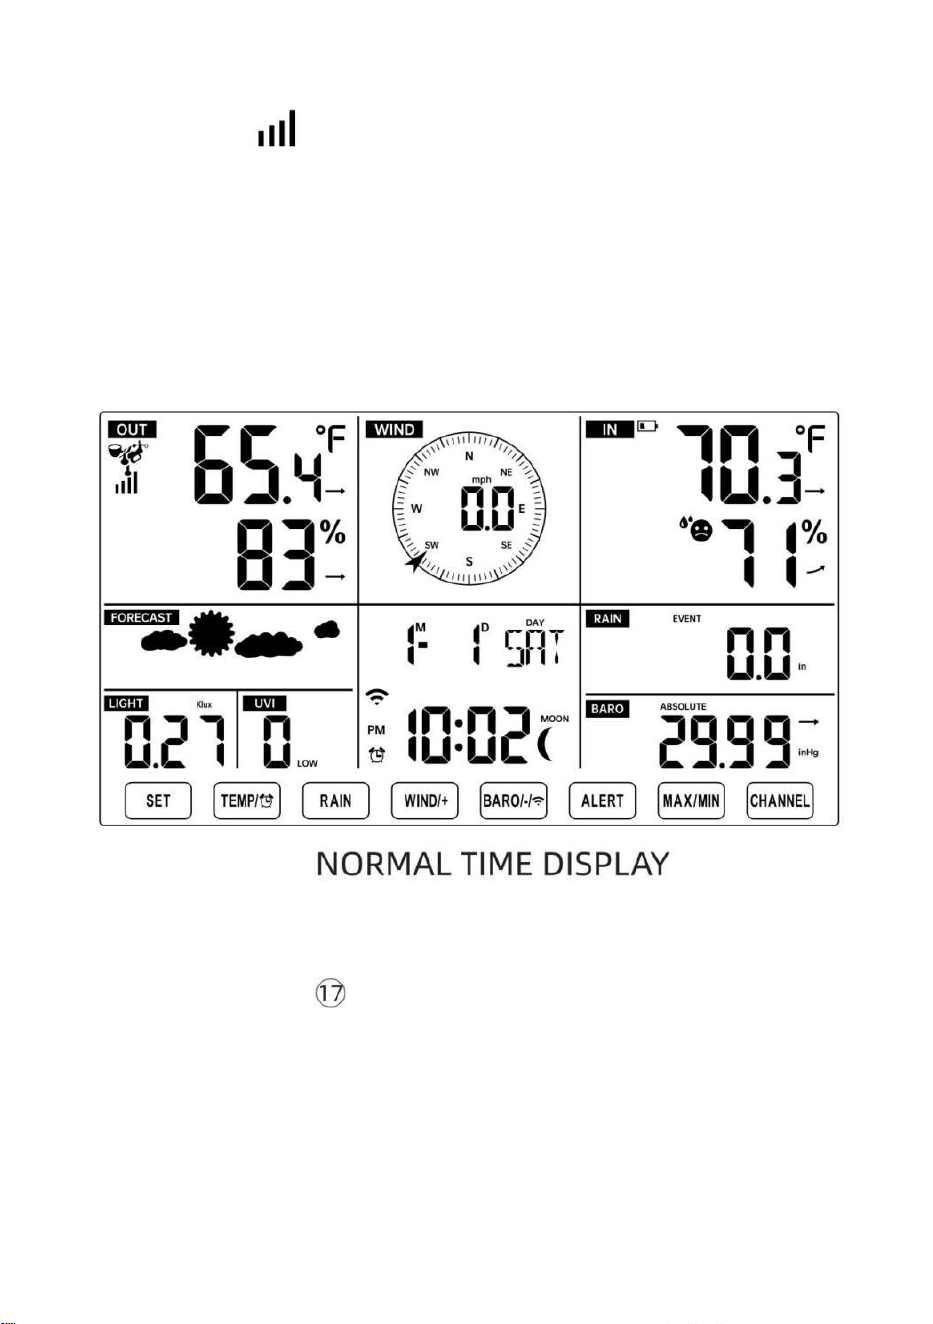
- 19 -
"REEMPLAZO DEL SENSOR”.
● Verás el icono de una antena que se desplaza en la sección de
temperatura y humedad (exterior) de la pantalla.
● Una vez realizado el emparejamiento Cuando el proceso se complete, el
icono de la antena se iluminará. aparecer fijo (no parpadeante) y las
lecturas de temperatura y humedad exterior, viento velocidad, dirección
del viento, UV, luz intensidad y las precipitaciones aparecerán en su
secciones designadas de la pantalla LCD
REEMPLAZO DEL SENSOR
● Si falla la conexión o la estación meteorológica se reinicia, luego
presione y sostener el Botón
【
CANAL
】
durante 2 segundos para
ingresar al modo de emparejamiento y el
La estación meteorológica estará Vuelva a registrar todos los sensores
que ya tiene estado
registrado anteriormente , (es decir, la estación meteorológica no perder
el Conexión de los sensores que había emparejado arriba antes.)
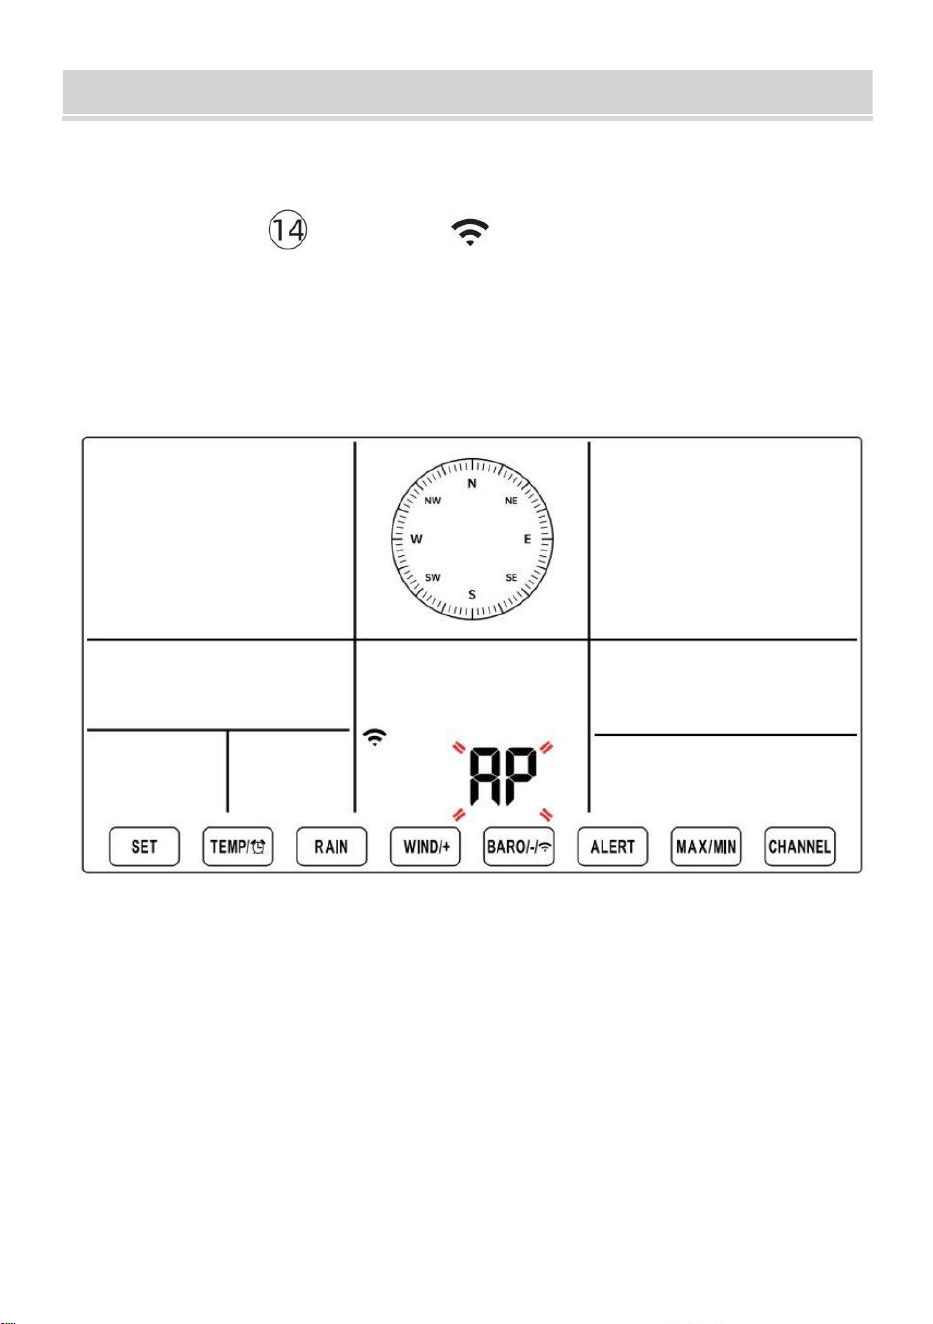
SETUPINSTRUCTION
- 20 -
CONFIGURACIÓN CONEXIÓN WI-FI Y SERVIDOR WE
ATHER CONEXIÓN
Mantenga pulsado 【 BARÓ/-/ 】 Botón durante 3 segundos, el
tiempo estación La pantalla LCD mostrará la letra “AP” que él ha entrado
Acceso
Punto (AP) modo. En este momento será ser listo para la
configuración de wifi ser equilibrado.
Utilice su teléfono inteligente, tableta o computadora para
conectarse a la estación meteorológica a través de Wi-Fi siguiendo
estos pasos:
En ORDENADOR PERSONAL, abierto Tu wifi red ajustes. En
Androide™ o iOS
dispositivos, vaya al menú de configuración y luego seleccione
Conexiones /WI-FI a abrir la red ajustes.
Localice el SSID de la estación meteorológica en la lista. Debería
aparecer como

SETUPINSTRUCTION
- 20 -
WWS-XXXXXX (donde todas las X son números enteros) en el lista.
Grifo en El SSID para conectarse. Este paso tardará varios
segundos.
Una vez que están conectados a El clima estación, abierto arriba
su Internet o web móvil navegador e ingrese la siguiente dirección en
el

- 21 -
barra de direcciones: http://192.168.1.1 para acceder a la interfaz
web de la estación meteorológica . (Asegúrese de Incluya el http://
o de lo contrario La red El navegador puede interpretar la dirección
como una consulta de búsqueda). recomendar utilizando la última
versión de un sitio web de buena reputación navegadores.
Introduzca lo siguiente información en la interfaz web (Figura 1).
Hacer Seguro que toda la información se ingresa antes de
seleccionar Guardar. Si usted
elija no cargar Wunderground.com o cargar weathercloud.net, dejar
las casillas de verificación desenfrenado.
NOTA :
Configuración de zona horaria (predeterminada ) : 0h). Para
configurar automáticamente la visualización de la hora según su

- 21 -
zona horaria, cambie la zona horaria en la sección Configuración del
servidor horario de la página CONFIGURACIÓN de '0:00'
(predeterminado) a su zona horaria (por ejemplo, +1:00).
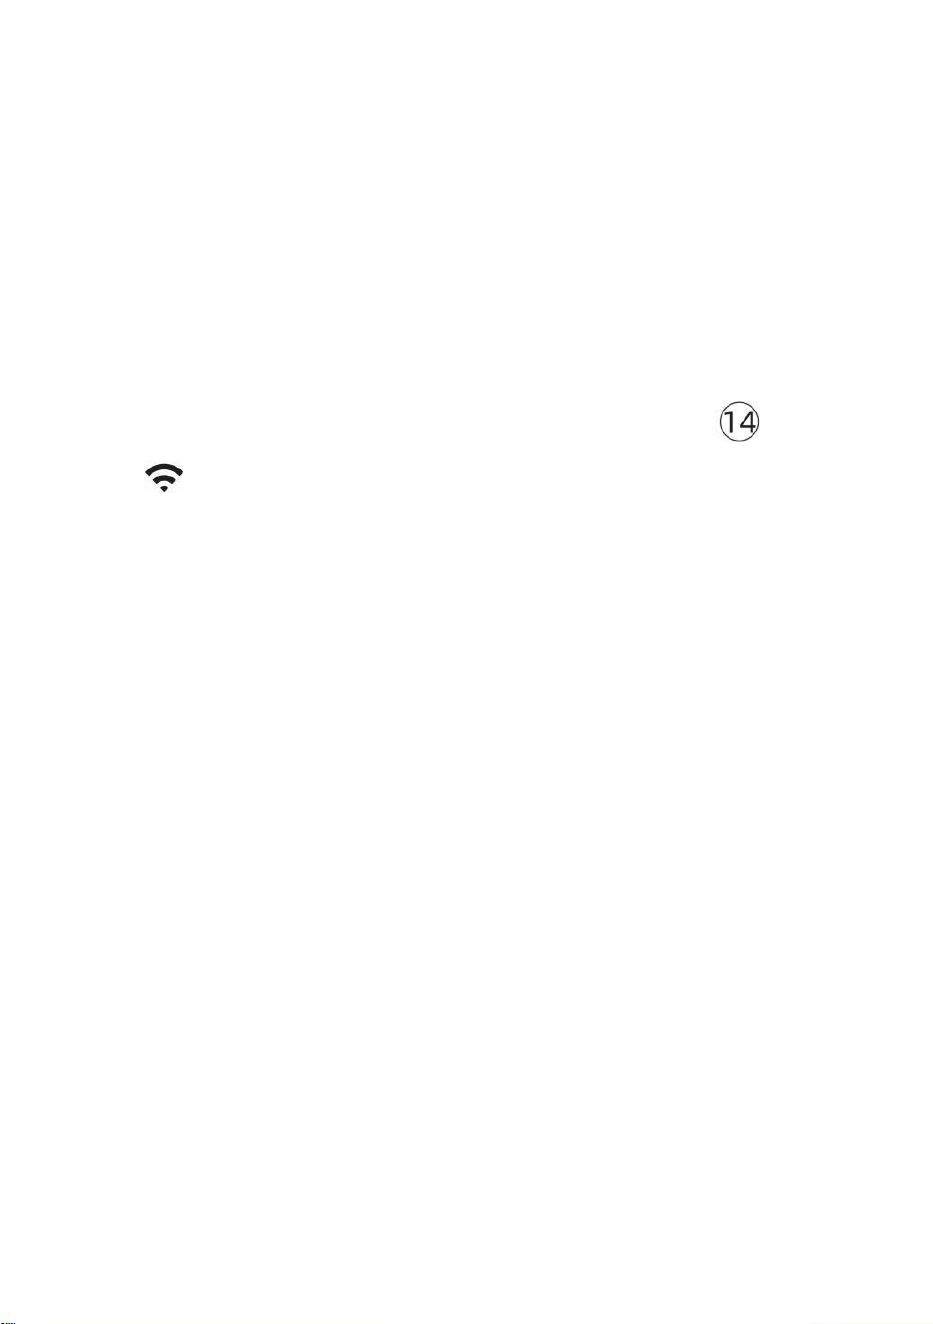
- 22 -
para Alemania ).
5.) Si toda la información ingresada es correcta, Presione “ Aplicar ” a
confirmar (Cifra 1). Si no es así, revisa tu web. interfaz i nformación de
nuevo.
NOTAS:
Cuando se complete la configuración de Wi-Fi, su computadora o
dispositivo móvil dispositivo
Volverá a la conexión Wi-Fi por defecto. Si lo hace no, simplemente
Abra la configuración de red inalámbrica de su dispositivo y
manualmente Reconectar.
Mientras En el modo AP, puedes presionar y Sostener el
【
B
ARÓ/-/
】
Mantenga presionado el botón durante 3 segundos
para salir del modo AP. La estación meteorológica simplemente
restaurará la configuración AP anterior.
CALIBRACIÓN
Una vez que esté conectado vía Wi-Fi a la estación meteorológica y tenga
abrió la configuración página en http://192.168.1.1 , al hacer clic en “ AV
ANZADO ” se abrirá lo siguiente página (Figura 2).

- 22 -
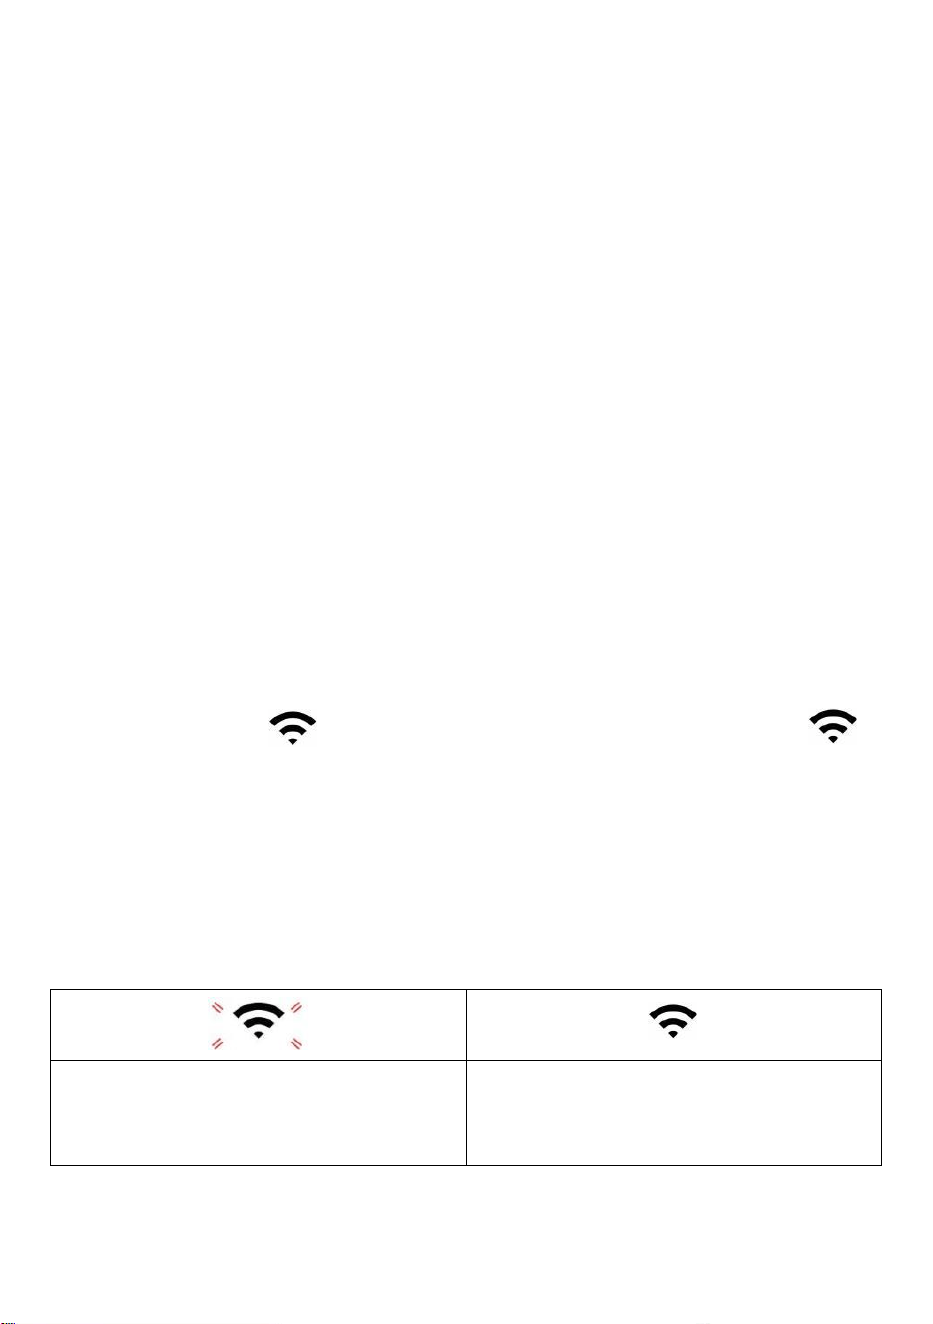
- 23 -
1) Usted puede ingresar o cambiar el compensar y ganar valores
para diferente medición parámetro s.
2) Una vez que tener Completó su libraciones ca , prensa el "APLICAR" botón.
3) La corriente valor de compensación voluntad actualizar a espectáculo el valor
eso tú entró
( en cambio de el por defecto valor ). Si tú desear a cambiar el valor , tu
poder ingresar Un nuevo valor en el caja al lado de el número ( como en paso
1) A actualizar el valor de nuevo , prensa " APLICAR " botón .
NOTA :
Nosotros lo hacemos no Recomendamos la calibración de la mayoría
de los valores con excepción de de Relativo Presión, que debe estar
correctamente calibrado para reflejar su
distancia sobre el mar nivel para tener en cuenta la altitud efectos.
ESTADO DE LA CONEXIÓN WI-FI
Cuando la estación meteorológica se conecta con éxito a su enrutador Wi-
Fi,
Señal wifi
aparecerá en la pantalla LCD mostrar . Si la
señal wifi
es no es estable o la estación meteorológica está intentando
conectarse a la enrutador, el El icono parpadeará. Si el icono
desaparece, él significa que la estación meteorológica está no
conectado al enrutador wifi .
Brillante: el clima estación
es intentando a conectar a su
inalámbrico enrutador.
Sólido: la estación meteorológica
tiene estado conectado a tu wifi
enrutador.
NOTA :

- 23 -
Si tú propio a dual banda enrutador (2,4 GHz y 5,0 GHz ), hacer seguro tú
Conectarse a los 2,4 GHz banda, de lo contrario No se podrá conectar la
estación meteorológica a
Wifi .
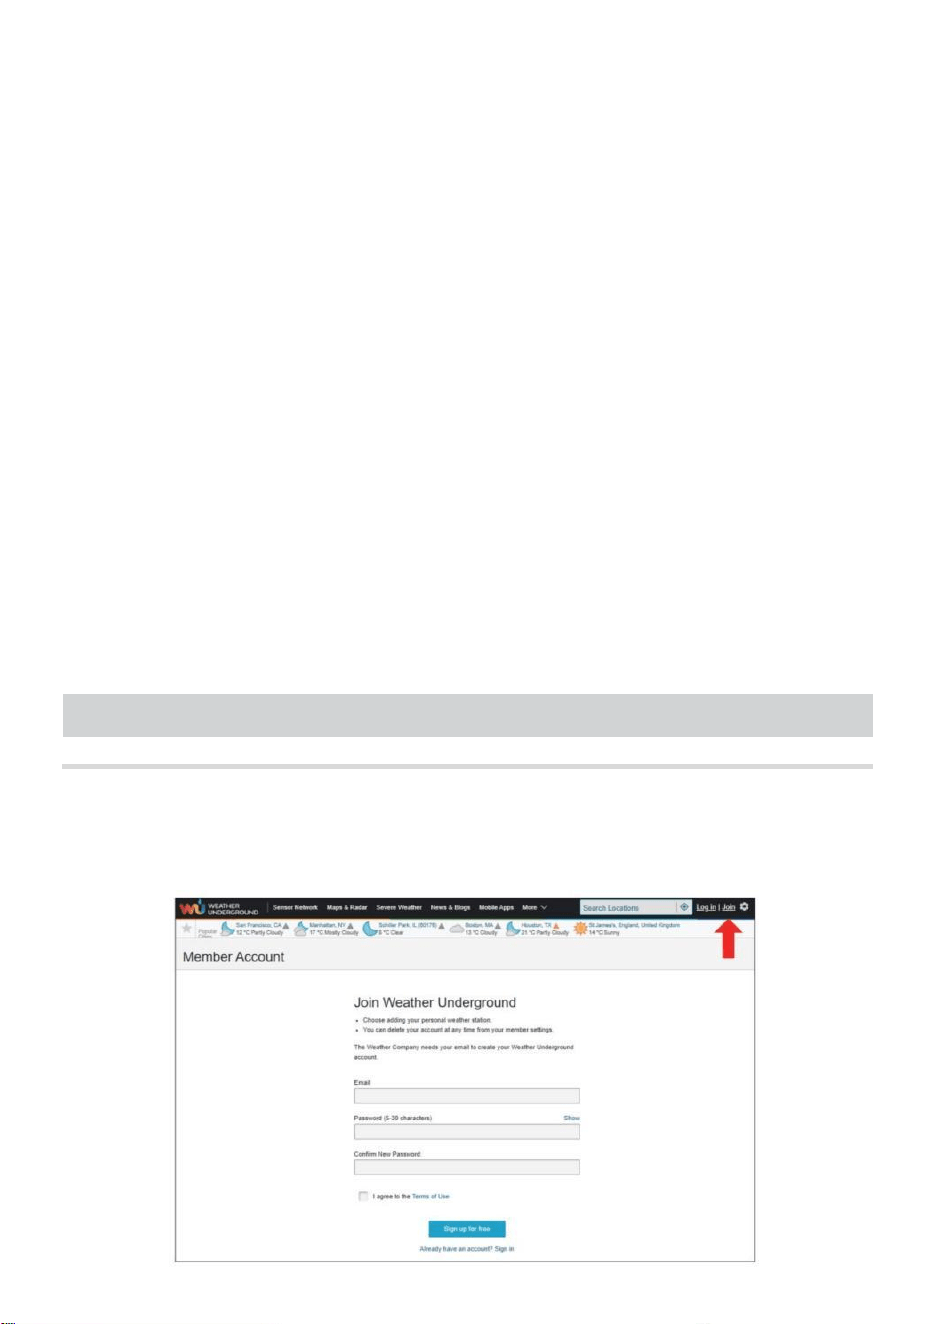
- 24 -
ESTADO DE CONEXIÓN DEL SERVIDOR DE TIEMPO
vez que la estación meteorológica se haya conectado a Internet,
voluntad intentar Para conectarse al servidor horario de Internet para
obtener la UTC tiempo. Una vez el
se estableció la hora de la estación meteorológica. actualizado. El
icono “SYNC” aparecerá en la Pantalla LCD.
Para mostrar la hora correcta para su zona horaria específica, deberá
Necesitar
cambiar la zona horaria en la configuración RELOJ modo desde 00
(predeterminado) A tu zona horaria (por ejemplo, -5 para EST). Si No
sabes tu zona horaria , puedes buscarla en línea
NOTA :
La hora se sincronizará automáticamente con la Internet por hora.
CREAYSINCRONIZATUCUENTADESERVIDOR
METEOROLÓGICO
CREAR CLIMA CUENTA SUBTERRÁNEA
1.) Visita: https://Wunderground.com y seleccione “Unirse” en el
superior derecha y esquina y crear a Gratis Cuenta.
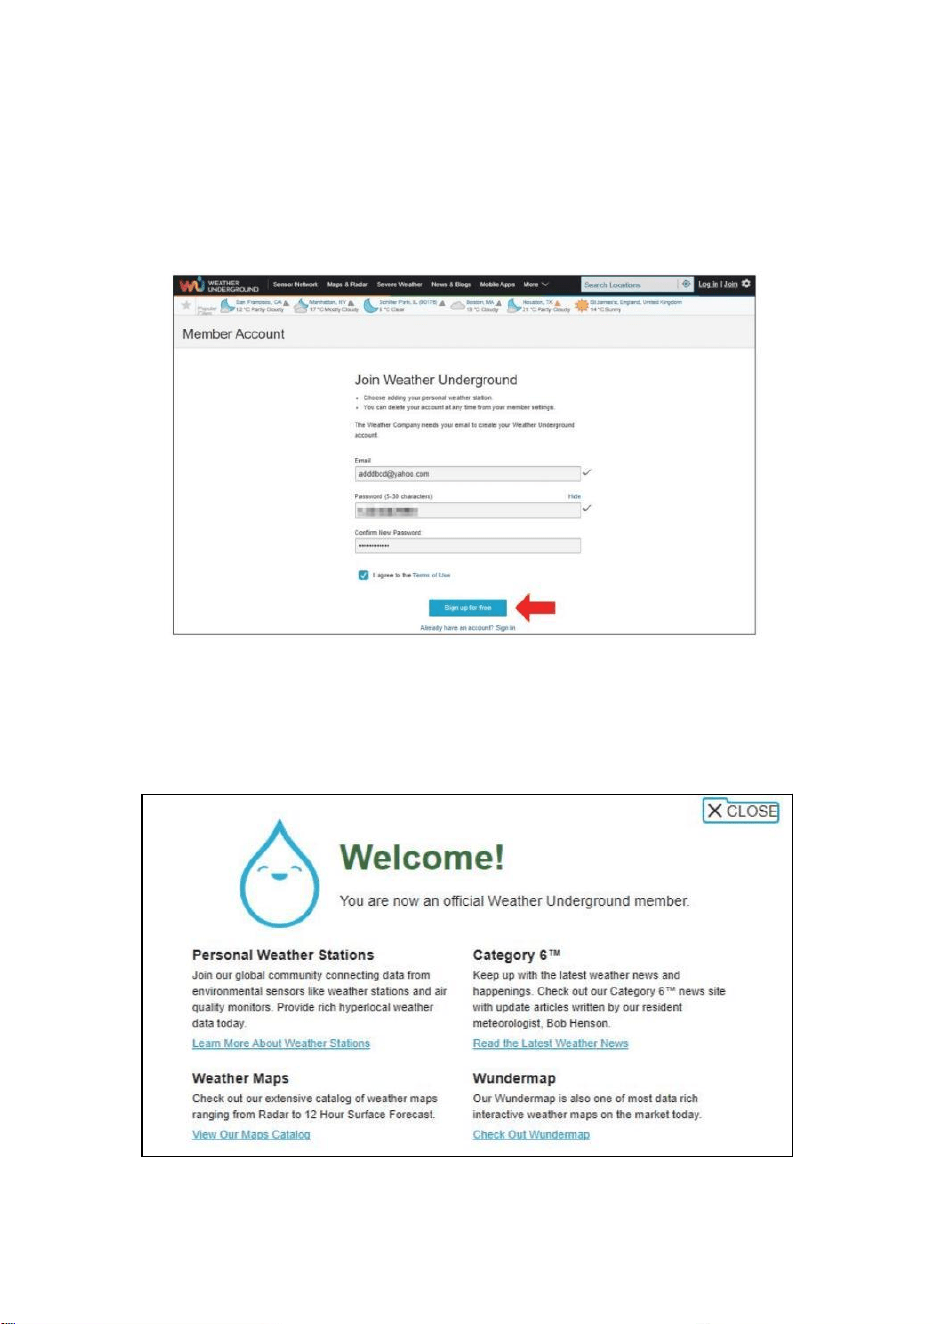
- 25 -
2.) Introduzca un Nombre de usuario , Correo electrónico y Contraseña
(Él es tu Acceso
contraseña del sitio web, no la contraseña de tu correo electrónico.
Así que no La privacidad será estar expuesto). Haga clic Firmar de
forma gratuita .
3.) Una vez realizado el registro exitosamente, va a ser mostrado
abajo el mensaje.
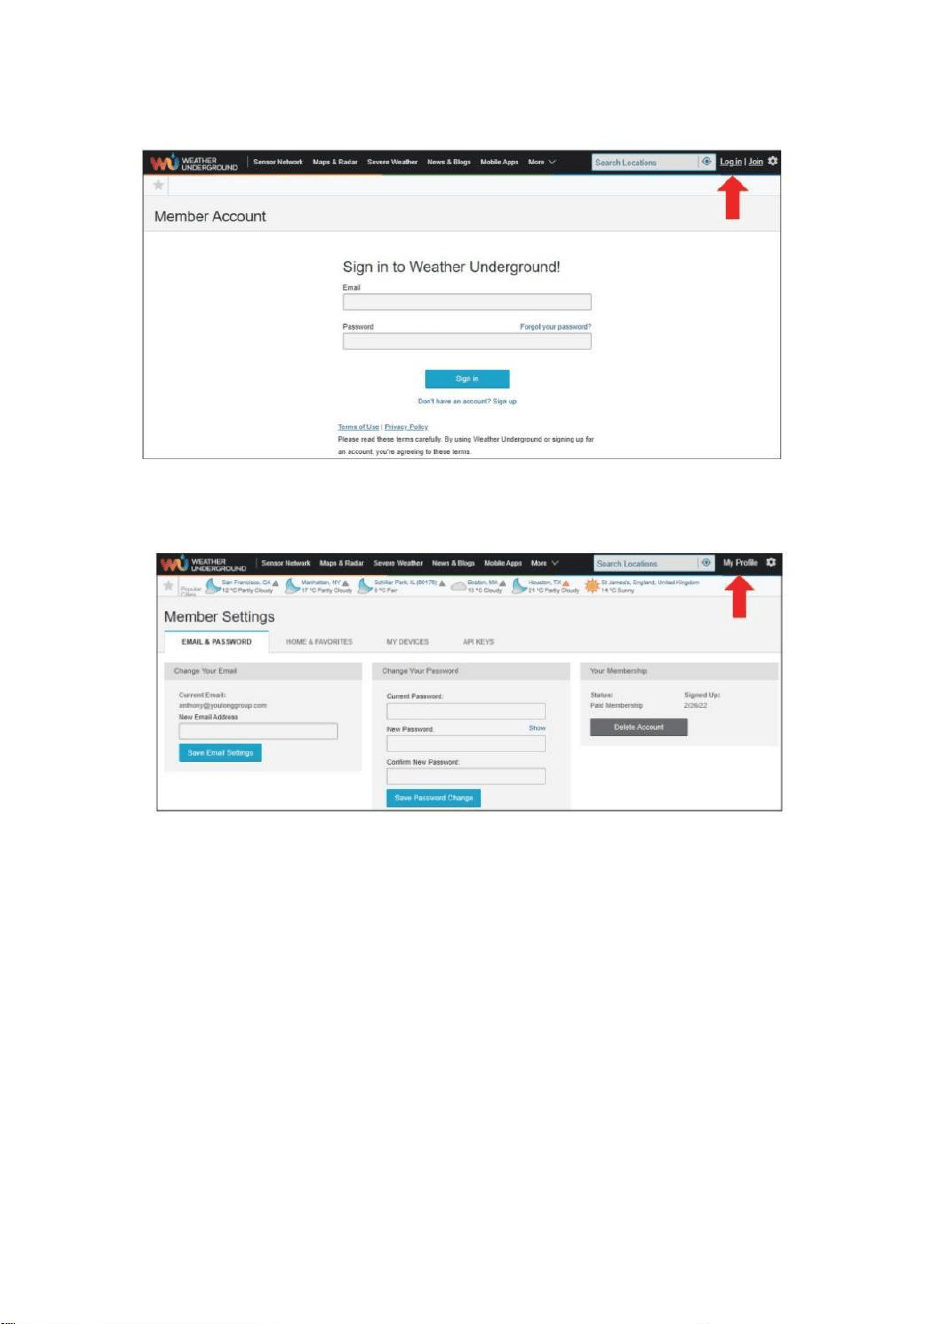
- 26 -
4.) Haga clic en “Iniciar sesión” e ingrese la dirección de correo
electrónico y contraseña tu solo registrado.
5.) Haga clic en “Mi perfil”. " y entrar Miembro ajustes.

- 27 -
6.) Haga clic en “Actualizar” hogar ubicación " .
7.) Haga clic en “Mi Dispositivos", y Haga clic en "Agregar" Nuevo
Dispositivo".

- 28 -
8.) Seleccione la dirección ingresando una DIRECCIÓN o seleccione
Manual a posición
Tu dirección se aliará automáticamente. Luego haz clic "Próximo ".

- 29 -
9.) Introduzca la información meteorológica. Los espacios en blanco
con rojo (obligatorio) deben ser lleno en.
NOTA :
Tú poder Seleccione “ otro ” de el Dispositivo Hardware .
10.) Una vez completada esta sesión, haga clic en “Acepto ” y “
Próximo ". 11.) Después de registrarse exitosamente, por favor
Graba tu clima Subterráneo Identificación y Información clave
para la configuración tardía usar.

- 30 -
12.) Como se muestra Abajo, registro se realizó con éxito.
CREA TU CUENTA WEATHERCLOUD
1.) Visite el sitio web de Weathercloud en https://weathercloud.net/ , e
ingrese a Nombre de usuario, Correo electrónico y Ingrese su contraseña
y haga clic en “ Registrarse ”. Siguiendo el
Instrucciones para crear una cuenta.
NOTA: Esto se hace mejor en a computadora de oficina o computadora
portátil.
(Él es tu Acceso contraseña para el sitio web No es tu correo electrónico
contraseña. Entonces No La privacidad será expuesto).
2.) Cuando él tiene éxito, un El correo electrónico será ser recibió En
tu r registrado buzón.

- 30 -
3.) Abre tu correo e inicia sesión En la web DIRECCIÓN en el
correo. Hacer clic “ Activar su Nube meteorológica cuenta ".
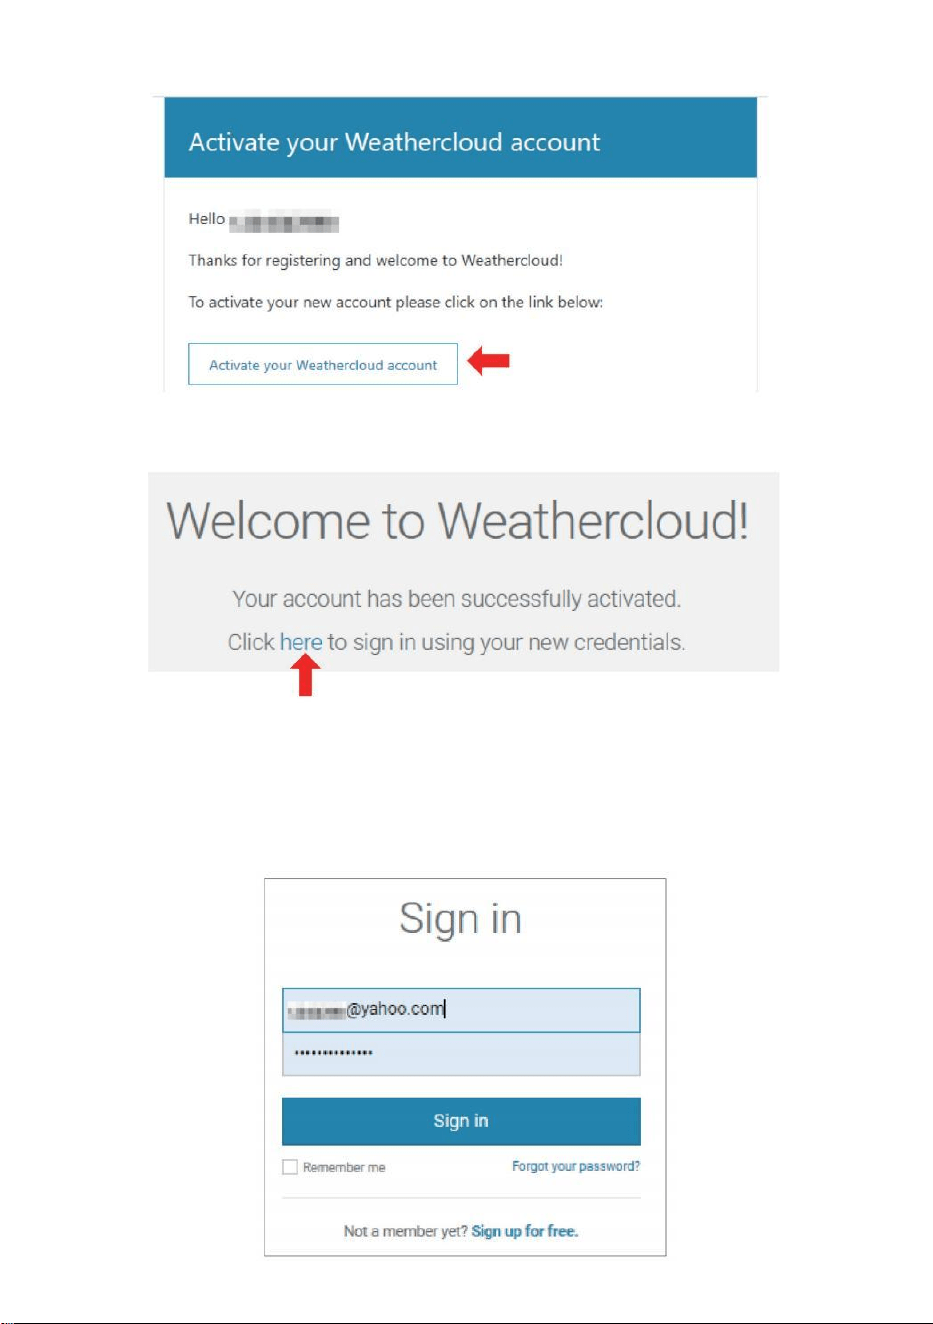
- 31 -
4.) Haga clic en “ aquí ” para entrar en el Página de inicio del sitio web
Weathercloud. 5.) Ingresa la dirección de correo electrónico y la
contraseña que acabas de registrar para ingresar al Sitio web de
Weathercloud.
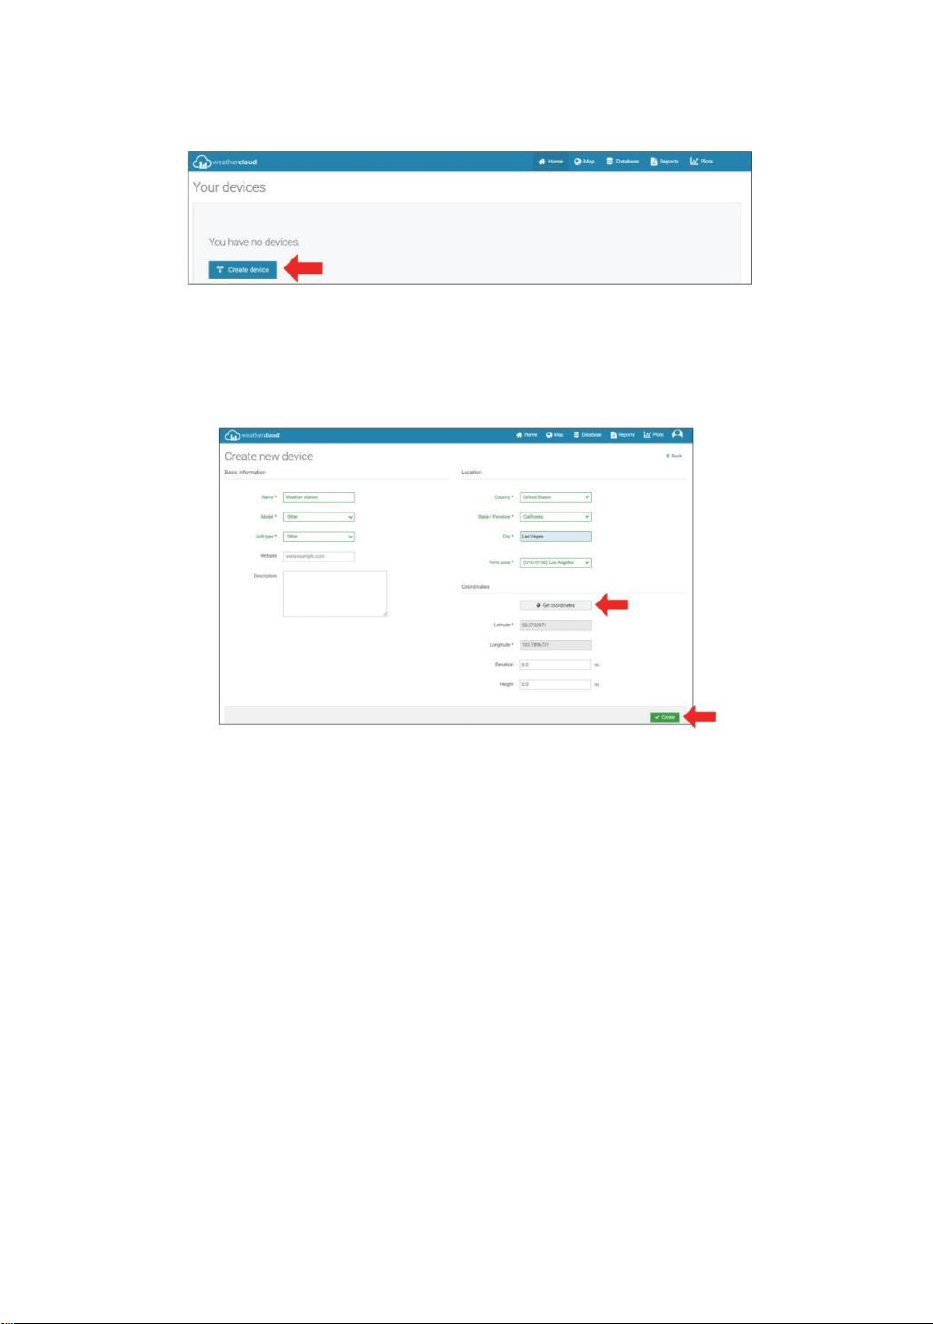
- 32 -
6.) Haga clic en “ Crear dispositivo ” para agregar un dispositivo de
estación meteorológica.
7.) Ingrese todos los solicitado información dentro del Crear Nuevo
Dispositivo página. Los espacios en blanco con rojo *deben estar
lleno en.
NOTA :
Tú poder Seleccione “ otro ” de el Modelo número y Enlace tipo en el
Arriba en blanco. Haga clic “Obtener coordenadas” para identificar tu
Ubicación en el mapa, Luego haga clic “ Hecho ” a con fi rmar .
8.) Una vez que han completado este sección , Haga clic en “ Crear ”.
9.) Después de registrarse exitosamente, por favor graba tu
Weathercloud IDENTIFICACIÓN y Información clave para configuración
posterior usar.
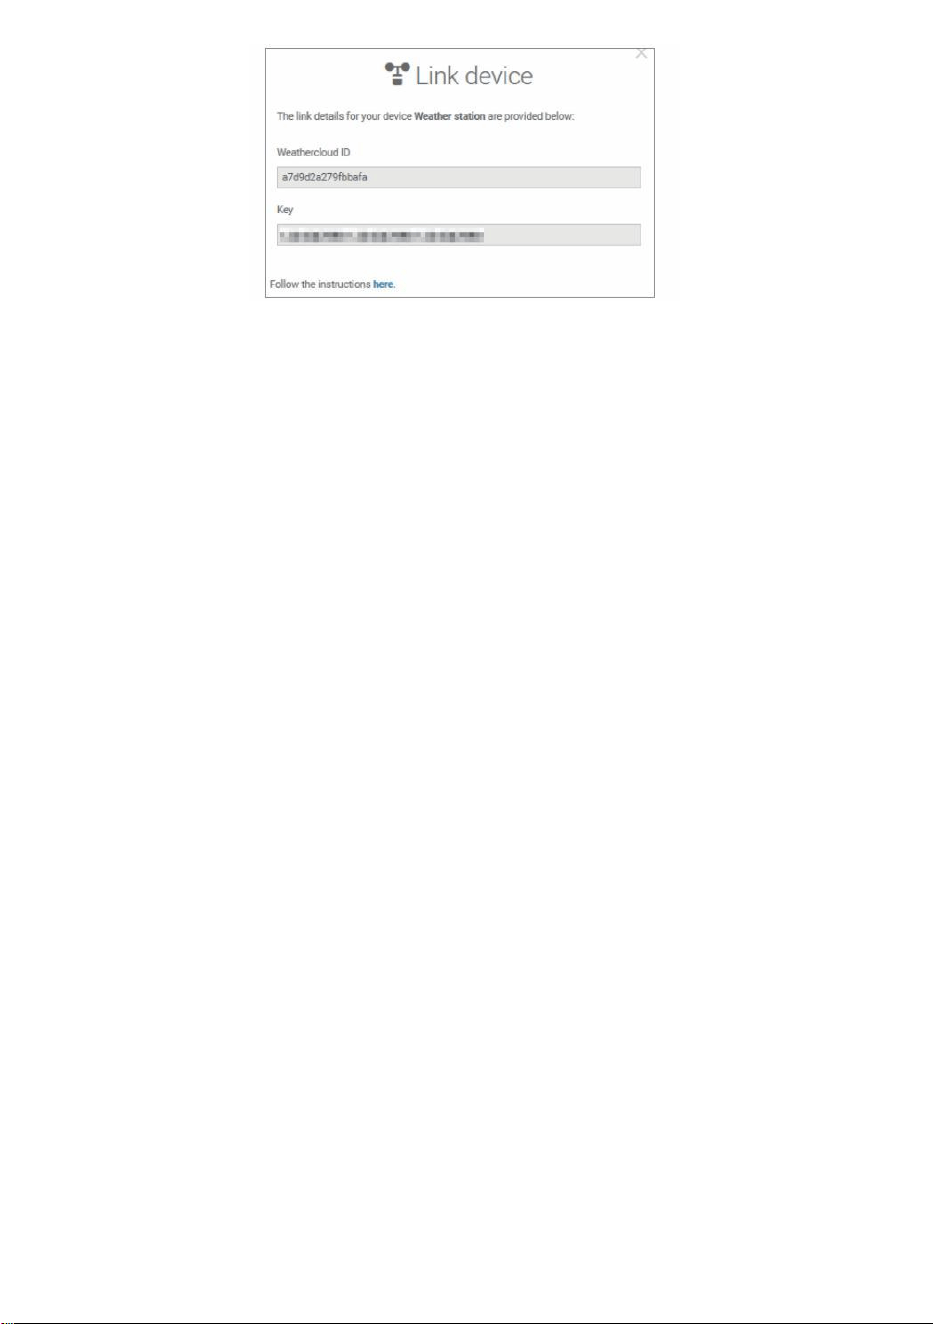
- 32 -
- 33 -
MIRA TU CLIMA DATOS DEL TIEMPO SUBTERRÁNEO
Para ver los datos de su estación meteorológica en vivo a través de PC o
web móvil navegador,
visita http://www.wunderground. com, y luego ingrese a la Estación
Identificación que se le proporcionó durante la configuración de la cuenta
en el buscar caja. Tus datos meteorológicos aparecerá en el próximo
página.
MIRA TU CLIMA DATOS EN WEATHERCLOUD
1.) Para ver los datos de su estación meteorológica vivir a través de
ordenador personal o móvil web navegador, visita
http://www.weathercloud.net e inicie sesión en la cuenta que creó. 2.)
Haga clic en la pestaña en la parte superior de la página titulada
Dispositivos.
3.) Haga clic en el menú Configuración en la parte superior derecho de
la página, y seleccionar el Opción Ver.
4.) Haga clic en Actual, Viento o Evolución para ver la estación
meteorológica. datos.
INSTRUCCIONES DEUSO
RELOJ
Configuración de la Reloj
En Normal tiempo mostrar , presionar y sostener 【 SET 】 durante 2
segundos a ingresar ajuste de hora modo . Prensa y liberar 【 VIENTO /+ 】
y 【 BARO /-/ 】 a ajustar los valores.
Sostener 【 VIENTO /+ 】 y 【 BARO /-/ 】 más de 2 segundos
a ajustar Los valores rápidamente . prensa y liberar 【 ESTABLECER 】 a
confirmar y mover a el próximo artículo.
- 33 -
A salida el configuración modo en cualquier tiempo , prensa 【
LUZ / SNOOZE 】 botón .
- 34 -
Configuración Orden
1. BIP Encendido /Apagado
2. Programa Nacional de Pruebas Encendido /Apagado
3. Tiempo Zona
4. Horario de verano Encendido /Apagado
5. Doctor en Medicina/D- M Fecha Formato
6. Año
7. Mes
8. Día
9. 24/12 Hora Formato
10. Hora 11. Minuto
12. Temperatura Unidad
13. Presión Unidad
14. Relativo Presión Calibración
15. Luz Intensidad Unidad
16. Lluvia Unidad
17. Viento Velocidad Unidad
18. Hemisferio
19. Fin de configuración
1.) Prensa y sostener Botón 【 SET 】 entrando el Ajustes . Pitido ON
parpadea . Presione 【 VIENTO /+ 】 o 【 BARO /-/ 】 a
cambiar entre Bip en y pitido apagado . Prensa 【 COLOCAR 】 a
seleccionar Programa Nacional de Pruebas encendido /apagado .
2.) Cuando Programa Nacional de Pruebas ENCENDIDO parpadea , prensa
【 VIENTO /+ 】 o 【 BARO /-/ 】 a cambiar entre Programa Nacional

- 34 -
de Pruebas en y Programa Nacional de Pruebas apagado . Prensa 【 COLO
CAR 】 a seleccionar tiempo zona .
- 35 -
3.) Cuando Tiempo Zona Destellos , prensa 【 VIENTO /+ 】 o 【 B
ARO /-/ 】 a colocar tiempo zona . Prensa 【 COLOCAR 】 a
seleccionar Horario de verano encendido /apagado .
4.) Cuando Horario de verano ENCENDIDO parpadea , prensa 【 VIENTO
/+ 】 o 【 BARO /-/ 】 a cambiar entre Horario de verano en y Horario
de verano apagado . Prensa 【 ESTABLECER 】 a seleccionar fecha
formato . 5.) Cuando M --D parpadea , prensa 【 VIENTO /+ 】 o 【 B
ARO /-/ 】】 a cambiar entre M - D y D - M fecha formato . Prensa 【 C
OLOCAR 】 a seleccionar año .
6.) Cuando año Destellos , prensa 【 VIENTO /+ 】 o 【 BARO /-
/ 】 a ajustar el calendario año . Prensa 【 COLOCAR 】 a
seleccionar mes .
7.) Cuando el mes destella , prensa 【 VIENTO /+ 】 o 【 BARO /-
/ 】 Ajustar el calendario mes . Prensa 【 COLOCAR 】 a seleccionar
día .
8.) Cuando Destellos del día , prensa 【 VIENTO /+ 】 o 【 BARO /-/
】 a ajustar el día del calendario . Prensa 【 ESTABLECER 】 a seleccionar
12/24 horas formato .
- 35 -
9.) Cuando 12 H parpadea , prensa 【 VIENTO /+ 】 o 【 BARO /-
/ 】 para cambiar entre 12 hora y 24 hora formato . Prensa 【 COLOCA
R 】 a seleccionar hora . 10.) Cuando La hora parpadea , presione 【 VIEN
TO /+ 】 o 【 BARO /-/ 】 a ajustar el hora . prensa 【 COLOCAR
】 a seleccionar minuto .
- 36 -
11.) Cuando destellos de minutos , prensa 【 VIENTO /+ 】 o 【 BA
RO /-/ 】 Ajustar el minuto . Prensa 【 COLOCAR 】 a seleccionar
temperatura unidad .
12.) Cuando ℉ Destellos , presione 【 VIENTO /+ 】 o 【 BARO /-
/ 】 a cambiar entre ℉ y ℃ . Prensa 【 COLOCAR 】 a seleccionar
presión unidad .
13.) Cuando presión La unidad parpadea , presione 【 VIENTO /+ 】 o
【 BARO / -/ 】 a cambiar entre hPa , en Hg y Presión arterial . Prensa
【 COLOCAR 】 a seleccionar Calibración de presión relativa .
14.) Cuando Relativo La presión destella , prensa 【 VIENTO /+ 】 o
【 BARO /-/ 】 a ajustar el relativo presión . prensa 【 ESTABLECER 】
a seleccionar Intensidad de la luz unidad.
15.) Cuando Luz intensidad la unidad parpadea , prensa 【 VIENTO /+ 】 o
【 BARO /-/ 】 a cambiar unidad entre Klux , fc y Peso /m2 . Pulse 【 SE
T 】 Para seleccionar lluvia unidad.
16.) Cuando Lluvia la unidad parpadea , prensa 【 VIENTO /+ 】 o 【 B
ARO /-/ 】 para cambiar unidad entre en y mm . Prensa 【 COLOCAR
】 a seleccionar velocidad del viento unidad . 17.) Cuando Viento velocidad La
- 36 -
unidad parpadea , presione 【 VIENTO /+ 】 o 【 BARO /-/ 】 a
cambiar unidad entre en y mm . Prensa 【 COLOCAR 】 a seleccionar
hemisferio .
18.) Cuando NTH parpadea , presione 【 VIENTO /+ 】 o 【 BARO /-
/ 】 a cambiar
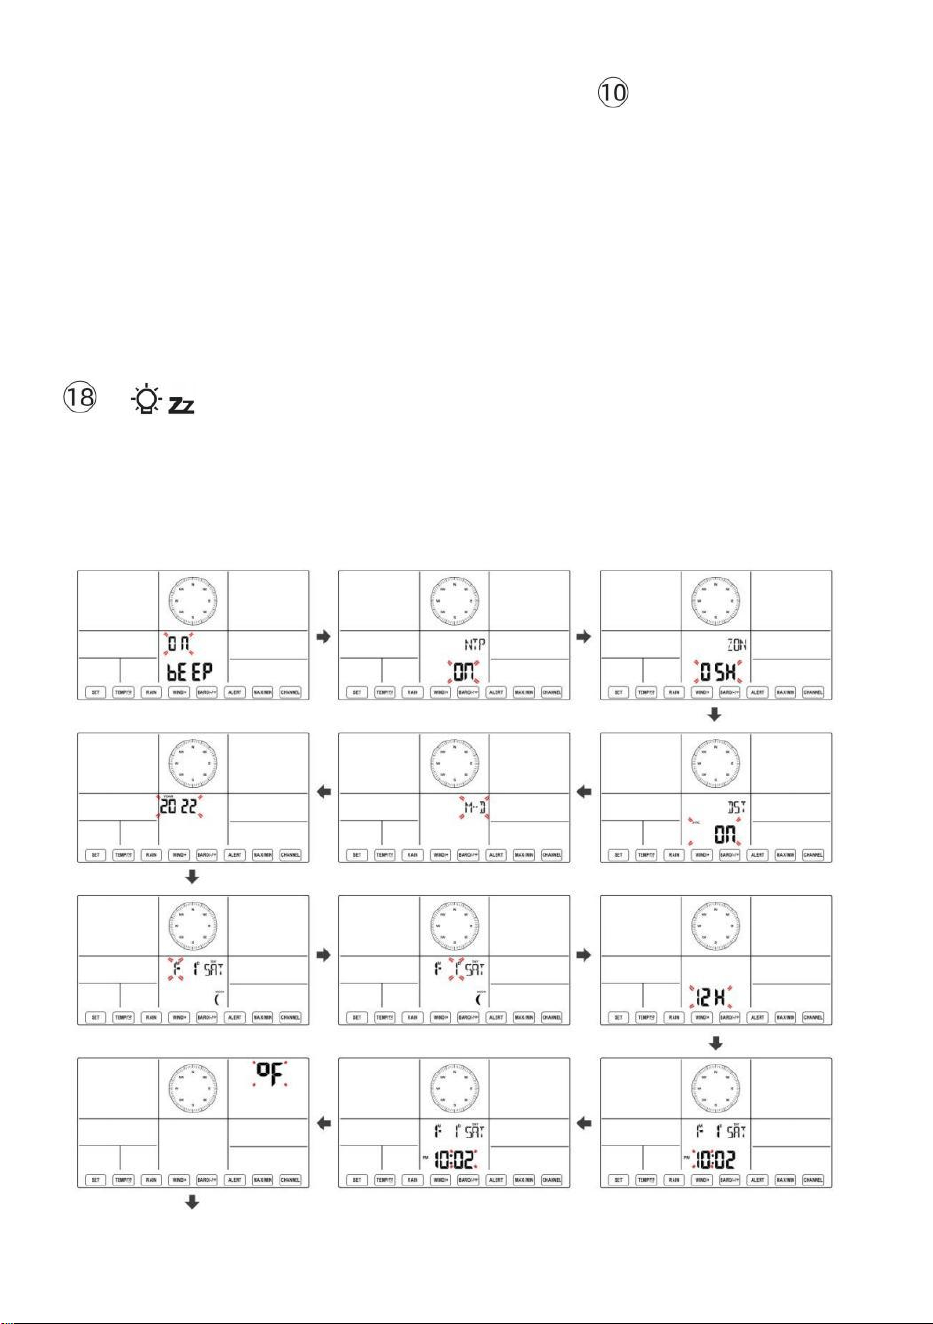
- 37 -
hemisferio entre NTH ( norte ) y STH ( sur ). Prensa 【 COLOCAR 】 para
guardar y salir de la configuración. Va a volver a el normal modo mostrar .
NOTA: Si hay es ninguna operación válida en 2 0 segundos, lo hará
automáticamente volver a la visualización normal modo desde la
configuración modo. Mientras se ajusta ajustes, puedes prensa
LUZ/SESIÓN DE DORMITORIO 】 botón para volver a la
visualización normal modo.
【

- 38 -
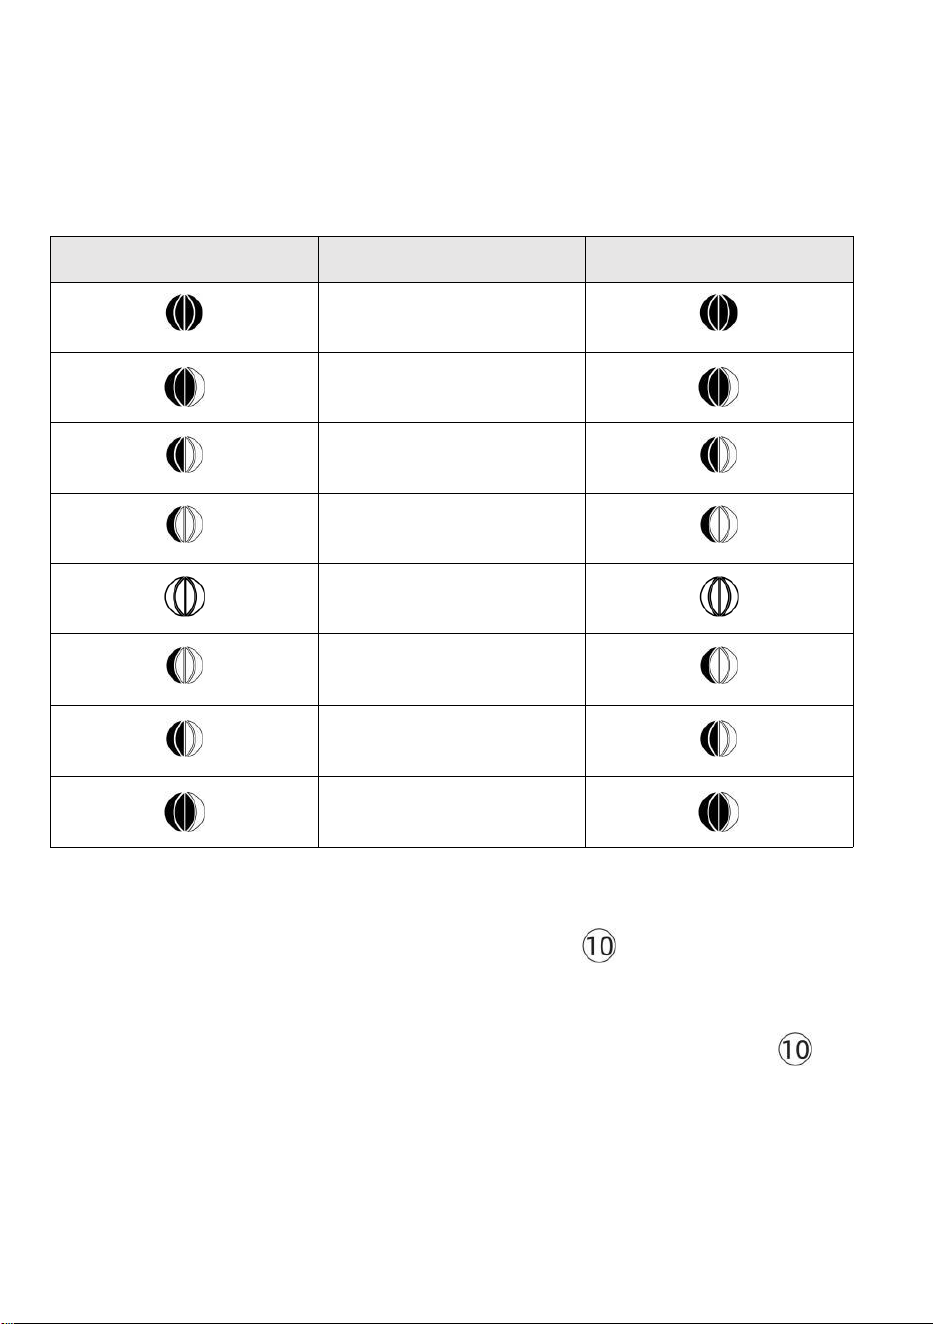
- 39 -
Luna Fase
La consola de visualización calcula la fase lunar. de acuerdo a su Hora,
fecha y zona horaria. La siguiente tabla explica la correspondiente fases
y sus iconos tanto para el Norte y Sur hemisferios.
Del norte Iconos del
hemisferio
Luna Fase
Hemisferio Sur Iconos
Nuevo Luna
Luna creciente Luna
Primer trimestre Luna
Luna gibosa creciente Luna
Lleno Luna
Luna gibosa menguante
Luna
Tercer trimestre Luna
Luna menguante Luna
Configuración de la alarma
● En la visualización de la hora normal, presione Botón 【 SET 】 para
cambiar la hora de alarma de visualización (hora de alarma modo).
● En la visualización de la hora de la alarma, mantenga presionado 【 S
ET
】
Botón durante 2 segundos para ingresar al modo de configuración
de alarma. La hora de alarma empieza a parpadear.
- 39 -
● Prensa 【 VIENTO/+ 】 botón o 【 BARÓ/-/ 】 Botón para
configurar requerido horas de alarma. Sostener 【 VIENTO/+ 】 botón
o 【 BARÓ/-/ 】 botón para
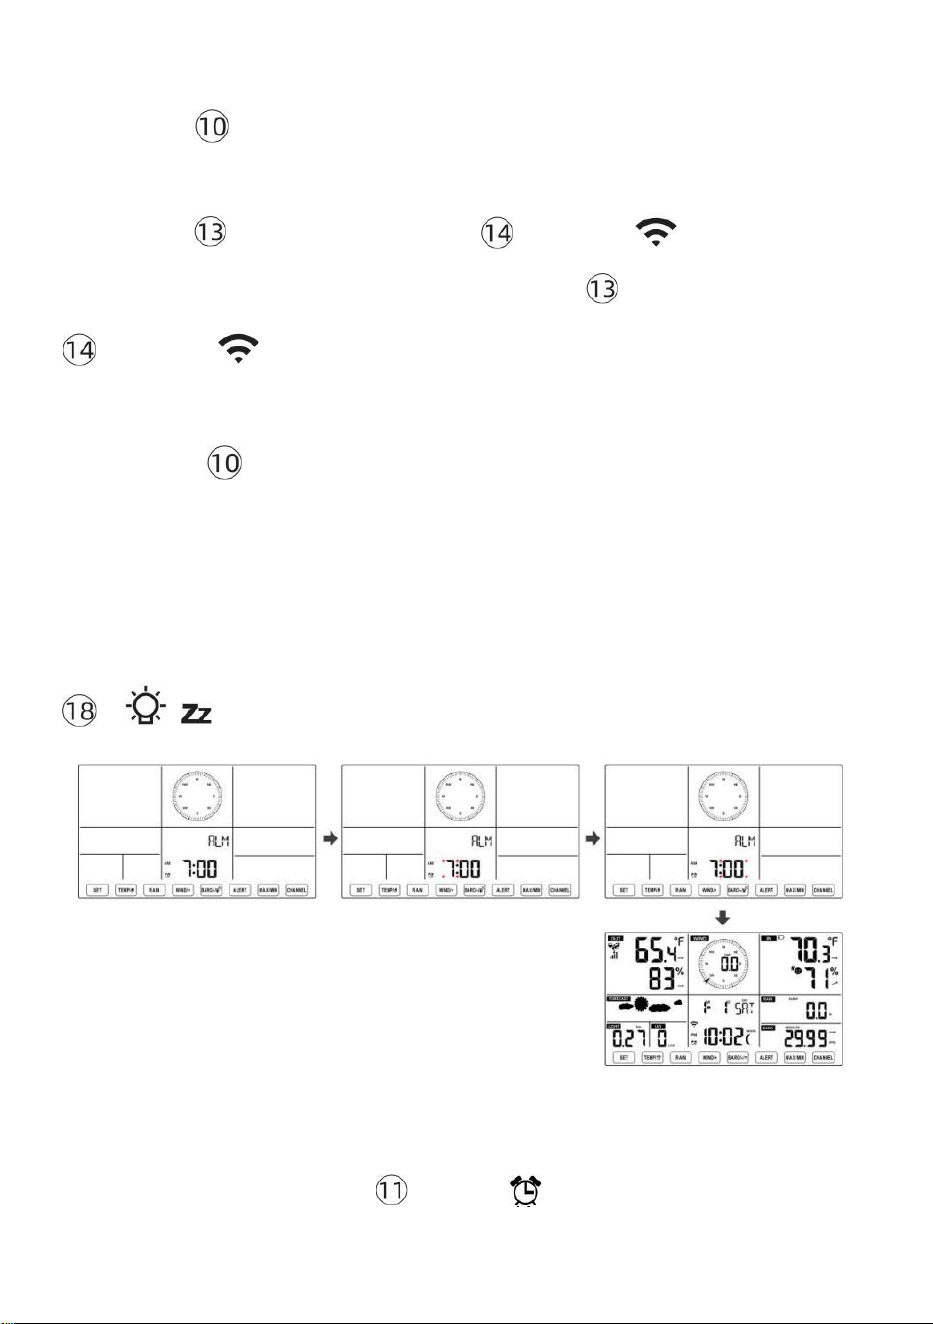
- 40 -
ajustar las horas de la alarma rápidamente.
● Prensa Botón 【 SET 】 para seleccionar minuto de Alarma.
Minuto de alarma empieza a parpadear.
● Prensa 【 VIENTO/+ 】 botón o 【 BARÓ/-/ 】 Botón para
configurar requerido Minutos de alarma. Espera 【 VIENTO/+ 】 botón o
【 BARÓ/-/ 】 botón para ajustar los minutos de la alarma
rápidamente.
● Presione
【
SET
】
Botón para guardar todas las configuraciones y
salir a visualización normal modo.
NOTA: Si hay es ninguna operación válida en 2 0 segundos, lo hará
automáticamente volver a la visualización normal modo desde la
configuración modo. Mientras se ajusta ajustes, puedes prensa
【 LUZ / SNOOZE 】 botón a devolver a normal mostrar modo .
Desactivar/Activar Alarma
● En alarma tiempo mostrar ,
presionar Apagado .
【 TEMPER
ATURA /
】 botón a seleccionar el Alarma
en o
- 41 -
● Si el alarma es en , es correspondiente alarma icono voluntad ser
mostrado en La pantalla.
● Cuando el alarma es sonando , prensa cualquier botones excepto 【
No
mbre el
LUZ/SESIÓN DE DORMITORIO 】 Botón para detener la señal de alarma. Él es
no necesario para reactivar La alarma. Va a Suena de nuevo este tiempo próximo
día.
Siesta Función
Cuando el alarma anillos , prensa 【 LUZ / SNOOZE 】 botón a
pausa La
alarma . La siesta indicador icono
z 2
sigue parpadeando . El
alarma voluntad reanudar Después de
las 5 minutos .
TEMPERATURA
Tendencia de temperatura y humedad
Las flechas de tendencia le permiten determinar rápidamente la
temperatura. y La humedad sube y baja En un una hora actualizar
período .
Tendencia de la temperatura
Temperatura tiene
resucitado > 1 °C/2 ° F en el
pasado
hora
Temperatura tiene no
cambió más que
1°C/2° F en el pasado hora
Temperatura tiene
caído < 1°C/2° F en el pasado
hora

- 41 -
Tendencia de la humedad

- 42 -
Humedad ha
subido > 3%
en el pasado
hora
Humedad tiene no
cambió más que 3% en
el pasado hora
Humedad Ha
caído < 3%
en el pasado
hora
Confort interior Índice
El El confort interior muestra una pictórico representación basada en la
temperatura del aire interior y niveles de humedad para determinar la
comodidad aproximada nivel.
También frío
Cómodo
También caliente
PRESIÓN
Presión barométrica Mostrar
En condiciones
normales modo,
prensa y presión
relativa.
【 BARÓ/-/ 】 interruptor de botón estar
entre absoluto
Absoluto
La presión atmosférica absoluta de su ubicación.
Relativo
La presión atmosférica relativa es Residencia en el mar nivel.
Tendencia de presión

- 42 -
Las flechas de tendencia le permiten determinar rápidamente Si hay
presión es creciente o descendente en una actualización de una hora
período.

- 43 -
La presión ha
aumentado > 2 hpa/0,06 inHg
en
El pasado hora
La presión ha No
cambiado Más de 2
hpa/0,06 inHg
en el pasado hora
Presión tiene
caída > 2 hpa/0,06 inHg en
El pasado hora
VIENTO
Viento Mostrar
Promedio/ráf
aga viento
velocidad
Viento en tiempo real
Indicador de dirección
Selección del modo de visualización del viento
En visualización normal modo,
prensa
Botón
【
WIND/+
】 para cambiar
entre
Velocidad media actual del viento, velocidad de las ráfagas de viento y
dirección del viento.
LLUVIA
Visualización de precipitaciones

- 43 -
El Espectáculos de lluvia información En cuanto a las precipitaciones y
tasa de lluvia .
Seleccione el Visualización de lluvia Modo
- 44 -
【 LLUVIA 】 para cambiar entre Lluvia
Tasa, Lluvia Evento, Lluvia Cada hora, Lluvia A diario, Lluvia semanal,
Lluvia Mensual y Lluvia total.
Incrementos de lluvia Definición
Lluvia Tasa : actual lluvia tasa en el pasado hora.
Evento de lluvia : lluvia continua, y se reinicia a cero si caída de lluvia
acumulación es
menos que 10 mm (0,039 pulgadas) en a 24 horas período.
Lluvia diaria : Precipitación total desde medianoche (0 0:00)
Semanalmente Lluvia : Precipitación total para la semana actual del
calendario y restablecimientos en Domingo por la
mañana a medianoche (de domingo a Sábado)
Mensual Lluvia : Precipitación total para el mes calendario actual, y
reiniciar en El primer día de la Mes.
Total Lluvia : Precipitación total desde el último reiniciar.
Restablecer el total Récord de precipitaciones
En visualización normal modo, Mantenga presionado
【
LLUVIA
】
botón encima 2 segundos para reiniciar el lluvia registro .
NOTA:
Al restablecer la lluvia semanal también se restablece la a diario
lluvia.
Restablecer la lluvia mensual también Restablece el diario y semanal.
lluvia.
Al restablecer la lluvia total también se restablecen las lluvias
mensuales, semanales y a diario lluvia.
CLIMA
Índice meteorológico
In normal display mode, press
- 44 -
Al leer el tiempo Visualización de índice, puede presionar 【 TEMPERAT
URA/ 】
Botón para recorrer diferentes índices meteorológicos en el siguiente
orden: Se siente Me gusta > Calor Índice > Viento Enfriar

- 45 -
Se siente Como
El Se siente El índice de temperatura determina la temperatura que
realmente se siente afuera, teniendo en cuenta factores como la
velocidad del viento, Presión, temperatura y humedad .
Sensación térmica
La sensación térmica se determina mediante una combinación de los
datos de temperatura y velocidad del viento del sensor meteorológico
inalámbrico .
NOTA: Solo cuando la temperatura sea inferior a 50 ℉ (10 ℃ ) y Si
la velocidad del viento es superior a 4,8 km/h (3 mph), se mostrará
el valor de sensación térmica.
de lo contrario se mostrará “--.-“.
Calor Índice
El Calor El índice está determinado por el sensor
meteorológico inalámbrico. Temperatura y humedad lecturas.
Rocío Punto
El punto de rocío es la temperatura a la que se encuentra un determinado
parcela de humedad aire
Debe enfriarse a temperatura barométrica constante. presión para que el
vapor de agua
condensarse en agua. El agua condensada se llama rocío. rocío punto
es una temperatura de saturación.
El rocío La temperatura puntual está determinada por la temperatura y
datos de humedad del sensor meteorológico inalámbrico .
Pronóstico del tiempo
El El barómetro incorporado puede Observar los cambios de presión
atmosférica y, en función de los datos recopilados, predecir el clima.
condiciones.
Hay 6 iconos meteorológicos: soleado, parcialmente soleado. Nublado,
Nublado, Lluvioso, Tempestuoso y De mucha nieve.

- 46 -
NOTA:
pronóstico general basado en la presión Se trata de 65-70%. Los
pronósticos no son Garantizado.
Puede que no necesariamente reflejan la actual situación.
Hielo Alerta
Cuando la temperatura exterior es inferior a 1 ℃ /33,8 ℉ , el icono del
copo de nieve
aparecerá en el Pantalla LCD mostrar.
MÁXIMO/MÍNIMO
● En visualización normal modo, prensa Botón de cambio
【
MA
X/MIN 】 entre valor máximo y mínimo.
NOTA: Si hay es No hay ninguna operación de
identificación válida dentro 10 segundos, Volverá
automáticamente a la visualización normal. modo.

- 46 -
- 47 -
Para ver el MAX/MIN acumulado
● Mostrar Sentir como, sensación térmica, Calor Índice, Rocío Valores
máximos y mínimos de los puntos
1.) Cuando se muestran los valores máximos,
prensa
【 TEMPER
ATURA /
】 botón
para
Intercambio de visualización de la temperatura exterior → Sentirse
como → Sensación térmica → Calor Índice → Rocío Punto →
Temperatura exterior.
2.) Cuando se muestren los valores mínimos , presione 【 TEMPERATU
RA/ 】 botón para
temperatura exterior → Sentirse como → Sensación térmica → Calor
Índice → Rocío Punto → Temperatura exterior.
● Mostrar velocidad del viento, ráfagas de viento Valores máximos
Cuando se muestran los valores máximos ,
prensa
Botón
【
WIND/+
】 para
visualización de intercambio Entre el Velocidades del viento
PROMEDIO y RÁFAGAS. ● Mostrar Lluvia Tasa, A diario Lluvia,
Semanal Lluvia y Mensual Lluvia Máximo Valores
Cuando se muestren los valores máximos, presione Botón 【 LLUVIA
】 para
visualización de intercambio Lluvia Calificar → A diario Lluvia →
Semanalmente Lluvia → Mensual Lluvia.
● Mostrar Absoluto y Relativo presión Valores máximos y mínimos
1.) Cuando se muestran los valores máximos, prensa 【 BARÓ/-/
】 botón para visualización de intercambio entre Absoluto y Relativo
presión.
- 47 -
2.) Cuando se muestren los valores mínimos, presione 【 BARÓ/-/
】 botón para
visualización de intercambio entre Absoluto y Relativo presión.
● Mostrar Sensor de temperatura de canales interiores y otros y
humedad Valores máx./mín.
1.) Cuando se muestran los valores máximos, prensa Botón
【
CANA
L 】 para
visualización de intercambio Sensor(es) de temperatura interior y exterior
emparejados y humedad.
- 48 -
2.) Cuando se muestran los valores mínimos,
prensa
【 CANAL 】 botón
para
visualización de intercambio Sensor(es) de temperatura interior y exterior
emparejados y humedad.
NOTA: Si se emparejaran otros sensores de canal , podría mostrar el
valores máximos/mínimos de temperatura y humedad de otros
canales . Si otro canal Los sensores no estaban emparejado, Solo
mostraría la corriente actual interior máx./mín. temperatura y valores
de humedad.
Para borrar el MAX/MIN Datos Registro
● Para borrar el valor máximo , prensa y
sostener
Botón 【 MAX/MIN 】
sobre
2
segundos mientras Se muestran los
valores máximos.
● Para borrar el valor mínimo , prensa y
sostener
Botón 【 MAX/MIN 】
sobre 2
segundos mientras Se muestran los
valores mínimos.
ALTO/BAJO CONFIGURACIÓN DE ALERTA
Para ver el Configuración de alerta
● En el modo de visualización normal, presione
【
ALERTA
】
botón de
cambio entre Hola alerta y Alerta baja configuración valor.

- 48 -
Para configurar la alerta
● En visualización normal modo, prensa y sostener Botón 【 ALERTA
】 sobre 2
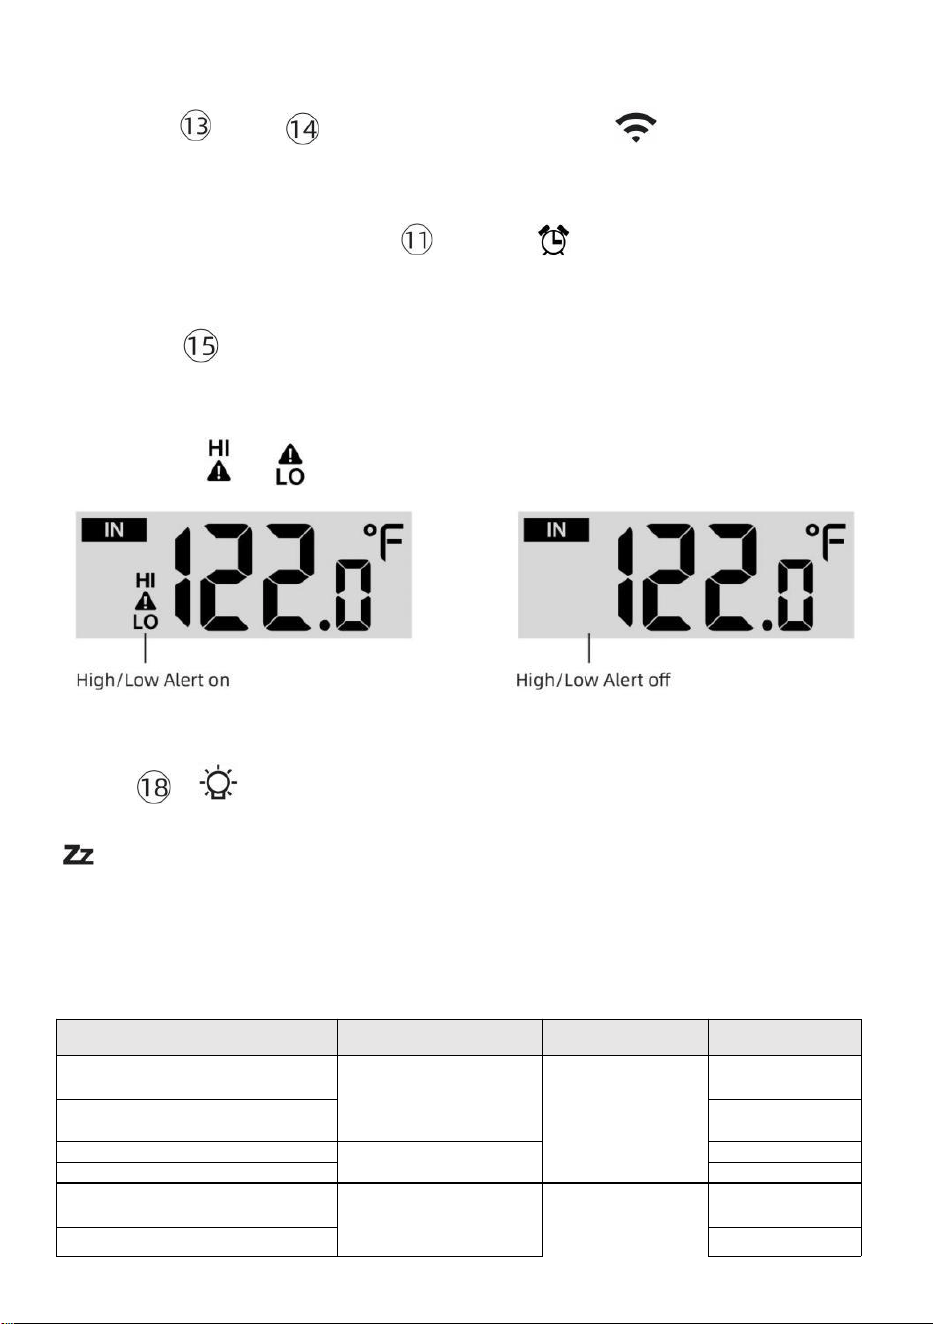
- 49 -
segundos para ingresar a la configuración de alerta modo.
● Prensa Botón 【 WIND/+ 】 y【 BARO/-/ 】 Presione el botón
para ajustar el
valor arriba o abajo,
entonces prensa alerta.
【 TEMPER
ATURA /
】 Botón para
encender/apagar el
● Prensa Botón
【
ALERTA
】
para confirmar y saltar a próximo
configuración.
● El icono o se mostrará cuando la alerta es en.
● Para salir de la configuración de alerta modo en cualquier tiempo,
prensa 【
Botón LIGHT/SNOOZE
】 . El
Se muestra el orden de configuración
de alerta alta/baja abajo:
Alerta Configuración
Orden
Configuración
Rango
Sección de
visualización
Por defecto
Temperatura interior Hola
Alerta
-14.1 ℉ – 122
℉ (-9,9 ℃ –
50 ℃ )
Interior
temperatura &
Humedad
Exterior
temperatura &
Humedad
122 ℉ (50 ℃ )
Temperatura interior Lo Alerta
14.1 ℉ (-9,9 ℃
)
Humedad interior Hola Alerta
1%–99%
-40 ℉ –158
℉ (-40 ℃ –
70 ℃ )
80%
Interior Alerta de humedad
baja Temperatura exterior
Hola alerta
40%
104 ℉ (40 ℃ )
Temperatura exterior Lo Alerta
32 ℉ (0 ℃ )

- 49 -
Velocidad del
viento
Humedad exterior Hola Alerta
1%–99%
0–50 m/s
2–180 kilómetros
por hora
1–111 mph
1–97 Nudos 0-60 BFT
-A
80%
Humedad exterior Lo Alerta
Alto Velocidad media del viento
Alerta
40%
17
m/s
62 kilómetros
por hora
38 mph
33 Nudos 20bft
Fuerte ráfaga de viento
alerta
0–50 m/s
2–180 kilómetros
por hora
1–111 mph
1–97 nudos
0-60 BFT-A
Velocidad del
viento
17 m/s
62 kilómetros
por hora
38 mph
33 Nudos 20bft
- 50 -
Alerta de caída de presión
1 HPA–10
HPA 0,03 ~
0,3 pulgadas
de mercurio
0,7 ~ 7,5
mmHg
Caída del
barómetro
3 hpa
0,09
pulgadas
de
mercurio
2,2
mmHg
Alto Lluvia Alerta de tasa
1 mm/h–1000 mm/h
(0,04 pulg./h–39
en/hora)
Lluvia Tasa
101 mm/h
(4
en/hora)
Alto A diario Alerta de lluvia
1 mm–1000 mm
(0,03 pulg.–39,37
pulg.) en)
Lluvia Tasa
101
mm (4
en)
Índice UV Alto Alerta
1-15
Ultravioleta
Índice
10
Luz Intensidad Alto Alerta
1 Klux–200,0 Klux
7-1580 W/m²
0-185 Kfc
Luz Intensidad
100 Klux
790 W/m²
92 KFC
Para silenciar el Hi/Lo Alarma de alerta
Presione el Botón 【 LUZ/SNOOZE 】 en la parte
superior de la
consola de visualización para silenciar la alarma, o
se silenciará automáticamente. doblar Apagado después de una
minuto.
NOTA: Una vez que se activa la alerta, la alarma sonará durante un
minuto. y la alerta asociada El icono y las lecturas meteorológicas
parpadearán.
Si la alarma de alerta se apaga automáticamente después de un
minuto En lugar de apagarse manualmente, la alerta asociada
icono y Las lecturas se harán Continúe parpadeando hasta que la
lectura sea afuera del alerta rango.
La alarma de alerta meteorológica se activará una vez que las
lecturas bajen. en alerta alcance de nuevo.
ILUMINAR DESDE EL FONDO
Retroiluminación de la pantalla
Con corriente continua Adaptador
El La luz de fondo solo puede estar continuamente encendido cuando el
Adaptador de CC es
- 50 -
permanentemente encendido. Cuando el El adaptador de CC está
desconectado, el La luz de fondo puede estar encendido temporalmente.
Prensa Botón 【 LIGHT/SNOOZE 】 para ajustar la luz
de fondo
brillo, Alto, Bajo y Apagado.
Sin corriente continua
Adaptador
Prensa Elbotón【 LIGHT/SNOOZE 】 enciende
temporalmente la

- 51 -
luz de fondo para 15 segundos.
INDICADOR DE BATERÍA BAJA
Si el icono indicador de batería baja se muestra en el temperatura exterior
y la sección de humedad o la sección CH correspondiente de la pantalla
LCD consola
mostrar, esto indica que las baterías de sus sensores meteorológicos
inalámbricos se están agotando y deberían ser reemplazado. Asegúrese
de reemplazar todo Baterías al mismo tiempo.
REINICIO DE FÁBRICA
Si hay es un mal funcionamiento, el Fábrica Reanudar es una
excelente manera de devolver tu dinero estación para "salir de la
condición "caja".
1.) Eliminar todo energía (baterías y Adaptador de CC) de sensores
exteriores y estación meteorológica.
2.) Siga la operación “CONFIGURACIÓN “ARRIBA LA ESTACIÓN
METEOROLÓGICA” para empieza la pareja sensor.
CUIDADO Y MANTENIMIENTO
1.) Limpie el pluviómetro cada 3 meses. Girar El embudo
en sentido antihorario y levántelo para exponer el pluviómetro
mecanismos, y limpio con un paño húmedo. Elimine la suciedad, los
residuos y Insectos. Si bicho La infestación es un problema, rocíe el
sensor ligeramente con insecticida.

- 52 -
2.) Limpiar el Luz Intensidad/ Sensor UV y panel solar cada uno 3
meses Con humedad paño.
3.) Al reemplazar las baterías, aplique un producto anticorrosión.
preventivo compuesto en los terminales de la batería.
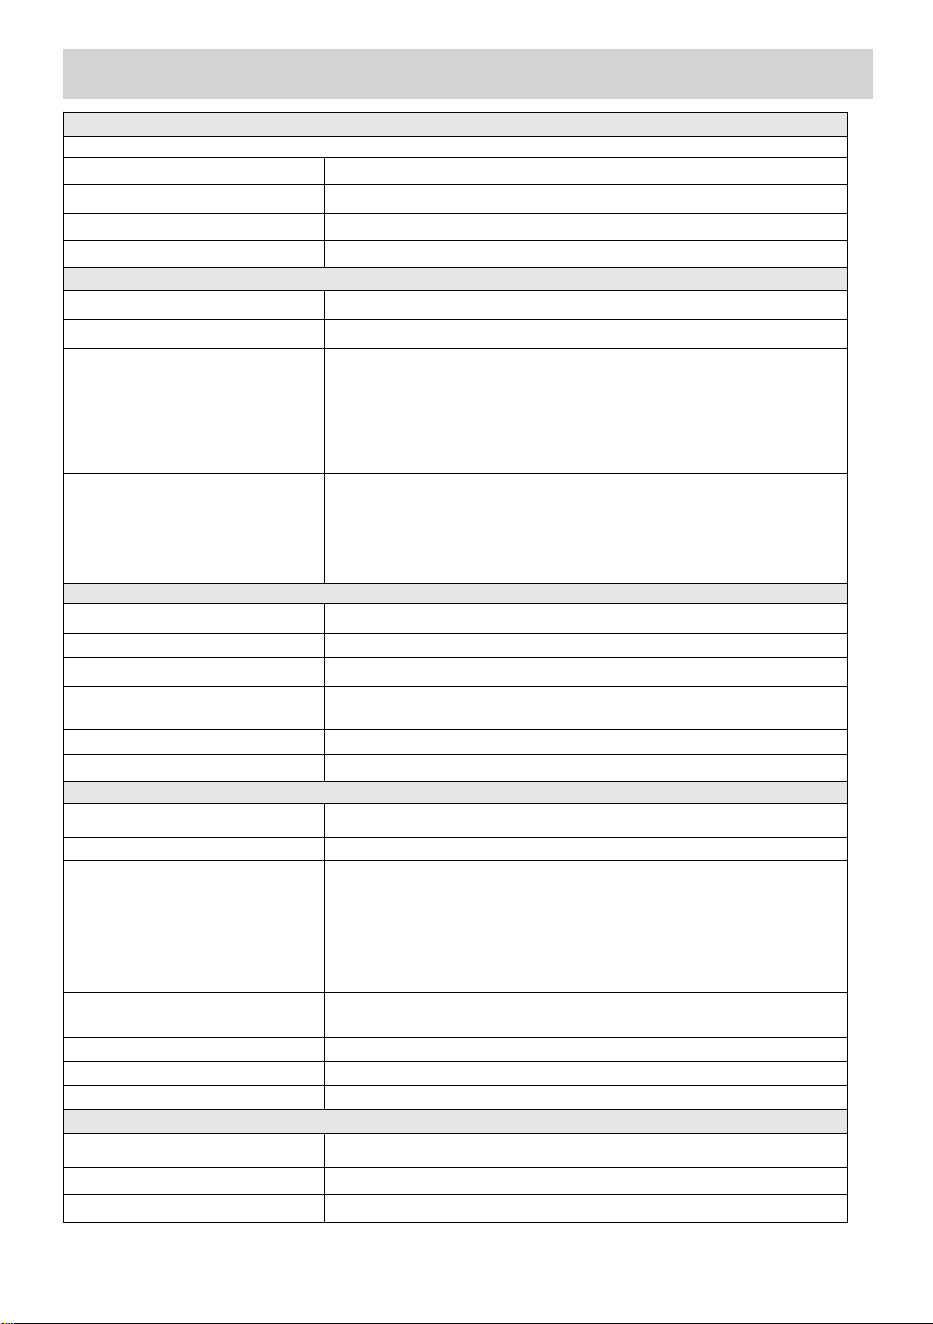
- 53 -
ESPECIFICACIÓN
CLIMAESTACIÓN
General Específico cationes
Dimensión
7,5 x 5 x 1.1 pulgada (191,6 x 127x 28,8 mm)
Fuerza fuente
AC/DC 5 V, Adaptador 1A (incluido)
Batería
3 xAAA batería ( no incluido)
Apoyo sensores
1 incógnita 7 en 1 sensor ( incluido)
Wisconsin- Comunicación Fi Especificaciones
Wifi Estándar
802. 11 b/g/norte
Wifi operación frecuencia
2,4 GHz
Dispositivos
compatibles para
configuración Interfaz
de usuario
Empotrar Wifi con WAP modo elegante dispositivo ,
incluyendo computadoras portátiles, computadoras,
teléfonos inteligentes y almohadillas inteligentes
Recomendar web
navegador para
configuración Interfaz de
usuario
El último Versión de cualquier web navegador eso apoya
HTML 5
Tiempo Especificaciones de funciones
Tiempo mostrar
S.S : M.M.
Formato de hora
12 horas o 24 hora
Fecha mostrar
DD/MM o MM/DD
Tiempo método de
sincronización
Sincroniza con atómico reloj
Tiempo zonas
GMT±12
Horario de verano
ENCENDIDO/APAGADO
de la pantalla y funciones del barómetro
Unidades del barómetro
hPa, en Hg y mmHg
Rango de medición
600 – 1100 hPa (ajuste relativo rango 930 – 1050 hPa)
Exactitud
700-1100 hPa ± 5 hPa/600 -696 hPa±8 hPa
20.67 – 32,48 enHg±0. 15 pulgadas de mercurio/ 17,72 -
20,55 pulgadas de mercurio ±0,24 pulg.Hg 525-825 mmHg ±
3,8 mmHg / 450 -522 mmHg ± 6 mmHg Típico en 77 ℉
(25 ℃ )
Clima pronóstico
Soleado, En parte Nublado, Nublado , Lluvioso, Tempestuoso y
De mucha nieve
Mostrar modo
Actual
Memoria modo
A diario Máximo/ Mínimo
Alerta
Presión cambiar alerta
Interior/ Especificaciones de funciones y visualización de temperatura exterior
Unidad de temperatura
℃ y ℉
Interior Mostrar rango
-14,1 ℉ – 122 ℉ (-9,9 ℃) – 50 ℃ )
Exterior Mostrar rango
-40 ℉ – 158 ℉ (-40 ℃ – 70 ℃ )
- 53 -
En/Afuera exactitud
50– 122 ℉ ± 1,8 ℉ / 10 – 50 ℃ ± 1
℃ -4 - 50 ℉ ±2,7 ℉ / -20 – 10 ℃ ±
1,5 ℃ otros : ±3,6 ℉ / ±2 ℃
Mostrar modo
Actual
Memoria modo
A diario Máximo/ Mínimo
Alerta
Alto/Bajo temperatura alerta
- 54 -
Interior/ Exterior Humedad Mostrar & Función Presupuesto
Humedad unidad
%
Mostrar rango
1 – 99%
En/Afuera exactitud
40 – 80% HR ± 5% Humedad
relativa a 77 ℉ (25 ℃) Otros : ± 8%
RH @77 ℉ (25 ℃)
Mostrar modo
Actual
Memoria modo
A diario Máximo/ Mínimo
Alerta
Alto/Bajo humedad alerta
Visualización de la velocidad y dirección del viento & Función Presupuesto
Viento Velocidad unidad
millas por hora, EM, kilómetros por hora, nudos
Mostrar rango
0 -112 mph, 50 m/s, 180 kilómetros por hora, 97 nudos
Precisión de velocidad
<5 m/s: ±0,5 m/s, >5 m/s : ±10% (cualquiera es mayor)
Mostrar modo
Ráfaga/ Promedio
Memoria modo
A diario Ráfaga/Promedio
Alerta
Alto Viento Velocidad Alerta ( Ráfaga / Promedio )
Viento dirección
16 instrucciones
Pantalla de lluvia y Función Presupuesto
Unidad de lluvia
mm, en
Rango de lluvia
0 – 12999 mm (0 – 511.7 en)
Exactitud de lluvia
±7%
Mostrar modo
Actual
Memoria modo
A diario Máximo
Lluvia mostrar modo
Cada hora/ A diario/ Semanalmente/ Mensual/ Total Lluvia
Alerta
Alto A diario Lluvia alerta
Especificaciones de visualización y funciones del índice UV
Mostrar rango
0 - 16
Mostrar modo
Actual
Memoria modo
A diario Máximo
Alerta
Alto UVI alerta

- 54 -
Intensidad de la luz Especificaciones de pantalla y funciones

- 55 -
Luz Intensidad unidad
Klux, Kfc y W/
m2
Mostrar rango
0 – 200 Klux
Mostrar modo
Actual
Memoria modo
A diario Máximo
Alerta
Alto Luz intensidad alerta
Especificaciones de visualización y funciones del índice meteorológico
Índice meteorológico modo
Se siente como, sensación térmica, calor. índice y rocío punto
Modo de visualización
Actual
Modo memoria
Máximo/mín diario
SENSOR INALÁMBRICO 7 EN 1 PARA EXTERIORES
Dimensiones
16x 13,8x 14,4 pulgadas (408 x 396 x 367 mm)
Alimentación principal
3,6 V Batería de níquel-metal hidruro (NiMH) recargable paquete
de batería
Energía de respaldo
Energía solar
Datos meteorológicos
temperatura, humedad, viento velocidad, viento dirección,
lluvia, UVI y la intensidad de la luz
De radiofrecuencia frecuencia
915 MHz
Rango de transmisión de RF
492 pies (150 m)
Intervalo de transmisión
Cada20 artículos de segunda clasepara UV , intensidad de
luz , velocidad del viento , Datos de temperatura, humedad
, lluvia y viento. datos de dirección
Temperatura de funcionamiento
-40 ℉ hasta 140 ℉ / 40 ℃ hasta 60 ℃
Herramientas adicionales
necesarias para sensor
Sí
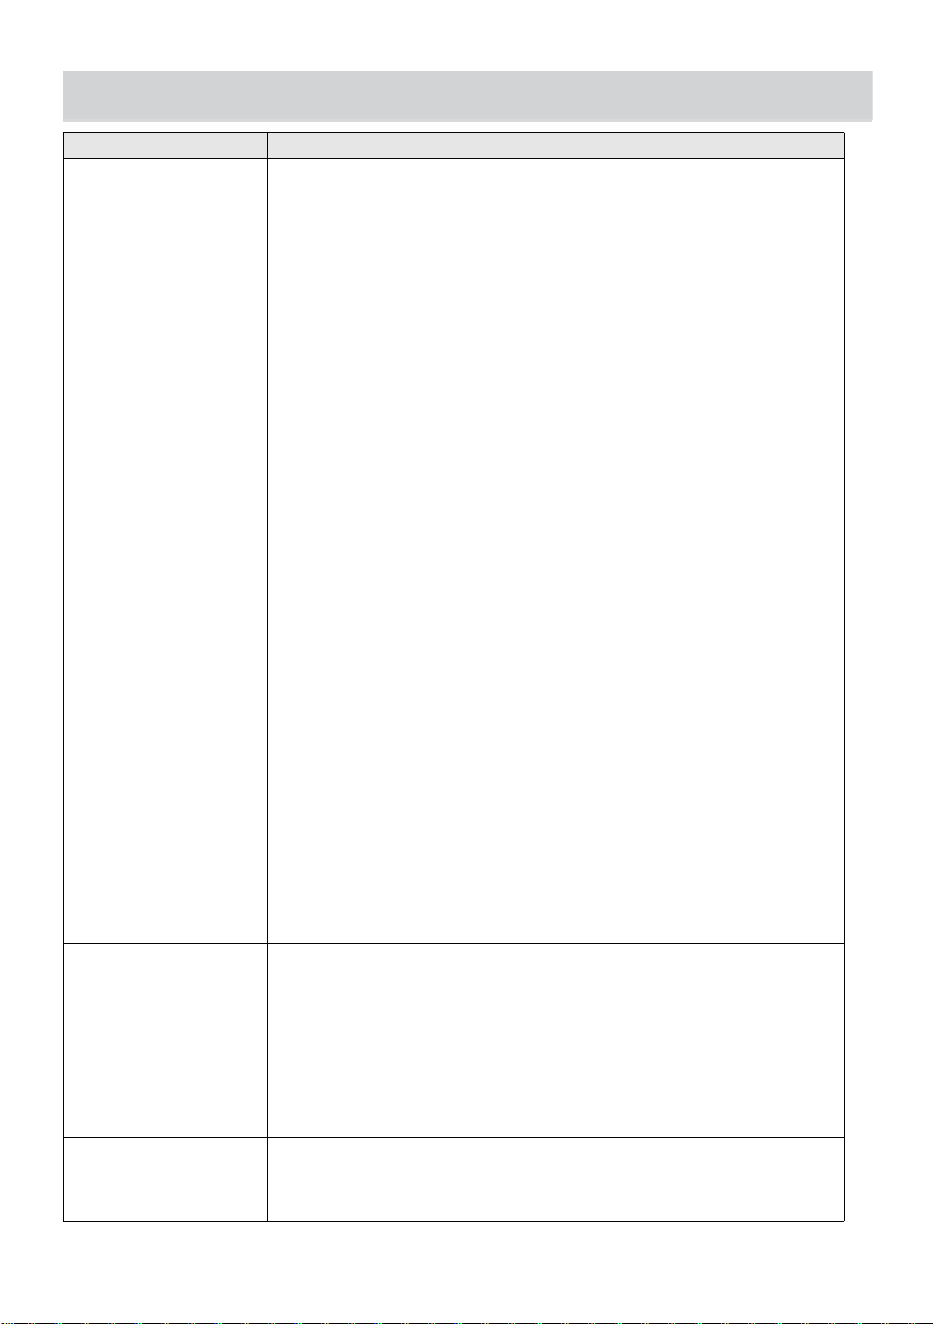
- 56 -
SOLUCIÓN DEPROBLEMAS
Problema
Solución
Inalámbrico sensor
hace no comunicar el
clima estación
El inalámbrico sensor puede tener iniciado adecuadamente, y
el datos es registrado por el clima estación como inválido, y el
clima
estación debe ser reiniciar.
Con Un final abierto clip de papel, presione el REINICIAR
botón durante 3 segundos a completo el mostrar de el Voltaje
. CONDUJO voluntad parpadear cada 20 artículos de
segunda clase.
Si CONDUJO hace No parpadear cada vez 20 artículos de
segunda clase, sacar el Baterías y esperar 5 minuto, mientras
cubierta el solar panel a drenar El voltaje.
Poner Baterías atrás en y resincronizar el clima estación y
Resincronizar la estación meteorológica (Referirse a Página 18
REPARACIÓN DEL SENSOR DE ANILLO) con El inalámbrico
sensor acerca de 10 pies (3m) lejos .
El El LED del sensor inalámbrico se encenderá destello cada 20
artículos de segunda clase. Si El LED es aún no parpadeando
cada 20 artículos de segunda clase, reemplazar el nuevo
Baterías en el inalámbrico sensor.
Si el Las baterías estaban recientemente reemplazado, comprobar el
polaridad. Si el
inalámbrico sensor es parpadeando cada 20 artículos de segunda
clase, proceder a el próximo paso.
Allá puede ser a temporario pérdida de comunicación pendiente a
recepción pérdida relacionado a interferencia o otro ubicación
factores,
O Baterías puede tener estado cambió en el inalámbrico sensor y el
clima estación tiene no estado reiniciar. El solución puede ser Tan
simple como Alimentando abajo y arriba el clima estación (eliminar
corriente continua fuerza y baterías), esperar 30 artículos de
segunda clase, y reinsertar corriente continua fuerza y baterías) .
Interior y Exterior
temperatura hacer
no aceptar
Permitir hasta uno hora para el inalámbrico sensores a estabilizar
pendiente a
señal filtrado. El interior y exterior temperatura sensores
Debe coincidir dentro de ±4 ℉ (±2 ℃ ) (la precisión del sensor es de ±2
℉ (±1 ℃ )
Usar el calibración característica a Coincidir con el interior
y exterior temperatura a a conocido fuente.
Sensor de temperatura
lee tambien alto en el
tiempo de día
Hacer seguro que el sensor inalámbrico es no también cerca a calor
generando fuentes o estenosis, semejante como edificios, pavimento,
paredes, o aire acondicionamiento unidades.
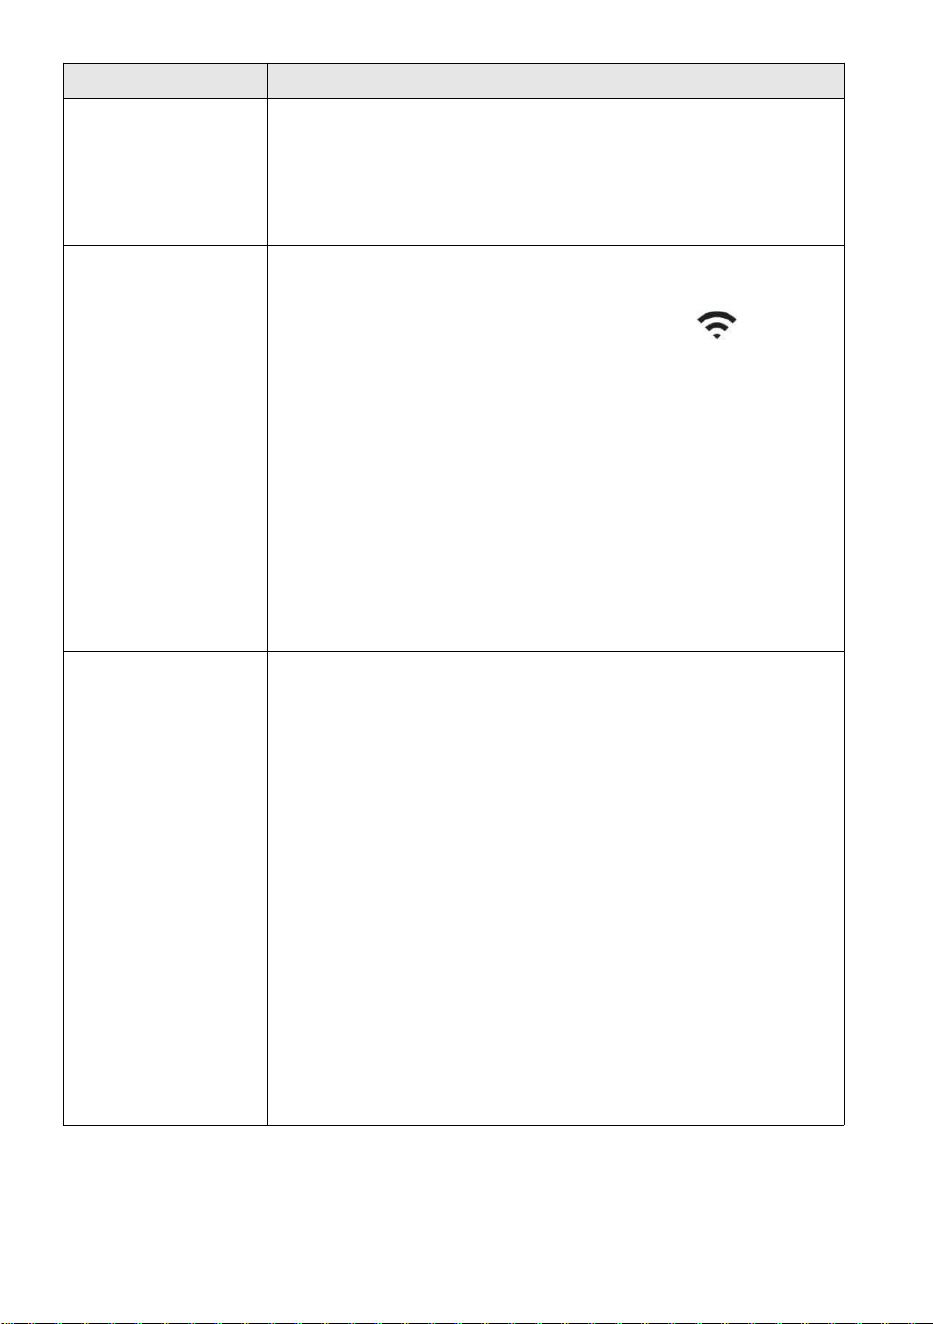
- 57 -
Problema
Solución
Pluviómetro
informes llueve
cuando él es no
lloviendo.
Una solución de montaje inestable (balanceo) en el montaje polo)
puede
El resultado es que el cucharón se vuelca incorrectamente . aumento
de las precipitaciones. Hacer seguro Tienes un nivel estable montaje
solución. (Referirse a página 16
AJUSTE DEL NIVEL DEL SENSOR INALÁMBRICO 7 EN 1 )
El wifi lo hace no
mostrar sobre el
tiempo
estación
Comprueba si tu enrutador tiene problemas.
1.) Compruebe el símbolo de Wi-Fi en la pantalla. Si la
conectividad inalámbrica es exitosa, el ícono de Wi-Fi
voluntad ser mostrado en el tiempo archivado. 2.) Asegúrese de
que la configuración de Wi-Fi de su módem sea correcta (red
nombre, y contraseña)
3.) Asegúrese de que la estación meteorológica esté atascado
en Alimentación de CC. La estación meteorológica no se
conectará a Wi -Fi cuando motorizado Solo con pilas .
4.) Solo la consola apoya y se conecta a 2,4 GHz enrutadores. Si
Tu propio 5GHz enrutador, y él es un dual l banda enrutador, lo
harás
Es necesario deshabilitar la banda de 5 GHz y habilitarla. el
2,4 GHz banda. 5.) El clima hace no apoyo invitado
redes.
Datos no reportando
a www.wunder
ground.com o
www.weatherc
loud.net
1.) Confirme su contraseña o clave Es correcto. Él es el
contraseña tú registrado en Wunderground.com.
Wunderground.com. Su contraseña de .com underground no puede
comenzar con caracteres no alfanuméricos (un limitación de
Wunderground.com, no la estación ). Por ejemplo, $worknet es No es
una contraseña válida, pero trabajar en red $ es válido)
2.) Confirme su estación La identificación es correcta. La estación
La identificación es todo gorras, y el problema más común es la
sustitución y Oh para a 0 (o viceversa). Ejemplo, KCAPHOEM12,
no KCAPH0EM12.
3.) Asegúrese de que los datos y la hora sean correctos en la
estación meteorológica. Si es incorrecto, usted tal vez reportando
datos antiguos, no es real tiempo datos.
4.) Asegúrate de tu zona horaria está configurado correctamente
Si es incorrecto, usted puede estar reportando datos antiguos, no
real datos de tiempo.
5.) Revisa tu configuración del firewall del enrutador. El clima
estación envía datos a través de Puerto 80.

FCCSTATEMENT
- 58 -
Este dispositivo cumple con la parte 15 de las Normas de la FCC.
Operación es sujeto a las dos condiciones siguientes :
1. Este dispositivo puede NO causar daño Interferencia .
2. Este dispositivo debe aceptar cualquier interferencia recibió,
incluido interferencia que Puede provocar un funcionamiento
no deseado.
NOTA :
Este equipo tiene Se ha probado y se ha demostrado que cumple con las
límites para a
Clase Dispositivo digital B, conforme a Parte 15 de los Normas de la FCC.
Estas límites son Diseñado para Proporcionar razonable protección contra
dañino Interferencia En un Residencial Instalación. Este equipo genera y
puede irradiar — radio energía de frecuencia y, si no instalado y usado de
acuerdo con el
instrucciones, Puede causar dañino interferencia a comunicaciones por
radio .
Sin embargo, hay No hay garantía de que la interferencia no
ocurrir en a instalación particular.
Si el equipo no causa daños interferencia a recepción de radio o
televisión , que puede determinarse apagando el equipo y en, Se
recomienda al usuario que intente corregir el error. interferencia por uno
o más de la siguiente medidas:
Reorientar o reubicar el receptor antena.
Aumentar la separación entre el equipo y el receptor.
Conectar el equipo en un salida en a circuito diferente de eso a cual
el receptor es conectado.
Consultar el distribuidor o un experimentado radio/televisión técnico
para ayuda.
ADVERTENCIA: Los cambios o modificaciones a este unidad no
expresamente aprobado por La fiesta responsable del cumplimiento podría
anular la autoridad del usuario para

FCCSTATEMENT
- 58 -
operar el equipo.
Hecho En China


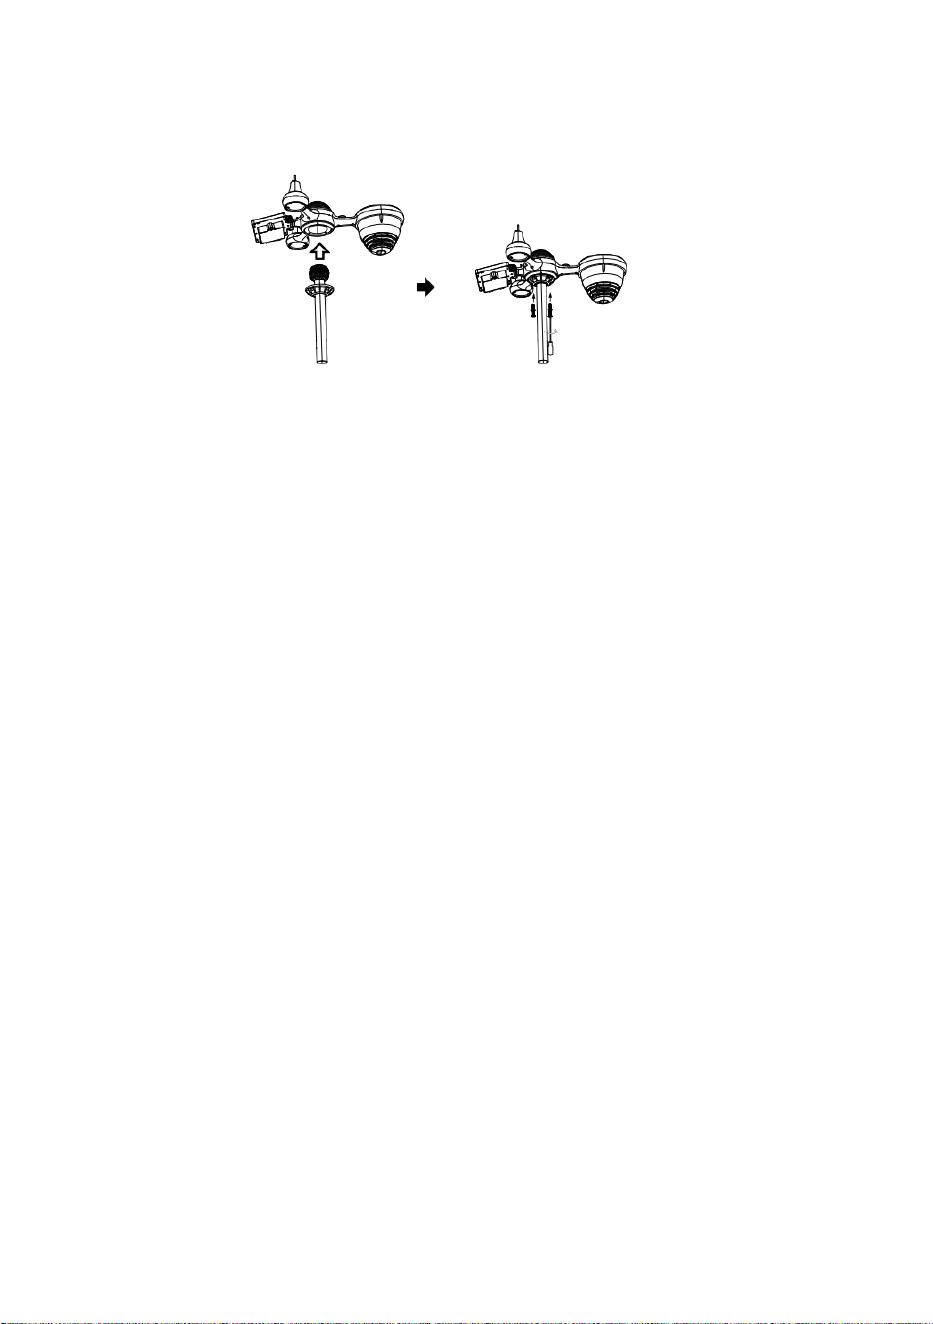
Z
a
m
e
k
Szybki przewodnik
⑤
U
S
T
A
W
I
A
N
I
E
Z
B
I
E
R
A
C
Z
A
D
E
S
Z
C
①INSTALLING THE MOUNTING POLE
Secure the sensor onto a mounting pole (included) using the screws (included).

Z
U
W
ł
ó
ż
l
e
j
e
k
d
o
z
b
i
o
r
n
i
k
a
n
a
d
e
s
z
c
z
ó
w
k
ę
i
z
a
b
l
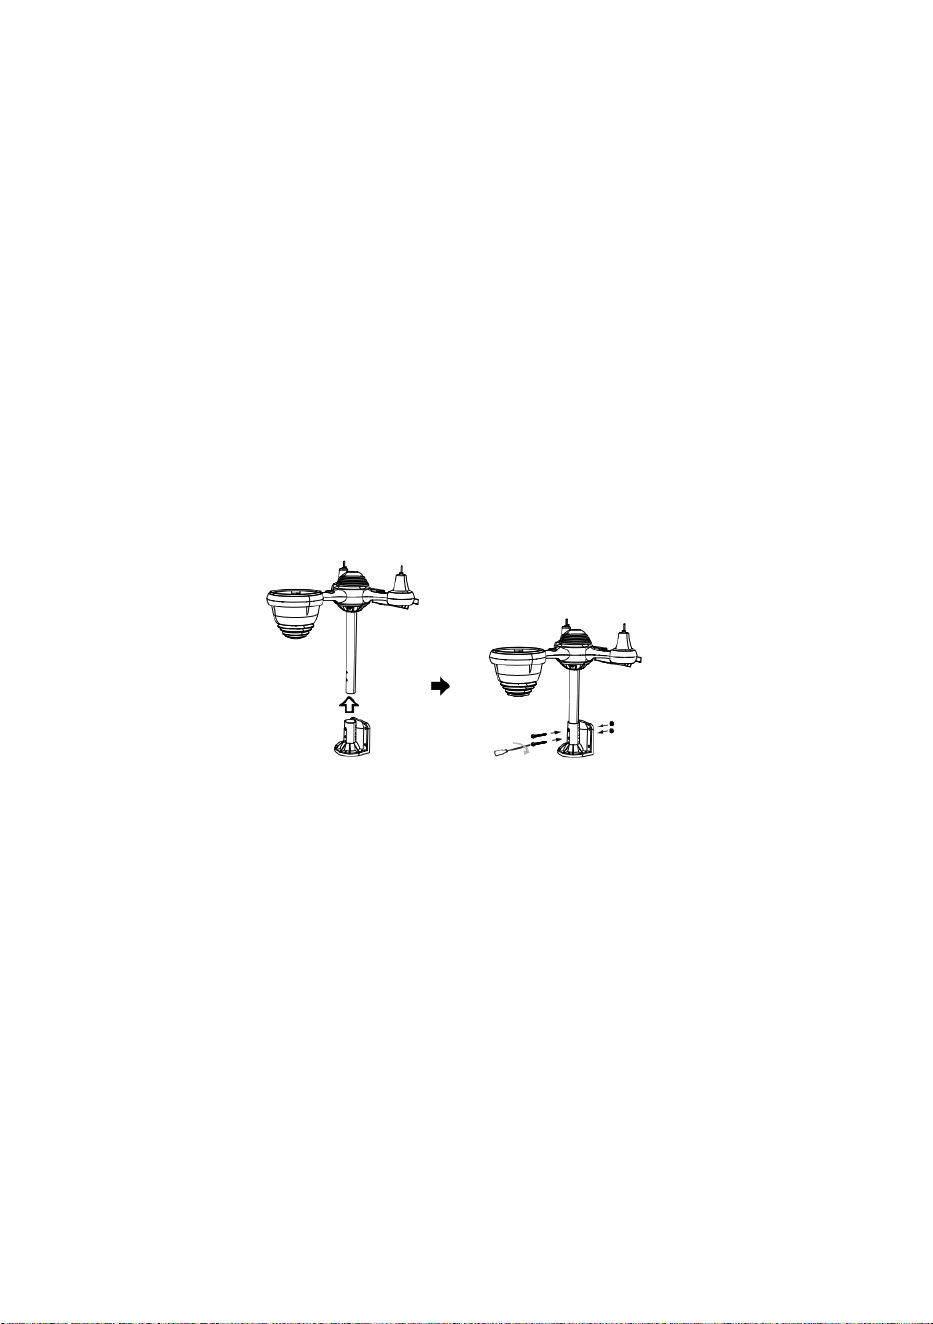
o
k
u
j
g
o
n
a
m
i
e
j
s
c
u
.
⑥
I
N
S
T
A
L
O
W
A
N
I
E
B
A

T
E
R
I
I
I
E
S
O
d
k
r
ę
ć
p
o
k
r
y
w
ę
b
a
t
e
r
i
i
n
a
d
o
l
e
.
P
o
d
ł
ą
c
z
k
a
b
②INSTALLING THE MOUNTING BRACKET
Secure the sensor onto a mounting bracket (included) using the screws (included).

e
l
a
k
u
m
u
l
a
t
o
r
,
k
t
ó
r
y
m
o
ż
n
a
ł
a
d
o
w
a
ć
.
D
o
p
a
s
u
j
p
o
d
ł
ą
c
z
o
n
e
k
a
b

l
e
t
a
k
,
a
b
y
w
y
g
o
d
n
i
e
d
o
s
i
e
b
i
e
p
a
s
o
w
a
ł
y
.
K
o
m
o
r
a
.
Z
a
m
k
n
i
j
i
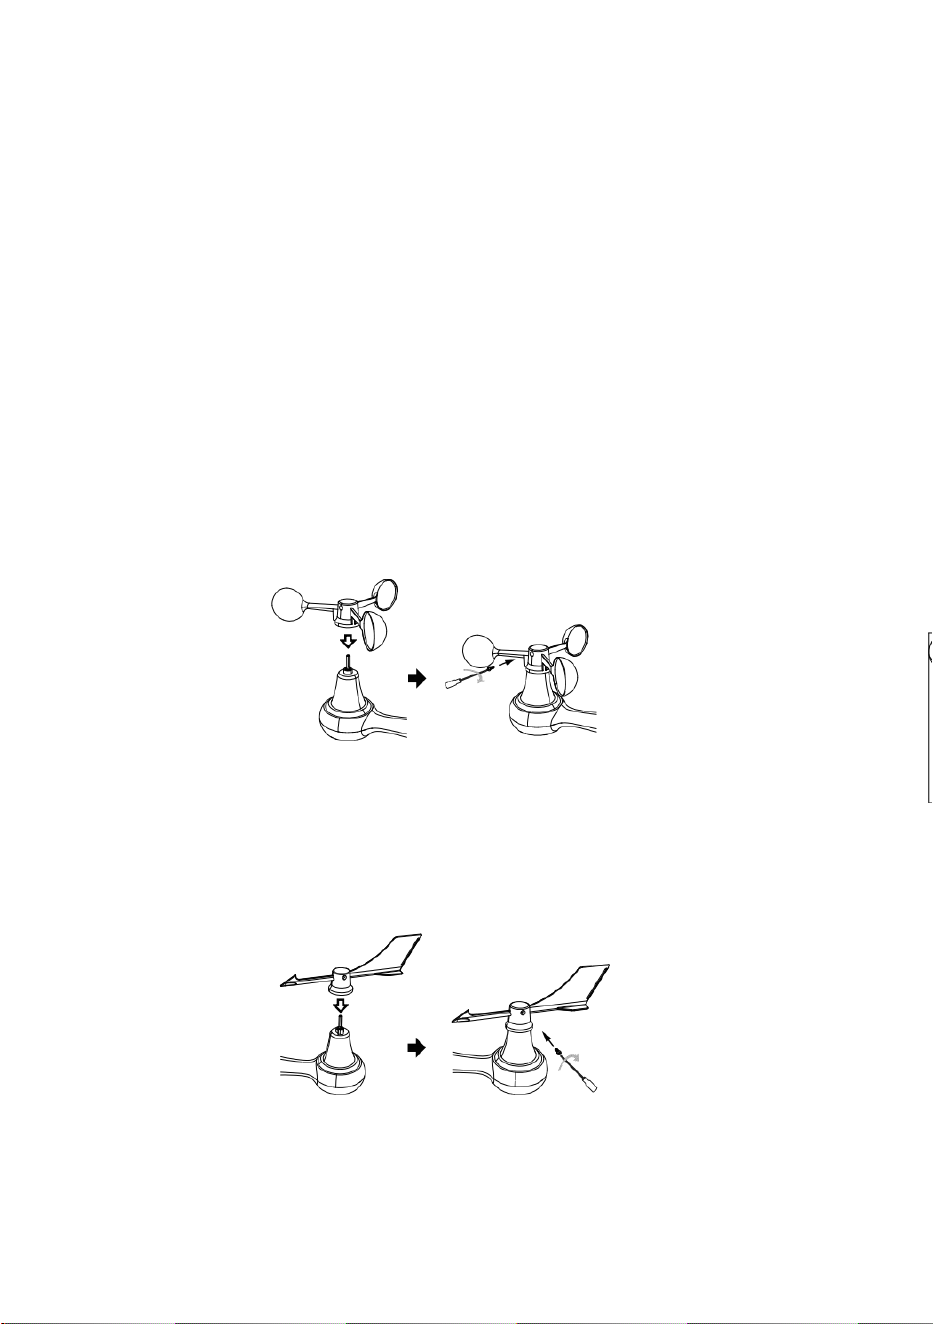
z
a
m
o
c
u
j
d
r
z
w
i
c
z
k
i
b
a
t
e
r
i
i
.
③MONTAŻ MISKÓW PRĘDKOŚCI WIATRU
Wyrównaj otwory na śruby w miseczkach czujnika prędkości wiatru z płaski, bok
pionowy z pręt metalowy.
Włóż miseczki z czujnikiem prędkości wiatru do metalowego pręta i mocno przykręć
aby zablokować go na miejscu.
W
c
i
ś
n
i
j
p
r
z
e
k

ł
a
d
n
i
ę
d
o
ś
r
o
d
k
a
i
m
o
c
n
o
d
o
k
r
ę
ć
d
z
i
e
s
i
ę
ć
ś
r
u
b
a
.

P
u
n
k
t
D
o
P
u
n
k
t
D
o
P
u
n
k
t
D
o
④MONTAŻ WIRNIKA KIERUNKOWEGO WIATRU
Wyrównaj otwory na śruby w wiatrowskazie z płaski, pionowy strona z pręt metalowy.
Włóż wiatrowskaz do pręta metalowego i mocno przykręć. aby zablokować go na
miejscu.
Point to
SOUTH

The
bubble
⑩WŁĄCZANIE
STACJA POGODOWA
Podłącz zasilacz do
pogoda stacja.
Gdy stacja pogodowa jest włączony,
automatycznie przejdzie w tryb parowania.
USTAWIANIE
POŁĄCZENIE WI-FI
Naciśnij i przytrzymaj przycisk
BARO/-/
3 sekundy na wejście Tryb AP.
ustawienia sieci Wi-Fi na komputerze
stację pogodową
SSID (WWS-XXXXXX) z listy .
Kliknij na SSID Do łączyć.
NA
NAJMNIEJ
(0,9m)
OPRÓCZ
Aby zapobiec zakłóceniom bezprzewodowym, umieść obie jednostki w odległości co najmniej 3 stóp ( 0,9 m) od siebie
z urządzeń elektronicznych (telewizora, komputera, kuchenki mikrofalowej, radia itp.).
SETTINGS
SETUP ADVANCED
Language:
Wi-Fi Router Setup
Router 12345
Select the menu and choose your 2.4GHz WIFI Router
Password
Weather Server Setup
WeatherUnderground
Station ID
Station Key
Upload wunderground.com
WeatherCloud
Station ID
Station Key
Upload weatherCloud.net
Time Zone Setup
Time Zone
Time Server Setup
Server URL
Firmware Version: 1.0.1
time.windows.com
a7d 9d 2a27 9 fbbafa
**********
**********
**********
Apply
KCACANTI9
English
Router
+0.00
Flashing: the weather station is attempting
to connect to your wireless router
Solid: the weather station has been
connected to your wireless router.
Select setup UI display language
Select your Wi-Fi Router (SSID) from the list
Router Password
Enter your station ID
Enter your station key/password
check to confirm upload to
WeatherUnderground server
Enter your station ID
Enter your station key/password
check to confirm upload to
⑧MOUNTING THE WIRELESS 7-IN-1 OUTDOOR SENSOR
Various options to install. Make sure the rain collector faces north and
the solar panel faces south before fastening the screws (included).
If you are a user located in the Southern Hemisphere,
please reverse the direction.
ENTER SETUP INTERFACE
Enter the following address into the web browser address bar:
http://192.168.1.1 to access the setup interface.
Please click to check your password before clicking
APPLY.
⑨ADJUSTING THE 7-IN-1 WIRELESS SENSOR LEVEL
Use the bubble level indicator to make sure the wireless outdoor sensor is completely level.
Weathercloud.net
Time zone setting
Internet time server setting
Press Apply to confirm the setting
Please scan the QR code or visit https://youtu.be/LESE8poieYY to see a video on how to use it.
WI-FI CONNECTION STATUS
TV
3
feet

Wsparcie techniczne i Certyfikat E-Gwarancji www.vevor.com/support
STACJA METEOROLOGICZNA
MODEL:YT60234
Nadal jesteśmy zaangażowani w zapewniamy Ci narzędzia konkurencyjne cena.
"Ratować Połowa", "Połowa ceny " lub jakiekolwiek inne podobne wyrażenia przez nas
tylko reprezentuje jakiś
Oszacowanie oszczędności, jakie możesz uzyskać kupując u nas niektóre narzędzia w
porównaniu z innymi
najlepsze marki i dawki niekoniecznie oznaczać pokrycie Wszystko kategorie oferowanych
narzędzi przez nas. Ty
Czy uprzejmie przypominamy o dokładnym sprawdzeniu, kiedy jesteś składanie
zamówienia nas jeśli ty Czy
faktycznie oszczędzając o połowę w porównaniu z najlepszymi,
największymi markami.


- 3 -
METEOROLOGICAL
STATION
MODEL:YT60234
POTRZEBOWAĆ POMOCY? KONTAKT NAS!
Mieć produkt pytania? Potrzebować techniczny wsparcie? Proszę
czuć bezpłatny Do
kontakt nas:
Obsługa Klienta@vevor.com
To jest oryginał instrukcja, proszę przeczytać wszystko podręcznik
instrukcje
ostrożnie przed uruchomieniem. VEVOR zastrzega sobie prawo do
jednoznacznej interpretacji naszej instrukcji obsługi. Wygląd produktu
powinien podlegać
produkt ty otrzymane. Proszę wybaczyć nas, że nie będziemy
poinformuję cię ponownie jeśli istnieje jakaś technologia lub
oprogramowanie Aktualizacje na naszym produkt.

SAFETYPRECAUTIONS
- 4 -
OSTRZEŻENIE! Proszę przeczytać i przed rozpoczęciem użytkowania
urządzenia należy zapoznać się ze wszystkimi środkami ostrożności,
instrukcjami obsługi oraz instrukcjami dotyczącymi pielęgnacji i
konserwacji
urządzenie. Zachowaj tę instrukcję do wykorzystania w przyszłości.
jest produkt Jest nie A zabawka. Trzymać na zewnątrz z zasięg
dzieci.
jest produkt jest przeznaczony do używać W ten dom tylko Jak
jakiś wskazanie z warunki atmosferyczne.
jest produkt Jest nie do Być używany do medyczny cele lub
dla publiczny informacja.
Do nie czyścić urządzenia środkami ściernymi lub żrący przybory.
Do nie umieść urządzenie w pobliżu otwartego ognia lub źródeł
ciepła. Pożar, porażenie prądem, uszkodzenie produktu lub
obrażenia móc zdarzać się.
Tylko użyj świeżego nowy baterie W ten produkt. Do nie mieszać
nowy I stary baterie razem.
Do nie rozmontowywać, nie filtrować ani nie modyfikować produkt.
Tylko
użyj załączników lub akcesoria z Ten produkt określony przez ten
producent.
Do nie zanurzać jednostki w wodzie. Wysuszyć produkt z miękki
płótno Jeśli wycieki płynów NA To.
Do nie narażaj urządzenia na działanie nadmiernej siły,
wstrząsów, kanał, ekstremalne temperatury i wilgotność .
Do nie zakrywać i nie blokować wentylacji dziury z dowolnymi
obiektami.
Ta stacja pogodowa tego produkt Jest przeznaczony do Być
używany w domu tylko.
Ten produkt Jest tylko odpowiedni dla montaż w wysokość mniej niż
6,6 stóp. (2 M).
Nie wolno ingerować w wewnętrzne elementy urządzenia.
Ingerencja w produkt spowoduje utratę gwarancji.
Baterie Czy nie dołączony. Gdy wkładanie baterie, robić Jasne
To pozytywne i negatywny polaryzacja pasuje do znakowania w
przedział.
robię nie mieszać standard, alkaliczny, I akumulatorowy baterie
razem.
Pozostawienie akumulator narażony na ekstremalne wysokie
temperatury w otaczającym środowisku mogą spowodować
eksplozję Lub wyciek ciecz łatwopalna lub gazu.

SAFETYPRECAUTIONS
- 4 -
Pozostawienie akumulator narażony na ekstremalne niskie
ciśnienie powietrza W otaczające środowisko może spowodować
eksplozję Lub wyciek ciecz łatwopalna lub gazu.

TIPS FOR SENSORSITE SELECTION
- 5 -
Zbieracz deszczu musi być czyszczonym co kilka miesiące.
Czujnik powinien Być zainstaluj ed w co najmniej 5' (1,5 M) z dala od
każdy budynek Lub struktura.
A lokalizacja W jakiś Otwarte przestrzeń pod
bezpośredni światło słoneczne z NIE przeszkody.
Czujnik powinien pozostać w w zasięgu wzroku i w promieniu 492' (1
50 m) stacji pogodowej w celu zapewnienia stałej, stabilnej transmisji .
Trzymaj czujnik i stację pogodową z dala od gospodarstwa
domowego.
urządzeń działających na tej samej częstotliwości. Konsola i
czujnik powinien znajdować się co najmniej 3' -7' (1 - 2 m) z dala z taki
interferencje .
CECHYPRODUKTU
Kolorowe i duży wyświetlacz cyfrowy z superjasnością
podświetlenie.
9 funkcjonalny pikolak: USTAWIENIE, TEMP./ALARM , DESZCZ,
WIATR/+, BAR/-/ , ALERT, MAX/MIN, KANAŁ, ŚWIATŁO/
DRZEMKA
Czas automatycznie synchronizuje się z internetem.
Alarm z funkcją drzemki.
czasu letniego (DS T).
Strefa czasowa: GMT ±12.
Księżyc Faza.
Temperatura wewnętrzna i zewnętrzna (°C/°F) oraz wilgotność
odczyty z trendem.
Godzinowe, Dzienne, Tygodniowe , Miesięczne, Całkowite
opady deszczu i Opad deszczu stawka w ten przeszłość godzina.
Średnia prędkość wiatru, porywisty wiatr prędkość i wiatr kierunek
wyświetlacze.
Absolutny i względny Barom etykowy wyświetlacze ciśnienia z
tendencja.
Intensywność światła i Promieniowanie ultrafioletowe indeks
wyświetlacz .
Indeks pogody wyświetlacz : Czuć lubi, Wiatr Chłod, Ciepło indeks,
Rosa punkt.
Prognoza pogody.
Maks./min. czytanie.
Ustawienia alertów pogodowych.

TIPS FOR SENSORSITE SELECTION
- 5 -
Prześlij pogodę dane do pogody Podziemny i /lub Weathercloud
przez Wi-Fi routera.
4-poziomowy jasność podświetlenia t.
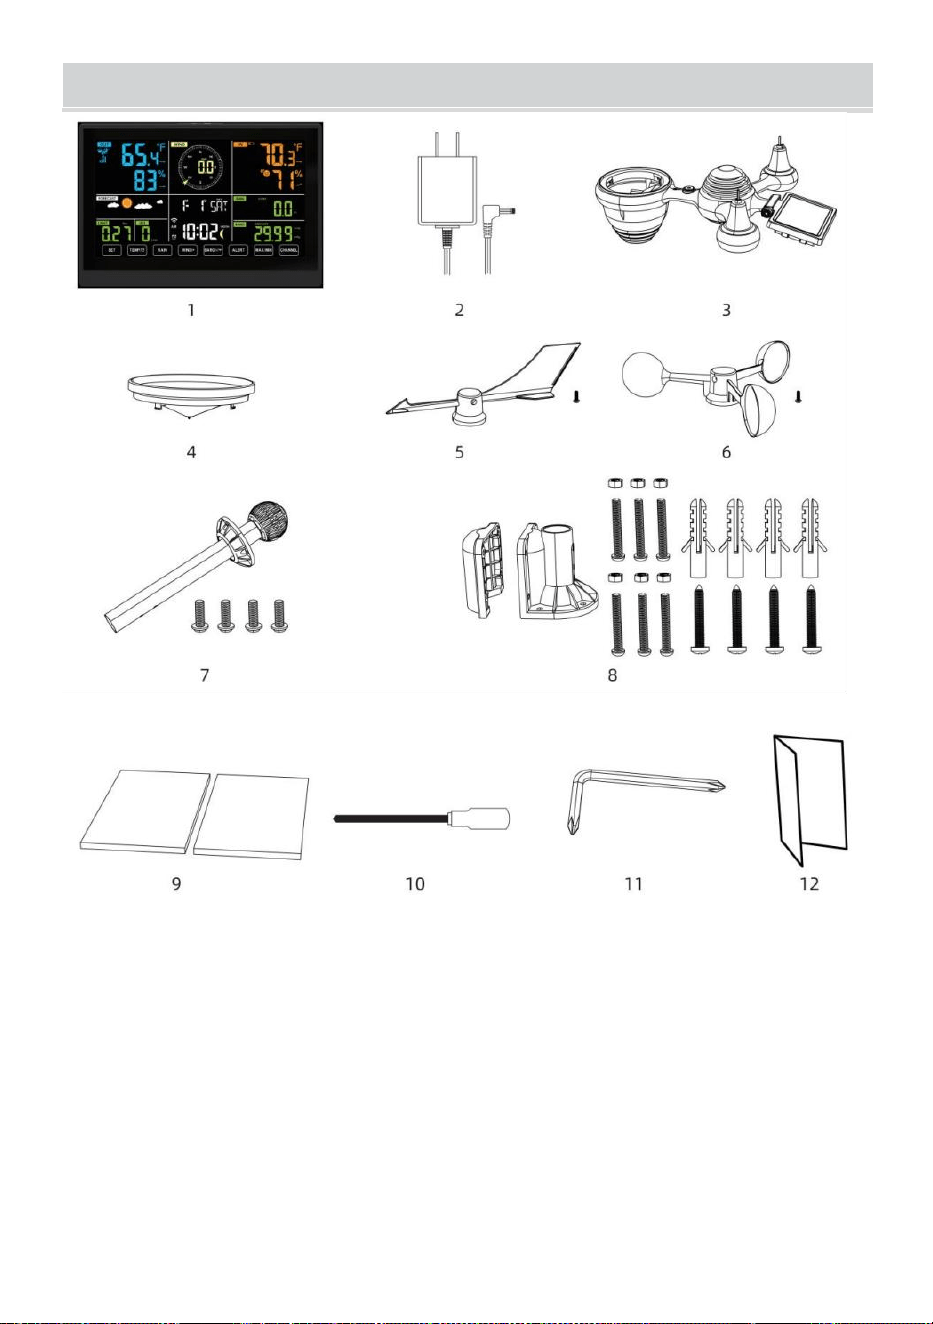
- 6 -
ZAWARTOŚĆOPAKOWANIA
1 stacja pogodowa
2 Adapter
czujnik zewnętrzny 7 w 1
4 Lejek
5. Chorągiewka kierunku wiatru z 1 śruba
6 kubków prędkości wiatru z 1 śruba
7 Montowanie słupek z 4 śrubami
8 Montowanie uchwyty z 6 śrubami
9 Guma podkładki X 2
10 Śrubokręt 1
11 Śrubokręt 2
12 Instrukcja obsługi

UWAGA: Do wiatrowskazu i miseczek wskazujących prędkość wiatru
potrzebne są 4 dodatkowe śruby.
PRODUCT OVERVIEW
- 7 -
BEZPRZEWODOWE 7 W 1 ZEWNĘTRZNE CZUJNIKI
1 Słoneczny płyta
2
Wiatrowskaz kierunku wiatru
3 Czujnik UV/światła
4 Poziomica pęcherzykowa gradientujący
5 Zbieracz deszczu
6
Puchary prędkości wiatru
7 Montaż Polak
8 Montaż wsporniki
9 Czujnik higrotermiczny
10 PROWADZONY: Miga, gdy
jednostka przekazuje czytanie
⑪ Przycisk RESET
⑫ Drzwi baterii

WEATHERSTATION
- 8 -
- 9 -
1 Temperatura/wilgotność zewnętrzna czytanie, pogoda indeks
2 Kierunek wiatru i prędkość
3
Odczyt temperatury/wilgotności wewnętrznej
4 Prognoza pogody
5 Czas i data, księżyc faza, My w dni powszednie
6 Światło intensywność
7
UV indeks
8 Deszcz
9 Barometr
10 USTAWIĆ przycisk
11 TEMPERATURA/ przycisk (ALARM)
12 Przycisk DESZCZU
13 Przycisk WIATR/+
14 BAR/-/ (Wi-Fi) przycisk
15 Przycisk ALERT
16 Przycisk MAX/MIN
17 Przycisk KANAŁ
18
ŚWIATŁO/DRZEMKA przycisk
19
Komora baterii (3,6 V) Ni-MH akumulatorowy bateria pakiet)
USTAWIENIE W GÓRĘ BEZPRZEWODOWY 7-W-1CZUJNIK
ZEWNĘTRZNY
Bezprzewodowy czujnik zewnętrzny 7 w 1 mierzy prędkość wiatru,
kierunek wiatru , opad deszczu, UV, natężenie światła , temperatura i
wilgotność.

- 9 -
INSTALOWANIE MONTOWANIE BIEGUN I NAWIAS
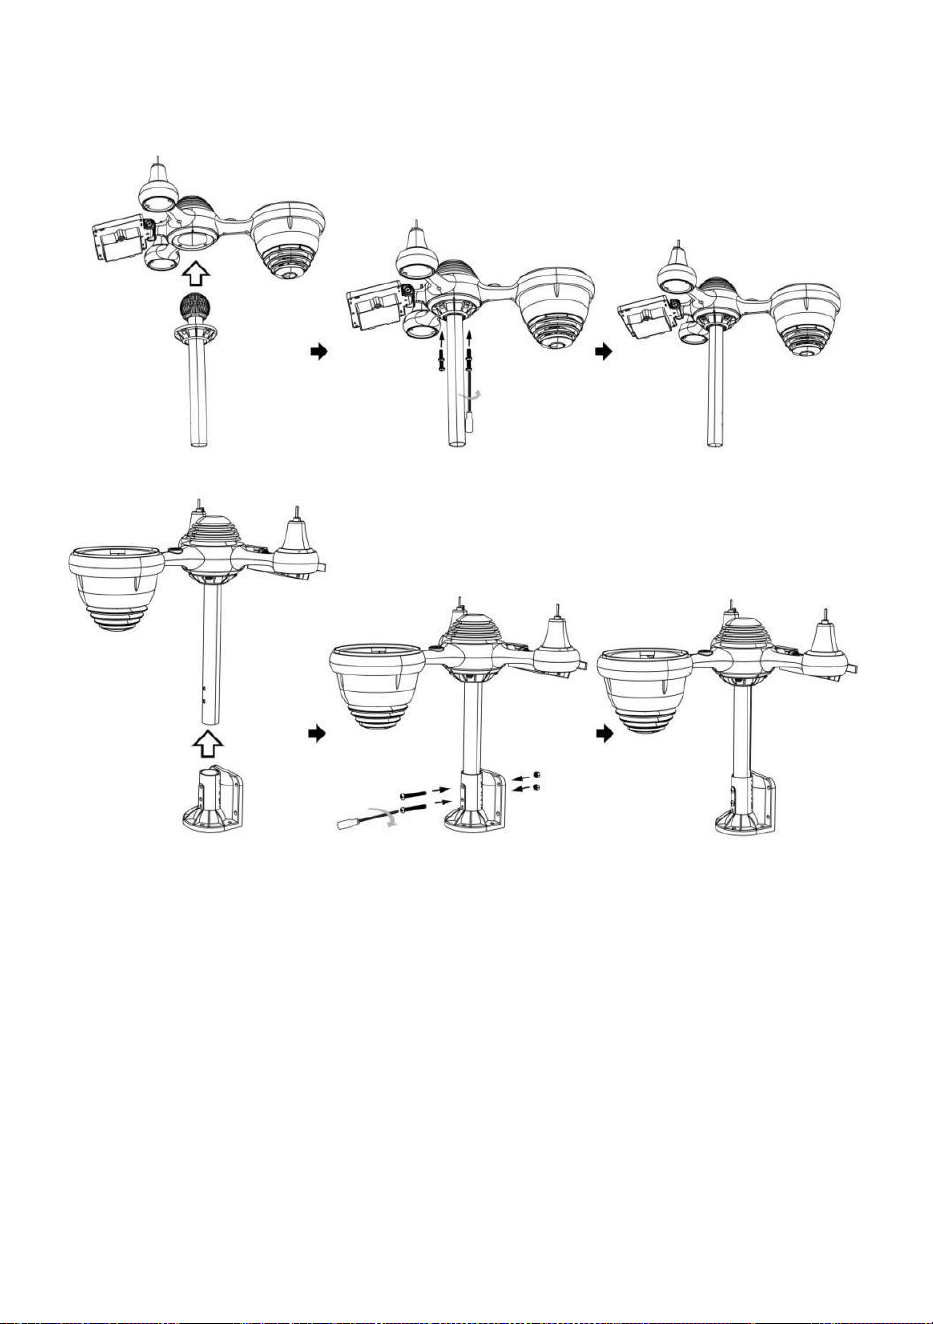
- 10 -
● Zamocuj czujnik na słupku montażowym i nawias (dołączony ) za
pomocą śrub ( w zestawie ).
INSTALOWANIE KIELICHÓW PRĘDKOŚCI WIATRU I ŁOPATKĘ
JONOWĄ KIERUNKU WIATRU
● Wyrównaj otwory na śruby w miseczkach czujnika prędkości wiatru z
płaski, pionowy strona z ten metal pręt.
● Włóż kubki pomiarowe prędkości wiatru do metalu pręt I pieprzyć ich
NA obcisły Do zamek To W miejsce.
● Wyrównaj otwory na śruby w wiatrowskazie z płaską, pionową strona z
metalu pręt.
● Włóż chorągiewkę kierunku wiatru w metalu pręt i mocno je przykręć
zamek To W miejsce.
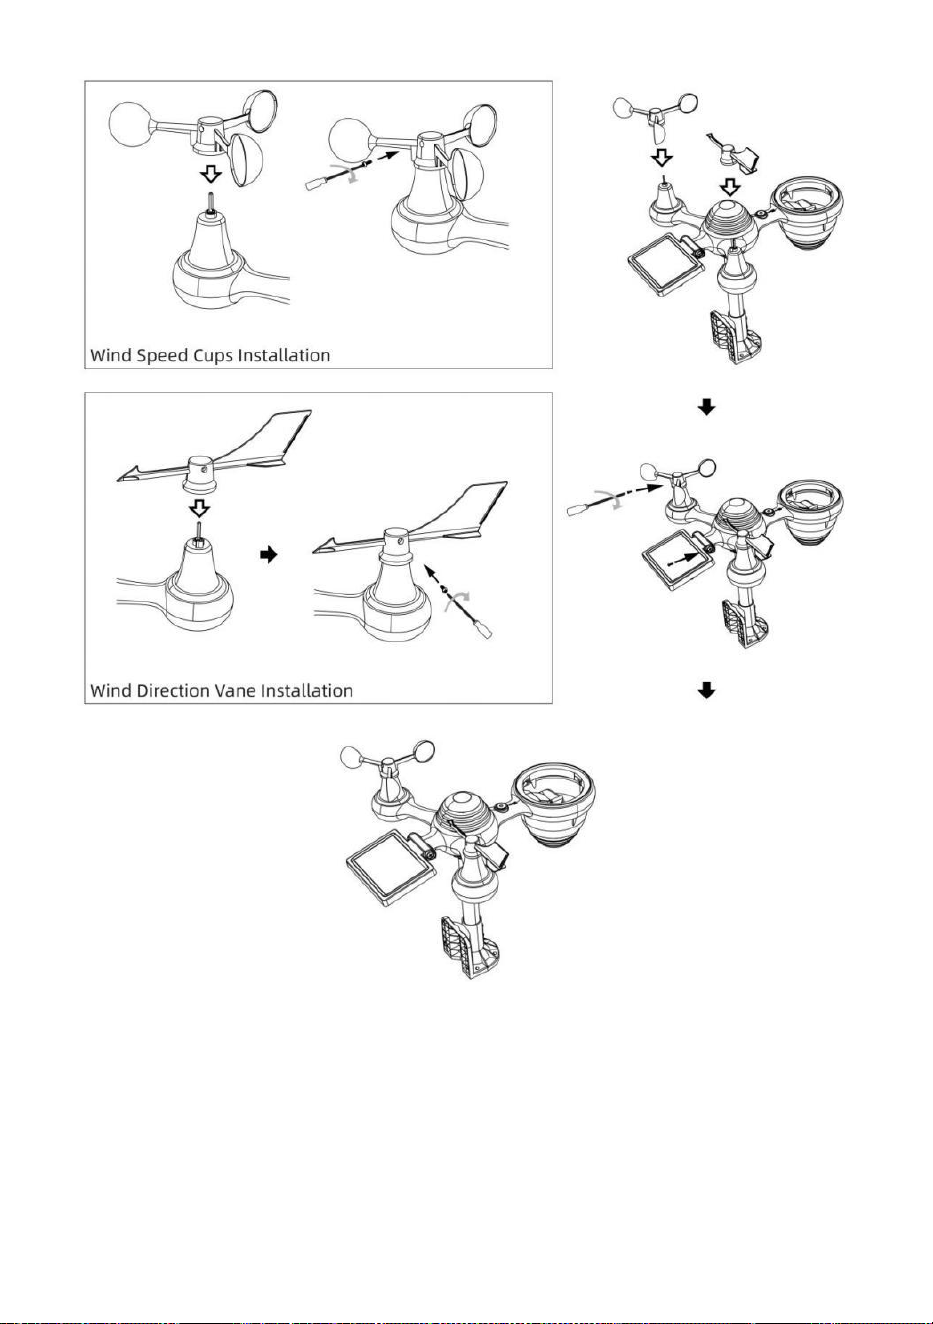
- 11 -
USTAWIENIE ZBIERACZ DESZCZU
● Wyrównaj nacięcia na lejku z rowkami blokującymi wewnątrz ten
deszcz kolektor.
● Włóż lejek w zbiorniku na deszczówkę i przykręcić je obcisły Do zamek
To W miejsce.

- 12 -
INSTALOWANIE BATERIE
● Odkręć pokrywę baterii znajdującą się na dole Czujnik zewnętrzny
7 w 1 za pomocą śrubokręta 1.
● Podłącz kabel do akumulatora zestaw baterii (dołączony) do kabel
znajduje się w akumulatorze przedział.

- 13 -
Dopasuj podłączone kable tak, aby wygodnie mieściły się w komorze.
Następnie, włóż akumulator do przedział.
Zamknij i zapiąć ten bateria drzwi z powrotem NA ten przedział.
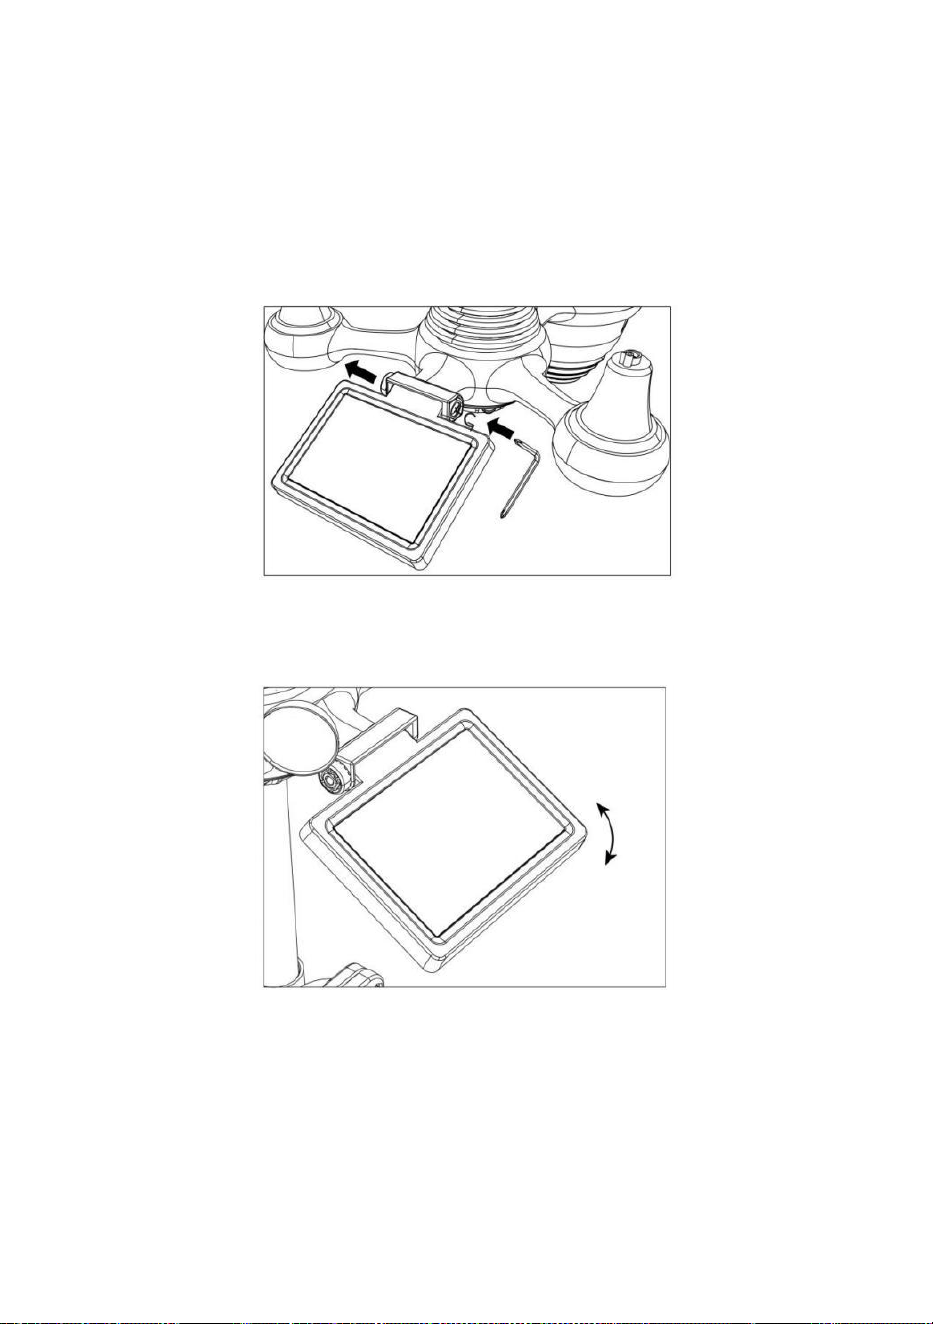
- 14 -
OGNIWA SŁONECZNEGO
● Odkręć śrubę przy połączenie, aby koło zębate znajdowało się po
drugiej stronie z wspólny wypycha. Ogniwo słoneczne powinno teraz
Być W jakiś odblokowany pozycja.
● Dostosuj kąt pionowy ogniwa słonecznego, aby uzyskać najbardziej
optymalny wykorzystanie ogniwa słonecznego w zależności od
lokalizacja.
● Wciśnij przekładnię do środka i dokręć śrubę do momentu ten koła
zębate zamek W miejsce.

- 15 -
Podczas regulacji ogniwa słonecznego ustaw je pod kątem najbardziej
zbliżonym do Twojej szerokości geograficznej . Zobacz poniżej wykres,
aby uzyskać wyobrażenie z jak ty powinien kąt twój słoneczny komórka.
Szerokość geograficzna
Bliskość
Ogniwo słoneczne Wybór kąta
Jeśli Twoja lokalizacja to
zamknąć Do 84°
84°
Jeśli Twoja lokalizacja to
zamknąć Do 63°
63°
Jeśli Twoja lokalizacja to
zamknąć do 42°
42°
Jeśli Twoja lokalizacja to
zamknąć Do 21°
21°
Jeśli Twoja lokalizacja to
zamknąć Do 0°
0°
MONTAŻ BEZPRZEWODOWEGO CZUJNIKA ZEWNĘTRZNEGO 7-I N-
1
Wybierz lokalizację zewnętrznego czujnika 7 w 1, który Jest
otwórz za pomocą NIE przeszkody.
Dokręć montowanie nawiasy do powierzchnia/ściana używając
cztery śruby samogwintujące (w zestawie) lub dokręć śrubę
mocującą biegun do twojego obecnego
montowanie słup z czterema φ5 Śruby i M5 Montaż nakrętek.
Dodaj podkładki gumowe na ten montowanie nawias zanim
zapięcie ten montowanie uchwyt na czujniku.

- 15 -
Upewnij się, że zbiornik na deszczówkę jest skierowany na
północ i słoneczny płyta twarze skierowane na południe zanim
zapięcie ten śruby ( w zestawie ).
ę zapewnić To ten transduktor Jest naprawił w szczególności
ciasno, w przeciwnym razie wietrzne warunki powodują drżenie
nadajnika i błędne odczytywanie sygnału

- 16 -
dane dotyczące opadów deszczu.
Skierowanie bezprzewodowego czujnika zewnętrznego 7 w 1 na
południe (FAKULTATYWNY)
Bezprzewodowy czujnik pogodowy do użytku na zewnątrz jest
skalibrowany tak, aby spiczasty północ dla maksymalna dokładność.
Jednak dla Twojej wygody, jeśli jesteś użytkownikiem
znajduje się w południowej części Półkula, możesz użyj czujnika z deszcz

- 17 -
kolektor skierowany na południe.
1.) Zamontuj i zainstaluj bezprzewodowy czujnik temperatury za
pomocą zbieracz deszczu wskazując na południe, zamiast Północy.
(Proszę zapoznać się z MONTAŻ
BEZPRZEWODOWY 7 W 1 NA ZEWNĄTRZ CZUJNIK .)
2.) Wybierz „STH” dla półkuli południowej w ten zegar ustawienie tryb.
(Proszę zobacz „ustawianie zegara”)
UWAGA: Zmiana ustawienia półkuli spowoduje automatyczną
zmianę kierunek faz księżyca NA wyświetlacz.
Skierowanie bezprzewodowego czujnika pogody w stronę
południa zapewni maksymalne nasłonecznienie panelu
słonecznego, zwłaszcza w sezonie zimowym na południu Półkula.
BEZPRZEWODOWEGO CZUJNIKA 7 W 1 POZIOM
● Użyj bańki poziom wskaźnik, aby upewnić się, że bezprzewodowy
czujnik zewnętrzny jest całkowicie równy. Jeżeli czujnik nie jest poziom,
ten osiągać miernik, Promieniowanie ultrafioletowe I Światło intensywność
będzie nie Zmierz dokładnie.
● Aby wyregulować poziom bezprzewodowego czujnika zewnętrznego,
poluzuj śruby montażu Polak. Dostosuj poziom bezprzewodowego
czujnika zewnętrznego, aby upewnij się, że bańka Jest w środku bańki
poziom w dyktaturze.
● Dokręć śrubę mocującą biegun znowu n.
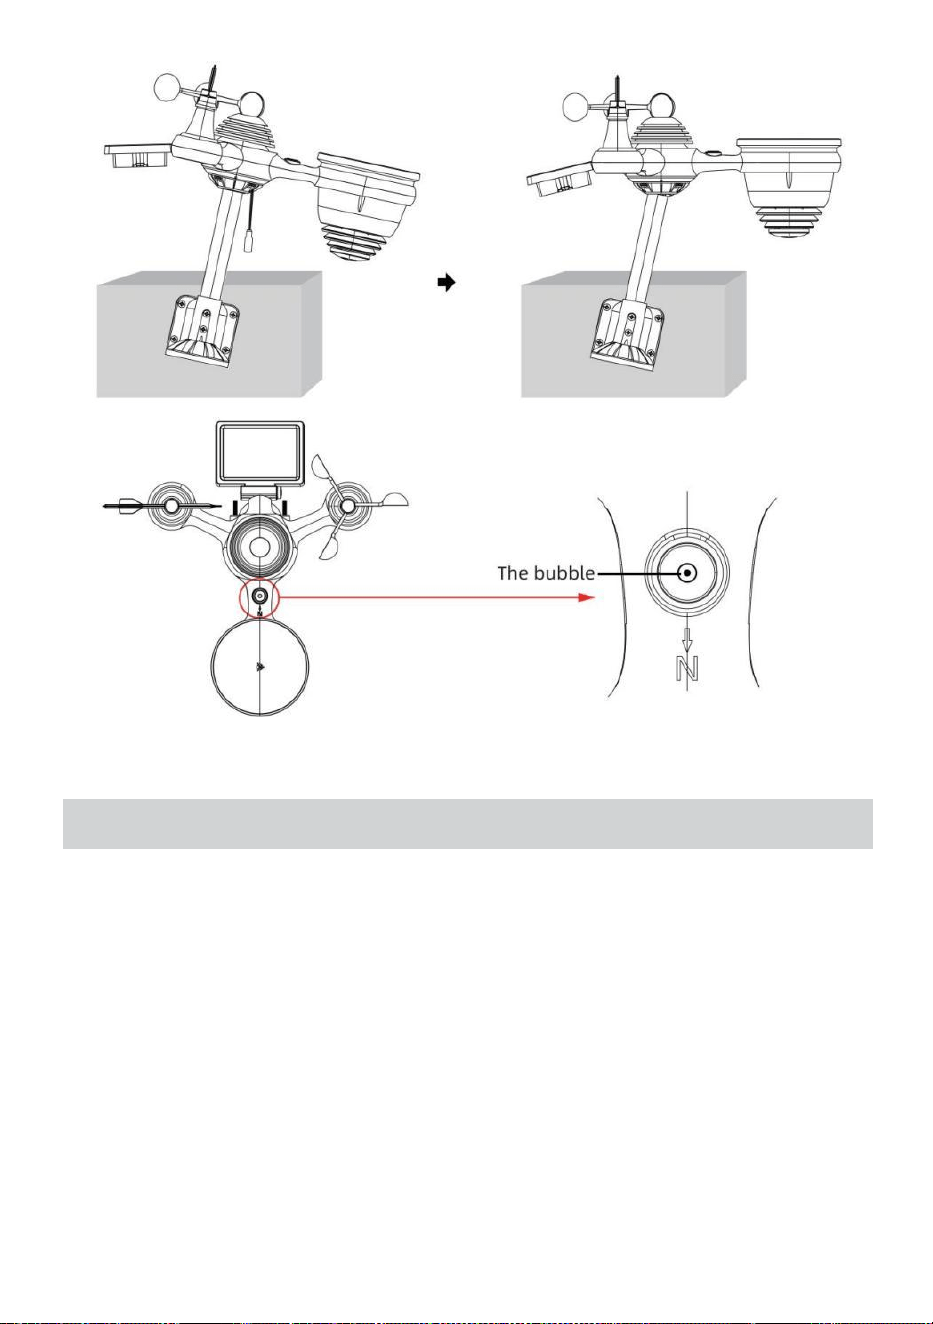
- 18 -
USTAWIENIE W GÓRĘ STACJI POGODOWEJ
ZASILANIE W GÓRĘ STACJI POGODOWEJ
● Podłącz zasilacz do gniazdka elektrycznego. podnośnik usytuowany
W ten z powrotem stacji meteorologicznej. Wstaw 3 nowy Baterie
alkaliczne AAA (brak w zestawie) stanowiące zapasowe źródło
zasilania.
● Po stacji pogodowej jest włączony, automatycznie wejdzie łączenie w
pary tryb.
PAROWANIE BEZPRZEWODOWEGO CZUJNIKA 7 W 1
● Po włączeniu stacji pogodowej powinna ona: automatycznie szukaj do
czujników bezprzewodowych i łączenia się z nimi. Jeżeli stacja
pogodowa nie

- 18 -
połącz się w ciągu pierwszych 5 minut, zapoznaj się z poniższą sekcją,
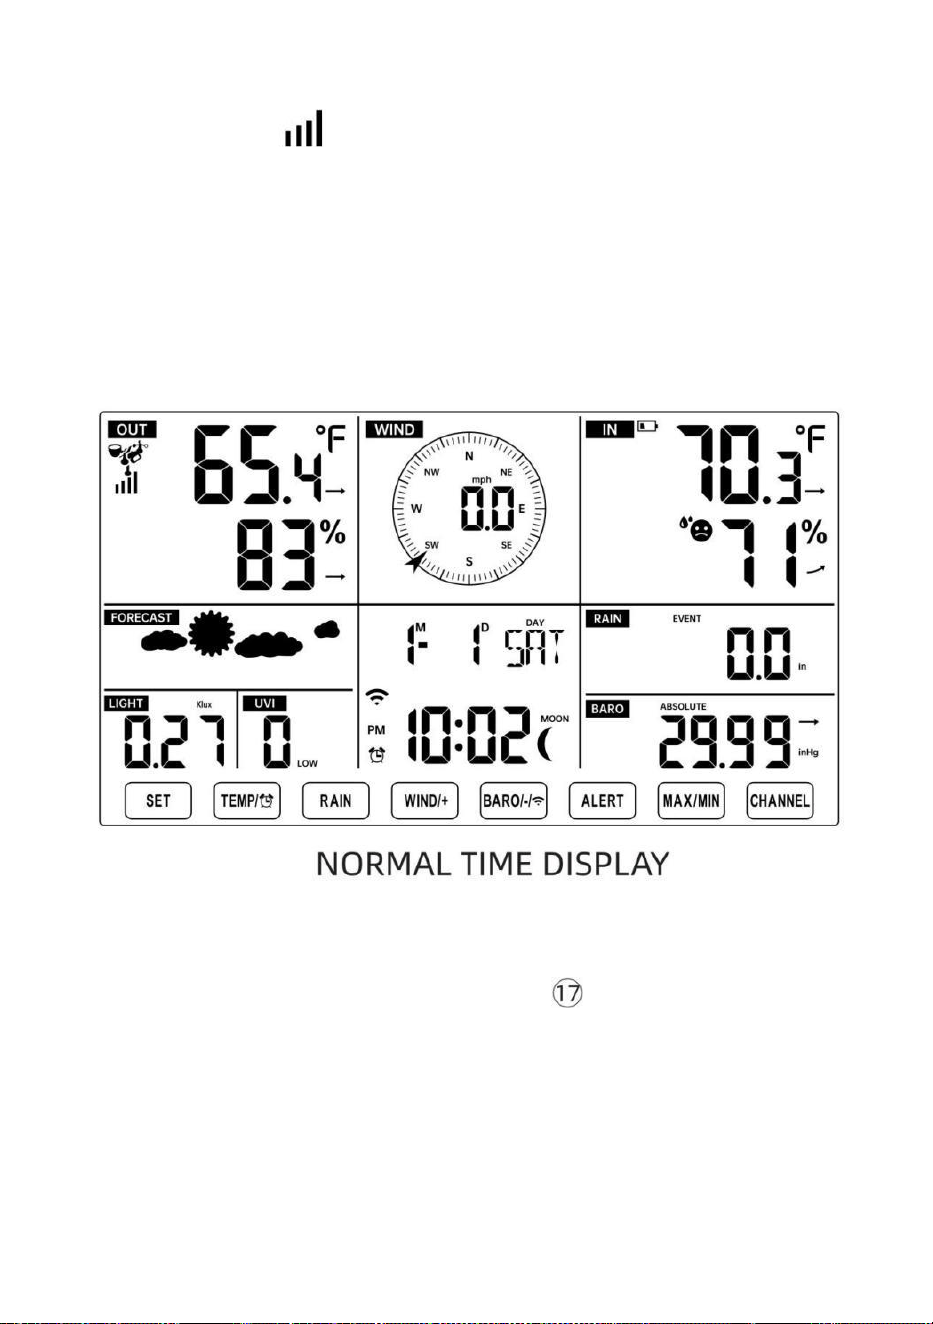
- 19 -
„„PONOWNE PAROWANIE CZUJNIKA”.
● Zobaczysz ikonę anteny przesuwającej się w sekcji wyświetlacza,
pokazującej temperaturę i wilgotność (na zewnątrz) .
● Po sparowaniu po zakończeniu procesu ikona anteny zniknie pojawić
się stałe (nie migające) oraz odczyty temperatury i wilgotności zewnętrznej,
wiatru prędkość, kierunek wiatru, UV, światło intensywność i opady
deszczu będą się pojawiać W ich
wyznaczone sekcje wyświetlacza LCD
PONOWNE PAROWANIE CZUJNIKA
● Jeśli połączenie zostanie przerwane lub stacja pogodowa nie działa jest
resetowany, następnie naciśnij i trzymać ten Naciśnijprzycisk
【
KANAŁ
】
i
przytrzymaj go przez 2 sekundy, aby przejść do trybu parowania, a
następnie
stacja pogodowa będzie ponownie zarejestruj wszystkie czujniki, które już
zostały został
zarejestrowano go wcześniej (tj. stacja pogodowa będzie nie stracić ten
połączenie sparowanych czujników w górę zanim.)
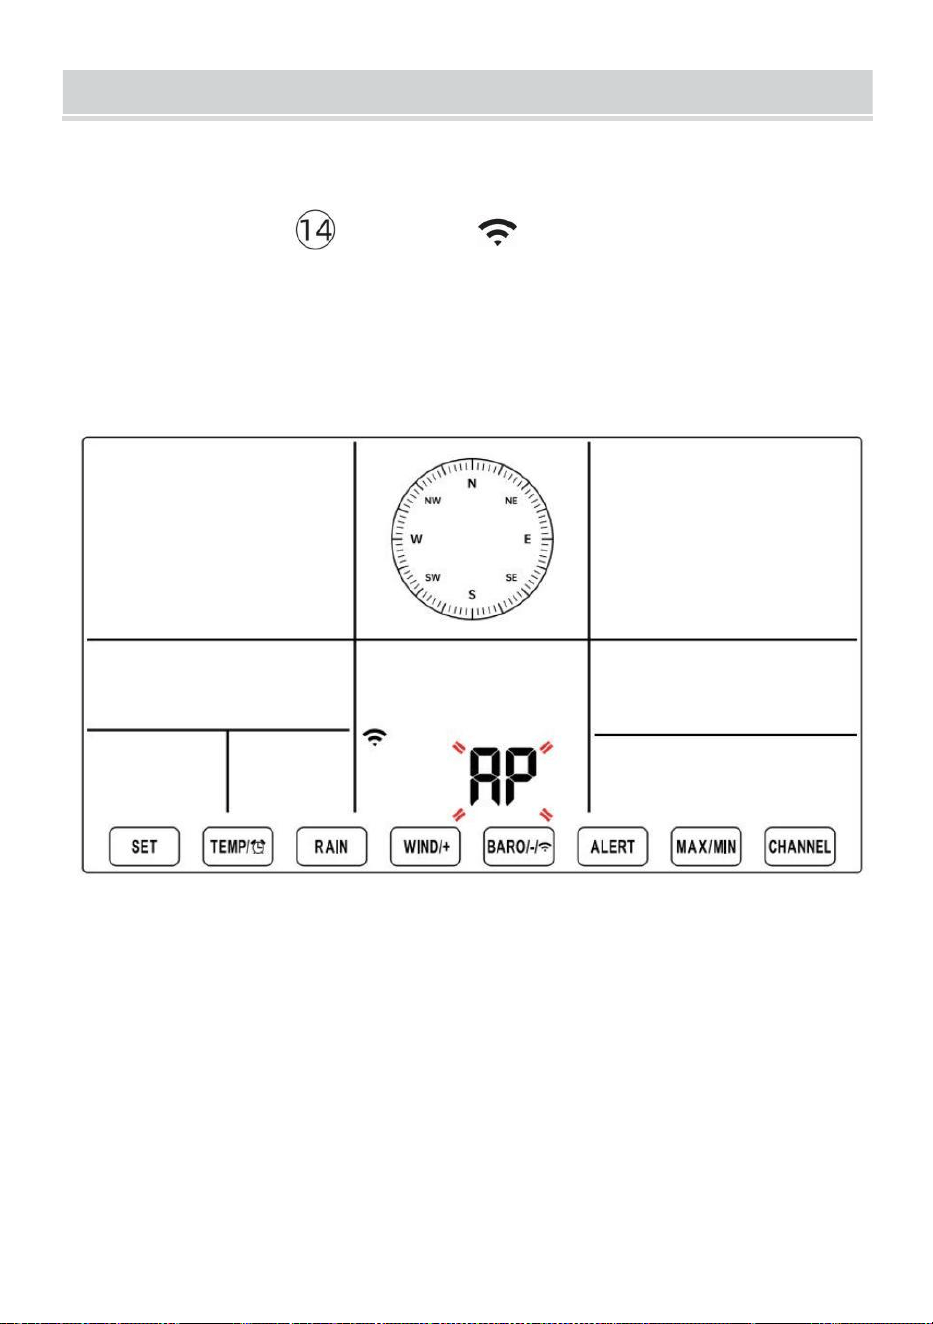
SETUPINSTRUCTION
- 20 -
USTAWIENIE UP POŁĄCZENIE WI-FI I MAMY DRUGI
SERWER POŁĄCZENIE
Naciśnij i przytrzymaj 【 BARO/-/ 】 przycisk powyżej r 3
sekundy, pogoda stacja Na wyświetlaczu LCD pojawi się litera „AP”, która
To wszedł Dostęp
Punkt (AP) tryb. W tym momencie będzie Być gotowy do ustawienia
Wi-Fi Być dostosowano.
Użyj smartfona, tabletu lub komputera, aby połączyć się ze stacją
pogodową przez Wi-Fi, wykonując następujące czynności:
Włączony Komputer, Otwarte Twoja sieć Wi-Fi sieć Ustawienia. NA
Android™ Lub iOS
urządzenia, przejdź do menu ustawień, a następnie wybierz
Połączenia/WI-FI Do otwórz sieć Ustawienia.
Znajdź SSID stacji pogodowej na liście. Powinno się pojawić Jak
WWS-XXXXXX (gdzie wszystkie X są liczbami całkowitymi) w lista.
Uzyskiwać NA SSID do połączenia. Ten krok zajmie kilka sekund.

SETUPINSTRUCTION
- 20 -
Kiedy ty są połączone Do pogoda stacja, Otwarte w górę twój
internet lub sieć mobilna przeglądarki i wprowadź następujący adres
ten
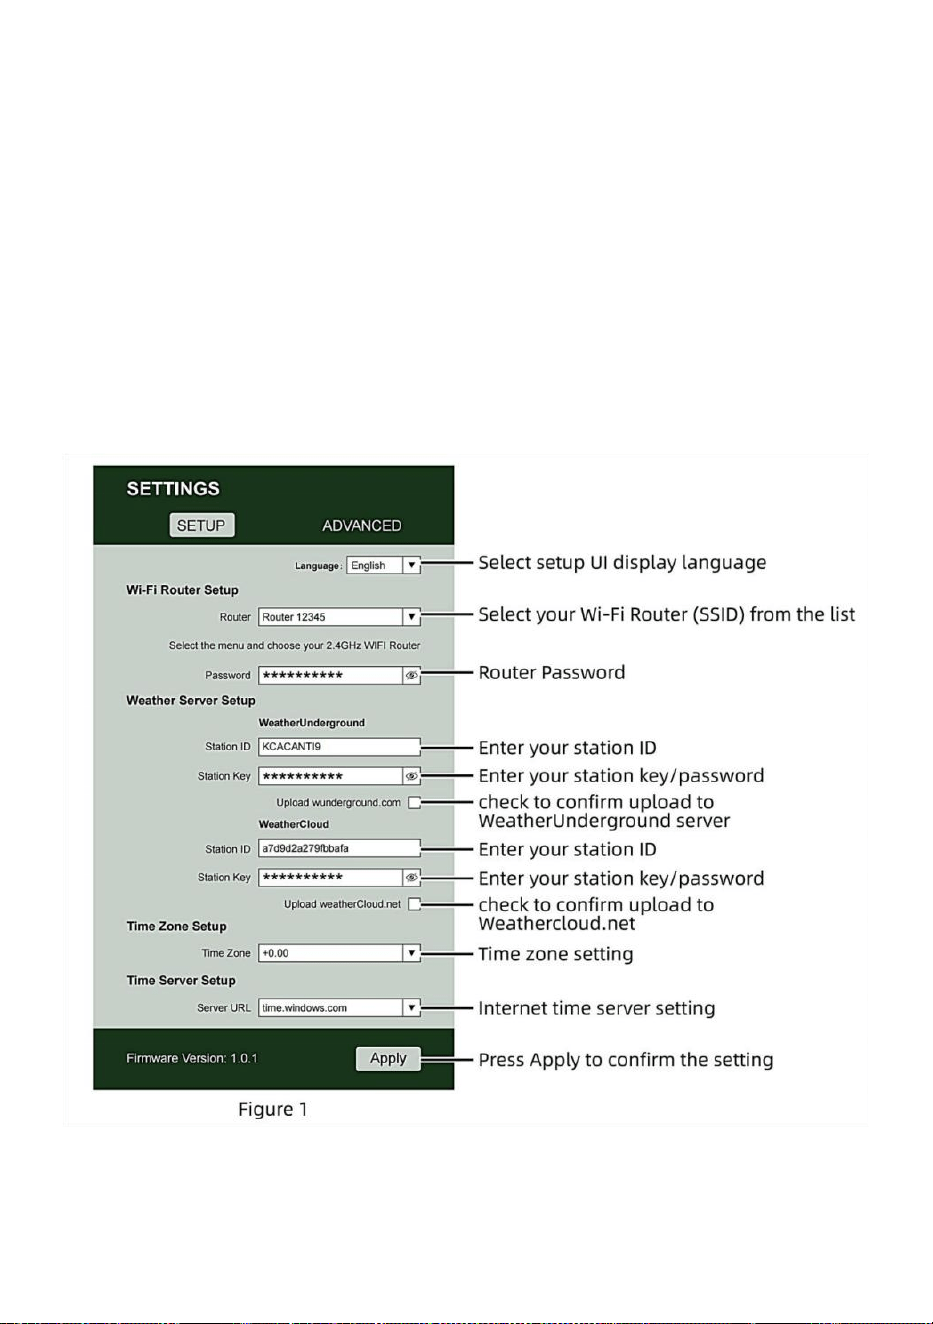
- 21 -
pasek adresu: http://192.168.1.1, aby uzyskać dostęp do interfejsu
internetowego stacji pogodowej . (Upewnij się, że włącz http:// lub
else sieć przeglądarka może zinterpretować adres jako zapytanie
wyszukiwania). polecić korzystając z najnowszej wersji
renomowanej witryny internetowej przeglądarki.
Wprowadź następujące dane informacja n do interfejsu
internetowego (rysunek 1). Robić pewnie wszystkie informacje jest
wpisany przed wybraniem opcji Zapisz. Jeśli ty
wybierz opcję nie przesyłania Wunderground.com lub
weathercloud.net, pozostaw pola wyboru niepowstrzymany.
NOTATKA :
Ustawienia strefy czasowej (domyślne ) : 0h). Aby automatycznie
ustawić wyświetlanie czasu zgodnie ze swoją strefą czasową, zmień

- 21 -
strefę czasową w sekcji Ustawienia serwera czasu na stronie
USTAWIENIA z „0:00” (domyślnie) na swoją strefę czasową (np.
+1:00
- 22 -
Do Niemcy ).
5.) Jeżeli wszystkie wprowadzone przez Ciebie informacje są poprawne,
naciśnij „ Zastosuj ” Do potwierdzać (Postać 1). Jeśli nie, sprawdź swoją
sieć interfejs Jeszcze raz proszę o informację.
UWAGI:
Po zakończeniu konfiguracji sieci Wi-Fi komputer lub urządzenie
mobilne urządzenie
powróci do domyślnego połączenia Wi-Fi. Jeśli tak nie, po prostu
otwórz ustawienia sieci bezprzewodowej swojego urządzenia i
ręcznie na nowo połączyć.
Chwila w trybie AP możesz nacisnąć i trzymać
【
BARO/-/
】
przycisk przez ponad 3 sekundy, aby wyjść z trybu AP. Stacja
pogodowa po prostu przywróci poprzednie ustawienia AP.
KALIBROWANIE
Po połączeniu się ze stacją pogodową za pomocą sieci Wi-Fi i otworzyłem
ustawienia strona na http://192.168.1.1 , kliknięcie „ ZAAWANSOWANE ”
spowoduje otwarcie następującego okna strona (Rysunek 2).

- 22 -

- 23 -
1) Możesz Wchodzić Lub zmiana ten zrównoważyć I osiągać
wartości Do różny pomiar parametr s.
2) Kiedy już Posiadać ukończyłeś swoje libacje ca , naciskać ten "STOSOWAĆ"
przycisk.
3) Obecny wartość przesunięcia będzie aktualizacja Do pokazywać ten wartość To
Ty wszedł
( Zamiast z ten domyślny wartość ). Jeśli Ty chcieć Do zmiana ten wartość , ty
Móc Wchodzić nowy wartość W ten skrzynka obok ten liczba ( jako W krok 1)
Do aktualizacja ten wartość ponownie , naciskać " STOSOWAĆ " przycisk .
NOTATKA :
My robimy nie zalecamy kalibrację większości wartości z wyjątkiem z
Względny Ciśnienie, które musieć być prawidłowo skalibrowany, aby
odzwierciedlać Twoje
odległość nad poziomem morza poziom uwzględniający wysokość
ruchomości.
STATUS POŁĄCZENIA WI-FI
Gdy stacja pogodowa połączy się pomyślnie z routerem Wi-Fi,
Sygnał Wi-Fi
pojawi się na wyświetlaczu LCD wyświetlacz .
Jeśli sygnał Wi-Fi
Jest niestabilny lub stacja pogodowa próbuje się połączyć router, ten
Ikona zacznie migać. Jeśli ikona zniknie, To oznacza, że stacja
pogodowa jest nie połączony z routerem Wi-Fi .
Błyskowy: ten pogoda stacja s
Jest Próba Do łączyć Do twój
bezprzewodowy routera.
Solid: stacja pogodowa ma został
podłączony do sieci przewodowej
routera.
NOTATKA :

- 23 -
Jeśli Ty własny A podwójny zespół router (2,4 GHz) I (częstotliwość 5,0
GHz ) robić Jasne Ty połącz się z 2,4 GHz zespół, w przeciwnym razie nie
uda się połączyć stacji pogodowej
Wi - Fi .

- 24 -
STAN POŁĄCZENIA Z SERWEREM CZASU
Po połączeniu stacji pogodowej z internetem , będzie próba aby
połączyć się z internetowym serwerem czasu w celu uzyskania czasu
UTC czas. Raz ten
połączenie zostało nawiązane, a czas stacji pogodowej został
zaktualizowano. Ten ikona Na wyświetlaczu pojawi się napis „SYNC”.
Ekran LCD.
Aby wyświetlić prawidłowy czas dla swojej strefy czasowej, należy:
potrzebować
Zmień strefę czasową w ustawieniu ZEGARA tryb od 00 (domyślny) do
twojego strefa czasowa (np. -5 dla EST). Jeśli nie znasz swojej strefy
czasowej , możesz ją sprawdzić online.
NOTATKA :
Czas zostanie automatycznie zsynchronizowany z Internet na godzinę.
UTWÓRZI SYNCHRONIZUJSWOJEKONTO SERWERA
POGODY
STWÓRZ POGODĘ KONTO PODZIEMNE
1.) Odwiedź: https://Wunderground.com i wybierz opcję „Dołącz” w
górny w prawo i w róg i stwórz A Bezpłatny Konto.
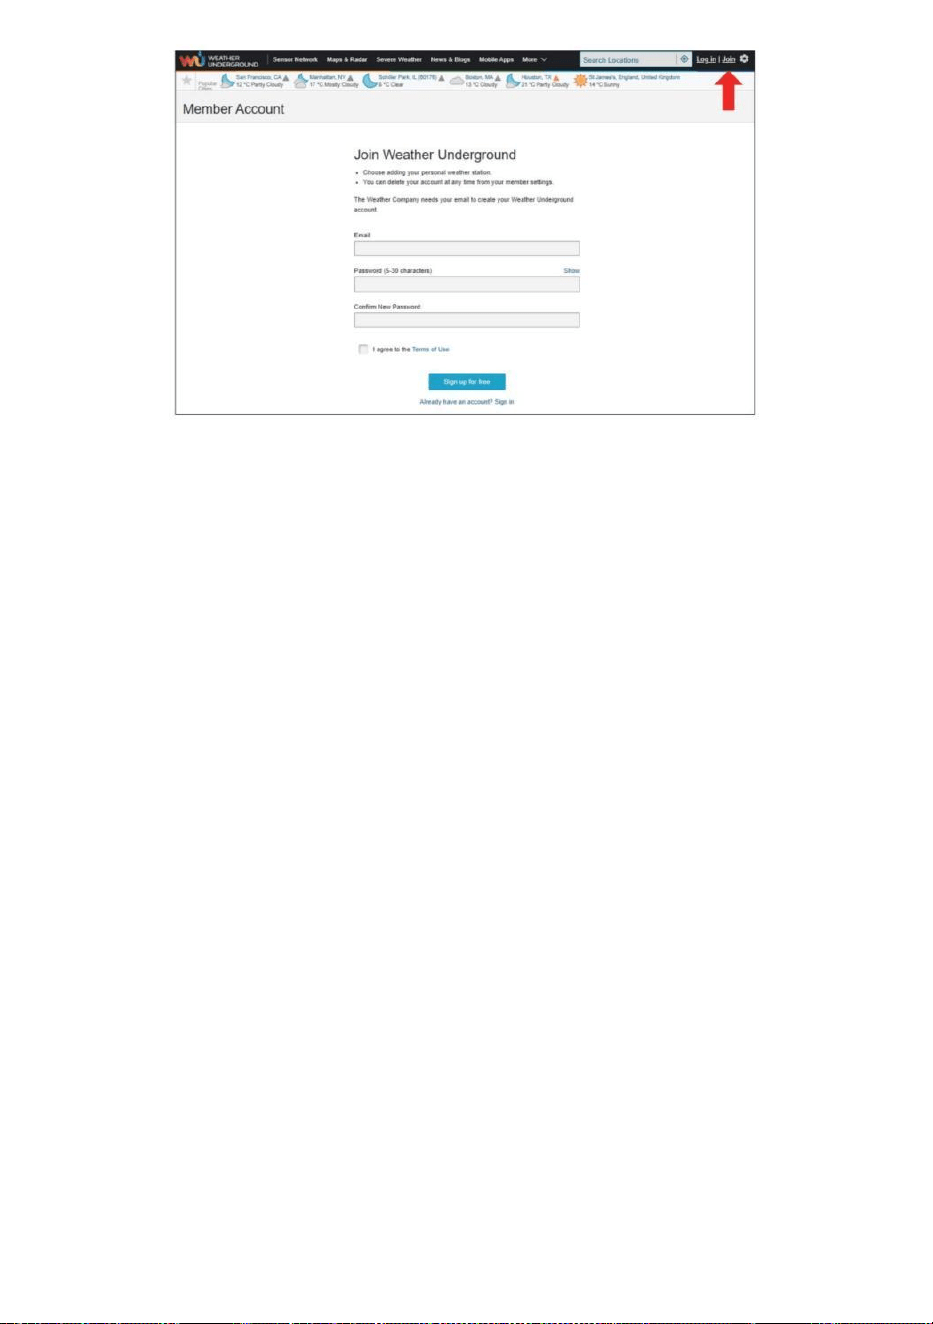
- 24 -

- 25 -
2.) Wprowadź Nazwa użytkownika , E-mail I Hasło (To jest twój Login
hasło do strony internetowej, a nie hasło do poczty e-mail. Więc nie
prywatność będzie być narażonym). Kliknij Podpisać za darmo .
3.) Po dokonaniu rejestracji skutecznie, to będzie Być pokazano
poniżej ten wiadomość.

- 26 -
4.) Kliknij „Zaloguj się” i wprowadź adres e-mail i hasło ty po prostu
zarejestrowany.
5.) Kliknij „Mój profil” „ i wejdź Członek Ustawienia.
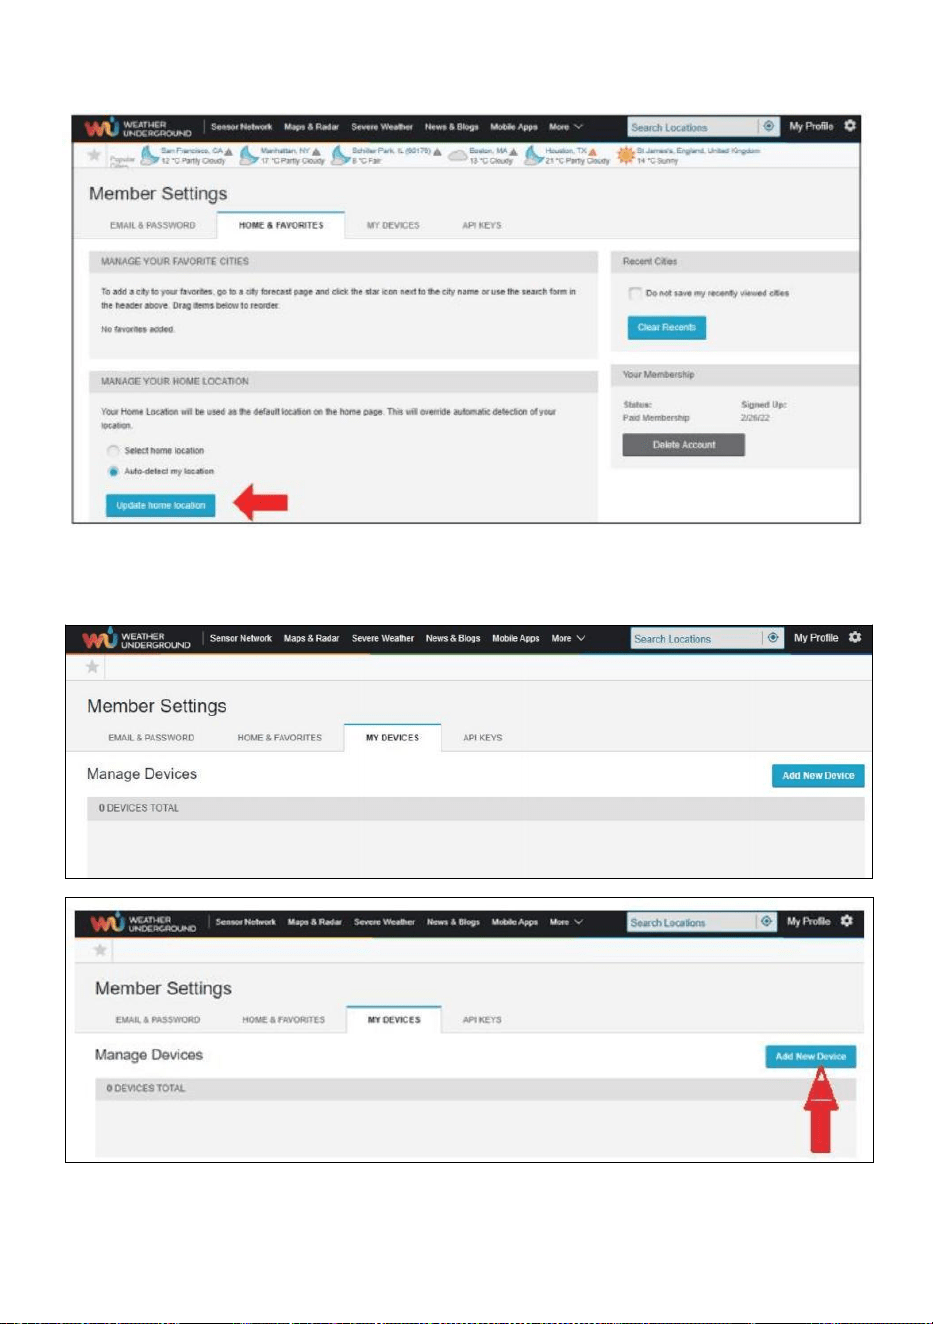
- 27 -
6.) Kliknij „Aktualizuj” dom lokalizacja ” .
7.) Kliknij „Moje Urządzenia", I kliknij „Dodaj” Nowy Urządzenie".

- 28 -
8.) Wybierz adres, wprowadzając adres lub wybierz Podręcznik Do
pozycja
Twój adres automatycznie sojusznik. Następnie kliknij „Następny ".
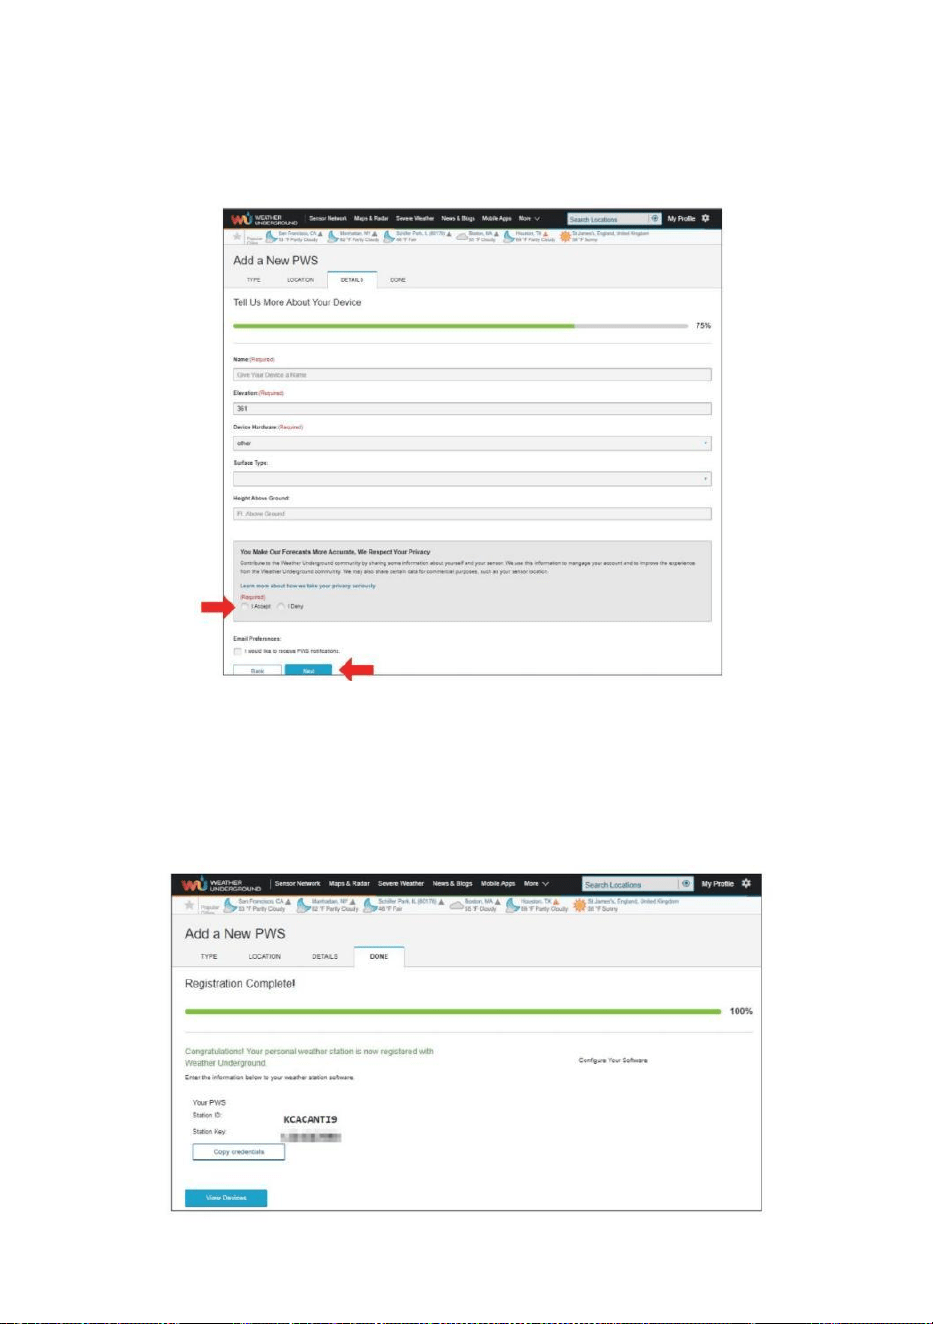
- 29 -
9.) Wprowadź informacje o pogodzie. Pola oznaczone kolorem
czerwonym (wymagane) muszą być puste. Być wypełniony W.
NOTATKA :
Ty Móc wybierz „ inne ” z ten Urządzenie Sprzęt .
10.) Po zakończeniu tej sesji kliknij „Akceptuję ” i „Następny ".
11.) Po pomyślnej rejestracji, Proszę zapisz swoją pogodę
Podziemny Identyfikator i Kluczowe informacje dotyczące
późniejszej konfiguracji używać.

- 30 -
12.) Jak pokazano poniżej rejestracja zostało wykonane pomyślnie.
UTWÓRZ SWOJE KONTO WEATHERCLOUD
1.) Odwiedź witrynę Weathercloud pod adresem https://weather
cloud.net/ i wprowadź A Nazwa użytkownika, E-mail i Wpisz hasło i kliknij
„ Zarejestruj się ”. Po
instrukcje dotyczące tworzenia konta.
UWAGA: To najlepiej zrobić to na A komputer pulpit Lub laptopa.
(To jest twój Login hasło do strony internetowej nie twój e-mail hasło.
Więc NIE prywatność będzie narażony).
2.) Kiedy To jest udany, jakiś e-mail będzie Być otrzymane w twoim
zarejestrowany skrzynka pocztowa.
3.) Otwórz pocztę i zaloguj się do sieci adres W ten poczta.
Trzask „ Aktywuj twój Chmura pogodowa konto ”.
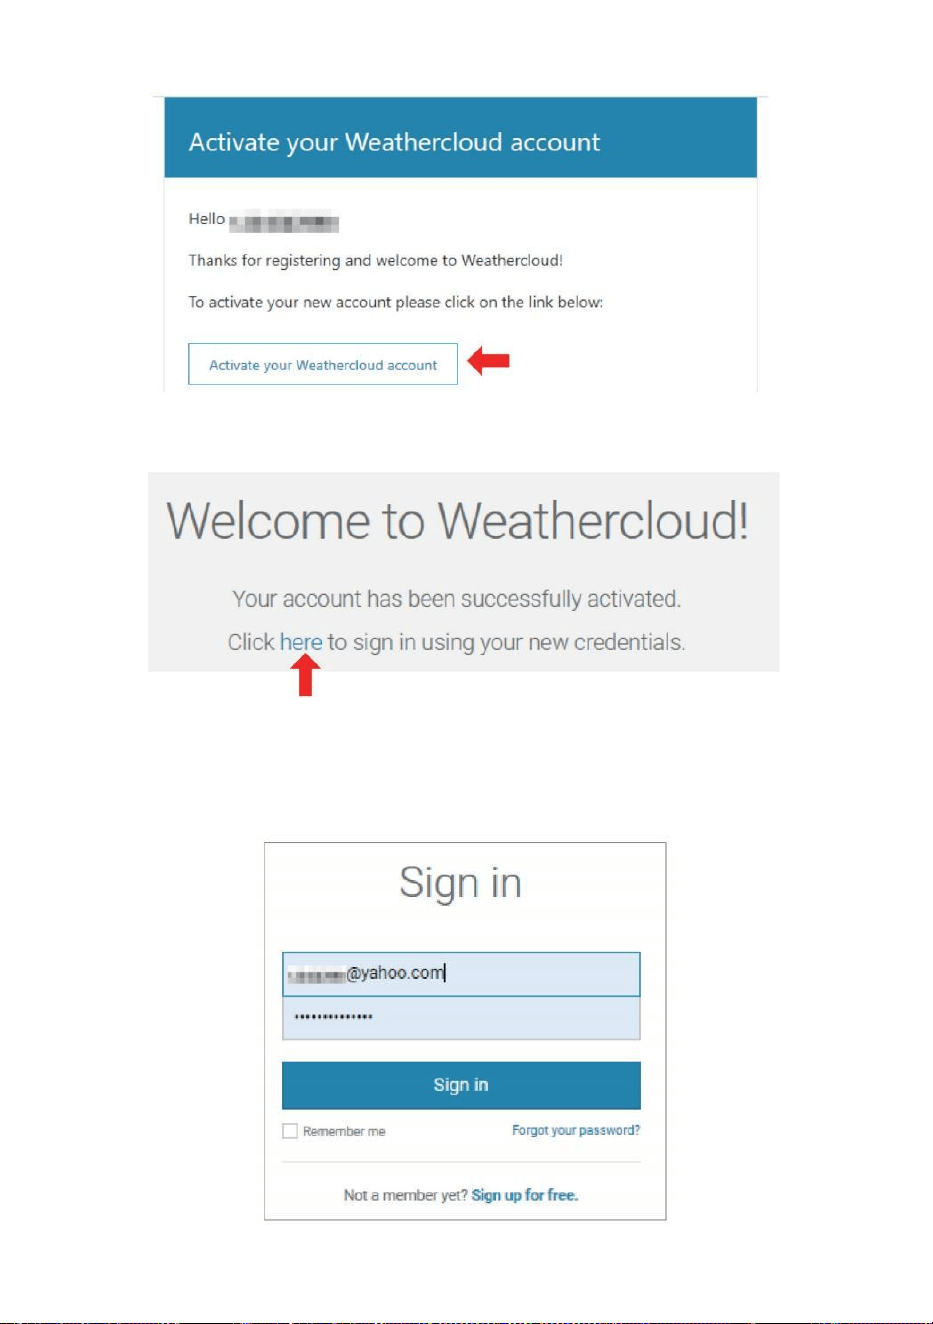
- 31 -
4.) Kliknij „ tutaj „aby wejść Strona główna witryny Weathercloud. 5.)
Wprowadź adres e-mail i hasło, które właśnie zarejestrowałeś, aby wejść
na stronę Strona internetowa Weathercloud.
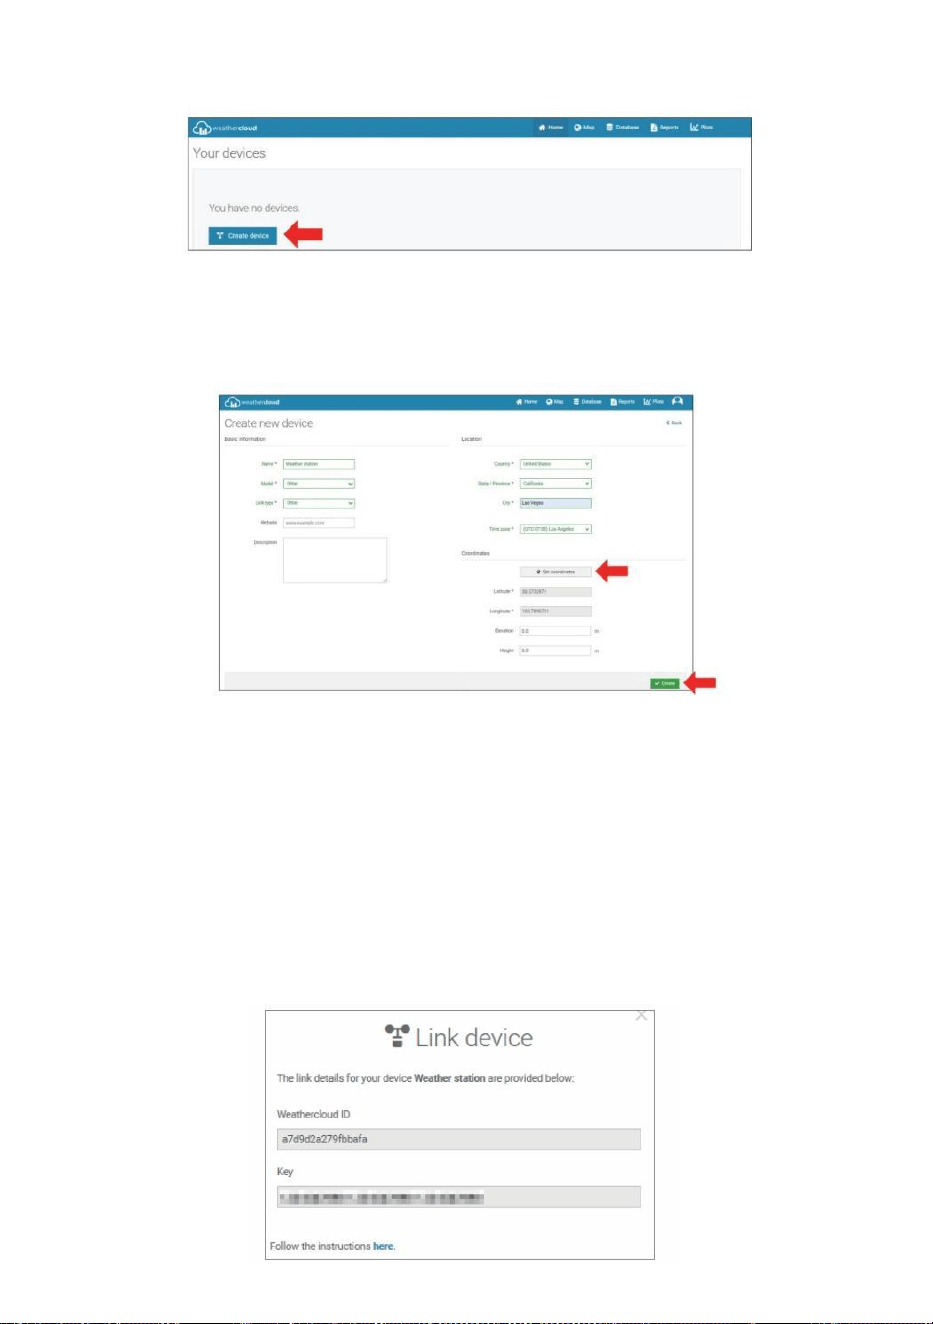
- 32 -
6.) Kliknij „ Utwórz urządzenie ”, aby dodać stację pogodową.
7.) Wprowadź wszystkie wymagany informacja do Tworzyć Nowy
Urządzenie strona. Puste pola z czerwonym *muszą być wypełnionym
W.
NOTATKA :
Ty Móc wybierz „ inne ” z ten Model numer I Połączyć typ W ten powyżej
puste miejsca. Kliknij „Uzyskaj współrzędne”, aby zidentyfikować swoje
lokalizacja na ten mapa, kliknij „ Gotowe ” do potwierdź .
8.) Kiedy już ukończyć Ten sekcja , Kliknij „ Utwórz ”.
9.) Po pomyślnej rejestracji, proszę zapisz swoją Weathercloud ID I
Kluczowe informacje dotyczące późniejszej konfiguracji używać.
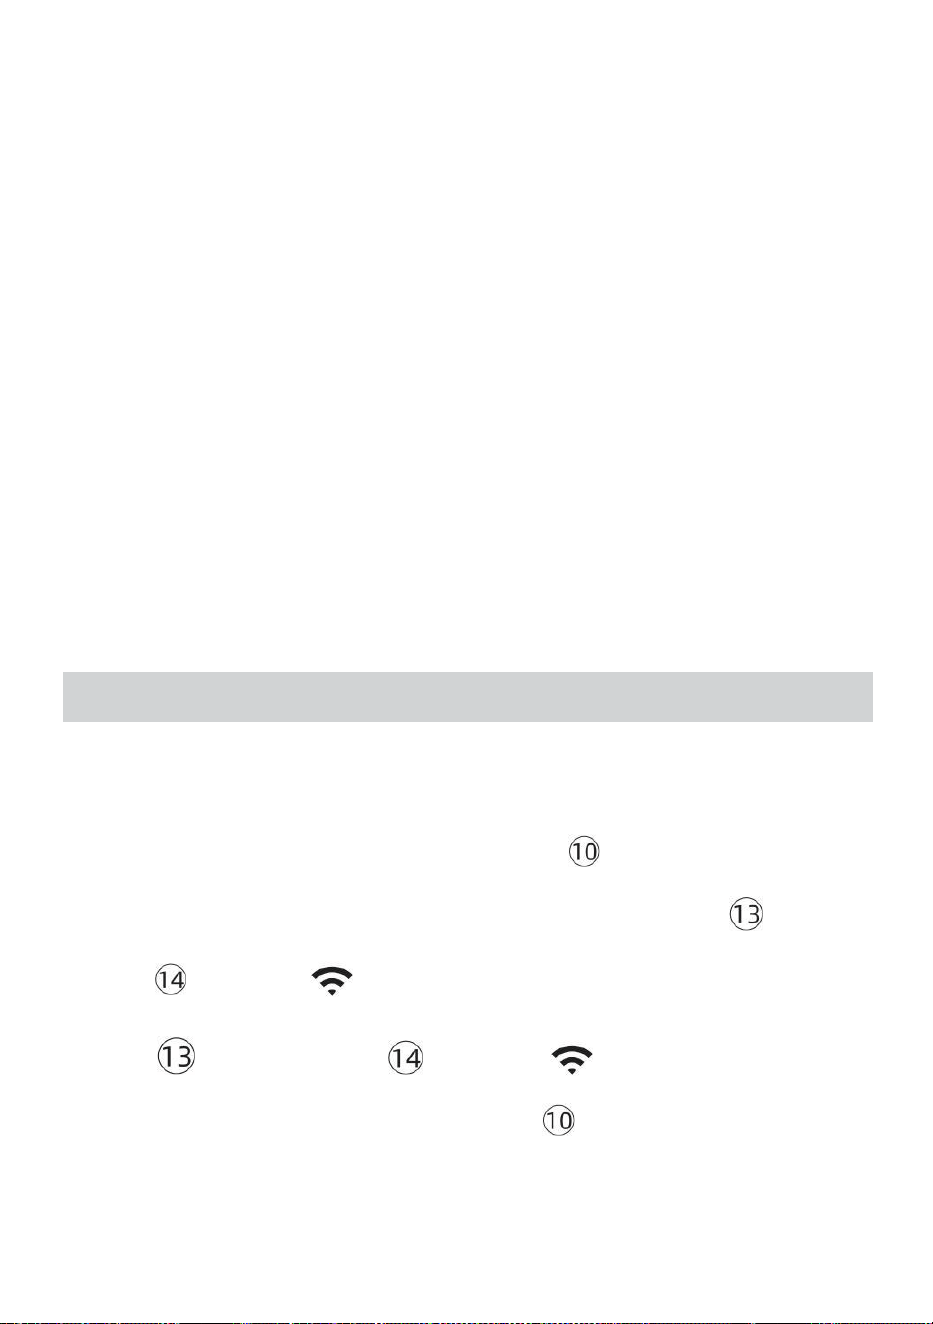
- 33 -
ZOBACZ SWOJĄ POGODĘ DANE DOTYCZĄCE POGODY PODZIEMNY
Aby przeglądać dane ze stacji pogodowej na żywo za pośrednictwem
Komputer lub sieć mobilna przeglądarka,
odwiedzać http://www.wunderground.com, a następnie wejdź na
stację Identyfikator, który otrzymałeś podczas zakładania konta w szukaj
pole. Twoje dane pogodowe pojawi się NA ten Następny strona.
ZOBACZ SWOJĄ POGODĘ DANE W WEATHERCLOUD
1.) Aby wyświetlić dane ze stacji pogodowej na żywo przez Komputer Lub
przenośny sieć przeglądarka, odwiedź http://www.weathercloud.net i
zaloguj się na utworzone konto. 2.) Kliknij na zakładkę u góry strona
zatytułowana Urządzenia.
3.) Kliknij menu Ustawienia u góry po prawej stronie strona, I wybierać
ten opcja Widok.
4.) Kliknij opcję Aktualny, Wiatr lub Ewolucja, aby wyświetlić dane ze
swojej stacji pogodowej. dane.
INSTRUKCJAOBSŁUGI
ZEGAR
Ustawianie Zegar
W Normalna czas wyświetl , naciśnij I trzymać 【 USTAW 】 przez 2
sekundy Do Wchodzić ustawianie czasu tryb . Naciskać I uwolnienie 【 WIATR
/+ 】 I 【 BARO /-/ 】 Do Dostosuj wartości.
Trzymać 【 WIATR /+ 】 i 【 BARO /-/ 】 ponad 2 sekundy Do
regulować wartości szybko . Naciśnij I uwolnienie 【 USTAWIENIE 】 do kon fi
rm I przenosić Do ten Następny przedmiot .
- 33 -
Do Wyjście ten ustawienie tryb Na każdy czas , naciskać 【
ŚWIATŁO / DRZEMKA 】 przycisk .
- 34 -
Ustawienie Zamówienie
1. BRZĘCZYK Włącz / Wyłącz
2. NTP Włącz / Wyłącz
3. Czas Strefa
4. Czas letni Włącz / Wyłącz
5. MD/D- M Data Format
6. Rok
7. Miesiąc
8. Dzień
9. 12/24 Godzina Format
10. Godzina 11. Chwila
12. Temperatura Jednostka
13. Ciśnienie Jednostka
14. Względny Ciśnienie Kalibrowanie
15. Światło Intensywność Jednostka
16. Opad deszczu Jednostka
17. Wiatr Prędkość Jednostka
18. Półkula
19. Koniec z ustawienie
1.) Naciśnij I trzymać Przycisk 【 USTAW 】 wstępowanie ten ustawienia .
Sygnał dźwiękowy WŁ miga . Naciśnij 【 WIATR /+ 】 lub 【 BARO /-
/ 】 Do zmiana między Brzęczyk NA i sygnał dźwiękowy o nie . Naciskać
【 USTAWIĆ 】 Do wybierać NTP włączony /wyłączony.
- 34 -
2.) Kiedy NTP ON miga , naciskać 【 WIATR /+ 】 Lub 【 BARO /-
/ 】 Do zmiana między NTP NA I NTP o nie . Naciskać 【 USTAWIĆ 】
Do wybierać czas strefa .
- 35 -
3.) Kiedy Czas Strefa błyski , naciskać 【 WIATR /+ 】 Lub 【 BARO
/-/ 】 Do ustawić czas strefa . Naciskać 【 USTAWIĆ 】 Do wybierać
Czas letni włączony /wyłączony .
4.) Kiedy Czas letni ON miga , naciskać 【 WIATR /+ 】 Lub 【 BAR
O /-/ 】 Do zmiana między Czas letni NA I Czas letni o nie . Naciskać 【
USTAWIENIE 】 do wybierać data formatuj . 5.) Kiedy M --D miga , naciskać
【 WIATR /+ 】 Lub 【 BARO /-/ 】】 Do przełącznik między M - D I
D - M data formatuj . Naciskać 【 USTAWIĆ 】 Do wybierać rok .
6.) Kiedy rok błyski , naciskać 【 WIATR /+ 】 Lub 【 BARO /-
/ 】 Do regulować ten kalendarz rok . Naciskać 【 USTAWIĆ 】 Do
wybierać miesiąc .
7.) Kiedy miesiąc miga , naciskać 【 WIATR /+ 】 Lub 【 BARO /-
/ 】 dostosować ten kalendarz miesiąc . Naciskać 【 USTAWIĆ 】 Do
wybierać dzień .
8.) Kiedy Dzień miga , naciśnij 【 WIATR /+ 】 lub 【 BARO /-/ 】
Do dostosować dzień kalendarzowy . Naciskać 【 USTAWIENIE 】 do
wybierać 12/24- godzinny formatuj .
- 35 -
9.) Kiedy 12 H miga , naciskać 【 WIATR /+ 】 Lub 【 BARO /-/
】 zmienić między 12 godzina i 24 godzina formatuj . Naciskać 【 USTAWIĆ
】 Do wybierać godzina . 10.) Kiedy godzina miga , naciśnij 【 WIATR /+
】 lub 【 BARO /-/ 】 Do dostosować godzina . Naciśnij 【 USTA
WIĆ 】 Do wybierać minuta .
- 36 -
11.) Kiedy minutowe błyski , naciskać 【 WIATR /+ 】 Lub 【 BAR
O /-/ 】 dostosować ten minuta . Naciskać 【 USTAWIĆ 】 Do
wybierać temperatura jednostka .
12.) Kiedy ℉ miga , naciśnij 【 WIATR /+ 】 lub 【 BARO /-/ 】
Do zmiana między ℉ I ℃ . Naciskać 【 USTAWIĆ 】 Do wybierać ciśnienie
jednostka .
13.) Kiedy ciśnienie jednostka miga , naciśnij 【 WIATR /+ 】 lub 【 B
ARO / -/ 】 Do zmiana między hPa inHg I mmHg . Naciskać 【 US
TAWIĆ 】 Do wybierać kalibracja ciśnienia względnego .
14.) Kiedy Względny Ciśnienie błyska , naciskać 【 WIATR /+ 】 Lub
【 BARO /-/ 】 Do regulować ten względny ciśnienie . Naciśnij 【 USTA
WIENIE 】 do wybierać Intensywność światła jednostka.
15.) Kiedy Światło intensywność jednostka miga , naciskać 【 WIATR /+ 】
Lub
【 BARO /-/ 】 Do zmiana jednostka między Klux Klan , FC I w /m2 . Naciśnij
【 USTAW 】 wybrać opad deszczu jednostka.
16.) Kiedy Deszcz jednostka miga , naciskać 【 WIATR /+ 】 Lub 【
BARO /-/ 】 zmienić jednostka między W I mm . Naciskać 【 USTAWIĆ
】 Do wybierać prędkość wiatru jednostka . 17.) Kiedy Wiatr prędkość jednostka
- 36 -
miga , naciśnij 【 WIATR /+ 】 Lub 【 BARO /-/ 】 Do zmiana
jednostka między W I mm . Naciskać 【 USTAWIĆ 】 Do wybierać półkula .
18.) Kiedy NTH miga , naciśnij 【 WIATR /+ 】 Lub 【 BARO /-/ 】
Do zmiana
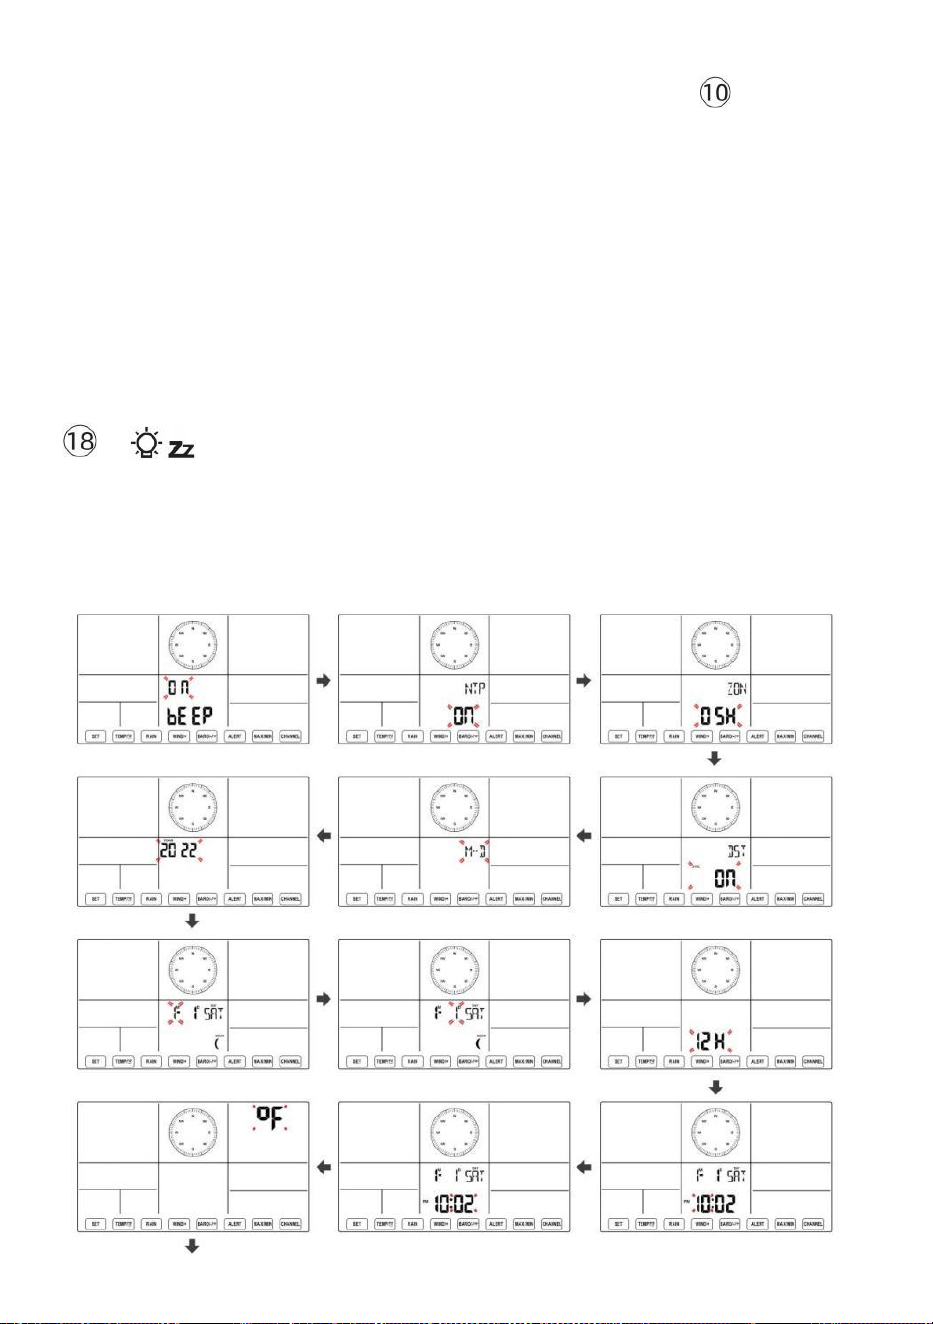
- 37 -
półkula między NTH ( północny ) i STH ( południowy ). Naciśnij 【 USTAWI
Ć 】 aby zapisać i wyjść z ustawień. To będzie powrót do ten normalna tryb
wyświetlacz .
NOTATKA: Jeśli tam Jest brak prawidłowej operacji w ciągu 2 0 sekund,
to będzie automatyczne powrót do normalny wyświetlacz tryb z ustawienia
tryb. Podczas regulacji ustawienia, możesz naciskać
ŚWIATŁO/DRZEMKA 】 przycisk do powrót do normalnego
wyświetlania tryb.
【

- 38 -
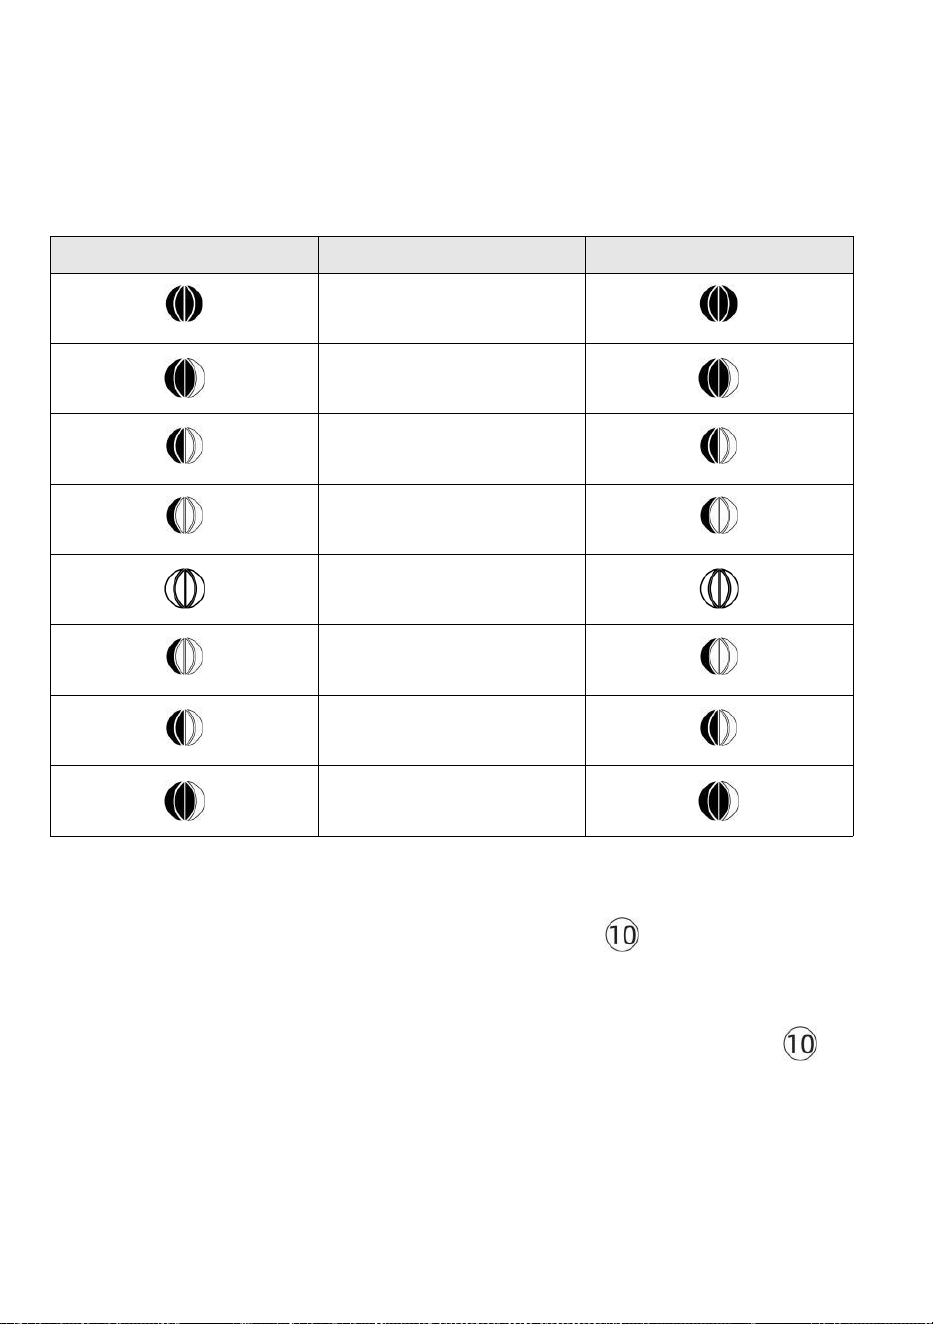
- 39 -
Księżyc Faza
Konsola wyświetlacza oblicza fazę księżyca według twój czas, datę i
strefę czasową. Poniższa tabela wyjaśnia odpowiedni fazy i ich ikony
dla obu Północny i południowy półkule.
Północny Ikony półkuli
Księżyc Faza
Półkula południowa Ikony
Nowy Księżyc
Przybywający Półksiężyc
Księżyc
Pierwszy kwartał Księżyc
Przybywający garb Księżyc
Pełny Księżyc
Ubywający garb Księżyc
Trzeci kwartał Księżyc
Ubywający Sierp Księżyca
Księżyc
Ustawianie alarmu
● W trybie wyświetlania czasu normalnego naciśnij Przycisk 【 SET 】
do
przełączania wyświetlanego czasu alarmu (czas alarmu tryb).
● W trybie wyświetlania czasu alarmu naciśnij i przytrzymaj przycisk 【
SET
】
Naciśnij przycisk i przytrzymaj go przez 2 sekundy , aby wejść w tryb
ustawiania alarmu. Godzina alarmu zaczyna migać.
- 39 -
● Naciskać 【 WIATR/+ 】 przycisk lub 【 BARO/-/ 】 przycisk
do ustawienia wymaganego godziny alarmu. Trzymać 【 WIATR/+ 】
przycisk lub 【 BARO/-/ 】 przycisk do
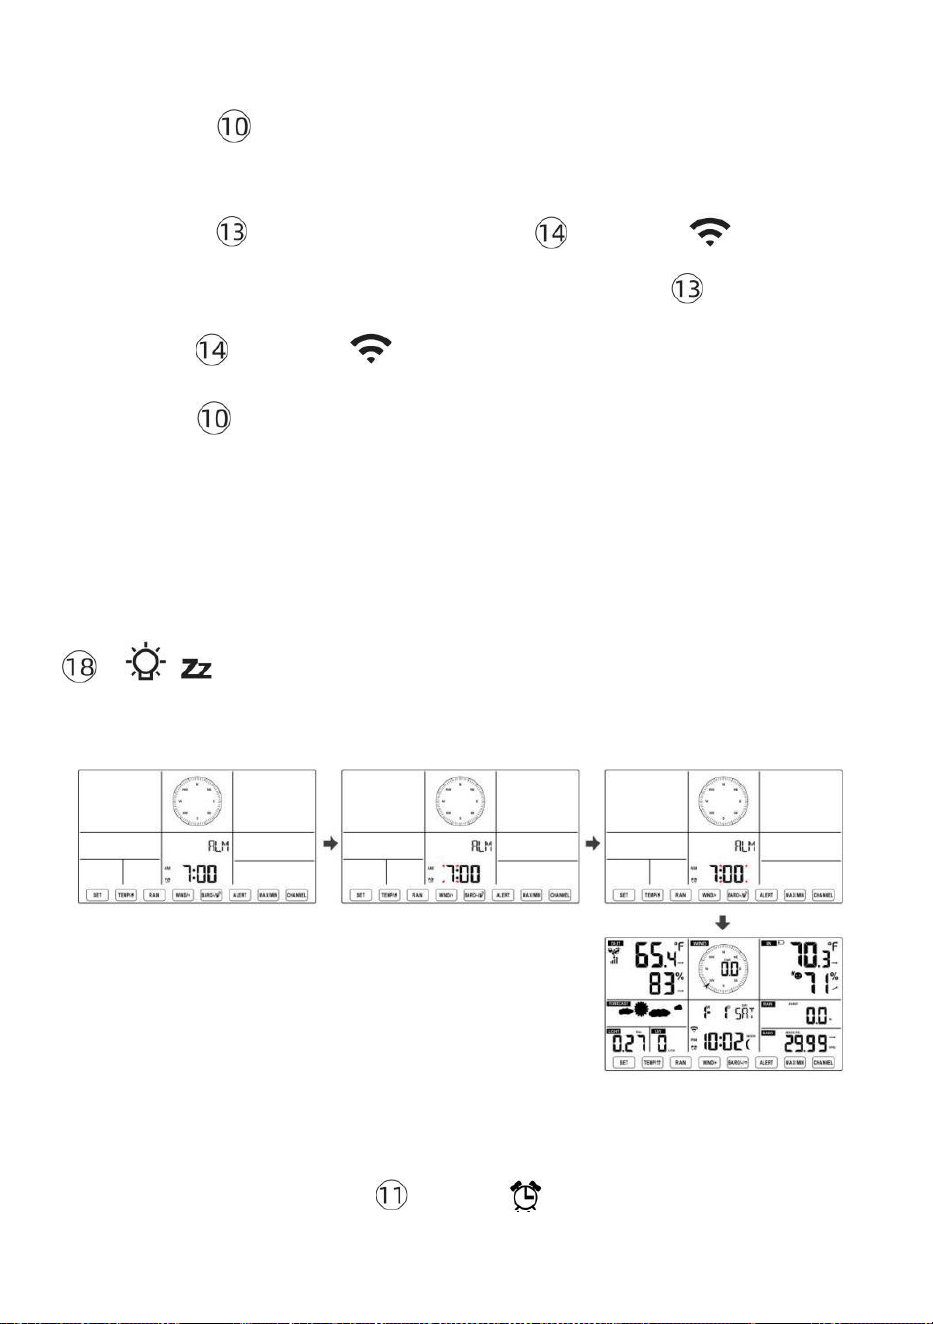
- 40 -
dostosuj godziny alarmu szybko.
● Naciskać Przycisk 【 USTAW 】 do wyboru minuta Alarm.
Minuta alarmu zaczyna migać.
● Naciskać 【 WIATR/+ 】 przycisk lub 【 BARO/-/ 】 przycisk
do ustawienia wymaganego minuty alarmu. Przytrzymaj 【 WIATR/+ 】
przycisk lub 【 BARO/-/ 】 przycisk do ustaw minuty alarmu szybko.
● Naciśnij 【 USTAW 】 przycisk, aby zapisać wszystkie ustawienia i
wyjść do normalny wyświetlacz tryb.
NOTATKA: Jeśli tam Jest brak prawidłowej operacji w ciągu 2 0 sekund,
to będzie automatyczne powrót do normalny wyświetlacz tryb z ustawienia
tryb. Podczas regulacji ustawienia, możesz naciskać
【 ŚWIATŁO / DRZEMKA 】 przycisk Do powrót Do normalna
wyświetlacz tryb .
Dezaktywuj/Aktywuj alarm
● W alarm czas wyświetl ,
naciśnij wyłączony .
【 TEMPER
ATURA /
】 przycisk Do wybierać ten
Alarm NA Lub
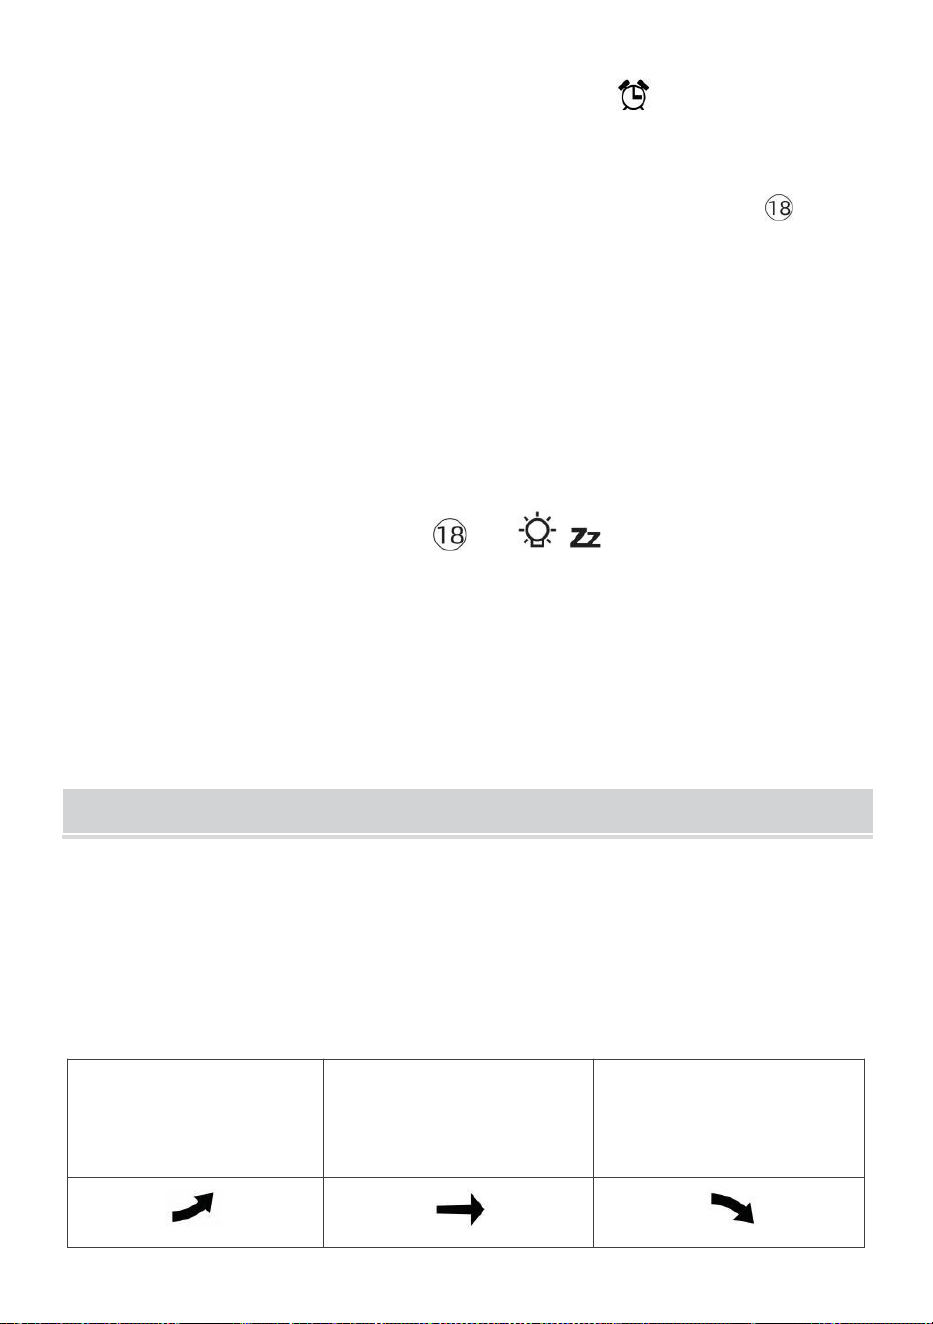
- 41 -
● Jeśli ten alarm Jest NA , jego odpowiedni alarm ikona będzie Być
pokazano NA wyświetlacz .
● Gdy ten alarm Jest dzwonienie , naciskać każdy pikolak z wyjątkiem 【
Ś
wiat z
ŚWIATŁO/DRZEMKA 】 przycisk, aby zatrzymać sygnał alarmowy. To Jest nie
konieczne do reaktywować alarm. To będzie zadzwoń jeszcze raz czas Następny
dzień.
Drzemka Funkcjonować
Gdy ten alarm Pierścienie , naciskać 【 ŚWIATŁO / DRZEMKA 】
przycisk Do pauza alarm
. drzemka wskaźnik ikona
z 2
migają .
alarm będzie wznawiać po
5 minut .
TEMPERATURA
Trend temperatury/wilgotności
Strzałki tendencji pozwalają na szybkie określenie temperatury I
wilgotność wzrasta i spada w jedna godzina aktualizacja okres .
Trend temperatury
Temperatura ma
zmartwychwstały > 1°C/2° F W
ten przeszłość
godzina
Temperatura ma nie
Zmieniony ponad
1°C/2° F W ten przeszłość
godzina
Temperatura ma
upadły < 1°C/2° F W ten
przeszłość
godzina

- 41 -
Trend wilgotności
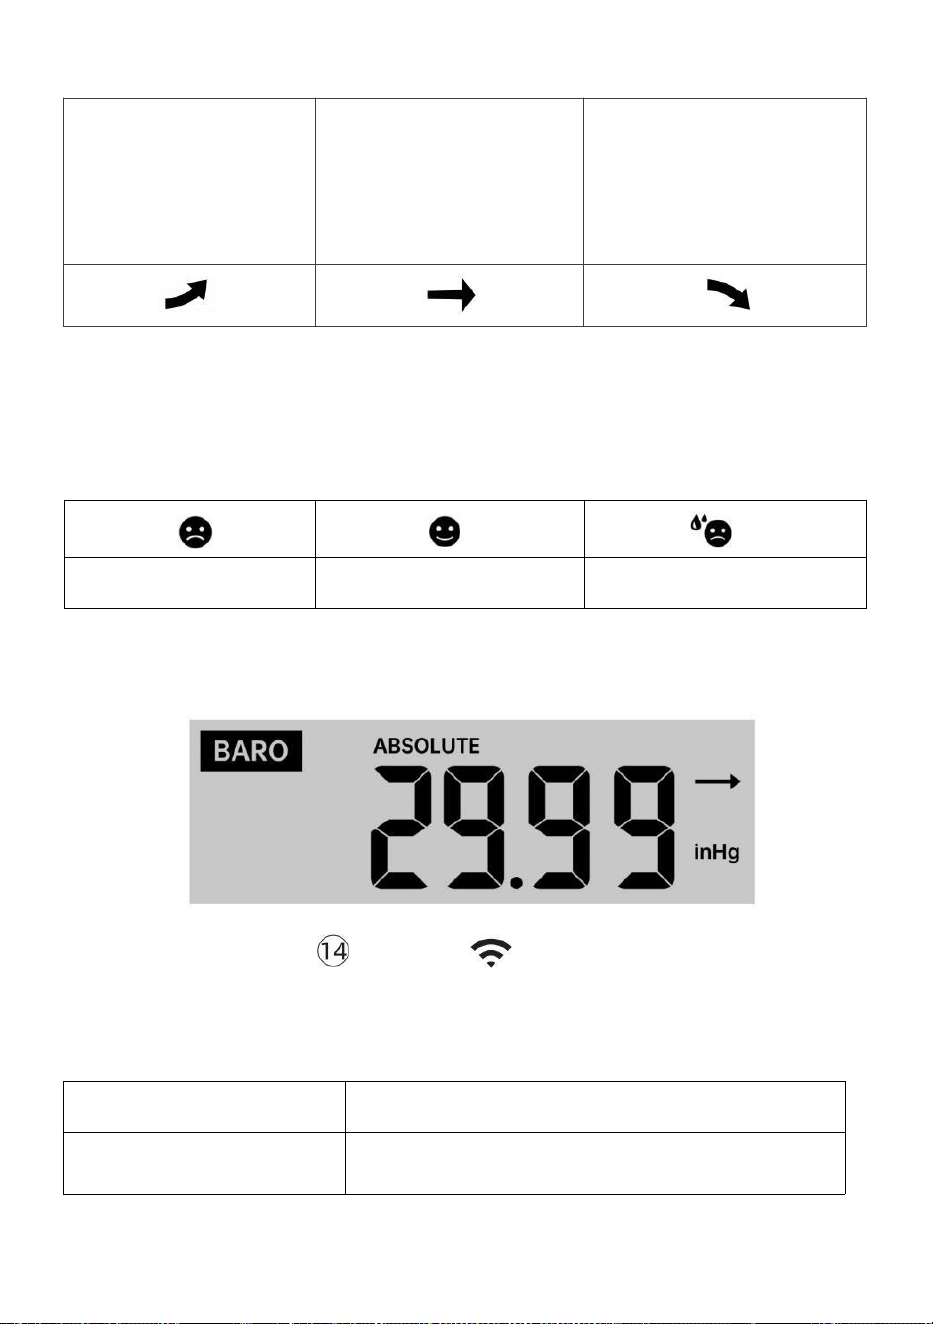
- 42 -
Wilgotność
podniósł się
> 3% w
przeszłość
godzina
Wilgotność ma nie
Zmieniony ponad 3% W
ten przeszłość godzina
Wilgotność
spadł < 3%
w
przeszłość
godzina
Komfort w pomieszczeniu Indeks
Ten komfort wewnątrz pomieszczeń wyświetla obrazowy reprezentacja
oparta na temperatura powietrza w pomieszczeniu i poziom wilgotności,
aby określić przybliżony komfort poziom.
Zbyt zimno
Wygodny
Zbyt gorący
CIŚNIENIE
Ciśnienie barometru Wyświetlacz
W normalnym tryb,
naciskać I ciśnienie
względne.
【 BARO/-/ 】 przełącznik przyciskowy być
pomiędzy absolutnym
Absolutny
Bezwzględne ciśnienie atmosferyczne w Twojej lokalizacji.
Względny
Względne ciśnienie atmosferyczne wynosi na podstawie ten
morze poziom.
Trend ciśnienia

- 42 -
Strzałki tendencji pozwalają na szybkie określenie jeśli ciśnienie Jest
rosnący Lub spadający w aktualizacji trwającej godzinę okres.

- 43 -
Ciśnienie ma
wzrosło > 2hpa/0,06inHg W
przeszłość godzina
Ciśnienie ma nie
zmieniono ponad
2hpa/0,06inHg
w przeszłości godzina
Ciśnienie ma
spadło > 2hpa/0,06inHg W
przeszłość godzina
WIATR
Wiatr Wyświetlacz
Średnia/pod
much wiatr
prędkość
Wiatr w czasie rzeczywistym
wskaźnik kierunku
Wybór trybu wyświetlania wiatru
W normalnym trybie wyświetlania
tryb, naciskać
【
WIND/+
】
do przełączania
między
aktualna średnia prędkość wiatru, prędkość wiatru w porywach i
kierunek wiatru.
DESZCZ
Wyświetlacz opadów deszczu

- 43 -
Ten Pokazy opadów deszczu informacja odnośnie opadów deszczu i
intensywność opadów .
Wybierz Wyświetlacz opadów deszczu Tryb
- 44 -
【 RAIN 】 do przełączania między Deszcz
Wskaźnik, Deszcz Wydarzenie, Deszcz Cogodzinny, Deszcz
Codziennie, Deszcz co tydzień, Deszcz Miesięcznie i Całkowity opad
deszczu.
Przyrosty deszczu Defi nicja
Deszcz Wskaźnik : aktualny opad deszczu Oceń w przeszłość godzina.
Wydarzenie deszczowe : ciągły deszcz i resetuje się do zero Jeśli opady
deszczu akumulacja Jest
mniej niż 10 mm (0,039 cala) W A 24-godzinny okres.
Codzienny deszcz : Całkowite opady deszczu od północ (0 0:00)
Tygodnik Deszcz : Całkowita suma opadów w bieżącym tygodniu
kalendarzowym i ponowne NA Niedzielny poranek o
północy (od niedzieli do Sobota)
Miesięczny Deszcz : Całkowita suma opadów w bieżącym miesiącu
kalendarzowym, I nastawić NA pierwszy dzień Miesiąc.
Całkowity Deszcz : Całkowite opady deszczu od ostatni nastawić.
Zresetuj sumę Rekord opadów deszczu
W normalnym trybie wyświetlania tryb, naciśnij i przytrzymaj
【
D
ESZCZ
】
zapiąć guzik 2 sekund, aby zresetować deszcz nagrywać
.
NOTATKA:
Zresetowanie tygodniowego poziomu opadów deszczu powoduje
również zresetowanie codziennie deszcz.
Zresetowanie miesięcznego deszczu również resetuje dzienne i
tygodniowe deszcz.
Zresetowanie całkowitego deszczu powoduje również zresetowanie
miesięcznych, tygodniowych i codziennie deszcz.
POGODA
In normal display mode, press

- 44 -
Indeks pogody
Czytając prognozę pogody Wyświetlanie indeksu, możesz nacisnąć 【
TEMP./ 】
przycisk umożliwiający przełączanie się między różnymi indeksami
pogody w następującej kolejności: Czuje Lubię > Ciepło Indeks > Wiatr
Chłod

- 45 -
Czuje Tak jak
Ten Czuje Podobnie jak wskaźnik temperatury , określa on, jaka
temperatura jest odczuwalna na zewnątrz, biorąc pod uwagę różne
czynniki jak prędkość wiatru, ciśnienie, temperatura i wilgotność .
Chłód wiatru
Temperatura odczuwalna jest mierzona na podstawie kombinacji danych
o temperaturze i prędkości wiatru pochodzących z bezprzewodowego
czujnika pogody .
UWAGA: Tylko wtedy, gdy temperatura jest niższa niż 50 ℉ (10 ℃ )
i prędkość wiatru przekracza 4,8 km/h (3 mph), wyświetli się
wartość odczuwalnej temperatury,
W przeciwnym razie to wyświetli „--.-“.
Ciepło Indeks
Ten Ciepło Indeks jest ustalany przez bezprzewodowy czujnik
pogodowy temperatura i wilgotność odczyty.
Rosa Punkt
Punkt rosy jest temperaturą, w której dany paczka z wilgotność powietrze
musi być chłodzony przy stałym ciśnieniu barycznym ciśnienie pary
wodnej do
skroplić się do wody. Skroplona woda nazywana jest rosą. rosa punkt
Jest temperatura nasycenia.
Rosa Temperatura punktu jest określana przez temperaturę i dane
dotyczące wilgotności z bezprzewodowego czujnika pogody .
Prognoza pogody
Ten wbudowany barometr może zauważać zmiany ciśnienia
atmosferycznego i na podstawie zebranych danych przewidywać
pogodę warunki.
Dostępnych jest 6 ikon pogody --- Słonecznie, Częściowo Mętny, Mętny,
Deszczowy, Burzliwy I Śnieżny.
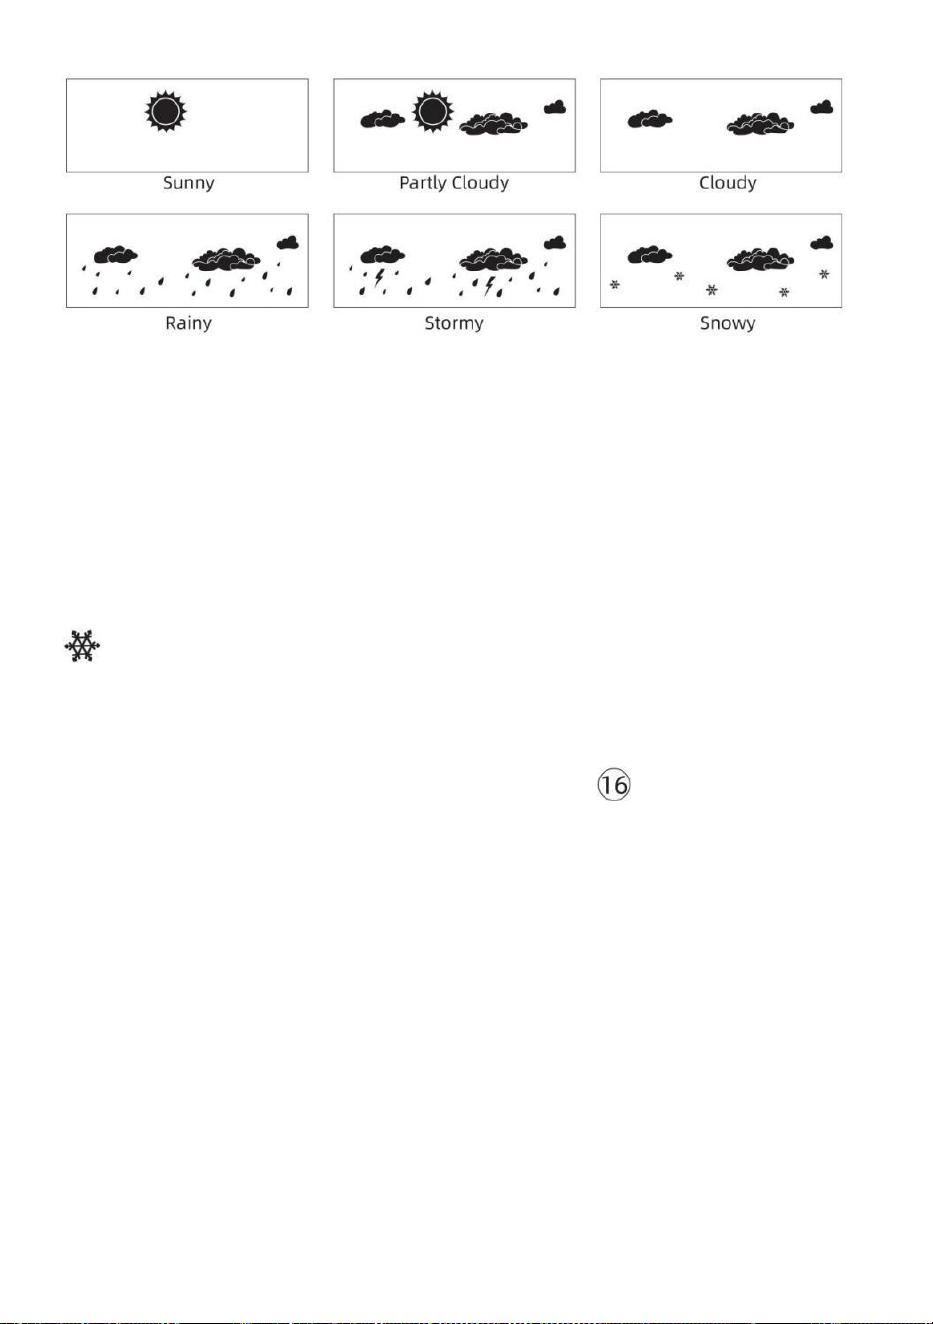
- 46 -
NOTATKA:
Dokładność ogólnej prognozy opartej na ciśnieniu chodzi o 65-70%.
Prognozy nie są gwarantowane.
Może nie koniecznie odzwierciedlać aktualny sytuacja.
Lód Alarm
Gdy temperatura na zewnątrz wynosi niższy niż 1 ℃ /33,8 ℉ , ikona
płatka śniegu
pojawi się na LCD wyświetlacz.
MAKS./MIN.
● W normalnym trybie wyświetlania tryb, naciskać
【
Przełączani
e przycisków MAX/MIN 】 między wartość maksymalna i minimalna.
NOTATKA: Jeśli tam Jest brak operacji z prawidłowym
identyfikatorem 10 sekund, automatycznie powróci do
normalnego wyświetlania tryb.

- 46 -
- 47 -
Aby wyświetlić Skumulowane MAX/MIN
● Wyświetlacz Czuć jak, Wind Chill, Ciepło Indeks, Rosa Wartości
maks./min. punktów
1.) Gdy wyświetlone zostaną wartości
maksymalne, naciskać
【 TEMPER
ATURA /
】 przycisk
do
wymiana oglądania temperatury zewnętrznej → Czuję się jak → Chłód
wiatru → Ciepło Indeks → Rosa Punkt → Temperatura zewnętrzna.
2.) Gdy wyświetlone zostaną wartości minimalne , naciśnij 【 TEMP./
】 przycisk do
temperatury zewnętrznej → Czuję się jak → Chłód wiatru → Ciepło
Indeks → Rosa Punkt → Temperatura zewnętrzna.
● Wyświetl prędkość wiatru, porywy wiatru Wartości maksymalne
wyświetlane są wartości maksymalne ,
naciskać
Przycisk
【
WIND/+
】 ,
aby
przeglądanie wymiany pomiędzy Średnia i porywista prędkość wiatru.
● Wyświetlacz Deszcz Wskaźnik, Codziennie Deszcz, co tydzień
Deszcz i Miesięczny Deszcz Maksymalnie Wartości
Gdy wyświetlone zostaną wartości maksymalne, naciśnij przycisk
【
D
ESZCZ 】
przeglądanie wymiany Deszcz Oceń → Codziennie Deszcz → Mały kly
Deszcz → Miesięczny Deszcz.
● Wyświetl wartości bezwzględne i Względny ciśnienie Wartości
maks./min .
1.) Gdy wyświetlone zostaną wartości maksymalne, naciskać 【 BARO
/-/ 】 przycisk do przeglądanie wymiany między Absolutny i
Względny ciśnienie.
- 47 -
2.) Gdy wyświetlone zostaną wartości minimalne, naciśnij 【 BARO/-/
】 ale do
przeglądanie wymiany między Absolutny i Względny ciśnienie.
● Wyświetlacz czujnik temperatury wewnętrznej i innych kanałów
wilgotność Wartości maks./min.
1.) Gdy wyświetlone zostaną wartości maksymalne, naciskać przycisk
【 KANAŁ 】
przeglądanie wymiany temperatura i czujniki wewnętrzne i
zewnętrzne sparowane wilgotność.
- 48 -
2.) Gdy wyświetlone zostaną wartości minimalne,
naciskać
【 KANAŁ 】 przycisk
do
przeglądanie wymiany temperatura i czujniki wewnętrzne i
zewnętrzne sparowane wilgotność.
NOTATKA: Gdyby sparowano inne czujniki kanałowe , mogłoby to
pokazać wartości maksymalnej/minimalnej temperatury i wilgotności
dla innych kanałów . Jeśli inny kanał czujników nie było sparowany,
pokazywałoby tylko aktualne maks./min. w pomieszczeniu
temperatura i wartości wilgotności.
Aby wyczyścić MAX/MIN Dane
Nagrywać
● Aby wyczyścić wartość maksymalną ,
naciskać I trzymać
przycisk 【 MAX/MIN 】
nad r 2
sekund, podczas gdy wyświetlane są
wartości maksymalne.
● Aby wyczyścić wartość minimalną ,
naciskać I trzymać
【 Maks./min.】przycisk
powyżej 2
sekund, podczas gdy wyświetlane są
wartości minimalne.
WYS/NIS USTAWIENIE ALARMÓW
Aby wyświetlić Ustawienia alertów
● W normalnym trybie wyświetlania naciśnij 【 ALERT 】 przycisk
przełączający pomiędzy Cześć, czujny i Niski poziom alertu ustawienie
wartość.
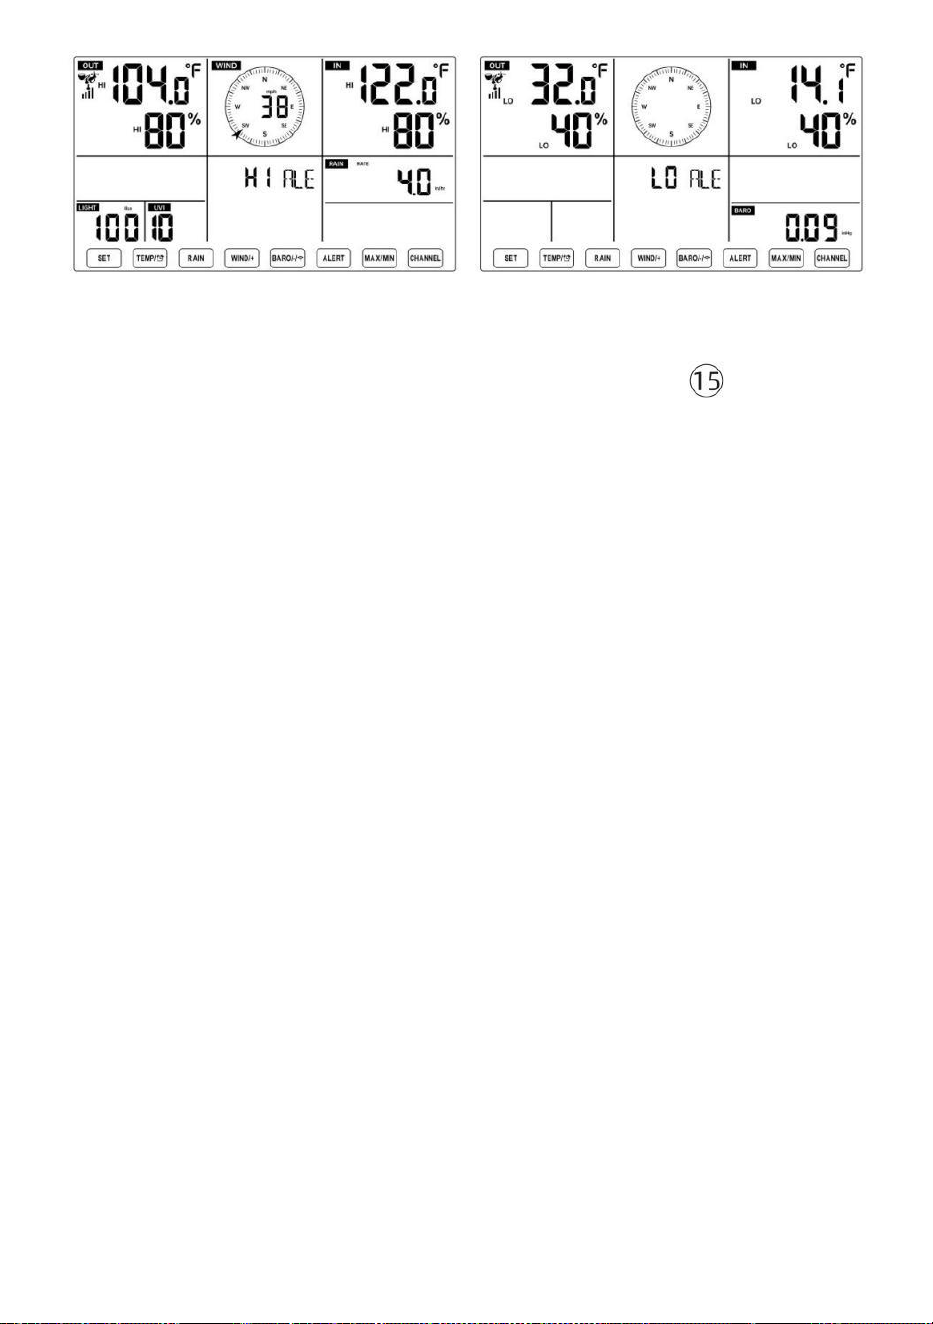
- 48 -
Aby ustawić alert
● W normalnym trybie wyświetlania tryb, naciśnij i trzymać przycisk 【
ALERT 】 powyżej 2
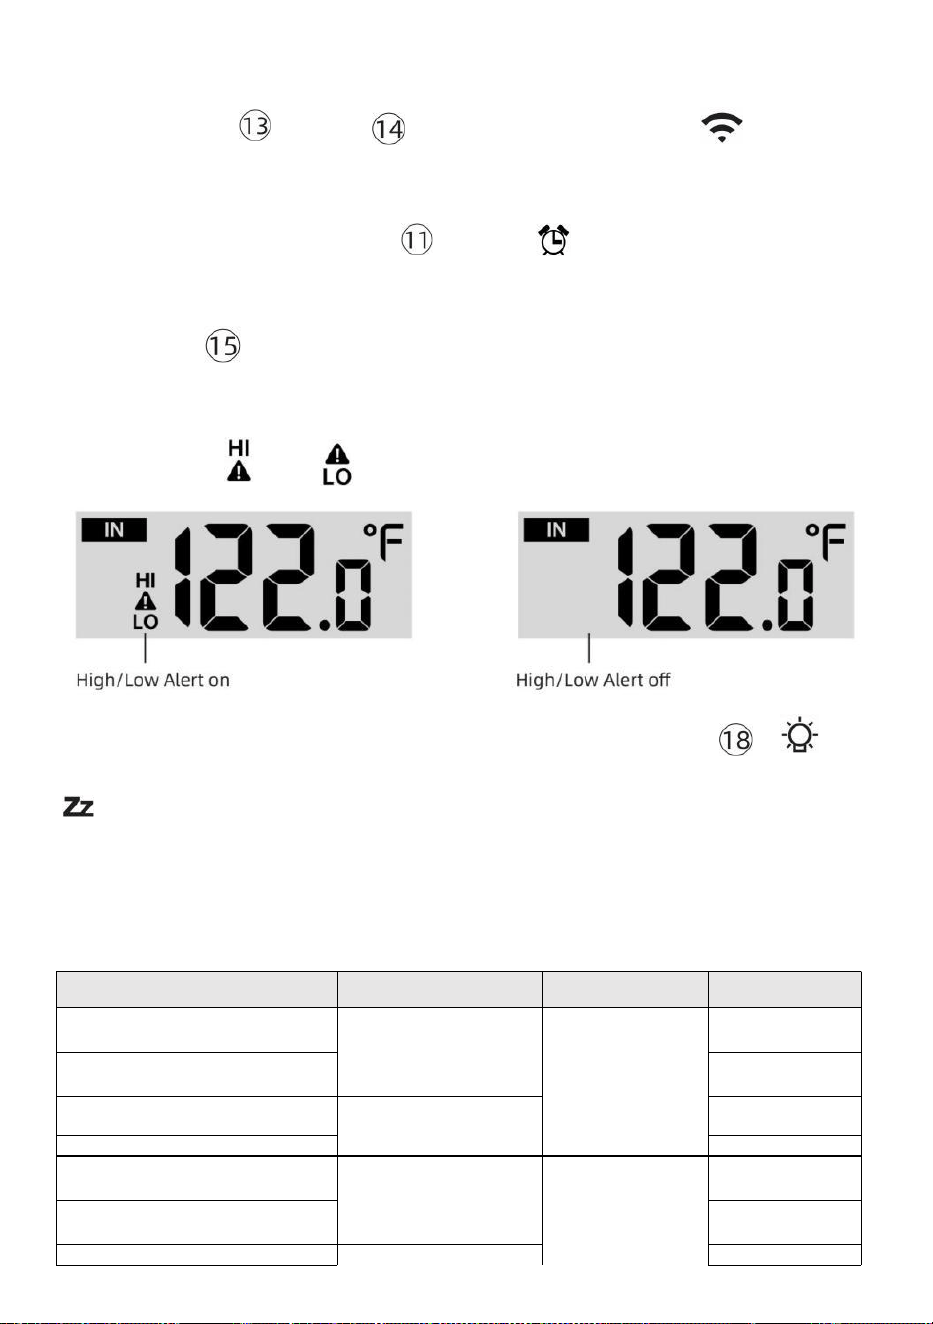
- 49 -
sekund na wejście w ustawienia alertu tryb.
● Naciskać Przycisk 【 WIND/+ 】 i【 BARO/-/ 】 naciśnij ,
aby wyregulować
wartość w górę lub w dół, a
następnie naciskać alarm.
【 TEMPER
ATURA /
】 przycisk do
włączania/wyłączania
● Naciskać przycisk
【
ALERT
】
, aby potwierdzić I skok Do
Następny ustawienie.
● Ten ikona Lub wyświetli się, gdy pojawi się alert Jest NA.
● Aby wyjść z ustawień alertu tryb w każdy czas, naciskać 【
Przycisk ŚWIATŁO/DRZEMKA
】 .
Wyświetlana jest kolejność
ustawiania alertów Hi/Lo poniżej:
Alarm Ustawienie
Zamówienie
Ustawienie Zakres
Sekcja
wyświetlania
Domyślny
Temperatura wewnętrzna
Cześć Al ert
-14.1 ℉ –122
℉ (-9,9 ℃ –
50 ℃ )
Wnętrz
temperatura i
Wilgotność
Plenerowy
temperatura i
Wilgotność
Prędkość wiatru
122 ℉ (50 ℃ )
Temperatura wewnętrzna Lo
Alarm
14.-9,9 ℃ ( 1
℉ )
Wilgotność w pomieszczeniu
Cześć Alarm
1%–99%
-40 ℉ –158
℉ (-40 ℃ –
70 ℃ )
80%
Wnętrz Alert niskiej
wilgotności Temperatura
zewnętrzna Cześć Alert
40%
104 ℉ (40 ℃ )
Temperatura zewnętrzna Lo
Alarm
32 ℉ (0 ℃ )
Wilgotność na zewnątrz
1%–99%
80%

- 49 -
Cześć Alarm
0–50m/s
2–180 km/godz.
1–111 mil na
godzinę
1–97 węzły 0-60 bft
Wilgotność na zewnątrz Lo
Alarm
Wysoki Średnia prędkość wiatru
Alarm
40%
17m/s
62 km/godz.
38 mil na
godzinę
33 węzły 20bft
Silny podmuch wiatru alarm
0–50m/s
2–180 km/godz.
1–111 mil na
godzinę
1–97 węzły
0-60 bft
Prędkość wiatru
17m/s
62 km/godz.
38 mil na
godzinę
33 węzły 20bft
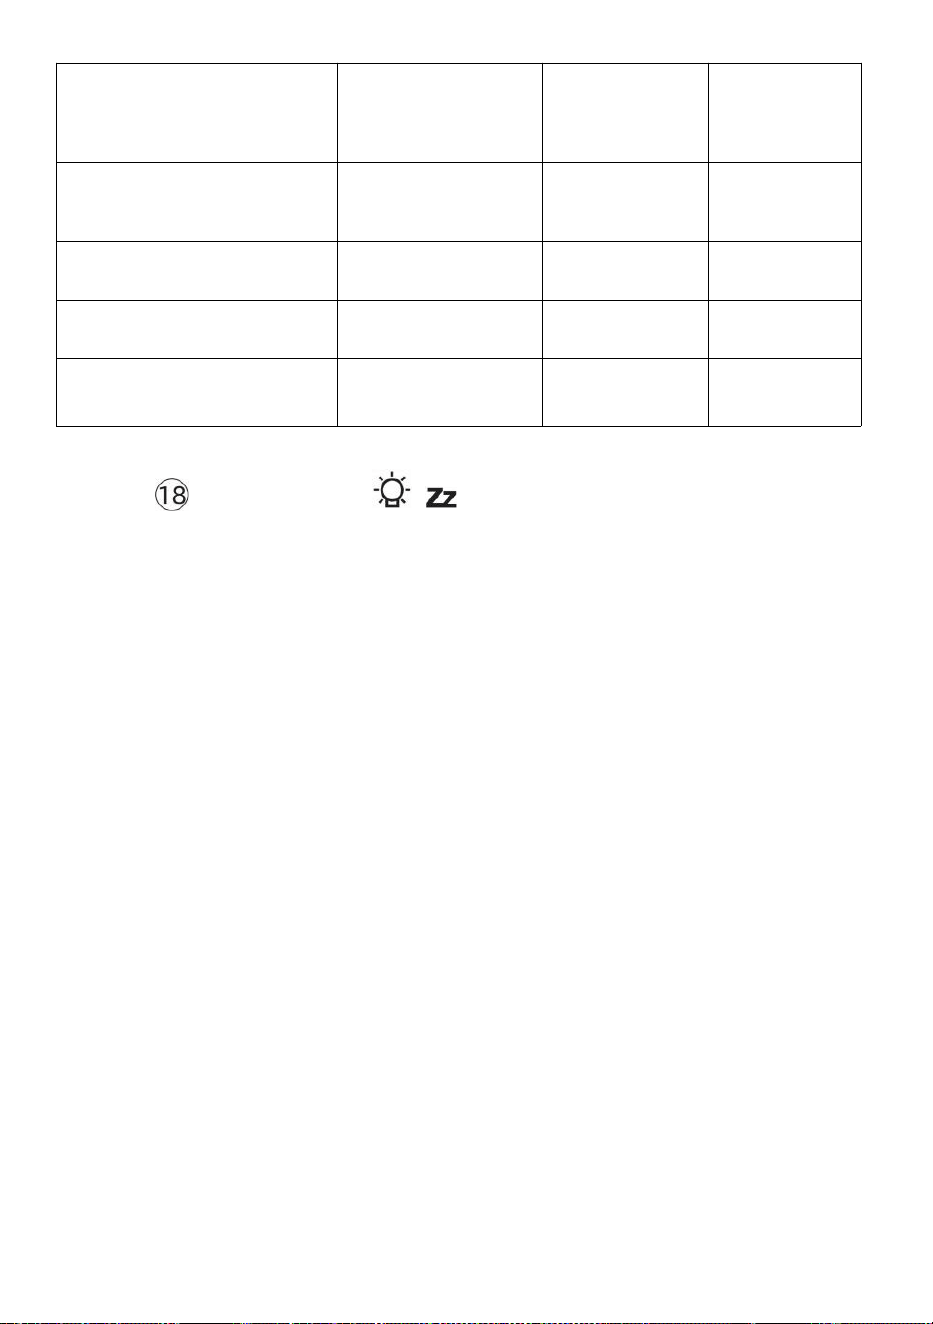
- 50 -
Alert spadku ciśnienia
1 HPA–
10hpa
0,03~0,3 cala
Hg 0,7~7,5
mmHg
Spadek
barometru
3hpa
0,09 cala
Hg 2,2
mmHg
Wysoki Deszcz Alert o
stawce
1 mm/godz.–1000
mm/godz. (0,04
cala/godz.–39
w/godz.)
Opad deszczu
Wskaźnik
101
mm/god
z. (4
w/godz.)
Wysoki Codziennie Alert
deszczowy
1 mm–1000 mm
(0,03 cala–39,37
W)
Opad deszczu
Wskaźnik
101
mm (4
W)
Indeks UV Wysoki Alarm
1-15
Promieniowani
e ultrafioletowe
Indeks
10
Światło Intensywność Wysoki
Alarm
1 Klux–200,0 Klux
7-1580 W/m²
0-185Kfc
Światło
Intensywność
100 Klux
790 W/m²
92 KFC
Aby uciszyć Hi/Lo Alert Alarm
Naciśnij
【 Przycisk
LIGHT/SNOOZE
】
na górze
konsoli wyświetlacza, aby wyciszyć alarm lub automatycznie się
wyłączy. zakręt wyłącz po jednym chwila.
UWAGA: Po uruchomieniu alarmu, alarm będzie brzmiał przez jedną
minutę. i powiązany alert ikona i wskazania pogody będą migać.
Jeśli alarm ostrzegawczy wyłączy się automatycznie po upływie
jednej minuty zamiast ręcznego wyłączania, powiązany alert ikona
i czytania będą migać nadal, aż odczyt zostanie na zewnątrz z
alarm zakres.
Alarm pogodowy zostanie uruchomiony, gdy odczyty spadną do
alarm zasięg ponownie.
PODŚWIETLENIE
Podświetlenie wyświetlacza
Z Prąd stały Adapter
Ten podświetlenie może tylko być ciągle włączonym, gdy Zasilacz prądu
stałego Jest
na stałe. Kiedy Zasilacz prądu stałego jest odłączony, podświetlenie
może być tymczasowo włączony.
- 50 -
Naciskać Przycisk
【
ŚWIATŁO/DRZEMKA
】
do regulacji
podświetlenia
jasność, Wysoki, niski i
Wyłączone. Bez Prąd stały
Adapter
Naciskać Przycisk【 ŚWIATŁO/DRZEMKA 】 tymczasowo
włącza

- 51 -
podświetlenie dla 15 sekund.
WSKAŹNIK NISKIEGO POZIOMU NAŁADOWANIA BATERII
Jeśli ikona wskaźnika niskiego poziomu naładowania baterii jest
wyświetlany w temperatura na zewnątrz i sekcji wilgotności lub
odpowiedniej sekcji CH wyświetlacza LCD konsola
wyświetl to oznacza, że bateria w bezprzewodowym czujniku(ach) pogody
jest rozładowana kończą się i powinny Być zastąpiony. Upewnij się, że
zastępować Wszystko baterie naraz.
PONOWNE URUCHOMIENIE FABRYCZNE
Jeśli tam jest to awaria, Fabryka Uruchom ponownie to świetny
sposób na zwrot stacja do „poza "stan pudełka".
1.) Usuń wszystko moc (baterie i Zasilacz DC) z czujników
zewnętrznych i stacja meteorologiczna.
2.) Postępuj zgodnie z operacją „USTAWIENIA „W GÓRĘ STACJI
POGODOWEJ” zacznij parę transduktor.
OPIEKA I KONSERWACJA
1.) Czyść deszczomierz co 3 miesiące. Obracać lejek
przeciwnie do ruchu wskazówek zegara i podnieś, aby odsłonić
deszczomierz mechanizmy, I czysty wilgotną szmatką. Usuń wszelki brud,
zanieczyszczenia i owady. Jeśli błąd jeśli problemem jest inwazja ,
spryskaj czujnik lekko z środek owadobójczy.

- 52 -
2.) Wyczyść Światło Intensywność/ Czujnik UV i panel słoneczny każdy
3 miesiące z wilgocią płótno.
3.) Podczas wymiany baterii należy zastosować środek antykorozyjny.
zapobiegawczy mieszanina na zaciskach akumulatora.
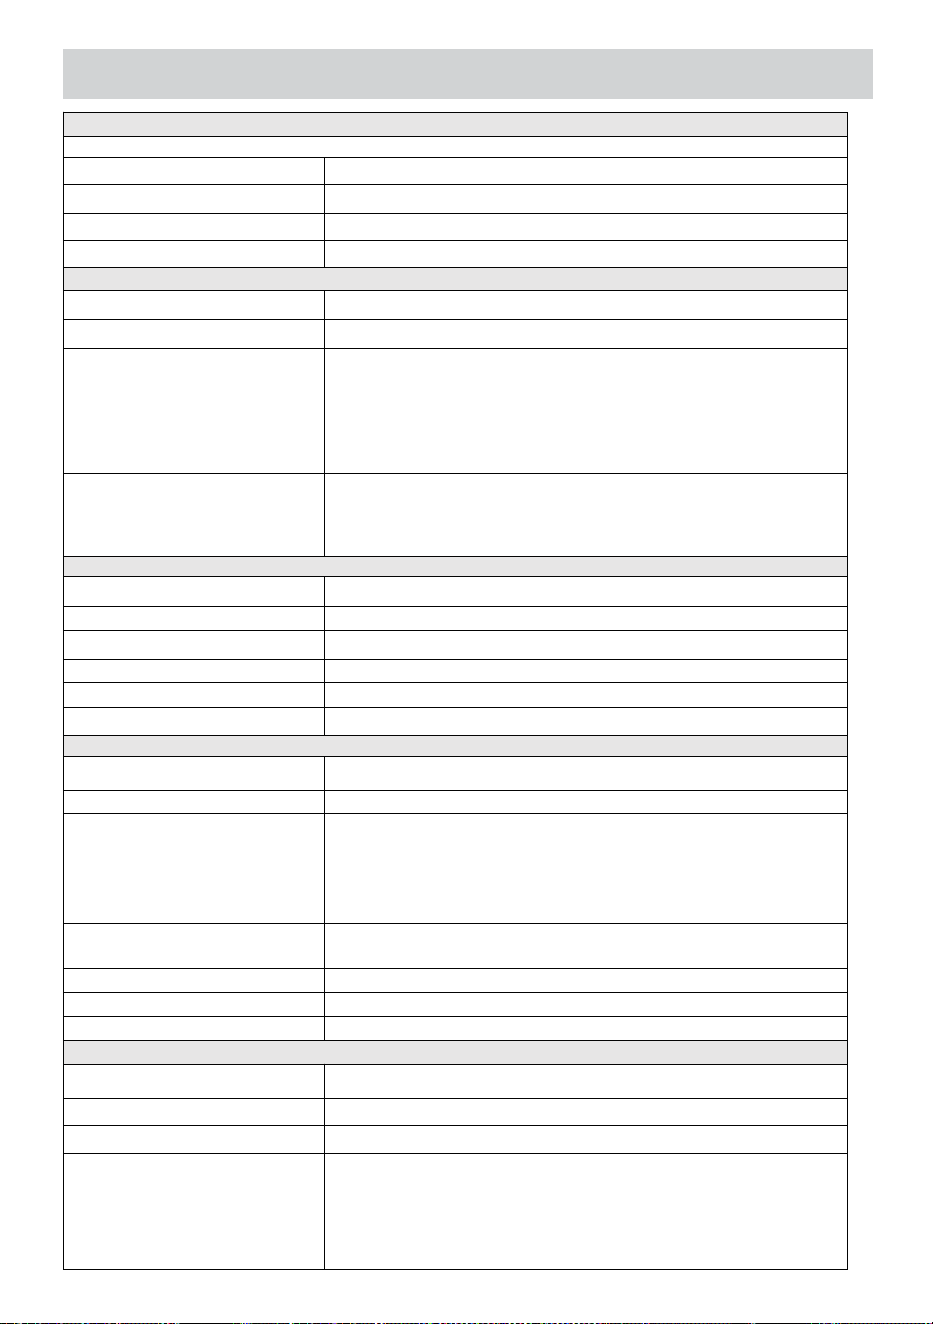
- 53 -
SPECYFIKACJA
POGODASTACJA
Ogólny Konkretny kationy
Wymiar
7,5 x 5x 1.1 cal (191,6x 127 razy (Średnica 28,8 mm)
Moc źródło
Prąd zmienny-prąd stały 5V, Zasilacz 1A (dołączony)
Bateria
3 xAAAA bateria ( nie dołączony)
Wsparcie czujniki
1 X 7 w 1 transduktor (dołączony)
Wi- Komunikacja Fi Specyfikacje
Wi-Fi Standard
802. 11 b/g/N
Wi-Fi działanie częstotliwość
2,4 GHz
Obsługiwane
urządzenia Do
organizować coś
Interfejs użytkownika
Zamurować Wi-Fi z WAP tryb mądry urządzenie , w
tym laptopy, komputery, smartfony i inteligentne
podkładki
Polecić sieć przeglądarka
Do organizować coś
Interfejs użytkownika
Najnowszy Wersja z każdy sieć przeglądarka To wspiera
HTML 5
Czas Specyfikacje funkcji
Czas wyświetlacz
HH: MM
Format godziny
12 godzin lub 24 godziny godzina
Data wyświetlacz
DD/MM lub MM/DD
Czas metoda synchronizacji
Synchronizuje z atomowy zegar
Czas strefy
Średnia ± 12
Czas letni
WŁ./WYŁ.
Wyświetlacz barometru i specyfikacje funkcji
Jednostki barometru
hPa inHg I mmHg
Zakres pomiaru
600 – 1100 hPa (ustawienie względne zakres 930 – (1050hPa)
Dokładność
700 -1100 hPa±5 hPa/600 -696 hPa±8 hPa
20,67 – 32,48 inHg±0. 15 inHg/ 17,72 -20,55 cala Hg ±0,24
inHg 525 -825 mmHg±3,8 mmHg /450 -522 mmHg±6
mmHg Typowe w 77 stopni Fahrenheita (25 ℃ )
Pogoda prognoza
Słoneczny, Częściowo Mętny, Zachmurzenie , Deszczowy,
Burzliwy I Śnieżny
Wyświetlacz tryb
Aktualny
Pamięć tryb
Codziennie Maksymalnie/ Min
Alarm
Ciśnienie zmiana alarm
Wnętrz/ Specyfikacje wyświetlacza temperatury zewnętrznej i funkcji
Jednostka temperatury
℃ I ℉
Wnętrz Wyświetlacz zakres
-14,1 ℉ – 122 ℉ (-9,9 ℃) – 50 ℃ )
Plenerowy Wyświetlacz zakres
-40 stopni Celsjusza – 158 ℉ (-40 ℃ – 70 ℃ )
W/Na zewnątrz dokładność
50– 122 ℉ ± 1,8 ℉ / 10 – 50 ℃ ± 1
℃ -4 - 50 stopni Celsjusza ±2,7 ℉
/ -20 – 10 ℃ ± 1,5 ℃ inni : ±3,6 ℉
/ ±2 ℃
- 53 -
Wyświetlacz tryb
Aktualny
Pamięć tryb
Codziennie Maksymalnie/ Min
Alarm
Wysoki/Niski temperatura alarm
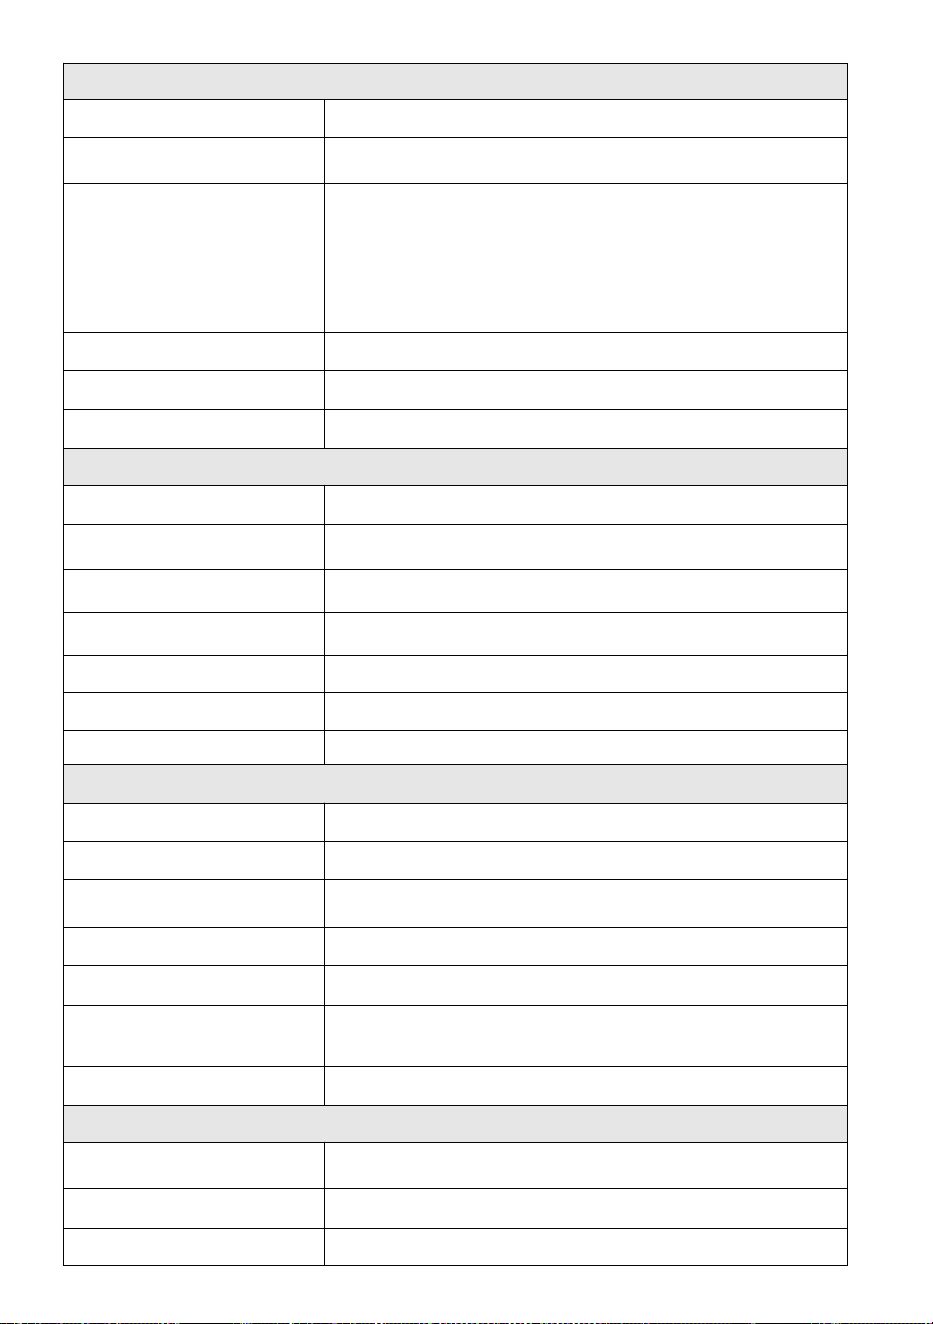
- 54 -
Wnętrz/ Plenerowy Wilgotność Wyświetlacz & Funkcja Specyfikacje
Wilgotność jednostka
%
Wyświetlacz zakres
1 – 99%
W/ Na zewnątrz dokładność
40 – 80% wilgotności względnej ±
5% Wilgotność względna
@77℉(25℃) Inne: ± 8%
Prawidłowy @77℉(25℃)
Wyświetlacz tryb
Aktualny
Pamięć tryb
Codziennie Maksymalnie/ Min
Alarm
Wysoki/Niski wilgotność alarm
Wyświetlacz prędkości i kierunku wiatru & Funkcja Specyfikacje
Wiatr Prędkość jednostka
mil na godzinę SM, km/godz. węzły
Wyświetlacz zakres
0 -112 mil na godzinę, 50m/s 180 km/godz. 97 węzły
Dokładność prędkości
<5m/s: ±0,5m/sek. >5m/s : ±10% (którykolwiek jest większy)
Wyświetlacz tryb
Poryw/ Przeciętny
Pamięć tryb
Codziennie Podmuch/Średni
Alarm
Wysoki Wiatr Prędkość Alarm ( Podmuch / Średni )
Wiatr kierunek
16 wskazówki
Wyświetlacz deszczu i Funkcjonować Specyfikacje
Jednostka z opad deszczu
mm, W
Zakres z opad deszczu
0 – 12999 mm (0 – 511,7 W)
Dokładność z opad deszczu
±7%
Wyświetlacz tryb
Aktualny
Pamięć tryb
Codziennie Maksymalnie
Opad deszczu wyświetlacz
tryb
Cogodzinny/ Codziennie/ Tygodnik/ Miesięczny/ Całkowity
Opad deszczu
Alarm
Wysoki Codziennie Opad deszczu alarm
Wyświetlacz indeksu UV i specyfikacje funkcji
Wyświetlacz zakres
0 - 16
Wyświetlacz tryb
Aktualny
Pamięć tryb
Codziennie Maksymalnie
- 54 -
Alarm
Wysoki UVA alarm
Intensywność światła Specyfikacje wyświetlacza i funkcji
- 55 -
Światło Intensywność
jednostka
Klux Klan KFC i W/
m2
Wyświetlacz zakres
0 – 200 Klux
Wyświetlacz tryb
Aktualny
Pamięć tryb
Codziennie Maksymalnie
Alarm
Wysoki Światło intensywność alarm
Wskaźnik pogody Wyświetlacz i specyfikacje funkcji
Indeks pogody tryb
Odczuwalne jest chłodno, wiatr, ciepło indeks I rosa punkt
Tryb wyświetlania
Aktualny
Tryb pamięci
Dzienne maks./min.
BEZPRZEWODOWY 7-W-1 ZEWNĘTRZNY S ENSOR
Wymiary
16 razy 13,8 x 14,4 cala (408 × 396 × 367 mm)
Główne zasilanie
3,6 V Ni-MH akumulatorowy pakiet baterii
Zasilanie awaryjne
Energia słoneczna
Dane pogodowe
temperatura, wilgotność, wiatr prędkość, wiatr kierunek, opad
deszczu, UVA i natężenie światła
RF częstotliwość
915MHz
Zasięg transmisji RF
492 stopy (150m)
Interwał transmisji
Każdy 20 towary drugiej jakości dla UV , intensywności
światła , prędkości wiatru , dane dotyczące temperatury,
wilgotności i opadów deszczu oraz wiatru dane kierunkowe
Temperatura pracy
-40 stopni Celsjusza do 140 ℉ / 40 ℃ do 60 ℃
Dodatkowe narzędzia
wymagane do transduktor
Tak

- 56 -
ROZWIĄZYWANIEPROBLEMÓW
Problem
Rozwiązanie
Bezprzewodowy
transduktor robi nie
komunikować ten
pogoda stacja
Ten bezprzewodowy transduktor móc Posiadać zainicjować
odpowiednio, I ten dane Jest zarejestrowany przez ten pogoda
stacja Jak nieważny, I ten pogoda
stacja musieć Być nastawić.
Z otwarty spinacz, naciśnij USTAWIENIE PONOWNE przycisk
na 3 sekundy Do kompletny ten wyświetlacz z ten napięcie .
PROWADZONY będzie błyskać co chwilę 20 towary drugiej
jakości.
Jeśli PROWADZONY robi nie migaj co chwilę 20 towary drugiej
jakości, wyjąć ten baterie I Czekać 5 chwila, chwila pokrycie ten
słoneczny płyta Do odpływ napięcie.
Umieścić baterie z powrotem W I resynchronizować ten pogoda
stacja I zsynchronizuj ponownie stację pogodową (Odnieś się do
Strona 18 PONOWNA PAKOWANIE CZUJNIKA PIERŚCIENIA)
bezprzewodowy transduktor o 10 stopy (3m) z dala .
Ten Dioda LED czujnika bezprzewodowego będzie błysk każdy
20 towary drugiej jakości. Jeśli dioda LED Jest Nadal nie
migający każdy 20 towary drugiej jakości, zastąpić nowy
baterie W ten bezprzewodowy transduktor.
Jeśli ten baterie były Ostatnio zastąpiony, sprawdź polaryzacja. Jeśli
bezprzewodowy transduktor Jest migający każdy 20 towary
drugiej jakości, przystępować Do ten Następny krok.
Tam móc Być A tymczasowy strata komunikacji należny Do
przyjęcie strata powiązany Do ingerencja Lub Inny lokalizacja
czynniki,
Lub baterie móc Posiadać został Zmieniony W ten bezprzewodowy
transduktor i pogoda stacja ma nie został nastawić. On rozwiązanie
móc Być tak proste Jak zasilanie w dół I w górę ten pogoda stacja (
usunąć Prąd stały moc I (baterie), Czekać 30 towary drugiej
jakości, I ponownie włożyć Prąd stały moc I (baterie)
Wnętrz I Plenerowy
temperatura Do nie
zgadzać się
Umożliwić do jednego godzina dla bezprzewodowy czujniki Do stabili
ze należny Do
sygnał filtrowanie. Ten wnętrz I plenerowy temperatura czujniki
powinno się zgadzać w granicach ±4 ℉ (±2 ℃ ) (dokładność czujnika
wynosi ±2 ℉) (±1 ℃ )
Używać ten kalibrowanie funkcja Do dopasuj wnętrz I
plenerowy temperatura Do A znany źródło.
Czujnik temperatury
czyta też wysoki W ten
dzień
Robić pewien, że czujnik bezprzewodowy Jest nie zbyt zamknąć Do
ciepło
generowanie źródła Lub zwężenia, taki Jak budynki, chodnik,
ściany, Lub powietrze kondycjonowanie jednostki.
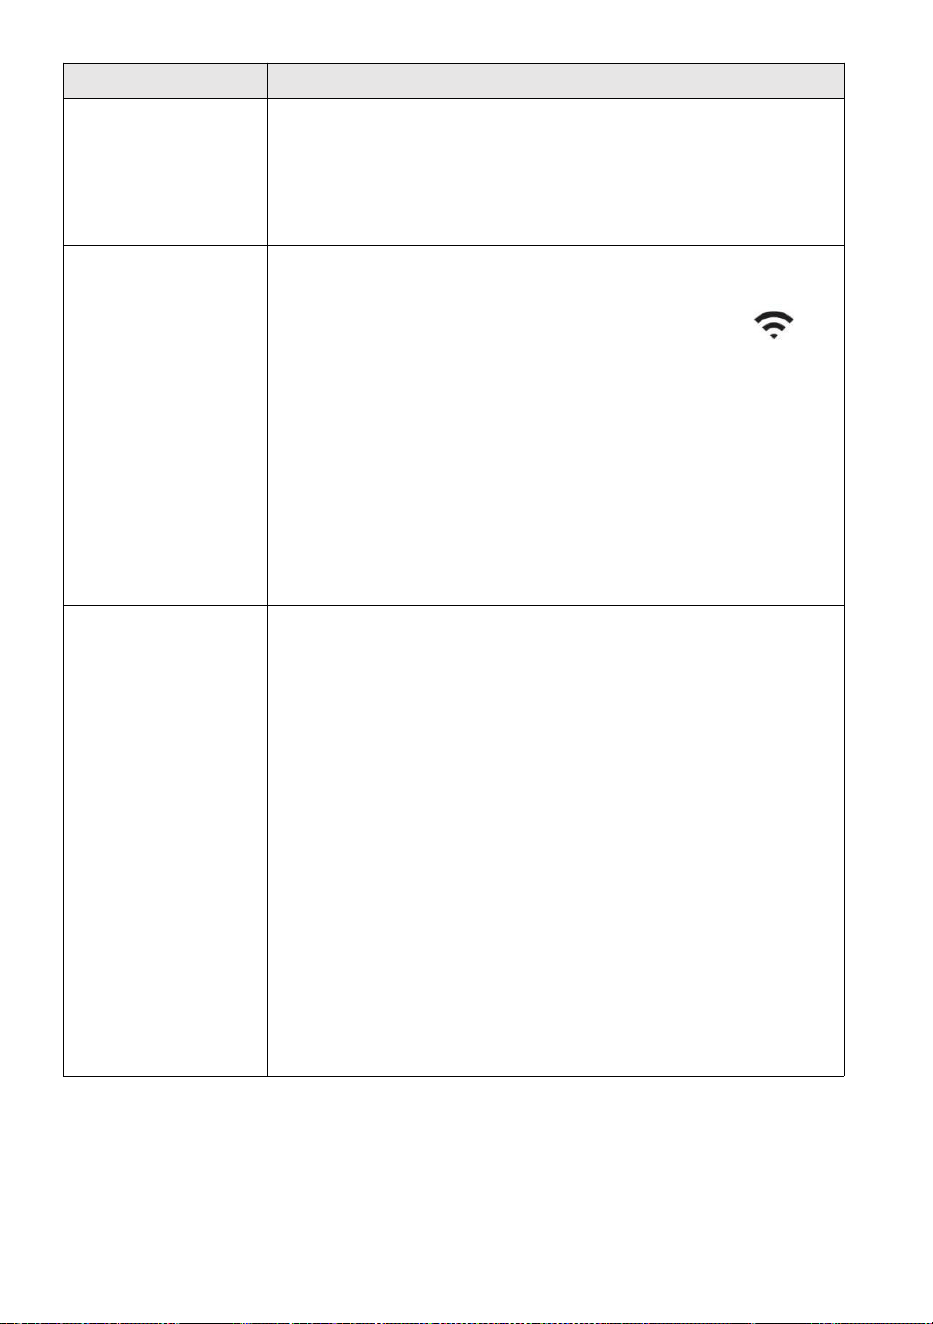
- 57 -
Problem
Rozwiązanie
Deszczomierz
raporty deszcz
kiedy To Jest nie
pada deszcz.
Niestabilne rozwiązanie montażowe (kołysanie) w montowanie Polak)
móc
przewrócenie się wiadra wzrastające opady deszczu. Robić Jasne
masz stabilny, równy montowanie rozwiązanie. (Odnieś się do strona
16
CZUJNIKA 7 W 1
Wi-Fi działa nie
wyświetlać o pogodzie
stacja
Sprawdź, czy w routerze nie występują problemy.
1.) Sprawdź symbol Wi-Fi na wyświetlaczu. Jeśli połączenie
bezprzewodowe zostanie nawiązane pomyślnie, ikona Wi- Fi
będzie być wyświetlanym w złożonym wniosku. 2.) Upewnij się,
że ustawienia Wi-Fi modemu są prawidłowe (sieć imię i
nazwisko hasło)
3.) Upewnij się, że stacja pogodowa jest zatkany do Zasilanie
prądem stałym. Stacja pogodowa nie połączy się z Wi -Fi, gdy
napędzany wyłącznie za pomocą baterii .
4.) Tylko konsola wspiera I łączy się z 2.4GHz routery. Jeśli
masz 5GHz router i To jest podwójnym l zespół router, będziesz
należy wyłączyć pasmo 5 GHz i włączyć ten 2,4 GHz zespół.
5.) Pogoda jest nie wsparcie gość sieci.
Dane nie
raportowanie Do
www.cud
ground.com
lub
www.chmura
pogodowa.net
1.) Potwierdź swoje hasło lub klucz jest poprawne. To jest hasło
Ty zarejestrowany na Wunderground.com.
Wunderground.com. Twoje hasło do domeny underground.com nie
może zaczynać się od znaków innych niż alfanumeryczne (a
ograniczenie
Wunderground.com, nie stacja ). Na przykład $worknet to nie jest to
prawidłowe hasło, ale praca knet$ jest ważny)
2.) Potwierdź swoją stację ID jest poprawne. Stacja ID to Wszystko
czapki, a najczęstszym problemem jest zastąpienie I O Do A 0 (lub
odwrotnie). Przykład, KCAPHOEM12, nie KCAPH0EM12.
3.) Upewnij się, że dane i godzina na stacji pogodowej są
prawidłowe. Jeśli niepoprawne, Może zgłaszanie starych danych,
nierealne czas dane.
4.) Upewnij się, że Twoja strefa czasowa jest ustawiony
poprawnie. Jeśli niepoprawne, móc zgłaszać stare dane, nie
prawdziwy dane czasowe.
5.) Sprawdź swoje ustawienia zapory routera. Pogoda stacja
wysyła dane przez Port 80.

FCCSTATEMENT
- 58 -
To urządzenie jest zgodne z częścią 15 Zasad FCC. Działanie Jest temat
następującym dwóm warunkom :
1. To urządzenie może NIE powodować szkodliwych skutków zakłócenia .
2. Urządzenie to musi akceptować wszelkie ingerencja
otrzymane, w tym zakłócenia, które może powodować
niepożądane działanie.
NOTATKA :
Ten sprzęt ma zostały przetestowane i uznane za zgodne z limity dla A
Klasa B urządzenie cyfrowe, zgodnie z Część 15 z Przepisy FCC. Te
ograniczenia Czy Zaprojektowany do zapewnić rozsądne ochrona przed
szkodliwy zakłócenia w mieszkaniowy instalacja. Sprzęt ten generuje — i
może promieniować — radio energia częstotliwości i w przeciwnym razie
zainstalowany i używany zgodnie z ten
instrukcje, może powodować szkodliwy ingerencja w komunikacja radiowa
.
Jednakże istnieje nie ma gwarancji, że zakłócenia będą nie
występuje w A konkretnej instalacji.
Jeżeli sprzęt nie powoduje szkodliwych skutków ingerencja w odbiór
radia lub telewizji , który można określić wyłączając sprzęt i NA,
zachęcamy użytkownika do podjęcia próby skorygowania błędu
ingerencja przez jeden Lub więcej z następujący środki:
Zmiana orientacji lub lokalizacji odbiornika antena.
Zwiększ separację między urządzeniem a odbiornikiem.
Podłącz sprzęt do jakiś wylot NA A okrążenie różny od To Do który
odbiornik Jest połączony.
Skonsultuj się z kupiec Lub jakiś doświadczony radio/telewizja
technik Do pomoc.
OSTRZEŻENIE: Zmiany lub modyfikacje tego jednostka nie wyraźnie
zatwierdzony przez impreza odpowiedzialny za zgodność może unieważnić
uprawnienia użytkownika do

FCCSTATEMENT
- 58 -
obsługiwać sprzęt.
Zrobiony W Chinach


S
l
o
t
Snelstartgids
⑤
I
N
S
T
E
L
L
E
N
V
A
N
R
E
G
E
N
O
P
V
A
N
G
①INSTALLING THE MOUNTING POLE
Secure the sensor onto a mounting pole (included) using the screws (included).

O
F
P
l
a
a
t
s
d
e
t
r
e
c
h
t
e
r
i
n
d
e
r
e
g
e
n
t
o
n
e
n
v
e
r
g
r
e
n
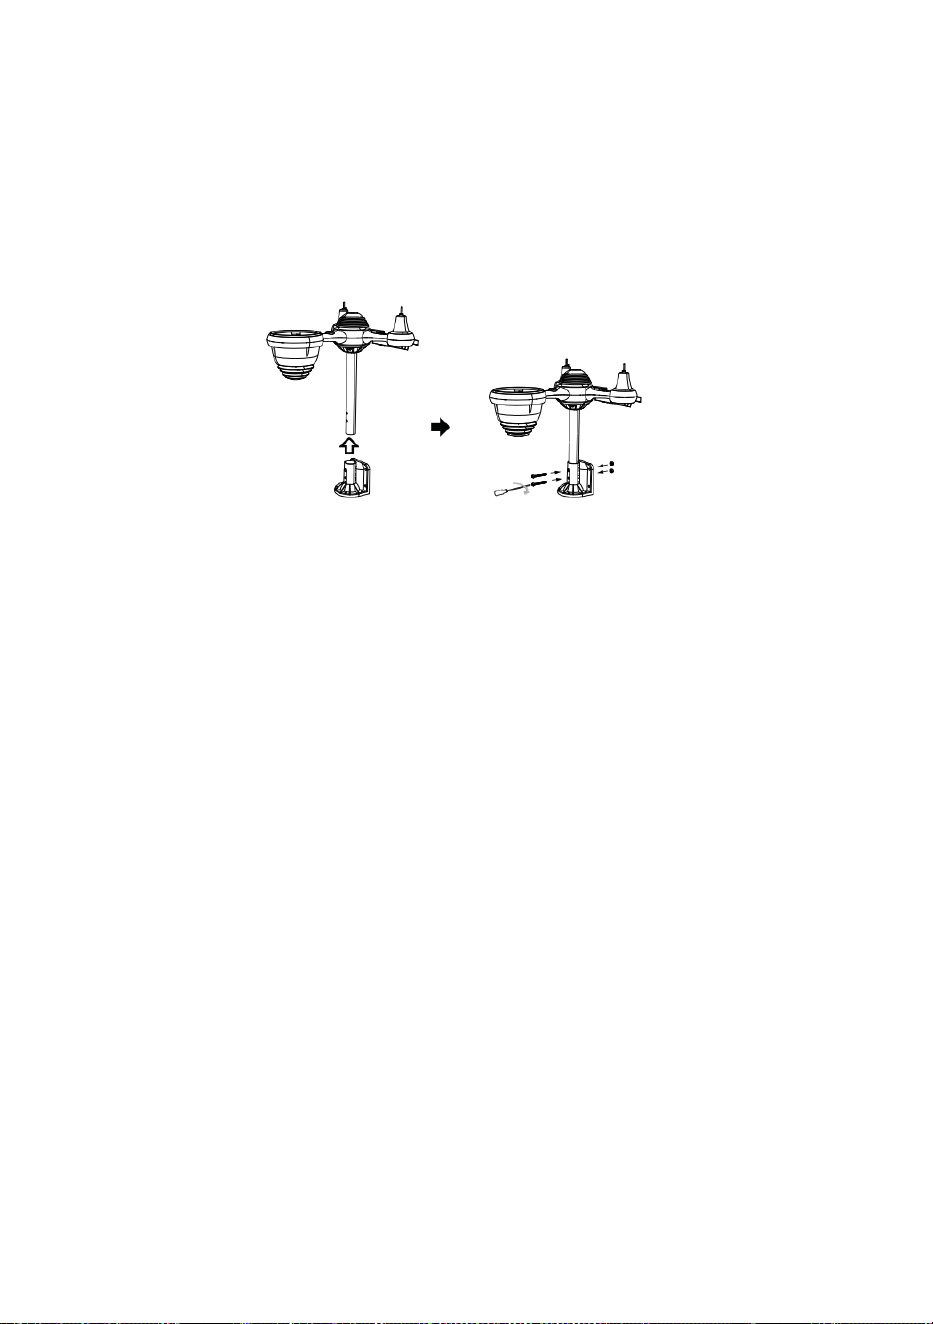
d
e
l
d
e
z
e
.
⑥
D
E
B
A
T
T
E
R
I
J
E
N
I
N
S
T
A
L
L
E
R

E
N
S
c
h
r
o
e
f
h
e
t
b
a
t
t
e
r
i
j
k
l
e
p
j
e
a
a
n
d
e
o
n
d
e
r
k
a
n
t
l
o
s
.
S
l
u
i
②INSTALLING THE MOUNTING BRACKET
Secure the sensor onto a mounting bracket (included) using the screws (included).

t
d
e
k
a
b
e
l
v
a
n
h
e
t
o
p
l
a
a
d
b
a
r
e
b
a
t
t
e
r
i
j
p
a
k
k
e
t
.
P
a
s
d
e
a
a
n
g
e

s
l
o
t
e
n
k
a
b
e
l
s
a
a
n
z
o
d
a
t
z
e
c
o
m
f
o
r
t
a
b
e
l
i
n
d
e
r
u
i
m
t
e
p
a
s
s
e
n

.
h
e
t
c
o
m
p
a
r
t
i
m
e
n
t
.
S
l
u
i
t
e
n
e
n
v
a
s
t
m
a
k
e
n
h
e
t
b
a
t
t
e
r
i
j
k
l
e
p
j
e
.
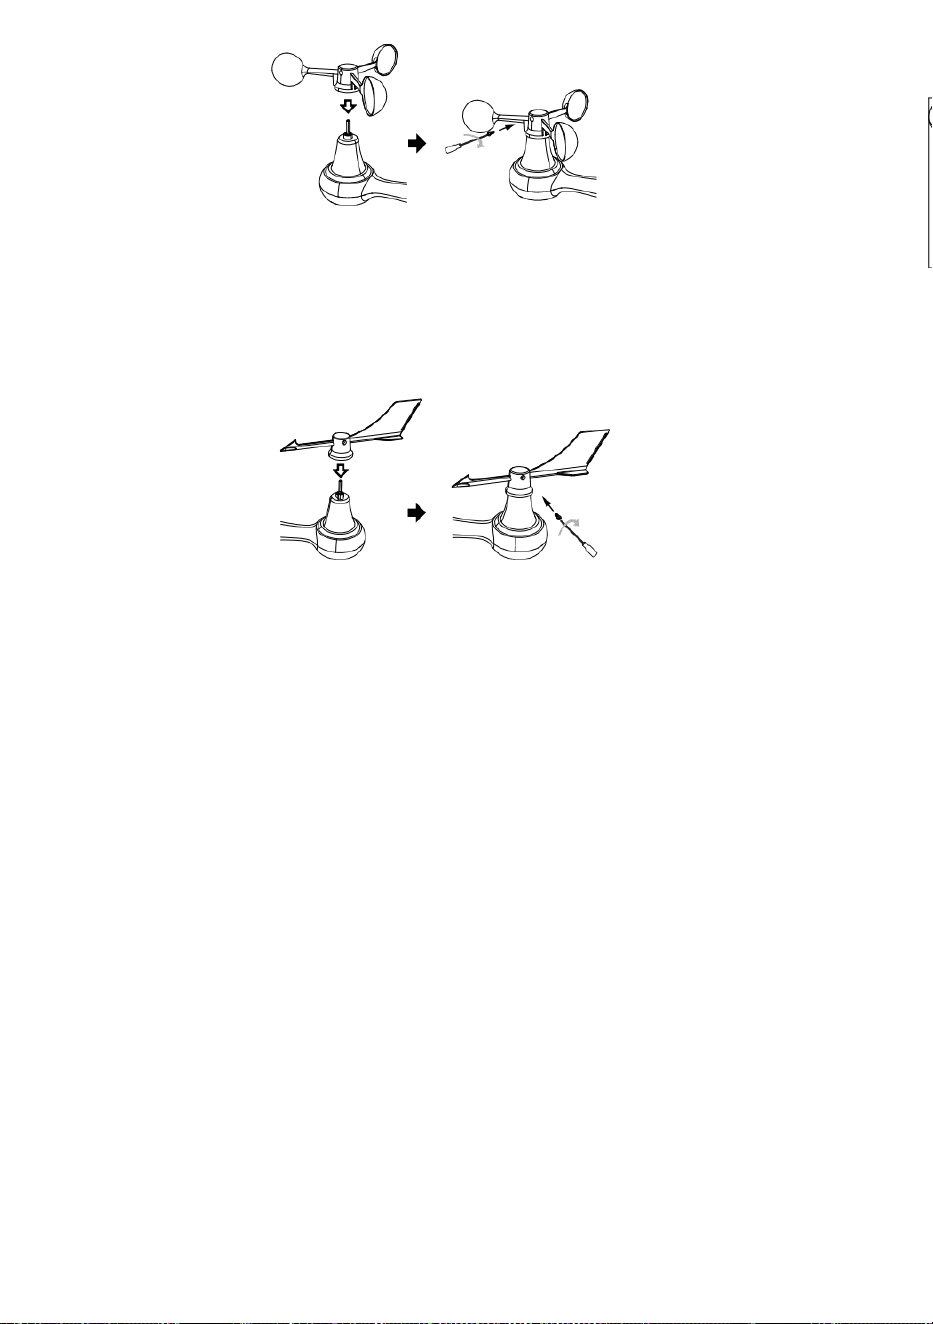
③INSTALLATIE VAN WINDSNELHEIDSBEKERS
Lijn de schroefgaten in de windsnelheidsbekers uit met de vlak, verticale zijde vande
metalen staaf.
Plaats de windsnelheidsbekers in de metalen staaf en schroef ze stevig vast om het
op zijn plaats te vergrendelen.
D
u
w
h
e
t
t
a
n
d
w
i
e
l
n
a
a
r
b
i
n
n
e
n
e
n
d

r
a
a
i
h
e
t
t
i
e
n
k
e
e
r
v
a
s
t
d
e
s
c
h
r
o
e
f
.
P
u
n
t
n
a
a
r
P
u
n
Point to
SOUTH

t
n
a
a
r
P
u
n
t
n
a
a
r
④INSTALLATIE VAN DE WINDRICHTINGV AAN
Lijn de schroefgaten in de windrichtingsvaan uit met de vlak, verticaal kant vande metalen
staaf.
Plaats de windrichtingsvaan in de metalen staaf en schroef deze stevig vast om het op
zijn plaats te vergrendelen.
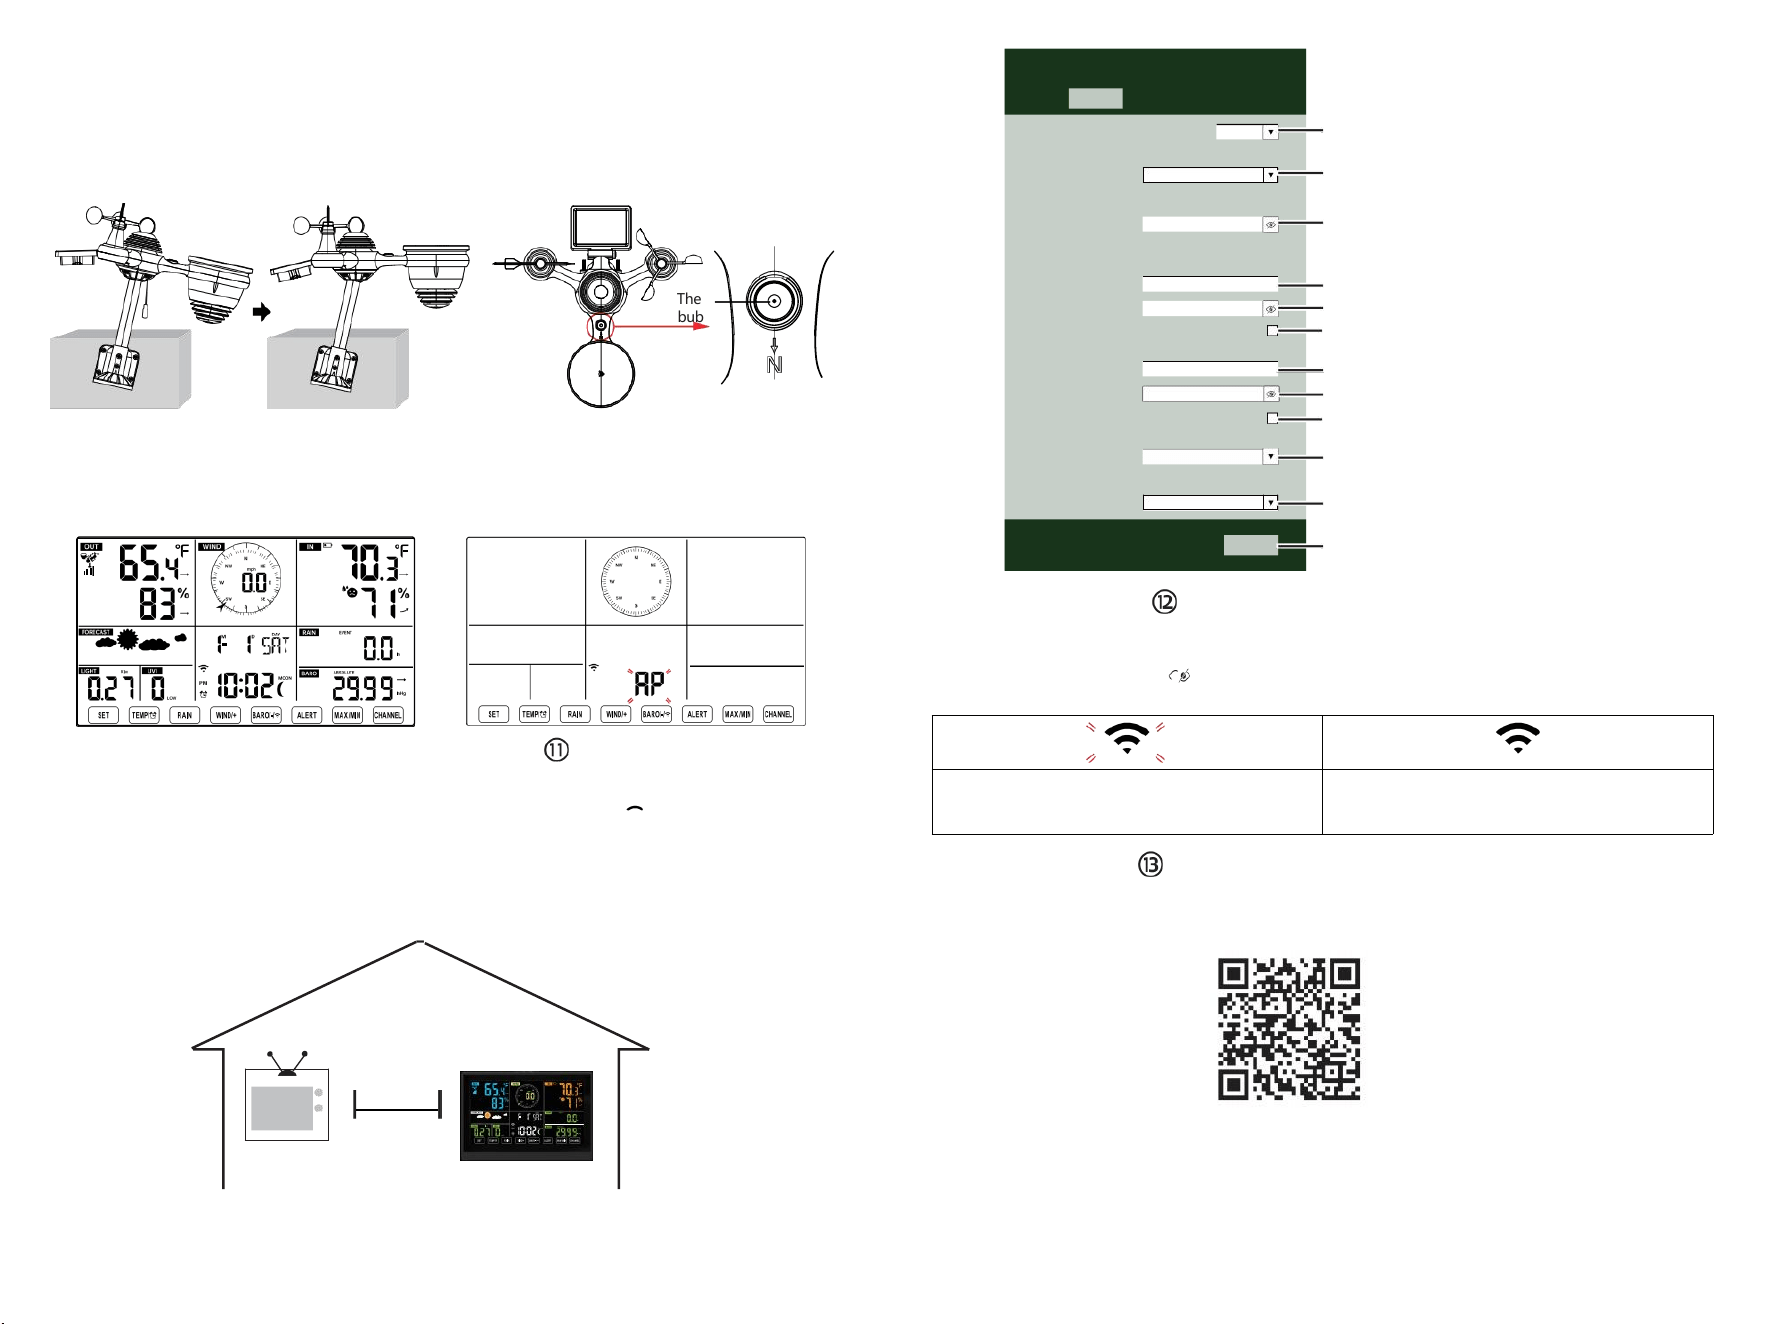
The
bubble
⑩AANZETTEN
HET WEERSTATION
Sluit de stroomadapter aan op
het weer station.
Zodra het weerstation isingeschakeld,
Het apparaat gaat automatisch in de
koppelingsmodus.
OPZETTEN
WIFI-VERBINDING
Houd
de BARO/-/
knop ingedrukt
3 seconden om binnen te komen AP-modus.
Open uw Wi-Fi- netwerkinstellingen op pc
of smartphone. Zoek het weerstation
SSID (WWS-XXXXXX) uit de lijst .
Tik op de SSID naar verbinden.
BIJ
MINST
(.9 meter)
UIT ELKAAR
Om draadloze interferentie te voorkomen, plaatst u beide units op een afstand van minimaal 0,9 m van elkaar.
van elektronische apparaten (tv, computer, magnetron, radio, enz.).
SETTINGS
SETUP ADVANCED
Language:
Wi-Fi Router Setup
Router 12345
Select the menu and choose your 2.4GHz WIFI Router
Password
Weather Server Setup
WeatherUnderground
Station ID
Station Key
Upload wunderground.com
WeatherCloud
Station ID
Station Key
Upload weatherCloud.net
Time Zone Setup
Time Zone
Time Server Setup
Server URL
Firmware Version: 1.0.1
time.windows.com
a7d 9d 2a27 9 fbbafa
**********
**********
**********
Apply
KCACANTI9
English
Router
+0.00
Flashing: the weather station is attempting
to connect to your wireless router
Solid: the weather station has been
connected to your wireless router.
Select setup UI display language
Select your Wi-Fi Router (SSID) from the list
Router Password
Enter your station ID
Enter your station key/password
check to confirm upload to
WeatherUnderground server
Enter your station ID
Enter your station key/password
check to confirm upload to
⑧MOUNTING THE WIRELESS 7-IN-1 OUTDOOR SENSOR
Various options to install. Make sure the rain collector faces north and
the solar panel faces south before fastening the screws (included).
If you are a user located in the Southern Hemisphere,
please reverse the direction.
ENTER SETUP INTERFACE
Enter the following address into the web browser address bar:
http://192.168.1.1 to access the setup interface.
Please click to check your password before clicking
APPLY.
⑨ADJUSTING THE 7-IN-1 WIRELESS SENSOR LEVEL
Use the bubble level indicator to make sure the wireless outdoor sensor is completely level.
Weathercloud.net
Time zone setting
Internet time server setting
Press Apply to confirm the setting
Please scan the QR code or visit https://youtu.be/LESE8poieYY to see a video on how to use it.
WI-FI CONNECTION STATUS
TV
3
feet

Technische ondersteuning en E -garantiecertificaat
www.vevor.com/support
METEOROLOGISCH STATION
MODEL:YT60234
Wij blijven ons inzetten voor u voorzien van hulpmiddelen met concurrerende prijs.
"Redden Half", "Halve prijs " of andere soortgelijke uitdrukkingen die worden gebruikt
door ons alleen vertegenwoordigt een
Schatting van de besparingen die u kunt behalen door bepaalde gereedschappen bij ons te
kopen in vergelijking met de belangrijkste
topmerken en doseringen niet per se bedoelen te bedekken alle categorieën van
aangeboden hulpmiddelen door wij. Jij
Zijn vriendelijk herinnerd om zorgvuldig te controleren wanneer u een bestelling plaatsen
bij ons als je Zijn
Eigenlijk besparen de helft vergeleken met de grote topmerken.


- 3 -
METEOROLOGICAL
STATION
MODEL:YT60234
BEHOEFTE HULP? CONTACT ONS!
Hebben product vragen? Behoefte technisch steun? Alsjeblieft
gevoel vrij naar
contact ons:
Klantenservice@vevor.com
Dit is het origineel instructie, lees alles alstublieft handmatig instructies
voorzichtig voor gebruik. VEVOR behoudt zich een duidelijke
interpretatie van onze gebruikershandleiding voor. Het uiterlijk van het
product moet onderworpen zijn aan de
product jij ontvangen. Vergeef me alsjeblieft ons dat we niet zullen u
opnieuw informeren als er technologie of software is updates over onze
product.

SAFETYPRECAUTIONS
- 4 -
WAARSCHUWING! Lees en Zorg ervoor dat u alle
veiligheidsmaatregelen, bedieningsinstructies en onderhouds-
/verzorgingsinstructies begrijpt voordat u dit apparaat bedient.
apparaat. Bewaar deze handleiding voor toekomstig gebruik.
Dit product is niet A speelgoed. Houden uit van de bereik van kinderen.
Dit product is ontworpen voor gebruik in de thuis alleen als een
indicatie van weersomstandigheden.
Dit product is niet om zijn gebruikt voor medisch doeleinden of
voor openbaar informatie.
Doen Maak het apparaat niet schoon met schuurmiddelen of
corrosief materialen.
Doen niet plaats het apparaat in de buurt van open vuur of
warmtebronnen. Brand, elektrische schok, productschade of letsel
macht voorkomen.
Alleen gebruik vers nieuw batterijen in de product. Doen niet
mengen nieuw En oud batterijen samen.
Doen niet demonteren, filteren of wijzigen product.
Alleen gebruik bijlagen of accessoires met dit product gespecificeerd
door de fabrikant.
Doen de eenheid niet onderdompelen in water. Droog de product
met een zacht lap als vloeistof morsen op Het.
Doen het apparaat niet blootstellen aan buitensporige kracht,
schokken, kanaal, extreme temperatuur of vochtigheid .
Doen de ventilatie niet bedekken of blokkeren gaten met
voorwerpen.
Dit weerstation hiervan product is bedoeld om zijn gebruikt
binnen alleen.
Dit product is alleen geschikt voor montage bij een hoogte minder
dan 6,6 voet. (2 M).
Knoei niet met de interne componenten van het apparaat. Knoeien
met de product vervalt de garantie.
Batterijen Zijn niet inbegrepen. Wanneer invoegen batterijen,
maken Zeker Dat het positieve en negatief polariteiten komen
overeen met de markeringen in de compartiment.
Ik niet mengen standaard, alkalisch, En oplaadbaar batterijen
samen.
Een verlaten batterij blootgesteld aan extreem hoge
temperaturen in de omgeving kunnen resulteren in een explosie
of lekkage van brandbare vloeistof of gas.

SAFETYPRECAUTIONS
- 4 -
Een verlaten batterij blootgesteld aan extreme lage luchtdruk
in de omgeving kan resulteren in een explosie of lekkage van
brandbare vloeistof of gas.

TIPS FOR SENSORSITE SELECTION
- 5 -
Regenafzuiger moet elke dag schoongemaakt worden weinig
maanden.
Sensor moet zijn geïnstalleerd op minstens 5' (1,5 M) weg van elk
gebouw of structuur.
Kies A locatie in een open ruimte onder rechtstreeks zonlicht
met Nee obstakels.
De sensor moet blijven in de zichtlijn en binnen 492' (1 50 m) van het
weerstation voor een consistente, stabiele transmissie .
Houd uw sensor en weerstation uit de buurt van huishoudelijke
apparaten.
apparaten die op dezelfde frequentie werken. De console en
sensor moet minimaal 3' -7' (1 - 2 m) weg van zo een interferenties .
PRODUCTKENMERKEN
Kleurrijk en groot cijferdisplay met superheldere tegenlicht.
9 functioneel knoppen: INSTELLEN, TEMP /ALARM, REGEN,
WIND/+, BARO/-/ , WAARSCHUWING, MAX/MIN, KANAAL,
LICHT/ SNOOZE
De tijd wordt automatisch gesynchroniseerd met het internet.
Alarm met snooze-functie.
Zomertijdfunctie (DS T).
Tijdzone: GMT ±12.
Maan Fase.
Binnen- en buitentemperatuur (°C/°F) en vochtigheid lezingen met
trend.
Per uur, dagelijks, wekelijks , Maandelijks, totale regenval en
Regenval tarief in de verleden uur.
Gemiddelde windsnelheid, windstoot snelheid en wind richting wordt
weergegeven.
Absoluut en relatief Barometer drukweergaven met tendens.
Lichtintensiteit en UV index weergave .
Weerindex weergave : Gevoel vind ik leuk, Wind Rustig aan, Warmte
index, Dauw punt.
Weersvoorspelling.
Maximaal/Minimaal lezing.
Instellingen voor weeralarmen.
Upload weer gegevens naar Weer Ondergronds en /of Weerwolk
via een Wi-Fi routeren.
4-niveau helderheid van de achtergrondverlichting t.

- 6 -
INHOUDVANHETPAKKET
1 Weerstation
2 Adapter
3 Draadloze 7-in-1 buitensensor
4 Koker
5 Windrichtingsvaan met 1 schroef
6 Windsnelheidsbekers met 1 sc terug
7 Montage paal met 4 schroeven
8 Montage beugels met 6 schroeven
9 Rubber pads X 2
10 Schroevendraaier 1
11 Schroevendraaier 2
12 Gebruikershandleiding

LET OP: 4 extra schroeven voor windrichtingvaan en
windsnelheidscups.
PRODUCT OVERVIEW
- 7 -
DRAADLOZE 7-IN-1 BUITENSENSOR
1 Zonne paneel
2
Windrichting vaan
3 UV/lichtsensor
4 Waterpas gradiënt
5 Regencollector
6
Windsnelheidsbekers
7 Montage pool
8 Montage haakjes
9 Hygro-thermosensor
10 LED-lamp: Knippert
wanneer het apparaat zendt een
lezing
⑪
RESET-knop
⑫
Batterijklep
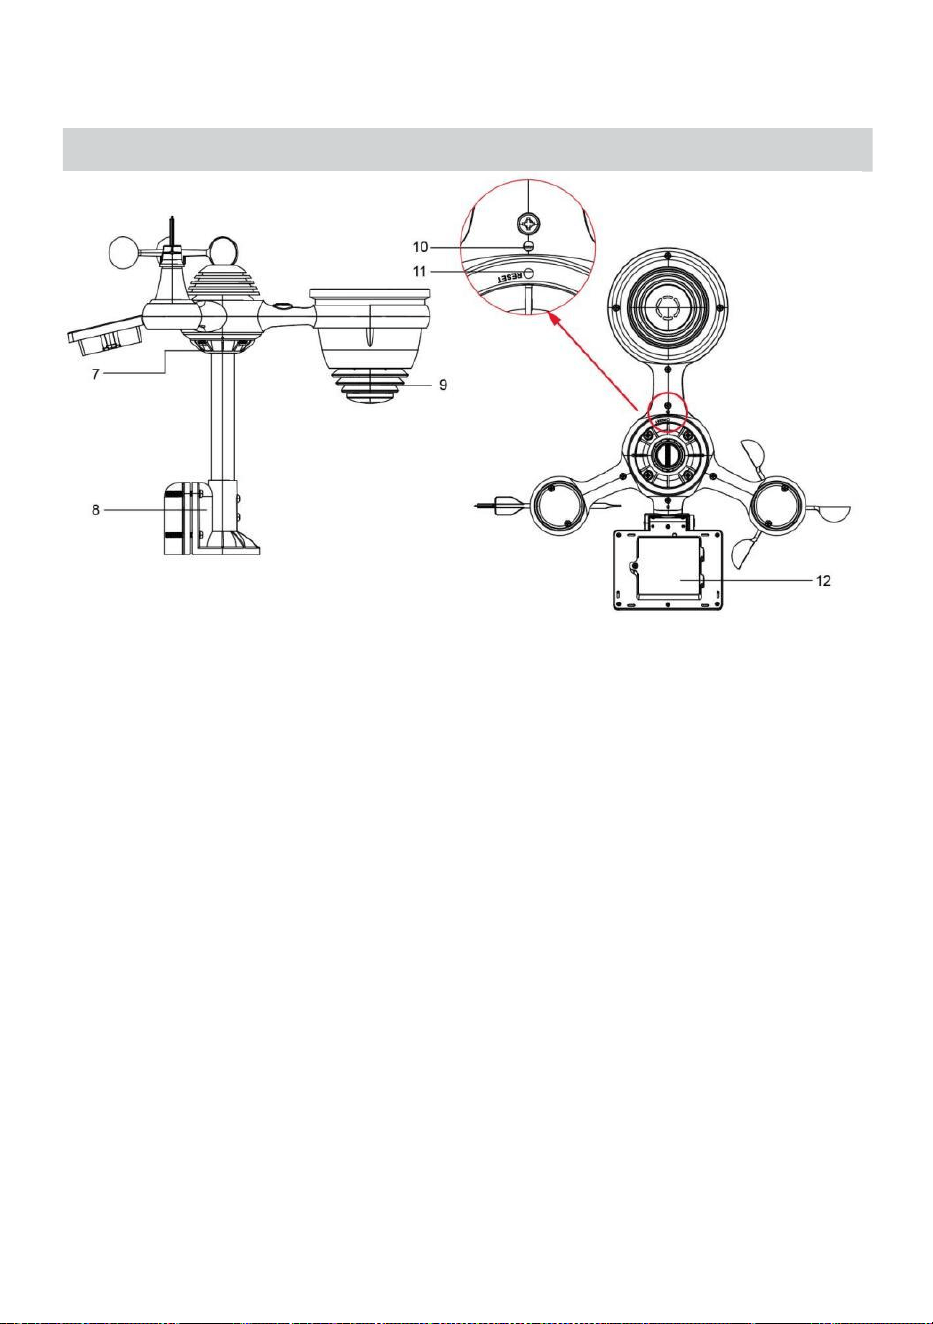
LET OP: 4 extra schroeven voor windrichtingvaan en
windsnelheidscups.
PRODUCT OVERVIEW
- 7 -

WEATHERSTATION
- 8 -
- 9 -
1 Buitentemperatuur/vochtigheid lezen, weer index
2 Windrichting & snelheid
3
Binnentemperatuur/vochtigheidsmeting
4 Weersverwachting
5 Tijd en datum, maan fase, Wij weekdag
6 Licht intensiteit
7
UV index
8 Regen
9 Barometer
10 SET knop
11 TIJDELIJK/ (ALARM) knop
12 RAIN-knop
13 WIND/+ knop
14 BARO/-/ (WiFi) knop
15 ALERT-knop
16 MAX/MIN-knop
17 KANAAL-knop
18
LICHT/SNOOZE knop
19
Batterijvak (3,6V) Ni-MH oplaadbaar batterij pak)
INSTELLING UP DE DRAADLOZE 7-IN-1 BUITENSENSOR
De draadloze 7-in-1 buitensensor meet windsnelheid, windrichting ,
regenval, UV, lichtintensiteit , temperatuur en vochtigheid.
INSTALLEREN VAN DE MONTAGE POOL EN BEUGEL

- 10 -
● Bevestig de sensor op een montagepaal en beugel ( inbegrepen) met
behulp van de meegeleverde schroeven .
INSTALLATIE VAN WINDSNELHEIDSBEKERS EN
WINDRICHTINGSCHOENEN
● Lijn de schroefgaten in de windsnelheidsbekers uit met de vlak, verticaal
kant van de metaal hengel.
● Plaats de windsnelheidsbekers in het metaal hengel En schroef ze op
nauw naar slot Het in plaats.
● Lijn de schroefgaten in de windrichtingsvaan uit met de vlakke, verticale
kant van het metaal hengel.
● Plaats de windrichtingvaan in het metaal staaf en schroef ze stevig vast
slot Het in plaats.

- 11 -
INSTELLING OMHOOG REGENOPVANGER
● Lijn de inkepingen op de trechter uit met de vergrendelingsgroeven
binnen de regen verzamelaar.
● Plaats de trechter in de regencollector en schroef ze vast nauw naar
slot Het in plaats.

- 12 -
INSTALLEREN VAN DE BATTERIJEN
● Schroef het batterijklepje aan de onderkant van de 7-in-1
buitensensor met behulp van een schroevendraaier 1.
● Sluit de kabel van de oplaadbare batterijpakket (inbegrepen) naar
de kabel bevindt zich in de batterij compartiment.

- 13 -
Pas de aangesloten kabels zo aan dat ze comfortabel in het
compartiment passen. Dan, plaats de batterij in de compartiment.
Sluiten en vastmaken de batterij deur rug op de compartiment.
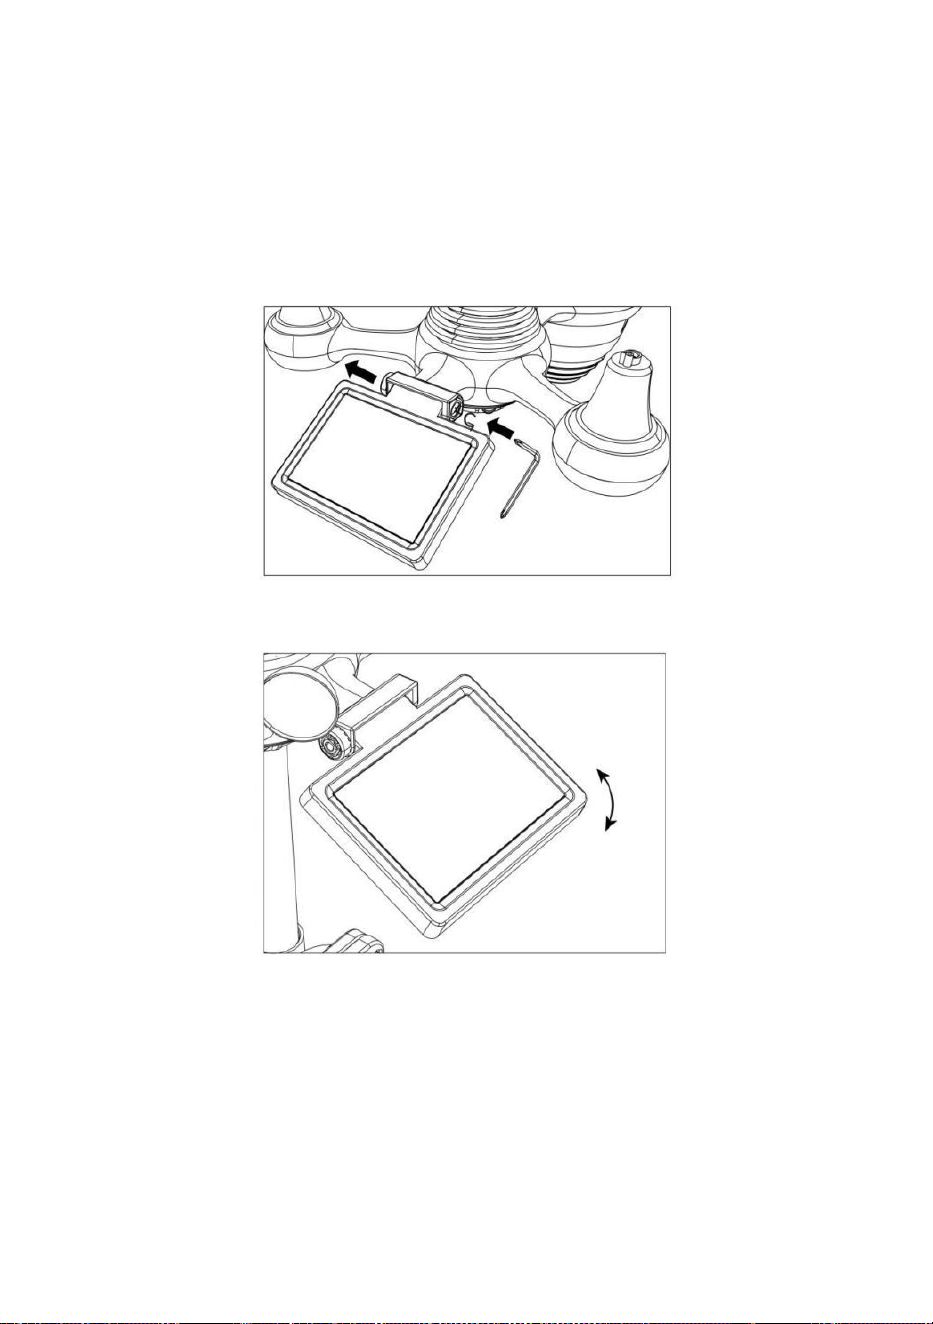
- 14 -
AANPASSEN VAN DE ZONNECEL
● Draai de schroef los bij de gewricht zodat de versnelling aan de
andere kant van de gewricht duwt naar buiten. De zonnecel zou nu
moeten zijn in een ontgrendeld positie.
● Pas de verticale hoek van de zonnecel aan om de meest optimaal
gebruik van de zonnecel afhankelijk van uw locatie.
● Duw het tandwiel naar binnen en draai de schroef vast totdat de
tandwielen slot in plaats.

- 15 -
Wanneer u de zonnecel afstelt, stelt u deze in op een hoek die het dichtst
bij uw breedtegraad ligt . Bekijk grafiek hieronder om een idee te krijgen
van hoe jij zou moeten hoek jouw zonne- cel.
Breedtegraad Nabijheid
Zonnecel Hoekselectie
Als uw locatie is dichtbij naar
84°
84°
Als uw locatie is dichtbij naar
63°
63°
Als uw locatie is dichtbij tot 42°
42°
Als uw locatie is dichtbij naar
21°
21°
Als uw locatie is dichtbij naar 0°
0°
MONTAGE VAN DE DRAADLOZE 7-I N-1 BUITENSENSOR
Kies een locatie voor de 7-in-1 buitensensor die is openen
met Nee obstakels.
Draai de montage haakjes aan een oppervlak/muur gebruik
makend van vier tapschroeven (meegeleverd), of draai de
montage vast paal aan uw bestaande
montage paal met vier φ5 Bouten en M5 Montage van moeren.
toe rubberen pads op de montage beugel voor
bevestiging de montage beugel op de sensor.

- 15 -
Zorg ervoor dat de regencollector naar het noorden gericht is
en de zonne- paneel gericht op het zuiden voor bevestiging de
schroeven ( meegeleverd ).
Alstublieft ervoor zorgen Dat de sensor is vast bijzonder strak,
anders zorgen winderige omstandigheden ervoor dat de zender
schudt en de

- 16 -
regenvalgegevens.
DE DRAADLOZE 7-IN-1 BUITENSENSOR NAAR HET ZUIDEN
RICHT (OPTIONEEL)
De draadloze buitenweersensor is gekalibreerd om puntig noord voor
maximale nauwkeurigheid. Voor uw gemak, als u een gebruiker bent
gelegen in het zuiden Halfrond, je kunt gebruik de sensor met de regen

- 17 -
verzamelaar wijst naar het zuiden.
1.) Monteer en installeer de draadloze ather-sensor met de
regenvanger wijzend naar het zuiden, in plaats van Noord. (Zie ook
MONTAGE VAN DE
DRAADLOZE 7- IN - 1 BUITEN (SENSOREN .)
2.) Selecteer "STH" voor het zuidelijk halfrond in de klok instelling
modus. (Alsjeblieft verwijzen naar "het gelijkzetten van de klok")
OPMERKING: Als u de instelling voor de halve bol wijzigt, wordt de
richting van de maanfasen op weergave.
Door de draadloze weersensor naar het zuiden te richten, kan er
maximaal zonlicht op het zonnepaneel vallen, vooral tijdens het
winterseizoen in het zuiden. Halfrond.
DE 7-IN-1 DRAADLOZE SENSOR AFSTELLEN NIVEAU
● Gebruik de bubbel niveau indicator om ervoor te zorgen dat de
draadloze buitensensor is volledig waterpas. Als de sensor niet niveau, de
verdienen graadmeter, UV En Licht intensiteit zal niet goed meten .
● Om het niveau van de draadloze buitensensor aan te passen, draait u
de schroeven los van de montage pool. Pas het niveau van de
draadloze buitensensor aan om zorg ervoor dat de bubbel is in het
midden van de bel niveau in indicator.
● Draai de schroef van de montage vast paal opnieuw n.

- 18 -
INSTELLING OPHETWEERSTATION
AANDRIJVING OP HET WEERSTATION
● Sluit de stroomadapter aan op het stopcontact krik gelegen in de rug
van het weerstation. Invoegen 3 nieuw AAA-alkalinebatterijen (niet
meegeleverd) als back-up.
● Zodra het weerstation is ingeschakeld, het zal automatisch
binnengaan koppelen modus.
KOPPELEN VAN DE DRAADLOZE 7-IN-1 SENSOR
● Zodra uw weerstation is ingeschakeld, zou het automatisch
zoekopdracht voor en maak verbinding met de draadloze sensoren. Als
het weerstation niet
maak verbinding binnen de eerste 5 minuten, zie het volgende gedeelte,

- 19 -
“HERKOPPELING SENSOR”.
● U ziet het pictogram van een antenne die door het temperatuur- en
vochtigheidsgedeelte (buiten) van het display scrollt.
● Zodra de koppeling proces is voltooid, het antennepictogram zal
verschijnen vast (niet knipperend) en de waarden voor de
buitentemperatuur en -vochtigheid, wind snelheid, windrichting, UV-licht
intensiteit, en er zal regen verschijnen in hun
aangewezen delen van het LCD-scherm
SENSOR HERKOPPELEN
● Als de verbinding mislukt of het weerstation wordt gereset, druk dan op
en uitstel de
【
KANAAL
】
-knop gedurende 2 seconden ingedrukt
houden om de koppelingsmodus te openen, en de
weerstation zal registreer alle sensoren die al zijn geregistreerd opnieuw
geweest
geregistreerd voordat het weerstation (d.w.z. het weerstation zal niet
verliezen de verbinding van de sensoren die u hebt gekoppeld omhoog
voor.)

SETUPINSTRUCTION
- 20 -
INSTELLING UP WI-FI VERBINDING EN WE ATHER
SERVER VERBINDING
Houd ingedrukt 【 BAR/-/ 】 knop langer dan 3 seconden, het
weer station Het LCD-scherm toont de letter "AP" dat Het is
binnengekomen Toegang
Punt (AP) modus. Op dit moment zal het zijn klaar voor de Wi-Fi-
instellingen om zijn aangepast.
Gebruik uw smartphone, tablet of computer om via Wi-Fi
verbinding te maken met het weerstation door de volgende stappen
te volgen:
Op computer, open uw wifi netwerk k instellingen. Op Androïde™ of
iOS
apparaten, ga naar het instellingenmenu en selecteer vervolgens
Verbindingen /WI-FI naar open het netwerk instellingen.
Zoek de SSID van het weerstation in de lijst. Het zou moeten
verschijnen als

SETUPINSTRUCTION
- 20 -
WWS-XXXXXX (waar alle X-en gehele getallen zijn) in de lijst.
Kraan op de SSID om verbinding te maken. Deze stap duurt
enkele seconden.
Zodra je zijn verbonden naar het weer station, open omhoog jouw
internet of mobiel web browser en voer het volgende adres in de

- 21 -
adresbalk: http://192.168.1.1 om toegang te krijgen tot de
webinterface van het weerstation . (Zorg ervoor dat u inclusief http://
of anders het web browser kan het adres interpreteren als een
zoekopdracht). Wij aanbevelen met behulp van de nieuwste versie
van gerenommeerde web browsers.
Voer het volgende in informatie n in de webinterface (Figuur 1).
Maken zeker alle informatie is ingevoerd voordat u Opslaan selecteert.
Als je
Wunderground.com niet te uploaden , of upload weathercloud.net,
laat de selectievakjes leeg ongecontroleerd.
OPMERKING :
Tijdzone-instelling ( standaardinstelling) : 0u). Om de tijdweergave
automatisch in te stellen op uw tijdzone, wijzigt u de tijdzone in het

- 21 -
gedeelte Tijdserverinstellingen van de SETUP-pagina van '0:00'
(standaard) naar uw tijdzone (bijv. +1:00
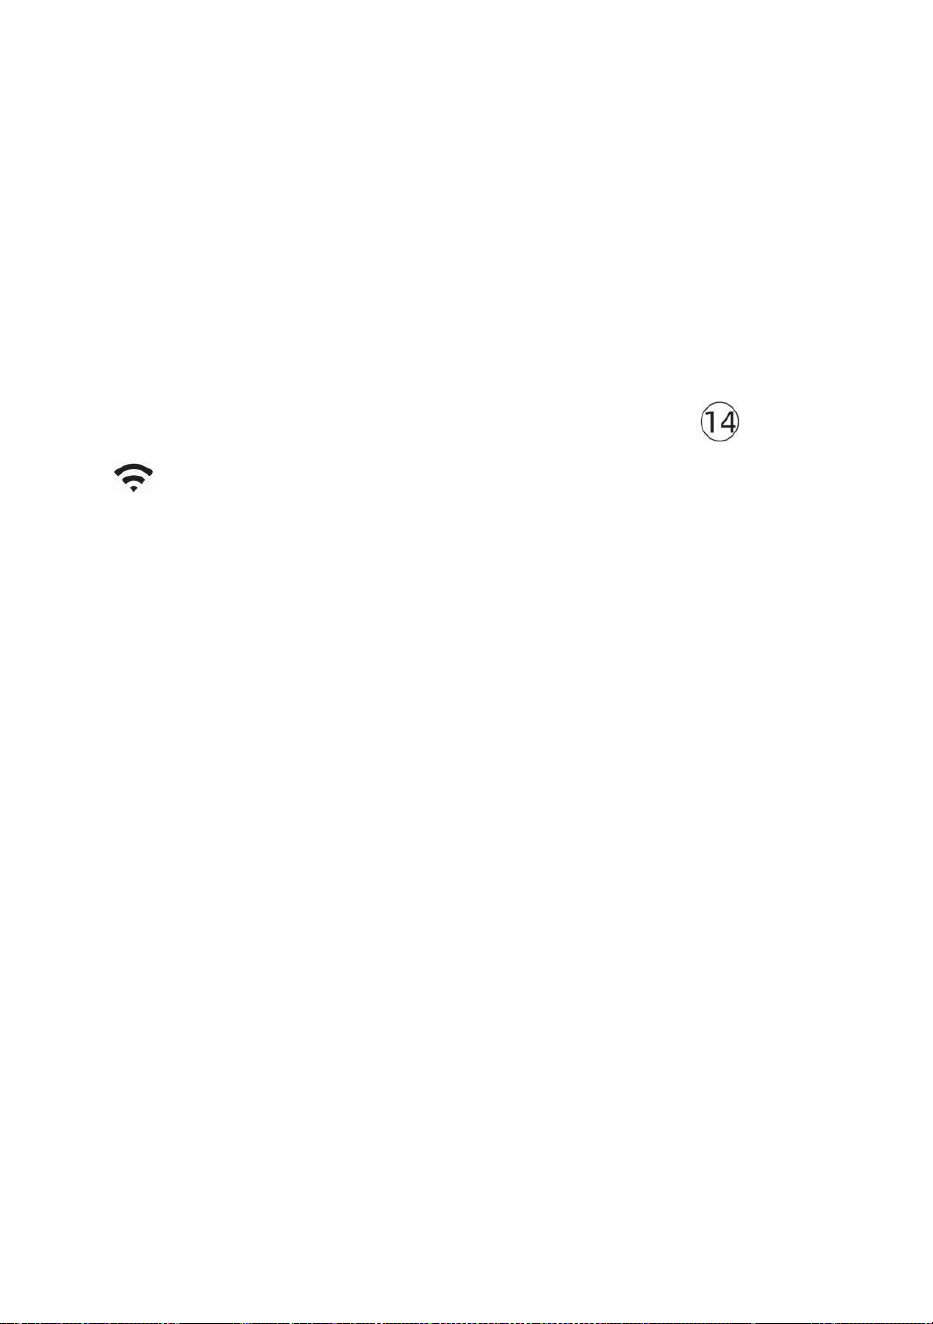
- 22 -
voor Duitsland ).
5.) Als alle door u ingevoerde informatie correct is, druk op “ Toepassen ”
naar bevestigen (Figuur 1). Als dit niet het geval is, controleer dan uw
website. interface informatie opnieuw.
OPMERKINGEN:
Wanneer de wifi-installatie is voltooid, wordt uw computer of mobiele
telefoon apparaat
keert terug naar de standaard Wi-Fi-verbinding. Als dat zo is niet,
gewoon Open de draadloze netwerkinstellingen van uw apparaat en
voer handmatig opnieuw verbinden.
Terwijl in de AP-modus kunt u op en drukken houd de
【
BA
R/-/
】
knop gedurende 3 seconden ingedrukt om de AP-
modus te verlaten. Het weerstation zal gewoon de vorige AP-
instellingen herstellen .
KALIBRATIE
Zodra u via wifi verbinding hebt met het weerstation en de instelling
geopend pagina op http://192.168.1.1 , door op “ GEAVANCEERD ” te
klikken wordt het volgende geopend pagina (Figuur 2).

- 22 -
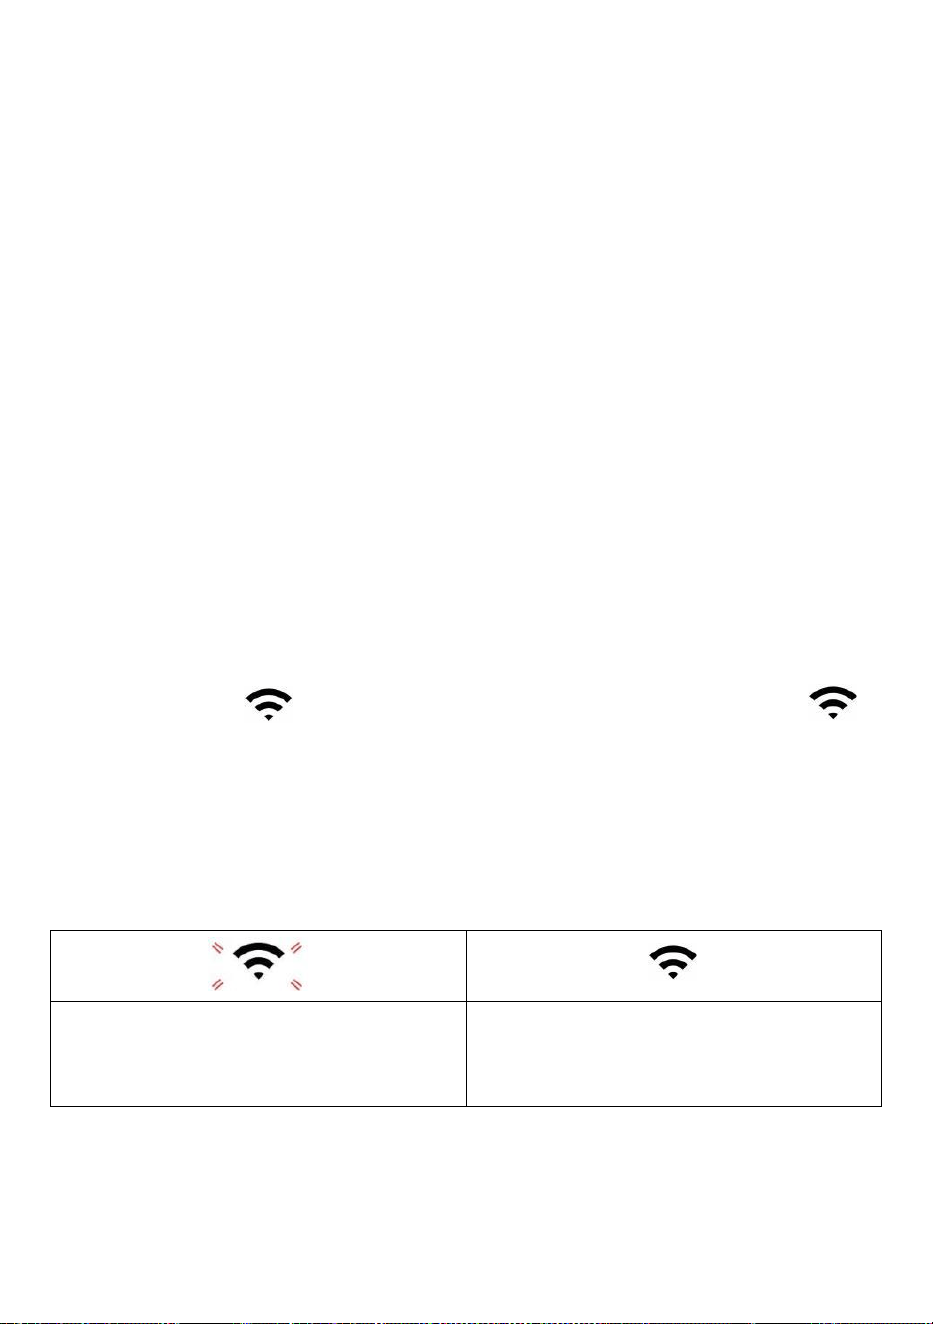
- 23 -
1) Je mag binnenkomen of wijziging de verschuiven En verdienen
waarden voor verschillend meting parameters .
2) Zodra je hebben voltooid uw kalibraties , pers de "TOEPASSEN" knop.
3) De huidige offsetwaarde zullen update naar show de waarde Dat Jij
binnengekomen
( in plaats van van de standaard waarde ). Als Jij wil naar wijziging de waarde ,
jij kan binnenkomen een nieuwe waarde in de doos naast de nummer ( zoals
in stap 1). Aan update de waarde opnieuw , pers " TOEPASSEN " knop .
OPMERKING :
Wij doen niet adviseren kalibratie van de meeste waarden met
uitzondering van van Relatief Druk, die moeten correct gekalibreerd
zijn om uw
afstand boven zee niveau om rekening te houden met de hoogte effecten.
WI-FI-VERBINDINGSSTATUS
Wanneer het weerstation succesvol verbinding maakt met uw Wi -Fi-router,
Wi-Fi-
signaal
zal op het LCD verschijnen weergave . Als het
wifi-signaal
is niet stabiel of het weerstation probeert verbinding te maken met de
router, de Het pictogram zal knipperen. Als het pictogram verdwijnt,
Het betekent dat het weerstation is niet verbonden met de Wi-Fi- router.
Knipperend: de weer statie
is proberen naar verbinden naar
jouw draadloze routeren.
Vast: het weerstation heeft
geweest verbonden met uw
draadloze routeren.
OPMERKING :

- 23 -
Als Jij eigen A dubbel band router (2,4 GHz) En 5,0 GHz ), maken Zeker Jij
verbinding maken met de 2,4GHz band, anders het zal niet lukken om het
weerstation te verbinden met
Wifi .
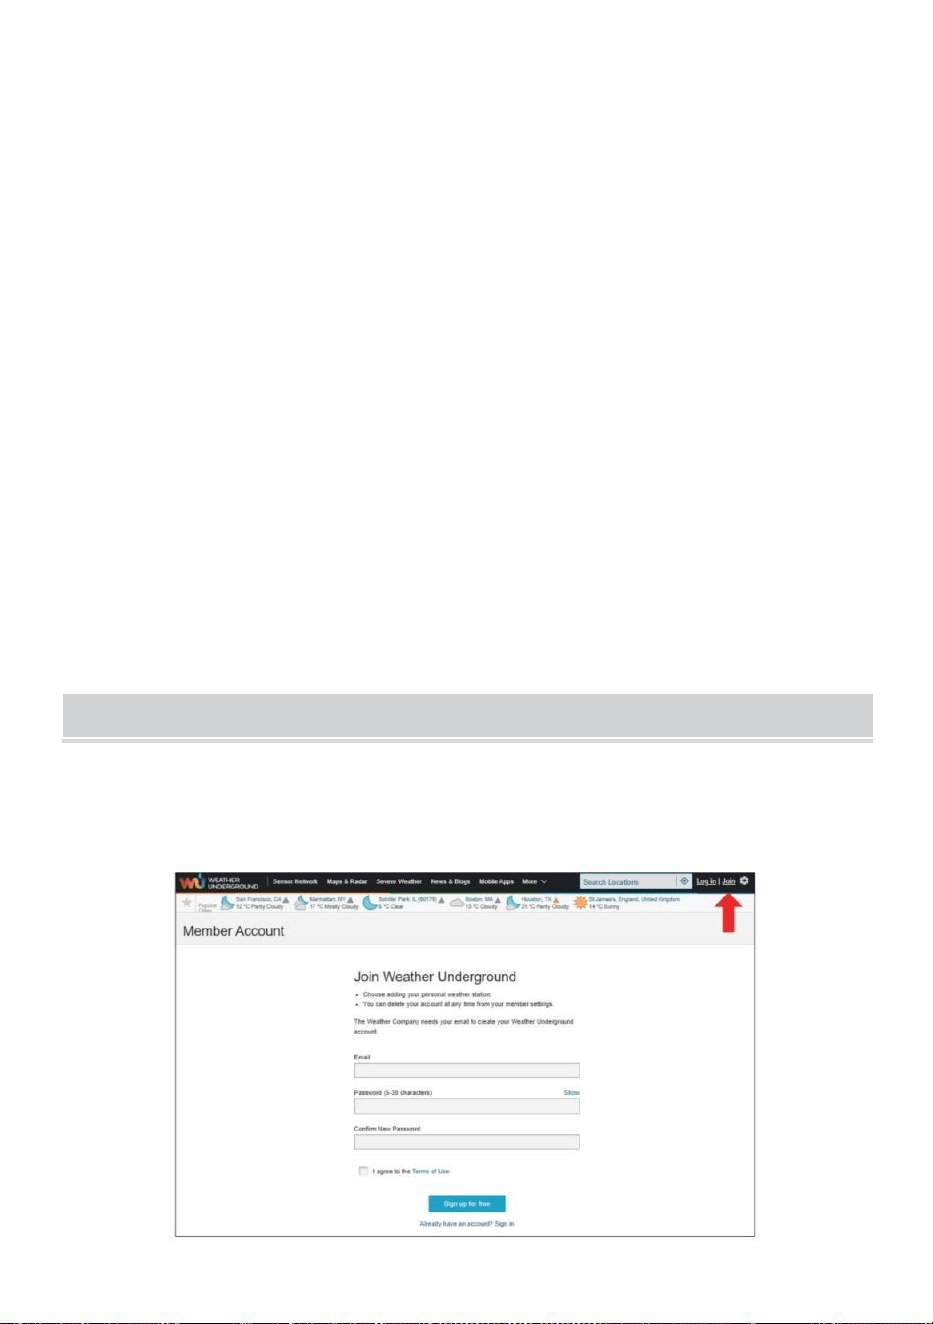
- 24 -
TIJDSERVERVERBINDINGSSTATUS
Nadat het weerstation verbinding heeft gemaakt met internet, zullen
poging om verbinding te maken met de internettijdserver om de UTC te
verkrijgen tijd. Eenmaal de
verbinding is gelukt en de tijd van het weerstation is bijgewerkt. De
icon "SYNC" zal op de LCD-scherm.
Om de juiste tijd voor uw specifieke tijdzone weer te geven, moet u: nodig
hebben
de tijdzone wijzigen in de CLOCK-instelling modus vanaf 00 (standaard)
naar jouw tijdzone (bijv. -5 voor EST). Als Als je je tijdzone niet kent , kun
je het opzoeken online.
OPMERKING :
De tijd wordt automatisch gesynchroniseerd met de internet per uur.
MAAKENSYNCHRONISEERUWWEERSERVERACCOUN
WEER CREËREN ONDERGRONDSE REKENING
1.) Bezoek: https://Wunderground.com en selecteer 'Join' in de
bovenste rechts en hoek en creëren A Vrij Rekening.

- 25 -
2.) Voer een Ons ernaam, E-mail En Wachtwoord (Het is jouw Login
wachtwoord voor de website, niet uw e-mailwachtwoord. Dus nee
privacy zal worden blootgesteld). Klik Teken gratis beschikbaar .
3.) Nadat de registratie is voltooid succesvol, het zal zijn getoond
onderstaand de bericht.

- 26 -
4.) Klik op "Inloggen" en voer het e-mailadres in en wachtwoord je bent
gewoon geregistreerd.
5.) Klik op ‘Mijn profiel’ " en ga naar binnen Lid instellingen.

- 27 -
6.) Klik op 'Bijwerken' thuis locatie " .
7.) Klik op "Mijn Apparaten”, En Klik op "Toevoegen" Nieuw Apparaat".
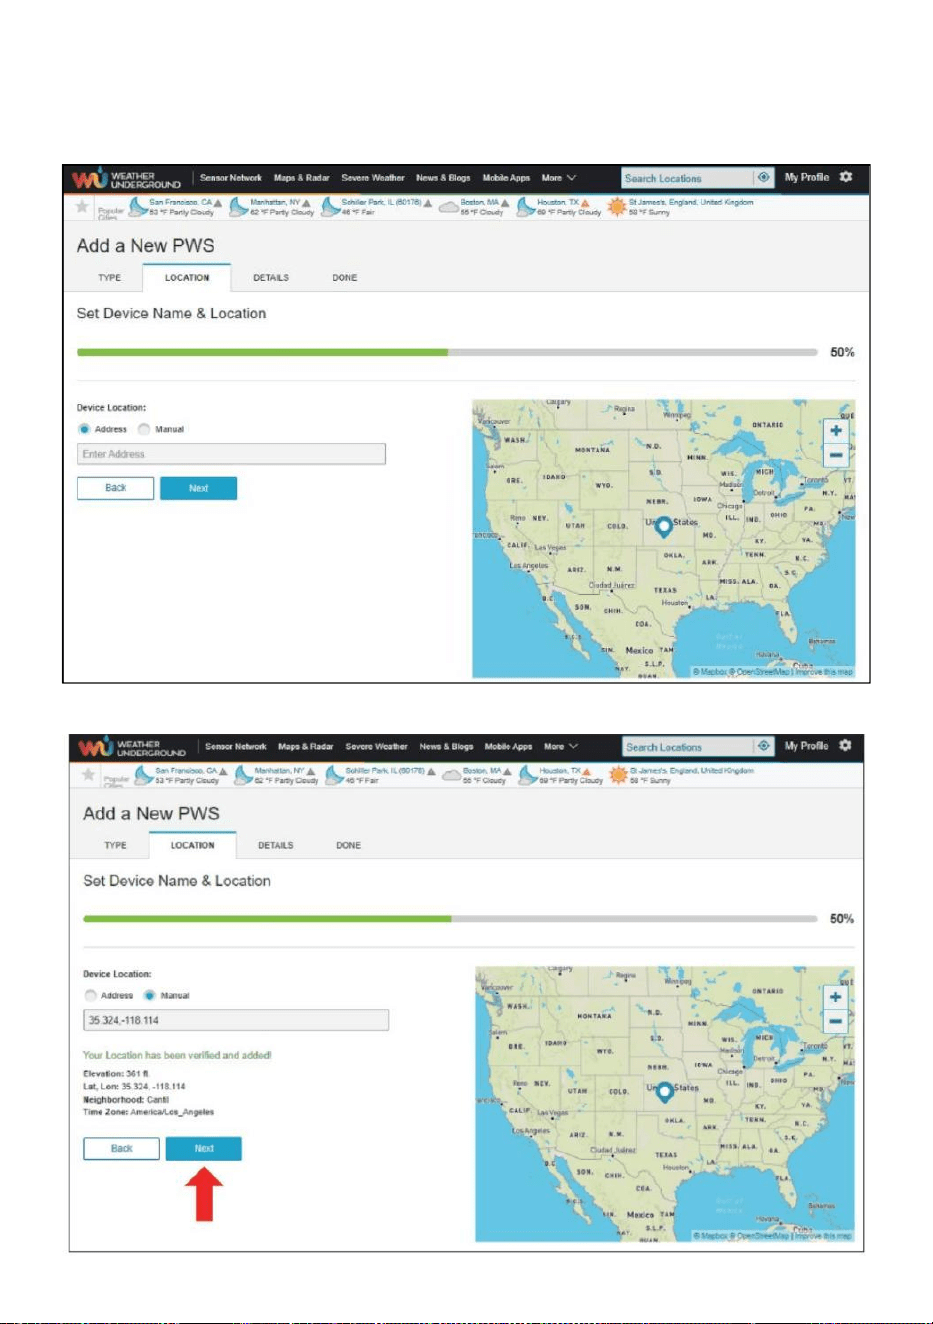
- 28 -
8.) Selecteer het adres door een adres of selecteer Handmatig naar
positie
uw adres automatisch bondgenoot. Klik vervolgens op “Volgende ".

- 29 -
9.) Voer de weersinformatie in. Blanco's met rood (verplicht) moeten
zijn gevuld in.
OPMERKING :
Jij kan selecteer “ andere ” van de Apparaat Gereedschap .
10.) Zodra u deze sessie hebt voltooid, klikt u op "Ik accepteer ”
en “Volgende ". 11.) Nadat u zich succesvol heeft geregistreerd,
Alsjeblieft registreer uw weer Ondergronds ID en Belangrijke
informatie voor latere r-installatie gebruik.

- 30 -
12.) Zoals getoond hieronder, registratie succesvol is uitgevoerd.
MAAK UW WEATHERCLOUD-ACCOUNT AAN
1.) Bezoek de website van Weathercloud op https://weather cloud.net/,
en voer in A Gebruikersnaam, E-mail en Voer uw wachtwoord in en klik
op “ Aanmelden ”. Na de
Instructies om een account aan te maken.
OPMERKING: Dit wordt het beste gedaan op A computer bureaublad of
laptop.
(Het is jouw Login wachtwoord voor de website niet uw e-mail
wachtwoord. Dus Nee privacy zal zijn blootgesteld).
2.) Wanneer Het is succesvol, een e-mail zal zijn ontvangen in jouw
geregistreerd postbus.

- 30 -
3.) Open uw e-mail en log in in het web adres in de mail. Klik “ Ac
tiveren jouw Weerwolk rekening ".

- 31 -
4.) Klik op “ hier "om de startpagina van de website van Weatherclou d.
5.) Voer het e-mailadres en wachtwoord in dat u zojuist hebt
geregistreerd om deel te nemen aan de Website van Weathercloud.
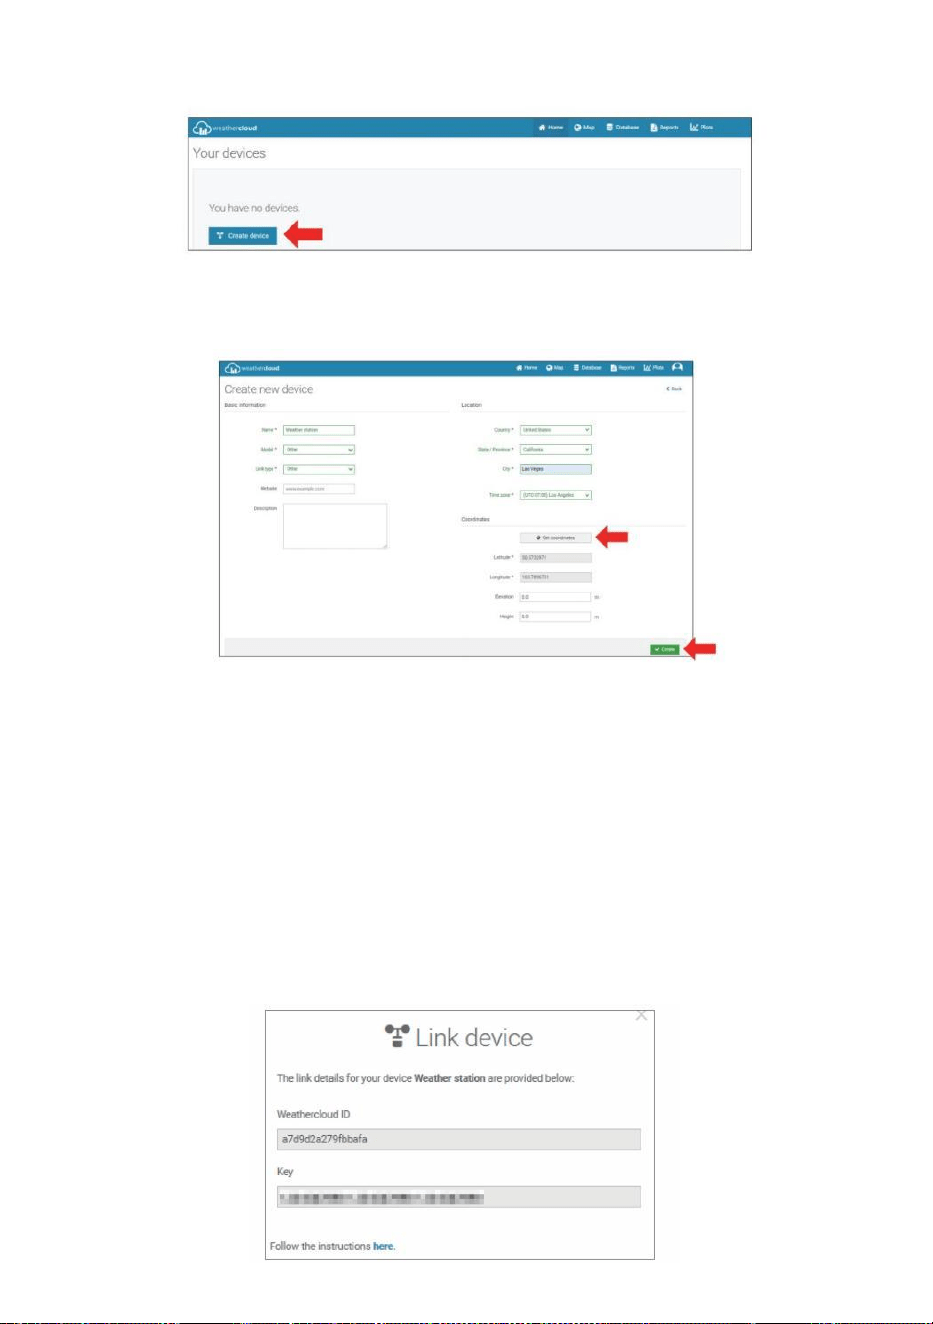
- 32 -
6.) Klik op “ Apparaat maken ” om een weerstation toe te voegen.
7.) Voer alle gevraagd informatie in de Creëren Nieuw Apparaat
pagina. Blanco's met rood *moet gevuld worden in.
OPMERKING :
Jij kan selecteer “ andere ” van de Model nummer En Link type in de
bovenstaande blanco's. Klik “Haal coördinaten op” om uw locatie op de
kaart, dan klikken “ Gedaan ” aan bevestigen .
8.) Zodra je hebben voltooid dit sectie ion, Klik op “ Maken ”.
9.) Nadat u zich succesvol heeft geregistreerd, registreer uw
Weathercloud identiteitsbewijs En Belangrijke informatie voor latere
installatie gebruik.
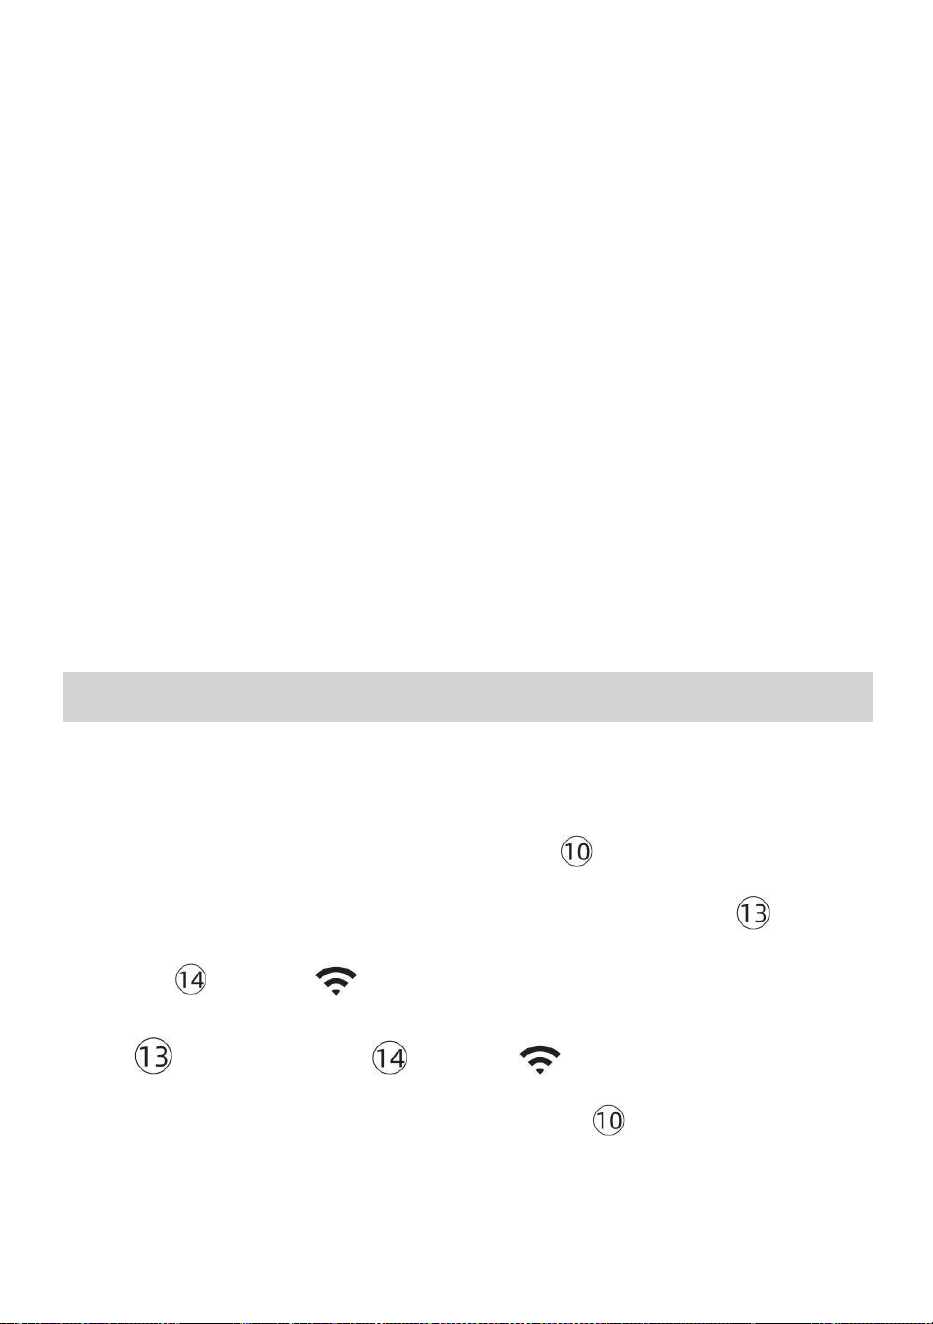
- 33 -
BEKIJK UW WEER GEGEVENS IN HET WEER ONDERGRONDS
Bekijk uw weerstationgegevens live via PC of mobiel web browser,
bezoek http://www.wunderground.com, en ga dan naar het station ID
die u hebt gekregen tijdens het instellen van uw account in de
zoekopdracht box. Uw weergegevens zal verschijnen op de volgende
pagina.
BEKIJK UW WEER GEGEVENS IN WEERWOLKEN
1.) Om de gegevens van uw weerstation te bekijken live via computer of
mobiel web browser, bezoek http://www.weathercloud.net en meld u
aan bij het account dat u hebt aangemaakt. 2.) Klik op het tabblad
bovenaan de pagina getiteld Apparaten.
3.) Klik bovenaan op het menu Instellingen rechts van de pagina, En
selecteren de optie Bekijken.
4.) Klik op Current, Wind of Evolution om de gegevens van uw weerstation
te bekijken. gegevens.
GEBRUIKSAANWIJZING
KLOK
Het instellen van de Klok
In Normaal tijd weergeven , druk op En uitstel 【 SET 】 gedurende 2
seconden naar binnenkomen tijdsinstelling modus . Pers En uitgave 【 WIND
/+ 】 En 【 BAR /-/ 】 naar Pas de waarden aan.
Uitstel 【 WIND /+ 】 en 【 BAR /-/ 】 meer dan 2 seconden
naar aanpassen de waarden snel . Druk op En uitgave 【 INSTELLEN 】 naar
bevestigen En beweging naar de volgende item.
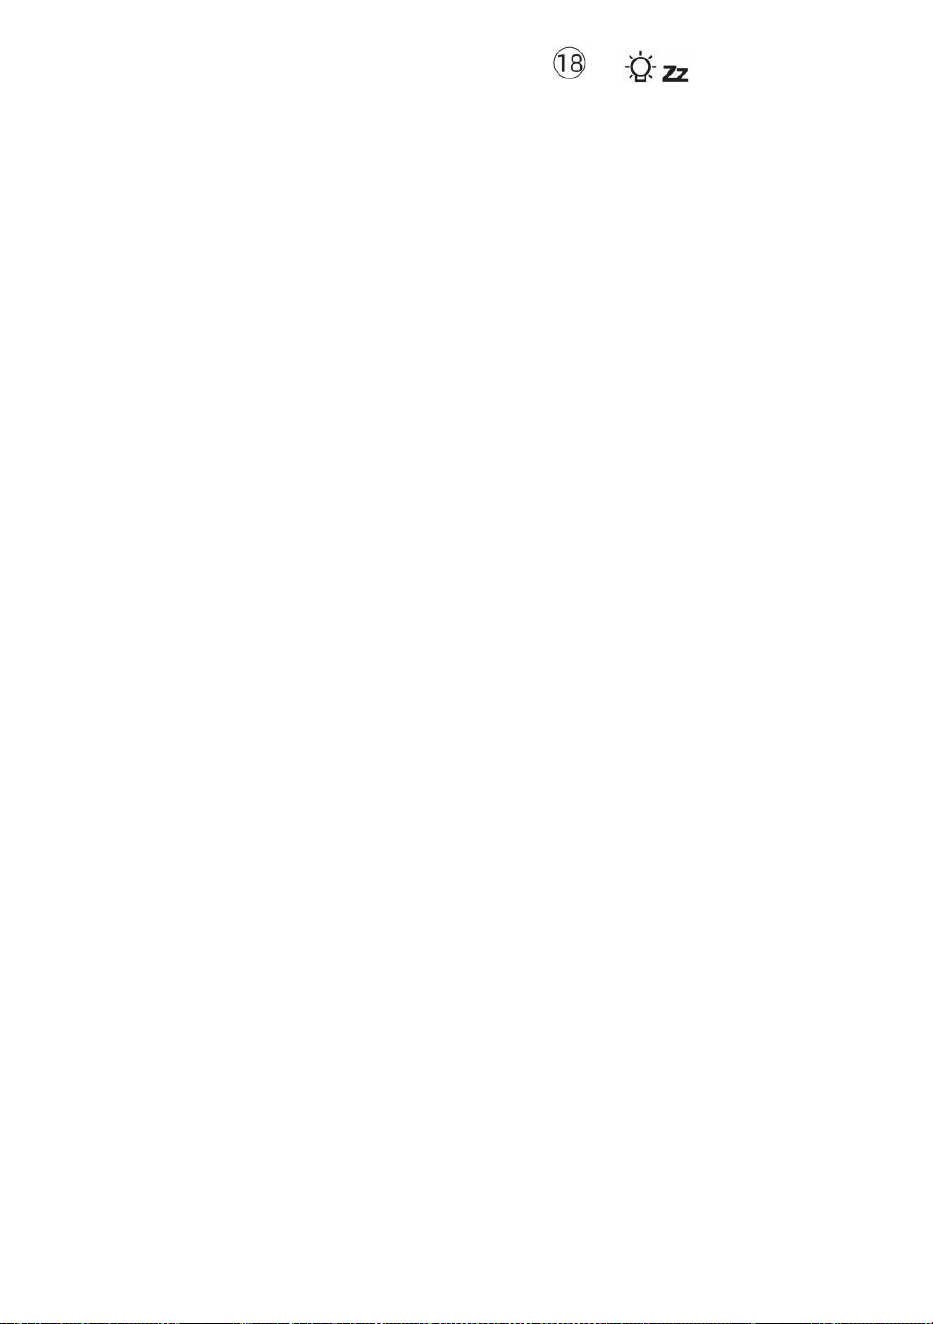
- 33 -
Naar Uitgang de instelling modus bij elk tijd , pers 【 LICHT /
SNOOZE 】 knop .
- 34 -
Instelling Volgorde
1. PIEP Aan /Uit
2. NTP Aan /Uit
3. Tijd Zone
4. Zomertijd Aan /Uit
5. MD/D- M Datum Formaat
6. Jaar
7. Maand
8. Dag
9. 24/12 Uur Formaat
10. Uur 11. Minuut
12. Temperatuur Eenheid
13. Druk Eenheid
14. Relatief Druk Kalibratie
15. Licht Intensiteit Eenheid
16. Regenval Eenheid
17. Wind Snelheid Eenheid
18. Halfrond
19. Einde van instelling
1.) Druk op En uitstel 【 SET 】 -knop binnenkomen de instellingen . Pieptoon
AAN knippert . Druk op 【 WIND /+ 】 of 【 BAR /-/ 】 naar
wijziging tussen Piep op en piep o fff . Pers 【 SET 】 naar selecteren NTP
aan /uit.
- 34 -
2.) Wanneer NTP AAN knippert , pers 【 WIND /+ 】 of 【 BAR /-
/ 】 naar wijziging tussen NTP op En NTP o fff . Pers 【 SET 】 naar
selecteren tijd gebied .
- 35 -
3.) Wanneer Tijd Zone flitsen , pers 【 WIND /+ 】 of 【 BAR /-/
】 naar set tijd gebied . Pers 【 SET 】 naar selecteren Zomertijd aan /uit .
4.) Wanneer Zomertijd AAN knippert , pers 【 WIND /+ 】 of 【 BAR
/-/ 】 naar wijziging tussen Zomertijd op En Zomertijd o fff . Pers 【 INS
TELLEN 】 naar selecteren datum formaat . 5.) Wanneer M --D knippert , pers
【 WIND /+ 】 of 【 BAR /-/ 】】 naar schakelaar tussen M - D
En D - M datum formaat . Pers 【 SET 】 naar selecteren jaar .
6.) Wanneer jaar flitsen , pers 【 WIND /+ 】 of 【 BAR /-/ 】
naar aanpassen de kalender jaar . Pers 【 SET 】 naar selecteren maand .
7.) Wanneer maand flitsen , pers 【 WIND /+ 】 of 【 BAR /-/
】 aanpassen de kalender maand . Pers 【 SET 】 naar selecteren dag .
8.) Wanneer Dag flitsen , druk op 【 WIND /+ 】 of 【 BAR /-/ 】
naar pas de kalenderdag . Pers 【 INSTELLEN 】 naar selecteren 12/24 -
uurs formaat .
9.) Wanneer 12 H knippert , pers 【 WIND /+ 】 of 【 BAR /-/ 】
veranderen tussen 12 uur en 24 uur formaat . Pers 【 SET 】 naar
selecteren uur . 10.) Wanneer uur knippert , druk op 【 WIND /+ 】 of

- 35 -
【 BAR /-/ 】 naar pas de uur . Druk op 【 SET 】 naar selecteren
minuut .
- 36 -
11.) Wanneer minuten flitsen , pers 【 WIND /+ 】 of 【 BAR /-
/ 】 aanpassen de minuut . Pers 【 SET 】 naar selecteren
temperatuur eenheid .
12.) Wanneer ℉ flitsen , druk op 【 WIND /+ 】 of 【 BAR /-/ 】
naar wijziging tussen ℉ En ℃ . Pers 【 SET 】 naar selecteren druk eenheid
.
13.) Wanneer druk eenheid knippert , druk op 【 WIND /+ 】 of 【 BAR /
-/ 】 naar wijziging tussen hPa , inHg En mmHg . Pers 【 SET 】
naar selecteren relatieve drukkalibratie.
14.) Wanneer Relatief Drukflitsen , pers 【 WIND /+ 】 of
【 BAR /-/ 】 naar aanpassen de relatief druk . Druk 【 INSTELLEN 】
naar selecteren Lichtintensiteit eenheid.
15.) Wanneer Licht intensiteit eenheid flitst , pers 【 WIND /+ 】 of
【 BAR /-/ 】 naar wijziging eenheid tussen Klux , fc En met m2 . Druk op
【 SET 】 selecteren regenval eenheid.
16.) Wanneer Regen eenheid flitst , pers 【 WIND /+ 】 of 【 BAR /-
/ 】 veranderen eenheid tussen in En mm . Pers 【 SET 】 naar
selecteren windsnelheid eenheid . 17.) Wanneer Wind snelheid eenheid knippert ,
- 36 -
druk op 【 WIND /+ 】 of 【 BAR /-/ 】 naar wijziging eenheid
tussen in En mm . Pers 【 SET 】 naar selecteren halfrond .
18.) Wanneer NTH knippert , druk op 【 WIND /+ 】 of 【 BAR /-/ 】
naar wijziging
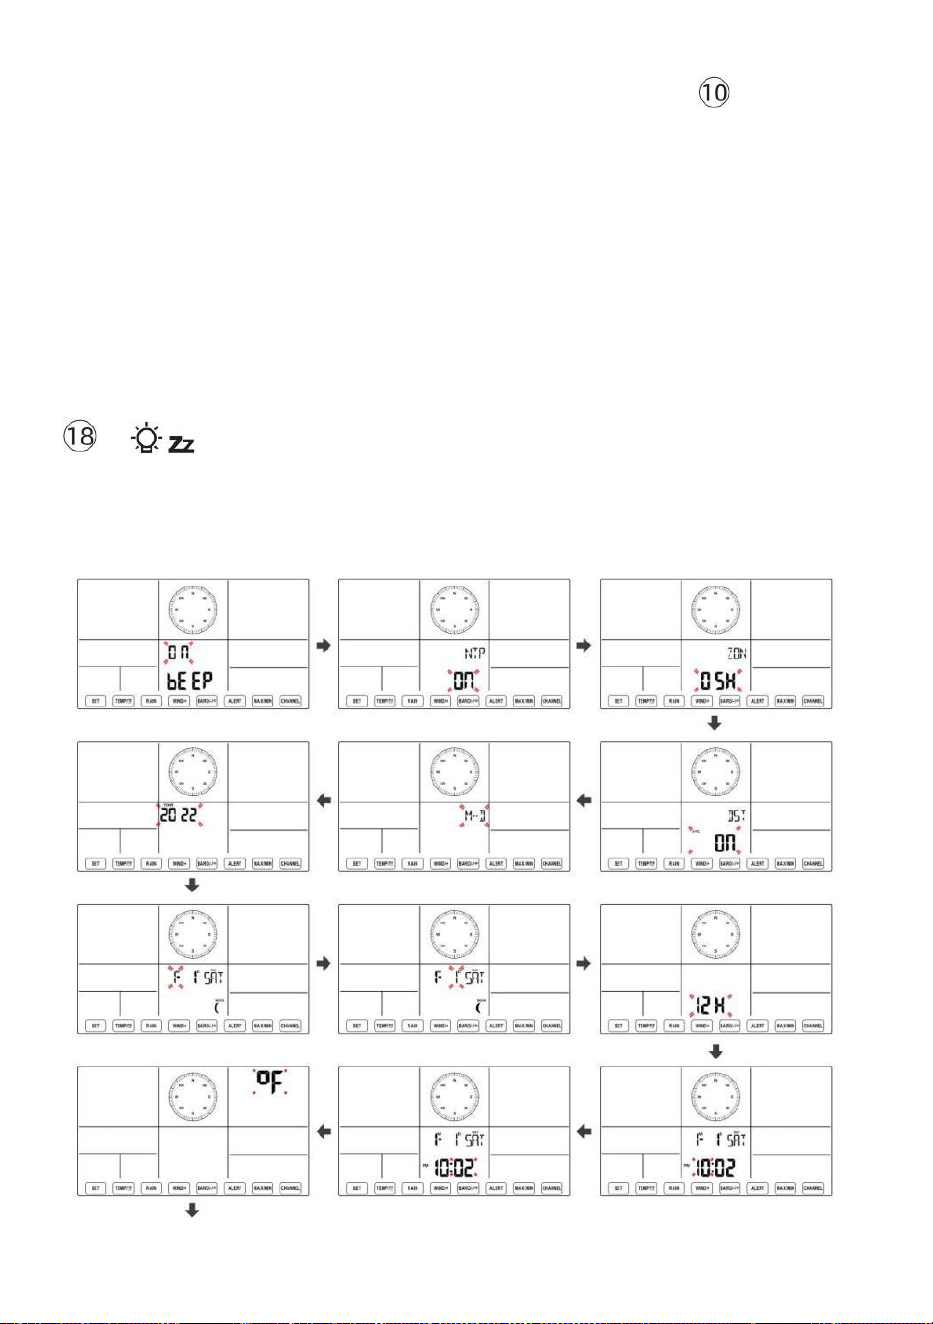
- 37 -
halfrond tussen NTH ( noordelijk ) en STH ( zuidelijk ). Druk op 【 SET 】
om de instelling op te slaan en te verlaten. Het zal terug naar de normaal modus
weergave .
OPMERKING: Als er is geen geldige bewerking binnen 2 0 seconden, het
zal automatisch terug naar de normale weergave modus van de instelling
modus. Tijdens het aanpassen instellingen, kunt u druk op
LICHT/SNOOZE 】 knop naar terug naar normale weergave modus.
【

- 38 -
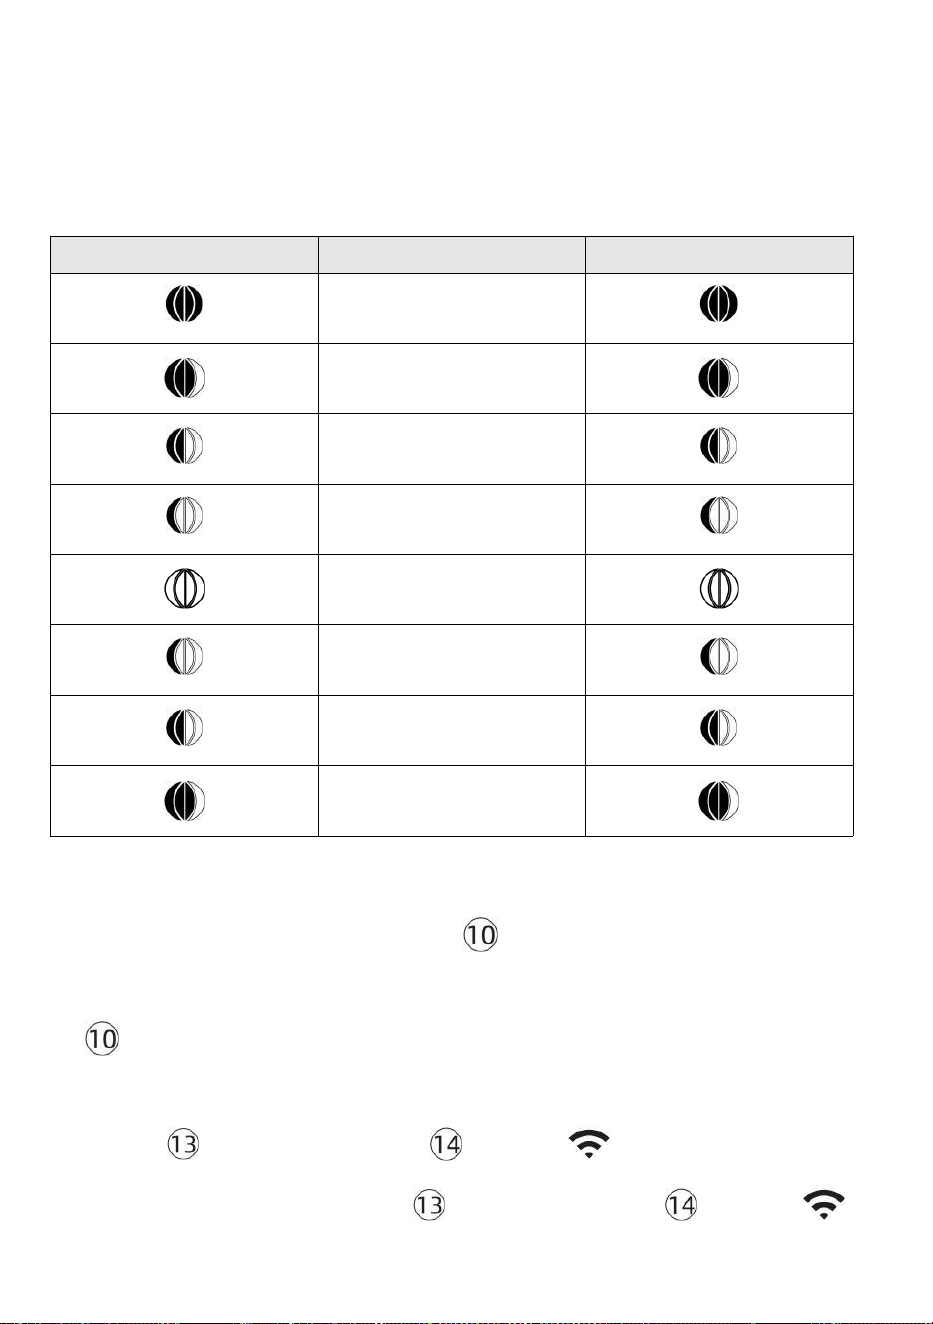
- 39 -
Maan Fase
Het display berekent de maanfase volgens jouw tijd, datum en
tijdzone. De onderstaande tabel legt de overeenkomstig fasen en hun
iconen voor zowel de Noord en Zuid hemisferen.
Noordelijk Halfrond-iconen
Maan Fase
Zuidelijk halfrond Iconen
Nieuw Maan
Wassende halve maan
Maan
Eerste kwartaal Maan
Wassende bolle buik Maan
Vol Maan
Afnemende bolle Maan
Derde kwartaal Maan
Afnemende halve maan
Maan
Het alarm instellen
● Druk in de normale tijdweergave op 【 SET 】 -knop om de
weergave van de alarmtijd te wijzigen (alarmtijd modus).
d
【
SET
】
ingedrukt Houd de knop 2 seconden ingedrukt om de
alarminstellingsmodus te openen. Het alarmuur begint te knipperen.
● Pers 【 WIND/+ 】 knop of 【 BAR/-/ 】 knop om de vereiste
in te stellen alarmuren. Uitstel 【 WIND/+ 】 knop of 【 BAR/-/ 】
knop naar
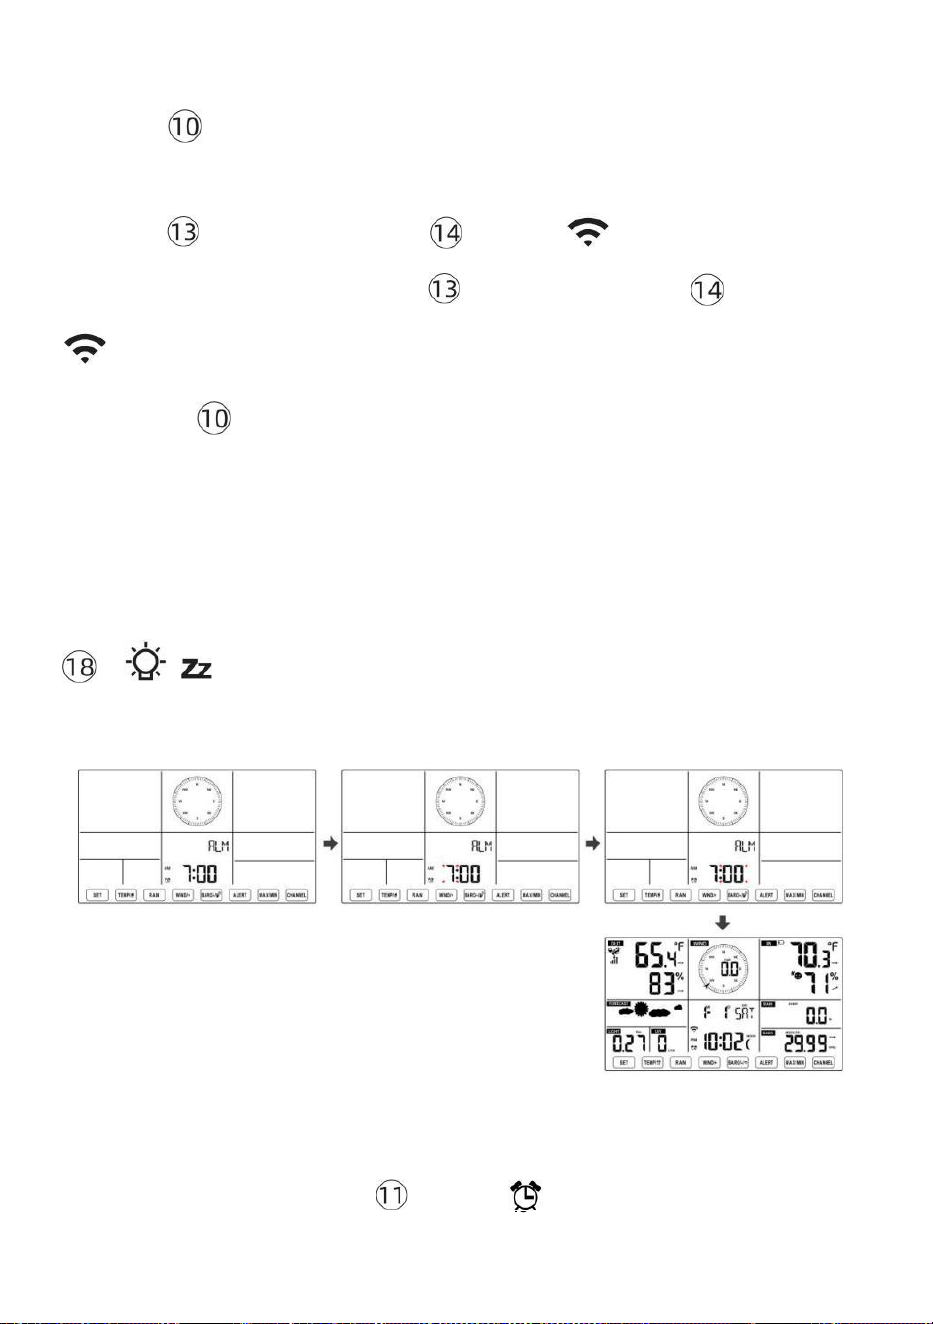
- 40 -
alarmuren aanpassen snel.
● Pers 【 SET 】 knop om te selecteren minuut van Alarm.
Minuut van alarm begint te knipperen.
● Pers 【 WIND/+ 】 knop of 【 BAR/-/ 】 knop om de vereiste
in te stellen alarm minuten. Houd 【 WIND/+ 】 knop of 【 BAR/-/
】 knop naar alarmminuten aanpassen snel.
● Druk op 【 SET 】 knop om alle instellingen op te slaan en af te
sluiten normale weergave modus.
OPMERKING: Als er is geen geldige bewerking binnen 2 0 seconden, het
zal automatisch terug naar de normale weergave modus van de instelling
modus. Tijdens het aanpassen instellingen, kunt u druk op
【 LICHT / SNOOZE 】 knop naar opbrengst naar normaal
weergave modus .
Alarm deactiveren/activeren
● In alarm tijd weergeven , druk
op uit .
【 TIJDELIJ
K /
】 knop naar selecteren de
Alarm op of

- 41 -
● Als de alarm is op , zijn overeenkomstig alarm icon zullen zijn
getoond op het display.
● Wanneer de alarm is rinkelen , pers elk knoppen behalve 【
容 z
LICHT/SNOOZE 】 knop om het alarmsignaal te stoppen. Het is niet noodzakelijk
om opnieuw activeren het alarm. Het zal bel nog een keer dit s tijd volgende dag.
Sluimeren Functie
Wanneer de alarm ringen , pers 【 LICHT / SNOOZE 】 knop naar
pauze het
alarm . De snooze indicator icon
z 2
blijf knipperen . De alarm
zullen cv na
5 minuten .
TEMPERATUUR
Temperatuur/vochtigheidstrend
Met tendentiepijlen kunt u snel de temperatuur bepalen En de
luchtvochtigheid stijgt en daalt in een een uur update periode .
Temperatuurtrend
Temperatuur heeft
opgestaan > 1°C/2° F in de
verleden
uur
Temperatuur heeft niet
veranderd meer dan
1°C/2° F in de verleden uur
Temperatuur heeft
gevallen < 1°C/2° F in de
verleden
uur
Vochtigheidstrend
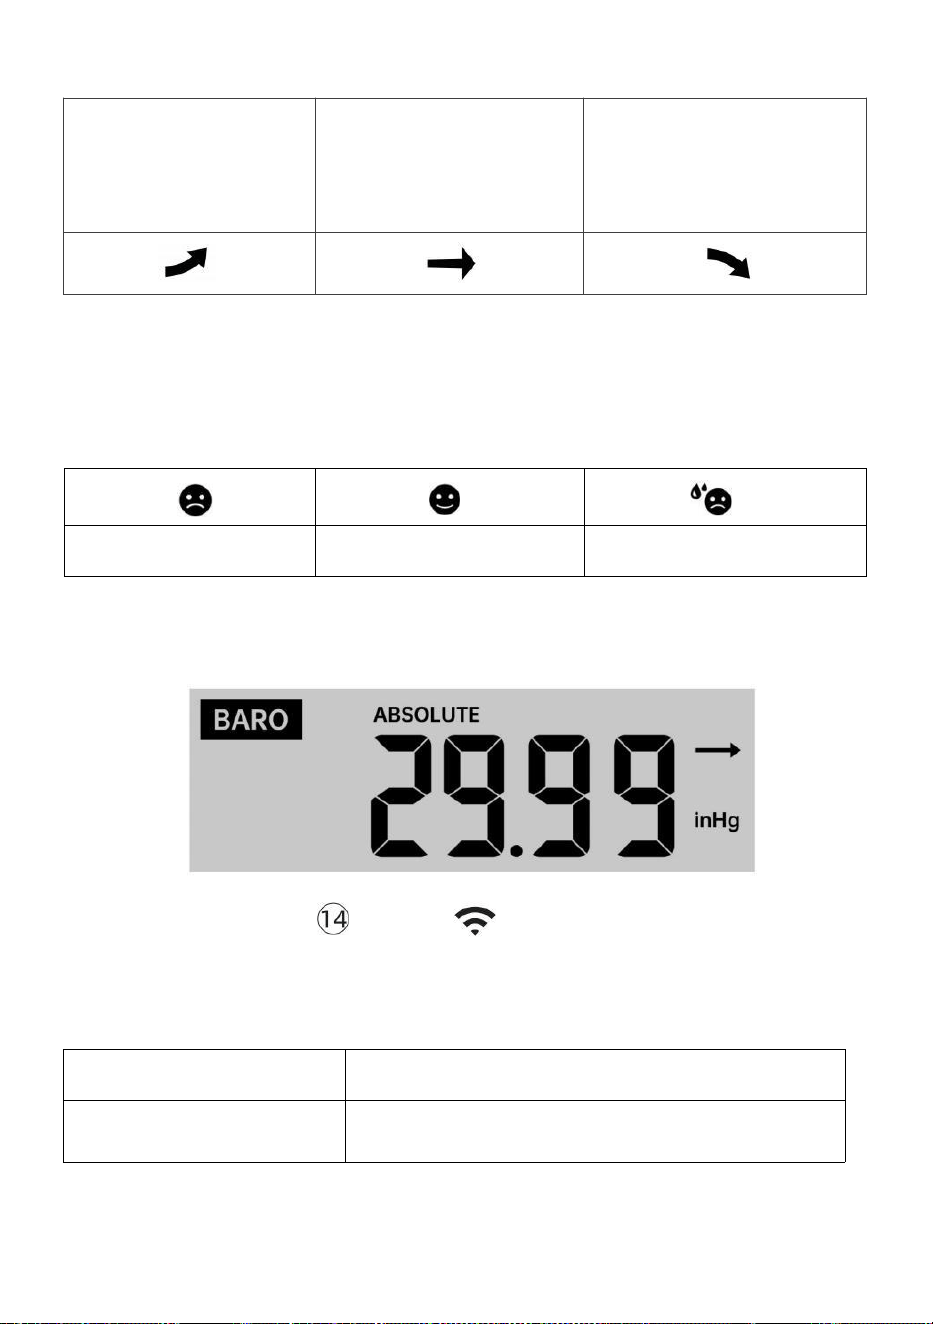
- 42 -
Vochtigheid
is opgestaan
> 3% in de
verleden uur
Vochtigheid heeft niet
veranderd meer dan 3% in
de verleden uur
Vochtigheid
is gevallen <
3% in de
verleden uur
Binnencomfort Index
De binnencomfort vertoont een fotografisch representatie op basis van
de binnenluchttemperatuur en vochtigheidsniveaus om het geschatte
comfort te bepalen niveau.
Te koud
Comfortabel
Te heet
DRUK
Barometerdruk Weergave
Normaal gesproken
modus, pers En
relatieve druk.
【 BAR/-/ 】 drukknop schakelaar tussen
absoluut zijn
Absoluut
De absolute atmosferische druk van uw locatie.
Relatief
De relatieve atmosferische druk is gebaseerd op de zee
niveau.
Druktrend

- 42 -
Met tendentiepijlen kunt u snel bepalen als druk e is stijgend of
vallend in een update van een uur periode.
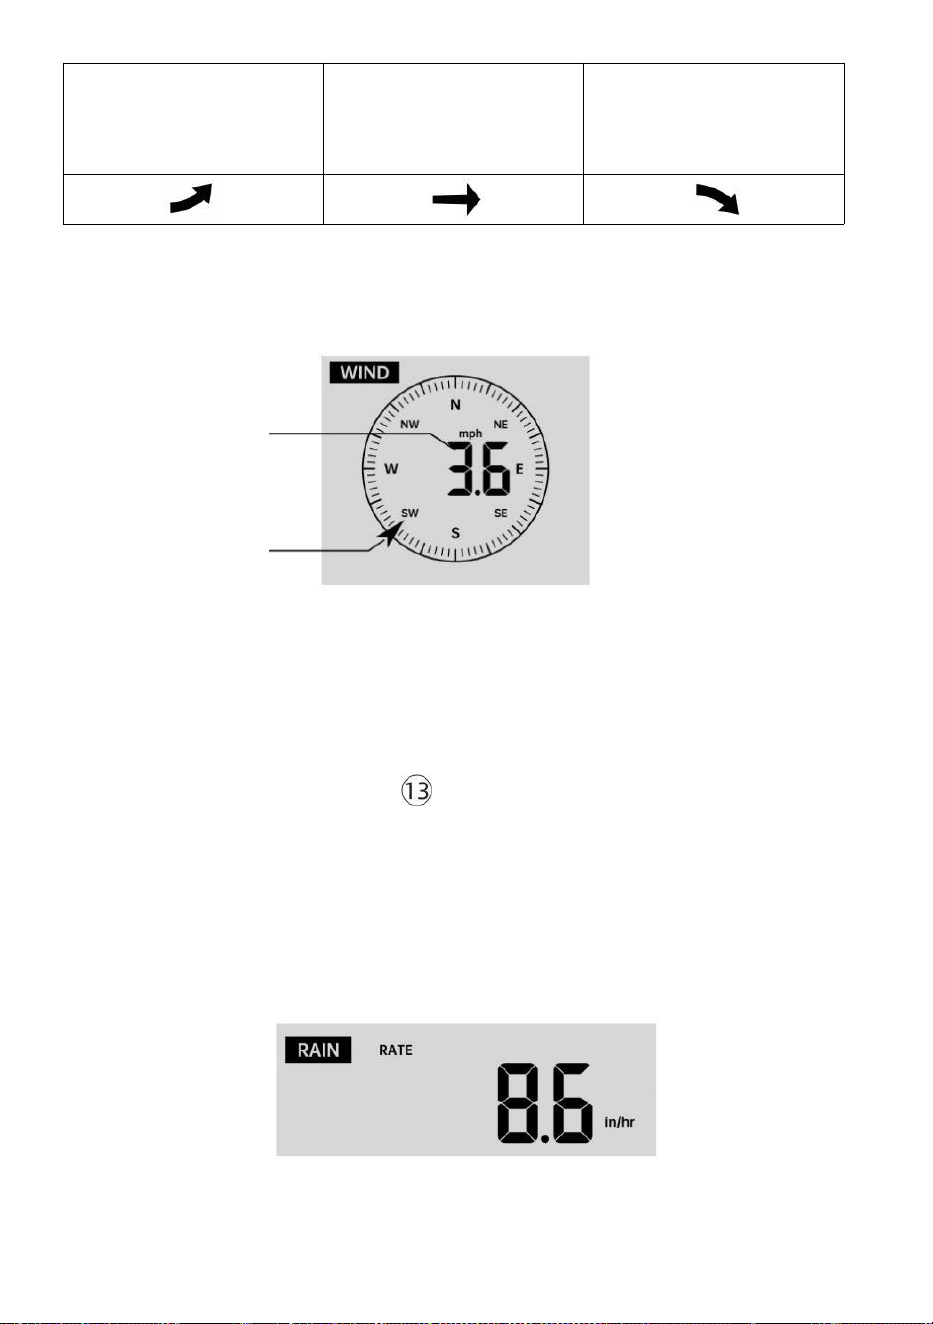
- 43 -
De druk is
gestegen > 2hpa/0,06inHg in
het verleden uur
De druk is niet veranderd
meer dan 2hpa/0,06inHg
in het verleden uur
Druk heeft
gevallen > 2hpa/0,06inHg in
het verleden uur
WIND
Wind Weergave
Gemiddeld/w
indstoot
wind
snelheid
Wind in realtime
richtingaanwijzer
Windweergavemodus selecteren
Bij normale weergave modus,
pers
【
WIND/+
】
knop om te schakelen
tussen
huidige gemiddelde windsnelheid, windstootsnelheid en windrichting .
REGEN
Weergave van regenval

- 43 -
De Neerslag toont informatie met betrekking tot de regenval en regenval
.
Selecteer de Weergave van regenval Modus
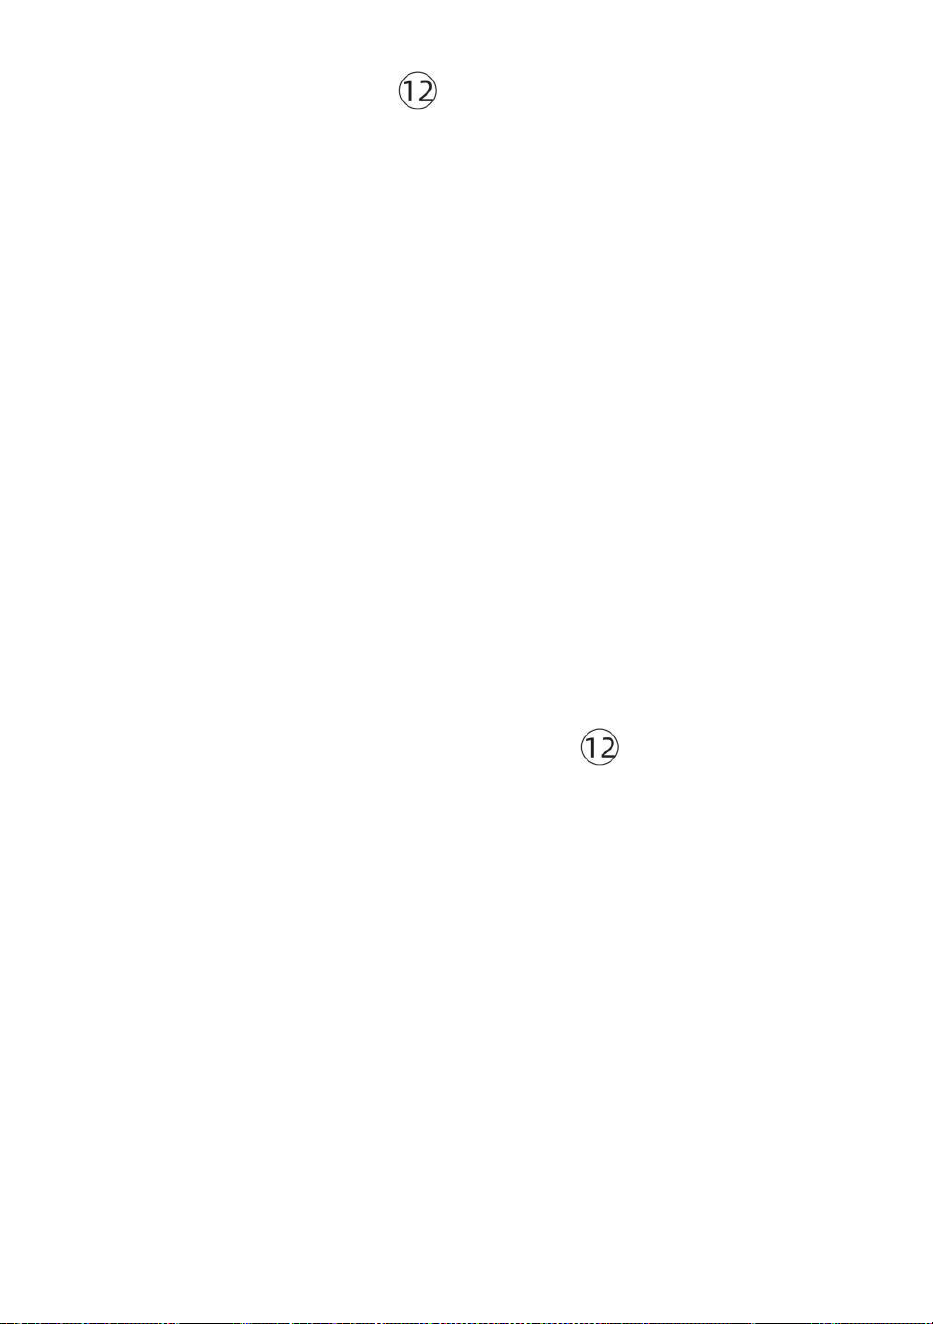
- 44 -
【 RAIN 】 -knop om te schakelen tussen Regen
Tarief, Regen Evenement, Regen Per uur, Regen Dagelijks, Regen
wekelijks, Regen Maandelijks en Totaal regen.
Toename van regen Defi nitie
Regen Tarief : huidig regenval tarief in de verleden uur.
Regengebeurtenis : aanhoudende regen, en reset naar nul als
regenval ophoping is
minder dan 10 mm (0,039 inch) in A 24 uur per dag periode.
Dagelijkse regen : Totale regenval sinds middernacht (0 0:00)
Wekelijks Regen : Totale regenval voor de huidige kalenderweek, en
resets op Zondagmorgen om middernacht (zondag t/m
Zaterdag)
Maandelijks Regen : Totale regenval voor de huidige kalendermaand,
En opnieuw instellen op de eerste dag van de Maand.
Totaal Regen : Totale regenval sinds de laatst opnieuw instellen.
Reset het totaal Neerslagrecord
Bij normale weergave modus, druk en houd vast
【
REGEN
】
knop over 2 seconden om de regen dossier .
OPMERKING:
Door de wekelijkse regenval opnieuw in te stellen, wordt ook de
dagelijks regen.
Het resetten van de maandelijkse regenval ook reset de dagelijkse en
wekelijkse regen.
Als u de totale regenval opnieuw instelt, worden ook de maandelijkse,
wekelijkse en dagelijks regen.
WEER
Weersindex
In normal display mode, press

- 44 -
Bij het lezen van het Weer Indexweergave, u kunt op drukken 【 TIJDEL
IJK/ 】
knop om door verschillende weerindexen te bladeren in de volgende
volgorde: Voelt Vind ik leuk > Warmte Inhoudsopgave > Wind Rustig
aan

- 45 -
Voelt Leuk vinden
De Voelt Zoals de temperatuurindex bepaalt hoe warm het buiten
werkelijk aanvoelt, rekening houdend met factoren zoals windsnelheid,
druk, temperatuur en vochtigheid .
Windchill
De gevoelstemperatuur wordt bepaald door een combinatie van de
temperatuur- en windsnelheidsgegevens van de draadloze weersensor .
OPMERKING: Alleen als de temperatuur laag is (50 ℉ (10 ℃ )) en
de windsnelheid meer dan 4,8 km/u (3 mph) bedraagt, zal de
windchillwaarde weergeven,
anders het zal weergeven “ --.-“.
Warmte Index
De Warmte Index wordt bepaald door de draadloze
weersensor temperatuur en vochtigheid lezingen.
Dauw Punt
Het dauwpunt is de temperatuur waarbij een gegeven perceel van
vochtigheid lucht
moet worden gekoeld, bij constante barometerstand druk, voor waterdamp
om
condenseren tot water. Het gecondenseerde water wordt dauw genoemd.
De dauw punt is een verzadigingstemperatuur.
De dauw De punttemperatuur wordt bepaald door de temperatuur en
vochtigheidsgegevens van de draadloze weersensor .
Weersverwachting
De ingebouwde barometer kan veranderingen in de
atmosferische druk opmerken en op basis van de verzamelde
gegevens het weer kunnen voorspellen voorwaarden.
Er zijn 6 weericonen: zonnig, gedeeltelijk zonnig Bewolkt, Bewolkt,
Regenachtig, Stormachtig En Sneeuwachtig.
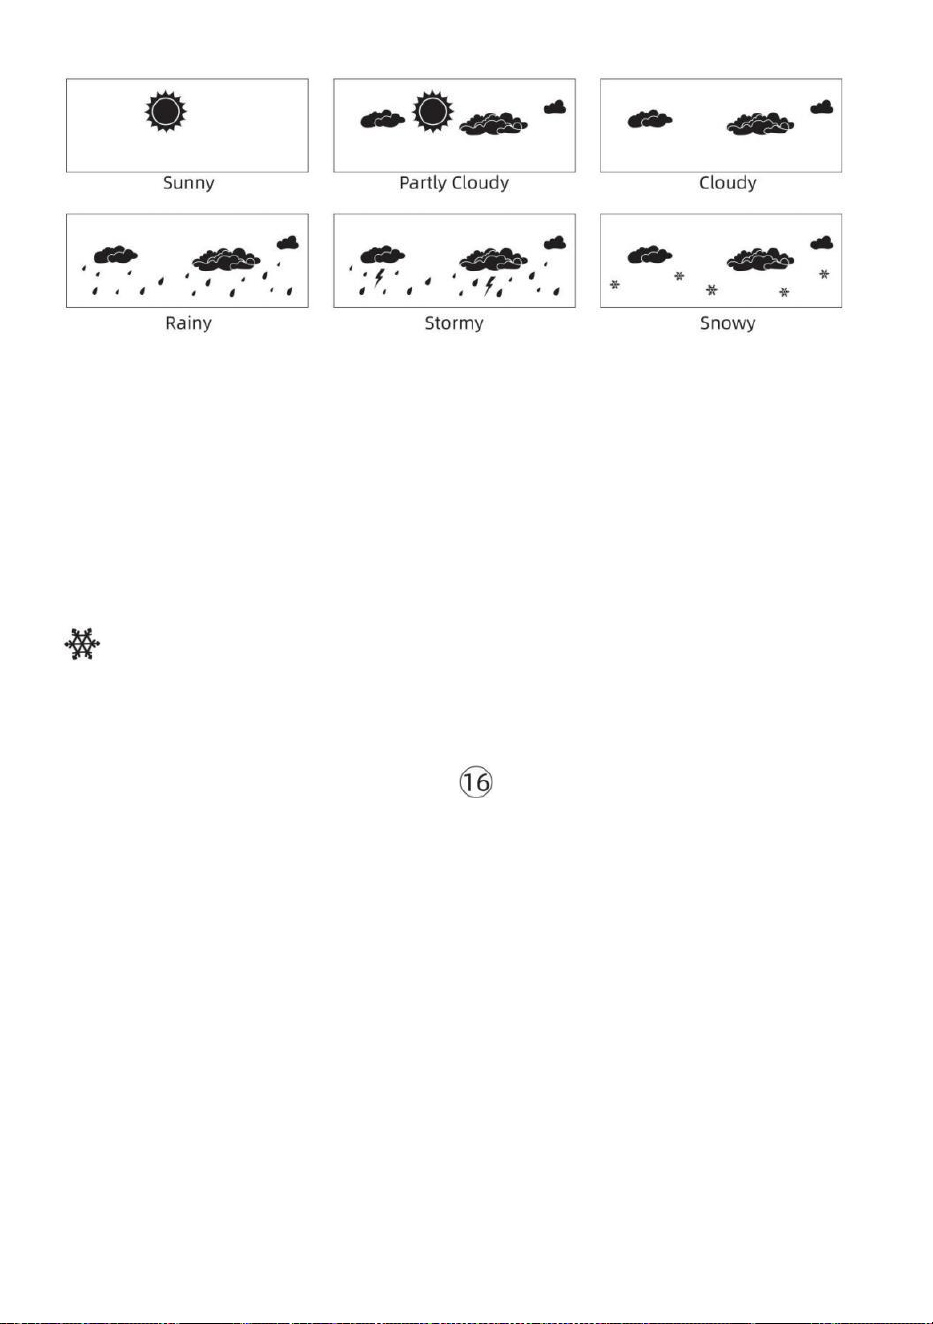
- 46 -
OPMERKING:
De nauwkeurigheid van een algemene druk -gebaseerde
voorspelling gaat over 65-70%. De voorspellingen zijn niet
gegarandeerd.
Het kan niet weerspiegelen noodzakelijkerwijs de huidig situatie.
Ijs Waarschuwing
de buitentemperatuur lager dan 1 ℃ /33,8 ℉ , het sneeuwvlokpictogram
zal verschijnen op de LCD weergave.
MAX/MIN
● Bij normale weergave modus, pers 【 MAX/MIN 】 knop
omschakelen tussen maximale en minimale waarde.
OPMERKING: Als er is geen geldige id-bewerking binnen 10
seconden, het zal automatisch terugkeren naar de normale
weergave modus.
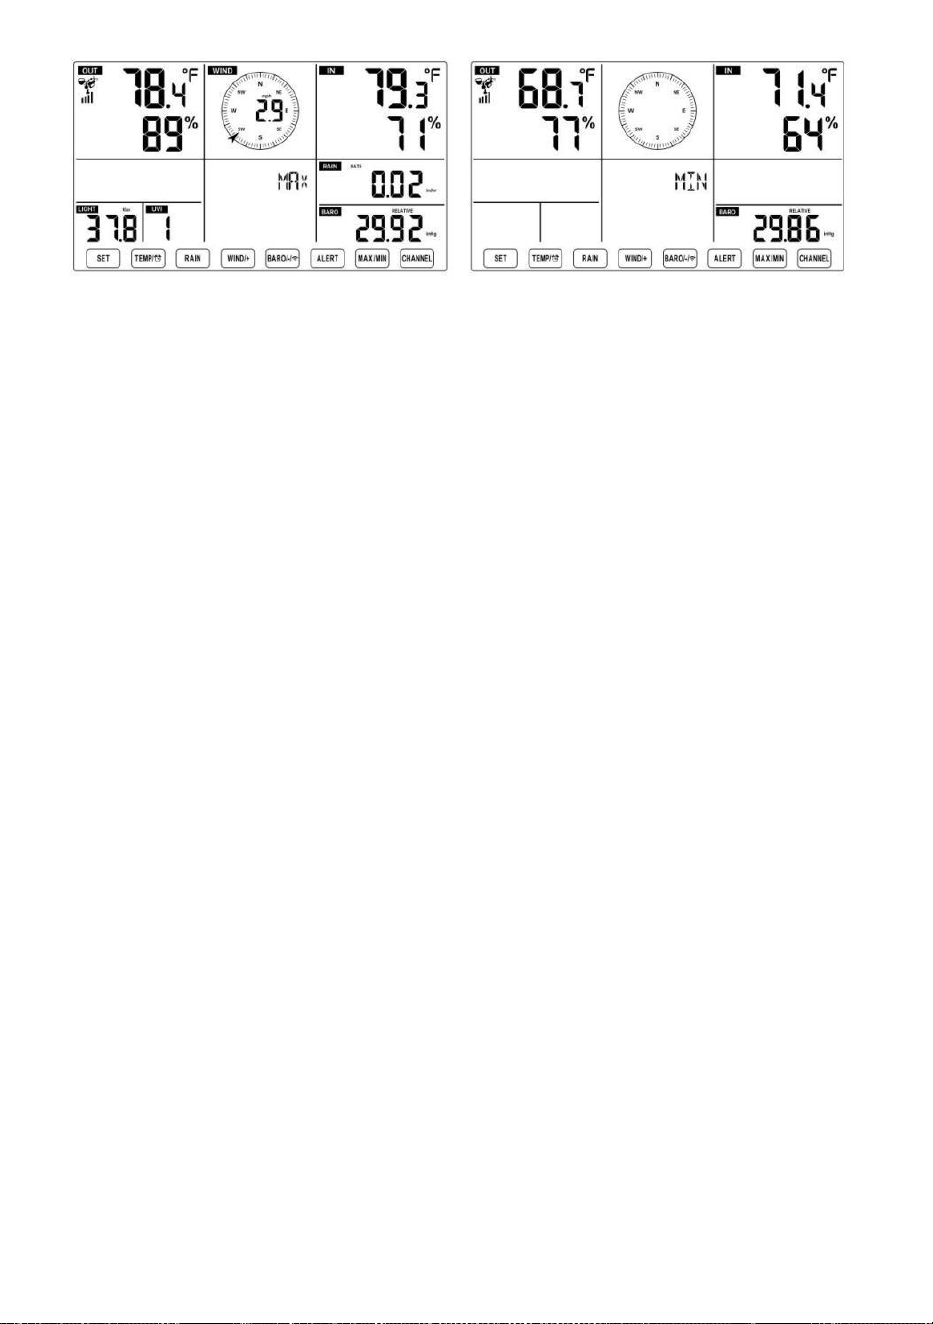
- 46 -
- 47 -
Om de Geaccumuleerde MAX/MIN
● Weergave Gevoel zoals, Wind Chill, Warmte Index, Dauw Punt
Max/Min Waarden
1.) Wanneer de maximale waarden worden
weergegeven, pers
【 TIJDELIJ
K /
】 knop
naar
uitwisseling bekijken van de buitentemperatuur → Voel je als →
Windchill → Warmte Inhoudsopgave → Dauw Punt → Buitentemperatuur.
2.) Wanneer de minimale waarden worden weergegeven , drukt u op 【
TIJDELIJK/ 】 knop naar
uitwisseling bekijken van de buitentemperatuur → Voel je als →
Windchill → Warmte Inhoudsopgave → Dauw Punt → Buitentemperatuur.
● Weergave windsnelheid, windstoot Maximale waarden
Wanneer de maximale waarden worden
weergegeven, pers
【
WIND/+
】
knop om
uitwisseling bekijken tussen de GEMIDDELDE en GUST
windsnelheden. ● Weergave Regen Tarief, Dagelijks Regen,
wekelijks Regen en Maandelijks Regen Maximaal Waarden
Wanneer de maximale waarden worden weergegeven, drukt u op
【
R
EGEN 】 knop om
uitwisseling bekijken Regen Beoordeel → Dagelijks Regen →
Kleintje Regen → Maandelijks Regen.
● Toon Absolute en Relatief druk Max /Min Waarden
1.) Wanneer de maximale waarden worden weergegeven, pers 【 BA
R/-/ 】 knop naar uitwisseling bekijken tussen Absoluut en Relatief
druk.
2.) Wanneer de minimumwaarden worden weergegeven, drukt u op 【
BAR/-/ 】 maar om

- 47 -
uitwisseling bekijken tussen Absoluut en Relatief druk.
● Weergave binnen- en andere kanalen sensor temperatuur &
vochtigheid Max/Min-waarden
1.) Wanneer de maximale waarden worden weergegeven, pers 【 KA
NAAL 】 knop om
uitwisseling bekijken binnen- en buitensensor(en) temperatuur en
vochtigheid.
- 48 -
2.) Wanneer de minimale waarden worden
weergegeven, pers
【 KANAAL 】 knop
naar
uitwisseling bekijken binnen- en buitensensor(en) temperatuur en
vochtigheid.
OPMERKING: Als er andere kanaalsensoren gekoppeld waren, kon
het de Maximale/minimale temperatuur- en vochtigheidswaarden
van het andere kanaal . Als een ander kanaal sensoren waren niet
gepaard, het zou alleen de huidige weergeven binnen max/min
temperatuur en vochtigheidswaarden.
Om de MAX/MIN te wissen Gegevens
Dossier
● Om de maximale waarde te wissen ,
pers En uitstel
【 MAX/MIN 】 knop
boven r 2
seconden terwijl maximale waarden
worden weergegeven.
● Om de minimumwaarde te wissen ,
pers En uitstel
【 MAX/MIN 】 knop over
2
seconden terwijl minimale waarden
worden weergegeven.
HOOG/LAAG ALARMINSTELLING
Om de Waarschuwingsinstelling
● Druk in de normale weergavemodus op 【 ALERT 】 knop schakelen
tussen Hallo alert en Laag alarm instelling waarde.
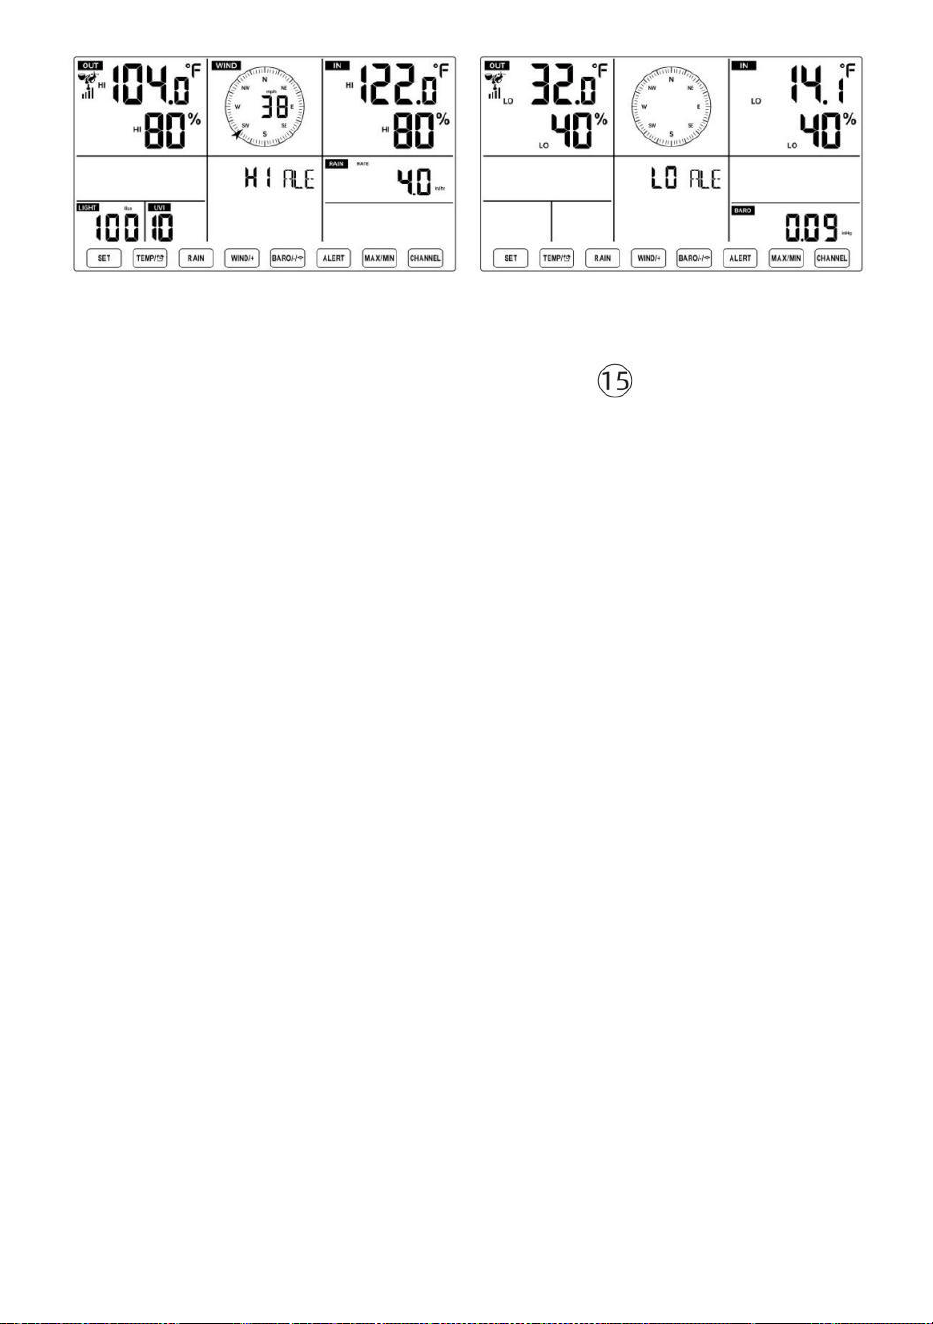
- 48 -
Om de waarschuwing in te stellen
● Bij normale weergave modus, druk op en uitstel 【 ALERT 】 knop
over 2
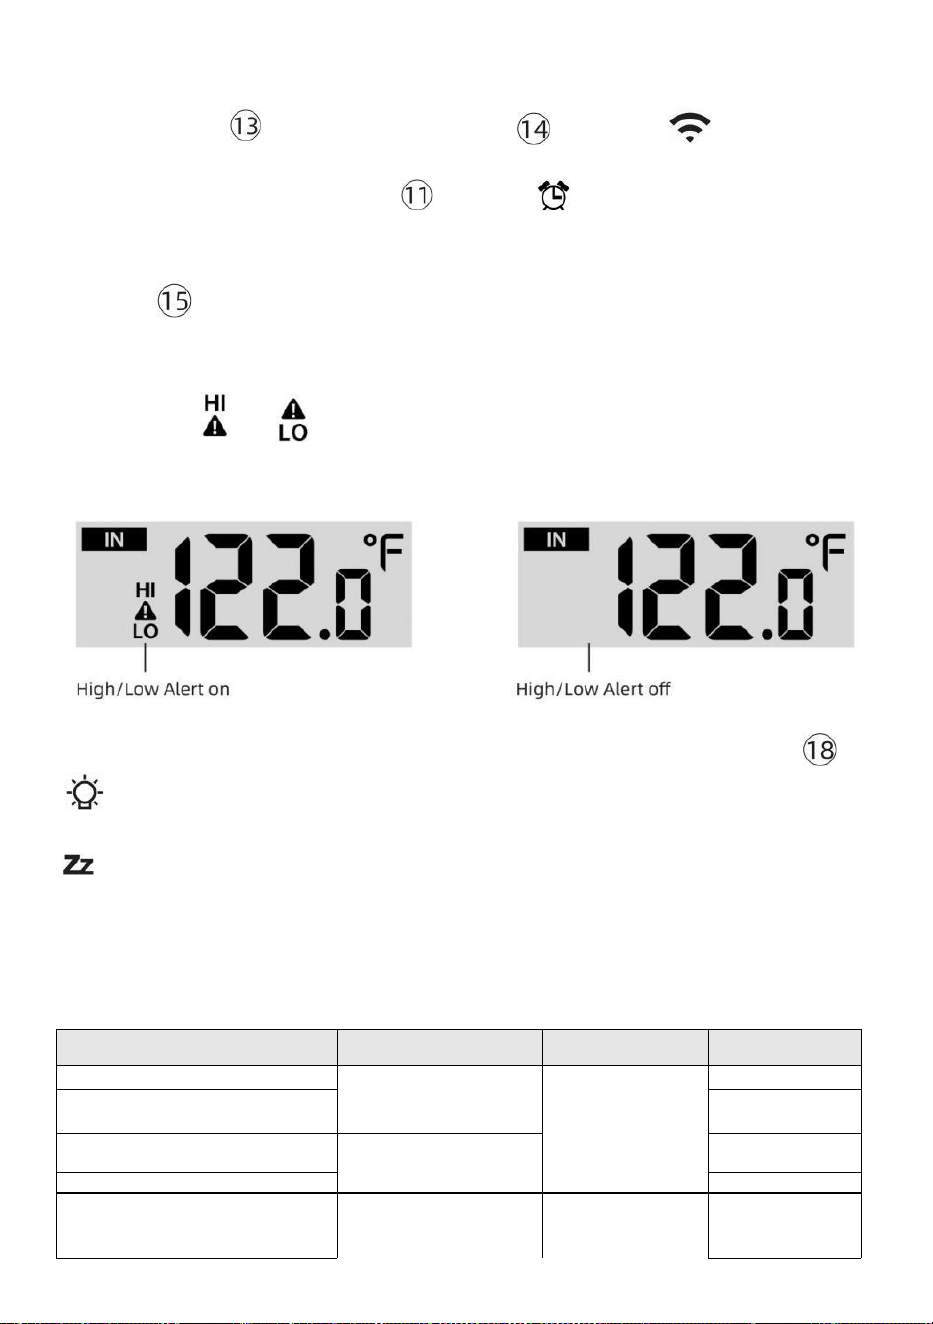
- 49 -
seconden om de waarschuwingsinstelling te openen modus.
● Pers 【 WIND/+ 】 knop en 【 BARO/-/ 】 knop om de
waarde omhoog of omlaag,
dan druk waarschuwing.
【 TIJDELIJ
K /
】 knop om de
● Pers
【
ALERT
】
-knop om te bevestigen En springen naar
volgende instelling.
● De icon of zal worden weergegeven wanneer de
waarschuwing is op.
● Om de waarschuwingsinstelling te verlaten modus bij elk tijd, pers 【
LICHT/SNOOZE 】 knop. De De instelvolgorde voor hoge/lage
waarschuwingen wordt weergegeven onderstaand:
Waarschuwing Instelling
Volgorde
Instelling Bereik
Weergave sectie
Standaard
Binnentemperatuur Hoi Alert
-14.1 ℉ –122
℉ (-9,9 °C
–50 °C )
Binnen
temperatuur &
Vochtigheid
Openlucht
temperatuur &
Vochtigheid
50 ℃ (122 ℉ )
Binnentemperatuur Zie
Waarschuwing
14.1 ℉ (-9,9 ℃
)
Binnenvochtigheid Hoi
Waarschuwing
1%–99%
-40 °F –
158 °F (-40
℃ –70 ℃ )
80%
Binnen Vochtigheid laag
waarschuwing
Buitentemperatuur Hallo
waarschuwing
40%
40 ℃ (104 ℉ )

- 49 -
Windsnelheid
Buitentemperatuur Zie
Waarschuwing
0 ℃ (32 ℉ )
Luchtvochtigheid buiten Hoi
Waarschuwing
1%–99%
0–50 m/s
2–180 km/u
1–111 mph
1–97 knopen 0-60 bft
80%
Luchtvochtigheid buiten Zie
Waarschuwing
Hoog Gemiddelde windsnelheid
Waarschuwing
40%
17m/s
62 km/u
38 mph
33 knopen 20bft
Hoge windstoot
waarschuwing
0–50 m/s
2–180 km/u
1–111 mph
1–97 knopen
0-60 bft
Windsnelheid
17m/s
62 km/u
38 mph
33 knopen 20bft
- 50 -
Waarschuwing voor drukval
1 pk–10 pk
0,03~0,3 inHg
0,7~7,5
mmHg
Barometerdaling
3 pk
0,09 inch
Hg 2,2
mmHg
Hoog Regen
Tariefwaarschuwing
1 mm/uur–1000
mm/uur (0,04
inch/uur–39 in/uur)
Regenval Tarief
101
mm/uur
(4 in/uur)
Hoog Dagelijks
Regenwaarschuwing
1 mm–1000 mm
(0,03 inch–39,37
in)
Regenval Tarief
101mm
(4 in)
UV-index Hoog
Waarschuwing
1-15
UV Index
10
Licht Intensiteit Hoog
Waarschuwing
1 Klux–200.0 Klux
7-1580 W/M²
0-185Kfc
Licht Intensiteit
100 Klux
790 W/M²
92 KFC
Om de Hi/Lo tot zwijgen te brengen Waarschuwing Alarm
Druk op de
【
LICHT/SNOOZE
】
-knop boven op het
display om het alarm uit te zetten, anders gaat het automatisch uit.
draai uit na één minuut.
OPMERKING: Zodra het alarm afgaat, klinkt het alarm gedurende één
minuut en de bijbehorende waarschuwing pictogram en
weerswaarden knipperen.
Als het waarschuwingsalarm na één minuut automatisch wordt
uitgeschakeld in plaats van handmatig te worden uitgeschakeld,
wordt de bijbehorende waarschuwing icoon en lezingen zullen Blijf
knipperen totdat de meting is uit van de waarschuwing bereik.
Het weeralarm gaat af zodra de waarden dalen naar binnen
waarschuwing bereik opnieuw.
ACHTERGRONDVERLICHTING
Achtergrondverlichting van het scherm
Met gelijkstroom Adapter
De achtergrondverlichting kan alleen continu aan staan als de DC-adapter
is
permanent aan. Wanneer de De DC-adapter is losgekoppeld, de
achtergrondverlichting kan tijdelijk worden ingeschakeld.

- 50 -
Pers
【
LICHT/SNOOZE
】
-knop om de
achtergrondverlichting aan te passen
helderheid, Hoog, Laag en Uit.
Zonder gelijkstroom Adapter
Pers Metdeknop
【
LICHT/SNOOZE
】
schakelt u tijdelijk het

- 51 -
achtergrondverlichting voor 15 seconden.
INDICATOR VOOR LAGE BATTERIJ
Als het pictogram van de indicator voor een lege batterij wordt
weergegeven in de buitentemperatuur en vochtigheidssectie of de
overeenkomstige CH-sectie van het LCD troosten
weergeven, dit geeft aan dat de batterijen in uw draadloze weersensor(en)
leeg zijn zijn bijna op en zouden moeten zijn vervangen. Zorg ervoor dat
vervangen alle batterijen tegelijkertijd.
FABRIEK HERSTART
Als er is een storing, de Fabriek Opnieuw starten is een geweldige
manier om je station naar "uit de "box" conditie.
1.) Alles verwijderen vermogen (batterijen en DC-adapter) van
buitensensoren en weerstation.
2.) Volg de handeling “INSTELLING OMHOOG HET WEERSTATION”
naar start het paar de sensor.
ZORG EN ONDERHOUD
1.) Maak de regenmeter elke 3 uur schoon. maanden. Draaien de
trechter
tegen de klok in en til op om de regenmeter bloot te leggen mechanismen,
En schoon met een vochtige doek. Verwijder alle vuil, puin en insecten.
Als beestje Als er sprake is van een plaag , spuit dan de sensor in
lichtjes met insecticide.
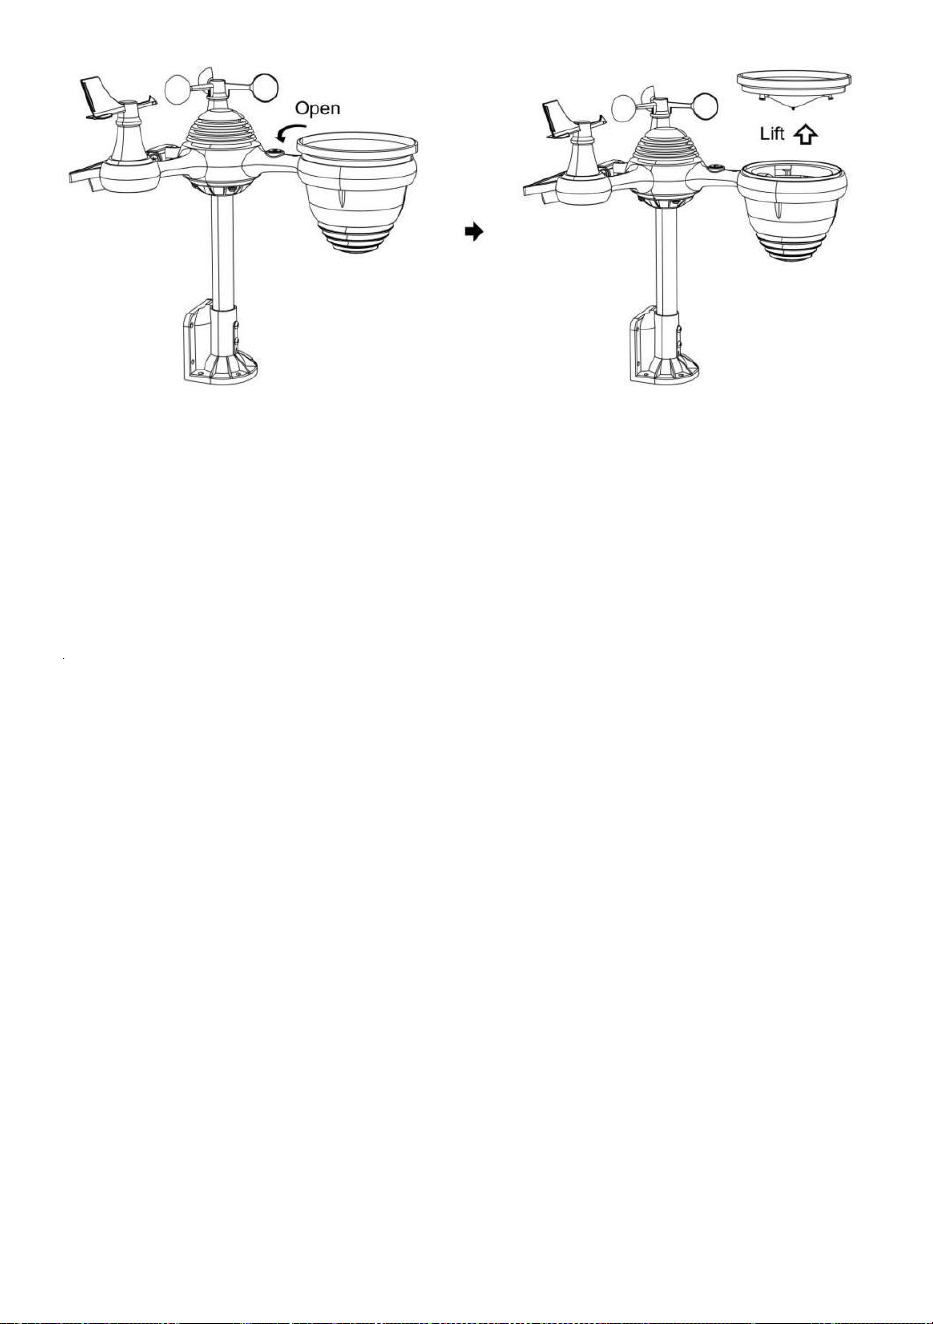
- 52 -
2.) Maak de Licht Intensiteit/ UV-sensor en zonnepaneel elke 3
maanden met vocht lap.
3.) Gebruik bij het vervangen van de batterijen een corrosiewerend
middel. preventief verbinding op de accupolen.

- 53 -
SPECIFICATIE
WEERSTATION
Algemeen Specifiek kationen
Dimensie
7,5 x 5 x 1.2,54 cm (191,6 keer 127 keer 28,8 mm)
Stroom bron
Wisselstroom-gelijkstroom 5V, 1A-adapter (inbegrepen)
Batterij
3 xAAA batterij (niet inbegrepen)
Steun sensoren
1 X 7-in-1 sensor (inbegrepen)
Wi- Fi-communicatie Specificaties
Wi-Fi Standaard
802. 11 b/g/N
Wi-Fi operatie frequentie
2,4 GHz
Ondersteunde
apparaten voor
opstelling
Gebruikersinterface
Ingebouwd Wi-Fi met WAP modus slim apparaat e,
inclusief laptops, computer, smartphones en slimme
pads
Aanbevelen web browser
voor opstelling
Gebruikersinterface
Laatste Versie van elk web browser Dat ondersteunt HTML 5
Tijd Functiespecificaties
Tijd weergave
HH: MM
Uurformaat
12 uur of 24 uur
Datum weergave
DD/MM of MM/DD
Tijd synchronisatiemethode
Synchroniseert met atomisch klok
Tijd zones
GMT±12
Zomertijd
AAN/UIT
Barometerweergave en functiespecificaties
Barometer-eenheden
hPa, inHg En mmHg
Meetbereik
600 – 1100 hPa (relatieve instelling bereik 930 – 1050hPa)
Nauwkeurigheid
700 -1100 hPa±5 hPa/600 -696 hPa±8 hPa
20.67 – 32.48 inHg±0. 15 inHg/ 17.72 -20,55 inch Hg ±0,24
inHg 525 -825 mmHg±3,8 mmHg /450 -522 mmHg±6
mmHg Typisch bij 25 °C (25 ℃ )
Weer voorspelling
Zonnig, Gedeeltelijk Bewolkt, Bewolkt , Regenachtig, Stormachtig
En Sneeuwachtig
Weergave modus
Huidig
Geheugen modus
Dagelijks Maximaal/ Mijn
Waarschuwing
Druk wijziging waarschuwing
Binnen/ Buitentemperatuurweergave en functiespecificaties
Temperatuur eenheid
℃ En ℉
Binnen Weergave bereik
-14,1 °F – -9,9 °C (122 ° F) – 50 ℃ )
Openlucht Weergave bereik
-40 ℉ – -40 ℃ (158 ℉) – 70 ℃ )
In/Uit nauwkeurigheid
50– 122 ℉ ± 1,8 ℉ / 10 – 50 ℃ ± 1
℃ -4 - 50 ℉ ±2,7 ℉ / -20 – 10 ℃ ±
1,5 ℃ anderen : ±3,6 ℉ / ±2 ℃
Weergave modus
Huidig

- 53 -
Geheugen modus
Dagelijks Maximaal/ Mijn
Waarschuwing
Hoog/Laag temperatuur waarschuwing

- 54 -
Binnen/ Openlucht Vochtigheid Weergave & Functie Specificaties
Vochtigheid eenheid
%
Weergave bereik
1 – 99%
In/Uit nauwkeurigheid
40 – 80% RV ± 5% RV @25℃
Overige : ± 8% rechts @25℃
Weergave modus
Huidig
Geheugen modus
Dagelijks Maximaal/ Mijn
Waarschuwing
Hoog/Laag vochtigheid waarschuwing
Weergave van windsnelheid en -richting & Functies Specificaties
Wind Snelheid eenheid
km/u, mevrouw, km/u, knopen
Weergave bereik
0 -180 km/u, 50 m/s, 180 km/u, 97 knopen
Snelheidsnauwkeurigheid
<5m/s: ±0,5 m/s, >5m/s : ±10% (welke dan ook is groter)
Weergave modus
Windvlaag/ Gemiddeld
Geheugen modus
Dagelijks Windvlaag/Gemiddelde
Waarschuwing
Hoog Wind Snelheid Waarschuwing ( Windvlaag / Gemiddeld
)
Wind richting
16 richtingen
Regenweergave & Functie Specificaties
Eenheid van regenval
mmm, in
Bereik van regenval
0 – 12999mm (0 – 511.7 in)
Nauwkeurigheid van regenval
±7%
Weergave modus
Huidig
Geheugen modus
Dagelijks Maximaal
Regenval weergave modus
Per uur/ Dagelijks/ Wekelijks/ Maandelijks/ Totaal Regenval
Waarschuwing
Hoog Dagelijks Regenval waarschuwing
UV-indexweergave en functiespecificaties
Weergave bereik
0 - 16
Weergave modus
Huidig
Geheugen modus
Dagelijks Maximaal
Waarschuwing
Hoog UVI waarschuwing
Lichtintensiteit Weergave- en functiespecificaties

- 54 -

- 55 -
Licht Intensiteit eenheid
Klus, Kfc en V/
m2
Weergave bereik
0 – 200 Klux
Weergave modus
Huidig
Geheugen modus
Dagelijks Maximaal
Waarschuwing
Hoog Licht intensiteit waarschuwing
Weerindexweergave en functiespecificaties
Weersindex modus
Voelt als windchill, hitte index En dauw punt
Weergavemodus
Huidig
Geheugenmodus
Dagelijks Max/min
DRAADLOZE 7-IN-1 BUITENSENSOR
Afmetingen
16 keer 13,8 keer 14,4 inch (408 x 396 x 367 mm)
Hoofdstroom
3,6V Ni-MH oplaadbaar batterijpakket
Noodstroom
Zonne-energie
Weergegevens
temperatuur, vochtigheid, wind snelheid, wind richting,
regenval, UVI en lichtintensiteit
RF frequentie
915 MHz
RF- transmissiebereik
149 meter (150m)
Transmissie-interval
Elk20 seconden voor UV 、 lichtintensiteit 、 windsnelheid
、 temperatuur-, vochtigheids- en regengegevens en wind
richtingsgegevens
Bedrijfstemperatuur
-40 ℉ tot 140 ℉ / 40 ℃ tot 60 ℃
Extra hulpmiddelen vereist
voor sensor
Ja
- 56 -
PROBLEEMOPLOSSING
Probleem
Oplossing
Draadloze sensor
doet niet
communiceren de
weer station
De draadloze sensor kunnen hebben geïnitieerd op de juiste
manier, En de gegevens is geregistreerd door de weer station
als ongeldig, En de weer
station moeten zijn opnieuw instellen.
Met een open einde paperclip, druk op de OPNIEUW
INSTELLEN knop gedurende 3 seconden naar compleet de
weergave van de spanning . LED zullen flits elke 20
seconden.
Als LED doet niet elke keer flitsen 20 seconden, eruit halen de
batterijen En wachten 5 minuut, terwijl bedekken de zonne-
paneel naar droogleggen de spanning.
Neerzetten batterijen rug in En opnieuw synchroniseren de
weer station En sy n c h r o n i s e e r het weerstation opnieuw (Zie
Pagina 18 RE-PAI RING SENSOR) met de draadloze sensor over
10 voeten (3m) weg .
De De LED van de draadloze sensor zal flits elk 20 seconden.
Als de LED is nog steeds niet knipperend elk 20 seconden,
vervang de nieuw
batterijen in de draadloze sensor.
Als de batterijen waren onlangs vervangen, controleer de polariteit. Als
de
draadloze sensor is knipperend elk 20 seconden, doorgaan naar
de volgende stap.
Daar kunnen zijn A tijdelijk verlies van communicatie vanwege
naar receptie verlies verwant naar interferentie of ander locatie
factoren,
Of batterijen kunnen hebben geweest veranderd in de draadloze
sensor en de weer station heeft niet geweest opnieuw instellen. De
oplossing kunnen zijn zo eenvoudig als aandrijven omlaag En omhoog
de weer station ( verwijderen gelijkstroom stroom En batterijen),
wachten 30 seconden, En opnieuw invoegen gelijkstroom stroom En
batterijen).
Binnen En
Openlucht
temperatuur Doen
niet mee eens zijn
Toestaan tot één uur voor de draadloze sensoren naar stabiliseren
vanwege naar
signaal filteren. De binnen En openlucht- temperatuur sensoren
℉ overeenkomen (±2 ℃ ) (de sensornauwkeurigheid is ±2 ℉ (±1 ℃ )
Gebruik de kalibratie functie naar overeenkomen met de
binnen En openlucht- temperatuur naar A bekend bron.
Temperatuursensor
leest ook hoog in de
dag
Maken zeker dat de draadloze sensor is niet te dichtbij naar warmte
genereren bronnen of vernauwingen, zo een als gebouwen, trottoir,
muren, of lucht conditionering Eenheden.
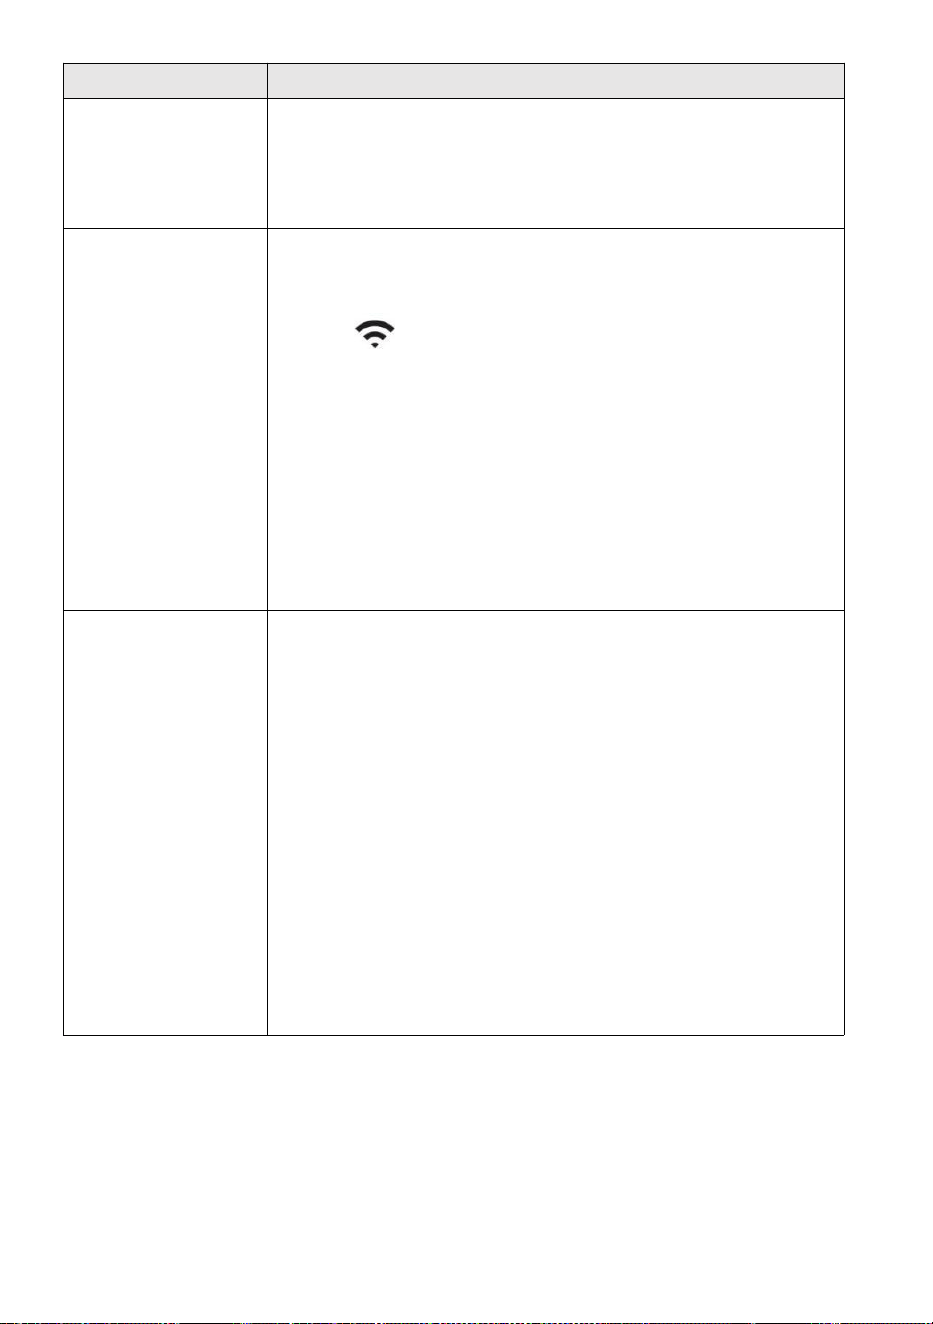
- 57 -
Probleem
Oplossing
Regenmeter
rapporten regen
wanneer Het is
niet
regent.
Een onstabiele montageoplossing (sway in de montage pool) kunnen
onjuiste kantelbak toenemende regenval. Maken Zeker je hebt een
stabiele, vlakke montage oplossing. (Zie pagina 16
DRAADLOZE 7-IN-1-SENSOR AANPASSEN
Wi-Fi doet niet
weergeven over het
weer
station
Controleer of er problemen zijn met uw router.
1.) Controleer het Wi-Fi-symbool op het display. Als de
draadloze verbinding succesvol is, verschijnt het Wi- Fi-
pictogram zullen worden weergegeven in de tijd ingediend.
2.) Zorg ervoor dat de wifi- instellingen van uw modem correct
zijn (netwerk naam, en wachtwoord)
3.) Zorg ervoor dat het weerstation aangesloten naar binnen DC-
stroom. Het weerstation maakt geen verbinding met Wi -Fi wanneer
aangedreven alleen op batterijen .
4.) Alleen de console ondersteunt En verbindt met 2.4GHz
routeren. Als je eigen 5GHz router, en Het is een dubbele l band
router, dan zul je
moet de 5Ghz- band uitschakelen en inschakelen de 2,4 GHz
band. 5.) Het weer doet niet steun gast netwerken.
Gegevens niet
verslaggeving naar
www.wonder
ground.com of
www.weerwol
k.net
1.) Bevestig uw wachtwoord of sleutel klopt. Het is de wachtwoord
Jij geregistreerd op Wunderground.com.
Wunderground.com. Uw underground .com-wachtwoord mag niet
beginnen met niet-alfanumerieke tekens (een beperking van
Wunderground.com, niet het station ). Bijvoorbeeld, $worknet is geen
geldig wachtwoord, maar werk knet$ is geldig)
2.) Bevestig uw station ID is correct. Het station ID is alle doppen,
en het meest voorkomende probleem is het vervangen En O voor A
0 (of omgekeerd). Voorbeeld, KCAPHOEM12, niet KCAPH0EM12.
3.) Controleer of de gegevens en tijd op het weerstation correct
zijn. Als het niet klopt, misschien oude gegevens rapporteren, niet
echt tijd gegevens.
4.) Zorg ervoor dat uw tijdzone is correct ingesteld. Als het niet
klopt, kunnen oude gegevens rapporteren, niet echt tijdsgegevens.
5.) Controleer uw router firewall-instellingen. Het weer station
verzendt gegevens via Haven 80.

FCCSTATEMENT
- 58 -
Dit apparaat voldoet aan onderdeel 15 van de FCC-regels. Werking is
onderwerp aan de volgende twee voorwaarden :
1. Dit apparaat kan GEEN schadelijke stoffen veroorzaken interferentie .
2. Dit apparaat moet alle interferentie ontvangen, inbegrepen
inmenging die kan een ongewenste werking veroorzaken.
OPMERKING :
Deze apparatuur heeft getest en in overeenstemming bevonden met de
limieten voor A
Klas B digitaal apparaat, overeenkomstig Deel 15 van de FCC-regels. Deze
limieten Zijn ontworpen om redelijke bescherming tegen schadelijk
interferentie in een residentieel installatie. Deze apparatuur genereert —
en kan uitstralen - radio frequentie-energie en, indien niet geïnstalleerd en
gebruikt in overeenstemming met de
instructies, kan veroorzaken schadelijk inmenging in radiocommunicatie .
Er is echter geen garantie dat interferentie zal niet voorkomen in A
bepaalde installatie.
Als de apparatuur geen schadelijke stoffen veroorzaakt inmenging in
radio- of televisieontvangst , die kan worden bepaald door de apparatuur
uit te schakelen en op, de gebruiker wordt aangemoedigd om te
proberen de fout te corrigeren interferentie door een of meer van het
volgende maatregelen:
Heroriënteer of verplaats de ontvanger antenne.
Vergroot de scheiding tussen het apparaat en de ontvanger.
Sluit de apparatuur naar binnen een uitlaat op A circuit anders dan
Dat naar welke de ontvanger is aangesloten.
Raadpleeg de handelaar of een ervaren radio/televisie technicus
voor hulp.
WAARSCHUWING: Wijzigingen of aanpassingen aan deze eenheid niet
uitdrukkelijk goedgekeurd door het feest verantwoordelijk voor naleving
kan de bevoegdheid van de gebruiker om

FCCSTATEMENT
- 58 -
de apparatuur bedienen.
Gemaakt In China


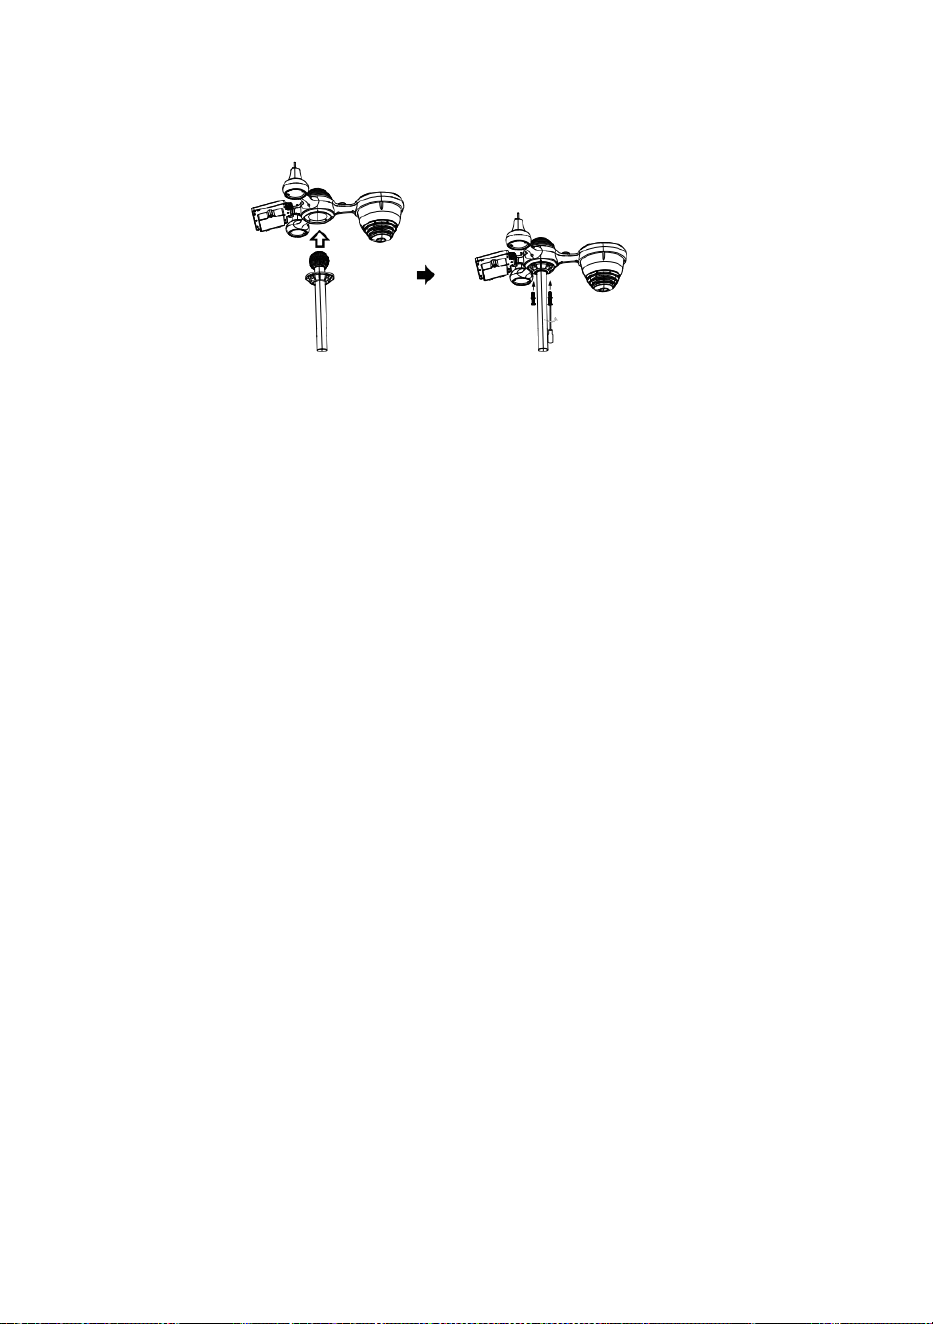
L
å
s
a
Snabbstartguide
⑤
I
N
S
T
Ä
L
L
N
I
N
G
A
V
R
A
I
N
C
o
l
l
e
c
t
①INSTALLING THE MOUNTING POLE
Secure the sensor onto a mounting pole (included) using the screws (included).

E
L
L
E
R
S
ä
t
t
i
t
r
a
t
t
e
n
i
r
e
g
n
u
p
p
s
a
m
l
a
r
e
n
o
c
h
l
å
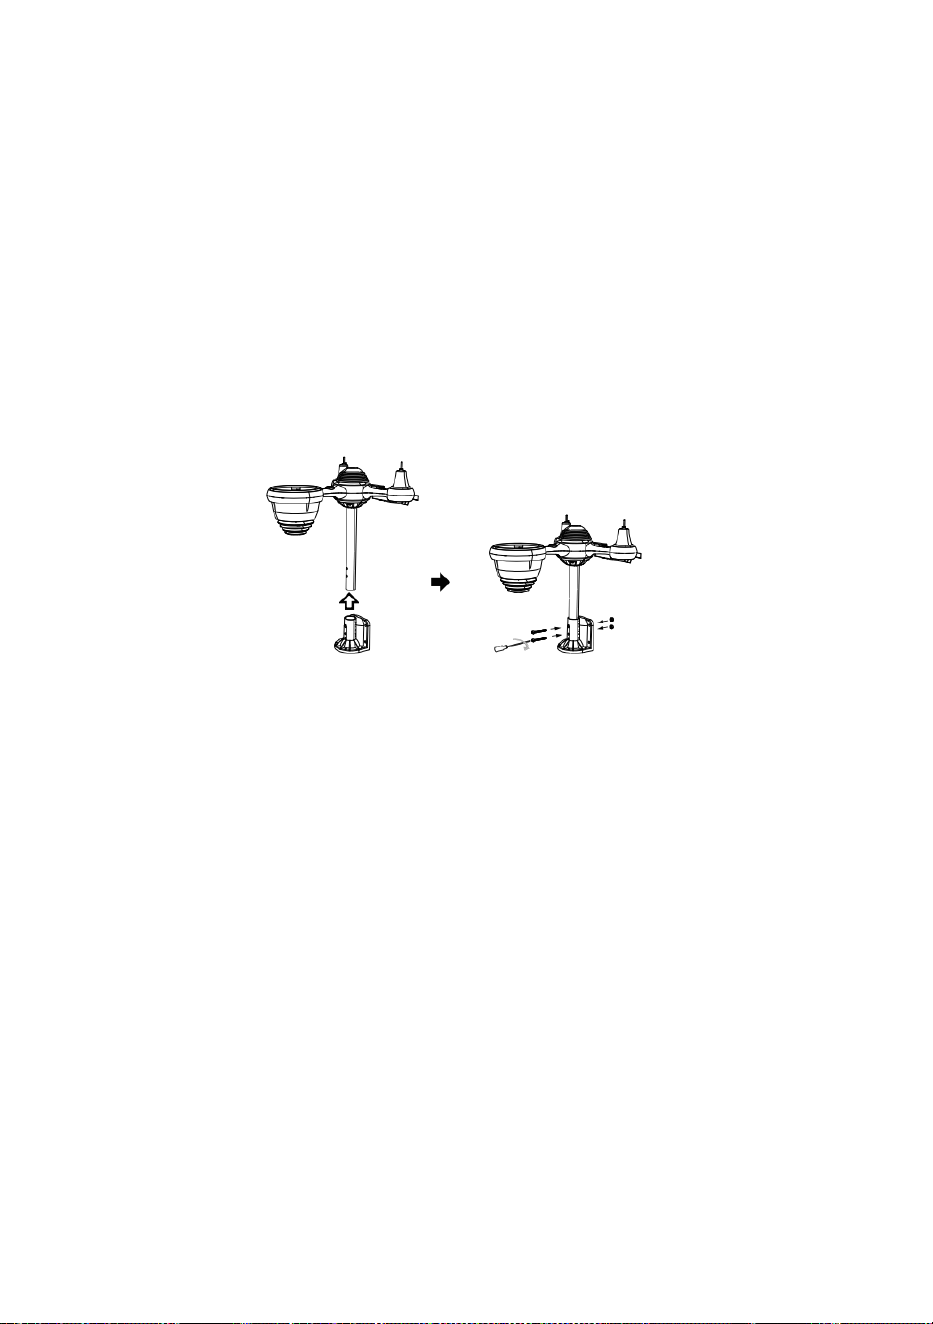
s
d
e
n
p
å
p
l
a
t
s
.
⑥
I
N
S
T
A
L
L
A
T
I
O
N
A
V
B
A

T
T
E
R
I
E
R
N
A
S
k
r
u
v
a
l
o
s
s
b
a
t
t
e
r
i
l
u
c
k
a
n
i
b
o
t
t
e
n
.
A
n
s
l
u
t
②INSTALLING THE MOUNTING BRACKET
Secure the sensor onto a mounting bracket (included) using the screws (included).

k
a
b
e
l
n
t
i
l
l
d
e
t
u
p
p
l
a
d
d
n
i
n
g
s
b
a
r
a
b
a
t
t
e
r
i
p
a
k
e
t
e
t
.
J
u
s
t
e
r
a

d
e
a
n
s
l
u
t
n
a
k
a
b
l
a
r
n
a
s
å
a
t
t
d
e
p
a
s
s
a
r
i
n
b
e
k
v
ä
m
t
f
a
c
k
e
t
.
S
t
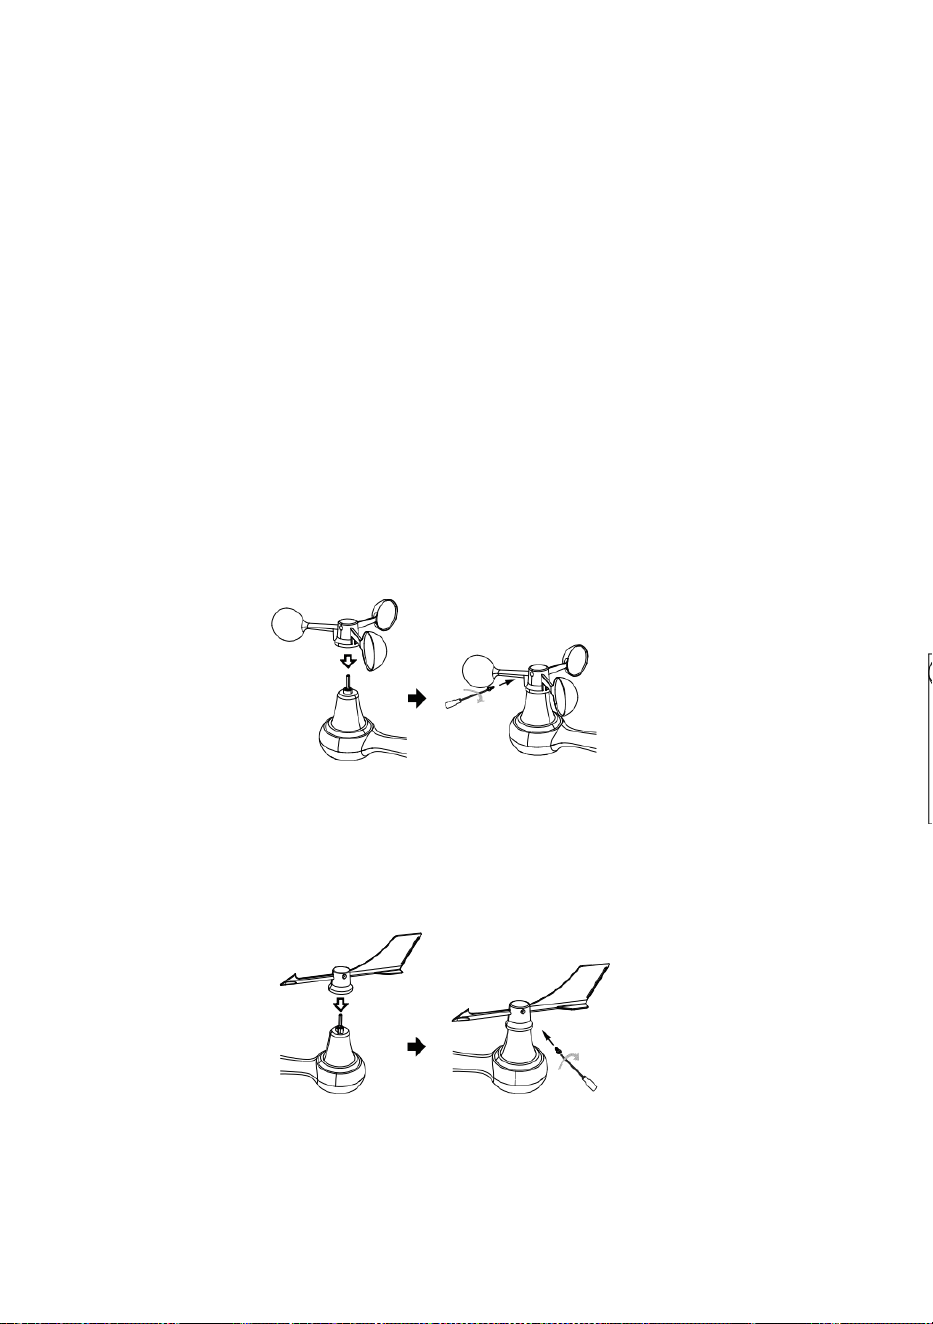
ä
n
g
o
c
h
f
ä
s
t
b
a
t
t
e
r
i
l
u
c
k
a
n
.
③INSTALLATION AV VINDHASTIGHETSKUPPER
Rikta in skruvhålen i vindhastighetskopparna med platt, vertikala sidan av metallstången .
Sätt in vindhastighetskopparna i metallstången och skruva fast för att låsa den på
plats.
S
k
j
u
t
v
ä
x
e
l
n

i
n
å
t
o
c
h
d
r
a
å
t
t
i
o
s
k
r
u
v
e
n
.
P
u
n
k
t
t
i
l
l
P
u
n
k
t
t
i
l
l
Point to
SOUTH

P
u
n
k
t
t
i
l
l
④INSTALLATION AV VINDRIKNING V ANE
Rikta in skruvhålen i vindriktningsvingen med platt, vertikal sida av metallstången.
Sätt in vindvingen i metallstången och skruva fast för att låsa den på plats.

The
bubble
⑩STRÖMNING
VÄDERSTATIONEN
Anslut strömadaptern till
vädret station.
När väderstationen är påslagen,
den går automatiskt in i parningsläge.
INSTÄLLNINGAR
WI-FI-ANSLUTNING
Tryck och håll ner
BARO/-/-
knappen över
3 sekunder att gå in AP-läge.
Öppna dina Wi-Fi- nätverksinställningar på PC
eller smartphone. Leta reda på väderstationen
SSID (WWS-XXXXXX) från listan .
Tryck på SSID till ansluta.
PÅ
MINST
(0,9 m)
ISÄR
För att förhindra trådlösa störningar, placera båda enheterna minst 0,9 m (3 ft ) bort
från elektronisk utrustning (TV, dator, mikrovågsugn, radio, etc.).
SETTINGS
SETUP ADVANCED
Language:
Wi-Fi Router Setup
Router 12345
Select the menu and choose your 2.4GHz WIFI Router
Password
Weather Server Setup
WeatherUnderground
Station ID
Station Key
Upload wunderground.com
WeatherCloud
Station ID
Station Key
Upload weatherCloud.net
Time Zone Setup
Time Zone
Time Server Setup
Server URL
Firmware Version: 1.0.1
time.windows.com
a7d 9d 2a27 9 fbbafa
**********
**********
**********
Apply
KCACANTI9
English
Router
+0.00
Flashing: the weather station is attempting
to connect to your wireless router
Solid: the weather station has been
connected to your wireless router.
Select setup UI display language
Select your Wi-Fi Router (SSID) from the list
Router Password
Enter your station ID
Enter your station key/password
check to confirm upload to
WeatherUnderground server
Enter your station ID
Enter your station key/password
check to confirm upload to
⑧MOUNTING THE WIRELESS 7-IN-1 OUTDOOR SENSOR
Various options to install. Make sure the rain collector faces north and
the solar panel faces south before fastening the screws (included).
If you are a user located in the Southern Hemisphere,
please reverse the direction.
ENTER SETUP INTERFACE
Enter the following address into the web browser address bar:
http://192.168.1.1 to access the setup interface.
Please click to check your password before clicking
APPLY.
⑨ADJUSTING THE 7-IN-1 WIRELESS SENSOR LEVEL
Use the bubble level indicator to make sure the wireless outdoor sensor is completely level.
Weathercloud.net
Time zone setting
Internet time server setting
Press Apply to confirm the setting
Please scan the QR code or visit https://youtu.be/LESE8poieYY to see a video on how to use it.
WI-FI CONNECTION STATUS
TV
3
feet

Teknisk support och E- garanticertifikat www.vevor.com/support
METEOROLOGISK STATION
MODELL: YT60234
Vi fortsätter att vara engagerade i förse dig med konkurrenskraftiga verktyg pris.
"Spara Halva, "Halva priset " eller andra liknande uttryck som används av oss endast
representerar en
e stimulera besparingar du kan dra nytta av att köpa vissa verktyg hos oss jämfört med de
stora
toppmärken och doser inte nödvändigtvis menar att täcka alla kategorier verktyg som erbjuds
av oss. Du
är vänligen påmind om att kontrollera noggrant när du är lägga en beställning med oss
om du är
faktiskt sparar hälften i jämförelse med de främsta stora varumärkena.

- 3 -
METEOROLOGICAL
STATION
MODELL: YT60234
BEHOV HJÄLP? KONTAKTA USA!
Ha produkt frågor? Behov tekniskt stöd? Behaga känsla gratis till
kontakta oss:
CustomerService@vevor.com
Detta är originalet instruktion, snälla läs allt manuell instruktioner
försiktigt före drift. VEVOR reserverar sig för en tydlig tolkning av vår
användarmanual. Produktens utseende ska vara föremål för
produkt dig mottagen. Snälla förlåt oss att vi inte gör det informera dig
igen om det finns någon teknik eller programvara uppdateringar på vår
produkt.

SAFETYPRECAUTIONS
- 4 -
VARNING! Läs gärna och förstå alla säkerhetsföreskrifter,
bruksanvisningar och skötsel-/underhållsinstruktioner innan du använder
detta
apparat. Spara denna bruksanvisning för framtida referens.
Detta produkt är inte a leksak. Hålla ut av räckvidd av barn.
Detta produkt är designad för använda i de hem endast som en
indikation av väderförhållanden.
Detta produkt är inte att vara används för medicinsk syften eller
för offentlig information.
Do rengör inte enheten med slipmedel eller korrosiv material.
Do inte placera apparaten inga öppna lågor eller värmekällor.
Brand, elektrisk stöt, produktskada eller skada makt inträffa.
Endast använd färsk ny batterier i de produkt. Do inte blanda ny
och gammal batterier tillsammans.
Do inte demontera , eller modifiera produkt.
Endast använda bilagor eller tillbehör med detta produkt specificeras
av de tillverkare.
Do inte sänka ner enheten i vatten. Torka produkt med en mjuk
trasa om vätskespill på det.
Do utsätt inte enheten för överdriven kraft, stötar, kanal, extrem
temperatur eller fuktighet .
Do inte täcka eller blockera ventilationen hål med några föremål.
Denna väderstation av detta produkt är tänkt att vara begagnad
inomhus endast.
Denna produkt är endast lämplig för montering vid a höjd mindre än
6,6 fot (2 m).
Ändra inte enhetens interna komponenter. manipulera med produkten
upphäver garantin.
Batterier är inte ingår. När sätter in batterier, göra su re att det
positiva och negativ polariteter matchar med markeringar i
avdelning.
gör inte blanda standard, alkalisk, och uppladdningsbar batterier
tillsammans.
Lämnar en batteri utsatt för extremt höga temperaturer i den
omgivande miljön kan resultera i en explosion eller läckage av
brandfarlig vätska eller gas.
Lämnar en batteri utsatt för extremt ljus lågt lufttryck i den
omgivande miljön kan resultera i en explosion eller läckage av
brandfarlig vätska eller gas.

TIPS FOR SENSORSITE SELECTION
- 5 -
Regnsamlare måste städas varje få månader.
Sensor bör vara installera ed kl minst 5' (1.5 m) bort från några
byggnad eller strukturera.
Välj a plats i en öppna utrymme under r direkt solljus med inga
hinder.
Sensorn ska sitta kvar i siktlinje och inom 492' (1 50 m) av
väderstationen för konsekvent, stadig sändning .
Håll sensorn och väderstationen borta från hushållet
apparater som arbetar på samma frekvens. Konsolen och
sensorn bör vara minst 3' -7' (1 - 2 m) bort från sådan inter erferenser.
PRODUKTFUNKTIONER
Färgglada och storsiffrig display med superljus bakgrundsbelysning.
9 funktionell knappar: SET, TEMP /ALARM, REGN, VIND/+, BARO/
-/ , ALERT, MAX/MIN, KANAL, LIGHT/ SNOOZE
Tiden synkroniseras automatiskt till internet.
Larm med snoozefunktion.
Sommartid (DS T) funktion.
Tidszon: GMT ±12.
Månen Fas.
Inomhus- och utomhustemperatur (°C/°F) och luftfuktighet läsningar
med trend.
Varje timme, dagligen, varje vecka, Månatlig, totalt nederbörd och
Regn betygsätt in de förbi timme.
Medelvindhastighet, vindby hastighet och vind riktning visas.
Absolut och relativ Barom etrisk tryck visas med trend.
Ljusintensitet och UV index di splay.
Väderindex visa : Känsla gillar, Wind Kyla, Värme index, Dagg punkt.
Väderprognos.
Max/Min läsning.
Inställningar för vädervarning.
Ladda upp väder data till Weather Underground ett nd/eller
Weathercloud via ett Wi-Fi router.
4-nivå bakgrundsbelysningens ljusstyrka t.
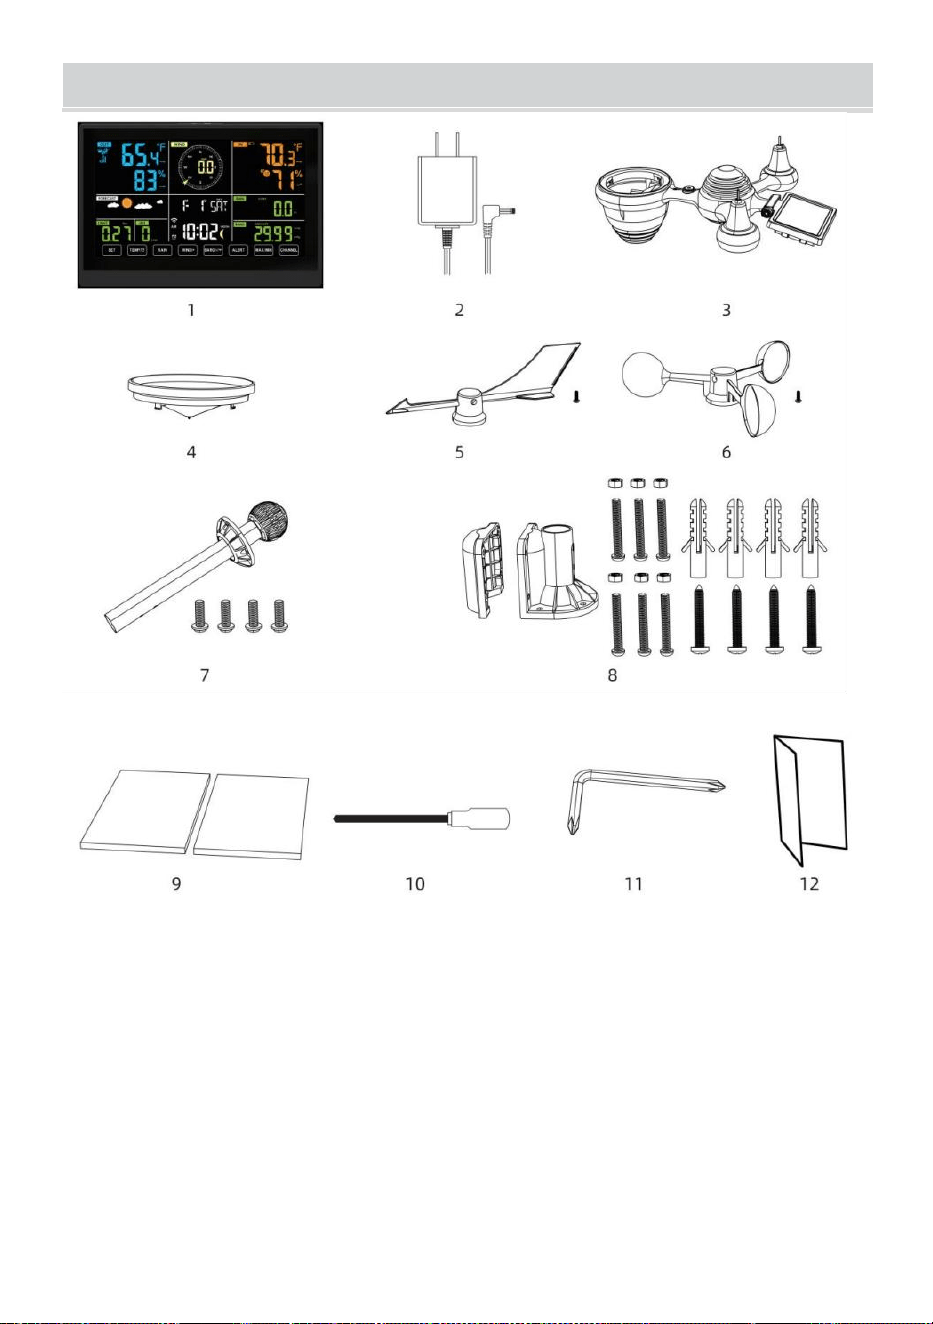
- 6 -
PAKETETSINNEHÅLL
1 väderstation
2 Adapter
3 Trådlös 7-i-1 utomhussensor
4 Tratt
5 Vindriktningsvinge med 1 skruv
6 Vindhastighetskoppar med 1 fm varv
7 Montering stolpe med 4 skruvar
8 Montering fästen med 6 skruvar
9 Gummi kuddar X 2
10 Skruvmejsel 1
11 Skruvmejsel 2
12 Användarhandbok
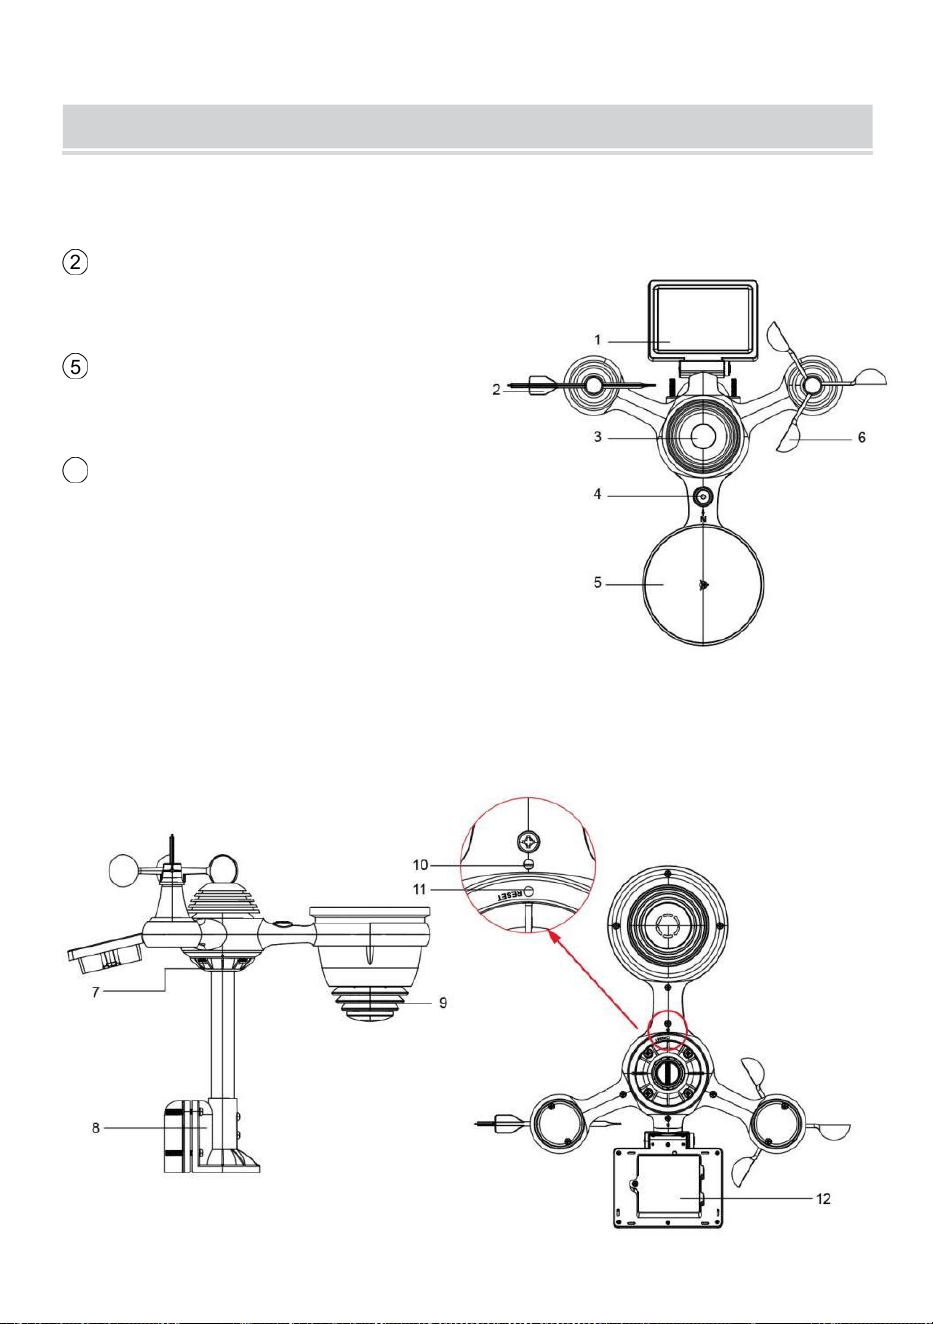
OBS: 4 extra skruvar för vindriktningsvingar och vindhastighetskoppar.
PRODUCT OVERVIEW
- 7 -
TRÅDLÖSA 7-I-1 UTOMHUSSENSOR ELLER
1
Sol panel
2 Vindriktningsvinge
3
UV/ljussensor
4
Bubbla nivå gradienter
5 Regnsamlare
6 Vindhastighetskoppar
7 Montering stolpe
8
Montering parenteser
9
Hygrotermogivare
10 LED: Blinkar när enheten
sänder en läsning
⑪
RESET-knapp
⑫
Batterilucka
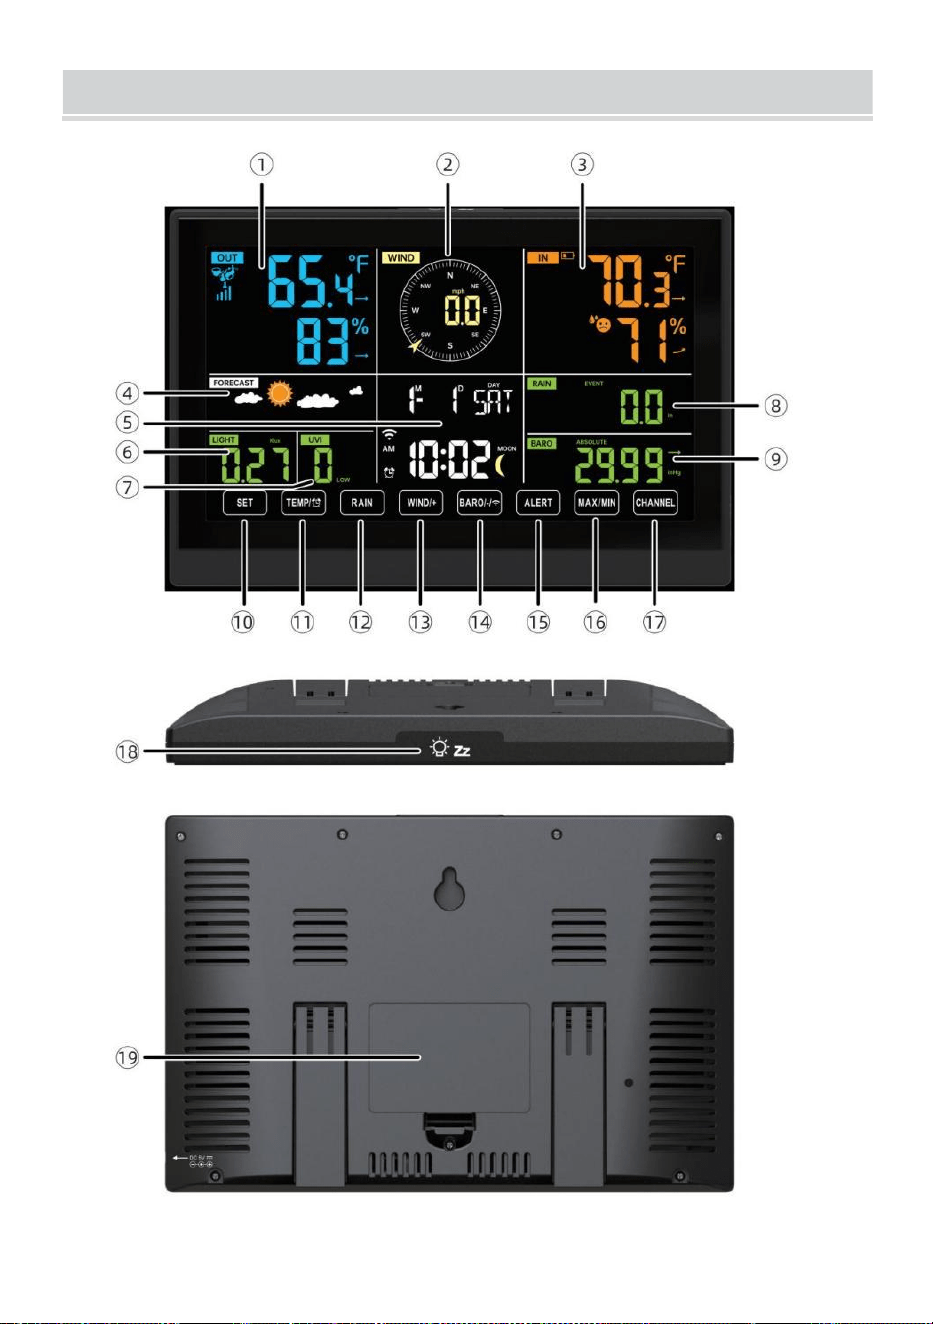
WEATHERSTATION
- 8 -
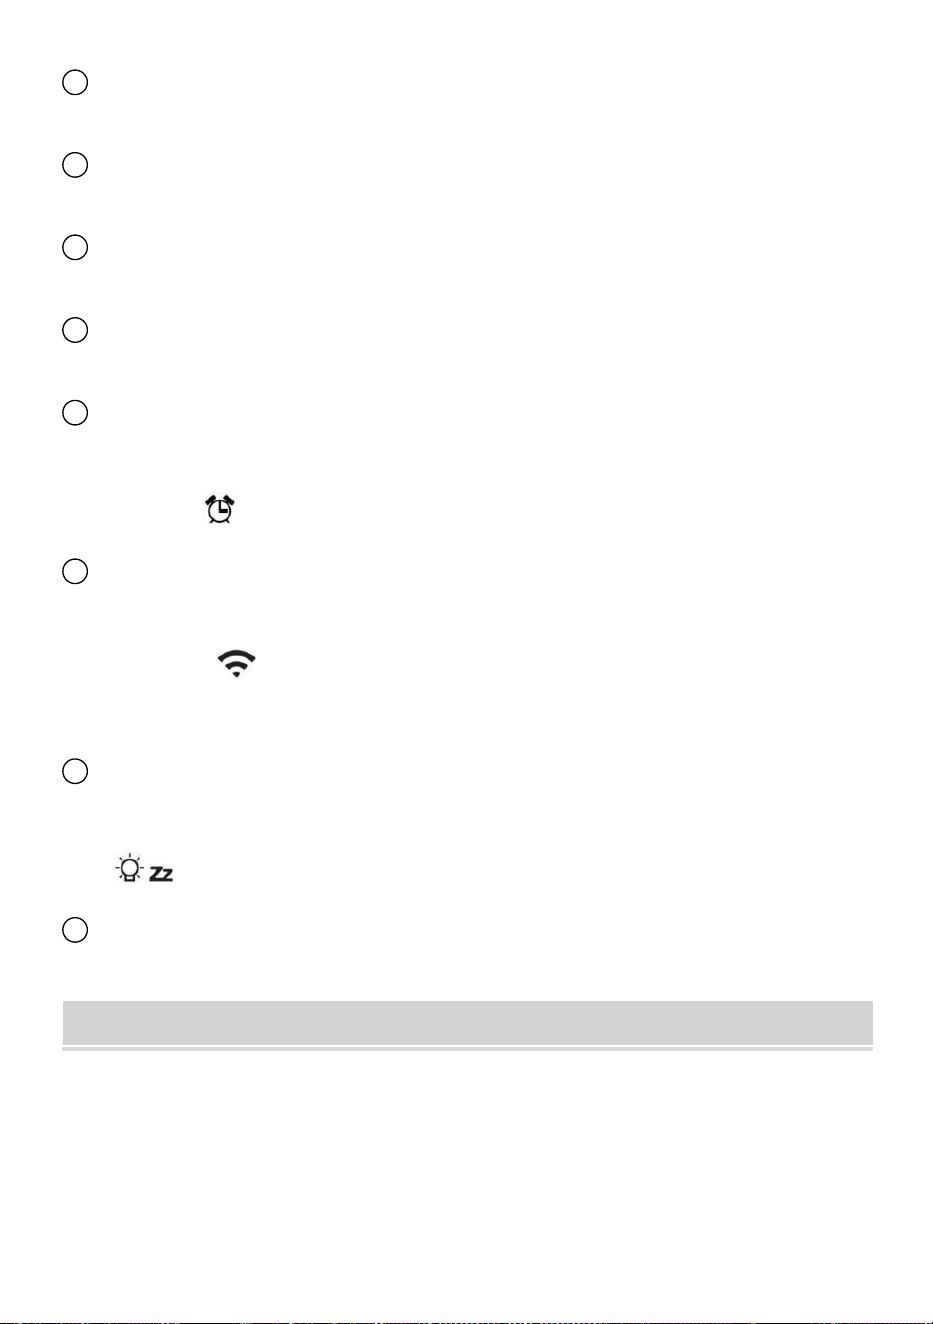
- 9 -
1 Utomhustemperatur/fuktighet läsning, väder index
2 Vindriktning & hastighet
3
Avläsning av inomhustemperatur/fuktighet
4 Väderprognos
5 Tid & datum, måne fas, Vi ekdag
6 Ljus intensitet
7
UV index
8 Regn
9 Barometer
10 UPPSÄTTNING knapp
11 TEMP/ (ALARM) knapp
12 REGN-knapp
13 WIND/+-knapp
14 BARO/-/ (Wi-Fi) knapp
15 ALERT-knapp
16 MAX/MIN-knapp
17 CHANNEL-knapp
18
LIGHT/ SNOOZE knapp
19
Batterifack (3,6 V Ni-MH uppladdningsbar batteri packa)
MILJÖ UPPDENTRÅDLÖSA7-I-1 UTOMHUSSENSOR
Den trådlösa 7-i-1 utomhussensorn mäter vindhastighet, vindriktning ,
regn, UV, ljusintensitet , temperatur och fuktighet.
INSTALLERA DEN MONTERING POLE OCH KONSOL

- 10 -
● Fäst sensorn på en monteringsstång och konsol (ingår ) med hjälp av
skruvarna ( medföljer ).
INSTALLATION AV VINDHASTIGHETSKOPPAR OCH
VINDRIKNINGSJÖN
● Rikta in skruvhålen i vindhastighetskopparna med platt, vertikal sida o f
de metall stång.
● Sätt in vindhastighetskopparna i metallen stång och skruva på dem på
stram till låsa det i plats.
● Rikta in skruvhålen i vindriktningsvingen med den platta, vertikala sida
av metallen stång.
● Sätt i vindriktningsvingen i metallen stång och skruva fast dem låsa det i
plats.

- 11 -
MILJÖ UPP REGNSAMLARE
● Rikta in skårorna på tratten med låsspåren inuti de regn samlare.
● Sätt i tratten i regnsamlaren och skruva fast dem stram till låsa det i
plats.

- 12 -
INSTALLERA DEN BATTERIER
● Skruva loss batteriluckan längst ner på 7-i-1 utomhussensor med
hjälp av en skruvmejsel 1.
● Anslut kabeln till den uppladdningsbara enheten batteripaket (ingår)
till kabel finns i batteriet avdelning.

- 13 -
Justera de anslutna kablarna så att de passar bekvämt i facket. Sedan,
sätt i batteripaketet in i avdelning.
Stäng och fäst de batteri dörr tillbaka på de avdelning.
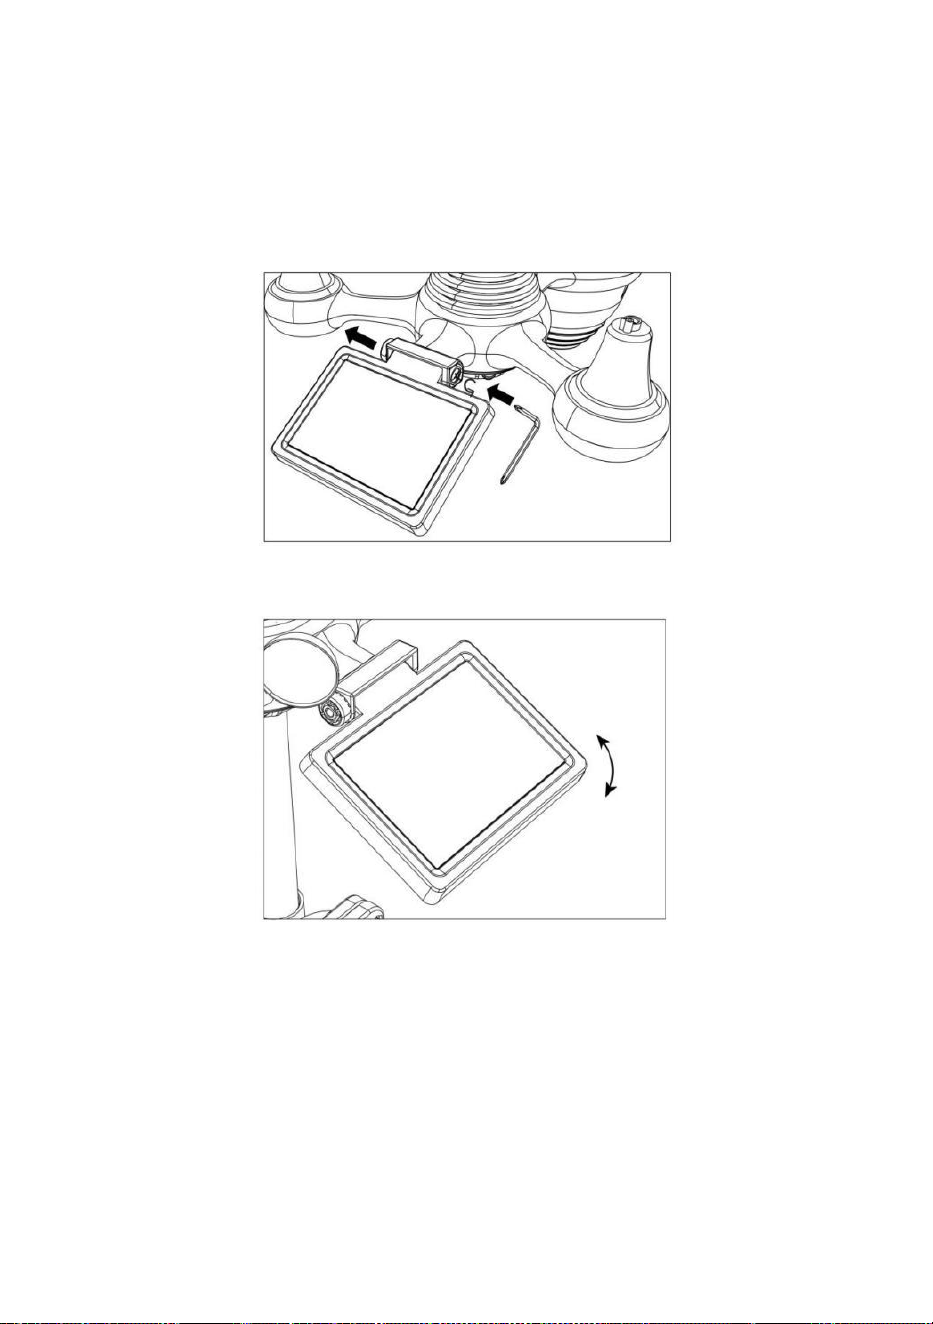
- 14 -
JUSTERING AV SOLCELLEN
● Lossa skruven vid led så växeln på andra sidan av gemensam
trycker ut. Solcellen borde nu vara i en olåst placera.
● Justera den vertikala vinkeln på solcellen för att få mest optimala
användning av solcellen beroende på din plats.
● Skjut kugghjulet inåt och dra åt skruven tills de växlar låsa i plats.
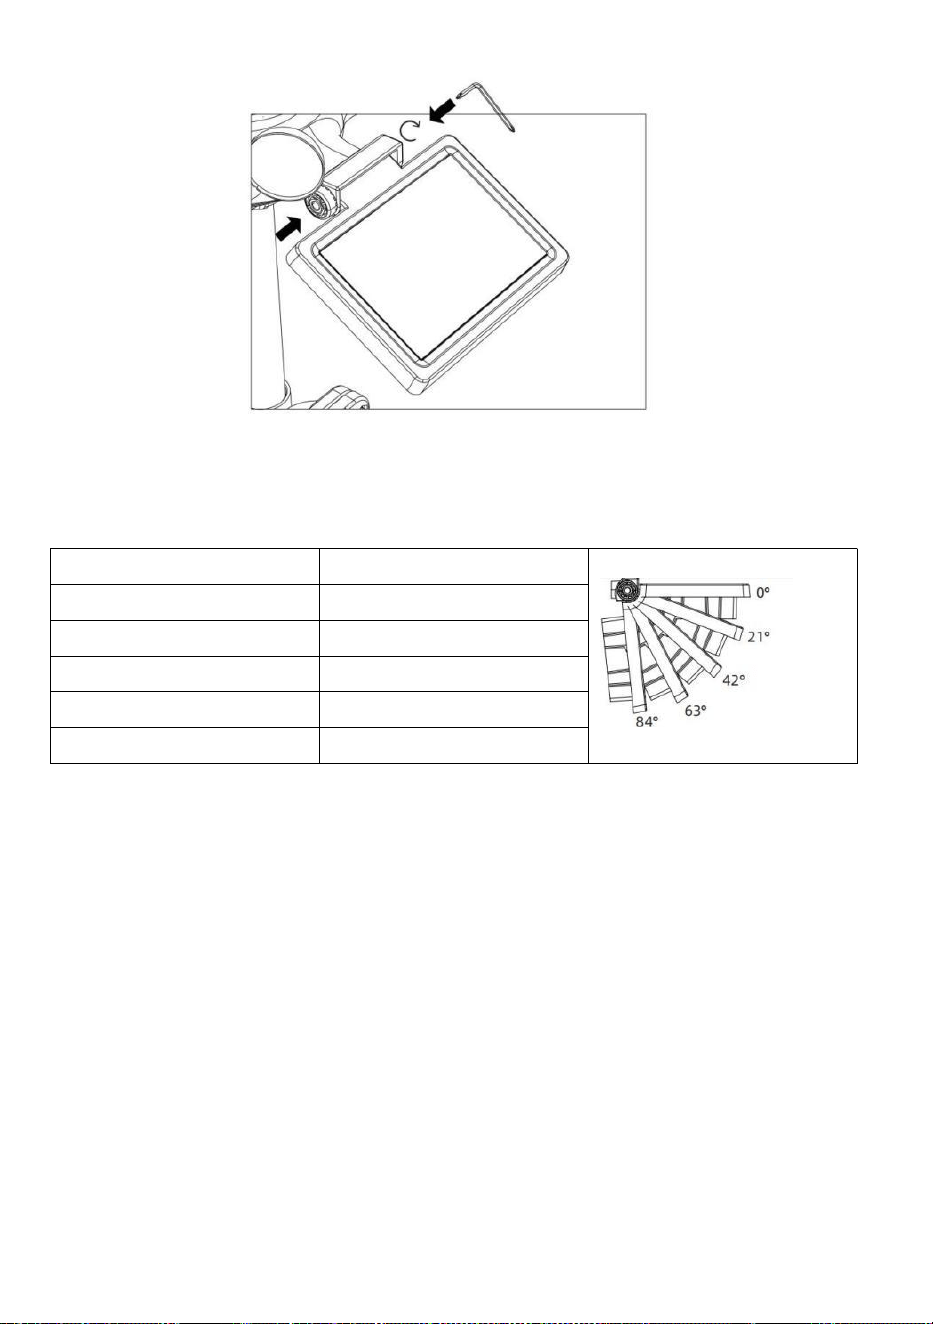
- 15 -
När du justerar solcellen ställ in den i en vinkel närmast din latitud . Se
diagrammet nedan för att få en idé av hur du skall vinkel din sol- cell.
Latitude Proximity
Solcell Vinkelval
Om din plats är nära till 84°
84°
Om din plats är nära till 63°
63°
Om din plats är nära till 42°
42°
Om din plats är nära till 21°
21°
Om din plats är nära till 0°
0°
MONTERA DEN TRÅDLÖSA 7-I N-1 UTOMHUSSENSOR
Välj en plats för 7-i-1 utomhussensorn som är öppna med inga
hinder.
Dra åt montering parentes till en yta/vägg använder fyra
gängskruvar (ingår), eller dra åt fästet pol till din befintliga
montering stolpe med fyra φ5 Bultar och M5 Muttrar montering.
Lägg till gummikuddar på de montering konsol före fastsättning
de montering fäste på sensorn.
Se till att regnsamlaren är vänd mot norr och att sol- panel vetter
mot söder före fastsättning de skruvar ( medföljer ).
snälla säkerställa att de sensor är fast särskilt tätt, annars orsakar
blåsiga förhållanden att sändaren skakar och därmed läser fel

- 16 -
nederbördsdata.
PEKTA DEN TRÅDLÖSA 7-I-1 UTOMHUSSENSOR MOT SÖDER
(FRIVILLIG)
Den trådlösa vädersensorn utomhus är ka librerad att vara spetsig norr
för maximal noggrannhet. Men för din bekvämlighet, om du är en
användare
ligger i södra Halvklotet, du kan använd sensorn med regn

- 17 -
samlare som pekar söderut.
1.) Montera och installera den trådlösa vi atersensorn med
regnsamlare pekar söderut, istället för norr. (Se MONTERING AV
TRÅDLÖS 7- IN- 1 UTOMHUS SENSOR .)
2.) Välj "STH" för södra halvklotet i de klocka miljö läge. (Behaga se
"ställa in klockan")
OBS: Om du ändrar inställningen för halvklotet växlar du automatiskt
månfasernas riktning på visa.
Att peka den trådlösa vädersensorn mot söder ger maximalt
solljus på solpanelen, speciellt under vintersäsongen i södra
Hemisfär.
JUSTERING AV 7-I-1 TRÅDLÖSA SENSOR NIVÅ
● Använd bubblan nivå indikator för att säkerställa den trådlösa
utomhussensorn är helt i nivå. Om sensorn inte är det nivå, de få spårvidd,
UV och Ljus intensitet kommer inte mäta ordentligt.
● Lossa skruvarna för att justera nivån på den trådlösa utomhussensorn
av monteringen stolpe. Justera nivån på den trådlösa utomhussensorn
för att se till bubblan är i mitten av bubblan nivå i indikator.
● Dra åt fästets skruv pole igen n.

- 18 -
MILJÖ UPP PÅ VÄDERSTATIONEN
DRIFT UPP PÅ VÄDERSTATIONEN
● Anslut nätadaptern till strömmen jack belägen i de tillbaka av
väderstationen. Sätt in 3 ny AAA alkaliska batterier (ingår ej) för
backup.
● En gång väderstationen är påslagen, den kommer in automatiskt
parning läge.
KOPPA DEN TRÅDLÖSA 7-I-1-SENSOREN
● När din väderstation slås på bör den göra det automatiskt söka för och
anslut till de trådlösa sensorerna. Om väderstationen inte gör det
ansluta inom de första 5 minuter, se följande avsnitt,
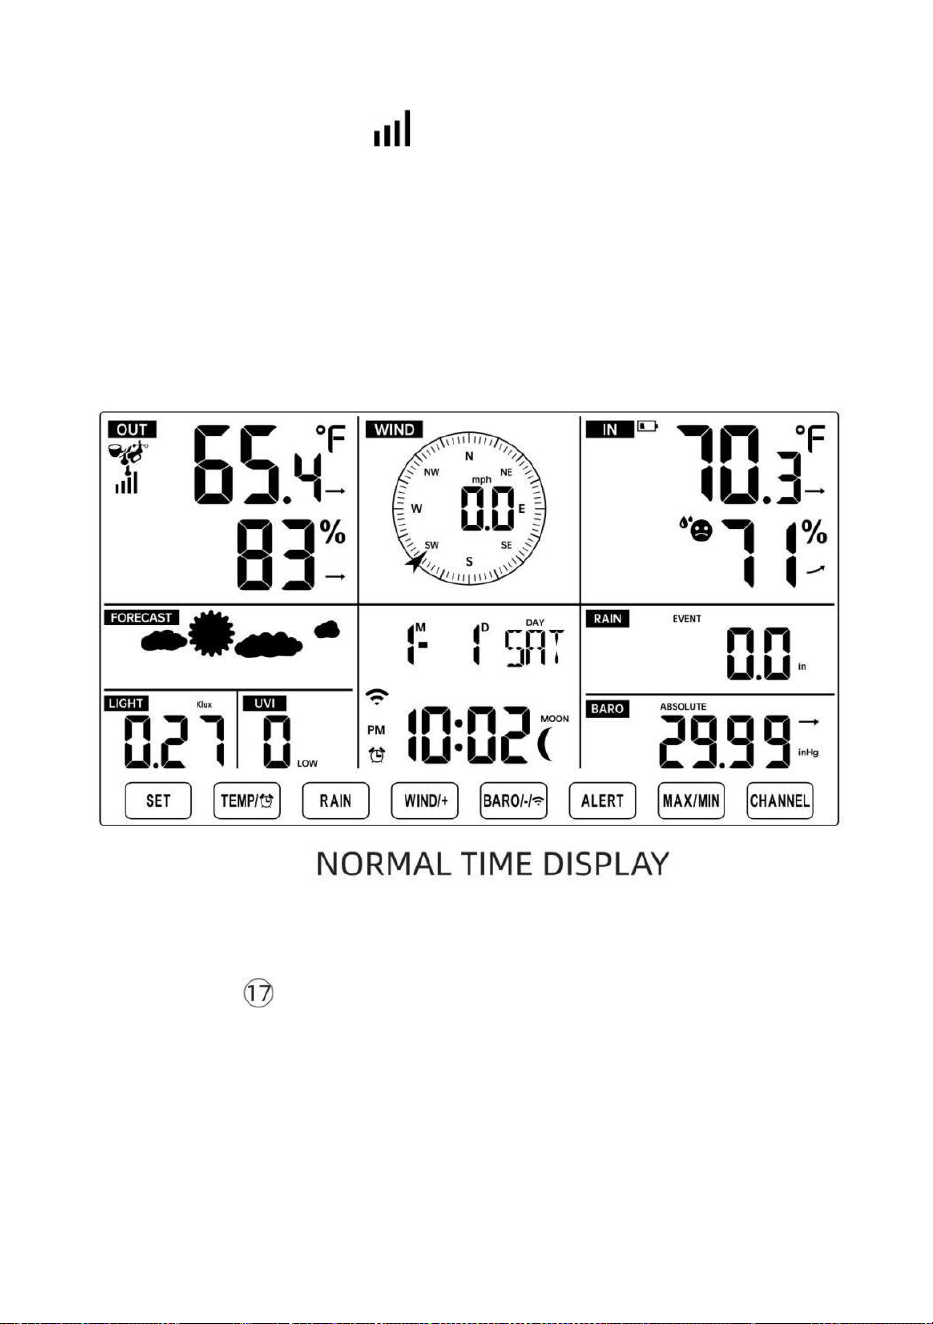
- 19 -
"ÅTERKOPPLING AV SENSOR”.
● Du kommer att se ikonen av en antenn som rullar i temperatur- och
luftfuktighetssektionen (utomhus) på displayen.
● När parningen processen slutförs kommer antennikonen synas fast
(blinkar inte), och avläsningarna för utomhustemperatur och luftfuktighet,
vind hastighet, vindriktning, UV, ljus intensitet och nederbörd kommer att
visas i deras
angivna delar av LCD-skärmen
ÅTERKOPPLING AV SENSOR
● Om anslutningen misslyckas eller väderstationen återställs, tryck sedan
på och hålla de
【
CHANNEL
】
knapp över 2 sekunder för att gå in i
parningsläge, och
väderstation kommer omregistrera alla sensorer som redan har gjort det
varit
registrerad på den innan, (dvs väderstationen kommer inte förlora de
anslutning av sensorerna som du hade parat upp före.)
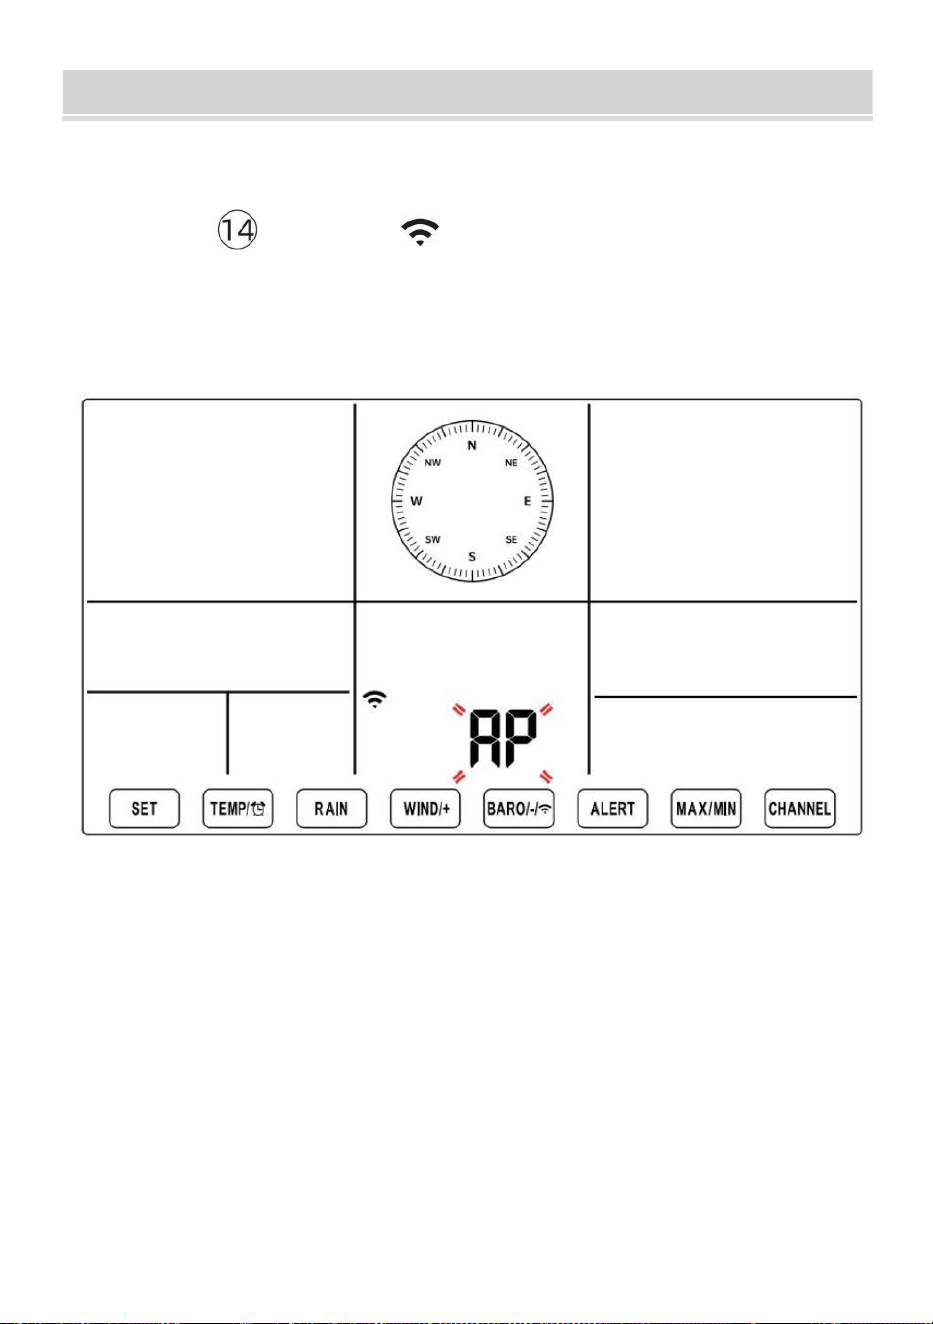
SETUPINSTRUCTION
- 20 -
MILJÖ UPP WI-FI-ANSLUTNING OCH VI ÄR SERVER
FÖRBINDELSE
Tryck och håll 【 BARO/-/ 】 knapp över r 3 sekunder, vädret
station LCD-skärmen visar bokstaven "AP" som det har gått in Tillträde
Punkt (AP) läge. Vid den här tiden kommer det att göra det vara redo
för Wi-Fi- inställningen vara justeras.
Använd din smartphone, surfplatta eller dator för att ansluta till
väderstationen via Wi-Fi genom att följa dessa steg:
På PC, öppna ditt Wi-Fi nätverk k inställningar. På Android™ eller iOS
enheter, gå till inställningsmenyn och välj sedan Anslutningar /WI-
FI till öppna nätverket inställningar.
Leta reda på väderstationens SSID från listan. Det borde dyka upp
som
WWS-XXXXXX (där alla X är heltal) i lista. T ap på SSID för att
ansluta. Detta steg kommer att ta flera sekunder.
När du är anslutna t o vädret station, öppna upp din internet eller
mobilwebb webbläsare och ange följande adress i de
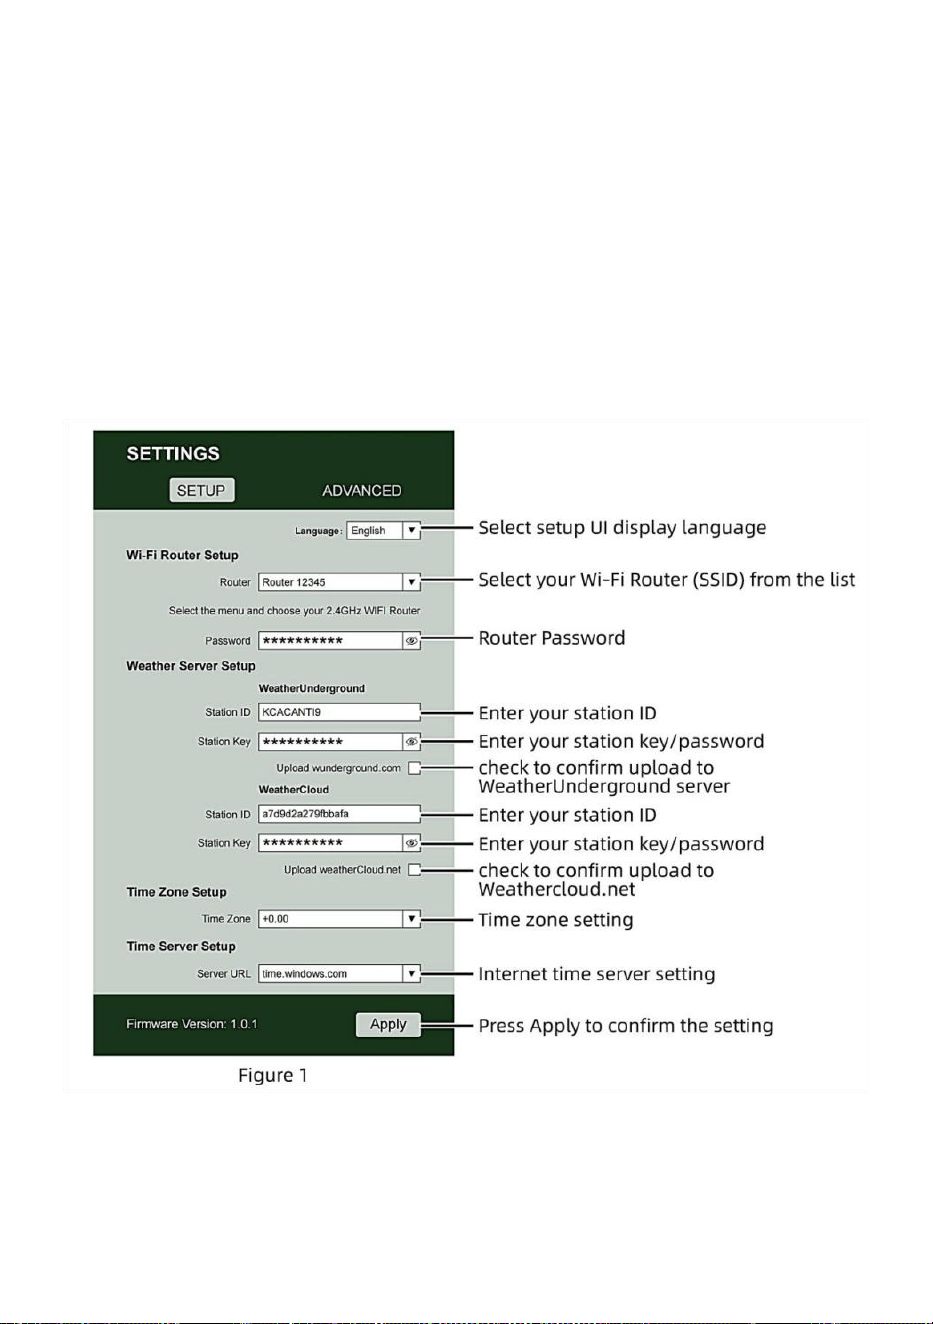
- 21 -
adressfält: http://192.168.1.1 för att komma åt väderstationens
webbgränssnitt . (Se till att inkludera http:// eller annat webben
webbläsaren kan tolka adressen som en sökfråga). Vi
rekommendera med den senaste versionen av ansedd webb
webbläsare.
Ange följande information n in i webbgränssnittet (Figur 1). Göra
säker på all information är inmatad innan du väljer Spara. Om du
välj att inte ladda upp Wunderground.com eller ladda upp
weathercloud.net, lämna kryssrutorna okontrollerad.
NOTERA :
Tidszonsinställning ( standard : 0h). För att automatiskt ställa in
tidsvisningen till din tidszon, ändra tidszonen i avsnittet

- 21 -
Tidsserverinställningar på sidan INSTÄLLNING från '0:00' (standard)
till din tidszon (t.ex.+1:00
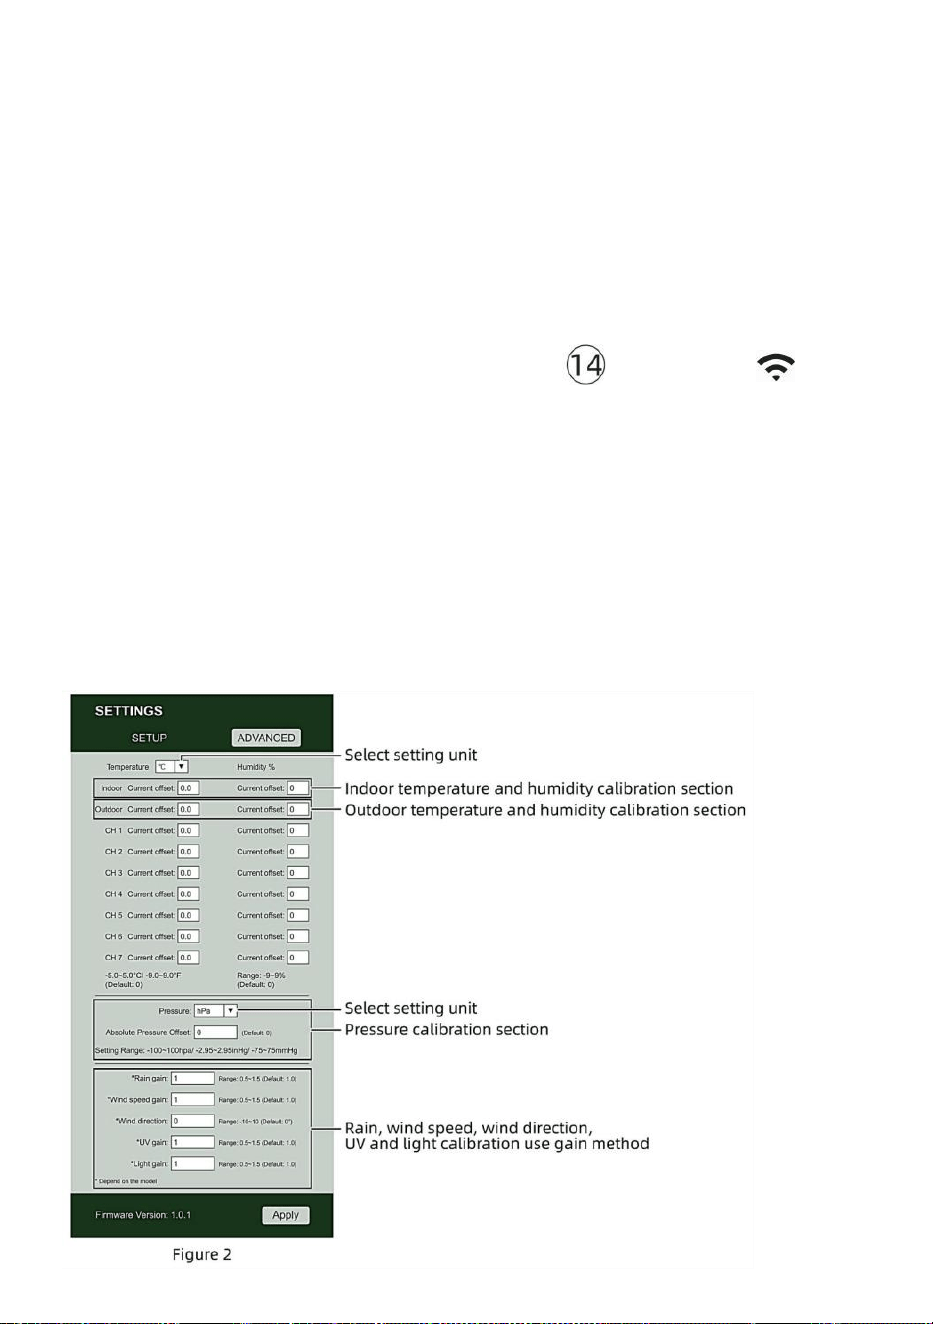
- 22 -
för Tyskland ).
5.) Om all information du angett är korrekt, tryck på " Apply " till bekräfta
(Figur 1). Om det inte gör det, kolla din webb gränssnitt information igen.
ANMÄRKNINGAR:
När Wi-Fi-installationen är klar, din dator eller mobil anordning
kommer att återgå till standard Wi-Fi-anslutning. Om det gör det inte,
helt enkelt öppna enhetens trådlösa nätverksinställningar och
manuellt återanslut.
Medan i AP-läge kan du trycka på och håll
【
BARO/-/
】
knappen över 3 sekunder för att lämna AP-läget. Väderstationen
återställer helt enkelt de tidigare AP-inställningarna.
KALIBRERING
När du är ansluten via Wi-Fi till väderstationen och har öppnade
inställningen sida på http :// 192.168.1.1 , klicka på " AVANCERAD "
öppnar följande sida (Figur 2).
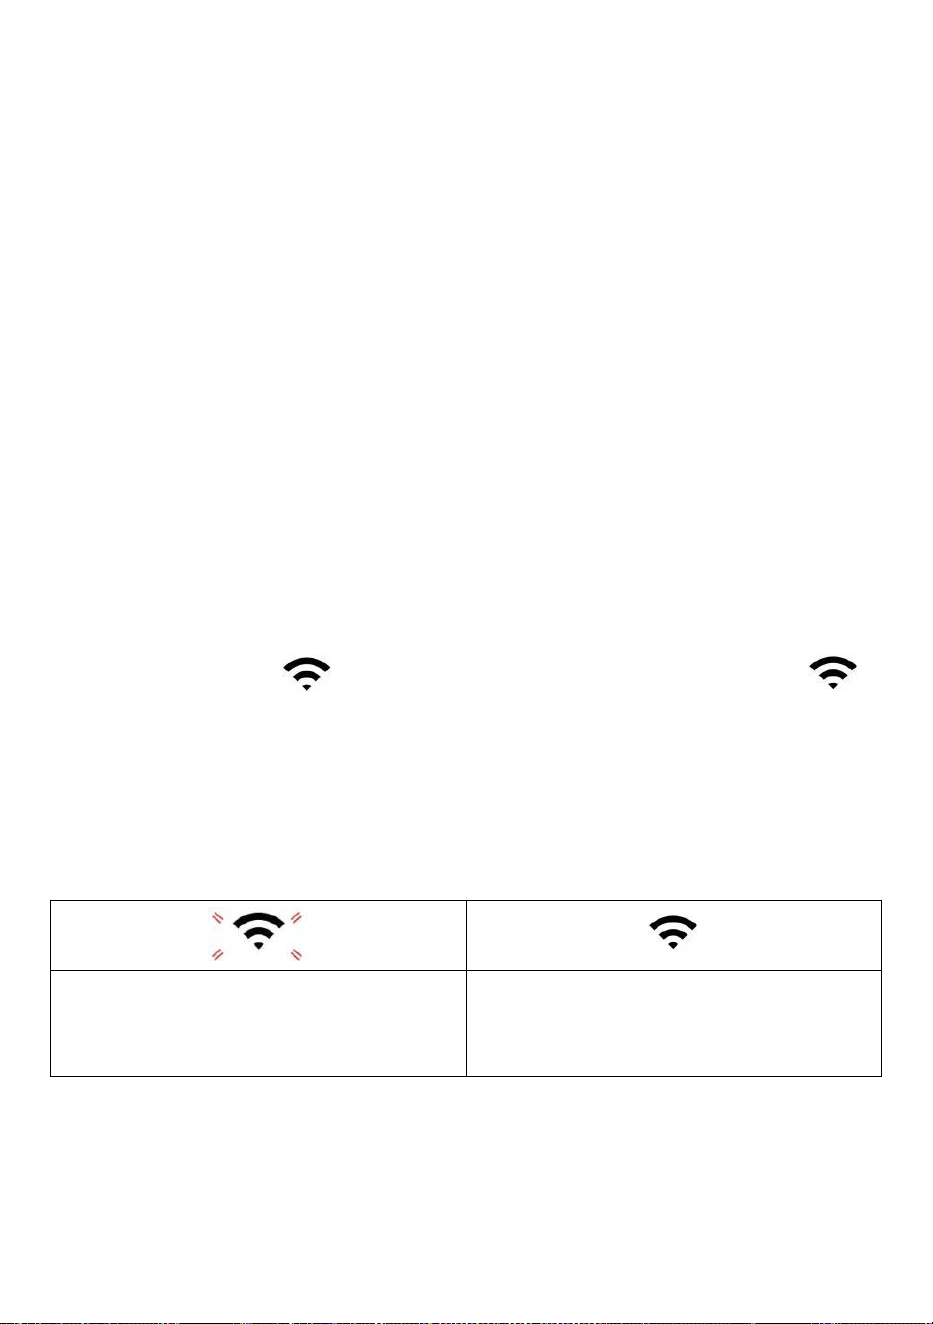
- 23 -
1) Du kan skriva in eller ändra de offset och få värden för olik mått
parameter s.
2) När du ha avslutat din ca -librationer, trycka de "TILLÄMPAS" knapp.
3) Strömmen offsetvärde vilja uppdatera till visa de värde att du in
( istället av de standard värde ). Om du brist till ändra de värde , du burk
skriva in en ny värde i de låda bredvid de nummer ( som i steg 1). Till
uppdatera de värde igen , trycka " ANSÖK " knapp .
OBS :
Det gör vi inte rekommenderar kalibrering av de flesta värden med
undantag av Relativ Tryck, vilket måste vara korrekt kalibrerad för att
återspegla dig
avstånd över havet nivå för att ta hänsyn till höjden effekter.
WI-FI-ANSLUTNINGSSTATUS
När väderstationen lyckats ansluta till din Wi -Fi-router,
Wi-Fi-signal
visas på LCD-skärmen display . Om Wi-Fi-
signalen
är inte stabil eller väderstationen försöker ansluta till router, den ikonen
blinkar. Om ikonen försvinner, det betyder att väderstationen är inte
ansluten till Wi-Fi-routern .
Blinkar: de väder s tation är
försöker till ansluta till du r trådlös
router.
Solid: väderstationen har varit
ansluten till din tråd eless router.
OBS :

- 23 -
Om du egen a dubbel band router (2,4 GHz och 5,0 GHz ), göra säker du
ansluta till 2,4GHz band, annars det kommer inte att kunna ansluta
väderstationen till
Wi - Fi .
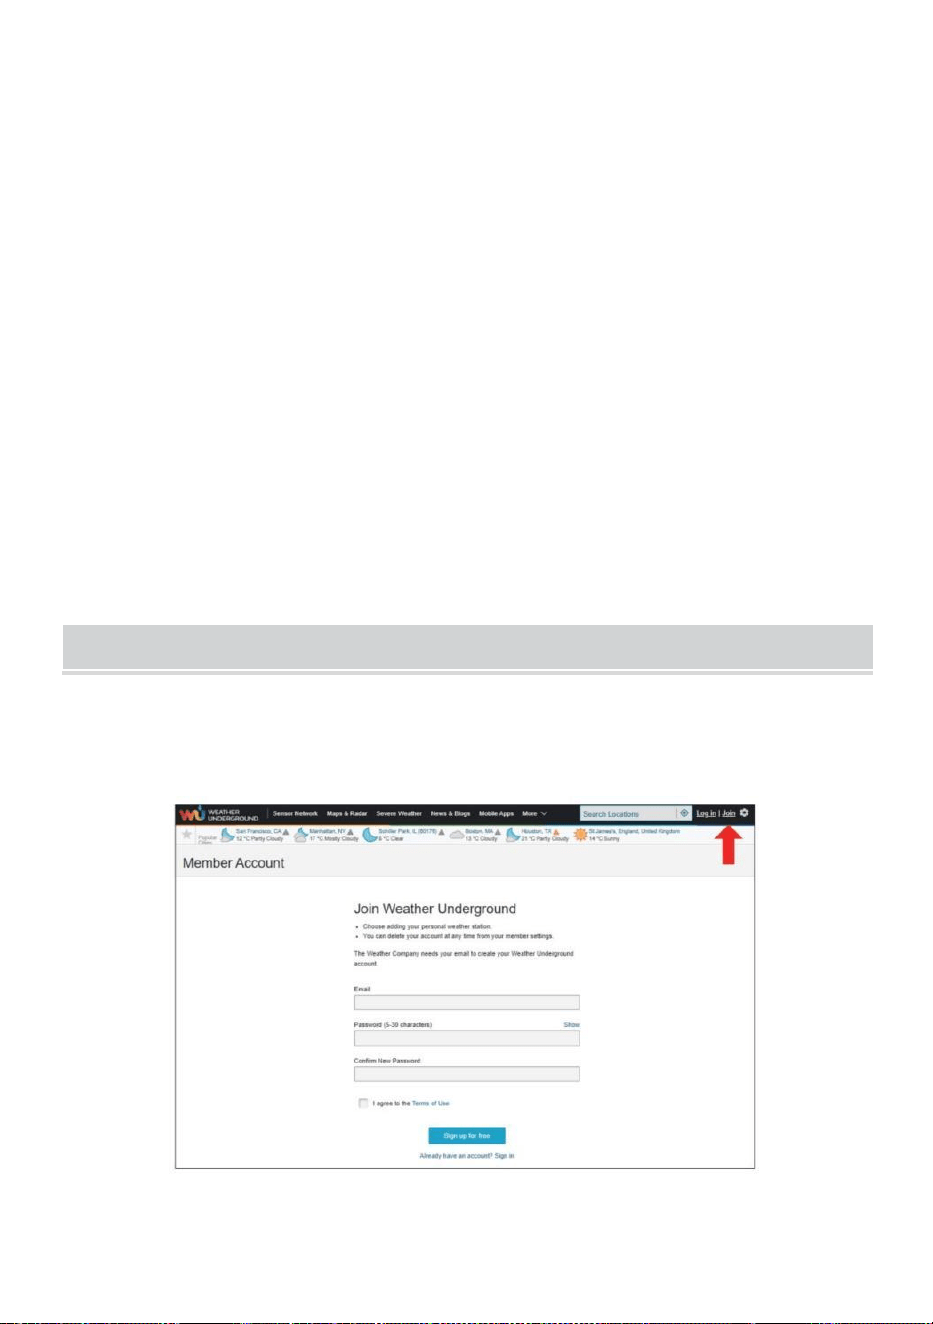
- 24 -
STATUS FÖR ANSLUTNING AV TIDSERVER
Efter att väderstationen har anslutit till internet, i t vilja försök för att
ansluta till internettidsservern för att få UTC tid. En gång de
anslutningen lyckas och väderstationens tid har varit uppdaterad. De
ikon "SYNC" kommer att visas på LCD.
För att visa rätt tid för din specifika tidszon, kommer du behöver
ändra tidszonen i KLOCKA-inställningen läge från 00 (standard) till din
tidszon (t.ex. -5 för EST). Om du inte vet din tidszon , du kan titta på den
upp på nätet.
OBS :
Tiden synkroniseras automatiskt till internet varje timme.
SKAPAOCHSYNKERADITT VÄDERSERVERKONTO
SKAPA VÄDER UNDERJORDSKONTO
1.) Besök: https://Wunderground.com och välj "Gå med" i övre höger
och hörn och skapa a Gratis Konto.

- 25 -
2.) Ange en Oss namn, E-post och Lösenord (Det är din Inloggning
lösenord för webbplatsen inte ditt e-postlösenord. Så nej integritet
kommer bli utsatt). Klick Tecken upp gratis .
3.) Efter registrering är gjord framgångsrikt, det kommer vara visas b
nedan de meddelande.

- 26 -
4.) Klicka på "Logga in" och ange e-postadressen och lösenord du bara
registrerad.
5.) Klicka på "Min profil ” och gå in Medlem inställningar.

- 27 -
6.) Klicka på "Uppdatera hem plats ” .
7.) Klicka på "My enheter”, och klicka på "Lägg till Ny Anordning".
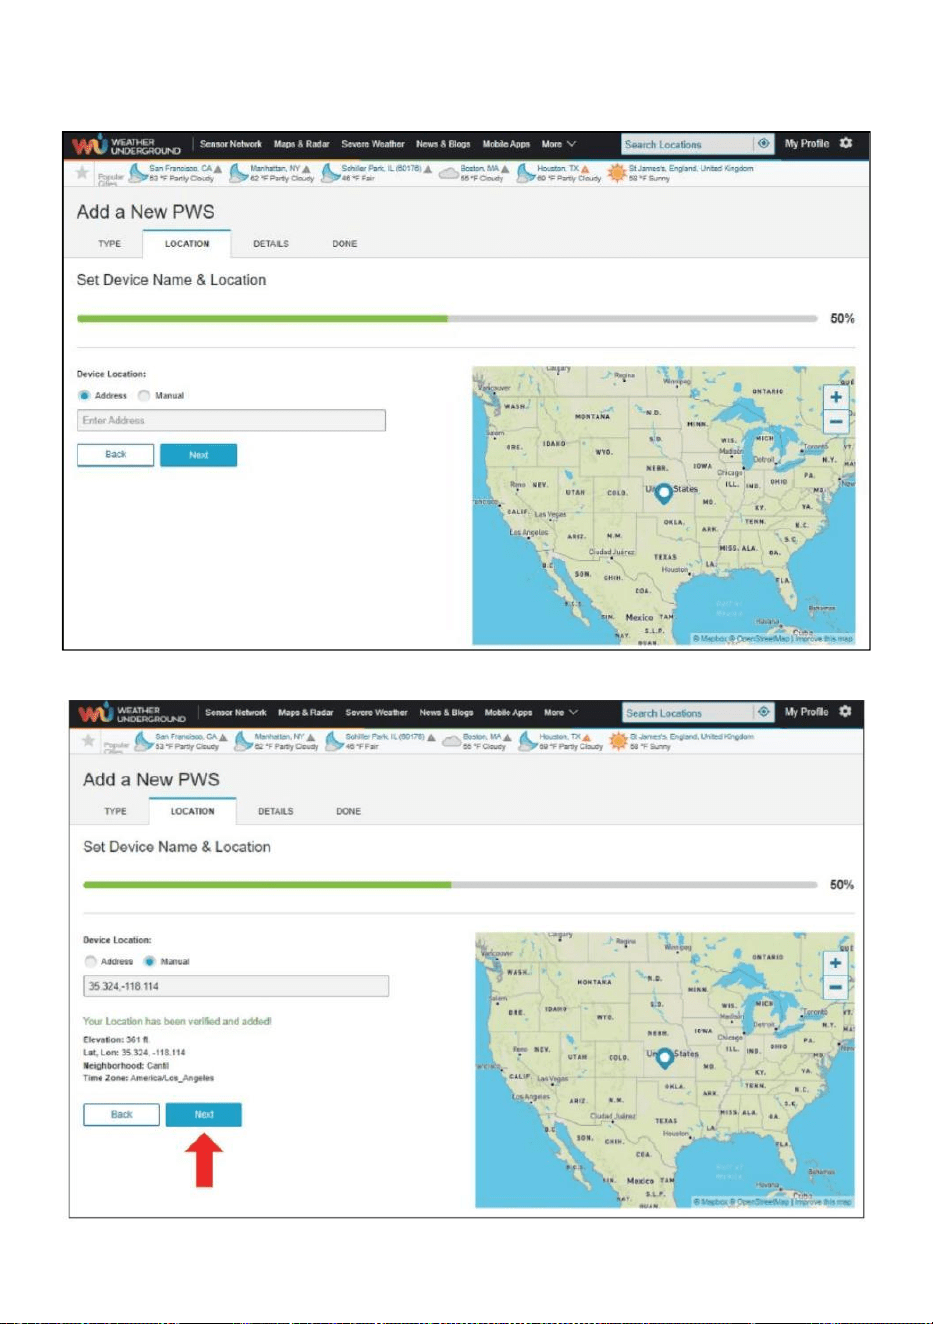
- 28 -
8.) Välj adress genom att mata in en adress eller välj Manuell till placera
din adress automatiska allierade. Klicka sedan "Nästa ”.

- 29 -
9.) Ange väderinformation. Blanks med rött (obligatoriskt) must vara
fylld i.
OBS :
Du burk välj " annat " av de Anordning Hårdvara .
10.) När du har slutfört den här sessionen klickar du på " Jag
accepterar " och "Nästa ”. 11.) Efter framgångsrik registrering,
behaga registrera ditt väder Underground ID och
Nyckelinformation för sen r installation använda.
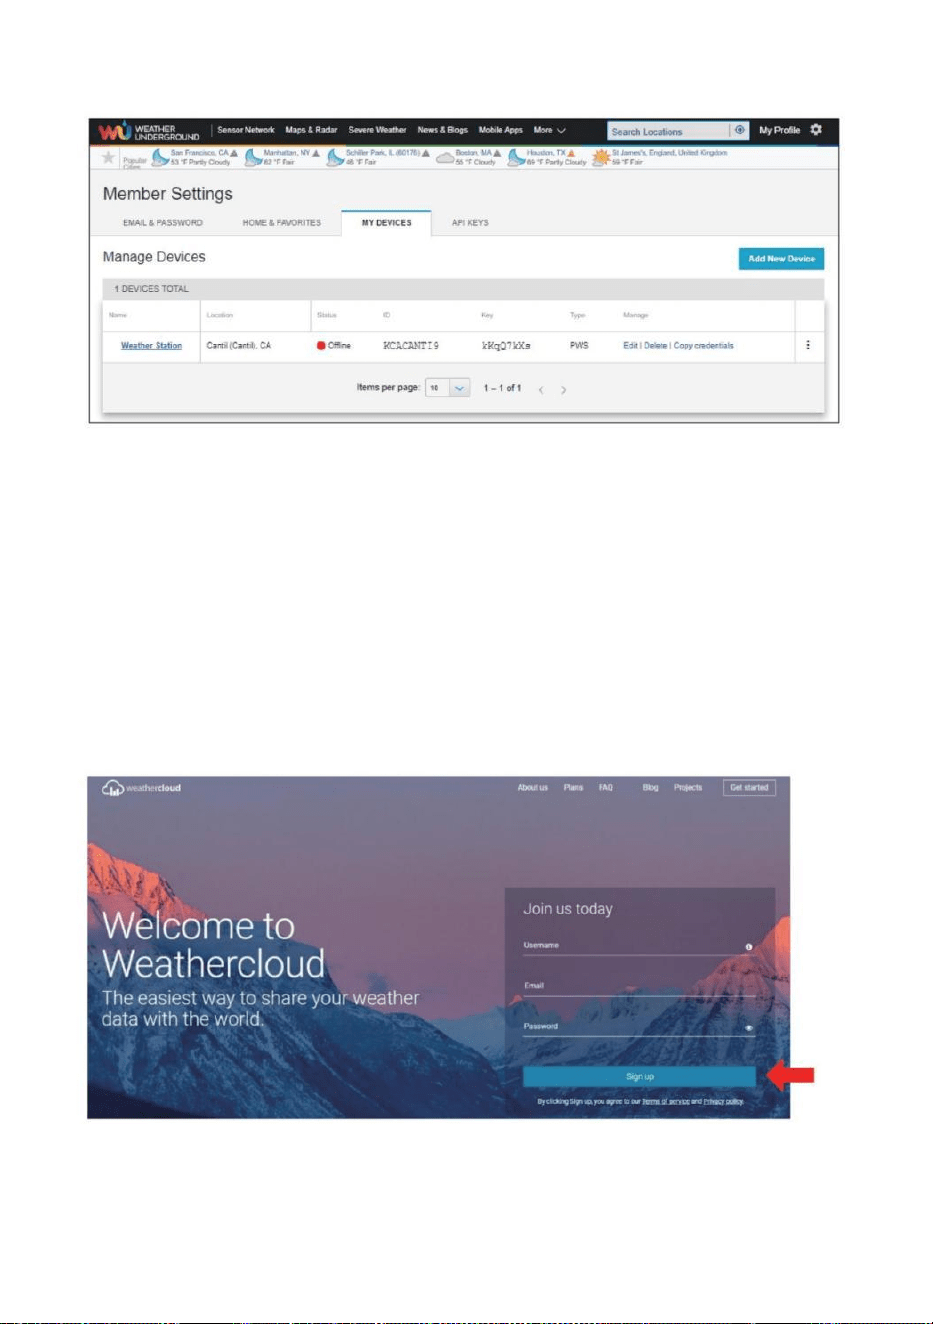
- 30 -
12.) Som visas nedan, registrering har gjorts framgångsrikt.
SKAPA DITT WEATHERCLOUD-KONTO
1.) Besök Weatherclouds webbplats på https://weather cloud.net/ och
ange a Användarnamn, E-post och Lösenord och klicka på " Registrera
dig ". Efter
instruktioner för att skapa ett konto.
OBS: Detta görs bäst på a dator skrivbordet eller bärbar dator.
(Det är din Inloggning lösenord för webbplatsen inte din e-post lösenord.
Så inga integritet kommer att vara utsatt).
2.) När det är framgångsrik, en e-post kommer vara mottagen i ditt
registrerad brevlåda.
3.) Öppna din e-post och logga in på webben adress i de post.
Klick " Aktivera din Vädermoln konto ”.

- 31 -
4.) Klicka på " här ” för att komma in i hemsidan för Weatherclou d-
webbplatsen. 5.) Ange e-postadressen och lösenordet du just
registrerade för att ange Weathercloud webbplats.
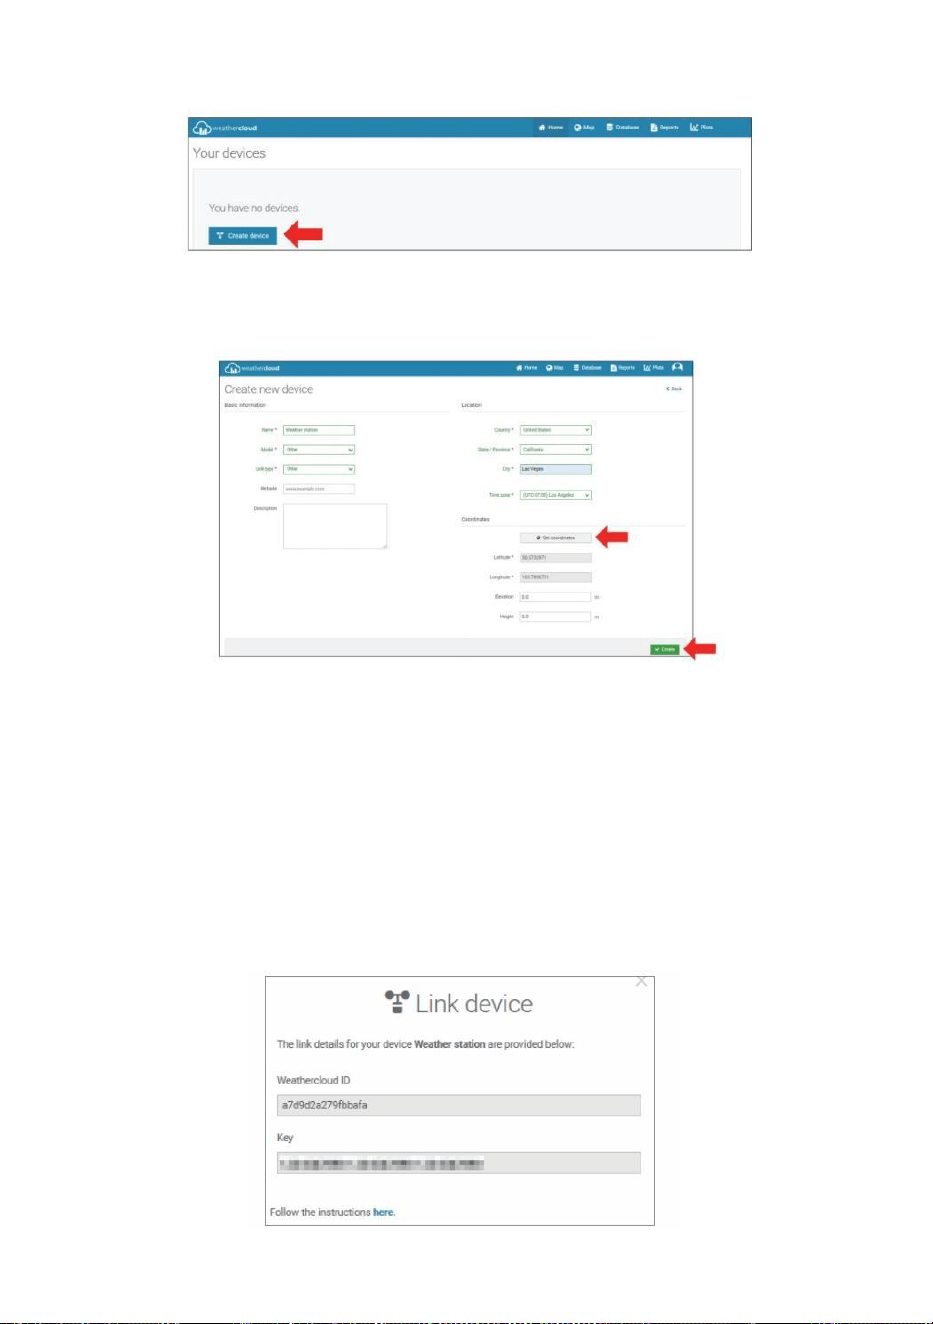
- 32 -
6.) Klicka på " Skapa enhet " för att lägga till en väderstationsenhet.
7.) Ange alla begärde information in i C skapa Ny Anordning sida.
Blanks med rött *måste fyllas i.
OBS :
Du burk välj " annat " av de Modell antal och Länk typ i de ovanför ämnen.
Klick "Hämta koordinater" för att identifiera din plats på de karta, sedan
klicka " Klar " till bekräfta .
8.) När du har genomfört detta sektion jon, klicka på " Skapa ".
9.) Efter framgångsrik registrering, vänligen spela in ditt vädermoln ID
och Nyckelinformation för senare installation använda.
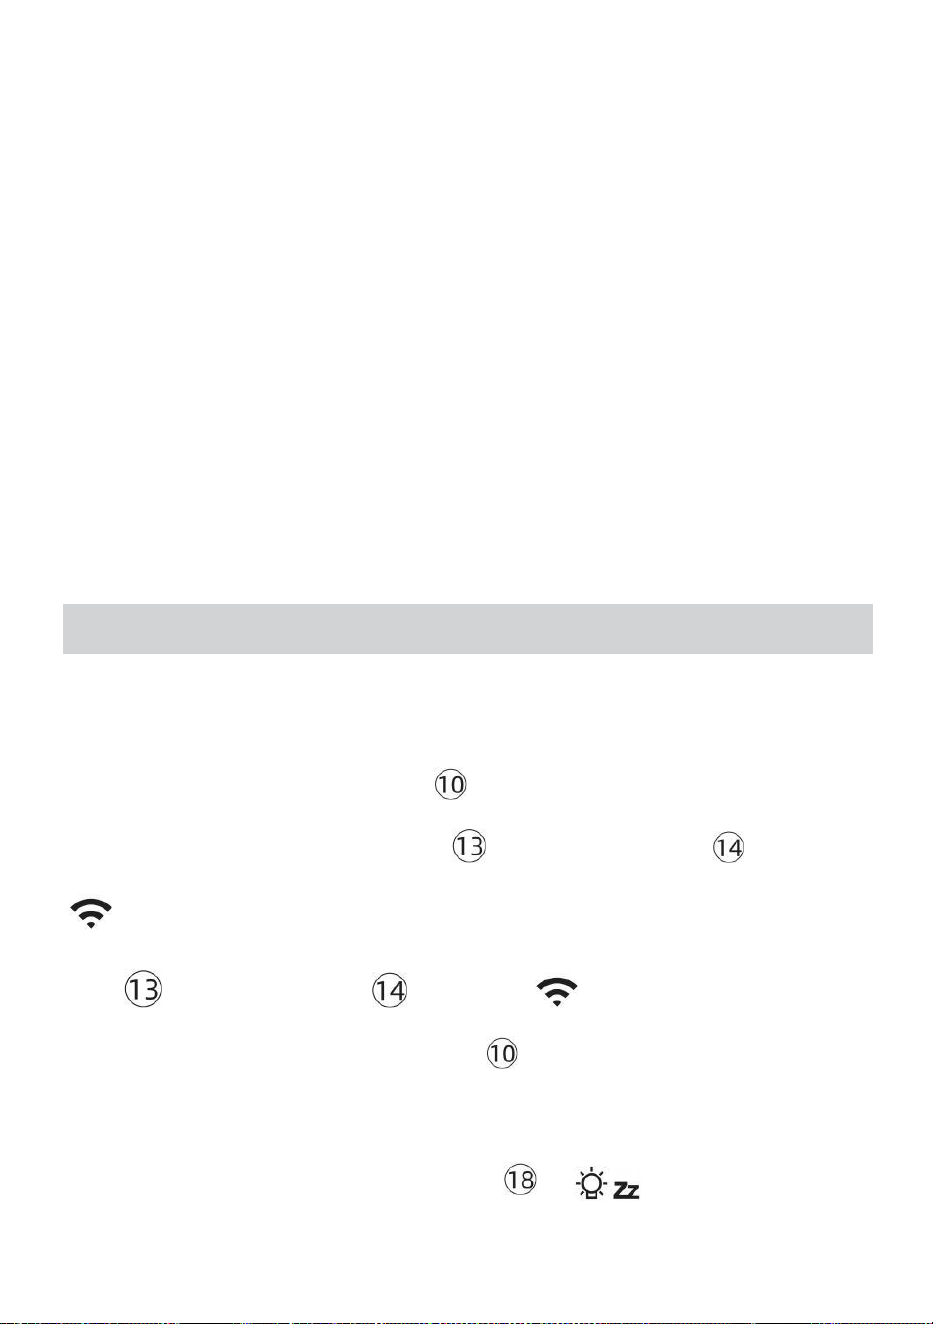
- 33 -
SE DITT VÄDER DA TA I VÄDER UNDERGROUND
För att se din väderstationsdata live via PC eller mobil webb webbläsare,
besök http://www.wunderground. com och ange sedan stationen ID
som du fick under konfigurationen av kontot i söka låda. Dina väderdata
kommer att dyka upp på de nästa sida.
SE DITT VÄDER DATA I WEATHERCLOUD
1.) För att se din väderstationsdata bo via PC eller mobil web webbläsare,
besök http://www.weathercloud.net och logga in på kontot du skapade.
2.) Klicka på fliken högst upp på sida med titeln Enheter.
3.) Klicka på menyn Inställningar längst upp höger om sida, och välja de
alternativ Visa.
4.) Klicka på antingen Ström, Vind eller Evolution för att se din
väderstations data.
DRIFTSINSTRUKTIONER
KLOCKA
Ställa in Klocka
I Normal tid display , tryck och hålla 【 SET 】 över 2 sekunder till skriva in
tidsinställning läge . Trycka och släppa 【 VIND /+ 】 och 【 BARO /-
/ 】 till justera värdena.
Hålla 【 WIND /+ 】 och 【 BARO /-/ 】 över 2 sekunder till
justera värdena snabbt . Trycka och släppa 【 STÄLL 】 till bekräfta och
flytta till de nästa punkt.
Till utgång de miljö läge på några tid , trycka 【 LIGHT /
SNOOZE 】 knappen .

- 34 -
Miljö Beställa
1. PIP På /Av
2. NTP På /Av
3. Tid Zon
4. Sommartid På /Av
5. MD/D -M Datum Formatera
6. År
7. Månad
8. Dag
9. 24/12 Timme Formatera
10. Timme 11. Minut
12. Temperatur Enhet
13. Tryck Enhet
14. Relativ Tryck Kalibrering
15. Ljus Intensitet Enhet
16. Regn Enhet
17. Vind Hastighet Enhet
18. Hemisfär
19. Avsluta av miljö
1.) Tryck och hålla 【 SET 】 -knapp går in de inställningar . Pip PÅ blinkar .
Trycka 【 VIND /+ 】 eller 【 BARO /-/ 】 till ändra mellan Pip på
och Pip o ff . Trycka 【 SET 】 till välja NTP på /av.
2.) När NTP PÅ blinkar , trycka 【 VIND /+ 】 eller 【 BARO /-/
】 till ändra mellan NTP på och NTP o ff . Trycka 【 SET 】 till välja tid zon .
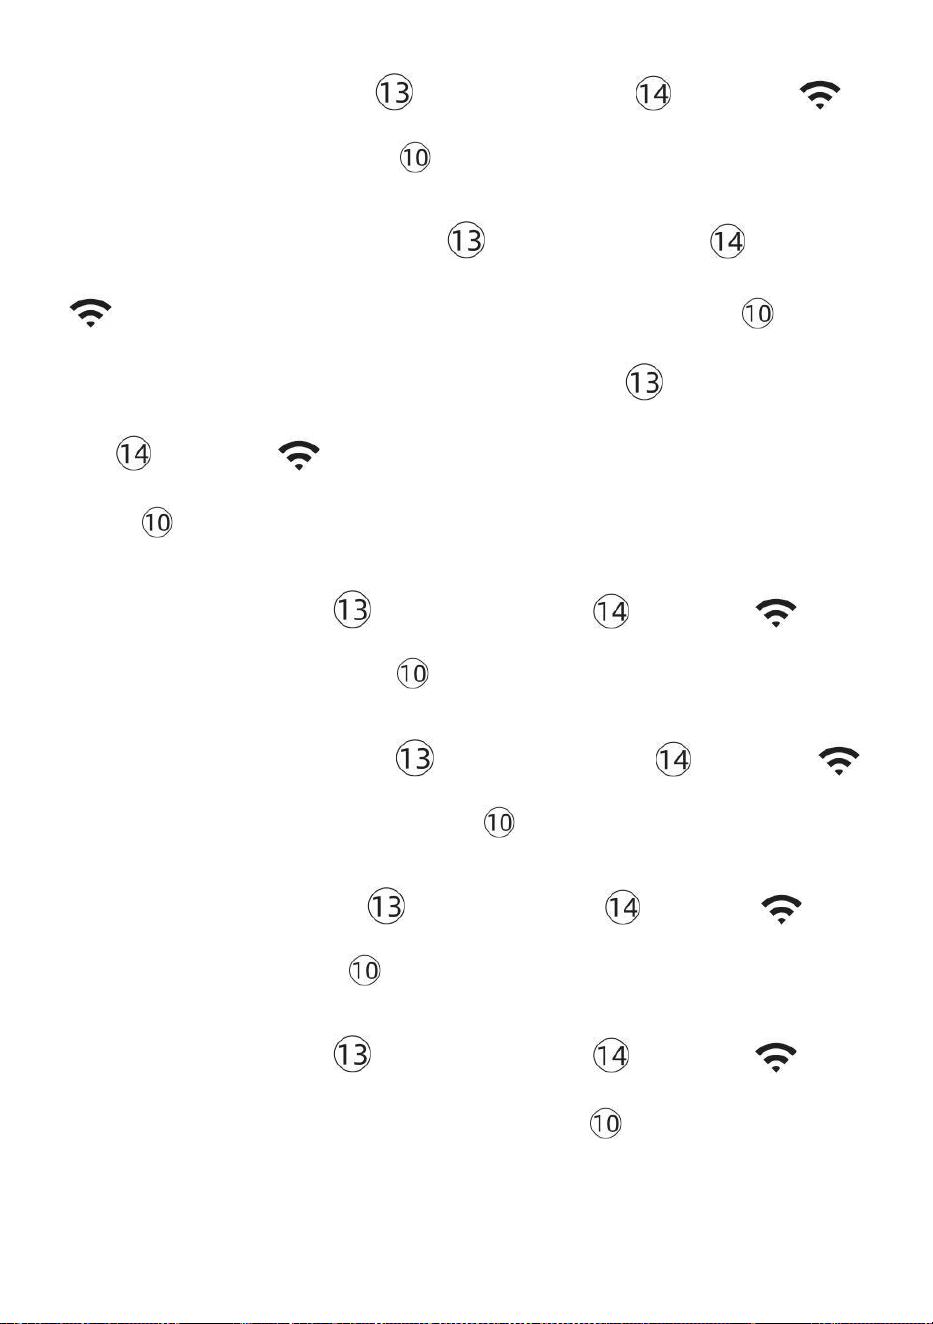
- 35 -
3.) När Tid Zon blixtar , trycka 【 VIND /+ 】 eller 【 BARO /-/
】 till uppsättning tid zon . Trycka 【 SET 】 till välja Sommartid på / av .
4.) När Sommartid PÅ blinkar , trycka 【 VIND /+ 】 eller 【 BARO /-
/ 】 till ändra mellan Sommartid på och Sommartid o ff . Trycka 【 STÄL
L 】 till välja datum format . 5.) När M --D blinkar , trycka 【 VIND /+ 】
eller 【 BARO /-/ 】】 till växla mellan M - D och D - M datum format .
Trycka 【 SET 】 till välja år .
6.) När år blixtar , trycka 【 VIND /+ 】 eller 【 BARO /-/ 】
till justera de kalender år . Trycka 【 SET 】 till välja månad .
7.) När månaden blinkar , trycka 【 VIND /+ 】 eller 【 BARO /-/
】 att justera de kalender månad . Trycka 【 SET 】 till välja dag .
8.) När Dagen blinkar , tryck 【 VIND /+ 】 eller 【 BARO /-/ 】 till
justera kalenderdag . Trycka 【 STÄLL 】 till välja 12/24- timmar format .
9.) När 12 H fl ash , trycka 【 VIND /+ 】 eller 【 BARO /-/ 】 att
ändra mellan 12 timme och 24 timme format . Trycka 【 SET 】 till välja
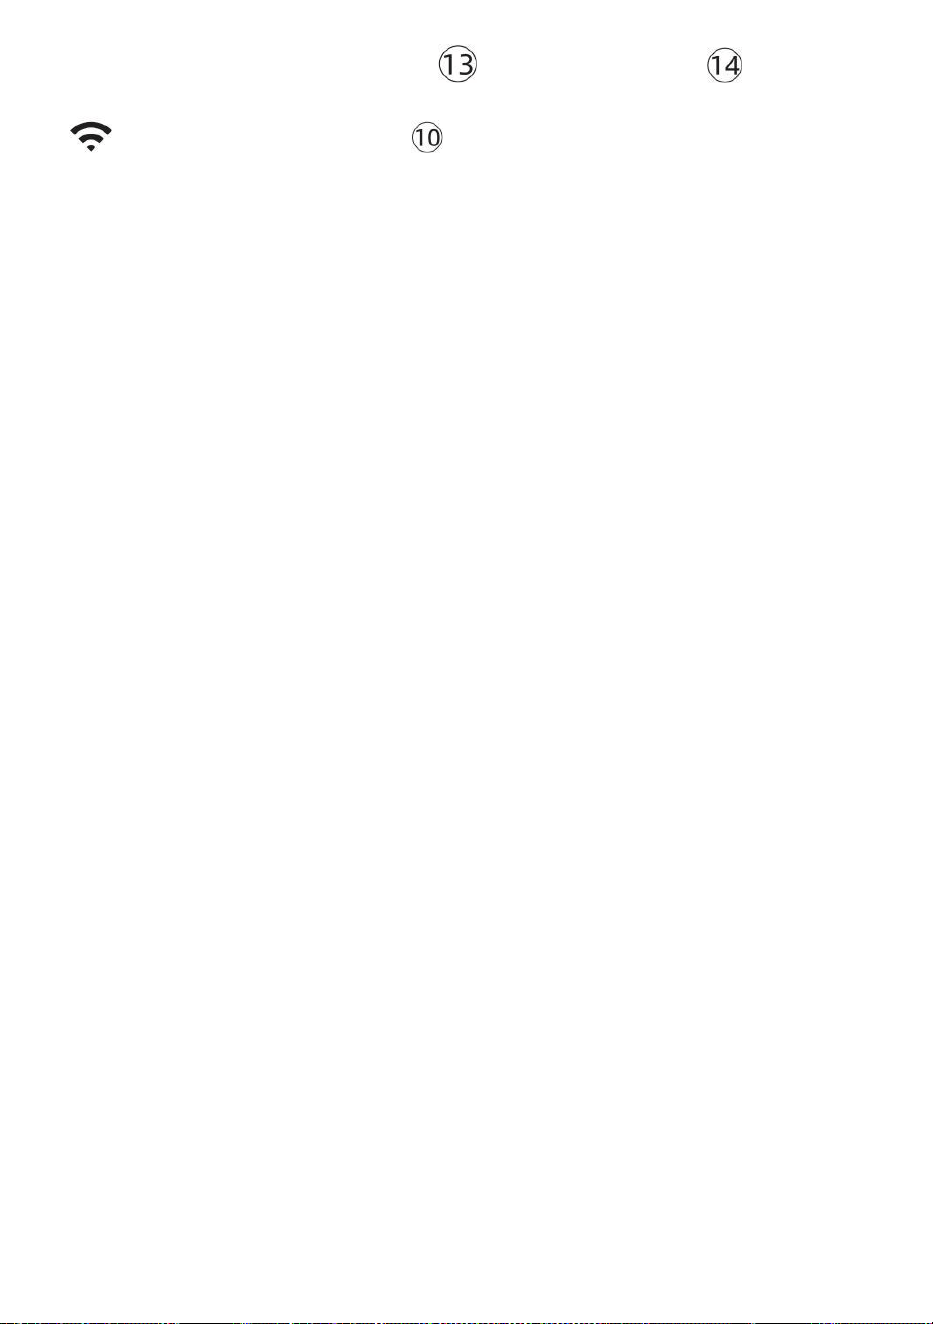
- 35 -
timme . 10.) När timme blinkar , tryck 【 VIND /+ 】 eller 【 BARO /-
/ 】 till justera timme . Trycka 【 SET 】 till välja minut .
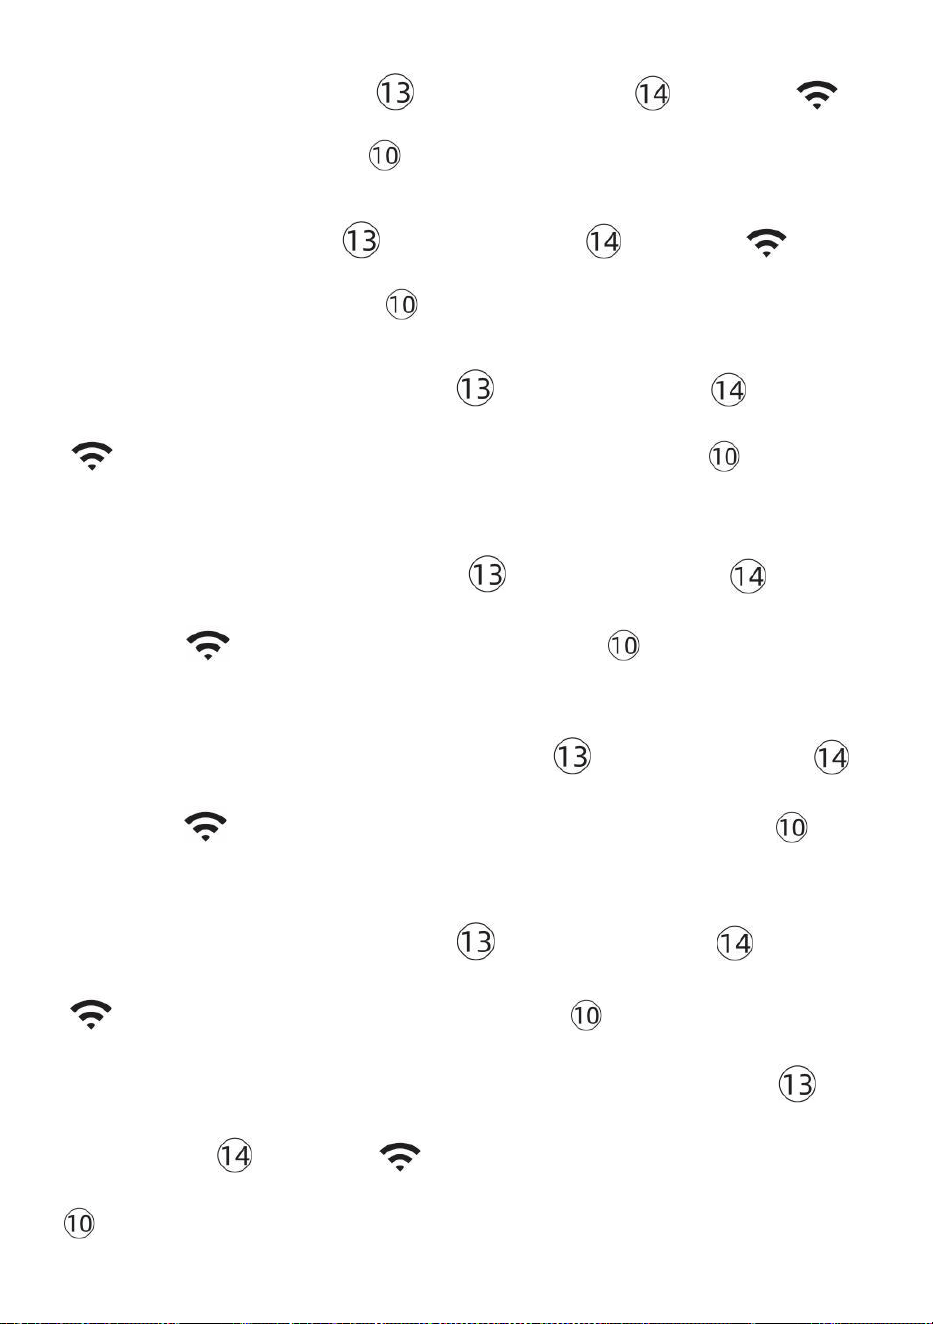
- 36 -
11.) När minut blixtar , trycka 【 VIND /+ 】 eller 【 BARO /-/
】 att justera de minut . Trycka 【 SET 】 till välja temperatur enhet .
12.) När ℉ blinkar , tryck 【 VIND /+ 】 eller 【 BARO /-/ 】 till
ändra mellan ℉ och ℃ . Trycka 【 SET 】 till välja tryck enhet .
13.) När tryck enheten blinkar , tryck 【 VIND /+ 】 eller 【 BARO / -
/ 】 till ändra mellan hPa , inHg och mmHg . Trycka 【 SET 】 till
välja relativtryckskalibrering .
14.) När Relativ Trycket blinkar , trycka 【 VIND /+ 】 eller
【 BARO /-/ 】 till justera de relativ tryck . Trycka 【 STÄLL 】 till välja
Ljusintensitet enhet.
15.) När Ljus intensitet enheten blinkar , trycka 【 VIND /+ 】 eller
【 BARO /-/ 】 till ändra enhet mellan Klux , fc och w /m2 . Tryck på 【 S
ET 】 att välja regn enhet.
16.) När Regn enheten blinkar , trycka 【 VIND /+ 】 eller 【 BARO /-
/ 】 att ändra enhet mellan i och mm . Trycka 【 SET 】 till välja
vindhastighet enhet . 17.) När Vind hastighet enheten blinkar , tryck 【 VI
ND /+ 】 eller 【 BARO /-/ 】 till ändra enhet mellan i och mm . Trycka
【 SET 】 till välja halvklotet .
- 36 -
18.) När NTH blinkar , tryck 【 VIND /+ 】 eller 【 BARO /-/ 】 till
ändra

- 37 -
hemisfär mellan NTH ( norra ) och STH ( södra ). Trycka 【 SET 】 för att
spara och avsluta inställningen. Det kommer återvända till de normal läge d
display.
NOTERA: Om det finns är ingen giltig operation inom 2 0 sekunder, det
kommer automatiskt gå tillbaka till normal display läge från inställningen
läge. Under justering inställningar kan du pr ess
LIGHT/SNOOZE 】 knappen till återgå till normal visning läge.
【

- 38 -
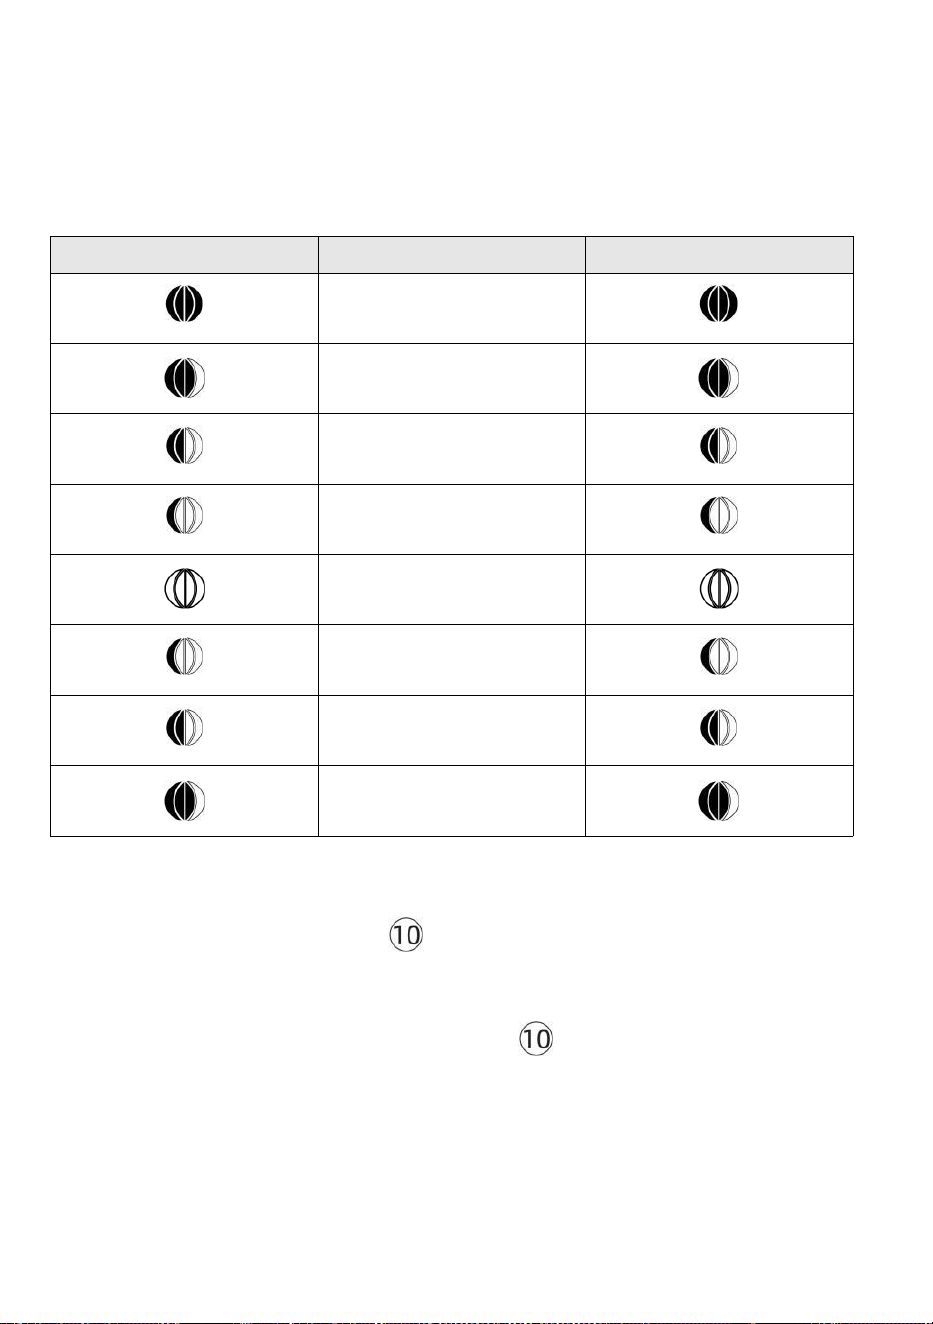
- 39 -
Månen Fas
Displaykonsolen beräknar månfasen enligt din tid, datum och tidszon.
Tabellen nedan förklarar motsvarande faser och deras ikoner för båda
Norra och södra halvklot.
Norra Halvklot ikoner
Månen Fas
Södra halvklotet Ikoner
Ny Månen
Vaxande Crescent Månen
Första kvartalet Månen
Vaxande Gibbous Månen
Full Månen
Avtagande Gibbous Månen
Tredje kvartalet Månen
Avtagande halvmåne Månen
Ställa in larmet
● Tryck på i normal tidsvisning 【 SET 】 -knapp för att byta
displayalarmtid (alarmtid läge).
● I alarmtidsvisningen, tryck och håll ned d
【
SET
】
knappen över 2
sekunder för att gå in i larminställningsläget. Alarmets timme börjar
blinka.
- 39 -
● Trycka 【 VIND/+ 】 knapp eller 【 BARO/-/ 】 knappen för att
ställa in önskad alarm timmar. Hålla 【 VIND/+ 】 knapp eller 【 BA
RO/-/ 】 knappen till
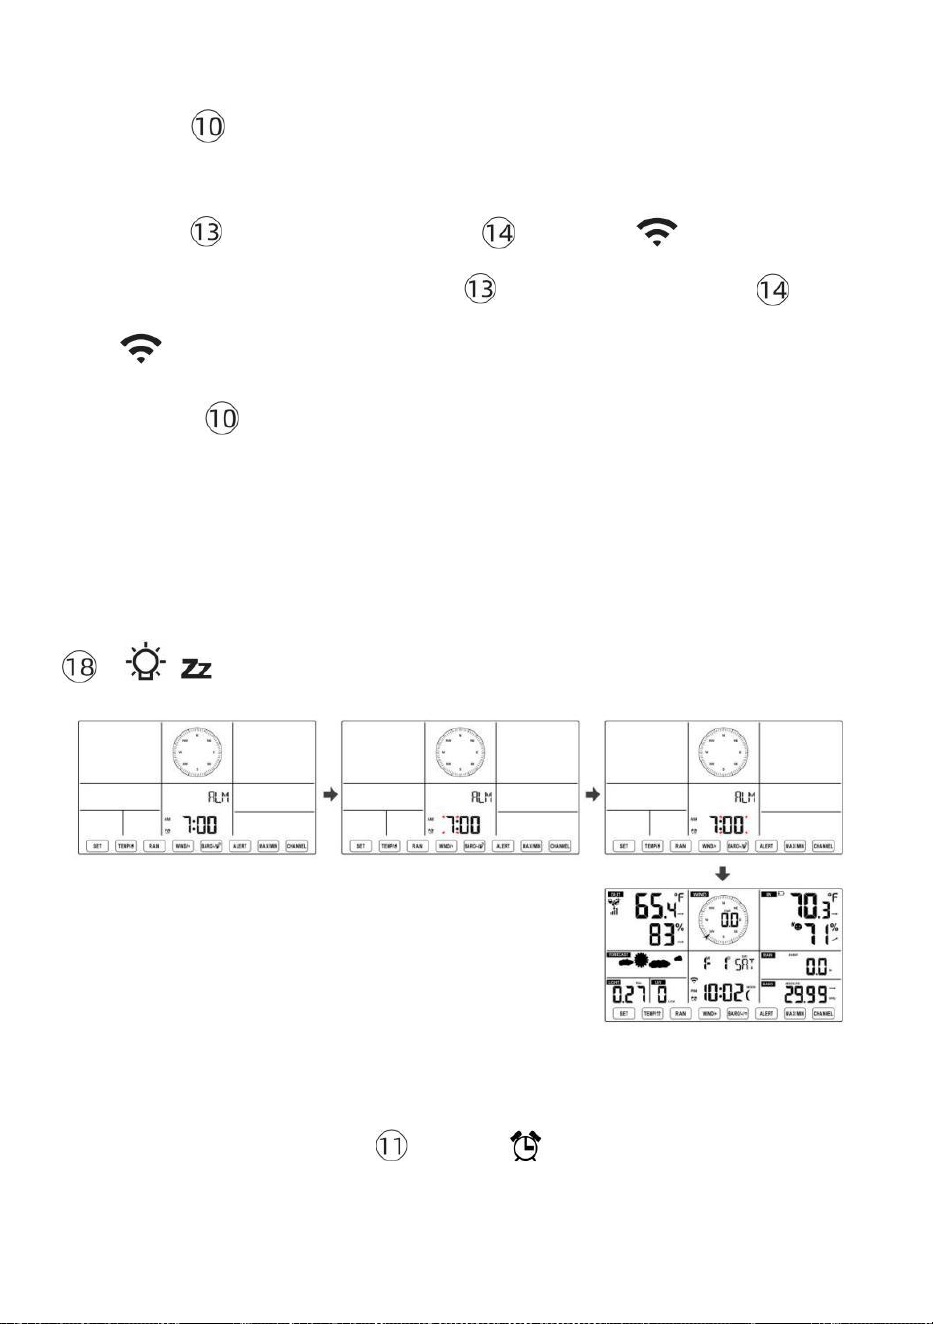
- 40 -
justera alarmtimmar snabbt.
● Trycka 【 SET 】 -knapp för att välja minut av Larm. Minut av
larm börjar blinka.
● Trycka 【 VIND/+ 】 knapp eller 【 BARO/-/ 】 knappen för att
ställa in önskad alarm minuter. Hålla 【 VIND/+ 】 knapp eller 【 BA
RO/-/ 】 knappen till justera alarmminuter snabbt.
● Tryck på 【 SET 】 för att spara alla inställningar och avsluta till
normal display läge.
NOTERA: Om det finns är ingen giltig operation inom 2 0 sekunder, det
kommer automatiskt gå tillbaka till normal display läge från inställningen
läge. Under justering inställningar kan du pr ess
【 LIGHT / SNOOZE 】 knapp till återvända till normal visa läge .
Avaktivera/aktivera larm
● In larm tid display , tryck av .
【 TEMP /
】 -knappen till välja de Larm på
eller
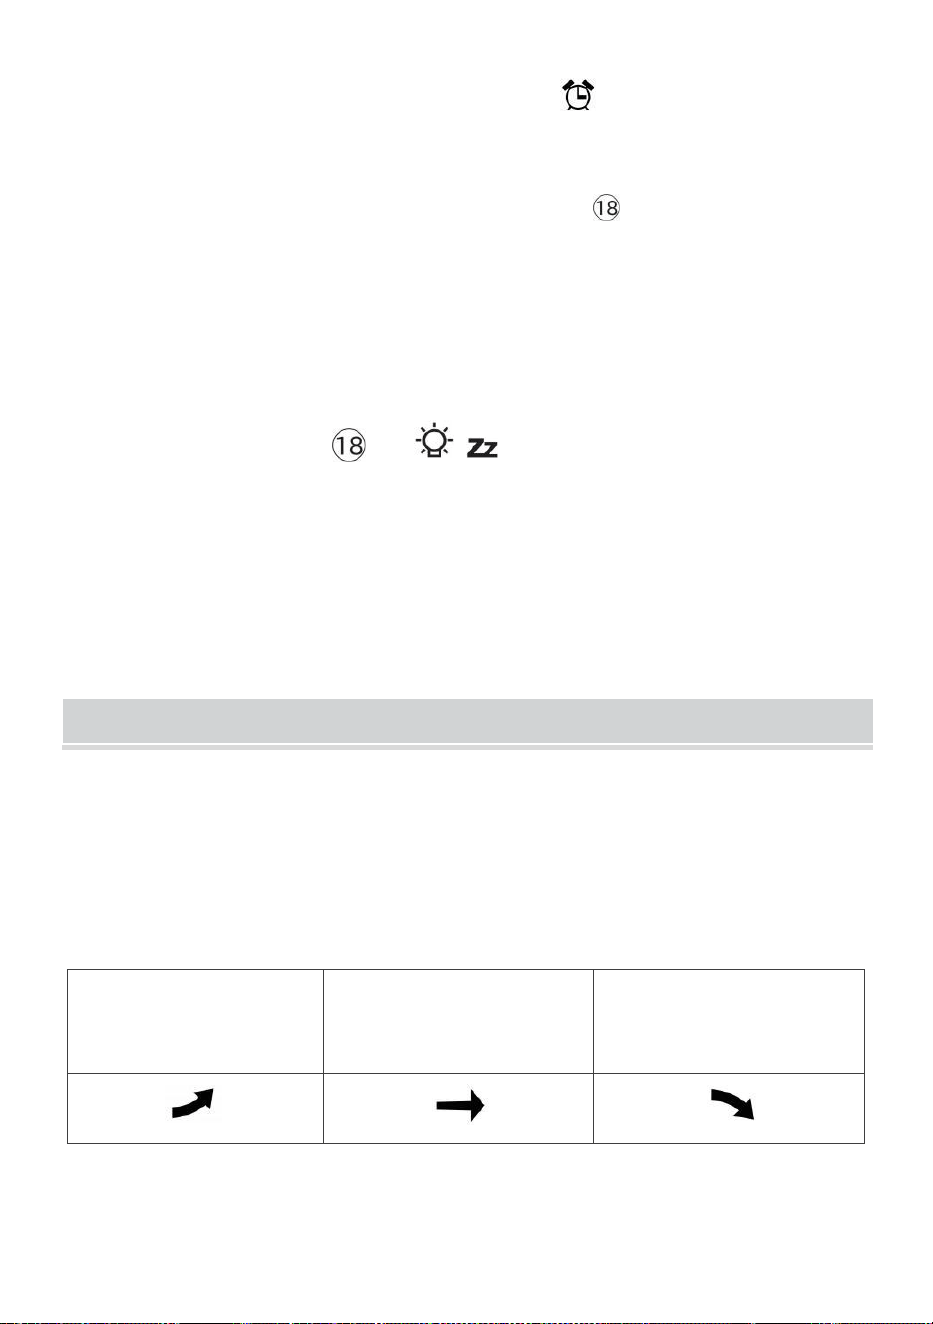
- 41 -
● Om de larm är på , dess motsvarande larm ikon vilja vara visas på
displayen .
● När de larm är ringer , trycka några knappar utom 【
容 z
LIGHT/SNOOZE 】 knappen för att stoppa larmsignalen. Det är inte nödvändigt
att återaktivera larmet. Det kommer ring igen här tid nästa dag.
Snooze Fungera
När de larm ringar , trycka 【 LIGHT / SNOOZE 】 knapp till paus
larmet
. De snooze indikator ikon
z 2
fortsätt att blinka . De larm vilja
resume efter
5 minuter .
TEMPERATUR
Temperatur/fuktighetstrend
Tendenspilar låter dig snabbt bestämma temperaturen och
luftfuktigheten stiger och sjunker i en en timme uppdatera per riod.
Temperaturtrend
Temperatur har
stigit > 1°C/2° F i de förbi
timme
Temperatur har inte
ändrats mer än
1°C/2° F i de förbi timme
Temperatur har
fallen < 1°C/2° F i de förbi
timme
Fuktighetstrend

- 42 -
Fuktighet har
stigit > 3 %
i förbi
timme
Fuktighet har inte
ändrats mer än 3 % i
de förbi timme
Fuktighet har
fallit < 3 %
i förbi
timme
Komfort inomhus Index
De inomhuskomfort visar en bild representation baserad på
inomhuslufttemperatur och luftfuktighetsnivåer för att bestämma den
ungefärliga komforten nivå.
För kall
Bekväm
För varm
TRYCK
Barometertryck Dis play
I normala fall läge,
trycka och relativa
trycket.
【 BARO/-/ 】 knappbrytare vara mellan
absolut
Absolut
Det absoluta atmosfäriska heriska trycket på din plats.
Relativ
Det relativa atmosfärstrycket är baserat på de hav nivå.
Trycktrend

- 42 -
Tendenspilar låter dig snabbt avgöra om tryck e är stigande eller
fallande i en timmes uppdatering period.
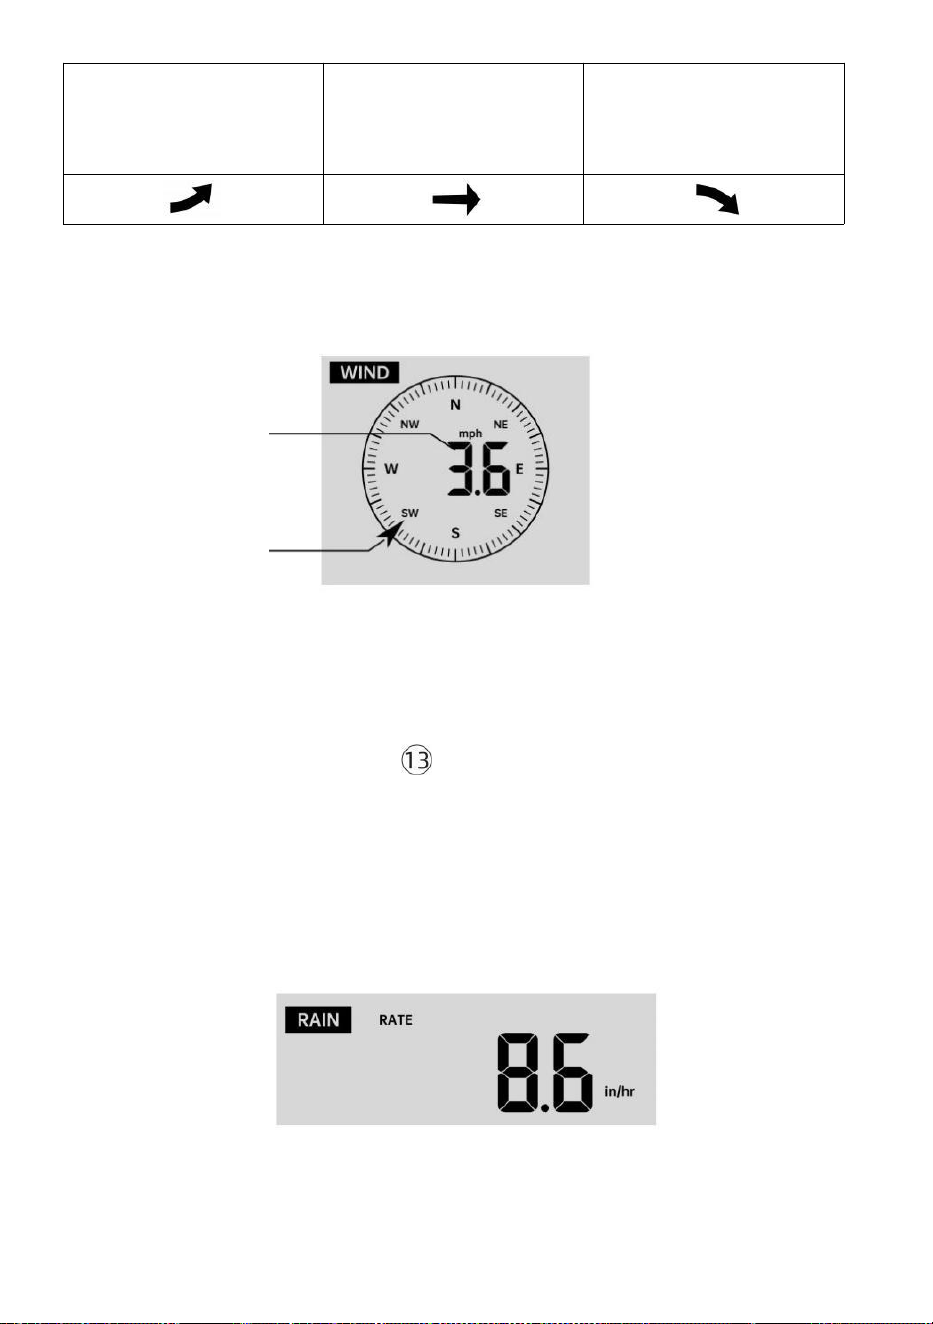
- 43 -
Trycket har
stigit > 2hpa/0,06inHg i
det förflutna timme
Trycket har inte ändrats
mer än 2hpa/0,06inHg
tidigare timme
Tryck har
fallit > 2hpa/0,06inHg i
det förflutna timme
VIND
Vind Visa
Medel/byst
vind
hastighet
Vind i realtid
körriktningsvisare
Välja vindvisningsläge
I normal visning läge, trycka
【
WIND/+
】
-knapp för att växla
mellan
nuvarande medelvindhastighet, vindbyar och vindriktning.
REGN
Nederbördsskärm
De Nederbörd visar information angående nederbörden och
regnhastighet .

- 43 -
Välj Nederbördsvisning Läge
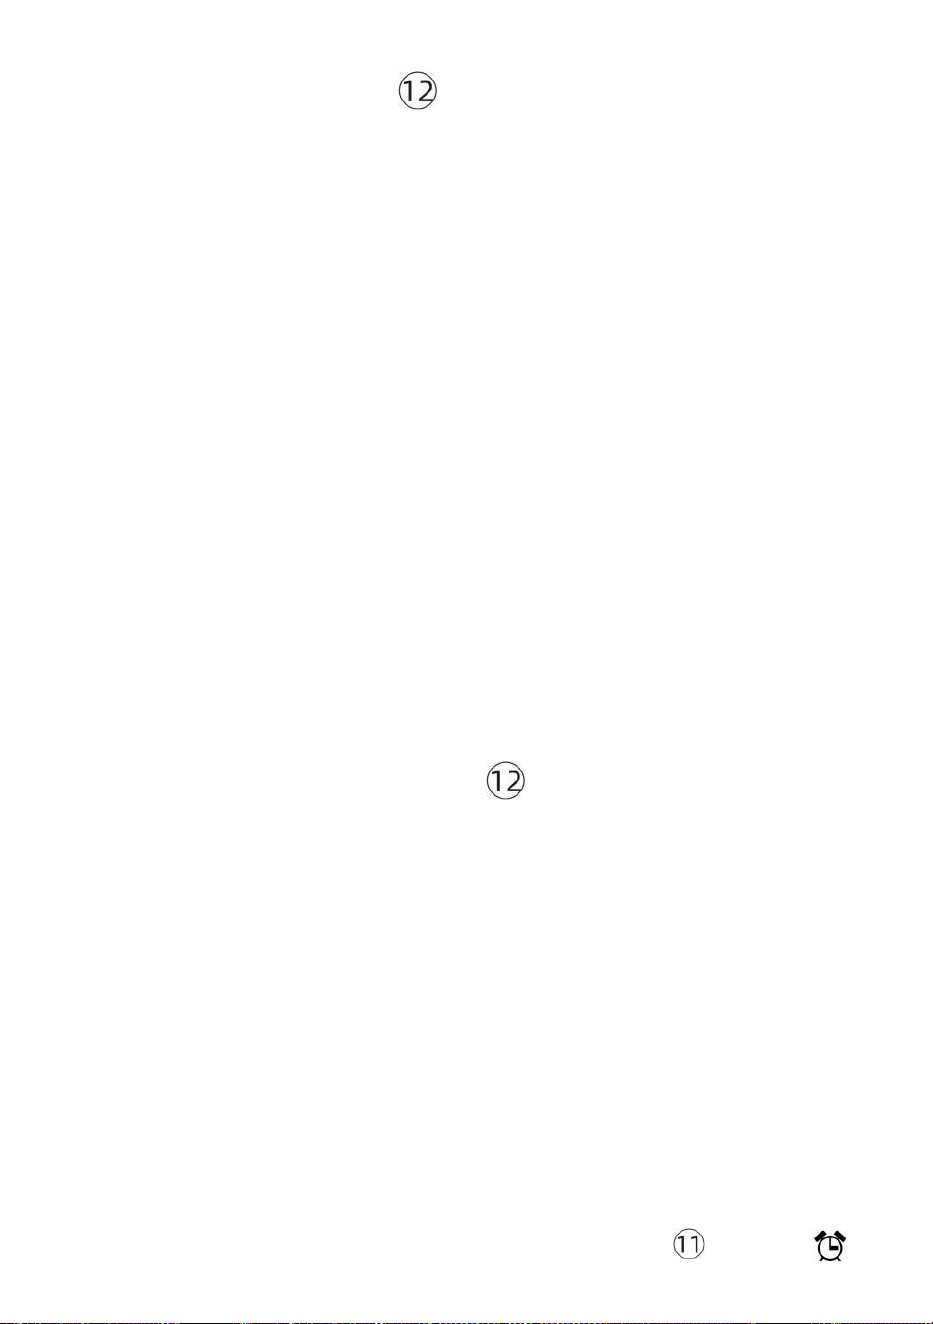
- 44 -
【 REGN 】 -knapp för att växla mellan Regn
Hastighet, Regn Händelse, Regn Varje timme, Ra in Dagligen, Regn varje
vecka, Regn Månatlig och Regn totalt.
Ökar av regn Definition
Regn Hastighet : aktuell regn betygsätt i n förbi timme.
Regnhändelse : kontinuerligt regn och återställs till noll om regn faller
ackumulation är
mindre än 10 mm (0,039 tum) i a 24 timmar om dygnet
period.
Dagligt regn : Totalt regn sedan midnatt (0 0:00)
Varje vecka Regn : Totalt nederbörd för den aktuella kalenderveckan
och återställningar på Söndag morgon vid midnatt
(Söndag tom lördag)
Månatlig Regn : Totalt nederbörd för den aktuella kalendermånaden,
och återställa på den första dagen av Månad.
Total Regn : Totalt nederbörd s sedan den sista återställa.
Återställ totalen Regnrekord
I normal visning läge, tryck och håll ned 【 REGN 】 knappen
över 2 sekunder för att återställa regn rekord .
NOTERA:
Att återställa veckoregnet återställer också dagligen regn.
Återställer också månadsregnet återställer dagligen och veckovis
regn.
Återställning av det totala regnet återställer också månads-, vecko-
och dagligen regn.
VÄDER
Väderindex
När man läser Vädret Indexdisplay kan du trycka på 【 TEMP/ 】
In normal display mode, press

- 44 -
knappen för att bläddra igenom olika väderindex i följande ordning:
Känns Gillar > Värme Index > Vind Kyla

- 45 -
Känns Som
De Känns Liksom temperaturindex bestämmer vilken temperatur det
faktiskt känns ute, med hänsyn tagen till faktorer som vindhastighet, tryck,
temperatur och fuktighet .
Vindkyla
Wind Chill bestäms av en kombination av den trådlösa vädersensorns
temperatur- och vindhastighetsdata .
OBS: Endast när temperaturen är låg 50 ℉ (10 ℃ ) och
vindhastigheten är över 4,8 km/h (3mph), kommer att visa
vindavkylningsvärdet,
annat det kommer att visas " --.-".
Värme Index
De Värme Indexet bestäms av den trådlösa vädersensorn
temperatur och luftfuktighet avläsningar.
Dagg Punkt
Daggpunkten är den temperatur vid vilken en given paket av fuktighet luft
måste kylas vid konstant barometrik tryck, för vattenånga till
kondensera till vatten. Det kondenserade vattnet kallas dagg. De d ew
punkt är en mättnadstemperatur.
Daggen Punkttemperaturen bestäms av temperaturen och fuktighetsdata
från den trådlösa vädersensorn .
Väderprognos
De inbyggd barometerburk notera förändringar i atmosfärstrycket och
baserat på insamlade data kan förutsäga vädret villkor.
Det finns 6 väderikoner --- soligt, delvis Molnig, Molnig, Regnig, Stormig
och Snöig.
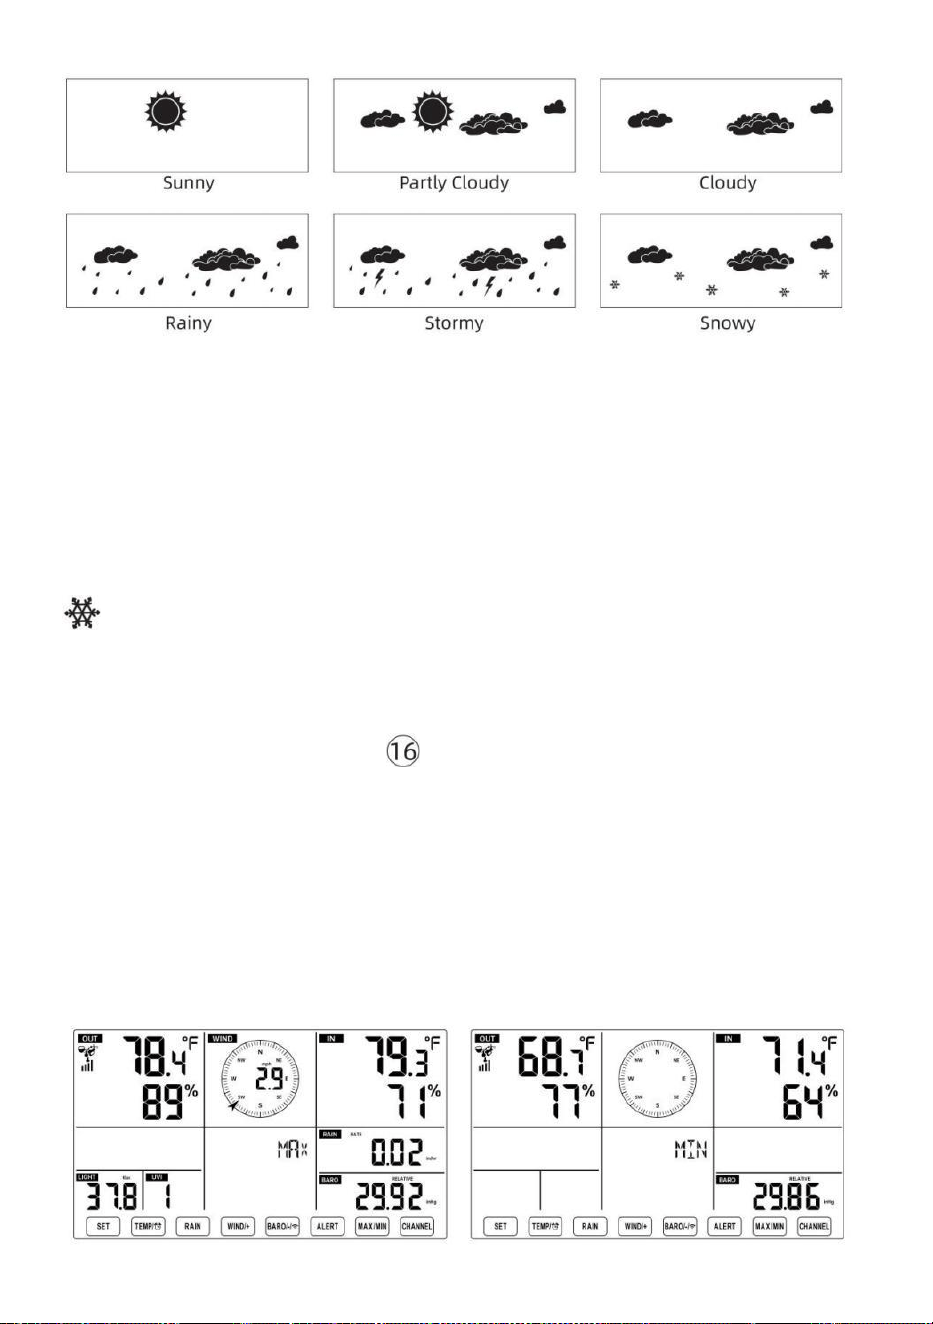
- 46 -
NOTERA:
Noggrannheten i en allmän tryckbaserad prognos handlar om 65-
70%. Det är inte prognoser garanterat.
Det kanske inte nödvändigtvis återspeglar nuvarande situation.
Is Varna
När utomhustemperaturen är lägre än 1 ℃ /33,8 ℉ , snöflingikonen
kommer att visas på LCD visa.
MAX/MIN
● I normal visning läge, trycka 【 MAX/MIN 】 knappbyte mellan
högsta och lägsta värde.
NOTERA: Om det finns är ingen giltig id-operation inom 10
sekunder, den kommer automatiskt att återgå till normal
display läge.
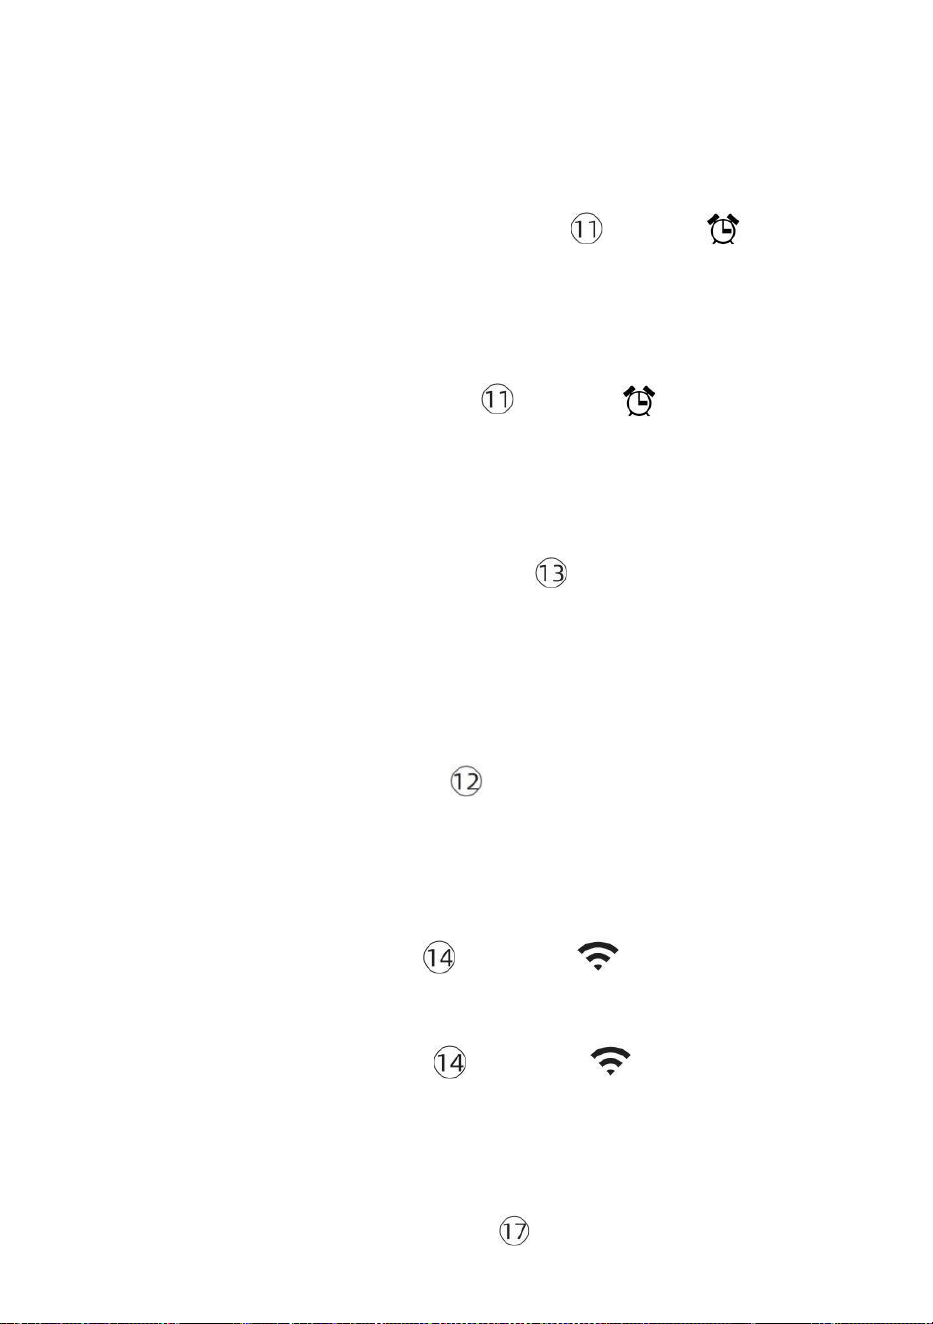
- 47 -
För att se Ackumulerat MAX/MIN
● Visa Känsla som, Wind Chill, Värme Index, Dagg Punkt Max/Min
värden
1.) När maxvärdena visas, trycka
【 TEMP /
】 knappen
till
utbyte tittar på utomhustemperaturen → Känns som → Vindkyla → Värme
Index → Dagg Punkt → Utetemperatur.
2.) När minvärdena visas trycker du på 【 TEMP/ 】 knappen till
utbyte tittar på utomhustemperaturen t → Känns som → Vindkyla →
Värme Index → Dagg Punkt → Utetemperatur.
● Visa vindhastighet, vindby Maxvärden
När maxvärdena visas, trycka
【 WIND/+ 】 -knapp för
att
utbytesvisning mellan MEDEL och GUST vindhastigheter. ● Visa
Regn Hastighet, Dagligen Regn, veckovis Regn och Månatlig Regn
Max Värderingar
När maxvärdena visas trycker du på 【 REGN 】 -knapp för att
utbytesvisning Regn Betygsätt → Dagligen Regn → Vem kly Regn →
Månatlig Regn.
● Visa Absolut och Relativ tryck Max /Min värden
1.) När maxvärdena visas, trycka 【 BARO/-/ 】 knappen till
utbytesvisning mellan Absolut och Relativ e tryck.
2.) När minvärdena visas, tryck på 【 BARO/-/ 】 men tton till
utbytesvisning mellan Absolut och Relativ e tryck.
● Visa inomhus och andra kanaler sensor temperatur & hum iditet
Max/Min värden
1.) När maxvärdena visas, trycka
【
CHANNEL
】
knapp för att

- 47 -
utbytesvisning inomhus- och parad utomhussensor(er) temperatur och
fuktighet.
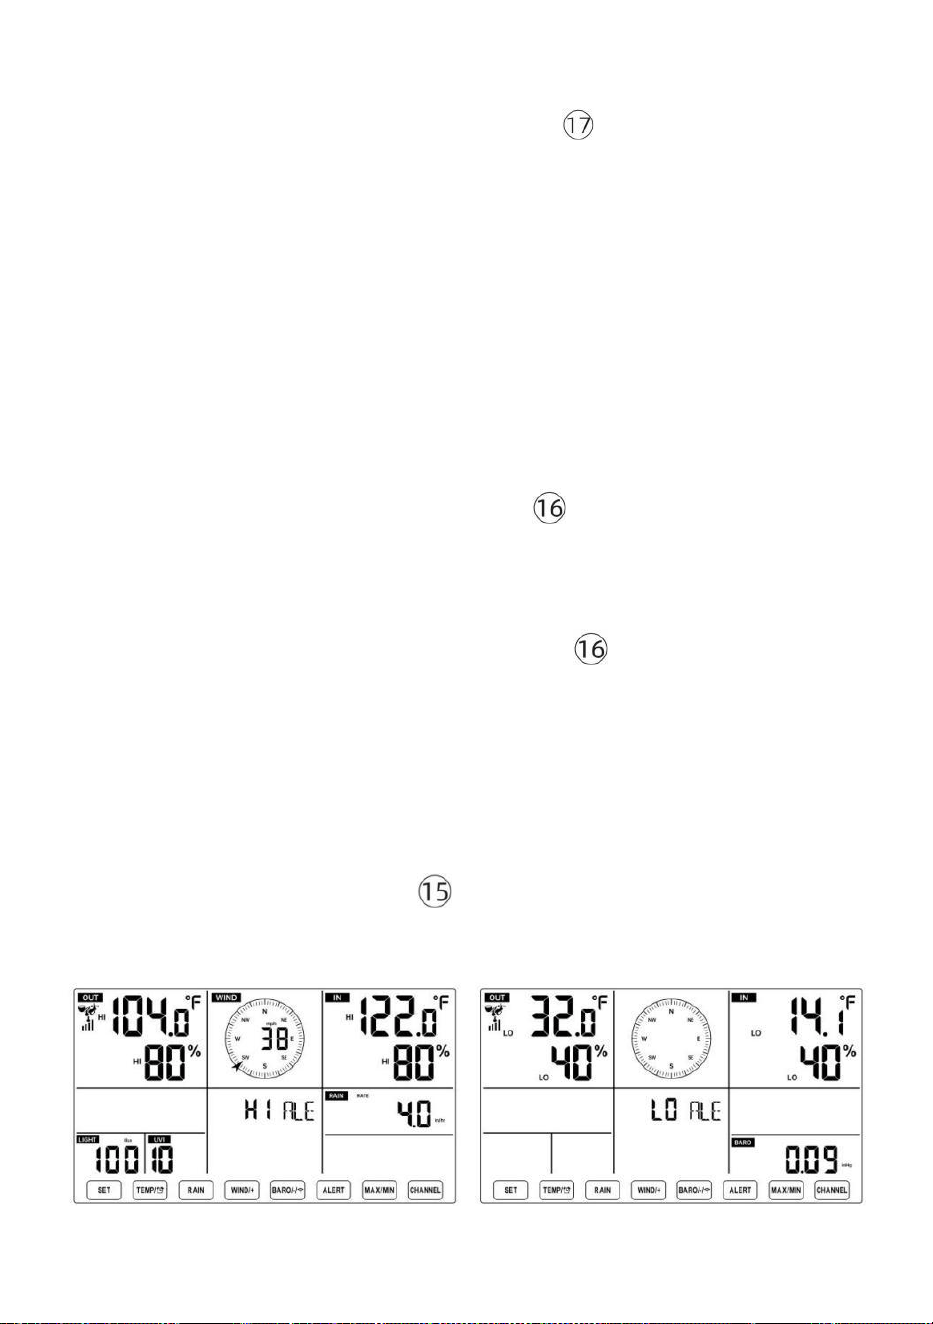
- 48 -
2.) När minvärdena visas, trycka
【 KANAL 】 knappen
till
utbytesvisning inomhus- och parad utomhussensor(er) temperatur och
fuktighet.
NOTERA: Om andra kanalsensorer parades, kunde den visa andra
kanalers max/min temperatur och fuktighetsvärden . Om annan kanal
sensorer var det inte parat, det skulle bara visa aktuellt inomhus
max/min temperatur och fuktighetsvärden.
För att nollställa MAX/MIN Data Spela in
● För att rensa maxvärdet , trycka och
hålla
【
MAX/MIN
】
-knapp
över r 2
sekunder medan maxvärden visas.
● För att rensa min-värdet , trycka och
hålla
【
MAX/MIN
】
-knapp
över 2
sekunder medan min-värden visas.
HI/LO VARNINGSINSTÄLLNING
För att se Varningsinställning
● I normalt visningsläge, tryck på 【 ALERT 】 knapp växla mellan Hej
alert och Låg beredskap inställning värde.
För att ställa in varningen

- 48 -
● I normal visning läge, tryck och hålla 【 VARNING 】 -knapp över 2
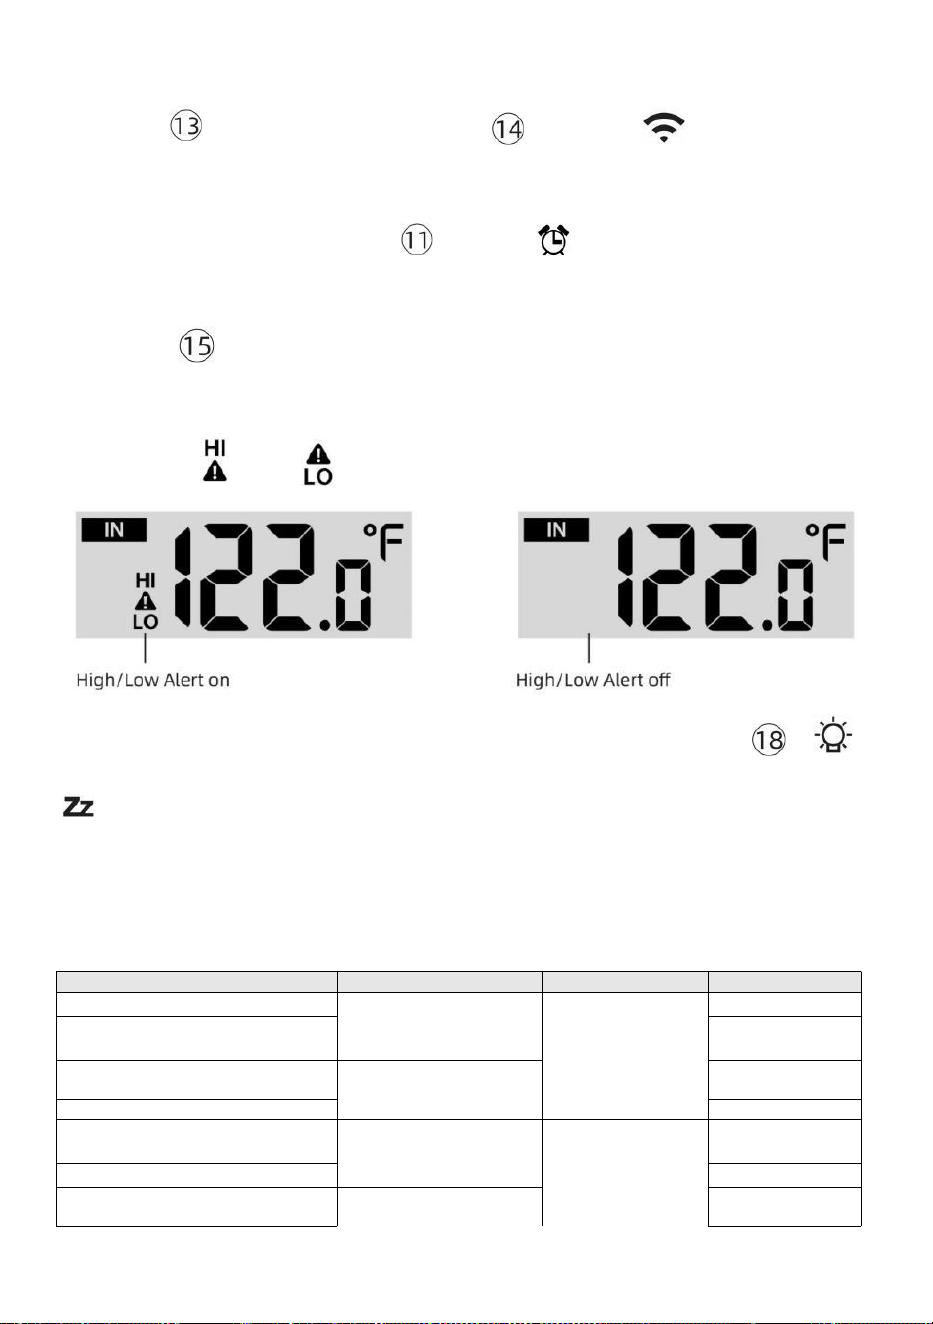
- 49 -
sekunder för att gå in i varningsinställningen läge.
● Trycka 【 WIND/+ 】 -knapp och 【 BARO/-/ 】 tryck på för att
justera
värde upp eller ner alltså
tryck varna.
【 TEMP /
】 knappen för att slå
på/stänga av
● Trycka
【
ALERT
】
-knapp för att bekräfta och hoppa till nästa
miljö.
● De ikon eller kommer att visas när varningen är på.
● För att avsluta varningsinställningen läge kl några tid, trycka 【
LIGHT/SNOOZE
】
-knapp. De Inställningsordning för Hi/Lo-varningar
visas nedan:
Varna Miljö Beställa
Miljö Räckvidd
Visa avsnitt
Standard
Inomhustemperatur Hej Al ert
-14.1 ℉ –122
℉ (-9,9 ℃ –
50 ℃ )
Inomhus
temperatur &
Fuktighet
Utomhus
temperatur &
Fuktighet
Vindhastighet
122 ℉ (50 ℃ )
Inomhustemperatur Lo Varna
14.1 ℉ (-9,9 ℃
)
Luftfuktighet inomhus Hej
Varna
1 %–99 %
-40 ℉ –158
℉ (-40 ℃ –
70 ℃ )
80 %
Inomhus Fuktighet Lo
Alert Utetemperatur Hej
Alert
40 %
104 ℉ (40 ℃ )
Utetemperatur Lo Varna
32 ℉ (0 ℃ )
Luftfuktighet utomhus Hej
Varna
1 %–99 %
80 %

- 49 -
0–50m/s
2–180 km/h
1–111 mph
1–97 knop 0-60 bft
Luftfuktighet utomhus Lo
Varna
Hög Genomsnittlig vindhastighet
Varna
40 %
17m/s
62 km/h
38 mph
33 knop 20bft
Hög vindby varna
0–50m/s
2–180 km/h
1–111 mph
1–97 knutar
0-60 bft
Vindhastighet
17m/s
62 km/h
38 mph
33 knop 20bft
- 50 -
Tryckfallsvarning
1 hpa–10hpa
0,03~0,3 inHg
0,7~7,5
mmHg
Barometerfall
3 hpa
0,09
tumHg
2,2
mmHg
Hög Regn Betygsvarning
1 mm/h–1000 mm/h
(0,04 tum/h–39
om/timme)
Regn Hastighet
101 mm/h
(4
om/timm
e)
Hög Dagligen Regnvarning
1mm–1000mm
(0,03 tum–39,37
i)
Regn Hastighet
101
mm (4
i)
UV-index Hög Varna
1-15
UV Index
10
Ljus Intensitet Hög Varna
1 Klux–200,0 Klux
7-1580 W/M²
0-185Kfc
Ljus Intensitet
100 Klux
790 W/M²
92 Kfc
Att tysta Hi/Lo Varningslarm
Tryck på
【
LIGHT/SNOOZE
】
-knapp på toppen av
displaykonsolen för att tysta larmet, annars kommer det automatiskt
sväng av efter ett minut.
OBS: När larmet har utlösts kommer larmet att ljuda i en minut och
tillhörande varning ikonen och väderavläsningarna kommer att
blinka.
Om varningslarmet automatiskt stängs av efter en minut istället för
att stängas av manuellt, den associerade varningen ikon och
avläsningar kommer fortsätt att blinka tills avläsningen är ut av
varna räckvidd.
Vädervarningslarmet kommer att aktiveras när avläsningarna
faller till varna räckvidd igen.
BAKGRUNDSLJUS
Display Bakgrundsbelysning
Med DC Adapter
De bakgrundsbelysning kan bara vara kontinuerligt på när DC-adapter är
permanent på. När DC -adaptern är frånkopplad, den
bakgrundsbelysning kan vara tillfälligt påslagen.
- 50 -
Trycka
【
LIGHT/SNOOZE
】
-knapp för att justera
bakgrundsbelysningen
ljusstyrka, Hög, låg och Av.
Utan DC Adapter
Trycka
【
LIGHT/SNOOZE
】
-knappen sätter tillfälligt på
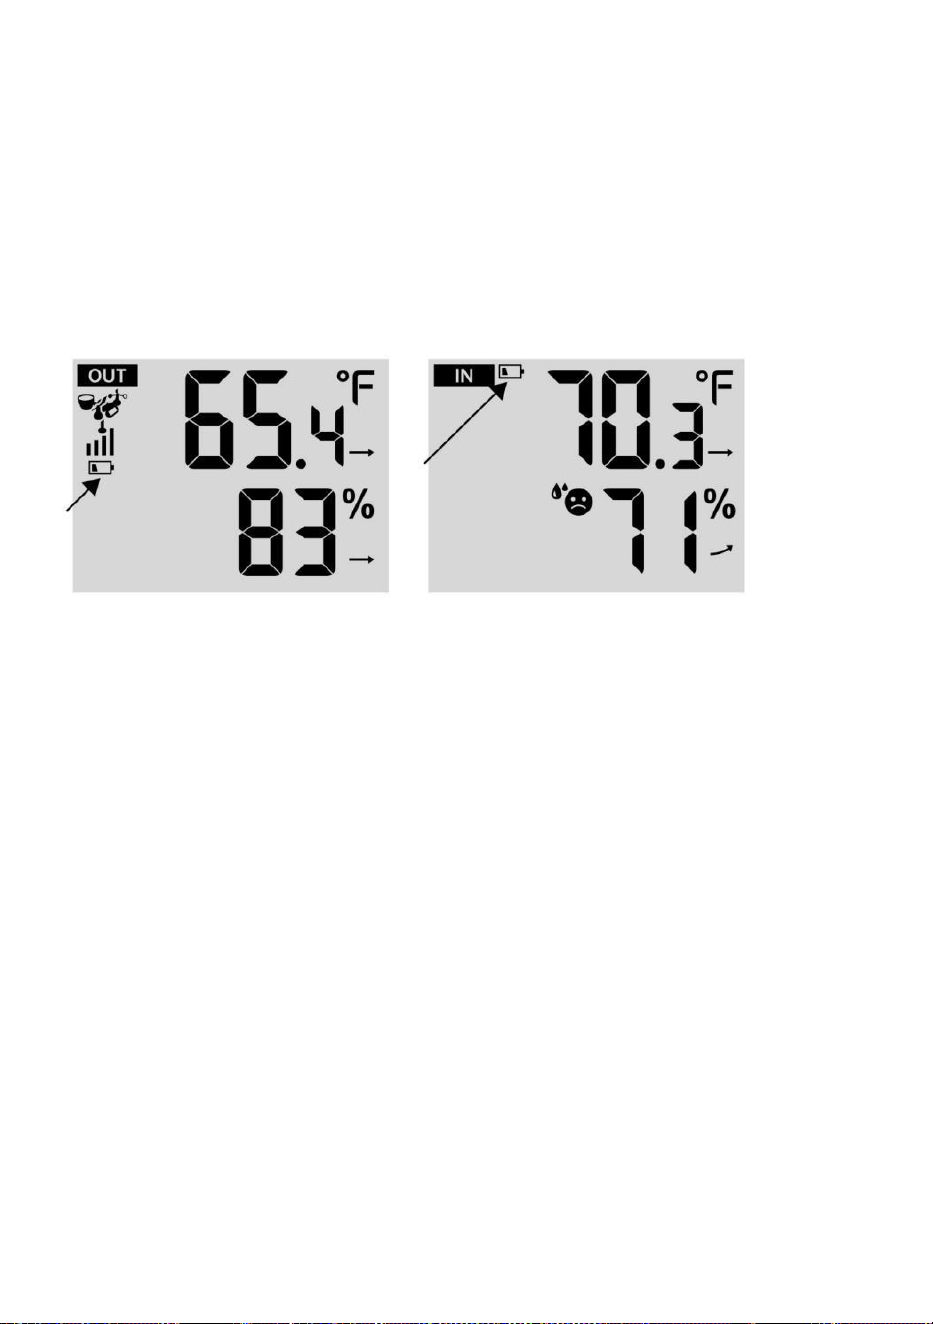
- 51 -
bakgrundsbelysning för 15 sekunder.
INDIKATOR FÖR LÅG BATTERI
Om ikonen för låg batterinivå visas i utomhustemperatur och
fuktighetssektionen eller motsvarande CH-sektion på LCD-skärmen trösta
visa, detta indikerar att batterierna finns i dina trådlösa vädersensorer
håller på att ta slut och borde vara ersatt. Se till att rep spets alla batterier
samtidigt.
FABRIKSOMSTART
Om det finns är fel, den Fabrik Starta om är ett bra sätt att returnera
din station till "ut ur box" skick.
1.) Ta bort alla ström (batterier och DC-adapter) från utomhussensorer
och väderstation.
2.) Följ operationen "INSTÄLLNING UPP VÄDERSTATIONEN” till
starta paret sensor.
VÅRD OCH UNDERHÅLL
1.) Rengör regnmätaren var 3 månader. Rotera tratten
moturs och lyft för att visa regnmätaren mekanismer, och rena med en
fuktig trasa. Ta bort all smuts, skräp och insekter. Om bugga angrepp är
ett problem, spraya sensorn lätt med insekticid.

- 52 -
2.) Rengör Ljus Intensitet/ UV-sensor och solpanel varje 3 månader
med fuktig trasa.
3.) När du byter batterier, applicera en korrosion förebyggande förening
på batteripolerna.
- 53 -
SPECIFIKATION
VÄDERSTATION
Allmän Specificera katjoner
Dimensionera
7,5 x 5 x 1.1 tum (191,6 x 127 x 28,8 mm)
Driva källa
AC-DC 5V, 1A adapter (ingår)
Batteri
3 x AAA batteri ( inte ingår)
Stöd sensorer
1 x 7-i-1 sensor (ingår)
Wi- Fi kommunikation Specifikationer
Wi-Fi Standard
802. 11 b/g/n
Wi-Fi drift frekvens
2,4 GHz
Enheter som stöds för
inställning UI
Inbyggd Wi-Fi med WAP läge smart enhet e, inklusive
bärbara datorer, datorer, smarta telefoner och nd
smarta kuddar
Rekommendera web
webbläsare för inställning
UI
Senast Version av några web webbläsare att stödjer HTML 5
Tid Funktionsspecifikationer
Tid visa
HH: MM
Timformat
12 timmar eller 24 timme
Datum visa
DD/MM eller MM/DD
Tid synkroniseringsmetod
Synkroniserar med atom- klocka
Tid zoner
GMT±12
Sommartid
PÅ/AV
Barometer Display & Funktion Specifikationer
Barometerenheter
hPa, inHg och mmHg
Mätområde
600 – 1100 hPa (relativ inställning intervall 930 – 1050 hPa)
Noggrannhet
700 -1100 hPa±5 hPa/600 -696 hPa±8 hPa
20,67 – 32,48 inHg±0.15 inHg/17,72 -20.55inHg ±0,24 inHg
525 -825 mmHg±3,8 mmHg /450 -522 mmHg±6 mmHg
Typiskt kl 77 ℉ (25 ℃ )
Väder prognos
Solig, Delvis Molnig, Clo udy, Regnig, Stormig och Snöig
Visa läge
Nuvarande
Minne läge
Dagligen Max/ Min
Varna
Tryck ändra varna
Inomhus/ Utomhustemperatur Display & Funktion Specifikationer
Temperaturenhet
℃ och ℉
Inomhus Visa räckvidd
-14,1 ℉ – 122 ℉ (-9,9 ℃ – 50 ℃ )
Utomhus Visa räckvidd
-40 ℉ – 158 ℉ (-40 ℃ – 70 ℃ )
I/ Ut noggrannhet
50– 122 ℉ ± 1,8 ℉ / 10 – 50 ℃ ± 1
℃ -4 - 50 ℉ ±2,7 ℉ / -20 – 10 ℃ ±
1,5 ℃ andra: ±3,6 ℉ / ±2 ℃
Visa läge
Nuvarande
Minne läge
Dagligen Max/ Min
Varna
Hög/Låg temperatur varna

- 53 -

- 54 -
Inomhus/ Utomhus Fuktighet Visa & Funktion Specifikationer
Fuktighet enhet
%
Visa räckvidd
1 – 99 %
I/Ut noggrannhet
40 – 80 % RH ± 5 % RH
@77℉(25℃) Övriga: ± 8 % RH
@77℉ (25℃)
Visa läge
Nuvarande
Minne läge
Dagligen Max/ Min
Varna
Hög/Låg fuktighet varna
Visning av vindhastighet och riktning & Fungerar Specifikationer
Vind Hastighet enhet
mph, m/s, km/h, knutar
Visa räckvidd
0 -112 mph, 50m/s, 180 km/h, 97 knutar
Hastighetsnoggrannhet
<5m/s: ±0,5 m/s, >5m/s: ±10 % (vilket som helst är större)
Visa läge
Vindil/ Genomsnitt
Minne läge
Dagligen Vindbyar/Genomsnitt
Varna
Hög Vind Hastighet Varna ( Vindby / Genomsnitt )
Vind riktning
16 vägbeskrivningar
Regnskärm & Fungera Specifikationer
Enhet av regn
mm, i
Räckvidd av regn
0 – 12999 mm (0 – 511,7 i)
Noggrannhet av regn
±7 %
Visa läge
Nuvarande
Minne läge
Dagligen Max
Regn visa läge
Varje timme/ Dagligen/ Varje vecka/ Månatlig/ Total Regn
Varna
Hög Dagligen Regn varna
UV-index display & funktionsspecifikationer
Visa räckvidd
0 - 16
Visa läge
Nuvarande
Minne läge
Dagligen Max
Varna
Hög UVI varna

- 54 -
Ljusintensitet Display & funktion Specifikationer

- 55 -
Ljus Intensitet enhet
Klux, Kfc och W/m
2
Visa räckvidd
0 – 200 Klux
Visa läge
Nuvarande
Minne läge
Dagligen Max
Varna
Hög Ljus intensitet varna
Weather Index Display & Function Specifikationer
Väderindex läge
Känns som, vindkyla, värme index en nd dagg punkt
Visningsläge
Nuvarande
Minnesläge
Daglig Max/min
TRÅDLÖS 7-I-1 UTOMHUSSENSOR
Mått
16 x 13,8 x 14,4 tum (408 x 396 x 367 mm)
Huvudkraft
3,6V Ni-MH uppladdningsbar batteripaket
Reservkraft
Solenergi
Väderdata
temperatur, fuktighet, vind hastighet, vind riktning, regn, UVI
och ljusintensitet
RF frekvens
915MHz
RF-sändning sprang ge
492 fot (150m)
Överföringsintervall
Varje 20 sekunder för UV 、 ljusintensitet 、 vindhastighet 、
temperatur, luftfuktighet och regndata och vind
riktningsdata
Driftstemp
-40 ℉ till 140 ℉ / 40 ℃ till 60 ℃
Ytterligare verktyg som
krävs för sensor
Ja
- 56 -
FELSÖKNING
Problem
Lösning
Trådlös sensor gör
inte kommunicera de
väder station
De trådlös sensor maj ha initierad ordentligt, och de data är
registrerad av de väder station som ogiltig, och de väder
station måste vara återställa.
Med ett öppet slut gem, tryck på ÅTERSTÄLL knappen i 3
sekunder till komplett de visa av de spänning . LED vilja blixt
varje 20 sekunder.
Om LED gör inte blinka varje 20 sekunder, ta ut de batterier och
vänta 5 minut, medan beläggning de sol- panel till dränera
spänningen.
Sätta batterier tillbaka i och synkronisera om de w äter station och
synkronisera om väderstationen (Referera till Sida 18 RE-PAI
RING SENSOR) med det trådlösa sensor om 10 fötter (3m) bort .
De LED för den trådlösa sensorn kommer blixt varje 20 sekunder.
Om lysdioden är fortfarande inte blinkande varje 20 sekunder,
byt ut n ew
batterier i de trådlös sensor.
Om de batterier var nyligen ersatt, kontrollera polaritet. Om
trådlös sensor är blinkande varje 20 sekunder, fortsätta till de
nästa steg.
Det maj vara a tillfällig förlust av kommunikation förfallen till
mottagning förlust släkt till interferens eller andra plats faktorer,
Eller batterier maj ha varit ändrats i de trådlös sensor och den väder
station har inte varit återställa. T han lösning maj vara lika enkelt som
strömförsörjning ner och upp de väder st ation (ta bort DC driva och
batterier), vänta 30 sekunder, och sätt in igen DC driva och
batterier).
Inomhus och
Utomhus
temperatur do inte
komma överens
Tillåta upp till en timme för trådlös sensorer till stabilisera förfallen till
signal filtrering. De inomhus- och utomhus- temperature sensorer
bör komma överens inom ±4 ℉ (±2 ℃ ) (sensornoggrannheten är ±2 ℉
(±1 ℃ )
Använda de kalibrering särdrag till matcha inomhus- och
utomhus- temperatur till a känd källa.
Temperaturgivare
läser också hög i de
dagtid
Göra säker på att tråden mindre sensor är inte för nära till värme
alstrande källor eller strängningar, sådan som byggnader, trottoar,
väggar, eller luft konditionering enheter.
- 57 -
Problem
Lösning
Regnmätare
rapporterar regn
när det är inte
regnar.
En instabil monteringslösning (svaj i montering stolpe) maj
resulterar i att tippskopan är felaktigt ökande nederbörd. Göra säker
du har en stabil nivå montering lösning. (Referera till sida 16
JUSTERING AV 7-I-1 TRÅDLÖSA SENSORNIVÅ )
Wi-Fi gör det inte
visas på vädret
station
Kontrollera din router för problem.
1.) Kontrollera Wi-Fi-symbolen på skärmen. Om trådlös
anslutning lyckas visas Wi- Fi-ikonen vilja visas under den
angivna tiden. 2.) Se till att modemets Wi-Fi- inställningar är
korrekta (nätverk namn, och lösenord)
3.) Se till att väderstationen är pluggat i nto Likström.
Väderstationen kommer inte att ansluta till Wi -Fi när drivs endast
med batterier .
4.) Endast konsolen stödjer och ansluter till 2. 4GHz routrar. Om
din egen en 5GHz router och det är en dua l band router, du
kommer
måste inaktivera 5Ghz- bandet och aktivera de 2,4 GHz
band. 5.) Det gör vädret inte stöd t gäst nätverk.
Data inte
rapportering till
www.wunder
ground.com
eller
www.weather
cloud.net
1.) Bekräfta ditt lösenord eller nyckel är korrekt. Det är den
lösenord du registrerad på Wunderground.com.
Wunderground.com. Ditt underground .com-lösenord kan inte börja
med icke-alfanumeriska tecken (a begränsning av
Wunderground.com, inte stationen ). Till exempel är $worknet inte ett
giltigt lösenord, men wor knet$ är giltig)
2.) Bekräfta din station ID är korrekt. Stationen ID är alla kepsar,
och det vanligaste problemet är att ersätta och O för a 0 (eller vice
versa). Exempel, KCAPHOEM12, inte KCAPH0EM12.
3.) Se till att data och tid är korrekta på väderstationen. Om
felaktigt, du kan vara rapportera gamla data, inte äkta tid data.
4.) Kontrollera din tidszon är korrekt inställd. Om felaktigt, du maj
rapportera gamla data, inte verklig tidsdata.
5.) Kontrollera din routerns brandväggsinställningar. Vädret
station skickar data via Port 80.

FCCSTATEMENT
- 58 -
Denna enhet överensstämmer med del 15 i FCC:s regler. Operation n är
ämne till följande två villkor :
1. Denna enhet kan INTE orsaka skadligt i ninterferens.
2. Denna enhet måste acceptera alla interferens mottagen,
inklusive störa det kan orsaka oönskad funktion.
OBS :
Denna utrustning har har testats och befunnits överensstämma med gränser
för a
Klass B digital enhet, enligt Del 15 av FCC:s regler. Dessa gränser är
utformad för att tillhandahålla rimliga skydd mot skadlig i ninterferens i en
bostads- installation. Denna utrustning genererar — och kan utstråla —
radio frekvensenergi och, om inte installerat och begagnad i enlighet med
de
instruktioner, kan orsaka skadlig störning till radiokommunikationer .
Det finns dock ingen garanti för det interferens kommer inte
förekomma i a speciell installation.
Om utrustningen inte orsakar skadliga störning till radio- eller tv-
mottagning, som kan fastställas genom att stänga av utrustningen och på,
användaren uppmanas att försöka korrigera interferens av en eller mer
av följande åtgärder:
Omorientera eller flytta mottagaren antenn.
Öka separationen mellan utrustningen och mottagaren.
Anslut utrustning till en utlopp på a krets olik att till som mottagaren
är ansluten.
Konsultera -handlare o r en erfaren radio/TV tekniker för hjälp.
VARNING: Ändringar eller modifieringar av detta enhet inte uttryckligen
godkänd av partiet ansvarig för efterlevnad kan ogiltigförklara användarens
behörighet att
använda utrustningen.

FCCSTATEMENT
- 58 -
Gjord I Kina