Lock
Quick Start Guide
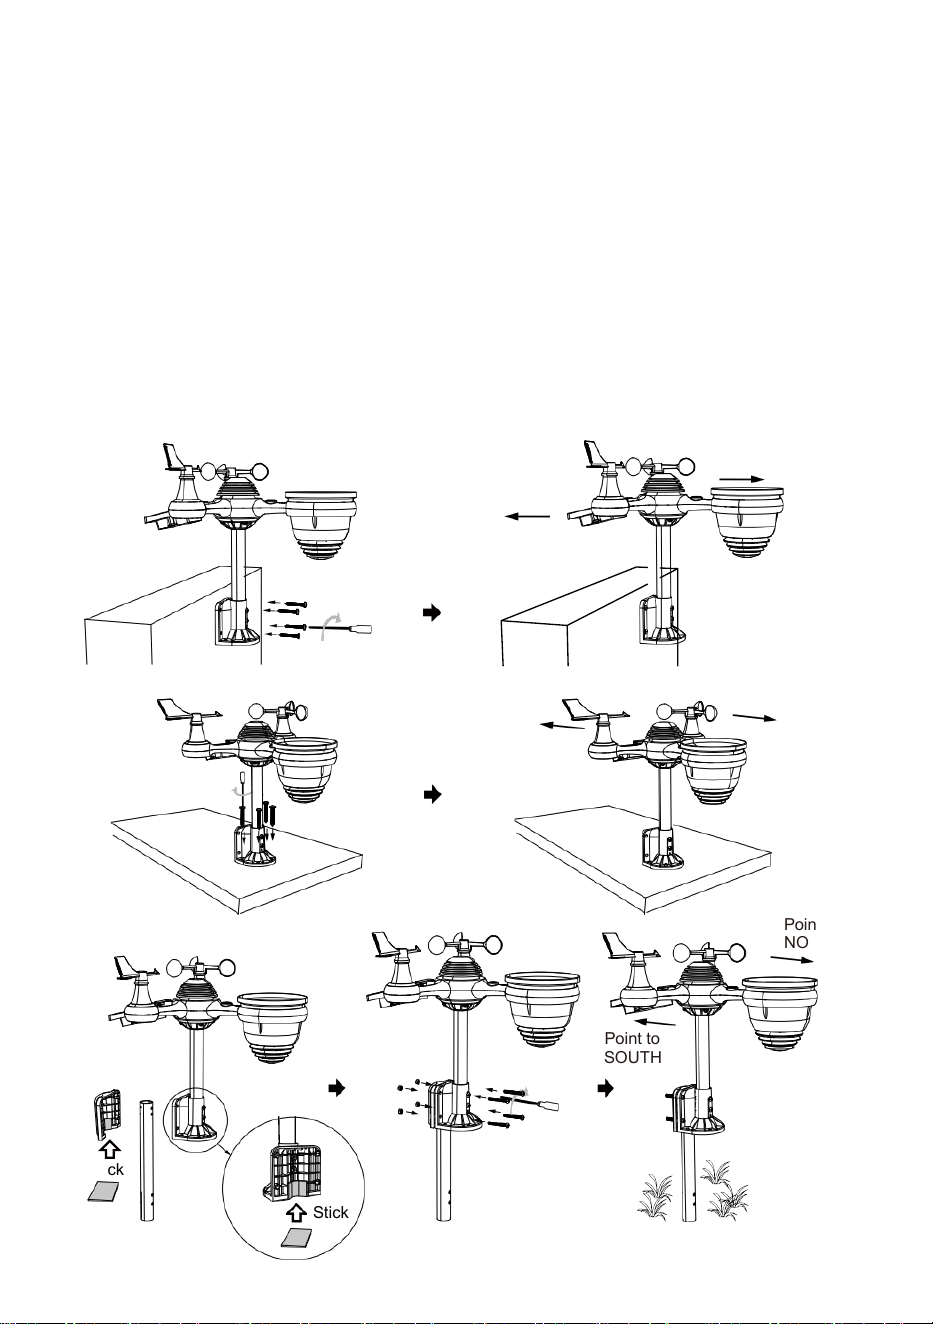
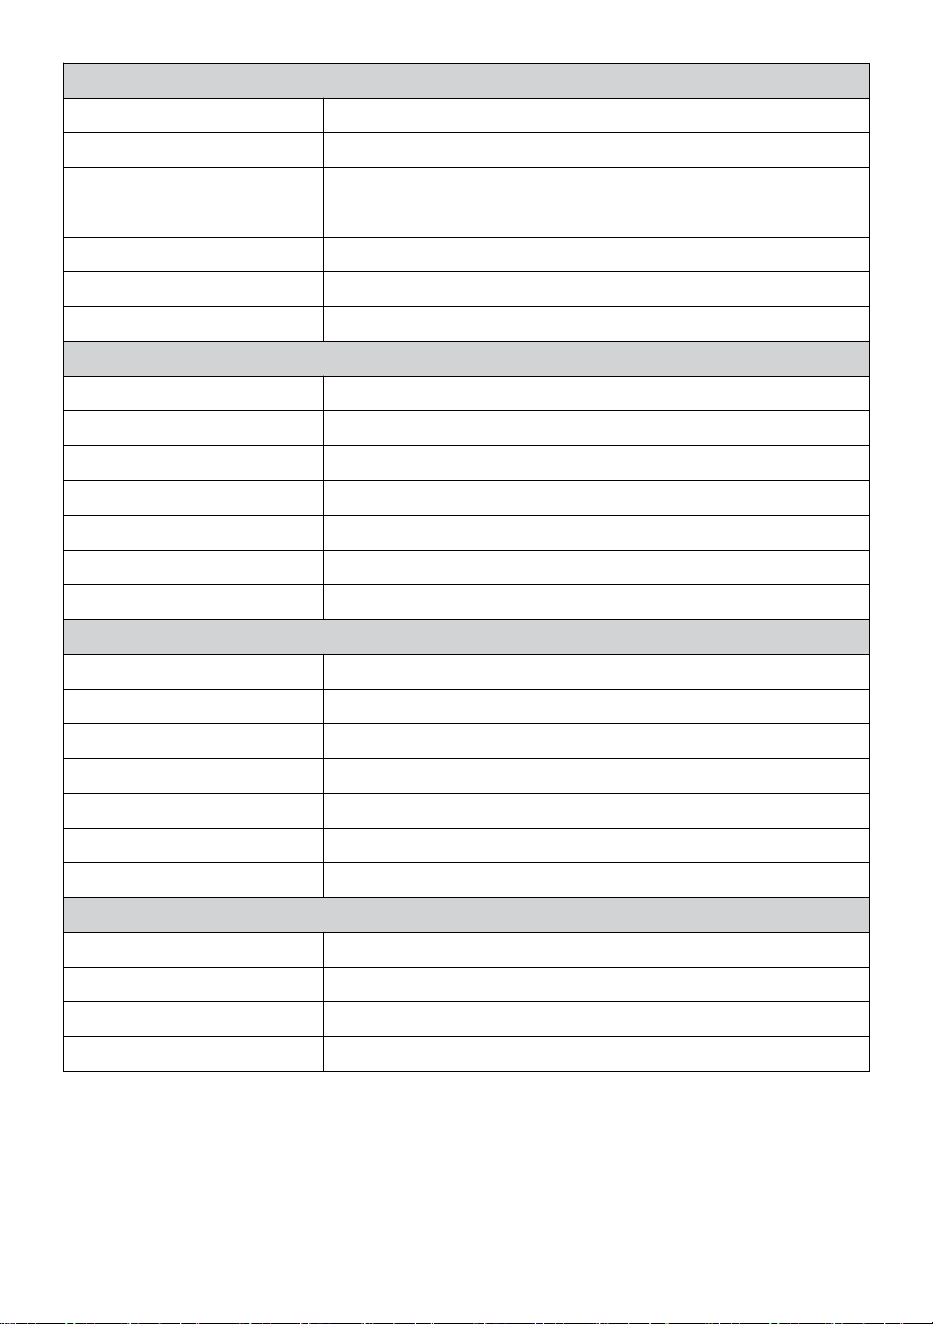
⑤SETTING UP RAIN COLLECTOR
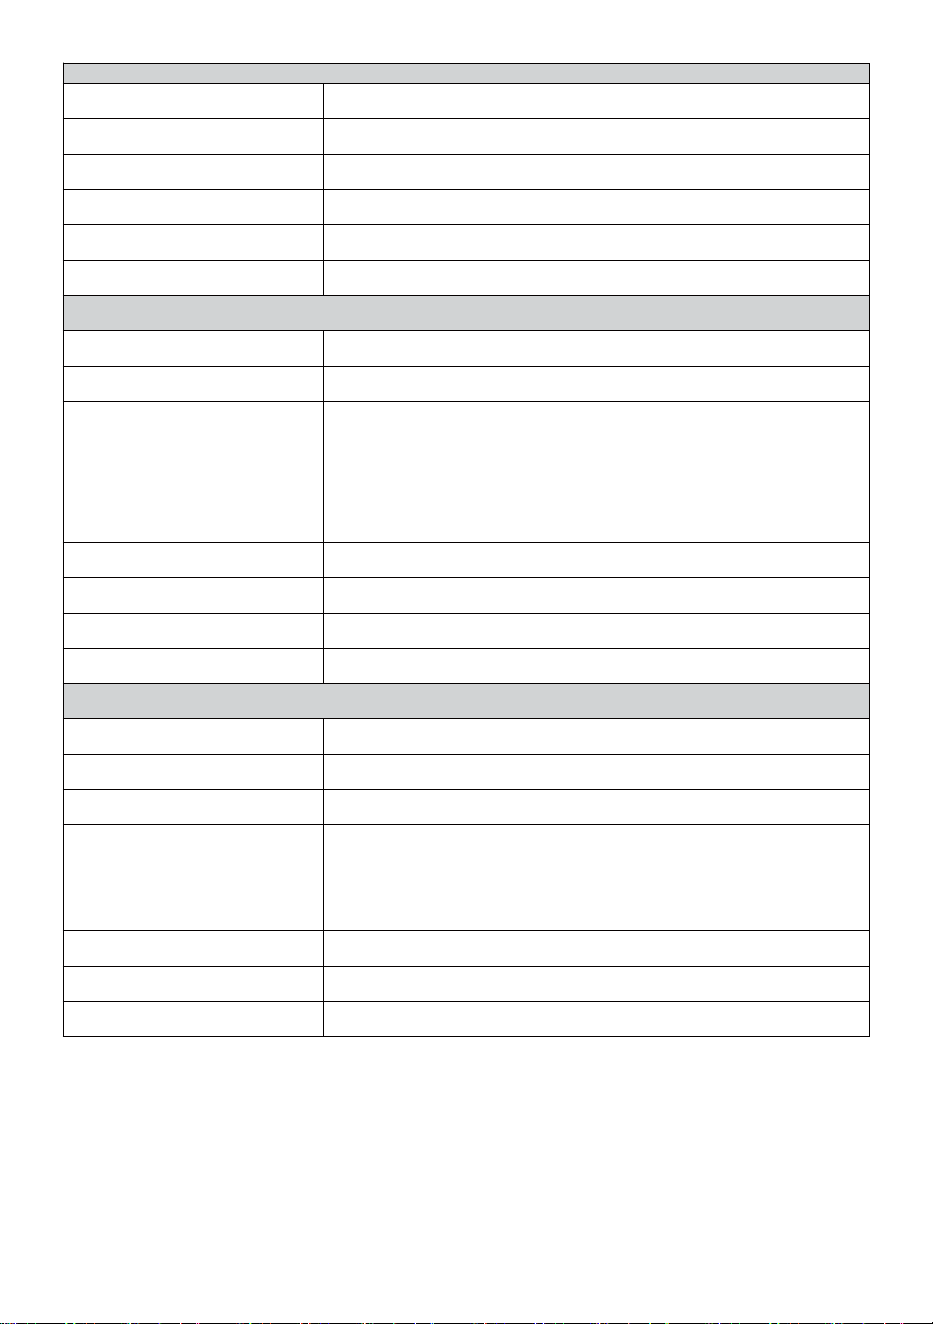
Insert the funnel in the rain collector and lock it in place.
⑥ INSTALLING THE BATTERIES
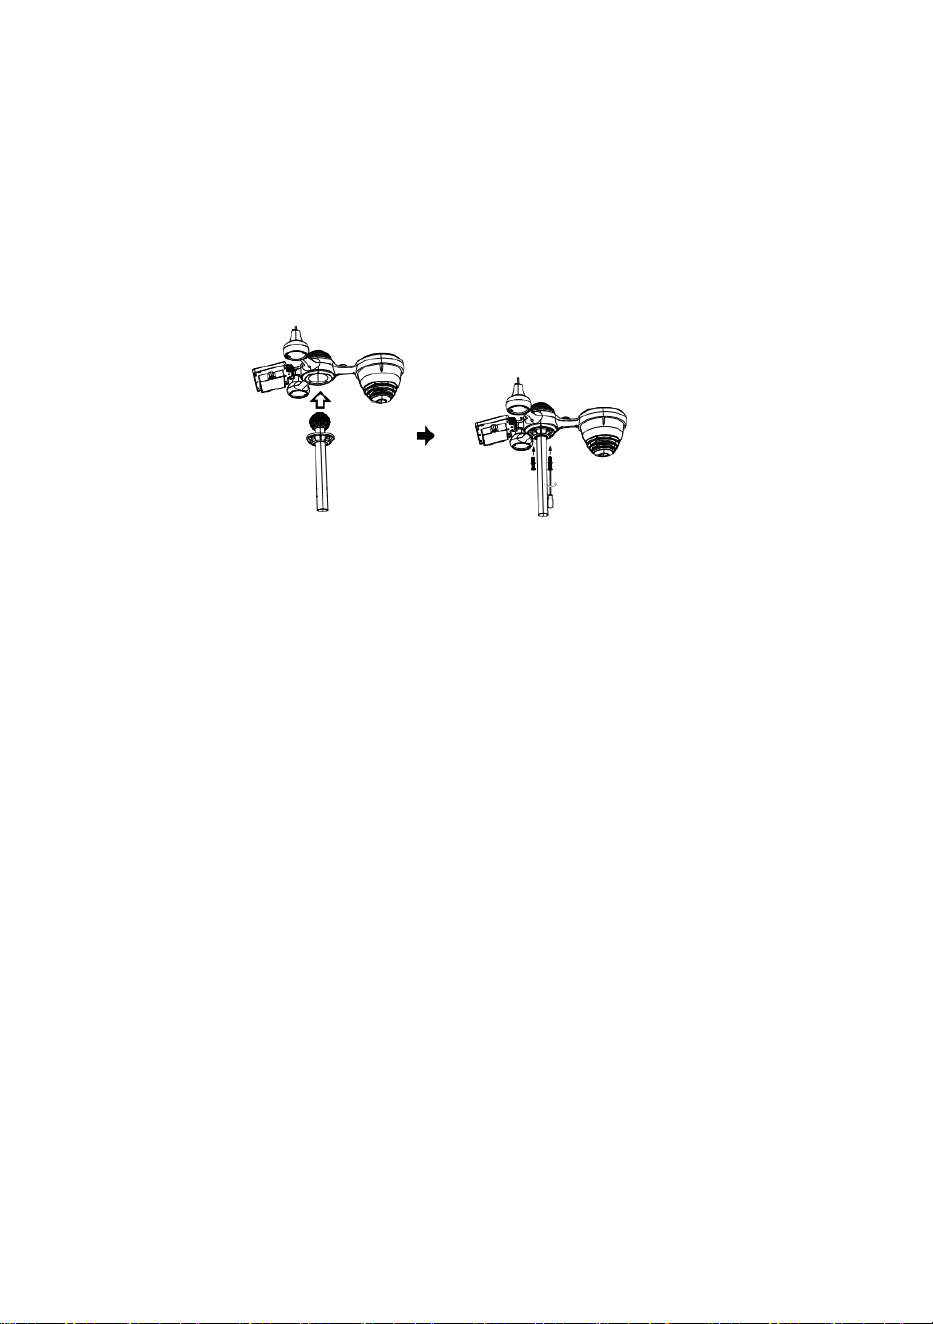
②INSTALLING THE MOUNTING BRACKET
Unscrew the battery door at the bottom. Connect the cable of the rechargeable battery pack.
Adjust the connected cables so they fit comfortably in the compartment.
Close and fasten the battery door.
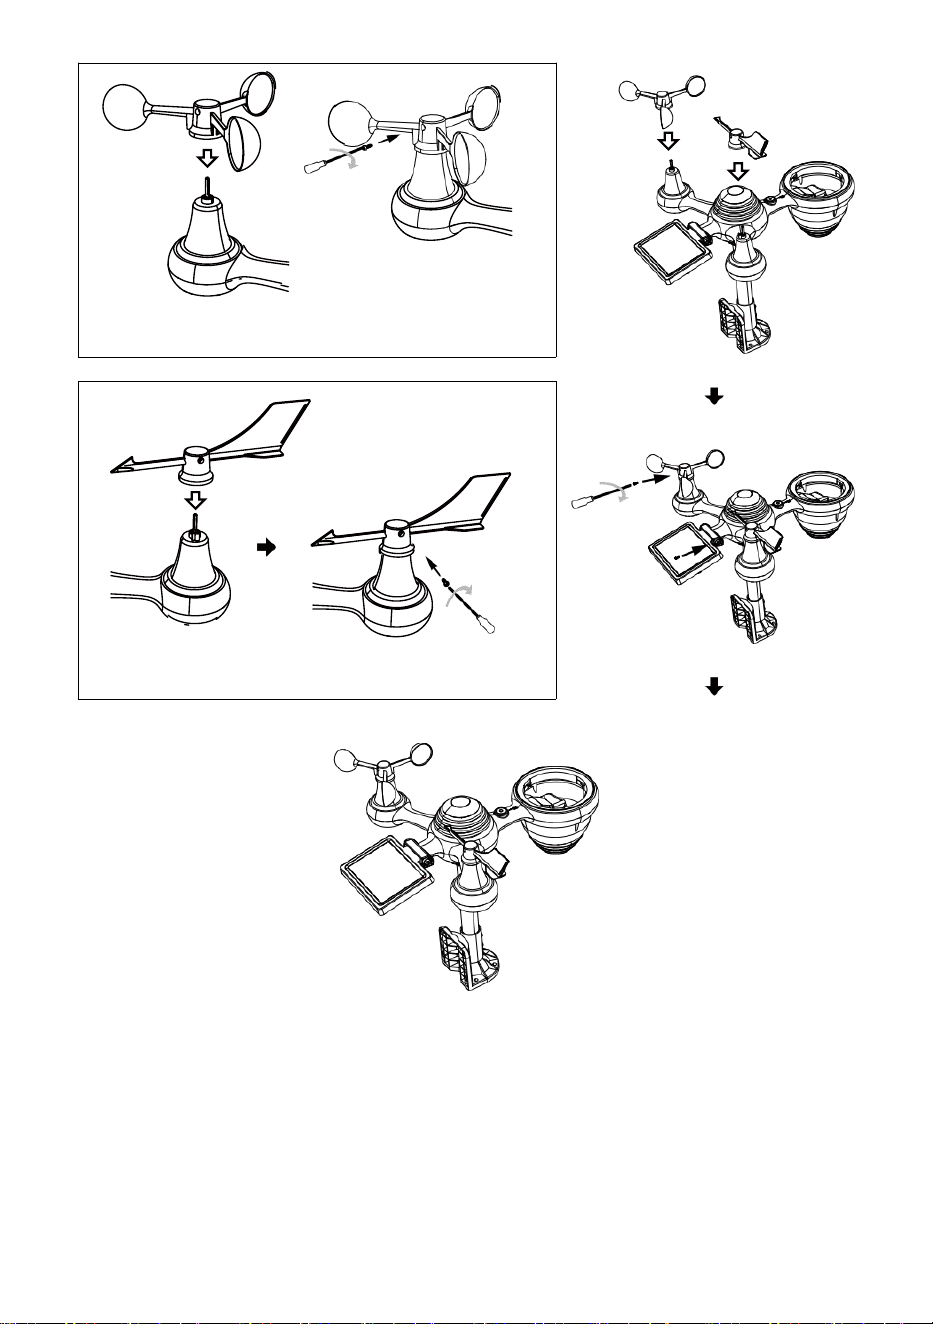
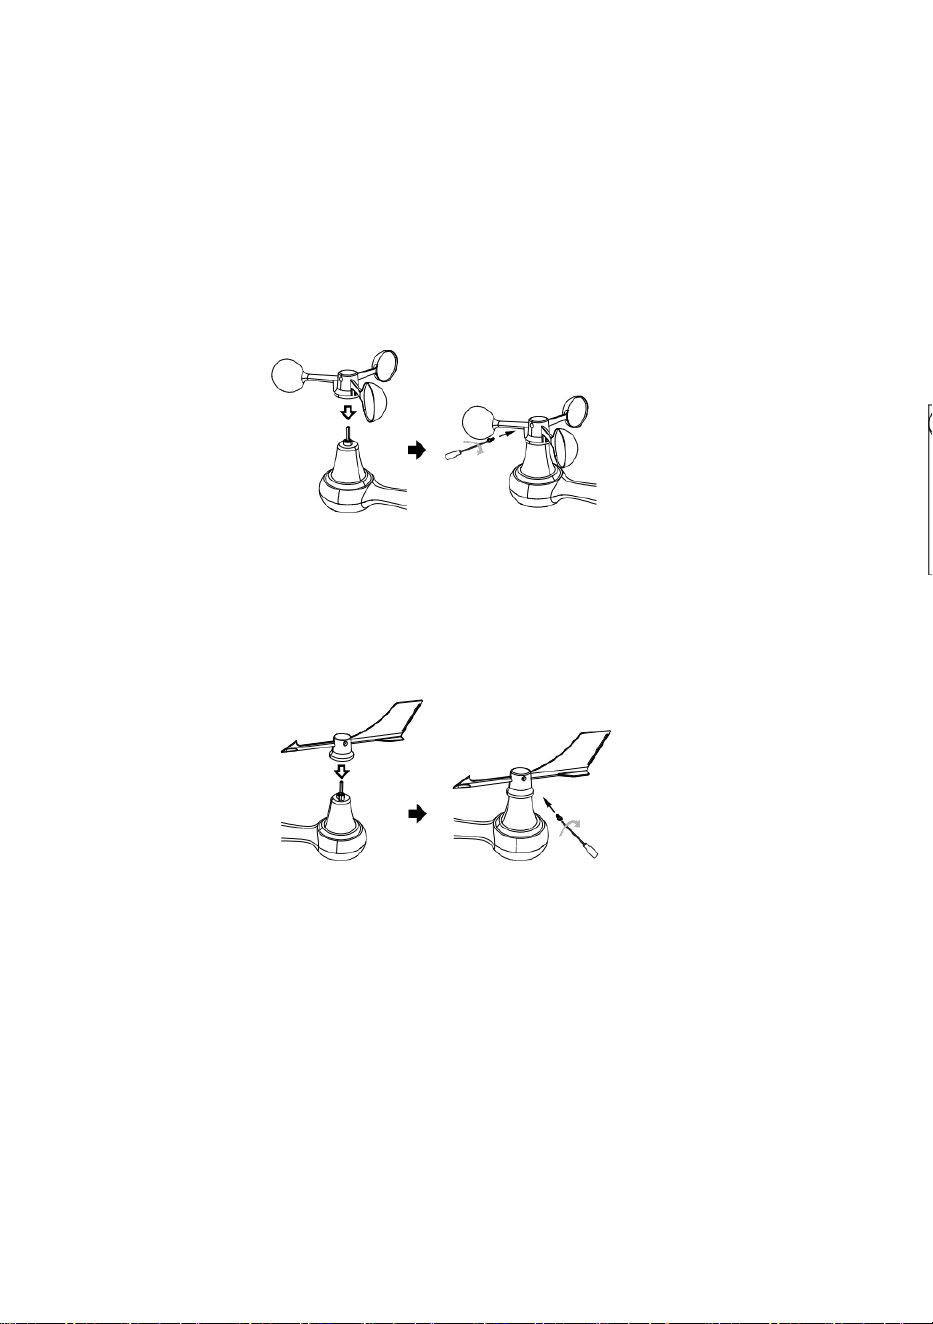
③INSTALLING WIND SPEED CUPS
Align the screw holes in the wind speed cups with the flat, vertical side of the metal rod.
Insert the wind speed cups in the metal rod and screw on tight to lock it in place.
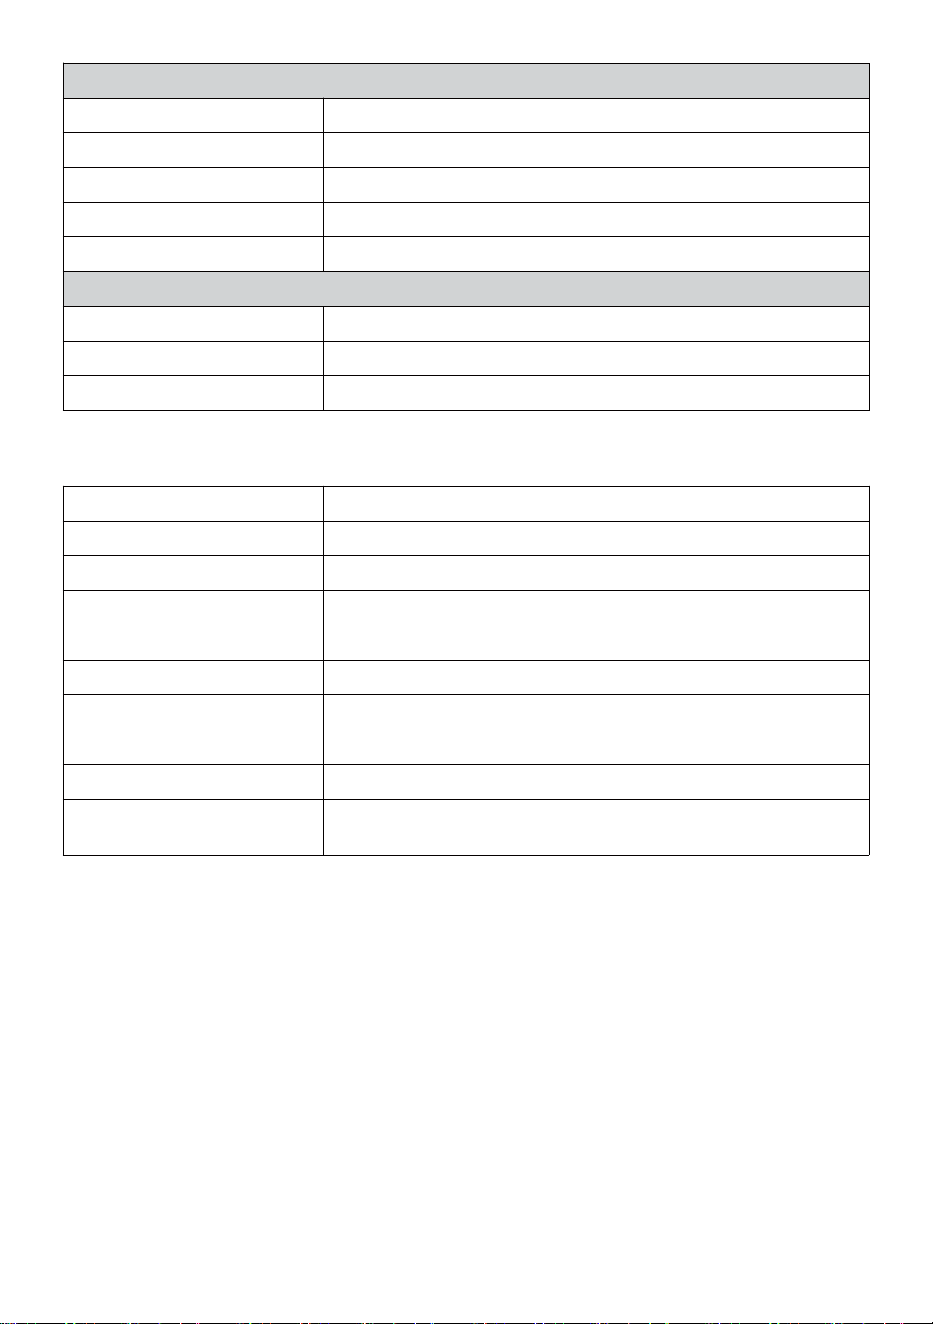
Loosen the screw at the joint. Adjust the vertical angle of the solar cell.
Push the gear inward and tighten the screw.
Point to
NORTH
NORTH
Point to
④INSTALLING WIND DIRECTION VANE
Align the screw holes in the wind direction vane with the flat, vertical side of the metal rod.
Insert the wind direction vane in the metal rod and screw on tight to lock it in place.
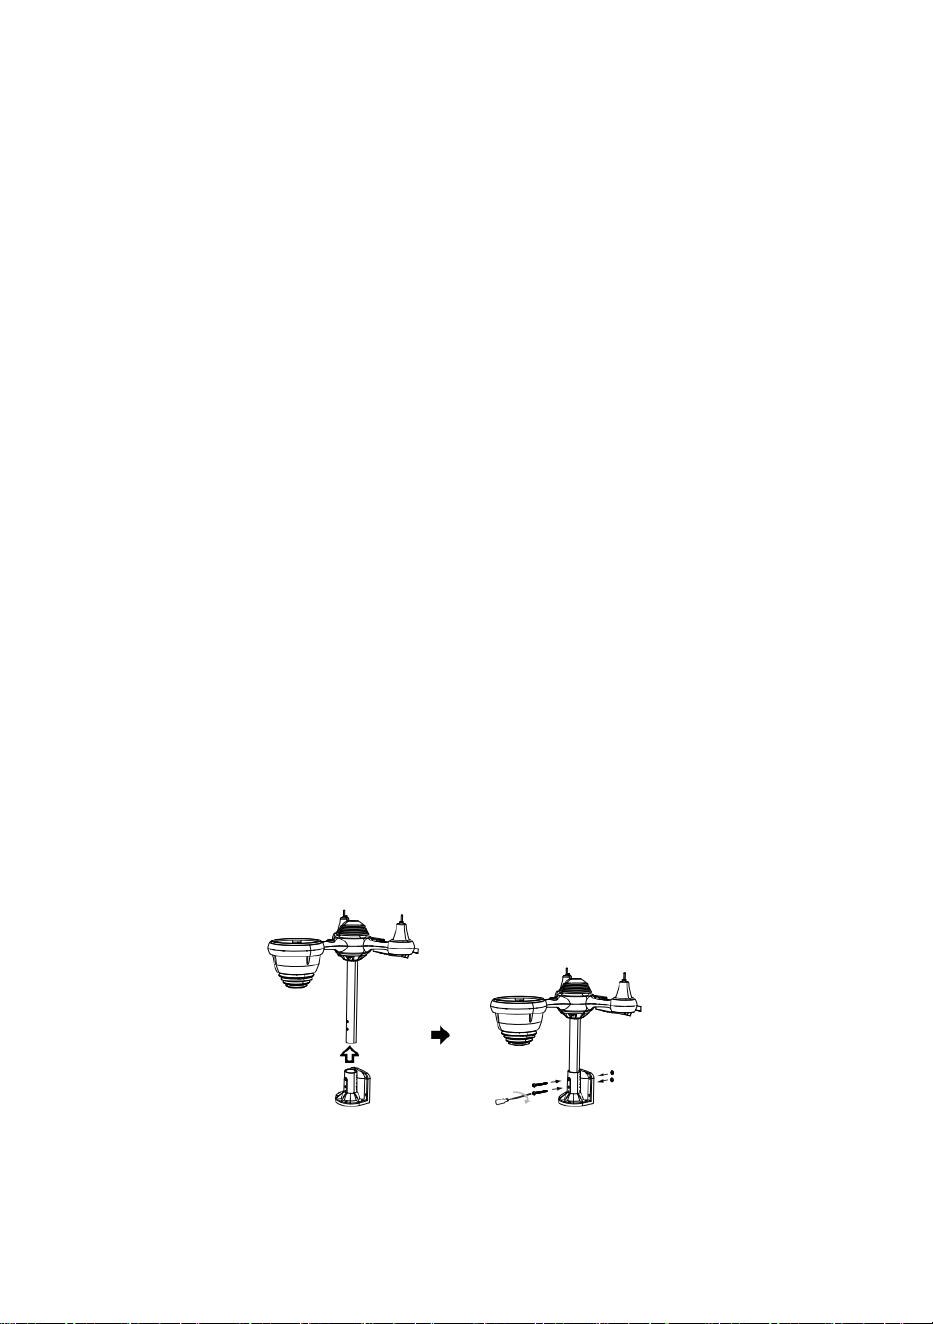
①INSTALLING THE MOUNTING POLE
Secure the sensor onto a mounting pole (included) using the screws (included).
Secure the sensor onto a mounting bracket (included) using the screws (included).
⑦ADJUSTING THE SOLAR CELL
Point to
SOUTH
Point to
NORTH
Point to
SOUTH
Point to
Align
SOUTH
TV
⑩POWERING UP
THE WEATHER STATION
Plug the power adapter into
the weather station.
Once the weather station is turned on,
it will automatically enter pairing mode.
press or button to start the AP
mode. Open your Wi-Fi network
settings on PC or smartphone.
Locate the weather station SSID
(WWS-XXXXXX) from the list.
Tap on the SSID to connect.
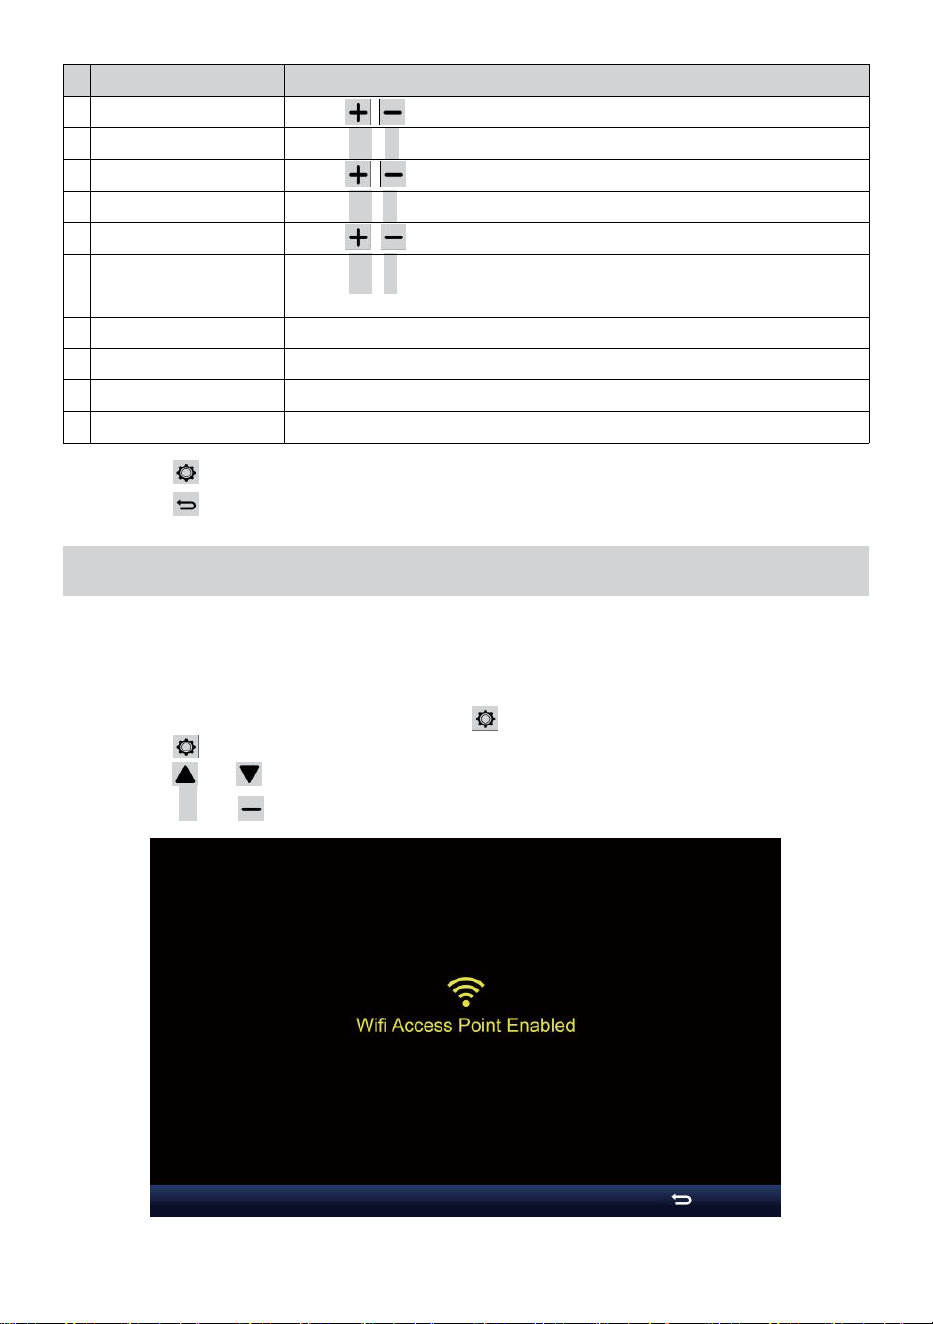
SETTING UP
WI-FI CONNECTION
In the simple/detail screen, press
button to enter Setting menu.
Press button to switch “Other
Setting ” display.
Press or button to enter “Enable
Access Point ”.
AT
LEAST
3
feet
(.9 m)
APART
To prevent wireless interference,
place both units at least 3 ft (.9 m)
away from electronic devices (TV,
computer, microwave, radio, etc.).
SETTINGS
SETUP ADVANCED
Language:
Wi-Fi Router Setup
Router 1234 5
Select the menu and choose your 2.4GHz WIFI Router
Password
Weather Server Setup
WeatherUnderground
Station ID
Station Key
Upload wunderground.com
WeatherCloud
Station ID
Station Key
Upload weatherCloud.net
Time Zone Setup
Time Zone
Time Server Setup
Server URL
Firmware Version: 1.0.1
time.windows.com
a7d9d2a279 fbbafa
**********
**********
**********
Apply
KCACANTI9
English
Router
+0.00
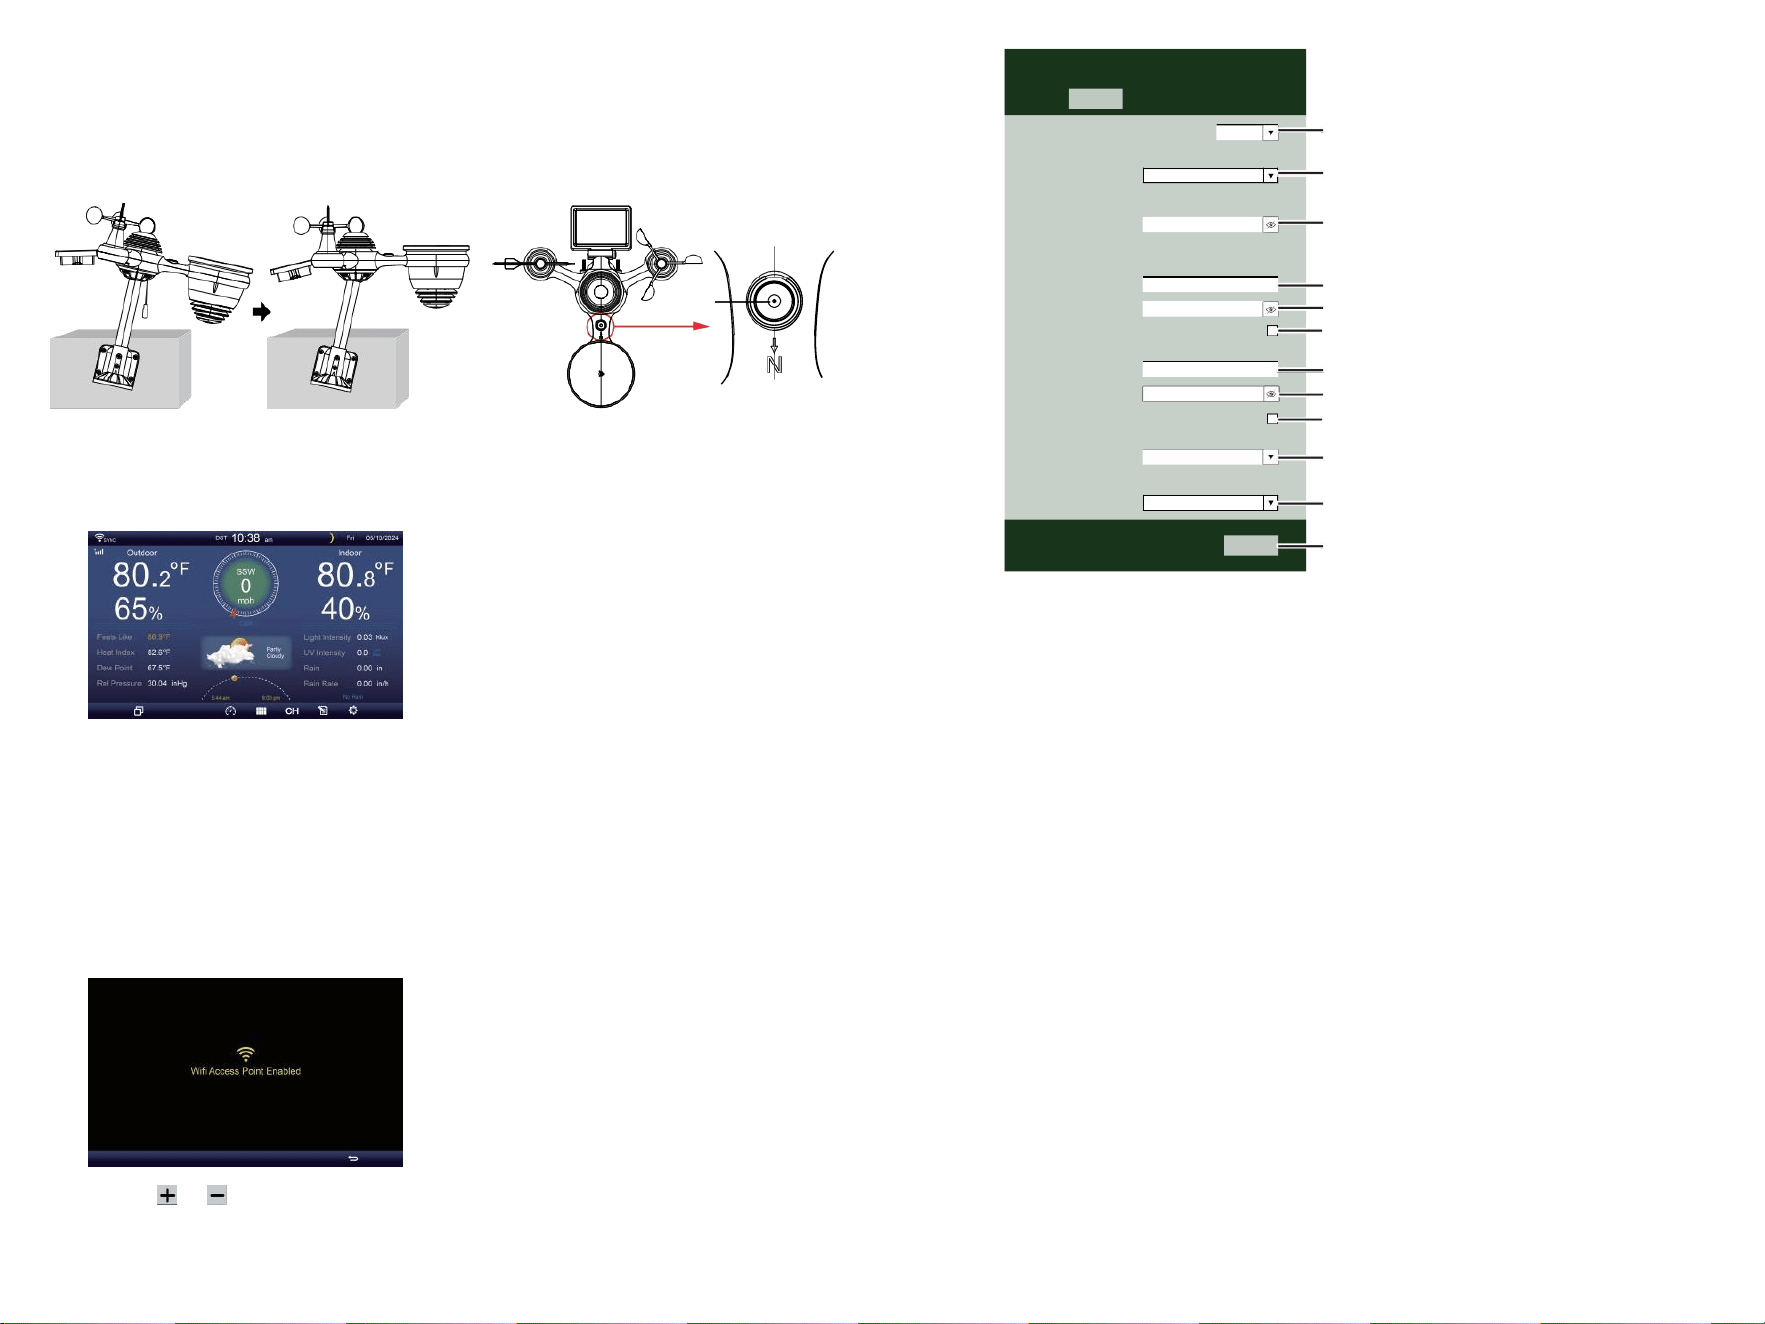
⑧MOUNTING THE WIRELESS 7-IN-1 OUTDOOR SENSOR
Various options to install. Make sure the rain collector faces north and
the solar panel faces south before fastening the screws (included).
If you are a user located in the Southern Hemisphere,
please reverse the direction.
Enter your station ID
Enter your station key/password
check to confirm upload to
WeatherUnderground server
Enter your station ID
Enter your station key/password
check to confirm upload to
Weathercloud.net
Time zone setting
Internet time server setting
Press Apply to confirm the setting
WI-FI disconnected
WI-FI connected
WI-FI connected with Sync
ENTER SETUP INTERFACE
Enter the following address into the web browser address bar:
http://192.168.1.1 to access the setup interface.
Please click to check your password before clicking APP.LY
⑨ADJUSTING THE 7-IN-1 WIRELESS SENSOR LEVEL
Use the bubble level indicator to make sure the wireless outdoor sensor is completely level.
Select setup UI display language
Select your Wi-Fi Router (SSID) from the list
Router Password
Please scan the QR code or visit https://youtu.be/JYr4BeOmEKo to see a video on how to use it.
Familiarize yourself with the icons for Wi-fi connection status.
WI-FI CONNECTION STATUS
The
bubble

Technical Support and E-Warranty Certificate www.vevor.com/support
METEOROLOGICAL STATION
MODEL:YT60233
We continue to be committed to provide you tools with competitive price.
"Save Half", "Half Price" or any other similar expressions used by us only represents an
estimate of savings you might benefit from buying certain tools with us compared to the major
top brands and doses not necessarily mean to cover all categories of tools offered by us. You
are kindly reminded to verify carefully when you are placing an order with us if you are
actually saving half in comparison with the top major brands.


- 3 -
METEOROLOGICAL
STATION
MODEL:YT60233
NEED HELP? CONTACT US!
Have product questions? Need technical support? Please feel free to
contact us:
CustomerService@vevor.com
This is the original instruction, please read all manual instructions
carefully before operating. VEVOR reserves a clear interpretation of our
user manual. The appearance of the product shall be subject to the
product you received. Please forgive us that we won't inform you again if
there are any technology or software updates on our product.

SAFETY PRECAUTIONS
- 4 -
WARNING! Please read and understand all safety precautions, operating
instructions, and care/maintenance instructions before operating this
appliance. Keep this manual for future reference.
This product is not a toy. Keep out of the reach of children.
This product is designed for use in the home only as an indication of
weather conditions.
This product is not to be used for medical purposes or for public
information.
Do not clean the unit with abrasive or corrosive materials.
Do not place the appliance near open flames or heat sources. Fire,
electric shock, product damage, or injury might occur.
Only use fresh new batteries in the product. Do not mix new and old
batteries together.
Do not disassemble, alter, or modify the product.
Only use attachments or accessories with this product specified by the
manufacturer.
Do not submerge the unit in water. Dry the product with a soft cloth if
liquid spills on it.
Do not subject the unit to excessive force, shock, duct, extreme
temperature, or humidity.
Do not cover or block the ventilation holes with any objects.
This weather station of this product is intended to be used indoors
only.
This product is only suitable for mounting at a height less than2 m (6.6 ft.).
Do not tamper with the unit’ s internal components. Tampering with the
product will void the warranty.
Batteries are not included. When inserting batteries, make sure that
the positive and negative polarities match with the markings in the
compartment.
Do not mix standard, alkaline, and rechargeable batteries together.
Leaving a battery exposed to extremely high temperature in the
surrounding environment can result in an explosion or leakage of
flammable liquid or gas.
Leaving a battery exposed to extremely low air pressure in the
surrounding environment can result in an explosion or leakage of
flammable liquid or gas.

TIPS FOR SENSOR SITE SELECTION
- 5 -
Rain collector must be cleaned every few months.
Sensor should be installed at least 1.5 m (5’) away from any building or
structure.
Choose a location in an open space under direct sunlight with no
obstructions.
The sensor should remain in the line of sight and within150 m (492’) of
the weather station for consistent, steady transmission.
Keep your sensor and weather station away from household
appliances that operate on the same frequency. The console and
sensor should be at least 1 - 2 m (3’ -7’) away from such interferences.
PRODUCT FEATURES
7″ HD TFT display screen.
Real Time Clock with calendar.
Alarm function.
Moon Phase.
Sunrise/Sunset Time.
Time zone setting and Daylight Saving Time (DST) function.
Time Zone : GMT +13 to -12h.
Automatically sync with internet time server.
7 languages (EN/ DE/ FR/ ES/ IT/ NL/ CZ) for display.
Indoor & Outdoor temperature and humidity displays with trend.
Event, Hourly, Daily, Weekly, Monthly, Total rainfall and Rainfall rate in
past hour.
Average wind speed, gust wind speed and wind direction displays.
Absolute and relative Barometric pressure displays with trend.
Solar Radiation intensity display and UVI display.
Weather index display : Feel likes, Wind Chill, Heat index. Dew point.
Weather Forecasting.
Weather data with Max/Min reading, data log & history graph display.
Weather alert settings.
Brightness of backlight adjustment.
Low battery indications for outdoor sensors.
Night Light function.
Data upload weather data to Weather Underground and/or Weather-
cloud via WiFI router.
PACKAGECONTENTS
- 6 -
1 2 3
4 5 6
7
8
9 10 11 12
1 Weather station
7 Mounting pole with 4 screws
2 Adapter
8 Mounting brackets with 6 screws
3 Wireless 7-in-1 outdoor sensor 9 Rubber pads X 2
4 Funnel
10 Screwdriver 1
5 Wind direction vane with 1 screw
11 Screwdriver 2
6 Wind speed cups with 1 screw
12 User guide
NOTE: 4 extra screws for wind direction vane and wind speed
cups.
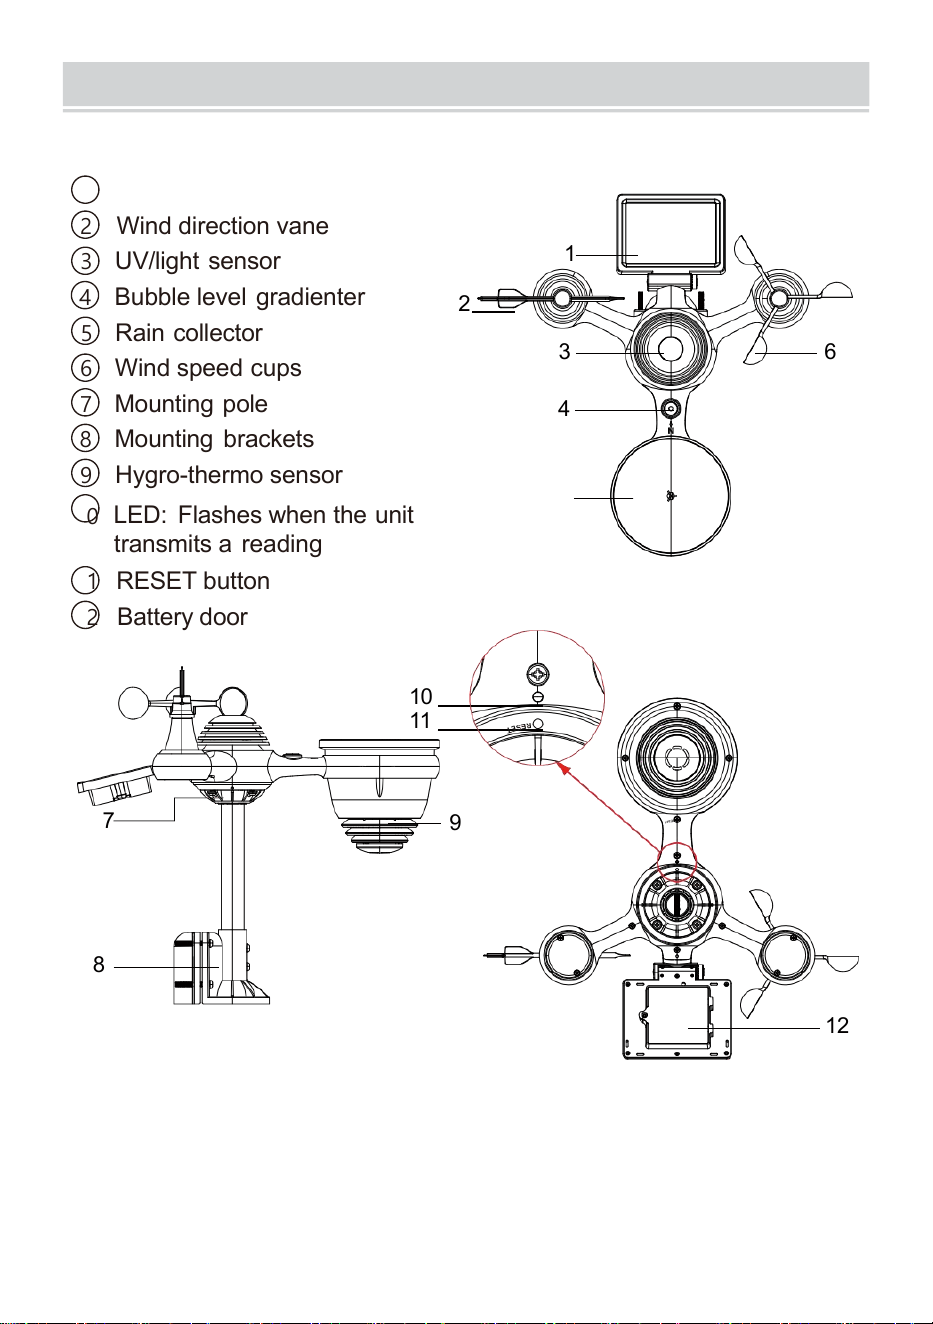
PRODUCTOVERVIEW
- 7 -
WIRELESS 7-IN-1 OUTDOOR SENSOR
1
Solar panel
2 Wind direction vane
3 UV/light sensor
4
Bubble level gradienter
2
5 Rain collector
6 Wind speed cups
7
Mounting pole
8 Mounting brackets
9 Hygro-thermo sensor
10
LED: Flashes when the unit
transmits a reading
11 RESET button
12
Battery door
10
11
7
9
8
12
3 6
4
1
5
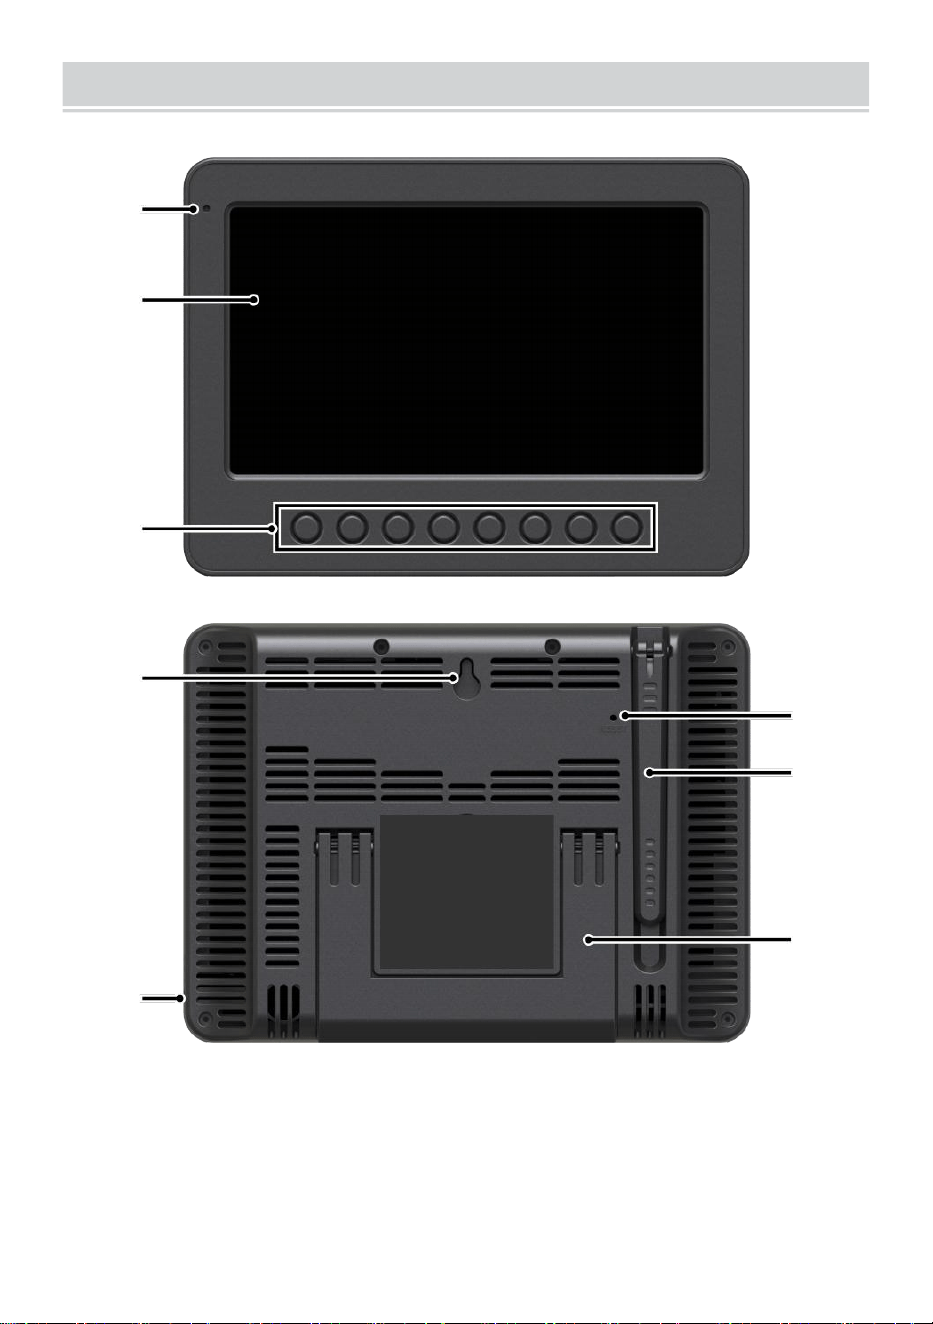
WEATHERCONSOLEOVERVIEW
- 8 -
1
2
3
4
5
6
7
8
1 Ambient light detector
4 Wall mounting holder
7 Antenna
2 Display screen
5 Power input
8 Kickstand
3 Function buttons
6 RESET button
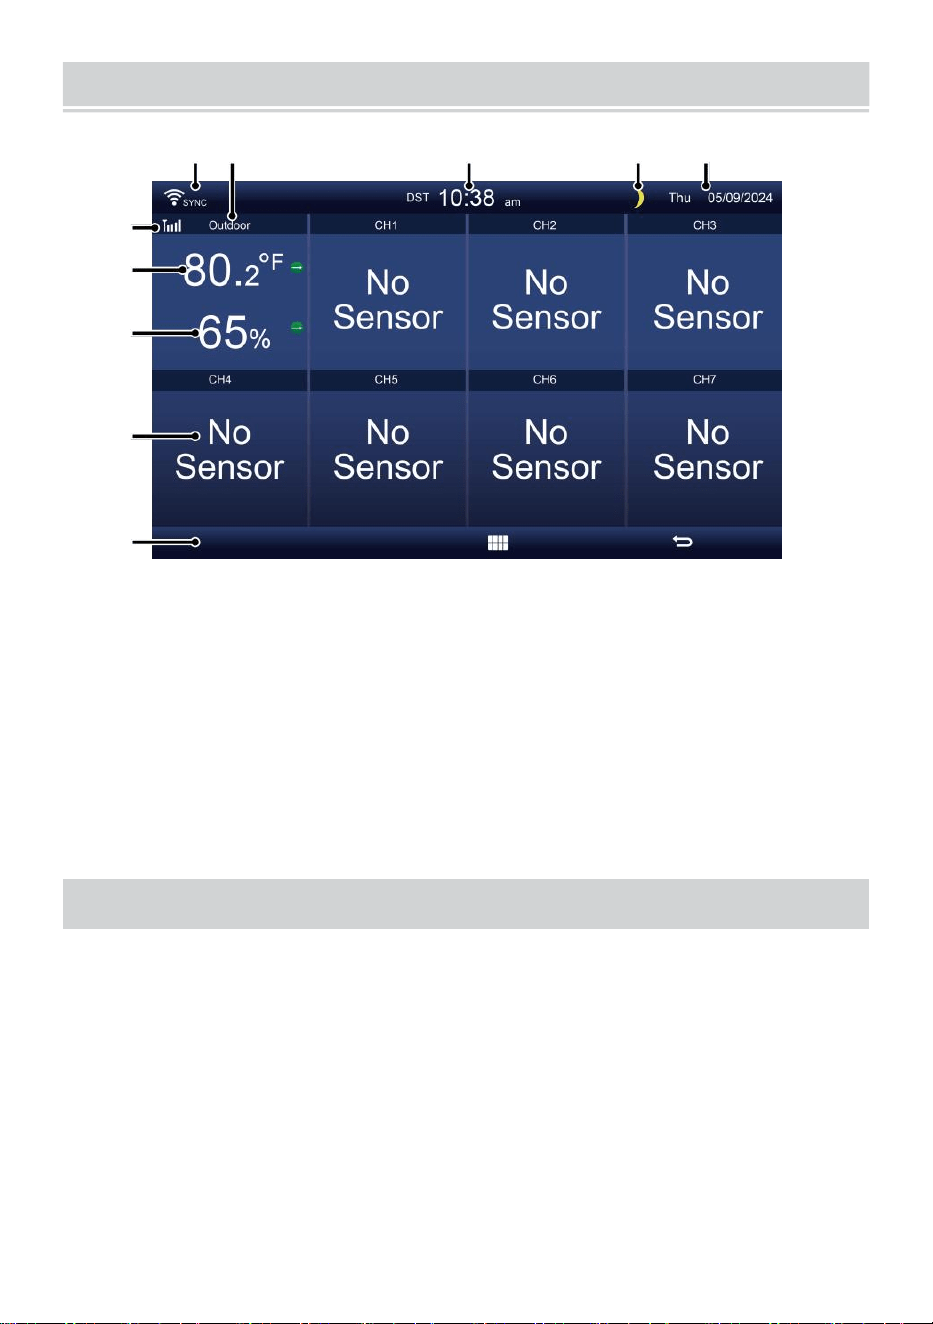
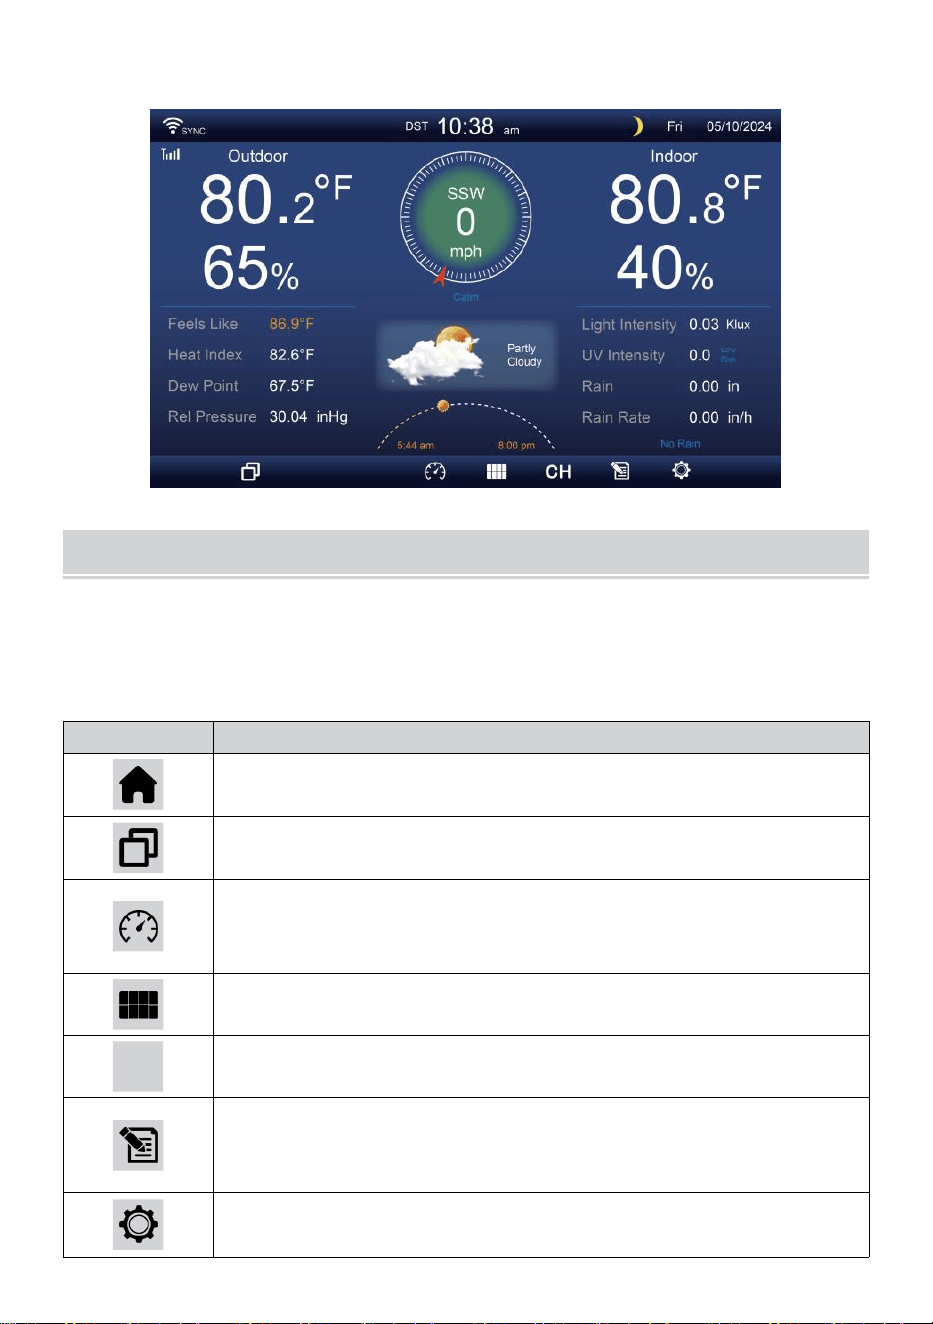
HOME SCREEN OVERVIEW
- 9 -
1 2 3 4 5
6
15
8
16
10
17
18
o—
19
20
21
。 一
22
11
12
13
14
9
7
23 24
1 Wi-fi connection/time sync icon
13 Dew point
2 Time
14 Baro pressure
3 Wind direction
15 Indoor temperature
4 Moon phase 16 Indoor humidity
5 Date
17 Light intensity
6 Sensor signal strength icon
18 UVI
7 Outdoor temperature
19 Rainfall
8 Wind speed 20 Rain rate
9 Outdoor humidity 21 Rain rate level
10 Wind speed level 22 Functional button icon
11 Feels like temperature 23 Weather forecast
12 Heat index
24 Sunrise/sunset time
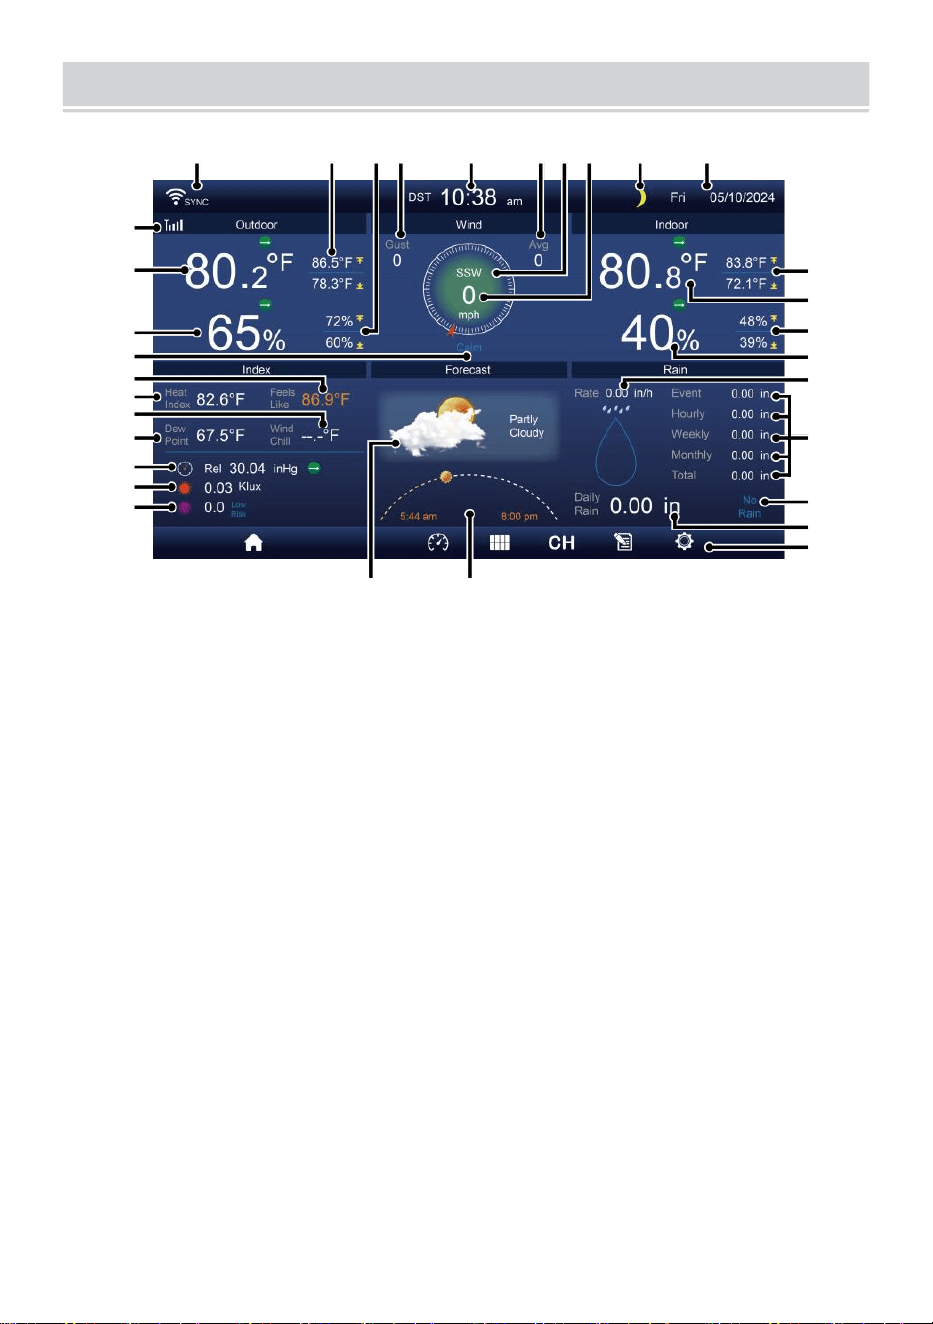
DETAIL SCREEN OVERVIEW
- 10 -
11
12
13
14
15
16
17
18
19
20
21
1 2 3 4 5 6 7 8 9 10
22
23
24
25
26
27
28
29
30
31 32
1 Wi-fi connection/time sync icon
17 Wind chill
2 Outdoor MAX/MIN temperature
18 Dew point
3 Outdoor MAX/MIN humidity
19 Baro pressure
4 Wind gust
20 Light intensity
5 Time 21 UVI
6 Average wind speed 22 Indoor MAX/MIN temperature
7 Wind direction
23 Indoor temperature
8 Wind speed
24 Indoor MAX/MIN humidity
9 Moon phase
25 Indoor humidity
10 Date
26 Rain rate
11 Feels like temperature 27 Event, hourly, weekly,
12 Outdoor temperature
monthly, total rainfall
13 Outdoor humidity 28 Rain rate level
14 Wind speed level
29 Daily rainfall
15 Feels like temperature 30 Functional button icon
16 Heat index
31 Weather forecast
32 Sunrise/sunset time
SUMMARY SCREEN OVERVIEW
- 11 -
6
7
8
9
10
1 2 3 4 5
1 Wi-fi connection/time sync icon
2 In/out icon label
3 Time
4 Moon phase
5 Date
6 Sensor signal strength icon
7 In/outdoor temperature
8 In/outdoor humidity
9 No screen connect screen
10 Functional button icon
SETTING UP THE WIRELESS 7-IN-1 OUTDOORSENSOR
The wireless 7-in-1 outdoor sensor measures wind speed, wind direction,
rainfall, UV, light intensity, temperature, and humidity.
INSTALLING THE MOUNTING POLE AND BRACKET
Secure the sensor onto a mounting pole and bracket (included) using
the screws (included).

INSTALLING WIND SPEED CUPS AND WIND DIRECTION VANE
Align the screw holes in the wind speed cups with the flat, vertical side
of the metal rod.
Insert the wind speed cups in the metal rod and screw them on tight to
lock it in place.
Align the screw holes in the wind direction vane with the flat, vertical
side of the metal rod.
Insert the wind direction vane in the metal rod and screw them on tight
to lock it in place.
- 12 -
- 13 -
Wind Speed Cups Installation
Wind Direction Vane Installation
SETTING UP RAIN COLLECTOR
Align the notches on the funnel with the lock grooves inside the rain
collector.
Insert the funnel in the rain collector and screw them on tight to lock it
in place.

Lock
Align
INSTALLING THE BATTERIES
Unscrew the battery door at the bottom of the 7-in-1 outdoor sensor
using screwdriver 1.
Connect the cable of the rechargeable battery pack (included) to the
cable located in the battery compartment.
Adjust the connected cables so they fit comfortably in the compart-
ment. Then, insert the battery pack into the compartment.
- 14 -
- 15 -
Close and fasten the battery door back on the compartment.
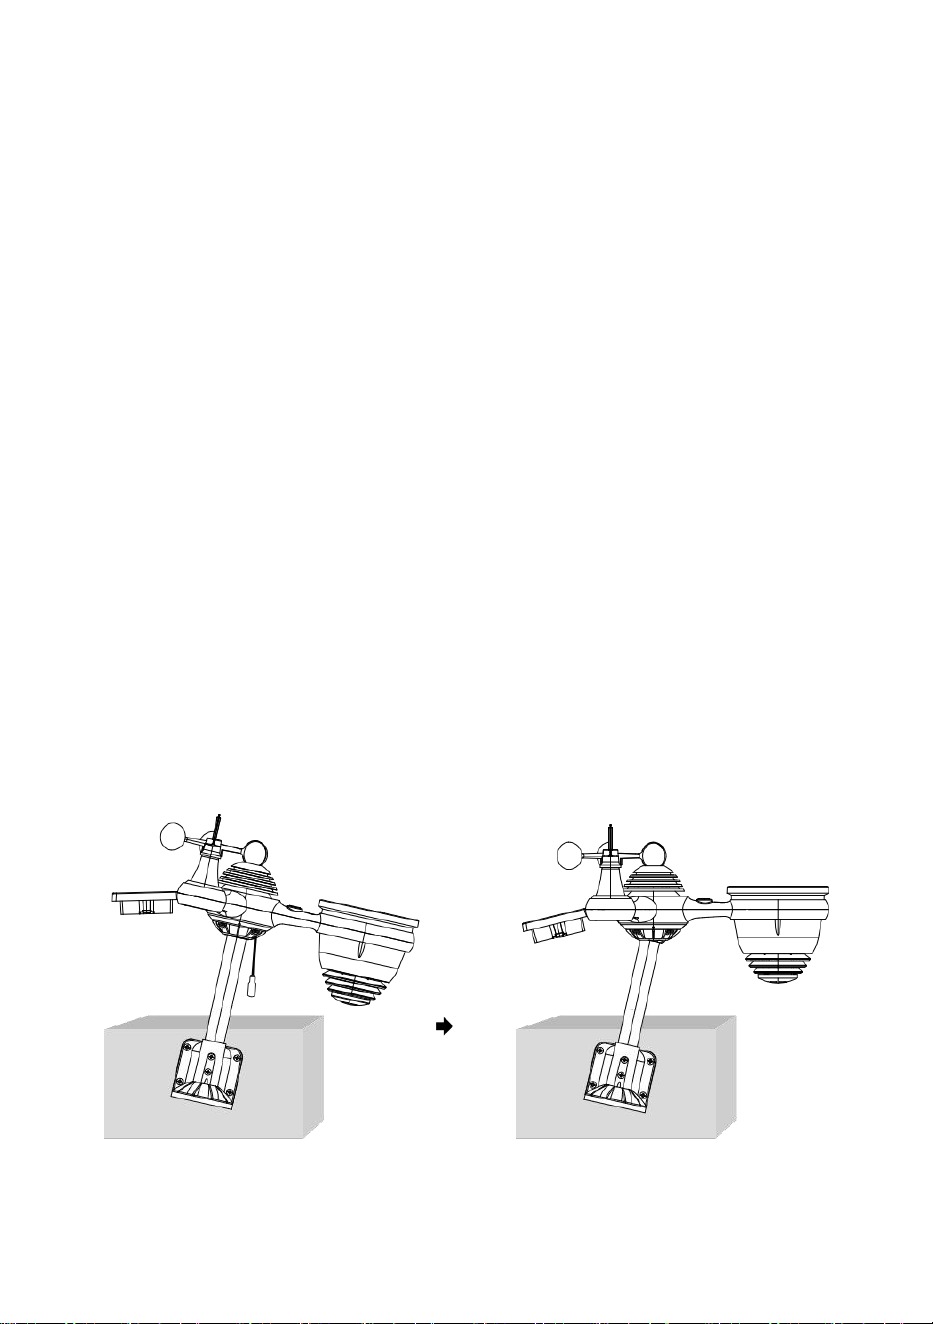
ADJUSTING THE SOLAR CELL
Loosen the screw at the joint so the gear on the other side of the joint
pushes out. The solar cell should now be in an unlocked position.
Adjust the vertical angle of the solar cell to get the most optimal usage
out of the solar cell depending on your location.
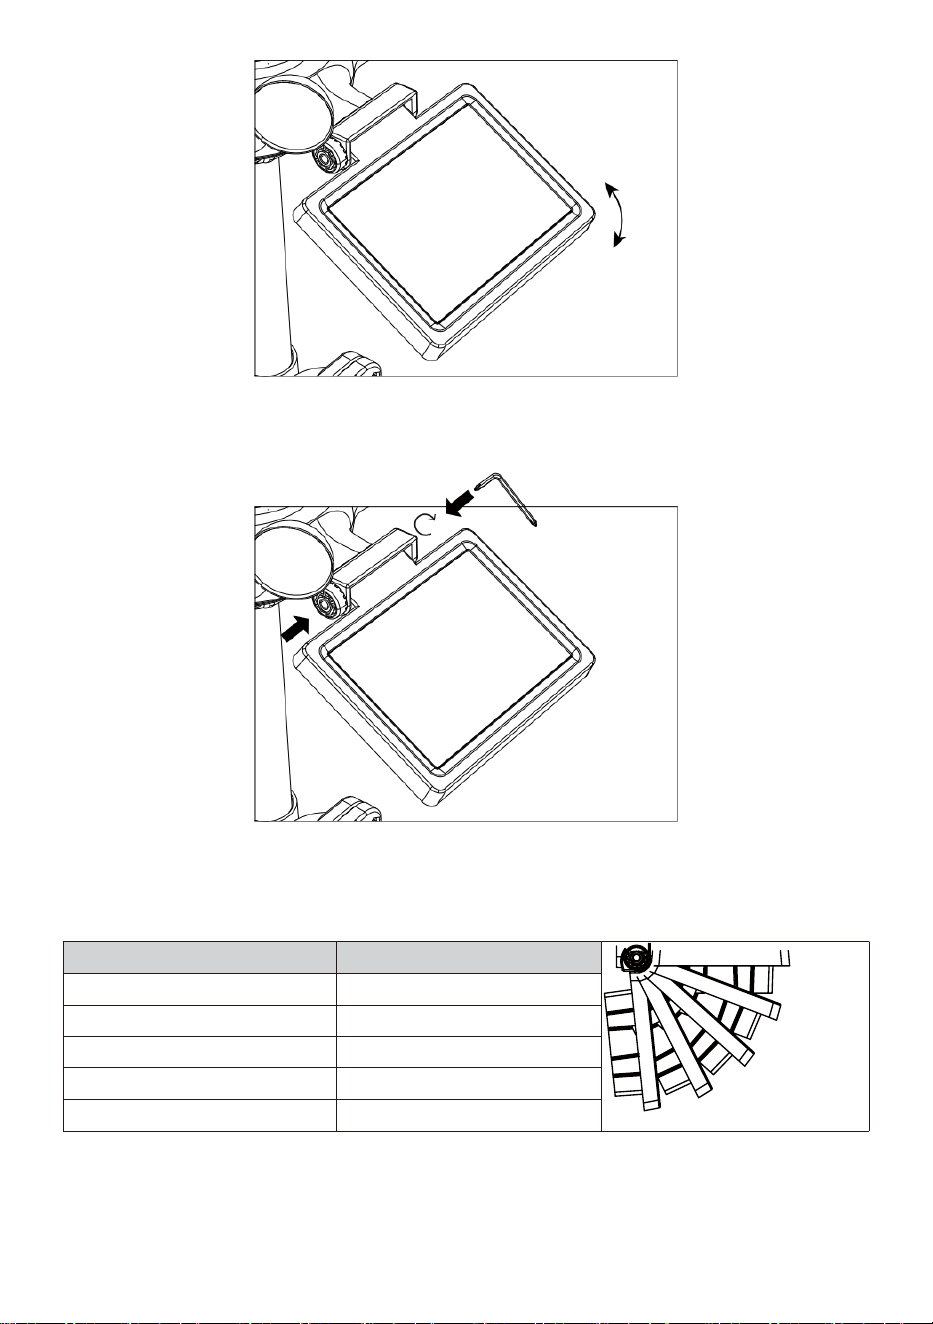
- 16 -
Push the gear inward and tighten the screw until the gears lock in
place.
When adjusting the solar cell set it to an angle closest to your latitude.
View chart below to get an idea of how you should angle your solar cell.
Latitude Proximity
Solar Cell Angle Selection
0°
21°
42°
63°
84°
If your location is close to 84°
84°
If your location is close to 63°
63°
If your location is close to 42°
42°
If your location is close to 21°
21°
If your location is close to 0°
0°
- 17 -
MOUNTING THE WIRELESS 7-IN-1 OUTDOOR SENSOR
Pick a location for the 7-in-1 outdoor sensor that is open with no
obstructions.
Tighten the mounting brackets to a surface/wall using four tapping
screws (included), or tighten the mounting pole to your existing mount-
ing pole with four φ5 Bolts and M5 Nuts assembly.
Add rubber pads onto the mounting bracket before fastening the
mounting bracket on the sensor.
Make sure the rain collector faces north and the solar panel faces
south before fastening the screws (included).
Please ensure that the sensor is fixed particularly tightly, otherwise
windy conditions cause the transmitter to shake and thus misread the
rainfall data.
Point to
NORTH
Point to
SOUTH
Point to
NORTH
Point to
SOUTH
Point to
NORTH
Point to
SOUTH
Stick
Stick
- 18 -
POINTING THE WIRELESS 7-IN-1 OUTDOOR SENSOR TO SOUTH
The outdoor wireless weather sensor is calibrated to be pointed north for
maximum accuracy. However, for your convenience, if you are a user
located in the Southern Hemisphere, you can use the sensor with the rain
collector pointing south.
1. Mount and install the wireless weather sensor with the rain collector
pointing South, instead of North. (Please refer to MOUNTING THE
2. WIRELESS 7-IN-1 OUTDOOR SENSOR.)
Select "STH" for south hemisphere in the clock setting mode. (Please
refer to "setting the clock")
NOTE: Changing the hemisphere setting will automatically switch
the direction of the moon phases on the display.
Pointing the wireless weather sensor toward the south will allow
maximum sunlight on the solar panel, especially during the winter
season in the Southern Hemisphere.
ADJUSTING THE 7-IN-1 WIRELESS SENSOR LEVEL
Use the bubble level indicator to make sure the wireless outdoor
sensor is completely level. If the sensor is not level, the gain gauge,
UV and Light intensity will not measure properly.
To adjust the level of wireless outdoor sensor, loose the screws of the
mounting pole. Adjust the level of the wireless outdoor sensor in order
to make sure the bubble is in the center of the bubble level indicator.
Tighten the screw of the mounting pole again.
- 19 -
The bubble
SETTING UPTHE DISPLAYCONSOLE
POWER UP THE CONSOLE
1. Connect the power adaptor to the display console.
2. Flip the antenna on back of the console up.
3. Once the console is turned on, the opening screen will be displayed
and then enter into main screen.
4. Wait the outdoor sensor to pair with your console.
- 20 -
5. Once paired, the outdoor data will be shown on the screen.
OPERATINGINSTRUCTION
This section describes the main functions and other functions of buttons
inside the console.
MAIN FUNCTIONS OF BUTTONS
ICON
DESCRIPTION
Home button
Press this button to show simple data display screen.
Expand button
Press this button to show the detailed data screen.
Pressure
Press this button to show between Relative and absolute
pressure screen.
Multi sensor
Press this button to show the multi-sensor screen.
CH
Channel
Press this button to switch Indoor, CH1-7 data screen.
History Record button
Press this button to show the history screen (Max/Min,
Data record, Graphic display).
Setting
Press this button to show the setting screen.
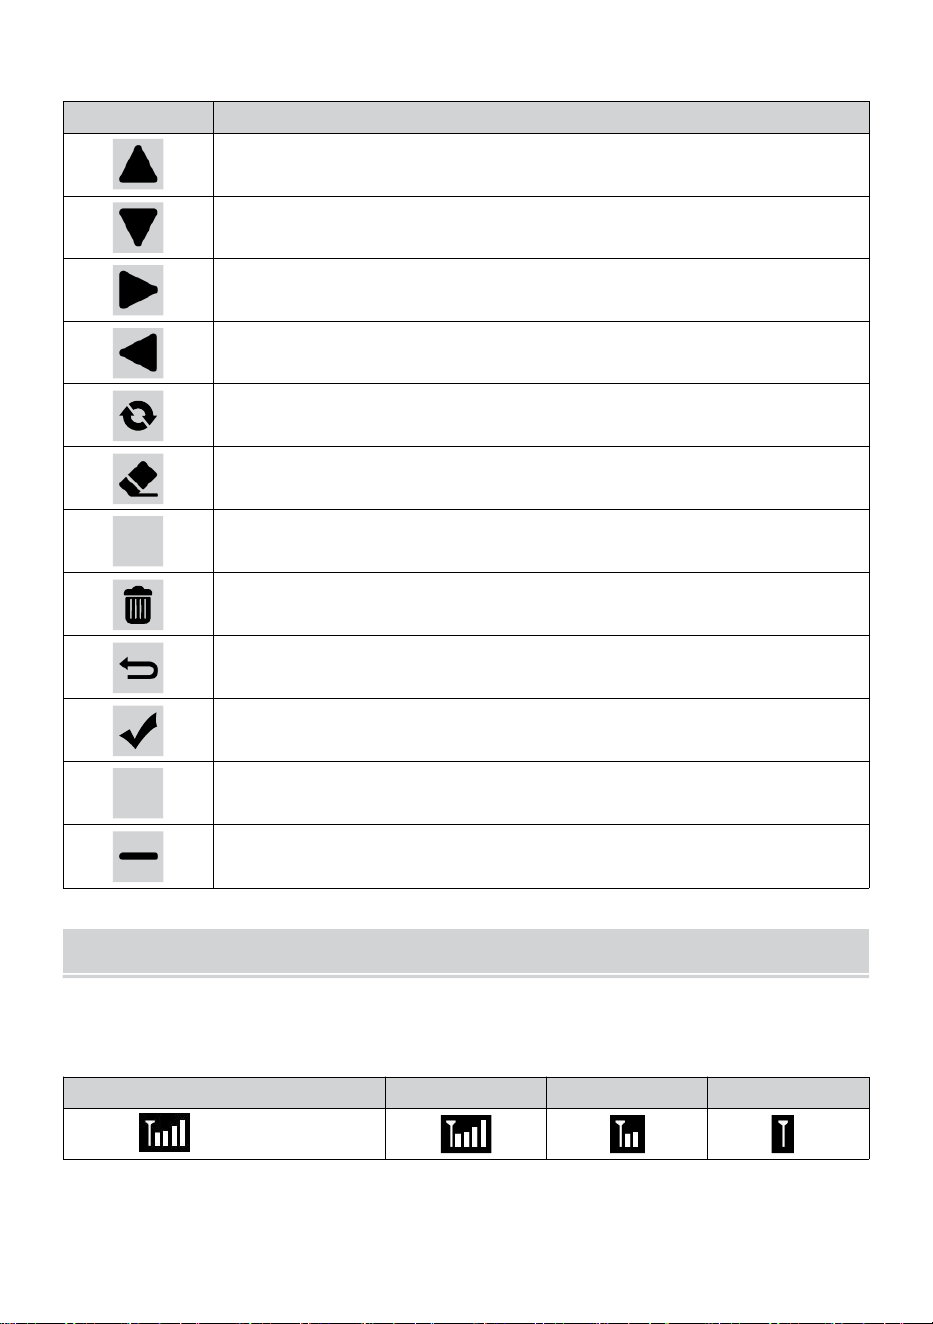
- 21 -
OTHER FUNCTION BUTTONS FOR SETTINGS
ICON
DESCRIPTION
Up button
Press this button to select upper row or item.
Down button
Press this button to select lower row or item.
Right button
Press this button to select right side column or item.
Left button
Press this button to select left side column or item.
Cycle button
Press this button toggle to change different parameter screen.
Clear button
Press this button to clear the max/min record.
Q
Search button
Press this button to search the data record.
Delete button
Press and hold this button to delete records.
Return button
Press this button to return previous page.
OK button
Press this button to confirm the selection.
+
+ button
Press this button to increase value or switch to other option.
- button
Press this button to decrease value or switch to other option.
WIRELESS SIGNAL RECEPTION
Familiarize the icons for different signal strength. Relocate your console
or weather sensor if signal is weak or lost.
Signal searching
Strong signal
Weak signal
Signal lost
Antenna bar is
scrolling
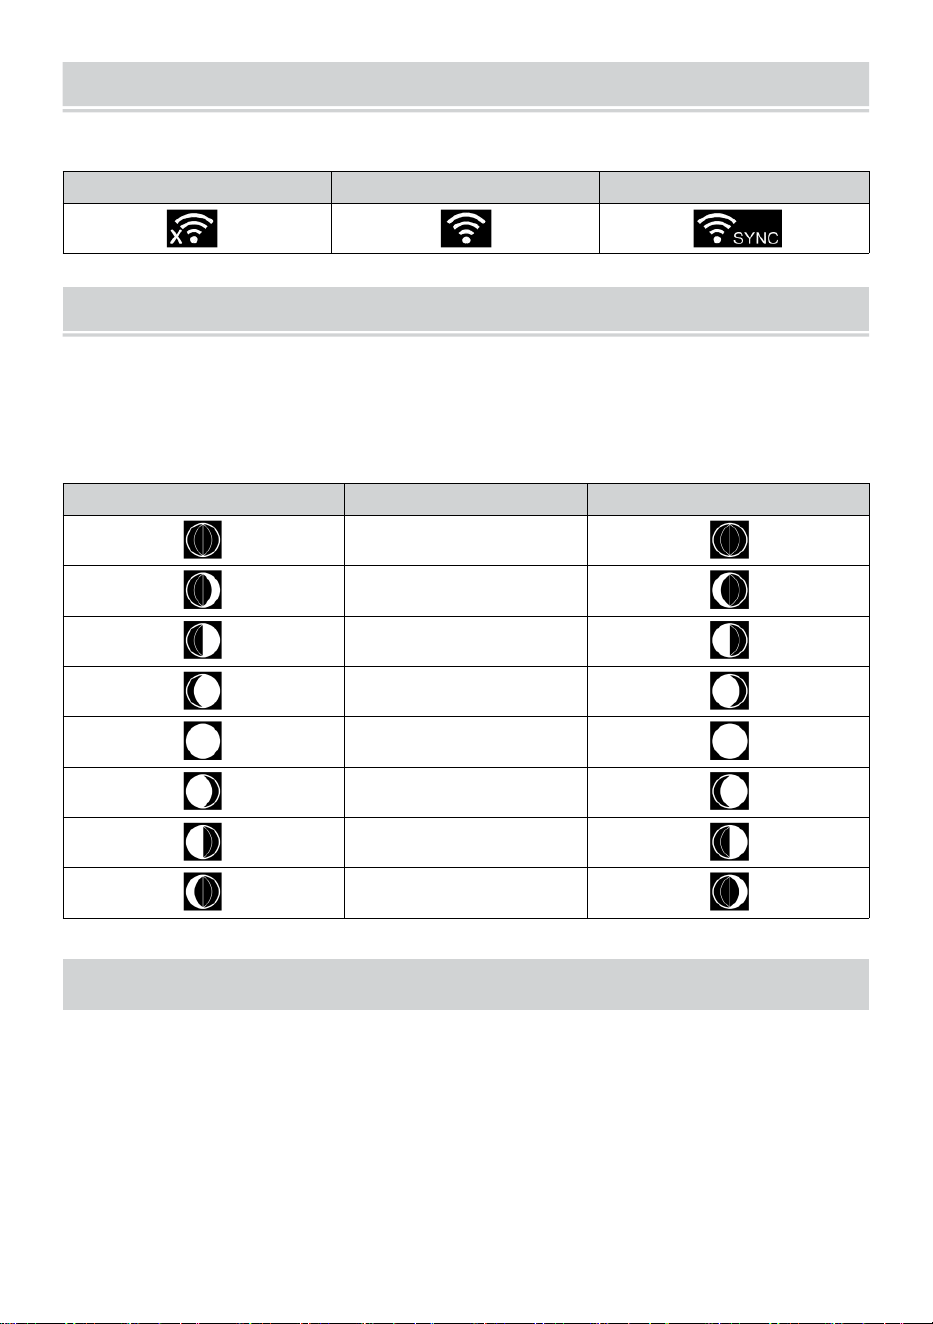
WI-FI CONNECTION STATUS
- 22 -
Familiarize yourself with the icons for Wi-fi connection status.
WI-FI disconnected
WI-FI connected
WI-FI connected with Sync
MOON PHASE
The display console calculates the moon phase according to your time,
date, and time zone.
The table below explains the corresponding phases and their icons for
both the Northern and Southern hemispheres.
Northern Hemisphere Icons
Moon Phase
Southern Hemisphere Icons
New Moon
Waxing Crescent Moon
First Quarter Moon
Waxing Gibbous Moon
Full Moon
Waning Gibbous Moon
Third Quarter Moon
Waning Crescent Moon
SUNRISE/SUNSETTIME
The console indicates your location’s sunrise/sunset, which is based on
time zone, latitude, and longitude you entered. If Daylight Saving is set to
AUTO, the times will adjust an hour forward automatically for daylight
saving.
NOTE: For time zone, latitude and longitude setting, please refer
“Time & Date Setting”.

WEATHER FORECASTINGAND WEATHERINDEX
- 23 -
WEATHER FORECASTING
The built-in barometer can notice atmospheric pressure changes, and
based on the data collected, can predict the weather conditions.
There are 6 weather icons --- Sunny, Partly Cloudy, Cloudy, Rainy, Rainy/
Stormy and Snowy (Light Snow & Heavy Snow).
Sunny
Partly cloudy
Cloudy
Light rain
Heavy rain/storm
Light snow
Heavy snow
NOTE:
The accuracy of a general pressure-based forecast is about 65-70%.
Forecasts are not guaranteed.
It may not necessarily reflect the current situation.
TREND INDICATOR
The trend indicator shows the trends of changes in the forthcoming few
minutes. These icons will appear in the temperature, humidity, and baro-
metric pressure section of the detail screen.
Rising
Steady
Falling
ICE ALERT
When outdoor temperature is lower than 1°C/33.8°F, the snowflake icon
i
·
will appear on the display.
- 24 -
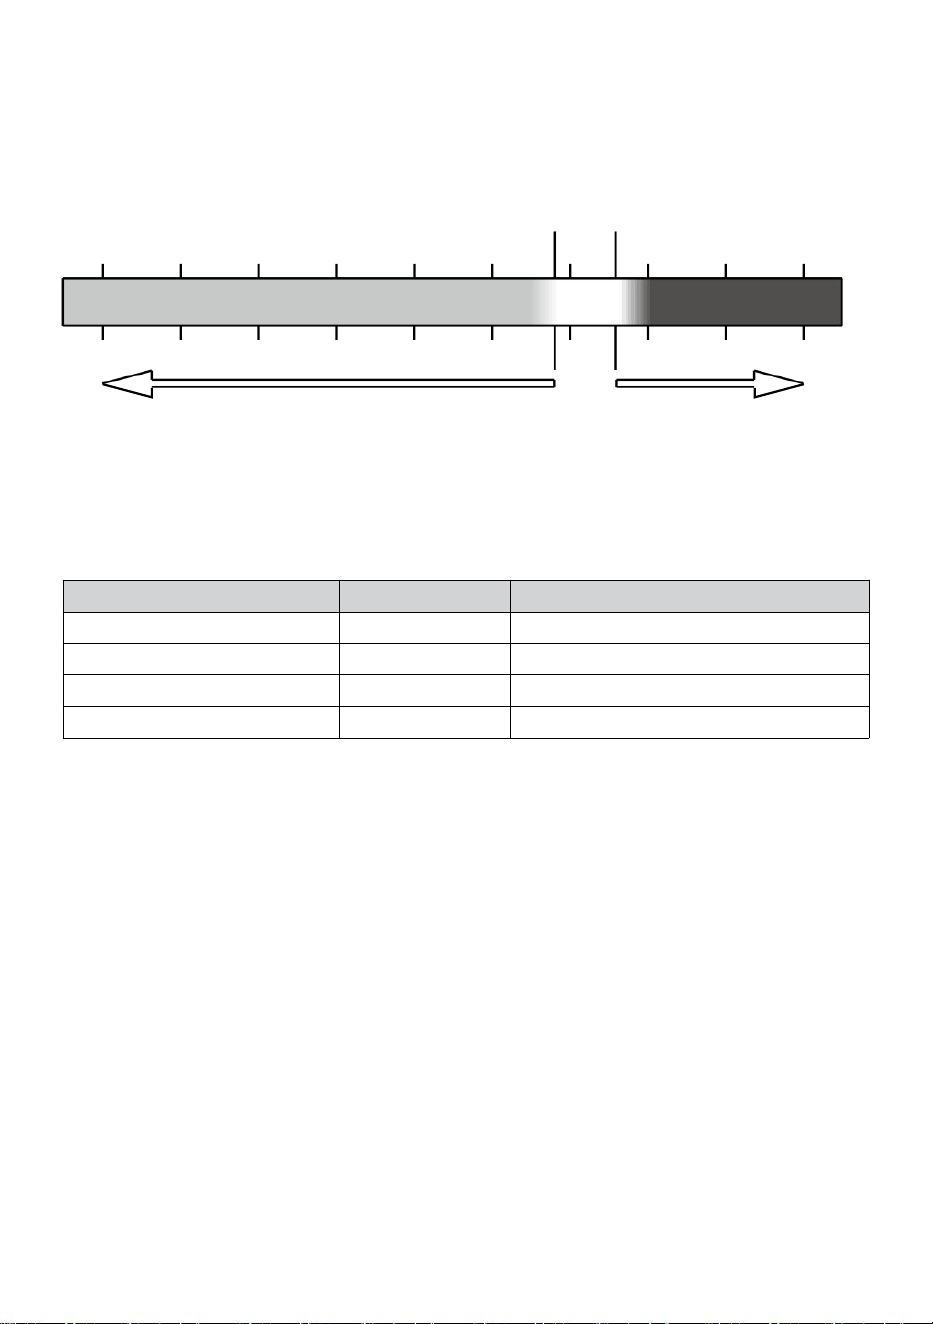
FEELS LIKE
The Feels Like temperature index determines what temperature it actually
feels like outside, taking into account factors like wind speed, pressure,
temperature and humidity (wind chill and heat index).
18°C 26°C
10 20 30
-40 -22 -4 14 32 50 68 86 104 122 °F
Wind Chill Heat Index
HEAT INDEX
The Heat Index is determined by the wireless weather sensor’s tempera-
ture and humidity readings when the temperature is between 79 °F (26
°C) and 120 °F (50 °C).
Heat Index range
Warning
Explanation
81°F - 90°F (27°C - 32°C)
Caution
Possibility of heat exhaustion
91°F - 104°F (33°C - 40°C)
Extreme Caution
Possibility of heat dehydration
106°F - 129°F (41°C - 54°C)
Danger
Heat exhaustion highly likely
≥ 131°F (≥ 55°C)
Extreme Danger
Strong risk of dehydration/heatstroke
WIND CHILL
Wind chill or windchill is the lowering of temperature due to the pass-
ing-flow of lower-temperature air. Wind chill is determined by a combina-
tion of the wireless weather sensor’s temperature and wind speed data
.
NOTE: Only when the temperature is below 50℉(10℃) and the wind
speed is over 4.8km/h (3mph), will display the wind chill value,
otherwise it will display “--.-“.
DEW POINT
The dew point is the temperature below which the water vapor in air at
constant barometric pressure condenses into liquid water at the same rate
at which it evaporates. The condensed water is called dew when it forms
on a solid surface.
The dew point temperature is determined by the temperature and humidi-
ty data from the wireless weather sensor.
-40 -30 -20 -10 0
40 50 °C
Increasing danger Increasing danger
BAROMETRIC PRESSURE
- 25 -
Check the weather website for real-time barometer conditions then adjust
the relative in the Calibration setting section.
Absolute
The absolute atmospheric pressure of your location.
Relative
The relative atmospheric pressure based on the sea level.
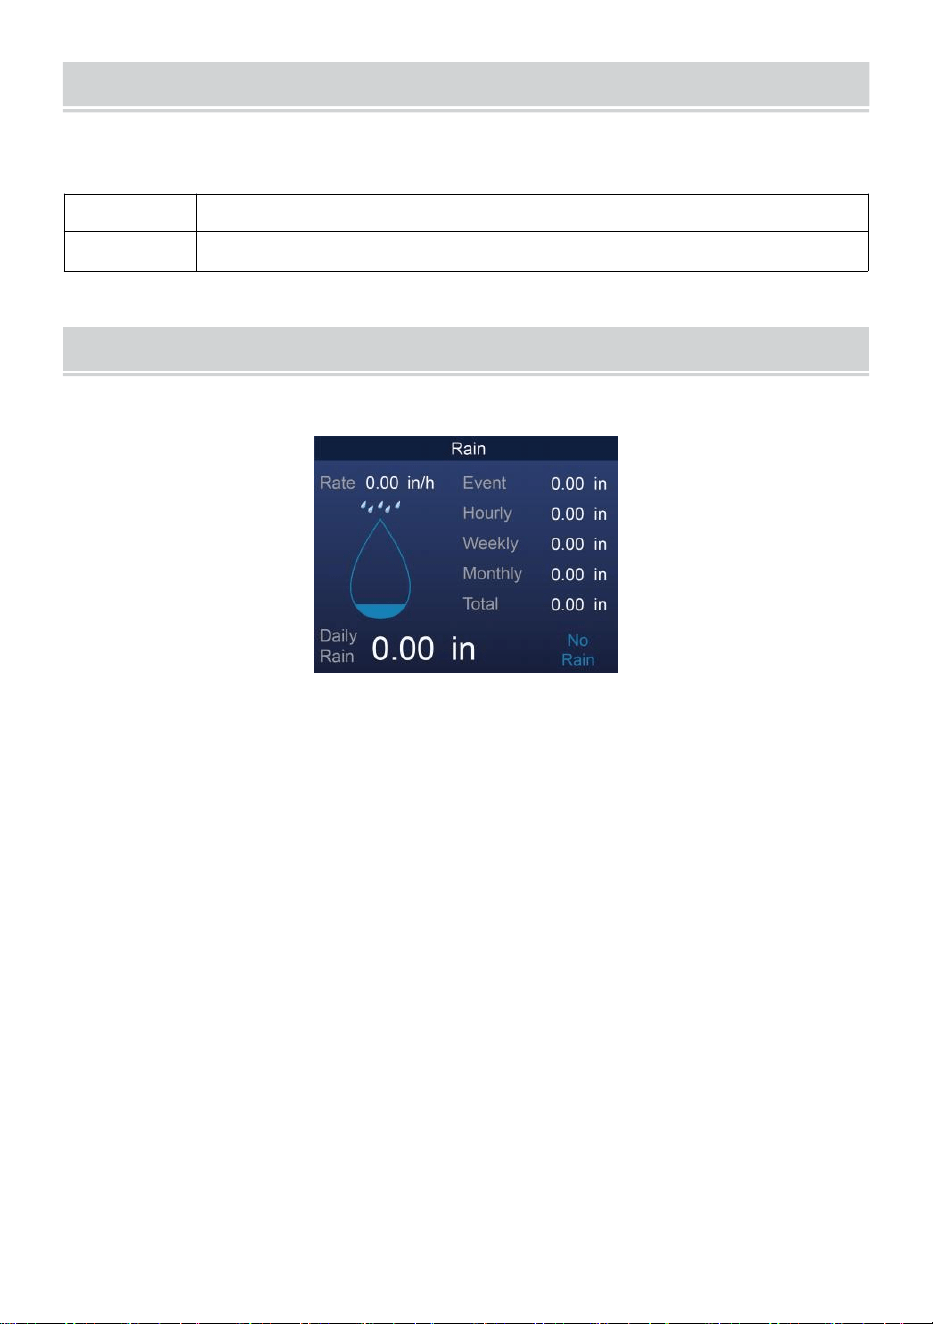
RAIN
This section shows the rainfall or rain rate information.
RAINFALL DISPLAY MODES
Rain Rate
: Current rainfall rate in the past hour.
Rain event
: continuous rain, and resets to zero if rainfall accumulation
is less than 10mm (0.039 in) in a 24-hour period.
Hourly Rain
: Total rainfall for each hour.
Daily Rain
: Total rainfall since midnight (00:00)
Weekly Rain
: Total rainfall for the current calendar week, and resets on
Sunday morning at midnight (Sunday thru Saturday)
Monthly Rain : Total rainfall for the current calendar month, and reset on
the first day of the Month.
Total Rain : Total rainfall since the last reset.
RESET THE TOTAL RAINFALL RECORD
Refer to “Erase All Data” section to clear rainfall data.
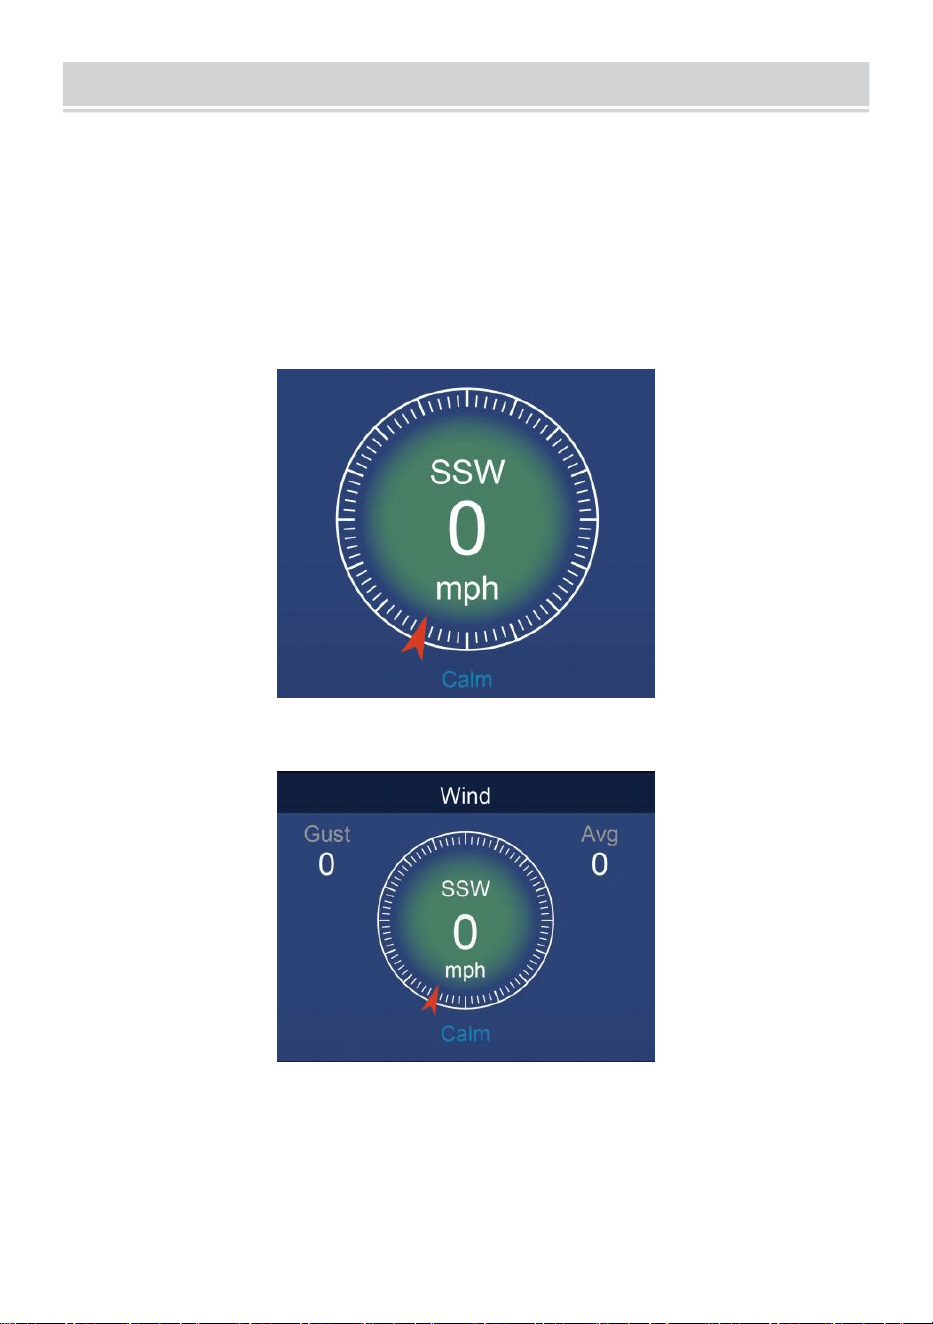
WIND
- 26 -
WIND SPEED AND DIRECTION
This section displays the wind speed, current wind direction, predominant
wind directions, and wind speed level.
Wind speed: is the average wind speed measured in the previous 20
seconds.
Average wind: is the average wind speed in 10 minutes.
Gust: is the highest wind speed recorded in the previous 20 seconds
.
Simple Data Display
Detailed Data Display
BEAUFORT SCALE
The Beaufort scale below is an international scale of wind velocities from
0 (calm) to 12 (Hurricane force).
- 27 -
Beaufort Scale
Description
Wind Speed
Land Condition
0
Calm
< 1 km/h
Calm. Smoke rises vertically.
< 1 mph
< 1 knots
< 0.3 m/s
1
Light air
1.1 ~ 5 km/h
Smoke drift indicates wind direction.
Leaves and wind vanes are stationary.
1 ~ 3 mph
1 ~ 3 knots
0.3 ~ 1.5 m/s
2
Light breeze
6 ~ 11 km/h
Wind felt on exposed skin. Leaves rustle.
Wind vanes begin to move.
4 ~ 7 mph
4 ~ 6 knots
1.6 ~ 3.3 m/s
3
Gentle breeze
12 ~ 19 km/h
Leaves and small twigs constantly moving.
Light flags extended.
8 ~ 12 mph
7 ~ 10 knots
3.4 ~ 5.4 m/s
4
Moderate
breeze
20 ~ 28 km/h
Dust and loose paper raised.
Small branches begin to move.
13 ~ 17 mph
11 ~ 16 knots
5.5 ~ 7.9 m/s
5
Fresh breeze
39 ~ 38 km/h
Branchies of a moderate size move.
Small trees in leaf begin to sway.
18 ~ 24 mph
17 ~ 21 knots
8.0 ~ 10.7 m/s
6
Strong breeze
39 ~ 49 km/h
Large branches in motion. Whistling heard
in overhead wires. Umbrella use becomes
difficult. Empty plastic bins tip over.
25 ~ 30 mph
22 ~ 27 knots
10.8 ~ 13.8 m/s
7
High wind
50 ~ 61 km/h
Whole trees in motion. Effort needed to
walk against the wind.
31 ~ 38 mph
28 ~ 33 knots
13.9 ~ 17.1 m/s
8
Gale
62 ~ 74 km/h
Some twigs broken from trees.
Cars veer on road. Progress on foot is
seriously impeded.
39 ~ 46 mph
34 ~ 40 knots
17.2 ~ 20.7 m/s
9
Strong gale
75 ~ 88 km/h
Some branches break off trees, and some
small trees blow over. Construction /
temporary signs and barricades blow over.
47 ~ 54 mph
41 ~ 47 knots
20.8 ~ 24.4 m/s
10
Storm
89 ~ 102 km/h
Trees are broken off or uprooted,
structural damage likely.
55 ~ 63 mph
48 ~ 55 knots
2.45 ~ 28.4 m/s
11
Violent storm
103 ~ 117 km/h
Widespread vegetation and structural
damage likely.
64 ~ 73 mph
56 ~ 63 knots
28.5 ~ 32.6 m/s
12
Hurricane force
≥ 118 km/h
Severe widespread damage to vegetation
and structures. Debris and unsecured
objects are hurled about.
≥ 74 mph
≥ 64 knots
≥ 32.7 m/s
- 28 -
WIND SPEED LEVEL
The wind speed level chart on display provides a quick reference on the
current wind condition. The background color of the compass changes
according to the wind speed.
Level
Light
Moderate
Strong
Storm
Speed
0 - 12 mph
0 - 19 km/h
12 - 30 mph
20 - 49 km/h
31 - 55 mph
50 - 88 km/h
≥ 55 mph
≥ 89 km/h
Compass color
Green
Yellow
Orange
Red
LIGHT INTENSITYAND UV INDEX
This section displays a chart for light intensity and UV index.
UVI
Rating
Comment
0-2
Low
A UV Index reading of 0 to 2 means low danger from
the sun’s UV rays for the average person.
3-5
Medium
A UV Index reading of 3 to 5 means moderate risk of harm
from unprotected sun exposure.
6-7
High
A UV Index reading of 6 to 7 means high risk of harm from
unprotected sun exposure. Protection against skin and eye
damage is needed.
8-10
Very High
A UV Index reading of 8 to 10 means very high risk of harm
from unprotected sun exposure. Take extra precautions
because unprotected skin and eyes will be damaged and
can burn quickly.
11-15
Extreme
A UV Index reading of 11 or more means extreme risk of
harm from unprotected sun exposure. Take all precautions
because unprotected skin and eyes can burn in minutes.
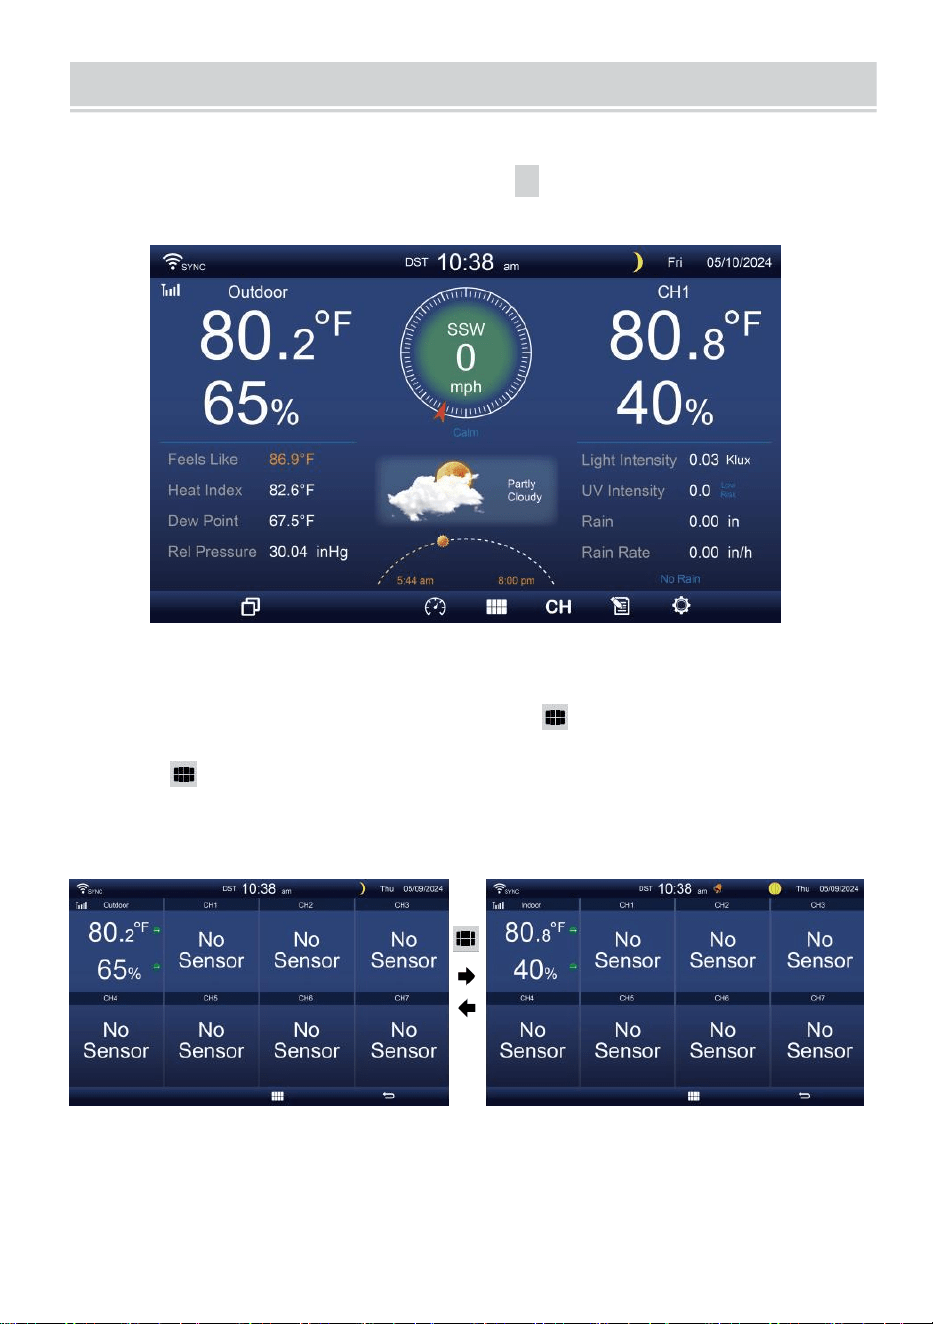
MULTI-CHANNEL DISPLAY MODE
- 29 -
CHANNEL DISPLAY
While
on
the simple/detail
screen,
press
cH
button to switch between
indoor and Channel 1-7 data.
MULTI-SENSOR DISPLAY PAGE
While on the simple/detail screen, press button to enter Multi-sen-
sor display screen.
Press button to interchange the display between indoor and outdoor
sensor data.
Press
w
button to return simple/detail screen.
WEATHER DATA RECORD
- 30 -
This section explains how to get to view the weather data record (Max-
/Min, data log, history graph). To view the weather data record, press
button in simple/detail screen to enter weather data screen. Press
button to interchange the max/min, data log and history graph modes.
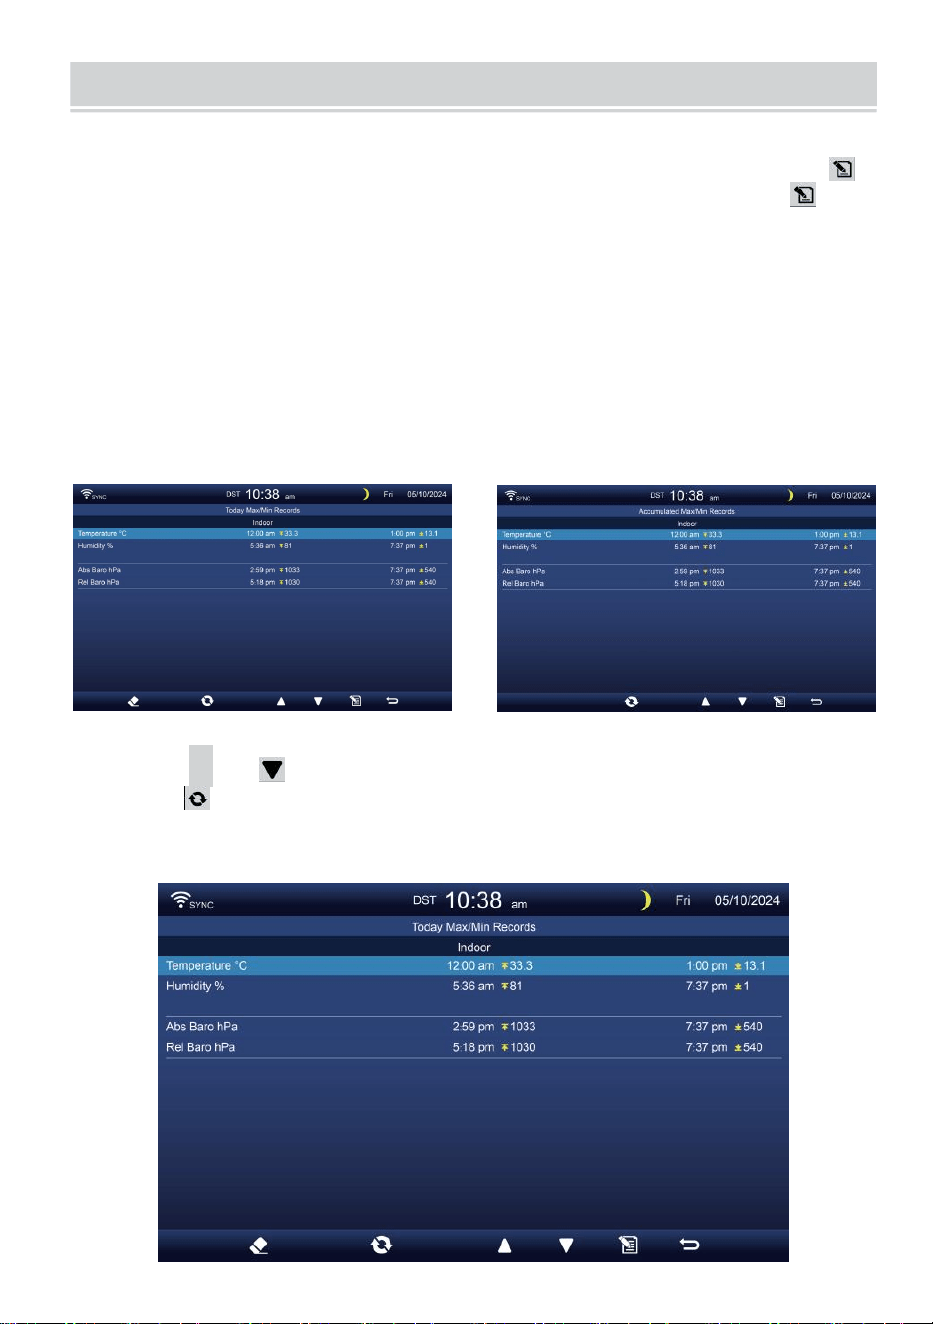
MAX/MIN
There are 2 data modes for MAX/MIN records: Daily or Accumulated.
(Depend on the Max/Min record mode inside Display Setting page)
Daily Max/Min data mode
Max/Min data will be displayed and clear at midnight.
Accumulated Max/Min data mode
Max/Min data will be kept accumulated.
Daily Max/Min Record Accumulated Max/Min Record
Press
▲
or button to select the desired Max/Min record.
Press button to interchange to show indoor, outdoor and channel’s
Max/Min records.
Press . button to return simple/detail screen.
- 31 -
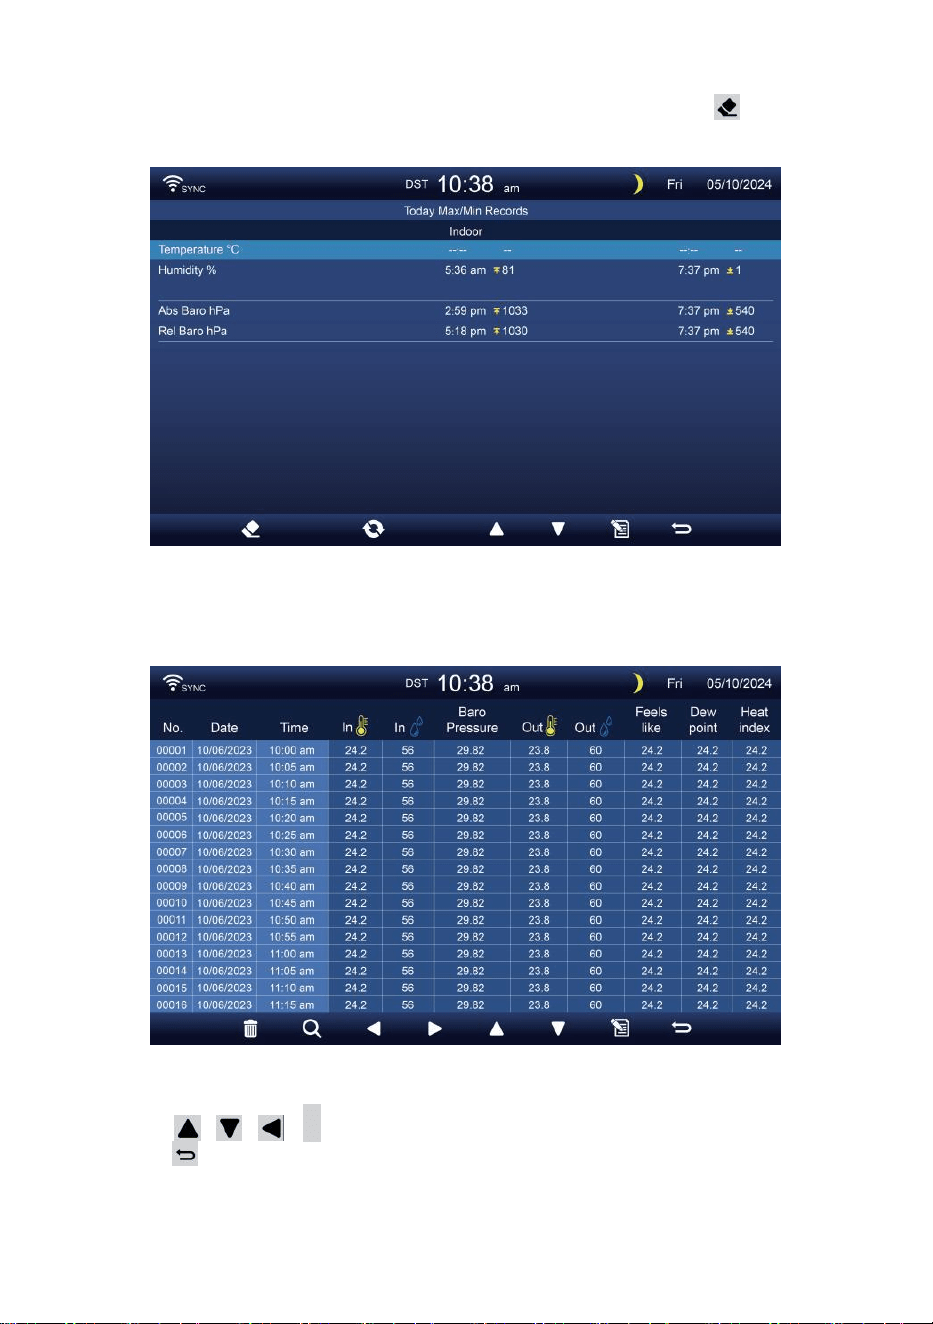
Clear Max/Min data
To clear the selected MAX/MIN records, press and hold button
over 2s to clear the selected Max/Min record.
DATA LOG SCREEN
The data log screen capatures all the history records.
Navigating the data log screen
Press , , ,
b
buttons to broswe through the screen.
Press button to return simple/detail screen.
- 32 -
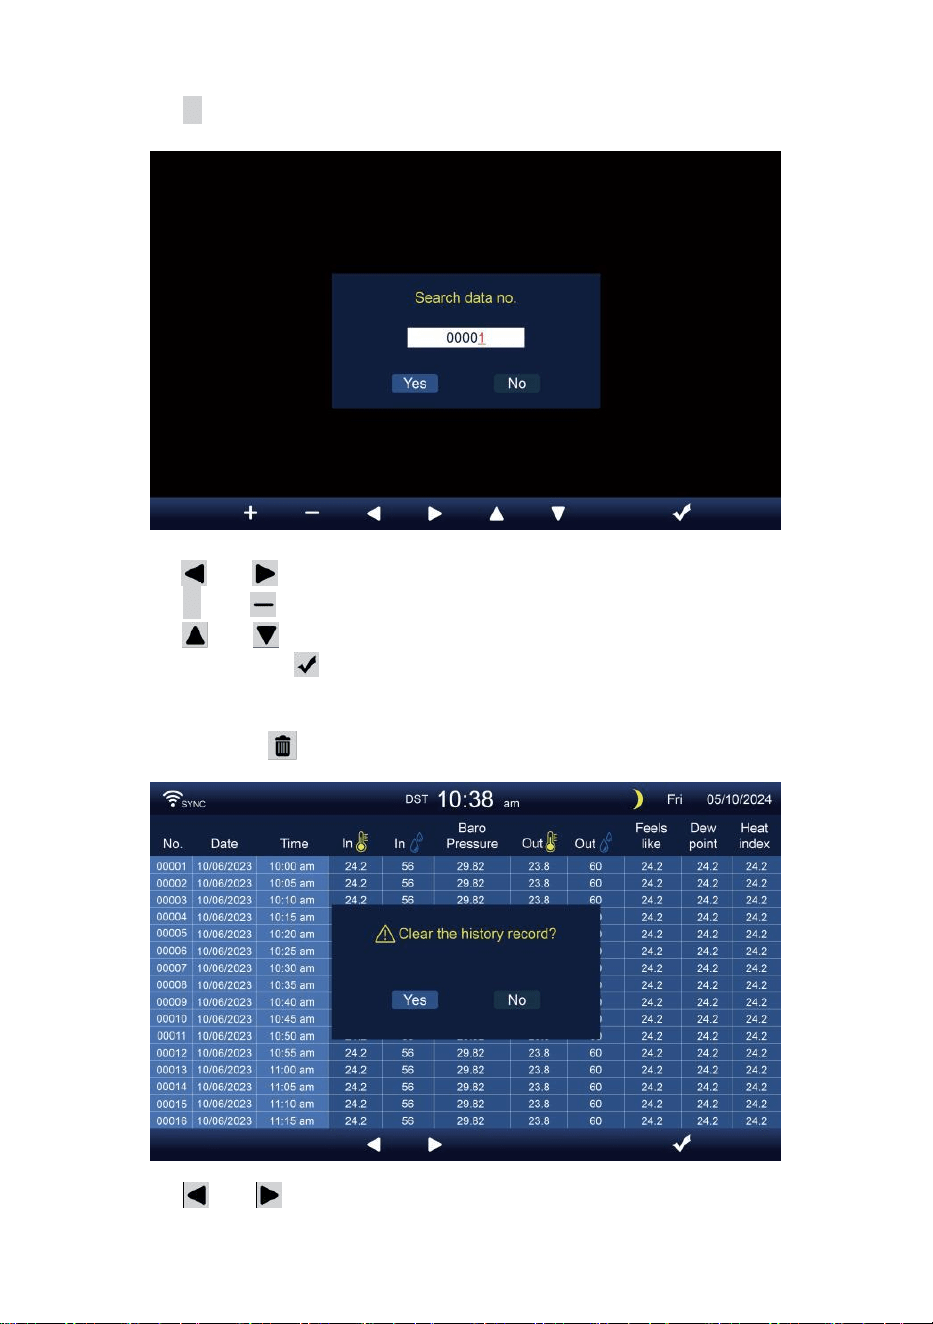
Searching for a specific page
Press Q to display search the data record.
Press or button to select a digit in the page number,
Press + or button to change the number up or down.
Press or button to change the activated option field, toggle
Yes or NO, press to confirm.
Delete all data log records
Press and hold over 2s to delete all records.
Press or button to select change the activated option field,
toggle Yes or NO, press w to confirm.
- 33 -
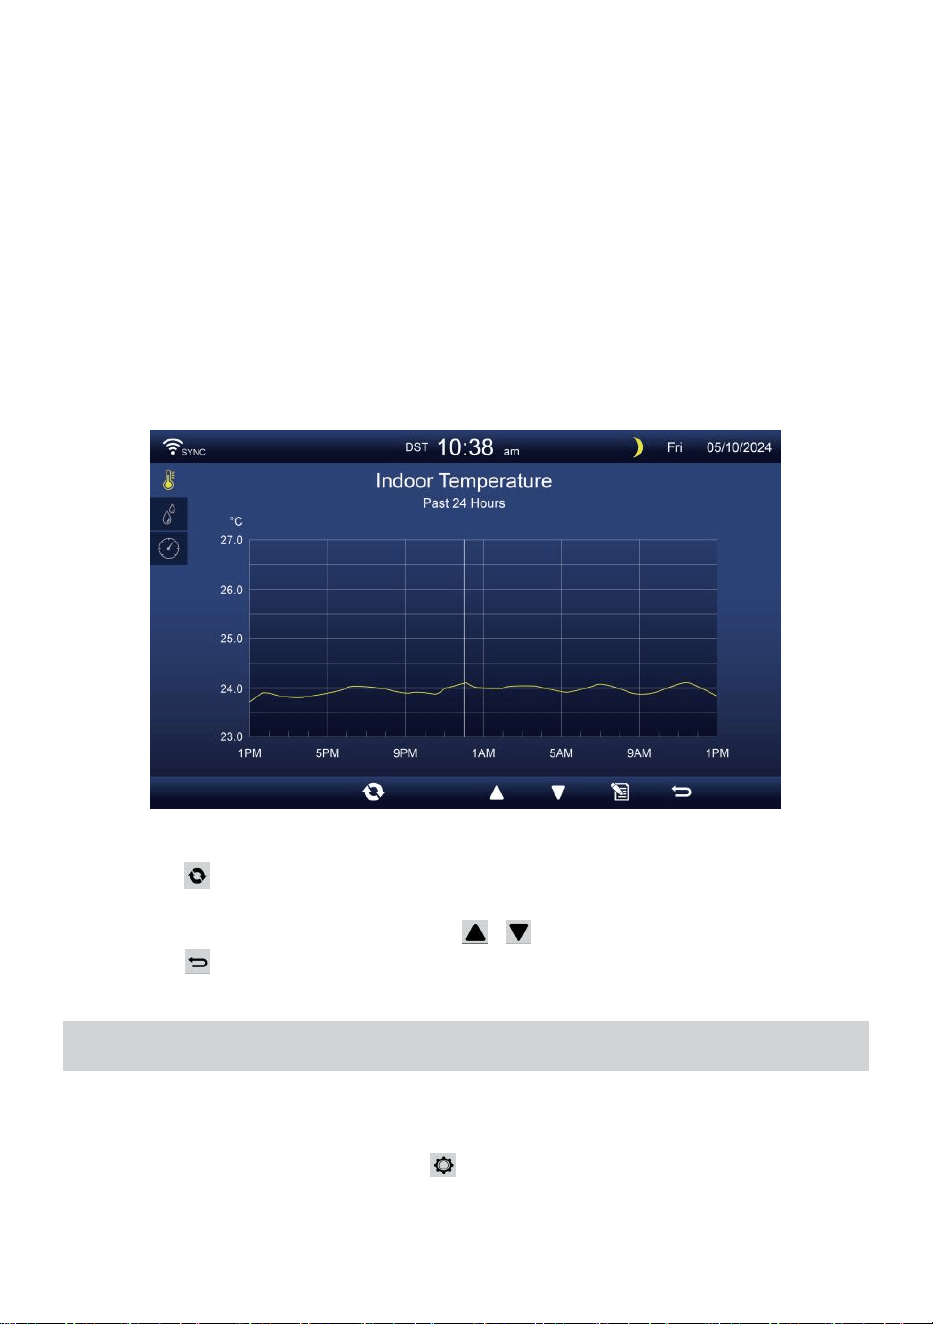
HISTORICAL GRAPH
This section explains how to get to and view history graphs.
There are indoor graph, outdoor graph and channel’s graphs to be shown.
Indoor graph
Temperature, Humidity, Relative and Absolute pressure
.
Outdoor graph
Temperature, Humidity, Rain Rate, Past 24 -hour Rainfall, Average
Wind speed, Wind Gust, Wind direction, Light Intensity and UVI.
CH1-CH7 graph
Temperature, Humidity.
Press button to interchange to show indoor, outdoor and channel’s
historical graph.
When the graph appears, press , buttons to show other graphs.
Press button to return simple/detail screen.
GENERAL SETTING
All the console settings and system information are in the setting menu.
There are 8 types of setting parameters inside the setting menu.
While simple/detail screen, press button to enter the setting menu.
- 34 -
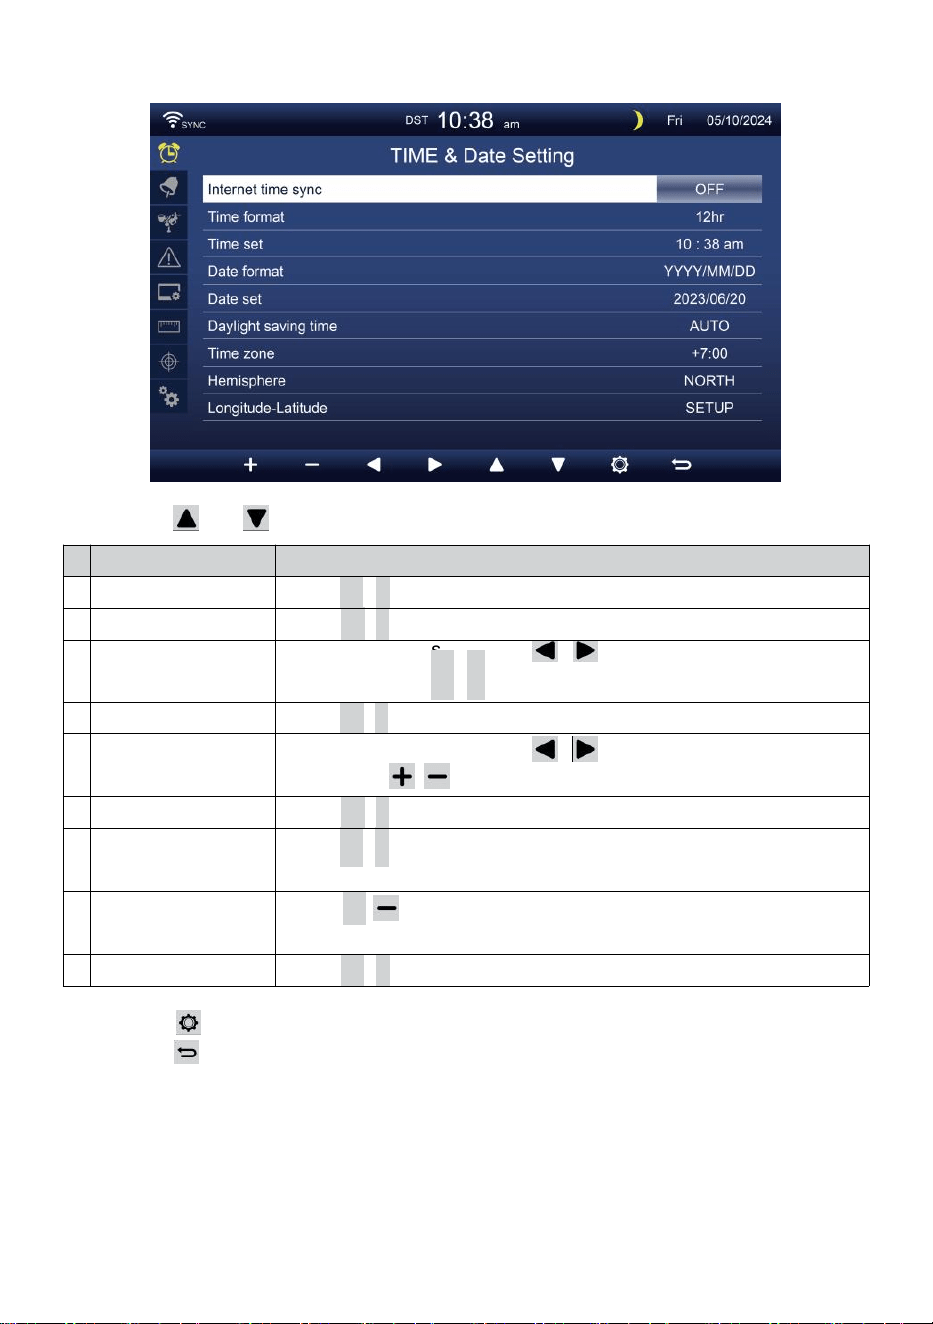
TIME/DATE SETTING
Press or button to select one of the following settings:
#
Sub item
Operation
a
Internet time sync
Press
+
/
-
button to turn on or turn off.
b
Time format
Press
+
/
-
button to select 12 or 24 format.
c
Time set
When time sync is off, press / button to select between hour
or minute, press + /
-
button to adjust the value.
d
Date format
Press
+
/
-
button to select M / D or D / M format.
e
Date set
When time sync is off, press / button to select Year, Month,
Date, press / button to adjust the value.
f
Daylight saving time
Press
+
/
-
button to turn off or set the DST to auto.
g
Time zone
Press
+
/
-
button to select the your local time zone to get
correct time.
h
Hemisphere
Press
+
/ button to select NORTH or SOUTH hemisphere for
the 7-in-1 sensor point to and moon phase.
i
Longitude-Latitude
Press
+
/
-
button to enter Longitude-Latitude setup page.
Press button to enter the Alarm setting display.
Press button to return simple/detail screen.
- 35 -
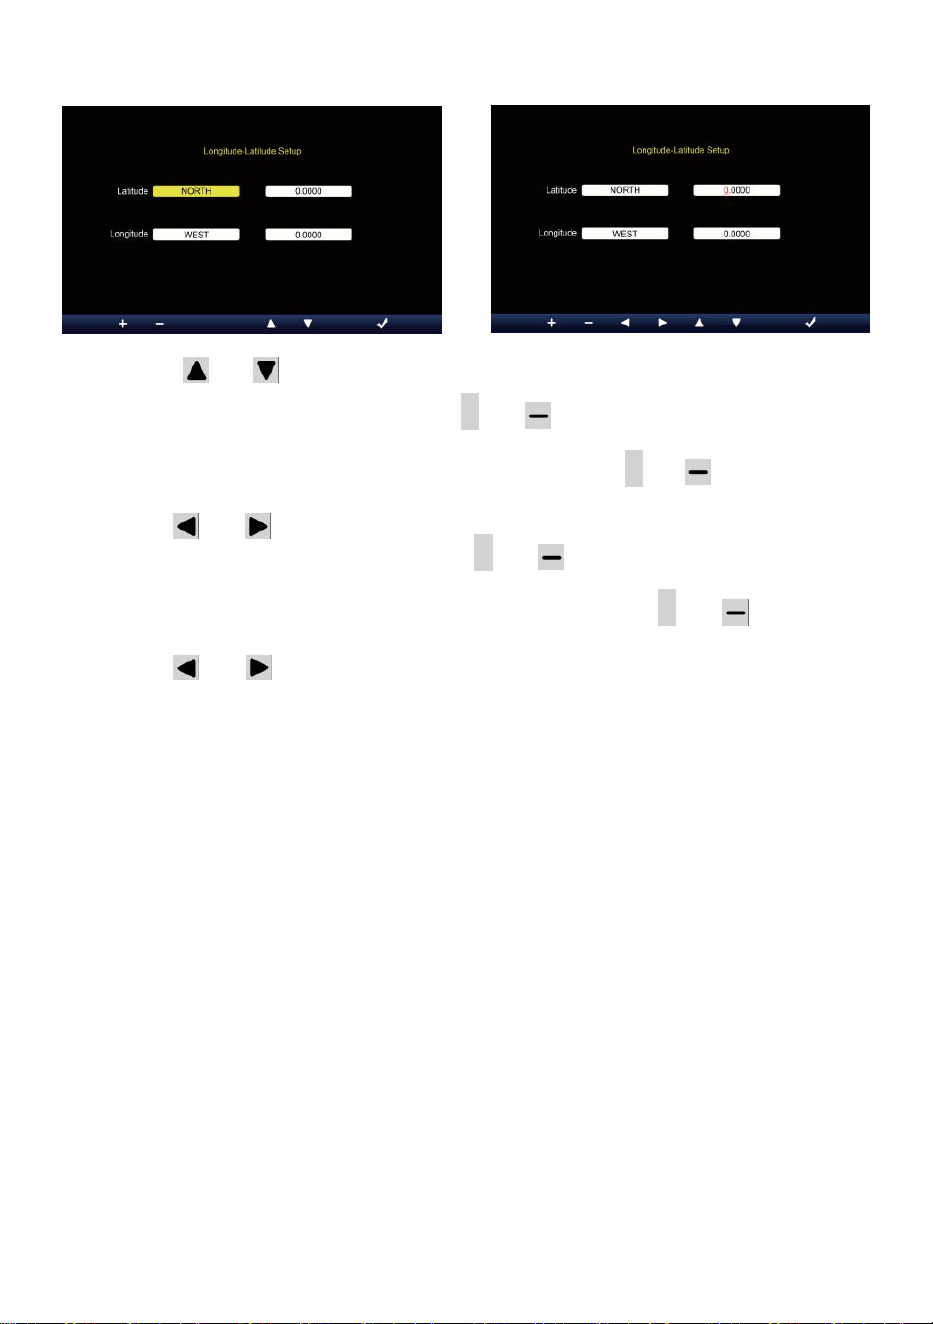
Longitude-Latitude setting
Press or button to change the activated option field.
1. Latitude (Hemisphere) --- Press
+
or button to select the hemi-
sphere. (NORTH/SOUTH)
Latitude --- The latitude x 10 will turn red. Press + or button to
increase or decrease the value.
Press or to change remain latitude value.
2. Longitude (Hemisphere) --- Press + or button to select the hemi-
sphere. (EAST/WEST)
Longitude --- The latitude x 100 will turn red. Press
+
or button to
increase or decrease the value.
Press or button to change remain longitude value.
Press w button to confirm Longitude Latitude setting.
NOTE:
Determine the longitude and latitude.
e.g.
Latitude
Longitude
: 33.2981
: -111.9602
If location is in the Northern Hemisphere, Latitude will be positive.
If location is in the Southern Hemisphere, Latitude will be negative.
If location is in the Eastern Hemisphere, longitude will be positive.
If location is in the Western Hemisphere, longitude will be negative.
So, the above Longitude and Latitude will be entered into display as
follows:
Latitude = NORTH --- 33.2981
Longitude = WEST --- 111.9602.
US New York (EST, GMT-5)
Latitude
Longitude
: 40.7128 (North 40.7128)
: -74.0060 (West 74.0060)
- 36 -
EU Frankfort Germany (GMT+1)
Latitude
Longitude
: 50.1109 (North 50.1109)
: 8.6821 (East 8.6821)
UK London England (GMT)
Latitude
Longitude
: 51.5072 (North 51.5072)
: -0.1276 (West 0.1276)
Australia Sydney (GMT+10)
Latitude
Longitude
: -33.8688 (South 33.8688)
: 151.2093 (East 151.2093)
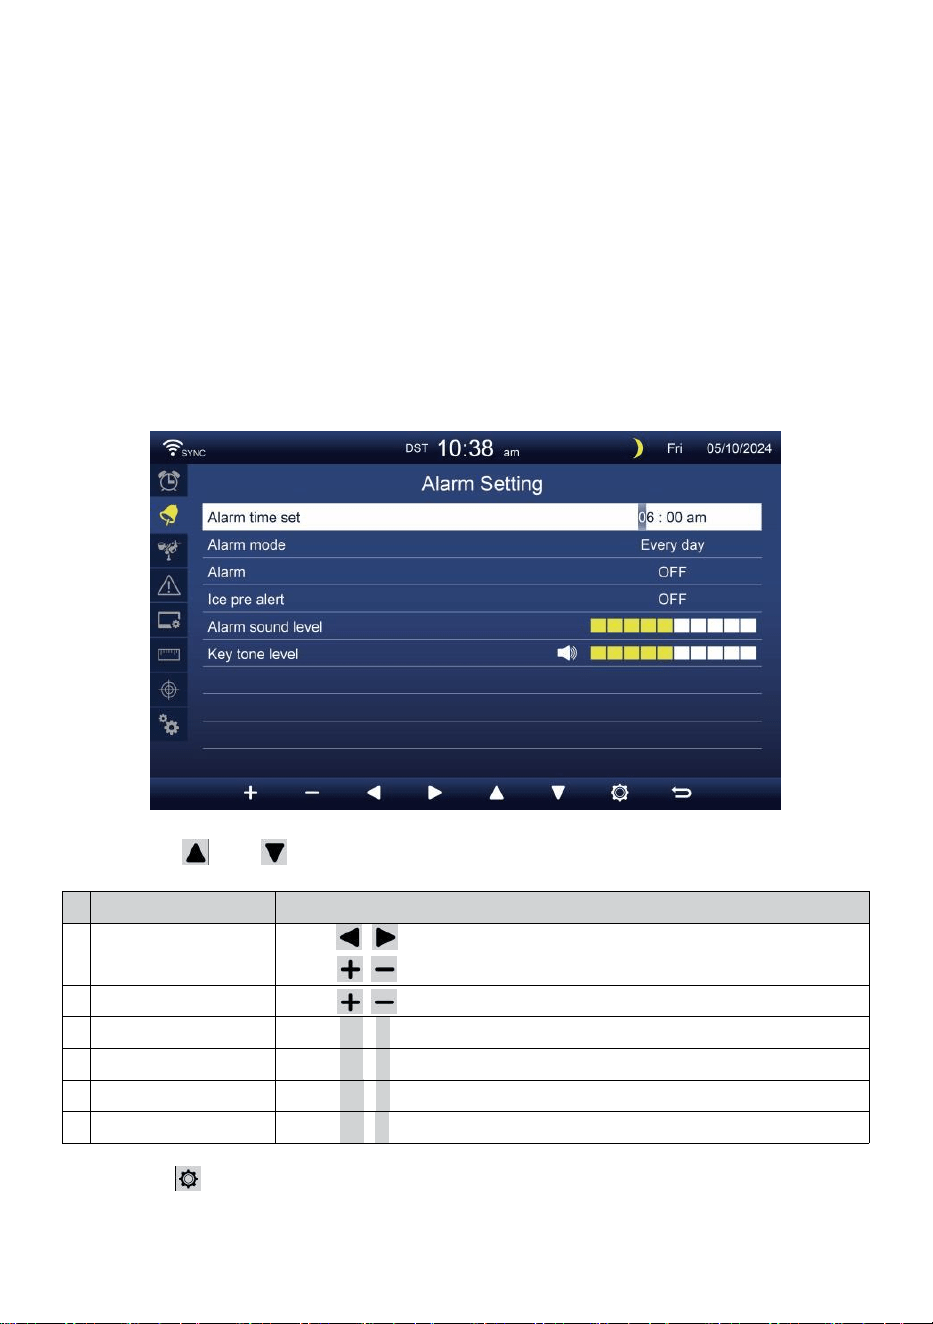
ALARM SETTING
Press or button to change the activated option field:
#
Sub item
Operation
a
Alarm time set
Press / button to select between hour or minute.
Press / button to adjust the value.
b
Alarm mode
Press / button to select Everyday or Weekday only.
c
Alarm
Press
+
/
-
button to turn on or turn off.
d
Ice pre alert
Press
+
/
-
button to turn on or turn off.
e
Alarm sound level
Press
+
/
-
button to adjust the sound level.
f
Key tone level
Press
+
/
-
button to adjust the key tone level.
Press button to enter the Sensor setting display.
Press
w
button to return simple/detail screen.
- 37 -
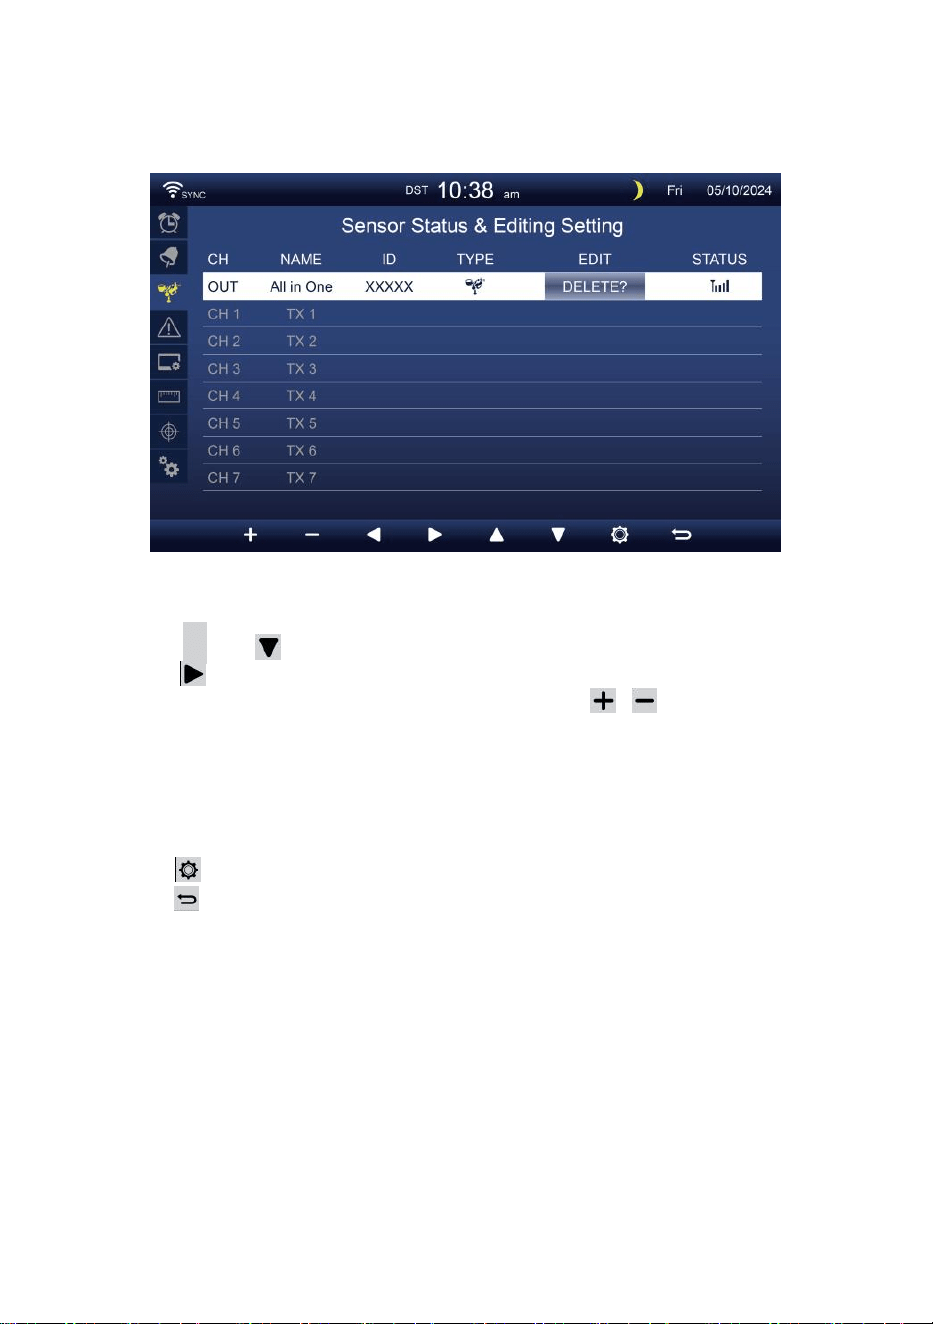
SENSOR SETTING
This page is to add/delete the all-in-one sensor or extra 7 channels
hygrometers.
Adding a new sensor
Press
▲
or button to select the empty channel.
Press button to select the edit sensor column.
When the column shows “Add” option, press / button to start the
sensor searching.
Select the matching channel number on the sensor, then power on or
press RESET button to start the pairing.
Once devices are connected, the sensor icon, ID will show in the
channel row.
Press button to enter the Alert setting display.
Press button to return simple/detail screen.
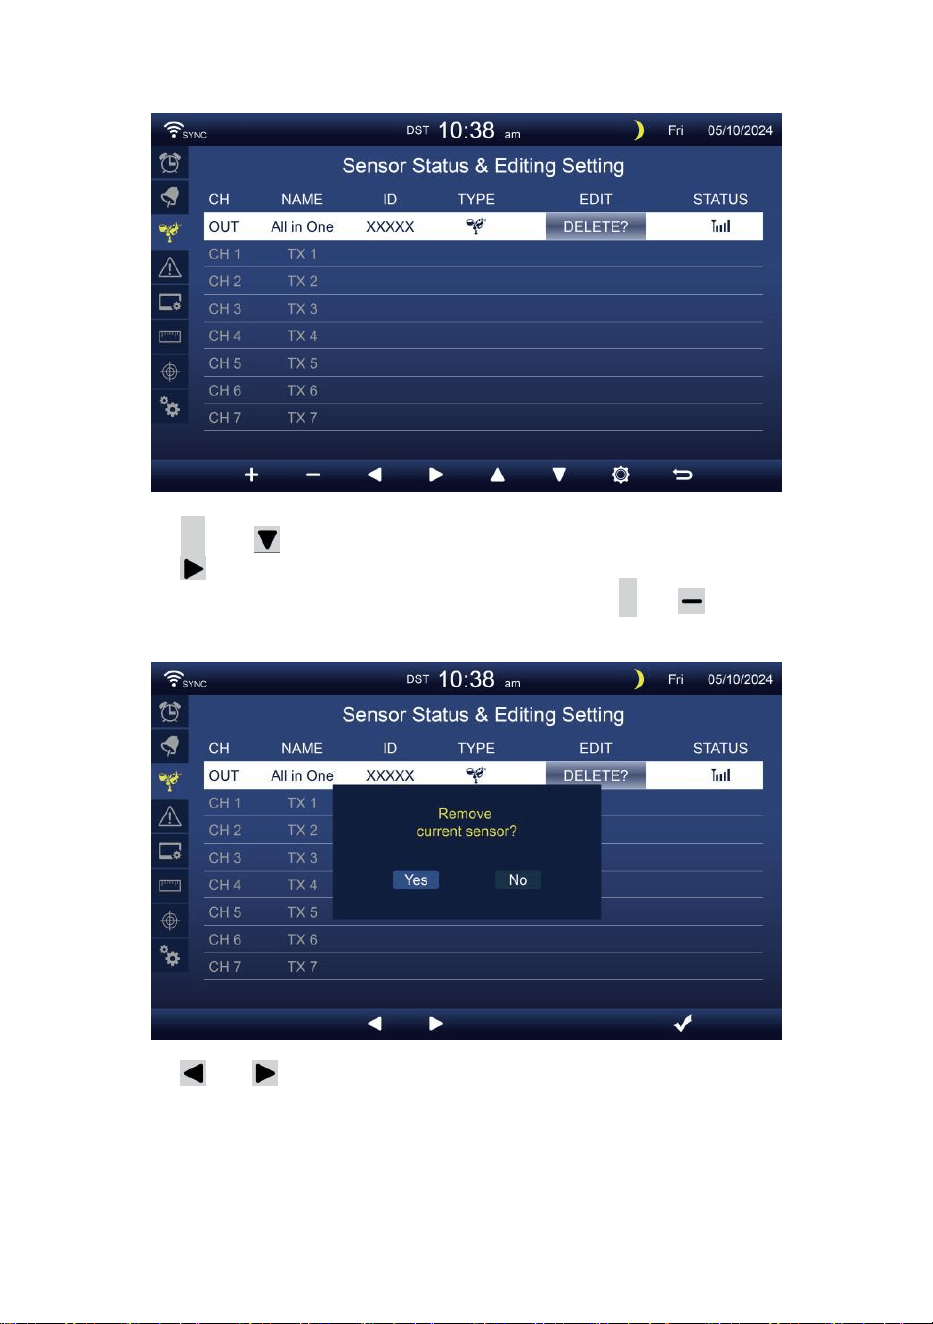
- 38 -
Delete paired sensor
Press
▲
or button to select the connected sensor.
Press button to select the edit sensor column.
When the column shows “Delete” option, press
+
or button to
confirm.
Press or button to select change the activated option field,
toggle Yes or NO, press
.
button to confirm.
- 39 -
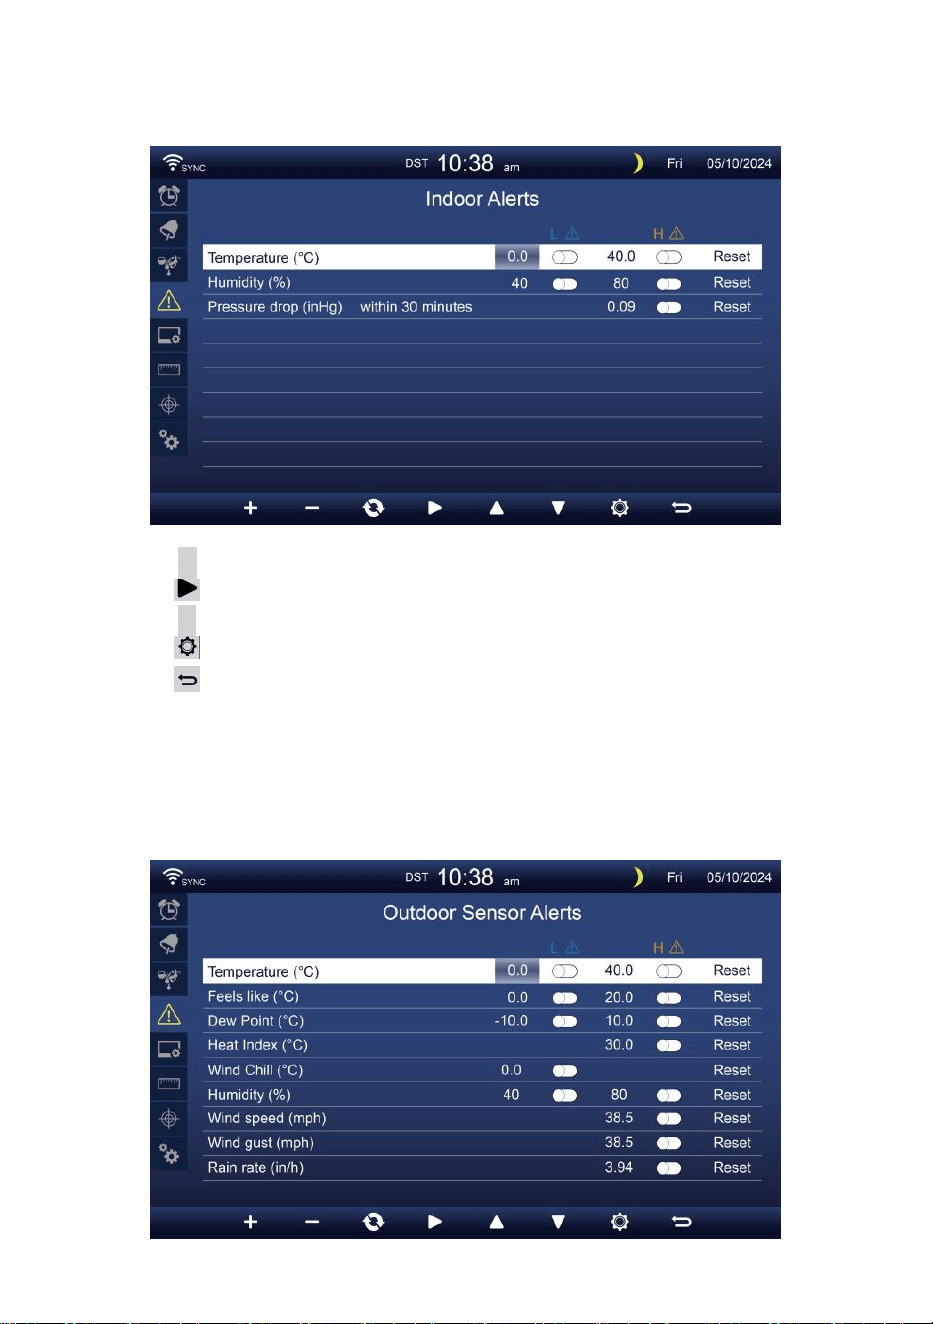
ALERT SETTING
Set indoor alert
Press
▲
or
w
button to select different row of activated option field.
Press
button to select high/low/Reset alert option.
Press
+
or
w
button to adjust the value or on/off option.
Press
button to enter the Display setting display.
Press
button to return simple/detail screen.
NOTE:
When selecting reset option, all alerts values will be reset to the
default values.
Set outdoor alert
- 40 -
Press or button to select different row of activated option field.
Press button to select high/low/Reset alert option.
Press or button to adjust the value or on/off option.
Press button to interchange the Indoor alert setting display.
Press button to enter the Display setting display.
Press
w
button to return simple/detail screen.
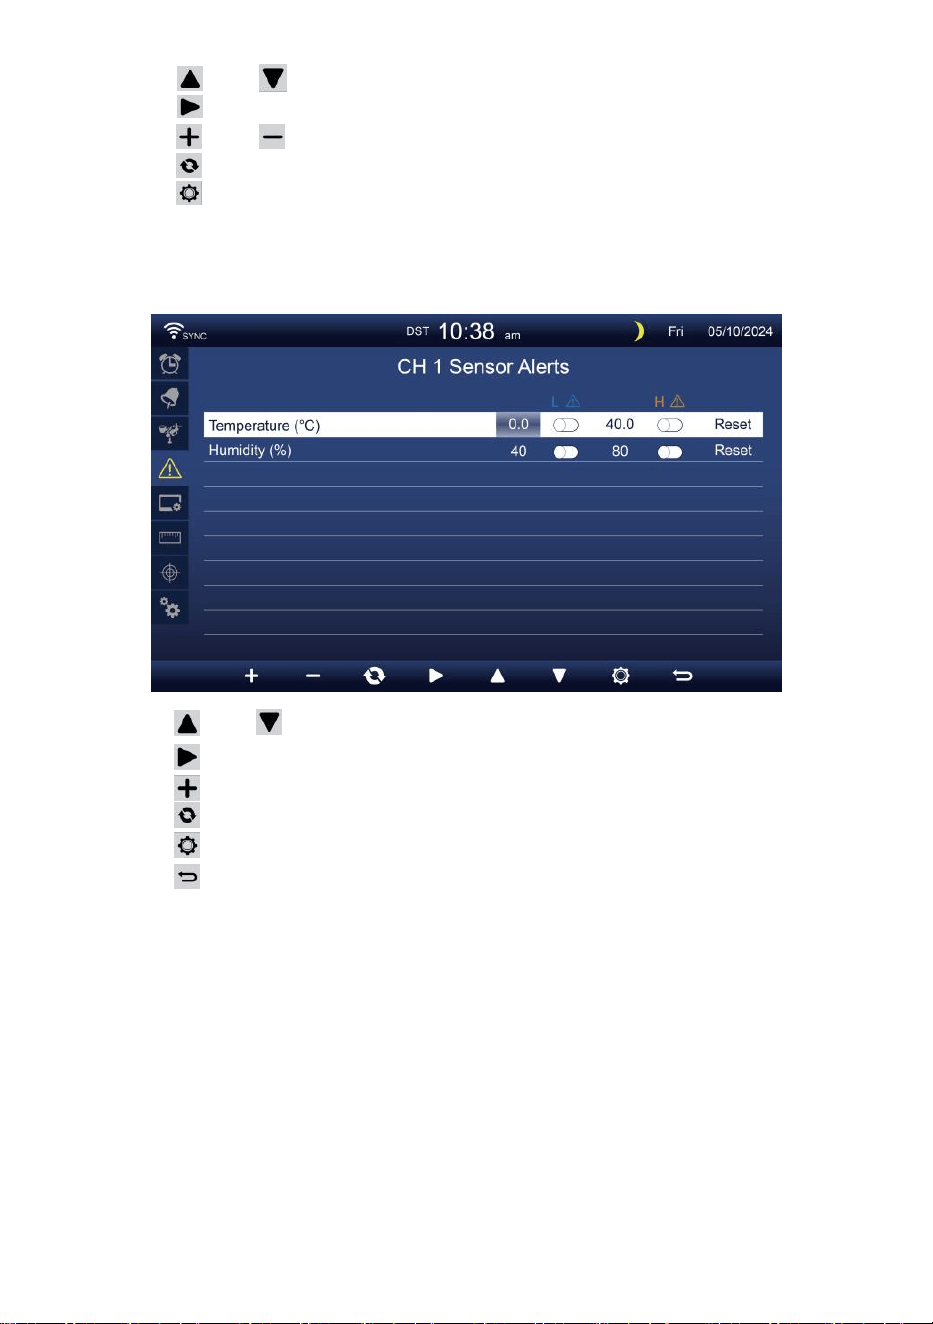
Set CH1-7 sensor alert
Press
Press
Press
Press
Press
Press
NOTE:
or button to select different row of activated option field.
button to select high/lower/Reset alert option.
or
w
button to adjust the value or on/off option.
button to interchange the Indoor alert setting display.
button to enter the Display setting display.
button to return simple/detail screen.
When selecting reset option, all alerts values will be reset to the
default values.
- 41 -
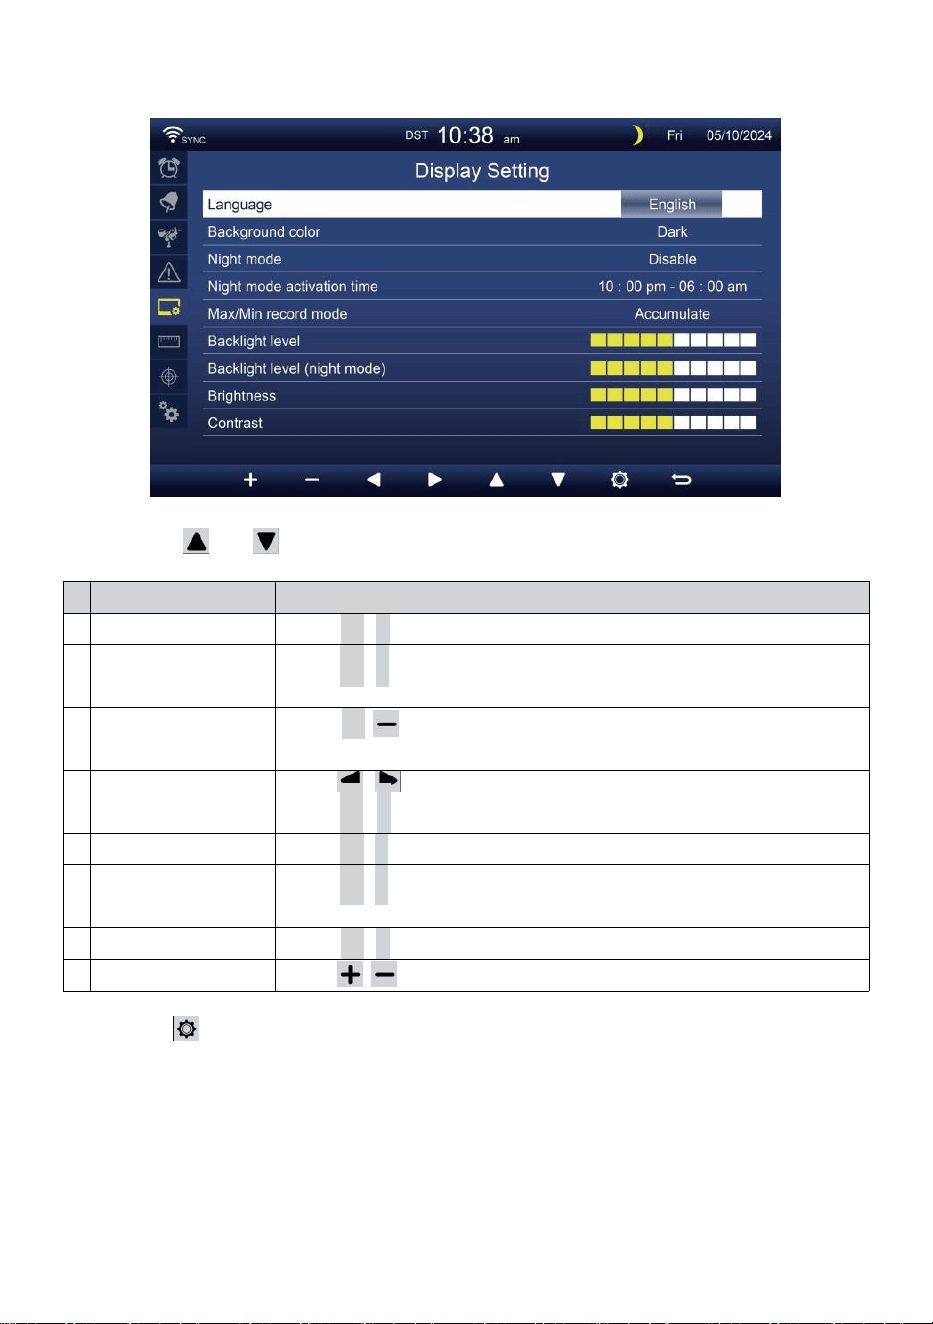
DISPLAY SETTING
Press or button to change the activated option field:
#
Sub item
Operation
a
Language
Press
+
/
-
button to select the display language.
b
Background color
Press
+
/
-
button to select light or dark color background for
display mode.
c
Night mode
Press
+
/ button to set enable (trigger to the activate time
period), disable or auto (trigger by your room ambient light level).
d
Night mode activate
time
Press / button to select between hour or minute.
Press
+
/
-
to adjust the value.
e
Backlight level
Press
+
/
-
button to adjust the back light level in normal.
f
Backlight level
(Night mode)
Press
+
/
-
button to adjust the back light level during night
mode.
g
Brightness
Press
+
/
-
button to adjust the screen brightness.
h
Contrast
Press / button to adjust the screen contrast.
Press button to enter the Unit setting display.
Press
w
button to return simple/detail screen.
- 42 -
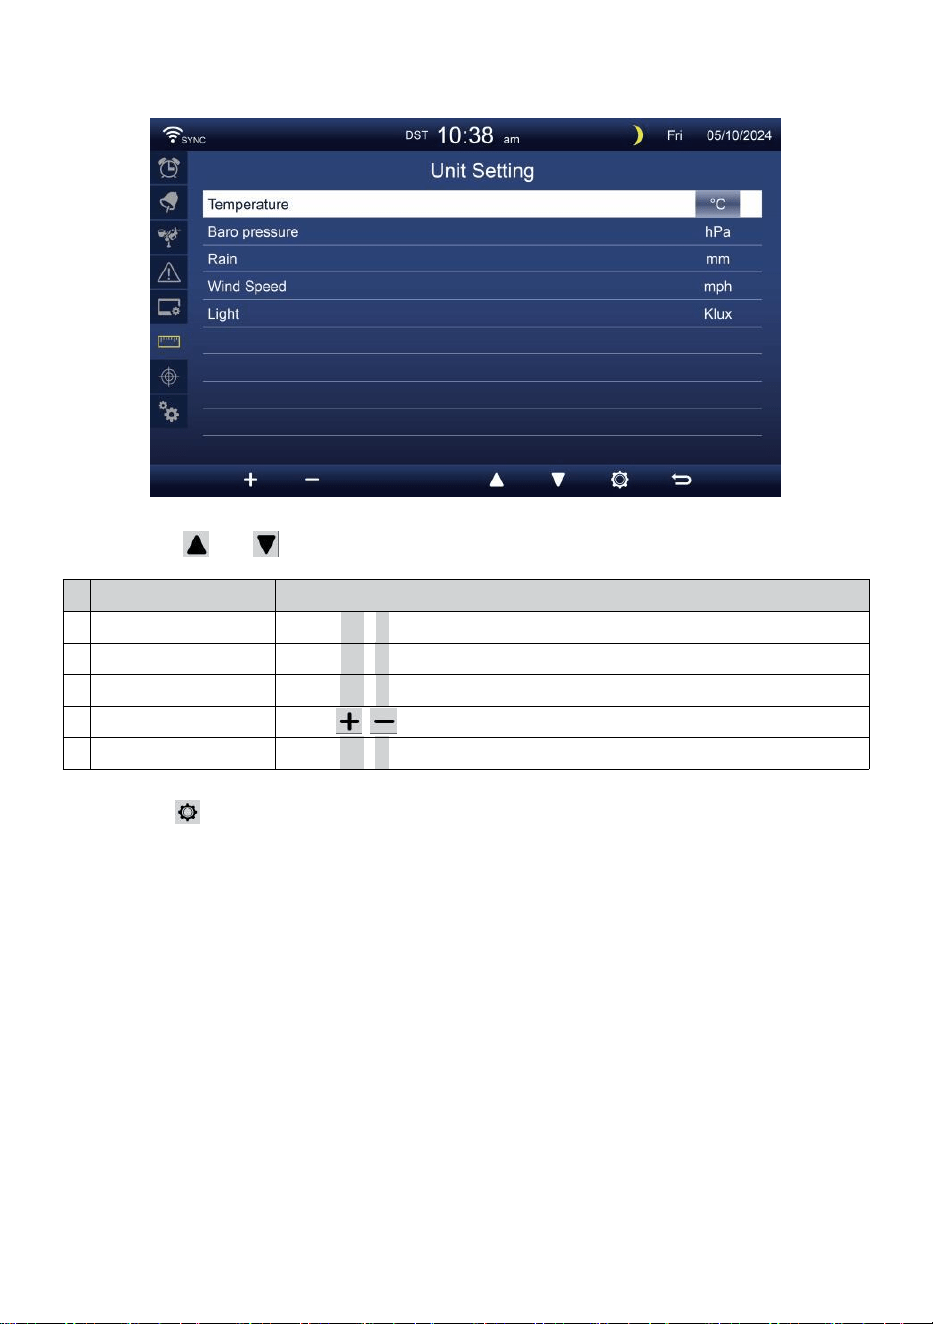
UNIT SETTING
Press or button to change the activated option field:
#
Sub item
Operation
Temperature
Press
+
/
-
button to select °C or °F.
Baro pressure
Press
+
/
-
button to select hPa, inHg or mmHg.
Rain
Press
+
/
-
button to select mm or in.
Wind speed
Press / button to select m/s, km/h, knots or mph.
Light
Press
+
/
-
button to select Klux, Kfc or w/m
2
.
Press button to enter the Calibration setting display.
Press
w
button to return simple/detail screen.
- 43 -
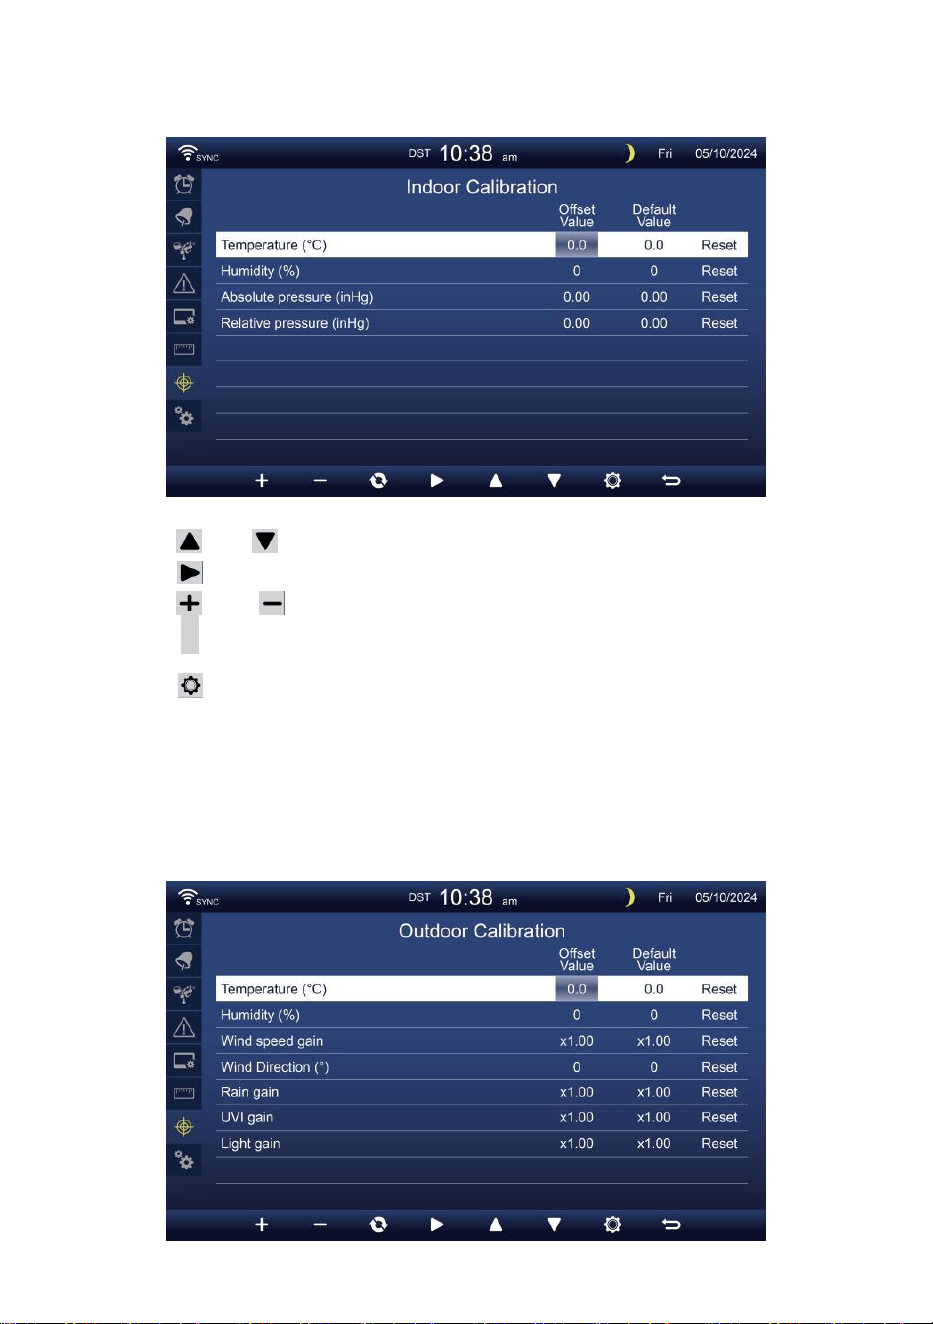
CALIBRATION SETTING
Calibration for indoor parameters
Press or button to select different row of activated option field.
Press button to select high/low/Reset alert option.
Press or button to adjust the value or on/off option.
Press
c
button to interchange to show the indoor, outdoor and
channel’s Calibration setting display.
Press button to enter the Other setting display.
Press
w
button to return simple/detail screen,
NOTE:
When selecting reset option, all calibration values will be reset to the
default values.
Calibration for outdoor parameters
- 44 -
Press or button to select different row of activated option field.
Press button to select high/low/Reset alert option.
Press or button to adjust the value or on/off option.
Press c button to interchange to show the indoor, outdoor and
channel’s Calibration setting display.
Press button to enter the Other setting display.
Press button to return simple/detail screen,
NOTE:
When selecting reset option, all calibration values will be reset to the
default values.
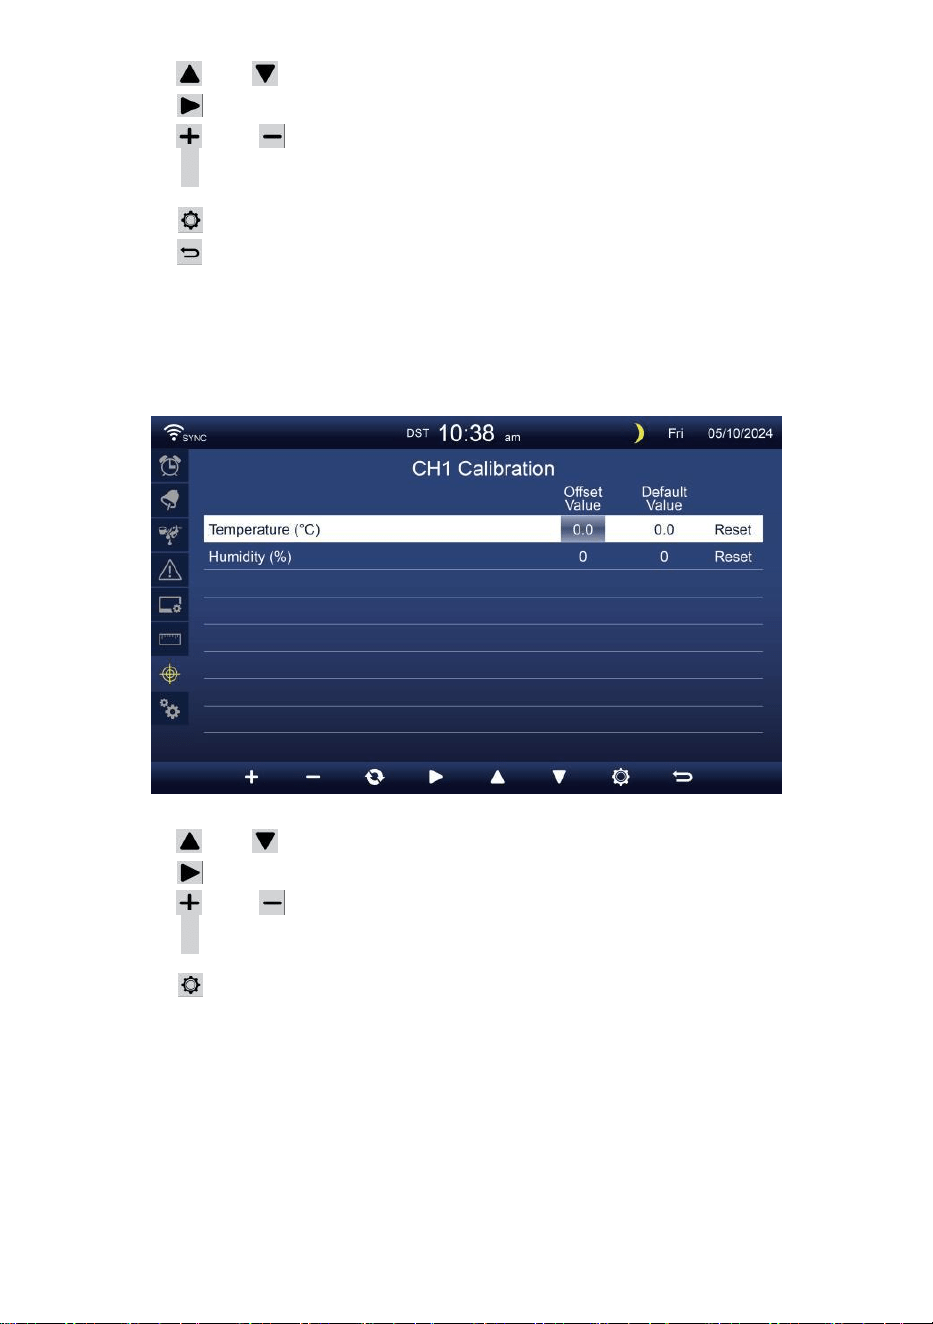
Calibration for CH1-CH7 sensor parameters
Press or button to select different row of activated option field.
Press button to select high/low/Reset alert option.
Press or button to adjust the value or on/off option.
Press c button to interchange to show the indoor, outdoor and
channel’s Calibration setting display.
Press button to enter the Other setting display.
Press
w
button to return simple/detail screen,
NOTE:
When selecting reset option, all calibration values will be reset to the
default values.
- 45 -
Calibration parameters
Sensor
Parameter
Type of
calibration
Default
value
Setting range
Typical calibration
source
Indoor,
Outdoor or
channel(s)
Temperature
Offset
0
±36 °F (±20 °C)
Red spirit or mercury
thermometer
Humidity
Offset
0
±20 %
Sling psychrometer
Indoor
Absolute
pressure
Offset
0
±560hPa (±16.51inHg
or ±420mmHg
Calibrated laboratory grade
barometer
Relative
pressure
Offset
0
±560hPa (±16.51inHg
or ±420mmHg
Local airport
Outdoor
Wind speed
Gain
1
x 0.5 ~ 1.5
Calibrated laboratory grade
wind meter
Wind direction
Offset
0
±10°
GPS or Compass
Rain
Gain
1
x 0.5 ~ 1.5
Sight glass rain gauge with
meter
UVI
Gain
1
x 0.01 ~ 10.0
Calibrated laboratory grade
UV meter
Light
intensity
Gain
1
x 0.01 ~ 10.0
Calibrated laboratory grade
solar radiation sensor
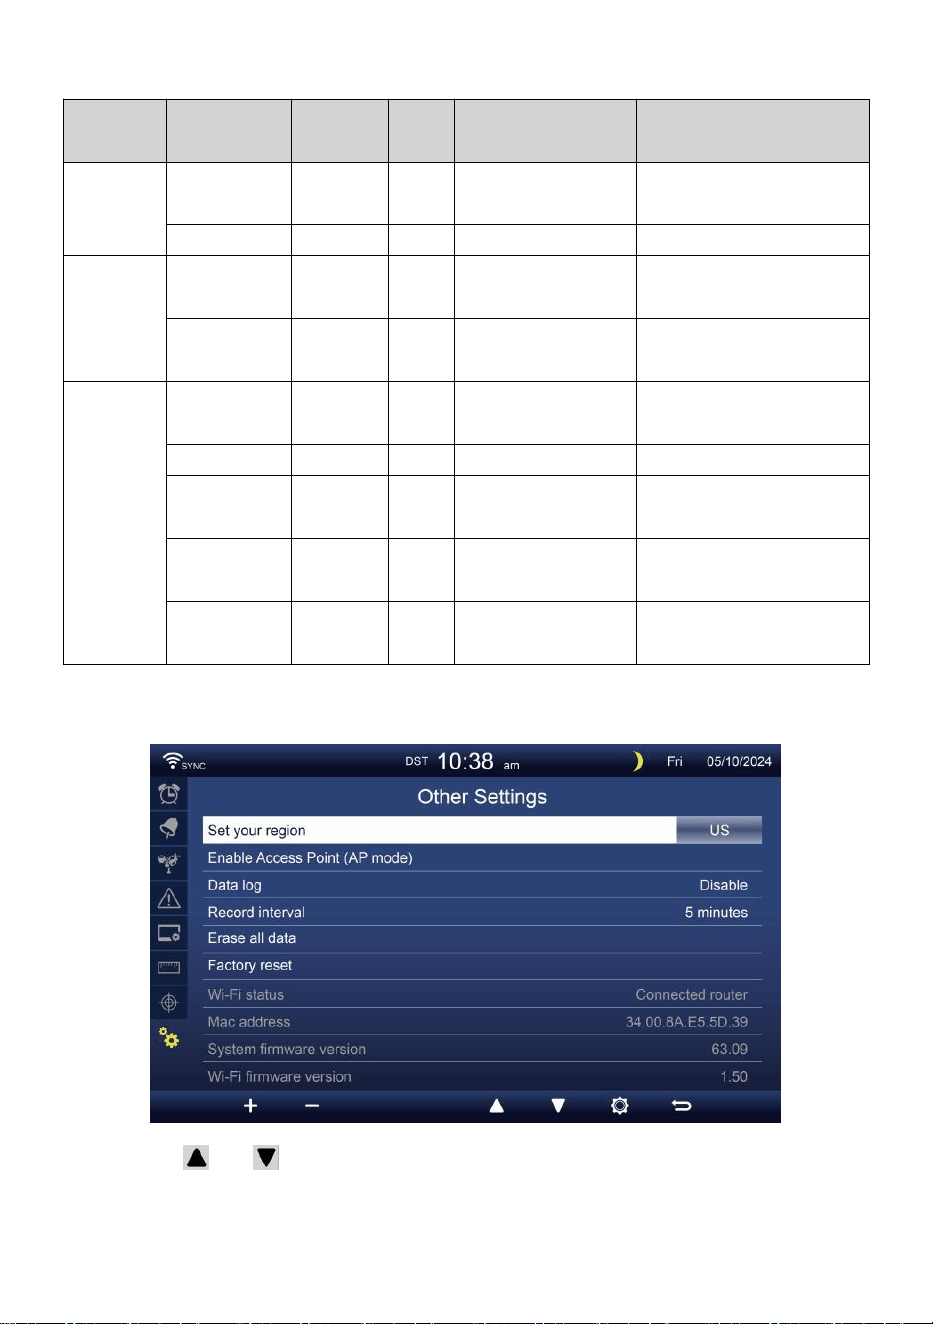
OTHER SETTING
Press or button to change the activated option field:
- 46 -
#
Sub item
Operation / Description
a
Set your region
Press / button to select Europe, UK, US, Australia.
b
Enable Access Point
Press
+
/
-
button to startAP mode for WI-FI connection setup.
c
Data log
Press / button to enable or disable the data log function.
d
Record interval
Press
+
/
-
button to setup the record interval of the data log.
e
Erase all data
Press / button to erase all the data in console.
f
Factory reset
Press
+
/
-
button to reset all the setting to default and clear all
the data in console.
g
WI-FI status
Show the current console WI-FI connection status.
h
Mac address
Show the console Mac address.
i
Systemfirmwareversion
Shows current system firmware version of the console.
j
Wi-fi firmware version
Shows current Wi-fi firmware version of the console.
Press button to enter the Time & Date setting display.
Press button to return simple/detail screen.
SETTING UPWI-FI CONNECTION
In order to set up the Wi-Fi connection of the console, it needs to configu-
rate the console into Access Point (AP) mode. To activate the Access
Point (AP) mode, please follow the below procedures.
1. In the simple/detail screen, press button to enter Setting menu.
2. Press button to switch “Other Setting” display.
3. Press or button to enter “Enable Access Point”,
press + or button to start the AP mode.
- 47 -
Note:
While in AP mode, you can press button to exit AP mode. The
weather station will simply restore the previous AP settings.
Use your smartphone, tablet, or computer to connect to the weather
station via Wi-Fi by following these steps:
1. On PC, open your Wi-Fi network settings. On Android™ or iOS devic-
es, go to settings menu and then select Connections/WI-FI to open
the network settings.
2. Locate the weather station SSID from the list. It should appear as
WWS-XXXXXX (where all the X’s are integers) in the list. Tap on the
SSID to connect. This step will take several seconds.
3. Once you are connected to the weather station, open up your internet
or mobile web browser, and enter the following address into the
address bar: http://192.168.1.1 to access the weather station web
interface. (Make sure to include the http:// or else the web browser
may interpret the address as a search query). We recommend using
the latest version of reputable web browsers.
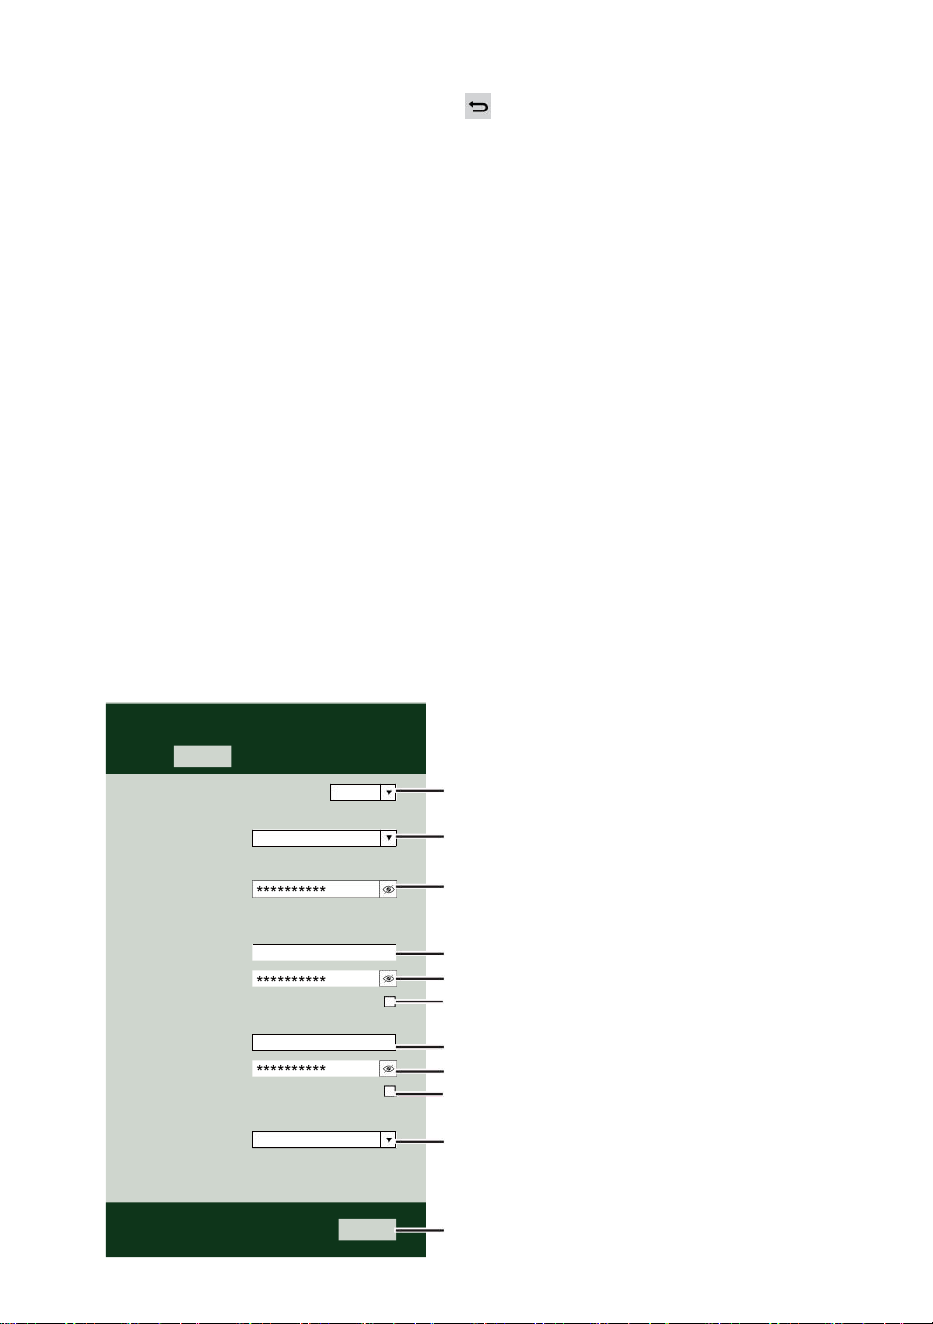
4. Enter the following information into the web-interface (Figure 1). Make
sure all of the information is entered prior to selecting Save. If you
choose not to upload Wunderground.com, or upload weather-
cloud.net, leave the check boxes unchecked.
Select the menu and choose your 2.4 GHz WIFI Router
Password
Weather Server Setup
WeatherUnderground
Station ID
Station Key
Upload wunderground.com
WeatherCloud
Station ID
Station Key
Upload weatherCloud.net
Time Server Setup
time.windows.com
Firmware Version: 1.0.1
a7d9d2a279fbbafa
**********
**********
**********
Apply
KCACANTI9
Server URL
Enter your station ID
Enter your station key/password
check to confirm upload to
WeatherUnderground server
Enter your station ID
Enter your station key/password
check to confirm upload to Weathercloud.net
Internet time server setting
Press Apply to confirm the setting
Select setup UI display language
Select your Wi-Fi Router (SSID) from the list
Router Password
Router
Wi-Fi Router Setup
Language:
Router 12345
SETTINGS
SETUP
English
- 48 -
5. If all of the information you entered is correct, press “Apply” to
confirm. If it does not, check your web interface information again.
NOTE:
When the Wi-Fi setup is complete, your computer or mobile device
will return to the default Wi-Fi connection. If it does not, simply open
your device’s wireless network settings and manually reconnect.
TIME SERVER CONNECTION STATUS
After the weather station has connected to the internet, it will attempt to
connect to the internet time server to obtain the UTC time. Once the
connection succeeds and the weather station’s time has updated. The
icon “SYNC” will appear on the LCD.
To display the correct time for your specific time zone, you will need to
change the time zone in the CLOCK setting mode from 00 (default) to
your time zone (eg. -5 for EST). If you don’t know your time zone, you can
look it up online.
NOTE:
The time will automatically synchronize to the internet per an hour.
CREATE AND SYNC YOUR WEATHER SERVER ACCOUNT
CREATE YOUR WEATHERUNDERGROUND ACCOUNT
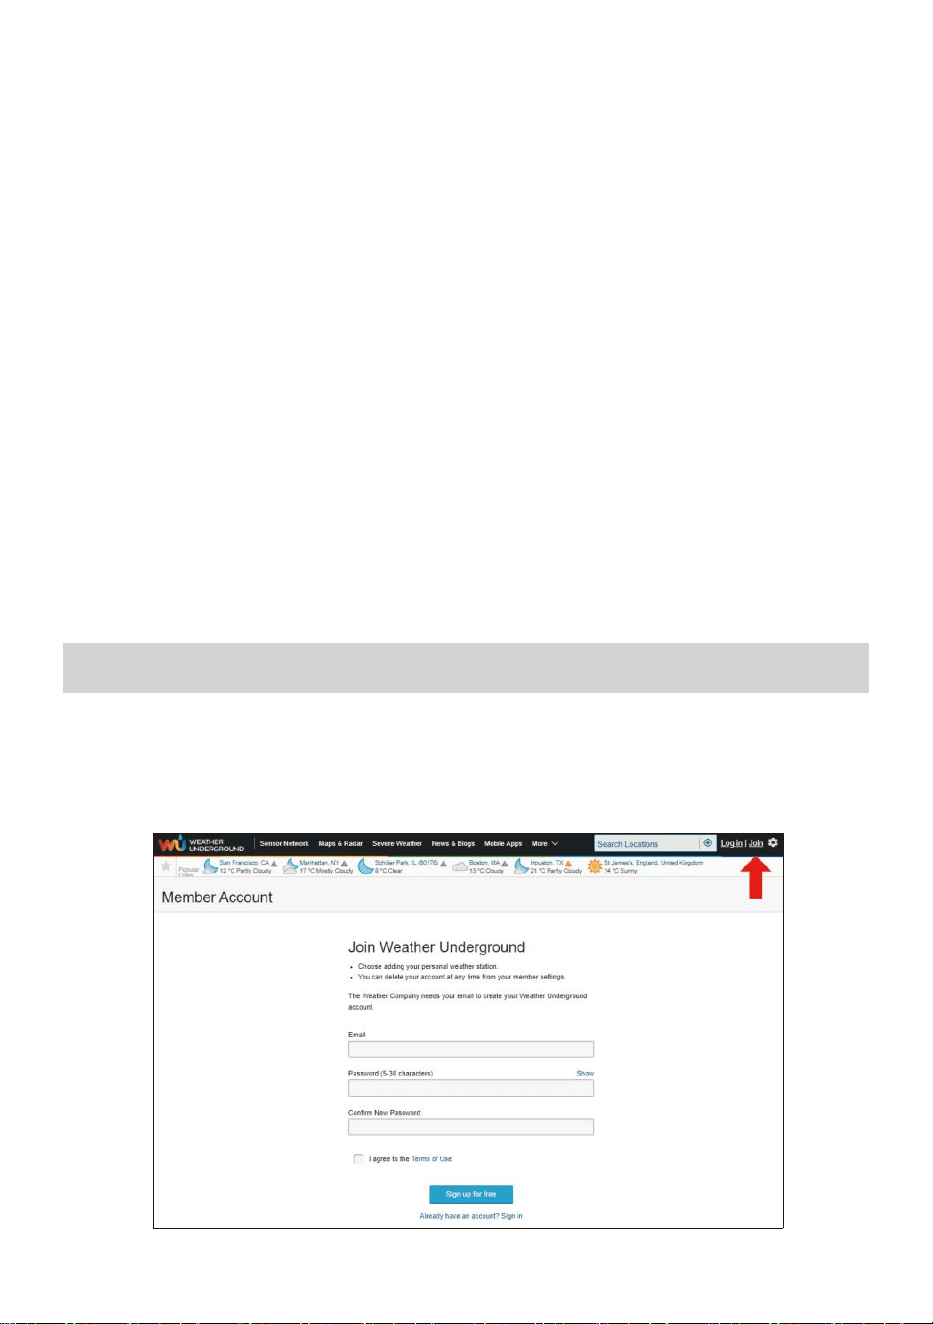
1. Visit: https://Wunderground.com, and select the “Join” in the upper
right and corner and create a Free Account.
- 49 -
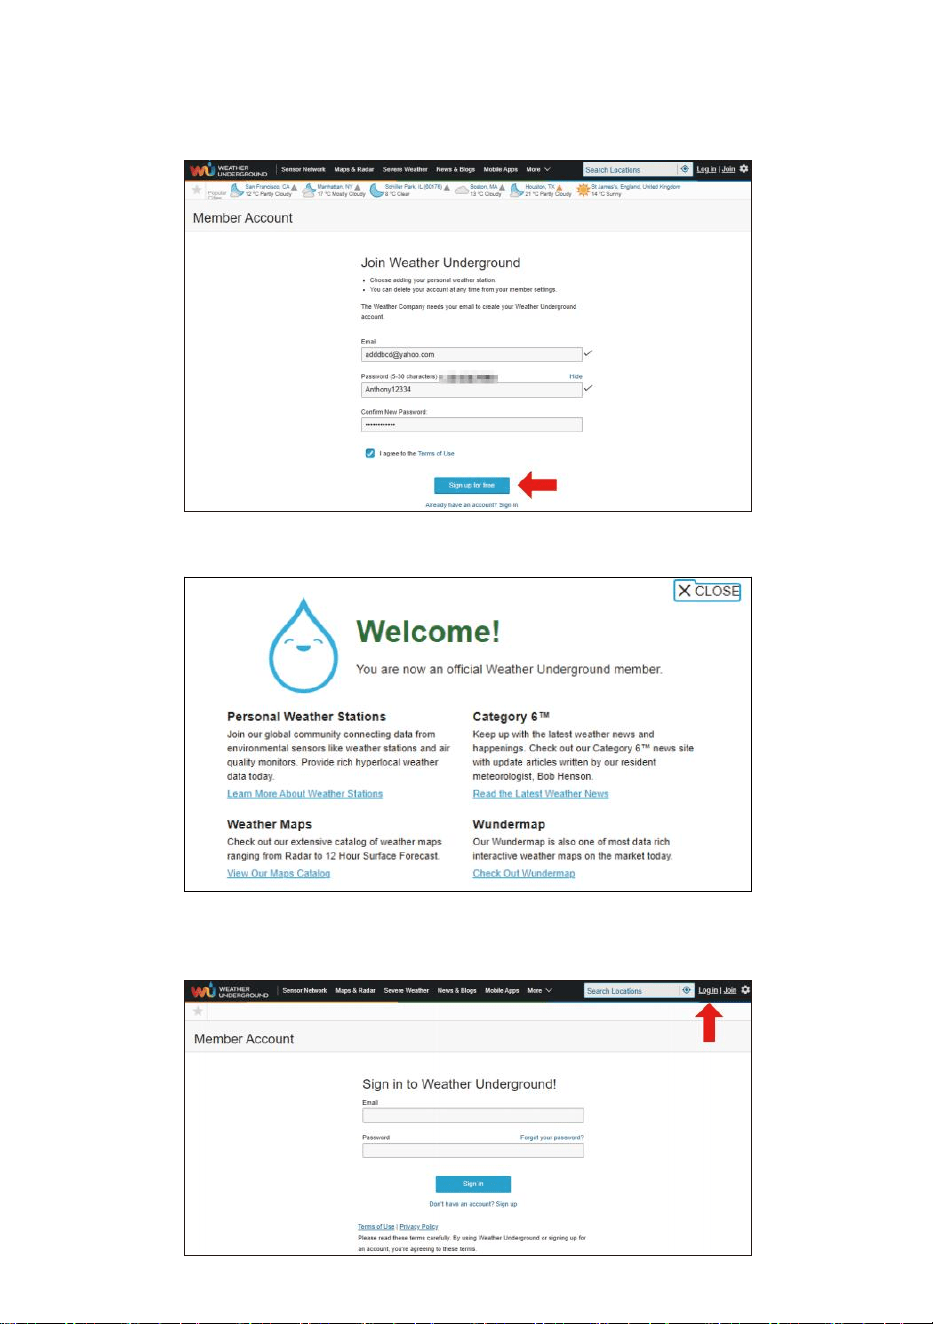
2. Enter a Username, Email and Password (It is your Login password
of the websiteIt, not your email password.So no privacy will be
exposed). Click Sign up for free.
3. After registration is done successfully, it will shown below message.
4. Click “Login” and enter the email address and password you just
registered.

- 50 -
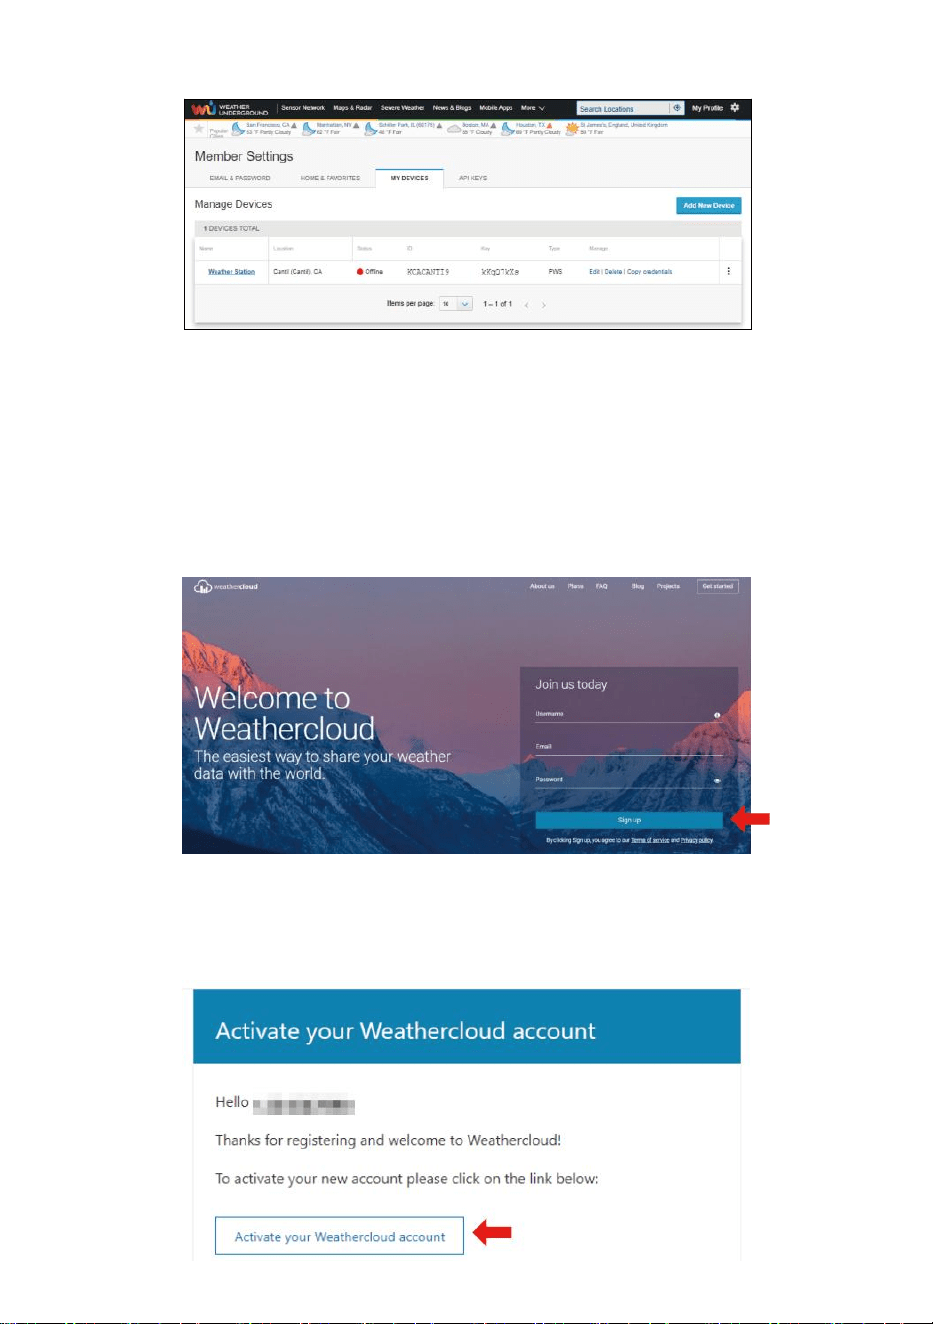
5. Click “My profile” and enter Member settings.
6. Click “Update home location”.
7. Click “My Devices”, and click “Add New Device”.
- 51 -
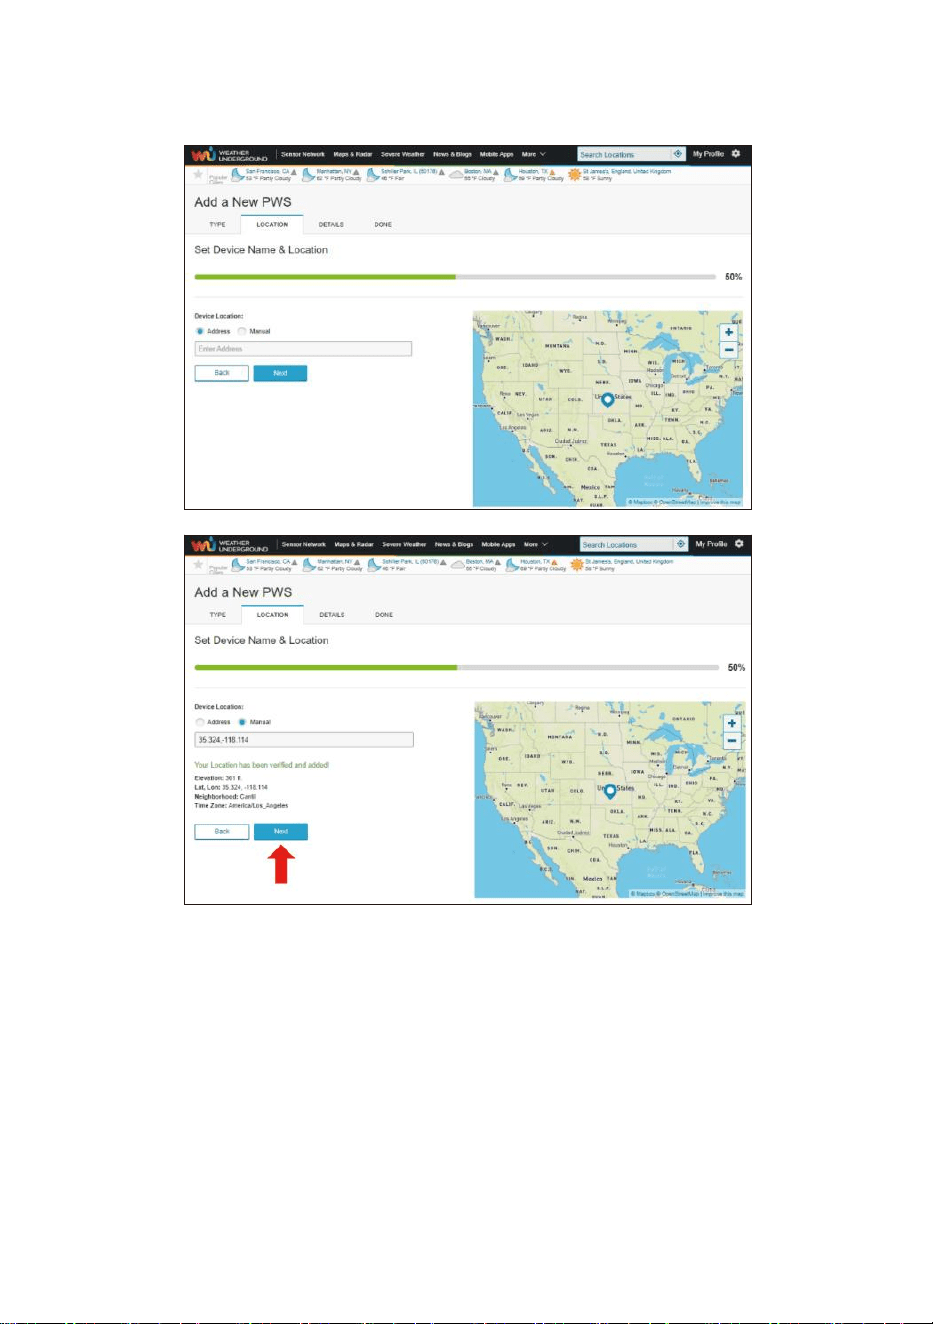
8. Select address by inputting an address or select Manual to position
your address automatically. Then click “Next”.

- 52 -
9. Enter the weather information. Blanks with red (required) must be
filled in.
NOTE:
You can select “other” of the Device Hardware.
10. Once complete this session, click “I Accept” and “Next”.
11. After registering successfully, please record your Weather Under-
ground ID and Key information for later setup use.
- 53 -
12. As shown below, registration is done successfully.
CREAT YOUR WEATHERCLOUD ACCOUNT
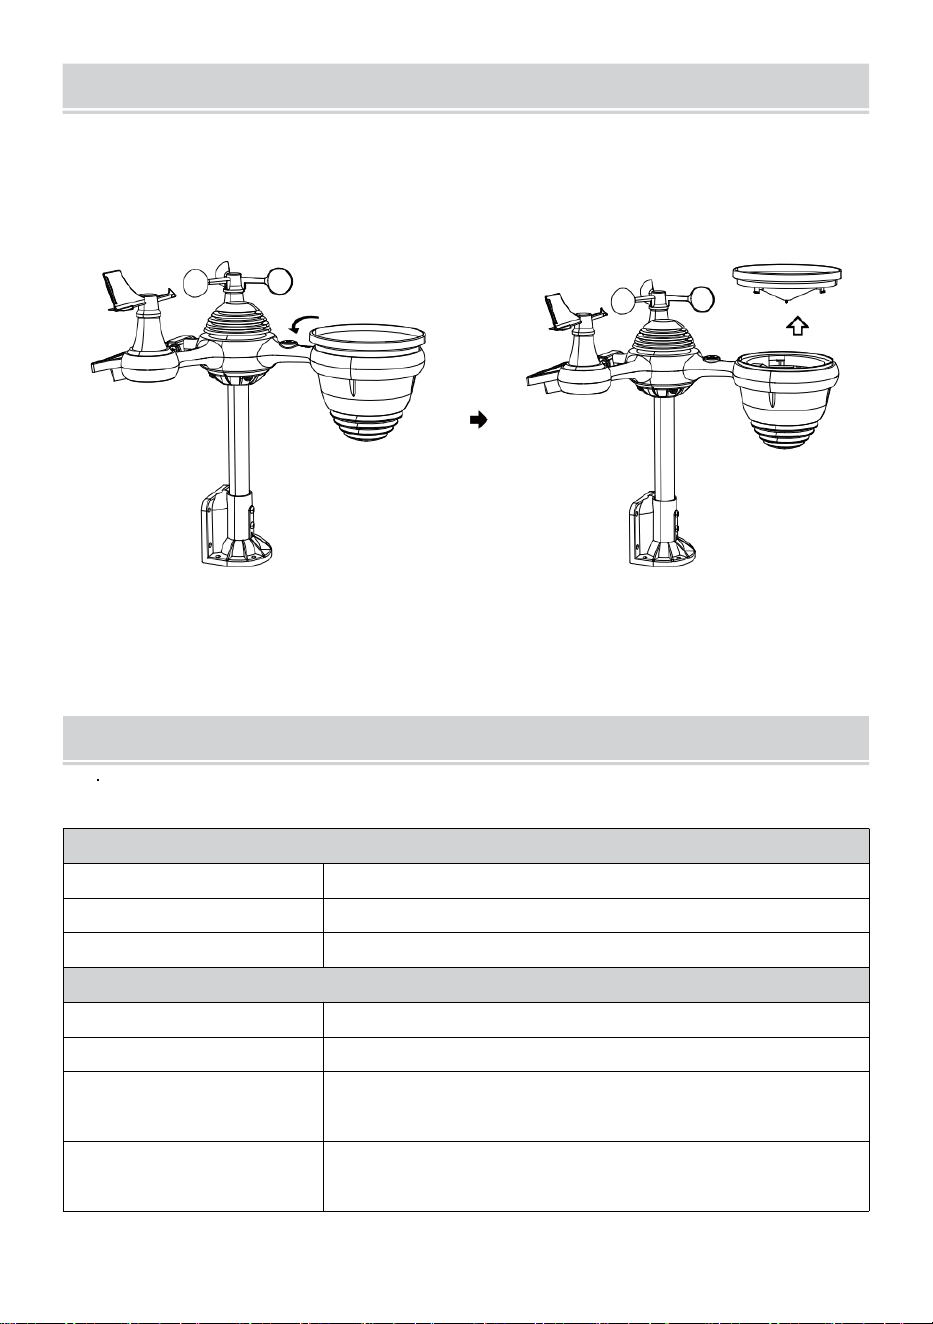
1. Visit Weathercloud website at https://weathercloud.net/, and enter a
Username, Email and Password and click “Sign up”. Following the
instructions to create an account.
NOTE: This is best done on a computer desktop or laptop.
(It is your Login password of the websiteIt, not your email password.
So no privacy will be exposed).
2. When it is successful, an email will be received in your registered
mailbox.
3. Open your mail and log in to the web address in the mail. Click “Acti-
vate your Weathercloud account”.

- 54 -
4. Click “here” to enter the homepage of the weathercloud website.
5. Enter the email address and password you just registered to enter the
weathercloud website.
6. Click “Create device” to add a weather station device.
7. Enter all the requested information into the Create New Device page.
Blanks with red * must be filled in.

- 55 -
NOTE:
You can select “other” of the Model number and Link type in the
above blanks.
Click “Get coordinates” to identify your location of on the map, then
click “Done” to confirm.
8. Once you have completed this section, click “Create”.
9. After registering successfully, please record your Weathercloud ID
and Key information for later setup use.
VIEW YOUR WEATHER DATA IN WEATHERUNDERGROUND
To view your weather station data live via PC or mobile web browser,
visit http://www.wunderground.com, and then enter the Station ID you
were provided during account setup in the search box. Your weather data
will show up on the next page.
- 56 -
CAREAND MAINTENANCE
1. Clean the rain gauge every 3 months. Rotate the funnel counterclock-
wise and lift to expose the rain gauge mechanisms, and clean with a
damp cloth. Remove any dirt, debris, and insects. If bug infestation is
an issue, spray the sensor lightly with insecticide.
Open
Lift
2. Clean the Light Intensity/ UV sensor and solar panel every 3 months
with damp cloth.
3. When replacing the batteries, apply a corrosion preventive compound
on the battery terminals.
SPECIFICATION
WEATHER STATION
General Specifications
Dimension
7.3 x 5.4 x 1.1inch (185.9 x 137.4 x 28.5mm)
Power source
AC-DC 5V, 1A adapter (included)
Support sensors
1 x 7-in-1 sensor (included)
Wi-Fi Communication Specification
Wi-Fi Standard
802.11 b/g/n
Wi- Fi operation frequency
2.4GHz
Supported devices for
setup UI
Build-in Wi-Fi with WAP mode smart device, including
laptops, computers, smart phones and smart pads
Recommend web browser
for setup UI
Latest Version of any web browser that supports HTML 5
- 57 -
Tim e Fun c t i on Sp e c if i c at i o n s
T i m e di s p l a y
HH : MM
H o u r f o r m a t
12 hour or 24 hour
Date display
DD/MM or MM/DD
T i m e s y n c h r o n i z a t i o n m e t h o d
Sy n ch r o n iz e s wi th a to m i c cl oc k
Time zones
-12 ~ +13 hours
DST
ON/OFF
Barometer Display & Function Specifications
Barometer units
hPa, inHg and mmHg
Measuring range
600 – 1100 hPa (relative setting range 930 – 1050hPa)
Accuracy
700 -1100 hPa±5 hPa/600 -696 hPa±8 hPa
20.67 – 32.48 inHg±0.15 inHg/17.72 -20.55inHg ±0.24 inHg
525 -825 mmHg±3.8 mmHg/450 -522 mmHg±6 mmHg
Typical at 77吓 (25℃)
Weather forecast
Sunny, Partly Cloudy, Cloudy, Rainy, Stormy and Snowy
Display mode
Current
Memory mode
Daily Max/ Min
Alert
Pressure change alert
Indoor/Outdoor Temperature Display & Function Specifications
Temperature unit
℃
and
吓
Indoor Display range
-14.1吓 – 122吓(-9.9℃ – 50℃)
Outdoor Display range
-40
吓
– 158
吓
(-40
℃
– 70
℃
)
In/Out accuracy
50 – 122吓 ± 1.8吓 / 10 – 50℃ ± 1℃
-4 - 50
吓
±2.7
吓
/ -20 – 10
℃
± 1.5
℃
others : ±3.6吓 / ±2℃
Display mode
Current
Memory mode
Daily Max/ Min
Alert
High/Low temperature alert
- 58 -
Indoor/Outdoor Humidity Display & Function Specifications
Humidity unit
%
Display range
1 – 99%
In/Out accuracy
40 – 80% RH ± 5% RH @77吓(25℃)
Others : ± 8% RH @77吓(25℃)
Display mode
Current
Memory mode
Daily Max/ Min
Alert
High/Low humidity alert
Wind Speed and Direction Display & Function Specifications
Wind Speed unit
mph, m/s, km/h, knots
Display range
0 -112mph, 50m/s, 180km/h, 97 knots
Speed accuracy
<5m/s: ±0.5m/s, >5m/s : ±10% (whichever is greater)
Display mode
Gust/Average
Memory mode
Daily Gust/Average
Alert
High Wind Speed Alert (Gust/Average)
Wind direction
16 directions
Rain Display & Function Specifications
Unit of rainfall
mm, in
Range of rainfall
0 – 12999mm (0 – 511.7 in)
Accuracy of rainfall
±7%
Display mode
Current
Memory mode
Daily Max
Rainfall display mode
Hourly/ Daily/ Weekly/ Monthly/ Total Rainfall
Alert
High Daily Rainfall alert
UV Index Display & Function Specifications
Display range
0 - 16
Display mode
Current
Memory mode
Daily Max
Alert
High UVI alert
- 59 -
Light Intensity Display & Function Specifications
Light Intensity unit
Klux, Kfc and W/m
2
Display range
0 – 200 Klux
Display mode
Current
Memory mode
Daily Max
Alert
High Light intensity alert
Weather Index Display & Function Specifications
Weather Index mode
Feels like, wind chill, heat index and dew point
Display mode
Current
Memory mode
Daily Max/min
WIRELESS 7-IN-1 OUTDOOR SENSOR
Dimension
16 x 15.6 x 14.4inch (408 x 396 x 367mm)
Main power
3.6V Ni-MH rechargeable battery pack
Backup power
Solar power
Weather data
temperature, humidity, wind speed, wind direction, rainfall,
UVI and light intensity
RF transmission range
330ft (100m)
Transmission interval
Every 20 seconds for UV
、
light intensity
、
wind speed
、
temperature, humidity and rain data and wind direction data
Operation temp
-40吓 – 140吓(-40℃ – 60℃)
Additional tools required for
sensor
Yes
- 60 -
TROUBLESHOOTING
Problem
Solution
Wireless sensor does
not communicate the
weather station
The wireless sensor may have initiated properly, and the data is
registered by the weather station as invalid, and the weather statio must
be reset.
With an open-ended paperclip, press the RESET button for 3 seconds to
complete display the voltage. LED will flash every 20 seconds.
If LED will not flash every 20 seconds, take out the batteries and wait 5
minute, while covering the solar panel to drain the voltage.
Put batteries back in and resync the weather station and resync the
weather station (Refer Page 10 RE-PAIRING SENSOR) with the
wireless sensor about 10 feet (3m) away .
The LED of the wirless sensor will flash every 20 seconds. If the LED is
still not flashing every 20 seconds, replace the new batteries in the
wireless sensor.
If the batteries were recently replaced, check the polarity. If the wireless
sensor is flashing every 20 seconds, proceed to the next step.
There may be a temporary loss of communication due to reception loss
related to interference or other location factors,
Or batteries may have been changed in the wireless seonsor and the
weather station has not been reset. The solution may be as simple as
powering down and up the weather station (remove DC power and
batteries), wait 30 seconds, and reinsert DC power and batteries).
Indoor and Outdoor
temperatue do not
agree
Allow up to one hour for the wireless sensors to stabilize due to signal
filtering. The indoor and outdoor temperature sensors should agree within
±4吓 (±2℃) (the sensor accuacy is ±2吓 (±1℃)
Use the calibration feature to match the indoor and outdoor temperature
to a known source.
Temperatur sensor
reads too high in the
daytime
Make certain that the wireless sensor is not too close to heat generating
sources or strictures, such as buildings, pavement, walls, or air condition-
ing units.
- 61 -
Problem
Solution
Rain gauge repors rain
when it it not raining.
An unstable mounting solution (sway in the mounting pole) may result
in the tipping bucket incorrectly incrementing rainfall. Make sure you
have a stable, level mounting solution. (Refer page 9 ADJUSTING THE
7-IN-1 WIRELESS SENSOR LEVEL)
Wi-Fi does not display
on the weather station
Check your router for problems.
1. Check Wi-Fi symbol on the display. If wireless connectivity is
successful, the Wi-Fi icon awill be displayed in the time filed.
2. Make sure your modem Wi-Fi settings are correct (network name,
and password)
3. Make sure the weather station is plugged into AC power. The weather
station will not connect to Wi-Fi when powered by batteries only.
4. The console only supports and connects to 2.4GHz routers. If your
own a 5GHz router, and it is a dual band router, you will need to
disable the 5Ghz band, and enable the 2.4GHz band.
5. The weather does not support guest networks.
Data not reporting to
www.wunder-
ground.com or
www.weathercloud.net
1. Confirm your password or key is correct. It is the password you
registered on Wunderground.com.
Wunderground.com. Your underground.com password cannot begin
with non-alphanumeric characters (a limitation of Wunderground.com,
not the station). Example, $worknet is not a valid password, but
worknet$ is valid)
2. Confirm your station ID ix correct. The station ID is all caps, and the
most common issue is substituting and O for a 0 (or vice versa).
Example, KCAPHOEM12, not KCAPH0EM12.
3. Make sure the data and time is correct on the weather station. If
incorrect, you may be reporting old data, not real time data.
4. Make sure your time zone is set properly. If incorrect, you may be
reporting old data, not real time data.
5. Check your router firewall settings. The weather station sends data
via Port 80.

FCC STATEMENT
- 62 -
This device complies with part 15 of the FCC Rules. Operation is subject
to the following two conditions:
1. This device may NOT cause harmful interference.
2. This device must accept any interference received, including interfer-
ence that may cause undesired operation.
NOTE:
This equipment has been tested and found to comply with the limits
for a Class B digital device, pursuant to Part 15 of the FCC Rules.
These limits are designed to provide reasonable protection against
harmful interference in a residential installation. This equipment
generates — and can radiate — radio frequency energy and, if not
installed and used in accordance with the instructions, may cause
harmful interference to radio communications.
However, there is no guarantee that interference will not occur in a
particular installation.
If the equipment does not cause harmful interference to radio or television
reception, which can be determined by turning the equipment off and on,
the user is encouraged to try to correct the interference by one or more of
the following measures:
Reorient or relocate the receiving antenna.
Increase the separation between the equipment and the receiver.
Connect the equipment into an outlet on a circuit different from that to
which the receiver is connected.
Consult the dealer or an experienced radio/TV technician for help.
WARNING: Changes or modifications to this unit not expressly
approved by the party responsible for compliance could void the
user’s authority to operate the equipment.
Sanven Technology Ltd.
Address: Suite 250, 9166 Anaheim Place, Rancho Cucamonga, CA
91730
Made In China


Technical Support and E-Warranty Certificate
www.vevor.com/support
V
e
r
r
o
u
i
l
l
a
g
e
Démarrage rapide
Guide
⑤
I
N
S
T
A
L
L
A
T
I
O
N
D
U
C
O
L
L
E
C
T
①INSTALLING THE MOUNTING POLE
Secure the sensor onto a mounting pole (included) using the screws (included).

E
U
R
D
E
P
L
U
I
E
I
n
s
é
r
e
r
l
e
e
n
t
o
n
n
o
i
r
d
a
n
s
l
e
p
l
u
i
e
c
o
l
l
e
c
t
i
o
n
n
e
u
r
e
t
v
e
r
r
o
u
i
l
l
a
g
e
i
l
d
a
n
s
l
i
e
u
.
⑥
I
N
S
T
A

L
L
A
T
I
O
N
L
E
P
I
L
E
S
② INSTALLATION LE MONTAGE SUPPORT
Dévisser la porte de la batterie à le bas. Connecter le câble de la batterie rechargeable.
A
j
u
s
t
e
r
l
e
s
c
â
b
l
e
s
c
o
n
n
e
c
t
é
s
d
o
n
c
i
l
s
s
'
Secure the sensor onto a mounting bracket (included) using the screws (included).

i
n
t
é
g
r
e
r
c
o
n
f
o
r
t
a
b
l
e
m
e
n
t
l
e
c
o
m
p
a
r
t
i
m
e
n
t
.
F
e
r
m
e
r
e
t
f
i
x
e
r
l
a
p
o
r
t
e
d
e
l
a
b
a
t
t
e
r
i
e
.
③ INSTALLATION VENT VITESSE TASSES
Aligner les trous de vis dans le coupes de vitesse du vent avec le plat, côté vertical
de le métal tige.
Insérer le coupelles de vitesse du vent dans la tige métallique et la vis serré à
verrouillage il dans lieu.
D
e
s
s
e
r
r
e
r
l
a
v
i
s
à
l
e
a
r
t
i
c
u

l
a
t
i
o
n
.
A
j
u
s
t
e
r
l
e
a
n
g
l
e
v
e
r
t
i
c
a
l
d
e
l
e
s
o
l
a
i
r
e
c
e
l
l
u
l
e
.
P

o
u
s
s
e
r
l
'
e
n
g
r
e
n
a
g
e
v
e
r
s
l
'
i
n
t
é
r
i
e
u
r
e
t
s
e
r
r
e
r
l
e
v
i
s
.
I
n

d
i
q
u
e
r
à
N
O
R
D
N
O
R
D
I
n
d
i
q
u
e
r
à
④ INSTALLATION VENT DIRECTION GIROUETTE
Aligner les trous de vis dans le direction du vent girouette avec le plat, côté vertical
de la tige métallique.
Insérer le vent direction girouette dans le métal tige et vis sur serré à verrouillage il
dans lieu .
Point to
SOUTH
⑩MISE SOUS TENSION
LE STATION MÉTÉO
Prise l'adaptateur secteur dans
le station météo.
Une fois le la station météo est allumé ,
il entrera automatiquement en
couplage mode.
presse ou bouton pour commencer le
AP
mode . Ouvert ton Wi - Fi réseau
paramètres sur PC ou téléphone
intelligent .
Situer le SSID de la station météo
( WWS - XXXXXX ) depuis le liste .
Robinet sur le SSID à connecter .
SETTINGS
SETUP ADVANCED
Language:
Wi-Fi Router Setup
Router 1234 5
Select the menu and choose your 2.4GHz WIFI Router
Password
Weather Server Setup
WeatherUnderground
Station ID
Station Key
Upload wunderground.com
WeatherCloud
Station ID
Station Key
Upload weatherCloud.net
Time Zone Setup
Time Zone
Time Server Setup
Server URL
Firmware Version: 1.0.1
time.windows.com
a7d9d2a279 fbbafa
**********
**********
**********
Apply
KCACANTI9
English
Router
+0.00
⑧MOUNTING THE WIRELESS 7-IN-1 OUTDOOR SENSOR
Various options to install. Make sure the rain collector faces north and
the solar panel faces south before fastening the screws (included).
If you are a user located in the Southern Hemisphere,
please reverse the direction.
Enter your station ID
Enter your station key/password
check to confirm upload to
WeatherUnderground server
Enter your station ID
Enter your station key/password
check to confirm upload to
Weathercloud.net
Time zone setting
Internet time server setting
Press Apply to confirm the setting
⑨ADJUSTING THE 7-IN-1 WIRELESS SENSOR LEVEL
Use the bubble level indicator to make sure the wireless outdoor sensor is completely level.
Select setup UI display language
Select your Wi-Fi Router (SSID) from the list
Router Password
The
bubble
TV
PARAMÈTRE EN HAUT
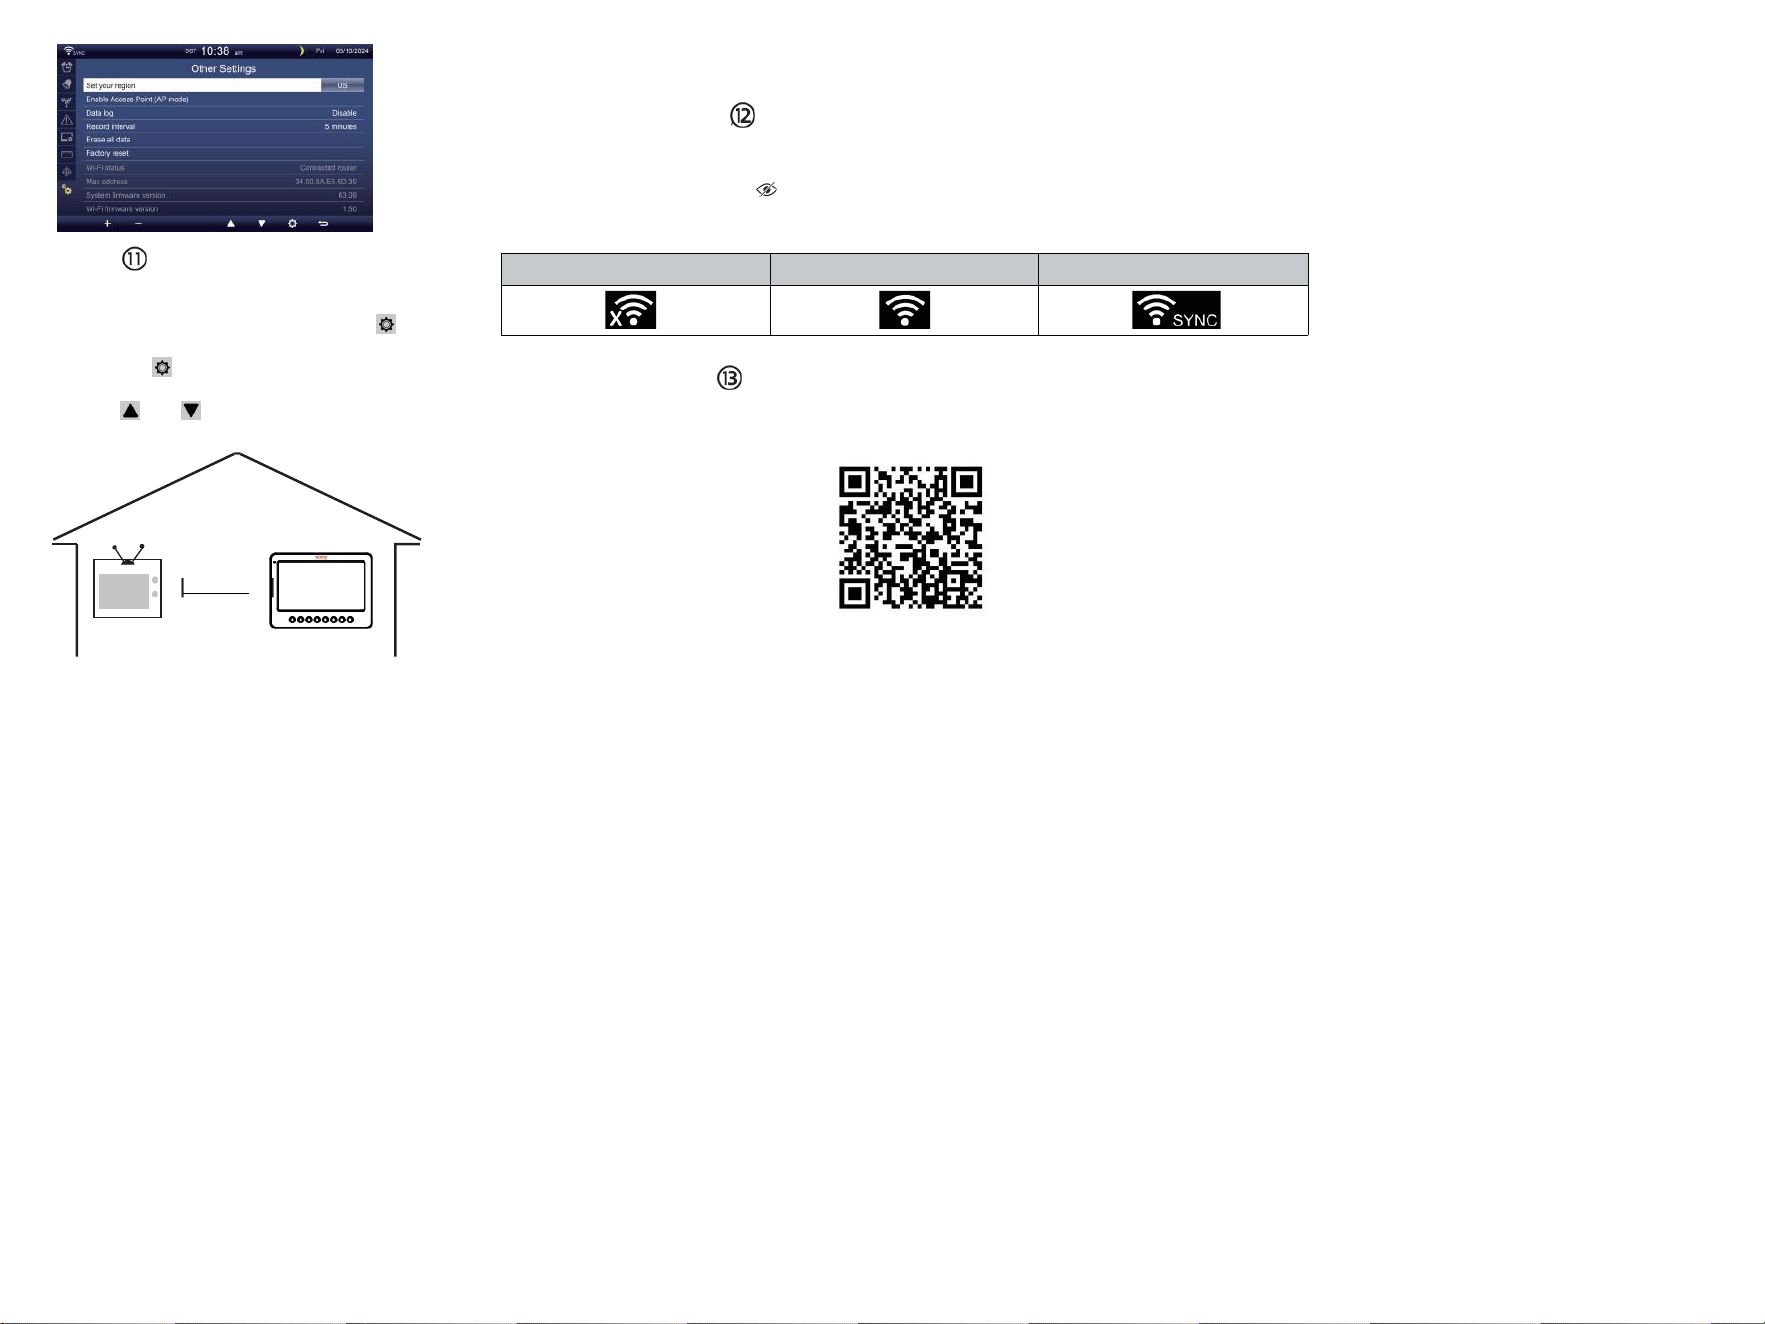
CONNEXION WI-FI
Dans l'écran simple/détail, presse
bouton à entrer Paramètre menu .
Presse bouton pour changer « Autre
Paramètre " afficher.
Presse ou bouton à entrez « Activer »
Point d'accès".
AT
MOINS
3
pieds
(.9 m)
À PART
P
o
u
r
p
r
é
v
e
n
i
r
i
n
t
e
r
f
é
r
e
n
c
e
s
a
n
s fil, lieu les deux unités à moins 3
pieds (.9 m) loin à partir
d'appareils électroniques (TV,
ordinateur, micro-ondes, radio,
etc.).
WI-FI disconnected
WI-FI connected
WI-FI connected with Sync
ENTER SETUP INTERFACE
Enter the following address into the web browser address bar:
http://192.168.1.1 to access the setup interface.
Please click to check your password before clicking APP.LY
Please scan the QR code or visit https://youtu.be/JYr4BeOmEKo to see a video on how to use it.
Familiarize yourself with the icons for Wi-fi connection status.
WI-FI CONNECTION STATUS

Support technique et Certificat de garantie électronique
www.vevor.com/su pport
STATION MÉTÉOROLOGIQUE
MODÈLE : YT60233
Nous continuons à nous engager à fournir toi outils avec compétitif prix.
"Sauvegarder Moitié", "Moitié Prix" ou toute autre expression similaire utilisé par nous
seulement représente un
estimation des économies que vous pourrait bénéficier de l'achat de certains outils avec nous
rouge comparatif à le majeur
haut marques et doses pas nécessairement entend couvrir toutes les catégories d'outils offert
par nous. Toi
sont gentiment rappelez-vous de vérifier attentivement lorsque vous êtes passer une
commande avec nous si tu es
en fait, je sauve la moitié par rapport au sommet grande marque ds.


- 3 -
MÉTÉOROLOGIQU
E GARE
MODÈLE : YT60233
BESOIN DE L'AIDE? CONTACT NOUS!
Avoir Des questions sur les produits ? Besoin d'assistance
technique ? N'hésitez pas à contact nous:
Service client @ vevor . com
Ce est l'original instruction, s'il te plaît lire tout manuel instructions
soigneusement avant d'utiliser. VEVOR se réserve le droit
interprétation de notre manuel d'utilisation. L'apparence du produit doit
être sujet à le
produit vous reçu. S'il vous plaît, pardonnez -nous, nous ne le ferons
pas. je vous informe à nouveau s'il y a des mises à jour technologiques
ou logicielles sur notre produit .

SAFETY PRECAUTIONS
- 4 -
AVERTISSEMENT! Veuillez lire et comprendre toutes les consignes de
sécurité. précautions , mode d'emploi , et entretien / maintenance
instructions avant en fonctionnement ce
appareil. Conservez ce manuel pour référence ultérieure .
Ce produit est pas un jouet. Restez hors de la portée des enfants.
Ce produit est conçu pour être utilisé dans le maison seulement
comme un indication du temps conditions .
Ce produit est ne pas être utilisé à des fins médicales à des
fins ou pour le public information.
Faire ne pas nettoyer le unité avec abrasif ou corrosif matériels.
Faire pas placer l'appareil à proximité de flammes nues ou de
sources de chaleur . Incendie, choc électrique, dommages au
produit ou blessures pourrait se produire.
Seulement utiliser frais nouveau piles dans le produit . Faire pas
mélanger nouveau et ancien piles ensemble.
Faire ne pas démonter, altérer ou modifier le produit .
Utilisez uniquement des accessoires ou des pièces jointes avec cet
produit spécifié par le fabricant.
Faire ne pas submerger le unité dans l'eau. Sécher le produit avec
un chiffon doux si déversements de liquide sur il.
Faire ne soumettez pas l'appareil à une force excessive, à des
chocs, canal, température extrême , ou humidité .
Faire ne pas couvrir ni bloquer la ventilation trous avec n'importe quel
objets.
Cette station météo de cette produit est destiné à être utilisé à
l'intérieur seulement.
Ce produit convient uniquement pour le montage sur un hauteur moins de
2 m (6.6 pieds carrés).
Faire ne pas altérer l'appareil Composants internes . Toute altération
du produit annulera la garantie .
Les piles sont pas inclus. Quand insertion piles , assurez-vous que
le positif et négatif polarités correspondre avec le marquages dans
le compartiment .
Faire pas mélanger la norme, l'alcalin et rechargeable piles ensemble.
Laisser un batterie exposée à des conditions extrêmement haute
température dans l' environnement environnant peut entraîner un
explosion ou fuite de liquide inflammable ou du gaz.
Laisser un batterie exposée à des températures extrêmement faibles
air pression dans le

SAFETY PRECAUTIONS
- 4 -
l'environnement environnant peut entraîner un explosion ou
fuite de liquide inflammable ou du gaz.

TIPS FOR SENSOR SITE SELECTION
- 5 -
Le collecteur de pluie doit être nettoyé tous les peu mois .
Le capteur doit être installé à moins 1,5 m (5') de toute bâtiment ou
structure.
Choisissez un emplacement dans un espace ouvert sous direct
soleil avec Non Obstacles.
Le capteur doit rester dans la ligne de mire et à moins de 150 m (492')
de la météo gare pour cohérent , stable transmission .
Gardez votre capteur et votre station météo loin de la maison
appareils électroménagers que fonctionner sur le même fréquence . La
console et
le capteur devrait battre moins 1 - 2 m (3' -7') de tel interférence s.
PRODUIT CARACTÉRISTIQUES
7″ Écran TFT haute définition écran.
Horloge en temps réel avec calendrier r.
Fonction d'alarme.
Lune Phase.
Heure du lever/coucher du soleil.
Réglage du fuseau horaire et Heure d' été Fonction (DST).
Fuseau horaire : GMT +13 à -12h.
Synchronisation automatique avec le serveur de temps Internet.
7 langues (FR/ DE/ FR/ FR/ IL/ (NL/ CZ) pour affichage.
de température et d'humidité intérieures et extérieures
avec s'orienter.
Événement, Toutes les heures, Quotidien, Hebdomadaire, Mensuel,
Total précipitations et Précipitations taux dans passé heure.
Affichage de la vitesse moyenne du vent, de la vitesse des rafales et
de la direction du vent.
Absolu et relatif Affichage de la pression barométrique avec tendance.
Solaire Radiation affichage de l'intensité et Affichage UV I.
Affichage de l'indice météo : Sentir J'aime, Wind Chill, Chaleur indice.
Rosée indiquer.
Météo Prévision.
Données météorologiques avec Max/Min lecture, journal de données
et affichage graphique de l'historique.
Paramètres d'alerte météo.
Réglage de la luminosité du rétroéclairage.
Faible batterie indications pour les capteurs extérieurs.
Nuit Fonction lumière.

TIPS FOR SENSOR SITE SELECTION
- 5 -
Téléchargement des données météorologiques vers Weather
Underground et/ou Weather- nuage via Wi-Fi routeur.

PACKAGECONTENTS
- 6 -
1 2 3
4 5 6
7
8
9 10 11 12
1 station météo
7 Montage poteau avec 4 vis
2 Adaptateur
8 Montage parenthèses avec 6 vis
3 Capteur extérieur sans fil 7 en 1 9 Coussinets en caoutchouc X 2
4 Entonnoir
10 Tournevis 1
5 Girouette de direction du vent avec 1 vis
11 Tournevis 2
6 tasses de vitesse du vent avec 1 vis
12 Guide d'utilisation
REMARQUE : 4 supplémentaires vis pour vent direction
girouette et vent tasses de vitesse .
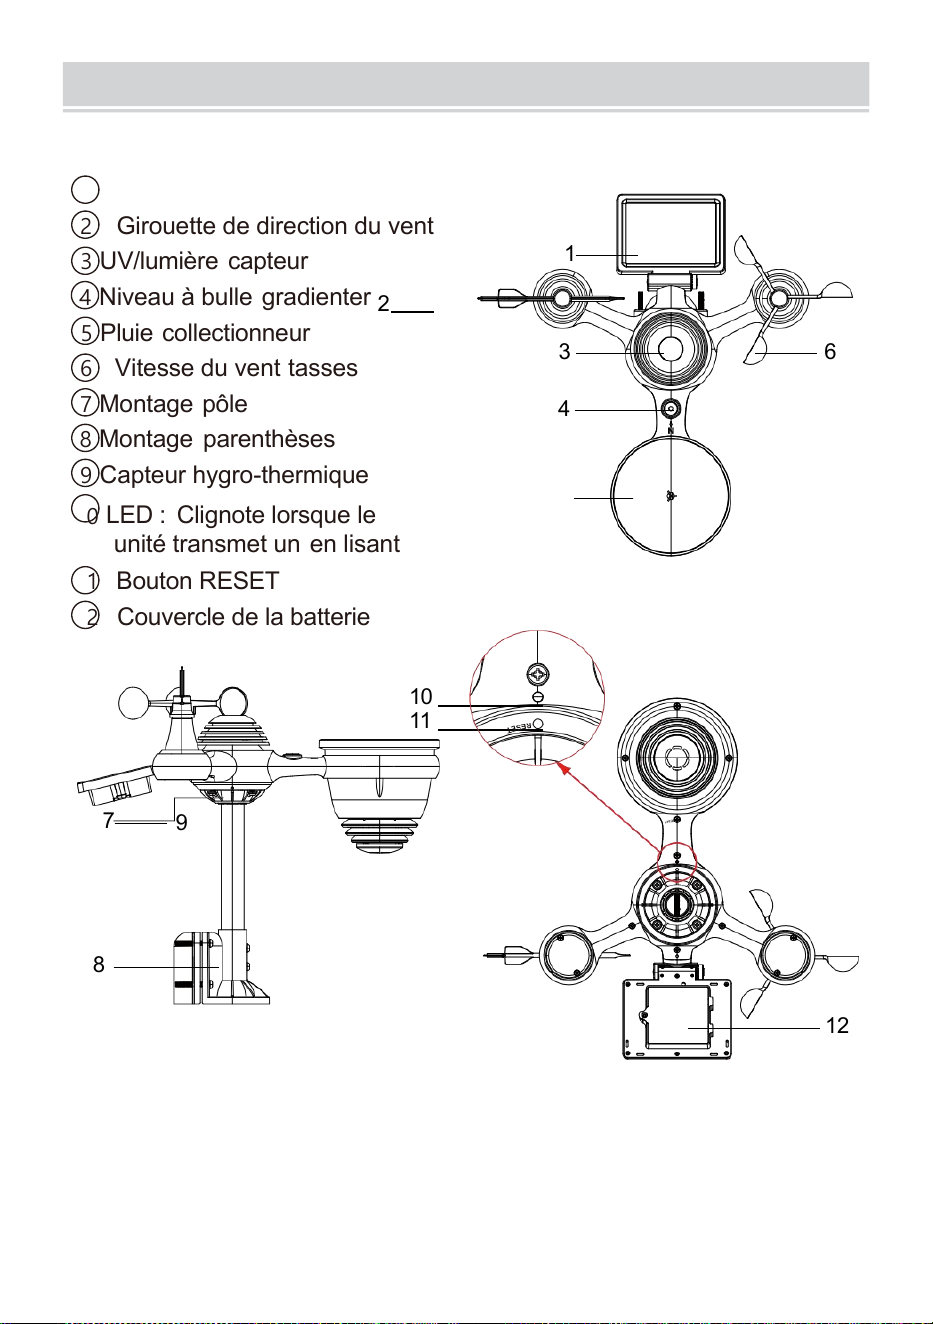
PRODUCTOVERVIEW
- 7 -
7 EN 1 SANS FIL POUR L'EXTÉRIEUR CAPTEUR
1
Solaire panneau
2 Girouette de direction du vent
3 UV/lumière capteur
4
Niveau à bulle gradienter
2
5 Pluie collectionneur
6 Vitesse du vent tasses
7
Montage pôle
8 Montage parenthèses
9 Capteur hygro-thermique
10
LED : Clignote lorsque le
unité transmet un en lisant
11 Bouton RESET
12
Couvercle de la batterie
10
11
7
9
8
12
3 6
4
1
5

WEATHERCONSOLEOVERVIEW
- 8 -
1
2
3
4
5
6
7
8
1 Lumière ambiante
détecteur
4 murs montage titulaire
7 Antenne
2 Écran d'affichage
5 Pouvoir saisir
8 Béquille
3 Fonction
boutons
6 Bouton RESET

HOME SCREEN OVERVIEW
- 9 -
1 2 3 4 5
6
15
8
16
10
17
18
o—
19
2
11
12
13
14
9
7
23 24
1 Connexion Wi-Fi/synchronisation horaire icône
13 Rosée indiquer
2 fois
14 Baro pression
3 Direction du vent
15 Température intérieure
4 Lune phase 16 Humidité intérieure
5 Date
17 Lumière intensité
6 Intensité du signal du capteur icône
18 UVI
7 Température extérieure
19 Précipitations
8 Vitesse du vent 20 Pluie taux
9 Humidité extérieure 21 Pluie taux niveau
10 Vitesse du vent niveau 22 Fonctionnel bouton icône
11 Sentiments comme la température 23 Prévisions météo
12 Chaleur index
24 Lever/coucher du soleil temps

DETAIL SCREEN OVERVIEW
- 10 -
11
12
1 3
1 4
1 5
1 6
1 7
1 8
1 9
20
21
1 2 3 4 5 6 7 8 9 10
22
23
24
25
26
27
28
29
30
31 32
1 connexion Wi-Fi/synchronisation horaire icône
17
Refroidissement éolien
2 Température extérieure MAX/MIN
18 Rosée indiquer
3 MAX/MIN extérieur humidité
19 Bar -ro pression
4 Rafales de vent
20 Lumière intensité
5 Heure 21 UVI
6 Vitesse moyenne du vent 22 Température intérieure MAX/ MIN
7 Direction du vent
23 Température intérieure
8 Vitesse du vent
24 MAX/MIN intérieur humidité
9 Lune phase
25 Intérieur humidité
10 Date
26 Pluie taux
11 Sentiments comme la température 27 Événement, horaire,
hebdomadaire,
12 Température extérieure
mensuel, total précipitations
13 Humidité extérieure 28 Pluie taux niveau
14 Vitesse du vent niveau
29 Tous les jours
précipitations
15 Sentiments comme une température de 30 Fonctionnel bouton icône

DETAIL SCREEN OVERVIEW
- 10 -
16 Chaleur indice
31 Prévisions météo
32 Heure du lever/coucher du
soleil
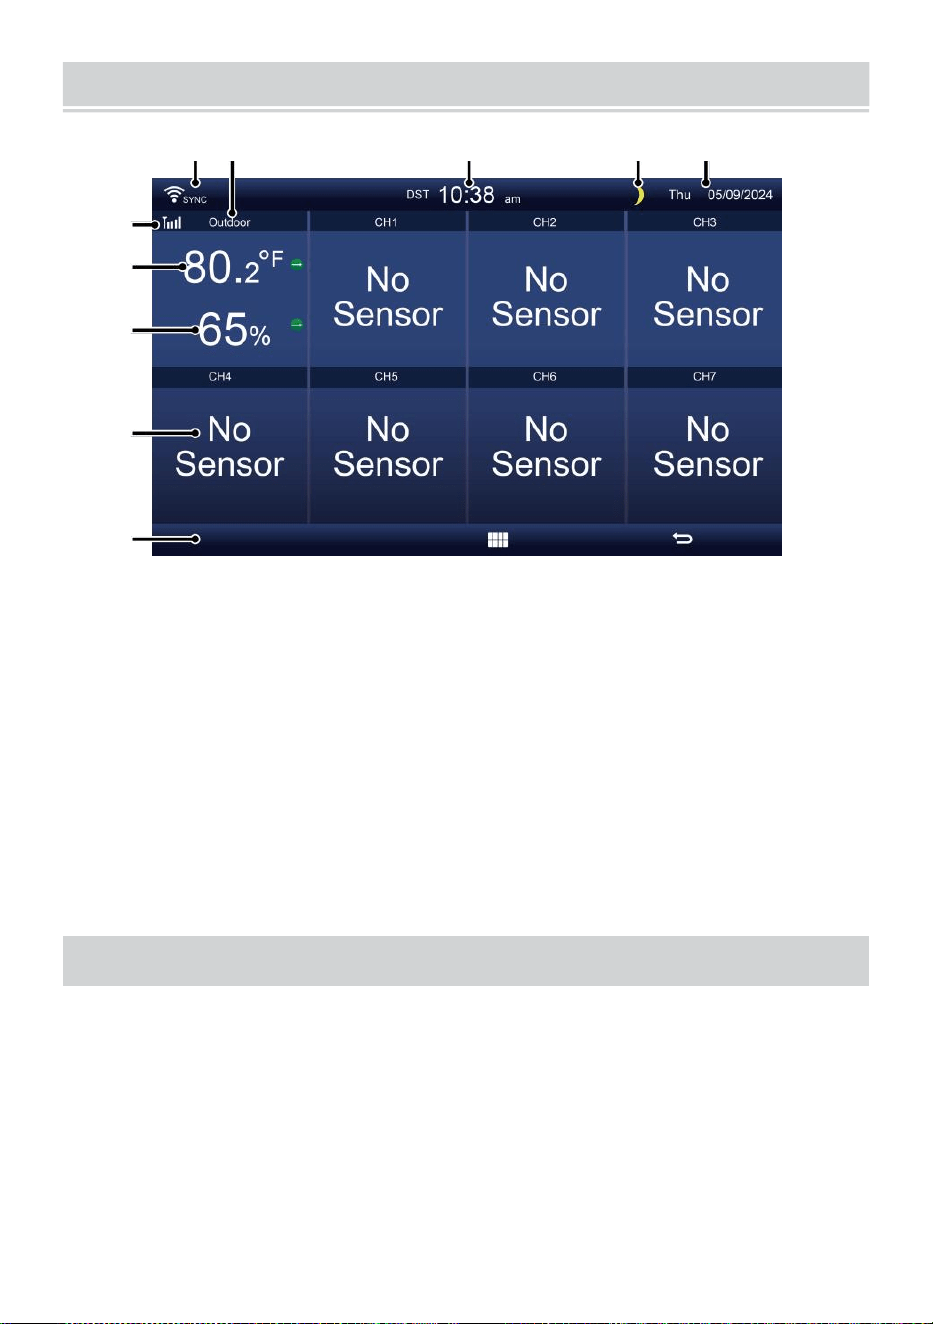
SUMMARY SCREEN OVERVIEW
- 11 -
6
7
8
9
1 0
1 2 3 4 5
1 connexion Wi-Fi/synchronisation
horaire icône
2 Entrée/sortie icône étiquette
3 Temps
4 Lune phase
5 Date
6 Force du signal du capteur
icône
7 Température
intérieure/extérieure
8 Humidité intérieure/extérieure
9 Non écran connecter écran
10 Fonctionnel bouton icône
PARAMÈTRE CAPTEUREXTÉRIEUR 7 EN1 UP THE WIREL
ESS
Le extérieur sans fil 7 en 1 capteur mesures vent vitesse , vent direction ,
précipitations, UV, lumière intensité, température et humidité.
INSTALLATION DU MONTAGE PÔLE ET SUPPORT ET
Fixez le capteur sur un montage pôle et support (inclus) en utilisant
le vis ( inclus ).

INSTALLATION DES COUPELLES DE VITESSE DU VENT ET DU
VENT DIRECTION V ANE
Aligner la vis trous dans les coupelles de vitesse du vent avec le côté
plat et vertical de la métal tige.
Insérer les coupelles de vitesse du vent dans le métal tige et vissez-
les sur serré à verrouillage il dans lieu.
Alignez les trous de vis dans le vent girouette de direction avec
l'appartement, verticale côté de la métal tige.
Insérer la girouette de direction du vent dans le métal tige et vissez-
les serré à verrouillage il dans lieu.

- 12 -

- 13 -
Installation de coupe-vent
Direction du vent Installation de la palette
PARAMÈTRE EN HAUT COLLECTEUR DE PLUIE
Alignez le encoches sur l'entonnoir avec les rainures de
verrouillage à l'intérieur du pluie collectionneur.
Insérer l'entonnoir dans le récupérateur de pluie et vissez-les
fermement à verrouillage il dans lieu.

Verrouillage
Aligner
INSTALLATION DU PILES
Dévissez le porte de la batterie en bas du 7-en-1 de plein air
capteur en utilisant un tournevis 1.
Connectez le câble du rechargeable batterie pack (inclus) au câble
situé dans le batterie compartiment.
Ajustez les câbles connectés pour qu'ils s'adaptent
confortablement dans le compartiment- ment. Alors, insérer le
batterie paquet dans le compartiment.

- 14 -
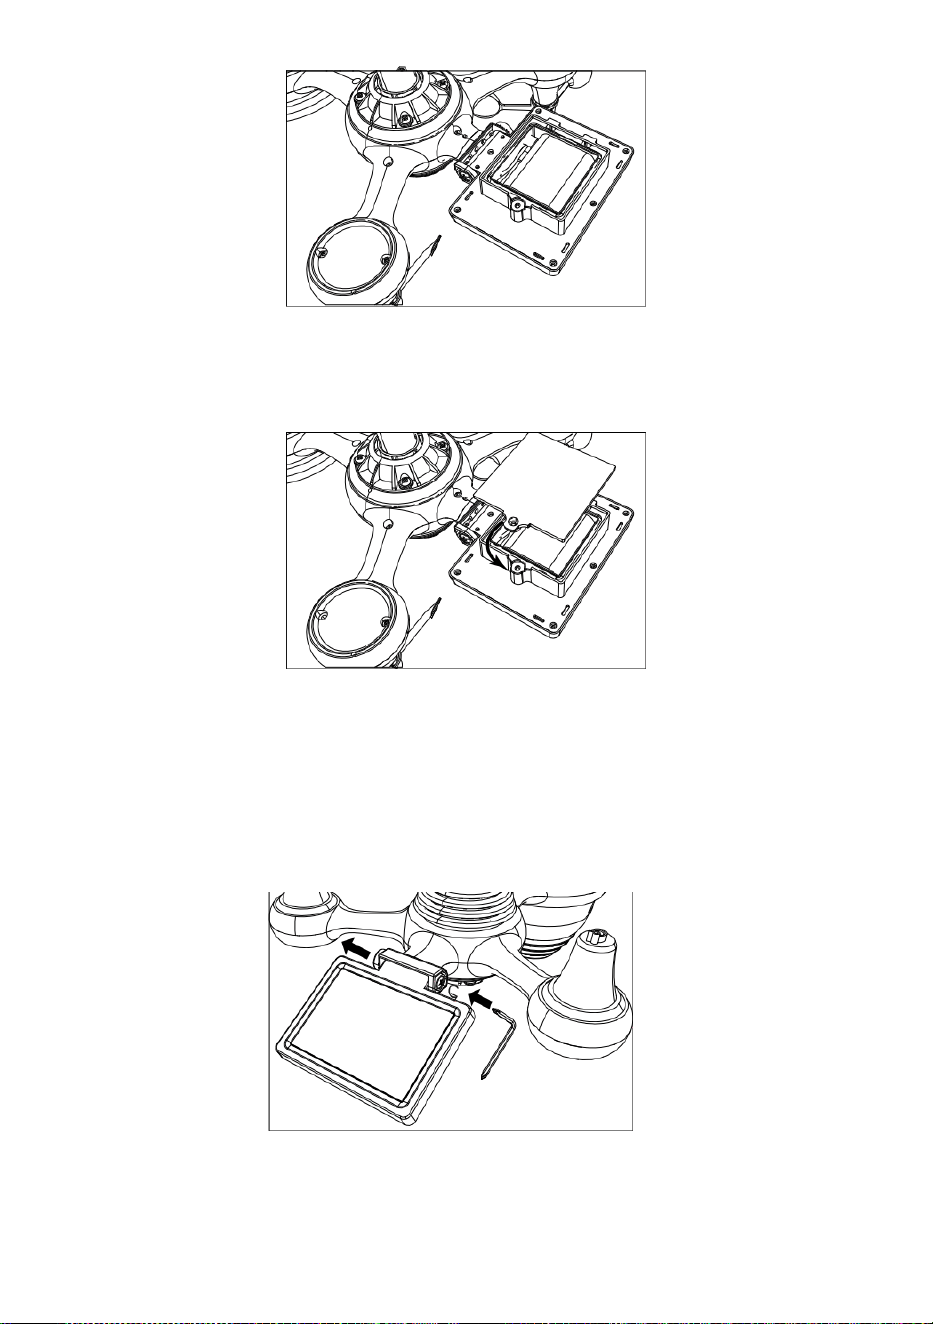
- 15 -
Fermez et fixez la porte du compartiment à piles de retour sur le
compartiment.
RÉGLAGE LE SOLAIRE CELLULE
engrenage de l'autre côté de l'articulation
pousse vers l'extérieur. La cellule solaire doit maintenant être dans un
déverrouillé position .
Ajustez l'angle vertical de la cellule solaire pour obtenir le la plupart
optimal utilisation de la cellule solaire en fonction de votre
emplacement.

- 16 -
Poussez l'engrenage vers l'intérieur et serrez la vis jusqu'à le
engrenages verrouillage dans lieu.
Lors du réglage de la cellule solaire, réglez-la sur un angle fermer est à
ton latitude. Voir la carte ci-dessous pour obtenir un idée de comment
vous devrait inclinez votre solaire cellule.
Latitude Proximité
de l'angle des cellules
solaires
0°
21°
42°
63°
84°
Si ton emplacement est fermer à
84°
84°
Si ton emplacement est fermer à
63°
63°
Si ton emplacement est fermer à
42°
42°
Si ton emplacement est fermer à
21°
21°
Si ton emplacement est fermer à
0°
0°
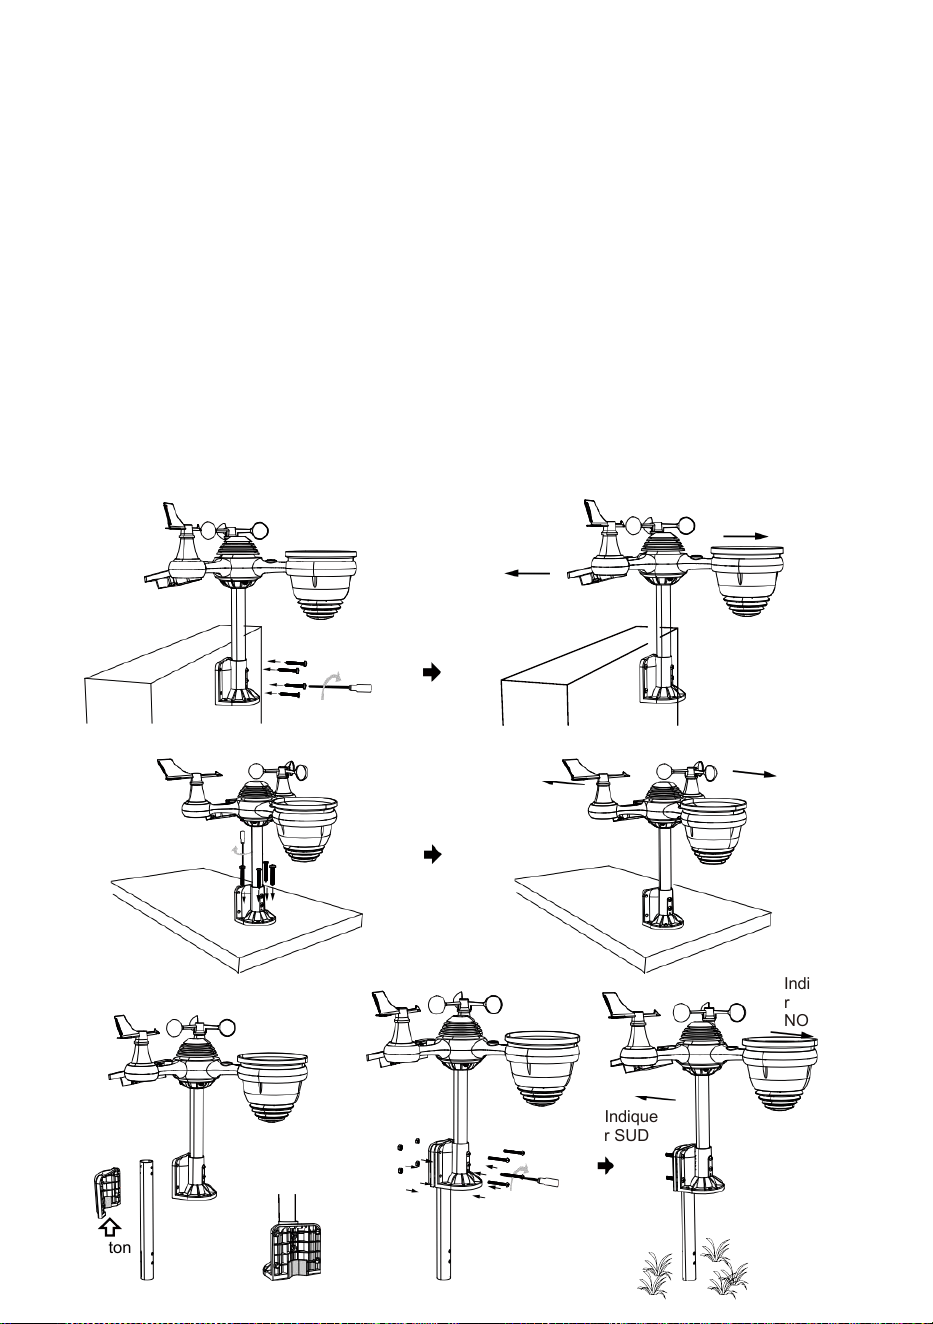
- 17 -
MONTAGE LE 7 EN 1 SANS FIL POUR L'EXTÉRIEUR CAPTEUR
Choisissez un emplacement pour le capteur extérieur 7 en 1 qui
est ouvert avec Non Obstacles.
Serrez le supports de montage sur une surface/un mur à l'aide quatre
tapotement
vis (incluses), ou serrer le montage pôle à votre existant monter- ing
pôle avec quatre φ5 Boulons et M5 Assemblage d'écrous.
Ajouter tampons en caoutchouc sur le support de montage
avant de fixer le support de montage sur le capteur.
Assurez-vous que le visages de collecteurs de pluie le nord et le
solaire le panneau est orienté vers le sud avant fixation le vis ( in
clus ).
Assurez-vous que le capteur est fixé de manière particulière
fermement, sinon venté conditions cause le émetteur à secouer et
ainsi mal interpréter les précipitations données .
Indiquer
NORD
Indiquer
SUD
Indique
r NORD
Indique
r SUD
Indique
r
NORD
Indique
r SUD
Bâton
- 17 -
Bâton

- 18 -
POINTAGE LE 7 EN 1 SANS FIL POUR L'EXTÉRIEUR CAPTEUR À
SUD
Le capteur météo sans fil extérieur est calibré pour être pointu nord pour
une précision maximale. Cependant, pour votre commodité, si vous êtes
un utilisateur
situé dans le Sud Hémisphère , vous pouvez utiliser le capteur avec le
collecteur de pluie pointant vers le sud.
1. Montez et installez le système météo sans fil capteur avec h le pluie
collecteur pointant vers le sud, au lieu de No rth. (S'il vous plaît se
référer à MONTAGE DU
2. 7-EN-1 SANS FIL POUR L'EXTÉRIEUR CAPTEUR.)
Sélectionnez « STH » pour le sud hémisphère dans le mode de
réglage de l'horloge. (S'il te plaît se référer à « réglage de la horloge")
REMARQUE : Modification du le réglage de l'hémisphère
changera automatiquement la direction de la lune phases sur le
afficher.
Pointage le sans fil météo capteur vers le sud volonté permettre
maximum soleil sur le solaire panneau , en particulier pendant le
hiver saison dans le Sud Hémisphère.
RÉGLAGE LE SANS FIL 7 EN 1 CAPTEUR NIVEAU
Utilisez le bulle niveau indicateur de assurez-vous que le sans fil est à
l'extérieur
le capteur est complètement de niveau. Si le capteur est pas
niveau, le gagner jauge, UV et Lumière l'intensité sera pas mesure
correctement.
Pour régler le niveau du capteur extérieur sans fil, desserrez le vis du
poteau de montage. Réglez le niveau du capteur extérieur sans fil
dans commander à assurez-vous que le bulle est au centre de la
niveau à bulle indicateur.
Serrez la vis de la montage pôle à nouveau.

- 18 -

- 19 -
Le bulle
PARAMÈTRE ENHAUT CONSOLED'AFFICHAGE
POUVOIR EN HAUT DE LA CONSOLE
1. Connectez le Adaptateur d'alimentation pour l'écran console.
2. Retournez l'antenne sur dos de la console en haut.
3. Une fois la console est allumé, l' ouverture l'écran va être affiché et
puis entrer dans principal écran.
4. Attendez le de plein air capteur à paire avec ton console .
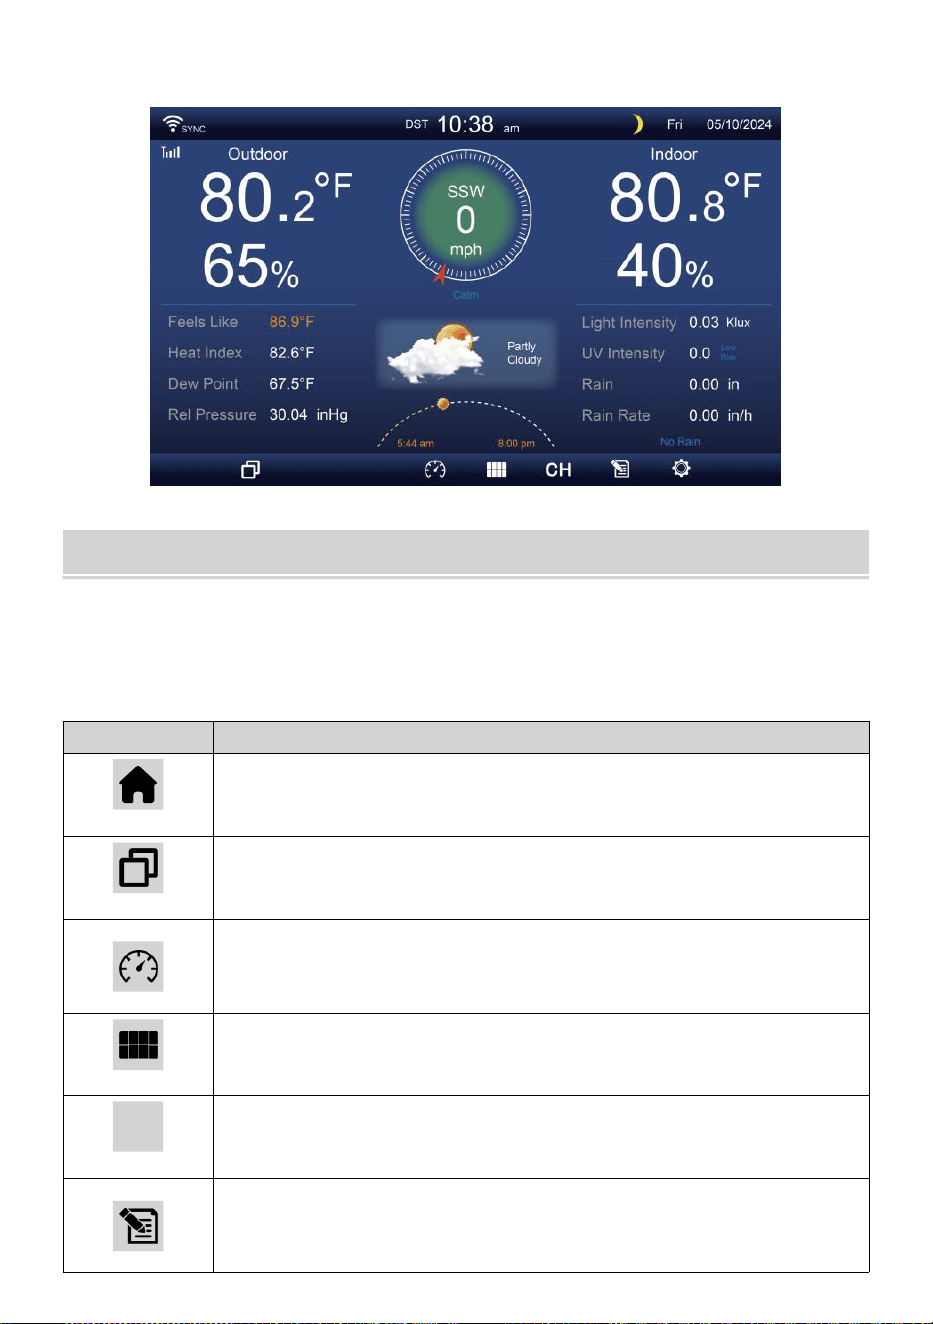
- 20 -
5. Une fois appariés, les données extérieures seront montré sur le écran.
MODED'EMPLOI
Ce section décrit le principal fonctions et autre fonctions de boutons à
l'intérieur de la console.
PRINCIPAL FONCTIONS DE BOUTONS
ICÔNE
DESCRIPTION
Maison bouton
Appuyez sur ce bouton pour afficher un affichage simple
données afficher écran.
Développer bouton
Appuyez sur ce bouton pour afficher le détaillé données
écran.
Pression
Appuyez sur ceci bouton pour afficher entre Relatif et
absolu écran de pression.
Multi-capteur
Appuyez sur ce bouton pour afficher le écran multi-
capteurs.
CH
Canal
Appuyez sur ceci bouton pour changer Intérieur, données
CH1-7 écran.
Histoire Enregistrer bouton
Appuyez sur ceci bouton pour afficher le écran
d'historique (Max/Min, enregistrement de données,

- 20 -
Affichage graphique).
Paramètre
Appuyez sur ce bouton pour afficher le paramètre écran.
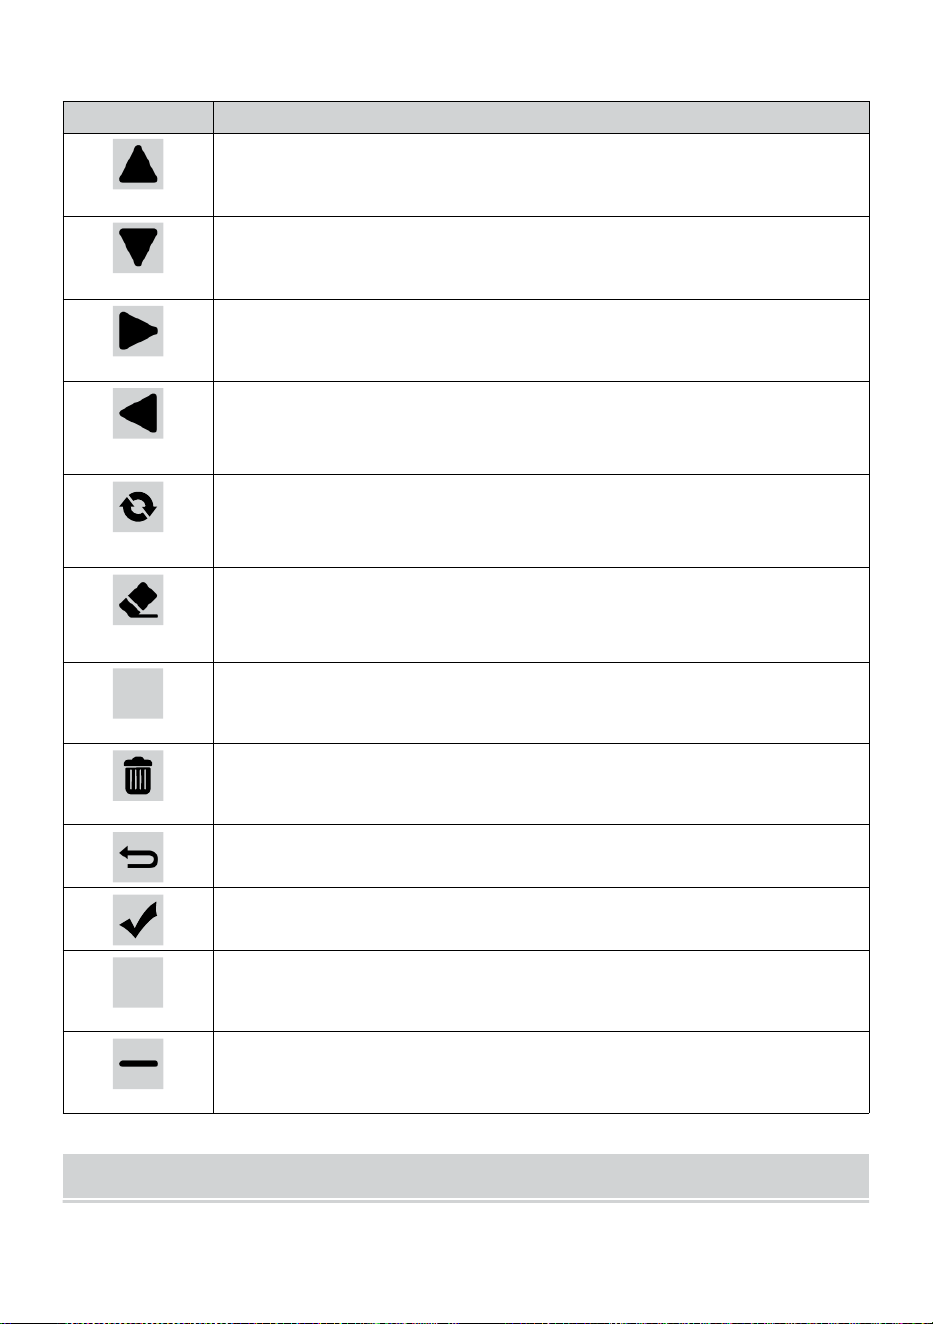
- 21 -
AUTRE FONCTION BOUTONS POUR LES PARAMÈTRES
ICÔNE
DESCRIPTION
En haut bouton
Appuyez sur ceci bouton pour sélectionner le haut rangée
ou article .
Vers le bas bouton
Appuyez sur ceci bouton pour sélectionner le bas rangée
ou article .
Droite bouton
Appuyez sur ceci bouton pour sélectionner colonne de
droite ou article.
Gauche bouton
Appuyez sur ceci bouton pour sélectionner à gauche côté
colonne ou article.
Faire du vélo bouton
Appuyez sur ce bouton pour changer les différents écran de
paramètres.
Clair bouton
Appuyez sur ceci bouton pour effacer le enregistrement
max/min.
Q
Recherche bouton
Appuyez sur ceci bouton pour rechercher les données
enregistrer.
Supprimer bouton
Appuyez et tiens ça bouton pour supprimer enregistrement
s.
Retour bouton
Appuyez sur ceci bouton pour retour précédent page.
D'ACCORD bouton
Appuyez sur ce bouton pour confirmer le sélection.
+
+ bouton
Appuyez sur ce bouton pour augmenter la valeur ou
changer à autre option.
- bouton
Appuyez sur ce bouton pour diminuer la valeur ou changer à
autre option.
SIGNAL SANS FIL RÉCEPTION
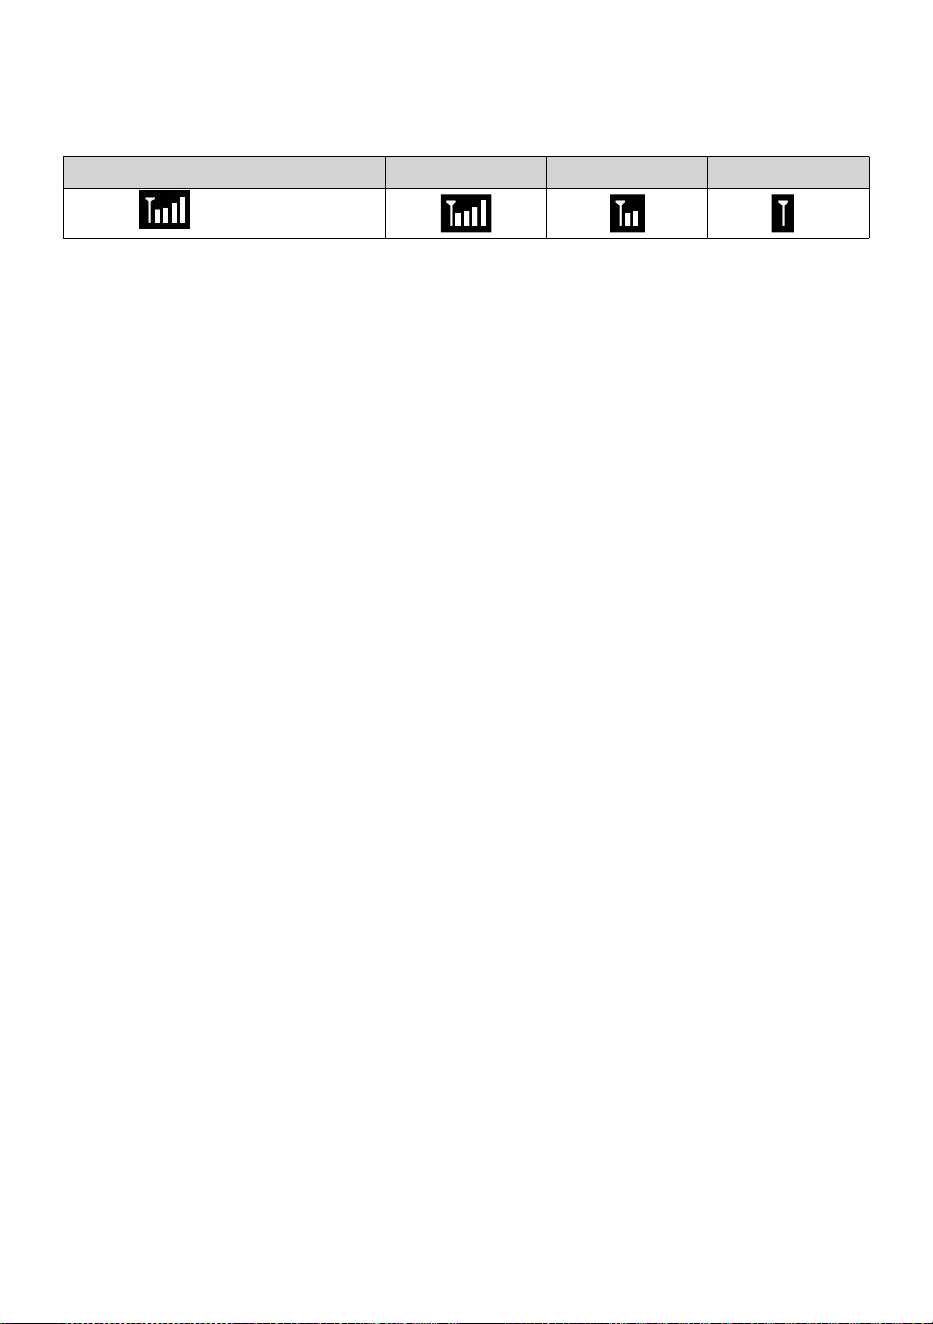
- 21 -
Familiarisez-vous avec le icônes pour différentes intensités de signal.
Déplacez votre console ou votre capteur météo si le signal est faible ou
perdu.
Recherche de signal
Signal fort
Signal faible
Signal perdu
Antenne bar
est défilement

WI-FI CONNECTION STATUS
- 22 -
Familiarisez-vous avec les icônes indiquant l’état de la connexion Wi-Fi.
WI-FI déconnecté
Connecté au WI-FI
Connexion Wi-Fi avec Sync
LUNE PHASE
La console d'affichage calcule la lune phase selon à votre heure, date
et heure zone.
Le tableau ci-dessous explique les phases correspondantes et leur
icônes pour les deux Nord et Sud hémisphères.
Nord Hémisphère Icônes
Lune Phase
Du sud Hémisphère Icônes
Nouveau Lune
Croissant de lune Lune
Premier trimestre
Lune
Gibbeuse croissante
Lune
Complet Lune
Lune gibbeuse
décroissante Lune
Troisième trimestre
Lune
Croissant décroissant
Lune
HEURE DE LEVER/COUCHER DU SOLEIL
La console indique le lever/coucher du soleil de votre emplacement, qui
est basé sur le fuseau horaire, latitude et longitude que vous avez
saisies. Si la lumière du jour Économie est réglé sur AUTO , le fois
volonté ajuster un heure avant automatiquement pour lumière du jour
économie.

WI-FI CONNECTION STATUS
- 22 -
NOTE: Pour le fuseau horaire, latitude et réglage de la longitude,
s'il te plaît référer " Temps & Date Paramètre ".
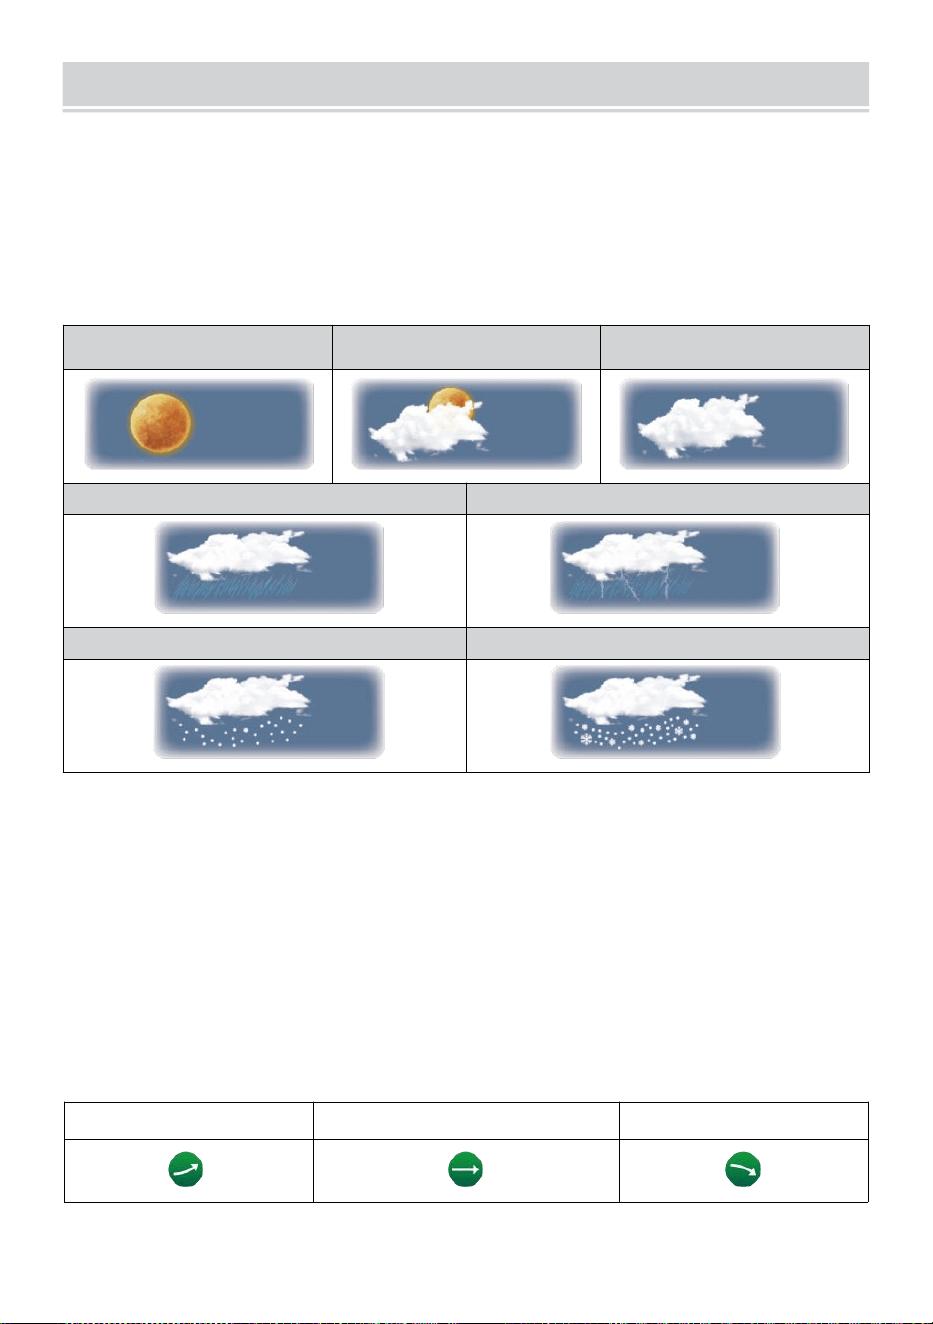
WEATHER FORECASTINGAND WEATHERINDEX
- 23 -
MÉTÉO PRÉVISION
Le intégré baromètre peut pas de glace atmosphérique changements
de pression et, en fonction des données collectées, peuvent prédire
les conditions météorologiques .
Il y a 6 icônes météo --- Ensoleillé, En partie Nuageux, Nuageux, Pluvieux,
Pluvieux/ orageux et neigeux (léger ) Neige & Lourd Neige).
Ensoleillé
Partiellement
nuageux
Nuageux
Lumière pluie
Fortes pluies/orages
Légère neige
Fortes chutes de neige
NOTE:
L'exactitude d'un général prévision basée sur la pression est
d'environ 6,5 à 70 %. Les prévisions sont non garanti.
Il se peut que pas nécessairement refléter la situation actuelle.
S'ORIENTER INDICATEUR
Le s'orienter indicateur spectacles le tendances de changements dans
le à venir quelques minutes. Ces des icônes apparaîtront dans la
température , l'humidité, et baro -métrique section de pression de l'
écran de détail.
Soulèvement
Constant
Chute
ALERTE AU GLACE

WEATHER FORECASTINGAND WEATHERINDEX
- 23 -
Lorsque la température extérieure est inférieur à 1°C/33,8° F, le flocon de
neige icône
je
· apparaîtra sur le afficher.
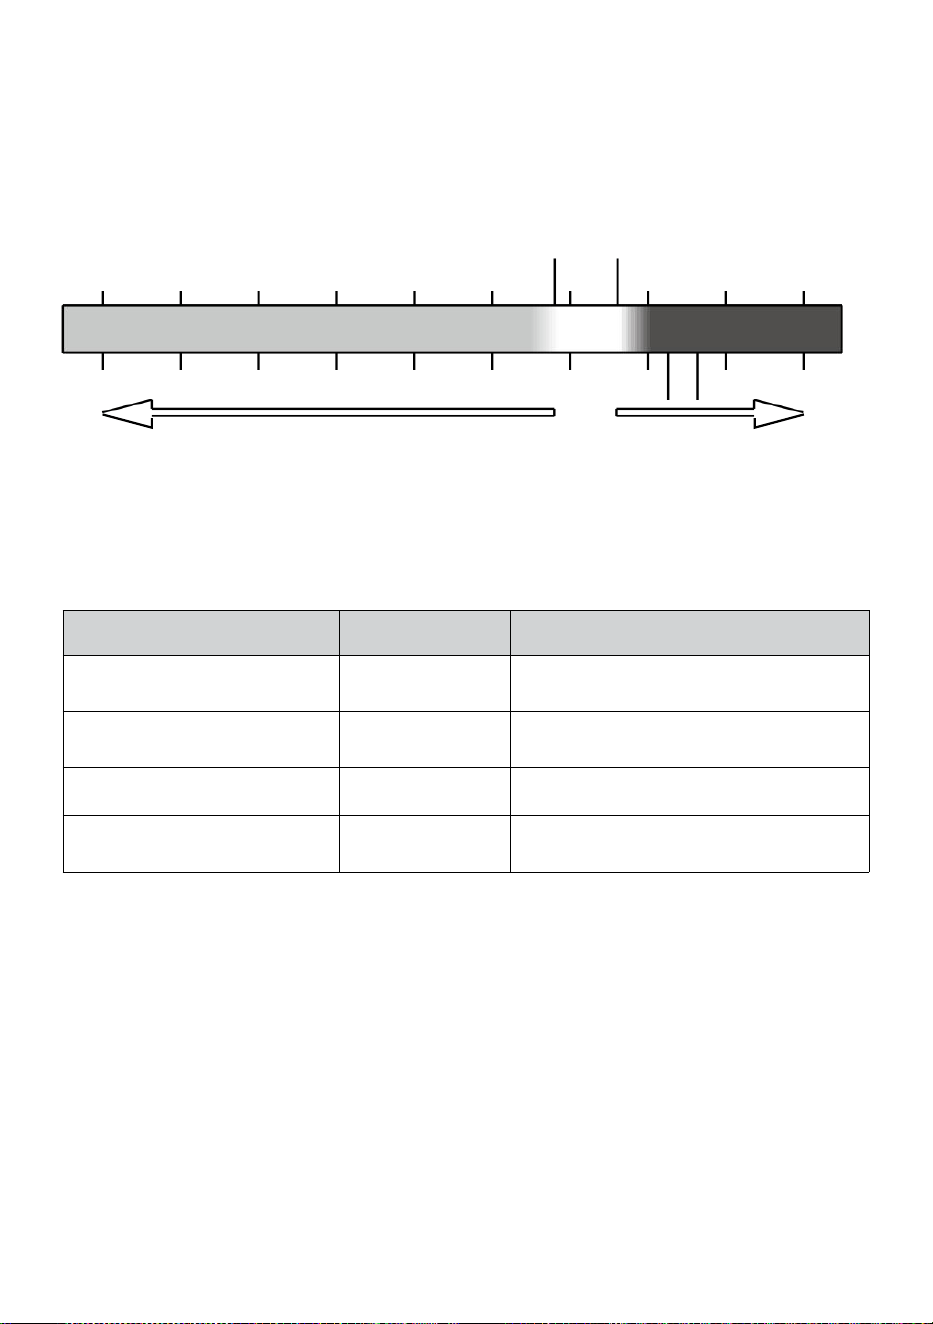
- 24 -
SENTIMENTS COMME
Le Sentiments Comme la température L'indice détermine la température
ressentie à l'extérieur, en tenant compte de facteurs comme le vent
vitesse, pression, température et humidité (vent froideur et chaleur
indice).
18°C 26°C
10 20 30
-40 -22 -4 14 32 50 68 86 104 122 °F
Vent froid Chaleur Indice
CHALEUR INDICE
Le Chaleur Indice est déterminé par la température du capteur météo
sans fil. nature et humidité lectures lorsque la température est entre 79
°F (26 °C) et 120 °F (50 °C).
Chaleur Indice gamme
Avertisseme
nt
Explication
27°C à 32°C (27°C - 32°C)
Prudence
Possibilité d'épuisement dû à la
chaleur
91°F - 104°F (33°C - 40°C)
Prudence
extrême
Possibilité de déshydratation par la
chaleur
106°F - 129°F (41°C - 54°C)
Danger
Épuisement dû à la chaleur très
probable
≥ 131°F (≥ 55°C)
Extrême Danger
Risque élevé de déshydratation/ coup
de chaleur
VENT FROIDEUR
Le refroidissement éolien ou le refroidissement éolien est l'abaissement
de la température due à le passer-
flux d'air à basse température. Le refroidissement éolien est déterminé
par un combinaison des données de température et de vitesse du vent
du capteur météo sans fil . REMARQUE : Uniquement lorsque la
température est inférieure à 50
℉
(10
℃
) et la vitesse du vent est
supérieur à 4,8 km/h (3 mph), affichera la valeur du refroidissement
éolien,
sinon il affichera «--.-».
ROSÉE INDIQUER
-40 -30 -20 -10 0
40 50 °C
Increasing danger Increasing danger

- 24 -
La rosée indiquer est la température en dessous de laquelle la vapeur
d'eau dans air à
constante barométrique la pression se condense dans l'eau liquide en
même temps taux auquel elle s'évapore. L'eau condensée est appelée
rosée lorsque il formes sur un solide surface.
La rosée température ponctuelle est déterminé par la température et
humidité données depuis le sans fil météo capteur .

BAROMETRIC PRESSURE
- 25 -
Vérifier le météo site web pour en temps réel baromètre conditions alors
ajuster le relatif dans le Étalonnage paramètre section.
Absolu
Le absolu atmosphérique pression de ton emplacement .
Relatif
Le atmosphérique relative pression basé sur le niveau de
la mer.
PLUIE
Cette section montre les précipitations l ou pluie taux information.
PRÉCIPITATIONS AFFICHER MODES
Pluie Taux
: Actuel précipitations taux dans le passé heure .
Pluie
événement
: continu pluie, et remet à zéro si accumulation de
précipitations est moins que 10 mm (0,039 dans) dans
une période de 24 heures.
Horaire Pluie
: Total précipitations pour chaque heure.
Tous les
jours Pluie
: Total précipitations depuis minuit (00:00)
Hebdomadair
e Pluie
: Total précipitations pour la semaine calendaire en cours,
et réinitialise le dimanche matin à minuit (du dimanche
au samedi)
Mensuel Pluie : Total les précipitations pour le mois calendaire en cours,
et réinitialiser sur le premier jour de la Mois.
Total Pluie : Totale précipitations depuis le dernier réinitialiser.
RÉINITIALISER LE TOTAL PRÉCIPITATIONS ENREGISTRER
Se référer à «Tout effacer Section « Données » pour effacer les
précipitations données.

WIND
- 26 -
VITESSE DU VENT ET DIRECTION
Ce section affiche le vent vitesse , courant vent direction , directions
prédominantes du vent et vitesse du vent niveau.
Vitesse du vent: est la vitesse moyenne du vent mesuré dans le
précédent 20 secondes.
Vent moyen : est la vitesse moyenne du vent dans 10 minutes.
Rafale: est le vitesse du vent la plus élevée enregistré dans le il y a 20
secondes .
Simple Données Afficher
Détaillé Données Afficher
ÉCHELLE DE BEAUFORT
Le L'échelle de Beaufort ci-dessous est une échelle internationale des
vitesses du vent de 0 (calme) à 12 (Force d'un ouragan).
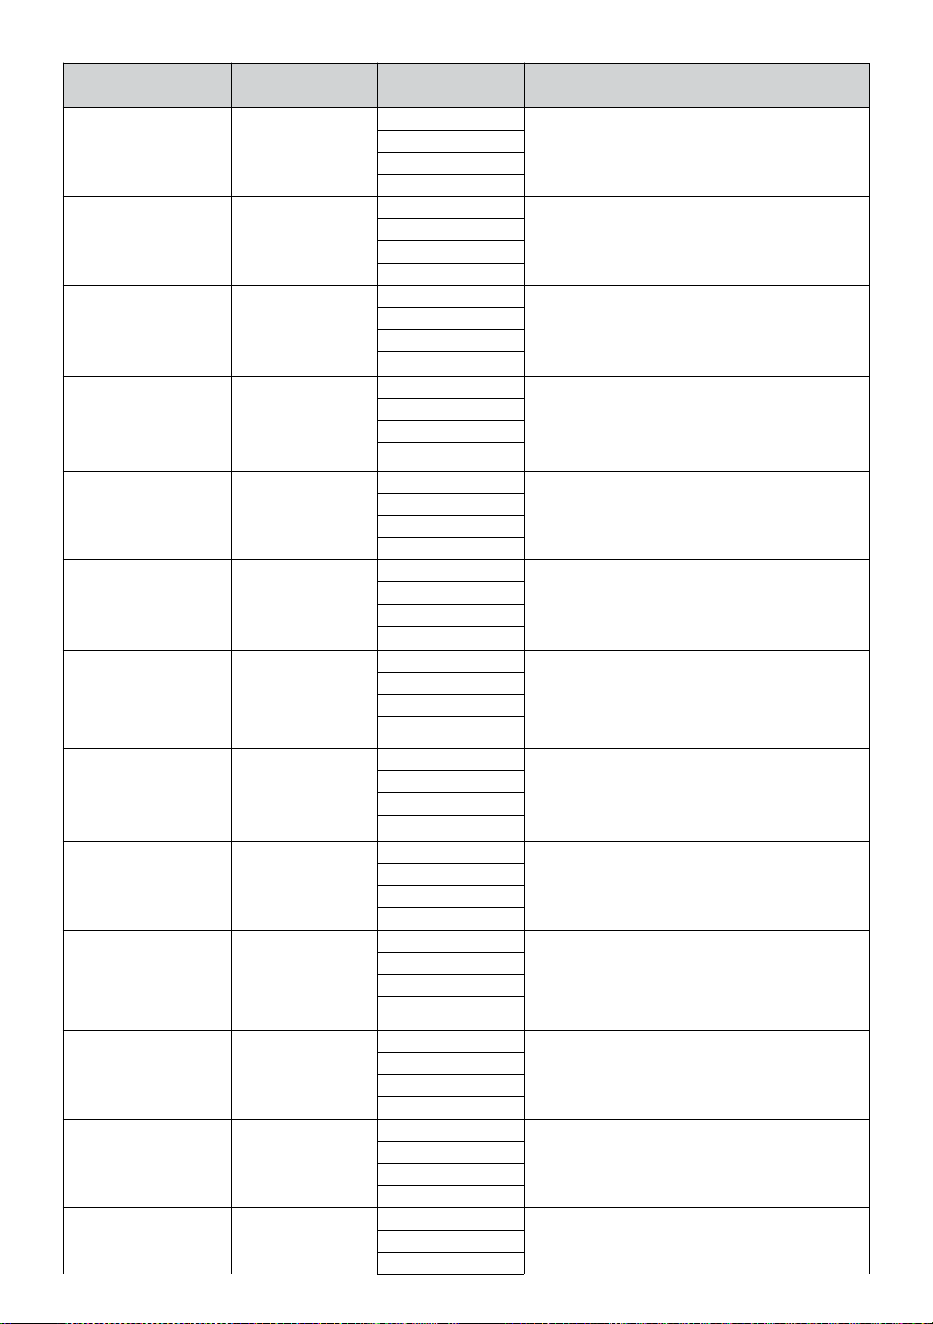
- 27 -
Échelle de
Beaufort
Description
Vitesse du
vent
État du terrain
0
Calme
< 1 km/h
Calme. Fumée s'élève verticalement.
< 1 mph
< 1 noeuds
< 0,3 MS
1
Lumière air
1.1 ~ 5 km/h
La fumée dérive indique le vent
direction. Les feuilles et les girouettes
sont stationnaires.
1 ~ 3 mph
1 ~ 3 noeuds
0,3 ~ 1,5 MS
2
Lumière brise
6 ~ 11 km/h
Vent ressenti sur la peau exposée.
Feuilles bruissement. Les girouettes
commencent à se déplacer.
4 ~ 7 mph
4 ~ 6 noeuds
1.6 ~ 3.3 MS
3
Doux brise
12 ~ 19 km/h
Feuilles et petites brindilles en
permanence mobile. Drapeaux lumineux
déployés.
8 ~ 12 mph
7 ~ 10 noeuds
3.4 ~ 5.4 MS
4
Modéré
brise
20 ~ 28 km/h
Poussière et lâche papier soulevé.
Petit succursales commencer à se
déplacer.
13 ~ 17 mph
11 ~ 16 noeuds
5.5 ~ 7.9 MS
5
Frais brise
39 ~ 38 km/h
Branchies d'un taille moyenne se
déplacer. Petits arbres en feuille
commencer à se balancer.
18 ~ 24 mph
17 ~ 21 noeuds
8.0 ~ 10.7 MS
6
Fort brise
39 ~ 49 km/h
Grand succursales dans mouvement.
Sifflement entendu dans les fils aériens.
Utilisation du parapluie devient difficile.
Vide plastique les poubelles basculent r.
25 ~ 30 mph
22 ~ 27 noeuds
10.8 ~ 13.8 MS
7
Vent fort
50 ~ 61 km/h
Arbres entiers dans mouvement.
Effort il fallait marcher contre le vent
d.
31 ~ 38 mph
28 ~ 33 noeuds
13,9 ~ 17.1 MS
8
Coup de vent
62 ~ 74 km/h
Quelques brindilles cassées arbres.
Les voitures dévient route. Progrès à
pied est sérieusement entravé.
39 ~ 46 mph
34 ~ 40 noeuds
17.2 ~ 20.7 MS
9
Fort coup de vent
75 ~ 88 km/h
Certaines branches se cassent des
arbres, et quelques petits arbres sont
renversés . Construction /
barricades temporaires souffler sur.
47 ~ 54 mph
41 ~ 47 noeuds
20,8 ~ 24.4 MS
10
Tempête
89 ~ 102 km/h
Les arbres sont cassés
désactivé ou déraciné,
dommages structurels probable.
55 ~ 63 mph
48 ~ 55 noeuds
2.45 ~ 28.4 MS
11
Tempête violente
103 ~ 117 km/h
Végétation répandue et structure
dommage probable.
64 ~ 73 mph
56 ~ 63 noeuds
28,5 ~ 32,6 MS
12
Force d'ouragan
≥ 118 km/h
Dégâts graves et généralisés à la
végétation et structures. Débris et non
≥ 74 mph
≥ 64 noeuds

- 27 -
sécurisés
les objets sont lancé de tous côtés.
≥ 32,7 MS
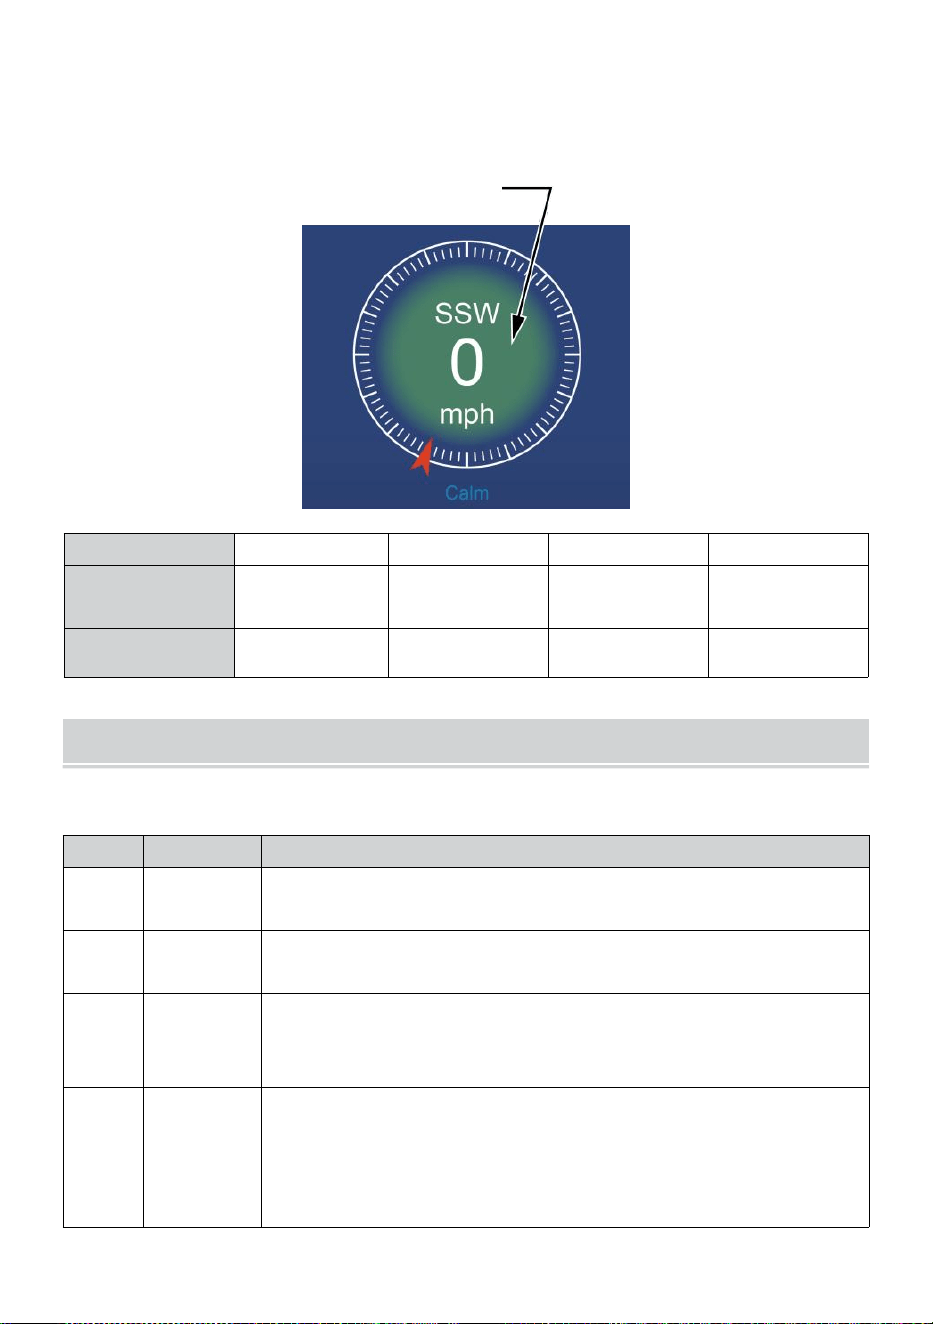
- 28 -
VITESSE DU VENT NIVEAU
Le graphique des niveaux de vitesse du vent affiché fournit des un rapide
référence sur le
actuel vent état . Le arrière-plan couleur de le boussole change en
fonction de la vitesse du vent.
Niveau
Lumière
Modéré
Fort
Tempête
Vitesse
0 - 12 mph
0 - 19 km/h
12 - 30 mph
20 - 49 km/h
31 - 55 mph
50 - 88 km/h
≥ 55 mph
≥ 89 km/h
Couleur de la
boussole
Vert
Jaune
Orange
Rouge
LUMIÈRE INTENSITÉ ET U V INDICE
Cette section affiche un graphique pour lumière intensité et UV indice.
UVI
Notation
Commentaire
0-2
Faible
UN UV Indice lecture de 0 à 2 moyens faible danger de
le soleil UV rayons pour la moyenne personne.
3-5
Moyen
UN UV Indice lecture de 3 à 5 moyens modéré risque de
préjudice du soleil non protégé exposition.
6-7
Haut
UN UV Indice lecture de 6 à 7 moyens haut risque de
préjudice d' une exposition au soleil non protégée. Protège
la peau et les yeux dommage est nécessaire.
8-10
Très Haut
UN UV Indice lecture de 8 à 10 signifie très haut risque de
dommages dus à une exposition au soleil non protégée.
Prenez des précautions supplémentaires précautions
car la peau et les yeux non protégés être endommagé et
peut brûler rapidement.

- 28 -
11-15
Extrême
UN UV Indice lecture de 11 ou plus signifie extrême risque
des dommages causés par une exposition au soleil sans
protection . Prenez toutes les précautions nécessaires
précautions parce que la peau et les yeux non protégés
peuvent brûler dans minutes.
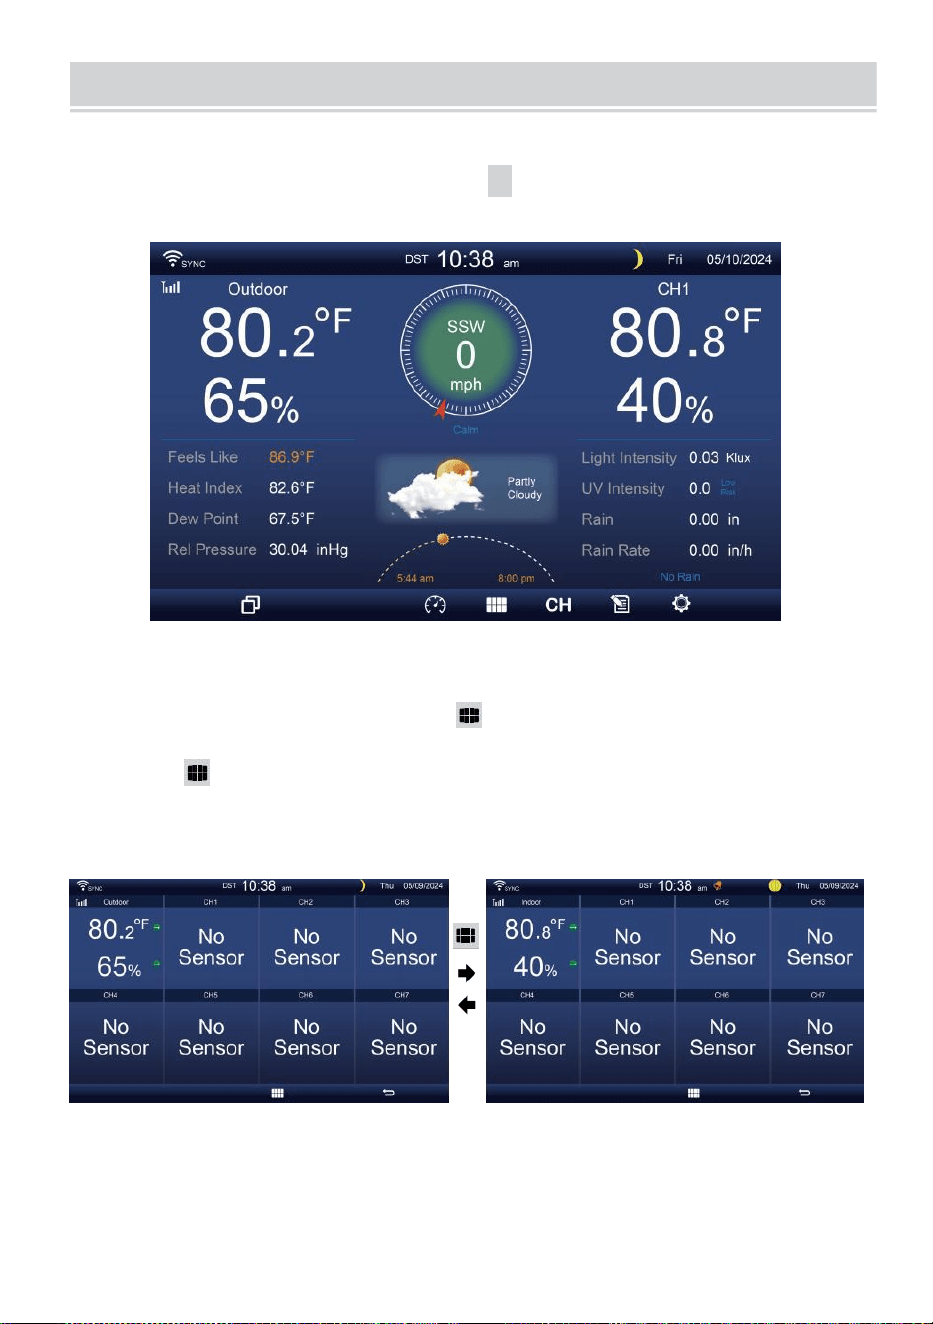
MULTI-CHANNEL DISPLAY MODE
- 29 -
CANAL AFFICHER
Sur
l' écran
simple/détail
,
appuyez sur
cH
bouton pour basculer entre
intérieur et canal 1-7 données.
MULTI-CAPTEURS AFFICHER PAGE
Sur l'écran simple/détail, presse bouton pour entrer dans Multi-
sen- écran d'affichage sor.
Presse bouton pour échanger l'affichage entre intérieur et extérieur
ou données du capteur.
Appuyez sur le bouton
w
pour revenir au mode simple/détaillé écran.
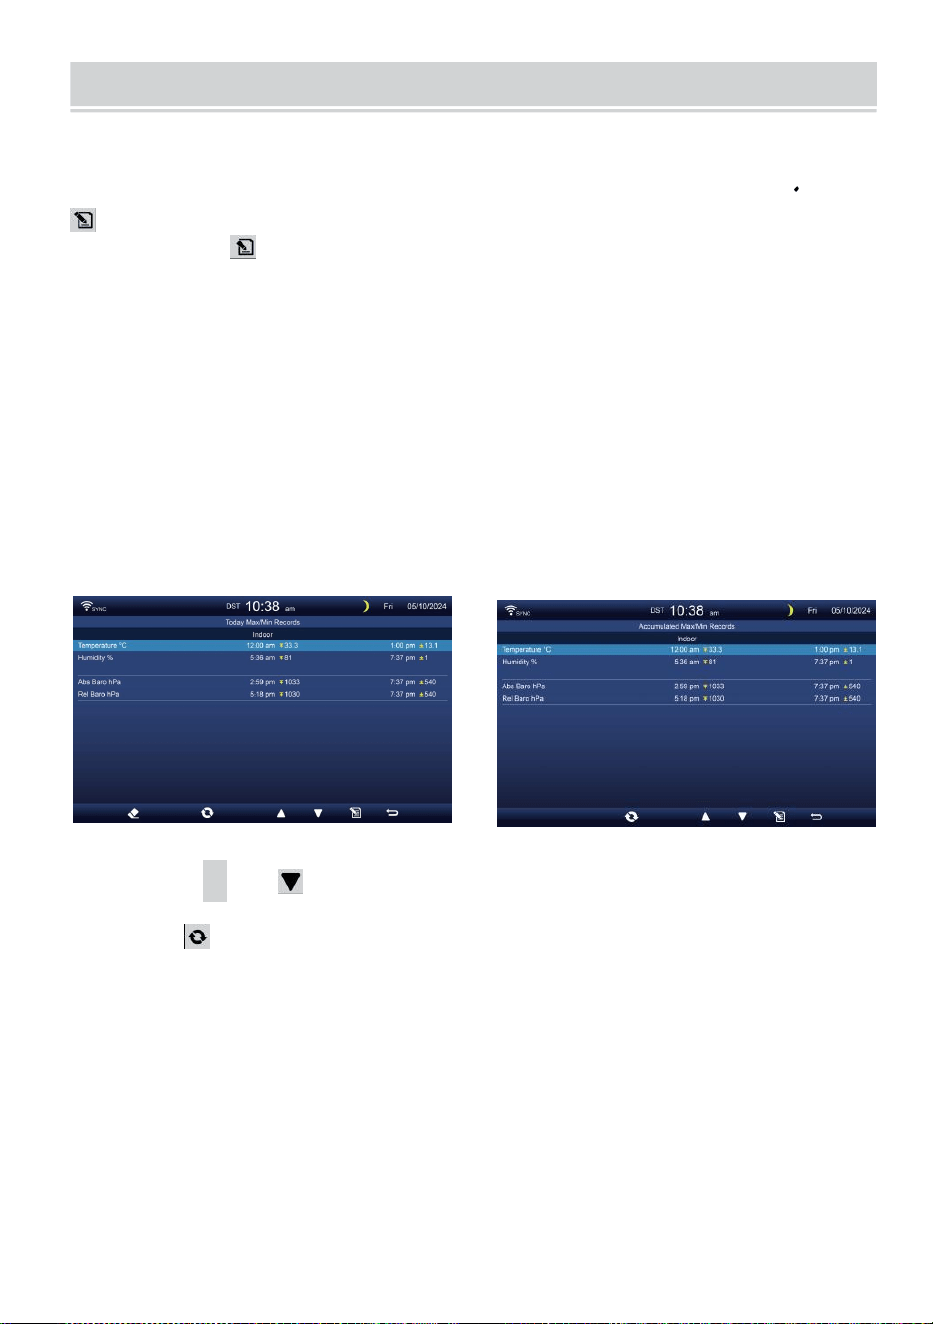
WEATHER DATA RECORD
- 30 -
Cette section explique comment accéder à la visualisation de ses
données météo enregistrer (Max- /Min, journal de données, graphique
historique). Pour afficher le météo données enregistrer , presse
bouton dans l'écran simple/détaillé pour accéder à l'écran de données
météo. Presse
bouton pour échanger le max/min, journal de données et graphique
historique modes.
MAX/MIN
Il existe 2 modes de données pour MAX/MIN enregistrements: Tous
les jours ou accumulé. (Dépend du Max/Min enregistrer mode à
l'intérieur Paramètre d'affichage page )
Tous les jours Données max/min mode
Les données Max/Min seront être affiché et clair à minuit.
Accumulé Mode de données max/min
Les données Max/Min seront gardé accumulé.
Tous les jours Max/Min Record accumulé Max/Min Enregistrer
Presse
▲
ou bouton pour sélectionner le voulu Max/Min
enregistrer.
Presse bouton pour interchange pour montrer intérieur, extérieur et
les chaînes Max/Min enregistrements.
Presse . bouton à retour simple / détail écran .
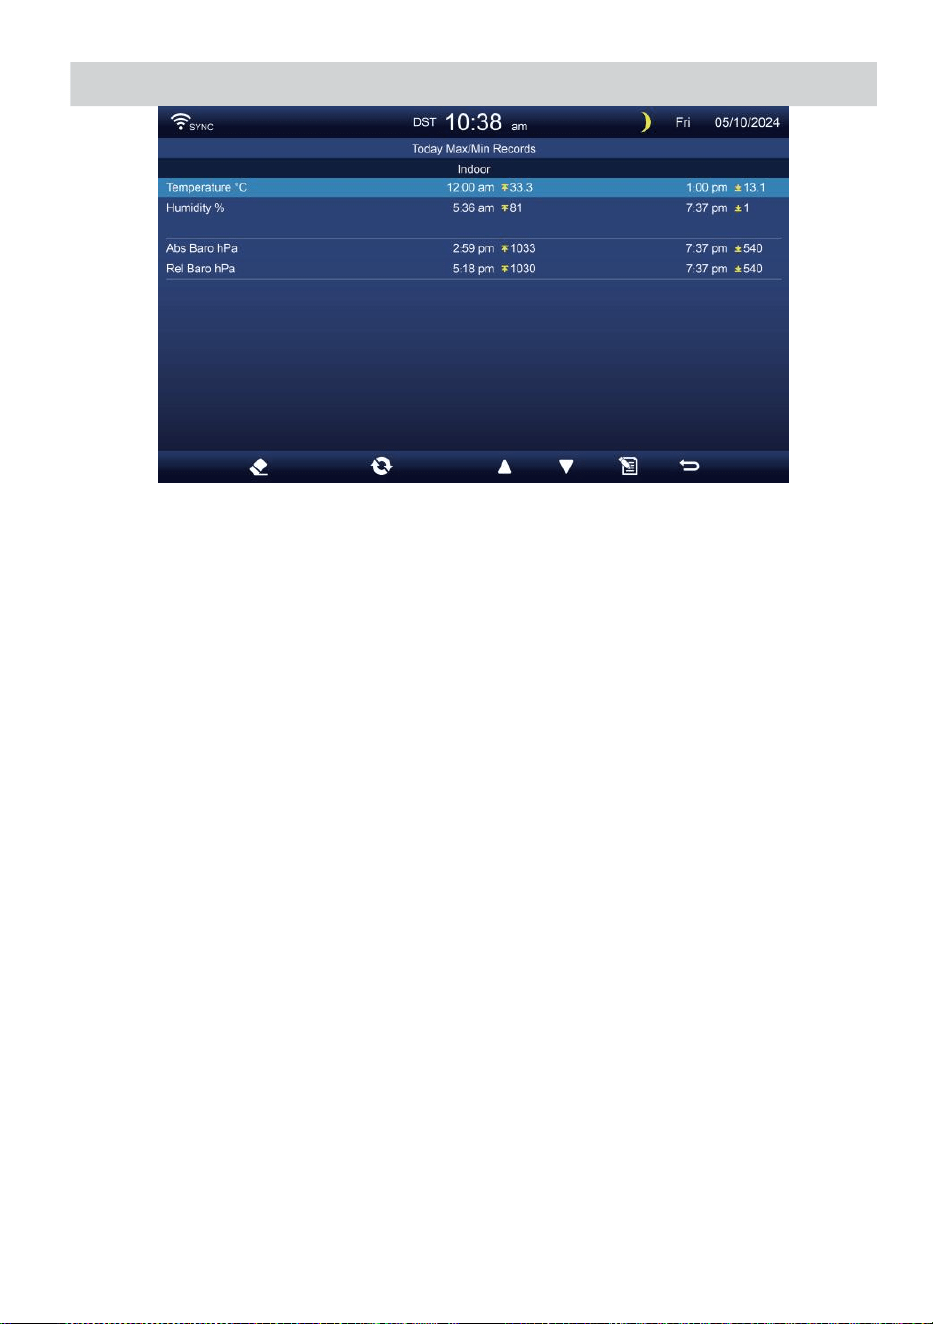
WEATHER DATA RECORD
- 30 -
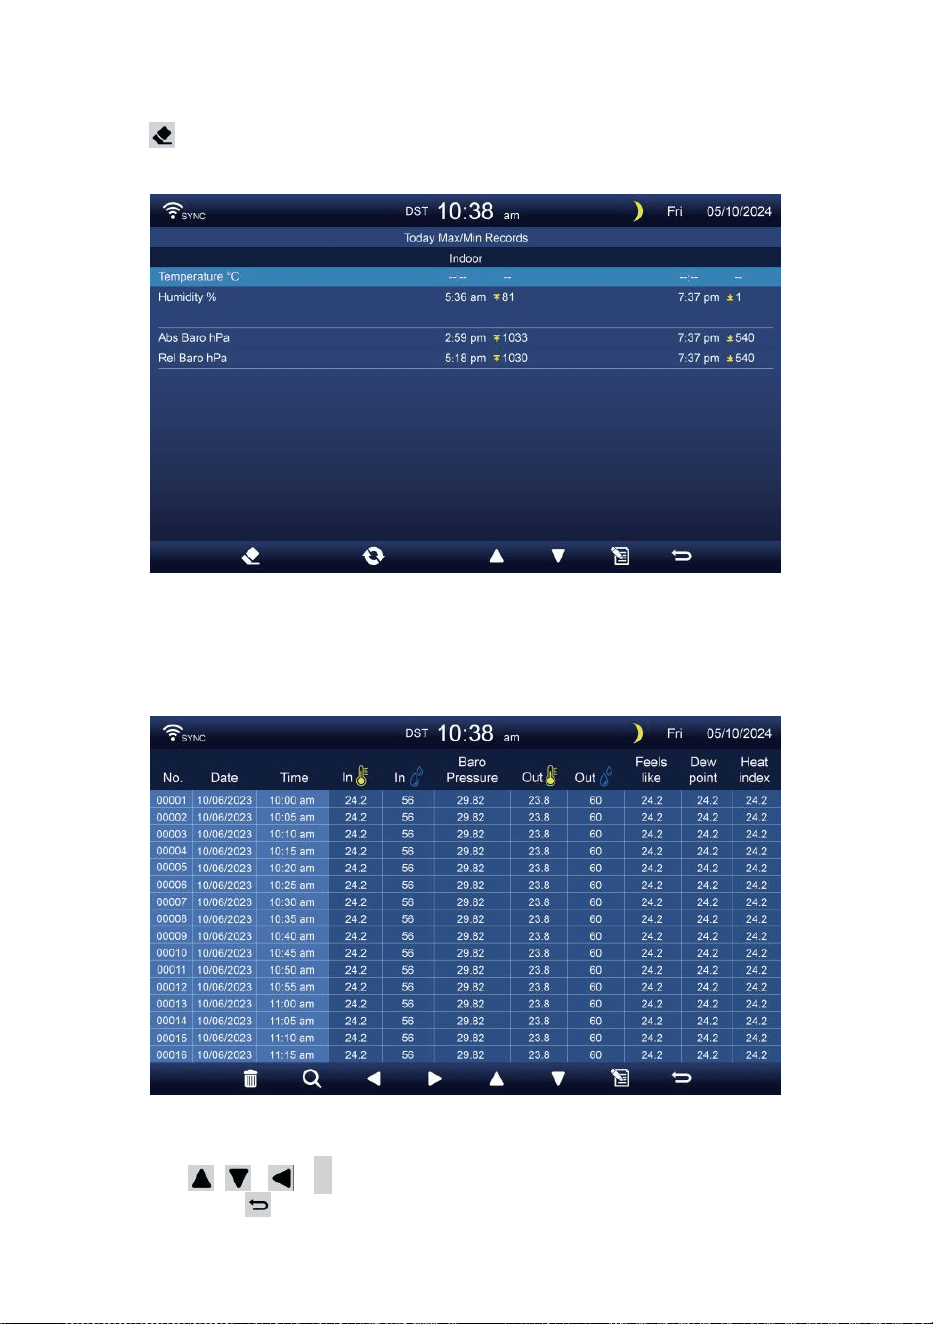
- 31 -
Effacer Max/Min données
Pour effacer la sélection MAX/MIN enregistrements, appuyez sur et
prise bouton plus de 2 secondes pour effacer la sélection
Max/Min enregistrer.
DONNÉES ÉCRAN DE JOURNAL
Les captures d'écran du journal de données tous le histoire
enregistrements.
Naviguer dans les données écran de journal
Presse , , ,
b
boutons pour parcourir le écran.
Appuyez sur bouton pour revenir à l'écran simple/
détaillé.
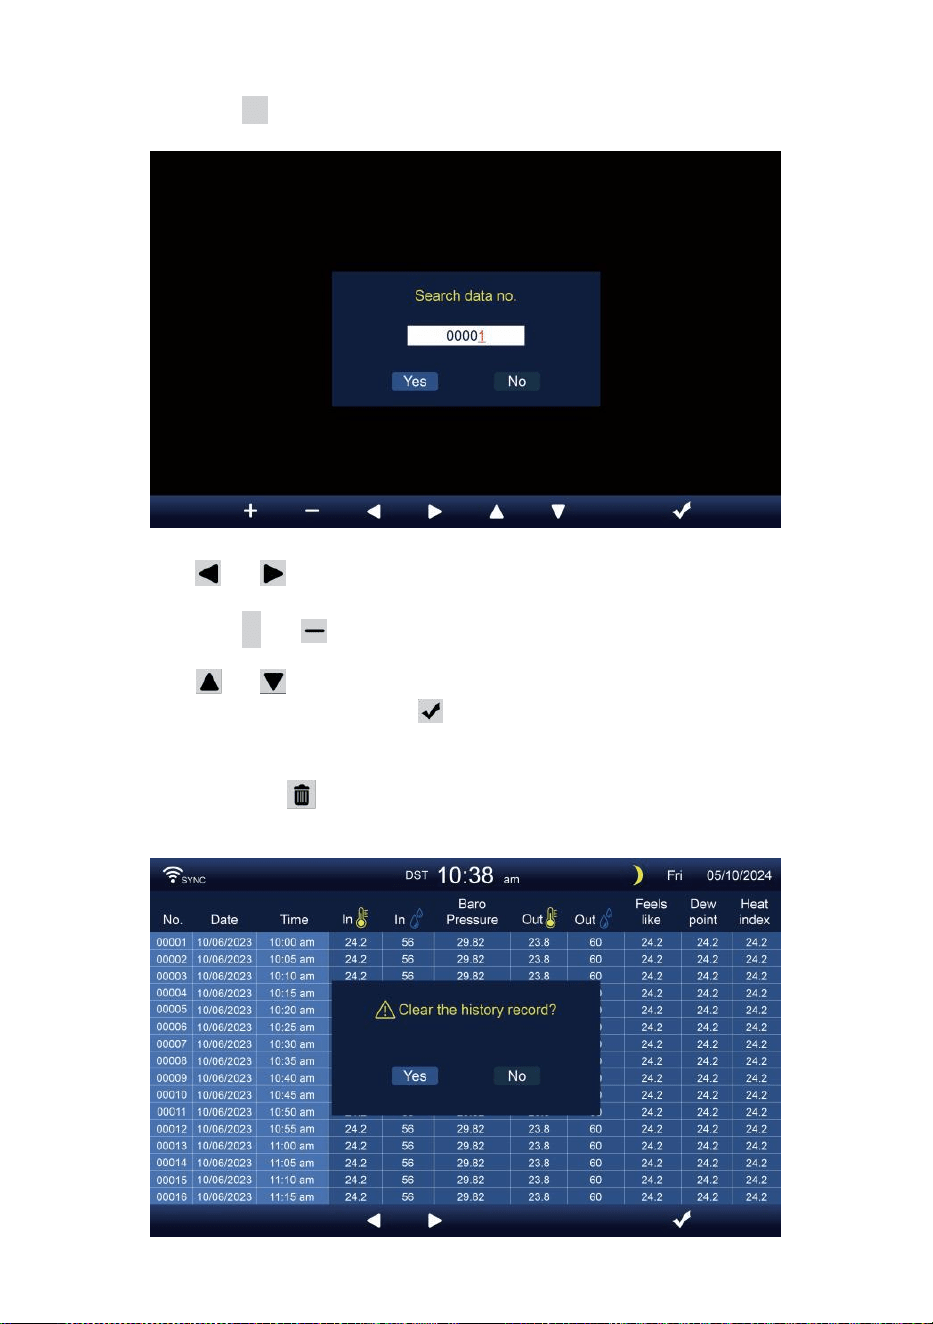
- 32 -
À la recherche d'un produit spécifique page
Appuyez sur Q pour afficher recherche le données enregistrer.
Presse ou bouton pour sélectionner un chiffre dans le page
nombre,
Appuyez sur + ou bouton pour changement le nombre en haut
ou vers le bas.
Presse ou bouton pour changer l' activé champ d'option,
basculer Oui ou NON, presse à confirmer.
Supprimer toutes les données enregistrer enregistrements
Appuyez et prise plus de 2 secondes pour supprimer tous
enregistrements.

- 32 -
Presse ou bouton pour sélectionner changement le activé
option champ, basculer Oui ou NON, presse m à confirmer.
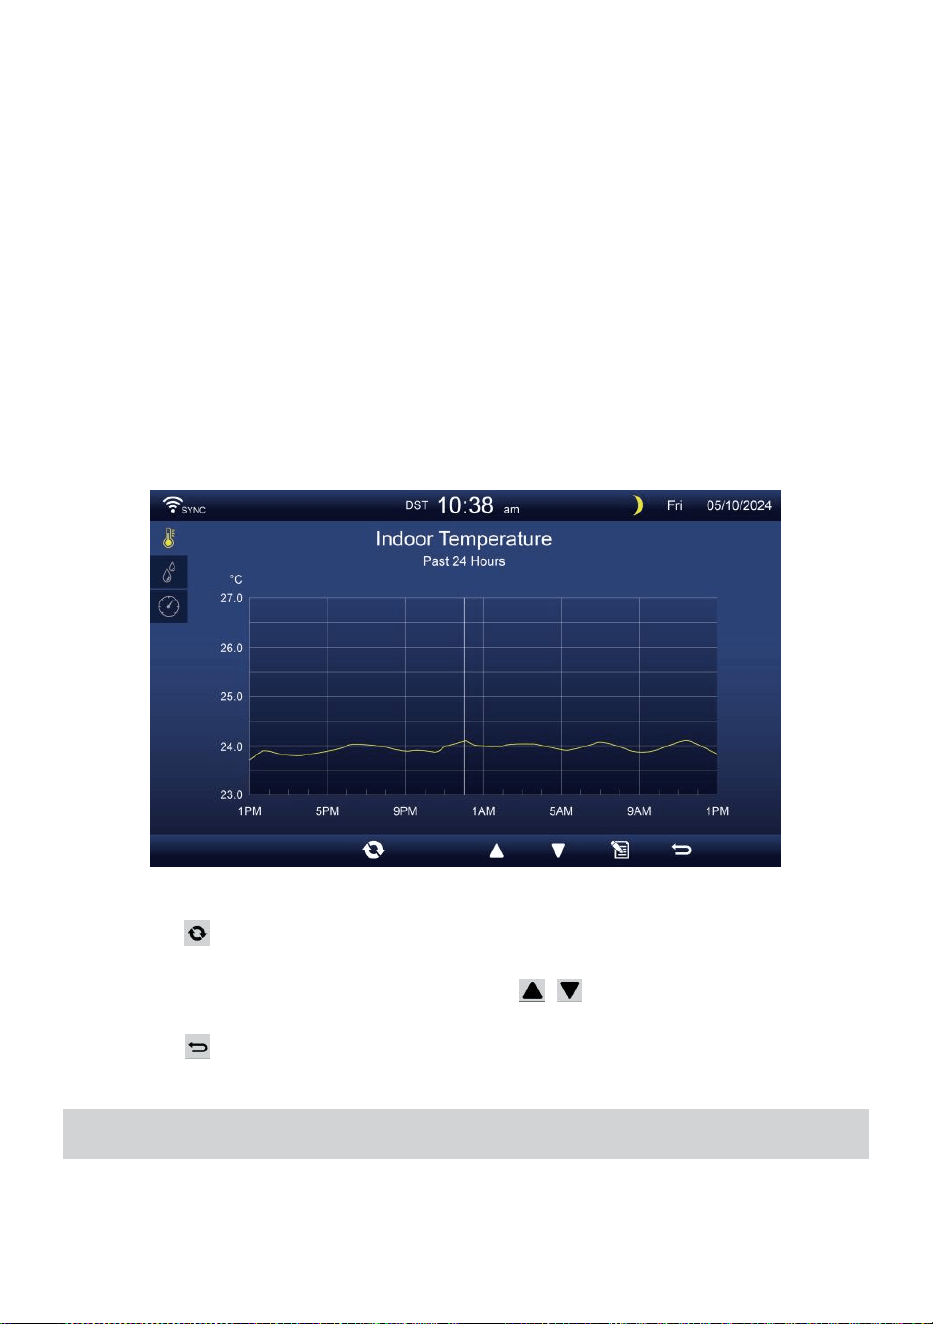
- 33 -
GRAPHIQUE HISTORIQUE
Cette section explique comment y arriver et voir histoire graphiques.
Il y a graphique intérieur, graphique extérieur et graphiques des canaux à
être montré.
Graphique intérieur
Température, Humidité, Relatif et absolu pression .
Graphique extérieur
Température, Humidité, Pluie Taux, Dernières 24 heures
Précipitations, vitesse moyenne du vent, rafales de vent, direction
du vent, Lumière Intensité et UVI.
Graphique CH1-CH7
Température, Humidité.
Presse bouton pour interchange pour montrer intérieur, extérieur et
les chaînes graphique historique.
Lorsque le graphique apparaît, presse , boutons pour afficher
d'autres graphiques.
Presse bouton pour retour simple/détail écran.
CONFIGURATION GÉNÉRALE
Tous les paramètres de la console et les informations système sont
dans le paramètre menu. Il existe 8 types de paramètres de réglage à
l'intérieur du paramètre menu.

- 33 -
Dans l'écran simple/détaillé, appuyez sur bouton pour entrer dans le
réglage menu.
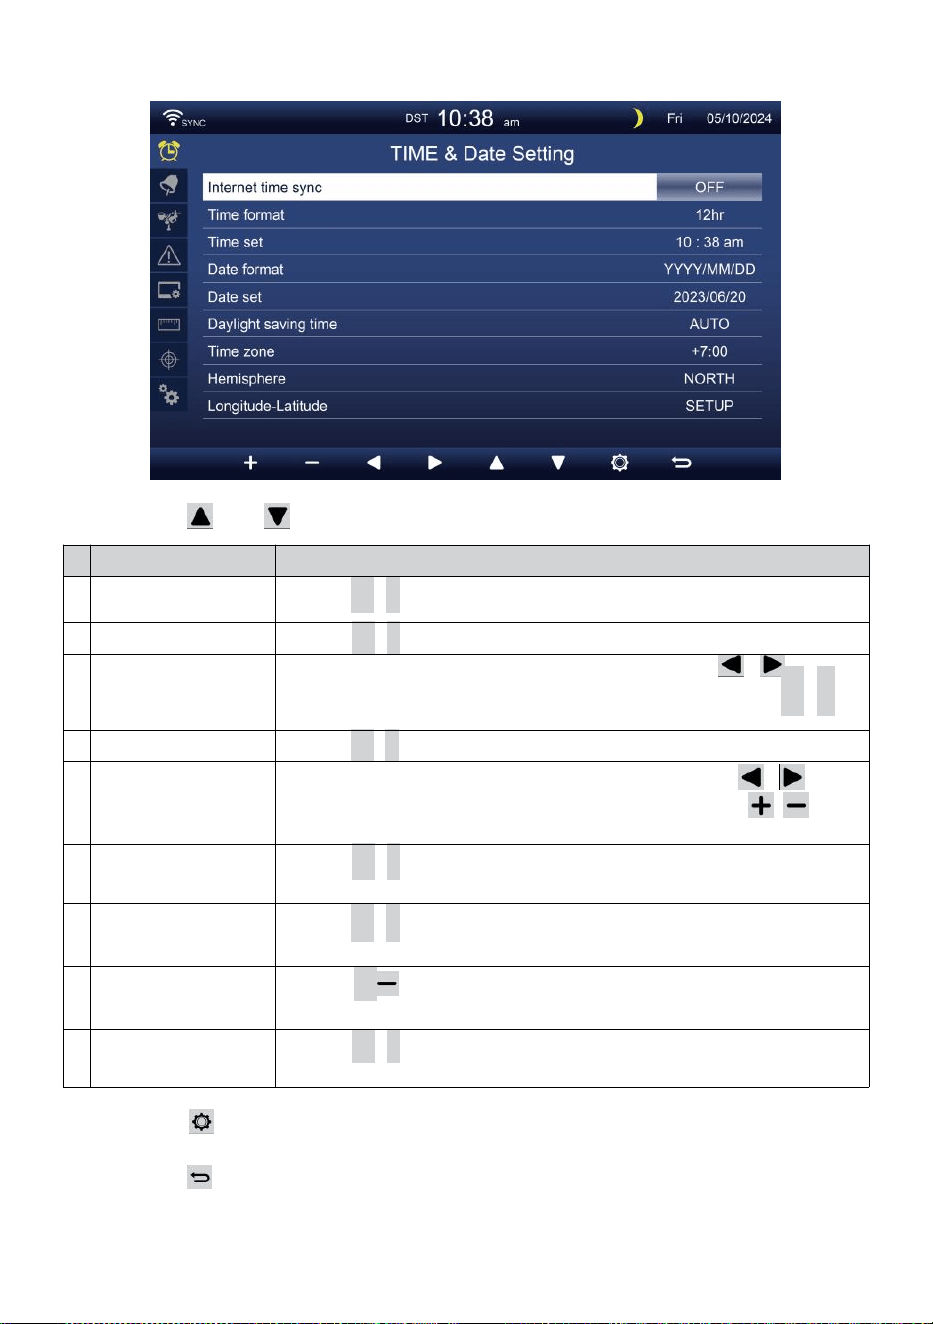
- 34 -
HEURE / DATE PARAMÈTRE
Presse ou pour sélectionner l’un des paramètres suivants :
#
Sous article
Opération
u
n
Synchronisation
horaire sur Internet
Presse
+
/
-
bouton à tourner sur ou tourner désactivé .
b
Format de l'heure
Presse
+
/
-
bouton à sélectionner 12 ou format 24 .
c
Temps ensemble
Quand le temps se synchronise est éteint, presse / bouton
pour sélectionner entre heure ou minute, appuyez sur + /
-
bouton pour régler la valeur.
d
Format de date
Presse
+
/
-
bouton pour sélectionner M / D ou D / Format M.
et
Date ensemble
Quand le temps se synchronise est éteint, presse /
bouton pour sélectionner l'année, Mois, Date, presse /
bouton pour régler le valeur.
f
Heure d'été
Presse
+
/
-
bouton pour éteindre ou régler le DST en
automatique.
g
Fuseau horaire
Presse
+
/
-
bouton à sélectionner le ton locale temps
zone à obtenir l'heure exacte.
h
Hémisphère
Presse + / bouton pour sélectionner NORD ou SUD
hémisphère pour le point capteur 7 en 1 à et lune phase.
j
e
Longitude-Latitude
Presse
+
/
-
bouton à entrer Longitude - Latitude installation
page .
Presse bouton pour accéder à l'affichage des paramètres de
l'alarme.
Presse bouton pour retourner à l'écran simple/détaillé .

- 35 -
Réglage de la longitude et de la latitude
Presse ou bouton pour changer le activé champ d'option.
1. Latitude (hémisphère) --- Appuyez sur
+
ou bouton pour
sélectionnez le hémisphère . (NORD/SUD)
Latitude --- Le latitude x 10 tourneront n rouge. Presse + ou
bouton pour augmenter ou diminuer la valeur .
Presse ou changer rester valeur de latitude.
2. Longitude (hémisphère e) --- Appuyez sur + ou bouton pour
sélectionner le hémisphère . (EST/OUEST)
Longitude --- La latitude x 100 tourneront rouge. Presse
+
ou
bouton pour augmenter ou diminuer la valeur .
Presse ou bouton pour changer rester valeur de longitude.
Presse m bouton pour confirmer Longitude Latitude de réglage.
NOTE:
Déterminer le longitude et latitude.
par exemple
Latitude
Longitude
: 33.2981
: -111.9602
Si l'emplacement est dans le Nord Hémisphère, La latitude sera
être positif. Si l'emplacement est dans le Sud Hémisphère, La
latitude sera être négatif. Si l'emplacement est dans le Ea poupe
Hémisphère, la longitude sera être positif.
Si l'emplacement est dans l'Ouest Hémisphère, la longitude sera
être négatif. Donc, ce qui précède Longitude et La latitude sera
saisie dans afficher comme suit :
Latitude = NORD --- 33. 2981
Longitude = OUEST --- 111.9602.
NOUS New York (EST, GMT-5)
Latitude
Longitude

- 35 -
:
4
0
.
7
1
2
8
(
N
o
r
d
4
0
.
7
1
2
8
)
:
-
7
4
.
0
0
6
0
(
O
u
e
s
t
7
4
.
0
0
60)

- 36 -
UE Francfort Allemagne (GMT+1)
Latitude
Longitude
: 50.1109 (Nord 50.1109)
: 8.6821 (Est 8.6821)
ROYAUME-UNI Londres Angleterre (GMT)
Latitude
Longitude
: 51.5072 (Nord 51.5072)
: -0,1276 (Ouest 0,1276)
Australie Sydney ( GMT +10)
Latitude
Longitude
: -33.8688 (Sud 33.8688) :
151.2093 (Est 151,20 93)
ALARME PARAMÈTRE
Presse ou bouton pour changer le champ d'option activé :
#
Sous article
Opération
u
n
Réglage de l'heure
de l'alarme
Presse / bouton pour sélectionner entre heure
ou minute. Appuyez sur / bouton pour régler la
valeur.
b
Alarme mode
Presse / bouton pour sélectionner Tous les jours ou en
semaine uniquement.
c
Alarme
Presse
+
/
-
bouton à tourner sur ou tourner désactivé .
d
Glace pré alerte
Presse
+
/
-
bouton à tourner sur ou tourner désactivé .
et
Son d'alarme niveau
Presse
+
/
-
bouton à ajuster le son niveau .
f
Tonalité clé niveau
Presse
+
/
-
bouton à ajuster le clé tonifier niveau .
Presse bouton pour accéder à l'affichage des paramètres du
capteur.

- 36 -
Presse b o u t o n
w
pour revenir au simple/détail écran.
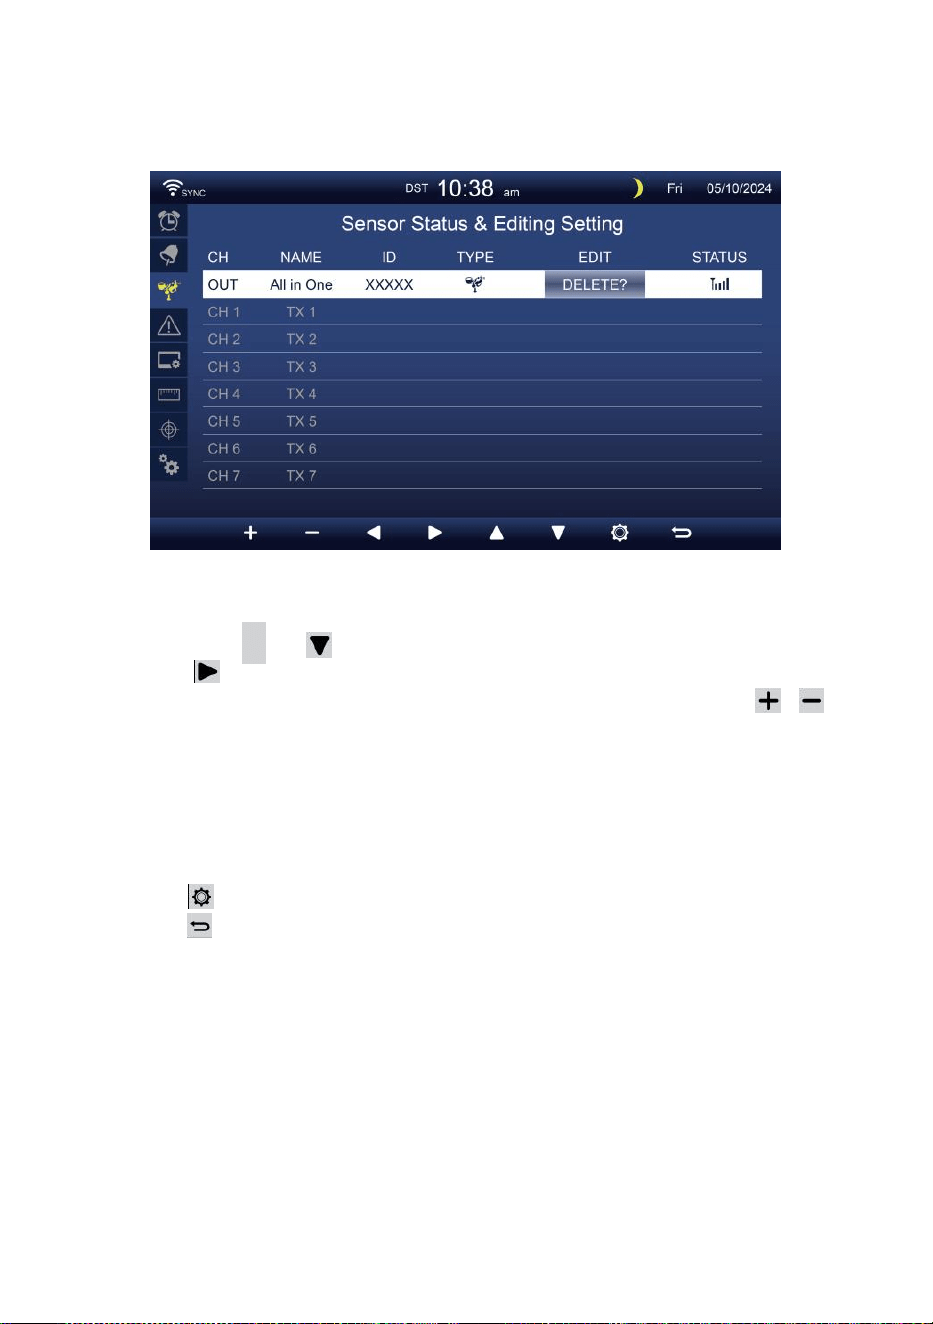
- 37 -
CAPTEUR PARAMÈTRE
Ce page consiste à ajouter/supprimer le capteur tout-en-un ou
supplémentaire 7 chaînes hygromètres.
Ajout d'un nouveau capteur
Appuyez sur
▲
ou bouton pour sélectionner le vide canal.
Presse bouton pour sélectionner le capteur d'édition colonne.
Lorsque la colonne affiche l'option « Ajouter », appuyez sur /
bouton pour démarrer la recherche du capteur.
Sélectionnez le canal correspondant numéro sur le capteur, puis
allumer ou presse RÉINITIALISER bouton pour démarrer le
appariement.
Une fois les appareils connectés, l'icône du capteur,
IDENTIFIANT volonté montrer dans le canal rangée.
Presse bouton pour accéder à l'affichage des paramètres d'alerte.
Presse bouton pour retourner à l'écran simple/détaillé .
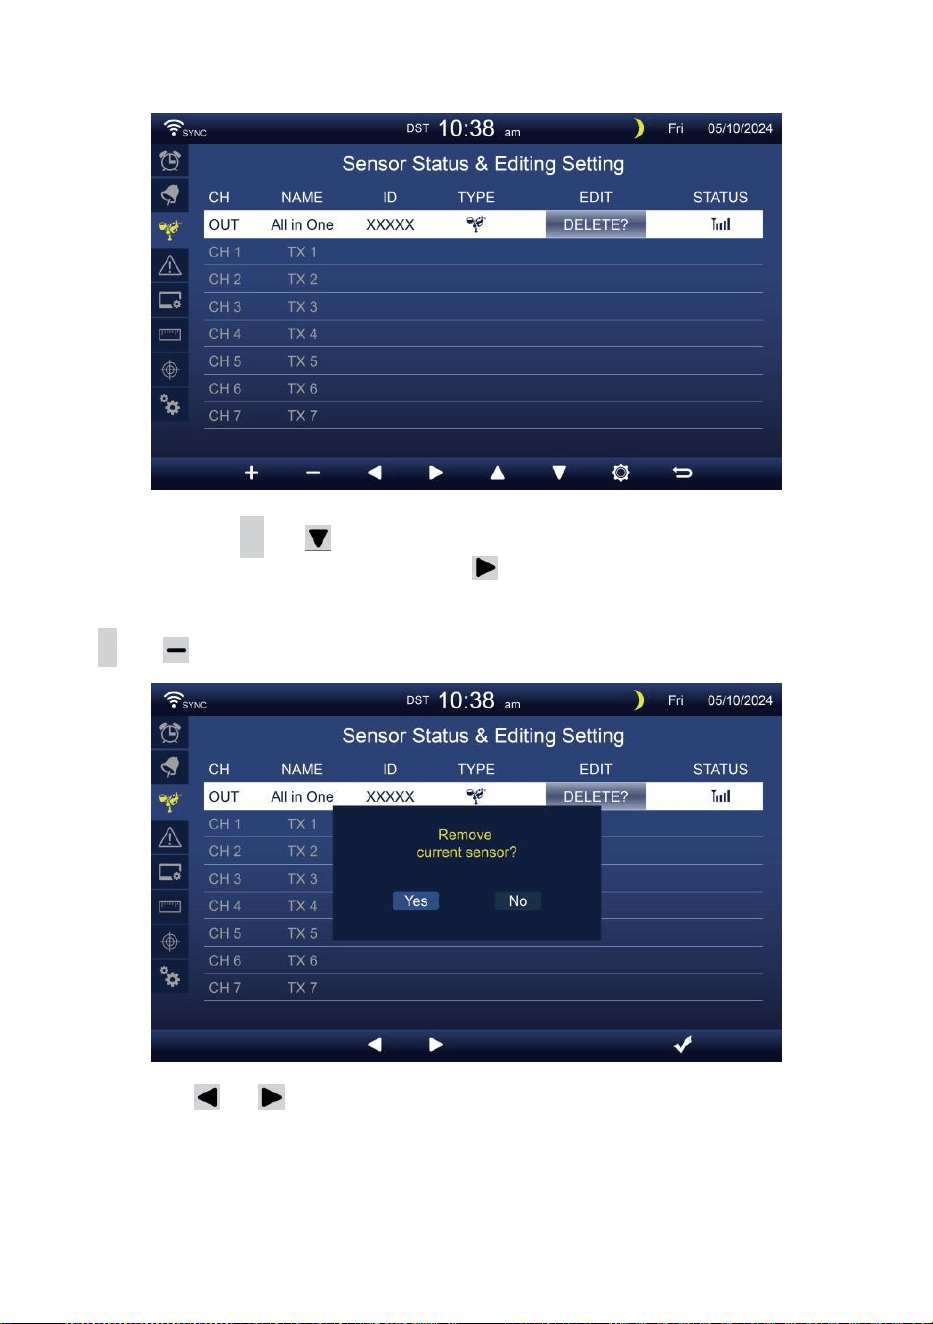
- 38 -
Supprimer capteur couplé
Appuyez sur
▲
ou bouton pour sélectionnez le
connecté d capteur. Appuyez sur bouton pour
sélectionner le capteur d'édition colonne.
Lorsque la colonne affiche «Option « Supprimer », appuyez sur
+
ou bouton à confirmer.
Presse ou bouton pour sélectionner changer le activé
champ d'option, bascule Oui ou NON , appuyez sur
.
bouton à
confirmer .

- 39 -
PARAMÈTRESD'ALERTE
Ensemble alerte intérieure
Presse
▲
ou bout on
w
pour sélectionner différents rangée de
activé champ d'option .
Presse
bouton pour sélectionner l'alerte haute/basse/réinitialiser
option .
Presse
+
ou bo u t o n
w
pour régler la valeur ou option
marche/arrêt.
Presse
bouton pour entrer dans le Réglage de l'affichage.
Presse
bouton pour revenir au simple/détail écran.
NOTE:
Lors de la sélection option de réinitialisation, toutes les valeurs
d'alertes seront réinitialiser à le valeurs par défaut.
Définir une alerte extérieure
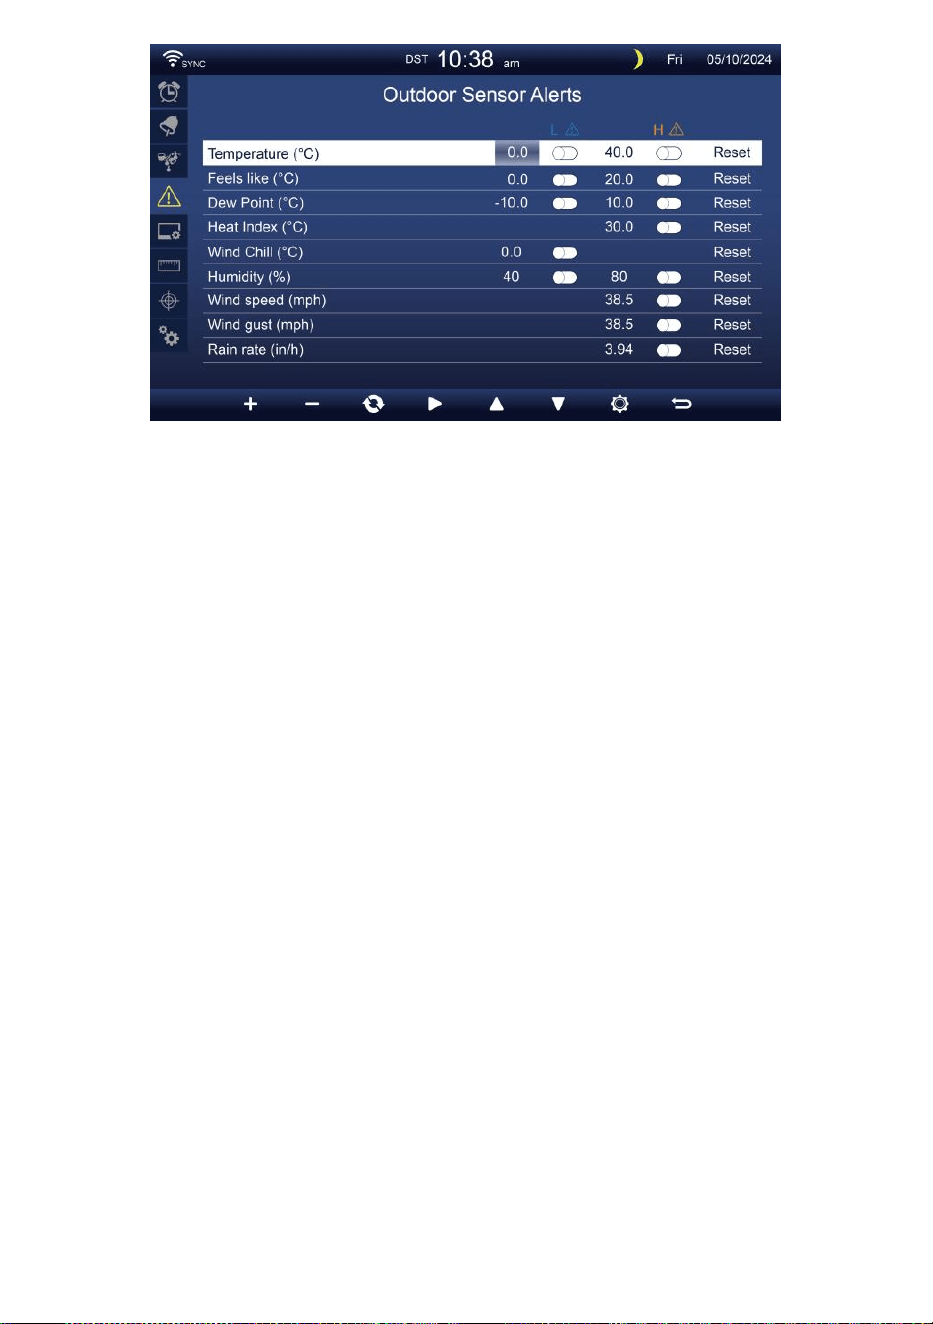
- 39 -
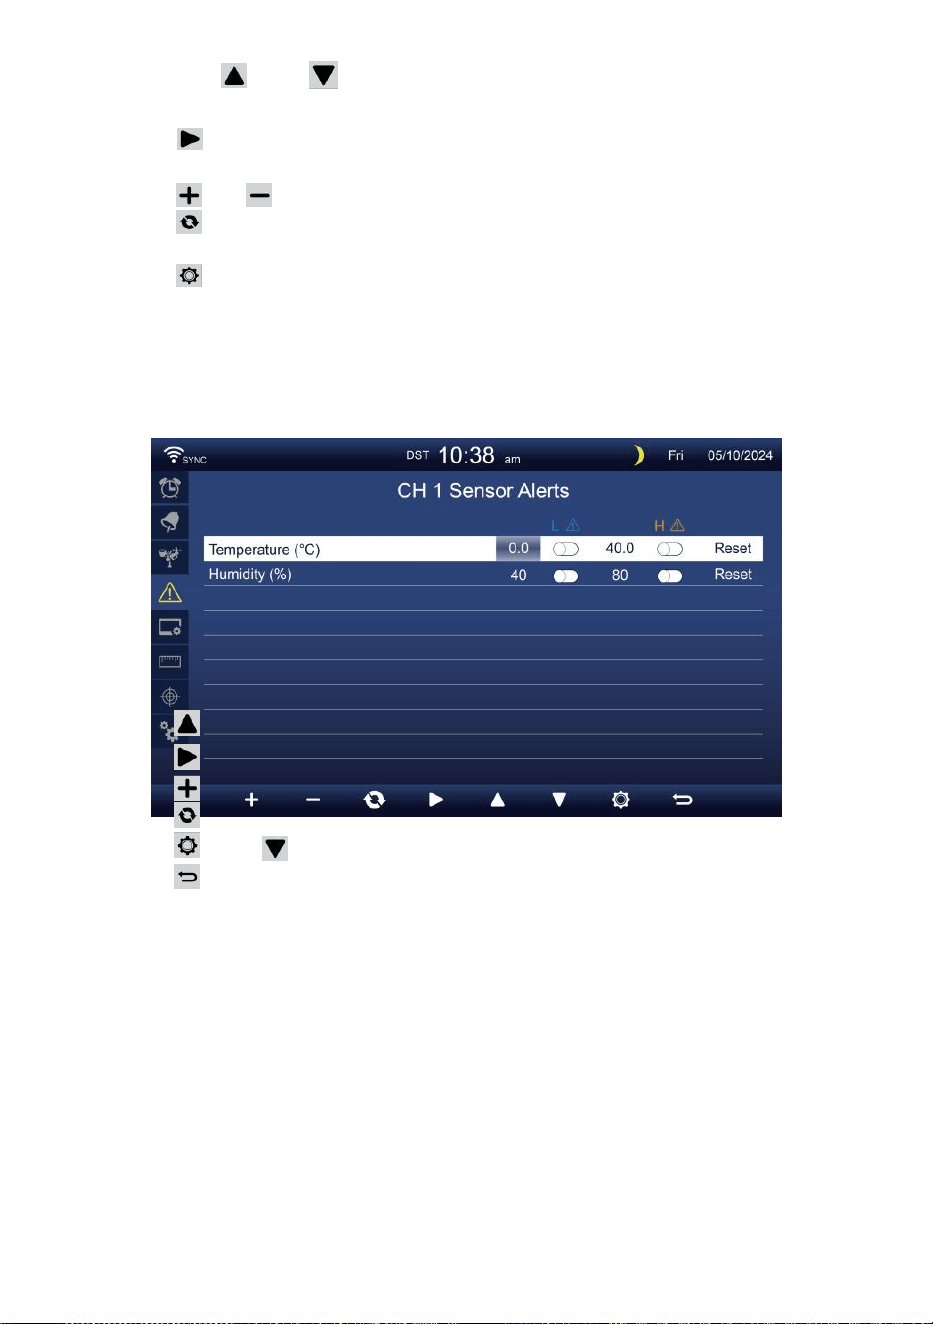
- 40 -
Presse ou bouton pour sélectionner une ligne différente de
activé champ d'option.
Presse bouton pour sélectionner Option d'alerte
haute/basse/réinitialisation.
Presse ou bouton pour régler la valeur ou l'option marche/arrêt.
Presse bouton pour échanger le Affichage du réglage d'alerte
intérieure.
Presse bouton pour entrer dans le Paramètre d'affichage afficher.
Appuyez sur
w
bouton pour revenir
simple/détaillé écran. Définir le capteur CH1-7
alerte
Presse
Presse
Presse
Presse
Presse
Presse
NOTE:
ou bouton pour sélectionner une rangée différente de
activée option champ. bouton pour sélectionner l'alerte
haute/basse/réinitialiser option .
ou bo u t o n
w
pour régler la valeur ou option
marche/arrêt.
bouton pour échanger le Affichage du réglage d'alerte
intérieure.
bouton pour entrer dans le Bouton de
réglage de l'affichage pour revenir au
mode simple/détaillé écran.
Lors de la sélection option de réinitialisation, toutes les valeurs
d'alertes seront réinitialiser à le valeurs par défaut.

- 41 -
PARAMÈTRES D'AFFICHAGE
Presse ou bouton pour changer le activé champ d'option:
#
Sous article
Opération
u
n
Langue
Presse
+
/
-
bouton à sélectionner le afficher langue .
b
Couleur d'arrière-
plan
Presse
+
/
-
bouton à sélectionner lumière ou sombre
couleur arrière-plan pour l'affichage mode.
c
Nuit mode
Presse
+
/ bouton pour activer (déclencheur de la activer temps
période), désactiver ou auto (déclenché par votre chambre
ambiant lumière niveau).
d
Nuit mode activé
temps
Presse / bouton pour sélectionner entre heure
ou minute . Presse
+
/
-
à ajuster le valeur .
et
Rétroéclairage
niveau
Presse
+
/
-
bouton pour régler le rétroéclairage niveau dans
normale .
f
Rétroéclairag
e niveau (Nuit
mode)
Presse
+
/
-
bouton pour régler le rétroéclairage niveau
pendant mode nuit .
g
Luminosité
Presse
+
/
-
bouton à ajuster le écran luminosité .
h
Contraste
Presse / bouton pour régler l'écran contraste.
Presse bouton pour entrer dans le Affichage du réglage de l'unité .
Presse b o u t o n
w
pour revenir au simple/détail écran.

- 42 -
RÉGLAGE DE L'UNITÉ
Presse ou bouton pour changer le activé champ d'option:
#
Sous article
Opération
Température
Presse
+
/
-
bouton à sélectionner ° C ou °F.
Baro pression
Presse
+
/
-
bouton à sélectionner hPa , inHg ou mmHg .
Pluie
Presse
+
/
-
bouton à sélectionner mm ou dans .
Vitesse du vent
Presse / bouton pour sélectionner MS, km/h, nœuds ou
mi/h.
Lumière
Presse
+
/
-
bouton à sélectionner Le Klux Klan , KFC ou p /
m2
.
Presse bouton pour accéder à l'affichage des paramètres
d'étalonnage.
Presse b o u t o n
w
pour revenir au simple/détail écran.

- 43 -
ÉTALONNAGE PARAMÈTRE
Étalonnage pour intérieur paramètres
Presse ou bouton pour sélectionner différents rangée de activé
option champ.
Presse bouton pour sélectionner Option d'alerte
haute/basse/réinitialisation.
Presse ou bouton pour régler la valeur ou option marche/arrêt.
Presse
c
bouton pour échange pour montrer le intérieur,
extérieur et canal Étalonnage paramètre afficher .
Presse bouton pour entrer dans l'Autre
paramètre afficher.
Appuyez sur
w
bouton pour
revenir simple/détaillé écran,
NOTE:
Lors de la sélection option de réinitialisation, toutes les valeurs
d'étalonnage seront réinitialiser à le valeurs par défaut.
Étalonnage pour de plein air paramètres
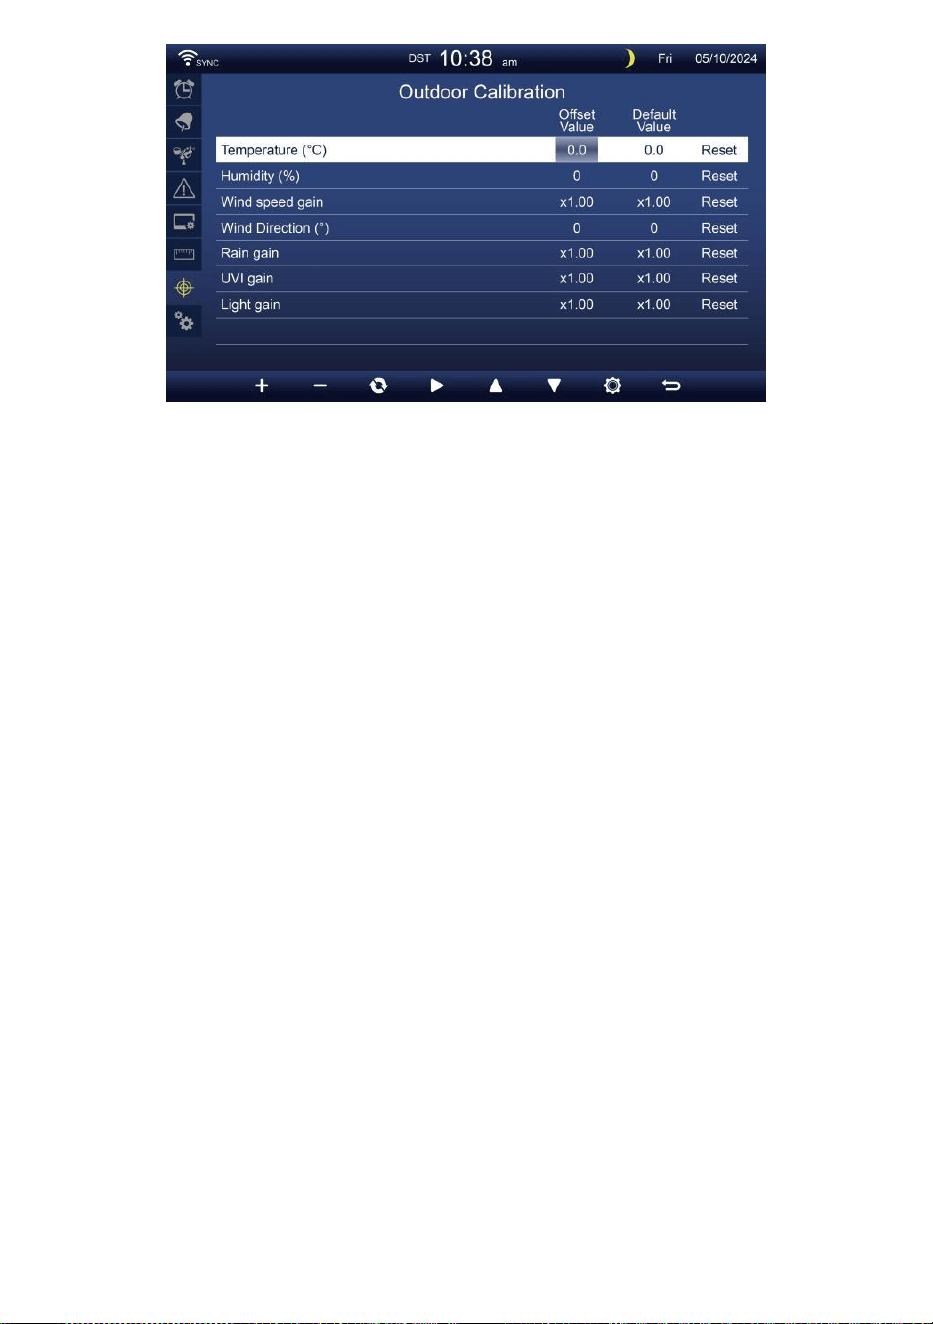
- 43 -
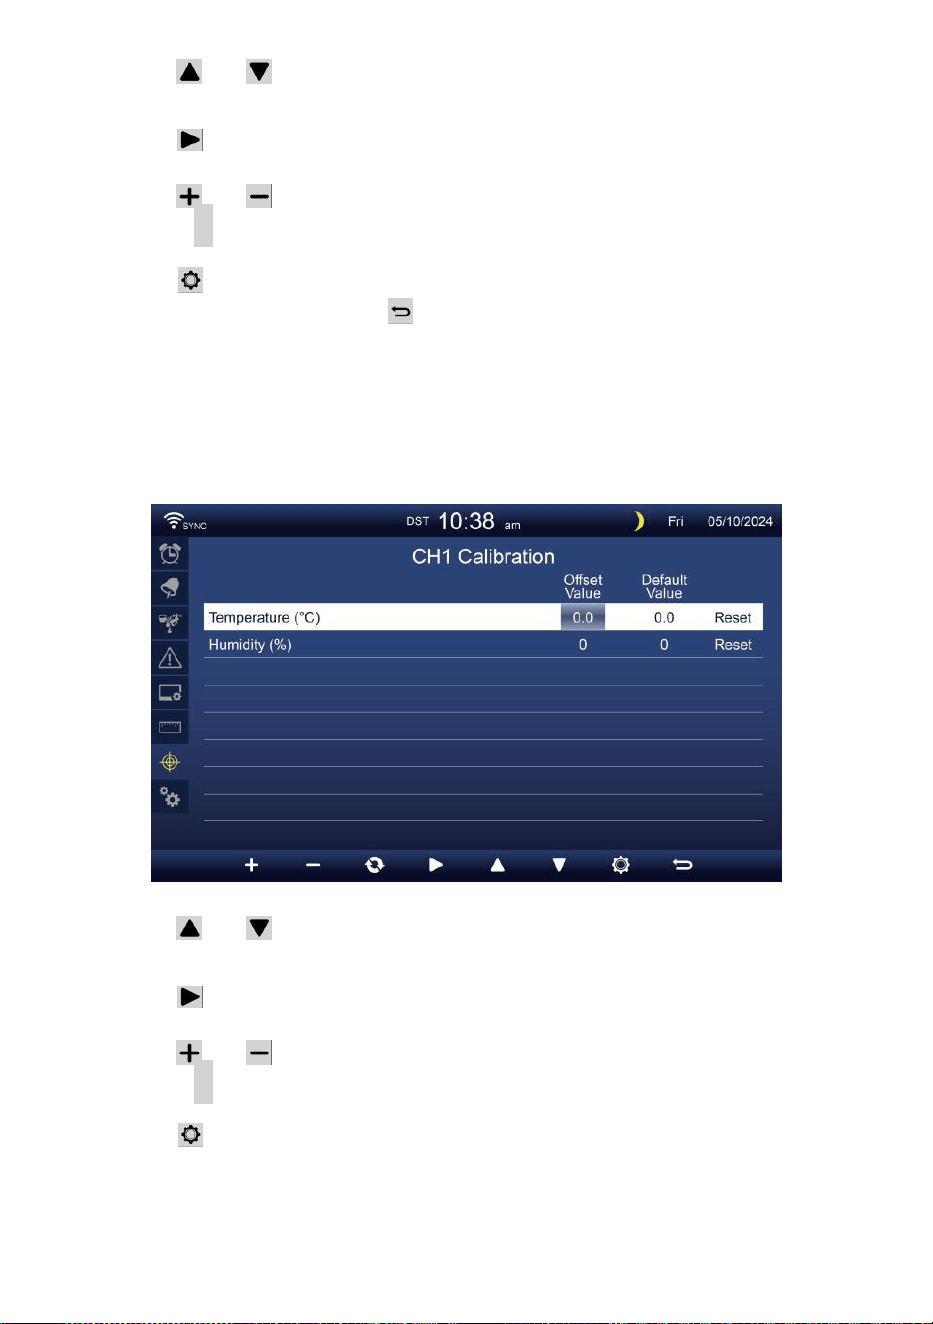
- 44 -
Presse ou bouton pour sélectionner différents rangée de activé
option champ.
Presse bouton pour sélectionner Option d'alerte
haute/basse/réinitialisation.
Presse ou bouton pour régler la valeur ou marche/arrêt option.
Presse c bouton pour échange pour montrer le intérieur,
extérieur et canal Étalonnage paramètre afficher .
Presse bouton pour entrer dans l'Autre
paramètre afficher. Presse bouton pour
retourner l'écran simple/détaillé,
NOTE:
Lors de la sélection option de réinitialisation, toutes les valeurs
d'étalonnage seront réinitialiser à le valeurs par défaut.
Étalonnage pour Capteur CH 1- CH 7 paramètres
Presse ou bouton pour sélectionner différents rangée de activé
option champ.
Presse bouton pour sélectionner Option d'alerte
haute/basse/réinitialisation.
Presse ou bouton pour régler la valeur ou option marche/arrêt.
Presse c bouton pour échange pour montrer le intérieur,
extérieur et canal Étalonnage paramètre afficher .
Presse bouton pour entrer dans l'Autre
paramètre afficher.
Appuyez sur
w
bouton pour
revenir simple/détaillé écran,
NOTE:

- 44 -
Lors de la sélection option de réinitialisation, toutes les valeurs
d'étalonnage seront réinitialiser à le valeurs par défaut.
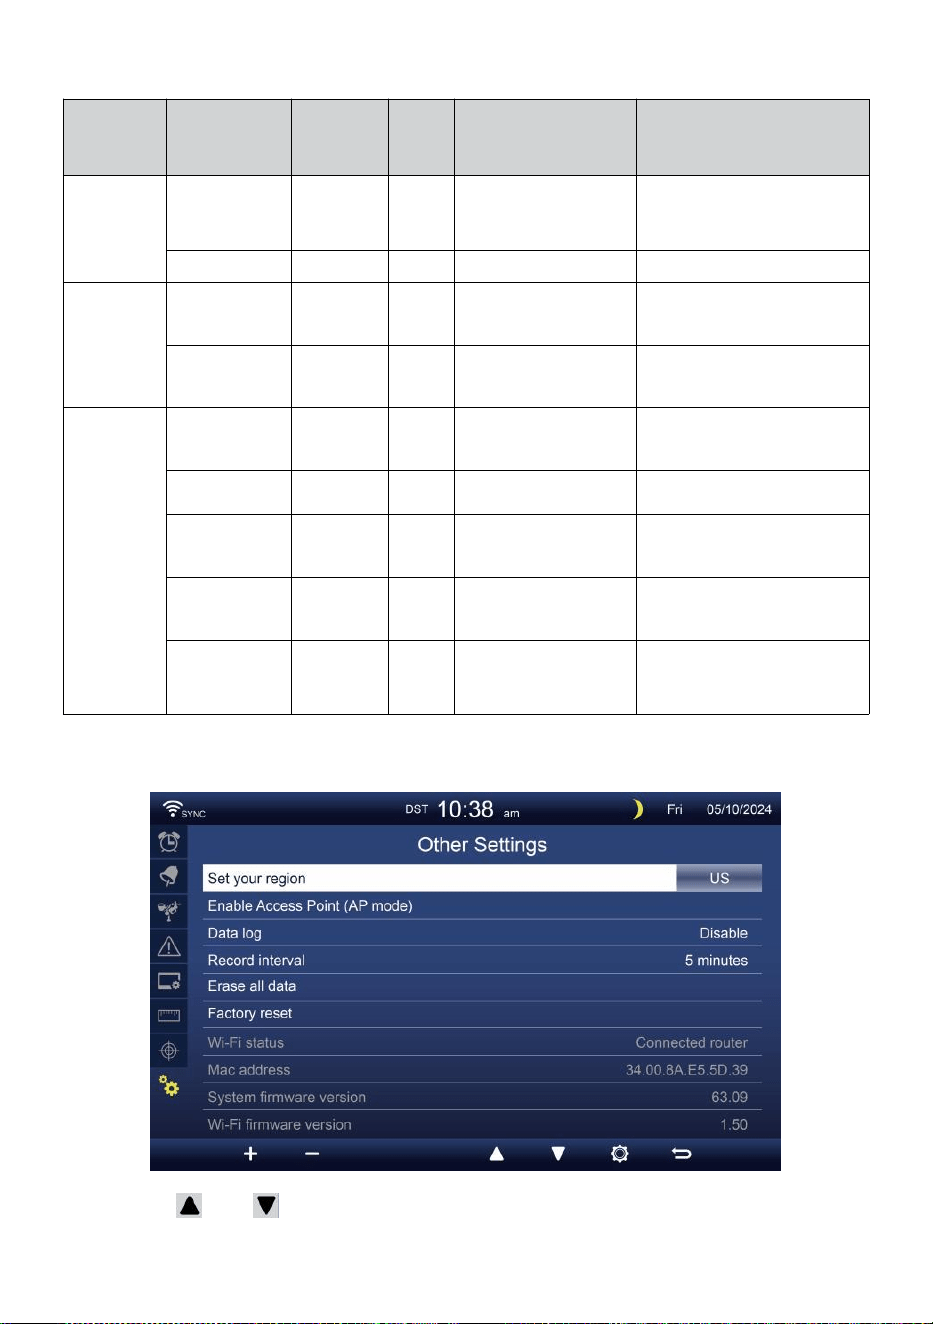
- 45 -
Étalonnage paramètres
Capteur
Paramètre
Taper de
étalonnag
e
Défaut
valeur
Paramètre
gamme
Calibrage typique
source
Intérieur,
Extérieur
ou
chaîne(s)
Température
Compenser
0
±36 °F (±20 °C)
Esprit rouge ou
mercure
thermomètre
Humidité
Compenser
0
±20 %
Psychromètre à fronde
Intérieur
Absolu
pression
Compenser
0
± 560 hPa (± 16,51
poHg ou ±420 mmHg
Qualité de laboratoire
calibrée baromètre
Relatif
pression
Compenser
0
± 560 hPa (± 16,51
poHg ou ±420 mmHg
Aéroport local
De plein air
Vitesse du
vent
Gagner
1
x 0,5 ~ 1,5
Qualité de laboratoire
calibrée vent mètre
Direction du
vent
Compenser
0
±10°
GPS ou Boussole
Pluie
Gagner
1
x 0,5 ~ 1,5
Voyant pluviomètre avec
mètre
UVI
Gagner
1
x 0,01 ~ 10.0
Qualité de laboratoire
calibrée UV mètre
Lumière
intensité
Gagner
1
x 0,01 ~ 10.0
Qualité de laboratoire
calibrée rayonnement
solaire capteur
AUTRE PARAMÈTRE
Presse ou bouton pour changer le activé champ d'option:
- 46 -
#
Sous article
Opération / Description
u
n
Définissez votre
région
Presse / bouton pour sélectionner Europe, ROYAUME-
UNI, NOUS, Australie.
b
Activer Accéder
Indiquer
Presse
+
/
-
bouton à démarrageAP mode pour WI - FI
connexion installation .
c
Données enregistrer
Presse / bouton pour activer ou désactiver le données
fonction log.
d
Enregistrer intervalle
Presse
+
/
-
bouton à installation le enregistrer intervalle de le
données enregistrer .
et
Tout effacer données
Presse / bouton pour tout effacer le données dans console.
f
Usine réinitialiser
Presse
+
/
-
bouton à réinitialiser tous le paramètre à défaut et
clair toutes les données dans console.
g
État du Wi-Fi
état actuel de la connexion WI-FI de la console .
h
Adresse Mac
Afficher la console Adresse Mac.
j
e
Versiondumicrologiciel
dusystème
Affiche la version actuelle du micrologiciel du système de la
console.
j
Version du
micrologiciel Wi-Fi
Affiche la version actuelle du micrologiciel Wi-Fi de la console.
Presse bouton pour entrer l'heure et Réglage de la date afficher .
Presse bouton pour retourner à l'écran simple/détaillé .
PARAMÈTRE CONNEXIONWI-FI AMÉLIORÉE
Afin de configurer la connexion Wi-Fi de la console, il besoins à
configurer la console dans Access Point (AP) mode. Pour activer l'accès
Point (AP) mode, veuillez suivre ce qui suit procédures.
1. Dans l'écran simple/détail, presse bouton à entrer Paramètre menu.
2. Appuyez sur bouton à commutateur « Autre Paramètre " afficher.
3. Appuyez sur ou bouton à entrer "Activer l'accès
Indiquer ", appuyez sur + ou bouton pour
démarrer l'AP mode.

- 46 -

- 47 -
Note :
Alors que en mode AP, vous pouvez presse bouton pour
quitter AP mode. La météo gare volonté simplement restaurer le
précédent AP paramètres .
Utiliser ton smartphone , tablette ou ordinateur à connecter à le
météo station via Wi-Fi en suivant ces mesures:
1. Sur PC, ouvrez votre Wi -Fi paramètres réseau. Sur Android™ ou iOS
appareils , allez dans le menu des paramètres, puis sélectionner
Connexions/WI-FI à ouvrir
le réseau paramètres.
2. Localisez le SSID de la station météo à partir de le liste. Il devrait
apparaître comme
WWS-XXXXXX (où tous les X sont des entiers) dans le liste.
Robinet sur le SSID pour se connecter. Cette étape prendra
plusieurs secondes.
3. Une fois que vous êtes connecté à la météo gare, ouvrir en haut ton
navigateur Internet ou mobile, et saisissez les informations suivantes
adresse dans le
adresse barre : http : //192.168.1.1 à accéder à l'interface Web de la
station météo. (Assurez-vous d'inclure le http:// ou sinon e le web le
navigateur peut interpréter l'adresse comme une requête de
recherche y). Nous recommander en utilisant la dernière version
d'un site Web réputé navigateurs.
4. Entrez les informations suivantes information dans l'interface Web
(Figure 1). Assurez -vous que tous les information est entré avant
de sélectionner Enregistrer. Si tu
choisir pas à télécharger Wunderground .com , ou télécharger
météo -
cloud.net, laissez le chèque boîtes non coché.

- 47 -
Select the menu and choose your 2.4 GHz WIFI Router
Password
Weather Server Setup
WeatherUnderground
Station ID
Station Key
Upload wunderground.com
WeatherCloud
Station ID
Station Key
Upload weatherCloud.net
Time Server Setup
time.windows.com
Firmware Version: 1.0.1
a7d9d2a279fbbafa
**********
**********
**********
Apply
KCACANTI9
Server URL
Enter your station ID
Enter your station key/password
check to confirm upload to
WeatherUnderground server
Enter your station ID
Enter your station key/password
check to confirm upload to Weathercloud.net
Internet time server setting
Press Apply to confirm the setting
Select setup UI display language
Select your Wi-Fi Router (SSID) from the list
Router Password
Router
Wi-Fi Router Setup
Language:
Router 12345
SETTINGS
SETUP
English

- 48 -
5. Si tous les informations que vous entré est correct, appuyez sur «
Appliquer » pour
confirmer. Si c'est le cas non, vérifie ton site web interface
informations à nouveau.
NOTE:
Quand le Wi - Fi installation est complet , votre ordinateur ou mobile
appareil
volonté revenir à la connexion Wi-Fi par défaut. Si c'est le cas non,
simplement ouvre ton appareil sans fil réseau paramètres et
manuellement reconnecter .
TEMPS SERVEUR CONNEXION STATUT
Une fois la station météo connectée à Internet, ce sera tentative pour
se connecter à la serveur de temps Internet pour obtenir le Heure U
TC. Une fois le
la connexion réussit et l'heure de la station météo a mis à jour. L'
icône « SYNC » apparaîtra sur le Écran LCD.
Pour afficher l'heure correcte pour votre fuseau horaire spécifique, vous
devez besoin de
changer le fuseau horaire dans le mode de réglage de l'HORLOGE depuis
00 (défaut) à
votre fuseau horaire (par exemple -5 pour EST). Si vous ne le faites pas
connais ton temps zone, toi peut regarder il en ligne.
NOTE:
L'heure sera automatiquement synchronisée avec la Internet par an
heure.
CRÉEZ ETSYNCHRONISEZ VOTRE COMPTE WEA THER
SERVER
CRÉER TON Météo souterraine COMPTE
1. Visitez : https://Wunderground.com et sélectionnez « Rejoindre »
dans le supérieur droit et coin et créer un Compte gratuit.

- 48 -

- 49 -
2. Entrez un Nom d'utilisateur, Courriel et Mot de passe ( il est ton Se
connecter mot de passe du siteIl, pas ton email mot de
passe.Alors Non la vie privée sera être exposé ). Cliquez sur
Signer gratuitement .
3. Après l'inscription c'est fait avec succès, ce sera montré ci-dessous
message.
4. Cliquez sur «Connexion » et entrer le e-mail adresse et mot de
passe tu viens de inscrit.
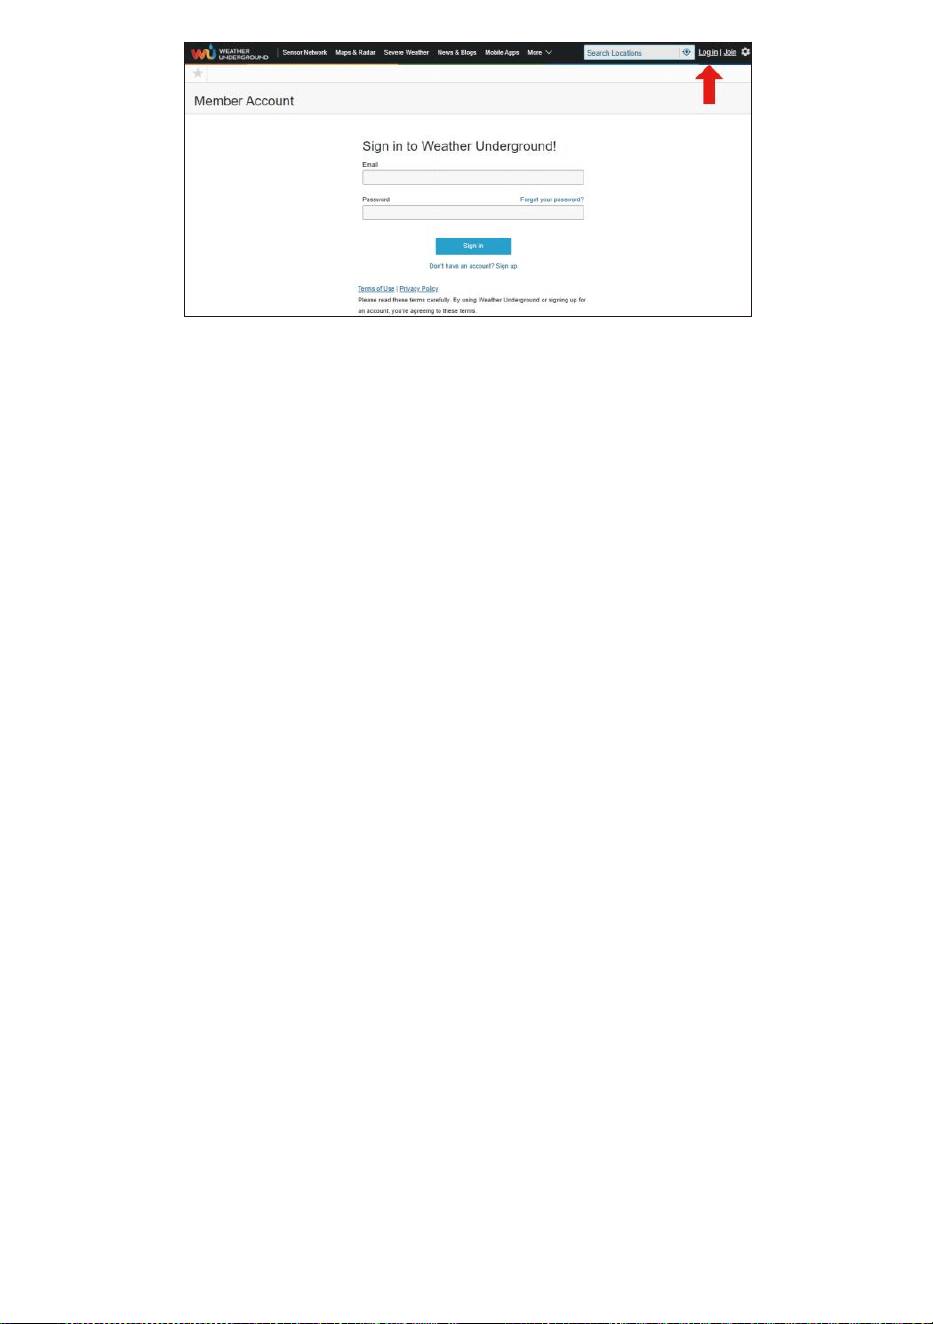
- 49 -
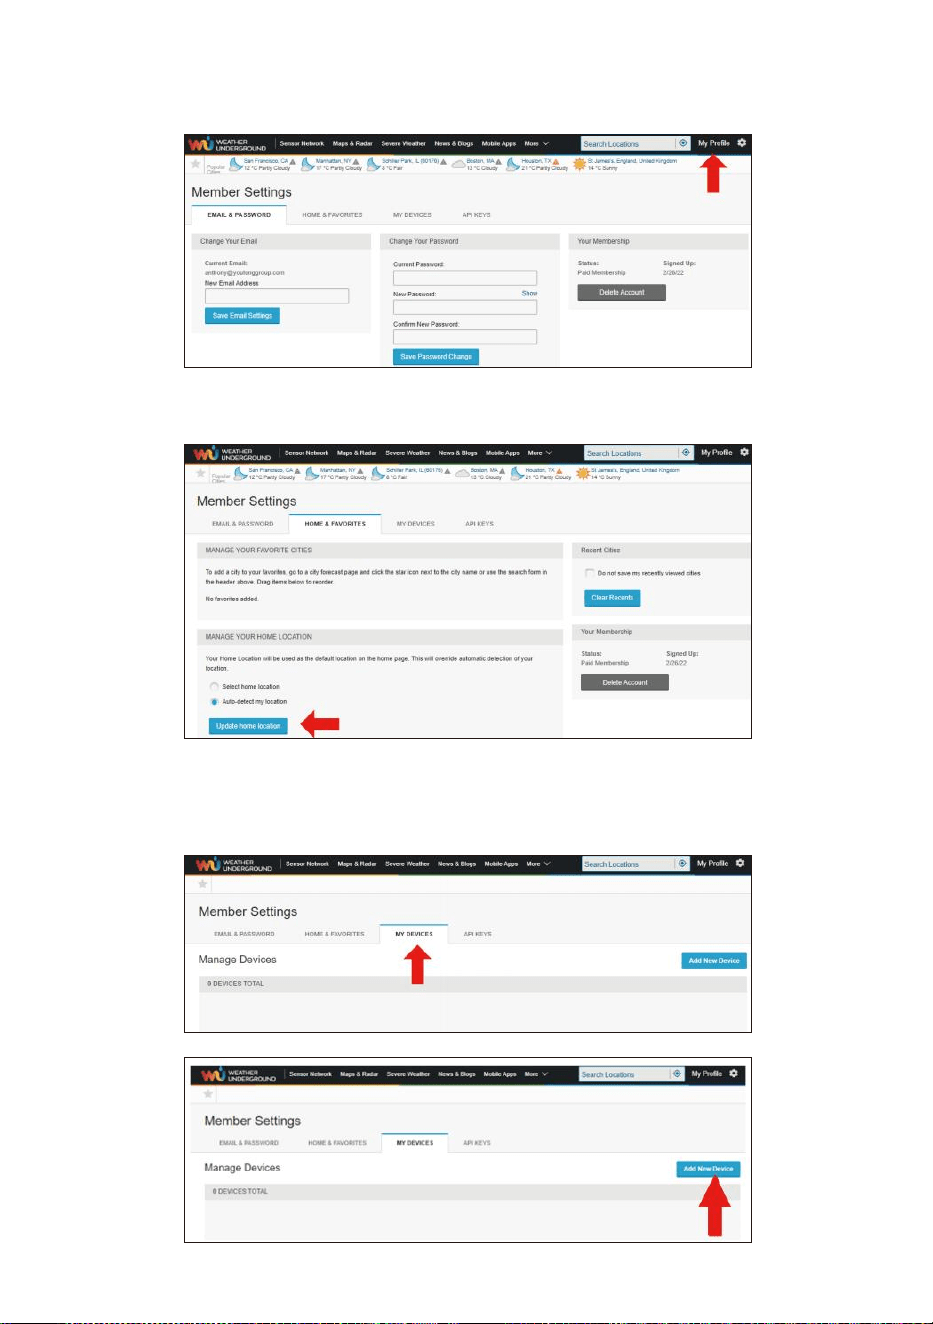
- 50 -
5. Cliquez sur «Mon profil » et entrez dans les paramètres du
membre.
6. Cliquez sur «Mise à jour maison emplacement ".
7. Cliquez sur «Mon Appareils », puis cliquez sur « Ajouter
Nouveau Appareil ".
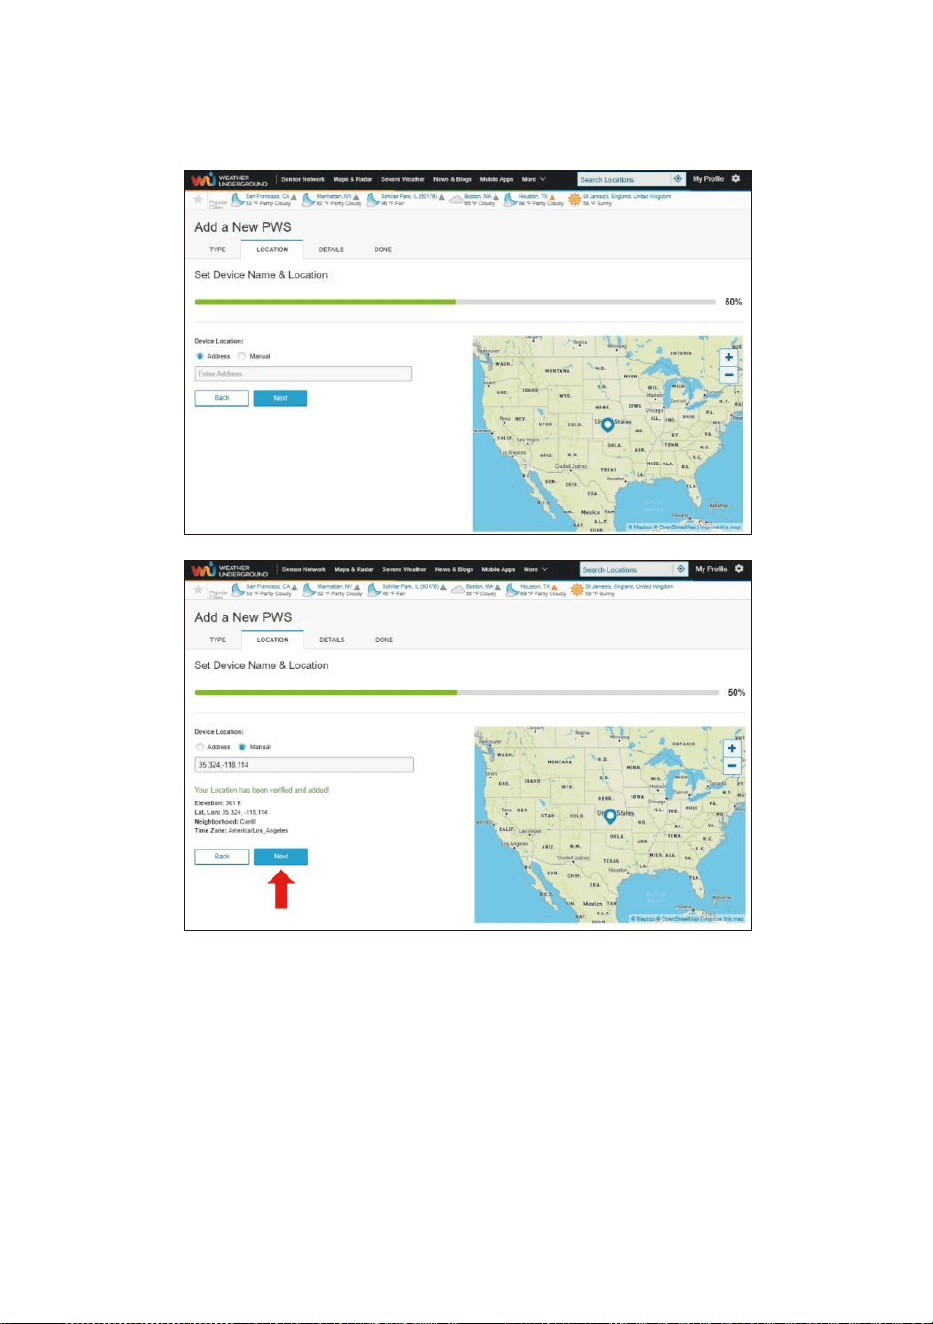
- 51 -
8. Sélectionnez l'adresse par saisir une adresse ou sélectionner
Manuel à positionnez votre adresse automatiquement. Cliquez
ensuite sur «Suivant ".
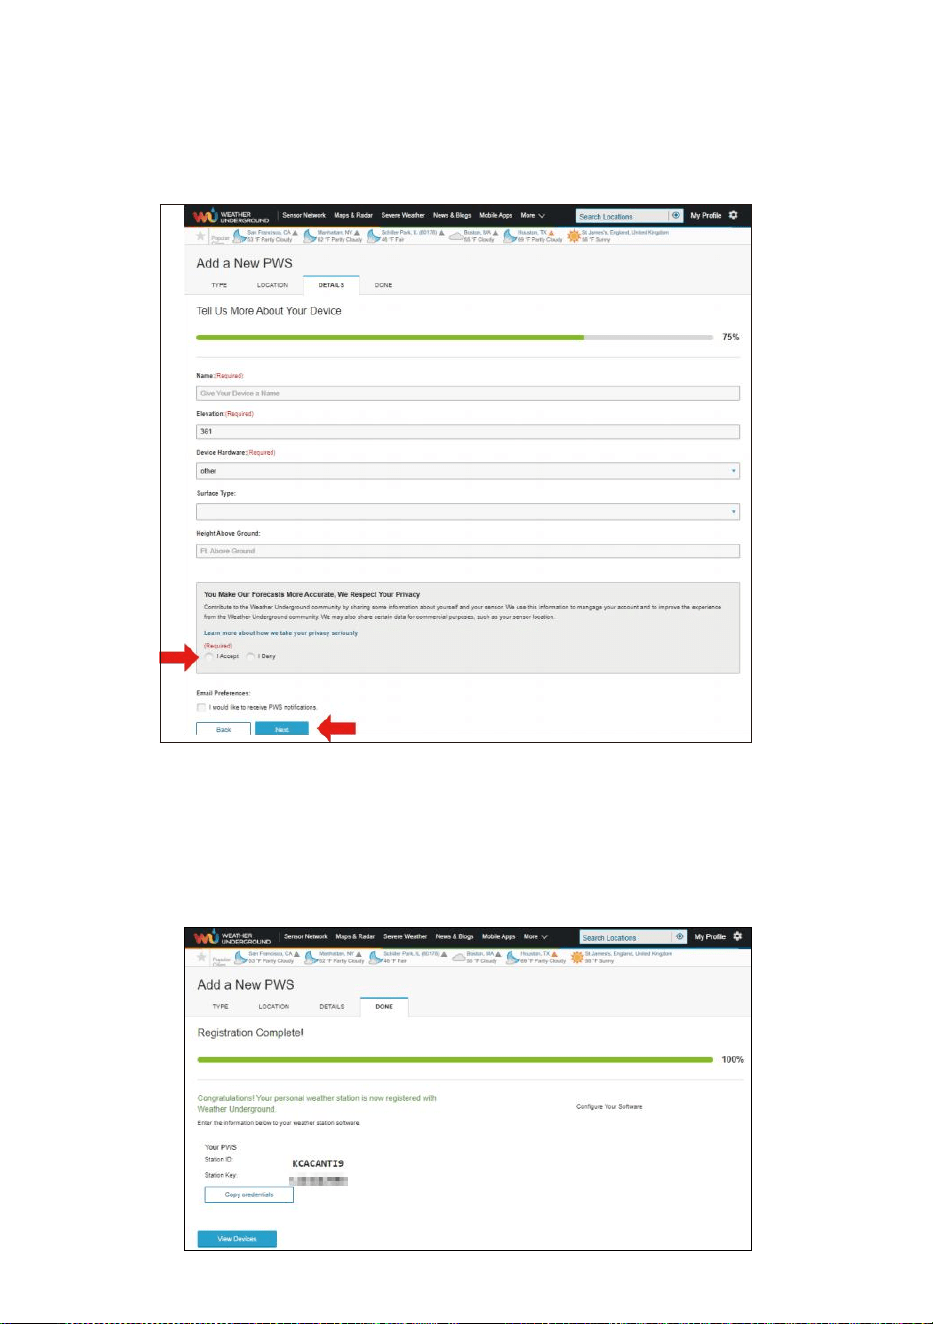
- 52 -
9. Entrez les informations météo. Blancs avec rouge (obligatoire)
doit être rempli dans.
NOTE:
Vous pouvez sélectionner « autre » parmi les Appareil Matériel.
10. Une fois complète ce session, cliquez sur «je Accepter " et «
Suivant ".
11. Après une inscription réussie, s'il te plaît enregistrez votre météo
Sous- sol ID et Clé informations pour une configuration ultérieure
utiliser.
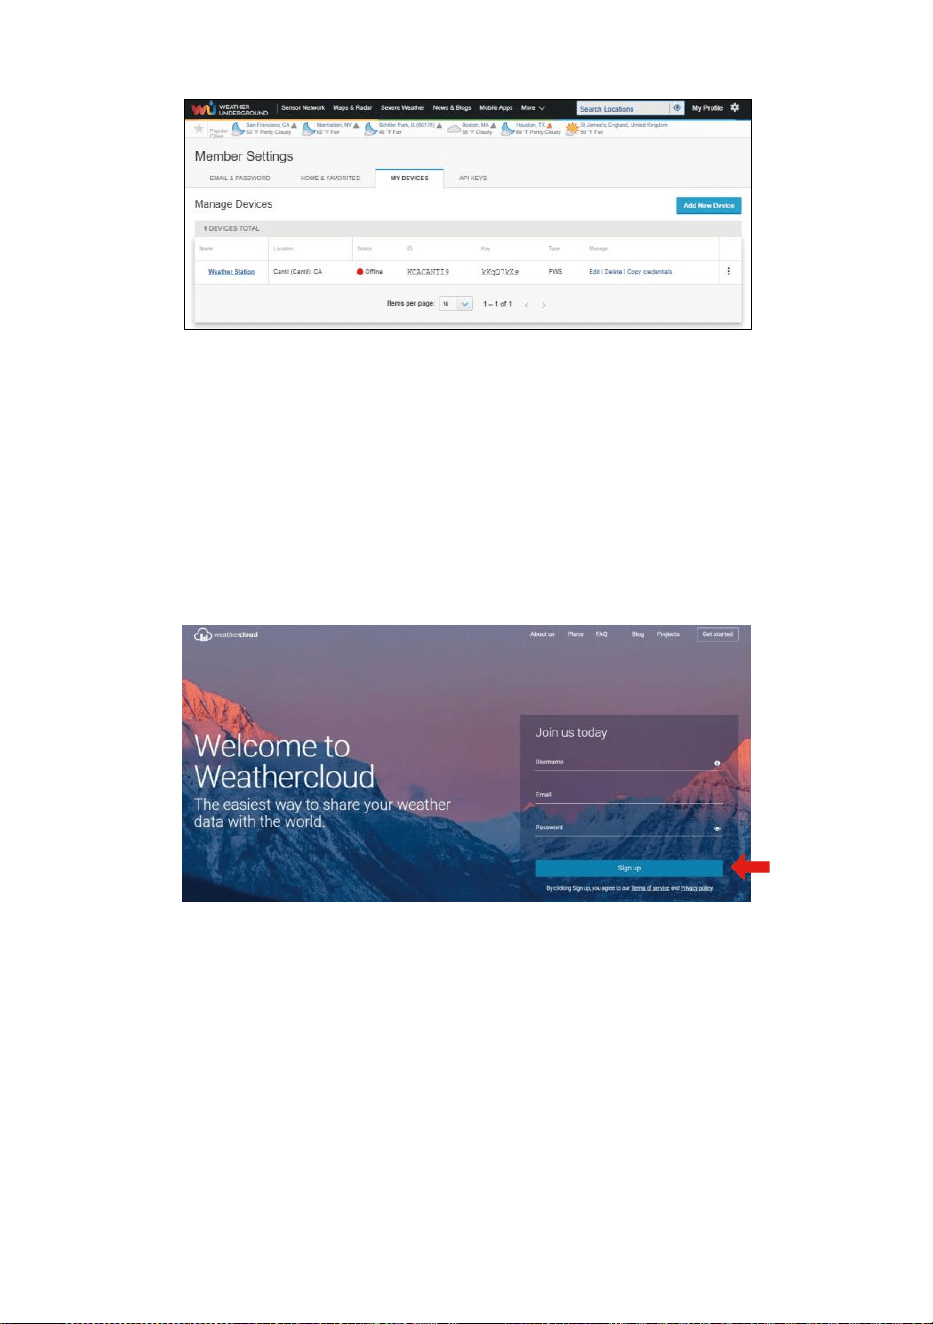
- 53 -
12. Comme indiqué ci-dessous, inscription est fait avec succès.
CRÉER TON NUAGE MÉTÉOROLOGIQUE COMPTE
1. Visitez le site Web de Weathercloud à l'adresse
https://weathercloud.net/ , et entrez un nom d'utilisateur, Courriel et
Mot de passe et cliquez sur « Si gn en haut ". Suite à la
instructions pour créer un compte.
REMARQUE : Ceci est il est préférable de le faire sur un ordinateur
bureau ou ordinateur portable.
(Il est votre identifiant mot de passe du siteIl, pas ton email mot de
passe. Donc Non la vie privée sera être exposé).
2. Quand il est réussi, un le courrier électronique sera être reçu dans
ton inscrit boîte aux lettres.
3. Ouvrez votre courrier et enregistrer dans à le web adresse dans le
mail. Cliquez sur « Activer » ton Nuage météorologique compte ".

- 53 -

- 54 -
4. Cliquez sur «ici » pour accéder à la page d’accueil du site Web
weathercloud e.
5. Entrez l'adresse e-mail et le mot de passe que vous venez de saisir.
inscrit à entrer dans le nuage météorologique site web .
6. Cliquez sur « Créer un appareil » pour ajouter une station météo.
7. Entrez tous les demandé information dans la création Nouveau
Appareil page. Blancs avec rouge * doit être rempli dans.
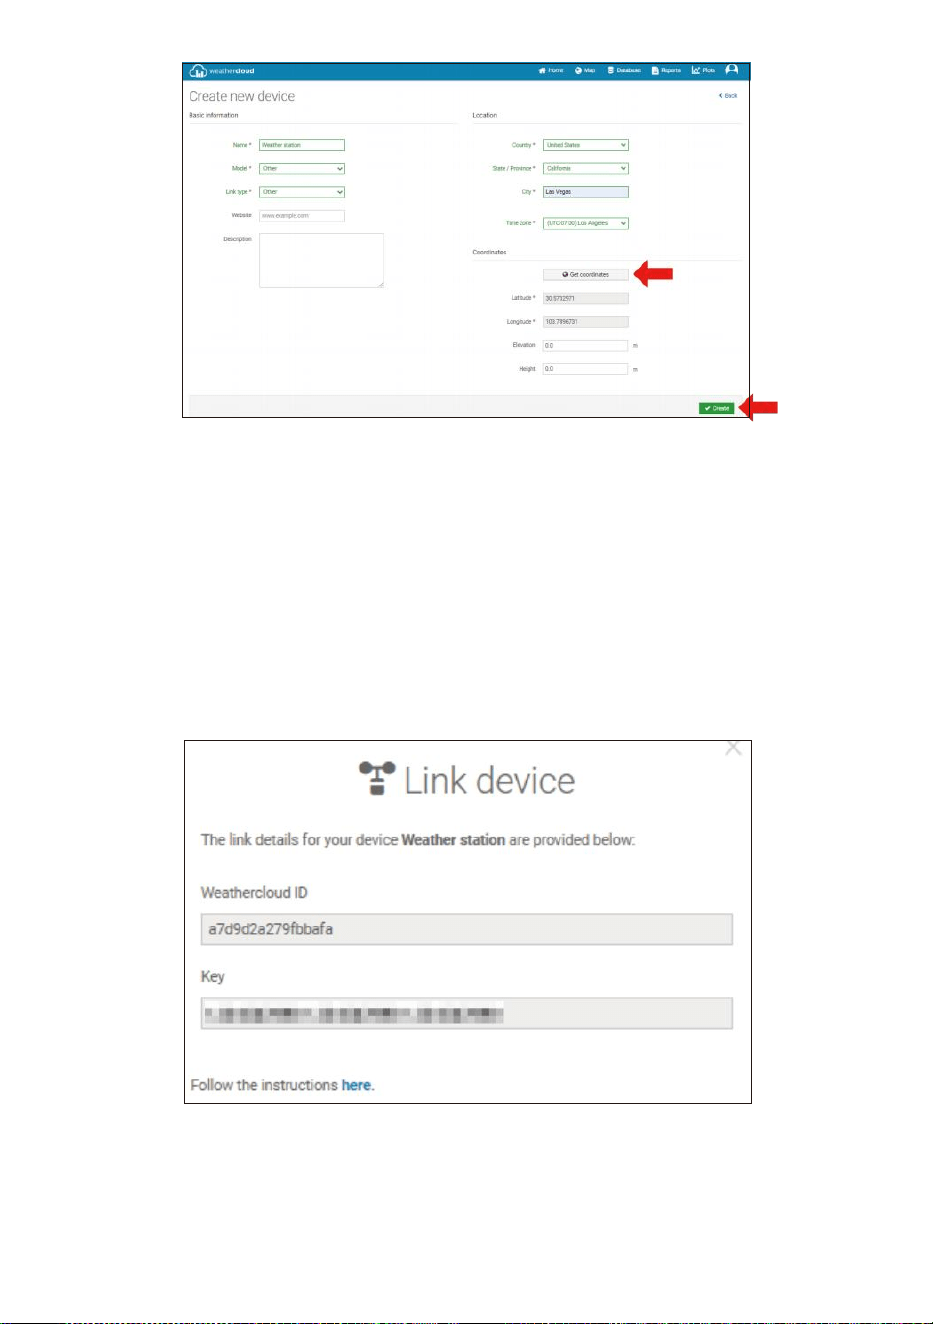
- 55 -
NOTE:
Vous pouvez sélectionner « autre » parmi les Modèle nombre et
Type de lien dans le au-dessus de blancs.
Cliquez sur « Obtenir les coordonnées » pour identifier votre
emplacement sur le carte, alors cliquez sur « Terminé » pour
confirmer.
8. Une fois que vous avez complété ce section, cliquez sur « Créer ».
9. Après vous être enregistré avec succès, veuillez enregistrez votre
Weathercloud IDENTIFIANT et Clé informations pour une
configuration ultérieure utiliser.
VOIR TON MÉTÉO DONNÉES DANS Météo souterraine
Pour visualiser les données de votre station météo en direct via PC ou
Web mobile navigateur,

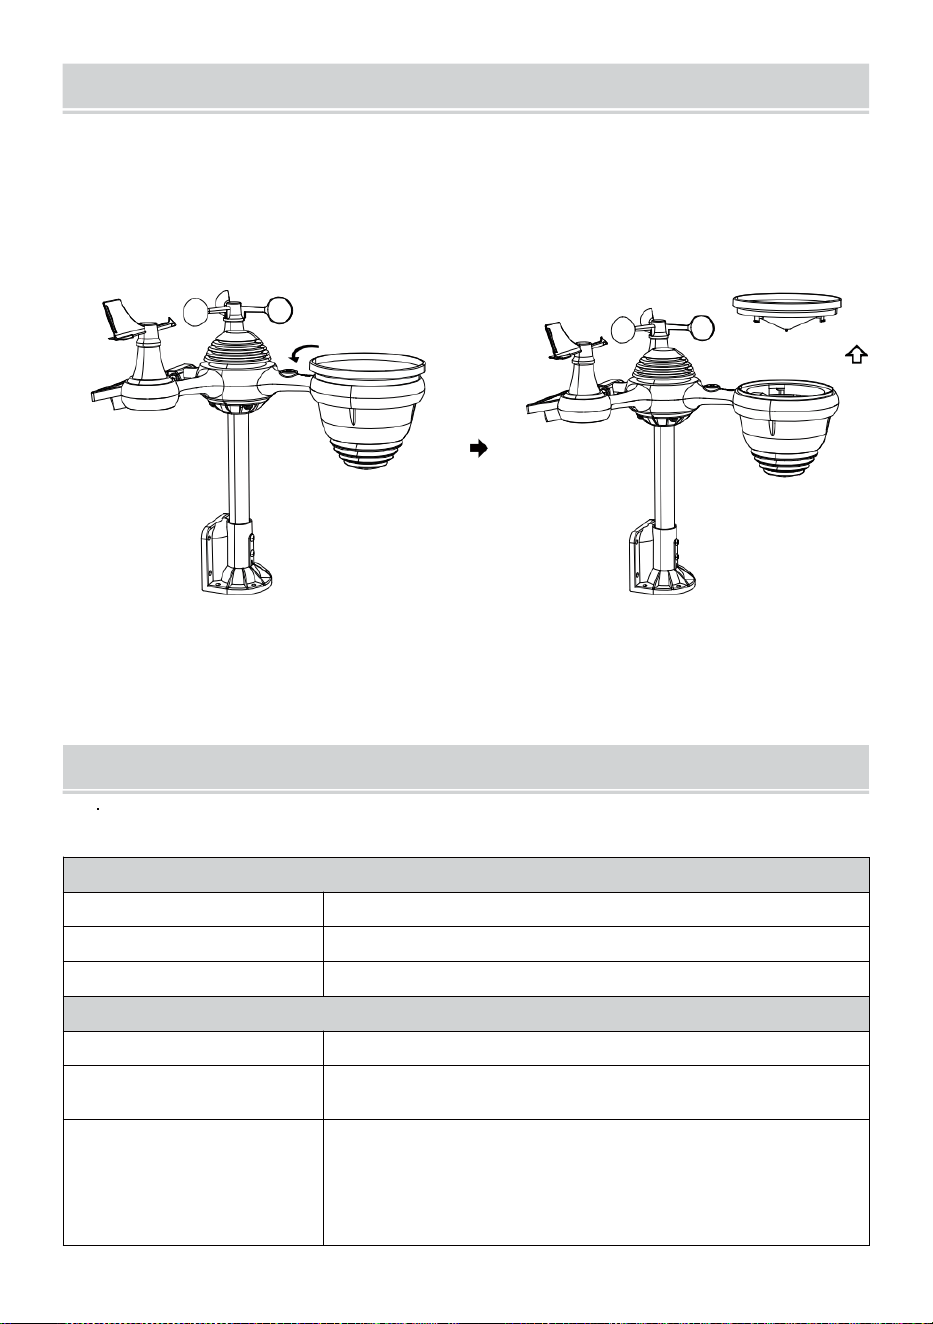
- 56 -
SOINSET ENTRETIEN
1. Nettoyez le pluviomètre tous les 3 mois. Tourner le entonnoir dans le
sens inverse des aiguilles d'une montre et soulevez pour exposer le
pluviomètre mécanismes, et nettoyer avec un chiffon humide.
Retirez toute la saleté, les débris et insectes. Si bug infestation est un
problème, vaporisez légèrement le capteur avec un insecticide.
Ouvrir
Ascenseur
2. Nettoyez le Lumière Intensité/ Capteur UV et solaire panneau chaque
3 mois avec de l'humidité tissu.
3. Lors du remplacement des piles, appliquer un corrosion p préventif
composé sur la batterie terminal s.
SPÉCIFICATION
MÉTÉO GARE
Spécifications générales
Dimension
7,3 x 5,4 x 1,1 pouce (185,9 x 137 .4 x 28,5 mm)
Source d'énergie
CA-CC 5 V, Adaptateur 1A (inclus)
Capteurs de support
1 capteur 7 en 1 (compris)
Spécifications de communication Wi-Fi
Norme Wi-Fi
802.11 b/g/n
Wi- Fréquence de
fonctionnement du Fi
2,4 GHz
Appareils pris en
charge pour
installation Interface
utilisateur
Appareil intelligent avec mode Wi-Fi intégré et WAP,
y compris les ordinateurs portables, les ordinateurs,
les téléphones intelligents et intelligent tampons

- 56 -
Recommander un
navigateur Web pour la
configuration Interface
utilisateur
Dernière version d'un navigateur Web qui prend en charge HTML 5
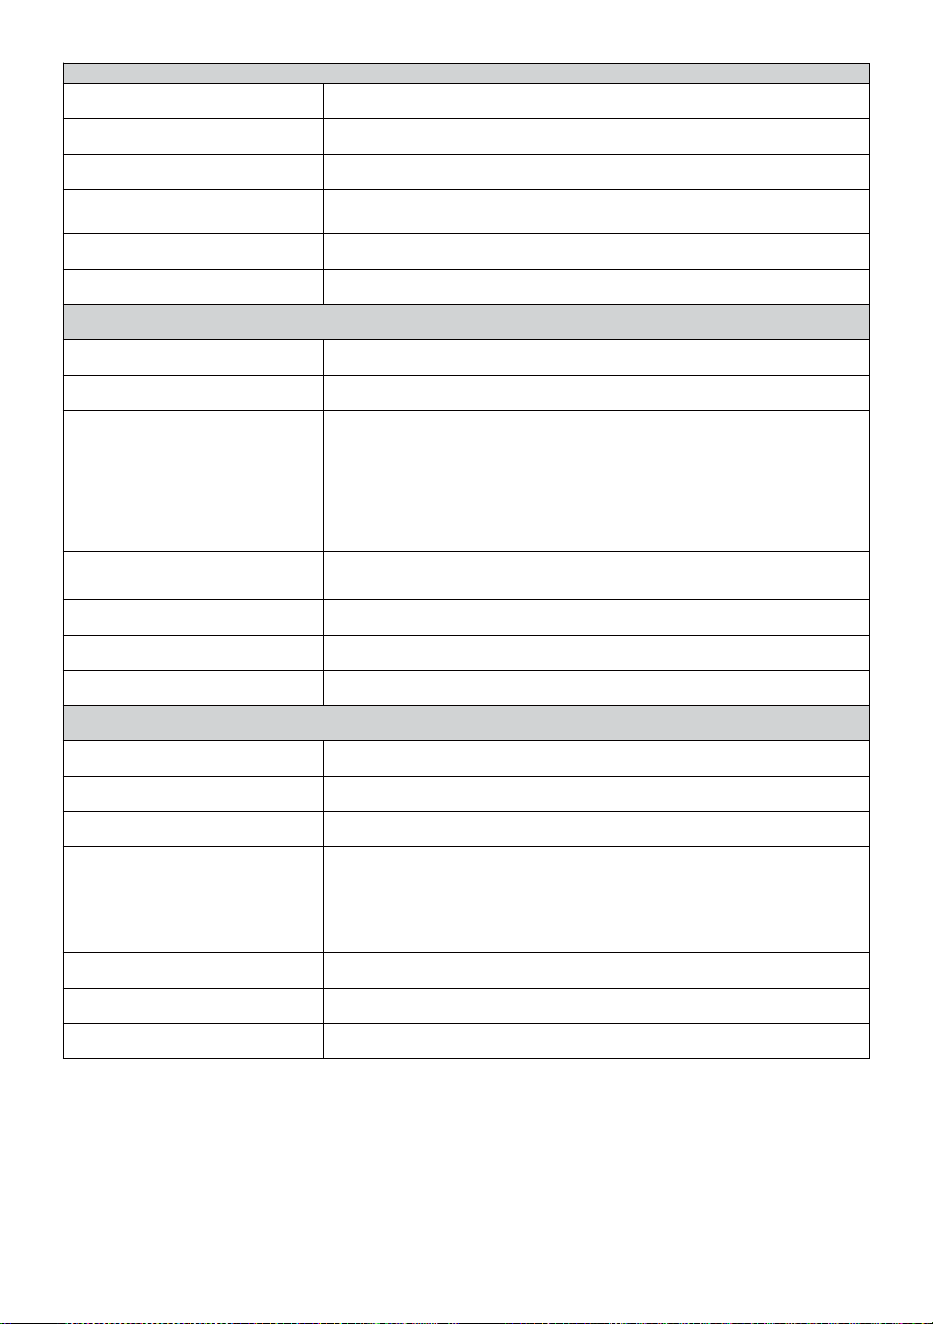
- 57 -
Te mp s Sp é cif i c a t io n s fon c t i on n e l le s
T e m p s a f f i c h e r
HH : MM
F o r m a t h o r a i r e
12 heure ou 24 heure
Date afficher
JJ/MM ou MM/JJ
S y n c h r o n i s a t i o n h o r a i r e
m é t h o d e
Sy n ch r o n is e av e c l' at o m e ho r lo g e
Fuseaux horaires
-12 ~ +13 heures
Heure d'été
MARCHE/ARRÊT
Affichage du baromètre et Spécifications fonctionnelles
Unités du baromètre
hPa, inHg et mmHg
Mesure gamme
600 – 1100 hPa ( réglage relatif) gamme 930 – 1050 hPa)
Précision
700 -1100 hPa±5 hPa/600-696 hPa±8 hPa
20,67 – 32,48 poHg±0,15 poHg/17,72 -20,55 poHg ±0,24 inHg
525 -825 mmHg±3,8 mmHg/450 -5 22 mmHg±6
mmHg Typique à 77
ans
(25
℃
)
Prévisions météorologiques
Ensoleillé, Partiellement nuageux, nuageux, Pluvieux, orageux et
Neigeux
Afficher mode
Actuel
Mémoire mode
Tous les jours Max/ Min
Alerte
Alerte de changement de pression
Température intérieure/extérieure Afficher & Spécifications fonctionnelles
Température unité
℃ et Non
Affichage intérieur gamme
-14.1
mois–
122
°C
(-9,9
°C
– 50
°C
)
Affichage extérieur gamme
-40 peur – 158 °C (-40 °C – 70 °C )
Précision d'entrée/sortie
50 – 122
Effrayant
1.8
peur
/ 10 –
50 ℃ ± 1 ℃ -4 - 50 ± 2,7 / -20 – 10
℃ ± 1,5 ℃ autres : ± 3,6 / ±2 ℃
Afficher mode
Actuel
Mémoire mode
Tous les jours Max/ Min
Alerte
Alerte de température haute/basse
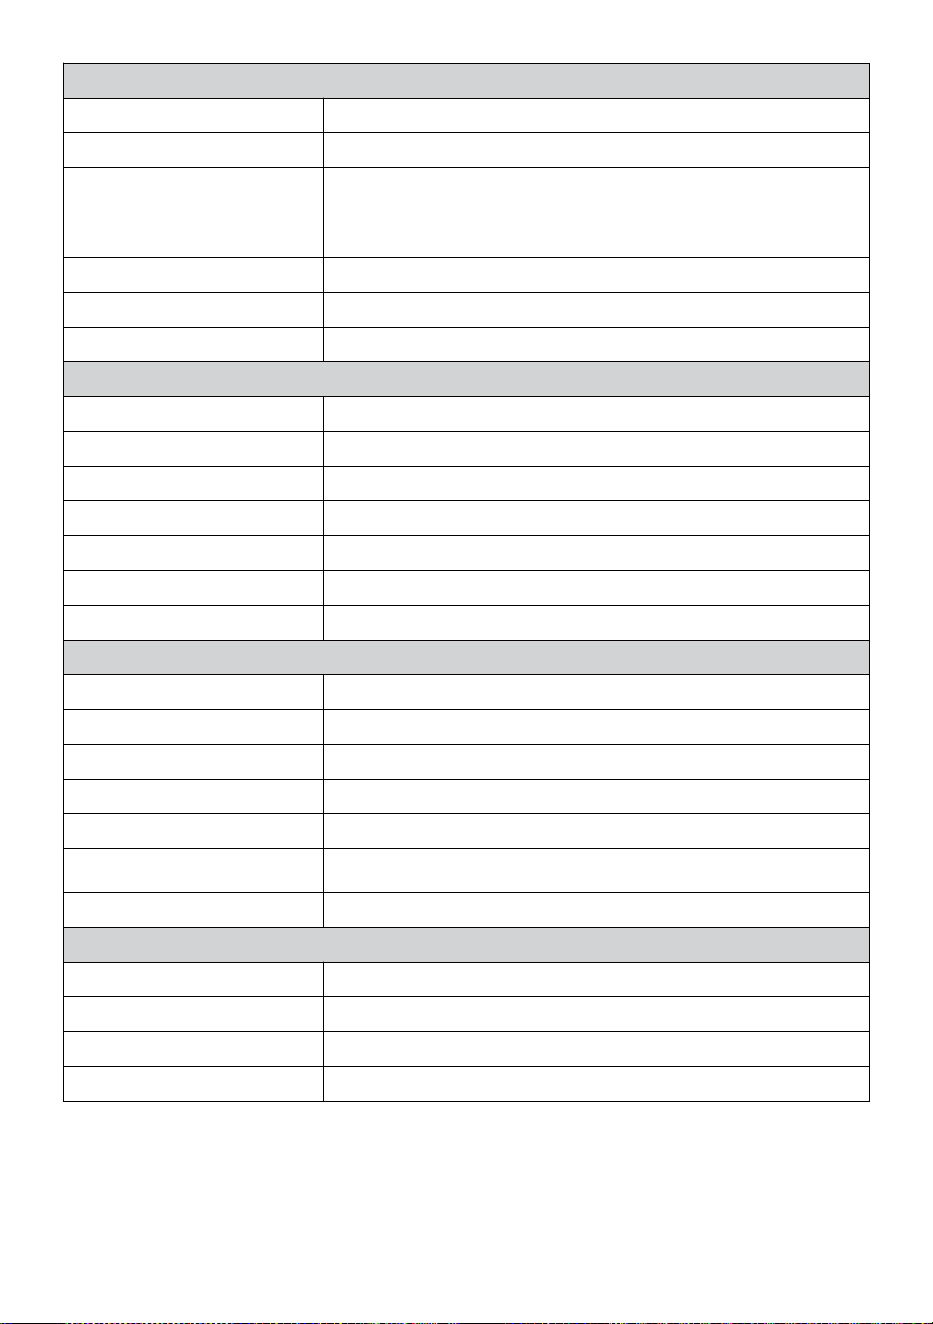
- 58 -
Humidité intérieure/extérieure Afficher & Spécifications fonctionnelles
Humidité unité
%
Afficher gamme
1 – 99%
Précision d'entrée/sortie
40 – 80 % HR ± 5% RH @77 °C (2,5
° C ) Autres : ± 8% RH à 77 °C (25 °C
)
Afficher mode
Actuel
Mémoire mode
Tous les jours Max/ Min
Alerte
Haut/Bas humidité ale rt
Vitesse du vent et Direction Afficher & Spécifications fonctionnelles
Vitesse du vent unité
mph, MS, km/h, noeuds
Afficher gamme
0 -112 mph, 50 m/s, 180 km/h, 97 noeuds
Précision de la vitesse
< 5 m/s : ± 0,5 m/s, > 5 m/s : ±10% (quel que soit est plus grand)
Afficher mode
Rafales/Moyenne
Mémoire mode
Rafales quotidiennes/moyennes
Alerte
Vitesse du vent élevée Alerte (rafale/moyenne)
Direction du vent
16 directions
Pluie Afficher & Spécifications fonctionnelles
Unité de précipitations
mm, dans
Gamme de précipitations
0 – 12999 mm (0 – 511,7 dans)
Précision des précipitations
±7%
Afficher mode
Actuel
Mémoire mode
Tous les jours Max
Affichage des précipitations
mode
Horaire/ Quotidien/Hebdomadaire/ Mensuel/Total Précipitations
Alerte
Haut Tous les jours Alerte pluie
UV Indice Afficher & Spécifications fonctionnelles
Afficher gamme
0 - 16
Afficher mode
Actuel
Mémoire mode
Tous les jours Max
Alerte
Haut Alerte UVI
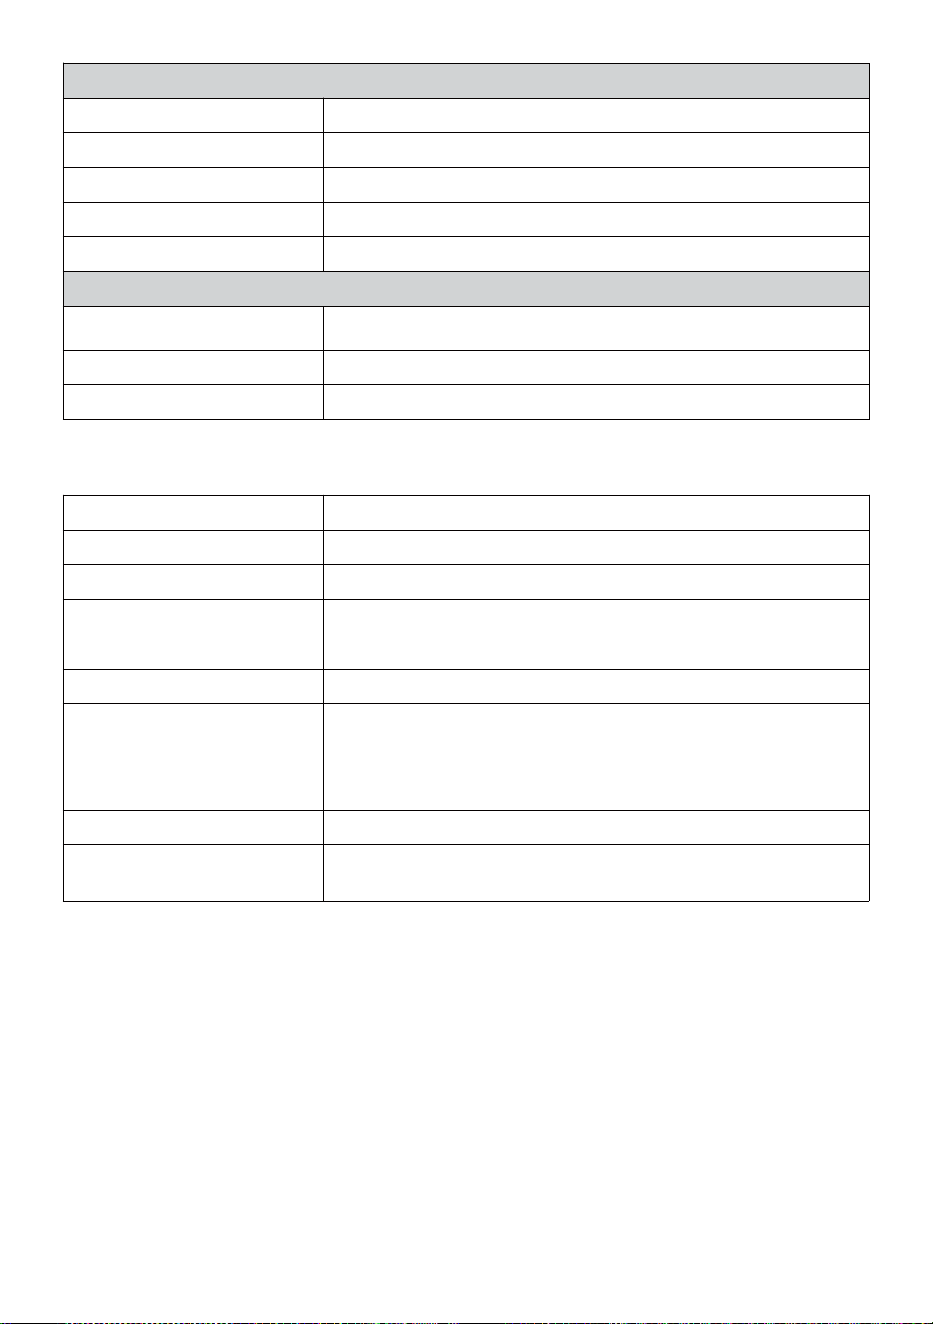
- 59 -
Lumière Intensité Afficher & Spécifications fonctionnelles
Lumière Intensité unité
Le Klux Klan, KFC et W/
m2
Afficher gamme
0 – 200 Klux
Afficher mode
Actuel
Mémoire mode
Tous les jours Max
Alerte
Haut Lumière alerte d'intensité
Indice météorologique Afficher & Spécifications fonctionnelles
Météo Indice mode
Sentiments comme le refroidissement éolien, chaleur index et rosée
indiquer
Afficher mode
Actuel
Mémoire mode
Tous les jours Max/min
7 EN 1 SANS FIL POUR L'EXTÉRIEUR CAPTEUR
Dimension
16 x 15,6 x 14,4 pouces (408 x 396 x 367 mm)
Principal pouvoir
3,6 V Ni-MH rechargeable batterie paquet
Sauvegarde pouvoir
Solaire pouvoir
Données météorologiques
température, humidité, vitesse du vent , direction du vent,
précipitations, UVI et lumière intensité
Transmission RF gamme
330 pieds (100m)
Intervalle de transmission
Toutes les 20 secondes pendant UV
,
lumière intensité
、
vitesse du
vent 、
température, données sur l'humidité et la pluie et la direction du vent
données
Température de fonctionnement
-40 jours– 140 °C (-40 °C – 60 °C )
Outils supplémentaires
requis pour le capteur
Oui
- 60 -
DÉPANNAGE
Problème
Solution
Le capteur sans fil
fait ne pas
communiquer le
station météo
Le capteur sans fil peut avoir initié correctement, et les données est
enregistré par la station météorologique comme invalide , et le météo
station doit être réinitialiser.
Avec une durée ouverte trombone , appuyez sur le Appuyez sur le
bouton RESET pendant 3 secondes pour terminer l'affichage de la
tension. La LED clignotera toutes les 20 secondes.
Si la LED va ne clignote pas toutes les 20 secondes, retirez le piles et
attendez 5 minutes, tout en recouvrant le panneau solaire pour drainer
le tension.
Mettre piles dos dans et resynchroniser la station météo et
resynchroniser le station météo (voir page 10 RE-PAIRING
SENSOR) avec le capteur sans fil à propos de 10 pieds (3 m)
loin .
Le La LED du capteur sans fil clignotera toutes les 20 secondes. Si le
La LED est toujours ne clignote pas toutes les 20 secondes, remplacez
le nouveau piles dans le
capteur sans fil.
Si le les piles étaient récemment remplacé, vérifiez le polarité. Si le
capteur sans fil clignote toutes les 2 0 secondes, procéder à la suivant
étape.
Là peut être une perte temporaire de communication due à réception
perte liée à une interférence ou autre facteurs de localisation,
Ou des piles peut avoir a été changé dans le senseur sans fil et le
station météo a pas a été réinitialiser. La solution peut c'est aussi
simple que d'éteindre et d'allumer la station météo (retirer DC
puissance et
piles), attendez 30 secondes et réinsérez DC puissance et piles).
Intérieur et De plein
air température
faire pas accepter
Prévoyez jusqu'à une heure pour que les capteurs sans fil stabiliser
exigible à signal
filtrage. Les capteurs de température intérieure et extérieure doivent
concorder ± 4
°C
(± 2
°C
) (la précision du capteur est ±2
minutes
(±1
℃
)
Utilisez la fonction d'étalonnage pour correspondre à l' intérieur et
température extérieure à un connu source.

- 60 -
Capteur de
température lit
aussi haut dans le
jour
Assurez-vous que le capteur sans fil n'est pas aussi fermer à chaleur
sources génératrices ou structures, telles que bâtiments, chaussées,
murs , ou air condition- ing unités.
- 61 -
Problème
Solution
Pluviomètre rapports
pluie quand il il pas il
pleut.
Un instable solution de montage (balancement) dans le montage
pôle) peut résultat dans le basculement seau incorrectement
incrémentation précipitations. Assurez-vous que vous
solution de montage stable et de niveau . (Référer page 9 RÉGLAGE
DU CAPTEUR SANS FIL 7 EN 1 NIVEAU)
Le Wi-Fi fait ne pas
afficher à la station
météo
Vérifiez votre routeur pour Problèmes.
1. Vérifiez le symbole Wi-Fi sur l’écran. Si la connectivité sans fil est
réussi , le Wi - Fi icône unvolonté être affiché dans le temps déposé
.
2. Assurez-vous que les paramètres Wi-Fi de votre modem sont
corrects (réseau nom, et mot de passe)
3. Assurez-vous que la station météo est branché dans CA puissance.
La station météorologique ne pas se connecter au Wi -Fi lorsque
alimenté par des piles seulement.
4. La console ne prend en charge et ne se connecte qu'à 2,4 GHz
routeurs. Si votre posséder un 5GHz routeur, un d il est un double
groupe routeur, toi volonté besoin à
désactiver la bande 5 GHz et activer le 2,4 GHz groupe.
5. Le temps fait ne prend pas en charge les réseaux invités.
Données pas
signaler à
www.wunder-
ground.com ou
www.weathercloud.net
1. Confirmez votre mot de passe ou votre clé est correct . Il est le
mot de passe toi inscrit sur Wunderground.com.
Wunderground.com. Votre mot de passe underground.com ne peut
pas commencer par des caractères non alphanumériques (une
limitation de Wunderg round.com, pas la station). Exemple, $worknet
est pas valide mot de passe, mais
réseau de travail$ est valide)
2. Confirmez votre station IDENTIFIANT ix correct. La station
IDENTIFIANT est tout en majuscules, et le plus courant problème
remplace et O par un 0 (ou vice versa).
Exemple, KCAPHOEM12, pas KCAPH0EM12.
3. Assurez-vous que les données et l'heure est correct sur le
météo gare. Si incorrect, vous peut être signaler des données
anciennes, pas données en temps réel .
4. Assurez-vous de votre fuseau horaire est réglé correctement. Si
ce n'est pas correct, vous peut être signaler des données
anciennes, pas temps réel données .
5. Vérifiez les paramètres du pare-feu de votre routeur. La station
météo envoie des données via Port 80.

FCC STATEMENT
- 62 -
Cet appareil est conforme à partie 15 des FCC Règles. Fonctionnement
est soumis à le suivant deux conditions :
1. Cet appareil peut PAS cause nocif ingérence.
2. Cet appareil doit accepter toute interférence reçu, y compris
interférence qui peut provoquer des effets indésirables opération.
NOTE:
Cet équipement a ont été testés et jugés conformes aux limites
pour une classe Appareil numérique B, conformément à Partie 15
des FCC Règles.
Ces les limites sont conçues pour fournir des informations
raisonnables protection contre nocif ingérence dans un
Résidentiel installation. Cet équipement
génère — et peut rayonner — énergie radiofréquence et, s'il
n'est pas installé et utilisé conformément à la instructions, peut
causer des effets nocifs interférence avec les communications
radio.
Cependant, il y a est aucune garantie que l'interférence va ne se
produit pas dans un installation particulière.
Si l'équipement ne ne pas causer nocif interférences avec la réception
radio ou télévision , qui peuvent être déterminées en tournant le
équipement désactivé et sur, le l'utilisateur est encouragé à essayer de
corriger le ingérence par un ou plus de la suivant mesures :
Réorienter ou déplacer le antenne de réception.
Augmenter la séparation entre l' équipement et le récepteur.
Connecter l'équipement dans une prise sur un circuit différent depuis
que auquel le récepteur est connecté .
Consultez le revendeur ou un technicien radio/TV expérimenté pour
aide.
AVERTISSEMENT : Les changements ou modifications apportés à ce
unité pas expressément sournois
approuvé par le La non-exécution par la partie responsable
de la conformité pourrait annuler l' autorisation de l'utilisateur à
utiliser l'équipement.

FCC STATEMENT
- 62 -
Technologie Sanven Ltd.
Adresse : Suite 250, 9166 Anaheim Lieu, Rancho Cucamonga,
Californie 91730
Fait En Chine


Support technique et Certificat de garantie
électronique www.vevor.com/support
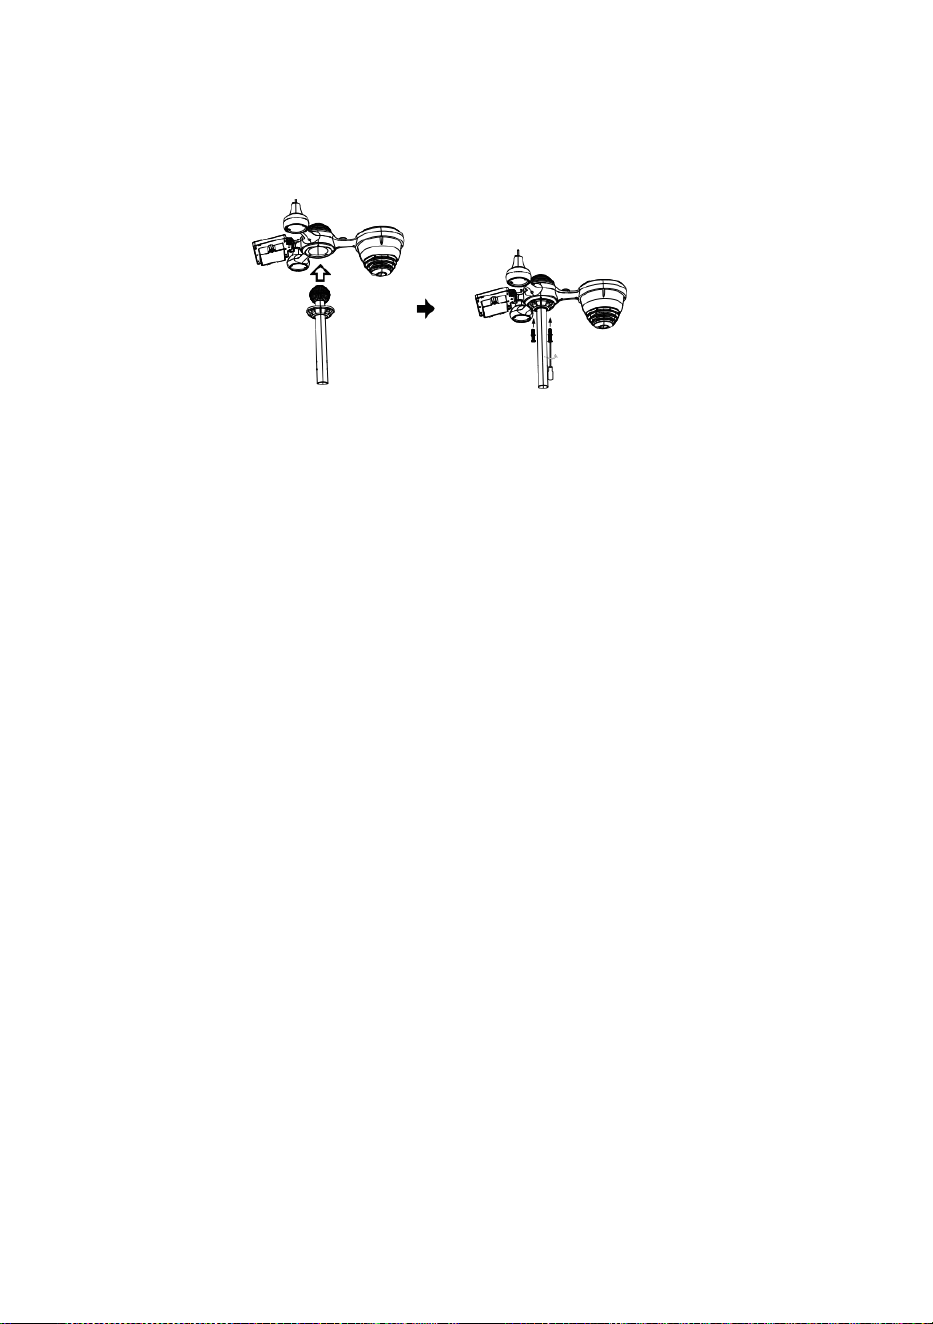
S
p
e
r
r
e
n
Schnellstart Führung
⑤
R
E
G
E
N
S
A
M
M
L
E
R
E
I
N
R
I
C
H
T
E
N
E
i
n
f
ü
g
e
①INSTALLING THE MOUNTING POLE
Secure the sensor onto a mounting pole (included) using the screws (included).

n
D
i
e
T
r
i
c
h
t
e
r
I
n
D
i
e
R
e
g
e
n
K
o
l
l
e
k
t
o
r
U
n
d
s
p
e
r
r
e
n
E
s
I
n
O
r
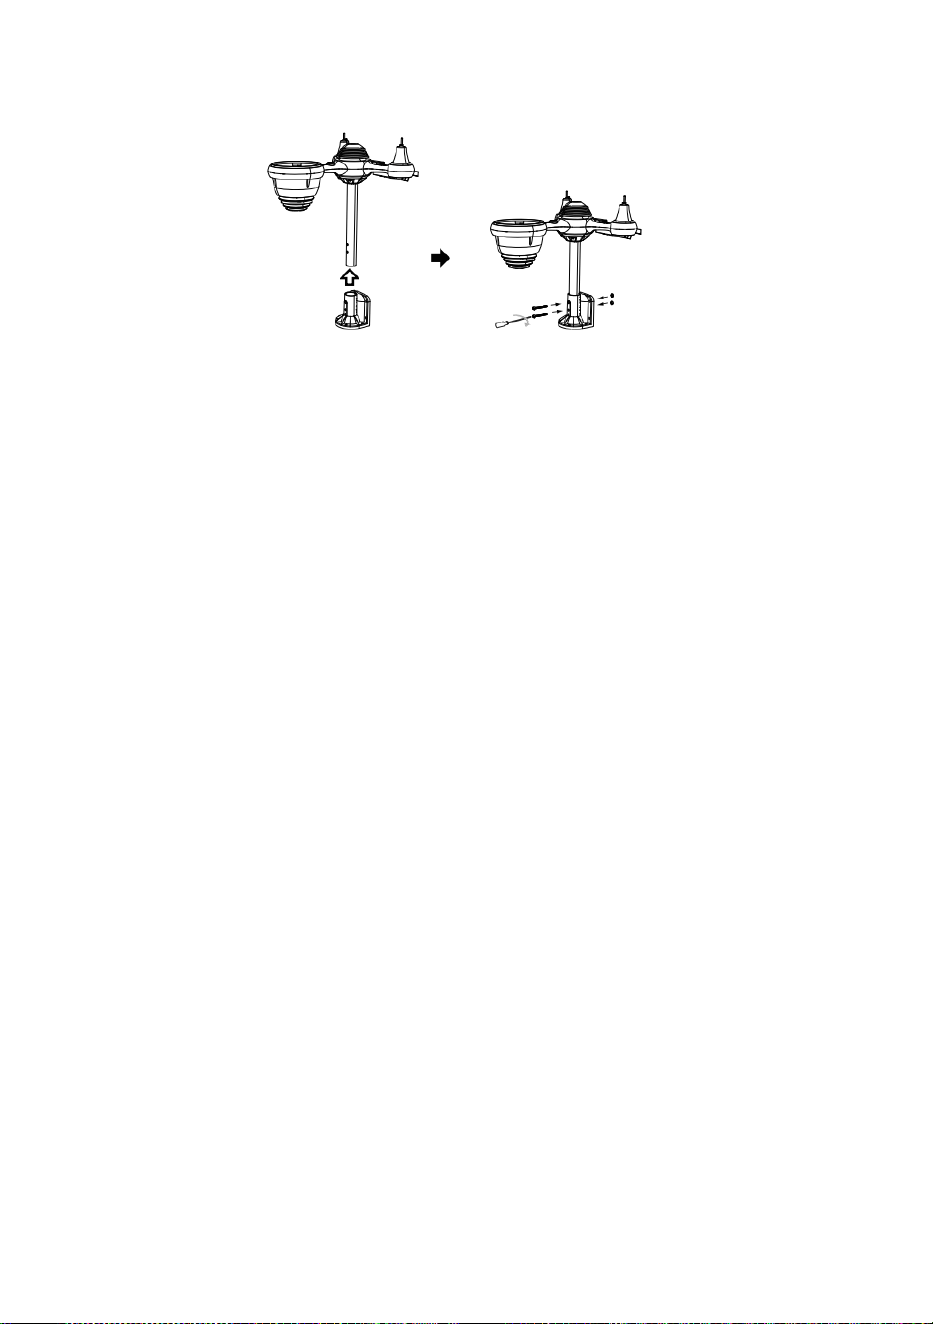
t
.
⑥
I
N
S
T
A
L
L
A
T
I
O
N
D
E
R
B
A
T
T
E
R
I
E
N
② INSTALLATION DER MONTAGE HALTERUNG
Abschrauben das Batteriefach an unten. Verbinden das Kabel von des Akkupacks.
A
n
p
a
s
s
e
n
d
i
e
a
Secure the sensor onto a mounting bracket (included) using the screws (included).

n
g
e
s
c
h
l
o
s
s
e
n
e
n
K
a
b
e
l
s
o
S
i
e
p
a
s
s
e
n
b
e
q
u
e
m
i
n
D
i
e
F
a
c
h
.
S
c
h
l
i
e
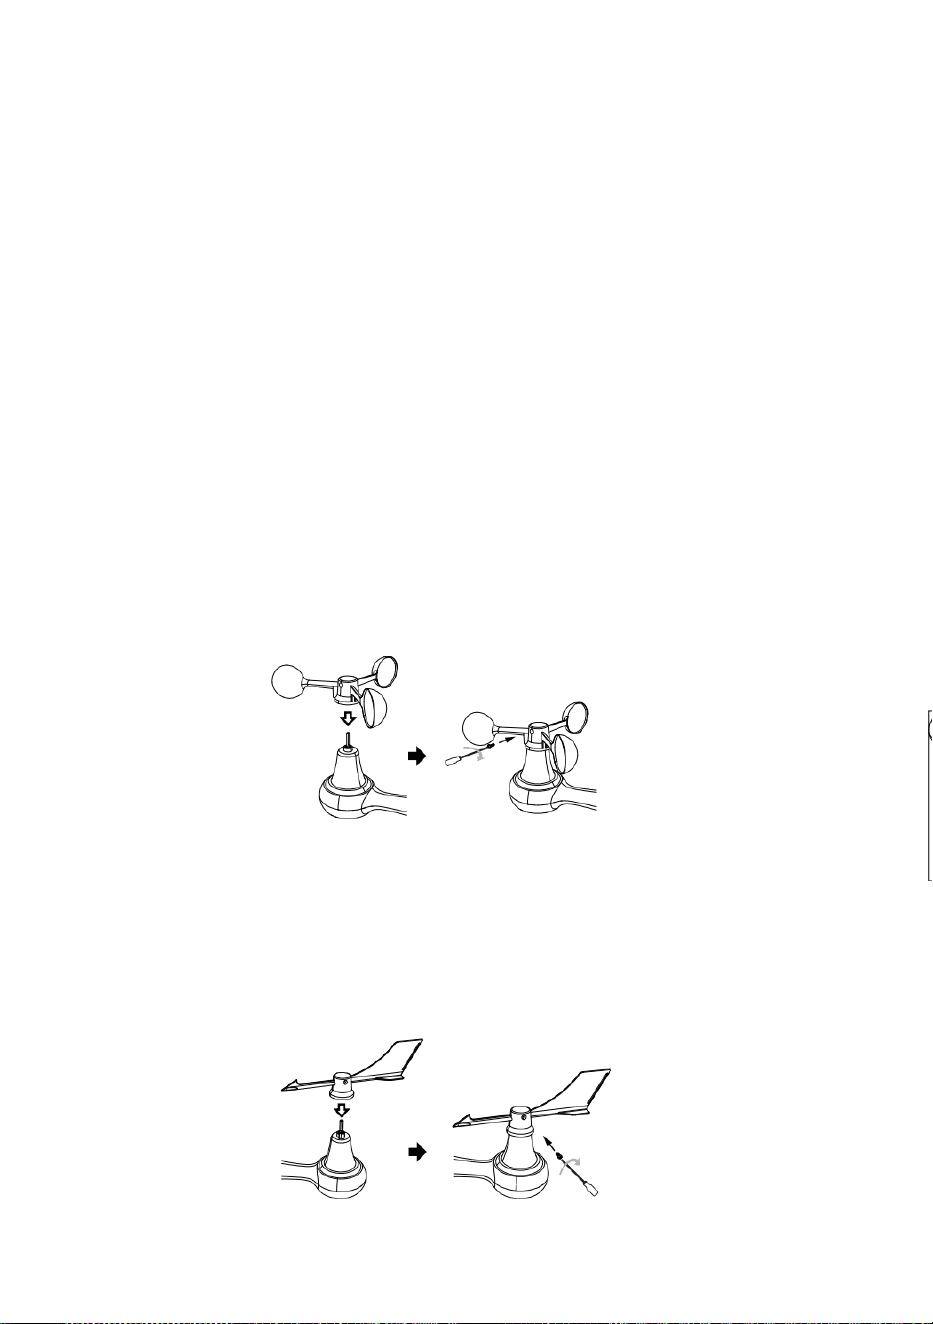
ß
e
n
u
n
d
b
e
f
e
s
t
i
g
e
n
d
a
s
B
a
t
t
e
r
i
e
f
a
c
h
.
③ INSTALLATION WIND GESCHWINDIGKEIT
TASSEN
Ausrichten die Schraubenlöcher in Die Windgeschwindigkeitsbecher mit Die flach,
vertikale Seite von Die Metall Stange.
Einfügen Die Windgeschwindigkeitsbecher in die Metallstange und schrauben Sie
eng Zu sperren Es In Ort.
L
ö
s
e
n
d
i
e
S
c

h
r
a
u
b
e
a
n
D
i
e
g
e
m
e
i
n
s
a
m
.
A
n
p
a
s
s
e
n
D
i
e
v
e
r
t
i
k
a
l
e
r
W
i
n
k
e
l
v
o

n
D
i
e
S
o
l
a
r
-
Z
e
l
l
e
.
D
r
ü
c
k
e
n
d
a
s
Z
a
h
n
r
a
d
n
a
c
h
i
n
n
e
n
u
n
d
a
n
z

i
e
h
e
n
D
i
e
s
c
h
r
a
u
b
e
n
.
P
u
n
k
t
Z
u
N
O
R
D
E
N
N
O
R
D
E
N
P
u
n
k
t
Z
u
④ INSTALLATION WIND RICHTUNG SCHAUFEL
Point to
SOUTH

Ausrichten die Schraubenlöcher in Die Windrichtung Substantiv , maskulin— Schaufel
mit Die flach, vertikale Seite von die Metallstange.
Einfügen Die Wind Richtung Schaufel In Die Metall Stange Und schrauben An eng
Zu sperren Es In Ort .
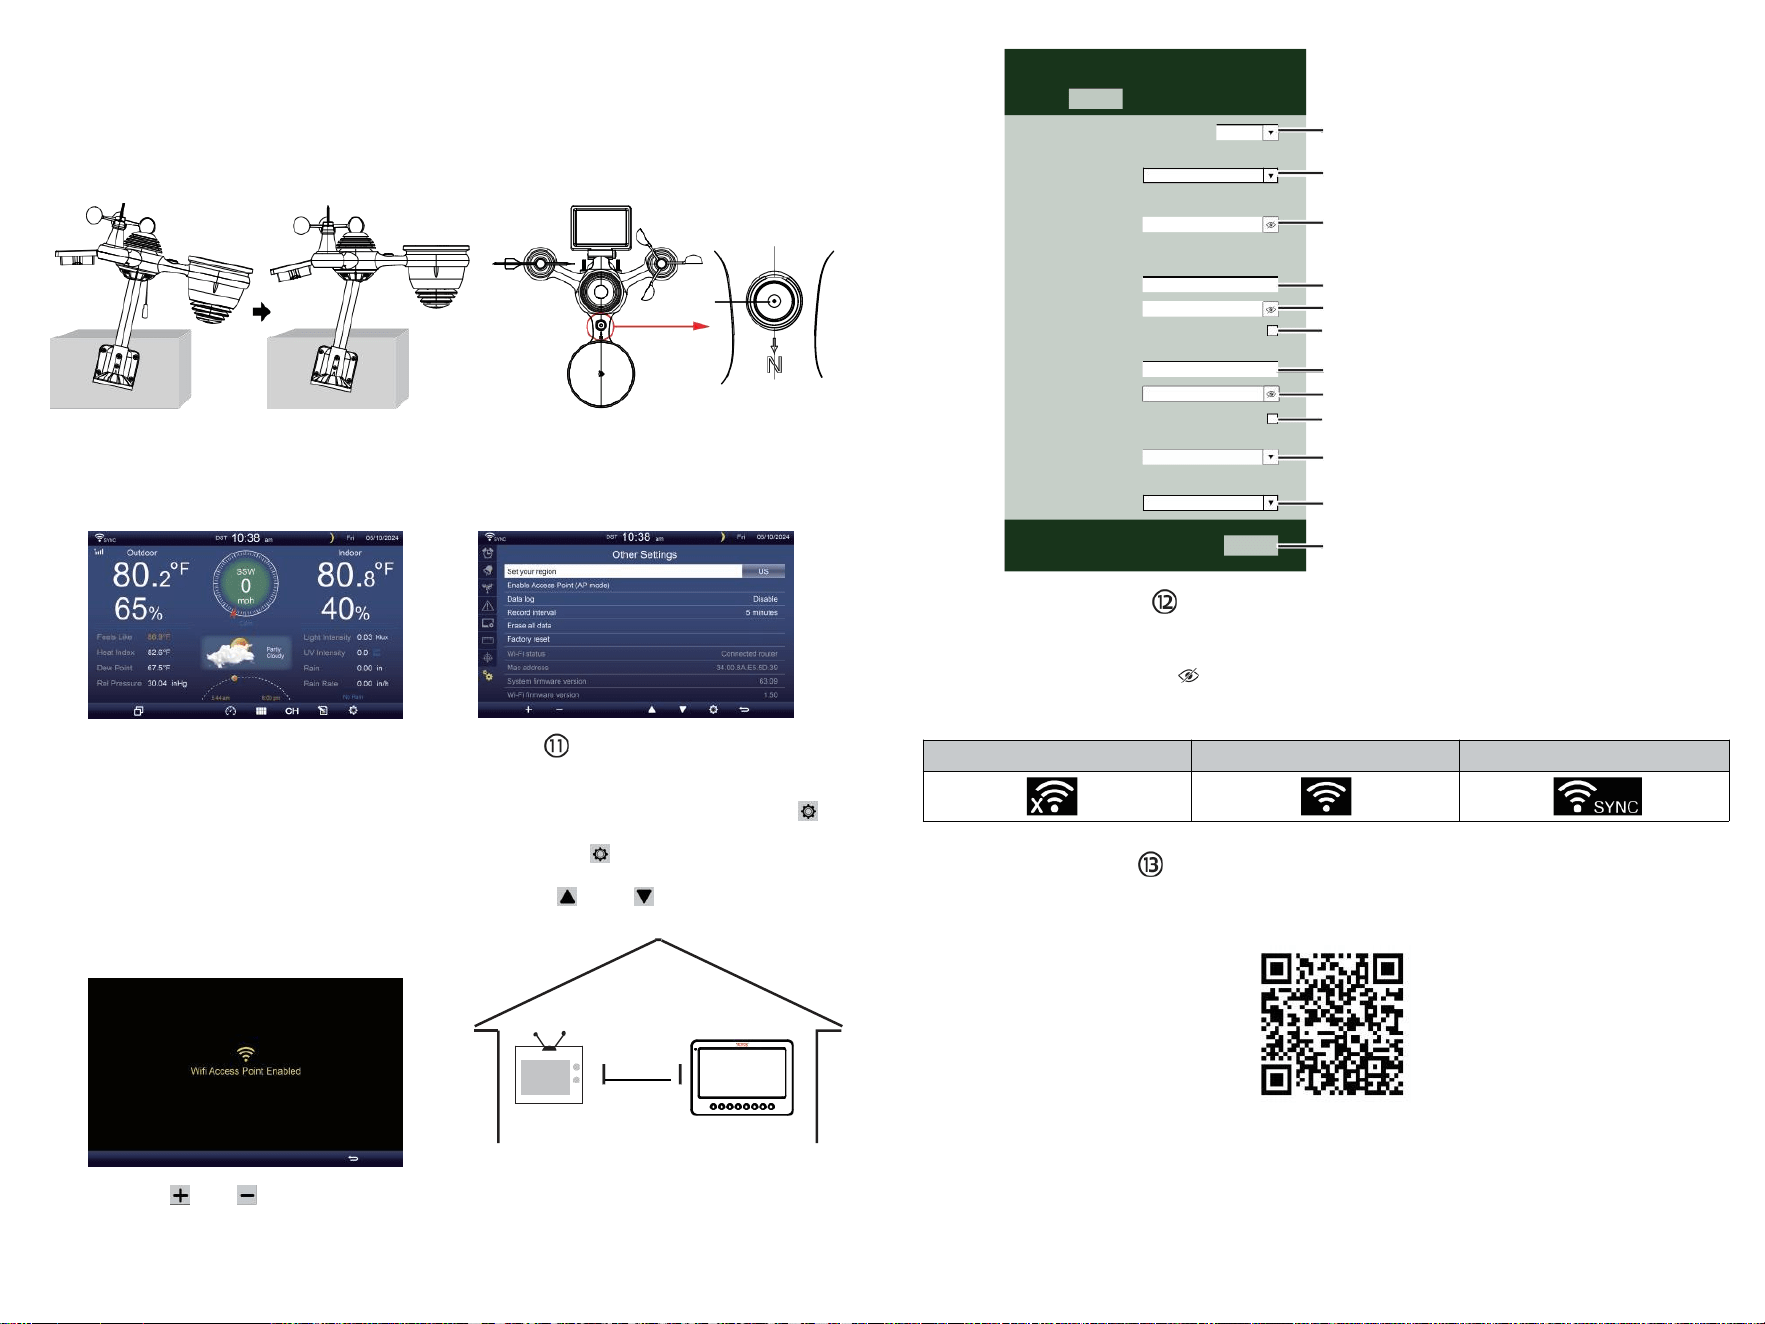
TV
⑩EINSCHALTEN
DER WETTERSTATION
Stecker das Netzteil in
Die Wetterstation.
Einmal Die Wetterstation ist
eingeschaltet , Es wird automatisch in
den Pairing- Modus.
drücken oder Taste zum Start Die AP
Modus . Öffnen dein W - lan Netzwerk
Einstellungen An PC oder Smartphone .
Lokalisieren Die Wetterstation SSID
( WWS - XXXXXX ) aus Die Liste .
Klopfen An Die SSID Zu verbinden .
EINSTELLUNG HOCH
WLAN-VERBINDUNG
In der Einfach-/Detail-Bildschirm, Presse
Taste Zu eingeben Einstellung Speisekarte .
Drücken Taste zum Umschalten auf „ Andere
Einstellung ” Anzeige.
Drücken oder Taste Zu Geben Sie „ Aktivieren “ ein.
Zugriffspunkt ”.
AT
AM WENIGSTEN
3
Fuß
(.9 m)
AUSEINANDER
Vorbeugen Funkstörungen, Ort
beide Einheiten bei am wenigsten
3 Fuß (.9 m) weg von
elektronischen Geräten
(FERNSEHER, Computer,
Mikrowelle, Radio usw.).
SETTINGS
SETUP ADVANCED
Language:
Wi-Fi Router Setup
Router 1234 5
Select the menu and choose your 2.4GHz WIFI Router
Password
Weather Server Setup
WeatherUnderground
Station ID
Station Key
Upload wunderground.com
WeatherCloud
Station ID
Station Key
Upload weatherCloud.net
Time Zone Setup
Time Zone
Time Server Setup
Server URL
Firmware Version: 1.0.1
time.windows.com
a7d9d2a279 fbbafa
**********
**********
**********
Apply
KCACANTI9
English
Router
+0.00
⑧MOUNTING THE WIRELESS 7-IN-1 OUTDOOR SENSOR
Various options to install. Make sure the rain collector faces north and
the solar panel faces south before fastening the screws (included).
If you are a user located in the Southern Hemisphere,
please reverse the direction.
Enter your station ID
Enter your station key/password
check to confirm upload to
WeatherUnderground server
Enter your station ID
Enter your station key/password
check to confirm upload to
Weathercloud.net
Time zone setting
Internet time server setting
Press Apply to confirm the setting
WI-FI disconnected
WI-FI connected
WI-FI connected with Sync
ENTER SETUP INTERFACE
Enter the following address into the web browser address bar:
http://192.168.1.1 to access the setup interface.
Please click to check your password before clicking APP.LY
⑨ADJUSTING THE 7-IN-1 WIRELESS SENSOR LEVEL
Use the bubble level indicator to make sure the wireless outdoor sensor is completely level.
Select setup UI display language
Select your Wi-Fi Router (SSID) from the list
Router Password
Please scan the QR code or visit https://youtu.be/JYr4BeOmEKo to see a video on how to use it.
Familiarize yourself with the icons for Wi-fi connection status.
WI-FI CONNECTION STATUS
The
bubble

Technischer Support und E-Garantie-Zertifikat www.vevor.com/su pport
METEOROLOGISCHE STATION
MODELL:YT60233
Wir sind weiterhin bestrebt, Du Werkzeuge mit wettbewerbsfähig Preis.
"Speichern Halb", "Halber Preis" oder andere ähnliche Ausdrücke gebraucht von uns nur
repräsentiert ein
Sie Ihre Ersparnisse könnte vom Kauf bestimmter Werkzeuge mit uns compa rot Zu Die
wesentlich
Spitze Marken und Dosierungen nicht unbedingt bedeutet, alle Kategorien von
Werkzeugen abzudecken angeboten von uns. Sie
Sind freundlich Bitte überprüfen Sie sorgfältig, wenn Sie eine Bestellung aufgeben mit
uns wenn Sie
tatsächlich sparen die Hälfte im Vergleich zu den Top große Marken .

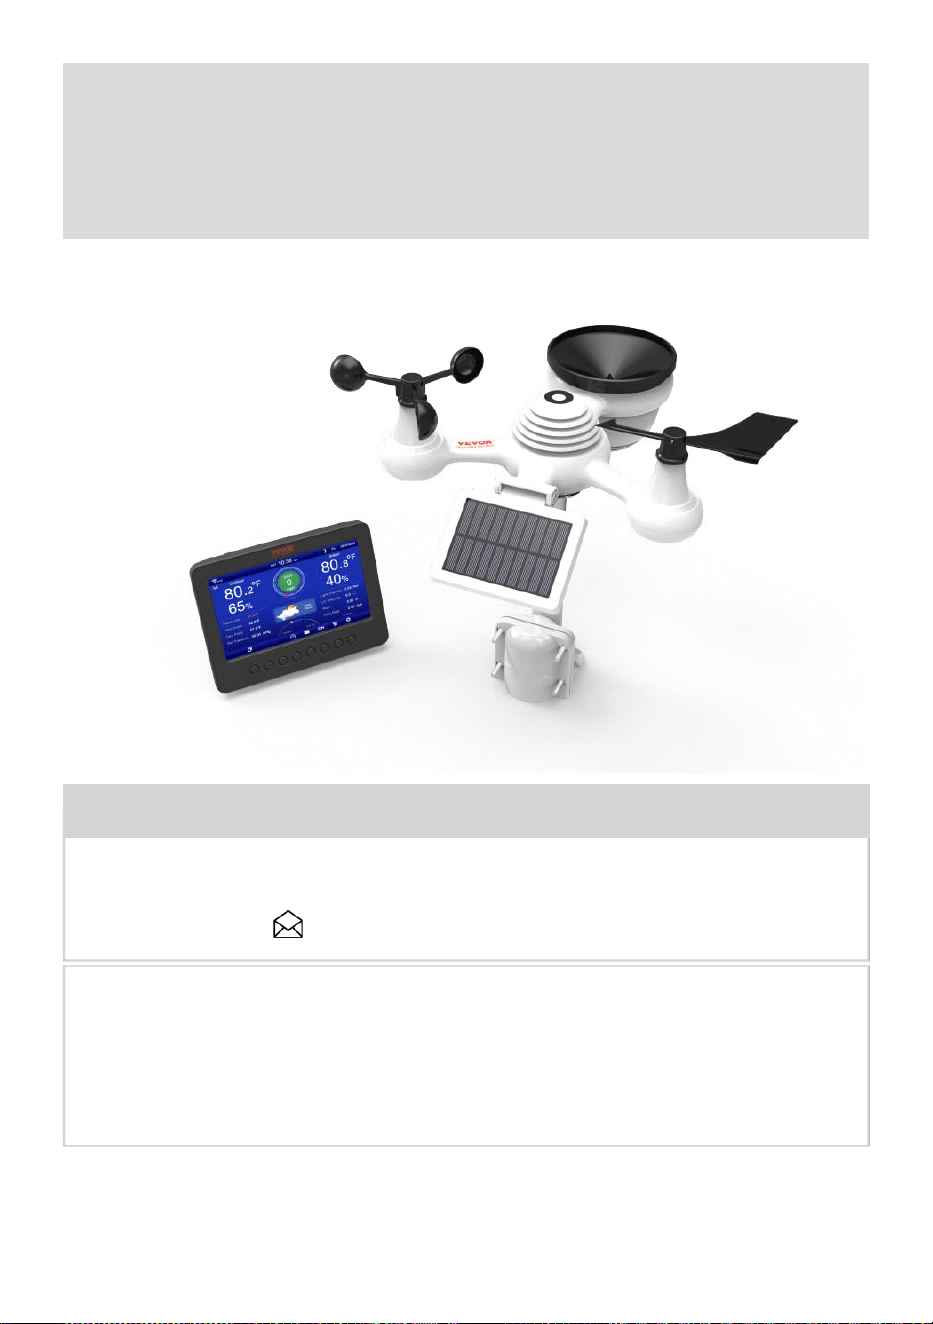
- 3 -
METEOROLOGISCH
STATION
MODELL:YT60233
BRAUCHEN HILFE? KONTAKT UNS!
Haben Fragen zum Produkt? Benötigen Sie technischen Support?
Bitte zögern Sie nicht, Kontakt uns:
Das ist das Original Anweisung, Bitte alles lesen Handbuch
Anweisungen
sorgfältig vor der Inbetriebnahme. VEVOR behält sich Interpretation
unserer Bedienungsanleitung. Das Aussehen des Produkts soll Sei
Thema Zu Die
Produkt Sie erhalten. Bitte gib uns, dass wir nicht informiere euch
nochmal ob es Technologie- oder Software-Updates gibt An unser
Produkt .

SAFETY PRECAUTIONS
- 4 -
WARNUNG! Bitte lesen und verstehen Sie alle Sicherheits
Vorsichtsmaßnahmen , Bedienungsanleitungen und Pflege /
Wartung Anweisungen vor Betriebs Das
Gerät. Bewahren Sie dieses Handbuch zum späteren Nachschlagen auf.
Das Produkt Ist kein Spielzeug. Halten Sie sich fern von außerhalb der
Reichweite von Kindern.
Das Produkt ist für den Einsatz konzipiert im nur zu Hause als ein
Anzeige des Wetters Bedingungen .
Das Produkt Ist nicht zu Sei für medizinische Zwecke Zwecke
oder für öffentliche Information.
Tun nicht reinigen die mit abrasiven oder korrosiven Materialien.
Tun nicht Stellen Sie das Gerät in der Nähe von offenen Flammen
oder Wärmequellen . Feuer, Stromschlag, Produktschäden oder
Verletzungen auftreten können.
Nur frisch verwenden neu Batterien im Produkt . Tun nicht mischen
neu und alt Batterien zusammen.
Tun nicht zerlegen, verändern oder modifizieren Die Produkt .
Benutzen Sie nur Zubehörteile oder Zubehörteile mit diesem Produkt
angegeben durch die Hersteller.
Tun nicht untertauchen die Einheit im Wasser. Trocknen Sie die
Produkt mit einem weichen Tuch Wenn verschüttete Flüssigkeiten An
Es.
Tun Setzen Sie das Gerät keiner übermäßigen Kraft, Stößen,
Leitung, extreme Temperaturen oder Luftfeuchtigkeit .
Tun Die Belüftung nicht abdecken oder blockieren Löcher mit Objekte.
Diese Wetterstation dieser Produkt Ist beabsichtigt Sei
gebraucht drinnen nur.
Das Produkt ist nur geeignet für die Montage an einer Höhe weniger als2
M (6,6 ft.).
Tun nicht mit dem Gerät manipulieren interne Komponenten.
Manipulationen am Produkt führen zum Erlöschen der Garantie .
Batterien sind nicht enthalten. Wann Einfügen Batterien , Stellen
Sie sicher, dass Die positiv und Negativ Polaritäten
Übereinstimmung mit dem Markierungen im Fach .
Tun nicht Mischen Sie Standard-, Alkali- und wiederaufladbar
Batterien zusammen .
Hinterlassen eines Batterie, die extremen hohe Temperatur in
der Umgebung kann zu ein Explosion oder Leckage von
brennbarer Flüssigkeit oder Gas.

SAFETY PRECAUTIONS
- 4 -
Hinterlassen eines Batterie wird extrem schwacher Luft Druck In Die
Umgebung kann zu ein Explosion oder Leckage von
brennbarer Flüssigkeit oder Gas.

TIPS FOR SENSOR SITE SELECTION
- 5 -
Regensammler müssen gereinigt werden alle wenige Monat
Der Sensor sollte Sei installiert bei am wenigsten 1.5 m (5') entfernt
von Gebäude oder Struktur.
Wählen Sie ein Standort in einem offenen Raum unter direkt
Sonnenlicht mit NEIN Hindernisse.
Der Sensor sollte bleiben in Sichtweite und innerhalb von150 M (492')
der Wetter Station für beständig , stetig Übertragung .
Bewahren Sie Sensor und Wetterstation außerhalb der Reichweite
von
Haushaltsgeräte Das arbeiten An Die Dasselbe Frequenz . Die
Konsole Und
Sensor sollte schlagen am wenigsten 1 - 2 m (3' -7') entfernt von solch
Störungen s.
PRODUKT MERKMALE
7″ HD-TFT-Bildschirm Bildschirm.
Echtzeituhr mit Kalender r.
Alarmfunktion.
Mond Phase.
Sonnenaufgangs-/Sonnenuntergangszeit.
Zeitzoneneinstellung und Sommerzeit (DST)-Funktion.
Zeitzone Zeitzone: GMT +13 bis -12 Std.
Automatische Synchronisierung mit dem Internet-Zeitserver.
7 Sprachen (DE/ DE/ FR/ ES/ ES/ NL/CZ) zur Anzeige.
Temperatur- und Luftfeuchtigkeitsanzeigen für den Innen- und
Außenbereich mit Trend.
Ereignis, Stündlich, Täglich, Wöchentlich, Monatlich, Gesamt
Niederschlag und Niederschlagsmenge Rate In Vergangenheit Stunde.
Anzeige der durchschnittlichen Windgeschwindigkeit, der
Windböengeschwindigkeit und der Windrichtung.
Absolut und relativ Luftdruckanzeige mit Trend.
Solar Strahlung Intensitätsanzeige und UV I-Anzeige.
Wetterindexanzeige : Fühlen Gefällt mir, Windchill, Hitze Index. Tau
Punkt.
Wetter Prognosen.
Wetterdaten mit Max/Min Auslesen, Datenlog & Anzeige des
Verlaufsdiagramms.
Wetterwarneinstellungen.
Einstellung der Helligkeit der Hintergrundbeleuchtung.

TIPS FOR SENSOR SITE SELECTION
- 5 -
Niedrig Batterie Angaben zu Außensensoren .
Nacht Lichtfunktion.
Daten hochladen Wetterdaten zu Weather Underground und/oder
Weather- Cloud über WLAN Router.

PACKAGECONTENTS
- 6 -
1 2 3
4 5 6
7
8
9 10 11 12
1 Wetterstation
7 Montage Pol mit 4 Schrauben
2 Adapter
8 Montage Klammern mit 6 Schrauben
3 Kabelloser 7-in-1 Außensensor 9 Gummipads X 2
4 Trichter
10 Schraubendreher 1
5 Windrichtungsfahne mit 1 Schraube
11 Schraubendreher 2
6 Windgeschwindigkeitsbecher mit 1 Schraube
12 Benutzerhandbuch
HINWEIS : 4 zusätzliche Schrauben für Wind Richtung
Schaufel Und Wind Geschwindigkeitsbecher .
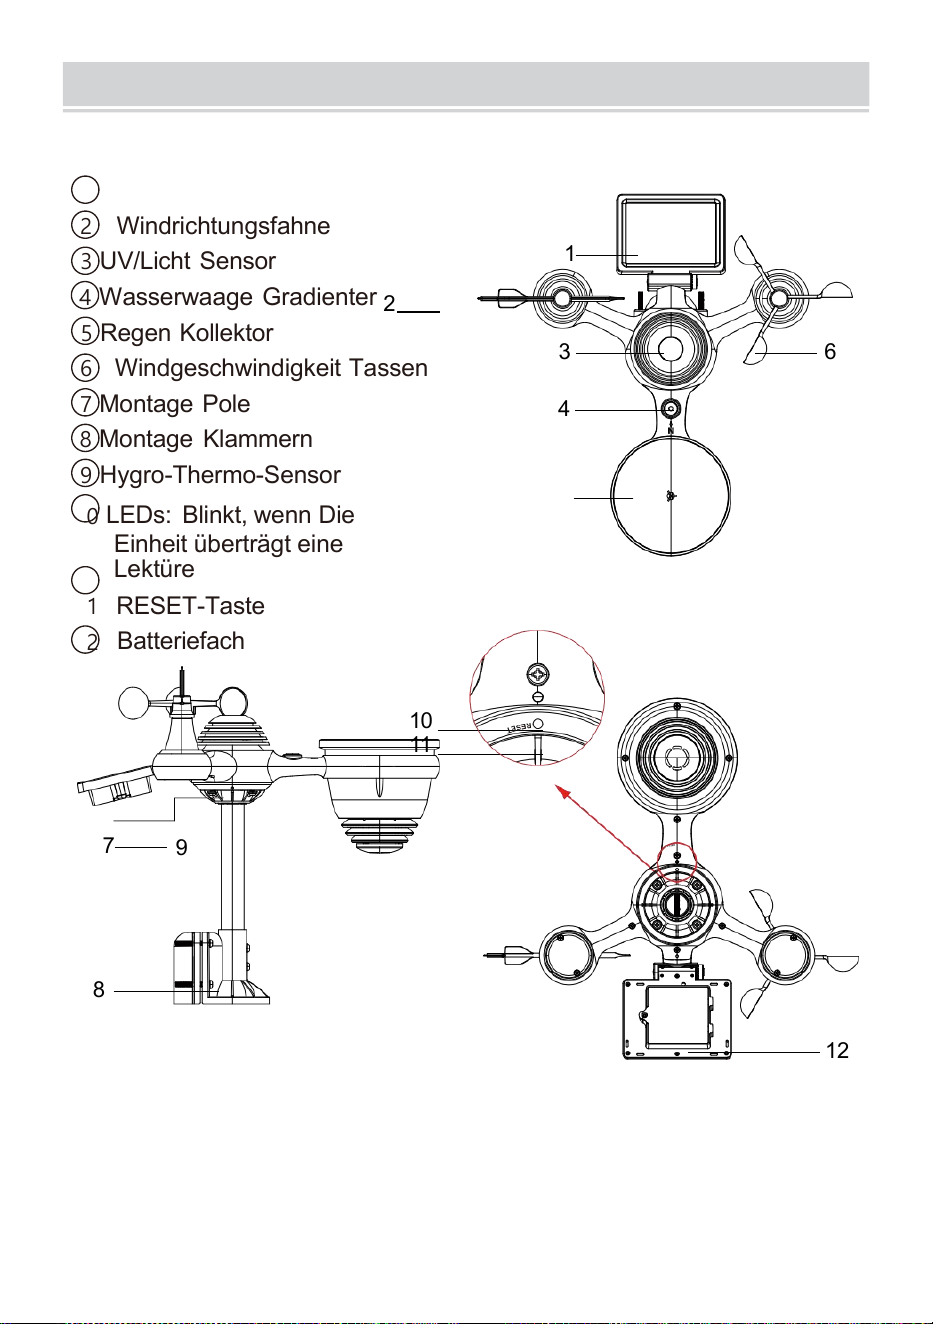
PRODUCTOVERVIEW
- 7 -
DRAHTLOSER 7- IN- 1- OUTDOOR SENSOR
1
Solar Bedienfeld
2 Windrichtungsfahne
3 UV/Licht Sensor
4
Wasserwaage Gradienter
2
5 Regen Kollektor
6 Windgeschwindigkeit Tassen
7
Montage Pole
8 Montage Klammern
9 Hygro-Thermo-Sensor
10
LEDs: Blinkt, wenn Die
Einheit überträgt eine
Lektüre
11
RESET-Taste
12
Batteriefach
10
11
7
9
8
12
3 6
4
1
5
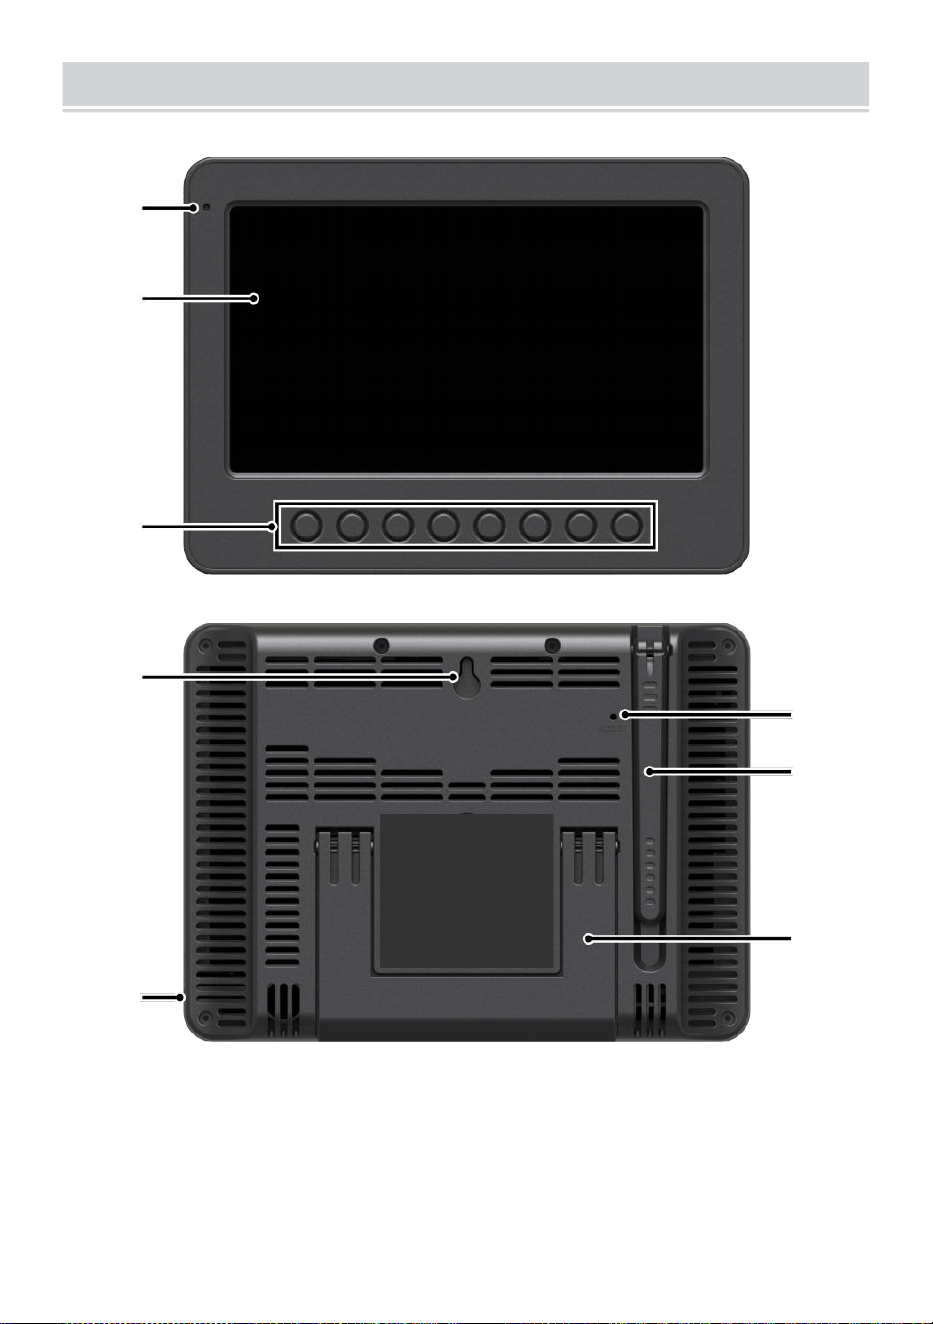
WEATHERCONSOLEOVERVIEW
- 8 -
1
2
3
4
5
6
7
8
1 Umgebungslicht Detektor
4 Wand Montage Halter
7 Antenne
2 Bildschirm
5 Leistung Eingang
8 Ständer
3 Funktion Tasten
6 RESET-Taste

HOME SCREEN OVERVIEW
- 9 -
1 2 3 4 5
6
15
8
16
10
17
18
o—
19
2
11
12
13
14
9
7
23 24
1 Wi-Fi-Verbindung/ Zeitsynchronisierung Symbol
13 Tau Punkt
2 Zeit
14 Baro Druck
3 Windrichtung
15 Innentemperatur
4 Mond Phase 16 Luftfeuchtigkeit im Innenbereich
5 Datum
17 Licht Intensität
6 Sensorsignalstärke Symbol
18 UVI
7 Außentemperatur
19 Niederschlagsmenge
8 Windgeschwindigkeit 20 Regen Rate
9 Luftfeuchtigkeit im Freien 21 Regen Rate Ebene
10 Windgeschwindigkeit Stufe 22 Funktional Taste Symbol
11 Fühlt sich an wie Temperatur 23 Wettervorhersage
12 Hitze Index
24 Sonnenaufgang/Sonnenuntergang Zeit

DETAIL SCREEN OVERVIEW
- 10 -
11
12
1 3
1 4
1 5
1 6
1 7
1 8
1 9
20
21
1 2 3 4 5 6 7 8 9 10
22
23
24
25
26
27
28
29
30
31 32
1 Wi-Fi-Verbindung/Zeitsynchronisierung Symbol
17 Windchill
2 Außentemperatur MAX/MIN
18 Tau Punkt
3 Außen MAX/MIN Luftfeuchtigkeit
19 Ba ro Druck
4 Windböen
20 Licht Intensität
5 Zeit 21 UVI
6 Durchschnittliche Windgeschwindigkeit 22 Innentemperatur MAX/
MIN
7 Windrichtung
23 Innentemperatur
8 Windgeschwindigkeit
24 Innen MAX/MIN Luftfeuchtigkeit
9 Mond Phase
25 Innenbereich Luftfeuchtigkeit
10 Datum
26 Regen Rate
11 Fühlt sich an wie Temperatur 27 Ereignis, stündlich, wöchentlich,
12 Außentemperatur
monatlich, gesamt
Niederschlagsmenge
13 Luftfeuchtigkeit im Freien 28 Regen Rate Ebene
14 Windgeschwindigkeit Ebene
29 Täglich
Niederschlagsmenge
15 Fühlt sich an wie Temperatur 30 Funktionalität Taste Symbol

DETAIL SCREEN OVERVIEW
- 10 -
16 Hitze Index
31 Wettervorhersage
32 Sonnenaufgangs-
/Sonnenuntergangszeit

SUMMARY SCREEN OVERVIEW
- 11 -
6
7
8
9
1 0
1 2 3 4 5
1 Wi-Fi-
Verbindung/Zeitsynchronisierung
Symbol
2 Ein/Aus Symbol Etikett
3 Zeit
4 Mond Phase
5 Datum
6 Sensorsignalstärke Symbol
7 Innen-/Außentemperatur
8 Luftfeuchtigkeit innen/außen
9 Nein Bildschirm verbinden
Bildschirm
10 Funktionalität Taste Symbol
EINSTELLUNG UP THE WIREL ESS 7-IN-1 OUTDOOR SENSOR
Der kabelloses 7- in -1 Outdoor Sensor Maßnahmen Wind
Geschwindigkeit , Wind Richtung , Niederschlagsmenge, UV, Licht
Intensität, Temperatur und Luftfeuchtigkeit.
INSTALLATION DER MONTAGE POLE UND HALTERUNG ET
Befestigen Sie den Sensor an einem Montage Pol und Halterung (im
Lieferumfang enthalten) mit dem Schrauben ( im Lieferumfang
enthalten ).

INSTALLATION VON WINDGESCHWINDIGKEITSBECHERN UND
WIND RICHTUNG V ANE
Richten Sie die Schraube aus Löcher in den
Windgeschwindigkeitsbechern mit der flachen, vertikalen Seite der
Metall Stange.
Setzen Sie die Windgeschwindigkeitsbecher ein im Metall Stange und
schrauben Sie sie auf eng Zu sperren Es In Ort.
Richten Sie die Schraubenlöcher im Wind aus Richtungsfahne mit
die Wohnung, vertikal Seite des Metall Stange.
Setzen Sie die Windrichtungsfahne ein im Metall Stange und
schrauben Sie sie an eng Zu sperren Es In Ort.

- 12 -
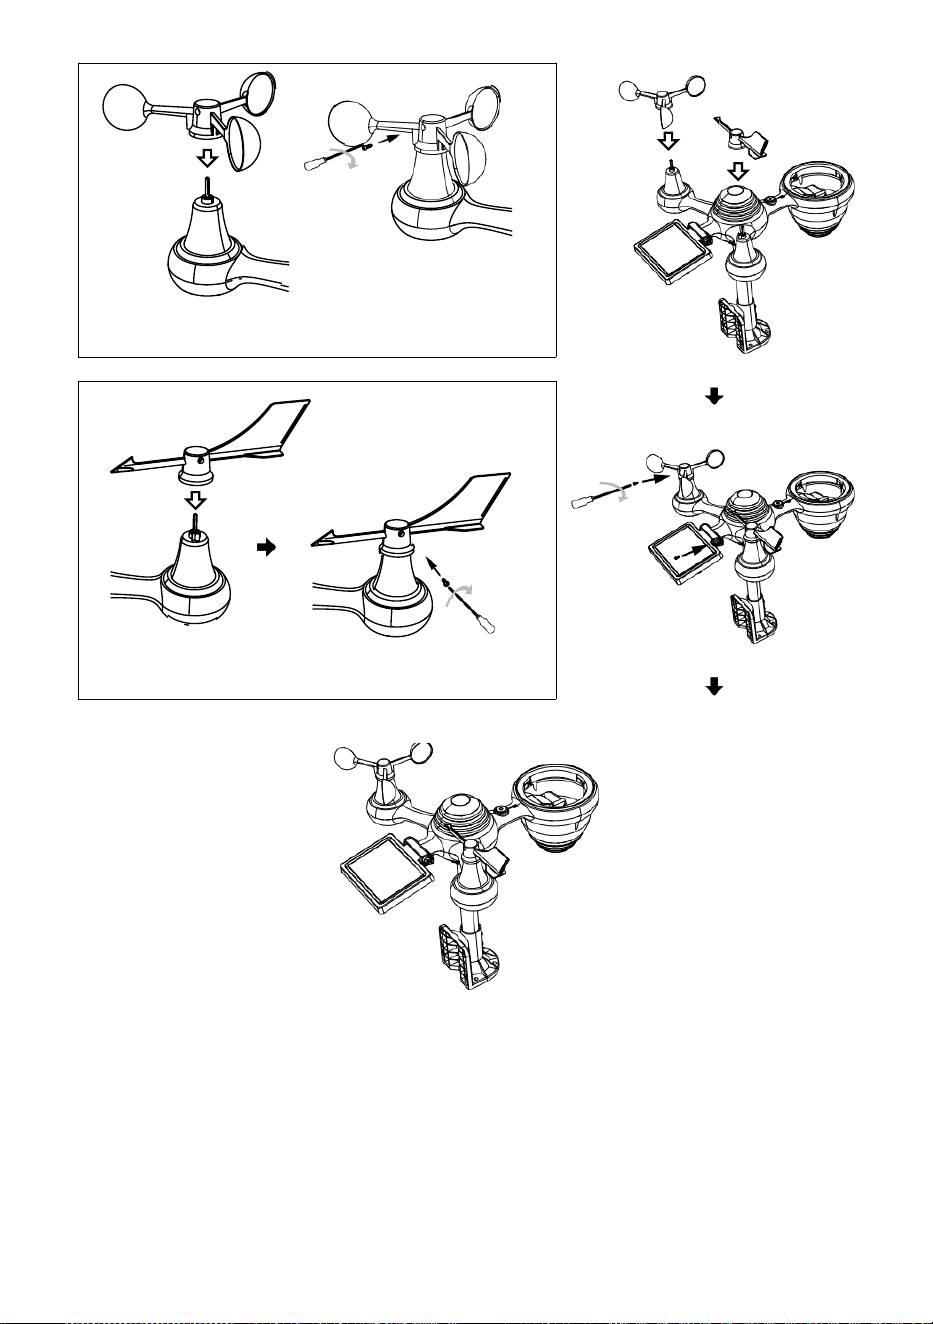
- 13 -
Installation von Windgeschwindigkeitsbechern
Windrichtung Installation der Leitschaufeln
EINSTELLUNG HOCH REGENSAMMLER
Richten Sie die Kerben am Trichter mit den Verriegelungsnuten
innerhalb der Regen Kollektor.
Den Trichter einsetzen im Regensammler und schrauben Sie diese
fest Zu sperren Es In Ort.
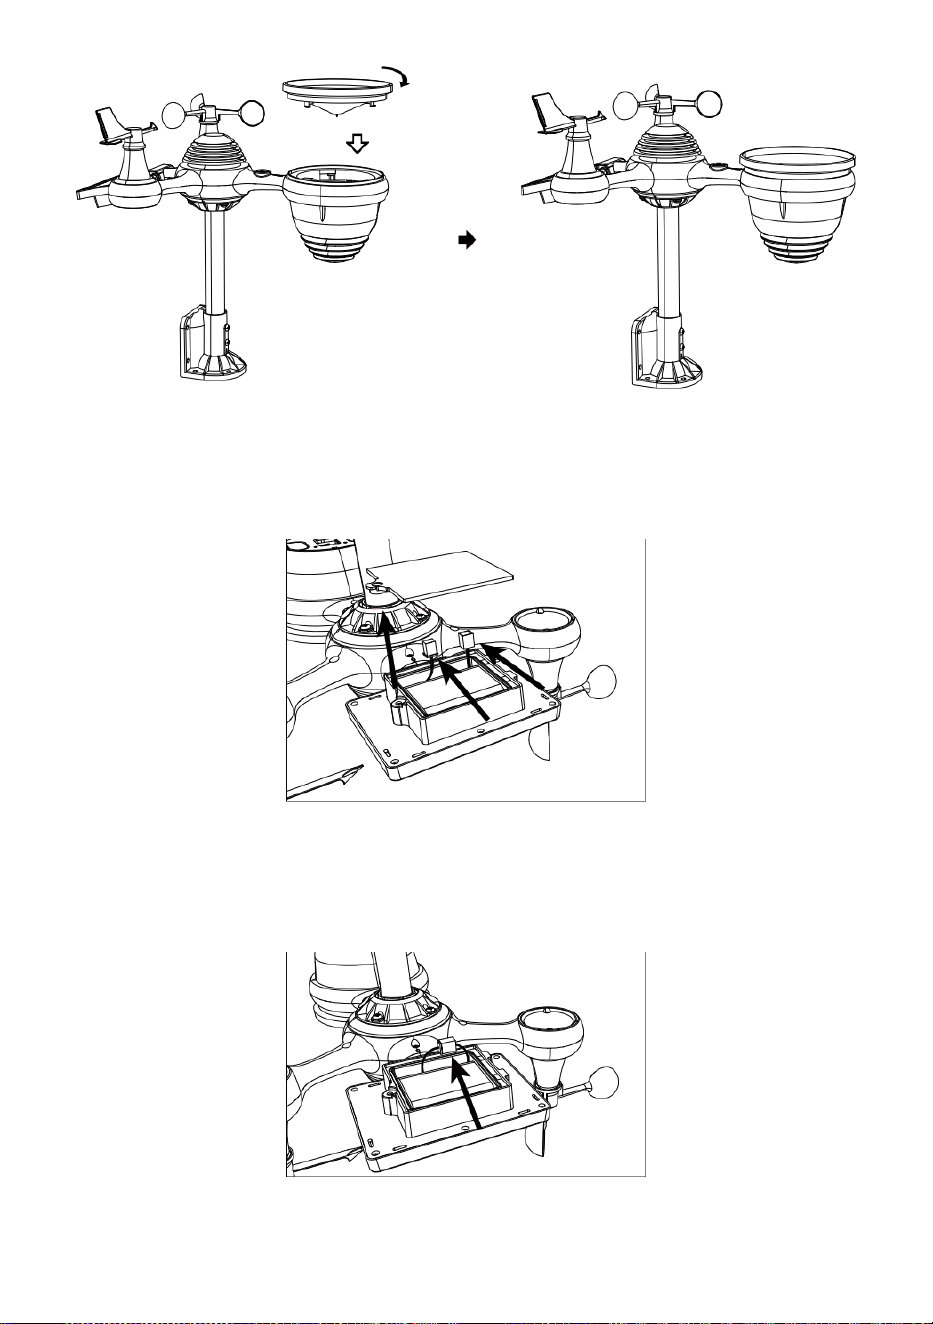
Sperren
Ausrichten
INSTALLATION DER BATTERIEN
Schrauben Sie die Batteriefach an der Unterseite des 7-in-1 im
Freien Sensor mit einem Schraubendreher 1.
Schließen Sie das Kabel des wiederaufladbar Batterie Paket (im
Lieferumfang enthalten) zum Kabel befindet sich in Die Batterie
Fach.
Passen Sie die angeschlossenen Kabel so an, dass sie bequem
sitzen im Fach- Dann, legen Sie die Batterie Pack in das Fach.

- 14 -
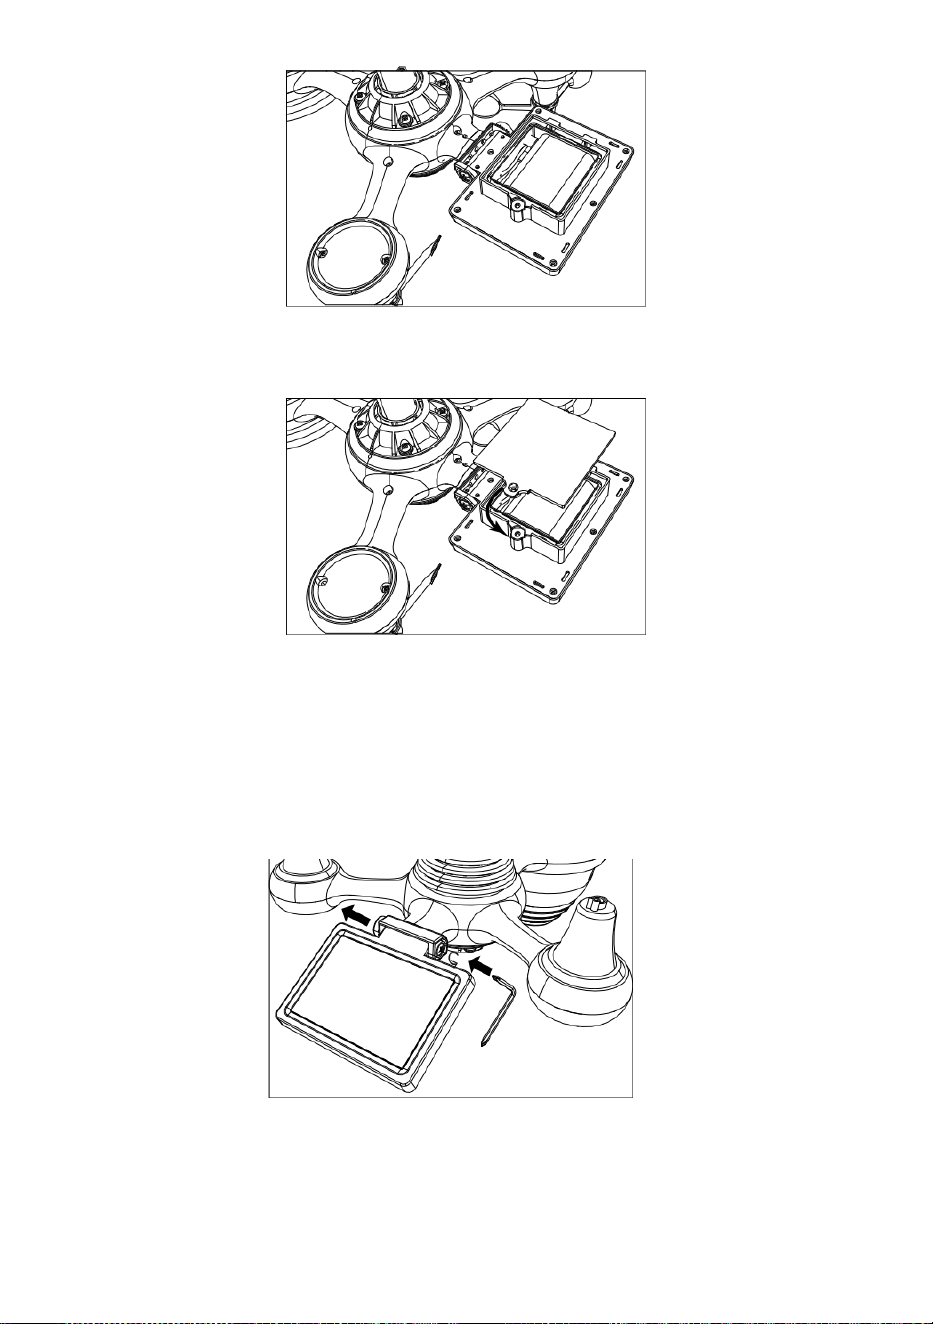
- 15 -
Schließen und befestigen Sie die Batterieklappe wieder auf Die Fach.
EINSTELLEN DER SOLAR ZELLE
Lösen Sie die Schraube am Gelenk, so dass das Zahnrad auf der
anderen Seite des Gelenks
drückt heraus. Die Solarzelle sollte Jetzt Sei in einem entsperrt
Position n.
Passen Sie den vertikalen Winkel der Solarzelle an , um die am
meisten optimal Nutzung der Solarzelle abhängig von Ihrer Standort.

- 16 -
Drücken Sie das Zahnrad nach innen und ziehen Sie die
Schraube fest bis Die Getriebe sperren In Ort.
Stellen Sie beim Justieren der Solarzelle diese auf ein Winkel
schließen Zu dein Breitengrad. Diagramm anzeigen unten, um eine
Vorstellung davon, wie Sie sollen Winkeln Sie Ihre Solar- Zelle.
Breite Nähe
Auswahl des
Solarzellenwinkels
0°
21°
42°
63°
84°
Wenn dein Standort Ist schließen
Zu 84°
84°
Wenn dein Standort Ist schließen
Zu 63°
63°
Wenn dein Standort Ist
schließen Zu 42°
42°
Wenn dein Standort Ist
schließen Zu 21°
21°
Wenn dein Standort Ist
schließen Zu 0°
0°
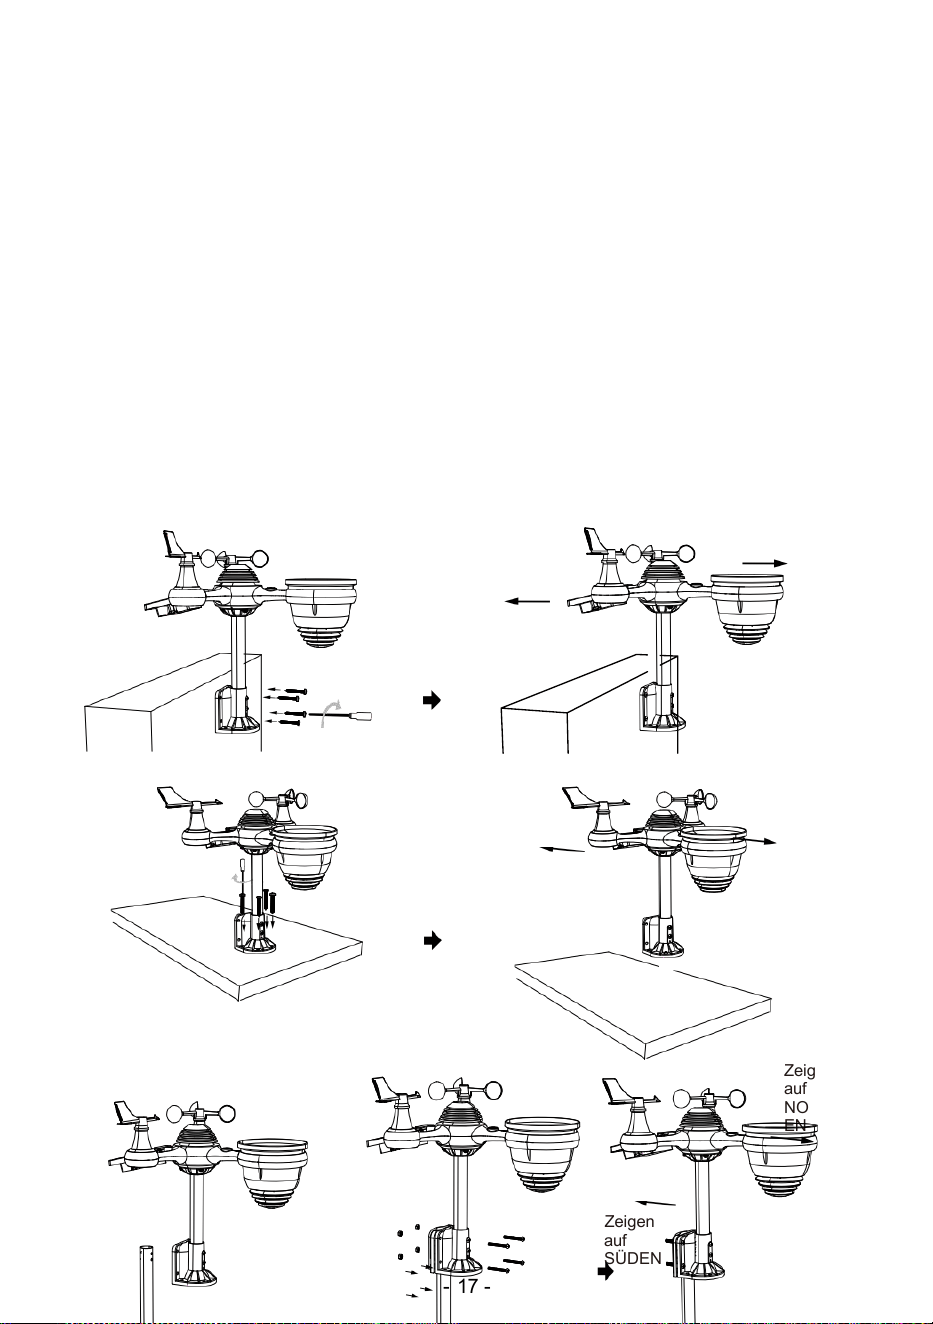
- 17 -
MONTAGE DER DRAHTLOSER 7- IN- 1- OUTDOOR SENSOR
Wählen Sie ein Standort für den 7-in-1-Außensensor, der ist
offen mit NEIN Hindernisse.
Ziehen Sie die Montagehalterungen an einer Oberfläche/Wand mit
vier Tippen
Schrauben (im Lieferumfang enthalten) oder ziehen Sie die Montage
Pol an Ihrem bestehenden montieren- ing Pol mit vier φ5 Bolzen und
BMW M5 Montage der Muttern.
Hinzufügen Gummipads auf die Montagehalterung vor dem
Befestigen der Befestigungswinkel auf Die Sensor.
Stellen Sie sicher, dass die Regensammler-Gesichter Norden
und die Solar Das Panel ist nach Süden ausgerichtet vor
Befestigung Die Schrauben ( im Lieferumfang enthalten ).
Achten Sie darauf, dass der Sensor besonders fest sitzt dicht, sonst
windig Bedingungen Ursache Die Sender Zu Shake Und daher
falsch gelesen der Niederschlag Daten .
Zeigen auf
NORDEN
Zeigen auf
SÜDEN
Zeigen
auf
NORD
EN
Zeigen
auf
SÜDEN
Zeigen
auf
NORD
EN
Zeigen
auf
SÜDEN
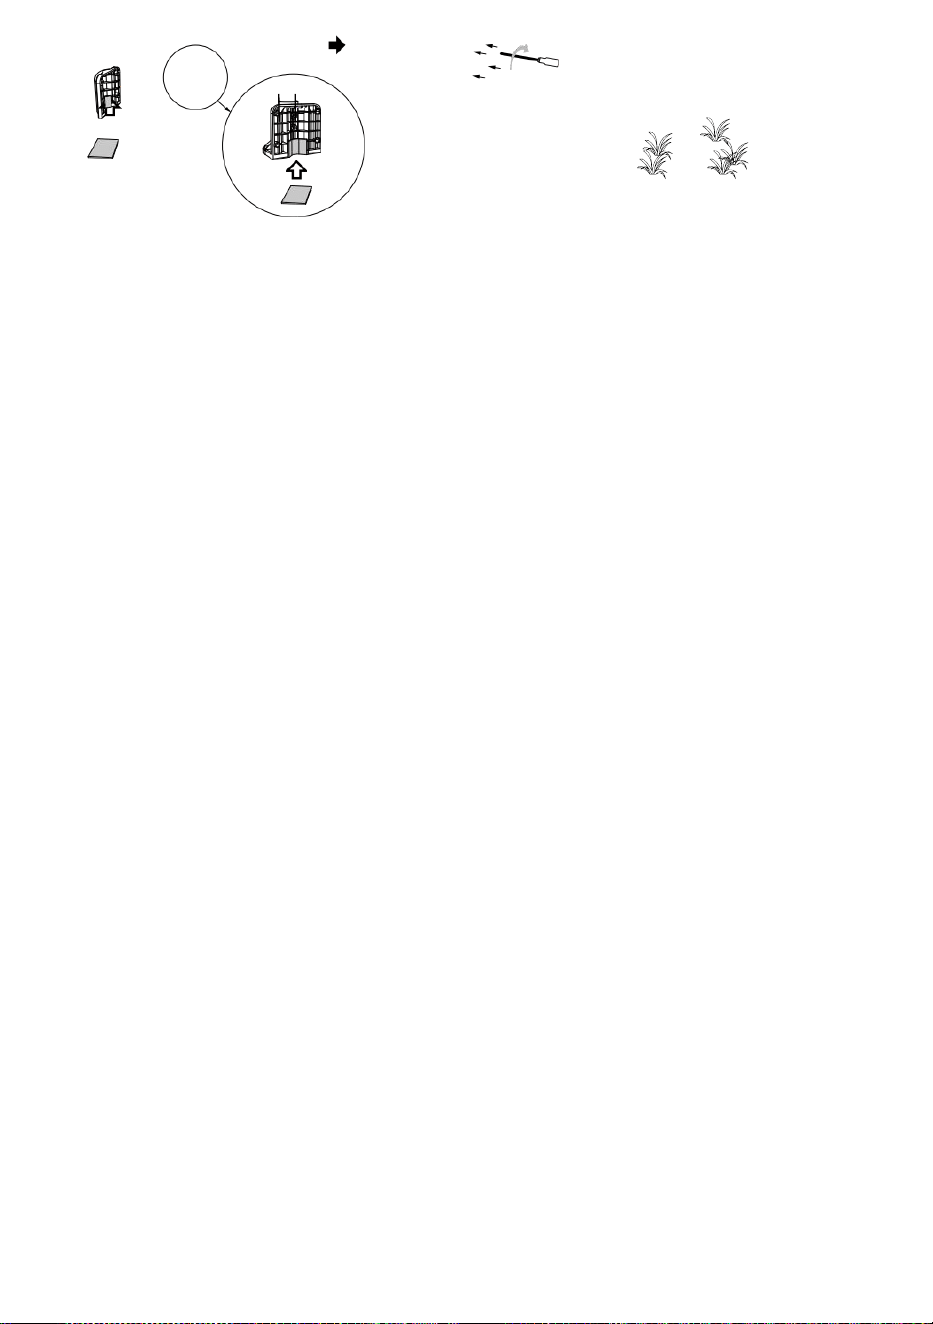
- 17 -
Stock
Stock
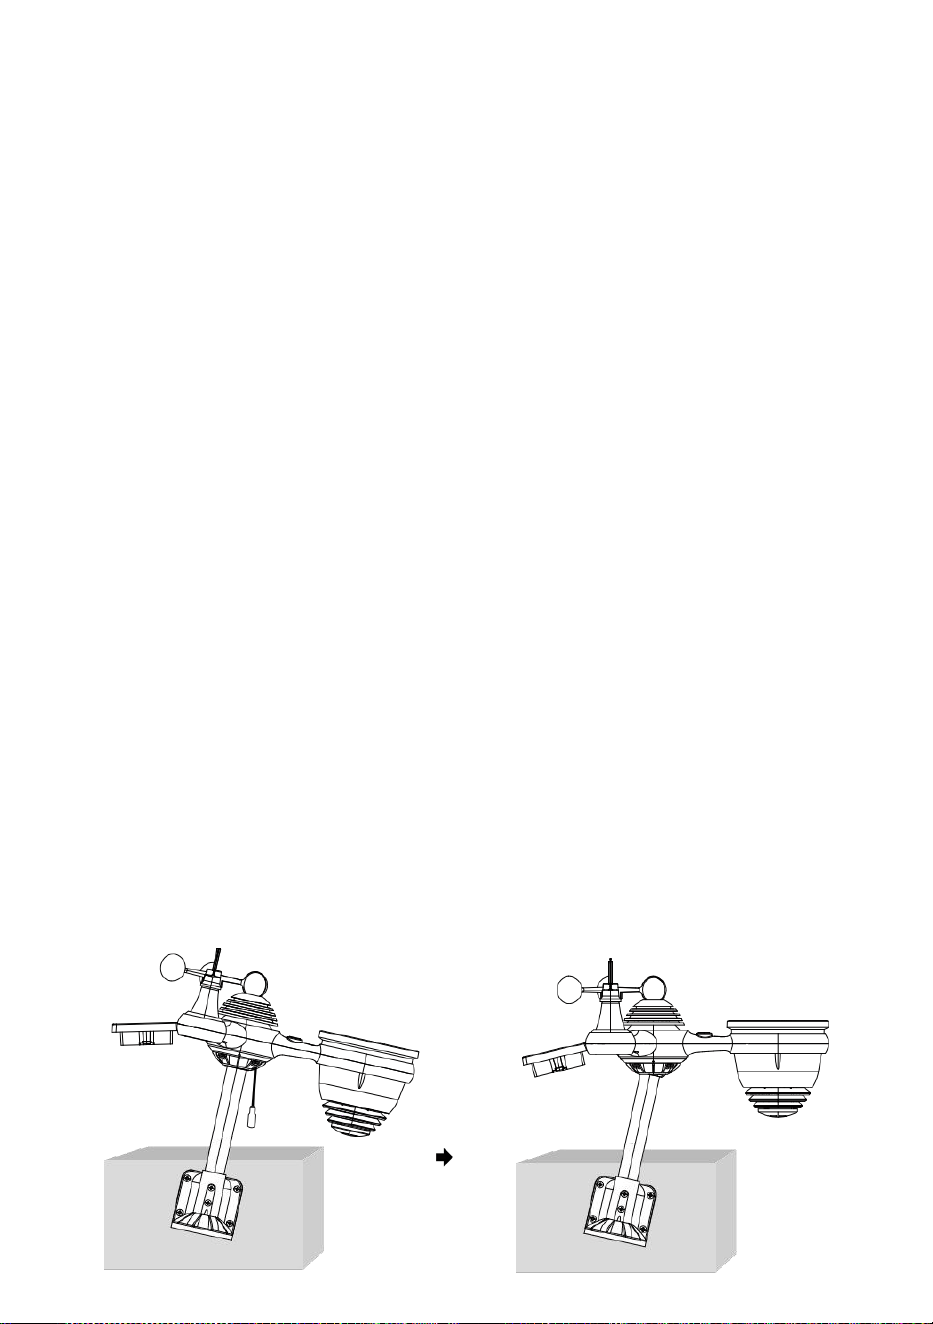
- 18 -
ZEIGEN DER DRAHTLOSER 7- IN- 1- OUTDOOR SENSOR ZU
SÜDEN
Der drahtlose Außenwettersensor ist kalibriert auf spitz Norden für
maximale Genauigkeit. Wenn Sie jedoch ein Benutzer
Lage im Süden Hemisphere können Sie den Sensor mit Die
Regensammler nach Süden ausgerichtet.
1. Montage und Installation des Funkwettergeräts Sensor mit Die
Regen Sammler nach Süden gerichtet, statt Nord. (Bitte siehe
MONTAGE DES
2. Kabelloses 7-in-1-Outdoor-Gerät SENSOR.)
Wählen Sie „STH“ für Süden Hemisphäre im Uhreinstellmodus .
(Bitte siehe "Einstellen der Uhr")
HINWEIS: Das Ändern der Die Halbkugeleinstellung wechselt
automatisch die Richtung des Mondes Phasen auf Die Anzeige.
Zeigen Die kabellos Wetter Sensor zu Die Süden Wille erlauben
maximal Sonnenlicht An Die Solar- Panel , insbesondere während
Die Winter Jahreszeit im Süden Hemisphäre.
EINSTELLEN Das kabellose 7 -in -1 SENSOR EBENE
Verwenden Sie die Blase Ebene Indikator zu Stellen Sie sicher, dass
die drahtlose Außen
Sensor ist völlig waagerecht. Wenn der Sensor Ist nicht Ebene, die
gewinnen Messgerät, UV und Licht Intensität wird nicht messen
richtig.
Um den Pegel des drahtlosen Außensensors anzupassen, lösen Sie
Die Schrauben der Montagestange. Passen Sie die Höhe des
drahtlosen Außensensors an In Um Stellen Sie sicher, dass die
Blase Ist im Zentrum des Wasserwaage Indikator.
Die Schraube des Montage wieder Pol.

- 19 -
Der Blase
EINSTELLUNG AUFDIE ANZEIGEKONSOLE
LEISTUNG DIE KONSOLLE HOCH
1. Verbinden Sie die Netzteil zum Display Konsole.
2. Drehen Sie die Antenne um An zurück der Konsole hoch.
3. Sobald die Konsole eingeschaltet ist, wird die Öffnung Bildschirm
wird Sei angezeigt und dann betreten Sie hauptsächlich Bildschirm.
4. Warten Die im Freien Sensor Zu Paar mit dein Konsole .
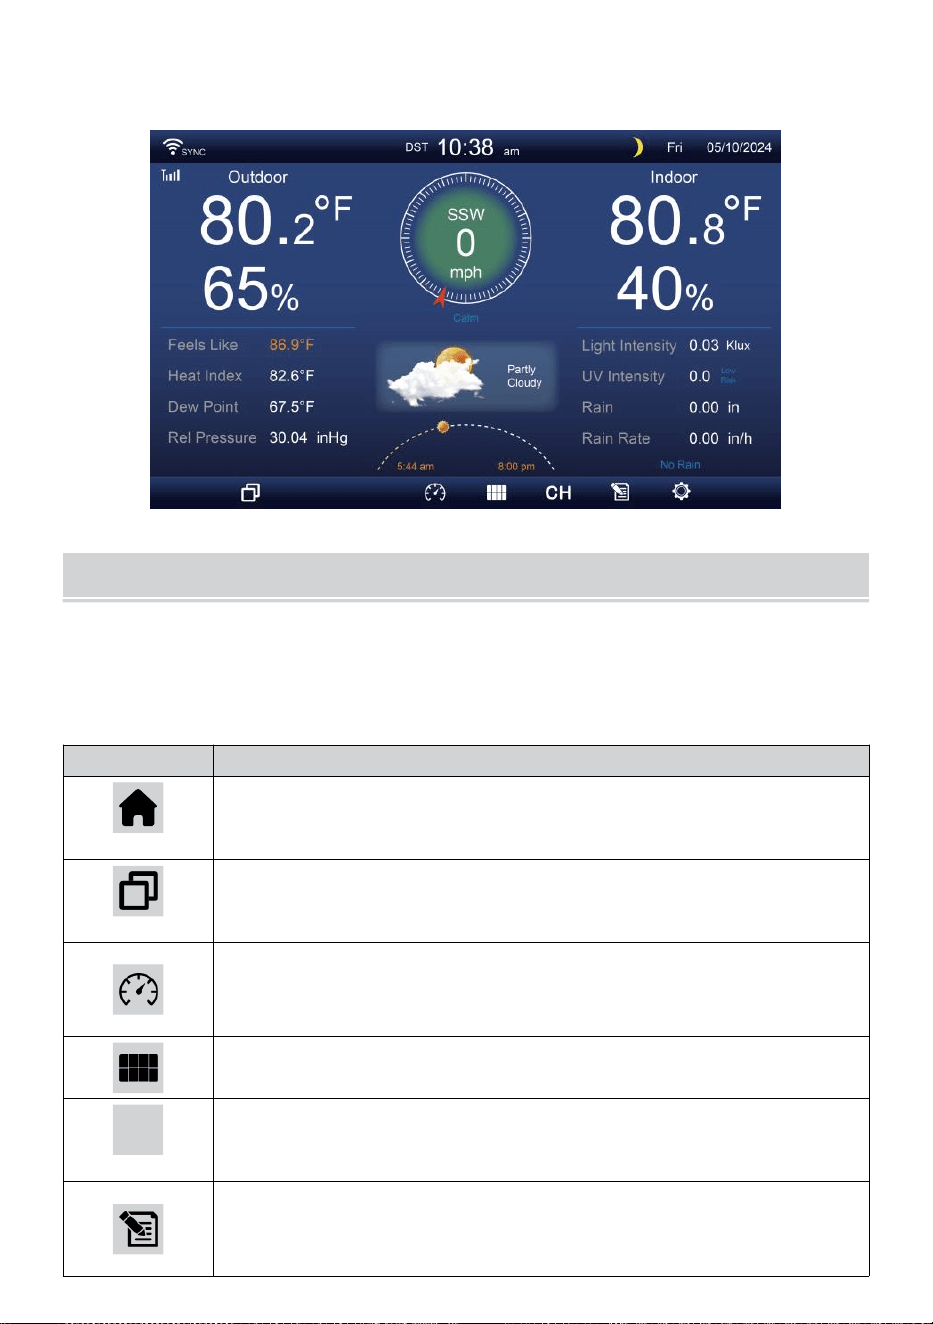
- 20 -
5. Einmal gekoppelt werden, werden die Außendaten gezeigt An Die
Bildschirm.
BEDIENUNGSANLEITUNG
Das Abschnitt beschreibt Die hauptsächlich Funktionen Und andere
Funktionen von Tasten in der Konsole.
HAUPTSÄCHLICH FUNKTIONEN VON TASTEN
SYMBOL
BESCHREIBUNG
Heim Taste
Drücken Sie diese Taste, um einfache Daten Anzeige
Bildschirm.
Expandieren Taste
Drücken Sie diese Taste, um die ausführlich Daten
Bildschirm.
Druck
Drücken Sie diese Schaltfläche zum Anzeigen zwischen
Relative und Absolute Druckbildschirm.
Mehrfachsensor
Drücken Sie diese Taste, um die Multisensor- Bildschirm.
CH
Kanal
Drücken Sie diese Taste zum Umschalten Innenbereich,
CH1-7-Daten Bildschirm.
Geschichte Aufzeichnen Taste
Drücken Sie diese , um die Verlaufsbildschirm
(Max/Min, Datensatz, Grafische Darstellung).

- 20 -
Einstellung
Drücken Sie diese Taste, um Die Einstellung Bildschirm.

- 21 -
ANDERE FUNKTION TASTEN FÜR EINSTELLUNGEN
SYMBOL
BESCHREIBUNG
Hoch Taste
Drücken Sie diese Taste zum Auswählen der oberen Reihe
oder Artikel .
Runter Taste
Drücken Sie diese Taste zum Auswählen einer niedrigeren
Reihe oder Artikel .
Rechts Taste
Drücken Sie diese , um auszuwählen rechte Spalte oder
Artikel.
Links Taste
Drücken Sie diese Taste zum Auswählen nach links Seite
Spalte oder Artikel.
Zyklus Taste
Drücken Sie diese Taste, um verschiedene
Parameterbildschirm.
Klar Taste
Drücken Sie diese , um die Max/Min-Aufzeichnung.
Q
Suchen Taste
Drücken Sie diese Schaltfläche zum Durchsuchen der
Daten aufzeichnen.
Löschen Taste
Drücken Sie und halte das Schaltfläche zum Löschen
Aufzeichnung s.
Zurückkehren Taste
Drücken Sie diese Taste, um zurückkehren vorherige Seite.
OK Taste
Drücken Sie diese Taste zur Bestätigung Die Auswahl.
+
+ Taste
Drücken Sie diese Taste, um den Wert zu erhöhen oder
wechseln Zu andere Option.
- Taste
Drücken Sie diese Taste, um den Wert zu verringern oder
umzuschalten. Zu andere Option.
DRAHTLOSES SIGNAL REZEPTION
Machen Sie sich mit den Symbole für unterschiedliche Signalstärken.
Bei schwachem Signal die Konsole oder den Wettersensor verlegen
oder verloren.
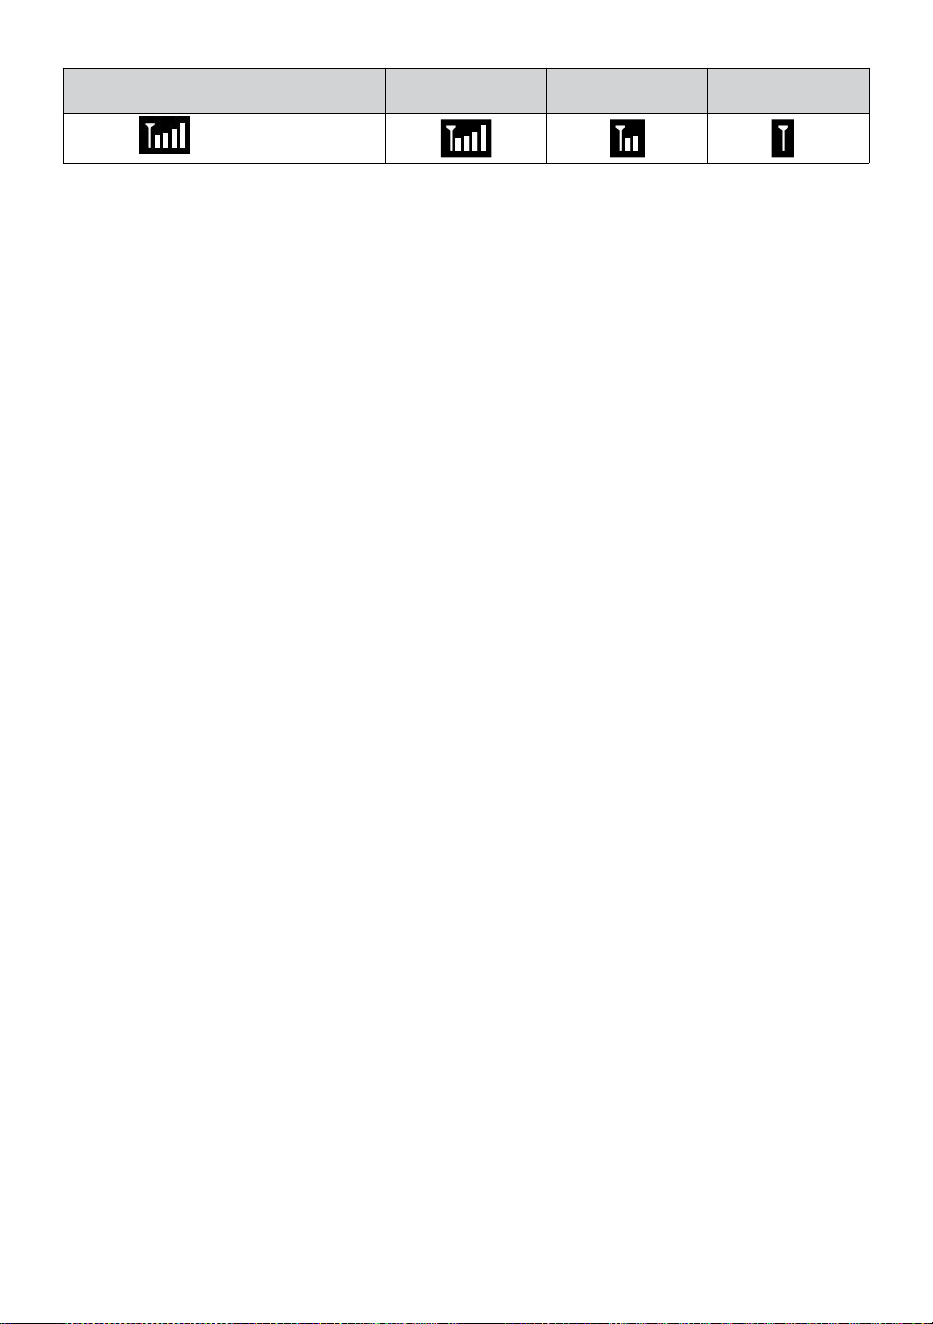
- 21 -
Signalsuche
Starkes Signal
Schwaches
Signal
Signal
verloren
Antenne Bar
Ist Scrollen
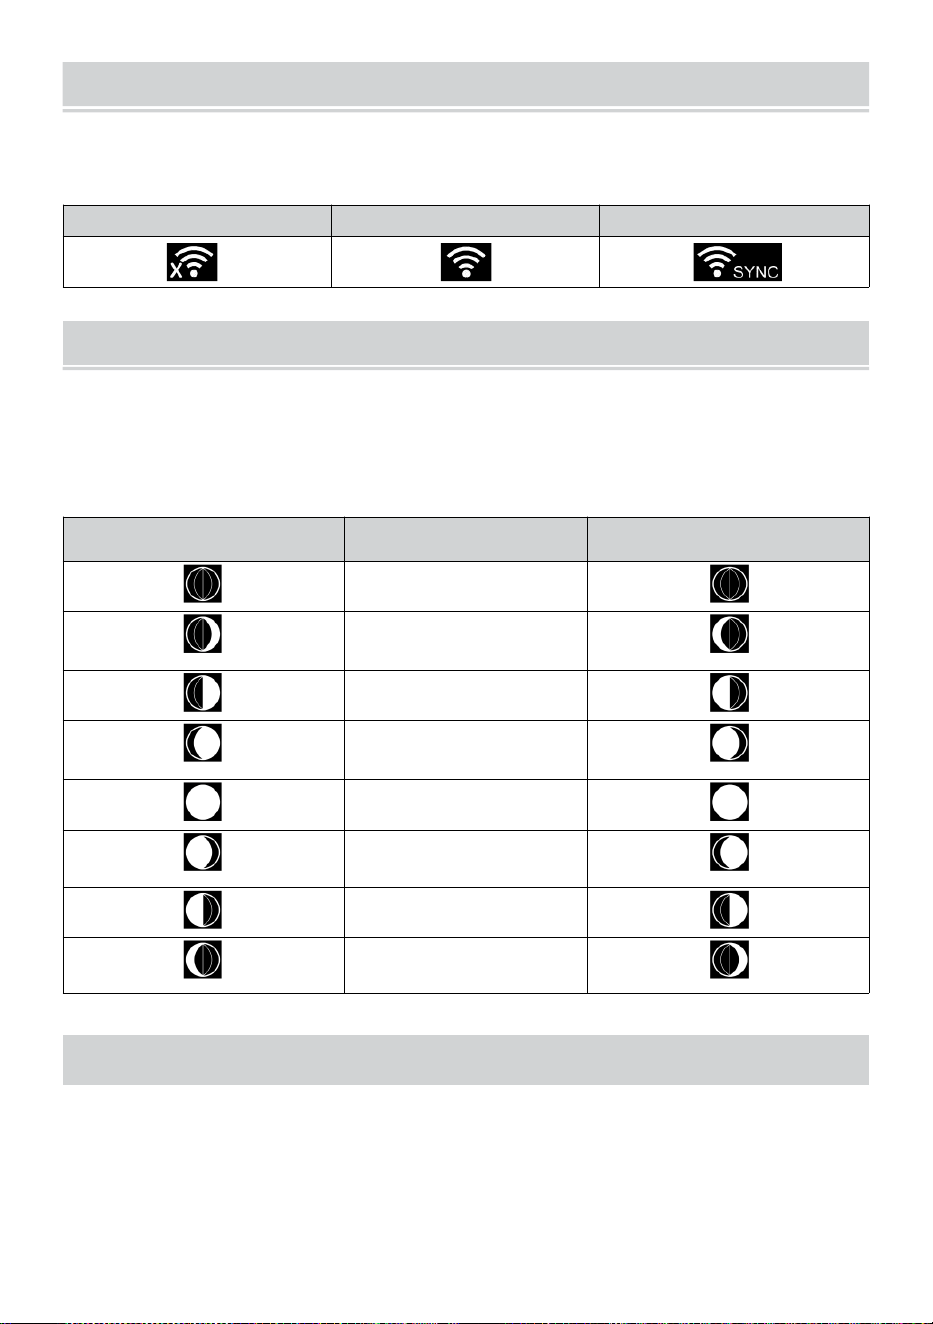
WI-FI CONNECTION STATUS
- 22 -
Machen Sie sich mit den Symbolen für den WLAN-Verbindungsstatus
vertraut.
WLAN getrennt
WLAN-Verbindung
WLAN verbunden mit Sync
MOND PHASE
Die Anzeigekonsole berechnet den Mond Phase nach zu Ihrem
Uhrzeit, Datum und Zeit Zone.
Die folgende Tabelle erläutert die entsprechenden Phasen Und ihre
Symbole für beide Nord- und Süd Hemisphären.
Nördlich Hemisphäre
Symbole
Mond Phase
Süd Hemisphäre Symbole
Neu Mond
Zunehmender Mond
Mond
Erstes Viertel Mond
Zunehmender
Dreiviertelmond Mond
Voll Mond
Abnehmender
Dreiviertelmond Mond
Drittes Viertel Mond
Abnehmender
Halbmond Mond
SONNENAUFGANG/SONNENUNTERGANG
Die Konsole zeigt den Sonnenaufgang/Sonnenuntergang Ihres
Standortes an, basierend auf der Zeitzone, Breitengrad und Längengrad,
die Sie eingegeben haben. Wenn Tageslicht Speichern Ist auf AUTO
gestellt , mal Wille anpassen ein Stunde nach vorne automatisch für
Tageslicht
sparen.

WI-FI CONNECTION STATUS
- 22 -
NOTIZ: Für die Zeitzone: Breitengrad und
Längengradeinstellung, Bitte verweisen " Zeit & Datum
Einstellung ".
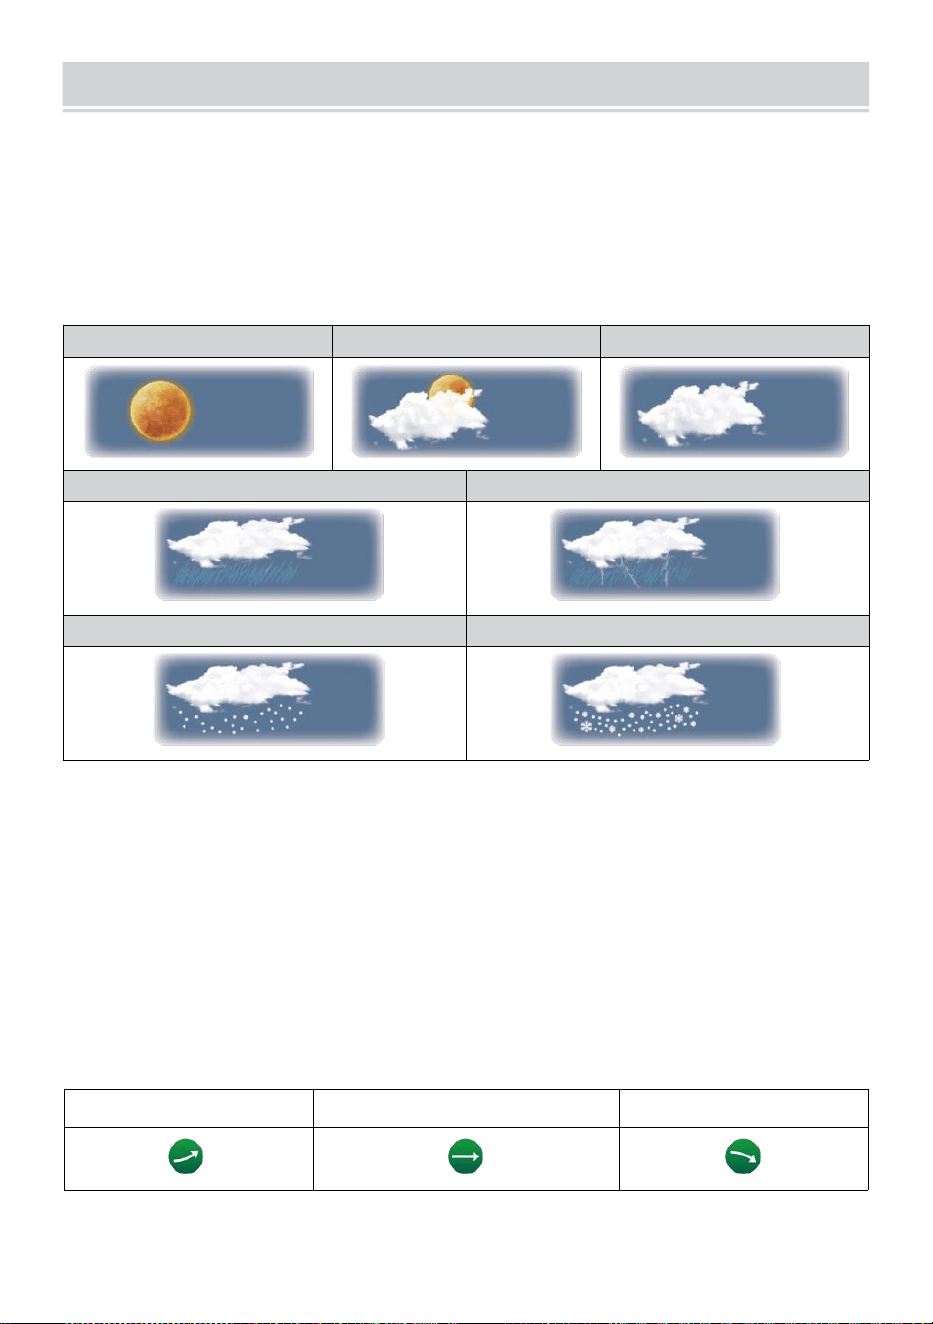
WEATHER FORECASTINGAND WEATHERINDEX
- 23 -
WETTER PROGNOSE
Der eingebaut Barometer kann kein Eis atmosphärisch
Druckänderungen und kann auf der Grundlage der gesammelten
Daten die Wetterbedingungen vorhersagen .
Es gibt 6 Wettersymbole --- Sonnig, Teilweise Wolkig, Wolkig, Regnerisch,
Regen/ Sturm und Schnee ( leicht Schnee und Schwer Schnee).
Sonnig
Teilweise bewölkt
Wolkig
Licht Regen
Starker Regen/Sturm
Leichter Schneefall
Starker Schneefall
NOTIZ:
Die Genauigkeit einer allgemeinen Druckbasierte Prognose beträgt
etwa 6,5–70 %. Prognosen sind nicht garantiert.
Es kann nicht unbedingt spiegeln die aktuelle Situation wider.
TREND INDIKATOR
Der Trend Indikator zeigt Die Trends von Änderungen In Die
bevorstehend wenige Minuten. Diese Symbole erscheinen in den
Bereichen Temperatur , Luftfeuchtigkeit, Und baro- metrisch
Druckabschnitt des Detailbildschirms.
Aufstand
Stetig
Fallen
EISALARM

WEATHER FORECASTINGAND WEATHERINDEX
- 23 -
Wenn die Außentemperatur Ist niedriger als 1°C/33,8° F, die Schneeflocke
Symbol
ich
· erscheint auf der Anzeige.
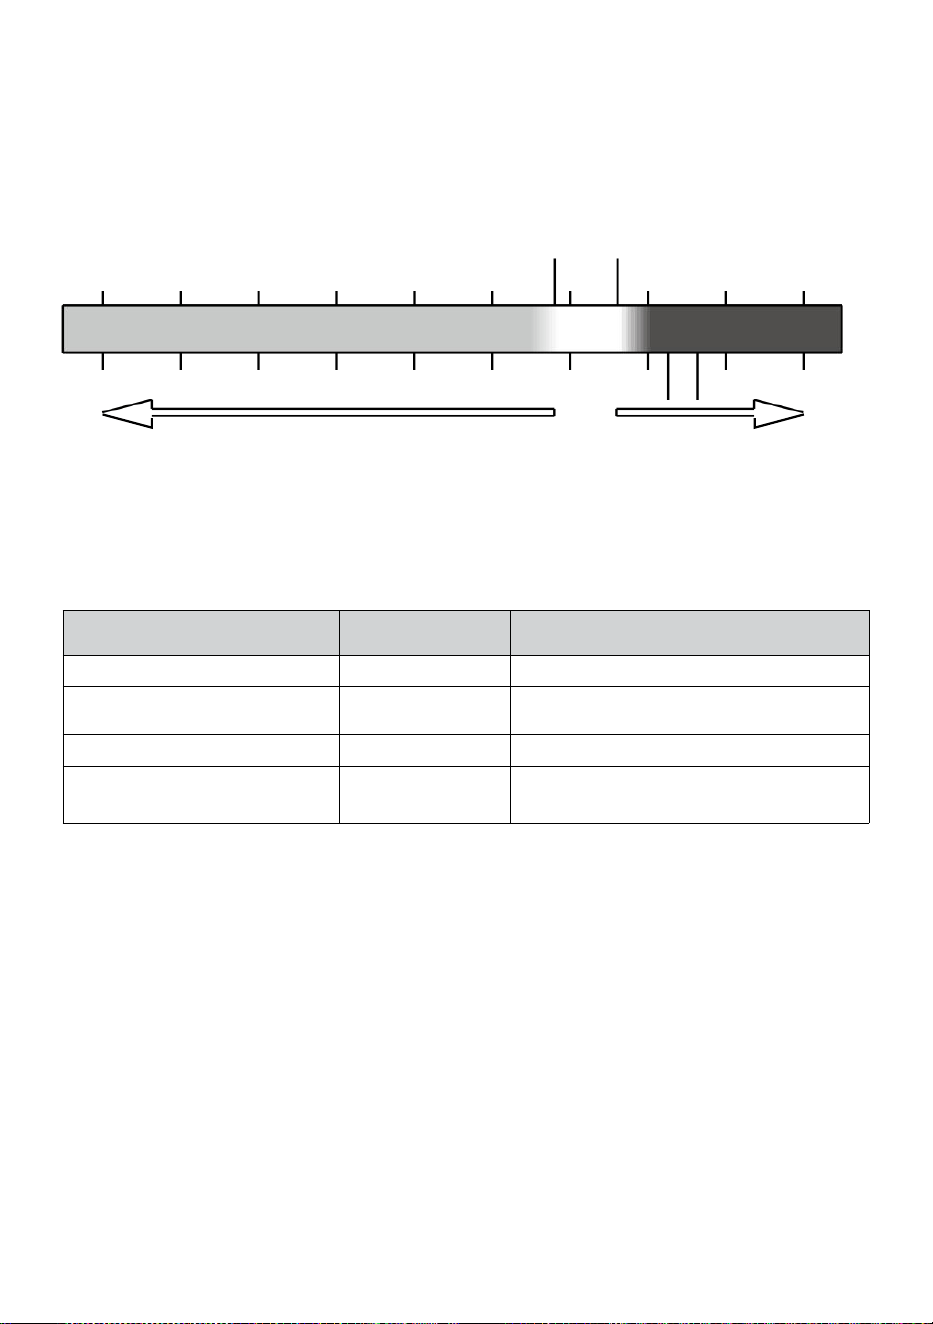
- 24 -
GEFÜHL WIE
Der Fühlt sich an Wie Temperatur Der Index bestimmt, wie hoch die
gefühlte Temperatur draußen ist, unter Berücksichtigung der Faktoren wie
Wind Geschwindigkeit, Druck, Temperatur und Luftfeuchtigkeit (Wind
kühlen Und Hitze Index).
18°C 26°C
10 20 30
-40 -22 -4 14 32 50 68 86 104 122 °F
Windchill Hitze Index
HITZE INDEX
Der Hitze Index wird durch die Temperatur des Funk-Wettersensors
bestimmt. tur und Luftfeuchtigkeit Messwerte, wenn die Temperatur Ist
zwischen 26 °C (26 °C) und 120 °F (50 °C).
Hitze Index
Reichweite
Warnung
Erläuterung
81°F – 90°F (27°C - 32°C)
Vorsicht
Möglichkeit eines Hitzekollapses
91°F - 104°F (33°C - 40°C)
Äußerste
Vorsicht
Möglichkeit der Hitzedehydratation
106°F - 129°F (41°C - 54°C)
Gefahr
Hitzeerschöpfung hoch wahrscheinlich
≥ 131°F (≥ 55 °C)
Extrem Gefahr
Hohes Risiko für Dehydratation/
Hirnschlag
WIND KÜHLEN
Windchill oder Windchill ist die Absenkung der Temperatur durch Zu Die
passieren-
strömung von Luft mit niedrigerer Temperatur. Windchill ist bestimmt
von A Kombination der Temperatur- und Windgeschwindigkeitsdaten des
drahtlosen Wettersensors
.
HINWEIS: Nur wenn die Temperatur
liegt unter 50 ℉ (10 ℃ ) und die Windgeschwindigkeit über 4,8
km/h (3 mph) liegt, wird der Windchill-Wert angezeigt,
ansonsten Es wird „--.-“ angezeigt..
TAU PUNKT
Der Tau Punkt ist die Temperatur, unterhalb der der Wasserdampf in Luft
bei
-40 -30 -20 -10 0
40 50 °C
Increasing danger Increasing danger

- 24 -
Konstante barometrisch Druck kondensiert in flüssiges Wasser bei
gleichzeitiger Rate , mit der es verdunstet. Das kondensierte Wasser wird
Tau genannt , wenn Es Formen auf einem solide Oberfläche.
Der Tau Punkttemperatur wird durch die Temperatur bestimmt und
Luftfeuchtigkeit Daten aus Die kabellos Wetter Sensors .
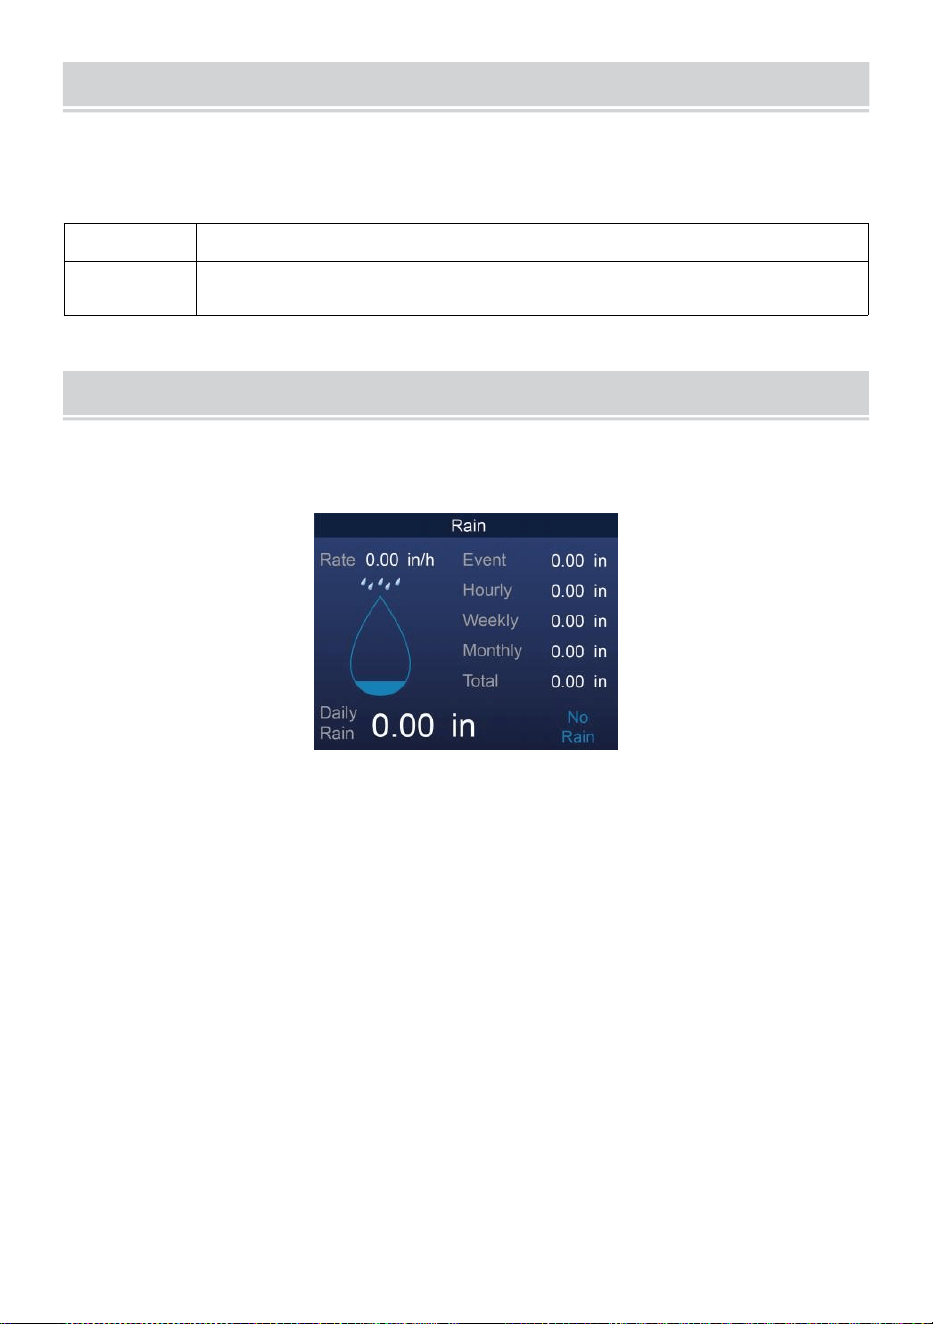
BAROMETRIC PRESSURE
- 25 -
Überprüfen Die Wetter Webseite für Echtzeit Barometer
Bedingungen Dann Passen Sie den relativen Wert in der Kalibrierung
Einstellung Abschnitt.
Absolute
Der Absolute atmosphärisch Druck von dein Standort .
Relativ
Der relative atmosphärische Druck basierend auf dem
Meeresspiegel.
REGEN
Dieser Abschnitt zeigt die Niederschlagsmenge bzw. Regen Rate
Information.
NIEDERSCHLAGSMENGE ANZEIGE MODI
Regen Rate
: Aktuell Niederschlagsmenge Rate im Vergangenheit
Stunde .
Regen
Ereignis
: kontinuierlich Regen und wird auf Null zurückgesetzt
wenn sich Regen ansammelt Ist weniger als 10 mm
(0,039 In) innerhalb eines Zeitraums von 24 Stunden.
Stündlich
Regen
: Gesamt Niederschlag für jedes Stunde.
Täglich
Regen
: Gesamt Niederschlag seit Mitternacht (00:00)
Wöchentlich
Regen
: Gesamt Niederschlagsmenge für die aktuelle
Kalenderwoche und wird am Sonntag zurückgesetzt
Morgen um Mitternacht (Sonntag bis Samstag)
Monatlich Regen : Gesamt Niederschlagsmenge für den aktuellen
Kalendermonat und zurücksetzen An der erste Tag des
Monat.
Gesamt Regen: Gesamt Niederschlag seit dem zuletzt zurücksetzen.

BAROMETRIC PRESSURE
- 25 -
SETZEN SIE DEN SUMMEN ZURÜCK NIEDERSCHLAGSMENGE
AUFZEICHNEN
Siehe „Alles löschen Daten ” Abschnitt zum Löschen von
Niederschlägen Daten.
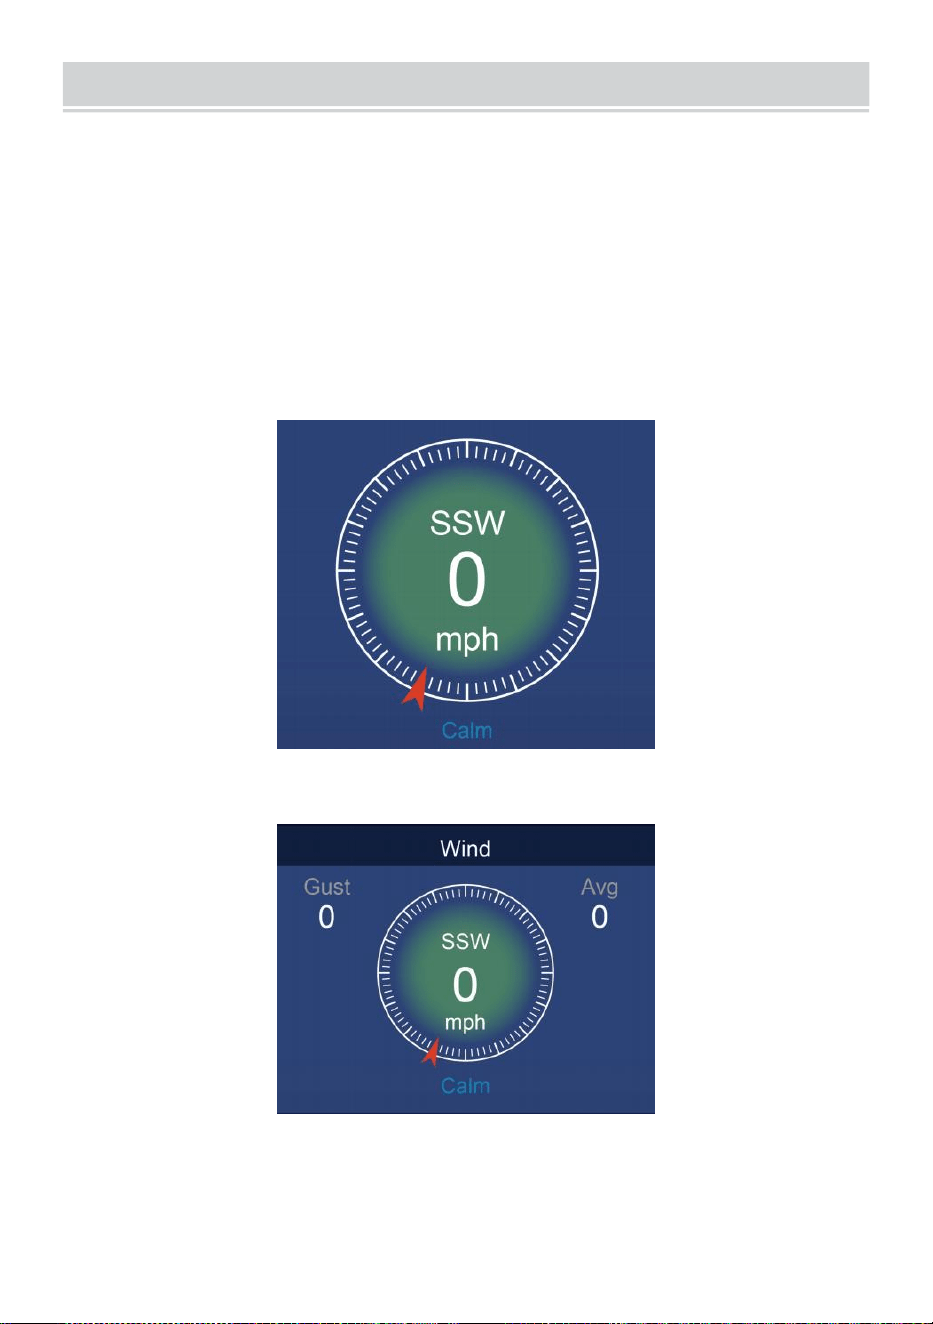
WIND
- 26 -
WINDGESCHWINDIGKEIT UND ANWEISUNG
Das Abschnitt zeigt Die Wind Geschwindigkeit , Strom Wind Richtung ,
vorherrschende Windrichtungen und Windgeschwindigkeit Ebene.
Windgeschwindigkeit: ist die durchschnittliche Windgeschwindigkeit
gemessen im vorherige 20 Sekunden.
Durchschnittlicher Wind: ist die durchschnittliche Windgeschwindigkeit
In 10 Minuten.
Böen: ist das höchste Windgeschwindigkeit aufgezeichnet im
vorherige 20 Sekunden
.
Einfach Daten Anzeige
Detaillierte Daten Anzeige
BEAUFORT-SKALA

WIND
- 26 -
Der Die Beaufort-Skala unten ist eine internationaler Maßstab der
Windgeschwindigkeiten von 0 (ruhig) bis 12 (Orkanstärke).

- 27 -
Beaufortskala
Beschreibun
g
Windgeschwi
ndigkeit
Grundstückszustand
0
Ruhig
< 1 km/h
Ruhe. Rauch steigt senkrecht nach oben.
< 1 Meilen
proStunde
< 1 Knoten
< 0,3 MS
1
Licht Luft
1.1 ~ 5 km/h
Rauchschwaden deuten auf Wind hin
Richtung. Blätter und Windfahnen sind
ortsfest.
1 ~ 3 Meilen
pro Stunde
1 ~ 3 Knoten
0,3 ~ 1.5 MS
2
Licht Brise
6 ~ 11 km/h
Wind auf freiliegender Haut spürbar.
Blätter rascheln. Windfahnen beginnen
Zu bewegen.
4 ~ 7 Meilen
pro Stunde
4 ~ 6 Knoten
1.6 ~ 3.3 MS
3
Sanft Brise
12 ~ 19 km/h
Blätter und kleine Zweige ständig
bewegend. Lichtfahnen ausgefahren.
8 ~ 12 Meilen
pro Stunde
7 ~ 10 Knoten
3.4 ~ 5.4 MS
4
Mäßig
Brise
20 ~ 28 km/h
Staub und lose Papier angehoben.
Klein Filialen beginnen zu bewegen.
13 ~ 17 Meilen
pro Stunde
11 ~ 16 Knoten
5.5 ~ 7.9 MS
5
Frisch Brise
39 ~ 38 km/h
Verzweigungen eines moderate
Größe bewegen . Kleine Bäume im
Blatt beginnen zu schwanken.
18 ~ 24 Meilen
pro Stunde
17 ~ 21 Knoten
8,0 ~ 10.7 MS
6
Stark Brise
39 ~ 49 km/h
Groß Filialen In Bewegung. Pfeifen gehört
in Oberleitungen. Regenschirm
verwenden wird schwierig. Leer Plastik
Mülltonnen kippen um.
25 ~ 30 Meilen
pro Stunde
22 ~ 27 Knoten
10,8 ~ 13.8 MS
7
Starker Wind
50 ~ 61 km/h
Ganze Bäume In Bewegung.
Bemühung musste gegen den Wind
laufen .
31 ~ 38 Meilen
pro Stunde
28 ~ 33 Knoten
13,9 ~ 17.1 MS
8
Sturm
62 ~ 74 km/h
Einige Zweige abgebrochen Bäume.
Autos geraten ins Schleudern Straße.
Fortschritt zu Fuß Ist ernsthaft
behindert.
39 ~ 46 Meilen
pro Stunde
34 ~ 40 Knoten
17,2 ~ 20,7 MS
9
Starker Sturm
75 ~ 88 km/h
Einige Äste brechen von Bäumen, und
einige kleine Bäume werden umgeworfen
. Konstruktion /
temporäre Schilder und Barrikaden Schlag
über.
47 ~ 54 Meilen
pro Stunde
41 ~ 47 Knoten
20,8 ~ 24.4 MS
10
Sturm
89 ~ 102 km/h
Bäume sind gebrochen aus oder
entwurzelt, Strukturschäden
wahrscheinlich.
55 ~ 63 Meilen
pro Stunde
48 ~ 55 Knoten
2,45 ~ 28.4 MS
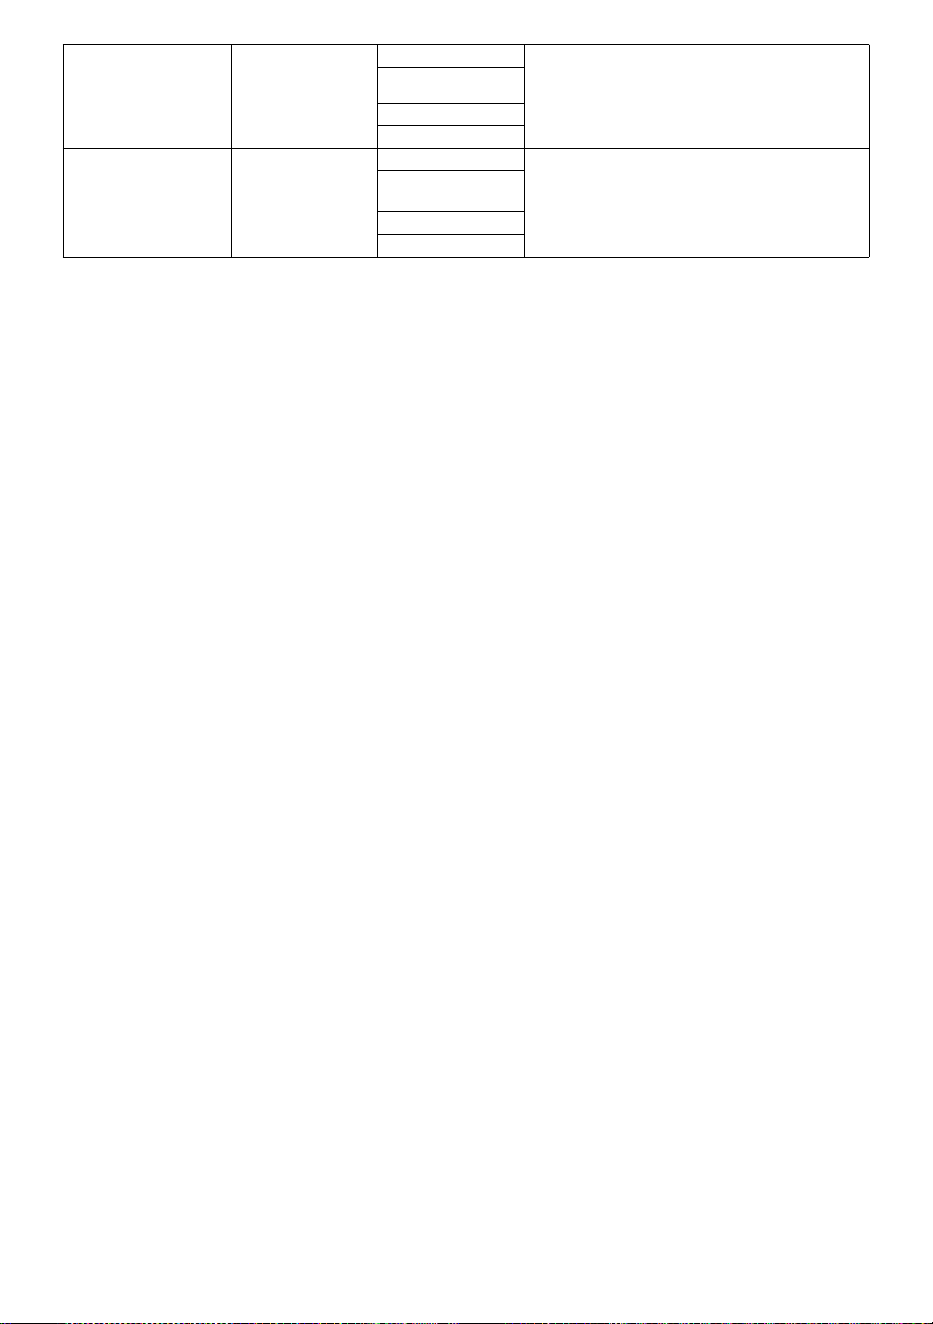
- 27 -
11
Heftiger Sturm
103 ~ 117 km/h
Weit verbreitete Vegetation und
Struktur Schaden wahrscheinlich.
64 ~ 73 Meilen
pro Stunde
56 ~ 63 Knoten
28,5 ~ 32,6 MS
12
Orkanstärke
≥ 118 km/h
Schwere, großflächige Schäden an der
Vegetation und Strukturen. Trümmer und
ungesicherte
Objekte sind herumgeschleudert.
≥ 74 Meilen
pro Stunde
≥ 64 Knoten
≥ 32,7 MS
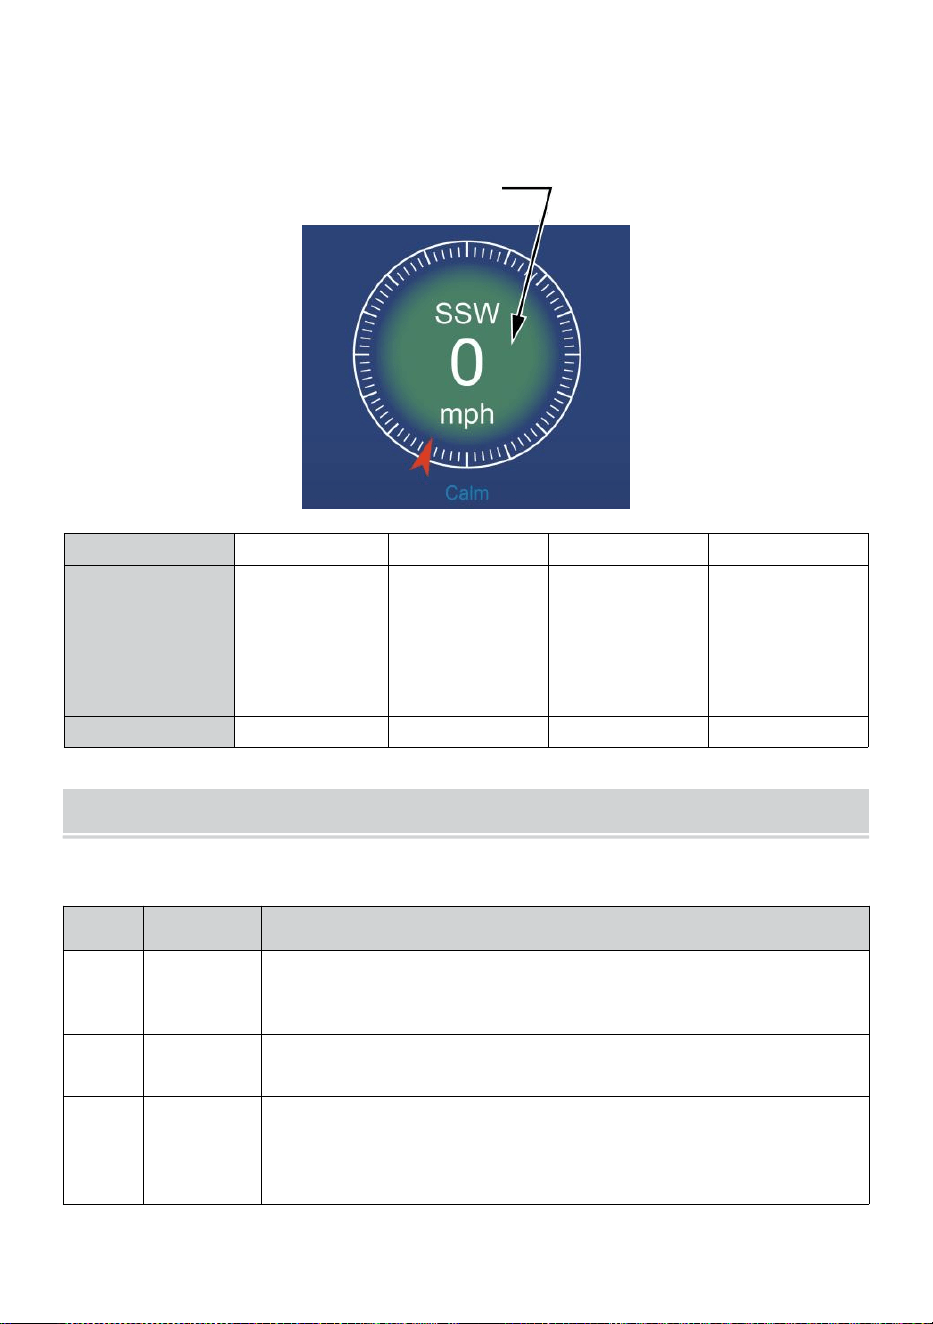
- 28 -
WINDGESCHWINDIGKEIT EBENE
Das angezeigte Windgeschwindigkeits-Diagramm bieten A schnell
Referenz auf Die
aktuell Wind Zustand . Die Hintergrund Farbe von Die Kompass
ändert sich je nach Windgeschwindigkeit.
Ebene
Licht
Mäßig
Stark
Sturm
Geschwindigkei
t
0 - 12 Meilen
pro Stunde
0 - 19 km/h
12 - 30 Meilen
pro Stunde
20 - 49 km/h
31 - 55
Meilen pro
Stunde
50 - 88 km/h
≥ 55
Meilen
pro
Stunde ≥
89 km/h
Kompassfarbe
Grün
Gelb
Orange
Rot
LICHT INTENSITÄT UND UV INDEX
Dieser Abschnitt zeigt ein Diagramm für Licht Intensität und UV Index.
UVI
Bewertu
ngen
Kommentar
0-2
Niedrig
A UV Index Anzeige von 0 bis 2 bedeutet geringe Gefahr
durch
die Sonne UV Strahlen für den Durchschnitt Person.
3-5
Medium
A UV Index Messwert von 3 bis 5 bedeutet mäßig
Schadensrisiko vor ungeschützter Sonne Belichtung.
6-7
Hoch
A UV Index Messwert 6 bis 7 bedeutet hoch
Schadensrisiko vor ungeschützter Sonneneinstrahlung.
Schützen Sie Ionen vor Haut und Augen Schaden Ist
erforderlich.

- 28 -
8-10
Sehr Hoch
A UV Index Ablesung von 8 bis 10 bedeutet sehr hoch
Risiko von Schäden durch ungeschützte
Sonneneinstrahlung. Nehmen Sie zusätzliche
Vorsichtsmaßnahmen
weil ungeschützte Haut und Augen Sei beschädigt Und
dürfen brennen schnell.
11-15
Extrem
A UV Index Lesen von 11 oder mehr bedeutet extrem
Risiko vor Schäden durch ungeschützte
Sonneneinstrahlung . Vorsichtsmaßnahmen Weil
ungeschützte Haut und Augen können brennen In
Minuten.

MULTI-CHANNEL DISPLAY MODE
- 29 -
KANAL ANZEIGE
Wenn Sie sich
auf
dem einfachen/detaillierten
Bildschirm befinden,
drücke
cH Taste zum Umschalten zwischen Innen- und Kanal 1-7
Daten.
MEHRFACHSENSOR ANZEIGE SEITE
Wenn Sie sich auf dem einfachen/detaillierten Bildschirm befinden,
drücken Taste zum Aufrufen des Multisensor- Sor-
Anzeigebildschirm.
Drücken Taste, um Anzeige austauschen zwischen drinnen und
draußen oder Sensordaten.
Drücken Sie
die w-
Taste, um zur Einzel-/Detailansicht
zurückzukehren. Bildschirm.

WEATHER DATA RECORD
- 30 -
In diesem Abschnitt wird erläutert Wie kann ich die Wetterdaten
einsehen? aufzeichnen (Max- /Min, Datenprotokoll, Verlaufsdiagramm).
Zum Anzeigen Die Wetter Daten aufzeichnen , drücken Schaltfläche
im Einfach-/Detailbildschirm, um den Wetterdatenbildschirm aufzurufen.
Drücken
Taste, um Austausch der Max/Min, Datenprotokoll und Verlaufsdiagramm
Modi.
MAX/MIN
Es gibt 2 Datenmodi für MAX/MIN Aufzeichnungen: Täglich oder
kumuliert. (Abhängig von der Max/Min aufzeichnen Modus innen
Anzeigeeinstellungen Seite )
Täglich Max/Min-Daten Modus
Max/Min-Daten werden angezeigt und klar bei Mitternacht.
Kumuliert Max/Min-Datenmodus
Max/Min-Daten werden gehalten angesammelt.
Täglich Max/Min Datensatz kumuliert Max/Min Aufzeichnen
Drücken
▲
oder , um die gewünscht Max/Min aufzeichnen.
Drücken Taste, um Austausch zu zeigen Innen-, Außen- und
Kanal Max/Min Aufzeichnungen.
Drücken
.
Taste Zu zurückkehren einfach / detailliert Bildschirm .

WEATHER DATA RECORD
- 30 -
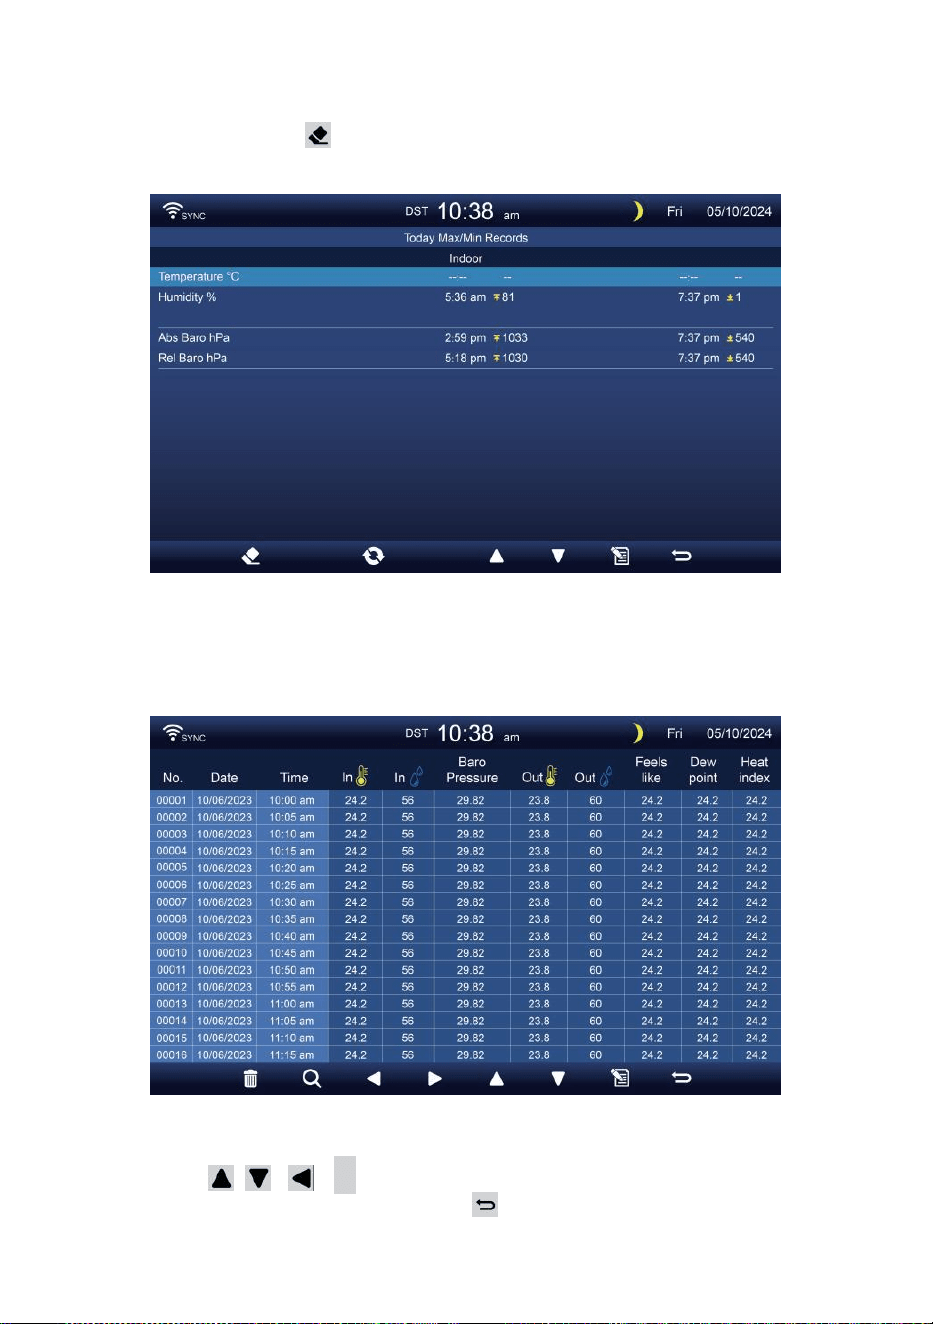
- 31 -
Max/Min löschen Daten
Zum Löschen der ausgewählten MAX/MIN Aufzeichnungen,
drücken und halten Taste über 2s, um die ausgewählte
Max/Min aufzeichnen.
DATEN LOG-BILDSCHIRM
Der Datenprotokoll-Bildschirm erfasst alle Die Geschichte
Aufzeichnungen.
Navigieren in den Daten Protokollbildschirm
Drücken , , ,
B
Schaltflächen zum Stöbern Sie
durch die Bildschirm. Drücken Sie S c h a l t f l ä c h e ,
u m z u m e i n f a c h e n / detaillierten Bildschirm
zurückzukehren .
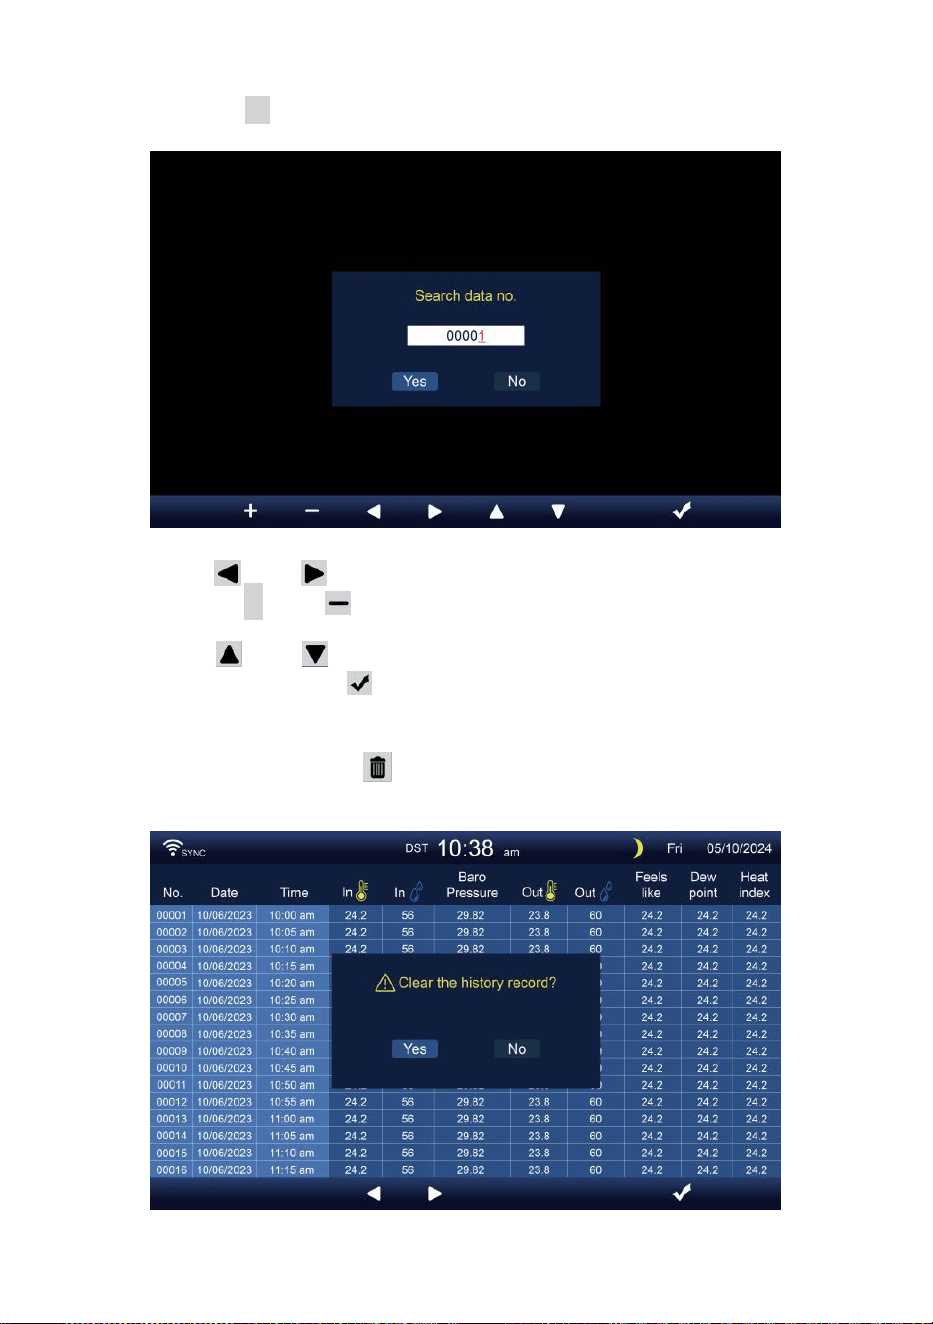
- 32 -
Suche nach einem bestimmten Seite
Drücken Sie Q zur Anzeige suchen Die Daten aufzeichnen.
Drücken oder , um eine Ziffer In Die Seite Nummer,
Drücken Sie + oder Taste, um ändern Die Nummer hoch
oder runter.
Drücken oder , um die aktivierte Optionsfeld, Umschalten
Ja oder NEIN, drücken Zu bestätigen.
Alle Daten löschen Protokoll Aufzeichnungen
Drücken Sie und halten über 2s zum Löschen alle
Aufzeichnungen.

- 32 -
Drücken oder Taste zur Auswahl von ändern Die aktiviert
Option Feld, Umschalten zwischen Ja und NEIN, drücken m Zu
bestätigen.
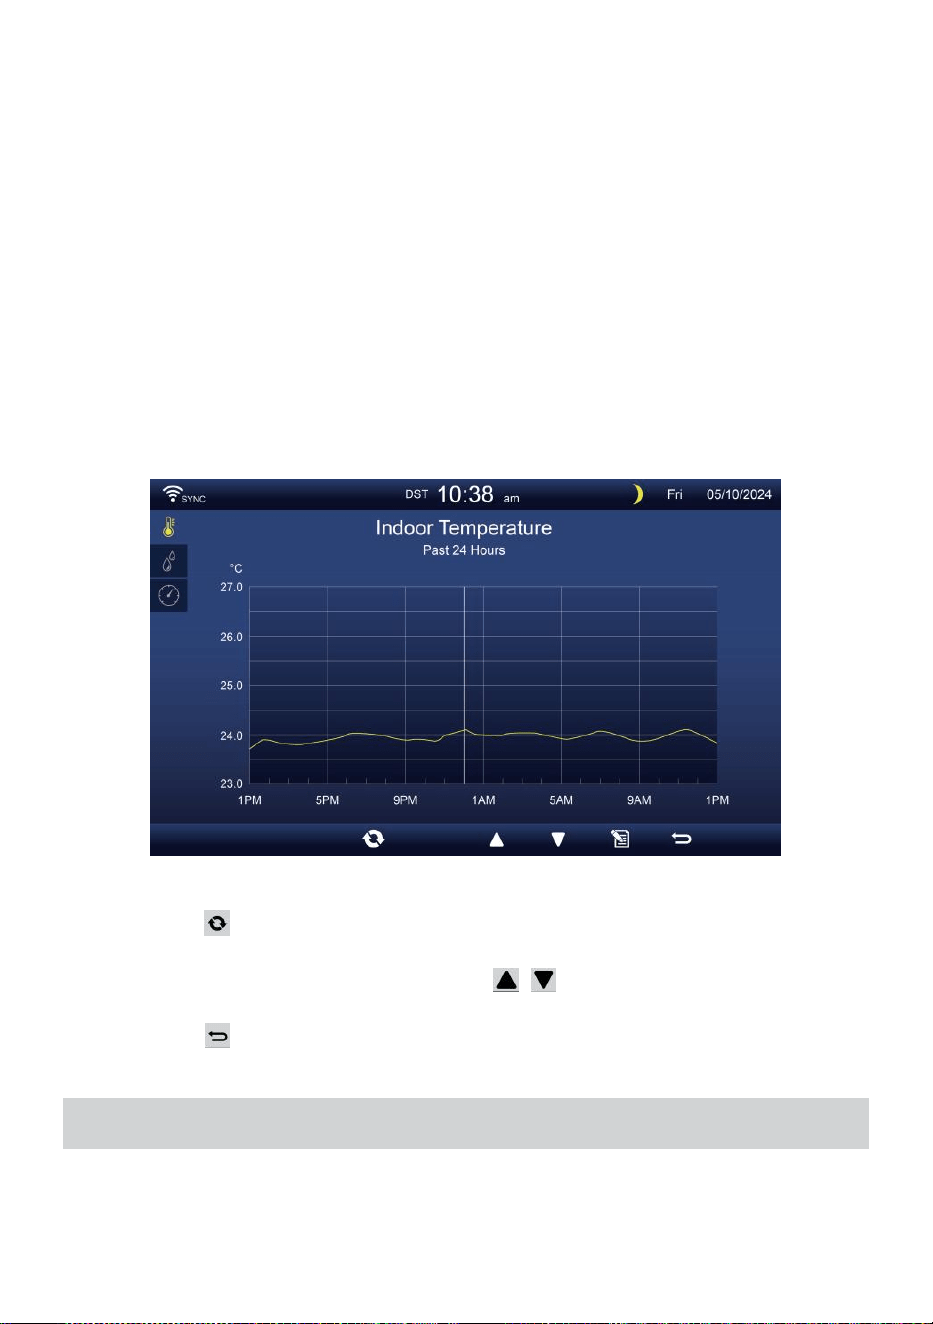
- 33 -
HISTORISCHE GRAFIKEN
In diesem Abschnitt wird erläutert Anreise und Besichtigung Geschichte
Diagramme.
Es gibt Indoor-Grafik, Outdoor-Grafik und Kanalgrafik s zu Sei gezeigt.
Indoor-Grafik
Temperatur, Luftfeuchtigkeit, Relativ und absolut Druck
.
Outdoor-Grafik
Temperatur, Luftfeuchtigkeit, Regen Rate, Letzte 24 Stunden
Niederschlag, Durchschnittliche Windgeschwindigkeit, Windböen,
Windrichtung , Licht Intensität und UVI.
CH1-CH7-Diagramm
Temperatur, Luftfeuchtigkeit.
Drücken Taste, um Austausch zu zeigen Innen-, Außen- und
Kanal historische Grafik.
Wenn die Grafik erscheint, drücken , Schaltflächen zum Anzeigen
anderer Diagramme.
Drücken Taste, um Rückgabe einfach/detailliert Bildschirm.
ALLGEMEINEEINSTELLUNGEN
Alle Konsoleneinstellungen und Systeminformationen Sind im
Einstellung Menü. Es gibt 8 Arten von Einstellungsparametern
innerhalb der Einstellung Speisekarte.

- 33 -
Drücken Sie im einfachen/detaillierten Bildschirm Taste zum Aufrufen
der Einstellung Speisekarte.
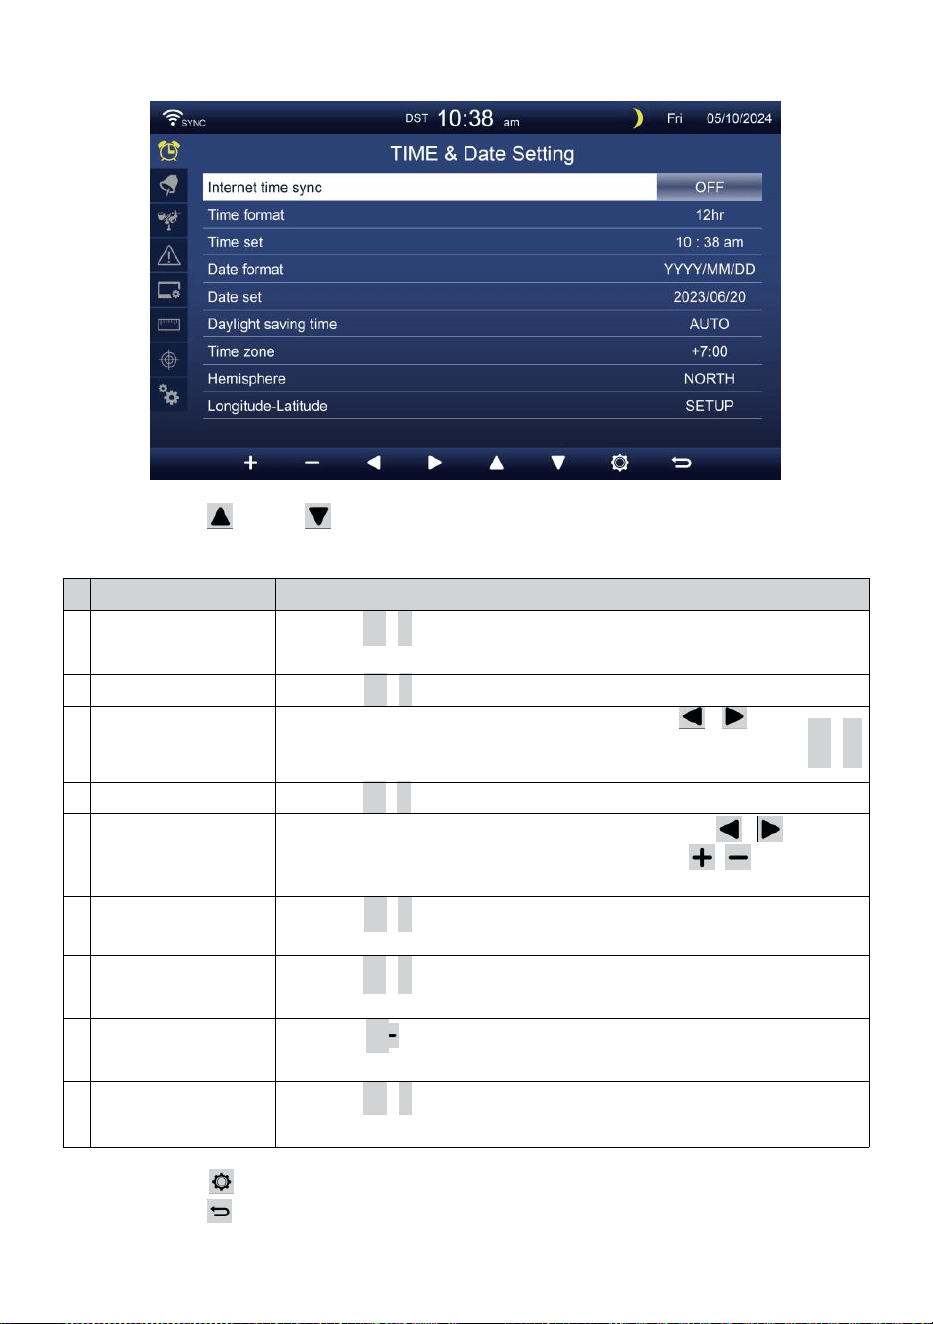
- 34 -
UHRZEIT / DATUM EINSTELLUNG
Drücken oder , um eine der folgenden Einstellungen
auszuwählen:
#
Unter Artikel
Betrieb
A
Internet-
Zeitsynchronisierun
g
Drücken
+
/
-
Taste Zu drehen An oder drehen aus .
B
Zeitformat
Drücken
+
/
-
Taste Zu wählen 12 oder 24- Format .
C
Zeit Satz
Bei der Zeitsynchronisierung ist aus, drücken / , um
auszuwählen zwischen Stunde oder Minute, drücken Sie + /
-
, um den Wert anzupassen.
D
Datumsformat
Drücken
+
/
-
, um auszuwählen M / D oder D / M-Format.
t
Datum Satz
Bei der Zeitsynchronisierung ist aus, Drücken Sie / , um
das Jahr auszuwählen. Monat, Datum, presse / Taste zum
Einstellen der Wert.
F
Sommerzeit
Drücken
+
/
-
Taste zum Ausschalten oder Einstellen des
Sommerzeit auf Auto.
G
Zeitzone
Drücken
+
/
-
Taste Zu wählen Die dein lokal Zeit Zone
Zu Holen Sie sich die richtige Zeit.
H
Hemisphäre
Drücken +/ -Taste zur Auswahl NORDEN oder SÜDEN
Hemisphäre für der 7-in-1-Sensorpunkt Zu Und Mond Phase.
i
c
h
Längengrad-
Breitengrad
Drücken
+
/
-
Taste Zu eingeben Längengrad - Breitengrad
aufstellen Seite .
Drücken , um die Alarmeinstellungsanzeige aufzurufen.
Drücken Taste, um Geben Sie den einfachen/detaillierten
Bildschirm zurück.
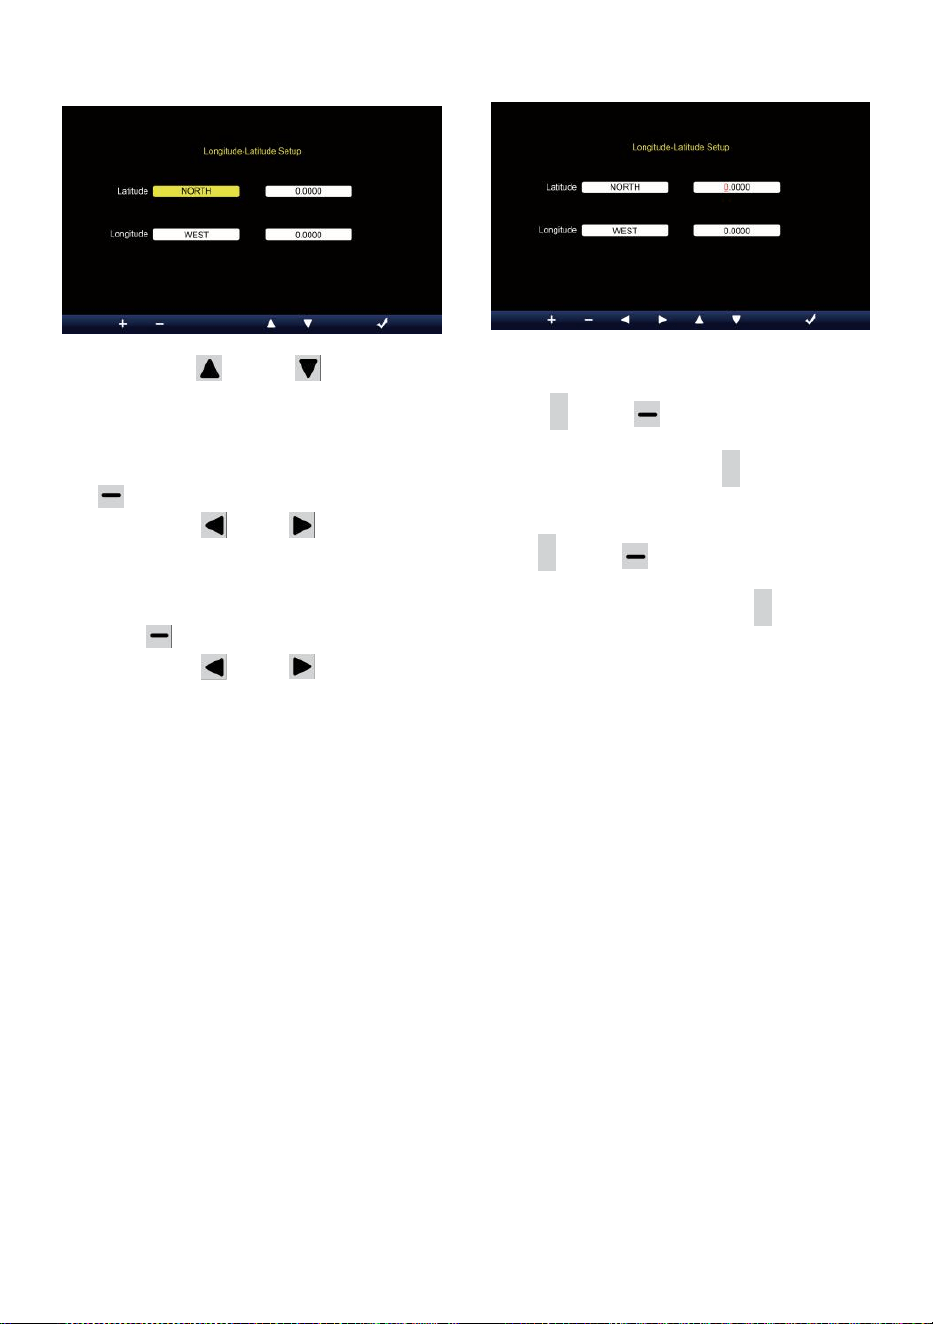
- 35 -
Längen- und Breitengradeinstellung
Drücken oder Taste zum Ändern Die aktiviert aus.
1. Breitengrad (Hemisphäre) --- Drücken Sie
+
oder Taste, um
Wählen Sie die Hemisphäre . (NORD/SÜD)
Breitengrad --- Der Breitengrad x 10 wird n Rot. Drücken + oder
Taste, um den Wert zu erhöhen oder zu verringern .
Drücken oder zu ändern bleiben Breitengradwert.
2. Längengrad (Halbkugel ) --- Drücken Sie + oder , um die
Hemisphäre . (OST/WEST)
Längengrad --- Der Breitengrad x 100 werden Rot. Drücken
+
oder Taste, um den Wert zu erhöhen oder zu verringern .
Drücken oder Taste zum Ändern der verbleibenden
Längengradwert.
Drücken m zur Bestätigung Länge Einstellungsbreite .
NOTIZ:
Bestimmen Sie die Längengrad und
Breite. z.B
Breite
Länge
: 33,2981
: -111.9602
Wenn der Standort Ist im Nördlich Hemisphäre, Latitude wird Sei
positiv. Wenn der Standort Ist im Süden Hemisphäre, Latitude
wird Sei Negativ. Wenn der Standort Ist im Oststern
Hemisphäre, Längengrad wird Sei positiv.
Wenn der Standort Ist im Westen Hemisphäre, Länge wird Sei
negativ. Das obige Längengrad und Der Breitengrad wird
eingegeben hinein Anzeige wie folgt :
Breitengrad = NORDEN --- 33. 2981
Längengrad = WEST --- 111.9602.
UNS New York (EST, GMT-5)
Breite
Länge

- 35 -
:
4
0
.
7
1
2
8
(
N
o
r
d
4
0
,
7
1
2
8
)
:
-
7
4
.
0
0
6
0
(
W
e
s
t
7
4
.
0
0
6
0)
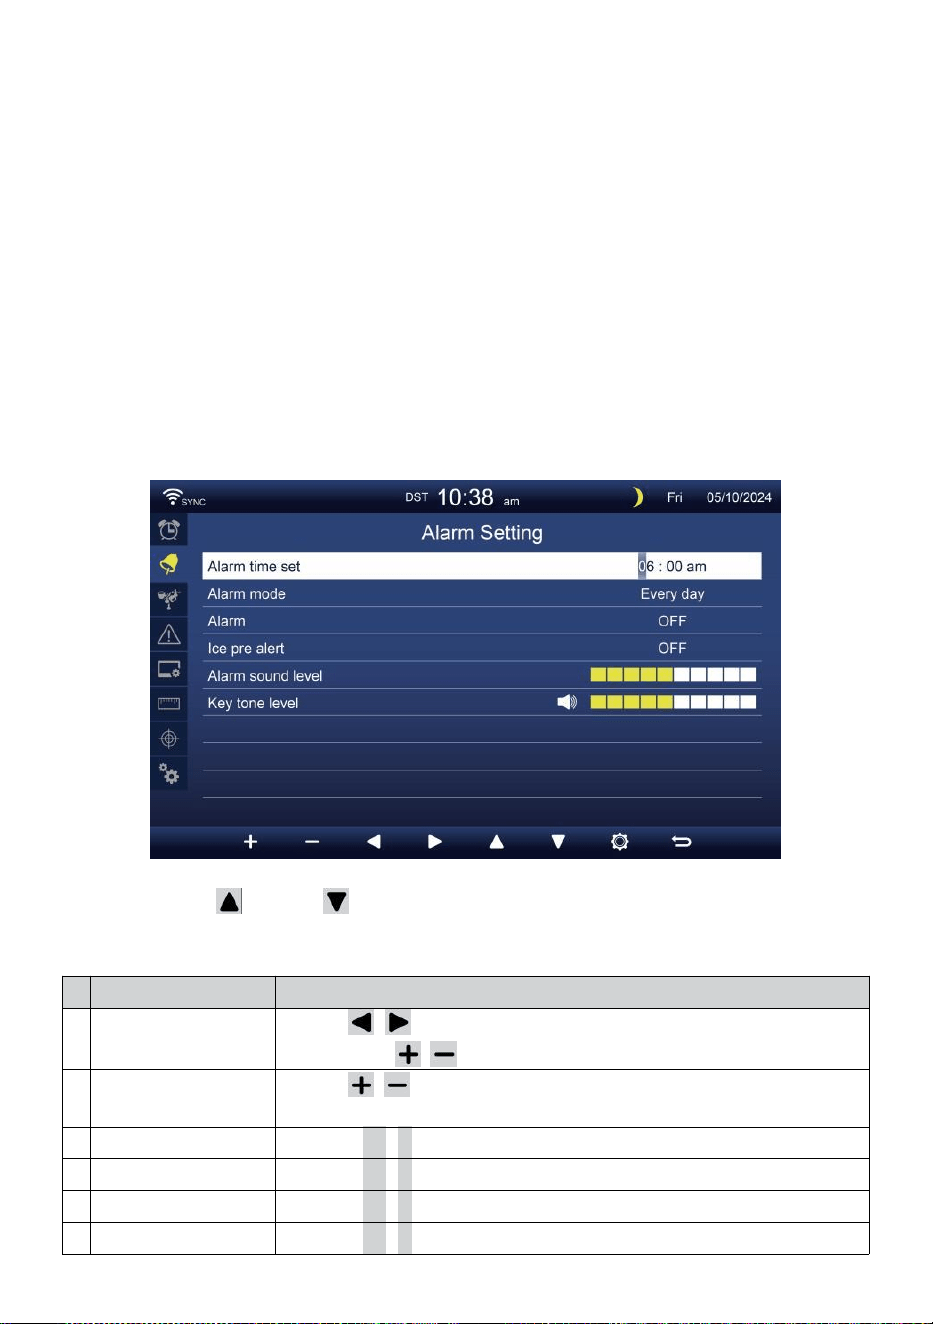
- 36 -
EU Frankfurt, Deutschland (GMT+1)
Breite
Länge
: 50,1109 (Norden
50.1109) : 8,6821 (Ost
8,6821)
Vereinigtes Königreich London England (GMT)
Breite
Länge
: 51,5072 (Norden
51,5072) : -0,1276 (West
0,1276)
Australien Sydney ( GMT +10)
Breite
Länge
: -33.8688 (Süd 33.8688) :
151.2093 (Ost 151,20 93)
ALARM EINSTELLUNG
Drücken oder Schaltfläche zum Ändern des aktivierten
Optionsfelds:
#
Unter Artikel
Betrieb
A
Weckzeit eingestellt
Presse / , um zwischen Stunde oder Minute.
Drücken Sie / Taste zum Anpassen der Wert.
B
Alarm Modus
Presse / , um auszuwählen Jeden Tag oder nur an
Wochentagen.
C
Alarm
Drücken
+
/
-
Taste Zu drehen An oder drehen aus .
D
Eis Vor Alarm
Drücken
+
/
-
Taste Zu drehen An oder drehen aus .
t
Alarmton Ebene
Drücken
+
/
-
Taste Zu anpassen Die Klang Ebene .
F
Tastenton Ebene
Drücken
+
/
-
Taste Zu anpassen Die Schlüssel Ton Ebene .

- 36 -
Drücken , um die Sensoreinstellungsanzeige aufzurufen.
Drücken
w
-Taste, um zur Einzel-/Detailansicht zurückzukehren
Bildschirm.
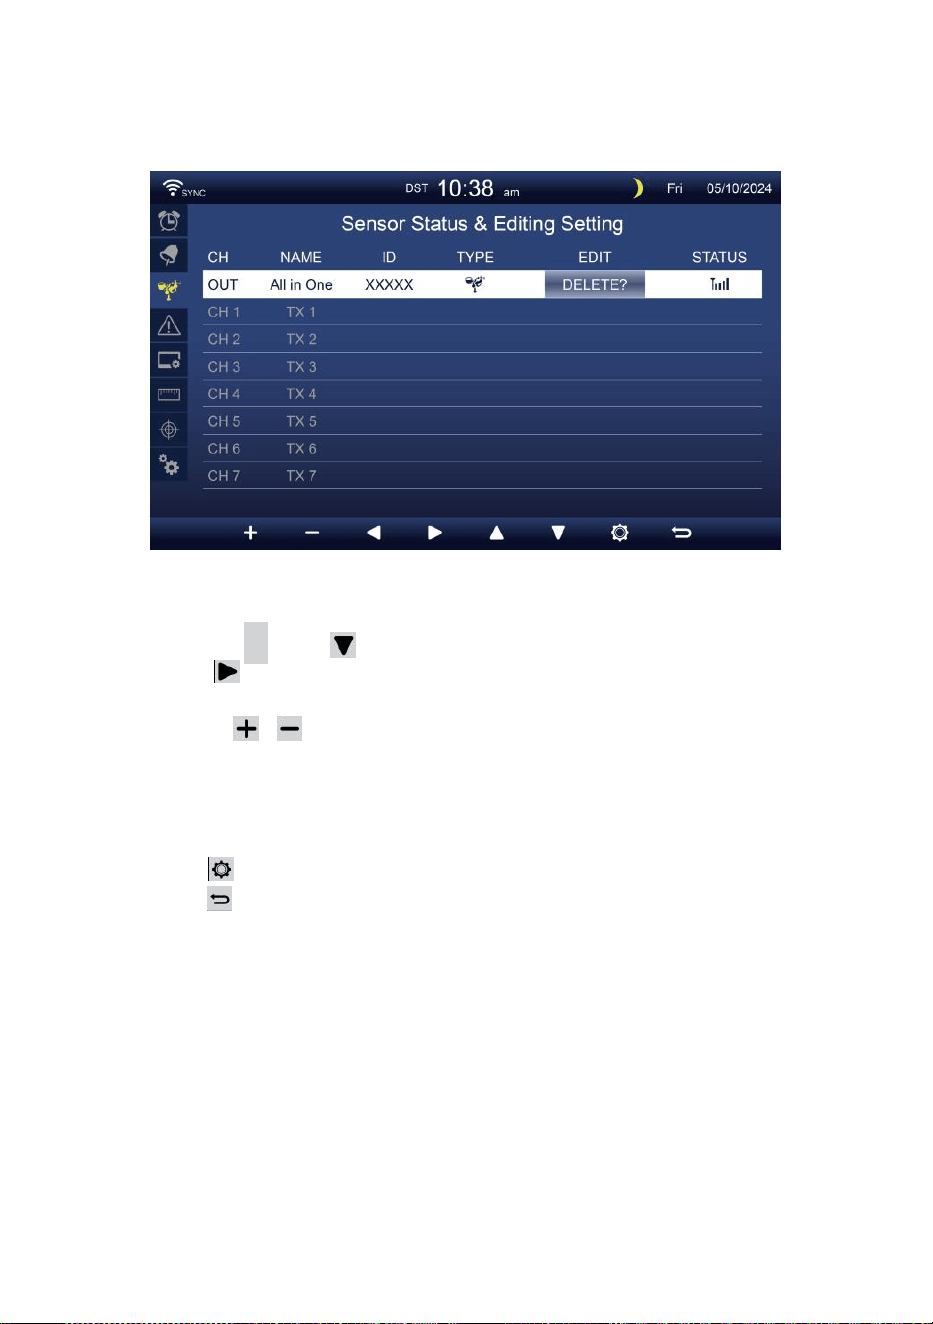
- 37 -
SENSOR EINSTELLUNG
Das Seite ist das Hinzufügen/Entfernen des All-in-One-Sensors
oder zusätzlicher 7 Kanäle Hygrometer.
Hinzufügen eines neuer Sensor
Drücken Sie
▲
oder , um die leer Kanal.
Drücken Taste zum Auswählen des Bearbeitungssensors Spalte.
Wenn in der Spalte die Option „ Hinzufügen “ angezeigt wird,
drücken Sie / Taste, um die Sensorsuche zu starten.
Wählen Sie die passender Kanal Nummer auf dem Sensor, dann
einschalten oder drücken ZURÜCKSETZEN , um den Paarung.
Sobald die Geräte verbunden sind, wird das Sensorsymbol,
AUSWEIS Wille zeigen In Die Kanal Reihe.
Drücken , um die Anzeige für die Alarmeinstellungen aufzurufen.
Drücken Taste, um Geben Sie den einfachen/detaillierten
Bildschirm zurück.
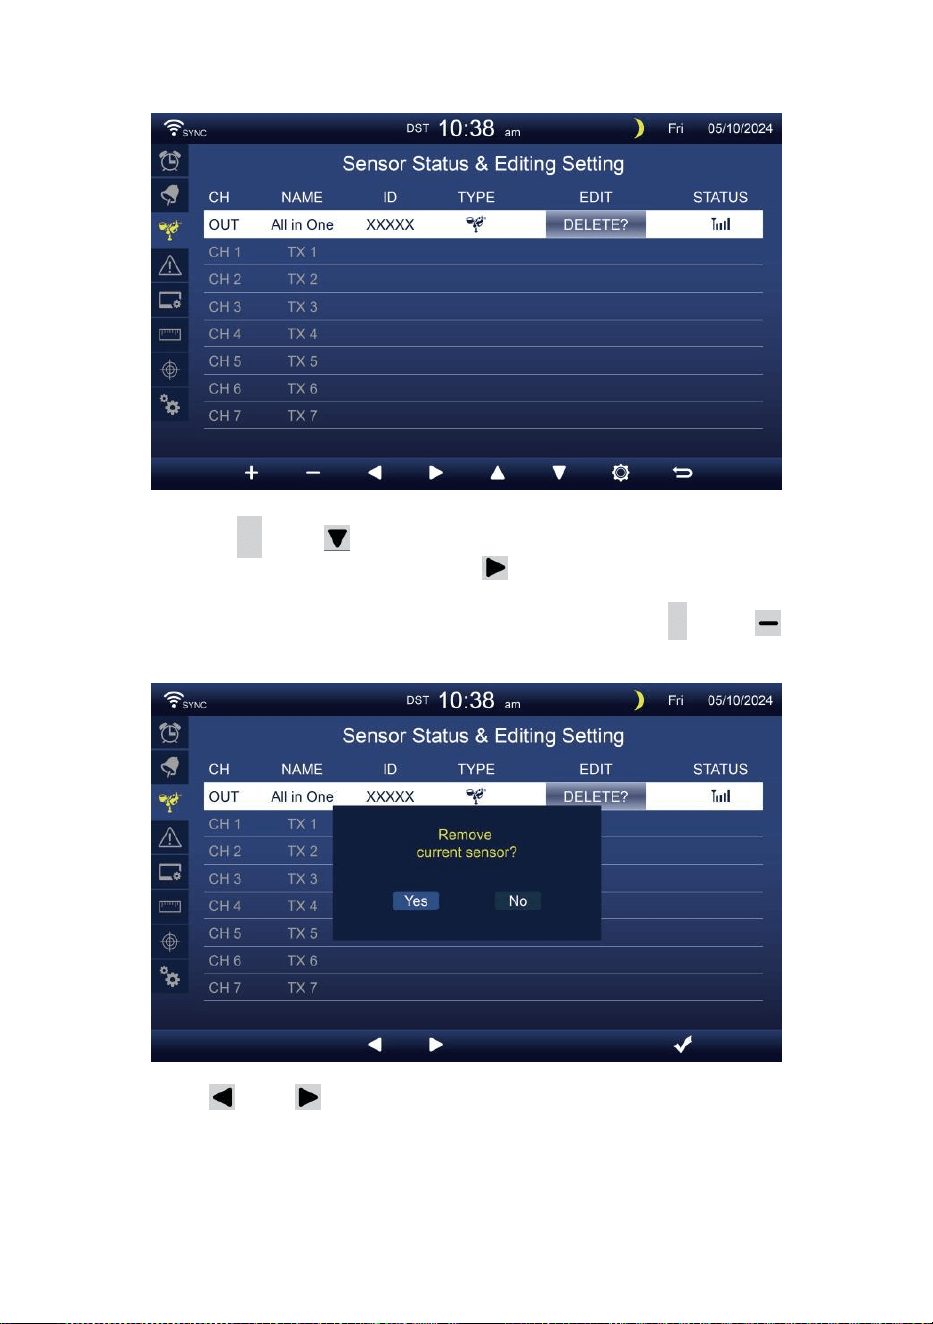
- 38 -
Löschen gepaarter Sensor
Drücken Sie
▲
oder Taste, um Wählen Sie die
verbunden d Sensor. Drücken Sie Taste zum
Auswählen des Bearbeitungssensors Spalte.
Wenn in der Spalte „Löschen ” Option, drücken Sie
+
oder
Taste Zu bestätigen.
Drücken oder , um die Option „Ändern“ auszuwählen.
aktiviert Optionsfeld, Umschalten Ja oder NEIN , drücken
.
Taste
Zu bestätigen .
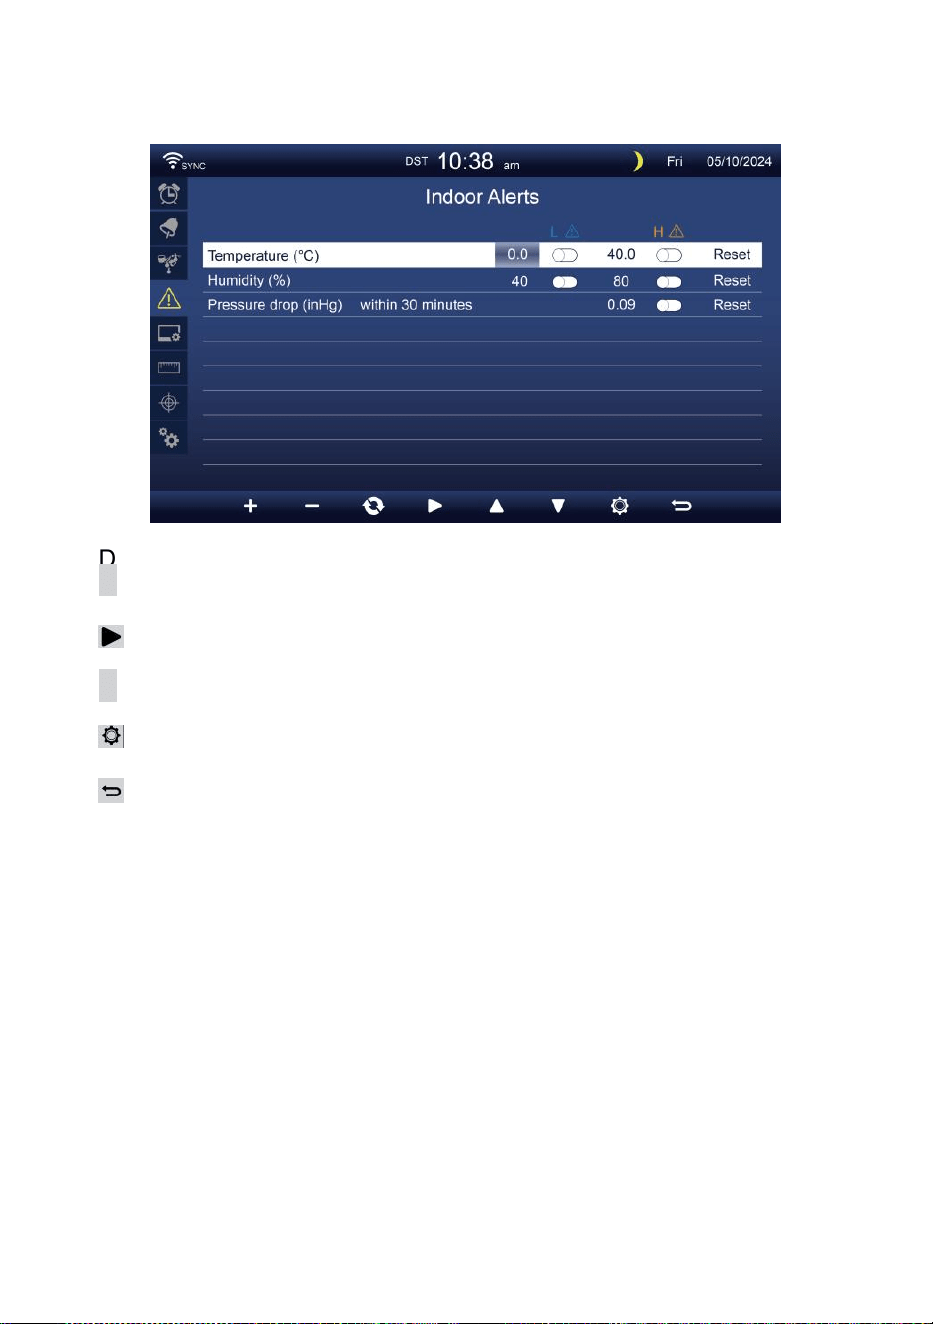
- 39 -
ALARMEINSTELLUNGEN
Satz Alarm für Innenräume
Drücken
▲
oder
w
-Taste zum Auswählen verschiedener Reihe von
aktivierten Optionsfeld .
Drücken
Taste zum Auswählen von „Hoch“/„Niedrig“/Alarm
zurücksetzen Option .
Drücken
+
oder
w
-Taste zum Einstellen des Wertes oder Ein/Aus-
Option.
Drücken
, um die Anzeige der Displayeinstellungen .
Drücken
Schaltfläche zum Zurückkehren zu „einfach“/„detailliert“ Bild
schirm.
NOTIZ:
Bei der Auswahl Reset-Option werden alle Alarmwerte
zurücksetzen auf Die Standardwerte.
Außenalarm einstellen
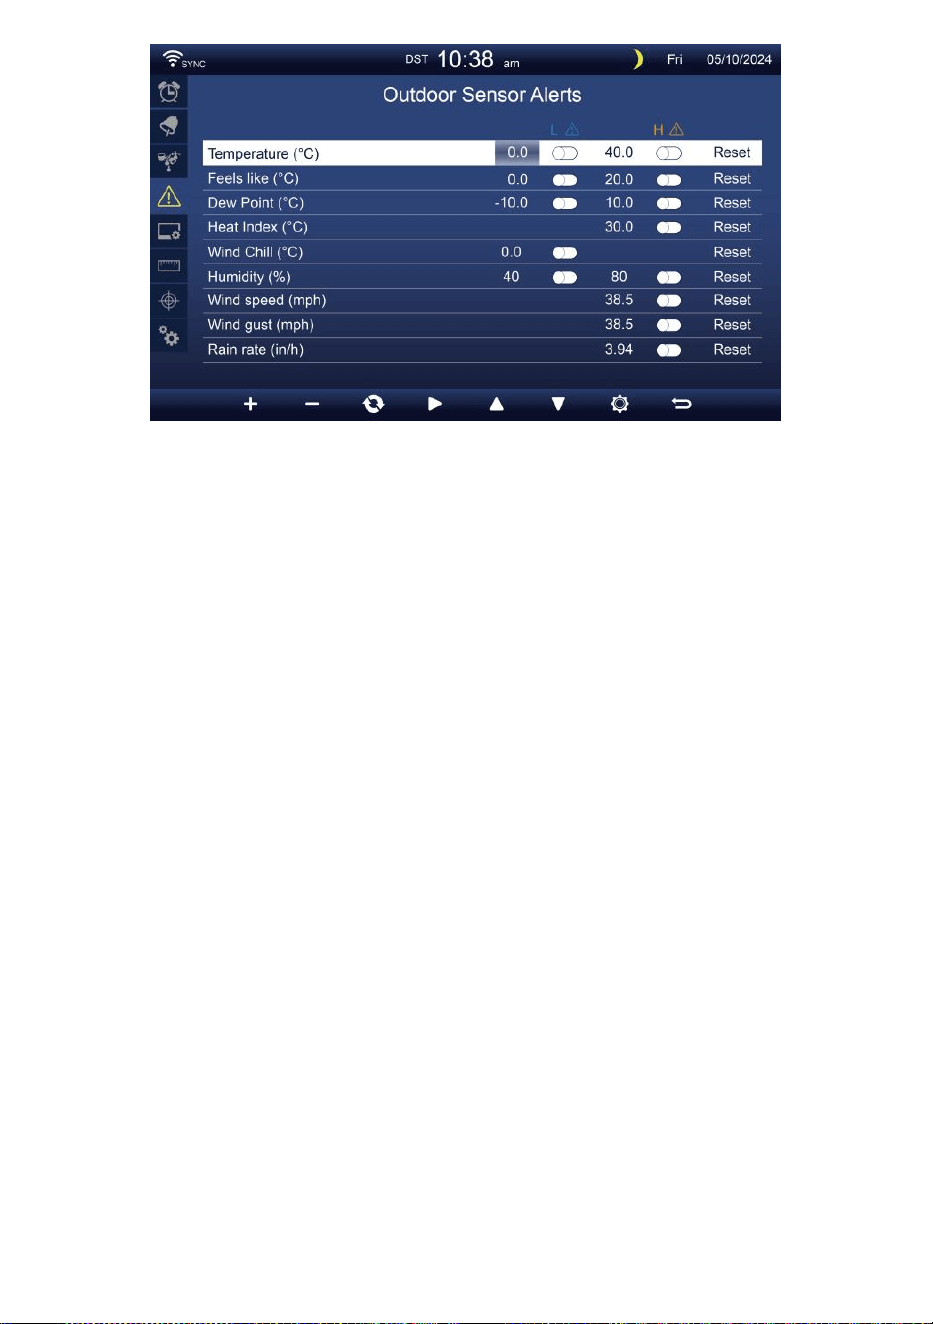
- 39 -
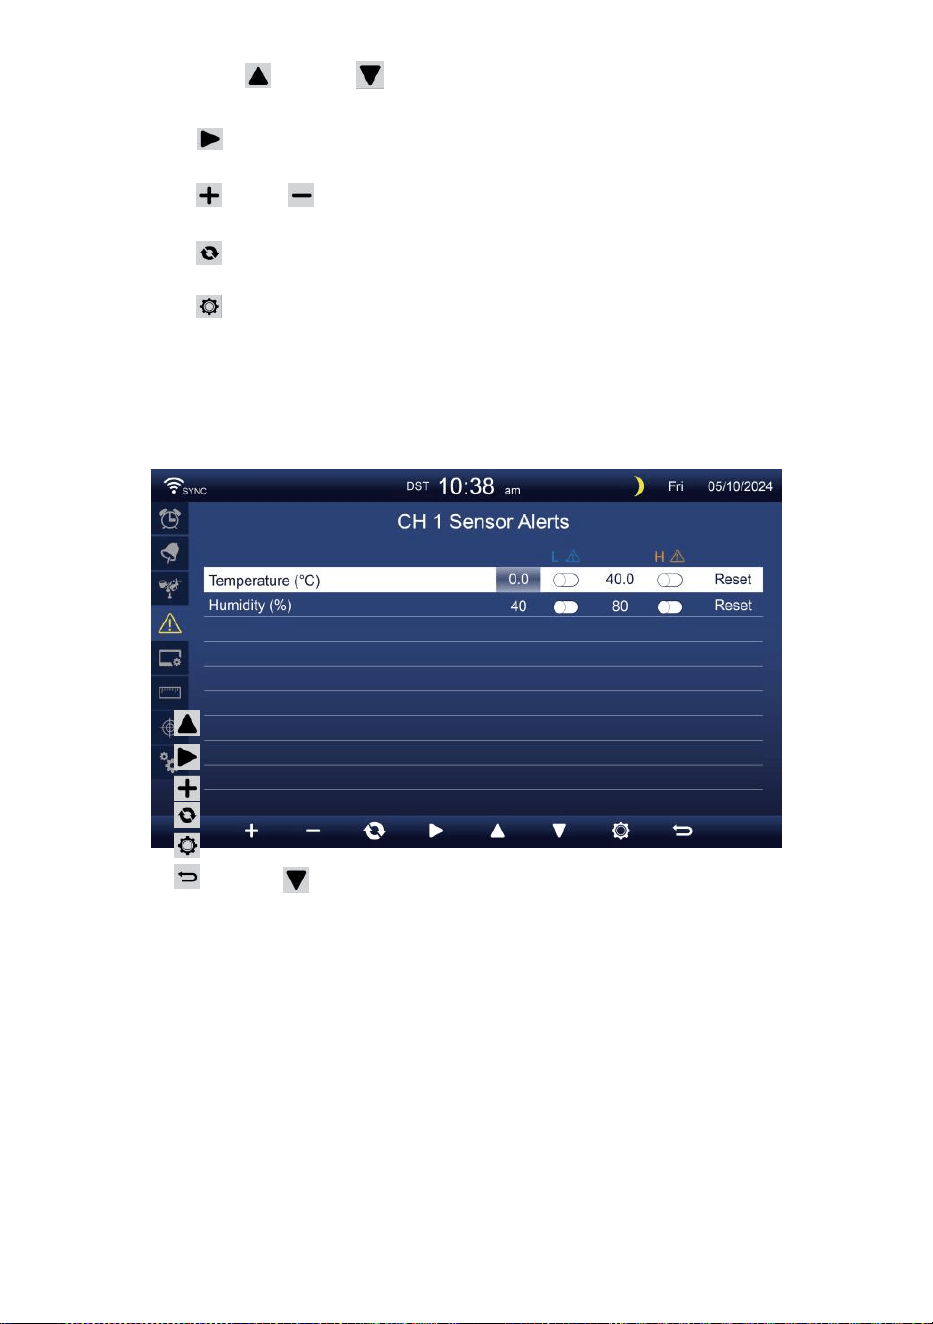
- 40 -
Drücken oder Schaltfläche zum Auswählen einer anderen
Zeile von aktivierten aus.
Drücken , um auszuwählen Option für hohen/niedrigen
Alarm/Alarm zurücksetzen.
Drücken oder Taste, um den Wert oder die Ein/Aus-Option
anzupassen.
Drücken Taste, um tauschen Sie die Anzeige der
Alarmeinstellungen für den Innenbereich.
Drücken , um die Anzeigeeinstellungen Anzeige.
Drücken Sie
w
Taste zum Zurückkehren
einfach/detailliert Bildschirm. CH1-7-Sensor
einstellen Alarm
Drücken
Drücken
Drücken
Drücken
Drücken
Drücken
NOTIZ:
oder Schaltfläche zum Auswählen einer anderen Zeile
aktivierter Option Feld. Schaltfläche zum Auswählen von
Hoch/Tief/Alarm zurücksetzen Option .
oder
w
-Taste zum Einstellen des Wertes oder Ein/Aus-
Option.
Taste, um tauschen Sie die Anzeige der
Alarmeinstellungen für den Innenbereich.
, um die Anzeigeeinstellungen anzeigen .
Schaltfläche zum Zurückkehren zur
einfachen/detaillierten Anzeige Bildschirm.
Bei der Auswahl Reset-Option werden alle Alarmwerte
zurücksetzen auf Die Standardwerte.
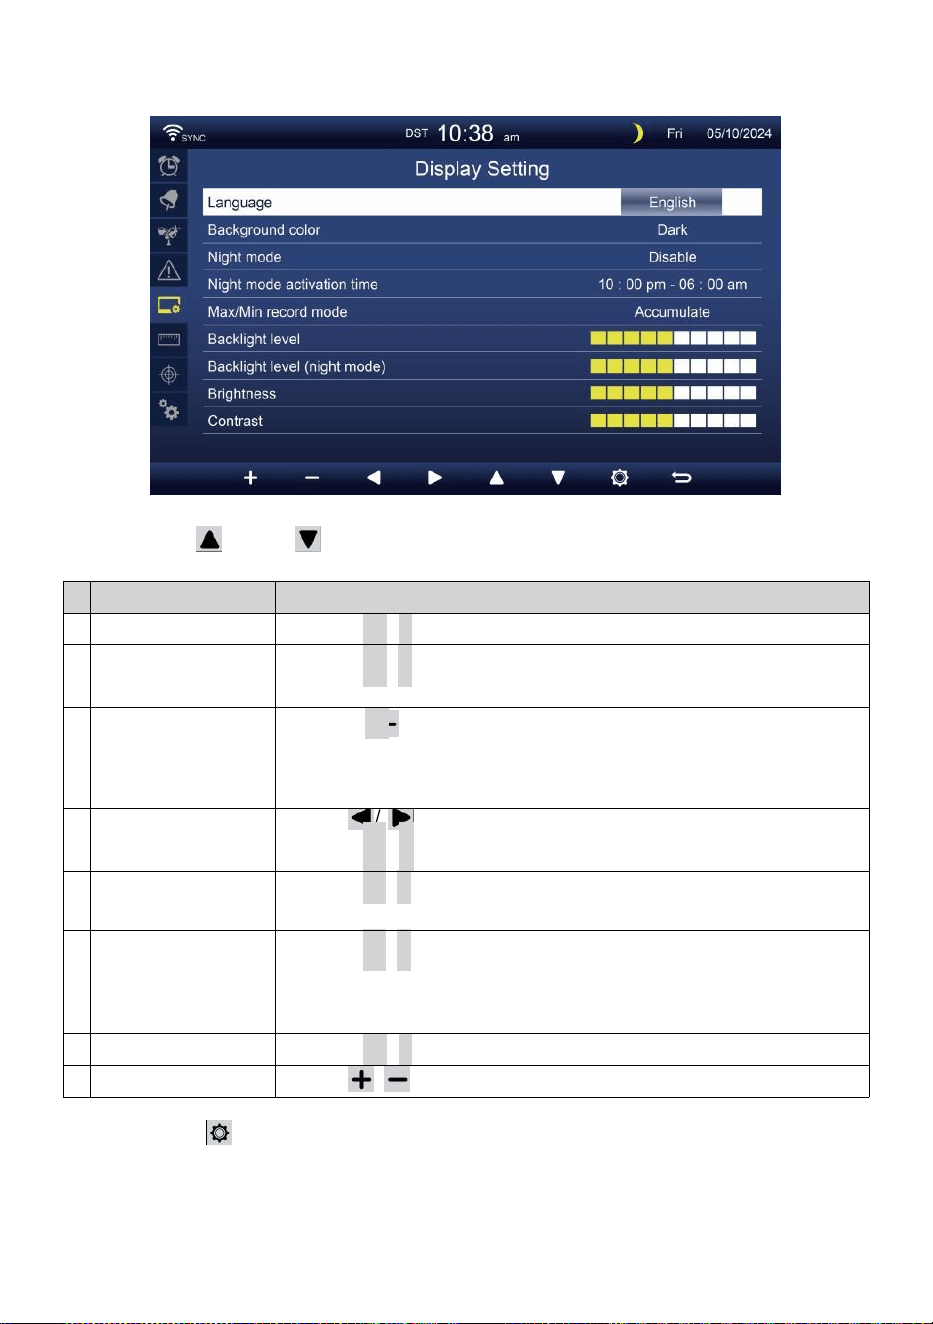
- 41 -
DISPLAY-EINSTELLUNGEN
Drücken oder Taste zum Ändern Die aktiviert Optionsfeld:
#
Unter Artikel
Betrieb
A
Sprache
Drücken
+
/
-
Taste Zu wählen Die Anzeige Sprache .
B
Hintergrundfarbe
Drücken
+
/
-
Taste Zu wählen Licht oder dunkel Farbe
Hintergrund zur Anzeige Modus.
C
Nacht Modus
Drücken
+
/ -Taste zum Aktivieren (Auslöser für die aktivieren
Zeit
Zeitraum), deaktivieren oder automatisch (Auslösung durch
Zimmer Umgebungstemperatur Licht Ebene).
D
Nacht Modus
aktivieren Zeit
Presse / , um zwischen Stunde oder Minute .
Drücken
+
/
-
Zu anpassen Die Wert .
t
Hintergrundbeleucht
ung Ebene
Drücken
+
/
-
Taste zum Einstellen der Hintergrundbeleuchtung
Ebene In normal .
F
Hintergrundbe
leuchtung
Ebene (Nacht
Modus)
Drücken
+
/
-
Taste zum Einstellen der
Hintergrundbeleuchtung Ebene während Nachtmodus .
G
Helligkeit
Drücken
+
/
-
Taste Zu anpassen Die Bildschirm Helligkeit .
H
Kontrast
Presse / Taste zum Anpassen des Bildschirms Kontrast.
Drücken , um die Anzeige der Einheiteneinstellung .
Drücken
w
-Taste, um zur Einzel-/Detailansicht zurückzukehren
Bildschirm.

- 42 -
EINHEITENEINSTELLUNG
Drücken oder Taste zum Ändern Die aktiviert Optionsfeld:
#
Unter Artikel
Betrieb
Temperatur
Drücken
+
/
-
Taste Zu wählen ° C oder °F.
Baro Druck
Drücken
+
/
-
Taste Zu wählen hPa , inHg oder mmHg .
Regen
Drücken
+
/
-
Taste Zu wählen mm oder In .
Windgeschwindigkei
t
Presse / , um auszuwählen MS, km/h, Knoten oder Meilen
pro Stunde.
Licht
Drücken
+
/
-
Taste Zu wählen Klux , KFC oder W /
m²
.
Drücken Ta s t e, um die Anzeige der Kalibrierungseinstellungen
aufzurufen .
Drücken
w
-Taste, um zur Einzel-/Detailansicht zurückzukehren
Bildschirm.

- 43 -
KALIBRIERUNG EINSTELLUNG
Kalibrierung für innen Parameter
Drücken oder , um verschiedene Reihe von aktivierten Option
Feld.
Drücken , um auszuwählen Option für hohen/niedrigen
Alarm/Alarm zurücksetzen.
Drücken oder Taste zum Anpassen des Wertes oder Ein/Aus-
Option.
Drücken C Taste, um Austausch, um zu zeigen, die Innen- ,
Außen- und Kanal Kalibrierung Einstellung Anzeige .
Drücken , um die Anderen Einstellung Anzeige.
Drücken Sie
w
Taste zum Zurückkehren
einfach/detailliert Bildschirm,
NOTIZ:
Bei der Auswahl Mit der Reset-Option werden alle Kalibrierwerte
zurücksetzen auf Die Standardwerte.
Kalibrierung für im Freien Parameter

- 43 -
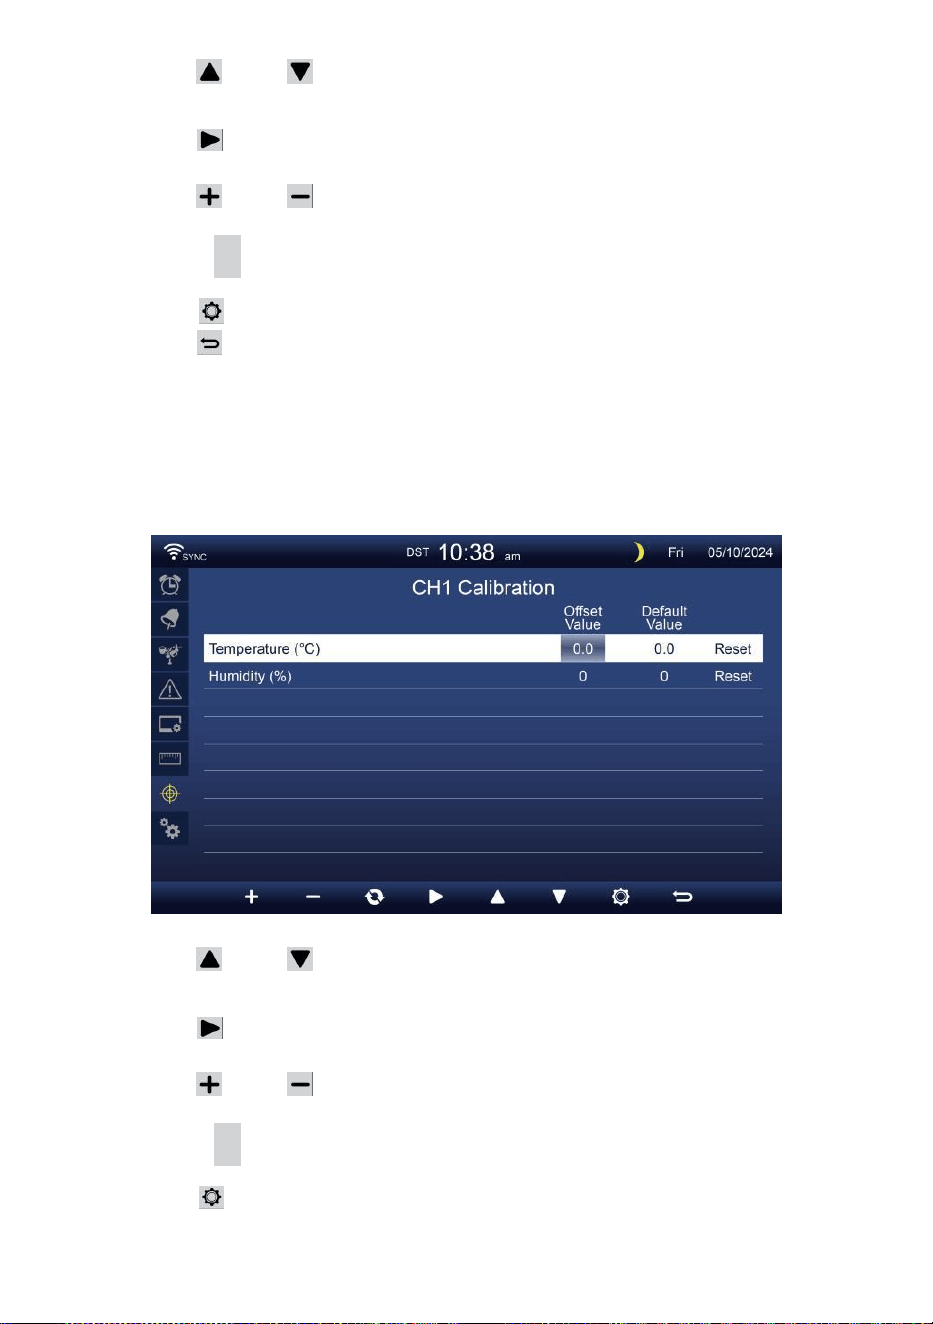
- 44 -
Drücken oder , um verschiedene Reihe von aktivierten Option
Feld.
Drücken , um auszuwählen Option für hohen/niedrigen
Alarm/Alarm zurücksetzen.
Drücken oder Taste zum Einstellen des Wertes oder zum Ein-
/Ausschalten Option.
Drücken
C
Taste, um Austausch, um zu zeigen, die Innen- ,
Außen- und Kanal Kalibrierung Einstellung Anzeige .
Drücken , um die Anderen Einstellung Anzeige.
Drücken Taste, um Einfachen/detaillierten
Bildschirm zurückgeben,
NOTIZ:
Bei der Auswahl Mit der Reset-Option werden alle Kalibrierwerte
zurücksetzen auf Die Standardwerte.
Kalibrierung für CH 1- CH 7- Sensor Parameter
Drücken oder , um verschiedene Reihe von aktivierten Option
Feld.
Drücken , um auszuwählen Option für hohen/niedrigen
Alarm/Alarm zurücksetzen.
Drücken oder Taste zum Einstellen des Wertes oder Ein/Aus-
Option.
Drücken C Taste, um Austausch, um zu zeigen, die Innen- ,
Außen- und Kanal Kalibrierung Einstellung Anzeige .
Drücken , um die Anderen Einstellung Anzeige.
Drücken Sie
w
Taste zum Zurückkehren
einfach/detailliert Bildschirm,

- 44 -
NOTIZ:
Bei der Auswahl Mit der Reset-Option werden alle Kalibrierwerte
zurücksetzen auf Die Standardwerte.
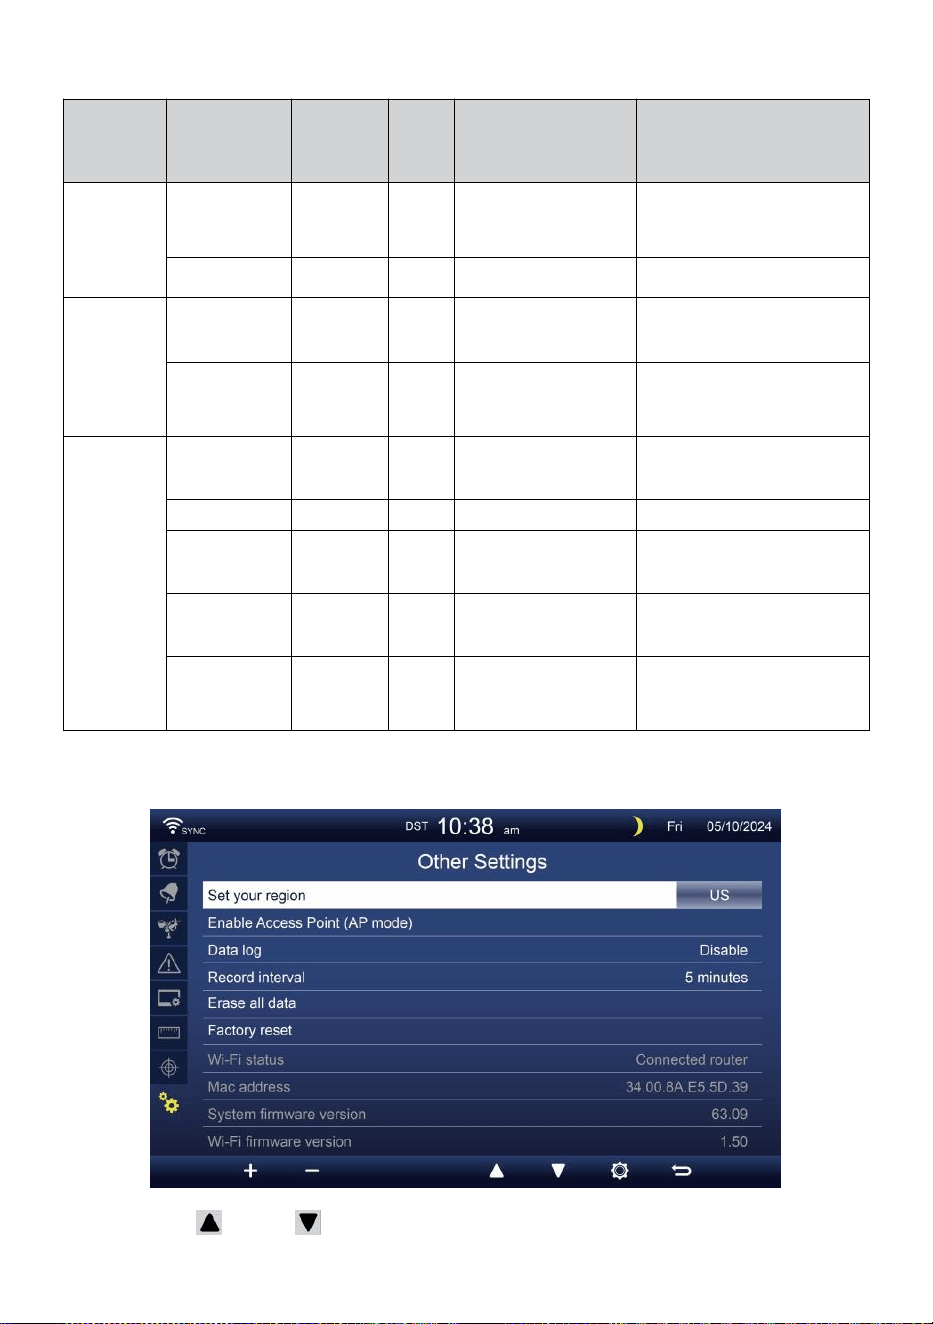
- 45 -
Kalibrierung Parameter
Sensor
Parameter
Typ von
Kalibrieru
ng
Standa
rd
Wert
Einstellung
Reichweite
Typische
Kalibrierung
Quelle
Innenbereic
h,
Outdoor
oder
Kanal(e)
Temperatur
Versatz
0
±36 °F (±20 °C)
Roter Spiritus oder
Quecksilber
Thermometer
Luftfeuchtigkeit
Versatz
0
±20 %
Schleuderpsychrometer
Innenbereic
h
Absolute
Druck
Versatz
0
±560 hPa (±16,51
inHg oder
±420mmHg
Kalibrierte Laborqualität
Barometer
Relativ
Druck
Versatz
0
±560 hPa (±16,51
inHg oder
±420mmHg
Lokaler Flughafen
Im Freien
Windgeschwin
digkeit
Gewinnen
1
X 0,5 ~ 1.5
Kalibrierte Laborqualität
Wind Meter
Windrichtung
Versatz
0
±10°
GPS oder Kompass
Regen
Gewinnen
1
X 0,5 ~ 1.5
Schauglas Regenmesser
mit Meter
UVI
Gewinnen
1
X 0,01 ~ 10,0
Kalibrierte Laborqualität
UV Meter
Licht
Intensität
Gewinnen
1
X 0,01 ~ 10,0
Kalibrierte Laborqualität
Sonneneinstrahlung
Sensor
ANDERE EINSTELLUNGEN
Drücken oder Taste zum Ändern Die aktiviert Optionsfeld:
- 46 -
#
Unter Artikel
Bedienung / Beschreibung
A
Stellen Sie Ihre
Region
Presse / , um auszuwählen Europa, VEREINIGTES
KÖNIGREICH, UNS, Australien.
B
Aktivieren Zugang
Punkt
Drücken
+
/
-
Taste Zu startAP Modus für W - LAN
Verbindung aufstellen .
C
Daten Protokoll
Presse / Schaltfläche zum Aktivieren oder Deaktivieren der
Daten Protokollfunktion.
D
Aufzeichnen Intervall
Drücken
+
/
-
Taste Zu aufstellen Die aufzeichnen Intervall von
Die Daten Protokoll .
t
Alles löschen Daten
Presse / , um alle Die Daten In Konsole.
F
Fabrik zurücksetzen
Drücken
+
/
-
Taste Zu zurücksetzen alle Die Einstellung Zu
Standard Und klar alle Daten In Konsole.
G
WLAN-Status
Zeigt den aktuellen WLAN-Verbindungsstatus der Konsole an.
H
Mac-Adresse
Zeigen Sie die Konsole an Mac-Adresse.
i
c
h
System-Firmware-
Version
Zeigt die aktuelle System-Firmware-Version der Konsole an.
J
Wi-Fi-Firmware-
Version
Zeigt die aktuelle Wi-Fi-Firmware-Version der Konsole an.
Drücken Taste zum Eingeben der Uhrzeit und Datumseinstellung
Anzeige .
Drücken Taste, um Geben Sie den einfachen/detaillierten
Bildschirm zurück.
EINSTELLUNG WLAN-VERBINDUNG
Verbindung einzurichten der Konsole, Es Bedürfnisse Zu Konfiguriere die
Konsole in Access Punkt (AP) Modus. Um den Access-Modus zu
aktivieren
Punkt (AP) Modus, folgen Sie bitte den untenstehenden Verfahren.
1. Im Einfach-/Detail-Bildschirm drücken Taste Zu eingeben
Einstellung Speisekarte.
2. Drücken Sie Taste Zu Schalter „ Andere Einstellung " Anzeige.
3. Drücken Sie oder Taste Zu eingeben "Zugriff
aktivieren Punkt ”, Drücken Sie + oder Taste zum
Starten des AP Modus.
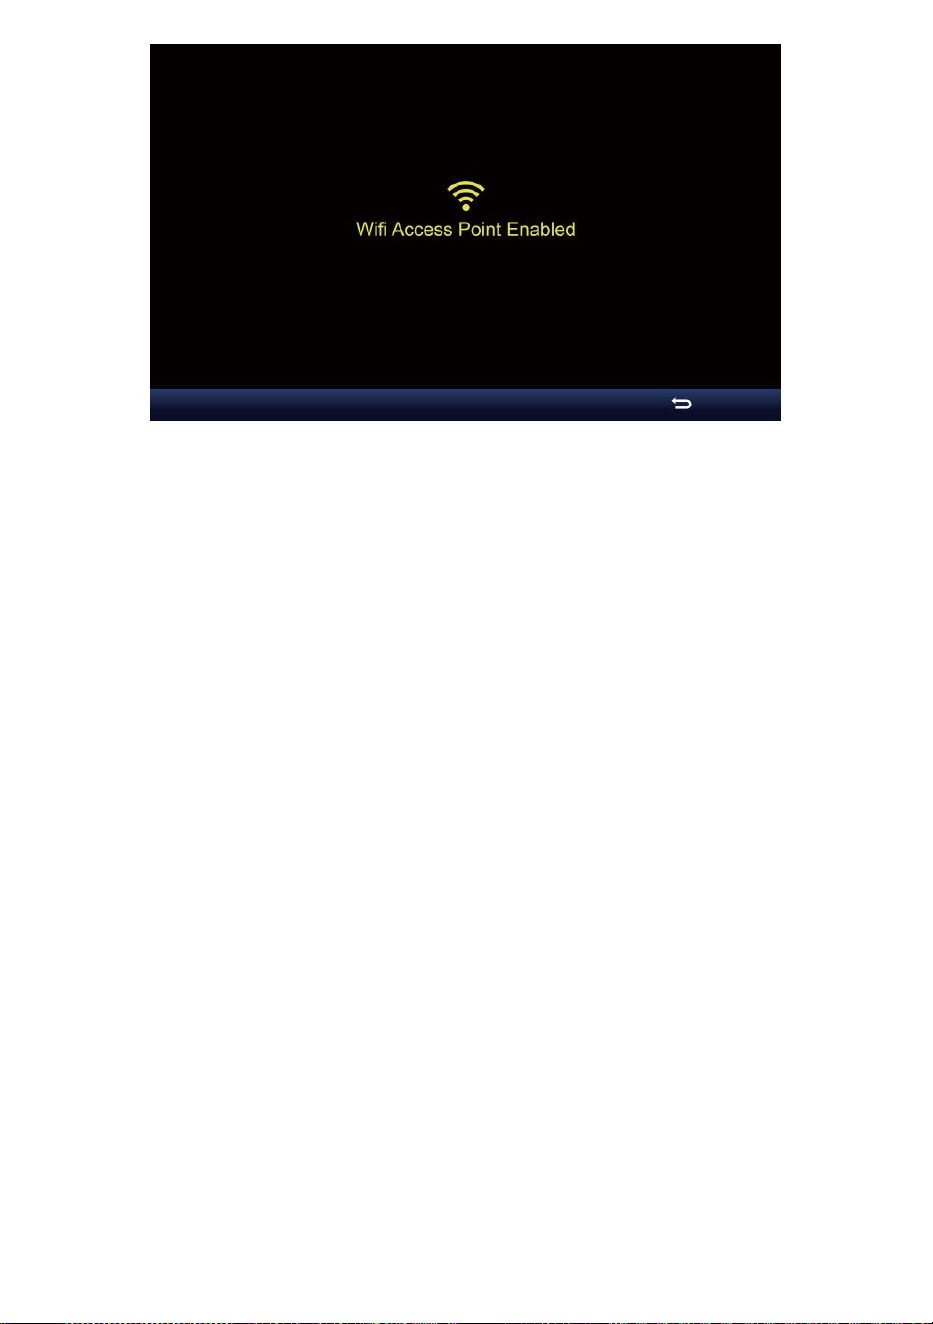
- 46 -

- 47 -
Notiz :
Während Im AP-Modus können Sie Drücken Sie Taste zum
Beenden von AP Modus. Das Wetter Station Wille einfach
wiederherstellen Die vorherige AP Einstellungen .
Verwenden dein Smartphone , Tablet oder Computer Zu
verbinden Zu Die Wetter Station über WLAN, indem Sie diese
Schritte:
1. Ein PC, öffnen Sie Ihr WLAN Netzwerkeinstellungen. Ein Android™
oder iOS Geräte , gehen Sie zum Einstellungsmenü und dann
wählen Verbindungen/WLAN t o offen
das Netzwerk Einstellungen.
2. Suchen Sie die SSID der Wetterstation von Die Liste. Es sollen
erscheinen als
WWS-XXXXXX (wobei alle X ganzzahlige Zahlen sind) In Die Liste.
Klopfen An die SSID zum Verbinden. Dieser Schritt dauert einige
Sekunden.
3. Sobald Sie mit dem Wetter verbunden sind Station, offen hoch dein
Internet- oder mobilen Webbrowser und geben Sie Folgendes ein
Adresse hinein Die
Adresse Balken : http://192.168.1.1 Zu auf die Weboberfläche
der Wetterstation zugreifen. (Stellen Sie sicher, dass Sie die http://
oder sonst e das Web Browser kann die Adresse als Suchanfrage
interpretieren ). Wir empfehlen mit der neuesten Version von
seriösen Web Browser.
4. Geben Sie Folgendes ein Information in die Weboberfläche (Abbildung
1). Stellen Sie sicher, dass alle Information wird eingegeben bevor
Sie Speichern auswählen. Wenn du
wählen nicht Zu hochladen Wunderground.com oder
hochladen Wetter -
cloud.net, lassen Sie den Haken Boxen deaktiviert.
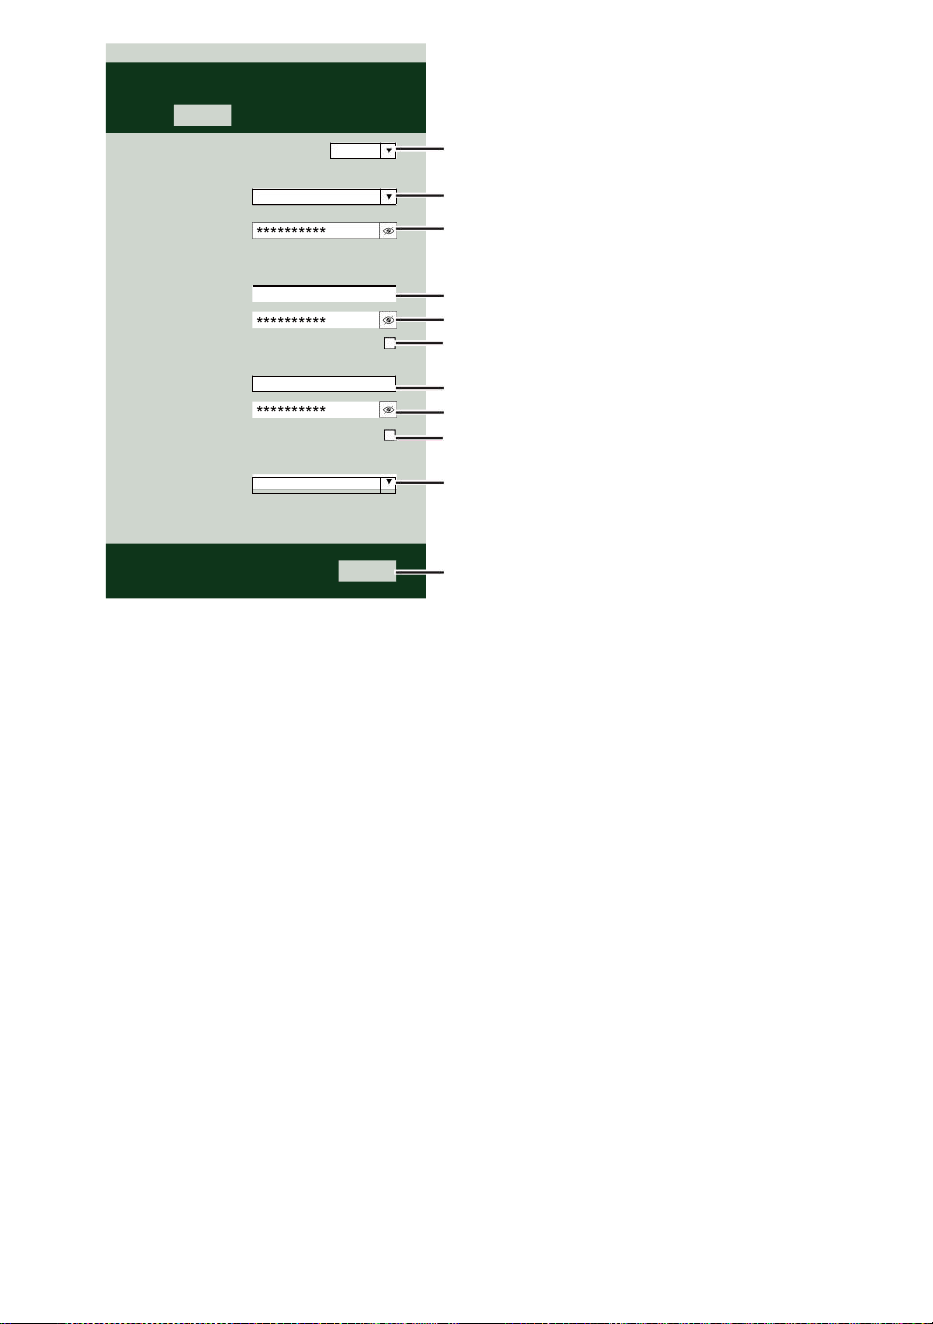
- 47 -
Select the menu and choose your 2.4 GHz WIFI Router
Password
Weather Server Setup
WeatherUnderground
Station ID
Station Key
Upload wunderground.com
WeatherCloud
Station ID
Station Key
Upload weatherCloud.net
Time Server Setup
time.windows.com
Firmware Version: 1.0.1
a7d9d2a279fbbafa
**********
**********
**********
Apply
KCACANTI9
Server URL
Enter your station ID
Enter your station key/password
check to confirm upload to
WeatherUnderground server
Enter your station ID
Enter your station key/password
check to confirm upload to Weathercloud.net
Internet time server setting
Press Apply to confirm the setting
Select setup UI display language
Select your Wi-Fi Router (SSID) from the list
Router Password
Router
Wi-Fi Router Setup
Language:
Router 12345
SETTINGS
SETUP
English

- 48 -
5. Wenn alle Informationen, die Sie eingegeben Ist richtig, Klicken Sie
auf „ Übernehmen “, um
bestätigen. Wenn das der Fall ist nicht, überprüfen Sie Ihre Web
Schnittstelle Informationen erneut.
NOTIZ:
Wann Die W - lan aufstellen Ist komplett , Ihre Computer oder Mobile
Gerät
Wille Kehren Sie zur standardmäßigen WLAN-Verbindung zurück.
Wenn ja nicht, einfach öffnen Sie Ihre Geräte kabellos Netzwerk
Einstellungen Und manuell erneut verbinden .
ZEIT SERVER VERBINDUNG STATUS
Nachdem die Wetterstation eine Verbindung zum Internet hergestellt
hat, es wird versuchen zur Verbindung mit dem Internet-Zeitserver, um
die U TC Zeit. Einmal Die
Verbindung erfolgreich ist und die Uhrzeit der Wetterstation
aktualisiert. Das Symbol „ SYNC “ erscheint auf dem LCD-Anzeige.
Um die korrekte Zeit für Ihre Zeitzone anzuzeigen, müssen Sie müssen
die Zeitzone ändern im CLOCK- Einstellmodus aus 00 (Standard) Zu
Ihre Zeitzone (z. B. -5 für EST). Wenn Sie nicht Kennen Sie Ihre Zeit
Zone, Du dürfen sehen Es online.
NOTIZ:
Die Uhrzeit wird automatisch mit der Internet pro Stunde.
ERSTELLENUND SYNCHRONISIEREN SIE IHR
WETTERSERVER-KONTO
ERSTELLEN DEIN WETTERUNTERGRUND KONTO
1. Besuchen Sie: https://Wunderground.com und wählen Sie „
Beitreten “ In Die obere rechts und Ecke und erstellen A
Kostenloses Konto.

- 48 -
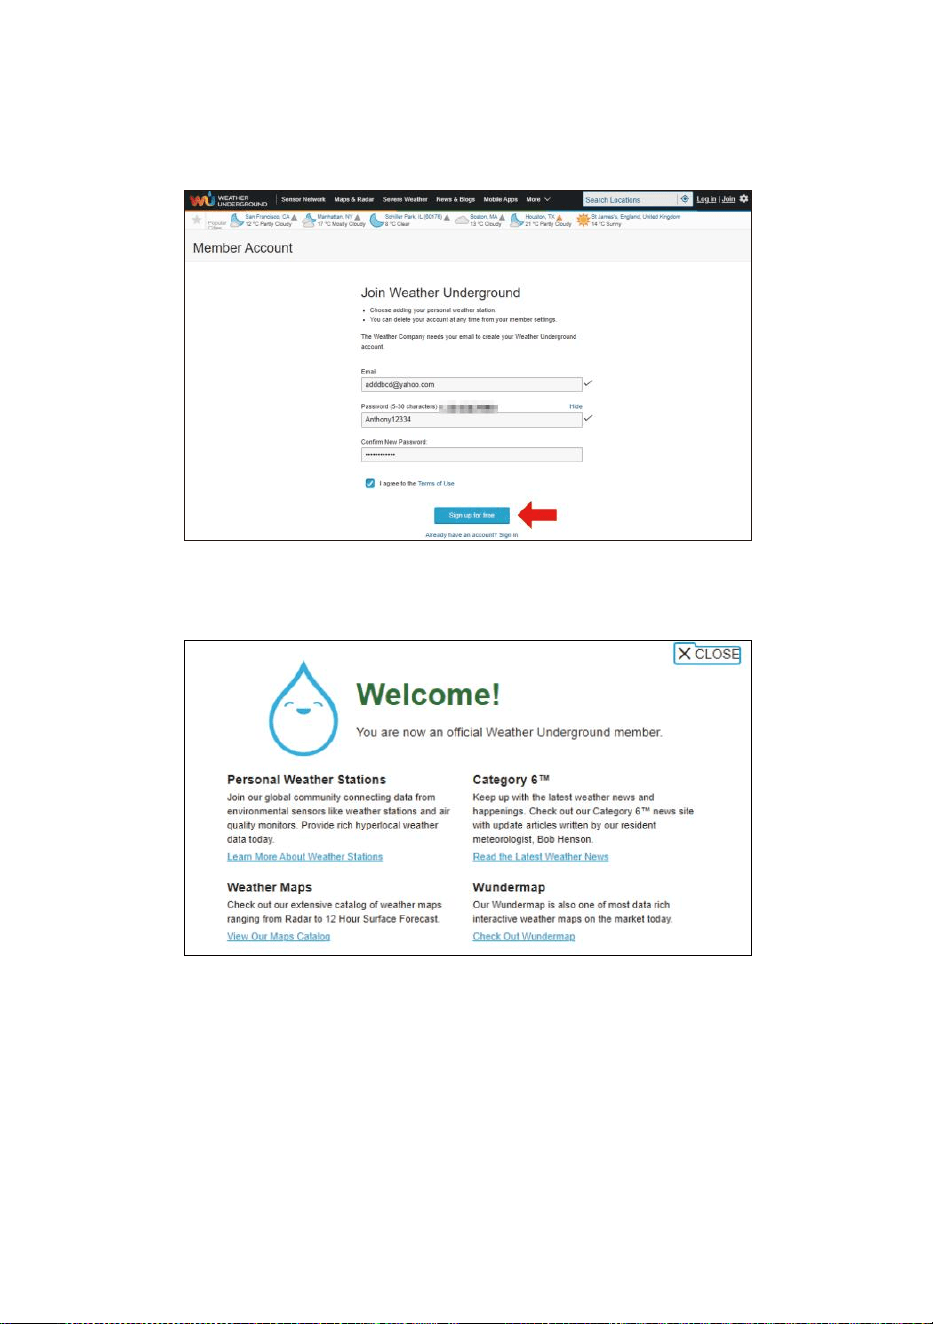
- 49 -
2. Geben Sie einen Benutzername, E-Mail und Passwort ( Es ist Ihr
Login Passwort der WebsiteEs, nicht deine E-Mail Passwort.
NEIN Privatsphäre wird ausgesetzt sein ). Klicken Sie auf Sign
kostenlos .
3. Nach der Registrierung ist erledigt erfolgreich, es wird gezeigt unten
Nachricht.
4. Klicken Sie auf „Anmelden ” und eingeben Die E-Mail Adresse
Und pas schwert du hast gerade eingetragen.

- 49 -

- 50 -
5. Klicken Sie auf „Mein Profil “ und geben Sie die
Mitgliedseinstellungen ein.
6. Klicken Sie auf „Aktualisieren heim Standort ".
7. Klicken Sie auf „Mein Geräte “ und klicken Sie auf „
Hinzufügen Neu Gerät ".
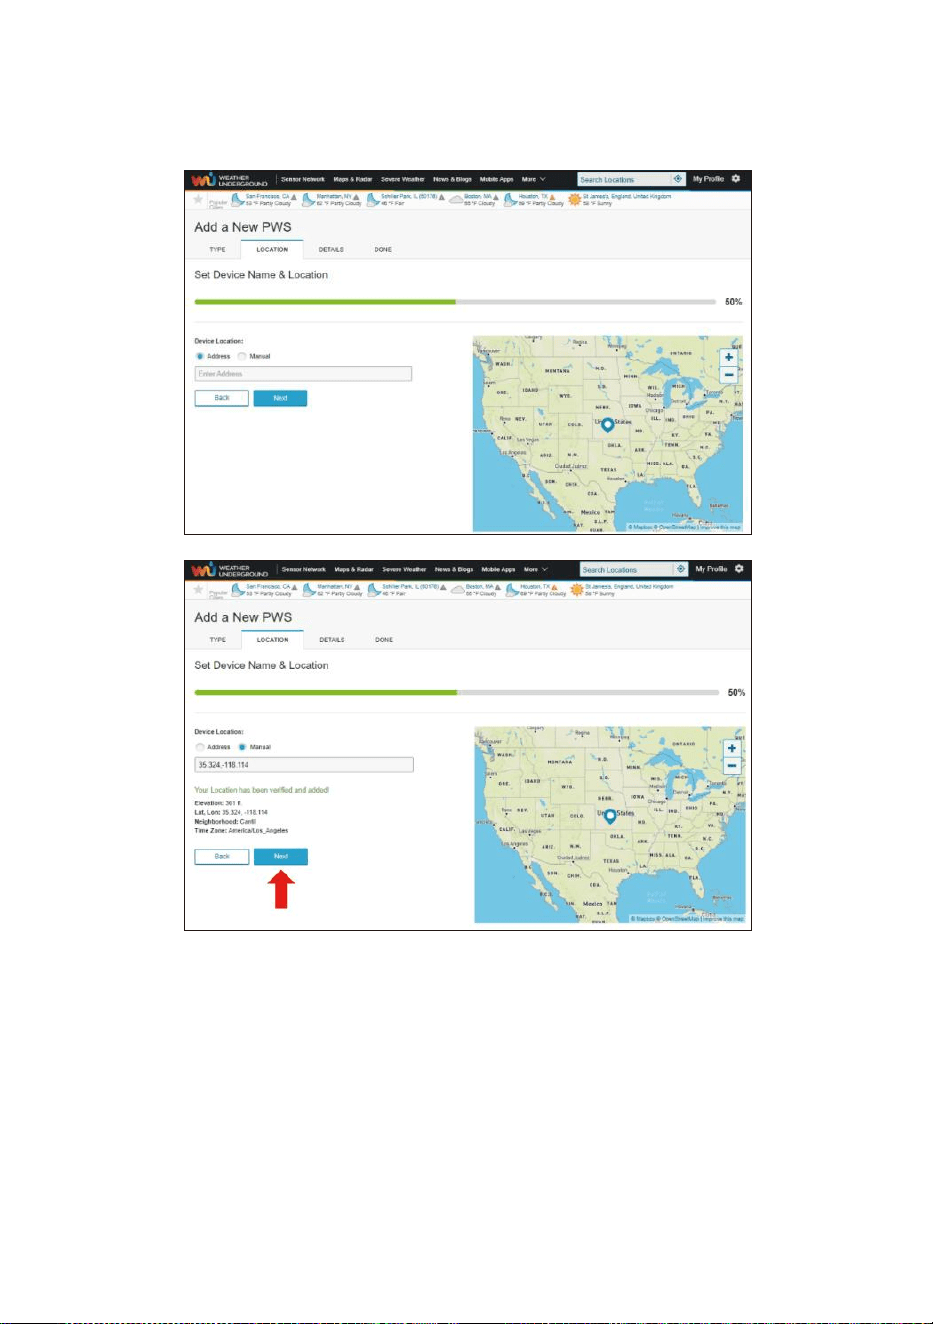
- 51 -
8. Adresse auswählen von durch Eingabe einer Adresse oder durch
Auswahl Handbuch zu Positionieren Sie Ihre Adresse automatisch.
Klicken Sie dann auf „Nächste ".
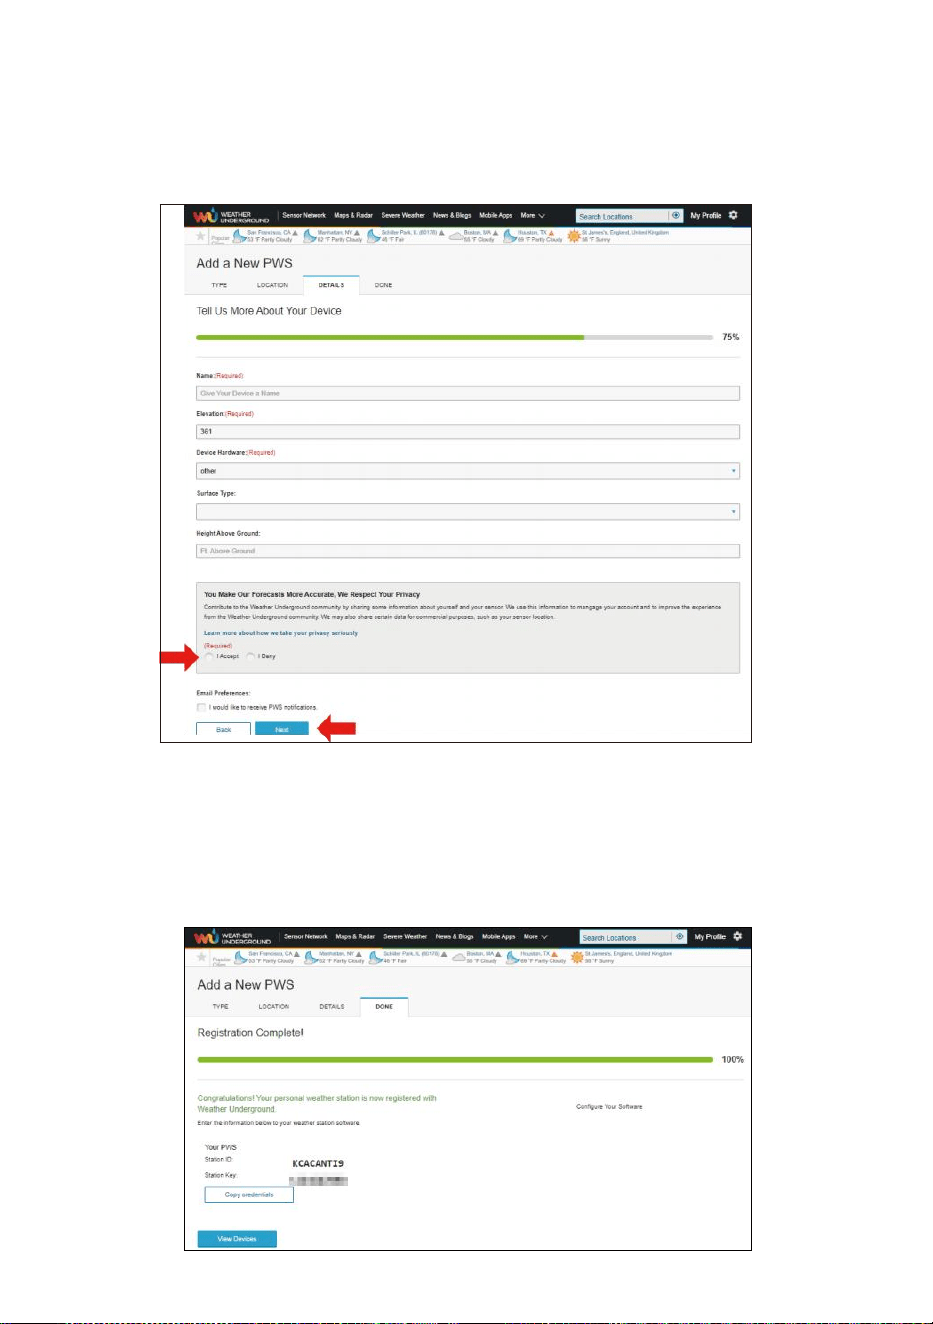
- 52 -
9. Geben Sie die Wetterinformationen ein. Rohlinge mit rot
(erforderlich) muss sein gefüllt In.
NOTIZ:
Sie können „andere“ der Gerät Hardware.
10. Einmal Vervollständigen Sie dies Sitzung, klicken Sie auf „ICH
Akzeptieren " Und „Nächste ".
11. Nach erfolgreicher Registrierung Bitte Notieren Sie Ihr Wetter
Unter- Boden ID und Schlüssel Informationen zur späteren
Einrichtung verwenden.

- 53 -
12. Wie gezeigt unten, Anmeldung ist erfolgreich durchgeführt.
ERSTELLEN DEIN WETTERWOLKE KONTO
1. Besuchen Sie die Weathercloud-Website unter
https://weathercloud.net/ und geben Sie ein einen Benutzernamen,
E-Mail und Passwort und klicken Sie auf „ Anmelden hoch ". Im
Anschluss an die
Anweisungen zum Erstellen einer Konto.
HINWEIS: Diese Ist am besten am Computer Desktop-Computer oder
Laptop.
(Es ist Ihr Login Passwort der WebsiteEs, nicht deine E-Mail
Passwort. Also NEIN Privatsphäre wird ausgesetzt sein).
2. Wann Es ist erfolgreich, ein E-Mail wird Sei erhalten in Ihrem
eingetragen Postfach.
3. Öffnen Sie Ihr Mail und Protokoll In Zu das Web Adresse In Die Mail.
Klicken Sie auf „ Aktivieren dein Wetterwolke Konto ".

- 53 -
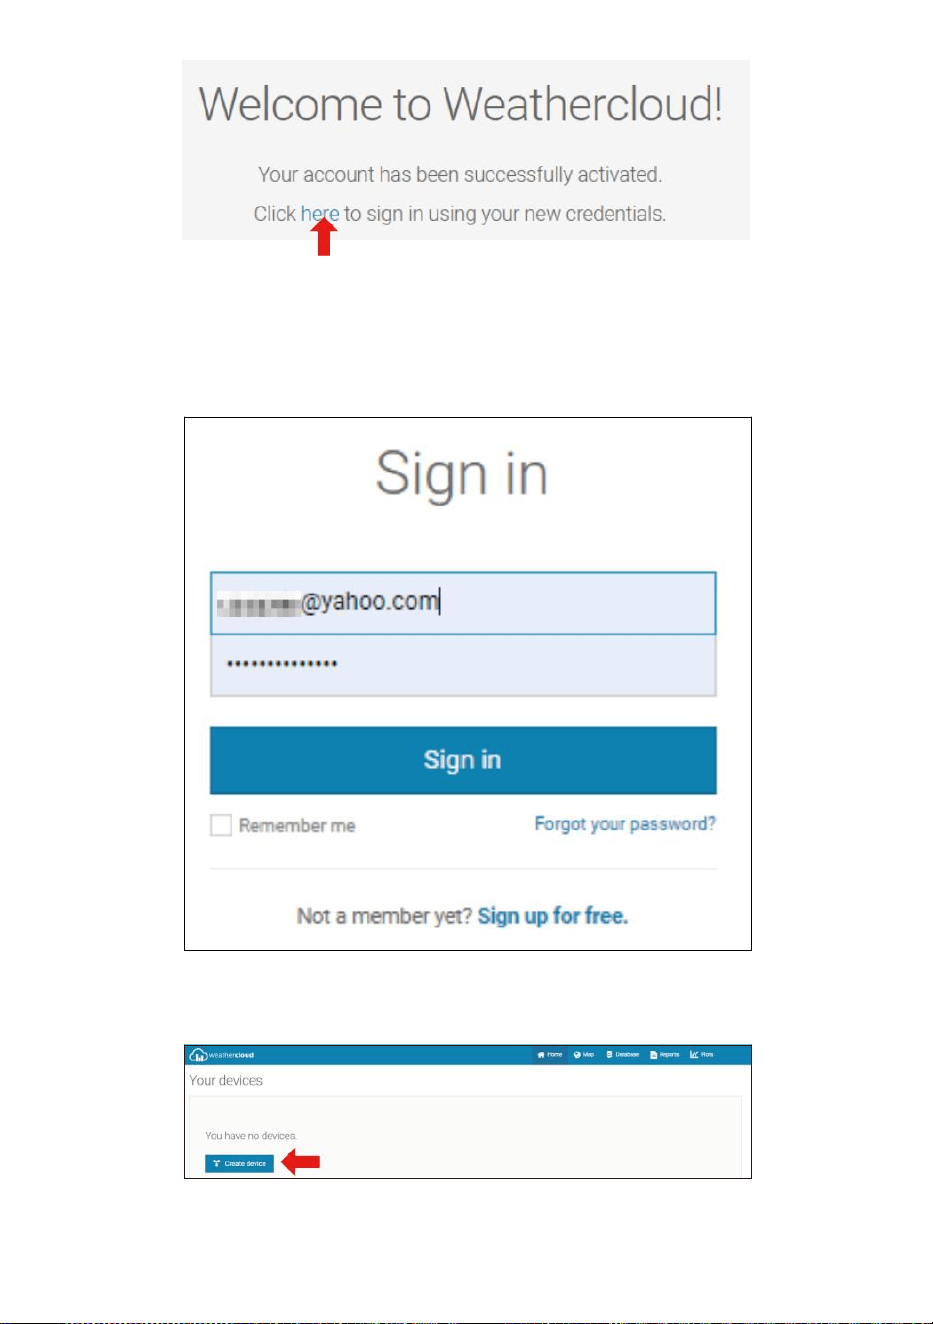
- 54 -
4. Klicken Sie auf „hier “, um auf die Homepage der WeatherCloud-
Website zu gelangen .
5. Geben Sie die E-Mail-Adresse und das Passwort ein, die Sie gerade
registriert bei betritt die Wetterwolke website .
6. Klicken Sie auf „ Gerät erstellen “, um ein Wetterstationsgerät
hinzuzufügen.
7. Geben Sie alle angefordert Information in die Kreative Neu Gerät Seite.
Rohlinge mit Rot * muss ausgefüllt werden In.

- 55 -
NOTIZ:
Sie können „andere“ der Modell Nummer und Link-Typ im über
Leerzeichen.
Klicken Sie auf „Koordinaten abrufen“, um Ihren Standort ermitteln
auf Die Karte, Dann Klicken Sie auf „Fertig“, um bestätigen.
8. Sobald Sie vollendet Das Abschnitt, Klicken Sie auf „ Erstellen “.
9. Nach erfolgreicher Registrierung bitte zeichnen Sie Ihre
Weathercloud auf AUSWEIS Und Schlüssel Informationen zur
späteren Einrichtung verwenden.
SICHT DEIN WETTER DATEN IN WETTERUNTERGRUND
Zur Live-Ansicht der Daten Ihrer Wetterstation über PC oder Mobiles
Web Browser,
besuchen http://www.wunderground.com , und geben Sie dann die
Station ion ein ID, mit der Sie bei der Kontoeinrichtung in der Suche

- 55 -
angegeben Feld. Ihre Wetterdaten werden angezeigt auf dem nächste
Seite.
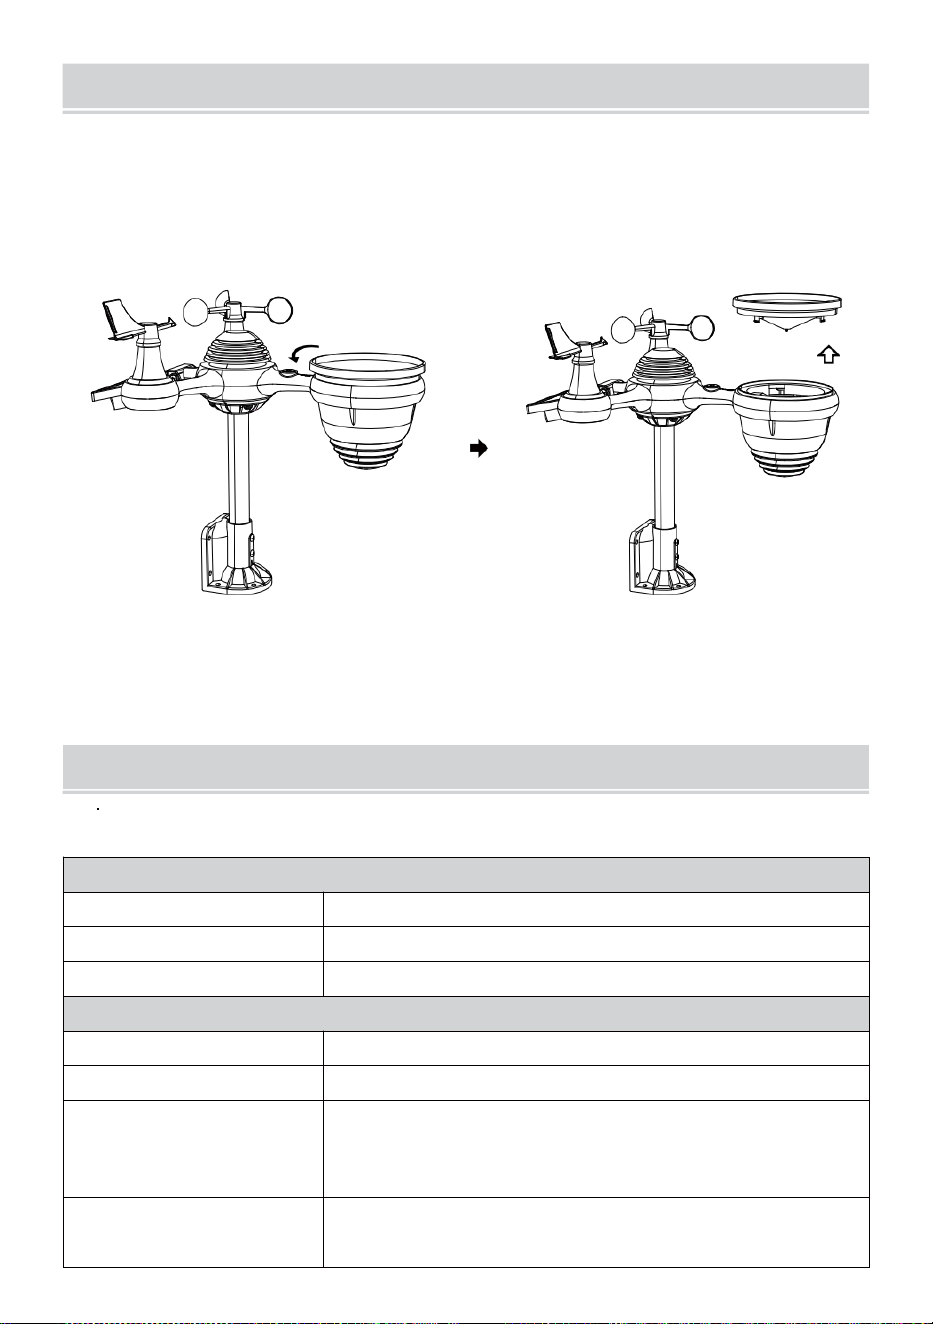
- 56 -
PFLEGEUND WARTUNG
1. Reinigen Sie die Regenmesser alle 3 Monate. Drehen Die Trichter
gegen den Uhrzeigersinn drehen und anheben, um die
Regenmesser Mechanismen, Und reinigen mit A feuchtes Tuch.
Entfernen Sie Schmutz, Ablagerungen und Insekten. Wenn Fehler
Befall ist ein Problem, sprühen Sie den Sensor leicht mit Insektizid .
Offen
Aufzug
2. Reinigen Sie die Licht Intensität/ UV-Sensor und Solar Bedienfeld
jeder 3 Monate mit Feuchtigkeit Tuch.
3. Beim Auswechseln der Batterien anwenden A Korrosion
vorbeugend Verbindung auf der Batterie Terminals
SPEZIFIKATION
WETTER STATION
Allgemeine Spezifikationen
Dimension
7,3 x 5,4 x 1,1 Zoll (185,9 x 137 .4 X 28,5 mm)
Energiequelle
AC-DC 5 V, 1A-Adapter (im Lieferumfang enthalten)
Unterstützungssensoren
1 x 7-in-1-Sensor (im Lieferumfang enthalten)
Wi-Fi- Kommunikationsspezifikation
WLAN-Standard
802.11 b/g/n
WLAN Fi-Betriebsfrequenz
2,4 GHz
Unterstützte Geräte
für aufstellen
Benutzeroberfläche
Integriertes WLAN mit WAP-Modus für Smart-Geräte,
darunter Laptops, Computer, Smartphones und
schlau Polster
Webbrowser empfehlen
für die Einrichtung
Neueste Version eines beliebigen Webbrowsers, der unterstützt
HTML 5

- 56 -
Benutzeroberfläche

- 57 -
Ze it Fun k t i on s s p ez i f ik a t io n e n
Z e i t A n z e i g e
HH : MM
S t u n d e n f o r m a t
12 Stunde oder 24 Stunde
Datum Anzeige
TT.MM oder TT.MM.
Z e i t s y n c h r o n i s a t i o n V e r f a h r e n
Sy n ch r o n is i e r t mit At o m ic U h r
Zeitzonen
-12 ~ +13 Std.
Sommerzeit
EIN/AUS
Barometeranzeige & Funktionsspezifikationen
Barometereinheiten
hPa, inHg und mmHg
Messung Reichweite
600 – 1100 hPa (relative Einstellung Baureihe 930 – 1050 hPa)
Genauigkeit
700 -1100 hPa±5 hPa/600 -696 hPa±8 hPa
20,67 – 32,48 ZollHg ± 0,15 ZollHg/17,72 – 20,55 ZollHg ±0,24 inHg
525 -825 mmHg±3,8 mmHg/450 -5 22 mmHg±6
mmHg Typisch bei 77 Jahre (25 ℃ )
Wettervorhersage
Sonnig, Teilweise bewölkt, bewölkt, Regnerisch, stürmisch und
Schneebedeckt
Anzeige Modus
Aktuell
Erinnerung Modus
Täglich Max/ Mindest
Alarm
Druckänderungsalarm
Innen-/Außentemperatur Anzeige & Funktionsspezifikationen
Temperatur Einheit
℃ und 吓
Innendisplay Reichweite
-14.1
Uhr–
122
°C
(-9,9
°C
– 50
°C
)
Außendisplay Reichweite
-40 Schrecken – 158 °C (-40 °C – 70 °C )
In/Out-Genauigkeit
50 – 122
Gruselig
1.8
Angst
/ 10 –
50 ℃ ± 1 ℃ -4 - 50 ± 2,7 / -20 – 10
℃ ± 1,5 ℃ Sonstiges : ± 3,6 / ±2 ℃
Anzeige Modus
Aktuell
Erinnerung Modus
Täglich Max/ Mindest
Alarm
Hoch-/Niedrigtemperaturalarm
- 58 -
Luftfeuchtigkeit innen/außen Anzeige & Funktionsspezifikationen
Luftfeuchtigkeit Einheit
%
Anzeige Reichweite
1 – 99 %
In/Out-Genauigkeit
40 – 80 % relative Luftfeuchtigkeit ± 5
% ABSCHNITT HR-V @77 °C (2,5 °
C ) Sonstiges : ± 8 % ABSCHNITT
HR-V @77
°C
(25
°C
)
Anzeige Modus
Aktuell
Erinnerung Modus
Täglich Max/ Mindest
Alarm
Hoch/Niedrig Feuchtigkeitsalarm
Windgeschwindigkeit und Richtung Anzeige & Funktionsspezifikationen
Windgeschwindigkeit Einheit
Meilen pro Stunde, MS, km/h, Knoten
Anzeige Reichweite
0 -180 km/h, 50 m/s, 180 km/h, 97 Knoten
Geschwindigkeitsgenauigkeit
<5 m/s: ±0,5 m/s, >5 m/s : ±10 % (je nachdem, ist größer)
Anzeige Modus
Böen/Durchschnitt
Erinnerung Modus
Tägliche Böen/Durchschnitt
Alarm
Hohe Windgeschwindigkeit Alarm (Böen/Durchschnitt)
Windrichtung
16 Richtungen
Regen Anzeige & Funktionsspezifikationen
Einheit von
Niederschlagsmenge
mm, In
Reichweite
Niederschlagsmenge
0 – 12999 mm (0 – 511,7 In)
Genauigkeit der
Niederschlagsmenge
±7 %
Anzeige Modus
Aktuell
Erinnerung Modus
Täglich Max
Niederschlagsanzeige Modus
Stündlich/ Täglich/ Wöchentlich/ Monatlich/ Gesamt
Niederschlagsmenge
Alarm
Hoch Täglich Niederschlagsalarm
UV Index Anzeige & Funktionsspezifikationen
Anzeige Reichweite
0 - 16
Anzeige Modus
Aktuell
Erinnerung Modus
Täglich Max
Alarm
Hoch UVI-Warnung
- 59 -
Licht Intensität Anzeige & Funktionsspezifikationen
Licht Intensität Einheit
Klux, Kfc und W/
m²
Anzeige Reichweite
0 – 200 Klux
Anzeige Modus
Aktuell
Erinnerung Modus
Täglich Max
Alarm
Hoch Licht Intensitätsalarm
Wetterindex Anzeige & Funktionsspezifikationen
Wetter Index Modus
Fühlt sich an wie Windchill, Hitze Index und Tau Punkt
Anzeige Modus
Aktuell
Erinnerung Modus
Täglich Max./Min.
DRAHTLOSER 7- IN- 1- OUTDOOR SENSOR
Dimension
16 x 15,6 x 14,4 Zoll (408 x 396 x 367 mm)
Hauptsächlich Leistung
3,6 V Ni-MH wiederaufladbar Batterie Pack
Sicherung Leistung
Solar Leistung
Wetterdaten
Temperatur, Luftfeuchtigkeit, Windgeschwindigkeit ,
Windrichtung, Niederschlagsmenge, UVI und Licht
Intensität
HF-Übertragung Reichweite
330 Fuß (100 m)
Übertragungsintervall
Alle 20 Sekunden für UV
,
Licht Intensität
、
Windgeschwindigkeit
、
Temperatur, Luftfeuchtigkeits- und Niederschlagsdaten sowie
Windrichtung Daten
Betriebstemperatur
-40
Minuten–
140
°C
(-40
°C
– 60
°C
)
den Sensor erforderliches
Werkzeug
Ja

- 60 -
FEHLERBEHEBUNG
Problem
Lösung
Der kabellose Sensor
funktioniert nicht
kommunizieren die
Wetterstation
Der Funksensor kann haben initiiert richtig, und die Daten Ist
von der Wetterstation als ungültig registriert und Die Wetter Bahnhof
muss Sei zurücksetzen.
Mit einem offenen Büroklammer , Drücken Sie die Drücken Sie die
RESET-Taste 3 Sekunden lang, um die Anzeige der Spannung
abzuschließen. Die LED blinkt alle 20 Sekunden.
Wenn die LED nicht alle 20 Sekunden blinkt, nehmen Sie den
Batterien Und Warten 5 Minuten, während das Solarpanel abgedeckt
wird, um Die Stromspannung.
Setzen Batterien zurück in und die Wetterstation neu
synchronisieren und synchronisieren Sie Wetterstation (siehe Seite
10 SENSOR NEU KOPPELN) mit dem Funksensor über 10 Fuß
(3 m) weg .
Der Die LED des Funksensors blinkt alle 20 Sekunden. Wenn das LED
ist Trotzdem nicht alle 20 Sekunden blinkt, ersetzen Sie die neu
Batterien im
drahtloser Sensor.
Wenn das Batterien waren kürzlich ersetzt, überprüfen Sie die Polarität.
Wenn der Funksensor alle 20 Sekunden blinkt , weiter zum nächste
Schritt.
Dort Mai ein vorübergehender Kommunikationsverlust aufgrund von
Rezeption Verlust durch Störungen oder andere Standortfaktoren,
Oder Batterien Mai haben wurde geändert im drahtlosen Sensor und
der Wetterstation hat nicht gewesen zurückgesetzt. Die Lösung Mai
so einfach sein wie das Ein- und Ausschalten der Wetterstation
(entfernen Gleichstrom Macht und
Batterien), warten Sie 30 Sekunden und legen Sie sie erneut ein
Gleichstrom Macht und Batterien).
Innen- und Im
Freien Temperatur
nicht zustimmen
Warten Sie bis zu einer Stunde, bis die drahtlosen Sensoren stabilisieren
fällig Zu Signal
Filterung. Die Innen- und Außentemperatursensoren sollten innerhalb ±4
°C (±2 °C ) (die Sensorgenauigkeit Ist ±2 Zoll (±1 ℃ )
Verwenden Sie die Kalibrierungsfunktion, um die Innen- Und

- 60 -
Außentemperatur zu einem bekannt Quelle.
Temperatursensor
liest auch hoch im
Tageszeit
Stellen Sie sicher, dass der drahtlose Sensor nicht zu schließen Zu Hitze
erzeugende Quellen oder Strukturen, wie Gebäude, Bürgersteige,
Wände , oder Luft Zustand- ing Einheiten.

- 61 -
Problem
Lösung
Regenmesser Berichte
Regen Wann Es Es
nicht es regnet.
Ein instabil Montagelösung (Schwing im Montage Pole) Mai
Ergebnis im Kippen Eimer falsch Inkrementieren
Niederschlagsmenge. Stellen Sie sicher, dass Sie
haben Sie eine stabile, ebene Montagelösung. (Verweisen Seite 9
EINSTELLEN DER 7-IN-1-DRAHTLOSER SENSOR EBENE)
WLAN funktioniert
nicht anzeigen auf der
Wetterstation
Überprüfen Sie Ihren Router auf Probleme.
1. Überprüfen Sie das WLAN-Symbol auf dem Display. Wenn die
drahtlose Verbindung Ist
erfolgreich , die W - lan Symbol AWille Sei angezeigt In Die Zeit
abgelegt .
2. Stellen Sie sic her, dass die WLAN-Einstellungen Ihres
Modems korrekt sind (Netzwerk Name, Und Passwort)
3. Stellen Sie sicher, dass die Wetterstation Ist eingesteckt hinein
Klimaanlage Stromversorgung. Die Wetterstation wird keine
Verbindung zum WLAN herstellen, wenn batteriebetrieben nur.
4. Die Konsole unterstützt und verbindet sich nur mit 2,4 GHz
Router. Wenn Ihr besitzen ein 5GHz Router, ein Es ist ein Dual
Band Router, Du Wille brauchen Zu
Deaktivieren Sie das 5-GHz-Band und Aktivieren Sie die 2,4 GHz Band.
5. Das Wetter unterstützt keine Gastnetzwerke.
Daten nicht
Berichterstattung an
www.wunder-
ground.com oder
www.weathercloud.net
1. Bestätigen Sie Ihr Passwort oder Ihren Schlüssel ist richtig . Es
Ist Die Passwort Du auf Wunderground.com registriert.
Wunderground.com. Ihr Passwort für underground.com darf nicht mit
nicht-alphanumerischen Zeichen beginnen (eine Einschränkung von
Wunderround.com , nicht der Bahnhof). Beispiel, $worknet Ist kein
gültiger Passwort, aber
Arbeitsnetz$ ist gültig)
2. Bestätigen Sie Ihren Sender AUSWEIS ix richtig. Die Station
AUSWEIS ist alles in Großbuchstaben, und die häufigste Ausgabe
ist das Ersetzen von und O durch ein 0 (oder umgekehrt).
Beispiel, KCAPHOEM12, nicht KCAPH0EM12.
3. Stellen Sie sicher, dass Datum und Uhrzeit ist richtig auf Die
Wetter Station. Wenn falsch, Sie Mai Sei Meldung alter Daten,
nicht Echtzeitdaten .
4. Stellen Sie sicher, dass Ihre Zeitzone ist eingestellt richtig. Wenn
das falsch ist, Mai Sei Meldung alter Daten, nicht Echtzeit da ist
es .
5. Überprüfen Sie die Firewall-Einstellungen Ihres Routers. Die
Wetterstation sendet Daten über Hafen 80.

FCC STATEMENT
- 62 -
Dieses Gerät entspricht Teil 15 der FCC Regeln. Betrieb unterliegt
Die folgende zwei Bedingungen :
1. Dieses Gerät Mai NICHT Ursache schädlich Interferenz.
2. Dieses Gerät muss jede Einmischung akzeptieren erhalten,
einschließlich Störungen , die kann zu unerwünschten Betrieb.
NOTIZ:
Dieses Gerät hat wurde getestet und entspricht den Grenzen für
eine Klasse B digitales Gerät, gemäß Teil 15 der FCC Regeln.
Diese Grenzwerte sind so konzipiert, bieten angemessene Schutz
vor schädlich Interferenz in einem Wohnen Installation. Dieses
Gerät
erzeugt — und kann ausstrahlen — Radiofrequenzenergie und
wenn nicht installiert und gebraucht in Übereinstimmung mit der
Anweisungen, können schädliche Störungen des Funkverkehrs .
Es gibt jedoch Ist keine Garantie, dass Störungen werden nicht
auftreten in einem bestimmte Installation.
Wenn das Gerät nicht verursachen schädlich Störungen des Radio- oder
Fernsehempfangs , die durch Drehen des Ausrüstung aus und auf, die
Der Benutzer wird aufgefordert, zu versuchen, die Interferenz von eins
oder mehr der folgende Maßnahmen :
Neuausrichtung oder Standortwechsel des Empfangsantenne.
Erhöhen Sie den Abstand zwischen dem Gerät und dem Empfänger.
Anschließen der Geräte in eine Steckdose eines Stromkreises
anders aus Das an den der Empfänger Ist verbunden .
Wenden Sie sich an den Händler oder einen erfahrenen Radio-
/Fernsehtechniker für helfen.
ACHTUNG: Änderungen oder Modifikationen an dieser Einheit nicht
ausdrücklich
genehmigt durch die Die für die Einhaltung der Vorschriften
verantwortliche Partei kann zum Erlöschen der Berechtigung
des Benutzers zum Betrieb des Geräts führen.
Sanven-Technologie GmbH.

FCC STATEMENT
- 62 -
Adresse: Suite 250, 9166 Anaheim Ort, Rancho Cucamonga,
Kalifornien 91730
Gemacht In China


Technischer Support und E-Garantie-
Zertifikat www.vevor.com/support

S
e
r
r
a
t
u
r
a
Avvio rapido Guida
⑤
I
M
P
O
S
T
A
Z
I
O
N
E
D
E
L
R
A
C
C
O
G
L
I
T
O
①INSTALLING THE MOUNTING POLE
Secure the sensor onto a mounting pole (included) using the screws (included).

R
E
D
I
P
I
O
G
G
I
A
I
n
s
e
r
i
r
e
I
L
i
m
b
u
t
o
I
n
I
L
p
i
o
v
e
r
e
c
o
l
l
e
t
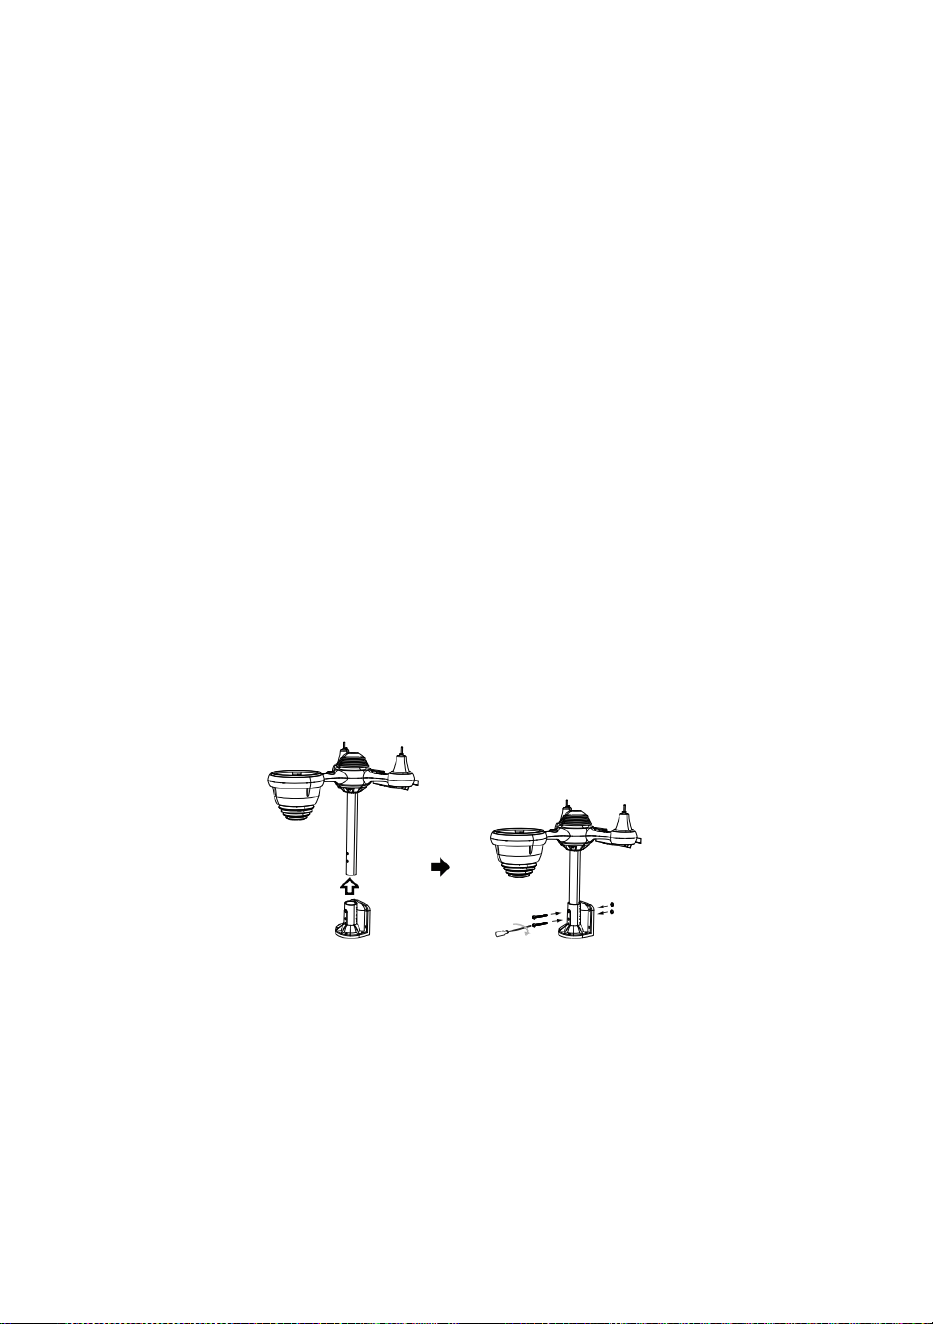
t
o
r
e
E
s
e
r
r
a
t
u
r
a
E
s
s
o
I
n
p
o
s
t
o
.
⑥
I
N
S
T
A
L
L
A
Z
I
O
N
E

I
L
B
A
T
T
E
R
I
E
② INSTALLAZIONE IL MONTAGGIO STAFFA
Svitare lo sportello della batteria a il fondo. Connetti il cavo di il pacco batteria
ricaricabile.
R
e
g
o
l
a
r
e
i
c
a
v
i
c
o
l
l
e
g
a
t
i
c
o
s
ì
E
s
s
i
a
d
a
t
t
a
r
Secure the sensor onto a mounting bracket (included) using the screws (included).

s
i
c
o
m
o
d
a
m
e
n
t
e
I
L
s
c
o
m
p
a
r
t
o
.
C
h
i
u
d
i
e
f
i
s
s
a
r
e
l
o
s
p
o
r
t
e
l
l
o
d
e
l
l
a
b
a
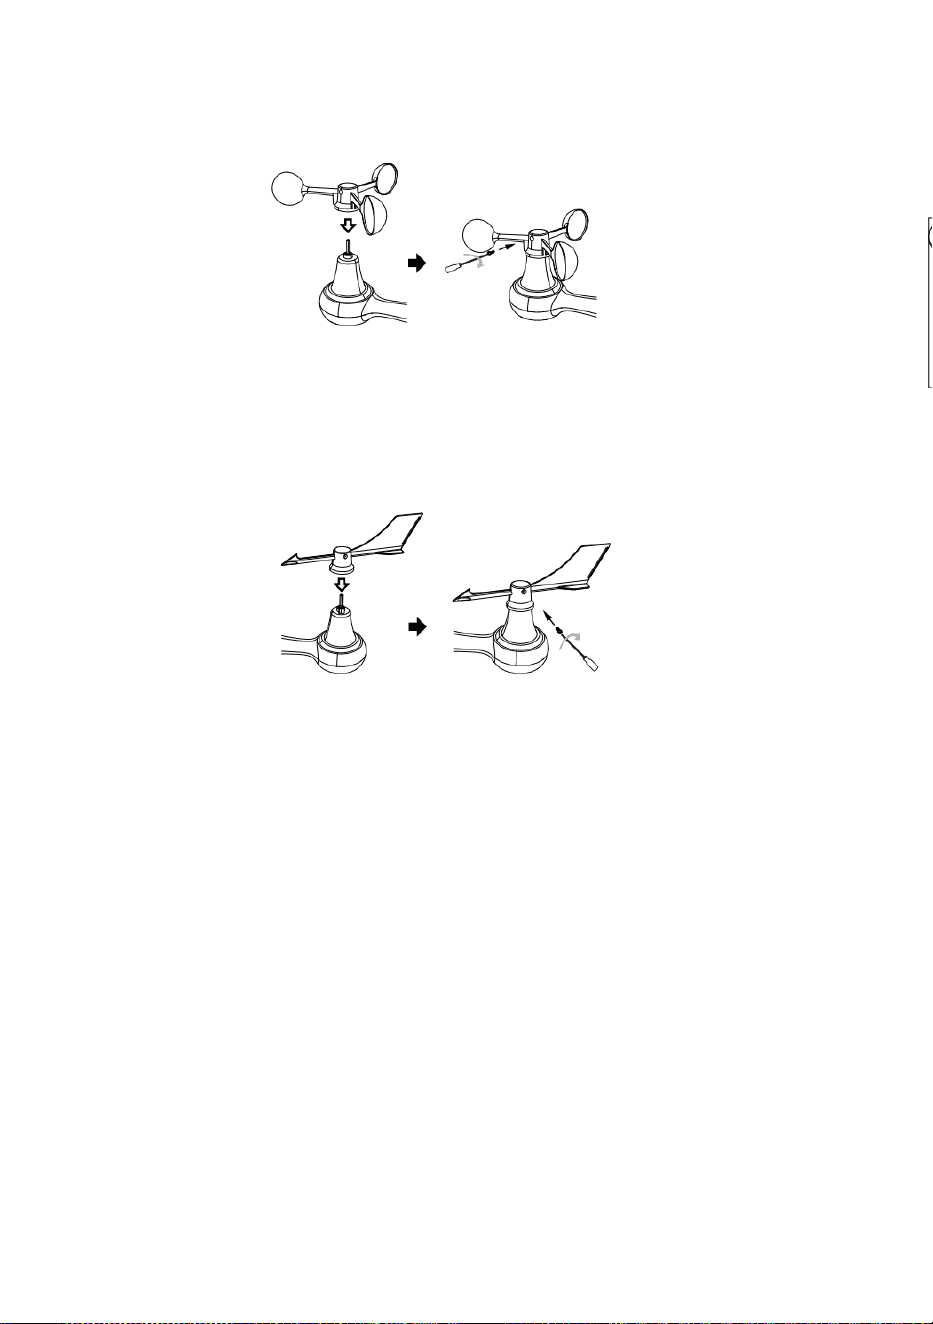
t
t
e
r
i
a
.
③ INSTALLAZIONE VENTO VELOCITÀ TAZZE
Allineare i fori delle viti in IL tazze per la velocità del vento con IL piatto, lato
verticale di IL metallo asta.
Inserire IL tazze di velocità del vento in l'asta di metallo e avvitare stretto A
serratura Esso In posto.
A
l
l
e
n
t
a
r
e
l
a
v
i
t
e
a
I
L
g
i
u
n
t
o
.
R
e
g
o
l
a

r
e
I
L
a
n
g
o
l
o
v
e
r
t
i
c
a
l
e
e
d
i
I
L
s
o
l
a
r
e
c
e
l
l
a
.
S
p
i
n
g
e
r
e
l
'
i
n

g
r
a
n
a
g
g
i
o
v
e
r
s
o
l
'
i
n
t
e
r
n
o
e
s
t
r
i
n
g
e
r
e
I
L
v
i
t
e
.
P
u
n
t
o
A
N
O
R
D

N
O
R
D
P
u
n
t
o
A
④ INSTALLAZIONE VENTO DIREZIONE PALETTA
Allineare i fori delle viti in IL direzione del vento banderuola con IL piatto, lato
verticale di la barra di metallo.
Inserire IL vento direzione banderuola In IL metallo asta E vite SU stretto A serratura
Esso In posto .
Point to
SOUTH
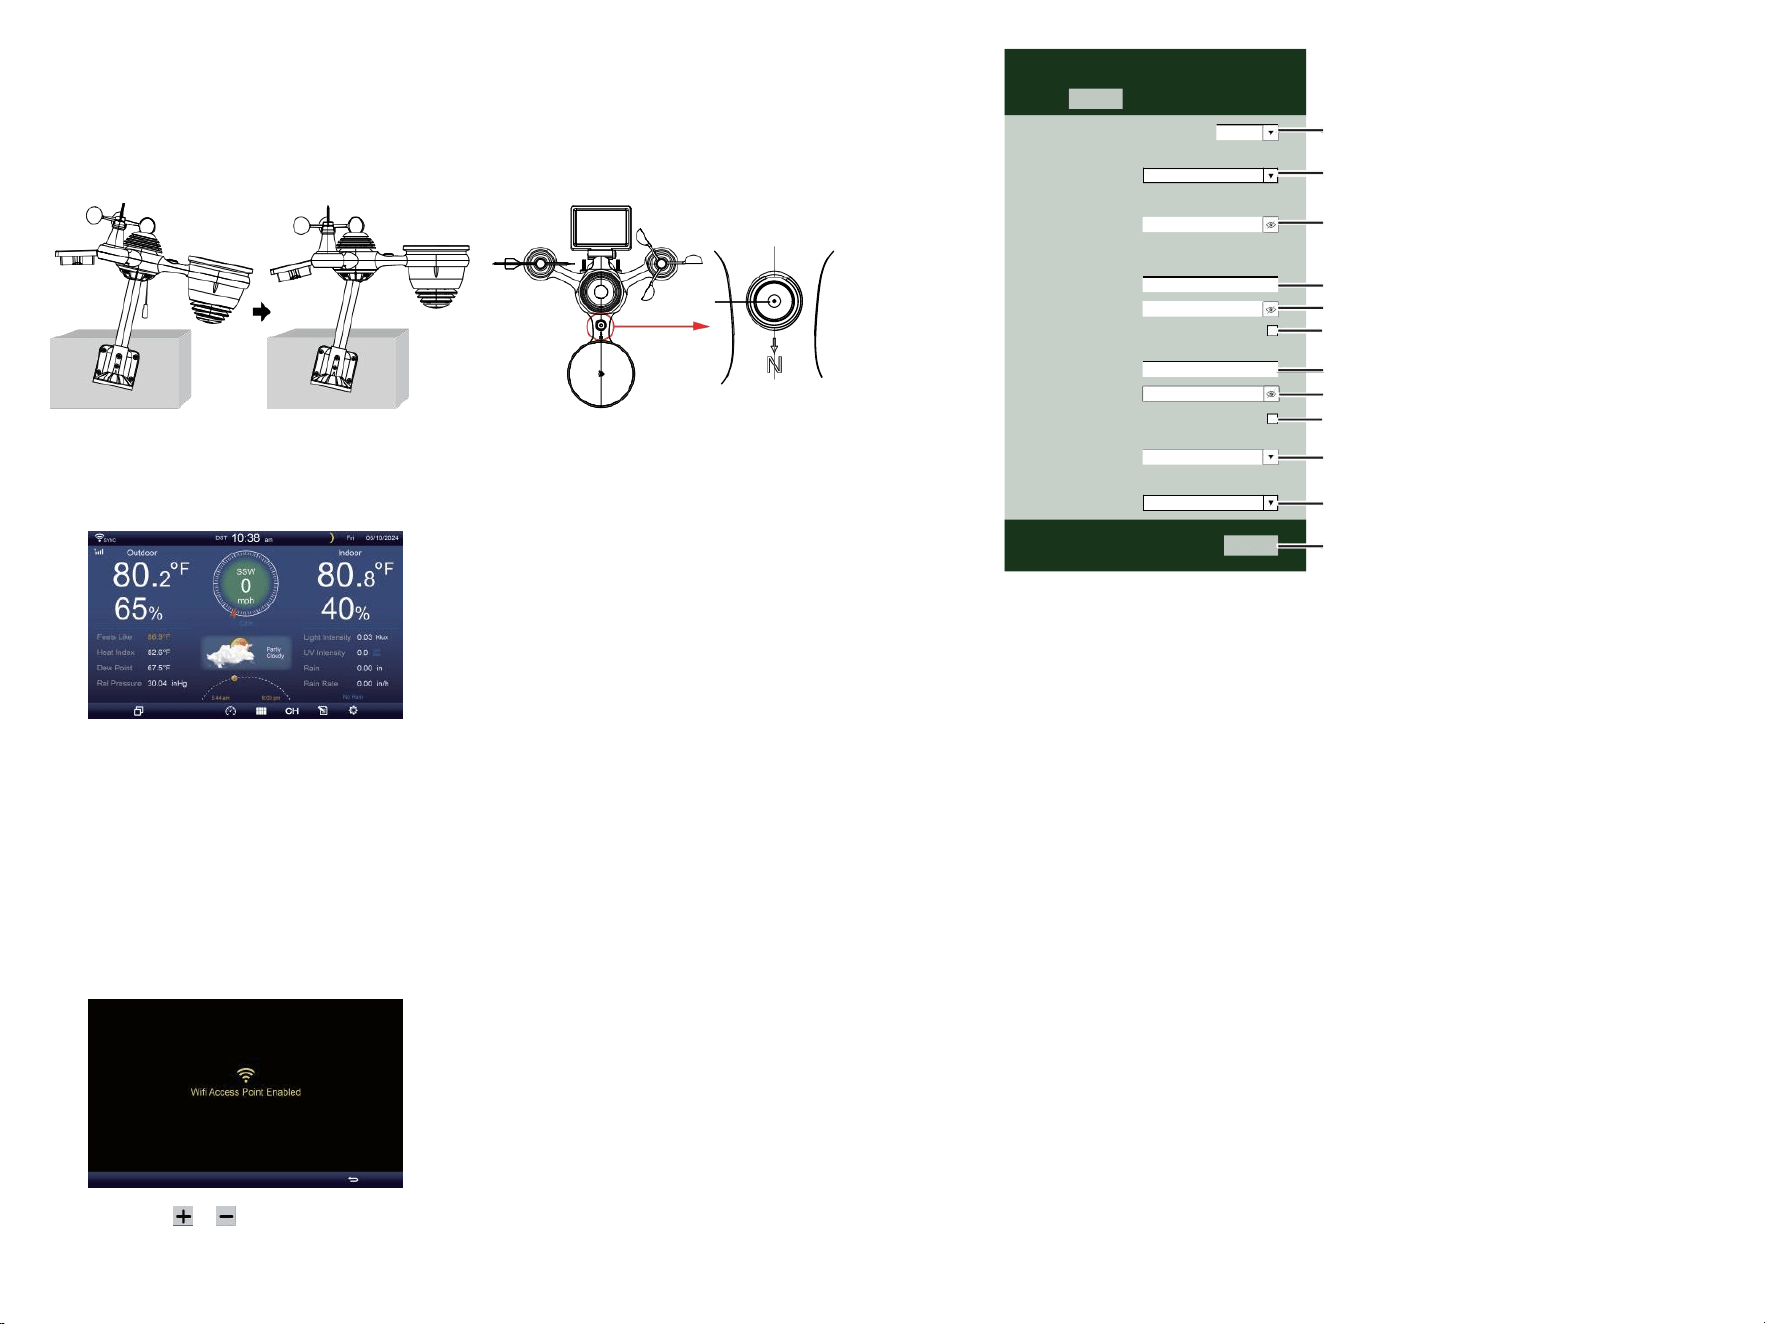
⑩ACCENSIONE
IL STAZIONE METEO
Tappo l'adattatore di alimentazione in
IL stazione meteorologica.
Una volta IL la stazione meteorologica
è acceso , Esso entrerà
automaticamente nell'associazione
modalità.
premere O pulsante per iniziare IL AP
modalità . Aperto tuo Wifi rete
impostazioni SU Per PC O smartphone .
Individuare IL stazione meteo n SSID
( WWS - XXXXXX ) da IL lista .
Rubinetto SU IL Nome utente A collegare .
SETTINGS
SETUP ADVANCED
Language:
Wi-Fi Router Setup
Router 1234 5
Select the menu and choose your 2.4GHz WIFI Router
Password
Weather Server Setup
WeatherUnderground
Station ID
Station Key
Upload wunderground.com
WeatherCloud
Station ID
Station Key
Upload weatherCloud.net
Time Zone Setup
Time Zone
Time Server Setup
Server URL
Firmware Version: 1.0.1
time.windows.com
a7d9d2a279 fbbafa
**********
**********
**********
Apply
KCACANTI9
English
Router
+0.00
⑧MOUNTING THE WIRELESS 7-IN-1 OUTDOOR SENSOR
Various options to install. Make sure the rain collector faces north and
the solar panel faces south before fastening the screws (included).
If you are a user located in the Southern Hemisphere,
please reverse the direction.
Enter your station ID
Enter your station key/password
check to confirm upload to
WeatherUnderground server
Enter your station ID
Enter your station key/password
check to confirm upload to
Weathercloud.net
Time zone setting
Internet time server setting
Press Apply to confirm the setting
⑨ADJUSTING THE 7-IN-1 WIRELESS SENSOR LEVEL
Use the bubble level indicator to make sure the wireless outdoor sensor is completely level.
Select setup UI display language
Select your Wi-Fi Router (SSID) from the list
Router Password
The
bubble

TV
COLLOCAMENTO SU
CONNESSIONE WI-FI
In la schermata semplice/dettagliata,
premere
pulsante A entrare Collocamento menù .
Premere pulsante per cambiare “ Altro
Collocamento ” display.
Premere O pulsante A inserisci " Abilita
"
Punto di accesso ”.
AT
MENO
3
piedi
(0,9 metri)
A PARTE
P
e
r
p
r
e
v
e
n
i
r
e
i
n
t
e
r
f
e
r
e
n
z
a
w
ireless, luogo Entrambi unità A
meno 3 piedi (0,9 metri) lontano
da dispositivi elettronici (TV,
computer, microonde, radio, ecc.).
WI-FI disconnected
WI-FI connected
WI-FI connected with Sync
ENTER SETUP INTERFACE
Enter the following address into the web browser address bar:
http://192.168.1.1 to access the setup interface.
Please click to check your password before clicking APP.LY
Please scan the QR code or visit https://youtu.be/JYr4BeOmEKo to see a video on how to use it.
Familiarize yourself with the icons for Wi-fi connection status.
WI-FI CONNECTION STATUS

Supporto tecnico e Certificato di garanzia elettronica www.vevor.com/su
pport
STAZIONE METEOROLOGICA
MODELLO:YT60233
Continuiamo ad impegnarci a fornire Voi utensili con competitivo prezzo.
"Salva Metà", "Metà prezzo" o altre espressioni simili usato di noi soltanto rappresenta UN
stima dei risparmi che hai potrebbe trarre vantaggio dall'acquisto di alcuni strumenti con noi
Compa rosso A IL maggiore
superiore marche e dosi non necessariamente significa coprire tutte le categorie di strumenti
offerto di noi. Tu
Sono gentilmente ricordato di verificare attentamente quando sei effettuare un ordine con
noi se tu sei
effettivamente risparmiando metà rispetto alla cima grande marchio ds.


- 3 -
METEOROLOGICO
STAZION
E
MODELLO:YT60233
BISOGNO AIUTO? CONTATTO NOI!
Avere domande sul prodotto? Hai bisogno di supporto tecnico? Non
esitate a contattarci contatto noi:
Servizio Clienti @ vevor . com
Questo è l'originale istruzione, Per favore leggi tutto manuale istruzioni
attentamente prima di operare. VEVOR si riserva il diritto di
interpretazione del nostro manuale utente. L'aspetto del prodotto deve
Essere soggetto A IL
prodotto tu ricevuto. Per favore, dicci che non lo faremo informarti di
nuovo se ci sono aggiornamenti tecnologici o software SU Nostro
prodotto .

SAFETY PRECAUTIONS
- 4 -
AVVERTIMENTO! Si prega di leggere e comprendere tutte le norme di
sicurezza precauzioni , istruzioni per l'uso , e cura / manutenzione
istruzioni Prima operativo Questo
apparecchio. Conservare questo manuale per riferimento futuro .
Questo prodotto È non è un giocattolo. Tieni fuori dal alla portata dei
bambini.
Questo prodotto è progettato per l'uso nel casa solo come UN
indicazione del tempo condizioni .
Questo prodotto È non a Essere utilizzato per uso medico
scopi o per il pubblico informazioni.
Fare non pulire il unità con abrasivo o corrosivo materiali.
Fare non posizionare l'apparecchio vicino a fiamme libere o fonti di
calore . Incendio, scossa elettrica, danni al prodotto o lesioni
potrebbe verificarsi.
Soltanto utilizzare fresco nuovo batterie nel prodotto . Fare non
mescolare nuovo e vecchio batterie insieme.
Fare non smontare, alterare o modificare IL prodotto .
Utilizzare solo accessori o accessori con questo prodotto specificato
dal produttore.
Fare non immergere il unità nell'acqua. Asciugare il prodotto con un
panno morbido Se fuoriuscite di liquidi SU Esso.
Fare non sottoporre l' unità a forza eccessiva, urti, condotto,
temperatura estrema , o umidità .
Fare non coprire o bloccare la ventilazione buchi con qualsiasi oggetti.
Questa stazione meteorologica di questo prodotto È destinato a
Essere usato al chiuso soltanto.
Questo prodotto è adatto solo per il montaggio a altezza meno di 2 M (6.6
piedi).
Fare non manomettere l'unità Componenti interni . La manomissione
del prodotto invaliderà la garanzia.
Le batterie sono non incluso. Quando inserimento batterie ,
assicurarsi che IL positivo e negativo polarità corrispondere con il
marcature nello scompartimento .
Fare non miscela standard, alcalina e ricaricabile batterie insieme r.
Lasciando un batteria esposta a condizioni estreme alta
temperatura nell'ambiente circostante può dare origine a UN
esplosione O perdita di liquido infiammabile o gas.
Lasciando un batteria esposta a temperature estremamente basse aria
pressione In IL

SAFETY PRECAUTIONS
- 4 -
l'ambiente circostante può provocare UN esplosione O perdita
di liquido infiammabile o gas.

TIPS FOR SENSOR SITE SELECTION
- 5 -
Il collettore di pioggia deve essere pulito ogni pochi mesi .
Il sensore dovrebbe Essere installato a meno 1.5 m (5') di distanza
da qualsiasi edificio O struttura.
Scegli un posizione in uno spazio aperto sotto diretto luce solare
con NO ostruzioni.
Il sensore dovrebbe rimanere nella linea di vista e entro 150 M (492')
del tempo atmosferico stazione per coerente , costante trasmissione
.
Tieni il sensore e la stazione meteorologica lontano dalla casa
elettrodomestici Quello operare SU IL Stesso frequenza . La consolle
E
il sensore dovrebbe colpo meno 1 - 2 m (3' -7') di distanza da come
interferenza s.
PRODOTTO CARATTERISTICHE
7″ Schermo TFT HD schermo.
Orologio in tempo reale con calendario r.
Funzione di allarme.
Luna Fase.
Ora dell'alba/tramonto.
Impostazione del fuso orario e Ora legale Funzione (DST).
Fuso orario : GMT +13 a -12 ore.
Sincronizzazione automatica con il server orario di Internet.
7 lingue (IT/ DE/ FR/ ES/ ESSO/ NL/ CZ) per la visualizzazione.
per la temperatura e l'umidità interna ed esterna con
tendenza.
Evento, Ogni ora, Quotidiano, Settimanale, Mensile, Totale pioggia e
Piovosità valutare In passato ora.
Visualizzazione della velocità media del vento, della velocità delle
raffiche di vento e della direzione del vento.
Assoluto e relativo Visualizzazione della pressione barometrica con
tendenza.
Solare Radiazione visualizzazione dell'intensità e Display UV I.
Visualizzazione dell'indice meteo : Tatto piace, Wind Chill, Calore
indice. Rugiada punto.
Tempo atmosferico Previsioni.
Dati meteo con Massimo/minimo lettura, registro dati e visualizzazione
del grafico storico.
Impostazioni di allerta meteo.

TIPS FOR SENSOR SITE SELECTION
- 5 -
Regolazione della luminosità della retroilluminazione.
Basso batteria indicazioni per i sensori esterni .
Notte Funzione luce.
Caricamento dei dati meteo su Weather Underground e/o Weather-
cloud tramite WiFi router.

PACKAGECONTENTS
- 6 -
1 2 3
4 5 6
7
8
9 10 11 12
1 Stazione meteorologica
7 Montaggio palo con 4 viti
2 Adattatore
8 Montaggio parentesi con 6 viti
3 Sensore esterno wireless 7 in 1 9 Cuscinetti in gomma X 2
4 Imbuto
10 Cacciavite 1
5 Banderuola direzione vento con 1 vite
11 Cacciavite 2
6 tazze per la velocità del vento con 1 vite
12 Guida utente
NOTA : 4 extra viti per vento direzione banderuola E vento
tazze di velocità .
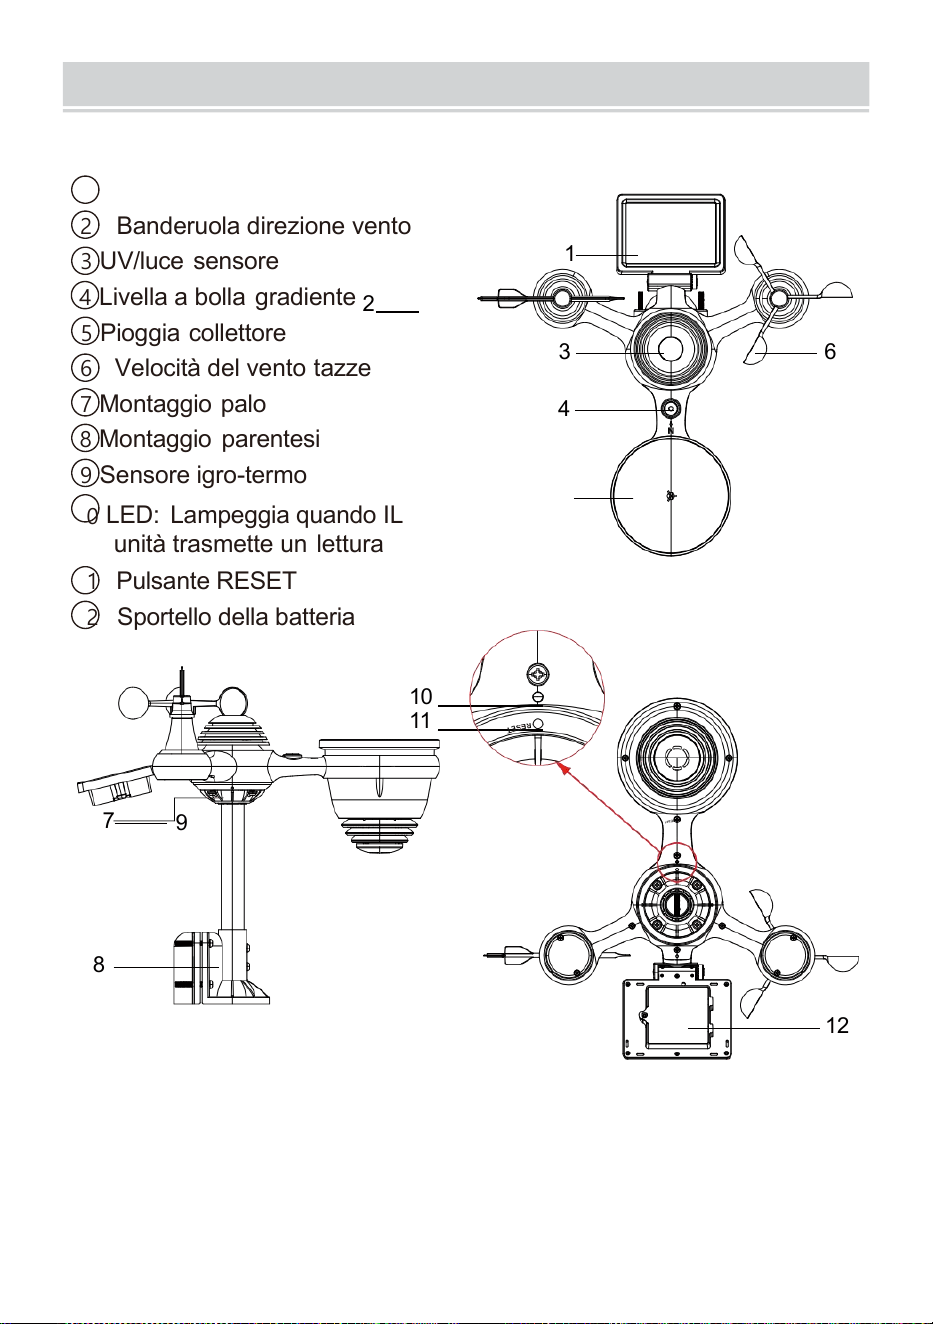
PRODUCTOVERVIEW
- 7 -
WIRELESS 7- IN- 1 PER ESTERNI SENSORE
1
Solar pannello
2 Banderuola direzione vento
3 UV/luce sensore
4
Livella a bolla gradiente
2
5 Pioggia collettore
6 Velocità del vento tazze
7
Montaggio palo
8 Montaggio parentesi
9 Sensore igro-termo
10
LED: Lampeggia quando IL
unità trasmette un lettura
11 Pulsante RESET
12
Sportello della batteria
10
11
7
9
8
12
3 6
4
1
5

WEATHERCONSOLEOVERVIEW
- 8 -
1
2
3
4
5
6
7
8
1 Luce ambientale rivelatore
4 Muro montaggio titolare
7 Antenna
2 Schermo di
visualizzazione
5 Energia ingresso
8 Cavalletto
3 Funzione
pulsanti
6 Pulsante RESET

HOME SCREEN OVERVIEW
- 9 -
1 2 3 4 5
6
15
8
16
10
17
18
o—
19
2
11
12
13
14
9
7
23 24
1 Connessione Wi-Fi/sincronizzazione oraria icona
13 Rugiada punto
2 Tempo
14 Baro pressione
3 Direzione del vento
15 Temperatura interna
4 Luna fase 16 Umidità interna
5 Data
17 Leggero intensità
6 Intensità del segnale del sensore icona
18 UVI
7 Temperatura esterna
19 Piovosità
8 Velocità del vento 20 Piovere valutare
9 Umidità esterna 21 Piovere valutare livello
10 Velocità del vento livello 22 Funzionale pulsante icona
11 Sente come temperatura 23 Previsioni del tempo
12 Calore indice
24 Alba/tramonto tempo

DETAIL SCREEN OVERVIEW
- 10 -
11
12
1 3
1 4
1 5
1 6
1 7
1 8
1 9
20
21
1 2 3 4 5 6 7 8 9 10
22
23
24
25
26
27
28
29
30
31 32
1 Connessione Wi-Fi/sincronizzazione oraria icona
17
Raffreddamento da vento
2 Temperatura esterna MAX/MIN
18 Rugiada punto
3 MAX/MIN esterno umidità
19 Ba ro pressione
4 Raffica di vento
20 Leggero intensità
5 Tempo 21 UVI
6 Velocità media del vento 22 Temperatura interna MAX/ MIN
7 Direzione del vento
23 Temperatura interna
8 Velocità del vento
24 MAX/MIN interno umidità
9 Luna fase
25 Al chiuso umidità
10 Data
26 Piovere valutare
11 Sente come temperatura 27 Evento, oraria, settimanale,
12 Temperatura esterna
mensile, totale piovosità
13 Umidità esterna 28 Piovere valutare livello
14 Velocità del vento livello
29 Quotidiano piovosità
15 Sente come temperatura 30 Funzionale pulsante icona
16 Calore indice
31 Previsioni del tempo
32 Ora dell'alba/tramonto

SUMMARY SCREEN OVERVIEW
- 11 -
6
7
8
9
1 0
1 2 3 4 5
1 Connessione Wi-Fi/sincronizzazione
oraria icona
2 Dentro/fuori icona etichetta
3 Tempo
4 Luna fase
5 Data
6 Intensità del segnale del
sensore icona
7 Temperatura interna/esterna
8 Umidità interna/esterna
9 Non schermo collegare
schermo
10 Funzionale pulsante icona
COLLOCAMENTO UP IL SENSORE ESTERNO 7 IN1 WIREL
ESS
IL wireless 7- in -1 per esterni sensore misure vento velocità , vento
direzione , piovosità, UV, luce intensità, temperatura e umidità.
INSTALLAZIONE DEL MONTAGGIO PALO E STAFFA ET
Fissare il sensore su un montaggio palo e staffa (inclusa) utilizzando
il viti ( incluso ).

INSTALLAZIONE DI COPPE PER LA VELOCITÀ DEL VENTO E DEL
VENTO PALETTA DIREZIONALE
Allineare la vite buchi nelle tazze della velocità del vento con il lato
piatto e verticale del metallo asta.
Inserire le tazze per misurare la velocità del vento nel metallo asta e
avvitarli su stretto A serratura Esso In posto.
Allineare i fori delle viti nel vento banderuola direzionale con
l'appartamento, verticale lato del metallo asta.
Inserire la banderuola direzione vento nel metallo asta e avvitarli
stretto A serratura Esso In posto.

- 12 -
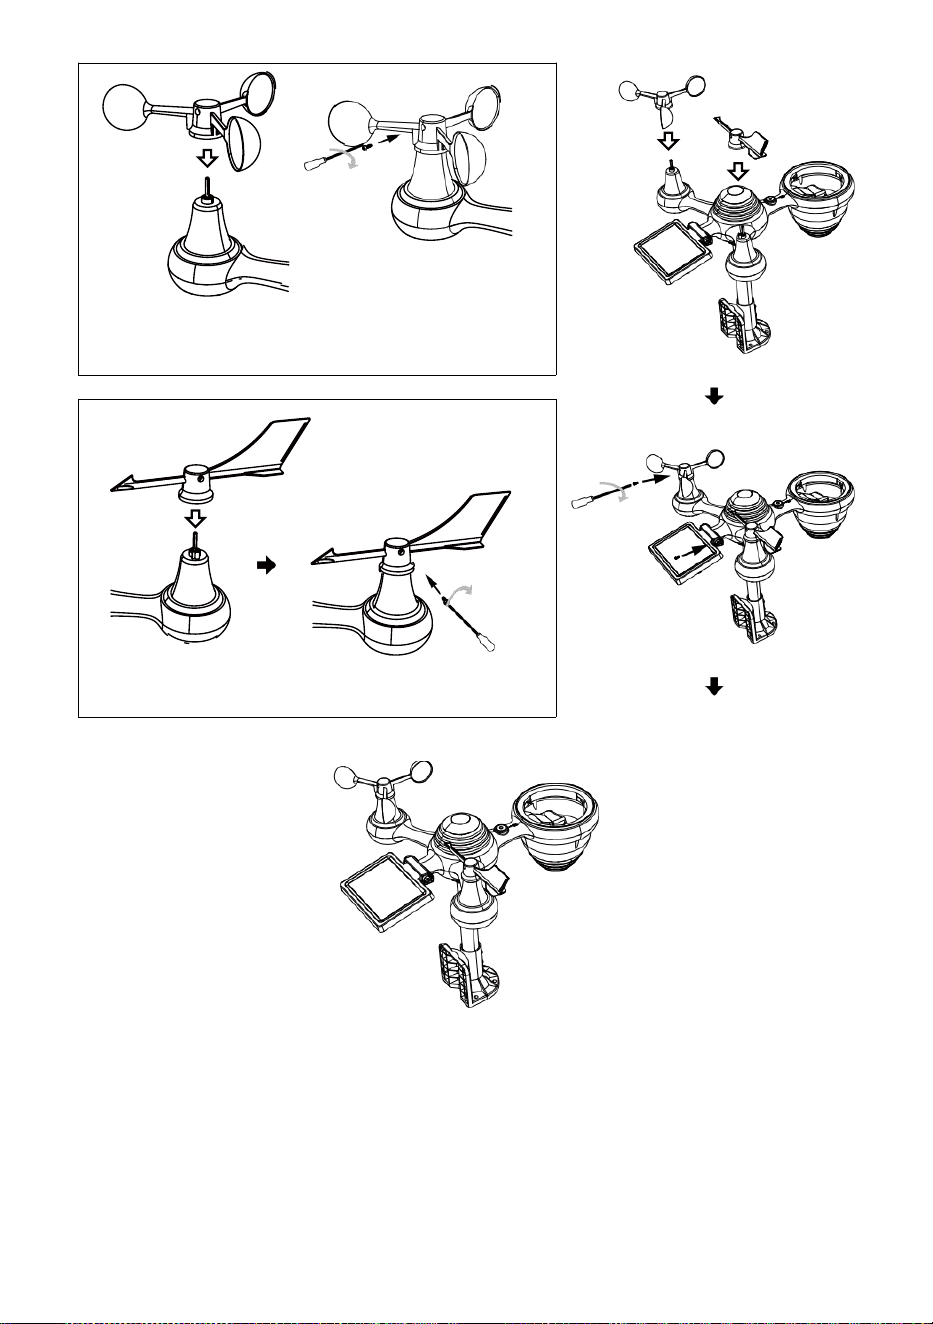
- 13 -
Installazione di tazze per la misurazione della velocità
del vento
Direzione del vento Installazione delle palette
COLLOCAMENTO SU RACCOGLITORE PIOGGIA
Allinea il tacche sull'imbuto con le scanalature di bloccaggio dentro
il piovere collettore.
Inserire l'imbuto nel raccogli pioggia e avvitarli bene A serratura
Esso In posto.

Serratura
Allineare
INSTALLAZIONE DEL BATTERIE
Svitare il sportello della batteria nella parte inferiore del 7-in-1
all'aperto sensore usando il cacciavite 1.
Collegare il cavo del ricaricabile batteria confezione (inclusa) per il
cavo situato in IL batteria scomparto.
Regola i cavi collegati in modo che si adattino comodamente nel
compartimento- mento. Poi, inserire il batteria pacchetto nello
scompartimento.

- 14 -

- 15 -
Chiudere e fissare lo sportello della batteria di nuovo su IL scomparto.
REGOLAZIONE IL SOLARE CELLA
Allentare la vite sul giunto in modo che l'ingranaggio sull'altro lato
dell'articolazione
spinge fuori. La cella solare dovrebbe Ora Essere in un sbloccato
posizione n.
Regolare l'angolo verticale della cella solare per ottenere l' maggior
parte ottimale utilizzo della cella solare a seconda del tuo posizione.

- 16 -
Spingere l'ingranaggio verso l'interno e stringere la vite Fino a IL
ingranaggi serratura In posto.
Quando si regola la cella solare impostarla su UN angolo chiudere A
tuo latitudine. Visualizza grafico qui sotto per ottenere un idea di come
tu Dovrebbe angola il tuo solare cella.
Latitudine Prossimità
Selezione dell'angolo della
cella solare
0°
21°
42°
63°
84°
Se tuo posizione È vicino A 84°
84°
Se tuo posizione È vicino A 63°
63°
Se tuo posizione È vicino A 42°
42°
Se tuo posizione È vicino A 21°
21°
Se tuo posizione È vicino A 0°
0°
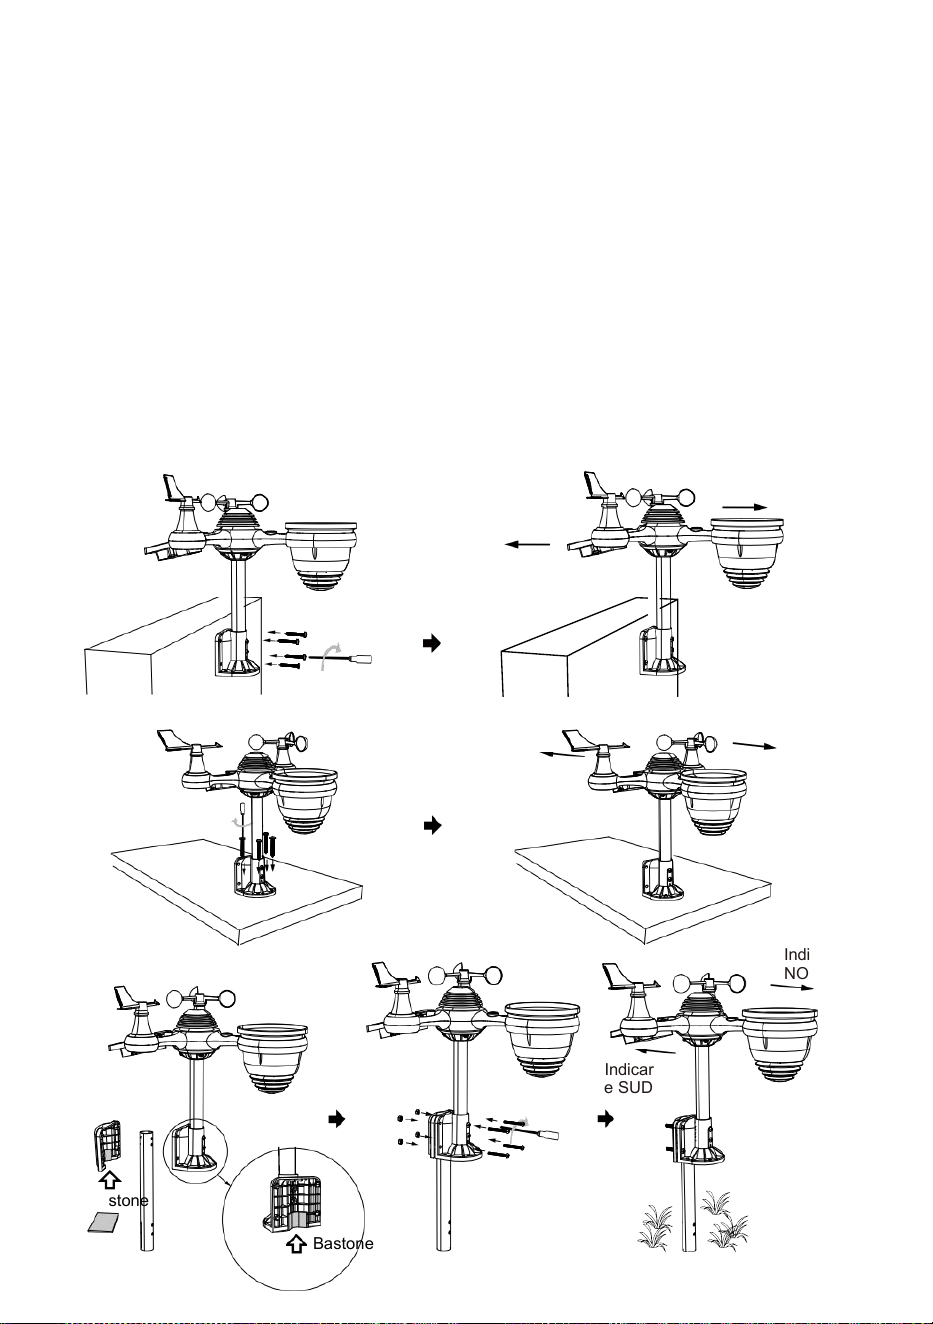
- 17 -
MONTAGGIO IL WIRELESS 7- IN- 1 PER ESTERNI SENSORE
Scegli un posizione per il sensore esterno 7 in 1 che è aperto
con NO ostruzioni.
Stringere il staffe di montaggio su una superficie/parete utilizzando
quattro toccando
viti (incluse) o stringere il montaggio palo al tuo esistente montare- ing
palo con quattro φ5 Bulloni e La M5 Assemblaggio dei dadi.
Aggiungere cuscinetti di gomma sul staffa di montaggio prima
di fissare il staffa di montaggio su IL sensore.
Assicurati che il facce del collettore di pioggia nord e il solare il
pannello è rivolto a sud Prima fissaggio IL viti ( incluso ).
Assicurarsi che il sensore sia fissato in modo particolare strettamente,
altrimenti ventoso condizioni causa IL trasmettitore A scuotere E così
frainteso la pioggia dati .
Indicare
NORD
Indicare
SUD
Indicare
NORD
Indicar
e SUD
Indicare
NORD
Indicar
e SUD
Bastone
Bastone

- 17 -

- 18 -
PUNTANDO IL WIRELESS 7- IN- 1 PER ESTERNI SENSORE A SUD
Il sensore meteorologico wireless esterno è calibrato per essere
appuntito nord f o massima precisione. Tuttavia, per vostra comodità, se
siete un utente
situato nel sud Emisfero , puoi usare il sensore con IL collettore di
pioggia puntato verso sud.
1. Montare e installare il meteo wireless sensore con h IL piovere
collettore che punta a sud, invece di No rth. (Per favore fare
riferimento a MONTAGGIO DEL
2. WIRELESS 7-IN-1 PER ESTERNI SENSORE.)
Selezionare "STH" per sud emisfero nella modalità di impostazione
dell'orologio. (Per favore fare riferimento a "impostazione del
orologio")
NOTA: modifica del l'impostazione dell'emisfero cambierà
automaticamente la direzione della luna fasi su IL display.
Indicando IL senza fili tempo atmosferico sensore verso IL sud
Volere permettere massimo luce solare SU IL solare pannello ,
in particolare durante IL inverno stagione nel sud Emisfero.
REGOLAZIONE IL WIRELESS 7 IN 1 SENSORE LIVELLO
Utilizzare il bolla livello indicatore di assicurati che il wireless sia
esterno
il sensore è completamente a livello. Se il sensore È non livello, il
guadagno misura, UV e Leggero l'intensità sarà non misura
correttamente.
Per regolare il livello del sensore esterno wireless, allentare IL viti del
palo di montaggio. Regolare il livello del sensore esterno wireless In
ordine di assicurarsi che il bolla È al centro del livella a bolla
indicatore.
Stringere la vite del montaggio di nuovo palo.

- 18 -
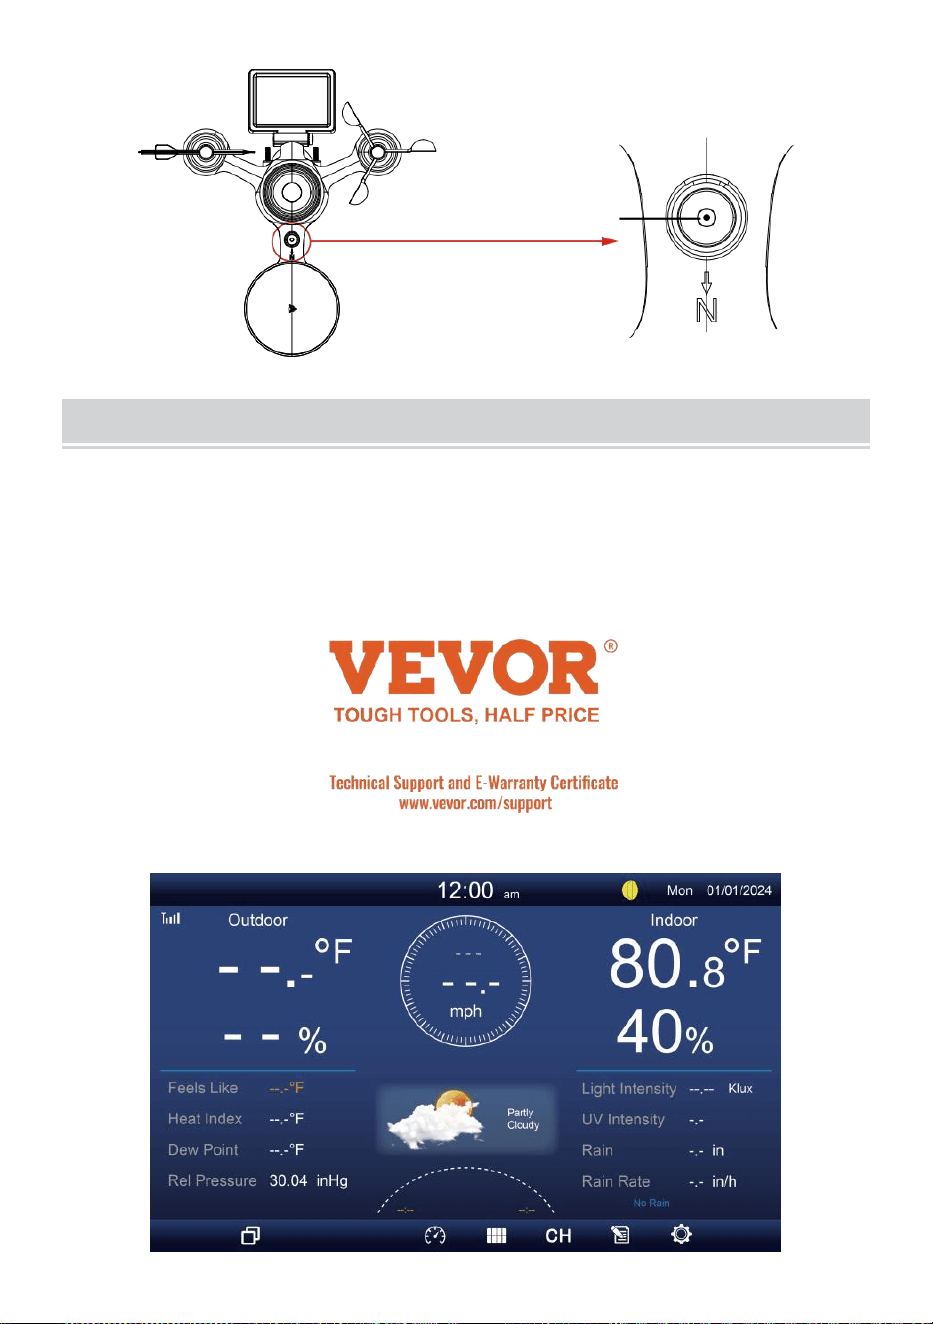
- 19 -
IL bolla
COLLOCAMENTO SUIL CONSOLE DISPLAY
ENERGIA SU PER LA CONSOLE
1. Collegare il adattatore di alimentazione per il display consolle.
2. Girare l'antenna SU Indietro del consolle su.
3. Una volta che la console è acceso, l' apertura lo schermo sarà
Essere visualizzato e poi entrare in principale schermo.
4. Aspetta IL all'aperto sensore A paio con tuo consolle .

- 20 -
5. Una volta accoppiati, i dati esterni saranno mostrato SU IL schermo.
ISTRUZIONIPER L'USO
Questo sezione descrive IL principale funzioni E altro funzioni Di
pulsanti all'interno della console.
PRINCIPALE FUNZIONI DI BOTTONI
ICONA
DESCRIZIONE
Casa pulsante
Premi questo pulsante per mostrare semplice dati display
schermo.
Espandere pulsante
Premere questo pulsante per visualizzare il dettagliato dati
schermo.
Pressione
Premi questo pulsante per mostrare tra Relativo e
assoluto schermo di pressione.
Multi sensore
Premere questo pulsante per visualizzare il schermo
multisensore .
CH
Canale
Premi questo pulsante per cambiare Dati interni CH1-7
schermo.
Storia Documentazione pulsante
Premi questo pulsante per mostrare il schermata
cronologia (Max/Min, record dati, Visualizzazione
- 20 -
grafica).
Collocamento
Premere questo pulsante per mostrare IL collocamento
schermo.

- 21 -
ALTRO FUNZIONE BOTTONI PER IMPOSTAZIONI
ICONA
DESCRIZIONE
Su pulsante
Premi questo pulsante per selezionare superiore riga O
articolo .
Giù pulsante
Premi questo pulsante per selezionare inferiore riga O
articolo .
Giusto pulsante
Premi questo pulsante per selezionare colonna di destra O
articolo.
Sinistra pulsante
Premi questo pulsante per selezionare a sinistra lato
colonna O articolo.
Ciclo pulsante
Premere questo pulsante per cambiare le diverse schermata
dei parametri.
Chiaro pulsante
Premi questo pulsante per cancellare il registrazione
max/min.
Q
Ricerca pulsante
Premi questo pulsante per cercare i dati documentazione.
Eliminare pulsante
Premere e tieni questo pulsante per eliminare registrare s.
Ritorno pulsante
Premi questo pulsante per ritorno precedente pagina.
OK pulsante
Premere questo pulsante per confermare IL selezione.
+
+ pulsante
Premere questo pulsante per aumentare il valore o
cambiare A altro opzione.
- pulsante
Premere questo pulsante per diminuire il valore o cambiare
A altro opzione.
SEGNALE WIRELESS RECEPTION
Familiarizzare con il icone per diverse intensità del segnale. Sposta la
console o il sensore meteo se il segnale è debole O perduto.
- 21 -
Ricerca del segnale
Segnale forte
Segnale
debole
Segnale
perduto
Antenna
sbarra È
scorrimento
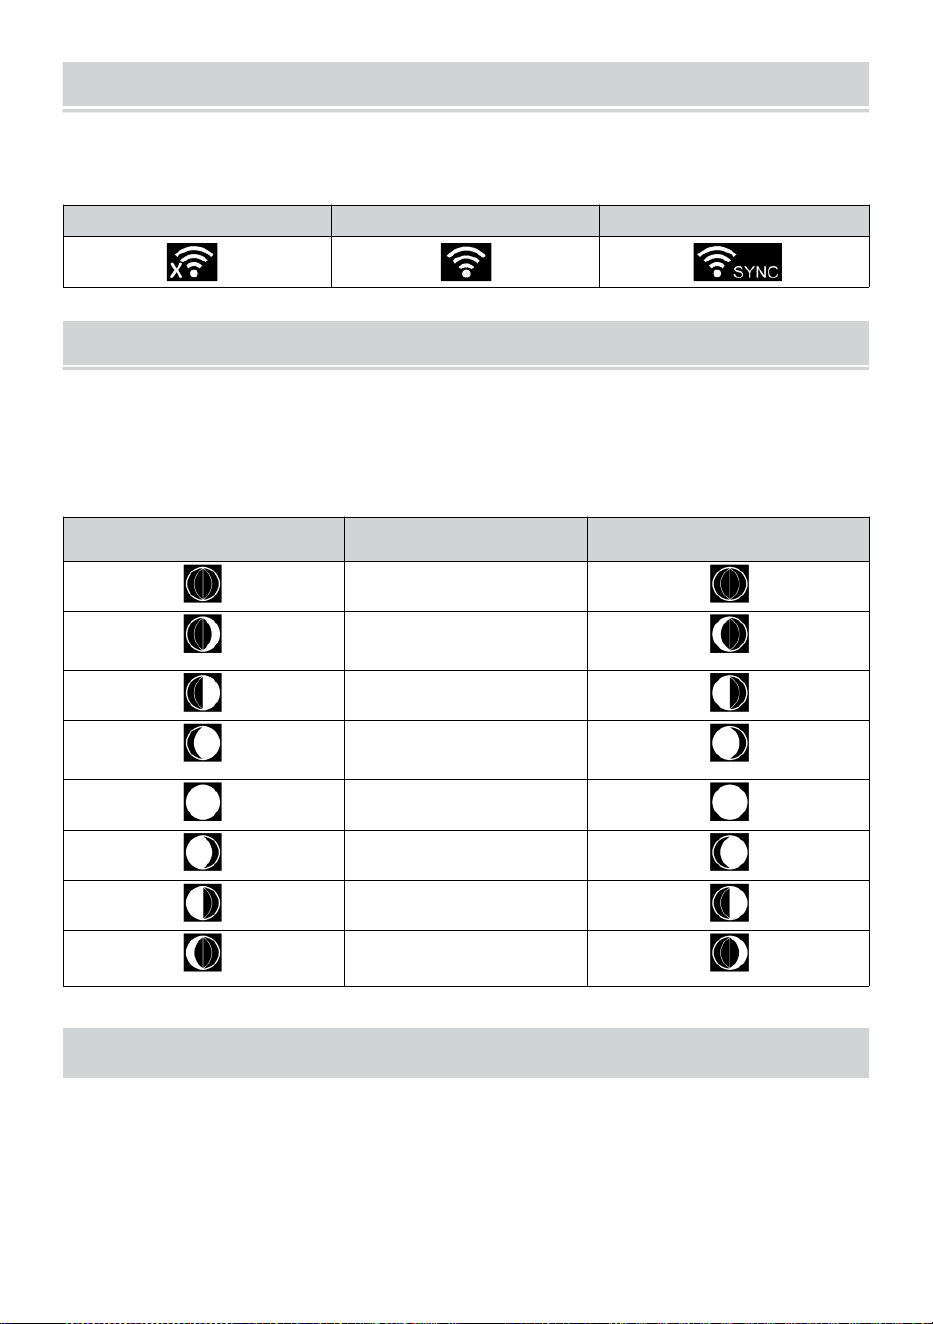
WI-FI CONNECTION STATUS
- 22 -
Prendi familiarità con le icone che indicano lo stato della connessione Wi-
Fi.
WI-FI disconnesso
Connessione WI-FI
WI-FI connesso con Sync
LUNA FASE
La console di visualizzazione calcola la luna fase secondo al tuo ora,
data e ora zona.
Nella tabella seguente sono spiegate le fasi corrispondenti E loro
icone per entrambi i Settentrionale e Meridionale emisferi.
Settentrionale Emisfero
Icone
Luna Fase
Meridionale Emisfero Icone
Nuovo Luna
Mezzaluna crescente
Luna
Primo trimestre Luna
Gibbosa crescente
Luna
Pieno Luna
Gibbosa calante Luna
Terzo trimestre Luna
Mezzaluna calante
Luna
ORA DELL'ALBA/TRAMONTO
La console indica l'alba/il tramonto della tua posizione, che è in base al
fuso orario, latitudine e longitudine inserite. Se la luce del giorno
Risparmio È impostato su AUTO , il volte Volere regolare UN ora
inoltrare automaticamente per luce del giorno
risparmio.

WI-FI CONNECTION STATUS
- 22 -
NOTA: Per il fuso orario, latitudine e impostazione della
longitudine, Per favore rifare " Tempo & Data Collocamento ".
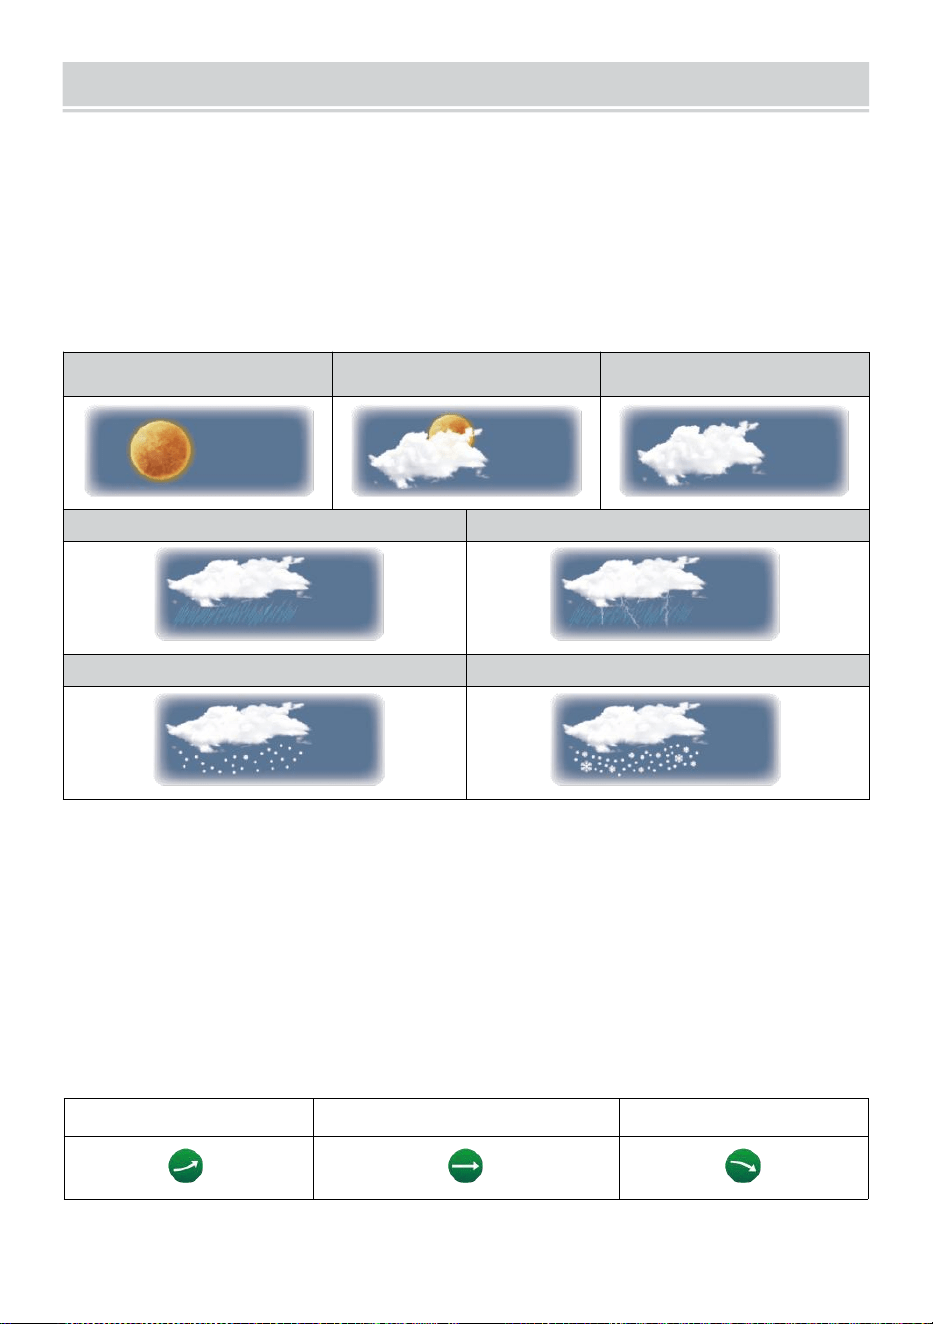
WEATHER FORECASTINGAND WEATHERINDEX
- 23 -
TEMPO ATMOSFERICO PREVISIONE
IL incorporato il barometro può non ghiaccio atmosferico variazioni di
pressione e, in base ai dati raccolti, può prevedere le condizioni
meteorologiche .
Ci sono 6 icone meteo --- Soleggiato, In parte Nuvoloso, Nuvoloso,
Piovoso, Piovoso/ Tempestoso e nevoso ( Luce Nevicare e Pesante
Nevicare).
Soleggiato
Parzialmente
nuvoloso
Nuvoloso
Leggero piovere
Pioggia intensa/tempesta
Neve leggera
Neve pesante
NOTA:
La precisione di un generale previsione basata sulla pressione è
circa il 6,5-70 %. Le previsioni sono non garantito.
Potrebbe non necessariamente riflettono la situazione attuale.
TENDENZA INDICATORE
IL tendenza indicatore spettacoli IL tendenze Di cambiamenti In IL
imminente pochi minuti. Questi appariranno le icone nella temperatura ,
umidità, E baro -metrico sezione di pressione dello schermo di dettaglio.
In aumento
Costante
Cadente
ALLERTA GHIACCIO

WEATHER FORECASTINGAND WEATHERINDEX
- 23 -
Quando la temperatura esterna È inferiore a 1°C/33,8° F, il fiocco di neve
icona
io
· apparirà sul display.
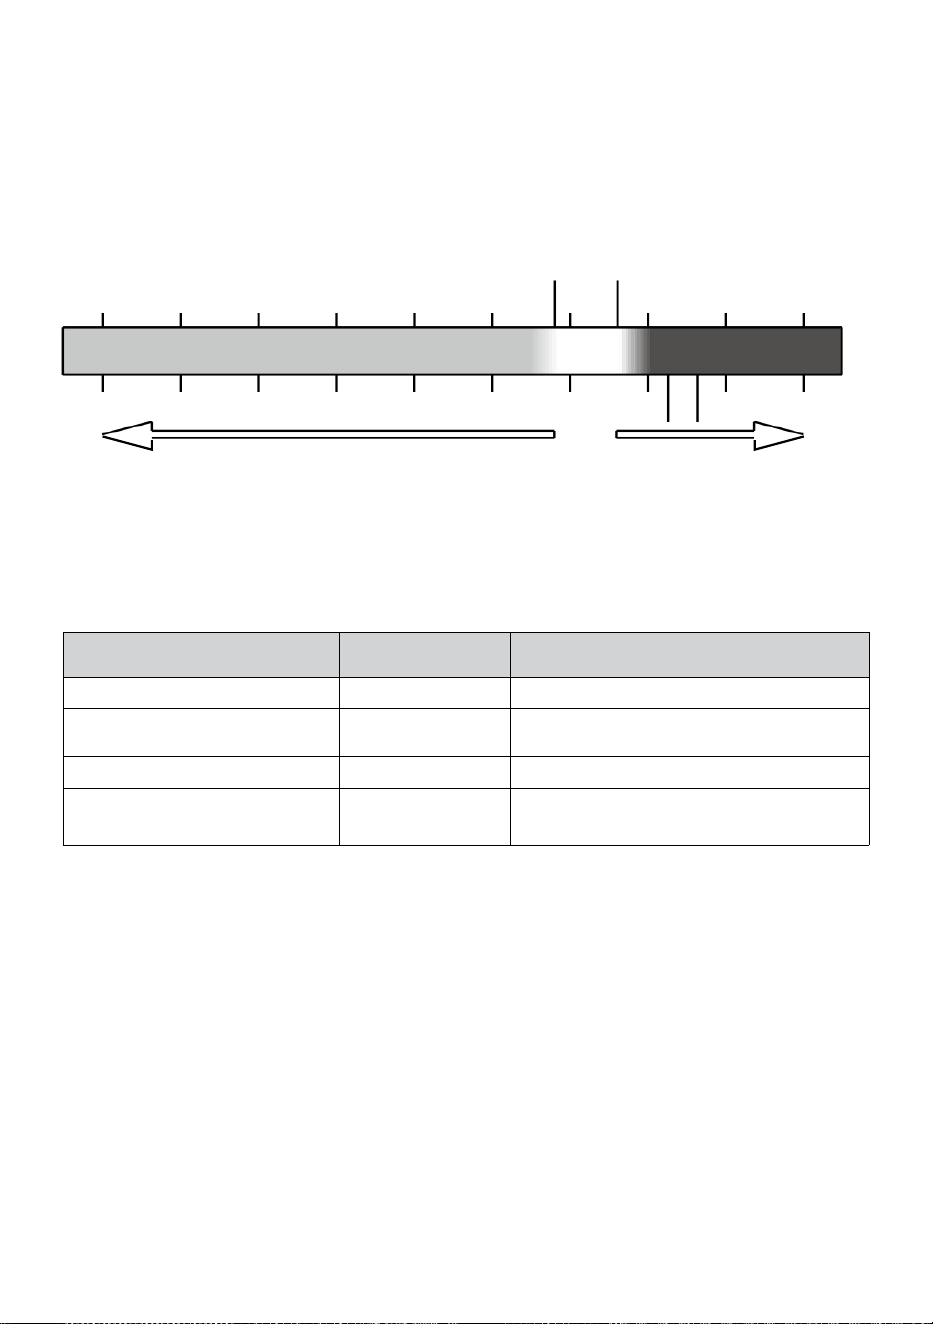
- 24 -
SENTE COME
IL Sente Come la temperatura l'indice determina la temperatura
effettivamente percepita all'esterno, tenendo conto di fattori come il vento
velocità, pressione, temperatura e umidità (vento freddo E Calore
indice).
Temperatura: 18°C
Temperatura: 26°C
10 20 30
-40 -22 -4 14 32 50 68 86 104 122 °F
Vento freddo Calore Indice
CALORE INDICE
IL Calore Indice è determinato dalla temperatura del sensore
meteorologico wireless tura e umidità letture quando la temperatura È
tra 79 °F (26 °C) e 120 °F (50 (°C).
Calore Indice allineare
Avvertiment
o
Spiegazione
81°F - 90°F (27°C - (32°C)
Attenzione
Possibilità di colpo di calore
91°F - 104°F Temperatura: da
33°C a 40°C
Estrema cautela
Possibilità di disidratazione termica
106°F - 129°F (41°C - 54°C)
Pericolo
Colpo di calore altamente probabile
≥ 131°F Temperatura
ambiente (≥ 55°C)
Estremo Pericolo
Alto rischio di disidratazione/ colpo di
calore
VENTO FREDDO
Il wind chill o windchill è l'abbassamento di temperatura dovuta A IL
passaggio-
flusso di aria a temperatura più bassa. Raffreddamento del vento è
determinato di UN combinazione dei dati relativi alla temperatura e alla
velocità del vento del sensore meteorologico wireless . NOTA: Solo
quando la temperatura è inferiore a 50
℉
(10
℃
) e la velocità del
vento è superiore a 4,8 km/h (3 mph), verrà visualizzato il valore del
wind chill,
Altrimenti verrà visualizzato “--.-“.
RUGIADA PUNTO
La rugiada punto è la temperatura al di sotto della quale il vapore acqueo
in aria A
-40 -30 -20 -10 0
40 50 °C
Increasing danger Increasing danger

- 24 -
costante barometrico la pressione si condensa in acqua liquida allo stesso
tempo tasso al quale evapora. L'acqua condensata è chiamata rugiada
quando Esso forme su un solido superficie.
La rugiada temperatura del punto è determinato dalla temperatura e
umidità dati da IL senza fili tempo atmosferico sensore .
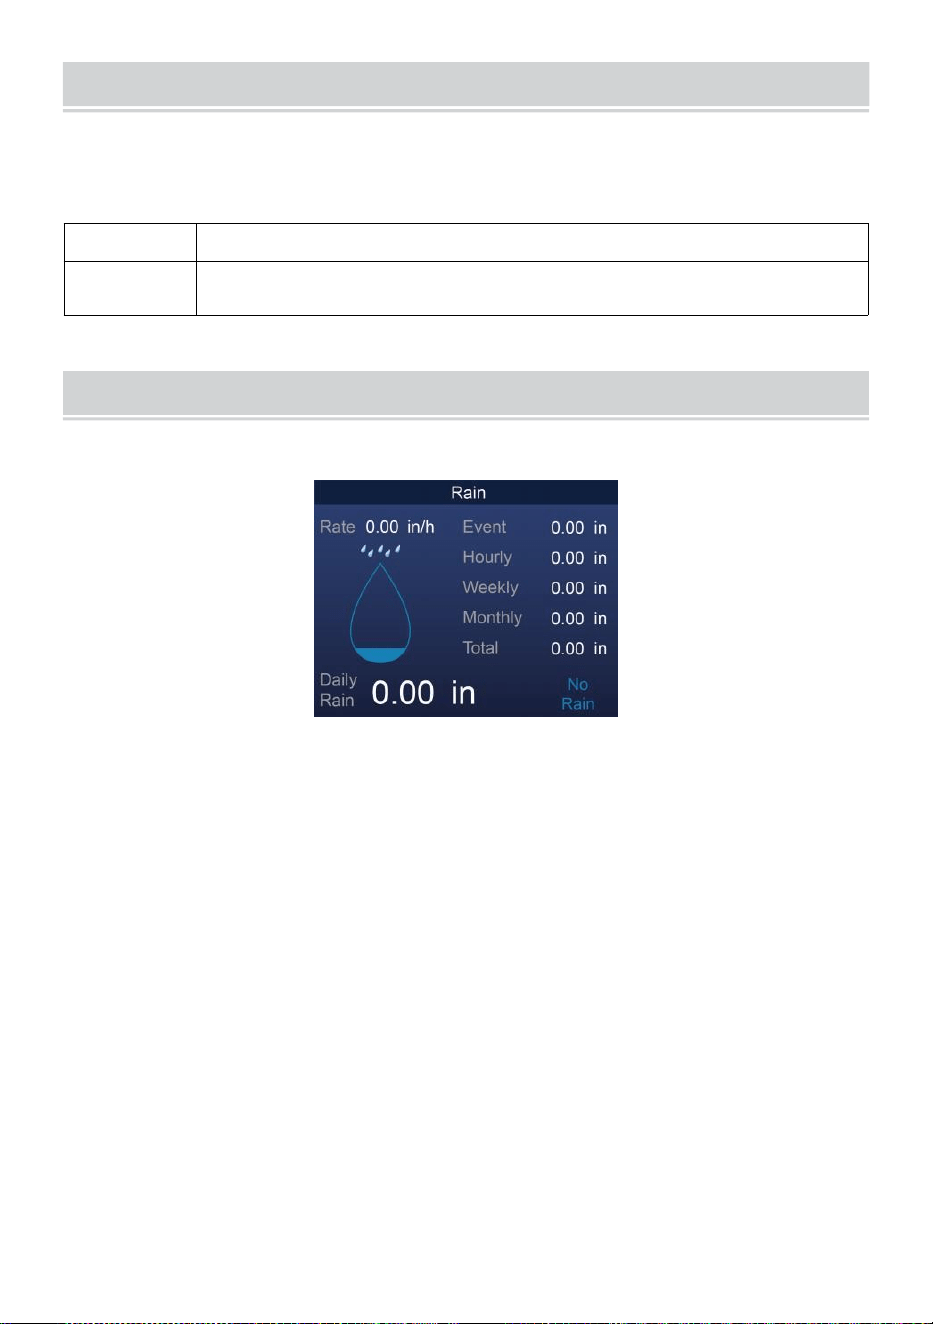
BAROMETRIC PRESSURE
- 25 -
Controllo IL tempo atmosferico sito web per in tempo reale barometro
condizioni Poi regolare il relativo nel Calibrazione collocamento
sezione.
Assoluto
IL assoluto atmosferico pressione Di tuo posizione .
Relativo
IL atmosferica relativa pressione in base al livello del
mare.
PIOVERE
Questa sezione mostra le precipitazioni piovere valutare informazioni.
PIOVOSITÀ DISPLAY MODALITÀ
Piovere
Valutare
: Attuale piovosità valutare nel passato ora .
Piovere
evento
: continuo pioggia, e si ripristina a zero se si accumula
pioggia È meno di 10 millimetri (0,039 In) in un periodo di
24 ore.
Ogni ora
Piovere
: Totale precipitazioni per ogni ora.
Quotidiano
Piovere
: Totale pioggia da mezzanotte (00:00)
Settimanale
Piovere
: Totale precipitazioni per la settimana corrente del
calendario, e si ripristina la domenica mattina alle
mezzanotte (da domenica a sabato)
Mensile Piovere : Totale precipitazioni per il mese solare corrente, e
reset SU il primo giorno del Mese.
Totale Pioggia: Totale pioggia dal scorso reset.
AZZERA IL TOTALE PIOVOSITÀ DOCUMENTAZIONE

BAROMETRIC PRESSURE
- 25 -
Fare riferimento a “Cancella tutto Sezione " Dati " per cancellare le
precipitazioni dati.
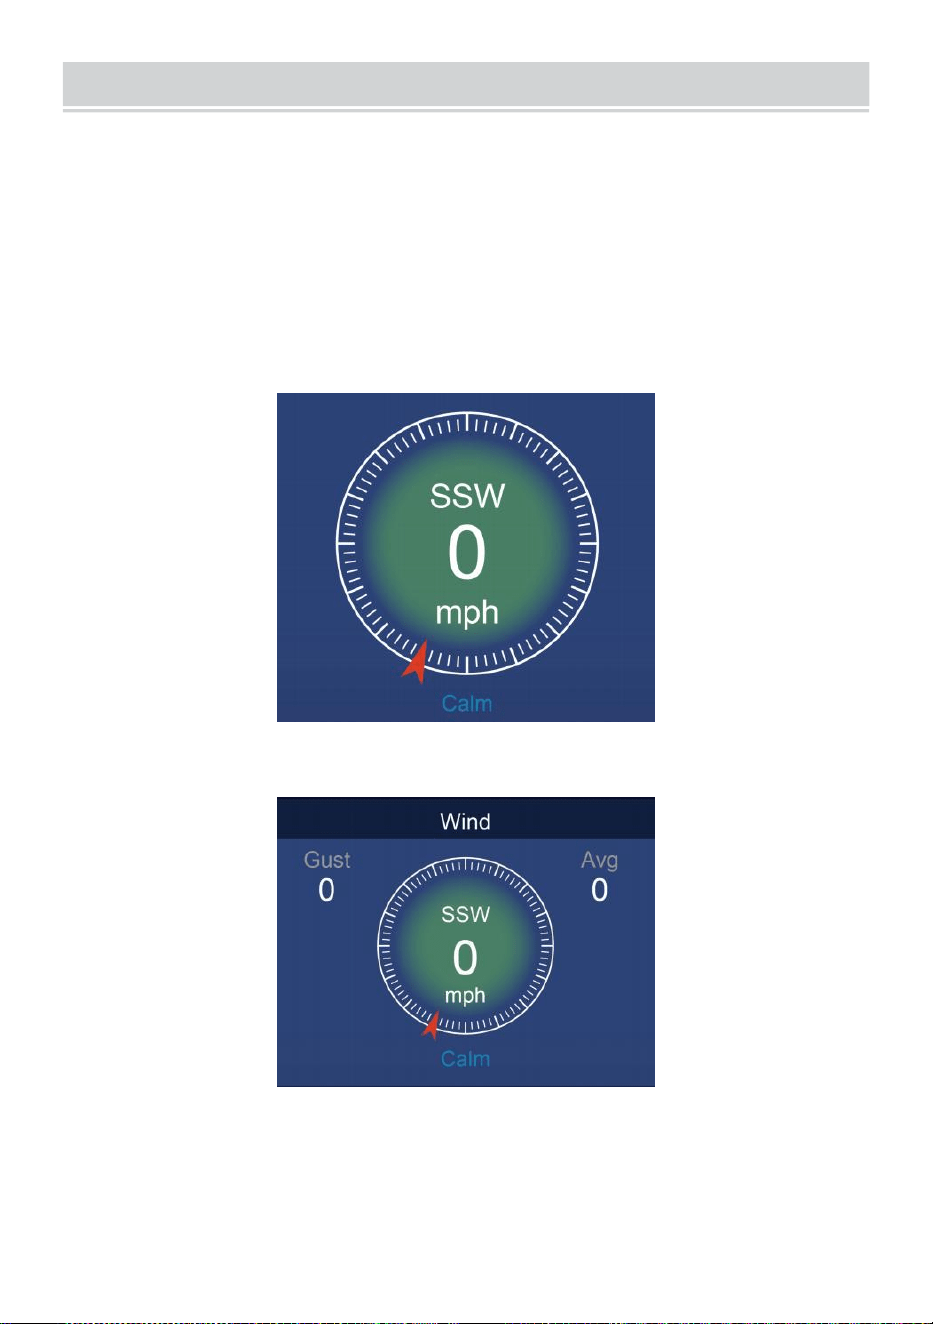
WIND
- 26 -
VELOCITÀ DEL VENTO E DIREZIONE
Questo sezione mostra IL vento velocità , corrente vento direzione ,
direzioni predominanti del vento e velocità del vento livello.
Velocità del vento: è la velocità media del vento misurato nel
precedente 20 secondi.
Vento medio: è la velocità media del vento In 10 minuti.
Raffica: è il velocità del vento più alta registrato nel indietro di 20
secondi .
Semplice Dati Display
Dettagliato Dati Display
SCALA DI BEAUFORT
IL La scala Beaufort qui sotto è una scala internazionale delle velocità
del vento da 0 (calmo) a 12 (Forza uragano).

- 27 -
Scala Beaufort
Descrizione
Velocità del
vento
Condizioni del terreno
0
Calma
< 1 km/h
Calma. Fumo si eleva verticalmente.
< 1 miglia
orarie
< 1 nodi
< 0,3 SM
1
Leggero aria
1.1 ~ 5 km/h
La deriva del fumo indica il vento
direzione. Le foglie e le banderuole
sono fisse.
1 ~ 3 miglia
orarie
1 ~ 3 nodi
0,3 ~ 1.5 SM
2
Leggero brezza
6 ~ 11 km/h
Il vento si percepisce sulla pelle esposta.
Foglie fruscio. Le banderuole cominciano
A mossa.
4 ~ 7 miglia
orarie
4 ~ 6 nodi
1.6 ~ 3.3 SM
3
Gentile brezza
12 ~ 19 km/h
Foglie e piccoli rametti costantemente in
movimento. Bandiere luminose estese.
8 ~ 12 miglia
orarie
7 ~ 10 nodi
3.4 ~ 5.4 SM
4
Moderar
e brezza
20 ~ 28 km/h
Polvere e sciolto carta sollevata.
Piccolo rami iniziare a mossa.
13 ~ 17 miglia
orarie
11 ~ 16 nodi
5.5 ~ 7.9 SM
5
Fresco brezza
39 ~ 38 km/h
Rami di un dimensioni moderate
mossa . Piccoli alberi nella foglia
iniziare a ondeggiare.
18 ~ 24 miglia
orarie
17 ~ 21 nodi
8.0 ~ 10.7 SM
6
Forte brezza
39 ~ 49 km/h
Grande rami In movimento. Fischiando
sentito nei cavi aerei. Uso dell'ombrello
diventa difficile. Vuoto plastica i bidoni si
ribaltano r.
25 ~ 30 miglia
orarie
22 ~ 27 nodi
10.8 ~ 13.8 SM
7
Vento forte
50 ~ 61 km/h
Alberi interi In movimento. Sforzo
necessario camminare contro la vittoria
.
31 ~ 38 miglia
orarie
28 ~ 33 nodi
13.9 ~ 17.1 SM
8
Burrasca
62 ~ 74 km/h
Alcuni rametti spezzati da alberi.
Le auto sterzano strada. Progresso a
piedi È seriamente ostacolato.
39 ~ 46 miglia
orarie
34 ~ 40 nodi
17.2 ~ 20.7 SM
9
Forte burrasca
75 ~ 88 km/h
Alcuni rami si spezzano dagli alberi, e
alcuni piccoli alberi vengono abbattuti .
Costruzione /
segnaletica temporanea e barricate soffio
Sopra.
47 ~ 54 miglia
orarie
41 ~ 47 nodi
20,8 ~ 24.4 SM
10
Tempesta
89 ~ 102 km/h
Gli alberi sono rotti spento o
sradicato, danno strutturale
probabile.
55 ~ 63 miglia
orarie
48 ~ 55 nodi
2.45 ~ 28.4 SM

- 27 -
11
Tempesta
violenta
103 ~ 117 km/h
Vegetazione diffusa e strutturale
danno probabile.
64 ~ 73 miglia
orarie
56 ~ 63 nodi
28,5 ~ 32.6 SM
12
Forza
dell'uragano
≥ 118 km/h
Gravi danni diffusi alla vegetazione e
strutture. Detriti e non protetti
gli oggetti sono scagliati qua e là.
≥ 74 miglia
orarie
≥ 64 nodi
≥ 32.7 SM
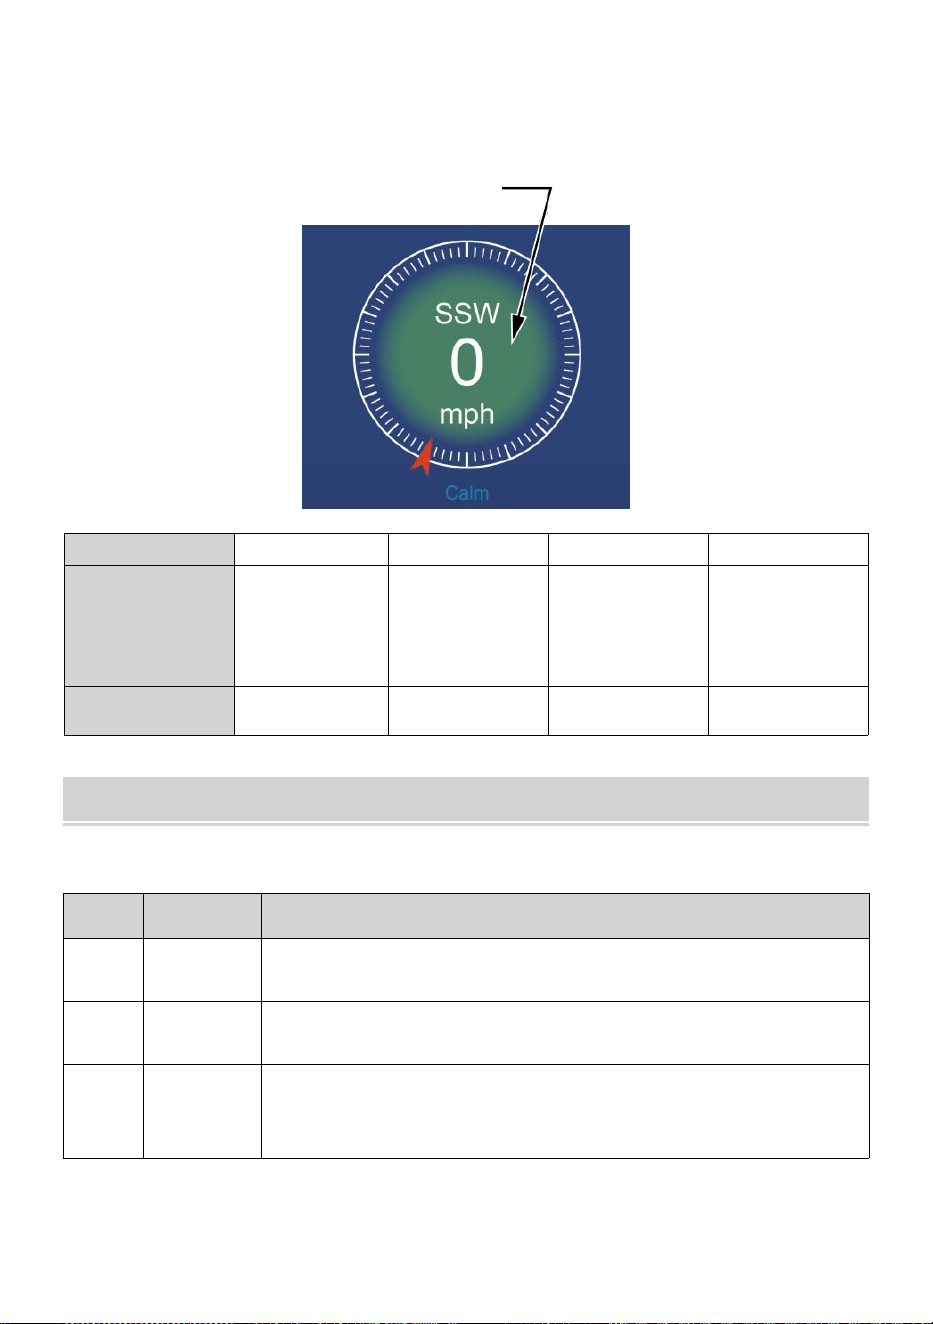
- 28 -
VELOCITÀ DEL VENTO LIVELLO
Il grafico del livello di velocità del vento visualizzato fornisce UN presto
riferimento su IL
attuale vento condizione . La sfondo colore Di IL bussola cambia in
base alla velocità del vento.
Livello
Leggero
Moderare
Forte
Tempesta
Velocità
0 - 12 miglia
orarie
0 - 19 km/h
12 - 30 miglia
orarie
20 - 49 km/h
31 - 55 miglia
orarie
50 - 88 km/h
≥ 55
miglia
orarie ≥
89 km/h
Colore della
bussola
Verde
Giallo
Arancia
Rosso
LEGGERO INTENSITÀ E U V INDICE
Questa sezione mostra un grafico per leggero intensità e UV indice.
UVI
Valutazi
one
Commento
0-2
Basso
UN UV Indice lettura da 0 a 2 significa basso pericolo da
il sole UV raggi per la media persona.
3-5
Medio
UN UV Indice lettura da 3 a 5 significa moderare rischio di
danno dal sole non protetto esposizione.
6-7
Alto
UN UV Indice lettura da 6 a 7 significa alto rischio di danno
dall'esposizione al sole senza protezione. Proteggere gli
ioni dalla pelle e dagli occhi danno È necessario.

- 28 -
8-10
Molto Alto
UN UV Indice lettura da 8 a 10 significa molto alto rischio
di danni da esposizione al sole senza protezione. Prendere
extra precauzioni
perché la pelle e gli occhi non protetti Essere
danneggiato E Potere bruciare rapidamente.
11-15
Estremo
UN UV Indice lettura di 11 o più significa estremo rischio
di danni da esposizione al sole non protetta. Prendere
tutte le precauzioni Perché la pelle e gli occhi non protetti
possono bruciare In minuti.

MULTI-CHANNEL DISPLAY MODE
- 29 -
CANALE DISPLAY
Mentre sei
nella schermata
semplice/dettagliata
,
premere
cH
pulsante per passare da interno e canale 1-7 dati.
MULTI-SENSORE DISPLAY PAGINA
Mentre sei nella schermata semplice/dettagliata, premere
pulsante per entrare in Multi-sen- schermo di visualizzazione.
Premere pulsante per scambiare il display fra interno ed esterno o
dati del sensore.
Premere il pulsante
w
per tornare alla modalità semplice/dettagliata
schermo.
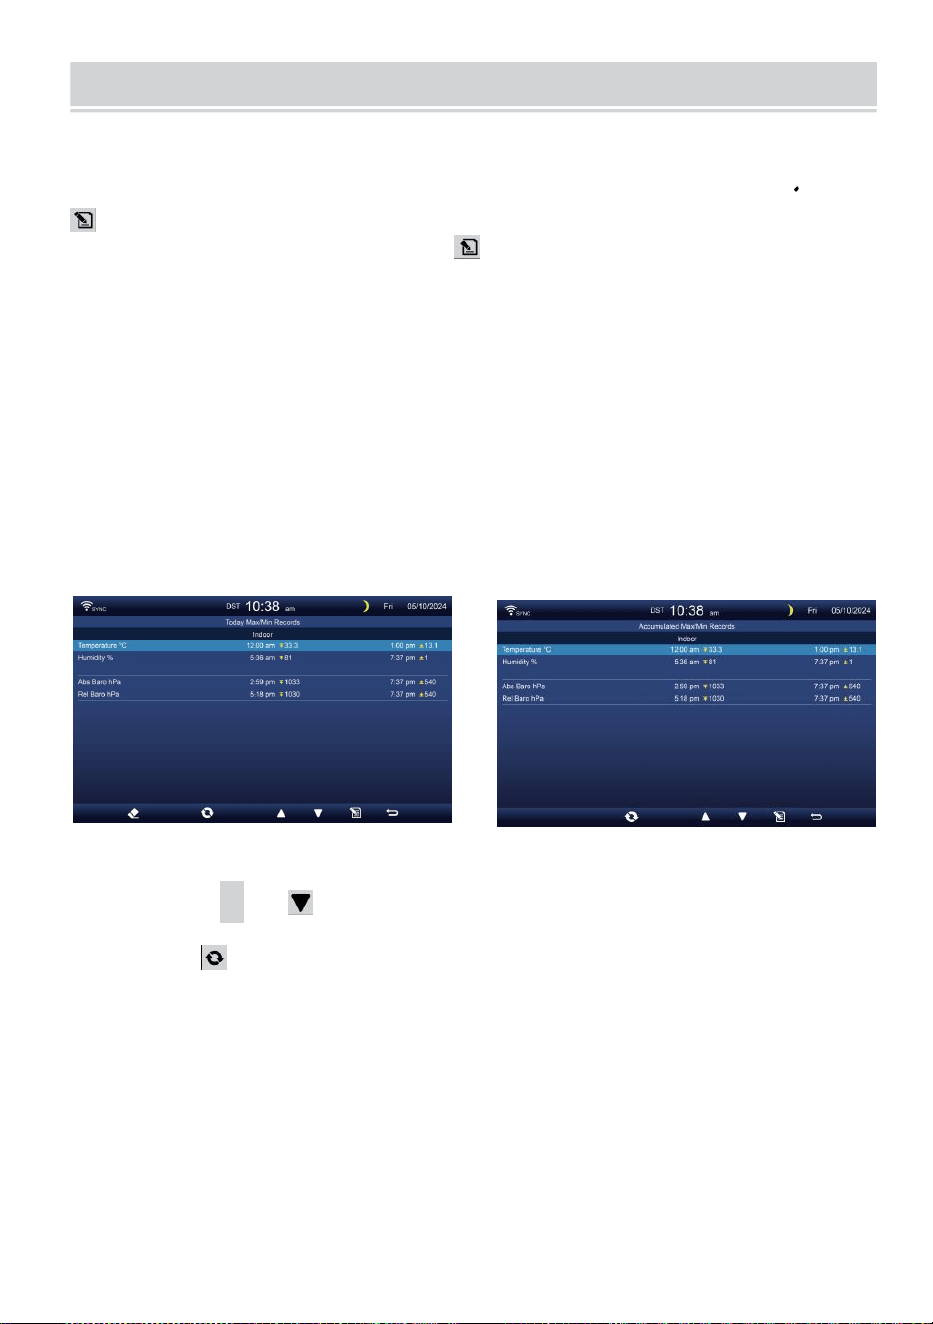
WEATHER DATA RECORD
- 30 -
Questa sezione spiega come arrivare a visualizzare i dati weat her
documentazione (Max- /Min, registro dati, grafico storico). Per
visualizzare IL tempo atmosferico dati documentazione , premere
pulsante nella schermata semplice/dettagliata per accedere alla
schermata dei dati meteo. Premere
pulsante per interscambio il max/min, registro dati e grafico storico
modalità.
Massimo/minimo
Ci sono 2 modalità dati per MAX/MIN registrazioni: Quotidiano o
Accumulato. (Dipende dal Massimo/minimo documentazione
modalità dentro Impostazione dello schermo pagina )
Quotidiano Dati Max/Min modalità
I dati Max/Min saranno essere visualizzato e chiaro a mezzanotte.
Accumulato Modalità dati Max/Min
I dati Max/Min saranno tenuto accumulato.
Quotidiano Massimo/minimo Registra accumulato Massimo/minimo
Documentazione
Premere
▲
O pulsante per selezionare il desiderato
Massimo/minimo documentazione.
Premere pulsante per intercambiare per mostrare interno, esterno
e canale Massimo/minimo registrazioni.
Premere . pulsante A ritorno semplice / dettaglio schermo .
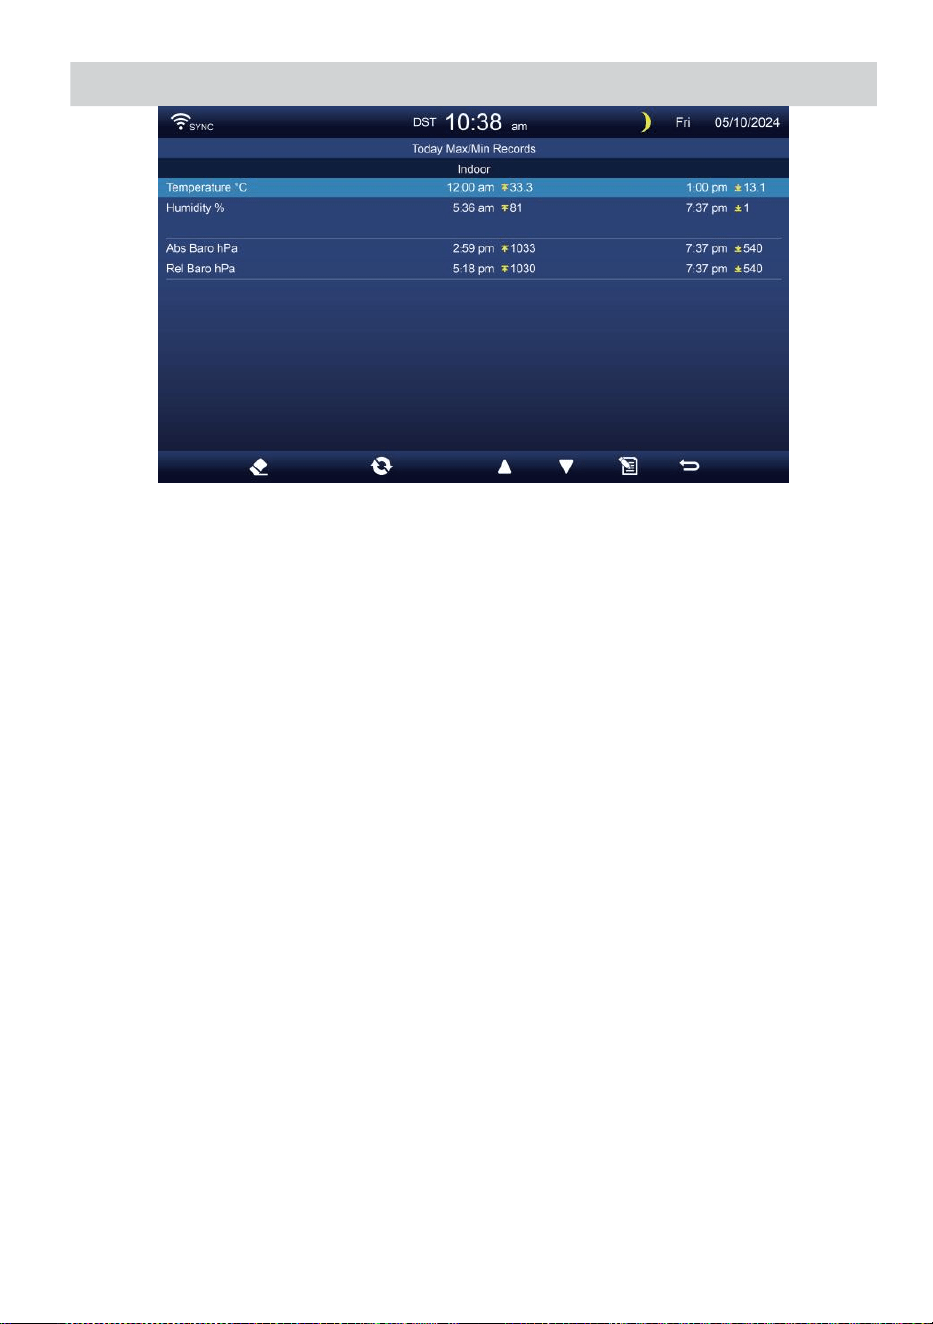
WEATHER DATA RECORD
- 30 -
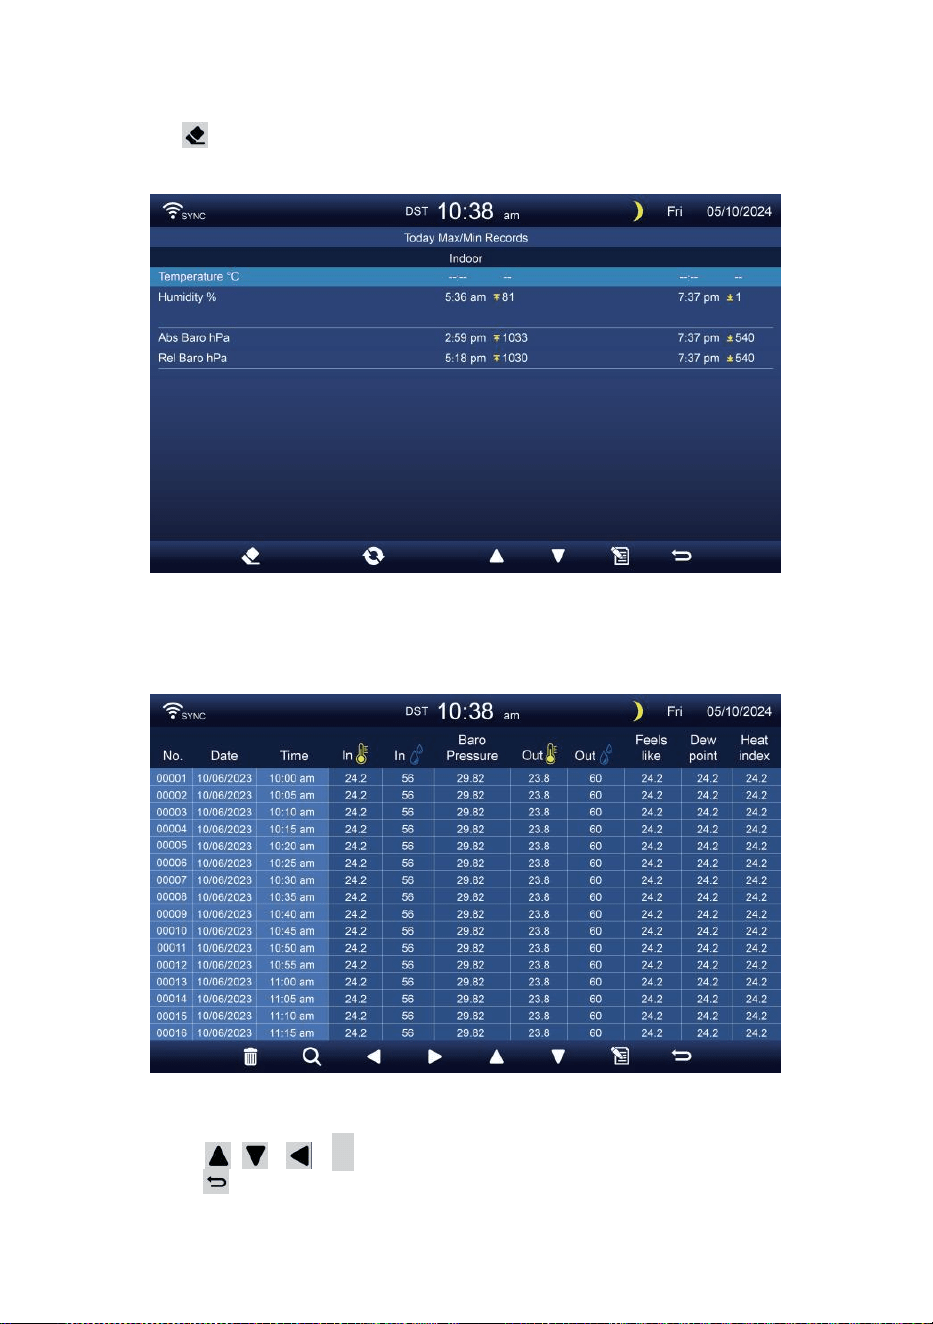
- 31 -
Cancella Max/Min dati
Per cancellare la selezione Massimo/minimo registrazioni, premere
e Presa pulsante oltre 2s per cancellare la selezione
Massimo/minimo documentazione.
DATI SCHERMATA DI REGISTRO
La schermata del registro dati cattura Tutto IL storia registrazioni.
Navigazione dei dati schermata di registro
Premere , , ,
B
pulsanti per sfogliare il schermo.
Premere pulsante per tornare alla schermata
semplice/ dettagliata.
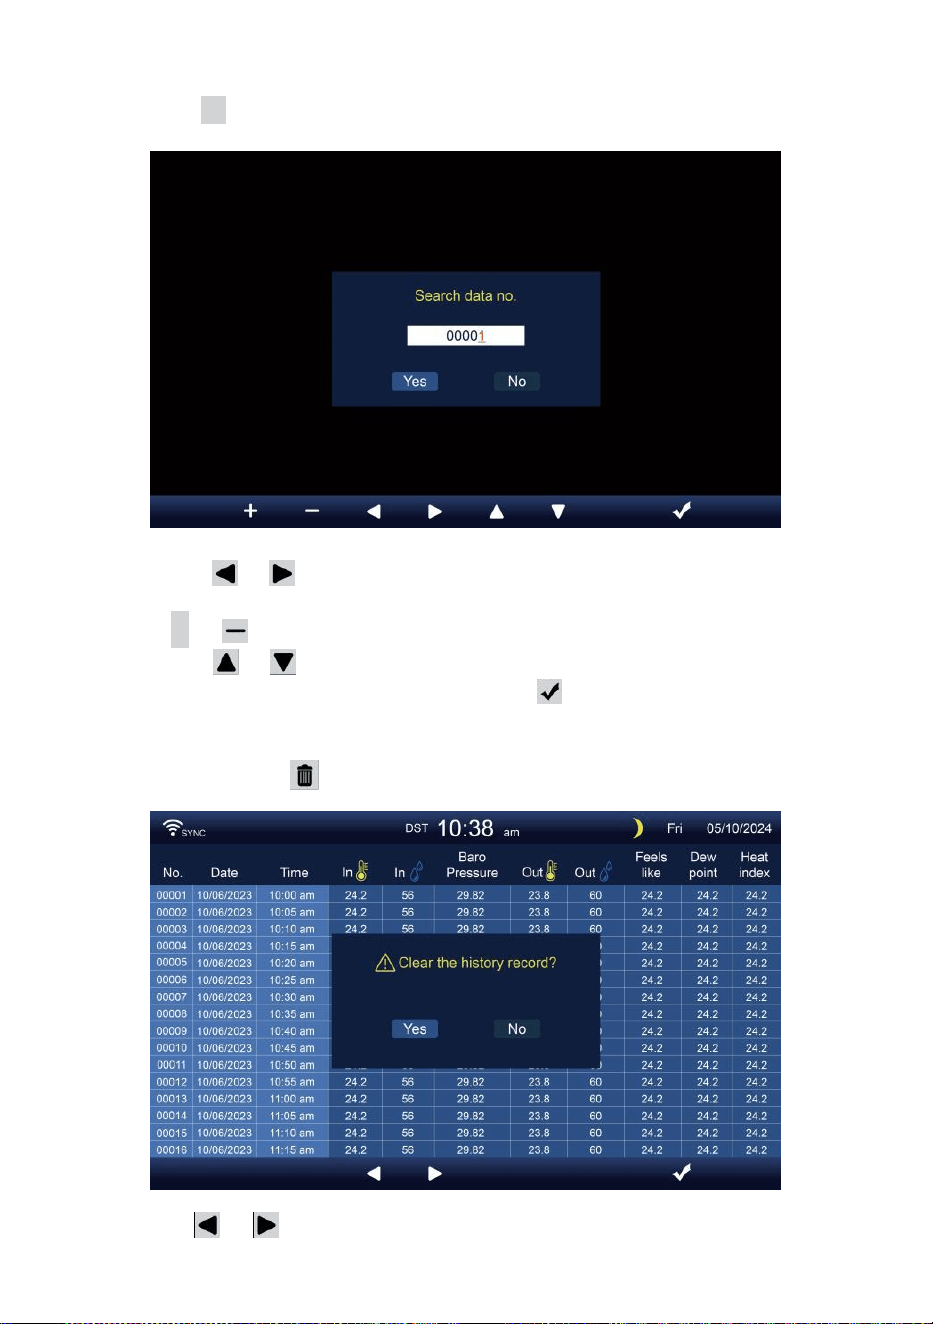
- 32 -
Alla ricerca di uno specifico pagina
Premere Q per visualizzare ricerca IL dati documentazione.
Premere O pulsante per selezionare un cifra In IL pagina
numero,
Premi + O pulsante per modifica IL numero su O giù.
Premere O pulsante per cambiare l' attivato campo
opzionale, commutare Sì o NO, premere A confermare.
Elimina tutti i dati tronco d'albero registrazioni
Premere e Presa oltre 2s per eliminare Tutto registrazioni.
Premere O pulsante per selezionare modifica IL attivato
opzione campo, attiva Sì o NO, premere io A confermare.
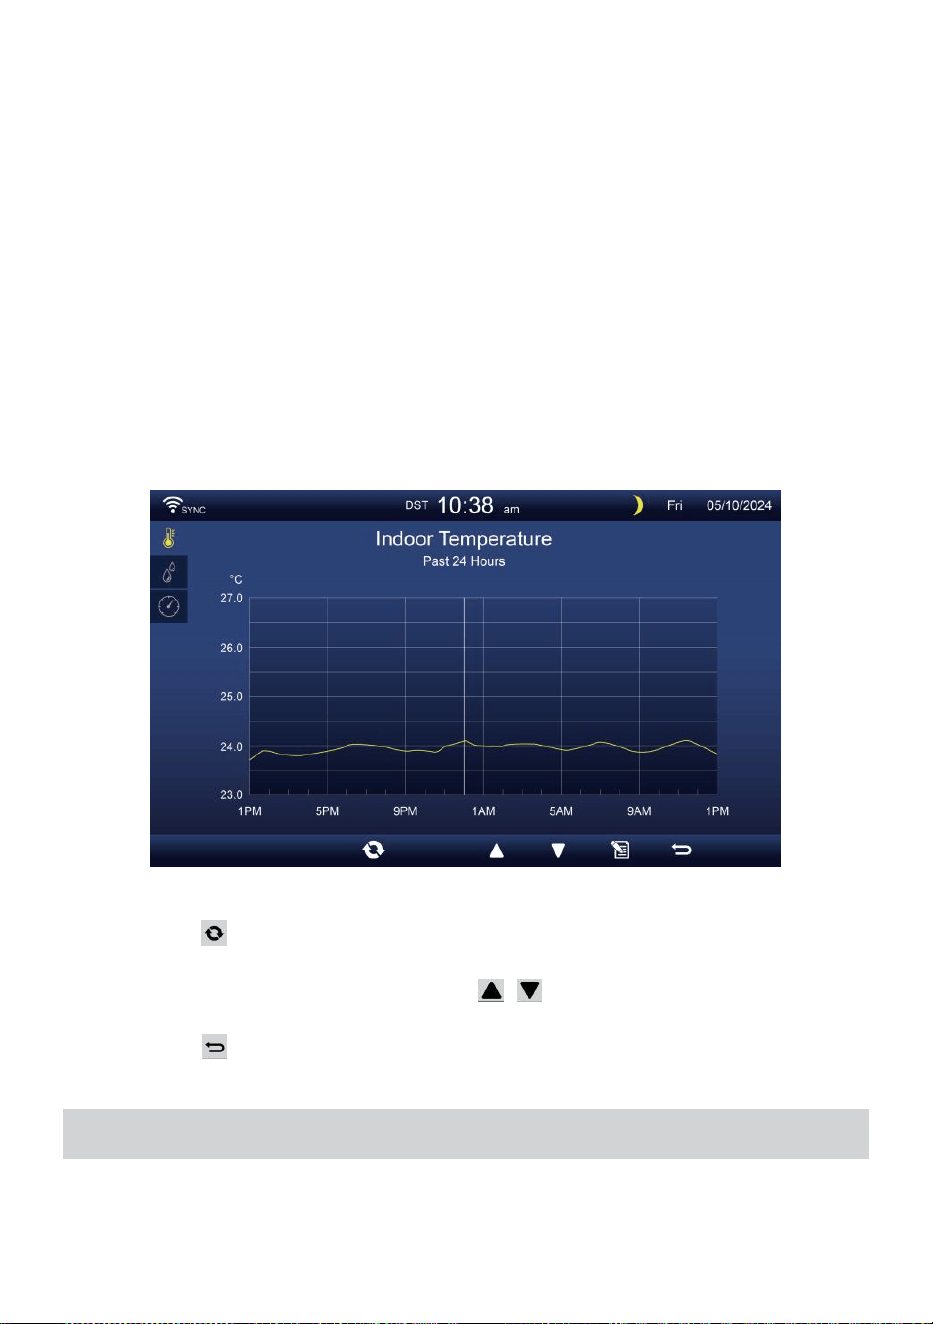
- 33 -
GRAFICO STORICO
Questa sezione spiega come arrivare e vedere storia grafici.
Ci sono grafico interno, grafico esterno e grafico del canale s a Essere
mostrato.
Grafico interno
Temperatura, Umidità, Relativo e assoluto pressione .
Grafico esterno
Temperatura, Umidità, Piovere Valutare, Ultime 24 ore Pioggia,
Velocità media del vento, Raffica di vento, Direzione del vento,
Leggero Intensità e UVI.
Grafico CH1-CH7
Temperatura, Umidità.
Premere pulsante per intercambiare per mostrare interno, esterno
e canale grafico storico.
Quando appare il grafico, premere , pulsanti per visualizzare altri
grafici.
Premere pulsante per ritorno semplice/dettaglio schermo.
IMPOSTAZIONE GENERALE
Tutte le impostazioni della console e le informazioni di sistema Sono
nel collocamento menu. Ci sono 8 tipi di parametri di impostazione
dentro il collocamento menu.

- 33 -
Nella schermata semplice/dettagliata, premere pulsante per entrare
nell'impostazione menu.
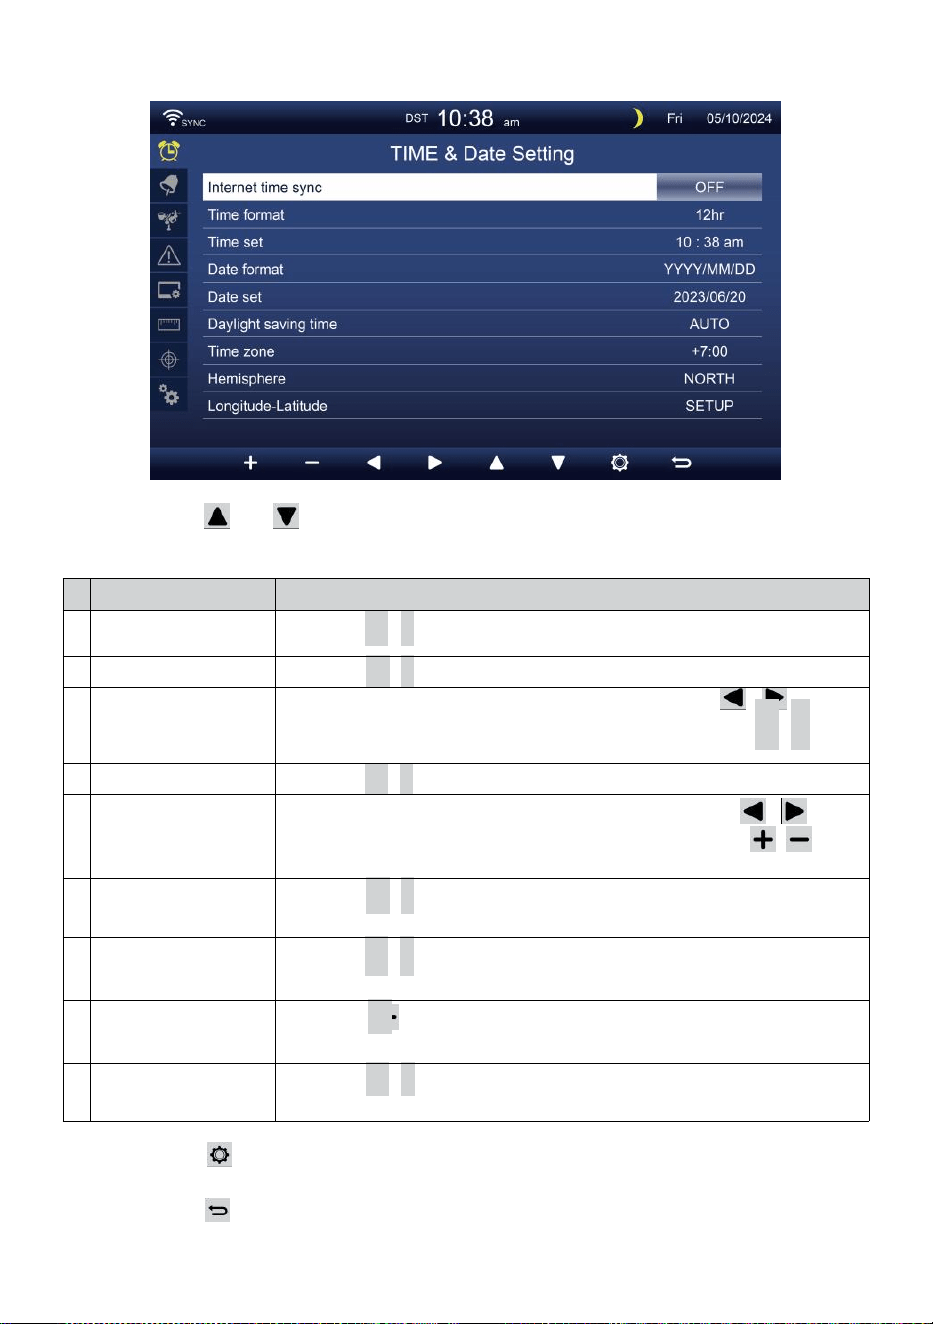
- 34 -
ORA / DATA COLLOCAMENTO
Premere O pulsante per selezionare una delle seguenti
impostazioni:
#
Sub articolo
Operazione
U
N
Sincronizzazione
dell'ora di Internet
Premere
+
/
-
pulsante A giro SU O giro spento .
B
Formato dell'ora
Premere
+
/
-
pulsante A selezionare 12 o formato 24 .
C
Tempo impostato
Quando il tempo si sincronizza è spento, premere /
pulsante per selezionare fra ora o minuto, premere + /
-
pulsante per regolare il valore.
D
Formato data
Premere
+
/
-
pulsante per selezionare M / D o D / Formato M.
e
Data impostato
Quando il tempo si sincronizza è spento, premere /
pulsante per selezionare Anno, Mese, Data, premere /
pulsante per regolare il valore.
F
Ora legale
Premere
+
/
-
pulsante per spegnere o impostare il Da ora
legale a automatica.
G
Fuso orario
Premere
+
/
-
pulsante A selezionare IL tuo locale tempo
zona A ottenere l'ora esatta.
H
Emisfero
Premere
+
/ pulsante per selezionare NORD o SUD emisfero
per il punto sensore 7 in 1 A E luna fase.
i
o
Longitudine-
Latitudine
Premere
+
/
-
pulsante A entrare Longitudine - Latitudine
impostare pagina .
Premere pulsante per accedere alla schermata di impostazione
della sveglia.
Premere pulsante per ritorna alla schermata semplice/dettagliata .
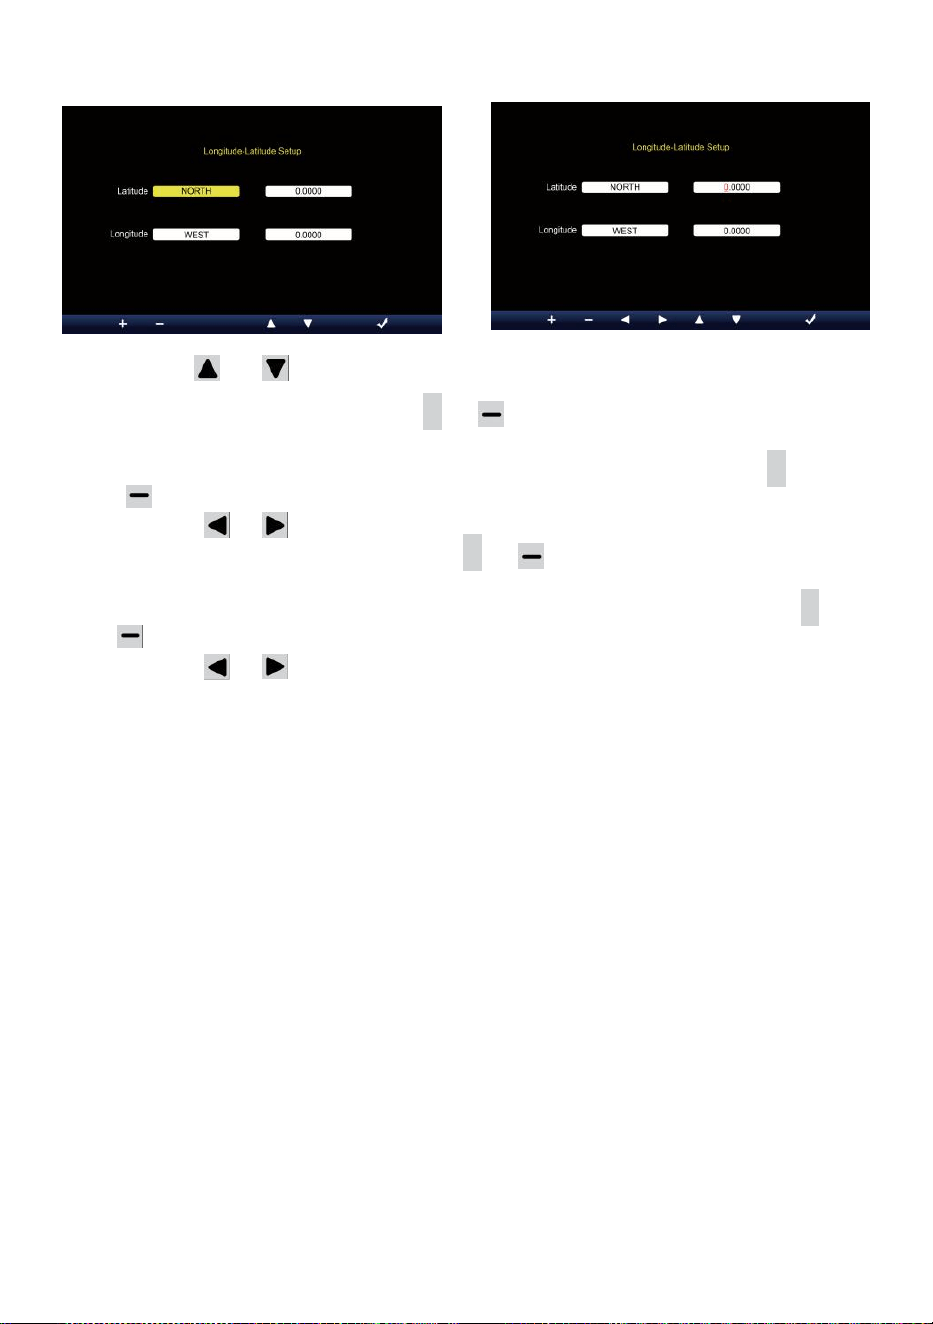
- 35 -
Impostazione Longitudine-Latitudine
Premere O pulsante per cambiare IL attivato campo opzione.
1. Latitudine (emisfero) --- Premi
+
O pulsante per seleziona il
emisfero . (NORD/SUD)
Latitudine --- La latitudine x 10 si trasformerà rosso. Premere +
O pulsante per aumentare o diminuire il valore .
Premere O cambiare rimanere valore della latitudine.
2. Longitudine (emisfero e) --- Premi + O pulsante per selezionare il
emisfero . (EST/OVEST)
Longitudine --- La latitudine x 100 si trasformerà rosso. Premere
+
O pulsante per aumentare o diminuire il valore .
Premere O pulsante per cambiare rimane valore della
longitudine.
Premere io pulsante per confermare Longitudine Latitudine di
impostazione.
NOTA:
Determinare il longitudine e
latitudine. per esempio
Latitudine
Longitudine
: 33.2981
: -111.9602
Se la posizione È nel Settentrionale Emisfero, La latitudine sarà
Essere positivo. Se la posizione È nel sud Emisfero, La latitudine
sarà Essere negativo. Se la posizione È nel Ea poppa Emisfero, la
longitudine sarà Essere positivo.
Se la posizione È nell'Occidente Emisfero, la lunga condotta sarà
Essere negativo. Quindi, quanto sopra Longitudine e La latitudine
verrà inserita in display come segue :
Latitudine = NORD --- 33. 2981
Longitudine = OVEST --- Italiano: 111.9602.
NOI New York (ora solare, (GMT-5)

- 35 -
Latitudine
Longitudine
: 40.7128 (Nord (40.7128)
: -74.0060 (Ovest 74.0060)

- 36 -
Unione Europea Francoforte Germania (GMT+1)
Latitudine
Longitudine
: 50.1109 (Nord 50.1109)
: 8.6821 (Est 8.6821)
Regno Unito Londra Inghilterra (GMT)
Latitudine
Longitudine
: 51.5072 (Nord 51.5072)
: -0,1276 (Ovest 0,1276)
Australia Sidney ( GMT +10)
Latitudine
Longitudine
: -33.8688 (Sud 33.8688) :
151.2093 (Est 151,20 93)
ALLARME COLLOCAMENTO
Premere O pulsante per modificare il campo opzione attivato:
#
Sub articolo
Operazione
U
N
Ora di sveglia
impostata
Premere / pulsante per selezionare tra ora O
minuto. Premere / pulsante per regolare il
valore.
B
Allarme modalità
Premere / pulsante per selezionare Solo tutti i giorni o nei
giorni feriali.
C
Allarme
Premere
+
/
-
pulsante A giro SU O giro spento .
D
Ghiaccio pre
allertare
Premere
+
/
-
pulsante A giro SU O giro spento .
e
Suono di allarme
livello
Premere
+
/
-
pulsante A regolare IL suono livello .
F
Tono chiave livello
Premere
+
/
-
pulsante A regolare IL chiave tono livello .

- 36 -
Premere pulsante per accedere alla schermata di impostazione
del sensore.
Premere P u l s a n t e
w
per tornare semplice/dettaglio schermo.
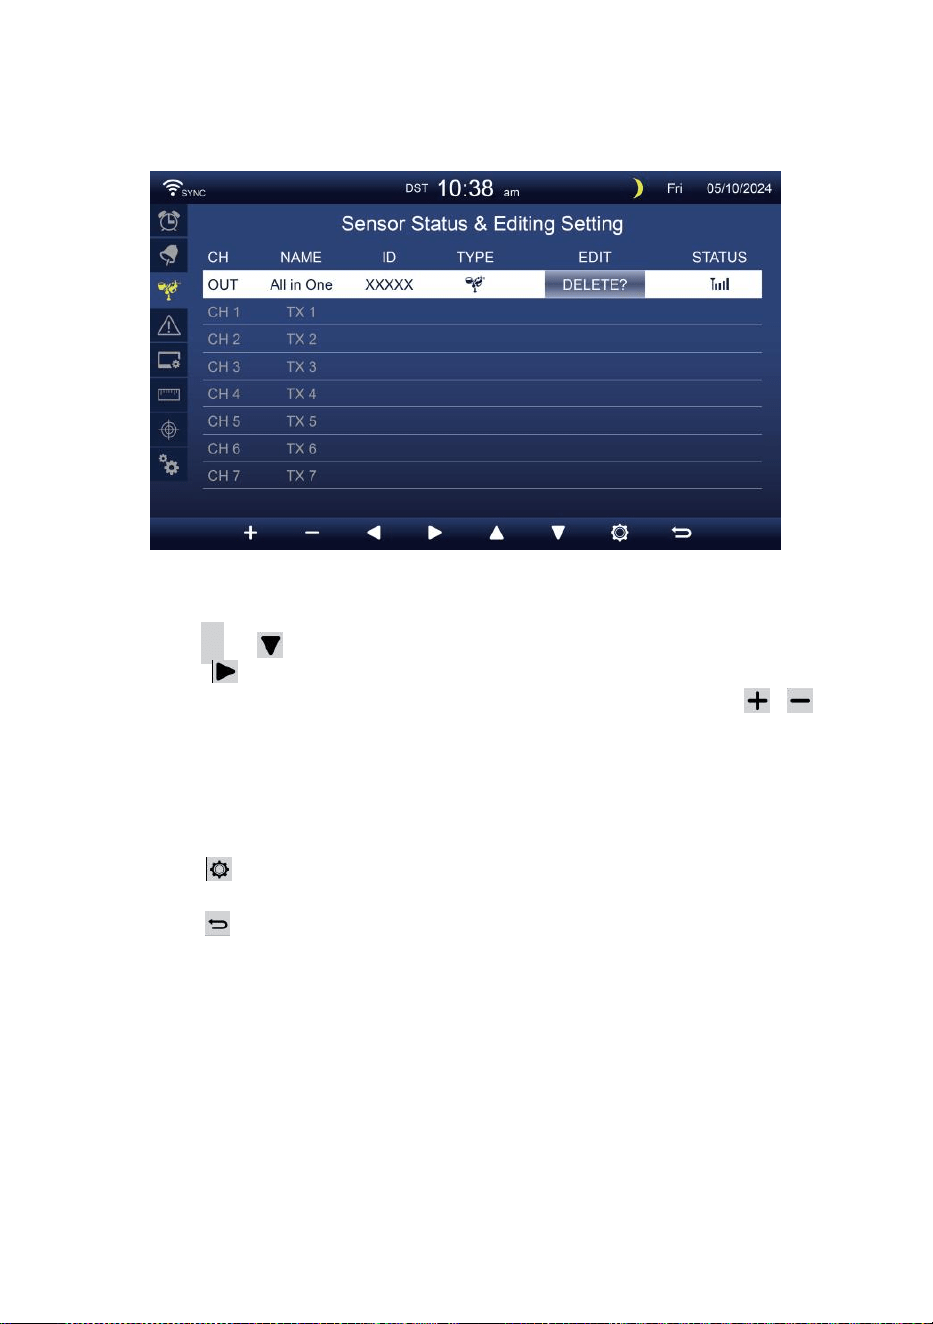
- 37 -
SENSORE COLLOCAMENTO
Questo pagina è aggiungere/eliminare il sensore all-in-one o extra
7 canali igrometri.
Aggiungere un nuovo sensore
Premere
▲
O pulsante per selezionare il vuoto canale.
Premere pulsante per selezionare il sensore di modifica colonna.
Quando la colonna mostra l'opzione " Aggiungi ", premere /
pulsante per avviare la ricerca del sensore.
Selezionare il canale corrispondente numero sul sensore, quindi
accendere o premere RESET pulsante per avviare il abbinamento.
Una volta che i dispositivi sono collegati, l'icona del sensore, ID
Volere spettacolo In IL canale riga.
Premere pulsante per accedere alla schermata delle impostazioni
di avviso.
Premere pulsante per ritorna alla schermata semplice/dettagliata .

- 38 -
Eliminare sensore accoppiato
Premere
▲
O pulsante per seleziona il connetti d
sensore. Premere pulsante per selezionare il
sensore di modifica colonna.
Quando la colonna mostra “Opzione " Elimina ", premere
+
O
pulsante A confermare.
Premere O pulsante per selezionare cambia il attivato
campo opzione, commuta SÌ O NO , premere
.
pulsante A
confermare .

- 39 -
IMPOSTAZIONE DI AVVISO
Impostato allerta interna
Premere
▲
O Pu ls an te
w
per selezionare diversi fila di attivati
campo opzione .
Premere
pulsante per selezionare avviso alto/basso/reset opzione .
Premere
+
O
w
pulsante per regolare il valore oppure opzione on/off.
Premere
pulsante per entrare nel Impostazione del display .
Premere
pulsante per tornare semplice/dettaglio schermo.
NOTA:
Quando si seleziona opzione di reimpostazione, tutti i valori
degli avvisi saranno ripristinare a IL valori predefiniti.
Imposta avviso esterno
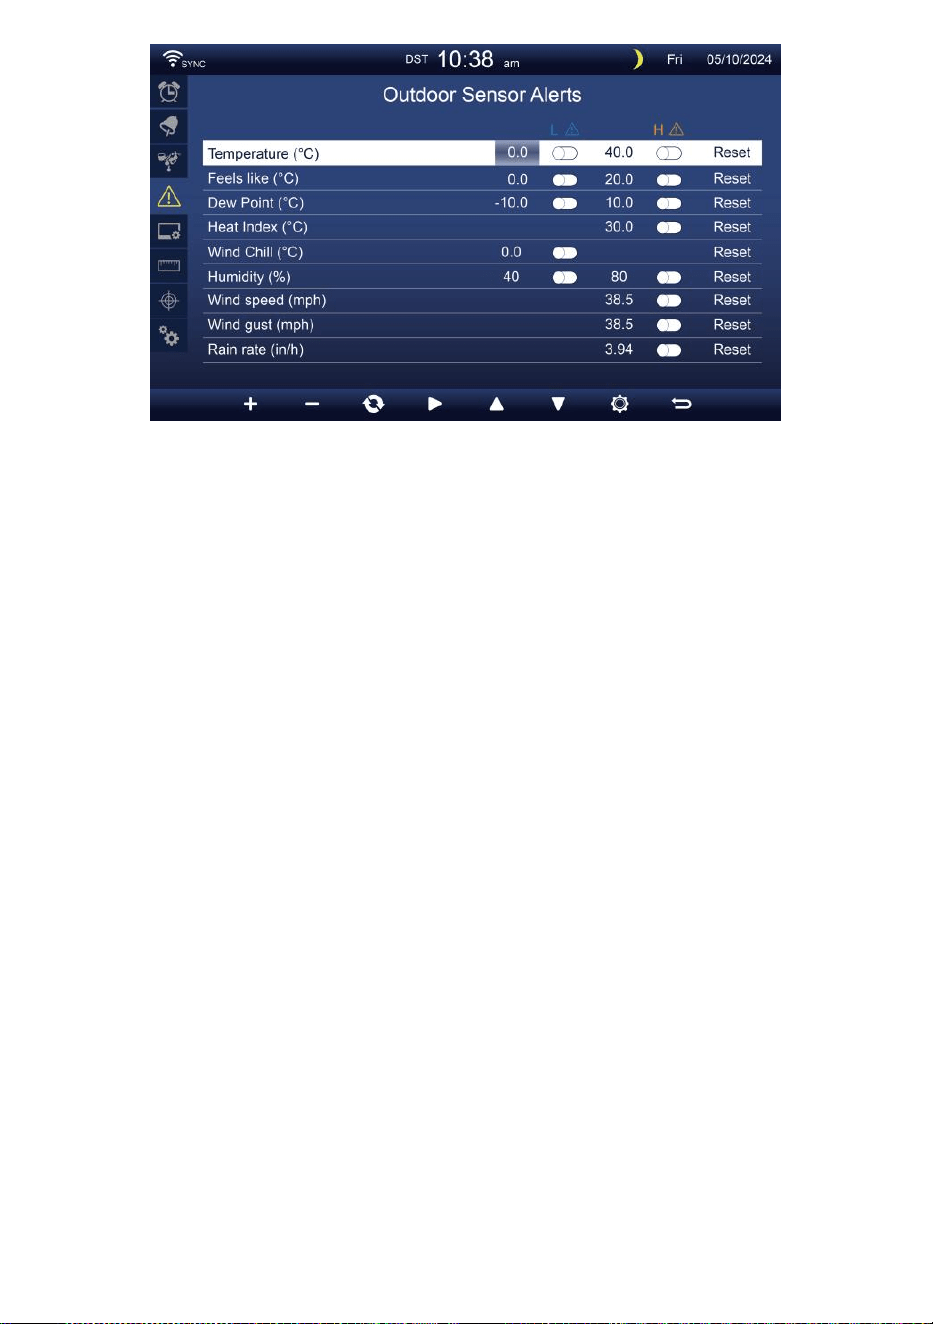
- 39 -

- 40 -
Premere O pulsante per selezionare una riga diversa di
attivato campo opzione.
Premere pulsante per selezionare opzione di avviso
alto/basso/reset.
Premere O Pulsante per regolare il valore o l'opzione on/off.
Premere pulsante per scambiare il Visualizzazione delle
impostazioni di avviso interne.
Premere pulsante per entrare nel Impostazione dello schermo
display.
Premere
w
pulsante per tornare
semplice/dettaglio schermo. Imposta il sensore
CH1-7 allertare
Premere
Premere
Premere
Premere
Premere
Premere
NOTA:
O pulsante per selezionare una riga diversa di attivati
opzione campo. pulsante per selezionare avviso
alto/basso/reset opzione .
O
w
pulsante per regolare il valore oppure opzione on/off.
pulsante per scambiare il Visualizzazione delle
impostazioni di avviso interne.
pulsante per entrare nel Visualizza
impostazione display. Pulsante per
tornare semplice/dettaglio schermo.
Quando si seleziona opzione di reimpostazione, tutti i valori
degli avvisi saranno ripristinare a IL valori predefiniti.

- 41 -
IMPOSTAZIONE DISPLAY
Premere O pulsante per cambiare IL attivato campo opzionale:
#
Sub articolo
Operazione
U
N
Lingua
Premere
+
/
-
pulsante A selezionare IL display lingua .
B
Colore di sfondo
Premere
+
/
-
pulsante A selezionare leggero O buio colore
sfondo per esposizione modalità.
C
Notte modalità
Premere
+
/ pulsante per impostare l'abilitazione (attivare il
attivare tempo
periodo), disabilita o automatico (attivato dal tuo camera
ambientale leggero livello).
D
Notte modalità
attiva tempo
Premere / pulsante per selezionare tra ora o
minuto . Premere
+
/
-
A regolare IL valore .
e
Retroilluminazione
livello
Premere
+
/
-
pulsante per regolare la retroilluminazione livello
In non normale .
F
Retroilluminaz
ione livello
(Notte
modalità)
Premere
+
/
-
pulsante per regolare la retroilluminazione
livello durante modalità notturna .
G
Luminosità
Premere
+
/
-
pulsante A regolare IL schermo luminosità .
H
Contrasto
Premere / pulsante per regolare lo schermo contrasto.
Premere pulsante per entrare nel Visualizzazione delle
impostazioni dell'unità .
Premere P u l s a n t e
w
per tornare semplice/dettaglio schermo.
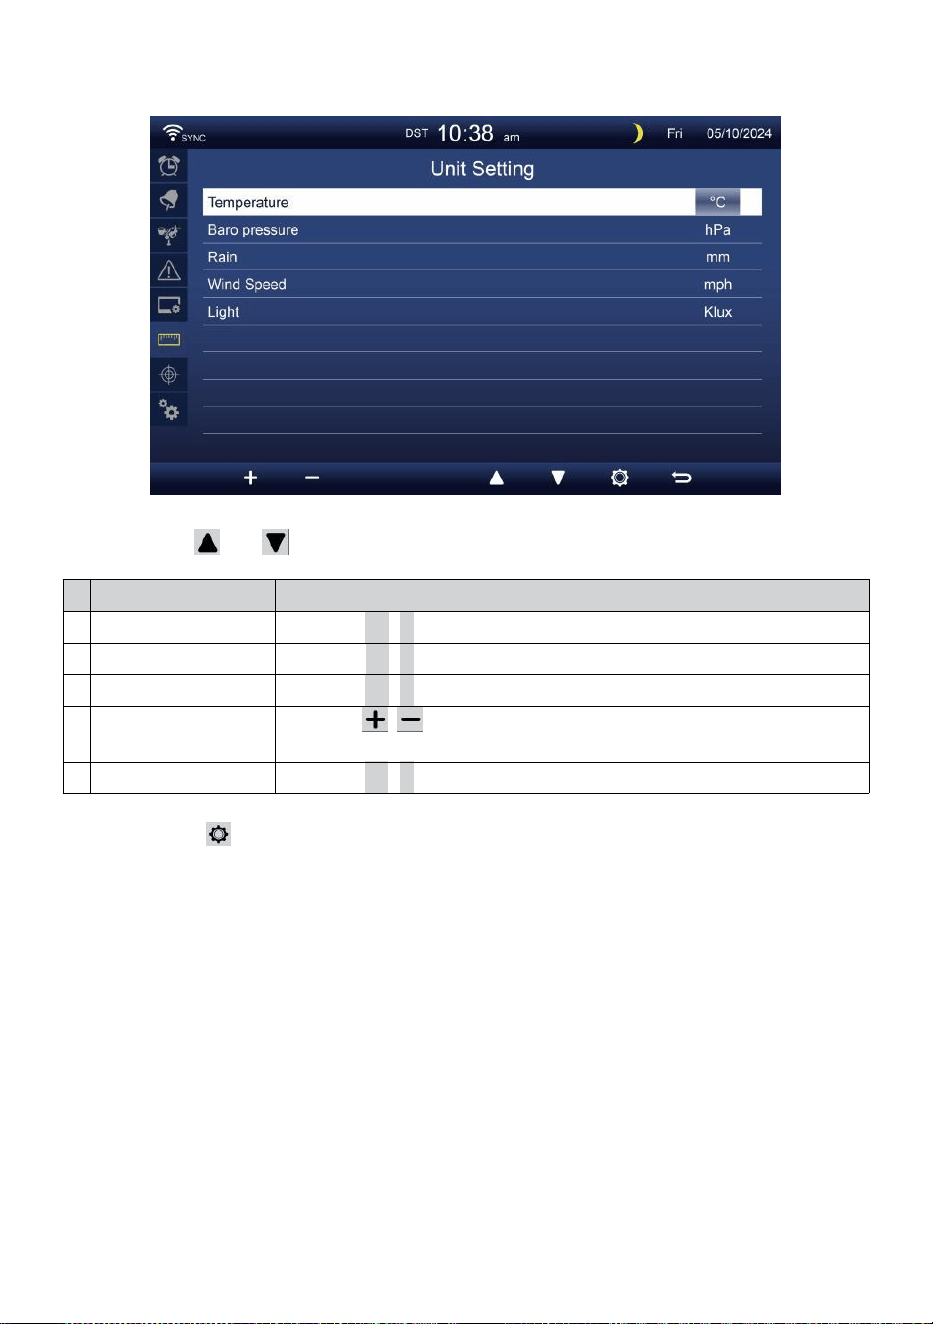
- 42 -
IMPOSTAZIONE UNITÀ
Premere O pulsante per cambiare IL attivato campo opzionale:
#
Sub articolo
Operazione
Temperatura
Premere
+
/
-
pulsante A selezionare ° C O °F.
Baro pressione
Premere
+
/
-
pulsante A selezionare hPa , inHg O mmHg .
Piovere
Premere
+
/
-
pulsante A selezionare mm O In .
Velocità del vento
Premere / pulsante per selezionare SM, km/h, nodi o miglia
orarie.
Leggero
Premere
+
/
-
pulsante A selezionare Klux , Il KFC O la /
m2
.
Premere pulsante per accedere alla schermata delle impostazioni
di calibrazione.
Premere P u l s a n t e
w
per tornare semplice/dettaglio schermo.
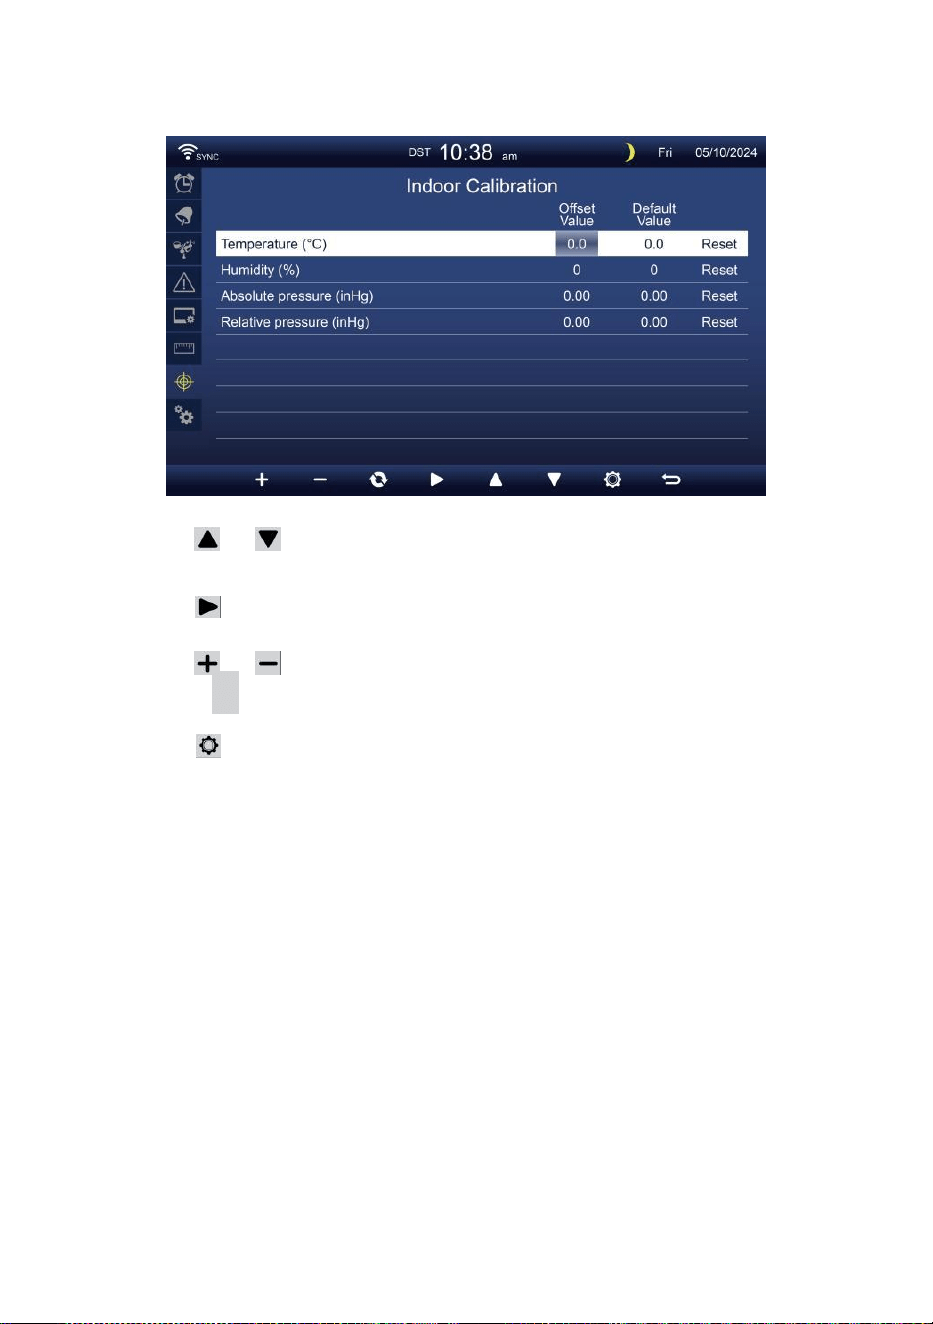
- 43 -
CALIBRAZIONE COLLOCAMENTO
Calibrazione per al chiuso parametri
Premere O pulsante per selezionare diversi riga di attivato
opzione campo.
Premere pulsante per selezionare opzione di avviso
alto/basso/reset.
Premere O pulsante per regolare il valore o opzione on/off.
Premere
C
pulsante per interscambio per mostrare il interno ,
esterno e canale Calibrazione collocamento visualizzare .
Premere pulsante per entrare in Altro
collocamento display.
Premere
w
pulsante per
tornare semplice/dettaglio schermo,
NOTA:
Quando si seleziona opzione di reset, tutti i valori di calibrazione
saranno ripristinare a IL valori predefiniti.
Calibrazione per all'aperto parametri
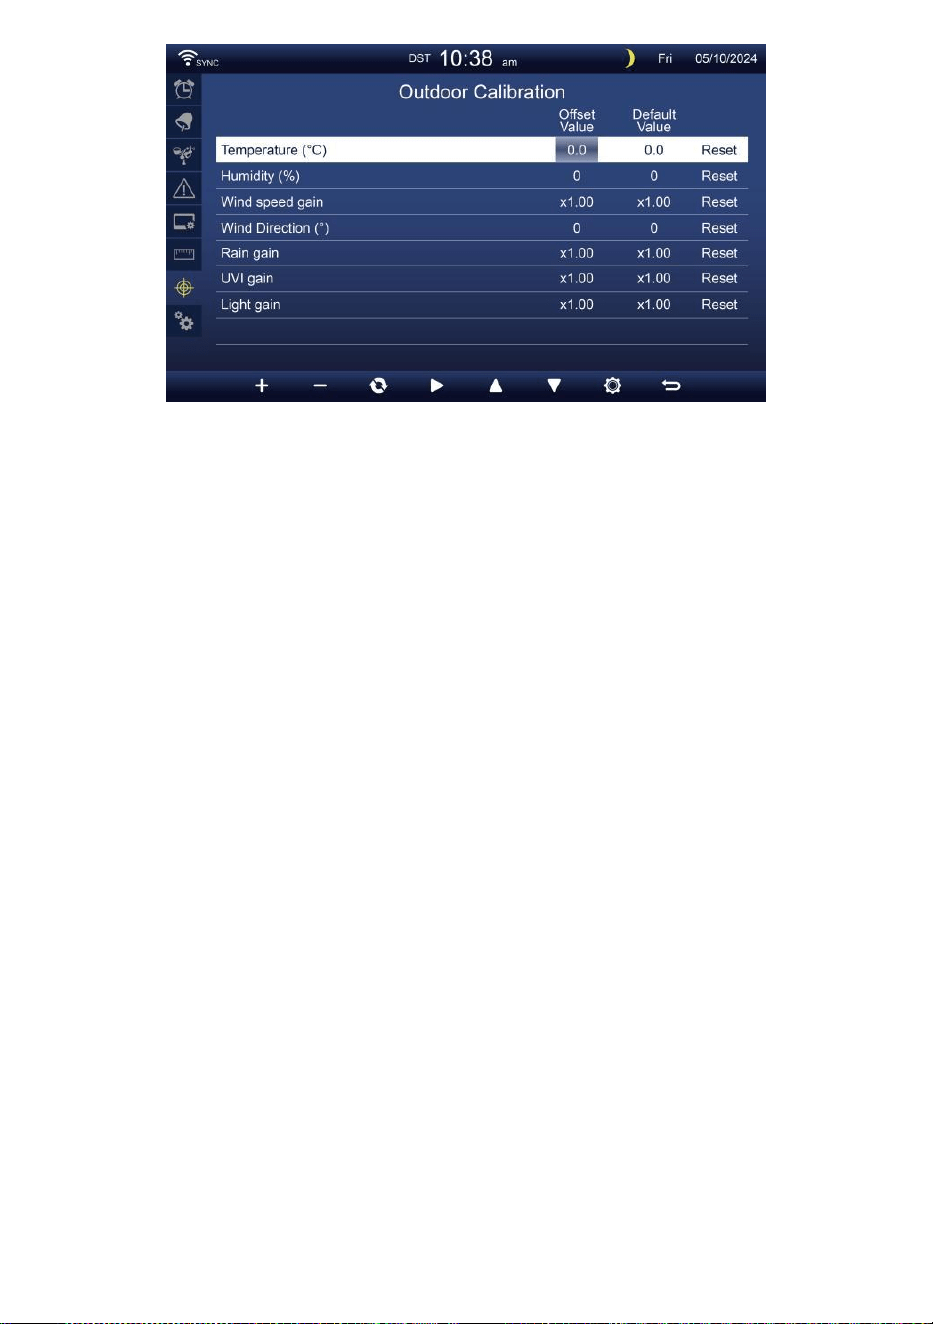
- 43 -
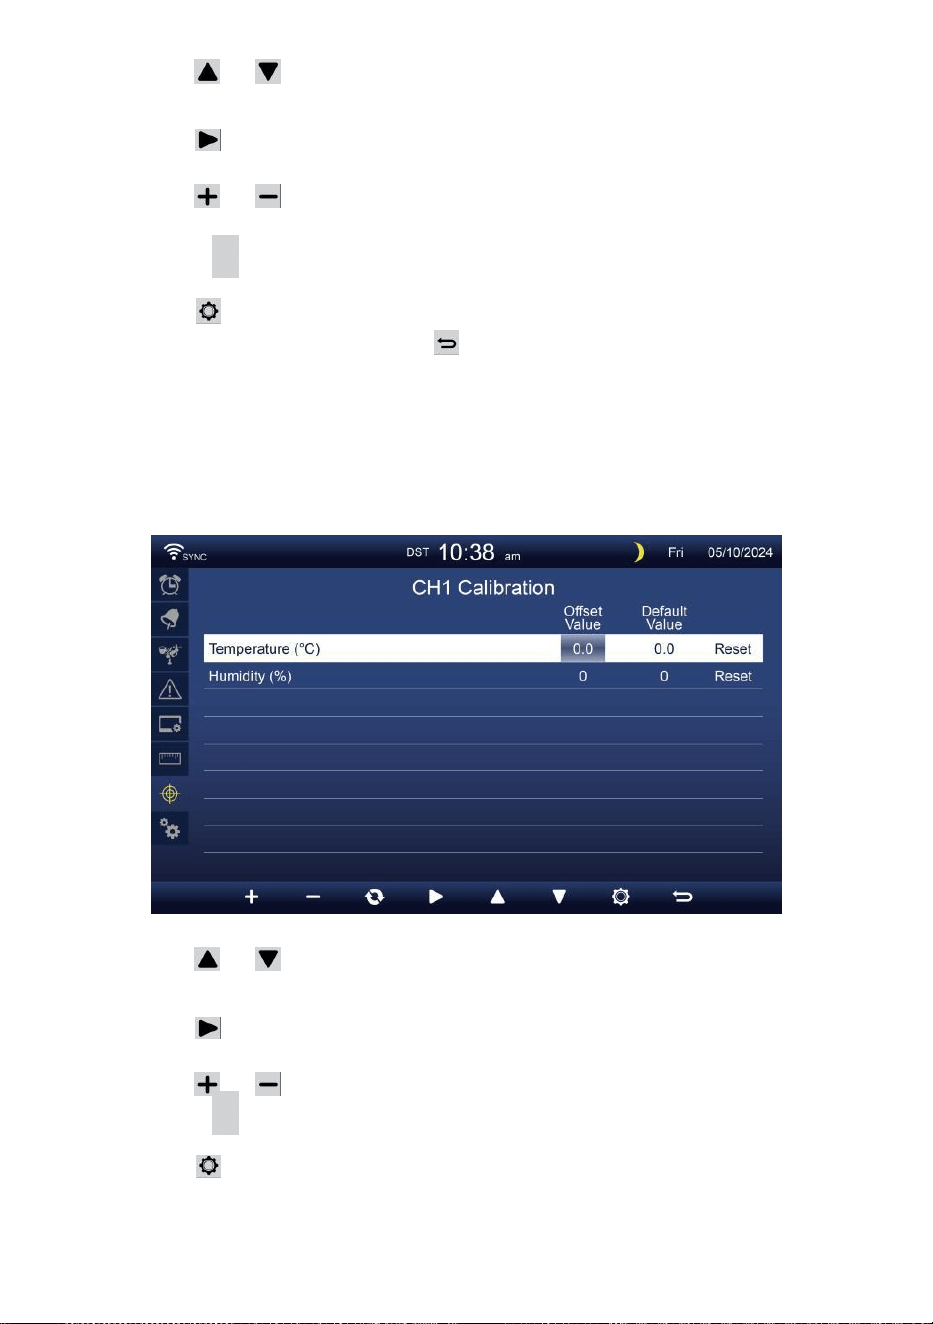
- 44 -
Premere O pulsante per selezionare diversi riga di attivato
opzione campo.
Premere pulsante per selezionare opzione di avviso
alto/basso/reset.
Premere O pulsante per regolare il valore o accendere/spegnere
opzione.
Premere
C
pulsante per interscambio per mostrare il interno ,
esterno e canale Calibrazione collocamento visualizzare .
Premere pulsante per entrare in Altro
collocamento display.
Premere pulsante per
ritorna schermata semplice/dettagliata,
NOTA:
Quando si seleziona opzione di reset, tutti i valori di calibrazione
saranno ripristinare a IL valori predefiniti.
Calibrazione per Sensore CH 1- CH 7 parametri
Premere O pulsante per selezionare diversi riga di attivato
opzione campo.
Premere pulsante per selezionare opzione di avviso
alto/basso/reset.
Premere O pulsante per regolare il valore o opzione on/off.
Premere
C
pulsante per interscambio per mostrare il interno ,
esterno e canale Calibrazione collocamento visualizzare .
Premere pulsante per entrare in Altro
collocamento display. Premere
w
pulsante per
tornare semplice/dettaglio schermo,
NOTA:

- 44 -
Quando si seleziona opzione di reset, tutti i valori di calibrazione
saranno ripristinare a IL valori predefiniti.
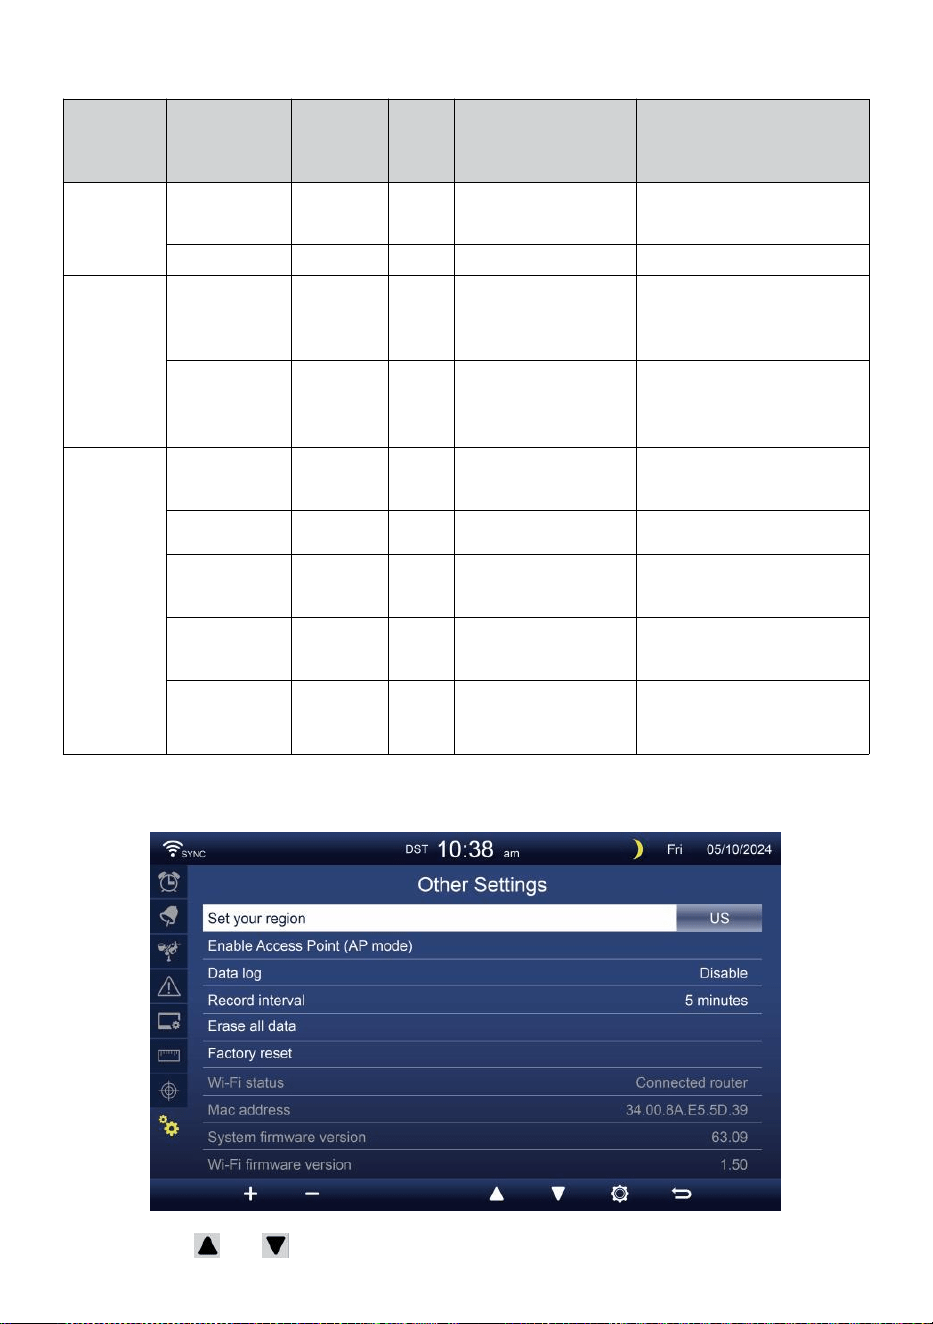
- 45 -
Calibrazione parametri
Sensore
Parametro
Tipo Di
calibrazio
ne
Predefi
nito
valore
Collocamento
allineare
Taratura tipica
fonte
Al chiuso,
All'aperto
o canale(i)
Temperatura
Offset
0
±36 °F (±20 °C)
Spirito rosso o
mercurio termometro
Umidità
Offset
0
±20 %
Psicrometro a fionda
Al chiuso
Assoluto
pression
e
Offset
0
±560hPa (±16,51inHg
o ±420mmHg
Grado di laboratorio
calibrato barometro
Relativo
pression
e
Offset
0
±560hPa (±16,51inHg
o ±420mmHg
Aeroporto locale
All'aperto
Velocità del
vento
Guadagno
1
X 0,5 ~ 1.5
Grado di laboratorio
calibrato vento metro
Direzione del
vento
Offset
0
±10°
GPS o Bussola
Piovere
Guadagno
1
X 0,5 ~ 1.5
Vetro spia pluviometro con
metro
UVI
Guadagno
1
X 0,01 ~ 10.0
Grado di laboratorio
calibrato UV metro
Leggero
intensità
Guadagno
1
X 0,01 ~ 10.0
Grado di laboratorio
calibrato radiazione solare
sensore
ALTRE IMPOSTAZIONI
Premere O pulsante per cambiare IL attivato campo opzionale:
- 46 -
#
Sub articolo
Operazione / Descrizione
U
N
Imposta il tuo regione
Premere / pulsante per selezionare Europa, REGNO
UNITO, NOI, Australia.
B
Abilitare Accesso
Punto
Premere
+
/
-
pulsante A inizioAP modalità per WIFI
connessione impostare .
C
Dati tronco d'albero
Premere / pulsante per abilitare o disabilitare il dati
funzione logaritmica.
D
Documentazione
intervallo
Premere
+
/
-
pulsante A impostare IL documentazione
intervallo Di IL dati tronco d' albero .
e
Cancella tutto dati
Premere / pulsante per cancellare tutto IL dati In consolle.
F
Fabbrica reset
Premere
+
/
-
pulsante A reset Tutto IL collocamento A
predefinito E chiaro tutti i dati In consolle.
G
Stato WI-FI
Mostra lo stato attuale della connessione WI-FI della console.
H
Indirizzo Mac
Mostra la console Indirizzo Mac.
i
o
Versionedelfirmwaredi
sistema
Mostra la versione corrente del firmware di sistema della console.
J
Versione firmware Wi-
Fi
Mostra la versione corrente del firmware Wi-Fi della console.
Premere pulsante per immettere l'ora e Impostazione della data
visualizzare .
Premere pulsante per ritorna alla schermata semplice/dettagliata .
COLLOCAMENTO ATTIVALA CONNESSIONE WI-FI
Per impostare la connessione Wi-Fi della console, Esso esigenze A
configurare la console in Accesso Punto (AP) modalità. Per attivare
l'Accesso
Punto (AP) modalità, si prega di seguire quanto segue procedure.
1. Nella schermata semplice/dettagliata, premere pulsante A entrare
Collocamento menu.
2. Premere pulsante A cambia “ Altro Collocamento " display.
3. Premere O pulsante A inserisci “Abilita accesso
Punto ", premere + O pulsante per avviare l'AP
modalità.

- 46 -

- 47 -
Nota :
Mentre in modalità AP, puoi premere pulsante per uscire
dall'AP modalità. Il meteo stazione Volere semplicemente
ripristinare IL precedente AP impostazioni .
Utilizzo tuo smartphone , tablet o computer A collegare A IL
tempo atmosferico stazione tramite Wi-Fi seguendo queste
istruzioni passaggi:
1. Su PC, apri il tuo Wi -Fi impostazioni di rete. Acceso Androide™ O iOS
dispositivi , vai al menu impostazioni e poi selezionare
Connessioni/WI-FI a aprire
la rete impostazioni.
2. Individuare l'SSID della stazione meteorologica da IL lista. Esso
Dovrebbe apparire COME
WWS-XXXXXX (dove tutte le X sono in numeri interi) In IL lista.
Rubinetto SU l' SSID per connettersi. Questo passaggio richiederà
diversi secondi.
3. Una volta connesso al meteo stazione, aprire su tuo browser web
Internet o mobile e inserisci quanto segue indirizzo in IL
indirizzo barra : http://192.168.1.1 A accedere all'interfaccia
web della stazione meteorologica. (Assicurati di includere il Italiano:
o altrimenti la rete il browser potrebbe interpretare l'indirizzo come
una query di ricerca ). consigliare utilizzando l'ultima versione del
web affidabile browser.
4. Inserisci quanto segue informazioni nell'interfaccia web (Figura 1).
Assicurati che tutto il informazione è inserito prima di selezionare
Salva. Se tu
scegliere non A caricamento Wunderground . com , o caricamento
tempo atmosferico -
cloud.net, lascia il controllo scatole non selezionato.

- 47 -
Select the menu and choose your 2.4 GHz WIFI Router
Password
Weather Server Setup
WeatherUnderground
Station ID
Station Key
Upload wunderground.com
WeatherCloud
Station ID
Station Key
Upload weatherCloud.net
Time Server Setup
time.windows.com
Firmware Version: 1.0.1
a7d9d2a279fbbafa
**********
**********
**********
Apply
KCACANTI9
Server URL
Enter your station ID
Enter your station key/password
check to confirm upload to
WeatherUnderground server
Enter your station ID
Enter your station key/password
check to confirm upload to Weathercloud.net
Internet time server setting
Press Apply to confirm the setting
Select setup UI display language
Select your Wi-Fi Router (SSID) from the list
Router Password
Router
Wi-Fi Router Setup
Language:
Router 12345
SETTINGS
SETUP
English

- 48 -
5. Se tutti i informazioni che ti riguardano entrato È corretto, premere "
Applica " per
confermare. Se lo fa no, controlla il tuo web interfaccia nuovamente
informazioni.
NOTA:
Quando IL Wifi impostare È completo , il tuo computer O mobile
dispositivo
Volere tornare alla connessione Wi-Fi predefinita. Se lo fa non,
semplicemente apri il tuo dispositivi senza fili rete impostazioni
E manualmente ricollegare .
TEMPO SERVER CONNESSIONE STATO
Dopo che la stazione meteorologica si è connessa a Internet, lo farà
tentativo per connettersi al server orario internet per ottenere il Ora
UTC. Una volta IL
la connessione riesce e l'ora della stazione meteorologica è
aggiornato. L' icona “ SYNC ” apparirà sul LCD.
Per visualizzare l'ora corretta per il tuo fuso orario specifico, dovrai
bisogno di
cambiare il fuso orario nella modalità di impostazione OROLOGIO da 00
(predefinito) A
il tuo fuso orario (ad esempio -5 per EST). Se non lo fai conosci il tuo
tempo zona, Voi Potere Aspetto Esso online.
NOTA:
L'ora verrà sincronizzata automaticamente con Internet per un ora.
CREAE SINCRONIZZA ILTUO ACCOUNTDEL SERVERMETEO
CREARE TUO METEO SOTTERRANEO ACCOUNT
1. Visita: https://Wunderground.com e seleziona " Unisciti " In IL
superiore a destra e all'angolo e crea UN Account gratuito.

- 48 -
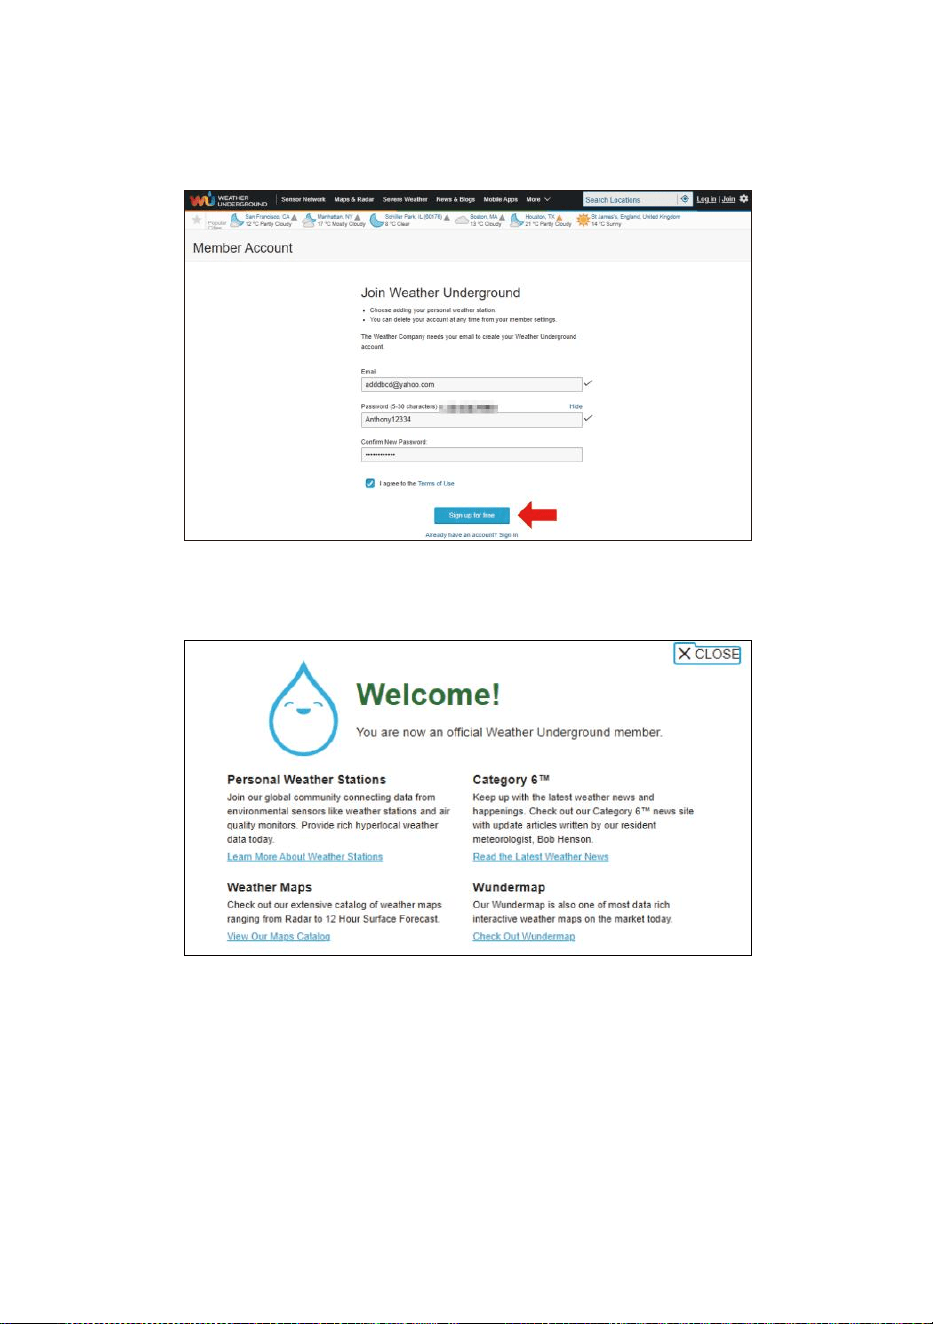
- 49 -
2. Inserisci un Nome utente, Invia un'e-mail e Password ( La è tuo
Login password del sito webIt, non la tua email
password.Quindi NO la privacy sarà essere esposto ). Clicca su
Firma gratuitamente .
3. Dopo la registrazione è fatto con successo, lo farà mostrato sotto
messaggio.
4. Fare clic su “Accedi ” e entrare IL e-mail indirizzo E spada senza
scrupoli tu solo registrato.
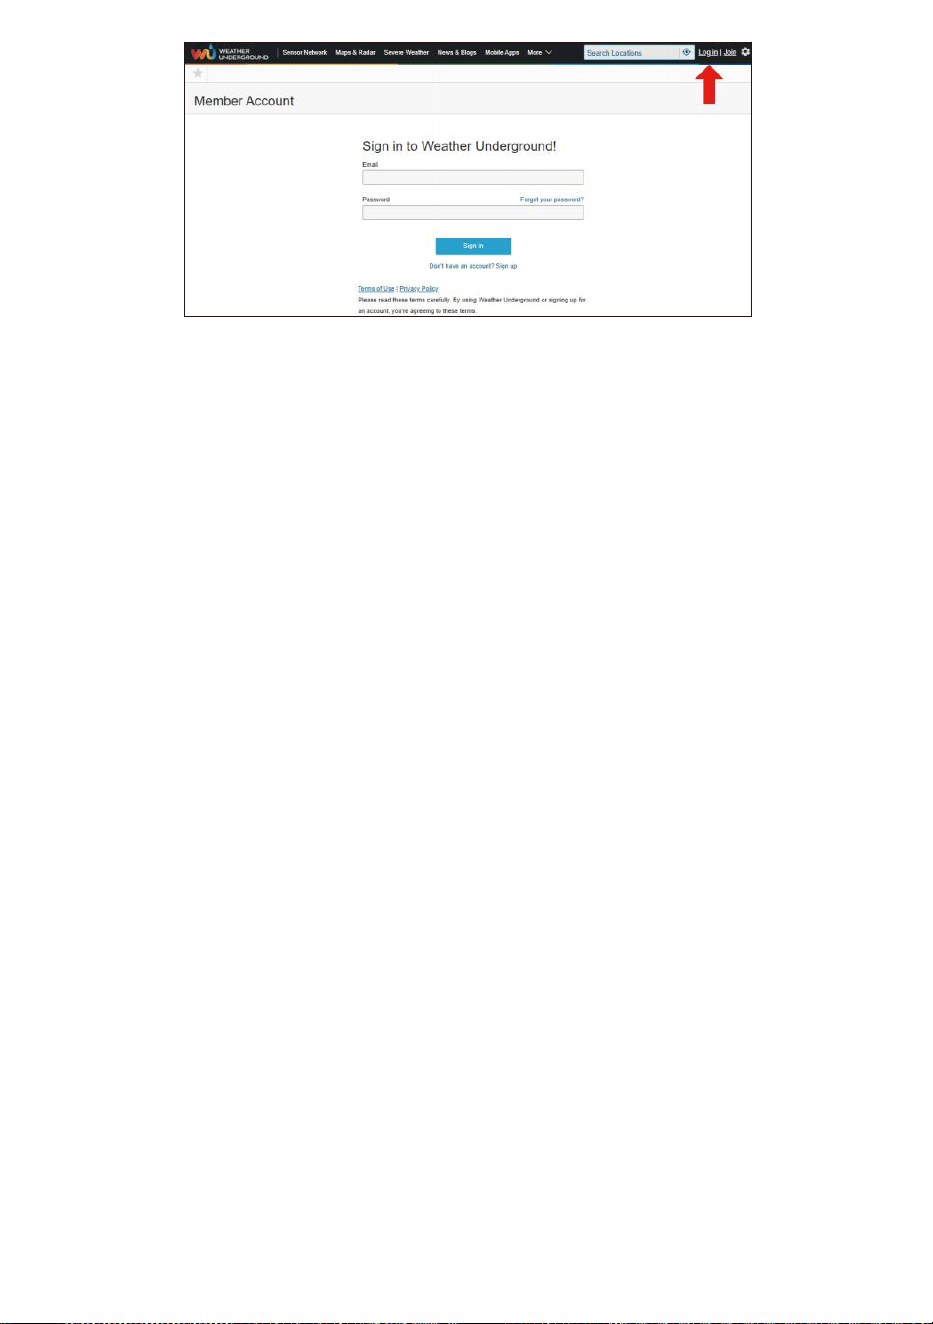
- 49 -

- 50 -
5. Fare clic su "Mio profilo " e accedi alle Impostazioni membro.
6. Fare clic su "Aggiornamento casa posizione ".
7. Fare clic su "Mio Dispositivi ”, e fare clic su “ Aggiungi
Nuovo Dispositivo ".

- 51 -
8. Seleziona l'indirizzo di inserendo un indirizzo o selezionando
Manuale per posiziona automaticamente il tuo indirizzo. Quindi fai
clic su "Prossimo ".

- 52 -
9. Inserisci le informazioni meteo. Spazi vuoti con rosso
(obbligatorio) deve essere riempito In.
NOTA:
Puoi selezionare "altro" Dispositivo Hardware.
10. Una volta completa questo sessione, clicca “IO Accettare ” E “Pro
ssimo ".
11. Dopo la registrazione avvenuta con successo, Per favore registra
il tuo meteo Sotto- terra ID e Chiave informazioni per una
configurazione successiva utilizzo.
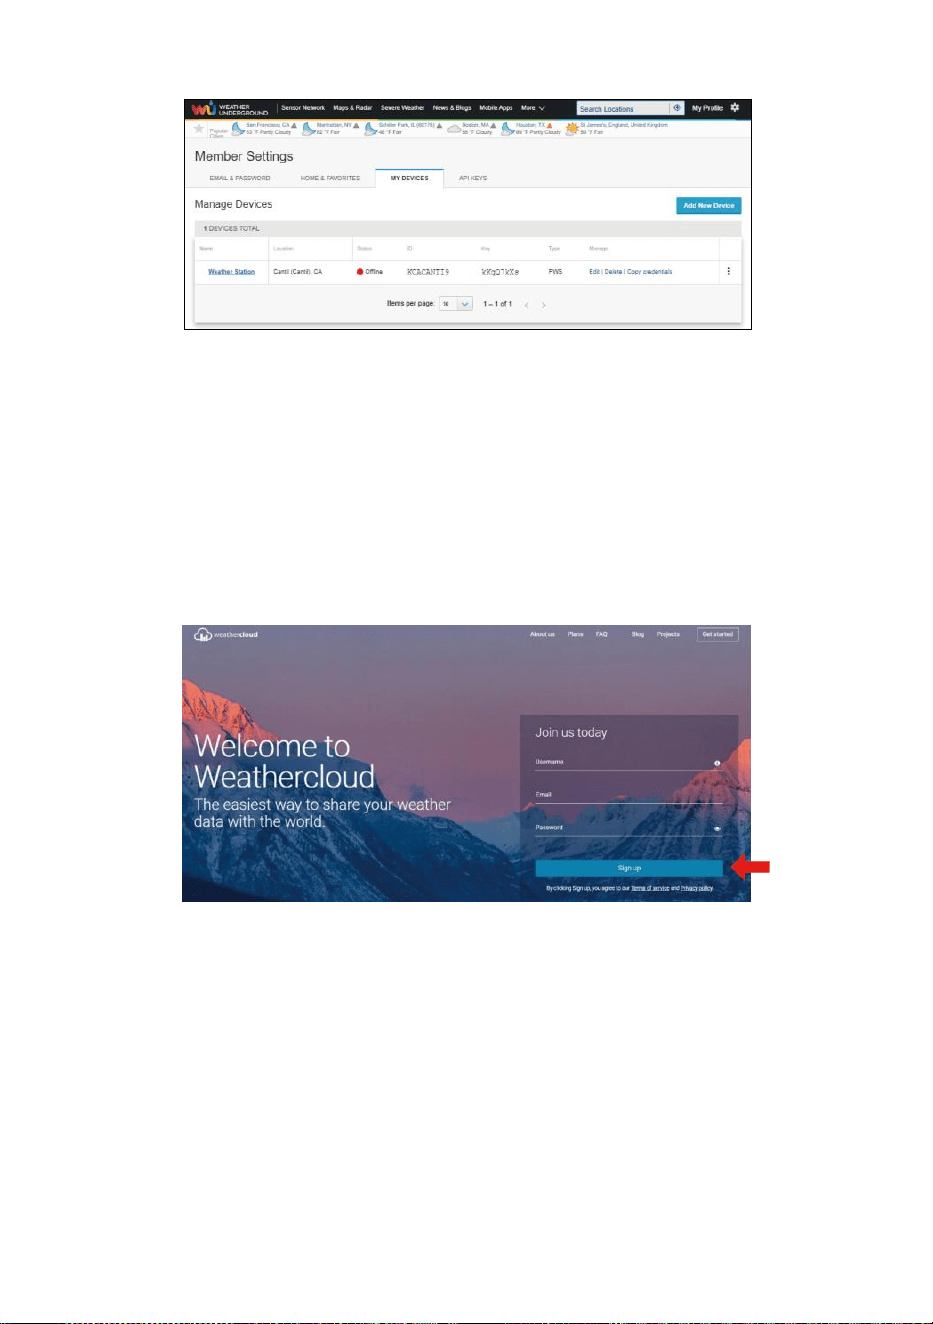
- 53 -
12. Come mostrato sotto, registrazione è stato eseguito con successo.
CREARE TUO NUVOLAMETEOLOGICA ACCOUNT
1. Visita il sito web di Weathercloud all'indirizzo
https://weathercloud.net/ e inserisci un nome utente, E-mail e
Password e clicca su " Sign " su ". Seguendo il
istruzioni per creare un account.
NOTA: Questo È meglio farlo su un computer tavolozza O computer
portatile.
(Esso è il tuo Login password del sito webIt, non la tua email
password. COSÌ NO la privacy sarà essere esposto).
2. Quando Esso ha successo, un la posta elettronica sarà Essere
ricevuto nel tuo registrato casella di posta.
3. Apri il tuo posta e tronco d'albero In A la rete indirizzo In IL posta.
Fare clic su " Attiva " tuo Nuvola del tempo account ".

- 53 -

- 54 -
4. Fare clic su “qui " per accedere alla homepage del sito web
weathercloud .
5. Inserisci l'indirizzo email e la password che hai appena registrati a
entra nel meteocloud sito web .
6. Fare clic su " Crea dispositivo " per aggiungere un dispositivo
stazione meteorologica.
7. Inserisci tutti i richiesto informazioni nella Creazione Nuovo Dispositivo
pagina. Spazi vuoti con rosso * dovere essere riempito In.
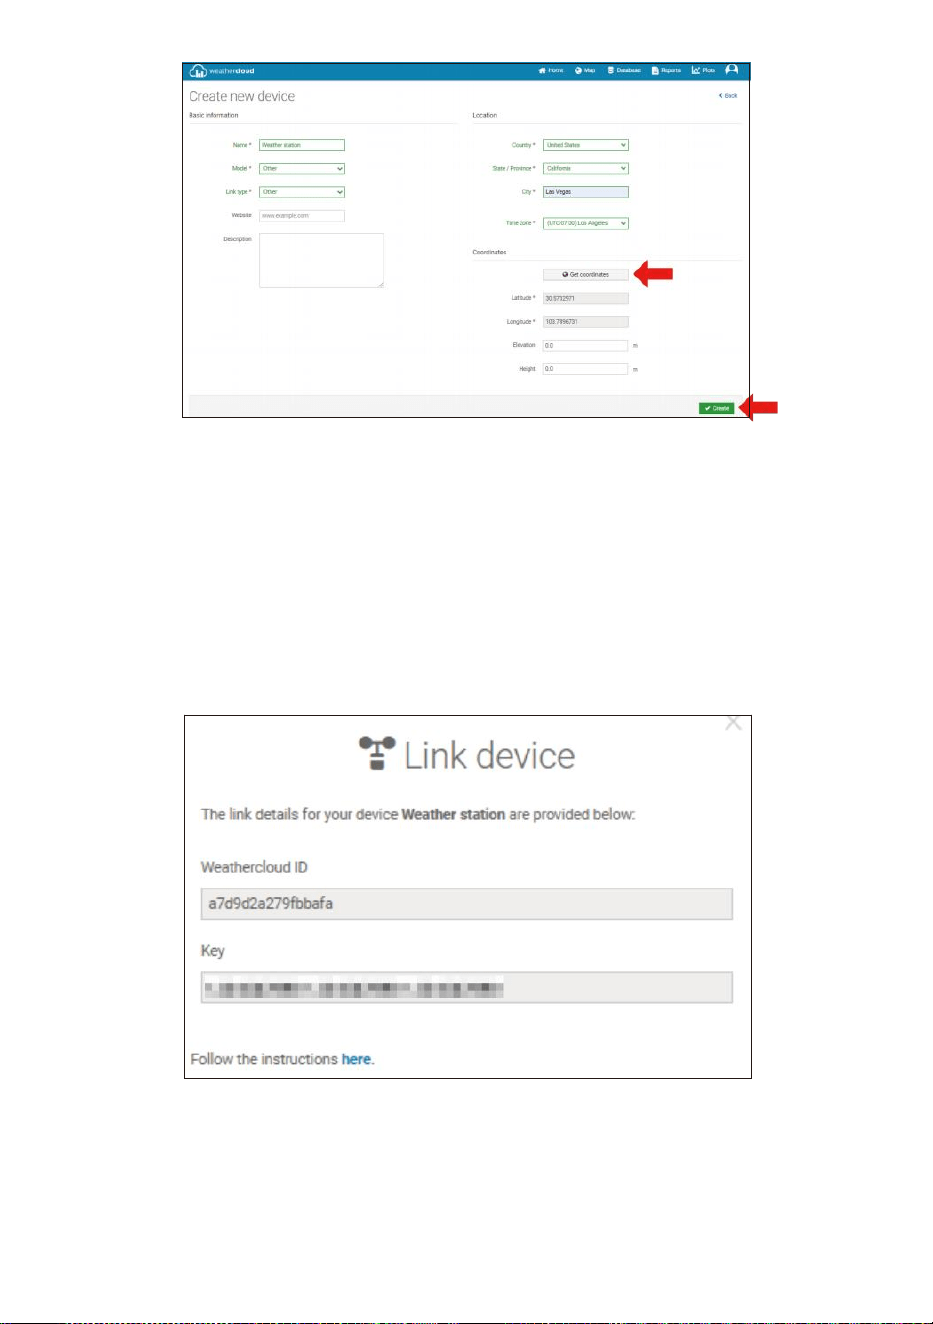
- 55 -
NOTA:
Puoi selezionare "altro " Modello numero e Tipo di
collegamento nel Sopra spazi vuoti.
Fai clic su "Ottieni coordinate" per identifica la tua posizione su IL
mappa, Poi fare clic su "Fatto" per confermare.
8. Una volta che hai completato Questo sezione, clicca su " Crea ".
9. Dopo aver effettuato la registrazione con successo, per favore
registra il tuo Weathercloud ID E Chiave informazioni per la
configurazione successiva utilizzo.
VISUALIZZAZIONE TUO TEMPO ATMOSFERICO DATI IN METEO
SOTTERRANEO
Per visualizzare i dati della tua stazione meteorologica in tempo reale
tramite PC o web mobile navigatore,

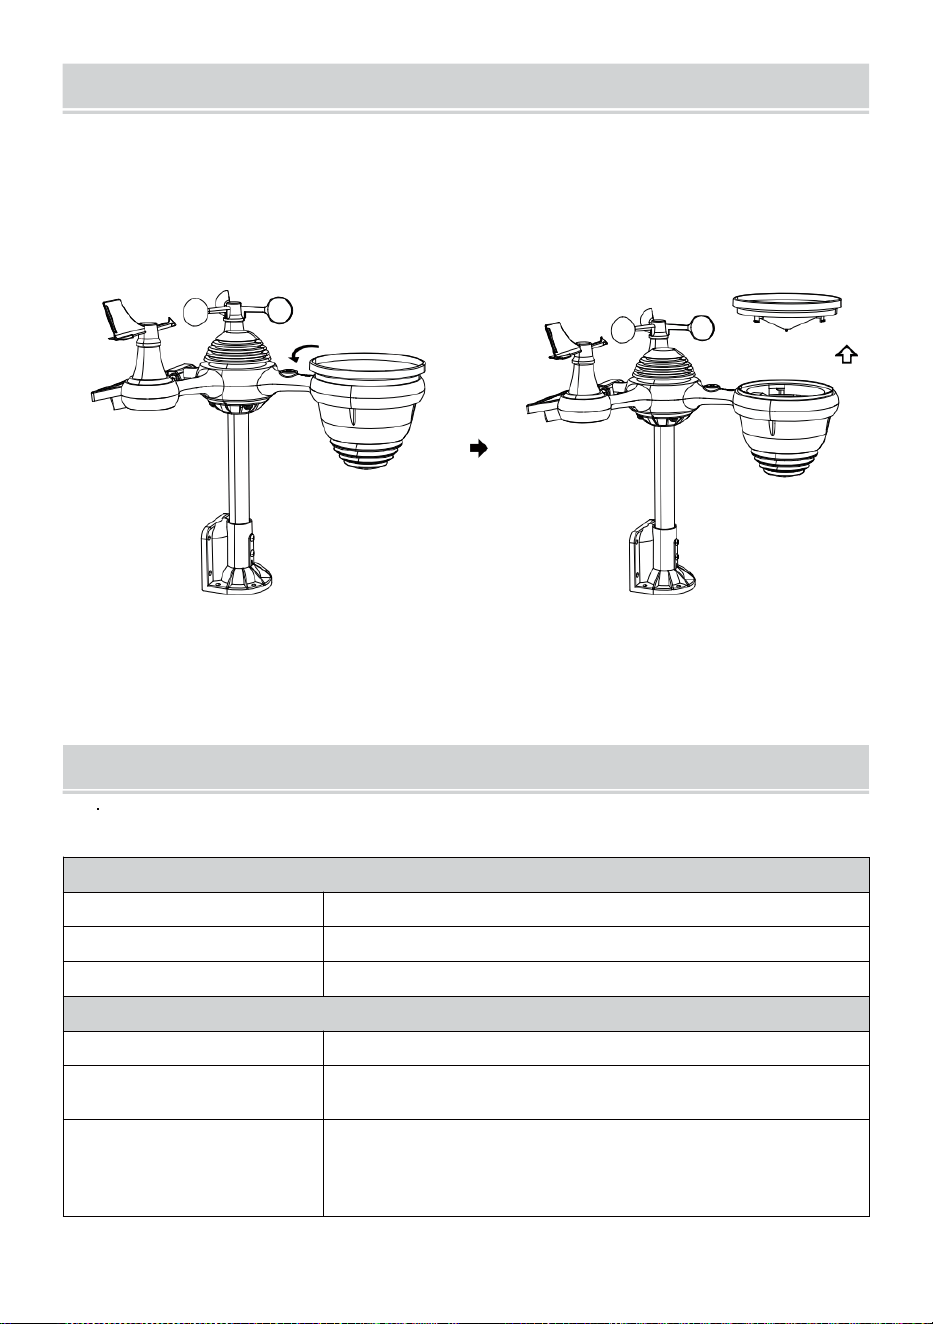
- 56 -
CURAE MANUTENZIONE
1. Pulisci il pluviometro ogni 3 mesi. Ruotare IL imbuto in senso
antiorario e sollevare per esporre il pluviometro meccanismi, E
pulire con UN panno umido. Rimuovere qualsiasi sporcizia, detriti e
insetti. Se bug infestazione è un problema, spruzzare leggermente il
sensore con insetticida .
Aprire
Sollevare
2. Pulisci il Leggero Intensità/ Sensore UV e solare pannello ogni 3
mesi con umidità stoffa.
3. Quando si sostituiscono le batterie, fare domanda a UN corrosione
preventivo composto sulla batteria terminale s.
SPECIFICHE
TEMPO ATMOSFERICO STAZIONE
Specifiche generali
Dimensione
Dimensioni: 7,3 x 5,4 x 1,1 pollici (185,9 x 137 .4 X 28,5 mm)
Fonte di energia
CA-CC 5V, Adattatore 1A (incluso)
Sensori di supporto
1 sensore 7 in 1 (incluso)
Specifiche di comunicazione Wi-Fi
Standard Wi-Fi
802.11 b/g/n
Wi- Frequenza di
funzionamento Fi
2,4 GHz
Dispositivi supportati
per impostare
Interfaccia utente
Dispositivo intelligente con Wi-Fi integrato e modalità
WAP, compresi laptop, computer, smartphone e
accorto cuscinetti

- 56 -
Consiglia browser web
per l'installazione
Interfaccia utente
Ultima versione di un browser web che supporta Codice HTML5
- 57 -
Te mp o Spe c i fi c h e del l a fu n z i o n e
T e m p o d i s p l a y
SUA : MM
F o r m a t o o r a r i o
12 ora o 24 ora
Data display
GG/MM o MM/GG
S i n c r o n i z z a z i o n e o r a r i a m e t o d o
Si nc r o n iz z a z io n e co n at o m ic o or o l og i o
Fusi orari
-12 ~ +13 ore
Ora legale
ACCESO/SPENTO
Display del barometro e Specifiche della funzione
Unità del barometro
hPa, pollici di mercurio e mmHg
Misurazione allineare
600 – 1100 hPa ( impostazione relativa gamma 930 – Pressione
atmosferica (bar)
Precisione
700 -1100 hPa±5 hPa/600 -696 hPa±8 hPa
20,67 – 32,48 pollici di mercurio±0,15 pollici di mercurio/17,72 -
20,55 pollici di mercurio ±0,24 inHg
525 -825 mmHg±3,8 mmHg/450 -5 22 mmHg±6
mmHg Tipico a 77 anni (25 ℃ )
Previsioni del tempo
Soleggiato, Parzialmente nuvoloso, Nuvoloso, Piovoso, tempestoso e
Nevoso
Display modalità
Attuale
Memoria modalità
Quotidiano Massimo/ Minimo
Attenzione
Avviso di variazione della pressione
Temperatura interna/esterna Visualizza e Specifiche della funzione
Temperatura unità
℃
e
Avanti
Esposizione interna allineare
-14.1– 122 gradi (-9,9 ℃ – 50 ℃ )
Esposizione esterna allineare
-40
spavento
– T e m p e r a t u r a d i c o n g e l a m e n t o : 158
°C
(-
40 °C – 70 °C )
Precisione in/out
50 – 122 Spaventoso 1.8
spaventare
/ 10 – 50
℃
± 1
℃
-4 -
50
±
2,7
/ -20 – 10
℃
± 1,5
℃
altri :
± 3,6
/
±2
℃
Display modalità
Attuale
Memoria modalità
Quotidiano Massimo/ Minimo
Attenzione
Avviso di temperatura alta/bassa

- 58 -
Umidità interna/esterna Visualizza e Specifiche della funzione
Umidità unità
%
Display allineare
1 – 99%
Precisione in/out
40 – 80% UR ± 5% RH @77 gradi
(2 5 ℃ ) Altri : ± 8% RH @77 ° (25 ℃
)
Display modalità
Attuale
Memoria modalità
Quotidiano Massimo/ Minimo
Attenzione
Alto/Basso avviso di umidità rt
Velocità del vento e Direzione Visualizza e Specifiche della funzione
Velocità del vento unità
miglia orarie, SM, km/h, nodi
Display allineare
0 -112 mph, 50 m/s, 180 chilometri all'ora, 97 nodi
Precisione della velocità
<5m/s: ±0,5m/s, >5m/s : ±10% (qualunque sia è maggiore)
Display modalità
Raffica/Media
Memoria modalità
Raffica giornaliera/media
Attenzione
Alta velocità del vento Allerta (raffica/media)
Direzione del vento
16 direzioni
Piovere Visualizza e Specifiche della funzione
Unità di piovosità
mm, In
Gamma di piovosità
0 – 12999mm (0 – 511,7 In)
Precisione delle precipitazioni
±7%
Display modalità
Attuale
Memoria modalità
Quotidiano Massimo
Visualizzazione delle
precipitazioni modalità
Ogni ora/ Giornaliero/ Settimanale/ Mensile/Totale Piovosità
Attenzione
Alto Quotidiano Allerta pioggia
UV Indice Visualizza e Specifiche della funzione
Display allineare
0 - 16
Display modalità
Attuale
Memoria modalità
Quotidiano Massimo
Attenzione
Alto Allerta UVI
- 59 -
Leggero Intensità Visualizza e Specifiche della funzione
Leggero Intensità unità
Klux, Kfc e W/
m2
Display allineare
Da 0 a 200 Klux
Display modalità
Attuale
Memoria modalità
Quotidiano Massimo
Attenzione
Alto Leggero allerta intensità
Indice Meteo Visualizza e Specifiche della funzione
Tempo atmosferico Indice
modalità
Sente tipo, vento gelido, Calore indice e rugiada punto
Display modalità
Attuale
Memoria modalità
Quotidiano Massimo/minimo
WIRELESS 7- IN- 1 PER ESTERNI SENSORE
Dimensione
16 volte 15,6 volte 14,4 pollici (408 x 396 x 367mm)
Principale energia
3,6 V Ni-MH ricaricabile batteria pacchetto
Backup energia
Solare energia
Dati meteo
temperatura, umidità, velocità del vento , direzione del
vento, precipitazioni, UVI e leggero intensità
Trasmissione RF allineare
330 piedi (100 metri)
Intervallo di trasmissione
Ogni 20 secondi per UV
,
leggero intensità
,
velocità del
vento
temperatura, dati di umidità e pioggia e direzione del vento dati
Temperatura di funzionamento
-40 giorni– 140 gradi (-40 ℃ – 60 ℃ )
Strumenti aggiuntivi
necessari per il sensore
SÌ

- 60 -
RISOLUZIONEDEI PROBLEMI
Problema
Soluzione
Il sensore wireless fa
non comunicare il
stazione
meteorologica
Il sensore wireless potrebbe Avere iniziato correttamente, e i dati È
registrato dalla stazione meteorologica come non valido, e IL tempo
atmosferico stazione dovere Essere reset.
Con un finale aperto graffetta per fogli, premere il Premere il pulsante
RESET per 3 secondi per completare la visualizzazione della tensione.
Il LED lampeggerà ogni 20 secondi.
Se il LED lo farà non lampeggiare ogni 20 secondi, togliere il batterie E
Aspettare 5 minuti, coprendo il pannello solare per farlo drenare IL
voltaggio.
Mettere batterie Indietro dentro e risincronizzare la stazione
meteorologica e risincronizzare il stazione meteorologica (Vedi
pagina 10 RI-ASSOCIAZIONE SENSORE) con il sensore
wireless circa 10 piedi (3 m) lontano .
IL Il LED del sensore wireless lampeggerà ogni 20 secondi. Se il Il
LED è Ancora non lampeggia ogni 20 secondi, sostituire il nuovo
batterie nel
sensore senza fili.
Se il le batterie erano recentemente sostituito, controllare il polarità. Se
il sensore wireless lampeggia ogni 20 secondi, procedere al Prossimo
fare un passo.
Là Maggio essere una perdita temporanea di comunicazione a causa
di reception perdita correlata a interferenza o altro fattori di
localizzazione,
Oppure batterie Maggio Avere è stato cambiato nel sensore wireless
e nel stazione meteorologica ha non stato resettare. La soluzione
Maggio essere semplice come spegnere e riaccendere la stazione
meteorologica (rimuovere corrente continua potere e
batterie), attendere 30 secondi e reinserirle corrente continua potere e
batterie).

- 60 -
Al chiuso e
All'aperto
temperatura non
Essere d'accordo
Attendere fino a un'ora affinché i sensori wireless stabilizzare dovuto A
segnale
filtraggio. I sensori della temperatura interna ed esterna devono
concordare entro ±4
gradi
(±2
℃
) (la precisione del sensore È ±2
gradi
(±1 ℃ )
Utilizzare la funzione di calibrazione per abbinare l' interno E
temperatura esterna a un conosciuto fonte.
Sensore di
temperatura legge
anche alto nel
giorno
Assicurarsi che il sensore wireless non sia pure vicino A Calore fonti
generatrici o strozzature, come edifici, pavimentazioni, muri , O aria
condizione- ing unità.
- 61 -
Problema
Soluzione
Pluviometro relazioni
piovere Quando Esso
Esso non pioggia.
UN instabile soluzione di montaggio (oscillazione nel montaggio
palo) Maggio risultato nella ribalta secchio in modo errato
incrementando piovosità. Assicurati di
soluzione di montaggio stabile e livellata . (Fare riferimento pagina 9
REGOLAZIONE DEL SENSORE WIRELESS 7 IN 1 LIVELLO)
Il Wi-Fi fa non
visualizzare sulla
stazione
meteorologica
Controlla il tuo router per problemi.
1. Controllare il simbolo Wi-Fi sul display. Se la connettività wireless È
di successo , il Wifi icona UNVolere Essere visualizzato In IL
tempo archiviato .
2. Assicurati che le impostazioni Wi-Fi del tuo modem siano corrette
(rete nome, E password)
3. Assicurati che la stazione meteorologica È collegato in Corrente
alternata potenza. La stazione meteorologica non connettersi al Wi -
Fi quando alimentato da batterie soltanto.
4. La console supporta e si connette solo a 2,4 GHz router. Se il tuo
possedere un 5GHz router, e Esso è un doppio banda router, Voi
Volere Bisogno A
disattivare la banda 5Ghz e abilitare il 2,4 GHz banda.
5. Il tempo fa non supporta reti ospiti.
Dati non
segnalando a
www.meraviglioso-
ground.com o
www.weathercloud.net
1. Conferma la tua password o chiave è corretto t. Esso È IL
password Voi registrato su Wunderground.com.
Wunderground.com. L a t u a password underground.com non può
iniziare con caratteri non alfanumerici (una limitazione di Wunderg
round.com, non la stazione). Esempio, $worknet È non valido
password, ma
rete di lavoro$ è valido)
2. Conferma la tua stazione ID ix corretto. La stazione ID è tutto
maiuscolo, e il più comune problema sta sostituendo e O per a 0 (o
viceversa).
Esempio, KCAPHOEM12, non Italiano:
3. Assicurati che la data e l'ora è corretto su IL tempo atmosferico
stazione. Se non è corretto, tu Maggio Essere segnalazione di
dati vecchi, non dati in tempo reale .
4. Assicurati del tuo fuso orario è impostato correttamente. Se non
è corretto, tu Maggio Essere segnalazione di dati vecchi, non
tempo reale dati .
5. Controlla le impostazioni del firewall del router. La stazione
meteorologica invia dati tramite Porta 80.

FCC STATEMENT
- 62 -
Questo dispositivo è conforme a parte 15 del Commissione federale
delle comunicazioni Regole. Funzionamento è soggetto a IL seguente
due condizioni :
1. Questo dispositivo Maggio NON causa dannoso interferenza.
2. Questo dispositivo deve accettare qualsiasi interferenza ricevuto,
compreso interferenza che può causare effetti indesiderati
operazione.
NOTA:
Questa attrezzatura ha sono stati testati e sono risultati conformi
alle limiti per una classe B dispositivo digitale, ai sensi di Parte 15
di lui Commissione federale delle comunicazioni Regole.
Questi i limiti sono progettati per fornire ragionevole protezione
contro dannoso interferenza in un Residenziale installazione.
Questa apparecchiatura
genera — e può irradiare — energia a radiofrequenza e, se non
installato e usato in conformità con il istruzioni, possono causare
danni interferenza alle comunicazioni radio .
Tuttavia, c'è È nessuna garanzia che l'interferenza sarà non si
verifica in un installazione particolare.
Se l'attrezzatura fa non causare dannoso interferenza alla ricezione
radiofonica o televisiva , che può essere determinata accendendo
attrezzatura spento e su, il l'utente è incoraggiato a provare a correggere
il interferenza di uno O Di più del seguente misure :
Riorientare o riposizionare il antenna ricevente.
Aumentare la separazione tra l' apparecchiatura e l' ricevitore.
Collegare l'attrezzatura in una presa su un circuito diverso da Quello
a cui il destinatario È connesso .
Consultare il rivenditore o un tecnico radio/TV esperto per aiuto.
ATTENZIONE: Cambiamenti o modifiche a questo unità non
espressamente furbo
approvato dal la parte responsabile della conformità potrebbe
invalidare l' autorità dell'utente a utilizzare l'apparecchiatura.
Tecnologia Sanven Società anonima

FCC STATEMENT
- 62 -
Indirizzo: Suite 250, 9166 Anaheim Posto, Rancho Cucamonga,
California 91730
Fatto In Cina


Supporto tecnico e Certificato di garanzia
elettronica www.vevor.com/support
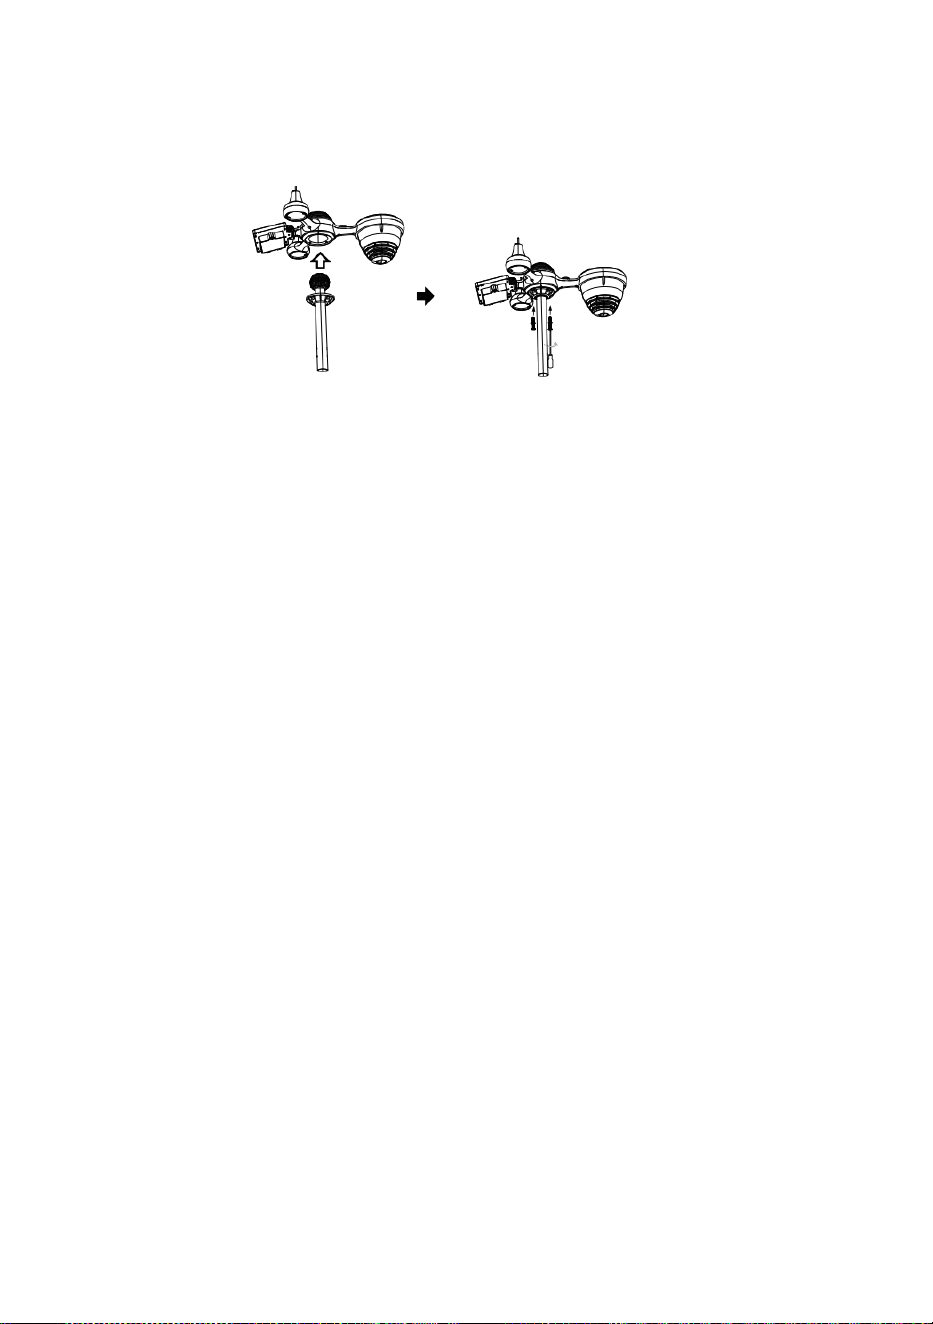
C
e
r
r
a
r
Inicio rápido Guía
⑤
I
N
S
T
A
L
A
C
I
Ó
N
D
E
L
C
O
L
E
C
T
O
R
D
E
①INSTALLING THE MOUNTING POLE
Secure the sensor onto a mounting pole (included) using the screws (included).

L
L
U
V
I
A
I
n
s
e
r
t
a
r
e
l
e
m
b
u
d
o
e
n
e
l
l
l
u
v
i
a
c
o
l
e
c
c
i
o
n
i
s
t
a
y
c
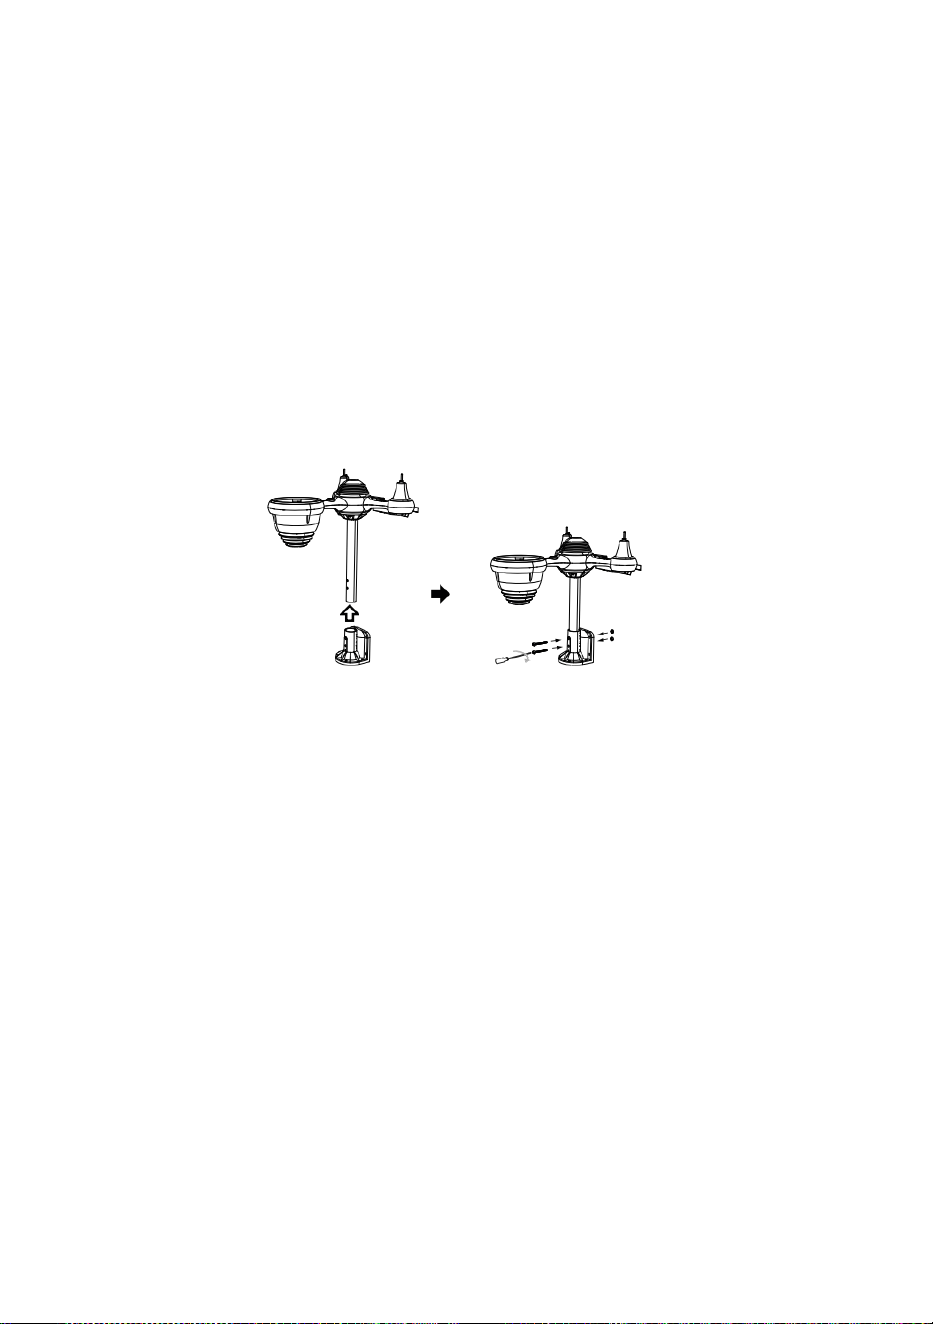
e
r
r
a
r
é
l
e
n
l
u
g
a
r
.
⑥
I
N
S
T
A
L
A
C
I
Ó
N
E
L
B
A
T
E
R
Í
A
S
② INSTALACIÓN EL MONTAJE SOPORTE
Destornillar La puerta de la batería en El fondo. Conectar El cable de La batería
recargable.

A
j
u
s
t
a
r
l
o
s
c
a
b
l
e
s
c
o
n
e
c
t
a
d
o
s
a
s
í
e
l
l
o
s
e
n
c
a
j
a
r
c
ó
m
o
d
a
m
e
n
t
e
Secure the sensor onto a mounting bracket (included) using the screws (included).

e
n
e
l
c
o
m
p
a
r
t
i
m
i
e
n
t
o
.
C
e
r
r
a
r
y
s
u
j
e
t
a
r
l
a
p
u
e
r
t
a
d
e
l
a
b
a
t
e
r
í
a
.
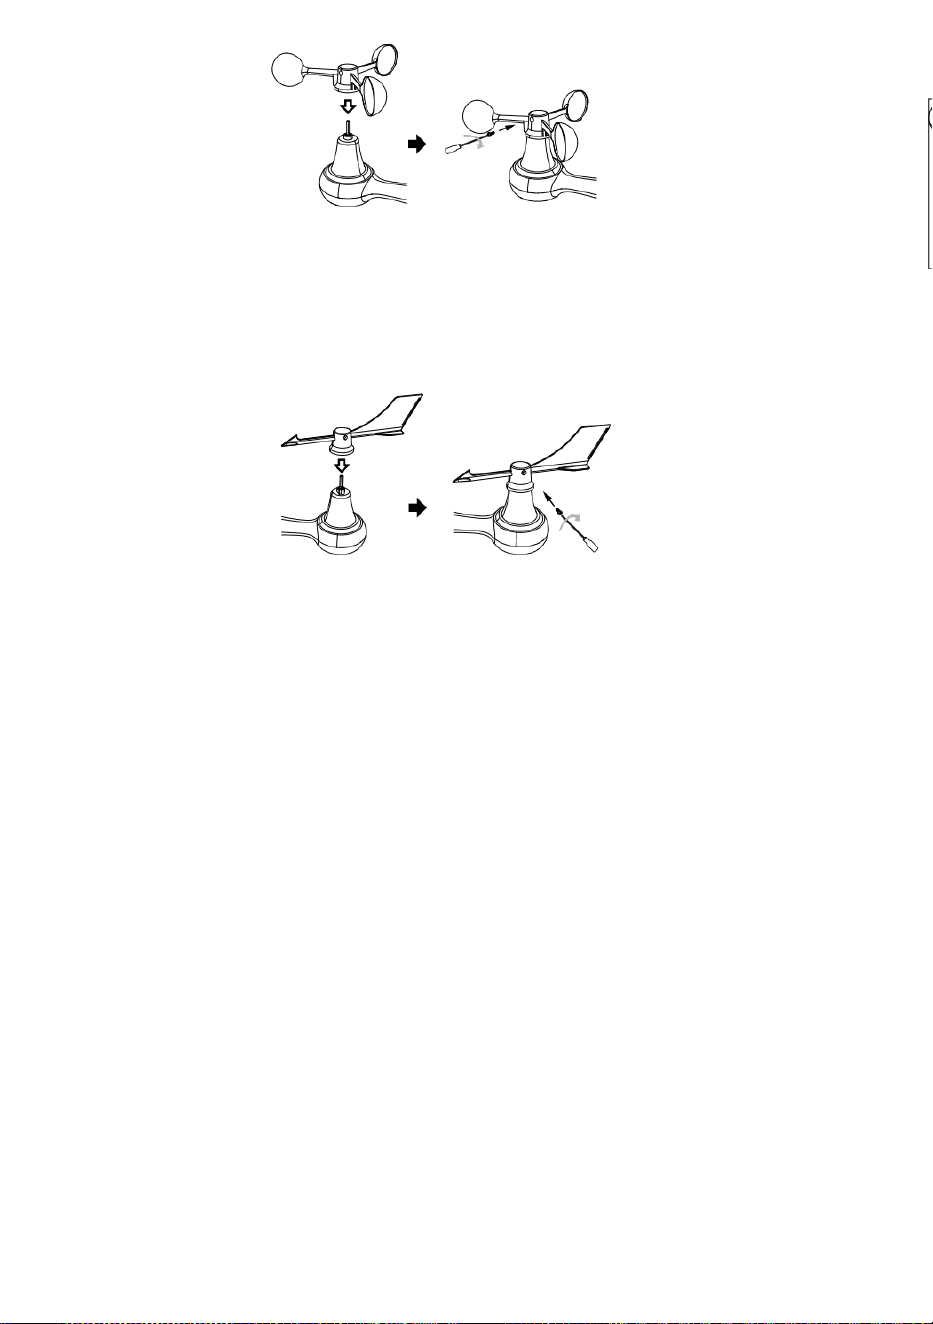
③ INSTALACIÓN VIENTO VELOCIDAD TAZAS
Alinear Los agujeros de los tornillos en el copas de velocidad del viento con el plano,
lado vertical de el metal vara.
Insertar el copas de velocidad del viento en La varilla de metal y el tornillo
ajustado a cerrar él en lugar.
A
f
l
o
j
a
r
E
l
t
o
r
n
i
l
l
o
e
n
e
l
a
r
t
i
c
u
l
a
c
i
ó
n
.
A
j

u
s
t
a
r
e
l
á
n
g
u
l
o
v
e
r
t
i
c
a
l
d
e
e
l
s
o
l
a
r
c
e
l
ú
l
a
.
E
m
p
u
j
a
r
e
l
e
n

g
r
a
n
a
j
e
h
a
c
i
a
a
d
e
n
t
r
o
y
a
p
r
e
t
a
r
e
l
t
o
r
n
i
l
l
o
.
P
u
n
t
o
a
N
O
R
T
E

N
O
R
T
E
P
u
n
t
o
a
④ INSTALACIÓN VIENTO DIRECCIÓN VELETA
Alinear Los agujeros de los tornillos en el dirección del viento veleta con el plano,
lado vertical de La varilla de metal.
Insertar el viento dirección veleta en el metal vara y tornillo en ajustado a cerrar él
en lugar .
Point to
SOUTH
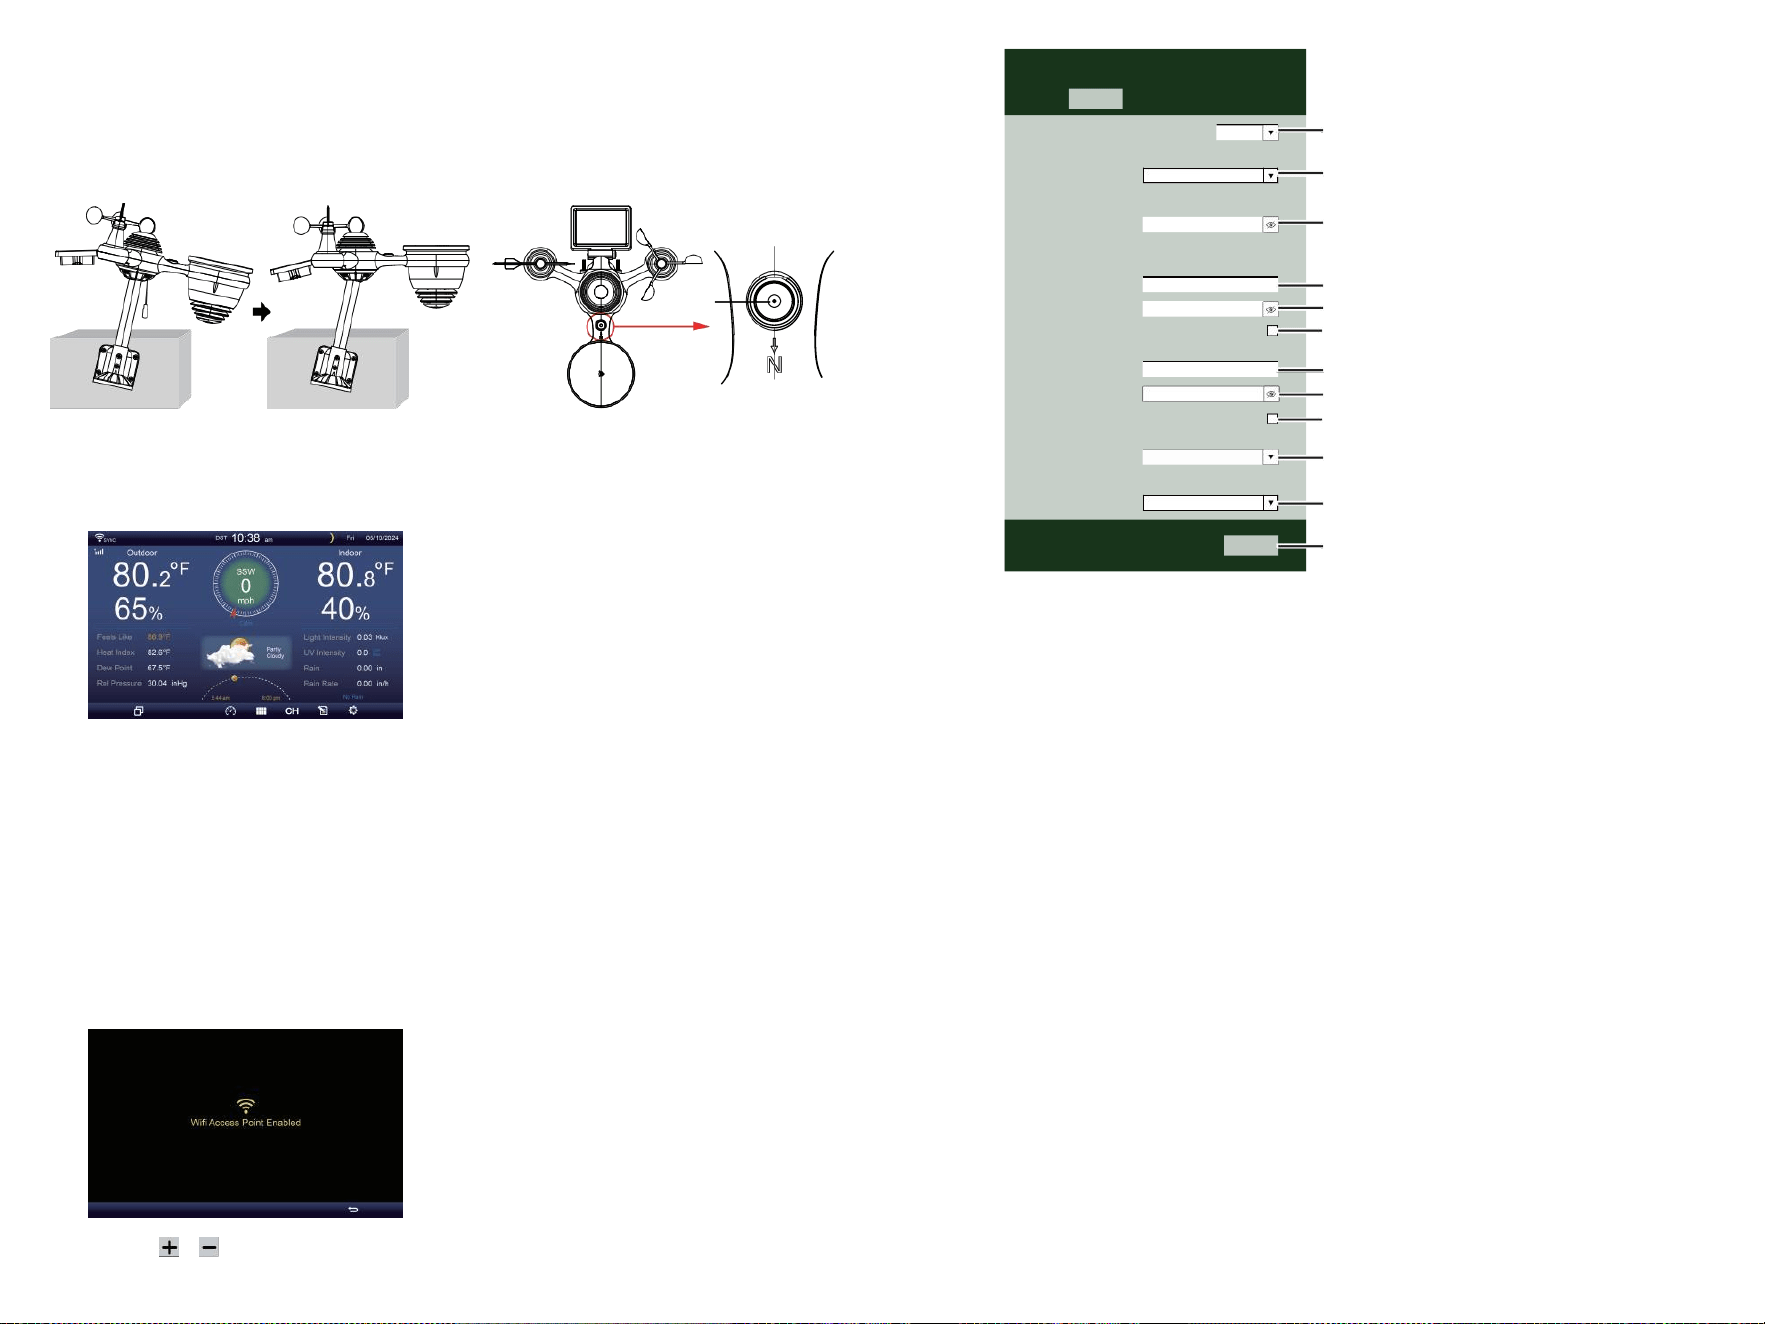
⑩ENCENDIENDO
EL ESTACIÓN
METEOROLÓGICA
Enchufar el adaptador de corriente en
el Estación meteorológica.
Una vez el La estación meteorológica
es encendido , él entrará
automáticamente en el
emparejamiento modo.
prensa o botón Para empezar el AP
Modo . Abierto su Wifi red
ajustes en ordenador personal o teléfono inteligente .
Localizar el SSID de la estación meteorológica
( WWS - XXXXXX ) de el lista .
Grifo en el SSID a conectar .
SETTINGS
SETUP ADVANCED
Language:
Wi-Fi Router Setup
Router 1234 5
Select the menu and choose your 2.4GHz WIFI Router
Password
Weather Server Setup
WeatherUnderground
Station ID
Station Key
Upload wunderground.com
WeatherCloud
Station ID
Station Key
Upload weatherCloud.net
Time Zone Setup
Time Zone
Time Server Setup
Server URL
Firmware Version: 1.0.1
time.windows.com
a7d9d2a279 fbbafa
**********
**********
**********
Apply
KCACANTI9
English
Router
+0.00
⑧MOUNTING THE WIRELESS 7-IN-1 OUTDOOR SENSOR
Various options to install. Make sure the rain collector faces north and
the solar panel faces south before fastening the screws (included).
If you are a user located in the Southern Hemisphere,
please reverse the direction.
Enter your station ID
Enter your station key/password
check to confirm upload to
WeatherUnderground server
Enter your station ID
Enter your station key/password
check to confirm upload to
Weathercloud.net
Time zone setting
Internet time server setting
Press Apply to confirm the setting
⑨ADJUSTING THE 7-IN-1 WIRELESS SENSOR LEVEL
Use the bubble level indicator to make sure the wireless outdoor sensor is completely level.
Select setup UI display language
Select your Wi-Fi Router (SSID) from the list
Router Password
The
bubble
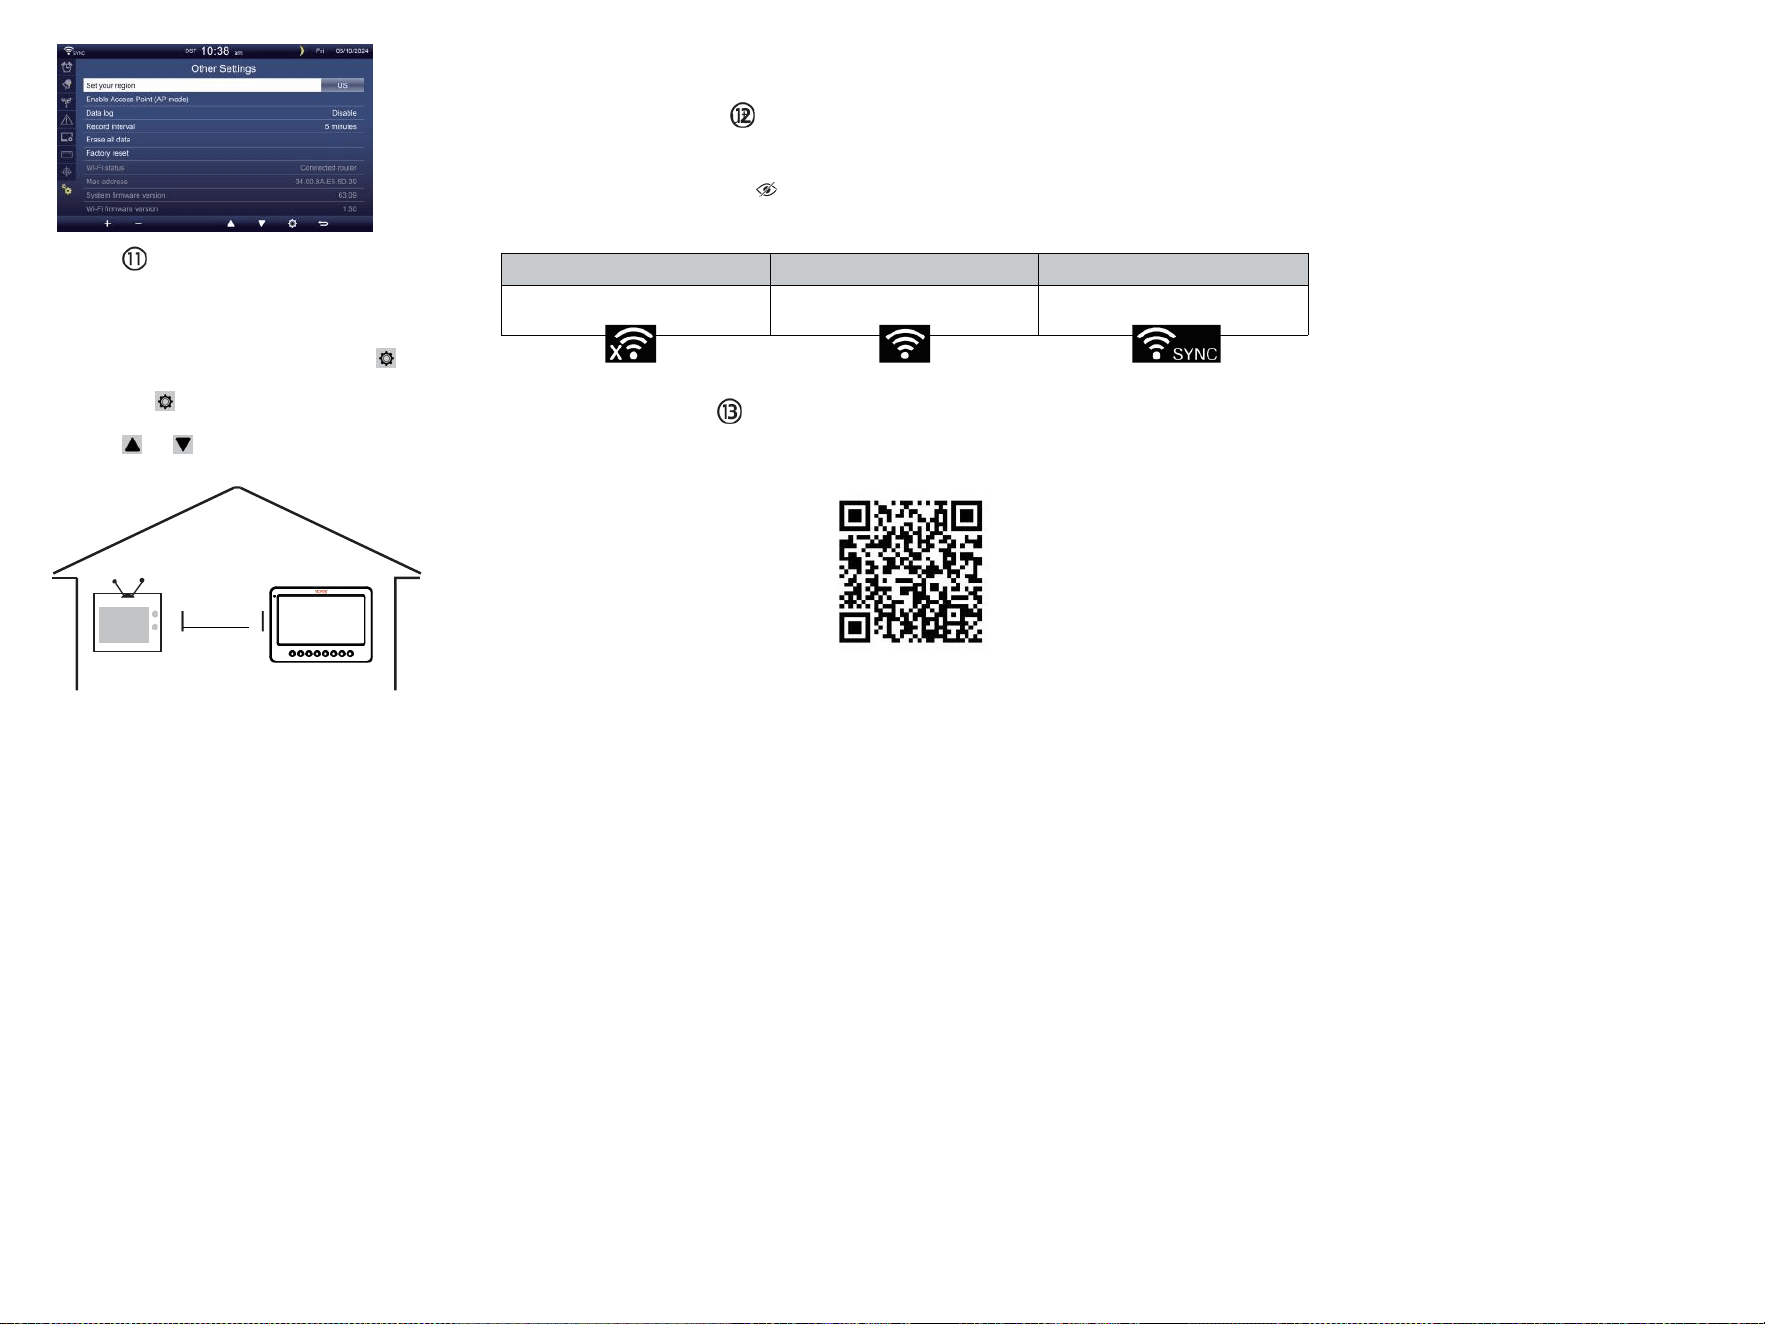
TV
CONFIGURACIÓN
ARRIBA
CONEXIÓN WI-FI
En la pantalla simple/detalle, prensa
botón a ingresar Configuración Menú .
Prensa botón para cambiar “ Otro”
Configuración " mostrar.
Prensa o botón a Ingrese “ Habilitar ”
Punto de acceso ".
AT
EL MENOS
3
pies
(0,9 metros)
APARTE
P
a
r
a
p
r
e
v
e
n
i
r
i
n
t
e
r
f
e
r
e
n
c
i
a
inalámbrica, lugar ambos unidades
en el menos 3 pie (0,9 metros)
lejos de dispositivos electrónicos
(TELEVISOR, computadora,
microondas, radio, etc.).
WI-FI disconnected
WI-FI connected
WI-FI connected with Sync
ENTER SETUP INTERFACE
Enter the following address into the web browser address bar:
http://192.168.1.1 to access the setup interface.
Please click to check your password before clicking APP.LY
Please scan the QR code or visit https://youtu.be/JYr4BeOmEKo to see a video on how to use it.
Familiarize yourself with the icons for Wi-fi connection status.
WI-FI CONNECTION STATUS

Soporte técnico y Certificado de garantía electrónica
www.vevor.com/support
ESTACIÓN METEOROLÓGICA
MODELO:YT60233
Seguimos comprometidos a brindar tú herramientas con competitivo precio.
"Ahorrar Mitad", "mitad de precio" o cualquier otra expresión similar usado por a nosotros
solo representa un
Estimación de ahorros que usted Podría beneficiarse de la compra de ciertos herramientas
con a nosotros Compa rojo a el importante
arriba marcas y dosis no necesariamente pretende cubrir todas las categorías de
herramientas Ofrecido por Nosotros. Tú
son amable Se le recuerda que debe verificar cuidadosamente cuando se encuentre
Realizar un pedido con a nosotros Si tu estas
realmente ahorrando la mitad en comparación con la parte superior
Principales marcas ds.


- 3 -
METEOROLÓGICO
ESTACI
ÓN
MODELO:YT60233
NECESIDAD ¿AYUDA? CONTACTO ¡A
NOSOTROS!
Tener ¿Preguntas sobre el producto? ¿Necesita soporte técnico?
Por favor, siéntete libre de contacto a nosotros:
Servicio de atención al cliente @ vevor.com
Este es el original instrucción, por favor leer todo manual instrucciones
con cuidado antes de operar. VEVOR se reserva un derecho de
interpretación de nuestro manual de usuario. La apariencia del
producto deberá ser sujeto a el
producto tu recibió. Por favor perdónanos por no poder hacerlo.
informarle nuevamente Si hay alguna actualización de tecnología o
software en nuestro producto .

SAFETY PRECAUTIONS
- 4 -
¡ADVERTENCIA! Por favor, lea y comprenda todas las normas de
seguridad. precauciones , instrucciones de funcionamiento , y cuidado /
mantenimiento instrucciones antes operante este
aparato. Conserve este manual para futuras consultas .
Este producto es No es un juguete. Mantenerse fuera de la alcance
de los niños.
Este producto está diseñado para su uso en el solo en casa
como un Indicación del tiempo condiciones .
Este producto es No a ser utilizado para fines médicos fines
o para uso público información.
Hacer No limpiar el Unidad con abrasivo o corrosivo materiales.
Hacer no Coloque el aparato cerca de llamas abiertas o fuentes
de calor . Incendio, descarga eléctrica, Daños al producto o
lesiones Podría ocurrir.
Solo utilizar fresco nuevo Baterías en el producto . Hacer no
mezcla nuevo y viejo Baterías juntas.
Hacer No desmontar, alterar ni modificar el producto .
Utilice únicamente accesorios o complementos con este producto
especificado por el fabricante.
Hacer No sumergir el unidad en el agua. Secar el producto con
un paño suave si derrames de líquidos en él.
Hacer No someta la unidad a una fuerza excesiva, golpes,
conducto, temperatura extrema , o humedad .
Hacer No cubra ni bloquee la ventilación agujeros con cualquier
objetos.
Esta estación meteorológica de esta producto es destinado a
ser usado dentro solo.
Este producto Sólo es adecuado para montaje en un altura menos de 2
metro (6.6 pie.).
Hacer No manipule la unidad Componentes internos . La
manipulación del producto anulará la garantía.
Las baterías son no incluido. Cuando insertando baterías ,
asegurar que el positivo y negativo Polaridades Coincidir con el
Marcas en el compartimento .
Hacer no Mezcla estándar, alcalina y recargable Baterías juntas .
Dejando un batería expuesta a condiciones extremadamente
temperatura alta en el entorno circundante puede provocar un
explosión o fuga de líquido inflamable o gas.

SAFETY PRECAUTIONS
- 4 -
Dejando un Batería expuesta a niveles extremadamente bajos aire
presión en el
El entorno circundante puede provocar un Explosión o fuga
de líquido inflamable o gas.

TIPS FOR SENSOR SITE SELECTION
- 5 -
El colector de lluvia debe ser limpiado cada pocos meses .
El sensor debe ser instalado en el menos 1.5 m (5') de distancia de
cualquier edificio o estructura.
Elige una ubicación en un espacio abierto bajo directo luz del
sol con No obstrucciones.
El sensor debe permanecer En la línea de visión y dentro de 150
metro (492') del clima estación para consistente , constante
transmisión .
Mantenga el sensor y la estación meteorológica lejos del hogar.
accesorios eso funcionar en el mismo frecuencia . La consola y
El sensor debe derrotar el menos 1 - 2 m (3' -7') de distancia de
semejante interferencia s.
PRODUCTO CARACTERÍSTICAS
7″ Pantalla TFT de alta definición pantalla.
Reloj de tiempo real con calendario r.
Función de alarma.
Luna Fase.
Hora de salida/puesta del sol.
Configuración de zona horaria y Horario de verano Función (DST).
Huso horario :GMT +13 a -12h.
Sincronizar automáticamente con el servidor horario de Internet.
7 idiomas (ES/ DELAWARE/ ES/ ES/ ÉL/ NL/ CZ) para exhibición.
de temperatura y humedad interiores y exteriores con
tendencia.
Evento, Cada hora, Diariamente, semanalmente, Mensual, Total
lluvia y Lluvia tasa en pasado hora.
Se muestra la velocidad media del viento, la velocidad de las
ráfagas de viento y la dirección del viento.
Absoluto y relativo Visualización de presión barométrica con
tendencia.
Solar Radiación visualización de intensidad y Pantalla UV I.
Visualización del índice meteorológico : Sentir Me gusta, sensación
térmica, Calor índice. Rocío punto.
Clima Pronóstico.
Datos meteorológicos con Máx./Mín. lectura, registro de datos y
visualización del gráfico histórico.
Configuración de alerta meteorológica.
Ajuste del brillo de la luz de fondo.

TIPS FOR SENSOR SITE SELECTION
- 5 -
Bajo batería Indicaciones para sensores exteriores.
Noche Función de luz.
Carga de datos meteorológicos a Weather Underground y/o
Weather- nube vía WiFi enrutador.

PACKAGECONTENTS
- 6 -
1 2 3
4 5 6
7
8
9 10 11 12
1 estación meteorológica
7 Montaje poste con 4 tornillos
2 Adaptador
8 Montaje corchetes con 6 tornillos
3 sensores inalámbricos para exteriores 7 en 1 9 almohadillas de goma
incógnita 2
4 embudos
10 destornilladores 1
5 Veleta de dirección del viento con 1 tornillo
11 Destornillador 2
6 tazas de velocidad del viento con 1 tornillo
12 Guía del usuario
NOTA : 4 extra tornillos para viento dirección veleta y viento
tazas de velocidad .
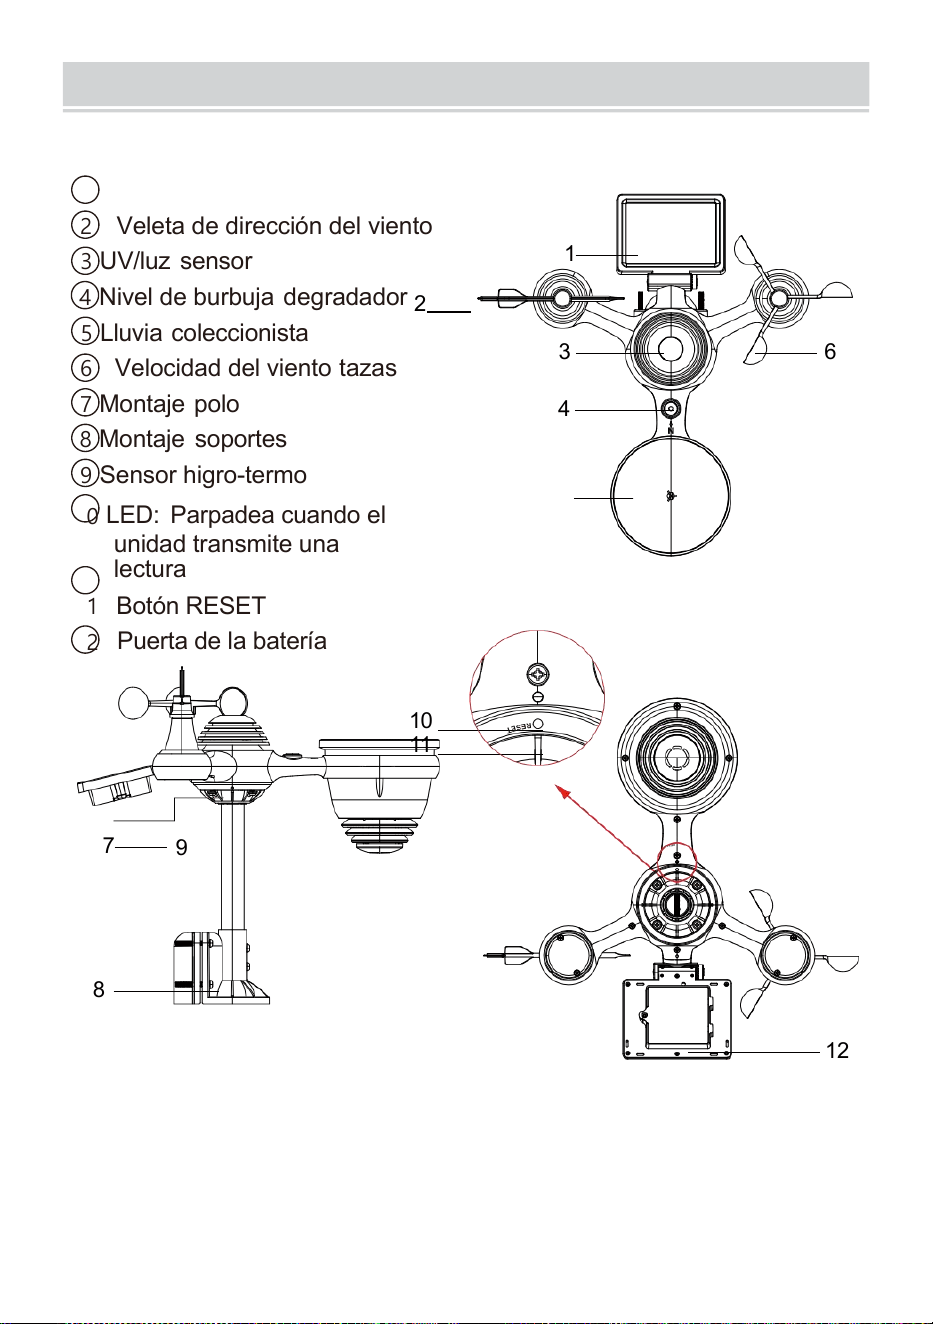
PRODUCTOVERVIEW
- 7 -
7 EN 1 INALÁMBRICO PARA EXTERIORES SENSOR
1
solar panel
2 Veleta de dirección del viento
3 UV/luz sensor
4
Nivel de burbuja degradador
2
5 Lluvia coleccionista
6 Velocidad del viento tazas
7
Montaje polo
8 Montaje soportes
9 Sensor higro-termo
10
LED: Parpadea cuando el
unidad transmite una
lectura
11
Botón RESET
12
Puerta de la batería
10
11
7
9
8
12
3 6
4
1
5

WEATHERCONSOLEOVERVIEW
- 8 -
1
2
3
4
5
6
7
8
1 Luz ambiental detector
4 paredes montaje titular
7 Antena
2 Pantalla de
visualización
5 Fuerza aporte
8 Pata de cabra
3 Función botones
6 Botón RESET

HOME SCREEN OVERVIEW
- 9 -
1 2 3 4 5
6
15
8
16
10
17
18
o—
19
2
11
12
13
14
9
7
23 24
1 Conexión wifi/sincronización horaria icono
13 Rocío punto
2 veces
14 Baro presión
3 Dirección del viento
15 Temperatura interior
4 Luna fase 16 Humedad interior
5 Fecha
17 Luz intensidad
6 Intensidad de la señal del sensor icono
18 UVI
7 Temperatura exterior
19 Lluvia
8 Velocidad del viento 20 Lluvia tasa
9 Humedad exterior 21 Lluvia tasa nivel
10 Velocidad del viento nivel 22 Funcional botón icono
11 Se siente como la temperatura 23 Pronóstico del tiempo
12 Calor índice
24 Amanecer/atardecer tiempo

DETAIL SCREEN OVERVIEW
- 10 -
11
12
1 3
1 4
1 5
1 6
1 7
1 8
1 9
20
21
1 2 3 4 5 6 7 8 9 10
22
23
24
25
26
27
28
29
30
31 32
1 Conexión wifi/sincronización horaria icono
17 Sensación térmica
2 Temperatura exterior MÁXIMA/MÍNIMA
18 Rocío punto
3 MÁX./MÍN. en exteriores humedad
19 Ba ro presión
4 Ráfaga de viento
20 Luz intensidad
5 Tiempo 21 UVI
6 Velocidad media del viento 22 Temperatura MÁXIMA/ MÍNIMA interior
7 Dirección del viento
23 Temperatura interior
8 Velocidad del viento
24 Interior MÁX/MÍN humedad
9 Luna fase
25 Interior humedad
10 Fecha
26 Lluvia tasa
11 Se siente como temperatura 27 Evento, por hora, por semana,
12 Temperatura exterior
mensual, total lluvia
13 Humedad exterior 28 Lluvia tasa nivel
14 Velocidad del viento nivel
29 A diario lluvia
15 Se siente como temperatura 30 Funcional botón icono
16 Calor índice
31 Pronóstico del tiempo
32 Hora de salida y puesta del
sol
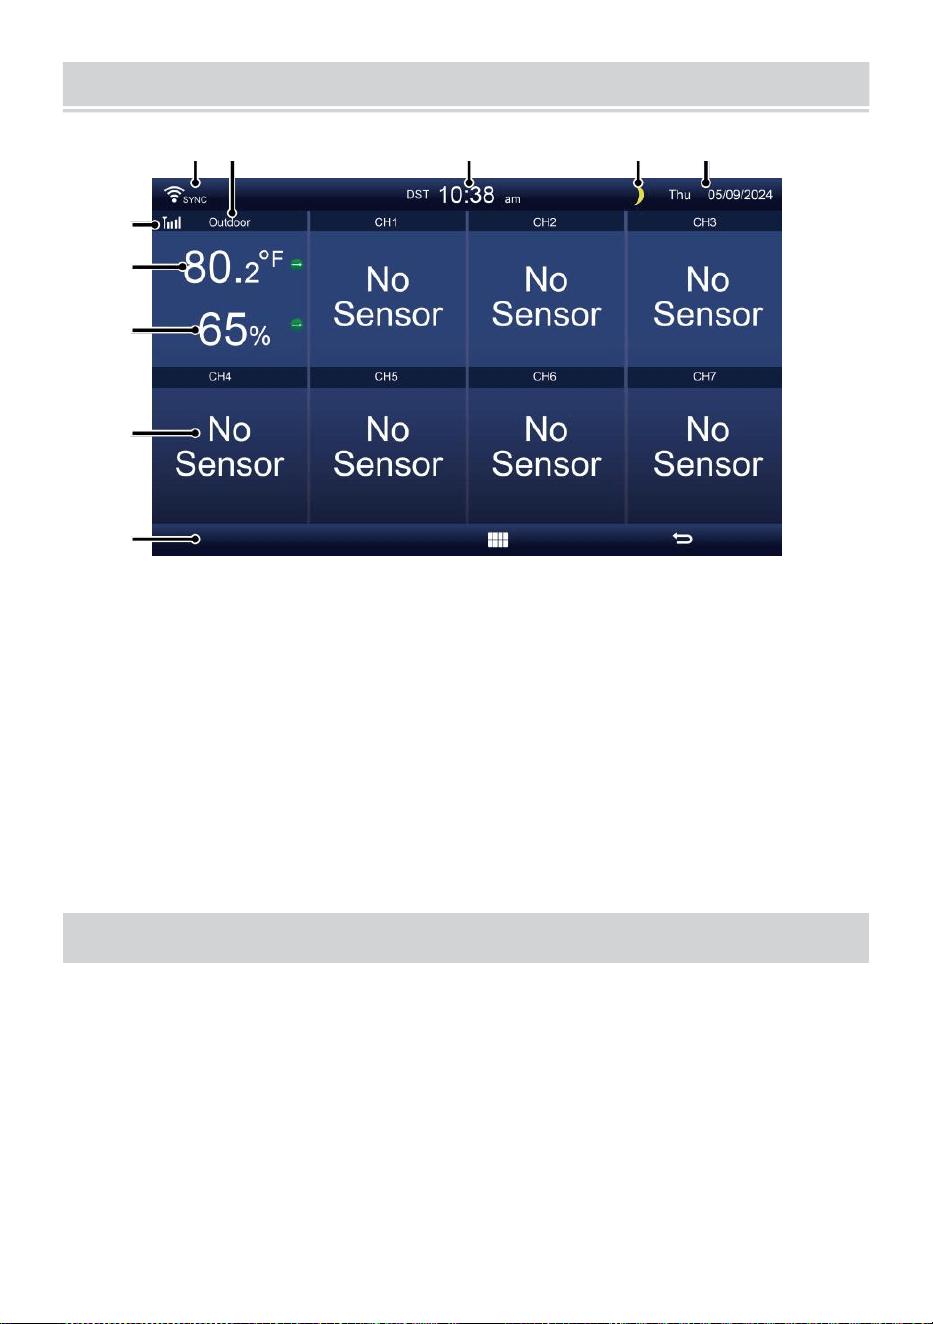
SUMMARY SCREEN OVERVIEW
- 11 -
6
7
8
9
1 0
1 2 3 4 5
1 Conexión wifi/sincronización horaria
icono
2 Dentro/fuera icono etiqueta
3 Tiempo
4 Luna fase
5 Fecha
6 Intensidad de la señal del
sensor icono
7 Temperatura interior/exterior
8 Humedad interior/exterior
9 No pantalla conectar pantalla
10 Funcional botón icono
CONFIGURACIÓN SENSOR EXTERIOR INALÁMBRICO 7 EN1
El Sistema inalámbrico 7 en 1 para exteriores sensor medidas viento
velocidad , viento dirección , lluvia, UV, luz intensidad, temperatura y
humedad.
INSTALACIÓN DEL MONTAJE POLO Y SOPORTE ET
Fije el sensor a un montaje polo y soporte (incluido) utilizando el
tornillos ( incluido ).

INSTALACIÓN DE COPAS DE VELOCIDAD DEL VIENTO Y VIENTO
DIRECCIÓN V ANE
Alinee el tornillo agujeros En las copas de velocidad del viento con
el lado plano y vertical del metal vara.
Insertar las copas de velocidad del viento en el metal varilla y
atornillarlos En apretado a cerrar él en lugar.
Alinee los orificios de los tornillos en el viento. paleta de
dirección con El piso, vertical lado de la metal vara.
Insertar la veleta de dirección del viento en el metal varilla y
atornillarlos ajustado a cerrar él en lugar.

- 12 -

- 13 -
Instalación de copas de velocidad del viento
Dirección del viento Instalación de paletas
CONFIGURACIÓN ARRIBA COLECTOR DE LLUVIA
Alinear el Muescas en el embudo l con las ranuras de bloqueo
Dentro de la lluvia coleccionista.
Insertar el embudo en el Colector de lluvia y atorníllelos bien. a
cerrar él en lugar.

Cerrar
Alinear
INSTALACIÓN DEL BATERÍAS
Desatornille el tapa de la batería en la parte inferior del 7 en 1
exterior sensor usando un destornillador 1.
Conecte el cable del recargable batería paquete (incluido) al
cable ubicado en el batería compartimiento.
Ajuste los cables conectados para que se ajusten
cómodamente . en el Compartimento- mento. Entonces, Insertar
el batería embalar en el compartimento.

- 14 -

- 15 -
Cierre y asegure la puerta de la batería. De nuevo en el
compartimiento.
AJUSTANDO EL SOLAR CELÚLA
engranaje del otro lado de la articulación
empuja hacia afuera. La célula solar debería ahora ser En un
desbloqueado posición .
Ajuste el ángulo vertical de la célula solar para obtener la mayoría
optimo Uso de la célula solar según su ubicación.
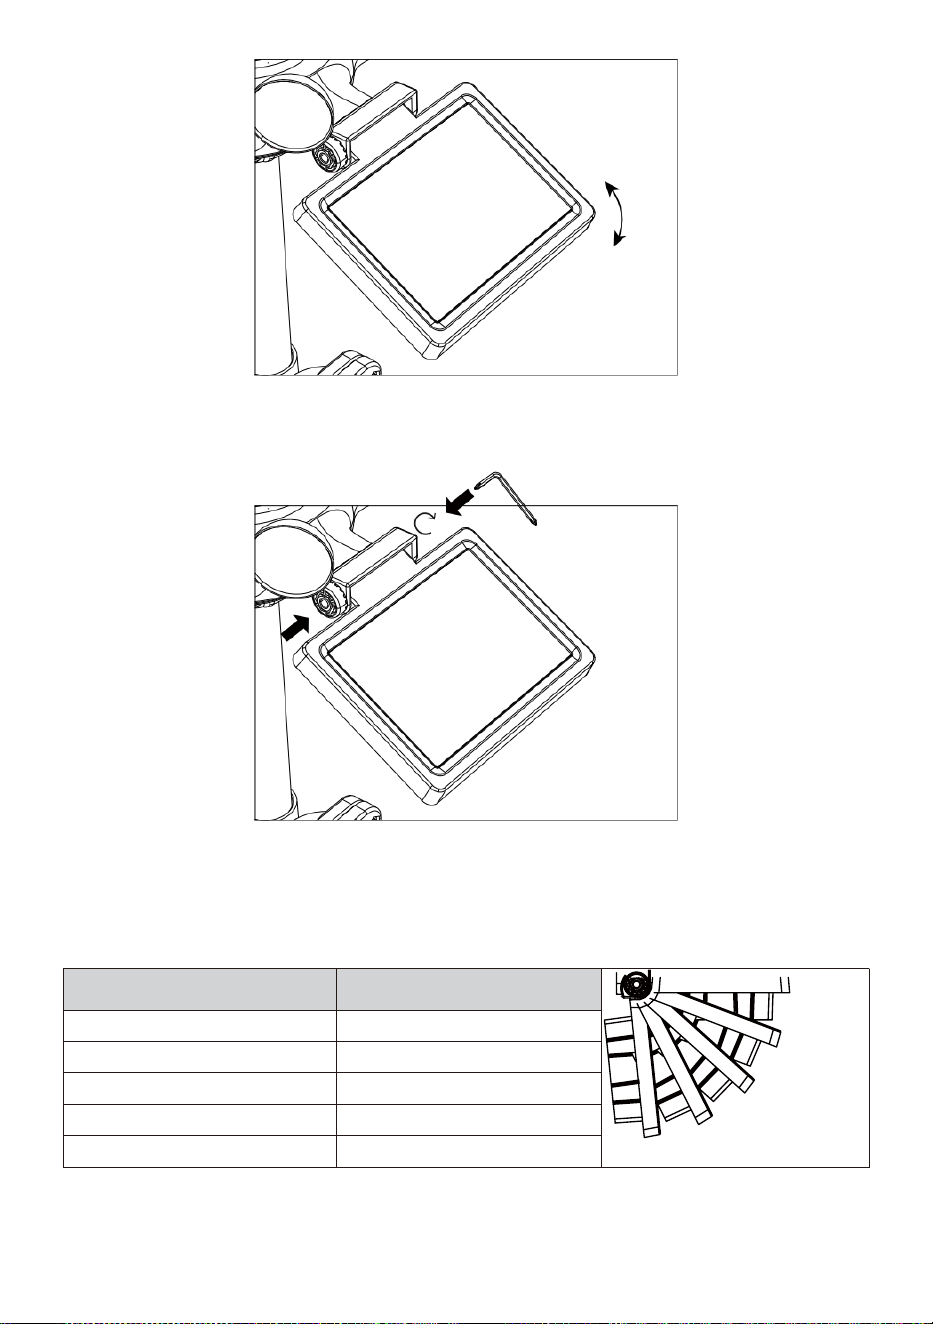
- 16 -
Empuje el engranaje hacia adentro y apriete el tornillo. hasta
el Engranajes cerrar en lugar.
Al ajustar la celda solar, configúrela en un ángulo cerrar sesión a su
latitud. Ver gráfico A continuación para obtener una idea de cómo tú
debería inclina tu solar celúla.
Latitud Proximidad
Selección del ángulo de la
célula solar
0°
21°
42°
63°
84°
Si su ubicación es cerca a 84°
84°
Si su ubicación es cerca a 63°
63°
Si su ubicación es cerca a 42°
42°
Si su ubicación es cerca a 21°
21°
Si su ubicación es cerca a 0°
0°
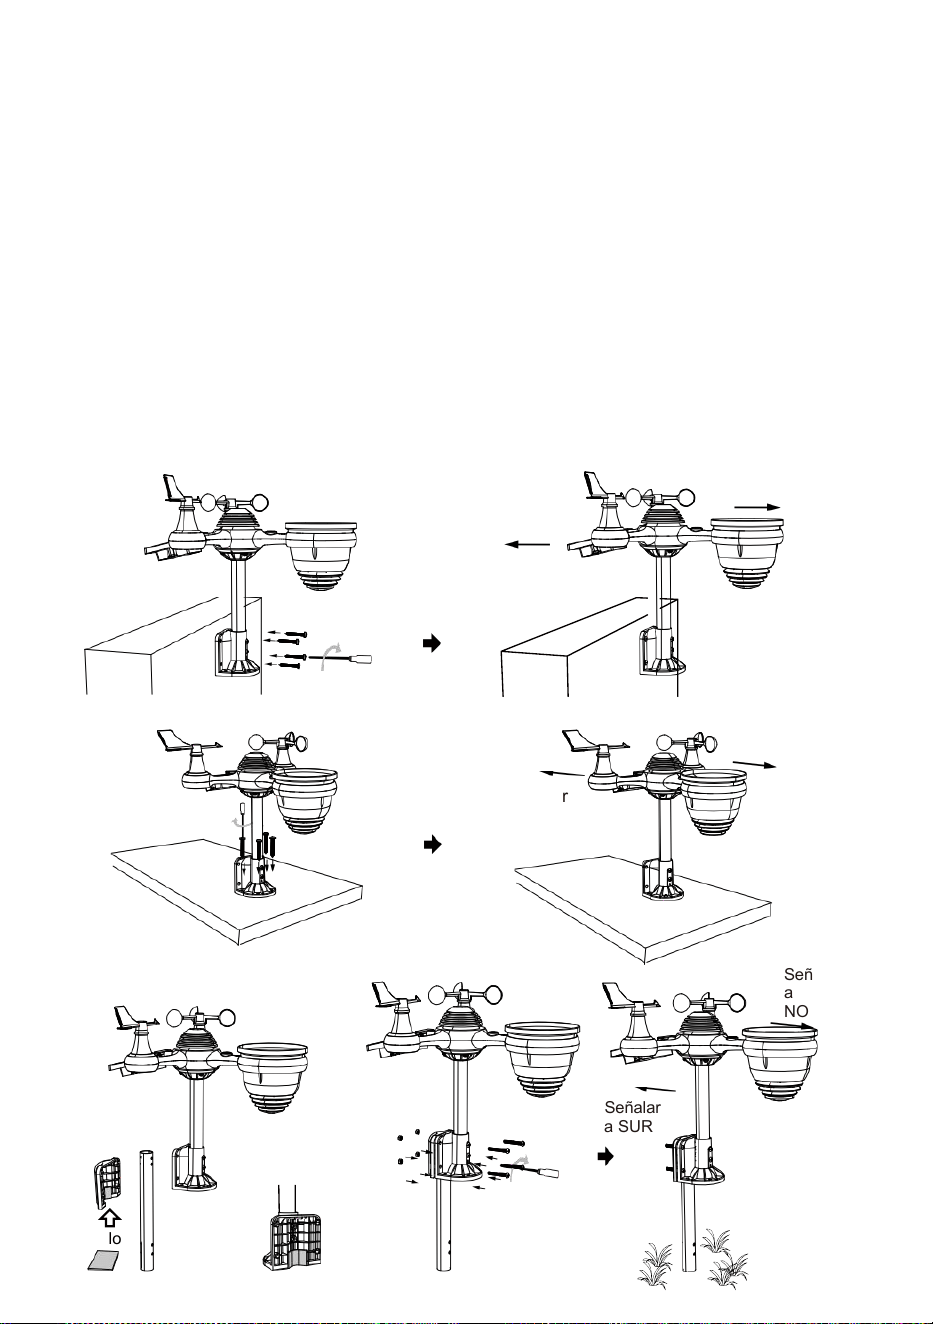
- 17 -
MONTAJE EL 7 EN 1 INALÁMBRICO PARA EXTERIORES SENSOR
Elige uno Ubicación del sensor exterior 7 en 1 que está
abierto con No obstrucciones.
Apriete el soportes de montaje a una superficie/pared utilizando
cuatro tocando
tornillos (incluidos), o apriete el montaje polo a tu existente montar-
En poste con cuatro φ5 Pernos y M5 Montaje de tuercas.
Agregar almohadillas de goma en el soporte de montaje
Antes de fijar el soporte de montaje en el sensor.
Asegúrese de que Caras de colectores de lluvia El norte y el
sol El panel mira hacia el sur antes fijación el tornillos ( incluido ).
Asegúrese de que el sensor esté fijado especialmente
estrechamente, De lo contrario, ventoso condiciones causa el
transmisor a agitar y de este modo leer mal La lluvia datos .
Señalar a
NORTE
Señalar a
SUR
Señalar
a
NORTE
Señalar
a SUR
Señalar
a
NORTE
Señalar
a SUR
Palo

- 17 -
Palo

- 18 -
SEÑALANDO EL 7 EN 1 INALÁMBRICO PARA EXTERIORES
SENSOR A SUR
El sensor meteorológico inalámbrico para exteriores está calibrado para
ser puntiagudo norte para máxima precisión. Sin embargo, para su
comodidad, si usted es un usuario
situado En el sur Hemisferio , puedes utilizar el sensor con el Colector
de lluvia apuntando al sur.
1. Monte e instale el sistema meteorológico inalámbrico sensor con h
el lluvia colector apuntando hacia el sur, En lugar de No rth. (Por
favor referirse a MONTAJE DEL
2. 7 EN 1 INALÁMBRICO PARA EXTERIORES SENSOR.)
Seleccione "STH" para el sur hemisferio en el modo de ajuste del
reloj. (Por favor Consulte "Configuración de la reloj")
NOTA: Cambiar el La configuración del hemisferio cambiará
automáticamente la dirección de la luna. fases en el mostrar.
Señalando el inalámbrico clima sensor hacia el sur voluntad
permitir máximo luz del sol en el solar panel , especialmente
durante el invierno estación En el sur Hemisferio.
AJUSTANDO EL 7 EN 1 INALÁMBRICO SENSOR NIVEL
Utilice el burbuja nivel indicador a Asegúrese de que la red
inalámbrica al aire libre
El sensor está completamente nivelado. Si el sensor es no nivel, el
ganar indicador, UV y Luz La intensidad será no medida
adecuadamente.
Para ajustar el nivel del sensor exterior inalámbrico, afloje el
tornillos del poste de montaje. Ajuste el nivel del sensor exterior
inalámbrico en Orden a Asegúrese de que burbuja es En el centro de
la nivel de burbuja indicador.
Apriete el tornillo de la montaje Polo de nuevo.

- 18 -

- 19 -
El burbuja
CONFIGURACIÓN Arriba el CONSOLADE
VISUALIZACIÓN
FUERZA SUBE LA CONSOLA
1. Conecte el adaptador de corriente a la pantalla consola.
2. Gira la antena en atrás del consola arriba.
3. Una vez que la consola está encendido, la apertura ing La pantalla
estará ser desplegado y luego entrar en principal pantalla.
4. Espera el exterior sensor a par con su consola .
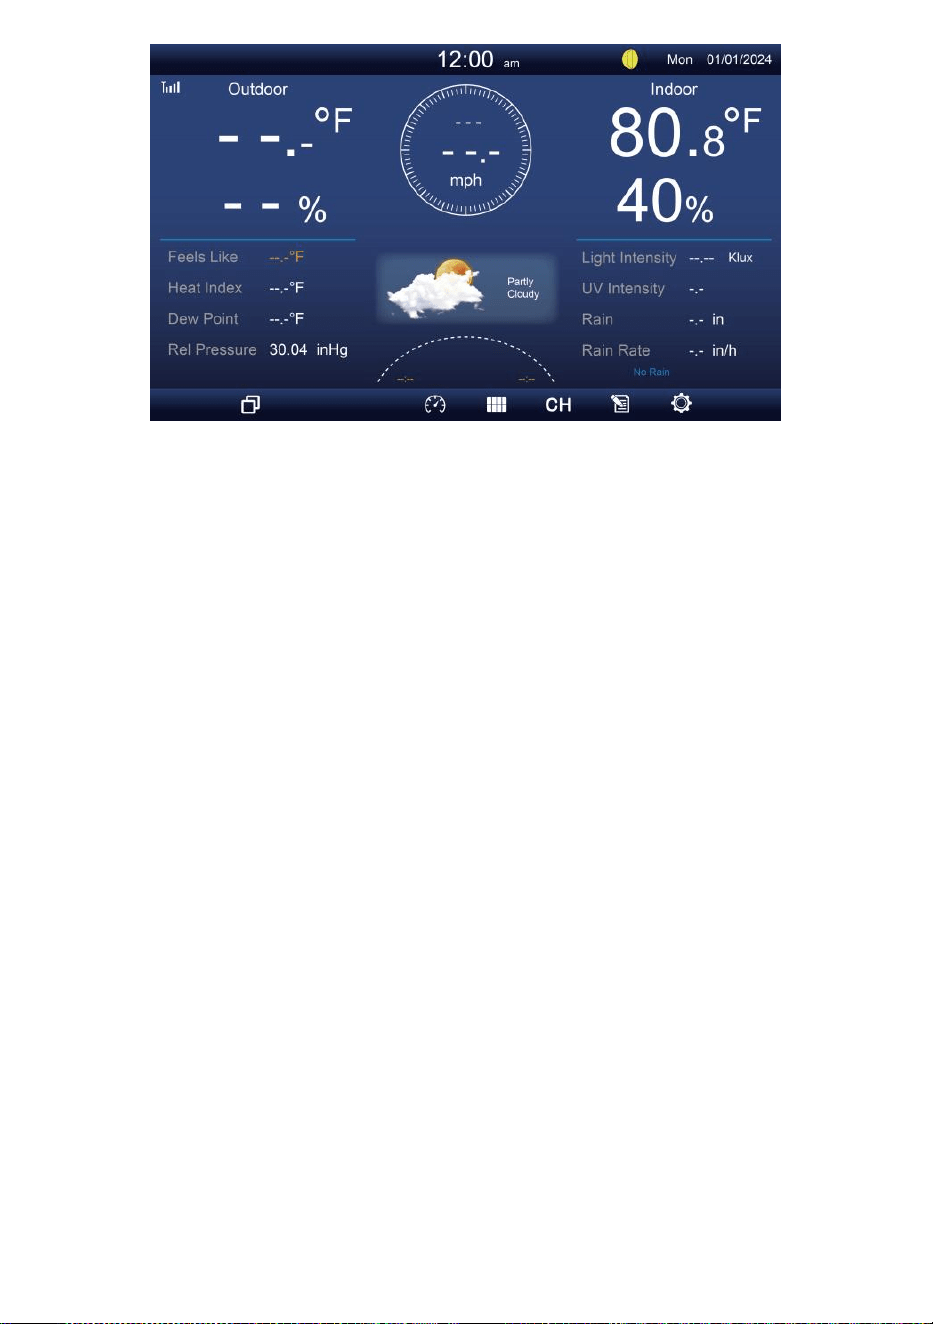
- 19 -
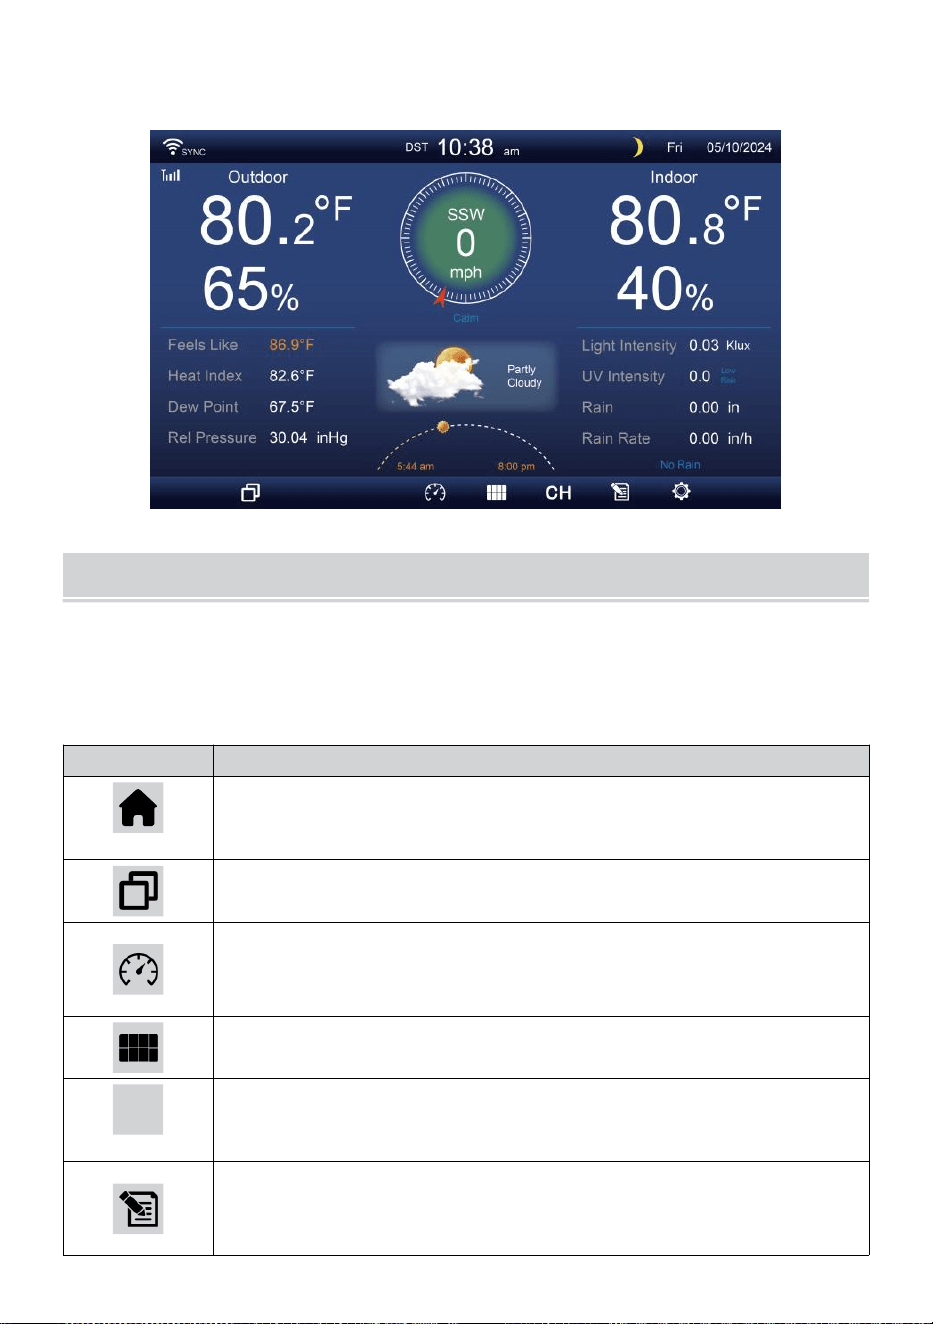
- 20 -
5. Una vez emparejado, los datos al aire libre serán mostrado en el
pantalla.
INSTRUCCIONES DE FUNCIONAMIENTO
Este sección describe el principal funciones y otro funciones de
Botones dentro de la consola.
PRINCIPAL FUNCIONES DE BOTONES
ICONO
DESCRIPCIÓN
Hogar botón
Pulse este botón para mostrar de forma sencilla datos
mostrar pantalla.
Expandir botón
Pulse este botón para mostrar el detallado datos pantalla.
Presión
Presione esto botón para mostrar entre Relativo y
absoluto Pantalla de presión.
Sensor múltiple
Pulse este botón para mostrar el Pantalla multisensor .
CH
Canal
Presione esto botón para cambiar Interior, datos CH1-7
pantalla.
Historia Registro botón
Presione esto botón para mostrar el Pantalla de
historial (Máx./Mín., Registro de datos, Pantalla

- 20 -
gráfica).
Configuración
Pulse este botón para mostrar el configuración pantalla.
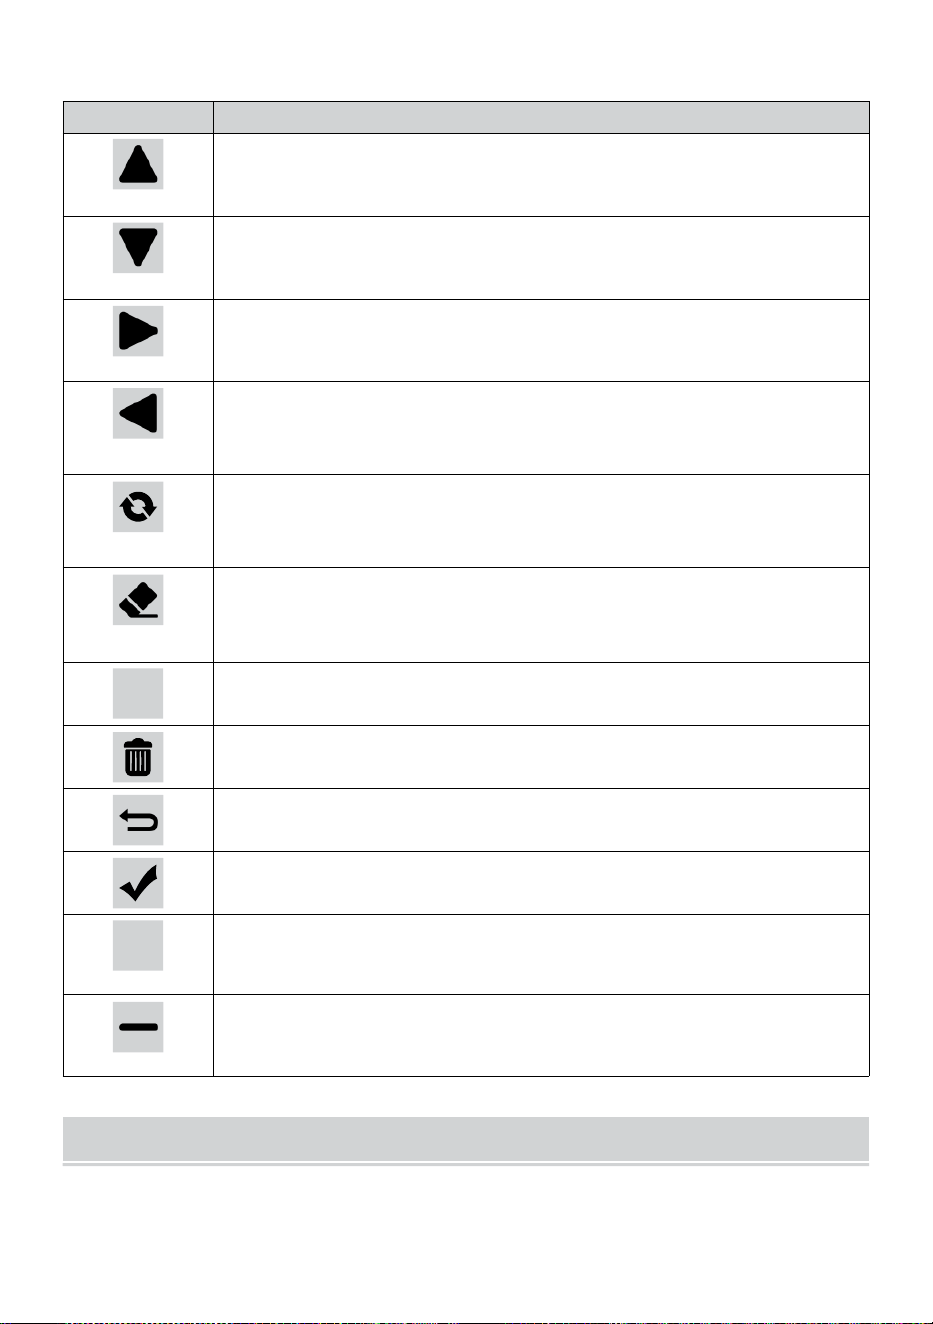
- 21 -
OTRO FUNCIÓN BOTONES PARA CONFIGURACIONES
ICONO
DESCRIPCIÓN
Arriba botón
Presione esto Botón para seleccionar superior fila o
artículo .
Abajo botón
Presione esto Botón para seleccionar inferior fila o artículo
.
Bien botón
Presione esto botón para seleccionar columna del lado
derecho o artículo.
Izquierda botón
Presione esto Botón para seleccionar izquierda lado
columna o artículo.
Ciclo botón
Presione este botón para alternar entre diferentes Pantalla de
parámetros.
Claro botón
Presione esto botón para borrar el registro
máximo/mínimo.
Q
Buscar botón
Presione esto Botón para buscar los datos registro.
Borrar botón
Prensa y Sostén esto botón para borrar registro s.
Devolver botón
Presione esto botón para devolver anterior página.
DE ACUERDO botón
Pulse este botón para confirmar el selección.
+
+ botón
Pulse este botón para aumentar el valor o cambiar a otro
opción.
- botón
Pulse este botón para disminuir el valor o cambiar a otro
opción.
SEÑAL INALÁMBRICA RECEPCIÓN
Familiarizarse con el Iconos para diferentes intensidades de señal.
Reubica tu consola o sensor meteorológico si la señal es débil o
perdido.
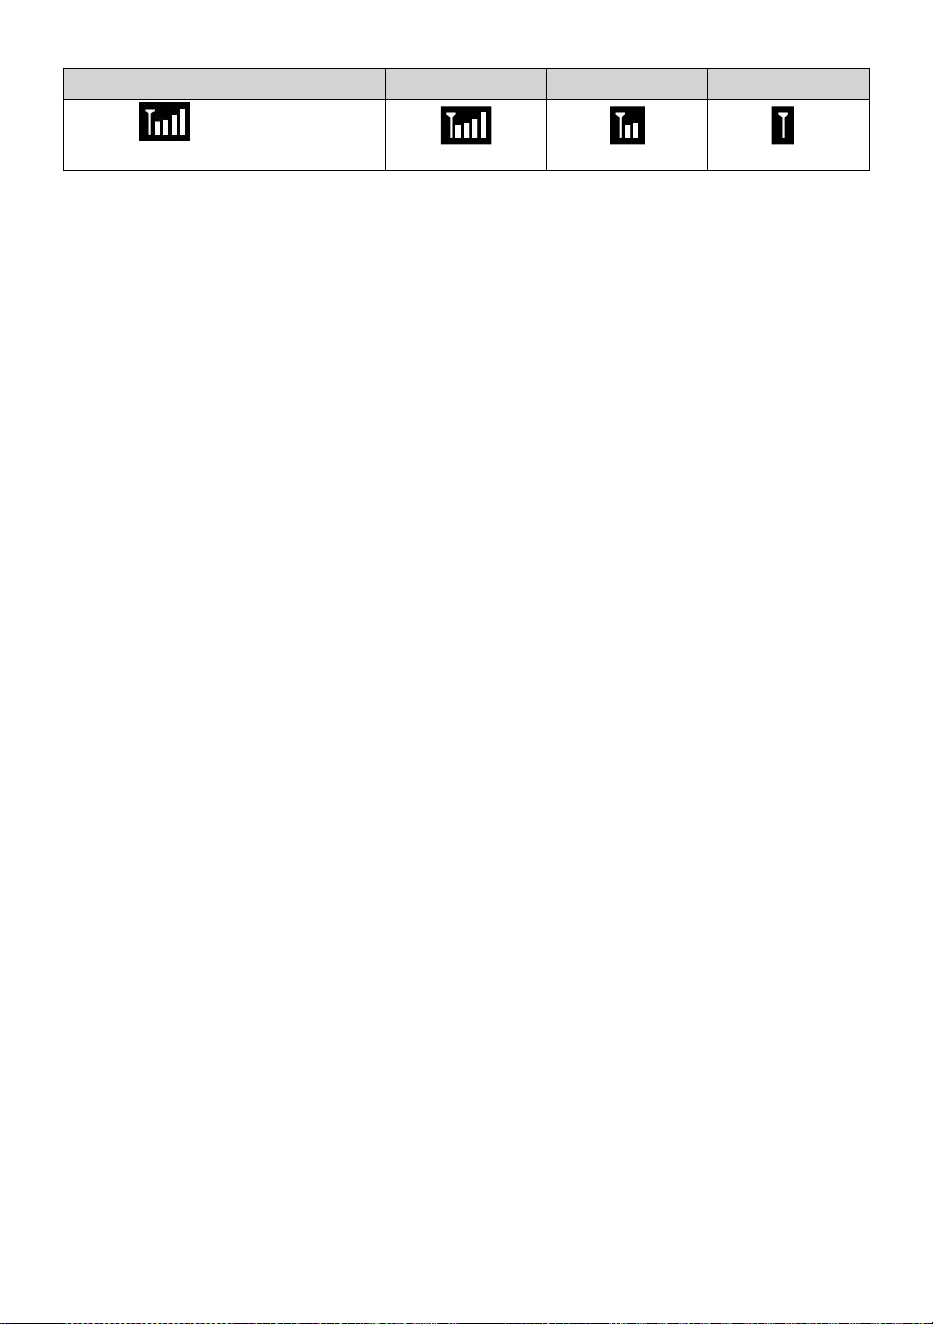
- 21 -
Búsqueda de señales
Señal fuerte
Señal débil
Señal perdido
Antena bar es
Desplazamien
to
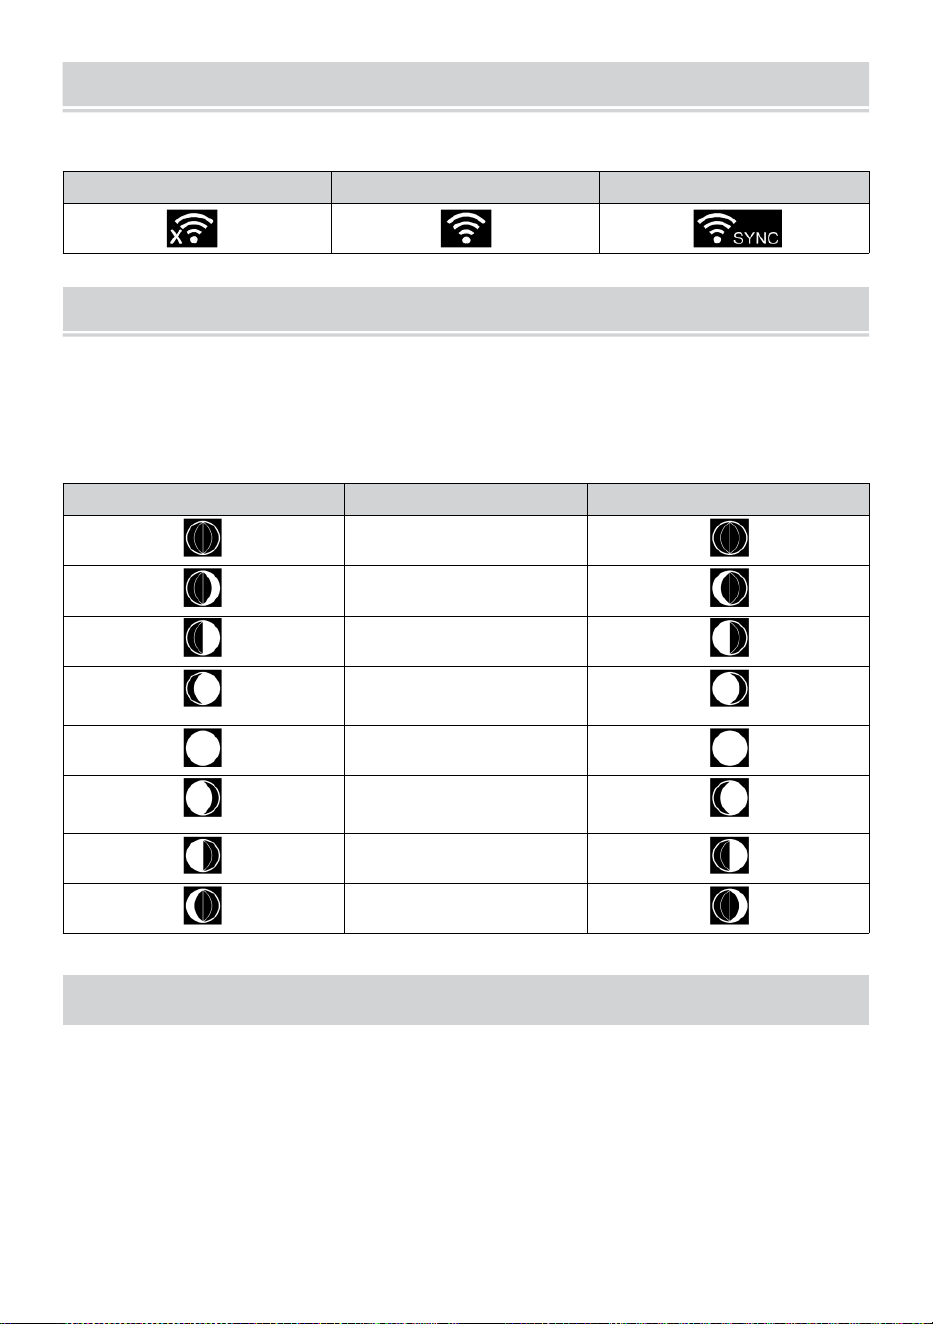
WI-FI CONNECTION STATUS
- 22 -
Familiarícese con los íconos del estado de la conexión Wi-Fi.
WI-FI desconectado
Conectado a WI-FI
Conexión WI-FI con Sync
LUNA FASE
La consola de visualización calcula la luna. fase según A tu hora,
fecha y hora zona.
La siguiente tabla explica las fases correspondientes y su iconos para
ambos Norte y Sur hemisferios.
Del norte Hemisferio Iconos
Luna Fase
Del sur Hemisferio Iconos
Nuevo Luna
Luna creciente Luna
Primer trimestre Luna
Luna gibosa creciente
Luna
Lleno Luna
Luna gibosa
menguante Luna
Tercer trimestre Luna
Luna menguante Luna
HORA DE SALIDA/PUESTA DEL SOL
La consola indica la hora del amanecer/atardecer en tu ubicación, que
es basado en la zona horaria, latitud y longitud que ingresaste. Si la luz
del día Ahorro es establecido en AUTO , el veces voluntad ajustar un
hora adelante automáticamente para luz
ahorro.
NOTA: Para la zona horaria, latitud y ajuste de longitud, por
favor referirse " Tiempo & Fecha Configuración ".

WEATHER FORECASTINGAND WEATHERINDEX
- 23 -
CLIMA PRONÓSTICO
El incorporado El barómetro puede No hay hielo atmosférico
cambios de presión y, en función de los datos recopilados, puede
predecir las condiciones meteorológicas .
Hay 6 iconos del clima: soleado, En parte Nublado, Nublado, Lluvioso,
Lluvioso/ Tormentoso y nevado (ligero ) Nieve & Pesado Nieve).
Soleado
Parcialmente
nublado
Nublado
Luz lluvia
Fuerte lluvia/tormenta
Nieve ligera
Fuerte nevada
NOTA:
La precisión de un general pronóstico basado en la presión es de
alrededor del 6,5-70 %. Los pronósticos son No garantizado.
Puede ser no necesariamente reflejar la situación actual.
TENDENCIA INDICADOR
El tendencia indicador muestra el tendencias de cambios en el próximo
unos minutos. estos Aparecerán iconos en la temperatura , humedad, y
barométrico Sección de presión de la pantalla de detalle.
Creciente
Estable
Descendente
ALERTA DE HIELO

WEATHER FORECASTINGAND WEATHERINDEX
- 23 -
Cuando la temperatura exterior es inferior a 1°C/33,8° F, el copo de nieve
icono
i
· aparecerá en el mostrar.

- 24 -
SIENTE COMO
El Se siente Me gusta la temperatura El índice determina la temperatura
que realmente se siente afuera, teniendo en cuenta factores como el
viento velocidad, presión, temperatura y humedad (viento enfriar y
calor índice).
18°C 26°C
10 20 30
-40 -22 -4 14 32 50 68 86 104 122 °F
Sensación térmica del viento Índice
CALOR ÍNDICE
El Calor Índice Está determinada por la temperatura del sensor
meteorológico inalámbrico. tura y humedad lecturas cuando la
temperatura es Entre 79 °F (26 °C) y 120 °F (50 °C).
Calor Índice rango
Advertencia
Explicación
81°F - 90°F (27°C - 32°C)
Precaución
Posibilidad de agotamiento por calor
91°F - 104°F (33°C - 40°C)
Precaución
extrema
Posibilidad de deshidratación por
calor.
106°F - 129°F (41°C - 54°C)
Peligro
Agotamiento por calor muy probable
≥ 131°F (≥ 55 °C)
Extremo Peligro
Alto riesgo de deshidratación/ golpe
térmico
VIENTO ENFRIAR
La sensación térmica o sensación térmica es la disminución de
temperatura debido a el aprobar-
Flujo de aire de baja temperatura. El enfriamiento por viento es
determinado por a Combinación de datos de temperatura y velocidad del
viento del sensor meteorológico inalámbrico
.
NOTA: Solo cuando la
temperatura está por debajo de 50 ℉ (10 ℃ ) y la velocidad del
viento es superior a 4,8 km/h (3 mph), se mostrará el valor de
sensación térmica,
de lo contrario Se mostrará “--.-“.
ROCÍO PUNTO
El rocío punto es la temperatura por debajo de la cual el vapor de agua en
aire en
-40 -30 -20 -10 0
40 50 °C
Increasing danger Increasing danger

- 24 -
constante barométrico La presión condensa en agua líquida al mismo
tiempo tasa a la cual se evapora. El agua condensada se llama rocío
cuando él formas en un sólido superficie.
El rocío temperatura puntual está determinada por la temperatura y
humedad datos de el inalámbrico clima sensor .
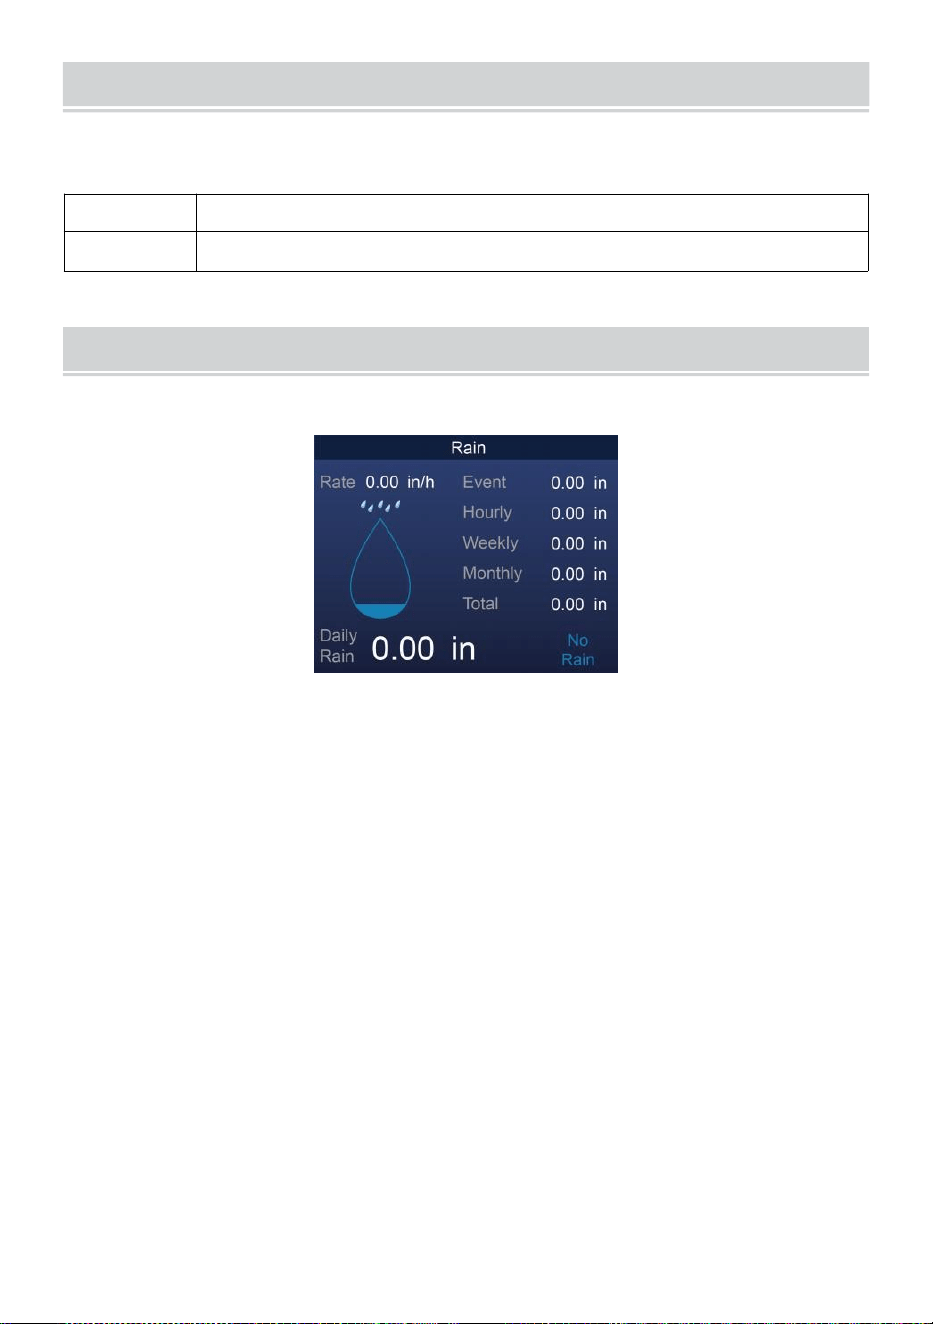
BAROMETRIC PRESSURE
- 25 -
Controlar el clima sitio web para tiempo real barómetro condiciones
entonces ajustar el relativo en el Calibración configuración sección.
Absoluto
El absoluto atmosférico presión de su ubicación .
Relativo
El Atmósfera relativa presión basado en el nivel del mar.
LLUVIA
En esta sección se muestran las precipitaciones o lluvia tasa información.
LLUVIA MOSTRAR MODOS
Lluvia Tasa
: Actual lluvia tasa en el pasado hora .
Lluvia evento
: continuo lluvia, y se reinicia a cero Si hay acumulación
de lluvia es menos que 10 mm (0,039 en) en un período
de 24 horas.
Cada hora
Lluvia
: Total lluvia para cada uno hora.
A diario
Lluvia
: Total lluvia desde Medianoche (00:00)
Semanalmen
te Lluvia
: Total precipitaciones para la semana del calendario
actual , y se reinicia el domingo mañana a las
Medianoche (de domingo a sábado)
Mensual Lluvia : Total precipitaciones para el mes calendario actual, y
reiniciar en El primer día de la Mes.
Total Lluvia: Total lluvia desde el último reiniciar.
RESTABLECER EL TOTAL LLUVIA REGISTRO
Consulte “Borrar todo Sección de “ Datos ” para despejar las
precipitaciones datos.
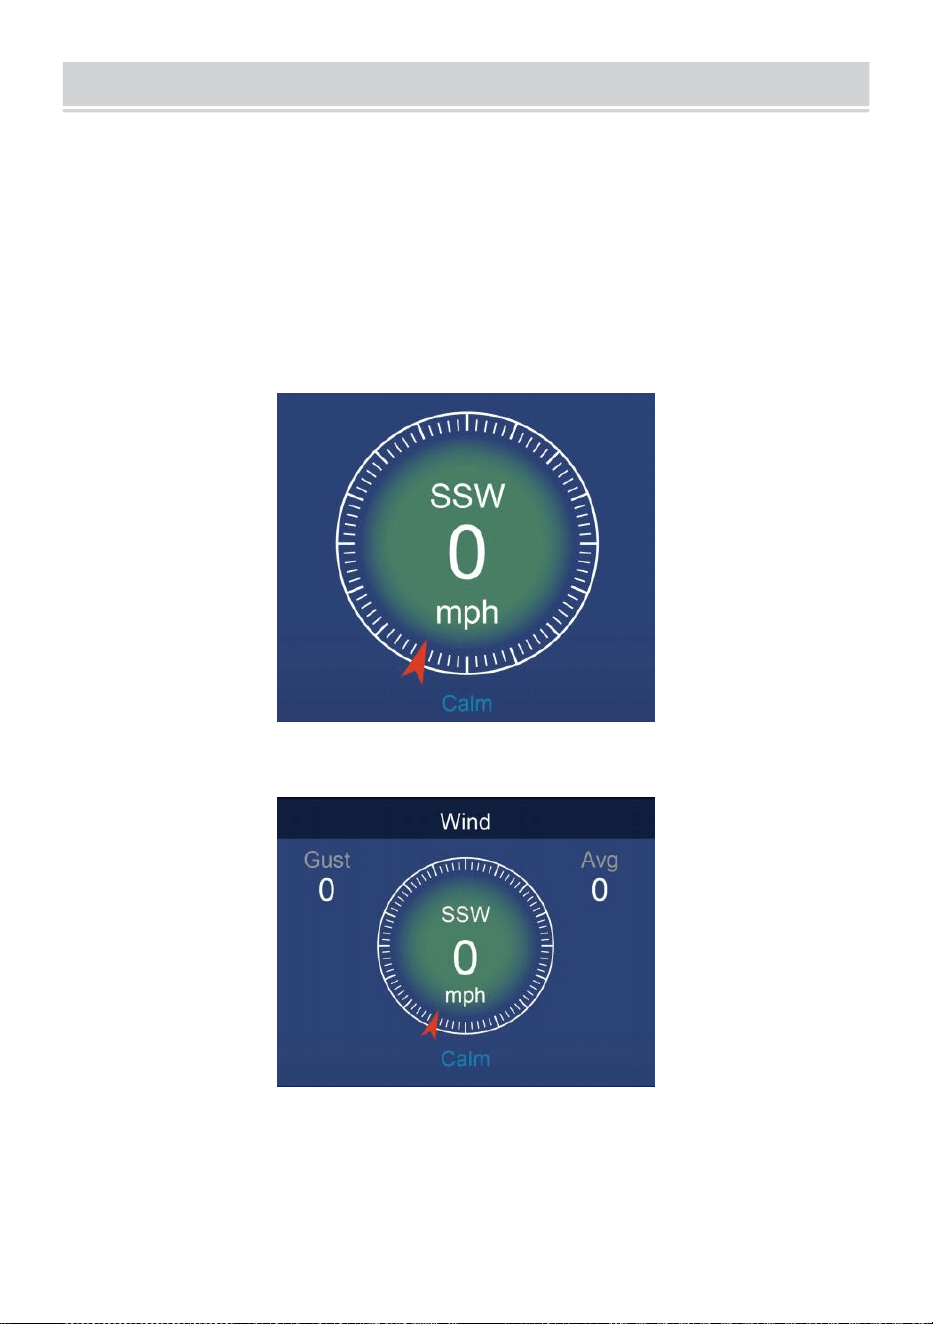
WIND
- 26 -
VELOCIDAD DEL VIENTO Y DIRECCIÓN
Este sección muestra el viento velocidad , corriente viento dirección ,
direcciones predominantes del viento y velocidad del viento nivel.
Velocidad del viento: es la velocidad media del viento mesurado
en el 20 anteriores artículos de segunda clase.
Viento medio: ¿Es la velocidad media del viento? en 10 minutos.
Ráfaga: es el velocidad del viento más alta grabado en el Hace 20
segundos .
Simple Datos Mostrar
Detallado Datos Mostrar
ESCALA DE BEAUFORT

WIND
- 26 -
El La escala Beaufort que se muestra a continuación es una escala
internacional de velocidades del viento desde 0 (tranquilo) a 12 (Fuerza
de huracán).
- 27 -
Escala Beaufort
Descripción
Velocidad del
viento
Estado del terreno
0
Calma
< 1
kilómetrospor
hora
Calma. Fuma se eleva verticalmente.
< 1 millaspor
hora
< 1 nudos
< 0.3 EM
1
Luz aire
1.1 ~ 5
kilómetros por
hora
La deriva de humo indica viento
dirección. Las hojas y las veletas
están estacionarias.
1 ~ 3 millas
por hora
1 ~ 3 nudos
0.3 ~ 1.5 EM
2
Luz brisa
6 ~ 11
kilómetros por
hora
Sentimientos de viento en la piel
expuesta. Hojas crujido. Las veletas
comienzan a mover.
4 ~ 7 millas
por hora
4 ~ 6 nudos
1.6 ~ 3.3 EM
3
Amable brisa
12 ~ 19
kilómetros por
hora
Hojas y ramitas pequeñas constantemente
emocionante. Banderas ligeras
extendidas.
8 ~ 12 millas
por hora
7 ~ 10 nudos
3.4 ~ 5.4 EM
4
Moderad
o brisa
20 ~ 28
kilómetros por
hora
Polvo y perder papel levantado.
Pequeño sucursales echar a mover.
13 ~ 17 millas
por hora
11 ~ 16 nudos
5.5 ~ 7.9 EM
5
Fresco brisa
39 ~ 38
kilómetros por
hora
Ramitas de una tamaño moderado
mover . Arboles pequeños En la
hoja echar a influencia.
18 ~ 24 millas
por hora
17 ~ 21 nudos
8.0 ~ 10.7 EM
6
Fuerte brisa
39 ~ 49
kilómetros por
hora
Grande sucursales en movimiento. silbido
escuchó en cables aéreos. Uso del
paraguas se convierte en difícil. Vacío
plástico Los contenedores se vuelcan .
25 ~ 30 millas
por hora
22 ~ 27 nudos
10,8 ~ 13.8 EM
7
Viento fuerte
50 ~ 61
kilómetros por
hora
Árboles enteros en movimiento.
Esfuerzo necesitaba caminar contra
el viento d.
31 ~ 38 millas
por hora
28 ~ 33 nudos
13,9 ~ 17.1 EM
62 ~ 74
Algunas ramitas rotas de árboles.
- 27 -
8
Vendaval
kilómetros por
hora
Los coches se desvían camino.
Progreso a pie es seriamente
impedido.
39 ~ 46 millas
por hora
34 ~ 40 nudos
17.2 ~ 20.7 EM
9
Fuerte vendaval
75 ~ 88
kilómetros por
hora
Algunas ramas se rompen de los árboles,
y algunos árboles pequeños se caen .
Construcción /
barricadas temporales explotar encima.
47 ~ 54 millas
por hora
41 ~ 47 nudos
20,8 ~ 24.4 EM
10
Tormenta
89 ~ 102
kilómetros por
hora
Los árboles están rotos apagado
o desarraigado, daño estructural
probable.
55 ~ 63 millas
por hora
48 ~ 55 nudos
2,45 ~ 28.4 EM
11
Tormenta
violenta
103 ~ 117
kilómetros por
hora
Vegetación extensa y estructura
daño probable.
64 ~ 73 millas
por hora
56 ~ 63 nudos
28,5 ~ 32.6 EM
12
Fuerza de
huracán
≥ 118
kilómetros por
hora
Daños graves y generalizados a la
vegetación y estructuras. Escombros y
sin seguridad
Los objetos son arrojado por todos lados.
≥ 74 millas
por hora
≥ 64 nudos
≥ 32.7 EM
- 28 -
VELOCIDAD DEL VIENTO NIVEL
El gráfico de niveles de velocidad del viento en pantalla proporciona a
rápido referencia en el
actual viento condición . El fondo color de el brújula cambia según la
velocidad del viento.
Nivel
Luz
Moderado
Fuerte
Tormenta
Velocidad
0 - 12 millas
por hora
0 - 19
kilómetros por
hora
12 - 30 millas
por hora
20 - 49
kilómetros por
hora
31 - 55 millas
por hora
50 - 88
kilómetros por
hora
≥ 55
millas por
hora ≥ 89
kilómetros
por hora
Color de la
brújula
Verde
Amarillo
Naranja
Rojo
LUZ INTENSIDAD Y U.V. ÍNDICE
Esta sección muestra un gráfico para luz intensidad y Ultravioleta índice.
UVI
Clasifica
ción
Comentario
0-2
Bajo
A Ultravioleta Índice lectura de 0 a 2 medio Bajo peligro de
El sol Ultravioleta rayos para el promedio persona.
3-5
Medio
A Ultravioleta Índice lectura de 3 a 5 medio moderado
riesgo de daño del sol sin protección exposición.
6-7
Alto
A Ultravioleta Índice lectura de 6 a 7 medio alto riesgo de
daño por exposición solar sin protección. Protege el ion
contra la piel y los ojos. daño es necesario.

- 28 -
8-10
Muy Alto
A Ultravioleta Índice lectura de 8 a 10 significa muy alto
riesgo de daño por exposición al sol sin protección. Tome
dosis adicionales precauciones
porque la piel y los ojos desprotegidos ser dañado y
poder quemar rápidamente
11-15
Extremo
A Ultravioleta Índice lectura de 11 o más significa extremo
riesgo de daño por exposición al sol sin protección. Tome
todas las precauciones precauciones porque La piel y los
ojos desprotegidos pueden quemar en minutos.
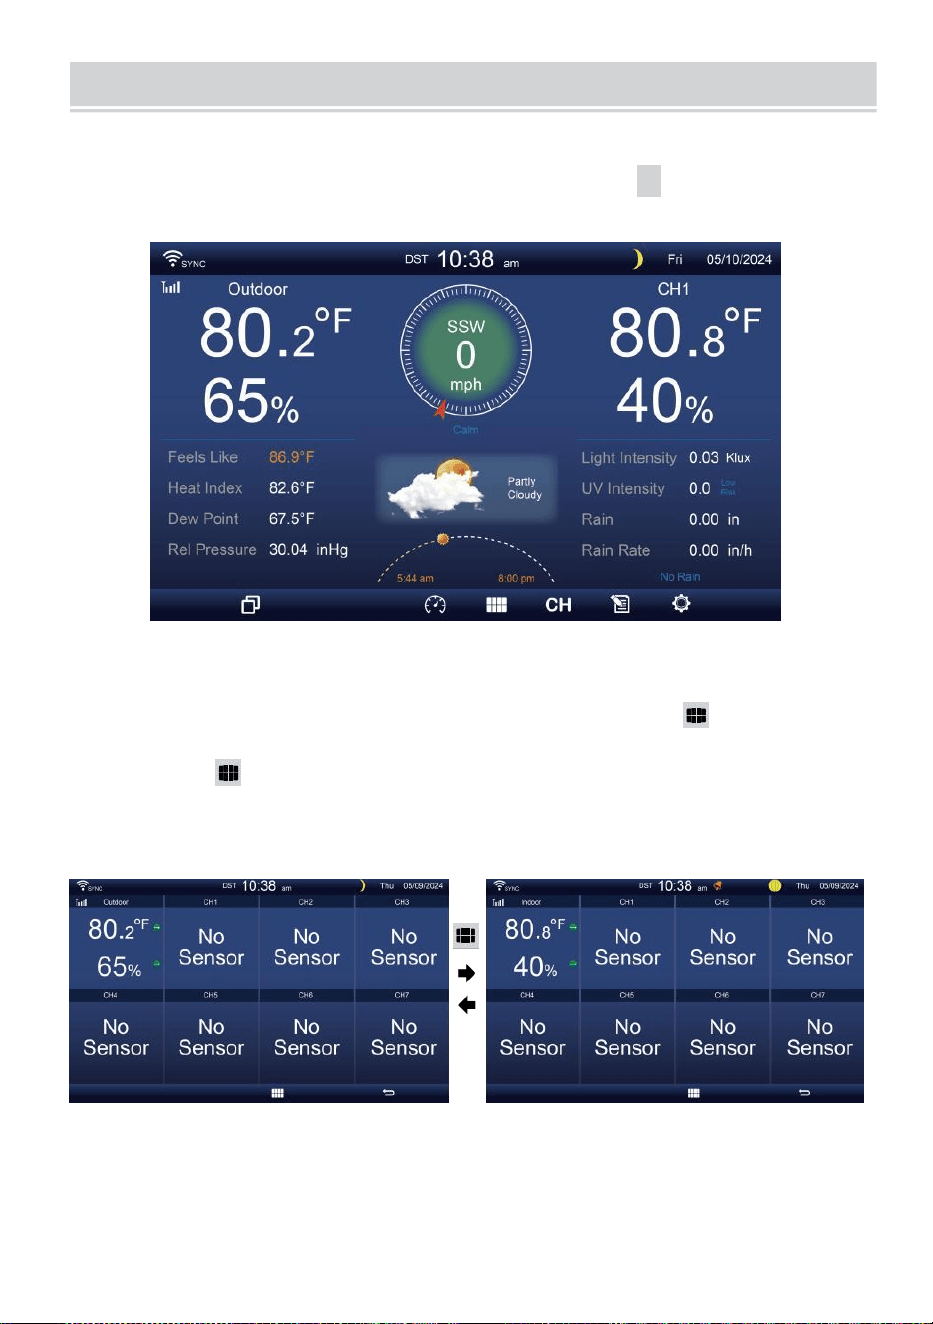
MULTI-CHANNEL DISPLAY MODE
- 29 -
CANAL MOSTRAR
Mientras
esté en la
pantalla
simple/detalle ,
presione
cH
botón para
cambiar entre Interior y Canal 1-7 datos.
MULTISENSOR MOSTRAR PÁGINA
Mientras esté en la pantalla simple/detalle, prensa Botón para
ingresar al modo Multi-sensor pantalla de visualización del sor.
Prensa botón para intercambiar la pantalla entre Interior y
exterior o datos del sensor.
Presione el botón
w
para regresar al modo simple/detalle pantalla.
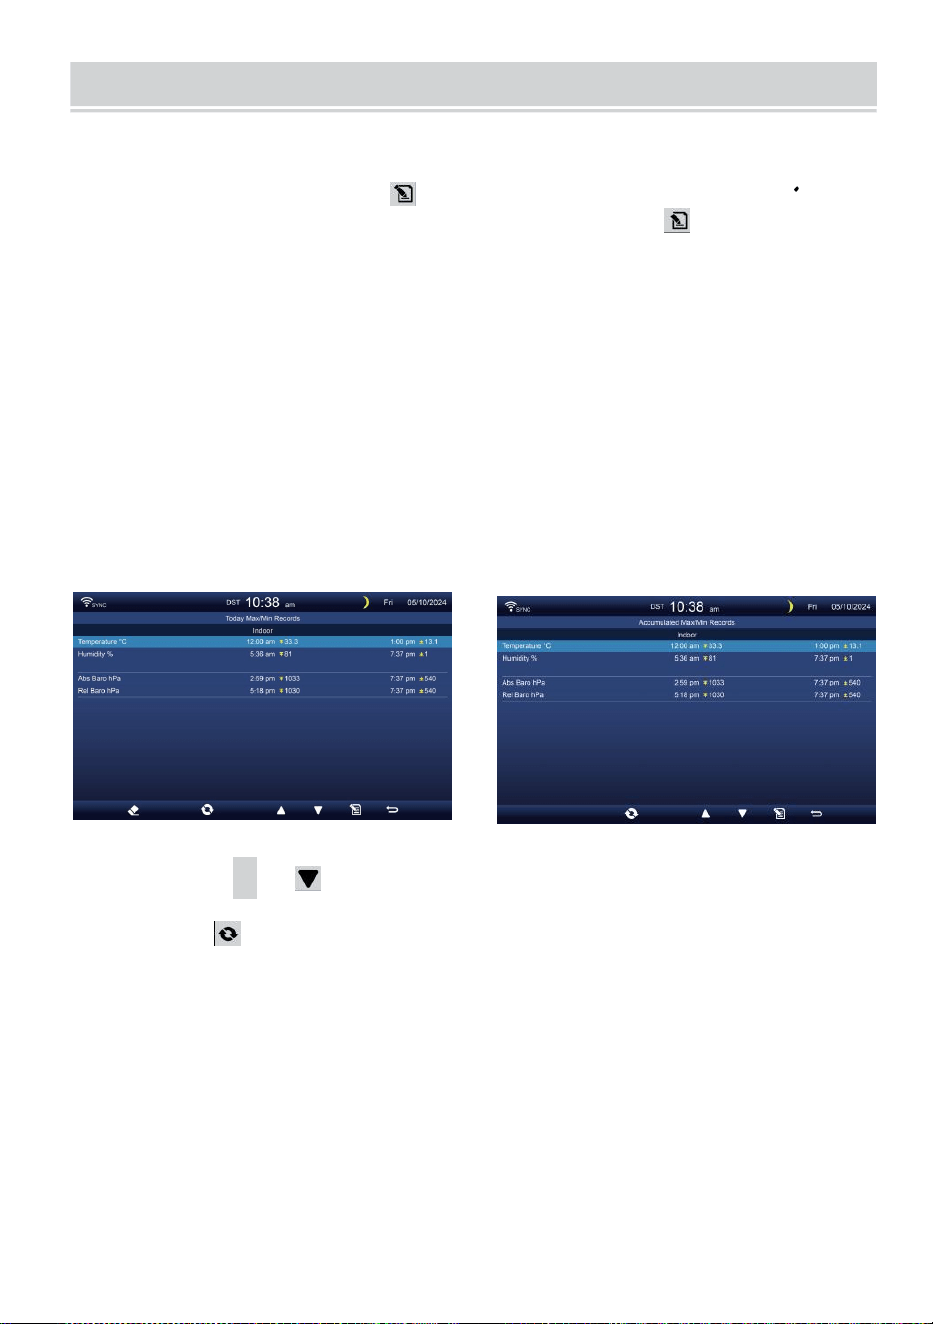
WEATHER DATA RECORD
- 30 -
Esta sección explica ¿Cómo acceder para ver los datos meteorológicos?
registro (Máx. /Mín., registro de datos, gráfico histórico). Para ver el
clima datos registro , prensa Botón en pantalla simple/detalle para
ingresar a la pantalla de datos meteorológicos. Prensa
botón para intercambiar el máx./mín., registro de datos y gráfico histórico
modos.
MÁXIMO/MÍNIMO
Hay 2 modos de datos para MAX/MIN archivos: A diario o
acumulado. (Dependiendo de la Máx./Mín. registro modo adentro
Configuración de pantalla página )
A diario Datos máx./mín. modo
Los datos máximos y mínimos se mostrarán ser mostrado y claro en
medianoche.
Acumulado Modo de datos máx./mín.
Los datos máximos y mínimos serán conservó acumulado.
A diario Máx./Mín. Récord acumulado Máx./Mín. Registro
Prensa
▲
o botón para seleccionar el deseado Máx./Mín.
registro.
Prensa botón para intercambiar para mostrar Interior, exterior y
del canal Máx./Mín. archivos.
Prensa
.
botón a devolver simple / detalle pantalla .

WEATHER DATA RECORD
- 30 -
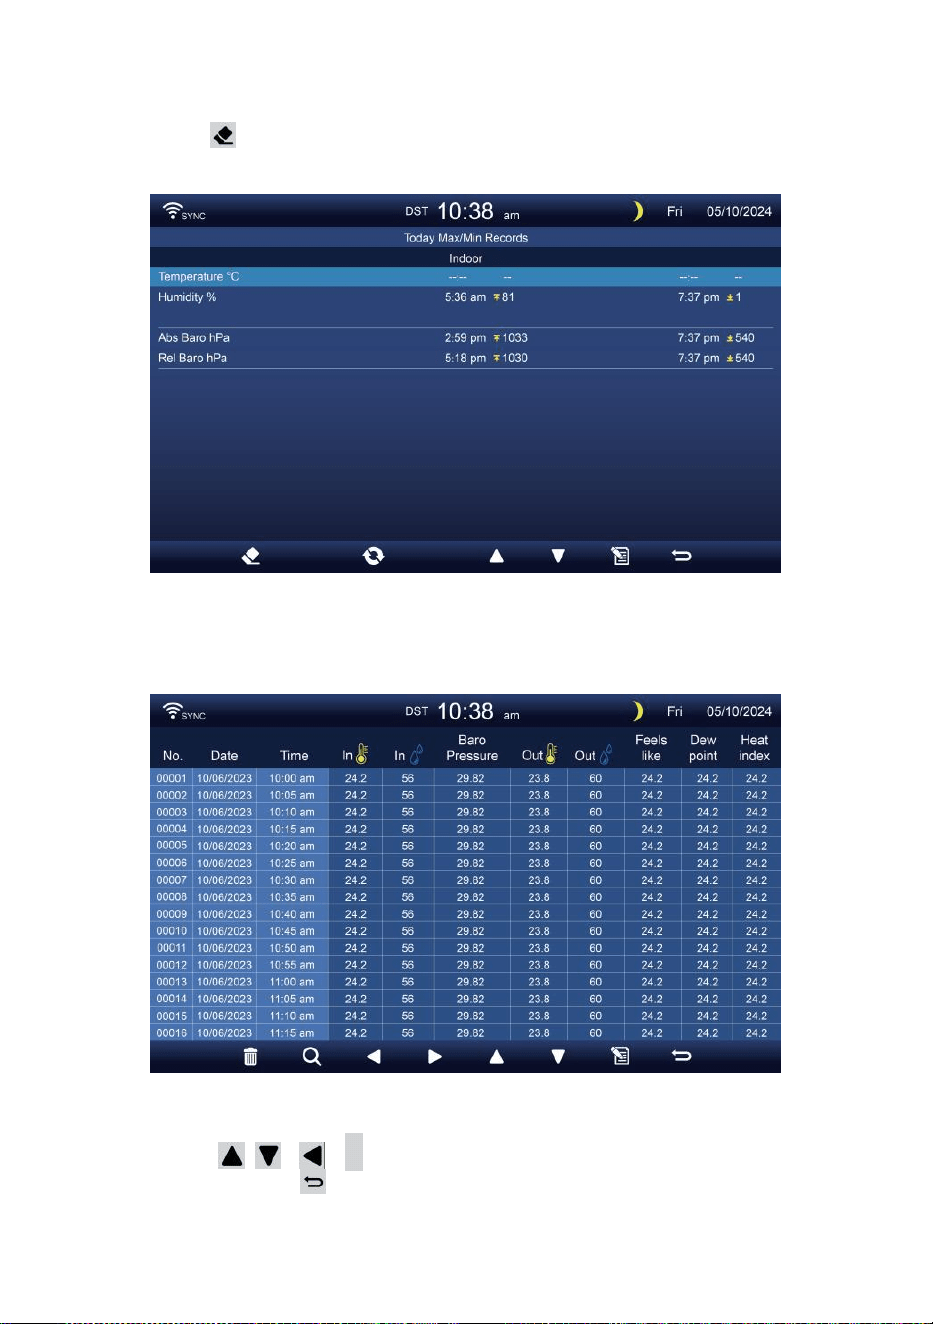
- 31 -
Borrar Máx./Mín. datos
Para borrar lo seleccionado MÁXIMO/MÍNIMO archivos, prensa
y sostener botón Más de 2 segundos para borrar lo
seleccionado Máx./Mín. registro.
DATOS PANTALLA DE REGISTRO
La pantalla de registro de datos captura todo el historia archivos.
Navegando por los datos pantalla de registro
Prensa , , ,
b
Botones para Navegar por el
pantalla. presione Botón para regresar a la pantalla
simple/ detalle.
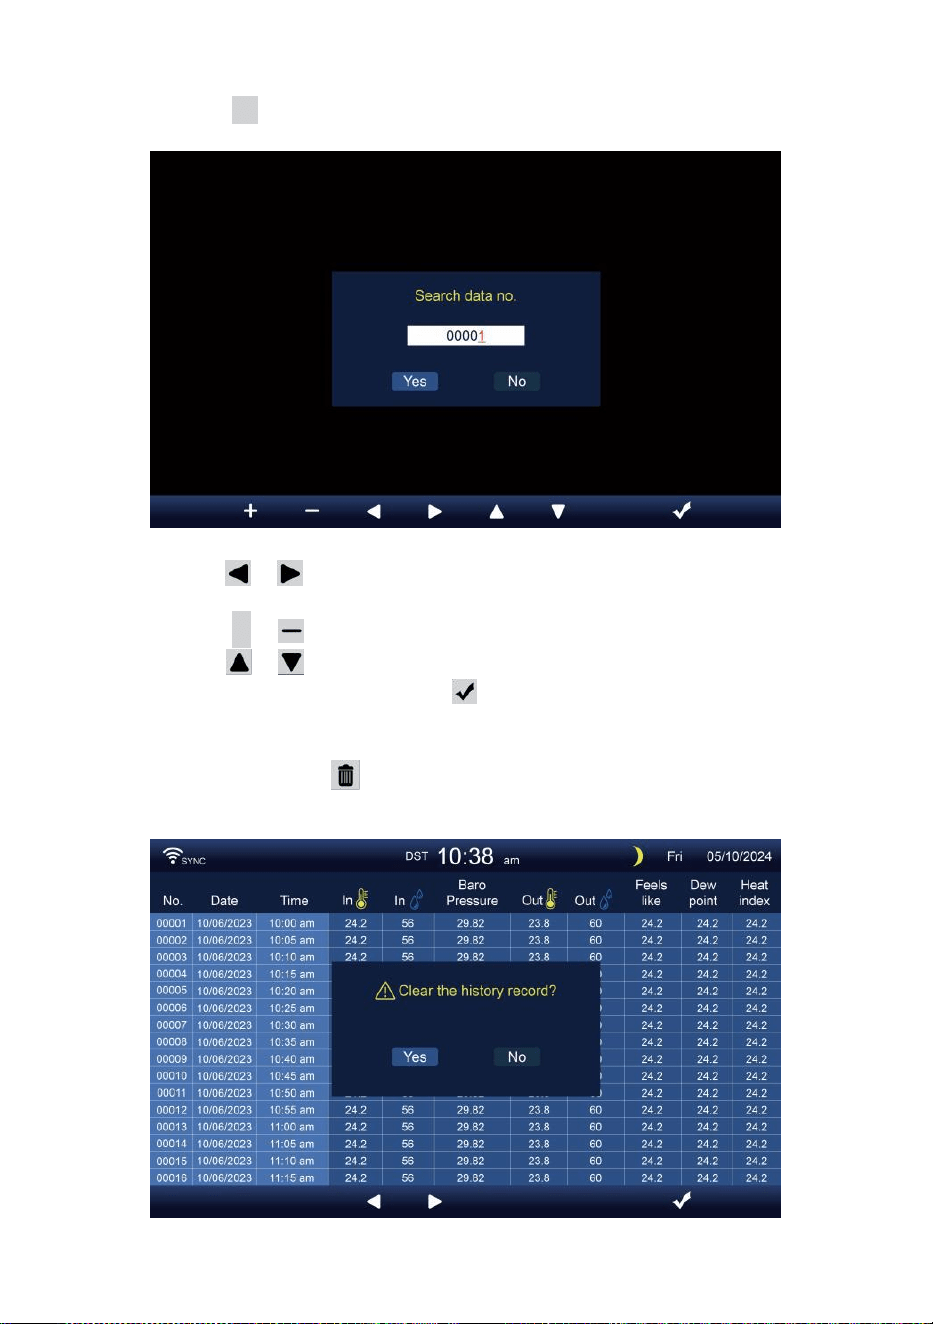
- 32 -
Buscando un específico página
Presione Q para visualizar buscar el datos registro.
Prensa o Botón para seleccionar un dígito en el página
número,
Presione + o botón para cambiar el número arriba o abajo.
Prensa o Botón para cambiar el activado campo de
opción, palanca Sí o NO, prensa a confirmar.
Borrar todos los datos registro archivos
Prensa y sostener Más de 2 segundos para eliminar todo
archivos.

- 32 -
Prensa o botón para seleccionar cambiar el activado
opción campo, alternar Sí o NO, prensa el a confirmar.
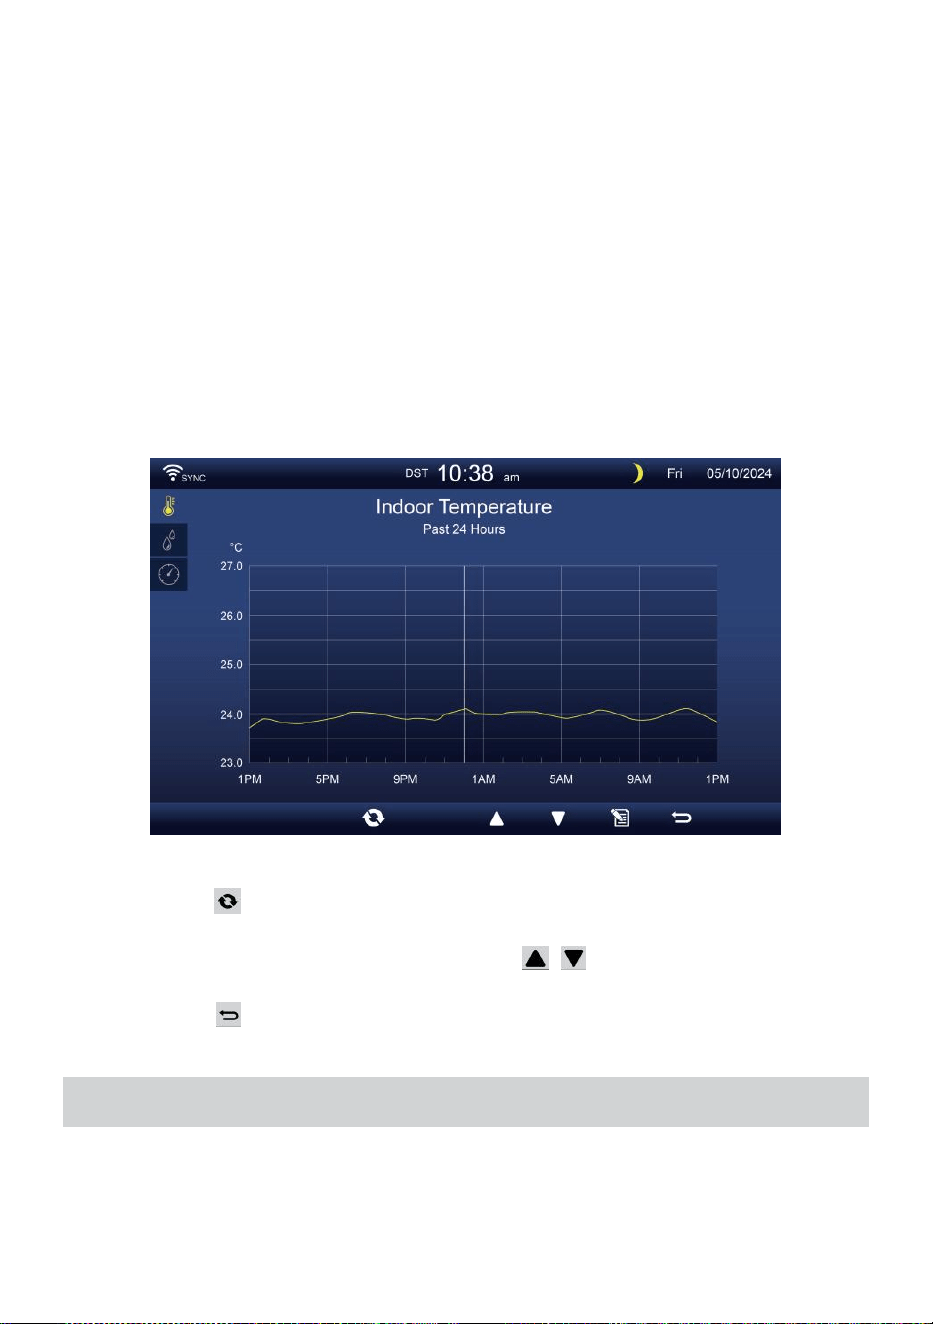
- 33 -
GRÁFICO HISTÓRICO
Esta sección explica Cómo llegar y ver historia gráficos.
Hay gráfico interior, gráfico exterior y gráfico de canales a ser mostrado.
Gráfico de interiores
Temperatura, Humedad, Relativo y absoluto presión
. Gráfico al aire libre
Temperatura, Humedad, Lluvia Tasa, Últimas 24 horas
Precipitaciones, Velocidad media del viento, Ráfaga de viento,
Dirección del viento, Luz Intensidad y Inmunodeficiencia humana.
Gráfico CH1-CH7
Temperatura, Humedad.
Prensa botón para intercambiar para mostrar Interior, exterior y
del canal gráfico histórico.
Cuando aparezca el gráfico, prensa , Botones para mostrar
otros gráficos.
Prensa botón para volver simple/detalle pantalla.
CONFIGURACIÓN GENERAL
Todas las configuraciones de la consola y la información del sistema.
son en el configuración Menú. Hay 8 tipos de parámetros de
configuración. Dentro de la configuración menú.

- 33 -
En la pantalla simple/detalle, presione Botón para ingresar a la
configuración menú.
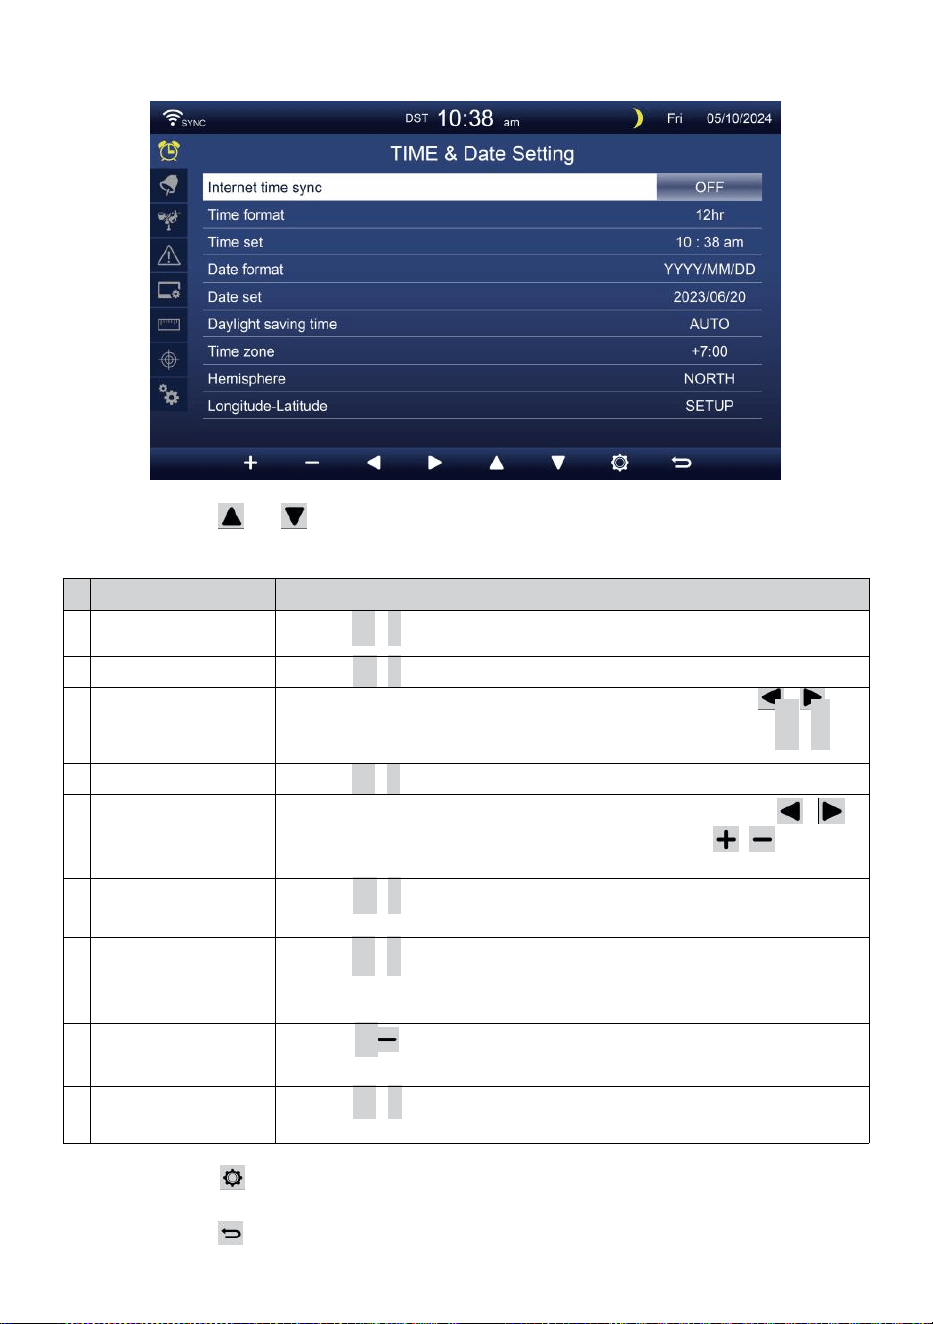
- 34 -
HORA / FECHA CONFIGURACIÓN
Prensa o Botón para seleccionar una de las siguientes
configuraciones:
#
Sub artículo
Operación
a
Sincronización
horaria por Internet
Prensa
+
/
-
botón a doblar en o doblar apagado .
b
Formato de hora
Prensa
+
/
-
botón a seleccionar 12 o formato 24 .
d
o
Tiempo colocar
Cuando se sincroniza el tiempo esta apagado, prensa /
botón para seleccionar entre hora o minuto, presione + /
-
Botón para ajustar el valor.
d
Formato de fecha
Prensa
+
/
-
botón para seleccionar Yo / D o D / Formato M.
m
i
Fecha colocar
Cuando se sincroniza el tiempo esta apagado, prensa /
botón para seleccionar Año, Mes, Fecha, prensa / botón
para ajustar el valor.
F
Horario de verano
Prensa
+
/
-
Botón para apagar o configurar el Cambio de
horario de verano a automático.
g
r
a
m
o
Huso horario
Prensa
+
/
-
botón a seleccionar el su local tiempo zona
a Obtenga la hora correcta.
y
o
Hemisferio
Prensa
+
/ botón para seleccionar NORTE o SUR hemisferio
para El punto sensor 7 en 1 a y luna fase.
i
Longitud-Latitud
Prensa
+
/
-
botón a ingresar Longitud - Latitud configuración
página .
Prensa Botón para ingresar a la pantalla de configuración de
alarma.
Prensa botón para devolver pantalla simple/detalle .

- 35 -
Ajuste de longitud y latitud
Prensa o botón para cambiar el activado campo de opción.
1. Latitud (hemisferio) --- Presione
+
o botón para Seleccione el
hemisferio . (NORTE/SUR)
Latitud --- La latitud x 10 se convertirá en rojo. Prensa + o
Botón para aumentar o disminuir el valor .
Prensa o cambiar permanecer valor de latitud.
2. Longitud (Hemisferio e) --- Presione + o botón para seleccionar el
hemisferio . (ESTE/OESTE)
Longitud --- La latitud x 100 se convertirán rojo. Prensa
+
o Botón
para aumentar o disminuir el valor .
Prensa o Botón para cambiar permanecer valor de longitud.
Prensa el botón para confirmar Longitud Latitud del escenario.
NOTA:
Determinar el longitud y latitud. p.ej
Latitud
Longitud
: 33.2981
:-111.9602
Si la ubicación es en el Del norte Hemisferio, La latitud será ser
positivo. Si la ubicación es En el sur Hemisferio, La latitud será
ser negativo. Si la ubicación es en el popa oriental Hemisferio, La
longitud será ser positivo.
Si la ubicación es En el oeste Hemisferio, La longitud será ser
negativo. Entonces, lo anterior Longitud y d Se introducirá la latitud
en mostrar como sigue :
Latitud = NORTE --- 33. 2981
Longitud = OESTE --- 111.9602.
A NOSOTROS Nueva York (EST, GMT-5)
Latitud
Longitud
: 40.7128 (Norte 40.7128)
:-74.0060 (Oeste 74.0060)
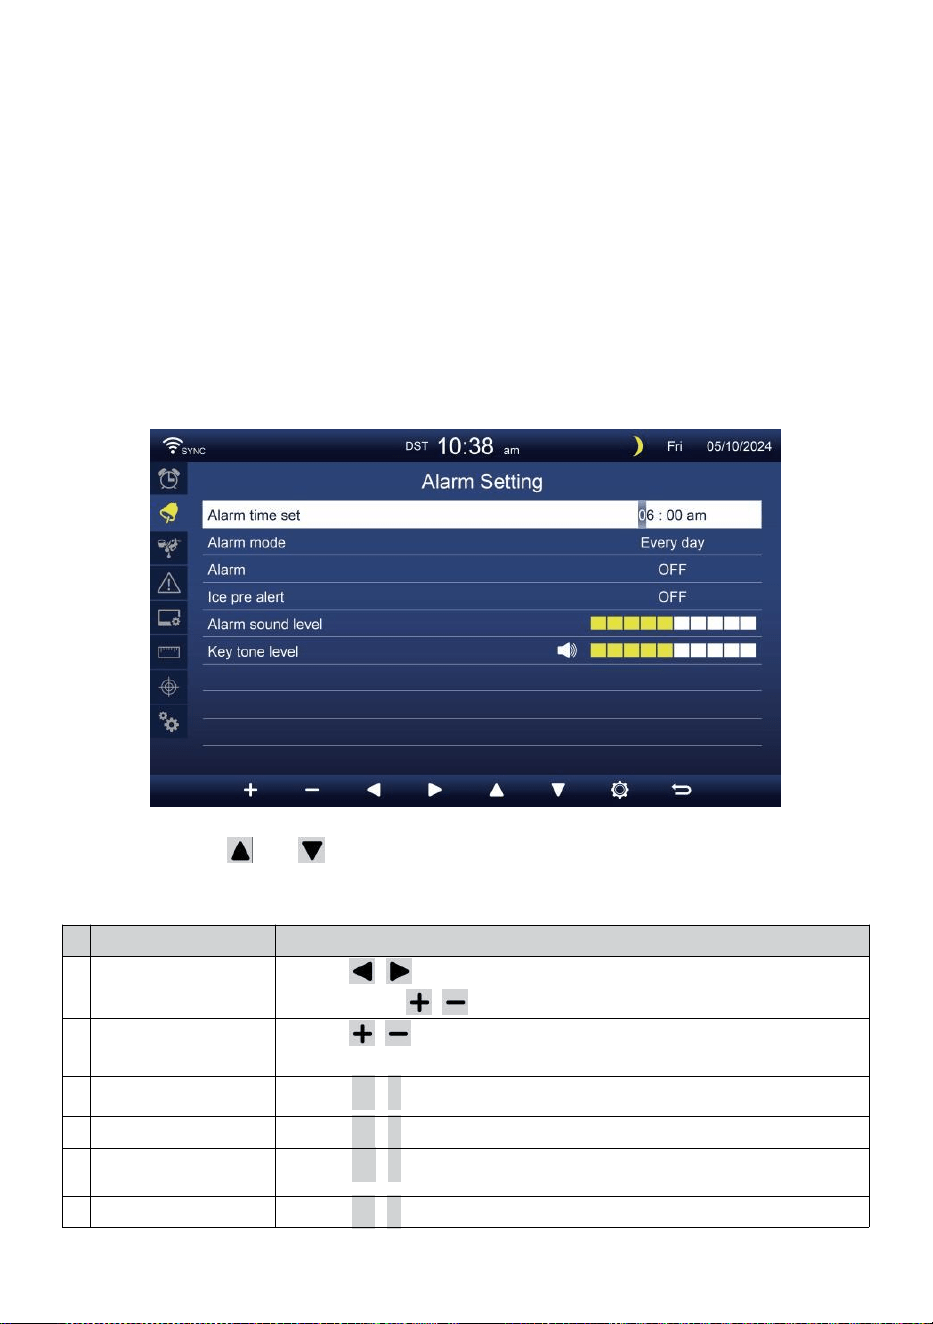
- 36 -
UE Francfort Alemania (GMT+1)
Latitud
Longitud
:50.1109 (Norte 50.1109)
:8.6821 (Este 8.6821)
Reino Unido Londres Inglaterra (GMT)
Latitud
Longitud
:51.5072 (Norte 51.5072)
:-0,1276 (Oeste 0,1276)
Australia Sídney ( GMT +10)
Latitud
Longitud
:-33.8688 (Sur 33.8688) :
151.2093 (Este 151.20 93)
ALARMA CONFIGURACIÓN
Prensa o Botón para cambiar el campo de opción
activada:
#
Sub artículo
Operación
a
Hora de alarma
establecida
Prensa / botón para seleccionar entre hora o
minuto. Pulse / botón para ajustar El valor.
b
Alarma modo
Prensa / botón para seleccionar Todos los días o solo entre
semana.
d
o
Alarma
Prensa
+
/
-
botón a doblar en o doblar apagado .
d
Hielo pre alerta
Prensa
+
/
-
botón a doblar en o doblar apagado .
m
i
Sonido de alarma
nivel
Prensa
+
/
-
botón a ajustar el sonido nivel .
F
Tono clave nivel
Prensa
+
/
-
botón a ajustar el llave tono nivel .

- 36 -
Prensa Botón para ingresar a la pantalla de configuración del
sensor.
Prensa B o t ó n
w
para volver al modo simple/detalle pantalla.
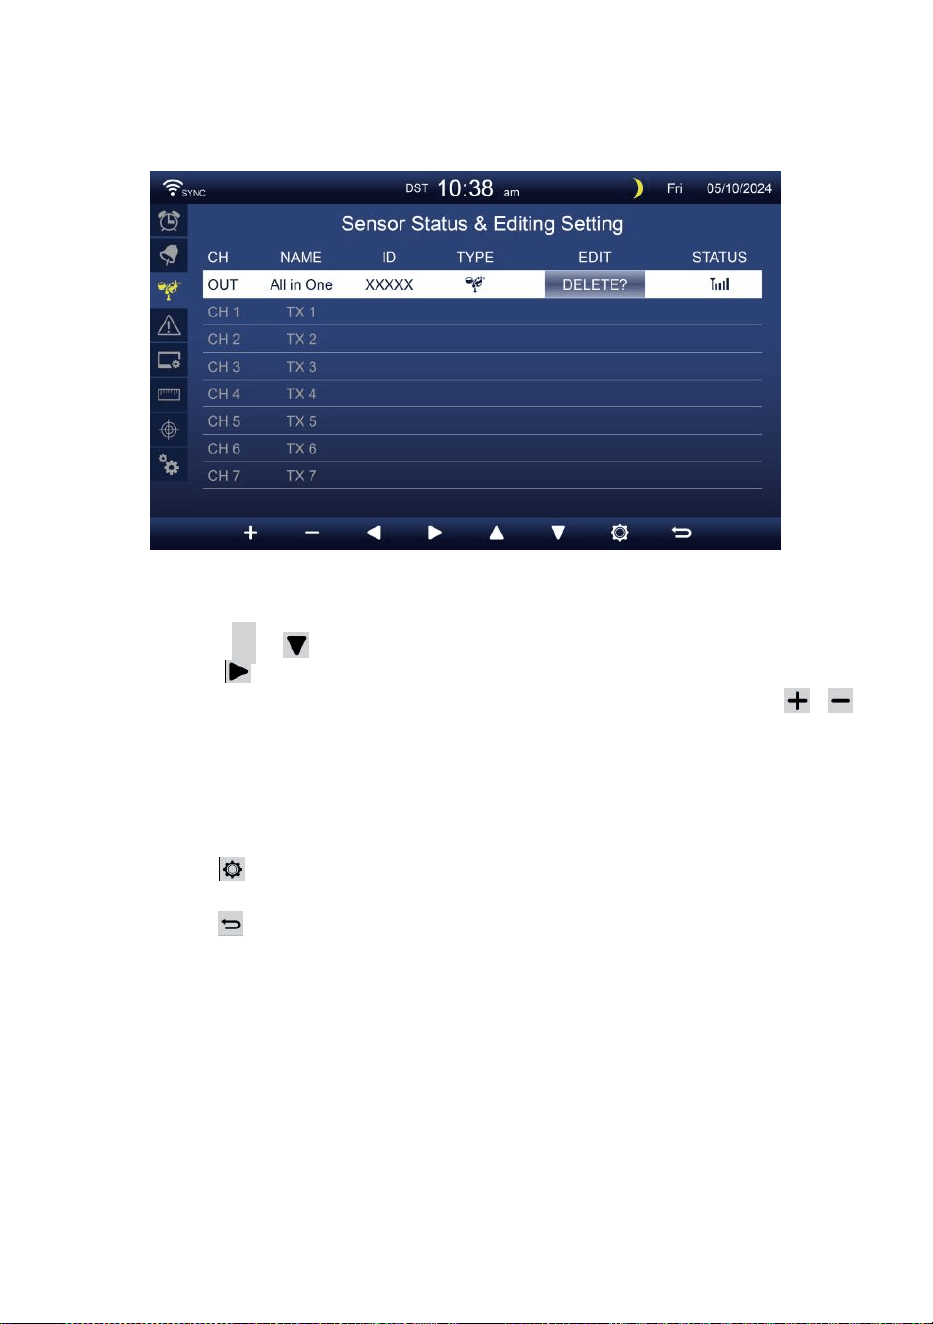
- 37 -
SENSOR CONFIGURACIÓN
Este página es agregar/eliminar el sensor todo en uno o adicional
7 canales higrómetros.
Añadiendo un nuevo sensor
Presione
▲
o botón para seleccionar el vacío canal.
Prensa Botón para seleccionar el sensor de edición columna.
Cuando la columna muestre la opción “ Agregar ”, presione /
Botón para iniciar la búsqueda del sensor.
Seleccione el canal de coincidencia número en el sensor, luego
encender o prensa REINICIAR botón para iniciar el emparejamiento.
Una vez conectados los dispositivos, el icono del sensor,
IDENTIFICACIÓN voluntad espectáculo en el canal fila.
Prensa Botón para ingresar a la pantalla de configuración de
alerta.
Prensa botón para devolver pantalla simple/detalle .

- 38 -
Borrar sensor emparejado
Presione
▲
o botón para Seleccione el conectado d
sensor. prensa Botón para seleccionar el sensor de
edición columna.
Cuando la columna muestra “Opción “ Eliminar ”, presione
+
o
botón a confirmar.
Prensa o Botón para seleccionar cambiar el activado
campo de opción, alternar Sí o NO , presione
.
botón a confirmar
.
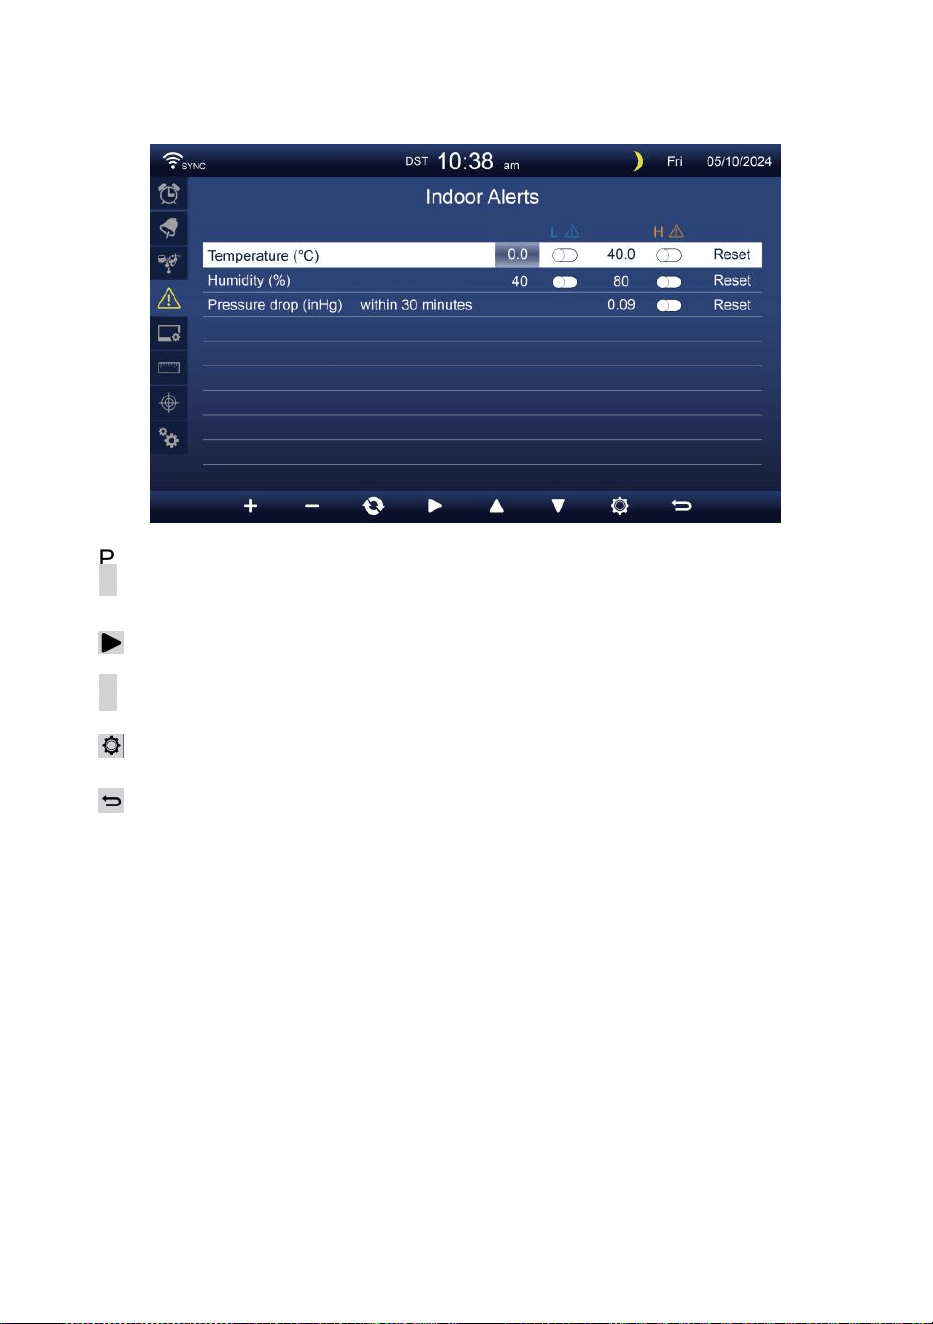
- 39 -
CONFIGURACIÓN DE ALERTA
Colocar alerta interior
Prensa
▲
o Bot ó n
w
para seleccionar diferentes fila de activados
campo de opción .
Prensa
Botón para seleccionar alerta alta/baja/reinicio opción .
Prensa
+
o Bo t ón
w
para ajustar el valor o opción de
encendido/apagado.
Prensa
Botón para ingresar al Configuración de pantalla .
Prensa
Botón para volver simple/detalle pantalla.
NOTA:
Al seleccionar Opción de reinicio, todos los valores de alerta
serán restablecer a el valores predeterminados.
Establecer alerta al aire libre
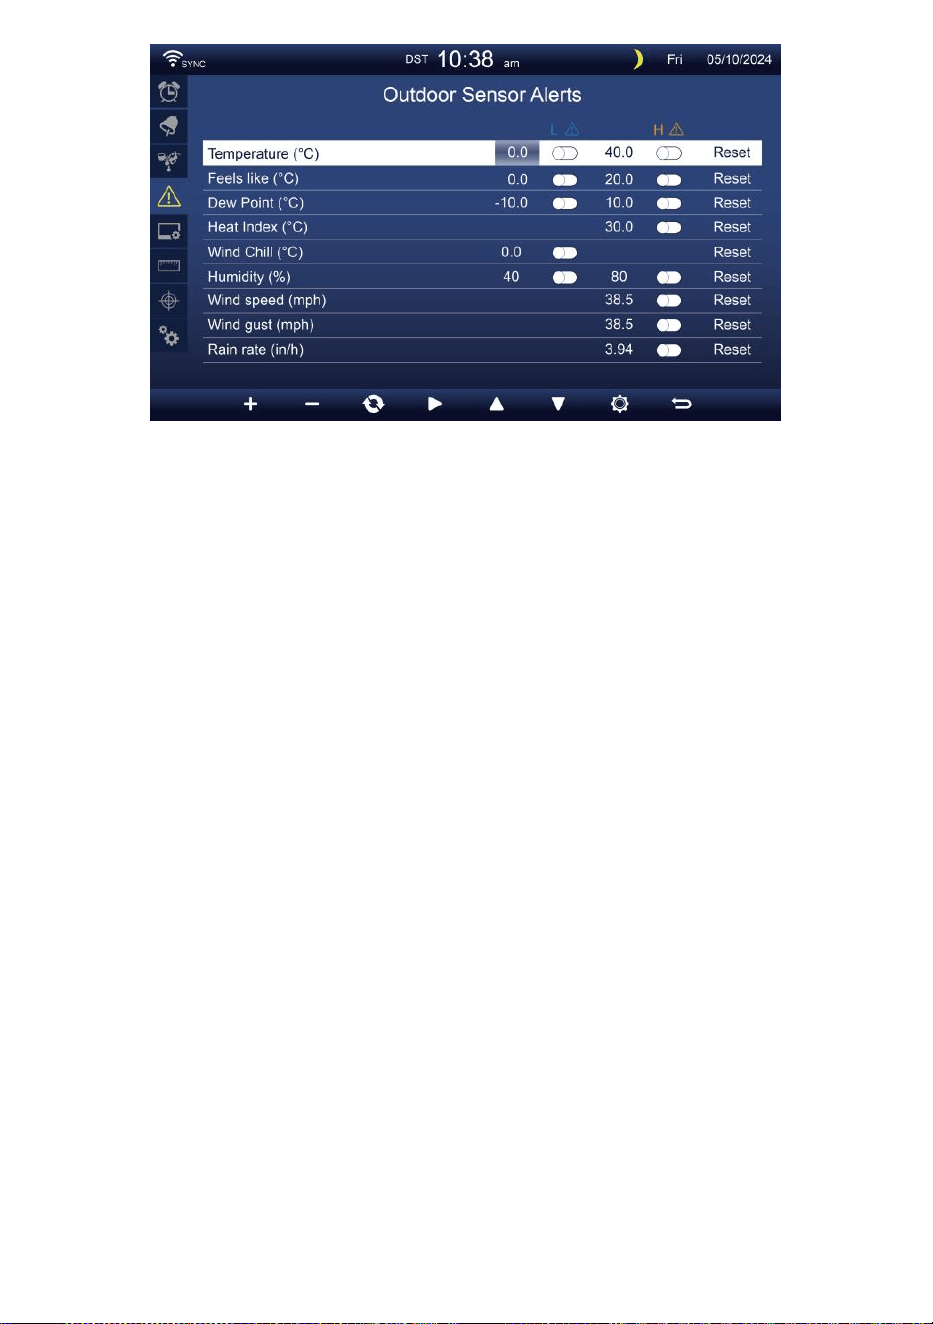
- 39 -
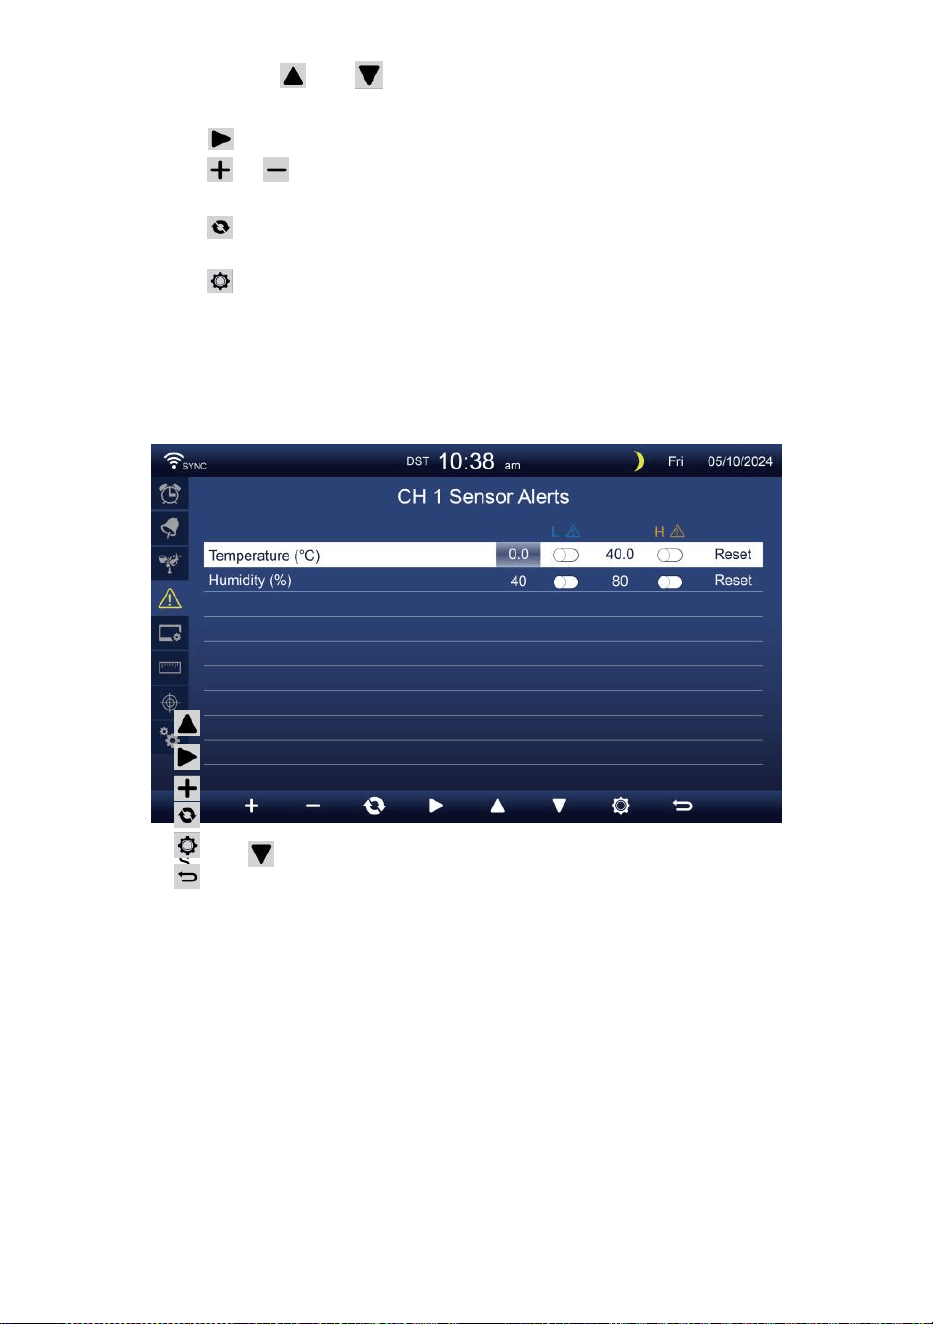
- 40 -
Prensa o Botón para seleccionar una fila diferente de
activado campo de opción.
Prensa botón para seleccionar Opción de alerta alta/baja/reinicio.
Prensa o Botón para ajustar el valor o la opción de
encendido/apagado.
Prensa botón para intercambiar el Pantalla de configuración de
alerta en interiores.
Prensa Botón para ingresar al Configuración de pantalla mostrar.
Presione
w
botón para regresar
simple/detalle pantalla. Establecer el sensor CH1
-7 alerta
Prensa
Prensa
Prensa
Prensa
Prensa
Prensa
NOTA:
o Botón para seleccionar diferentes filas de activadas
opción Campo. Botón para seleccionar alerta
alta/baja/Restablecer opción .
o Bo t ón
w
para ajustar el valor o opción de
encendido/apagado.
botón para intercambiar el Pantalla de configuración de
alerta en interiores.
Botón para ingresar al Configuración
de pantalla . Botón para volver a la
pantalla simple/detalle pantalla.
Al seleccionar Opción de reinicio, todos los valores de alerta
serán restablecer a el valores predeterminados.
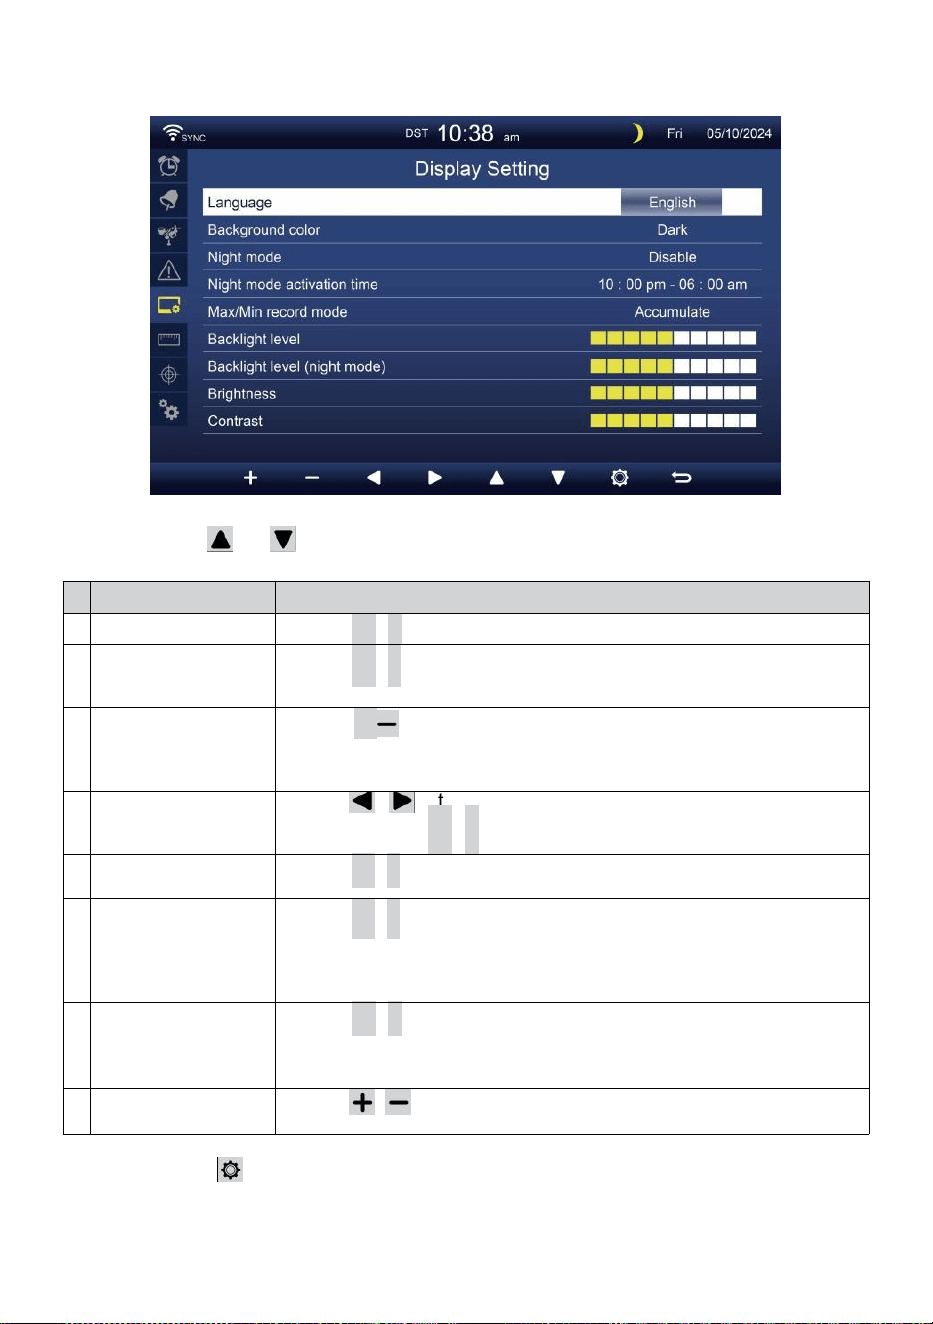
- 41 -
CONFIGURACIÓN DE PANTALLA
Prensa o botón para cambiar el activado campo de opción:
#
Sub artículo
Operación
a
Idioma
Prensa
+
/
-
botón a seleccionar el mostrar idioma .
b
Color de fondo
Prensa
+
/
-
botón a seleccionar luz o oscuro color fondo
Para exhibir modo.
d
o
Noche modo
Prensa
+
/ botón para habilitar (disparador al activar tiempo
período), deshabilitar o automático (activado por su habitación
ambiente luz nivel).
d
Noche modo
activar tiempo
Prensa / botón para seleccionar entre hora o
minuto . Prensa
+
/
-
a ajustar el valor .
m
i
Iluminar desde el
fondo nivel
Prensa
+
/
-
Botón para ajustar la luz de fondo nivel en normal .
F
Iluminar
desde el
fondo nivel
(Noche modo)
Prensa
+
/
-
Botón para ajustar la luz de fondo nivel
durante Modo nocturno .
g
r
a
m
o
Brillo
Prensa
+
/
-
botón a ajustar el pantalla brillo .
y
o
Contraste
Prensa / Botón para ajustar la pantalla contraste.
Prensa Botón para ingresar al Pantalla de configuración de la
unidad .
Prensa B o t ó n
w
para volver al modo simple/detalle pantalla.
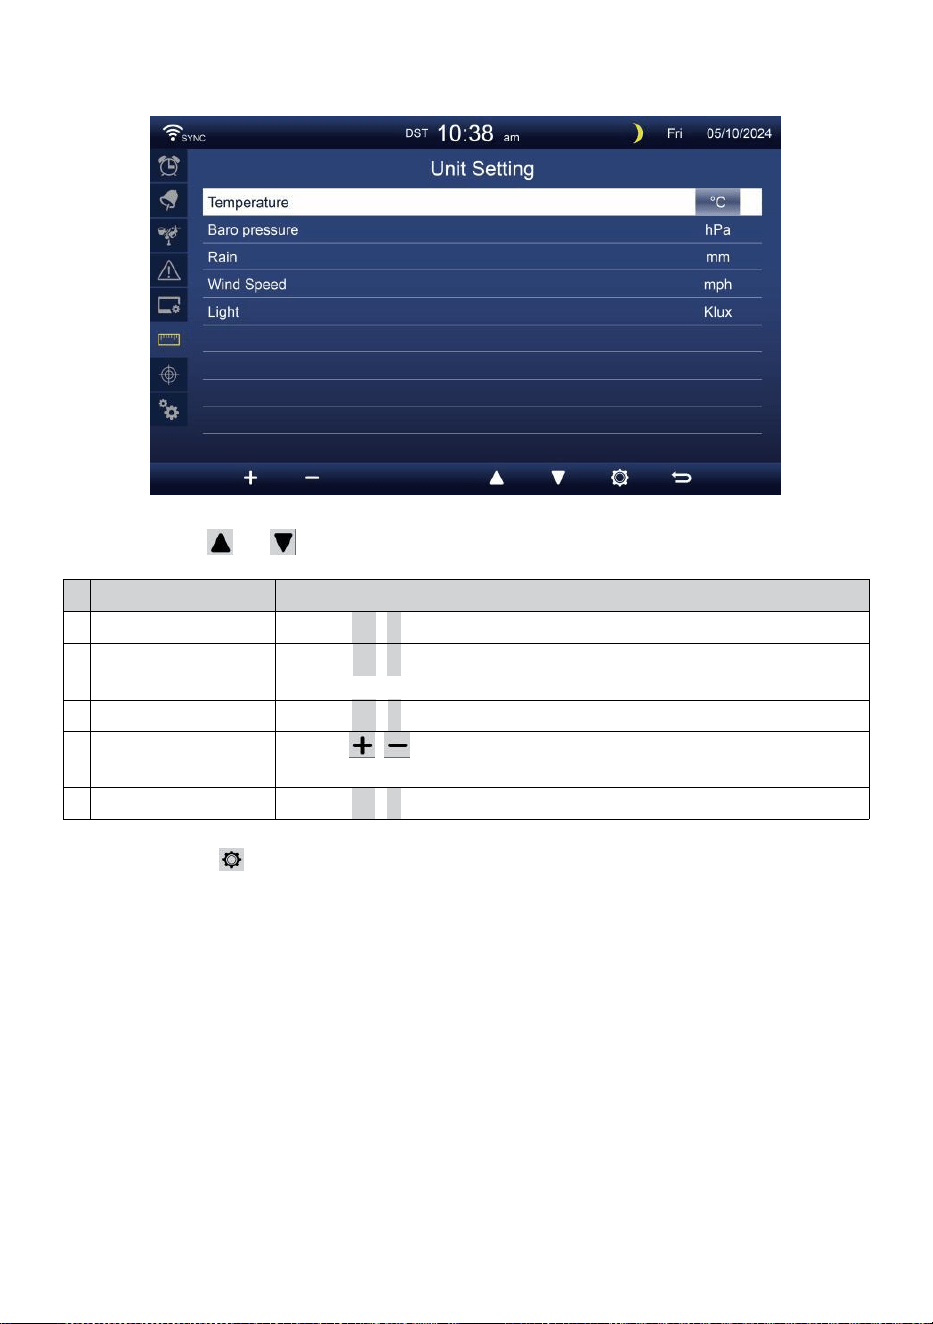
- 42 -
CONFIGURACIÓN DE LA UNIDAD
Prensa o botón para cambiar el activado campo de opción:
#
Sub artículo
Operación
Temperatura
Prensa
+
/
-
botón a seleccionar ° C o °F.
Baro presión
Prensa
+
/
-
botón a seleccionar hPa , pulgadas de mercurio o
Presión arterial .
Lluvia
Prensa
+
/
-
botón a seleccionar mm o en .
Velocidad del viento
Prensa / botón para seleccionar EM, kilómetros por hora,
nudos o r millas por hora.
Luz
Prensa
+
/
-
botón a seleccionar Klux , KFC o peso /
m2
.
Prensa Botón para ingresar a la pantalla de configuración de
calibración.
Prensa B o t ó n
w
para volver al modo simple/detalle pantalla.
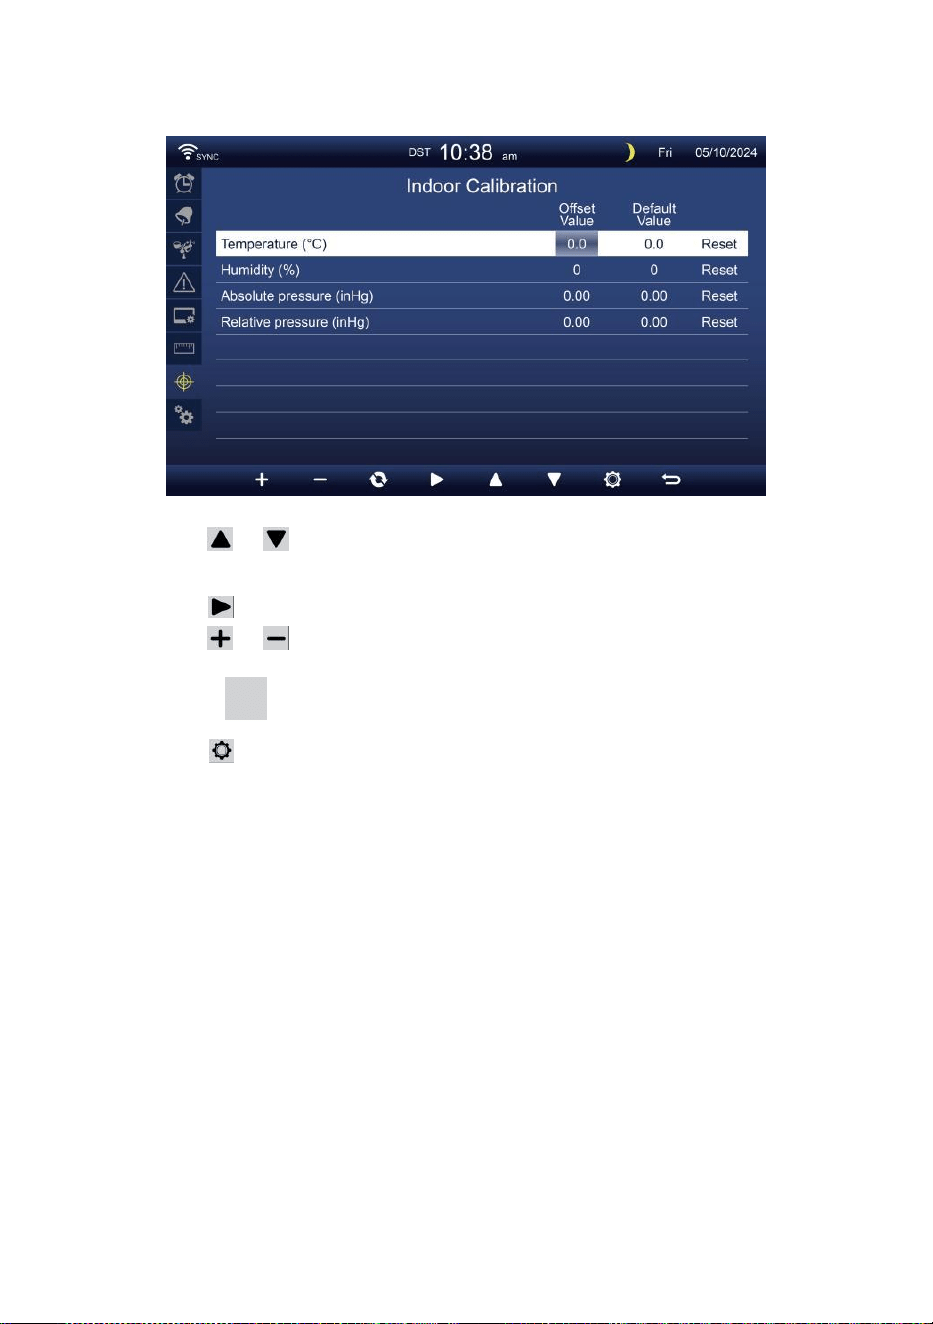
- 43 -
CALIBRACIÓN CONFIGURACIÓN
Calibración para interior parámetros
Prensa o Botón para seleccionar diferentes fila de activado
opción campo.
Prensa botón para seleccionar Opción de alerta alta/baja/reinicio.
Prensa o botón para ajustar el valor o Opción de
encendido/apagado.
Prensa do botón para intercambiar para mostrar el
Interior , exterior y canal Calibración configuración mostrar .
Prensa Botón para ingresar al Otro
configuración mostrar. Presione
w
botón para
regresar simple/detalle pantalla,
NOTA:
Al seleccionar Opción de reinicio, todos los valores de calibración
serán restablecer a el valores predeterminados.
Calibración para exterior parámetros

- 43 -
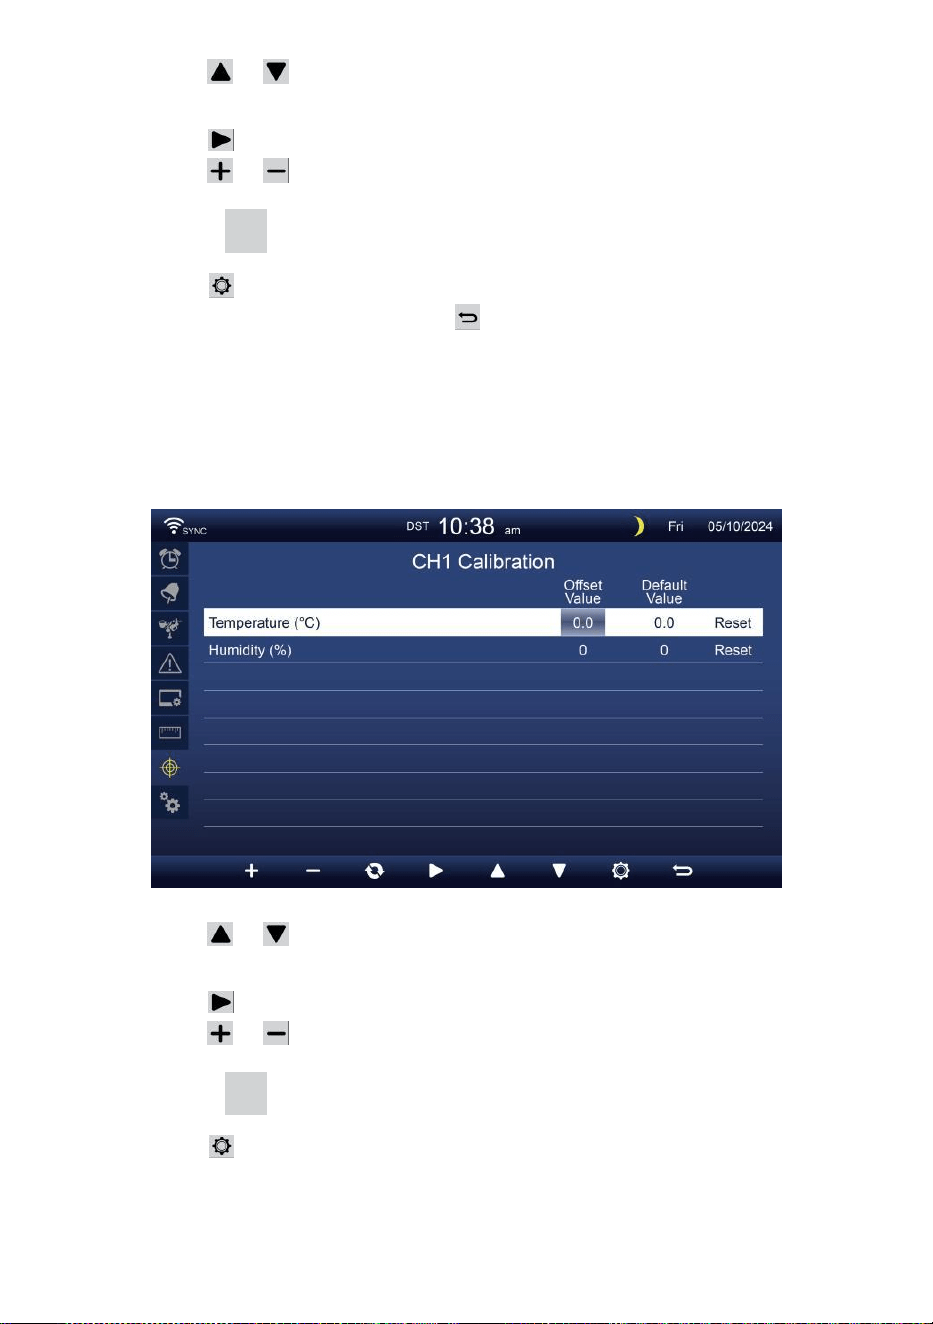
- 44 -
Prensa o Botón para seleccionar diferentes fila de activado
opción campo.
Prensa botón para seleccionar Opción de alerta alta/baja/reinicio.
Prensa o Botón para ajustar el valor o encender/apagar
opción.
Prensa do botón para intercambiar para mostrar el
Interior , exterior y canal Calibración configuración mostrar .
Prensa Botón para ingresar al Otro
configuración mostrar.
Prensa botón para
volver a la pantalla simple/detalle,
NOTA:
Al seleccionar Opción de reinicio, todos los valores de calibración
serán restablecer a el valores predeterminados.
Calibración para Sensores del canal 1 al canal 7 parámetros
Prensa o Botón para seleccionar diferentes fila de activado
opción campo.
Prensa botón para seleccionar Opción de alerta alta/baja/reinicio.
Prensa o botón para ajustar el valor o Opción de
encendido/apagado.
Prensa do botón para intercambiar para mostrar el
Interior , exterior y canal Calibración configuración mostrar .
Prensa Botón para ingresar al Otro
configuración mostrar.
Presione
w
botón para
regresar simple/detalle pantalla,
NOTA:

- 44 -
Al seleccionar Opción de reinicio, todos los valores de calibración
serán restablecer a el valores predeterminados.

- 45 -
Calibración parámetros
Sensor
Parámetro
Tipo de
calibració
n
Por
defect
o
valor
Configuración
rango
Calibración típica
fuente
Interior,
Al aire
libre o
canal(es)
Temperatura
Compensar
0
±36 °F (±20 °C)
Espíritu rojo o
mercurio termómetro
Humedad
Compensar
0
±20 %
Psicrómetro de honda
Interior
Absoluto
presión
Compensar
0
±560 hPa (±16,51
inHg) o ±420 mmHg
Grado de laboratorio
calibrado barómetro
Relativo
presión
Compensar
0
±560 hPa (±16,51
inHg) o ±420 mmHg
Aeropuerto local
Exterior
Velocidad del
viento
Ganar
1
incógnita 0,5 ~ 1.5
Grado de laboratorio
calibrado viento metro
Dirección del
viento
Compensar
0
±10°
GPS o Brújula
Lluvia
Ganar
1
incógnita 0,5 ~ 1.5
Mirilla pluviómetro con
metro
UVI
Ganar
1
incógnita 0,01 ~ 10.0
Grado de laboratorio
calibrado Ultravioleta metro
Luz
intensidad
Ganar
1
incógnita 0,01 ~ 10.0
Grado de laboratorio
calibrado radiación solar
sensor
OTROS AJUSTES
Prensa o botón para cambiar el activado campo de opción:
- 46 -
#
Sub artículo
Operación / Descripción
a
Establezca su región
Prensa / botón para seleccionar Europa, Reino Unido, A
NOSOTROS, Australia.
b
Permitir Acceso
Punto
Prensa
+
/
-
botón a iniciarAP modo para Wi - Fi conexión
configuración .
d
o
Datos registro
Prensa / Botón para habilitar o deshabilitar el datos
función de registro.
d
Registro intervalo
Prensa
+
/
-
botón a configuración el registro intervalo de el
datos registro .
m
i
Borrar todo datos
Prensa / botón para borrar todo el datos en consola.
F
Fábrica reiniciar
Prensa
+
/
-
botón a reiniciar todo el configuración a por
defecto y claro Todos los datos en consola.
g
r
a
m
o
Estado de WI-FI
estado actual de la conexión WI-FI de la consola .
y
o
Dirección MAC
Mostrar la consola Dirección MAC.
i
Versióndel firmwaredel
sistema
Muestra la versión actual del firmware del sistema de la consola.
y
o
Versión de firmware
de Wi-Fi
Muestra la versión actual del firmware Wi-Fi de la consola.
Prensa Botón para ingresar la hora y Ajuste de fecha mostrar .
Prensa botón para devolver pantalla simple/detalle .
CONFIGURACIÓN CONEXIÓN WI-FIUP
Para configurar la conexión Wi-Fi de la consola, él necesidades a
configurar la consola en Access Punto (AP) Modo. Para activar el acceso
Punto (AP) modo, Por favor siga lo siguiente procedimientos.
1. En la pantalla simple/detalle, prensa botón a ingresar Configuración
menú.
2. Prensa botón a Cambiar “ Otro ” Configuración " mostrar.
3. Prensa o botón a ingresar "Habilitar acceso
Punto ", presione + o Botón para iniciar el AP
modo.
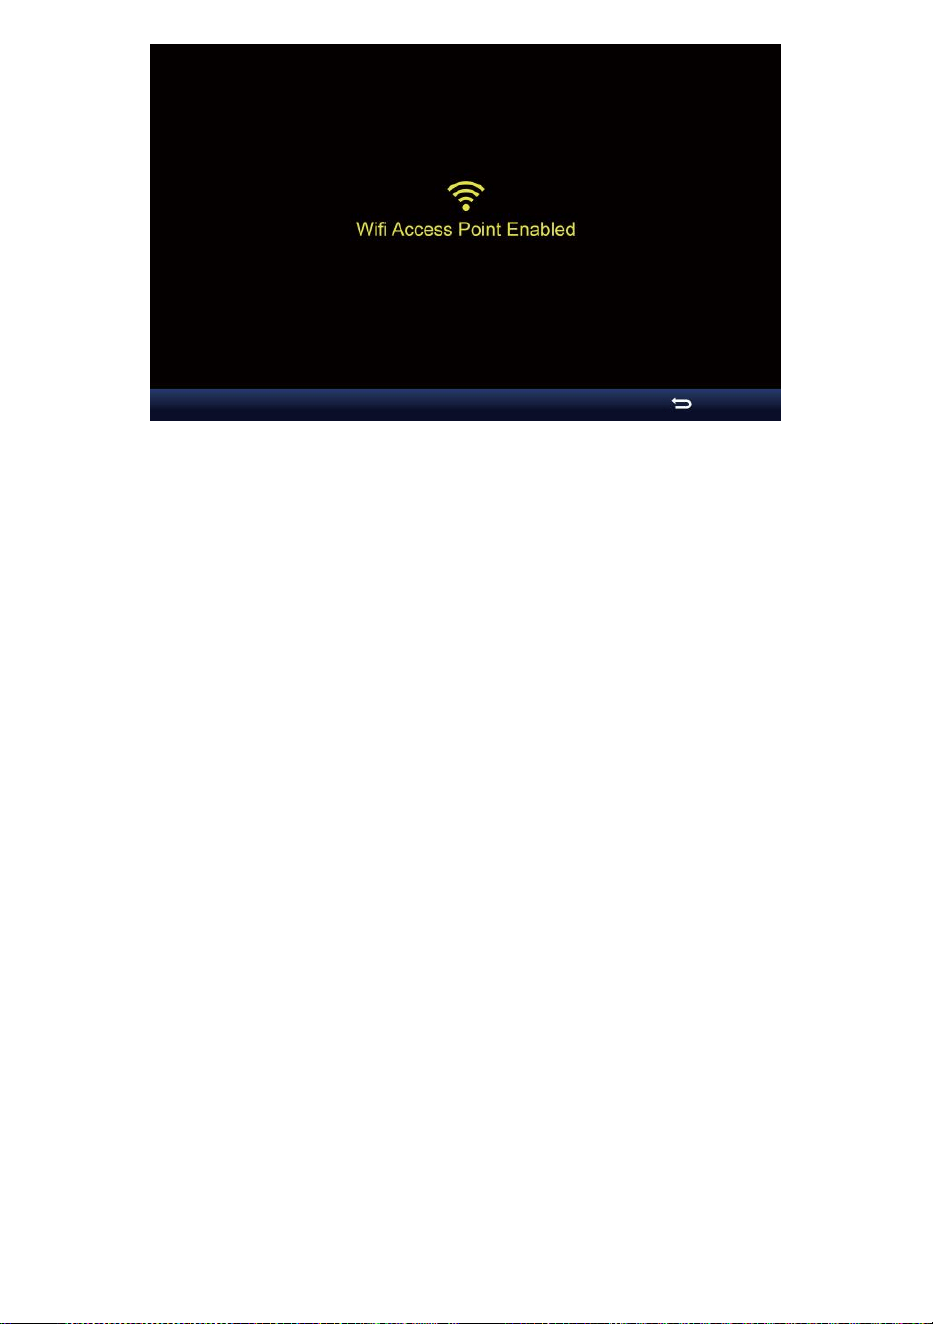
- 46 -

- 47 -
Nota :
Mientras En modo AP, puedes prensa Botón para salir de
AP modo. El clima estación voluntad simplemente restaurar el
anterior AP ajustes .
Usar su teléfono inteligente , tableta o computadora a conectar a el
clima estación a través de Wi-Fi siguiendo estos pasos:
1. En PC, abre tu Wi -Fi Configuración de red. Activado Android™ o iOS
dispositivos , vaya al menú de configuración y luego seleccionar
Conexiones/WIFI a abierto
La red ajustes.
2. Localice el SSID de la estación meteorológica desde el lista. Él
debería aparecer como
WWS-XXXXXX (donde todas las X están en números enteros) en el
lista. Grifo en El SSID para conectarse. Este paso tardará varios
minutos. artículos de segunda clase.
3. Una vez que esté conectado al clima estación, abierto arriba su
Internet o navegador web móvil e ingrese lo siguiente DIRECCIÓN
en el
DIRECCIÓN barra : http://192.168.1.1 a Acceda a la interfaz
web de la estación meteorológica. (Asegúrese de incluir la http:// o
si no e La red El navegador puede interpretar la dirección como una
consulta de búsqueda y). recomendar utilizando la última versión de
la web de confianza navegadores.
4. Ingrese lo siguiente información en la interfaz web (Figura 1).
Asegúrese de que todos los información se ingresa antes de
seleccionar Guardar. Si usted
elegir no a subir Wunderground.com , o subir clima -
cloud.net, deja el check cajas desenfrenado.

- 47 -
Select the menu and choose your 2.4 GHz WIFI Router
Password
Weather Server Setup
WeatherUnderground
Station ID
Station Key
Upload wunderground.com
WeatherCloud
Station ID
Station Key
Upload weatherCloud.net
Time Server Setup
time.windows.com
Firmware Version: 1.0.1
a7d9d2a279fbbafa
**********
**********
**********
Apply
KCACANTI9
Server URL
Enter your station ID
Enter your station key/password
check to confirm upload to
WeatherUnderground server
Enter your station ID
Enter your station key/password
check to confirm upload to Weathercloud.net
Internet time server setting
Press Apply to confirm the setting
Select setup UI display language
Select your Wi-Fi Router (SSID) from the list
Router Password
Router
Wi-Fi Router Setup
Language:
Router 12345
SETTINGS
SETUP
English

- 48 -
5. Si todos los información que usted entró es correcto, Presione “ Apli
car ” para
confirmar. Si lo hace No, revisa tu web interfaz información de nuevo.
NOTA:
Cuando el Wifi configuración es completa , tu computadora o
móvil dispositivo
voluntad volver a la conexión WiFi predeterminada. Si lo hace no,
simplemente abre tu dispositivos inalámbrico red ajustes y a
mano reconectar .
TIEMPO SERVIDOR CONEXIÓN ESTADO
Una vez que la estación meteorológica se haya conectado a Internet,
va a intentar Para conectarse a la servidor de tiempo de internet para
obtener la Hora U TC. Una vez el
La conexión se realizó correctamente y la hora de la estación
meteorológica ha actualizado. El icono “ SYNC ” aparecerá en la
Pantalla LCD.
Para mostrar la hora correcta para su zona horaria específica, deberá
Necesitar
cambiar la zona horaria en el modo de ajuste del RELOJ de 00 (por
defecto) a
su zona horaria (por ejemplo, -5 para EST). Si no lo haces conoce tu
tiempo zona, tú poder mirar él en línea
NOTA:
La hora se sincronizará automáticamente con la Internet por un hora.
CREAY SINCRONIZA TUCUENTADE SERVIDOR
METEOROLÓGICO
CREAR SU CLIMA SUBTERRÁNEO CUENTA
1. Visita: https://Wunderground.com y selecciona “ Unirse ” en el
superior derecha y esquina y crear a Cuenta gratuita.
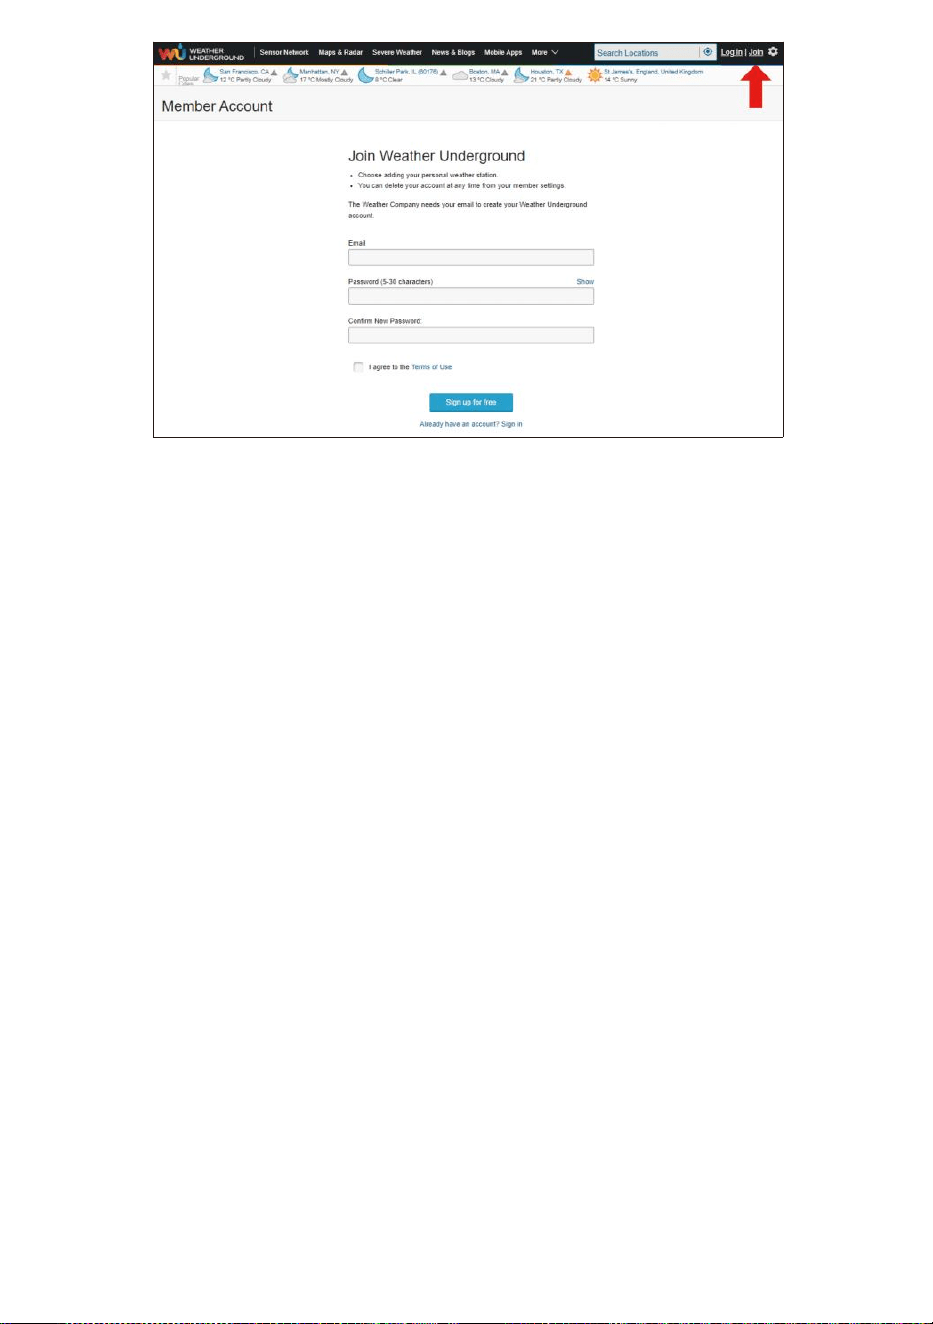
- 48 -

- 49 -
2. Introduzca una Nombre de usuario, Correo electrónico y Contraseña
( Es es tu Acceso contraseña del sitio webIt, No es tu correo
electrónico contraseña.Entonces No La privacidad será estar
expuesto ). Haga clic en Iniciar sesión de forma gratuita.
3. Después del registro Esta hecho exitosamente, va a mostrado abajo
mensaje.
4. Haga clic en “Iniciar sesión ” y ingresar el correo electrónico
DIRECCIÓN y contraseña tu solo registrado.

- 49 -
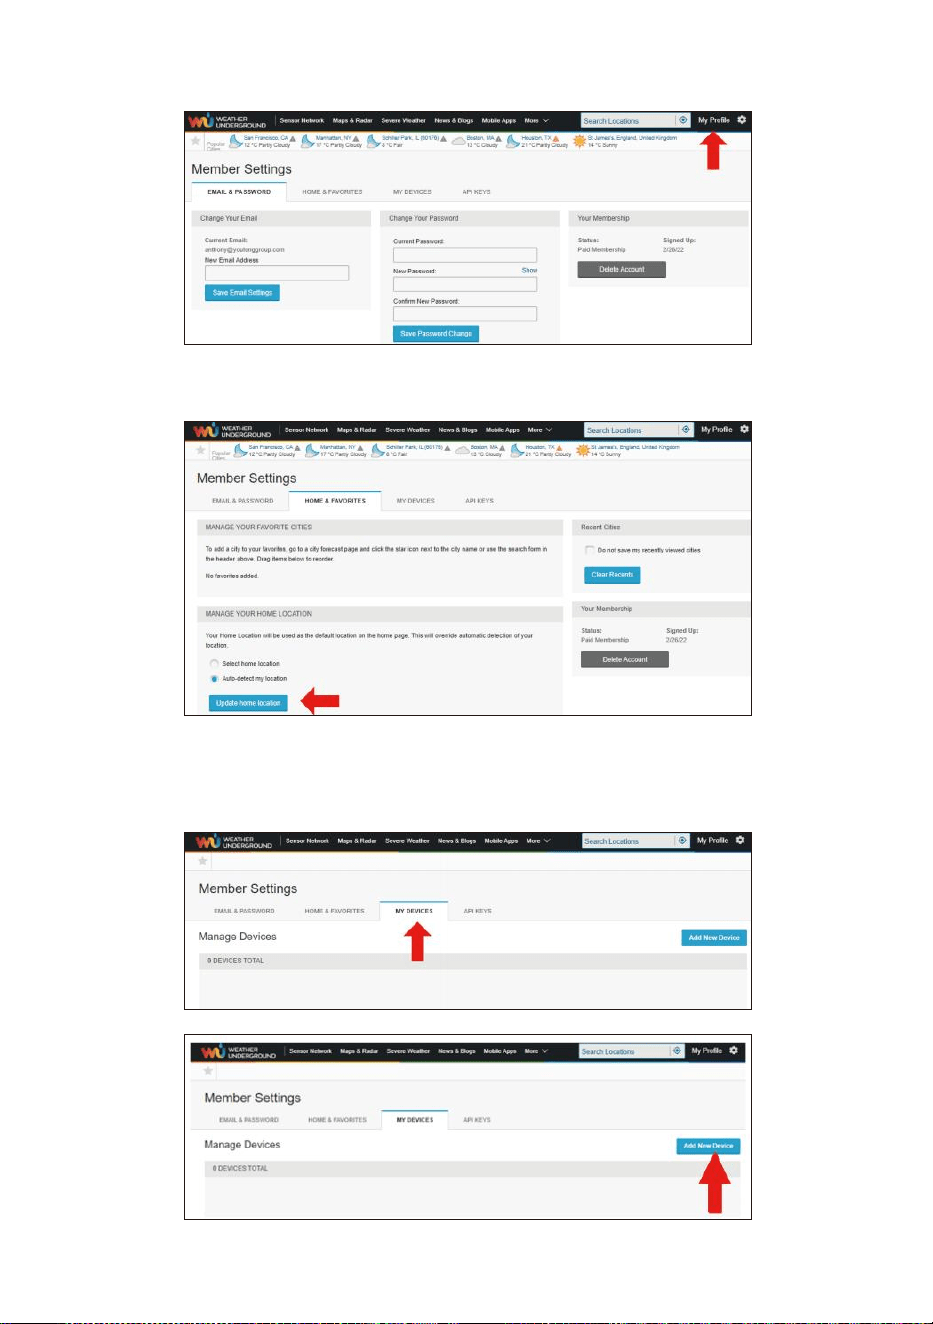
- 50 -
5. Haga clic en “Mi perfil ” e ingrese a Configuración de miembro.
6. Haga clic en “Actualizar hogar ubicación ".
7. Haga clic en “Mi Dispositivos ”, y haga clic en “ Agregar
Nuevo Dispositivo ".

- 51 -
8. Seleccione la dirección por ingresando una dirección o seleccionar
Manual para Posiciona tu dirección automáticamente. Luego haz
clic en “Próximo ".
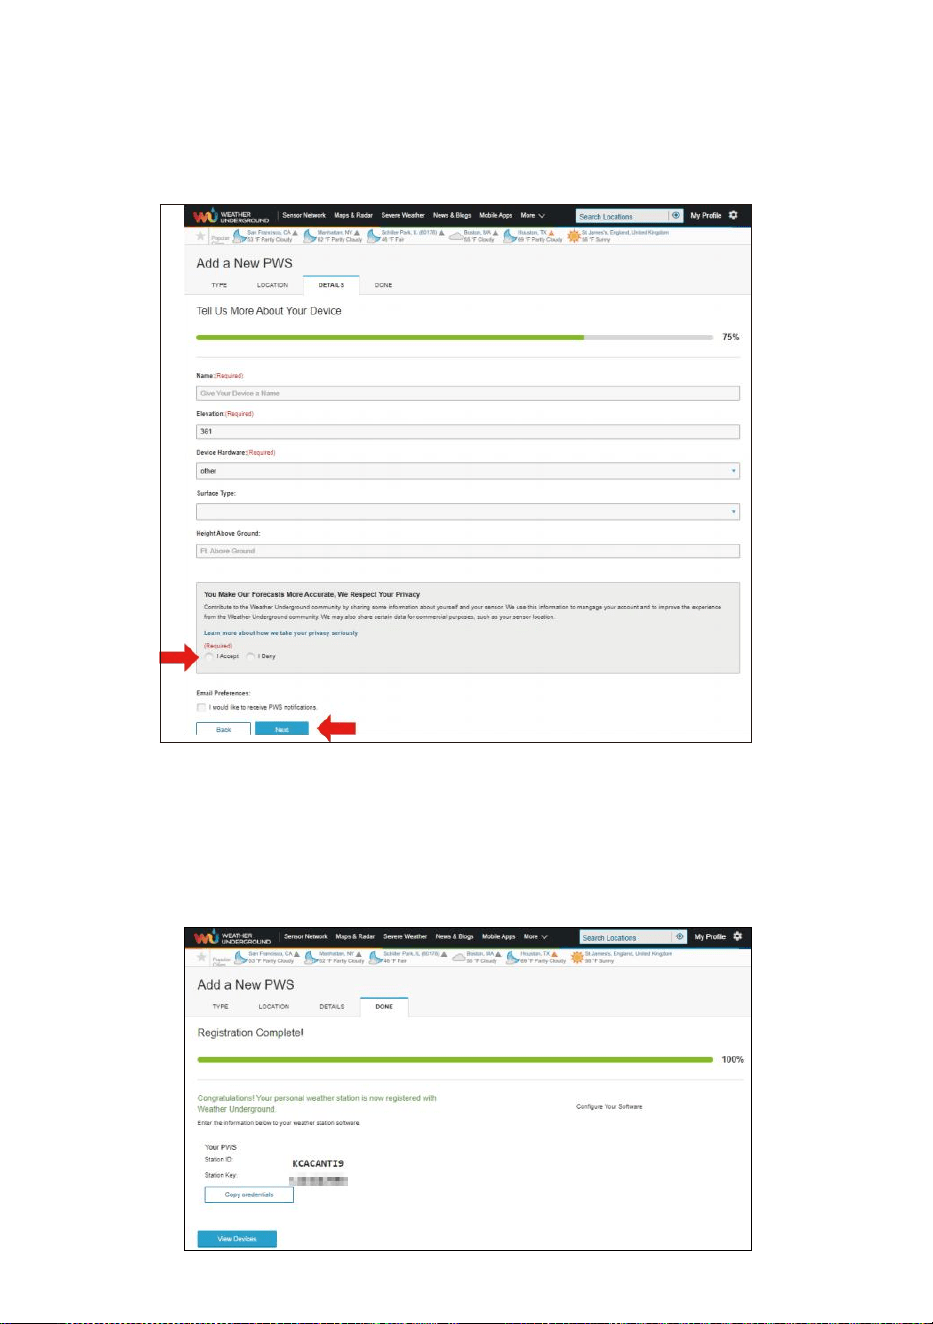
- 52 -
9. Introduzca la información meteorológica. Espacios en blanco con
rojo (requerido) debe ser completado en.
NOTA:
Puede seleccionar “otro” de los Dispositivo Hardware.
10. Una vez Completa esto sesión, Haga clic en "I Aceptar " y "
Próximo ".
11. Después de registrarse exitosamente, por favor Registra tu clima
Bajo- suelo Identificación y Llave Información para configuración
posterior usar.
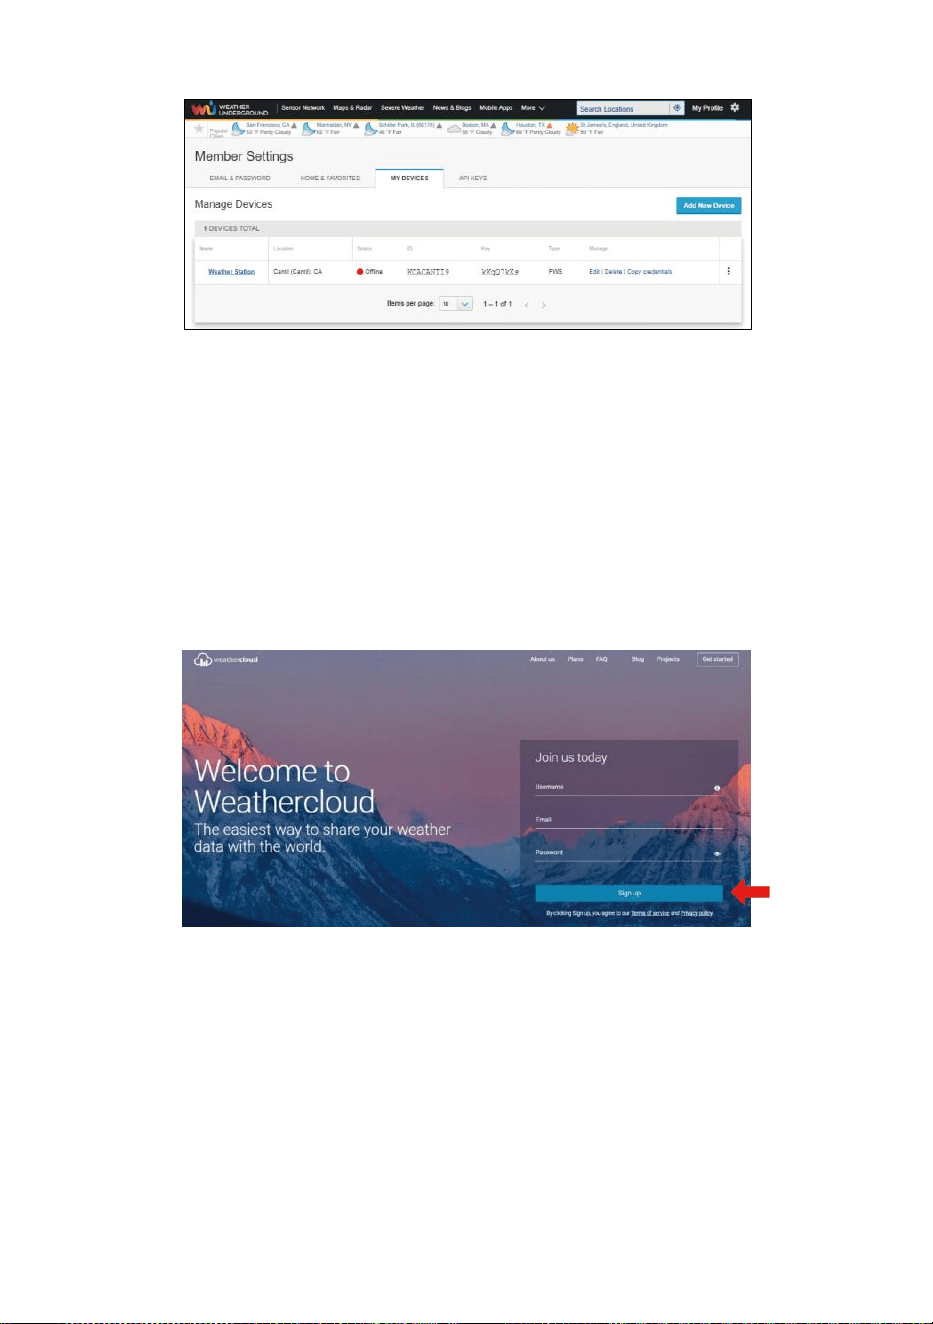
- 53 -
12. Como se muestra abajo, registro se realizó con éxito.
CREAR SU NUBE CLIMÁTICA CUENTA
1. Visite el sitio web de Weathercloud en https://weathercloud.net/ , e
ingrese Un nombre de usuario, Correo electrónico y Contraseña y
haga clic en “ Iniciar sesión” arriba ". Siguiendo el
Instrucciones para crear un cuenta.
NOTA: Esto es Se hace mejor en una computadora de oficina o
computadora portátil.
(Él ¿Es tu nombre de usuario? contraseña del sitio webEs, No es tu
correo electrónico contraseña. Entonces No La privacidad será
estar expuesto).
2. Cuando él tiene éxito, un El correo electrónico será ser recibió En
tu registrado buzón.
3. Abre tu correo y registro en a La red DIRECCIÓN en el correo. Haga
clic en “ Activar ”. su Nube meteorológica cuenta ".
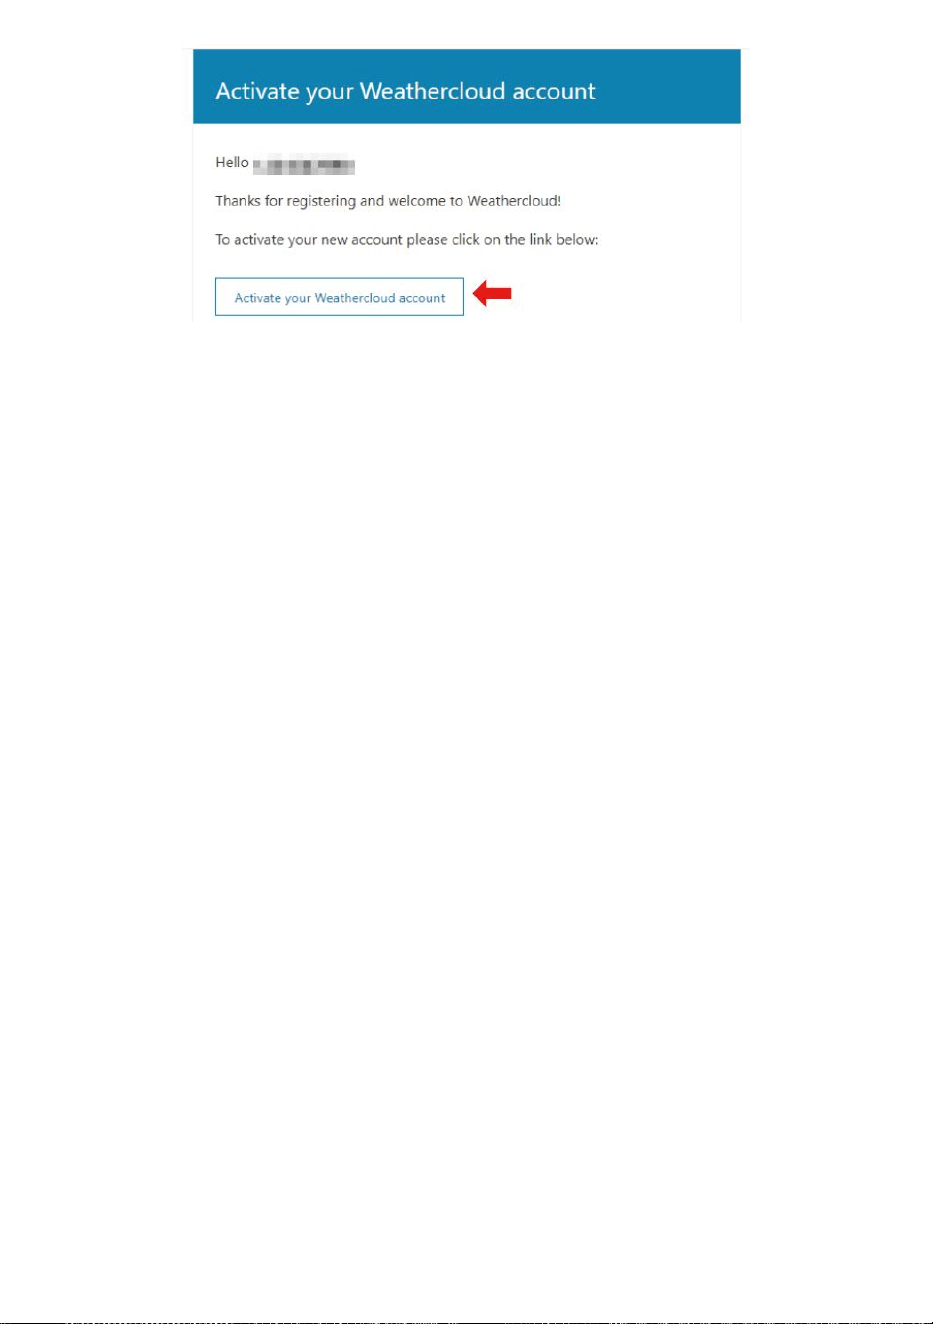
- 53 -
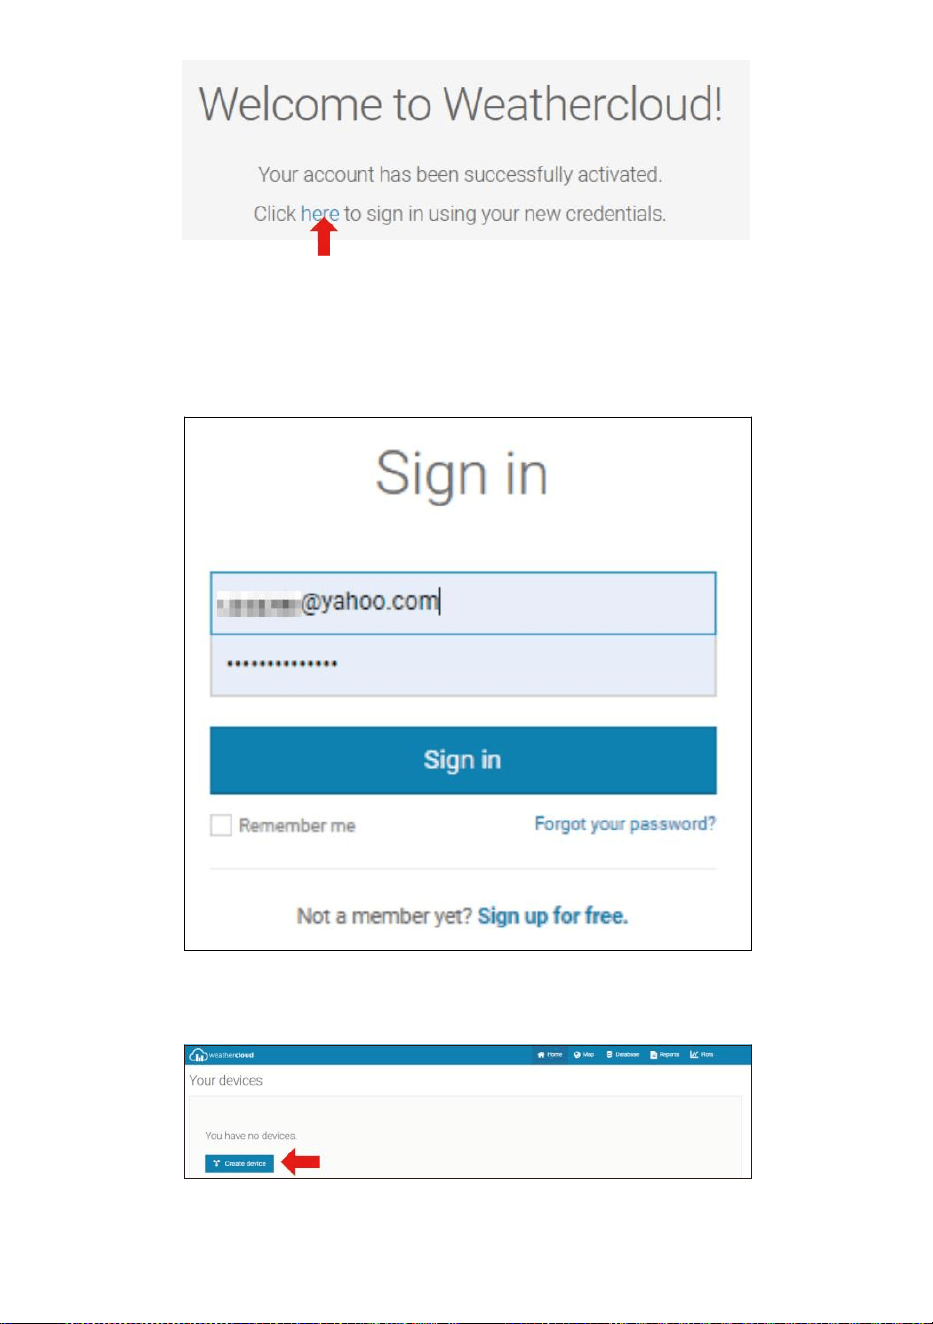
- 54 -
4. Haga clic en “aquí ” para ingresar a la página de inicio del sitio web
weathercloud .
5. Ingrese la dirección de correo electrónico y la contraseña que acaba de
ingresar. registrarse ed a Entra en la nube meteorológica sitio web .
6. Haga clic en “ Crear dispositivo ” para agregar un dispositivo de
estación meteorológica.
7. Ingrese todos los solicitado información En la Cr ea Nuevo Dispositivo
página. Espacios en blanco con rojo * debe Estar lleno en.

- 55 -
NOTA:
Puede seleccionar “otro” de los Modelo número y Tipo de
enlace en el arriba espacios en blanco.
Haga clic en “Obtener coordenadas” para Identifica tu ubicación en
el mapa, entonces Haga clic en "Listo" para confirmar.
8. Una vez que tengas terminado este sección, Haga clic en “ Crear ”.
9. Después de registrarse exitosamente, por favor graba tu
Weathercloud IDENTIFICACIÓN y Llave Información para
configuración posterior usar.
VISTA SU CLIMA DATOS EN CLIMA SUBTERRÁNEO
Para ver los datos de su estación meteorológica en vivo a través de PC
o Web móvil navegador,
visita http://www.wunderground.com y luego ingrese a la Estación ¿
Identificaste tu identidad ? proporcionado durante la configuración de la

- 55 -
cuenta en la búsqueda caja. Sus datos meteorológicos se mostrarán
Arriba en el próximo página.

- 56 -
CUIDADO Y MANTENIMIENTO
1. Limpiar el pluviómetro cada 3 meses. Girar el embudo en sentido
antihorario y levántelo para exponerlo pluviómetro mecanismos, y
Limpiar con a paño húmedo. Elimine la suciedad, los residuos y
Insectos. Si hay un error infestación es un Problema, rocíe el sensor
ligeramente con un insecticida.
Abierto
Elevar
2. Limpiar el Luz Intensidad/ Sensor UV y solar panel cada 3 meses
Con humedad paño.
3. Al reemplazar las baterías, aplicar a corrosión preventivo
compuesto en la batería terminales
ESPECIFICACIÓN
CLIMA ESTACIÓN
Especificaciones generales
Dimensión
7,3 x 5,4 x 1,1 pulgadas (185,9 x 137 .4 incógnita 28,5 mm)
Fuente de poder
CA-CC 5 V, Adaptador 1A (incluido)
Sensores de soporte
1 sensor 7 en 1 (incluido)
Especificación de comunicación Wi-Fi
Estándar Wi-Fi
802.11 b/g/n
Wisconsin- Frecuencia de
operación de Fi
2,4 GHz
Dispositivos
compatibles con
configuración Interfaz
de usuario
Dispositivo inteligente con Wi-Fi incorporado y modo
WAP. incluyendo computadoras portátiles,
computadoras, teléfonos inteligentes y elegante
Almohadillas

- 56 -
Recomendar navegador
web Para la configuración
Interfaz de usuario
Última versión de cualquier navegador web compatible HTML 5
- 57 -
Tie m p o Esp e ci f i c ac i o ne s de fu n c io n e s
T i e m p o mo s t r a r
S.S : M.M.
F o r m a t o d e h o r a
12 hora o 24 hora
Fecha mo strar
DD/MM o MM/DD
S i n c r o n i z a c i ó n h o r a r i a m é t o d o
Se sin c r o ni z a co n el at ó mi c o re l o j
Zonas horarias
-12 ~ +13 horas
Horario de verano
ENCENDIDO/APAGADO
Pantalla del barómetro y Especificaciones de funciones
Unidades del barómetro
hPa, inHg y mmHg
Medición rango
600 – 1100 hPa ( ajuste relativo) rango 930 – 1050 hPa)
Exactitud
700-1100 hPa±5 Presión de aire (hPa)/600-696 hPa±8 hPa
20,67 – 32,48 pulg. Hg ± 0,15 pulg. Hg/17,72 -20,55 pulg . Hg ±0,24
en Hg
525 -825 mmHg ± 3,8 mmHg/450 -5 22 mmHg ± 6
mmHg Típico en 77
años
(25
℃
)
Pronóstico del tiempo
Soleado, Parcialmente nublado, nublado, Lluvioso, tormentoso y De
mucha nieve
Mostrar modo
Actual
Memoria modo
A diario Máximo/ Mínimo
Alerta
Alerta de cambio de presión
Temperatura interior/exterior Mostrar & Especificaciones de funciones
Temperatura unidad
℃
y
吓
Exhibición en interiores rango
-14,1 ° – 122 °C (-9,9 °C – 50 °C )
Exhibición al aire libre rango
-40
susto
– 158
°C
(-40
°C
– 70
°C
)
Precisión de entrada/salida
50 – 122 Aterrador 1.8 susto / 10 –
50
℃
± 1
℃
-4 -
50
±
2,7
/ -20 – 10
℃
± 1,5
℃
otros :± 3,6
/
±2
℃
Mostrar modo
Actual
Memoria modo
A diario Máximo/ Mínimo
Alerta
Alerta de temperatura alta/baja
- 58 -
Humedad interior/exterior Mostrar & Especificaciones de funciones
Humedad unidad
%
Mostrar rango
1 – 99%
Precisión de entrada/salida
40 – 80% HR ± 5% RH @77 °C (2,5
° C ) Otros :±8% RH @77 °C (25 °C )
Mostrar modo
Actual
Memoria modo
A diario Máximo/ Mínimo
Alerta
Alto/Bajo Humedad ale rt
Velocidad del viento y Dirección Mostrar & Especificaciones de funciones
Velocidad del viento unidad
millas por hora, EM, kilómetros por hora, nudos
Mostrar rango
0-112 mph, 50 m/s, 180 kilómetros por hora, 97 nudos
Precisión de velocidad
<5 m/s: ±0,5 m/s, >5 m/s :±10% (cualquiera es mayor)
Mostrar modo
Ráfaga/Promedio
Memoria modo
Ráfaga diaria/promedio
Alerta
Alta velocidad del viento Alerta (ráfaga/promedio)
Dirección del viento
16 direcciones
Lluvia Mostrar & Especificaciones de funciones
Unidad de lluvia
mm, en
Rango de lluvia
0 – 12999 mm (0 – 511,7 en)
Precisión de la precipitación
±7%
Mostrar modo
Actual
Memoria modo
A diario Máximo
Visualización de precipitaciones
modo
Cada hora/ Diariamente/Semanalmente/ Mensual/Total Lluvia
Alerta
Alto A diario Alerta de lluvia
Ultravioleta Índice Mostrar & Especificaciones de la función
Mostrar rango
0 - 16
Mostrar modo
Actual
Memoria modo
A diario Máximo
Alerta
Alto Alerta UVI
- 59 -
Luz Intensidad Mostrar & Especificaciones de funciones
Luz Intensidad unidad
Klux, Kfc y W/
m2
Mostrar rango
0 – 200 Klux
Mostrar modo
Actual
Memoria modo
A diario Máximo
Alerta
Alto Luz alerta de intensidad
Índice meteorológico Mostrar & Especificaciones de funciones
Clima Índice modo
Se siente como, sensación térmica, calor índice y rocío punto
Mostrar modo
Actual
Memoria modo
A diario Máx./mín.
7 EN 1 INALÁMBRICO PARA EXTERIORES SENSOR
Dimensión
16x 15,6x 14,4 pulgadas (408 x 396 x 367 mm)
Principal fuerza
3,6 V Batería de níquel-metal hidruro (NiMH) recargable batería
embalar
Respaldo fuerza
Solar fuerza
Datos meteorológicos
temperatura, humedad, velocidad del viento , dirección
del viento, precipitaciones, UVI y luz intensidad
Transmisión de RF rango
330 pies (100 metros)
Intervalo de transmisión
Cada 20 segundos por Ultravioleta, luz intensidad、 velocidad del
viento
、
temperatura, Datos de humedad, lluvia y dirección del viento. datos
Temperatura de funcionamiento
-40 ° – 140 °C (-40 °C – 60 °C )
Herramientas adicionales
necesarias para el sensor
Sí
- 60 -
SOLUCIÓN DEPROBLEMAS
Problema
Solución
El sensor inalámbrico
hace No comunicar
el estación
meteorológica
El sensor inalámbrico puede tener iniciado correctamente, y los datos es
registrado por la estación meteorológica como no válido, y el clima
estación debe ser reiniciar.
Con un final abierto clip de papel , presione el Botón RESET durante 3
segundos para completar la visualización del voltaje. El LED
parpadeará cada 20 segundos.
Si el LED lo hará No parpadee cada 20 segundos, sáquelo. Baterías y
esperar 5 minutos, mientras se cubre el panel solar para drenar el
Voltaje.
Poner Baterías atrás En y Resincronizar la estación meteorológica
y resincronizar el Estación meteorológica (Consulte la página 10
RE-EMPAREJAMIENTO DEL SENSOR) con el sensor
inalámbrico acerca de 10 pies (3 m) lejos .
El El LED del sensor inalámbrico parpadeará cada 20 segundos. Si el
El LED es aún No parpadea cada 20 segundos, reemplace el nuevo
Baterías en el
sensor inalámbrico
Si el Las baterías estaban recientemente reemplazado, verifique el
polaridad. Si el sensor inalámbrico parpadea cada 20 segundos,
proceder a la próximo paso.
Allá puede ser una pérdida temporal de comunicación debido a
recepción pérdida relacionada con interferencia u otros factores de
ubicación,
O pilas puede tener Ha sido cambiado en el sensor inalámbrico y el
estación meteorológica tiene no estado restablecer. La solución
puede sea tan simple como apagar y encender la estación
meteorológica (eliminar corriente continua poder y
pilas), espere 30 segundos y vuelva a insertarlas corriente continua poder
y baterías).

- 60 -
Interior y Exterior
temperatura hacer
no aceptar
Espere hasta una hora para que los sensores inalámbricos estabilizar
pendiente a señal
filtrado. Los sensores de temperatura interior y exterior deben coincidir
dentro de ±4
°C
(±2
°C
) (la precisión del sensor es ±2
°
(±1
℃
)
Utilice la función de calibración para que coincida con la temperatura
interior. y temperatura exterior A un conocido fuente.
Sensor de
temperatura lee
tambien alto en el
tiempo de día
Asegúrese de que el sensor inalámbrico no esté también cerca a calor
fuentes generadoras o restricciones, tales como edificios, pavimento,
paredes , o aire condición- En unidades.

- 61 -
Problema
Solución
Pluviómetro informes
lluvia cuando él él no
lloviendo.
Un inestable Solución de montaje (oscilación) en el montaje polo)
puede resultado En la propina balde incorrectamente incrementando
lluvia. Asegúrate de que
solución de montaje estable y nivelada . (Referirse página 9 AJUSTE
DEL SENSOR INALÁMBRICO 7 EN 1 NIVEL)
El wifi lo hace no
mostrar en la estación
meteorológica
Comprueba tu enrutador para Problemas.
1. Compruebe el símbolo de Wi-Fi en la pantalla. Si hay conectividad
inalámbrica es
exitoso , el Wifi icono avoluntad ser desplegado en el tiempo
archivado .
2. Asegúrese de que la configuración de Wi-Fi de su módem sea
correcta (red nombre, y contraseña)
3. Asegúrese de que la estación meteorológica es atascado en C.A.
energía. La estación meteorológica No se conecta al Wi -Fi cuando
Funciona con pilas solo.
4. La consola solo admite y se conecta a 2,4 GHz. enrutadores. Si tu
tengo un 5GHz enrutador, y d él es un dual banda enrutador, tú
voluntad necesidad a
deshabilitar la banda de 5Ghz y Habilitar el 2,4 GHz banda.
5. El tiempo hace No admite redes de invitados.
Datos no reportando
a www.wunder-
ground.com o
www.weathercloud.net
1. Confirme su contraseña o clave es correcto Él es el
contraseña tú registrado en Wunderground.com.
Wunderground.com. Su contraseña de underground.com no puede
comenzar con caracteres no alfanuméricos (una limitación de
Wunderground.com , no la estación). Ejemplo, $worknet es no es
válido contraseña, pero
red de trabajo$ es válido)
2. Confirma tu estación IDENTIFICACIÓN ix correcto. La estación
IDENTIFICACIÓN todo esta en mayúsculas, y el más común
asunto está sustituyendo y O por a 0 (o viceversa).
Ejemplo, KCAPHOEM12, no KCAPH0EM12.
3. Asegúrese de los datos y la hora es correcto en el clima
estación. Si incorrecto, tu puede ser reportando datos antiguos,
no Datos en tiempo real .
4. Asegúrate de tu zona horaria Esta establecido adecuadamente.
Si no es correcto, puede ser reportando datos antiguos, no
tiempo real datos .
5. Verifique la configuración del firewall de su enrutador. La estación
meteorológica envía datos a través de Puerto 80.

FCC STATEMENT
- 62 -
Este dispositivo cumple con parte 15 de los Comisión Federal de
Comunicaciones (FCC) Reglas. Funcionamiento está sujeto a el
siguiente dos condiciones :
1. Este dispositivo puede NO causa dañino interferencia.
2. Este dispositivo Debe aceptar cualquier interferencia recibió, incluido
interferencia que Puede causar un deseo no deseado. operación.
NOTA:
Este equipo tiene Se ha probado y se ha comprobado que cumple
con las límites para una clase Dispositivo digital B, conforme a
Parte 15 de el Comisión Federal de Comunicaciones (FCC) Normas.
Estos Los límites están diseñados para Proporcionar razonable
protección contra dañino interferencia En un Residencial
Instalación. Este equipo
genera —y puede irradiar — energía de radiofrecuencia y, Si no
está instalado y usado de acuerdo con la instrucciones, pueden
causar daños Interferencias en las comunicaciones por radio.
Sin embargo, hay es No hay garantía de que la interferencia será
no ocurrir en un instalación particular.
Si el equipo no funciona no causa dañino interferencias en la recepción
de radio o televisión, que se pueden determinar girando el equipo
Apagado y En, el Se recomienda al usuario que intente corregir el error.
interferencia por uno o más del siguiente medidas :
Reorientar o reubicar el Antena receptora.
Aumentar la separación entre el equipo y el receptor.
Conectar el equipo en una toma de corriente de un circuito
diferente de eso A la que el receptor es C onectado.
Consulte al distribuidor o a un técnico experimentado en radio/TV
para ayuda.
ADVERTENCIA: Los cambios o modificaciones a este unidad no
expresamente astuto
aprobado por el la parte responsable del cumplimiento podría
anular la autoridad del usuario para operar el equipo.

FCC STATEMENT
- 62 -
Tecnología Sanven Limitado.
Dirección: Suite 250, 9166 Anaheim Lugar, Rancho Cucamonga,
California 91730
Hecho En China


Soporte técnico y Certificado de garantía
electrónica www.vevor.com/support
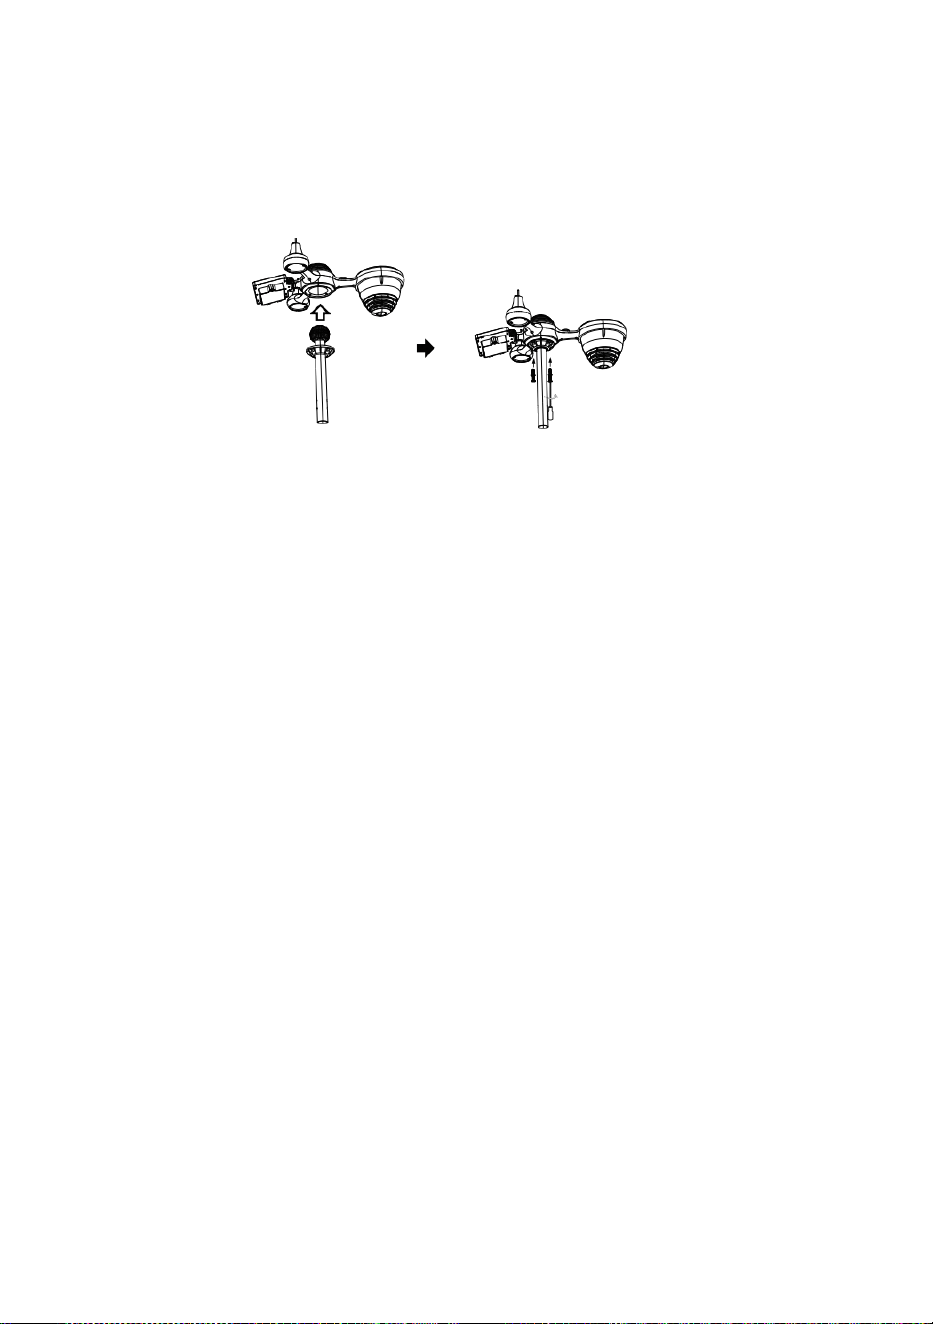
Z
a
m
e
k
Szybki start
Przewodnik
⑤
M
O
N
T
A
Ż
Z
B
I
O
R
N
I
K
A
D
E
S
Z
C
Z
U
W
s
t
a
①INSTALLING THE MOUNTING POLE
Secure the sensor onto a mounting pole (included) using the screws (included).

w
i
ć
t
e
n
l
e
j
e
k
W
t
e
n
d
e
s
z
c
z
k
o
l
e
k
t
o
r
I
z
a
m
e
k
T
o
W
m
i
e
j
s
c
e
.
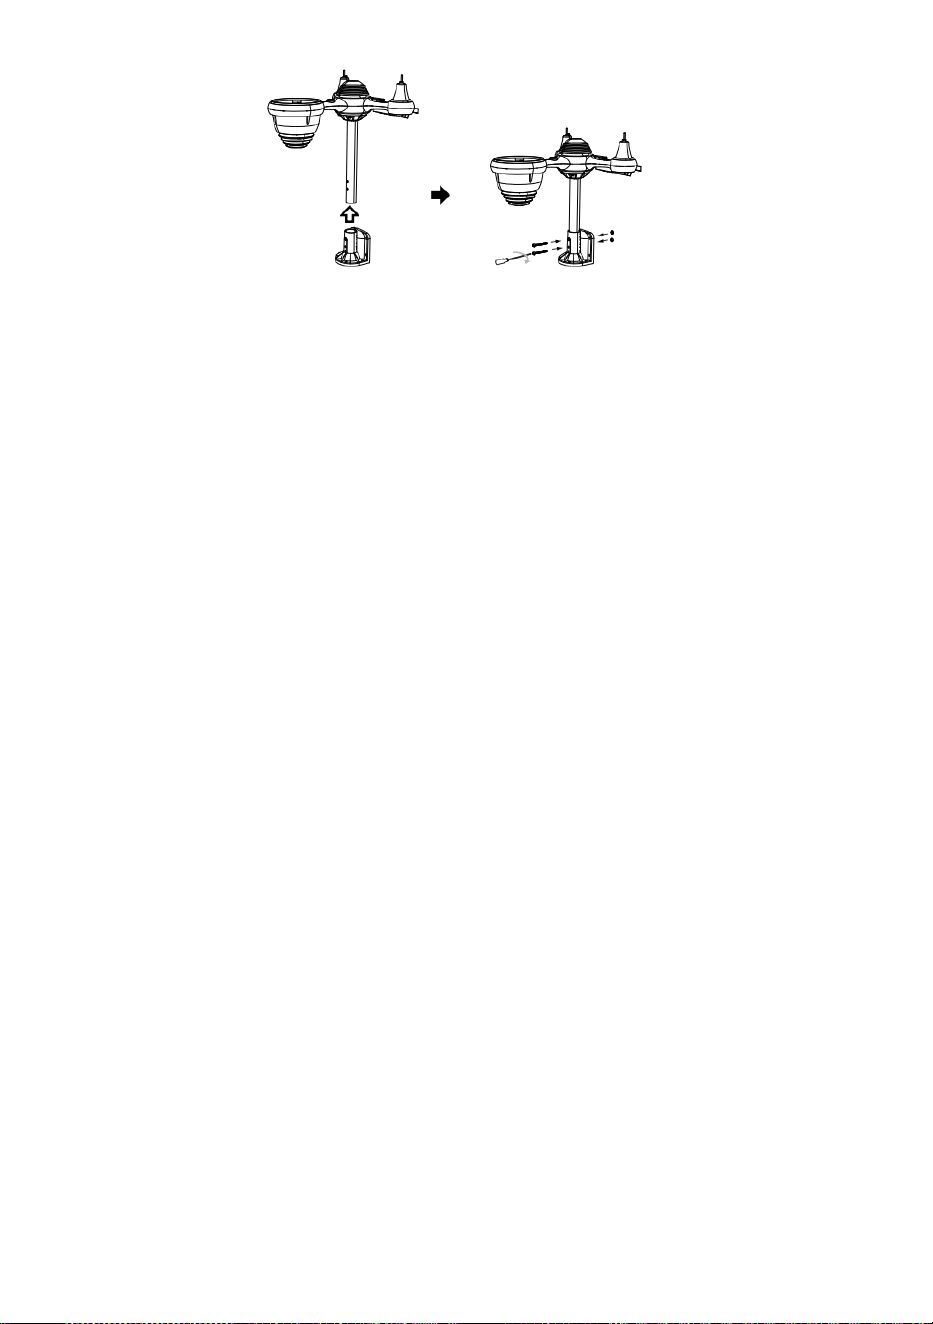
⑥
I
N
S
T
A
L
O
W
A
N
I
E
T
O
B
A
T
E
R
I
E
② INSTALOWANIE TO MONTOWANIE NAWIAS
Odkręcić drzwi baterii przy dół. Połącz kabel akumulator, który można ładować.
R
e
g
u
l
o
w
a
ć
p
o
d
ł
ą
c
z
o
n
e
k
Secure the sensor onto a mounting bracket (included) using the screws (included).

a
b
l
e
t
a
k
O
n
i
w
y
g
o
d
n
i
e
s
i
ę
z
m
i
e
ś
c
i
ć
t
e
n
p
r
z
e
d
z
i
a
ł
.
Z
a
m
k
n
i
j
i
z
a
p
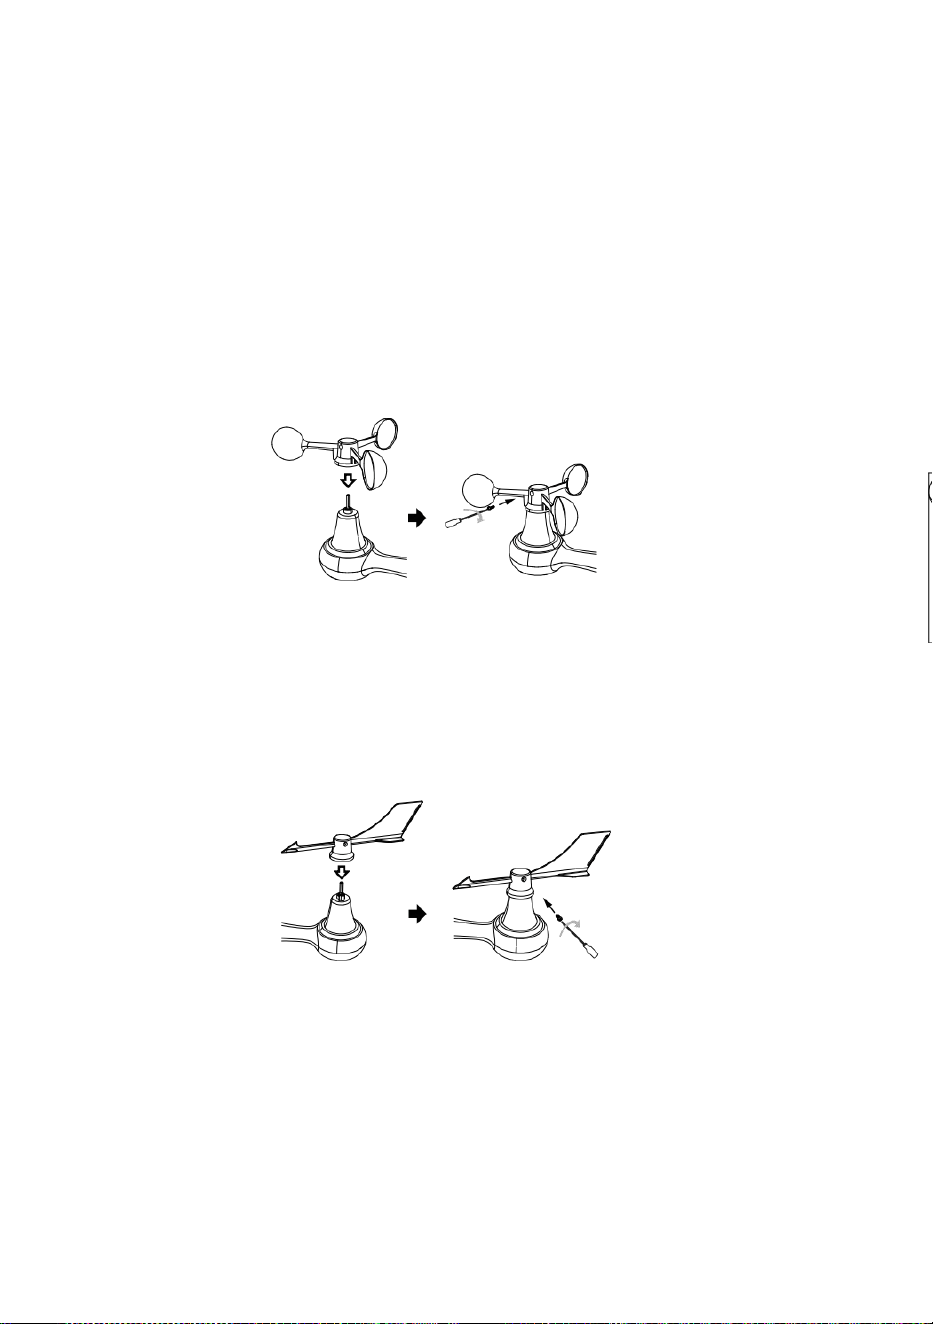
i
ą
ć
d
r
z
w
i
c
z
k
i
b
a
t
e
r
i
i
.
③ INSTALOWANIE WIATR PRĘDKOŚĆ STAN
NIETRZEŹWY
Wyrównywać otwory na śruby w ten kubki do pomiaru prędkości wiatru z ten płaski,
pionowa strona ten metal pręt.
Wstawić ten kubki prędkości wiatru w pręt metalowy i śruba obcisły Do zamek To
W miejsce.
P
o
l
u
z
o
w
a
ć
ś
r
u
b
a
p
r
z
y
t
e
n

w
s
p
ó
l
n
y
.
R
e
g
u
l
o
w
a
ć
t
e
n
k
ą
t
p
i
o
n
o
w
y
e
t
e
n
s
ł
o
n
e
c
z
n
y
k
o
m
ó
r
k
a

.
N
a
c
i
s
k
a
ć
b
i
e
g
d
o
w
e
w
n
ą
t
r
z
i
d
o
k
r
ę
c
a
ć
t
e
n
ś
r
u
b
a
.
P
u
n
k
t
D
o
P

Ó
Ł
N
O
C
P
Ó
Ł
N
O
C
P
u
n
k
t
D
o
④ INSTALOWANIE WIATR KIERUNEK
WIATROWSKAZ
Wyrównywać otwory na śruby w ten kierunek wiatru n wiatrowskaz z ten płaski,
pionowa strona pręt metalowy.
Wstawić ten wiatr kierunek wiatrowskaz W ten metal pręt I śruba NA obcisły Do
zamek To W miejsce .
Point to
SOUTH

TV
⑩WŁĄCZANIE
TO STACJA POGODOWA
Wtyczka zasilacz do
ten stacja meteorologiczna.
Raz ten stacja pogodowa jest włączony ,
To automatycznie przejdzie do
parowania tryb.
naciskać Lub przycisk zacząć ten AP
tryb . Otwórz twój Wi - Fi sieć
Ustawienia NA Komputer Lub smartfon .
Lokalizować ten stacja pogodowa n SSID
( WWS - XXXXXX ) z ten lista .
Uzyskiwać NA ten SSID Do łączyć .
USTAWIENIE W GÓRĘ
POŁĄCZENIE WI-FI
W ekran prosty/szczegółowy, naciskać
przycisk Do Wchodzić Ustawienie menu .
Naciskać przycisk przełączyć „ Inne
Ustawienie ” wyświetlacz.
Naciskać Lub przycisk Do wpisz „ Włącz ”
Punkt dostępowy ”.
AT
NAJMNIEJ
3
stopy
(0,9m)
OPRÓCZ
Aby zapobiec zakłócenia
bezprzewodowe, miejsce Zarówno
jednostki Na najmniej 3 stopy
(0,9m) z dala z urządzeń
elektronicznych (TELEWIZJA,
komputer, kuchenka mikrofalowa,
radio, itp.).
SETTINGS
SETUP ADVANCED
Language:
Wi-Fi Router Setup
Router 1234 5
Select the menu and choose your 2.4GHz WIFI Router
Password
Weather Server Setup
WeatherUnderground
Station ID
Station Key
Upload wunderground.com
WeatherCloud
Station ID
Station Key
Upload weatherCloud.net
Time Zone Setup
Time Zone
Time Server Setup
Server URL
Firmware Version: 1.0.1
time.windows.com
a7d9d2a279 fbbafa
**********
**********
**********
Apply
KCACANTI9
English
Router
+0.00
⑧MOUNTING THE WIRELESS 7-IN-1 OUTDOOR SENSOR
Various options to install. Make sure the rain collector faces north and
the solar panel faces south before fastening the screws (included).
If you are a user located in the Southern Hemisphere,
please reverse the direction.
Enter your station ID
Enter your station key/password
check to confirm upload to
WeatherUnderground server
Enter your station ID
Enter your station key/password
check to confirm upload to
Weathercloud.net
Time zone setting
Internet time server setting
Press Apply to confirm the setting
WI-FI disconnected
WI-FI connected
WI-FI connected with Sync
ENTER SETUP INTERFACE
Enter the following address into the web browser address bar:
http://192.168.1.1 to access the setup interface.
Please click to check your password before clicking APP.LY
⑨ADJUSTING THE 7-IN-1 WIRELESS SENSOR LEVEL
Use the bubble level indicator to make sure the wireless outdoor sensor is completely level.
Select setup UI display language
Select your Wi-Fi Router (SSID) from the list
Router Password
Please scan the QR code or visit https://youtu.be/JYr4BeOmEKo to see a video on how to use it.
Familiarize yourself with the icons for Wi-fi connection status.
WI-FI CONNECTION STATUS
The
bubble

Wsparcie techniczne i Certyfikat gwarancji elektronicznej
www.vevor.com/su pport
STACJA METEOROLOGICZNA
MODEL:YT60233
Nadal jesteśmy zaangażowani w zapewnianie Ty narzędzia z konkurencyjny cena.
"Ratować Połowa", "Połowa ceny" lub inne podobne wyrażenia używany przez nas tylko
reprezentuje jakiś
est imate oszczędności ty możesz skorzystać z zakupu pewnych narzędzia z nas porównaj
czerwony Do ten główny
szczyt marki i dawki nie koniecznie oznacza objęcie wszystkich kategorii narzędzi oferowany
przez nas. Ty
Czy uprzejmie przypomniałem, aby dokładnie sprawdzić, kiedy jesteś składanie
zamówienia nas jeśli jesteś
faktycznie oszczędzając połowa w porównaniu z górą główne marki .

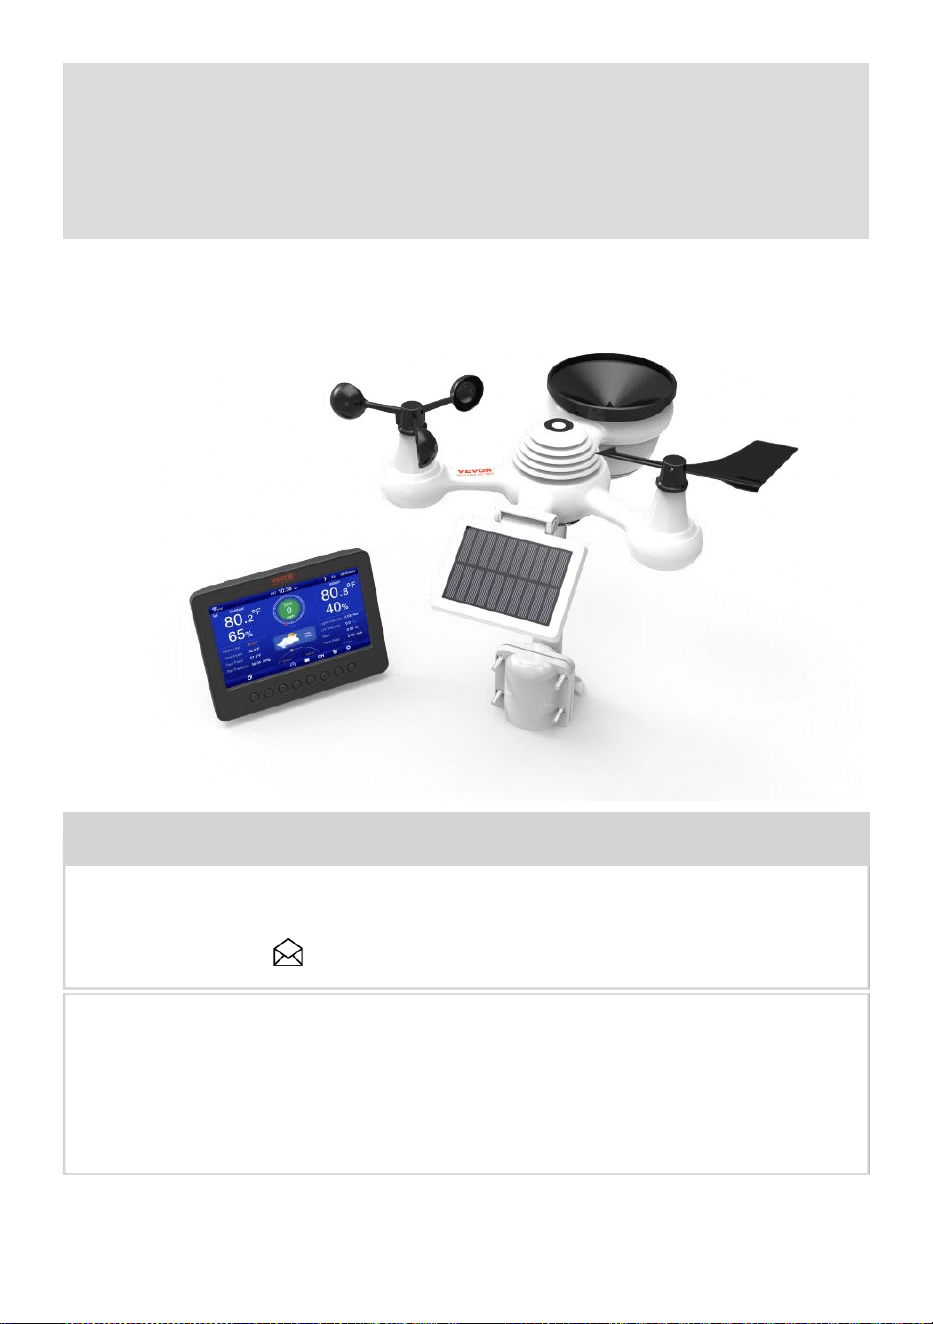
- 3 -
METEOROLOGICZN
Y
STACJA
MODEL:YT60233
POTRZEBOWAĆ POMOCY? KONTAKT NAS!
Mieć masz pytania dotyczące produktu? Potrzebujesz wsparcia
technicznego? Proszę, nie krępuj się kontakt nas:
Obsługa klienta @ vevor .com
Ten jest oryginałem instrukcja, Proszę przeczytaj wszystko podręcznik
instruować jony
przed rozpoczęciem użytkowania należy zachować ostrożność. VEVOR
zastrzega sobie wyraźne interpretacja naszej instrukcji obsługi. Wygląd
produktu powinien Być temat Do ten
produkt ty otrzymane. Proszę, daj nam to, żebyśmy tego nie zrobili
poinformuję cię ponownie czy są jakieś aktualizacje technologii lub
oprogramowania NA nasz produkt .

SAFETY PRECAUTIONS
- 4 -
OSTRZEŻENIE! Prosimy o zapoznanie się ze wszystkimi zasadami
bezpieczeństwa środki ostrożności , instrukcja obsługi i pielęgnacja /
konserwacja instrukcje zanim operacyjny Ten
urządzenie. Zachowaj tę instrukcję do wykorzystania w przyszłości .
Ten produkt Jest nie zabawka. Trzymaj się z dala od w miejscu
niedostępnym dla dzieci.
Ten produkt jest przeznaczony do użytku w tylko w domu jako
jakiś wskazanie pogody warunki .
Ten produkt Jest nie do Być używany w celach medycznych
celów lub dla celów publicznych informacja.
Do nie czyścić jednostka z materiałem ściernym lub żrącym
przybory.
Do nie umieść urządzenie w pobliżu otwartego ognia lub źródeł
ciepła . Pożar, porażenie prądem, uszkodzenie produktu lub
obrażenia może się zdarzyć.
Tylko użyj świeżego nowy baterie w produkt . Do nie mieszać
nowy i stary baterie razem.
Do nie rozmontowywać, nie zmieniać, ani nie modyfikować ten
produkt .
Używaj wyłącznie akcesoriów i dodatków . produkt określony przez
producent.
Do nie zanurzać jednostka w wodzie. Wysuszyć produkt miękką
ściereczką Jeśli wycieki płynów NA To.
Do nie narażaj urządzenia na działanie nadmiernej siły,
wstrząsów, kanał, ekstremalna temperatura lub wilgotność .
Do nie zakrywać i nie blokować wentylacji dziury z dowolnym
obiekty.
Ta stacja pogodowa tego produkt Jest przeznaczony do Być
używany w domu tylko.
Ten produkt nadaje się wyłącznie do montażu w wysokość mniej niż 2 M
(6,6) (stopy).
Do nie ingerować w działanie jednostki Komponenty wewnętrzne .
Ingerencja w produkt spowoduje unieważnienie gwarancji .
Baterie są nie wliczone. Kiedy wkładanie baterie , upewnij się,
że ten pozytywne i negatywny biegunowości pasuje do znakowania
w przedziale .
Do nie mieszaj standard, alkaliczny i akumulatorowy baterie razem
r.

SAFETY PRECAUTIONS
- 4 -
Pozostawienie akumulator narażony na ekstremalne wysoka
temperatura w otaczającym środowisku może spowodować jakiś
eksplozja Lub przeciek cieczy łatwopalnej lub gazu.
Pozostawienie bateria narażona na bardzo niskie temperatury
powietrze ciśnienie W ten
otaczające środowisko może spowodować jakiś eksplozja Lub
przeciek cieczy łatwopalnej lub gazu.

TIPS FOR SENSOR SITE SELECTION
- 5 -
Zbieracz deszczu musi być czyszczonym co kilka miesiące .
Czujnik powinien Być zainstalowany w najmniej 1,5 m (5') od
dowolnego budynek Lub struktura.
Wybierz lokalizacja w otwartej przestrzeni pod bezpośredni
światło słoneczne z NIE przeszkody.
Czujnik powinien pozostać w zasięgu wzroku i w promieniu 150 M
(492') z pogoda stacja Do stały , stały przenoszenie .
Trzymaj czujnik i stację pogodową z dala od gospodarstwa
domowego.
urządzenia To działać NA ten To samo częstotliwość . konsola I
czujnik powinien pokonać najmniej 1 - 2 m (3'-7') od taki zakłócenia s.
PRODUKT CECHY
7″ Wyświetlacz HD TFT ekran.
Zegar czasu rzeczywistego z kalendarz r.
Funkcja alarmu.
Księżyc Faza.
Czas wschodu/zachodu słońca.
Ustawienie strefy czasowej i Czas letni Funkcja (DST).
Strefa czasowa :GMT +13 do -12 godzin.
Automatyczna synchronizacja z internetowym serwerem czasu.
7 języki (PL/ NIE/ FR/ ES/ TO/ NL/CZ) do wyświetlenia.
Wyświetlacze temperatury i wilgotności wewnątrz i na zewnątrz
tendencja.
Wydarzenie, Cogodzinny, Codziennie, co tydzień, Miesięcznie,
Całkowicie opady deszczu i Opad deszczu wskaźnik W przeszłość
godzina.
Wyświetla średnią prędkość wiatru, prędkość wiatru w porywach i
kierunek wiatru.
Bezwzględne i względne Wyświetlanie trendu ciśnienia
barometrycznego .
Słoneczny Promieniowanie wyświetlacz intensywności i
Wyświetlacz UV I.
Wyświetlanie indeksu pogody : Czuć lubi, Chłód wiatru, Ciepło
indeks. Rosa punkt.
Pogoda Prognozowanie.
Dane pogodowe z Maks./min. odczyt, rejestrowanie danych i
wyświetlanie wykresu historii.
Ustawienia alertów pogodowych.

TIPS FOR SENSOR SITE SELECTION
- 5 -
Regulacja jasności podświetlenia.
Niski bateria wskazania dla czujników zewnętrznych.
Noc Funkcja oświetlenia.
Przesyłanie danych pogodowych do Weather Underground i/lub
Weather- chmura przez Wi-Fi routera.

PACKAGECONTENTS
- 6 -
1 2 3
4 5 6
7
8
9 10 11 12
1 stacja pogodowa
7 Montaż słupek z 4 śruby
2 Przejściówka
8 Montowanie nawias ts z 6 śruby
3 Bezprzewodowy czujnik zewnętrzny 7 w 1 9 Gumowe podkładki X 2
4 Lejek
10 Śrubokręt 1
5. Chorągiewka kierunku wiatru z 1 śruba
11 Śrubokręt 2
6 kubków prędkości wiatru z 1 śruba
12 Instrukcja obsługi
UWAGA : 4 dodatkowe śruby Do wiatr kierunek wiatrowskaz I
wiatr kubki prędkościowe .
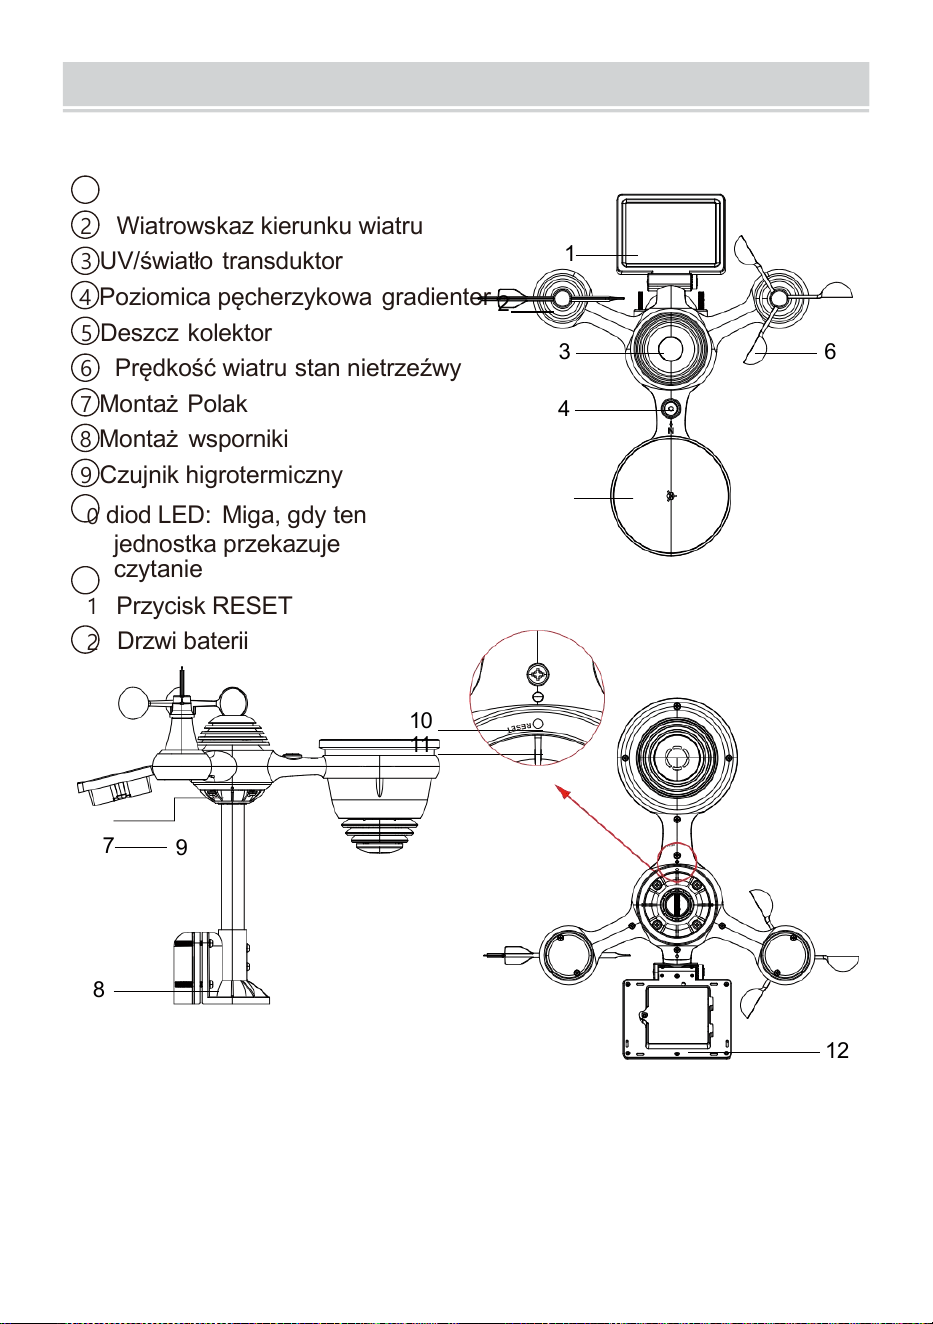
PRODUCTOVERVIEW
- 7 -
BEZPRZEWODOWY 7 W 1 NA ZEWNĄTRZ TRANSDUKTOR
1
Słoneczny płyta
2 Wiatrowskaz kierunku wiatru
3 UV/światło transduktor
4
Poziomica pęcherzykowa gradienter
2
5 Deszcz kolektor
6 Prędkość wiatru stan nietrzeźwy
7
Montaż Polak
8 Montaż wsporniki
9 Czujnik higrotermiczny
10
diod LED: Miga, gdy ten
jednostka przekazuje
czytanie
11
Przycisk RESET
12
Drzwi baterii
10
11
7
9
8
12
3 6
4
1
5
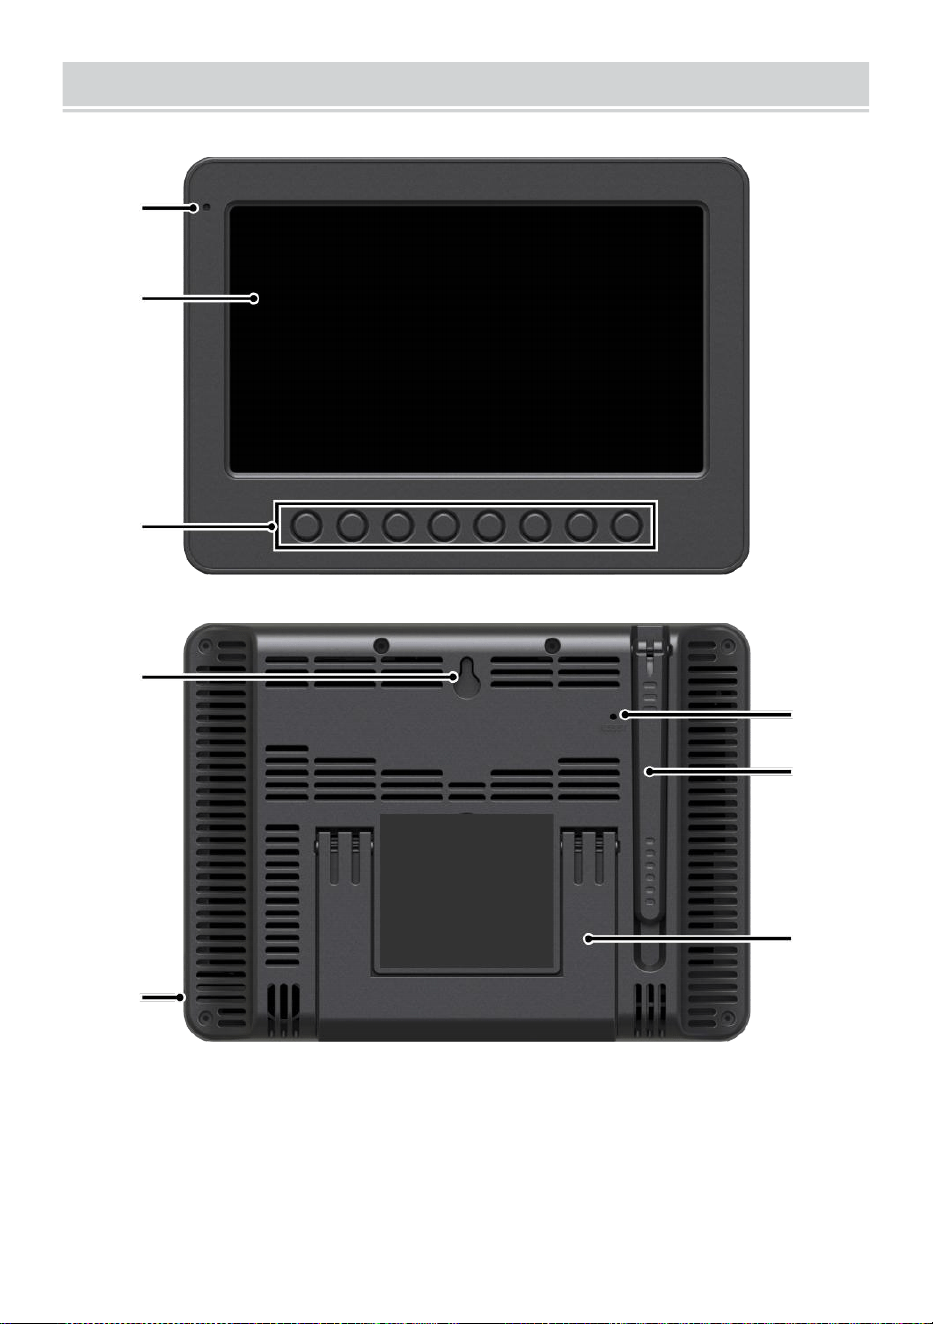
WEATHERCONSOLEOVERVIEW
- 8 -
1
2
3
4
5
6
7
8
1 Światło otoczenia detektor
4 ściany montowanie uchwyt
7 Antena
2 Ekran wyświetlacza
5 Moc wejście
8 Podpórka
3 Funkcjonować
pikolak
6 Przycisk RESET

HOME SCREEN OVERVIEW
- 9 -
1 2 3 4 5
6
15
8
16
10
17
18
o—
19
2
11
12
13
14
9
7
23 24
1 Połączenie Wi-Fi/synchronizacja czasu ikona
13 Rosa punkt
2 Czas
14 Baro ciśnienie
3 Kierunek wiatru
15 Temperatura w pomieszczeniu
4 Księżyc faza 16 Wilgotność powietrza w pomieszczeniu
5 Data
17 Światło intensywność
6 Sygnał czujnika o długości ikona
18 UVA
7 Temperatura zewnętrzna
19 Opad deszczu
8 Prędkość wiatru 20 Deszcz wskaźnik
9 Wilgotność na zewnątrz 21 Deszcz wskaźnik poziom
10 Prędkość wiatru poziom 22 Funkcjonalny przycisk ikona
11 Czuje jak temperatura 23 Prognoza pogody
12 Ciepło indeks
24 Wschód/zachód słońca czas

DETAIL SCREEN OVERVIEW
- 10 -
11
12
1 3
1 4
1 5
1 6
1 7
1 8
1 9
20
21
1 2 3 4 5 6 7 8 9 10
22
23
24
25
26
27
28
29
30
31 32
1 Połączenie Wi-Fi/synchronizacja czasu ikona
17 Temperatura
odczuwalna
2 Temperatura zewnętrzna MAX/MIN
18 Rosa punkt
3 Zewnętrzne MAX/MIN wilgotność
19 Ba -ro ciśnienie
4 Podmuch wiatru
20 Światło intensywność
5 Czas 21 UVA
6 Średnia prędkość wiatru 22 Temperatura wewnętrzna MAX/ MIN
7 Kierunek wiatru
23 Temperatura w pomieszczeniu
8 Prędkość wiatru
24 Maks./min. w pomieszczeniu wilgotność
9 Księżyc faza
25 Wnętrz wilgotność
10 Data
26 Deszcz wskaźnik
11 Czuje jak temperatura 27 Wydarzenie, godzinowy, tygodniowy,
12 Temperatura zewnętrzna
miesięczny, całkowity opad
deszczu
13 Wilgotność na zewnątrz 28 Deszcz wskaźnik poziom
14 Prędkość wiatru poziom
29 Codziennie opad
deszczu
15 Czuje temperatura jak 30 Funkcjonalny przycisk ikona

DETAIL SCREEN OVERVIEW
- 10 -
16 Ciepło indeks
31 Prognoza pogody
32 Czas wschodu/zachodu
słońca

SUMMARY SCREEN OVERVIEW
- 11 -
6
7
8
9
1 0
1 2 3 4 5
1 Połączenie Wi-Fi/synchronizacja
czasu ikona
2 Wejście/wyjście ikona etykieta
3 Czas
4 Księżyc faza
5 Data
Siła sygnału czujnika ikona
7 Temperatura wewnątrz/na
zewnątrz
8 Wilgotność wewnątrz/na
zewnątrz
9 Nie ekran łączyć ekran
10 Funkcjonalny przycisk ikona
USTAWIENIE W GÓRĘ BEZPRZEWODOWYCZUJNIK
ZEWNĘTRZNY7 W 1
Ten bezprzewodowy 7 w 1 na zewnątrz transduktor środki wiatr
prędkość , wiatr kierunek , opad deszczu, UV, światło intensywność,
temperatura i wilgotność.
INSTALOWANIE MONTOWANIE BIEGUN I NAWIAS
Zabezpiecz czujnik na montowanie biegun i uchwyt (w zestawie)
używając śruby ( dołączony ).

INSTALOWANIE KIELICHÓW PRĘDKOŚCI WIATRU I WIATRU
KIERUNEK VANE
Wyrównaj śrubę dziury w kubkach prędkości wiatru z płaską,
pionową stroną z metal pręt.
Włóż kubki mierzące prędkość wiatru w metal pręt i przykręć je na
ciasno Do zamek To W miejsce.
Wyrównaj otwory na śruby w wiatrze łopatka kierunkowa z
mieszkanie, pionowy strona metal pręt.
Włóż chorągiewkę kierunku wiatru w metal pręt i przykręć je
obcisły Do zamek To W miejsce.

- 12 -

- 13 -
Montaż kubków prędkości wiatru
Kierunek wiatru Montaż łopatki
USTAWIENIE W GÓRĘ ZBIORNIK DESZCZU
Wyrównaj nacięcia na lejku l z rowkami blokującymi wewnątrz
deszcz kolektor.
Włóż lejek w zbieracz deszczu i mocno go przykręć Do zamek
To W miejsce.

Zamek
Wyrównywać
INSTALOWANIE BATERIE
Odkręcić klapka baterii na dole 7 w 1 plenerowy transduktor za
pomocą śrubokręta 1.
Podłącz kabel akumulatorowy bateria pakiet (w zestawie) do
kabel znajduje się w ten bateria przedział.
Dopasuj podłączone kable tak, aby wygodnie do siebie
przylegały. w komp- ment. Następnie, włożyć bateria pakiet do
przedziału.

- 14 -

- 15 -
Zamknij i zamocuj pokrywę baterii z powrotem ten przedział.
NAREGULOWANIE TO SŁONECZNY KOMÓRKA
Odkręć śrubę przy złączu, tak aby koło zębate znajdowało się po
drugiej stronie stawu
wypycha. Ogniwo słoneczne powinno Teraz Być w odblokowany
pozycja n.
Dostosuj kąt pionowy ogniwa słonecznego , aby uzyskać bardzo
optymalny wykorzystanie ogniwa słonecznego w zależności od
lokalizacja.

- 16 -
Wciśnij przekładnię do środka i dokręć śrubę dopóki ten koła
zębate zamek W miejsce.
Podczas regulacji ogniwa słonecznego należy ustawić je na jakiś kąt
zamknij się Do twój szerokość geograficzna. Zobacz wykres poniżej,
aby uzyskać pomysł jak ty powinien kąt twój słoneczny komórka.
Szerokość Bliskość
Wybór kąta ogniwa
słonecznego
0°
21°
42°
63°
84°
Jeśli twój lokalizacja Jest
zamknąć Do 84°
84°
Jeśli twój lokalizacja Jest
zamknąć Do 63°
63°
Jeśli twój lokalizacja Jest
zamknąć Do 42°
42°
Jeśli twój lokalizacja Jest
zamknąć Do 21°
21°
Jeśli twój lokalizacja Jest
zamknąć Do 0°
0°
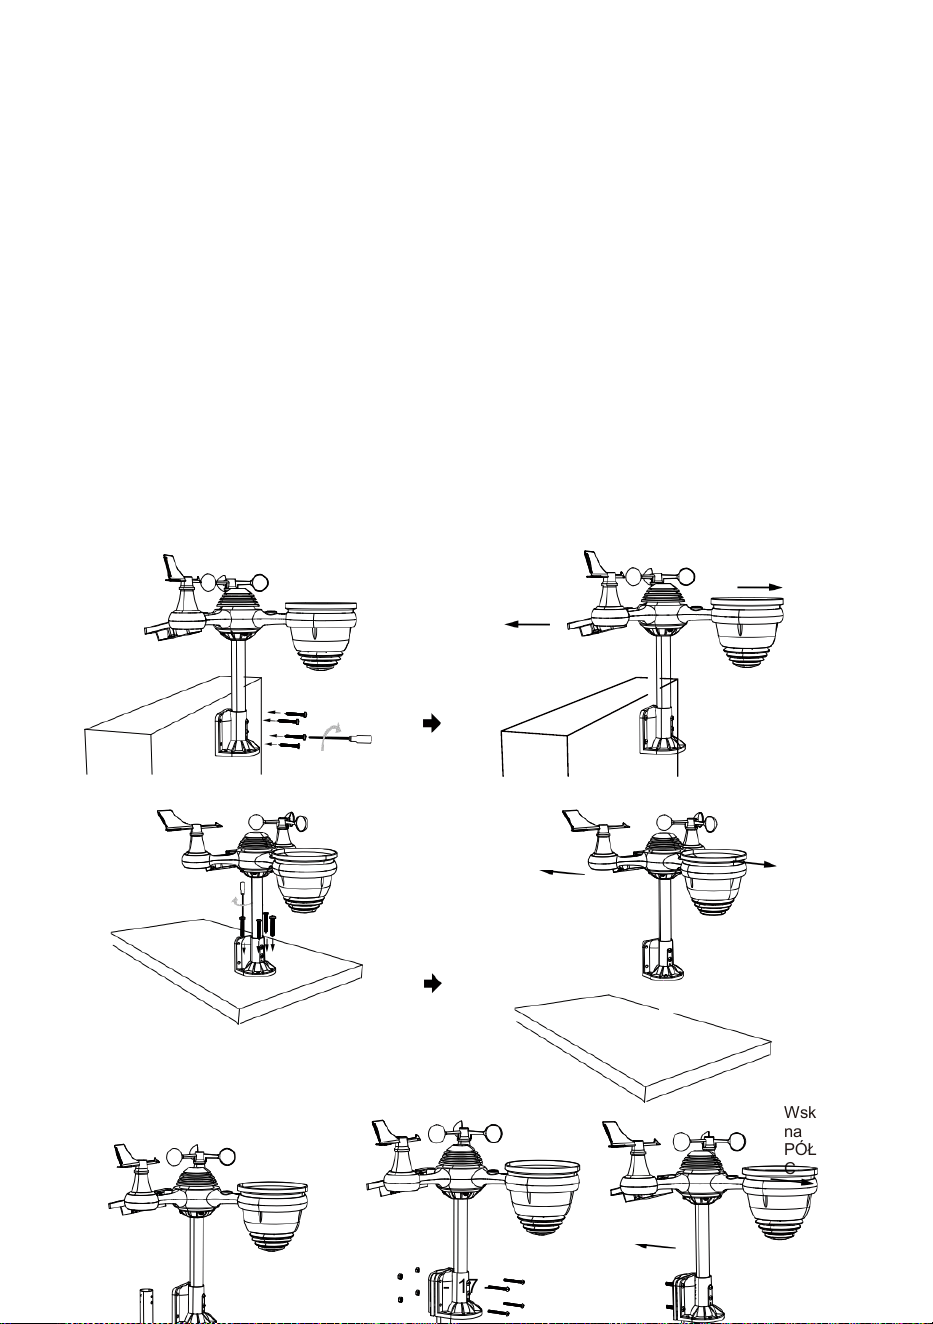
- 17 -
MONTOWANIE TO BEZPRZEWODOWY 7 W 1 NA ZEWNĄTRZ
TRANSDUKTOR
Wybierz lokalizacja zewnętrznego czujnika 7 w 1, który jest
otwarty z NIE przeszkody.
Dokręć montaż uchwytów do powierzchni/ściany za pomocą cztery
stukający
śruby (w zestawie) lub dokręć mocowanie biegun do twojego
istniejącego uchwyt- wchodzenie słup z czterema φ5 Śruby i M5
Montaż nakrętek.
Dodać gumowe podkładki na uchwyt montażowy przed
zapięciem uchwyt montażowy na ten transduktor.
Upewnij się, że twarze zbieraczy deszczu północ i słońce
panel skierowany na południe zanim zapięcie ten śruby ( dołączo
ny ).
Upewnij się, że czujnik jest zamocowany w sposób szczególny .
ciasno, w przeciwnym razie wietrznie warunki przyczyna ten nadajnik
Do potrząsnąć I zatem źle przeczytać opady deszczu dane .
Wskaż na
PÓŁNOC
Wskaż na
POŁUDNIE
Wskaż
na
PÓŁNO
C
Wskaż
na
POŁUD
NIE
Wskaż
na
PÓŁNO
C
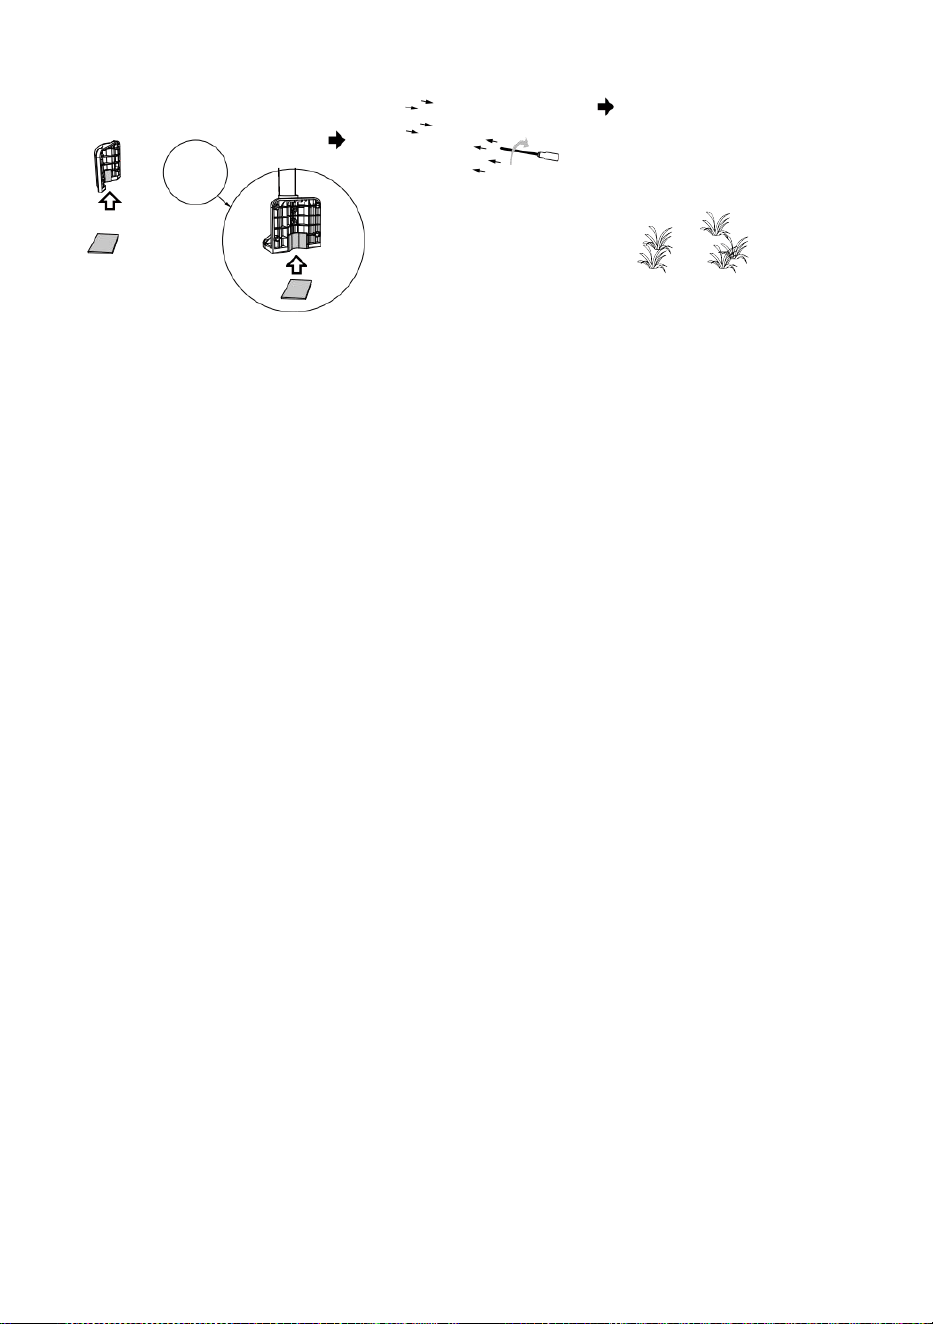
- 17 -
Wskaż
na
POŁUD
NIE
Stick
Stick

- 18 -
WSKAZYWANIE TO BEZPRZEWODOWY 7 W 1 NA ZEWNĄTRZ
TRANSDUKTOR DO POŁUDNIE
Bezprzewodowy czujnik pogodowy do użytku na zewnątrz jest
skalibrowany tak, aby spiczasty północ dla maksymalnej dokładności.
Jednak dla Twojej wygody, jeśli jesteś użytkownik
usytuowany na południu Półkula , możesz użyć czujnika z ten kolektor
deszczowy skierowany na południe.
1. Zamontuj i zainstaluj bezprzewodową prognozę pogody czujnik z h
ten deszcz kolektor wskazujący południe, zamiast Nie rth. (Proszę
odnosić się do MONTAŻ
2. BEZPRZEWODOWY 7 W 1 NA ZEWNĄTRZ TRANSDUKTOR.)
Wybierz „STH” dla południa półkula w trybie ustawiania zegara.
(Proszę zobacz „ustawienia” zegar")
UWAGA: Zmiana ustawienie półkuli automatycznie zmieni
kierunek księżyca fazy włączone on wyświetlacz.
Wskazywanie ten bezprzewodowy pogoda transduktor bliski ten
południe będzie umożliwić maksymalny światło słoneczne NA
ten słoneczny panel , szczególnie podczas ten zima sezon na
południu Półkula.
NAREGULOWANIE 7 W 1 BEZPRZEWODOWY TRANSDUKTOR
POZIOM
Użyj bańka poziom wskaźnik do upewnij się, że bezprzewodowe
lub zewnętrzne
czujnik jest całkowicie wypoziomowany. Jeśli czujnik Jest nie
poziom, ten osiągać miernik, UV i Światło intensywność będzie nie
mierzyć odpowiednio.
Aby dostosować poziom bezprzewodowego czujnika
zewnętrznego, poluzuj ten śruby słupka montażowego. Dostosuj
poziom bezprzewodowego czujnika zewnętrznego W zamówić
upewnij się, że bańka Jest w centrum poziomica wskaźnik.
Dokręć śrubę montowanie znowu biegun.
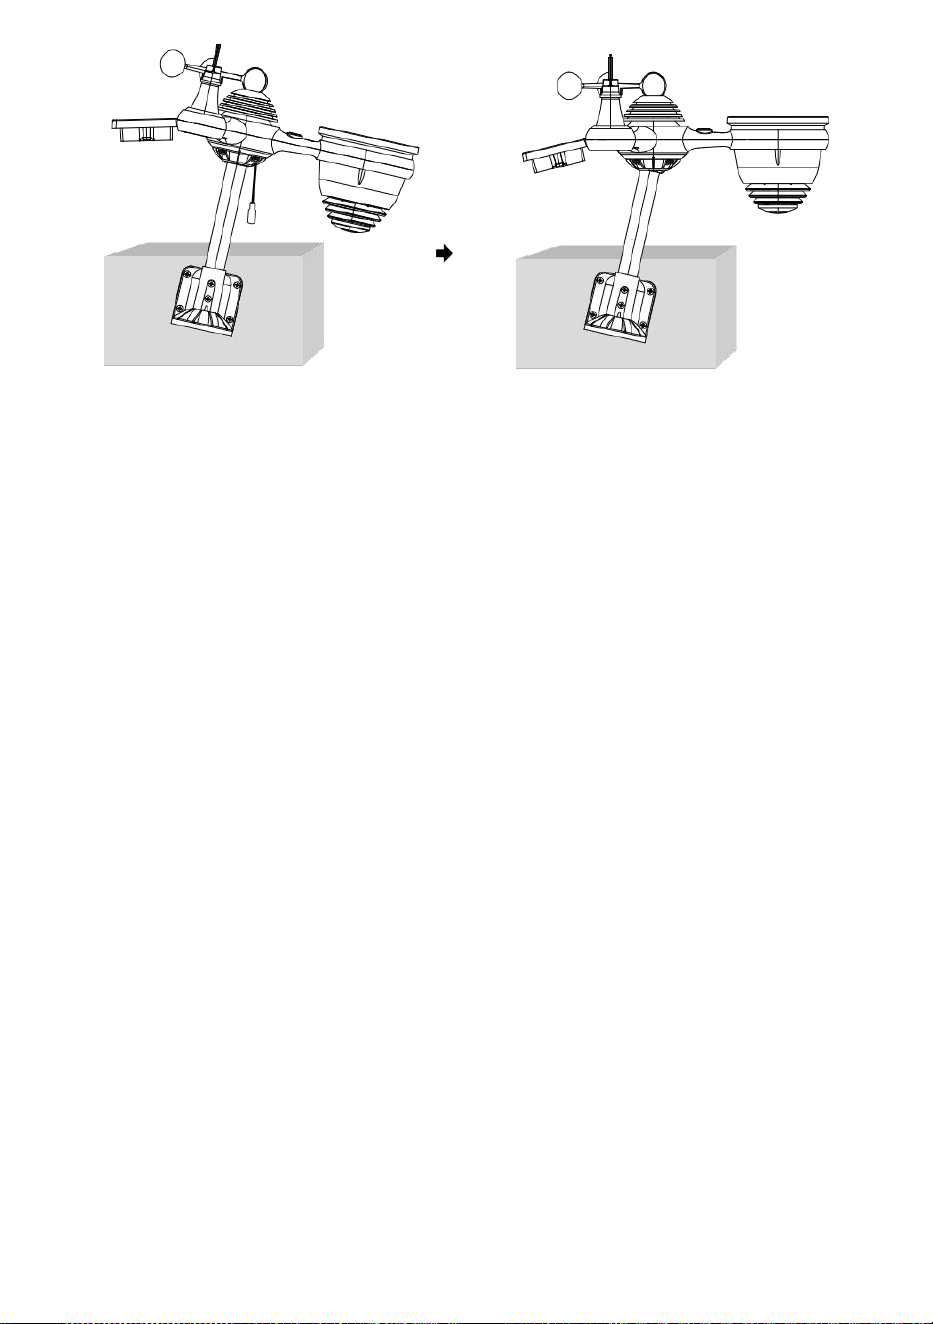
- 18 -

- 19 -
Ten bańka
USTAWIENIE WGÓRĘ KONSOLAWYŚWIETLAJĄCA
MOC W GÓRĘ KONSOLI
1. Podłącz zasilacz do wyświetlacza konsola.
2. Odwróć antenę NA z powrotem z konsola w górę.
3. Po uruchomieniu konsoli jest włączony, otwieranie ekran będzie Być
wystawiany a następnie wejdź do główny ekran.
4. Poczekaj ten plenerowy transduktor Do para z twój konsola .
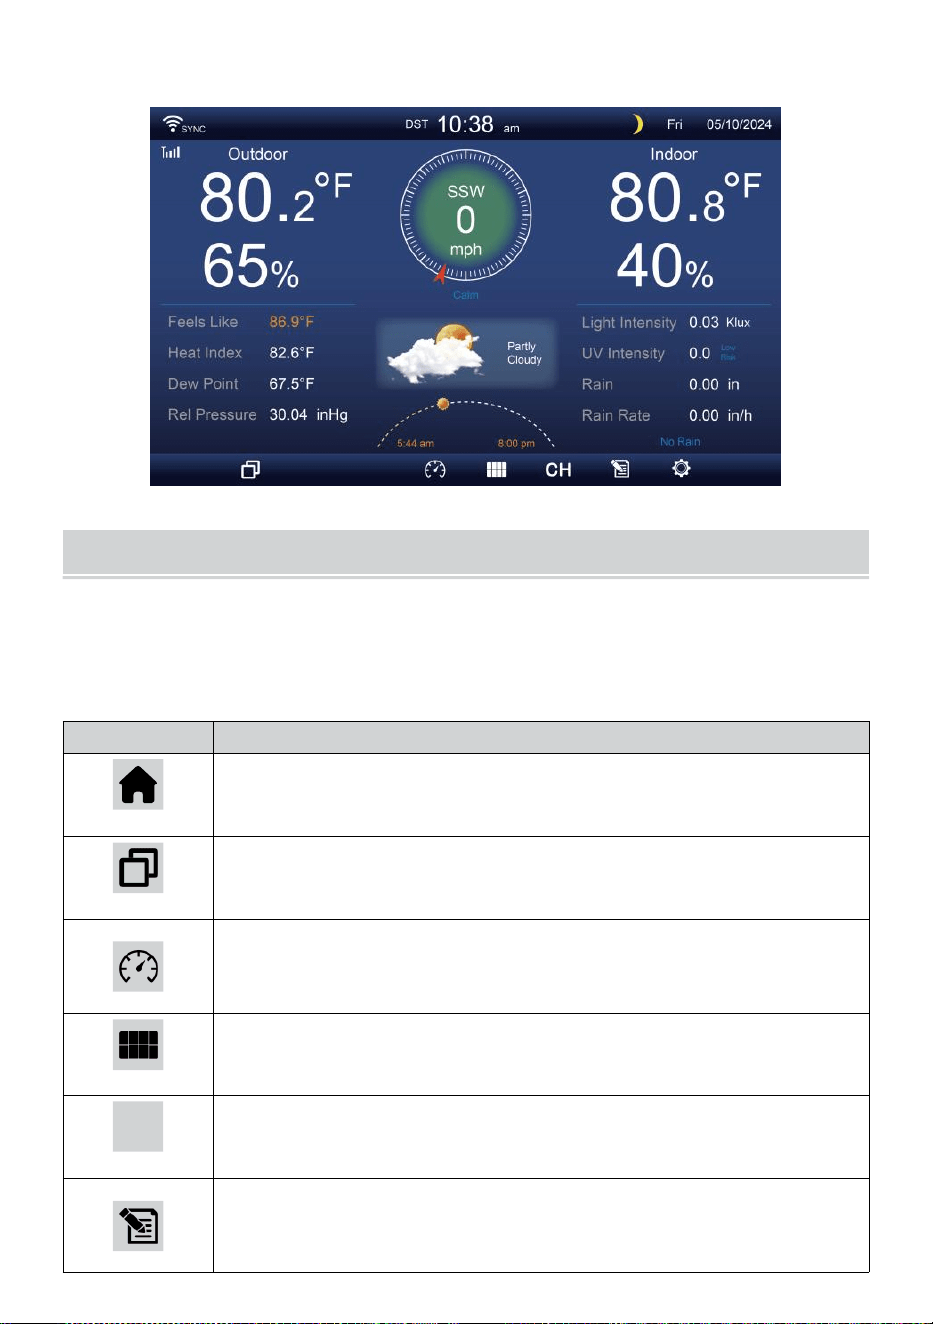
- 20 -
5. Raz sparowane, dane zewnętrzne będą pokazano NA ten ekran.
INSTRUKCJA OBSŁUGI
Ten sekcja opisuje ten główny funkcje I Inny funkcje z przyciski
wewnątrz konsoli.
GŁÓWNY FUNKCJE PIKOLAK
IKONA
OPIS
Dom przycisk
Naciśnij ten przycisk, aby wyświetlić proste dane
wyświetlacz ekran.
Zwiększać przycisk
Naciśnij ten przycisk, aby wyświetlić szczegółowy dane
ekran.
Ciśnienie
Naciśnij to przycisk do wyświetlania pomiędzy Krewny i
absolutny ekran ciśnieniowy.
Wieloczujnikowy
Naciśnij ten przycisk, aby wyświetlić ekran
wielosensorowy .
CH
Kanał
Naciśnij to przycisk do przełączania Wewnątrz, dane CH1-
7 ekran.
Historia Nagrywać przycisk
Naciśnij to przycisk, aby wyświetlić ekran historii
(maks./min., rekord danych, Wyświetlacz graficzny).
- 20 -
Ustawienie
Naciśnij ten przycisk, aby wyświetlić ten ustawienie ekran.
- 21 -
INNY FUNKCJONOWAĆ PIKOLAK DO USTAWIEŃ
IKONA
OPIS
W górę przycisk
Naciśnij to przycisk do wyboru górnego wiersz Lub
przedmiot .
W dół przycisk
Naciśnij to przycisk do wyboru niższego poziomu wiersz
Lub przedmiot .
Prawidłowy przycisk
Naciśnij to przycisk do wyboru kolumna prawa Lub
przedmiot.
Lewy przycisk
Naciśnij to przycisk do wyboru lewej strony strona kolumna
Lub przedmiot.
Cykl przycisk
Naciśnij ten przycisk, aby przełączać różne opcje ekran
parametrów.
Jasne przycisk
Naciśnij to przycisk do wyczyszczenia rekord maks./min.
Q
Szukaj przycisk
Naciśnij to przycisk do wyszukiwania danych nagrywać.
Usuwać przycisk
Naciśnij i trzymaj to przycisk do usuwania rekord s.
Powrót przycisk
Naciśnij to przycisk do powrót poprzedni strona.
OK przycisk
Naciśnij ten przycisk, aby potwierdzić on wybór.
+
+ przycisk
Naciśnij ten przycisk, aby zwiększyć wartość lub przełącz
Do Inny opcja.
- przycisk
Naciśnij ten przycisk, aby zmniejszyć wartość lub przełączyć
Do Inny opcja.
SYGNAŁ BEZPRZEWODOWY PRZYJĘCIE
Zapoznać się z ikony oznaczające różną siłę sygnału. Jeśli sygnał
jest słaby , przenieś konsolę lub czujnik pogody Lub zaginiony.
Przeszukiwanie sygnału
Silny sygnał
Słaby sygnał
Sygnał
- 21 -
zaginiony
Antena bar
Jest
przewijanie
WI-FI CONNECTION STATUS
- 22 -
Zapoznaj się z ikonami informującymi o stanie połączenia Wi-Fi.
Wi-Fi rozłączone
Połączono z siecią WI
-FI
Połączono z WI-FI za
pomocą Sync
KSIĘŻYC FAZA
Konsola wyświetlacza oblicza księżyc faza zgodnie do twojego czas,
data i godzina strefa.
Poniższa tabela wyjaśnia odpowiadające sobie fazy I ich ikony dla
obu Północny i południowy półkule.
Północny Półkula Ikony
Księżyc Faza
Południowy Półkula Ikony
Nowy Księżyc
Przybywający
Półksiężyc Księżyc
Pierwszy kwartał
Księżyc
Przybywający garb
Księżyc
Pełny Księżyc
Ubywający garb
Księżyc
Trzeci kwartał
Księżyc
Ubywający Sierp
Księżyca Księżyc
CZAS WSCHODU/ZACHODU SŁOŃCA
Konsola wskazuje wschód/zachód słońca w Twojej lokalizacji, czyli na
podstawie strefy czasowej, szerokość i długość geograficzną, którą
wprowadziłeś. Jeśli światło dzienne Oszczędność Jest ustaw na AUTO ,
czasy będzie regulować jakiś godzina do przodu automatycznie Do
światło dzienne
oszczędność.

WI-FI CONNECTION STATUS
- 22 -
NOTATKA: W przypadku strefy czasowej, szerokość
geograficzna i ustawienie długości geograficznej, Proszę
wspominać " Czas & Data Ustawienie ".

WEATHER FORECASTINGAND WEATHERINDEX
- 23 -
POGODA PROGNOZOWANIE
Ten wbudowany barometr może nie lód atmosferyczny zmiany
ciśnienia i na podstawie zebranych danych można przewidzieć
warunki pogodowe .
Dostępnych jest 6 ikon pogody --- Słonecznie, Częściowo Mętny, Mętny,
Deszczowy, Deszczowo/ burzowo i śnieżnie (jasno ) Śnieg & Ciężki
Śnieg).
Słoneczny
Częściowo
pochmurno
Mętny
Światło deszcz
Ulewny deszcz/burza
Lekki śnieg
Intensywne opady śniegu
NOTATKA:
Dokładność ogólna prognoza oparta na ciśnieniu wynosi około 6,5-
70 %. Prognozy są nie ma gwarancji.
Może to nie koniecznie odzwierciedlają aktualną sytuację.
TENDENCJA WSKAŹNIK
Ten tendencja wskaźnik widać ten trendy z zmiany W ten nadchodzący
kilka minut. Te pojawią się ikony temperatury , wilgotności, I baro-
metryczny sekcja ciśnieniowa ekranu szczegółowego.
Rosnący
Stały
Spadający
ALARM LODOWY

WEATHER FORECASTINGAND WEATHERINDEX
- 23 -
Gdy temperatura na zewnątrz Jest niższy niż 1°C/33,8° F, płatek śniegu
ikona
I
· pojawi się na wyświetlacz.

- 24 -
CZUCIA TAK JAK
Ten Czuje Jak temperatura indeks określa, jaka temperatura jest
odczuwalna na zewnątrz, biorąc pod uwagę czynniki jak wiatr prędkość,
ciśnienie, temperatura i wilgotność (wiatr) chłod I ciepło indeks).
Temperatura 18°C 26°C
10 20 30
-40 -22 -4 14 32 50 68 86 104 122 °F
Wiatr Chłodny Ciepło Indeks
CIEPŁO INDEKS
Ten Ciepło Indeks jest określana przez temperaturę bezprzewodowego
czujnika pogodowego tura i wilgotność odczyty przy temperaturze Jest
pomiędzy 79 °F (26 °C) i 120 °F (50 °C).
Ciepło Indeks zakres
Ostrzeżenie
Wyjaśnienie
81°F - 90°F (27°C - (32°C)
Ostrożność
Możliwość wyczerpania cieplnego
91°F - 40°C (33°C - 40°C)
Zachowaj
szczególną
ostrożność
Możliwość odwodnienia cieplnego
106°F - 129°F (41°C - (54°C)
Niebezpieczeńst
wo
Wyczerpanie cieplne wysoko
prawdopodobnie
≥ 131°F (≥ 55°C)
Skrajny
Niebezpieczeńst
wo
Duże ryzyko odwodnienia/ udaru
mózgu
WIATR CHŁOD
Chłodzenie wiatrem lub wiatr chłodzący to obniżanie temperatury z
powodu Do ten przechodzić-
przepływ powietrza o niższej temperaturze. Chłodzenie wiatrem jest
określony przez A połączenie danych dotyczących temperatury i
prędkości wiatru z bezprzewodowego czujnika pogodowego . UWAGA:
Tylko wtedy, gdy temperatura jest poniżej 50 ℉ (10 ℃ ), a
prędkość wiatru przekracza 4,8 km/h (3 mph), wyświetli wartość
odczuwalnej temperatury,
W przeciwnym razie wyświetli się „--.-“.
ROSA PUNKT
Rosa punkt jest temperaturą, poniżej której para wodna w powietrze Na
-40 -30 -20 -10 0
40 50 °C
Increasing danger Increasing danger

- 24 -
stały barometryczny ciśnienie się skrapla do wody w stanie ciekłym w tym
samym czasie szybkość , z jaką paruje. Skroplona woda nazywana jest
rosą , gdy To formy na solidny powierzchnia.
Rosa temperatura punktowa jest określana przez temperaturę i
wilgotność dane z ten bezprzewodowy pogoda czujnik .
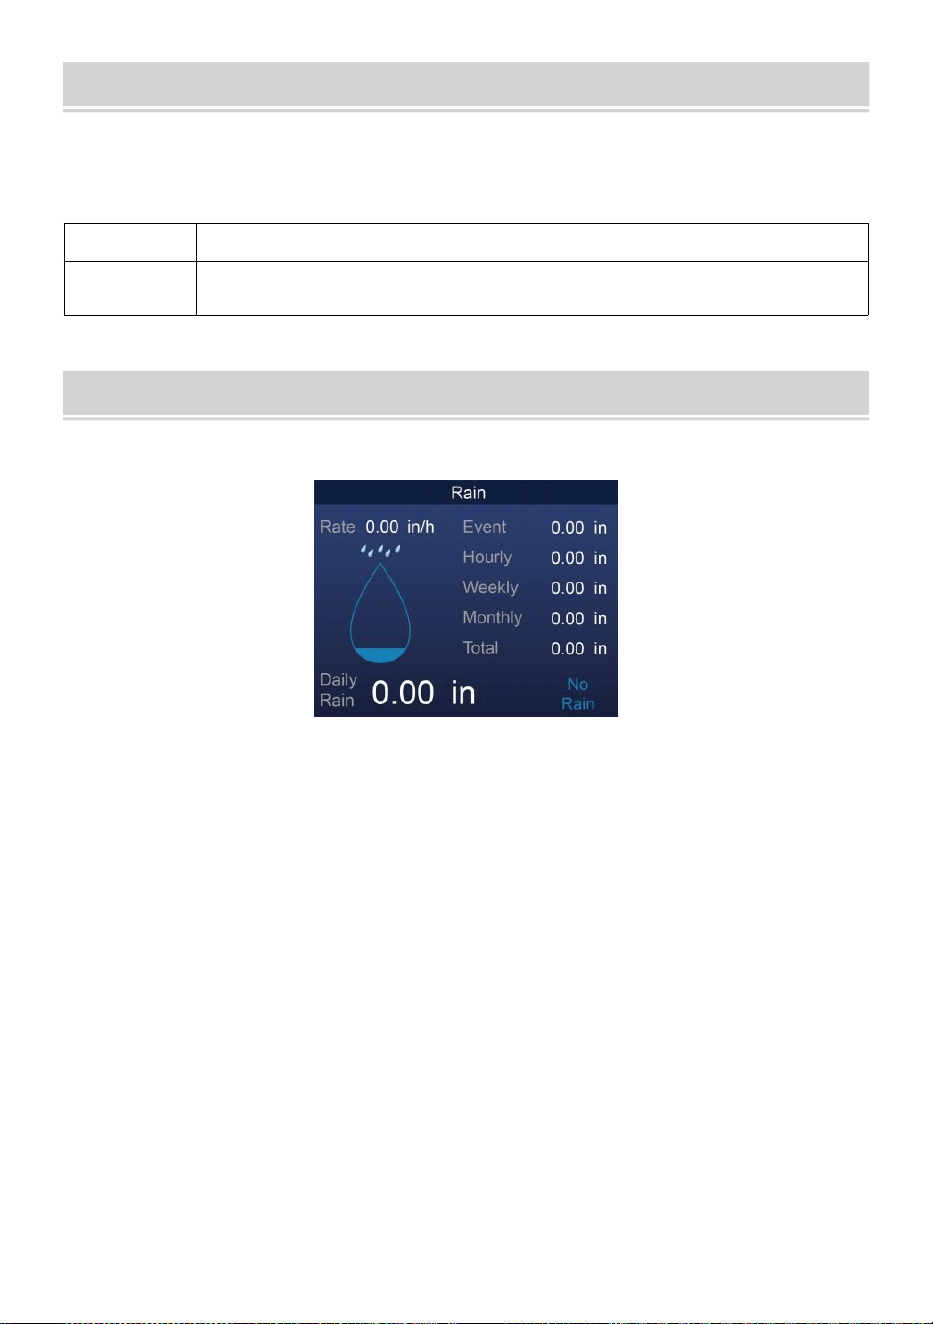
BAROMETRIC PRESSURE
- 25 -
Sprawdzać ten pogoda strona internetowa Do w czasie rzeczywistym
barometr warunki Następnie dostosuj względny w Kalibrowanie
ustawienie sekcja.
Absolutny
Ten absolutny atmosferyczny ciśnienie z twój lokalizacja .
Względny
Ten względny atmosferyczny ciśnienie na podstawie
poziomu morza.
DESZCZ
opady deszczu deszcz wskaźnik informacja.
OPAD DESZCZU WYŚWIETLACZ TRYBY
Deszcz
Wskaźnik
: Aktualny opad deszczu wskaźnik w przeszłość godzina
nasza.
Deszcz
wydarzenie
:ciągły deszcz, i resetuje do zera jeśli gromadzą się opady
deszczu Jest mniej niż 10mm (0,039 W) w ciągu 24
godzin.
Cogodzinny
Deszcz
: Całkowity opady deszczu dla każdego godzina.
Codziennie
Deszcz
: Całkowity opady deszczu od północ (00:00)
Tygodnik
Deszcz
: Całkowity opady deszczu w bieżącym tygodniu w
Kalifornii i resetuje się w niedzielę rano o północ (od
niedzieli do soboty)
Miesięczny Deszcz : Całkowity opady deszczu w bieżącym miesiącu
kalendarzowym oraz nastawić NA pierwszy dzień
Miesiąc.
Całkowity Deszcz: Całkowity opady deszczu od ostatni nastawić.
ZRESETUJ CAŁKOWITĄ SUMĘ OPAD DESZCZU NAGRYWAĆ

BAROMETRIC PRESSURE
- 25 -
Zobacz „Wymaż wszystko Sekcja „ Dane ” do usuwania opadów
deszczu dane.

WIND
- 26 -
PRĘDKOŚĆ WIATRU I KIERUNEK
Ten sekcja wyświetlacze ten wiatr prędkość , prąd wiatr kierunek ,
dominujące kierunki wiatru i prędkość wiatru poziom.
Prędkość wiatru: to średnia prędkość wiatru wymierzony w
poprzednie 20 towary drugiej jakości.
Średnia prędkość wiatru: średnia prędkość wiatru W 10 protokół.
Poryw: jest najwyższa prędkość wiatru nagrany w poprzednie 20
sekund .
Prosty Dane Wyświetlacz
Szczegółowy Dane Wyświetlacz
SKALA BEAUFORT
Ten Poniżej znajduje się skala Beauforta skala międzynarodowa
prędkości wiatru z 0 (spokojny) do 12 (Siła huraganu).
- 27 -
Skala Beauforta
Opis
Prędkość
wiatru
Stan gruntu
0
Spokój
< 1 km/godz.
Spokój. Dym wzrasta pionowo.
< 1 milna
godzinę
< 1 węzły
< 0,3 SM
1
Światło powietrze
1.1 ~ 5
km/godz.
Dym wskazuje na wiatr kierunek.
Liście i chorągiewki są nieruchome.
1 ~ 3 mil na
godzinę
1 ~ 3 węzły
0,3 ~ 1,5 SM
2
Światło bryza
6 ~ 11
km/godz.
Wiatr wyczuwalny na odsłoniętej skórze.
Liście szelest. Rozpoczynają się
wiatrowskazy Do przenosić.
4 ~ 7 mil na
godzinę
4 ~ 6 węzły
1.6 ~ 3.3 SM
3
Delikatny bryza
12 ~ 19
km/godz.
Liście i małe gałązki stale poruszający.
Lekkie flagi rozwinięte.
8 ~ 12 mil na
godzinę
7 ~ 10 węzły
3.4 ~ 5.4 SM
4
Umiarko
wany
bryza
20 ~ 28
km/godz.
Kurz i luźny papier podniesiony.
Mały gałęzie zacząć przenosić.
13 ~ 17 mil na
godzinę
11 ~ 16 węzły
5.5 ~ 7.9 SM
5
Świeży bryza
39 ~ 38
km/godz.
Gałęzie umiarkowany rozmiar
przenosić . Małe drzewa w liściu
zacząć kołysać.
18 ~ 24 mil na
godzinę
17 ~ 21 węzły
8.0 ~ 10.7 SM
6
Mocny bryza
39 ~ 49
km/godz.
Duży gałęzie W ruch. Gwizdanie usłyszał
w przewodach napowietrznych. Użycie
parasola staje się trudny. Pusty
plastikowy kosze na śmieci przewracają
się r.
25 ~ 30 mil na
godzinę
22 ~ 27 węzły
10.8 ~ 13.8 SM
7
Silny wiatr
50 ~ 61
km/godz.
Całe drzewa W ruch. Wysiłek trzeba
było iść przeciwko zwycięstwu .
31 ~ 38 mil na
godzinę
28 ~ 33 węzły
13.9 ~ 17.1 SM
8
Wichura
62 ~ 74
km/godz.
Niektóre gałązki są złamane drzewa.
Samochody skręcają droga. Postęp
pieszo Jest poważnie utrudnione.
39 ~ 46 mil na
godzinę
34 ~ 40 węzły
17.2 ~ 20.7 SM
9
Silny sztorm
75 ~ 88
km/godz.
Niektóre gałęzie się łamią z drzew, i
niektóre małe drzewa się przewracają .
47 ~ 54 mil na
godzinę
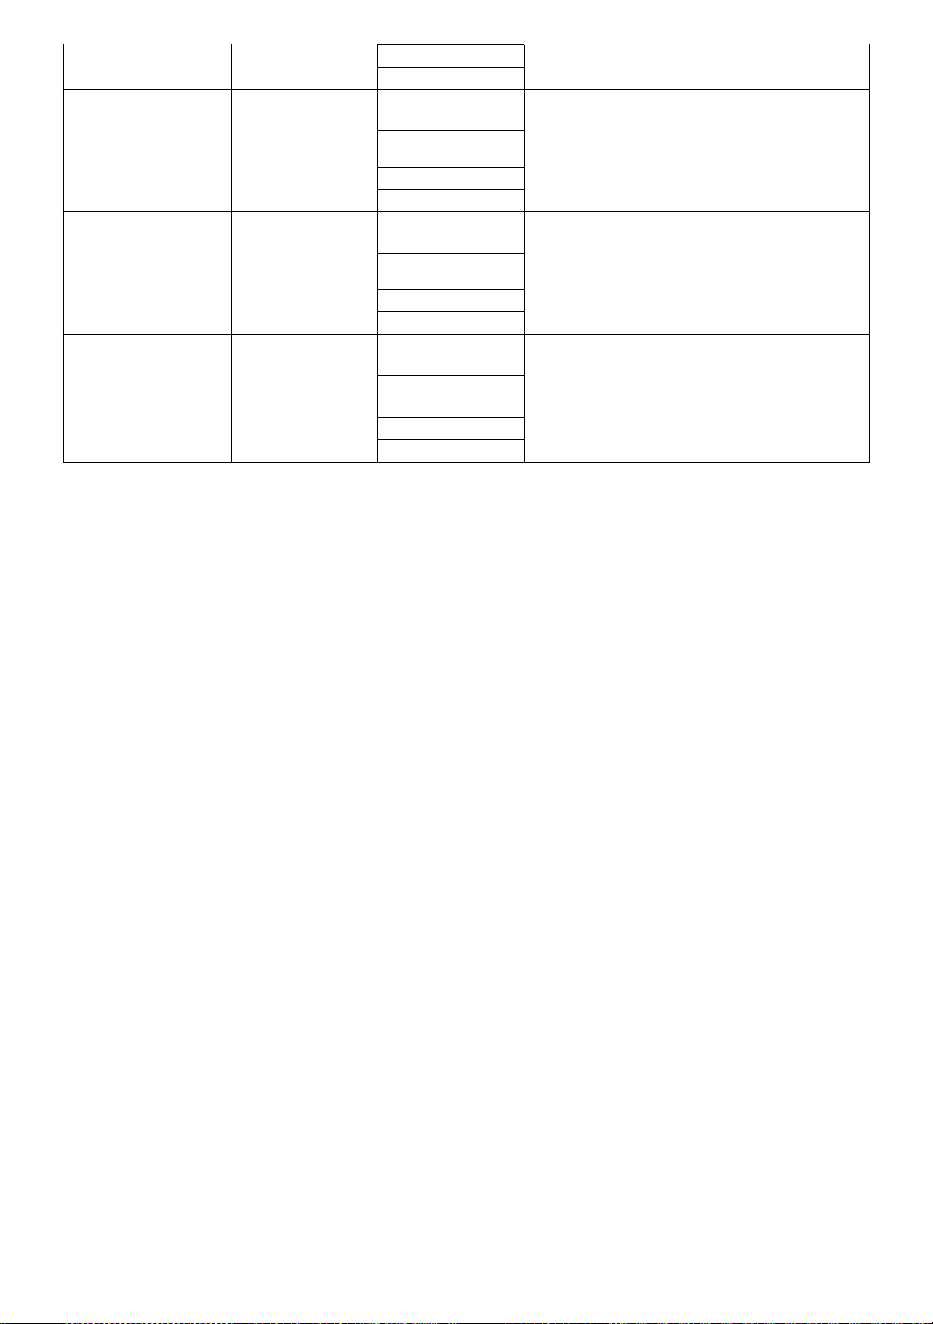
- 27 -
Budownictwo /
tymczasowe znaki i bariery cios nad.
41 ~ 47 węzły
20,8 ~ 24.4 SM
10
Burza
89 ~ 102
km/godz.
Drzewa są połamane wyłączony
lub wyrwany z korzeniami,
uszkodzenie strukturalne
prawdopodobnie.
55 ~ 63 mil na
godzinę
48 ~ 55 węzły
2,45 ~ 28.4 SM
11
Gwałtowna burza
103 ~ 117
km/godz.
Rozległa roślinność i struktura
szkoda prawdopodobnie.
64 ~ 73 mil na
godzinę
56 ~ 63 węzły
28,5 ~ 32,6 SM
12
Siła huraganu
≥ 118
km/godz.
Poważne i rozległe szkody w roślinności i
struktur. Gruz i niezabezpieczone
obiekty są rzucane na wszystkie strony.
≥ 74 mil na
godzinę
≥ 64 węzły
≥ 32,7 SM
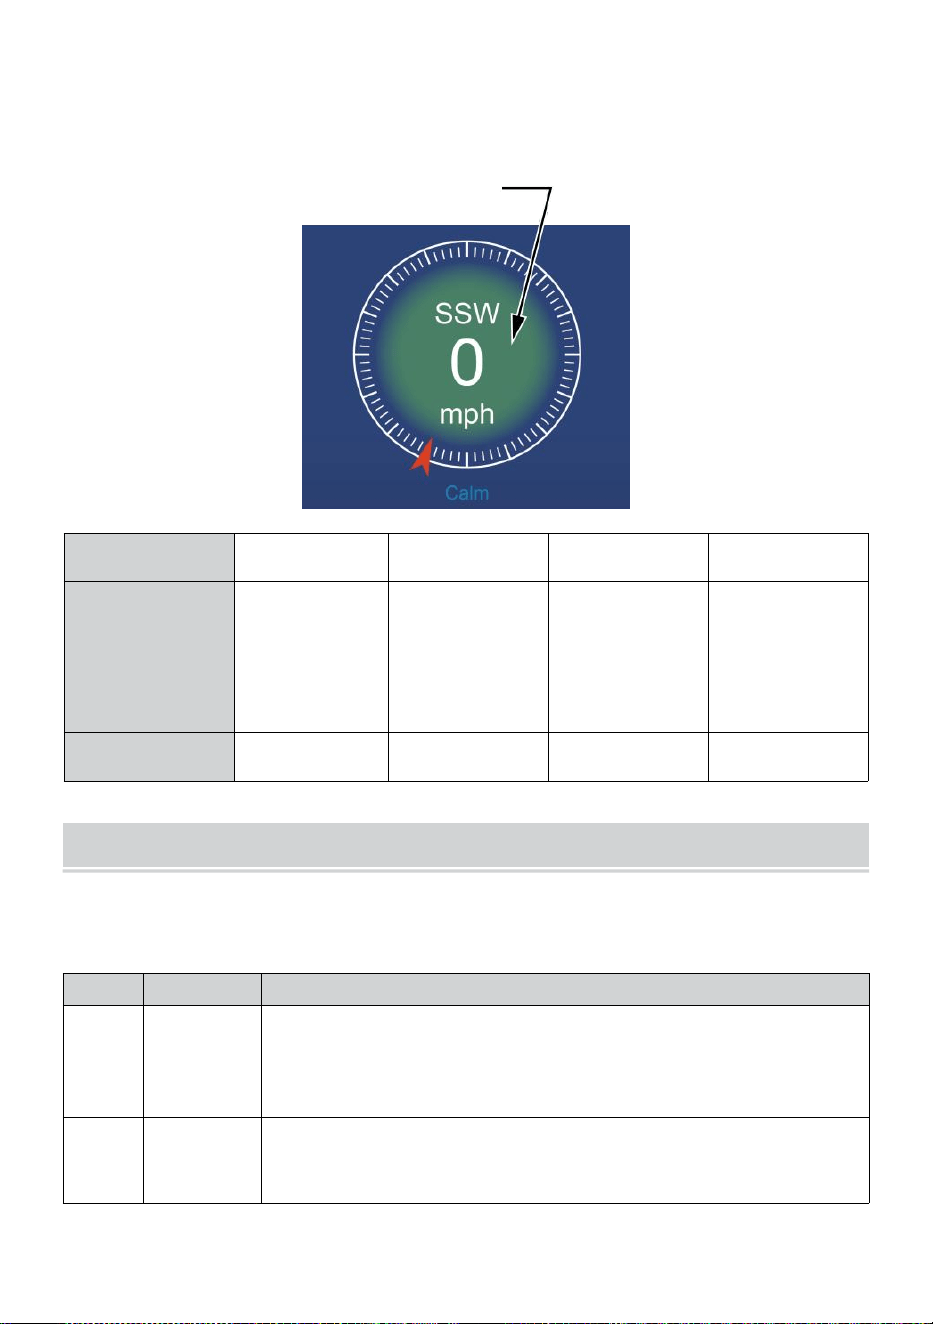
- 28 -
PRĘDKOŚĆ WIATRU POZIOM
Wyświetlany wykres poziomu prędkości wiatru zapewniać A szybki
odniesienie do ten
aktualny wiatr stan . tło kolor z ten kompas zmienia się w zależności
od prędkości wiatru.
Poziom
Światło
Umiarkowan
y
Mocny
Burza
Prędkość
0 - 12 mil na
godzinę
0 - 19
km/godz.
12 - 30 mil na
godzinę
20 - 49
km/godz.
31 - 55 mil na
godzinę
50 - 88
km/godz.
≥ 55 mil
na
godzinę ≥
89
km/godz.
Kolor kompasu
Zielony
Żółty
Pomarańcz
owy
Czerwony
ŚWIATŁO INTENSYWNOŚĆ I U V INDEKS
Ta sekcja wyświetla wykres dla światło intensywność i Promieniowanie
ultrafioletowe indeks.
UVA
Ocena
Komentarz
0-2
Niski
A Promieniowanie ultrafioletowe Indeks odczyt od 0 do 2
oznacza niskie zagrożenie ze strony
słońce Promieniowanie ultrafioletowe promienie dla
przeciętnego osoba.
3-5
Średni
A Promieniowanie ultrafioletowe Indeks czytanie od 3 do 5
oznacza umiarkowany ryzyko szkody od nieosłoniętego
słońca narażenie.
- 28 -
6-7
Wysoki
A Promieniowanie ultrafioletowe Indeks czytanie od 6 do 7
oznacza wysoki ryzyko szkody przed nieosłoniętym
działaniem promieni słonecznych. Chroń jon przed skórą i
oczami szkoda Jest wymagany.
8-10
Bardzo
Wysoki
A Promieniowanie ultrafioletowe Indeks czytanie od 8 do 10
oznacza bardzo wysoki ryzyko uszkodzenia skóry w wyniku
nieosłoniętego narażenia na słońce. Weź dodatkową
środki ostrożności
ponieważ nieosłonięta skóra i oczy będą Być
uszkodzony I Móc szybko się palą.
11-15
Skrajny
A Promieniowanie ultrafioletowe Indeks czytanie 11 lub
więcej oznacza ekstremalny ryzyko szkód
spowodowanych nieosłoniętą ekspozycją na słońce.
Zabierz wszystkie środki ostrożności ponieważ
nieosłonięta skóra i oczy mogą oparzenie W protokół.
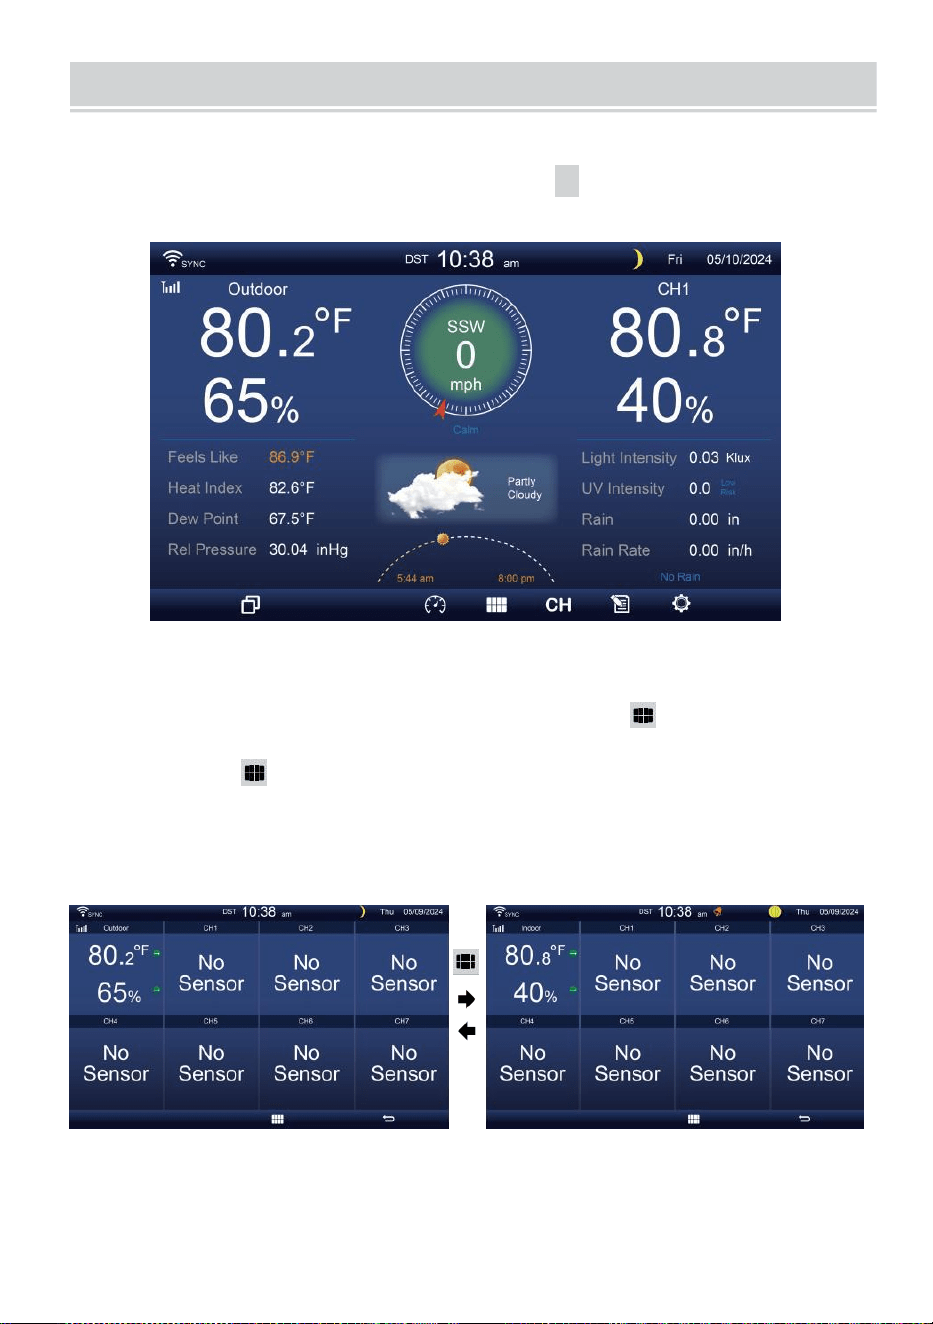
MULTI-CHANNEL DISPLAY MODE
- 29 -
KANAŁ WYŚWIETLACZ
Na ekranie prostym/
szczegółowym
,
naciśnij
cH
przycisk do
przełączania się między wewnątrz i na kanale 1-7 dane.
WIELOCZUJNIKOWY WYŚWIETLACZ STRONA
Na ekranie prostym/szczegółowym, naciskać przycisk do
wejścia w tryb wieloczujnikowy ekran wyświetlacza.
Naciskać przycisk do zamień wyświetlacz między wewnątrz i na
zewnątrz lub dane z czujnika.
Naciśnij przycisk
W
, aby powrócić do trybu
prostego/szczegółowego ekran.
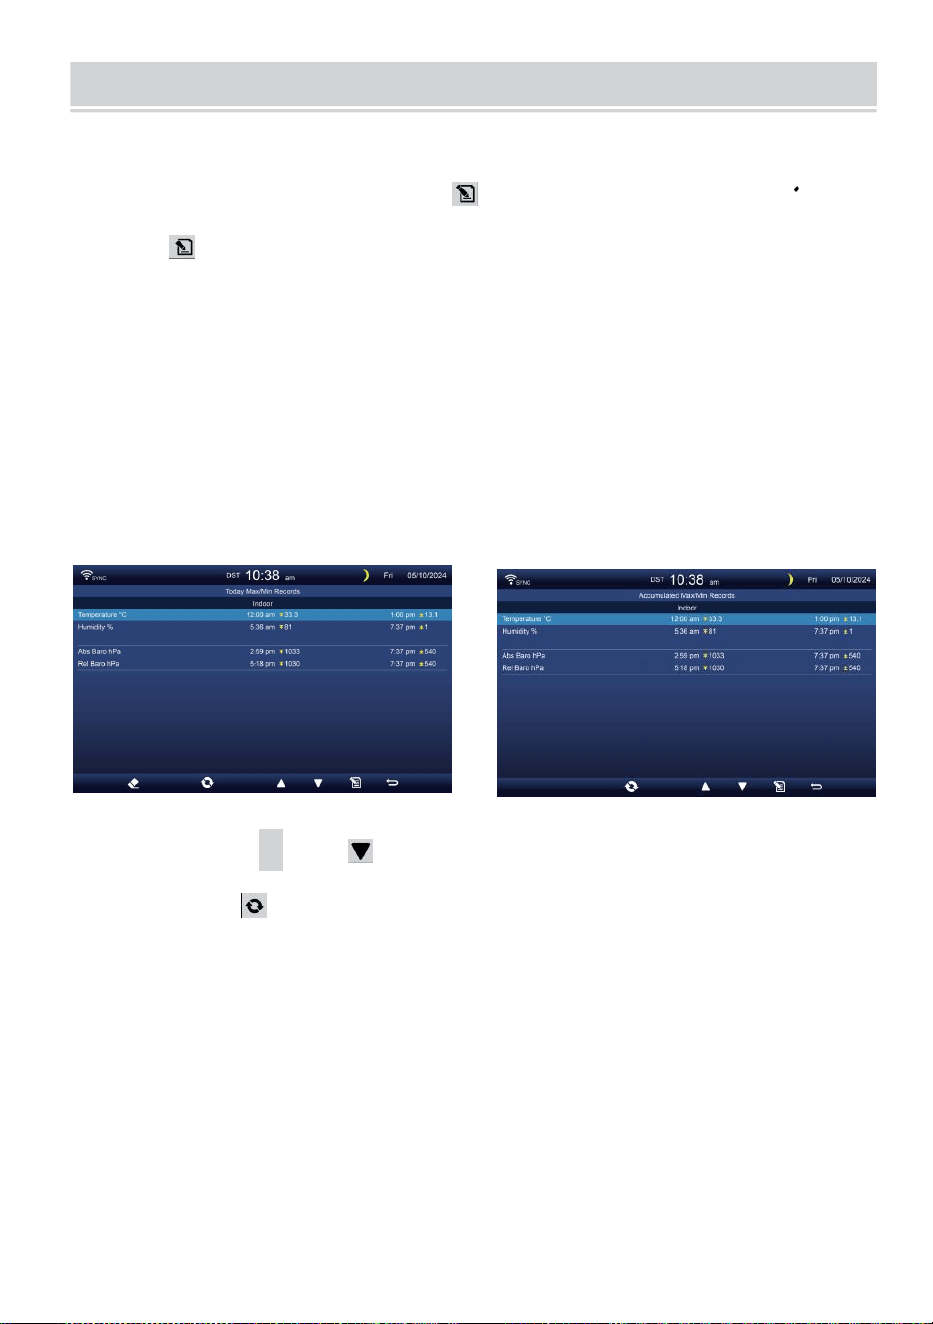
WEATHER DATA RECORD
- 30 -
W tej sekcji wyjaśniono jak dostać się do przeglądania jej danych
nagrywać (Max- /Min, rejestr danych, wykres historii). Aby wyświetlić ten
pogoda dane nagrywać , naciskać przycisk na ekranie
prostym/szczegółowym, aby przejść do ekranu danych pogodowych.
Naciskać
przycisk do zamienić maks./min., rejestr danych i wykres historii tryby.
MAKS./MIN.
Istnieją 2 tryby danych dla MAX/MIN dokumentacja: Codziennie
lub Skumulowane. (Zależy od Maks./min. nagrywać tryb wewnątrz
Ustawienia wyświetlania strona )
Codziennie Dane maks./min. tryb
Dane maks./min. być wyświetlanym i wyraźnym północ.
Nagromadzone Tryb danych maks./min.
Dane maks./min. będą utrzymany skumulowane.
Codziennie Maks./min. Rekord zgromadzony Maks./min. Nagrywać
Naciskać
▲
Lub przycisk, aby wybrać pożądany Maks./min.
nagrywać.
Naciskać przycisk do interchange do pokazania wewnątrz, na
zewnątrz i kanał Maks./min. dokumentacja.
Naciskać . przycisk Do powrót prosty / szczegółowy ekran .

WEATHER DATA RECORD
- 30 -

- 31 -
Wyczyść maks./min. dane
Aby wyczyścić wybrane MAKS./MIN. dokumentacja, naciśnij i
trzymać przycisk ponad 2s, aby wyczyścić wybrane Maks./min.
nagrywać.
DANE EKRAN LOGOWANIA
Ekran dziennika danych przechwytuje Wszystko ten historia
dokumentacja.
Poruszanie się po danych ekran dziennika
Naciskać , , ,
B
przyciski do przeglądać ekran.
Naciśnij przycisk powrotu do prostego/ szczegółowego
ekranu.
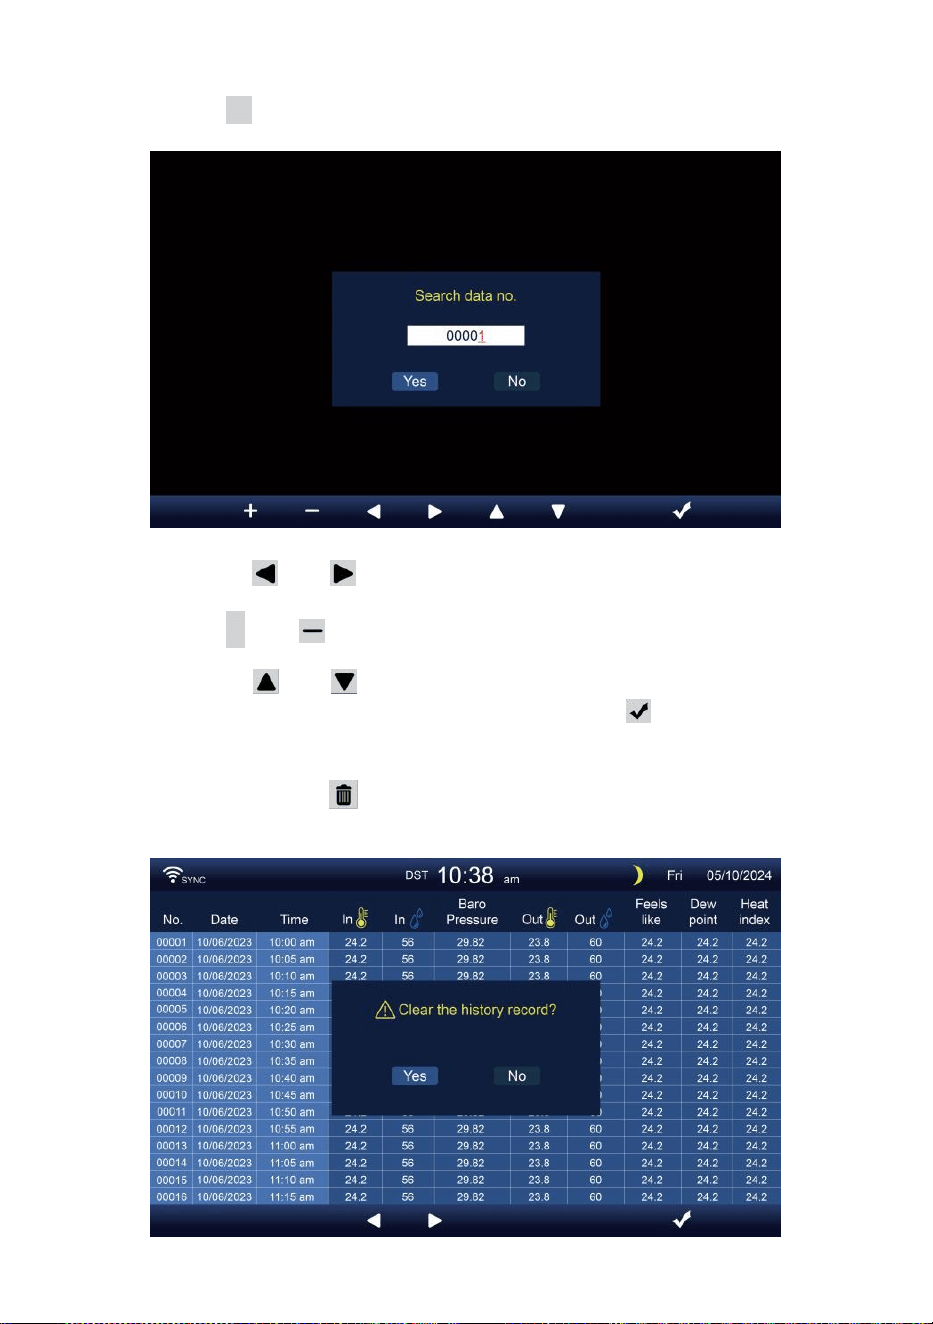
- 32 -
Poszukiwanie konkretnego strona
Naciśnij Q , aby wyświetlić szukaj ten dane nagrywać.
Naciskać Lub przycisk do wyboru cyfra W ten strona
numer,
Naciśnij + Lub przycisk do zmiana ten numer w górę Lub w
dół.
Naciskać Lub przycisk do zmiany aktywowanego pole
opcji, dźwignia kolankowa Tak czy NIE, naciskać Do potwierdzać.
Usuń wszystkie dane dziennik dokumentacja
Naciśnij i trzymać ponad 2s do usunięcia Wszystko
dokumentacja.

- 32 -
Naciskać Lub przycisk do wyboru t zmiana ten
aktywowany opcja pole, przełącz Tak lub NIE, naciskać ż Do
potwierdzać.
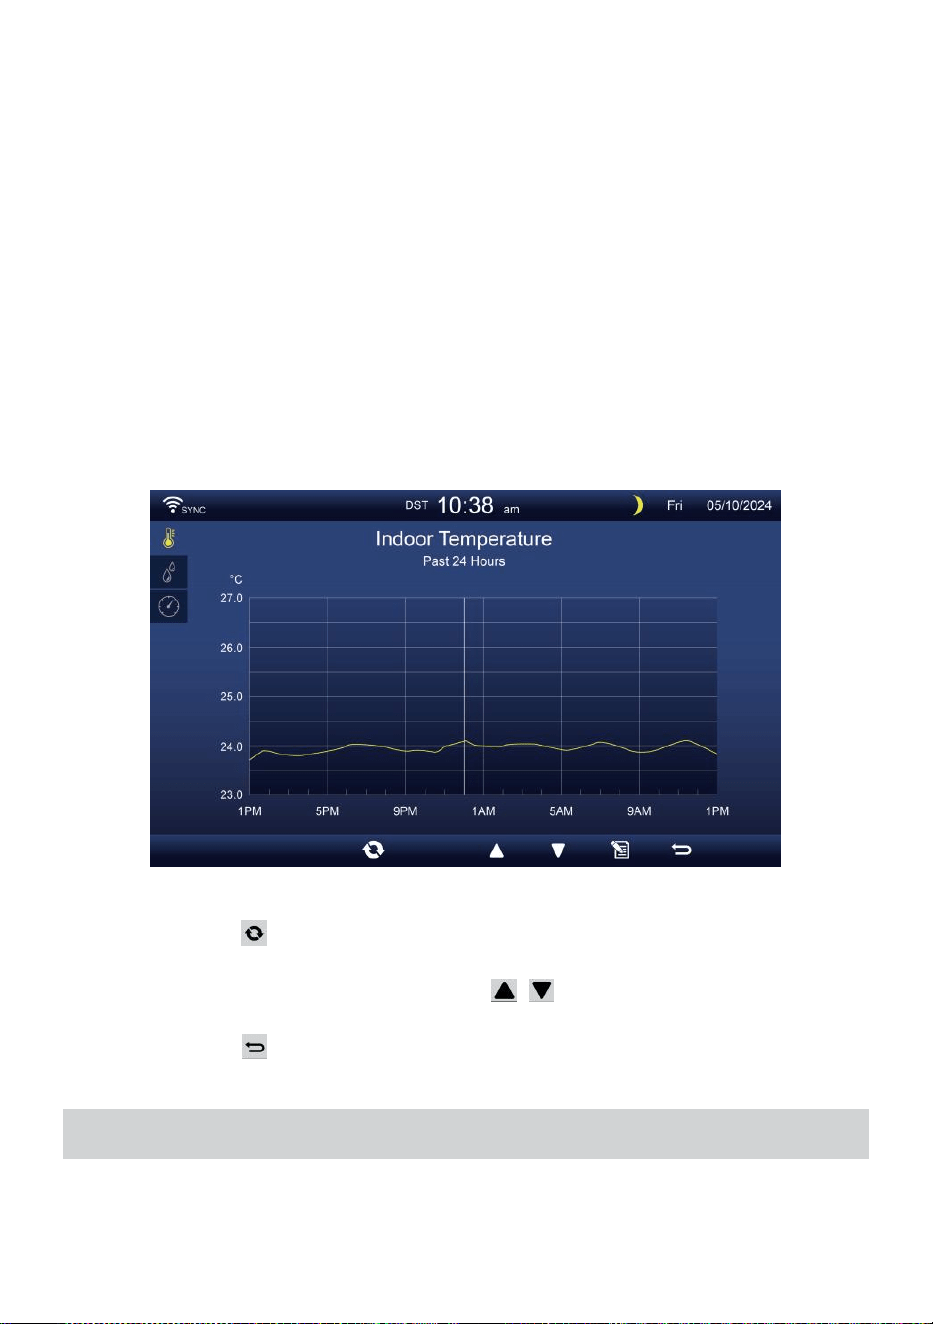
- 33 -
WYKRES HISTORYCZNY
W tej sekcji wyjaśniono jak dotrzeć i obejrzeć historia wykresy.
Tam są wykres wewnętrzny, wykres zewnętrzny i wykres kanału
Być pokazano.
Wykres wewnętrzny
Temperatura, Wilgotność, Względne i bezwzględne
ciśnienie
.
Wykres zewnętrzny
Temperatura, Wilgotność, Deszcz Wskaźnik, Ostatnie 24
godziny Opady deszczu, średnia prędkość wiatru, porywy wiatru,
kierunek wiatru, Światło Intensywność i UVA.
Wykres CH1-CH7
Temperatura, Wilgotność.
Naciskać przycisk do interchange do pokazania wewnątrz, na
zewnątrz i kanał wykres historyczny.
Gdy pojawi się wykres, naciskać , przyciski do wyświetlania
innych wykresów.
Naciskać przycisk do zwróć proste/szczegółowe ekran.
USTAWIENIA OGÓLNE
Wszystkie ustawienia konsoli i informacje systemowe Czy w
ustawienie menu. Istnieje 8 typów ustawień parametrów wewnątrz
ustawienie menu.

- 33 -
Podczas wyświetlania ekranu prostego/szczegółowego naciśnij
przycisk do wejścia w ustawienia menu.

- 34 -
CZAS / DATA USTAWIENIE
Naciskać Lub przycisk, aby wybrać jedno z następujących
ustawień:
#
Zastąpić przedmiot
Działanie
A
Synchronizacja
czasu
internetowego
Naciskać
+
/
-
przycisk Do zakręt NA Lub zakręt wyłączony .
B
Format czasu
Naciskać
+
/
-
przycisk Do wybierać 12 lub w formacie 24 .
C
Czas ustawić
Kiedy synchronizacja czasu jest wyłączony, naciskać /
przycisk do wyboru między godzina lub minuta, naciśnij + /
-
przycisk, aby dostosować wartość.
D
Format daty
Naciskać
+
/
-
przycisk do wyboru M / D lub D / W formacie M.
m
i
Data ustawić
Kiedy synchronizacja czasu jest wyłączony, naciskać /
przycisk do wyboru roku, Miesiąc, Data, naciskać /
przycisk do regulacji wartość.
F
Czas letni
Naciskać
+
/
-
przycisk do wyłączania lub ustawiania Czas letni
na automatyczny.
G
Strefa czasowa
Naciskać
+
/
-
przycisk Do wybierać ten twój lokalny czas
strefa Do podaj dokładny czas.
H
Półkula
Naciskać +przycisk / do wyboru PÓŁNOC czy POŁUDNIE
półkula dla punkt czujnika 7 w 1 Do I księżyc faza.
I
Długość-szerokość
geograficzna
Naciskać
+
/
-
przycisk Do Wchodzić Długość geograficzna -
szerokość geograficzna organizować coś strona .
Naciskać przycisk, aby przejść do ekranu ustawień alarmu.
Naciskać przycisk do powrót do ekranu
prostego/szczegółowego .
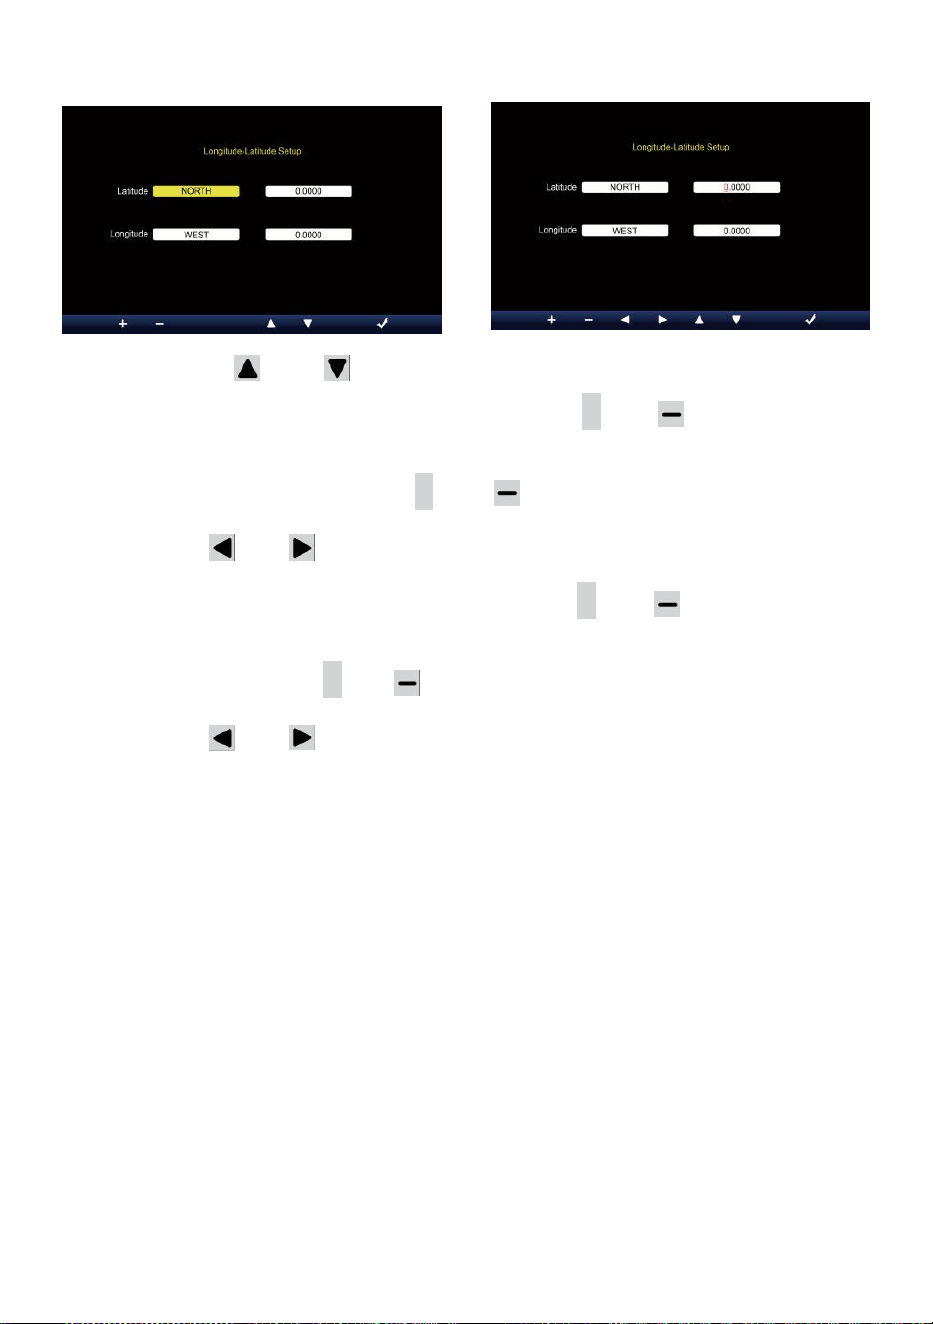
- 35 -
Ustawienie długości i szerokości geograficznej
Naciskać Lub przycisk do zmiany ten aktywowany pole opcji.
1. Szerokość geograficzna (półkula) --- Naciśnij
+
Lub przycisk do
Wybierz półkula . (PÓŁNOC/POŁUDNIE)
Szerokość geograficzna --- szerokość geograficzna x 10 się
odwróci czerwony. Naciskać + Lub przycisk służący do
zwiększania lub zmniejszania wartości .
Naciskać Lub zmienić pozostać wartość szerokości
geograficznej.
2. Długość geograficzna (półkula e) --- Naciśnij + Lub przycisk, aby
wybrać półkula . (WSCHÓD/ZACHÓD)
Długość geograficzna --- szerokość geograficzna x 100 się obróci
czerwony. Naciskać
+
Lub przycisk służący do zwiększania lub
zmniejszania wartości .
Naciskać Lub przycisk do zmiany pozostania wartość długości
geograficznej.
Naciskać ż przycisk do potwierdzenia Długość geograficzna
Szerokość ustawienia.
NOTATKA:
Określić długość geograficzna i
szerokość. np
Szerokość
Długość
geograficzna
: 33.2981
: -111.9602
Jeśli lokalizacja Jest w Północny Półkula, Szerokość geograficzna
będzie Być pozytywny. Jeśli lokalizacja Jest na południu Półkula,
Szerokość geograficzna będzie Być negatywny. Jeśli lokalizacja
Jest w Rufa wschodnia Półkula, długość geograficzna będzie Być
pozytywny.
Jeśli lokalizacja Jest na Zachodzie Półkula, długość geograficzna
będzie Być negatywne. Tak więc powyższe Długość geograficzna i

- 35 -
d Szerokość geograficzna zostanie wprowadzona do wyświetlacz w
następujący sposób :
Szerokość geograficzna = PÓŁNOC --- 33. 2981
Długość geograficzna = ZACHÓD --- 111.9602.
NAS Nowy Jork (EST, (GMT-5)
Szerokość
Długość
geograficzna
: 40.7128 (Północ
(40,7128) : -74.0060
(Zachód 74.0060)
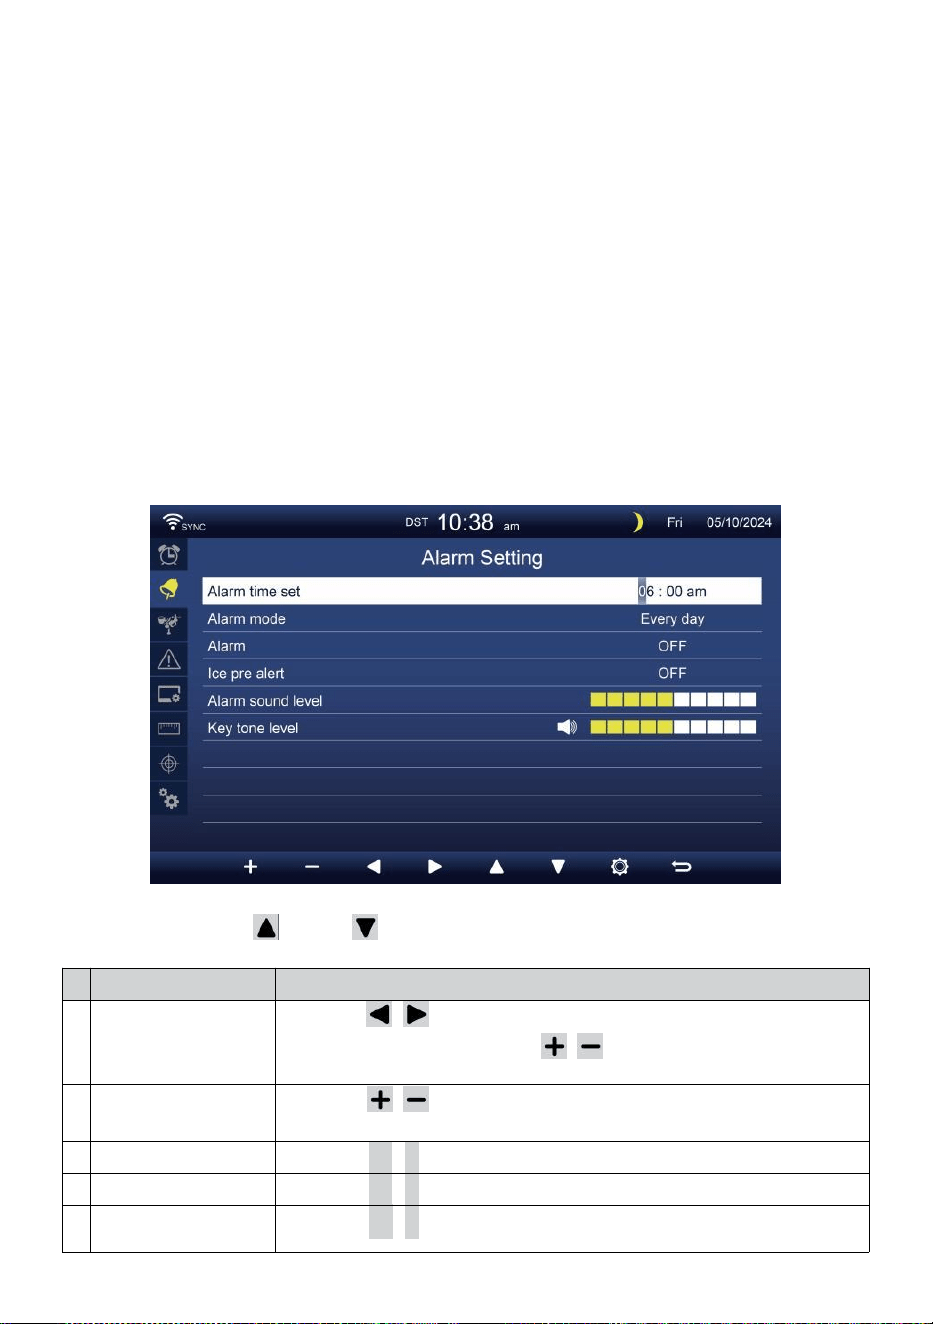
- 36 -
UE Frankfurt Niemcy (GMT+1)
Szerokość
Długość
geograficzna
: 50.1109 (Północ
(50.1109) : 8.6821
(Wschód (8,6821)
Wielka Brytania Londyn Anglia (GMT)
Szerokość
Długość
geograficzna
: 51.5072 (Północ
(51.5072) : -0,1276
(Zachód 0,1276)
Australia Sydney ( GMT +10)
Szerokość
Długość
geograficzna
: -33.8688 (Południe
33.8688) : 151.2093
(Wschód 151,20 93)
ALARM USTAWIENIE
Naciskać Lub przycisk do zmiany pola opcji aktywnej:
#
Zastąpić przedmiot
Działanie
A
Ustawiono czas
alarmu
Naciskać / przycisk do wyboru pomiędzy
godzina Lub minuta. Naciśnij / przycisk do
regulacji wartość .
B
Alarm tryb
Naciskać / przycisk do wyboru Tylko codziennie lub w dni
powszednie.
C
Alarm
Naciskać
+
/
-
przycisk Do zakręt NA Lub zakręt wyłączony .
D
Lód przed alarm
Naciskać
+
/
-
przycisk Do zakręt NA Lub zakręt wyłączony .
m
i
Dźwięk alarmu
poziom
Naciskać
+
/
-
przycisk Do regulować ten dźwięk poziom .
- 36 -
F
Ton kluczowy
poziom
Naciskać
+
/
-
przycisk Do regulować ten klawisz ton poziom .
Naciskać przycisk, aby przejść do ekranu ustawień czujnika.
Naciskać p r z y c i s k
w
, aby powrócić do trybu
prostego/szczegółowego ekran.

- 37 -
TRANSDUKTOR USTAWIENIE
Ten strona polega na dodaniu/usunięciu czujnika typu „wszystko w
jednym” lub dodatkowego 7 kanałów higrometry.
Dodawanie nowy czujnik
Naciśnij
▲
Lub przycisk, aby wybrać pusty kanał.
Naciskać przycisk do wyboru czujnika edycji kolumna.
Gdy w kolumnie pojawi się opcja „ Dodaj ”, naciśnij /
przycisk, aby rozpocząć wyszukiwanie czujnika.
Wybierz pasujący kanał c numer na czujniku, a następnie włącz
lub naciskać NASTAWIĆ przycisk do uruchomienia łączenie w pary.
Po podłączeniu urządzeń ikona czujnika ID będzie
pokazywać W ten kanał wiersz.
Naciskać przycisk, aby przejść do wyświetlania ustawień
alertów.
Naciskać przycisk do powrót do ekranu
prostego/szczegółowego .

- 38 -
Usuwać czujnik sparowany
Naciśnij
▲
Lub przycisk do Wybierz podłączony d
czujnik. Naciśnij przycisk do wyboru czujnika edycji
kolumna.
Gdy kolumna pokazuje „Opcja „ Usuń ”, naciśnij
+
Lub
przycisk Do potwierdzać.
Naciskać Lub przycisk do wyboru zmiany aktywowany
pole opcji, przełącz Tak Lub NIE , naciśnij
.
przycisk Do
potwierdzać .

- 39 -
USTAWIENIE ALARMÓW
Ustawić alert wewnętrzny
Naciskać
▲
Lub przy ci sk
w,
aby wybrać różne rząd aktywowanych
pole opcji .
Naciskać
przycisk do wyboru wysokiego/niskiego/resetowania alertu
opcja .
Naciskać
+
Lub pr z y c is k
w
do dostosowania wartości lub opcja
włącz/wyłącz.
Naciskać
przycisk, aby wejść Ustawienia wyświetlacza .
Naciskać
przycisk powrotu do prostego/szczegółowego ekran.
NOTATKA:
Podczas wybierania opcja resetowania, wszystkie wartości
alertów zostaną zresetuj do ten wartości domyślne.
Ustaw alert zewnętrzny

- 39 -

- 40 -
Naciskać Lub przycisk do wyboru innego wiersza
aktywowany pole opcji.
Naciskać przycisk do wyboru opcja alertu
wysokiego/niskiego/Resetuj.
Naciskać Lub przycisk umożliwiający dostosowanie wartości
lub włączenie/wyłączenie opcji.
Naciskać przycisk do zamienić Wyświetlanie ustawień alertu
wewnętrznego.
Naciskać przycisk, aby wejść Ustawienia wyświetlania
wyświetlacz.
Naciśnij
w
przycisk powrotu
prosty/szczegółowy ekran. Ustaw czujnik CH1-7
alarm
Naciskać
Naciskać
Naciskać
Naciskać
Naciskać
Naciskać
NOTATKA:
Lub przycisk do wyboru innego wiersza aktywowanego
opcja pole. przycisk do wyboru
wysokiego/niskiego/resetowania alertu opcja .
Lub pr z y c is k
w
do dostosowania wartości lub opcja
włącz/wyłącz.
przycisk do zamienić Wyświetlanie ustawień alertu
wewnętrznego.
przycisk, aby wejść Ustawienia
wyświetlania . Przycisk powrotu do trybu
prostego/szczegółowego ekran.

- 40 -
Podczas wybierania opcja resetowania, wszystkie wartości
alertów zostaną zresetuj do ten wartości domyślne.
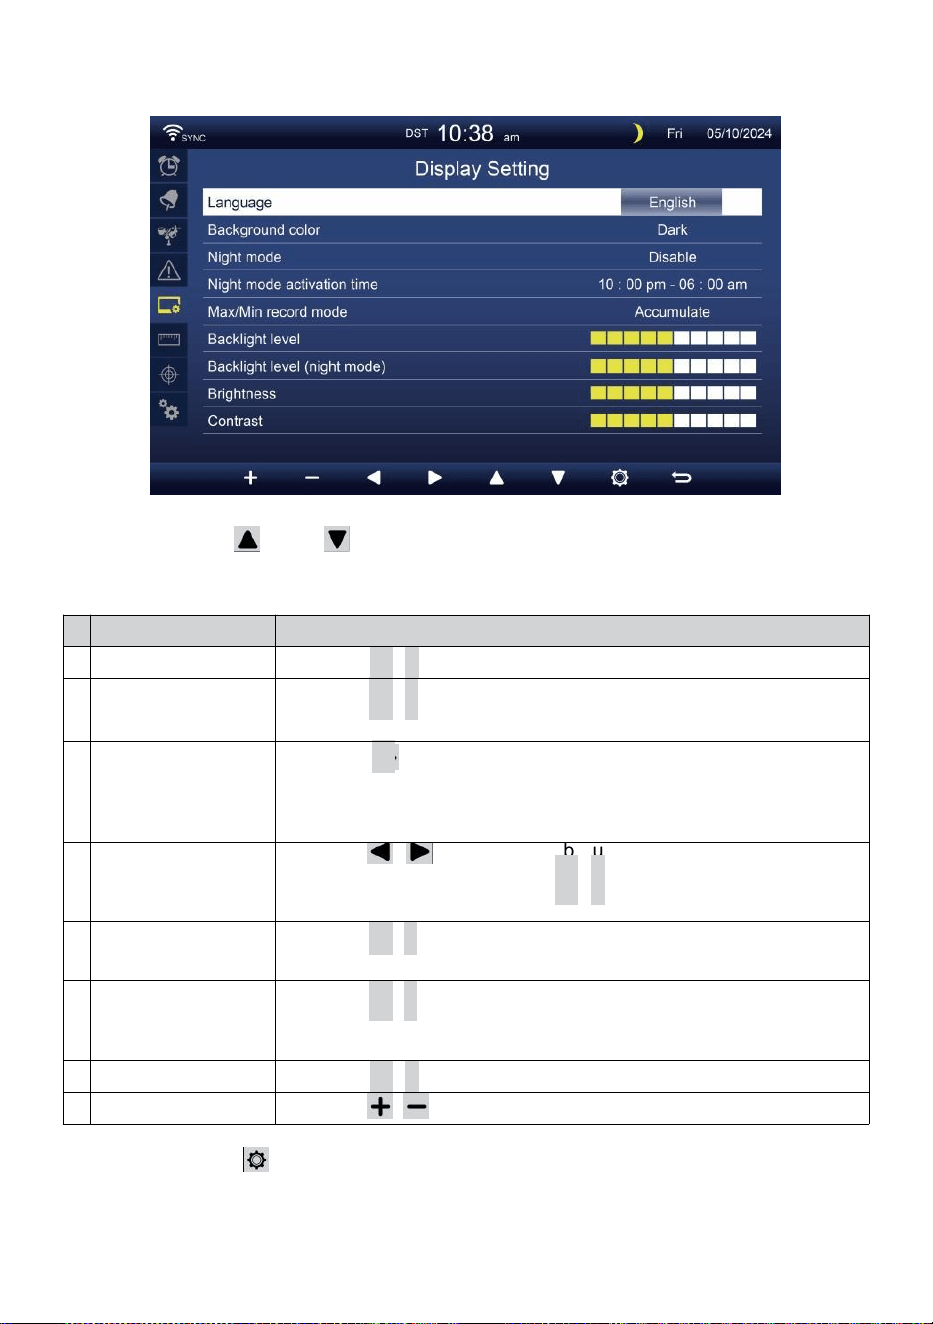
- 41 -
USTAWIENIA WYŚWIETLANIA
Naciskać Lub przycisk do zmiany ten aktywowany pole
opcji:
#
Zastąpić przedmiot
Działanie
A
Język
Naciskać
+
/
-
przycisk Do wybierać ten wyświetlacz język .
B
Kolor tła
Naciskać
+
/
-
przycisk Do wybierać światło Lub ciemny
kolor tło do wyświetlania tryb.
C
Noc tryb
Naciskać
+
przycisk / do ustawienia włączenia (wyzwalacz do
aktywować czas
okres), wyłącz lub automatycznie (wyzwalaj przez pokój otoczenia
światło poziom).
D
Noc tryb aktywacji
czas
Naciskać / przycisk do wyboru pomiędzy
godzina lub minuta . Naciskać
+
/
-
Do regulować
ten wartość .
m
i
Podświetlenie
poziom
Naciskać
+
/
-
przycisk do regulacji podświetlenia poziom W
bez rmalu.
F
Podświetlenie
poziom (Noc
tryb)
Naciskać
+
/
-
przycisk do regulacji podświetlenia poziom
podczas tryb nocny .
G
Jasność
Naciskać
+
/
-
przycisk Do regulować ten ekran jasność .
H
Kontrast
Naciskać / przycisk do regulacji ekranu kontrast.
Naciskać przycisk, aby wejść Wyświetlacz ustawień jednostki
.
Naciskać p r z y c i s k
w
, aby powrócić do trybu
prostego/szczegółowego ekran.
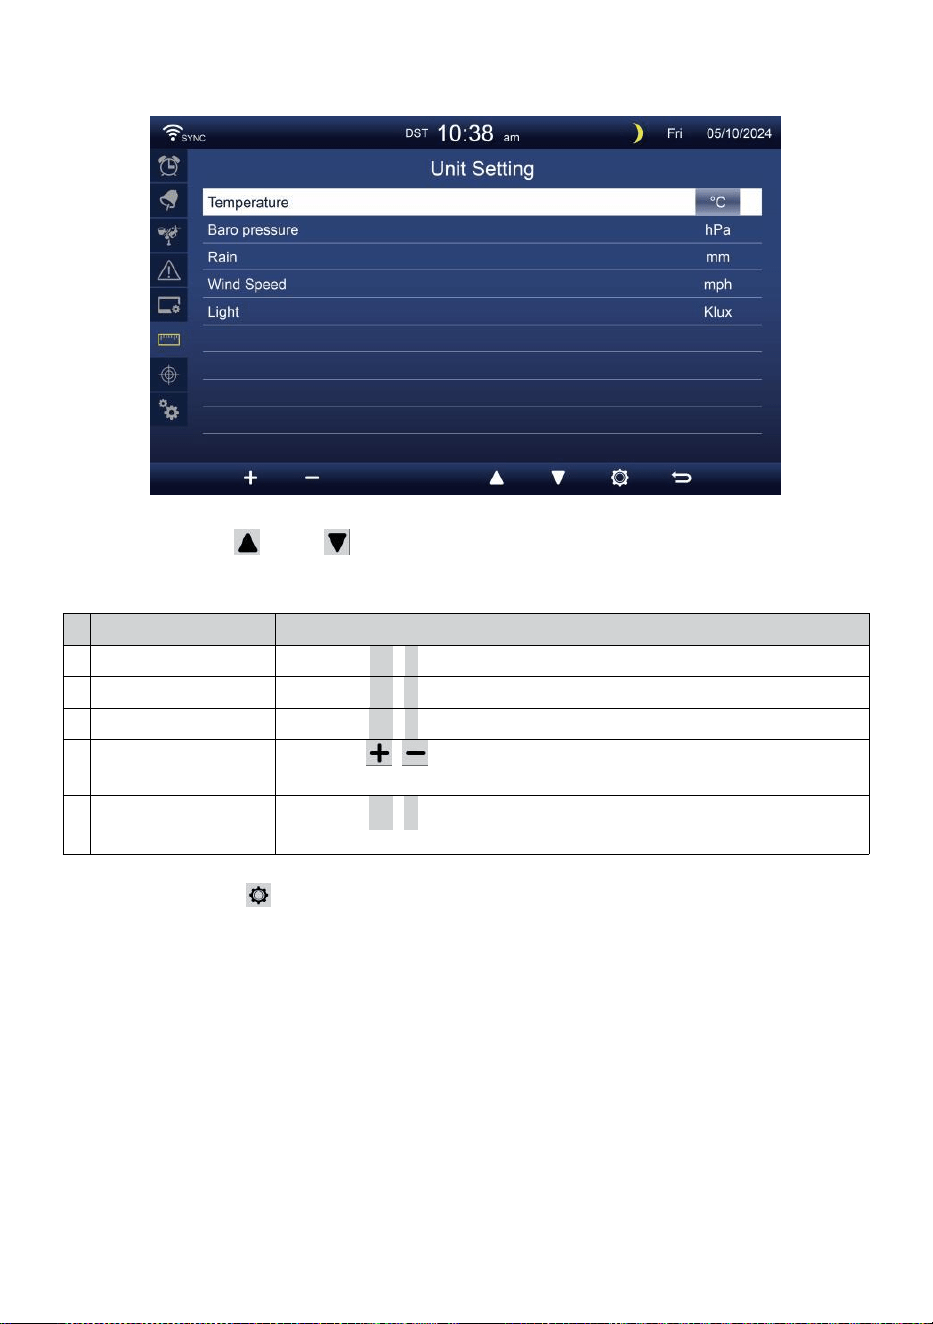
- 42 -
USTAWIENIE JEDNOSTKI
Naciskać Lub przycisk do zmiany ten aktywowany pole
opcji:
#
Zastąpić przedmiot
Działanie
Temperatura
Naciskać
+
/
-
przycisk Do wybierać ° C Lub °F.
Baro ciśnienie
Naciskać
+
/
-
przycisk Do wybierać hPa , inHg Lub mmHg .
Deszcz
Naciskać
+
/
-
przycisk Do wybierać mm Lub W .
Prędkość wiatru
Naciskać / przycisk do wyboru SM, km/godz. węzły lub r mil
na godzinę.
Światło
Naciskać
+
/
-
przycisk Do wybierać Klux Klan KFC Lub
powierzchnia /
m2
.
Naciskać Naciśnij przycisk, aby przejść do ekranu ustawień
kalibracji.
Naciskać p r z y c i s k
w
, aby powrócić do trybu
prostego/szczegółowego ekran.
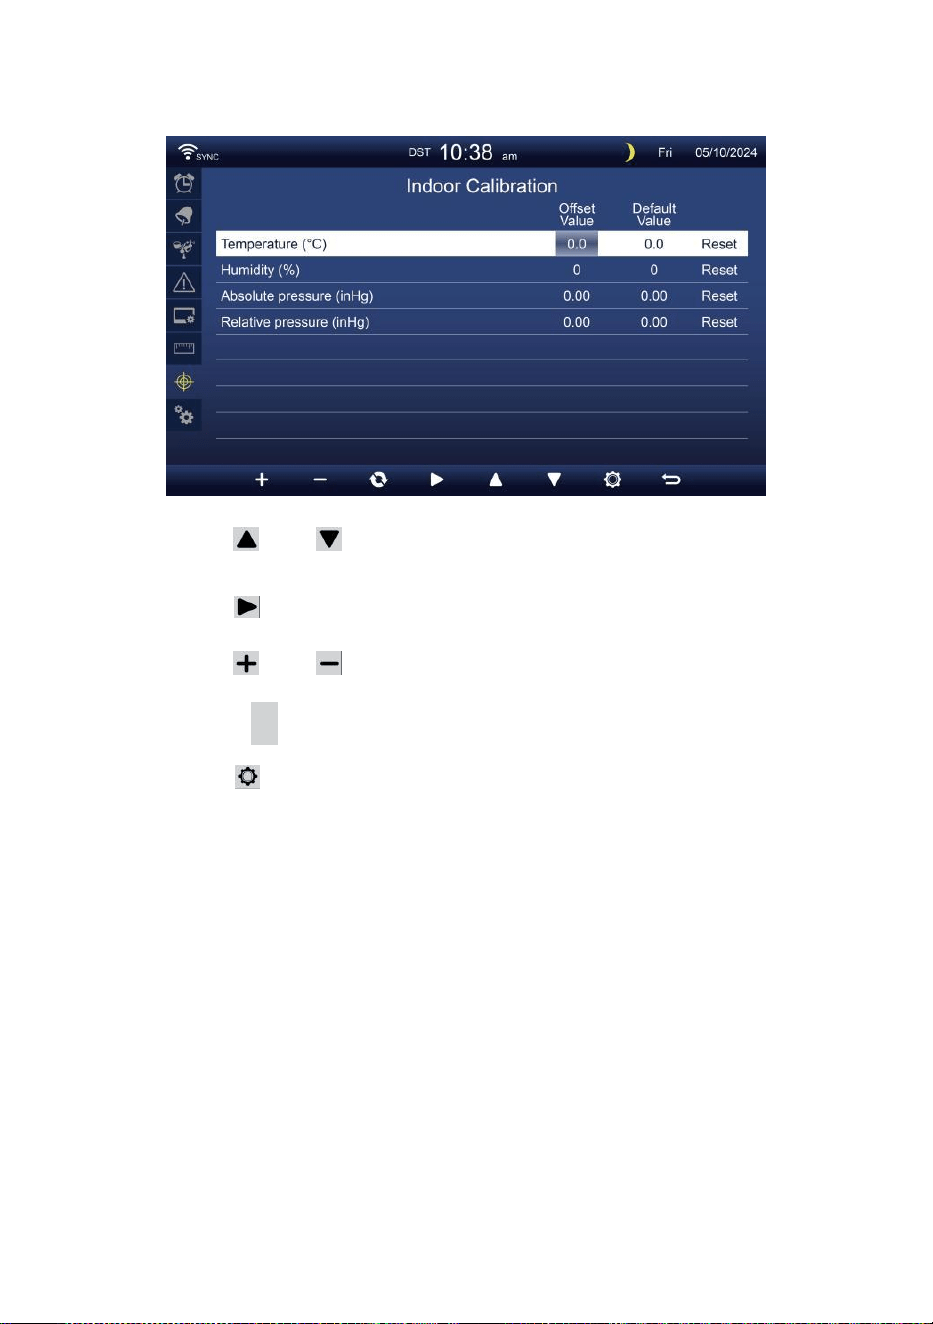
- 43 -
KALIBROWANIE USTAWIENIE
Kalibrowanie Do wnętrz parametry
Naciskać Lub przycisk do wyboru różnych wiersz
aktywowany opcja pole.
Naciskać przycisk do wyboru opcja alertu
wysokiego/niskiego/Resetuj.
Naciskać Lub przycisk do dostosowania wartości lub opcja
włącz/wyłącz.
Naciskać C przycisk do wymiana, aby pokazać wewnątrz ,
na zewnątrz i kanał Kalibrowanie ustawienie wyświetlacz .
Naciskać przycisk, aby wejść do Innego
ustawienie wyświetlacz.
Naciśnij
w
przycisk
powrotu prosty/szczegółowy ekran,
NOTATKA:
Podczas wybierania opcja resetowania, wszystkie wartości kalibracji
zostaną zresetuj do on wartości domyślne.
Kalibrowanie Do plenerowy parametry

- 43 -
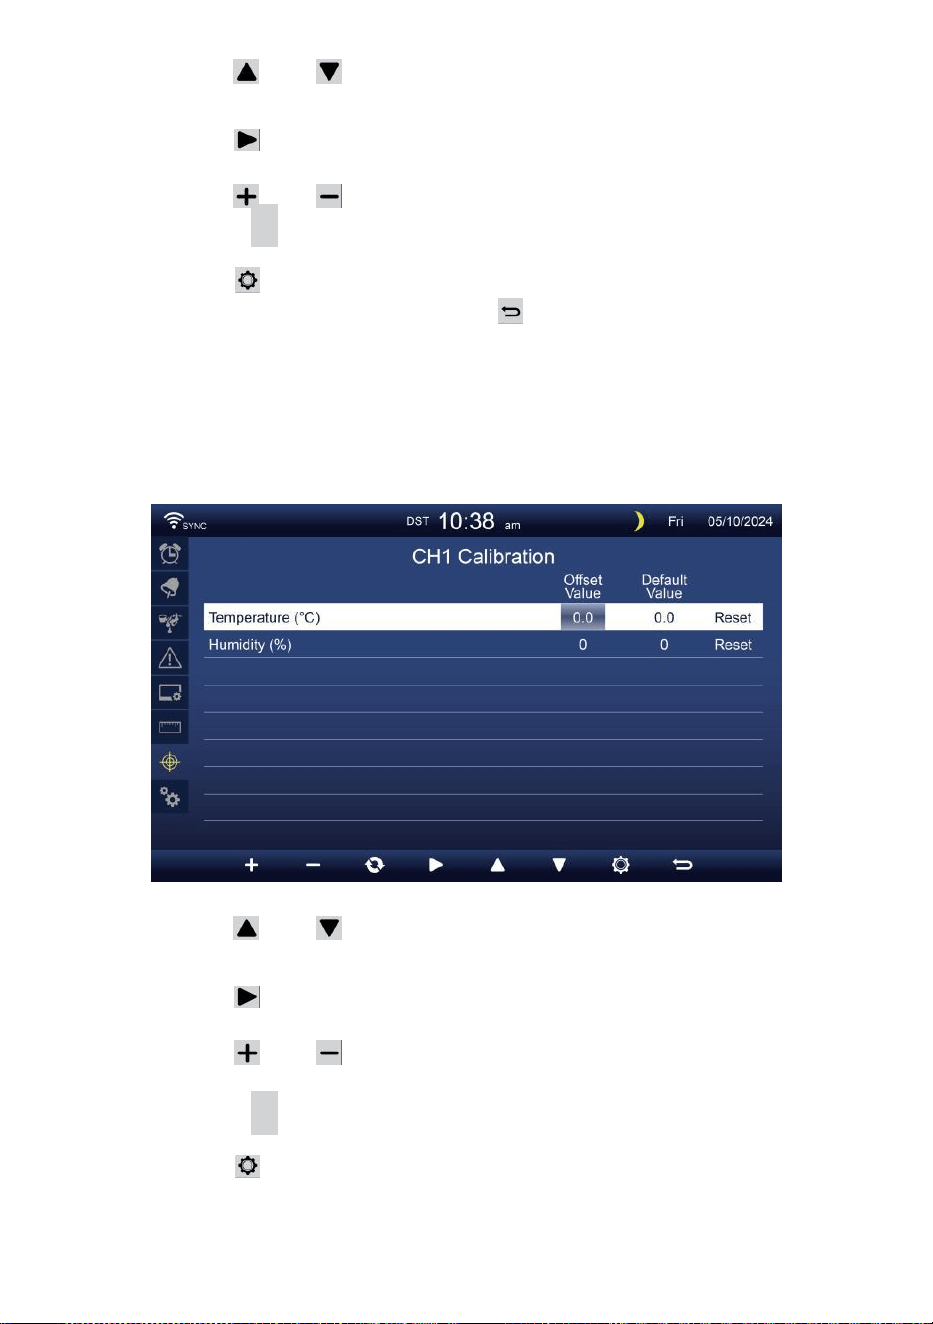
- 44 -
Naciskać Lub przycisk do wyboru różnych wiersz
aktywowany opcja pole.
Naciskać przycisk do wyboru opcja alertu
wysokiego/niskiego/Resetuj.
Naciskać Lub przycisk do regulacji wartości lub wł./wył. opcja.
Naciskać C przycisk do wymiana, aby pokazać wewnątrz ,
na zewnątrz i kanał Kalibrowanie ustawienie wyświetlacz .
Naciskać przycisk, aby wejść do Innego
ustawienie wyświetlacz. Naciskać przycisk
do powrót do ekranu prostego/szczegółowego,
NOTATKA:
Podczas wybierania opcja resetowania, wszystkie wartości kalibracji
zostaną zresetuj do on wartości domyślne.
Kalibrowanie Do Czujnik CH 1- CH 7 parametry
Naciskać Lub przycisk do wyboru różnych wiersz
aktywowany opcja pole.
Naciskać przycisk do wyboru opcja alertu
wysokiego/niskiego/Resetuj.
Naciskać Lub przycisk do regulacji wartości lub opcja
włącz/wyłącz.
Naciskać
C
przycisk do wymiana, aby pokazać wewnątrz ,
na zewnątrz i kanał Kalibrowanie ustawienie wyświetlacz .
Naciskać przycisk, aby wejść do Innego
ustawienie wyświetlacz. Naciśnij
w
przycisk
powrotu prosty/szczegółowy ekran,
NOTATKA:

- 44 -
Podczas wybierania opcja resetowania, wszystkie wartości kalibracji
zostaną zresetuj do on wartości domyślne.
- 45 -
Kalibrowanie parametry
Transdukto
r
Parametr
Typ z
kalibrowa
nie
Domyś
lny
warto
ść
Ustawienie
zakres
Typowa kalibracja
źródło
Wnętrz,
Na
zewnątrz
lub
kanał(y)
Temperatura
Zrównoważ
yć
0
±36 °F (±20 °C)
Czerwony spirytus
lub rtęć termometr
Wilgotność
Zrównoważ
yć
0
±20 %
Psychrometr podwieszany
Wnętrz
Absolutn
y
ciśnienie
Zrównoważ
yć
0
±560hPa
(±16,51inHg) lub
±420mmHg
Skalibrowana klasa
laboratoryjna barometr
Względn
y
ciśnienie
Zrównoważ
yć
0
±560hPa
(±16,51inHg) lub
±420mmHg
Lotnisko lokalne
Plenerowy
Prędkość
wiatru
Osiągać
1
X 0,5 ~ 1,5
Skalibrowana klasa
laboratoryjna wiatr metr
Kierunek
wiatru
Zrównoważ
yć
0
±10°
GPS lub Kompas
Deszcz
Osiągać
1
X 0,5 ~ 1,5
Szkło wziernikowe
deszczomierz z metr
UVA
Osiągać
1
X 0,01 ~ 10,0
Skalibrowana klasa
laboratoryjna
Promieniowanie
ultrafioletowe metr
Światło
intensywność
Osiągać
1
X 0,01 ~ 10,0
Skalibrowana klasa
laboratoryjna
promieniowanie słoneczne
transduktor
INNE USTAWIENIA
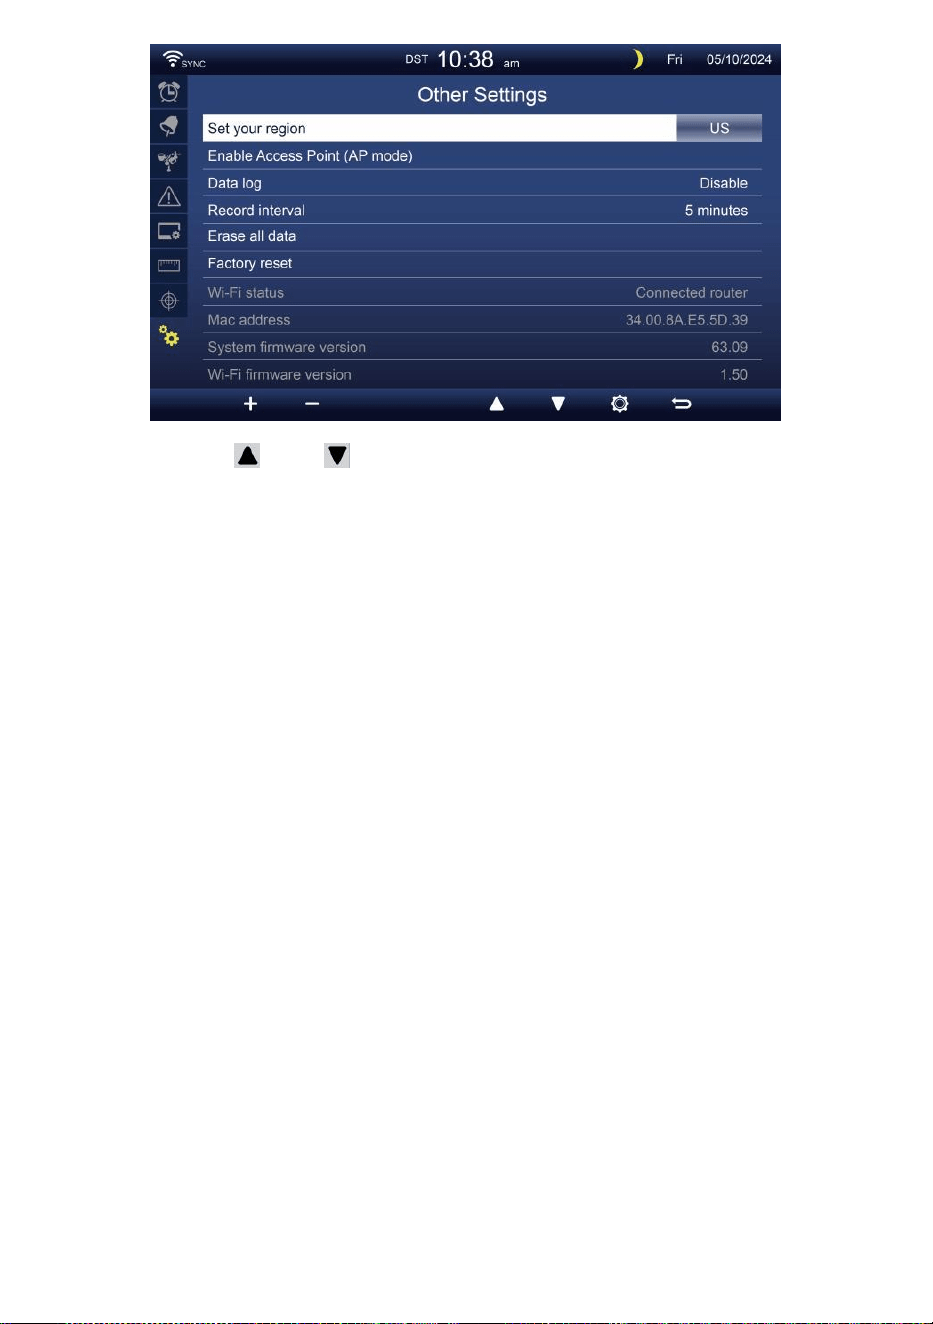
- 45 -
Naciskać Lub przycisk do zmiany ten aktywowany pole
opcji:
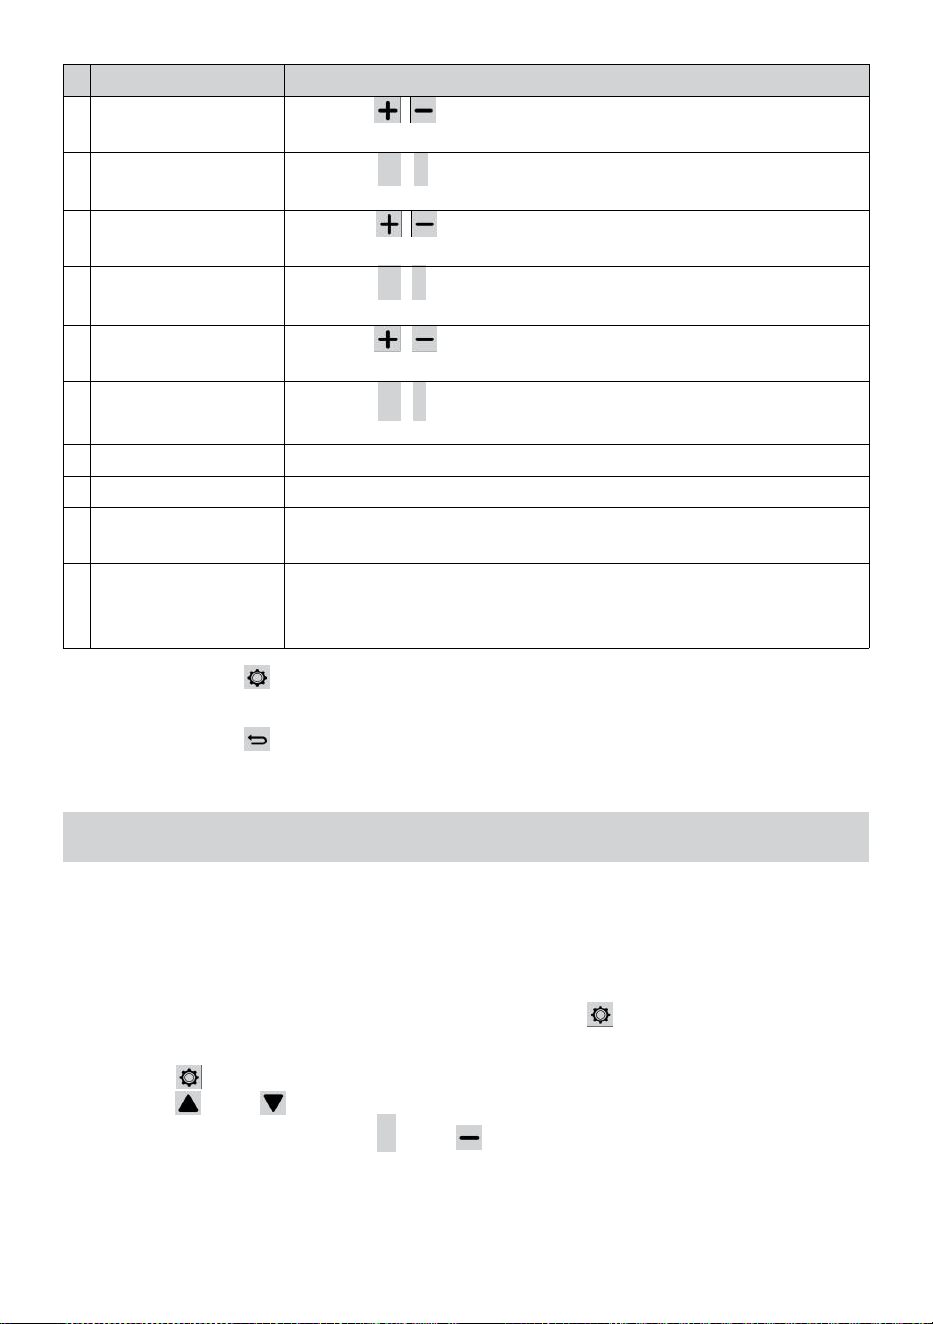
- 46 -
#
Zastąpić przedmiot
Operacja / Opis
A
Ustaw swój region
Naciskać / przycisk do wyboru Europa, Wielka Brytania
NAS, Australia.
B
Włączać Dostęp
Punkt
Naciskać
+
/
-
przycisk Do startAP tryb Do WI - FI połączenie
organizować coś .
C
Dane dziennik
Naciskać / przycisk umożliwiający włączenie lub
wyłączenie dane funkcja logarytmiczna.
D
Nagrywać interwał
Naciskać
+
/
-
przycisk Do organizować coś ten nagrywać
interwał z ten dane dziennik .
m
i
Wymaż wszystko
dane
Naciskać / przycisk do wymazania wszystkiego ten dane
W konsola.
F
Fabryka nastawić
Naciskać
+
/
-
przycisk Do nastawić Wszystko ten ustawienie
Do domyślny I jasne wszystkie dane W konsola.
G
Status WI-FI
Pokaż aktualny stan połączenia konsoli z siecią WI-FI.
H
Adres MAC
Pokaż konsolę Adres MAC.
I
Wersja oprogramowania
układowegosystemu
Pokazuje aktualną wersję oprogramowania układowego konsoli .
J
Wersja
oprogramowania
układowego Wi-Fi
Pokazuje aktualną wersję oprogramowania Wi-Fi konsoli .
Naciskać przycisk, aby wprowadzić czas i Ustawienie daty
wyświetlacz .
Naciskać przycisk do powrót do ekranu
prostego/szczegółowego .
USTAWIENIE POŁĄCZENIE WI-FI
Aby skonfigurować połączenie Wi- Fi konsoli, To wymagania Do
skonfiguruj konsolę do Accessa Punkt (AP) tryb. Aby aktywować dostęp
Punkt (AP) tryb, Proszę postępować zgodnie z poniższymi wskazówkami
Procedury.
1. Na ekranie prostym/szczegółowym, naciskać przycisk Do Wchodzić
Ustawienie menu.
2. Naciśnij przycisk Do przełącznik „ Inne Ustawienie " wyświetlacz.
3. Naciśnij Lub przycisk Do Wchodzić "Włącz
dostęp Punkt ", naciśnij + Lub przycisk do
uruchomienia AP tryb.

- 46 -

- 47 -
Notatka :
Chwila w trybie AP możesz naciskać przycisk wyjścia z AP
tryb. Pogoda stacja będzie po prostu przywrócić ten poprzedni
AP ustawienia .
Używać twój smartfon , tablet lub komputer Do łączyć Do ten
pogoda stację przez Wi-Fi, postępując zgodnie z poniższymi
instrukcjami kroki:
1. Na PC, otwórz swoją sieć Wi -Fi ustawienia sieciowe. Włączone
Android™ Lub iOS urządzenia , przejdź do menu ustawień, a
następnie wybierać Połączenia/WI-FI do Otwarte
Sieć Ustawienia.
2. Znajdź SSID stacji pogodowej on lista. To powinien pojawić się Jak
WWS-XXXXXX (gdzie wszystkie X-y są liczbami całkowitymi) W ten
lista. Uzyskiwać NA SSID do połączenia. Ten krok zajmie kilka
towary drugiej jakości.
3. Po połączeniu się z prognozą pogody stacja, Otwarte w górę twój
przeglądarkę internetową lub mobilną i wprowadź następujące dane
adres do ten
adres pasek : http :// 192.168.1.1 Do uzyskać dostęp do interfejsu
internetowego stacji pogodowej. (Pamiętaj, aby uwzględnić http://
lub inne sieć przeglądarka może interpretujemy adres jako
zapytanie wyszukiwania ). My polecić korzystając z najnowszej
wersji renomowanej witryny internetowej przeglądarki.
4. Wprowadź następujące dane informacja do interfejsu internetowego
(rysunek 1). Upewnij się , że wszystkie informować jest wpisany
przed wybraniem opcji Zapisz. Jeśli ty
wybierać nie Do wgrywać Wunderground .com lub wgrywać
pogoda -
cloud.net, zostaw czek pudełka niepowstrzymany.

- 47 -
Select the menu and choose your 2.4 GHz WIFI Router
Password
Weather Server Setup
WeatherUnderground
Station ID
Station Key
Upload wunderground.com
WeatherCloud
Station ID
Station Key
Upload weatherCloud.net
Time Server Setup
time.windows.com
Firmware Version: 1.0.1
a7d9d2a279fbbafa
**********
**********
**********
Apply
KCACANTI9
Server URL
Enter your station ID
Enter your station key/password
check to confirm upload to
WeatherUnderground server
Enter your station ID
Enter your station key/password
check to confirm upload to Weathercloud.net
Internet time server setting
Press Apply to confirm the setting
Select setup UI display language
Select your Wi-Fi Router (SSID) from the list
Router Password
Router
Wi-Fi Router Setup
Language:
Router 12345
SETTINGS
SETUP
English

- 48 -
5. Jeśli wszystkie Informacje ty wszedł Jest prawidłowy, naciśnij „
Zastosuj ”, aby
potwierdzać. Jeśli tak nie, sprawdź swoją sieć interfejs informacje
ponownie.
NOTATKA:
Gdy ten Wi - Fi organizować coś Jest kompletny , twój komputer Lub
przenośny urządzenie
będzie powrót do domyślnego połączenia Wi-Fi. Jeśli tak nie, po
prostu otwórz swój urządzenia bezprzewodowy sieć Ustawienia
I ręcznie połącz ponownie .
CZAS SERWER POŁĄCZENIE STATUS
Po połączeniu stacji pogodowej z internetem, to będzie próba połączyć
się z serwer czasu internetowego w celu uzyskania Czas U TC. Raz
ten
połączenie zostało nawiązane i czas stacji pogodowej został
zaktualizowano. Ikona „ SYNC ” pojawi się na Ekran LCD.
Aby wyświetlić prawidłowy czas dla swojej strefy czasowej, należy:
potrzebować
Zmień strefę czasową w trybie ustawiania ZEGARA z 00 (domyślny) Do
Twoja strefa czasowa (np. -5 dla EST). Jeśli nie znać swoje czas strefa,
Ty Móc Patrzeć To online.
NOTATKA:
Czas zostanie automatycznie zsynchronizowany z Internet na
godzina.
UTWÓRZ ISYNCHRONIZUJ SWOJE KONTONASERWERZE
WEATHER
TWORZYĆ TWÓJ WEATHERUNDERGROUND KONTO
1. Odwiedź: https://Wunderground.com i wybierz „ Dołącz ” W on
górny w prawo i w róg i stwórz A Konto bezpłatne.

- 48 -
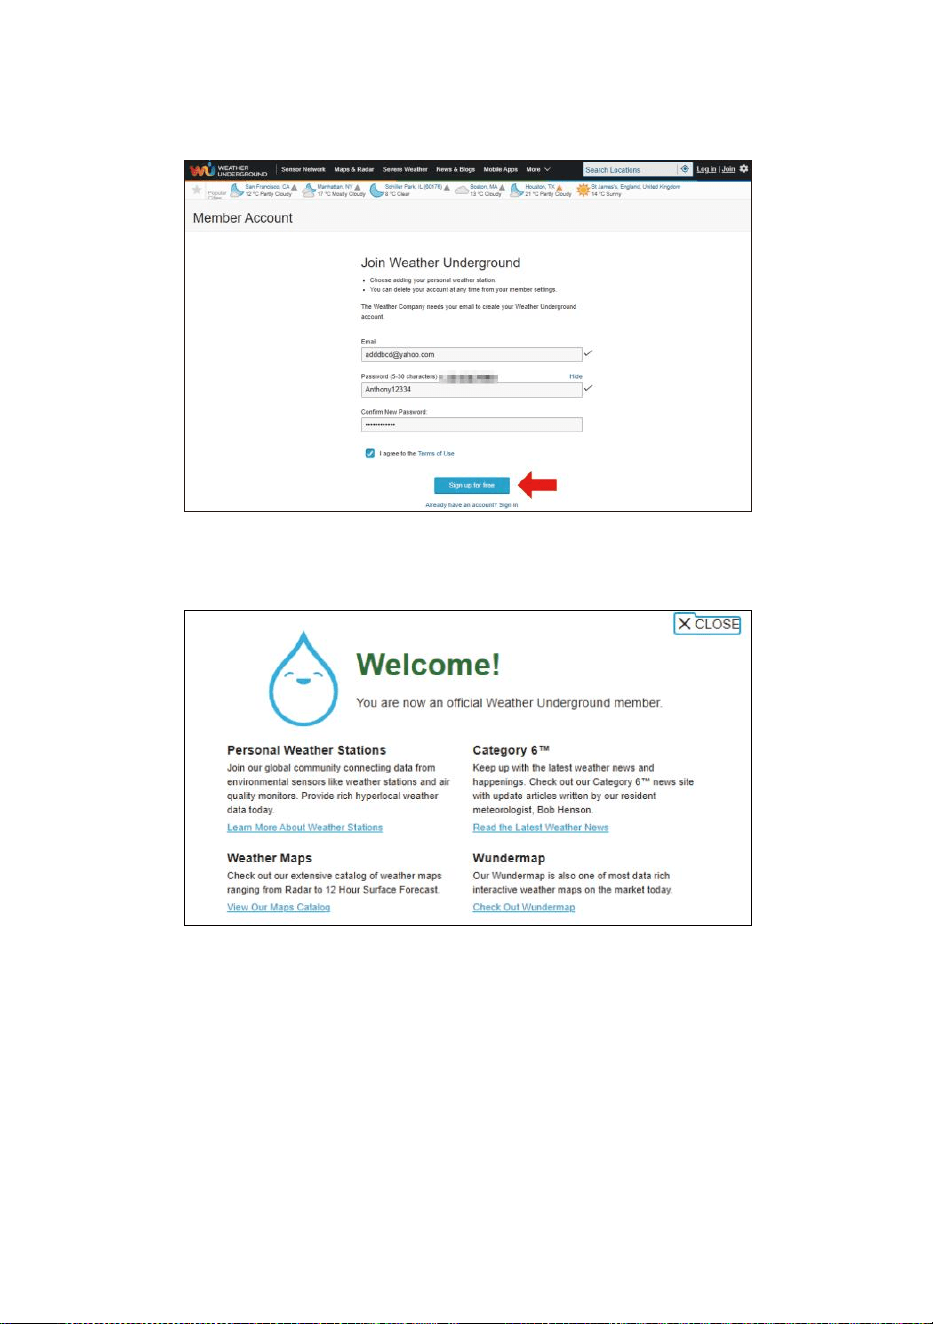
- 49 -
2. Wprowadź Nazwa użytkownika, Wyślij e- mail i Hasło ( to jest twój
Login hasło strony internetowejIt, nie twój e-mail hasło.Więc NIE
prywatność będzie być narażonym ). Kliknij Podpisz za darmo.
3. Po rejestracji jest zrobione skutecznie, to będzie pokazano poniżej
wiadomość.
4. Kliknij „Zaloguj się ” i Wchodzić ten e-mail adres I hasło ty po
prostu zarejestrowany.

- 49 -

- 50 -
5. Kliknij „Mój „profil ” i wejdź w Ustawienia członka.
6. Kliknij „Aktualizacja dom lokalizacja ”.
7. Kliknij „Mój Urządzenia ” i kliknij „ Dodaj ” Nowy Urządzenie ".

- 51 -
8. Wybierz adres przez wprowadź adres lub wybierz Instrukcja do
umieść swój adres automatycznie. Następnie kliknij „Następny ".

- 52 -
9. Wprowadź informacje o pogodzie . Puste z czerwony (wymagany)
musi być wypełniony W.
NOTATKA:
Możesz wybrać „inne” z Urządzenie Sprzęt komputerowy.
10. Raz ukończyć to sesja, Kliknij „I Akceptuję ” I „Następny ".
11. Po pomyślnej rejestracji, Proszę zapisz swoją wagę Pod- grunt
Identyfikator i Klawisz informacje dotyczące późniejszej
konfiguracji używać.

- 53 -
12. Jak pokazano poniżej, rejestracja zostało wykonane pomyślnie.
STWÓRZ TWÓJ CHMURA POGODOWA KONTO
1. Odwiedź witrynę Weathercloud pod adresem
https://weathercloud.net/ i wprowadź Nazwa użytkownika, E-mail i
Wprowadź hasło i kliknij „ Sign ” w górę ". Po
instrukcje dotyczące tworzenia konto.
UWAGA: To Jest najlepiej zrobić na komputerze pulpit Lub laptopa.
(To jest twój login hasło do strony internetowejIt, nie twój e-mail
hasło. Więc NIE prywatność będzie eksponować się).
2. Kiedy To jest udany, e-mail będzie Być otrzymane w twoim
zarejestrowany skrzynka pocztowa.
3. Otwórz swój poczta i dziennik W Do sieć adres W ten poczta. Kliknij „
Aktywuj ” twój Chmura pogodowa konto ".

- 53 -
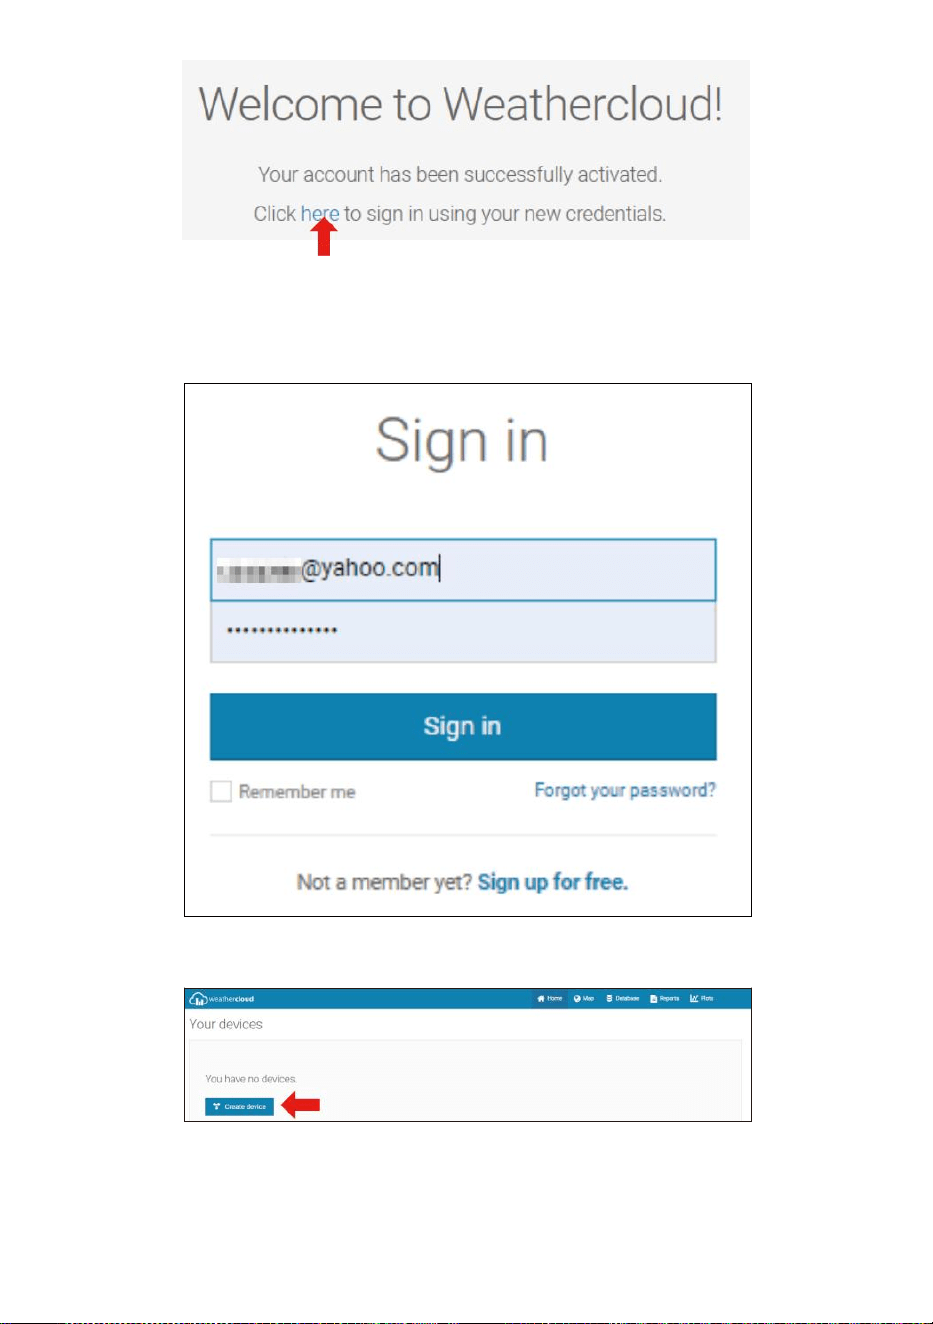
- 54 -
4. Kliknij „„tutaj ”, aby przejść na stronę główną witryny weathercloud .
5. Wprowadź adres e-mail i hasło, które właśnie podałeś zarejestruj się
do wejdź do chmury pogodowej strona internetowa .
6. Kliknij „ Utwórz urządzenie ”, aby dodać stację pogodową.
7. Wprowadź wszystkie wymagany informacja do Krety Nowy Urządzenie
strona. Puste z czerwony * musieć być wypełnionym W.
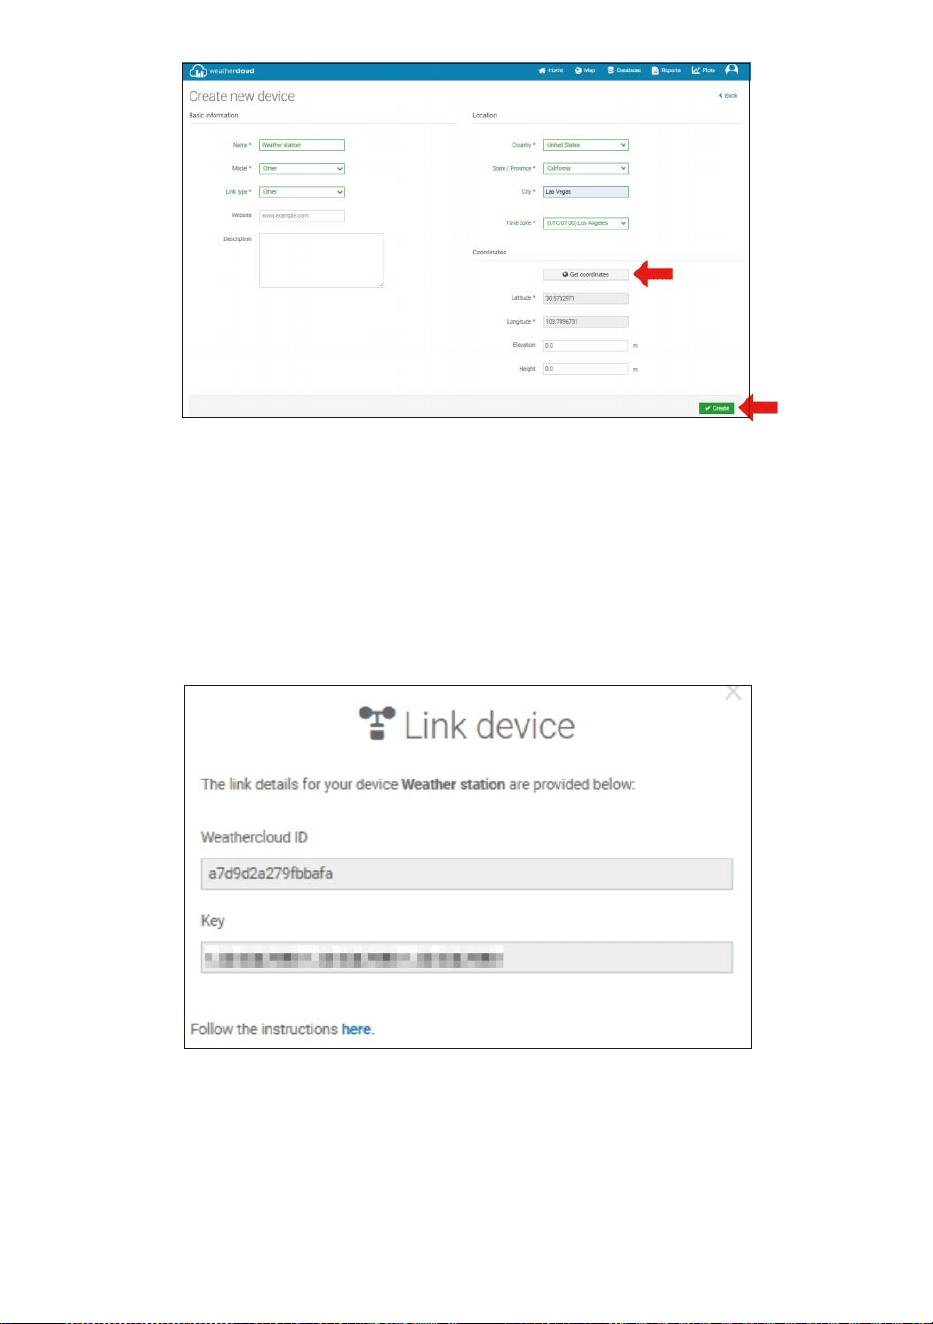
- 55 -
NOTATKA:
Możesz wybrać „inne” z Model liczba i Typ łącza w powyżej
puste miejsca.
Kliknij „Pobierz współrzędne”, aby zidentyfikuj swoją lokalizację ten
mapa, Następnie kliknij „Gotowe”, aby potwierdzać.
8. Gdy już masz zakończony Ten sekcja, Kliknij „ Utwórz ”.
9. Po pomyślnej rejestracji, proszę zapisz swoją Weathercloud ID I
Klawisz informacje dotyczące późniejszej konfiguracji używać.
POGLĄD TWÓJ POGODA DANE W WEATHERUNDERGROUND
Aby przeglądać dane ze stacji pogodowej na żywo za pośrednictwem
Komputer lub sieć mobilna przeglądarka,
odwiedzać http://www.wunderground.com , a następnie wejdź na
stację Zidentyfikuj, że byłeś podane podczas zakładania konta w

- 55 -
wyszukiwarce pole. Twoje dane pogodowe pokażą w górę na
Następny strona.

- 56 -
OPIEKAI KONSERWACJA
1. Wyczyść deszczomierz co 3 miesiące. Obracać ten lejek przeciwnie
do ruchu wskazówek zegara i podnieś, aby odsłonić deszczomierz
mechanizmy, I wyczyścić za pomocą A wilgotna ściereczka. Usuń
wszelki brud, zanieczyszczenia i owady. Jeśli błąd zarażenie jest
problem, spryskaj czujnik lekko środek owadobójczy.
Otwarte
Winda
2. Wyczyść Światło Intensywność/ Czujnik UV i solarny płyta każdy 3
miesiące z wilgocią płótno.
3. Podczas wymiany baterii, stosować A korozja zapobiegawczy
związek na akumulatorze terminal s.
SPECYFIKACJA
POGODA STACJA
Specyfikacje ogólne
Wymiar
7,3 x 5,4 x 1,1 cala (185,9 x 137.4 X (Średnica 28,5 mm)
Źródło zasilania
Prąd zmienny-stały 5V, Zasilacz 1A (w zestawie)
Czujniki wsparcia
1 czujnik 7 w 1 (dołączony)
Specyfikacja komunikacji Wi-Fi
Standard Wi-Fi
802.11 czarny/biały
Wi- Częstotliwość działania Fi
2,4 GHz
Obsługiwane
urządzenia dla
organizować coś
Interfejs użytkownika
Wbudowane Wi-Fi z trybem WAP w inteligentnym
urządzeniu, w tym laptopy, komputery, smartfony i
mądry naramienniki

- 56 -
Poleć przeglądarkę
internetową do
konfiguracji Interfejs
użytkownika
Najnowsza wersja przeglądarki internetowej obsługującej HTML5
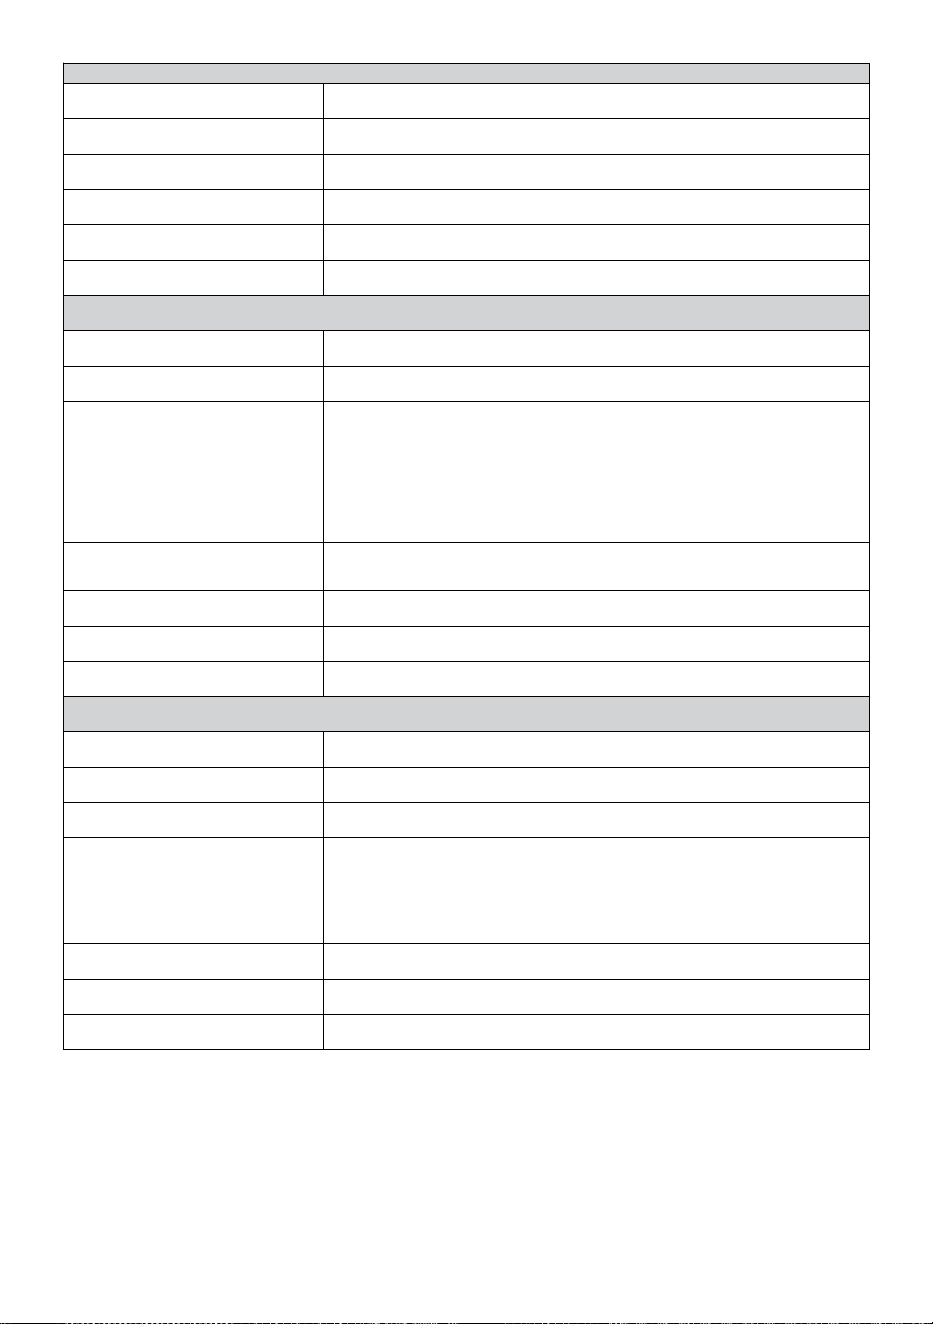
- 57 -
Cz as Spe c y f ik a c je fu n k c ji
Cz a s w y ś w i e t l a c z
HH : MM
F o r m a t g o d z i n y
12 godzina lub 24 godzina
Data wyświetla cz
DD/MM lub MM/DD
S y n c h r o n i z a c j a cz a s u m e t o d a
Sy n ch r o n iz u j e si ę z ato m em zega r
Strefy czasowe
-12 ~ +13 godziny
Czas letni
WŁ./WYŁ.
Wyświetlacz barometru i Specyfikacje funkcji
Jednostki barometru
hPa inHg i mmHg
Zmierzenie zakres
600 – 1100 hPa ( ustawienie względne zakres 930 – (1050hPa)
Dokładność
700 -1100 hPa±5 hPa/600 -696 hPa±8 hPa
20,67 – 32,48 inHg ± 0,15 inHg/17,72 -20,55 inHg ±0,24 inHg
525 -825 mmHg±3,8 mmHg/450 -5 22 mmHg±6
mmHg Typowe w 77 -lecie (25 ℃ )
Prognoza pogody
Słoneczny, Częściowo pochmurno, pochmurno, Deszczowo,
burzowo i Śnieżny
Wyświetlacz tryb
Aktualny
Pamięć tryb
Codziennie Maksymalnie/ Min
Alarm
Alert o zmianie ciśnienia
Temperatura wewnątrz/na zewnątrz Wyświetlacz & Specyfikacje funkcji
Temperatura jednostka
℃ i 吓
Wyświetlacz wewnętrzny zakres
-14.1– 122
°C
(-9,9
℃
– 50
℃
)
Wyświetlacz zewnętrzny zakres
-40 przestraszyć – 158 °C (-40 °C – 70 °C )
Dokładność wejścia/wyjścia
50 – 122
Straszne
1.8
przestraszyć
/
10 – 50 ℃ ± 1 ℃ -4 - 50 ± 2,7 / -20 –
10 ℃ ± 1,5 ℃ inni : ± 3,6 / ±2 ℃
Wyświetlacz tryb
Aktualny
Pamięć tryb
Codziennie Maksymalnie/ Min
Alarm
Alert wysokiej/niskiej temperatury

- 58 -
Wilgotność wewnątrz/na zewnątrz Wyświetlacz & Specyfikacje funkcji
Wilgotność jednostka
%
Wyświetlacz zakres
1 – 99%
Dokładność wejścia/wyjścia
40 – 80% wilgotność względna ± 5%
Prawidłowy @77 ° (2 5 ℃ ) Inni : ±
8% Prawidłowy @77 ° (25 ℃ )
Wyświetlacz tryb
Aktualny
Pamięć tryb
Codziennie Maksymalnie/ Min
Alarm
Wysoki/Niski wilgotność ale rt
Prędkość wiatru i Kierunek Wyświetlacz & Specyfikacje funkcji
Prędkość wiatru jednostka
mil na godzinę SM, km/godz. węzły
Wyświetlacz zakres
0 -112 mil na godzinę, 50m/s, 180 kilometrów na godzinę, 97 węzły
Dokładność prędkości
<5m/s: ±0,5m/s, >5m/s : ±10% (którykolwiek jest większy)
Wyświetlacz tryb
Podmuch/Średni
Pamięć tryb
Dzienny podmuch wiatru/średni
Alarm
Duża prędkość wiatru Alert (porywy wiatru/średnie)
Kierunek wiatru
16 kierunków
Deszcz Wyświetlacz & Specyfikacje funkcji
Jednostka opad deszczu
mm, W
Zakres opad deszczu
0 – 12999 mm (0 – 511,7 W)
Dokładność opadów
±7%
Wyświetlacz tryb
Aktualny
Pamięć tryb
Codziennie Maksymalnie
Wyświetlacz opadów deszczu
tryb
Cogodzinny/ Codziennie/Tygodniowo/ Miesięcznie/Suma Opad
deszczu
Alarm
Wysoki Codziennie Alert opadów deszczu
Promieniowanie ultrafioletowe Indeks Wyświetlacz & Specyfikacje funkcji
Wyświetlacz zakres
0 - 16
Wyświetlacz tryb
Aktualny
Pamięć tryb
Codziennie Maksymalnie
Alarm
Wysoki Alert UV
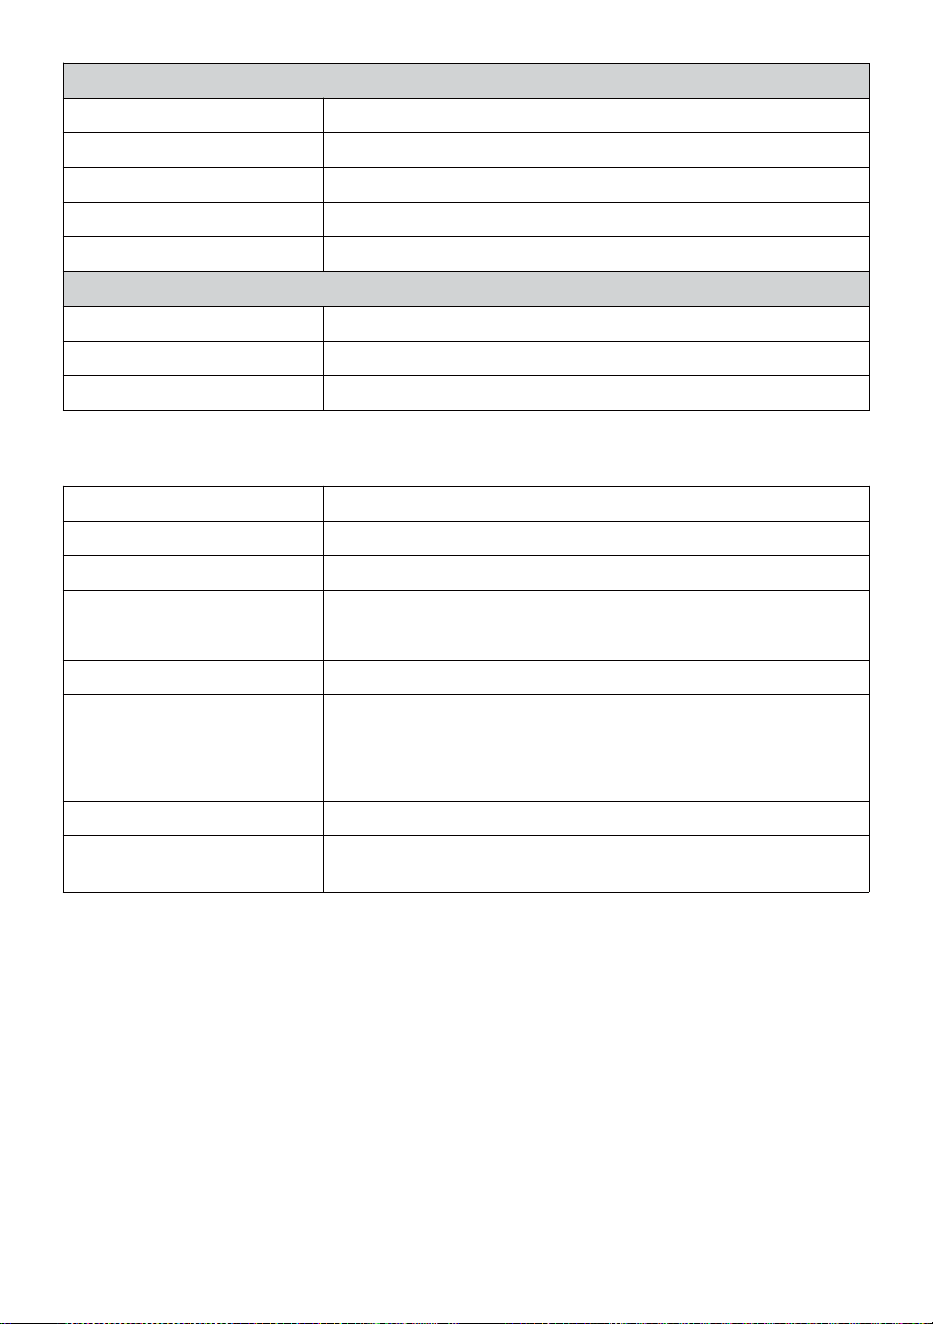
- 59 -
Światło Intensywność Wyświetlacz & Specyfikacje funkcji
Światło Intensywność jednostka
Klux Klan KFC i W/
m2
Wyświetlacz zakres
0 – 200 Klux
Wyświetlacz tryb
Aktualny
Pamięć tryb
Codziennie Maksymalnie
Alarm
Wysoki Światło alert intensywności
Indeks pogody Wyświetlacz & Specyfikacje funkcji
Pogoda Indeks tryb
Czuje jak, wiatr chłodzący, ciepło indeks i rosa punkt
Wyświetlacz tryb
Aktualny
Pamięć tryb
Codziennie Maks./min.
BEZPRZEWODOWY 7 W 1 NA ZEWNĄTRZ TRANSDUKTOR
Wymiar
16 razy 15,6x 14,4 cala (408 x 396x (367 mm)
Główny moc
3,6 V Ni-MH akumulatorowy bateria pakiet
Kopia zapasowa moc
Słoneczny moc
Dane pogodowe
temperatura, wilgotność, prędkość wiatru , kierunek
wiatru, opady deszczu, UVI i światło intensywność
Transmisja RF zakres
330 stóp (100m)
Interwał transmisji
Co 20 sekund Promieniowanie ultrafioletowe
,
światło intensywność
,
prędkość wiatru ,
temperatura, dane dotyczące wilgotności i opadów oraz kierunku
wiatru dane
Temperatura pracy
-40 - lecie– 140 °C (-40 ℃ – 60 ℃ )
Dodatkowe narzędzia
wymagane do czujnika
Tak

- 60 -
ROZWIĄZYWANIEPROBLEMÓW
Problem
Rozwiązanie
Bezprzewodowy
czujnik tak nie
komunikować się
stacja pogodowa
Bezprzewodowy czujnik może Posiadać zapoczątkowany właściwie i dane
Jest
zarejestrowany przez stację meteorologiczną jako nieważny i ten
pogoda stacja musieć Być nastawić.
Z otwartym zakończeniem spinacz do papieru p, naciśnij Aby
zakończyć wyświetlanie napięcia, naciśnij przycisk RESET przez 3
sekundy . Dioda LED będzie migać co 20 sekund.
Jeśli dioda LED będzie nie miga co 20 sekund, wyjmij baterie I Czekać
5 minut, przykrywając panel słoneczny, aby odprowadzić wodę ten
woltaż.
Umieścić baterie z powrotem w i ponownie zsynchronizuj stację
pogodową i zsynchronizuj ponownie stacja pogodowa (patrz strona
10 PONOWNE PAROWANIE CZUJNIKA) z bezprzewodowy
czujnik o 10 stóp (3m) z dala .
Ten Dioda LED czujnika bezprzewodowego będzie migać co 20
sekund. Jeśli Dioda LED jest Nadal nie miga co 20 sekund, wymień
nowy baterie w
czujnik bezprzewodowy.
Jeśli baterie były Ostatnio wymienione, sprawdź biegunowość. Jeżeli
czujnik bezprzewodowy miga co 20 sekund, przejdź do Następny krok.
Tam móc być tymczasową utratą łączności z powodu przyjęcie strata
związana z zakłóceniami lub innymi czynniki lokalizacji,
Albo baterie móc Posiadać zostało zmienione w bezprzewodowym
czujniku i stacja pogodowa ma nie został zresetuj. Rozwiązanie móc
może być tak proste , jak wyłączenie i włączenie stacji pogodowej
(usunąć Prąd stały moc i
baterie), odczekaj 30 sekund i włóż je ponownie Prąd stały moc i (baterie).
W
pomieszczeniach i
Plenerowy
temperatura do nie
zgadzać się
Na zadziałanie czujników bezprzewodowych należy odczekać do jednej
godziny. ustabilizować należny Do sygnał
filtrowanie. Czujniki temperatury wewnętrznej i zewnętrznej powinny się
zgadzać w ±4 ° (±2 °F ) (dokładność czujnika Jest ±2 miesiące (±1 ℃ )
Użyj funkcji kalibracji, aby dopasować wnętrze I temperatura na
zewnątrz do znany źródło.

- 60 -
Czujnik temperatury
czyta też wysoki w
dzień
Upewnij się, że czujnik bezprzewodowy nie jest zbyt zamknąć Do ciepło
generujące źródła lub ograniczenia, takie jak budynki, nawierzchnie,
ściany , Lub powietrze stan : schorzenie- wchodzenie jednostki.

- 61 -
Problem
Rozwiązanie
Deszczomierz raporty
deszcz Kiedy To To
nie pada deszcz.
Jakiś nietrwały rozwiązanie montażowe (wahadłowe) w montaż
Polak) móc wynik w przechylaniu wiaderko nieprawidłowo
zwiększający się opad deszczu. Upewnij się, że
posiadają stabilne i równe rozwiązanie montażowe. (Wspominać
strona 9 REGULACJA 7-W-1 BEZPRZEWODOWY CZUJNIK
POZIOM)
Wi-Fi działa nie
wyświetlać na stacji
pogodowej
Sprawdź swój router pod kątem problemy.
1. Sprawdź symbol Wi-Fi na wyświetlaczu. Jeśli łączność bezprzewodowa
Jest
udany , Wi - Fi ikona Abędzie Być wystawiany W ten czas złożony
.
2. Sprawd ź, czy ustawienia Wi-Fi modemu są prawidłowe (sieć
nazwa, I hasło)
3. Upewnij się, że stacja pogodowa Jest zatkany do klimatyzacja moc.
Stacja pogodowa będzie nie łączy się z Wi -Fi, gdy zasilany bateriami
tylko.
4. Konsola obsługuje i łączy się wyłącznie z częstotliwością 2,4 GHz
routery. Jeśli twój posiadam 5GHz router i d To jest dualny zespół
router, Ty będzie potrzebować Do
wyłącz pasmo 5Ghz i włączyć 2,4 GHz zespół.
5. Pogoda jest taka nie obsługuje sieci gościnnych.
Dane nie
raportowanie do
www.wunder-
ground.com lub
www.weathercloud.net
1. Potwierdź swoje hasło lub klucz jest poprawne . To Jest ten
hasło Ty zarejestrowany na Wunderground.com.
Strona internetowa Wunderground.com. H a s ł o do domeny
underground.com nie może zaczynać się od znaków innych niż
alfanumeryczne (ograniczenie z Wunderg round.com, nie stacja).
Przykład, $worknet Jest nie jest ważny hasło, ale
sieć robocza$ jest ważny)
2. Potwierdź swoją stację ID ix poprawne. Stacja ID to wszystko
wielkie litery, i najczęstsze wydanie zastępuje i O 0 (lub
odwrotnie).
Przykład, KCAPHOEM12, nie KCAPH0EM12.
3. Upewnij się, że dane i czas jest poprawny ten pogoda stacja.
Jeśli niepoprawne, ty móc Być zgłaszanie starych danych, nie
dane w czasie rzeczywistym .
4. Upewnij się, że Twoja strefa czasowa jest ustawiony
odpowiednio. Jeśli się mylę, móc Być zgłaszanie starych
danych, nie w czasie rzeczywistym dane .
5. Sprawdź ustawienia zapory routera. Stacja pogodowa wysyła dane
przez Port 80.

FCC STATEMENT
- 62 -
To urządzenie jest zgodne z część 15 z FCC Zasady. Operacja
podlega ten następny dwa warunki :
1. To urządzenie móc NIE powodować szkodliwy ingerencja.
2. To urządzenie musi zaakceptować jakąkolwiek ingerencję otrzymane,
w tym zakłócenia , które może powodować niepożądane działanie.
NOTATKA:
Ten sprzęt ma zostały przetestowane i uznane za zgodne z
ograniczenia na klasę B urządzenie cyfrowe, zgodnie z Część 15 z
nich FCC Zasady.
Te limity są zaprojektowane tak, aby zapewnić rozsądne ochrona
przed szkodliwy ingerencja w mieszkaniowy instalacja. Ten sprzęt
generuje — i może promieniować — energia o częstotliwości
radiowej i jeśli nie jest zainstalowany i używany zgodnie z
instrukcje, może powodować szkodliwe zakłócenia w łączności
radiowej .
Jednakże istnieje Jest nie ma gwarancji, że zakłócenia będą nie
występuje w konkretnej instalacji.
Jeśli sprzęt to robi nie powodować szkodliwy zakłócenia w odbiorze radia
lub telewizji , które można ustalić, włączając sprzęt wyłącz i na, na
zachęcamy użytkownika do próby skorygowania błędu ingerencja przez
jeden Lub więcej z następny środki :
Zmiana orientacji lub lokalizacji Antena odbiorcza.
Zwiększ odstęp między sprzętem a odbiornik.
Podłącz sprzęt do wyjścia w obwodzie różny z To do którego
odbiornik Jest połączony .
W celu uzyskania informacji należy skontaktować się ze
sprzedawcą lub doświadczonym technikiem radiowo-telewizyjnym. pomoc.
OSTRZEŻENIE: Zmiany lub modyfikacje tego jednostka nie wyrażam
się chytrze
zatwierdzony przez strona odpowiedzialna za zgodność może
unieważnić prawo użytkownika do korzystania ze sprzętu.
Technologia Sanven Sp. z o.o.

FCC STATEMENT
- 62 -
Adres: Suite 250, 9166 Anaheim Miejsce, Rancho Cucamonga,
Kalifornia 91730
Zrobiony W Chinach


Wsparcie techniczne i Certyfikat gwarancji
elektronicznej www.vevor.com/support

S
l
o
t
Snel starten Gids
⑤
R
E
G
E
N
O
P
V
A
N
G
E
R
I
N
S
T
E
L
L
E
N
I
n
v
o
e
g
e
①INSTALLING THE MOUNTING POLE
Secure the sensor onto a mounting pole (included) using the screws (included).

n
d
e
k
o
k
e
r
i
n
d
e
r
e
g
e
n
v
e
r
z
a
m
e
l
a
a
r
E
n
s
l
o
t
H
e
t
i
n
p
l
a
a
t
s
.

⑥
I
N
S
T
A
L
L
E
R
E
N
D
E
B
A
T
T
E
R
I
J
E
N
② INSTALLEREN DE MONTAGE BEUGEL
Losdraaien het batterijklepje bij de onderkant. Verbinden de kabel van het oplaadbare
batterijpakket.
A
a
n
p
a
s
s
e
n
d
e
a
a
n
g
e
Secure the sensor onto a mounting bracket (included) using the screws (included).

s
l
o
t
e
n
k
a
b
e
l
s
d
u
s
z
i
j
p
a
s
s
e
n
c
o
m
f
o
r
t
a
b
e
l
i
n
d
e
c
o
m
p
a
r
t
i
m
e
n
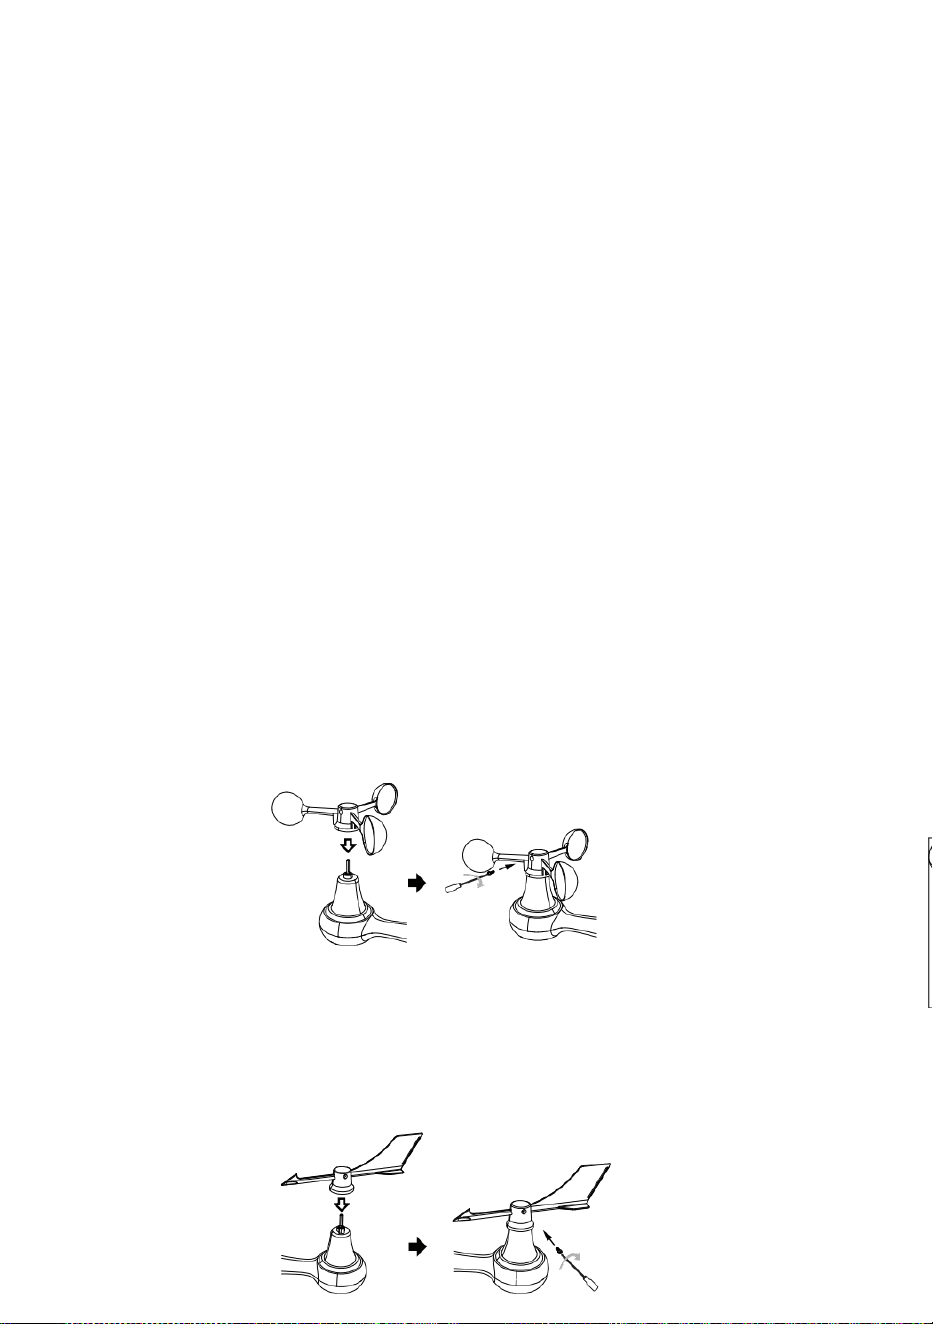
t
.
D
i
c
h
t
b
i
j
e
n
v
a
s
t
m
a
k
e
n
h
e
t
b
a
t
t
e
r
i
j
k
l
e
p
j
e
.
③ INSTALLEREN WIND SNELHEID BEKERS
Uitlijnen de schroefgaten in de windsnelheid bekers met de plat, verticale zijde van
de metaal hengel.
Invoegen de windsnelheid bekers in de metalen staaf en schroef erop nauw naar
slot Het in plaats.
L
o
s
m
a
k
e

n
d
e
s
c
h
r
o
e
f
b
i
j
d
e
g
e
w
r
i
c
h
t
.
A
a
n
p
a
s
s
e
n
d
e
v
e
r
t
i
c
a
l
e
h
o
e
k

v
a
n
d
e
z
o
n
n
e
-
c
e
l
.
D
u
w
d
e
v
e
r
s
n
e
l
l
i
n
g
n
a
a
r
b
i
n
n
e
n
e
n
a
a
n
s
p

a
n
n
e
n
d
e
s
c
h
r
o
e
f
.
P
u
n
t
n
a
a
r
N
O
O
R
D
E
N
N
O
O
R
D
E
N
P
u
n
t
n
a
a
r
④ INSTALLEREN WIND RICHTING VANE
Point to
SOUTH

Uitlijnen de schroefgaten in de windrichting n vaan met de plat, verticale zijde van de
metalen staaf.
Invoegen de wind richting vaan in de metaal hengel En schroef op nauw naar slot
Het in plaats .

TV
⑩AANZETTEN
DE WEERSTATION
Plug de stroomadapter in
de weerstation.
Eenmaal de weerstation is aangezet ,
Het zal automatisch de koppeling
invoeren modus.
pers of knop om te beginnen de AP
modus . Openen jouw Wi - Fi netwerk
instellingen op computer of smartphone .
Vinden de weerstation n SSID
( WWS - XXXXXX ) van de lijst .
Kraan op de SSID naar verbinden .
INSTELLING OMHOOG
WIFI-VERBINDING
In het eenvoudige/gedetailleerde scherm, druk
knop naar binnenkomen Instelling menukaart .
Pers knop om te schakelen naar " Anders"
Instelling " weergave.
Pers of knop naar voer " Inschakelen " in
Toegangspunt".
AT
MINST
3
voet
(.9 meter)
UIT ELKAAR
Om te voorkomen draadloze
interferentie, plaats beide
eenheden bij minst 3 voet (.9
meter) weg van elektronische
apparaten (TV, computer,
magnetron, radio, enz.).
SETTINGS
SETUP ADVANCED
Language:
Wi-Fi Router Setup
Router 1234 5
Select the menu and choose your 2.4GHz WIFI Router
Password
Weather Server Setup
WeatherUnderground
Station ID
Station Key
Upload wunderground.com
WeatherCloud
Station ID
Station Key
Upload weatherCloud.net
Time Zone Setup
Time Zone
Time Server Setup
Server URL
Firmware Version: 1.0.1
time.windows.com
a7d9d2a279 fbbafa
**********
**********
**********
Apply
KCACANTI9
English
Router
+0.00
⑧MOUNTING THE WIRELESS 7-IN-1 OUTDOOR SENSOR
Various options to install. Make sure the rain collector faces north and
the solar panel faces south before fastening the screws (included).
If you are a user located in the Southern Hemisphere,
please reverse the direction.
Enter your station ID
Enter your station key/password
check to confirm upload to
WeatherUnderground server
Enter your station ID
Enter your station key/password
check to confirm upload to
Weathercloud.net
Time zone setting
Internet time server setting
Press Apply to confirm the setting
WI-FI disconnected
WI-FI connected
WI-FI connected with Sync
ENTER SETUP INTERFACE
Enter the following address into the web browser address bar:
http://192.168.1.1 to access the setup interface.
Please click to check your password before clicking APP.LY
⑨ADJUSTING THE 7-IN-1 WIRELESS SENSOR LEVEL
Use the bubble level indicator to make sure the wireless outdoor sensor is completely level.
Select setup UI display language
Select your Wi-Fi Router (SSID) from the list
Router Password
Please scan the QR code or visit https://youtu.be/JYr4BeOmEKo to see a video on how to use it.
Familiarize yourself with the icons for Wi-fi connection status.
WI-FI CONNECTION STATUS
The
bubble

Technische ondersteuning en E-garantiecertificaat www.vevor.com/su
pport
METEOROLOGISCH STATION
MODEL:YT60233
Wij blijven ons inzetten om Jij hulpmiddelen met competitief prijs.
"Redden Half", "halve prijs" of andere soortgelijke uitdrukkingen gebruikt door ons alleen
vertegenwoordigt een
schatting van de besparingen die u kunt realiseren zou kunnen profiteren van de aankoop
van bepaalde gereedschap met ons compa rood naar de belangrijk
bovenkant merken en doseringen niet noodzakelijkerwijs betekent dat alle categorieën
gereedschappen worden gedekt aangeboden door wij. Jij
Zijn vriendelijk herinnerd om zorgvuldig te controleren wanneer u een bestelling plaatsen
bij ons als je bent
Eigenlijk besparen de helft in vergelijking met de bovenkant grote merken .

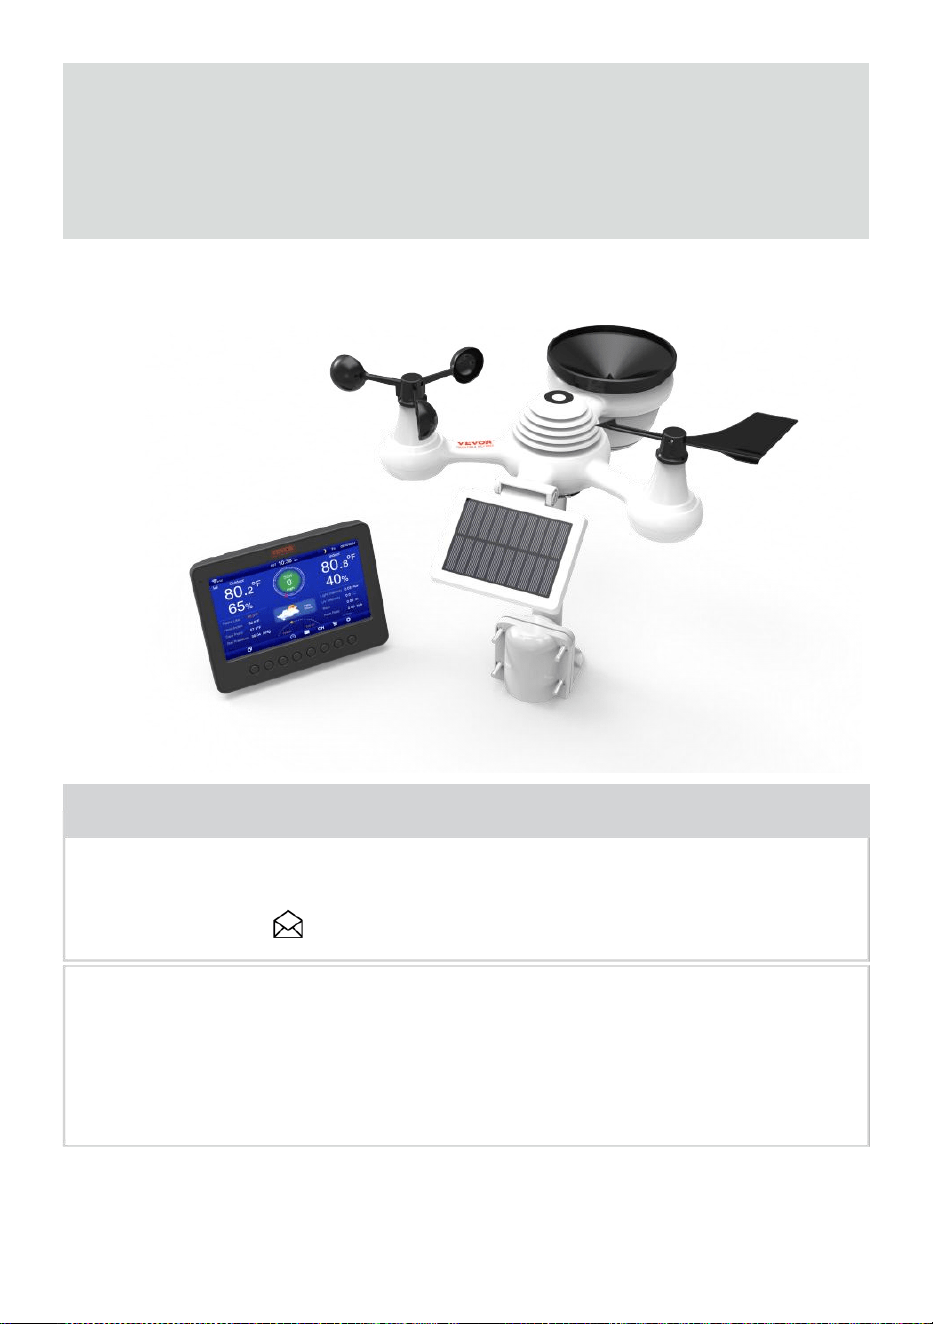
- 3 -
METEOROLOGISCH
STATION
MODEL:YT60233
BEHOEFTE HULP? CONTACT ONS!
Hebben productvragen? Technische ondersteuning nodig ? Voel je
vrij om contact ons:
Klantenservice @ vevor . com
Dit is het origineel instructie, Alsjeblieft lees alles handmatig instructies
zorgvuldig door voordat u gaat werken. VEVOR behoudt zich een
duidelijk interpretatie van onze gebruikershandleiding. Het uiterlijk van
het product zal zijn onderwerp naar de
product jij ontvangen. Geef ons alstublieft dat we niet zullen u opnieuw
informeren of er technologie- of software-updates zijn op ons product .

SAFETY PRECAUTIONS
- 4 -
WAARSCHUWING! Lees en begrijp alle veiligheidsmaatregelen
voorzorgsmaatregelen , gebruiksaanwijzing , en verzorging /
onderhoud instructies voor operationeel dit
apparaat. Bewaar deze handleiding voor toekomstig gebruik .
Dit product is geen speelgoed. Blijf uit de buurt van de buiten bereik
van kinderen.
Dit product is ontworpen voor gebruik in de alleen thuis als een
indicatie van het weer voorwaarden .
Dit product is niet om zijn gebruikt voor medische
doeleinden of voor het publiek informatie.
Doen niet schoonmaken eenheid met schurende of corrosieve
materialen.
Doen niet plaats het apparaat in de buurt van open vuur of
warmtebronnen . Brand, elektrische schok, productschade of letsel
zou kunnen voorkomen.
Alleen gebruik vers nieuw batterijen in de product . Doen niet
mengen nieuw en oud batterijen samen.
Doen niet demonteren, veranderen of modificeren de product .
Gebruik alleen opzetstukken of accessoires met dit product
gespecificeerd door de fabrikant.
Doen niet onderdompelen eenheid in water. Droog de product
met een zachte doek als vloeistof morsen op Het.
Doen de eenheid niet blootstellen aan buitensporige kracht,
schokken, kanaal, extreme temperatuur , of vochtigheid .
Doen de ventilatie niet bedekken of blokkeren gaten met welke dan
ook objecten.
Dit weerstation van deze product is bedoeld om zijn gebruikt
binnen alleen.
Dit product is alleen geschikt voor montage op een hoogte minder dan2 M
(6.6 voet).
Doen niet knoeien met de eenheid interne componenten. Knoeien
met het product maakt de garantie ongeldig .
Batterijen zijn niet inbegrepen. Wanneer invoegen batterijen ,
zorg ervoor dat de positief en negatief polariteiten overeenkomen
met de markeringen in het compartiment .
Doen niet meng standaard, alkalisch en oplaadbaar batterijen
samen r.

SAFETY PRECAUTIONS
- 4 -
Een verlaten batterij blootgesteld aan extreem hoge
temperatuur in de omgeving kan resulteren in een explosie of
lekkage van brandbare vloeistof of gas.
Een verlaten batterij blootgesteld aan extreem lage lucht druk in
de
de omgeving kan resulteren in een explosie of lekkage van
brandbare vloeistof of gas.

TIPS FOR SENSOR SITE SELECTION
- 5 -
Regenafzuiger moet elke keer worden schoongemaakt weinig
maand hs.
Sensor moet zijn geïnstalleerd bij minst 1.5 m (5') verwijderd van
elke gebouw of structuur.
Kies een locatie in een open ruimte onder rechtstreeks
zonlicht met Nee obstakels.
De sensor moet blijven in het zicht en binnen 150 M (492') van de
weer station voor consistent , gestaag overdragen .
Houd uw sensor en weerstation uit de buurt van huishoudelijke
apparaten.
apparaten Dat bedienen op de dezelfde frequentie . De troosten En
sensor moet verslaan minst 1 - 2 m (3' -7') verwijderd van zo een
interferentie s.
PRODUCT FUNCTIES
7″ HD TFT-scherm scherm.
Realtimeklok met kalender r.
Alarmfunctie.
Maan Fase.
Zonsopgang/zonsondergangstijd.
Tijdzone-instelling en Zomertijd (DST) functie.
Tijdzone :GMT +13 tot -12 uur.
Automatisch synchroniseren met internettijdserver.
7 talen (NL/ DE/ EN/ EN/ HET/ NL/ CZ) voor weergave.
van binnen- en buitentemperatuur en vochtigheid met
tendens.
Evenement, Per uur, Dagelijks, wekelijks, Maandelijks, Totaal
regenval en Regenval tarief in verleden uur.
Weergave van gemiddelde windsnelheid, windstootsnelheid en
windrichting.
Absoluut en relatief Luchtdrukweergaven met trend.
Zonne Straling intensiteitsweergave en UV I-scherm.
Weergave van weerindex : Gevoel vind ik leuk, Wind Chill, Warmte
index. Dauw punt.
Weer Voorspellen.
Weergegevens met Maximaal/Minimaal lezen, datalog & Weergave
van de geschiedenisgrafiek.
Instellingen voor weeralarmen.
Helderheid van de achtergrondverlichting aanpassen.

TIPS FOR SENSOR SITE SELECTION
- 5 -
Laag batterij indicaties voor buitensensoren .
Nacht Lichtfunctie.
Gegevens uploaden weergegevens naar Weather Underground
en/of Weather- wolk via WiFi routeren.

PACKAGECONTENTS
- 6 -
1 2 3
4 5 6
7
8
9 10 11 12
1 Weerstation
7 Montage paal met 4 schroeven
2 Adapter
8 Montage haakjes met 6 schroeven
3 Draadloze 7-in-1 buitensensor 9 Rubberen pads X 2
4 Trechter
10 Schroevendraaier 1
5 Windrichtingsvaan met 1 schroef
11 Schroevendraaier 2
6 Windsnelheidsbekers met 1 schroef
12 Gebruikershandleiding
OP : 4 extra schroeven voor wind richting vaan En wind
snelheidsbekers .

PRODUCTOVERVIEW
- 7 -
DRAADLOZE 7- IN - 1 BUITEN SENSOR
1
Zonne-energie paneel
2 Windrichting vaan
3 UV/licht sensor
4
Waterpas gradiënt
2
5 Regen verzamelaar
6 Windsnelheid kopjes
7
Montage pool
8 Montage haakjes
9 Hygro-thermosensor
10
LED's: Knippert wanneer de
eenheid zendt een lezing
11 RESET-knop
12
Batterijklep
10
11
7
9
8
12
3 6
4
1
5

WEATHERCONSOLEOVERVIEW
- 8 -
1
2
3
4
5
6
7
8
1 Omgevingslicht detector
4 Muur montage houder
7 Antenne
2 Beeldscherm
5 Stroom invoer
8 Standaard
3 Functie knoppen
6 RESET-knop
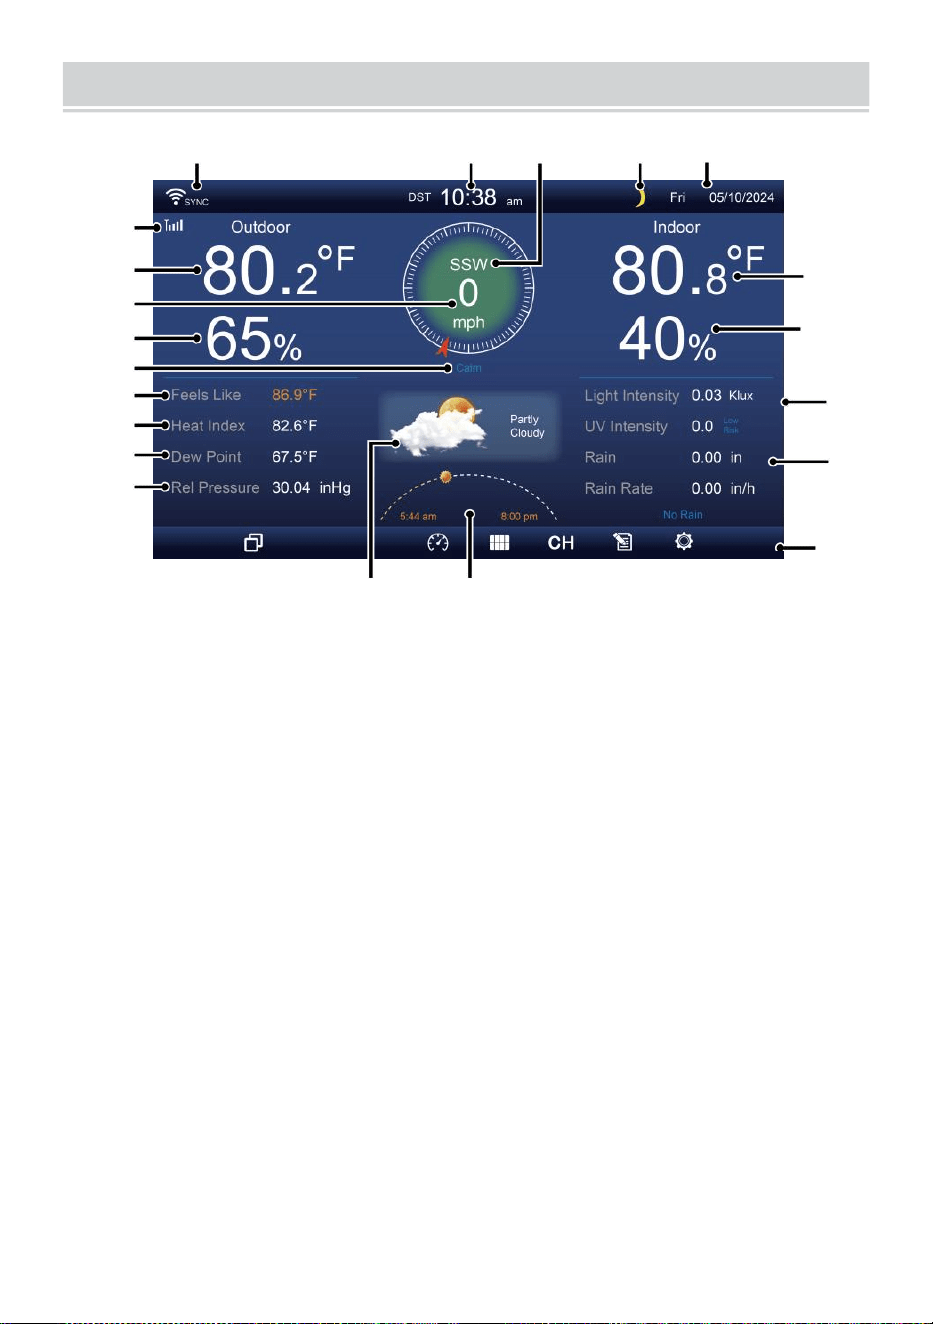
HOME SCREEN OVERVIEW
- 9 -
1 2 3 4 5
6
15
8
16
10
17
18
o—
19
2
11
12
13
14
9
7
23 24
1 Wi-Fi-verbinding/ tijdsynchronisatie pictogram
13 Dauw punt
2 Tijd
14 Baro druk
3 Windrichting
15 Binnentemperatuur
4 Maan fase 16 Binnenvochtigheid
5 Datum
17 Licht intensiteit
Sensor signaalsterkte icon
18 UVI
7 Buitentemperatuur
19 Regenval
8 Windsnelheid 20 Regen tarief
9 Buitenvochtigheid 21 Regen tarief niveau
10 Windsnelheid niveau 22 Functioneel knop icon
11 Voelt zoals temperatuur 23 Weersverwachting
12 Warmte index
24 Zonsopgang/zonsondergang tijd

DETAIL SCREEN OVERVIEW
- 10 -
11
12
1 3
1 4
1 5
1 6
1 7
1 8
1 9
20
21
1 2 3 4 5 6 7 8 9 10
22
23
24
25
26
27
28
29
30
31 32
1 Wi-Fi-verbinding/tijdsynchronisatie icon
17 Windchill
2 Buiten MAX/MIN temperatuur
18 Dauw punt
3 Buiten MAX/MIN vochtigheid
19 Ba ro druk
4 Windstoot
20 Licht intensiteit
5 Tijd 21 UVI
6 Gemiddelde windsnelheid 22 Binnen MAX/ MIN temperatuur
7 Windrichting
23 Binnentemperatuur
8 Windsnelheid
24 Binnen MAX/MIN vochtigheid
9 Maan fase
25 Binnen vochtigheid
10 Datum
26 Regen tarief
11 Voelt zoals temperatuur 27 Evenement, per uur, wekelijks,
12 Buitentemperatuur
maandelijks, totaal regenval
13 Buitenvochtigheid 28 Regen tarief niveau
14 Windsnelheid niveau
29 Dagelijks regenval
15 Voelt zoals temperatuur 30 Functioneel knop icon
16 Warmte index
31 Weersverwachting
32 Zonsopgang/zonsondergang
tijd

SUMMARY SCREEN OVERVIEW
- 11 -
6
7
8
9
1 0
1 2 3 4 5
1 Wi-Fi-verbinding/tijdsynchronisatie
icon
2 In/uit icon label
3 Tijd
4 Maan fase
5 Datum
6 Sensorsignaalsterkte icon
7 Binnen-/buitentemperatuur
8 Binnen-/buitenvochtigheid
9 Nee scherm verbinden scherm
10 Functioneel knop icon
INSTELLING UP DE DRAADLOZE ESS 7-IN-1 BUITENSENSOR
De draadloos 7- in -1 buiten sensor maatregelen wind snelheid , wind
richting , regenval, UV-licht intensiteit, temperatuur en vochtigheid.
INSTALLEREN VAN DE MONTAGE POOL EN BEUGEL EN
Bevestig de sensor op een montage paal en beugel (meegeleverd)
met behulp van de schroeven ( inbegrepen ).
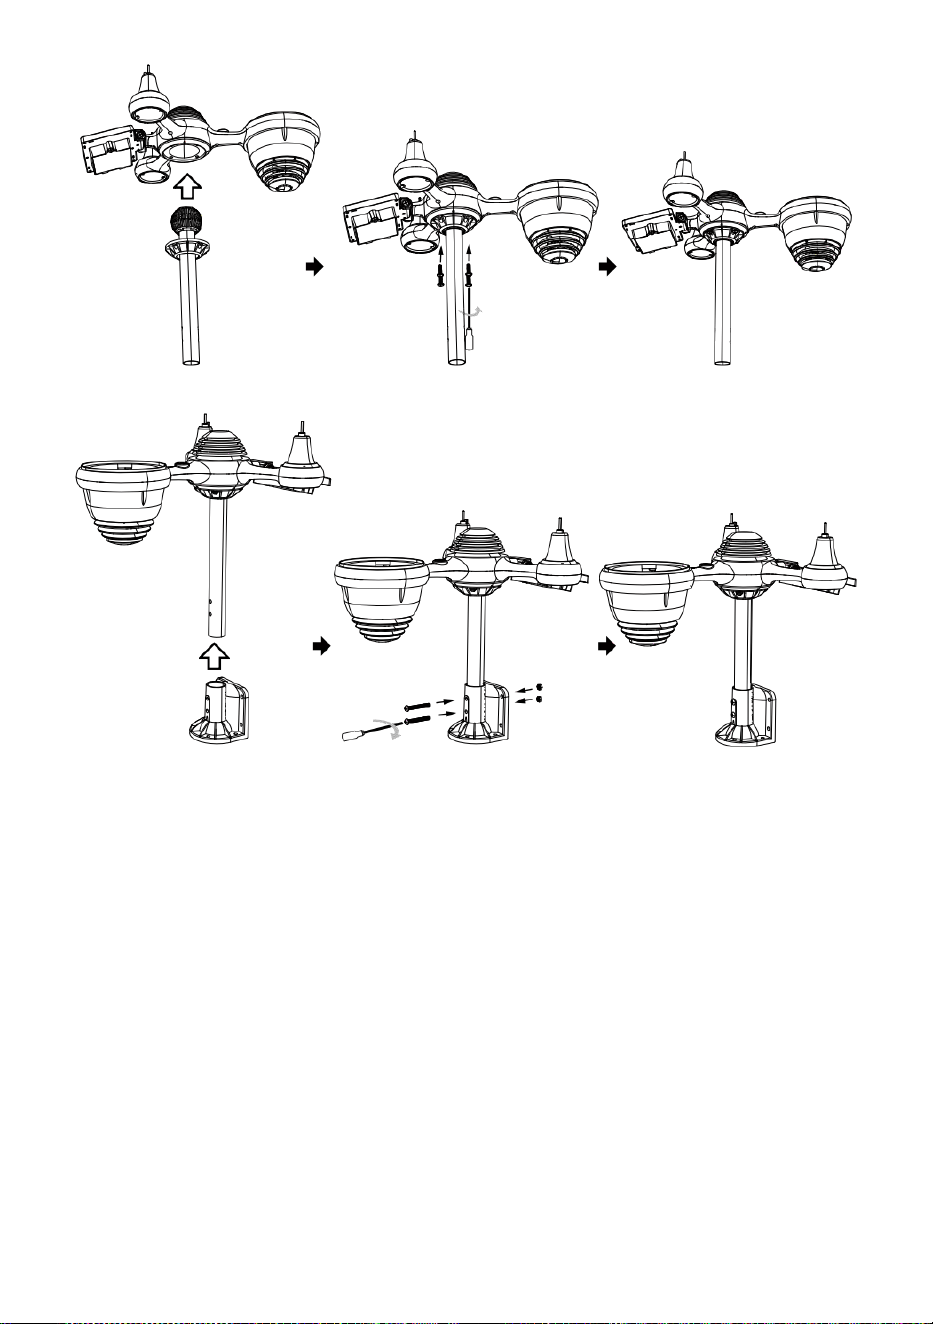
INSTALLATIE VAN WINDSPEED CUPS EN WIND RICHTING V AN
Lijn de schroef uit gaten in de windsnelheidsbekers met de vlakke,
verticale zijde van de metaal hengel.
Plaats de windsnelheidsbekers in de metaal staaf en schroef ze op
strak naar slot Het in plaats.
Lijn de schroefgaten uit in de wind richtingsvaan met het plat,
verticaal kant van de metaal hengel.
Plaats de windrichtingvaan in de metaal staaf en schroef ze vast
nauw naar slot Het in plaats.
- 12 -
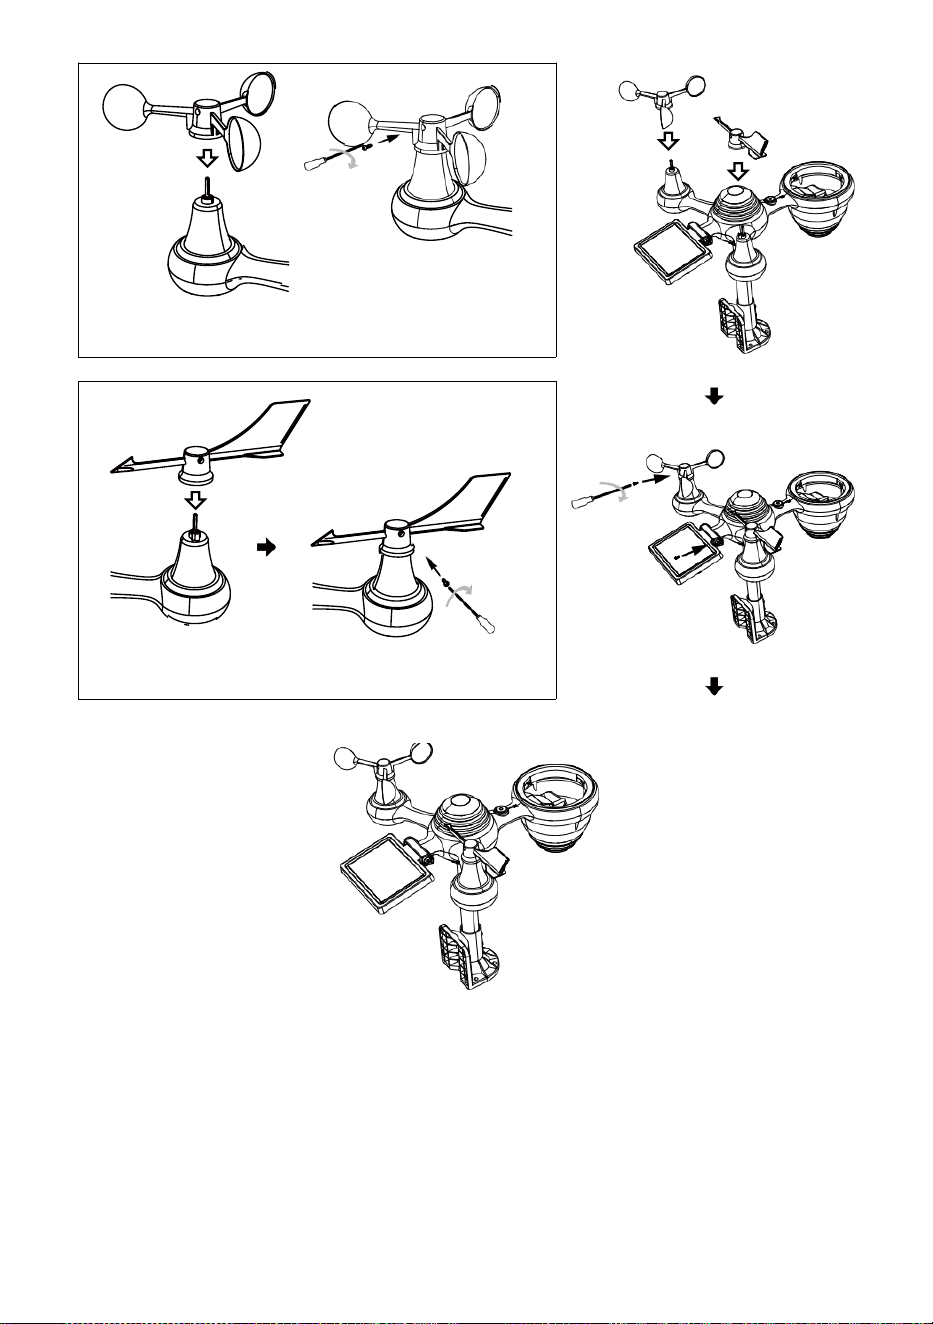
- 13 -
Installatie van Wind Speed Cups
Windrichting Installatie van schoepen
INSTELLING OMHOOG REGENOPVANGER
Lijn de inkepingen op de trechter l met de slotgroeven binnenin
de regen verzamelaar.
Plaats de trechter in de regencollector en schroef ze stevig vast
naar slot Het in plaats.

Slot
Uitlijnen
INSTALLEREN VAN DE BATTERIJEN
Draai de batterijklepje aan de onderkant van de 7-in-1 openlucht
- sensor met behulp van een schroevendraaier 1.
Sluit de kabel van de oplaadbaar batterij pakket (inbegrepen)
naar de kabel bevindt zich in de batterij compartiment.
Pas de aangesloten kabels aan zodat ze comfortabel passen in
de deel- ment. Toen, plaats de batterij pak in het compartiment.
- 14 -
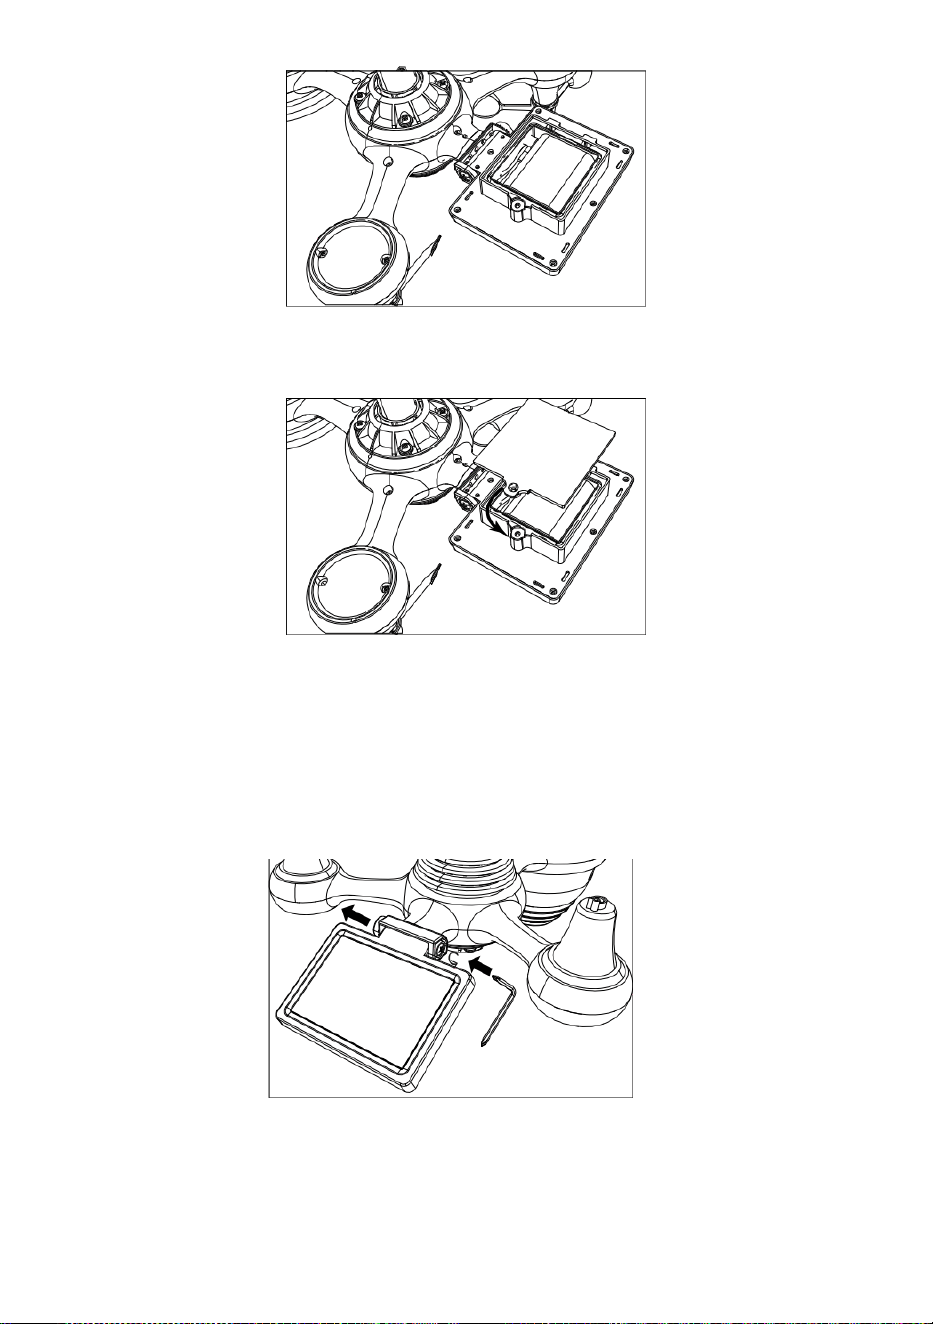
- 15 -
Sluit en bevestig het batterijklepje terug op de compartiment.
AANPASSEN DE ZONNE CEL
Draai de schroef bij de verbinding los zodat het tandwiel aan de
andere kant van het gewricht
duwt naar buiten. De zonnecel zou moeten nu zijn in een ontgrendeld
positie zn.
Pas de verticale hoek van de zonnecel aan om de meest optimaal
gebruik van de zonnecel, afhankelijk van uw locatie.
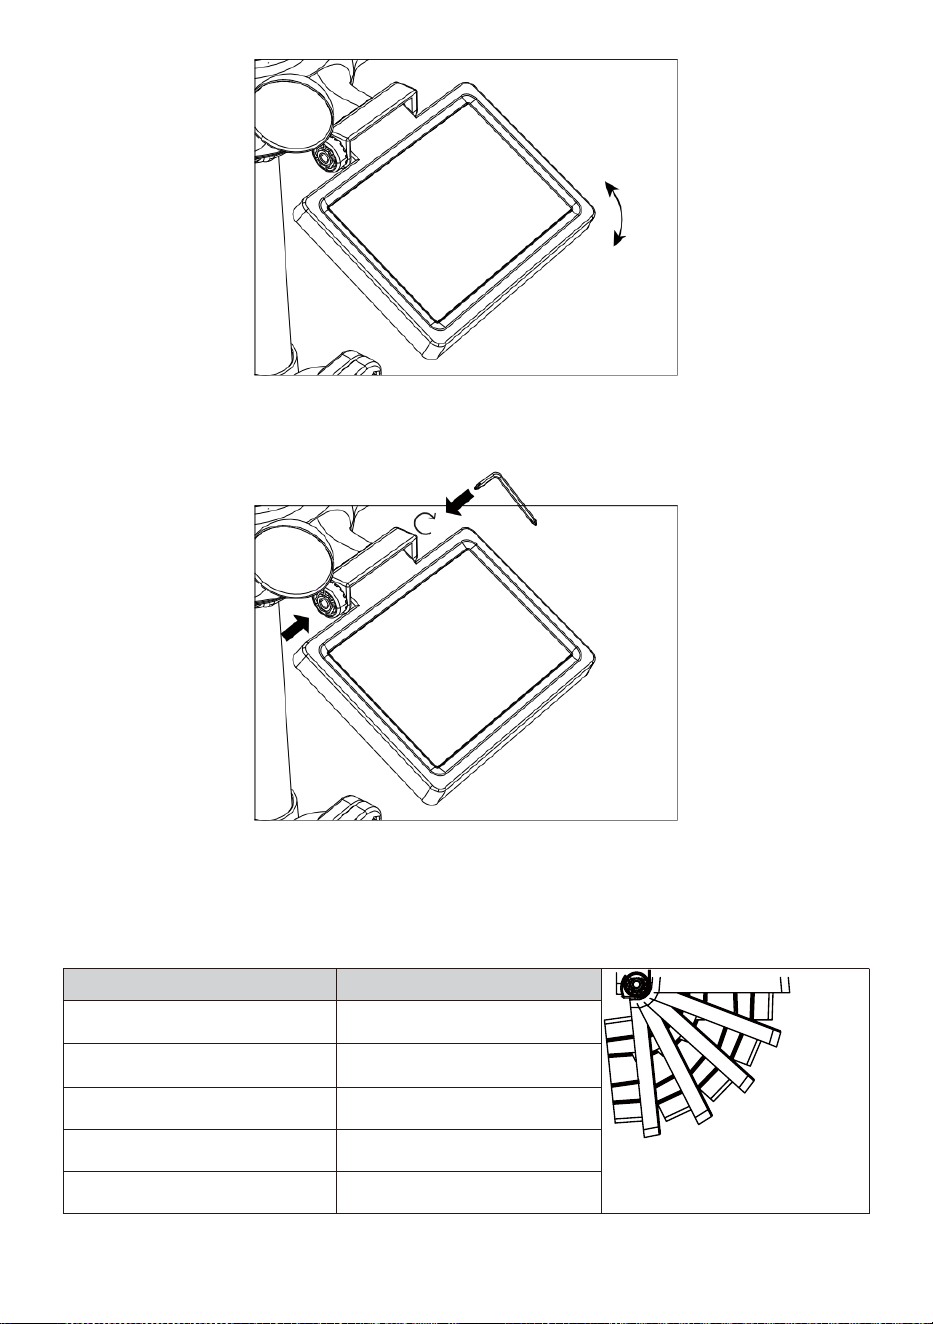
- 16 -
Duw het tandwiel naar binnen en draai de schroef vast tot de
tandwielen slot in plaats.
Bij het afstellen van de zonnecel moet u deze instellen op een hoek
dicht bij elkaar naar jouw breedtegraad. Bekijk grafiek hieronder om
een idee van hoe jij zou moeten hoek je zonne- cel.
Breedte Nabijheid
van de hoek van zonnecellen
0°
21°
42°
63°
84°
Als jouw locatie is dichtbij naar
84°
84°
Als jouw locatie is dichtbij naar
63°
63°
Als jouw locatie is dichtbij naar
42°
42°
Als jouw locatie is dichtbij naar
21°
21°
Als jouw locatie is dichtbij naar
0°
0°
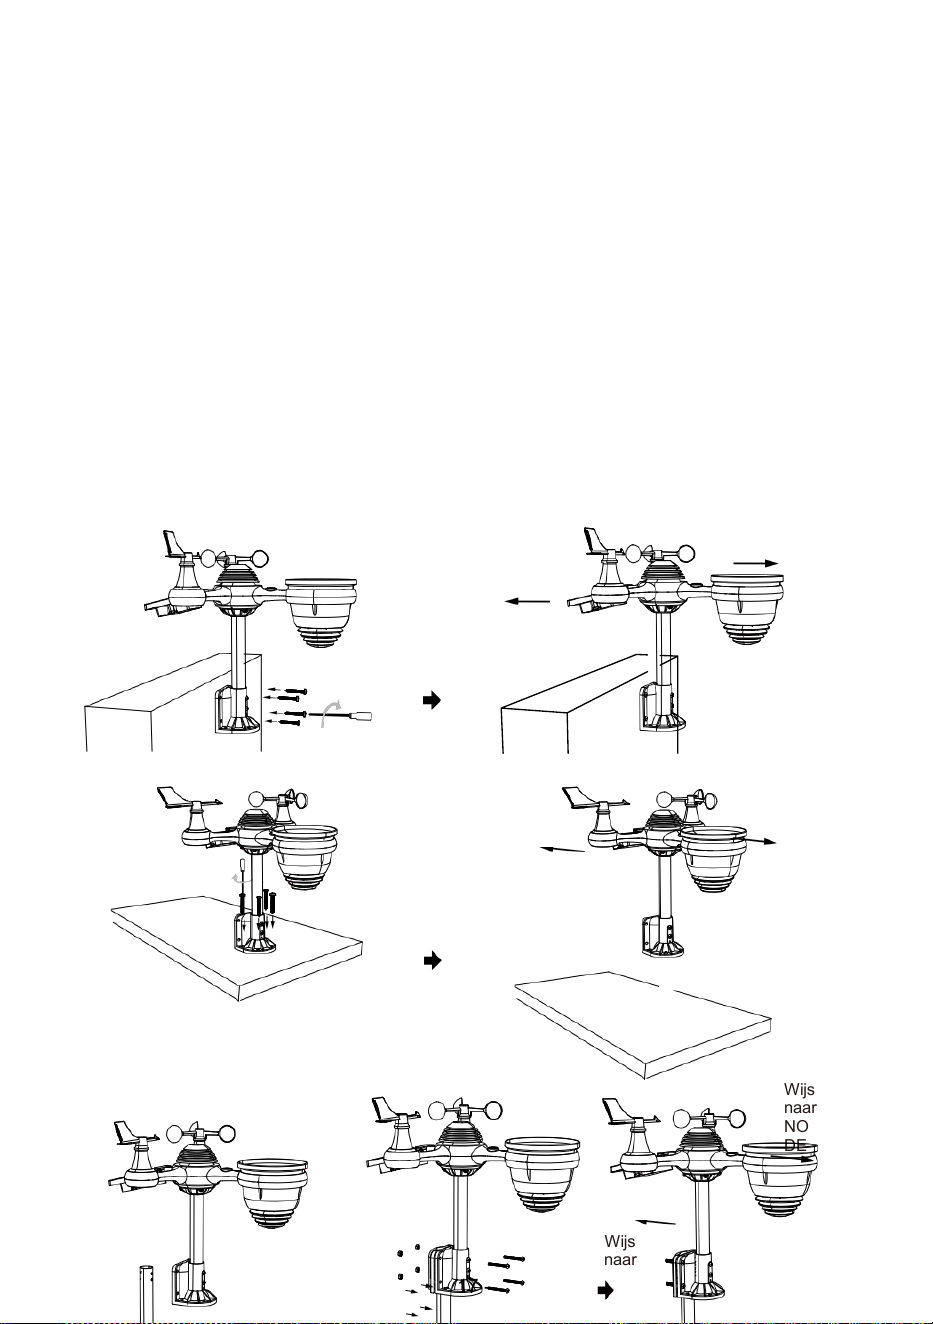
- 17 -
MONTAGE DE DRAADLOZE 7- IN - 1 BUITEN SENSOR
Kies een locatie voor de 7-in-1 buitensensor die is open met
Nee obstakels.
Draai de montagebeugels aan een oppervlak/muur met behulp van
vier tikken
schroeven (meegeleverd), of draai de montage vast paal naar uw
bestaande berg- ingaan paal met vier φ5 Bouten en M5 Montage van
moeren.
Toevoegen rubberen pads op de montagebeugel voordat u
de montagebeugel op de sensor.
Zorg ervoor dat de regenverzamelaar gezichten noorden en
de zon paneel is naar het zuiden gericht voor bevestiging de
schroeven ( inbegrepen ).
Zorg ervoor dat de sensor goed vastzit strak, anders winderig
voorwaarden oorzaak de zender naar schudden En dus verkeerd
gelezen de regenval gegevens .
Wijs naar
NOORDEN
Wijs naar
ZUIDEN
Wijs
naar
NOOR
DEN
Wijs
naar
ZUIDE
N
Wijs
naar
NOOR
DEN
Wijs
naar
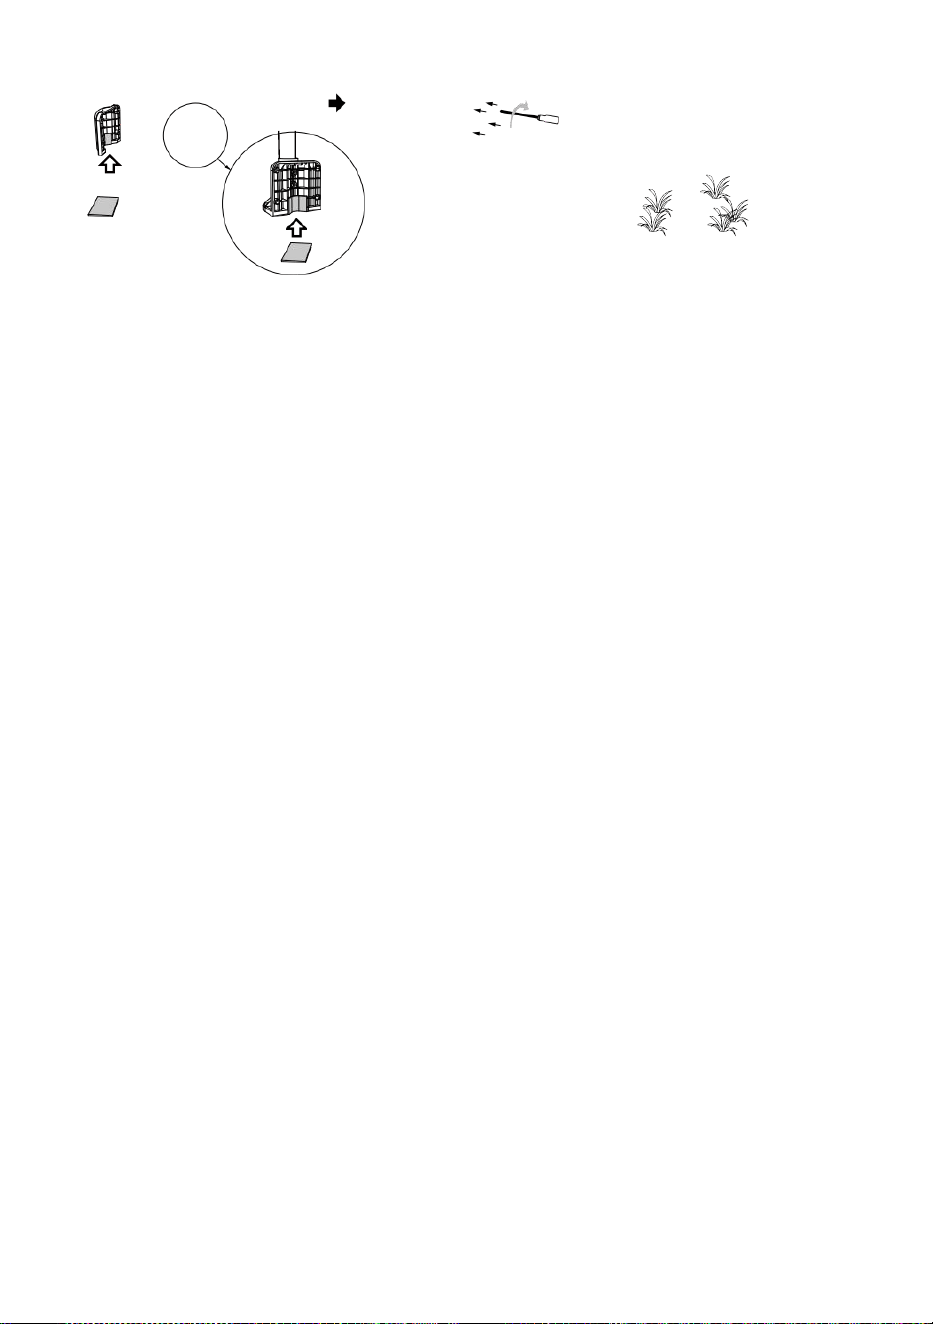
- 17 -
ZUIDE
N
Stok
Stok

- 18 -
WIJZEN DE DRAADLOZE 7- IN - 1 BUITEN SENSOR NAAR ZUIDEN
De draadloze buitenweersensor is gekalibreerd om puntig noord voor
maximale nauwkeurigheid. Voor uw gemak geldt echter dat als u een
gebruiker
gelegen in het Zuiden Hemisfeer , je kunt de sensor gebruiken met de
regenwaterreservoir dat naar het zuiden wijst.
1. Monteer en installeer het draadloze weerstation sensor met h de
regen verzamelaar wijst naar het zuiden, in plaats van No rth.
(Gelieve verwijzen naar MONTAGE VAN DE
2. DRAADLOZE 7-IN-1 BUITEN SENSOR.)
Selecteer "STH" voor zuid halfrond in de klokinstellingsmodus.
(Alsjeblieft verwijzen naar "het instellen van de klok")
OPMERKING: Wijzigen van de De halfrondinstelling schakelt
automatisch de richting van de maan om fasen op de weergave.
Wijzend de draadloze weer sensor naar de zuiden zullen toestaan
maximaal zonlicht op de zonne- paneel , vooral tijdens de winter
seizoen in het Zuiden Halfrond.
AANPASSEN DE 7- IN -1 DRAADLOZE SENSOR NIVEAU
Gebruik de bel niveau indicator naar zorg ervoor dat de draadloze
buiten
sensor volledig waterpas is. Als de sensor is niet niveau, de
verdienen graadmeter, UV en Licht intensiteit zal niet meeteenheid
op de juiste manier.
Om het niveau van de draadloze buitensensor aan te passen,
moet u de volgende onderdelen losmaken: de schroeven van de
montagepaal. Pas het niveau van de draadloze buitensensor aan in
bestellen om zorg ervoor dat de bel is in het midden van de waterpas
indicator.
Draai de schroef van de montage weer een paal.

- 18 -

- 19 -
De bel
INSTELLING OMHOOG DE WEERGAVECONSOLE
STROOM OP DE CONSOLE
1. Sluit de stroomadapter naar het display troosten.
2. Draai de antenne om op rug van de troosten omhoog.
3. Zodra de console is ingeschakeld, de opening scherm zal zijn
weergegeven en ga dan naar binnen voornaamst scherm.
4. Wacht de openlucht- sensor naar paar met jouw troosten .
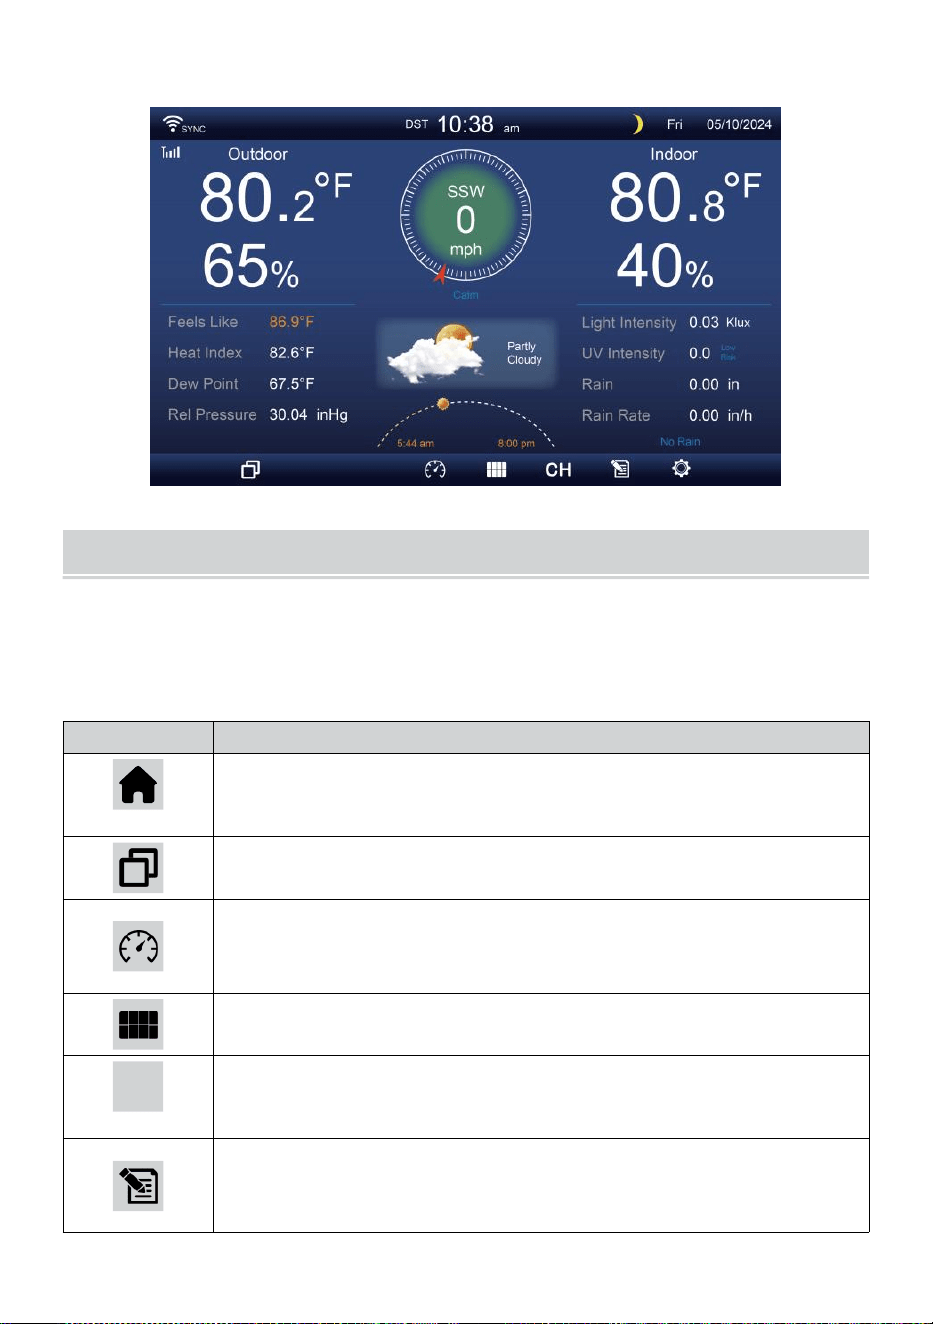
- 20 -
5. Eens gepaard, de buitendata zal zijn getoond op de scherm.
GEBRUIKSAANWIJZING
Dit sectie beschrijft de voornaamst functies En ander functies van
knoppen in de console.
VOORNAAMST FUNCTIES VAN KNOPPEN
ICON
BESCHRIJVING
Thuis knop
Druk op deze knop om eenvoudig te tonen gegevens
weergave scherm.
Uitbreiden knop
Druk op deze knop om de gedetailleerd gegevens scherm.
Druk
Druk hierop knop om tussen te laten zien Relatief en
absoluut drukscherm.
Meerdere sensoren
Druk op deze knop om de multi- sensor scherm.
CH
Kanaal
Druk hierop knop om te schakelen Binnen, CH1-7
gegevens scherm.
Geschiedenis Dossier knop
Druk hierop knop om de geschiedenisscherm
(Max/Min, Gegevensrecord, Grafische weergave).

- 20 -
Instelling
Druk op deze knop om te tonen de instelling scherm.
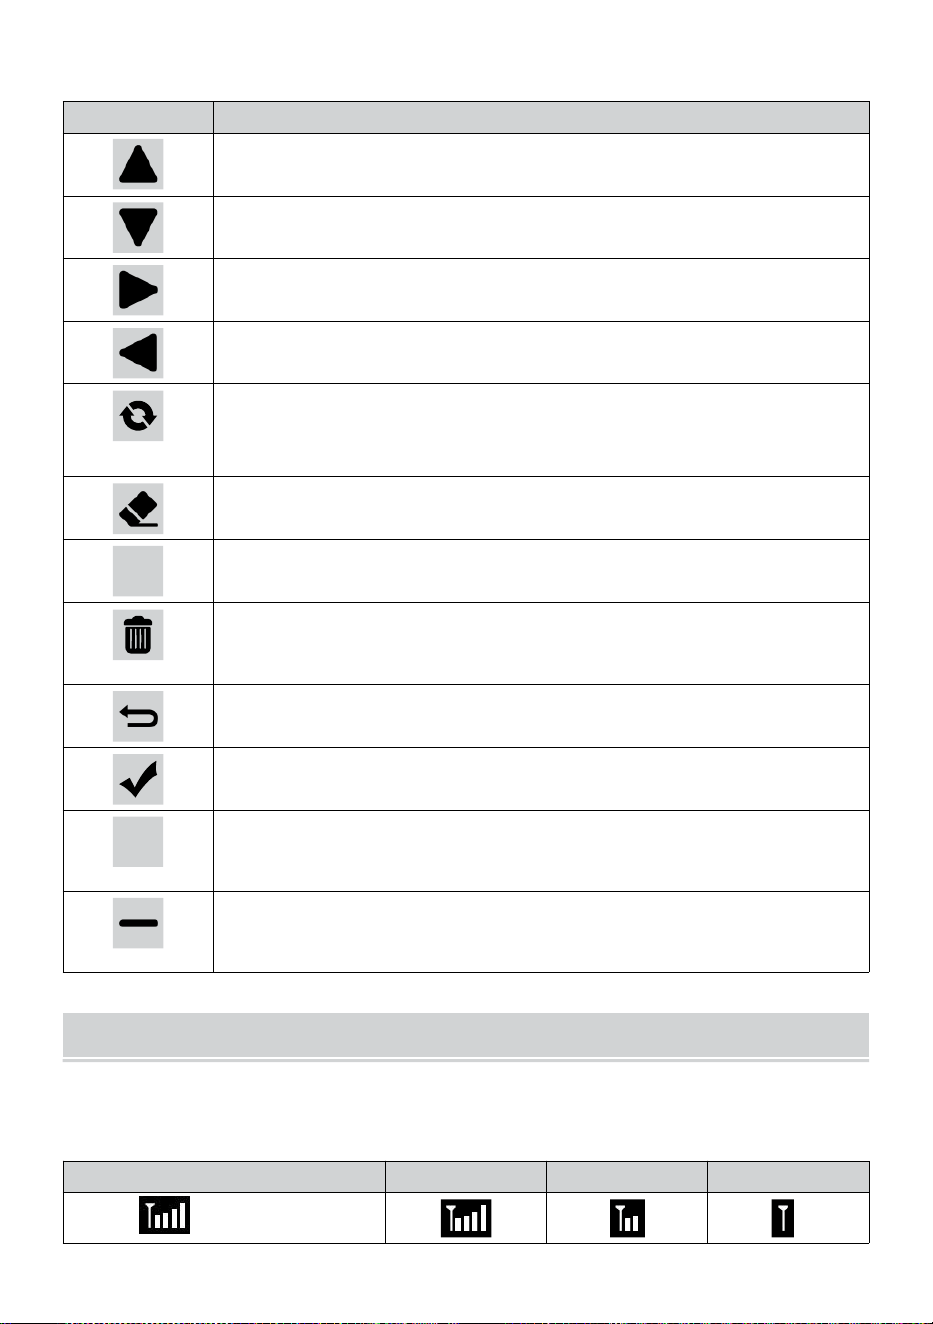
- 21 -
ANDER FUNCTIE KNOPPEN VOOR INSTELLINGEN
ICON
BESCHRIJVING
Omhoog knop
Druk hierop knop om boven te selecteren rij of het is ze .
Omlaag knop
Druk hierop knop om lager te selecteren rij of het is ze .
Rechts knop
Druk hierop knop om te selecteren rechterkolom of item.
Links knop
Druk hierop knop om links te selecteren kant kolom of item.
Cyclus knop
Druk op deze knop om verschillende opties te wijzigen
parameterscherm.
Duidelijk knop
Druk hierop knop om de max/min-opname.
Q
Zoekopdracht knop
Druk hierop knop om de gegevens te doorzoeken dossier.
Verwijderen knop
Druk op en houd dit vast knop om te verwijderen opnemen
s.
Opbrengst knop
Druk hierop knop naar opbrengst vorig pagina.
OK knop
Druk op deze knop om te bevestigen de selectie.
+
+ knop
Druk op deze knop om de waarde te verhogen of schakelen
naar ander optie.
- knop
Druk op deze knop om de waarde te verlagen of te wisselen
naar ander optie.
DRAADLOOSSIGNAAL RECEPTIE
Maak kennis met de pictogrammen voor verschillende signaalsterktes.
Verplaats uw console of weersensor als het signaal zwak is of kwijt.
Signaal zoeken
Sterk signaal
Zwak signaal
Signaal kwijt
Antenne bar is
scrollen
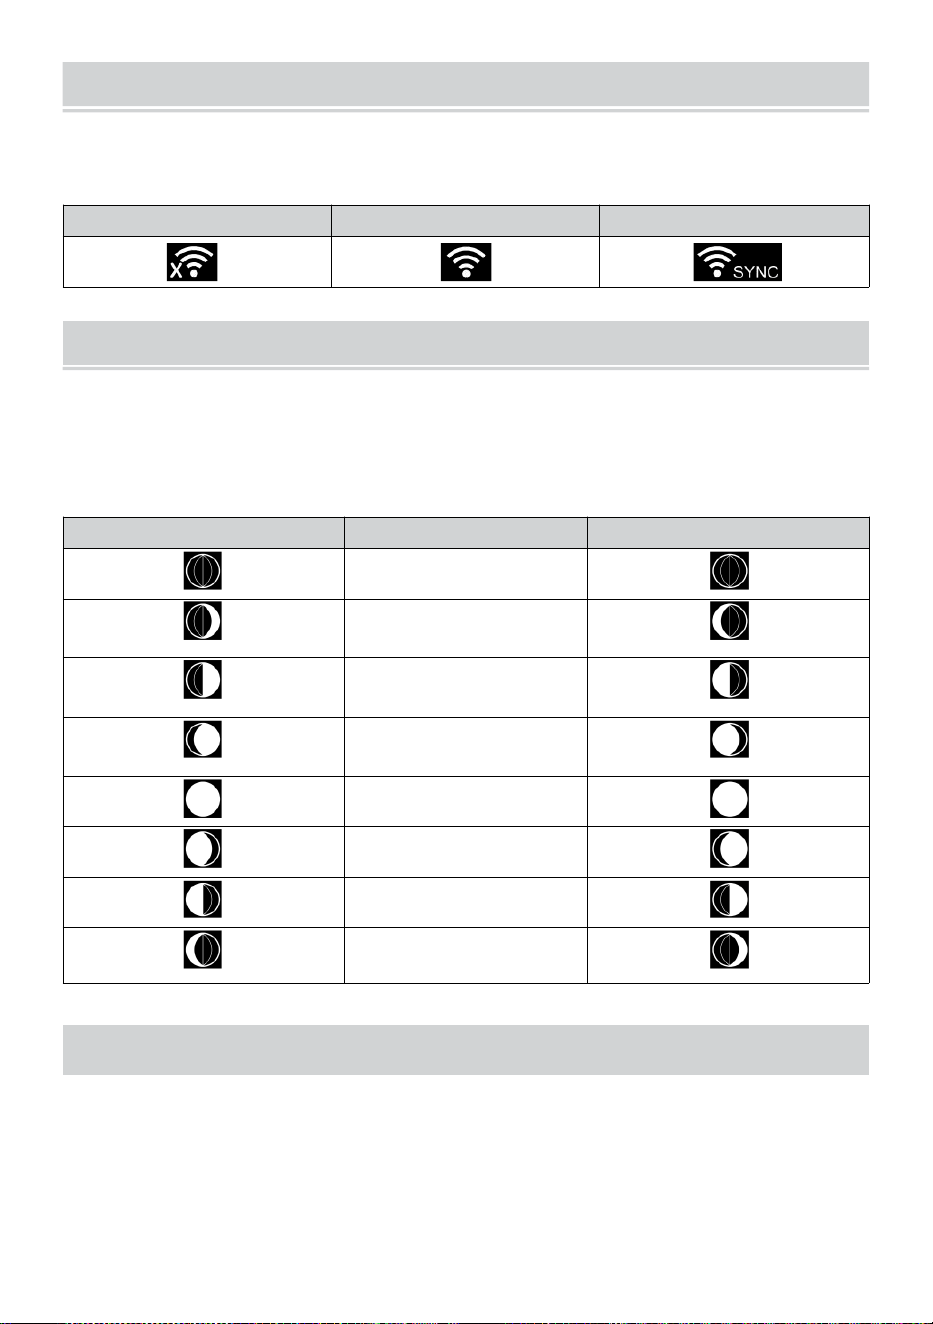
WI-FI CONNECTION STATUS
- 22 -
Maak uzelf vertrouwd met de pictogrammen voor de Wi-Fi-
verbindingsstatus.
WIFI verbroken
WIFI verbonden
WI-FI verbonden met Sync
MAAN FASE
Het display berekent de maan fase volgens naar jouw tijd, datum en
tijd zone.
De onderstaande tabel geeft de bijbehorende fasen weer En hun
iconen voor zowel de Noord en Zuid hemisferen.
Noordelijk Halfrond Iconen
Maan Fase
Zuidelijk Halfrond Iconen
Nieuw Maan
Wassende halve maan
Maan
Eerste kwartaal
Maan
Wassende bolle buik
Maan
Vol Maan
Afnemende bolle Maan
Derde kwartaal Maan
Afnemende halve maan
Maan
ZONSOPGANG/ZONSONDERGANG TIJD
De console geeft de zonsopgang/zonsondergang van uw locatie aan,
wat gebaseerd op tijdzone, de breedtegraad en lengtegraad die u hebt
ingevoerd. Als daglicht Besparing is ingesteld op AUTO , de keer zullen
aanpassen een uur vooruit automatisch voor daglicht
besparing.

WI-FI CONNECTION STATUS
- 22 -
OPMERKING: Voor tijdzone, breedtegraad en
lengtegraadinstelling, Alsjeblieft refereren " Tijd & Datum
Instelling ”.

WEATHER FORECASTINGAND WEATHERINDEX
- 23 -
WEER VOORSPELLING
De ingebouwd barometer kan niet ijs atmosferisch drukveranderingen,
en op basis van de verzamelde gegevens, kunnen de
weersomstandigheden voorspellen .
Er zijn 6 weericonen: zonnig, Gedeeltelijk Bewolkt, Bewolkt, Regenachtig,
Regenachtig/ Stormachtig en Sneeuwachtig ( Licht Sneeuw & Zwaar
Sneeuw).
Zonnig
Gedeeltelijk bewolkt
Bewolkt
Licht regen
Zware regen/storm
Lichte sneeuw
Zware sneeuwval
OPMERKING:
De nauwkeurigheid van een algemene drukgebaseerde voorspelling
is ongeveer 6 5-70%. De voorspellingen zijn niet gegarandeerd.
Het kan niet noodzakelijkerwijs de huidige situatie weerspiegelen.
TREND INDICATOR
De tendens indicator toont de tendensen van veranderingen in de
binnenkort beschikbaar enkele minuten. Deze pictogrammen
verschijnen in de temperatuur , vochtigheid, En barometrisch
drukgedeelte van het staartscherm .
Stijgende
Stabiel
Vallen
IJS ALERT

WEATHER FORECASTINGAND WEATHERINDEX
- 23 -
Als de buitentemperatuur is lager dan 1°C/33.8° F, de sneeuwvlok icon
i
·
zal verschijnen op de weergave.

- 24 -
VOELT LEUK VINDEN
De Voelt Zoals temperatuur index bepaalt hoe warm het buiten
daadwerkelijk aanvoelt, rekening houdend met factoren als wind snelheid,
druk, temperatuur en vochtigheid (wind rustig aan En warmte index).
18°C 26°C
10 20 30
-40 -22 -4 14 32 50 68 86 104 122 °F
Windchill Hitte Index
WARMTE INDEX
De Warmte Index wordt bepaald door de temperatuur van de draadloze
weersensor tuur en vochtigheid metingen wanneer de temperatuur is
tussen 79 °F (26 °C) en 120 °C (50 °C).
Warmte Index bereik
Waarschuwi
ng
Uitleg
81°F - 90°F (27°C - 32°C)
Voorzichtigheid
Mogelijkheid van hitte-uitputting
33°C - 40°C (33°C - 40°C)
Uiterste
voorzichtigheid
Mogelijkheid van hitte-uitdroging
41°C - 57°C (41°C - (54°C)
Gevaar
Hitte-uitputting zeer waarschijnlijk
≥ 55°C (≥ 55°C)
Extreem Gevaar
Groot risico op uitdroging/ beroerte
WIND KOELEN
Windchill of windchill is de verlaging van temperatuur als gevolg van naar
de doorgang-
stroming van lucht met een lagere temperatuur. Windchill is bepaald
door A combinatie van de temperatuur- en windsnelheidsgegevens van
de draadloze weersensor
.
LET OP: Alleen als de temperatuur is
lager dan 50
℉
(10
℃
) en de windsnelheid is meer dan 4,8 km/u (3
mph), zal de windchillwaarde weergeven,
anders er zal “--.-“ worden weergegeven.
DAUW PUNT
De dauw punt is de temperatuur waaronder de waterdamp in lucht bij
constante barometrisch druk condenseert in vloeibaar water tegelijk
snelheid waarmee het verdampt. Het gecondenseerde water wordt dauw
genoemd wanneer Het vormen op een stevig oppervlak.
-40 -30 -20 -10 0
40 50 °C
Increasing danger Increasing danger

- 24 -
De dauw punttemperatuur wordt bepaald door de temperatuur en
vochtigheid gegevens van de draadloze weer sensor .
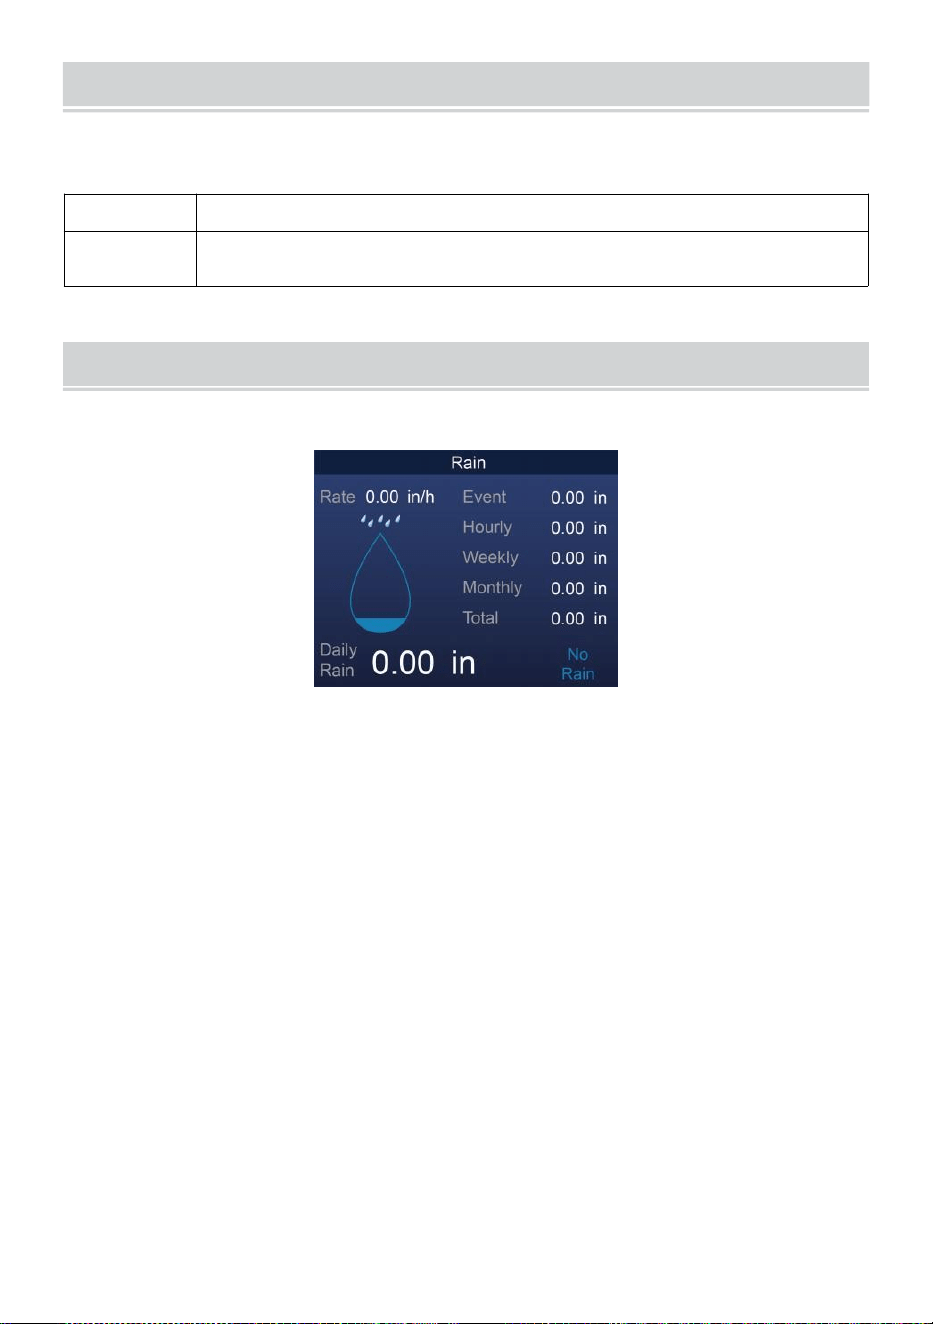
BAROMETRIC PRESSURE
- 25 -
Rekening de weer website voor echte tijd barometer voorwaarden Dan
pas de relatieve waarde aan in de Kalibratie instellen sectie.
Absoluut
De absoluut atmosferisch druk van jouw locatie .
Relatief
De relatieve atmosferische druk gebaseerd op de
zeespiegel.
REGEN
In dit gedeelte wordt de regenval weergegeven . regen tarief informatie.
REGENVAL WEERGAVE MODI
Regen Tarief
: Huidig regenval tarief in de verleden uur .
Regen
evenement
: continu regen, en reset naar nul als er regenval optreedt
is minder dan 10mm (0,039 in) in een periode van 24 uur.
Per uur
Regen
: Totaal regenval voor elk jaar uur.
Dagelijks
Regen
: Totaal regenval sinds middernacht (00:00)
Wekelijks
Regen
: Totaal regenval voor de huidige kalenderweek, en reset
op zondag ochtend om middernacht (zondag t/m
zaterdag)
Maandelijks Regen : Totaal regenval voor de huidige kalendermaand,
en opnieuw instellen op de eerste dag van de Maand.
Totaal Regen: Totaal regenval sinds de laatst opnieuw instellen.
RESET HET TOTAAL REGENVAL DOSSIER
Zie “Alles wissen Gegevenssectie om regenval te wissen gegevens.
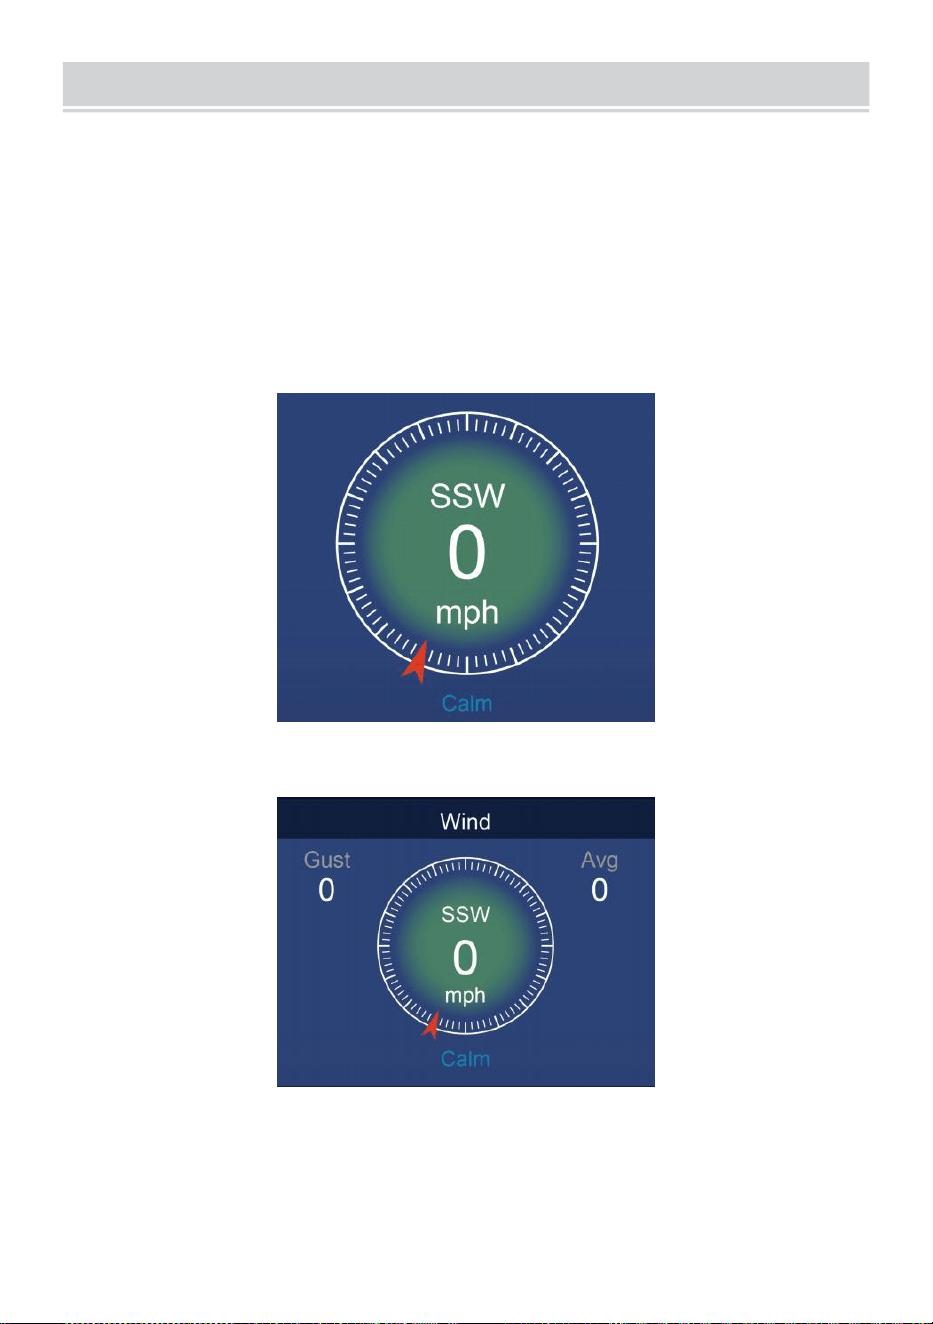
WIND
- 26 -
WINDSNELHEID EN RICHTING
Dit sectie beeldschermen de wind snelheid , stroom wind richting ,
overheersende windrichtingen en windsnelheid niveau.
Windsnelheid: is de gemiddelde windsnelheid gemeten in de
vorige 20 seconden.
Gemiddelde wind: is de gemiddelde windsnelheid in 10 notulen.
Windvlaag: is de hoogste windsnelheid opgenomen in de vorige
ons 20 seconden .
Eenvoudig Gegevens Weergave
Gedetailleerd Gegevens Weergave
BEAUFORT-SCHAAL
De De schaal van Beaufort hieronder is een internationale schaal van
windsnelheden van 0 (kalm) tot 12 (orkaankracht).
- 27 -
Schaal van
Beaufort
Beschrijving
Windsnelheid
Landconditie
0
Kalm
< 1 km/u
Kalm. Rook verticaal omhoog gaat.
< 1 km/u
< 1 knopen
< 0,3
mevrouw
1
Licht lucht
1.1 ~ 5 km/u
Rookverspreiding geeft wind aan
richting. Bladeren en windvanen staan
stil.
1 ~ 3 km/u
1 ~ 3 knopen
0,3 ~ 1.5
mevrouw
2
Licht briesje
6 ~ 11 km/u
Wind voelbaar op blote huid. Bladeren
geritsel. Windvaantjes beginnen naar
beweging.
4 ~ 7 km/u
4 ~ 6 knopen
1.6 ~ 3.3
mevrouw
3
Teder briesje
12 ~ 19 km/u
Bladeren en kleine takjes constant
bewegend. Uitgestoken lichtvlaggen.
8 ~ 12 km/u
7 ~ 10 knopen
3.4 ~ 5.4
mevrouw
4
Gematig
d briesje
20 ~ 28 km/u
Stof en loszittend papier opgeheven.
Klein takken beginnen met beweging.
13 ~ 17 km/u
11 ~ 16 knopen
5.5 ~ 7.9
mevrouw
5
Vers briesje
39 ~ 38 km/u
Vertakkingen van een gemiddelde
grootte beweging . Kleine bomen in
blad beginnen met zwaaien.
18 ~ 24 km/u
17 ~ 21 knopen
8.0 ~ 10.7
mevrouw
6
Sterk briesje
39 ~ 49 km/u
Groot takken in beweging. Fluiten
gehoord in bovenleidingen. Paraplu
gebruik wordt moeilijk. Leeg plastic
vuilnisbakken kantelen r.
25 ~ 30 km/u
22 ~ 27 knopen
10.8 ~ 13.8
mevrouw
7
Harde wind
50 ~ 61 km/u
Hele bomen in beweging. Poging
nodig om tegen de wind in te lopen .
31 ~ 38 km/u
28 ~ 33 knopen
13.9 ~ 17.1
mevrouw
8
Storm
62 ~ 74 km/u
Enkele twijgen zijn afgebroken bomen.
Auto's slaan af weg. Voortgang te
voet is ernstig belemmerd.
39 ~ 46 km/u
34 ~ 40 knopen
17.2 ~ 20.7
mevrouw
9
Sterke wind
75 ~ 88 km/u
Sommige takken breken van bomen, en
een paar kleine bomen waaien om . Bouw
/
tijdelijke borden en barricades blazen over.
47 ~ 54 km/u
41 ~ 47 knopen
20.8 ~ 24.4
mevrouw
10
Storm
89 ~ 102 km/u
Bomen zijn gebroken uit of
ontworteld, structurele schade
waarschijnlijk.
55 ~ 63 km/u
48 ~ 55 knopen
2.45 ~ 28.4
- 27 -
mevrouw
11
Hevige storm
103 ~ 117 km/u
Brede vegetatie en structurele
schade waarschijnlijk.
64 ~ 73 km/u
56 ~ 63 knopen
28.5 ~ 32.6
mevrouw
12
Orkaankracht
≥ 118 km/u
Ernstige wijdverspreide schade aan de
vegetatie en structuren. Puin en
onbeveiligde
objecten zijn heen en weer geslingerd.
≥ 74 km/u
≥ 64 knopen
≥ 32.7
mevrouw
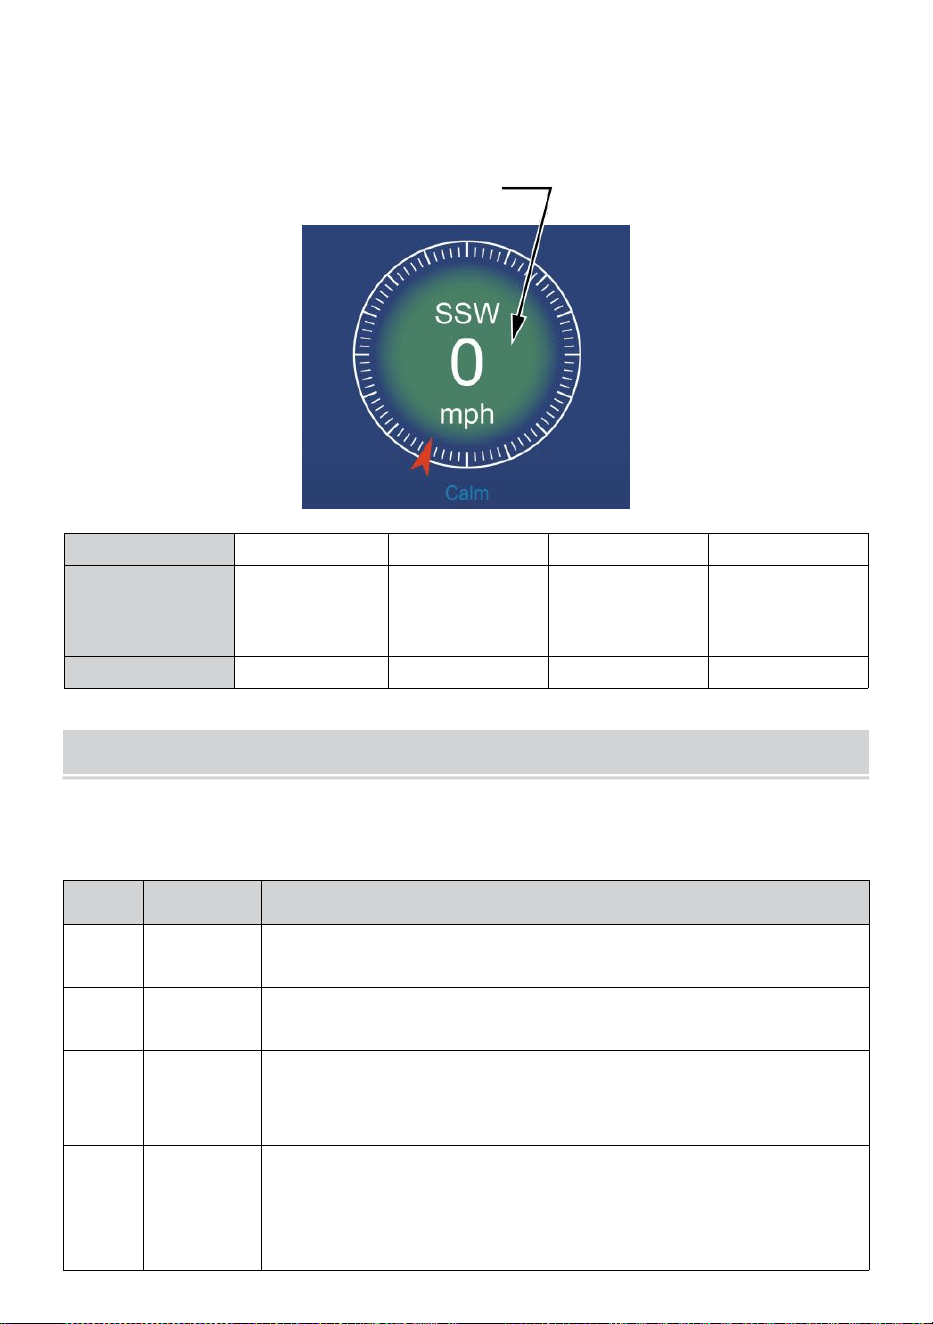
- 28 -
WINDSNELHEID NIVEAU
De grafiek met het windsnelheidsniveau op het display biedt A snel
referentie op de
huidig wind conditie . De achtergrond kleur van de kompas verandert
afhankelijk van de windsnelheid.
Niveau
Licht
Gematigd
Sterk
Storm
Snelheid
0 - 12 km/u
0 - 19 km/u
12 - 30 km/u
20 - 49 km/u
31 - 55 km/u
50 - 88 km/u
≥ 55
km/u ≥ 89
km/u
Kompas kleur
Groente
Geel
Oranje
Rood
LICHT INTENSITEITEN U -V INDEX
In dit gedeelte wordt een grafiek weergegeven voor licht intensiteit en UV
index.
UVI
Beoorde
ling
Opmerking
0-2
Laag
A UV Index lezen van 0 tot 2 middelen laag gevaar van
de zon UV stralen voor de gemiddelde persoon.
3-5
Medium
A UV Index lezen van 3 tot 5 middelen gematigd risico op
schade van onbeschermde zon blootstelling.
6-7
Hoog
A UV Index lezen van 6 tot 7 middelen hoog risico op
schade tegen onbeschermde blootstelling aan de zon.
Bescherm ionen tegen huid en ogen schade is nodig.
8-10
Erg Hoog
A UV Index lezen van 8 tot 10 betekent heel erg hoog
risico op schade door onbeschermde blootstelling aan de
zon. Neem extra voorzorgsmaatregelen
omdat onbeschermde huid en ogen zijn beschadigd En

- 28 -
kan snel verbranden.
11-15
Extreem
A UV Index lezen van 11 of meer betekent extreem risico
van schade door onbeschermde blootstelling aan de zon.
Neem alle voorzorgsmaatregelen omdat onbeschermde
huid en ogen kunnen brandwond in notulen.
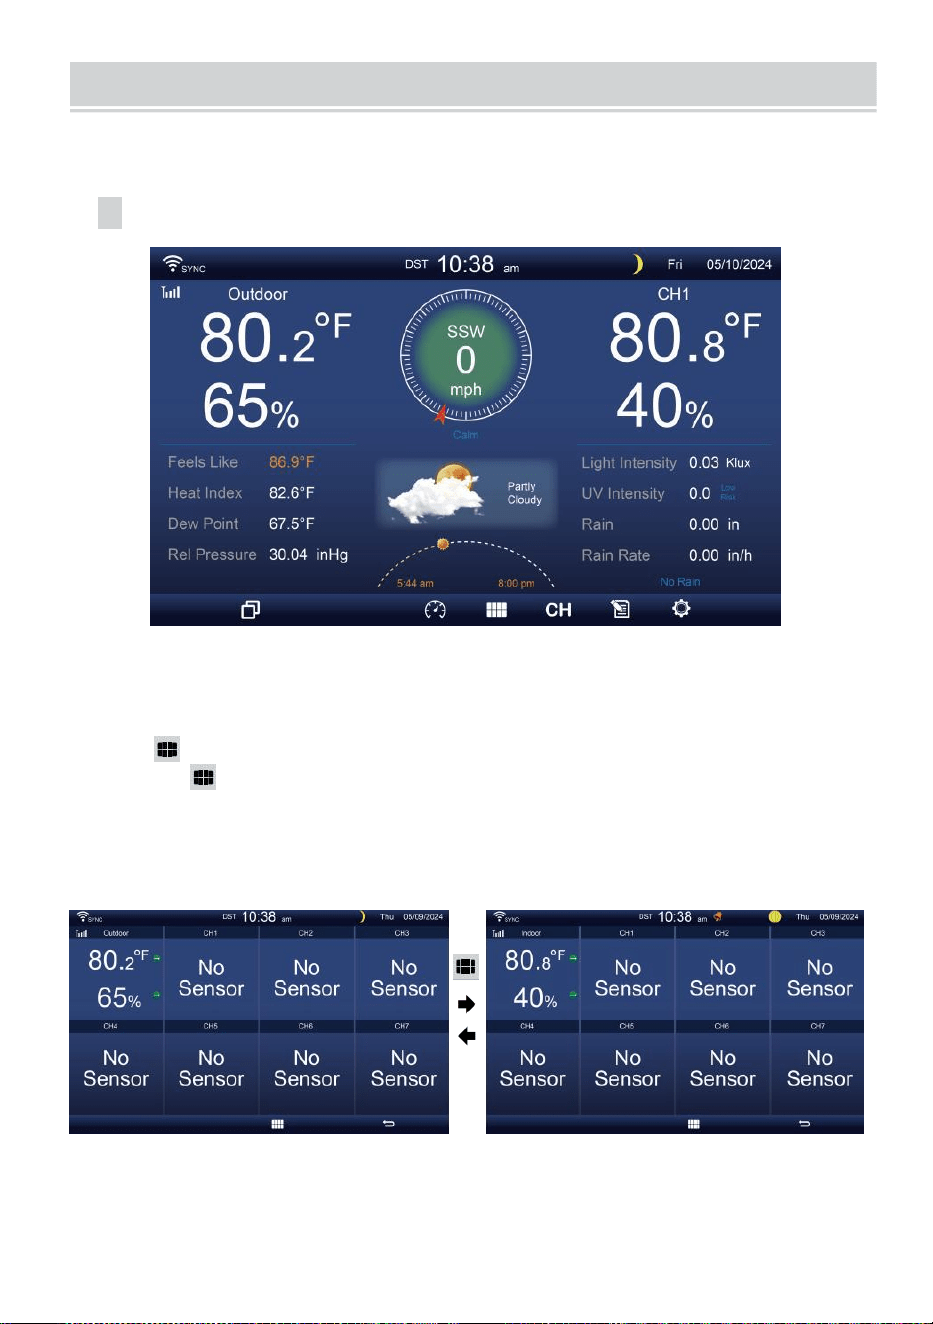
MULTI-CHANNEL DISPLAY MODE
- 29 -
KANAAL WEERGAVE
Terwijl u zich
op
het eenvoudige/gedetailleerde
scherm bevindt,
druk
op
cH knop om te schakelen tussen binnen en kanaal 1-7 gegevens.
MULTISENSOR WEERGAVE PAGINA
Terwijl u zich op het eenvoudige/gedetailleerde scherm bevindt,
pers knop om Multi- sen- sor-scherm.
Pers knop naar verwissel het display tussen binnen en buiten of
sensorgegevens.
Druk op
de w-
knop om terug te keren naar
eenvoudig/gedetailleerd scherm.
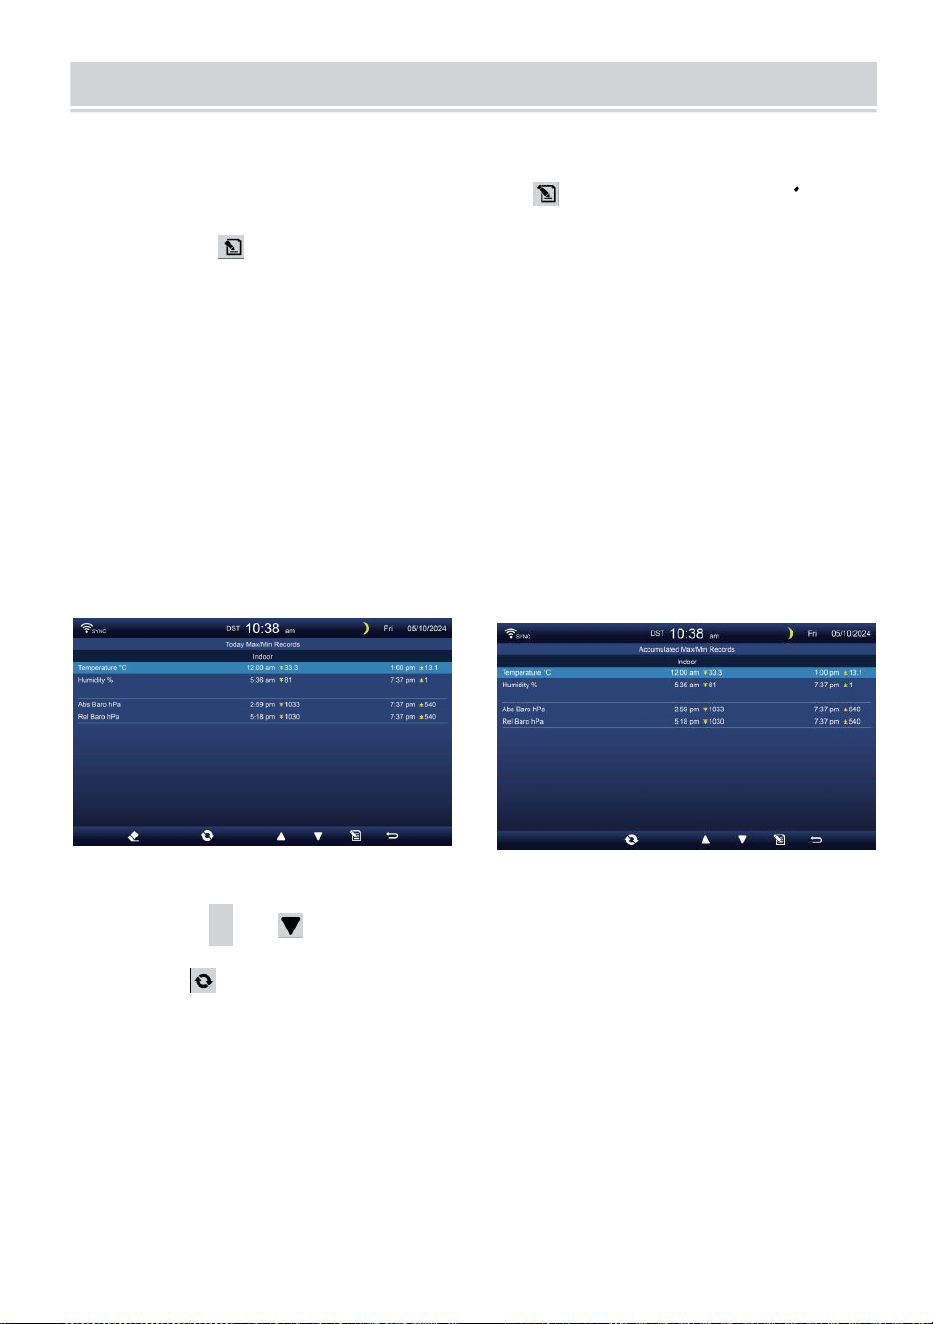
WEATHER DATA RECORD
- 30 -
In dit gedeelte wordt uitgelegd hoe je de weat her-gegevens kunt
bekijken dossier (Max- /Min, datalog, geschiedenisgrafiek). Om te
bekijken de weer gegevens dossier , pers knop in het
eenvoudige/gedetailleerde scherm om het scherm met weergegevens te
openen. Pers
knop naar verwisselen en de max/min, datalog en geschiedenis grafiek
modi.
MAX/MIN
Er zijn 2 datamodi voor MAX/MIN verslagen: Dagelijks of
Geaccumuleerd. (Afhankelijk van de Maximaal/Minimaal dossier
modus binnen Weergave-instelling pagina )
Dagelijks Max/Min gegevens modus
Max/Min-gegevens worden worden weergegeven en duidelijk op
middernacht.
Opgehoopt Max/Min gegevensmodus
Max/Min gegevens worden gehouden opgehoopt.
Dagelijks Maximaal/Minimaal Record verzameld Maximaal/Minimaal
Dossier
Pers
▲
of knop om de te selecteren gewenst
Maximaal/Minimaal dossier.
Pers knop naar interc hange om te laten zien binnen, buiten en
kanaal Maximaal/Minimaal verslagen.
Pers
.
knop naar opbrengst eenvoudig / gedetailleerd scherm .
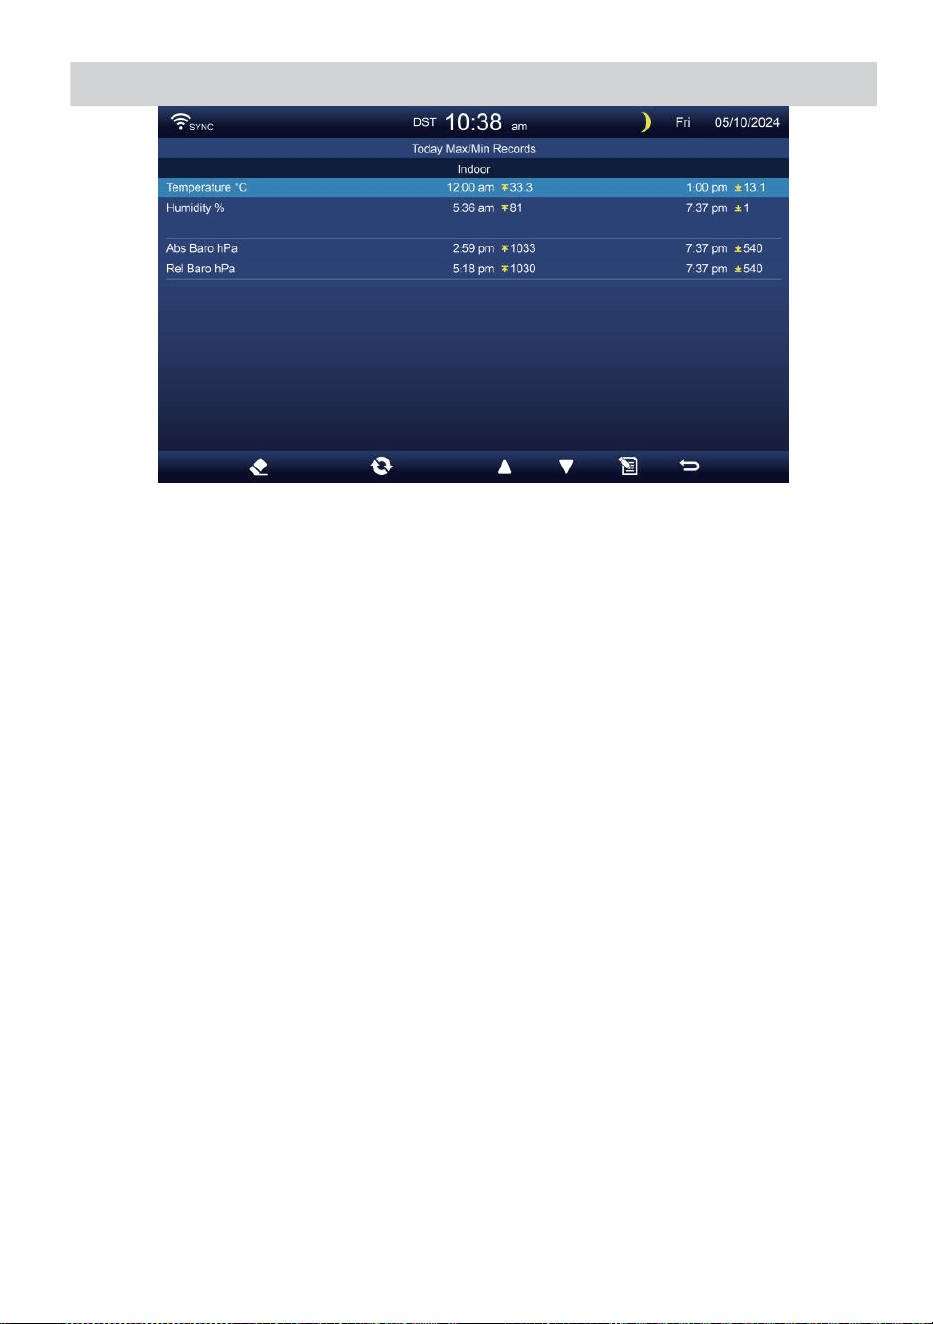
WEATHER DATA RECORD
- 30 -

- 31 -
Max/Min wissen gegevens
Om de geselecteerde items te wissen MAX/MIN verslagen, druk
op en uitstel knop meer dan 2 seconden om de geselecteerde
items te wissen Maximaal/Minimaal dossier.
GEGEVENS LOGSCHERM
Het gegevenslogboekscherm legt vast alle de geschiedenis
verslagen.
Navigeren door de gegevens logscherm
Pers , , ,
B
knoppen om blader door de scherm.
Druk op knop om terug te keren naar het eenvoudige/
gedetailleerde scherm.
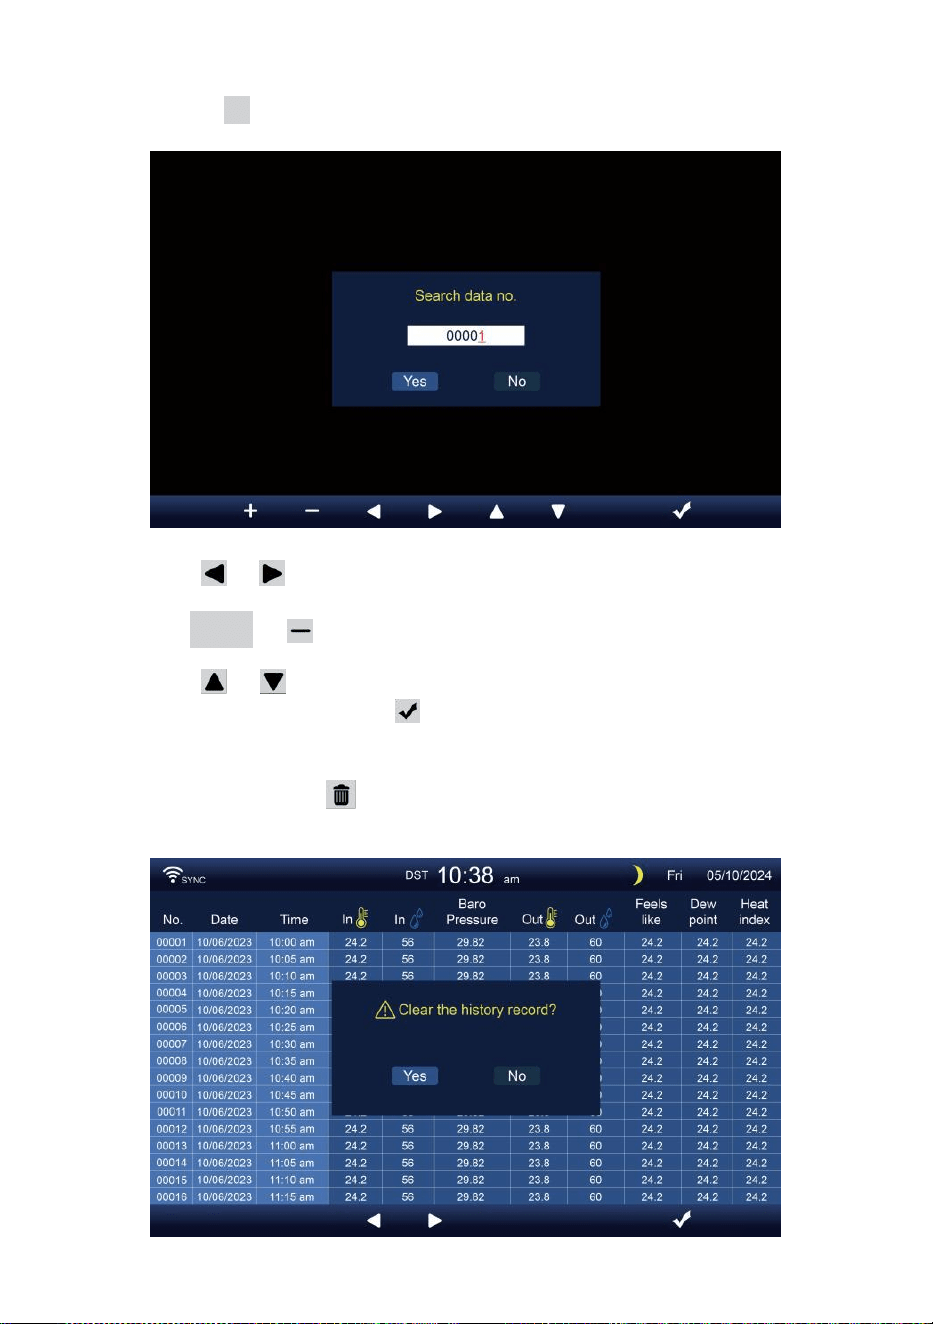
- 32 -
Op zoek naar een specifieke pagina
Druk op Q om weer te geven zoekopdracht de gegevens dossier.
Pers of knop om een te selecteren cijfer in de pagina
nummer,
Druk op + of knop naar wijziging de nummer omhoog of
omlaag.
Pers of knop om de geactiveerde te wijzigen optie veld,
schakelaar Ja of NEE, pers naar bevestigen.
Alle gegevens verwijderen logboek verslagen
Druk op en uitstel meer dan 2 seconden om te verwijderen alle
verslagen.

- 32 -
Pers of knop om te selecteren wijziging de geactiveerd
optie veld, wissel Ja of NEE, pers w naar bevestigen.
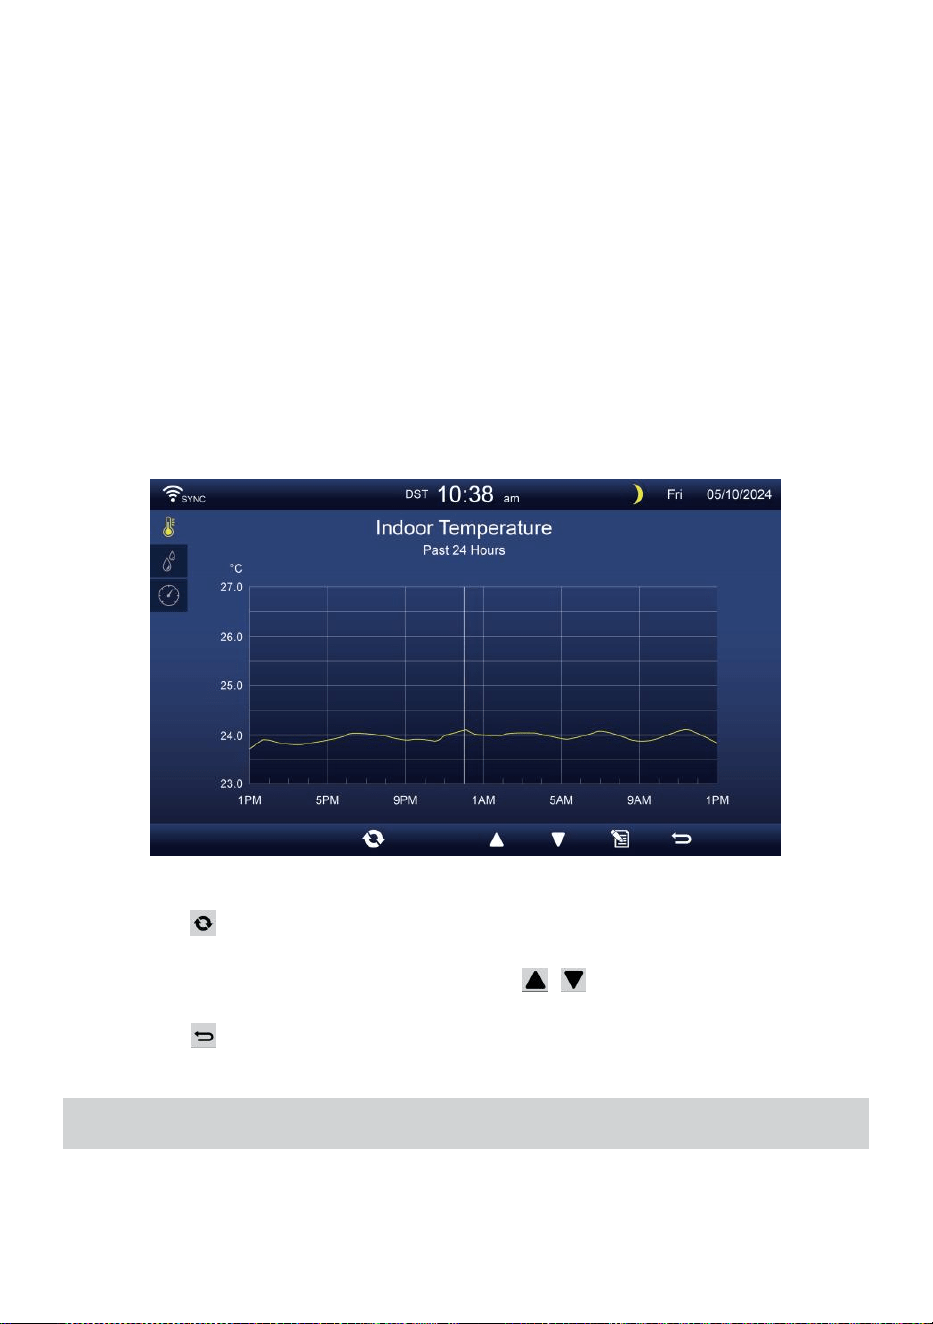
- 33 -
HISTORISCHE GRAFIEK
In dit gedeelte wordt uitgelegd hoe te bereiken en te bekijken geschiedenis
grafieken.
Er zijn binnengrafiek, buitengrafiek en kanaalgrafiek s naar zijn getoond.
Binnen grafiek
Temperatuur, Vochtigheid, Relatief en absoluut druk
.
Buiten grafiek
Temperatuur, Vochtigheid, Regen Tarief, Afgelopen 24 uur
Neerslag, Gemiddelde windsnelheid, Windvlaag, Windrichting ,
Licht Intensiteit en Universiteit van Californië
CH1-CH7 grafiek
Temperatuur, Vochtigheid.
Pers knop naar interc hange om te laten zien binnen, buiten en
kanaal historische grafiek.
Wanneer de grafiek verschijnt, pers , knoppen om andere
grafieken te tonen.
Pers knop naar retour eenvoudig/detail scherm.
ALGEMENE INSTELLING
Alle console-instellingen en systeeminformatie Zijn in de instelling
menu. Er zijn 8 soorten instellingsparameters binnenin de instelling
menu.

- 33 -
Terwijl u op het eenvoudige/gedetailleerde scherm bent, drukt u op
knop om de instellingen te openen menu.
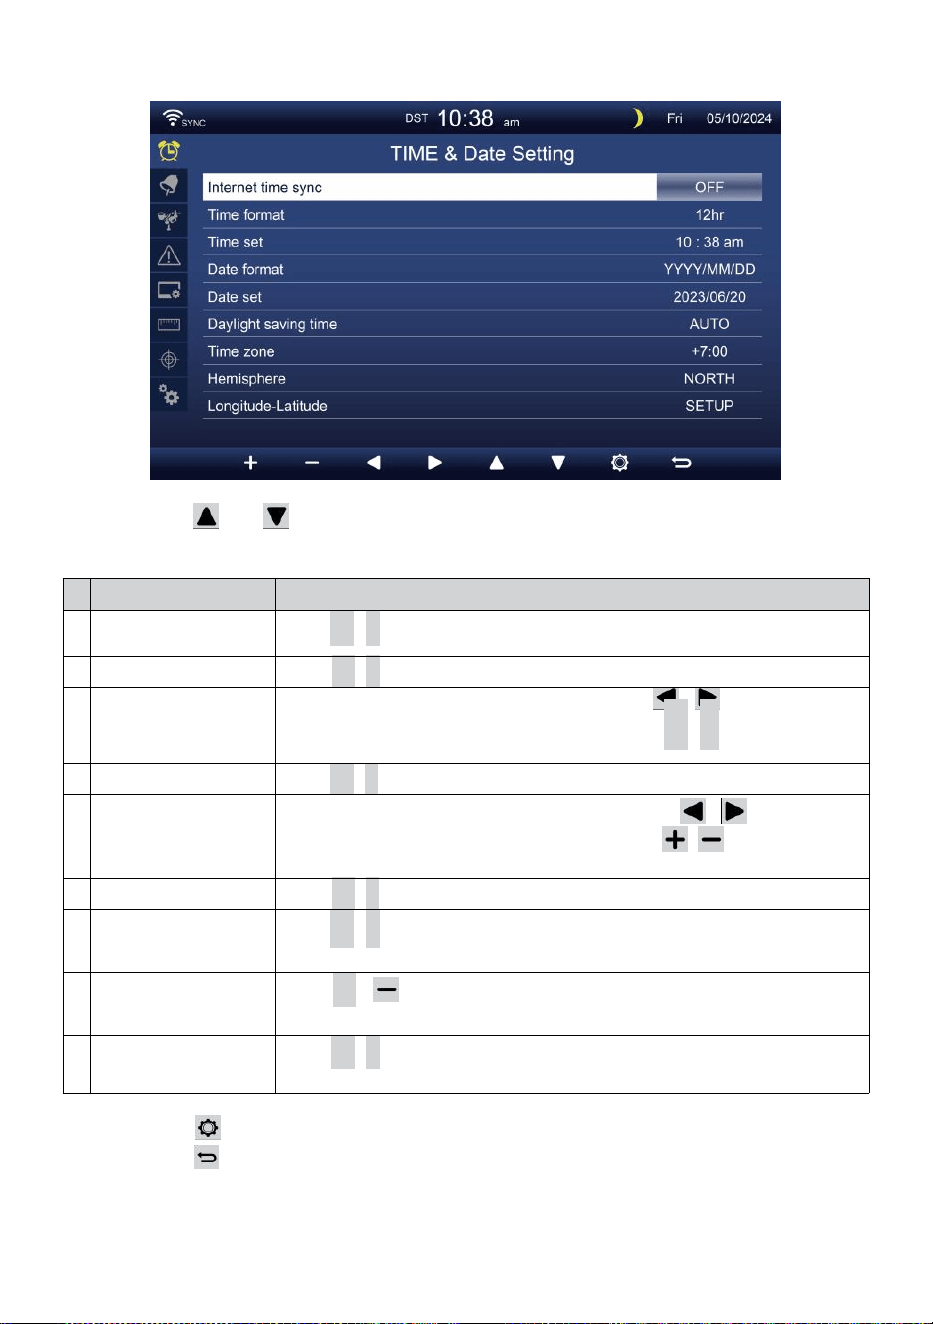
- 34 -
TIJD / DATUM INSTELLING
Pers of knop om een van de volgende instellingen te
selecteren:
#
Sub item
Bediening
A
Internettijd
synchronisatie
Pers
+
/
-
knop naar draai op of draai uit .
B
Tijdformaat
Pers
+
/
-
knop naar selecteren 12 of 24 formaat .
C
Tijd set
Wanneer de tijd synchroniseert is uit, pers / knop om te
selecteren tussen uur of minuut, druk op + /
-
knop om de
waarde aan te passen.
D
Datumnotatie
Pers
+
/
-
knop om te selecteren M / D of D / M-formaat.
e
n
Datum set
Wanneer de tijd synchroniseert is uit, druk op / knop om
Jaar te selecteren, Maand, Datum, druk op / knop om de
waarde.
F
Zomertijd
Pers
+
/
-
knop om de Zomertijd naar auto.
G
Tijdzone
Pers
+
/
-
knop naar selecteren de jouw lokaal tijd zone
naar de juiste tijd krijgen .
H
Halfrond
Pers
+
/ knop om te selecteren NOORD of ZUID halfrond voor
het 7-in-1 sensorpunt naar En maan fase.
i
Lengtegraad-
breedtegraad
Pers
+
/
-
knop naar binnenkomen Lengtegraad - Breedtegraad
opstelling pagina .
Pers knop om naar het scherm met alarminstellingen te gaan.
Pers knop naar terug naar eenvoudig/gedetailleerd scherm .
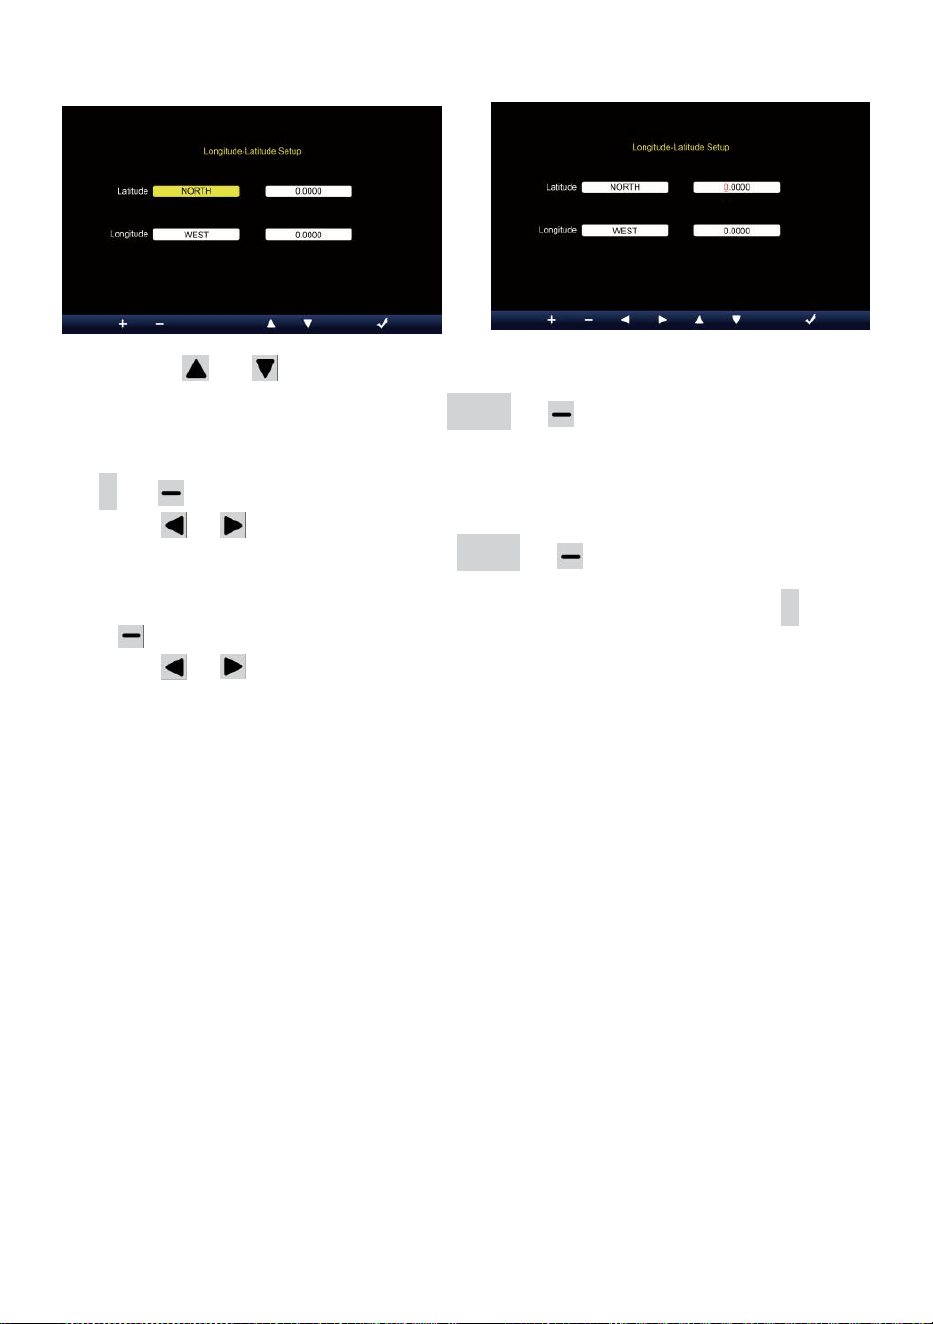
- 35 -
Lengtegraad-breedtegraad instelling
Pers of knop om te veranderen de geactiveerd optie veld.
1. Breedtegraad (halfrond) --- Druk
op +
of knop naar selecteer de
halfrond . (NOORD/ZUID)
Breedtegraad --- De breedtegraad x 10 zal veranderen rood. Pers
+ of knop om de waarde te verhogen of te verlagen .
Pers of veranderen blijven breedtegraadwaarde.
2. Lengtegraad (halfrond e) --- Druk op + of knop om de te
selecteren halfrond . (OOST/WEST)
Lengtegraad --- De breedtegraad x 100 zal draaien rood. Pers
+
of knop om de waarde te verhogen of te verlagen .
Pers of knop om te veranderen blijven Lengtegraadwaarde.
Pers w knop om te bevestigen Lengte Breedte van de instelling.
OPMERKING:
Bepaal de lengtegraad en breedte.
bijv.
Breedte
Lengte
: 33.2981
: -111.9602
Als locatie is in de Noordelijk Halfrond, Breedtegraad zal zijn
positief. Als locatie is in het Zuiden Halfrond, Breedtegraad zal
zijn negatief. Als locatie is in de Oostelijke achtersteven Halfrond,
lengtegraad zal zijn positief.
Als locatie is in het Westen Halfrond, lange termijn zal zijn negatief.
Dus, het bovenstaande Lengtegraad en Breedtegraad wordt
ingevoerd naar binnen weergave als volgt :
Breedtegraad = NOORD --- 33.2981
Lengtegraad = WEST --- 111.9602.
ONS New York (EST, (GMT-5)
Breedte
Lengte

- 35 -
:
4
0
.
7
1
2
8
(
N
o
o
r
d
4
0
.
7
1
2
8
)
:
-
7
4
.
0
0
6
0
(
W
e
s
t
e
n
7
4
.
0060)
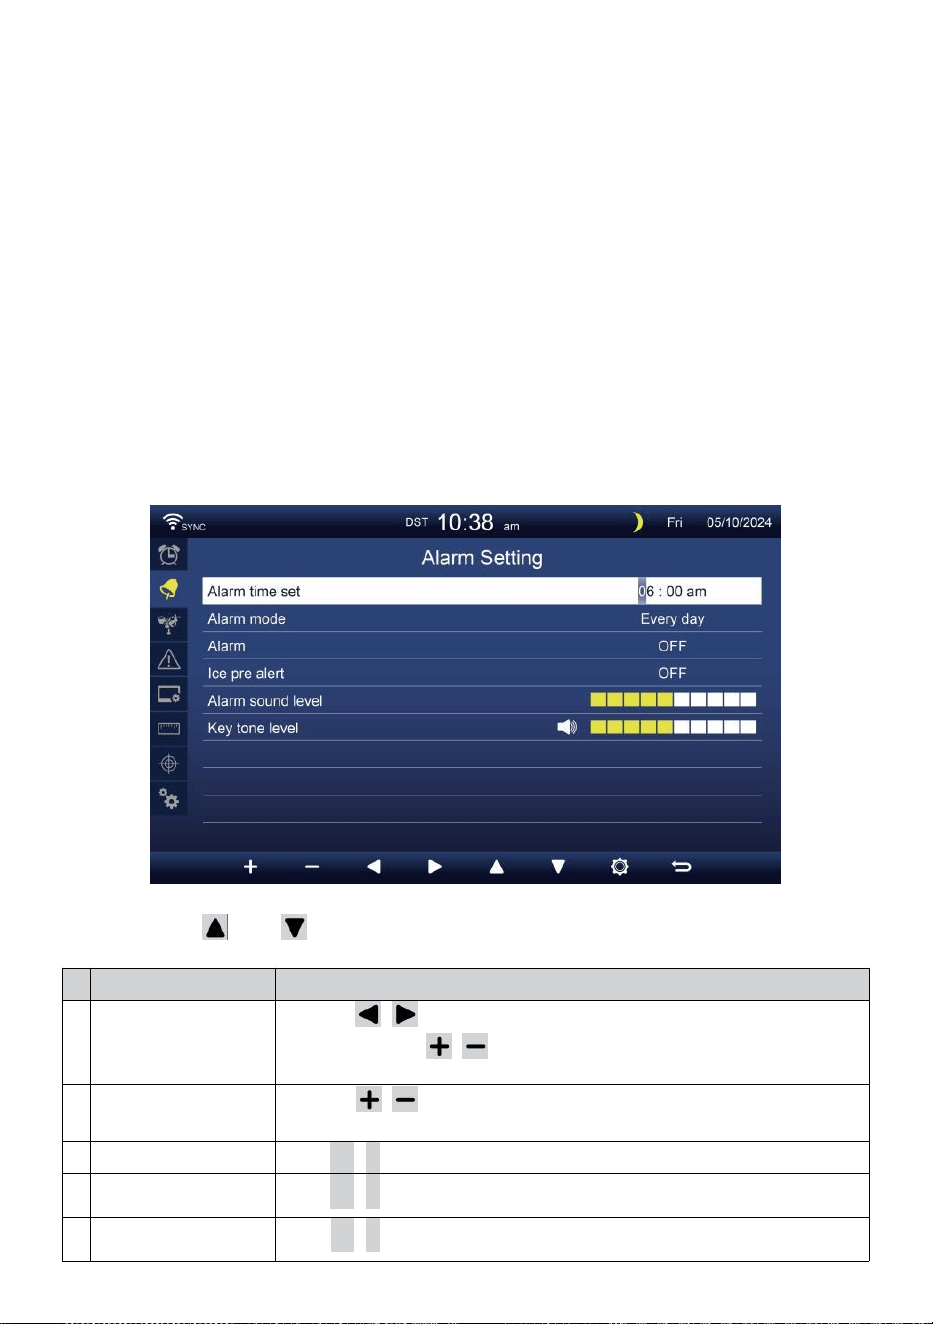
- 36 -
EU Frankfurt Duitsland (GMT+1)
Breedte
Lengte
: 50.1109 (Noorden
50.1109) : 8.6821 (Oosten
8.6821)
Verenigd Koninkrijk Londen Engeland (GMT)
Breedte
Lengte
: 51.5072 (Noorden
51.5072) : -0,1276
(Westen 0,1276)
Australië Sydney ( GMT +10)
Breedte
Lengte
: -33.8688 (Zuid 33.8688) :
151.2093 (Oosten 151.20
93)
ALARM INSTELLING
Pers of knop om het geactiveerde optieveld te wijzigen:
#
Sub item
Bediening
A
Alarmtijd ingesteld
Druk op / knop om te selecteren tussen uur of
minuut. Druk op / knop om aan te passen de
waarde.
B
Alarm modus
Druk op / knop om te selecteren Elke dag of alleen
doordeweeks.
C
Alarm
Pers
+
/
-
knop naar draai op of draai uit .
D
Ijs pre
waarschuwing
Pers
+
/
-
knop naar draai op of draai uit .
e
n
Alarmgeluid niveau
Pers
+
/
-
knop naar aanpassen de geluid niveau .
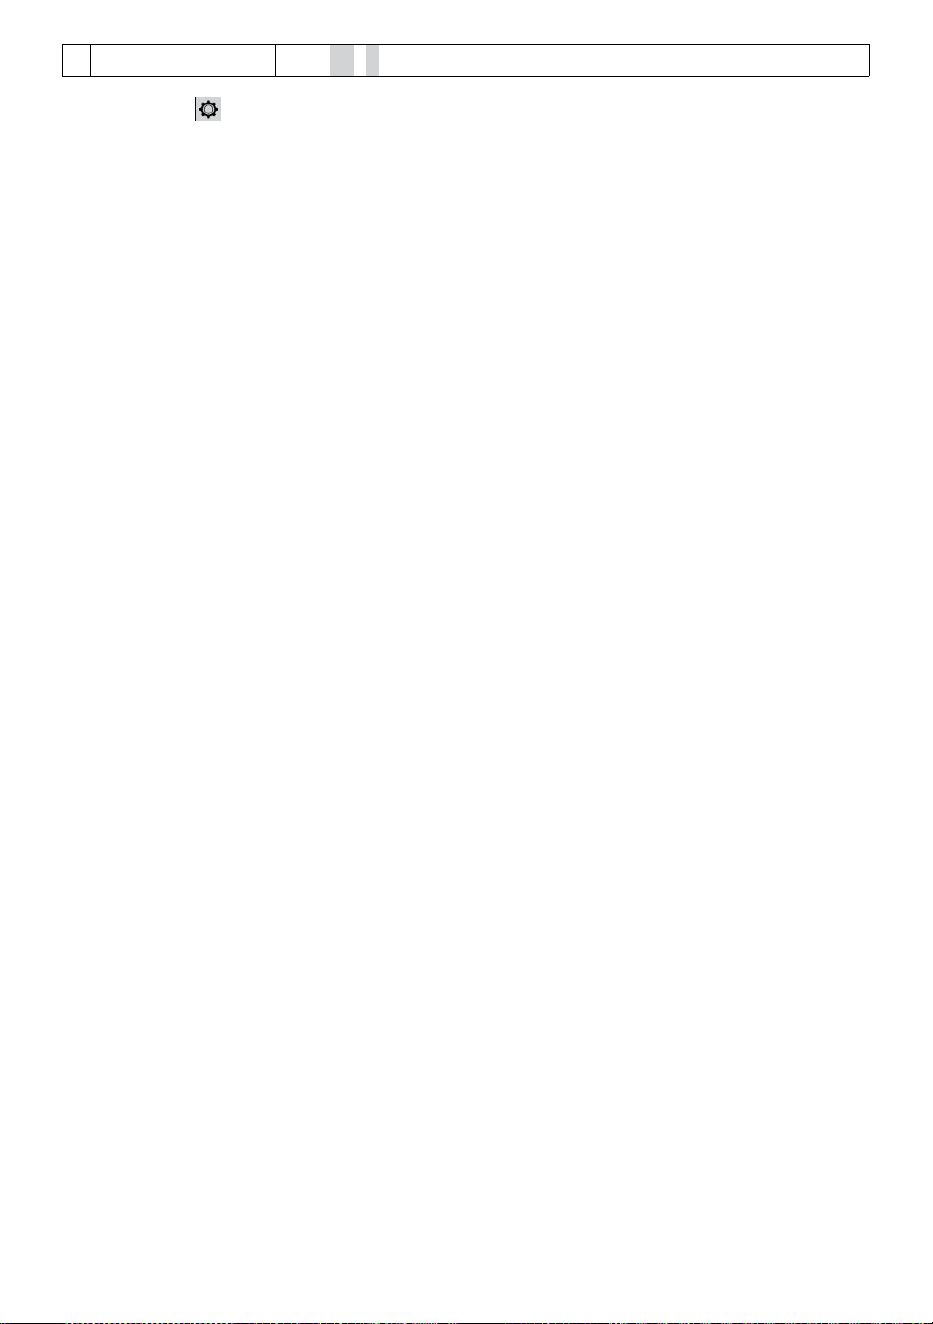
- 36 -
F
Toonsoort niveau
Pers
+
/
-
knop naar aanpassen de sleutel toon niveau .
Pers knop om naar het Sensorinstellingenscherm te gaan.
Pers
w
-knop om terug te keren naar eenvoudig/gedetailleerd
scherm.

- 37 -
SENSOR INSTELLING
Dit pagina is het toevoegen/verwijderen van de alles-in-één sensor
of extra 7 kanalen hygrometers.
Een toevoegen nieuwe sensor
Druk op
▲
of knop om de te selecteren leeg kanaal.
Pers knop om de bewerkingssensor te selecteren kolom.
Wanneer de kolom de optie " Toevoegen " toont, drukt u op /
knop om het zoeken naar de sensor te starten.
Selecteer de bijpassende kanaal nummer op de sensor, dan
inschakelen of pers RESET knop om de koppelen.
Zodra de apparaten zijn verbonden, verschijnt het
sensorpictogram, identiteitsbewijs zullen show in de kanaal rij.
Pers knop om naar het scherm met
waarschuwingsinstellingen te gaan.
Pers knop naar terug naar eenvoudig/gedetailleerd scherm .

- 38 -
Verwijderen gepaarde sensor
Druk op
▲
of knop naar selecteer de verbonden d
sensor. Druk op knop om de bewerkingssensor te
selecteren kolom.
Wanneer de kolom "Optie " Verwijderen ", druk op
+
of
knop naar bevestigen.
Pers of knop om te selecteren wijzigen de geactiveerd
optieveld, wissel Ja of NEE , druk op
.
knop naar bevestigen .
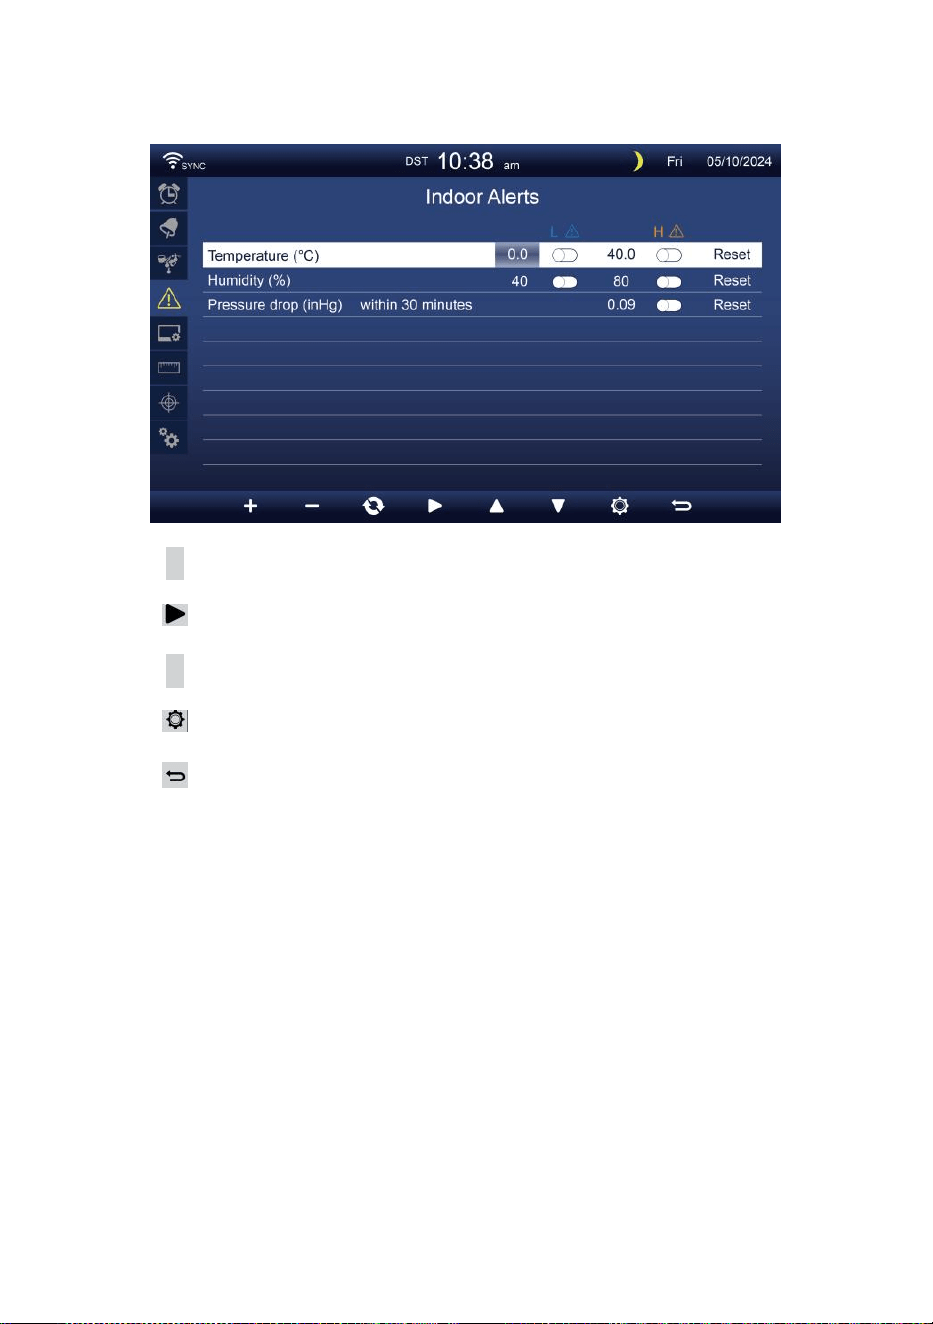
- 39 -
ALARMINSTELLING
Set binnenalarm
Pers
▲
of
w
-knop om verschillende te selecteren rij geactiveerd
optie veld.
Pers
knop om hoog/laag/reset waarschuwing te selecteren optie
.
Pers
+
of
w
-knop om de waarde aan te passen of aan/uit optie.
Pers
knop om de Weergave- instellingen weergeven.
Pers
knop om terug te keren naar eenvoudig/gedetailleerd
scherm.
OPMERKING:
Bij het selecteren reset-optie, alle waarschuwingswaarden
worden resetten naar de standaardwaarden.
Buitenalarm instellen

- 39 -
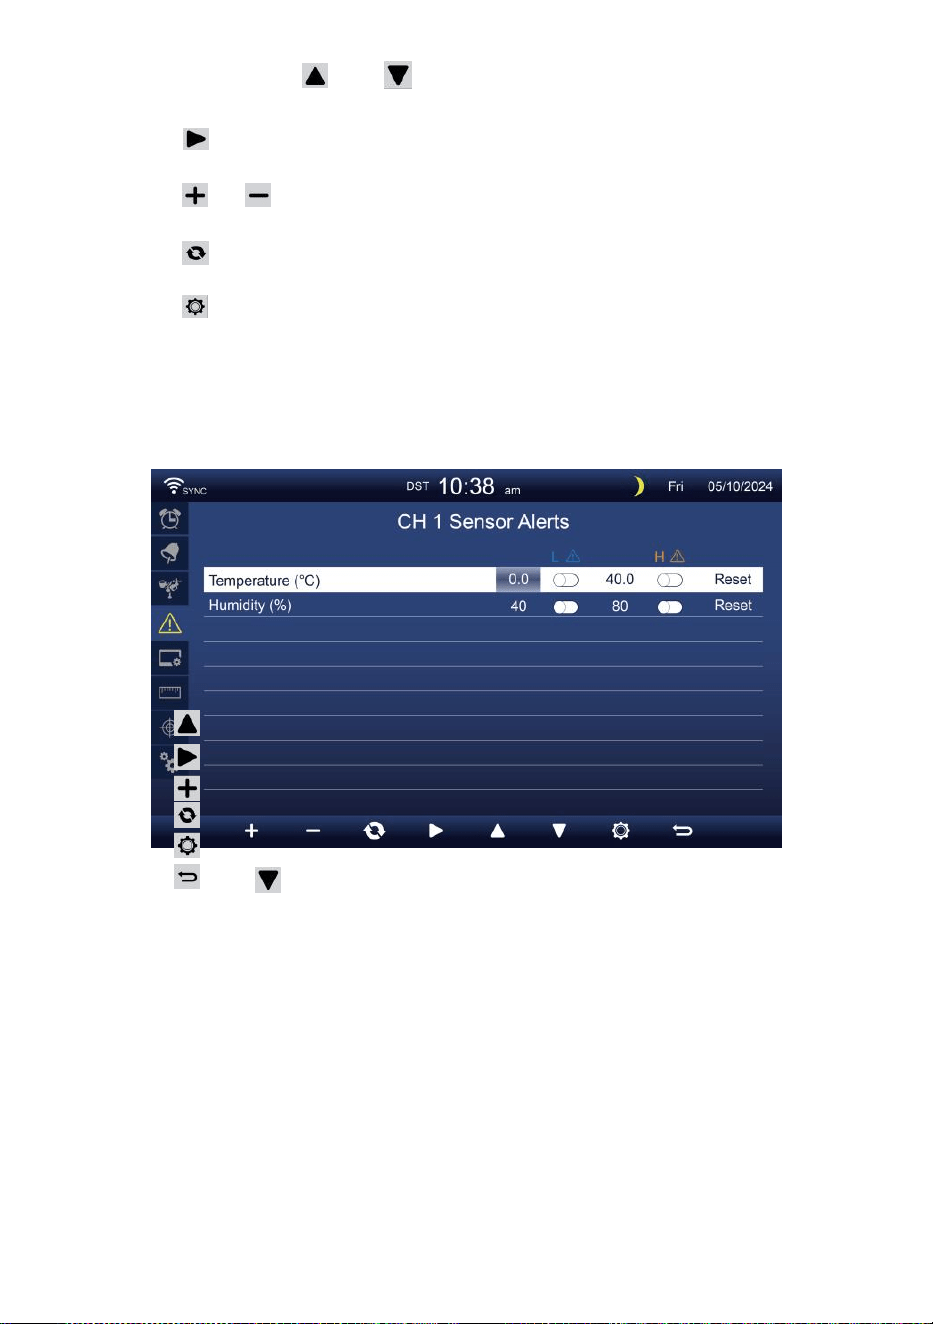
- 40 -
Pers of knop om een andere rij te selecteren van
geactiveerd optie veld.
Pers knop om te selecteren Optie voor hoog/laag/reset
waarschuwing.
Pers of knop om de waarde aan te passen of de aan/uit-optie
in te stellen.
Pers knop naar verwissel de Weergave van de instellingen voor
binnenalarm.
Pers knop om de Weergave-instelling weergave.
Druk
op w
knop om terug te keren
eenvoudig/gedetailleerd scherm. Stel CH1-7-
sensor in waarschuwing
Pers
Pers
Pers
Pers
Pers
Pers
OPMERKIN
G:
of knop om een andere rij geactiveerde items te
selecteren optie veld. knop om hoog/laag/reset
waarschuwing te selecteren optie .
of
w
-knop om de waarde aan te passen of aan/uit optie.
knop naar verwissel de Weergave van de instellingen voor
binnenalarm.
knop om de Weergave-instellingen
weergeven . Knop om terug te keren naar
eenvoudig/gedetailleerd scherm.
Bij het selecteren reset-optie, alle waarschuwingswaarden
worden resetten naar de standaardwaarden.
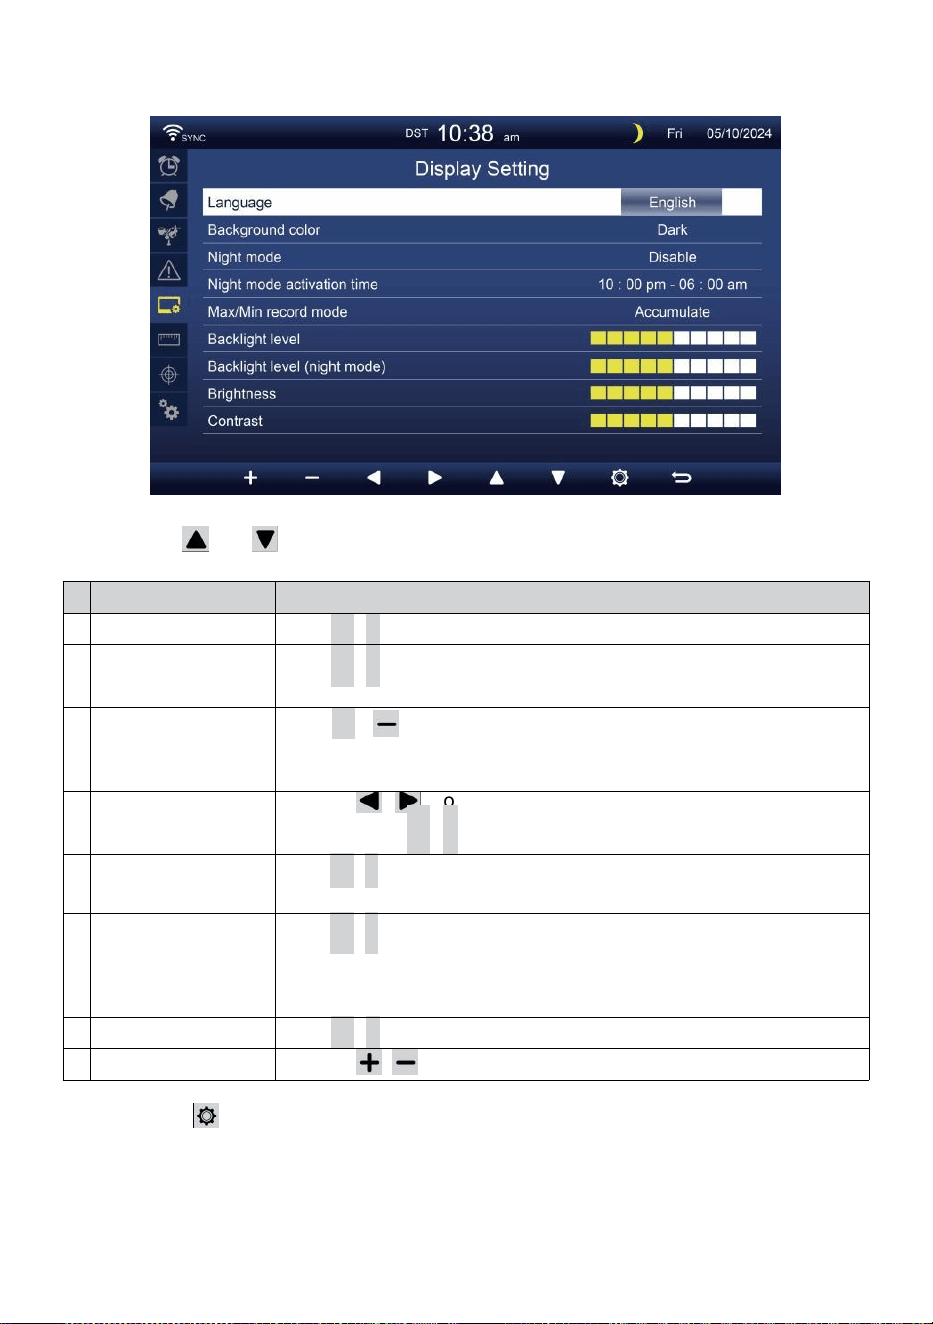
- 41 -
WEERGAVE-INSTELLING
Pers of knop om te veranderen de geactiveerd optie veld:
#
Sub item
Bediening
A
Taal
Pers
+
/
-
knop naar selecteren de weergave taal .
B
Achtergrondkleur
Pers
+
/
-
knop naar selecteren licht of donker kleur
achtergrond voor weergave modus.
C
Nacht modus
Pers
+
/ knop om in te schakelen (trigger naar de activeren tijd
periode), uitschakelen of automatisch (geactiveerd door uw kamer
omgeving licht niveau).
D
Nacht modus
activeren tijd
Druk op / knop om te selecteren tussen uur of
minuut . Pers
+
/
-
naar aanpassen de waarde .
e
n
Achtergrondverlichti
ng niveau
Pers
+
/
-
knop om de achtergrondverlichting aan te passen
niveau in geen RMAAL.
F
Achtergrondv
erlichting
niveau (Nacht
modus)
Pers
+
/
-
knop om de achtergrondverlichting aan te
passen niveau tijdens nachtmodus .
G
Helderheid
Pers
+
/
-
knop naar aanpassen de scherm helderheid .
H
Contrast
Druk op / knop om het scherm aan te passen contrast.
Pers knop om de Weergave van de eenheidsinstelling .
Pers
w
-knop om terug te keren naar eenvoudig/gedetailleerd
scherm.
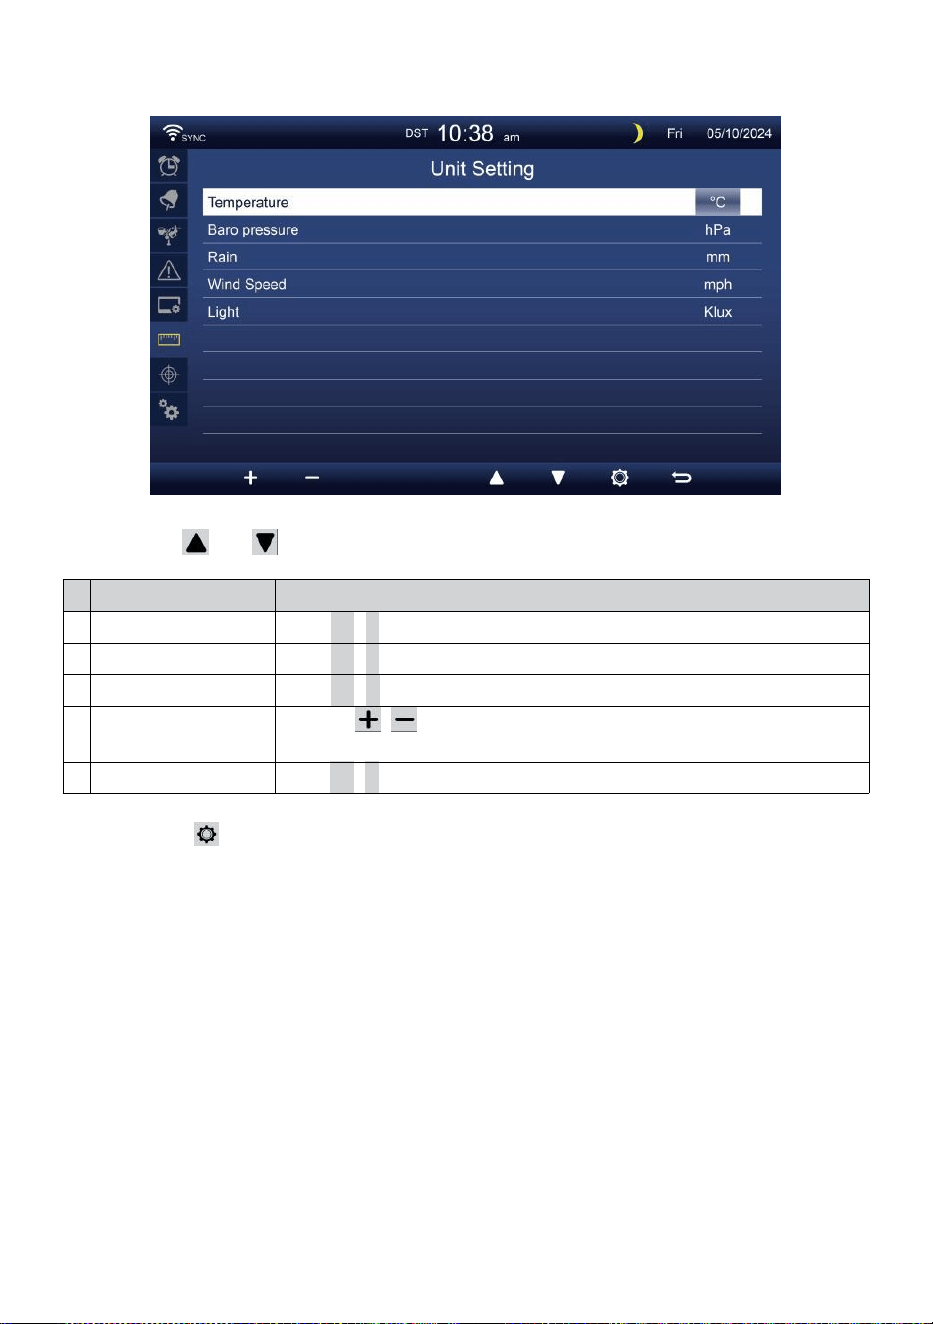
- 42 -
EENHEIDSINSTELLING
Pers of knop om te veranderen de geactiveerd optie veld:
#
Sub item
Bediening
Temperatuur
Pers
+
/
-
knop naar selecteren ° C of °F.
Baro druk
Pers
+
/
-
knop naar selecteren hPa , inHg of mmHg .
Regen
Pers
+
/
-
knop naar selecteren mm of in .
Windsnelheid
Druk op / knop om te selecteren mevrouw, km/u, knopen of
km/u.
Licht
Pers
+
/
-
knop naar selecteren Klux , KFC of
met
m 2.
Pers knop om het kalibratie-instellingenscherm te openen.
Pers
w
-knop om terug te keren naar eenvoudig/gedetailleerd
scherm.

- 43 -
KALIBRATIE INSTELLING
Kalibratie voor binnen parameters
Pers of knop om verschillende te selecteren rij van
geactiveerd optie veld.
Pers knop om te selecteren Optie voor hoog/laag/reset
waarschuwing.
Pers of knop om de waarde aan te passen of aan/uit optie.
Pers
C
knop naar uitwisseling om de binnen , buiten en
kanaal Kalibratie instelling weergave .
Pers knop om naar de Andere te gaan
instelling weergave.
Druk
op w
knop om
terug te keren eenvoudig/gedetailleerd scherm,
OPMERKING:
Bij het selecteren reset-optie, alle kalibratiewaarden worden resetten
naar de standaardwaarden.
Kalibratie voor openlucht- parameters

- 43 -

- 44 -
Pers of knop om verschillende te selecteren rij van
geactiveerd optie veld.
Pers knop om te selecteren Optie voor hoog/laag/reset
waarschuwing.
Pers of knop om de waarde aan te passen of aan/uit optie.
Pers C knop naar uitwisseling om de binnen , buiten en
kanaal Kalibratie instelling weergave .
Pers knop om naar de Andere te gaan
instelling weergave. Pers knop naar terug
naar eenvoudig/gedetailleerd scherm,
OPMERKING:
Bij het selecteren reset-optie, alle kalibratiewaarden worden resetten
naar de standaardwaarden.
Kalibratie voor CH 1- CH 7- sensor parameters
Pers of knop om verschillende te selecteren rij van
geactiveerd optie veld.
Pers knop om te selecteren Optie voor hoog/laag/reset
waarschuwing.
Pers of knop om de waarde aan te passen of aan/uit optie.
Pers C knop naar uitwisseling om de binnen , buiten en
kanaal Kalibratie instelling weergave .
Pers knop om naar de Andere te gaan
instelling weergave.
Druk
op w
knop om
terug te keren eenvoudig/gedetailleerd scherm,
OPMERKING:

- 44 -
Bij het selecteren reset-optie, alle kalibratiewaarden worden resetten
naar de standaardwaarden.
- 45 -
Kalibratie parameters
Sensor
Parameter
Type
van
kalibratie
Standa
ard
waard
e
Instelling bereik
Typische
kalibratie
bron
Binnen,
Buiten of
kanaal(en)
Temperatuur
Verschuive
n
0
±36 °C (±20 °C)
Rode geest of kwik
thermometer
Vochtigheid
Verschuive
n
0
±20 %
Slingerpsychrometer
Binnen
Absoluut
druk
Verschuive
n
0
±560 hPa (±16,51
inch Hg) of
±420mmHg
Gekalibreerde
laboratoriumkwaliteit
barometer
Relatief
druk
Verschuive
n
0
±560 hPa (±16,51
inch Hg) of
±420mmHg
Lokale luchthaven
Openlucht
Windsnelheid
Verdienen
1
X 0,5 ~ 1.5
Gekalibreerde
laboratoriumkwaliteit wind
meter
Windrichting
Verschuive
n
0
±10°
GPS of Kompas
Regen
Verdienen
1
X 0,5 ~ 1.5
Kijkglas regenmeter met
meter
UVI
Verdienen
1
X 0,01 ~ 10.0
Gekalibreerde
laboratoriumkwaliteit UV
meter
Licht
intensiteit
Verdienen
1
X 0,01 ~ 10.0
Gekalibreerde
laboratoriumkwaliteit
zonnestraling sensor
ANDERE INSTELLING

- 45 -
Pers of knop om te veranderen de geactiveerd optie veld:
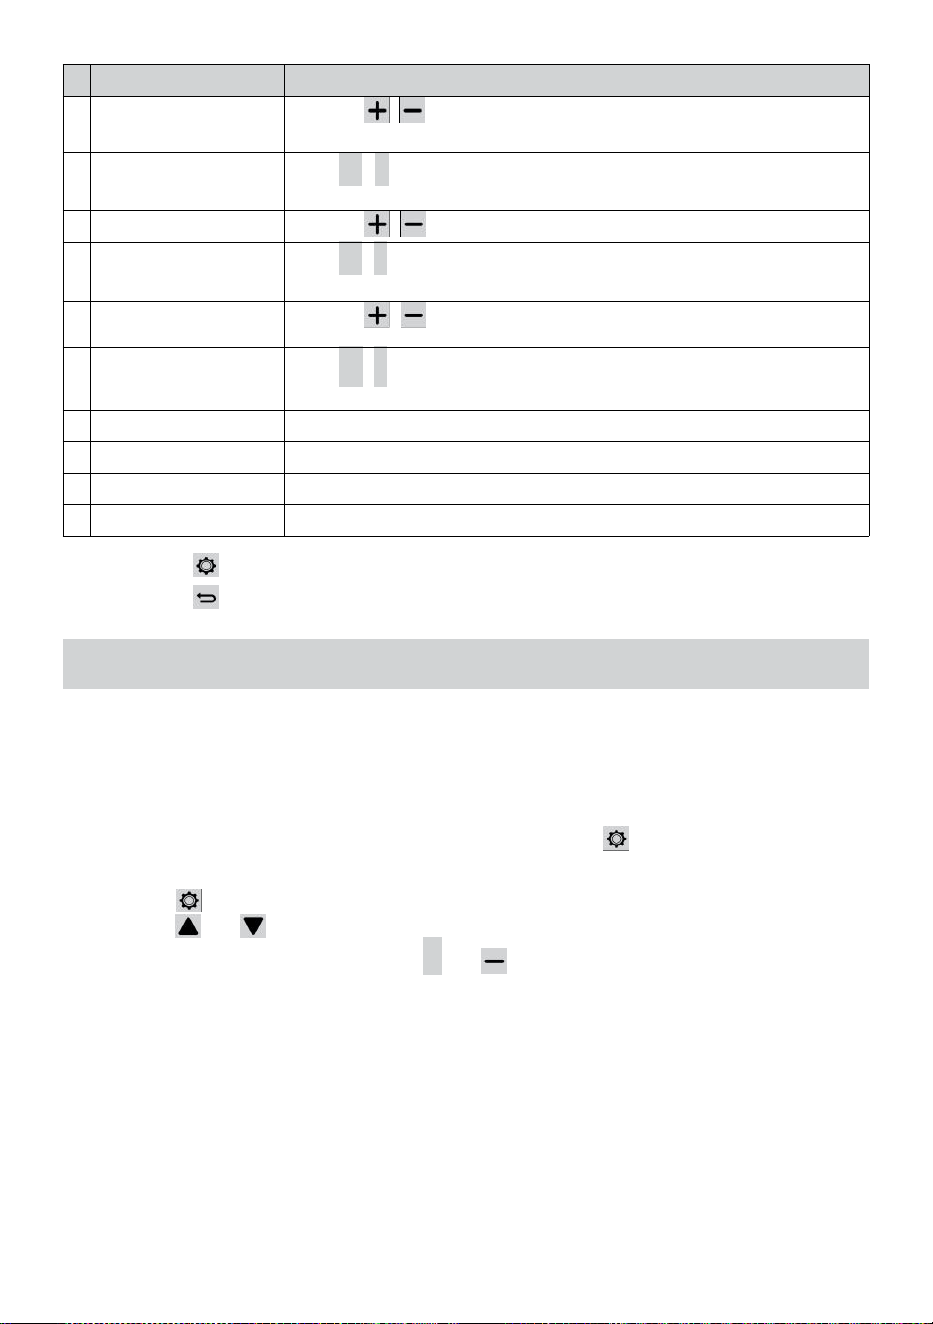
- 46 -
#
Sub item
Bediening / Beschrijving
A
Stel uw regio
Druk op / knop om te selecteren Europa, Verenigd
Koninkrijk, ONS, Australië.
B
Inschakelen Toegang
Punt
Pers
+
/
-
knop naar startAP modus voor WIFI verbinding
instellen .
C
Gegevens logboek
Druk op / knop om de gegevens logfunctie.
D
Dossier interval
Pers
+
/
-
knop naar opstelling de dossier interval van de
gegevens logboek .
e
n
Alles wissen
gegevens
Druk op / knop om alles te wissen de gegevens in troosten.
F
Fabriek opnieuw
instellen
Pers
+
/
-
knop naar opnieuw instellen alle de instelling naar
standaard En duidelijk alle gegevens in troosten.
G
WIFI-status
Geef de huidige Wi-Fi-verbindingsstatus van de console weer .
H
MAC-adres
Toon de console MAC-adres.
i
Systeemfirmwareversie
Geeft de huidige firmwareversie van de console weer.
J
Wi-Fi-firmwareversie
Geeft de huidige Wi-Fi-firmwareversie van de console weer.
Pers knop om de tijd en Datuminstelling weergave .
Pers knop naar terug naar eenvoudig/gedetailleerd scherm .
INSTELLING WI-FI-VERBINDING OPSTARTEN
Om de Wi-Fi- verbinding in te stellen van de console, Het behoeften naar
de console configureren in Access Punt (AP) modus. Om de Access te
activeren
Punt (AP) modus, volg onderstaande werkwijze.
1. In het eenvoudige/gedetailleerde scherm, pers knop naar
binnenkomen Instelling menu.
2. Druk op knop naar schakelaar “ Anders Instelling ” weergave.
3. Druk op of knop naar binnenkomen "Toegang
inschakelen Punt ”, druk op + of knop om de AP
te starten modus.

- 46 -

- 47 -
Opmerking :
Terwijl in de AP-modus kunt u druk op knop om AP te verlaten
modus. Het weer station zullen gewoon herstellen de vorig AP
instellingen .
Gebruik jouw smartphone , tablet of computer naar verbinden
naar de weer station via Wi-Fi door deze te volgen stappen:
1. Aan PC, open uw Wi -Fi netwerkinstellingen. Aan Android™ of iOS
apparaten , ga naar het instellingenmenu en dan selecteren
Verbindingen/WI-FI naar open
het netwerk instellingen.
2. Zoek de SSID van het weerstation op de lijst. Het zou moeten
verschijnen als
WWS-XXXXXX (waar alle X-en in gehele getallen zijn) in de lijst.
Kraan op de SSID om verbinding te maken. Deze stap zal meerdere
seconden.
3. Zodra u verbinding heeft met het weer station, open omhoog jouw
internet- of mobiele webbrowser en voer het volgende in adres
naar binnen de
adres balk : http://192.168.1.1 naar toegang tot de webinterface
van het weerstation. (Zorg ervoor dat u de http:// of anders e het
web browser kan interpreteren het adres als een zoekopdracht ).
Wij aanbevelen met behulp van de nieuwste versie van
gerenommeerde web browsers.
4. Voer het volgende in informatie in de webinterface (Figuur 1). Zorg
ervoor dat alle informatie is ingevoerd voordat u Opslaan selecteert.
Als je
kiezen niet naar uploaden Wunderground.com , of uploaden
weer -
cloud.net, laat de controle staan dozen ongecontroleerd.

- 47 -
Select the menu and choose your 2.4 GHz WIFI Router
Password
Weather Server Setup
WeatherUnderground
Station ID
Station Key
Upload wunderground.com
WeatherCloud
Station ID
Station Key
Upload weatherCloud.net
Time Server Setup
time.windows.com
Firmware Version: 1.0.1
a7d9d2a279fbbafa
**********
**********
**********
Apply
KCACANTI9
Server URL
Enter your station ID
Enter your station key/password
check to confirm upload to
WeatherUnderground server
Enter your station ID
Enter your station key/password
check to confirm upload to Weathercloud.net
Internet time server setting
Press Apply to confirm the setting
Select setup UI display language
Select your Wi-Fi Router (SSID) from the list
Router Password
Router
Wi-Fi Router Setup
Language:
Router 12345
SETTINGS
SETUP
English

- 48 -
5. Als alle informatie die u binnengekomen is juist, druk op "
Toepassen " om
bevestigen. Als dat zo is nee, controleer uw web interface informatie
opnieuw.
OPMERKING:
Wanneer de Wi - Fi opstelling is compleet , jouw computer of mobiel
apparaat
zullen terugkeren naar de standaard Wi-Fi-verbinding. Als dat zo is
niet, gewoon open je apparaat ' s draadloze netwerk instellingen En
handmatig opnieuw verbinden .
TIJD SERVER VERBINDING STATUS
Nadat het weerstation verbinding heeft gemaakt met internet, het zal
poging om verbinding te maken met de internettijdserver om de U TC
tijd. Eens de
verbinding slaagt en de tijd van het weerstation is bijgewerkt. Het
pictogram " SYNC " verschijnt op de LCD-scherm.
Om de juiste tijd voor uw specifieke tijdzone weer te geven, moet u: nodig
hebben
de tijdzone wijzigen in de KLOK- instelmodus van 00 (standaard) naar
uw tijdzone (bijv. -5 voor EST). Als je dat niet doet ken je tijd zone, Jij kan
Look Het online.
OPMERKING:
De tijd wordt automatisch gesynchroniseerd met de internet per een
uur.
MAAKEN SYNCHRONISEER UWWEBSERVERACCOUNT
CREËREN JOUW WEERONDERGRONDS REKENING
1. Ga naar: https://Wunderground.com en selecteer de optie " Join " in
de bovenste rechts en hoek en creëren A Gratis account.

- 48 -

- 49 -
2. Voer een Gebruikersnaam, E-mail en Wachtwoord ( Het is jouw
Login wachtwoord van de websiteIt, niet uw e-mail
wachtwoord.Dus Nee privacy zal worden blootgesteld ). Klik op
Ondertekenen gratis toegankelijk .
3. Na registratie is gedaan succesvol, het zal getoond onderstaand
bericht.
4. Klik op “Inloggen ” en binnenkomen de e-mail adres En pas
zwaard je bent gewoon geregistreerd.

- 49 -

- 50 -
5. Klik op “Mijn profiel ” en ga naar de ledeninstellingen.
6. Klik op “Update thuis locatie ”.
7. Klik op “Mijn Apparaten ”, en klik op “ Toevoegen ” Nieuw
Apparaat ".

- 51 -
8. Selecteer adres door een adres invoeren of selecteren Handleiding
voor positioneer uw adres automatisch. Klik vervolgens op “Volgen
de ".
- 52 -
9. Voer de weersinformatie in. Blanco's met rood (verplicht) moet
zijn gevuld in.
OPMERKING:
U kunt 'andere' selecteren uit de Apparaat Hardware.
10. Eens voltooi dit sessie, klik op “I Accepteren ” En “Volgende ".
11. Nadat u zich succesvol heeft geregistreerd, Alsjeblieft registreer
uw weer Onder- grond ID en Sleutel informatie voor latere
installatie gebruik.
- 53 -
12. Zoals getoond onderstaand, registratie succesvol is uitgevoerd.
CREËREN JOUW WEERWOLK REKENING
1. Bezoek de website van Weathercloud op https://weathercloud.net/ ,
en voer in een gebruikersnaam, E-mail en Wachtwoord en klik op "
Aanmelden " omhoog ". Na de
instructies om een rekening.
OPMERKING: Dit is het beste gedaan op een computer bureaublad
of laptop.
(Het is uw Login wachtwoord van de websiteHet, niet uw e-mail
wachtwoord. Dus Nee privacy zal worden blootgesteld).
2. Wanneer Het is succesvol, een e-mail zal zijn ontvangen in jouw
geregistreerd postbus.
3. Open uw mail en logboek in naar het web adres in de mail. Klik op '
Activeren ' jouw Weerwolk rekening ".

- 53 -

- 54 -
4. Klik op “hier ” om naar de homepage van de weathercloud website te
gaan .
5. Voer het e-mailadres en wachtwoord in dat u zojuist hebt ingevoerd.
geregistreerd bij ga de weerwolk binnen website .
6. Klik op “ Apparaat maken ” om een weerstation toe te voegen.
7. Voer alle gevraagd informatie in de Cr atee Nieuw Apparaat pagina.
Blanco's met rood * moeten gevuld worden in.
- 55 -
OPMERKING:
U kunt 'andere' selecteren uit de Model nummer en Linktype in
de boven blanco's.
Klik op "Coördinaten ophalen" om identificeer uw locatie op de
kaart, Dan Klik op "Gereed" om bevestigen.
8. Zodra je voltooid dit sectie, Klik op " Maken ".
9. Nadat u zich succesvol heeft geregistreerd, registreer uw
Weathercloud identiteitsbewijs En Sleutel informatie voor latere
installatie gebruik.
WEERGAVE JOUW WEER GEGEVENS IN WEERONDERGRONDS
Bekijk uw weerstationgegevens live via PC of mobiel web browser,
bezoek http://www.wunderground.com , en ga dan naar het station ID
jij was verstrekt tijdens het instellen van het account in de zoekopdracht
box. Uw weergegevens worden weergegeven op de volgende pagina.

- 56 -
ZORGEN ONDERHOUD
1. Maak de regenmeter elke 3 maanden. Draaien de koker tegen de klok
in en til op om de regenmeter mechanismen, En schoon met A
vochtige doek. Verwijder alle vuil, puin en insecten. Als er een fout is
besmetting is een probleem, spuit de sensor lichtjes in met en
insecticide.
Open
Tillen
2. Maak de Licht Intensiteit/ UV-sensor en zonne-energie paneel elk 3
maanden met vocht lap.
3. Wanneer u de batterijen vervangt, toepassen A corrosie preventief
samenstelling op de batterij terminals .
SPECIFICATIE
WEER STATION
Algemene specificaties
Dimensie
7,3 x 5,4 x 1,1 inch (185,9 x 137 .4 X 28,5 mm)
Stroombron
Wisselstroom-gelijkstroom 5V, 1A-adapter (meegeleverd)
Ondersteuningssensoren
1 x 7-in-1-sensor (inbegrepen)
Wi-Fi- communicatiespecificatie
Wi-Fi-standaard
802.11 z/g/n
Wi- Fi-werkingsfrequentie
2,4 GHz
Ondersteunde
apparaten voor
opstelling
Gebruikersinterface
Ingebouwde Wi-Fi met WAP-modus smart device,
inclusief laptops, computers, smartphones en slim
kussentjes

- 56 -
Aanbevolen webbrowser
voor installatie
Gebruikersinterface
Laatste versie van een webbrowser die HTML5

- 57 -
Tij d Fun c t i es p e ci f i c at i e s
T i j d w e e r g a v e
ZH : MM
U u r f o r m a a t
12 uur of 24 uur
Datum weergave
DD/MM of MM/DD
T i j d s y n c h r o n i s a t i e m e t h o d e
Sy n ch r o n is e e r t met at o m a i re kl o k
Tijdzones
-12 ~ +13 uren
Zomertijd
AAN/UIT
Barometerweergave & Functiespecificaties
Barometer-eenheden
hPa, inHg en mmHg
Meten bereik
600 – 1100 hPa (relatieve instelling ) bereik 930 – 1050hPa)
Nauwkeurigheid
700 -1100 hPa±5 hPa/600 -696 hPa±8 hPa
20,67 – 32,48 inch Hg ± 0,15 inch Hg / 17,72 -20,55 inch Hg ±0,24
inHg
525 -825 mmHg±3,8 mmHg/450 -5 22 mmHg±6
mmHg Typisch bij 77
jaar
(25
℃
)
Weersverwachting
Zonnig, Gedeeltelijk bewolkt, bewolkt, Regenachtig, stormachtig en
Sneeuwachtig
Weergave modus
Huidig
Geheugen modus
Dagelijks Maximaal/ Mijn
Waarschuwing
Waarschuwing voor drukverandering
Binnen-/buitentemperatuur Weergave & Functiespecificaties
Temperatuur eenheid
℃
en
吓
Binnenvertoning bereik
-14.1 jaar– 122 graden (-9,9 ℃ – 50 ℃ )
Buitenvertoning bereik
-40
schrikken
– 158
°C
(-40
°C
– 70
°C
)
In/Out nauwkeurigheid
50 – 122 Eng 1.8 schrikken / 10 –
50
℃
± 1
°C
-4 -
50
±
2,7
/ -20 – 10
℃
± 1,5
℃
anderen : ± 3,6
/
±2
℃
Weergave modus
Huidig
Geheugen modus
Dagelijks Maximaal/ Mijn
Waarschuwing
Waarschuwing voor hoge/lage temperatuur
- 58 -
Binnen-/ buitenvochtigheid Weergave & Functiespecificaties
Vochtigheid eenheid
%
Weergave bereik
1 – 99%
In/Out nauwkeurigheid
40 – 80% RV ± 5% rechts @77 °C (2
5 °C ) Anderen : ± 8% rechts @77 °C
(25
°C
)
Weergave modus
Huidig
Geheugen modus
Dagelijks Maximaal/ Mijn
Waarschuwing
Hoog/Laag vochtigheid ale rt
Windsnelheid en Richting Weergave & Functiespecificaties
Windsnelheid eenheid
km/u, mevrouw, km/u, knopen
Weergave bereik
0-180 km/u, 50 m/s, 180 km/u, 97 knopen
Snelheidsnauwkeurigheid
<5 m/s: ±0,5 m/s, >5 m/s : ±10% (welke dan ook is groter)
Weergave modus
Windvlaag/Gemiddelde
Geheugen modus
Dagelijkse windvlaag/gemiddelde
Waarschuwing
Hoge windsnelheid Waarschuwing (windvlaag/gemiddelde)
Windrichting
16 richtingen
Regen Weergave & Functiespecificaties
Eenheid van regenval
mmm, in
Bereik van regenval
0 – 12999mm (0 – 511,7) in)
Nauwkeurigheid van regenval
±7%
Weergave modus
Huidig
Geheugen modus
Dagelijks Maximaal
Weergave van regenval modus
Per uur/ Dagelijks/Wekelijks/ Maandelijks/Totaal Regenval
Waarschuwing
Hoog Dagelijks Waarschuwing voor regenval
UV Index Weergave & Functiespecificaties
Weergave bereik
0 - 16
Weergave modus
Huidig
Geheugen modus
Dagelijks Maximaal
Waarschuwing
Hoog UVI-waarschuwing
- 59 -
Licht Intensiteit Weergave & Functiespecificaties
Licht Intensiteit eenheid
Klus, Kfc en W/
m2
Weergave bereik
0 – 200 Klux
Weergave modus
Huidig
Geheugen modus
Dagelijks Maximaal
Waarschuwing
Hoog Licht intensiteitswaarschuwing
Weersindex Weergave & Functiespecificaties
Weer Index modus
Voelt zoals windchill, warmte index en dauw punt
Weergave modus
Huidig
Geheugen modus
Dagelijks Maximaal/minimum
DRAADLOZE 7- IN - 1 BUITEN SENSOR
Dimensie
16 keer 15,6 keer 14,4 inch (408x396x 367mm)
Voornaamst stroom
3,6V Ni-MH oplaadbaar batterij pak
Back-up stroom
Zonne stroom
Weergegevens
temperatuur, vochtigheid, windsnelheid , windrichting,
regenval, UVI en licht intensiteit
RF-transmissie bereik
330 voet (100m)
Transmissie-interval
Elke 20 seconden voor UV
,
licht intensiteit
、
windsnelheid
、
temperatuur, vochtigheids- en regengegevens en windrichting
gegevens
Bedrijfstemperatuur
-40
jaar–
140
°C
(-40
°C
– 60
°C
)
Extra gereedschap nodig
voor sensor
Ja
- 60 -
PROBLEEMOPLOSSING
Probleem
Oplossing
Draadloze sensor
doet niet
communiceren de
weerstation
De draadloze sensor kan hebben geïnitieerd correct, en de gegevens is
door het weerstation als ongeldig geregistreerd, en de weer station
moeten zijn opnieuw instellen.
Met een open einde papierclip p, druk op de Houd de RESET-knop 3
seconden ingedrukt om de spanningsweergave te voltooien. LED
knippert elke 20 seconden.
Als LED zal niet elke 20 seconden knipperen, haal de batterijen En
wachten 5 minuten, terwijl u het zonnepaneel afdekt om het water af te
voeren de spanning.
Neerzetten batterijen rug in en synchroniseer het weerstation
opnieuw en synchroniseer de weerstation (zie pagina) 10
(HERKOPPELING VAN DE SENSOR) met de draadloze sensor
over 10 voet (3m) weg .
De De LED van de draadloze sensor knippert elke 20 seconden. Als
de LED is nog steeds knippert niet elke 20 seconden, vervang de
nieuw batterijen in de
draadloze sensor.
Als de batterijen waren onlangs vervangen, controleer de polariteit. Als
de draadloze sensor elke 2 0 seconden knippert , ga naar de volgende
stap.
Daar kunnen een tijdelijk verlies van communicatie zijn als gevolg van
receptie verlies gerelateerd aan interferentie of andere locatiefactoren,
Of batterijen kunnen hebben is veranderd in de draadloze sensor en
de weerstation heeft niet geweest resetten. De oplossing kunnen net
zo eenvoudig zijn als het uit- en inschakelen van het weerstation
(verwijderen gelijkstroom kracht en
batterijen), wacht 30 seconden en plaats ze opnieuw gelijkstroom kracht en
batterijen).
Binnen en
Openlucht
temperatuur doen
niet mee eens zijn
Houd er rekening mee dat de draadloze sensoren maximaal een uur nodig
hebben om stabiliseren vanwege naar signaal
filteren. De binnen- en buitentemperatuursensoren moeten binnen ±4
°C
(±2
°C
) (de nauwkeurigheid van de sensor is ±2
jaar
(±1
℃
)
Gebruik de kalibratiefunctie om de binnentemperatuur te matchen En

- 60 -
buitentemperatuur naar een bekend bron.
Temperatuursensor
leest ook hoog in de
dag
Zorg ervoor dat de draadloze sensor niet te dichtbij naar warmte
bronnen of vernauwingen genereren , zoals gebouwen, bestrating,
muren , of lucht voorwaarde- ingaan Eenheden.
- 61 -
Probleem
Oplossing
Regenmeter verslagen
regen wanneer Het
Het niet regent.
Een onstabiel montageoplossing (sway) in de montage pool)
kunnen resultaat in de kiepstand emmer onjuist toenemend regenval.
Zorg ervoor dat je
montageoplossing hebben . (Refereren pagina 9 AANPASSEN VAN
DE 7-IN-1 DRAADLOZE SENSOR NIVEAU)
Wi-Fi doet niet
weergeven op het
weerstation
Controleer uw router op problemen.
1. Controleer het Wi-Fi-symbool op het display. Als draadloze
connectiviteit is
succesvol , de Wi - Fi icon Azullen zijn weergegeven in de tijd
ingediend .
2. Zorg ervoor dat de wifi-instellingen van uw modem correct zijn
(netwerk naam, En wachtwoord)
3. Zorg ervoor dat het weerstation is aangesloten naar binnen
Wisselstroom kracht. Het weerstation zal geen verbinding met wifi
wanneer aangedreven door batterijen alleen.
4. De console ondersteunt en maakt alleen verbinding met 2,4 GHz
routeren. Als je bezit een 5GHz router, en Het is een duale band
router, Jij zullen behoefte naar
schakel de 5Ghz-band uit en inschakelen van de 2,4 GHz band.
5. Het weer doet Ondersteunt geen gastnetwerken.
Gegevens niet
rapporteren aan
www.wonder-
ground.com of
www.weercloud.net
1. Bevestig uw wachtwoord of sleutel is correct. Het is de
wachtwoord Jij geregistreerd op Wunderground.com.
Wunderground.com. Uw wachtwoord voor underground.com mag
niet beginnen met niet-alfanumerieke tekens (een beperking van
Wunderg round.com, (niet het station). Bijvoorbeeld, $worknet is
geen geldige wachtwoord, maar
werknet$ is geldig)
2. Bevestig uw station identiteitsbewijs ix correct. Het station
identiteitsbewijs is allemaal hoofdletters, en de meest voorkomende
probleem is het vervangen van en O voor een 0 (of omgekeerd).
Voorbeeld, KCAPHOEM12, niet KCAPH0EM12.
3. Zorg ervoor dat de gegevens en tijd is correct op de weer
station. Als onjuist, jij kunnen zijn oude gegevens rapporteren,
niet realtime gegevens.
4. Zorg ervoor dat uw tijdzone is ingesteld op de juiste manier. Als
het niet klopt, jij kunnen zijn oude gegevens rapporteren, niet
echte tijd gegevens .
5. Controleer de firewall-instellingen van uw router. Het weerstation
stuurt gegevens via Haven 80.

FCC STATEMENT
- 62 -
Dit apparaat voldoet aan deel 15 van de FCC Regels. Bediening is
onderworpen aan de volgend twee voorwaarden :
1. Dit apparaat kunnen NIET oorzaak schadelijk interferentie.
2. Dit apparaat moet elke inmenging accepteren ontvangen,
inbegrepen interferentie die kan ongewenste woede veroorzaken
operatie.
OPMERKING:
Deze apparatuur heeft getest en bevonden te voldoen aan de
limieten voor een klas B digitaal apparaat, overeenkomstig Deel 15
van de FCC Regels.
Deze limieten zijn ontworpen om redelijke voorwaarden bieden
bescherming tegen schadelijk interferentie in een residentieel
installatie. Deze apparatuur
genereert — en kan uitstralen — radiofrequentie -energie en,
indien niet geïnstalleerd en gebruikt in overeenstemming met de
instructies, kan schadelijk zijn interferentie met
radiocommunicatie .
Er is echter is geen garantie dat interferentie zal niet voorkomen in
een bepaalde installatie.
Als de apparatuur dat wel doet niet veroorzaken schadelijk storingen in
de radio- of televisieontvangst , die kunnen worden vastgesteld door de
apparatuur uit en op, de De gebruiker wordt aangemoedigd om te
proberen de fout te corrigeren interferentie door een of meer van de
volgend maatregelen :
Heroriënteren of verplaatsen van de ontvangstantenne.
Vergroot de afstand tussen de apparatuur en de ontvanger.
Sluit de apparatuur aan in een stopcontact op een circuit
verschillend van Dat waaraan de ontvanger is verbonden .
Raadpleeg de dealer of een ervaren radio-/tv- technicus voor meer
informatie. hulp.
WAARSCHUWING: Wijzigingen of aanpassingen aan deze eenheid
niet uitdrukkelijk sluw
goedgekeurd door de De partij die verantwoordelijk is voor de
naleving, kan de bevoegdheid van de gebruiker om de
apparatuur te bedienen ongeldig verklaren .

FCC STATEMENT
- 62 -
Sanven-technologie BV.
Adres: Suite 250, 9166 Anaheim Plaats, Rancho Cucamonga,
Californië 91730
Gemaakt In China


Technische ondersteuning en E-garantie
certificaat www.vevor.com/support
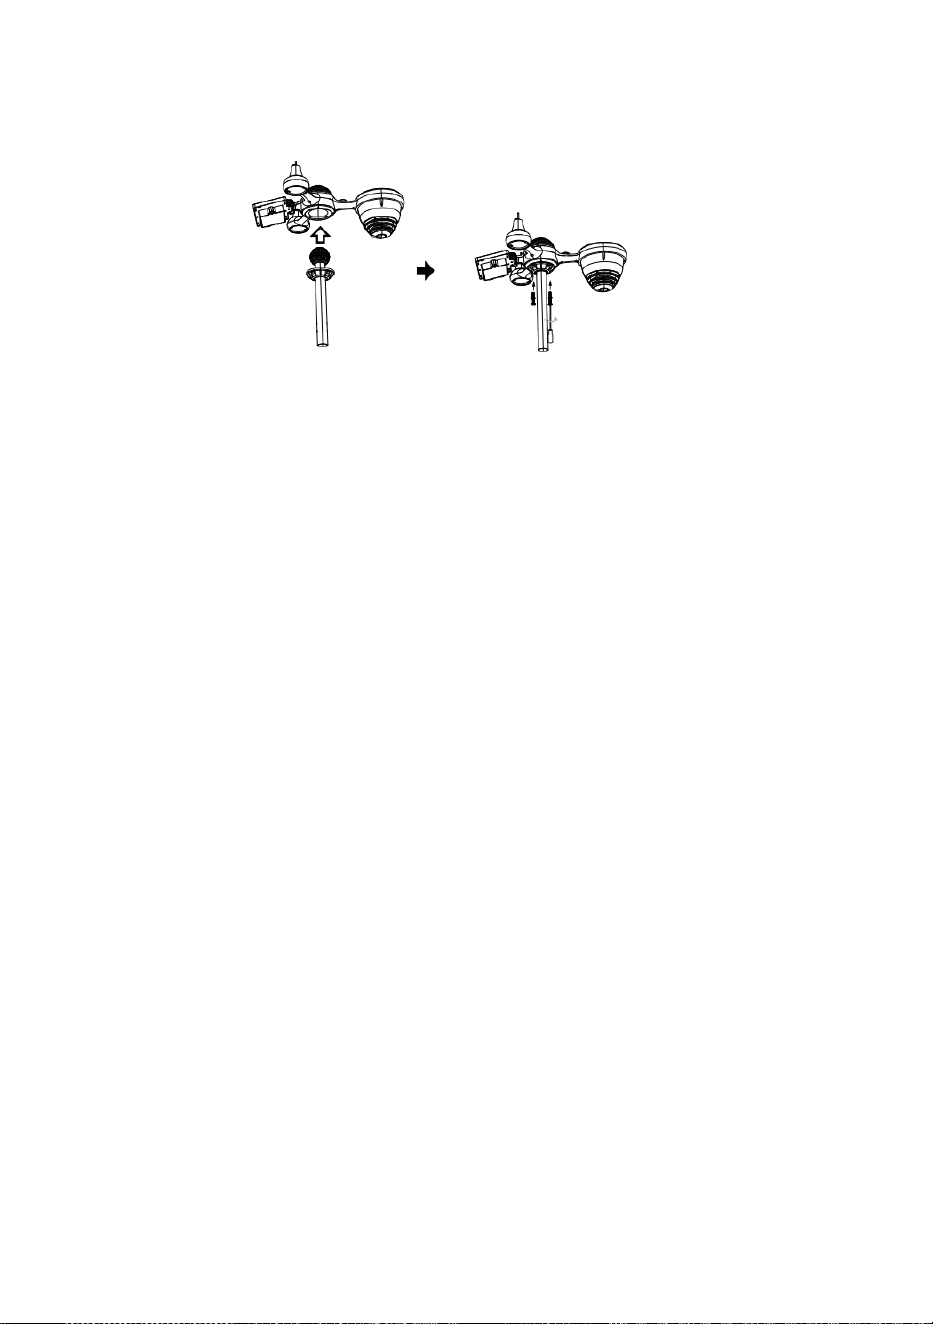
L
å
s
a
Snabbstart Guide
⑤
I
N
S
T
Ä
L
L
N
I
N
G
A
V
R
E
G
N
S
A
M
L
A
R
E
N
I
n
f
①INSTALLING THE MOUNTING POLE
Secure the sensor onto a mounting pole (included) using the screws (included).

o
g
a
d
e
t
r
a
t
t
i
d
e
r
e
g
n
s
a
m
l
a
r
e
o
c
h
l
å
s
a
d
e
t
i
p
l
a
t
s
.

⑥
I
N
S
T
A
L
L
A
T
I
O
N
D
E
B
A
T
T
E
R
I
E
R
② INSTALLATION DE MONTERING KONSOL
Skruva loss batteriluckan kl botten. Ansluta kabeln av det uppladdningsbara
batteripaketet.
J
u
s
t
e
r
a
d
e
a
n
s
l
u
t
n
Secure the sensor onto a mounting bracket (included) using the screws (included).

a
k
a
b
l
a
r
n
a
s
å
d
e
p
a
s
s
a
b
e
k
v
ä
m
t
i
n
d
e
a
v
d
e
l
n
i
n
g
.
S
t
ä
n
g
o
c
h
f
ä
s
t
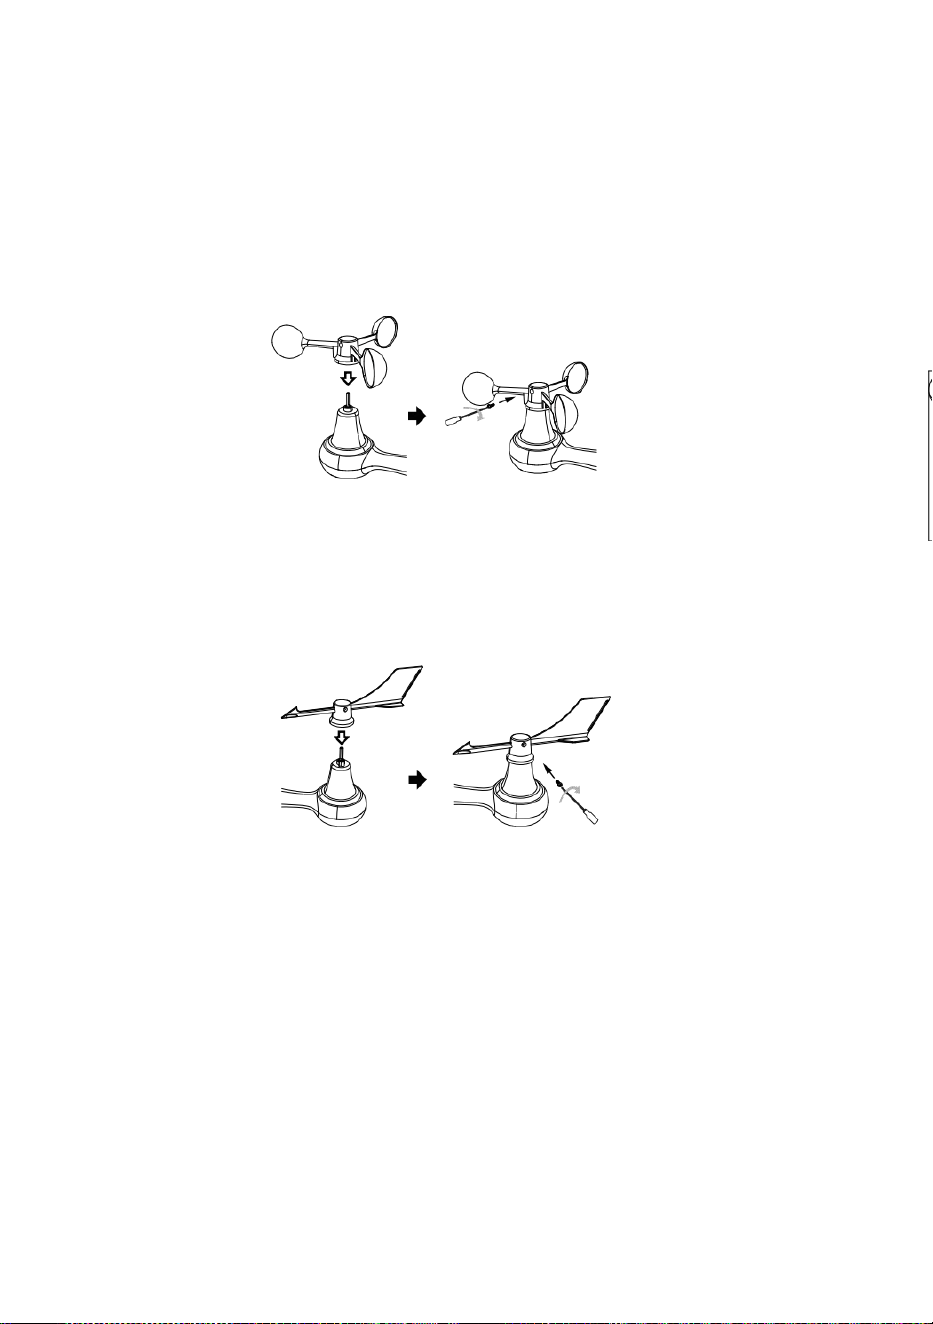
a
b
a
t
t
e
r
i
l
u
c
k
a
n
.
③ INSTALLATION VIND HASTIGHET KUPPER
Justera skruvhålen i de vindhastighetscuper med de platt, vertikala sidan av de metall
stång.
Infoga de vindhastigheten slår in metallstången och skruva fast stram till låsa det i
plats.
L
o
s
s
a
s
k
r
u
v
e
n
v
i
d
d
e
g
e
m
e
n
s
a
m

.
J
u
s
t
e
r
a
d
e
v
e
r
t
i
k
a
l
v
i
n
k
e
l
a
v
d
e
s
o
l
-
c
e
l
l
.
T
r
y
c
k
v
ä
x
e
l
n

i
n
å
t
o
c
h
s
p
ä
n
n
a
d
e
s
b
e
s
ä
t
t
n
i
n
g
.
P
u
n
k
t
t
i
l
l
N
O
R
R
N
O
R
R
P
u
n
Point to
SOUTH

k
t
t
i
l
l
④ INSTALLATION VIND RIKTNING VINDFLÖJEL
Justera skruvhålen i de vindriktning n vindflöjel med de platt, vertikala sidan av
metallstången.
Infoga de vind riktning vindflöjel i de metall stång och skruva på stram till låsa det i
plats .

TV
⑩STRÖMNING
DE VÄDERSTATION
Plugg strömadaptern i
de väderstation.
En gång de väderstation är slagit på n,
det kommer automatiskt att starta
ihopparning läge.
trycka eller knapp att börja de AP
läge . Öppna din Wi - Fi nätverk
inställningar på PC eller smartphone .
Lokalisera de väderstation med SSID
( WWS - XXXXXX ) från de lista .
Knacka på de SSID till ansluta .
MILJÖ UPP
WI-FI-ANSLUTNING
I den enkla/detaljerade skärmen, tryck
knapp till skriva in Miljö menyn .
Trycka knapp för att byta " Annat
Miljö ” visa.
Trycka eller knapp till ange " Aktivera
Access Point ”.
AT
MINST
3
fot
(0,9 m)
ISÄR
För att förhindra trådlös störning,
plats både enheter på minst 3 ft
(0,9 m) bort från elektroniska
enheter (TV, dator,
mikrovågsugn, radio, etc.).
SETTINGS
SETUP ADVANCED
Language:
Wi-Fi Router Setup
Router 1234 5
Select the menu and choose your 2.4GHz WIFI Router
Password
Weather Server Setup
WeatherUnderground
Station ID
Station Key
Upload wunderground.com
WeatherCloud
Station ID
Station Key
Upload weatherCloud.net
Time Zone Setup
Time Zone
Time Server Setup
Server URL
Firmware Version: 1.0.1
time.windows.com
a7d9d2a279 fbbafa
**********
**********
**********
Apply
KCACANTI9
English
Router
+0.00
⑧MOUNTING THE WIRELESS 7-IN-1 OUTDOOR SENSOR
Various options to install. Make sure the rain collector faces north and
the solar panel faces south before fastening the screws (included).
If you are a user located in the Southern Hemisphere,
please reverse the direction.
Enter your station ID
Enter your station key/password
check to confirm upload to
WeatherUnderground server
Enter your station ID
Enter your station key/password
check to confirm upload to
Weathercloud.net
Time zone setting
Internet time server setting
Press Apply to confirm the setting
WI-FI disconnected
WI-FI connected
WI-FI connected with Sync
ENTER SETUP INTERFACE
Enter the following address into the web browser address bar:
http://192.168.1.1 to access the setup interface.
Please click to check your password before clicking APP.LY
⑨ADJUSTING THE 7-IN-1 WIRELESS SENSOR LEVEL
Use the bubble level indicator to make sure the wireless outdoor sensor is completely level.
Select setup UI display language
Select your Wi-Fi Router (SSID) from the list
Router Password
Please scan the QR code or visit https://youtu.be/JYr4BeOmEKo to see a video on how to use it.
Familiarize yourself with the icons for Wi-fi connection status.
WI-FI CONNECTION STATUS
The
bubble

Teknisk support och E-garanticertifikat www.vevor.com/su pport
METEOROLOGISK STATION
MODELL: YT60233
Vi fortsätter att vara engagerade i att tillhandahålla du verktyg med
konkurrenskraftig pris.
"Spara Halva, "Halva Priset" eller andra liknande uttryck begagnad av oss endast
representerar en
uppskattar att spara dig kan tjäna på att köpa vissa verktyg med oss kompa röd till de majo r
bästa märken och doser inte nödvändigtvis innebär att täcka alla kategorier av verktyg
erbjuds av oss. Du
är vänligt påminns om att noggrant kontrollera när du är lägga en beställning med oss om
du är det
faktiskt sparar hälften i jämförelse med toppen major brand ds.


- 3 -
METEOROLOGISKT
STATION
MODELL: YT60233
BEHOV HJÄLP? KONTAKTA USA!
Ha produktfrågor? Behöver du teknisk support? Du får gärna
kontakta oss:
Kundtjänst @ vevor . com
Detta är originalet instruktion, behaga läs allt manuell instruera joner
noggrant innan användning. VEVOR reserverar en klar tolkning i vår
bruksanvisning. Produktens utseende ska vara ämne till de
produkt dig mottagen. Snälla för att ge oss att vi inte gör det informera
dig igen om det finns någon teknik eller mjukvaruuppdateringar på vår
pr produkt.

SAFETY PRECAUTIONS
- 4 -
VARNING! Läs och förstå all säkerhet försiktighetsåtgärder ,
bruksanvisning och skötsel / underhåll instruktioner före fungerar
detta
apparat. Spara denna handbok för framtida referens .
Detta produkt är inte en leksak. Håll dig borta från honom räckvidd för
barn.
Detta produkt är designad för användning i hem bara som en
indikation på väder villkor .
Detta produkt är inte att vara används för m edical ändamål
eller för allmänheten information.
Do inte rengöra enhet med slipmedel eller frätande material.
Do inte placera apparaten nära öppna lågor eller värmekällor .
Brand, elektrisk stöt, produktskada eller skada kan inträffa.
Endast använd färsk ny batterier i produkt . Do inte blanda nytt och
gammalt batterier tillsammans.
Do inte demontera, ändra eller modifiera de produkt .
Använd endast tillbehör eller tillbehör till detta specificerad produkt av
tillverkare.
Do inte sänka ner enhet i vatten. Torka p rodukt med en mjuk trasa
om vätskespill på det.
Do utsätt inte enheten för överdriven kraft, stötar, kanal, extrem
temperatur , eller fuktighet .
Do inte täcka eller blockera ventilationen hål med någon föremål.
Denna väderstation av detta produkt jag s tänkt att vara
begagnad inomhus endast.
Detta produkt är endast lämplig för montering vid en höjd mindre än 2 m
(6.6 ft.).
Do inte manipulera med enhetens interna komponenter. Ändring av
produkten upphäver garantin .
Batterier är inte ingår. När sätter in batterier , se till att de positiv
och negativ polariteter matcha med markeringar i facket .
Do inte blanda standard, alkalisk och uppladdningsbar batterier
tillsammans r.
Lämnar en batteri utsatt för extremt hög temperatur i den
omgivande miljön kan resultera i en explosion eller läckage av
brandfarlig vätska eller gas.
Lämnar en batteri som utsätts för extremt låg nivå luft tryck e i de

SAFETY PRECAUTIONS
- 4 -
omgivande miljö kan leda till en explosion eller läckage av
brandfarlig vätska eller gas.

TIPS FOR SENSOR SITE SELECTION
- 5 -
Regnsamlare måste städas varje få månad hs.
Sensor bör vara installerad kl l österut 1.5 m (5') bort från någon
byggnad eller strukturera.
Välj en plats i ett öppet utrymme under direkt solljus med inga
hinder.
Sensorn ska förbli i sikte och inom150 m (492') av väder station för
konsekvent , stadig överföring .
Håll din sensor och väderstation borta från hushållet
apparater att fungera på de samma frekvens . De trösta och
sensor bör vara vid minst 1 - 2 m (3' -7') bort från sådan störningar s.
PRODUKT DRAG
7 tum HD TFT-skärm skärm.
Realtidsklocka med kalender r.
Larmfunktion.
Månen Fas.
Tid för soluppgång/solnedgång.
Tidszonsinställning och Sommartid (DST) funktion.
Tidszon : GMT +13 till -12h.
Synkronisera automatiskt med internettidsserver.
7 språk (EN/ DE/ FR/ ES/ DET/ NL/CZ) för visning.
Inomhus & utomhus temperatur och luftfuktighet visar med trend.
Händelse, Varje timme, Dagligen, varje vecka, Månatlig, totalt regn och
Regn hastighet i förbi timme.
Genomsnittlig vindhastighet, vindstyrka och vindriktning visas.
Absolut och relativt Barometertryck visar med trend.
Sol Strålning intensitetsvisning och UV I display.
Visning av väderindex : Känsla gillar, Wind Chill, Värme index. Dagg
punkt.
Väder Prognoser.
Väderdata med Max/Min läsning, datalogg & historikgrafvisning.
Inställningar för vädervarning.
Justering av bakgrundsbelysningens ljusstyrka.
Låg batteri indikationer för utomhussensorer .
Natt Ljusfunktion.
Data ladda upp väderdata till Weather Underground och/eller
Weather- moln via wifi router.
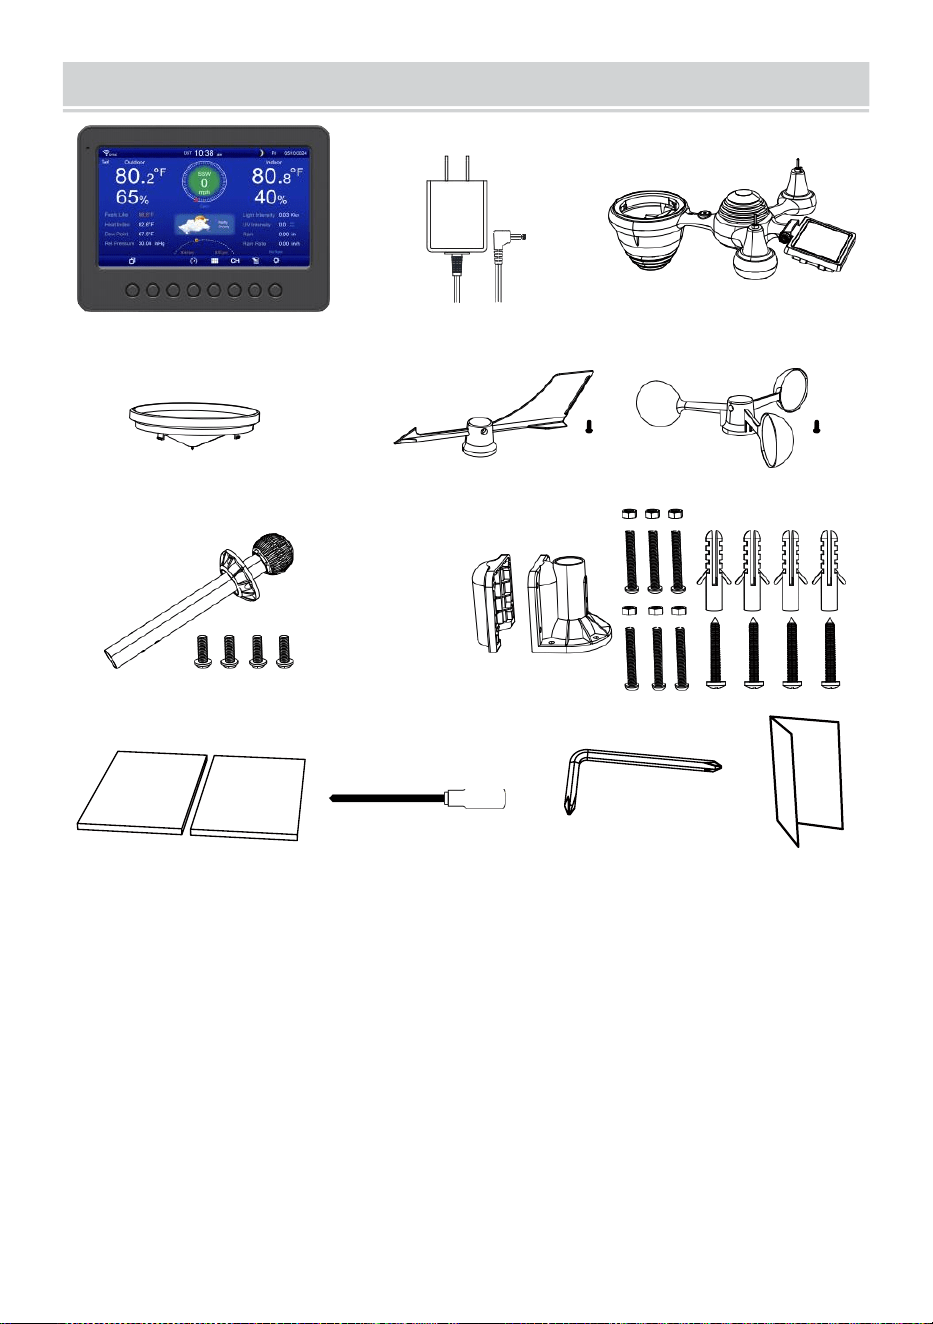
PACKAGECONTENTS
- 6 -
1 2 3
4 5 6
7
8
9 10 11 12
1 väderstation
7 Montering stolpe med 4 skruvar
2 Adapter
8 Montering fäste ts med 6 skruvar
3 Trådlös 7-i-1 utomhussensor 9 Gummikuddar X 2
4 tratt
10 skruvmejsel 1
5 Vindriktningsvinge med 1 skruv
11 Skruvmejsel 2
6 Vindhastighetskoppar med 1 skruv
12 Användarhandbok
OBS : 4 extra skruvar för vind riktning vindflöjel och vind
speed cups.

PRODUCTOVERVIEW
- 7 -
TRÅDLÖS 7- IN- 1 UTOMHUS SENSOR
1
Solenergi panel
2 Vindriktningsvinge
3 UV/ljus sensor
4
Bubbla nivå gradienter
2
5 Regn samlare
6 Vindhastighet koppar
7
Montering stolpe
8 Montering parenteser
9 Hygrotermogivare
10
LED: Blinkar när de enhet
sänder en läsning
11 RESET-knapp
12
Batterilucka
10
11
7
9
8
12
3 6
4
1
5

WEATHERCONSOLEOVERVIEW
- 8 -
1
2
3
4
5
6
7
8
1 Omgivande ljus detektor
4 vägg montering hållare
7 Antenn
2 Skärm
5 Driva input
8 Stativ
3 Fungera
knappar
6 RESET-knapp

HOME SCREEN OVERVIEW
- 9 -
1 2 3 4 5
6
15
8
16
10
17
18
o—
19
2
11
12
13
14
9
7
23 24
1 Wi-fi-anslutning/tidssyn c ikon
13 Dagg punkt
2 Tid
14 Baro tryck
3 Vindriktning
15 Inomhustemperatur
4 Månen fas 16 Luftfuktighet inomhus
5 Datum
17 Ljus intensitet
6 Sensorsignalstyrka ikon
18 UVI
7 Utetemperatur
19 Regn
8 Vindstyrka 20 Regn hastighet
9 Luftfuktighet utomhus 21 Regn hastighet nivå
10 Vindhastighet nivå 22 F unktionell knapp ikon
11 Känns som temperatur 23 Väderprognos
12 Värme index
24 Soluppgång/solnedgång tid

DETAIL SCREEN OVERVIEW
- 10 -
11
12
1 3
1 4
1 5
1 6
1 7
1 8
1 9
20
21
1 2 3 4 5 6 7 8 9 10
22
23
24
25
26
27
28
29
30
31 32
1 Wi-Fi-anslutning/tidssynkronisering ikon
17 Vindkyla
2 Utomhus MAX/MIN temperatur
18 Dagg poi nt
3 Utomhus MAX/MIN luftfuktighet
19 Ba ro tryck
4 Vindbyar
20 Ljus intensitet
5 Tid 21 UVI
6 Medelvindhastighet 22 Inomhus MAX/ MIN temperatur
7 Vindriktning
23 Inomhustemperatur
8 Vindstyrka
24 Inomhus MAX/MIN fuktighet
9 Månen fas
25 Inomhus fuktighet
10 Datum
26 Regn hastighet
11 Känns som temperatur 27 Händelse, varje timme, varje vecka,
12 Utetemperatur
månatlig, total regn
13 Utomhusfuktighet 28 Regn hastighet nivå
14 Vindhastighet nivå
29 Dagligen regn
15 Känns som temperatur 30 Funktionell knapp ikon
16 Värme index
31 Väderprognos
32 Tid för
soluppgång/solnedgång

SUMMARY SCREEN OVERVIEW
- 11 -
6
7
8
9
1 0
1 2 3 4 5
1 Wi-Fi-anslutning/tidssynkronisering
ikon
2 In/ut ikon märka
3 Tid
4 Månen fas
5 Datum
6 Sensorsignalstyrka ikon
7 In-/utomhustemperatur
8 Luftfuktighet inom/utomhus
9 Nej skärm ansluta skärm
10 Funktionell knapp ikon
MILJÖ UPP DEN WIREL ESS 7-IN-1UTOMHUSSENSOR
De trådlös 7- i- 1 utomhus sensor åtgärder vind fart , vind riktning , regn,
UV, ljus intensitet, t temperatur och luftfuktighet.
INSTALLERA DEN MONTERING POLE OCH BRACK ET
Fäst sensorn på en montering stolpe och fäste (ingår) med hjälp av
skruvar ( ingår ).

INSTALLERA VINDHASTIGHETSKOPPER OCH VIND RIKTNING V
ANE
Rikta in skruven hål i vindhastighetskopparna med den platta,
vertikala sidan av metall stång.
Sätt i vindhastighetskopparna i metall stång och skruva fast dem på
tätt till låsa det i plats.
Rikta in skruvhålen i vinden riktningsvinge med lägenheten, v ertikal
sidan av metall stång.
Sätt i vindriktningsvingen i metall stång och skruva fast dem stram till
låsa det i plats.

- 12 -

- 13 -
Installation av vindhastighetskoppar
Vindriktning Lamellinstallation
MILJÖ UPP REGNSAMLA TOR
Rikta in skåror på tratten l med låsspåren inuti regn samlare.
Sätt i tratten i regnsamlare och skruva fast dem till l ock det i plats.
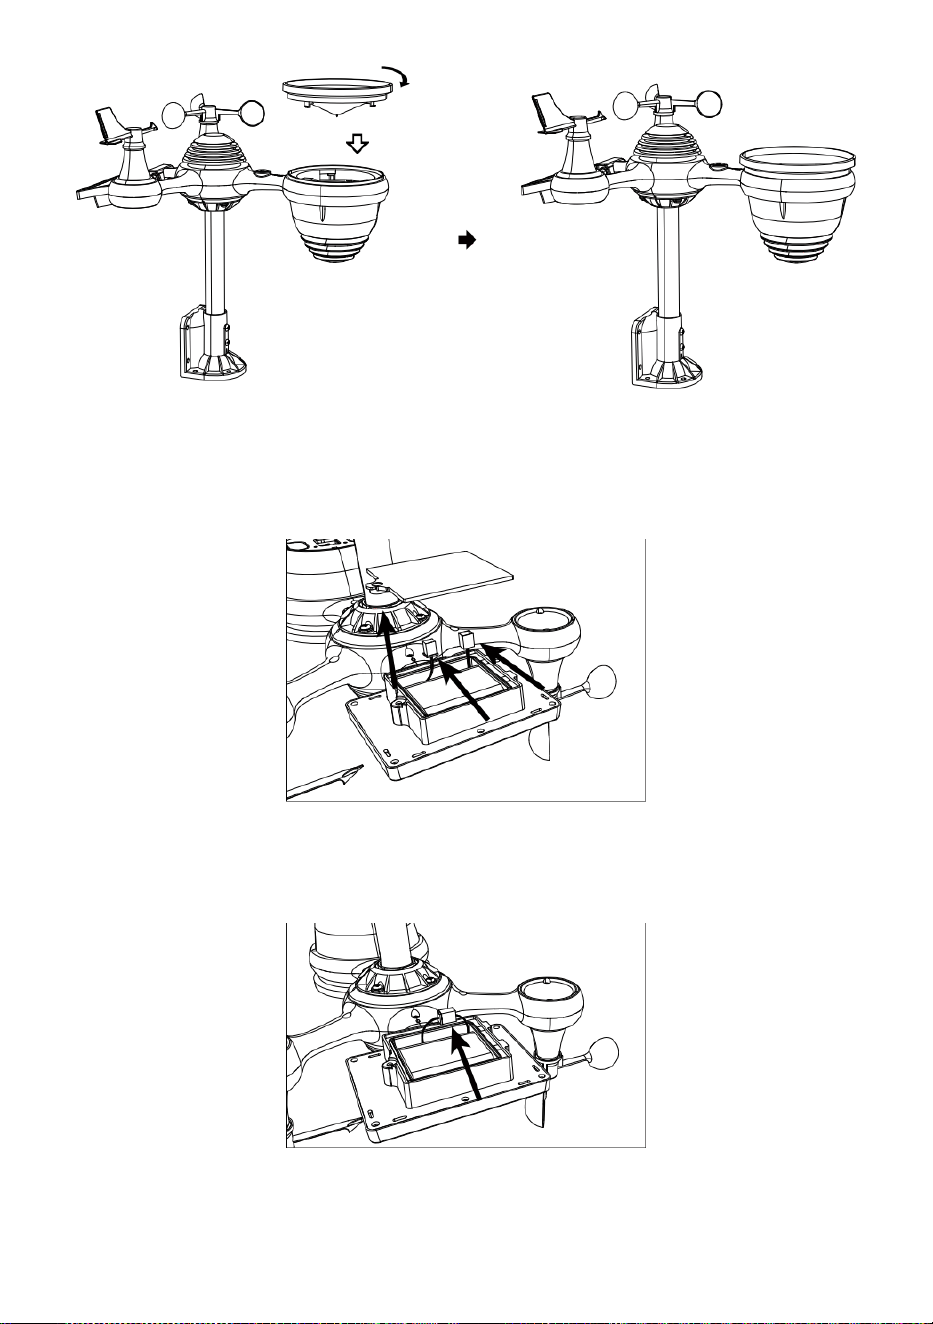
Låsa
Justera
INSTALLERA DEN BATTERIER
Skruva loss batterilucka längst ner på 7-i-1 utomhus- sensor med
hjälp av en skruvmejsel 1.
Anslut kabeln till uppladdningsbar batteri pack (ingår) till kabel
placerad i de batteri avdelning.
Justera de anslutna kablarna så att de sitter bekvämt i kompar-
ment. Sedan, sätt in batteri packa in i facket.
- 14 -
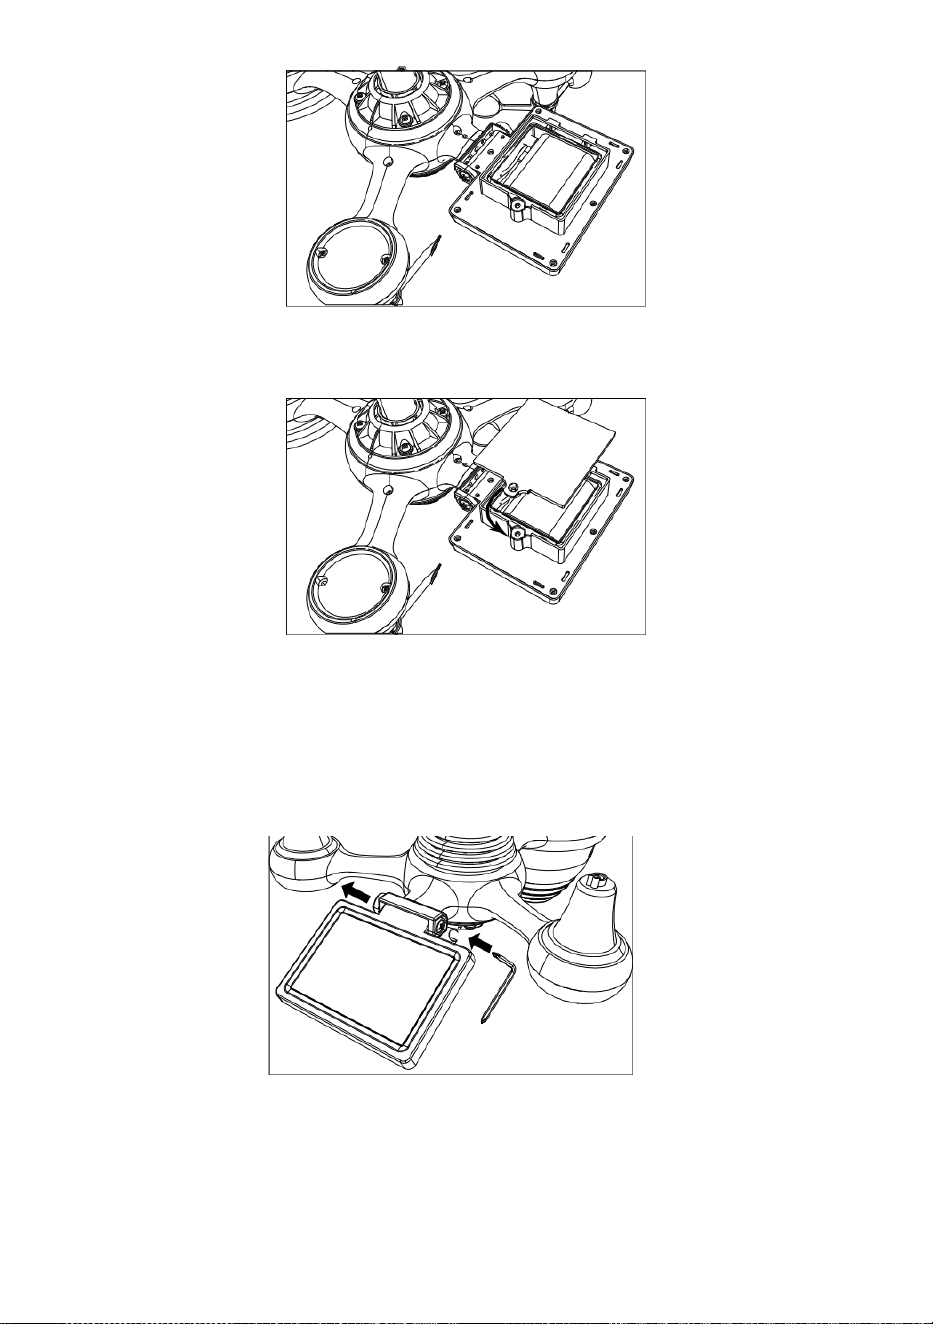
- 15 -
Stäng och fäst batteriluckan tillbaka på de avdelning.
JUSTERAS DE SOL CELL
Lossa skruven vid skarven så att kugghjulet ligger på den andra sidan
av leden
trycker ut. Solcellen ska nu vara i en olåst position n.
Justera den vertikala vinkeln på solcellen för att få mest optimal
användning av solcellen beroende på din plats.

- 16 -
Tryck in kugghjulet och dra åt skruven tills de växlar locka i
plats.
Vid justering av solcellen ställ in den på en vinkel nära sest till din
latitud. Visa diagram nedan för att få en idé om hur du skall vinkla din
sol- cell.
Latitud Anslutning
av solcellsvinkel
0°
21°
42°
63°
84°
Om din plats är nära till 84°
84°
Om din plats är nära till 63°
63°
Om din plats är nära till 42°
42°
Om din plats är nära till 21°
21°
Om din plats är nära till 0°
0°
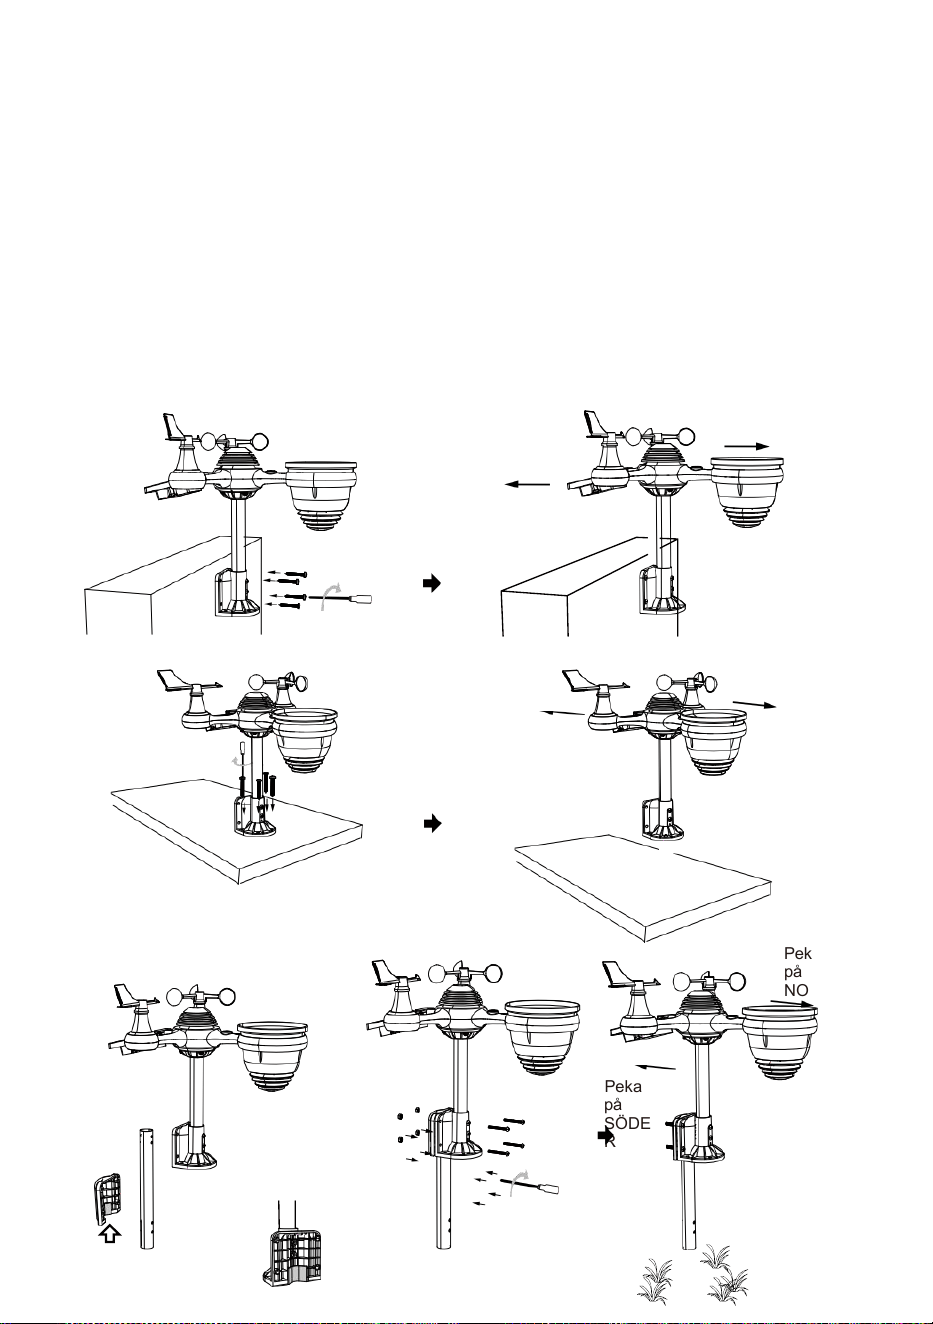
- 17 -
MONTERING DE TRÅDLÖS 7- IN- 1 UTOMHUS SENSOR
Välj en plats för 7-i-1 utomhussensorn som är öppen med inga
hinder.
Dra åt monteringsfästen på en yta/vägg med hjälp av fyra tappning
skruvar (ingår), eller dra åt fästet pol till din existerande montera- ing
stolpe med fyra φ5 Bultar och M5 Muttrar montering.
Tillägga gummikuddar på t han monteringsfäste innan du fäster
monteringsfäste på de sensor.
Se till att regnsamlaransikten norr och solen panelen vetter mot
söder före fastsättning de skruvar ( ingår ).
Se till att sensorn är fäst speciellt tätt, annars blåsigt villkor orsaka de
sändare till skaka och således felläst nederbörden data .
Peka på
NORR
Peka på
SÖDER
Peka
på
NORR
Peka
på
SÖDE
R
Peka
på
NORR
Peka
på
SÖDE
R
Stick

- 17 -
Stick
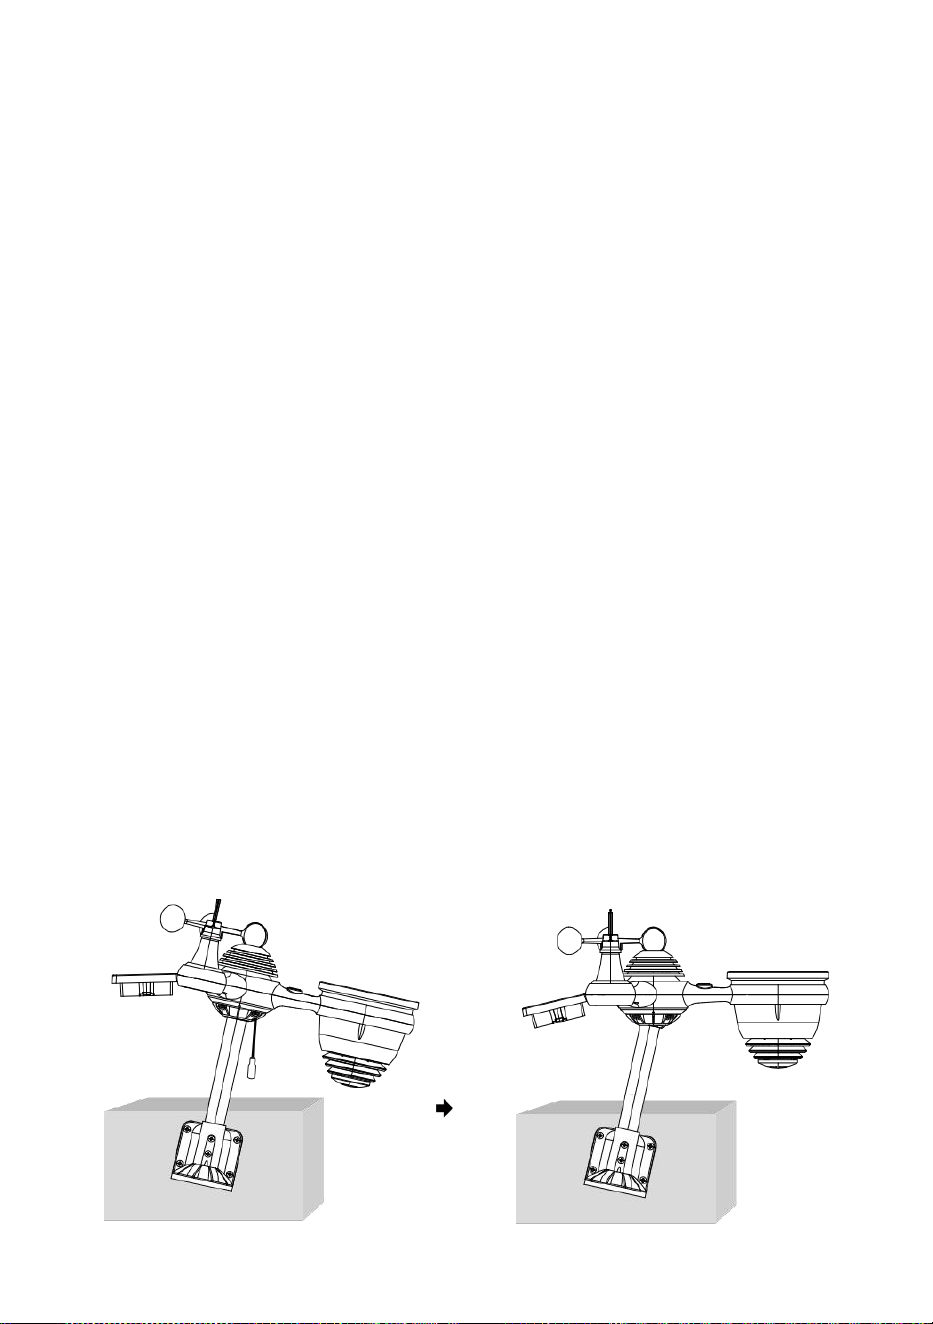
- 18 -
PEKANDE DE TRÅDLÖS 7- IN- 1 UTOMHUS SENSOR TILL SÖDER
Den trådlösa vädersensorn utomhus är kalibrerad för att vara spetsig
nord för maximal noggrannhet. Men för din bekvämlighet, om du är en
användare
belägen i södra Hemisphere , kan du använda sensorn med de
regnsamlare som pekar söderut.
1. Montera och installera det trådlösa vädret sensor med h de regn
samlare som pekar söderut, istället för No rth. (Behaga referera till
MONTERING AV
2. TRÅDLÖS 7-I-1 UTOMHUS SENSOR.)
Välj "STH" för söder hemisfär i läget för inställning av c -lås. (Behaga
se "ställa in klocka")
OBS: Ändra halvklotsinställningen ändrar automatiskt månens
riktning faser på t han visa.
Pekande de trådlös väder sensor mot de söder vilja tillåta
maximal solljus på de sol- panel , speciellt under de vinter säsong
i södra Hemisfär.
JUSTERAS DEN TRÅDLÖSA 7- I -1 SENSOR NIVÅ
Använd bubbla nivå indikator till se till att det trådlösa är ute
sensorn är helt i nivå. Om sensorn är inte nivå, den få spårvidd, UV
och Ljus intensitet kommer inte mäta ordentligt.
För att justera nivån på den trådlösa utomhussensorn, lossa de
skruvar av monteringsstången. Justera nivån på den trådlösa
utomhussensorn i beställa till se till att bubbla är i mitten av
bubbelnivå indikator.
Dra åt skruven på montering stolpen igen.

- 19 -
De bubbla
MILJÖ UPPPÅ DISPLAY KONSOL
DRIVA UPP PÅ KONSOLLEN
1. Anslut strömadapter till displayen trösta.
2. Vänd på antennen på tillbaka av trösta upp.
3. När konsolen är påslagen, öppnas ing skärmen kommer vara visas
och gå sedan in i huvud skärm.
4. Vänta de utomhus- sensor till par med din konsol .
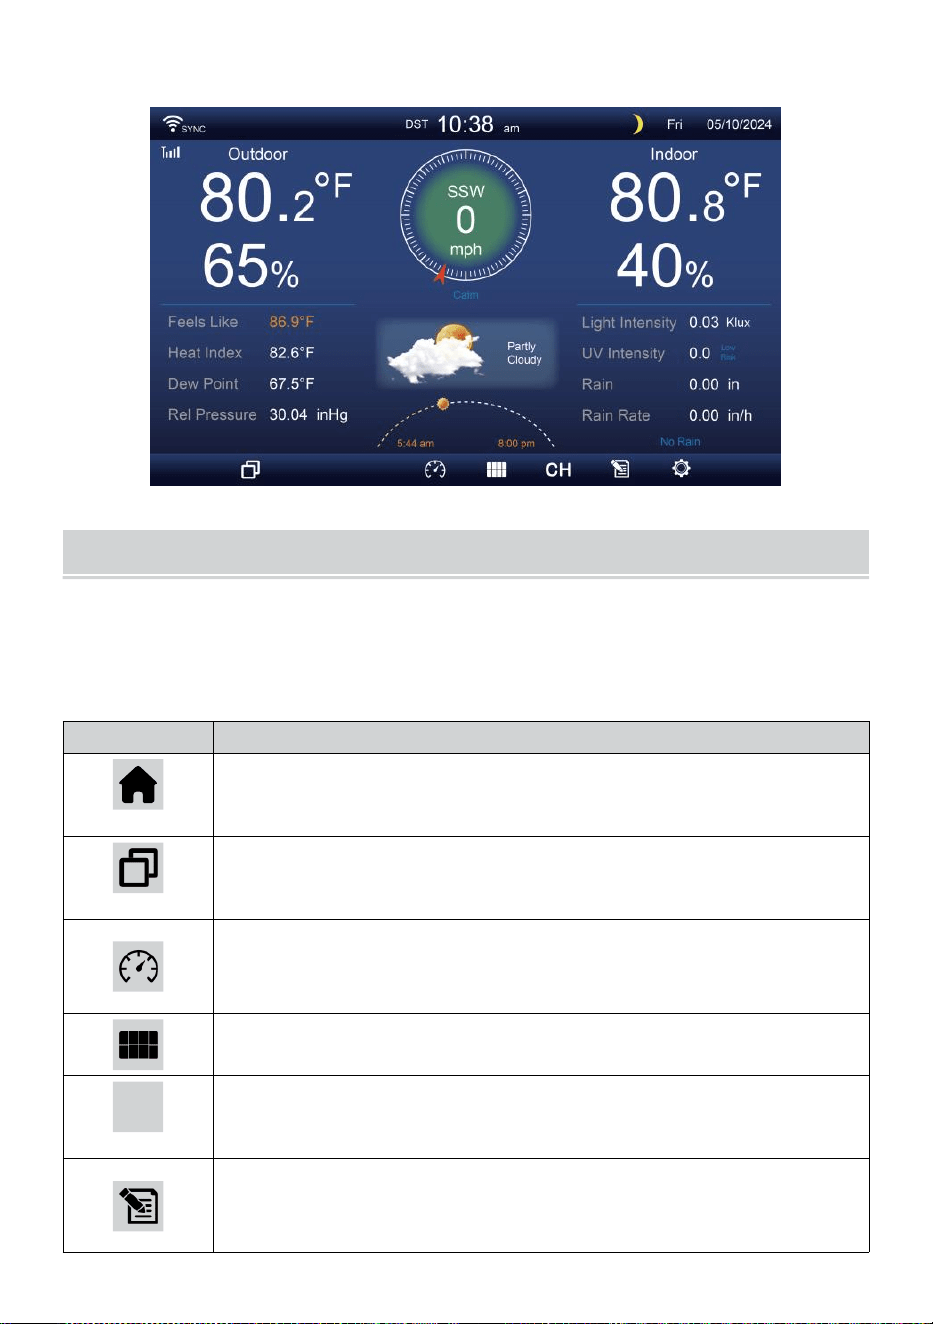
- 20 -
5. En gång parat, kommer utomhusdata a att vara visas på de skärm.
DRIFTSINSTRUKTION
Detta avsnitt beskriver de huvud funktioner och andra funktioner av
knappar inuti konsolen.
HUVUDSAK FUNKTIONER AV KNAPPAR
IKON
BESKRIVNING
Hem knapp
Tryck på den här knappen för att visa enkel data visa
skärm.
Expandera knapp
Tryck på den här knappen för att visa detaljerad data
skärm.
Tryck
Tryck på detta knapp för att visa mellan Släkting och
absolut tryckskärm.
Multisensor
Tryck på den här knappen för att visa multi-se nsor-skärm.
CH
Kanal
Tryck på detta knappen för att byta Inomhus, CH1-7 data
skärm.
Historia Spela in knapp
Tryck på detta knappen för att visa historikskärm
(Max/Min, Datapost, grafisk display).

- 20 -
Miljö
Tryck på denna knapp för att visa de miljö skärm.
- 21 -
ANDRA FUNGERA KNAPPAR FÖR INSTÄLLNINGAR
IKON
BESKRIVNING
Upp knapp
Tryck på detta knappen för att välja övre rad eller det em.
Ner knapp
Tryck på detta knappen för att välja lägre rad eller det em.
Rätt knapp
Tryck på detta knappen för att välja högra kolumnen eller
punkt.
Vänster knapp
Tryck på detta knappen för att välja vänster sida kolumn
eller punkt.
Cykel knapp
Tryck på den här knappen för att ändra olika parameterskärm.
Rensa knapp
Tryck på detta knappen för att rensa max/min rekord.
Q
Söka knapp
Tryck på detta knappen för att söka efter data spela in.
Radera knapp
Tryck på och håll det här knappen för att radera rekord s.
Återvända knapp
Tryck på detta knappen till återvända tidigare sida.
OK knapp
Tryck på denna knapp för att bekräfta t han urval.
+
+ knapp
Tryck på denna knapp för att öka värdet eller byta till andra
alternativ.
- knapp
Tryck på denna knapp för att minska värdet eller växla till
andra alternativ.
TRÅDLÖS SIGNAL RECEPTION
Bekanta dig med ikoner för olika signalstyrkor. Flytta din konsol eller
vädersensor om signalen är svag eller förlorad.
Signalsökning
Stark signal
Svag signal
Signal
förlorad
Antenn bar är
rullning

- 21 -
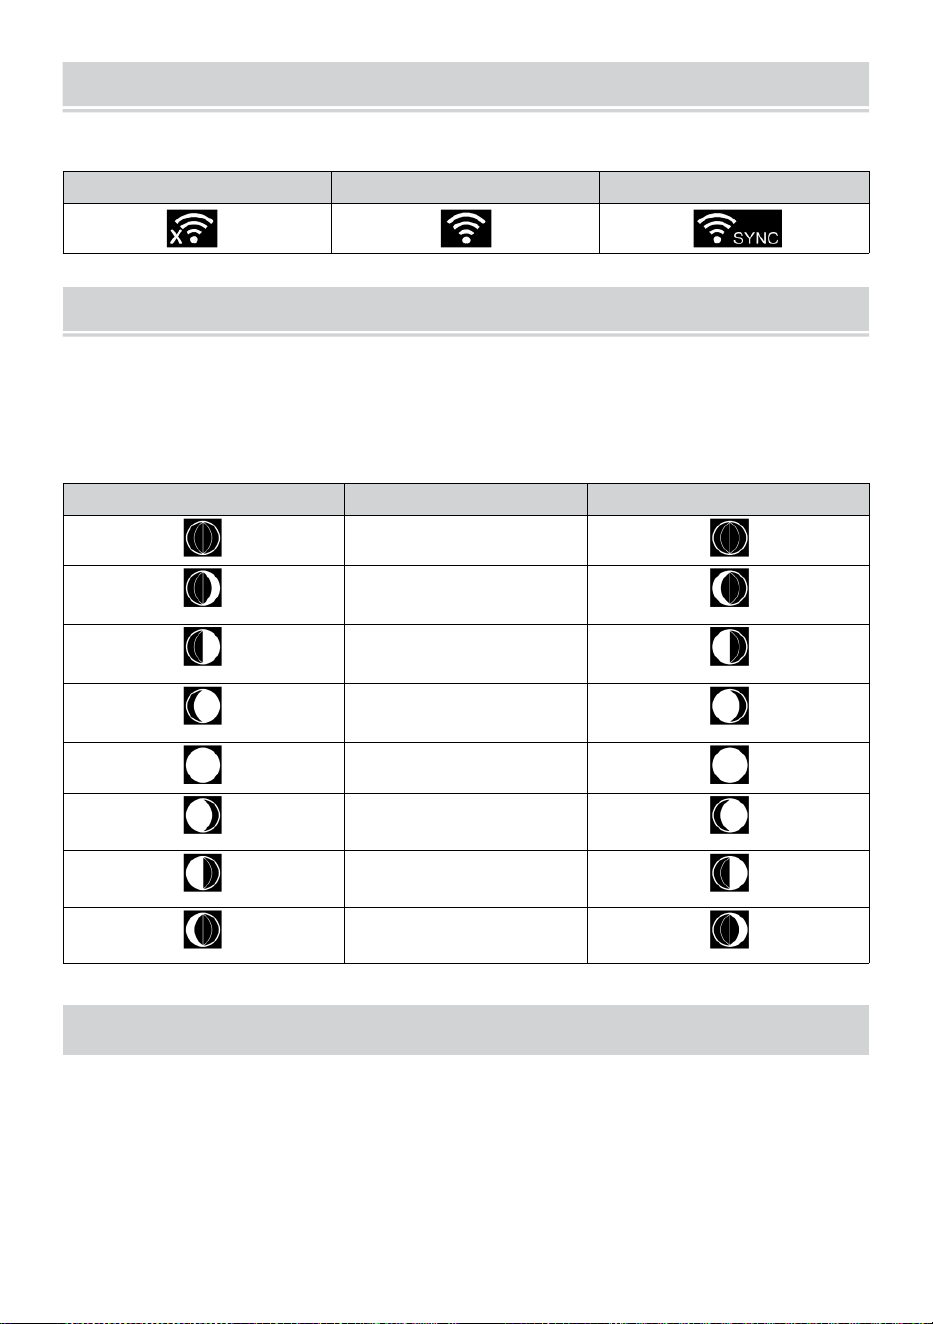
WI-FI CONNECTION STATUS
- 22 -
Bekanta dig med ikonerna för Wi-Fi-anslutningsstatus.
WI-FI frånkopplad
WI-FI ansluten
WI-FI ansluten med Sync
MÅNEN FAS
Displaykonsolen beräknar månen fas enligt till din tid, datum och tid
zon.
Tabellen nedan förklarar motsvarande faser och deras ikoner för båda
Norra och södra halvklot.
Norra Hemisfär Ikoner
Månen Fas
Sydlig Hemisfär Ikoner
Ny Månen
Vaxande Crescent
Månen
Första kvartalet
Månen
Vaxande Gibbous
Månen
Full Månen
Avtagande Gibbous
Månen
Tredje kvartalet
Månen
Avtagande halvmåne
Månen
SOLUPPGANG/SOLNEDGÅNGSTID
Konsolen indikerar din plats soluppgång/solnedgång, dvs baserat på
tidszon, latitud och longitud du angav. Om dagsljus Sparande är ställ in
på AUTO , den gånger vilja justera en timme fram automatiskt för
dagsljus
sparande.

WI-FI CONNECTION STATUS
- 22 -
NOTERA: För tidszon, breddgrad och longitudinställning,
behaga se fer “ Tid & Datum Inställning ”.
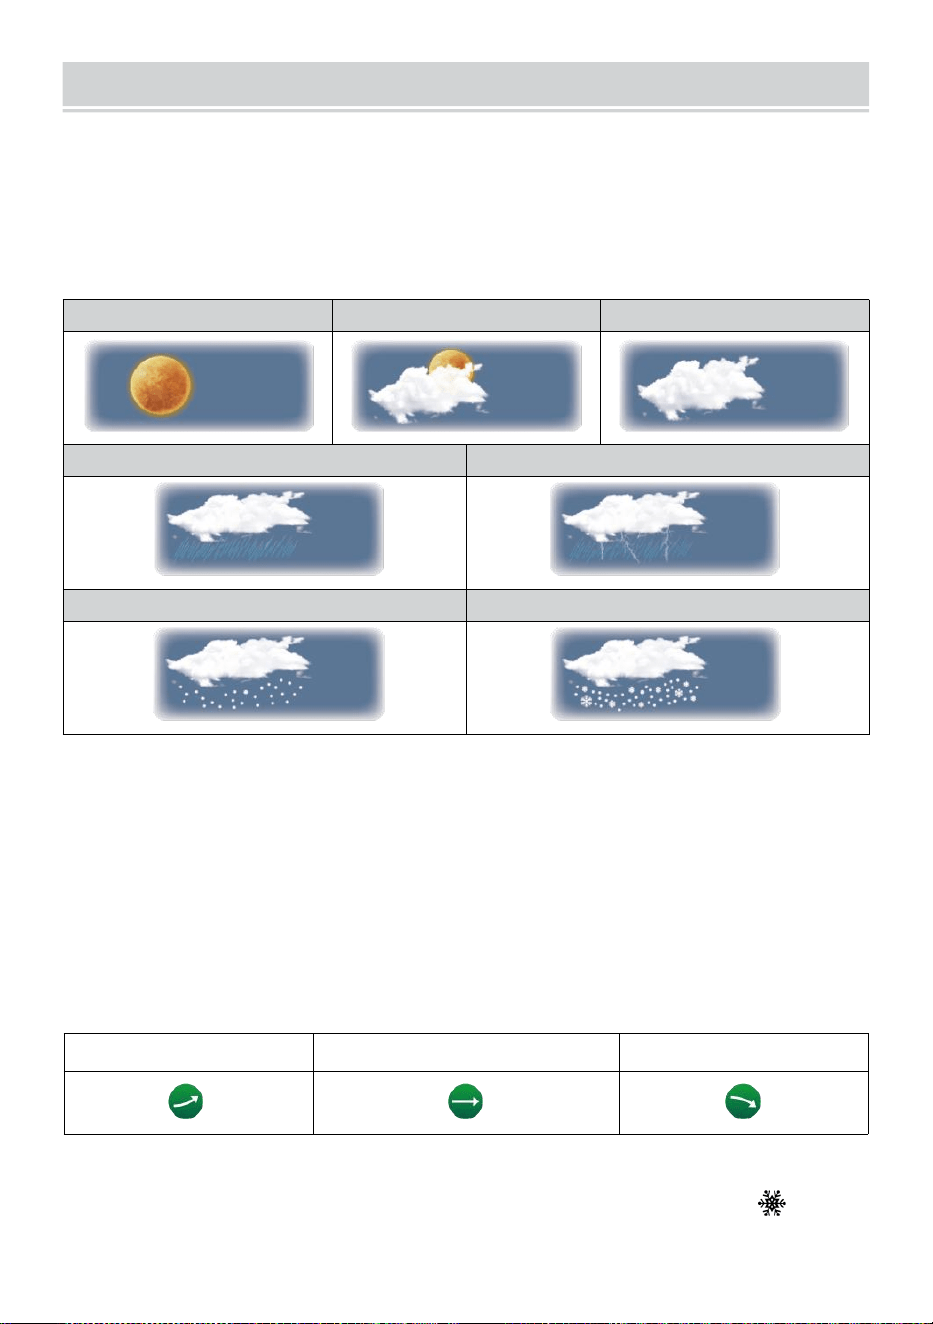
WEATHER FORECASTINGAND WEATHERINDEX
- 23 -
VÄDER PROGNOS
De inbyggt barometerburk inte isatmosfärisk tryckförändringar, och
baserat på insamlad data, kan förutsäga väderförhållandena .
Det finns 6 väderikoner --- Soligt, Delvis Molnig, Molnig, Regnig, Regnigt/
stormigt och snöigt ( Ljus Snö & Tung Snö).
Solig
Delvis molnigt
Molnig
Ljus regn
Kraftigt regn/storm
Lätt snö
Tung snö
NOTERA:
Noggrannheten hos en general tryckbaserad prognos är cirka 6 5-
70 %. Prognoser är inte garanterat.
Det kanske inte nödvändigtvis återspeglar den nuvarande situationen.
TREND INDIKATOR
De trend indikator visar de trender av förändringar i de kommande
några minuter. Dessa ikoner kommer att visas i temperatur , luftfuktighet,
och baro- metrisk trycksektion av detaljskärmen .
Stigande
Stadig
Fallande
ISVARNING
När utomhustemperatur är lägre än 1°C/33,8° F, snöflingan ikon
jag
· kom
mer att visas på visa.
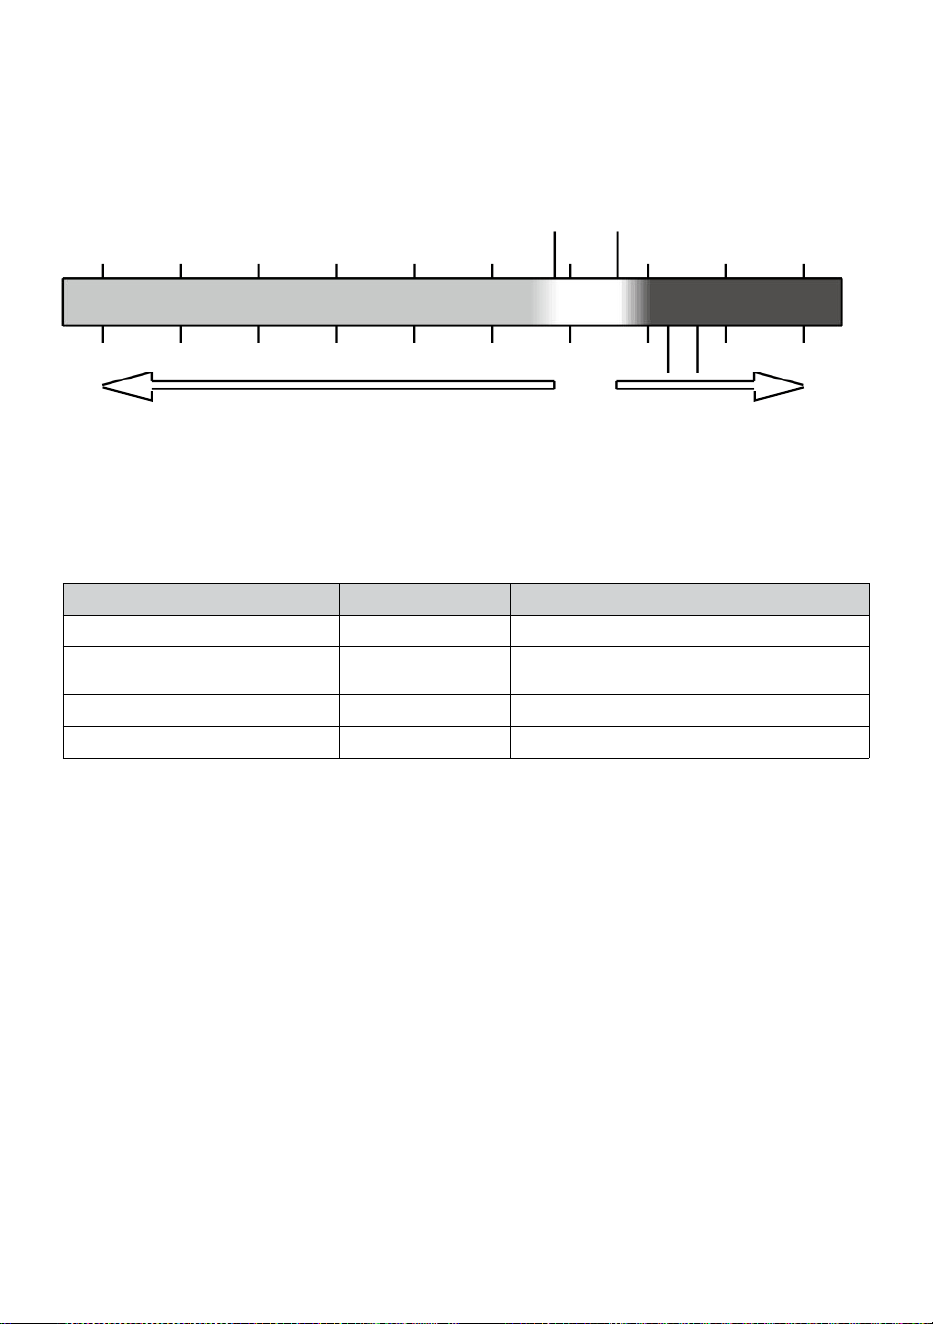
- 24 -
KÄNNER SOM
De Känns Som temperatur index bestämmer vilken temperatur det
faktiskt känns ute, med hänsyn tagen till faktorer som vind hastighet,
tryck, temperatur och luftfuktighet (vind kyla och hea t index).
18°C 26°C
10 20 30
-40 -22 -4 14 32 50 68 86 104 122 °F
Wind Chill H äta Index
VÄRME INDEX
De Värme Index bestäms av den trådlösa vädersensorns tempera- tur
och fuktighet avläsningar när temperaturen är mellan 79 °F (26 °C) och
120 °F (50 °C).
Värme Index räckvidd
Varning
Förklaring
81°F - 90°F (27°C - 32°C)
Försiktighet
Möjlighet till värmeutmattning
91°F - 104°F (33°C - 40°C)
Extrem
försiktighet
Möjlighet till värmeuttorkning
106°F - 129°F (41°C - 54°C)
Fara
Värmeutmattning starkt troligt
≥ 131°F (≥ 55°C)
Extrem Fara
Stor risk för uttorkning/h eatstroke
VIND KYLA
Vindkyla eller vindkyla är sänkningen av temperatur pga till de passera-
ing-flöde av lägre temperatur luft. Vindkyla jag är bestämd av a
kombination av den trådlösa vädersensorns temperatur- och
vindhastighetsdata
.
OBS: Endast när temperaturen är under 50
℉
(10 ℃ ) och vindhastigheten är över 4,8 km/h (3mph), visar
vindavkylningsvärdet,
annat det kommer att visa "--.-".
DAGG PUNKT
Daggen punkt är den temperatur under vilken vattenångan hamnar luft på
konstant barometrisk tryckkondenser i flytande vatten samtidigt takt
med vilken det avdunstar. Det kondenserade vattnet kallas dagg wh en
det formulär på en fast yta.
Daggen punkttemperatur bestäms av temperaturen och fuktighet data
från de trådlös väder sensor .
-40 -30 -20 -10 0
40 50 °C
Increasing danger Increasing danger
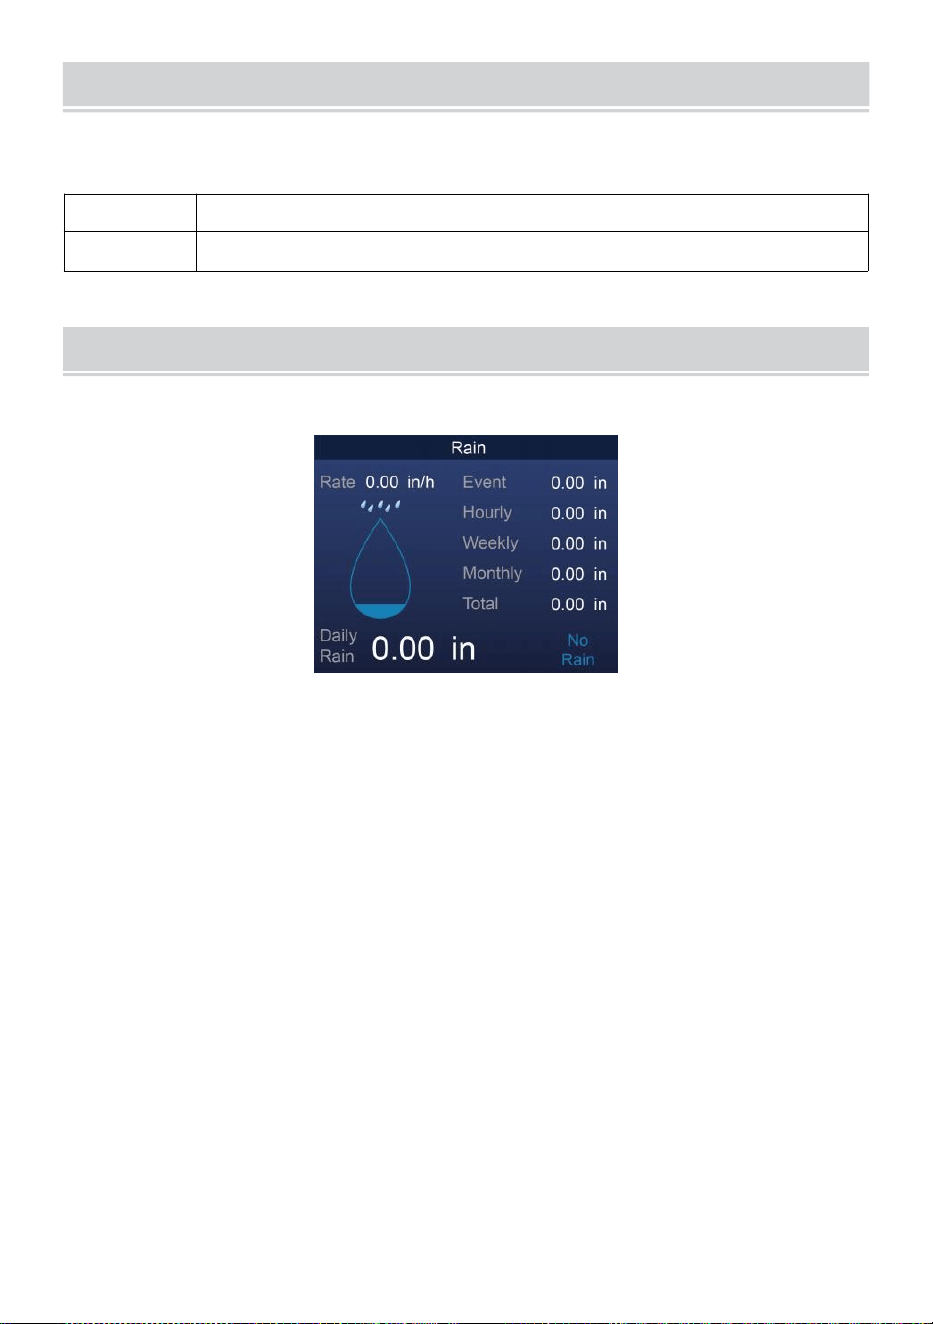
BAROMETRIC PRESSURE
- 25 -
Kontrollera de väder webbplats för realtid barometer villkor sedan
justera den relativa i Kalibrering inställning avsnitt.
Absolut
De absolut atmosfärisk tryck av din plats .
Relativ
De relativ atmosfärisk tryck ure baserat på havsnivån.
REGN
Detta avsnitt visar nederbörden eller regn hastighet information.
REGN VISA LÄGEN
Regn
Hastighet
: Aktuell regn hastighet i förbi h vår.
Regn
händelse
: kontinuerlig regn, en nd nollställs om regn ackumuleras
är mindre än 10 mm (0,039 i) under en 24-timmarsperiod.
Varje timme
Regn
: Totalt nederbörd för varje kap timme.
Dagligen
Regn
: Totalt regn sedan dess midnatt (00:00)
Varje vecka
Regn
: Totalt nederbörd för den aktuella kalenderveckan, och
återställs på söndag morgon kl midnatt (söndag till
lördag)
Månatlig Regn : Totalt nederbörd för den aktuella kalendermånaden,
och återställa på den första dagen av Månad.
Total Regn: Totalt nederbörd sedan sista återställa.
ÅTERSTÄLL TOTALT REGN SPELA IN
Se "Radera alla Data ” avsnitt för att rensa nederbörd data.
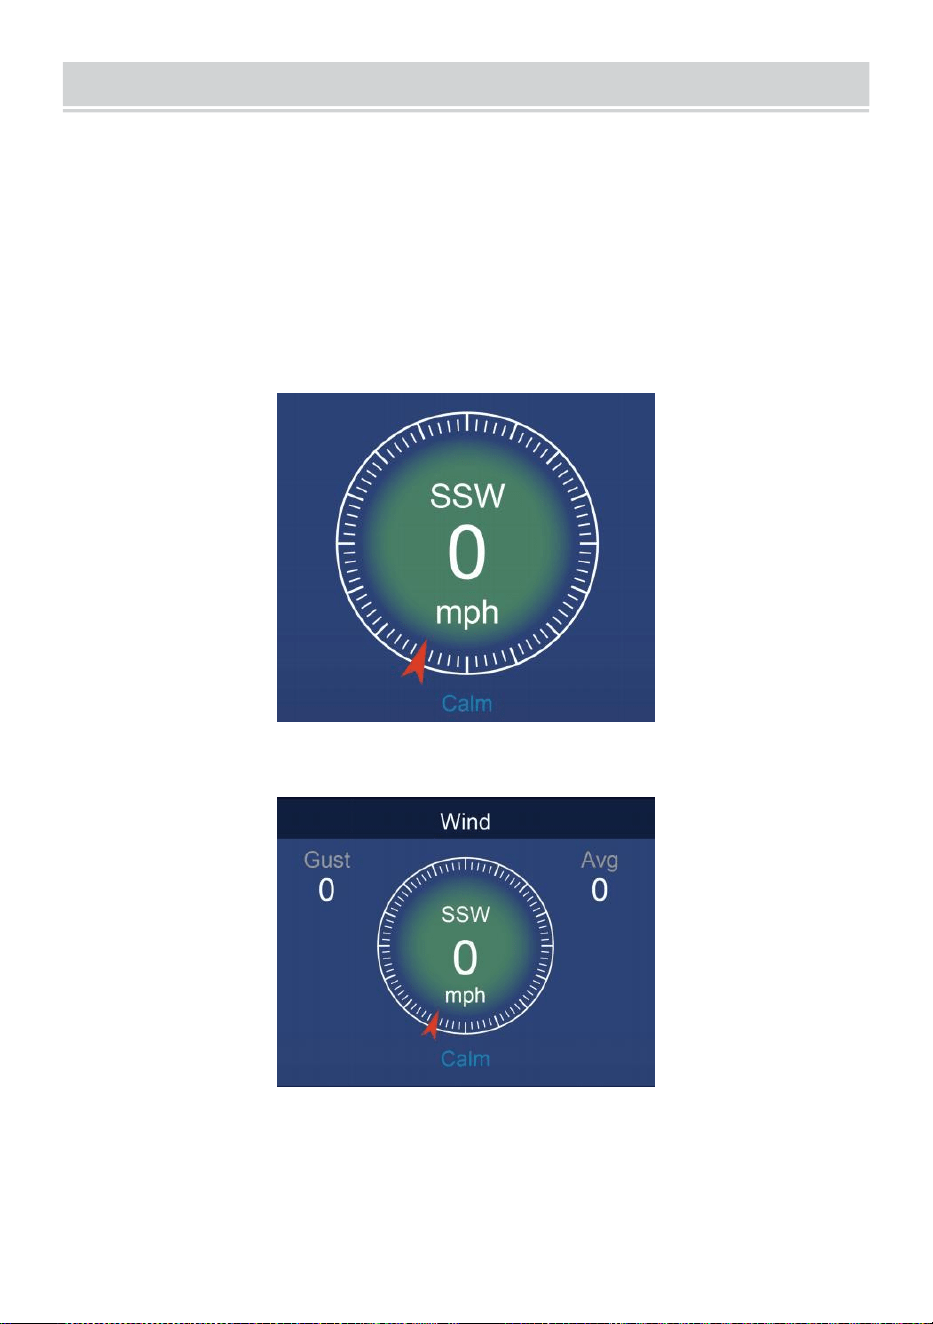
WIND
- 26 -
VINDHASTIGHET OCH DIREKTIV
Detta avsnitt visas de vind hastighet , ström vind riktning , dominerande
vindriktningar och vindhastighet nivå.
Vindhastighet: är medelvindhastigheten mätt i föregående 20
sekunder.
Medelvind: är den genomsnittliga vindhastigheten i 10 minuter.
Vindil: är den högsta vindhastighet inspelad i föregående oss 20
sekunder .
Enkel Data Visa
Detaljerad Data Visa
BEAUFORT SKALA
De Beaufort-skalan nedan är en internationell skala av vind v elociteter
från 0 (lugnt) till 12 (Orkanstyrka).
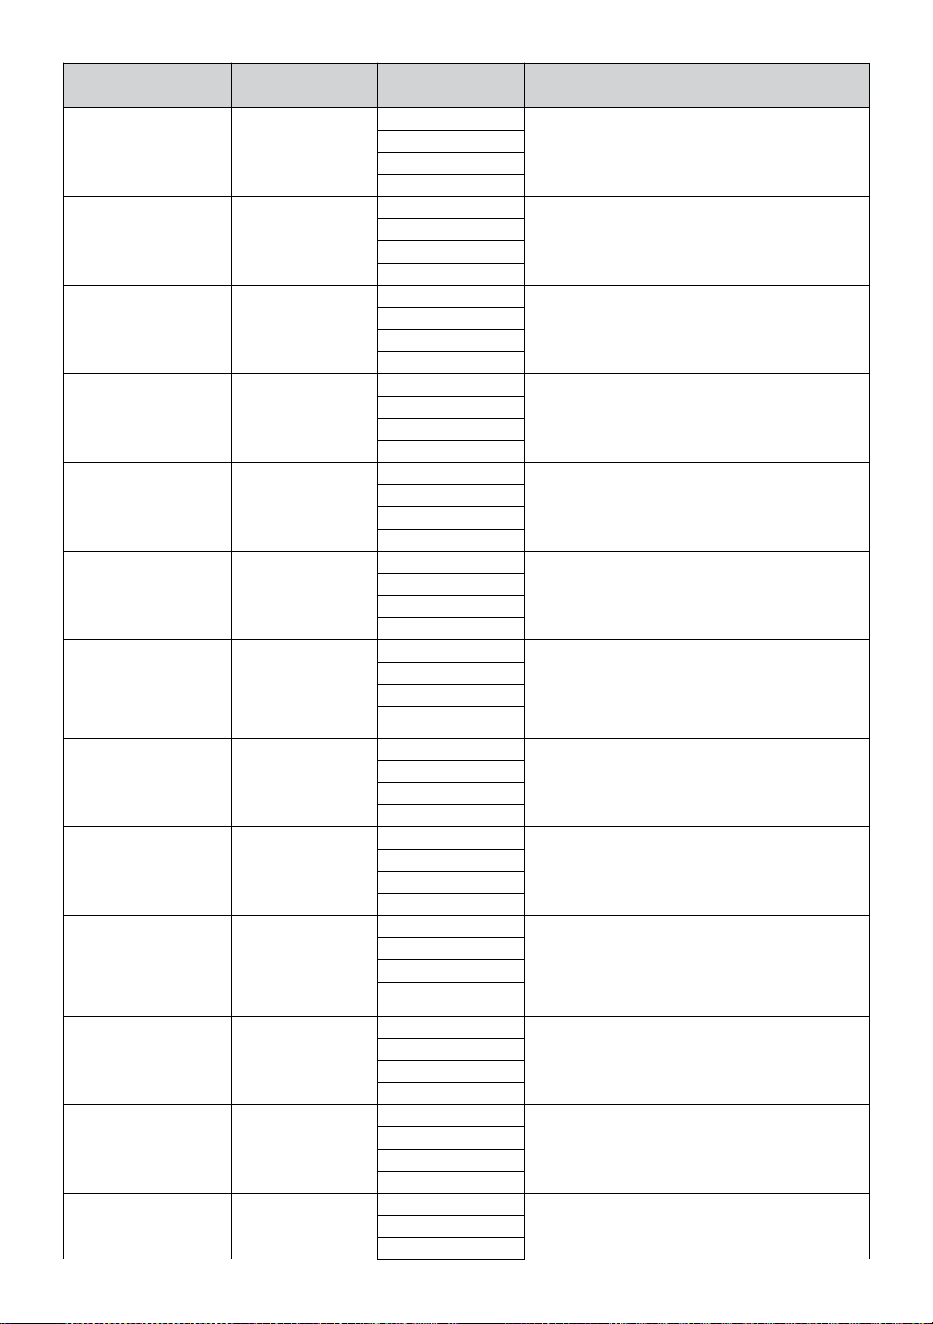
- 27 -
Beaufort skala
Beskrivning
Vindhastighe
t
Markens tillstånd
0
Lugna
< 1 km/h
Lugna. Rök stiger vertikalt.
< 1 mph
< 1 knutar
< 0,3 m/s
1
Ljus luft
1.1 ~ 5 km/h
Rökdrift indikerar vind riktning. Löv
och vindflöjlar står stilla.
1 ~ 3 mph
1 ~ 3 knutar
0,3 ~ 1.5 m/s
2
Ljus bris
6 ~ 11 km/h
Vind kändes på exponerad hud. Blad
prassla. Vindflöjlarna börjar till flytta.
4 ~ 7 mph
4 ~ 6 knutar
1.6 ~ 3.3 m/s
3
Mild bris
12 ~ 19 km/h
Löv och små kvistar konstant rörlig.
Ljusflaggor förlängda.
8 ~ 12 mph
7 ~ 10 knutar
3.4 ~ 5.4 m/s
4
Måttlig
bris
20 ~ 28 km/h
Damm och lösa papper upp.
Små grenar börja flytta.
13 ~ 17 mph
11 ~ 16 knutar
5.5 ~ 7.9 m/s
5
Färsk bris
39 ~ 38 km/h
Filialer av en måttlig storlek flytta .
Små träd i blad börja vingla.
18 ~ 24 mph
17 ~ 21 knutar
8,0 ~ 10.7 m/s
6
Stark bris
39 ~49 km/h
Stor grenar i rörelse. Visslande hört i
luftledningar. Användning av paraply blir
svår. Tömma plast papperskorgar tippar
över r.
25 ~ 30 mph
22 ~ 27 knutar
10,8 ~ 13.8 m/s
7
Hård vind
50 ~ 61 km/h
Hela träd i rörelse. Ef fort behövs för
att gå mot vinsten d.
31 ~ 38 mph
28 ~ 33 knutar
13,9 ~ 17.1 m/s
8
Storm
62 ~ 74 km/h
Några kvistar brutna från träd.
Bilar kör på väg. Framsteg på foten är
allvarligt hindrad.
39 ~46 mph
34 ~40 knutar
17,2 ~ 20.7 m/s
9
Stark kuling
75 ~ 88 km/h
Vissa grenar går sönder av träd, och
några små träd blåser omkull .
Konstruktion /
tillfälliga skyltar och b arrikader blåsa över.
47 ~ 54 mph
41 ~ 47 knutar
20,8 ~ 24.4 m/s
10
Storm
89 ~ 102 km/h
Träden är krossade av eller
uppryckt, strukturella skador
troligt.
55 ~ 63 mph
48 ~ 55 knutar
2,45 ~ 28.4 m/s
11
Våldsam storm
103 ~ 117 km/h
Utbredd vegetation och struktur
skada troligt.
64 ~ 73 mph
56 ~63 knutar
28,5 ~ 32.6 m/s
12
Orkanstyrka
≥ 118 km/h
Allvarliga omfattande skador på v
egetation och strukturer. Skräp och
≥ 74 mph
≥ 64 knutar

- 27 -
osäkrade
föremål är slungade omkring.
≥ 32,7 m/s
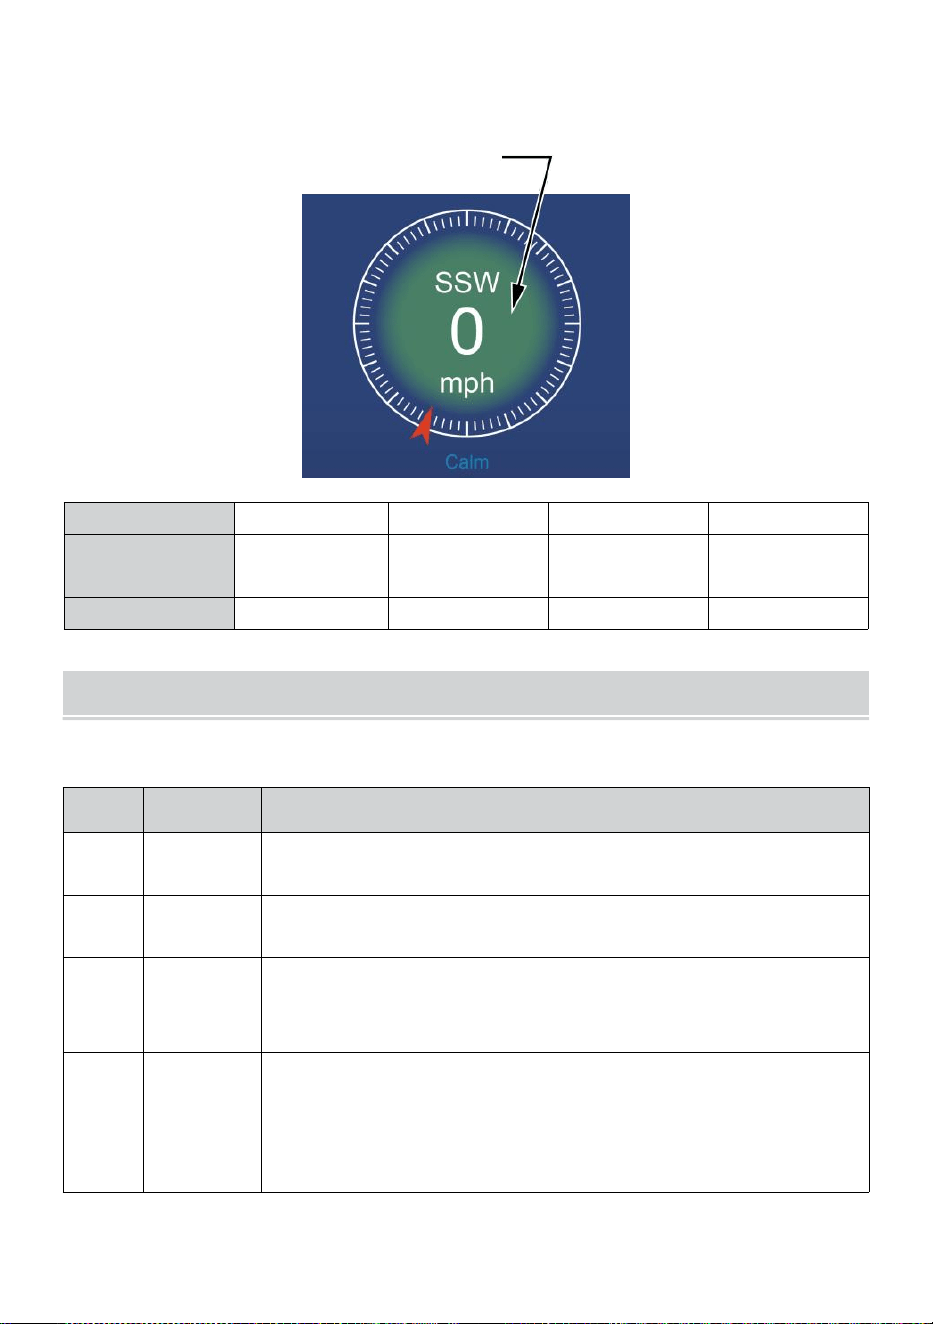
- 28 -
VINDHASTIGHET NIVÅ
Vindhastighetsdiagrammet visas förutsätter a snabbt referens på de
nuvarande vind skick . De bakgrund färg av de kompass ändras
beroende på vindhastigheten.
Nivå
Ljus
Måttlig
Stark
Storm
Hastighet
0 - 12 mph
0 - 19 km/h
12 - 30 mph
20 - 49 km/h
31 - 55 mph
50 - 88 km/h
≥ 55 mph
≥ 89 km/h
Kompassfärg
Grön
Gul
Orange
Röd
LJUS INTENSITETOCH U V INDEX
Detta avsnitt visar ett diagram för ljus intensitet och UV index.
UVI
Graderin
g
Kommentar
0-2
Låg
A UV Index läsning av 0 till 2 medel låg fara från
solens UV strålar för medelge person.
3-5
Medium
A UV Index läsning av 3 till 5 medel måttlig risk för skada
från oskyddad sol exponering.
6-7
Hög
A UV Index läsning av 6 till 7 medel hög risk för skada från
oskyddad solexponering. Skydda joner mot hud och ögon
skada är behövs.
8-10
Mycket
Hög
A UV Index läsning av 8 till 10 betyder mycket hög risk för
skada av oskyddad solexponering. Ta extra
försiktighetsåtgärder
eftersom oskyddad hud och ögon kommer vara skadad
och burk bränna snabbt.

- 28 -
11-15
Extrem
A UV Index läsning av 11 eller fler betyder extrem risk
skada från oskyddad solexponering . Ta alla
försiktighetsåtgärder därför att oskyddad hud och ögon
kan bränna i minuter.
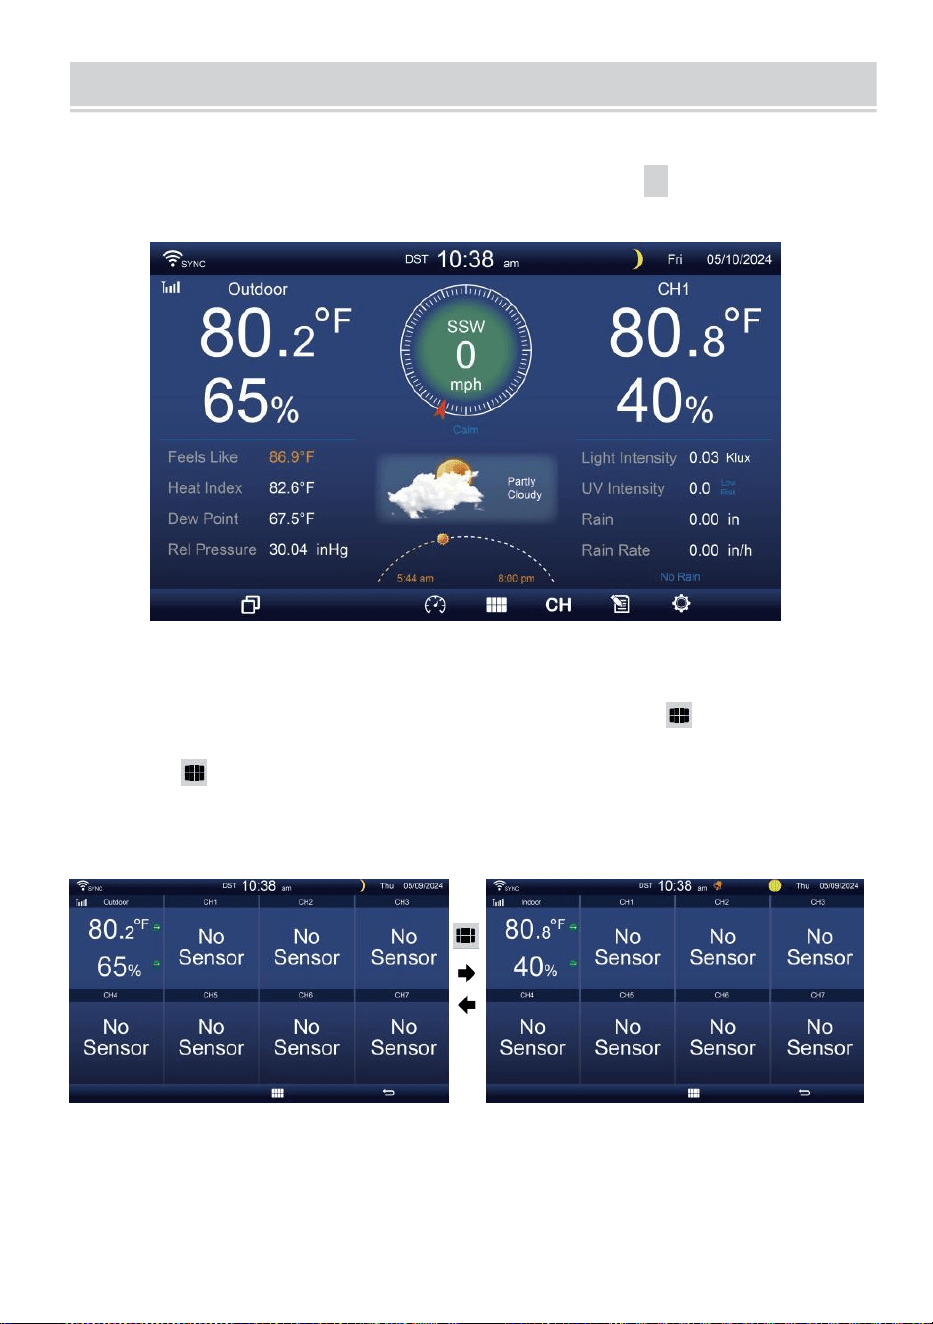
MULTI-CHANNEL DISPLAY MODE
- 29 -
KANAL VISA
När du
är på
den enkla/detaljerade
skärmen,
tryck på
cH
knappen för
att växla mellan inomhus och Channel 1-7 data.
MULTI-SENSOR VISA SIDA
När du är på den enkla/detaljerade skärmen, trycka knapp för att
ange Multi-sen- sor skärm.
Trycka knappen till byta display mellan inomhus och utomhus eller
sensordata.
Tryck på
w
-knappen för att återgå till enkel/detaljer skärm.
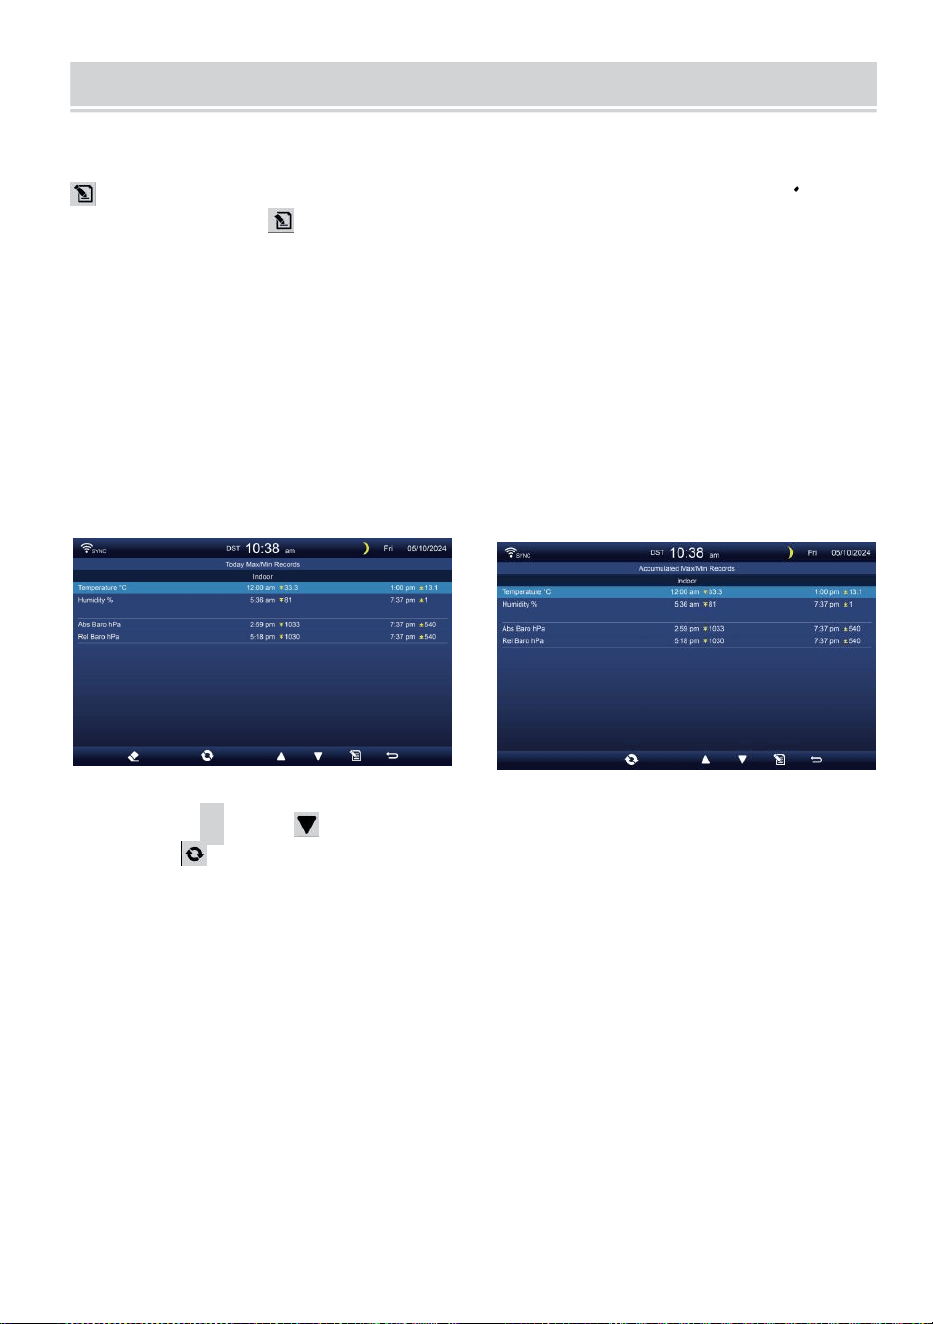
WEATHER DATA RECORD
- 30 -
Detta avsnitt förklarar hur man får se vad hennes data spela in (Max-
/Min, datalogg, historikdiagram). Att se de väder data r rekord, trycka
knapp i enkel/detaljerad skärm för att komma in på skärmen för
väderdata. Trycka
knappen till utbyta max/min, datalogg och historia graf lägen.
MAX/MIN
Det finns 2 datalägen för MAX/MIN uppgifter: Dag y eller
Ackumulerat. (Beroende på Max/Min spela in läge inuti e
Displayinställning sida )
Dagligen Max/Min data läge
Max/Min data kommer vara displa yed och tydlig kl midnatt.
Ackumulerat Max/Min dataläge
Max/Min data kommer att vara hålls ackumulerade.
Dagligen Max/Min Rekord ackumulerat Max/Min Spela in
Trycka
▲
eller för att välja önskas Max/Min spela in.
Trycka knappen till interc hange att visa inomhus, utomhus och
kanalens Max/Min uppgifter.
Trycka
.
knapp till återvända enkel / detaljerad skärm .
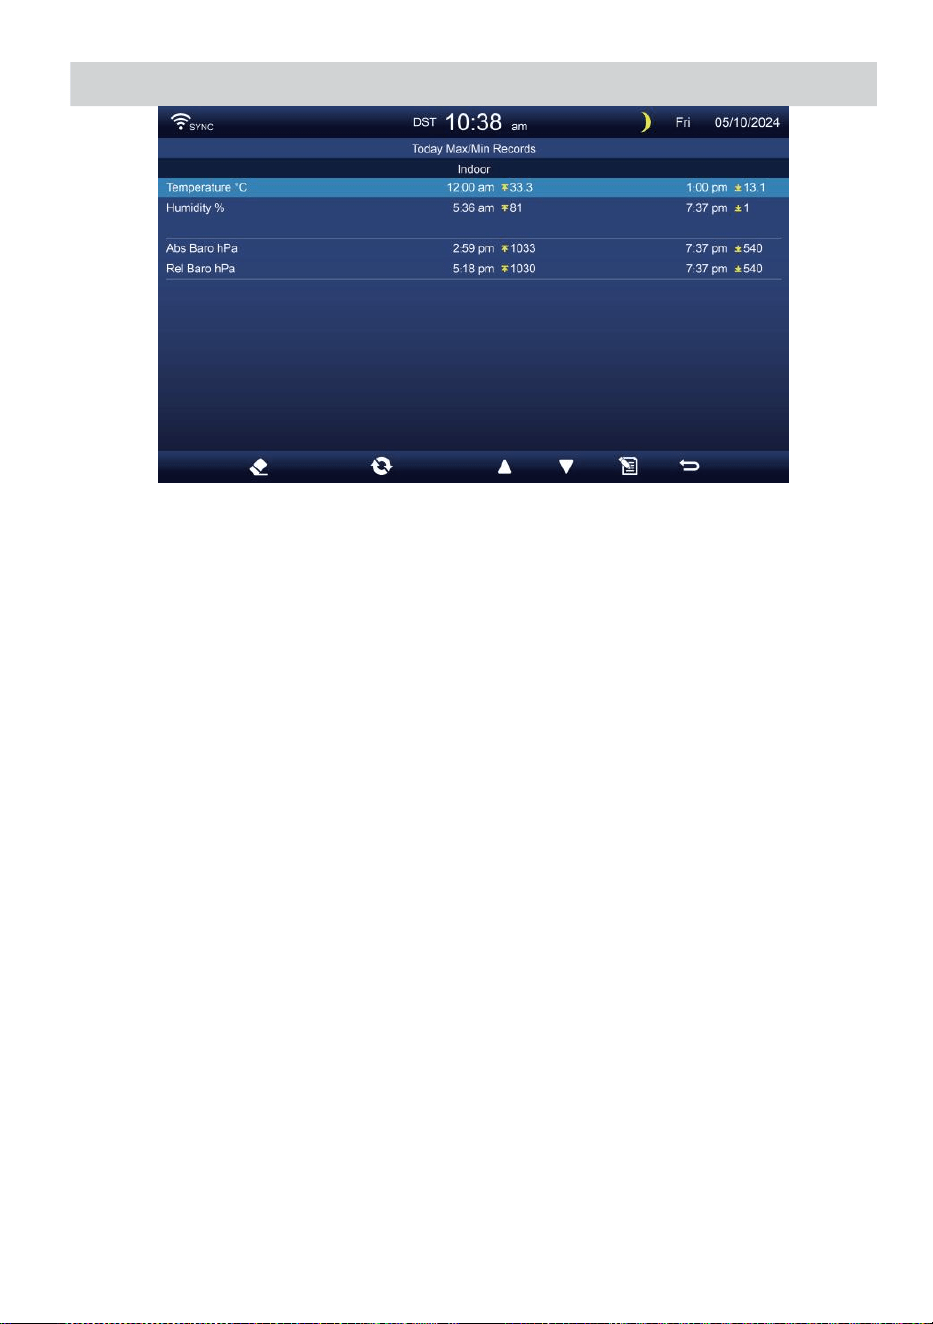
WEATHER DATA RECORD
- 30 -

- 31 -
Rensa Max/Min data
För att rensa det valda MAX/MIN uppgifter, tryck och hålla
knapp över 2s för att rensa det valda Max/Min spela in.
DATA LOGGSKÄRM
Skärmen för dataloggar registreras alla de historia uppgifter.
Navigerar data loggskärm
Trycka , , ,
b
knappar till bläddra igenom skärm.
Trycka knappen för att återgå till enkel/ detaljerad
skärm.

- 32 -
Söker efter en specifik sida
Tryck på Q för att visa söka de data spela in.
Trycka eller knappen för att välja en siffra i de sida antal,
Tryck på + eller knappen till ändra de antal u sid eller ner.
Trycka eller för att ändra den aktiverade alternativfält, växla
Ja eller INGA, trycka till bekräfta.
Radera all data logga uppgifter
Tryck på och hålla över 2s att radera alla uppgifter.
Trycka eller knappen för att välja t ändra de aktiveras
alternativ fält, växla Ja eller Nej, trycka w till bekräfta.
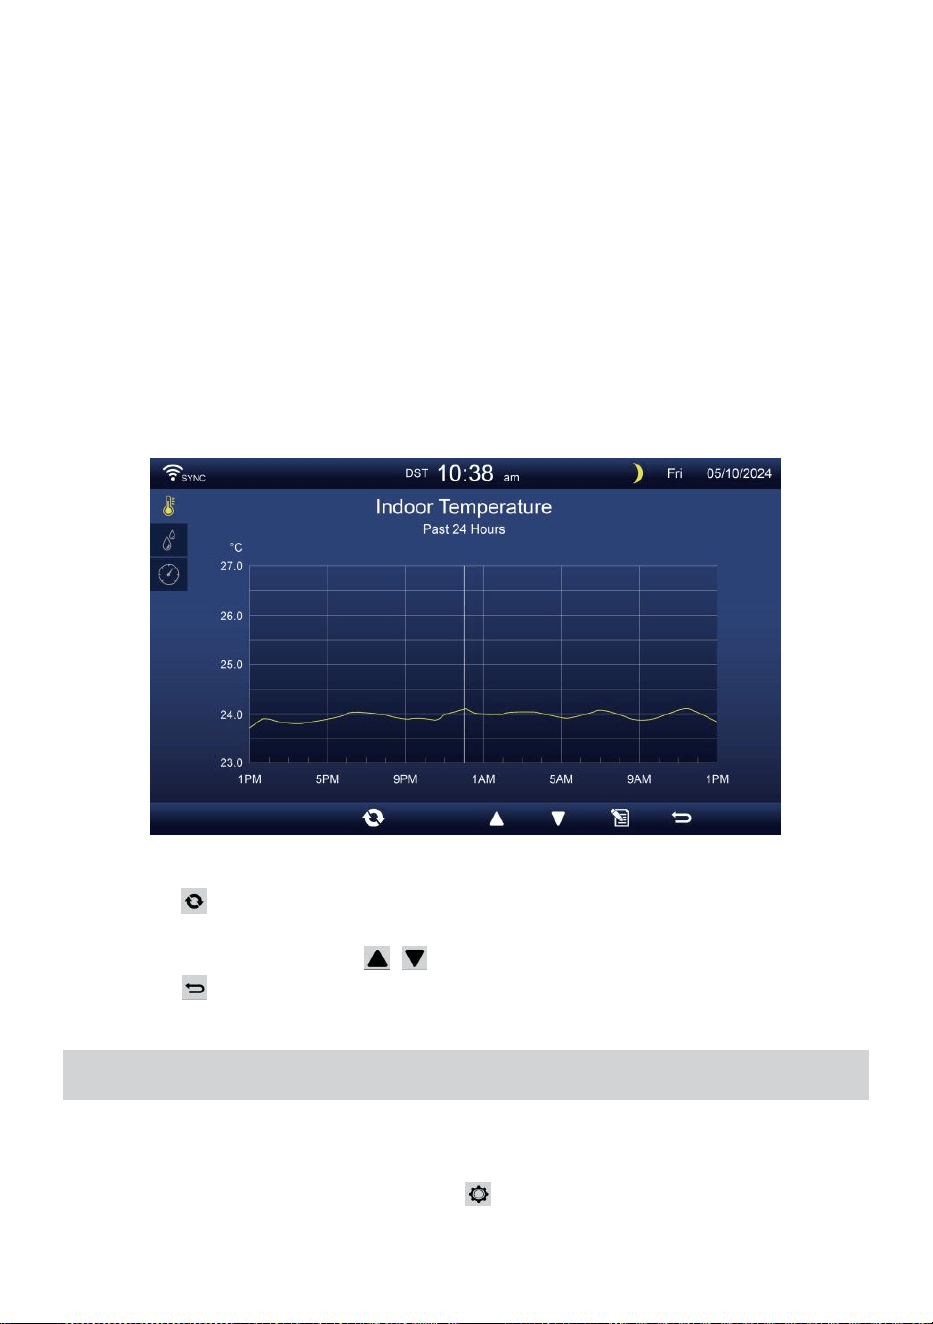
- 33 -
HISTORISK GRAFI
Detta avsnitt förklarar hur man tar sig till och ser historia grafer.
Det finns inomhusgraf, utomhusgraf och kanalens graf s till vara visas.
Inomhus graf
Temperatur, Fuktighet, Relativt och absolut tryck
.
Utomhus graf
Temperatur, Fuktighet, Regn Hastighet, Senaste 24 -timmar
Nederbörd, medelvindhastighet , vindbyar, vindriktning , Ljus
Intensitet och UVI.
CH1-CH7 graf
Temperatur, Fuktighet.
Trycka knappen till interc hange att visa inomhus, utomhus och
kanalens historisk graf.
När grafen visas, trycka , knappar för att visa andra grafer.
Trycka knappen till returnera enkel/detaljerad skärm.
ALLMÄN INSTÄLLNING
Alla konsolinställningar och systeminformation är i miljö meny. Det
finns 8 typer av inställningsparametrar inuti miljö meny.
Medan enkel/detaljerad skärm, tryck knappen för att gå in i
inställningen meny.
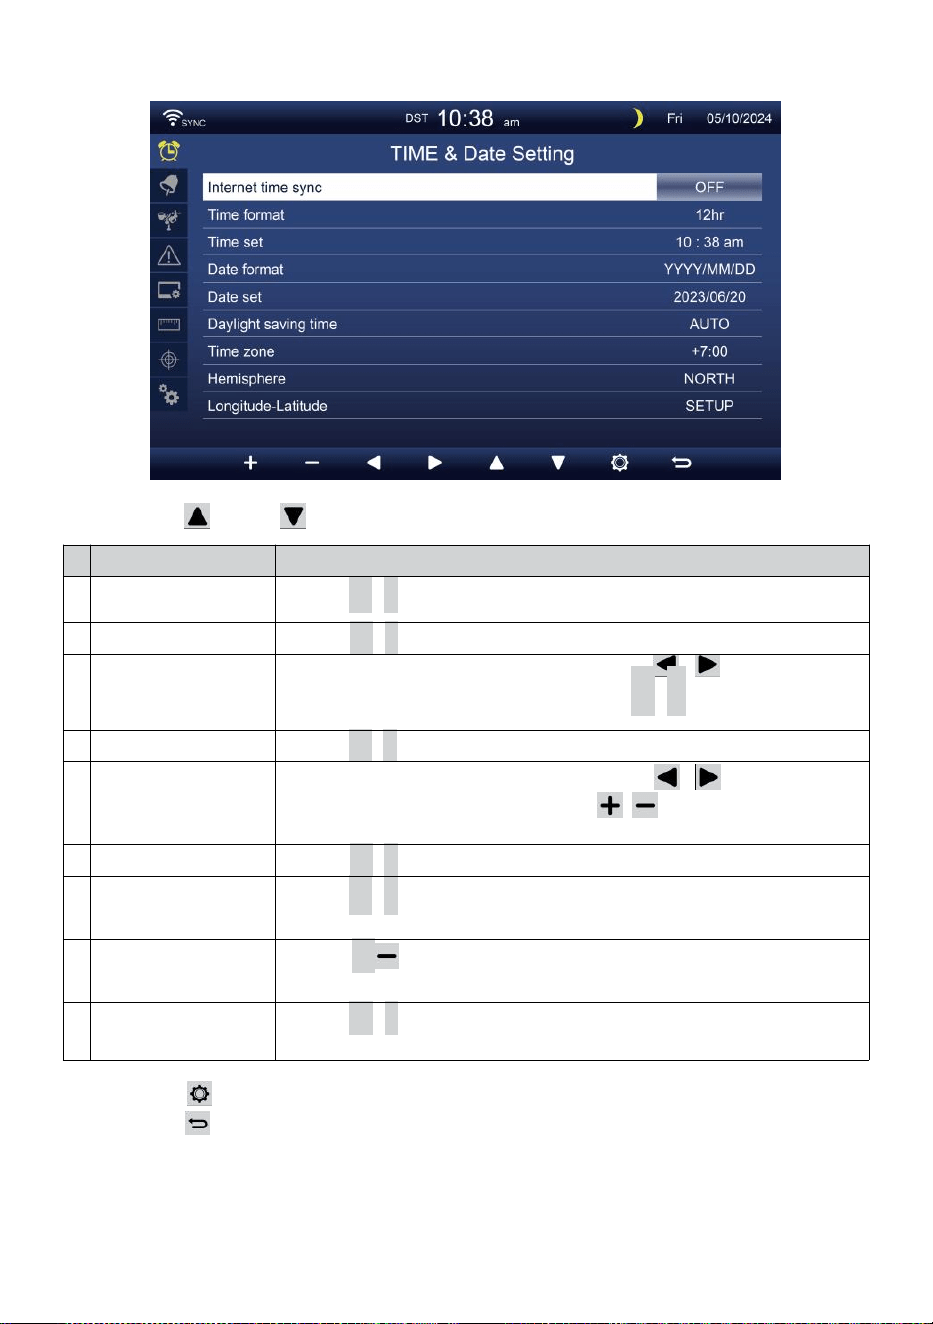
- 34 -
TID / DATUM MILJÖ
Trycka eller knappen för att välja en av följande inställningar:
#
Sub punkt
Drift
a
Internet
tidssynkronisering
Trycka
+
/
-
knapp till sväng på eller sväng av .
b
Tidsformat
Trycka
+
/
-
knapp till välja 12 eller 24- format .
c
Tid uppsättning
När tidssynkronisering är avstängd, trycka / knappen för att
välja b emellan timme eller minut, tryck + /
-
för att justera
värdet.
d
Datumformat
Trycka
+
/
-
knappen för att välja M / D eller D / M-format.
e
Datum uppsättning
När tidssynkronisering är avstängd, pre ss / knappen för
att välja år, månad, datum, tryck på / knapp för att justera
värde.
f
Sommartid
Trycka
+
/
-
för att stänga av eller ställa in Sommartid till auto.
g
Tidszon
Trycka
+
/
-
knapp till välja de din lokal tid zon till få rätt
tid.
h
Hemisfär
Trycka
+
/ för att välja NORD eller SÖDER halvklotet för 7-i-1-
sensorpunkten till och månen fas.
i
Longitud-Latitud
Trycka
+
/
-
knapp till skriva in Longitud - Latitud inställning sida
.
Trycka knappen för att öppna larminställningsdisplayen.
Trycka knappen till returnera enkel/detaljerad skärm.
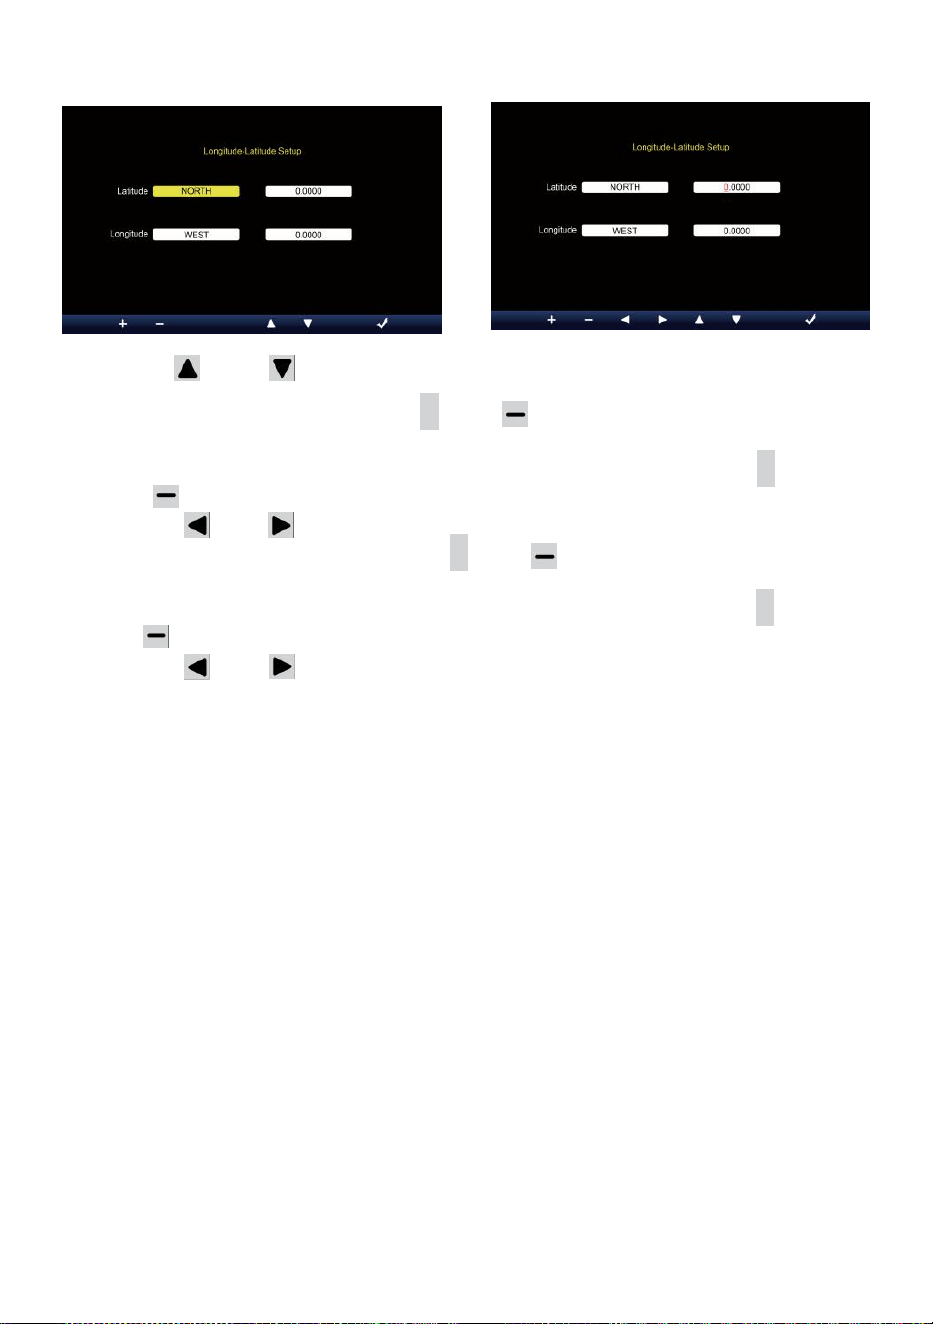
- 35 -
Longitud-Latitud inställning
Trycka eller knappen för att ändra de aktiveras alternativfält.
1. Latitud (hemisfär) --- Tryck på
+
eller knappen till välj hemi- sfär.
(NORD/SÖD)
Latitude --- Den latitud x 10 kommer att vända n röd. Trycka +
eller för att öka eller minska värdet .
Trycka eller att ändra kvar latitudvärde.
2. Longitud (halvklot e) --- Tryck på + eller för att välja hemi- sfär.
(ÖST/VÄST)
Longitud --- Den latitud x 100 kommer att vända röd. Trycka
+
eller för att öka eller minska värdet .
Trycka eller knappen för att ändra kvar longitudvärde.
Trycka w för att bekräfta Longitud Latitud de inställning.
NOTERA:
Bestäm longitud och latitud. till
exempel
Latitud
Longitud
: 33,2981
: -111,9602
Om plats är i Norra Hemisfär, Latitude kommer vara positiv. Om
plats är i södra Hemisfär, Latitude kommer vara negativ. Om plats
är i Östra aktern Hemisfär, longitud kommer vara positiv.
Om plats är i västra Hemisfär, lon gitude kommer vara negativ.
Alltså ovanstående Longitud och d Latitud kommer att anges till
visa enligt följande :
Latitud = NORR --- 33. 2981
Longitud = VÄST --- 111,9602.
USA New York (EST, GMT-5)
Latitud
Longitud
: 40,7128 (North 40,7128)
: -74,0060 (West 74.0060)
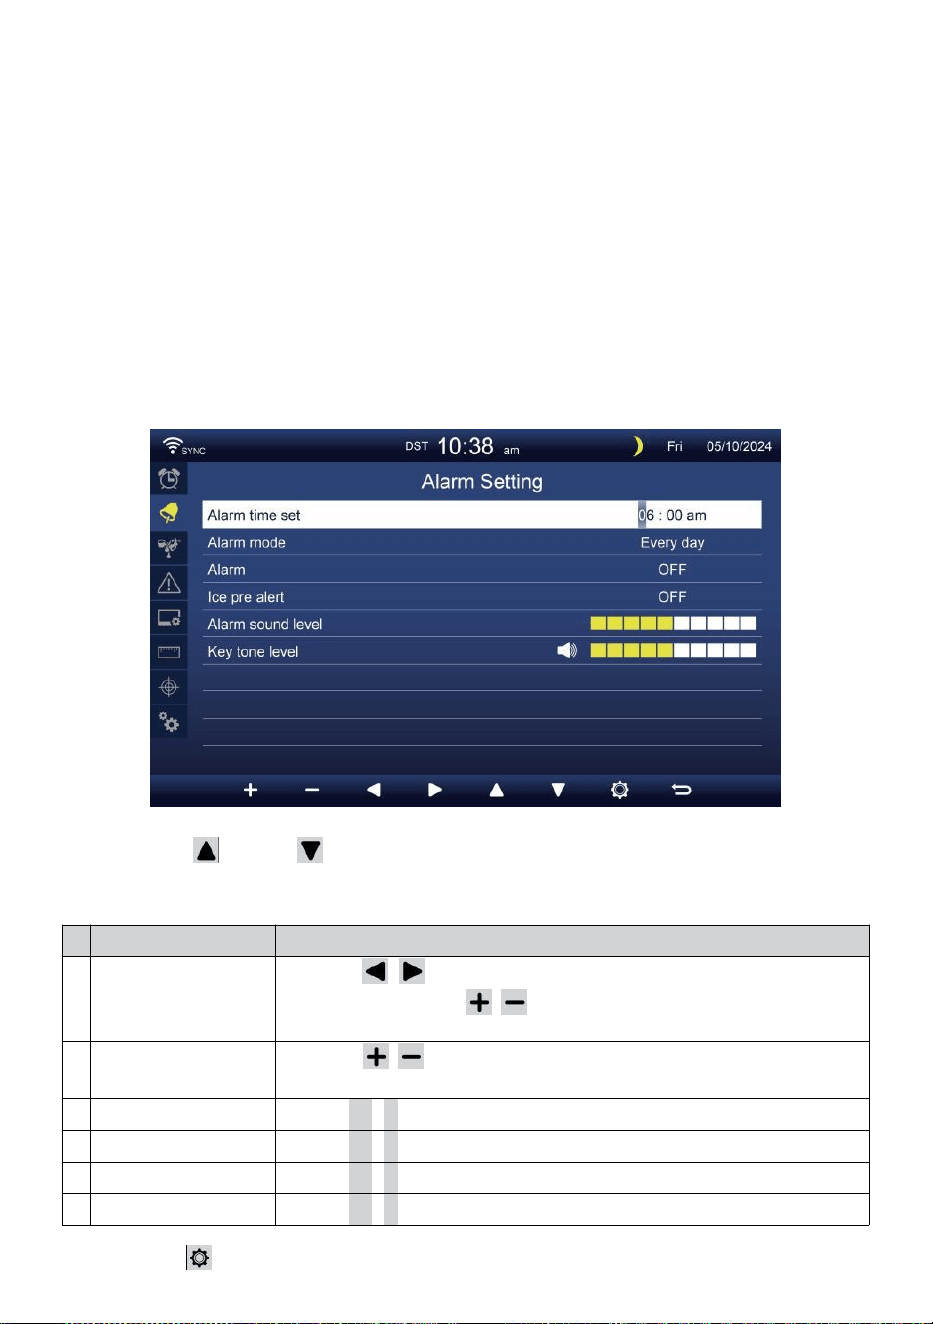
- 36 -
EU Frankfurt Tyskland (GMT+1)
Latitud
Longitud
: 50,1109 (Norr 50,1109) :
8,6821 (Öst 8,6821)
Storbritannien London England (GMT)
Latitud
Longitud
: 51,5072 (Norr 51,5072) :
-0,1276 (West 0,1276)
Australien Sydney ( GMT +10)
Latitud
Longitud
: -33,8688 (Södra 33.8688) :
151,2093 (Öst 151,20 93)
LARM MILJÖ
Trycka eller knappen för att ändra det aktiverade
alternativfältet:
#
Sub punkt
Drift
a
Alarmtid inställd
Tryck på / knappen för att välja mellan timme
eller minut. Tryck på / knappen för att justera
värdet .
b
Larm läge
Tryck på / knappen för att välja Endast vardag eller
veckodag.
c
Larm
Trycka
+
/
-
knapp till sväng på eller sväng av .
d
Is pre varna
Trycka
+
/
-
knapp till sväng på eller sväng av .
e
Larmljud nivå
Trycka
+
/
-
knapp till justera de ljud nivå .
f
Nyckelton nivå
Trycka
+
/
-
knapp till justera de nyckel tona nivå .
Trycka knappen för att öppna sensorinställningsdisplayen.

- 36 -
Trycka
w
-knappen för att återgå enkel/detaljerad skärm.
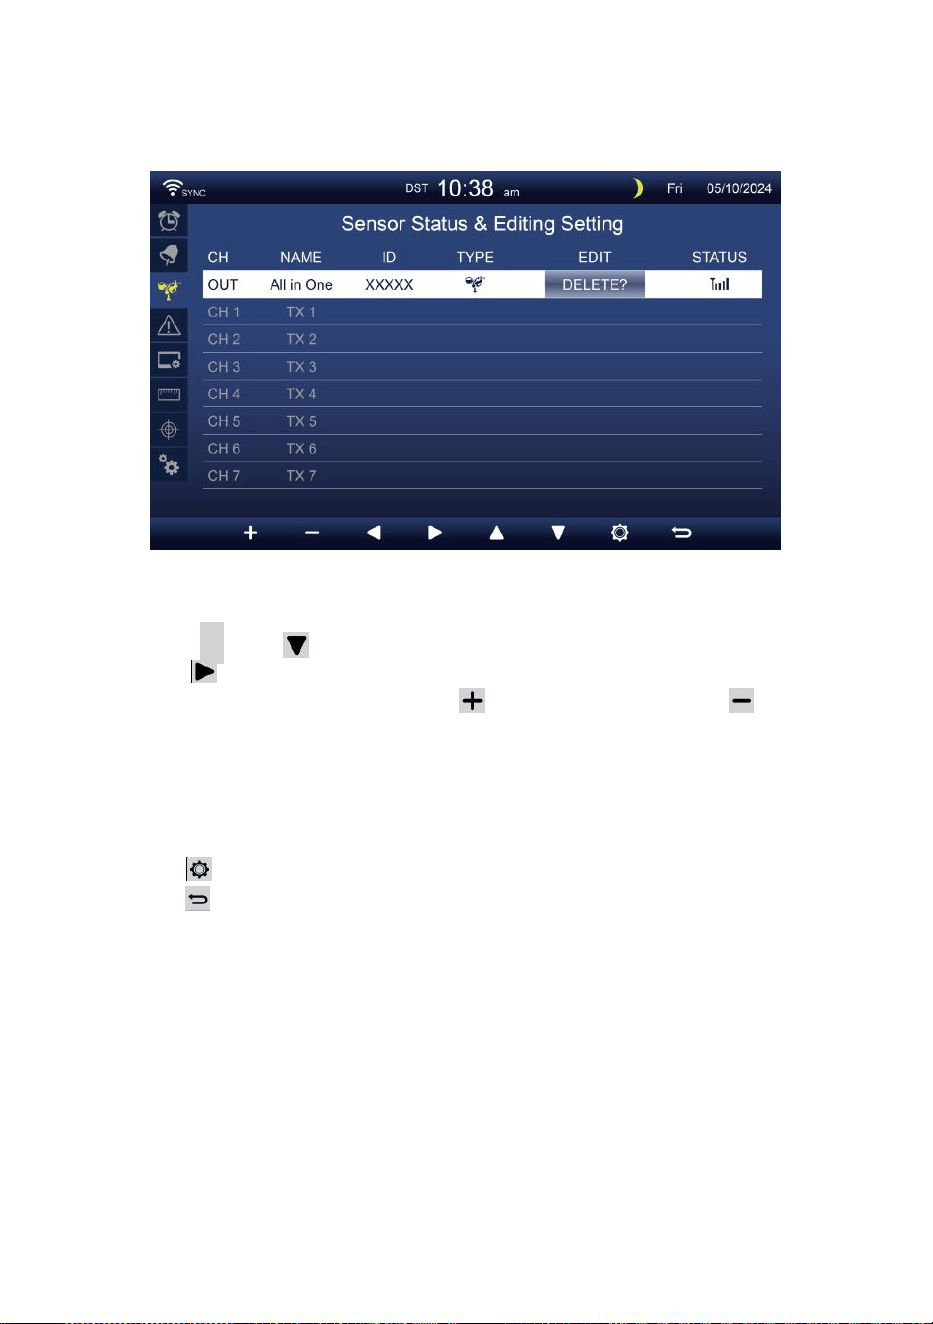
- 37 -
SENSOR MILJÖ
Detta sida är att lägga till/ta bort allt-i-ett-sensorn eller extra 7
kanaler hygrometrar.
Lägger till en ny sensor
Tryck på
▲
eller för att välja tömma kanal.
Trycka knappen för att välja redigeringssensorn kolumn.
När kolumnen visar alternativet " Lägg till ", tryck på /
knappen för att starta sensorsökningen.
Välj matchande kanal numret på sensorn då slå på eller trycka
ÅTERSTÄLLA knappen för att starta parning.
När enheterna är anslutna visas sensorikonen, ID vilja visa i de
kanal rad.
Trycka knappen för att gå in i displayen för varningsinställning.
Trycka knappen till returnera enkel/detaljerad skärm.
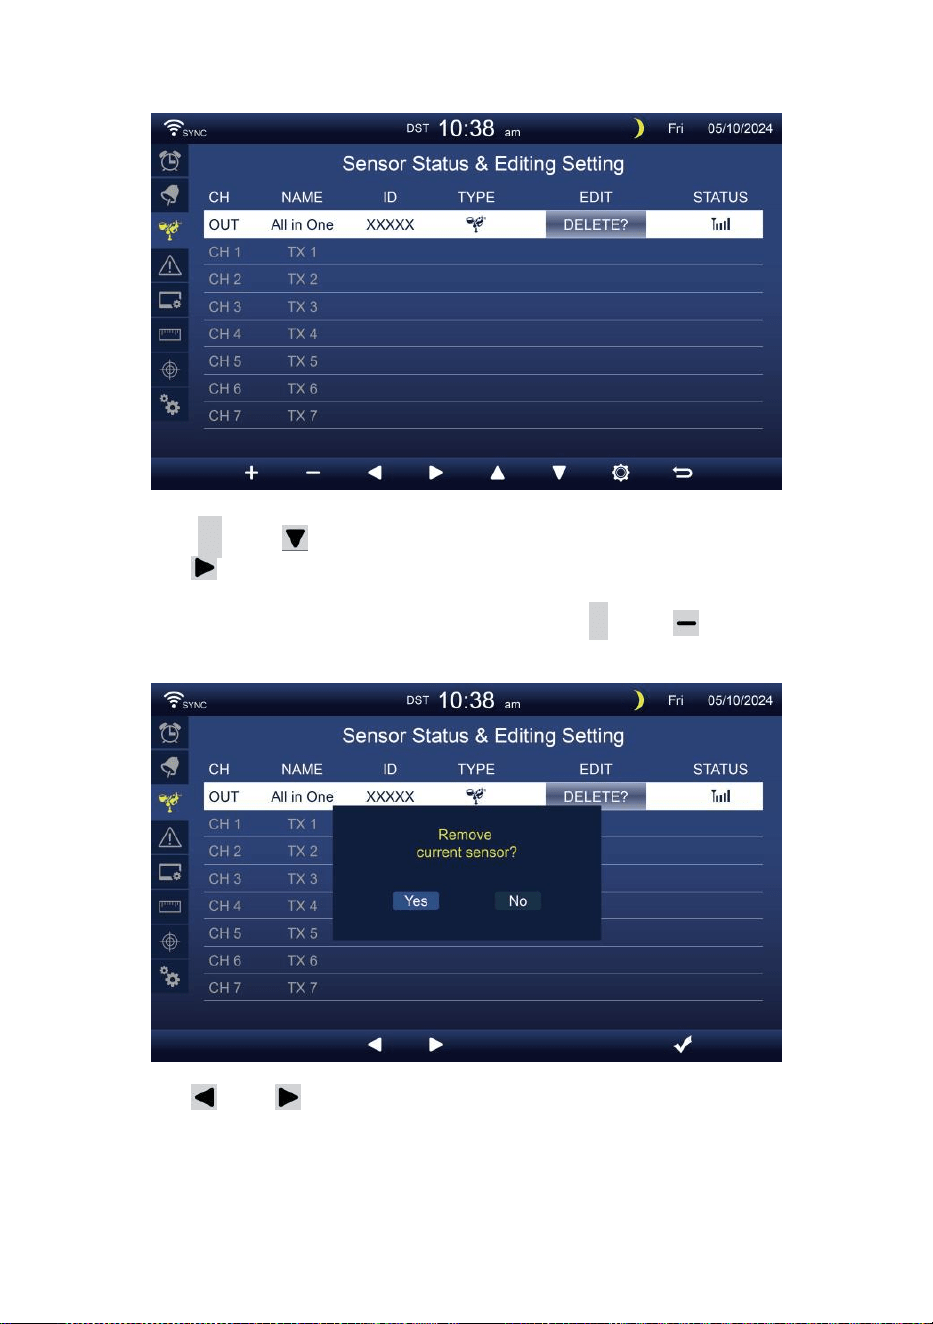
- 38 -
Radera parad sensor
Tryck på
▲
eller knappen till välj ansluta d sensor.
Trycka knappen för att välja redigeringssensorn
kolumn.
När kolumnen visar "Ta bort alternativ, tryck
+
eller knapp till
bekräfta.
Trycka eller knappen för att välja ändra aktiveras
alternativfält, växla Ja eller NEJ , tryck
.
knapp till bekräfta .
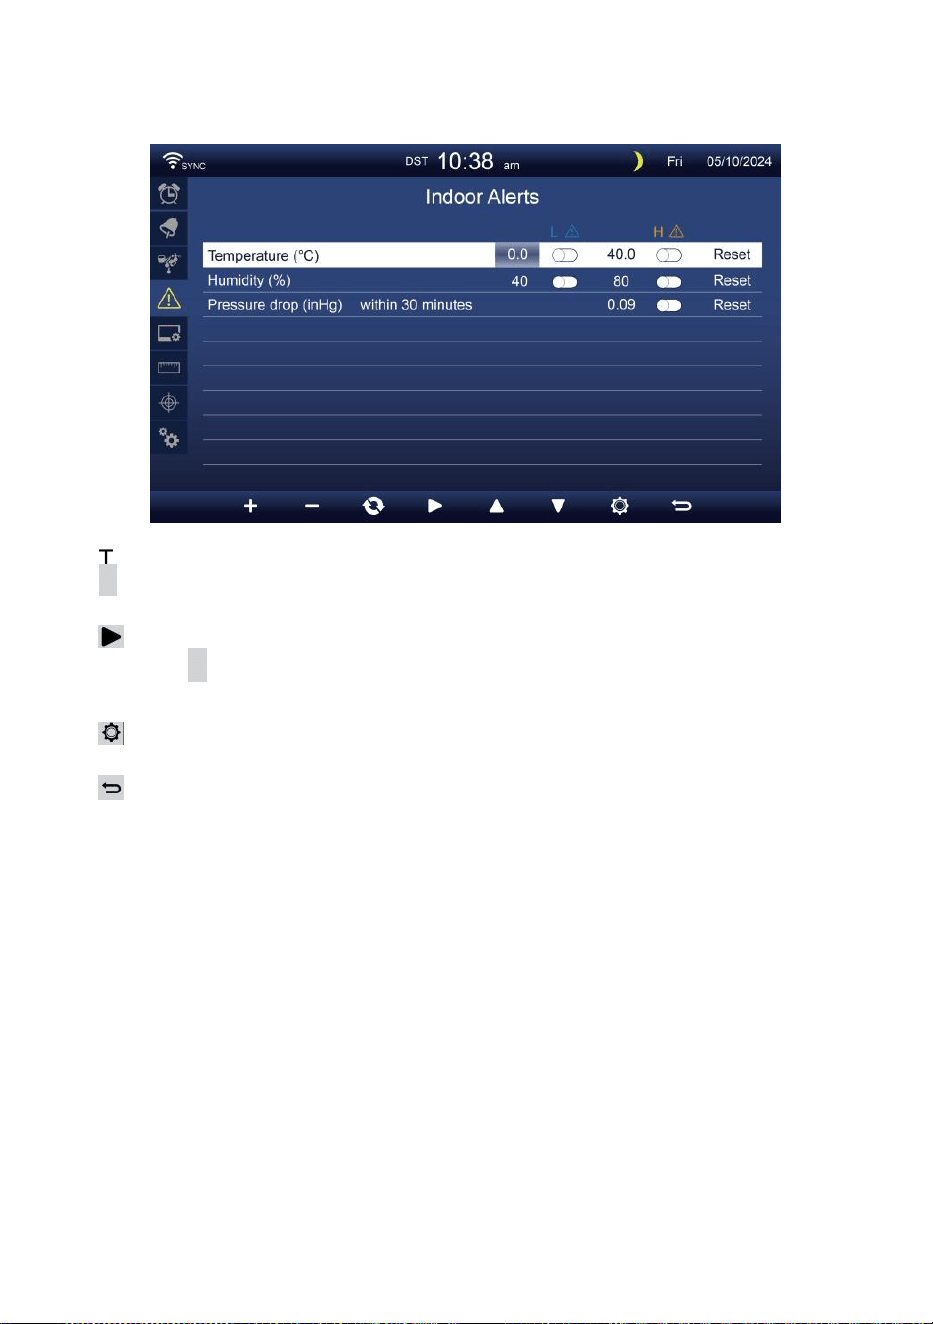
- 39 -
VARNINGSINSTÄLLNING
Uppsättning inomhusvarning
Trycka
▲
eller
w
-knappen för att välja olika rad av aktiverade
alternativfält .
Trycka
knappen för att välja hög/låg/Återställ varning alternativ .
Trycka
+
eller
w
-knappen för att justera värdet eller på/av-
alternativ.
Trycka
knappen för att ange Displayinställningsdisplay .
Trycka
knappen för att returnera enkel/detaljerad skärm.
NOTERA:
När du väljer återställningsalternativ, kommer alla
varningsvärden att vara återställ till de standardvärden.
Ställ in utomhusvarning
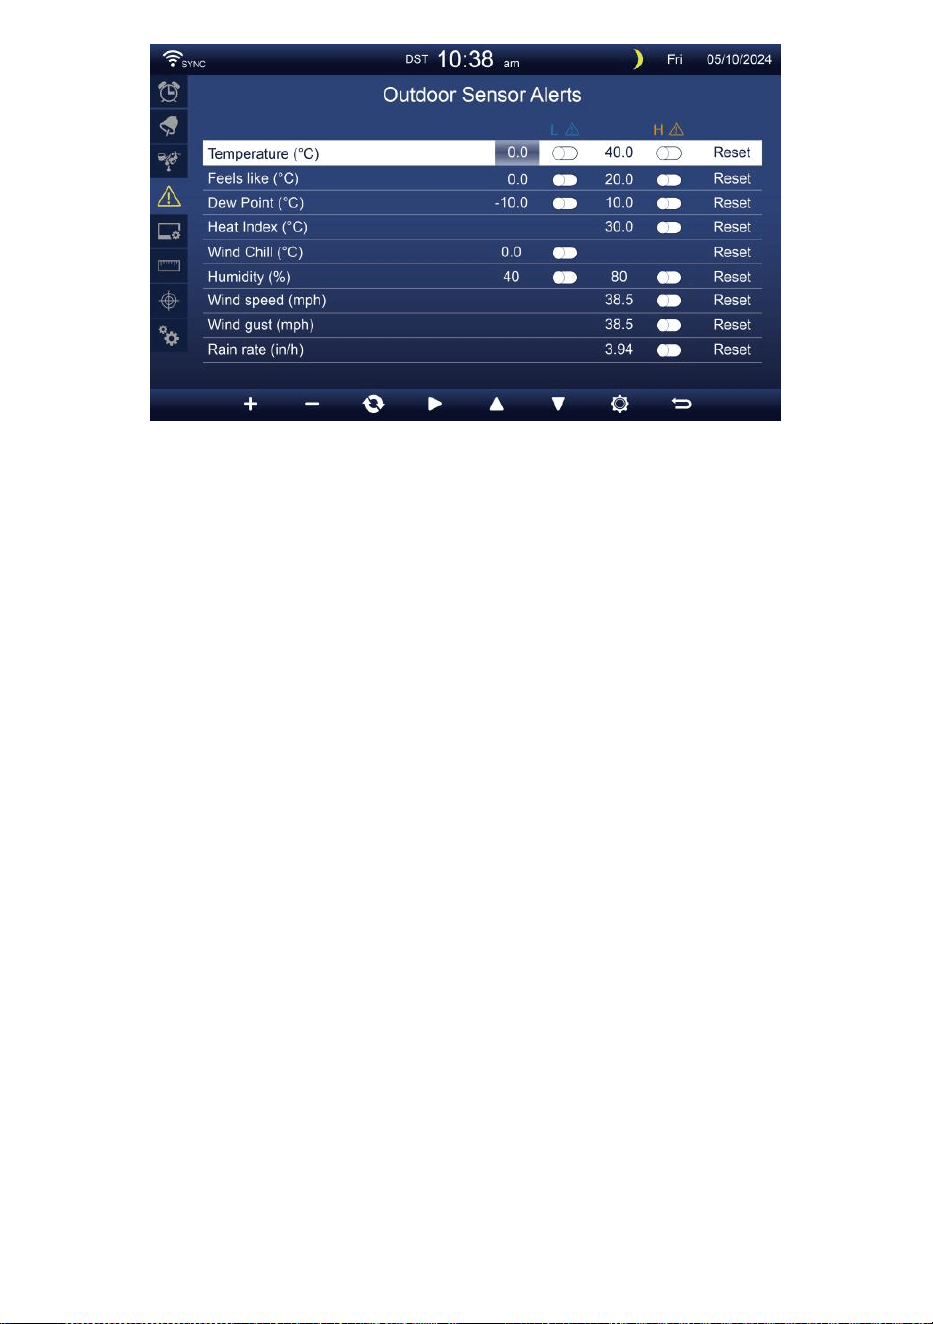
- 39 -
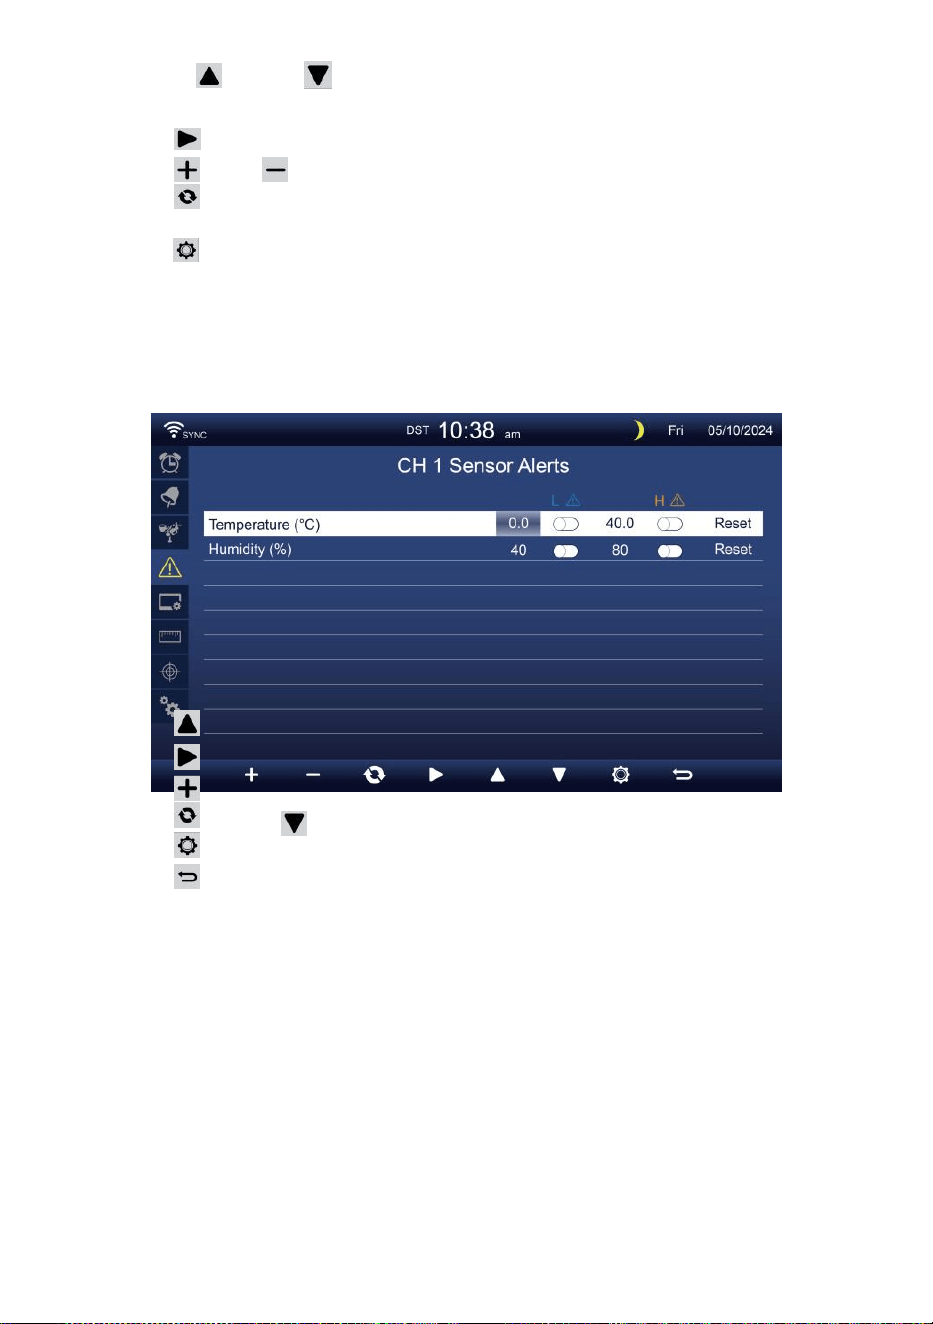
- 40 -
Trycka eller knappen för att välja en annan rad av aktiverade
alternativfält.
Trycka knappen för att välja hög/låg/Återställ varningsalternativ.
Trycka eller knappen för att justera värdet eller på/av-alternativet.
Trycka knappen till byta ut Inställningsdisplay för
inomhusvarningsinställning.
Trycka knappen för att ange Displayinställning visa.
Tryck
w
knappen för att gå tillbaka
enkel/detaljerad skärm. Ställ in CH1-7 sensor
varna
Trycka
Trycka
Trycka
Trycka
Trycka
Trycka
NOTERA:
eller för att välja en annan rad av aktiverade alternativ
fält. knappen för att välja hög/sänk/Återställ varning
alternativ .
eller
w
-knappen för att justera värdet eller på/av-
alternativ.
knappen till byta ut Inställningsdisplay för
inomhusvarningsinställning.
knappen för att ange
Displayinställningsdisplay . knappen för
att returnera enkel/detaljerad skärm.
När du väljer återställningsalternativ, kommer alla
varningsvärden att vara återställ till de standardvärden.

- 41 -
DISPLAYINSTÄLLNING
Trycka eller knappen för att ändra de aktiveras alternativfält:
#
Sub punkt
Drift
a
Språk
Trycka
+
/
-
knapp till välja de visa språk .
b
Bakgrundsfärg
Trycka
+
/
-
knapp till välja ljus eller mörk färg bakgrund för
visning läge.
c
Natt läge
Trycka
+
/-knappen för att aktivera (utlösare till aktivera tid
period), inaktivera eller auto (utlösas av din rum omgivande ljus
nivå).
d
Natt läge aktiveras
tid
Tryck på / knappen för att välja mellan timme
eller min ute. Trycka
+
/
-
till justera de värde .
e
Bakgrundsbelysning
nivå
Trycka
+
/
-
knappen för att justera bakgrundsbelysningen nivå i
ingen rmal.
f
Bakgrundsbel
ysning nivå
(Natt läge)
Trycka
+
/
-
knappen för att justera bakgrundsbelysningen
nivå under nattläge .
g
Ljusstyrka
Trycka
+
/
-
knapp till justera de skärm ljusstyrka .
h
Kontrast
Tryck på / knappen för att justera skärmen kontrast.
Trycka knappen för att ange Enhetsinställningsdisplay .
Trycka
w
-knappen för att återgå enkel/detaljerad skärm.

- 42 -
ENHETSINSTÄLLNING
Trycka eller knappen för att ändra de aktiveras alternativfält:
#
Sub punkt
Drift
Temperatur
Trycka
+
/
-
knapp till välja ° C eller °F.
Baro tryck
Trycka
+
/
-
knapp till välja hPa , inHg eller mmHg .
Regn
Trycka
+
/
-
knapp till välja mm eller i .
Vindhastighet
Tryck på / knappen för att välja m/s, km/h, knutar o r mph.
Ljus
Trycka
+
/
-
knapp till välja Klux , Kfc eller w /m
2
.
Trycka knappen för att gå till displayen för kalibreringsinställning.
Trycka
w
-knappen för att återgå enkel/detaljerad skärm.
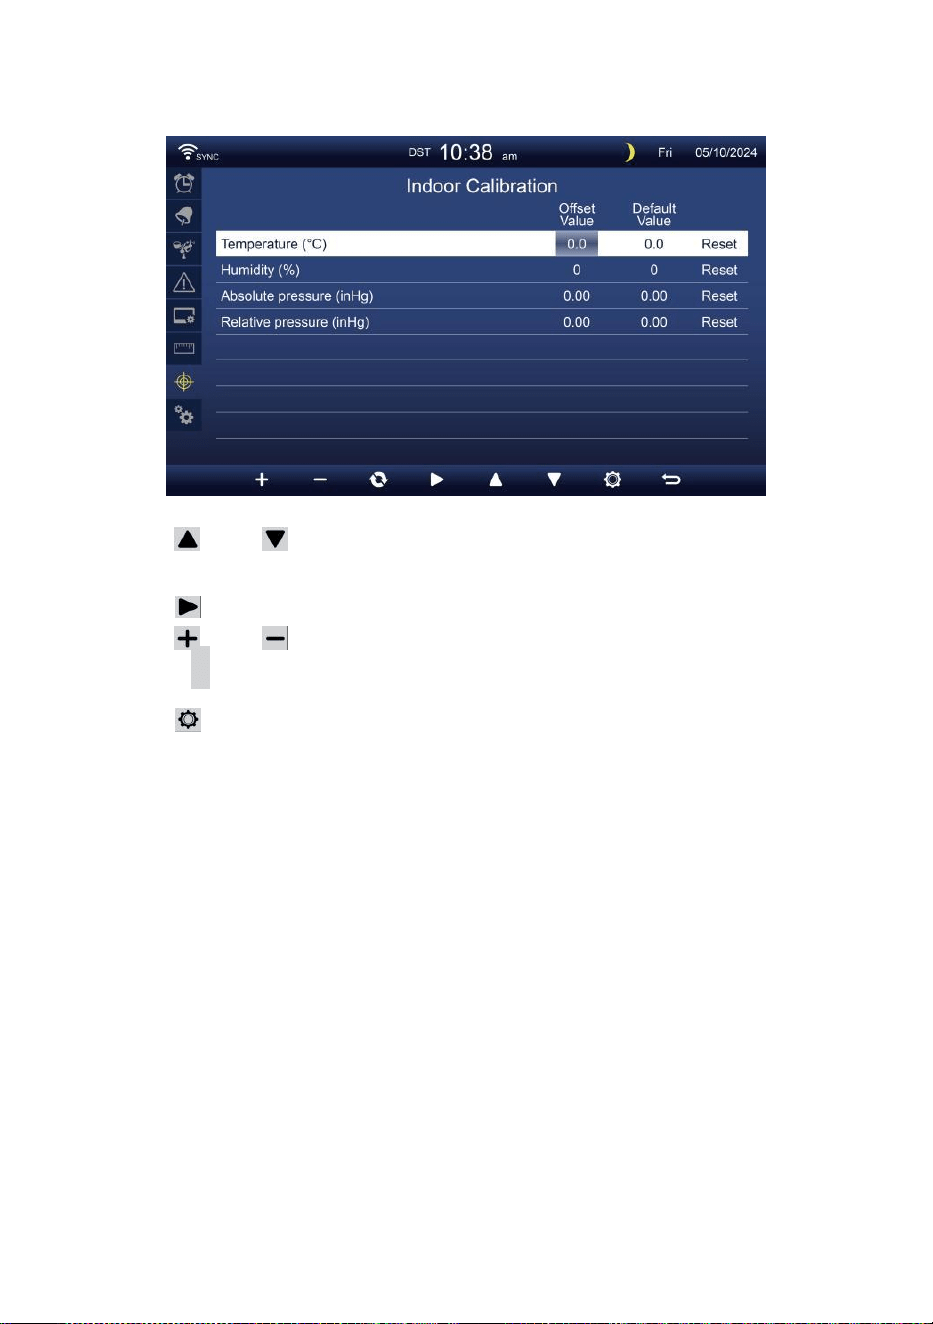
- 43 -
KALIBRERING MILJÖ
Kalibrering för inomhus- parametrar
Trycka eller knappen för att välja olika rad av aktiverade
alternativ fält.
Trycka knappen för att välja hög/låg/Återställ varningsalternativ.
Trycka eller för att justera värdet eller på/av-alternativ.
Trycka
c
knappen till utbyte för att visa inomhus , utomhus
och kanaler Kalibrering miljö display .
Trycka knappen för att ange Övrigt miljö visa.
Tryck
w
knappen för att gå tillbaka enkel/detaljerad
skärm,
NOTERA:
När du väljer återställningsalternativ, kommer alla
kalibreringsvärden att vara återställ till t han standardvärden.
Kalibrering för utomhus- parametrar

- 43 -
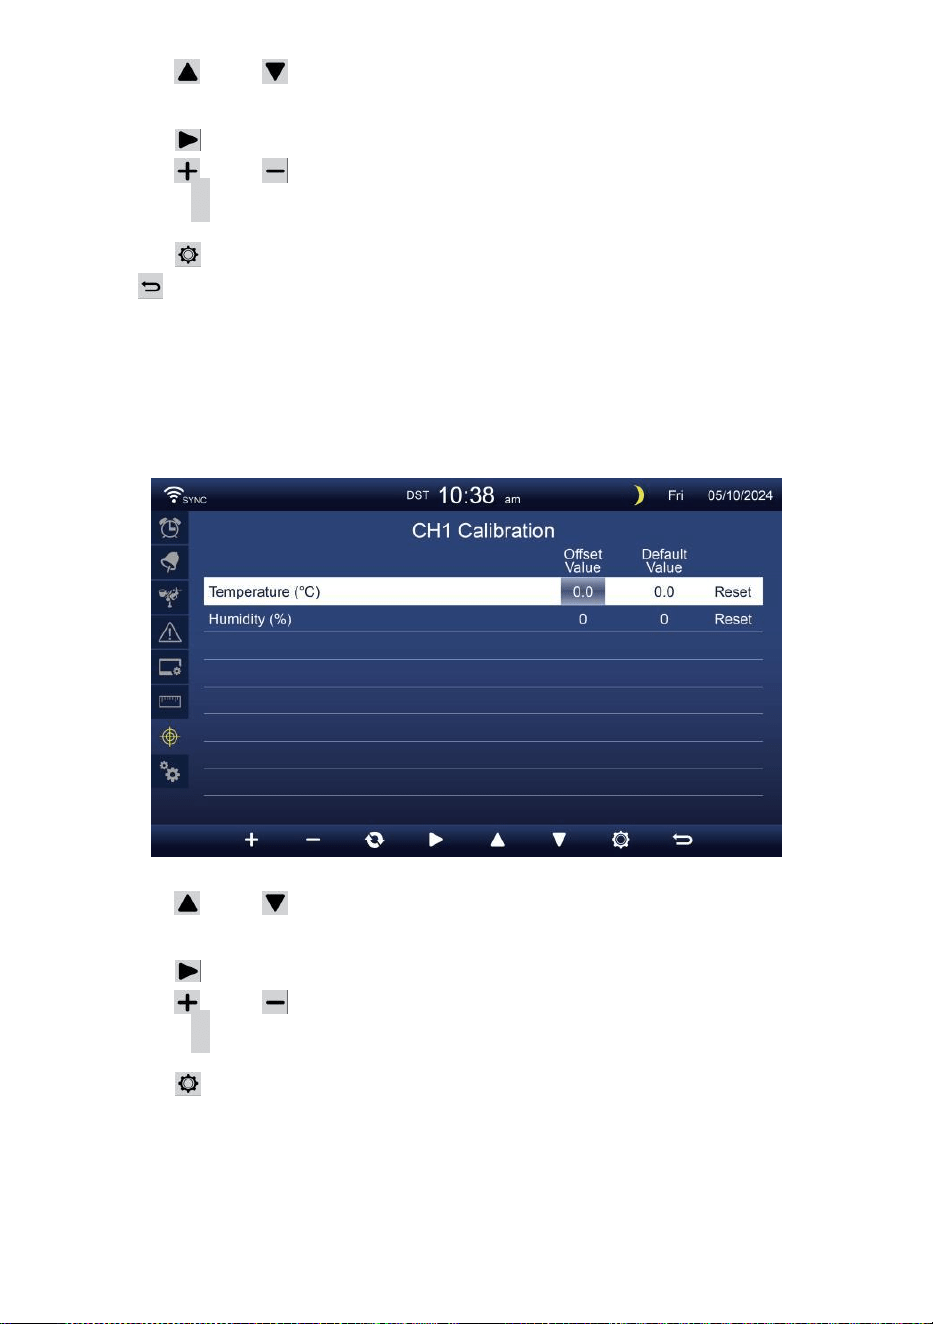
- 44 -
Trycka eller knappen för att välja olika rad av aktiverade
alternativ fält.
Trycka knappen för att välja hög/låg/Återställ varningsalternativ.
Trycka eller knapp för att justera värdet eller på/av alternativ.
Trycka
c
knappen till utbyte för att visa inomhus , utomhus
och kanaler Kalibrering miljö display .
Trycka knappen för att ange Övrigt miljö visa.
Trycka knappen till returnera enkel/detaljerad
skärm,
NOTERA:
När du väljer återställningsalternativ, kommer alla
kalibreringsvärden att vara återställ till t han standardvärden.
Kalibrering för CH 1- CH 7 sensor parametrar
Trycka eller knappen för att välja olika rad av aktiverade
alternativ fält.
Trycka knappen för att välja hög/låg/Återställ varningsalternativ.
Trycka eller knapp t för att justera värdet eller på/av-alternativ.
Trycka
c
knappen till utbyte för att visa inomhus , utomhus
och kanaler Kalibrering miljö display .
Trycka knappen för att ange Övrigt miljö visa.
Tryck
w
knappen för att gå tillbaka enkel/detaljerad
skärm,
NOTERA:
När du väljer återställningsalternativ, kommer alla
kalibreringsvärden att vara återställ till t han standardvärden.

- 45 -
Kalibrering parametrar
Sensor
Parameter
Typ av
kalibrerin
g
Standa
rd
värde
Miljö räckvidd
Typisk kalibrering
källa
Inomhus,
Utomhus
eller
kanal(er)
Temperatur
Offset
0
±36 °F (±20 °C)
Röd sprit eller
kvicksilver
termometer
Fuktighet
Offset
0
±20 %
Slingpsykrometer
Inomhus
Absolut
tryck
Offset
0
±560hPa (±16,51inHg
eller ±420 mmHg
Kalibrerad
laboratoriekvalitet
barometer
Relativ
tryck
Offset
0
±560hPa (±16,51inHg
eller ±420 mmHg
Lokal flygplats
Utomhus
Vindhastighet
Få
1
x 0,5 ~ 1.5
Kalibrerad
laboratoriekvalitet vind
meter
Vindriktning
Offset
0
±10°
GPS eller Kompass
Regn
Få
1
x 0,5 ~ 1.5
Synglas regnmätare med
meter
UVI
Få
1
x 0,01 ~ 10,0
Kalibrerad
laboratoriekvalitet UV
meter
Ljus
intensitet
Få
1
x 0,01 ~ 10,0
Kalibrerad
laboratoriekvalitet
solstrålning sensor
ANNAN INSTÄLLNING
Trycka eller knappen för att ändra de aktiveras alternativfält:
- 46 -
#
Sub punkt
Drift / Beskrivning
a
Ställ in din område
Tryck på / knappen för att välja Europa, Storbritannien,
USA, Australien.
b
Aktivera Tillträde
Punkt
Trycka
+
/
-
knapp till startAP läge för WI - FI förbindelse
inställning .
c
Data logga
Tryck på / för att aktivera eller inaktivera data loggfunktion.
d
Spela in intervall
Trycka
+
/
-
knapp till inställning de spela in intervall av de data
logga .
e
Radera alla data
Tryck på / för att radera alla de data i trösta.
f
Fabrik återställa
Trycka
+
/
-
knapp till återställa alla de miljö till standard och
rensa all data i trösta.
g
WI-FI status
Visa den aktuella konsolens WI-FI-anslutningsstatus .
h
Mac-adress
Visa konsolen Mac-adress.
i
Systemets
firmwareversion
Visar den aktuella versionen av systemets firmware av konsolen.
j
Wi-fi firmware version
Visar den aktuella Wi-Fi-firmwareversionen av konsolen.
Trycka knappen för att ange tid & Datuminställning visa .
Trycka knappen till returnera enkel/detaljerad skärm.
MILJÖ UPPWI-FI-ANSLUTNING
För att ställa in Wi-Fi- anslutningen av konsolen, det behov till
konfigurera konsolen in i Access Punkt (AP) läge. För att aktivera Access
Punkt (AP) läge, vänligen följ nedan förfaranden.
1. I den enkla/detaljerade skärmen, trycka knapp till skriva in Miljö
meny.
2. Tryck på knapp till växla “ Annat Inställning ” visa.
3. Tryck på eller knapp till ange "Aktivera åtkomst
Punkt ”, tryck på + eller knappen för att starta AP
läge.

- 46 -

- 47 -
Obs :
Medan i AP-läge kan du pre ss knappen för att avsluta AP läge.
Vädret station vilja helt enkelt återställa de tidigare AP
inställningar .
Använda din smartphone , surfplatta eller dator till ansluta till de
väder station via Wi-Fi genom att följa dessa steg:
1. På PC, öppna ditt Wi -Fi nätverksinställningar. På Android™ eller iOS
enheter , gå till inställningsmenyn och sedan välja Anslutningar/WI-FI
t o öppna
nätverket inställningar.
2. Hitta väderstationens SSID från t han lista. Det skall synas som
WWS-XXXXXX (där alla X är i teger) i de lista. Knacka på SSID för
att ansluta. Detta steg kommer att ta flera sekunder.
3. När du är ansluten till vädret station, öppna upp du r internet eller
mobil webbläsare och ange följande adress s till de
adress stapel : http :// 192.168.1.1 till komma åt väderstationens
webbgränssnitt. (Se till att inkludera http:// eller e webben
webbläsare kan tolka adressen som en sökfråga y). Vi
rekommendera använder den senaste versionen av ansedd webb
webbläsare.
4. Ange följande information in i webbgränssnittet (Figur 1). Se till att alla
information är inmatad innan du väljer Spara. Om du
välja inte till ladda upp Wunderground . com , eller ladda upp väder -
cloud.net, lämna checken rutor okontrollerad.

- 47 -
Select the menu and choose your 2.4 GHz WIFI Router
Password
Weather Server Setup
WeatherUnderground
Station ID
Station Key
Upload wunderground.com
WeatherCloud
Station ID
Station Key
Upload weatherCloud.net
Time Server Setup
time.windows.com
Firmware Version: 1.0.1
a7d9d2a279fbbafa
**********
**********
**********
Apply
KCACANTI9
Server URL
Enter your station ID
Enter your station key/password
check to confirm upload to
WeatherUnderground server
Enter your station ID
Enter your station key/password
check to confirm upload to Weathercloud.net
Internet time server setting
Press Apply to confirm the setting
Select setup UI display language
Select your Wi-Fi Router (SSID) from the list
Router Password
Router
Wi-Fi Router Setup
Language:
Router 12345
SETTINGS
SETUP
English

- 48 -
5. Om alla information du inträtt är rätta, tryck på " Apply " för att
bekräfta. Om det gör det inte, kolla din webb gränssnitt information
igen.
NOTERA:
När de Wi - Fi inställning är komplett , din dator eller mobil
anordning
vilja återgå till standard Wi-Fi-anslutningen. Jag f det gör det inte,
helt enkelt öppna din enhetens trådlös nätverk inställningar och
manuellt återanslut .
TID SERVER FÖRBINDELSE STATUS
Efter att väderstationen har anslutit till internet, det kommer försök att
ansluta till internet tidsserver för att få U TC tid. En gång de
anslutningen lyckas och väderstationens tid har uppdaterad. Ikonen "
SYNC " kommer att visas på LCD.
För att visa rätt tid för din specifika tidszon, kommer du att behöver
ändra tidszonen i KLOCKA- inställningsläget från 00 (standard) till
din tidszon (t.ex. -5 för EST). Om du inte gör det känna din tid zon, du
burk titt det upp på nätet.
NOTERA:
Tiden synkroniseras automatiskt till internet per an timme.
SKAPA OCHSYNKERA DITT WEATHER SERVERKONTO
SKAPA DIN WEATHERUNDERGROUND KONTO
1. Besök: https://Wunderground.com , och välj " Gå med " i t han övre
höger och hörn och skapa a Gratis konto.

- 48 -
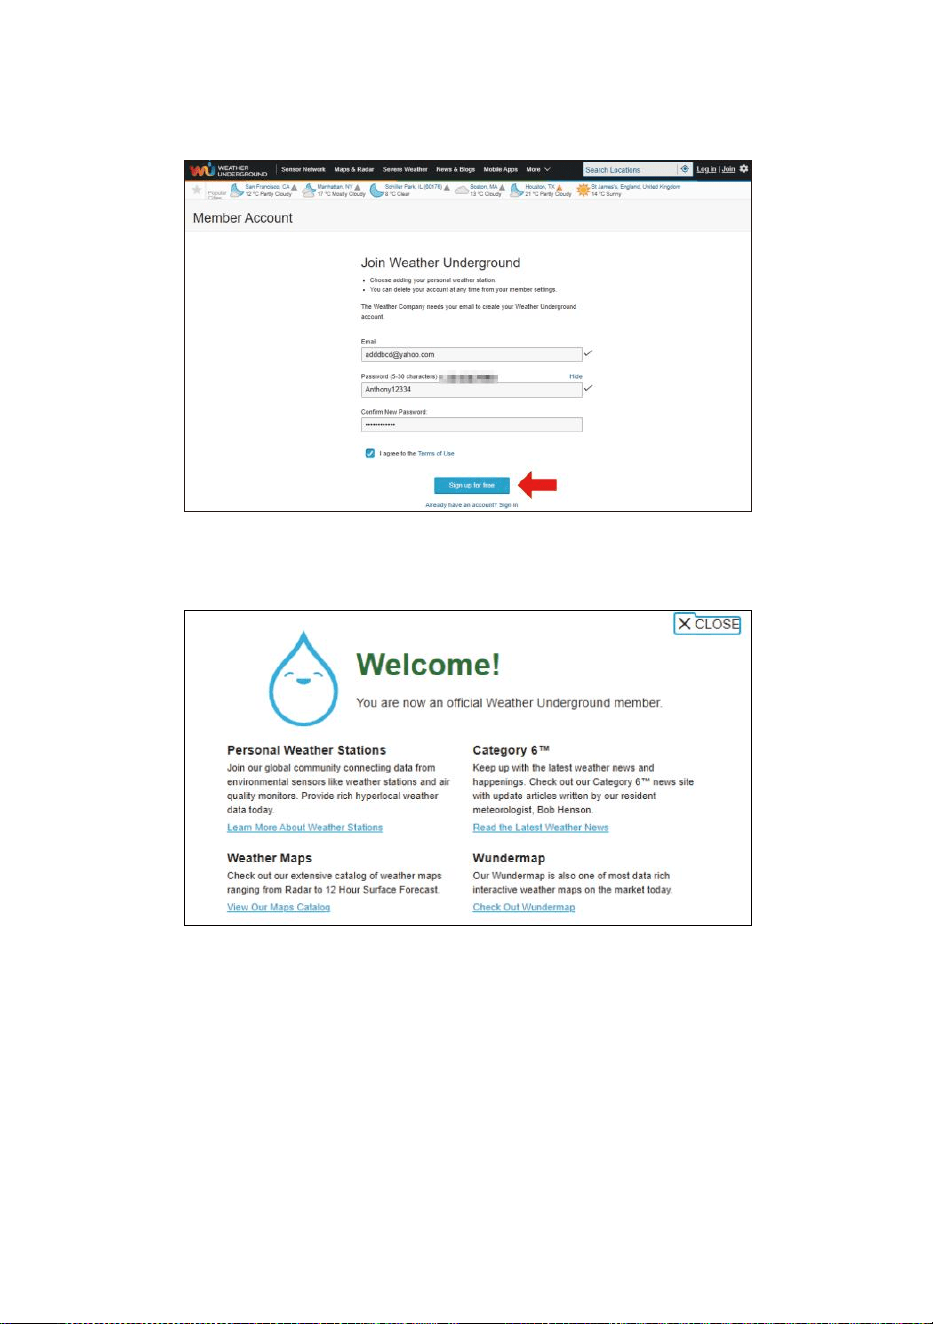
- 49 -
2. Ange a Användarnamn, Maila ett nd Lösenord ( It är din Inloggning
lösenord av webbplatsen Det, inte din e-post lösenord. Så inga
integritet kommer bli utsatt ). Klicka på Signera upp gratis.
3. Efter registrering är klar framgångsrikt, det är sjukt visas nedan
meddelande.
4. Klicka på "Logga in ” och skriva in de e-post adress och pas
svärd du bara registrerad.

- 49 -
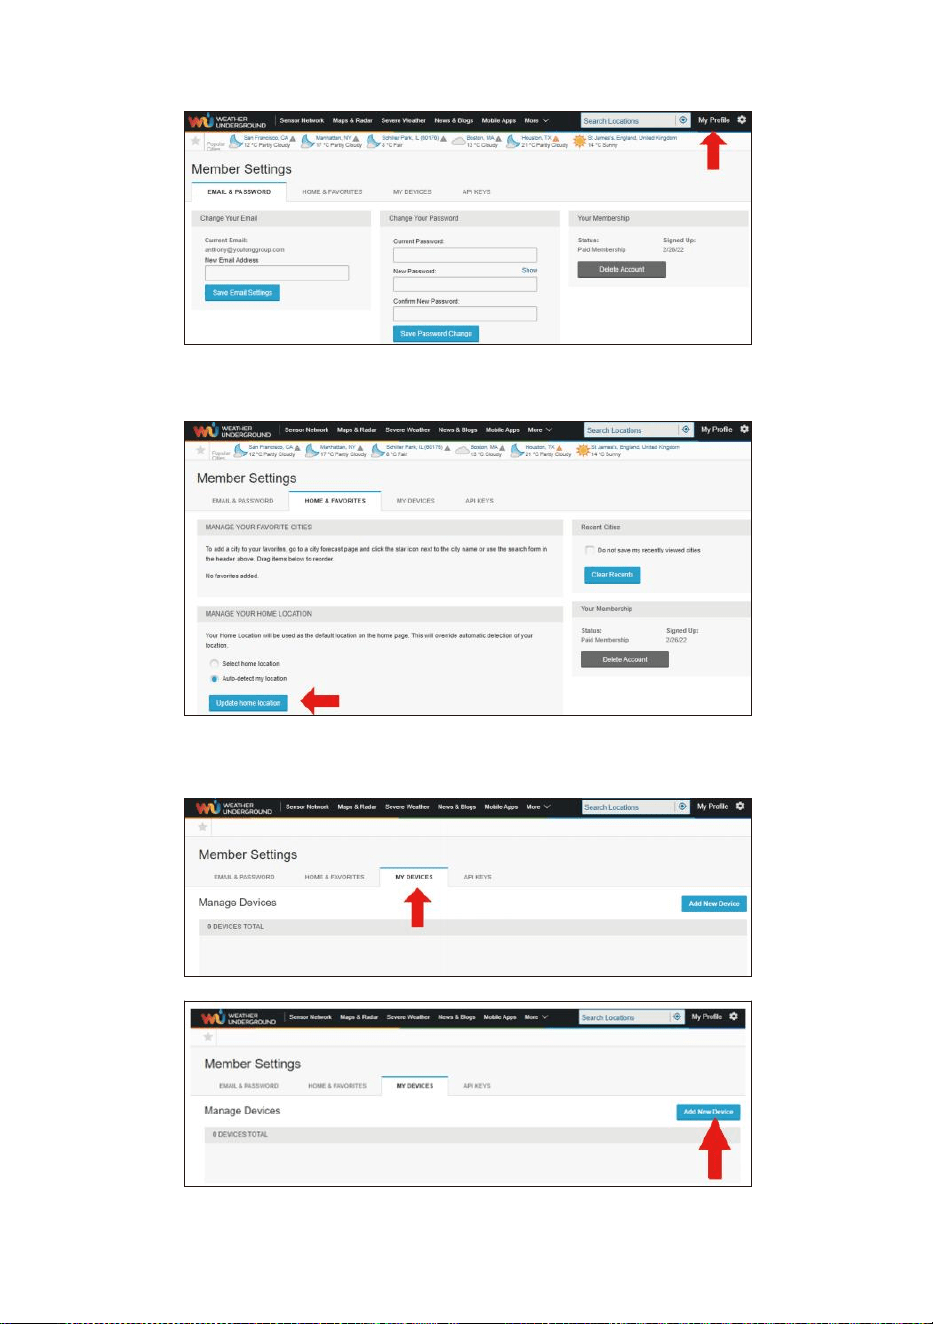
- 50 -
5. Klicka på "Min profil ” och ange medlemsinställningar.
6. Klicka på "Uppdatera hem plats ”.
7. Klicka på "Min Enheter ” och klicka på ” Lägg till Ny Enhet ”.

- 51 -
8. Välj adress av ange en adress eller välj Manuell till placera din
adress automatiskt. Klicka sedan på "Nästa ”.
- 52 -
9. Ange väderinformation . Blanks med röd (obligatorisk) måste
vara fylld i.
NOTERA:
Du kan välja "annat" av Dev is Hårdvara.
10. En gång komplett t hans session, klicka på "jag Acceptera ” och "
Nästa ”.
11. Efter framgångsrik registrering, behaga spela in ditt väder Under-
jord ID och Nyckel information för senare inställningar använda.
- 53 -
12. Som visas nedan, registrering har gjorts framgångsrikt.
SKAPA DIN VÄDERMOLN KONTO
1. Besök Weatherclouds webbplats på https://weathercloud.net/ och
ange ett användarnamn, E-post och Lösenord och klicka på " Sig gn
upp ”. Efter
instruktioner för att skapa en konto.
OBS: Detta är görs bäst på en dator skrivbordet eller bärbar dator.
(Det är din inloggning lösenord för webbplatsenDet, inte din e-post
lösenord. Så inga integritet kommer bli utsatt).
2. När det är framgångsrik, en e-post kommer vara mottagen i ditt
registrerad brevlåda.
3. Öppna din mail och logga i till webben adress i de post. Klicka på "
Aktivera din Vädermoln konto ”.

- 53 -
- 54 -
4. Klicka på "här ” för att komma in på hemsidan för weathercloud-
webbplatsen e.
5. Ange e-postadressen och lösenordet du just registrera dig till gå in i
vädermolnet webbplats .
6. Klicka på " Skapa enhet " för att lägga till en väderstationsenhet.
7. Ange alla begärde information in i Cr äta Ny Anordning sida. Blanks
med röd * måste fyllas i.

- 55 -
NOTERA:
Du kan välja "annat" av Modell nummer och Länktyp i ovan
ämnen.
Klicka på "Hämta koordinater" för att identifiera din plats på de
karta, sedan klicka på "Klar" för att bekräfta.
8. När du har avslutad detta avsnitt, klicka på " Skapa ".
9. Efter framgångsrik registrering, vänligen spela in ditt vädermoln ID
och Nyckel information för senare installation använda.
SE DIN VÄDER DATA I WEATHERUNDERGROUND
För att se din väderstationsdata live via PC eller mobil webb webbläsare,
besök http://www.wunderground.com och ange sedan stationen ID du
var tillhandahålls under kontoinställningen i sökningen låda. Din
väderdata kommer att visas upp på nästa t sida.
- 56 -
VÅRDOCH UNDERHÅLL
1. Rengör regnmätare var 3 månader. Rotera de tratt moturs och lyft för
att exponera regn ga uge mekanismer, och rensa med a fuktig trasa.
Ta bort all smuts, skräp och insekter. Om bugg angrepp är en
problem, spraya sensorn lätt med i insekticid.
Öppna
Lyfta
2. Rengör Ljus Intensitet/ UV-sensor och solenergi panel varje 3
månader med fuktig trasa.
3. När du byter batterier, tillämpas a korrosion p revansch blandning på
batteriet terminal s.
SPECIFIKATION
VÄDER STATION
Allmänna specifikationer
Dimensionera
7,3 x 5,4 x 1,1 tum (185,9 x 137 .4 x 28,5 mm)
Strömkälla
AC-DC 5V, 1A adapter (ingår)
Stödsensorer
1 x 7-i-1 sensor (ingår)
Wi-Fi kommunikationsspecifikation
Wi-Fi standard
802.11 b/g/n
Wi- Fi-driftsfrekvens
2,4 GHz
Enheter som stöds för
inställning UI
Inbyggd Wi-Fi med smart enhet i WAP-läge, inklusive
bärbara datorer, datorer, smarta telefoner och smart
kuddar
Rekommendera
webbläsare för installation
UI
Senaste versionen av en ny webbläsare som stöder HTML 5

- 56 -

- 57 -
Tid Fu nk t i on s s p ec i f i ka t i o ne r
T i d vi s a
HH : MM
T i m f o r m a t
12 timme eller 24 timme
Datum visa
DD/MM eller MM/DD
T i d s s y n k r o n i s e r i n g m e t o d
Sy n kr o n i se r a s me d ato m i c kl o c ka
Tidszoner
-12 ~ +13 timmar
Sommartid
PÅ/AV
Barometerdisplay & Funktionsspecifikationer
Barometerenheter
hPa, inHg och mmHg
Mätning räckvidd
600 – 1100 hPa (relativ inställning intervall 930 – 1050 hPa)
Noggrannhet
700 -1100 hPa±5 hPa/600 -696 hPa±8 hPa
20,67 – 32,48 tumHg±0,15 tumHg/17,72 -20,55 tumHg ±0,24 inHg
525-825 mmHg±3,8 mmHg/450 -5 22 mmHg±6 mmHg
Typiskt kl 77吓 (25 ℃ )
Väderprognos
Solig, Delvis molnigt, molnigt, Regnigt, stormigt och Snöig
Visa läge
Nuvarande
Minne läge
Dagligen Max/ Min
Varna
Varning för tryckförändring
Inomhus-/utomhustemperatur Display & Funktionsspecifikationer
Temperatur enhet
℃
och
吓
Display inomhus räckvidd
-14.1吓– 122吓(-9,9 ℃ – 50 ℃ )
Utomhus display räckvidd
-40
skrämma
– 158
°C
(-40
°C
– 70
°C
)
In/Ut noggrannhet
50 – 122 Skrämmande 1.8
skrämma
/ 10 – 50
℃
± 1
℃
-4 -
50
± 2,7 / -20 - 10 ℃ ± 1,5 ℃ andra : ±
3,6 / ±2 ℃
Visa läge
Nuvarande
Minne läge
Dagligen Max/ Min
Varna
Varning för hög/låg temperatur
- 58 -
Inomhus/Utomhus Fuktighet Display & Funktionsspecifikationer
Fuktighet enhet
%
Visa räckvidd
1 – 99 %
In/Ut noggrannhet
40–80 % RH ± 5 % RH @77吓(2 5
℃ ) Andra : ± 8 % RH @77吓(25 ℃ )
Visa läge
Nuvarande
Minne läge
Dagligen Max/ Min
Varna
Hög/Låg fuktighet ale rt
Vindhastighet och Riktning Display & Funktionsspecifikationer
Vindhastighet enhet
mph, m/s, km/h, knutar
Visa räckvidd
0 -112 mph, 50m/s, 180 km/h, 97 knutar
Hastighetsnoggrannhet
<5m/s: ±0,5m/s, >5m/s : ±10 % (vilket som helst är större)
Visa läge
Vindbyar/Genomsnitt
Minne läge
Daglig vind/genomsnitt
Varna
Hög vindhastighet Varning (byst/genomsnitt)
Vindriktning
16 vägbeskrivningar
Regn Display & Funktionsspecifikationer
Enhet av regn
mm, i
Utbud av regn
0 – 12999 mm (0 – 511,7 i)
Noggrannhet av nederbörd
±7 %
Visa läge
Nuvarande
Minne läge
Dagligen Max
Nederbördsdisplay läge
Varje timme/ Dagligen/ Veckovis/ Månadsvis/Totalt Regn
Varna
Hög Dagligen Regnvarning
UV Index Display & Funktionsspecifikationer
Visa räckvidd
0 - 16
Visa läge
Nuvarande
Minne läge
Dagligen Max
Varna
Hög UVI-varning

- 59 -
Ljus Intensitet Display & Funktionsspecifikationer
Ljus Intensitet enhet
Klux, Kfc och W/m
2
Visa räckvidd
0 – 200 Klux
Visa läge
Nuvarande
Minne läge
Dagligen Max
Varna
Hög Ljus intensitetsvarning
Väderindex Display & Funktionsspecifikationer
Väder Index läge
Känns som vindkyla, värme index och dagg punkt
Visa läge
Nuvarande
Minne läge
Dagligen Max/min
TRÅDLÖS 7- IN- 1 UTOMHUS SENSOR
Dimensionera
16 x 15,6 x 14,4 tum (408 x 396 x 367 mm)
Main driva
3,6V Ni-MH uppladdningsbar batteri packa
Säkerhetskopiering driva
Sol driva
Väderdata
temperatur, luftfuktighet, vindhastighet , vindriktning,
nederbörd, UVI och ljus intensitet
RF-överföring räckvidd
330 fot (100m)
Överföringsintervall
Var 20:e sekund för UV
、
ljus intensitet
、
vindhastighet
,
temperatur, fukt- och regndata och vindriktning data
Driftstemp
-40吓– 140吓(-40 ℃ – 60 ℃ )
Ytterligare verktyg som
krävs för sensor
Ja

- 60 -
FELSÖKNING
Problem
Lösning
Trådlös sensor gör
det inte kommunicera
väderstation
Den trådlösa sensorn kan ha initierade korrekt och uppgifterna är
registreras av väderstationen som ogiltig, och de väder station måste
vara återställa.
Med ett öppet slut papercli p, tryck på RESET-knapp i 3 sekunder för att
slutföra visningen av spänningen. LED kommer att blinka var 20:e
sekund.
Om LED kommer inte blinka var 20:e sekund, ta ut batterier och vänta
5 minuter, medan du täcker solpanelen för att dränera de spänning.
Sätta batterier tillbaka i och synkronisera om väderstationen och
synkronisera om väderstation (se sidan 10 RE-PAIRING SENSOR)
med trådlös sensor om 10 fot (3m) bort .
De LED för den trådlösa sensorn blinkar var 20:e sekund. Om LED är
fortfarande inte blinkar var 20:e sekund, byt ut ny batterier i
trådlös sensor.
Om batterier var nyligen byts ut, kontrollera polaritet. Om den trådlösa
sensorn blinkar var 2 :e sekund, fortsätt till nästa steg.
Det maj vara ett tillfälligt kommunikationsbortfall pga reception förlust
relaterad till störningar eller annat platsfaktorer,
Eller batterier maj ha ändrats i den trådlösa sensorn och
väderstation har inte varit återställa. Lösningen maj vara så enkelt
som att stänga av och slå upp väderstationen (ta bort DC kraft och
batterier), vänta 30 sekunder och sätt i igen DC kraft och batterier).
Inomhus och
Utomhus
temperatur gör inte
komma överens
Tillåt upp till en timme för de trådlösa sensorerna att stabilisera förfallen till
signal
filtrering. Inomhus- och utomhustemperatursensorerna bör
överensstämma inom ±4吓(±2 ℃ ) (sensorns noggrannhet är ±2吓 (±1 ℃ )
Använd kalibreringsfunktionen för att matcha inomhus och
utomhustemperatur till a känd källa.
Temperaturgivare
läser också hög i
dagtid
Se till att den trådlösa sensorn inte är det för nära till värme genererande
källor eller förträngningar, såsom byggnader, trottoarer, allt , eller luft
skick- ing enheter.
- 61 -
Problem
Lösning
Regnmätare
rapporterar regn när
det det inte regnar.
En instabil monteringslösning (svaj i montering g stolpe) maj resultat i
tippen hink felaktigt ökar regn. Se till att du
ha en stabil, jämn monteringslösning. (Hänvisa sida 9 JUSTERING AV
7-I-1 TRÅDLÖS SENSOR NIVÅ)
Wi-Fi gör det inte
visas på
väderstationen
Kontrollera din router för problem.
1. Kontrollera Wi-Fi-symbolen på displayen. Om trådlös anslutning är
framgångsrik , den Wi - Fi ikon avilja vara visas i de tid arkiveras .
2. Se till att modemets Wi-Fi-inställningar är korrekta (nätverk namn,
och lösenord)
3. Se till väderstationen är pluggat till AC driva. Väderstationen
kommer inte ansluta till Wi -Fi när drivs av batterier endast.
4. Konsolen stöder och ansluter endast till 2,4 GHz routrar. Om din
äger en 5GHz router, en d det är en dubbel band router, du vilja
behov till
inaktivera 5Ghz ba nd, och aktivera 2,4 GHz band.
5. Det gör vädret stöder inte gästnätverk.
Data inte
rapporterar till
www.wunder-
ground.com eller
www.weathercloud.net
1. Bekräfta ditt lösenord eller nyckel är korrekt t. Det är de
lösenord du registrerad på Wunderground.com.
Wunderground.com. Ditt underground.com- lösenord kan inte börja
med icke-alfanumeriska tecken (en begränsning från Wunderg
round.com, inte stationen). Exempel, $worknet är inte en giltig
lösenord, men
arbetsnät $ är giltig)
2. Bekräfta din station ID ix rätt. Stationen ID är alla kepsar, och det
vanligaste utfärda ersätter och O för a 0 (eller vice versa).
Exempel, KCAPHOEM12, inte KCAPH0EM12.
3. Se till att data och tid är korrekt på de väder station. Om
felaktigt, du maj vara rapportera gamla data, inte realtidsdata .
4. Kontrollera din tidszon är inställd ordentligt. Jag har fel, du maj
vara rapportera gamla data, inte realtid da ta.
5. Kontrollera inställningarna för din routers brandvägg.
Väderstationen skickar data via Hamn 80.

FCC STATEMENT
- 62 -
Denna enhet överensstämmer med del 15 av FCC Regler. Drift är
föremål för de följande två villkor :
1. Denna enhet maj INTE orsak skada ul interferens.
2. Denna enhet måste acceptera varje inblandning mottagen, inklusive
störa det kan orsaka skador drift.
NOTERA:
Denna utrustning har har testat och befunnits överensstämma med
gränser för en klass B digital enhet, enligt Del 15 av han FCC Regler.
Dessa gränser är utformade för att ge rimligt skydd mot skadlig
interferens i en bostads- installation. Denna utrustning
genererar — och kan utstråla — radio fr frekvens energi och, om
inte installerat och begagnad i enlighet med instruktioner, kan
orsaka skadliga störningar på radiokommunikationer .
Däremot är ingen garanti för det störning kommer inte förekomma
i en speciell installation.
Om utrustningen gör det inte orsaka skadlig störningar på radio- eller tv-
mottagning, vilket kan fastställas genom att vrida på utrustning av och på,
den användaren uppmuntras att försöka korrigera interferens av en eller
mer av följande åtgärder :
Omorientera eller flytta mottagningsantenn.
Öka avståndet mellan utrustningen och mottagare.
Anslut utrustningen in i ett uttag på en krets olik från att till vilken
mottagaren är c ansluten.
Rådfråga återförsäljaren eller en erfaren radio-/TV- tekniker för hjälp.
VARNING: Ändringar eller modifieringar av detta enhet inte uttrycker
slug
godkänd av part som är ansvarig för överensstämmelse kan
ogiltigförklara användarens behörighet att använda utrustningen.
Sanven Teknik Ltd.
Adress: Suite 250, 9166 Anaheim Plats, Rancho Cucamonga, CA
91730
Gjord I Kina


Teknisk support och E-garanticertifikat
www.vevor.com/support
