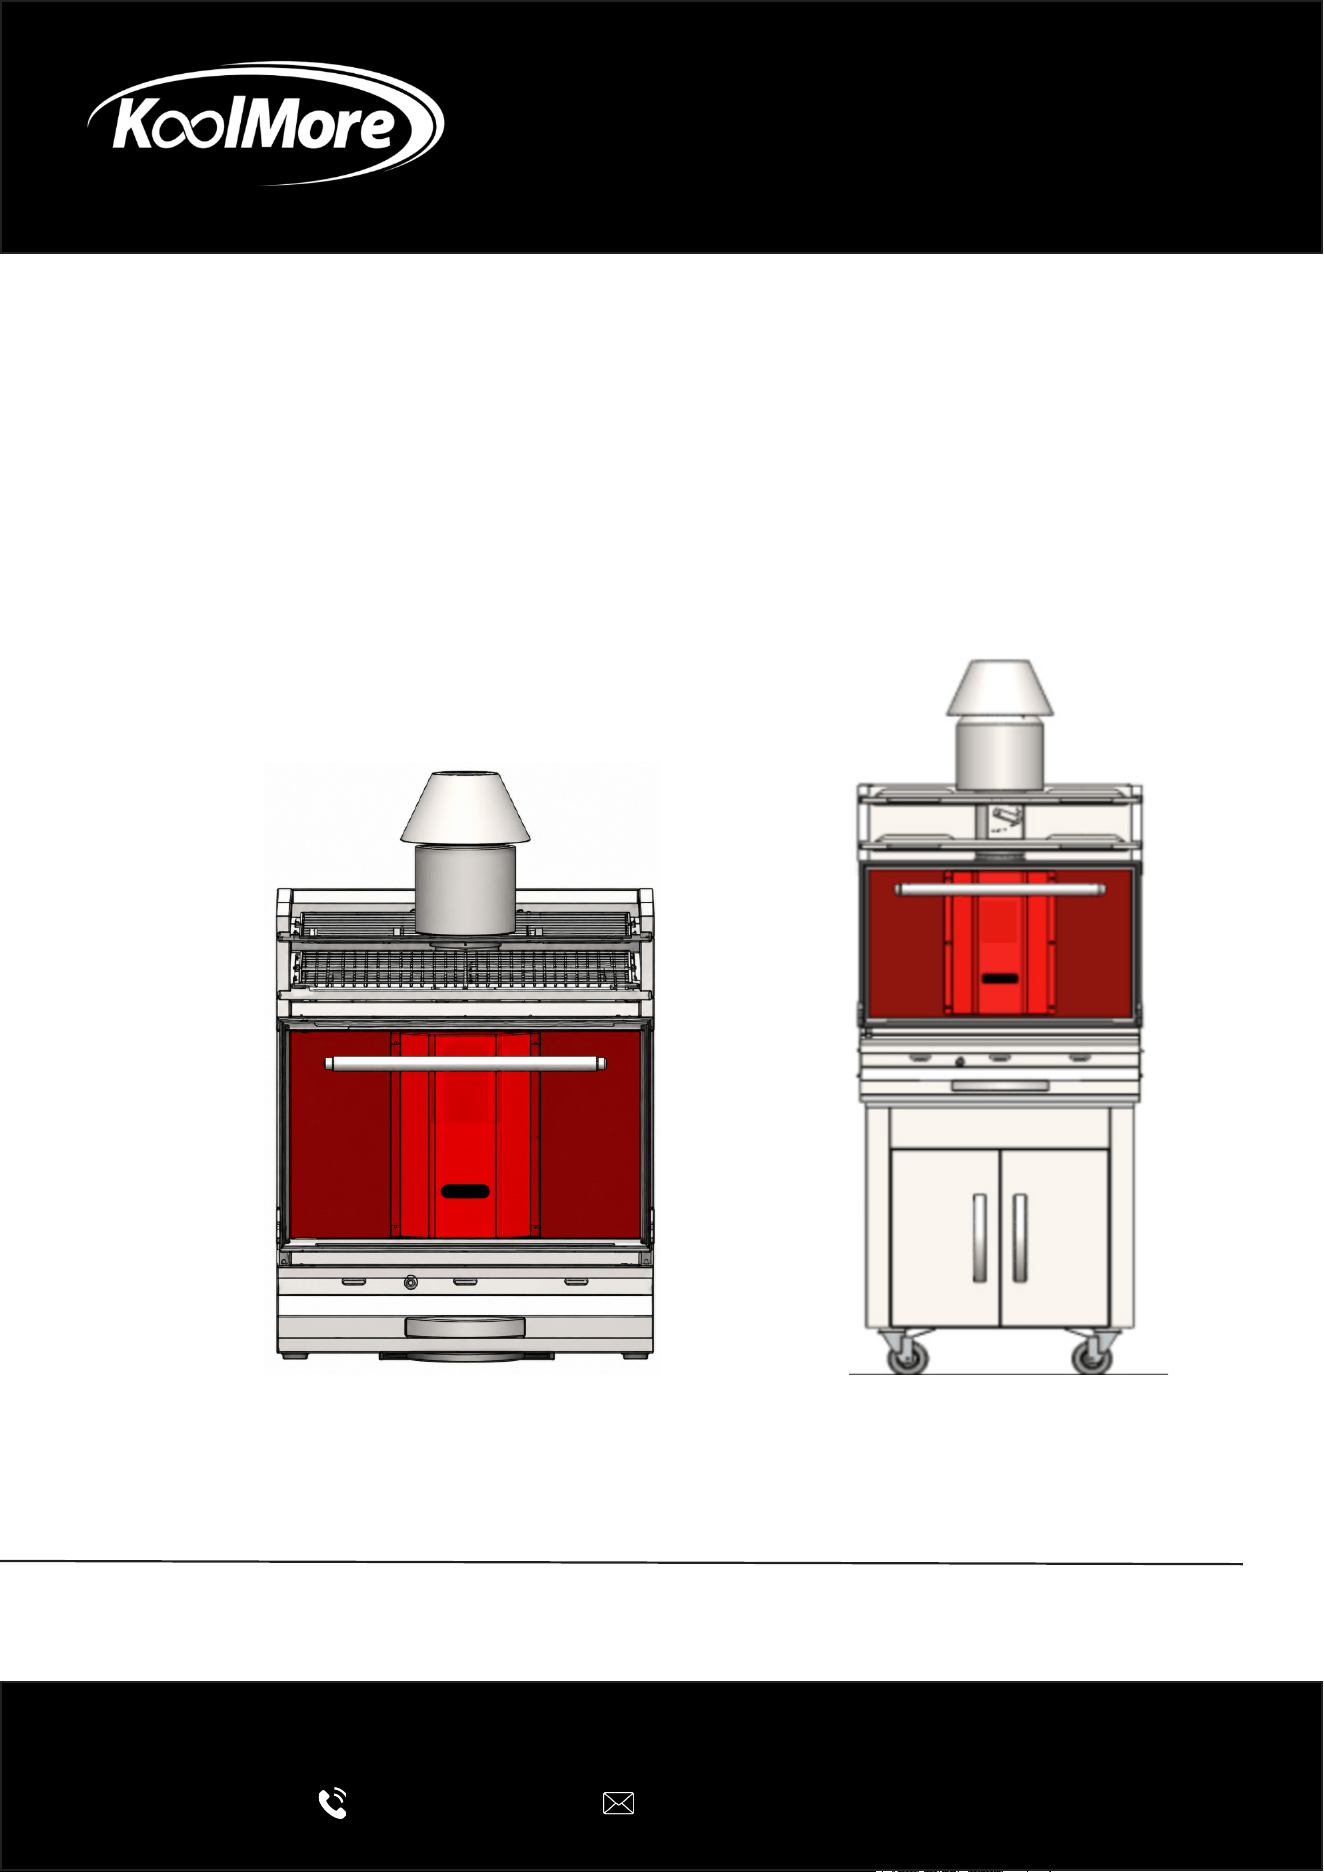
CHARCOAL OVEN
Stainless-Steel Professional Charcoal Oven
with Warming Racks
USER MANUAL
Before use, please read these instructions carefully to ensure proper
operation and optimal performance.
For any service related issues, please contact us:
718-576-6342
support@koolmore.com
Models: KM-CHO28-SS-TR, KM-CHO28-SS-TRB, KM-CHO35-
SS-TR, KM-CHO35-SS-TRB
KM-CHO28-SS-TR KM-CHO35-SS-TRB
Stay informed with the latest information for your
KoolMore appliance.
Scan the QR code below to access the most up-to-date user manual.
If you need any assistance or have questions, our customer support
team is here to help.
Phone: 718-576-6342 Email: support@koolmore.com
Please write down the model number and serial number below for future reference. Both numbers are located on the
rating label on the back of your unit or inside the unit and are needed to obtain warranty service. You may also want
to staple your receipt to this manual as it is your proof of purchase and may also be needed for service
under warranty.
Model Number:
Serial Number:
Date of Purchase:
To better serve you, please do the following before contacting customer service:
If you received a damaged product, immediately contact the retailer or dealer that sold you the product.
Read and follow this User Manual carefully to help you install, use, and maintain your unit.
Refer to the Troubleshooting section of this manual as it will help you diagnose and solve many common issues.

3
Contents
Safety ............................................................................................. 4
Product Features ............................................................................ 6
Technical Information .................................................................... 7
Installation ..................................................................................... 8
Operation ....................................................................................... 14
Cleaning and Maintenance ............................................................. 19
Warranty ......................................................................................... 22

4
General Safety
Read this manual completely before installing, operating, or servicing the appliance. Proper instal-
lation, operation, and maintenance are essential for safe and reliable performance.
Failure to follow the instructions in this manual may result in property damage, serious injury, or
death.
This appliance must be installed, operated, and serviced only by qualied personnel familiar with
commercial cooking equipment and applicable local codes.
Important Safety Requirements
1. Keep this manual in a safe and accessible location for future reference.
2. Installation must comply with all applicable local, state, and national codes and regulations.
3. Operate this appliance only as described in this manual.
4. Do not modify, alter, or tamper with any component of the appliance.
5. Use only manufacturer-approved replacement parts and accessories.
6. If the appliance malfunctions, discontinue use immediately and contact an authorized service
technician.
WARNING:
Improper installation, adjustment, alteration, service, or maintenance can result in property dam-
age, serious injury, or death.
Read all installation, operating, and maintenance instructions before installing or servicing this
equipment.
This appliance must be installed in a well-ventilated area and operated only under an approved
exhaust hood system where required by local codes.
Fire Safety
A major cause of oven-related res is failure to maintain the required clearances to combustible
materials.
Always maintain the minimum installation clearances specied in this manual.
Do not store gasoline, lighter uid, solvents, or other ammable vapors and liquids near this appli-
ance.
Before Operating the Oven
WARNING
• Use only charcoal approved for cooking applications.
• Do not use gasoline, alcohol, lighter uid, or other ammable liquids to ignite or rekindle char-
coal.
• Always operate the oven with the door closed unless otherwise instructed.
• Never place ashes in combustible or heat-sensitive containers, including plastic, rubber, card-
board, or wooden containers.
• All accessible surfaces may become extremely hot during operation. Use heat-resistant gloves
when handling racks, trays, or other components.
• Do not touch hot surfaces with unprotected hands.
Safety

5
CAUTION
Improper installation or operation may create a re hazard. Follow all installation, operating, and
maintenance instructions provided in this manual.
Inspection Upon Delivery
Inspect the appliance immediately upon receipt.
If shipping damage is discovered:
1. Retain all packaging materials.
2. Notify the carrier immediately.
3. File a freight damage claim as required by the carrier.
Failure to report shipping damage promptly may affect claim eligibility.
Codes and Standards
This appliance must be installed in accordance with all applicable local codes and regulations.
In the absence of local requirements, installation shall comply with applicable national standards
and fuel gas regulations in the country of installation.
For installations in Canada, installation must comply with applicable Canadian gas and electrical
codes.
Safety Symbols
The safety symbols and signal words used throughout this manual are intended to alert the opera-
tor to potential hazards and important operating instructions.
• WARNING – Indicates a potentially hazardous situation that could result in serious injury or
death.
• CAUTION – Indicates a potentially hazardous situation that may result in minor injury or equip-
ment damage.
• NOTICE – Indicates important operating, maintenance, or installation information.
6
Product Features
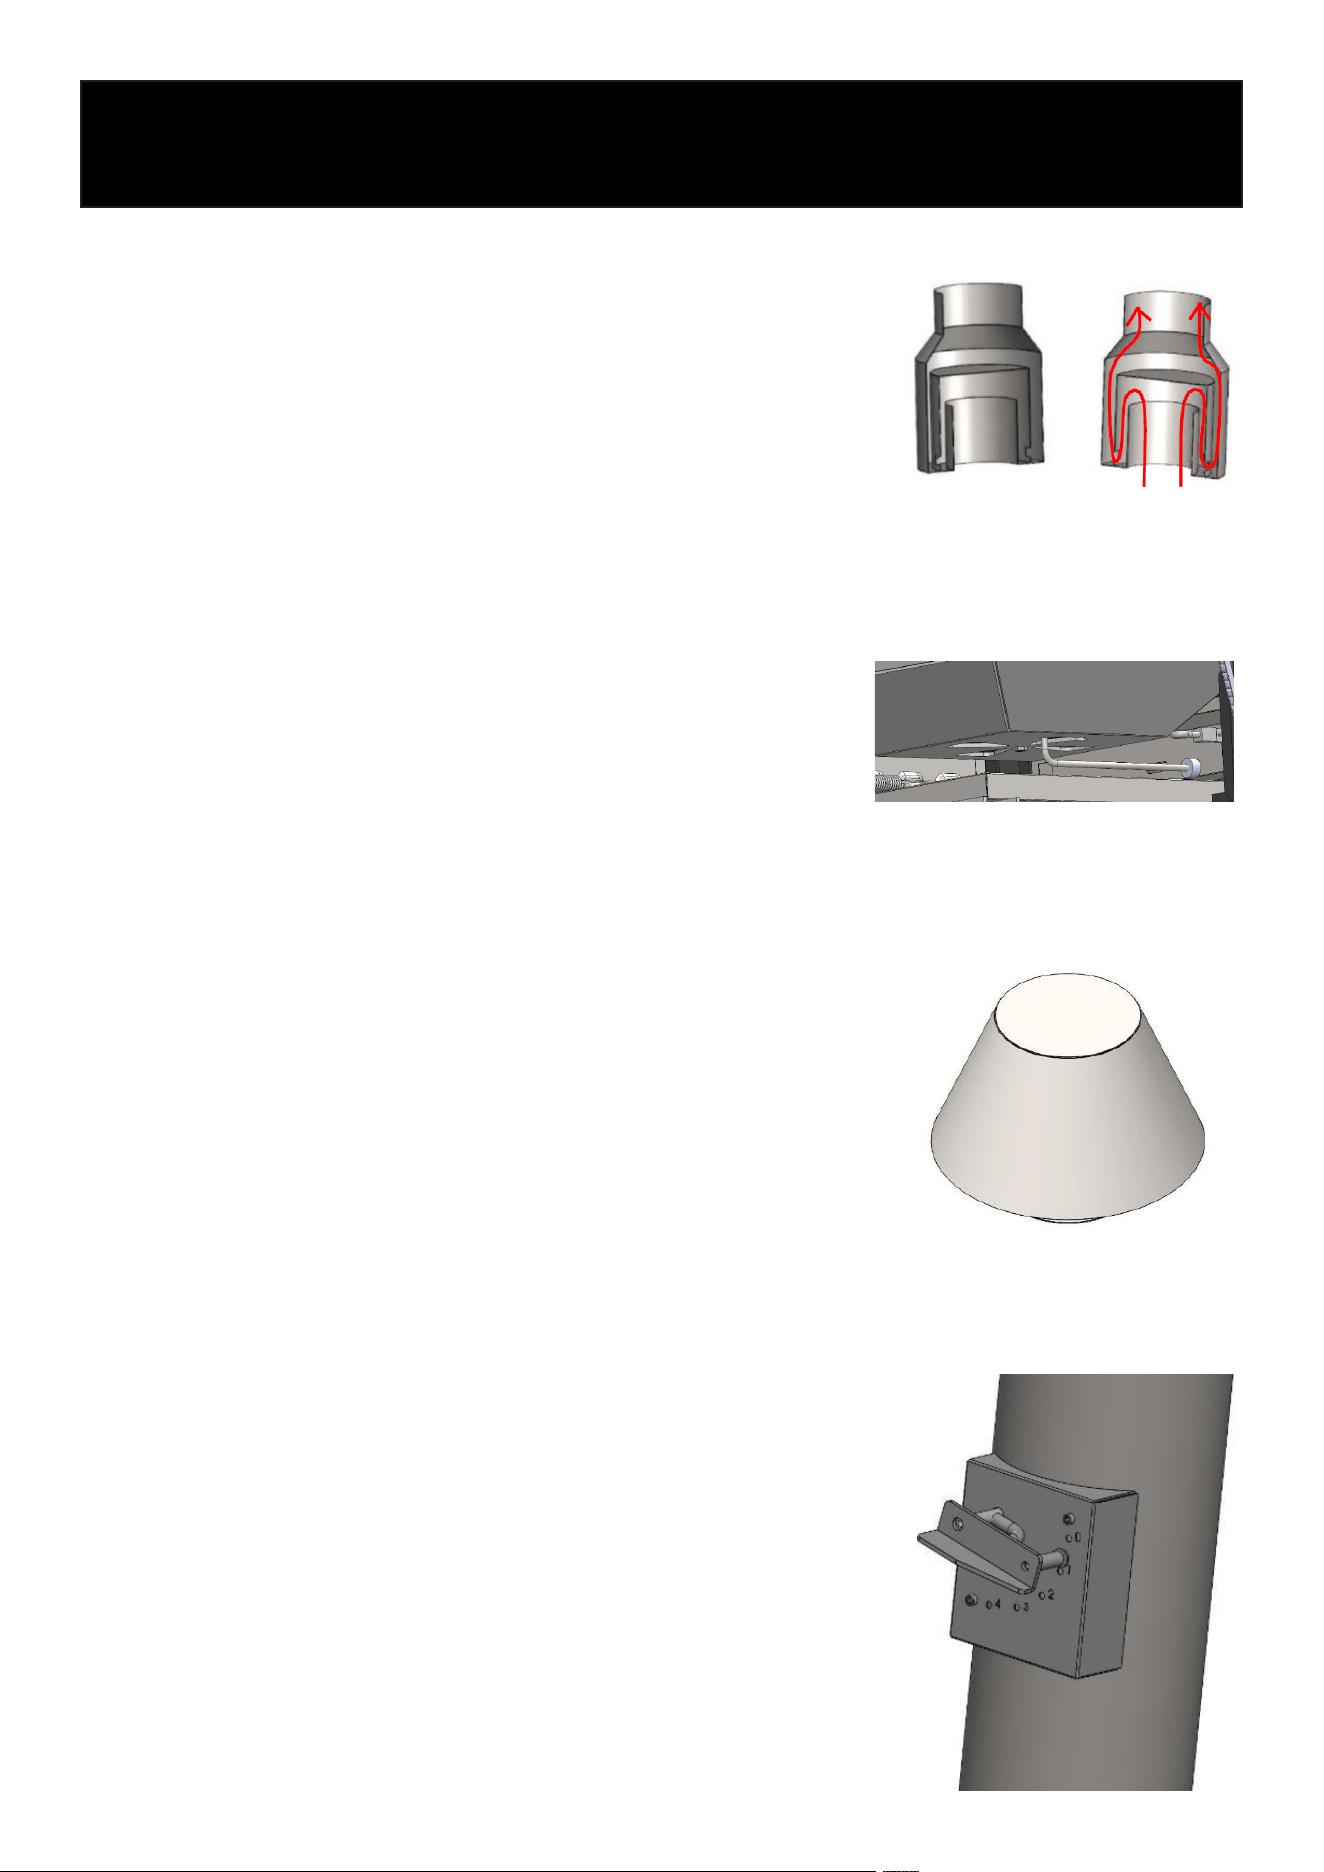
Antispark and Antiparticulate Design
The exhaust system is specially designed to reduce the discharge of
sparks and airborne particles.
As exhaust gases pass through the vent system, airow is redirected
to lower the velocity and temperature of sparks and particulates be-
fore they exit the unit. This design helps improve operational safety
and reduces the risk of sparks escaping into the surrounding envi-
ronment.
Oxygen Intake Control
The lower air vent provides precise control of airow into the com-
bustion chamber.
Its slide-adjustable design allows the vent opening to be easily
increased or decreased with a single movement, enabling accu-
rate regulation of combustion air. The vent also incorporates a
locking mechanism to help maintain the selected setting during
operation.
Spark Arrestor Cap
The spark arrestor cap helps reduce the discharge of sparks and
airborne particulate matter from the exhaust system.
Its design helps cool exhaust gases before they exit the unit,
reducing the temperature of combustion byproducts and helping
protect exhaust hood lters from excessive heat buildup and dis-
coloration.
Upper Vent
The upper vent provides adjustable exhaust control with ve vent
positions, allowing airow and smoke discharge to be regulated ac-
cording to operating conditions.
By adjusting the vent opening, users can optimize combustion per-
formance, temperature control, and exhaust ow throughout the
cooking process.
For additional operating instructions, refer to the Operating Instruc-
tions.
7
Technical Information
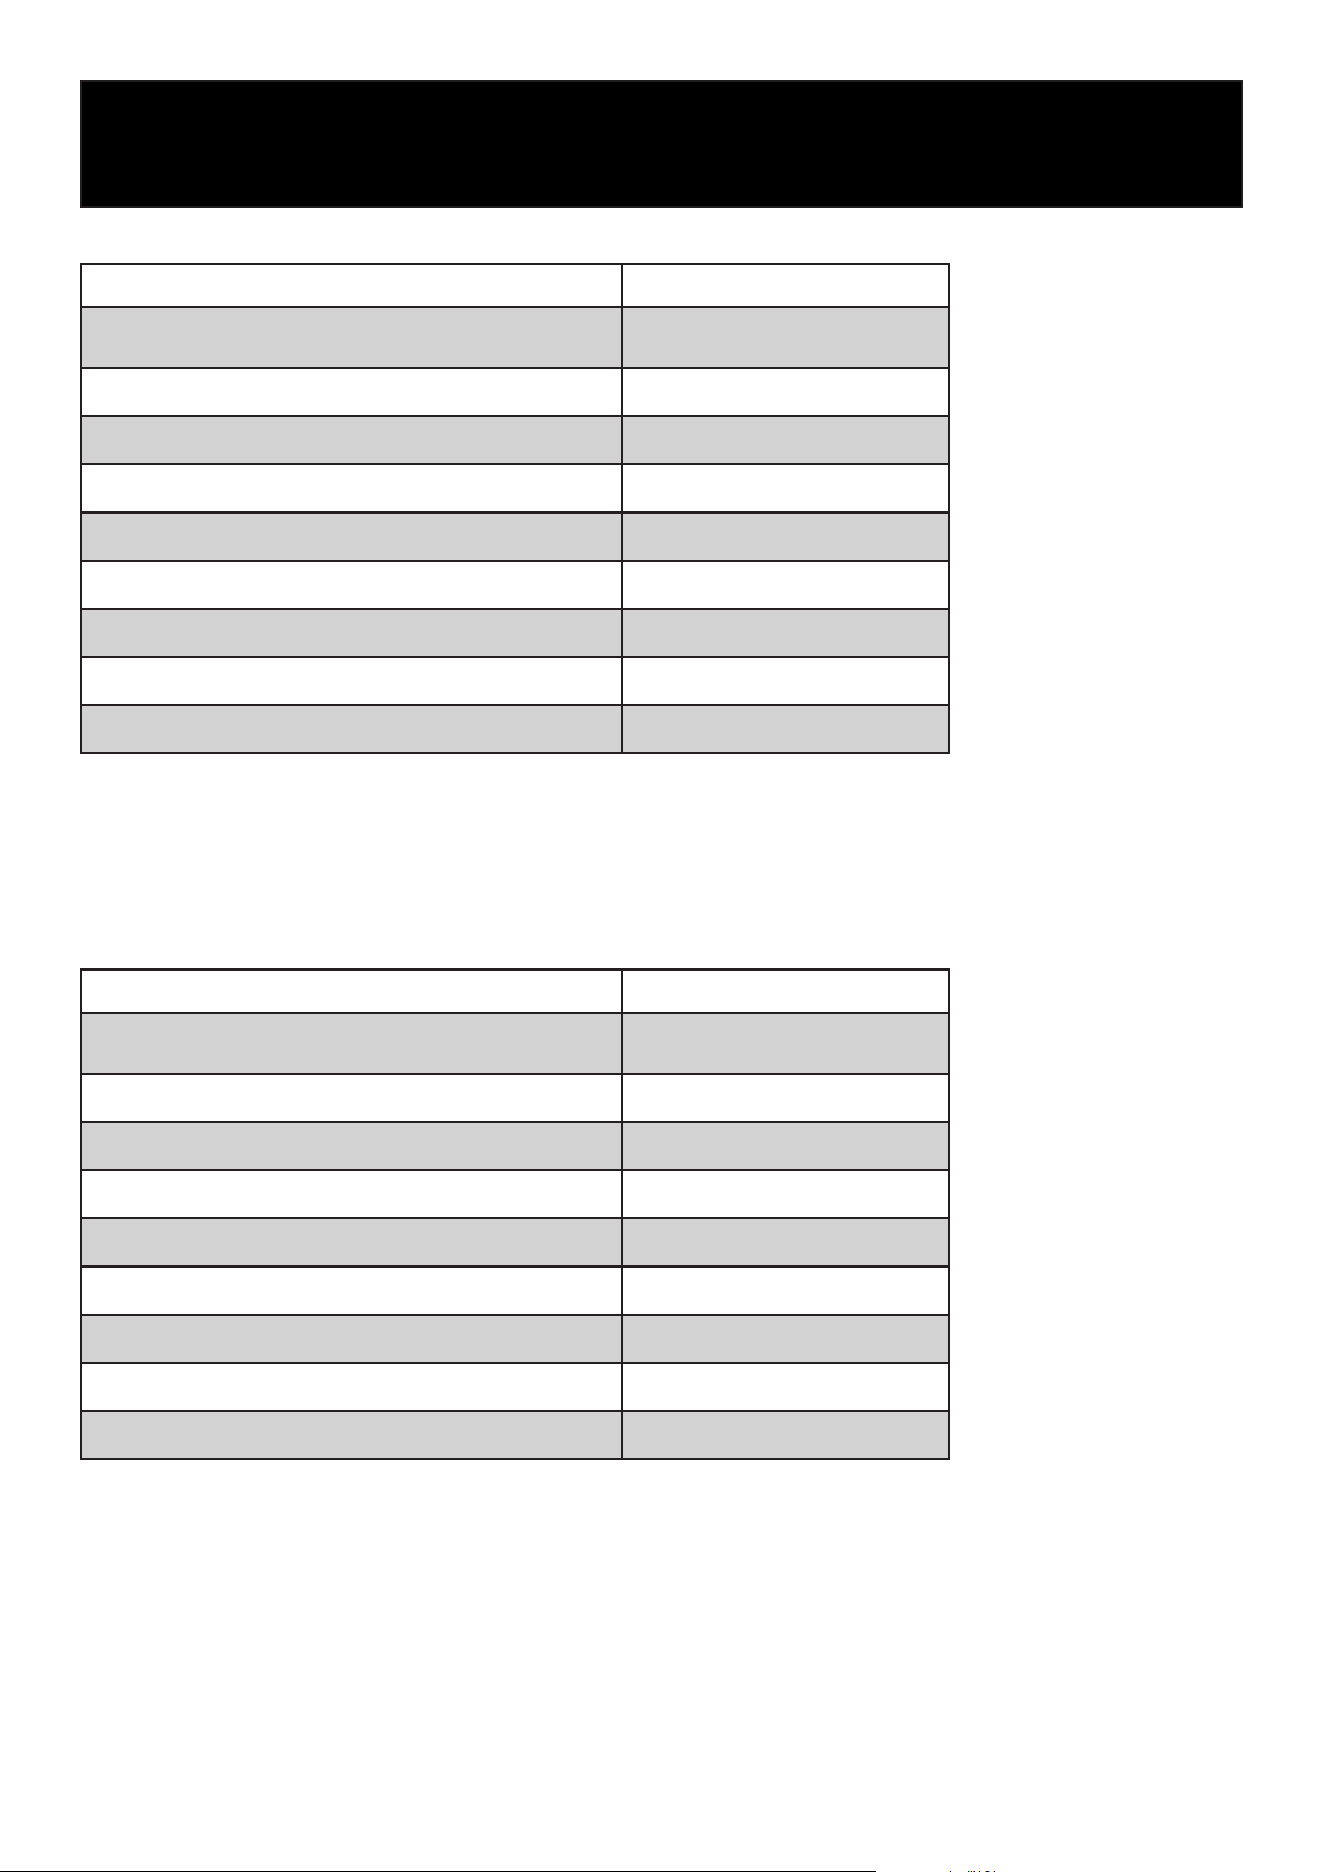
Specication Details
Recommended Capacity
Up to 80 guests per service
period
Average Preheat Time 30 minutes
Daily Charcoal Consumption 22–26.5 lb (10–12 kg)
Average Burn Time Up to 9 hours
Production Capacity 44 lb/hr (20 kg/hr)
Cooking Temperature Range 482–662°F (250–350°C)
Exhaust Airow 1,648 CFM
Flue Gas Flow Rate 0.68 oz/s
Exhaust Gas Temperature 407°F (208°C)
Included Accessories
• Grill rack tongs
• Ash pan
KM-CHO35-SS Series
Included Accessories
• Grill rack tongs
• Ash pan
Specication Details
Recommended Capacity
Up to 40 guests per service
period
Average Preheat Time 25 minutes
Daily Charcoal Consumption 13.2–17.6 lb (6–8 kg)
Average Burn Time Up to 7 hours
Production Capacity 55.1 lb/hr (25 kg/hr)
Cooking Temperature Range 482–662°F (250–350°C)
Exhaust Airow 1,471 CFM
Flue Gas Flow Rate 0.42 oz/s
Exhaust Gas Temperature 550.4°F (288°C)
KM-CHO28-SS Series
8
Installation
Warnings
Do not use ammable liquids or accelerants to ignite charcoal.
Use charcoal only. Never use gasoline, alcohol, lighter uid, or other combustible liquids
An initial burn-in must be performed before rst use.
Operate the oven at cooking temperature before preparing food to remove manufacturing residues
and odors.
Do not connect this appliance directly to a shared chimney or replace ue system.
Before rst use, remove all protective plastic lm and packaging materials from the appliance
exterior and interior.
Clean grill racks before rst use.
Wash with warm water, dry thoroughly, and ensure all surfaces are clean before cooking.
Keep the hood, lters, and ventilation ducts clean at all times.
Grease buildup may create a re hazard and reduce ventilation performance.
Do not block or cover ventilation openings during installation or operation.
Proper airow is required for safe and ecient operation.
Install the appliance according to all instructions in this manual and applicable local codes.
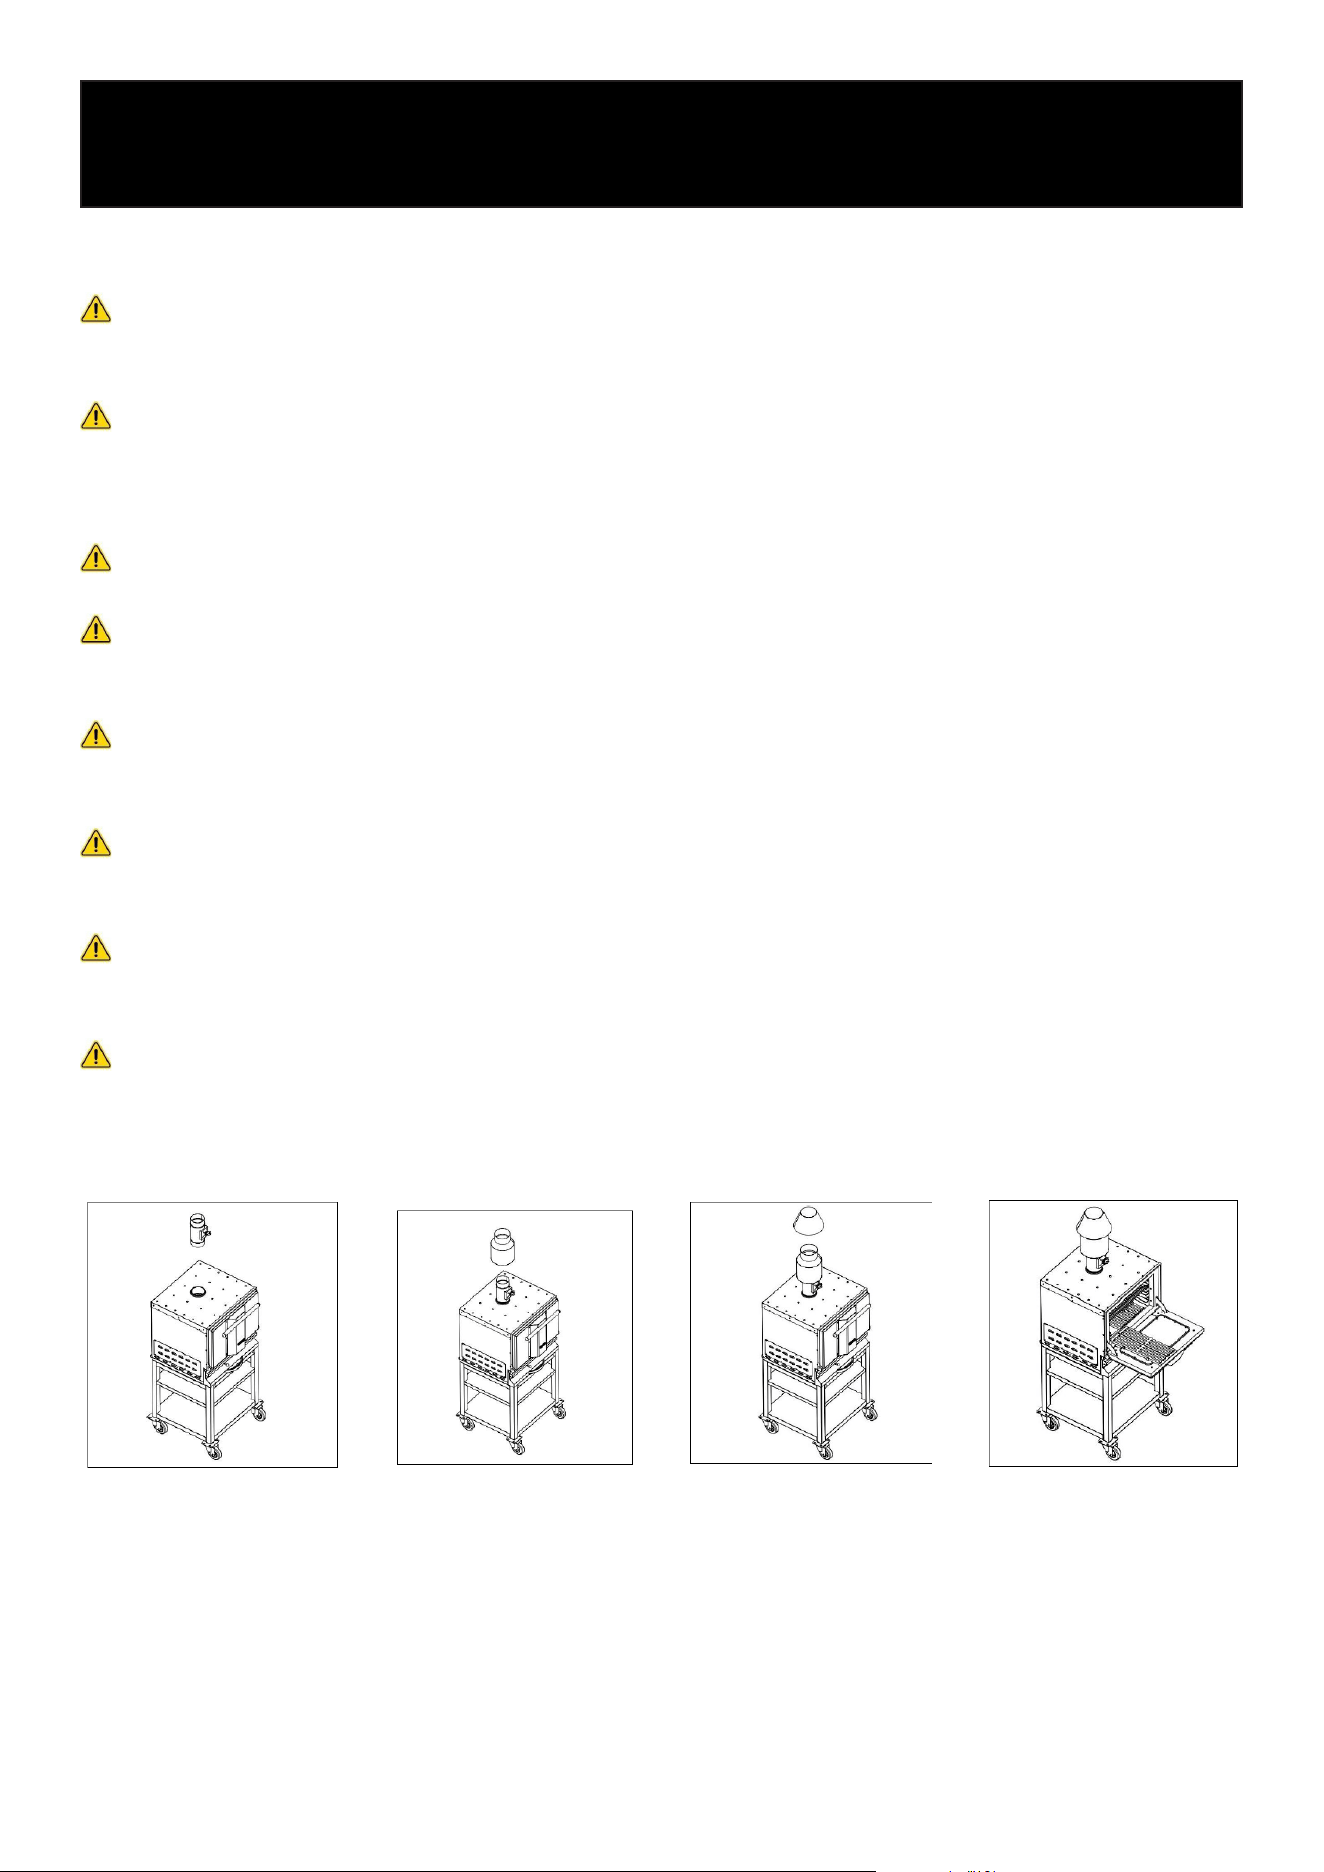
Oven Assembly
Before operating the oven, install the exhaust components in the order shown below.
Step 1 – Install the Flue
Adapter
Position the ue adapter
over the exhaust outlet
located on the top of the
oven and ensure it is fully
seated.
Step 2 – Install the Ex-
haust Stack
Place the exhaust stack
onto the ue adapter and
align it properly with the
exhaust outlet.
Step 3 – Install the Spark
Arrestor Cap
Position the spark ar-
restor cap on top of the
exhaust stack and ensure
it is securely seated.
Step 4 – Verify Assembly
and Install Accessories
Conrm that all exhaust
components are correctly
assembled and secure-
ly installed. Install the
cooking rack(s) and any
additional accessories
supplied with the oven.
Figure 1
Figure 2
Figure 3 Figure 4
9
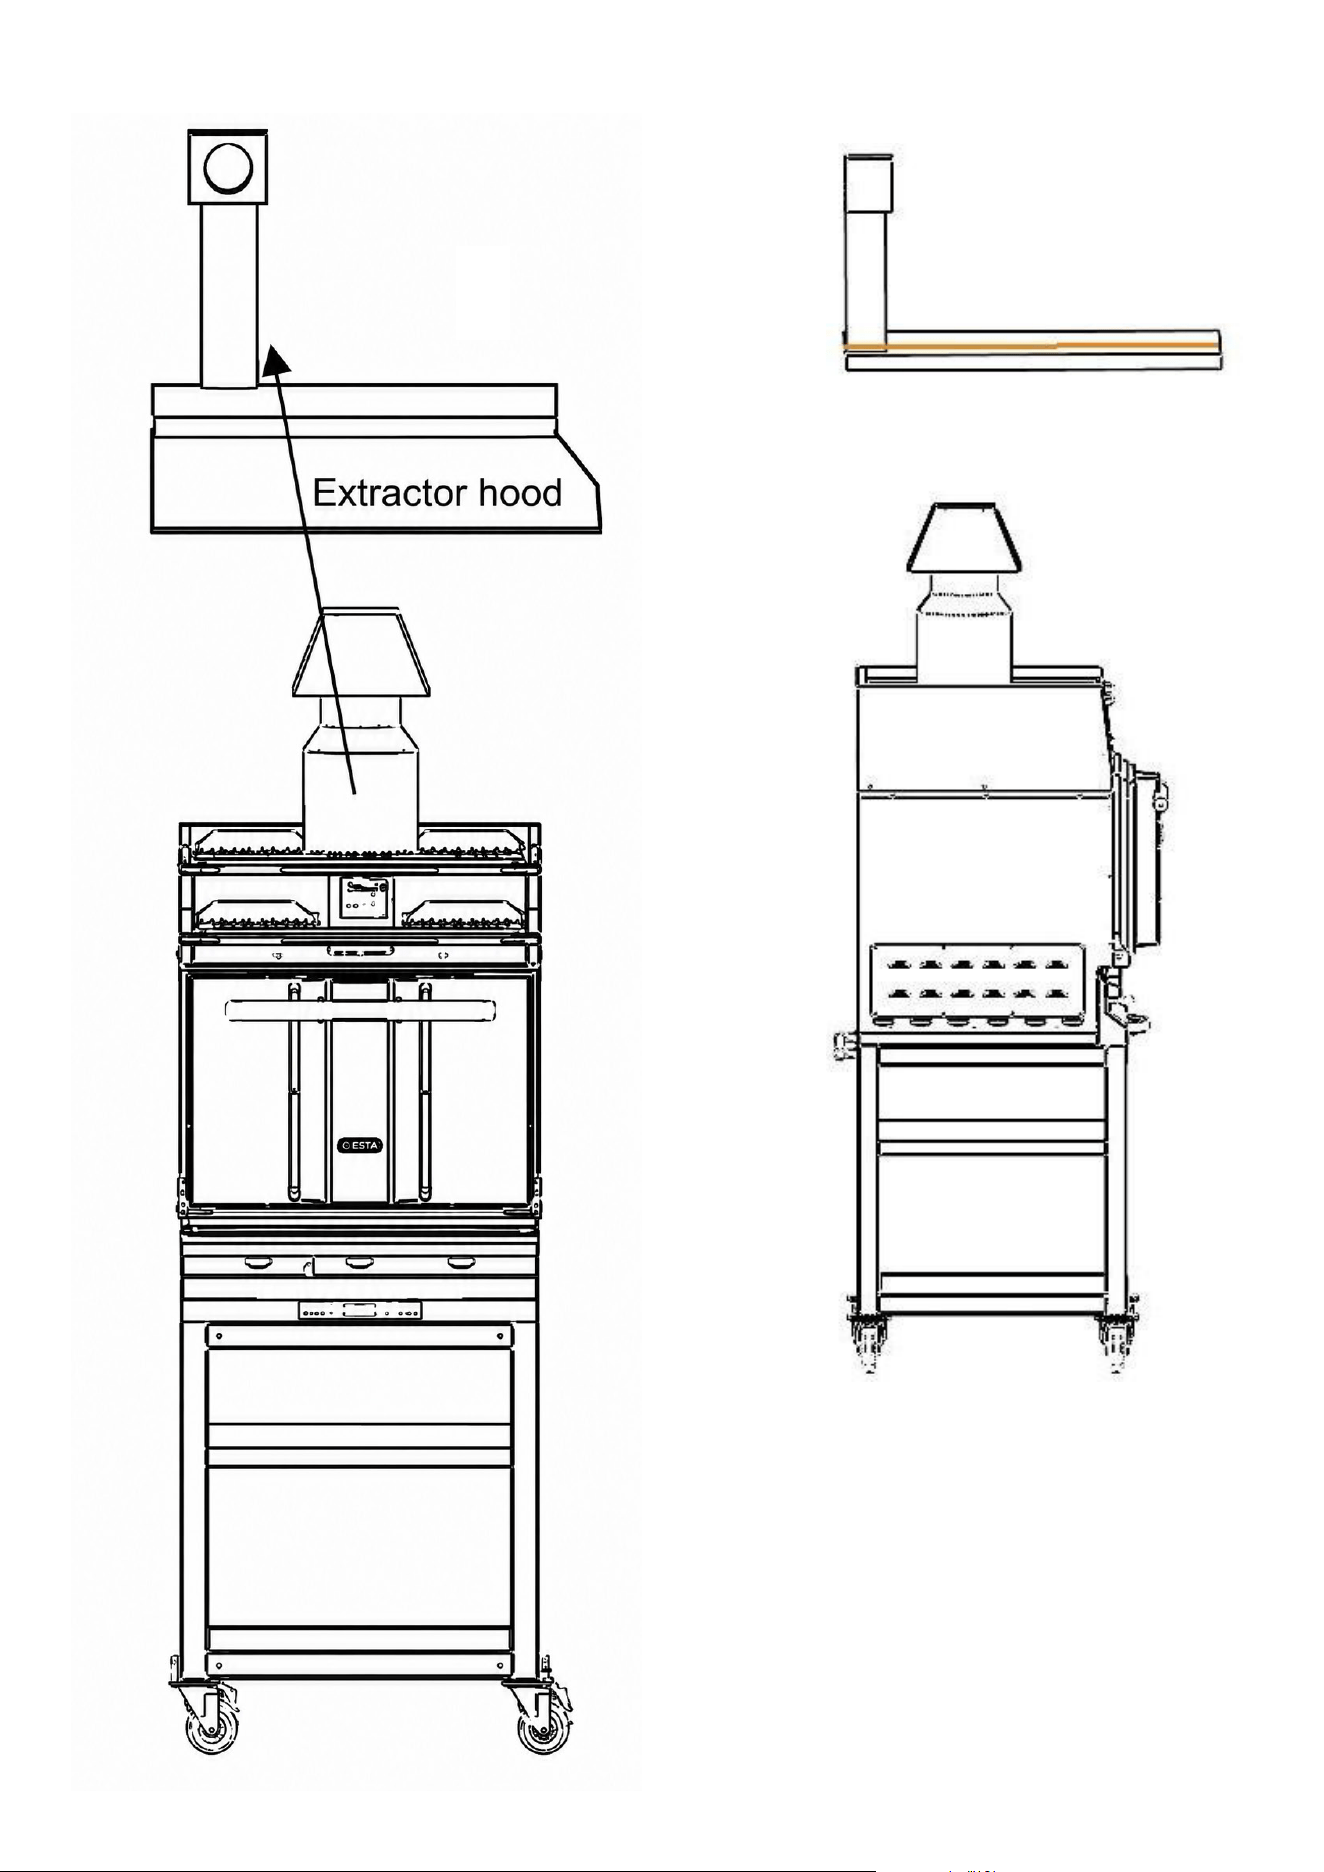
Oven Installation Under an Exhaust Hood
Designed to reduce the risk of
ames and sparks entering the
exhaust ductwork.
Illustration for reference only. Actual exhaust
hood installation must comply with local code
requirements.

This oven must be installed beneath a properly sized commercial exhaust hood in accordance with
all applicable local ventilation, re, and building codes.
The exhaust system must be designed to:
• Safely remove smoke, heat, grease, and cooking vapors
• Prevent ames or excessive heat from entering the ventilation ducts
• Maintain proper airow during operation
10
Installation must comply with:
• NFPA 96: Standard for Ventilation Control and Fire Protection of Commercial Cooking Opera-
tions
• All applicable local codes and regulations
Installation must be performed only by qualied personnel.
Exhaust Hood & Ventilation Recommendations
• Clean the exhaust hood, grease lters, and ductwork regularly.
Weekly cleaning is strongly recommended, especially for grease lters.
• A rebreak cap (spark arrestor / rebreak hat) is recommended to:
• Reduce smoke temperature before entering the ventilation system
• Help reduce the risk of ames entering the ductwork
• Inspection, cleaning, and maintenance of the hood and ventilation system must be performed
according to the hood manufacturer’s instructions and applicable re safety regulations.
• Always follow the exhaust hood manufacturer’s installation, operation, and maintenance guide-
lines.
Fire Safety Instructions
In the event of a chimney or ventilation re:
1. Immediately turn off the smoke extraction motor or exhaust fan.
2. Shut down the oven as quickly and safely as possible.
3. Close the upper and lower air vents on the oven to help restrict airow and smother the re.
4. Use an approved re extinguisher according to local re safety procedures.
5. Contact emergency services immediately if the re cannot be controlled safely.
Important
• Do not operate the oven without a properly functioning ventilation system.
• Do not block or restrict airow to the hood or ventilation openings.
• Failure to maintain proper ventilation and cleaning procedures may create a re hazard and
reduce equipment performance.
11
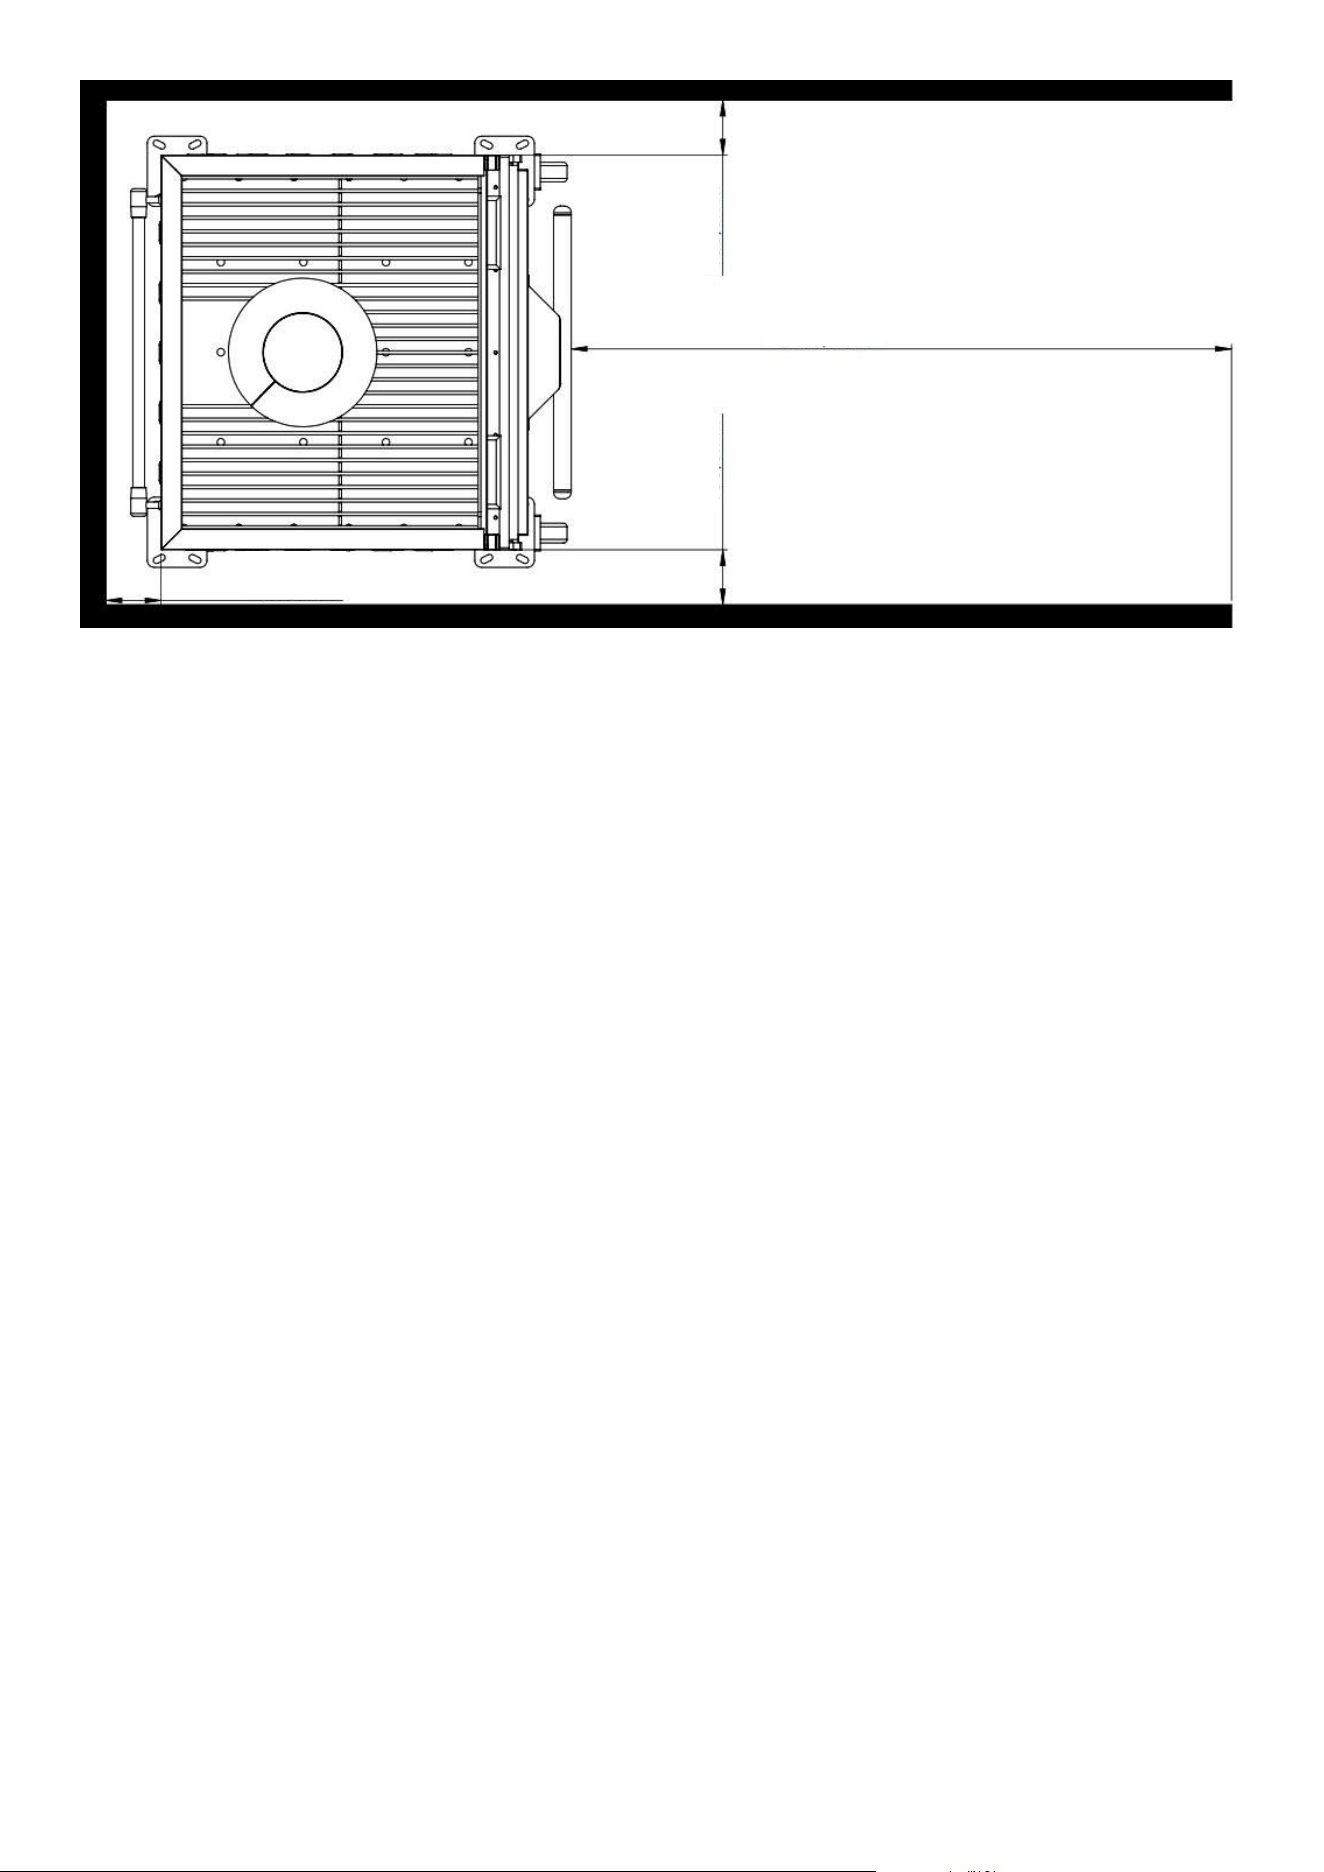
Clearance Requirements
Maintain the required clearances around the oven to ensure safe operation, proper ventilation, and
service access.
Minimum Clearances
To Combustible Materials
• Maintain a minimum clearance of 12 in. (305 mm) between the oven and any combustible ma-
terials or construction.
For Ventilation and Service Access
• Maintain a minimum clearance of 4 in. (100 mm) on the left side, right side, and rear of the
oven.
• Do not block ventilation openings or airow around the appliance.
Operator Working Space
• Maintain a minimum clear working space of 47.24 in. (1200 mm) in front of the oven for safe
loading, unloading, cleaning, and operation.
Installation Requirements
• Do not ll required air gaps with insulation, sealants, or other materials.
• Install the oven beneath a properly sized commercial exhaust hood in accordance with local
codes.
• Hood dimensions and placement must comply with applicable ventilation and re-safety re-
quirements.
• Any oven surfaces that contact surrounding cabinetry or enclosure panels must be sealed with
high-temperature silicone.
3.94 inch
47.24 inch
3.94 inch
3.94 inch
12
Installation Requirements
Failure to maintain the required clearances may result in:
• Fire hazards
• Overheating
• Reduced equipment performance
• Property damage or personal injury
Installation must comply with all applicable local re, ventilation, and building codes.
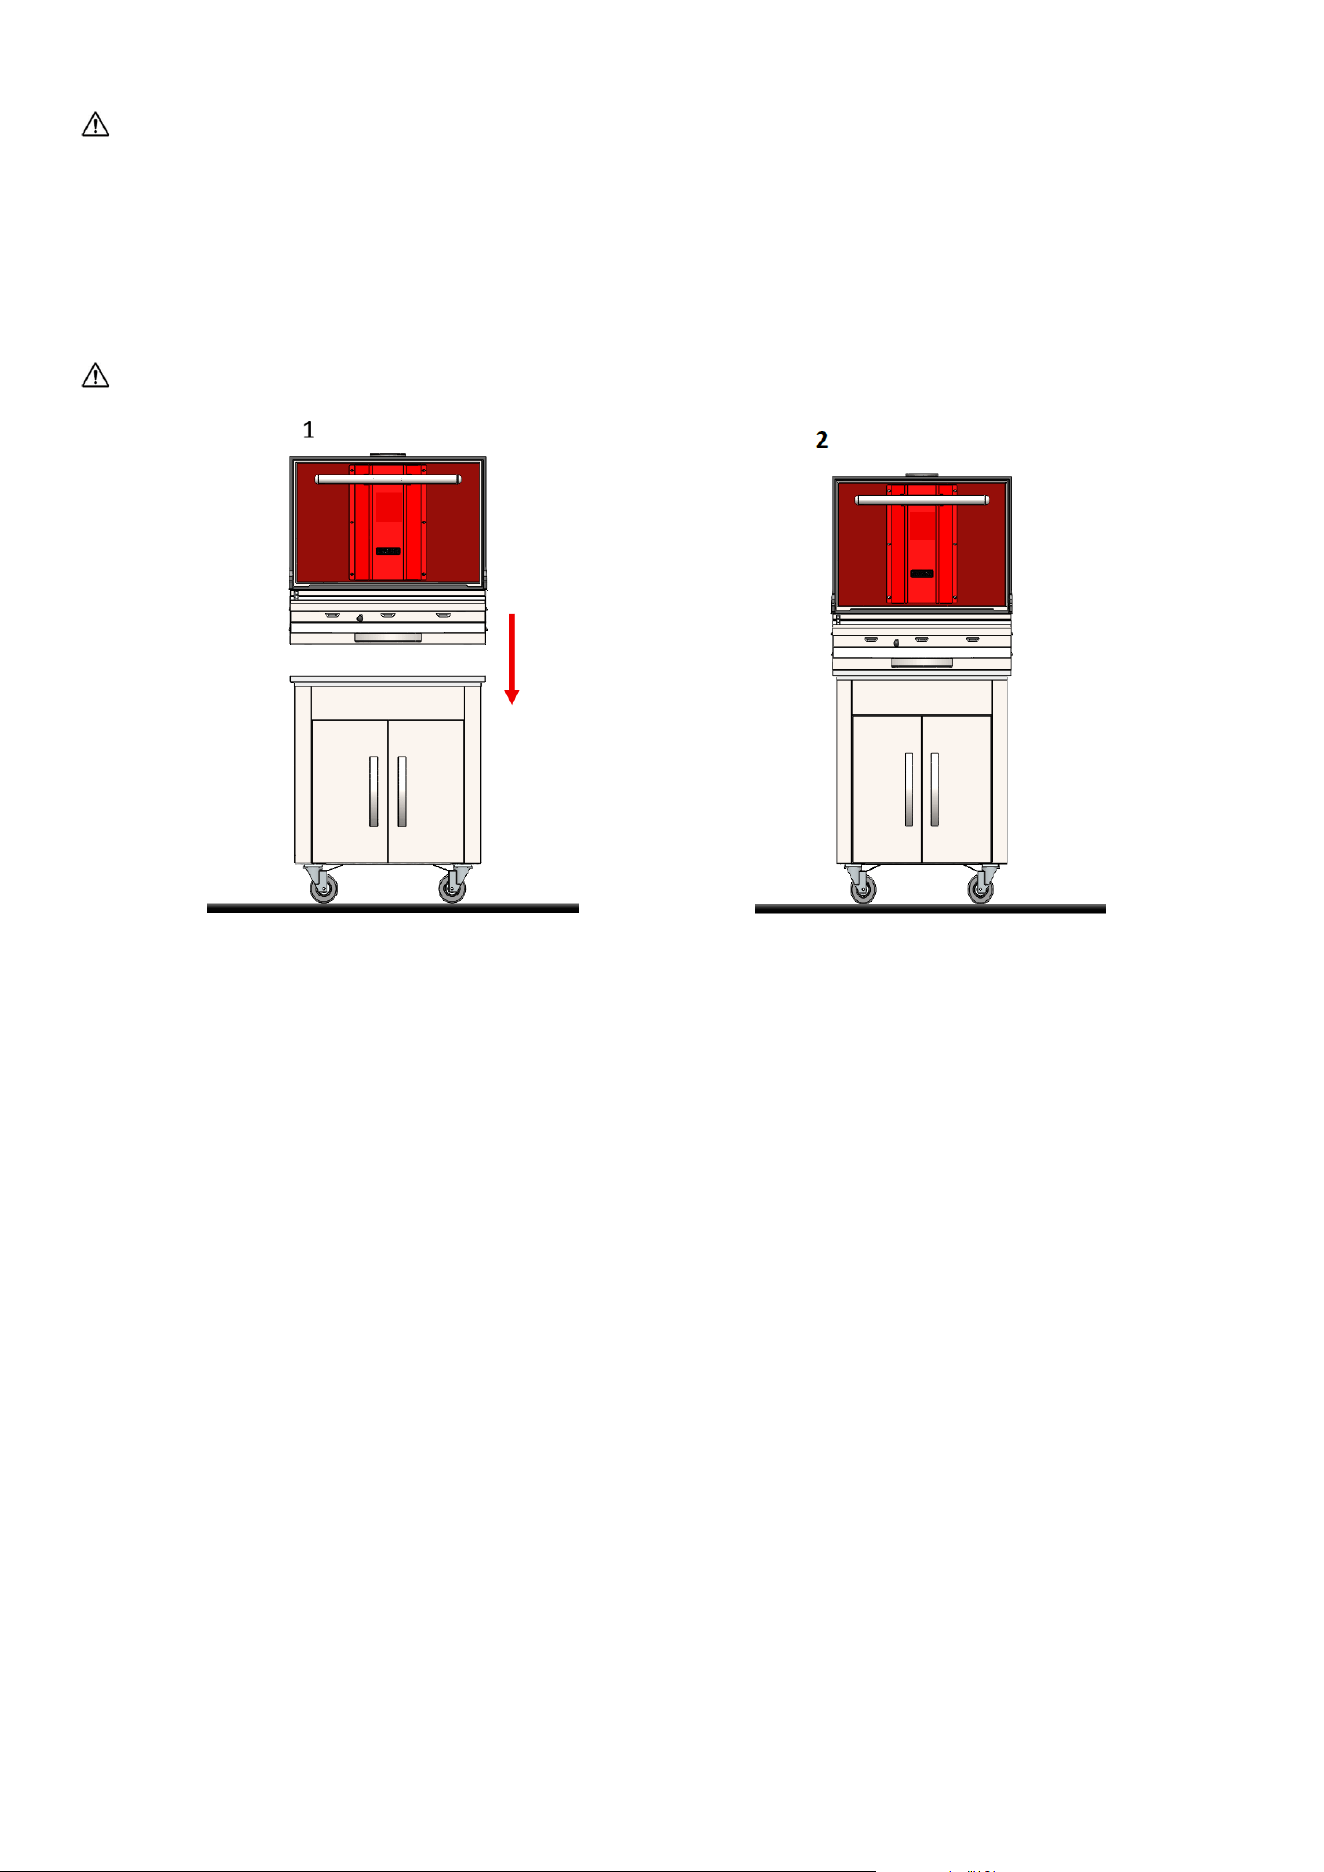
Note: For models without a base cabinet skip steps 1 and 2.
1. Position the Oven
Using appropriate lifting equipment, carefully lift the oven and lower it onto the cabinet base as
shown. Ensure the oven is fully seated on the cabinet and properly aligned on all sides. The oven
must not overhang any edge of the cabinet.
2. Secure the Oven
From inside the cabinet, insert the supplied mounting bolts through the cutout holes in the cabinet
top and into the threaded mounting holes on the bottom of the oven. Tighten all bolts securely to
fasten the oven to the cabinet.
Note: Verify that the oven is level and securely attached to the cabinet before operating the appli-
ance.
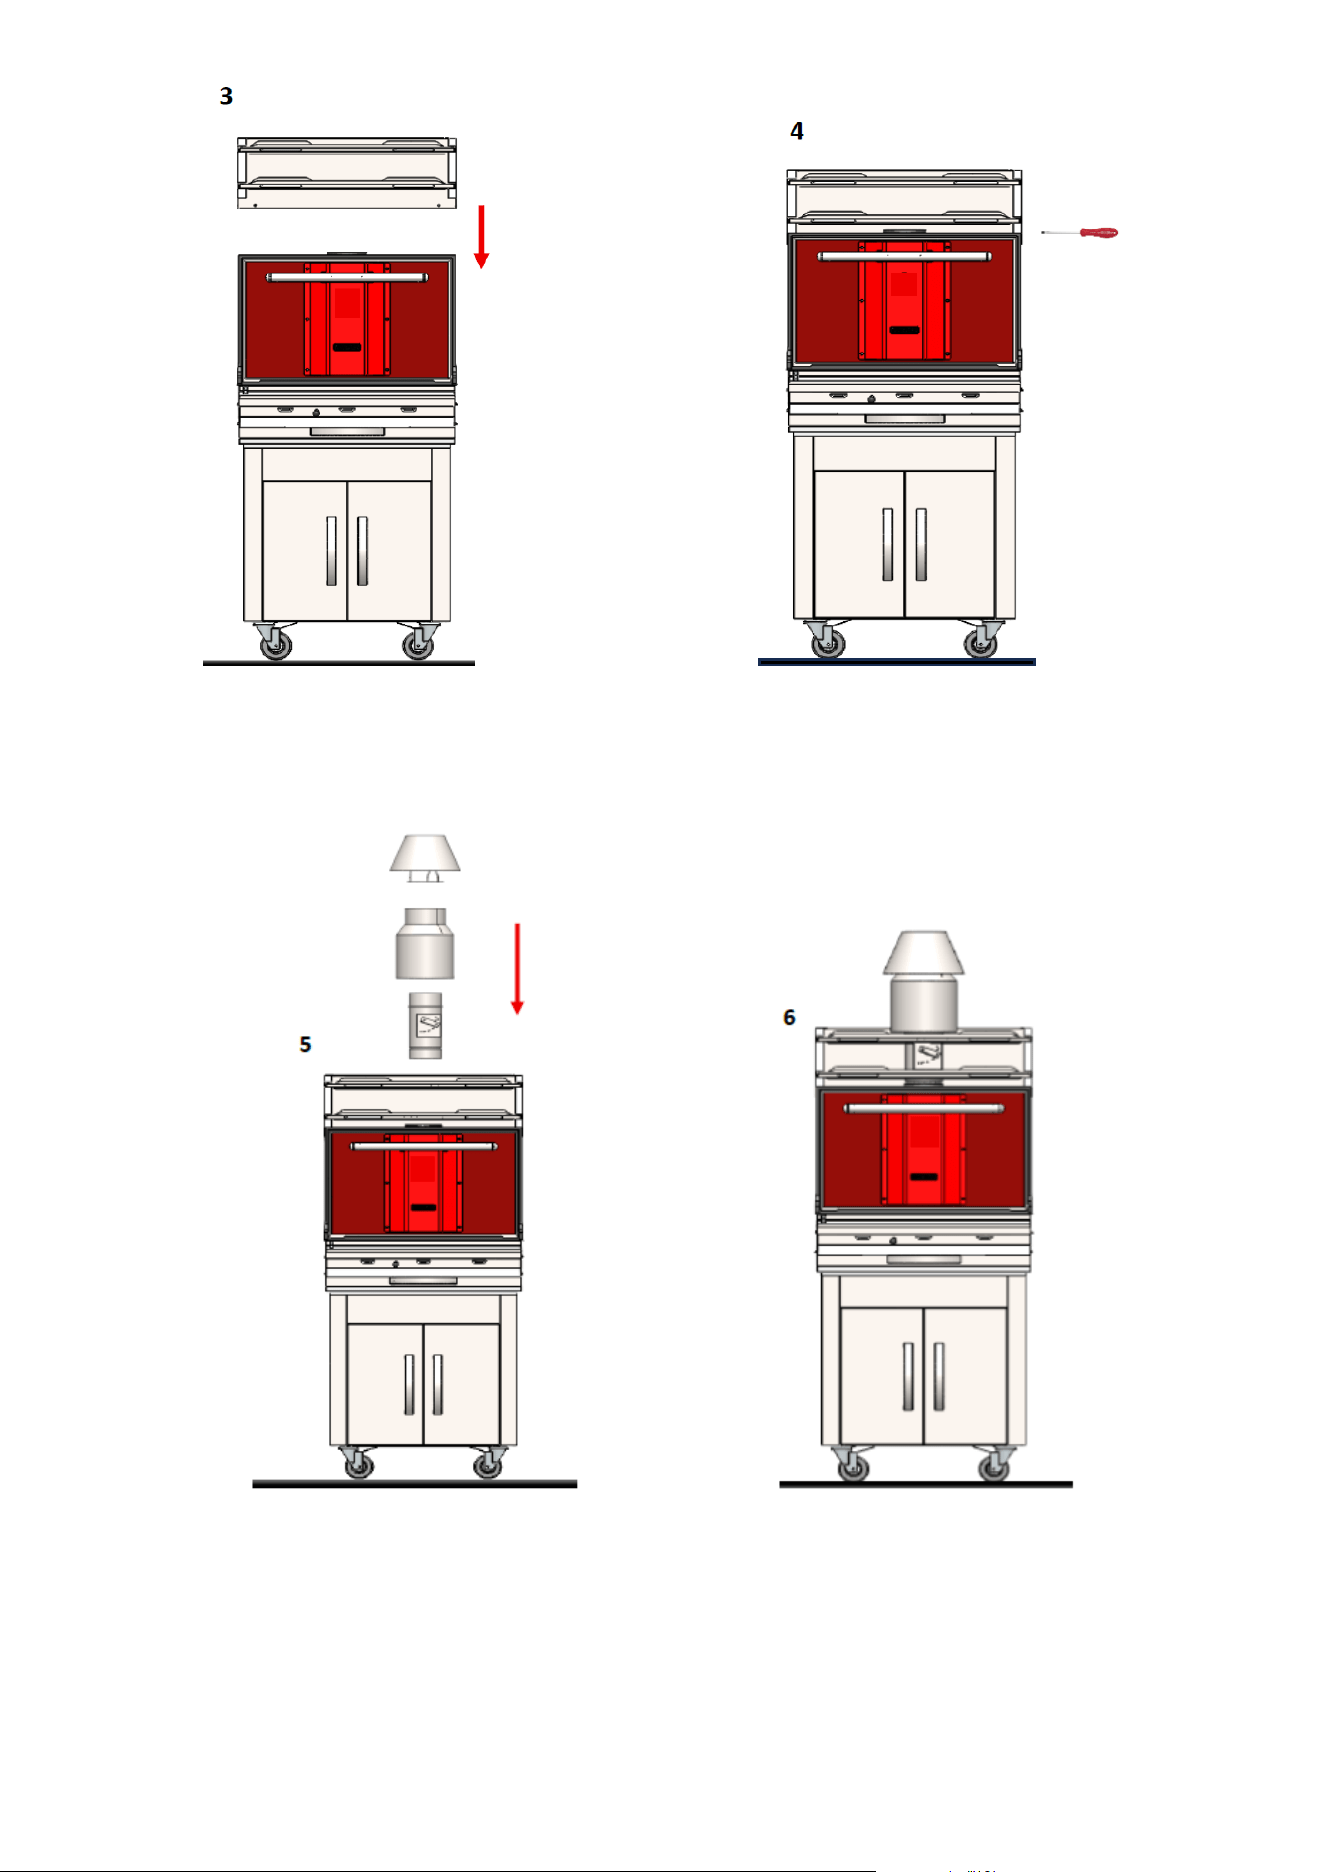
Place the top rack onto the oven as shown in Figures 3 and 4. Align all mounting holes, then se-
cure the cabinet using the supplied M5 × 20 screws through the mounting holes located on both
sides and the rear of the unit. Tighten all screws securely.
13
Install the chimney assembly supplied inside the oven into the chimney opening on top of the
oven, as shown in Figure 5. Ensure all chimney components are fully seated and securely installed
before operation.
14
Operation
Operate the oven only when the doors are fully open or fully closed.
Operating the oven with the doors partially open may allow heat, ames, or smoke to escape, cre-
ating a re hazard.
Use charcoal fuel only.
Do not use wood, ammable liquids, or other unauthorized fuels.
Never use gasoline, kerosene, lighter uid, alcohol, or other ammable liquids to ignite or accel-
erate the charcoal.
Keep all ammable liquids away from the appliance.
Do not operate the appliance in severe weather or unsuitable environmental conditions.
Avoid operation during conditions that may affect safe performance, including excessive moisture,
ooding, or freezing conditions.
Accessible surfaces become extremely hot during operation.
Use heat-resistant gloves, tools, or tongs when handling cooking grates or internal components.
Do not touch hot surfaces with bare hands.
Do not block or cover air intake or exhaust openings.
Restricted airow may affect combustion, ventilation, and safe operation of the oven.
Charcoal Loading
1. Open the oven door and remove the cooking racks if installed.
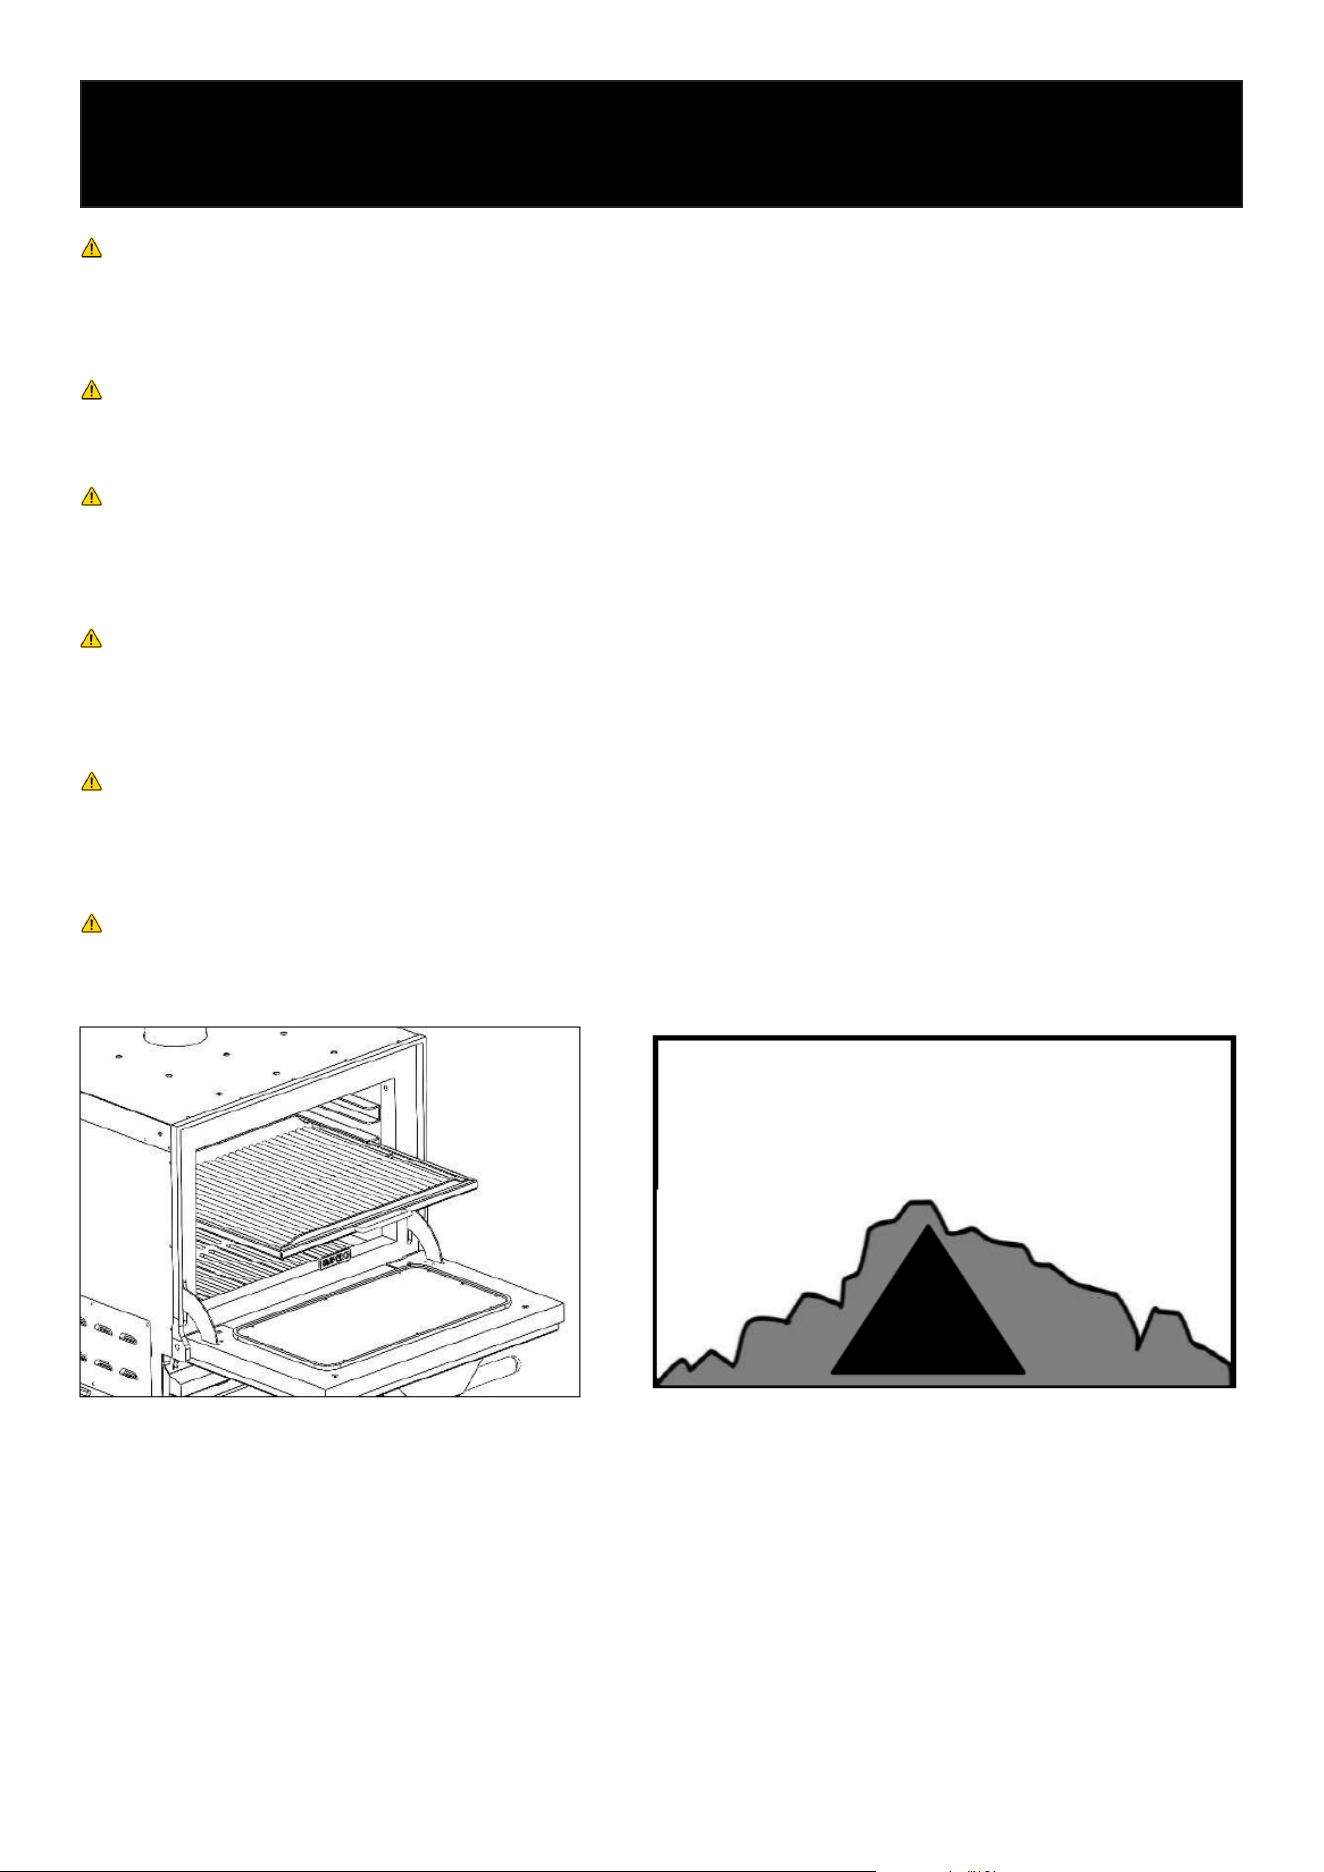
2. Arrange the charcoal in a pyramid-shaped pile to promote ignition and even heat distribution..
3. Ensure the charcoal is evenly distributed and does not block the air openings.
4. Use only high-quality charcoal intended for commercial cooking applications.
The pyramid arrangement promotes proper ignition and helps establish an even charcoal bed
during startup.
Recommended Charcoal Load
The amount of charcoal required varies depending on the oven model and cooking demand.
Do not exceed the recommended charcoal capacity for your oven model.
15
Firing The Oven
WARNING
The ignition process must be performed with all cooking racks, cookware, and food removed from
the oven.
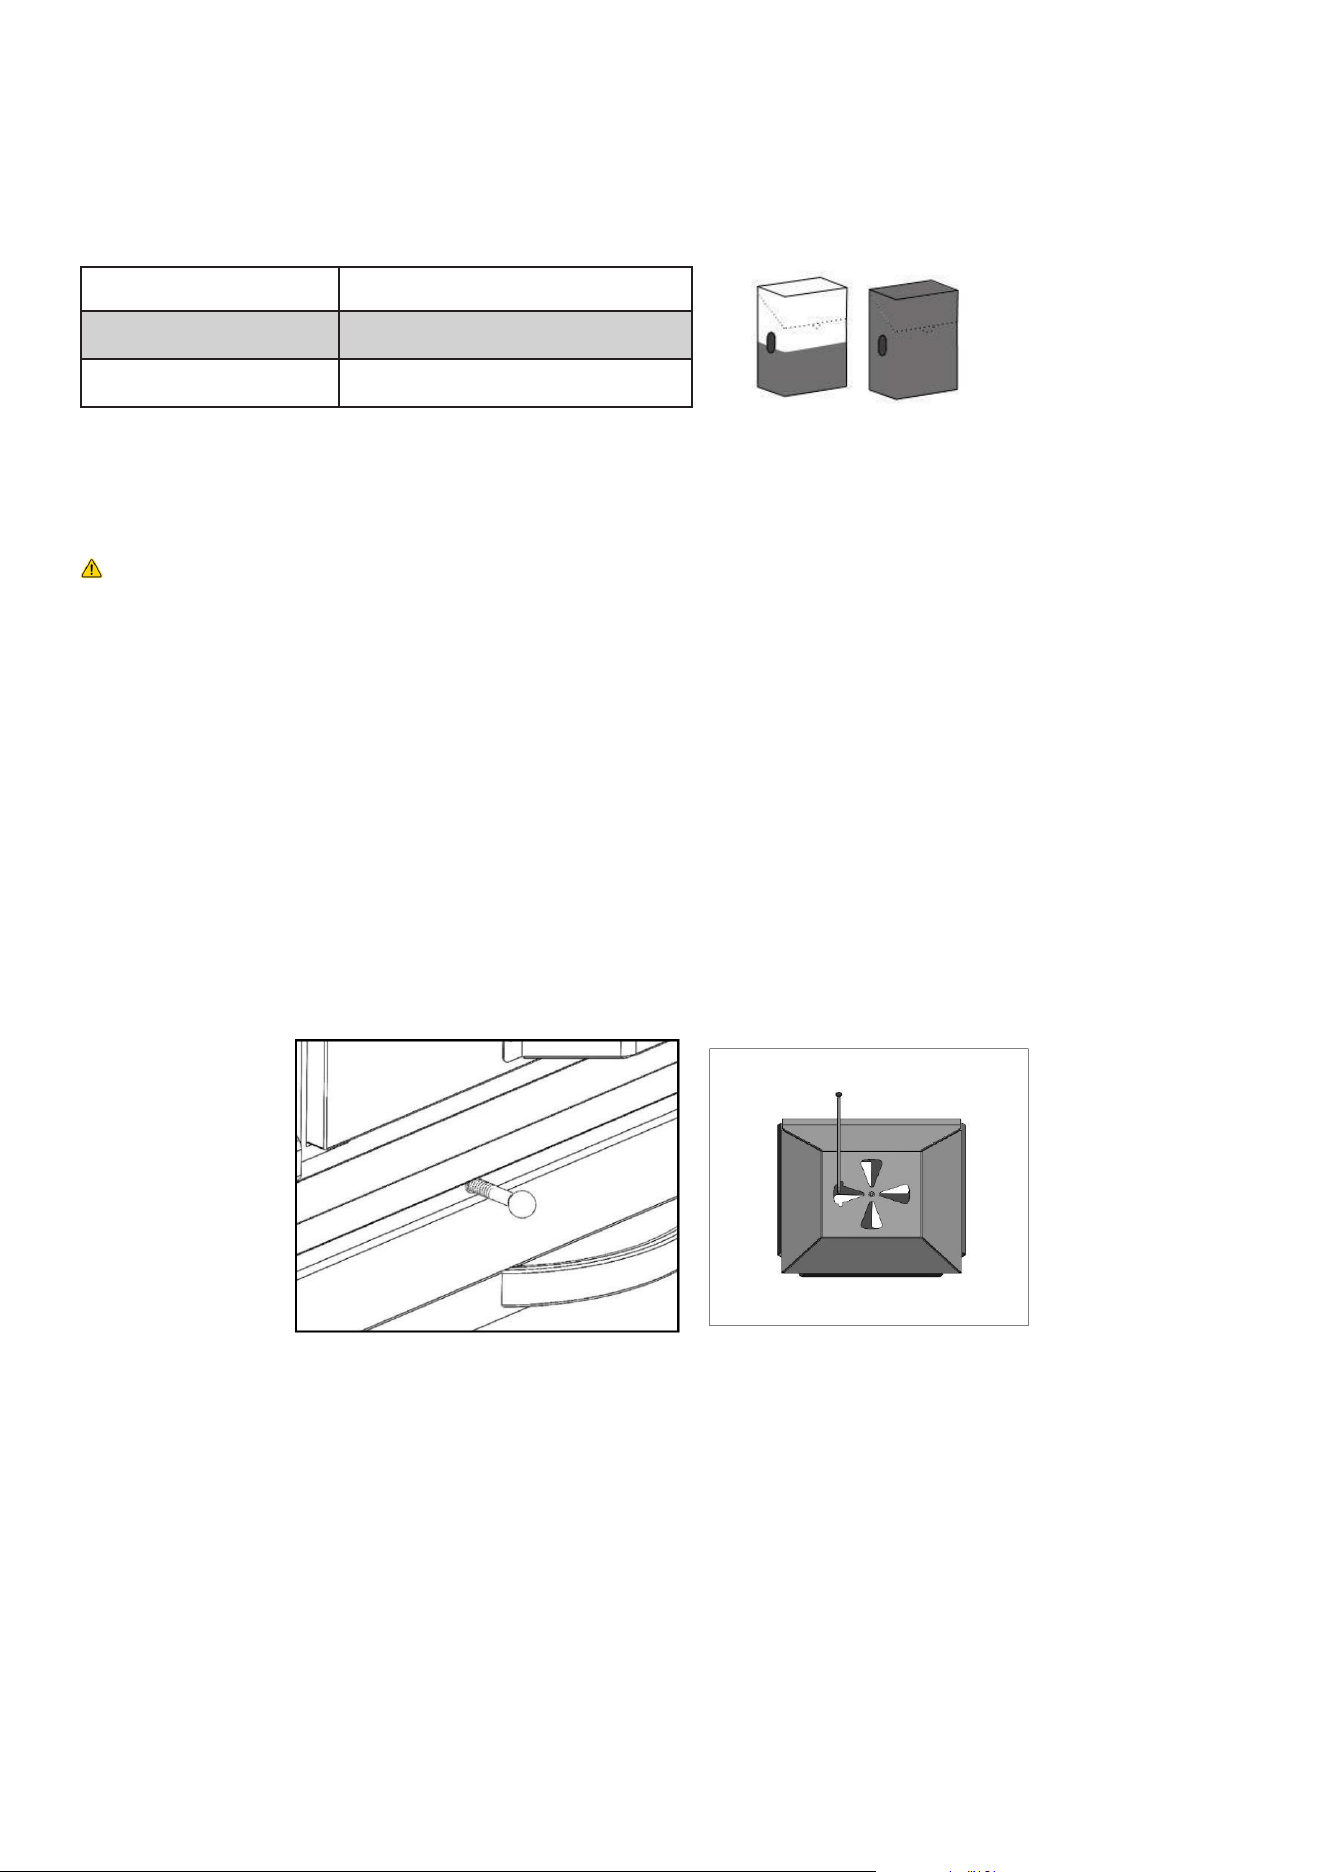
1. Fully open the upper exhaust vent.
2. Fully open the lower air intake vent by opening the ash drawer.
3. Place re starters or ignition cubes in three evenly spaced locations within the charcoal pile.
4. Ignite the re starters and close the oven door.
5. Allow the charcoal to ignite and burn for approximately 25–40 minutes, depending on the oven
model and charcoal type.
6. Once the charcoal is burning evenly, close the lower air intake vent and allow the oven to stabi-
lize for an additional 10 minutes while keeping the upper exhaust vent open.
7. Verify that the charcoal is fully ignited with no visible black or unlit charcoal remaining.
Model Recommended Charcoal Load
KM-CHO28 Series 13.2 lb
KM-CHO35 Series 22 lb
The oven is ready for operation when the charcoal bed is evenly lit and the desired cooking tem-
perature has been reached.
16
Ready to Cook
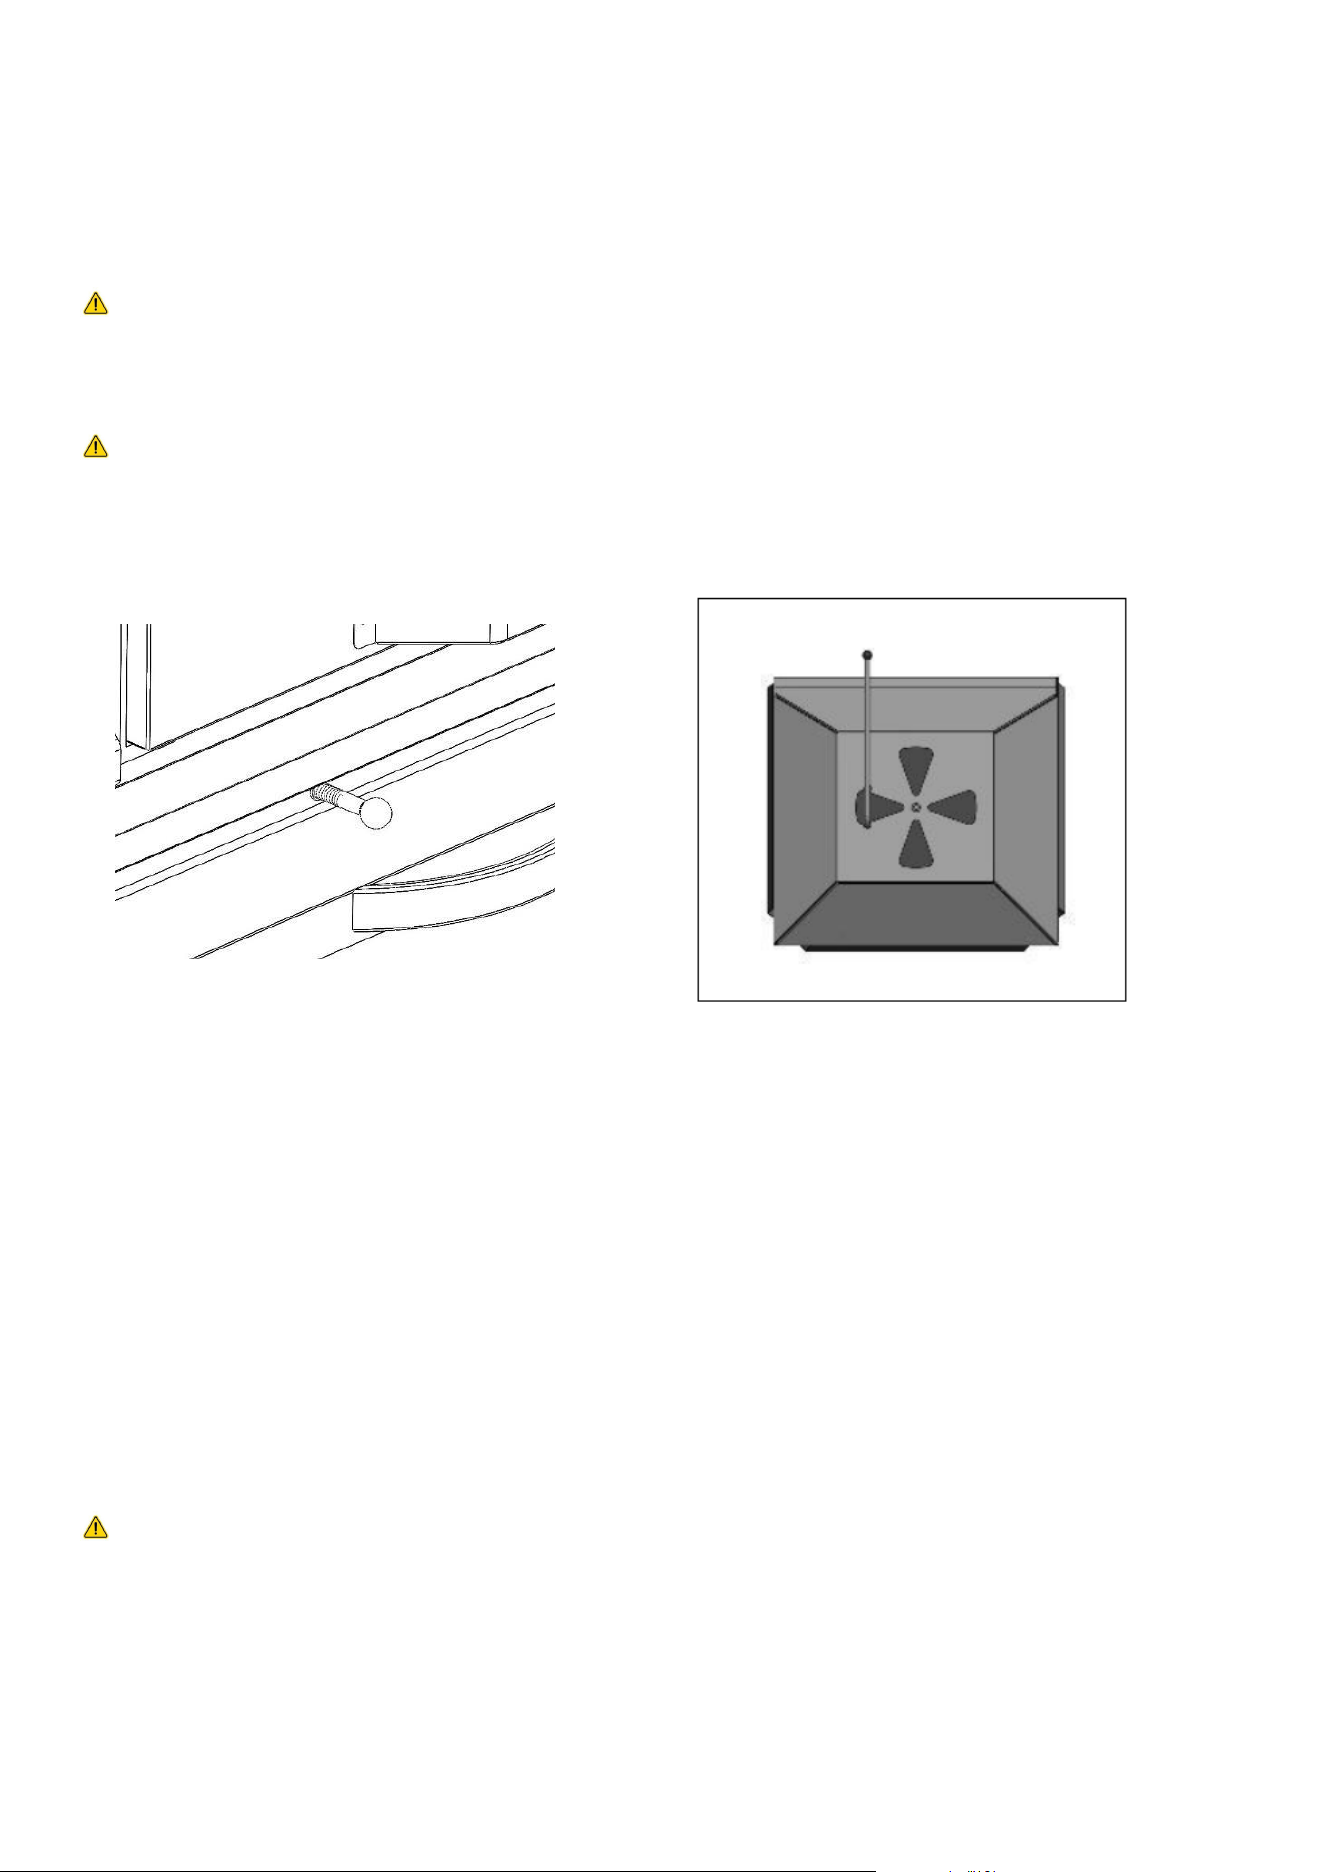
Once the charcoal has fully ignited and the
oven has reached the desired cooking tempera-
ture, adjust the cooking rack position according
to the type and thickness of the food being
prepared.
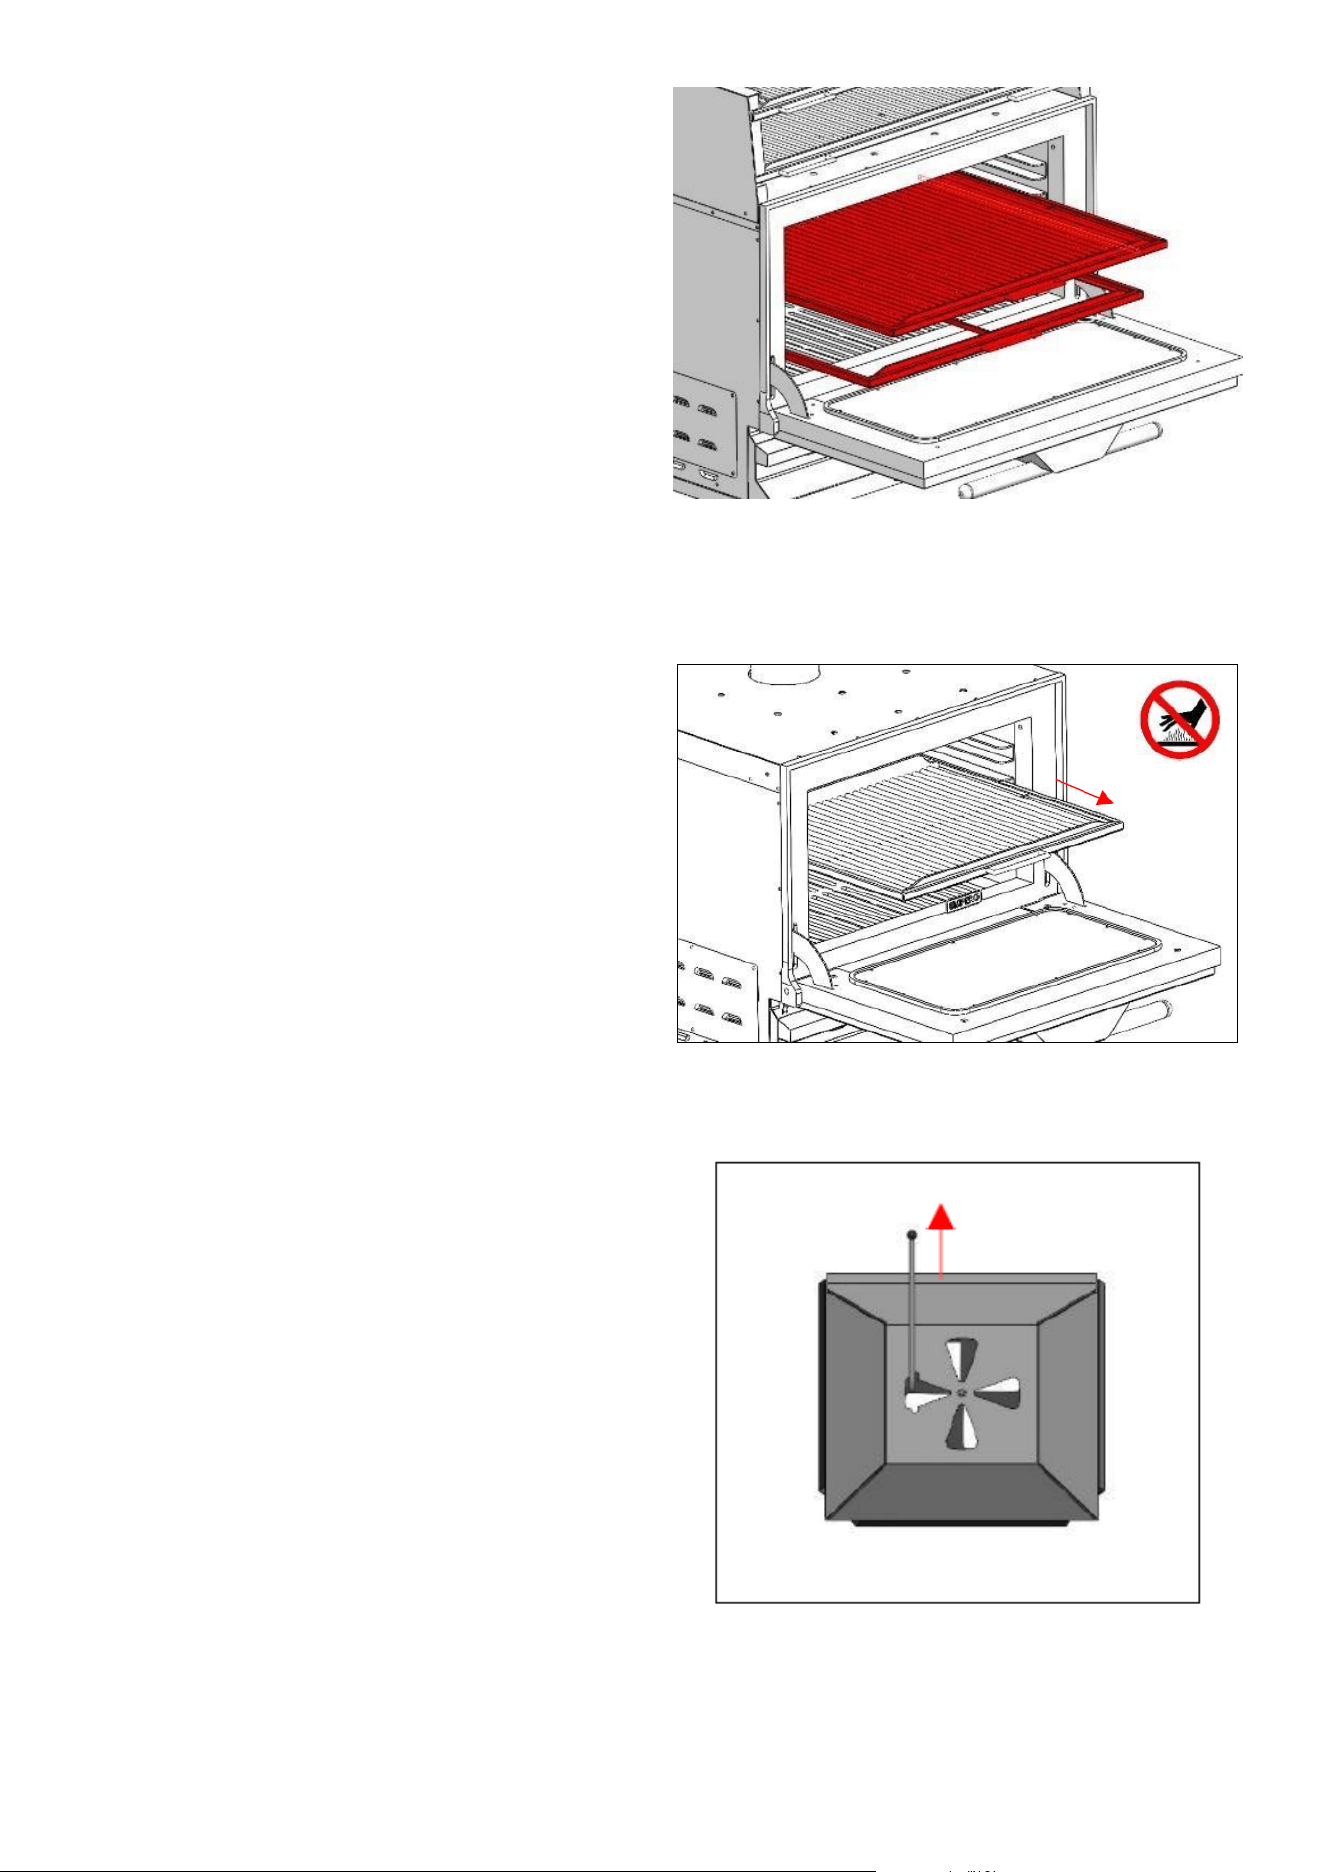
Position the cooking rack closer to the char-
coal for higher heat and faster cooking.
Position the cooking rack farther from the
charcoal for lower heat and more controlled
cooking.
Increasing Smoke Flavor
For foods that benet from additional smoke
avor, the upper exhaust vent may be partially
closed to increase smoke retention. Do not
completely close the vent while charcoal is
actively burning.
Note: Reducing airow will increase smoke
retention inside the cooking chamber and may
intensify the smoky avor of the food.
Adjusting the Cooking Rack
Open the oven door carefully.
Remove or reposition the cooking rack to the
desired height.
Ensure the rack is securely seated before load-
ing food.
Preparing for Cooking
Before placing food in the oven:
Open the upper and lower vents to establish
proper airow.
Verify that the charcoal is burning evenly and
the oven has reached the desired cooking tem-
perature.
Place food on the cooking rack and close the
oven door.
Important: Always use heat-resistant gloves
when handling cooking racks or adjusting
components while the oven is hot. All interior
surfaces may reach high temperatures during
operation.
Shutting Down the Oven
At the end of service, close the upper exhaust vent and ensure the lower air intake vent is fully
closed.
Closing both vents restricts airow to the charcoal bed, allowing the remaining charcoal to extin-
guish naturally while preserving any unused fuel for future use.
Important
Do not extinguish the charcoal with water or any other liquid. Rapid cooling may damage oven
components and can create steam and ash hazards.
Allow the charcoal to burn out naturally by keeping both vents closed.
Any remaining charcoal may be reused during the next cooking session, provided it is dry and in
good condition.
CAUTION: Charcoal and ash may remain hot for several hours after operation. Allow the oven to
cool completely before handling charcoal, removing ash, or performing cleaning and maintenance
procedures.
17
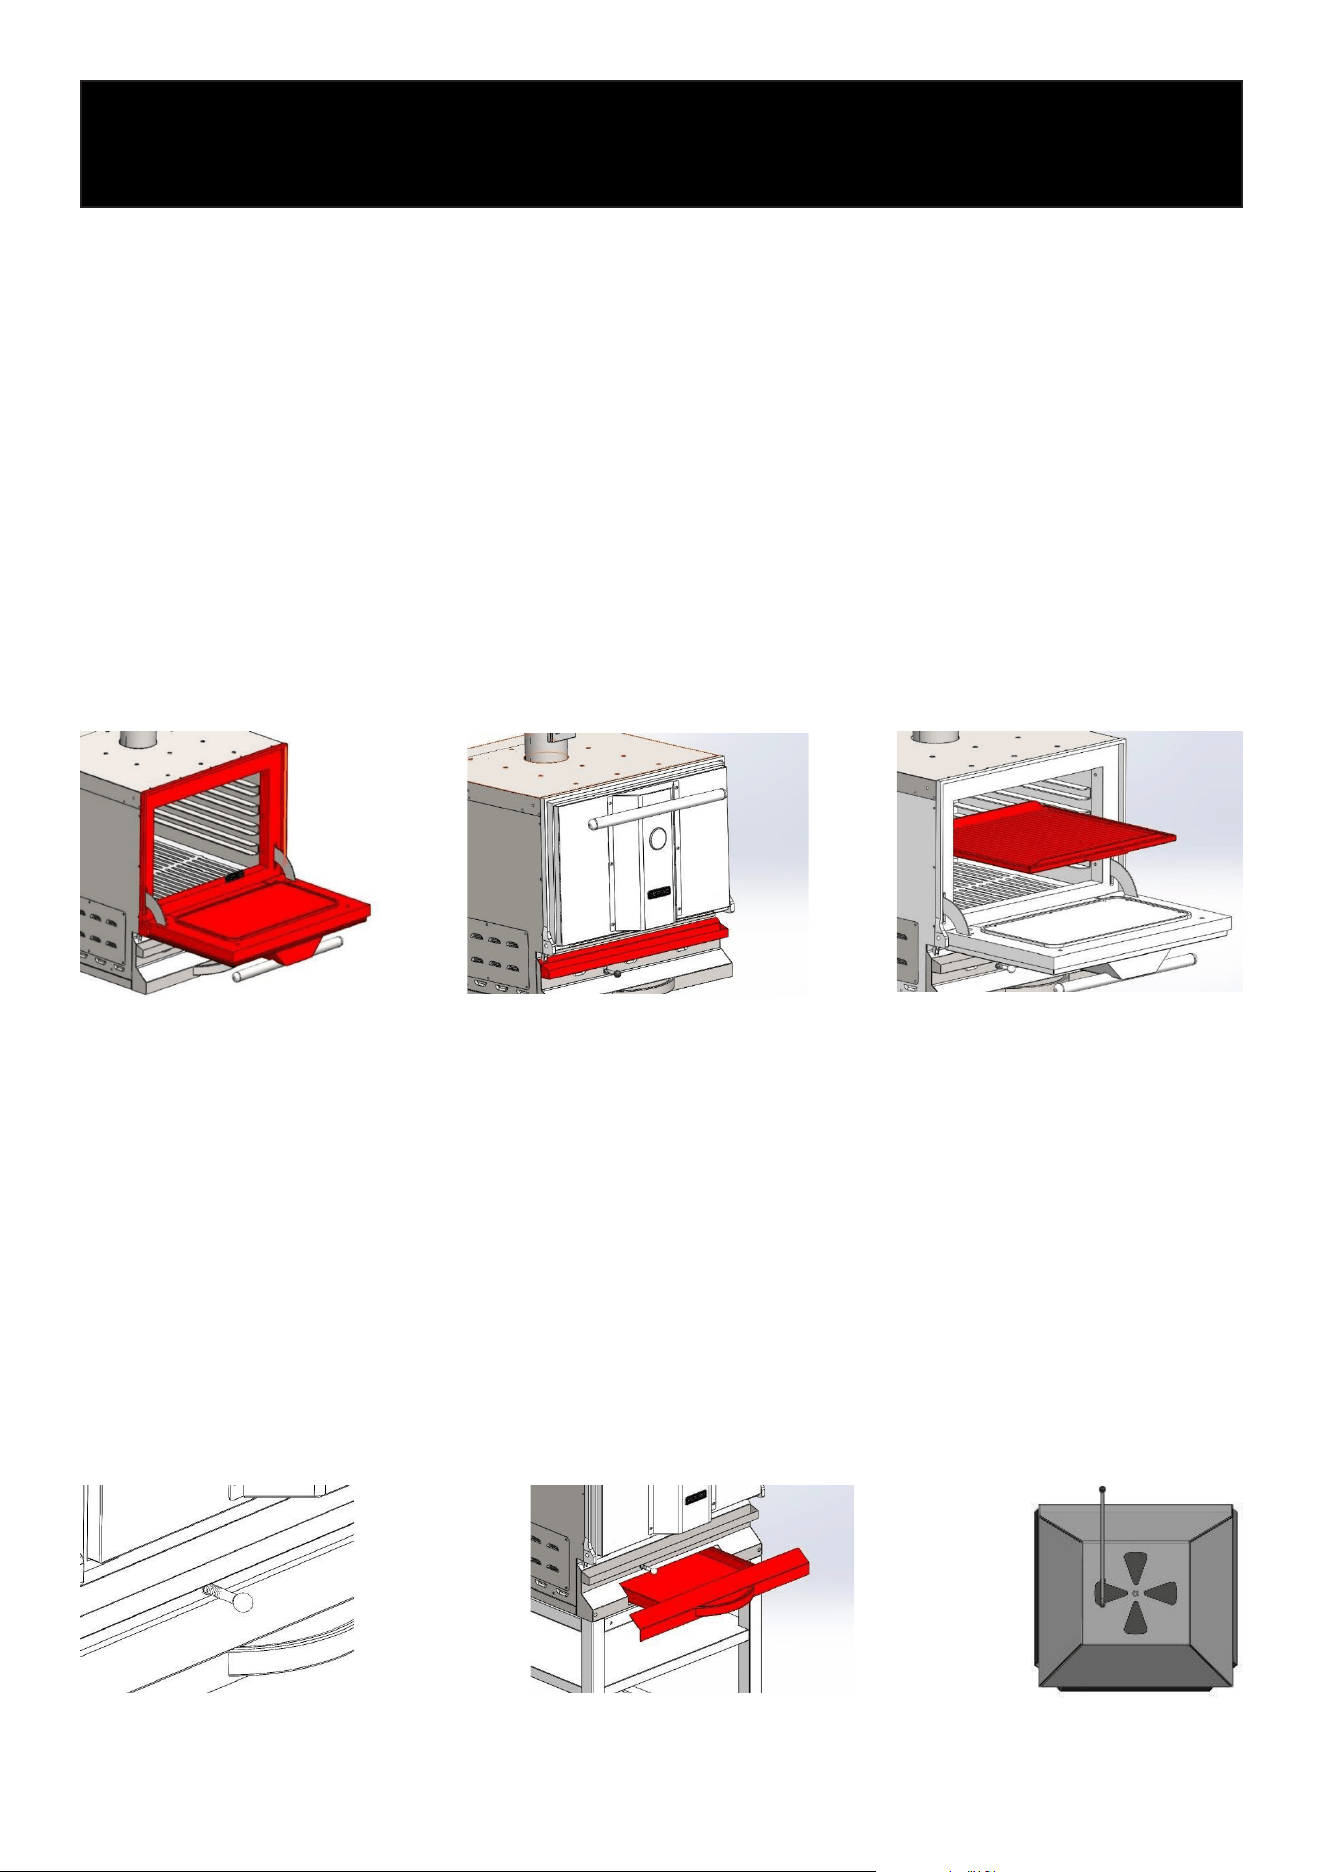
Monitoring Charcoal Levels
Use the charcoal level indicator (re stick) as a reference to check the remaining amount of char-
coal in the rebox.
Add charcoal as needed to maintain the desired fuel level and cooking temperature.
The amount of charcoal required will depend on previous usage and operating conditions.
WARNING
Charcoal packaging and storage materials are ammable. Keep all charcoal bags, packaging, and
combustible materials away from the oven and other heat sources.
CAUTION
Hot charcoal and embers may remain in the rebox during operation and for an extended period
after use. Use appropriate heat-resistant gloves and tools when handling or adding charcoal. Avoid
contact with hot coals to prevent burns.
18
Safety Guidelines
• Always allow the oven to cool completely before cleaning to prevent burns.
• Do not dispose of hot ashes in ammable or heat-sensitive containers such as plastic, rubber,
or wood.
Daily Cleaning
• Door Frame: Wipe down thoroughly, especially areas with grease buildup. Clean at the start of
each shift.
• Grill Racks: Remove and clean using a wire brush before each use to eliminate grease and
residue.
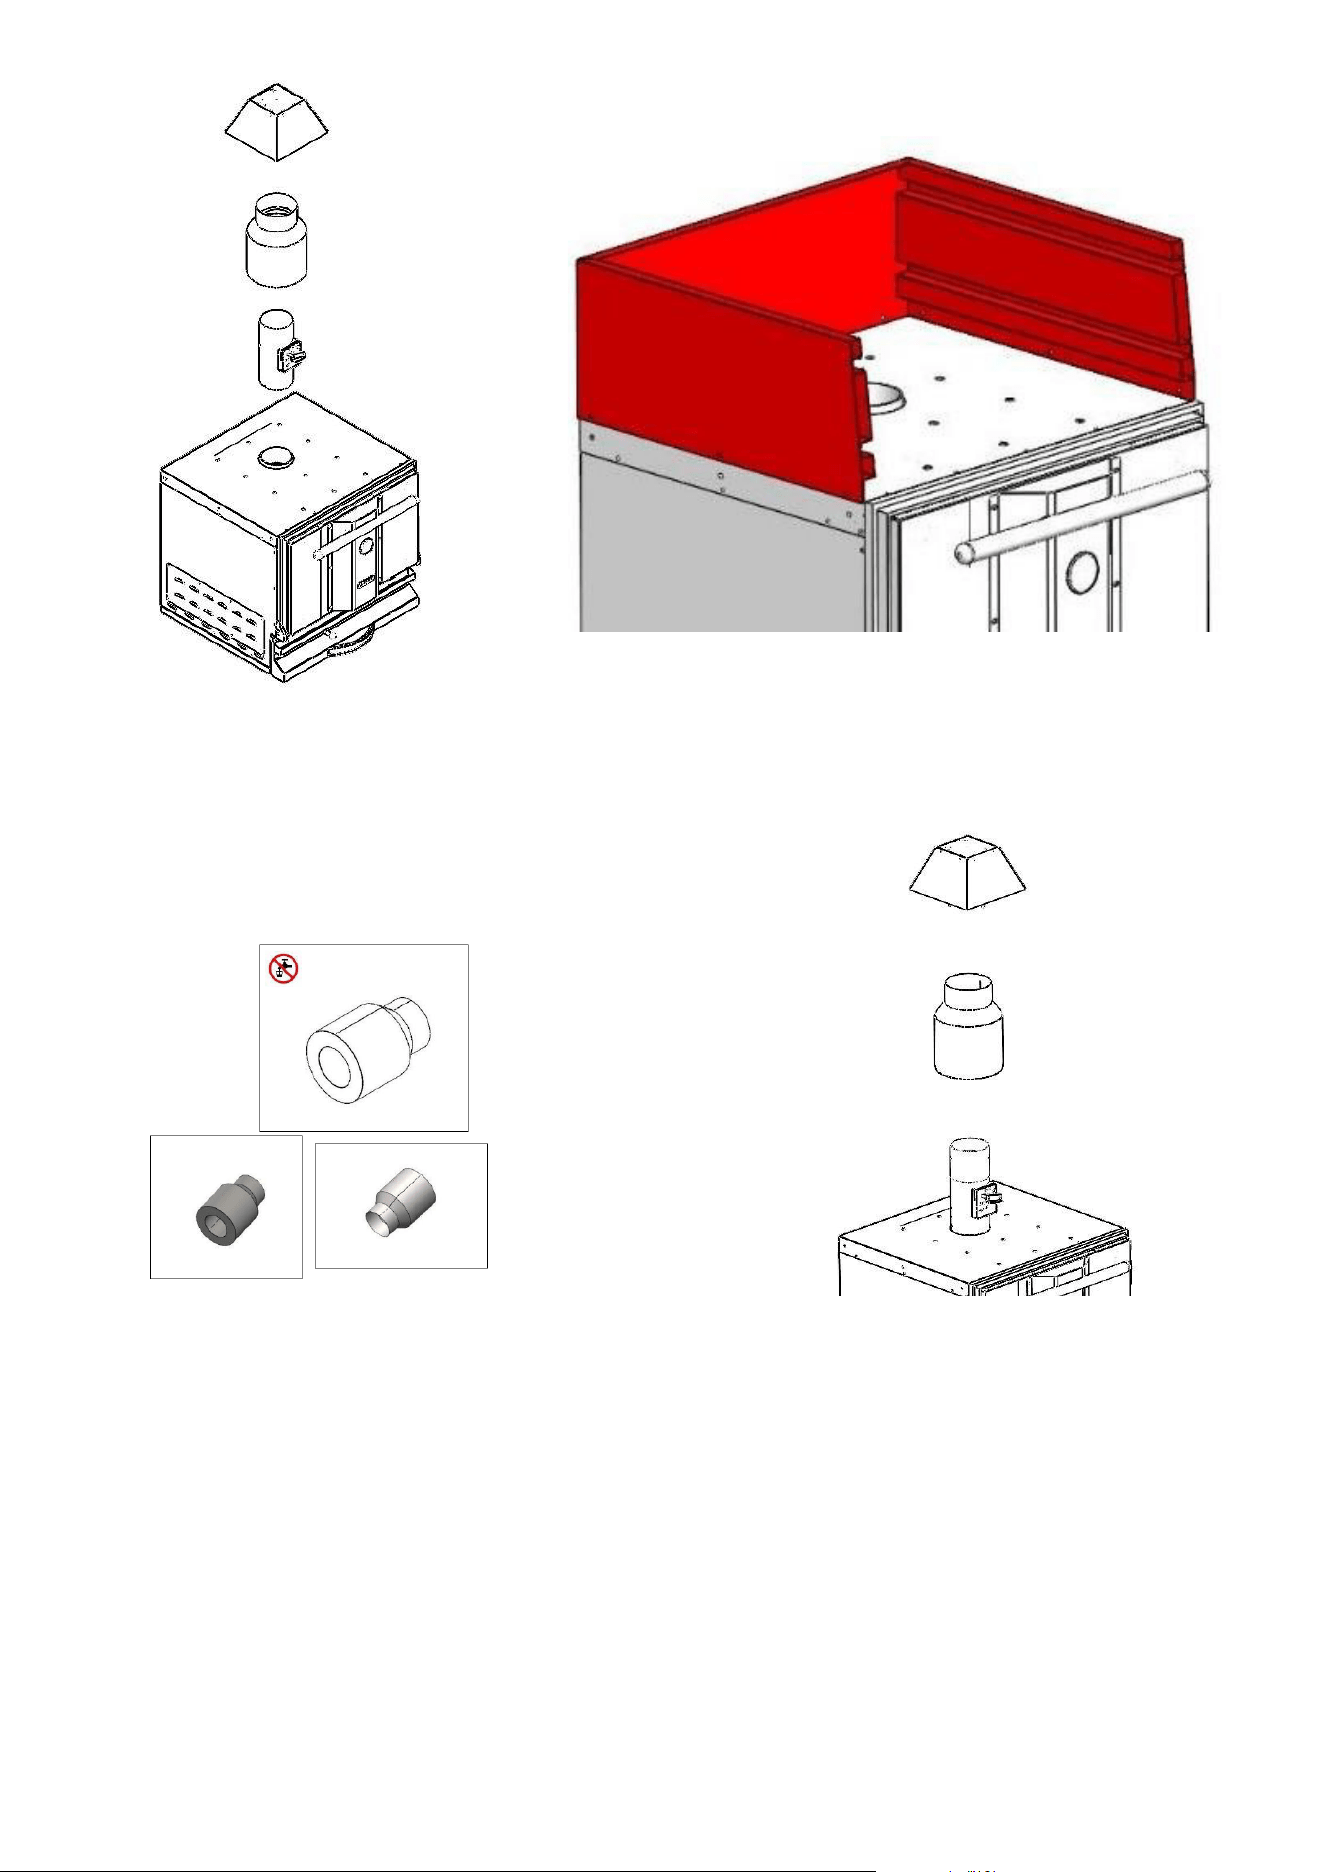
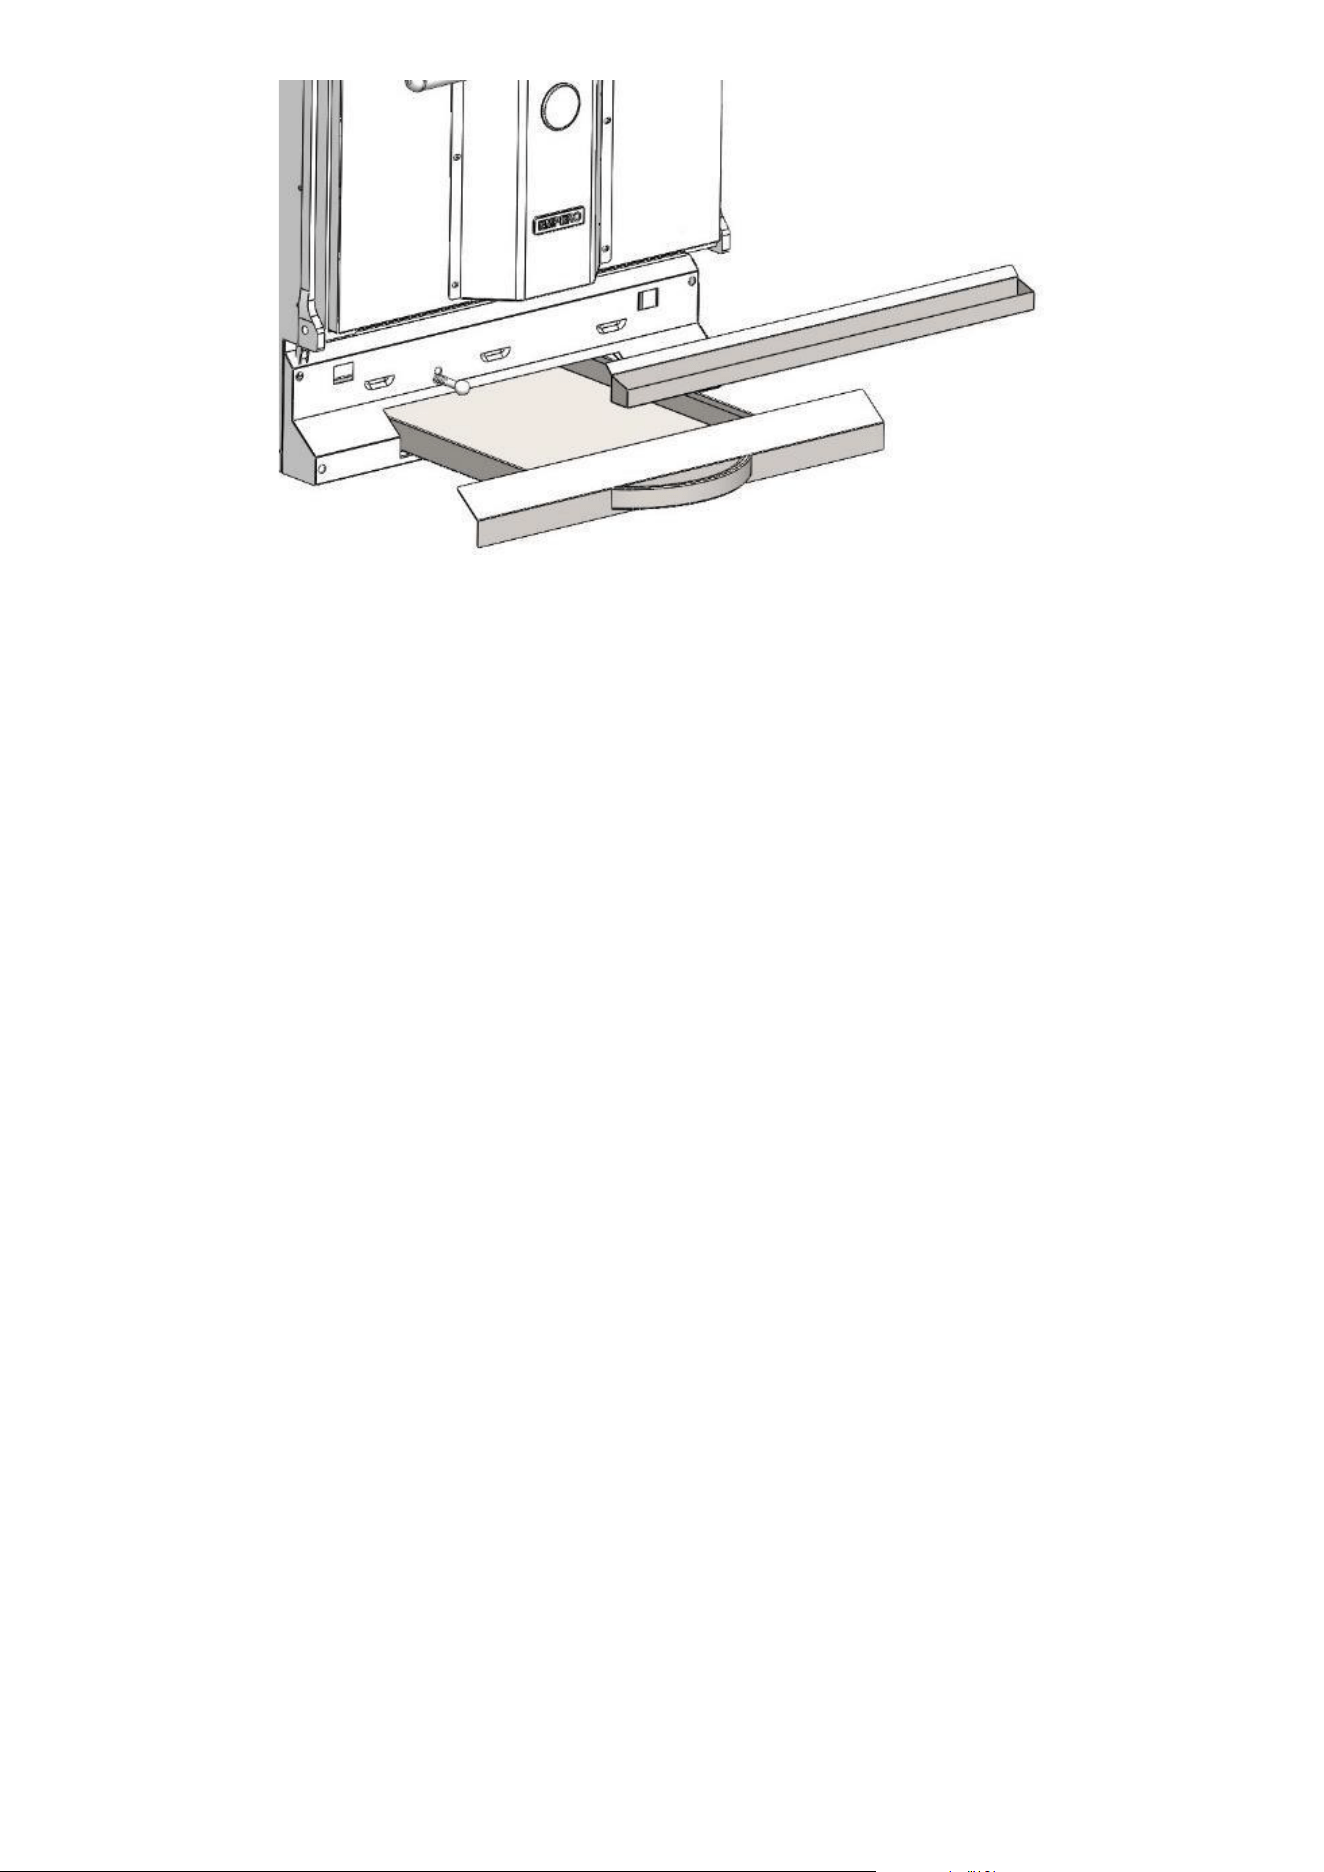
• Ash Tray: Slide out for removal. Clean regularly; disassemble if needed for a deeper clean.
• Exterior Components: Clean surfaces such as the re guard, exhaust, and tray shelf using a
damp cloth.
Cleaning and Maintenance
Ash Removal
• Always allow the oven to cool completely before cleaning to prevent burns.
• Do not dispose of hot ashes in ammable or heat-sensitive containers such as plastic, rubber,
or wood.
19
Weekly Maintenance
• Vent & Firebreak System: Empty and clean to prevent soot buildup and airow restriction.
• Chimney Check: Ensure the chimney is clear of obstructions for proper ventilation.
Deep Cleaning (Bi-Weekly)
• Fire Grates: Rotate positions during cleaning to promote even wear and extend lifespan.
• Clean internal surfaces using a degreaser and brush as needed.
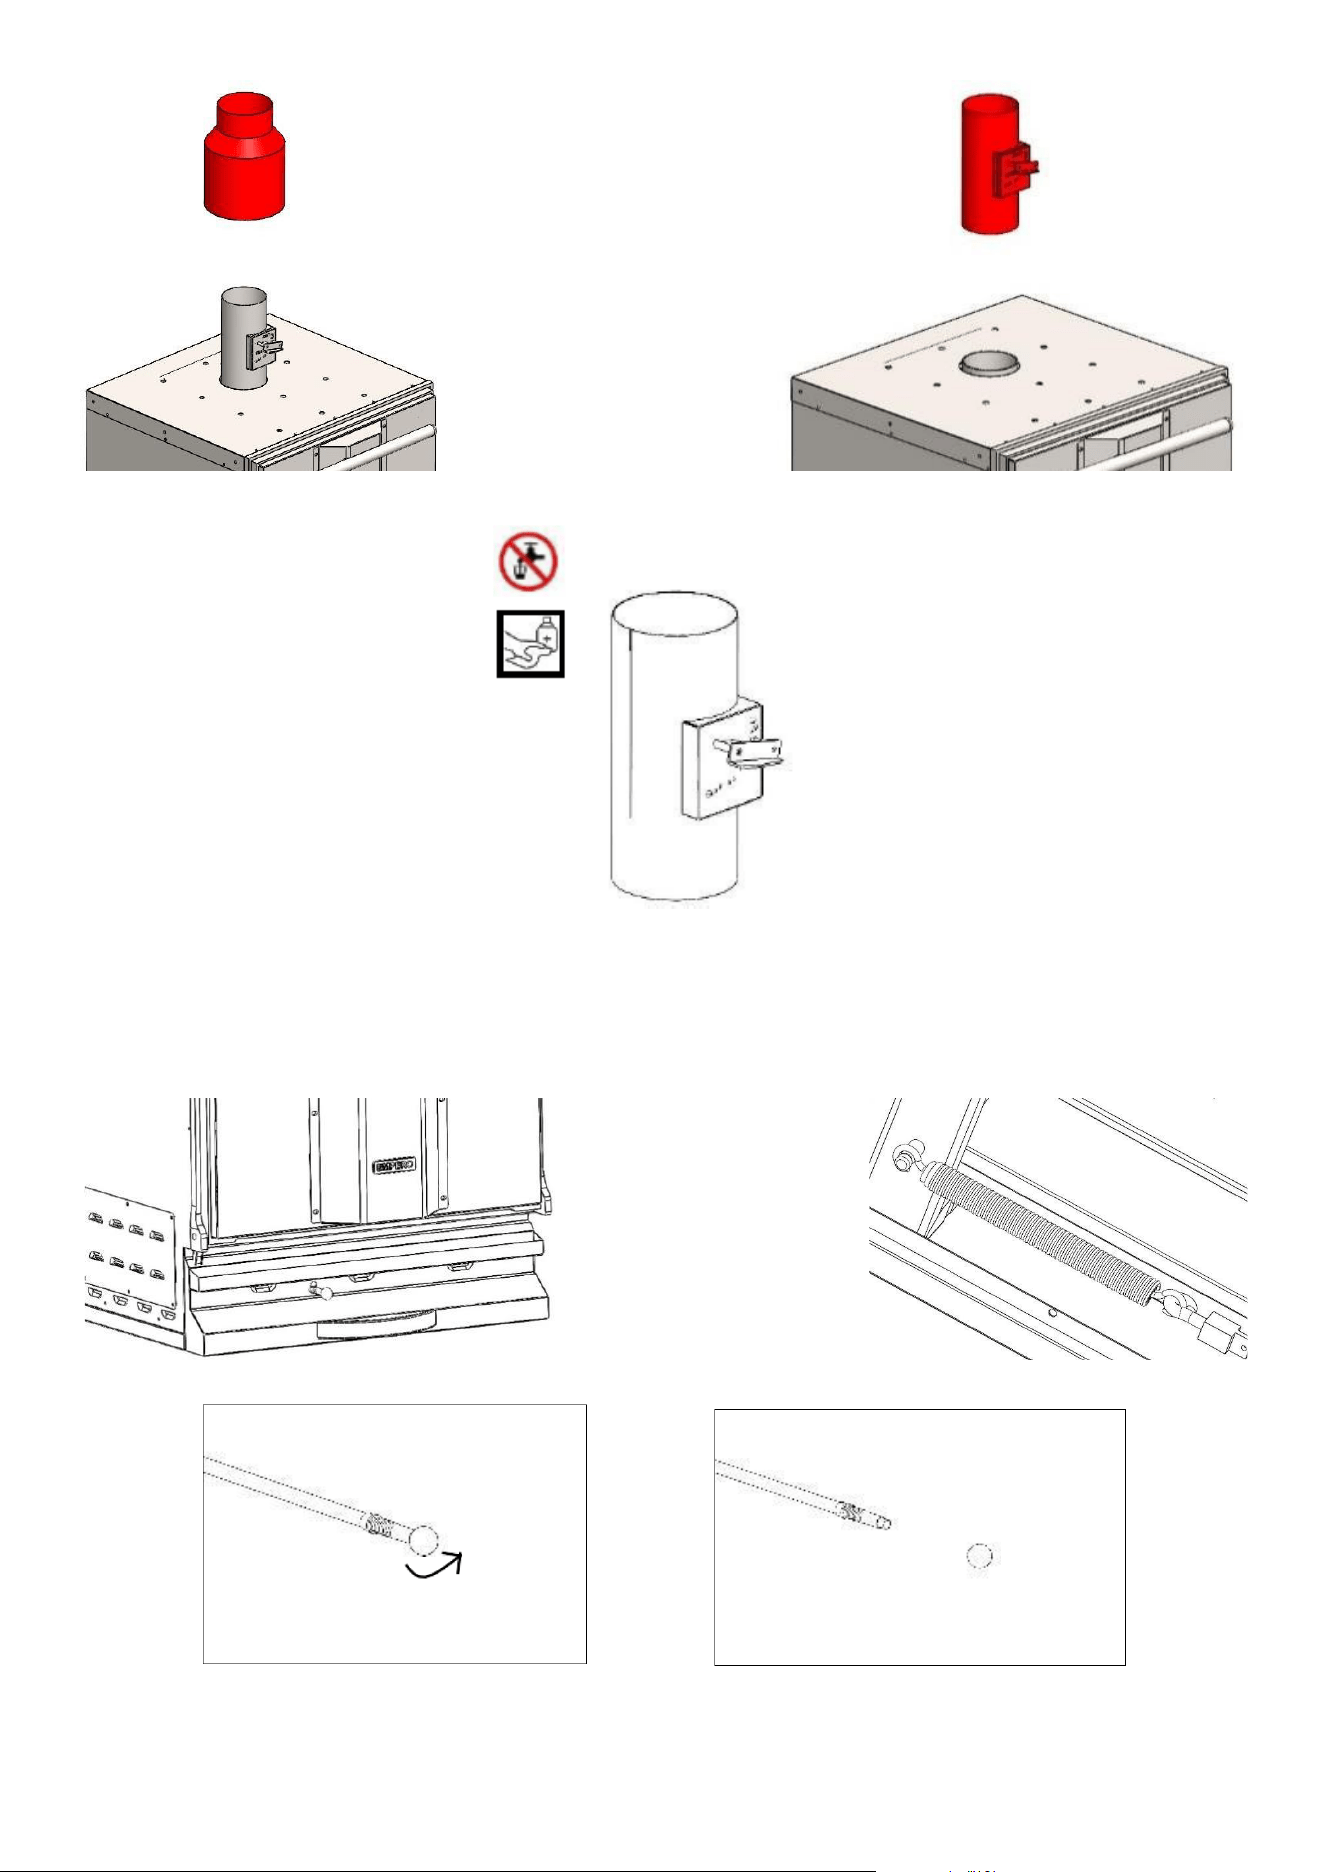
Creosote & Chimney Care
• Inspect the chimney regularly for creosote buildup, which can be a re hazard.
• Clean the chimney before each use if necessary and have it professionally inspected at least
twice per year.
• Never use water or liquids inside the rebreak or chimney system.
20
Annual Maintenance
• Lubrication: Apply high-temperature grease to moving components such as chains and hinges.
• Mechanical Inspection: Check springs, chains, and dampers for proper operation and replace
worn components as needed.
21
Important Cleaning Notes
• Do not use water or place components in a dishwasher.
• Use only appropriate tools such as wire brushes, degreasers, and cloths.
• Avoid excess moisture inside the unit.

22
LIMITED WARRANTY
KoolMore Supply Inc. extends a limited warranty to the original purchaser, guaranteeing that this KoolMore product is
free from manufacturing defects in material or workmanship for one year from the date of purchase.
Should you discover any such defect within the warranty period, KoolMore Supply Inc. reserves the right to repair or re-
place the product without charge, or to cover the cost of replacement parts and repair labor needed to correct defects
present at the time of purchase or resulting from regular usage, when the appliance has been installed, operated, and
maintained as per the instructions provided.
At its sole discretion, KoolMore Supply Inc. may decide to replace the product. In such an event, your replacement
appliance will carry the warranty for the remaining term of the original unit’s warranty period.
This warranty is valid exclusively to the original purchaser of the product and only applicable within the United States.
The warranty commences from the date of original consumer purchase. Proof of the original purchase date will be
required to obtain service under this warranty.
Under this limited warranty, your sole and exclusive remedy will be product repair, as outlined above. All services must
be provided by a KoolMore designated service company.
KoolMore shall not be responsible or liable for any loss, spoilage, or damage to food, beverages, pharmaceuticals,
medical supplies, or any other contents stored in the unit resulting from failure, malfunction, defects, improper instal-
lation, improper use, power interruption, or any other cause. Any such losses are expressly excluded from coverage
under this warranty.
To claim warranty or request repair service:
Email [email protected]. Please include your name, address, phone number, warranty repair request, and a copy
of your proof of purchase receipt. Alternatively, visit koolmore.com and use the Contact Us page. A KoolMore custom-
er service representative will promptly arrange service for your appliance.
We thank you for choosing KoolMore.
WARRANTY EXCLUSIONS
This limited warranty will not cover:
1. Failure of the product to perform during power failures or interruptions, or due to inadequate electrical service.
2. Damage incurred during transportation or handling.
3. Damage caused by accidents, vermin, lightning, winds, re, oods, or acts of God.
4. Damage resulting from accidents, alterations, misuse, abuse, improper installation, repair, or maintenance. This
includes using any external device that alters or converts the voltage or frequency of electricity.
5. Unauthorized product modications, repairs by unauthorized centers, or use of non-approved replacement parts.
6. Abnormal cleaning and maintenance not aligned with the user’s manual.
7. Use of incompatible accessories or components.
8. Any costs associated with repairs or replacements under these excluded circumstances shall be the responsibility
of the consumer.
WARRANTY