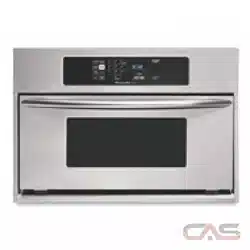
MICROWAVE OVEN
Use & Care Guide
For questions about features, operations/performance, parts, accessories, or service, call: 1-800-422-1230
www.kitchenaid.com/owners.
In Canada, call: 1-800-807-6777 or visit our website at www.kitchenaid.ca/owners.
KMCS3022TPS*,
KMCS3022TBL*, KMCS3022TWH*
Models / Modelos
HORNO MICROONDAS
Manual de uso y cuidado
Si tiene preguntas sobre funciones, funcionamiento, rendimiento, piezas, accesorios o servicio técnico, llame al: 1-800-422-1230 o
visite nuestro sitio web en www.kitchenaid.com/owners.
En Canadá, llame al: 1-800-807-6777 o visite nuestro sitio web en www.kitchenaid.ca/owners.
W11814046

2
TABLE OF CONTENTS
MICROWAVE OVEN SAFETY ........................................................3
INST
ALLATION INSTRUCTIONS ...................................................5
Unpacking ....................................................................................5
Location Requirements ................................................................5
Electrical Requirements ...............................................................5
PARTS AND FEATURES ................................................................6
T
urntable ......................................................................................
.6
MICROWAVE OVEN CONTROL ....................................................
7
Display ..........................................................................................
7
Standby mode ..............................................................................
7
START ...........................................................................................
7
Quick Start/Add 30 second .........................................................
7
STOP/UNLOCK ..............................................................
..............
7
Clock ............................................................................................
8
Mute On/Off ..................................................................................
8
Express Start ................................................................................
8
Timer .............................................................................................
8
Cooking End .................................................................................
Keypad Instructions .....................................................................9
MICROWAVE OVEN USE .........................
....................................13
Food Characteristics ..................................................................13
Cooking Guidelines ....................................................................13
Cookware and Dinnerware.........................................................14
Aluminum Foil and Metal ...........................................................14
Cooking Menu ............................................................................14
Popcor
n
......................................................................................15
Reheat ...................................
.....................................................15
Soften .........................................................................................15
Melt .............................................................................................15
Auto Defrost ...............................................................................16
Keep W
arm .................................................................................15
Combi .........................................................................................
16
MICROWAVE OVEN CARE ..........................................................17
General Cleaning ........................................................................17
TROUBLESHOOTING ..................................................................18
ASSIST
ANCE OR SERVICE .........................................................19
In the U.S.A. ...............................................................................19
In Canada ...................................................................................19
Replacement Parts ..........................................................
...........19
PRECAUTIONS TO AVOID POSSIBLEPRECAUTIONS TO AVOID POSSIBLE EXPOSURE
TO EXCESSIVE MICROWAVE ENERGY
......................................
4
ÍNDICE
20
22
22
22
22
ARTES Y CARACTERÍSTICAS................................................... 23
Plato giratorio ..........................................................................
Elemento de asado ..................................................................
Pantalla ....................................................................................
Modo de reposo ......................................................................
INICIAR ....................................................................................
Inicio rápido/Añadir 30 segundos ............................................
DETENER/DESBLOQUEAR .....................................................
Reloj .........................................................................................
Activar/desactivar silencio .......................................................
Inicio rápido (alternativo) ..........................................................
Temporizador ...........................................................................
Fin de cocción .........................................................................
Instrucciones del teclado .........................................................
Características de los alimentos ............................................
Directrices de cocción ...........................................................
Utensilios y vajilla ...................................................................
Lámina de aluminio y metales ................................................
Menú de cocción ...................................................................
Palomitas de maíz ..................................................................
Recalentar .............................................................................
Ablandar ................................................................................
Derretir ...................................................................................
Mantener caliente ..................................................................
Descongelado automático .....................................................
Asado .....................................................................................
Modo combinado ..................................................................
23
23
CONTROL DEL MICROONDAS ....................................................24
24
24
24
24
24
25
25
25
25
25
26
USO DEL MICROONDAS ..............................................................30
30
30
31
31
31
32
32
32
32
33
32
33
33
MANTENIMIENTO DEL MICROONDAS ................................... 34
Limpieza general ....................................................................... 34
SOLUCIÓN DE PROBLEMAS .................................................... 35
AYUDA O SERVICIO ................................................................... 36
En los Estados Unidos ............................................................. 36
En Canadá ..................................
.............................................. 36
Piezas de repuesto ................................................................ 36
21
SEGURIDAD DEL MICROONDAS..............................................
PRECAUCIONES PARA EVITAR POSIBLE EXPOSICIÓN A
ENERGÍA DE MICROONDAS EXCESIVA..................................
INSTRUCCIONES DE INSTALACIÓN........................................
Desembalaje ............................................................................
Requisitos de ubicación ..........................................................
Requisitos eléctricos ...............................................................
MICROW
AVE OVEN SAFETY
You can be killed or seriously injured if you don't immediately
You
can be killed or seriously injured if you don't
follow
All safety messages will tell you what the potential hazard is, tell you how to reduce the chance of injury, and tell you what can
happen if the instructions are not followed.
Your safety and the safety of others are very important.
We have provided many important safety messages in this manual and on your appliance. Always read and obey all safety
messages.
This is the safety alert symbol.
This symbol alerts you to potential hazards that can kill or hurt you and others.
All safety messages will follow the safety alert symbol and either the word “DANGER” or “WARNING.”
These words mean:
follow instructions.
instructions.
DANGER
WARNING
When using electrical appliances basic safety precautions should be followed, including the following:
IMPORTANT SAFETY INSTRUCTIONS
SAVE THESE INSTRUCTIONS
WARNING: To reduce the risk of burns, electric shock,
fire, injury to persons, or exposure to excessive microwave
energy:
■
Read all instructions before using the microwave oven.
■ Read and follow the specific “PRECAUTIONS TO AVOID
POSSIBLE EXPOSURE TO EXCESSIVE MICROWAVE
ENERGY” found in
■
The microwave oven must be grounded. Connect only to
properly grounded outlet. See “GROUNDING
INSTRUCTIONS” found in the “INSTALLATION
INSTRUCTIONS” section.
■
Install or locate the microwave oven only in accordance
with the provided Installation Instructions.
■
Some products such as whole eggs in the shell and
sealed containers - for example, closed glass jars - are
able to explode and should not be heated in the
microwave oven.
■
Use the microwave oven only for its intended use as
described in the manual. Do not use corrosive chemicals
or vapors in the microwave oven. This type of oven is
specifically designed to heat, cook, or dry food. It is not
designed for industrial or laboratory use.
■
Do not operate the microwave oven if it has a damaged
cord or plug, if it is not working properly, or if it has been
damaged or dropped.
■
The microwave oven should be serviced only by qualified
service personnel. Call an authorized service company for
examination, repair, or adjustment.
■
Do not cover or block any openings on the microwave oven.
■
Do not store this microwave oven outdoors. Do not use the
microwave oven near water - for example, near a kitchen
sink, in a wet basement, near a swimming pool, or similar
locations.
■
Do not immerse cord or plug in water.
■
Keep cord away from heated surfaces.
■
Do not let cord hang over edge of table or counter.
■
See door surface cleaning instructions in the “Microwave
Oven Care” section.
■
To reduce the risk of fire in the oven cavity:
– Do not overcook food. Carefully attend the microwave
oven when paper, plastic, or other combustible materials
are placed inside the oven to facilitate cooking.
– Remove wire twist-ties from paper or plastic bags before
placing bags in oven.
– If materials inside the oven ignite, keep oven door closed,
turn oven off, and disconnect the power cord, or shut off
power at the fuse or circuit breaker panel.
– Do not use the cavity for storage purposes. Do not leave
paper products, cooking utensils, or food in the cavity when
not in use.
■ H OT CONTENTS CAN CAUSE SEVERE BURNS. DO NOT
ALLOW CH ILDREN TO USE TH E MICROWAVE.
Use caution when removing hot items.
3
Page 4.
IMPORTANT SAFETY INSTRUCTIONS
To reduce the risk of injury to persons:
– Do not overheat the liquid.
– Stir the liquid both before and halfway through heating it.
– Do not use straight-sided containers with narrow necks.
– After heating, allow the container to stand in the microwave
oven for a short time before removing the container.
– Use extreme care when inserting a spoon or other utensil
into the container.
PRECAUTIONS
TO AVOID POSSIBLE EXPOSURE TO
EXCESSIVE MICROWAVE ENERGY
(a) Do not attempt to operate this oven with the door open
since open-d
oor operation can result in harmful exposure
to microwave energy. It is important not to defeat or
tamper with the safety interlocks.
(b) Do not place any object between the oven front face and
the door or allow soil or cleaner residue to accumulate on
sealing surfaces.
(c) Do not operate the oven if it is damaged. It is particularly
important that the oven door close properly and that there
is no damage to the:
(1)
Door (bent),
(2)
Hinges and latches (broken or loosened),
(3)
Door seals and sealing surfaces.
(d) The oven should not be adjusted or repaired
by anyone
except properly qualified service personnel.
This device complies with Part 18 of the FCC Rules.
This device complies with Industry Canada ICES-001.
■
Oversiz ed food or oversiz ed metal utensils should not be
inserted in a microwave toaster oven as they may create
a fire or risk of electric shock.
■
Do not clean with metal scouring pads.Pieces can burn off
the pad and touch electrical parts involving a risk of
■
Do not use paper products when appliance is operated
in the toaster mode.
electric shock.
■
Do not store any materials, other than manufacturer
recommended accessories, in this oven when not in use.
■
Do not cover racks or any other part of the oven with
metal foil. This will cause overheating of the oven.
's
/
■
Liquids, such as water, coffee, or tea are able to be
overheated beyond the boiling point without appearing to be
boiling. Visible bubbling or boiling when the container is
removed from the microwave oven is not always present.
THIS COULD RESULT IN VERY HOT LIQUIDS
SUDDENLY BOILING OVER WHEN THE CONTAINER IS
DISTURBED OR A SPOON OR OTHER UTENSIL IS
INSERTED INTO THE LIQUID.
SAVE THESE INSTRUCTIONS
4
INST
ALLATION INSTRUCTIONS
Unpacking
1. Empty the micr
owave oven of any packing materials.
2. Clean the inside with a soft, damp cloth.
3. Check for damage, such as:
n a door that is not lined up corr
ectly,
n
damage ar
ound the door, or
n
dents on the interior or exterior of the micr
owave oven.
If there is any damage, do not operate the microwave
oven until a designated service technician has checked
itandmade any needed repairs.
NOTE: To avoid damage to the microwave oven, do not remove
microwave inlet cover. See the “Parts and Features” section.
Location Requirements
IMPOR
TANT: The control side of the microwave oven is the
heavy side. Handle the microwave oven gently. The weight of the
microwave oven is over 35lbs (15.9kg).
n
Place the micr
owave oven on a cart, counter, table, or shelf
that is strong enough to hold the microwave oven and the
food and utensils you place inside it.
n
The micr
owave oven should be at a temperature above 50°F
(10°C) for proper operation.
NOTE: Some models can be built into a wall or cabinet by using
one of the trim kits listed in the “Assistance or Service” section.
n
The microwave oven rear plate must be placed close to the wall.
n
Make sur
e the microwave oven legs are in place to ensure
proper airow. If vents are blocked, a sensitive thermal
device may automatically turn the microwave oven off. The
microwave oven should work properly once it has cooled.
Electrical Requirements
Observe all gover
ning codes and ordinances.
Required:
n
A 120V
, 60Hz, AC only, 15A or 20A electrical supply with a
fuse or circuit breaker.
Recommended:
n
A time-delay fuse or time-delay cir
cuit breaker.
n
A separate cir
cuit serving only this microwave oven.
Electrical Shock Hazard
Plug into a grounded 3 prong outlet.
Do not remove ground prong.
Do not use an adapter.
Do not use an extension cord.
Failure to follow these instructions can result in death,
fire, or electrical shock.
WARNING
GROUNDING INSTRUCTIONS
SAVE THESE INSTRUCTIONS
■
For all cord connected appliances:
The microwave oven must be grounded. In the event of
an electrical short circuit, grounding reduces the risk of
electric shock by providing an escape wire for the electric
current. The microwave oven is equipped with a cord
having a grounding wire with a grounding plug. The plug
must be plugged into an outlet that is properly installed
and grounded.
WARNING:
Improper use of the grounding plug can
result in a risk of electric shock. Consult a qualified
electrician or serviceman if the grounding instructions are
not completely understood, or if doubt exists as to whether
the microwave oven is properly grounded.
Do not use an extension cord. If the power supply cord is
too short, have a qualified electrician or serviceman install
an outlet near the microwave oven. A short power supply
cord is provided to reduce the risks resulting from becoming
entangled in or tripping over a longer cord.
WARNING
Excessive Weight Hazard
Use two or more people to move and install
microwave oven.
Failure to do so can result in back or other injury.
5
The installation height needs to be higher than 916 mm.
P
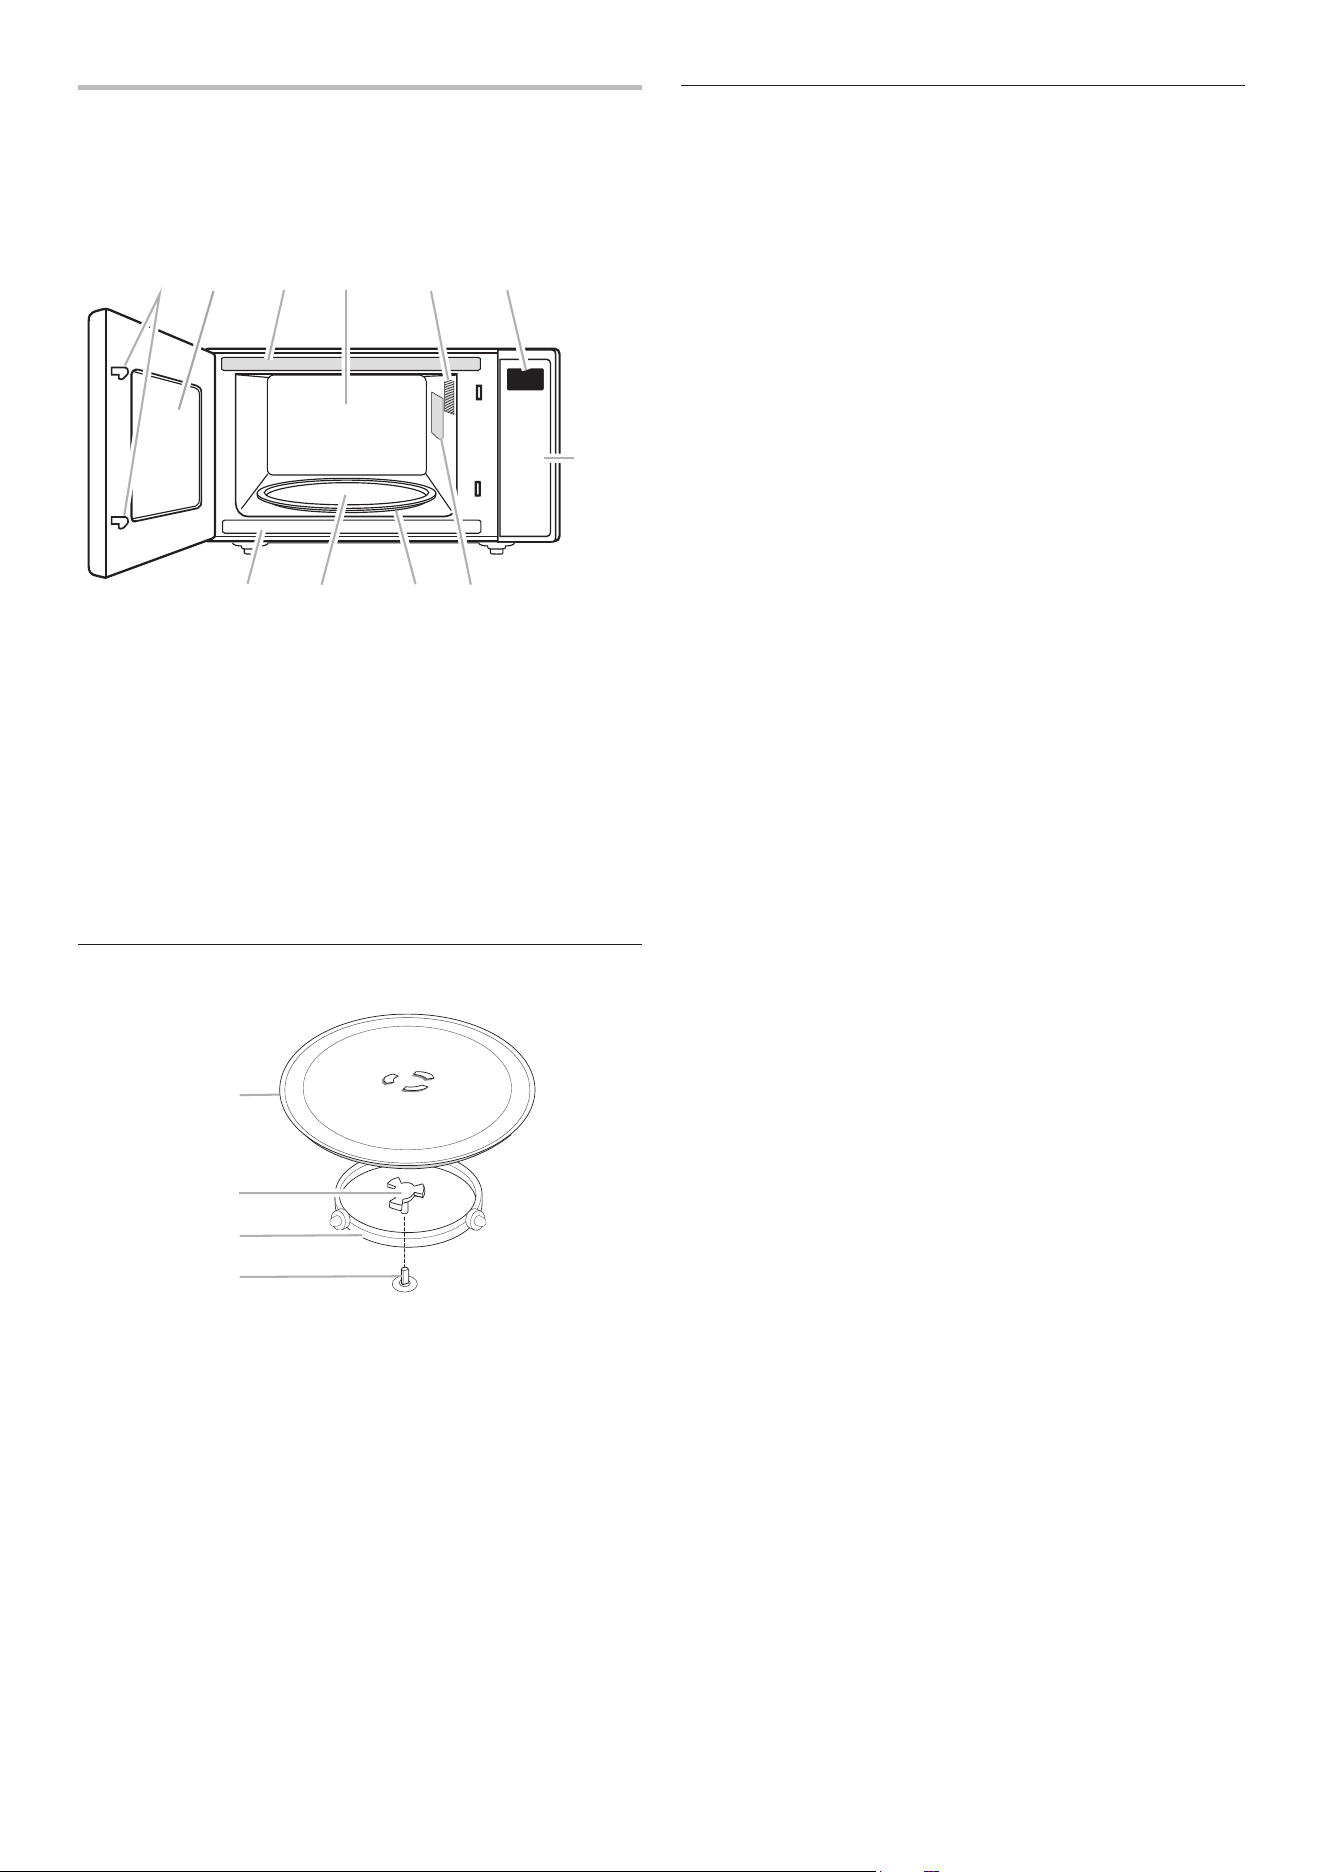
ARTS AND FEATURES
This manual may cover several dif
ferent models. The model you
have purchased may have some or all of the features shown
here. The appearance of your particular model may differ slightly
from the illustrations in this manual.
*NOTE: To avoid damage to the microwave oven,do not
removemicrowave inlet cover. See the “Parts and Features”
section.
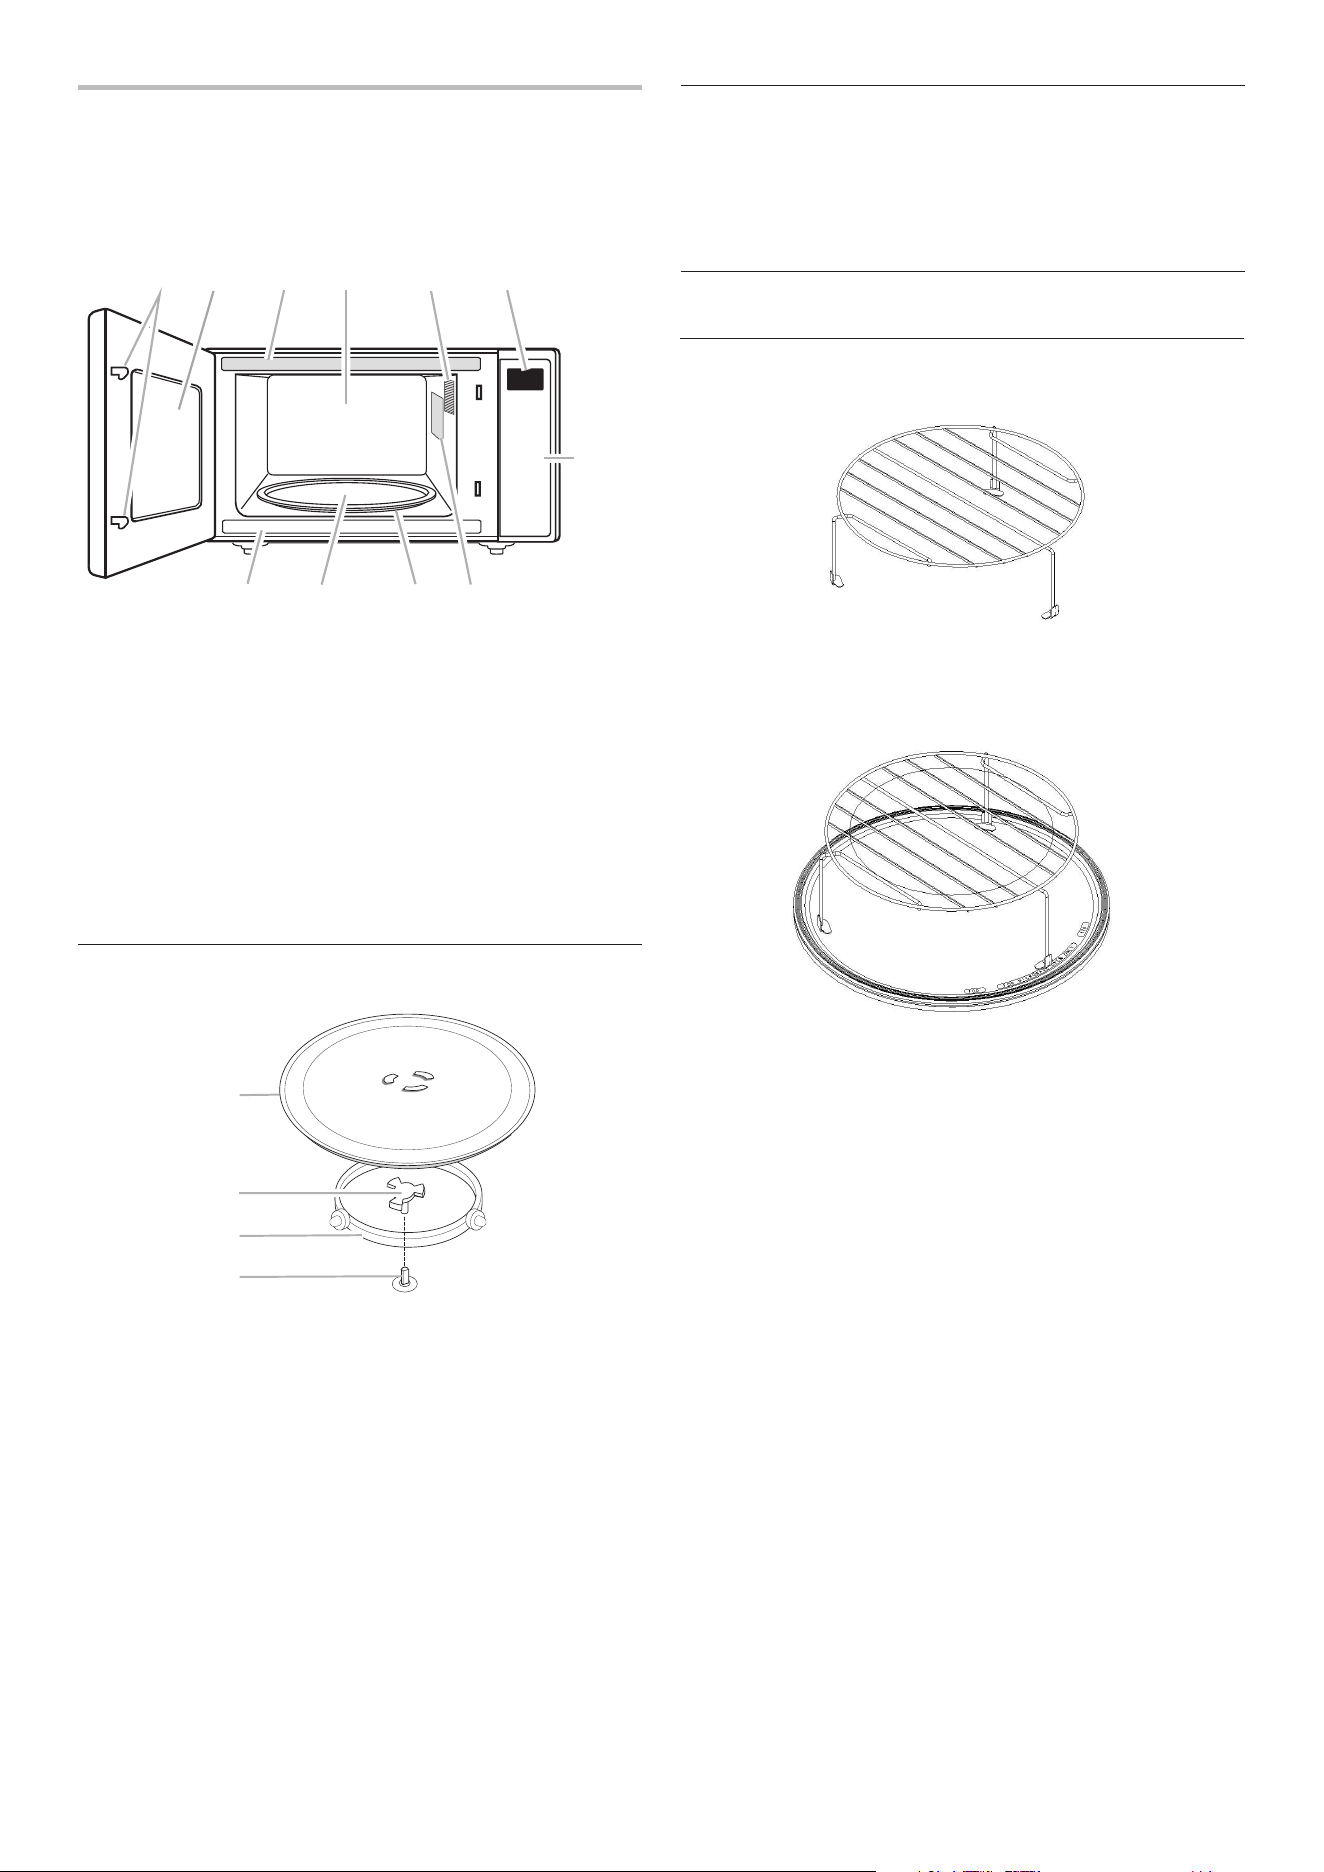
T
urntable
A.T
urntable
B.Hub
C.Support
D.Shaft
The tur
ntable can rotate in either direction to help cook food
more evenly. For best cooking results, do not operate the
microwave oven without having the turntable in place. See the
“Assistance or Service” section to reorder any of the parts.
T
o Install:
1. Place the support on the micr
owave oven cavity bottom.
2. Place the tur
ntable on the support.
Fit the raised, curved wedges in the center of the turntable
bottom between the three spokes of the hub. The rollers on
the support should t inside the turntable bottom ridge.
A. Door lock system
B. Window
C. Cooking guide label
D. Back panel
E. Microwave oven light
F
.
Display
G. Control panel
H. Microwave inlet cover*
I. Removable tur
ntable support
J. Glass tur
ntable
K. Model and serial number plate
P arts and Featur
es
N ot Shown: Grill element (on
cavity ceiling)
DA EC F B
H
J I
G
K
A
B
C
D
6
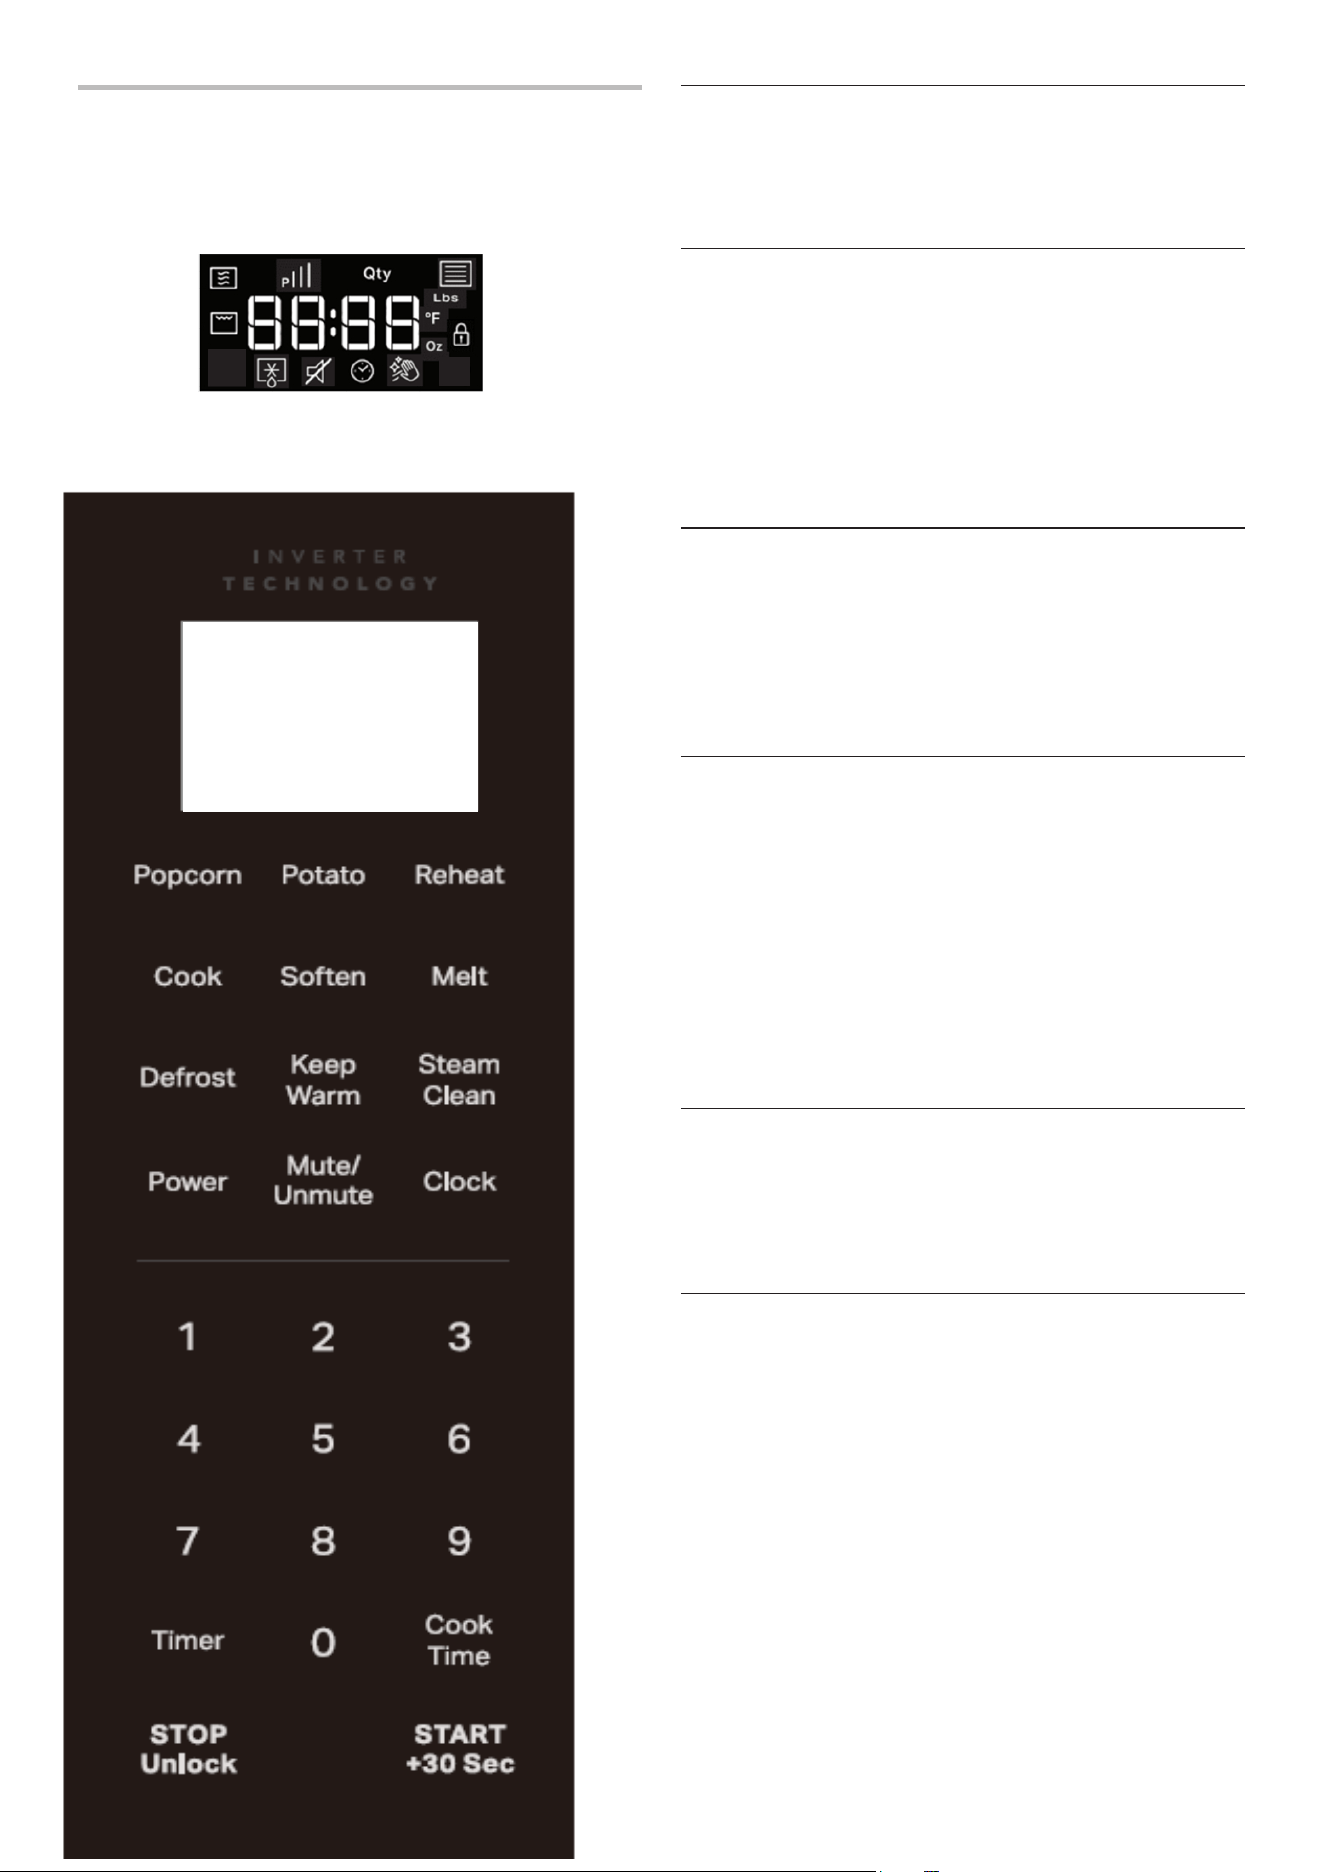
MICROW
AVE OVEN
CONTROL
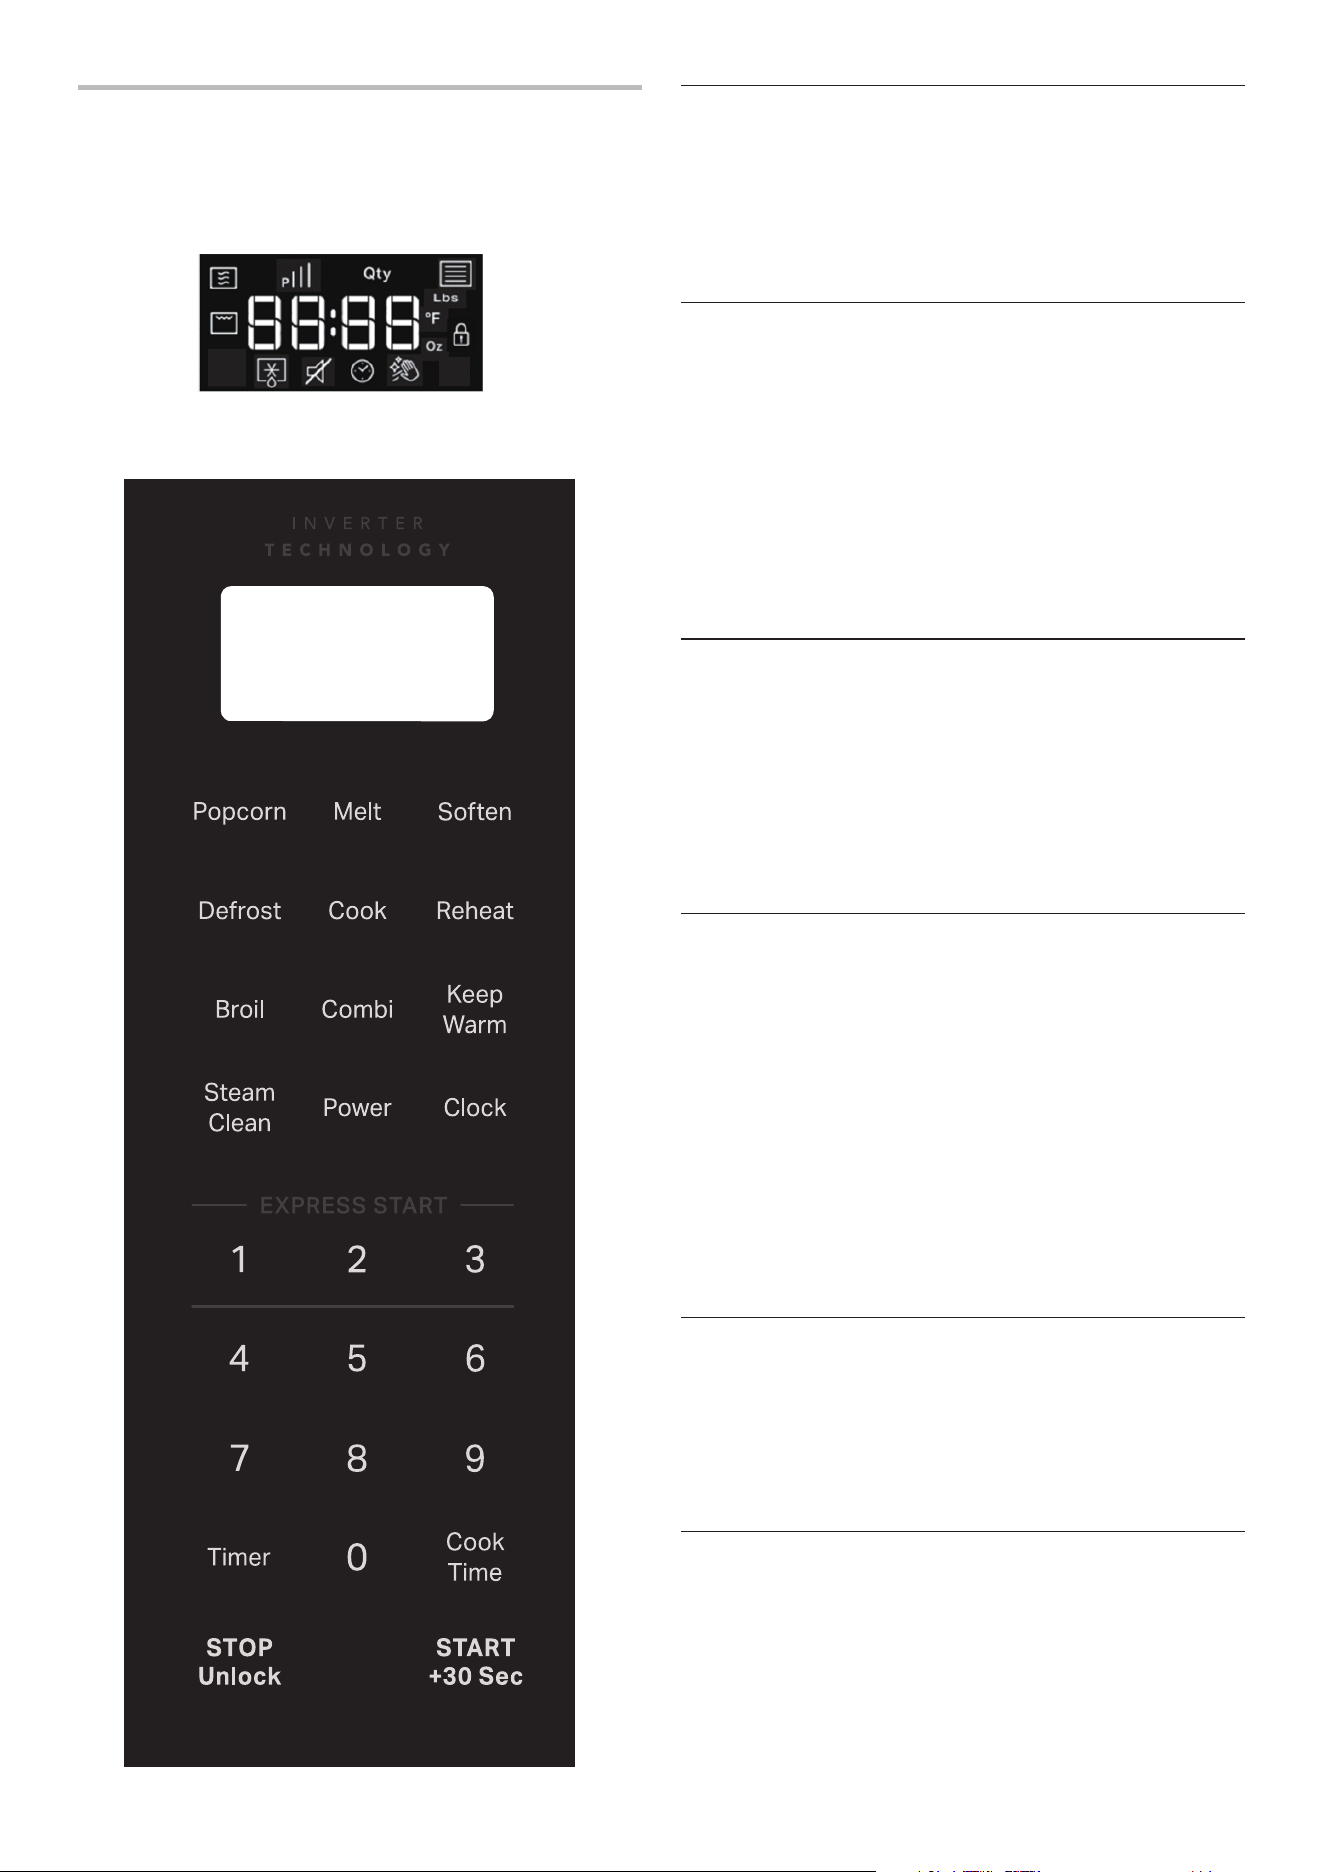
Display
When power is rst supplied to the microwave oven, “12 Hr” will
appear in the display. User can press Clock button to change 12
or 24 hour format.
Press START button to conrm. Then the screen shows “00:00”.
Standby mode
When no functions ar
e being used, the microwave oven will
switch to Standby mode.
Broil
After function selection, press the STOP/UNLOCK button to exit
the function selection. If you again press the STOP/UNLOCK
button it will be a invalid, as cooking mode is not activated.
When cooking mode is activated and the user presses the
Steam
Clean
STOP/UNLOCK button, the STOP/UNLOCK functions will be
triggered at the same time. Press the STOP/UNLOCK button
again to cancel the function and return to Standby mode.
ST
ART
The ST
ART button begins any function. If non-sensor cooking
is interrupted by opening the door, pressing START button will
resume the cycle.
NOTE: To avoid unintentional operation of the microwave oven,
a cooking function cannot be started if the microwave oven door
has been closed for about 1 minute. The word “door” will appear
in the display until the door is opened and closed.
Quick Start/Add 30 second
In standby mode, pr
essing START automatically starts the
microwave oven at 100% power for 30 seconds and adds
30 seconds of cook time, with each additional touch of the
control. Time may be added to any manual cooking cycle in 30
second increments, at the moment power level, by pressing
START button during cooking.
NOTE:
– Quick Start 30 sec: Pr
ess “Start/+ 30 sec”, it will quick
start of full power in 30 sec; press again if you need to add
moretime mid cycle or at the end of the cycle.
– Quick Minute Cooking: Y
ou can also press keypad 1-3 button
to have full power cooking of the selecting minutes.
STOP/UNLOCK
The STOP/UNLOCK button clears any incorr
ect command and
cancels any program during cooking. Press the STOP/UNLOCK
button to stop the cycle. It will not erase the time of day.
The microwave oven will also turn off when the door is opened.
Close the door and press START to resume the cycle.
Cook Menu
Weight - lbs
Weight - Oz
Door Lock
Power
Defrost
Quantity
Mute
ON/OFF
Timer
Clock
Micr
owave
7

Clock
The microwave oven must be in standby.
1. Press Clock button to enter clock
setting.
It will also appear every time the product is plugged
into the power source, or power is back after a fail.
2. Press the keypad 0-9 button to set the hour.
3. Press keypad 0-9 button to set the minute.
4. Press START or CLOCK button to conrm the setting.
6.
Mute On/Off
This function allows the user to activate/deactivate all the
sounds played by the appliances, includes button press,
warnings, alarm, even end audio feedback.
Press Keep Warm button and hold for 3 seconds to put into
mute, hold the button again for 3 seconds to turn on the sound.
Timer
To Set:
1. Press Timer button
2. Press keypad 0- 9 button to enter desired time.
3. Press START button. When the set time ends, the
end-of-timer.
4. When the Timer countdown is achieve in the display, tone
will sound. Press STOP/UNLOCK to stop the timer.
NOTE: The Timer does not start or stop the microwave oven.T
he function can be set only in Standby mode.
Cooking End
When the cooking is nished, the display will show the text
“End”. A reminder acoustic beep will signal.
1. After the Cooking End, If you press the STOP/UNLOCK
button, takes out the food and closes the door again, the
interface will display the clock, it will switch to 1-step door
opening.
2. I f you will not remove the food within 30 minutes, it will
consistently display “END” for 30 minutes, and automatically
return to standby mode and unlock after 30 minutes and it
will switch to 1-step door opening.
8
Express Start
Press the keypad button 1 or 2 or 3, the microwave oven at
100% power for 1 min, 2 min, 3 min of cook time directly. No
need press START button to conrm.
NOTE: The function can be active only in idle state. The
Microwave oven will alert user with invalid input sound if press
keys 4, 5, 6, 7, 8, 9, 0.
3. Lamp off , Fan work for 1 min and display will show "FAn ".

Keypad Featur
e Instructions
Timer Hold to Set the Timer To set the timer, follow the instructions below:
1. Pr
ess TIMER button.
2. Press the keypad 0-9 button to select timer values.
3. Pr
ess START button to conrm.
NOTE: The microwave oven must be in idle state
The
screen
shows
“30:00”
as
default value. It is set in minutes
from
00:01
to
60:00 min, press START
to confirm.
Power
Set Cook Power
Set Cook Time
To set the cook power, follow the instructions below:
1. In standy mode, Press Cook Time button. Default time is“00:00 ”
2. Press number buttons to en ter d esired time, from 0:01 to 90:00.
Cook Time
1. In standy mode, Press the Power b utton. Default Power Level is “1 0 0”.
2. Press number buttons to set the power levels
4. Press number buttons to set the desired time, from 0:01 to 90:00.
5. Press START button and oven will work
3. Press the Cook Time button to confirm and display will show
“00:00 ”
NOTE: While the Timer countdown is active in the display, touch
STOP/UNLOCK to stop the Timer. The timer does not start or stop
the microwave oven.
START
(+ 30Sec)
Add 30Seconds The button START can be used in two ways:
1. T
o start the microwave by cooking for 30seconds with FULL
power in idle state.
2. T
o increase a cooking time using increments of 30seconds.
Each press adds 30seconds.
START
(+ 30Sec)
Start Function Press the START button to start any cooking function. If cooking is
interrupted by opening the door, touch the START button after the
door is closed again to resume the cycle.
STOP/UNLOCK Microwave Pause/Stop Function
The STOP/UNLOCK button stops any microwave oven function
except for the clock. The microwave oven will also turn off when the
door is opened. When the door is opened, the element(s) will turn
off, but the microwave oven light will remain on. Close the door and
t
ouch the START button to resume the preset cycle.
Keypad Instructions
9
.
idle state.
3. Press the Power button to confirm and display will show
default Power Level “1 0 0”.
4. Press number buttons to set the power levels
5. Press START button and oven will work
To set the cook time, follow the instructions below:

Keypad F eatur
e I nstructions
NOTE: This microwave comes with the added feature of a 2-step
door opening functionality to avoid unintended access. When
children do not have access to the appliance, there is a disable
function if the 2-step functionality is not needed.
Disable/Enable 2-step door function operation on the display:
Steps to disable the 2-step door function operation:
1. After pr
essing the STOP/UNLOCK button for 3 seconds, “dI: 0”
will show on the display.
2. After pr
essing the “0” button, “dI: 1” will show on the
display.
3. Pr
ess the START button to conrm.
NOTE: DI (Disable)
NOTE: If you unplug the microwave, it will remember the last
operation. You will not need to disable or enable the 2 step door
function again.
Steps to enable the 2-step door function operation:
1. After pr
essing the STOP/UNLOCK button for 3 seconds, “EA: 0”
will show on the display.
2. After pr
essing the “0” button, “EA: 1” will show on the display.
3. Press the START button to conrm.
NOTE: EA (Enable)
IMPORTANT: Disabling this feature should only be done when the
owner i s certain and children are not
present.
0-9 K eypad Number
User can press 0-9 keypad number to select cook time, food class,
food weight and power level.
Keep Warm Keep Warm The function allows to keep your dishes warm. To use:
1. I n standy mode, Pr
ess “Keep Warm” button, default time “30:00”
will show on the
display.
2. Pr
ess “Keep Warm” or keypad 0-9 button to select 15 min,
30 min, 45 min or 60 min.
The function allows to set the clock. To use:
Clock Set the clock
1. I n standy mode, Pr
ess “Clock” button, current time
“00:00”
will
show
on the display. If no, it will show default time
2. Pr
ess “keypad 0-9” button to adjust cook time.
3. Pr
ess START/+30 Sec or Clock button to confirm.
10
NOTE: Once you press the STOP/UNLOCK button to stop/pause
any function, the Door Lock icon will disappear for 10 seconds and
you will be able to pull the door handle to open the door.
The Door Lock icon will reappear after 10 seconds and require you
to repeat steps 1 and 2 to open the door.
NOTE: When the machine is powered on after plug-in, the 2-Step
Door function will not be triggered. If a cooking cycle starts after the
door closes, then 2 steps are required to open the door. Once the
2 steps have been used to open the door, if the door closes and no
cooking power is applied, then you can open the door by just pulling
the door handle.
This microwave comes with the added feature of a 2-step door
opening functionality to avoid unintended access.
The STOP/UNLOCK button can be used to pause/cancel the
function during or after cook time.
The STOP/UNLOCK button can be used for 2-step door opening:
1. Once you set the cooking time and press the START button, the
Door Lock icon will appear on the display.
2. T
o open the microwave:
n
Pr
ess STOP/UNLOCK.
n
Pull the door handle.
STOP/UNLOCK 2-Step Door Opening

Keypad F eatur
e I nstructions
Defrost Defrost The Defrost function helps that frozen food. To defrost, follow the
instructions below:
1. Pr
ess “Defrost” button, P01 will show on display.
2. Pr
ess “Defrost” button or keypad 0-9 button to select Manual
defrost or the desired food class. P01…P04.
3. Pr
ess START button to conrm.
P01-Manual Defrost:
4. Default time “00:00” will show on the display
.
5. Pr
ess keypad 0-9 button to adjust defrost cooking time.
6. Pr
ess START button.
P02-P04 Auto Defrost
7. Display will show the default weight.
8. Pr
ess keypad 0-9 button to adjust desired weight.
9. Pr
ess START button.
Reheat Reheat To reheat using preset functions, follow the instructions below:
1. I n standby mode, Pr
ess “Reheat” button, P01 will show on display.
2. Pr
ess “Reheat” button or keypad 0-9 button to select the food
class. P01…P04.
3. Pr
ess START button.
NOTE: See the Reheat section in this guide for the food category or
reference sticker on the front plate of the microwaves.
4. Sensor Cooking: A sensor in the micr
owave oven detects
humidity released from the food as it heats and adjust the cook
time accordingly. (For non-sensor cooking, the display will show
the default weight. Press the keypad 0-9 button to adjust desired
weight. Press the START button.)
Cook Cook For Cook mode, it is not necessary to set the time and power, follow
the instructions below:
1. I n standby mode, Pr
ess “Cook” button, the P01 will show on display.
2. Pr
ess keypad 0-9 button or “Cook” button to select a food
category.
See the Cook Menu section in this guide for the food category or
reference sticker on the front plate of the microwaves.
3. Pr
ess START button.
By pressing the STOP/UNLOCK button again will stop the cooking
function and microwave oven will switch to standby mode
11
Popcor
n Popcorn To use the popcorn preset, follow the instructions below:
1. I n standby mode, Press “Popcorn” button repeatedly to
select the bag size
(2.75, 3.0 or 3.5oz).
2. Press START button.
Keep Warm Turn on or off beep sound The function allows to turn on or off the beep sound:
1. Press “Keep Warm” button and hold 3 seconds to put into mute,
the MUTE OFF icon will be shown on display.
2. Hold the button again for 3 seconds to turn on the sound.
3. Pr
ess START button.
NOTE: The Keep Warm cycle last for a duration of 15 min (default 30
minutes), the maximum time is 60 min. Each 15 min cycle,
microwave will be turned on 2.5 min. After cooking END, the cavity
lamp is off and fan will work for 1 min.
(Sensor Cooking)

12
Keypad F eatur
e I nstructions
Steam Clean
Auto cleaning cycle
The cleaning cycle will help to clean the microwave oven cavity
1. Place 1 cup of water (~250mL) in the middle of the cavity.
2. Press "Steam Clean" button, default "11:00" time will show on display
3. Press the START button to start the function
(After finishing the water heat-up cycle (8 min), the cavity lamp and fan will
be off , the countdown time is shown.)
NOTE:
Please follow Tips and Suggestions in Steam Clean section
Combi Combi The function allows to combi cooking. To use:
1. I n standby mode, Pr
ess “Combi” button, default “C01” will
show on the display.
2. Pr
ess “Combi”
see the Combi
section in this guide for the food category
or reference
the
sticker
on the door of the microwave.
5. Pr
ess START/+30 Sec button.
– E nsur
e that the utensils used are microwave safe and heat
resistant when you use this function.
– Don’
t use plastic utensils when grilling. They will melt. Items of
wood or paper are not suitable either.
–
Be car
eful, don’t touch the grill element.
–
It is possible to change the duration time even after the cooking
pr
ocess has been already started.
–
T
o change the duration time, please press cook time button first,
Melt Melt
The Melt function is used to melt food. To use:
1. I n standby mode, Pr
ess “Melt” button, P01 will show on
display.
2. Pr
ess “Melt” button or keypad 0-9 button to select a
food
category, see
the Melt section in this guide for the food category or reference
the sticker
on the door of the microwave. Press Start button to confirm.
NOTE:
or keypad 0-9 button to select a food category,
3. Pr
ess START/+30 Sec button, the display will show 00:00.
4. Pr
ess “keypad 0-9” button to adjust cooking time, from 0:01 to 90:
00.
Soften Soften
The Soften function is us ed to so ften fo od. To us e:
1. In standby mode, Pr
ess “Soften” button, P01 will show on
display.
2. Pr
ess “Soften” button or keypad 0-9 button to select a
food
category,
see the Soften section in this guide for the food
category or reference the
sticker on the door of the microwave. Press START button to conrm.
3. Use keypad 0-9 button to adjust the quantity
4. Pr
ess START button.
3. Use keypad 0-9 button to adjust the quantity.
4. Press START button.
then 0-9 button to set time value, press start button to confirm.

13
MICROW
AVE OVEN USE
A magnetr
on in the microwave oven produces microwaves which
reect off the metal oor, walls, and ceiling and pass through the
turntable and appropriate cookware to the food. Microwaves are
attracted to and absorbed by fat, sugar, and water molecules
in the food, causing them to move, producing friction and heat
which cooks the food.
n
T
o avoid damage to the microwave oven, do not lean on or
allow children to swing on the microwave oven door.
n
T
o avoid damage to the microwave oven, do not operate
microwave oven when it is empty.
n Baby bottles and baby food jars should not be heated in
micr
owave oven.
n
Clothes, owers, fruit, herbs, wood, gour
ds, and paper,
including brown paper bags and newspaper, should not be
dried in the microwave oven.
n
Paraf
n wax will not melt in the microwave oven because it
does not absorb microwaves.
n
Use oven mitts or pot holders when r
emoving containers
from microwave oven.
n
Do not over
cook potatoes. At the end of the recommended
cook time, potatoes should be slightly rm. Let potatoes
stand for 5minutes. They will nish cooking while standing.
n
Do not cook or r
eheat whole eggs inside the shell. Steam
buildup in whole eggs may cause them to burst, requiring
signicant cleanup of microwave oven cavity. Cover
poachedeggs and allow a standing time.
Food Characteristics
When microwave cooking, the amount, size and shape,
startingtemperature, composition and density of the food
affectcookingresults.
Amount of Food
The mor
e food heated at once, the longer the cook time
needed.Check for doneness and add small increments
oftimeifnecessary.
Size and Shape
Smaller pieces of food will cook mor
e quickly than larger pieces,
and uniformly shaped foods cook more evenly than irregularly
shaped food.
Starting T
emperature
Room temperatur
e foods will heat faster than refrigerated foods,
and refrigerated foods will heat faster than frozen foods.
Composition and Density
Foods high in fat and sugar will r
each a higher temperature and
will heat faster than other foods. Heavy, dense foods, such as
meat and potatoes, require a longer cook time than the same
size of a light, porous food, such as cake.
Cooking Guidelines
Covering
Covering food helps r
etain moisture, shorten cook time, and
reduce spattering. Use the lid supplied with cookware. If a
lid isnot available, wax paper, paper towels, or plastic wrap
approved for microwave ovens may be used. Plastic wrap
should be turned back at one corner to provide an opening to
vent steam. Condensation on the door and cavity surfaces is
normal during heavy cooking.
Stirring and T
urning
Stirring and tur
ning redistribute heat evenly to avoid overcooking
the outer edges of food. Stir from outside to center. If possible,
turn food over from bottom to top.
Arranging
If heating irr
egularly shaped or different-sized foods, arrange
the thinner parts and smaller-sized items toward the center. If
cooking several items of the same size and shape, place them
ina ring pattern, leaving the center of the ring empty.
Pier
cing
Befor
e heating, use a fork or small knife to pierce or prick foods
that have a skin or membrane, such as potatoes, egg yolks,
chicken livers, hot dogs, and sausage. Prick in several places
toallow steam to vent.
Shielding
Use small, at pieces of aluminum foil to shield the thin pieces
of irregularly shaped foods, bones and foods such as chicken
wings, leg tips, and sh tails. See the “Aluminum Foil and Metal”
section rst.
Standing Time
Food will continue to cook by the natural conduction of heat
even after the micr
owave cooking cycle ends. The length of
standing time depends on the volume and density of the food.

14
Cookwar
e and Dinnerware
Cookware and dinnerware must t on the turntable. Always
use oven mitts or pot holders when handling because any dish
may become hot from heat transferred from the food. Do not
use cookware and dinnerware with gold or silver trim. Use the
following chart as a guide, then test before using.
Material Recommendations
Aluminum Foil,
Metal
See the “Aluminum Foil and
Metal”section.
Br
owning Dish Bottom must be at least 3/16"
(5mm) above the turntable. Follow
manufacturer’srecommendations.
Ceramic Glass,
Glass
Acceptable for use
China,
Earthenware
Follow manufacturer’s recommendations.
Melamine Follow manufacturer’s recommendations.
Paper: Towels,
Dinnerware,
Napkins
Use non-recycled and those approved by
the manufacturer for microwave oven use.
Plastic: Wraps,
Bags, Covers,
Dinnerware,
Containers
Use those approved by the manufacturer
for microwave oven use.
Pottery and Clay Follow manufacturer’s recommendations.
Silicone
Bakeware
Follow manufacturer’s recommendations.
Straw, Wicker,
Wooden
Containers
Do not use in microwave oven.
Wax Paper Acceptable for use
T
o Test Cookware or Dinnerware for Microwave Use:
1. Place cookwar
e or dinnerware in microwave oven with 1cup
(250mL) of water beside it.
2. Cook at 100% cooking power for 1minute.
Do not use cookwar
e or dinnerware if it becomes hot and the
water stays cool.
Aluminum Foil and Metal
Always use oven mitts or pot holders when removing dishes
from the microwave oven.
Aluminum foil and some metal can be used in the microwave
oven. If not used properly, arcing (a blue ash of light) can
occurand cause damage to the microwave oven.
OK for Use
Racks and bakewar
e supplied with the microwave oven (on
some models), aluminum foil for shielding, and approved meat
thermometers may be used with the following guidelines:
n T
o avoid damage to the microwave oven, do not allow
aluminum foil or metal to touch the inside cavity walls,
ceiling,or oor.
n
Always use the tur
ntable.
n
To avoid damage to the microwave oven, do not allow
contact with another metal object during microwave cooking.
Do Not Use
Metal cookwar
e and bakeware, gold, silver, pewter, non-approved
meat thermometers, skewers, twist ties, foil liners such as
sandwich wrappers, staples, and objects with gold or silver trim
or a metallic glaze should not be used in the microwave oven.
For Use with Grill Element
Use the pr
ovided tall grill rack with an oven proof pan to catch
the drippings.
Cooking Menu
The micr
owave oven has been programmed with common
microwave foods, their quantities, cook powers, and cook
times.Use the following chart as a guide for preset cooking.
Item Food Category Quantity
P01
Potato-Large
Enter 1-4 pieces, 10-12 oz
(283-340 g) each. Pier
ce each potato
several times with a fork. Place on
paper towel on turntable center. Let
stand 5 minutes after cooking.
1-4 pieces/
1 piece
P02
P03
Fresh Vegetables
From room temperature.
Put food into microwave safe dish.
Add 2 tablespoons water to
1-2 cups, add 4 tablespoons water to
3-4 cups. Cover the dish, leaving an
air ventilation. Stir and let stand
3 mins after cooking.
1-4 cups
(Sensor
cooking)
P04
Frozen Vegetables
From frozen temperature. Place in
microwave-safe container Add
2 tablespoons water to 1-2 cups,
add 4 tablespoons water to 3-4
cups. Cover the dish, leaving an air
ventilation. Stir and let stand 3 min
after cooking.
1-4 cups
(Sensor
cooking)
P05
Oatmeal
Place in microwave-safe container
and add water depends on package
directions adds water cover with
plastic wrap and fold back one edge
about 1/4” (6 mm) to make a
vent.Place container in the center of
the oven. After cooking stir with
spoon or wh
isk until uniform.
1-4cups
(Sensor
cooking)
P06
Frozen Entrée
Remove entrée from package and loosen
lm covering on 3 sides of the container
leaving one of the short sides
still attached. Loosely cover with
lm.Allow the 10.5 and 20 oz (297 and
567 g) entrees to stand 3 minutes.
10 oz, 20 oz,
(283 g, 567 g)
(Sensor
cooking)
Potato-Small
Enter 1-16 pieces, 3-5 oz (85-141 g)
each. Pierce each potato several
times with a fork. Place on paper
towel on turntable center. Let stand
5 minutes after cooking.
1-16 pieces/
1 piece

Popcor
n
2.75, 3.0 or 3.5oz bags.
– D o not use r
egular paper bags or glassware
– P op only one package of popcor
n at a time.
– F ollow manufactur
er’s instructions when using a microwave
popcorn popper.
– Listen for popping to slow to one pop every 1 or 2seconds,
and then stop the cycle.
– Do not r
eppop unpopped kernels.
16-64 oz/16 oz
– For best r
esults, use fresh bags of popcorn.
– Cooking r
esults may vary by brand and fat content.
NOTE: Follow the instructions provided by the microwave
3 oz, 8 oz
popcorn manufacture.
Reheat
Times and cooking powers have been pr
eset for reheating a
number of food types. Use the following chart as a guide.
Item Food Category Quantity
P01 Dinner plate
Place food on plate. Cover with
plastic wrap and vent. Let stand
2-3 minutes after r
eheating.
Large (289-440g),
Small
P02
Soup
Place in microwave-safe container.
Cover with plastic wrap and vent.
Stir and let stand 2-3 minutes after
reheating.
1-4 cups
P03
Beverage
Do not cover.
1-4 cups
P04
Reheat Pizza
Place on paper towel lined
microwave-safe plate.
1-3 slices
4 oz (113 g) per slice
Soften
Soften function may be used to soften your food. Times and
cooking powers have been preset for a number of food types.
Use the following chart as a guide.
Item Food Category Quantity
P01
Unwrap and place in
micr
owave-safe container.
P02
Ice Cream
P03
Unwrap and place in
microwave-safe container.
Cream Cheese
Melt
Melt function may be used to melt your food. Times and cooking
powers have been pr
eset for a number of food types.
Use the following chart as a guide.
Item Food Category Quantity
P01
Butter
Unwrap and place in
micr
owave-safe container.
0.5-2.0 sticks/0.5 stick
P02 Chocolate Chips
Unwrap and place in
microwave-safe container
4-12 oz/4 oz
(113-340 g / 113 g)
Keep W
arm
This function allows you to keep your dishes warm.
1. Pr
ess “Keep Warm” button
2. Pr
ess keypad 0-9 button to select suitable time, then press
START button to start. Default time is 30 min, maximum time
is 60 min.
15
Unwrap and place in
microwave-safe container.
(Sensor Cooking)
(Sensor Cooking)
Butter
0.5-2.0 sticks/0.5 stick

MW: 18s Broil: 15s
16
Auto Defr
ost
– For optimal result, food should be 0oF (-18oC) or colder when
defrosting.
– Unwrap foods and r
emove lids (from fruit juice) before
defrosting.
– Shallow
packages will defrost more quickly than deep blocks.
– Separate food pieces as soon as possible during or at the
end of the cycle for mor
e even defrosting.
– Foods left outside the fr
eezer for more than 20minutes or
frozen ready-made food should not be defrosted using the
Defrost feature but should be defrosted manually.
– Use small pieces of aluminum foil to shield parts of food such
as chicken wings leg tips, and sh tails. See the “Aluminum
Foil and Metal” section rst.
– Times and cooking powers have been pr
eset for defrosting a
number of food types.
Item Food Category W
eight
P01 Manual Defrost ----------
P02 Poultry 0.2lbs-6.6lbs/0.1lbs
P03 Meat 0.2lbs-6.6lbs/0.1lbs
P04 Fish 0.2lbs-6.6lbs/0.1lbs
Use the following chart as a guide when defrosting poultry,
meat or sh
DEFROST PREPARATION CHART
POULTRY
Chicken: whole and cut up
Cornish hens
P lace in a microwave safe
container, chicken breast
side up. Remove giblets
from whole chicken.
MEAT
Beef: ground, steaks, roast, stew
Lamb: stew and chops
Pork: chops, ribs, roasts,
sausage
The narrow or fatty areas
of irregular-shaped cuts
should be shielded with
foil before defrosting.
Do not defrost less than
1/4lb (113g) or two 4oz
(113g) patties.
Place all meats in a
microwave-safe container.
FISH
Fillets, Steaks, Whole, Shellsh Place in a microwave-safe
MW: 10s Broil: 23s
container.
Combi
Using with the wir
e rack accessory, the function allows to have
combi cooking. Times and cooking powers have been preset for
a number of food types. Use the following chart as a guide.
Item Function
C01
C02

MICROW
AVE OVEN CARE
General Cleaning
IMPOR
TANT: Before cleaning, make sure all controls are off and
the microwave oven is cool. Always follow label instructions on
cleaning products.
Soap, water, and a soft cloth or sponge are suggested unless
otherwise noted.
MICROW
AVE OVEN CAVITY
T
o avoid damage to the microwave oven cavity, do not use
soap-lled scouring pads, abrasive cleaners, steel-wool pads,
gritty washcloths, or some recycled paper towels.
To avoid damage to stainless steel models, rub in direction
ofgrain.
The area where the microwave oven door and frame touch
whenclosed should be kept clean.
Average soil
n
Mild, nonabrasive soaps and deter
gents:
Rinse with clean water and dry with soft, lint-free cloth.
Heavy soil
n
Mild, nonabrasive soaps and deter
gents:
Heat 1cup (250mL) of water for 2 to 5minutes in microwave
oven. Steam will soften soil. Rinse with clean water and dry
with soft, lint-free cloth.
Odors
n
Lemon juice or vinegar:
Heat 1cup (250mL) of water with 1tbs (15mL) of either
lemon juice or vinegar for 2 to 5minutes in micr
owave oven.
Microwave Inlet Cover
To avoid arcing and microwave oven damage, the microwave
inlet cover (see the “Parts and Features” section) should be
keptclean.
n
Wipe with wet cloth.
MICROW
AVE OVEN DOOR AND EXTERIOR
The ar
ea where the microwave oven door and frame touch when
closed should be kept clean.
n
Mild, nonabrasive soaps and deter
gents:
Rinse with clean water and dry with soft, lint-free cloth.
n
Glass cleaner and paper towels or nonabrasive plastic
scrubbing pad:
Apply glass cleaner to towel, not dir
ectly to surface.
CONTROL P
ANEL
n Sponge or soft cloth and water:
Dampen sponge with water and wipe panel. Dry with
softcloth.
n
T
o avoid damage to the control panel, do not use chemical
or abrasive cleansers.
TURNT
ABLE
Replace tur
ntable immediately after cleaning. Do not operate the
microwave oven without the turntable in place.
n
Mild cleanser and scouring pad
n
Dishwasher
17

If you experience Recommended Solutions
Nothing will operate Check the following:
■
Household fuse or circuit breaker: If a household fuse has blown or a circuit breaker has tripped,
replace the fuse or reset the circuit breaker. If the problem continues, call an electrician.
Microwave oven will
not operate
Check the following:
■
Magnetron: Try to heat 1 cup (250 mL) of cold water for 2 minutes at 100% cooking power. If water
does not heat, try the steps in the bullets below. If microwave oven still does not operate, call for
service.
■
Door: Firmly close door. On some models, if a packaging spacer is attached to the inside of the door,
remove it, then rmly close door.
If a message about the door appears in the display, the door has been closed for 5 minutes or more
without the microwave oven being started. This occurs to avoid unintended starting of the microwave
oven. Open and close the door, then start the cycle.
■
Stop (Unlock): Make sure Stop/Unlock is OFF. Make sure Demo mode (onsome models) is OFF.
Microwave oven
makes humming noise
■
This is normal and occurs when the power supply in the magnetron cycles on.
Microwave oven door
looks wavy
■
This is normal and will not affect performance.
Turntable will not
operate
Check the following:
■
Turntable: Make sure turntable is correct side up and is sitting securely on the turntable support.
Seethe “Turntable” section.
■
Turntable support: Remove turntable. Remove and clean turntable hub, support, and rollers. Replace
hub, support, and turntable. Place 1 cup (250 mL) of water on the turntable, then restart microwave
oven. If it still is not working, call for service. For information on warranty, please visit
www.kitchenaid.com/owners, or in Canada
www.kitchenaid.ca/owner. Do not operate the microwave oven without turntable and turntable
support working properly.
Turntable alternates
rotation directions
■
This is normal and depends on motor rotation at the beginning of the cycle.
Display shows
messages
■
A ashing “0:00” means there has been a power failure. Reset the clock.
Display shows time
countdown, but the
microwave oven is not
operating
Check the following:
■
Timer: See the “Timer” section.
Tones are not
sounding
Check the following:
■
Tones: See the “Tones” section.
Cooking times seem
too long
Check the following:
■ Cooking power: See the “Power” section.
■
Amount of food: Larger amounts of food need longer cooking times.
■
Voltage: Have a qualied electrician check the electrical system in the home.
Odor coming from
microwave oven
during convection
■
This is normal for the rst few convection and/or grill cycles. The odor will dissipate with repeated use.
TROUBLESHOOTING
First try the solutions suggested here. If you need further assistance or more recommendations that may help you
avoidaservicecall,refer to the warranty, or visit www.kitchenaid.com/owners, or in Canada
www.kitchenaid.ca/owners.
Contact us by mail with any questions or concerns at the address below:
In the U.S.A.:
KitchenAid Brand Home Appliances
Customer eXperience Centre
553 Benson Road
Benton Harbor, MI 49022-2692
Please include a daytime phone number in your correspondence.
In Canada:
KitchenAid Brand Home Appliances
Customer eXperience Centre
220-6750 Century Ave.
Mississauga, Ontario L5N 0B7
18

ASSISTANCE OR SERVICE
If you need service:
For information on warranty, please visit
www.kitchenaid.com/owners, or in Canada
www.kitchenaid.ca/owners.
If you need replacement parts:
If you need to order replacement parts, we recommend that you
use only factory specied parts. These factory specied parts
will t right and work right because they are made with the same
precision used to build every new KitchenAid appliance.
To locate factory specied parts in your area, call us or your
nearest KitchenAid designated service center.
In the U.S.A.
Call the KitchenAid Customer eXperience Center toll-free:
1-800-422-1230 or visit our website at
www.kitchenaid.com/owners.
Our consultants provide assistance with:
■
Scheduling of service. KitchenAid appliances designated
service technicians are trained to fulll the product warranty
and provide after-warranty service anywhere in the United
States.
■ Features and specications on our full line of appliances.
■
Referrals to local KitchenAid appliance dealers.
■
Installation information.
■
Use and maintenance procedures.
■
Accessory and repair parts sales.
■ Specialized customer assistance (Spanish speaking, hearing
impaired, limited vision, etc.).
For further assistance:
If you need further assistance, you can write to KitchenAid with
any questions or concerns at:
KitchenAid Brand Home Appliances
Customer eXperience Center
553 Benson Road
Benton Harbor, MI 49022-2692
Please include a daytime phone number in your correspondence.
In Canada
Call the KitchenAid Customer eXperience Center toll-free:
1-800-807-6777 or visit our website at
www.kitchenaid.ca/owners.
Our consultants provide assistance with:
■
Scheduling of service. KitchenAid appliances designated
service technicians are trained to fulll the product warranty
and provide after-warranty service anywhere in Canada.
■
Features and specications on our full line of appliances.
■
Referrals to local KitchenAid appliance dealers.
■
Use and maintenance procedures.
■
Accessory and repair parts sales.
For further assistance:
If you need further assistance, you can write to KitchenAid with
any questions or concerns at:
KitchenAid Brand Home Appliances
Customer eXperience Centre
200–6750 Century Ave.
Mississauga, Ontario L5N 0B7
Please include a daytime phone number in your correspondence.
Replacement Parts
Glass Turntable
Turntable Support and Rollers
Part Number W11815765
Turntable Hub
Part Number W11815766
If you experience Recommended Solutions
Radio, TV, or cordless
phone interference
Check the following:
■
Proximity: Move the receiver away from the microwave oven or adjust the radio or TV antenna. If the
microwave oven is plugged into the same outlet, try a different outlet for the electronic device.
■ Soil: Make sure the microwave oven door and sealing surfaces are clean.
■
Frequency: Some 2.4 GHz based cordless phones and home wireless networks may experience
static ornoise while microwave oven is ON. Use a corded phone, a different frequency cordless
phone, or avoid using these items during microwave oven operation.
19
Part Number W11664476
SEGURIDAD DEL HORNO DE MICROONDAS
INSTRUCCIONES DE SEGURIDAD IMPORTANTES
PELIGRO
ADVERTENCIA
GUARDE ESTAS INSTRUCCIONES
–
–
–
–
20
Tu seguridad y la de otras personas es muy importante.
Hemos incluido muchos mensajes de seguridad importantes en este manual y en tu electrodoméstico. Siempre lee y cumple con
todos los mensajes de seguridad.
Al usar aparatos eléctricos, se deben seguir precauciones de seguridad básicas, incluyendo las siguientes:
ADVERTENCIA:
Para reducir el riesgo de quemadu-
ras, descargas eléctricas, incendios, lesiones personales o
exposición a una energía de microondas excesiva:
Lee todas las instrucciones antes de usar el horno de microondas.
Lee y sigue las PRECAUCIONES PARA EVITAR LA
EXPOSICIÓN POSIBLE A ENERGÍA DE MICROONDAS
EXCESIVA que se encuentran en la Página 4.
El horno de microondas debe estar conectado a tierra.
Conéctalo solo a un tomacorriente debidamente conectado a
tierra. Consulta las INSTRUCCIONES DE CONEXIÓN A TIERRA
que se encuentran en la sección INSTRUCCIONES DE
INSTALACIÓN.
Instala o coloca el horno de microondas únicamente de acuerdo
con las Instrucciones de Instalación proporcionadas.
Algunos productos como huevos enteros en su cáscara y
recipientes sellados (por ejemplo, frascos de vidrio cerrados)
pueden explotar y no deben calentarse en el horno de microondas.
Usa el horno de microondas solo para el uso previsto que se
describe en el manual. No uses productos químicos corrosivos
ni vapores en el horno de microondas. Este tipo de horno está
diseñado especícamente para calentar, cocinar o secar
alimentos. No está diseñado para uso industrial o de laboratorio.
LOS CONTENIDOS CALIENTES PUEDEN CAUSAR QUEMADU-
RAS GRAVES. NO DEJES QUE LOS NIÑOS USEN EL
MICROONDAS.Ten cuidado al retirar artículos calientes.
No opere el horno de microondas si tiene el cable o el enchufe
dañados, si no funciona correctamente, o si ha sufrido daños o
se ha caído.
El horno de microondas solo debe ser atendido por personal de
servicio calicado. Llama a una empresa de servicio autorizada para su
examen, reparación o ajuste.
No cubras ni obstruyas ninguna de las aberturas del horno de microondas.
No almacenes este horno de microondas al aire libre.
No uses el horno de microondas cerca del agua (por ejemplo, cerca de
un fregadero de cocina, en un sótano húmedo, cerca de una piscina u
otros lugares similares). No sumerjas el cable o el enchufe en agua.
Mantén el cable alejado de supercies calientes.
No dejes que el cable cuelgue sobre el borde de la mesa o el mostrador.
Consulta las instrucciones de limpieza de la supercie de la puerta en
la sección “Cuidado del Horno de Microondas”.
Para reducir el riesgo de incendio en la cavidad del horno:
No cocines los alimentos en exceso. Atenta cuidadosamente al
horno de microondas cuando coloques papel, plástico u otros
materiales combustibles dentro del horno para facilitar la cocción.
Retira los cabos de alambre de las bolsas de papel o plástico
antes de colocar las bolsas en el horno.
Si los materiales dentro del horno se incendian, mantén la puerta
cerrada, apaga el horno y desconecta el cable de alimentación, o
corta la energía en el panel de fusibles o interruptores automáticos.
No uses la cavidad para almacenamiento. No dejes productos de
papel, utensilios de cocina o alimentos en la cavidad cuando no
esté en uso.
Todos los mensajes de seguridad te indicarán cuál es el peligro potencial, te explicarán cómo reducir el riesgo de lesiones y
te informarán qué puede suceder si no se siguen las instrucciones.
Este es el símbolo de alerta de seguridad.
Este símbolo te advierte sobre peligros potenciales que pueden matarte o lesionarte a ti y a otros.
Todos los mensajes de seguridad irán acompañados de este símbolo de alerta de seguridad y de la palabra
“PELIGRO” o “ADVERTENCIA”.
Estas palabras signican:
Puedes morir o sufrir lesiones graves si no sigues las
instrucciones de inmediato.
Puedes morir o sufrir lesiones graves si no sigues las
instrucciones.
INSTRUCCIONES DE SEGURIDAD IMPORTANTES
GUARDE ESTAS INSTRUCCIONES
PRECAUCIONES PARA EVITAR LA EXPOSICIÓN POSIBLE
A ENERGÍA DE MICROONDAS EXCESIVA
(a)
(b)
(c)
(d)
21
No introduzcas alimentos de tamaño excesivo o utensilios metálicos
grandes en un horno de microondas/tostadora, ya que podrían causar
un incendio o un riesgo de descarga eléctrica.
No limpies con esponjas de alambre. Piezas de la esponja pueden
desprenderse y tocar partes eléctricas, involucrando un riesgo de
descarga eléctrica.
No uses productos de papel cuando el aparato funcione en modo
tostadora.
No almacenes ningún material (excepto los accesorios recomendados
por el fabricante) en este horno cuando no esté en uso.
No cubras las rejillas ni ninguna otra parte del horno con material
metálico. Esto causará el sobrecalentamiento del horno.
Los líquidos (como agua, café o té) pueden sobrecalentarse más allá
del punto de ebullición sin parecer estar hirviendo. No siempre hay
burbujeo o ebullición visible cuando se retira el recipiente del horno de
microondas.
ESTO PODRÍA CAUSAR QUE LÍQUIDOS MUY CALIENTES HIERVAN
DE REPENTE CUANDO SE DISTURBE EL RECIPIENTE O SE INTRO-
DUCE UNA CUCHARA U OTRO UTENSILIO EN EL LÍQUIDO.
Para reducir el riesgo de lesiones personales:
No sobrecalientes el líquido.
Revuelve el líquido tanto antes como a mitad del calentamiento.
No uses recipientes de paredes rectas con cuellos estrechos.
Después de calentar, deja que el recipiente permanezca en el horno
de microondas un breve tiempo antes de retirarlo.
Ten extrema precaución al introducir una cuchara u otro utensilio en
el recipiente.
No intentes operar este horno con la puerta abierta, ya que el
funcionamiento con la puerta abierta puede resultar en una
exposición dañina a la energía de microondas. Es importante
no anular ni manipular los enclavajes de seguridad.
No coloques ningún objeto entre la cara frontal del horno y la
puerta, ni permitas que se acumulen suciedad o residuos de
limpiador en las supercies de sellado.
No operes el horno si está dañado. Es particularmente
importante que la puerta del horno se cierre correctamente y
que no haya daños en:
(1) La puerta (doblada),
(2) Las bisagras y pestillos (rotos o aojados),
(3) Los sellos de la puerta y las supercies de sellado.
El horno no debe ser ajustado ni reparado por nadie que no
sea personal de servicio debidamente calicado.
Este dispositivo cumple con la Parte 18 de las Normas de la FCC.
Este dispositivo cumple con la Norma ICES-001 de Industria Canadá.
INSTRUCCIONES DE INSTALACIÓN
Desembalaje
1.
2.
3.
Requisitos de Ubicación
Requisitos Eléctricos
ADVERTENCIA
ADVERTENCIA
22
Retira todos los materiales de empaque del interior del horno de
microondas.
Limpia el interior con un paño suave y húmedo.
Verica si hay daños, como:
Una puerta que no esté alineada correctamente,
Daños alrededor de la puerta, o
Abolladuras en el interior o exterior del microondas.
Si hay algún daño, no operes el horno de microondas hasta que un
técnico de servicio designado lo haya revisado y realizado las
reparaciones necesarias.
NOTA: Para evitar daños al horno de microondas, no retire la tapa de la
entrada de microondas. Consulta la sección “Partes y Características”.
Riesgo de Peso Excesivo
Usa dos o más personas para mover e instalar el horno de
microondas.
Si no lo haces, podrías sufrir lesiones en la espalda u otras
lesiones.
Un suministro eléctrico de 120 V, 60 Hz, solo CA, de 15 A o 20 A,
con fusible o interruptor automático.
Coloca el horno de microondas en un carrito, mostrador, mesa o
estante lo sucientemente resistente como para soportar su peso y
el de los alimentos y utensilios que coloques en su interior.
El horno de microondas debe estar en un ambiente con temperatu-
ra superior a 50 °F (10 °C) para funcionar correctamente.
IMPORTANTE: El lado del panel de control del horno de microondas
es el lado más pesado. Maneja el horno de microondas con cuidado. El
peso del horno de microondas es de más de 35 libras (15,9 kg).
El horno de microondas no debe colocarse muy cerca de la pared.
La parte trasera de la instalación debe tener una altura superior a
916 mm.
Asegúrate de que las patas del horno de microondas estén
correctamente colocadas para garantizar una circulación de aire
adecuada. Si las salidas de ventilación están obstruidas, un
dispositivo térmico sensible puede apagar el microondas automáti-
camente. El horno de microondas debería funcionar correctamente
una vez que se haya enfriado.
NOTA: Algunos modelos se pueden integrar en una pared o gabinete
usando uno de los kits de moldura que se listan en la sección “Asisten-
cia o Servicio”.
Riesgo de Descarga Eléctrica
Conecta el aparato a un tomacorriente de 3 terminales
conectado a tierra.
No retires la terminal de tierra.
No uses un adaptador.
No uses un cable de extensión.
Si no sigues estas instrucciones, podrías sufrir la muerte, un
incendio o una descarga eléctrica.
Cumple con todos los códigos y ordenanzas vigentes.
Requerido:
Un fusible retardado o interruptor automático retardado.
Un circuito separado que alimente únicamente a este horno de
microondas.
Recomendado:
INSTRUCCIONES DE CONEXIÓN A TIERRA
Para todos los aparatos conectados por cable:
El horno de microondas debe estar conectado a tierra. En
caso de un cortocircuito eléctrico, la conexión a tierra reduce
el riesgo de descarga eléctrica al proporcionar una vía de
escape para la corriente eléctrica. El horno de microondas está
equipado con un cable que tiene un alambre de tierra y un
enchufe con terminal de tierra. El enchufe debe conectarse a
un tomacorriente que esté instalado correctamente y conecta-
do a tierra.
ADVERTENCIA:
El uso incorrecto del enchufe con terminal
de tierra puede resultar en un riesgo de descarga eléctrica.
Consulta a un electricista calicado o a un técnico de servicio si
no entiendes completamente las instrucciones de conexión a
tierra, o si tienes dudas sobre si el horno de microondas está
correctamente conectado a tierra.
No uses un cable de extensión. Si el cable de alimentación es
demasiado corto, pide a un electricista calicado o a un técnico
de servicio que instale un tomacorriente cerca del horno de
microondas. Se proporciona un cable de alimentación corto para
reducir los riesgos de enredarse o tropezar con un cable más
largo.
GUARDE ESTAS INSTRUCCIONES
PARTES Y CARACTERÍSTICAS
Componentes
Para instalar:
1.
2.
DA EC F B
H
J I
G
K
A
B
Rack de parrilla
C
D
Elemento de Asado
Accesorios para Asado
23
Rack de parrilla y Turntable
Este manual puede cubrir varios modelos diferentes. El modelo
que has comprado puede tener algunas o todas las característi-
cas que se muestran aquí. La apariencia de tu modelo particular
puede diferir ligeramente de las ilustraciones de este manual.
A. Sistema de bloqueo de la puerta
B. Ventana
C. Etiqueta de guía de cocción
D. Panel trasero
E. Luz del horno de microondas
F. Pantalla
G. Panel de control
H. Tapa de entrada de microondas*
I. Soporte removible de la turntable
J. Turntable de vidrio
K. Placa con número de modelo y
serie Partes y CaracterísticasNo
se muestra: Elemento de parrilla
(en el techo de la cavidad)
*NOTA: Para evitar daños al horno de microondas, no retire la
tapa de entrada de microondas. Consulta la sección “Partes y
Características”.
A. Turntable
B. Cubo (hub)
C. Soporte
D. Eje
La turntable puede girar en cualquier dirección para ayudar a cocinar
los alimentos de forma más uniforme. Para obtener los mejores
resultados de cocción, no opera el horno de microondas sin colocar
la turntable en su sitio. Consulta la sección “Asistencia o Servicio”
para volver a pedir cualquiera de las piezas.
Coloca el soporte en el fondo de la cavidad del horno de microondas.
Coloca la turntable sobre el soporte.
Ajusta las cuñas curvadas elevadas en el centro de la parte inferior
de la turntable entre los tres radios del cubo. Los rodillos del soporte
deben encajar dentro del borde inferior de la turntable.
El horno de microondas usa un elemento térmico de barra
caliente (cal rod) para el asado. La cavidad y la puerta del horno
de microondas se calentarán. Consulta la sección “Partes y
Características”. Se recomienda el uso de guantes para horno.
CONTROL DEL HORNO DE
MICROONDAS
Pantalla
Modo de espera
INICIAR
Inicio rápido/Añadir 30 segundos
DETENER/DESBLOQUEAR
Asado
Descongelar Silenciar Temporizador
Reloj
Vapor
Limpiar
ON/OF
NOTA:
–
–
Microondas Potencia Cantidad
24
Cuando se suministra energía por primera vez al horno de
microondas, aparecerá “12 Hr” en la pantalla. El usuario puede
presionar el botón Reloj para cambiar el formato a 12 o 24 horas.
Presiona el botón START (INICIAR) para conrmar. Luego la
pantalla mostrará “00:00”.
Cuando no se usan funciones, el horno de microondas pasará al
modo de espera.
Después de seleccionar una función, presiona el botón
STOP/UNLOCK (DETENER/DESBLOQUEAR) para salir de la
selección de función. Si presionas nuevamente el botón
STOP/UNLOCK y no se activa el modo de cocción, la acción
será inválida.
Cuando se activa el modo de cocción y el usuario presiona el
botón STOP/UNLOCK, las funciones de STOP/UNLOCK se
activarán simultáneamente. Presiona el botón STOP/UNLOCK
nuevamente para cancelar la función y volver al modo de espera.
El botón START inicia cualquier función. Si la cocción sin sensor
se interrumpe al abrir la puerta, presionar el botón START
reiniciará el ciclo.
NOTA: Para evitar el funcionamiento no intencional del horno de
microondas, no se puede iniciar una función de cocción si la
puerta del horno ha estado cerrada durante aproximadamente 1
minuto. La palabra “door (puerta)” aparecerá en la pantalla hasta
que se abra y cierre la puerta.
En modo de espera, presionar START inicia automáticamente el
horno de microondas a 100% de potencia durante 30 segundos,
y cada toque adicional del botón añade 30 segundos de tiempo
de cocción. Se pueden añadir incrementos de 30 segundos a
cualquier ciclo de cocción manual, en el momento del nivel de
potencia, presionando el botón START durante la cocción.
El botón STOP/UNLOCK borra cualquier comando incorrecto y
cancela cualquier programa durante la cocción. Presiona el
botón STOP/UNLOCK para detener el ciclo: no borrará la hora
del día.
El horno de microondas también se apagará al abrir la puerta.
Cierra la puerta y presiona START para reanudar el ciclo.
Inicio rápido 30 seg: Presiona “Start/+ 30 sec”, iniciará la
potencia máxima en 30 seg; presiona nuevamente si necesi-
tas añadir más tiempo en medio del ciclo o al nal del ciclo.
Cocción rápida por minutos: También puedes presionar el
botón del teclado 1-3 para cocinar a potencia máxima
durante los minutos seleccionados.
Menú de Cocción
Peso - lb (libras)
Peso - oz (onzas)
Bloqueo de Puerta

Reloj Temporizador
Finalización de Cocción
Silenciar Encendido/Apagado
Inicio Express
El horno de microondas debe estar en modo de espera.
1.
2.
3.
4.
Para congurar:
1.
2.
3.
4.
1.
2.
25
3.
Presiona el botón Reloj para entrar en la conguración del
reloj.
También aparecerá cada vez que el producto se conecte a la
fuente de energía, o cuando se restablezca la energía
después de un corte.
Presiona el botón del teclado 0-9 para congurar la hora.
Presiona el botón del teclado 0-9 para congurar los
minutos.
Presiona el botón INICIAR (START) o RELOJ (CLOCK) para
conrmar la conguración.
Esta función permite al usuario activar/desactivar todos los
sonidos del aparato, incluyendo los sonidos de pulsación de
botones, advertencias, alarmas e incluso la retroalimentación de
audio nal.
Presiona y mantén pulsado el botón Mantener Caliente (Keep
Warm) durante 3 segundos para activar el silencio; mantén
pulsado el botón nuevamente durante 3 segundos para volver a
activar el sonido.
Presiona el botón del teclado 1, 2 o 3: el horno de microondas
funcionará a 100% de potencia durante 1 min, 2 min o 3 min de
tiempo de cocción directamente. No es necesario presionar el
botón INICIAR (START).
NOTA: Esta función solo se puede activar en estado inactivo. El
horno de microondas emitirá un sonido de entrada inválida si se
presionan las teclas 4, 5, 6, 7, 8, 9, 0.
Presiona el botón Temporizador (Timer).
Presiona el botón del teclado 0-9 para ingresar el tiempo
deseado.
Presiona el botón INICIAR (START). Cuando nalice el tiempo
congurado, se emitirá un sonido de nalización del tempori-
zador.
Cuando la cuenta regresiva del temporizador se complete en
la pantalla, sonará una señal. Presiona DETENER/DESBLO-
QUEAR (STOP/UNLOCK) para detener el temporizador.
Después de la nalización de la cocción: si presionas el botón
DETENER/DESBLOQUEAR (STOP/UNLOCK), sacas la
comida y vuelves a cerrar la puerta, la interfaz mostrará el
reloj y pasará al modo de apertura de puerta de 1 paso.
Si no retiras la comida en 30 minutos, mostrará “END (Fin)”
constantemente durante 30 minutos, y después volverá
automáticamente al modo de espera, se desbloqueará y
pasará al modo de apertura de puerta de 1 paso.
La luz se apagará, el ventilador funcionará durante 1 minuto y
la pantalla mostrará “Fan (Vent)”.
NOTA: El temporizador no inicia ni detiene el horno de microon-
das. Esta función solo se puede congurar en modo de espera.
Cuando la cocción nalice, la pantalla mostrará el texto “End
(Fin)”. Se emitirá un pitido acústico de recordatorio.

Timer Para congurar el temporizador:
1.
2.
3.
Power
Para congurar la potencia de cocción:
Para congurar el tiempo de cocción:
1.
Cook Time
1.
2.
4.
5.
3.
1.
2.
STOP/UNLOCK
Instrucciones del Teclado
26
3.
2.
4.
5.
START
(+ 30 Seg)
START
(+ 30 Seg)
Mantener para congurar
el Temporizador
Congurar Potencia de Cocción
Congurar Tiempo de Cocción
Función de Pausa/Detener
del Microondas
Añadir 30 Segundos
Iniciar Función
Presiona el botón TIMER (Temporizador).
Presiona el botón del teclado 0-9 para seleccionar el valor del
temporizador.
Presiona el botón START (Iniciar) para conrmar.
NOTA: El microondas debe estar en estado inactivo.
La pantalla muestra “30:00” como valor predeterminado (establecido
en minutos, de 00:01 a 60:00 min); presiona START para conrmar.
En modo de espera, presiona el botón Cook Time (Tiempo de
Cocción). El tiempo predeterminado es “00:00”.
Presiona los botones numéricos para ingresar el tiempo deseado
(de 00:01 a 90:00).
Presiona el botón Power (Potencia) para conrmar; la pantalla
mostrará el nivel de potencia predeterminado “1 0”.
Presiona los botones numéricos para congurar los niveles de
potencia.
Presiona el botón START (Iniciar) y el horno funcionará.
En modo de espera, presiona el botón Power (Potencia). El nivel
de potencia predeterminado es “1 0”.
Presiona los botones numéricos para congurar los niveles de
potencia.
Presiona el botón Cook Time (Tiempo de Cocción) para conrmar;
la pantalla mostrará “00:00”.
Presiona los botones numéricos para ingresar el tiempo deseado
(de 00:01 a 90:00).
Presiona el botón START (Iniciar) y el horno funcionará.
Para iniciar el microondas (cocinando durante 30 segundos a
potencia máxima) en estado inactivo.
Para aumentar el tiempo de cocción en incrementos de 30
segundos. Cada pulsación añade 30 segundos.
NOTA: Mientras la cuenta regresiva del Temporizador esté activa en
la pantalla, pulsa STOP/UNLOCK (Detener/Desbloquear) para
detener el Temporizador. El temporizador no inicia ni detiene el
microondas.
Presiona el botón START (Iniciar) para activar cualquier función de
cocción. Si la cocción se interrumpe al abrir la puerta, pulsa el botón
START después de volver a cerrar la puerta para reanudar el ciclo.
El botón STOP/UNLOCK (Detener/Desbloquear) detiene cualquier
función del microondas (excepto el reloj). El microondas también se
apagará al abrir la puerta. Al abrir la puerta, el/los elemento(s) se
apagarán, pero la luz del microondas permanecerá encendida. Cierra
la puerta y pulsa el botón START para reanudar el ciclo precongu-
rado.
El botón START (Iniciar) se puede usar de dos formas:
Teclado Característica Instrucciones

1.
2.
1.
2.
3.
1.
2.
3.
0-9
Mantener Caliente
1.
2.
Reloj
Número del Teclado
Mantener Caliente
Congurar el reloj
1.
2.
3.
27
DETENER/DESBLOQUEAR Apertura de
Puerta en 2 Pasos
Función de Apertura de Puerta en 2 Pasos Este microondas incluye la
función adicional de apertura de puerta en 2 pasos para evitar accesos no
intencionados.
El botón STOP/UNLOCK (Detener/Desbloquear) se puede usar para
pausar/cancelar la función durante o después del tiempo de cocción.
El botón STOP/UNLOCK también se usa para la apertura de puerta en 2 pasos:
NOTA: Una vez que presiones el botón STOP/UNLOCK para detener/pausar
cualquier función, el icono de Bloqueo de Puerta desaparecerá durante 10
segundos y podrás tirar del mango de la puerta para abrirla.El icono de
Bloqueo de Puerta volverá a aparecer después de 10 segundos y deberás
repetir los pasos 1 y 2 para abrir la puerta.
NOTA: Cuando la máquina se enciende después de conectarla, la función de
Puerta en 2 Pasos no se activará. Si un ciclo de cocción comienza después
de cerrar la puerta, se necesitan 2 pasos para abrirla. Una vez que se usen
los 2 pasos para abrir la puerta, si la puerta se cierra y no se aplica cocción,
podrás abrirla simplemente tirando del mango.
NOTA: Este microondas incluye la función adicional de apertura de puerta en
2 pasos para evitar accesos no intencionados. Cuando los niños no tienen
acceso al aparato, existe una opción para desactivar la función si no se
necesita.
Activación/Desactivación de la función de puerta en 2 pasos en la pantalla:-
Pasos para desactivar la función de puerta en 2 pasos:
NOTA: dI (Desactivar)
NOTA: Si desconectas el microondas, recordará la última operación. No
necesitarás desactivar o activar la función de puerta en 2 pasos nuevamente.
Pasos para activar la función de puerta en 2 pasos:
NOTA: EA (Activar)
IMPORTANTE: La desactivación de esta función solo debe hacerse cuando
el propietario esté seguro y no haya niños presentes.
El usuario puede presionar los números del teclado 0-9 para seleccionar el
tiempo de cocción, la clase de alimento, el peso del alimento y el nivel de
potencia.
La función permite congurar el reloj. Para usarla:
La función permite mantener tus platos calientes. Para usarla:
Una vez que congures el tiempo de cocción y presiones el botón
START (Iniciar), el icono de Bloqueo de Puerta aparecerá en la pantalla.
Para abrir el microondas:
Presiona STOP/UNLOCK.
Tira del mango de la puerta.
Después de presionar el botón STOP/UNLOCK durante 3 segundos,
aparecerá “dI: 0” en la pantalla.
Después de presionar el botón “0”, aparecerá “dI: 1” en la pantalla.
Presiona el botón START (Iniciar) para conrmar.
Después de presionar el botón STOP/UNLOCK durante 3 segundos,
aparecerá “EA: 0” en la pantalla.
Después de presionar el botón “0”, aparecerá “EA: 1” en la pantalla.
Presiona el botón START (Iniciar) para conrmar.
En modo de espera, presiona el botón “Reloj (Clock)”; la hora actual
aparecerá en la pantalla. Si no, mostrará la hora predeterminada
“00:00”.
Presiona el botón del teclado 0-9 para ajustar la hora.
Presiona el botón START/+30 Seg (Iniciar/+30 Seg) o Reloj (Clock) para
conrmar.
En modo de espera, presiona el botón “Mantener Caliente (Keep
Warm)”; el tiempo predeterminado “30:00” aparecerá en la pantalla.
Presiona el botón “Mantener Caliente (Keep Warm)” o el teclado 0-9
para seleccionar 15 min, 30 min, 45 min o 60 min.
Teclado Característica Instrucciones

1.
2.
3.
P01-Descongelado Manual:
4.
5.
6.
P02-P04 Descongelado Automático:
7.
8.
9.
Para recalentar usando las funciones preconguradas:
1.
2.
3.
4.
1.
2.
3.
28
Para usar la preconguración de palomitas de maíz:
La función de Descongelar ayuda con los alimentos congelados. Para
descongelar:
1.
2.
Función para activar/desactivar el sonido de pitido:
1.
2.
3. Presiona el botón START (Iniciar).
NOTA: El ciclo de Mantener Caliente dura 15 minutos (predeterminado 30
minutos), el tiempo máximo es 60 minutos. Cada ciclo de 15 minutos, el
microondas se encenderá durante 2,5 minutos. Después de que nalice la
cocción, la luz de la cavidad se apagará y el ventilador funcionará durante 1
minuto.
Presiona y mantén pulsado el botón “Mantener Caliente (Keep Warm)”
durante 3 segundos para activar el silencio; aparecerá el icono MUTE
OFF (SILENCIO DESACTIVADO) en la pantalla.
Mantén pulsado el botón nuevamente durante 3 segundos para volver a
activar el sonido.
En modo de espera, pulsa repetidamente el botón “Palomitas (Popcorn)”
para seleccionar el tamaño de la bolsa (2,75, 3,0 o 3,5 oz).
Presiona el botón START (Iniciar).
Presiona el botón “Descongelar (Defrost)”; aparecerá P01 en la pantalla.
Presiona el botón “Descongelar (Defrost)” o el teclado 0-9 para seleccio-
nar el descongelado manual o la clase de alimento deseada (P01...P04).
Presiona el botón START (Iniciar) para conrmar.
La pantalla mostrará el tiempo predeterminado “00:00”.
Presiona el teclado 0-9 para ajustar el tiempo de descongelado.
Presiona el botón START (Iniciar).
La pantalla mostrará el peso predeterminado.
Presiona el teclado 0-9 para ajustar el peso deseado.
Presiona el botón START (Iniciar).
En modo de espera, presiona el botón “Recalentar (Reheat)”; aparecerá
P01 en la pantalla.
Presiona el botón “Recalentar (Reheat)” o el teclado 0-9 para seleccionar
la clase de alimento (P01...P04).
Presiona el botón START (Iniciar).
Cocción por Sensor: Un sensor en el horno de microondas detecta la
humedad que libera el alimento mientras se calienta, y ajusta el tiempo
de cocción en consecuencia. (Para cocción sin sensor, la pantalla
mostrará el peso predeterminado. Presiona el teclado 0-9 para ajustar el
peso deseado. Presiona el botón START.)
En modo de espera, presiona el botón “Cocción (Cook)”; aparecerá P01
en la pantalla.
Presiona el teclado 0-9 o el botón “Cocción (Cook)” para seleccionar una
categoría de alimentos.
Consulta la sección Menú de Cocción de esta guía para la categoría de
alimentos, o la etiqueta de referencia en la placa frontal del microondas.
Presiona el botón START (Iniciar).
Al presionar el botón STOP/UNLOCK (Detener/Desbloquear) nueva-
mente, se detendrá la función de cocción y el microondas pasará al
modo de espera (Cocción por Sensor).
NOTA: Consulta la sección Recalentar de esta guía para la categoría de
alimentos, o la etiqueta de referencia en la placa frontal del microondas.
En el modo Cocción, no es necesario congurar el tiempo y la potencia:
Teclado Característica Instrucciones
Mantener Caliente
Palomitas de Maíz
Descongelar
Activar o desactivar el
Palomitas de maíz
Descongelar
sonido de pitido
Recalentar
Cocinar
Recalentar
Cocinar

29
1.
2.
5.
NOTA:
3.
4.
Se usa para ablandar alimentos. Para utilizarla:
1.
2.
3.
4.
Teclado Característica Instrucciones
En modo de espera, presiona el botón “Ablandar (Soften)”; aparecerá
P01 en la pantalla.
Presiona el botón “Ablandar (Soften)” o el teclado 0-9 para seleccionar
una categoría de alimentos. Consulta la sección Ablandar de esta guía o
la etiqueta en la puerta del microondas. Presiona el botón START (Iniciar)
para conrmar.
Usa el teclado 0-9 para ajustar la cantidad.
Presiona el botón START (Iniciar).
Se usa para derretir alimentos. Para utilizarla:
1.
2.
3.
4.
En modo de espera, presiona el botón “Derretir (Melt)”; aparecerá P01 en
la pantalla.
Presiona el botón “Derretir (Melt)” o el teclado 0-9 para seleccionar una
categoría de alimentos. Consulta la sección Derretir de esta guía o la
etiqueta en la puerta del microondas. Presiona el botón START (Iniciar)
para conrmar.
Usa el teclado 0-9 para ajustar la cantidad.
Presiona el botón START (Iniciar).
Ayuda a limpiar la cavidad del microondas:
NOTA: Por favor, sigue los Consejos y Sugerencias en la sección
Limpieza por Vapor.
1.
2.
3.
Coloca 1 taza de agua (~250mL) en el centro de la cavidad.
Presiona el botón “Limpieza por Vapor (Steam Clean)”; aparecerá el
tiempo predeterminado “11:00” en la pantalla.
Presiona el botón START (Iniciar) para activar la función.
(Después de nalizar el ciclo de calentamiento del agua [8 min], la luz de
la cavidad y el ventilador se apagarán, y se mostrará el tiempo de cuenta
regresiva.)
Esta función permite asar alimentos. Para usarla:
Esta función permite cocinar con combinación de modos. Para usarla:
1.
2.
3.
En modo de espera, presiona el botón “Asar (Broil)”; la pantalla mostrará
el tiempo predeterminado “00:30”.
Presiona el teclado 0-9 para ajustar el tiempo de cocción (de 0:01 a
90:00).
Presiona el botón START/+30 Seg (Iniciar/+30 Seg).
En modo de espera, presiona el botón “Combinada (Combi)”; la pantalla
mostrará el valor predeterminado “C01”.
Presiona el botón “Combinada (Combi)” o el teclado 0-9 para seleccionar
una categoría de alimentos. Consulta la sección Combinada de esta guía
o la etiqueta en la puerta del microondas.
Presiona el botón START/+30 Seg (Iniciar/+30 Seg); la pantalla mostrará
“00:00”.
Presiona el teclado 0-9 para ajustar el tiempo de cocción (de 0:01 a
90:00).
Presiona el botón START/+30 Seg (Iniciar/+30 Seg).
Asegúrate de que los utensilios usados sean seguros para microondas y
resistentes al calor al utilizar esta función.
No uses utensilios de plástico al asar: se derretirán. Tampoco son
adecuados los artículos de madera o papel.
Ten cuidado: no toques el elemento de asado.
Es posible cambiar el tiempo de duración incluso después de que el
proceso de cocción haya comenzado.
Para cambiar el tiempo de duración: presiona primero el botón de
Tiempo de Cocción, luego el teclado 0-9 para establecer el valor del
tiempo, y presiona el botón Iniciar para conrmar.
Ablandar
Derretir
Limpieza por Vapor
Asar
Cocción Combinada
Ablandar
Derretir
Ciclo de limpieza automática
Cocción a asar
Cocción combinada

30
USO DEL HORNO DE MICROONDAS
CARACTERÍSTICAS DE LOS ALIMENTOS
DIRECTRICES DE COCCIÓN
Un magnetrón en el horno de microondas produce microondas
que rebotan en el suelo, paredes y techo (de metal) y pasan a
través del recipiente y los utensilios para calentar los alimen-
tos. Las microondas son atraídas y absorbidas por las
moléculas de grasa, azúcar y agua en los alimentos, lo que
hace que se muevan, generando fricción y calor (que cocina el
alimento).
Al cocinar en microondas, la cantidad, tamaño y forma,
temperatura inicial, composición y densidad del alimento
afectan los resultados de la cocción.
Cantidad de alimento
Cuanto más alimento se caliente a la vez, más tiempo se
necesita. Vericar si está cocido y añadir pequeños incremen-
tos de tiempo si es necesario.
Tamaño y forma
Las porciones pequeñas se cocinan más rápido que las
grandes; los alimentos de forma uniforme se cocinan más
evenly que los de forma irregular.
Temperatura inicial
Los alimentos a temperatura ambiente se calientan más rápido
que los refrigerados; estos, a su vez, más rápido que los
congelados.
Composición y densidad
Los alimentos ricos en grasa y azúcar alcanzan temperaturas
más altas y se calientan más rápido. Los alimentos pesados y
densos (como carne y papas) requieren más tiempo de
cocción que los ligeros y porosos (como el pastel) del mismo
tamaño.
Cubrir
Cubrir los alimentos ayuda a retener humedad, acortar el
tiempo de cocción y reducir salpicaduras. Usar la tapa del
utensilio; si no hay, papel de cera, toallas de papel o envoltura
plástica aprobada para microondas. Doblar una esquina de la
envoltura para dejar salir el vapor. La condensación en la
puerta y cavidad es normal durante cociones intensas.
Revolver y voltear
Revolver redistribuye el calor evenly para evitar que los bordes
se cocinen en exceso (revolver de afuera hacia adentro). Si es
posible, voltear el alimento de abajo hacia arriba.
Disponer
Al calentar alimentos de forma irregular o tamaños diferentes:
colocar las partes más delgadas y pequeños hacia el centro. Si
cocinas varios artículos del mismo tamaño/forma: disponerlos
en un círculo, dejando el centro vacío.
Perforar
Antes de calentar, usar un tenedor o cuchillo pequeño para
perforar alimentos con piel o membrana (papas, yemas de
huevo, hígados de pollo, perritos calientes, salchichas).
Perforar en varios puntos para dejar salir el vapor.
Proteger
Usar pequeños trozos planos de papel de aluminio para
proteger las partes delgadas de alimentos irregulares, huesos
y alimentos como alas de pollo, puntas de pierna o colas de
pescado. Consultar primero la sección "Papel de aluminio y
metal".
Tiempo de reposo
Los alimentos seguirán cocinándose por conducción natural
del calor, incluso después de que termine el ciclo del microon-
das. La duración del reposo depende del volumen y densidad
del alimento.
Para evitar dañar el horno, no apoyarse en la puerta ni
permitir que los niños se columpien en ella.
Para evitar daños, no operar el horno cuando esté vacío.
No calentar biberones ni frascos de comida para bebés en
el microondas.
No secar ropa, ores, frutas, hierbas, madera, calabazas ni
papel (incluyendo bolsas de papel marrón y periódicos) en
el microondas.
La cera de parana no se derretirá en el microondas, ya
que no absorbe las microondas.
Usar guantes o posavasos al sacar recipientes del horno.
No cocinar las papas en exceso: al nal del tiempo
recomendado, deben estar ligeramente rmes. Dejar
reposar 5 minutos (terminarán de cocinarse durante el
reposo).
No cocinar ni recalentar huevos enteros en su cáscara: el
vapor se acumulará y los huevos pueden explotar (requi-
riendo una limpieza extensa de la cavidad). Cubrir los
huevos pochados y dejar reposar.
31
Utensilios de cocina y vajilla
Material Recomendaciones
Para probar utensilios o vajillas para uso en microondas:
1.
2.
Lámina de aluminio y Metal
Válido para uso
No usar
Para uso con el elemento de parrilla
Menú de cocción
Artículo Categoría de alimentos Cantidad
P01
P02
P03
P04
P05
P06
Los utensilios de cocina y la vajilla deben caber en el plato giratorio.
Siempre usa guantes para horno o protectores de manos al manipularlos,
ya que cualquier recipiente puede calentarse por transferencia de calor
desde la comida. No uses utensilios de cocina ni vajilla con bordes de oro
o plata. Usa la siguiente tabla como guía, y luego prueba antes de usar.
Lámina de aluminio,
Metal
Vidrio cerámico,
Vidrio
Porcelana, Loza
Melamina
Plato para dorar
Papel: Toallas de papel,
Vajilla de papel,
Servilletas de papel
Plástico: Envoltorios de
plástico, Bolsas de
plástico, Taponeras de
plástico, Vajilla de
plástico, Recipientes de
plástico
Cerámica y arcilla
Utensilios de
horneado de silicona
Paja, mimbre,
Recipientes de
madera
Papel encerado
Consulta la sección "Lámina de aluminio y Metal".
Aceptable para uso
Sigue las recomendaciones del fabricante.
Sigue las recomendaciones del fabricante.
Usa productos no reciclados y aquellos aprobados
por el fabricante para uso en microondas.
Usa aquellos productos aprobados por el fabricante
para uso en microondas.
Sigue las recomendaciones del fabricante.
No usar en el microondas.
Aceptable para uso
Sigue las recomendaciones del fabricante.
La base debe estar a al menos 3/16" (5 mm) sobre el
plato giratorio. Sigue las recomendaciones del
fabricante.
Coloca el utensilio o la vajilla en el microondas junto con 1 taza
(250 mL) de agua.
Cocina a 100% de potencia durante 1 minuto.
No uses el utensilio o la vajilla si se calienta y el agua permanece fría.
Siempre usa guantes para horno o protectores de ollas al sacar los
platos del microondas.
La lámina de aluminio y algunos metales se pueden usar en el
microondas. Si no se usan correctamente, puede producirse una
descarga eléctrica (un destello azul) y dañar el microondas.
Se pueden usar las rejillas y utensilios de horneado que vienen con el
microondas (en algunos modelos), la lámina de aluminio para
protección y los termómetros de carne aprobados, siguiendo las
siguientes pautas:
No se deben usar en el microondas los utensilios y utensilios de
horneado de metal, objetos de oro, plata, peltre, termómetros de
carne no aprobados, brochetas, lazos de cierre, revestimientos de
lámina (como envoltorios de sándwiches), grapas y objetos con
bordes de oro o plata o un esmalte metálico.
Para evitar dañar el microondas, no permitas que la lámina de
aluminio o los metales toquen las paredes, el techo o el suelo de la
cavidad interior.
Siempre usa el plato giratorio.
Para evitar dañar el microondas, no permitas que entren en contacto
con otro objeto metálico durante la cocción en microondas.
Usa la rejilla alta de parrilla proporcionada junto con una sartén resistente
al horno para recoger las grasas.
El microondas está programado con alimentos comunes para microon-
das, sus cantidades, potencias de cocción y tiempos de cocción. Usa la
siguiente tabla como guía para la cocción preestablecida.
Verduras frescas
De temperatura ambiente.Coloca los
alimentos en un recipiente seguro para
microondas.Añade 2 cucharadas de agua al
recipiente:
2 cucharadas para 1-2 tazas de verduras
4 cucharadas para 3-4 tazas de verduras
Tapa el recipiente, dejando un oricio de
ventilación. Revuelve y deja reposar 3
minutos después de cocinar.
Verduras congeladas
De temperatura congelada. Colócalas en un
recipiente seguro para microondas. Añade
agua al recipiente:
2 cucharadas para 1-2 tazas de verduras
4 cucharadas para 3-4 tazas de verduras
Tapa el recipiente, dejando un oricio de
ventilación. Revuelve y deja reposar 3
minutos después de cocinar.
Avena
Coloca la avena en un recipiente seguro para
microondas y añade agua según las
instrucciones del empaque. Tapa con papel
lm y dobla un borde unos 6 mm (1/4
pulgada) para hacer una ventilación. Coloca
el recipiente en el centro del horno. Después
de cocinar, revuelve con una cuchara o
batidor hasta que quede uniforme.
Plato principal congelado
Saca el plato del empaque y aoja la cubierta
de lm en 3 lados del recipiente, dejando uno
de los lados cortos aún adherido. Cúbrelo
ligeramente con el lm. Deja reposar 3
minutos los platos de 10.5 oz (297 g) y 20 oz
(567 g).
Patata (grande)
Ingresa 1-4 unidades, de 10-12 oz (283-340
g) cada una. Pincha cada patata varias veces
con un tenedor. Colócalas sobre una toalla
de papel en el centro del plato giratorio. Deja
reposar 5 minutos después de cocinar.
Patata (pequeña)
Ingresa 1-16 unidades, de 3-5 oz (85-141 g)
cada una. Pincha cada patata varias veces
con un tenedor. Colócalas sobre una toalla
de papel en el centro del plato giratorio. Deja
reposar 5 minutos después de cocinar.
1-4 tazas(Cocción
por sensor)
1-4 tazas(Cocción
por sensor)
1-4 tazas(Cocción
por sensor)
10 oz, 20 oz,(283
g, 567 g)(Cocción
por sensor)
1-4 unidades / 1
unidad
1-16 unidades / 1
unidad

Palomitas de maíz
Bolsas de 2.75, 3.0 o 3.5 oz.
16-64 oz/16 oz
3 oz, 8 oz
Recalentamiento
Artículo Categoría de Alimentos Cantidad
Artículo Categoría de Alimentos Cantidad
Artículo Categoría de Alimentos Cantidad
P01
P0
2
1-4 tazas
P03
1-4 tazas
P04
Ablandar
P01
P02
P03
Derretir
P01
0.5-2.0 palos /0.5 palos
P02 4-12 oz/4 oz
(113-340 g / 113 g)
Mantener caliente
Esta función te permite mantener tus platos calientes.
1.
2.
32
0.5-2.0 palos /0.5 palos
No use bolsas de papel comunes ni utensilios de vidrio
Haz palomitas de solo un paquete a la vez.
Sigue las instrucciones del fabricante al usar una máquina
para palomitas de microondas.
Escucha hasta que el crujido se reduzca a un crujido cada 1
o 2 segundos, luego detén el ciclo.
No vuelvas a tostar los granos que no se abrieron.
Para obtener los mejores resultados, usa bolsas frescas de
palomitas.
Los resultados de la cocción pueden variar según la marca y
el contenido de grasa.
NOTA: Sigue las instrucciones proporcionadas por el fabricante
de las palomitas de microondas.
Los tiempos y potencias de cocción ya están precongurados
para recalentar varios tipos de alimentos. Usa la siguiente tabla
como guía.
Plato de cena
Coloca la comida en el plato.
Cúbrelo con lm transparente y
deja un oricio para la
ventilación. Deja reposar 2-3
minutos después de recalentar.
Grande (289-440g)
Pequeño
(Cocción por sensor)
1-3 rebanadas
4 oz (113 g) por
rebanada
(Cocción por sensor)
Recalentar pizza
Coloca en un plato apto para
microondas forrado con una
servilleta de papel.
Bebida
No tapar.
Sopa
Coloca en un recipiente apto
para microondas. Cúbrelo con
lm transparente y deja un
oricio para la ventilación.
Revuelve y deja reposar 2-3
minutos después de recalentar.
La función de Ablandar se puede usar para ablandar tu comida.
Se han preestablecido tiempos y potencias de cocción para
varios tipos de alimentos. Usa la siguiente tabla como guía.
Mantequilla
Desenvolver y colocar en
un recipiente apto para
microondas.
Helado
Desenvolver y colocar en
un recipiente apto para
microondas.
Queso crema
Desenvolver y colocar en
un recipiente apto para
microondas.
Mantequilla
Desenvolver y colocar en
un recipiente apto para
microondas.
Pepitas de chocolate
Desenvolver y colocar en
un recipiente apto para
microondas.
La función de Derretir se puede usar para derretir tu comida. Se
han preestablecido tiempos y potencias de cocción para varios
tipos de alimentos. Usa la siguiente tabla como guía.
Presiona el botón "Mantener caliente"
Presiona los botones numéricos (0-9) para seleccionar el
tiempo adecuado, luego presiona el botón START para
iniciar. El tiempo predeterminado es 30 minutos, y el
tiempo máximo es 60 minutos.
MW: 18s : 15s
33
Descongelado automático
Asar
Artículo Categoría de Alimentos Peso
P01 ----------
P02 0.2 lbs-6.6 lbs/0.1 lbs
P03 0.2 lbs-6.6 lbs/0.1 lbs
P04 0.2 lbs-6.6 lbs/0.1 lbs
TABLA DE PREPARACIÓN PARA DESCONGELAR
Aves de corral
Pollo: entero y troceado
Pollos de Cornualles
CARNE
PESCADO
MW: 10s Asar
Asar
: 23s
Ejemplos de tiempos de Asar
Elemento Categoría de alimento Peso
Tostada
5-5, 1/2 min
Modo de uso:
1.
2.
3.
4.
Cocción combinada
Elemento Función
C01
C02
Para obtener el mejor resultado, los alimentos deben estar a
0°F (-18°C) o más fríos al momento de descongelar.
Quita el envoltorio de los alimentos y retira las tapas (de los
jugos de fruta) antes de descongelar.
Los paquetes planos se descongelan más rápido que los
bloques gruesos.
Separa las piezas de los alimentos lo antes posible durante o
al nal del ciclo para un descongelado más uniforme.
Los alimentos que hayan estado fuera del congelador por más
de 20 minutos o los alimentos congelados preparados no
deben descongelarse con la función de descongelar, sino
manualmente.
Usa pequeños trozos de papel de aluminio para proteger
partes de los alimentos como las puntas de las alas de pollo y
las colas de pescado. Consulta primero la sección "Papel de
aluminio y metal".
Los tiempos y potencias de cocción están preestablecidos
para descongelar varios tipos de alimentos.
La función Asar utiliza un elemento térmico de barra caliente que
se calienta rápidamente para asar una variedad de alimentos.
Usa el accesorio para asar para colocar los alimentos más
cerca del elemento de parrilla y lograr una cocción más
rápida.
La cavidad del horno y la puerta se volverán muy calientes
durante el uso del elemento de parrilla. Se recomienda el uso
de guantes para horno.
Usa una sartén resistente al horno para recoger las grasas.
El accesorio para asar y la sartén se volverán muy calientes.
Usa guantes para horno para agarrar la sartén al retirarla.
Para evitar daños, no coloques la sartén caliente directa-
mente sobre supercies sensibles al calor.
La mesa giratoria debe estar en su lugar al usar la función
Asar.
Para obtener los mejores resultados, aplica una pequeña
cantidad de aceite de cocina al accesorio para asar.
Corta el pan en
rodajas y colócalo
en el accesorio
para asar
Coloca el accesorio para asar rmemente sobre la sartén y
coloca ambos en la mesa giratoria. Luego posiciona los
alimentos en la rejilla y cierra la puerta.
Presiona la función Asar: aparecerá "00:30" en la pantalla.
Ingresa la duración de la parrilla en minutos y segundos.
Presiona INICIAR/+30 Seg. El tiempo de asado comenzará a
contar hacia atrás en la pantalla. Cuando termine el ciclo,
aparecerá "Fin" en la pantalla y sonarán los tonos de
nalización del ciclo.
Presiona DETENER/Desbloquear o abre la puerta para
limpiar la pantalla.
Al usar el accesorio de rejilla de alambre, esta función permite
realizar una cocción combinada. Los tiempos y potencias de
cocción están preestablecidos para varios tipos de alimentos.
Usa la siguiente tabla como guía.
Deshielo Manual
Aves de corral
Carne
Pescado
Utilice la siguiente tabla como guía al descongelar aves de
corral, carne o pescado
Coloque en un recipiente apto
para microondas, con el pecho
de pollo hacia arriba. Retire las
vísceras del pollo entero.
Las zonas estrechas o grasosas
de los cortes de forma irregular
deben protegerse con papel de
aluminio antes de descongelar.
No descongele menos de 1/4
libra (113 g) ni dos hamburgue-
sas de 4 oz (113 g).
Coloque toda la carne en un
recipiente apto para microondas.
Carne de res: molida, letes,
asado, guiso
Cordero: guiso y chuletas
Cerdo: chuletas, costillas,
asados, salchicha
Filetes, Filetes gruesos,
Entero, Mariscos
Coloque en un recipiente apto
para microondas.

CUIDADO DEL HORNO DE MICROONDAS
Limpieza general
CAVIDAD DEL HORNO DE MICROONDAS
Suciedad promedio
Suciedad pesada
Olores
Tapa de entrada del microondas
Limpia con un paño húmedo.
PUERTA Y EXTERIOR DEL HORNO DE MICROONDAS
PANEL DE CONTROLES
MESA GIRATORIA
34
IMPORTANTE:
Antes de limpiar, asegúrate de que todos los
controles están apagados y que el horno de microondas está frío.
Siempre sigue las instrucciones de la etiqueta de los productos de
limpieza.
Se recomienda usar jabón, agua y un paño o esponja suave, a menos
que se indique lo contrario.
Para evitar dañar la cavidad del horno de microondas, no uses
esponjas de limpieza con jabón, limpiadores abrasivos, almohadillas de
lana de acero, toallas de limpieza granulosas o algunas toallas de
papel recicladas.
Para evitar dañar los modelos de acero inoxidable, frota en la dirección
del grano.
La zona donde la puerta y el marco del horno de microondas se tocan
al cerrarse debe mantenerse limpia.
Jabones y detergentes suaves no abrasivos:
Enjuaga con agua limpia y seca con un paño suave sin pelusa.
Jabones y detergentes suaves no abrasivos:
Calienta 1 taza (250 mL) de agua durante 2 a 5 minutos en el
horno de microondas. El vapor ablandará la suciedad. Enjuaga
con agua limpia y seca con un paño suave sin pelusa.
Jugo de limón o vinagre:
Calienta 1 taza (250 mL) de agua con 1 cucharada (15 mL) de
jugo de limón o vinagre durante 2 a 5 minutos en el horno de
microondas.
Para evitar chispas y daños al horno de microondas, la tapa de
entrada del microondas (consulta la sección "Partes y característi-
cas") debe mantenerse limpia.
La zona donde la puerta y el marco del horno de microondas se tocan
al cerrarse debe mantenerse limpia.
Vuelve a colocar la mesa giratoria inmediatamente después de
limpiarla. No opera el horno de microondas sin que la mesa giratoria
esté en su lugar.
Jabones y detergentes suaves no abrasivos: Enjuaga con agua
limpia y seca con un paño suave sin pelusa.
Limpiador de vidrios y toallas de papel o almohadilla de limpieza
plástica no abrasiva: Aplica el limpiador de vidrios en la toalla, no
directamente en la supercie.
Esponja o paño suave y agua: Humedece la esponja con agua y
limpia el panel. Seca con un paño suave.
Para evitar dañar el panel de controles, no uses limpiadores
químicos o abrasivos.
Limpiador suave y almohadilla de limpieza
Lavavajillas
Si experimentas
Nada funciona
El horno de
microondas no
funciona
Soluciones recomendadas
Verica lo siguiente:
Verica lo siguiente:
Esto es normal y ocurre cuando el suministro de energía del magnetrón se activa cíclicamente.
Esto es normal y no afectará el rendimiento.
Verica lo siguiente:
Esto es normal y depende de la rotación del motor al inicio del ciclo.
Potencia de cocción: Consulta la sección "Potencia".
Cantidad de comida: Cantidades más grandes de comida requieren tiempos de cocción más largos.
Voltaje: Que un electricista calicado revise el sistema eléctrico del hogar.
Un "0:00" parpadeante signica que hubo una falla de energía. Reinicia el reloj.
Verica lo siguiente:
Temporizador: Consulta la sección "Temporizador".
Verica lo siguiente:
Tonos: Consulta la sección "Tonos".
Verica lo siguiente:
Esto es normal durante los primeros ciclos de cocción por convección y/o parrilla. El olor desaparecerá
con el uso repetido.
SOLUCIÓN DE PROBLEMAS
Ponte en contacto con nosotros por correo con cualquier pregunta o inquietud en la siguiente dirección:
35
Primero prueba las soluciones sugeridas aquí. Si necesitas más asistencia o recomendaciones que te ayuden a evitar un servicio
técnico, consulta la garantía o visita www.kitchenaid.com/owners; en Canadá, www.kitchenaid.ca/owners.
En los Estados Unidos:KitchenAid Brand Home Appliances
Customer eXperience Centre
553 Benson Road
Benton Harbor, MI 49022-2692
Por favor, incluye un número de teléfono para horario laboral en tu comunicación.
En Canadá:KitchenAid Brand Home Appliances
Customer eXperience Centre
220-6750 Century Ave.
Mississauga, Ontario L5N 0B7
El horno de microondas
hace un ruido de zumbido
La puerta del horno de
microondas se ve ondulada
La mesa giratoria no
funciona
La mesa giratoria cambia
de dirección de rotación
La pantalla muestra la
cuenta regresiva del tiempo,
pero el horno de microondas
no está funcionando
Hay un olor que proviene del
horno de microondas
durante la cocción por
convección y/o parrilla
La pantalla muestra
mensajes
Los tonos no suenan
Los tiempos de cocción
parecen demasiado largos
Fusible doméstico o disyuntor: Si un fusible doméstico se ha fundido o un disyuntor se ha activado, reemplaza
el fusible o reinicia el disyuntor. Si el problema persiste, llama a un electricista.
Magnetrón: Intenta calentar 1 taza (250 mL) de agua fría durante 2 minutos a 100% de potencia de cocción. Si el
agua no se calienta, prueba los pasos de los puntos a continuación. Si el horno de microondas aún no funciona,
solicita servicio técnico.
Puerta: Cierra rmemente la puerta. En algunos modelos, si hay un separador de empaque adherido al interior de
la puerta, retíralo y luego cierra la puerta rmemente.
Si aparece un mensaje sobre la puerta en la pantalla, signica que la puerta ha estado cerrada durante 5 minutos
o más sin que el horno de microondas se haya encendido (esto se hace para evitar encendidos no intenciona-
dos). Abre y cierra la puerta, luego inicia el ciclo.
Stop (Desbloquear): Asegúrate de que la función Stop/Desbloquear esté DESACTIVADA. Asegúrate de que el
modo demostración (en algunos modelos) esté DESACTIVADO.
Mesa giratoria: Asegúrate de que la mesa giratoria esté colocada con el lado correcto hacia arriba y que esté
bien asentada en el soporte de la mesa giratoria. Consulta la sección "Mesa giratoria".
Soporte de la mesa giratoria: Retira la mesa giratoria. Retira y limpia el centro, el soporte y los rodillos de la
mesa giratoria. Vuelve a colocar el centro, el soporte y la mesa giratoria. Coloca 1 taza (250 mL) de agua en la
mesa giratoria y reinicia el horno de microondas. Si aún no funciona, solicita servicio técnico. Para información
sobre la garantía, visita www.kitchenaid.com/owners; en Canadá, www.kitchenaid.ca/owner. No opera el horno
de microondas si la mesa giratoria y su soporte no funcionan correctamente.
AYUDA O SERVICIO TÉCNICO
En los Estados Unidos
Nuestros consultores brindan ayuda con:
Para más asistencia:
En Canadá
Nuestros consultores brindan ayuda con:
Para más asistencia:
Piezas de Repuesto
Si experimentas Soluciones recomendadas
Verica lo siguiente:
■
■
■
36
interferencias en la
radio, TV o teléfono
sin cables
Proximidad: Aleja el receptor del horno de microondas o ajusta la antena de la radio o TV. Si el horno
está conectado al mismo enchufe, usa un enchufe diferente para el dispositivo electrónico.
Suciedad: Asegúrate de que la puerta del horno de microondas y las supercies de sellado estén
limpias.
Frecuencia: Algunos teléfonos sin cables y redes Wi-Fi basados en 2.4 GHz pueden experimentar
interferencias o ruido mientras el horno de microondas está ENCENDIDO. Usa un teléfono con cable,
un teléfono sin cables de otra frecuencia, o evita usar estos artículos mientras el horno está en funcio-
namiento.
Si necesitas servicio técnico:
Para información sobre la garantía, visita www. kitche-
naid.com/owners; en Canadá, www.kitchenaid.ca/owners.
Si necesitas piezas de repuesto:
Si debes pedir piezas de repuesto, te recomendamos usar solo
las piezas especicadas por la fábrica. Estas piezas se ajustan y
funcionan correctamente, ya que se fabrican con la misma
precisión que se usa para construir cada aparato nuevo de
KitchenAid.
Para encontrar las piezas especicadas por la fábrica en tu
área, llama a nosotros o a tu centro de servicio designado de
KitchenAid más cercano.
Llama al Centro de Experiencia del Cliente de KitchenAid de
forma gratuita: 1-800-422-1230 o visita nuestro sitio web en
www.kitchenaid.com/owners.
Programación de servicio técnico: Los técnicos de
servicio designados para aparatos KitchenAid están
capacitados para cumplir la garantía del producto y
ofrecer servicio post-garantía en cualquier parte de los
Estados Unidos.
Características y especicaciones de toda nuestra línea
de aparatos.
Referencias a distribuidores locales de aparatos
KitchenAid.
Información sobre instalación.
Procedimientos de uso y mantenimiento.
Venta de accesorios y piezas de reparación.
Asistencia al cliente especializada (atención en español,
para personas con discapacidad auditiva, visión
reducida, etc.).
Si necesitas ayuda adicional, puedes escribir a KitchenAid
con tus preguntas o inquietudes a la siguiente dirección:
KitchenAid Brand Home Appliances
Customer eXperience Center
553 Benson Road
Benton Harbor, MI 49022-2692
Por favor, incluye un número de teléfono para horario
laboral en tu comunicación.
Llama al Centro de Experiencia del Cliente de KitchenAid de
forma gratuita: 1-800-807-6777 o visita nuestro sitio web en
www.kitchenaid.ca/owners.
Si necesitas ayuda adicional, puedes escribir a KitchenAid con
tus preguntas o inquietudes a la siguiente dirección:
KitchenAid Brand Home Appliances
Customer eXperience Centre
200-6750 Century Ave.
Mississauga, Ontario L5N 0B7
Por favor, incluye un número de teléfono para horario laboral en
tu comunicación.
Programación de servicio técnico: Los técnicos de servicio
designados para aparatos KitchenAid están capacitados
para cumplir la garantía del producto y ofrecer servicio
post-garantía en cualquier parte de Canadá.
Características y especicaciones de toda nuestra línea de
aparatos.
Referencias a distribuidores locales de aparatos KitchenAid.
Procedimientos de uso y mantenimiento.
Venta de accesorios y piezas de reparación.
Mesa giratoria de vidrio
Número de parte: W11664476
Cubo de la mesa giratoria
Número de parte: W11815766
Soporte y rodillos de la mesa giratoria
Número de parte: W11815765