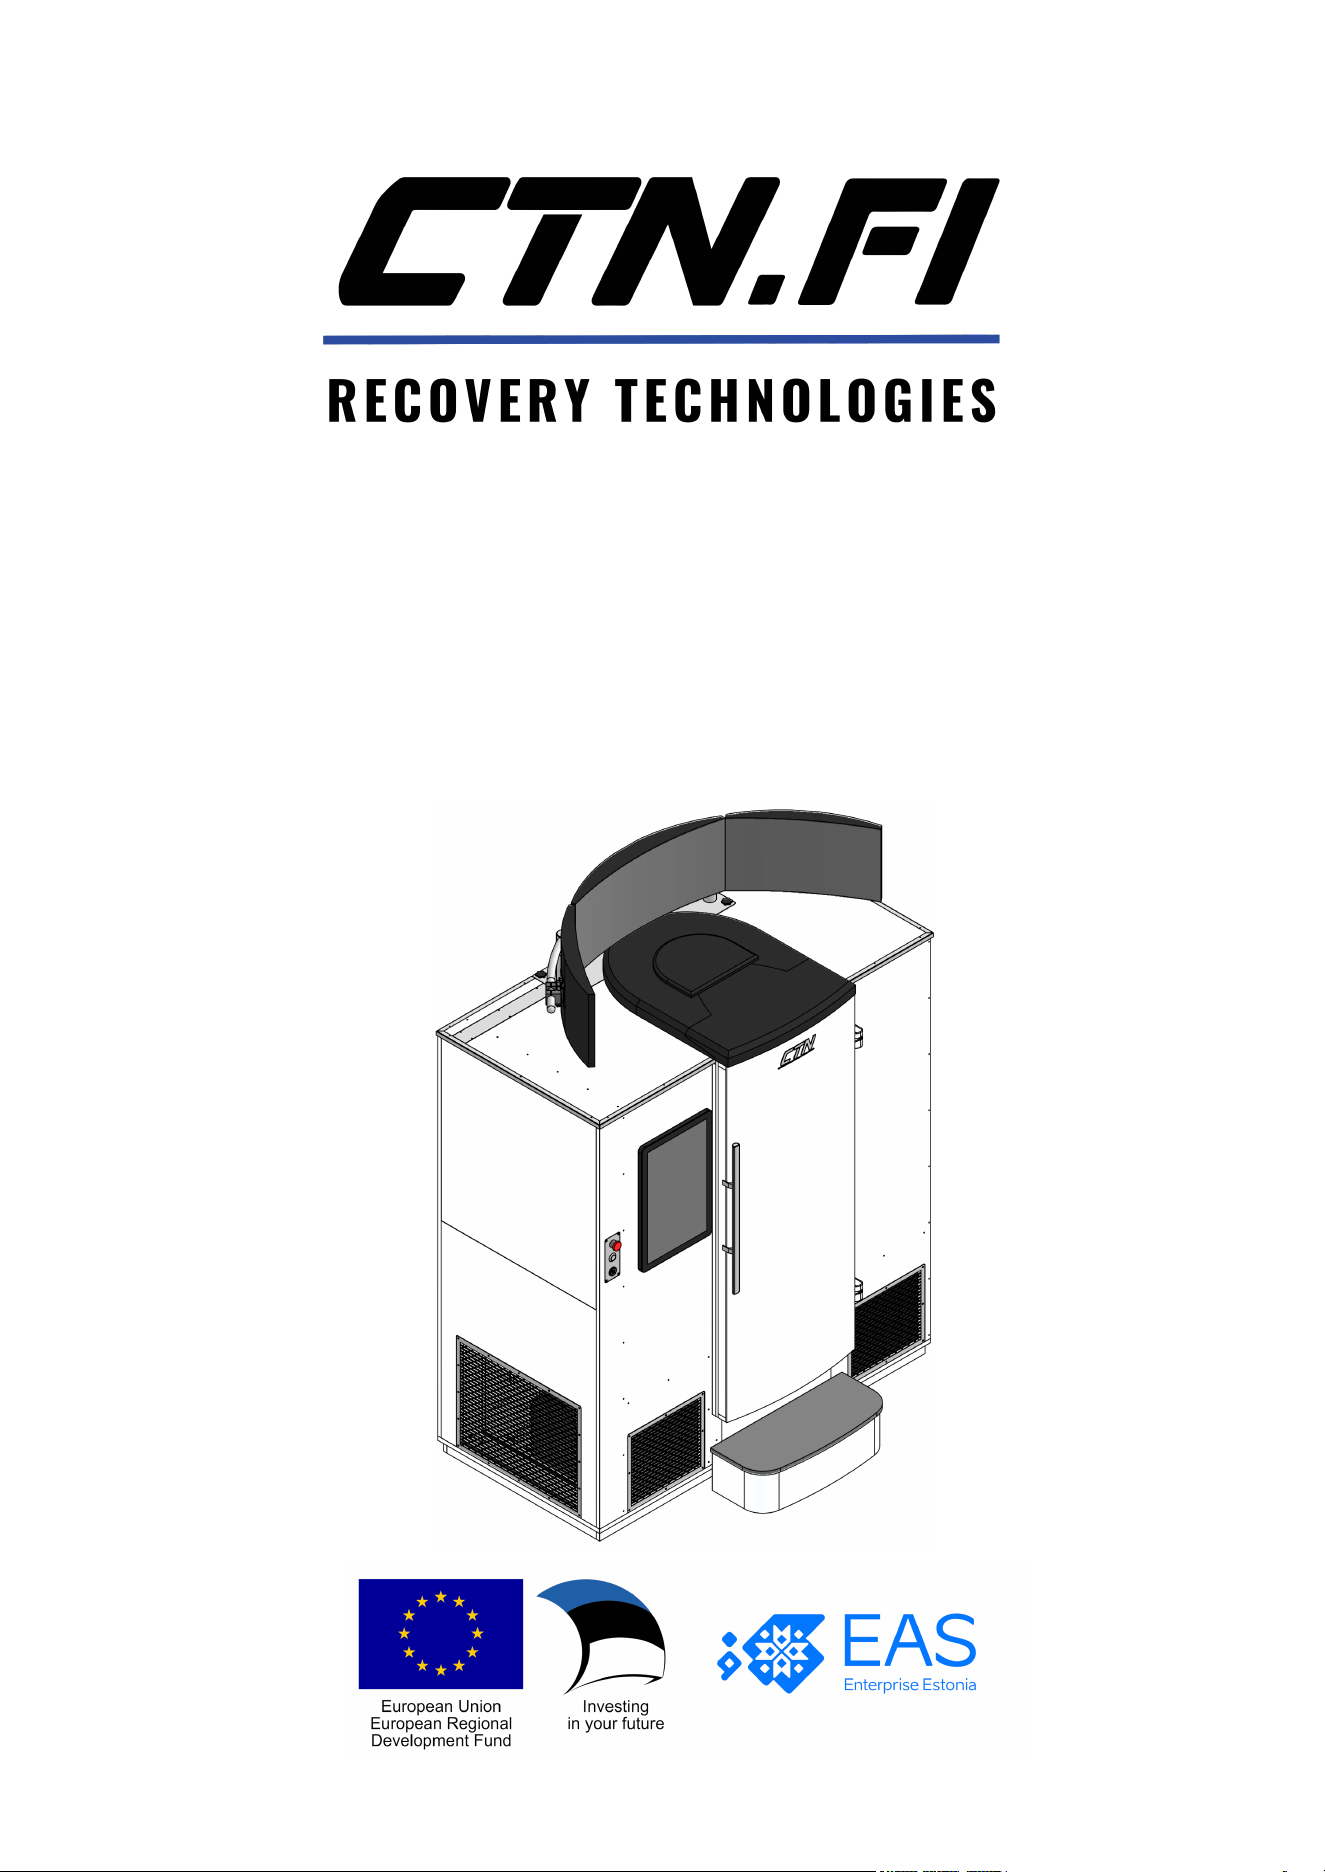
e°CABIN™
Electrically Powered Cryotherapy Cabin
User Manual

TABLE OF CONTENTS
TABLE OF CONTENTS 2
INTRODUCTION 3
SAFETY PRECAUTIONS 4
TECHNICAL INFORMATION 5
DIMENSIONS, ELECTRICAL 5
EXTERNAL COMPONENTS 6
ASSEMBLY INSTRUCTIONS 7
INSTRUCTIONS FOR USE 10
TURNING ON THE CABIN 10
PRECOOLING CYCLE 11
DRYING CYCLE (OPTIONAL) 13
TREATMENT SESSION & SETTINGS 14
AFTER USAGE 18
ADDITIONAL SETTINGS AND FEATURES 19
SYSTEM CLOCK 19
UNITS OF MEASUREMENT, LANGUAGES AND UPDATES 20
LIFT CALIBRATION 20
ONBOARD KEYBOARD 20
SET UP WI-FI 21
IO ADMINISTRATOR VIEW 21
USING YOUR MEDIA 22
CREATE NEW USER 23
TEAMVIEWER 23
MAINTENANCE INFORMATION 24
MONTHLY USER MAINTENANCE 24
YEARLY MAINTENANCE (Professional support required. Please consult with the
service and support team): 24
CONTACT AND SUPPORT 25
ANNEX 26
UNBOXING INSTRUCTIONS 26
2
INTRODUCTION
Thank you for choosing Cryotech Nordic! We sincerely appreciate your business
and hope that you are satisfied with your purchase. Our team will gladly assist you
in case you need support using or maintaining the e°Cabin.
The e°Cabin™ by Cryotech Nordic (CTN) is a revolutionary electrically powered
recovery cabin built for both professional and home use. It has been designed and
developed in Finland by experienced cryo engineers.
Please read this manual carefully before operating the e°Cabin. The manual
consists of easy to follow step-by-step guides to help you safely set up and
use the e°Cabin. This User Manual is an integral part of the product, please
keep it within easy reach for reference purposes.
This user manual contains important safety information and instructions for the
assembly, operation and maintenance of the e°Cabin, which must be taken into
account. Non-compliance with the safety information and instructions can lead to
danger for people, the environment, endanger the e°Cabin and its functions, and
lead to the loss of claims for damages of any kind.
If the e°Cabin is subject to demolition, the product and its components must be
disposed of in accordance with the environmental regulations.
Scan this QR code to access tutorial videos and
download the latest e°Cabin user manual.
3
SAFETY PRECAUTIONS
Symbols used in this manual:
WARNING: Precautions that must be
observed to prevent injuries or death.
CAUTION: Precautions that must be
observed to prevent damage to the
unit.
WARNING
Remove jewelry and/or other metal items from your body below the chin.
Wear warm and dry socks or shoes, gloves, underwear and a scarf/buff to protect sensitive body
parts.
Do not use body creams, oils or other skin products before the session. Make sure to dry your
body before the session if you are sweating.
Cryotherapy can cause various side effects (skin redness, irritation, numbness, frostnip etc.,
generally temporary). Use at your own risk.
Cryotherapy should be avoided if the patient has a high blood pressure, a heart disease, skin
infections, cold allergies, metal implants, pacemakers or history of other illnesses, is pregnant or
underage. Cryotherapy is known to decrease heart rate and increase blood pressure. Always
consult a doctor and/or physician before cryotherapy and use the e°Cabin at your own risk.
Do not stand on the device.
Do not touch electrical components with wet hands.
CAUTION
Only use accessories and replacement parts authorized/provided by CTN. Contact the Support
team for help and ask a qualified technician to fit the parts.
All electrical work should be performed by a qualified technician according to local regulations and
instructions given in this manual.
The device must be powered by a dedicated power supply and the correct voltage and circuit
breakers must be used.
The device should be positioned on a hard vertical surface that is capable of supporting its weight.
Only qualified personnel with proper refrigerant removal/ servicing equipment should handle the
maintenance and disposal of the refrigerant components.
Periodical maintenance should be performed according to the Maintenance Information
paragraph.
4
TECHNICAL INFORMATION
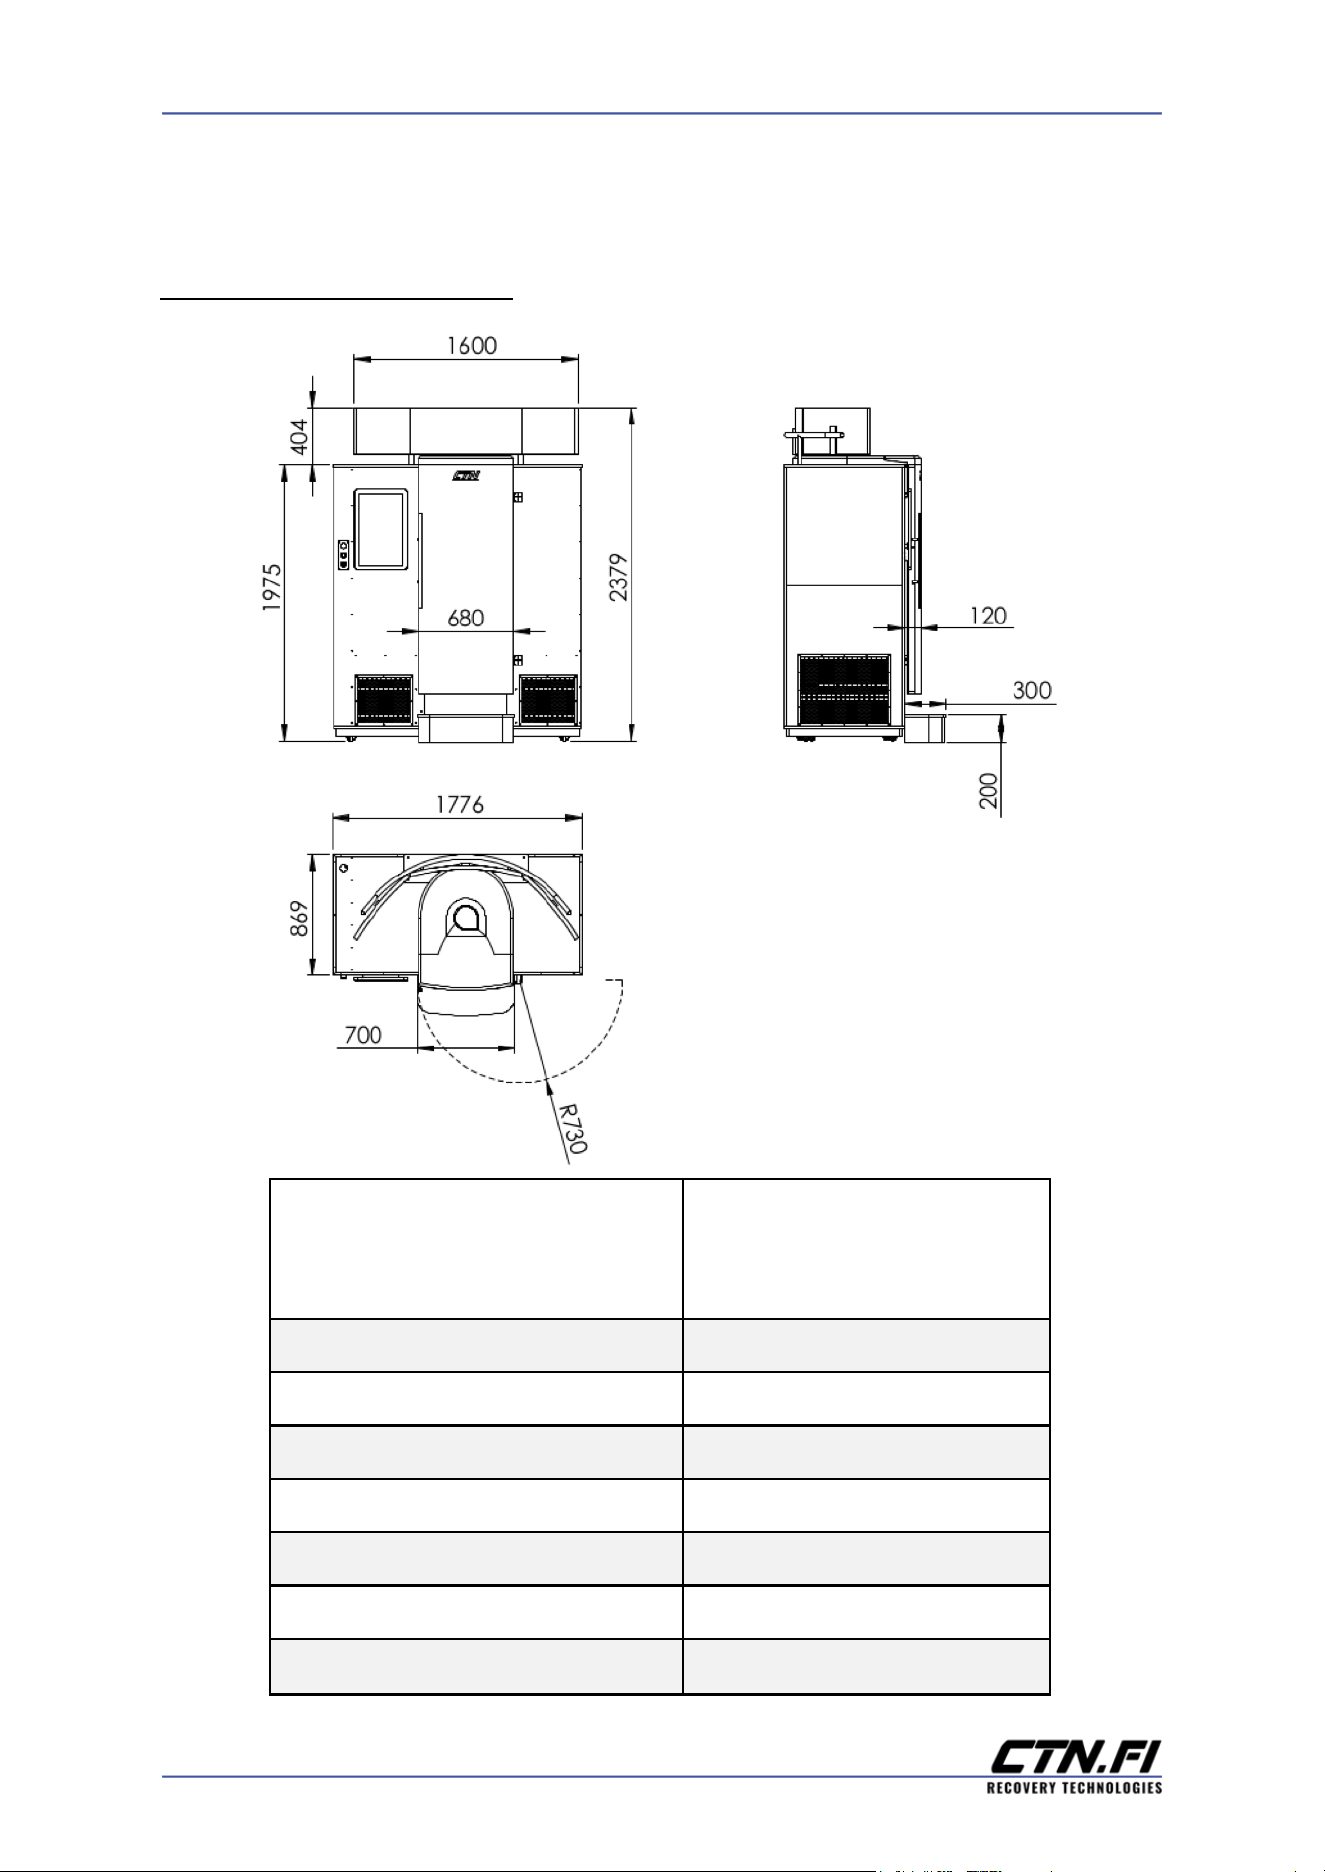
DIMENSIONS, ELECTRICAL
Dimensions (fully assembled,
door open)
Length: 2076mm / 81.73″
Width: 1644mm / 64.72″
Height: 2379mm / 93.66″
Weight
700 kg / 1543 lbs
Power consumption
3,2 kW/ hr
Main voltage (single phase)
208-240V, ≥16A fuse
Mains frequency
50 / 60 Hz
User interface screen
24″ UHD touch screen
Media screens
2 x 27″; 1 x 34″
Generated operating temperature
-20°C – -40°C / -4°F – -40°F
5
EXTERNAL COMPONENTS
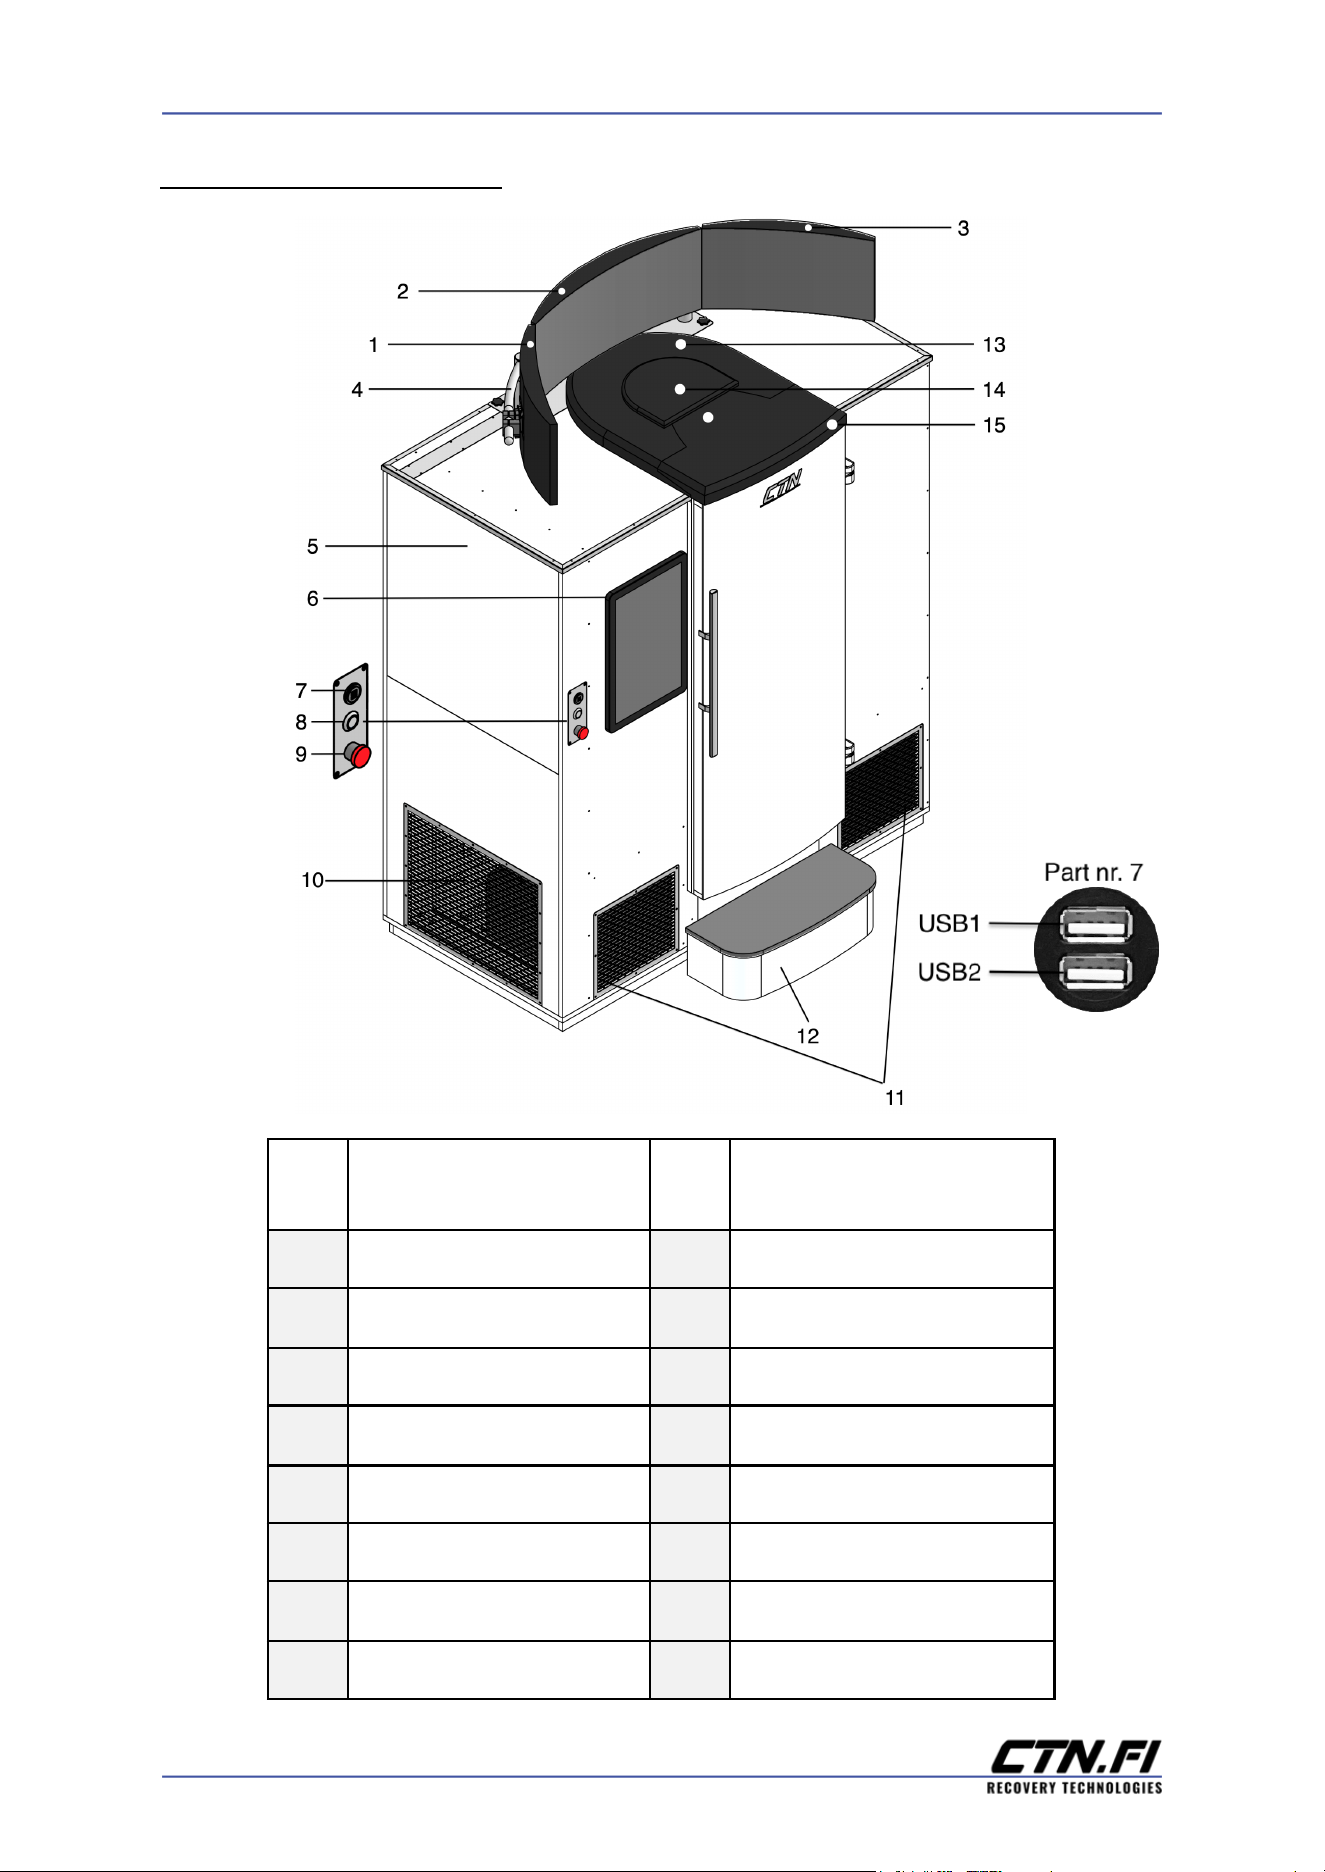
Part
nr.
Part name
Part
nr.
Part name
1
Monitor 1
9
Emergency switch
2
Monitor 2
10
Air vent cover+filter, side
3
Monitor 3
11
Air vent cover+filter, front
4
Monitor frame
12
Doorstep
5
Left side upper panel
13
Cabin cover
6
Main monitor
14
Head-opening cover
7
2x USB port
15
Door cover
8
On/Off button
15
6
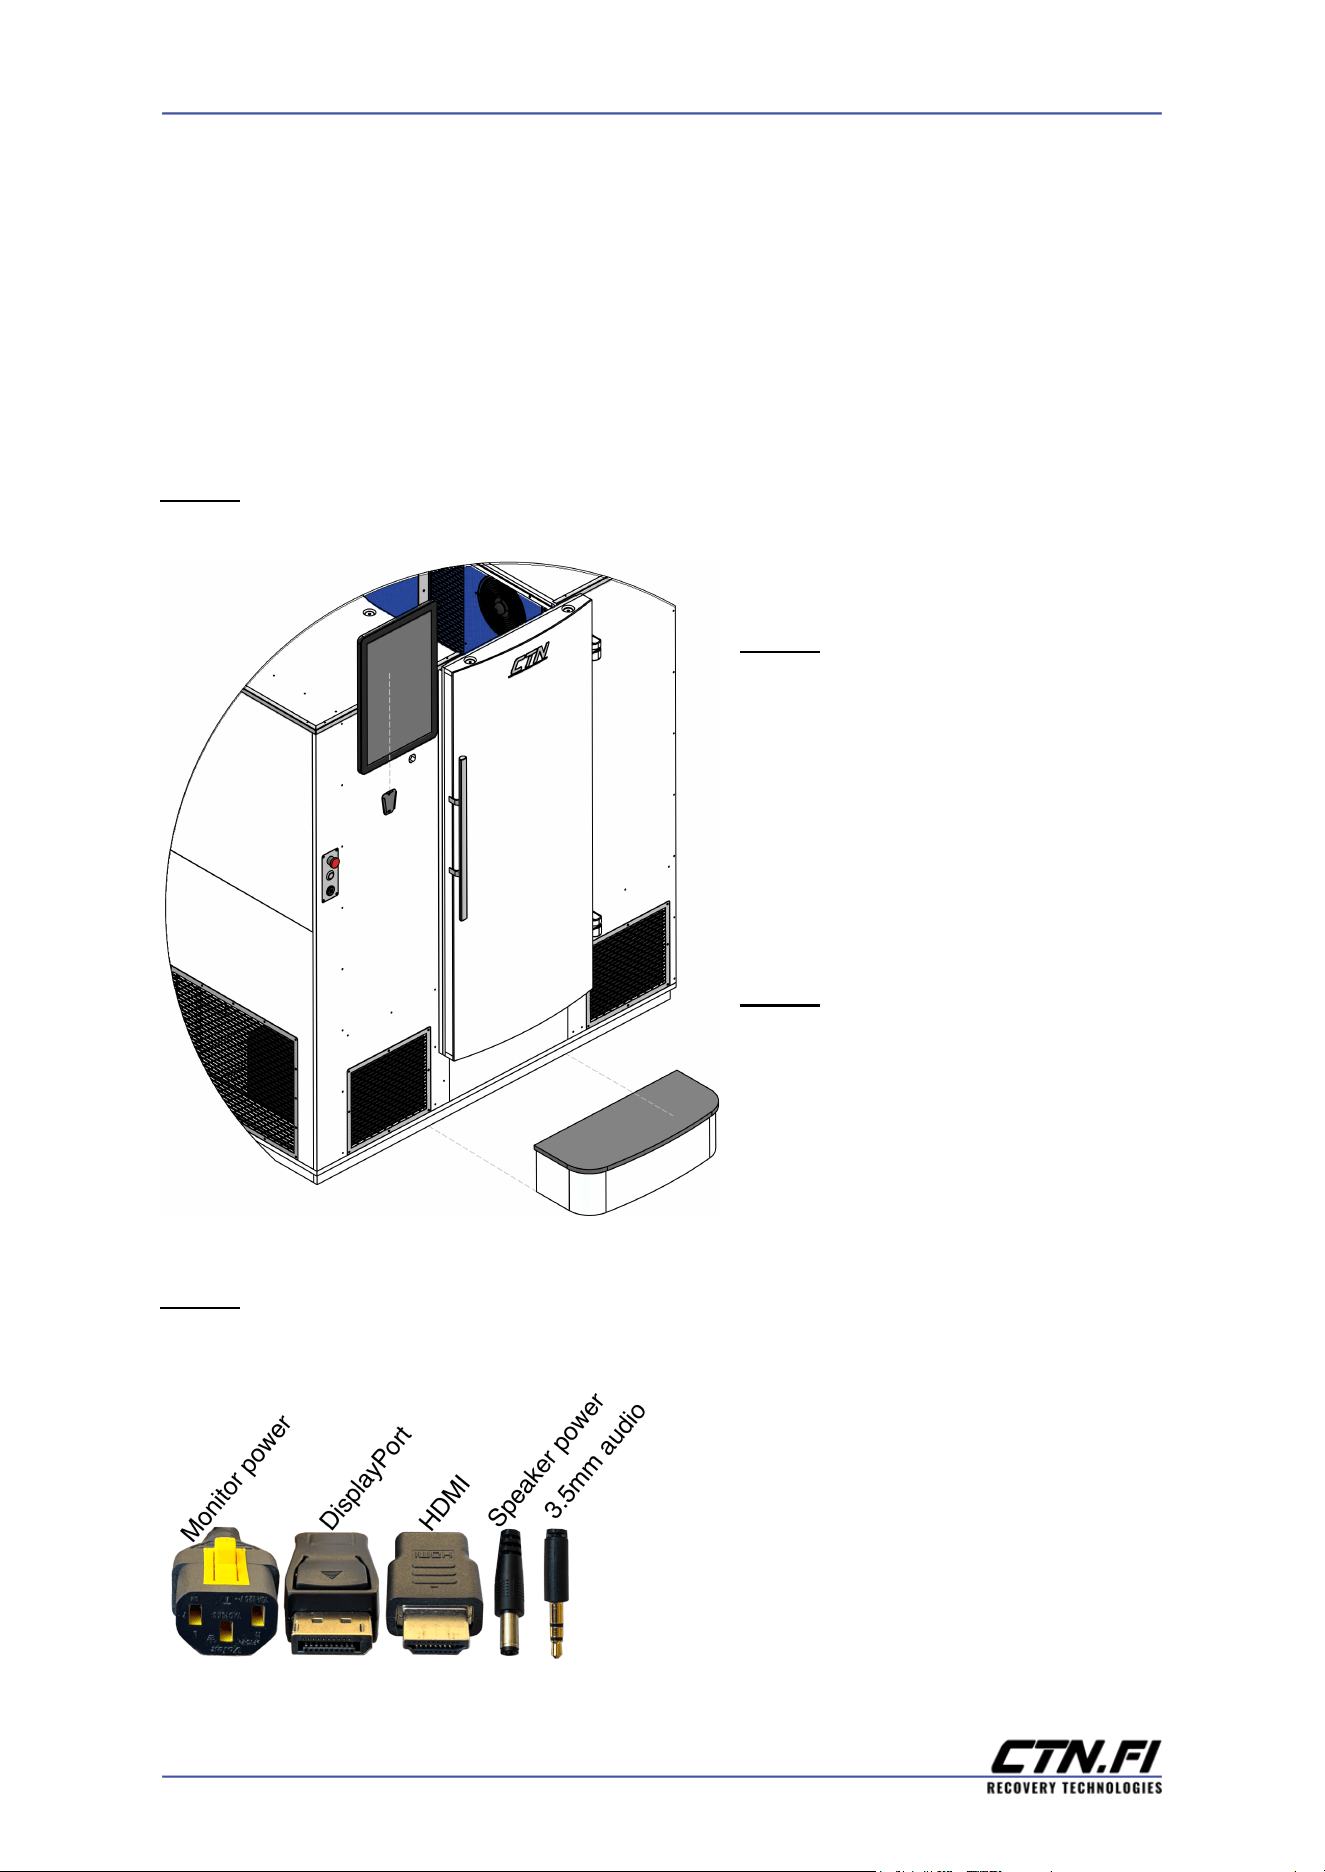
ASSEMBLY INSTRUCTIONS
Please follow the step-by-step instructions in this paragraph to complete the final
assembly of the e°Cabin.
Step1. Carefully remove all of the packaging materials from the included items.
Step2. Slide the main monitor (part
nr. 6) into its holder on the wall.
Connect the 3 pre-installed cables
(Display, USB and Power) to the
monitor.
Step3. Place the doorstep (part nr.
12) to its position. It will be secured
to its position by magnets.
Step4. Place the monitor frame (part nr. 4) on top of the cabin. Feed the 6
pre-installed cables at the top of the cabin (1x monitor power, 2x DisplayPort, 1x
HDMI, 1x speaker power, 1x 3,5mm
audio cable) through the holes of the
monitor frame.
7
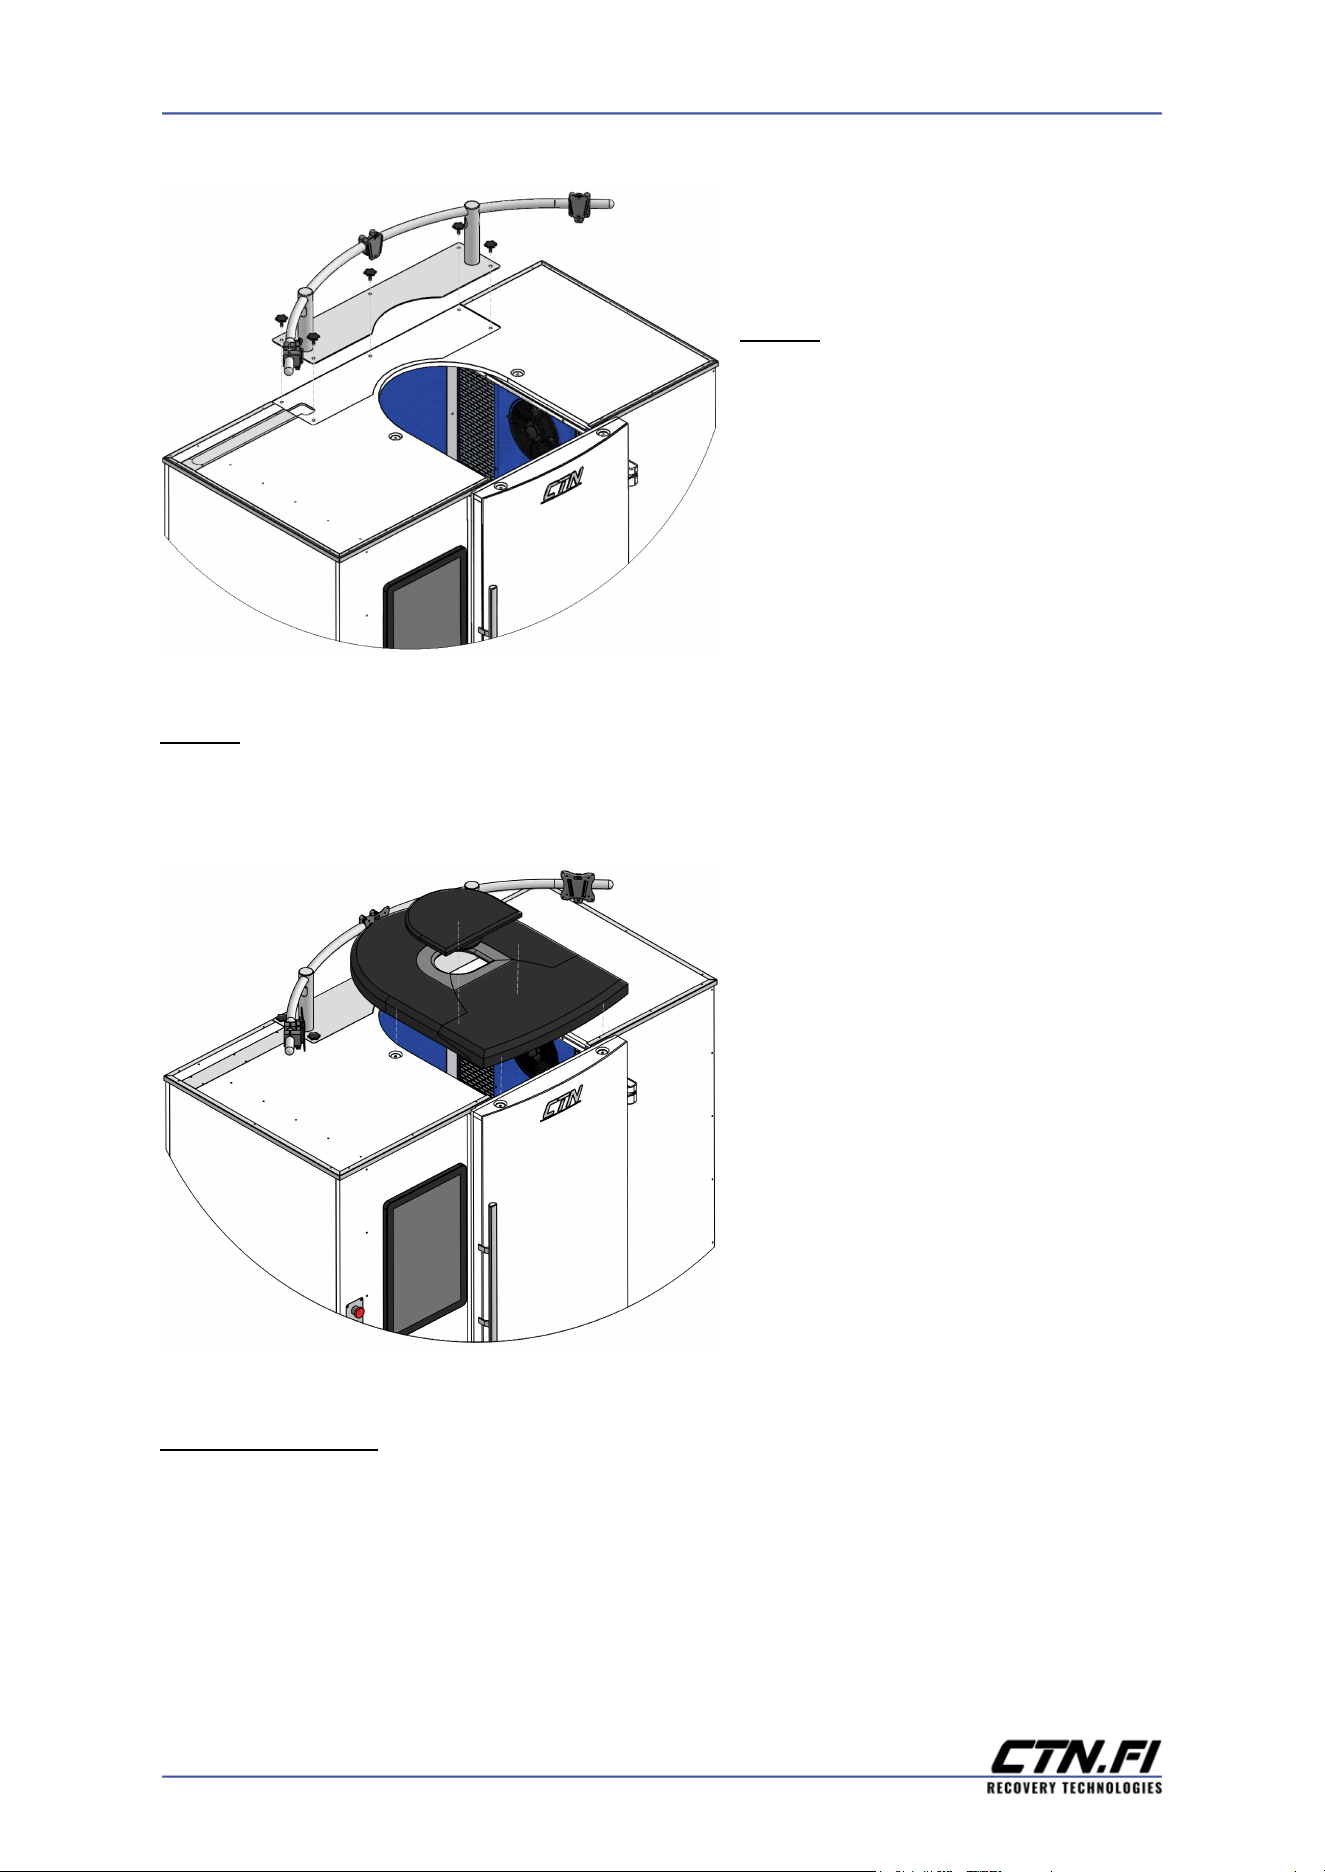
Step5. After successfully routing
the wires, use the provided thumb
screws to securely attach the frame
to the e°Cabin.
Step6. Attach the top covers (parts nr. 13-15), made to avoid the cold air from
exiting the e°Cabin. Simply attach the covers to the cabin as shown below.
● Parts 13 and 15 will be held
on by 4 magnets, of which 2 are
located at the top of the door and 2
on the top of the cabin.
● Carefully check that the
door closes without any
disturbance and that the covers
seal the opening properly.
Recommendation: It is easier to attach or detach the head-opening cover (part nr.
14) if the door is open.
8
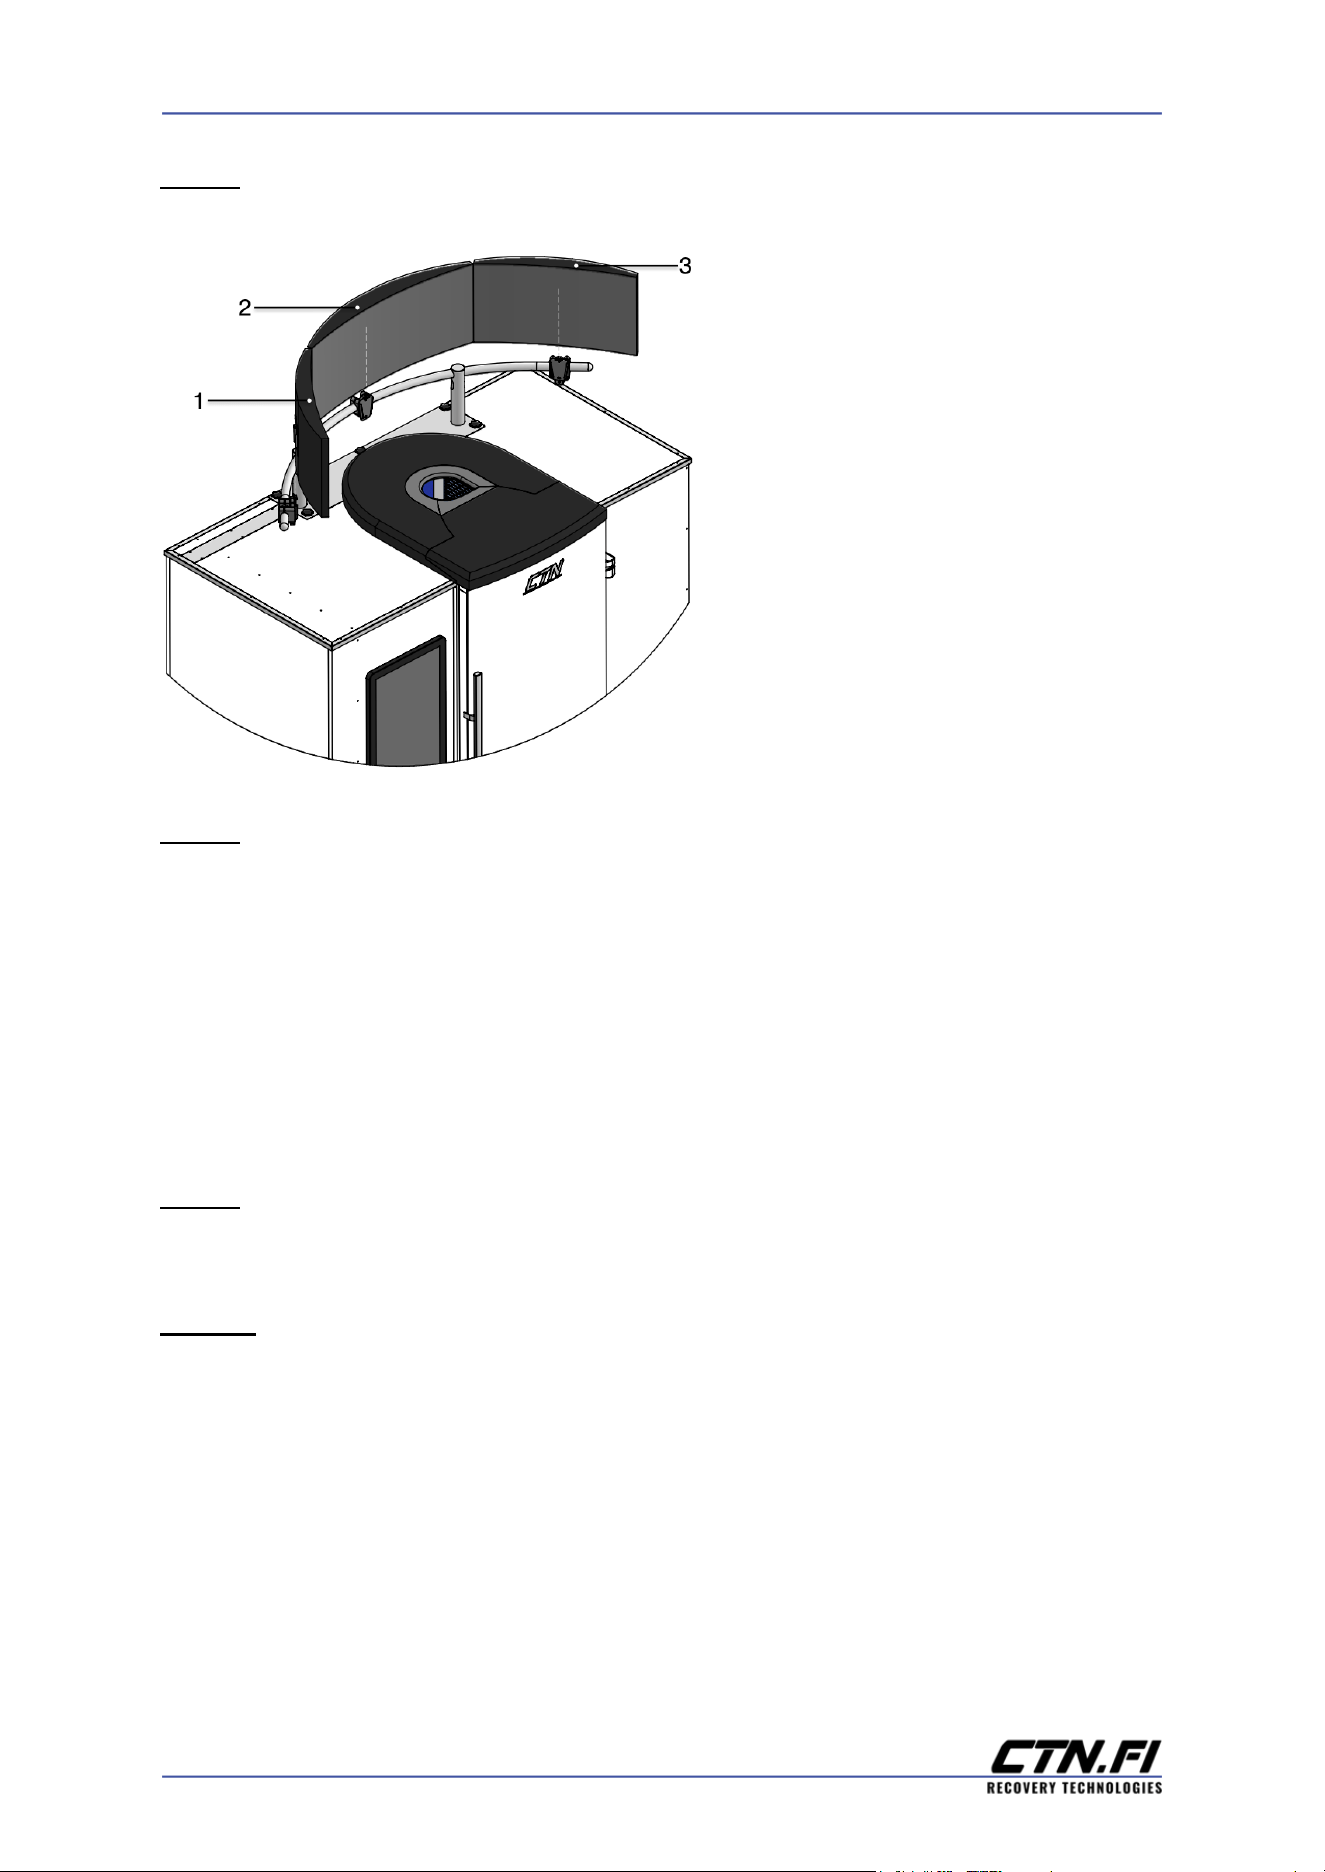
Step7. Attach the monitors to the pre-installed monitor mounts on the frame.
● It is easier to safely and
correctly line up the monitors if done
by 2 people.
● Each monitor has a numbered
label on the back side to help identify
its position on the frame.
Step8. Connect the cables to the monitors:
Monitor 1: DisplayPort, Monitor power
Monitor 2: DisplayPort, Monitor power
Monitor 3: HDMI, Monitor power
● The DisplayPort and HDMI cables have numbered labels attached to help
identify which monitor they should be connected to.
Step9. Place the speakers behind or next to monitors 1 and 3. Connect the 3.5 mm
audio cable and the power plug to the speakers.
Step10. Use zip ties to tie cables to the monitor frame for a cleaner install.
9
INSTRUCTIONS FOR USE
Please follow the step-by-step instructions in this paragraph to learn everything you
need to know to use the e°Cabin for the very first time!
TURNING ON THE CABIN
CAUTION: If the e°Cabin was shipped on the pallet backside down, DO
NOT turn on the e°Cabin until at least 12 hours have passed since
lifting the cabin into an upright position.
Step1. Connect the power cable at the back of the e°Cabin to a power outlet (rated
between 208V-240V, at least 16 amp fuse)
Step2. Remove the upper panel on the left side of the cabin (part nr. 5) by
unscrewing it.
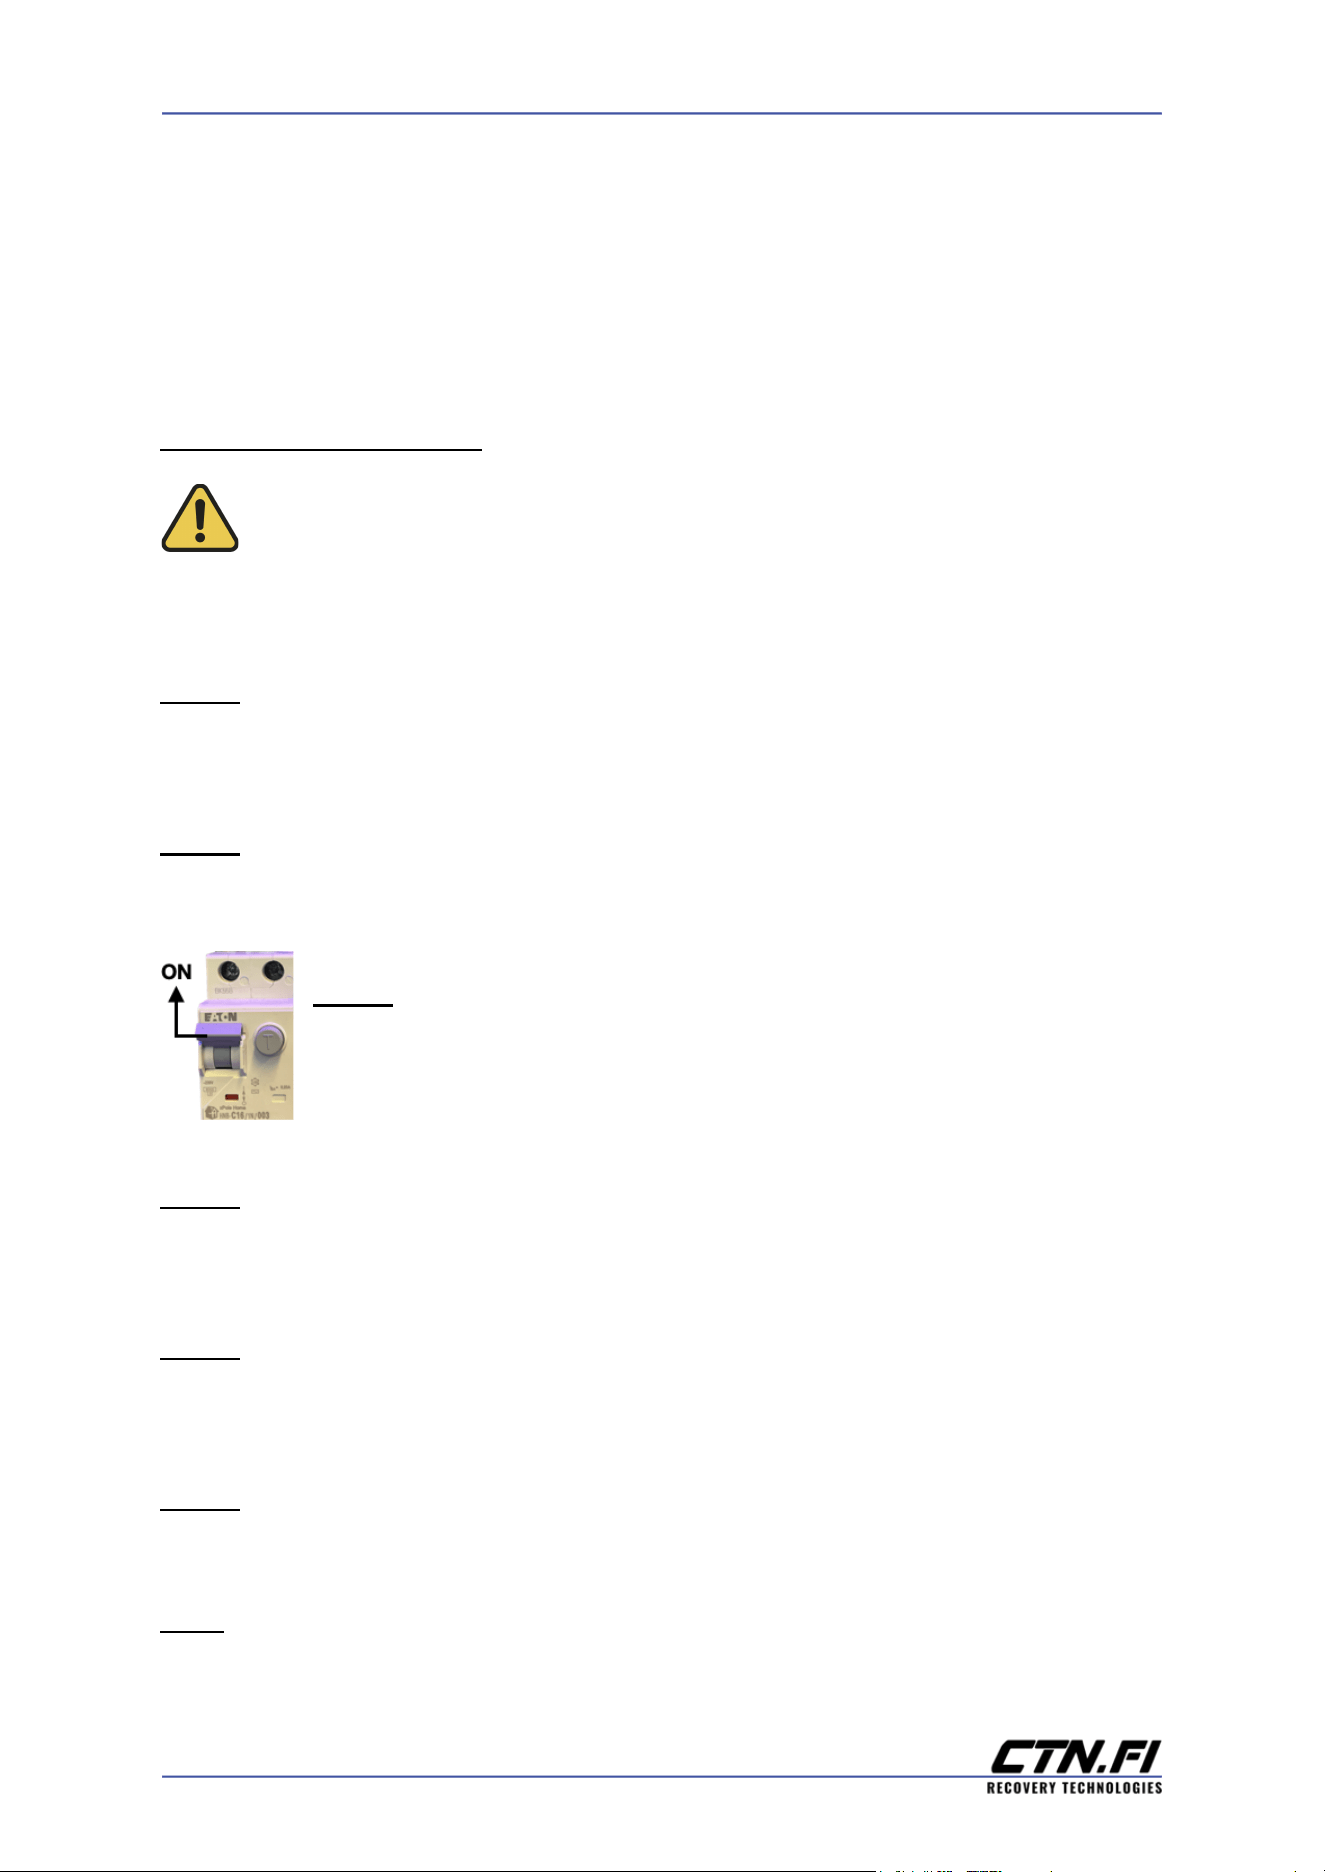
Step3. Make sure that the circuit breaker located at the bottom of the
switchboard is in the upright position (the switch is on).
Step4. Release the red emergency switch (part nr. 9) by turning it if it is pressed
down.
Step5. Power on the e°Cabin by pressing the On/Off button (part nr. 8). A blue led
light will indicate a successful start-up.
Step6. Wait for the e°Cabin user interface log-in screen to appear. This will take a
few minutes. Reattach the panel.
Note. Steps 1-4 are necessary only when using the e°Cabin for the first time or in
case the computers do not turn on as described in steps 5-6.
10
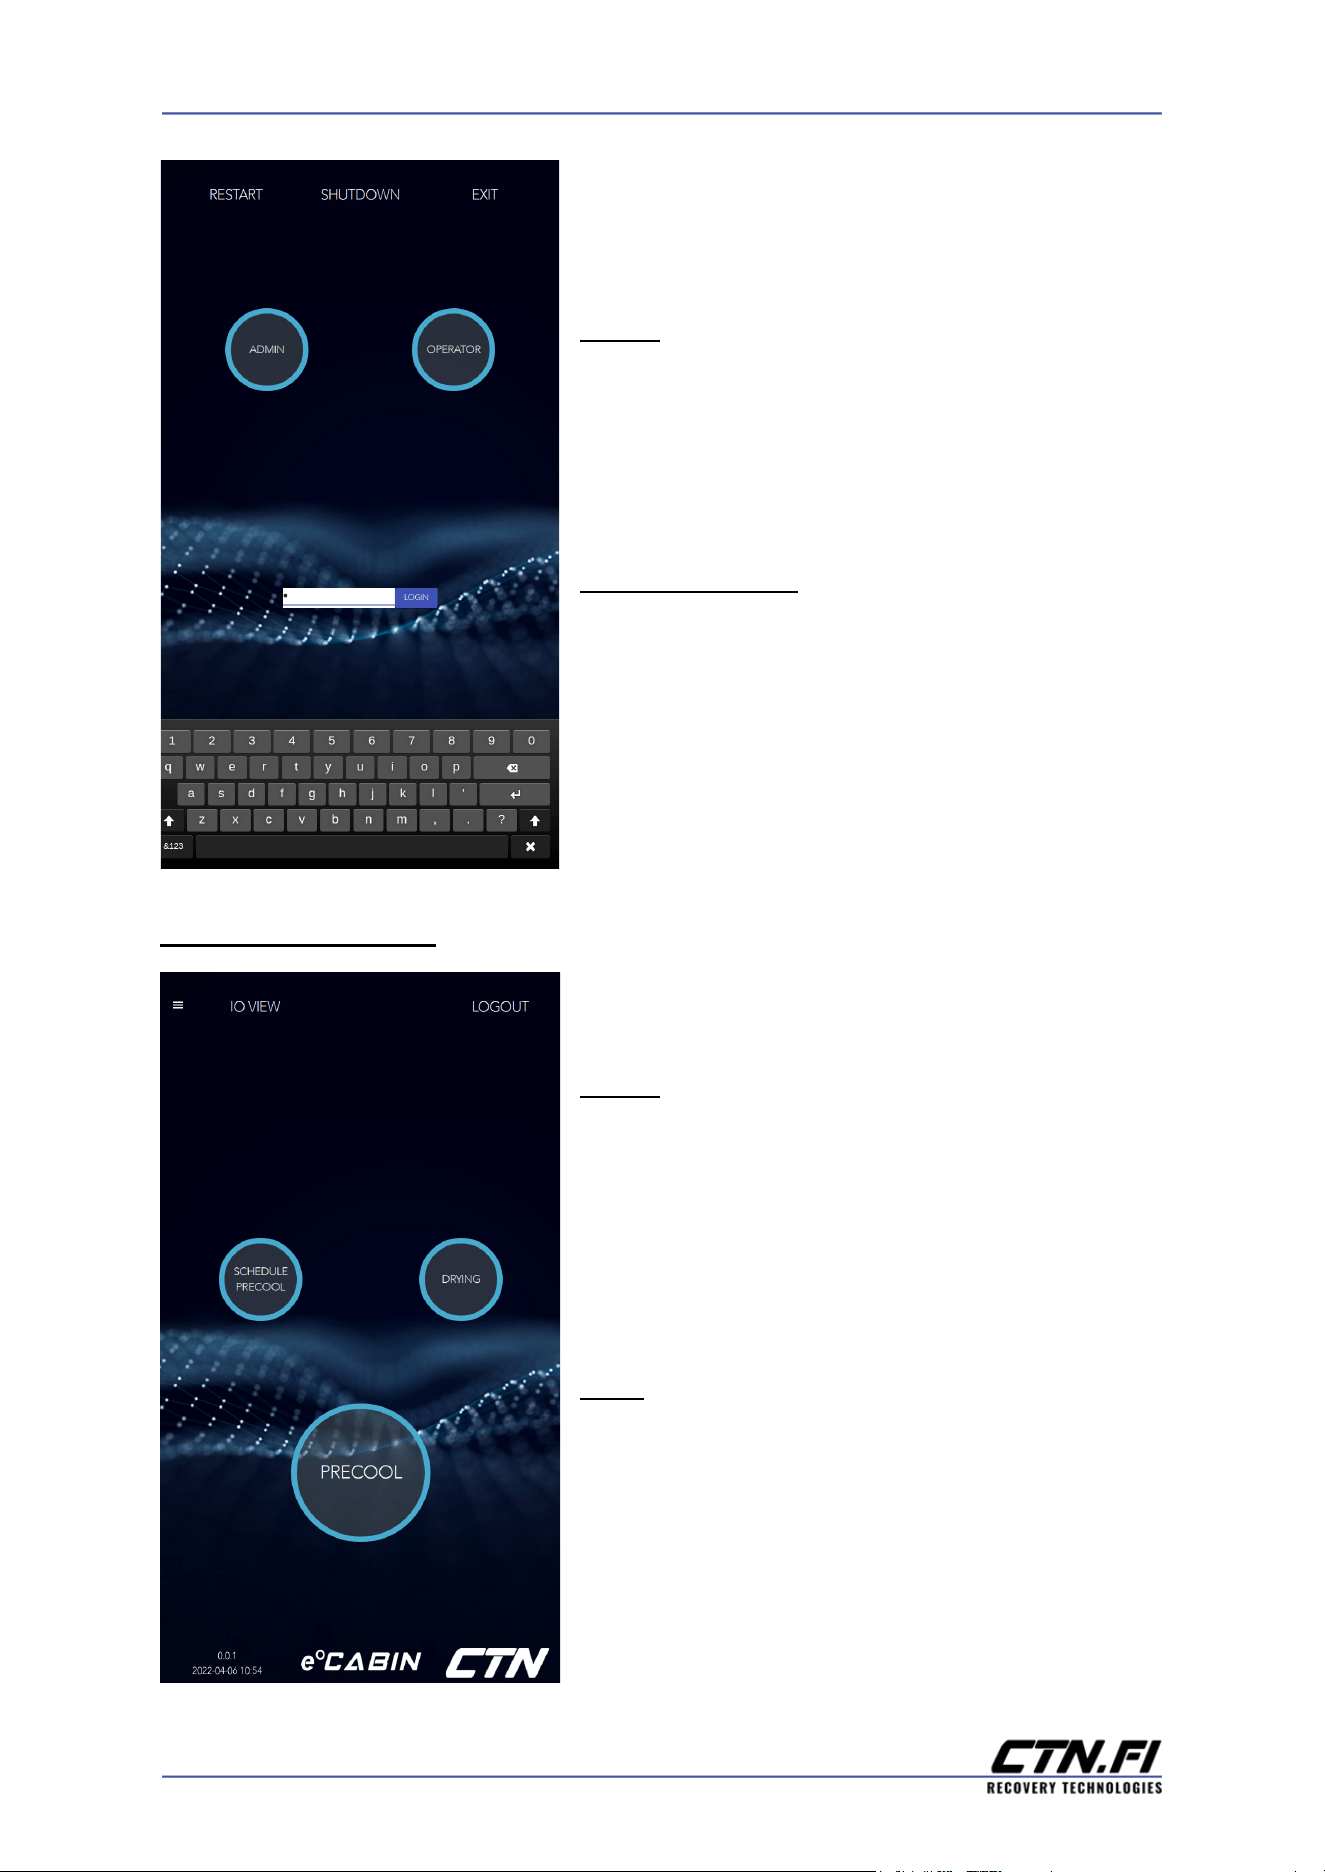
Step7. Tap on the ADMIN or OPERATOR icon,
then on the password field to be able to insert
the password. The default password for both
users is 1. Tap on the LOGIN button to proceed.
Recommendation: For everyday use, prefer the
OPERATOR account.
PRECOOLING CYCLE
Step8. The cabin is now ready for precooling.
Tap on the SCHEDULE PRECOOL icon to
program the precooling cycle to start at a
specific time or PRECOOL icon to begin
immediately.
Note. Please refer to the Drying Cycle paragraph
to learn more about the drying function.
● Precooling the cabin from room
temperature will take ~1,5-2 hours to complete.
11
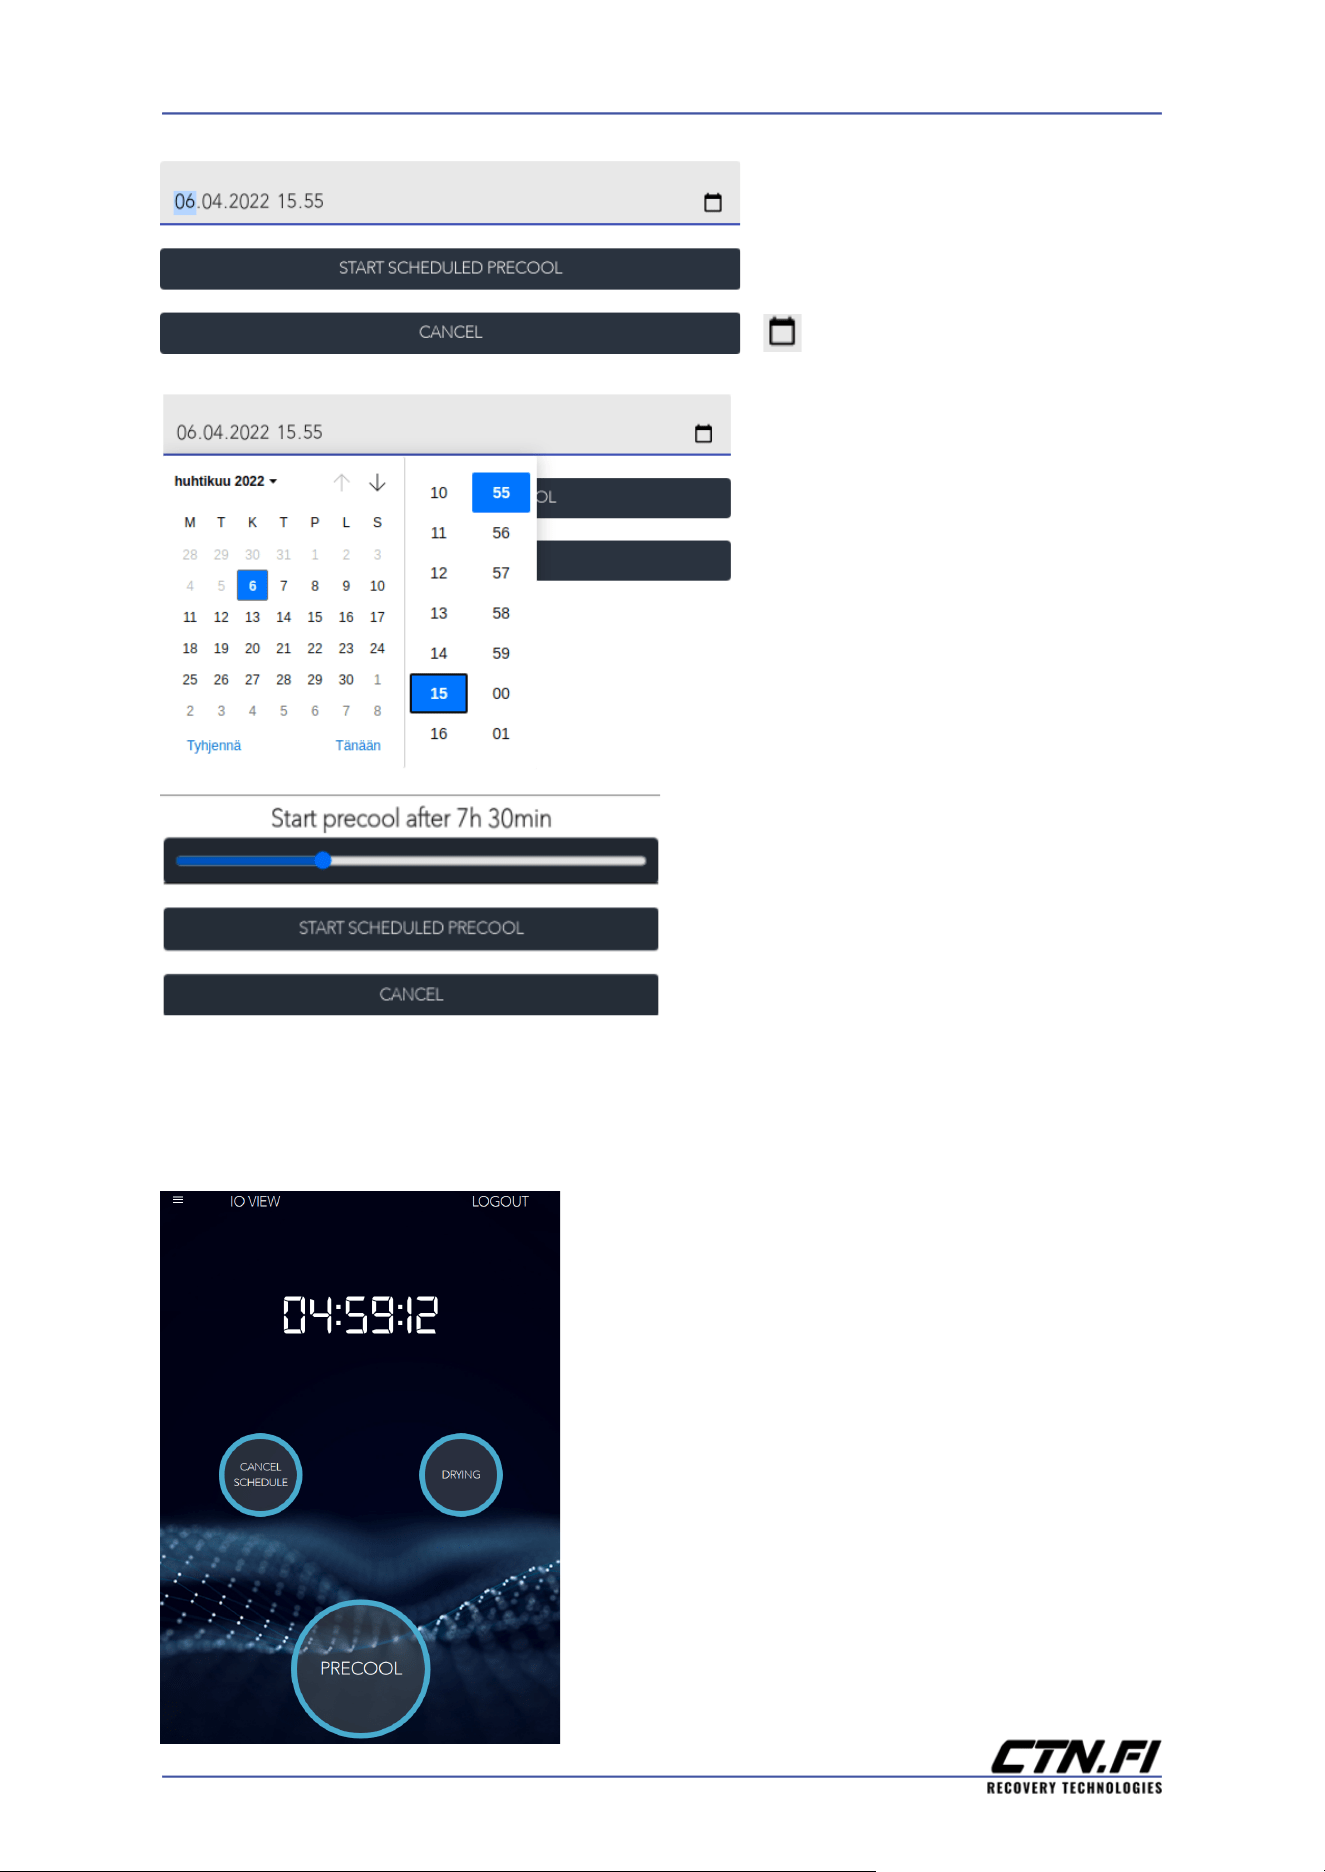
● To start a scheduled
precool, tap on the calendar icon
to open the calendar and
choose the start date and time.
➢ If the e°Cabin is connected to
the Internet, the desired start
time can be chosen from a
calendar selection.
➢ If the e°Cabin is not connected to the
Internet, the desired start time can be
chosen by using the slider.
● Tap on the START SCHEDULED PRECOOL icon to activate the program.
● Remaining time until the start of the
precooling cycle will then be displayed on the
main screen.
● The scheduled precooling cycle can be
canceled at any time by tapping on the CANCEL
SCHEDULE icon.
12
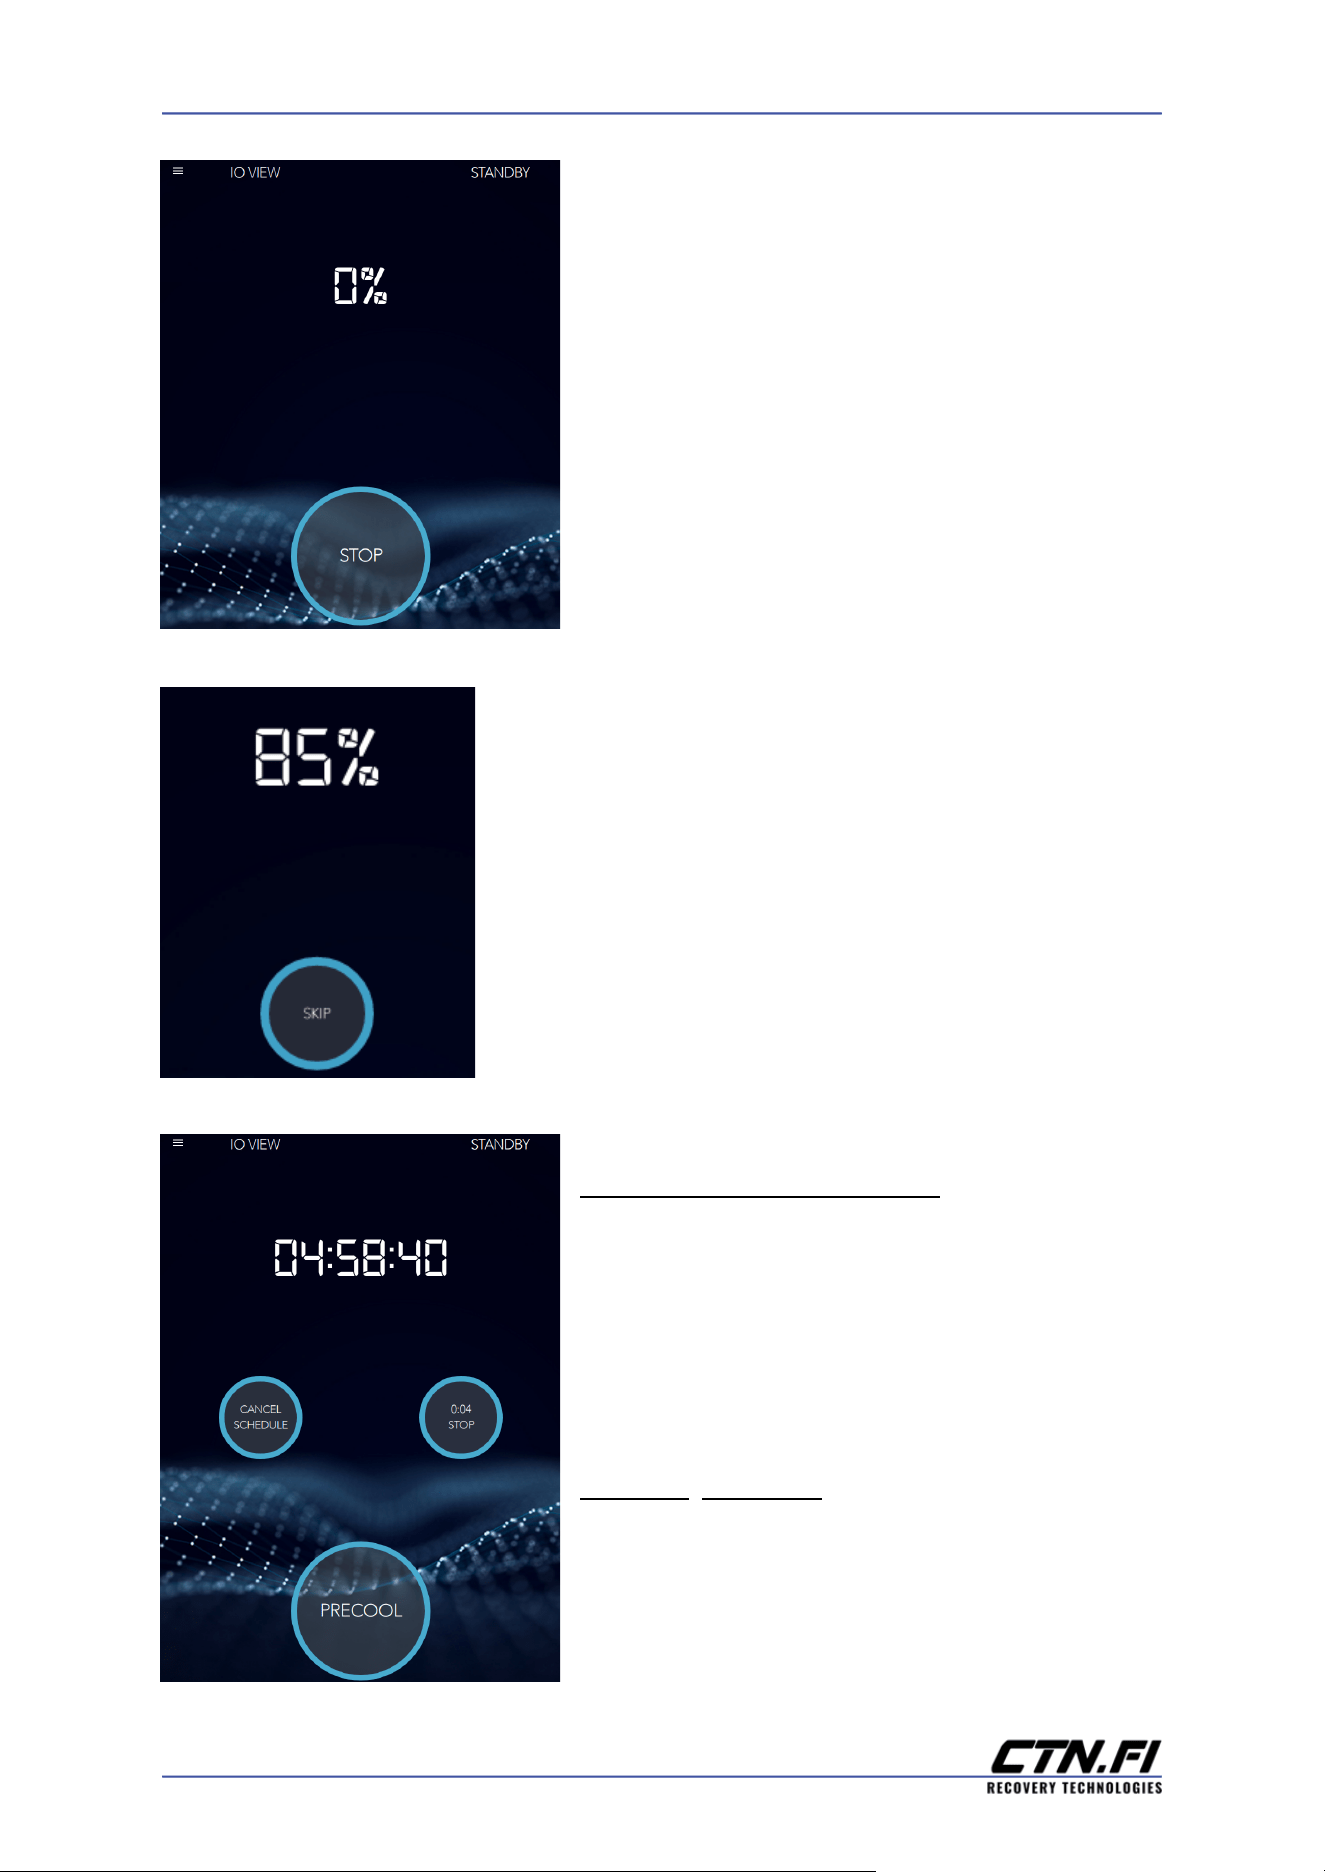
● The progress of the precooling stage will
be displayed on the screen when the process
has begun.
● "Precooling completed" sound will play
from the speakers when the progress has
reached 100%.
● Precooling can be stopped at any time by
tapping on the STOP icon.
● When the e°Cabin has cooled down to
-18°C/-0,4°F, the option to skip the rest of the
precooling cycle appears on screen to proceed and
begin a session. In case temperature inside rises above
that target, the system will automatically return to
standby stage where precooling can be activated again
to further cool down the cabin.
DRYING CYCLE (OPTIONAL)
A drying cycle is recommended in case the
surfaces inside the e°Cabin still feel wet after
letting the cabin dry overnight with the door
open, or after intensive use.
Step 8.5 (optional) Remove the head-opening
cover (part nr. 14). Make sure that the door is
closed and tap on the DRYING icon to begin the
process. Remaining drying time will be displayed
inside the same icon.
13
● By default, the drying session lasts for 4 hours.
● The drying session and the scheduled precooling function can be activated
simultaneously. When the precool schedule timer gets to 0, the drying
procedure will end and the precooling cycle will begin at the scheduled time.
Recommendation: If possible, reattach the head-opening cover (part nr. 14) once
the drying has ended and precooling has begun.
TREATMENT SESSION & SETTINGS
After precooling has been completed, adjust the
following settings (Steps 9-13) on the main
screen before beginning the cryotherapy
session.
Note. Please refer to the Additional Settings and
Features paragraph to learn how to choose the
preferred temperature scale and system of
measurement.
Note. Please refer to the Additional Settings and
Features paragraph to learn how to add personal
media files to the Music and Video selection.
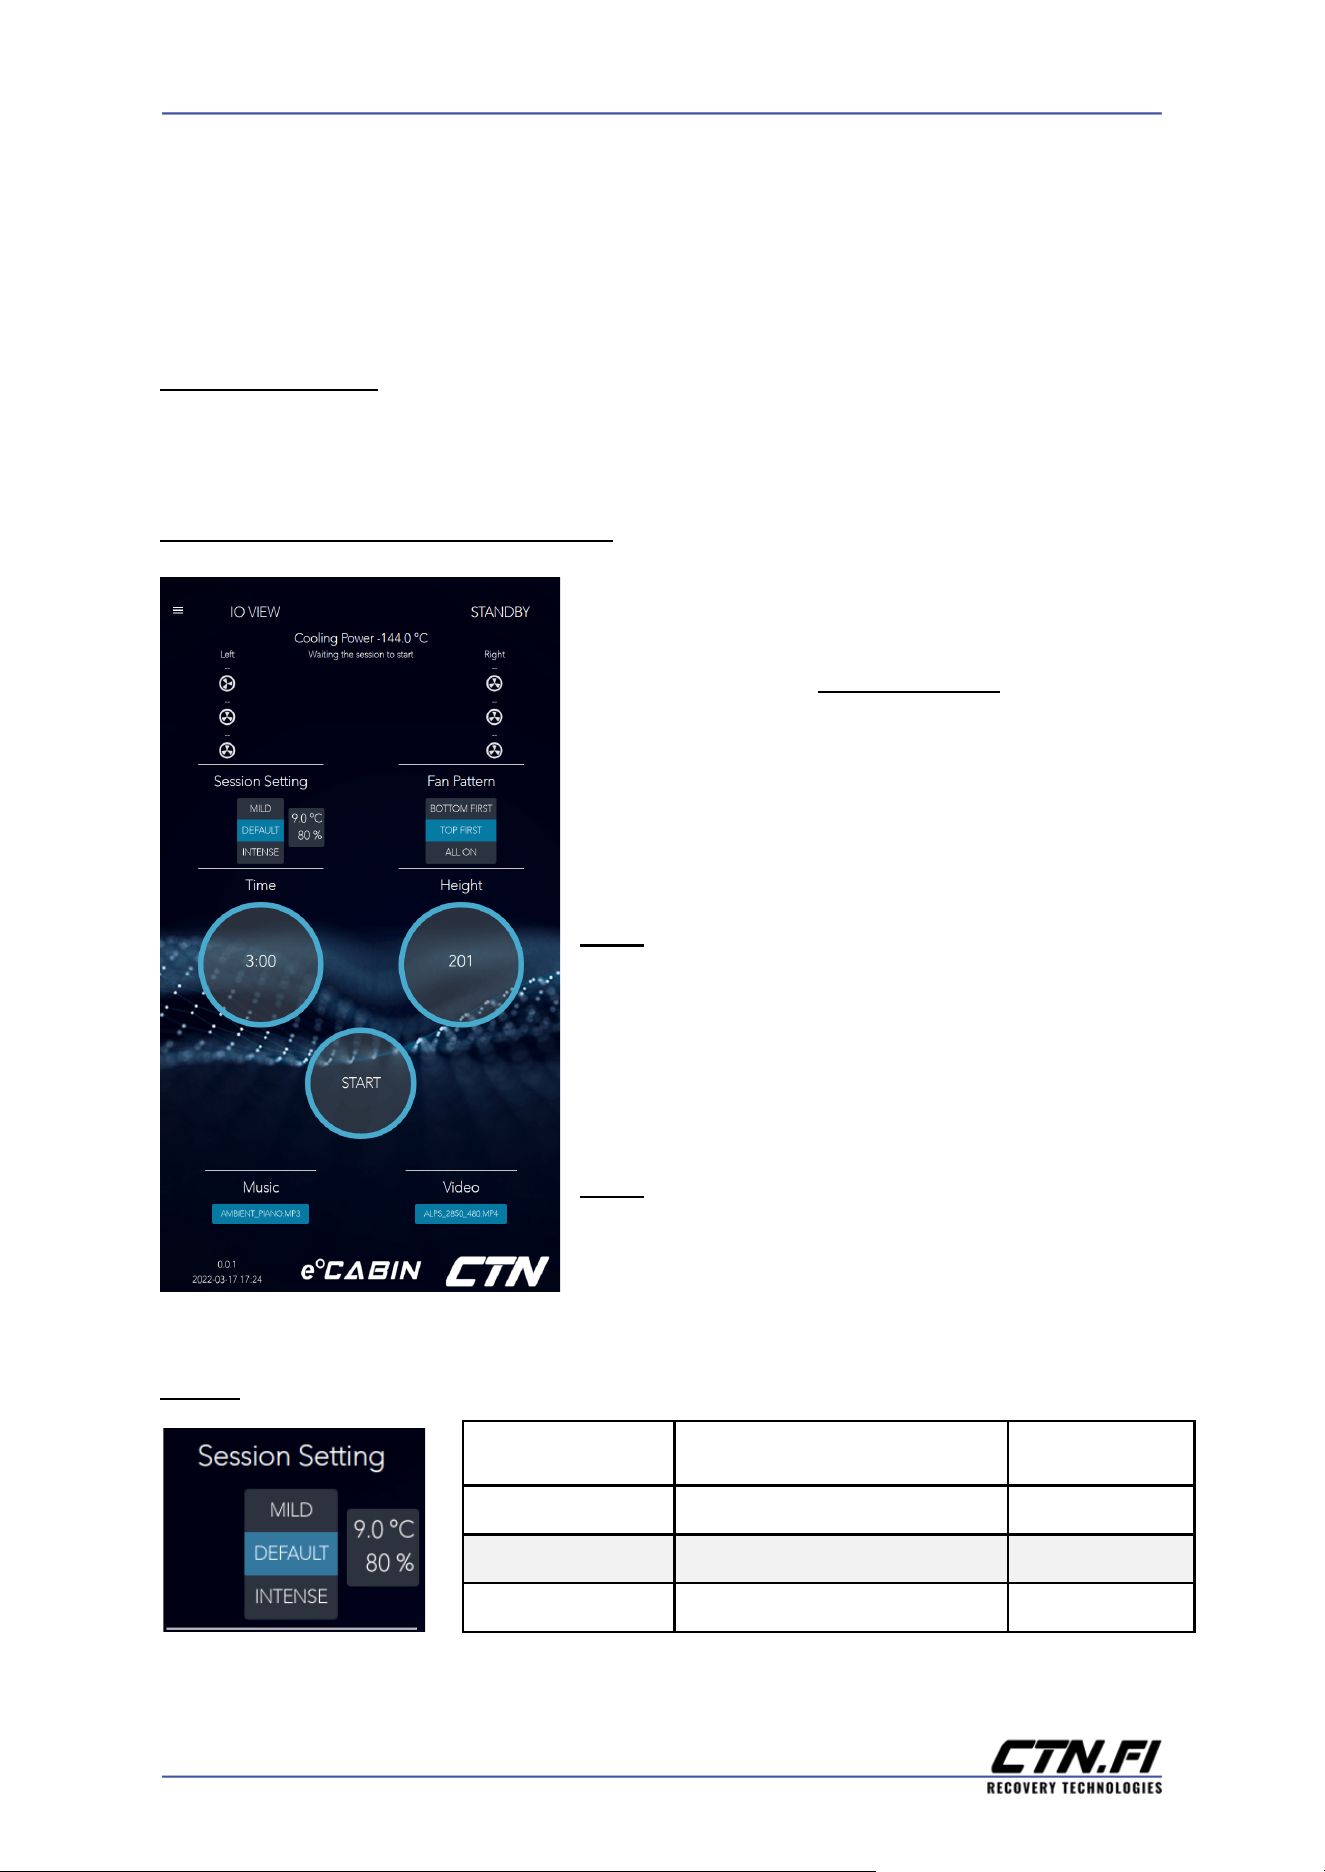
Step9. Choose the preferred Session Setting:
Session Setting
Target Skin Temperature
Fan Intensity
Mild
11°C/ 52°F
60%
Default
9°C/ 48°F
80%
Intense
7°C/ 45°F
100%
14
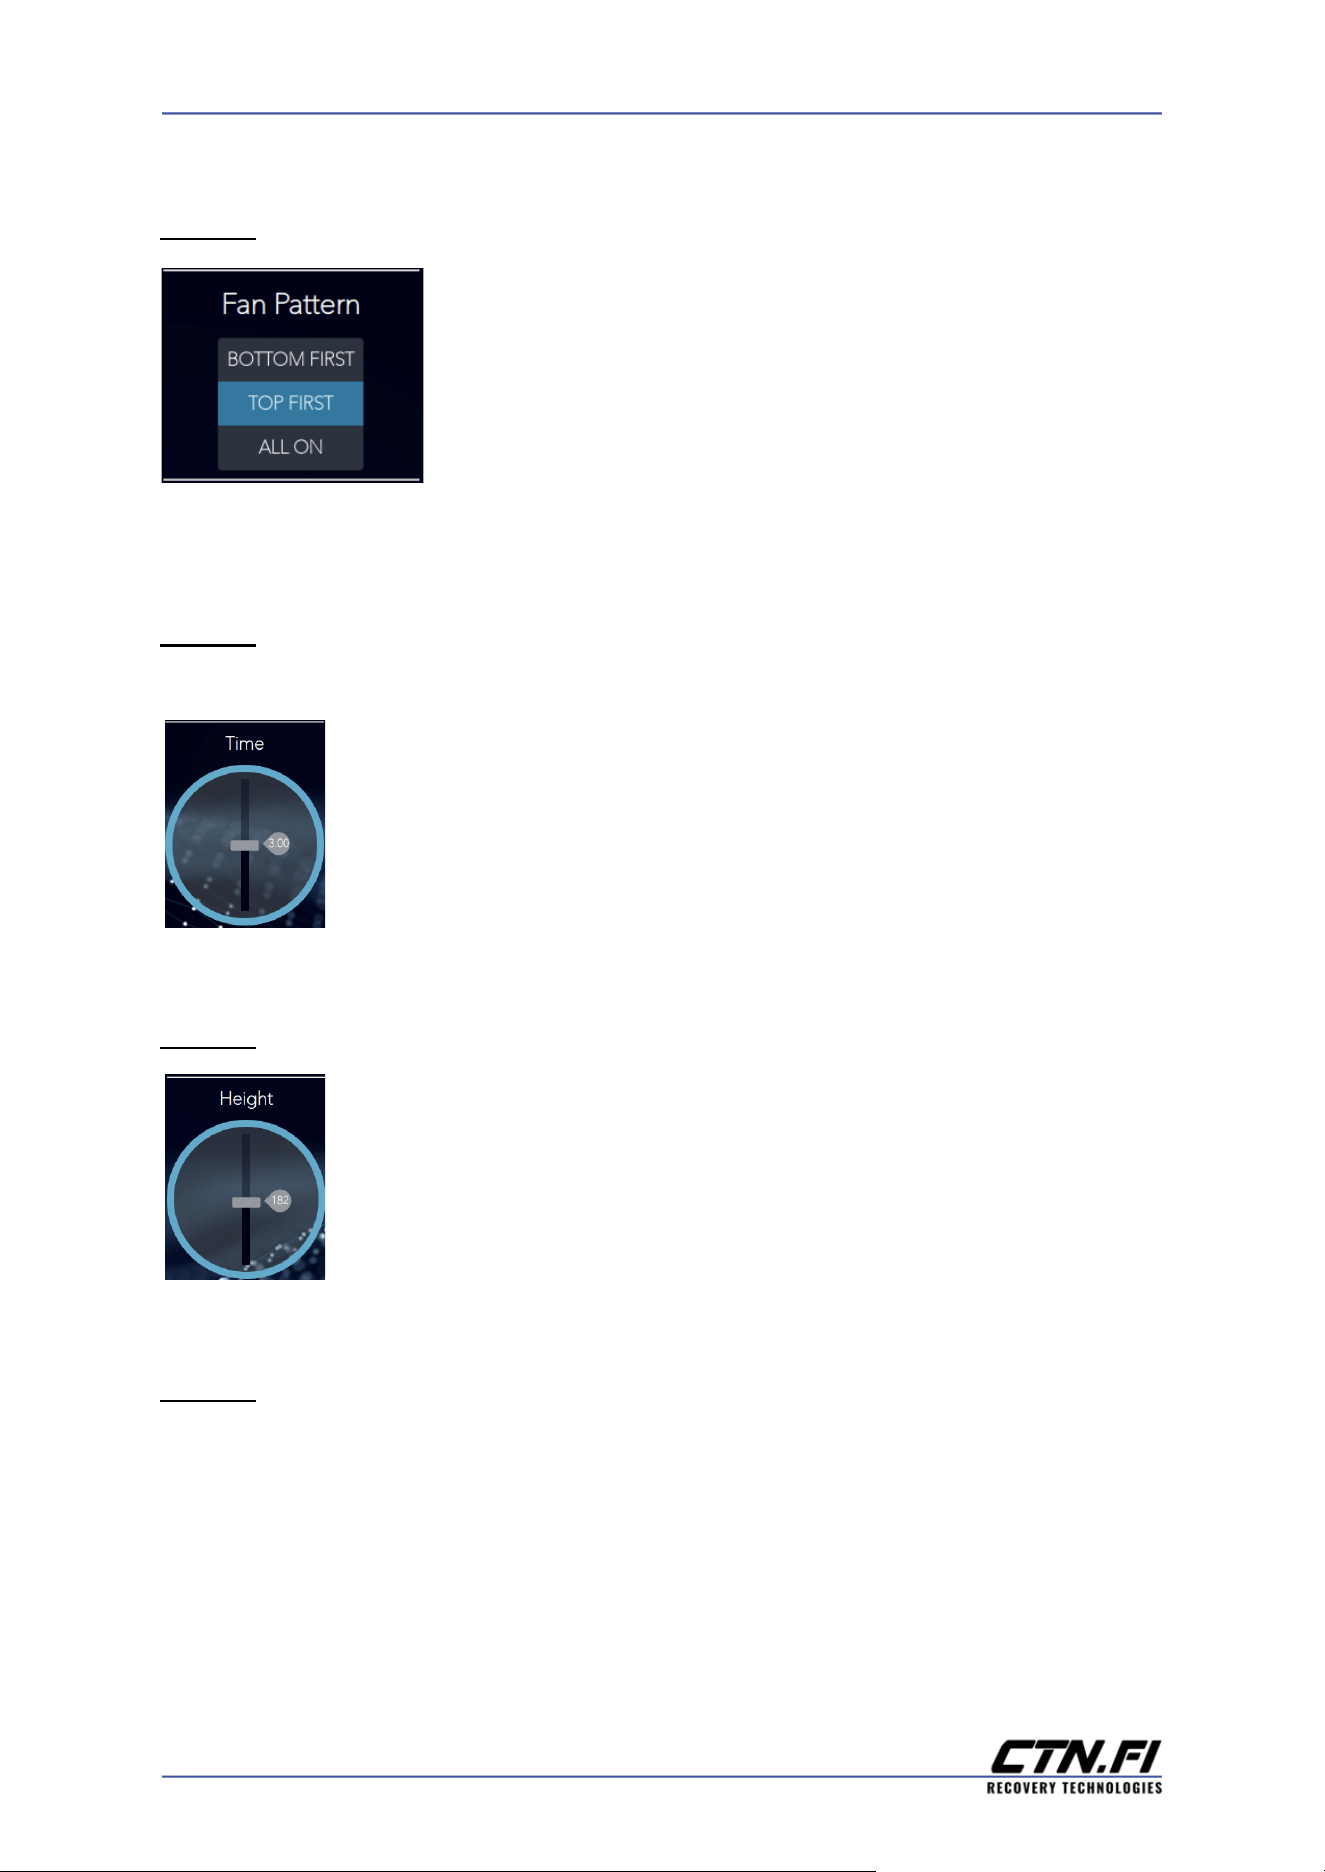
Step10. Choose the preferred Fan Pattern.
● This will dictate the first ~20 seconds of the session
and should be chosen according to personal preference.
The purpose of this is to help the body adapt to the cold
temperature at the very beginning of the session by starting
the fans from the chosen direction first. This setting will not
affect the end result as fans will then be controlled by the thermal sensors.
Step11. Choose the preferred time for the session by tapping on the icon and
adjusting the slider.
● The maximum and recommended session time is 3 minutes.
The session will last for at least two minutes. If the skin reaches the
chosen target temperature before 2 minutes, the session will
automatically end at the two minute mark.
Step12. Set the height of the client or user.
● It will take a few seconds for the lift inside the e°Cabin to
move.
Step13. Unattach the head-opening cover (part nr. 14) just before starting the
treatment session.
15
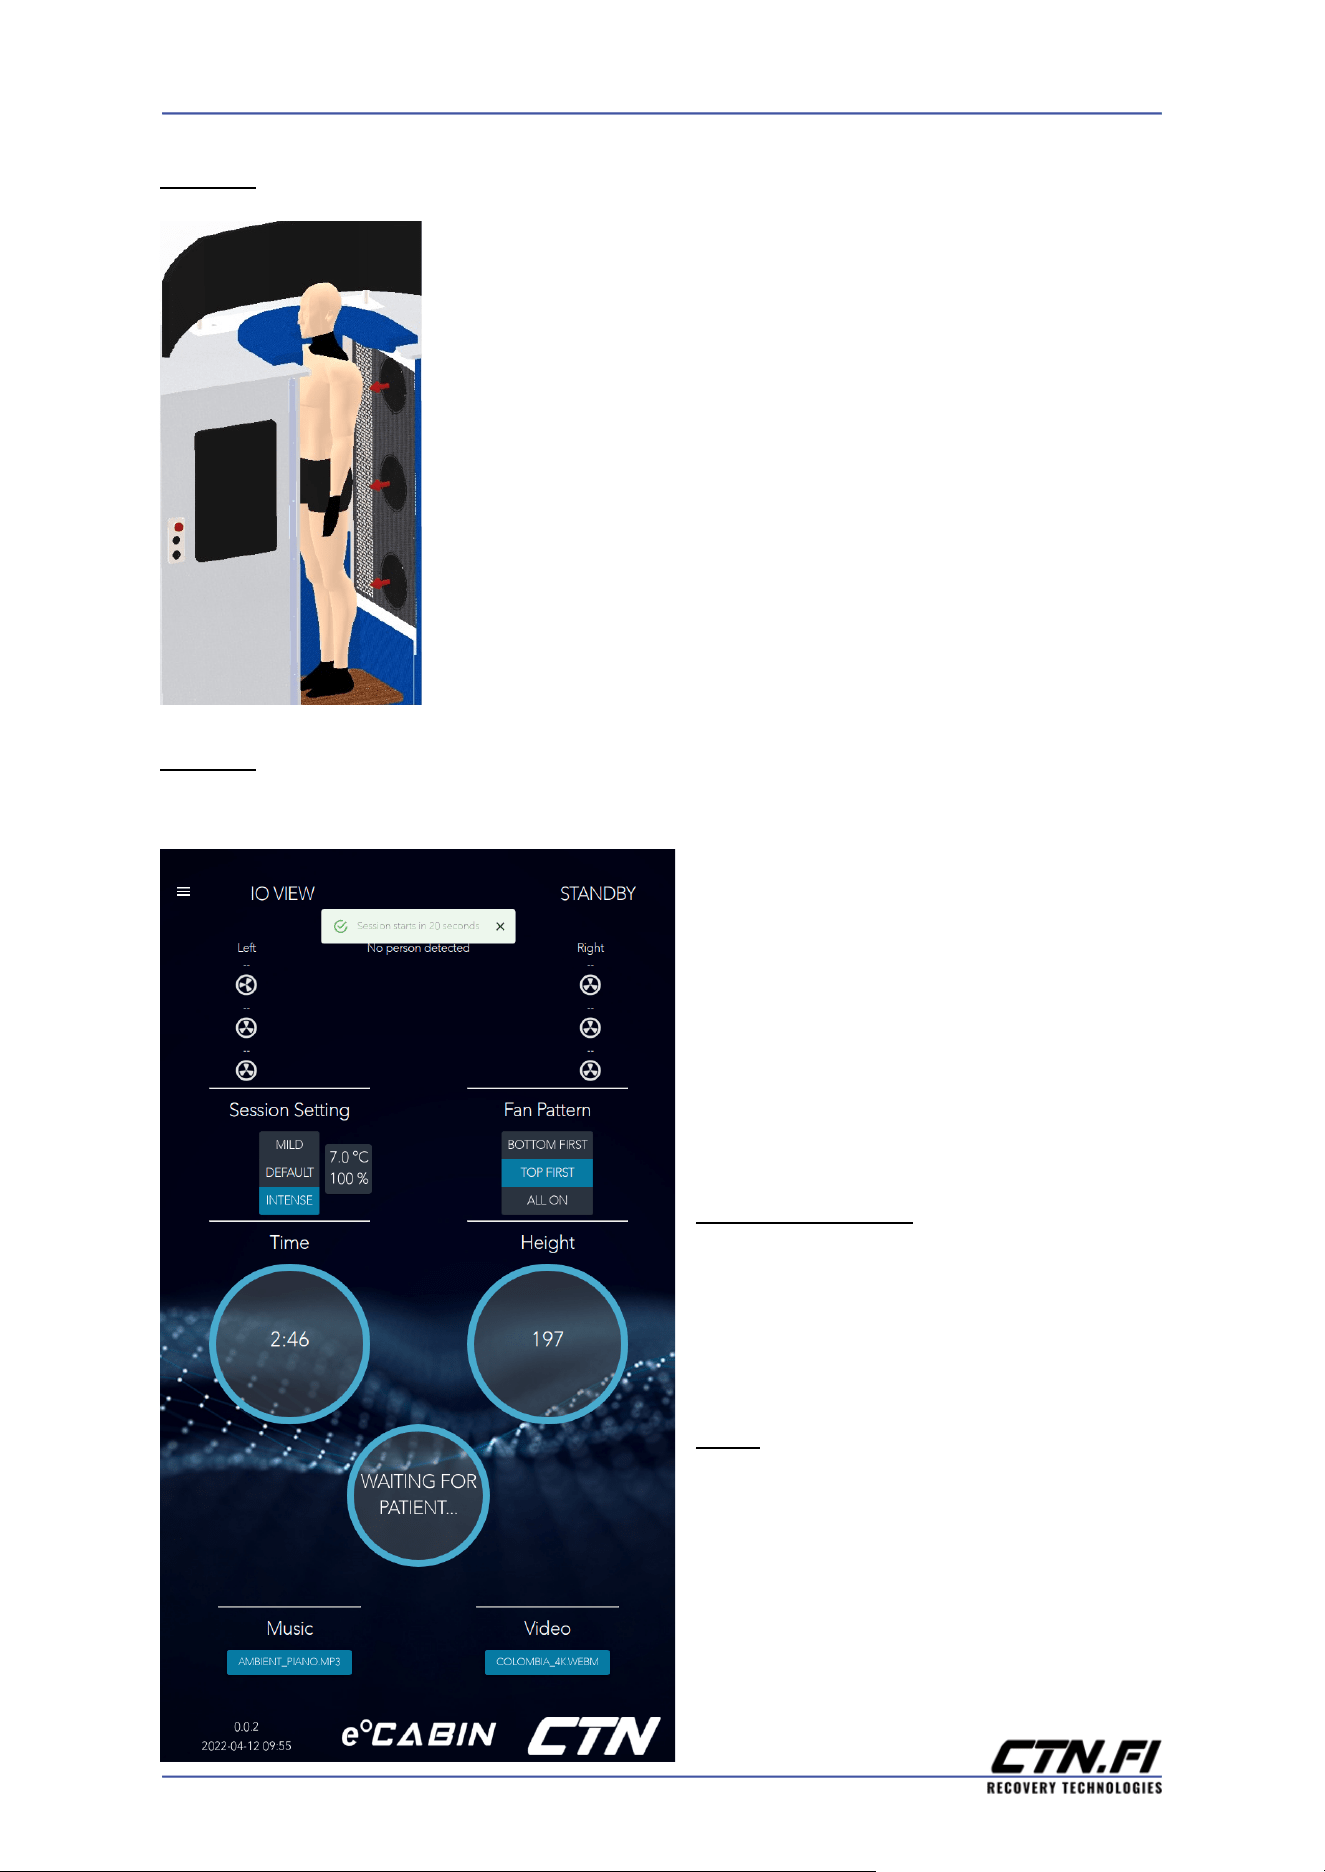
Step14. Before entering the e°Cabin, please keep the following points in mind:
● Shoes, gloves, underwear and a scarf/buff should be
worn during treatment. The space inside is limited so it is
recommended to dress/undress outside of the cabin.
● The correct body position for the session is facing
one of the side monitors. Wind generated by the fans should
target the front and back side of the body as illustrated.
Step15. Tap on the START icon to begin the session, then enter the cabin/ ask the
client to enter the cabin.
● After pressing the START icon,
the e°Cabin will wait for 20 seconds for
the user to enter the cabin and close
the door. The session will start as soon
as the door has been closed and the
system can detect a person inside.
Recommendation: If treating a client,
kindly ask them to hand you their robe
before entering the e°Cabin. Then
open the door for the client.
Note. If the lift height feels off/wrong
once the user is inside the cabin, the
lift may have to be recalibrated. Please
refer to the Lift Calibration paragraph
for more information.
16
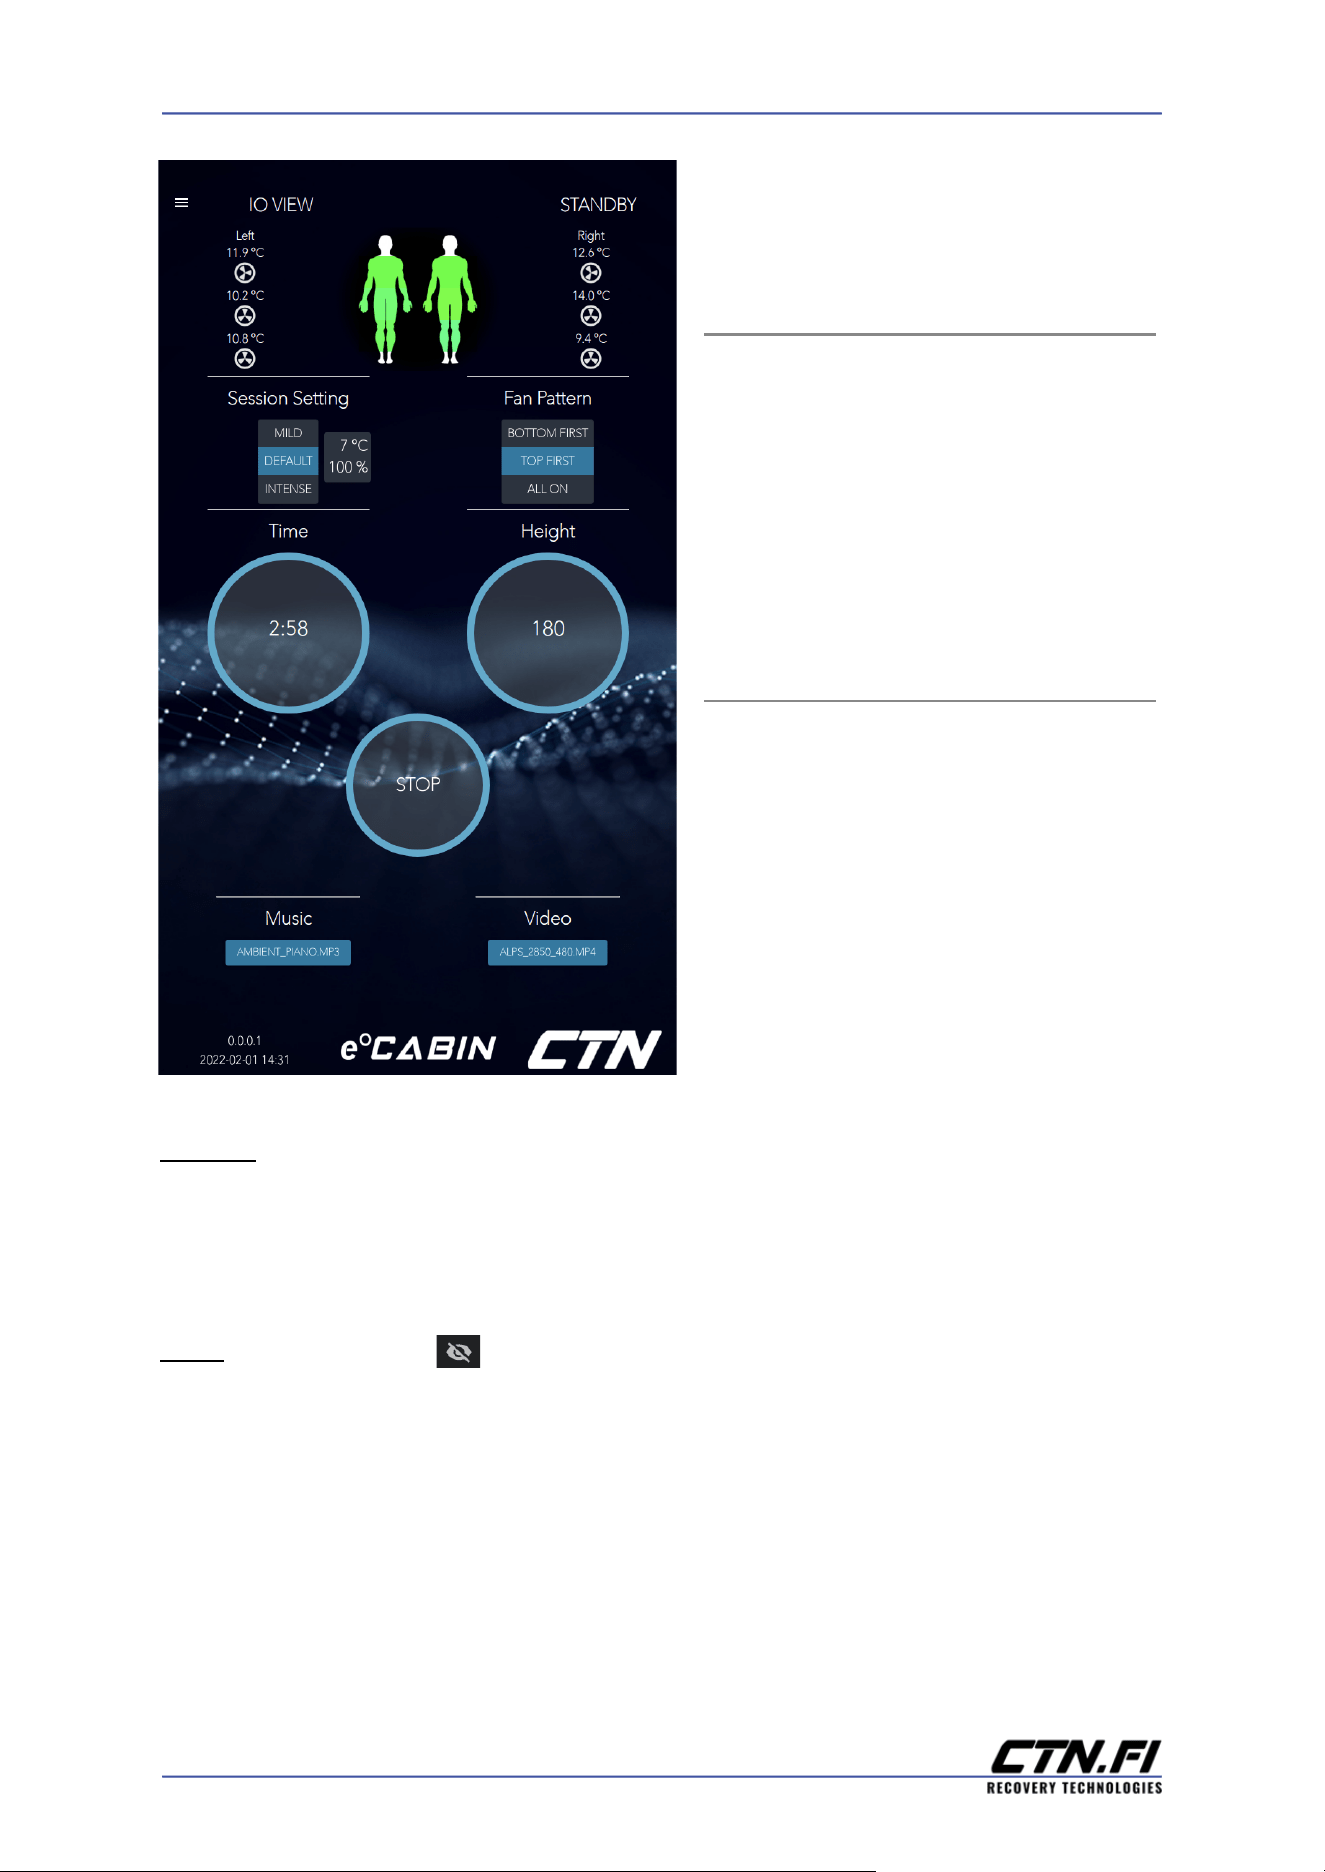
● Skin temperature ratings and
remaining time will be displayed on the
main screen.
● If necessary, the session can be
stopped by:
➢ tapping on the STOP icon;
➢ opening the door;
➢ pressing the EMERGENCY
SWITCH (part nr. 9).
● The session will automatically end
if:
➢ the maximum session time
has been reached;
➢ 2 minutes have passed and
the target skin temperature has been
detected by every thermal camera.
Step16. Exit/ have the client exit the e°Cabin when the session has ended. Close
the door and reattach the head-opening cover (part nr.14) to avoid cold loss. The
START button will reappear on the main operational screen to begin a new session.
Note. If a blocked eye icon appears on the screen while in session, one of the
sensors is not getting a correct temperature reading. For example, the sensors are
sometimes unable to measure skin temperature through covered body areas and
will get a reading directly from the fabric, which can have a drastically different
temperature compared to measurements from other sensors. In instances where
sensors get improper readings, the system will automatically use correct values
from other measure points instead to control the session.
17

Recommendations:
● If treating a client, open the door for the patient at the end of the
session and hand them back their robe.
● A 5-10 minute break is recommended between each treatment
session. In case the temperature inside the e°Cabin rises above -18°C
due to cold loss, the system will automatically start precooling after a
treatment session, which will continue until the temperature has
dropped below -18°C again.
AFTER USAGE
Step17. Tap on the STANDBY button if there are no more treatment sessions
planned for the day. The compressors will shut down and the system will revert
back to standby mode.
● Start a drying cycle and schedule a precool (please refer to the Precooling
Cycle and Drying Cycle paragraphs for more information), or
● Leave the door open to let the e°Cabin dry overnight.
Step18. (Optional). Shut down the system by tapping on
STANDBY→LOGOUT→SHUTDOWN. Wait for a “No signal” message to be
displayed on the monitors. Then press the On/Off button (part nr. 8) to fully shut
down the system. The blue led light will disappear and indicate a successful
shutdown.
● Leave the door open to let the e°Cabin dry.
18
ADDITIONAL SETTINGS AND FEATURES
SYSTEM CLOCK
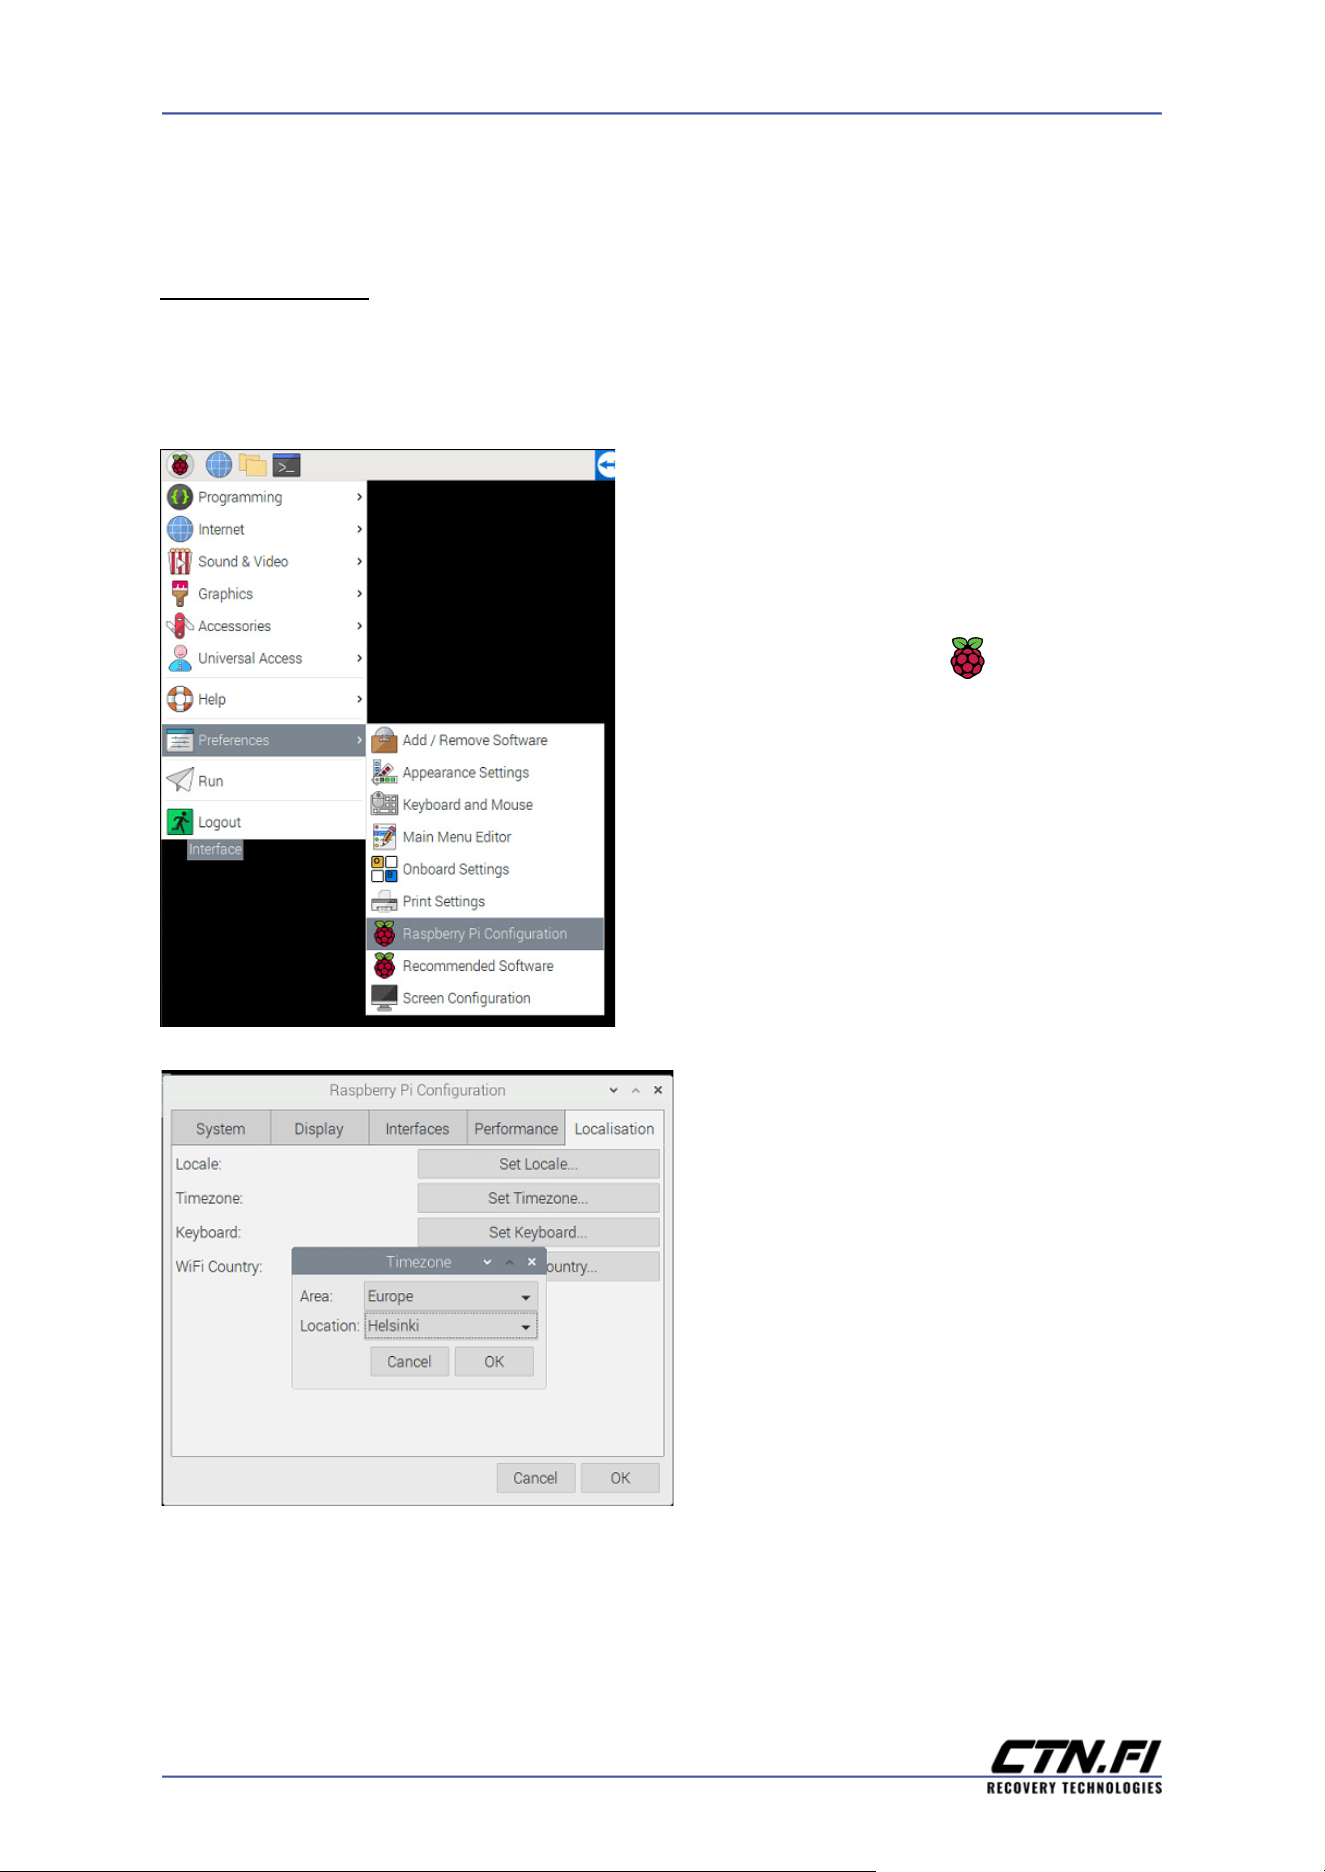
● To set the system clock, exit the e°Cabin Interface by tapping on the following
icons: STANDBY → LOGOUT → EXIT.
● Open the Raspberry Menu, then tap
on Preferences → Raspberry Pi Configuration.
● From the Localisation tab, tap on
Set Timezone..
● Select your current location and
confirm by tapping on OK in both windows.
19
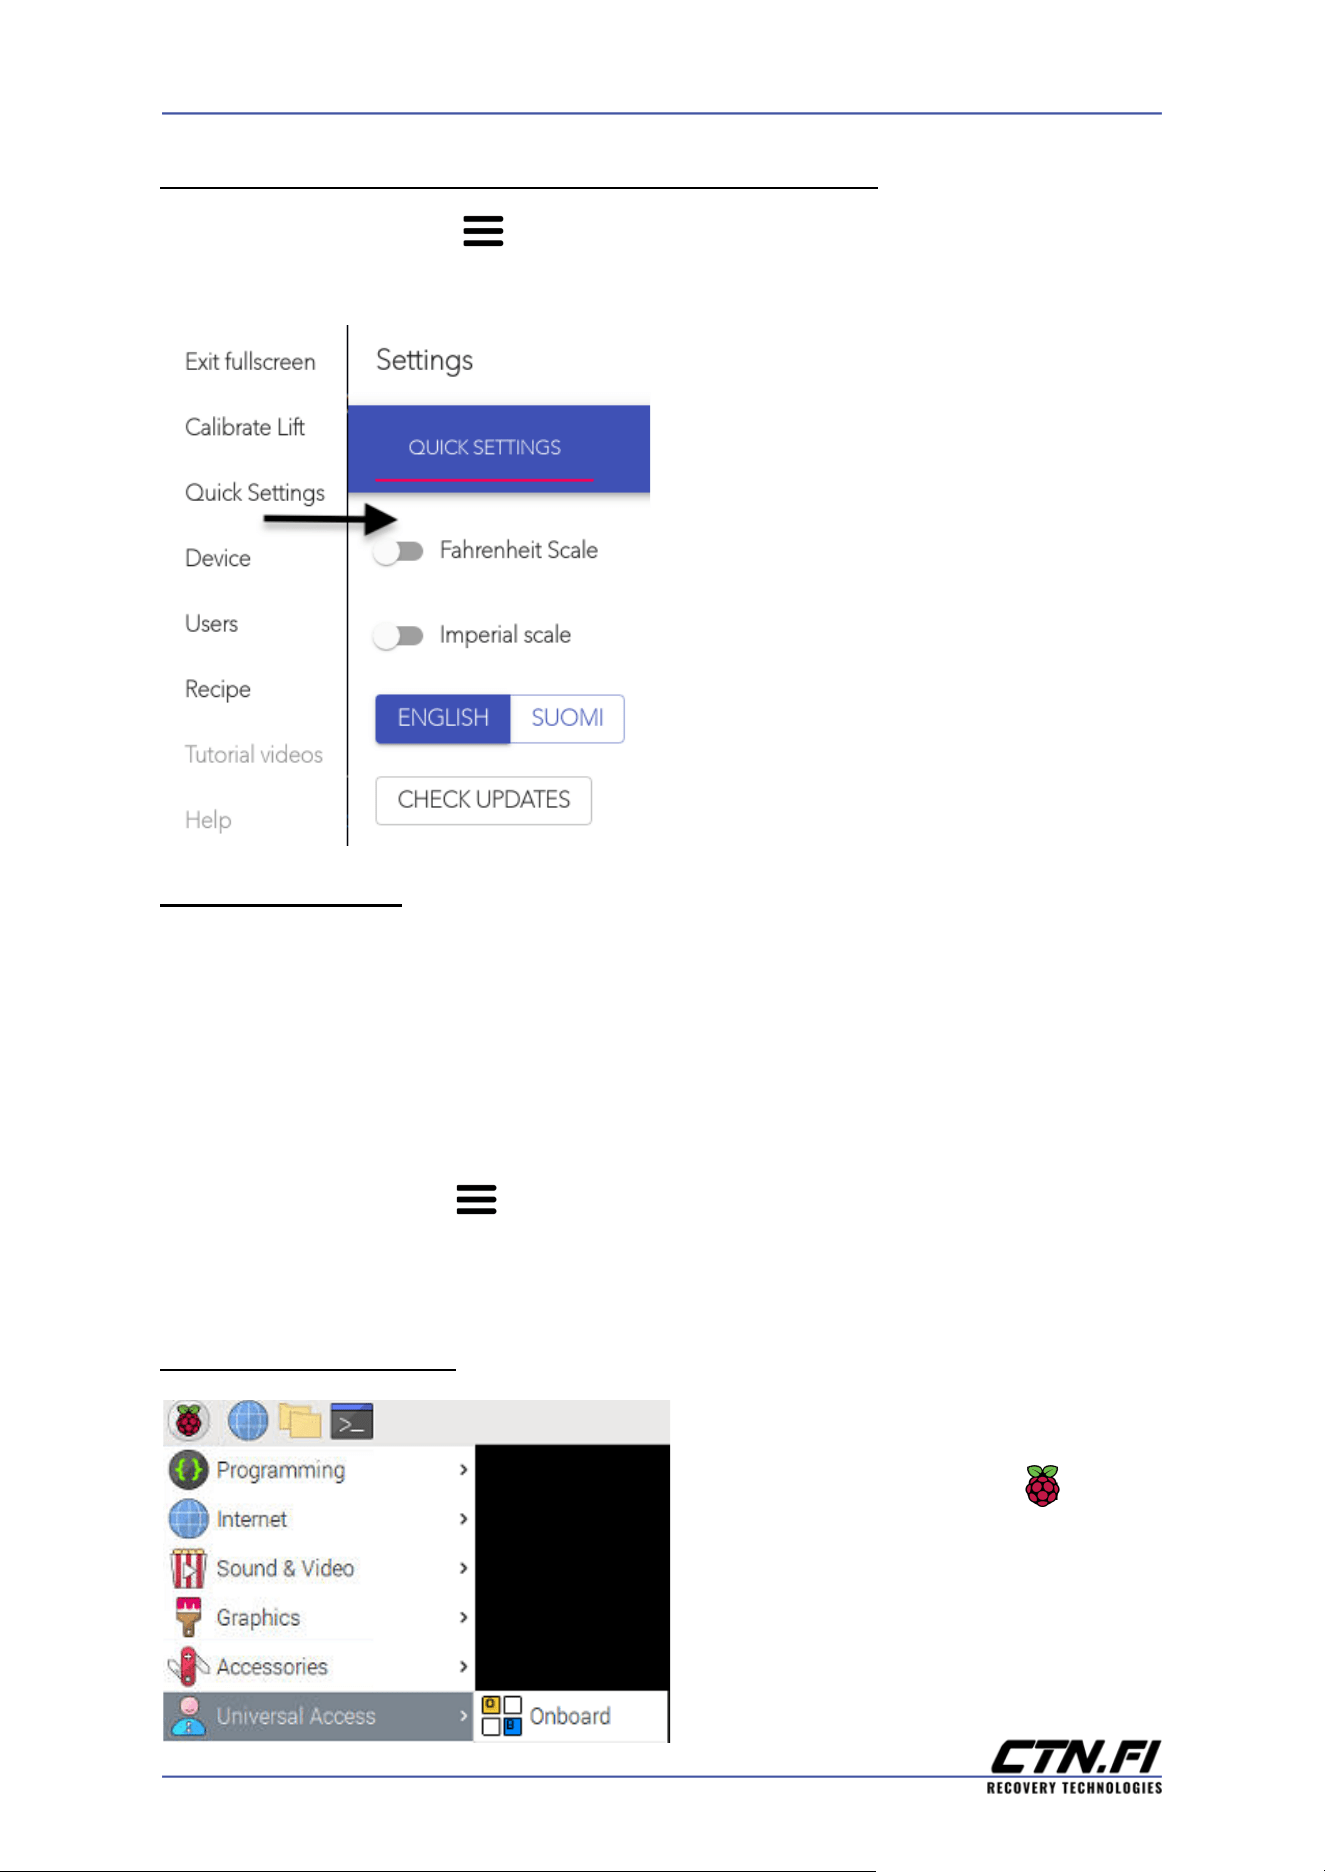
UNITS OF MEASUREMENT, LANGUAGES AND UPDATES
● Tap on the menu icon to reveal the below left side menu. Then choose
Quick Settings to open the Settings menu.
● Tap on the toggle buttons to
switch between the Celsius or Fahrenheit
scales and imperial or metric values.
● Choose your language
● Check for system updates.
LIFT CALIBRATION
In case the lift height feels off for the user/ client, the lift may need to be
recalibrated.
● Exit/ have the client exit the e°Cabin if they are inside.
● Tap on the menu icon to reveal the left side menu. Then tap on Calibrate
Lift.
ONBOARD KEYBOARD
● Open the Raspberry Menu, then
tap on Universal Access → Onboard, to
use the on-screen keyboard.
20
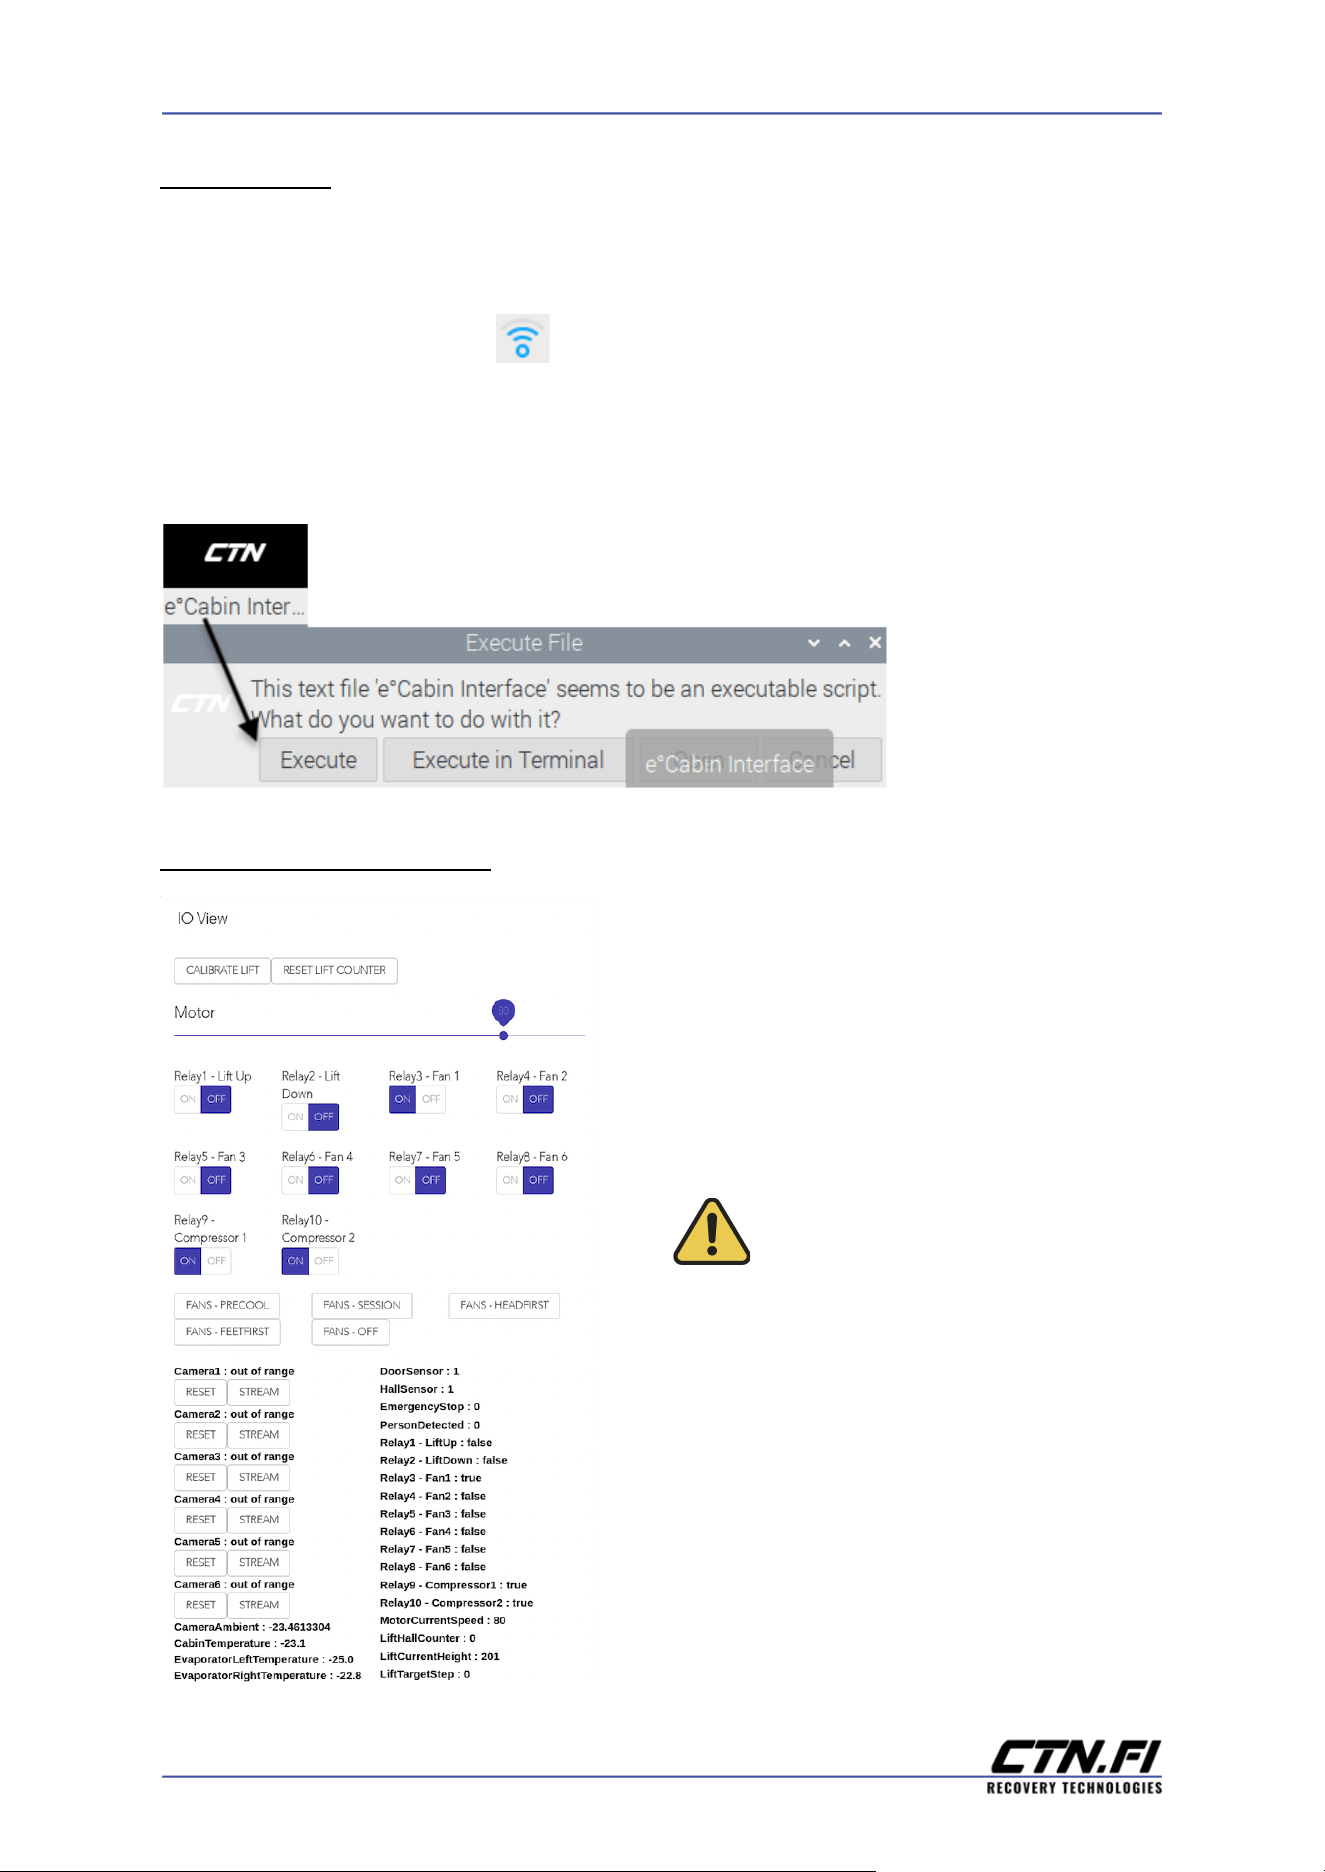
SET UP WI-FI
● Access the desktop of the computer by tapping on the following icons:
STANDBY→ LOGOUT→ EXIT
● Tap on the Wi-Fi icon at the top of the desktop to choose the network.
● Open the Onboard Keyboard to be able to type in the Wi-Fi password.
● Tap on the CTN e°Cabin Interface icon on the desktop and then
on “Execute” to reopen the user interface.
IO ADMINISTRATOR VIEW
● IO Administrator View is meant for testing
and check-ups. Please contact our service
and support team before testing.
CAUTION:
● Do not leave the fans or
compressors running after
testing.
21
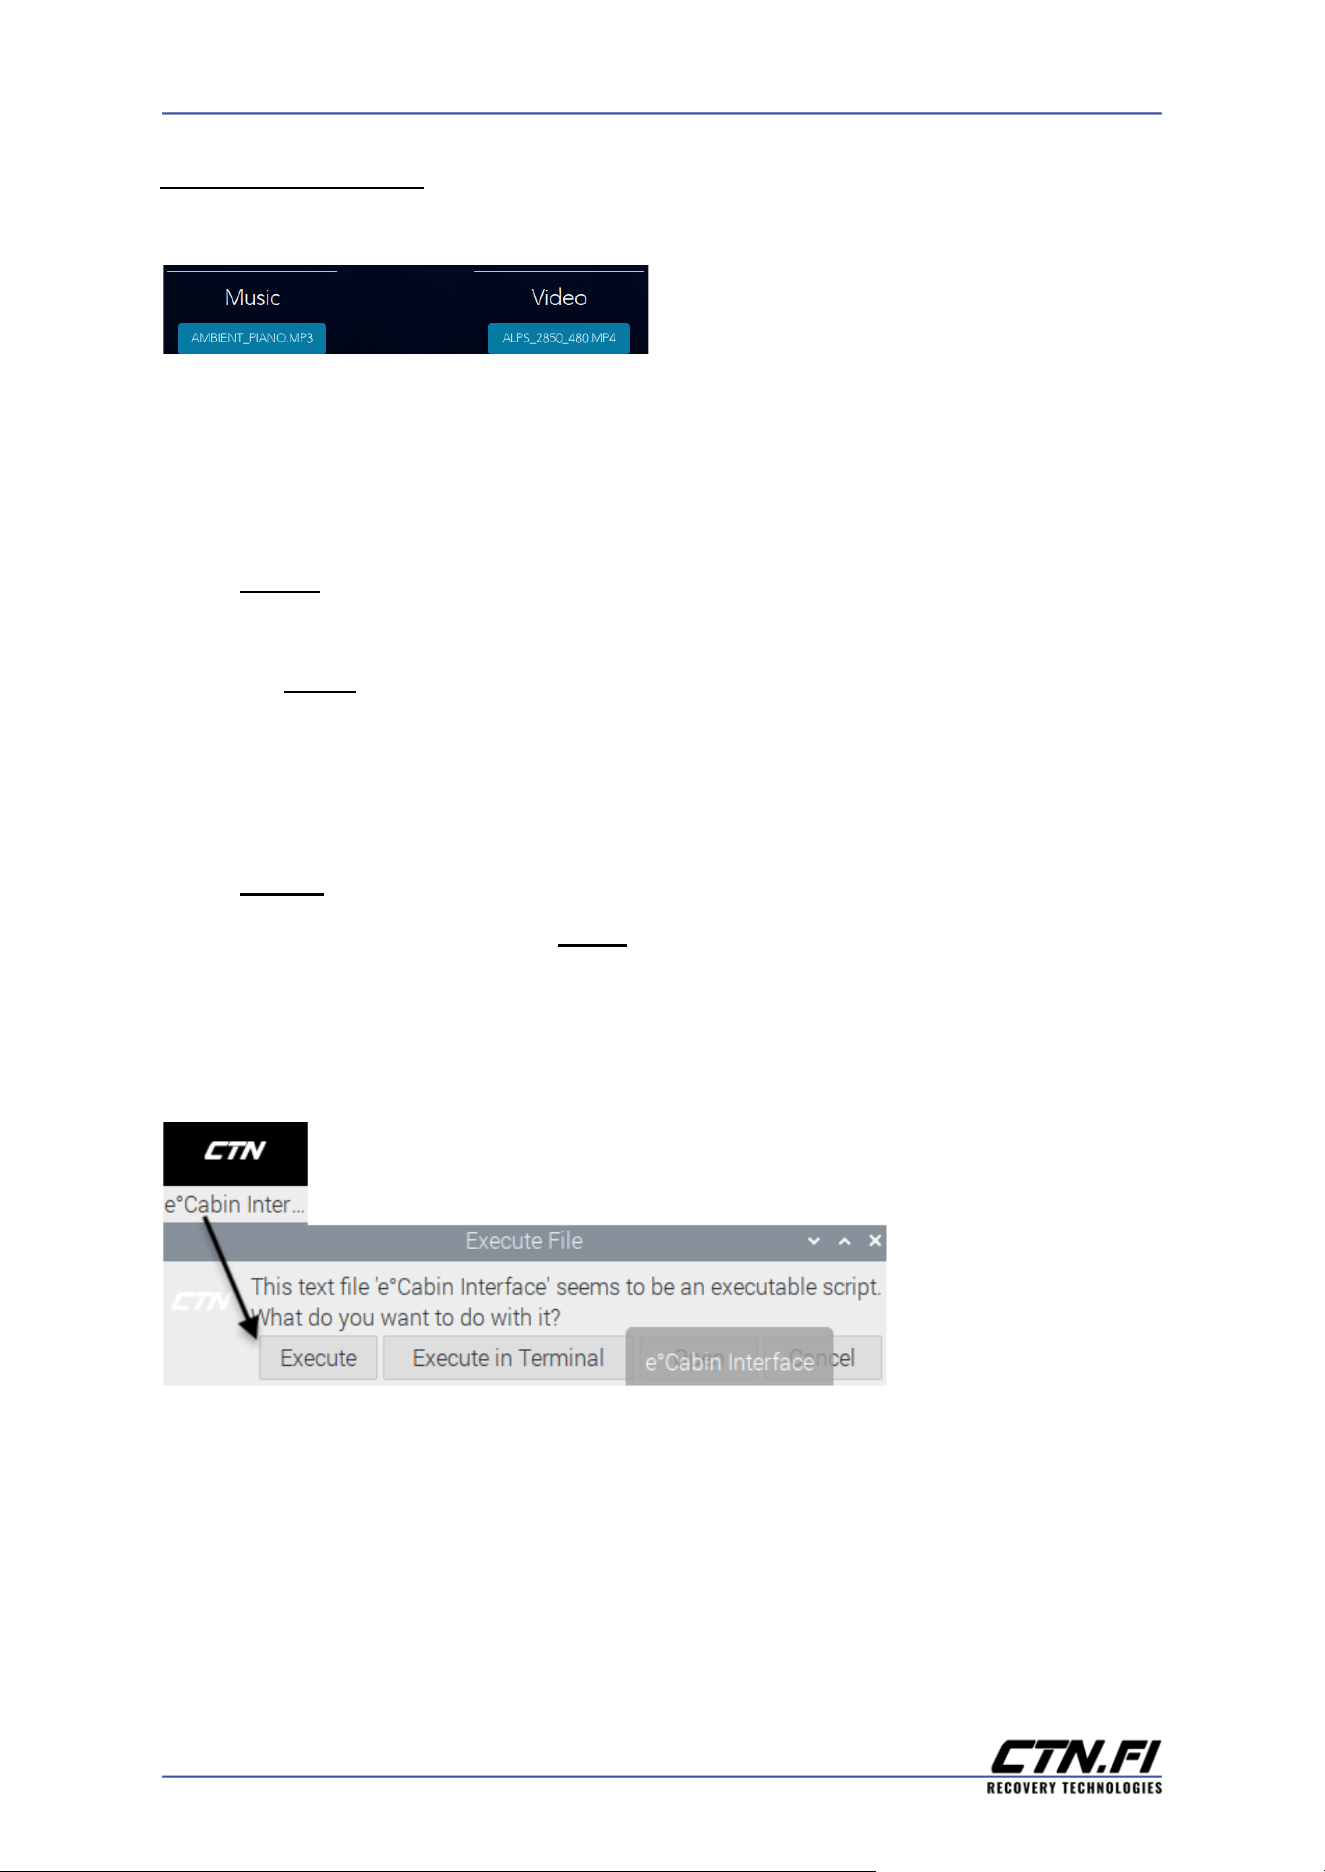
USING YOUR MEDIA
To add personal media to the Music and Video selection to use during a treatment
session, please follow the below steps to
upload media to the system:
● Exit the e°Cabin Interface by tapping on the following icons: STANDBY→
LOGOUT→EXIT:
1) Video:
● Use a USB-splitter to plug a mouse and a USB drive with your video files to
the USB1 port (part nr. 7 - USB1).
● Drag the MP4 or WEBM video files from the USB drive folder to the Video
folder on the desktop of the upper computer.
2) Music:
● Plug in a USB-drive to the USB2 port (part nr. 7 - USB2) with MP3 files.
● Drag the MP3 files from the USB-drive folder to the Music folder on the main
monitor.
● Tap on the CTN e°Cabin Interface icon on the desktop and then
on “Execute” to reopen the user interface.
● At the login screen, tap on the RESTART icon to restart the software and
activate the changes.
22
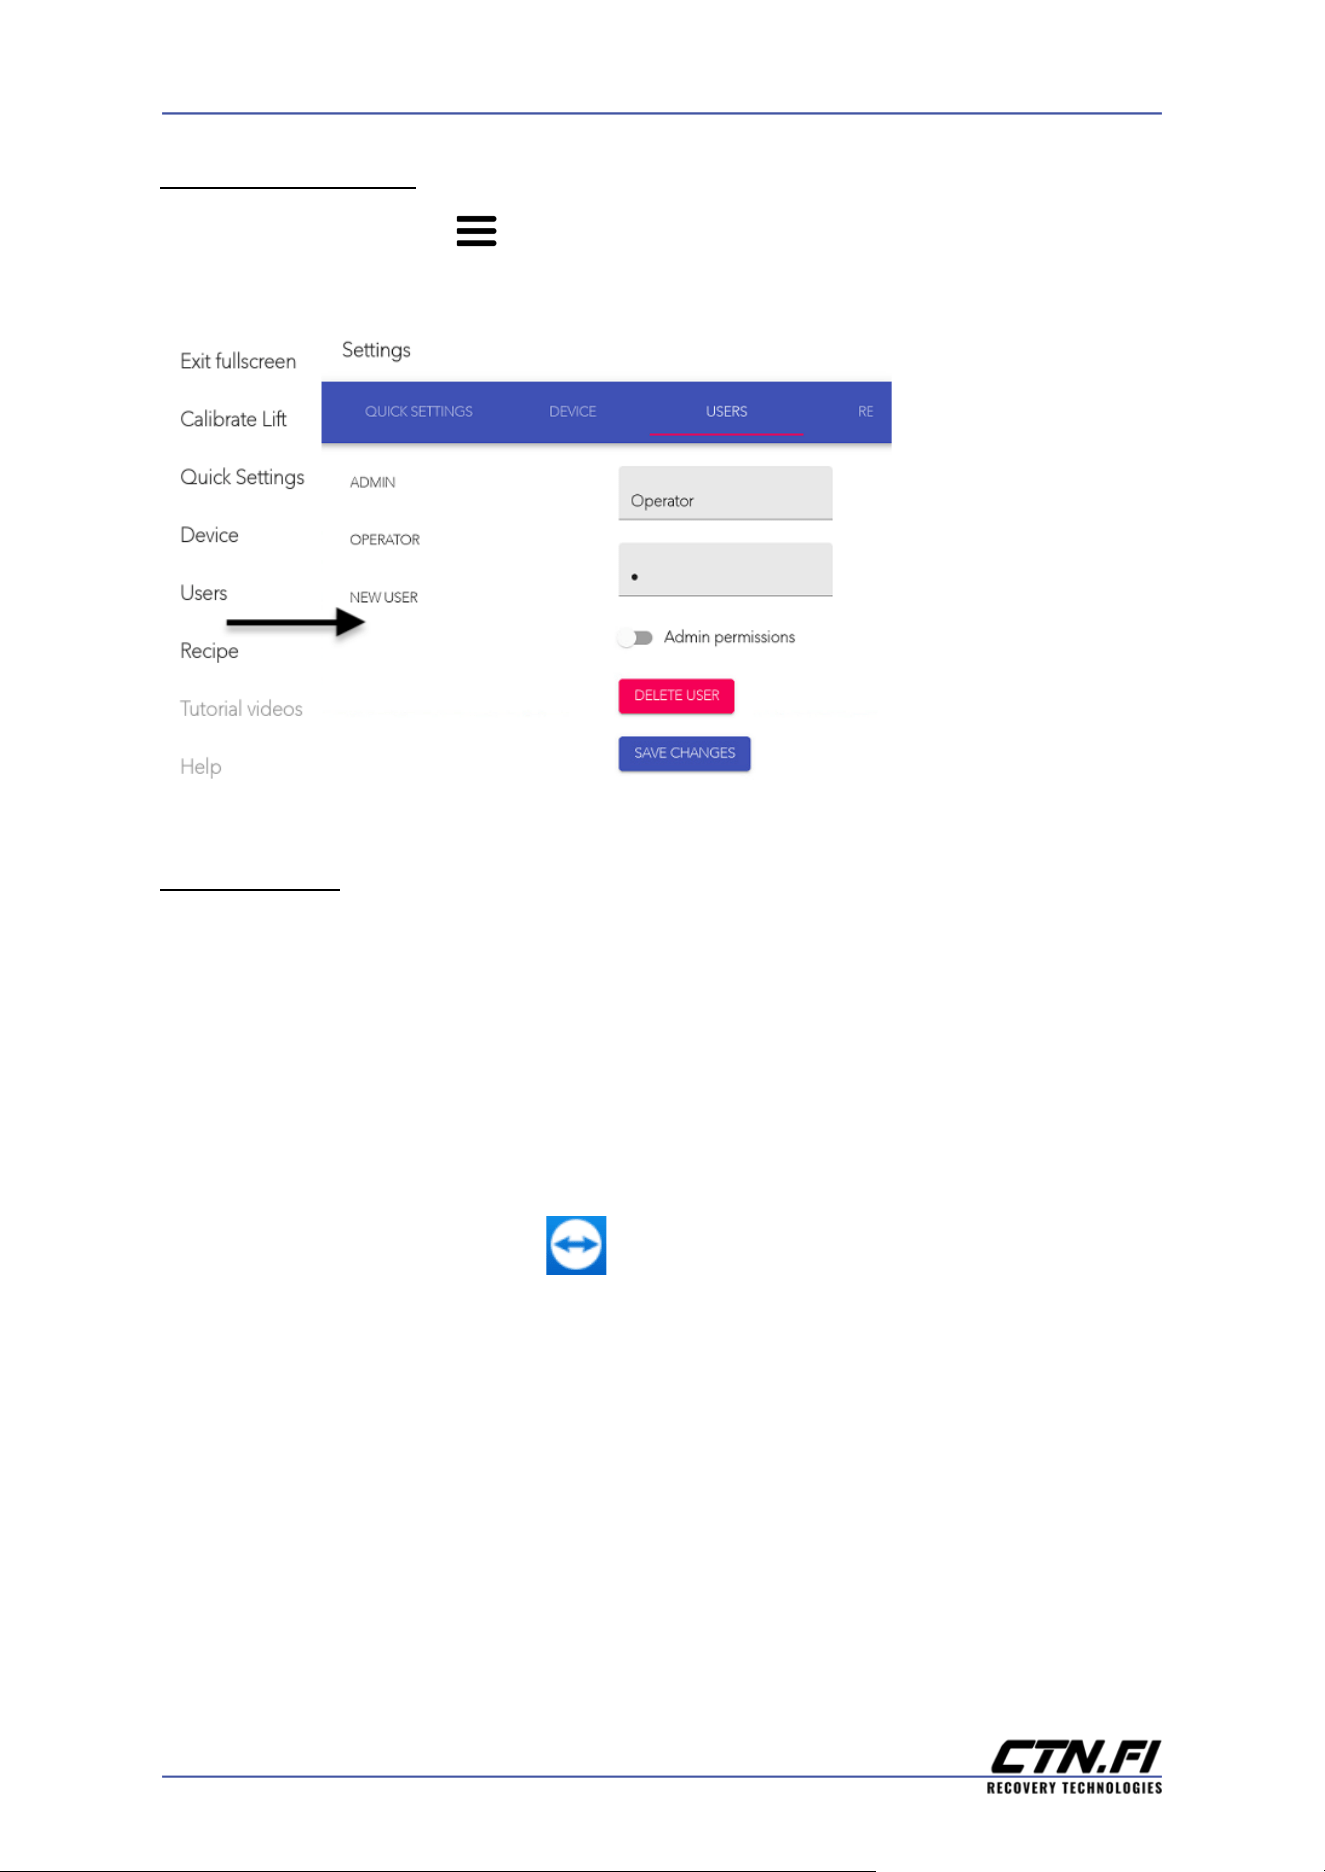
CREATE NEW USER
● Tap on the menu icon to reveal the left side menu. Then tap on Users to
create, modify and delete users.
TEAMVIEWER
Teamviewer is an application that can be used to offer remote assistance in case
there is a software problem with the e°Cabin.
● To open the Teamviewer software, exit from the user interface and access the
desktop of the computer by tapping on the following icons: STANDBY→
LOGOUT→EXIT.
● Tap on the Teamviewer icon at the top of the desktop to open the
software.
● Our technical support team will give you further instructions to get remote
access to the e°Cabin.
23
MAINTENANCE INFORMATION
MONTHLY USER MAINTENANCE
1. Treat the fabric surfaces inside the e°Cabin with a water repellent spray once
a month and dry any wet areas with a soft cloth.
2. Unscrew the air vent covers along with the filters from each side of the
e°Cabin (parts nr. 10 and 11)
● Check the water level in the drip pan on both sides. Open the valve
underneath the drip pan and let the water drain into a cup or container. Then
close the valve.
● Use a vacuum cleaner and/or compressed air to clean the filters and the
inside of the e°Cabin from dust.
● Reattach the air vent covers and filters.
YEARLY MAINTENANCE (Professional support required. Please consult with
the service and support team):
1. Replace the air vent filters.
2. Lubricate moving parts of the lift.
3. Refrigerant pressure/ fluid checkup.
4. Compressor checkup.
24
CONTACT AND SUPPORT
Please connect the e°Cabin to Wi-Fi to be able to get software updates.
Due to software updates, changes in the user manual may occur. Please scan the
below QR code to access the latest user manual version. If you have any questions
about your e°Cabin and wish to contact us, our service and support team is happy
to help you: https://ctn.fi/en/support-form/
Any feedback about the e°Cabin is appreciated and can be sent to info@ctn.fi.
Scan this QR code to access tutorial videos and
download the latest e°Cabin user manual.
English is the original language. The other language versions are translations of the
original.
Cryotech Nordic Group
www.ctn.fi
info@ctn.fi
Made in Finland
User manual version: 10.2022
25
ANNEX
UNBOXING INSTRUCTIONS
When the shipping crate is lying on the pallet backside down, please follow steps
1-10 to carefully unpack the cabin and lift it to its upright position.
● The following is needed for this process:
➢ A forklift or 6+ people capable to lift the cabin;
➢ A power drill, various torx (TX) driver bits, flat head screwdrivers;
➢ Wire cutters;
➢ Zip ties;
➢ At least 5,5m² / 59,5 ft² of floor space is recommended for the final
destination of the e°Cabin. Please refer to the Technical Information
paragraph for additional measurements and requirements.
Step1. Unscrew and remove the two top panels and the support beam from the
middle.
Step2. Step on the face of the cabin and remove any loose items placed on the face
of the e°Cabin for the shipment.
Step3. Open the door carefully, this may require two people as the door is heavy.
Step4. Remove all of the loose items from inside the cabin.
Step5. Once every loose item is removed from the e°Cabin, carefully close the door.
Step6. Attach the support beam and the two front panels back on (this will help the
crate endure the forces when lifting the e°Cabin to an upright position).
26

Step7. Slowly and carefully lift the e°Cabin to an upright position. Make sure that
two people prevent the forward sliding motion of the crate when lifting it up.
Step8. Remove the top panels which are now front panels due to the change in
orientation and the support beam.
Step 9. Remove the black foam paddings on the sides, between the cabin and the
shipping crate.
Step10. Carefully drag and slide the cabin out of the box. You might need to wiggle
the cabin a little from side to side to get it out of the box.
Step11. Move the cabin to the desired destination.
27