Dierent models
Please refer to the numbered drawings which correspond to the paragraph
numbers of the instructions manual.
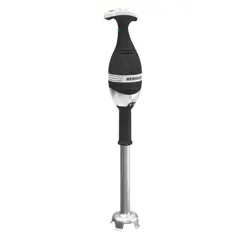
MIXER -
B3000- 40 - MIXER length 43 cm with or without whisk
350W to 750W
B3000- 50 - MIXER length 53 cm with or without whisk
350W to 750W
B3000-60 - MIXER length 63 cm with or without whisk
350W to 750W
Contents
Introduction 1
Installation 1
Use, safety 2
Cleaning, hygiene, storage 4
Fault nding 5
Maintenance 5
Conformity with regulations 6
Introduction
1.1 DESCRIPTION
• These portable WHISK-MIXERS are intended for restaurants,
large kitchens and small companies for:
- Mixing, liquidizing and giving soups and sauces a regular
consistency with the MIXER equipment.
- Whisking, emulsifying and mixing egg whites, mayonnaise or
purées with the WHISK equipment .
• For special preparations out of the food range: ASK FOR
DETAILS.
• These mixers are designed solely for professional use. They
must be used by qualied sta who have made themselves familiar
with these instructions.
•
These mixers must not be used in an explosive atmosphere
.
A Upper handle
B Lower handle
C Motor unit
D End cover
E Centring device
F Bayonet
G Handle
H Mixer tube
I Protective cover
J Blades
K Whisk
L Whisk unit
M “I” ON button
N Overload indicator
O “+” speed button
P “-” speed button
Q “O” OFF button
R Lamp indicating the speed
1.1
1
B3000 GB 11 2015
GB
11/2021
Introduction
The Operating Manual provides the user with useful information
in order to work correctly and in complete safety. It is designed to
facilitate use of the machine (hereinafter referred to as “machine”
or “appliance”).
The following should not under any circumstances be considered
as a long list of restrictive warnings, but rather as a set of instruc-
tions aimed at improving the performance of the machine in all
respects and particularly at preventing bodily injury or material
damage resulting from improper use and management.
It is essential that all the people responsible for transporting,
installing, commissioning, using, maintaining, repairing or dismant-
ling the machine should consult this manual and read it carefully
before proceeding with the various operations, in order to avoid
any incorrect or inappropriate handling likely to result in damage
to the machine or putting people’s safety at risk.
It is also important for the Manual to be ever available to the
operator and carefully kept at the workplace of the machine in
order to be easily and immediately consulted in the event of a
doubt or, in any case, as required.
If, after reading this Manual, you still have doubts or uncertainties
as to the use of the machine, please do not hesitate to contact
the Manufacturer or approved After-Sales Service who remain at
your disposal in order to guarantee a quick and thorough service
with a view to optimum operation and eciency of your machine.
As a reminder, the safety, hygiene and environmental protection
standards currently applicable in the country where the machine
is installed must always be applied during use of the machine.
Consequently, it is the user’s responsibility to ensure that the
machine is operated and used solely under the optimum safety
conditions laid down for people, animals and property.
Installation
2.1 DIMENSIONS - WEIGHT (for information only)
2.2 ELECTRICAL CONNECTION
• Provide a standard wall-mounted single phase10A power supply
socket protected by a circuit breaker or 10A fuse.
• Check that the voltage of the electrical system is the same as
that marked on the rating plate .
• Before using for the rst time, it is recommended that the tools
and whisks are cleaned. To do this please refer to paragraph 4.2
«Cleaning after use».
• Electrical characteristics:
A Supply voltage (Volts)
B Power rating (Watts)
C Frequency (Hertz)
D Current (Amperes)
2.1
2.2
The reference language for these instructions is French.
Use, safety
3.1 BUILT-IN SAFETY - GUIDELINES
• The safety of the user is guaranteed in accordance with the
UL 763 by:
- The need to press on both the ON pushbuttons items O and
M after a STOP («no volt release system»).
- The need to hold down button rep. M to ensure the motor works.
- The motor is protected against excess voltages by a thermal
fuse.
- The distance between the tool and handling areas.
- The protection of the mixer tool.
- The following safety guidelines being respected.
• The user of the Mixer - Whisk must respect the following safety
guidelines:
- The machine must always be unplugged before tting or
removing the mixer and whisk equipment.
- Never operate the machine when not in a recipient and
only immerse the tool to 2/3 of its length at most. (see
immersion limit)
- Always use a stable recipient at a suitable height.
- In order to avoid splashing hot liquids, before starting the tool
lower it to the bottom of the container, respecting the immersion
limit, and remove it after it has completely stopped.
- To prevent risks linked to the blade rotation, always start the
mixer in the recipient.
- Unplug the device immediately after use.
- Never clean the equipment with the machine plugged in. Unplug
the equipment before cleaning.
- The motor unit will remain stable if it is placed vertically on a
work surface.
To PAT test the Electrolux Range of Food Preparation Equipment,
the PCB board needs to be disconnected before any test is done.
This is due to the fact that the boards are tted with a grounding
diode that can give incorrect result during such a test. Also on a
standard appliance a ash test of 25 amps and up to 3000v is
used but, as you would expect, to use this on equipment, which
has a printed circuit, board would be quite destructive to that
board. We would recommend the use of a PAT tester approved
for computer systems which use a lower rate of amps.
The appliance is perfectly safe and is CE certicated. There are
two ways to get overcome this problem.
· Disconnect the board as instructed and test using test for PC’s,
· Or install the mixer on a fused spur (no plug) as this takes it
away from being a portable appliance and the PAT test is then
not needed.
2.1
2.1
1.1
2
B3000 GB 12 2015
Any other use than that described in this
manual will not be considered normal by the
3.2 OPERATION
a) Starting up:
- Respect the safety instructions in § 3.1.
- Hold the mixer using handles A and B on the motor unit C.
- Press simultaneously on button «I» item M and the green but-
ton «+» item O. The mixer starts to operate at speed 3 for the
350W and 450W models, and at speed 2 for the 550W 650W
and 750W models.
- Release button «+» item O while still holding the green button
item M pressed in.
b) Stopping the machine
- Release the green button item M.
c) Choice of speed
If the appliance has been stopped for more than 30 seconds, it
will always re-start at speed 3 in the case of the 350W and 450W
models, and at speed 2 for the 550W, 650W and 750W models.
If the appliance has been stopped for less than 30 seconds, it will
start again at the speed at which the mixer was operating when
it was stopped, the reason being to avoid having to adjust the
speed after a short stop (of less than 30 seconds), for example
to check the preparation.
d) To increase the speed
Press several times in succession on the green «+» button item O.
The speed changes by gradual steps with each press on the
green «+» button item O.
Holding the green «+» button item O in for more than1 second
changes the speed directly to maximum.
e) To reduce the speed
Press several times in succession on the black «-» button item P.
The speed drops by gradual steps with each press on the black
«-» button item P.
Note:
1) A red overload warning lamp item N ashes when the appliance
is overloaded: this does not alter the operation of the machine in
any way, but it is preferable to reduce the operating speed to a
point where the warning light goes out. If the speed is not reduced
when the warning lamp ashes, the machine continues to operate
correctly but is liable to stop more quickly due to overheating of
the motor; in this case red lamp M remains lit constantly.
The appliance is also protected against overheating that can
happen during prolonged and intensive use. In this case the mixer
stops by itself and the red warning light remains lit constantly, indi-
cating that the stop is due to the appliance thermic safety feature
operating.Unplug the appliance and wait for a few minutes until
the motor cools down; plug it in again, the indicator lamp should
be o. If that is the case, unplug the appliance once more and
wait again until the motor cools down.
3.3 FITTING THE WHISKS
- Respect the safety instructions in § 3.1.
- Align the bayonet of each whisk with the groove of the reduction
box spindles and push in fully.Each of the whisk rings should
be ush with the reduction box.
- Remove by pulling each whisk.
3.4 ASSEMBLY AND DISMANTLING OF MIXER AND WHISK EQUIPMENT
- Adhere to the safety instructions described in §3.1.
1) Assembling the whisk and mixer equipment
a) Position the centring device E on the ange D of the motor
unit, putting the bayonets F in line with the slots on the ange
D
b) Drive the centring device E fully into the ange D in small
rotational movements
The centring device must go in without forcing.
c) Turn a quarter of a revolution to bring the logos opposite
the logo .
d) Check that the blade J has not been expelled during assembly
If this is the case:
- Dismantle the equipment (see §3.4.2).
- Re-insert the blade J
- Resume the assembly procedure (see 3.4.1).
2) Dismantling the whisk and mixer equipment.
a) Turn handle G a quarter turn to bring the sign opposite
.
b) Release the handle G from the ange D.
3.4a
3.4
3.4d
4.2d
3.5 USE OF THE MIXER
- Respect the safety instructions in § 3.1.
- Place the Mixer in the pot, immerging it to a MAXIMUM 2/3 of
its length.
- Start the mixer and select maximum speed, by holding the
green «+» button item O in for 1 second .
- For 40, 50 and 60 tubes, hold the device by the tube mixerhan-
dle G and by one of the two handles A or B on the motorunit,
depending on the work height.
- For 30 tubes, do not hold the device by the handle G whichis
near the blade. Hold the device by the handles A and B on the
motor unit.
- Angle the mixer slightly and start to stir, keeping the blade o
the bottom. The products will be sucked up by the whirlpool
and liquidised.
- Then, allow the Mixer to rest at the bottom so that the job can
be nished without fatigue.
- Remove the Mixer from the pot after it has come to a complete
stop.
ATTENTION: The hands should be kept on the handles during
operation to avoid burns due to the tube becoming hot when
immersed in boiling liquids (soup, etc).
Take care not to go beyond the immersion depth.
Note: The shaft + blade assembly cannot be removed once
the equipment is tted onto the motor unit. If it can, refer to b).
Always unplug the machine before tting or removing an
item of equipment
Never start the machine when the tool is not immersed.
Never remove the tool while operating: risk of splashes
3.5a-b
3
B3000 GB 12 2015
2.1
3.4b
3.4c
3.6 USE OF THE WHISK
- Respect the safety instructions in § 3.1.
- Starting (See § 3.2).
- Hold the device by the whisk unit hub and one of the two handles
A or B on the motor unit, depending on the work height.
- If the speed is too low, increase it gradually, being careful about
splashing
- Move the whisk slowly from the centre to the edges of the
container (beaten egg whites, mayonnaise, etc.).
CARE:
- Do not attempt to hold the whisk equipment by the gearbox
unit. If you do, you run the risk of your hand sliding along
the unit and slipping into the whisk strands. The unit is
not the gripping area for the equipment.
- Do not attempt to introduce a nger or a hand between the
whisk strands. Do not attempt to stop the whisks when the
machine is running.
- To avoid the risks of damaging the whisks, excessive ma-
chine vibration and splashes, do not operate the assembly
at high speeds. This will not improve the quality of work.
Always start at slow speed, especially in hard pre-
parations (purées, pancake batter, etc.)
3.6A-B
2.1
3.7 BASIC RECIPES
a) With the Mixer
- All soups, veloutés, sh soups and sauces.
- Brandades, brunoises, cream of spinach, panandas.
b) With the whisk
• Mashed potatoes
- Drain the potatoes when boiling and fully cooked
Remarks: For up to 6 kg of mashed potatoes, the whisk may be
used directly: for larger quantities, up to 20 kg or if the potatoes
are a little hard after cooking, mix roughly with the mixer at high
speed then use the whisk.
- Select medium speed ( 1 —> 4 ).
- Pulverise potatoes from the centre outwards to the edges of
the container.
- Season then add the hot milk at HIGH speed and mix until a
smooth creamy mixture is obtained.
• Mayonnaise (for 5 litres):
- Start at medium speed.
- Progressively increase the speed, depending on the quantity.
• Beaten egg whites (up to 60 eggs):
- Beat the eggs slowly at low speed
- Gradually increase the speed to maximum to make sure egg
whites u up and remain sti.
• Others:
- Creams: pastry, butter, chantilly, genoese, meringue, ans,
choux pastry, soués, etc.
Cleaning, hygiene, storage
Respect the safety instructions in § 3.1.
4.1 IN BETWEEN USE
- Immerse the dirty parts of the utensil in hot water, swirl
the utensil around and it will clean itself.
4.2 AFTER USE
A/ Cleaning the mixer equipment.
1) Dismantle the mixer equipment : see
2) Take the mixer tool and push the central plastic shaft with both
thumbs, above a table or in a sink.
3) Separate tube H from the shaft + blade.
4) • Clean the shaft + blade assembly and tube H in a sink.
The shaft + blade assembly and tube H should be cleaned using
a brush and hot water with disinfectant detergent. Rinse in clean
water and leave to dry before sterilising.
• Cleaning in a machine: only the blade and tube H can be
cleaned by machine.
To unscrew blade J: hold the shaft with both hands with the blade
resting on a stable surface, and rotate the shaft anticlockwise
to unlock it
Finish unscrewing the blade by hand.
Avoid cleaning the shaft in a dishwasher, because it may blacken
due to the action of chlorine-based products. This has no eect
on health
Always disconnect the machine before any
intervention on it.
3.4
4.2a
3.4
Dismantling must take place above a table or a
stable surface in order not to injure anyone when
the shaft and blade eject.
To avoid deteriorating plastic parts, after they have
been through the dishwasher wait for them to
return to ambient temperature before using them.
5) Sterilisation
After cleaning and prior to each use, it is necessary to remove
the lower bearing for sterilisation. The parts to be sterilised are
all those that come into contact with food:
- the blade (3),
- sub assembly (4) - not dismantled -,
- the tube (5),
- sub assembly (6) - not dismantled -,
Sterilisation should take place with equipment suited to the pur-
pose (ultraviolet - ozone, etc...) according to the manufacturer’s
instructions.
6) Re-assemble the shaft + blade in the tube by pressing with
the palm of the hand.
B/ Cleaning the whisk equipment.
1) Remove the whisks: §3.3
2) Clean the whisk unit in hot water and detergent - degreaser -
disinfectant compatible with the material it is made of. Rinse in
clean water and leave to dry.
3) Do not wash this unit in the dishwasher.
The two whisks can be cleaned in the same way as the unit (see
point 2). They can also be cleaned in a dishwasher.
4) Sterilisation
Each time after cleaning and prior to each use, sterilise the gear
box and whisks, using the same methods as for the tube.
5) Ret the whisk (see §3.4)
Do not clean the motor unit by immersion nor in
a dishwasher. Rub over with a damp sponge and
detergent, then dry the unit.
4.2b
4.2c
4.2d
4
B3000 GB 12 2015
4.3 STORAGE
• Choose a place that is easily accessible to attach the wall support
(screws and rawl plugs not supplied).
- After cleaning, hang the motor unit and the Mixer and Whisk
equipment on the wall support. Put the power lead around the
winder and push the plug into the front panel.
Important:
- Keep the motor assembly away from sources of heat.
- Handle the machine carefully and avoid dropping or banging it.
- Handle the Mixer tool with care
- Avoid impacts against clip E
4.3
Fault nding
5.1 THE MACHINE WILL NOT START, CHECK
THAT:
- The machine is plugged in.
- The electrical power supply to the socket is correct.
- The operator has pressed the two START buttons simultaneously
(see §1.1 - case of standard model)
- The green button is held down.
- If the luminous indicator lights up, unplug the machine and wait
a short while for the motor to cool down. (see §1.1)
If the device stops while running and the luminous
indicator lights up :
- unplug it and leave to cool down so that the thermal
trip can reset.
If problems persist, contact the service department of your
local dealer.
5.2 ABNORMAL NOISE:
• Stop and unplug the appliance.
• Whenever it is used, check the condition of:
- the casing, (there should be no cracks)
- the equipment used (whisk properly engaged, blade tightened,
etc)
- operation of the assembly
- If there is any vibration during operation: play in the shaft,
deterioration of ball bearings or shaft out of true
5.3 IMMERSION OF THE DEVICE
If the device is accidentally immersed while running:
- DO NOT ATTEMPT TO GET IT OUT.
- DO NOT TOUCH THE CONTAINER
- IMMEDIATELY UNPLUG FROM THE POWER SUPPLY.
- Warn the service department or your supplier.
If the problem persists contact your supplier’s service depart-
ment.
5.4 ACCIDENTAL DROP
• With the machine unplugged:
- Check the condition of the casings (no cracks and splinters).
- Check there are no suspicious noises by shaking the appliance.
In case of any doubt, contact the service department or your
supplier.
Maintenance
6.1 MECHANICAL PARTS
• The Mixer - Whisks only require a minimum amount of mainte-
nance (the motor and the mechanical part bearings are greased
for life).
• Whenever using the appliance (see §5.2):
- The play at the end of the Mixer shaft.
- The sharpness of the Mixer blade.
- The whisk casing for leaks.
- The whisk attachment system.
• To gain access to the inside of the motor unit, proceed
as follows:
- Unplug the machine.
- Remove the corrugated belt item 12 (use a screwdriver as a
lever).
- Remove the 3 M4x16 screws item 11 and remove the clamp
10 and the end cover 9.
- Remove screw PT 40x20 located beneath the upper handle
item A and remove the upper cap item 2. Be careful not to lose
buttons S2.
- Remove the caps item 15.
- Remove the 7 screws item 13.
- Place the machine horizontally and separate the casing 14.(see
exploded view «unit».)
To ret: proceed in reverse order.
• To gain access to the inside of the whisk unit, proceed as follows
(see whisk unit exploded diagram):
- Remove the whisks 18 by pulling rmly on them.
- Remove the 4 caps item 10 using a screwdriver.
- Unscrew the 4 screws item 11.
- Separate the assembly S3 and the casing item 17, taking care
to keep the casing item 17 as shown in the exploded diagram
so as not to lose the grease inside.
To ret, proceed in reverse order.
Oils and grease suitable for use with foodstus are to be
used if the mechanisms need to be lubricated.
5
B3000 GB 11 2015
6.3 ADDRESS FOR SERVICE REQUIREMENTS
We advise you to contact the dealer who sold you the machine.
• The manufacturer reserves the right to modify and make impro-
vements to the products without giving prior warning.
Dealer’s stamp
Date of purchase: .................................
For any information or orders for spare parts, spe-
cify the type of machine, its serial number and the
electrical characteristics.
Conformity with regulations
The machine has been designed and manufactured in
conformity with:
- UL 763
- NSF / ANSI 8
- CSA standard C22.2 NO 195
The “ ” symbol on the product indicates that this product
should not be considered as household rubbish. Instead, it
should be taken to a recycling area for electric and electronic
equipment. By making sure that the product is correctly disposed
of in this way, you are assisting in preventing damage to the
environment and to the health of persons which may result
following uncontrolled scrapping of this product. For further
information on recycling this product, please contact the sales
department or the product retailer, the after-sales department
or the waste treatment department in question.
This conformity is certied by:
- The ETL conformity mark, attached to the machine
- This instruction manual, which must be given to the operator.
Acoustic characteristics:
- The acoustic pressure level measured in accordance with the
test code EN 11201-EN ISO 3744 is 80 dBA.
Protection indices :
- IP55 electrical controls
- IP34 overall machine
Integrated safety
- The machine has been designed and manufactured respecting
the regulations and standards concerning it indicated above.
- The operator must be trained before using the machine and
informed of any residual risks (personnel work station training
obligations).
Food hygiene:
The machine is made from materials that conform to the following
regulations and standards:
- NSF / ANSI 8.
The surfaces of the food area are smooth and easy to clean. Use
detergents that are approved for food hygiene and respect the
instructions for their use.
6
B3000 GB 11 2015