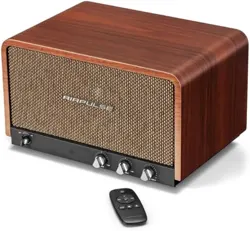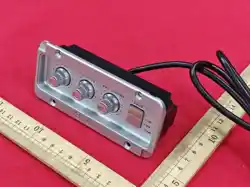
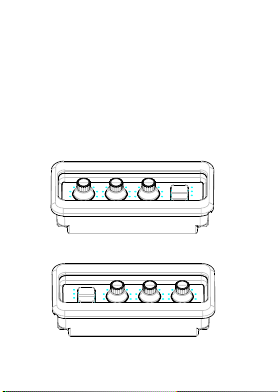
Remo6BTVS Audio Speaker
User manual
/ VOL
/ Bass
/ Vibration
BCST
WRLS
AUX
OPT
/ Bass
/ VOL
/ Vibration
WRLS
AUX
OPT
BCST
Bass
VOL
Vibration
WRLS
AUX
OPT
BCST
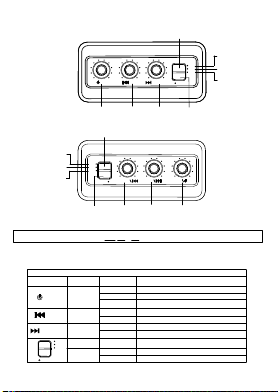
1. Panel diagram
Mode button
Wireless mode
indicator light
Auxiliary in mode
indicator light
Optical fiber mode
indicator light
Broadcast Button
Disconnect wireless
connection
Next track
Vibration knob
Previous track
Bass knob
Power
Play/Pause
Volume knob
This uint can wirelessly connect to a compatible phone, tablet,or audio device. Use the Mode button to select the audio.
The indicator lights identify the selected mode: WRLS
, AUX, or OPT.
2. Button Name and Function Description
Button Functions
Functional Description
How to operate
Button Name
Button Icon
Power
Play/Pause
Volume knob
Previous track
Bass knob
Next track
Vibration knob
Broadcast
Button
(Bottom button)
Mode Button
(Top button)
Long press
Long press
Rotation
Short press
Short press
Short press
Short press
Short press
Rotation
Rotation
Disconnect wireless connection
Power on/off
Control music play/pause
Adjust the volume. When the volume is at the
maximum, there will be a "beep" prompt sound.
Switch to previous track
Adjust the bass level
Switch to next track
Adjust vibration intensity
Switch between WRLS, AUX, and OPT input modes.
Enter/Exit Broadcast
Mode button
Wireless mode
indicator light
Auxiliary in mode
indicator light
Optical fiber mode
indicator light
Broadcast Button
Disconnect wireless
connection
Next track
Vibration knob
Previous track
Bass knob
Power
Play/Pause
Volume knob
VOL
Bass
Vibration
WRLS
AUX
OPT
BCST
WRLS
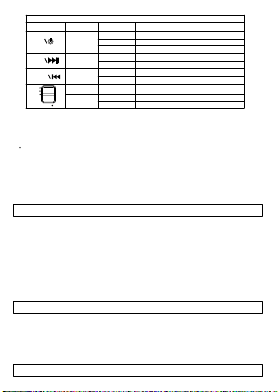
Button Functions
Functional Description
How to operate
Button Name
Button Icon
Power
Play/Pause
Volume knob
Previous track
Bass knob
Next track
Vibration knob
Broadcast
Button
(Bottom button)
Mode Button
(Top button)
Long press
Long press
Rotation
Short press
Short press
Short press
Short press
Short press
Rotation
Rotation
Disconnect wireless connection
Power on/off
Control music play/pause
Adjust the volume. When the volume is at the
maximum, there will be a "beep" prompt sound.
Switch to previous track
Adjust the bass level
Switch to next track
Adjust vibration intensity
Switch between WRLS, AUX, and OPT input modes.
Enter/Exit Broadcast
3. Operation Guide
Wireless connect steps:
1) Connect the unit to power.
2) Press the Mode button until the WRLS indicator is selected.
3) On the phone or audio device , open the wirelsee audio connection settings.
4) Search for and select Thunder.
5) When the wireless connection is successful, the unit will announce Wirelessly Connected.
6) Start audio playback from the phone or audio device and adjust volume as needed.
7) To disconnect, long press the BCST button. The unit will announce Wireless Disconnected.
A. WIRELESS AUDIO CONNECTION - PHONE OR AUDIO DEVICE
Preparation before use
1) Connect AC power plug of the product to the power source.
2) After the power is connected, the unit should automatically turn on, all buttons light up blue, and there will be a voice prompt: "Power on".
3) button flash blue, and the voice prompt is: " Wait for pairing " , and the product enters the wireless search state.
The unit may automatically reconnect to the last connected device when powered on.
To connect a different device, disconnect the current wireless connection and repeat the wireless connect steps.
B. CONNECTING AUDIO FROM A TV
TV audio may be connected to the unit wirelessly or by using a wired connection through the OPT or AUX inputports. TV menu names and audio settings
vary by TV manufacturer. Refer to the TV owner's manual for exact menu steps.
Important TV requirement: Before attempting to wireless connect TV audio, confirm that the TV supports wireless audio output to an external speaker. If
the TV does not support wireless audio output, use the OPT or AUX wired input instead.
Sound delay note: Wireless TV audio may create a delay between picture and sound. If sound delay occurs, or if picture and sound do not match, use a
wired connection through OPT or AUX.
B.1 Wireless TV Audio Connection
Use this method only if the TV supports wireless audio output to an external speaker.
1) Connect the unit to power.
2) Press the Mode button until the WRLS indicator is selected.
3) On the TV, open the sound or audio output settings.
4) Select the TV setting for wireless audio output or external wireless speaker connection.
5) Search for and select Thunder.
6) When the connection is successful, the unit will announce Wirelessly Connected.
7) Start TV audio playback and adjust volume as needed.
If the TV cannot find Thunder, confirm that the unit is in WRLS mode, disconnect any previous wirelessTo connect a different device,disconnect the
current wireless connection and repeat the wireless connect steps.
B.2 WIRED TV AUDIO CONNECTION - OPT OR AUX
A wired TV audio connection is recommended when the TV does not support wireless audio output, when wireless connection is unstable, or when
sound delay occurs.
Option 1: OPT Connection
1) Connect one end of an optical audio cable to the TV optical audio output.
2) Connect the other end of the optical audio cable to the unit's TV-OPT Port.
3) Press the Mode button until the OPT indicator is selected.
4) On the TV, open the sound or audio output settings.
5) Set the TV audio output to Optical Output, External Speaker, or a similar setting.
6) Start TV audio playback and adjust volume as needed.
If there is no sound through OPT, confirm the unit is set to OPT mode and that the TV sound output is set to optical or external speaker.
If the TV has a digital audio format setting, select PCM if required by the TV or audio source.
C. BROADCAST / SYNCHRONIZED MUSIC MODE
Broadcast mode allows multiple compatible units to play audio at the same time. One unit is used as the primary unit and the other units are used as
secondary units. Use broadcast mode only after the primary unit is wirelessly connected to the phone or audio device. Secondary units must be in WRLS
mode before entering broadcast mode.
C.1 Set up the primary unit:
1) Power on the secondary unit and make sure it is in WRLS mode, then connect the primary unit wirelessly to the phone or audio device.
2) Short press the BCST button. The blue light will flash slowly and the unit will announce Enter Broadcast Mode. Then the blue light
remains on music playback is synchronized.
C.2 Set up a secondary unit:
1) Power on the secondary unit and make sure it is in WRLS mode but not connected to any WRLS connection.
2) Short press the BCST button. The unit will announce Enter Broadcast Mode. then the blue light remains on music playback is
synchronized.
C.3 Exit broadcast mode:
- To exit from the primary unit, short press the primary unit BCST button.
- To exit from a secondary unit, short press the secondary unit BCST button.
For best performance, keep the primary and secondary units within range and free of large obstacles. In broadcast mode, the primary unit controls the
general volume. Secondary units may allow independent bass and vibration adjustment.
Audio vibration function: When music starts, the audio vibrator responds with the music. Rotate the Next Track/Vibration knob to adjust vibration
intensity.
4. Product Parameters
5.3
Product Parameters
Remo6B controller size
Input(*2)
Speaker power
Audio vibration output
Wireless version
L132*W62*H40mm
DC20V4,5A
36W*2+12W*4+4.5W*12
10W*12
Option 2: AUX Connection
1) Connect an AUX audio cable from the TV headphone, audio out, or line out port to the unit's AUX port.
2) Press the Mode button until the AUX indicator is selected.
3) Start TV audio playback and adjust the TV volume and unit volume as needed.
Some TVs may require an adapter to connect to the AUX input. If the TV does not have a compatible audio output, use the OPT connection if available.

FCC Caution.
This device complies with part 15 of the FCC Rules. Operation is subject to the following two
conditions:
(1) This device may not cause harmful interference, and
(2) this device must accept any interference received, including interference that may cause
undesired operation.
Any Changes or modifications not expressly approved by the party responsible for compliance
could void the user's authority to operate the equipment.
Note: This equipment has been tested and found to comply with the limits for a Class B digital
device, pursuant to part 15 of the FCC Rules. These limits are designed to provide reasonable
protection against harmful interference in a residential installation. This equipment generates
uses and can radiate radio frequency energy and, if not installed and used in accordance with the
instructions, may cause harmful interference to radio communications. However, there is no
guarantee that interference will not occur in a particular installation. If this equipment does
cause harmful interference to radio or television reception, which can be determined by turning
the equipment off and on, the user is encouraged to try to correct the interference by one or
more of the following measures:
-Reorient or relocate the receiving antenna.
-Increase the separation between the equipment and receiver.
-Connect the equipment into an outlet on a circuit different from that to which the receiver is
connected.
-Consult the dealer or an experienced radio/TV technician for help.
FCC Radiation Exposure Statement:
This equipment complies with FCC radiation exposure limits set forth for an uncontrolled
environment. This equipment should be installed and operated with minimum distance 20 cm
between the radiator & your body.