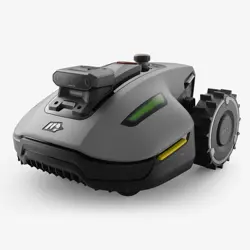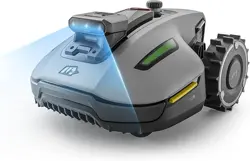

Thank you for choosing Mammotion as your garden care lawn mower. This user manual will help you learn
and operate Mammotion Luba, a 4-wheel-drive and perimeter-free lawn mower, to cut grass and
maintain your lawn.
This manual is copyrighted by Mammotion company. Without the written permission of the company, any
unit or individual shall not copy, modify, reproduce, transcribe or transmit in any way or for any reason.
This manual is subject to change without notice at any time.
Unless explicitly agreed otherwise, this manual serves solely as a usage guide, and all statements and
information contained herein do not constitute any form of warranty.
Revision Log
Date Version Description
2024.11 V1.0 Initial version

i
CONTENTS
1 Safety Instructions ......................................................................................................................... - 1 -
1.1 General Safety Instructions ................................................................................................. - 1 -
1.2 Safety Instructions for Installation ....................................................................................... - 2 -
1.3 Safety Instructions for Operation......................................................................................... - 2 -
1.4 Safety Instructions for Maintenance .................................................................................... - 3 -
1.5 Battery Safety .................................................................................................................... - 4 -
1.6 Residual Risks .................................................................................................................... - 4 -
1.7 Intended Use ...................................................................................................................... - 4 -
1.8 Disposal ............................................................................................................................. - 4 -
2 Introduction ................................................................................................................................... - 5 -
2.1 About Mammotion Luba ...................................................................................................... - 5 -
2.2 In the Box ........................................................................................................................... - 9 -
2.3 Symbols on the Product .....................................................................................................- 12 -
2.4 Product Overview ..............................................................................................................- 14 -
3 Installation .................................................................................................................................... - 19 -
3.1 Preparation ..................................................................................................................... - 19 -
3.2 Choosing a Location for RTK Reference Station ................................................................. - 19 -
3.3 Choosing a Location for Charging Station .......................................................................... - 22 -
3.4 Install .............................................................................................................................. - 23 -
4 Operation ..................................................................................................................................... - 34 -
4.1 Preparation ..................................................................................................................... - 34 -
4.2 Download Mammotion App ............................................................................................... - 34 -
4.3 Add Your Product ............................................................................................................. - 35 -
4.4 Update Firmware ............................................................................................................. - 36 -
4.5 Create a Map .................................................................................................................... - 36 -
4.6 Mow................................................................................................................................. - 45 -
4.7 Task Schedule .................................................................................................................. - 52 -
4.8 Activate FPV Mode ........................................................................................................... - 54 -

ii
4.9 View Status ...................................................................................................................... - 55 -
4.10 Service Page ................................................................................................................. - 65 -
4.11 Me Page ........................................................................................................................... - 65 -
5 Maintenance ................................................................................................................................. - 73 -
5.1 Cleaning .......................................................................................................................... - 73 -
5.2 Maintenance for Cutting Blades and Motor ......................................................................... - 75 -
5.3 Battery Maintenance ........................................................................................................ - 76 -
5.4 Winter Storage ................................................................................................................. - 76 -
6 Product Specifications ................................................................................................................. - 79 -
6.1 Technical Specifications ................................................................................................... - 79 -
6.2 Fault Codes ...................................................................................................................... - 84 -
7 Warranty ...................................................................................................................................... - 86 -
8 Compliance .................................................................................................................................. - 88 -

- 1 -
1 Safety Instructions
1.1 General Safety Instructions
Carefully read and understand the user manual before using the robot.
Only use the equipment recommended by Mammotion with the robot. Any other usage is incorrect.
Never allow children, persons with reduced physical, sensory or mental capabilities or lack of
experience and knowledge or people unfamiliar with these instructions to use the robot, local
restrictions may restrict the age of the operator.
Do not allow children to be in vicinity or play with the robot when it is operating.
Do not use the robot in areas where people are unaware of its presence.
When manually operating the robot with the Mammotion app, do not run. Always walk, watch your
steps on slopes, and maintain balance at all times.
Avoid touching moving hazardous parts, such as the blade disc, until it has completely stopped.
Avoid using the robot when there are people, especially children or animals, in the work area.
If operating the robot in public areas, place warning signs around the work area with the following
text: "Warning! Automatic lawn mower! Keep away from the robot! Supervise children!"
Wear sturdy footwear and long trousers when operating the robot.
To prevent damage to the robot and accidents involving vehicles and individuals, do not set work
areas or channels across public pathways.
Seek medical aid in case of injury or accidents.
Set the robot to OFF and remove the key before clearing blockages, performing maintenance, or
examining the robot. If the robot vibrates abnormally, inspect it for damage before restarting. Do not
use the robot if any parts are defective.
Do not connect or touch a damaged cable until it is disconnected from the power outlet. If the cable

- 2 -
becomes damaged during operation, disconnect the plug from the power outlet. A worn or damaged
cable increases the risk of electrical shock and should be replaced by service personnel.
Only use the charging station included in the package to charge the robot. Incorrect use may result in
electric shock, overheating, or corrosive liquid leakage from the battery. In case of electrolyte leakage,
flush with water/neutralizing agent and seek medical aid if the corrosive liquid comes into contact
with your eyes.
Only use original batteries recommended by Mammotion. The safety of the robot cannot be
guaranteed with non-original batteries. Do not use non-rechargeable batteries.
Keep extension cords away from moving hazardous parts to avoid damage to the cords which can
lead to contact with live parts.
The illustrations/screens used in this document are for reference only. Please refer to the actual
products.
1.2 Safety Instructions for Installation
Avoid installing the charging station in areas where people may trip over it.
Do not install the charging station in areas where there is a risk of standing water.
Do not install the charging station, including any accessories, within 60 cm/24 in of any combustible
material. Malfunctioning or overheating of the charging station and power supply can pose a fire
hazard.
For users in the USA/Canada: If installing the power supply outdoors, there is a risk of electric shock.
Only install it in a covered Class A GFCI receptacle (RCD) with a weatherproof enclosure, ensuring that
the attachment plug cap is inserted or removed.
1.3 Safety Instructions for Operation
Keep your hands and feet away from the rotating blades. Do not place your hands or feet near or
below the robot when it is turned on.
Do not lift or move the robot when it is turned on.

- 3 -
Stop the robot when there are people, especially children or animals, in the work area.
Ensure that there are no objects such as stones, branches, tools, or toys on the lawn. Otherwise, the
blades may be damaged when they come into contact with an object.
Do not put objects on top of the robot, charging station or RTK reference station.
Do not use the robot if the STOP button is not functioning.
Avoid collisions between the robot and people or animals. If a person or animal comes in the path of
the robot, stop it immediately.
Always set the robot to OFF when it is not in operation.
Do not use the robot simultaneously with a pop-up sprinkler. Utilize the Schedule function to ensure
that the robot and pop-up sprinkler do not operate at the same time.
Avoid setting a channel where pop-up sprinklers are installed.
Do not operate the robot in the presence of standing water in the work area, such as during heavy rain
or water pooling.
1.4 Safety Instructions for Maintenance
Power off the robot when performing maintenance.
Disconnect the plug from the charging station before cleaning or performing maintenance on the
charging station.
Do not use a high-pressure washer or solvents to clean the robot.
After washing, ensure that the robot is placed on the ground in its normal orientation, not upside
down.
Do not reverse the robot to wash the chassis. If you do reverse it for cleaning purposes, make sure to
restore it to its proper orientation afterward. This precaution is necessary to prevent water from
leaking into the motor and potentially affecting normal operation.

- 4 -
1.5 Battery Safety
Lithium-ion batteries can explode or cause a fire if disassembled, short-circuited, exposed to water, fire,
or high temperatures. Handle them with care, do not dismantle or open the battery, and avoid any form of
electrical/mechanical abuse. Store them away from direct sunlight.
Only use the battery charger and power supply provided by the Manufacturer. The use of an
inappropriate charger and power supply can cause electric shocks and/or overheating.
DO NOT ATTEMPT TO REPAIR OR MODIFY BATTERIES! Repair attempts may result in severe personal
injury, due to explosion or electrical shock. If a leak develops, released electrolytes are corrosive and
toxic.
This appliance contains batteries that are only replaceable by skilled persons.
1.6 Residual Risks
To avoid injuries, wear protective gloves when replacing the blades.
1.7 Intended Use
Mammotion robots are designed for residential lawn care and are not intended for commercial use.
1.8 Disposal
Dispose of this product in compliance with local electronic waste (WEEE) regulations. Do not dispose of it
with regular household waste. Instead, bring it to an authorized recycling center or collection point to
ensure safe handling and environmentally responsible disposal of electronic components.

- 5 -
2 Introduction
2.1 About Mammotion Luba
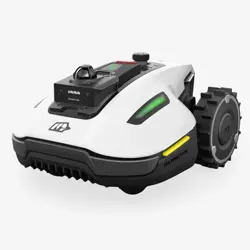
The Luba 2 AWD series, herein referred as LUBA or robot, is a 4-wheel-drive robotic lawnmower with a
suspension system that provides better grip through its spring. The robot is equipped with RTK GNSS
navigation and virtual-mapping systems, which allow users to customize their mowing tasks by defining
different mowing areas and schedules in the Mammotion app. Additionally, the robot offers an IoT service
and a rain sensor, providing a hands-free and picture-perfect lawn maintenance experience.
The LUBA 2 AWD is newly equipped with a 3D vision module, 4G module, Alexa voice control, anti-theft,
etc., which are explained in the following sections.
The LUBA 2 AWD series includes two types of models:
Standard version (Model: 3000X, 5000X, and 10000X) — provides cutting height of 25-70 mm/1-2.7
inches.
H version (Model: 3000HX, 5000HX, and 10000HX) — provides cutting height of 55-100 mm/2.2-4
inches.
2.1.1 About 3D vision module
The robot is equipped with a 3D vision module that provides 3D vision positioning, 3D vision obstacle
detection, and FPV mode.
3D vision positioning helps to guarantee positioning accuracy when RTK positioning fails due to poor
satellite signals.
3D vision obstacle detection identifies obstacles in the front.
FPV mode can be used for monitoring as a security camera.
2.1.2 About positioning
The robot is equipped with a RTK (real-time kinematic) navigation system, a multi-sensor integrated
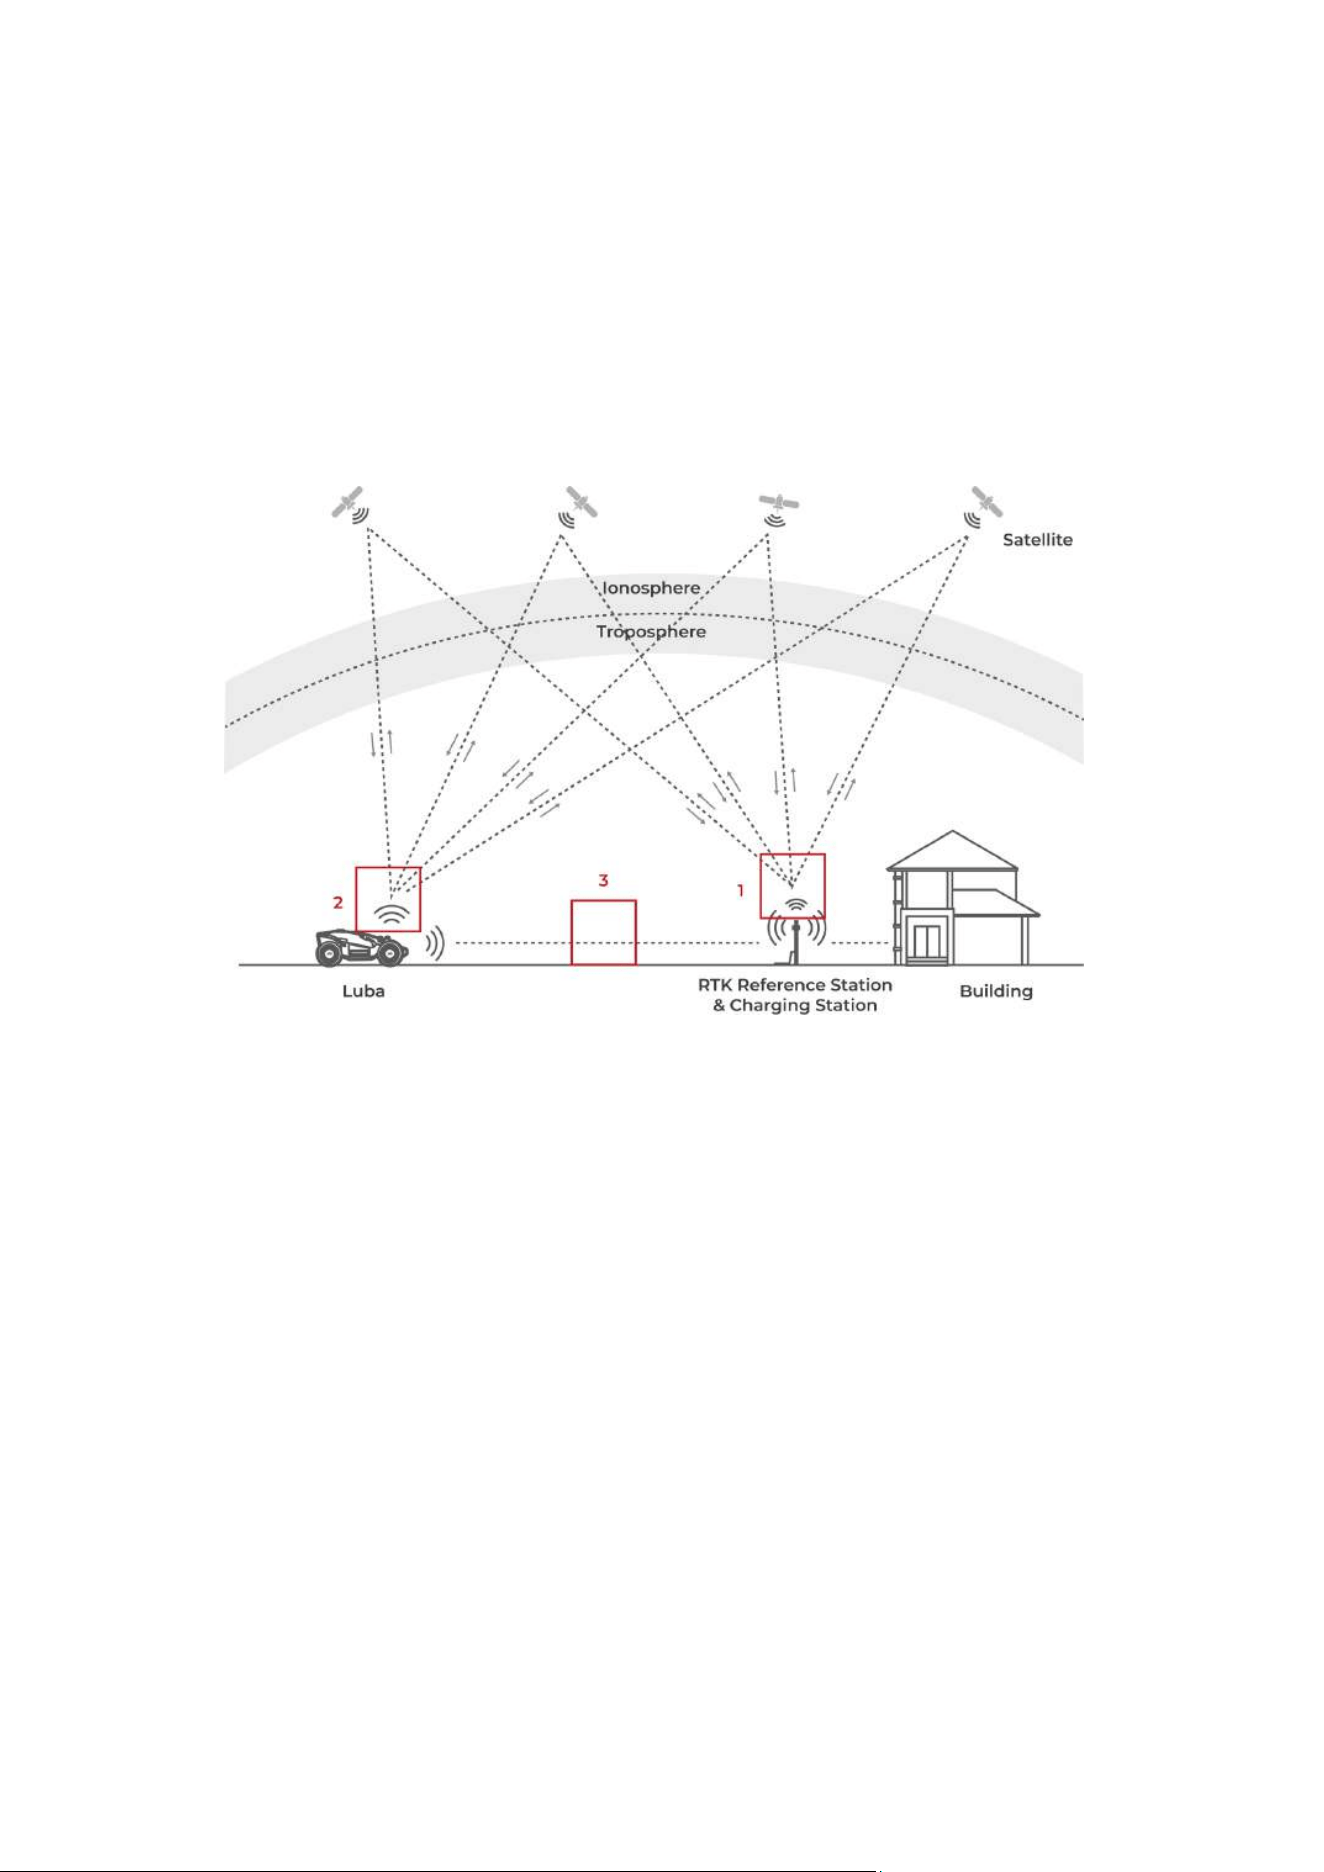
- 6 -
navigation system, and a 3D vision positioning system, which provide more accurate positioning data.
RTK positioning
RTK is a differential GNSS positioning technology that greatly enhances positioning accuracy to
approximately 5 cm/2 in. The robot accesses four global navigation systems (GPS, GLONASS, BeiDou, and
Galileo) and incorporates supplementary sensors, thus, providing nearly 100 times improved accuracy
than conventional GPS systems.
1. To perform its work, the RTK reference station receives satellite signals, requiring an obstruction-free
environment and open-sky view.
2. The robot operates similarly, requiring an open sky view to receive satellite signals.
3. Data transmission from the RTK reference station to the robot is possible. This does not imply that
there must constantly be an unobstructed view from every point on your lawn to the RTK reference
station. As long as the transmission path is not completely blocked, the data can be transmitted via
radio.
3D vision positioning
The robot primarily uses RTK positioning to locate itself. However, in situations where satellite signals are

- 7 -
obstructed by obstacles such as eaves or trees during mapping and mowing, The robot can still operate
effectively using the 3D vision positioning.
2.1.3 About obstacles detection
The robot supports both visual and ultrasonic obstacle detection. The 3D vision system can identify
obstacles and respond accordingly, while the ultrasonic system is used to detect obstacles in low-light
environments where visual identification is difficult.
2.1.4 About connectivity
The robot supports three methods of connectivity, namely, Bluetooth, Wi-Fi, and 4G cellular data.
Bluetooth is used to connect the robot with your phone, while Wi-Fi and 4G cellular data are used to
access the internet.
2.1.5 About lawn printing art
By utilizing AI algorithms to tailor the cutting path, cutting height, and angle, the robot can create special
patterns via the Mammotion app. See Create a Pattern for more information.
2.1.6 About auto-recharge
Auto-recharge function allows the robot to automatically return to charge when the battery is lower than
15%.
2.1.7 About voice control
NOTE
The robot now supports voice commands in English, German, and French.
The robot is compatible with both Alexa and Google Home voice control. Once linked, you can easily start
or stop working or recharging using simple voice commands. See Link Your Alexa Account or Link Your
Google Home Account for more information.

- 8 -
2.1.8 About anti-theft system
The robot has an anti-theft system to prevent unauthorized removal.
The alarm is triggered when the robot is lifted.
Users can track the robot's location by GPS and 4G positioning through the Mammotion app, as long
as it is online.
Additionally, the robot's structure allows for an AirTag to be attached to track its location.
- 9 -
2.2 In the Box
Ensure the parts can be found in the package according to your option. If any parts are missing or
damaged, contact your local dealer or our after-sales support.
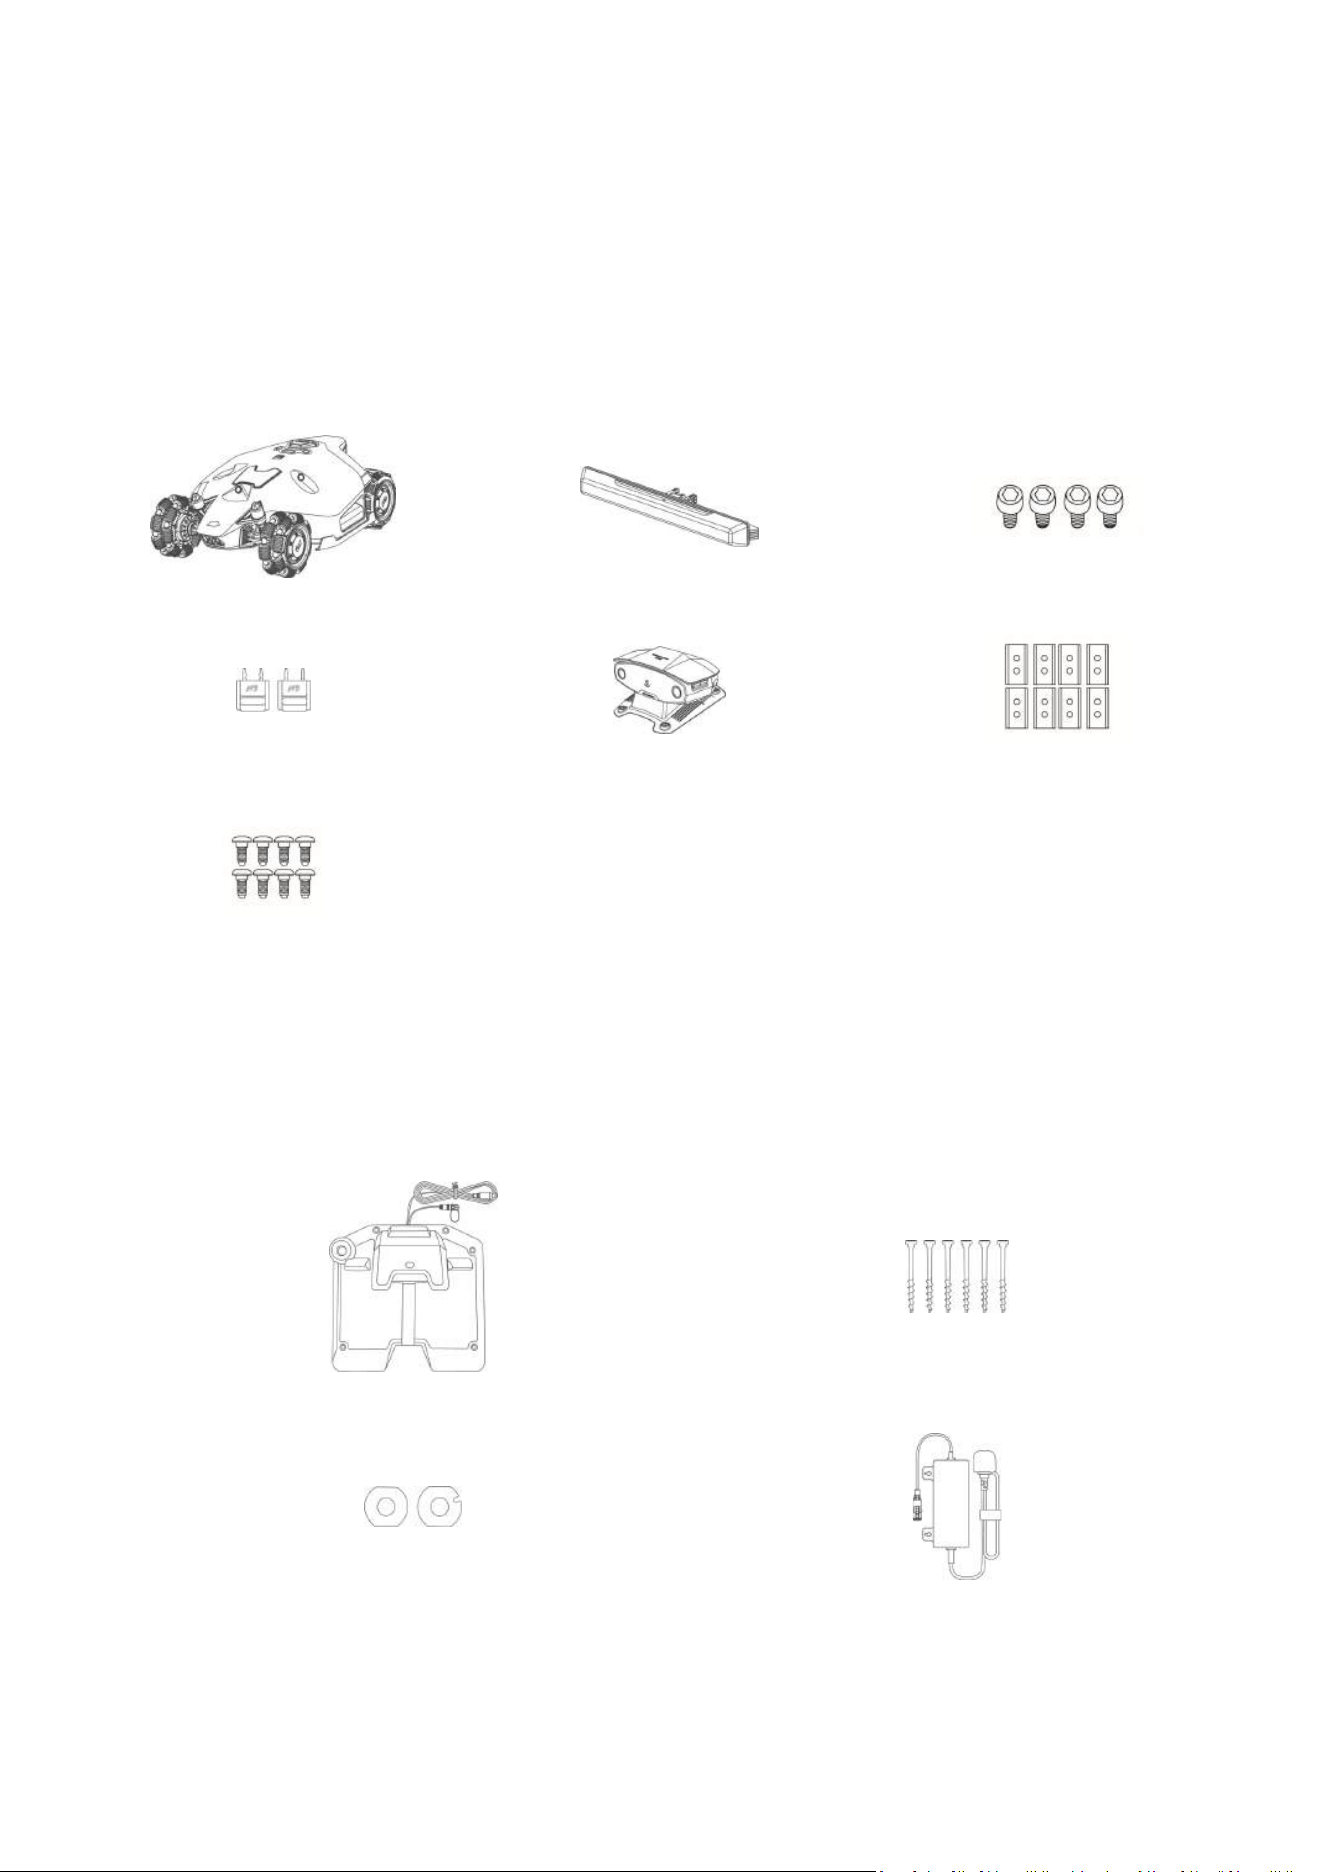
2.2.1 LUBA Installation Kit
LUBA x1 Front Bumper x1 Screw x4 (2 pcs for spare use)
Key x2
Vision Module x1 Blades x8 (for spare use)
Screw x8 (for spare use)
2.2.2 Charging Station Installation Kit
Charging Station x1
Stake x6
Gasket x2 Charging Station Power Supply x1
- 10 -
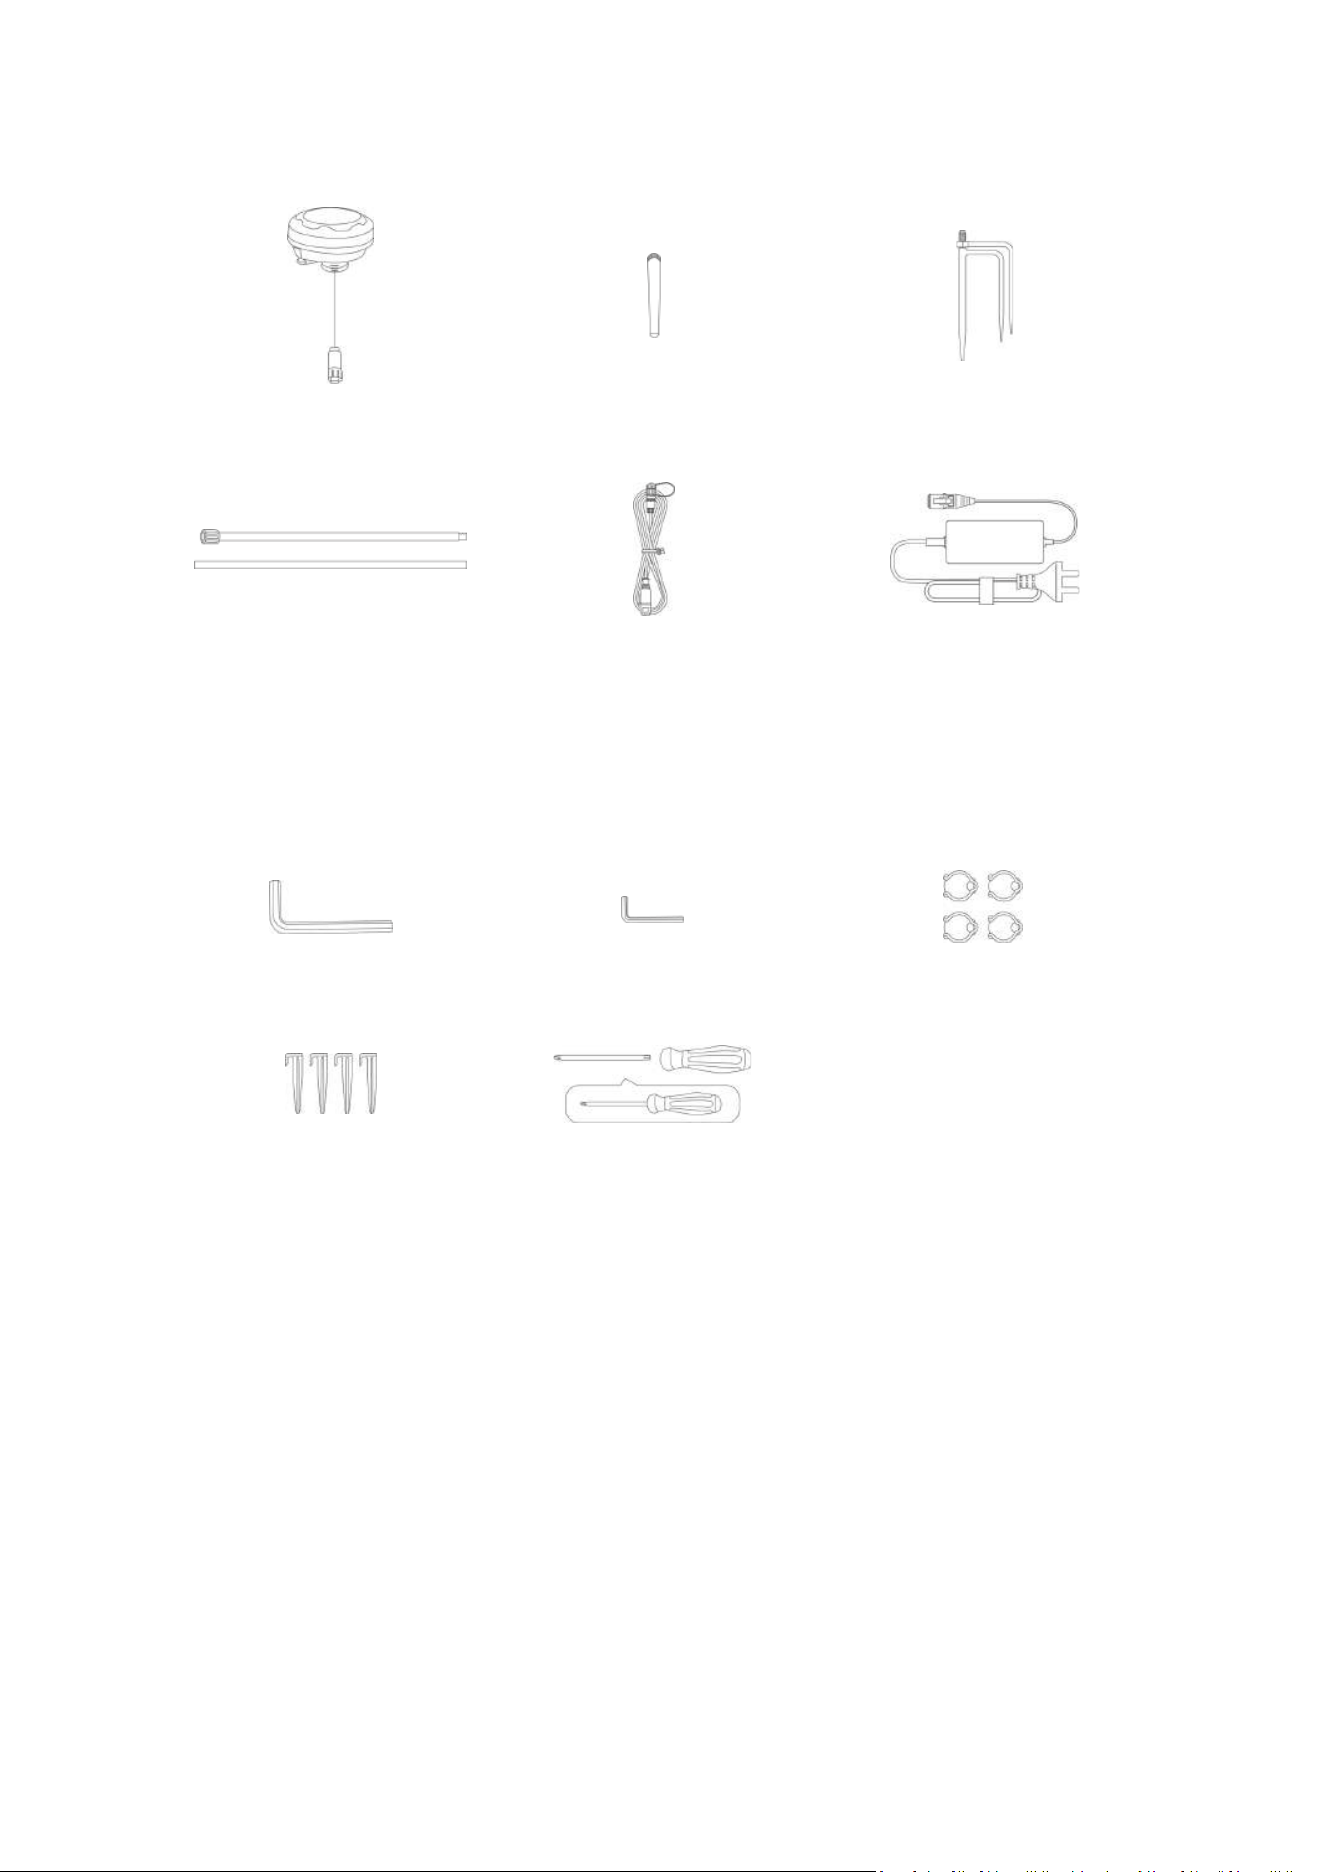
2.2.3 RTK Installation Kit
RTK Reference Station x1
Radio Antenna x1 Trident Ground Stake x1
Mounting Pole x2
RTK Reference Station
Extension Cable (10M) x1
RTK Reference Station
Power Supply x1
2.2.4 Tool Kit
Allen Key 8mm (0.3 in) x1
Allen Key 1.5mm (0.06 in) x1 Cord Tie x4
Cable Peg x4
Screwdriver (Phillips
bit+2.5mm hex bit) x1
- 11 -
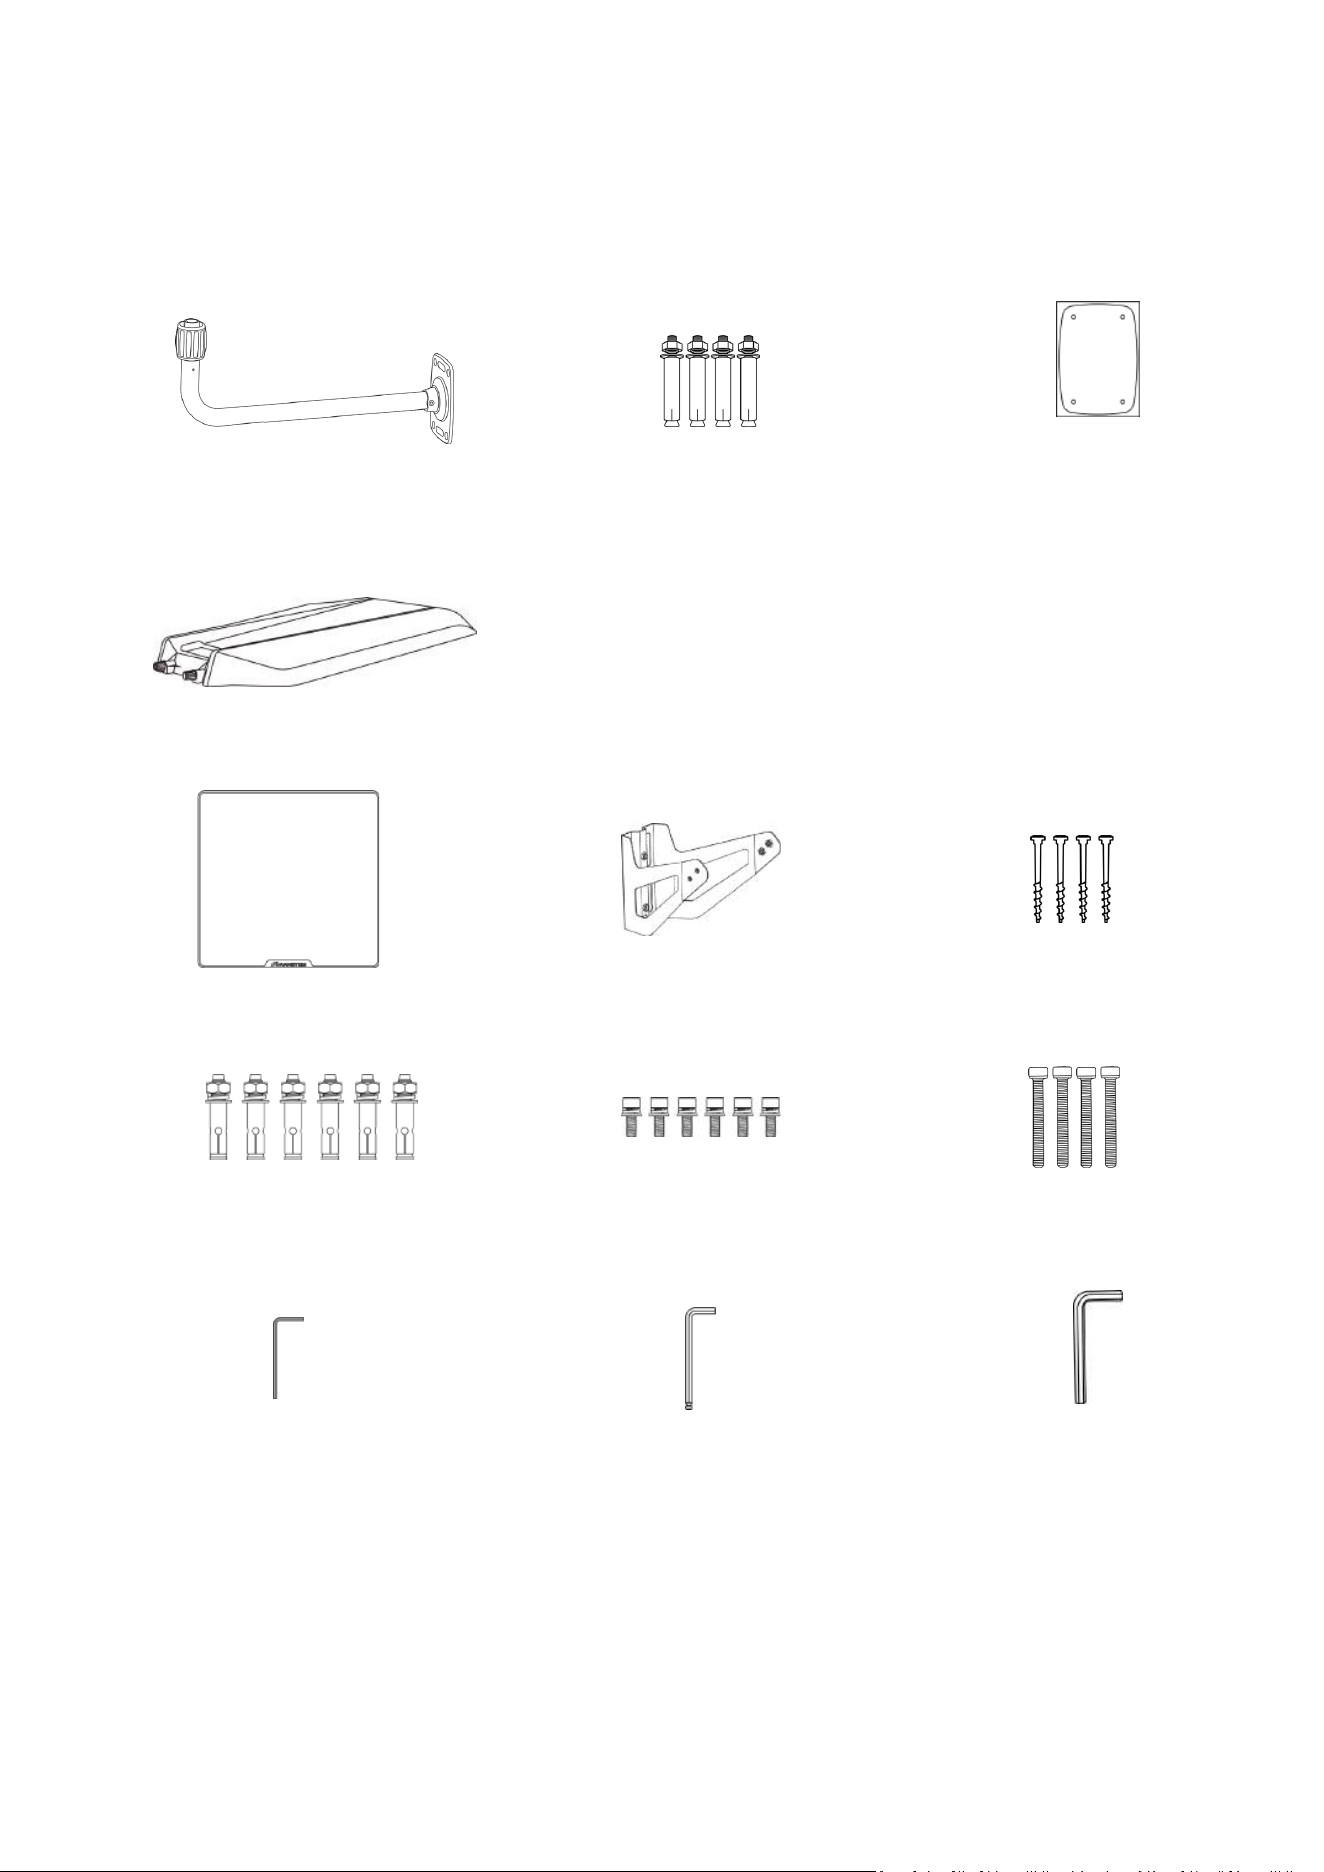
2.2.5 Other Accessories (optional)
The following accessories are sold separately.
RTK reference station wall mount kit
RTK Wall Mount x1 M8x50 Expansion Bolt x4 Drilling Template x1
Garage
Garage x1
RTK solar panel kit
Solar Panel x1 Mounting Bracket x1 Stake x4
Expansion Bolt x6
(2pcs for spare use)
Screw x6
(2pcs for spare use)
M5x40 Screw x4
(2pcs for spare use)
Allen Key 1.5mm x1 Allen Key 4mm x1 Allen Key 8mm x1
- 12 -
2.3 Symbols on the Product
2.3.1 Symbols
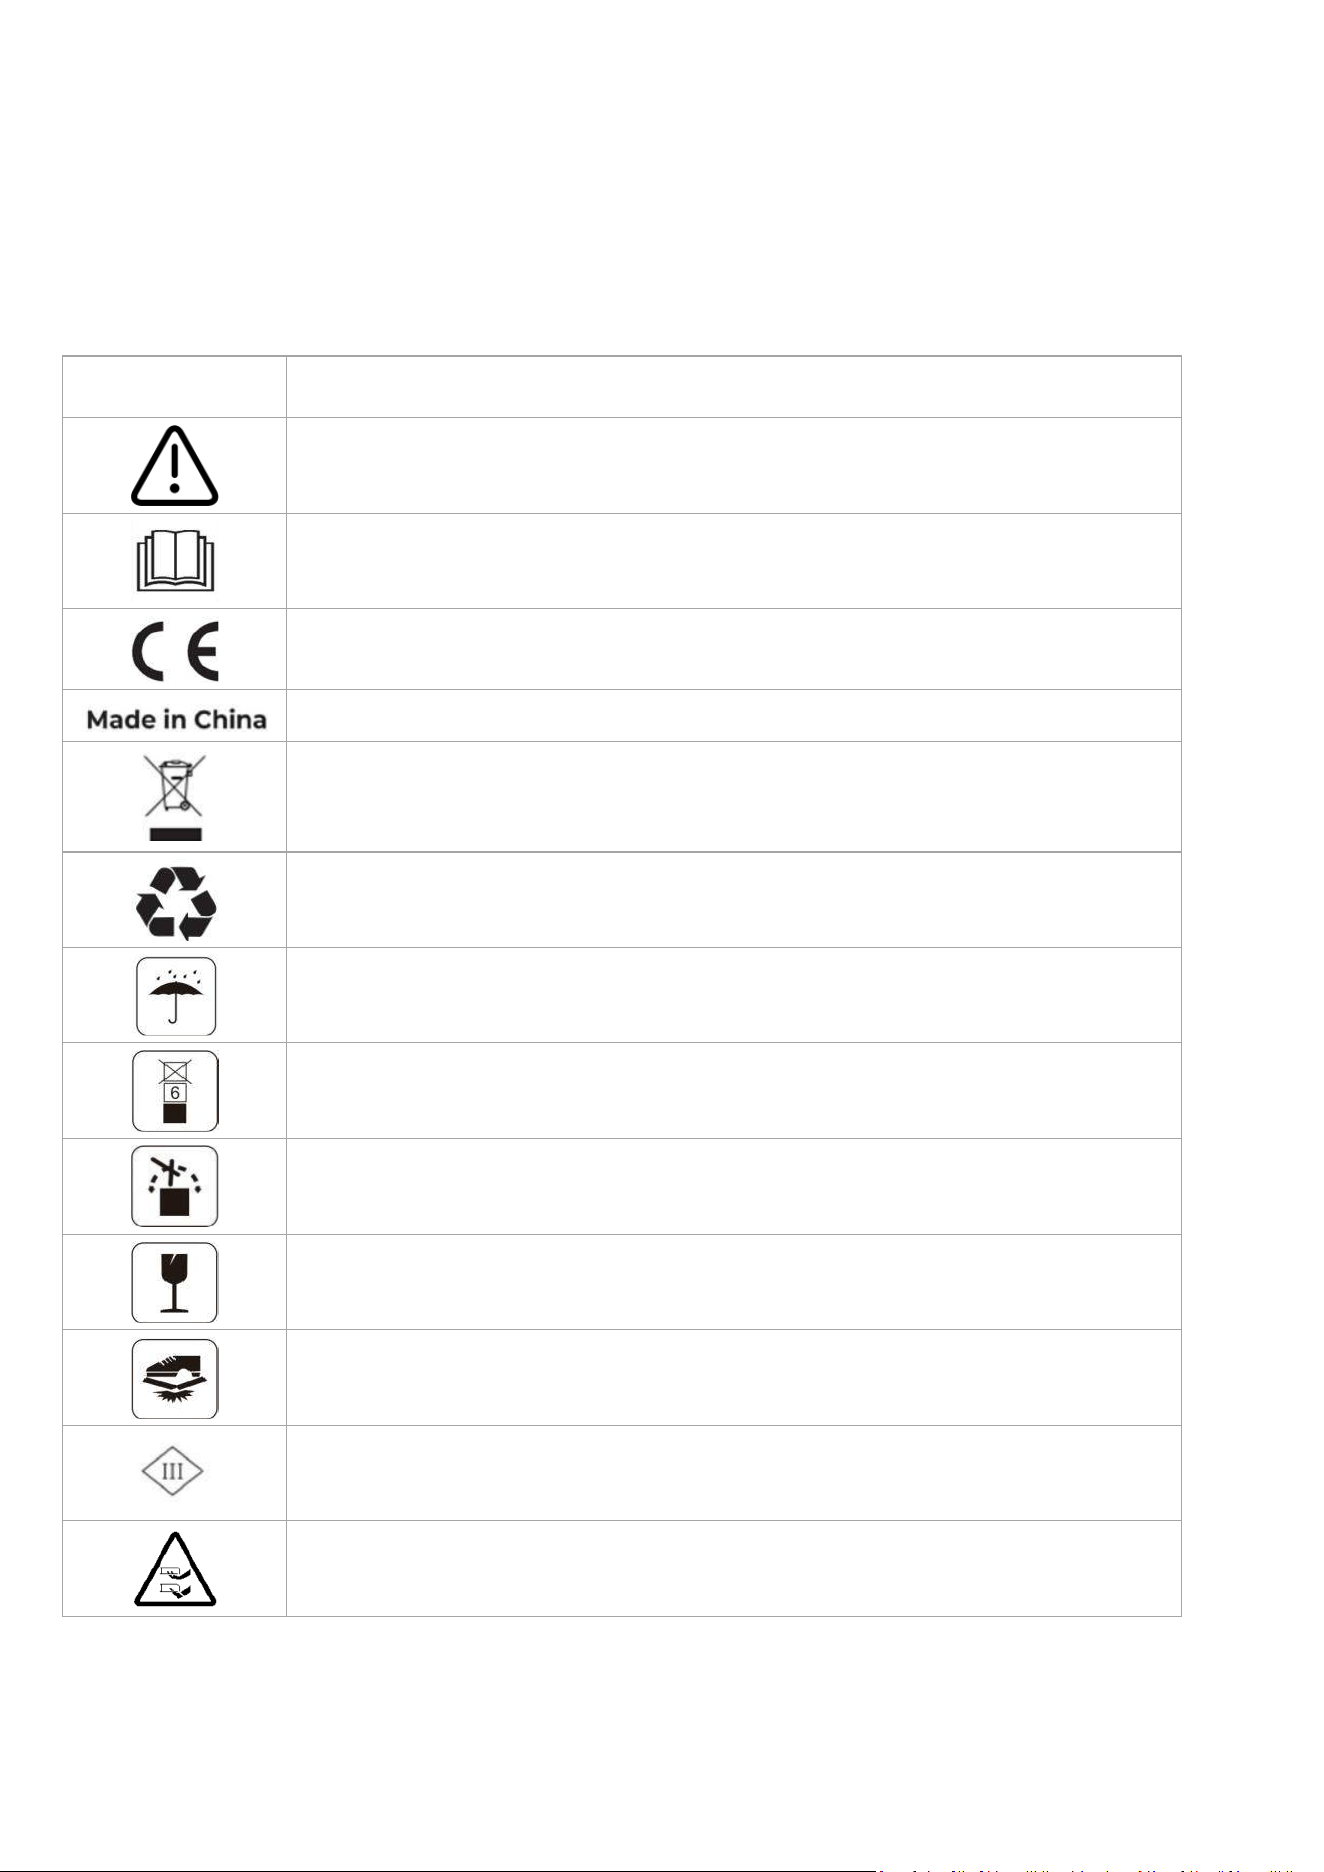
These symbols can be found on the product. Study them carefully.
Symbol Description
Warning.
Read the user manual before operating the product.
This product complies with the applicable EU Directives.
This product is manufactured in China.
It is not permitted to dispose of this product as normal household waste.
Ensure that the product is recycled in accordance with local legal
requirements.
This item can be recycled.
Keep the pack of this product dry.
The pack of this product should not be covered.
Prohibit flipping.
This product is fragile.
The pack of this product/the product should not be tread.
Class III appliance.
Keep hands or feet away from movable blades.
- 13 -
Symbol Description
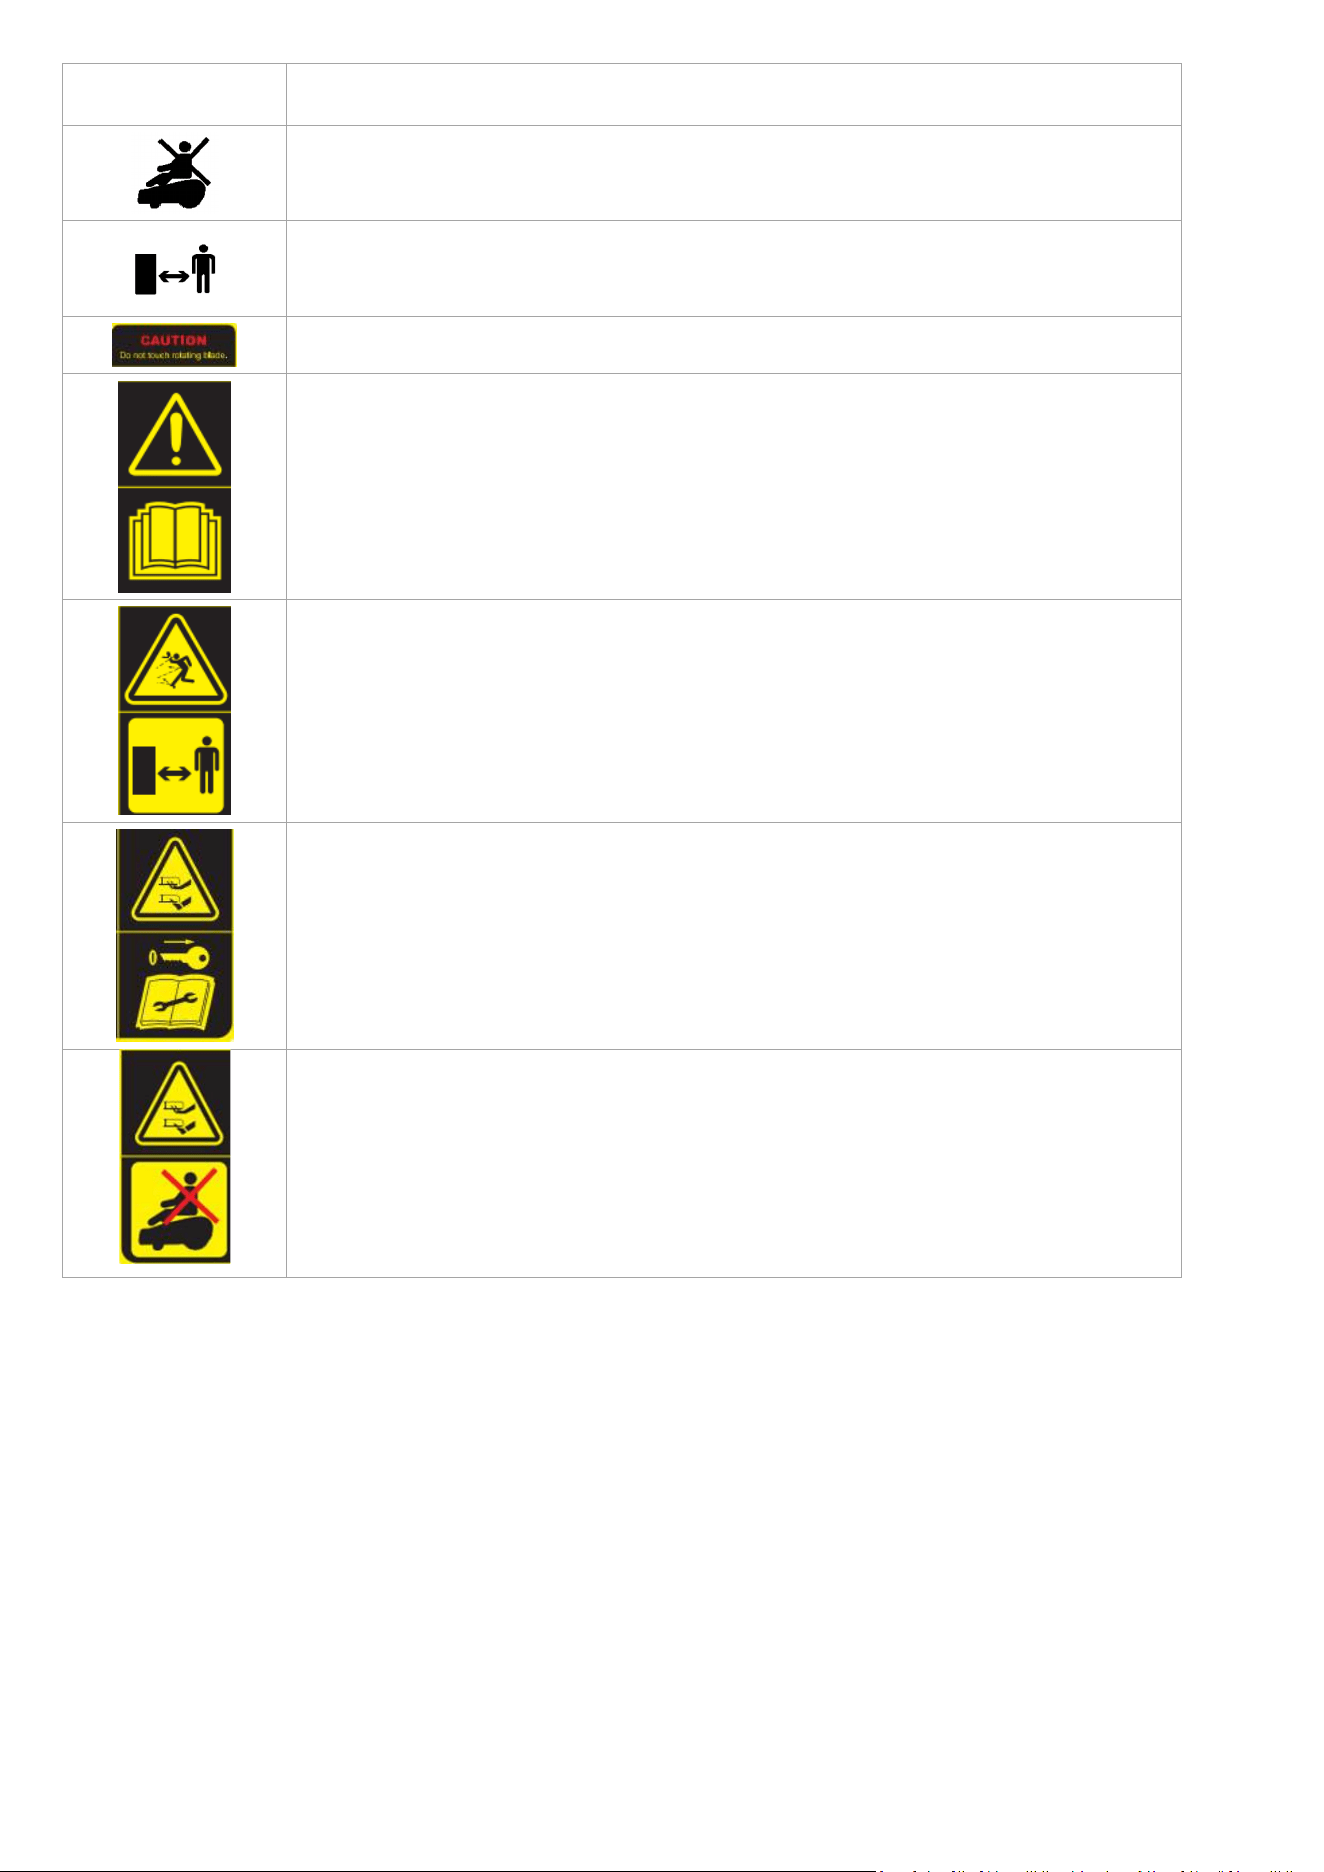
Do not ride on the product.
Keep a safe distance from your product when operating.
WARNING: Do not touch rotating blade.
WARNING – Read the user instructions before operating the product.
WARNING – Keep a safe distance from the machine when operating.
WARNING – Remove the disabling
device before working on or lifting the
machine.
WARNING – Do not ride on the machine. Never put your hands or feet close to
or under the product.
- 14 -
2.4 Product Overview
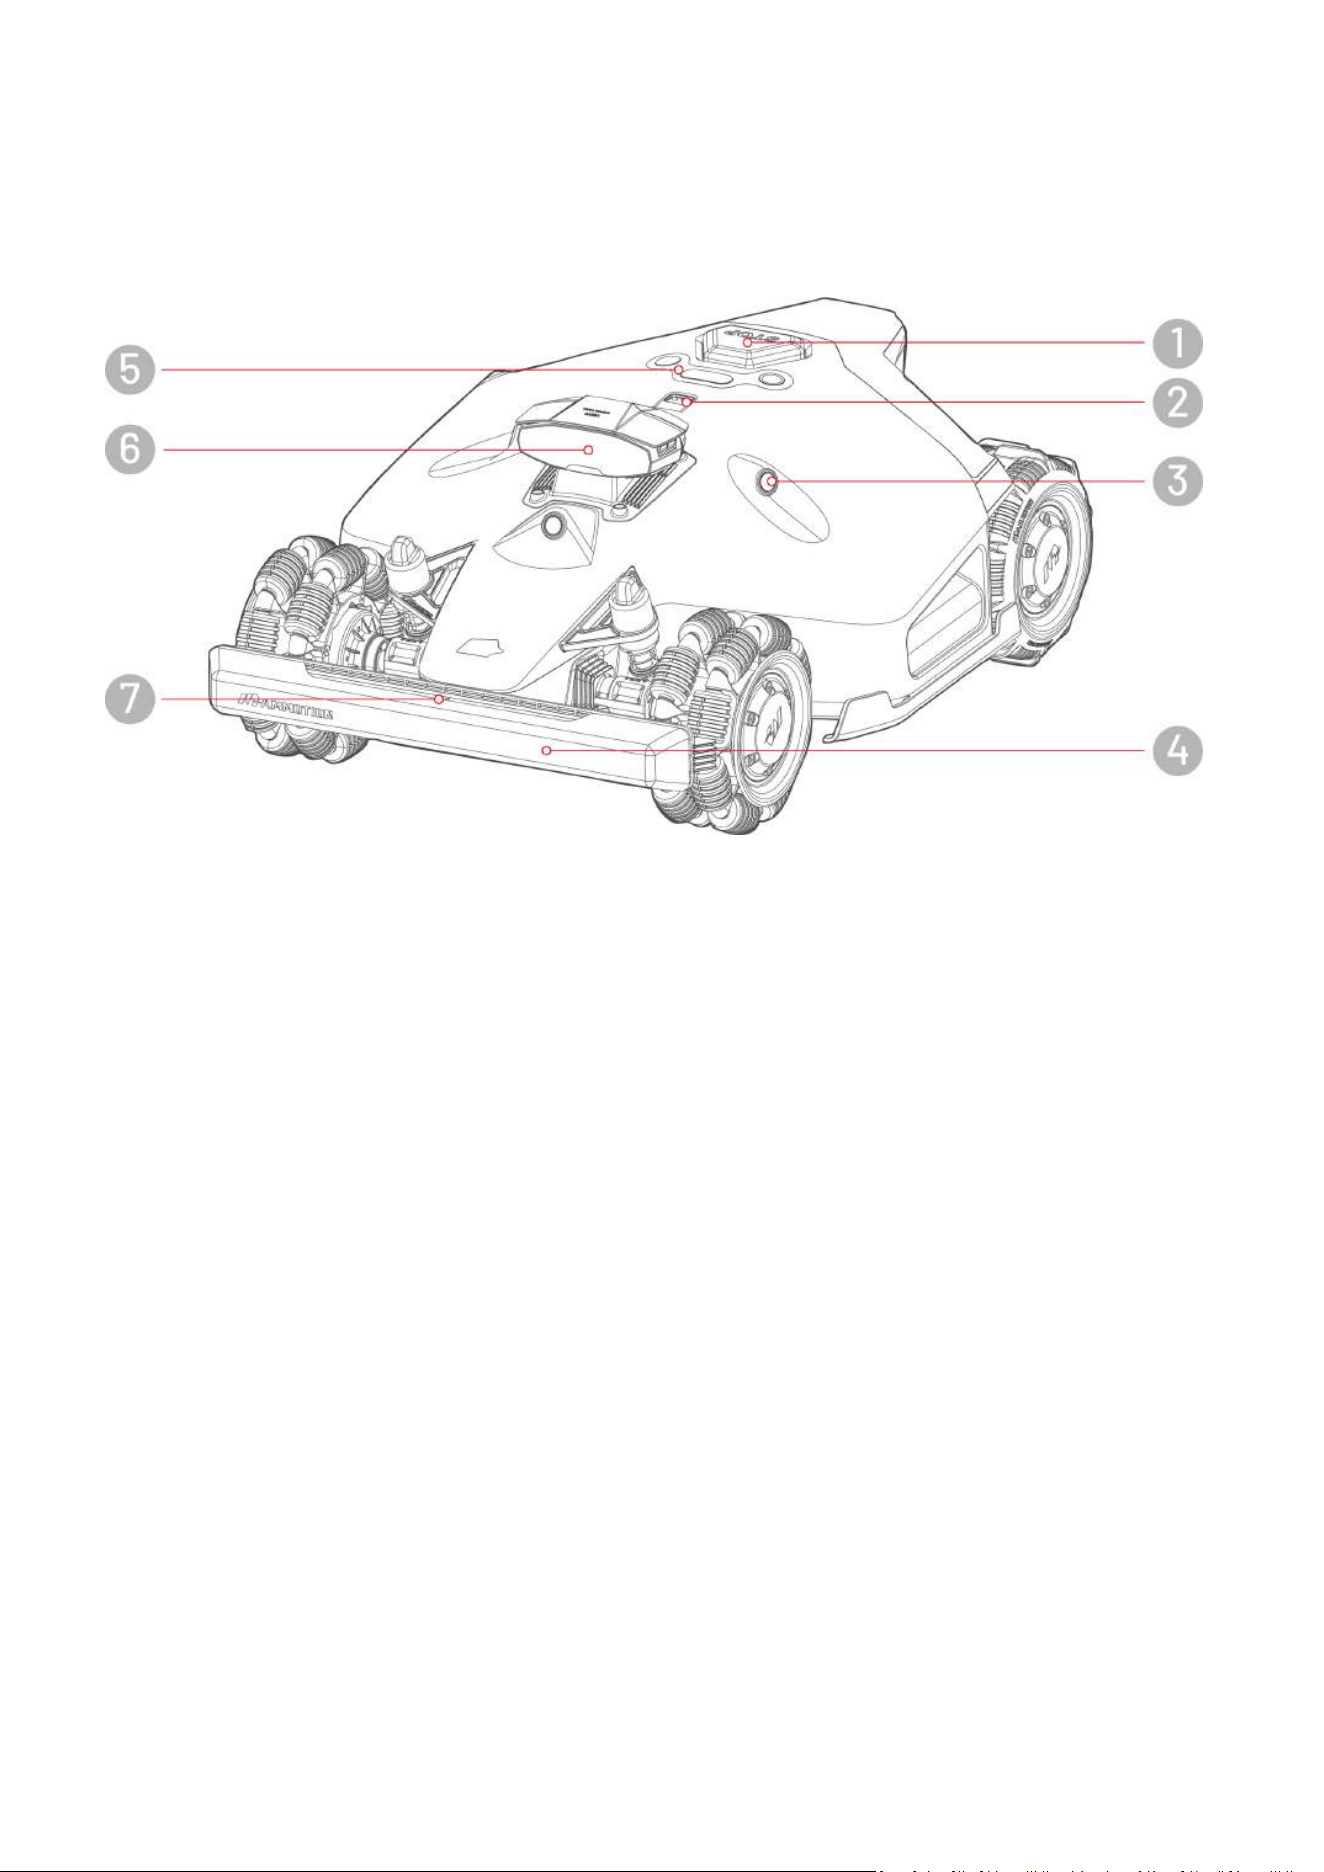
2.4.1 LUBA 2 AWD
1.
Emergency Stop Button 2.
Rain Sensor
3.
Ultrasonic Sensor 4.
Front Bumper
5.
Control Center 6.
Vision Module
7.
Front Indicator
- 15 -
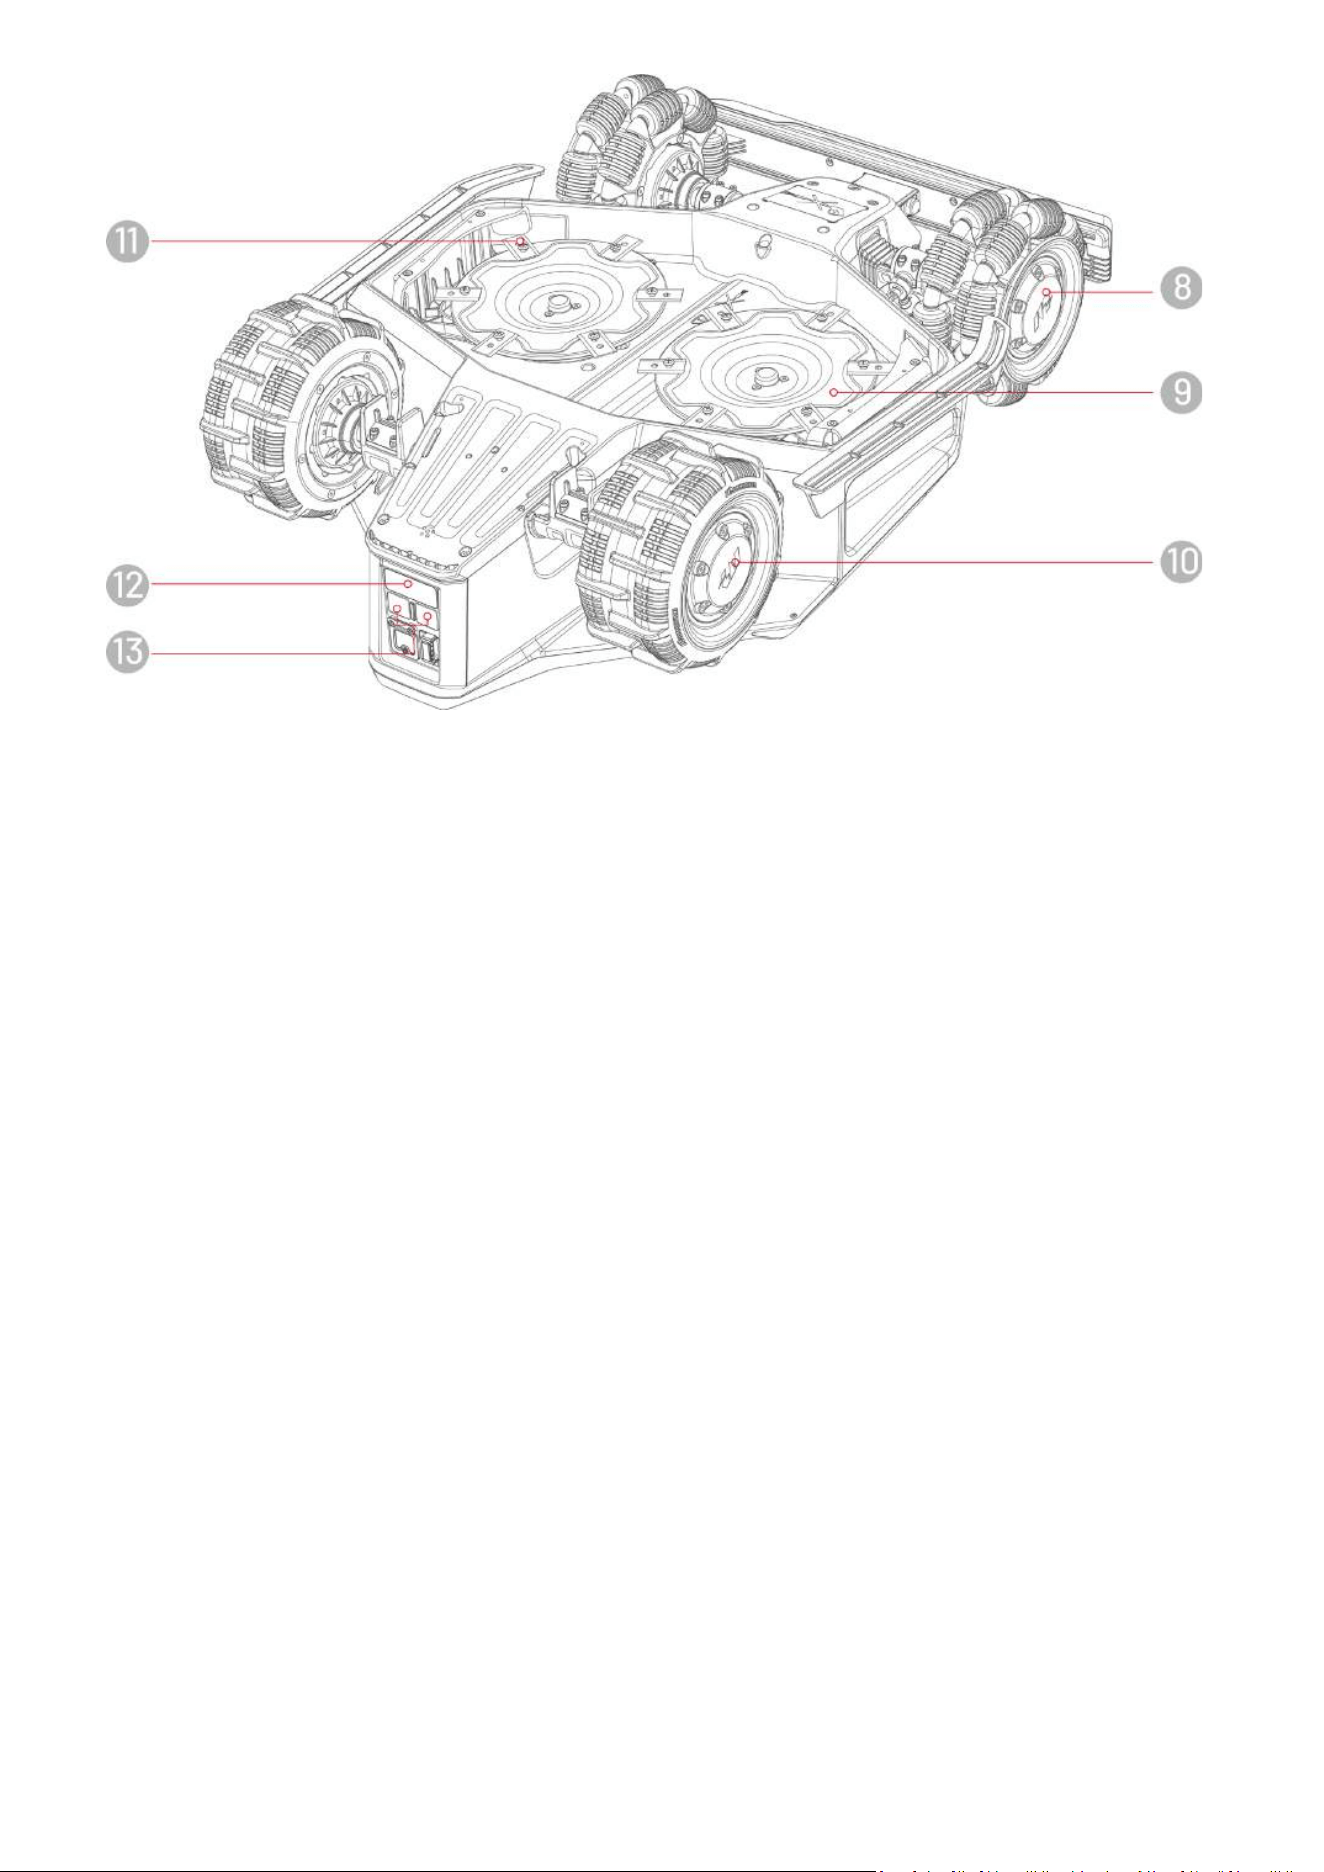
8.
Omni Wheel 9.
Cutting Disc
10.
Rear Wheel 11.
Cutting Blade
12.
Infrared Receiver 13.
Charging Pad
- 16 -
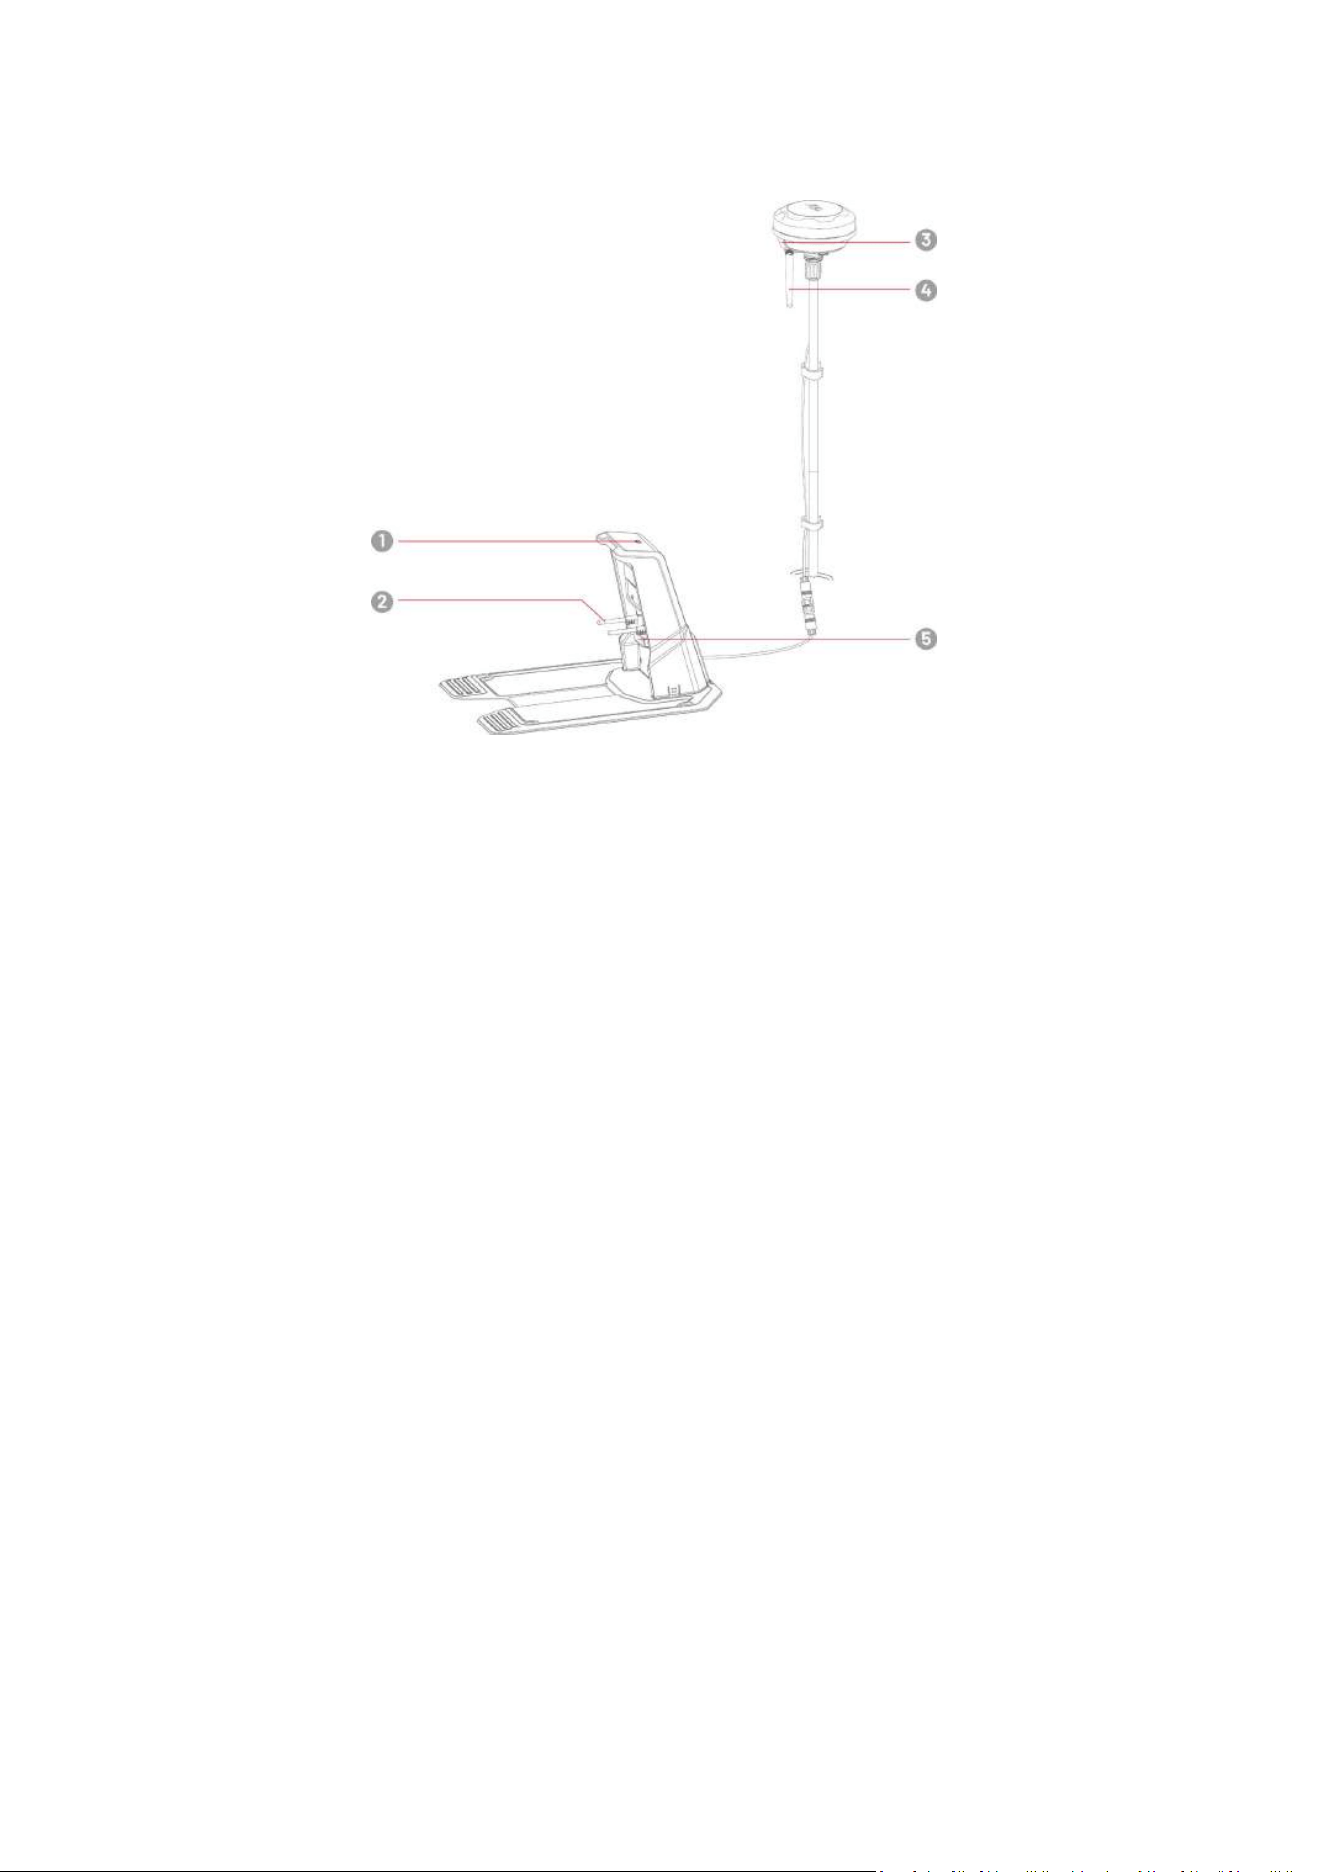
2.4.2 Charging Station and RTK Reference Station
1. Charging Station LED Indicator 2. Charging Pin
3. RTK Reference Station LED Indicator 4. Radio Antenna
5. Infrared Transmitter

- 17 -
2.4.3 LED Codes
Robot
Indicator Status
Description
Side LED
Constant red
System initialization
Manual control mode
Automatic work mode
Charging finished (Robot still on the charging station)
Breathing red
OTA upgrade in progress
Slow flash red
Emergency stop activated
Charging in progress
Fast flash red
Low battery
Bumper triggered
Robot got stuck
RTK positioning failed
Robot has been lifted/tilted/flipped over
Very fast flash red
System upgrade failed
Systematic error
Off
Pause
Standby
Sleeping
Front Indicator
Green
Power on
Off
Power off
Positioning
Indicator
Constant green
RTK positioning is working well.
Flash green
The RTK positioning has failed, but the vision positioning is
working well.
Constant red
Both RTK and vision positioning have failed.
Flash blue
Robot's firmware is being upgrading.
Constant blue
Robot powered on successfully.

- 18 -
Charging Station
Color Description
Flash green Robot is being charging.
Green Robot is fully charged or uncharged.
Red An error has occurred.
RTK Reference Station
Color Description
Flash blue The reference station is powering on.
Flash green The reference station is initializing.
Constant green The initialization is finished and the reference station works well.
Off The initialization is finished and the local time is between 18:00 and 8:00.
Constant red An error has occurred.
Slow flash green Low power consumption.
- 19 -
3 Installation
3.1 Preparation
Read and understand the safety instructions prior to installation.
Use original parts and installation materials.
Sketch your lawn and mark up obstacles. This will make it easier to examine where to place the
charging station and RTK reference station, and to set the virtual boundaries.
3.2 Choosing a Location for RTK Reference Station
3.2.1 Without Solar Panel Kit
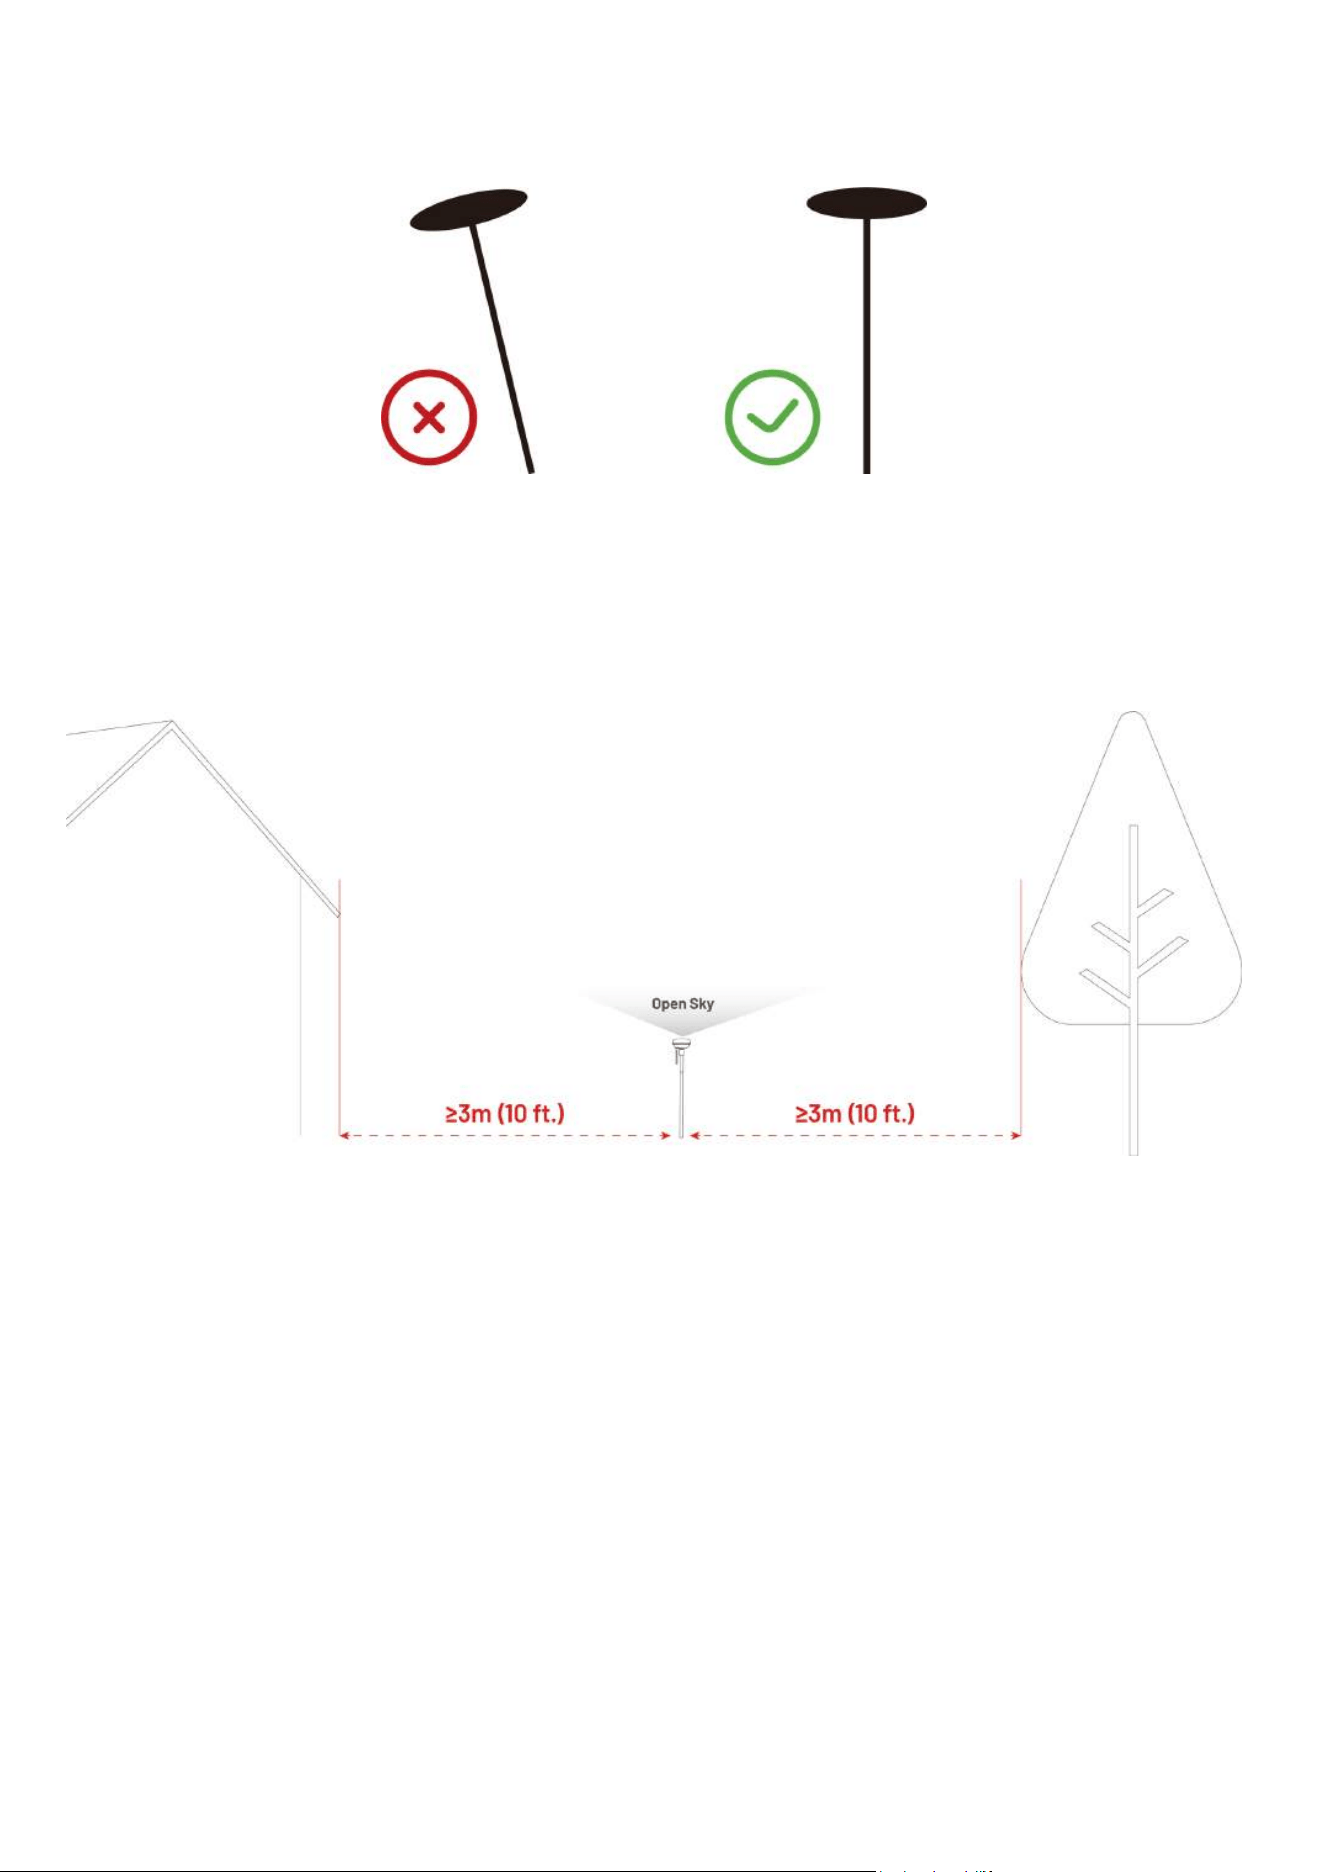
To optimize the performance of the RTK system, the RTK reference station must be in an open area to
receive satellite signals. You can install the RTK reference station on flat, open ground or on an
unobstructed wall or roof. In general, if your lawn is L-shaped, you can place the RTK reference station on
a wall or roof or on the ground; if your lawn is O-shaped or U-shaped, or if you have multiple lawns, we
recommend that you place the RTK reference station on a wall or roof.
NOTE
Both the RTK wall mount kit and solar panel kit are sold separately.
- 20 -
The location requirements are as follows:
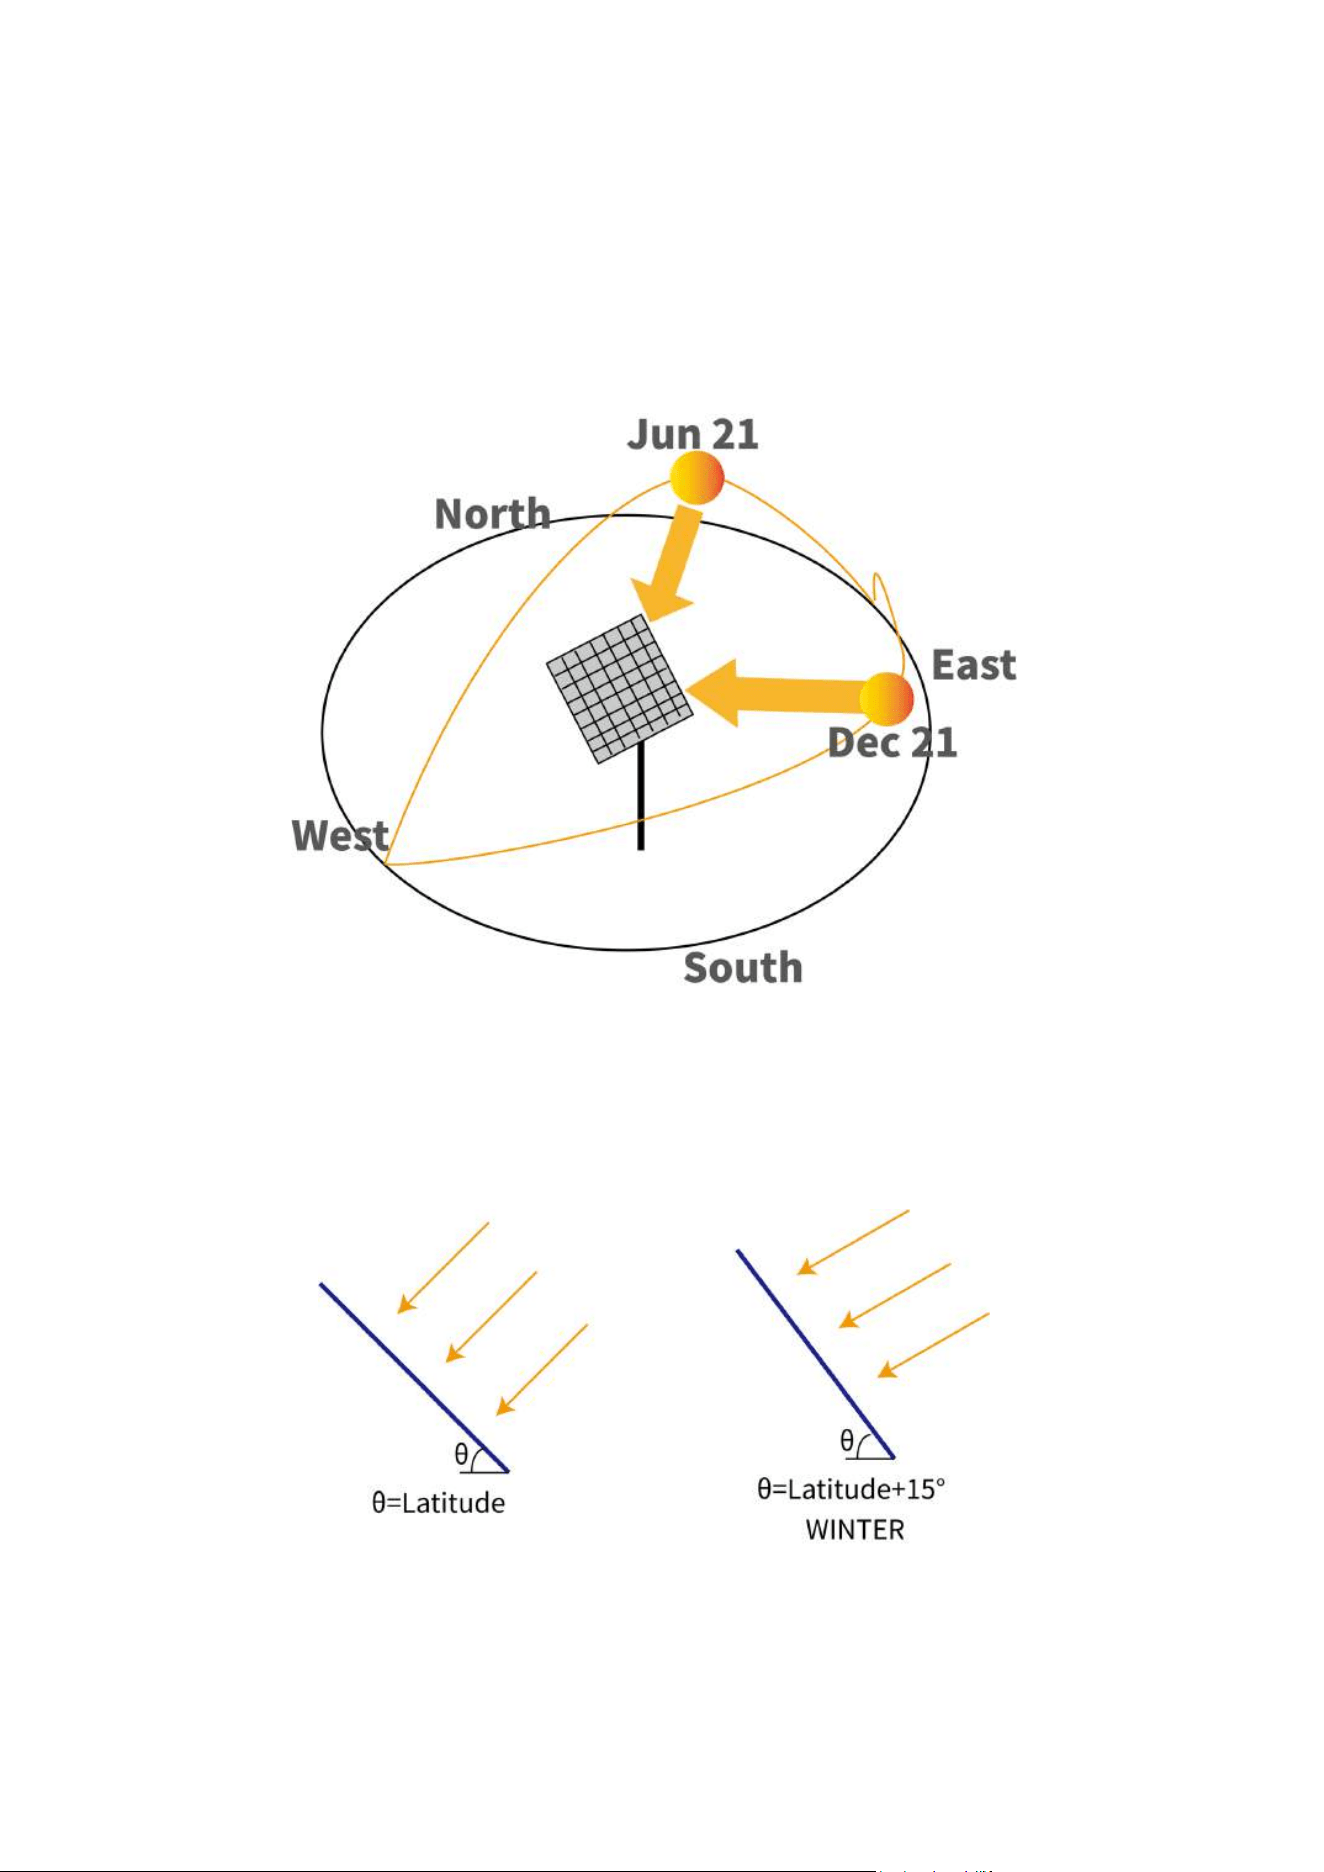
The RTK reference station should be oriented vertically, as shown below:
Place the RTK reference station on a flat, open ground or on an unobstructed wall or roof. Make sure
there are no eaves or trees that may obstruct the satellite signals.
Maintain a distance of at least 3 meters (10 feet) between the RTK reference station and any wall or
tree.
- 21 -
3.2.2 With Solar Panel Kit
If you need to install an RTK solar panel kit, for optimal exposure to sunlight, Mammotion recommends the
following locating guidelines:
If your home is located north of the equator, place the solar panel unit facing south;
If your home is located south of the equator, place the solar panel unit facing north;
The ideal angle for the solar panel kit is parallel to your location's latitude.
In winter, it is generally recommended to add 15 degrees more than your location's latitude to
maximize its efficiency.
- 22 -
3.3 Choosing a Location for Charging Station
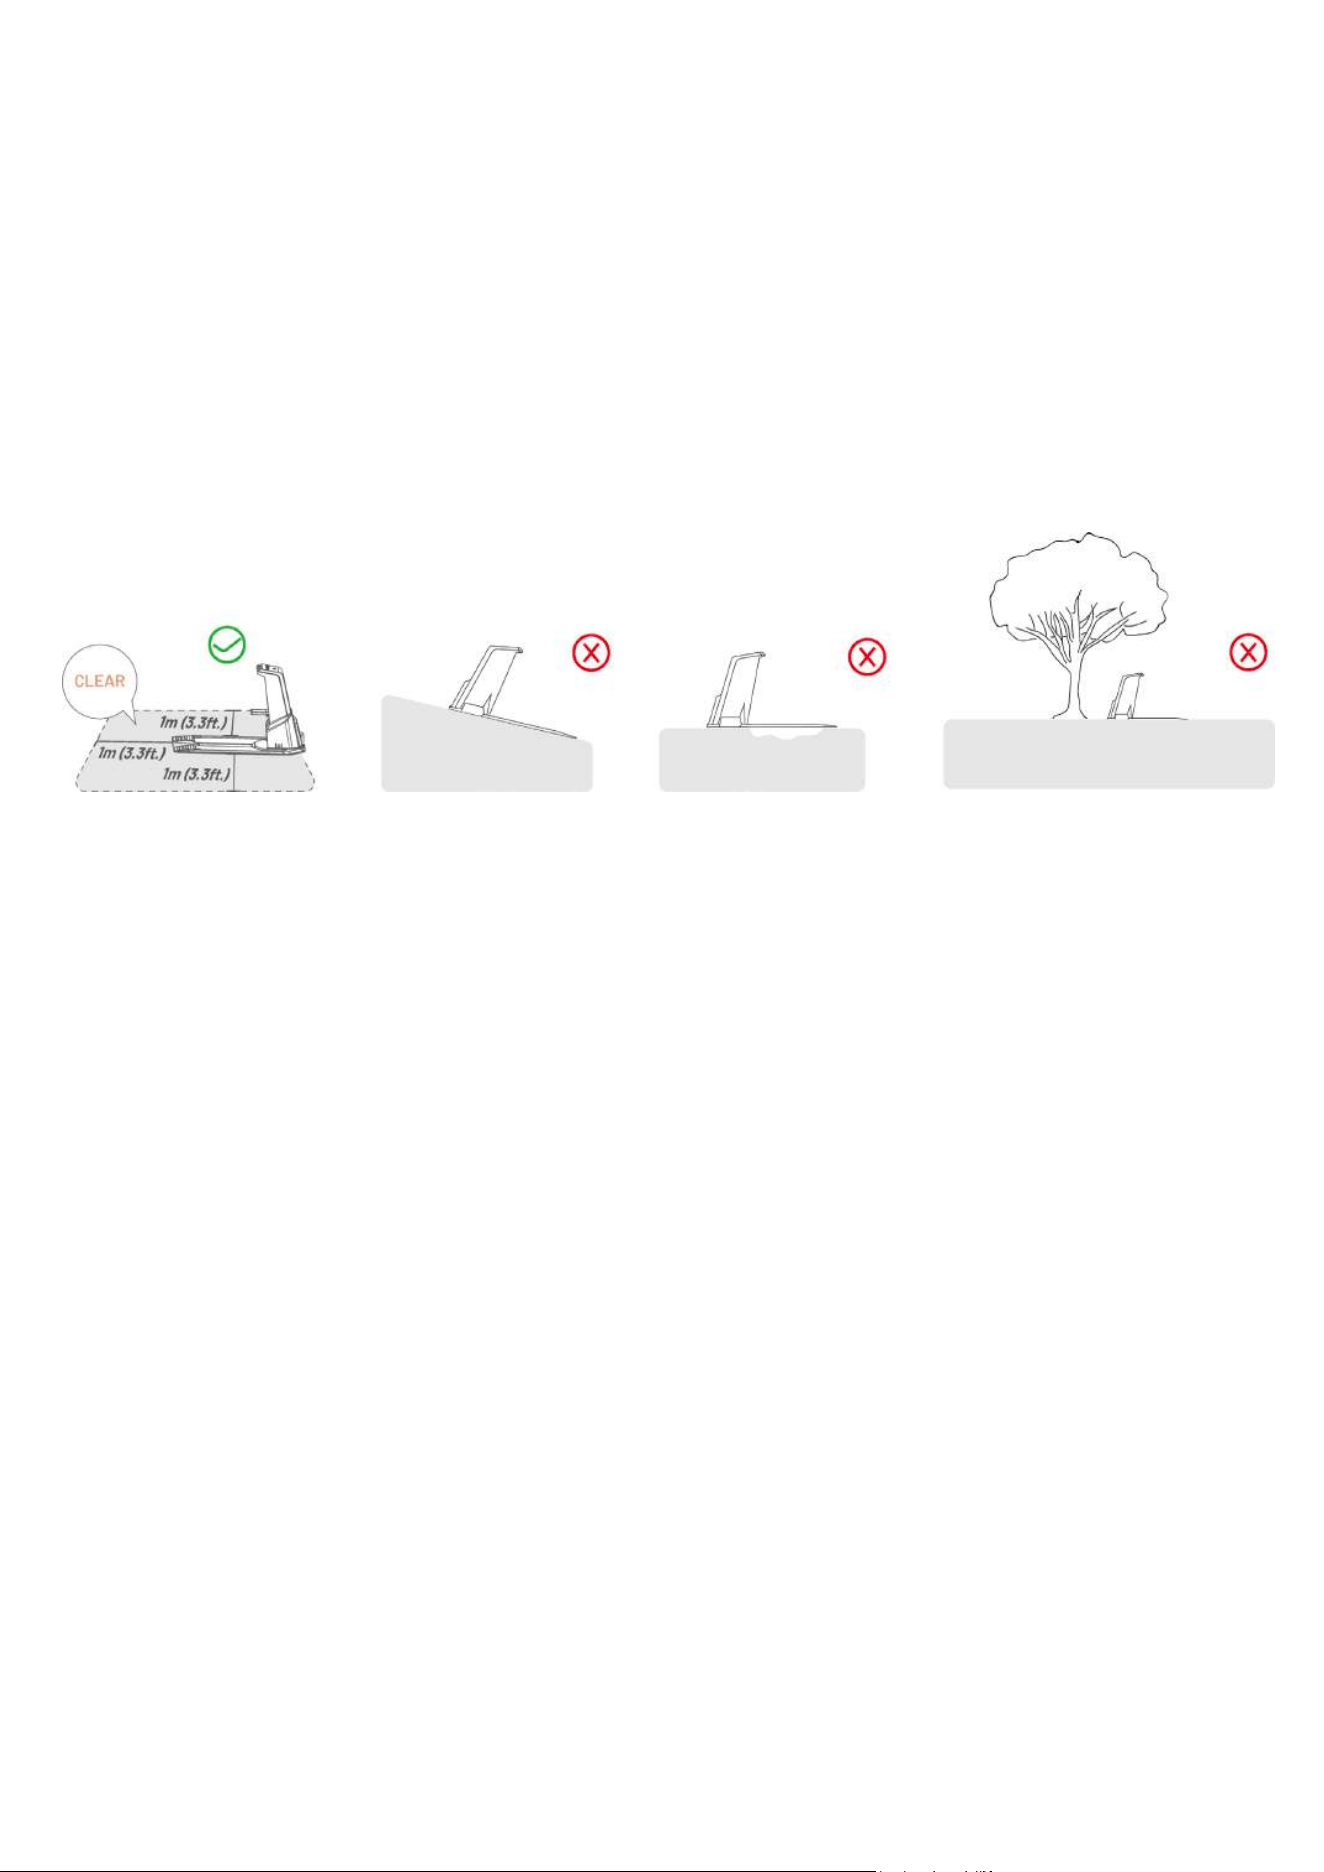
Place the charging station on a flat ground.
DO NOT install the charging station at the corner of an L-shaped building or on a narrow path between
two structures.
The charging area (1x1 m/3x3 ft. in front of the charging station) should be free of obstacles or other
items.
The base plate of the charging station must not be bent or tilted.
- 23 -
3.4 Install
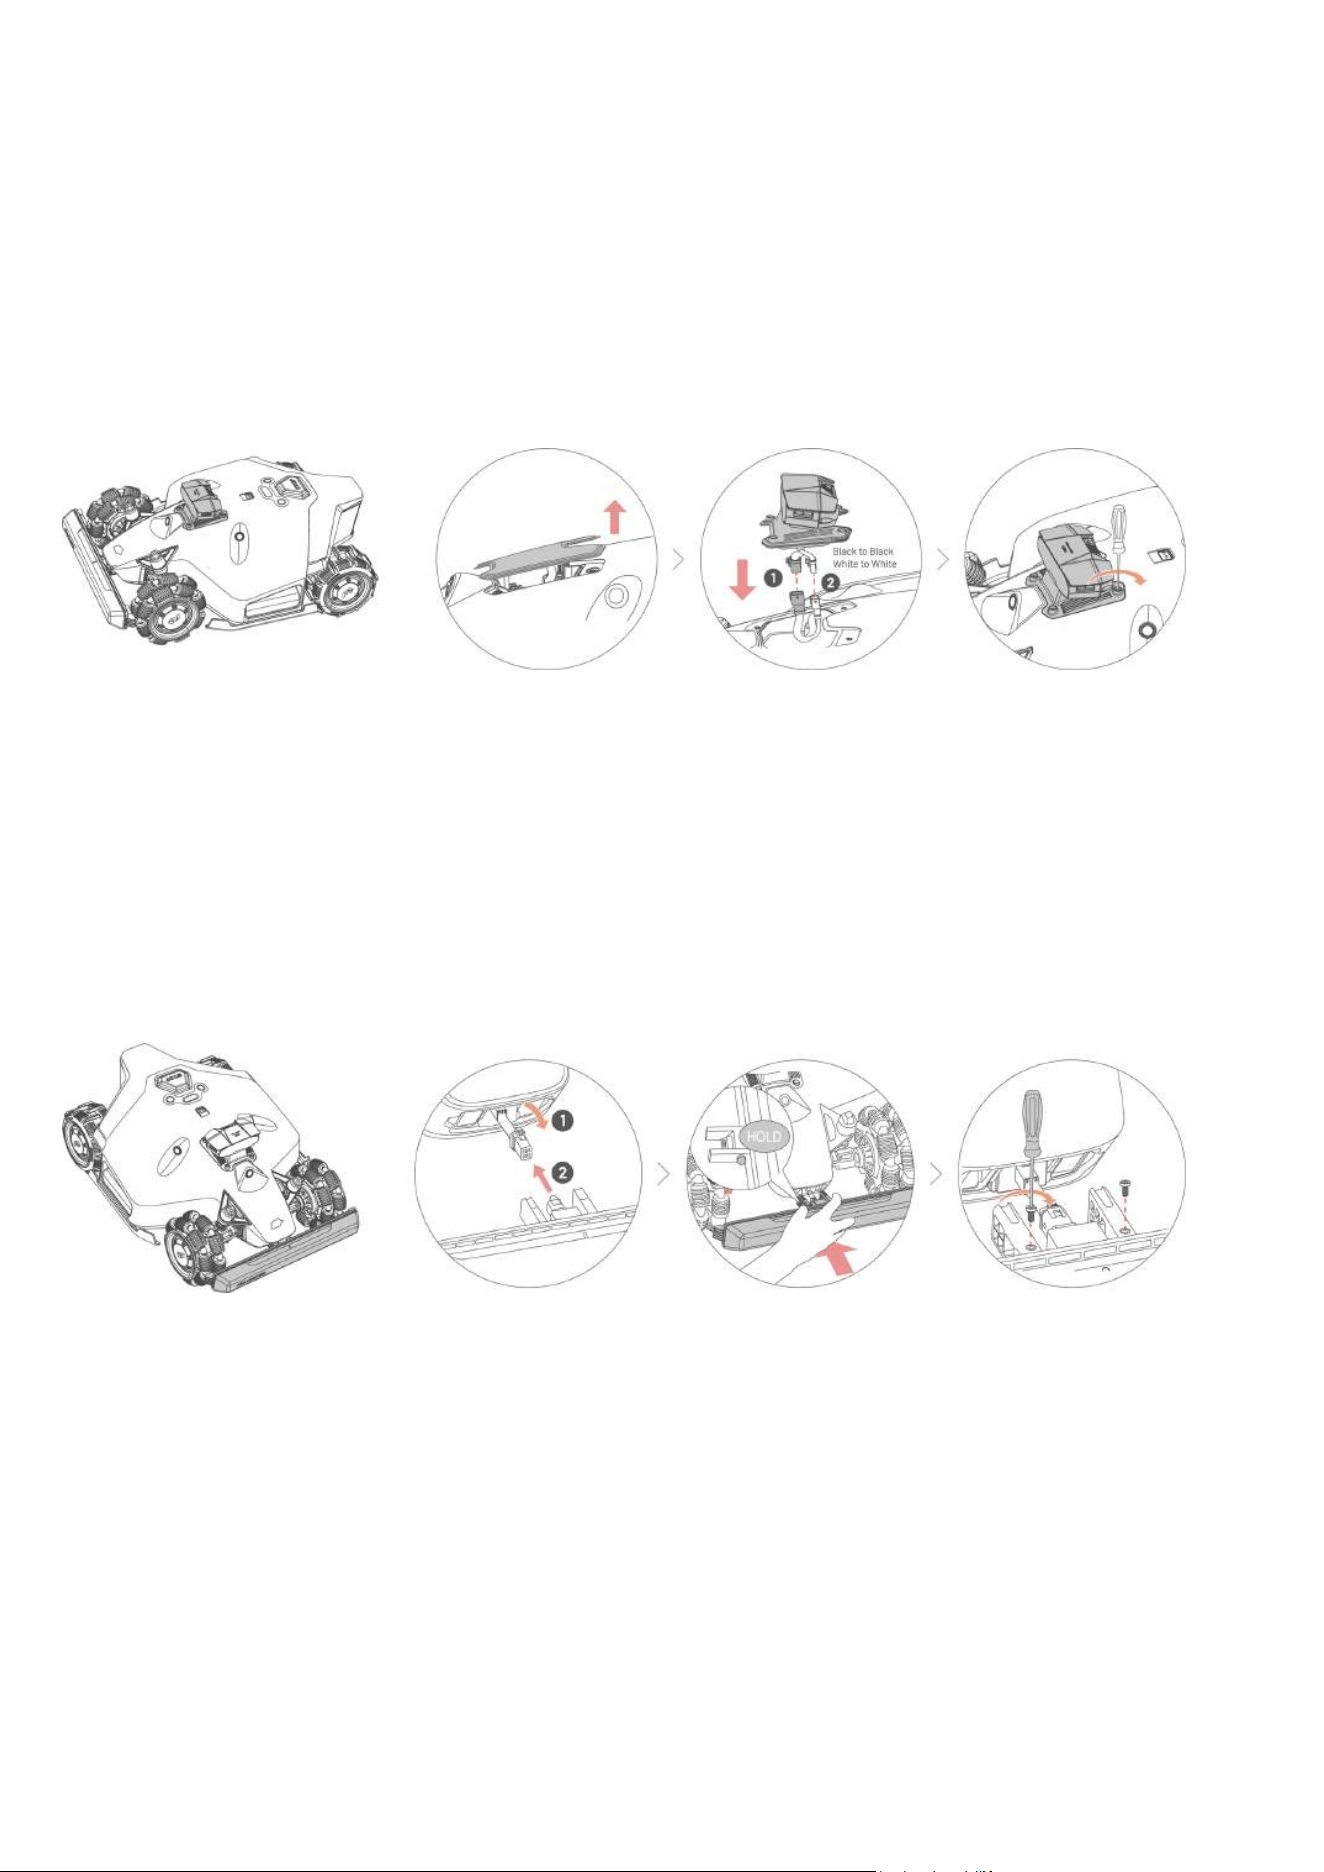
3.4.1 Install the Vision Module
1. Remove the cover.
2. Connect the vision module wires, matching black to black and white to white.
3. Secure the vision module in place and tighten the screws using a hex-bit screwdriver.
3.4.2 Install the Front Bumper
1. Gently pull the plug inside the robot and connect it to the front bumper.
2. Press and hold the side buttons to secure the front bumper in place, ensuring the front indicator is
facing upwards.
3. Use a hex-bit screwdriver to install and tighten the two screws.
- 24 -
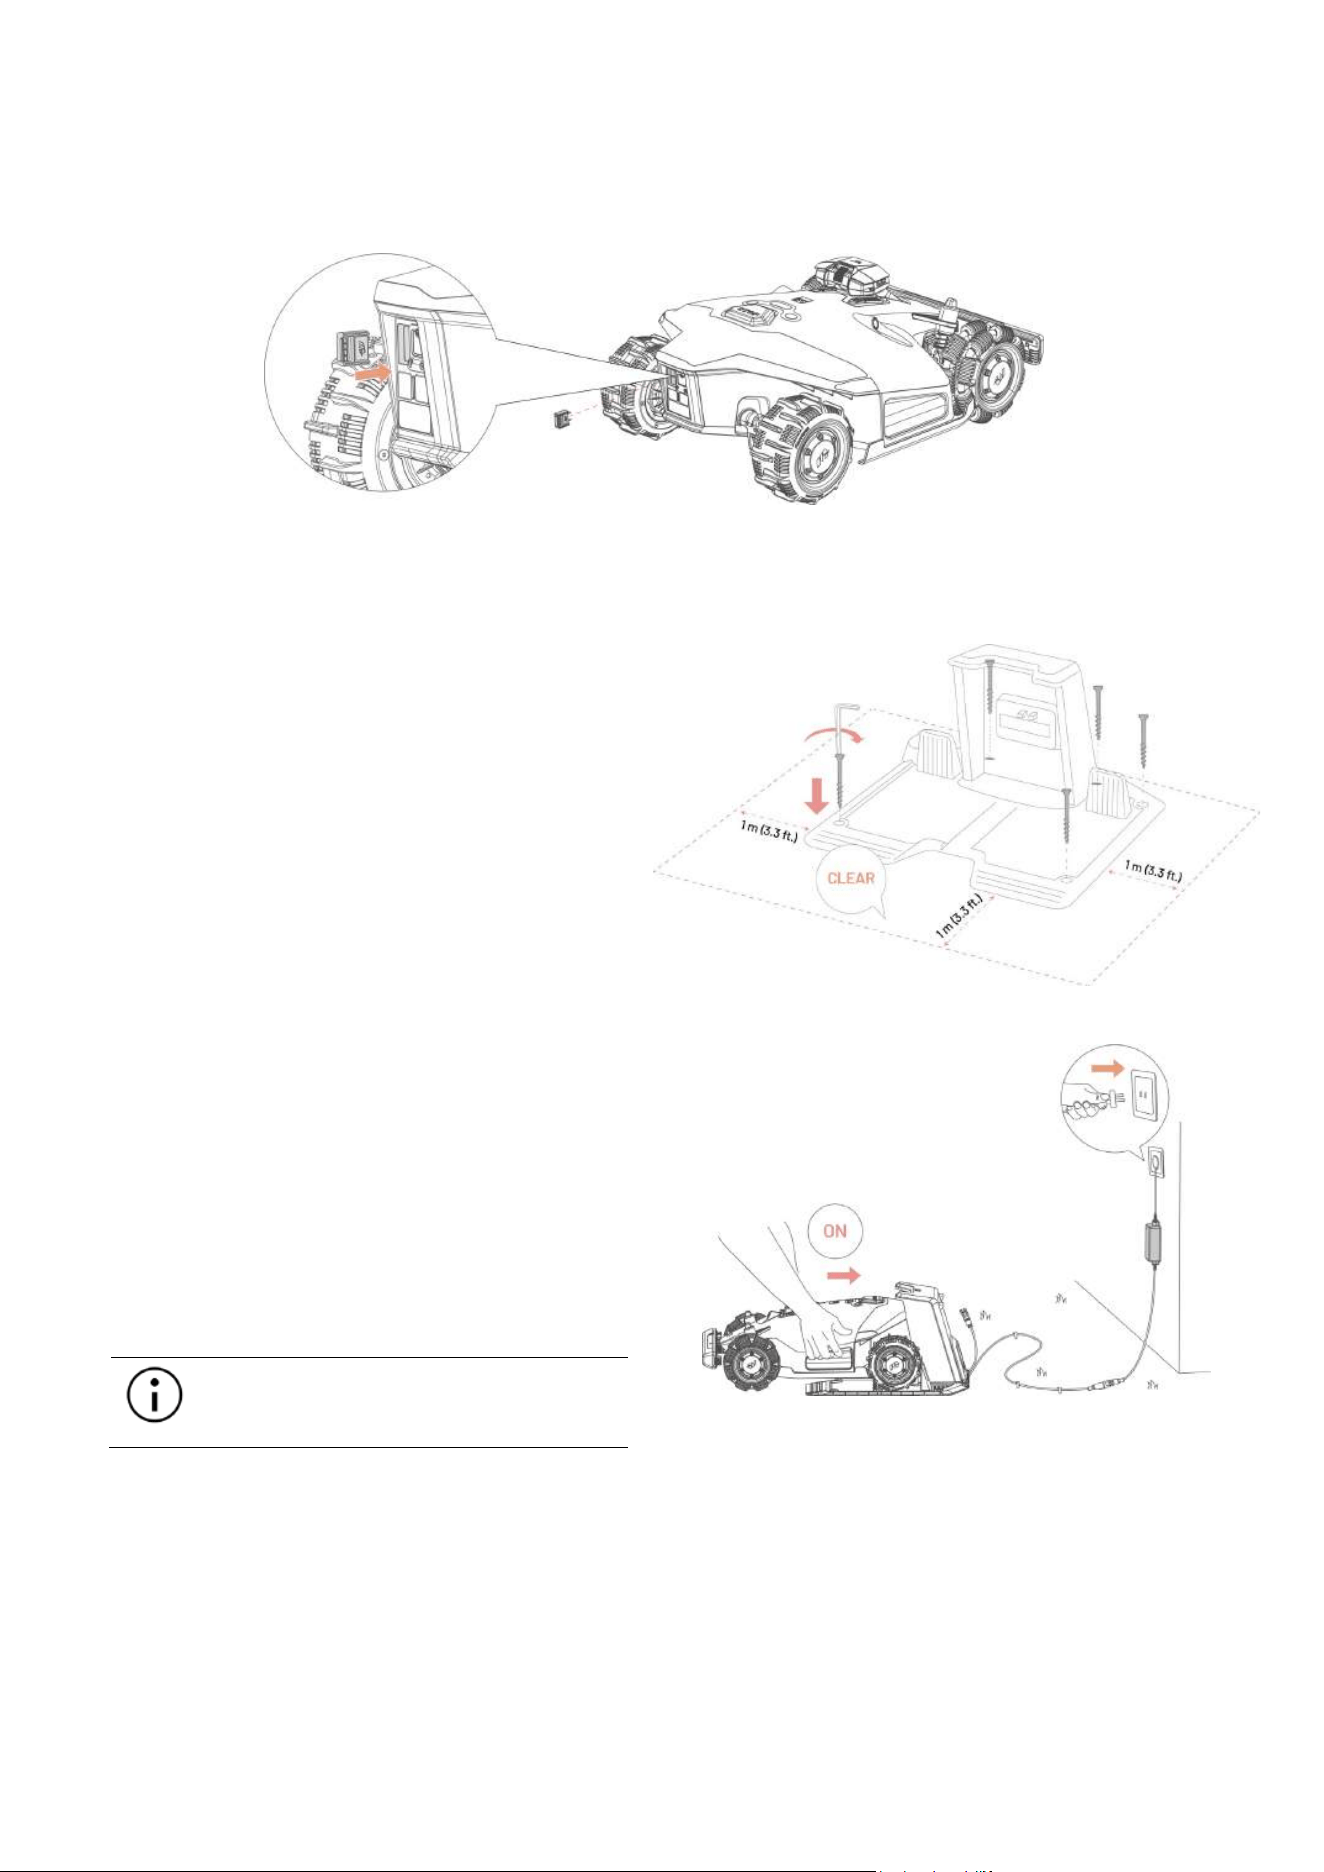
3.4.3 Install the Security Key
Insert a security key into the rear key slot.
3.4.4 Install the Charging Station
1.
Select an open spot to install the charging
statio
n, ensuring its front area is clear of
obstacles.
2. Secure the charging station in place using the
five stakes and the 8 mm (0.3 in) Allen key.
3. Connect the charging station cable (the longer
one) with the charging station power supply.
4. Plug the charging station power supply into
the wall socket.
5.
Place the robot on the charging station to
begin charging.
NOTE
Charge the robot for initial use.
- 25 -
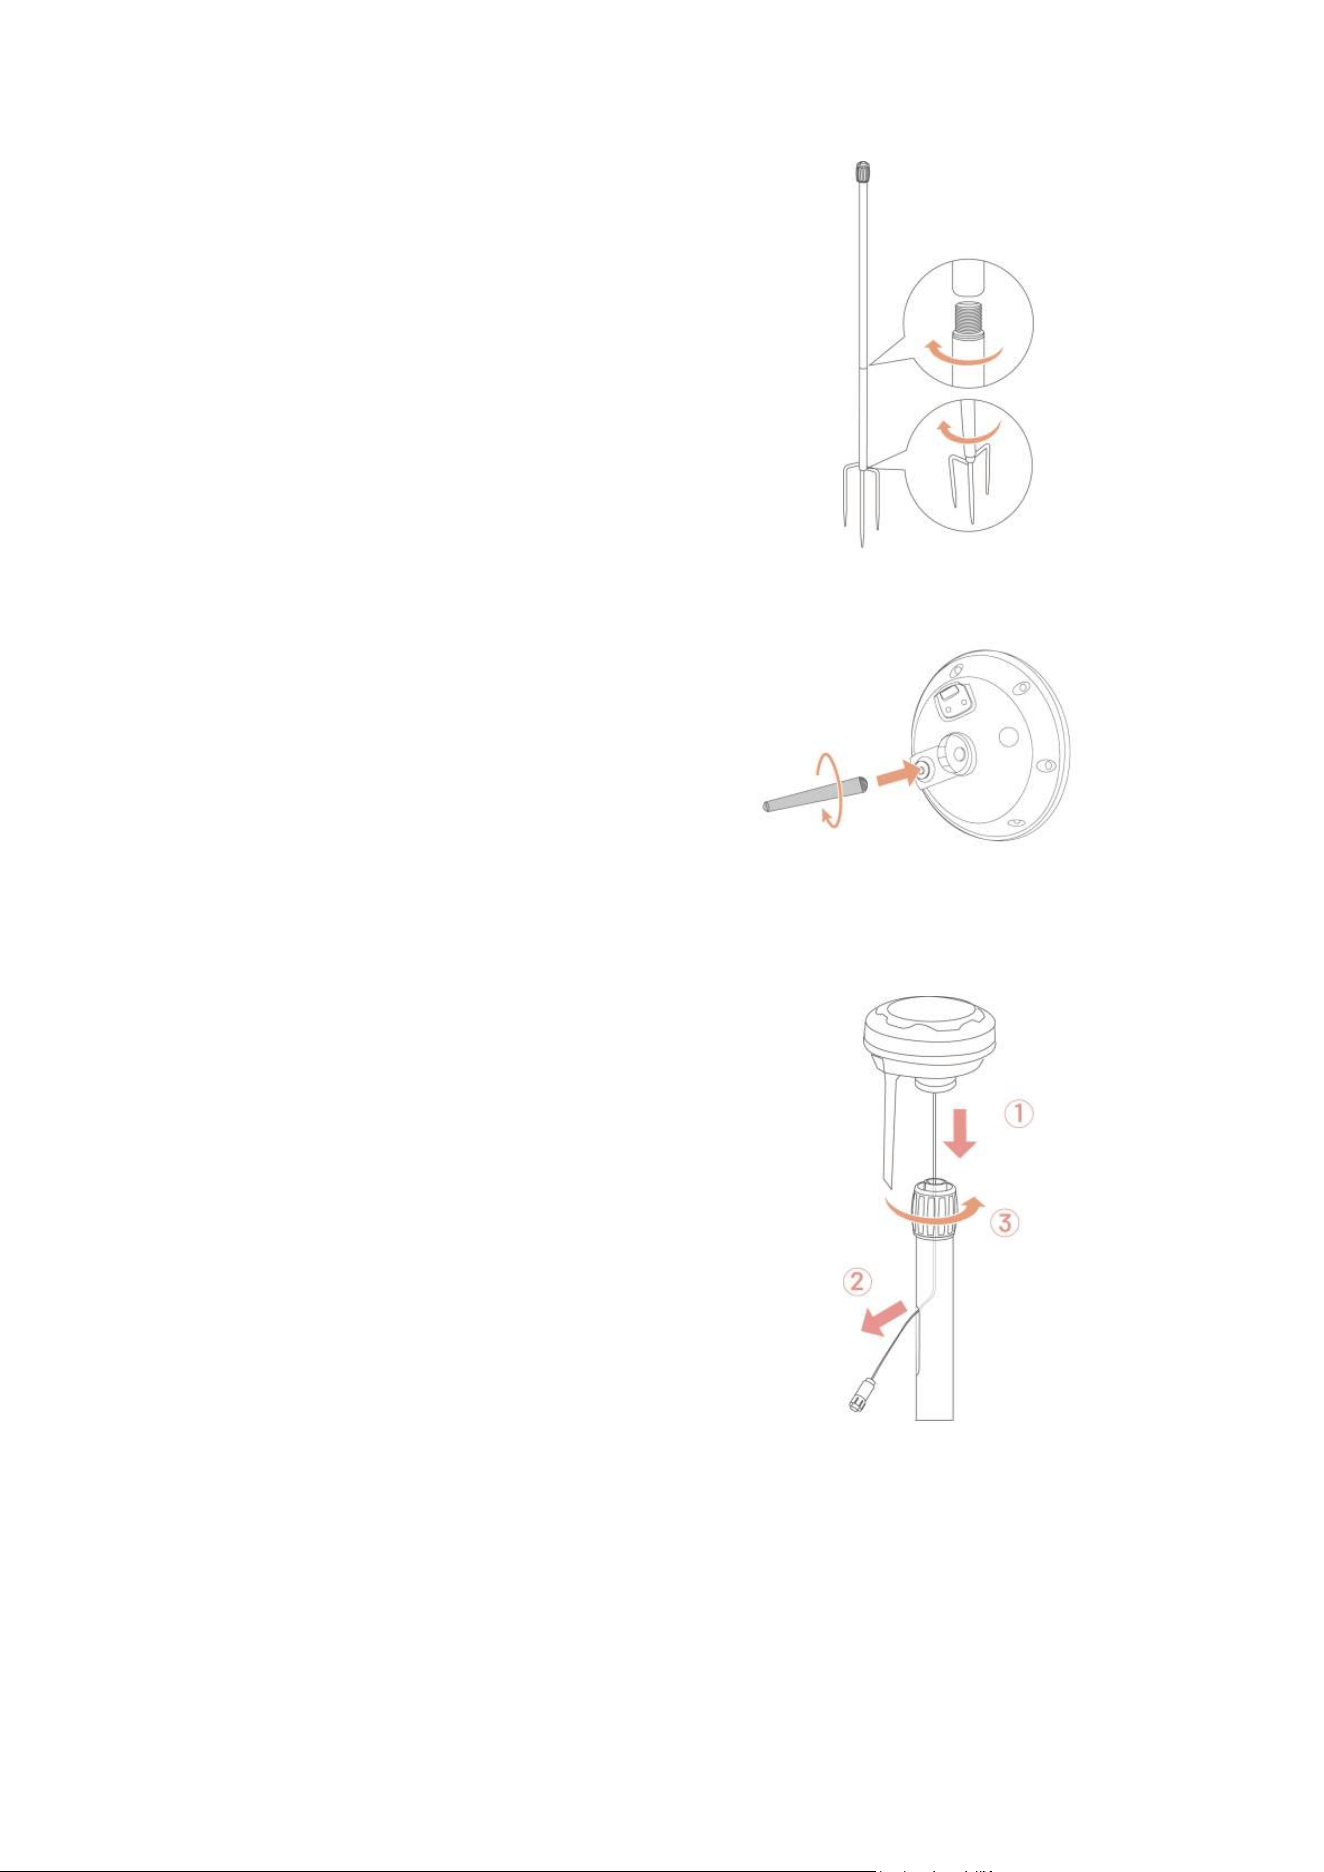
3.4.5 Install the RTK Reference Station (Floor Mount)
1. Assemble the two mounting poles and the
trident ground stake.
2. Fix the radio antenna to the RTK reference
station.
3.
Route the RTK reference station cable
through the mounting pole.
4.
Mount the RTK reference station on the
mounting pole.
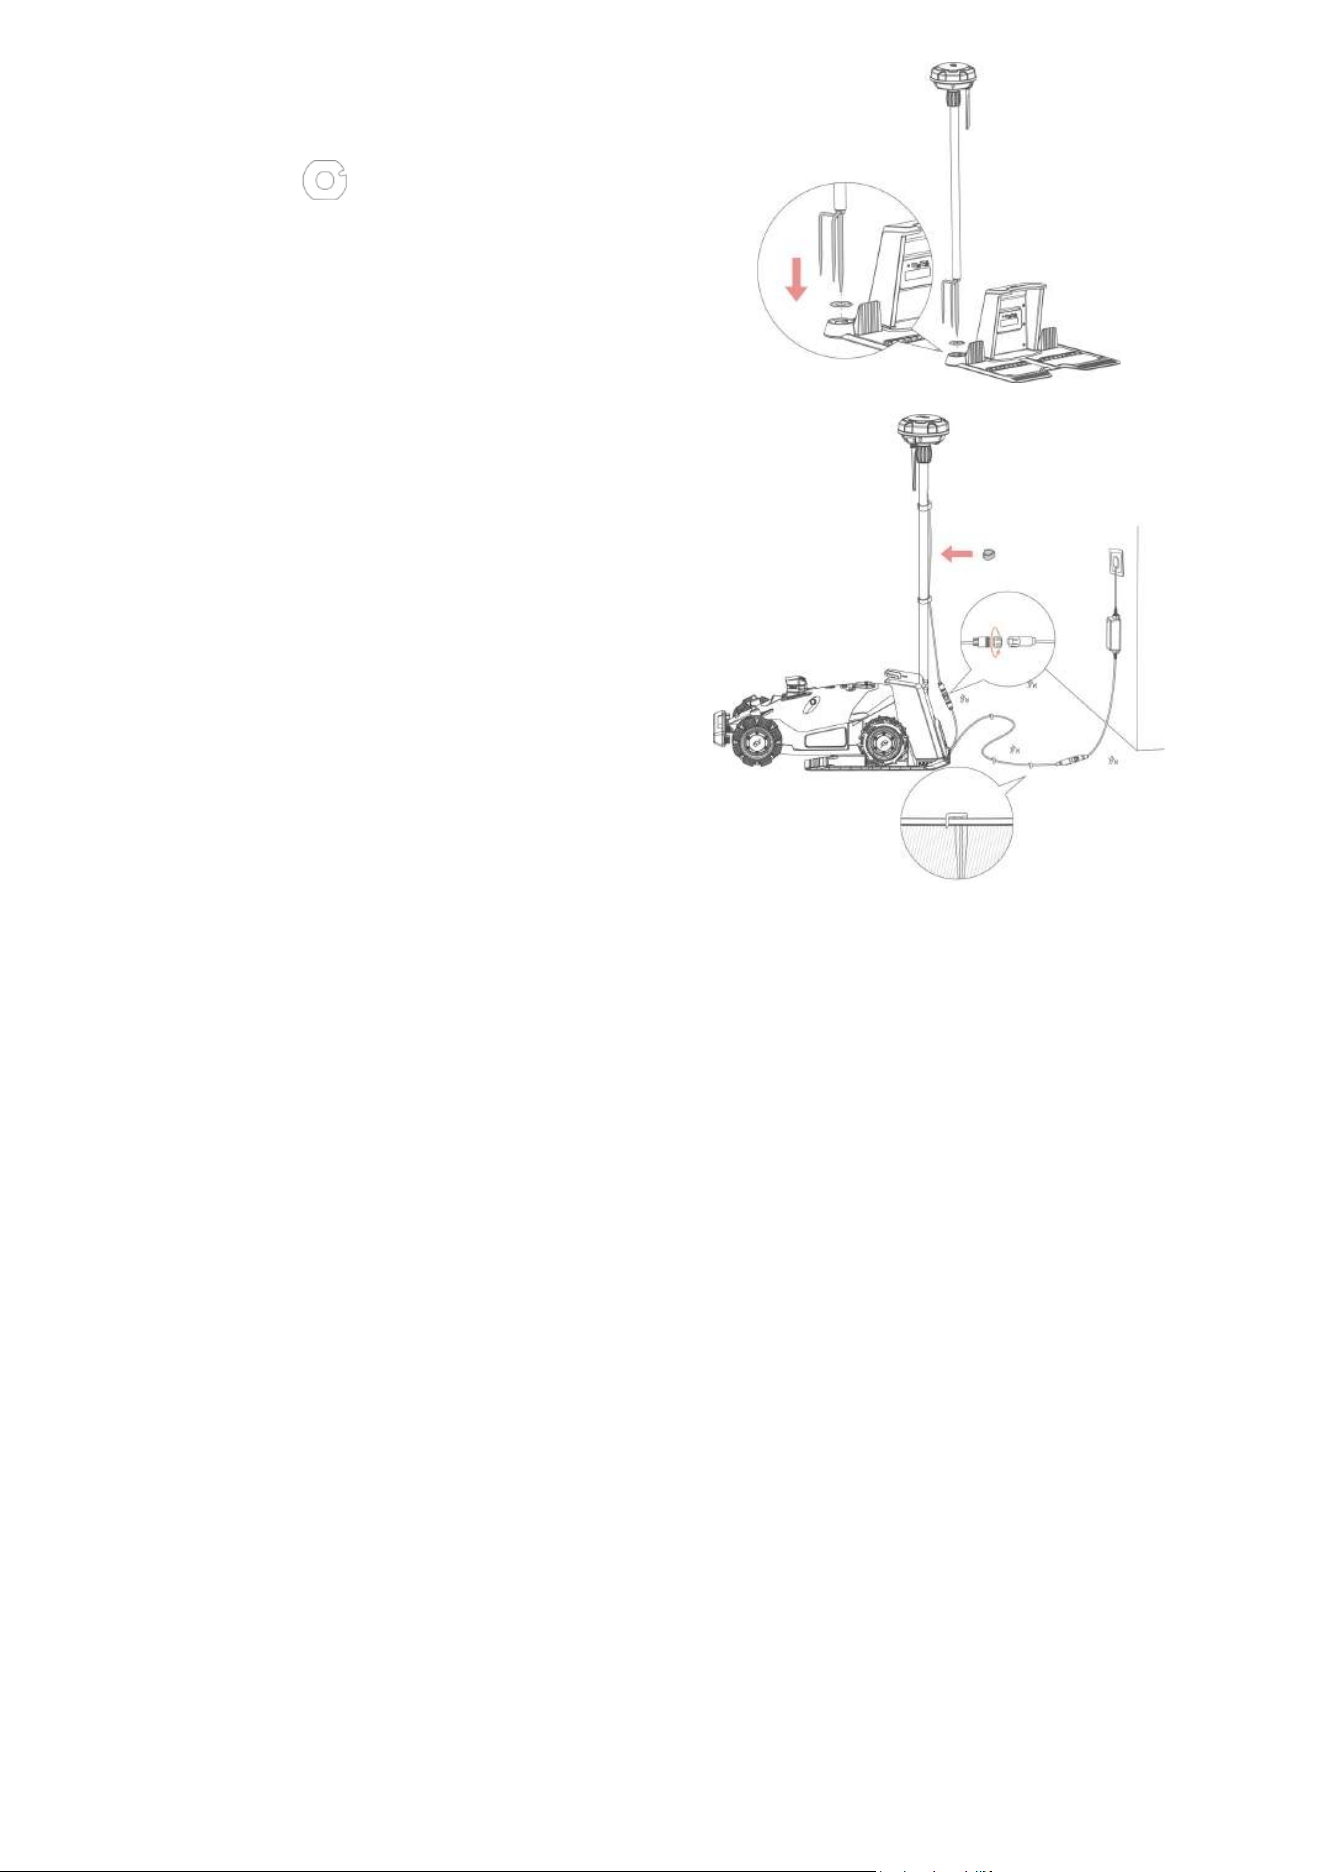
- 26 -
5. Place a gasket
onto the inlet, then
insert and fix the trident ground stake as
shown in the figure and keep it upright.
6.
Connect the RTK reference station cable
with the charging station cable (the shorter
one).
7.
Use the cord tie to fix the cable on the
mounting pole.
- 27 -
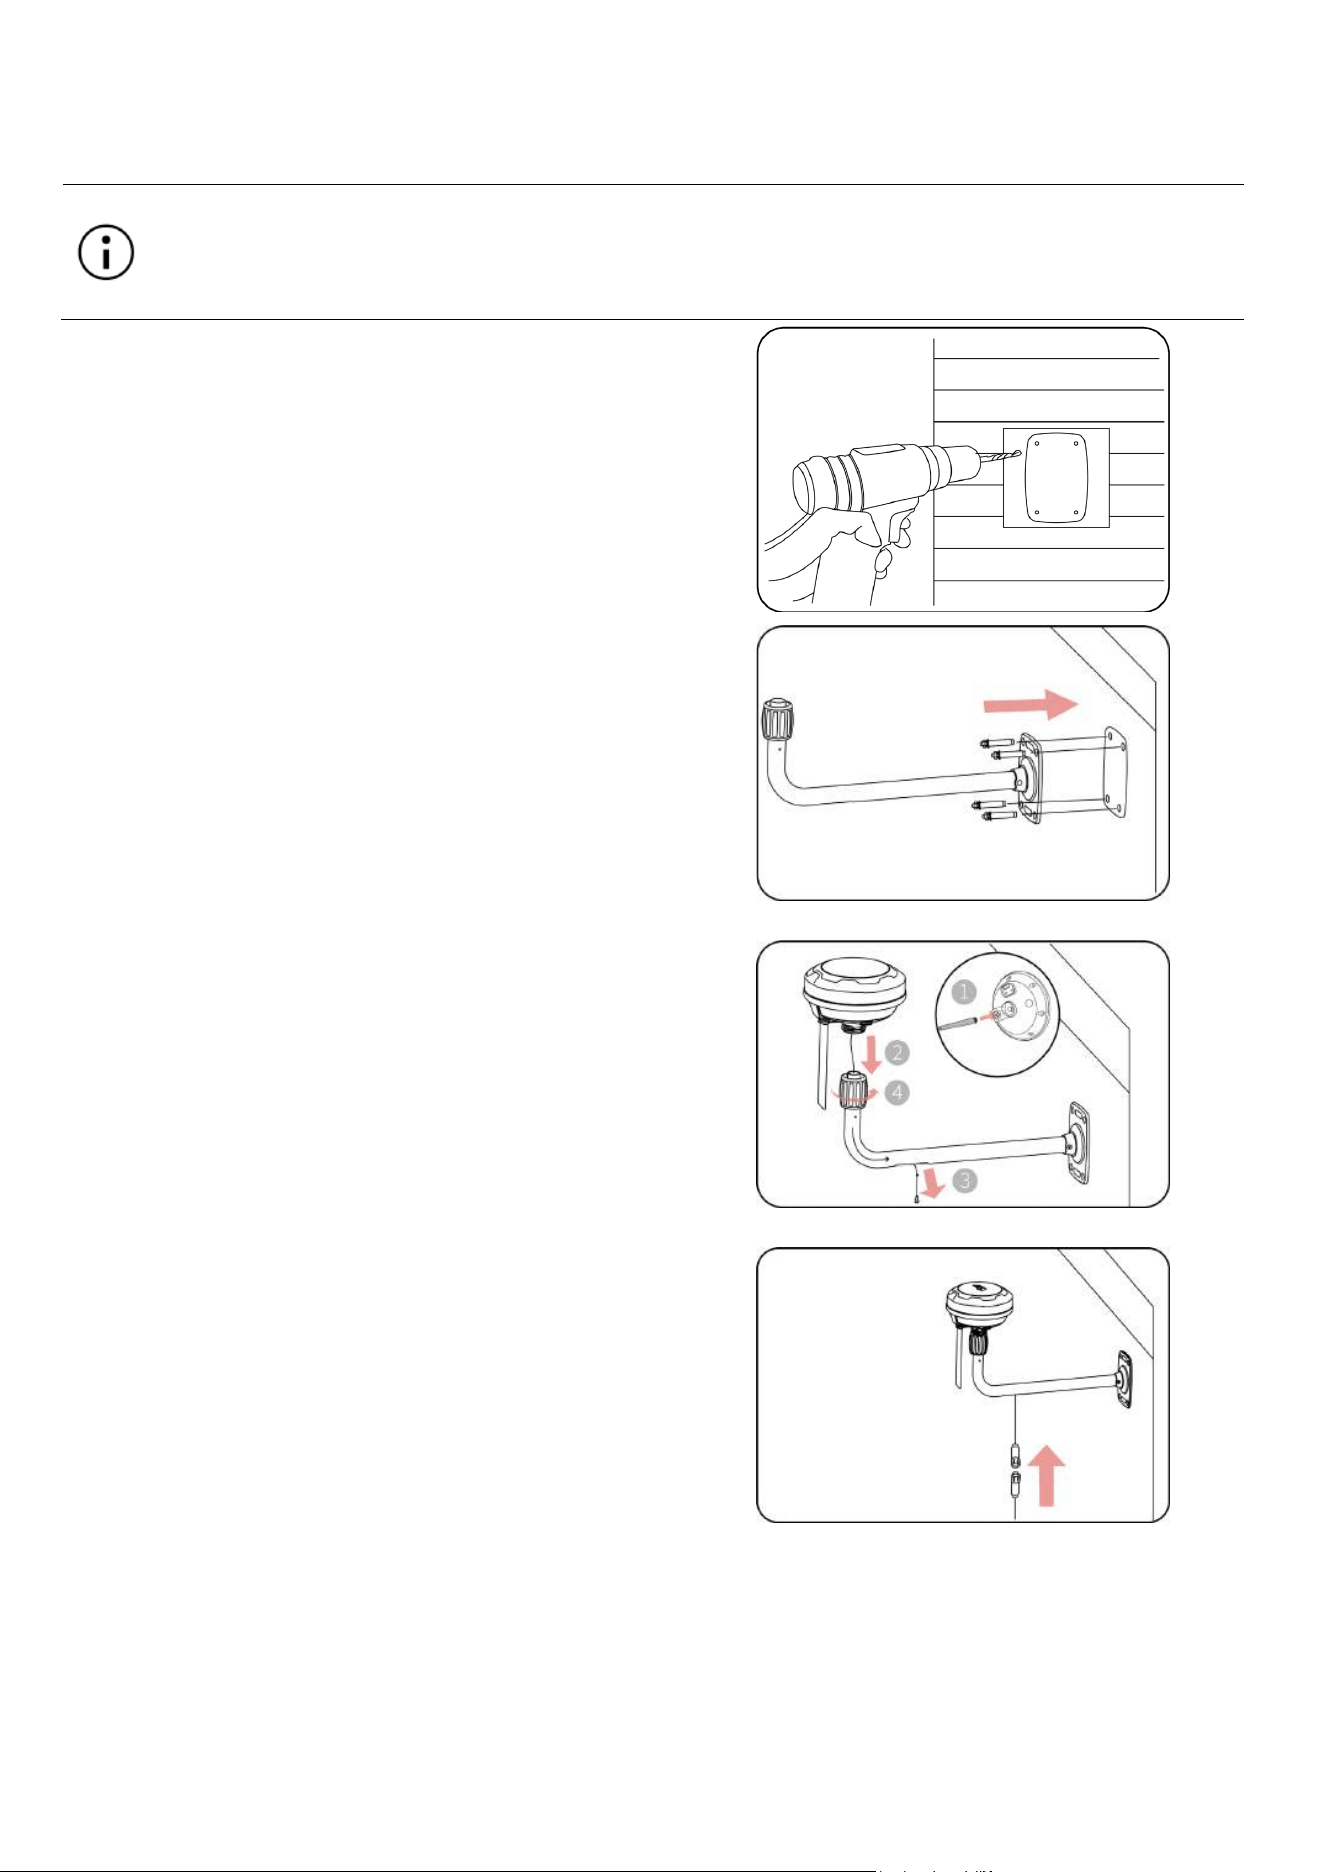
3.4.6 Install the RTK reference Station (Wall Mount)
NOTE
The RTK wall mount kit is sold separately.
Skip section 3.4.5 if you install the RTK reference station on a wall.
1.
Choose a suitable installation area at a high
place.
2. Stick the drilling template on the wall and drill
four holes (10 x 40mm/0.4 x 1.6 in) at the
appropriate position.
3. Attach the RTK wall mount on the wall using the
four bolts (M8 x 50) and secure the bolts firmly.
4.
Fix the radio antenna to the RTK reference
station.
5. Route the RTK reference station cable through
the wall mount as shown.
6.
Attach the RTK reference station to the wall
mount.
7. Connect the RTK reference station plug to the
RTK reference station extension cable (10 m/33
ft.).
- 28 -
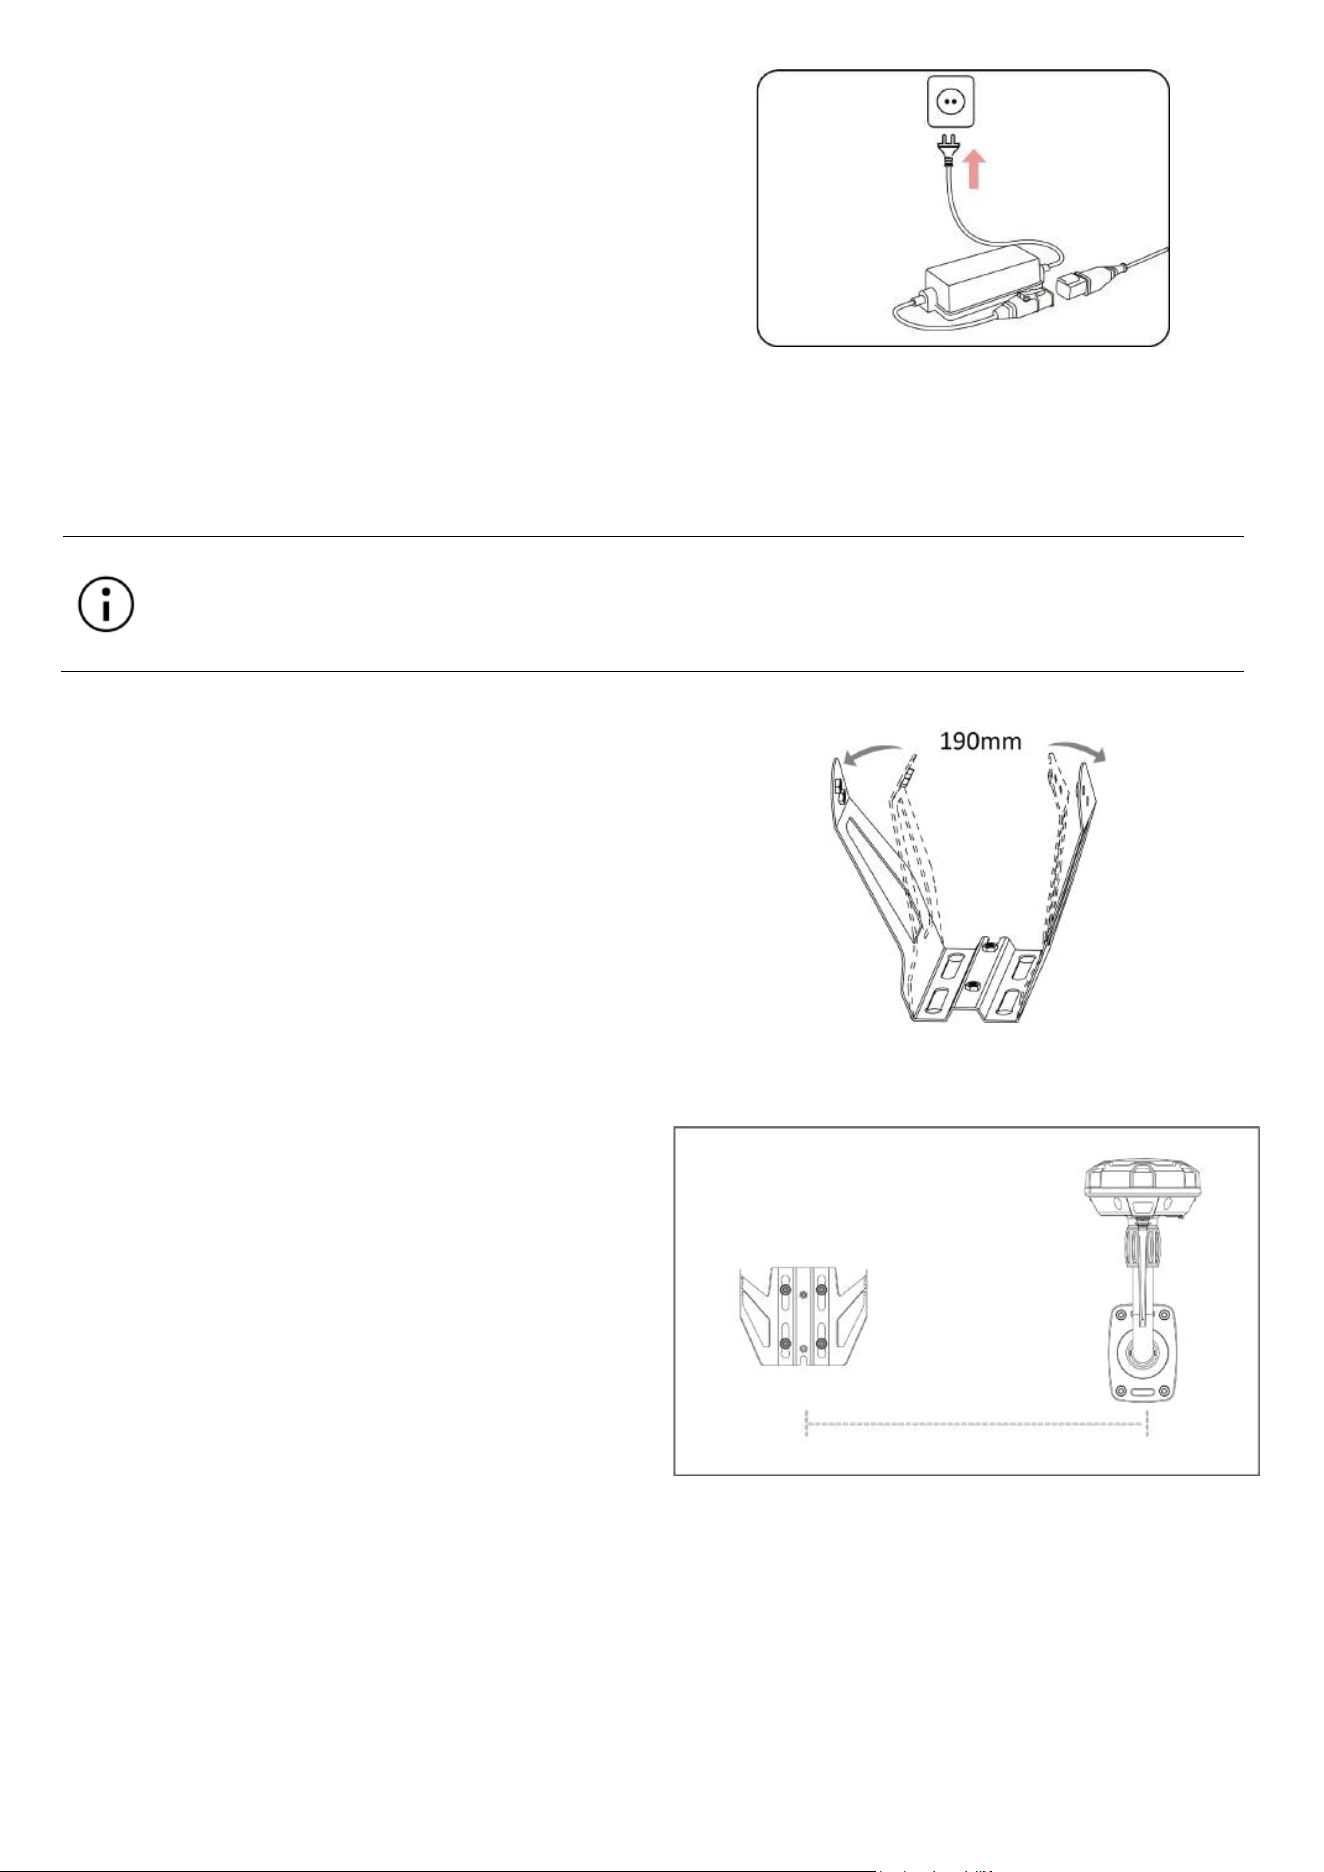
8.
Connect the RTK reference station cable (10
m/33 ft.) to the RTK reference station power
supply.
9. Plug the power supply into a wall socket.
3.4.7 Install the RTK Solar Panel Kit (Optional)
NOTE
There are three options to install the RTK solar panel kit. Please decide the optimal one to
continue.
Before installing, expand the bracket outward to
properly accommodate the solar panel.
Option 1: Install the RTK solar panel kit on a wall
1.
Place the mounting bracket on the wall and
mark four holes with a pencil, ensuring the
distance is within the cable's reach.
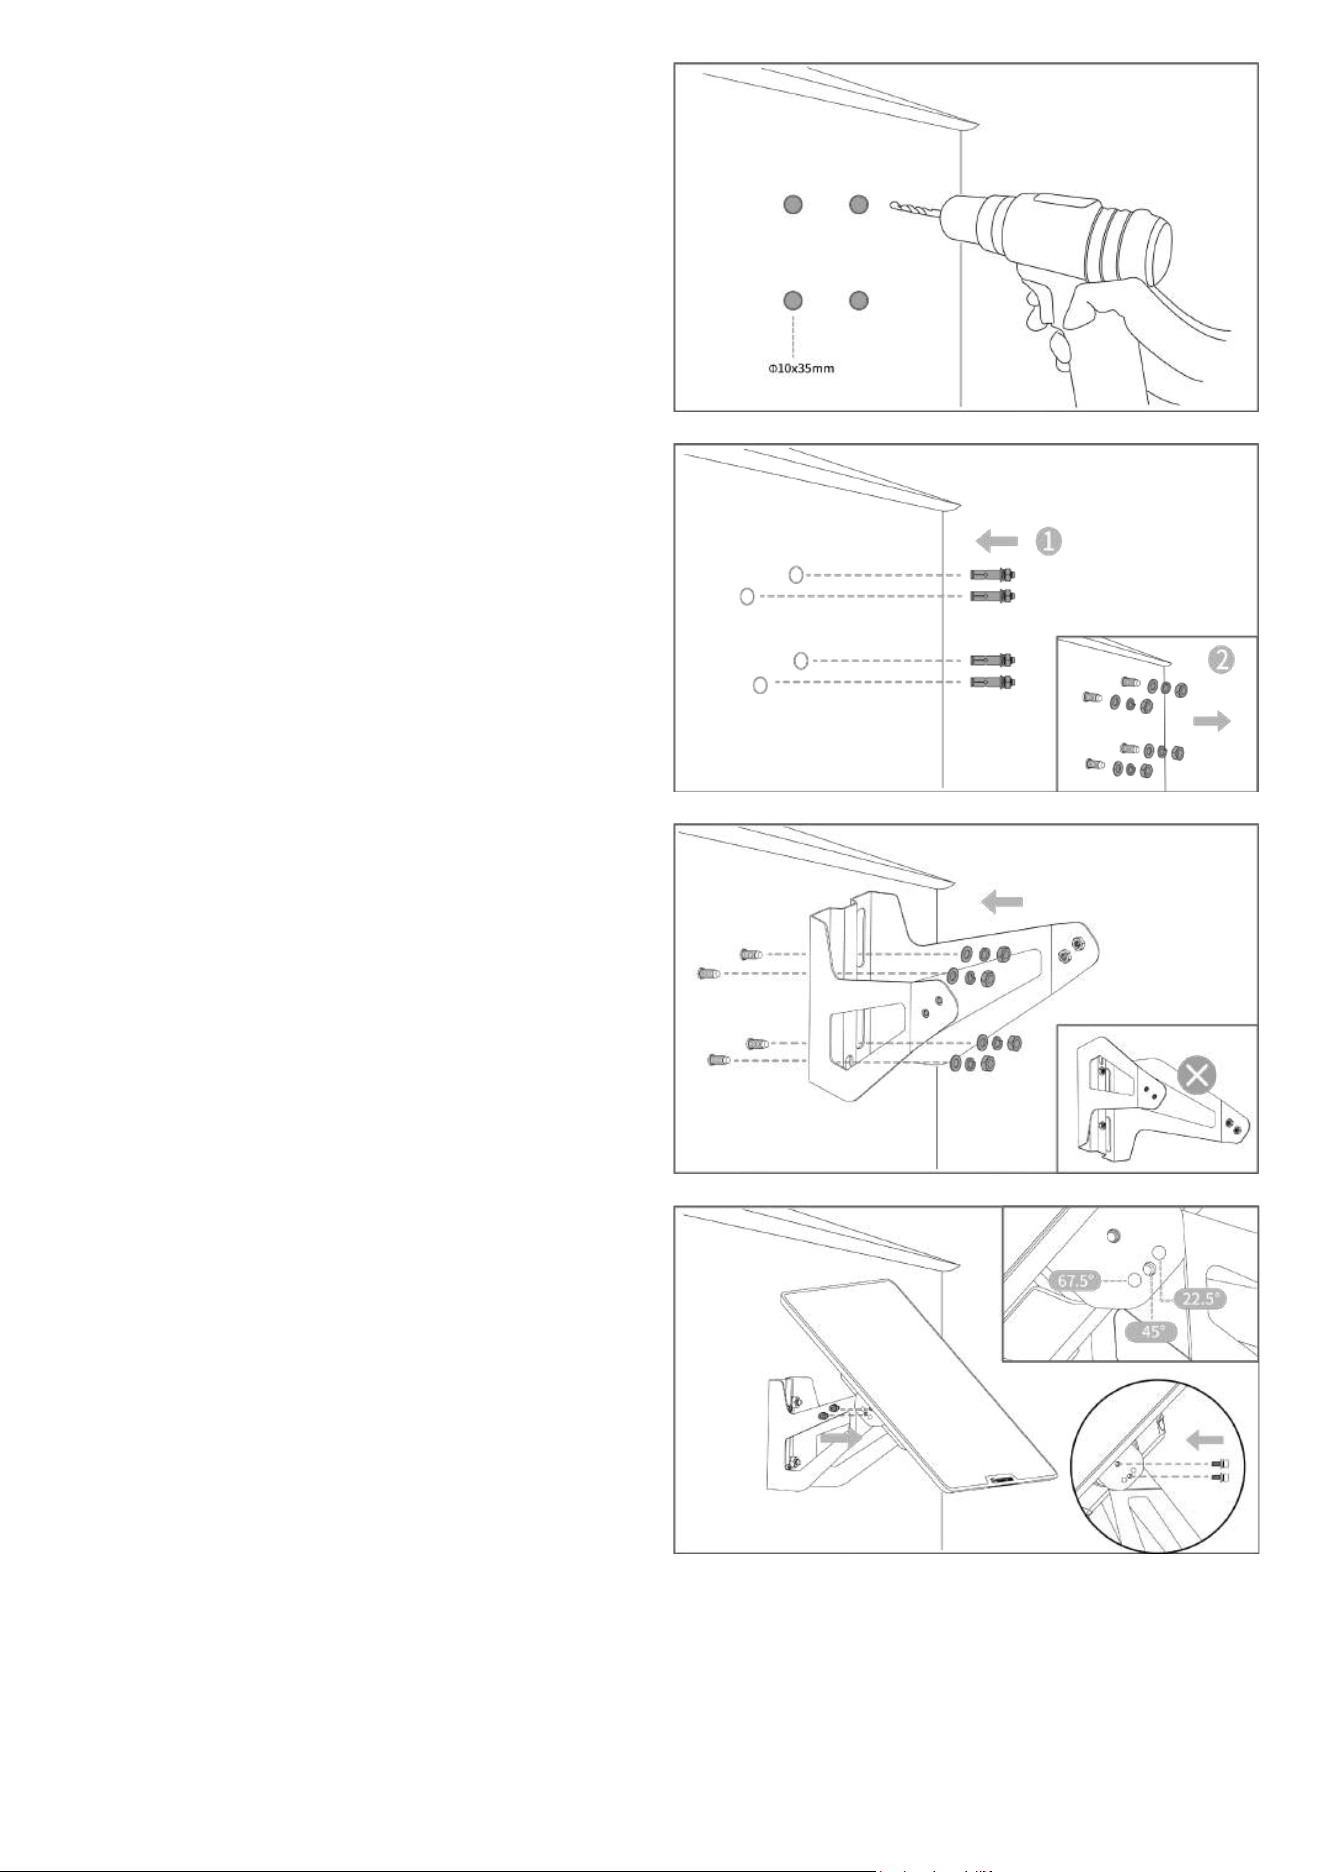
- 29 -
2. Drill 10mm/0.4 in. diameter, 35mm/1.4 in. depth
holes.
3.
Tap the expansion bolts into the holes and
remove the nuts, spring and flat washers when
the expansion bolts are stuck.
4. Attach the bracket to the wall without reversing
it. Reinsert washers, spring washers, nuts, and
tighten with a 13mm/0.5 in. socket wrench.
5. Secure the solar panel to the bracket with four
screws and tighten using a 4mm/1.5 in. Allen
key.
6. Adjust the angle by shifting the screw to another
hole if needed.
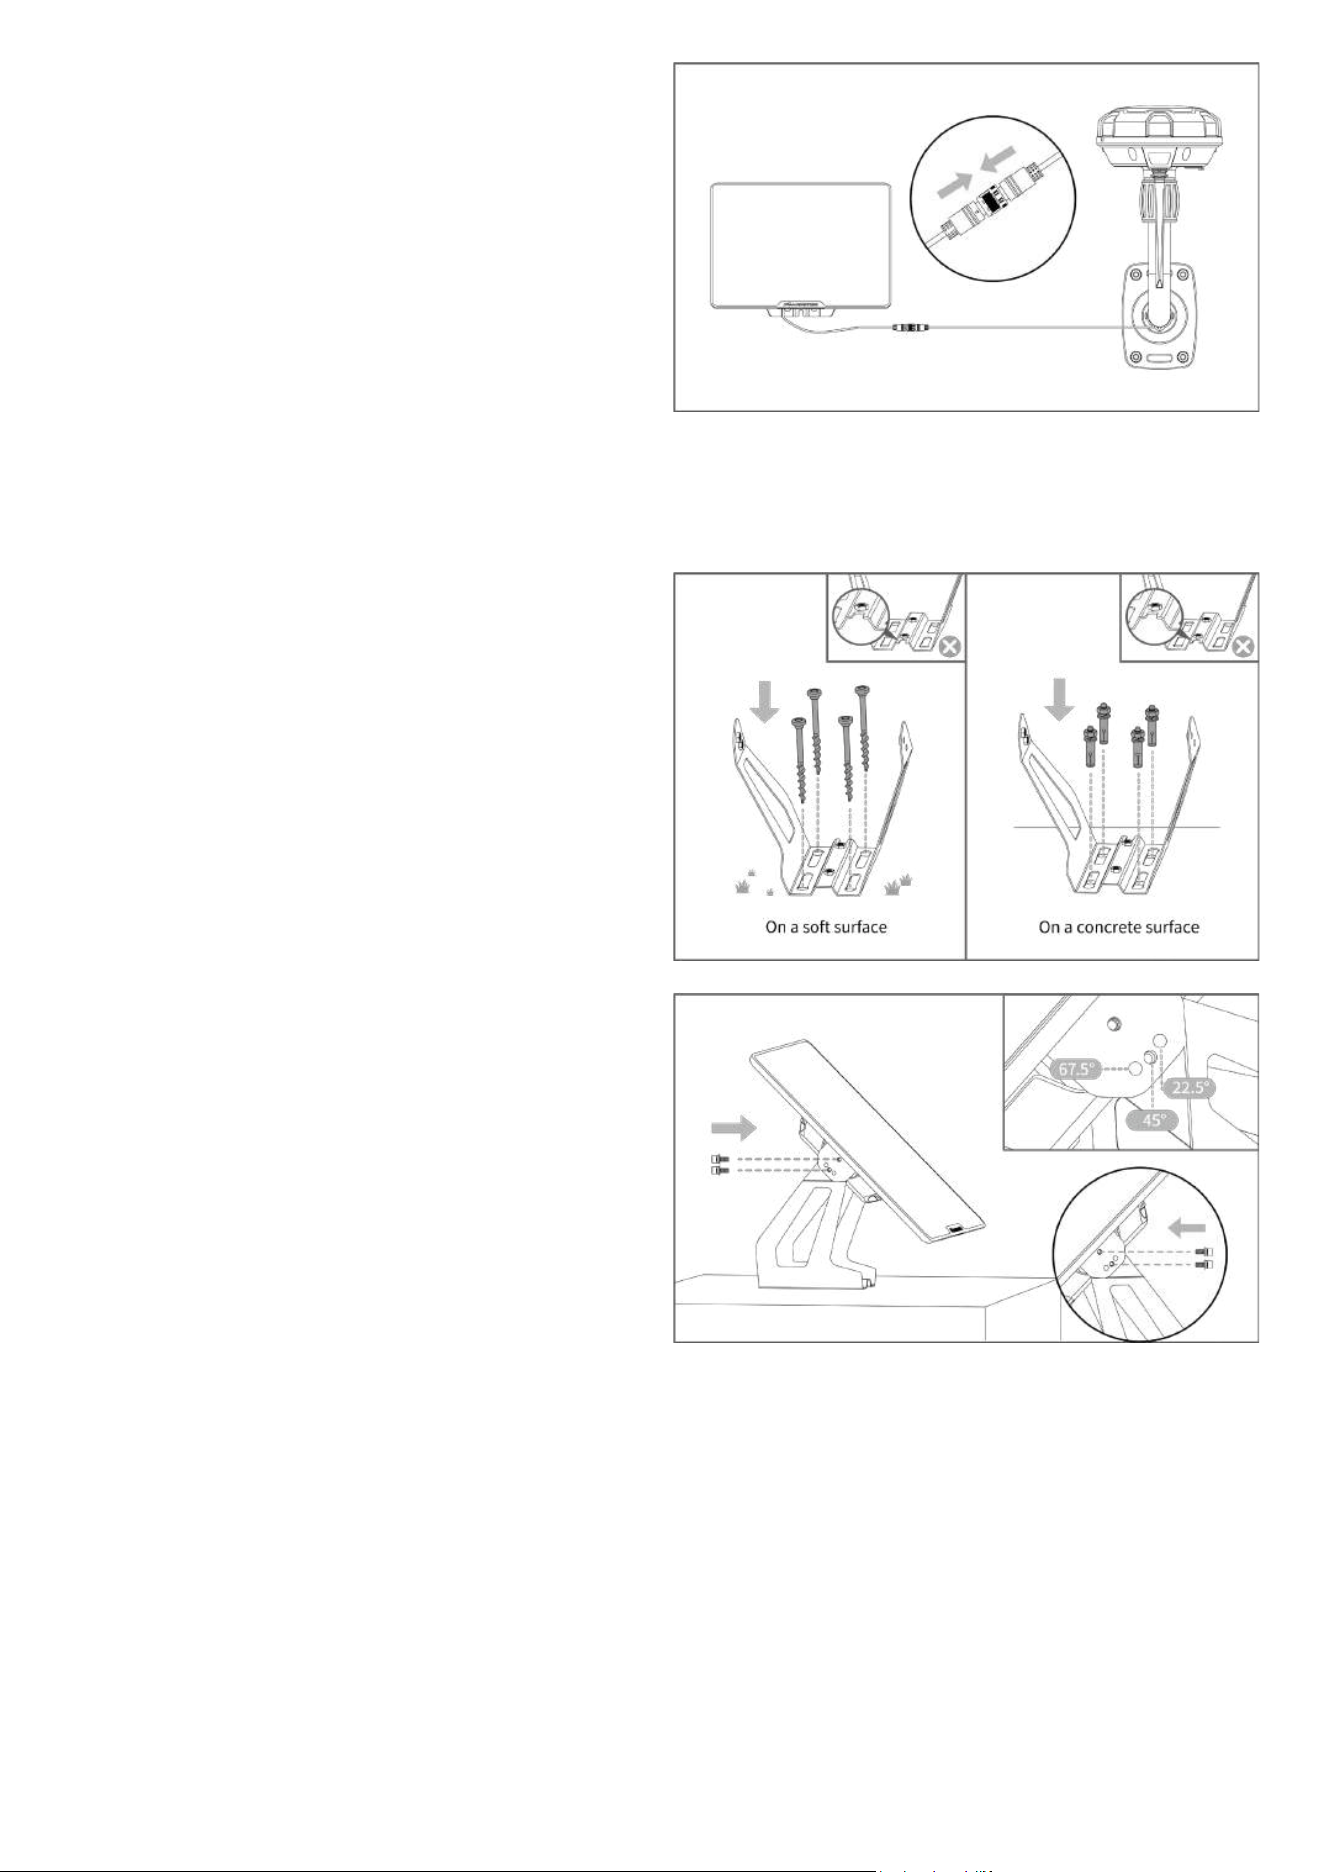
- 30 -
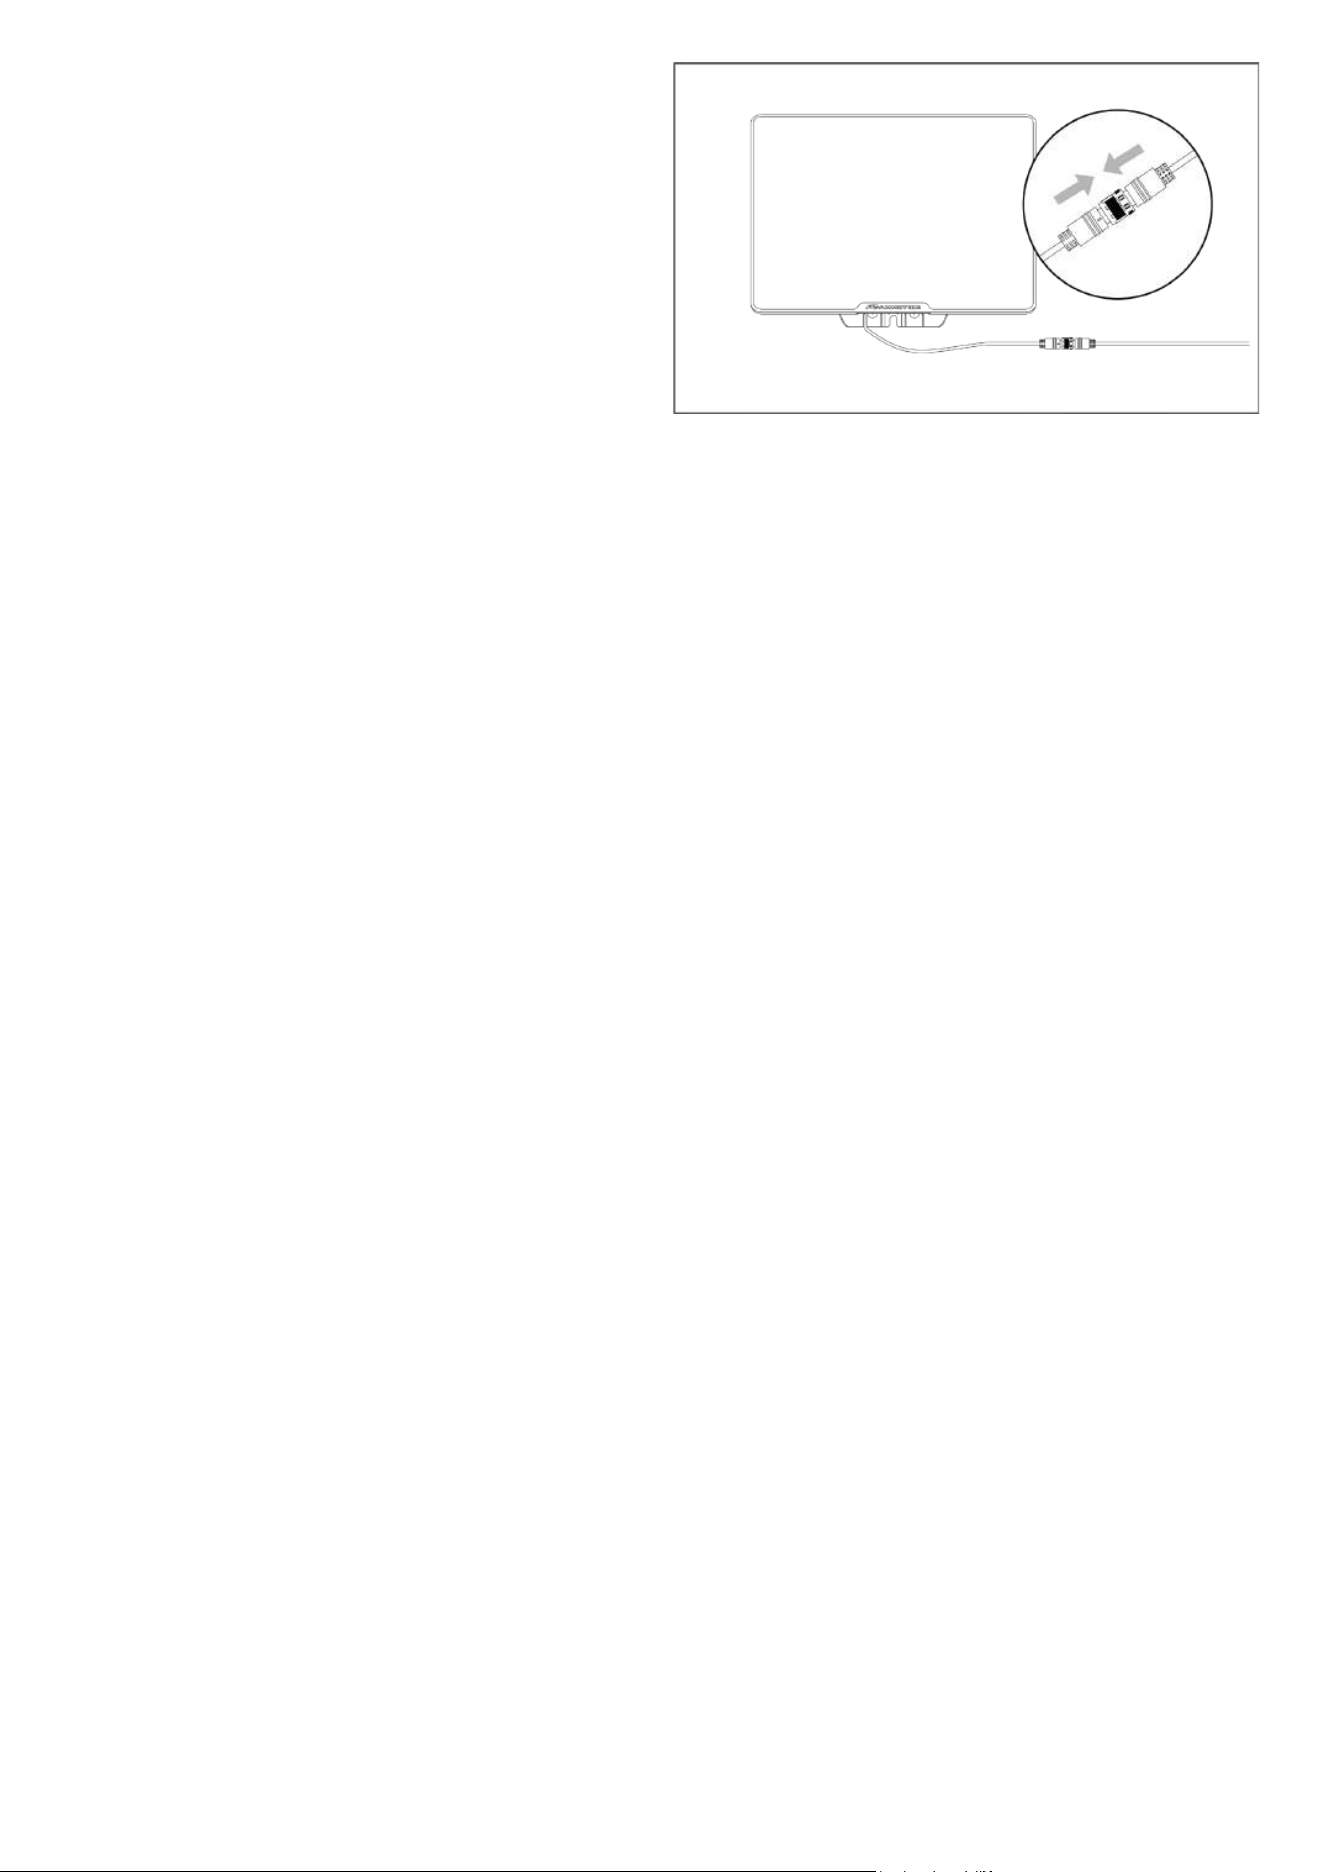
7.
Connect the solar panel cable to the RTK
reference station cable.
Option 2: Install the RTK solar panel kit on a flat ground/roof
1. Reverse and place the mounting bracket on the
surface, secure with stakes or expansion bolts,
ensuring the distance is within the cable's
reach.
2. Secure the solar panel to the bracket with four
screws and tighten using a 4mm/1.5 in. Allen
key.
3. Adjust the angle by shifting the screw to another
hole if needed.
- 31 -
4.
Connect the solar panel cable to the RTK
reference station cable.
- 32 -
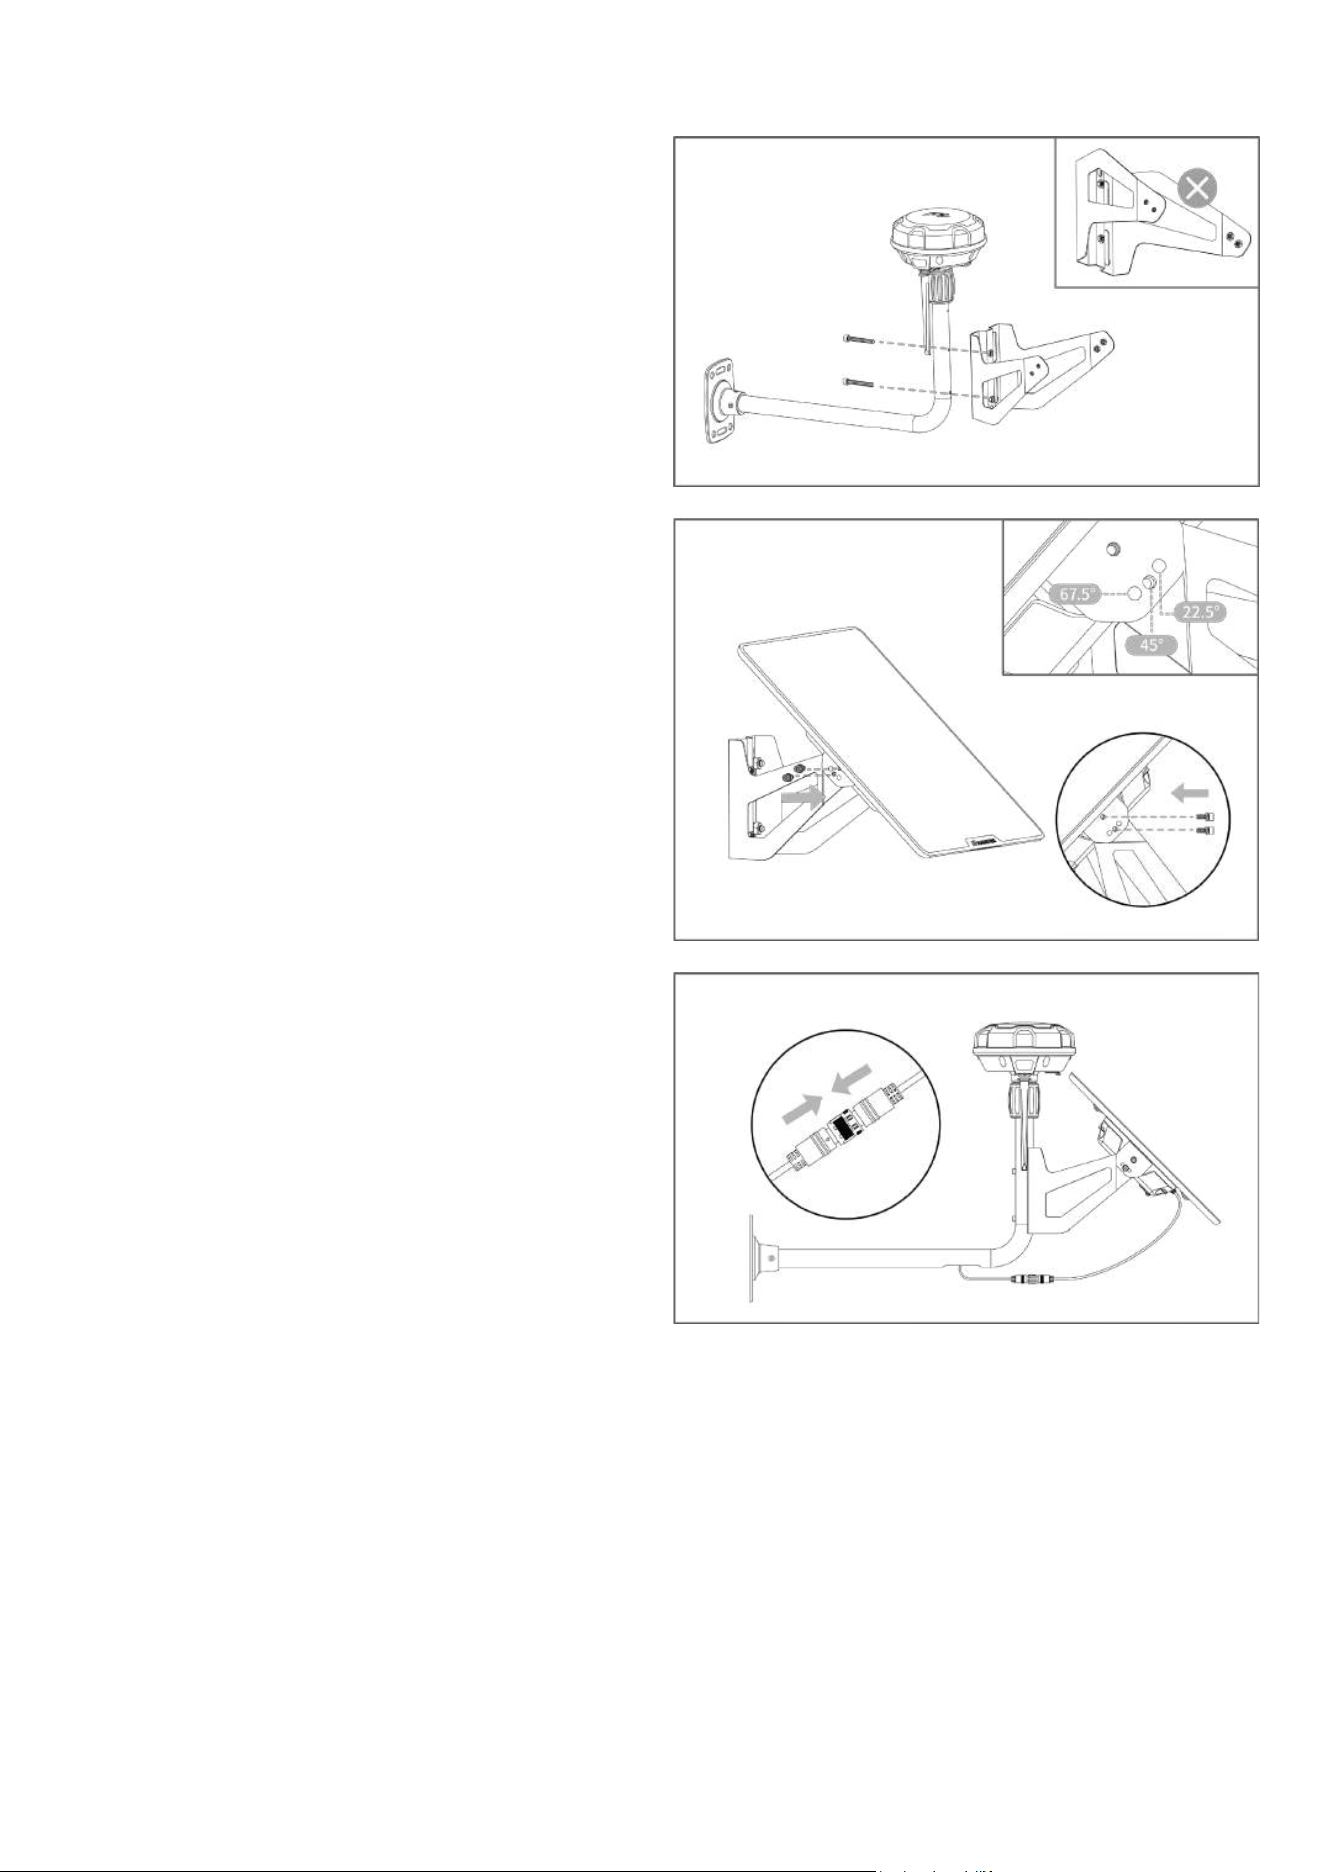
Option 3: Install the RTK solar panel kit on an RTK wall mount (sold separately)
1. Mount the bracket onto the RTK wall mount with
two screws (M5x40). Tighten the screws using a
4mm/1.5 in. Allen key. Avoid reversing the
mounting bracket during installation.
2. Secure the solar panel to the bracket with four
screws and tighten using a 4mm/1.5 in. Allen
key.
3. Adjust the angle by shifting the screw to another
hole if needed.
4.
Connect the solar panel cable to the RTK
reference station cable.
- 33 -
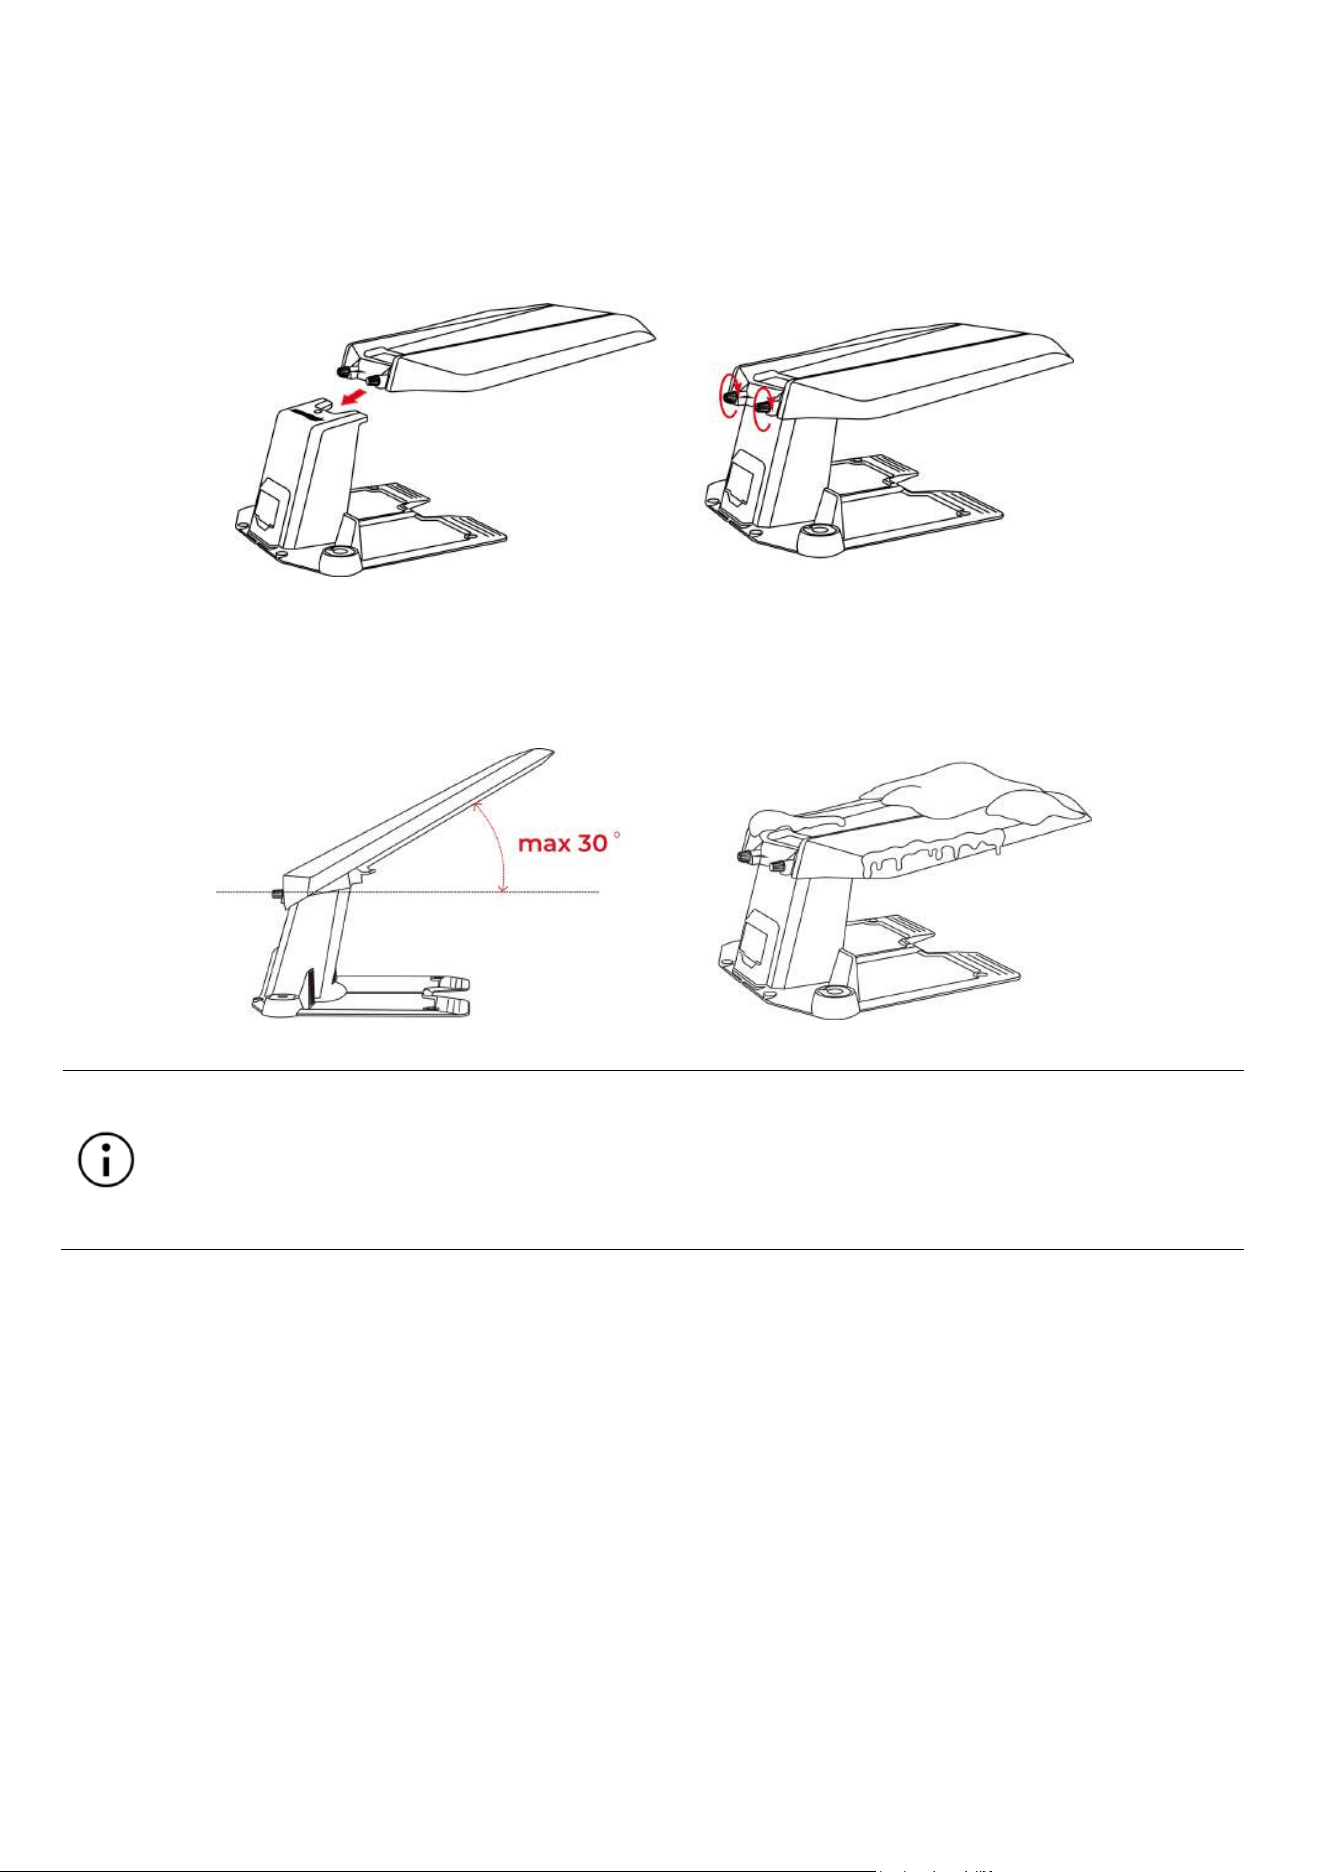
3.4.8 Installing the Garage (Optional)
Attach the garage to the top of the charging station from front to back and tighten the two screws on the
back of the garage to complete the installation.
If it snows a lot in your area during the winter, it is recommended to store the robot indoors. If The robot is
stored under the garage, clear the snow before starting work. Remove any ice from the shaft before lifting
the garage.
NOTE
Do not place anything on top of the garage to avoid damage and interference with the
robot signal.
The garage can be lifted to a maximum angle of 30°.
- 34 -
4 Operation
NOTE
The screens are for reference only. Please refer to actual user interfaces.
4.1 Preparation
Read and understand safety instructions before operation.
The charging station and RTK reference station have been properly installed.
Ensure the robot has already docked on the charging station.
Ensure there is a stable network and keep your phone Bluetooth on.
4.2 Download Mammotion App
The robot is designed to work with the Mammotion app, please download the free Mammotion app first.
You can scan the QR code below to get it from the Android or Apple app stores, or search for Mammotion
in these stores.
After installing the app, please sign up and log in. During use, the app may ask you for Bluetooth, Location,
and local network access when necessary. For optimal use, it is recommended to allow the above access.
For more information, please refer to our Privacy Agreement. Go to Mammotion app > Me > About
Mammotion > Privacy Agreement.
If you want to log in with a third-party account, tap or on the login page to continue. Mammotion
app now supports logging in with Google and Apple accounts.
- 35 -
4.3 Add Your Product
NOTE
Make sure the distance between your phone and the robot is less than 3 m (10 ft.).
You can skip the Wi-
Fi setup if you are using 4G cellular data. It is advisable to also
establish a connection to a Wi-Fi network for optimal performance.
4.3.1 Add Devices
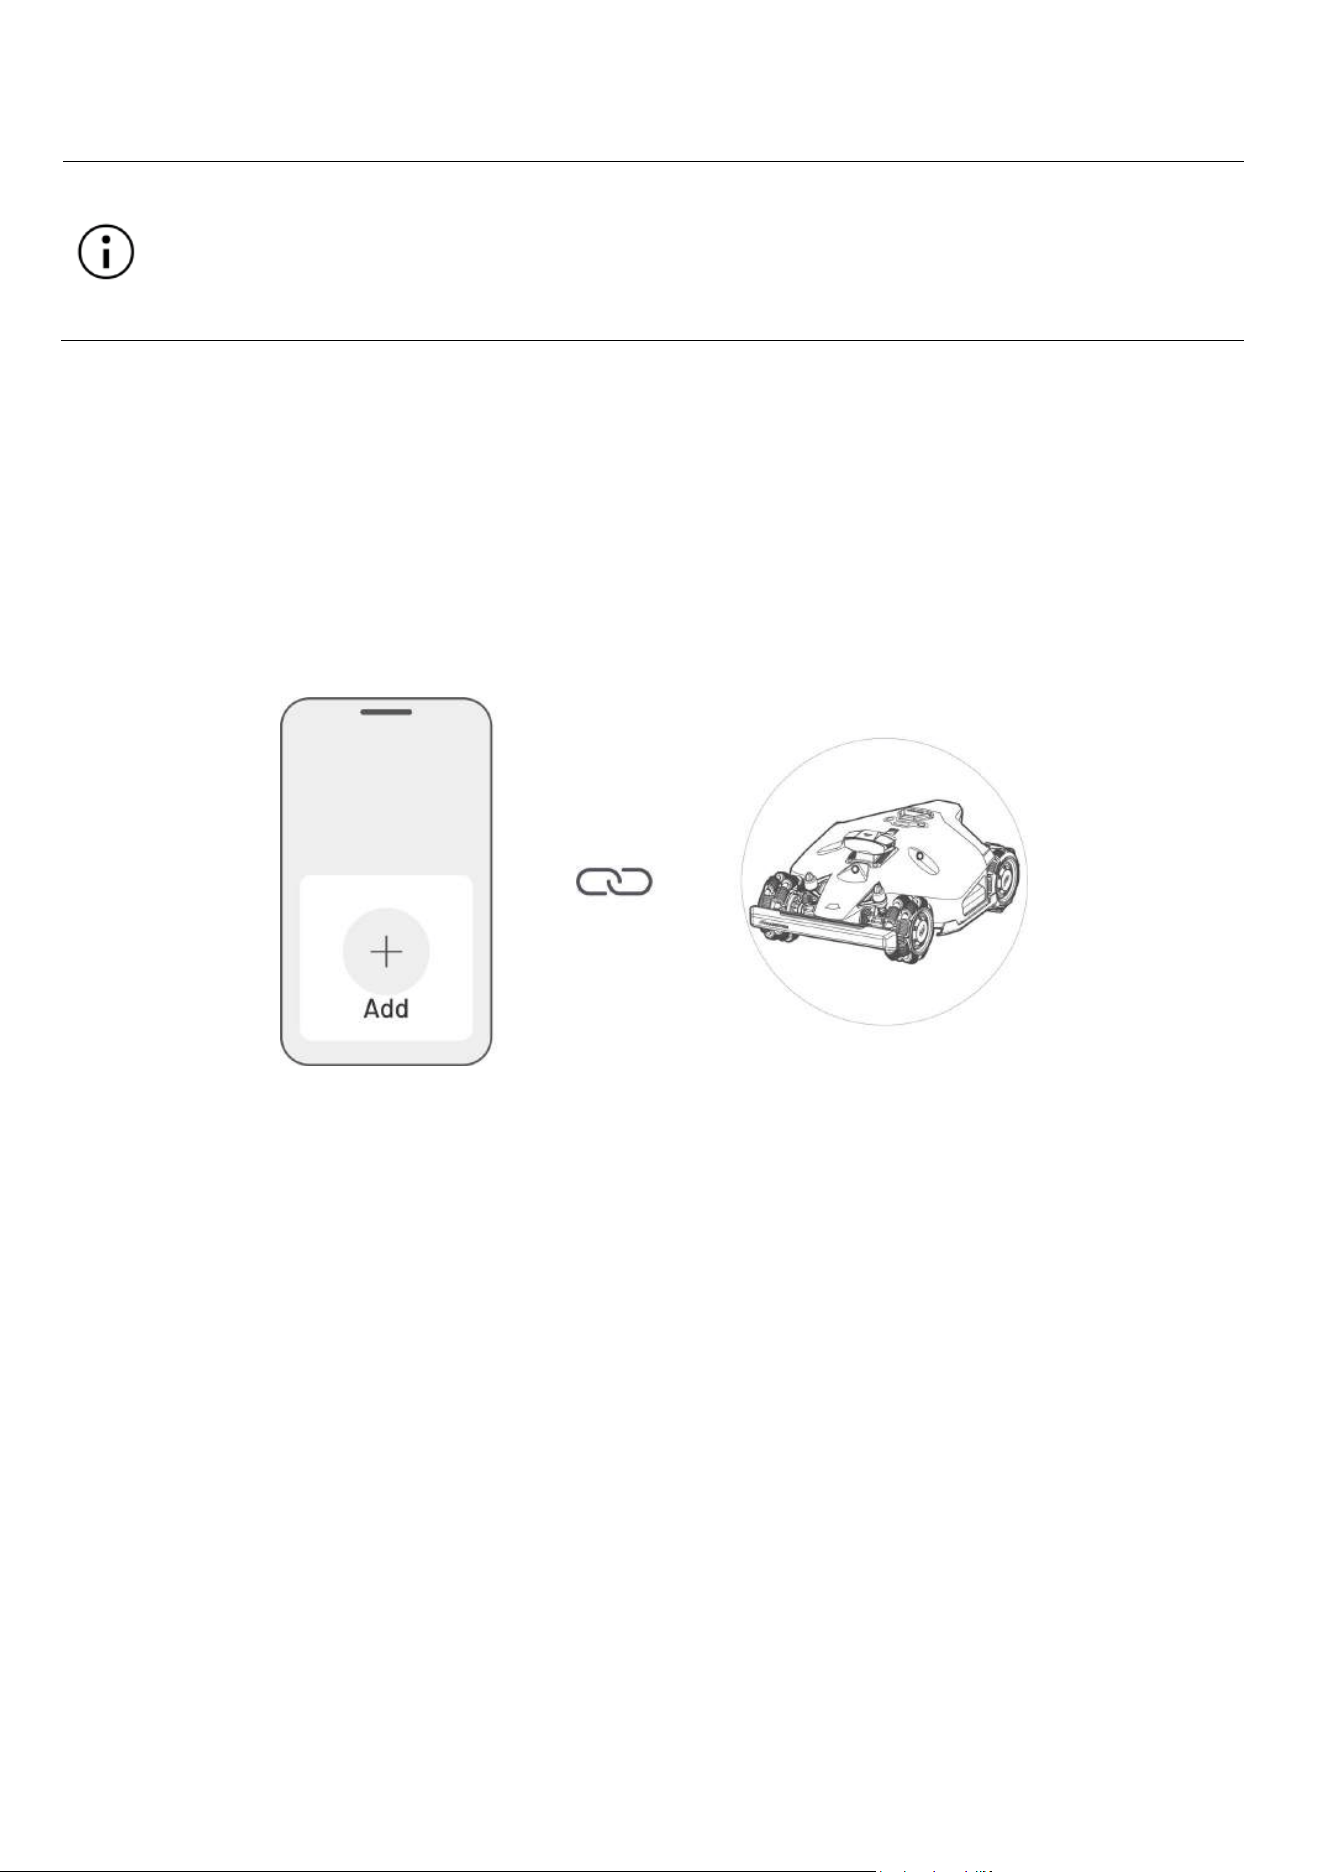
1. Tap + to add your robot or RTK reference station.
2. Select Add.
3. Follow the onscreen guidelines to set up the device.
4. Follow the onscreen instructions to connect the device and set network successfully.
- 36 -
4.4 Update Firmware
For optimal experience, ensure your robot and RTK reference station are updated to the latest firmware
version.
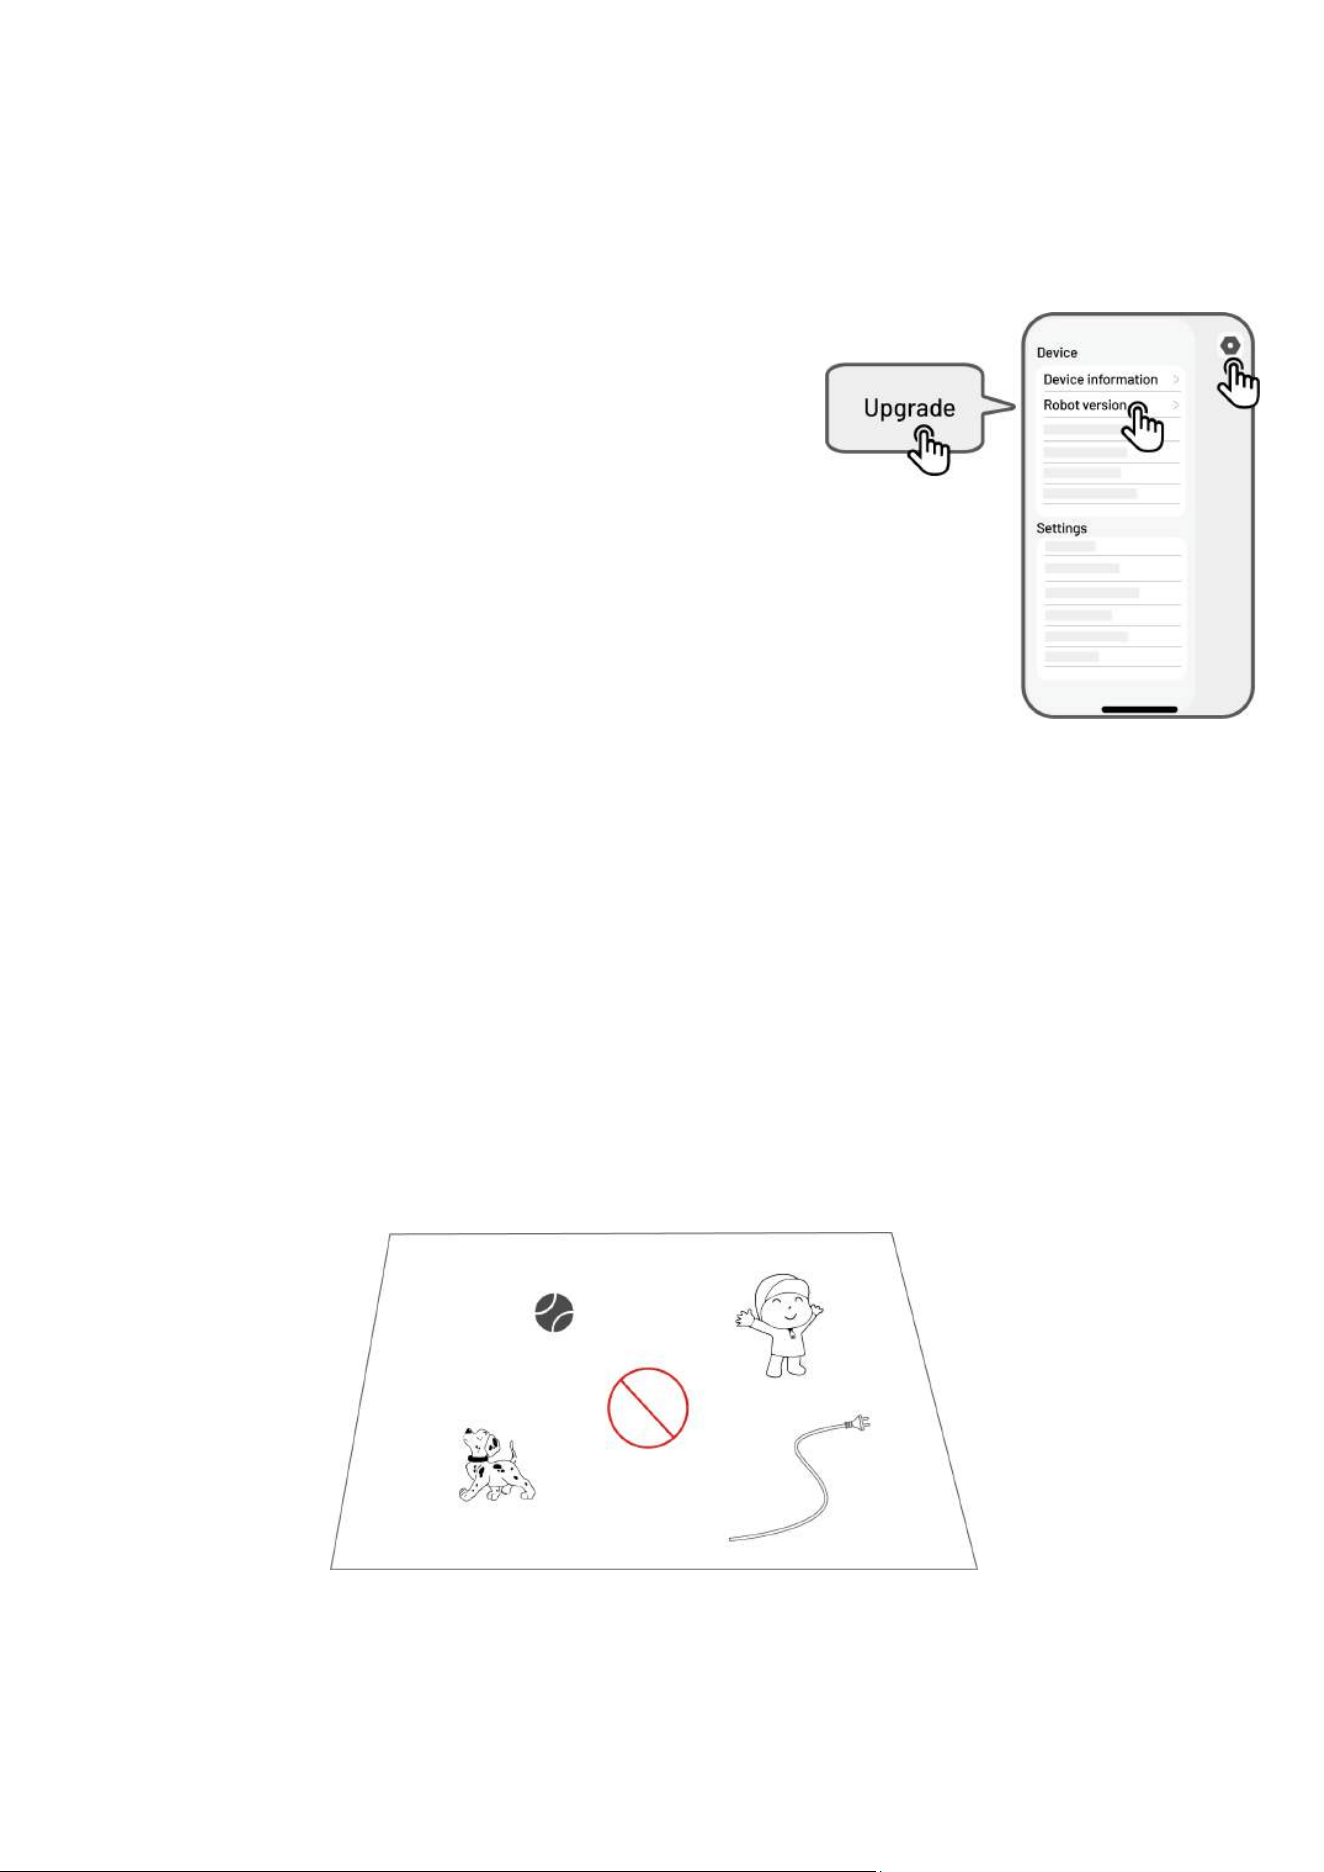
To update the firmware
1. Go to Settings > Device information > Robot version or
Settings > Robot version to update the firmware.
2. Ensure the robot is connected to a stable network.
During the update, please avoid exiting the app, performing
other operations, or turning off the robot.
4.5 Create a Map
4.5.1 Map out the Task Area
Before mapping
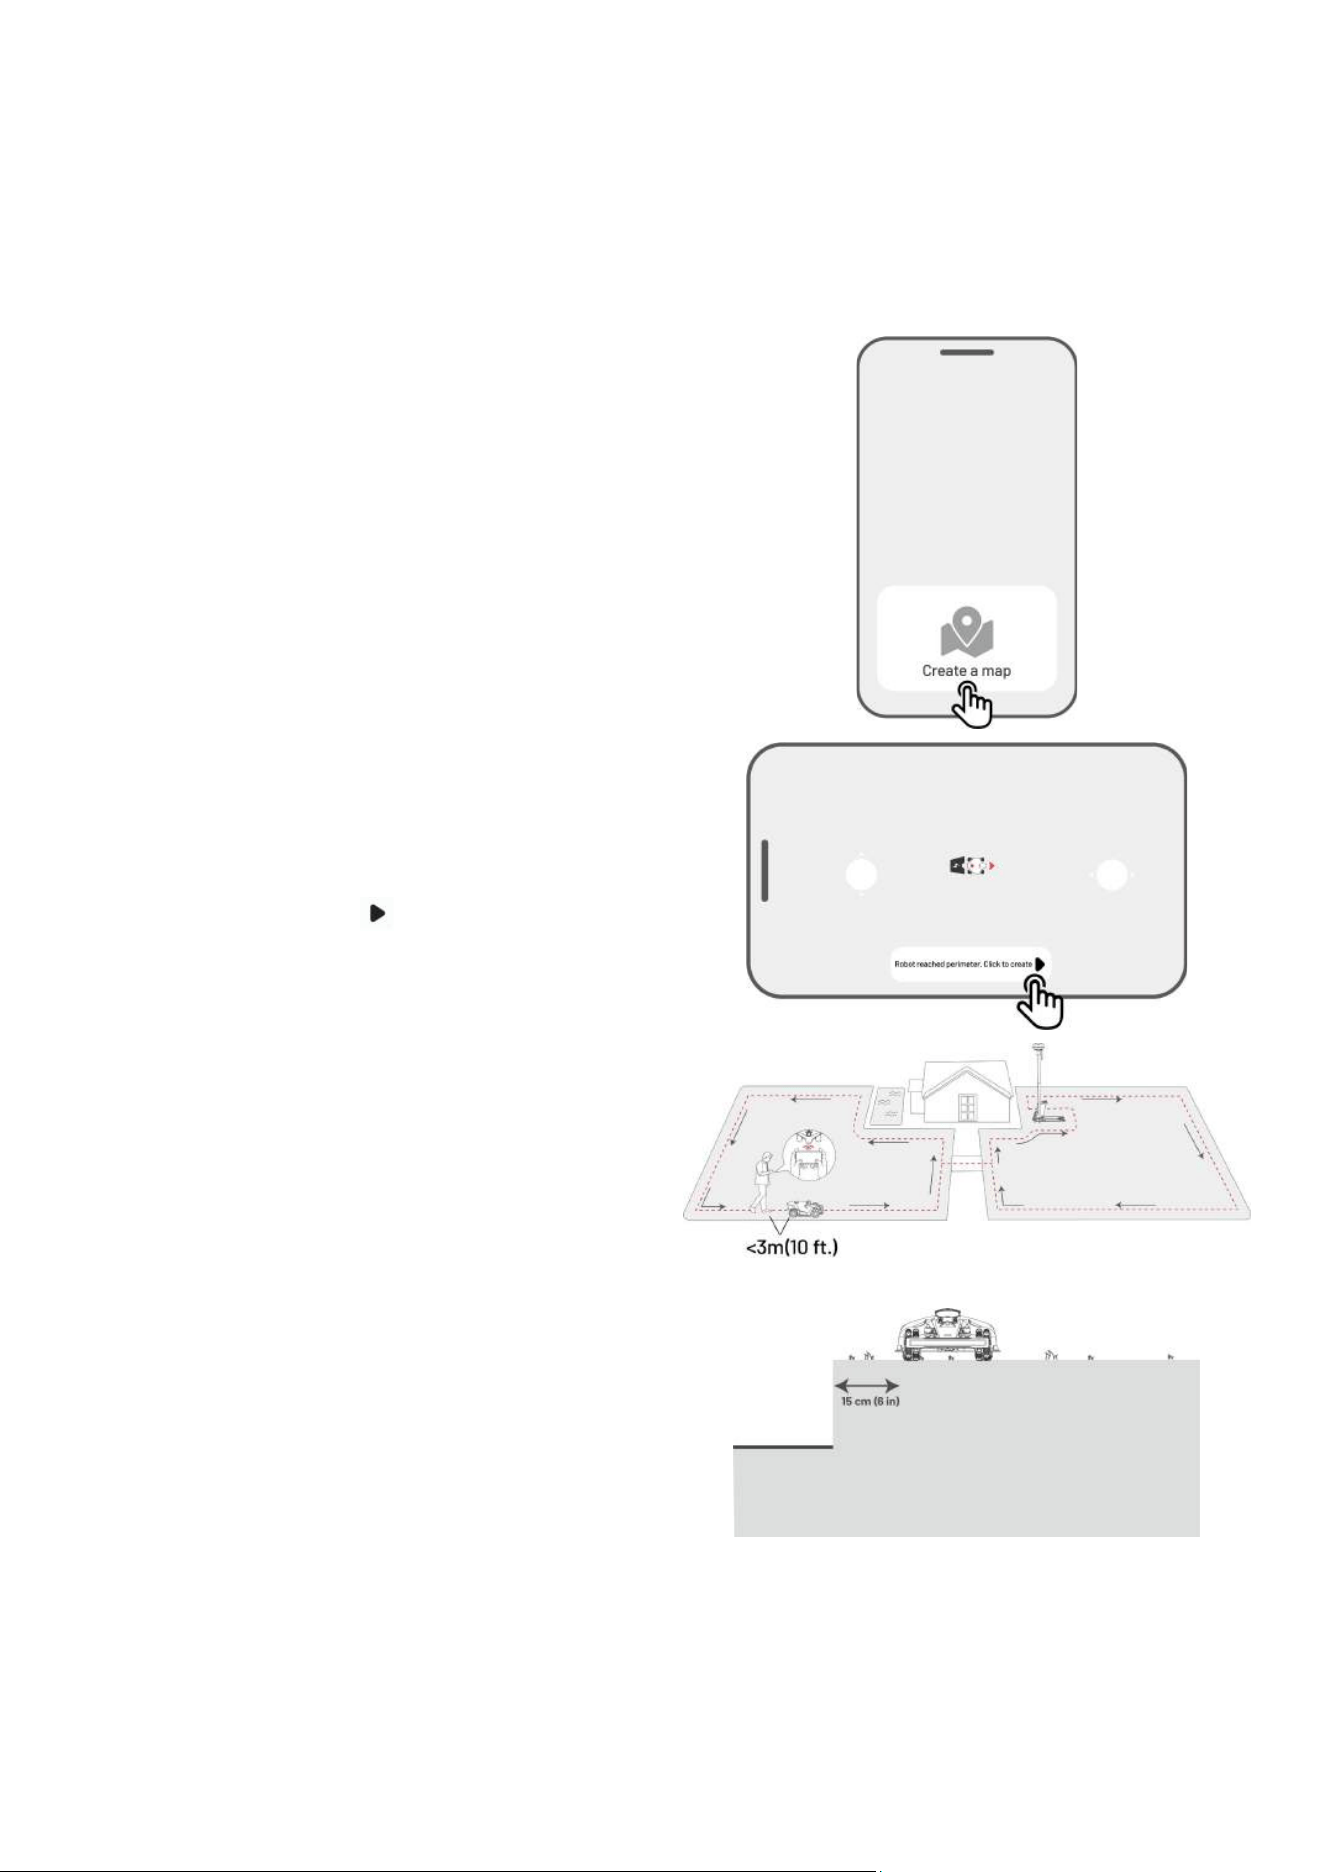
Before mapping, it is important to be aware of key considerations.
Remove debris, piles of leaves, toys, wires, stones, and other obstacles from the lawn. Make sure no
children or animals are on the lawn.
- 37 -
To map your lawn
1. Make sure the robot is powered on and your phone Bluetooth is on. Your phone will connect to the
robot automatically with a Bluetooth connection.
2. Tap Create a Map to start.
3. Control the robot to a proper starting point of
the perimeter and tap to start mapping.
4. Guide the robot along the perimeter. Keep the
controller within 3 meters (10 feet) of the robot
to maintain a stable Bluetooth connection.
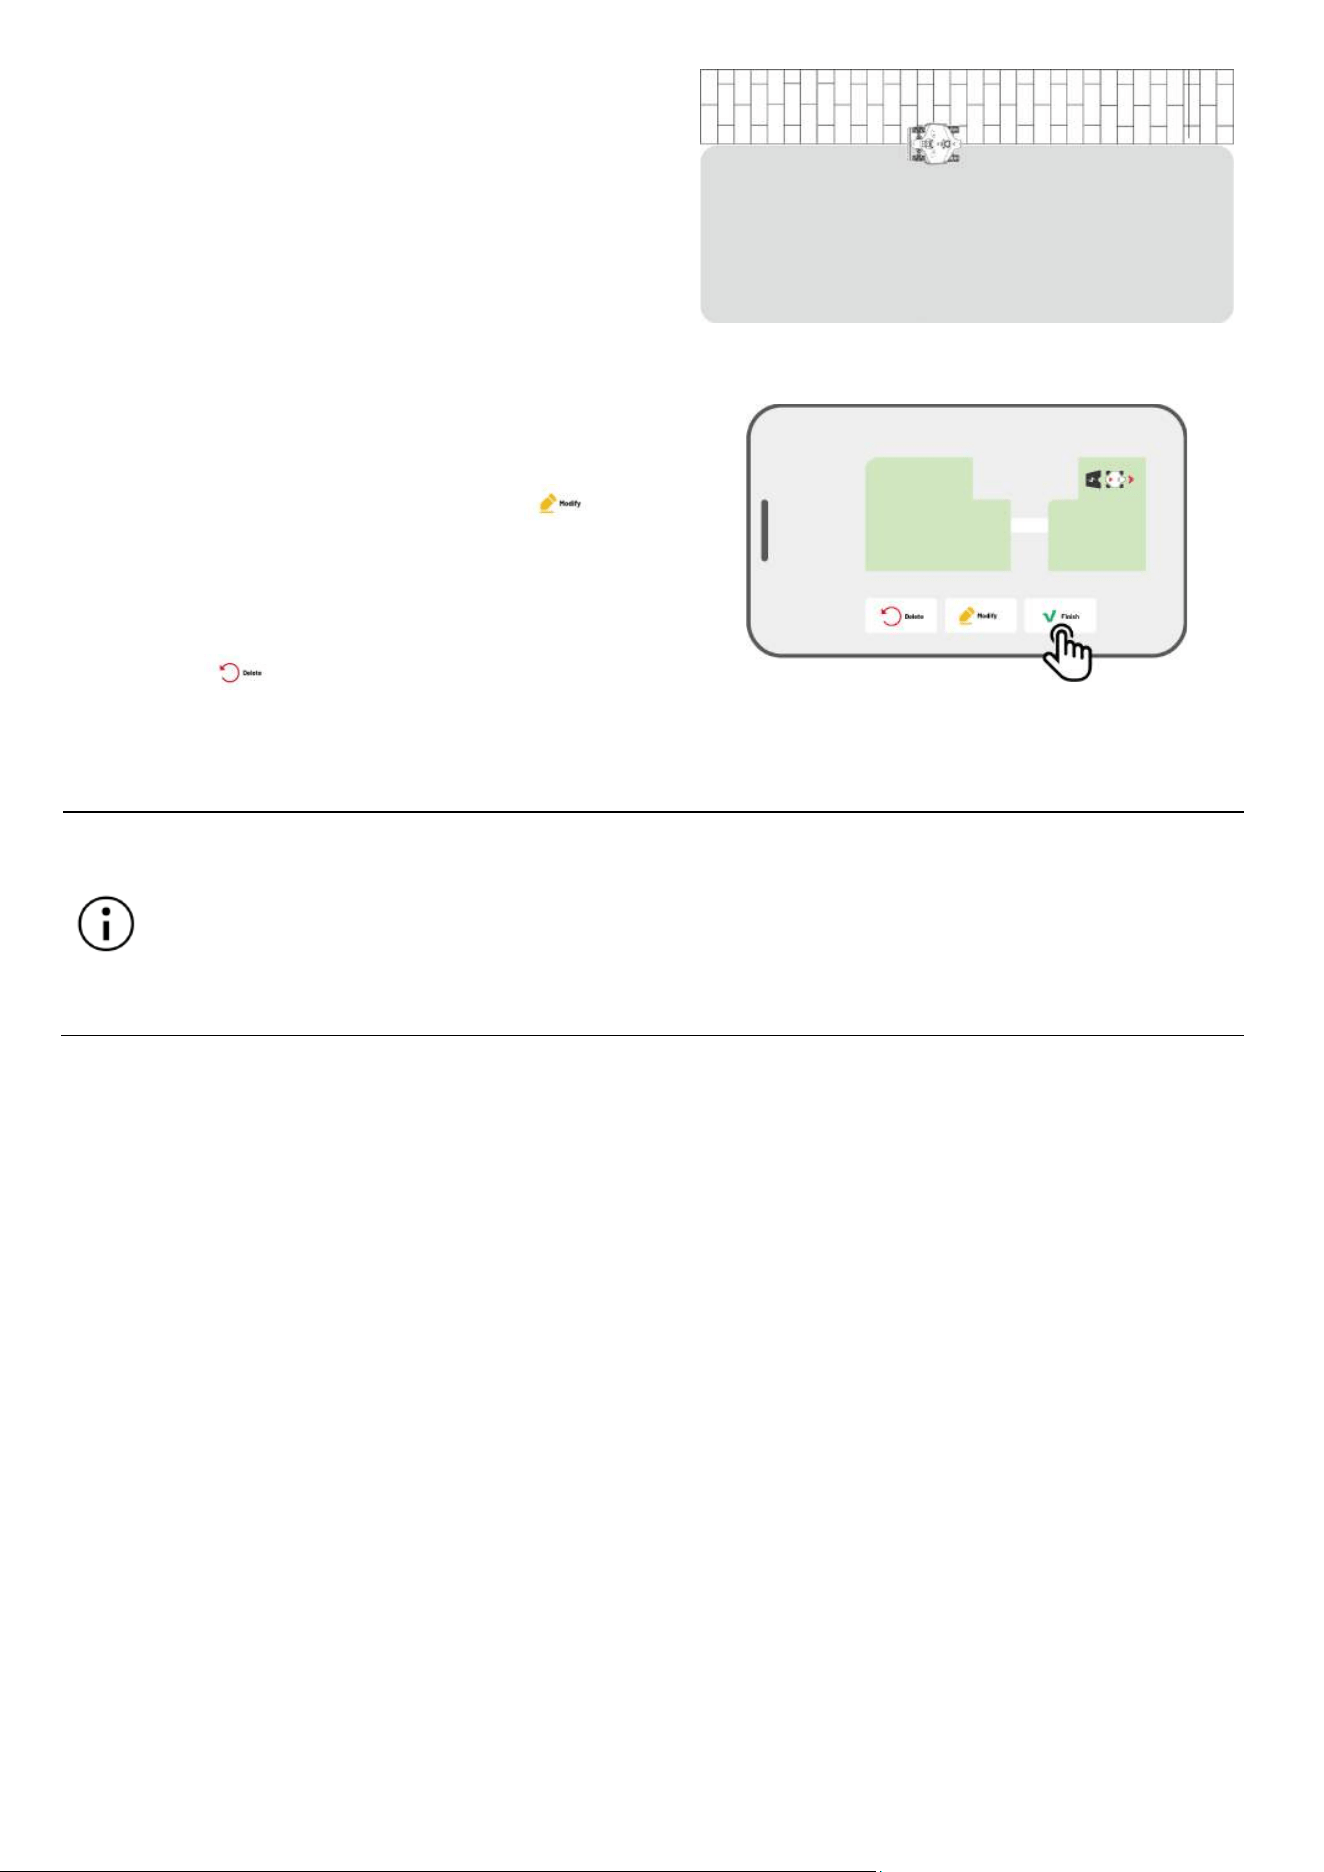
a) If the perimeter meets an obstacle such as a
wall, fence, ditch, or uneven pathway,
maintain a distance of at least 15 cm (6
inches) from the perimeter while guiding
the robot.
- 38 -
b)
If the perimeter meets a level, even
pathway, it is recommended to guide the
robot on the pathway for more efficient
cutting.
5. Control the robot back to the starting point and
tap Finish to finish mapping.
To modify the set perimeter, tap and
guide Yuka back along the path to the
intended location.
Tap to delete all existing perimeters
and remap if necessary.
NOTE
When mapping, the system will estimate the area. Please ensure that the area is not more
than the upper limit (See Technical Specifications for more information), or the task area
mapping will fail.
Drive The robot out of the task area or no-go zone first if a new area is created.
- 39 -
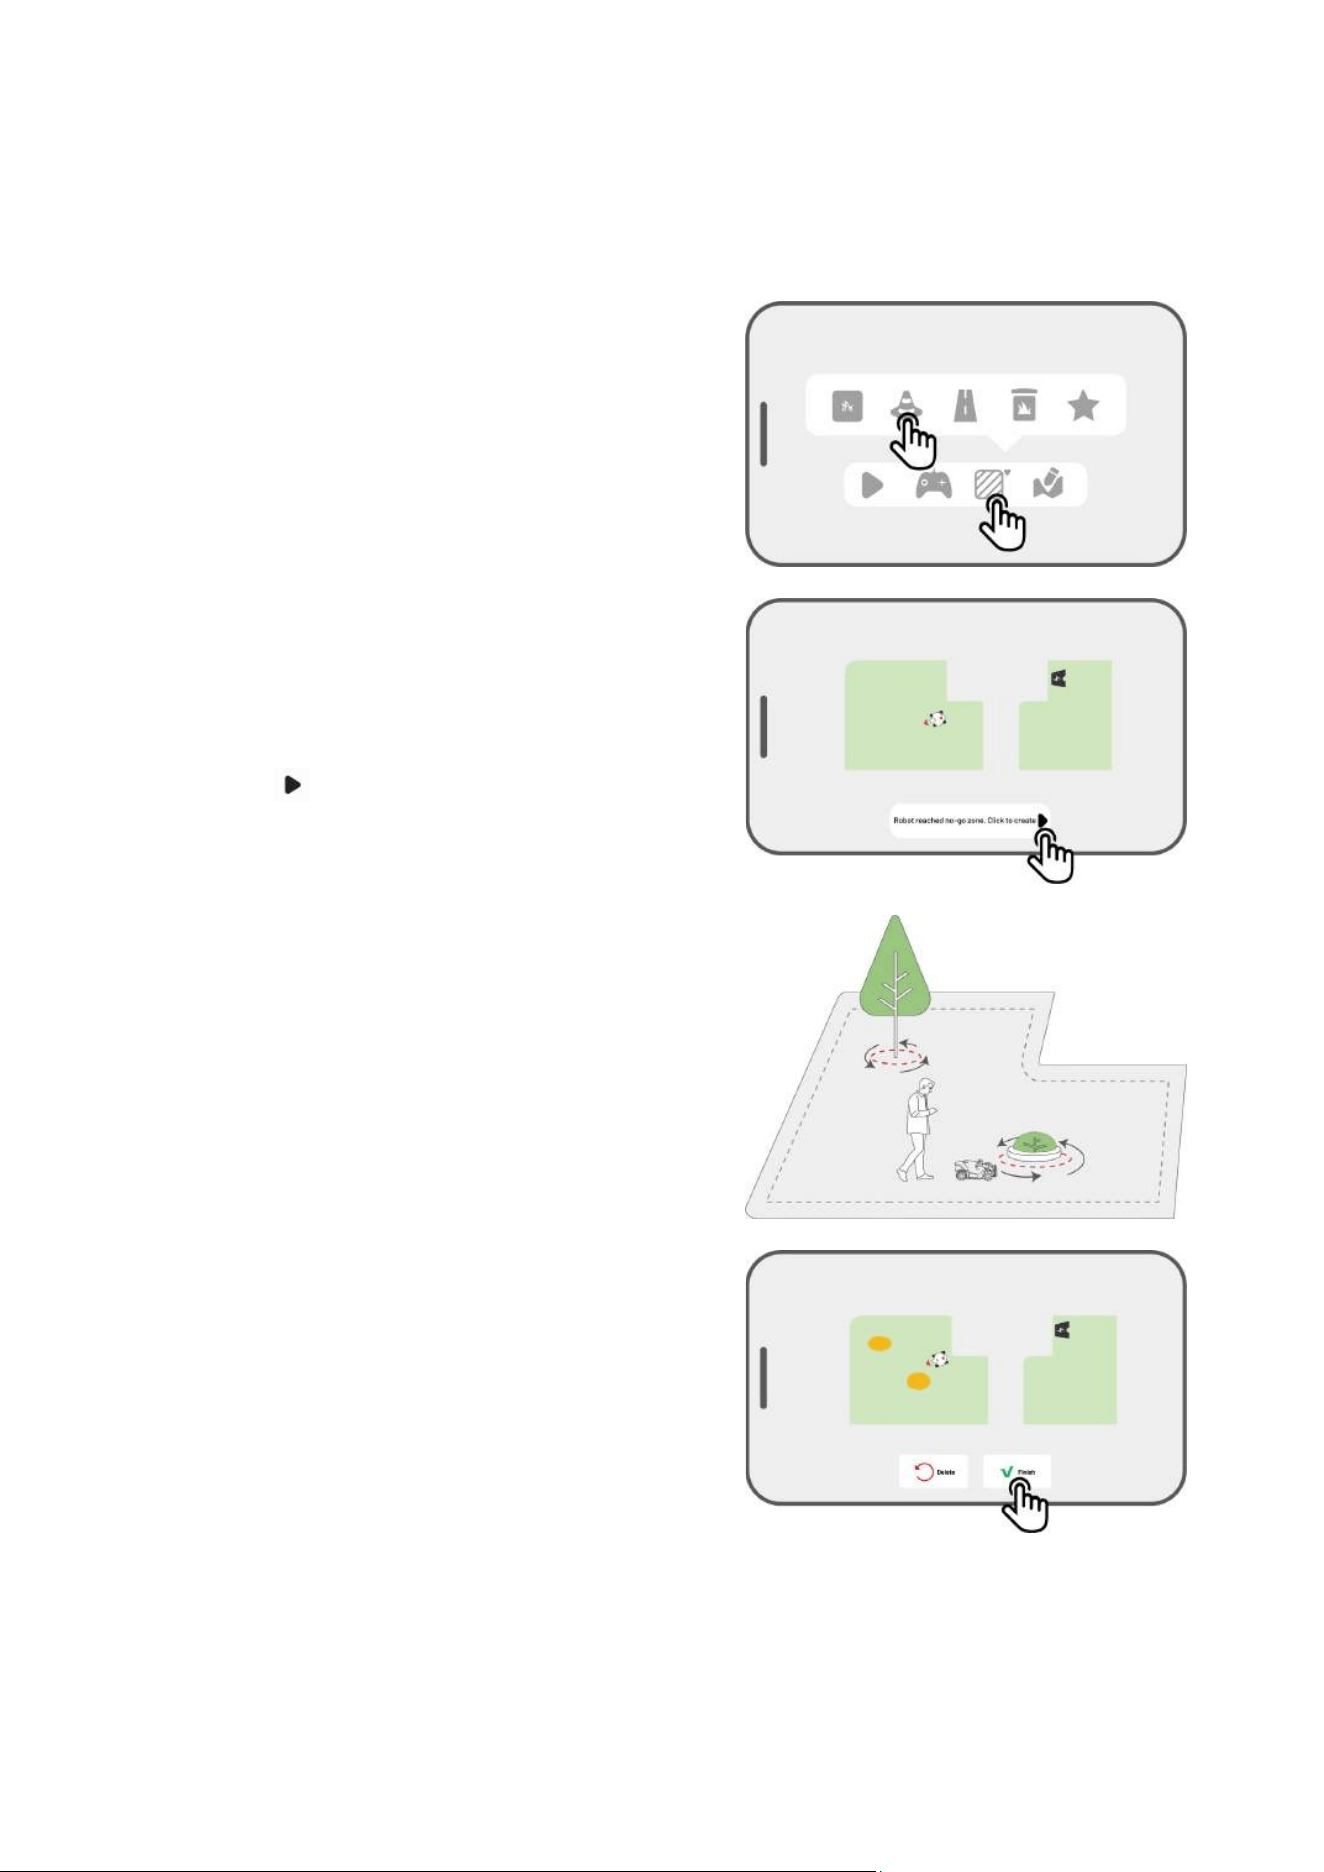
4.5.2 Map out a No-go Zone
No-go zones are created for pools, flowerbeds, trees, roots, ditches, and any other obstructions present in
the lawn. The robot will avoid mowing inside these designated areas.
1. Tap Create > No-go zone on the Map page.
2. Guide the robot around the perimeter of a no-go
zone, then tap to start mapping.
3. Control the robot along the perimeter of the no-
go zone and back to the start point to complete
mapping the no-go zone.
4. Tap Finish to save the setting.
- 40 -
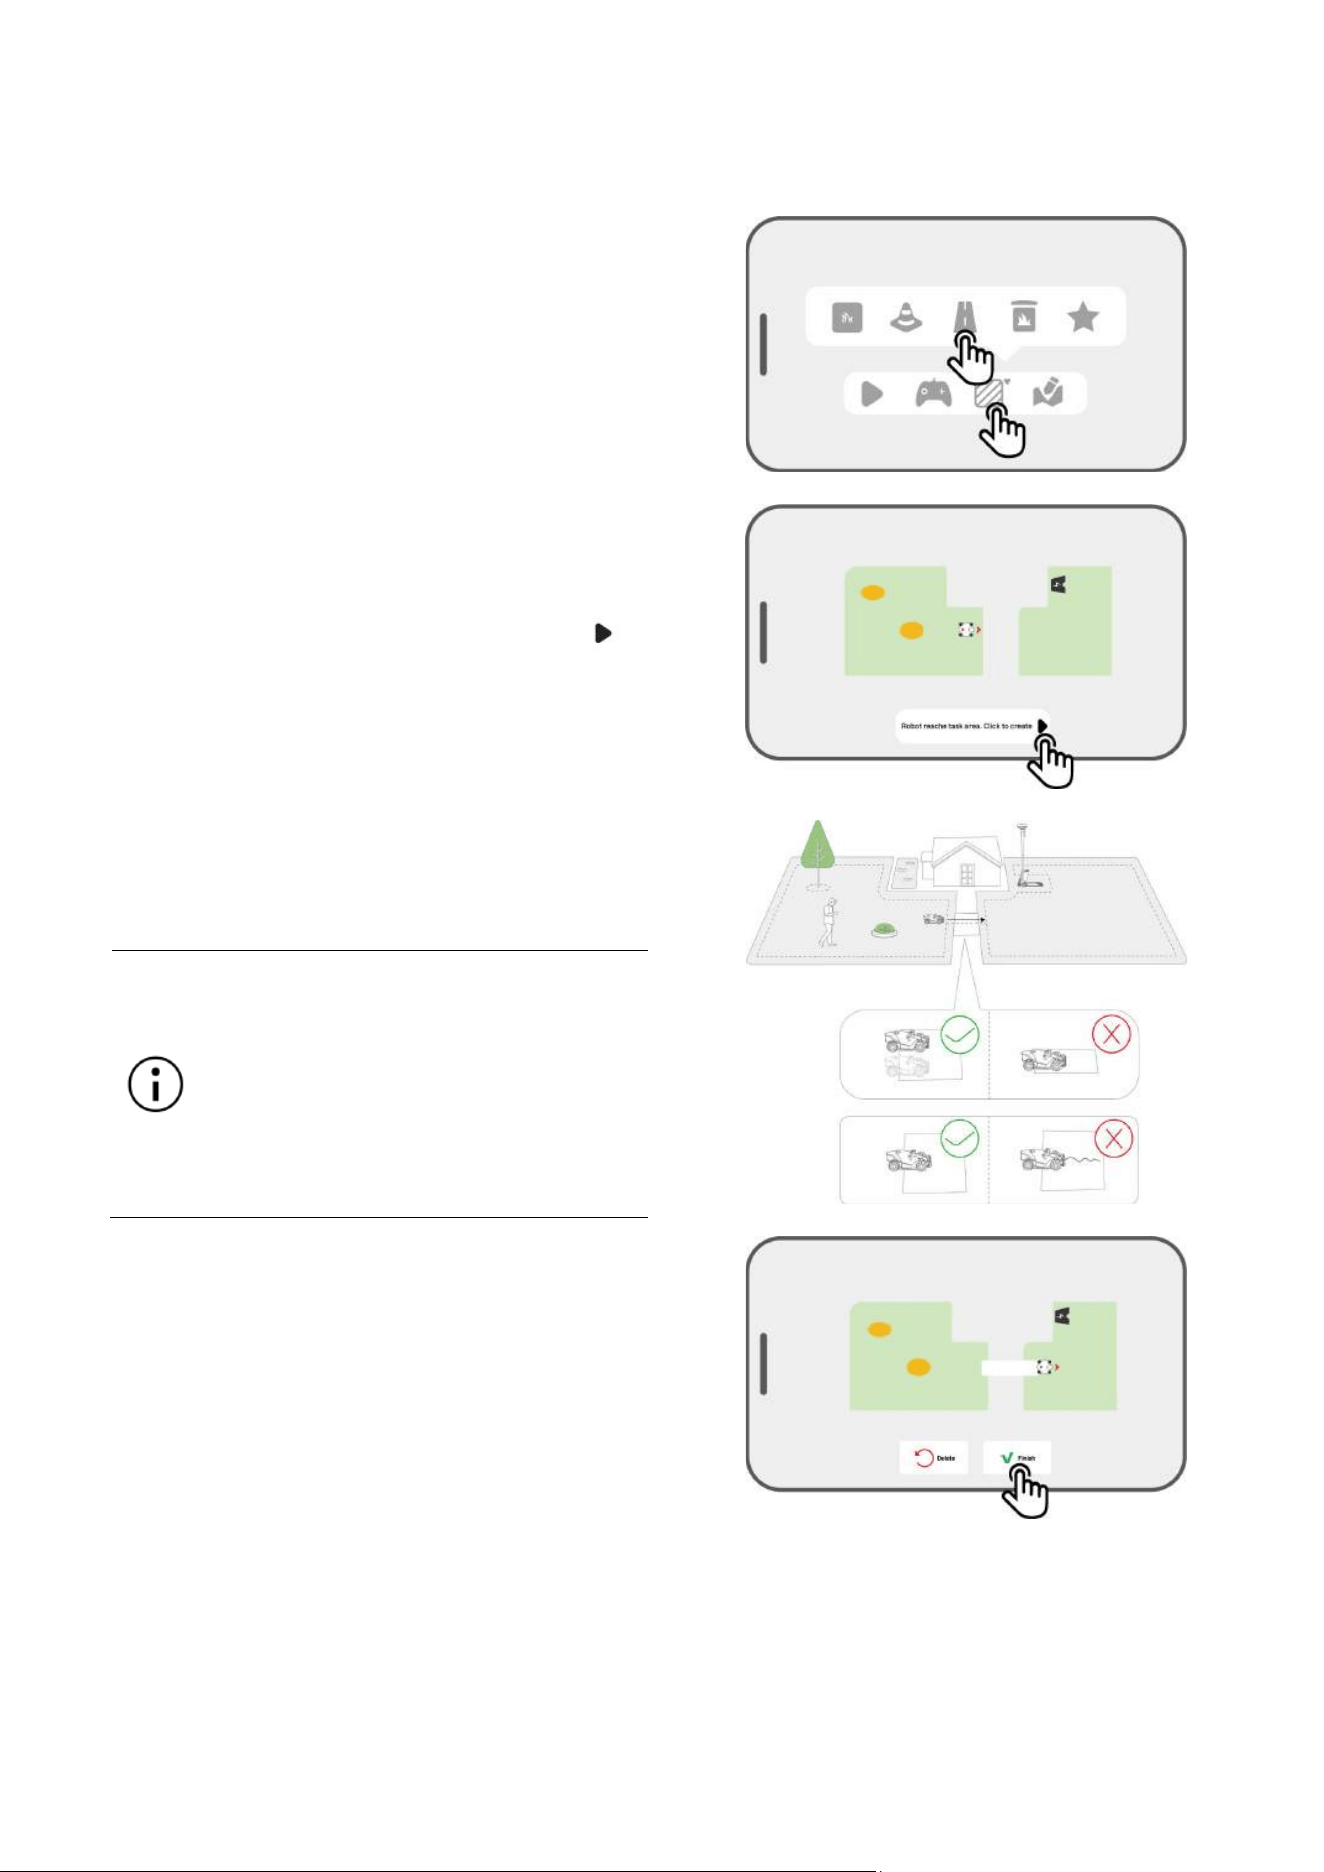
4.5.3 Map out a Channel
The channel is intended to connect various task areas or link the task area with the charging station.
1. Tap Create > Channel on the Map page.
2. Control the robot into a task area. Tap to
start mapping.
3. Manually control the robot from a task area to
another task area or to the charging station.
NOTE
The channel should be wide
enough to accommodate two
robots side by side.
The channel should be free
from significant bumps.
4. Tap Finish to save the setting.
- 41 -
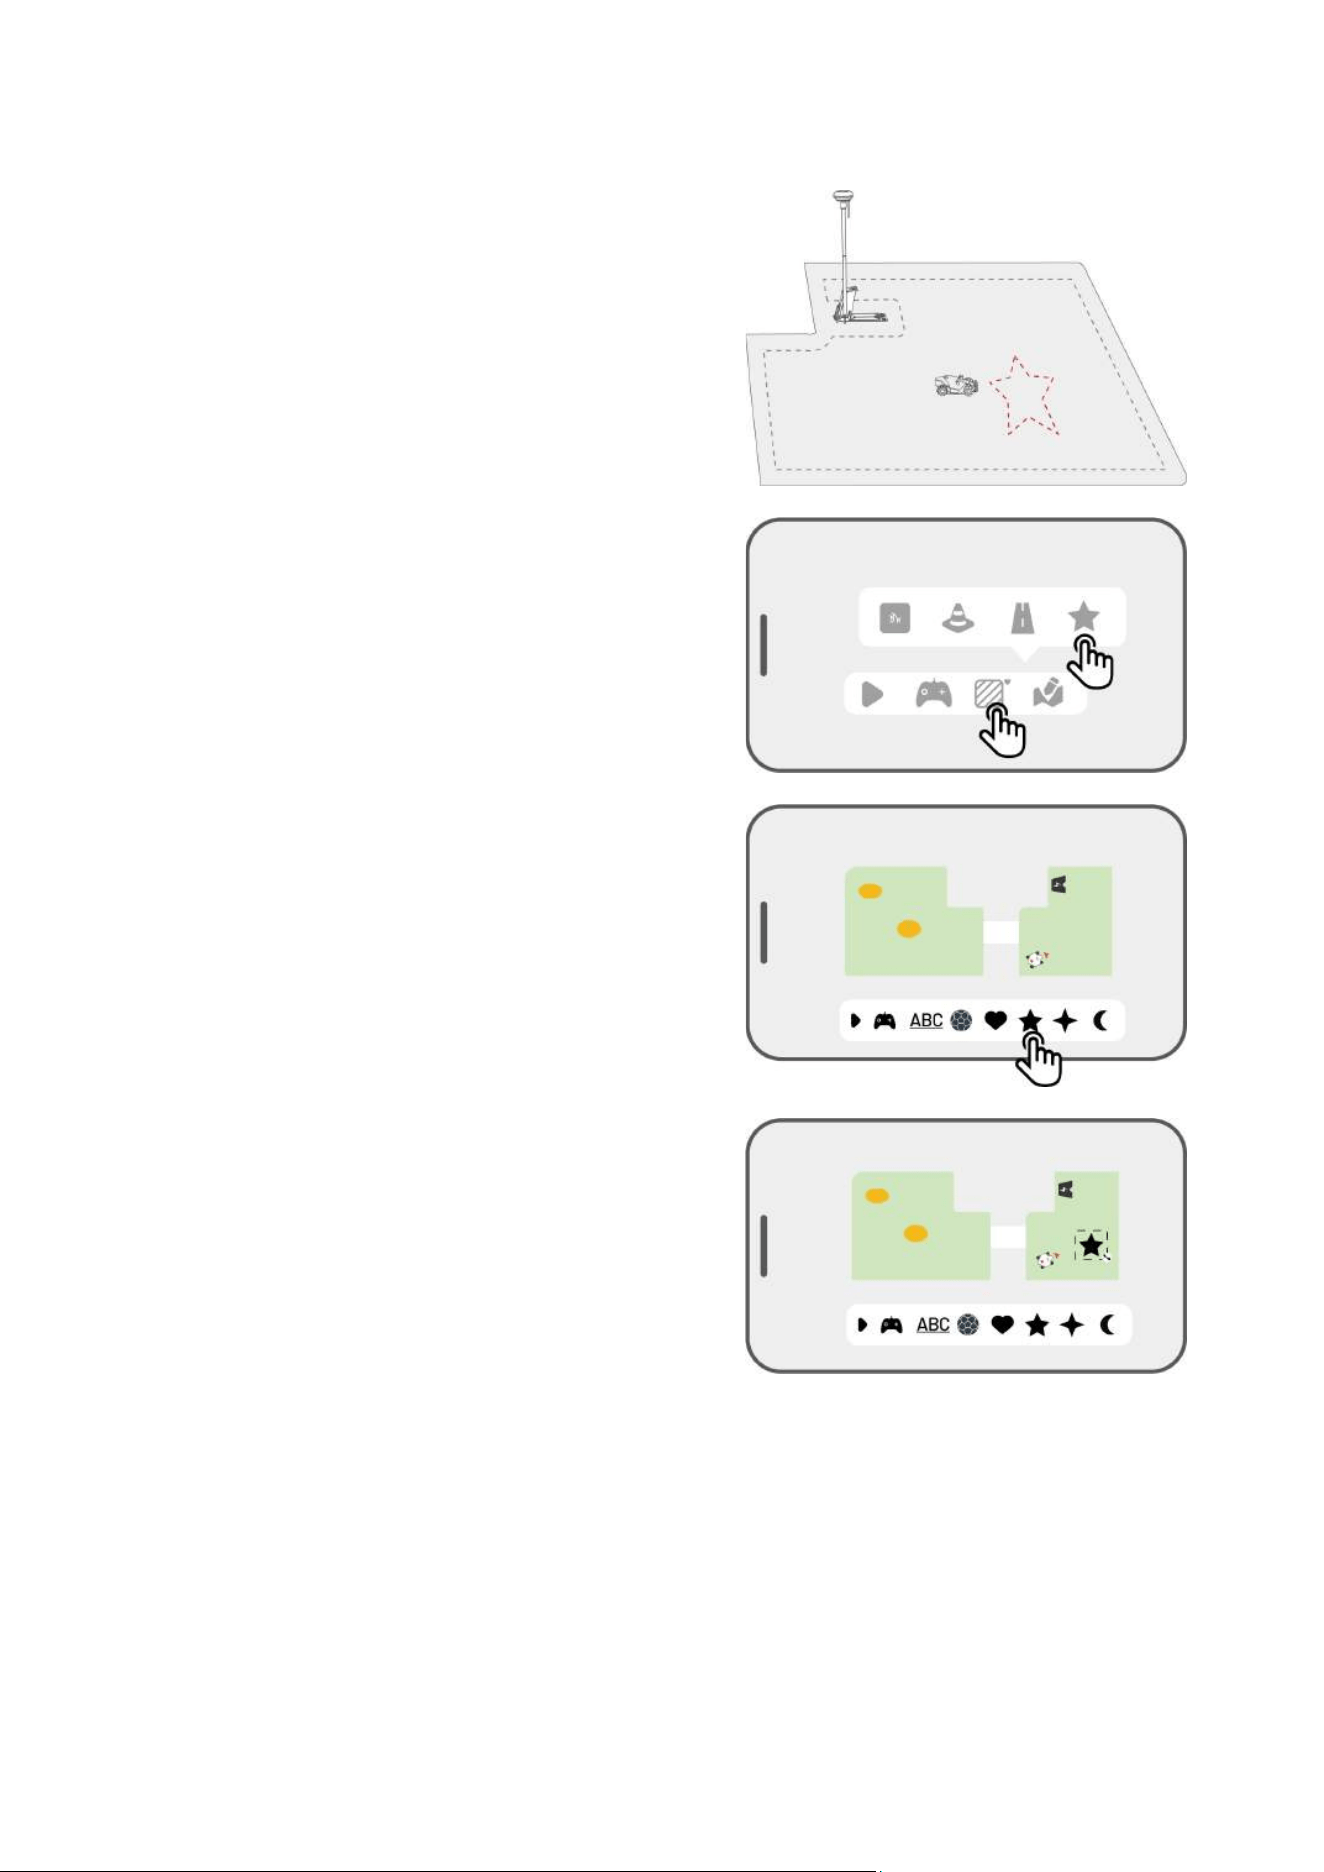
4.5.4 Create a Pattern
The pattern is designed to personalize your lawn-
cutting experience, and after it's added, the grass on
the patterned area will be preserved while cutting to
maintain its design. See the available patterns in the
app.
1. Tap Create > Pattern on the Map page.
2. Choose the pattern that you want to create.
3. Drag and zoom in/out the pattern to adjust its
location and size.
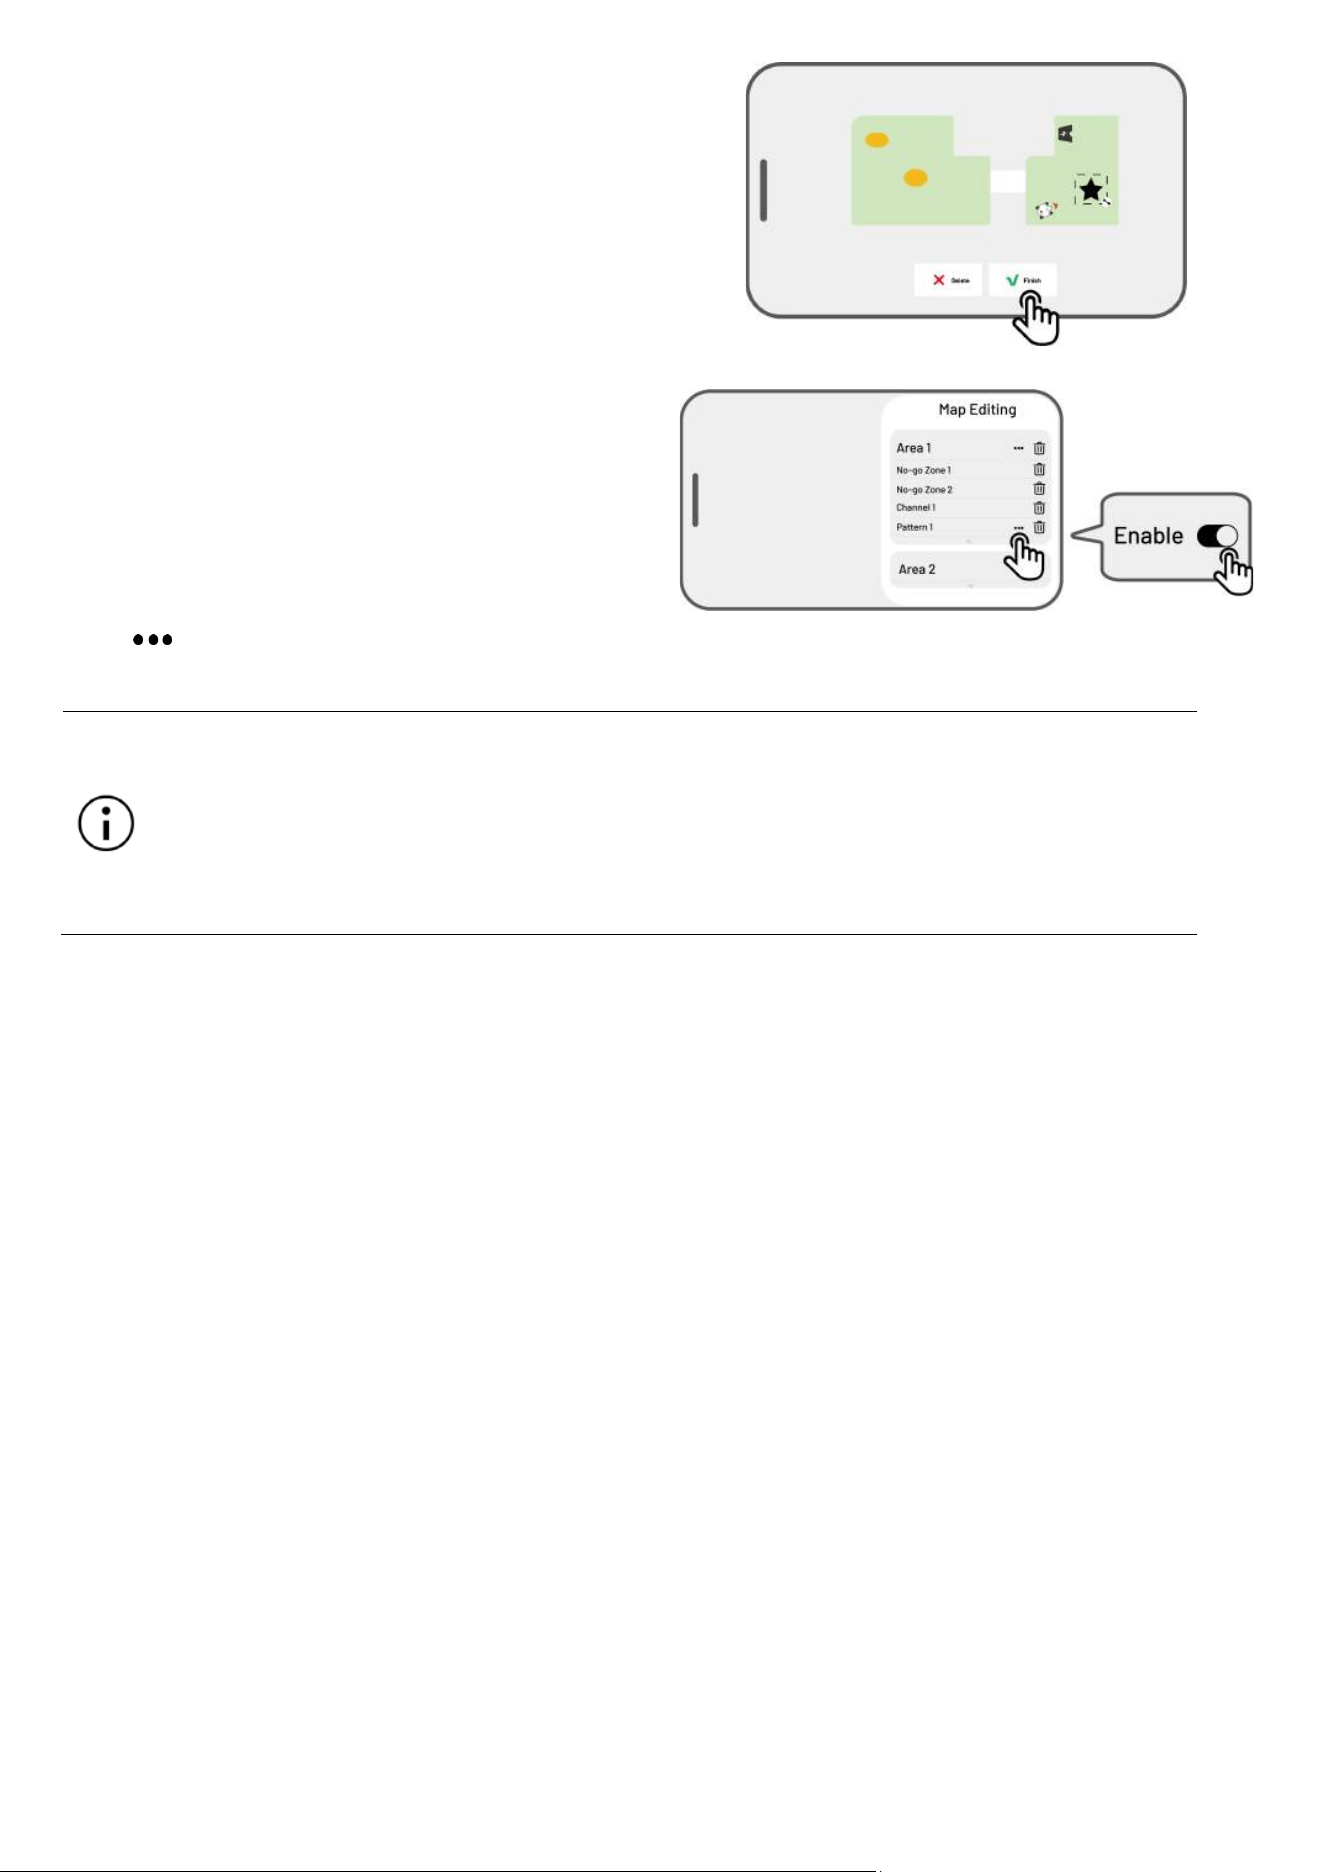
- 42 -
4. Tap Finish to finish the setup.
After creating a pattern, you can choose to enable or
disable it at any time. When enabled, the grass in the
patterned area will be preserved during mowing to
maintain its design, or mowed when disabled. Tap
Edit > to open the pop-up.
NOTE
Each task area can have a maximum of 10 patterns, with a total limit of 50 patterns
overall.
The pattern should not be placed too close to the task area perimeter, no-go zone, or
charging station. Maintain a minimum distance equal to the width of the robot.
- 43 -
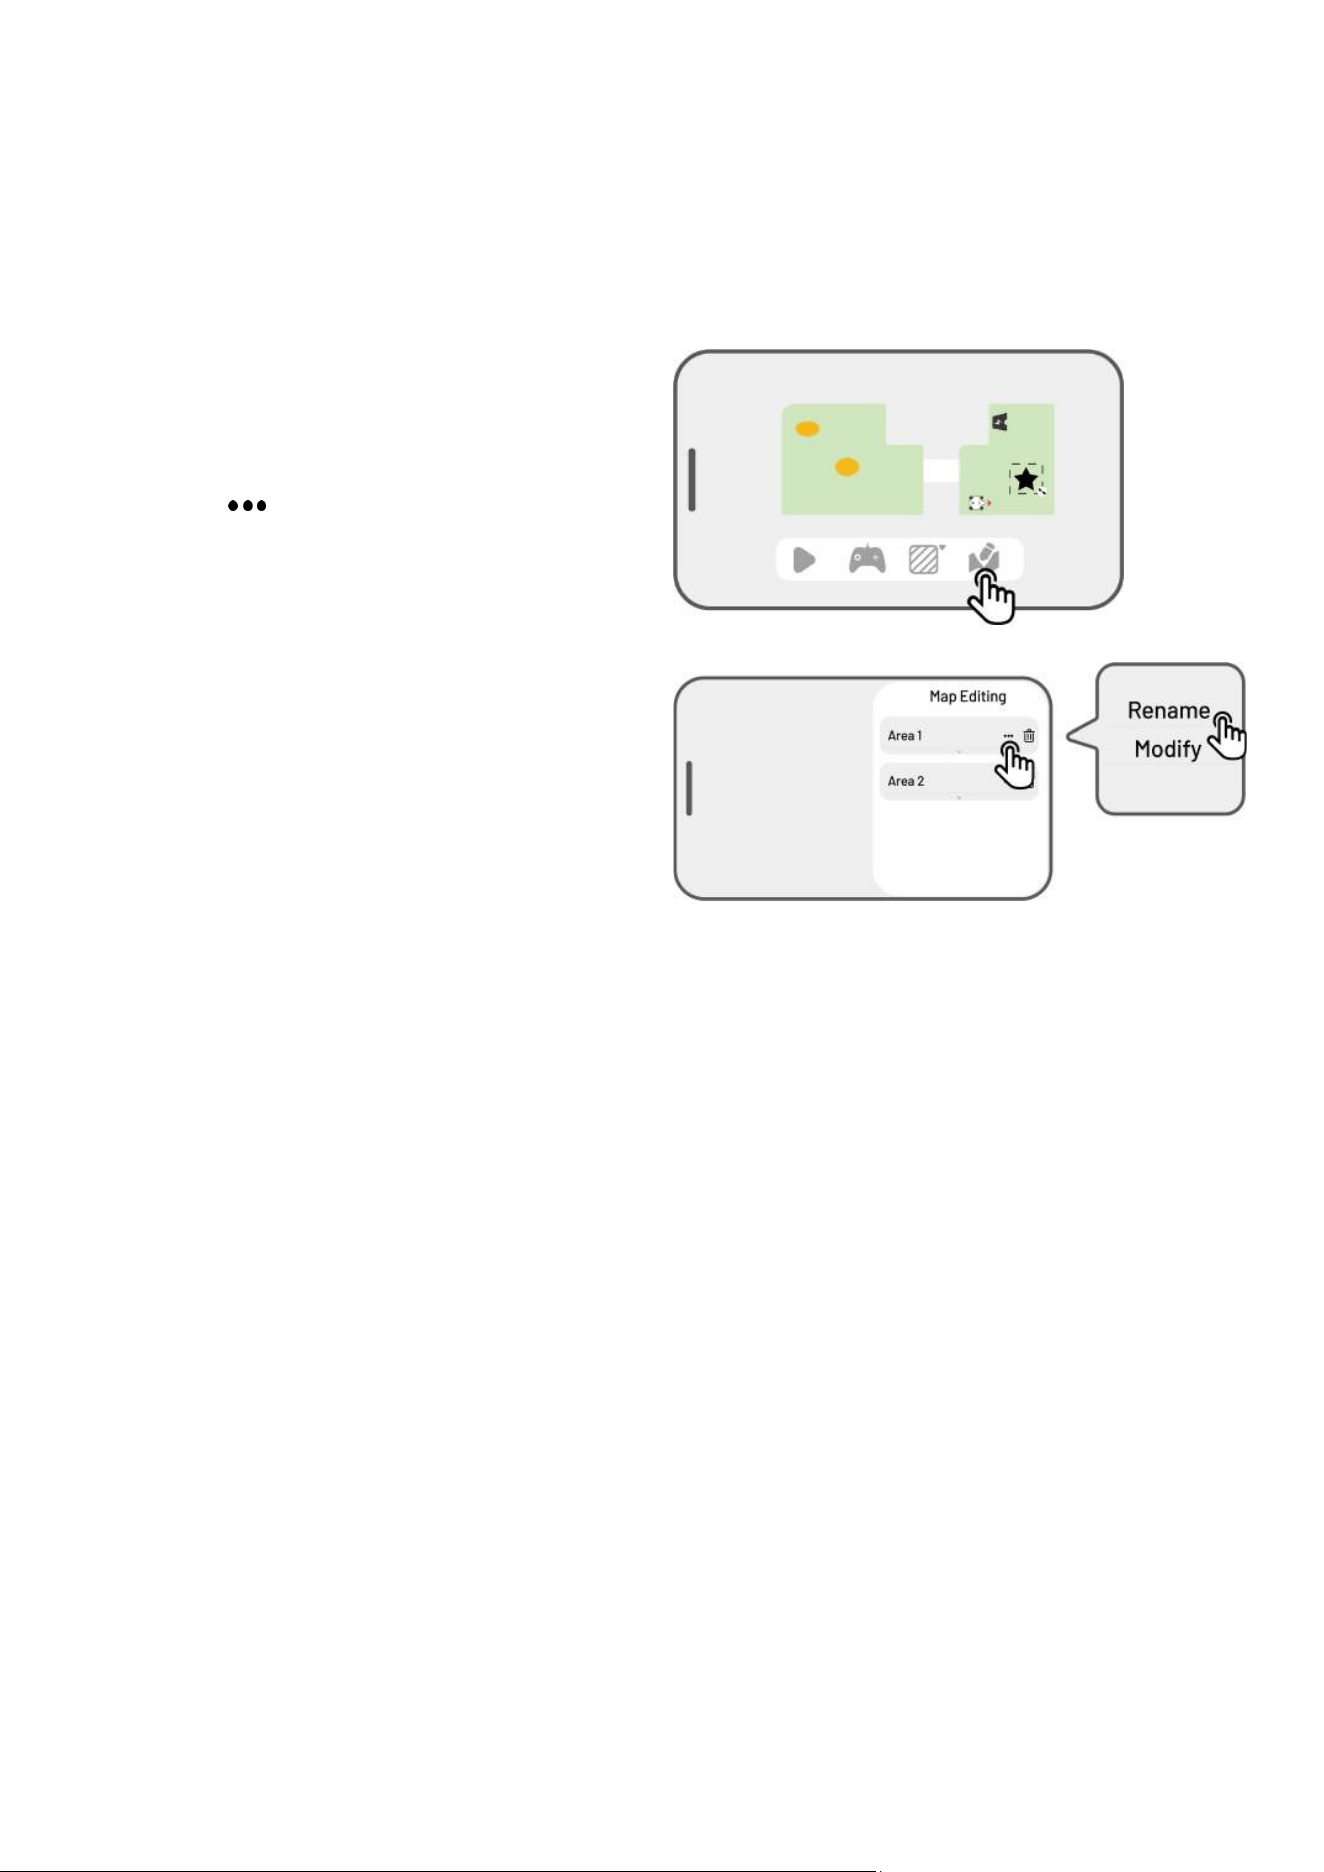
4.5.5 Edit Your Map
Rename the area
Mammotion allows you to create multiple areas. For easy management, you can rename the area.
1. Tap Edit > to open the popup.
2. Tap Rename to set a name for the area.
- 44 -
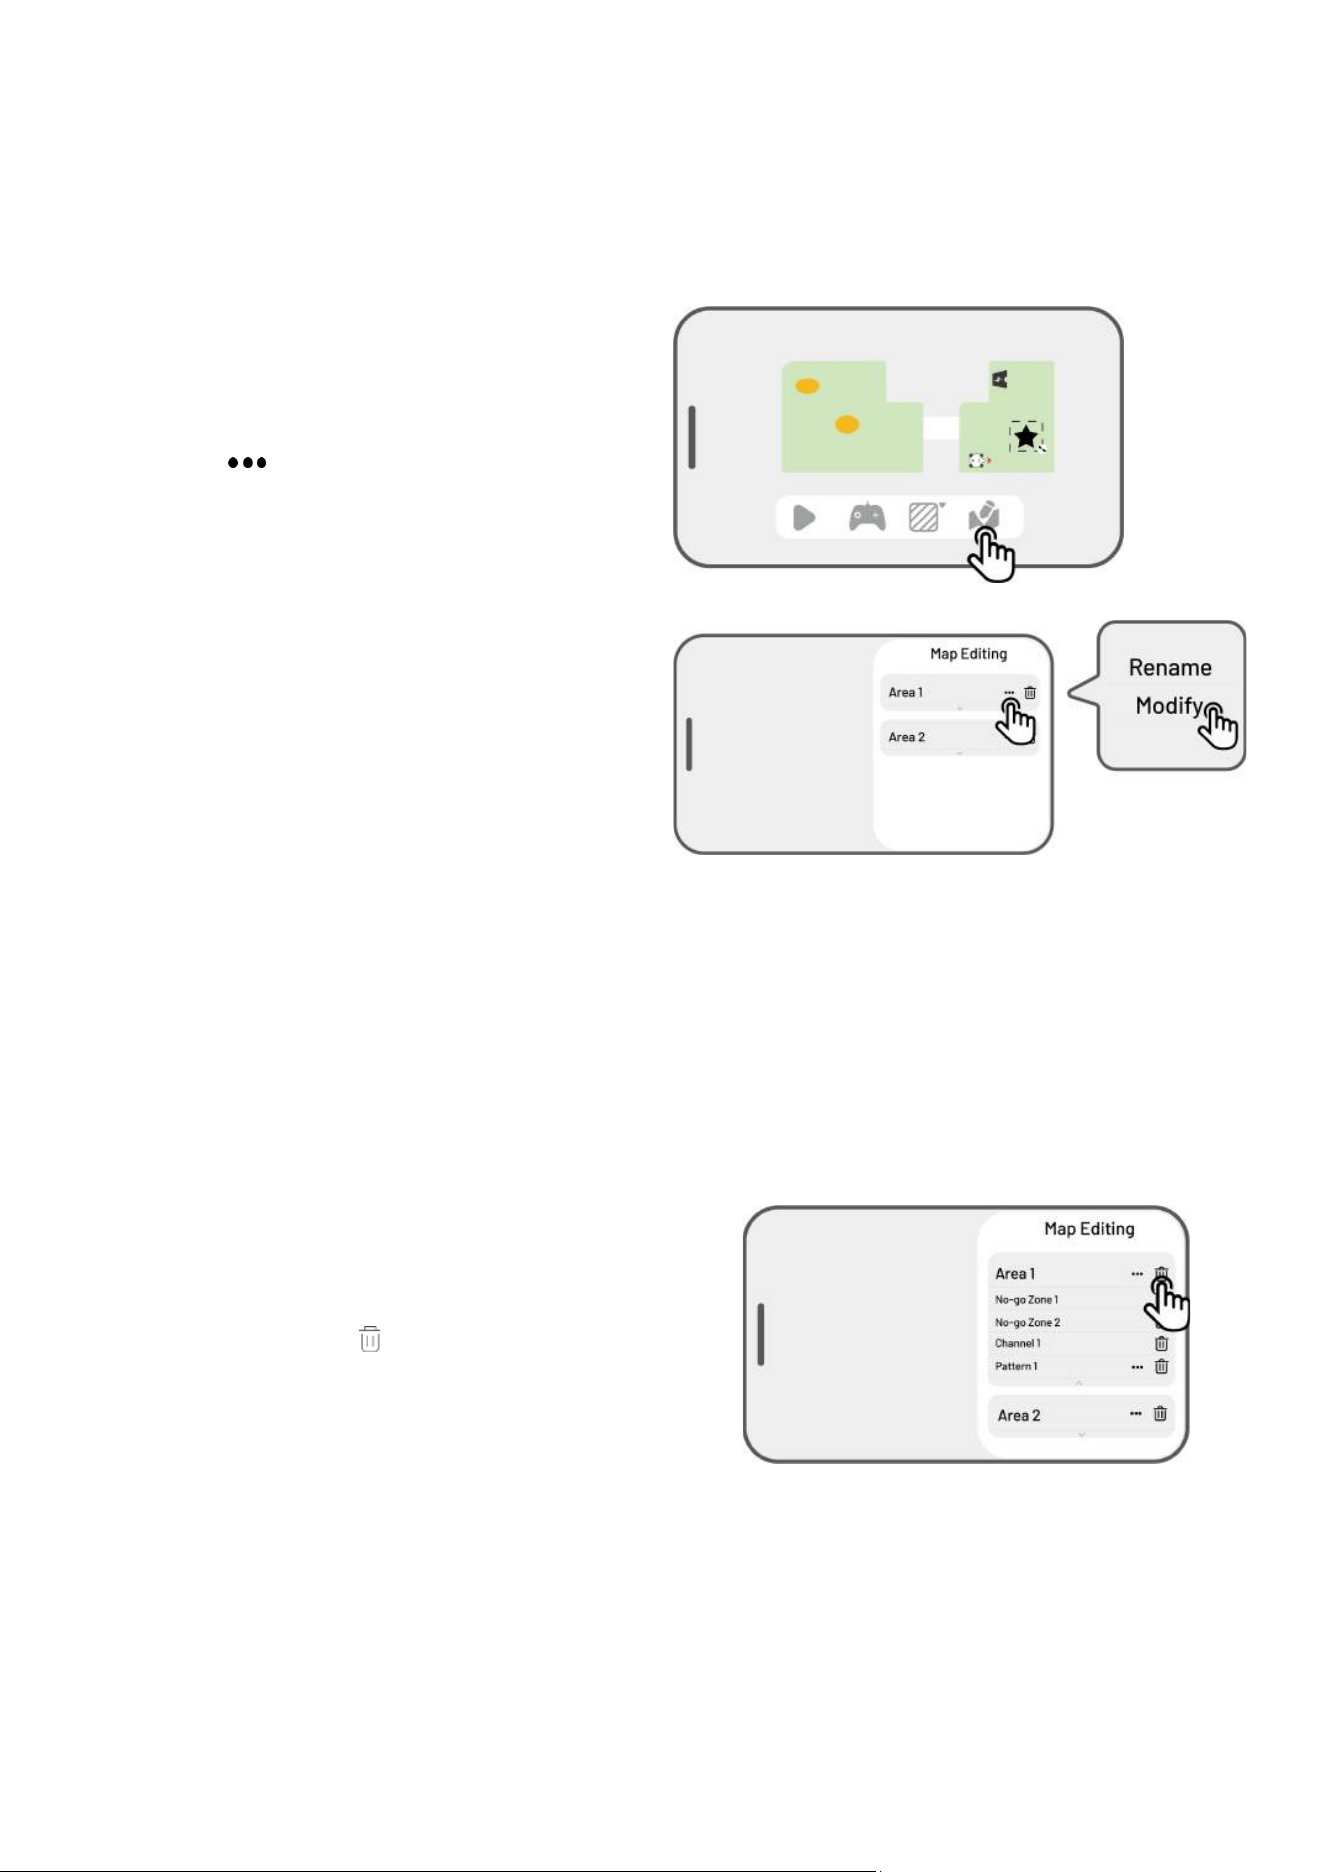
Modify the area
If changes occur in your lawn after mapping, such as planting a tree near the perimeter, the appearance
of a hole, or weak positioning signals, you can adjust the mapped area without needing to delete it entirely.
1. Tap Edit > to open the popup.
2. Tap Modify to re-draw the perimeter.
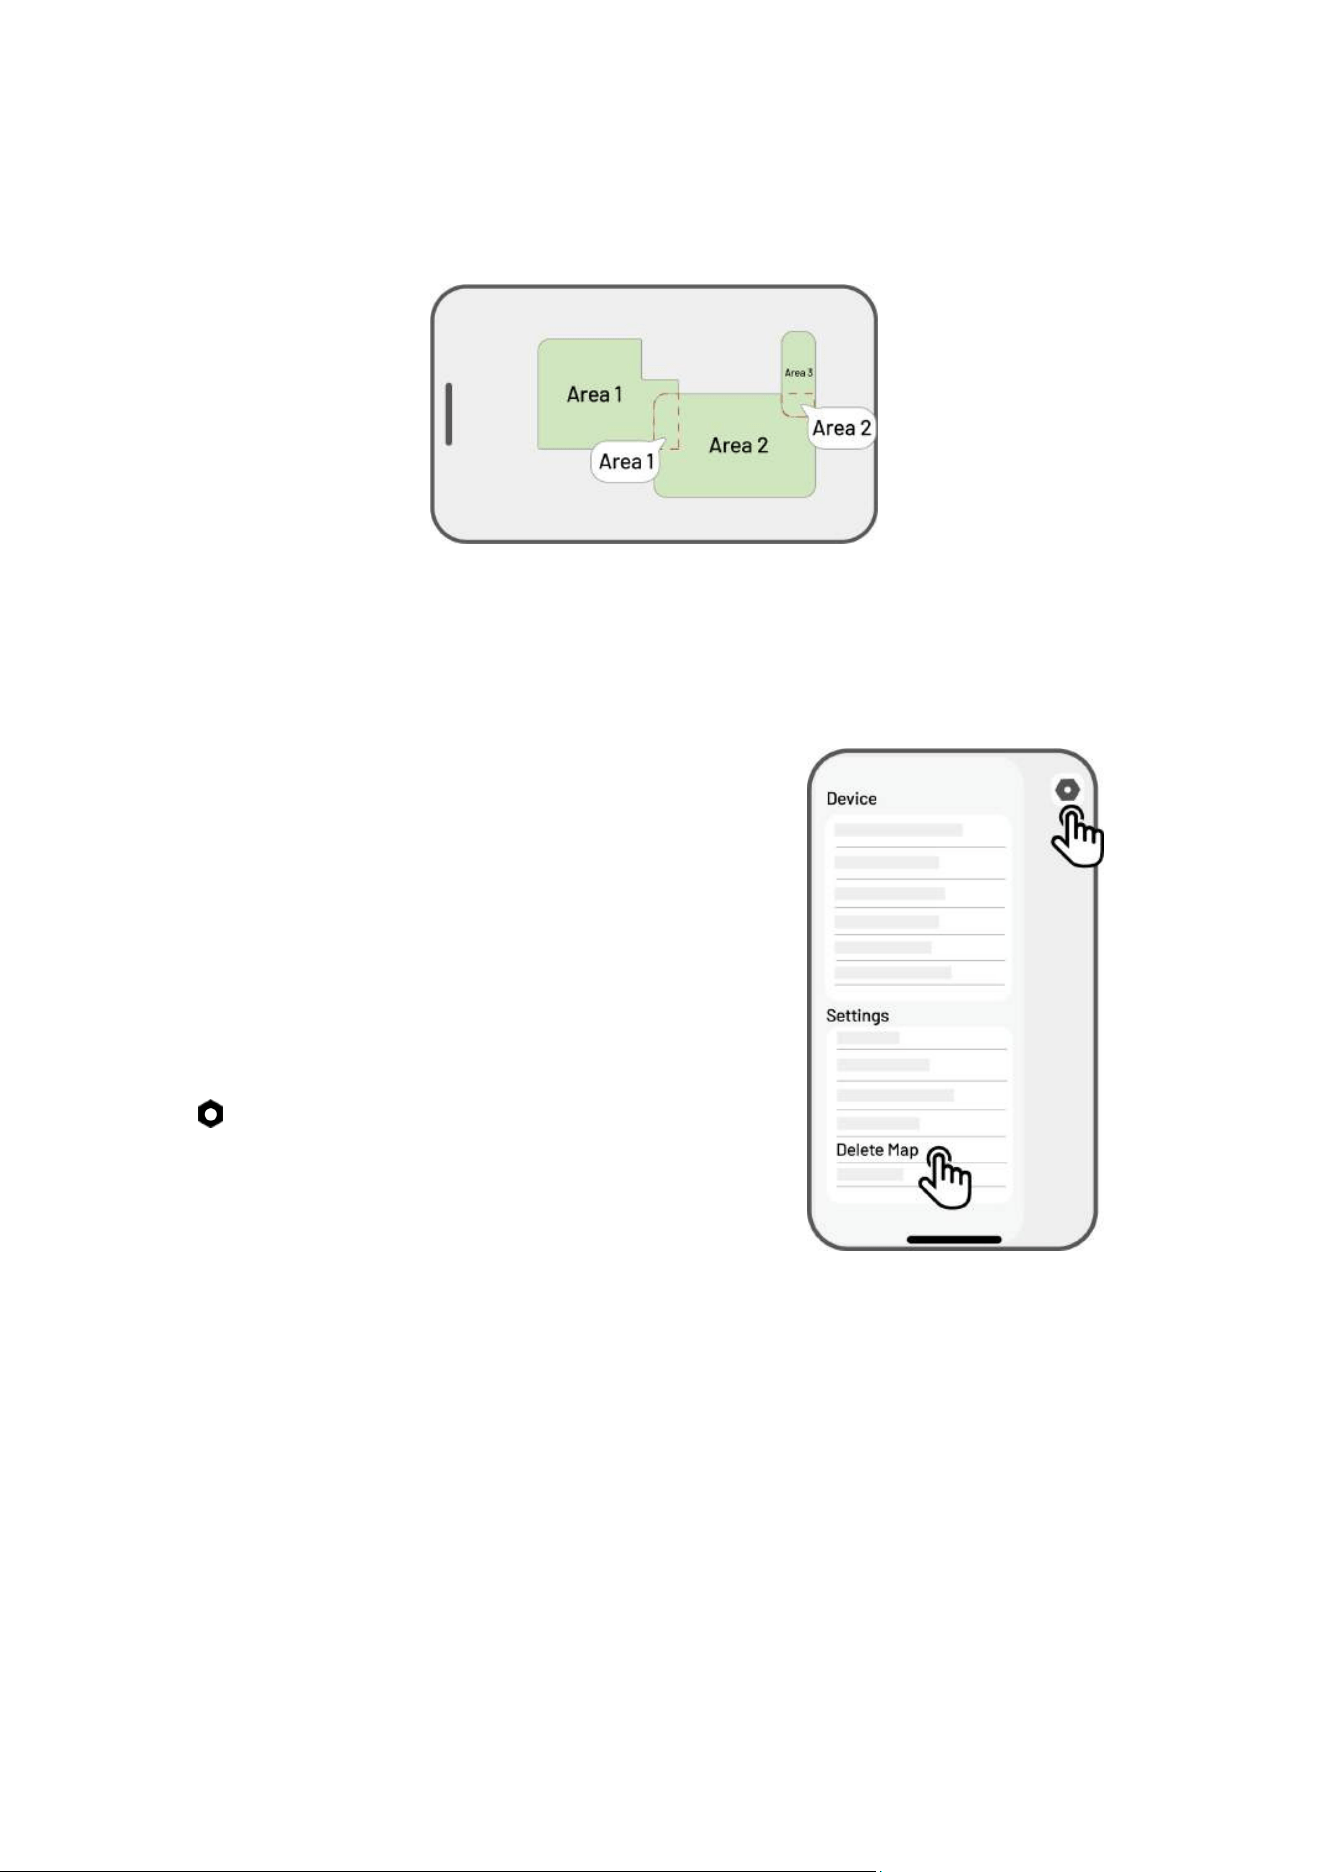
Delete the area/no-go zone/channel/pattern
To delete an area, no-go zone, channel, dumping
spot, or pattern, tap Edit > . Deleting an area will
also remove all items within it.
- 45 -
Multiple task areas with overlapping
If you have several lawns that overlap, the shared section will be assigned to the task area that was
created first. No channel is necessary for two task areas with overlapping sections.
RTK reference station cannot be moved once your lawn mapping is finished
Do not move the RTK reference station after the
map is created or the resulting working area will
diverge from the designated task area.
In the event of an
RTK reference station
relocation, reinstall it in its original position, or go
to Settings > Robot settings > Delete map to
delete the current map and remap the area.
4.6 Mow
4.6.1 Preparation
Ensure the robot is in the task area before mowing.
If any unexpected problems arise, please press the STOP button and secure the robot. The STOP
- 46 -
button holds top priority among all commands.
If the lift sensor is activated, the robot will come to a halt. Please press the Grass button followed by
the START button to unlock it.
Please mow the task area no more than once a day as doing so may be harmful to your lawn.
If the grass height exceeds 60 mm/2 in, it is advisable to raise the cutting height to at least 40 mm/1.6
in. When mowing, it is important to only trim a third of the grass height each time. For example, if the
initial grass height is 60 mm/2 in, the cutting height of the robot should be set to 40 or 45 mm/1.6 or
1.8 in. Similarly, if the grass is between 90-100 mm/3.5-4 in, the cutting height of the robot should be
set to 60 mm/2 in.
4.6.2 Start mowing
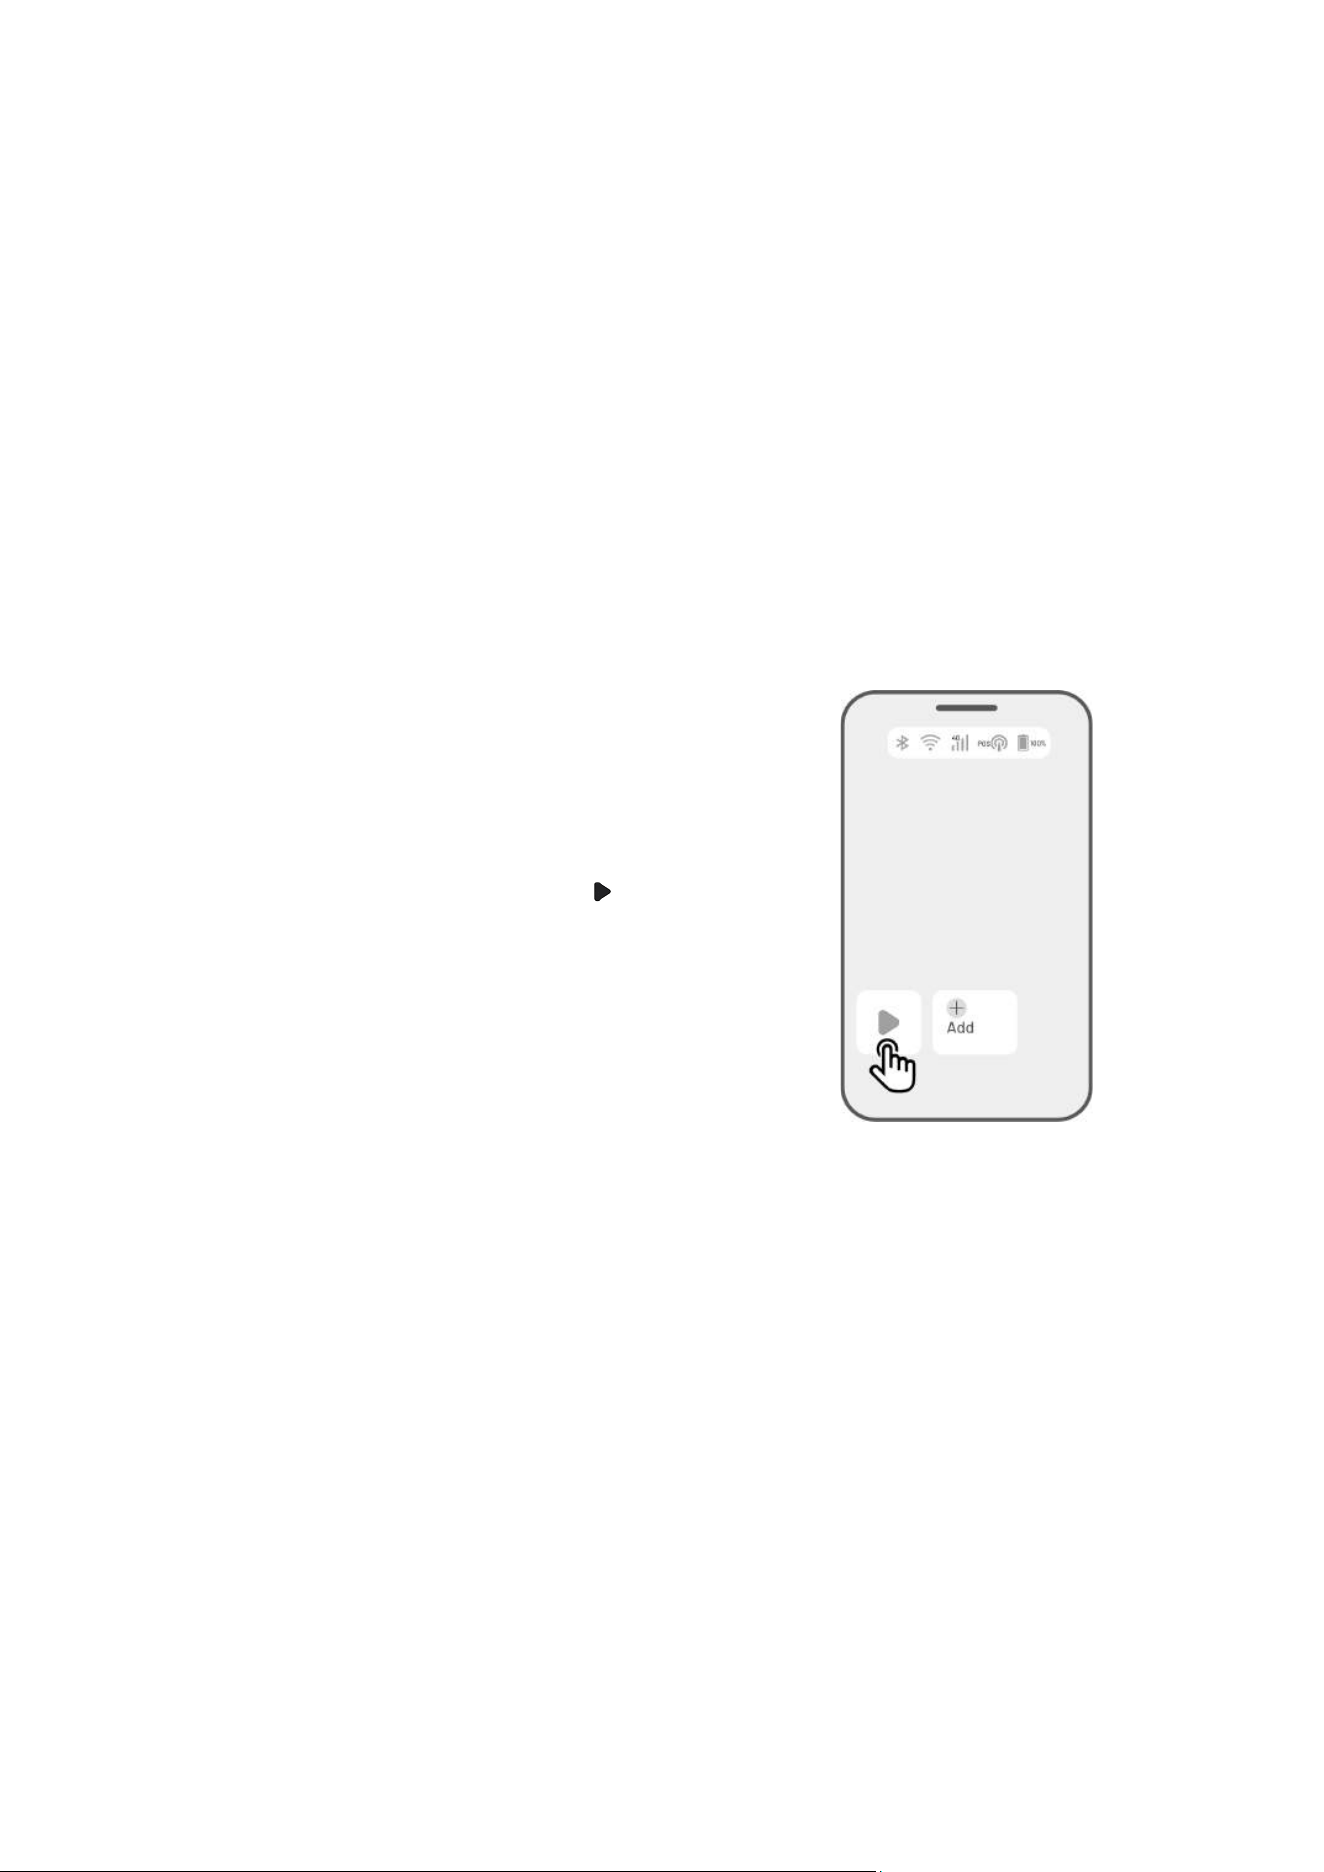
If you prefer not to set parameters, simply tap on
the Home page to quickly start mowing.
- 47 -
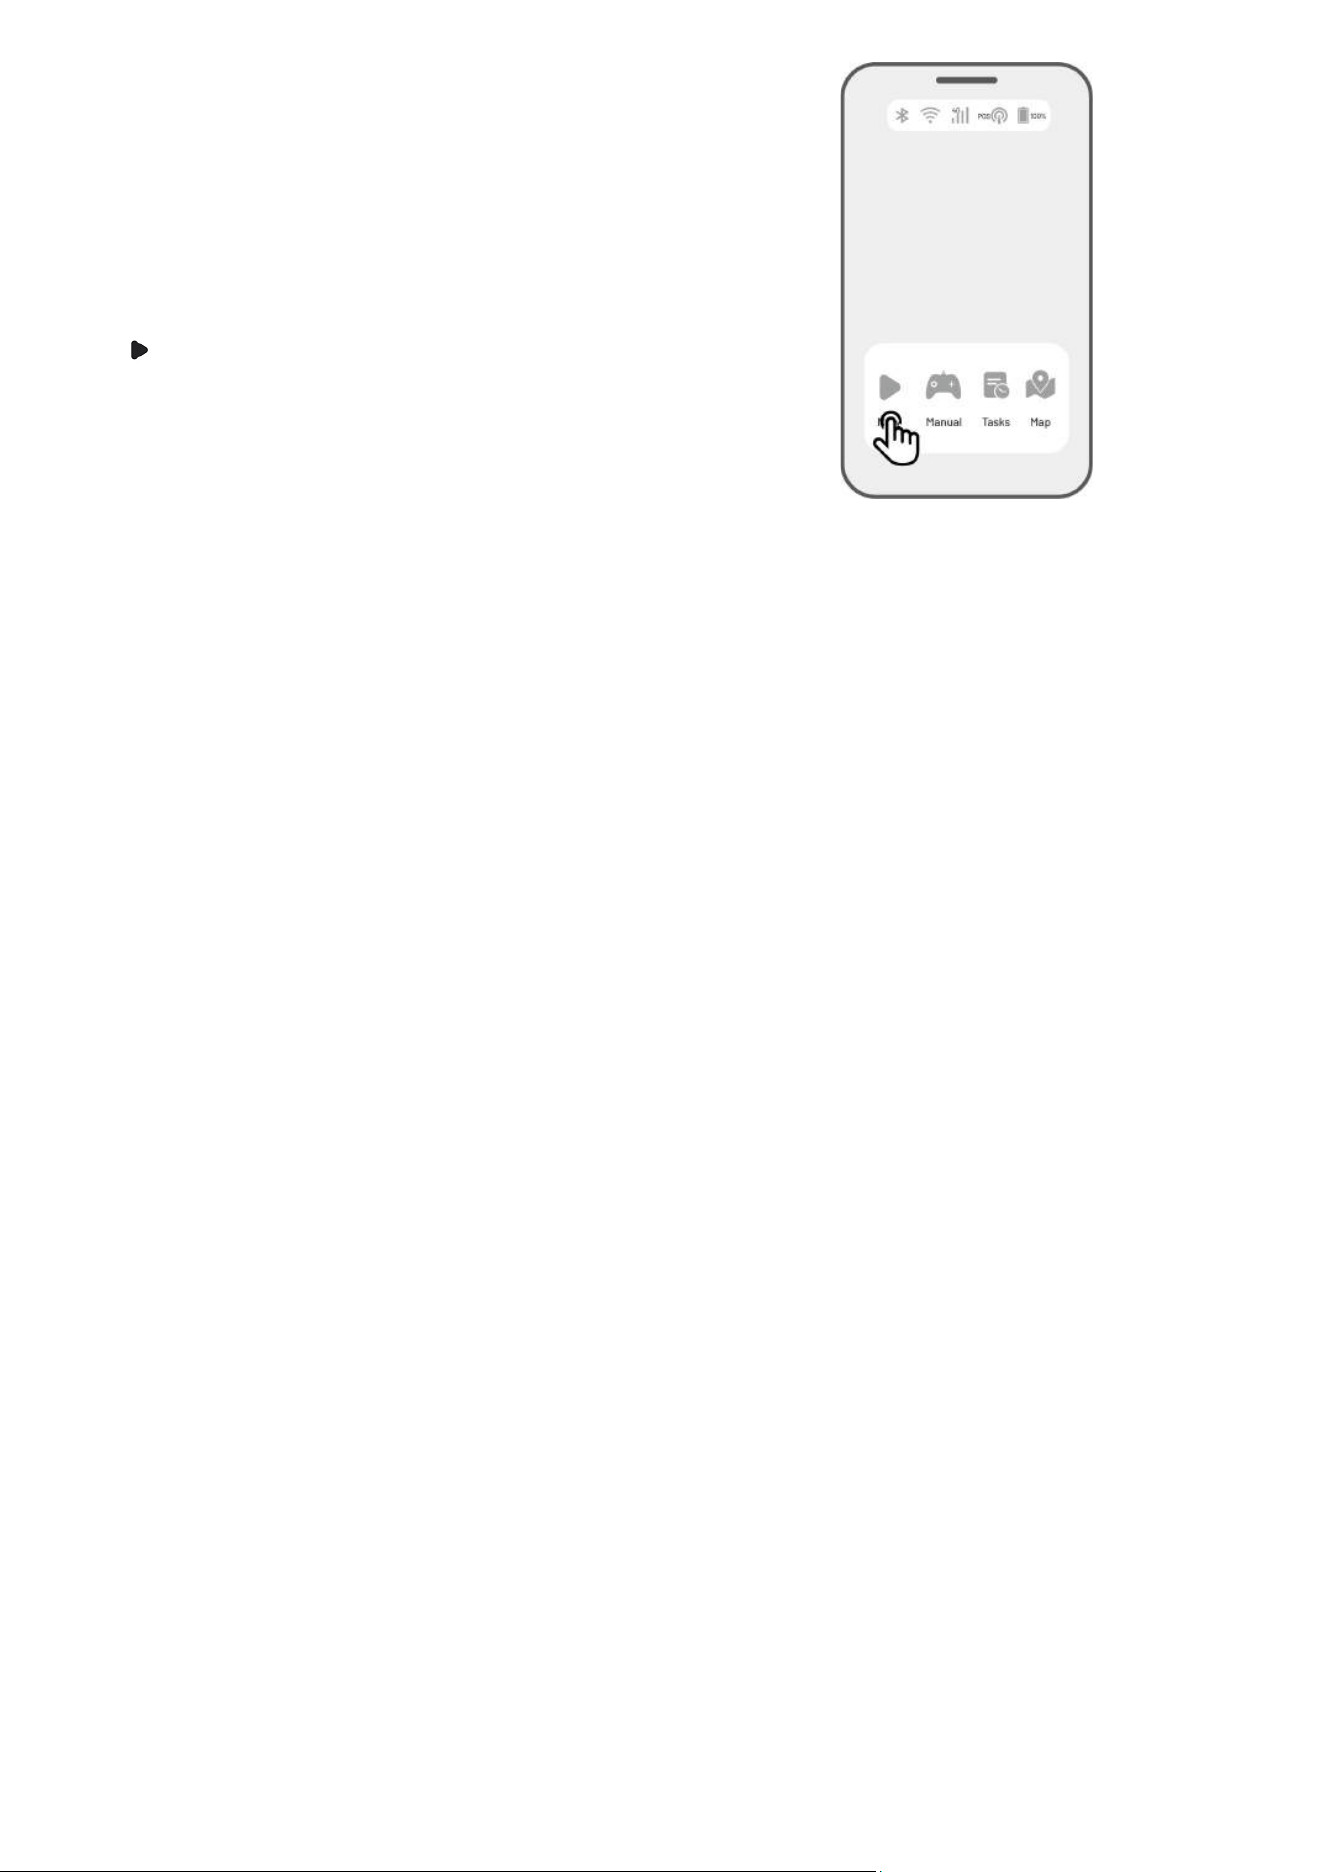
If you prefer to customize settings before mowing,
tap the robot image to enter the Map page. Then tap
Mow to access the task assignment page.
- 48 -
Mowing parameters
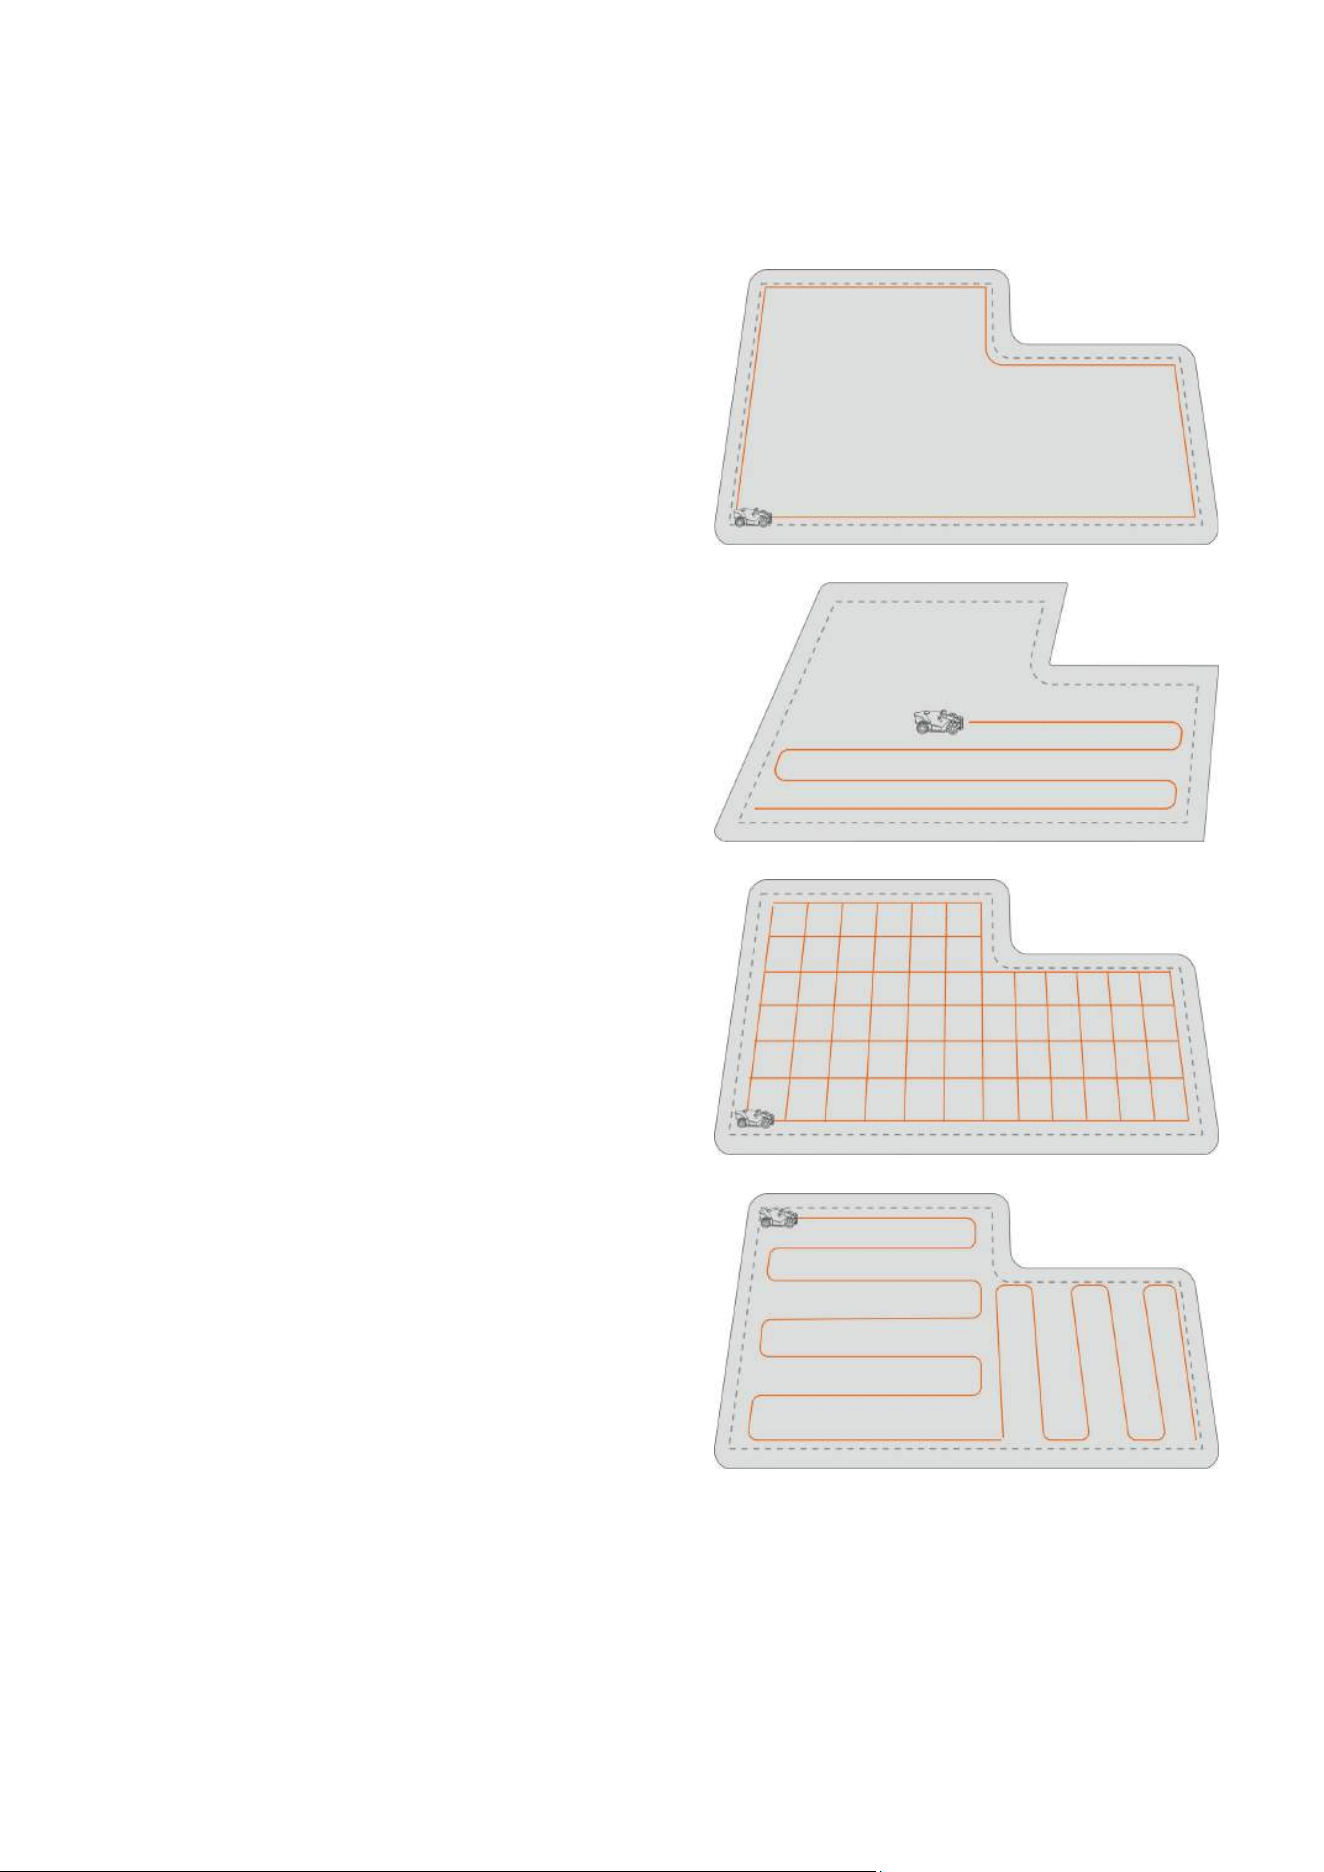
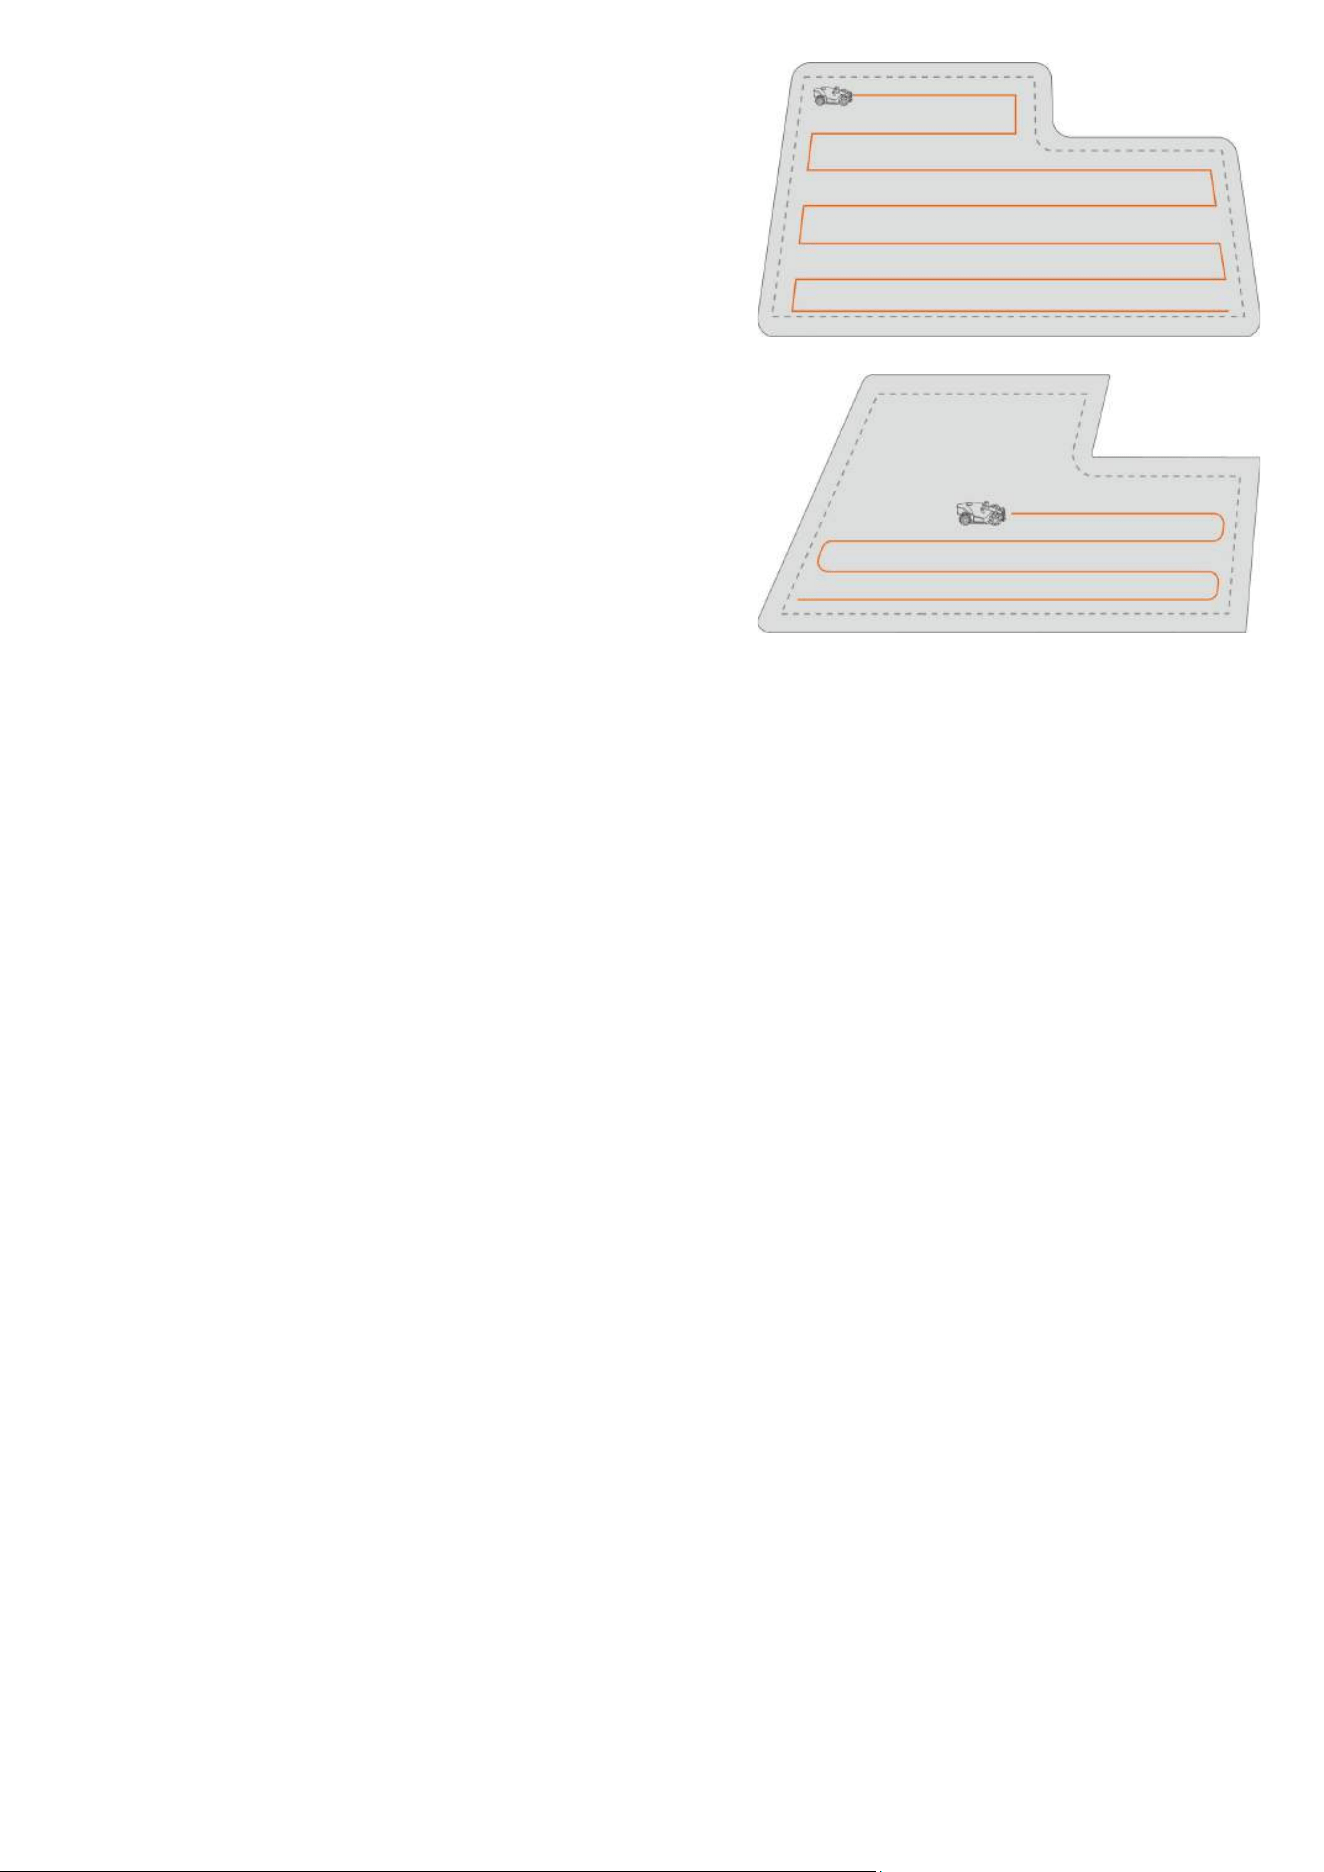
Cutting path mode
1. Perimeter laps only
The robot will mow the grass at the perimeter
only.
2. Zigzag path
The robot will mow in straight and single rows.
3. Chess board path
The robot
will work in straight rows both
horizontally and vertically.
4. Adaptive zigzag path
The task area will be divided into segments for
efficient working.
- 49 -
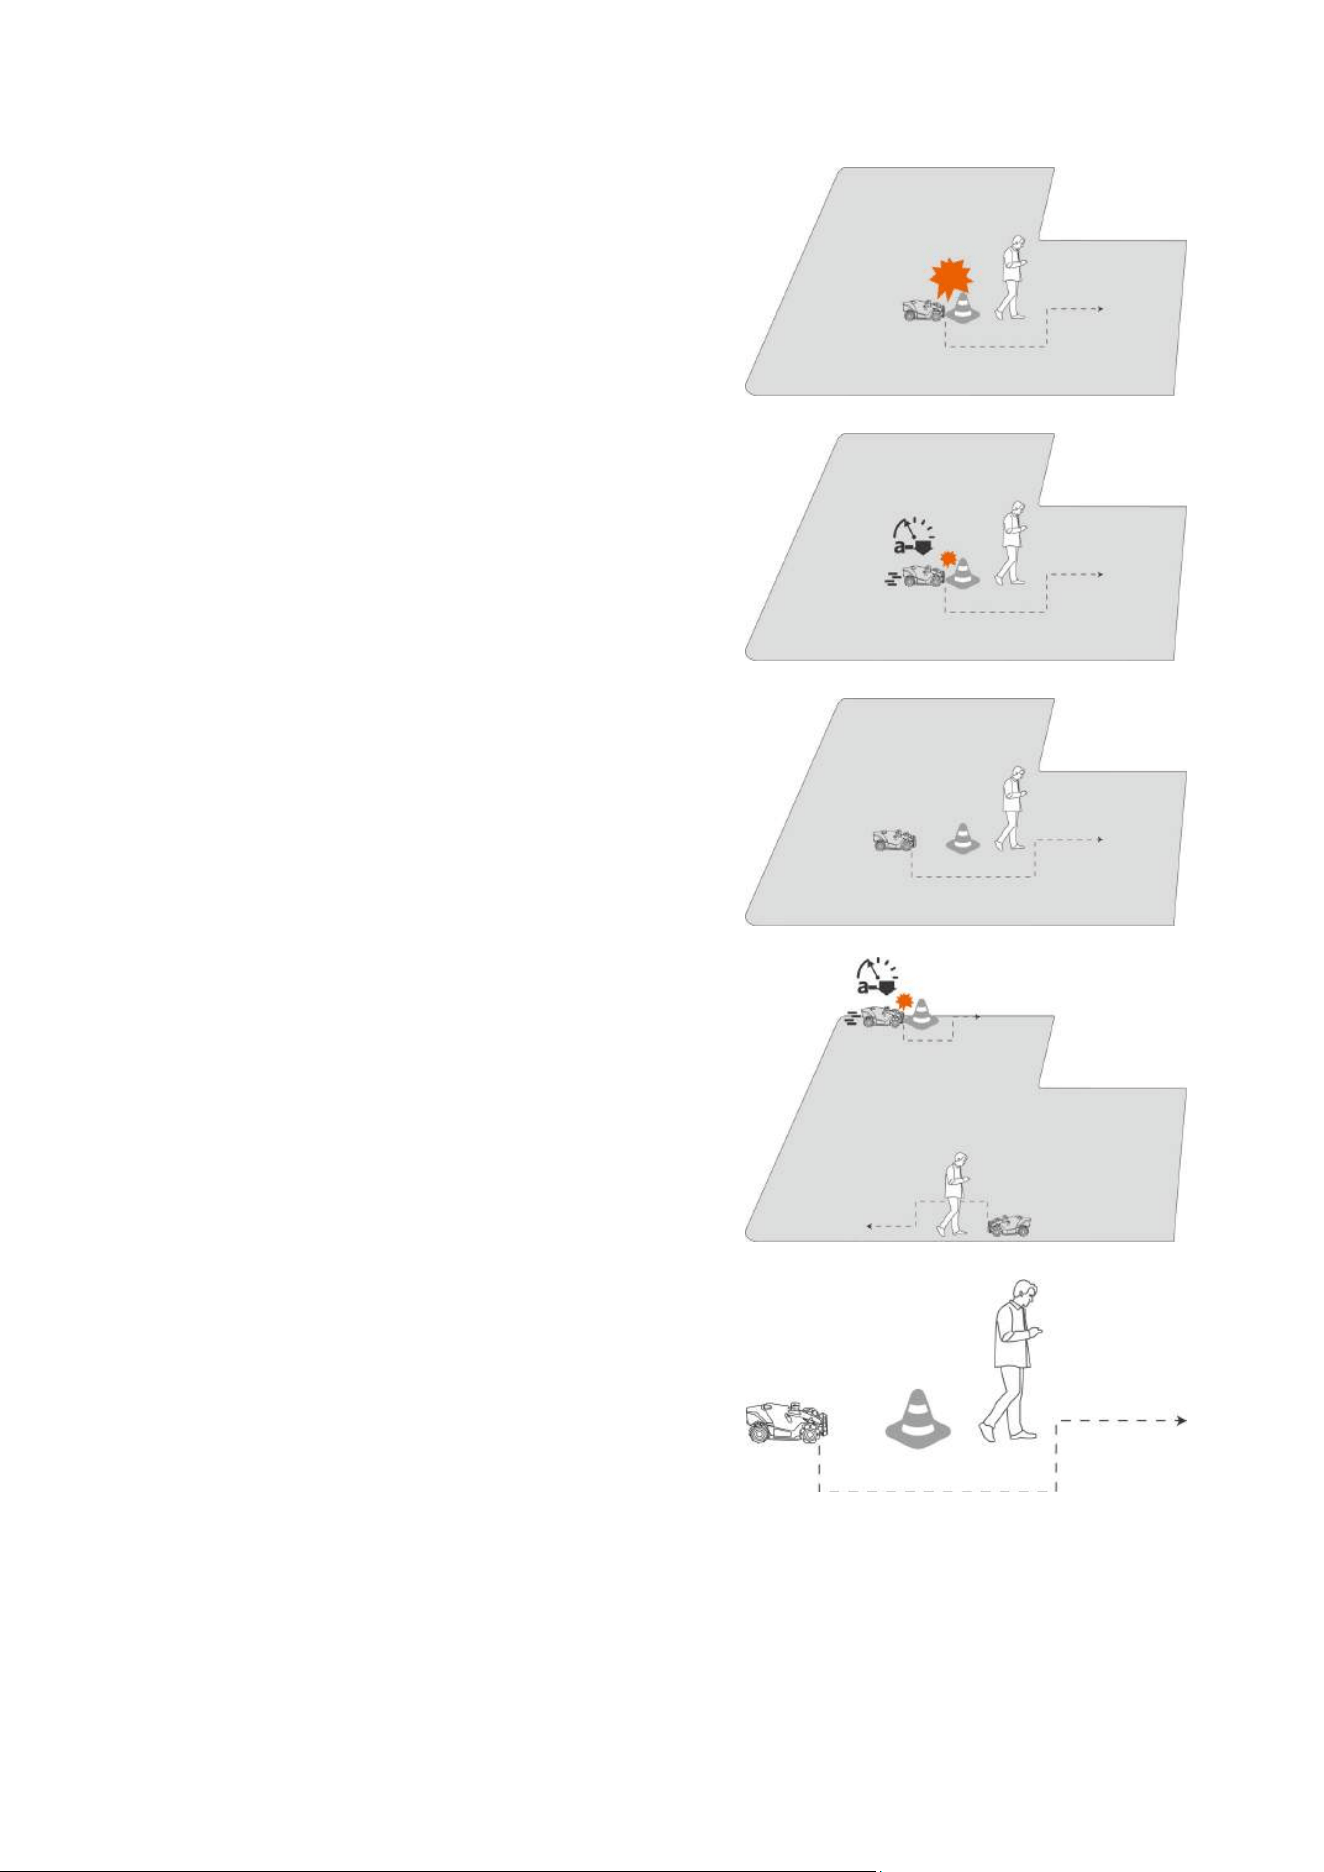
Obstacle detecting mode
1. Direct touch
Bypass the obstacles after a front bumper
collision.
2. Slow touch
The robot
will slow down after detecting the
obstacles and bypass them after a front bumper
collision.
3. Less touch
The robot
will bypass all obstacles upon
detection when working within the task area,
excluding the perimeters. While on the
perimeters, channels, and recharge paths, the
robot will bypass people and vehicles upon
detection; For other obstacles, it will use the
Slow Touch Mode.
4. No touch
The robot
will bypass the obstacles upon
detection.
- 50 -
Cutting height
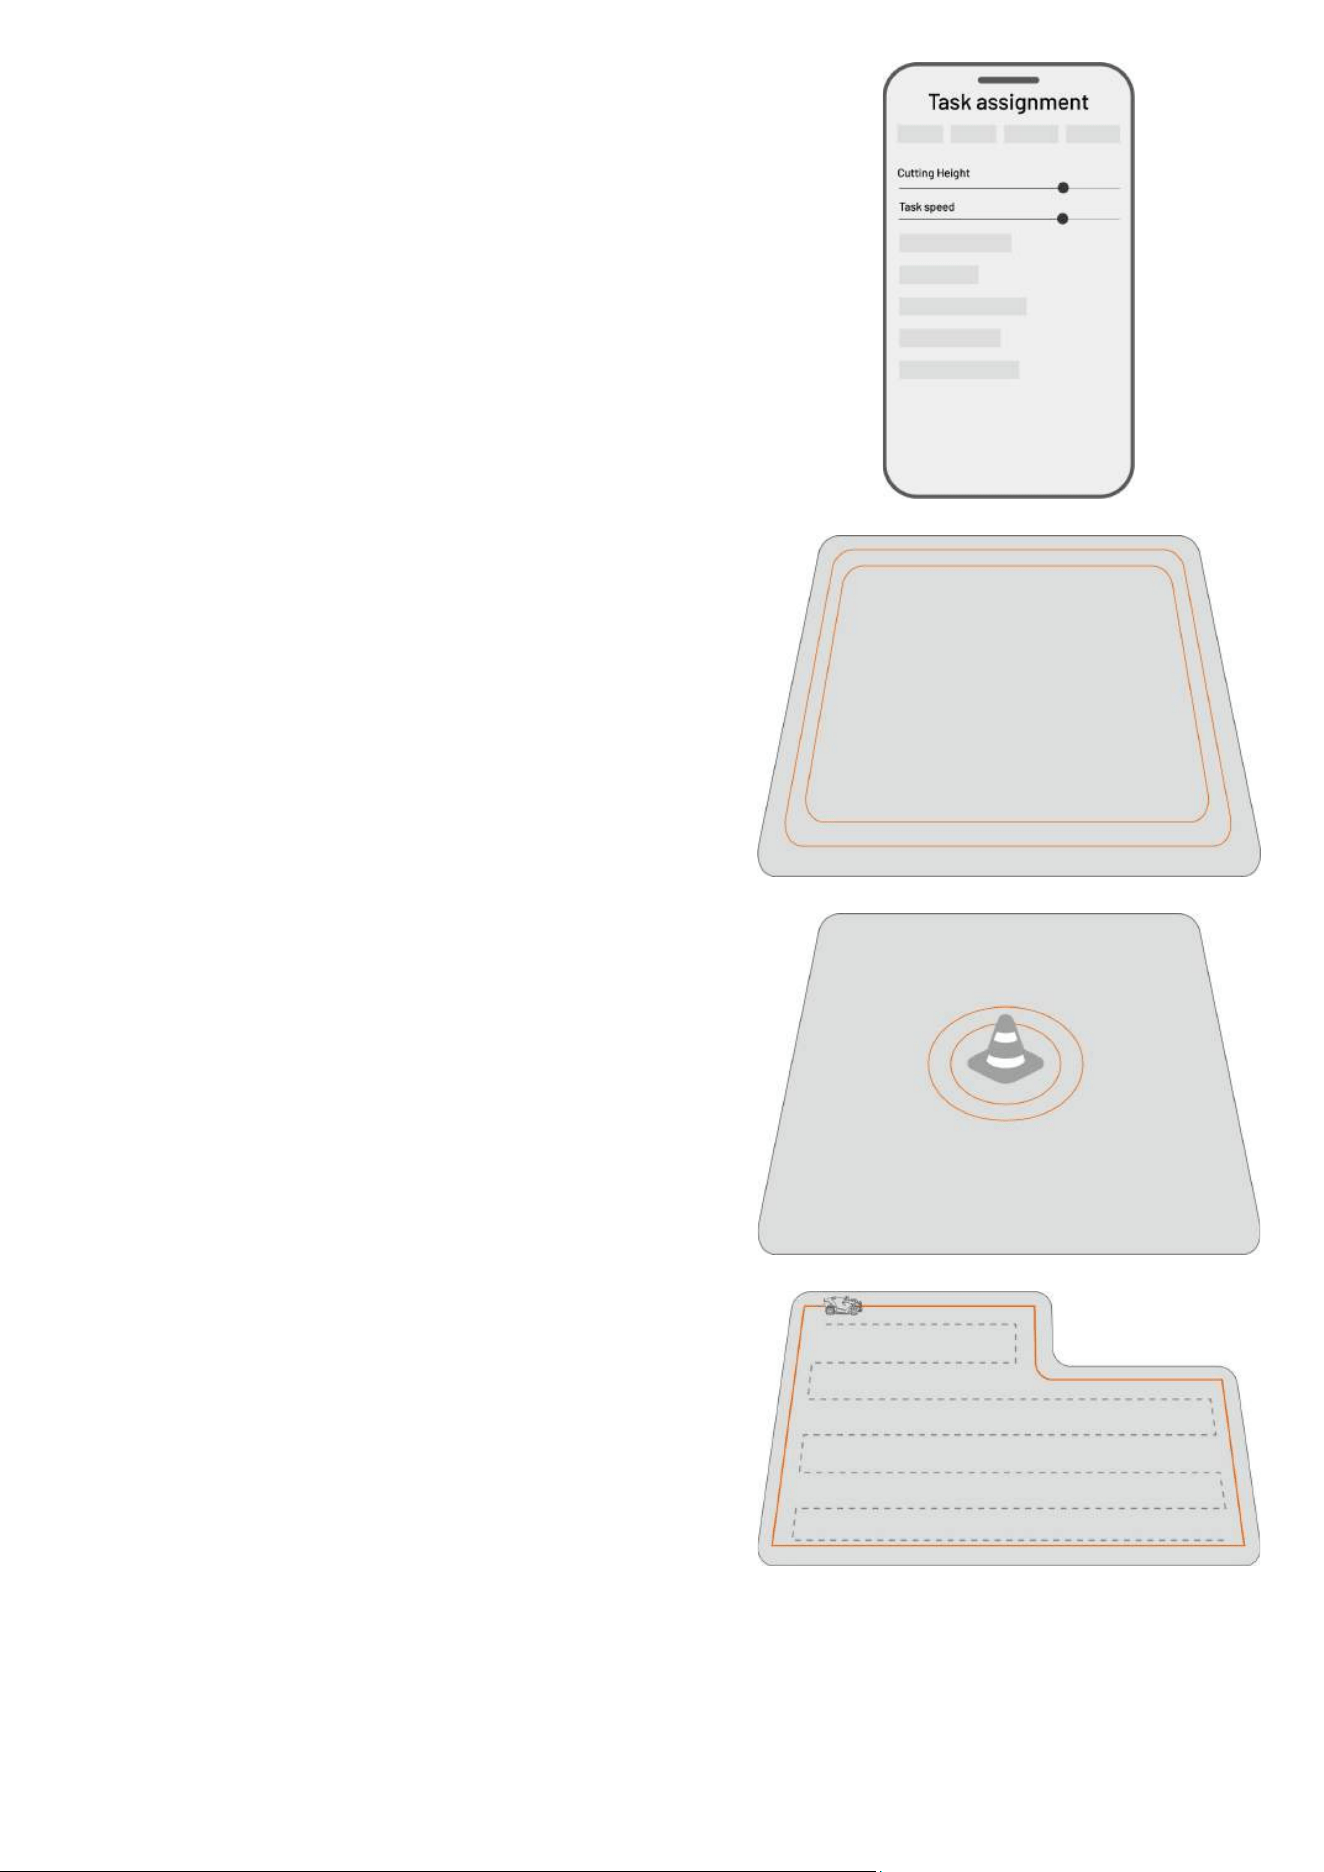
You can adjust the cutting height on the task assignment
page.
Task speed
You can adjust the
mowing speed of the robot on the
assignment page.
Perimeter mowing laps
The mowing circles at the perimeter.
*In the Perimeter laps only mode, the perimeter mowing
laps cannot be set 0.
No-go zone mowing laps
The grass-mowing circles surrounding the perimeter of the
restricted area.
Perimeter first
The robot will start mowing from the perimeter.
*Not available for the Perimeter laps only mode.
- 51 -
Zigzag first
The robot will start mowing from the zigzag path.
Start progress
The robot will start mowing from the set percentage.
When the robot enters an area where RTK signals are weak while mowing
If the robot enters an area where RTK signals are weak while mowing, the multi-sensor fusion positioning
system will assist it in continuing to operate through the vision module. The vision navigation can last for
50 meters/164 feet. The robot should return to an area covered by RTK signals before the vision navigation
reaches its limit, otherwise, it will come to a stop.
- 52 -
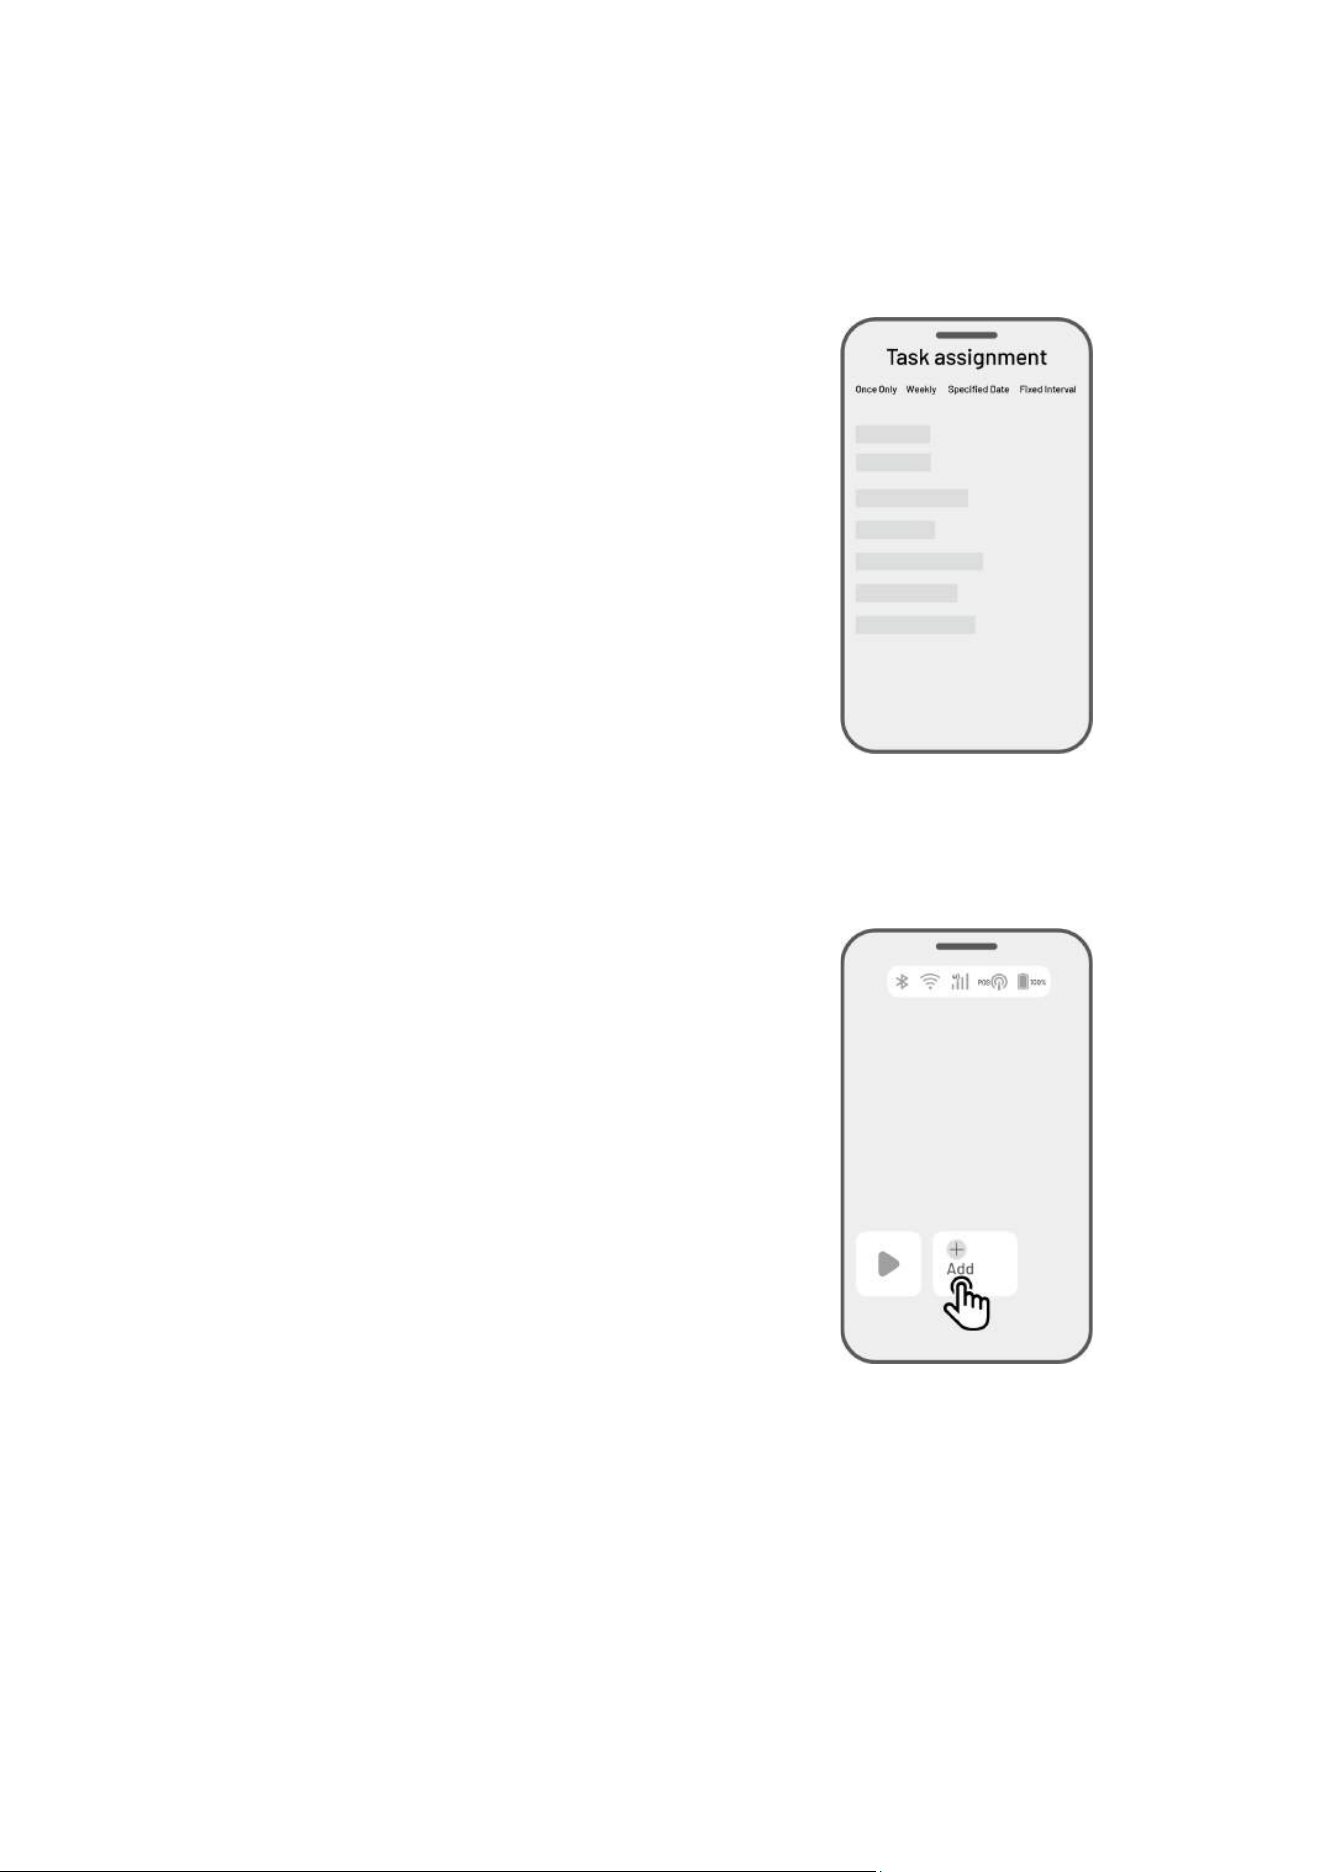
4.7 Task Schedule
With the Schedule function, you can set a regular task and the robot will automatically do its work
according to your setting.
Once only — The robot will commence work
promptly upon configuration.
Weekly — The robot will repeat the task every
week based on your preferences.
Specified date — The robot is scheduled to
commence work on the specified date.
Fixed interval — specify non-working days. For
example, if you input 3 days, the robot will
operate once every 4 days as per your settings.
4.7.1 Set a schedule
1. Tap Add on the Home page to enter the task
assignment page.
2. Select a day to set a schedule.
3. Configure the mowing parameters.
4. Select an area to apply the schedule.
5. Tap Save to confirm the settings.
- 53 -
4.7.2 Edit a schedule
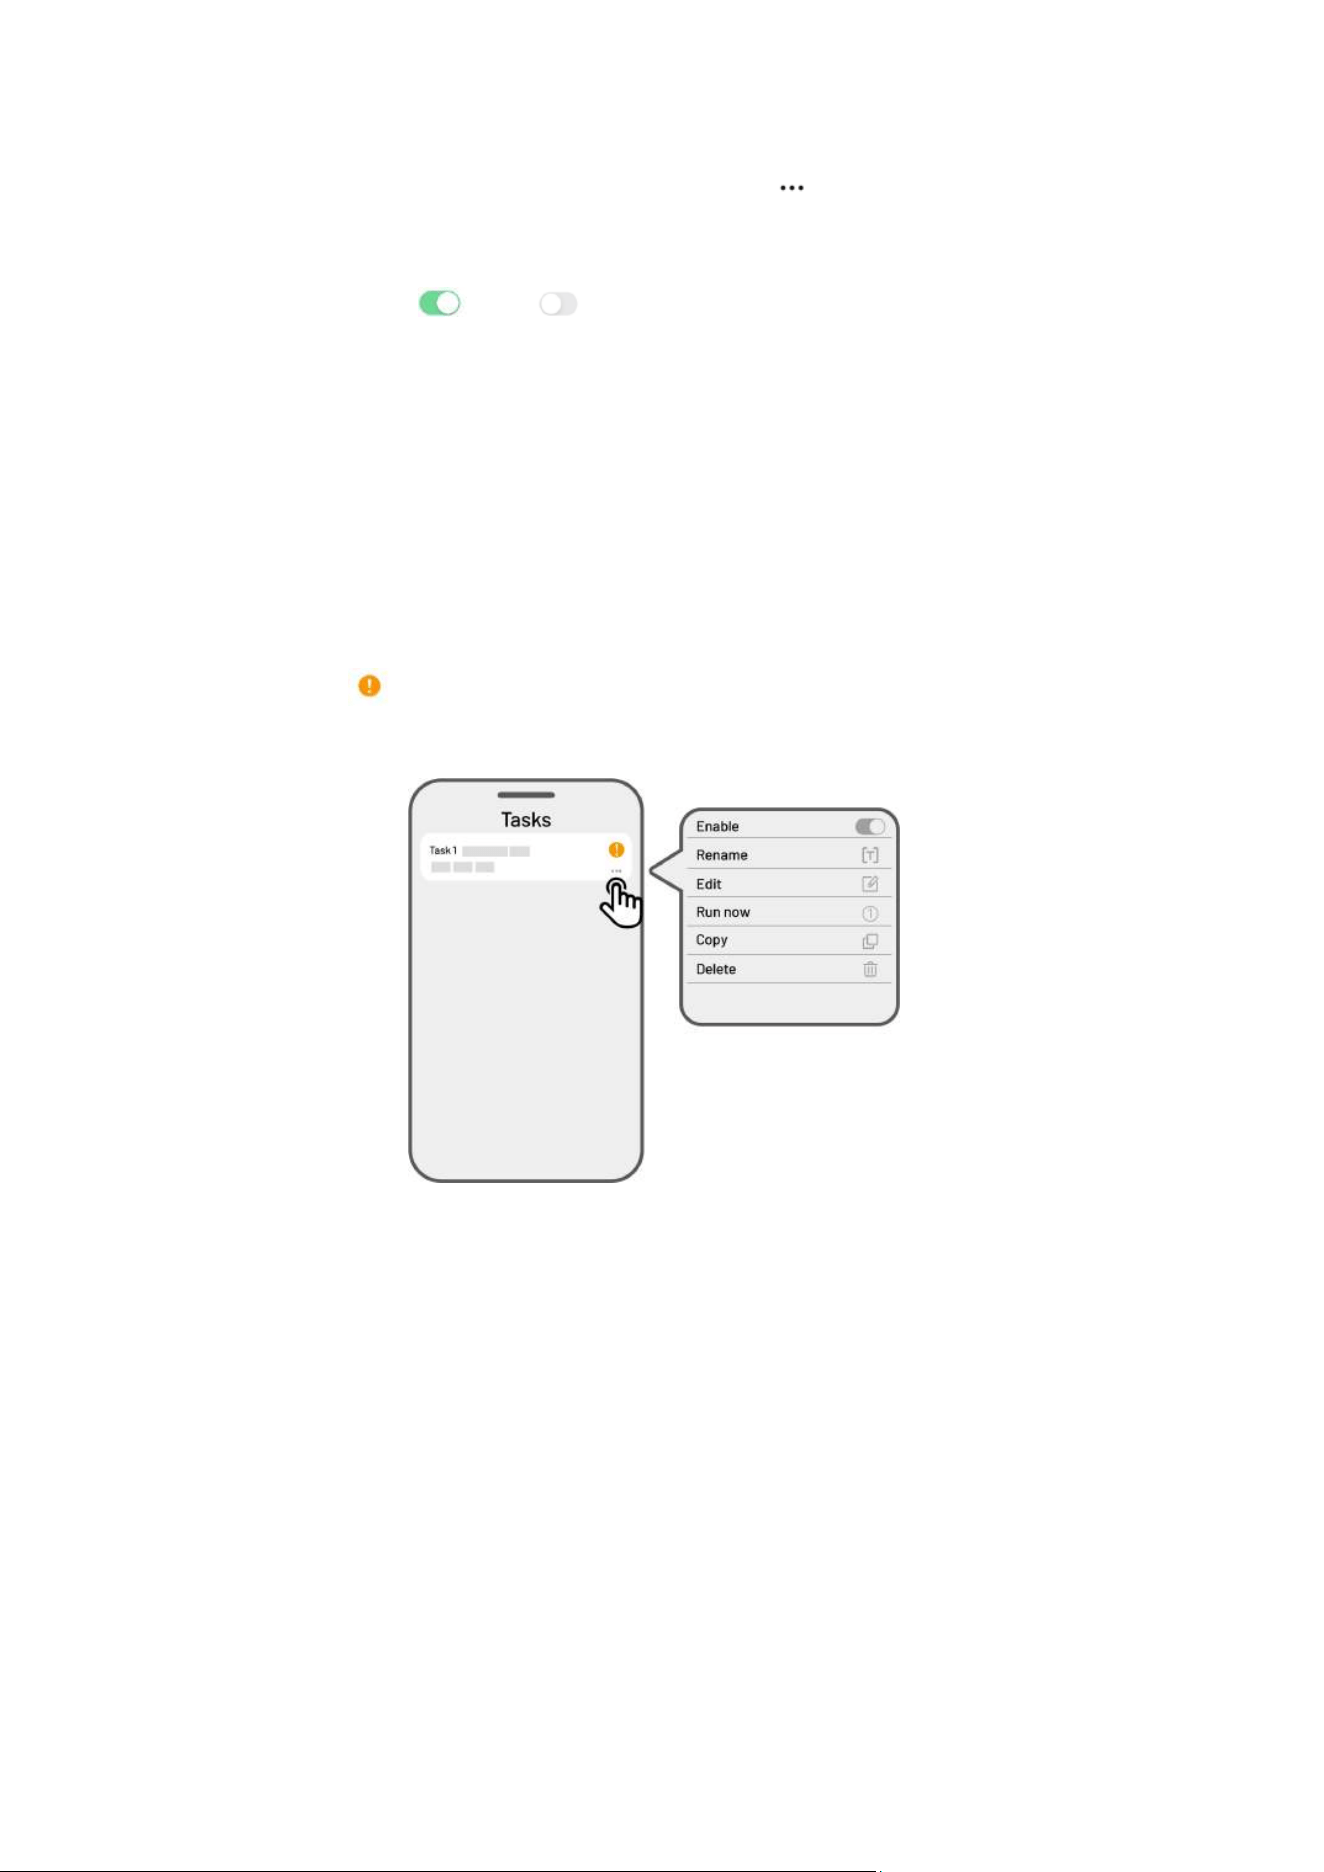
Tap Tasks on the Map page to access the schedule list. Tap on the schedule you set to open the
drop-down menu.
Enable — toggle the button to off to inactivate the schedule if needed.
Rename — tap to change the name of the schedule.
Edit — tap to change the schedule.
Run now — tap to run this schedule immediately.
Copy — tap to create a new schedule with the same settings while keeping the original schedule, then
choose one to edit.
Delete — tap to delete the schedule.
If the exclamation mark appears, it indicates that the task schedule cannot be performed due to
errors. Tap the exclamation mark for more details.
- 54 -
4.8 Activate FPV Mode
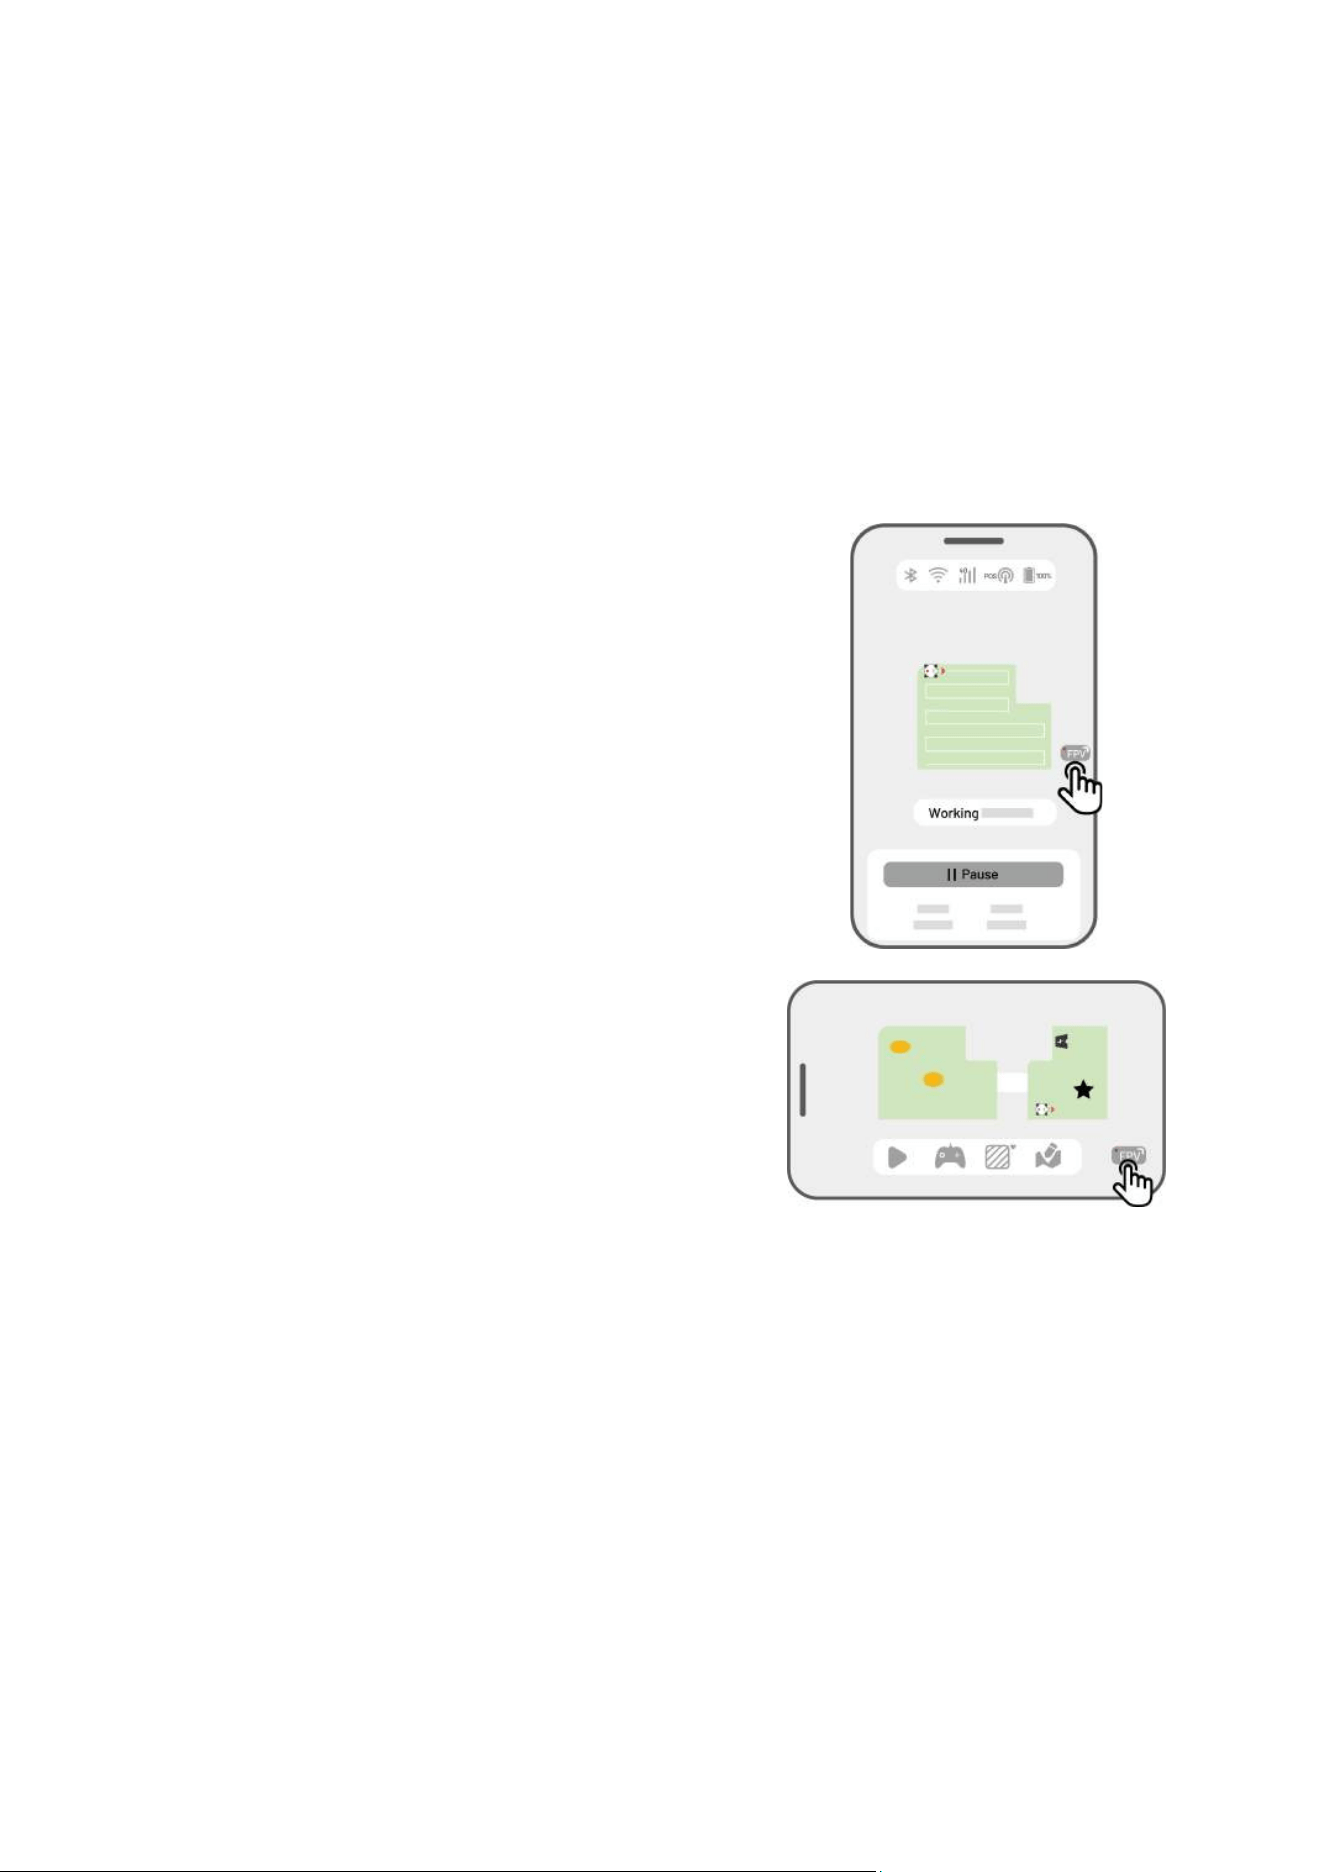
FPV Mode (First-Person View Mode) provides an immersive way to control and monitor your robot. By
activating this mode, the robot’s onboard camera streams live video, allowing you to see directly from the
robot’s perspective for enhanced control and navigation.
Additionally, FPV mode can turn your robot into a mobile security camera, providing real-time video
surveillance and enabling you to monitor various locations remotely from the robot’s viewpoint.
To activate FPV mode
When the robot is working, tap the FPV icon on the
working page.
On the Landscape Map page, tap the FPV icon.
- 55 -
4.9 View Status
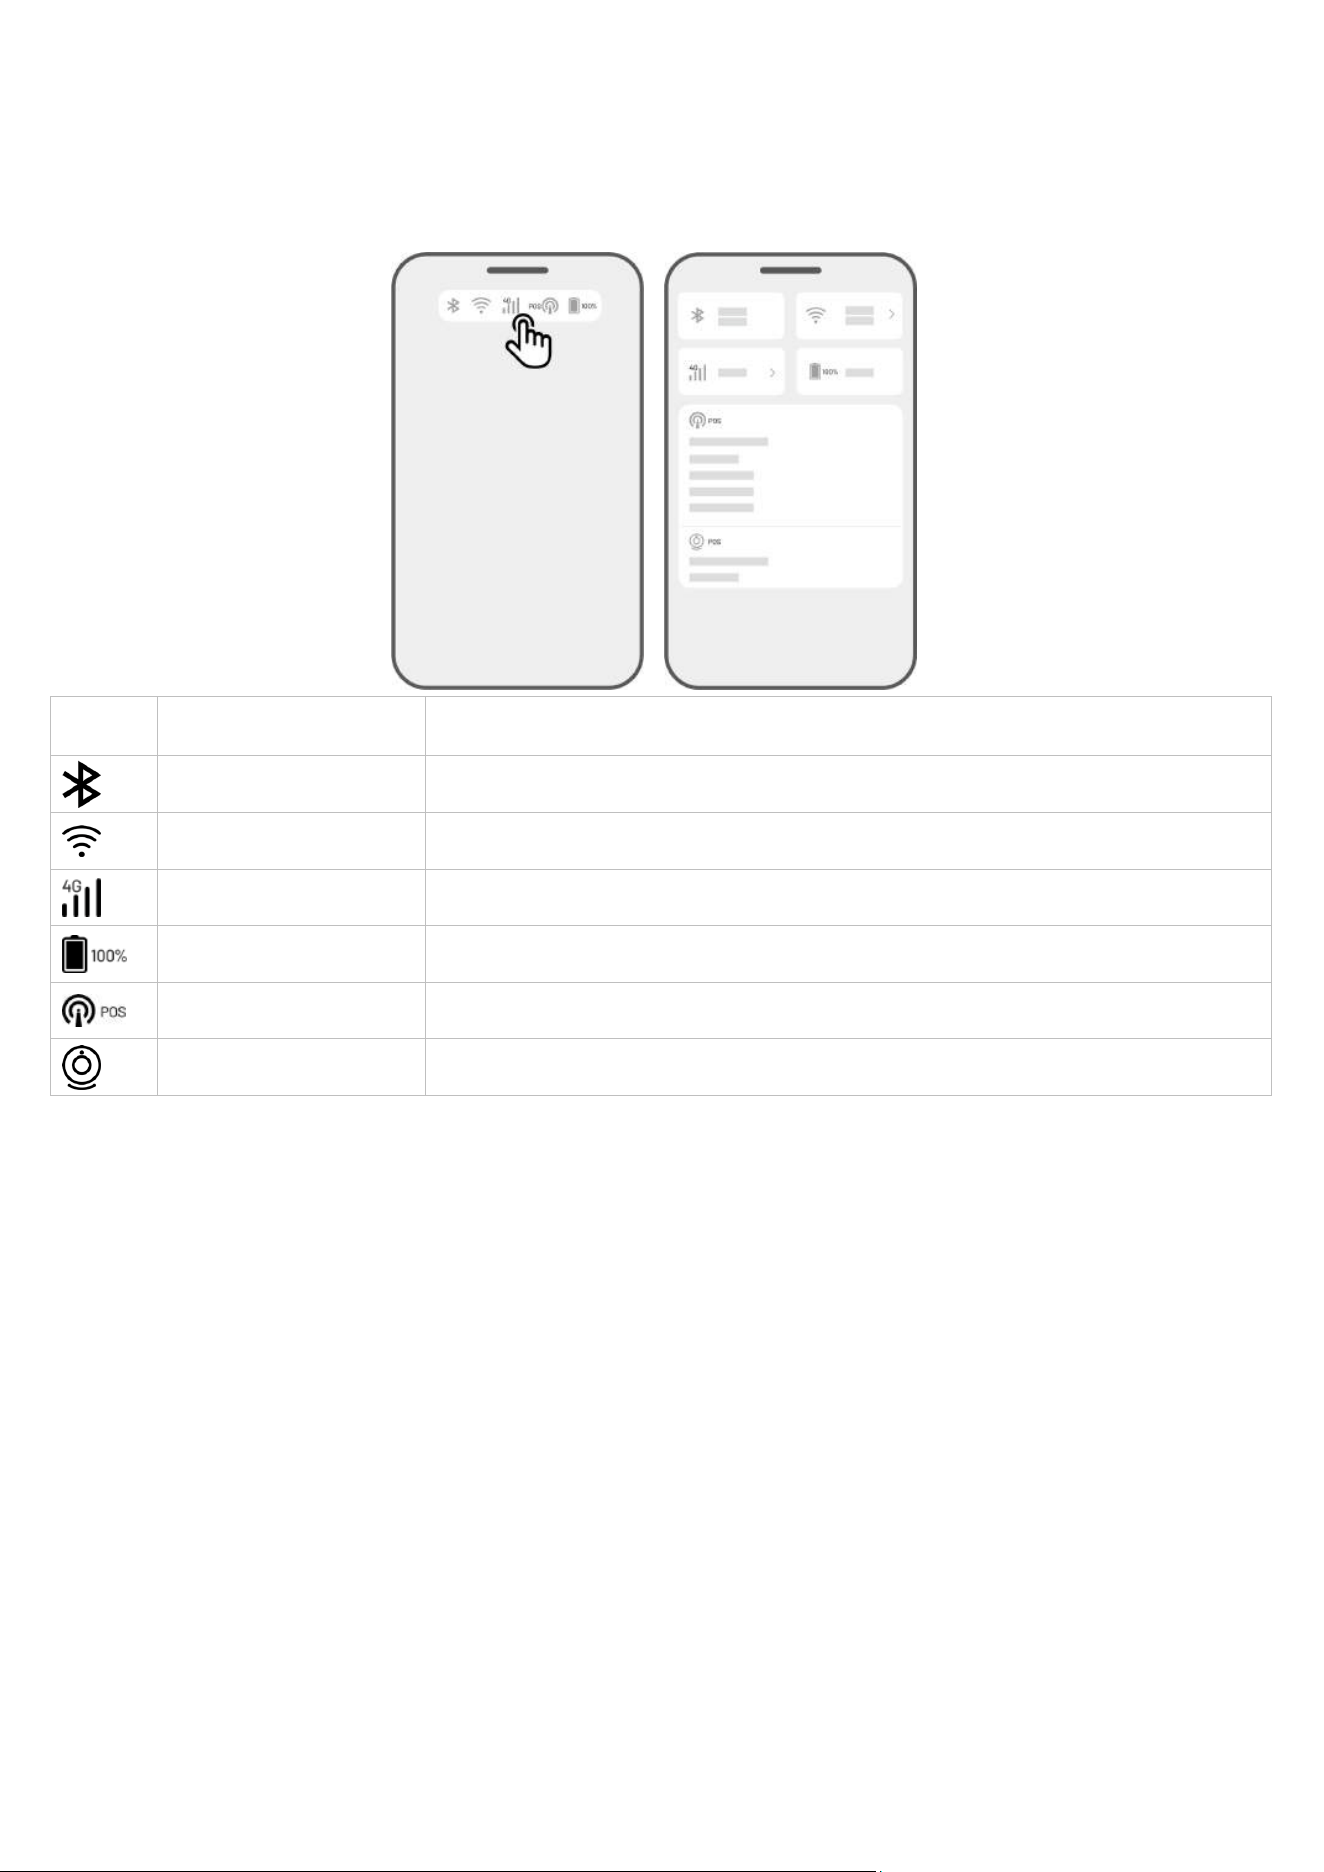
Tap the Status Bar to view the device status.
Icon Name Description
Bluetooth Indicates the Bluetooth signal.
Wi-Fi Connectivity Indicates the connected Wi-Fi signal strength.
4G Connectivity Indicates the cellular signal strength.
Battery Level Indicates the remaining battery level.
RTK Positioning Indicates the RTK positioning status.
Vision Module Status Indicates the vision module status.
Positioning status — shows the strength of satellite positioning.
Fix — fine positioning status with an accuracy of less than 10 cm/4 in, up to 2 cm/1 in with a good
open-sky area.
Float — poor positioning status with an accuracy of about 50-200 cm/20-79 in.
Single — bad positioning status with a meter-level accuracy.
None — no positioning status.
*Only Fix status enables automatic mowing.
Satellites — refers to the total number of satellites received by the robot and RTK reference station.

- 56 -
R stands for the number of satellites received by the robot.
B stands for the number of satellites received by RTK reference station.
C stands for the number of co-viewing satellites received by both the robot and RTK reference
station.
L1 and L2 respectively indicate the satellites operating at L1 and L2 frequencies.
Signal quality
R stands for satellite signal strength of the robot.
B stands for satellite signal strength of RTK reference station.
*The accuracy of positioning is affected by the quality of the satellite signal and the number of Co-
Viewing satellites. Objects such as trees, leaves, walls, and fences can weaken the signal and lead to
positioning errors. Despite the detection of more than 20 satellites by both the robot and RTK
reference station, the signal quality can still be deemed as Weak or Bad.
RTK link mode — offers two connection modes: LoRa and Internet RTK. See Switch RTK link mode for
more information.
RTK connection — indicates the connection status of RTK reference station.
Vision positioning status — shows the strength of vision positioning.
Fine — vision positioning is optimal.
Bad — vision positioning is poor.
Initialization — vision module is initializing.
None — no vision positioning available.
Brightness — shows the strength of ambient light.
Fine — ample brightness for vision positioning.
Dark — insufficient brightness; vision positioning cannot operate.
- 57 -
Switch RTK link mode
RTK link mode refers to the method of connection between an RTK reference station and a robot. There
are two primary modes: LoRa and Internet RTK.
LoRa involves data communication between the RTK reference station and the robot using radio antennas.
On the other hand, Internet RTK utilizes the internet for data communication between the RTK reference
station and the robot. Internet RTK significantly expands the range of RTK applications, enabling
operation over large geographical areas.
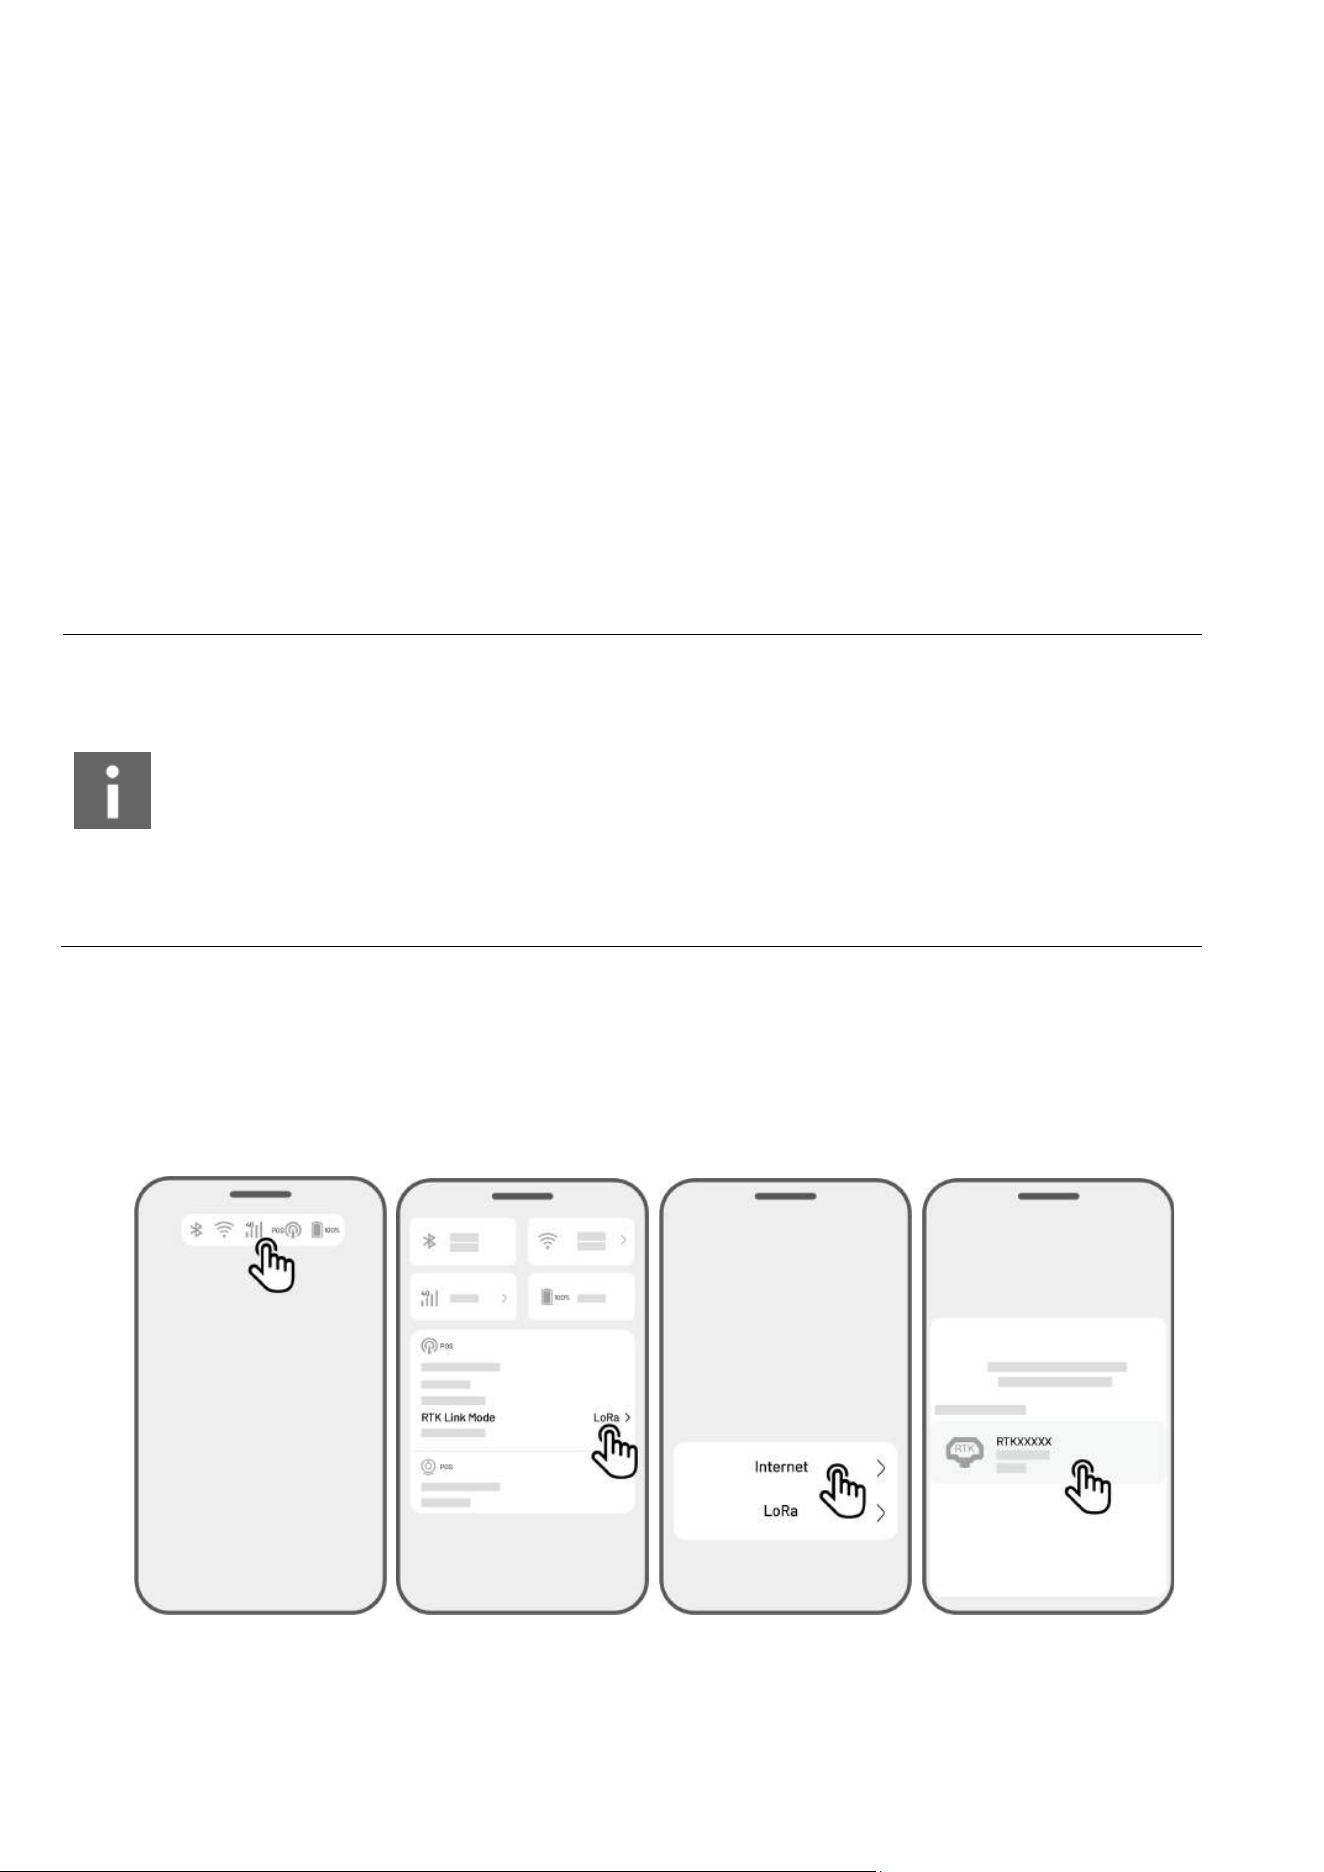
Switch LoRa to Internet RTK
IMPORTANT
Internet RTK relies on a stable 4G network. It is crucial to ensure that the robot
maintains a reliable 4G connection.
Please ensure that both the robot and RTK reference station are bound to the same
account.
For optimal operation, it is recommended to update both the robot and RTK reference
station firmware to the latest versions.
1. Verify the 4G icon on the Status bar to illuminate, indicating successful activation of the SIM card. Tap
the Status Bar to access the status information page.
2. The current RTK link mode is LoRa. Tap it to access the RTK link mode page. Select Internet and tap
the RTK reference station to configure your network.
- 58 -
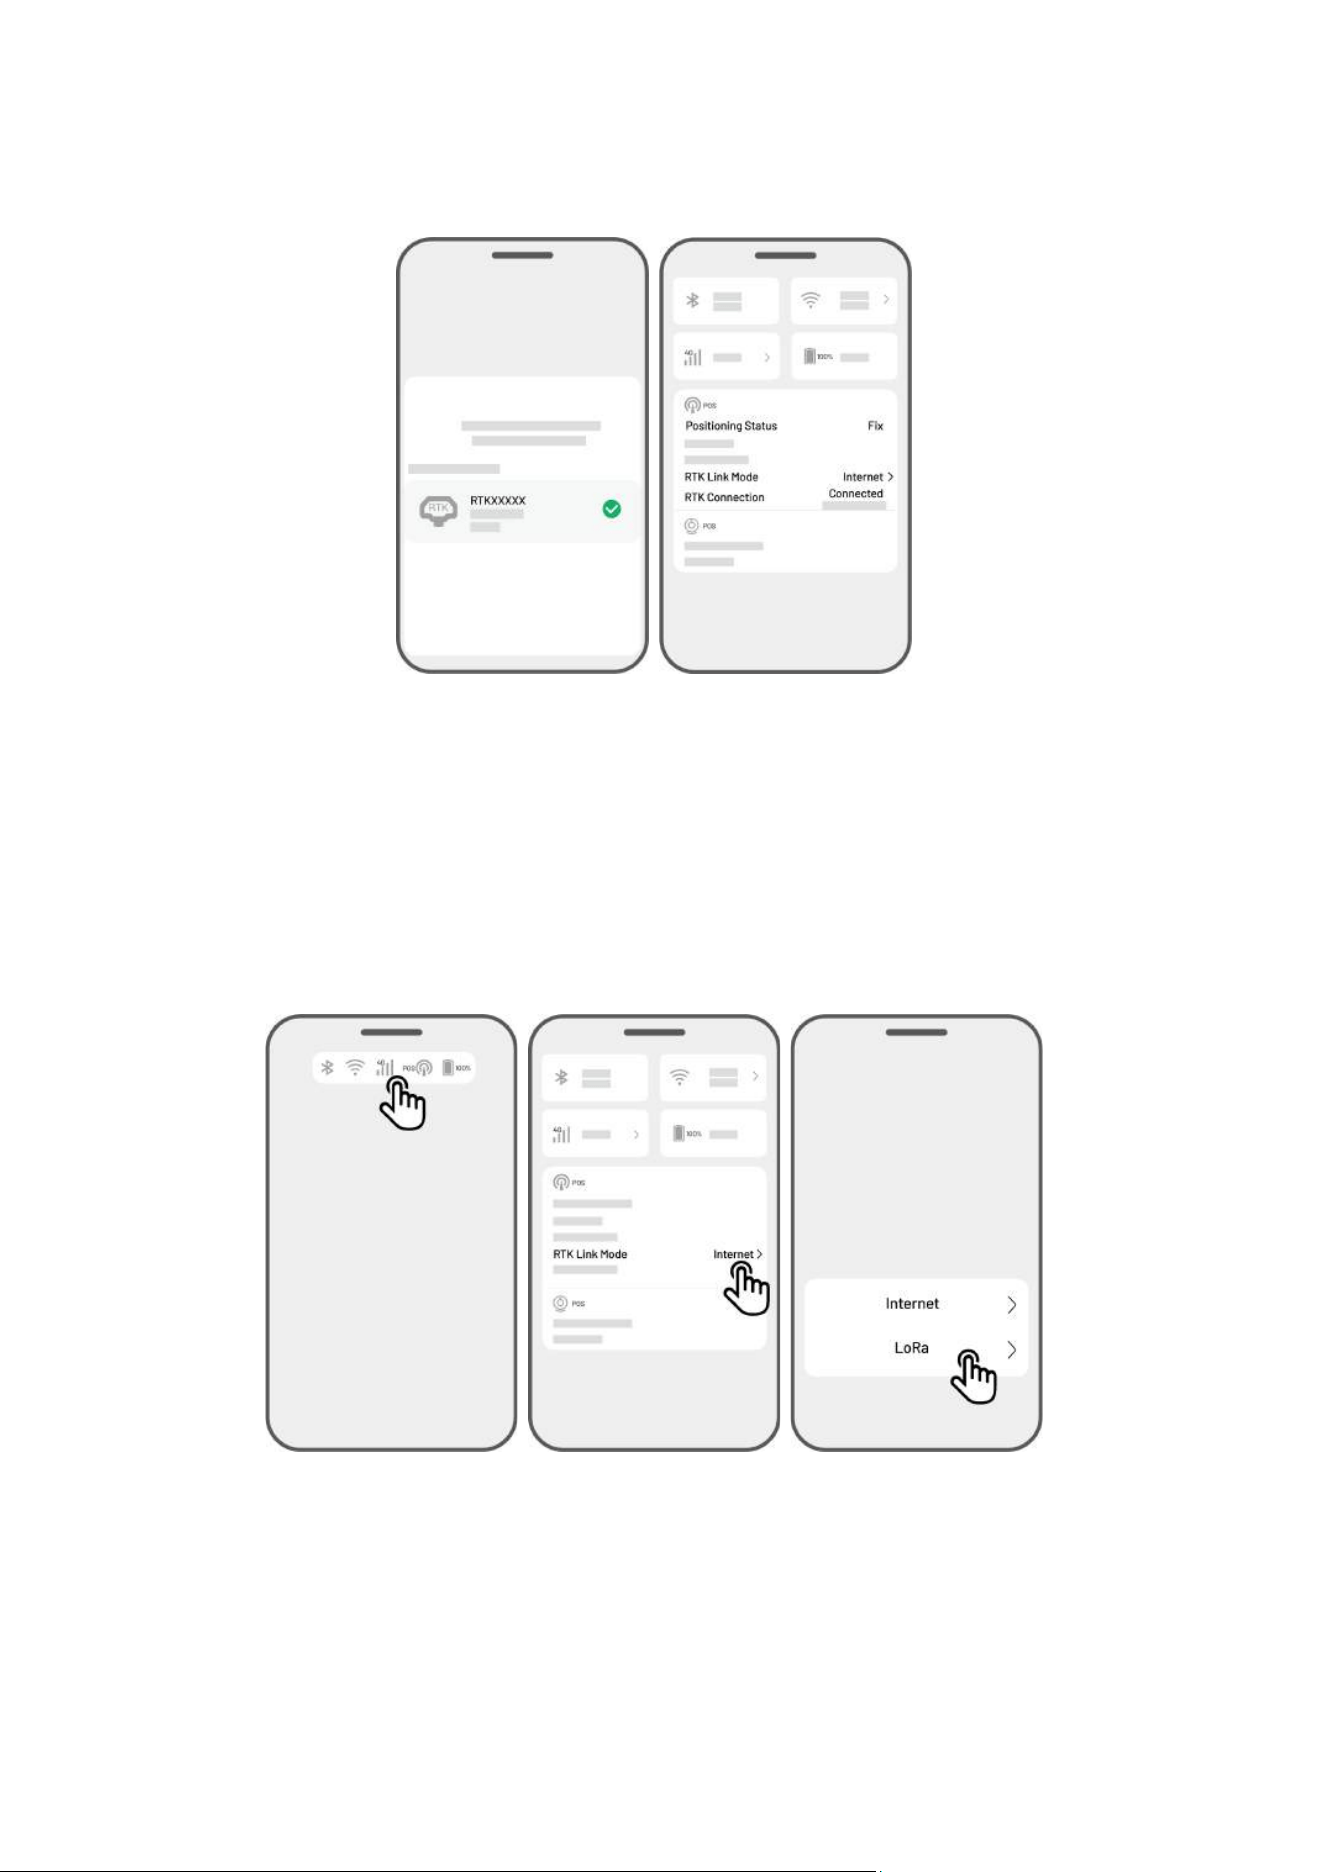
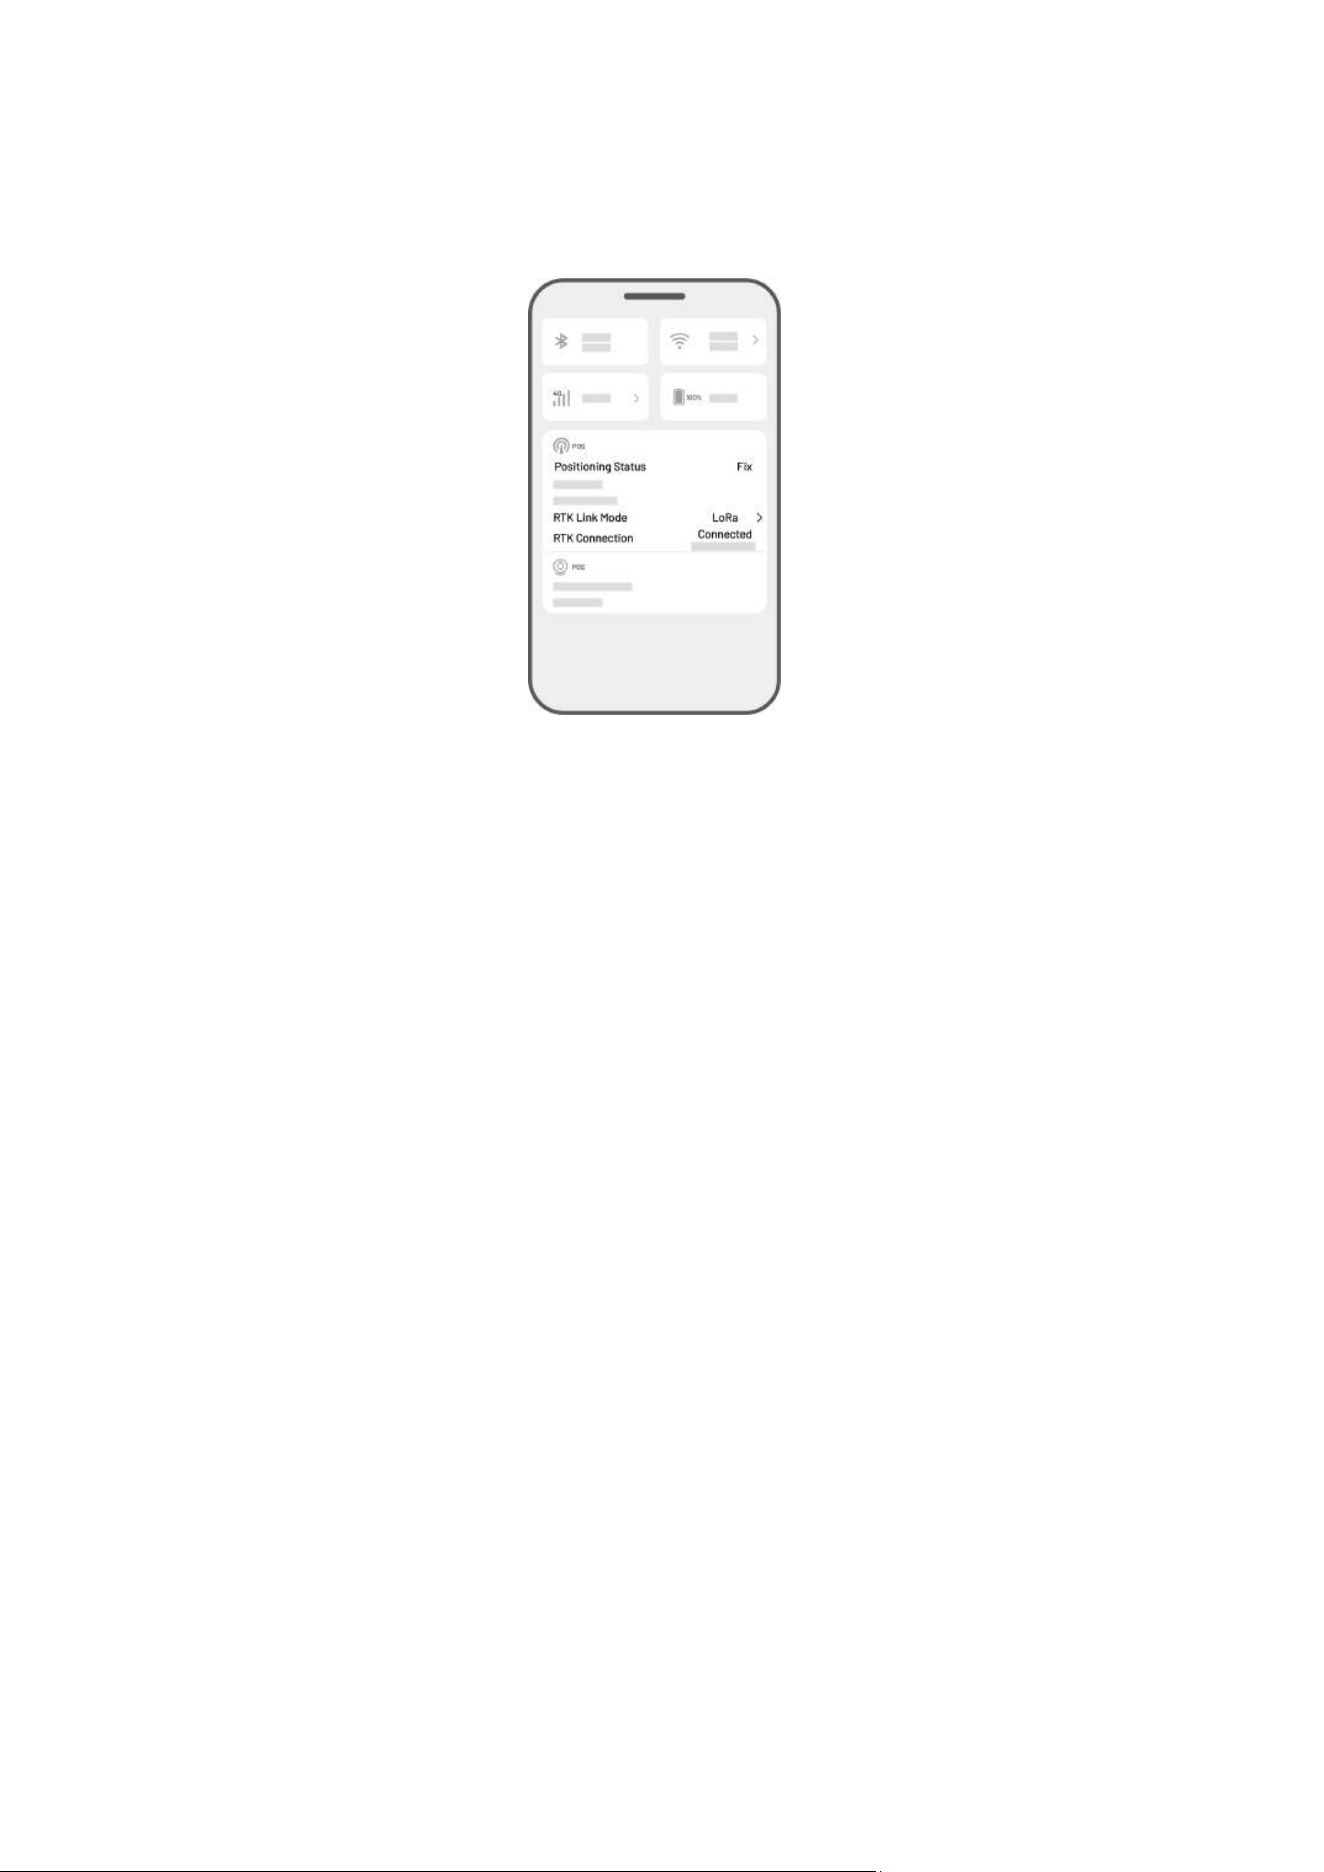
3. Wait for a green check mark to appear, then return to the status information page. Verify that the RTK
positioning status displays 'Fix' and the RTK connection shows 'Connected'. Your setup is now
complete.
Switch Internet RTK to LoRa
1. Tap the Status Bar to access the status information page.
2. The current RTK link mode is Internet. Tap it to access the RTK link mode page. Select LoRa, and
ensure the displayed LoRa number matches the one on the RTK reference station's nameplate. If not,
input the correct one. Tap OK to proceed.
- 59 -
3. Return to the status information page and verify that the RTK link mode displays 'LoRa', the RTK
positioning status shows 'Fix', and the RTK connection status shows 'Connected'. Your setup is now
complete.

- 60 -
What to do when the robot's positioning is not Fix.
Satellites (B): L1 < 20, L2 < 20
Satellites (C): L1 < 20, L2 < 20
Positioning status: Float
Measures:
Place the RTK reference station in an area with unobstructed views of the sky, without any physical
obstructions within at least 5 m/16 ft. Alternatively, position the RTK reference station on a wall or roof.
Signal quality (B): Bad or Weak
Positioning status: Float
Measures:
Place the RTK reference station in an area with unobstructed views of the sky, without any physical
obstructions within at least 5 m/16 ft. Alternatively, position the RTK reference station on a wall or roof.
Satellite (B): L1:0, L2:0
Satellite (C): L1:0, L2:0
Positioning status: Single
Measures:
Ensure the power supply to the RTK reference station is functioning normally.
Verify that the indicator on the RTK reference station remains a constant green between the hours
of 8:00-18:00 local time.
Check for any defects within the RTK reference station, such as water leaks.
Confirm that the radio antenna has been installed.
Re-pair the RTK reference station and the robot to see if it can be fixed.
If you replace the RTK reference station, pair the new station with the robot on the Mammotion app.
For more details, visit https://mammotion3006.zendesk.com/hc/en-us/articles/16503733641367
Satellites (R) < 25
Satellites (C): L1 < 20, L2 < 20
Positioning status: Float
Measures:
Check if the area where the The robot is situated, particularly when the The robot is being charged, has
tall trees/walls/metal barriers, etc.

- 61 -
Signal quality (R): Bad or Weak
Positioning status: Float
Measures:
Check if the robot's current location is fully or partially covered.
If the robot is positioned on the charging station, relocate it to a less obstructed area.
If the robot is located on the perimeter/corner of the task area, adjust the perimeter/corner to
ensure it is not covered.
If The robot is located within the task area and has lost its positioning due to obstacles such as
trees, iron tables or chairs, mark those obstacles as no-go zones.
Satellites (R): 0
Satellites (C): L1:0, L2:0
Positioning status: None
Measures:
Check whether the robot is inside or if its rear is covered with metal. If the robot is faulty, please contact
our after-sales team at https://mammotion3006.zendesk.com/hc/en-
us/requests/new?ticket_form_id=13773144519703
Satellites (B): L1:0, L2:0
Satellites (C): L1:0, L2:0
Positioning status: Float
Signal quality (B): None
Measures:
Check if the RTK reference station has powered off.
If the robot
is too far from the RTK reference station, narrow the distance between the RTK
reference station and the robot and retry.
Verify if there are any malfunctions with the antenna, RTK reference station, or the robot receiver. If
so, please contact our after-sales team at https://mammotion3006.zendesk.com/hc/en-
us/requests/new?ticket_form_id=13773144519703
- 62 -
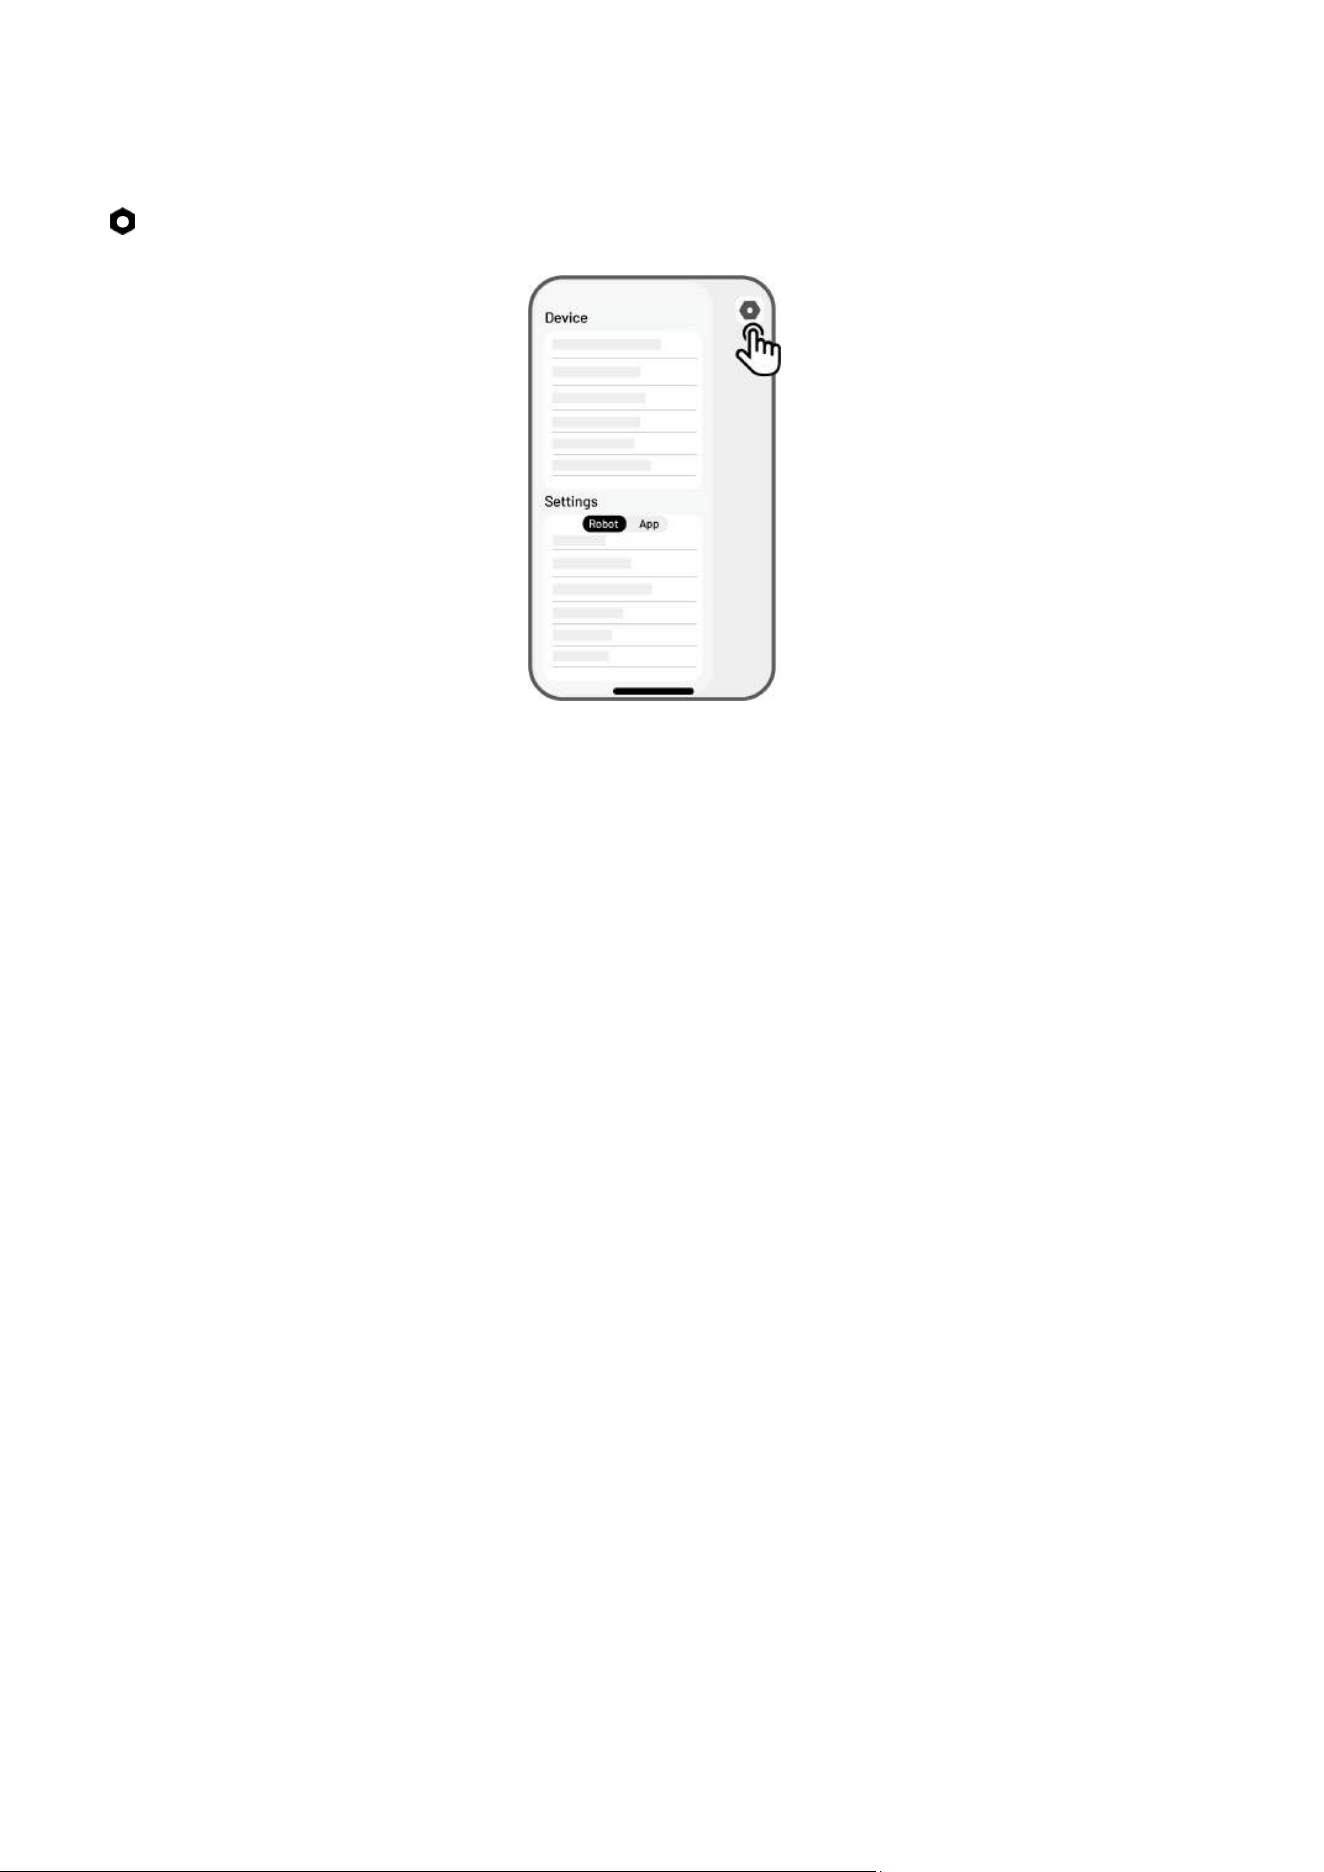
4.9.1 Settings
Tap to enter the Settings page.
Device settings
Device Information
Device Name — change the name of the robot.
Sharing Management — tap to view your sharing history and share your device with your
family.
Robot Version — check the firmware version of the robot.
Network Settings — set the robot network.
Upload Logs — tap to send your issues and logs to Mammotion to target. You can attach a
maximum of 5 images and 1 video.
Factory Reset — tap to perform factory reset. All the logs and Wi-Fi passwords will be clear.
Maintenance — shows the information on total mileage, mowing duration, battery cycle, and
activation time.
Unbind — tap to unbind the current robot. A set of the robot can only be associated with one
account and cannot be operated until it is bound. If you wish to transfer ownership of the
robot, you must unbind it before proceeding.
Robot Version — check the firmware version of the robot or upgrade it if any.
Network Settings — set robot network.
- 63 -
Task Record — shows the historical tasks which were completed and uncompleted.
Upload Logs — tap to send your issues and logs to Mammotion to target. You can attach a maximum
of 5 images and 1 video.
Robot settings
No mowing on rainy days — when you enable this function, the robot will not mow if it rains.
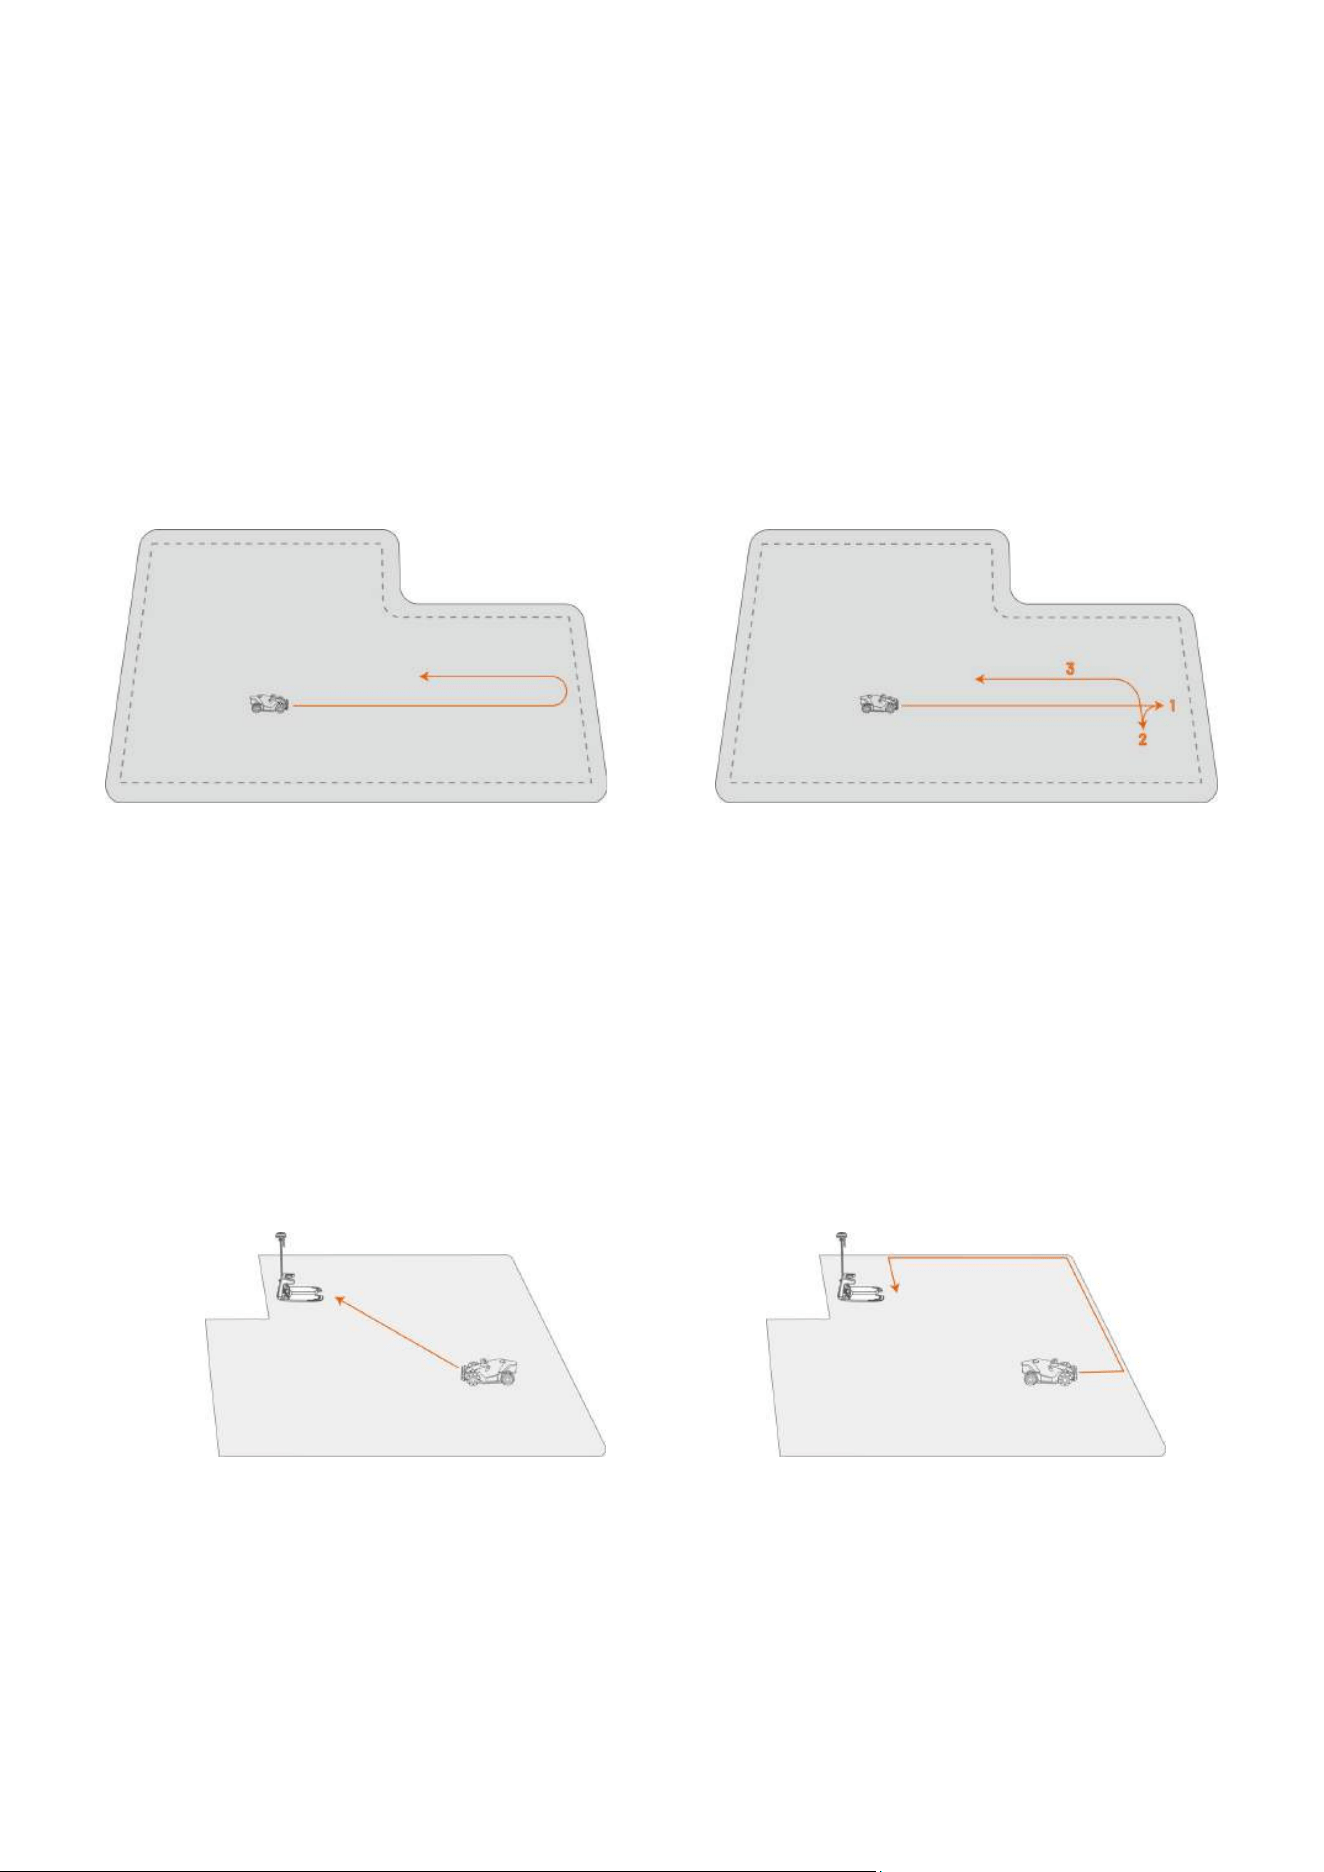
Turnaround Mode — Zero turn and Multi-point turn.
Zero turn
Multi-point turn
Side LED — tap to turn on/off the side indicator of the robot.
Delete Map — tap to delete the task area you create.
Recharge Route — provides two ways to recharge: Direct or Follow the perimeter; Direct means
that the robot takes the shortest route to return to the charging station; Follow the perimeter means
that the robot drives down the perimeter to the charging station without leaving any tracks within the
lawn.
Direct
Follow the perimeter
Non-working Periods — tap to set non-working period.
RTK Link Mode — tap to switch RTK link mode or reset RTK paring code.
- 64 -
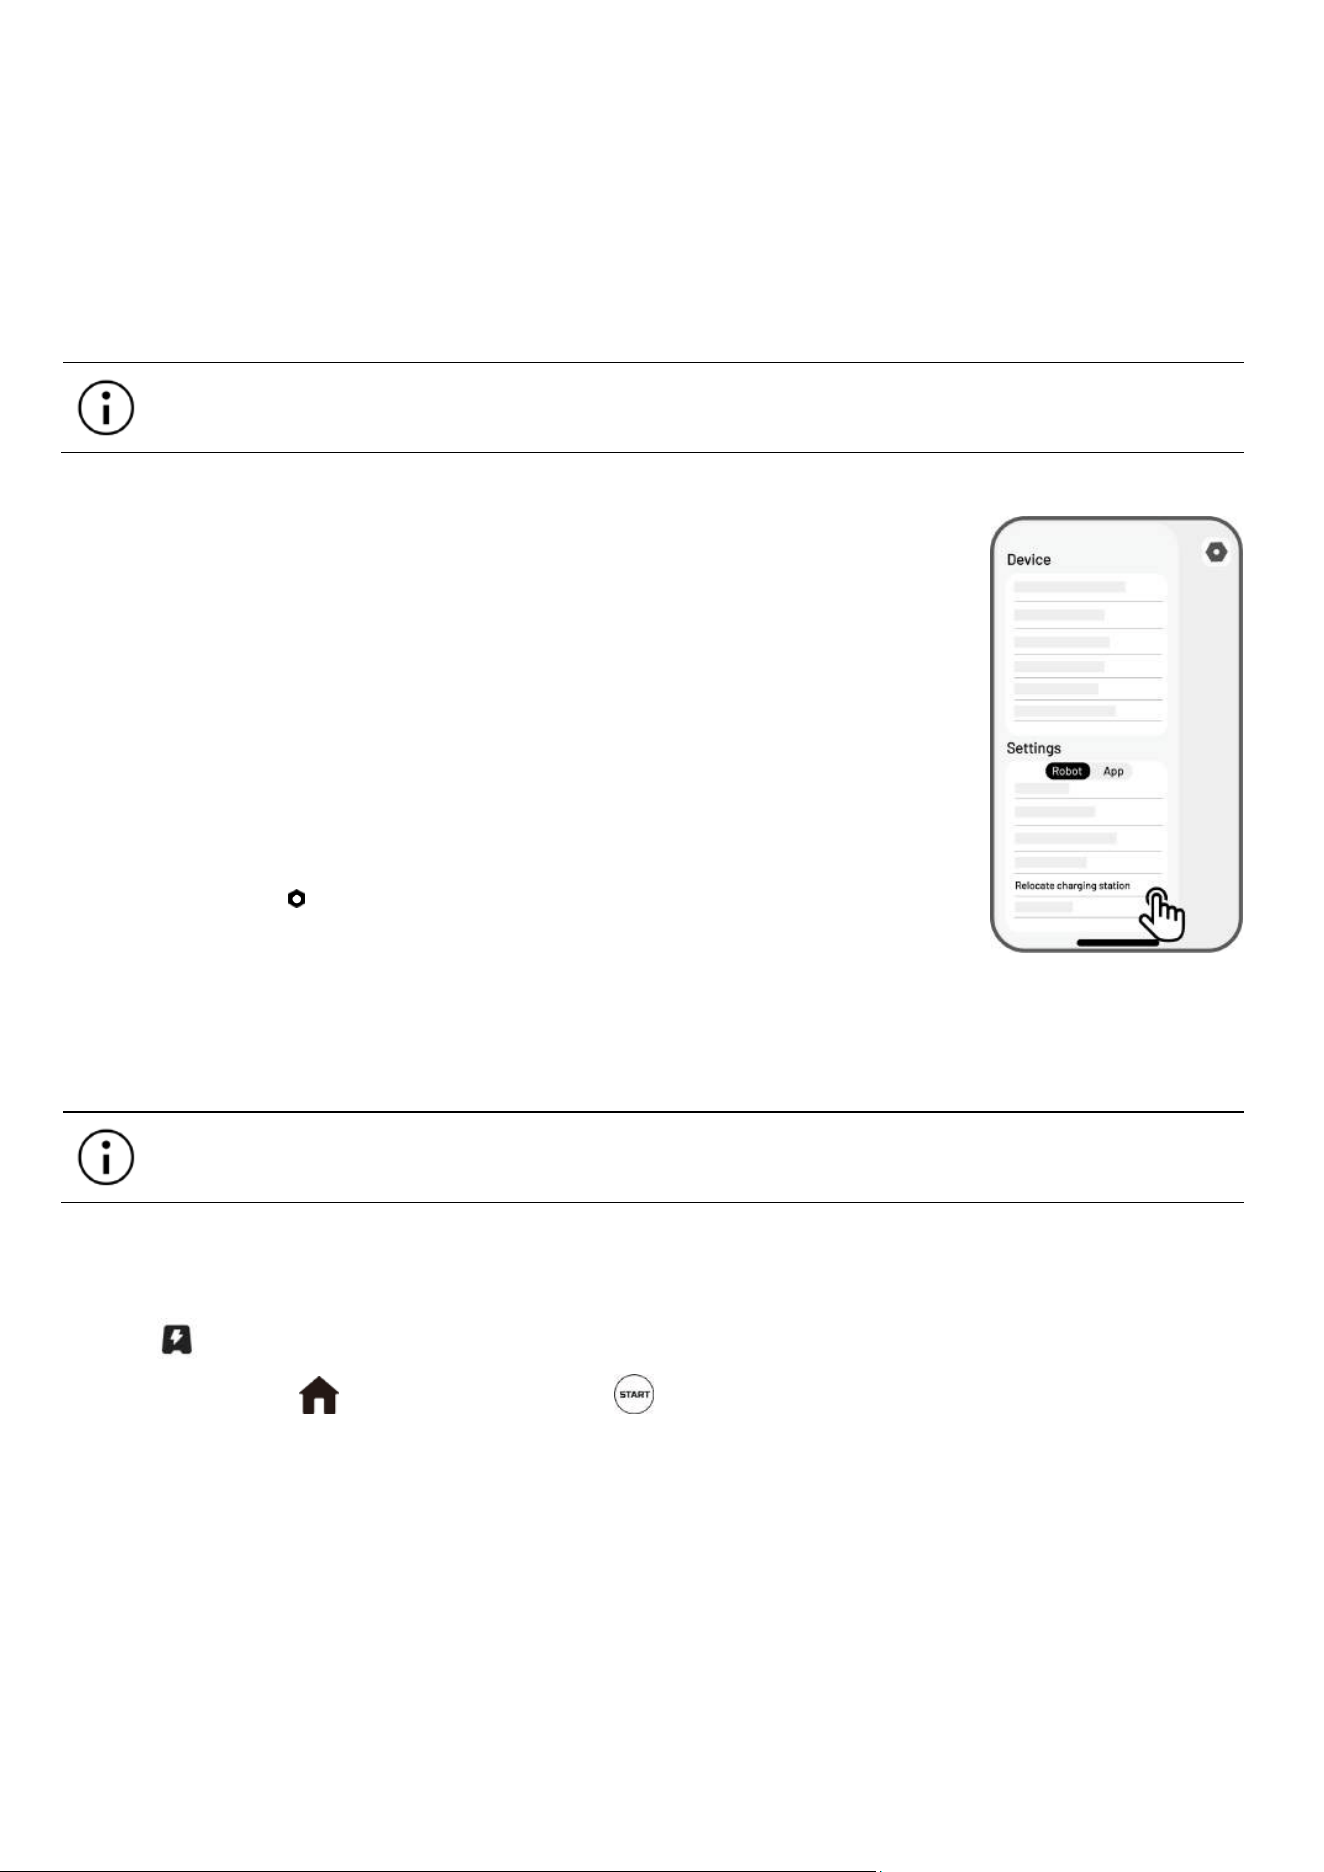
Relocate Charging Station — tap to relocate the charging station. See Relocate the charging station
for additional information.
Speaker — tap to turn on/off voice prompts.
Relocate the charging station
NOTE
Please relocate the charging station while the robot is charging.
Generally, the charging station should be relocated if
The charging station is moved.
The docking path has a significant incline.
The recharge process consistently fails.
1. Install the charging station in a proper place.
2. Place The robot on the charging station and ensure the positioning status
is fine.
3. Select Settings > Relocate charging station.
4.9.2 Recharge
NOTE
When performing the recharge function, the robot must be in the task area.
To perform recharge
Tap on the map page in Mammotion app, or
Press the button on the robot, then press to guide the robot to the charging station.
- 65 -
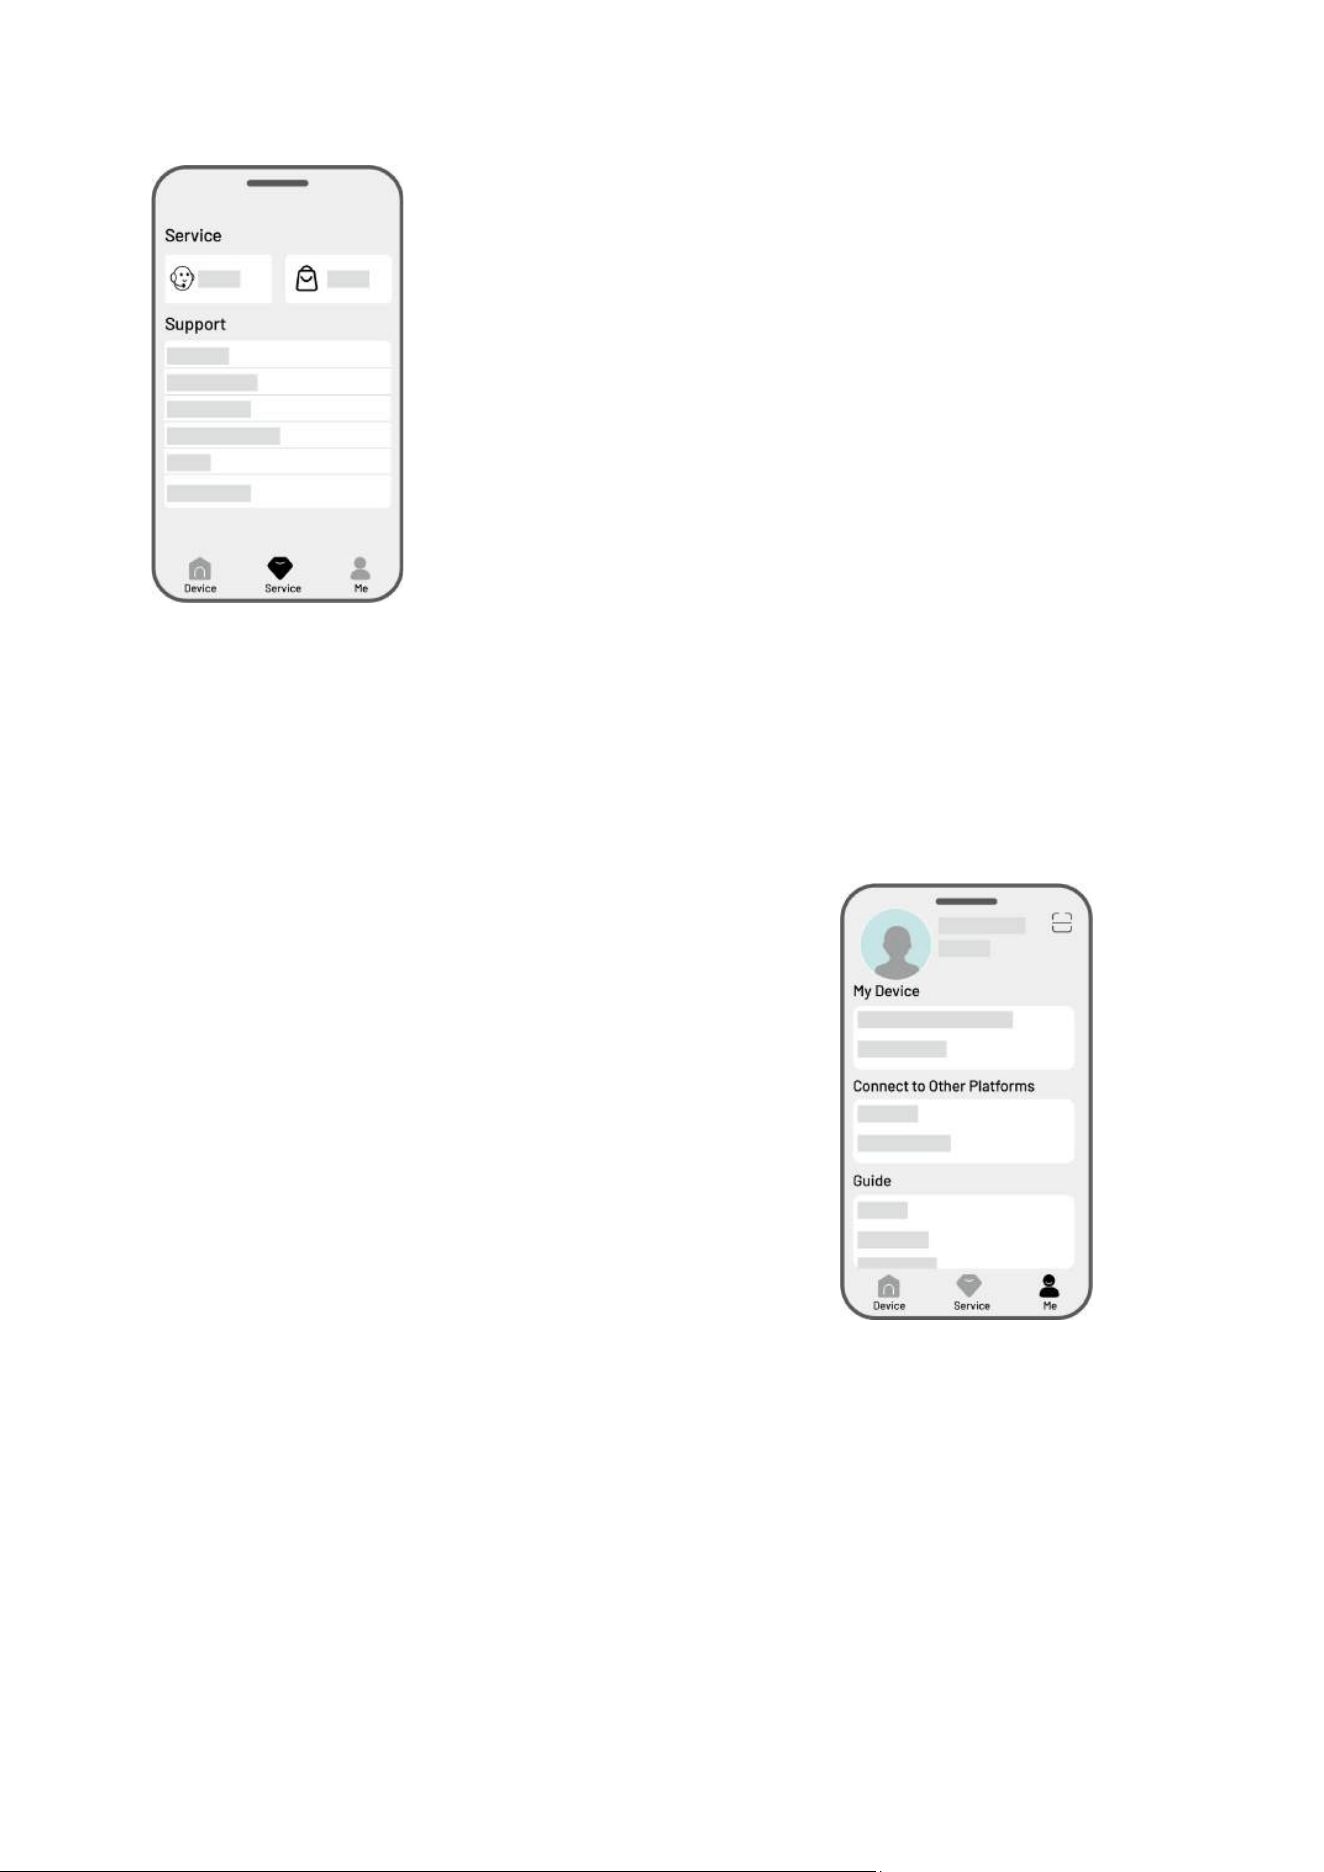
4.10 Service Page
Help — tap to access our customer service.
Store — tap to go to Mammotion mall.
Academy —tap to access user instructions.
User Manual — tap to access the user manual.
Winter Maintenance — tap to access the winter maintenance
details.
FAQ — shows common questions and answers.
About Us — tap to access more information about
Mammotion.
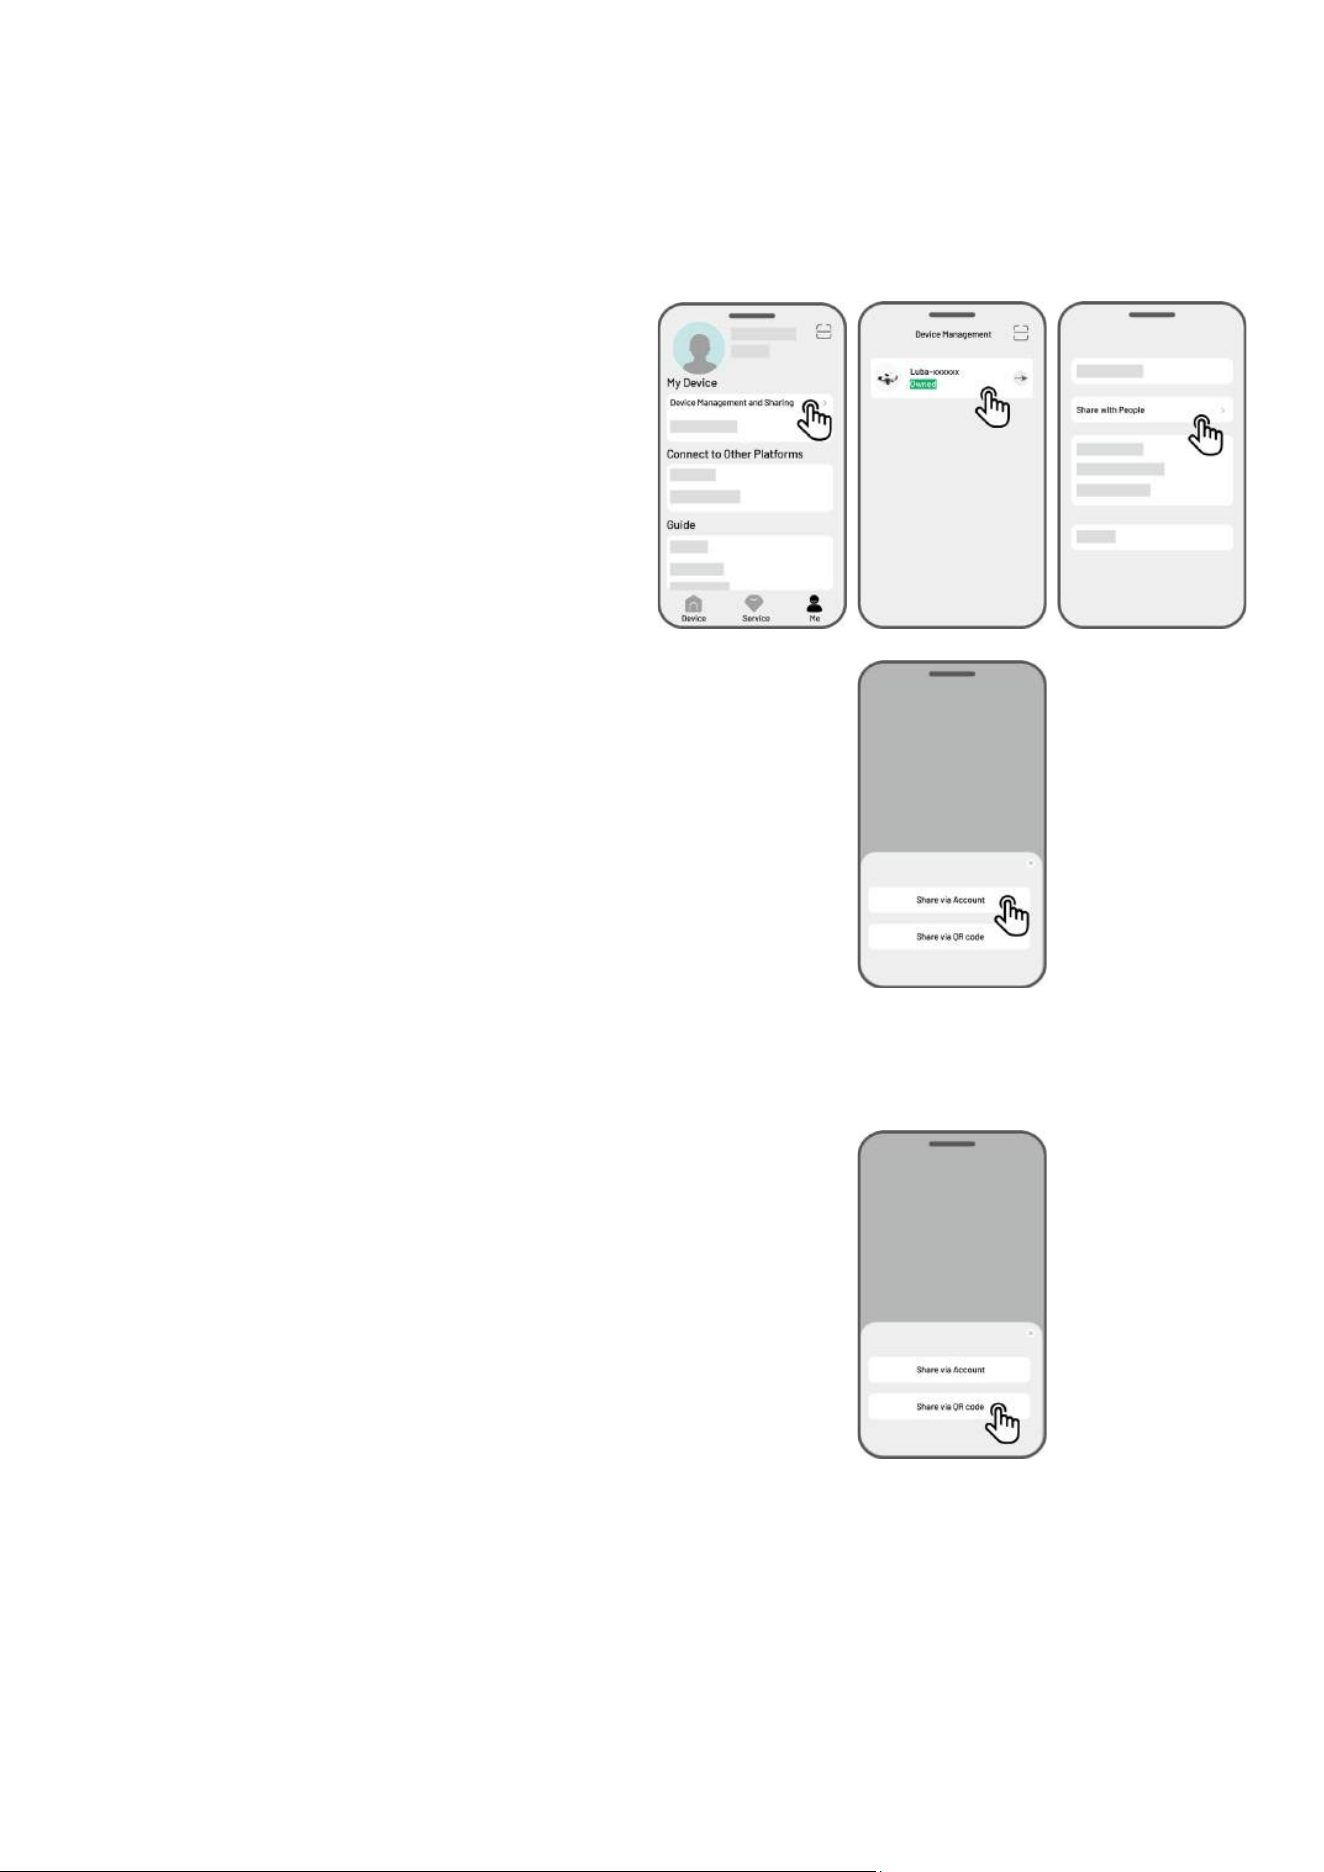
4.11 Me Page
Device Management and Sharing — tap to
share your devices.
Find My Device — tap to track your device.
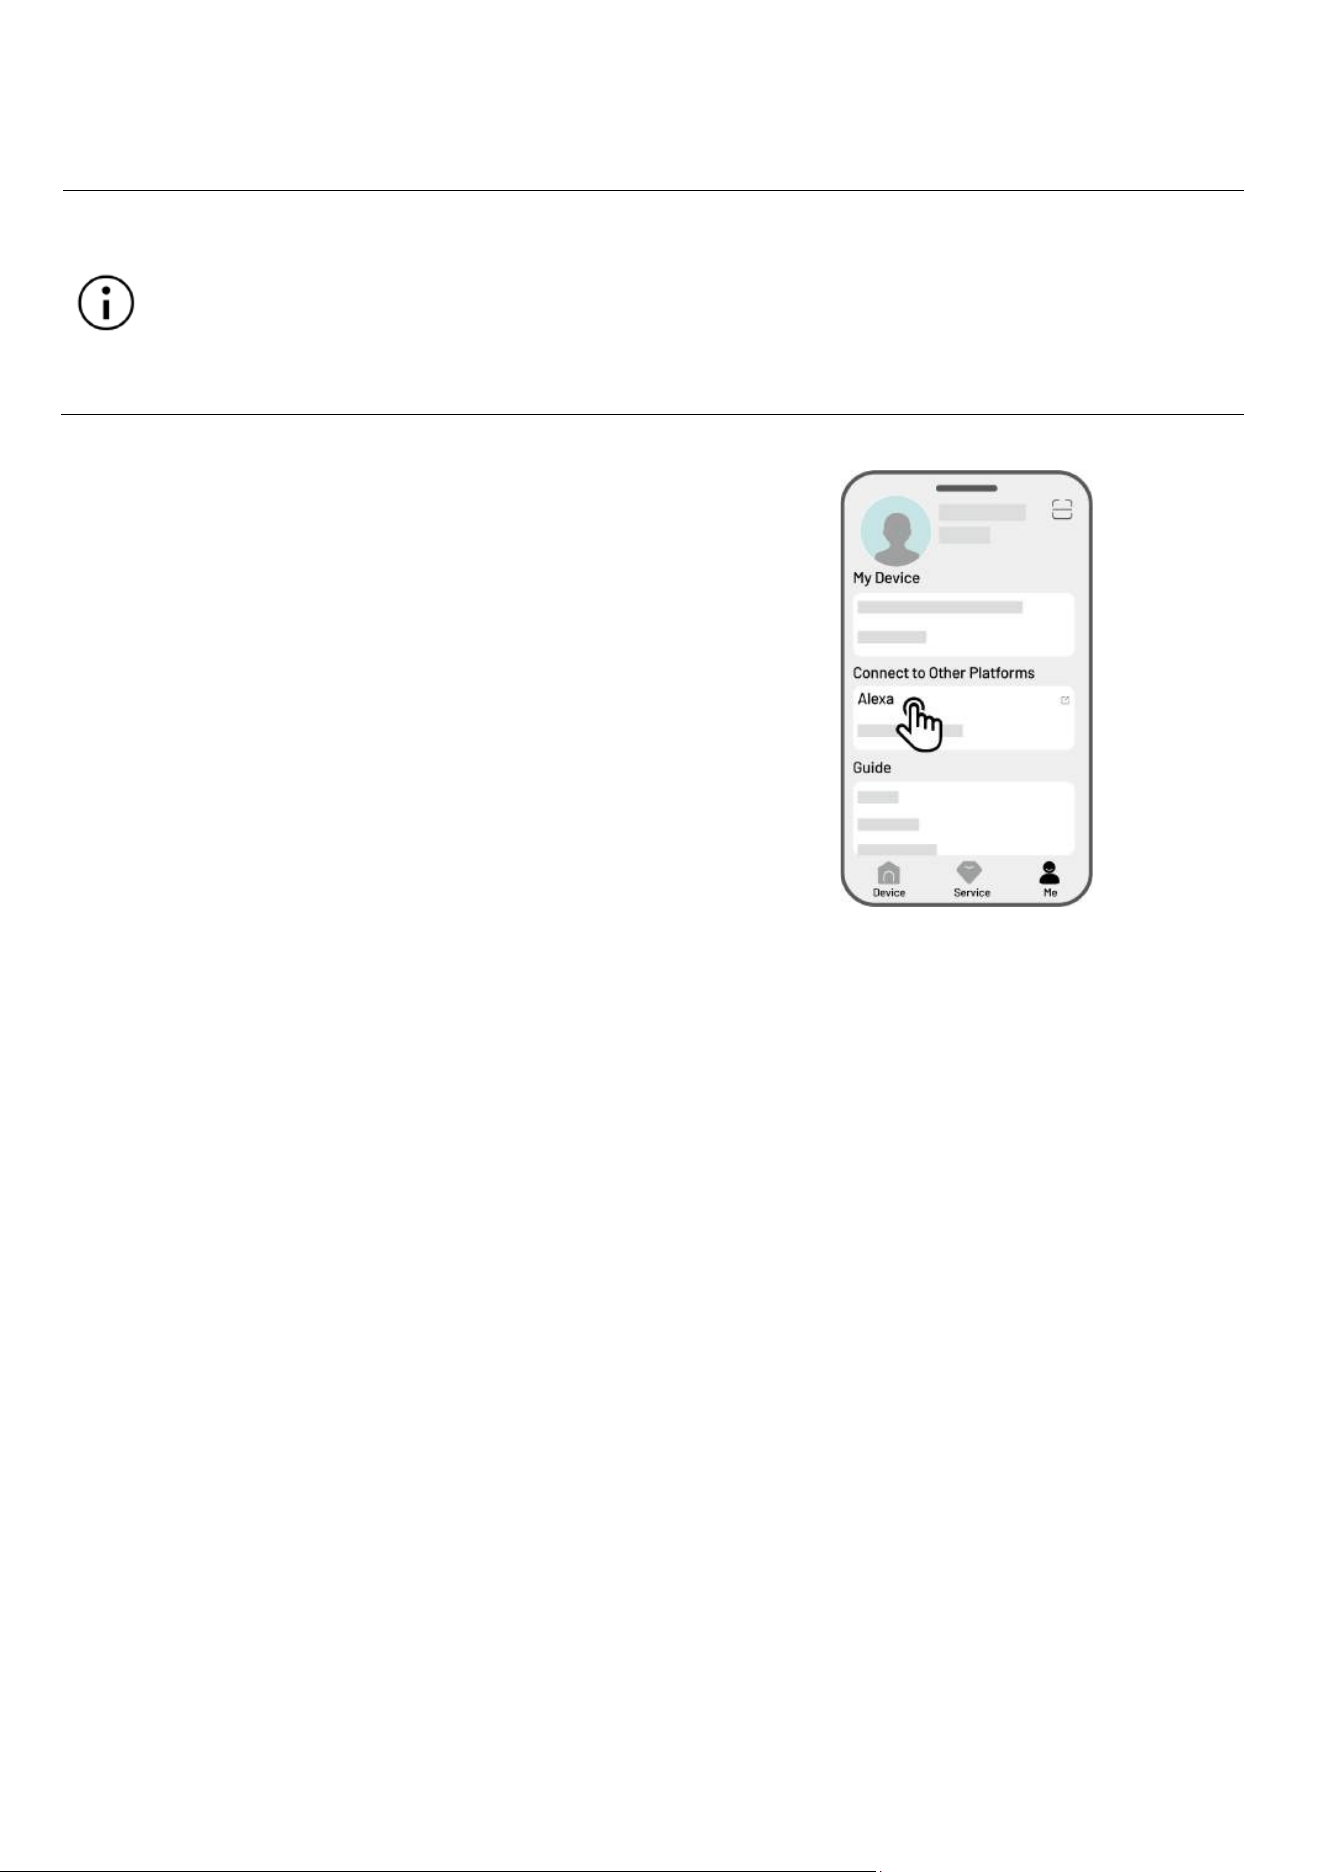
Alexa — tap to link your Alexa account.
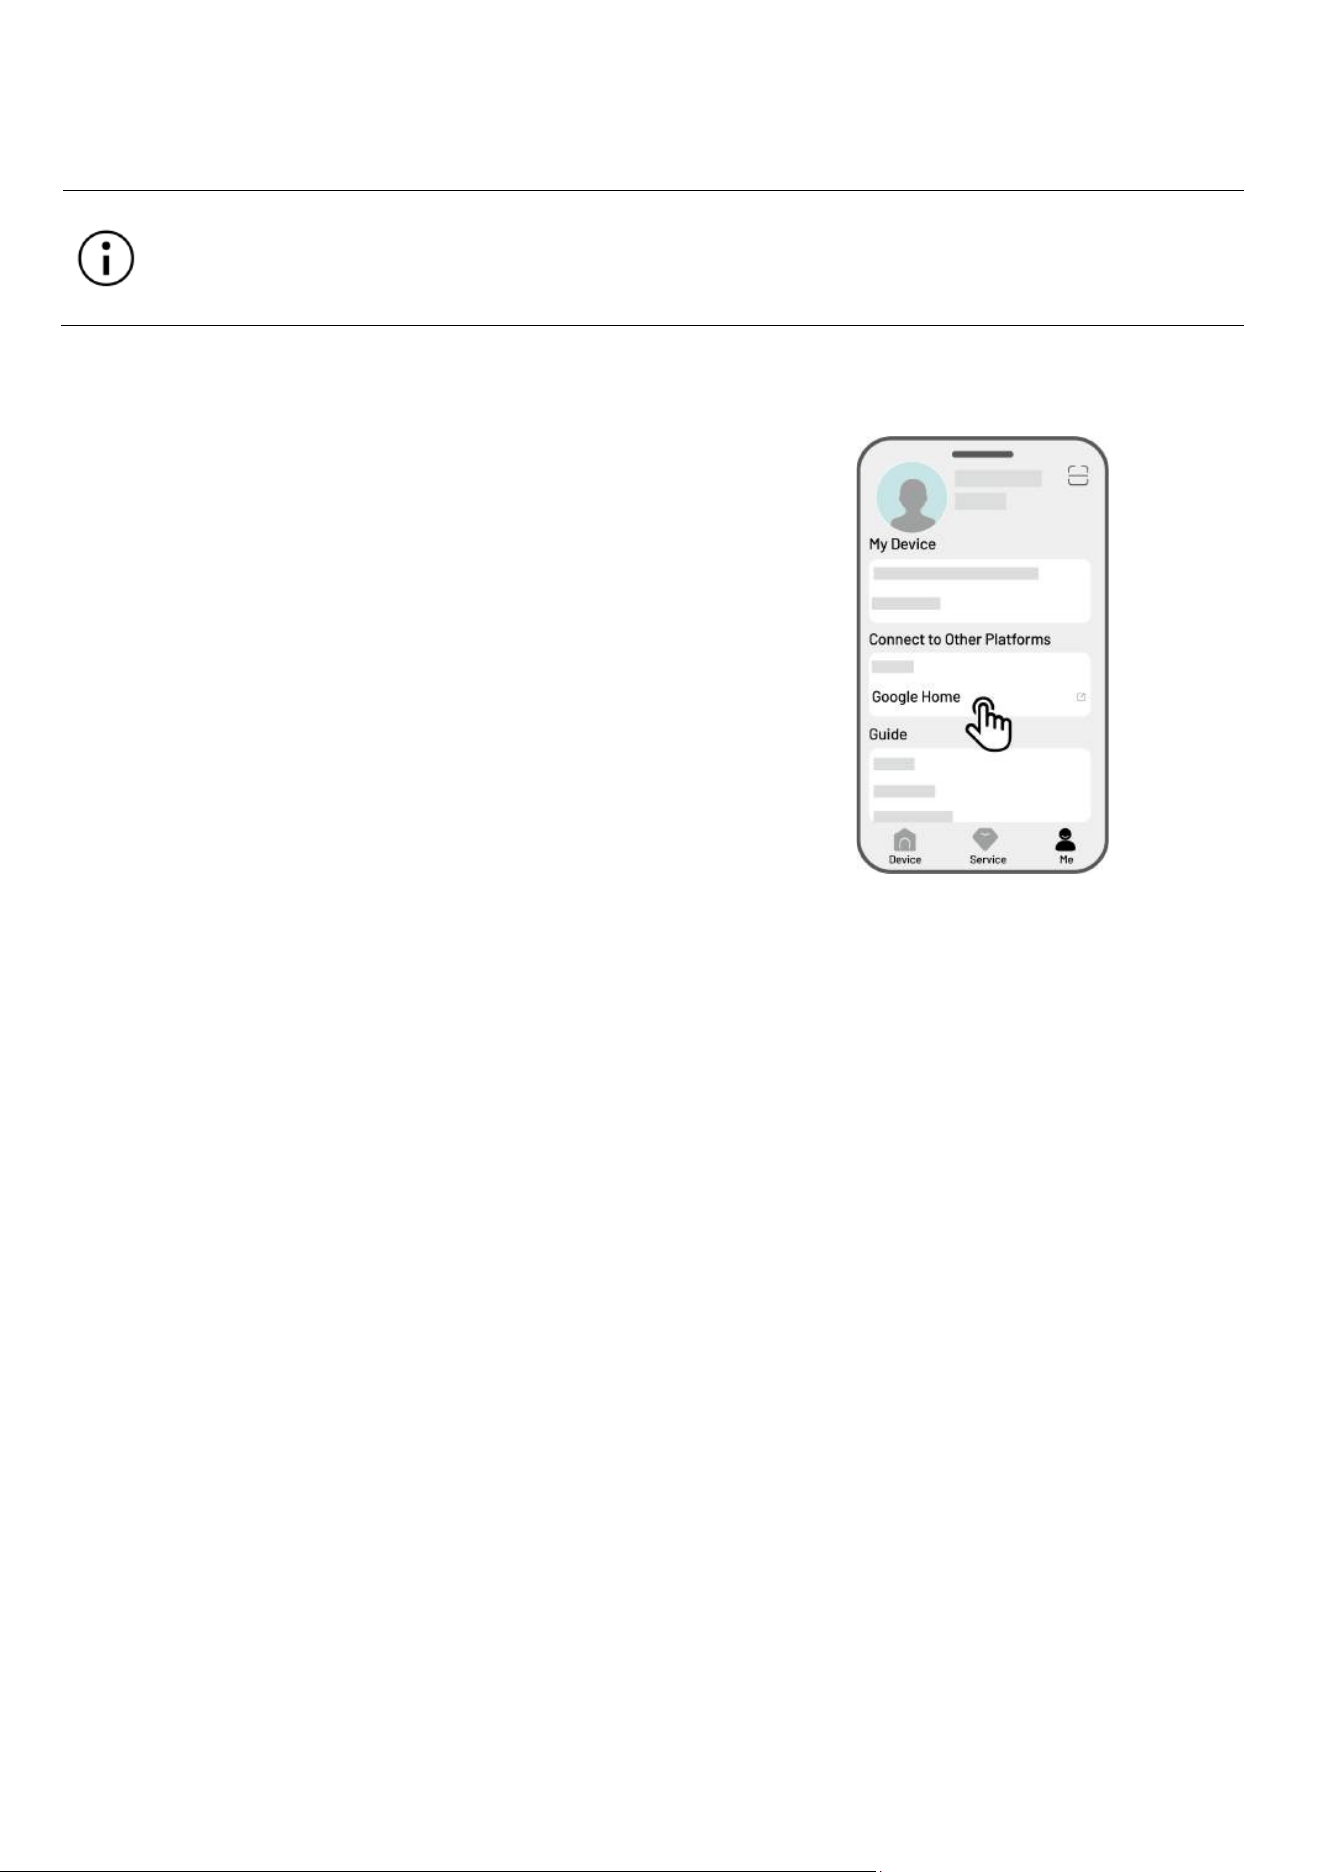
Google Home — tap to link your Google Home
account.
Guide — toggle to on/off to show/hide
guidelines.
Language — switch language.
Upload Logs — submit your issues and logs to
Mammotion to target.
About Mammotion — tap to view the app
version, User Agreement, and Privacy
Agreement.
- 66 -
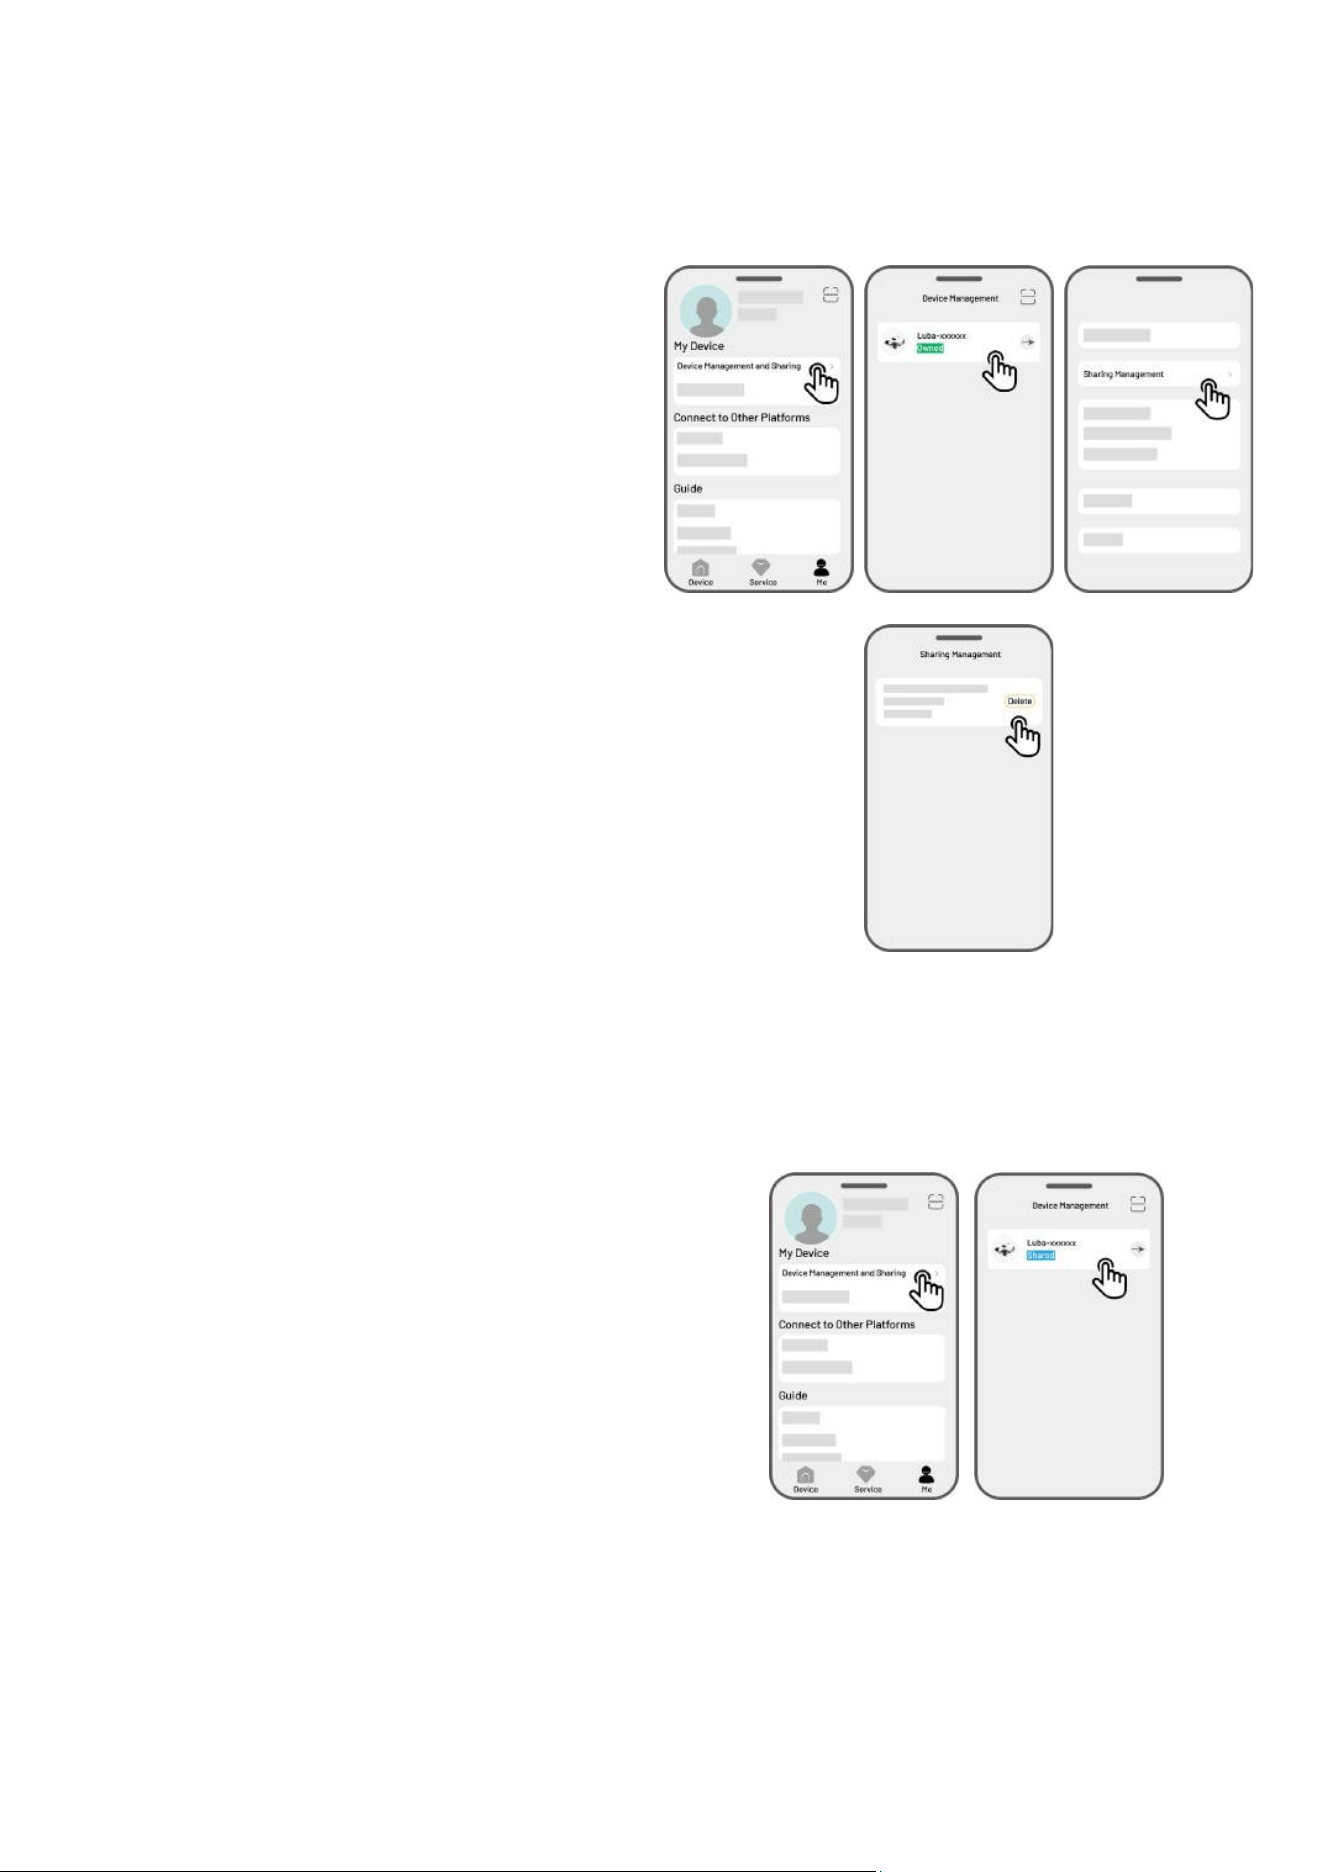
4.11.1 Share Your Device
Sharing your device allows the recipient to control and access device information, but they cannot share
it further or use its anti-theft feature.
1. Go to the Me page and tap Device
management and sharing.
2. Select your own device to share.
3. Tap Share with people to go on.
4. Select Share via account or
Share via QR
code to share your device.
Share via account
a. Tap Share via account.
b.
Enter the account number that you
want to share, then tap Share.
c. In the recipient’s Mammotion app,
tap Agree in the popup.
Share via QR code
a. Tap Share via QR code and a code
will appear.
b.
Use the recipient’s Mammotion app
to scan the QR code and tap Agree in
the popup.
- 67 -
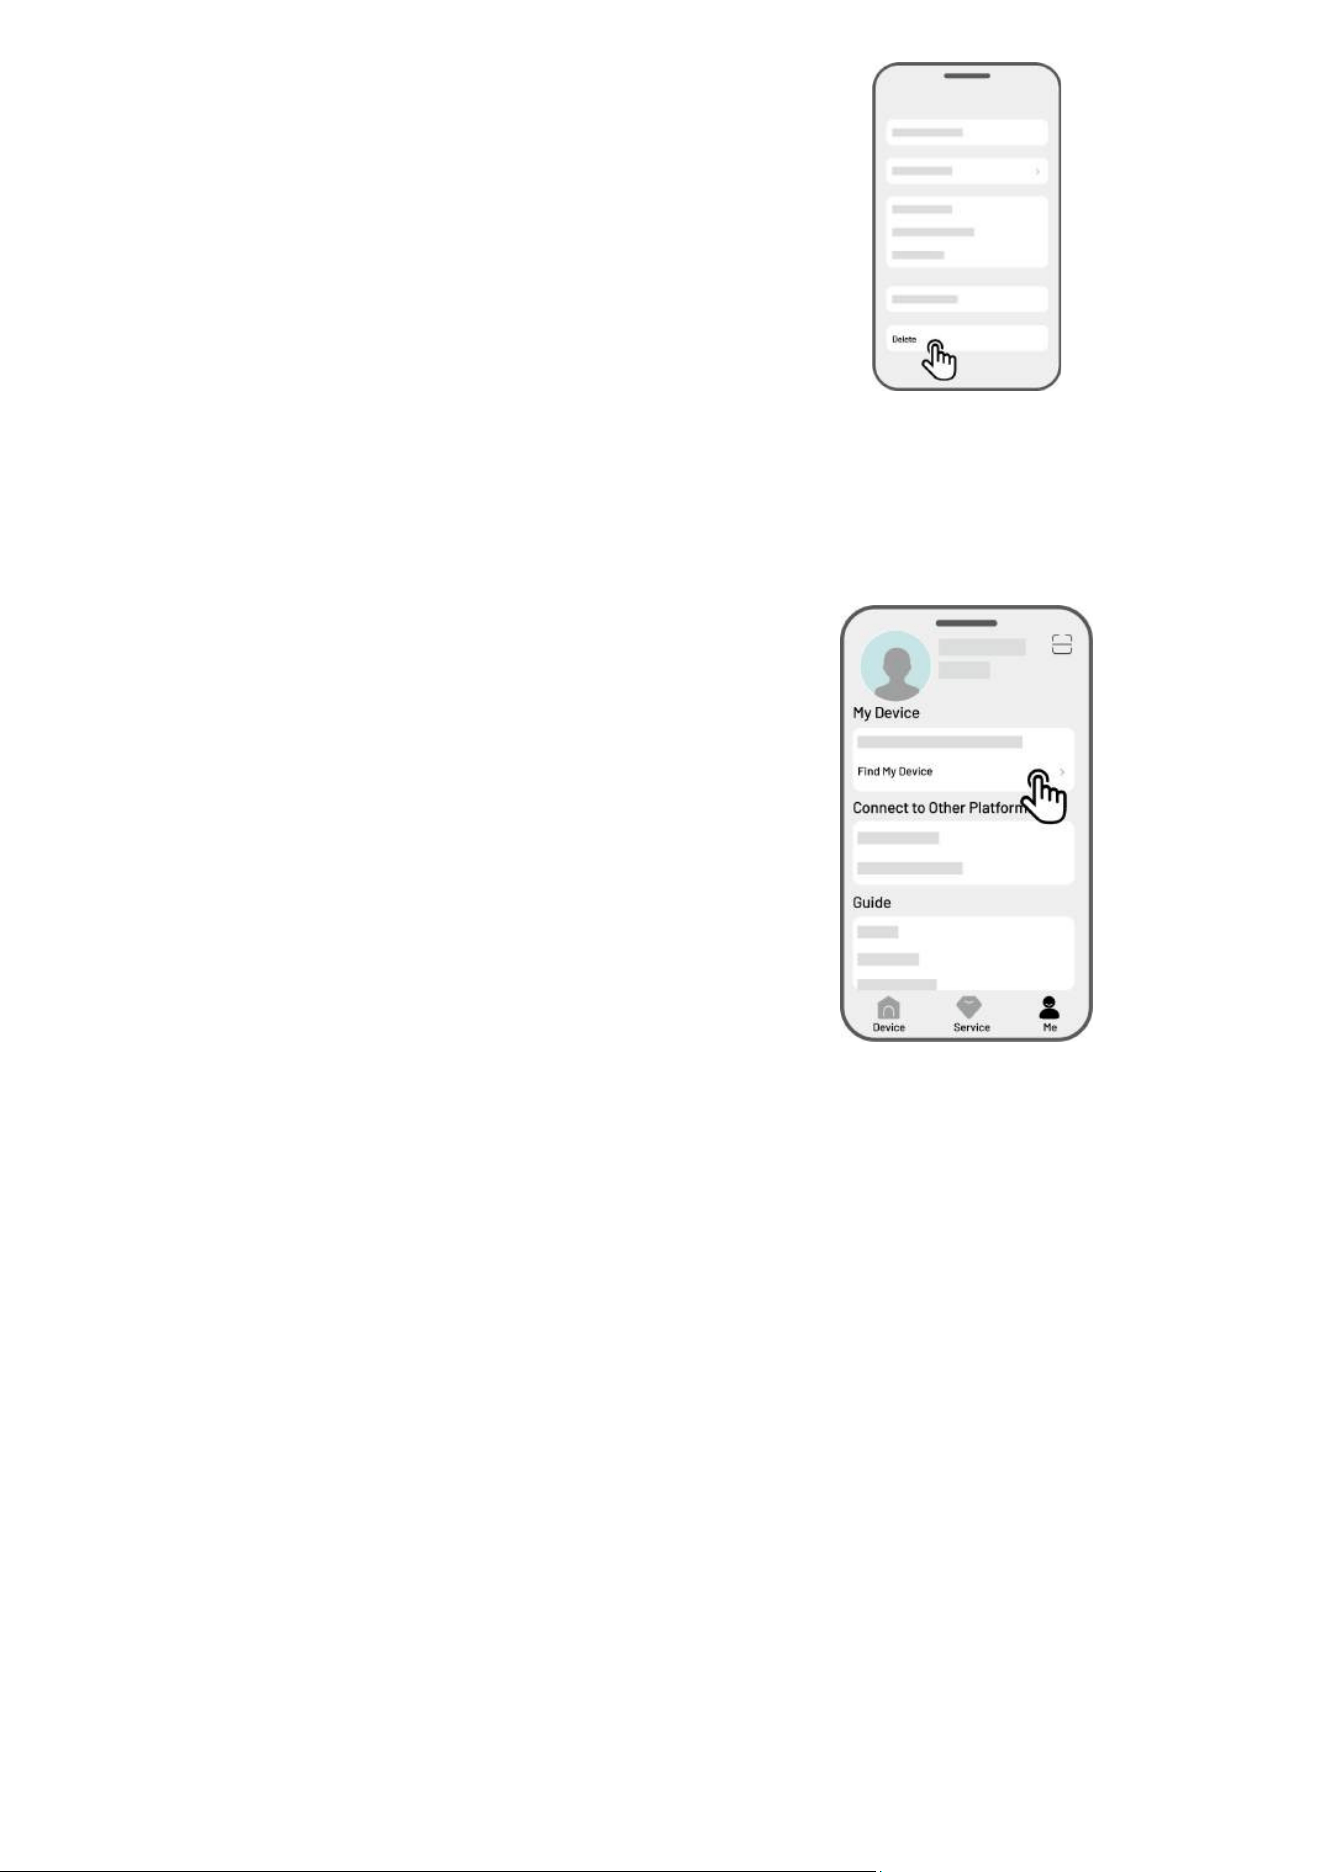
4.11.2 Stop Sharing Your Device
For owner
1. Go to the Me page and tap Device
management and sharing.
2. Select the device that you have shared.
3. Tap Sharing management to continue.
4. Select the corresponding sharing history and
tap Delete.
5. Tap Confirm to revoke the recipient’s access
to the device.
For recipient
1. Go to the Me page and tap Device management
and sharing.
2. Select the device that has been shared with you.
- 68 -
3. Tap Delete.
4. Tap Confirm
to stop using the device. This
action will not affect the owner’s data.
4.11.3 Find My Device
In the case that your robot or RTK reference station
that has been bound with the Mammotion app is
missing, go to Me > Find my Device page to track
your device.
Tap the device to enter the next page where you can enable/disable Location Notifications and Location
Recorder.
Location Notifications — You will receive a push notification when the robot is more than 50 meters
away from the working area after enabling it.
Location Recorder — Record the location history of the robot after enabling it.
- 69 -
4.11.4 Link Your Alexa Account
NOTE
Prior to starting a job using voice control, it is necessary to have created at least one task
beforehand.
In cases where more than 2 sets of robot are linked to the same Mammotion account, the
voice command will be directed to the most recently bound robot by default.
1. Go to the Me page and tap on Alexa.
2. Select Luba 2 (Mammotion Robot) to proceed.
3. Tap Link Alexa to go to the authorization page.
4. Finally, tap Link to complete the operation.
Once the linking is successful, you can control the robot with voice commands. Here are some examples
for starting, pausing, stopping, recharging, and checking the status:
Start working
-Alexa, ask Mammotion robot to start working
-Alexa, ask Mammotion robot to start task xx (xx means the name of the task you set)
Pause working
-Alexa, ask Mammotion robot to pause
-Alexa, ask Mammotion robot to hold on
Continue working
-Alexa, ask Mammotion robot to continue
Stop working

- 70 -
-Alexa, ask Mammotion robot to stop working
Return to the charging station
-Alexa, ask Mammotion robot to recharge
-Alexa, ask Mammotion robot go home
Check status
-Alexa, ask Mammotion robot status
- 71 -
4.11.5 Link Your Google Home Account
NOTE
Prior to starting a job using voice control, it is necessary to have created at least one task
beforehand.
1. Go to the Me page and tap on Google Home.
2. Tap Link Google Home to go to the authorization
page.
3. Follow the instructions to complete the setup.
After linking succeeds, you can control the robot using voice commands, try the following commands:
Start working
-Hey Google, start mowing
-Hey Google, start the Luba now
-Hey Google, let the Luba start running
-Hey Google, make the Luba start running
Pause working
-Hey Google, pause mowing
-Hey Google, pause the Luba now
-Hey Google, let the Luba pause
-Hey Google, make the Luba pause
Continue working
-Hey Google, continue mowing

- 72 -
-Hey Google, let the Luba continue
-Hey Google, make the Luba continue
Stop working
-Hey Google, stop mowing
-Hey Google, stop the Luba
-Hey Google, let the Luba stop
-Hey Google, make the Luba stop
Recharge Luba
-Hey Google, dock the Luba
-Hey Google, let the Luba go home
-Hey Google, make the Luba go home
Check status
-Hey Google, is the Luba running?
- 73 -
5 Maintenance
To maintain optimal mowing performance and extend the lifespan of your robot, Mammotion advises
performing regular inspections and maintenance weekly. For safety and effectiveness, always wear
protective clothing such as trousers and work shoes; avoid wearing open sandals or going barefoot
during maintenance.
5.1 Cleaning
WARNING
Ensure the robot is completely powered off before beginning any cleaning work.
Always power off the robot before turning it upside down.
When turning the robot upside down, handle it with care to avoid damaging the vision
module.
5.1.1 To Clean Robot
Housing
Use a soft brush or a damp cloth to clean the robot's housing. Avoid using alcohol, gasoline, acetone, or
other corrosive or volatile solvents, as they may damage the robot’s appearance and internal components.
Bottom
Wear protective gloves while cleaning the chassis and cutting discs. Use a brush to remove debris. Check
for blade damage and ensure that the blades and cutting discs can rotate freely.
DO NOT use sharp objects to clean the bottom.

- 74 -
DO NOT uninstall the protective bracket to clean the bottom.
Front wheels (Omni wheels)
Clean the front wheels using a brush or water hose. Remove the mud if any.
Rear wheels
Regularly clean the rear wheels with a brush or water hose if they become too dirty.
Vision camera
Wipe the vision camera lens with a cloth to remove any stains. A clean lens is crucial for the performance
of the vision module.
Rear part
Regularly clean the rear charging pads and infrared receiver with a cloth to remove grass clippings and
dirt. Keeping these parts clean ensures proper charging and prevents recharging failures.
5.1.2 To Clean Charging Station
Use a brush and cloth to clean the infrared transmitter and the charging pin.
5.1.3 To Clean RTK Reference Station
Wipe the top of the RTK reference station with a cloth to remove any accumulated dirt.
- 75 -
5.2 Maintenance for Cutting Blades and Motor
WARNING
Always wear protective gloves when inspecting, cleaning, or replacing the cutting blade.
DO NOT use an electrical screwdriver to tighten or loosen the cutting disc. Always use the
correct screws and original blades approved by Mammotion.
Replace all cutting blades and their screws simultaneously to ensure a safe and effective
cutting system.
DO NOT reuse the screws, which may cause serious injury.
To ensure optimal performance during long-term storage, keep the hub motor shaft dry and clean.
Regular maintenance of the motor shaft helps prevent dirt and moisture buildup, which can affect the
motor’s function. The motor has an expected lifespan of 150 hours of operation.
Blades are considered wear parts and should be replaced if they become severely worn. It is
recommended to replace the cutting blades every 3 months or after 150 hours of use. For thicker
grass, more frequent blade replacement may be necessary.
Wet grass is more likely to stick to the blades and bottom of the robot, which can impair performance
and lead to the need for more frequent cleaning. For optimal performance and long-term lawn health,
it is recommended to avoid mowing during heavy rain or when the grass is excessively wet.
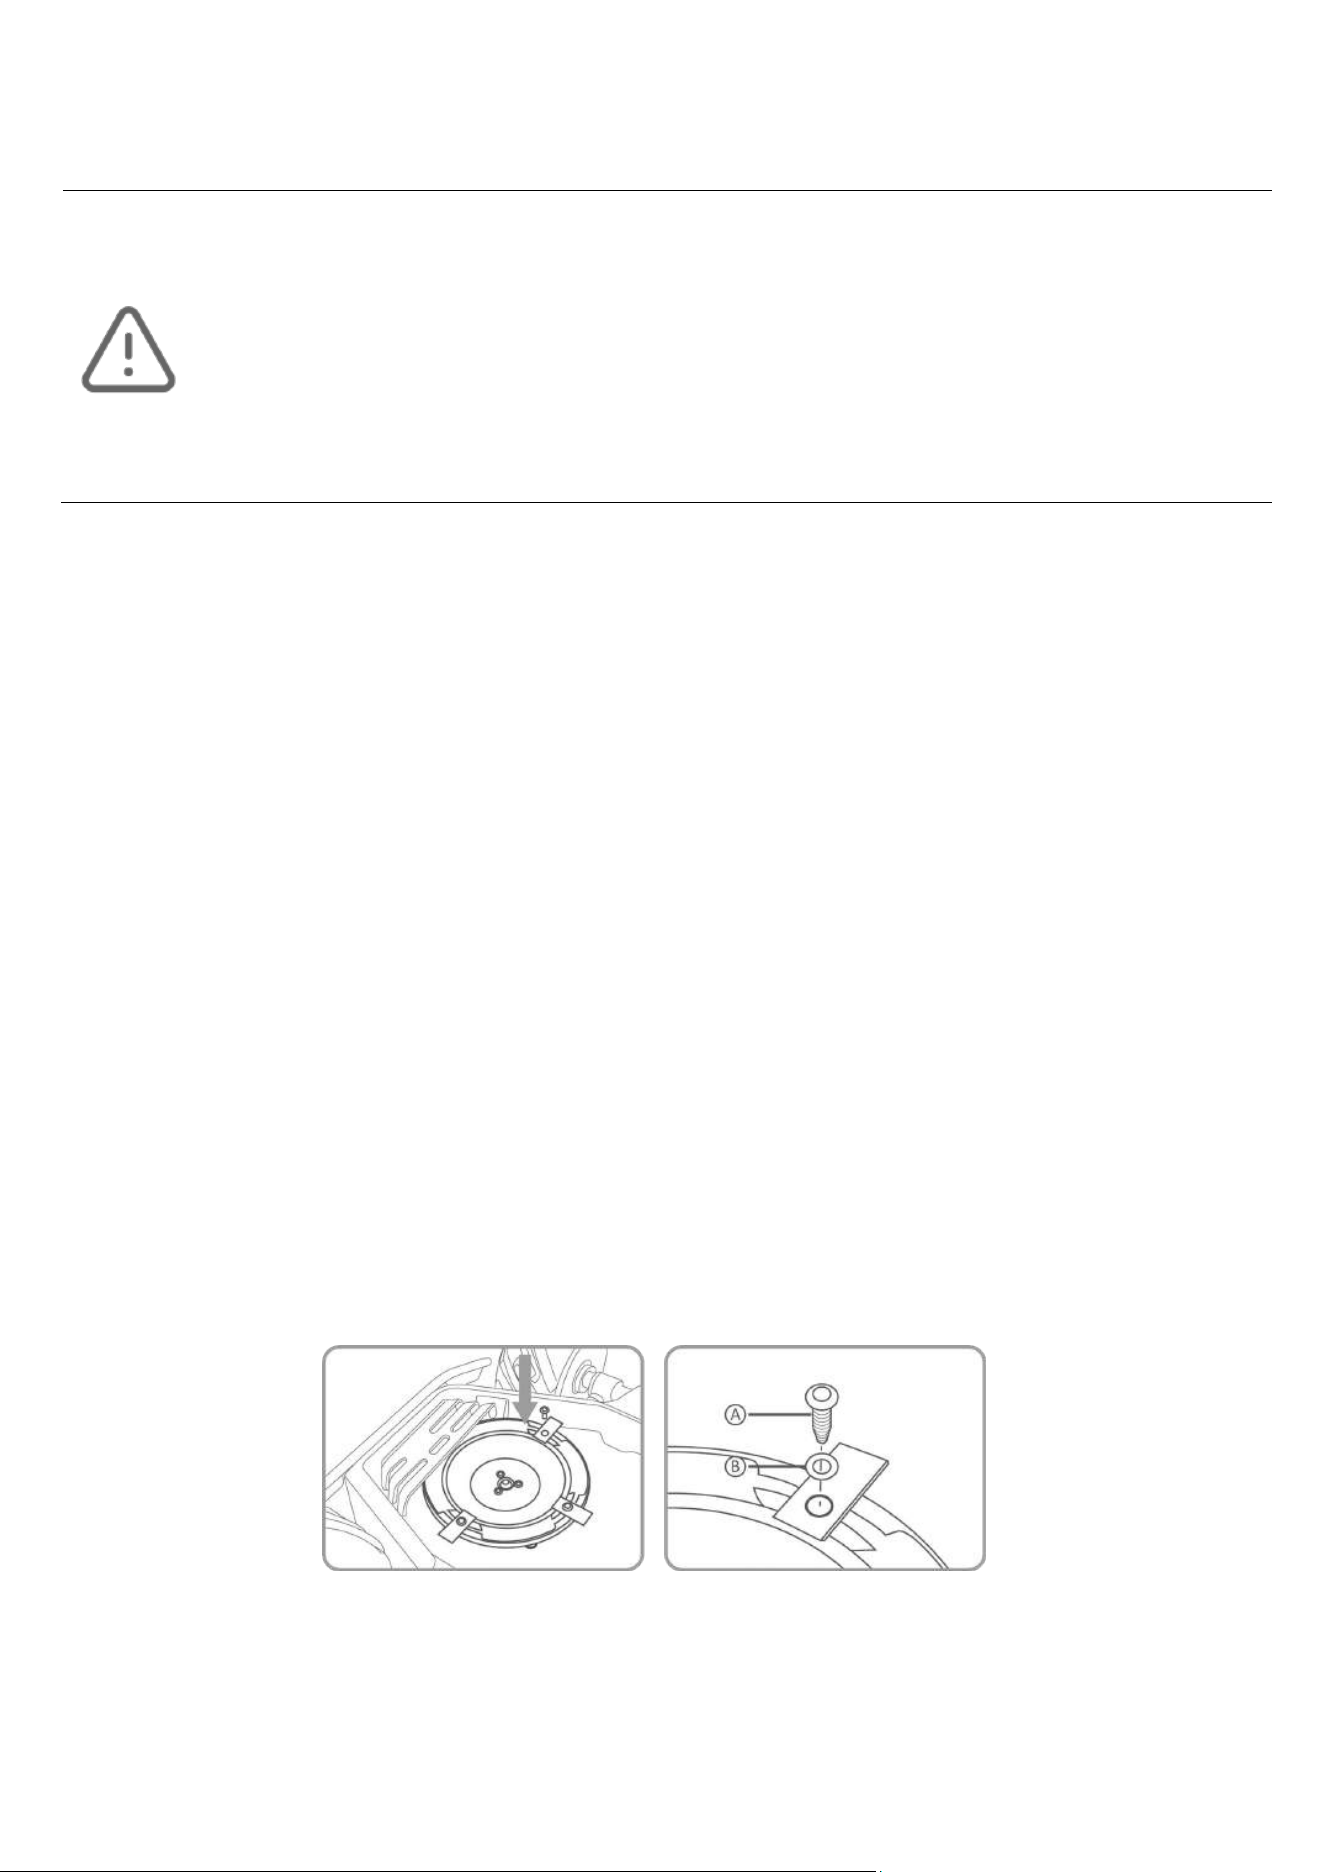
How to replace a cutting blade
1. Turn off the robot.
2. Place the robot on a soft, clean surface, ensuring it is in an upside-down position.
3. Remove the old cutting blades with a Phillips screwdriver.
4. Install the new cutting blades using screws. Ensure that the blades can rotate freely and are securely
installed.

- 76 -
5.3 Battery Maintenance
Maintain the battery fully charged before long-term storage to prevent over-discharge.
Charge fully every 90 days, even if it is not in use.
Ensure the charging ports on the robot are clean and dry before storing or charging.
5.4 Winter Storage
To ensure your robot is in optimal condition for the next mowing season, store the robot, charging station,
and RTK reference station properly. If the ambient temperature drops below -20°C (-4°F) during winter,
keep the robot, RTK reference station, and charging station indoors.
5.4.1 Store Robot
Control the robot off the charging station, ensuring the robot has been fully charged.
Power off the robot.
Clean The robot (the housing, wheels, chassis, vision module, etc.) with a damp cloth or soft brush.
You can wash the robot if necessary. DO NOT turn the robot upside down to clean its chassis with
water.
Leave the robot to get dry. DO NOT turn it upside down during this process.
Apply anti-corrosion lubricant to the charging pads. DO NOT apply the chemicals to any other parts of
the robot, especially metal contact areas, except for the connectors.
Remove the front bumper and clean the connection slot with a brush.
Clean the front bumper with a brush.
Remove the security key.
Remove the SIM card if any. (In the next mowing season, check the SIM card is available and
reinstall it.)
Store the robot indoors.
In the next mowing season, reinstall the front bumper and security key.

- 77 -
5.4.2 Store Charging Station
Disconnect the power supply.
Remove the stakes.
Use a brush and cloth to clean the charging station thoroughly.
Remove the charging station and the power supply.
In the next mowing season, reinstall the charging station, then relocate it (See Relocate the charging
station for more information) and remap a channel between the charging station and the task area
using the Mammotion app.
5.4.3 Store RTK Reference Station
If the ambient temperature is above -20°C (-4°F) in winter:
Unplug the RTK reference station.
Twine the RTK reference station cable around the station and tighten the protective cap.
Cover the RTK reference station with a plastic bag or cover.
If you follow these steps and do not move the RTK reference station, you will not need to delete the map
and remap for the next mowing season.
If the ambient temperature is below -20°C (-4°F) in winter:
If the RTK reference station is installed on the ground, follow the steps below:
Delete the map in the Mammotion app.
Unplug the RTK reference station.
Remove the RTK reference station from the mounting pole.
Remove the antenna.
Use a cloth to clean the RTK reference station.
Remove the mounting pole.
In the next season, reinstall the RTK reference station and remap in the Mammotion app.
If the RTK reference station is installed on the wall/roof, follow the steps below:
Unplug the RTK reference station.

- 78 -
Remove the RTK reference station from the wall mounting pole.
Remove the antenna.
Use a cloth to clean the RTK reference station.
In the next mowing season, reinstall the RTK reference station in its original position. There is no need
to delete the map and remap as the location of the RTK reference station remains unchanged.
5.4.4 Store Solar Panel Kit
If the ambient temperature is above -20°C (-4°F) in winter:
Disconnect the solar panel and tighten the protective cap.
Twine the solar panel cable around the mounting bracket.
Maintain a battery charge of over 50% (indicated by a flashing green LED).
Long press 2s to put the solar panel into standby mode.
If the ambient temperature is below -20°C (-4°F) in winter:
Disconnect the solar panel and tighten the protective cap.
Uninstall the solar panel.
Maintain a battery charge of over 50% (indicated by a flashing green LED).
Long press 2s to put the solar panel into standby mode.
Wipe the solar panel with a cloth.
- 79 -
6 Product Specifications
6.1 Technical Specifications
Table 6-1 Standard Version Specifications
Standard Version (Cutting Height: 25-70 mm/1-2.7 inches)
Specifications
LUBA 2 AWD
10000X 5000X 3000X
Max. Mowing Size
10,000 m
2
/
2.5 acres
5,000 m
2
/
1.25 acres
3,000 m
2
/
0.75 acres
In-App Area
Storage Capacity
12,000 m
2
/
3 acres
6,000 m
2
/
1.5 acres
3,500 m
2
/
0.9 acres
Max. multi-zone
Management
60 30 20
Engine All-wheel Drive (AWD)
Max. Climbing Ability 80% (38.6°)
Max. Slope at the Edge 45% (24°)
Vertical Obstacle Passing
Ability
50 mm/2 in.
Cutting Width 400 mm/15.7 in.
In-App Cutting Height
Adjustment
25-70 mm/1-2.7 in.
Charging Time 160 min 130 min 130 min
Mowing Time per Charge 260 min 210 min 210 min
Auto-recharge YES
GPS Theft Tracking YES
Geo-Alarm YES
- 80 -
Standard Version (Cutting Height: 25-70 mm/1-2.7 inches)
Vision GeoFence YES
Lift Sensor YES
Tilt Sensor YES
RTK Signal Coverage 5 km/3.1 mi.
Applicable RTK Reference
Station
RTK300
Applicable Charging Station CHG4400
Positioning & Navigation 3D Vision & RTK
Obstacle Avoidance 3D Vision & Ultrasonic Radar & Physical Bumper
Voice Control Alexa & Google Home
Vision Monitoring YES
Connectivity 4G & Bluetooth & Wi-Fi
A weighted sound power L
wA
=64dB, K
WA
=3dB
A weighted sound pressure L
PA
=56dB, K
PA
=3dB
Waterproof
LUBA Machine: IPX6
Charging Station: IPX6
RTK Station: IPX7
Rain Detection YES
Net Weight 19.1 kg/42.1 lbs. 18.6 kg/41 lbs. 18.6 kg/41 lbs.
Size (L x W x H) 690 x 513 x 273 mm/27.2 x 20.2 x 10.7 in.
Table 6-2 H Version Specifications
H Version (Cutting Height: 55-100 mm/2.2-4 inches)
Specifications
LUBA 2 AWD
10000HX 5000HX 3000HX
Max. Mowing Size
10,000 m
2
/
2.5 acres
5,000 m
2
/
1.25 acres
3,000 m
2
/
0.75 acres
In-App Area
Storage Capacity
12,000 m
2
/
3 acres
6,000 m
2
/
1.5 acres
3,500 m
2
/
0.9 acres
Max. multi-zone
Management
60 30 20
- 81 -
H Version (Cutting Height: 55-100 mm/2.2-4 inches)
Engine All-wheel Drive (AWD)
Max. Climbing Ability 80% (38.6°)
Max. Slope at the Edge 45% (24°)
Vertical Obstacle Passing Ability 80 mm/3.1 in.
Cutting Width 400 mm/15.7 in.
In-App Cutting Height
Adjustment
55-100 mm/2.2-4 in.
Charging Time 160 min 130 min 130 min
Mowing Time per Charge 260 min 210 min 210 min
Auto-recharge YES
GPS Theft Tracking YES
Geo-Alarm YES
Vision GeoFence YES
RTK Signal Coverage 5 km/3.1 mi.
Applicable RTK Reference Station RTK300
Applicable Charging Station CHG4401
Positioning & Navigation 3D Vision & RTK
Obstacle Avoidance 3D Vision & Ultrasonic Radar & Physical Bumper
Voice Control Alexa & Google Home
Vision Monitoring YES
Connectivity 4G & Bluetooth & Wi-Fi
A weighted sound power L
wA
=66dB, K
WA
=3dB
A weighted sound pressure L
PA
=58dB, K
PA
=3dB
Waterproof
LUBA Machine: IPX6
Charging Station: IPX6
RTK Station: IPX7
Rain Detection YES
Weight 19.6 kg/43.2 lbs. 19.1 kg/42.1 lbs. 19.1 kg/42.1 lbs.
Size (L x W x H) 690 x 513 x 303 mm/27.2 x 20.2 x 12 in.

- 82 -
Table 6-3 Battery Specifications
Parameters Specifications
Battery charger
TS-A180-2806431
Input: 100-240V~, 50/60Hz, 2.5A
Output: 28Vdc, 6.43A, 180W
Battery pack
Battery pack for 10000X and 10000HX: 21.6Vdc, 15Ah;
Battery pack for 3000X, 5000X, 3000HX, and 5000HX: 21.6 Vdc, 12Ah
The temperature range for charging is 4-45 °C / 39-113 °F.
WARNING: For the purposes of recharging the battery, only use the detachable supply unit provided
with this appliance.
Table 6-4 LUBA Onboard RTK Operating Bands Specifications (For EU Models)
Operating Frequency Maximum Transmitter Power
LORA 863.1.-869.85MHz <13.98dBm
Bluetooth 2400-2483.5MHz <20dBm
Wi-Fi
2400-2483.5MHz <20dBm
5500-5700MHz <20dBm
5745-5825MHz <13.98dBm
GSM900 880-915MHz(Tx);925-960MHz (Rx) 35dBm
GSM1800 1710-1785MHz(Tx);1805-1880MHz 32dBm
WCDMA Band I 1920-1980MHz(Tx);2110-2170MHz (Rx) 25dBm
WCDMA Band V 824-849MHz(Tx);869-894MHz (Rx) 25dBm
WCDMA Band VIII 880-915MHz(Tx);925-960MHz (Rx) 25dBm
LTE Band 1 1920-1980MHz(Tx);2110-2170MHz (Rx) 25dBm
LTE Band 3 1710-1785MHz(Tx);1805-1880MHz (Rx) 25dBm
LTE Band 5 824-849MHz(Tx);869-894MHz (Rx) 25dBm
LTE Band 7 2500-2570MHz(Tx);2620-2690MHz (Rx) 25dBm
LTE Band 8 880-915MHz(Tx);925-960MHz (Rx) 25dBm

- 83 -
LTE Band 20 832-862MHz(Tx);791-821MHz (Rx) 25dBm
LTE Band 28 703-748MHz(Tx);758-803MHz (Rx) 25dBm
LTE Band 38 2570-2620MHz(Tx);2570-2620MHz (Rx) 25dBm
LTE Band 40 2300-2400MHz(Tx);2300-2400MHz (Rx) 25dBm
LTE Band 40 2535-2675MHz(Tx);2535-2675MHz (Rx) 25dBm
GNSS 1559-1610MHz N/A
Table 6-5 RTK Reference Station Operating Bands Specifications (For EU Models)
Operating Frequency Maximum Transmitter Power
LORA 863.1.-869.85MHz <13.98dBm
Bluetooth 2400-2483.5MHz <20dBm
Wi-Fi 2400-2483.5MHz <20dBm
GNSS 1559-1610MHz N/A

- 84 -
6.2 Fault Codes
The app notification displays common fault codes along with their causes and troubleshooting steps.
Here lists the most common issues.
Fault Codes Causes Solutions
316
The left cutting disc motor is
overheating.
The machine will return to normal once the
motor has cooled down. This process may
take several minutes.
318
The sensor for the left cutting disc
motor has failed.
Restart the robot. If the issue persists after a
few times of restart, contact the after-sale
team.
323
The right cutting disc motor is
overloaded.
Check if the cutting disc is jammed and clear
it if necessary. Alternatively, raise the cutting
height.
325
The right cutting disc motor fails to
start.
Check whether the cutting disc is jammed. If
not, restart the robot
. If the issue persists
after a few times of restart, contact the after-
sale team.
326
The right cutting disc motor is
overheating.
Restart the robot. If the issue persists after a
few times of restart, contact the after-sale
team.
328
The sensor for the right cutting disc
motor has failed.
Restart the robot. If the issue persists after a
few times of restart, contact the after-sale
team.
1005 Low battery
The robot
will continue working after the
battery is charged to 80%.
1300 The positioning status is poor. Await the robot's repositioning.

- 85 -
Fault Codes Causes Solutions
1301
The charging station has been
moved.
Relocate the charging station.
1420
Timeout occurred while retrieving
wheel speed data.
Restart the robot
. If the issue persists,
contact the after-sale team.
2713
Charging has been stopped due to
low battery voltage.
Restart the robot. If the issue persists after a
few times of restart, contact the after-sale
team.
2726 The battery is overcharged.
Stop charging immediately. If overcharging
occurs frequently, contact the after-sale
team.
2727 The battery is over discharged. Recharge the robot.

- 86 -
7 Warranty
Shenzhen Mammotion Innovation Co., Ltd warrants that this product will be free from material and
workmanship defects under normal use in accordance with the product materials published by
Mammotion during the warranty period. The published product materials include but not limited to user
manual, quick start guide, maintenance, specifications, disclaimer, in-app notifications, etc. The warranty
period varies among different products and parts. Check the table below:
Component Warranty
Battery
2 Years
Front/Rear Axel
Wheel Hub Motor
GPS Kit
Vision Module
PCBA
RTK Reference Station
Charging Station
Decoration Parts
Consumable Parts
No warranty
Cutting Blade
Tire
Cutting Disc
If the product does not function as warranted during the warranty period, please contact Mammotion
customer service for instructions.
For products purchased from a local dealer, kindly reach out to the dealer first.
Users must present a valid proof of purchase, receipt, or order number (for Mammotion Direct Sales).

- 87 -
The Serial Number of the product is crucial for initiating warranty service.
Mammotion will make every effort to address concerns through phone calls, email, or online chat.
In some cases, Mammotion may advise you to download or install specific software updates.
If issues persist, you may need to send the product to Mammotion for further assessment or to a local
Mammotion-appointed service center.
The warranty period for the product commences from the original date of purchase indicated on the
sales receipt or invoice.
For pre-ordered products, the warranty period begins from the shipping date from the local
warehouse.
Mammotion will need users to arrange the shipment by themselves if users would like to send the
products to local service center or Mammotion factory for further diagnosis. Mammotion will repair or
replace and send back to users at no cost if the problem falls under the warranty. If not, Mammotion
or designated service center may charge a fee accordingly.
Here puts some examples of faults that warranty will not cover:
Failure to follow the instructions outlined in the user manual.
If the product arrives damaged during shipment and is not rejected upon delivery, or if no official
documentation confirming the damages is provided by the shipping company. Inability to provide
evidence of damage occurring during transit.
Product malfunction due to accidents, misuse, abuse, natural disasters like floods, fires, earthquakes,
exposure to food or liquid spills, incorrect electrical charging, or other external factors.
Damage resulting from using the product in ways not permitted or intended as specified by
Mammotion.
Modification of the product or its components that significantly alters functionality or capabilities
without obtaining written permission from Mammotion.
Loss, damage, or unauthorized access to your data.
Signs of tampering or alteration on product labels, serial numbers, etc.
Failure to provide a valid proof of purchase from Mammotion, such as a receipt or invoice, or if there
are suspicions of forgery or tampering with the documentation.

- 88 -
8 Compliance
FCC Compliance Statements
This device complies with Part 15 of the FCC Rules. Operation is subject to the following two conditions: (1)
this device may not cause harmful interference, and (2) this device must accept any interference received,
including interference that may cause undesired operation.
Caution: Changes or modifications not expressly approved by the party responsible for compliance could
void the user’s authority to operate the equipment.
Note: This equipment has been tested and found to comply with the limits for a Class B digital device,
pursuant to Part 15 of the FCC Rules. These limits are designed to provide reasonable protection against
harmful interference in a residential installation. This equipment generates, uses and can radiate radio
frequency energy and, if not installed and used in accordance with the instructions, may cause harmful
interference to radio communications. However, there is no guarantee that interference will not occur in a
particular installation.
If this equipment does cause harmful interference to radio or television reception, which can be
determined by turning the equipment off and on, the user is encouraged to try to correct the interference
by one or more of the following measures:
-- Reorient or relocate the receiving antenna.
-- Increase the separation between the equipment and receiver.
-- Connect the equipment into an outlet on a circuit different from that to which the receiver is connected.
-- Consult the dealer or an experienced radio/TV technician for help.

- 89 -
ISED Compliance Statements
This device contains licence-exempt transmitter(s)/receiver(s) that comply with Innovation, Science and
Economic Development Canada’s licence-exempt RSS(s). Operation is subject to the following two
conditions:
(1) This device may not cause interference.
(2) This device must accept any interference, including interference that may cause undesired operation
of the device.
This equipment complies with IC RSS-102 radiation exposure limits set forth for an uncontrolled
environment.
L’émetteur/récepteur exempt de licence contenu dans le présent appareil est conforme aux CNR
d’Innovation,
Sciences et Développement économique Canada applicables aux appareils radio exempts de licence.
L’exploitation est autorisée aux deux conditions suivantes:
(1) L’appareil ne doit pas produire de brouillage;
(2) L’appareil doit accepter tout brouillage radioélectrique subi, même si le brouillage est susceptible d’en
compromettre le fonctionnement.
Cet équipement est conforme aux limites d'exposition aux radiations IC CNR-102 établies pour un
environnement non contrôlé.
RF Exposure Compliance
This equipment complies with FCC/IC RSS-102 radiation exposure limits set forth for an uncontrolled
environment. This transmitter must not be co-located or operating in conjunction with any other antenna
or transmitter. This equipment should be installed and operated with minimum distance 20 cm between
the radiator and your body.
Cet équipement est conforme aux limites d'exposition aux radiations IC CNR-102 établies pour un
environnement non contrôlé.
Cet émetteur ne doit pas être colocalisé ou fonctionner en conjonction avec une autre antenne ou un

- 90 -
autre émetteur. Cet équipement doit être installé et utilisé avec une distance minimale de 20 cm entre le
radiateur et votre corps.
This radio transmitter [IC: 32325-RTK300N] has been approved by Innovation, Science and Economic
Development Canada to operate with the antenna types listed below, with the maximum permissible gain
indicated. Antenna types not included in this list that have a gain greater than the maximum gain indicated
for any type listed are strictly prohibited for use with this device.
Dipole Antenna:3.26dBi, 50Ω

- 91 -
Simplified EU Declaration of Conformity
Hereby, Shenzhen Mammotion Innovation Co., Limited declares that the radio equipment type
[Model:3000X/5000X/10000X/3000HX/5000HX/10000HX] is in compliance with Directive 2014/53/EU.
The full text of the EU declaration of conformity is available at the following internet address:
https://mammotion.com/pages/eu-declaration-of-conformity.