
YUKA mini 2 Series
500 / 600 / 800 / 1000 / 1000H
USER MANUAL
Original Instructions Version 1.0
01/2026
EN

This manual is copyrighted by Mammotion company. Without the written permission of
Mammotion, no company or individual shall not copy, modify, reproduce, transcribe, or
transmit this manual in any way or for any reason. This manual is subject to change without
notice at any time.
Unless explicitly stated otherwise, this manual serves solely as a usage guide, and all
statements and information contained herein do not constitute any form of warranty.
Intended Use
Mammotion robots are designed for residential lawn care and are not intended for commercial
use.
Revision Log
Date
Version
Description
01/2026
V1.0
Initial version

i
CONTENTS
1 Safety Instructions ..............................................................................................................- 1 -
1.1 General Safety Instructions ..........................................................................................- 1 -
1.2 Charging Station Safety Instructions .......................................................................... - 2 -
1.3 Mowing Safety Instructions ........................................................................................ - 2 -
1.4 Battery Safety Instructions .........................................................................................- 3 -
2 Instructions ........................................................................................................................- 4 -
2.1 Product Overview ...................................................................................................... - 4 -
2.2 LED Indicator Codes ..................................................................................................- 7 -
2.3 Product Symbols.......................................................................................................- 8 -
3 Getting Started ................................................................................................................. - 10 -
3.1 Installing the Charging Station .................................................................................. - 10 -
3.2 Installing Physical Fence (YUKA mini 2 500 only) ....................................................... - 14 -
3.3 Downloading Mammotion App .................................................................................. - 15 -
3.4 Setting Up Your Robot ..............................................................................................- 16 -
3.5 Pre-Mowing Preparations ........................................................................................ - 17 -
3.6 Mapping and Mowing Your Lawn .............................................................................. - 19 -
3.7 Recharging ..............................................................................................................- 19 -
4 Daily Mowing ....................................................................................................................- 20 -
4.1 DropMow .................................................................................................................- 20 -
4.2 Regular Task (Custom Settings) ................................................................................ - 21 -
4.3 Scheduled Task .......................................................................................................- 22 -
5 Mammotion App ...............................................................................................................- 23 -
5.1 Map Elements ..........................................................................................................- 23 -
5.2 Mowing Settings ......................................................................................................- 25 -
5.3 Safety & Protection ................................................................................................. - 26 -

ii
5.4 Security & Tracking ................................................................................................. - 26 -
5.5 Upload Logs ............................................................................................................- 28 -
5.6 Update Firmware .................................................................................................... - 28 -
6 Maintenance .....................................................................................................................- 29 -
6.1 Cleaning ..................................................................................................................- 30 -
6.2 Cutting Blades Maintenance ..................................................................................... - 31 -
6.3 Battery Maintenance ............................................................................................... - 32 -
6.4 Storage ...................................................................................................................- 32 -
7 Transportation and Moving ............................................................................................. - 33 -
8 Disposal ............................................................................................................................- 34 -
9 Product Specifications ....................................................................................................- 35 -
9.1 General Specifications ............................................................................................. - 35 -
9.2 Operating Bands Specifications (For EU Models) .......................................................- 37 -
9.3 Battery Specifications ............................................................................................. - 39 -
10 Warranty .........................................................................................................................- 40 -

- 1 -
1 Safety Instructions
IMPORTANT
READ CAREFULLY BEFORE USE
KEEP THIS GUIDE FOR FUTURE REFERENCE
1.1 General Safety Instructions
1. Read and understand all instructions carefully before using the robot.
2. Only use parts and accessories recommended by Mammotion with the robot.
3. Never allow children, persons with reduced physical, sensory or mental capabilities or lack
of experience and knowledge, or people unfamiliar with these instructions to use the robot.
Local restrictions may restrict the age of the operator.
4. DO NOT allow children to be in the vicinity or play with the robot while it is operating.
5. DO NOT use the robot in areas where people are unaware of its presence.
6. When manually controlling the robot via the Mammotion app, always walk—never run. Be
cautious on slopes and maintain proper footing and balance.
7. Only individuals who are legally considered adults in their state of residence are
recommended to use the robot.
8. DO NOT touch moving parts, such as the cutting disc, until all motion has completely
stopped.
9. If operating the robot in public areas, place warning signs around the task area with the
following text: "Warning! Automatic lawn mower! Keep away from the robot! Supervise
children!"
10. DO NOT leave the robot operating unattended if there are pets, children or people in the
vicinity.
11. Wear sturdy footwear and long trousers when operating the robot.
12. To prevent damage to the robot and accidents involving vehicles and individuals,do not set
task areas or channels across public pathways.
13. DO NOT connect or touch a damaged cable until it is disconnected from the power outlet. If
the cable becomes damaged during operation, disconnect the plug from the power outlet.
A worn or damaged cable increases the risk of electrical shock and should be replaced by
authorized service personnel.
14. Keep extension cords away from moving hazardous parts, such as cutting blades, to avoid
damage to the cords and robot.

- 2 -
15. DO NOT modify the robot by yourself. Modifications could interfere with robot operations,
result in serious injury and/or damage, or void the warranty. Use only Mammotion-
approved parts and accessories.
16. If the robot makes an abnormal sound or signals an alarm, press the STOP button
immediately.
17. Regularly check that all parts of the robot can function normally.
1.2 Charging Station Safety Instructions
1. DO NOT set up the charging station in areas where people may trip over it.
2. DO NOT set up the charging station in areas where there is a risk of standing water.
3. Only use the official charging station to charge the robot. Incorrect use may result in
electric shock, overheating, or corrosive liquid leakage from the battery. In case of
electrolyte leakage, flush with water or neutralizing agent and seek medical aid if the
corrosive liquid comes into contact with your eyes.
4. Keep the charging station and accessories at least 60 cm (24 in) away from combustible
materials. Malfunctions or overheating can pose a fire risk.
5. For USA/Canada users: If installing the power supply outdoors, use a covered Class A GFCI
receptacle (RCD) with a weatherproof enclosure. There is a risk of electric shock if
improperly installed.
1.3 Mowing Safety Instructions
1. Keep hands and feet away from the cutting blades. DO NOT reach under or touch the robot
while it is powered on.
2. DO NOT lift or move the robot when it is turned on.
3. Remove stones, branches, tools, toys, or other objects from the lawn before operation to
prevent blade damage.
4. DO NOT put objects on top of the robot and charging station.
5. DO NOT use the robot if the STOP button is not functioning.
6. Avoid collisions with people or animals. Stop the robot immediately if someone or
something enters its path.
7. Always turn off the robot when it is not in use.
8. DO NOT use the robot simultaneously with pop-up sprinklers and avoid setting a channel
where sprinklers are installed.
9. DO NOT operate the robot in standing water or during heavy rain.

- 3 -
1.4 Battery Safety Instructions
Lithium-ion batteries can explode or catch fire if mishandled. Avoid disassembly, short
circuits, exposure to water, fire, or high temperatures. Handle with care and avoid all
mechanical or electrical abuse. Store batteries out of direct sunlight.
1. Only use the official charging station and power supply. Incompatible chargers may cause
electric shock or overheating.
2. DO NOT attempt to repair or modify the batteries. Repair attempts may result in serious
injury due to explosion or electrical shock. If a leak develops, released electrolytes are
corrosive and toxic.
- 4 -
2 Instructions
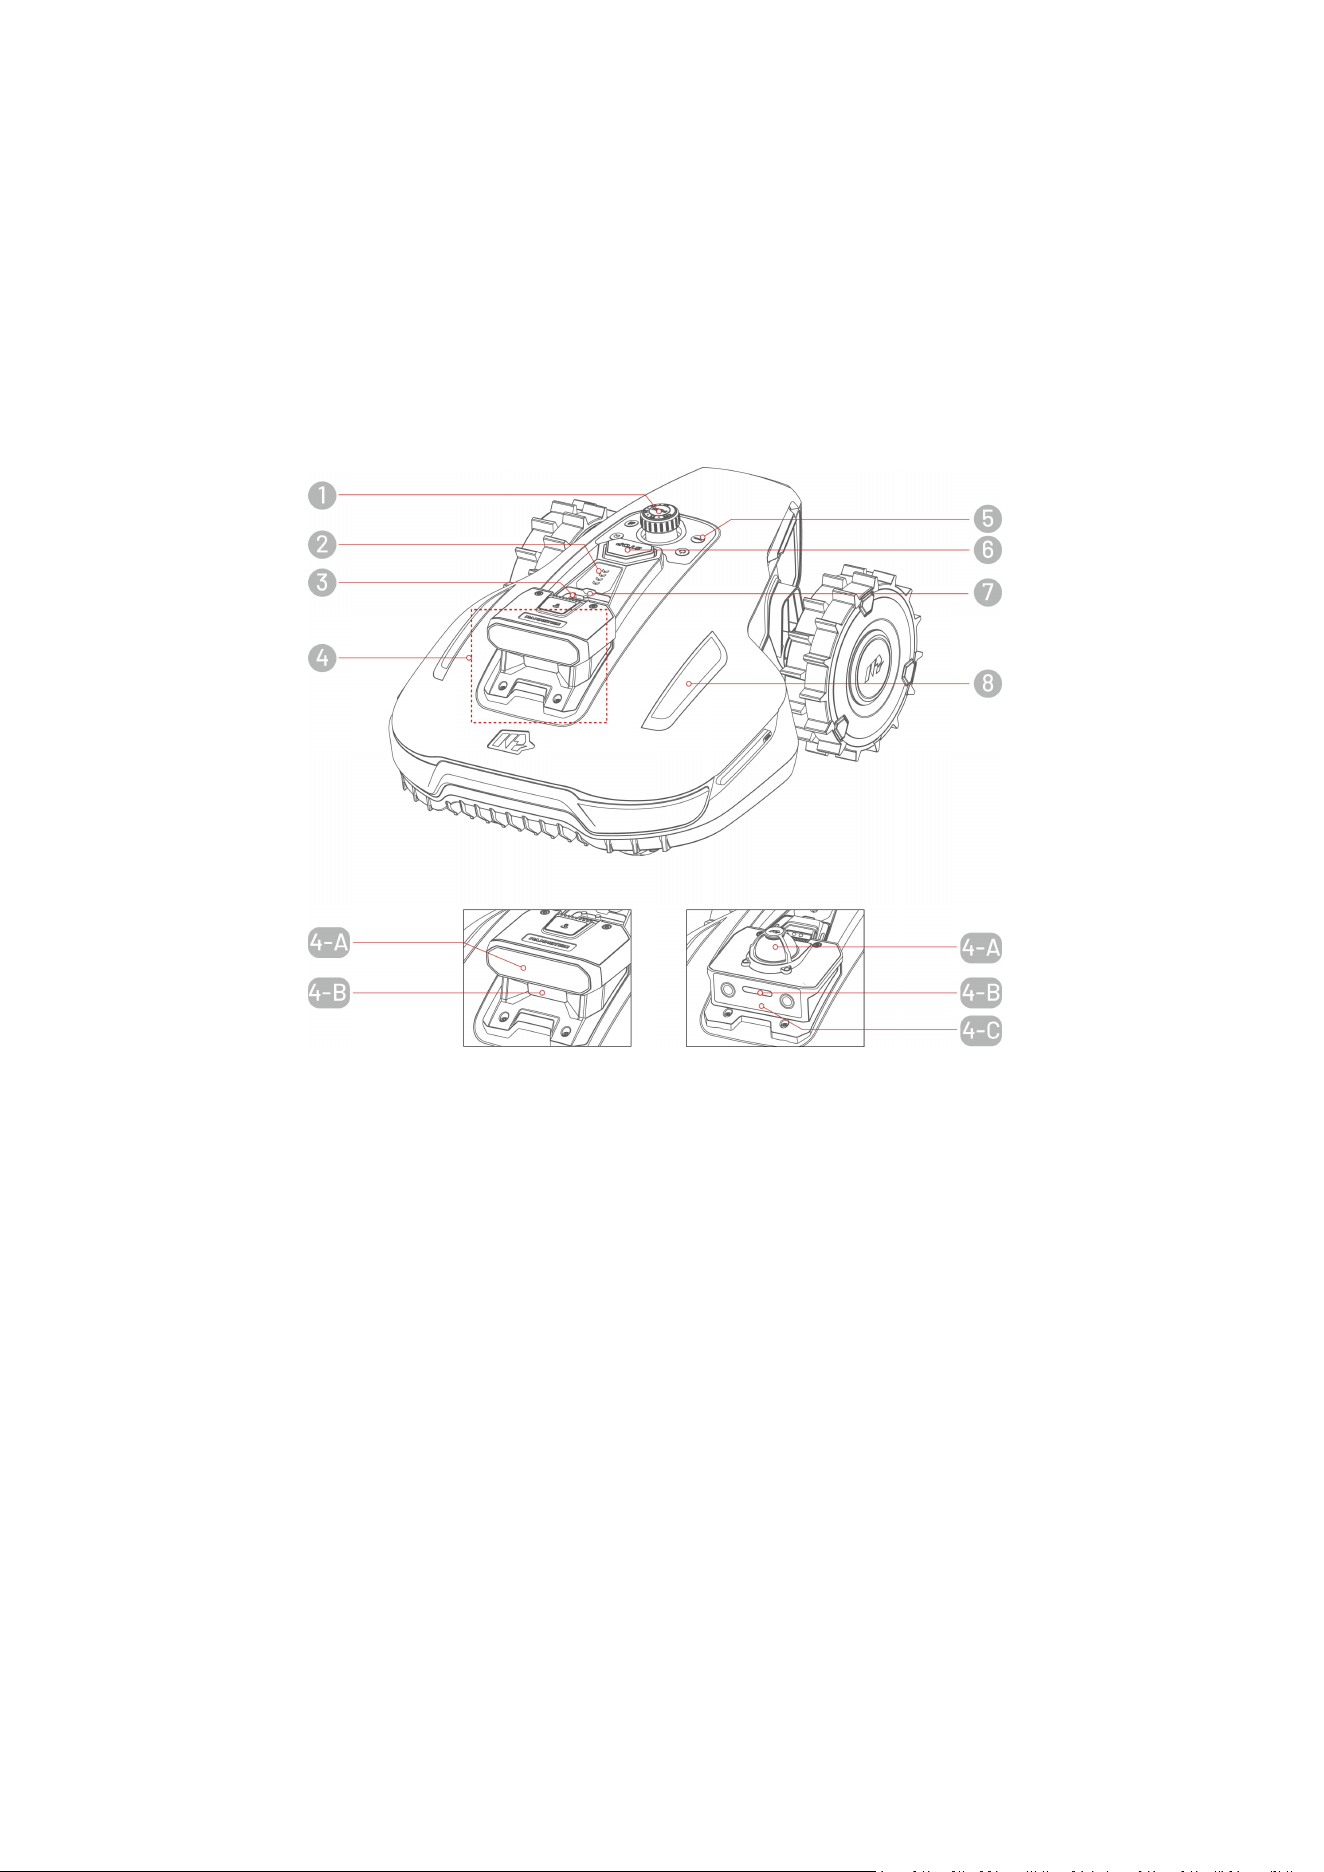
2.1 Product Overview
The illustrations are for reference only. Refer to the actual product for details.
Top View
YUKA mini 2 500 / 800
YUKA mini 2 600 / 1000 / 1000H
1. Cutting Height Adjustment Knob
2. Battery Level Indicator
3. Rain Sensor
4. Module
YUKA mini 2 500 / 800
YUKA mini 2 600 / 1000 / 1000H
4-A. Vision Module
4-A. 360° LiDAR Module
4-B. Supplemental Light
4-B. Supplemental Light
4-C. Vision Module

- 5 -
5. Controls
6. STOP Button
7. Security Key
8. Side LED
Controls
Button
Description
Long press to turn on/off the robot.
Double-press to unlock only the robot after an emergency stop.
Press to stop in an emergency.
Press in sequence to start or continue a task.
Press and hold for 5s, then press to activate DropMow. See 4.1
DropMow for more information.
Press in sequence to send the robot to the charging station.
Press down and turn the knob to adjust the cutting height.

- 6 -
Bottom View
9. Front Wheel
10. Rear Wheel
11. Removable Battery
12. Infrared Receiver
13. Handle
14. Cutting Blade
15. Cutting Disc
16. Charging Contact
Charging Station
1. LED Indicator
2. Infrared Transmitter
3. Charging Contact

- 7 -
2.2 LED Indicator Codes
Robot
Indicator
Color
Description
Side LED
Solid green
The robot is functioning properly.
Pulsing green
OTA update in progress.
The robot is charging.
Blinking blue
STOP Button activated.
Low battery.
The robot is stuck.
Security key not properly installed.
The robot has been lifted, tilted, or flipped over.
Solid red
Robot malfunction.
Robot update failed.
Off
The robot is turned off.
The robot is sleeping.
The side LED is turned off in the app.
The robot is in manual control mode but is
currently inactive.
Charging Station
Indicator
Color
Description
LED
Blinking green
The robot is docked in the charging station.
Solid green
The robot is not in the charging station.
Solid red
Charging station malfunction.
Off
No power.

- 8 -
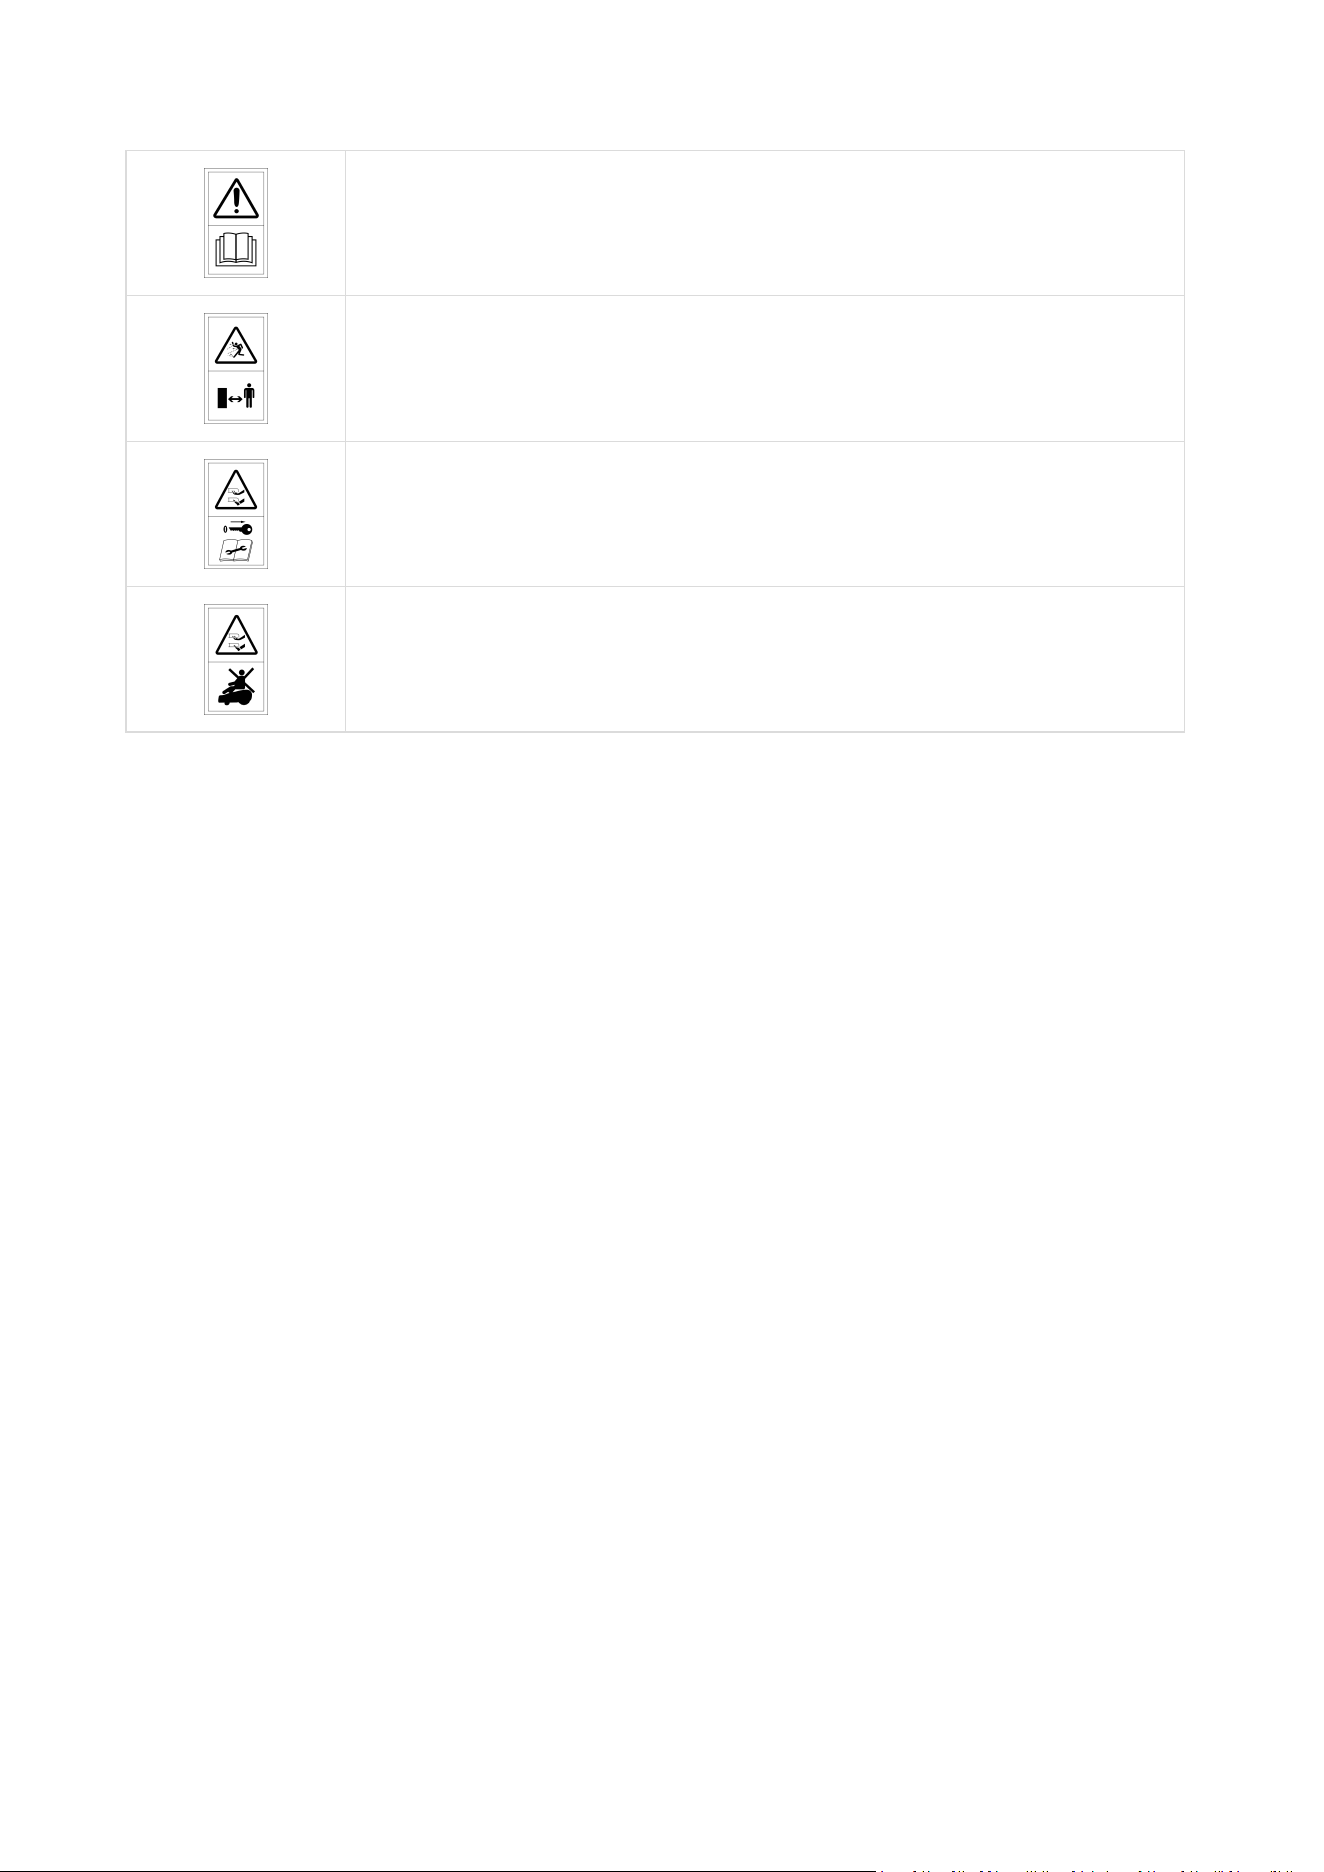
2.3 Product Symbols
Please study these symbols found on the product and understand their meaning:
TS-A081-2703002
Use the detachable supply unit TS-A081-2703002.
TS-A081-2703002
ADS-81EJ-27-5
Use the detachable supply unit TS-A081-2703002/ADS-81EJ-27-5.
This product complies with the applicable EU Directives.
Made in China
This product is manufactured in China.
It is not permitted to dispose of this product as normal household waste.
Ensure that the product is recycled in accordance with local legal
requirements.
This product can be recycled.
Keep this product’s packaging dry.
DO NOT cover this product’s packaging.
DO NOT flip this product’s packaging.
This product is fragile.
DO NOT step on this product or its packaging.
Class III appliance.
WARNING — Do not touch rotating blade.
- 9 -
WARNING — Read user instructions before operating the machine.
WARNING — Keep a safe distance from the machine when operating.
WARNING — Remove the disabling device before working on or lifting the
machine.
WARNING — Do not ride on the machine.
- 10 -
3 Getting Started
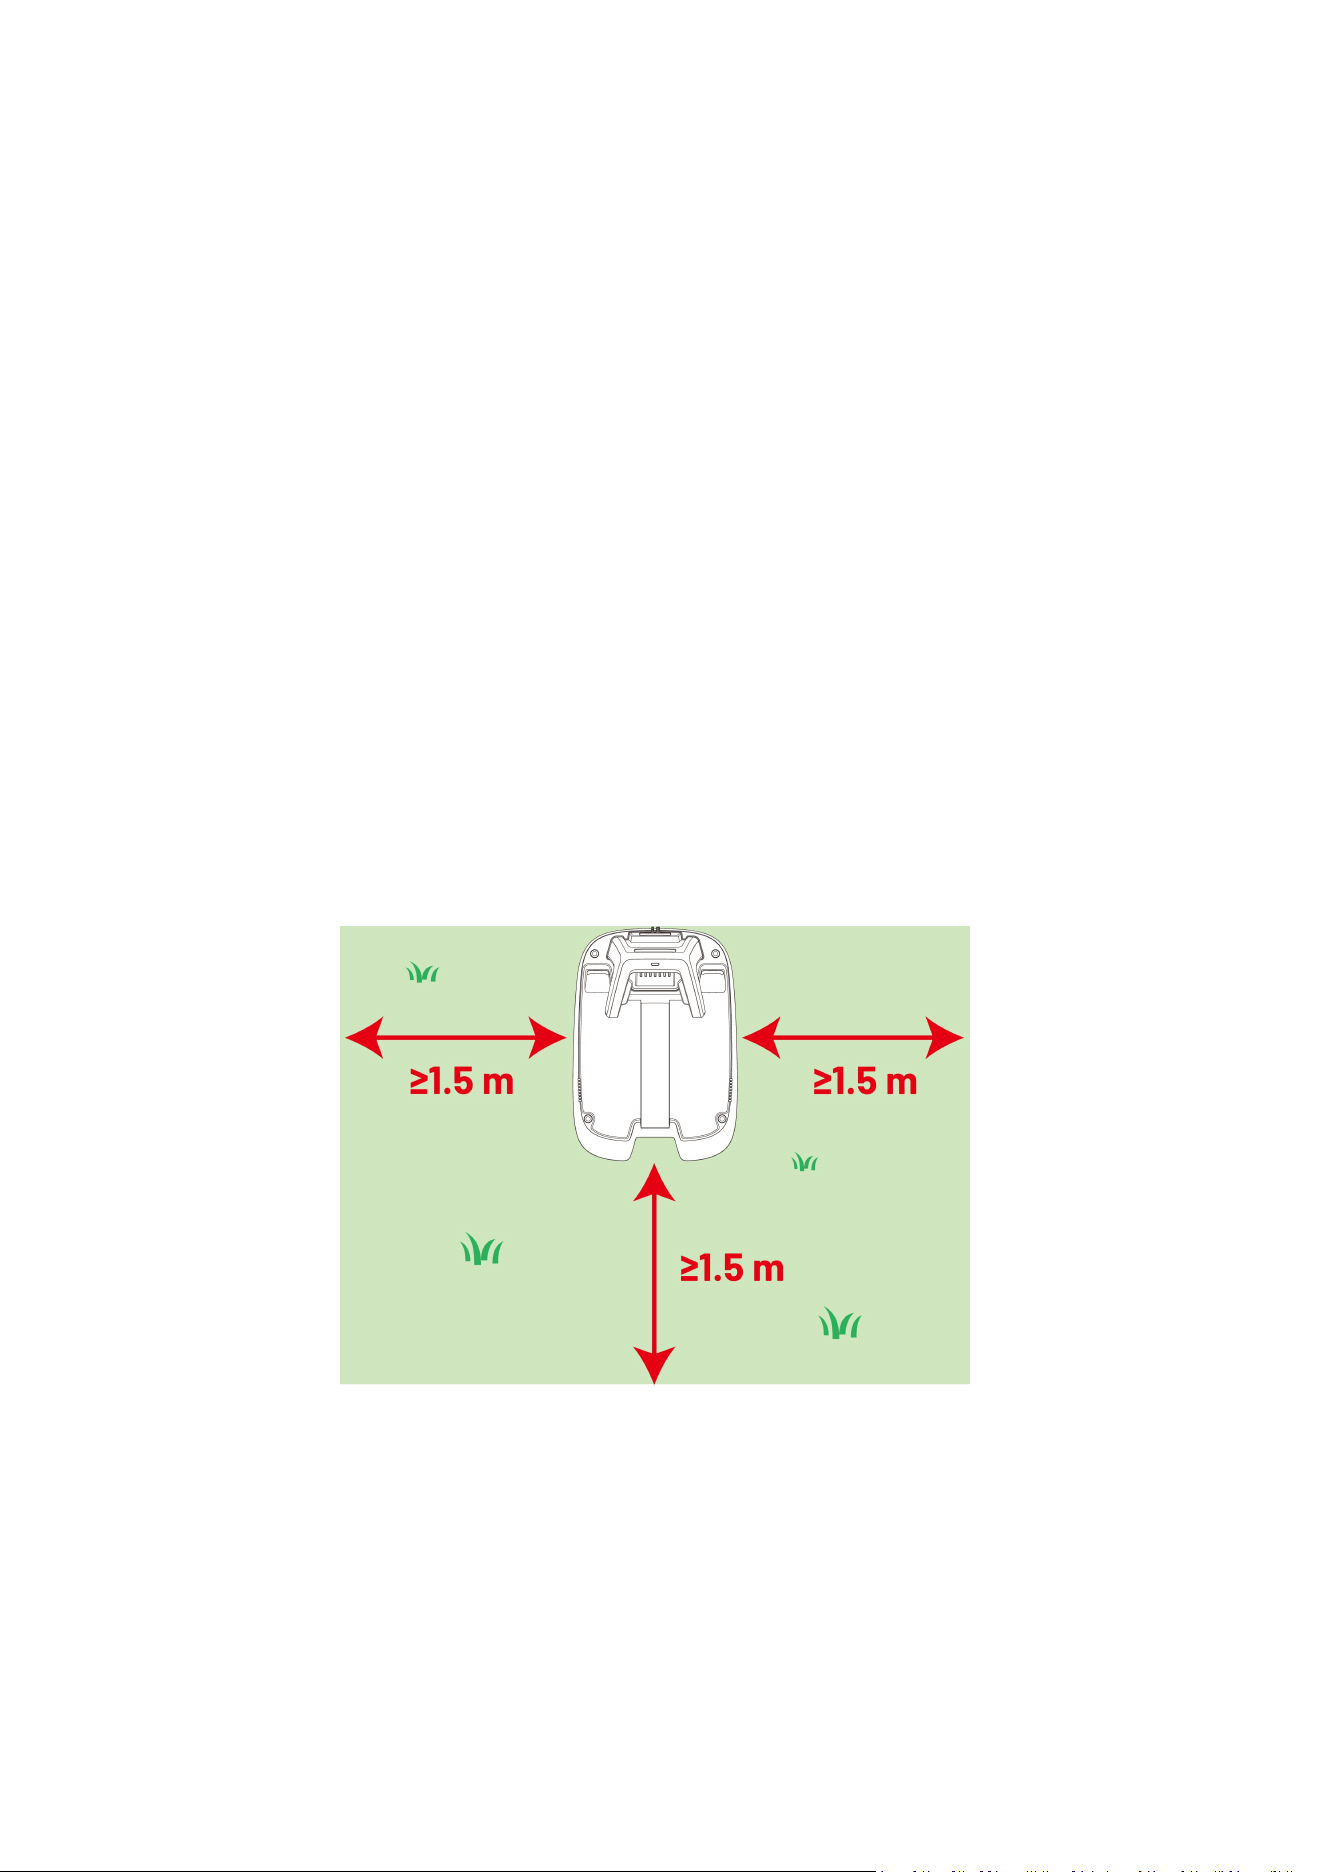
3.1 Installing the Charging Station
Choosing a Location for Charging Station
The charging station is where your robot docks and recharges. To ensure smooth operation,
ensure the installation area meets the following conditions:
Flat surface: The area should be free from significant bumps, slopes, or rocks.
Nearby power source: An accessible power outlet is required for powering the charging
station.
Clear surroundings: There should be no obstacles (like trees or houses) within 1.5 m (4.9 ft)
to the left, right, and front of the charging station.
Well-lit (YUKA mini 2 500 and 800 only): Good lighting helps the robot navigate.
Close to the lawn perimeter: Install the charging station close to the lawn perimeter for
accurate positioning. If you have more than one lawn, it is recommended to place the
charging station between them for optimal performance.
- 11 -
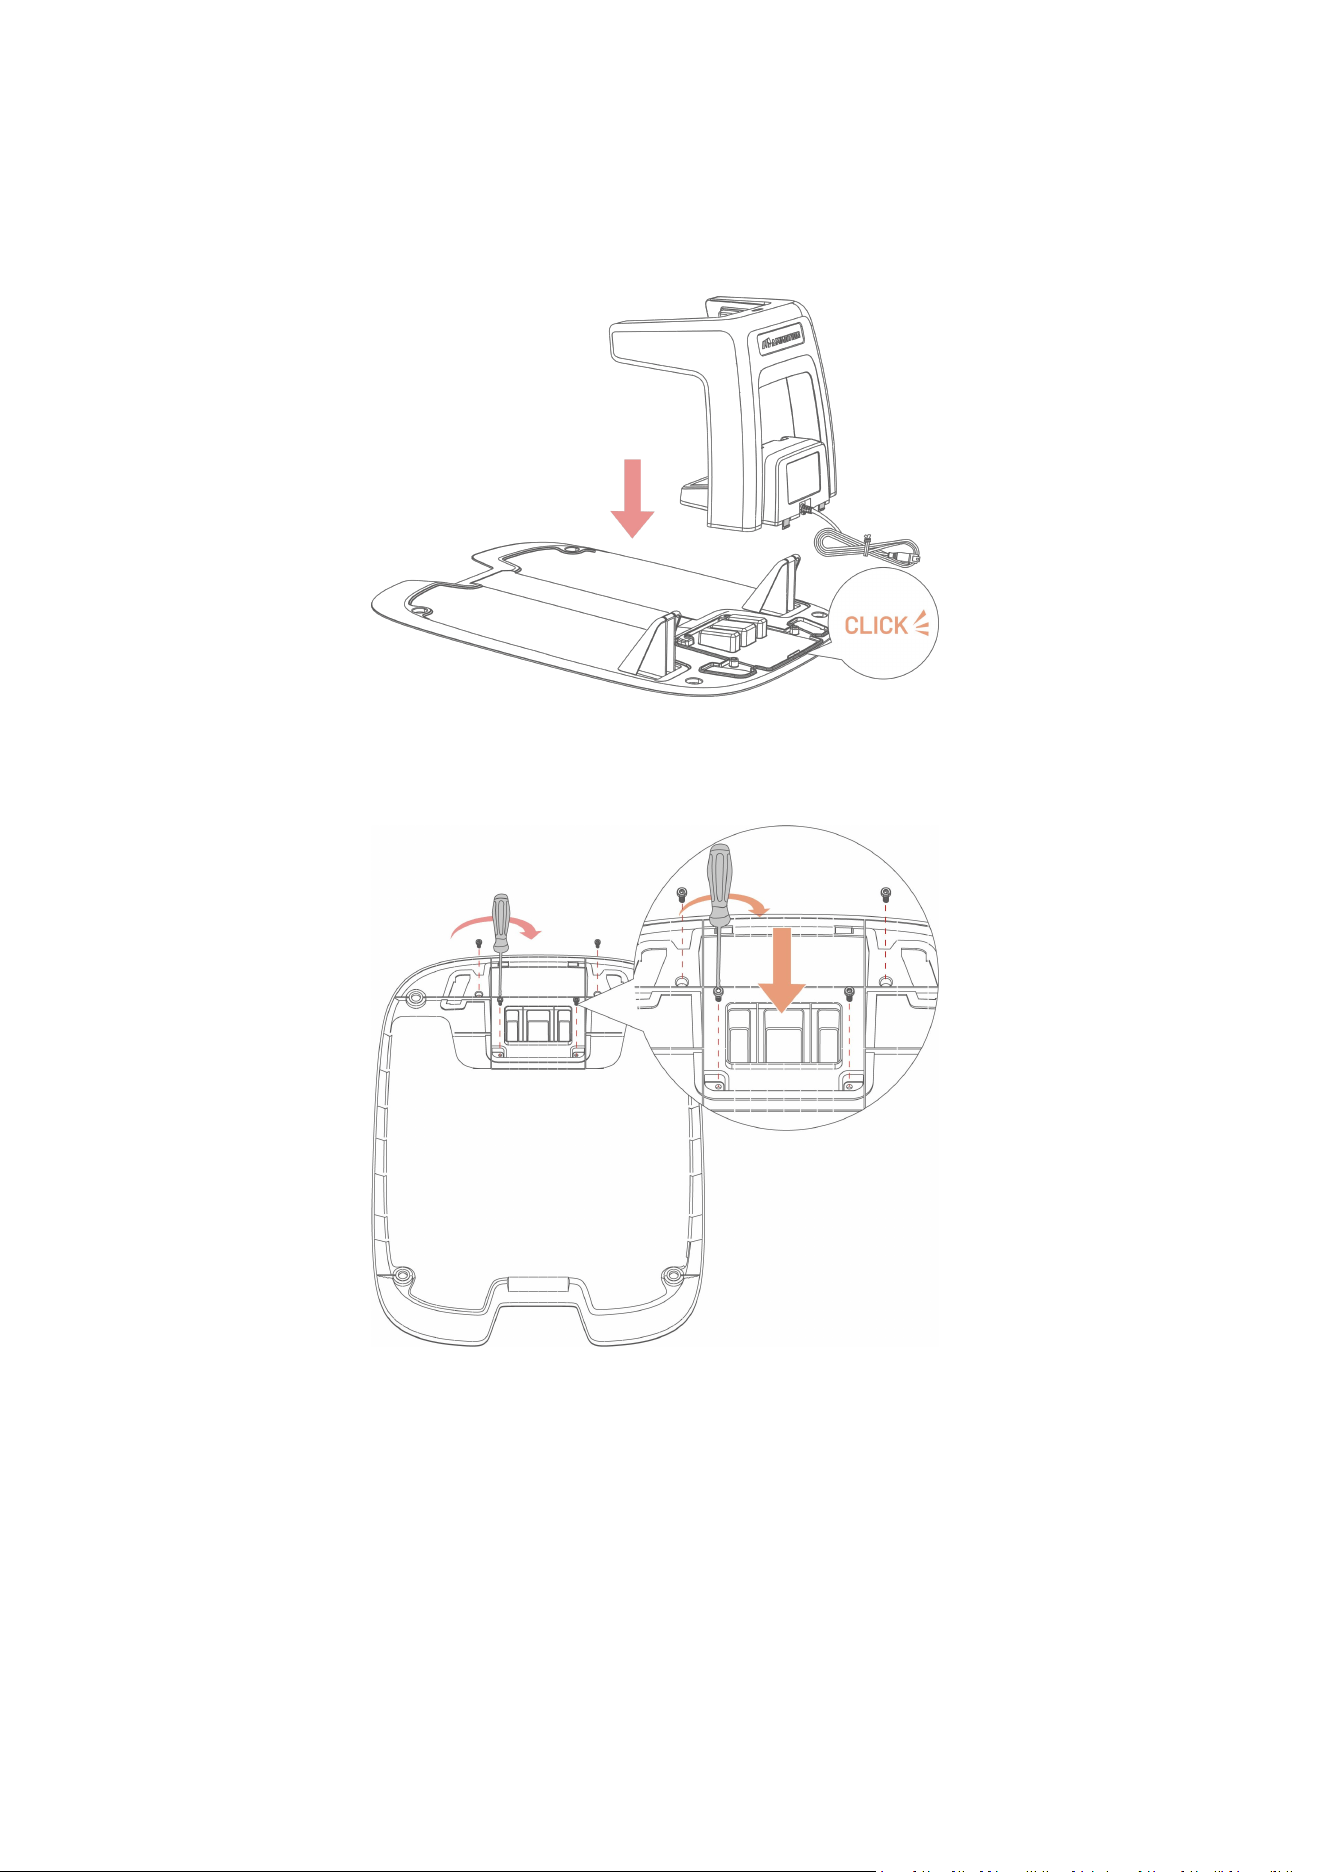
Assembling Charging Station
1. Insert the charging tower into the charging base plate until you hear a CLICK sound.
2. Insert the four screws into the bottom of the charging base plate and tighten them using
the included screwdriver.
- 12 -
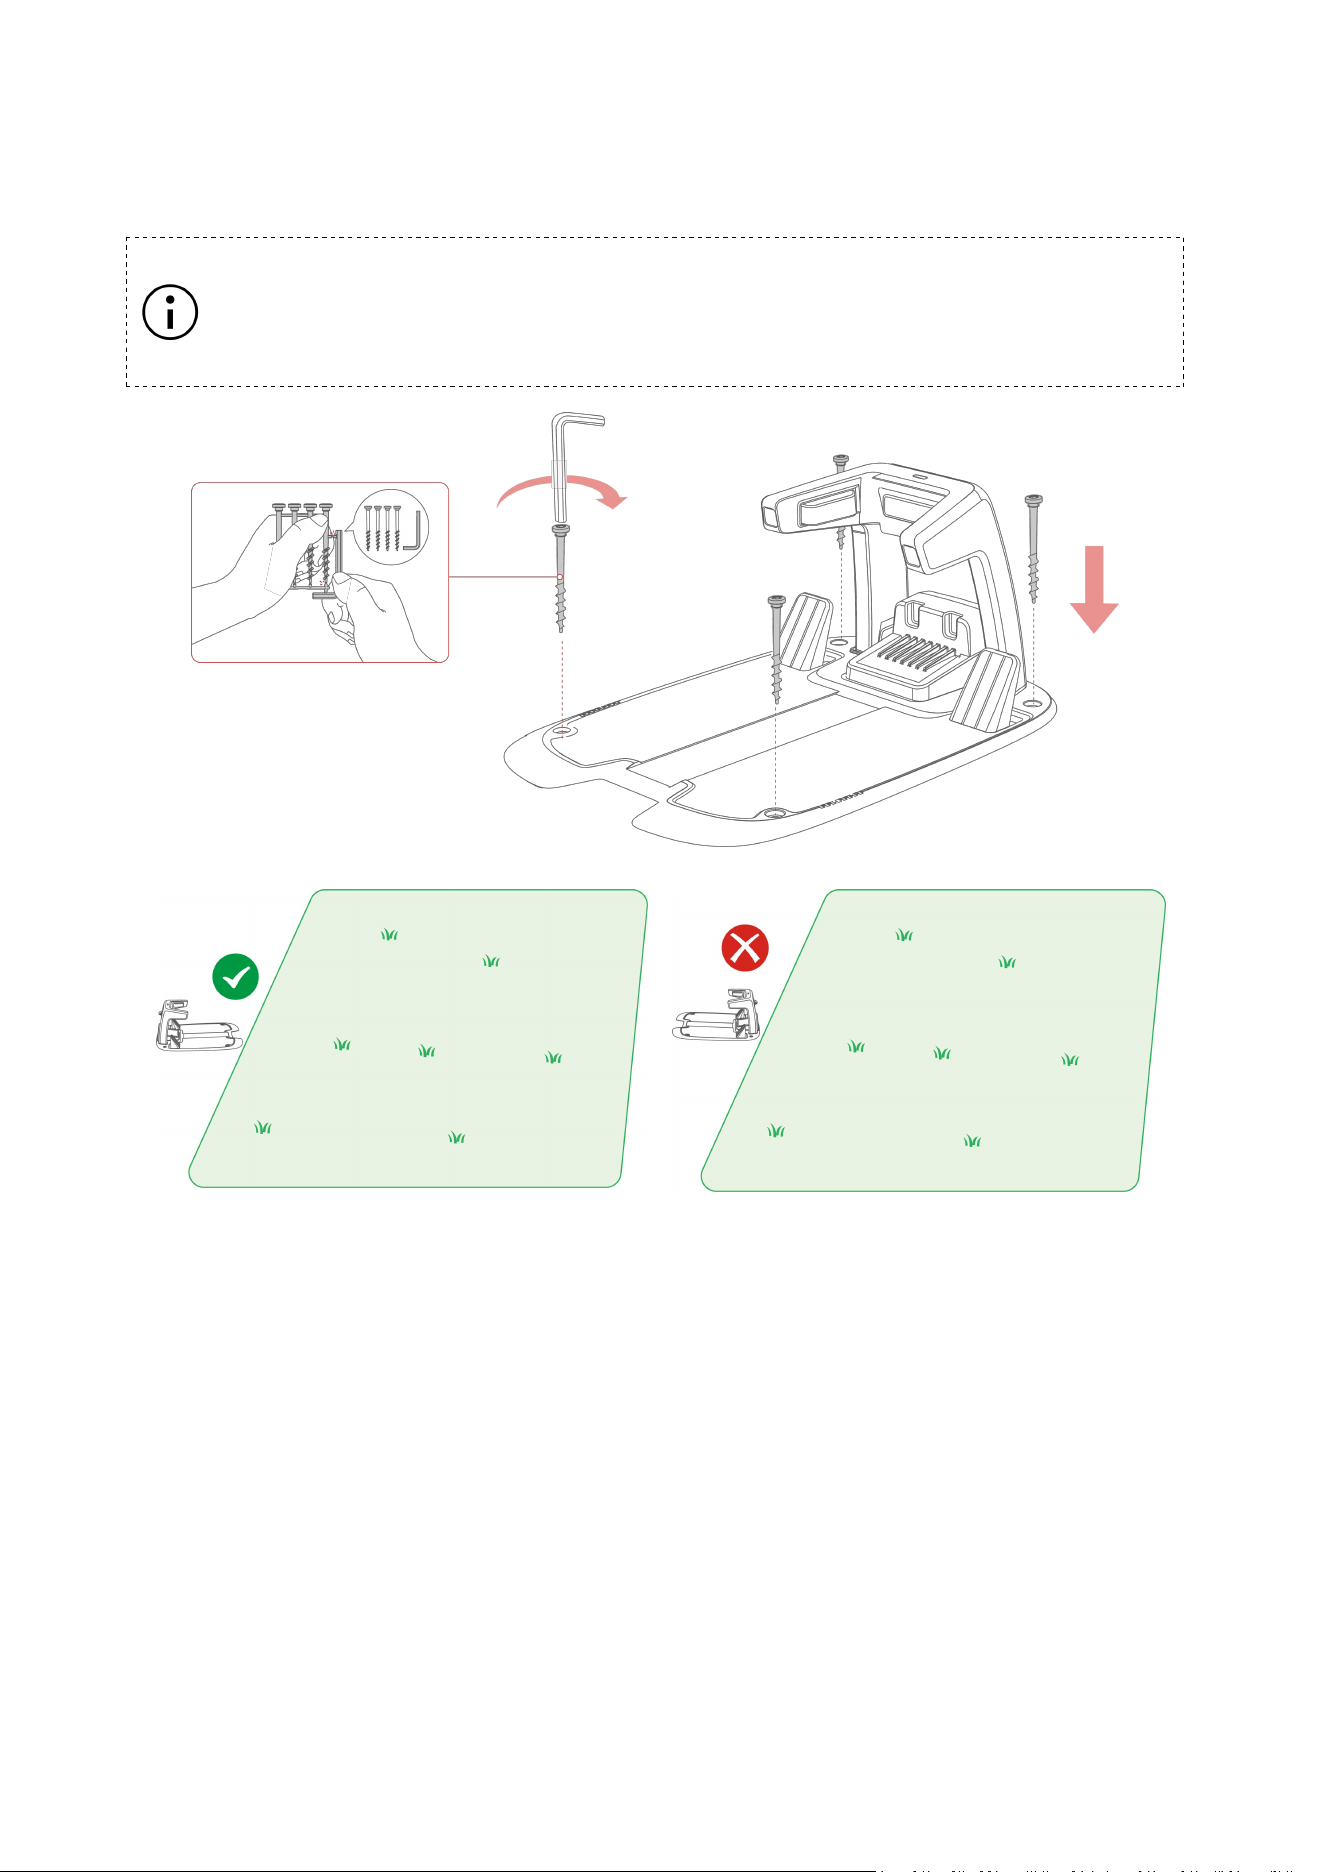
3. Use the included four stakes to secure the charging station to the chosen location. Make
sure the charging station is facing the lawn.
NOTE
If the charging station is installed on a concrete surface, please secure it with
expansion bolts (not included).
- 13 -
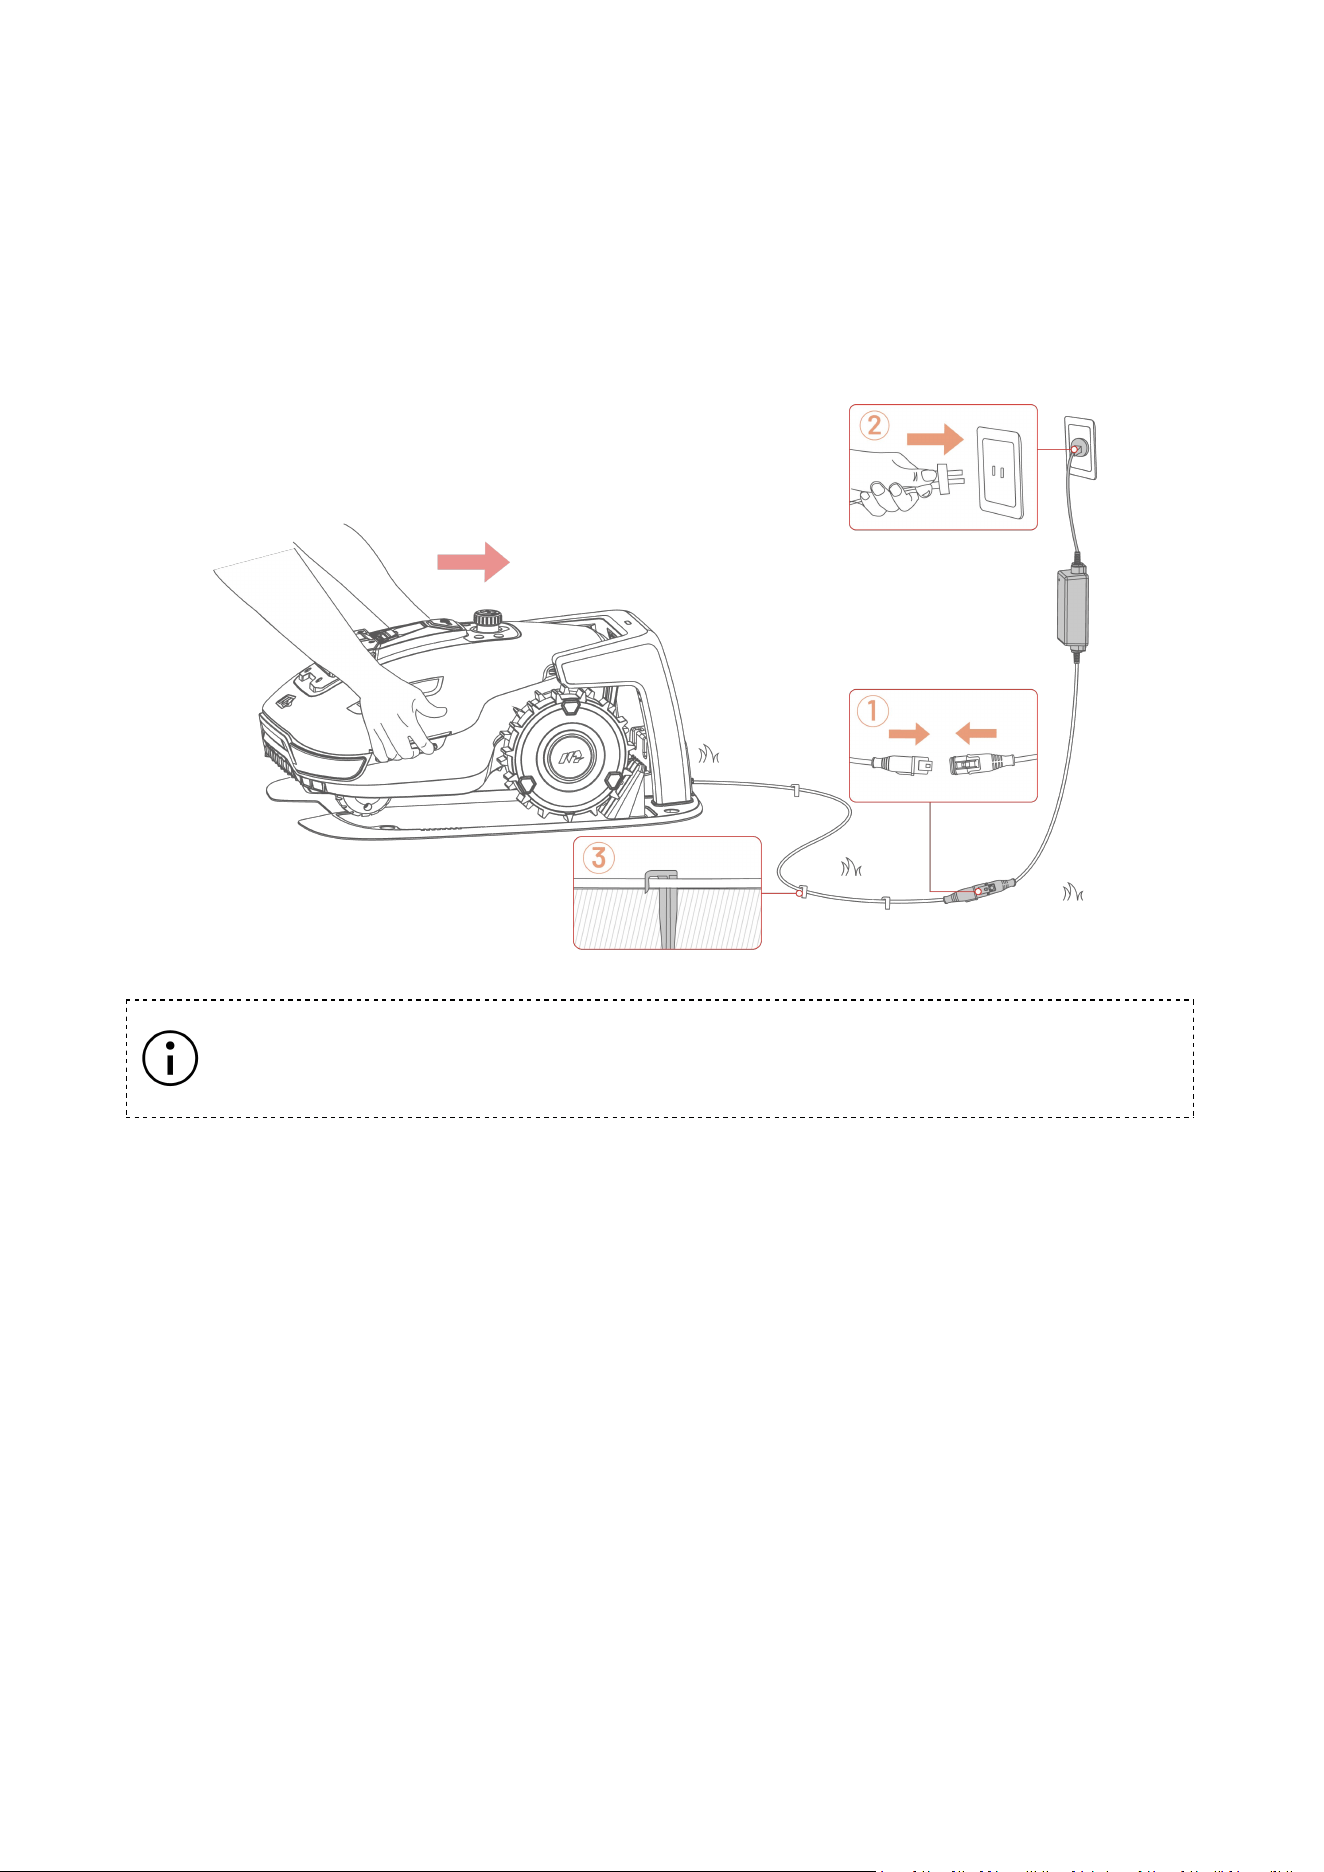
4. Connect the charging station cable to the charging station power supply.
5. Plug the charging station power supply into the power outlet. Secure the cable with the
included cable pegs.
6. Dock the robot onto the charging station to begin charging. The side LED will turn green
when the robot is properly docked.
NOTE
Charge the robot for initial use to activate it.
- 14 -
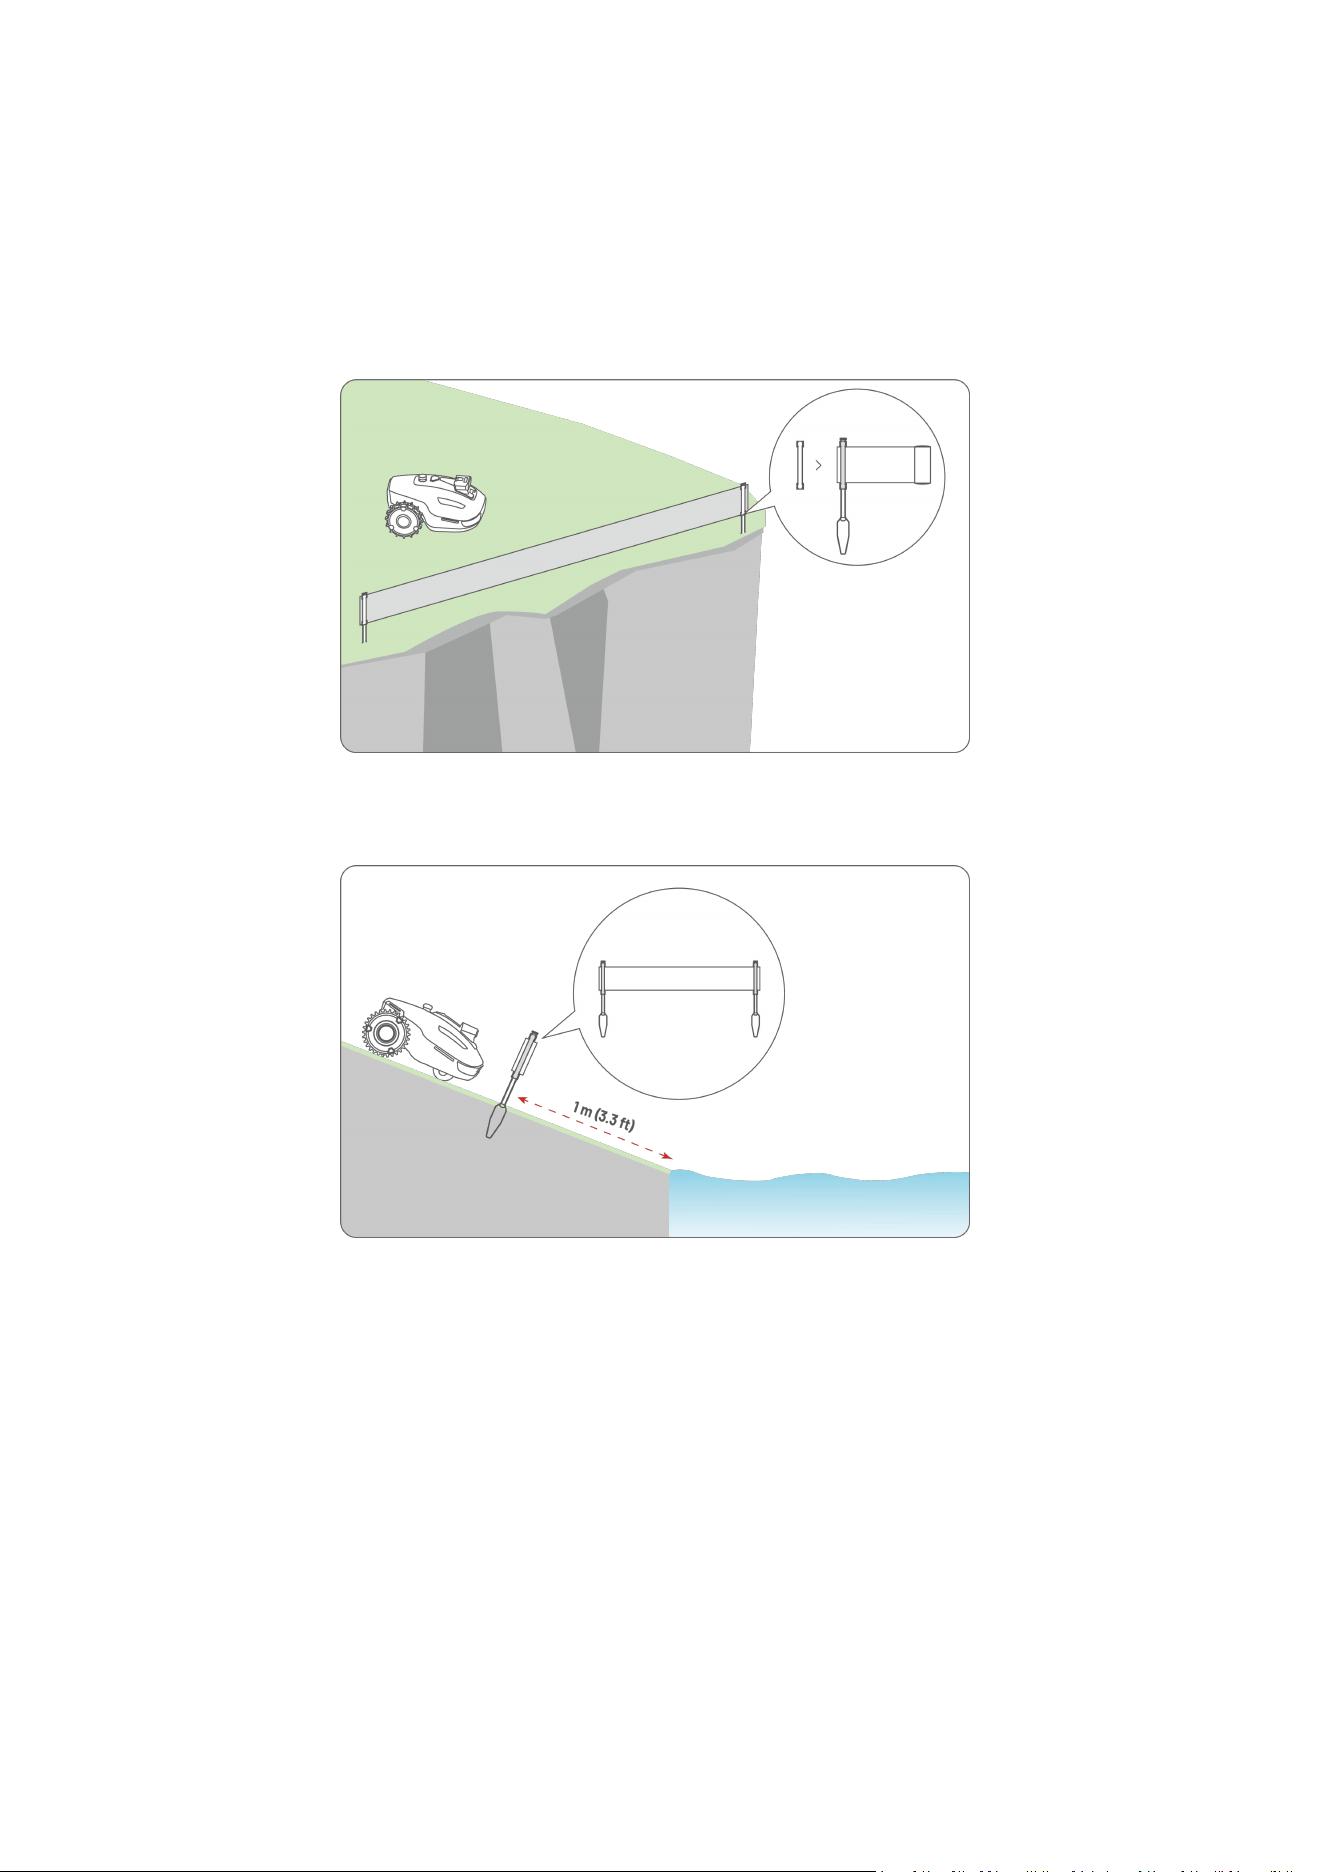
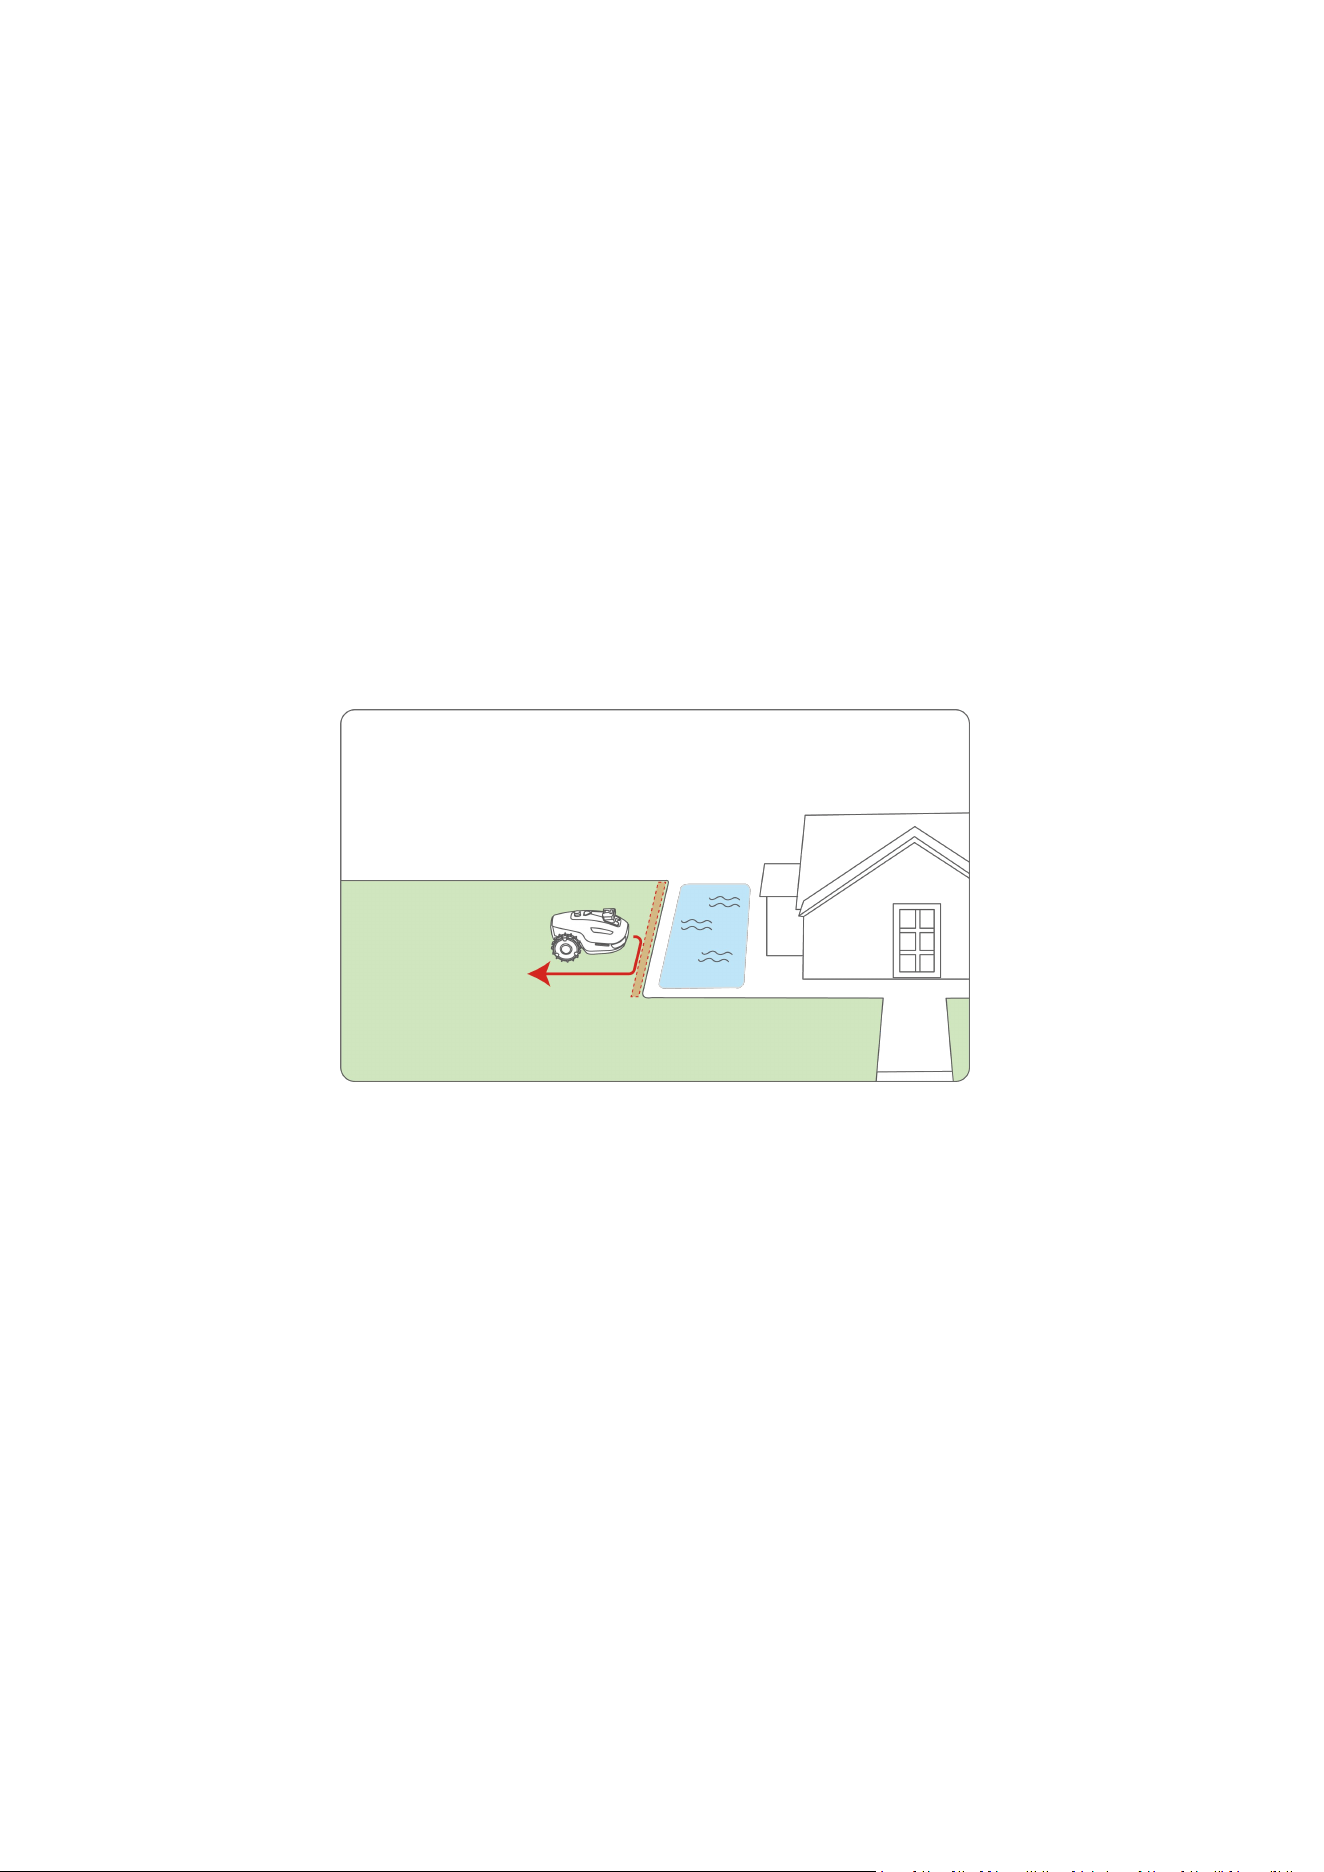
3.2 Installing Physical Fence (YUKA mini 2 500 only)
Use the physical fence to block off areas that you don't want the robot to enter. This is
important for safety hazards such as:
1. Retaining walls, steep slopes, or terraces that the robot can fall from.
2. Swimming pools, ponds, or large water hazards. Place the physical fence at least 1 m (3.3 ft)
in front of these obstacles so the robot does not enter the water.
- 15 -
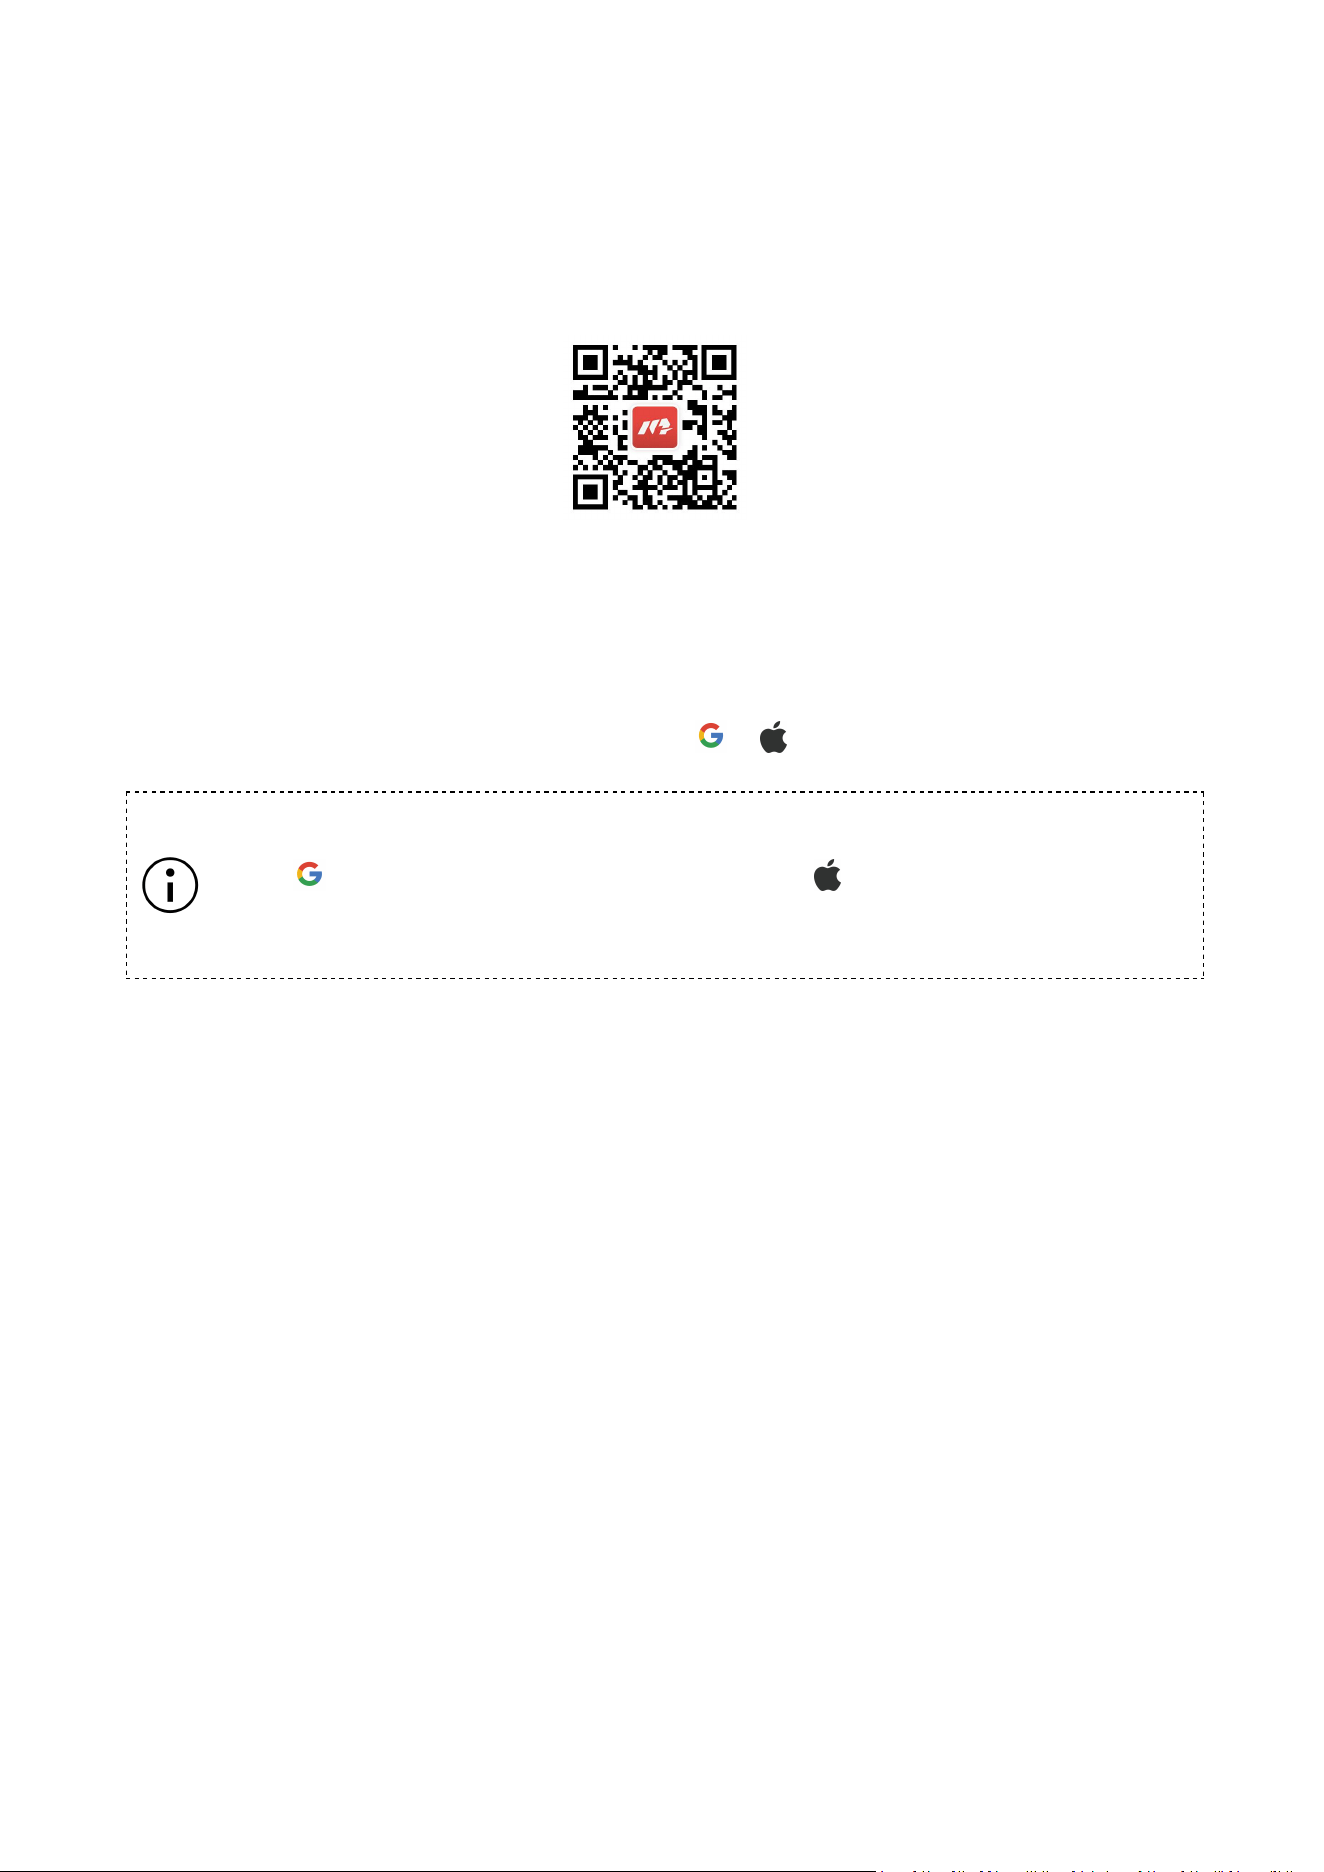
3.3 Downloading Mammotion App
Scan the QR code below to download it from Google Play or the App Store, or search
"Mammotion" on either store.
After installing the app, please sign up and log in. During use, the app may ask you for
Bluetooth, Location, and local network access when necessary. For optimal performance, it is
recommended to allow the above permissions. For more information, please refer to our
Privacy Agreement (In the app, go to Me > About Mammotion > Privacy Agreement).
If you want to log in with a third-party account, tap or on the login page to continue.
Trademark Notice:
The “ ” icon is the trademark of Google LLC. The “ ” icon is the trademark of Apple
Inc. All trademarks mentioned in this manual are the property of their respective
owners.
- 16 -
3.4 Setting Up Your Robot
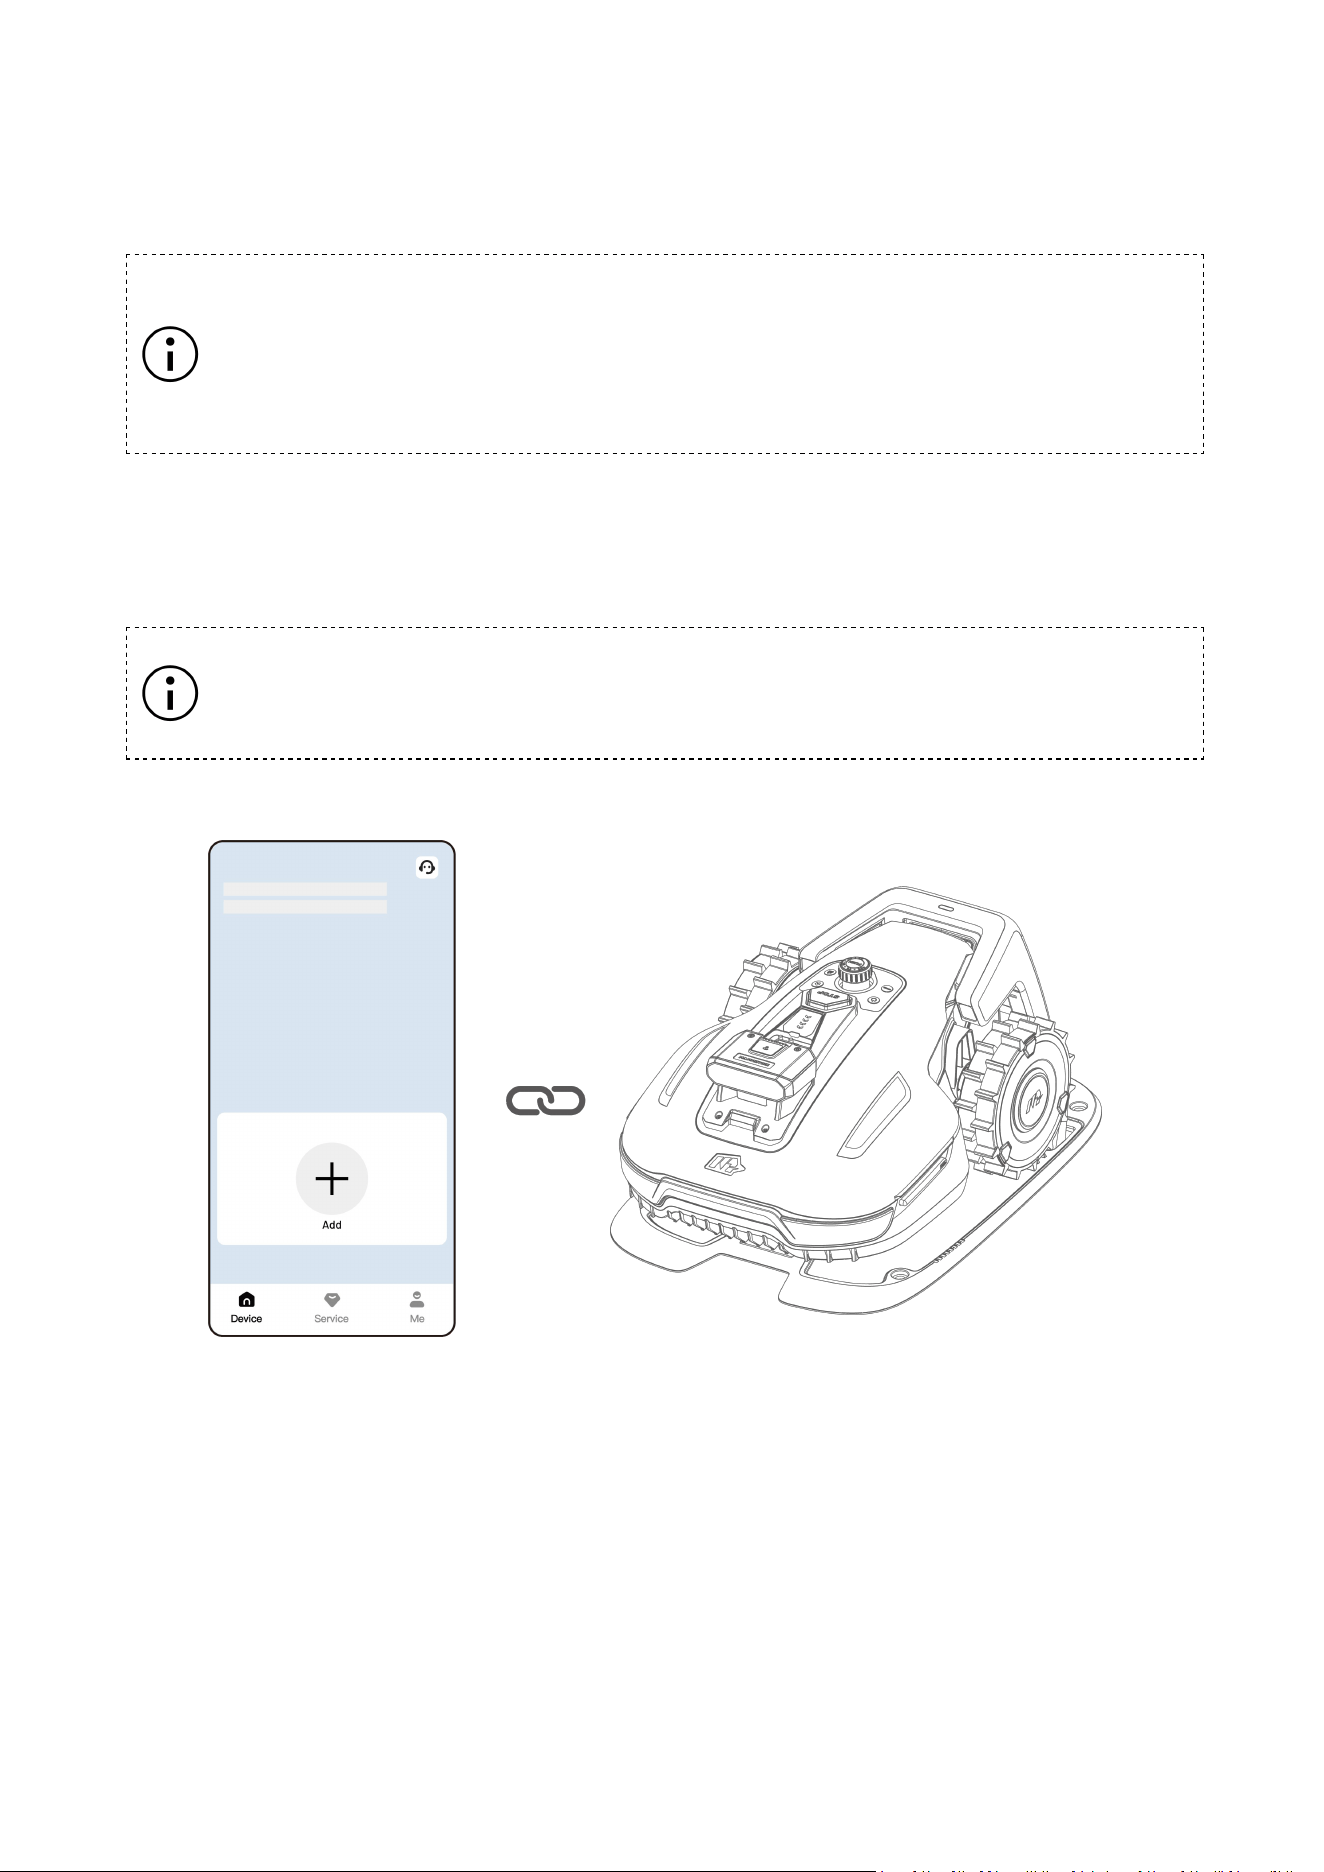
NOTE
Maintain a distance of 3 m (10 ft) or less between your phone and the robot.
If you're using 4G mobile data, you can skip the Wi-Fi setup, but connecting to
Wi-Fi is recommended for optimal performance.
1. Tap + to add your robot.
2. Follow the onscreen instructions to link your robot and connect to your Wi-Fi.
3. Follow the onscreen instructions to activate the built-in 4G module.
NOTE
4G module is optional for YUKA mini 2 500, 600, 1000, and 1000H.
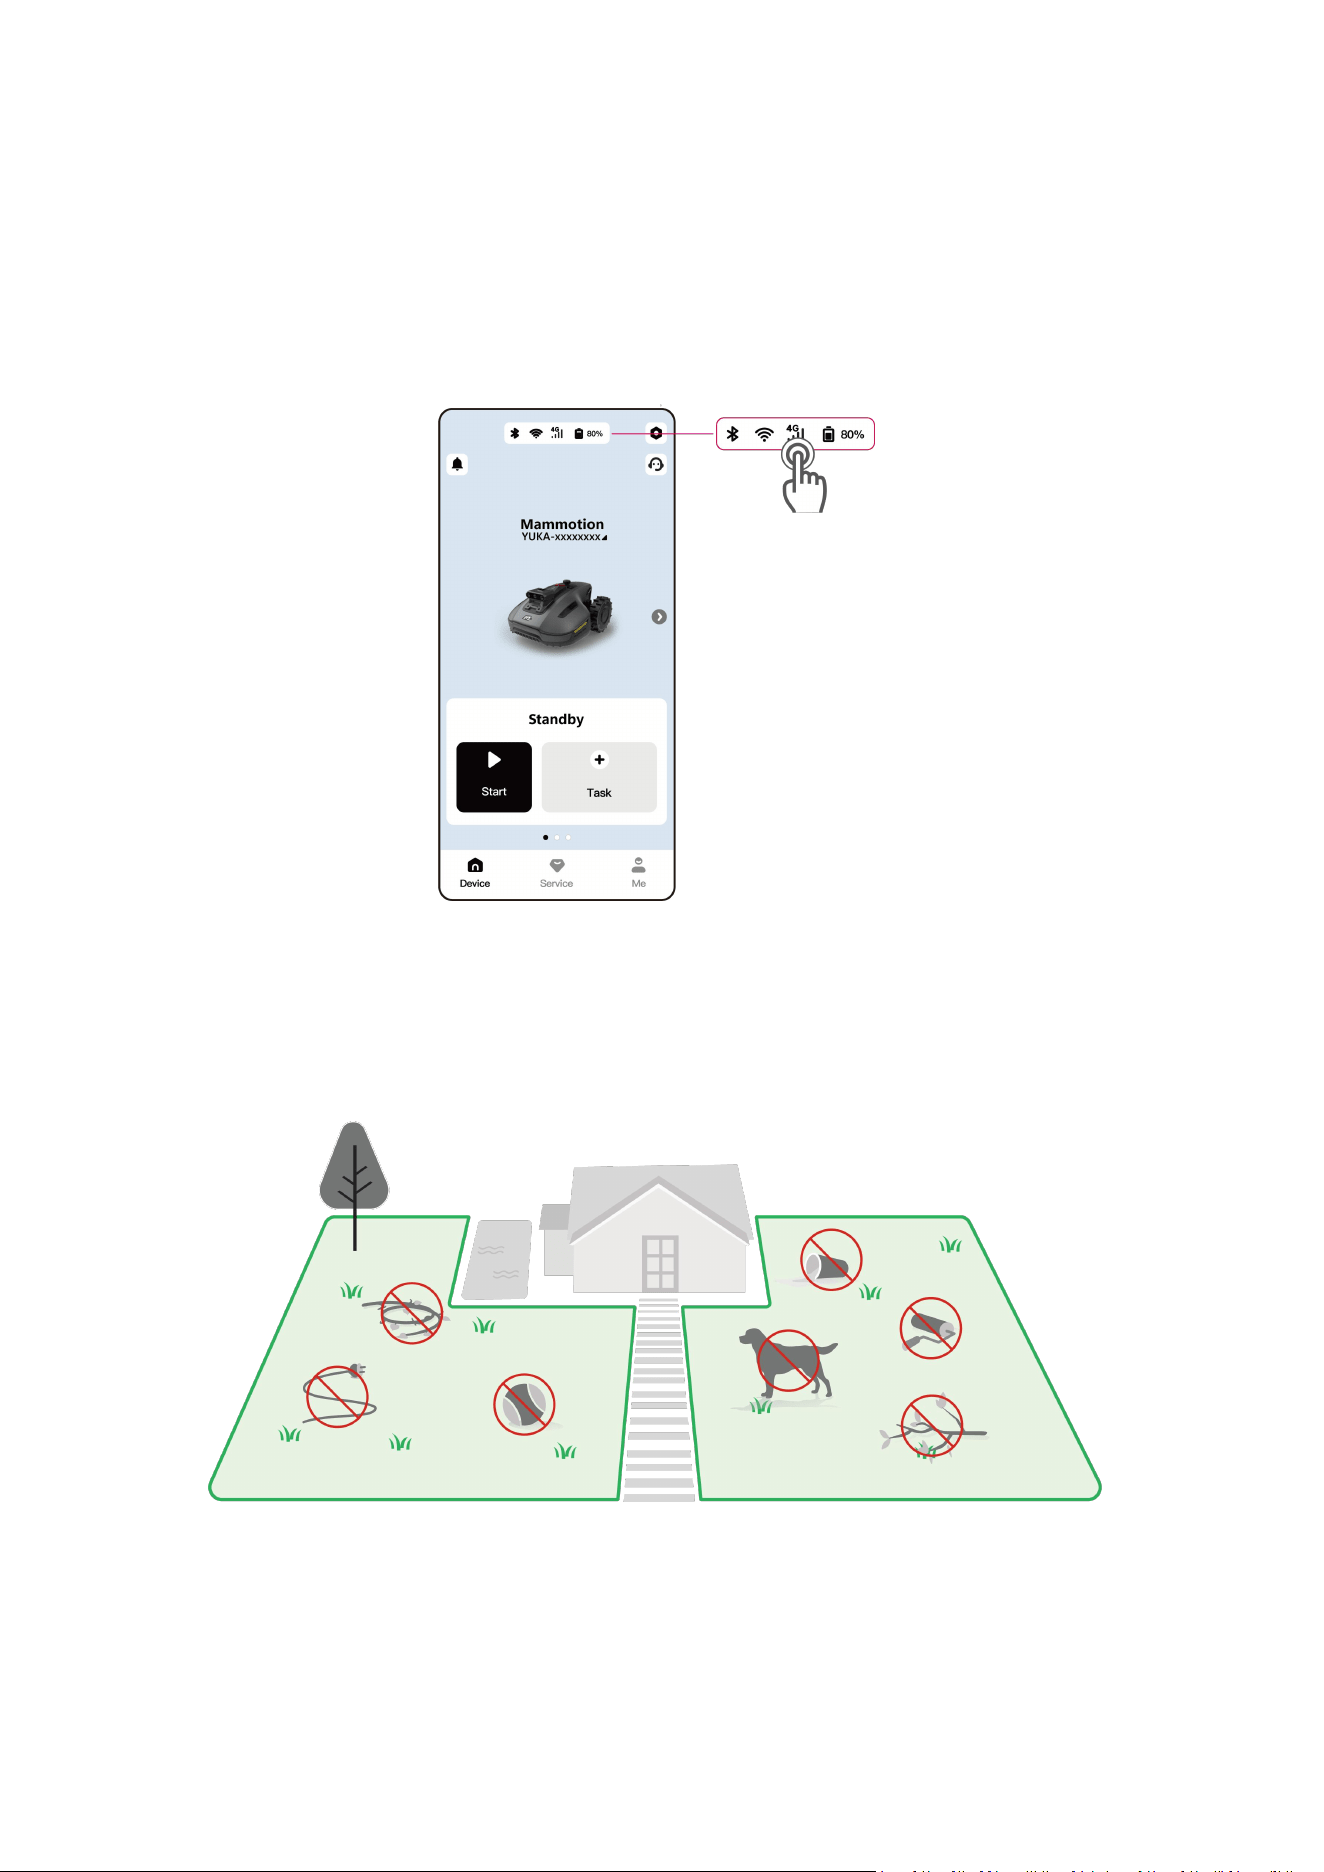
- 17 -
If you didn't activate the 4G module during the robot linking process, you can do so by tapping
the Status Bar on the Home page:
1. Tap the Status Bar on the Home page.
2. Tap the 4G status button.
3. Tap Activate and wait for the activation to complete successfully.
3.5 Pre-Mowing Preparations
Remove debris, piles of leaves, toys, wires, stones, and other objects from the lawn.
Make sure no children or animals are on the lawn.
- 18 -
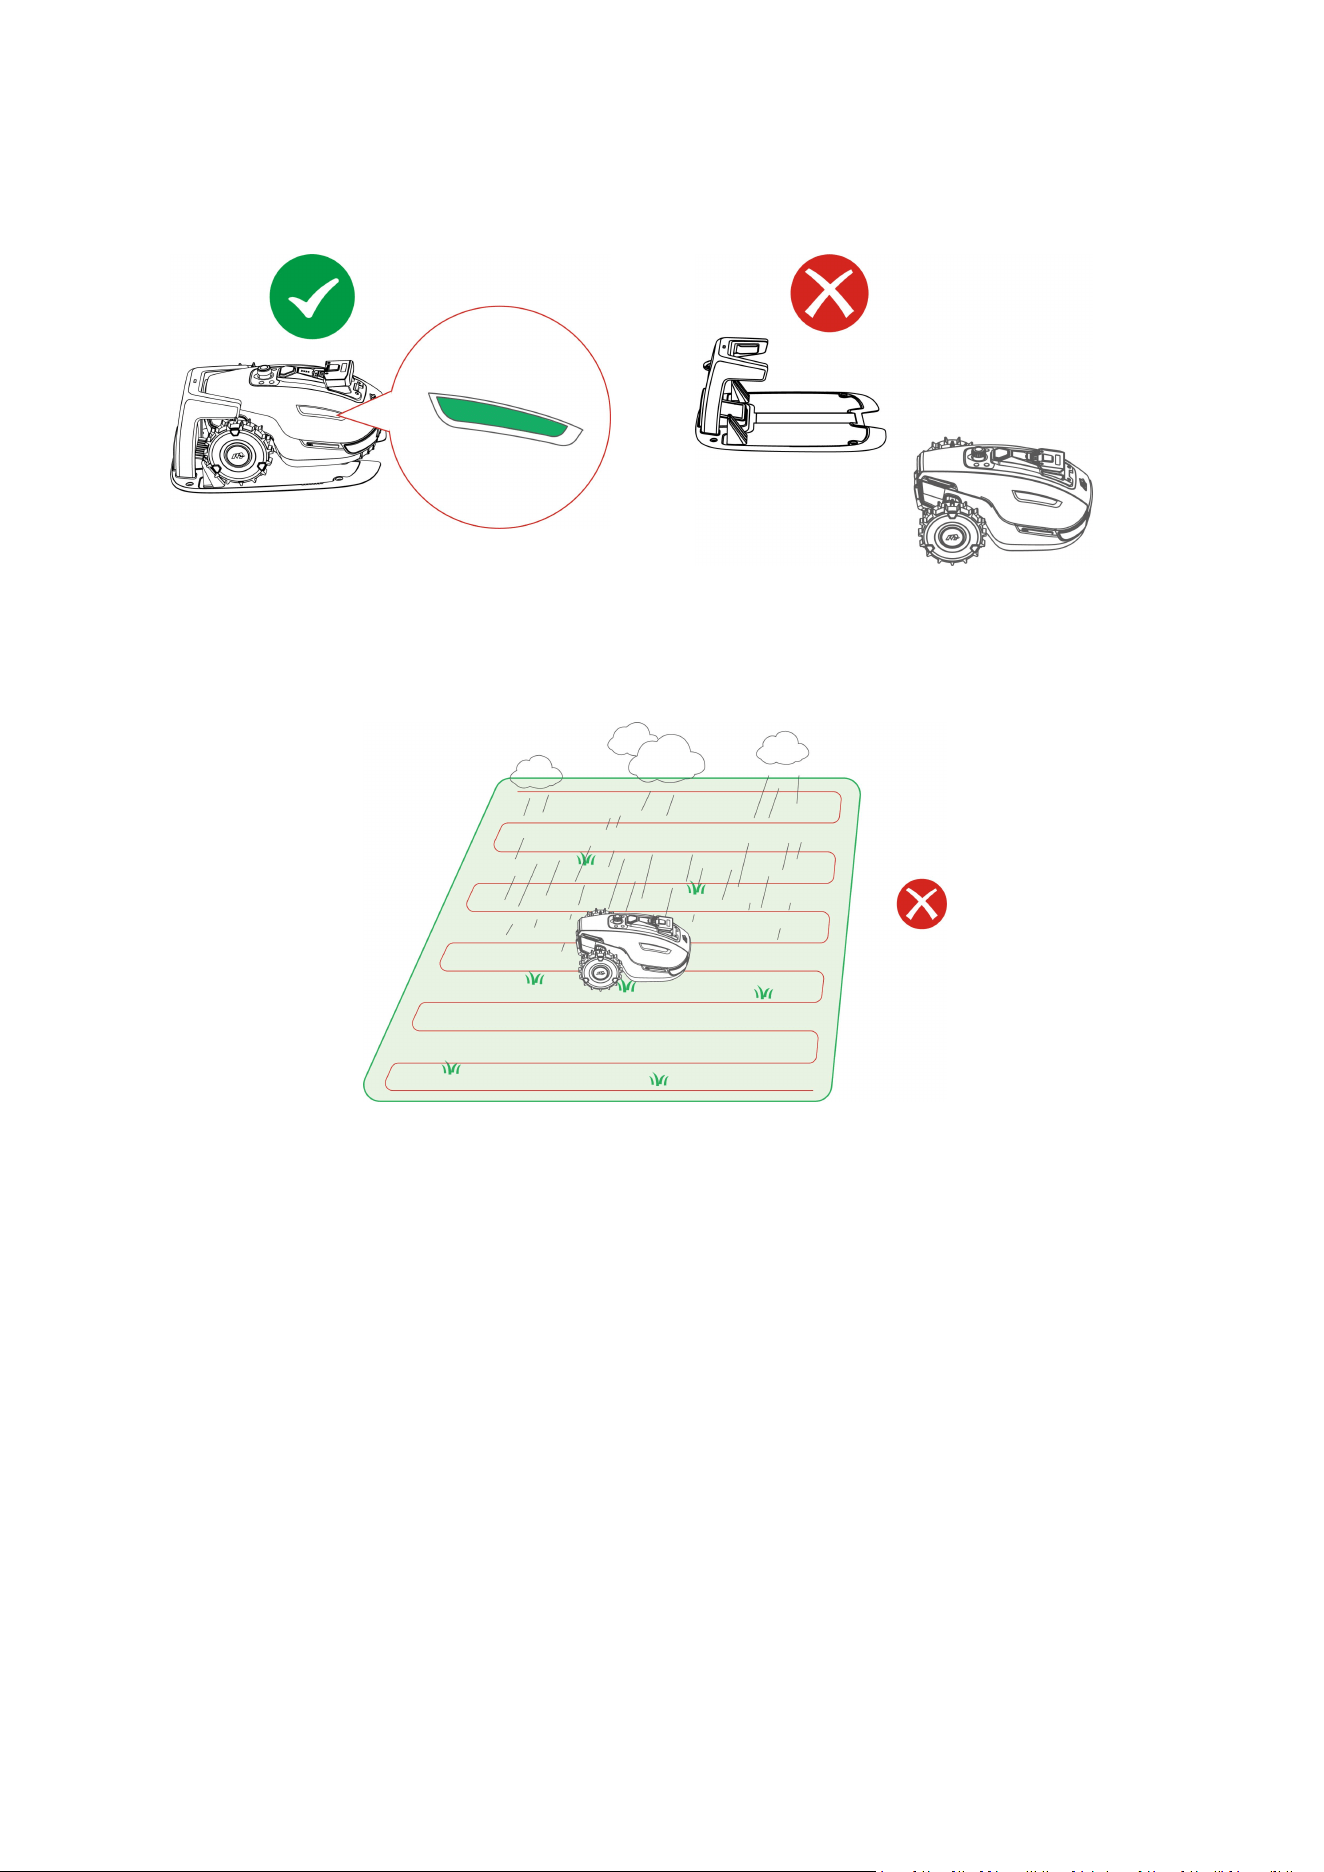
Ensure the robot is properly docked on the charging station and that the side LED is green.
Then, complete calibration in the app.
For the best mowing results, it is recommended to mow in dry weather. Mowing in the rain
can make the grass stick on the robot and cause slipping. DO NOT mow in bad weather,
such as heavy rain, thunderstorms or snow.
- 19 -
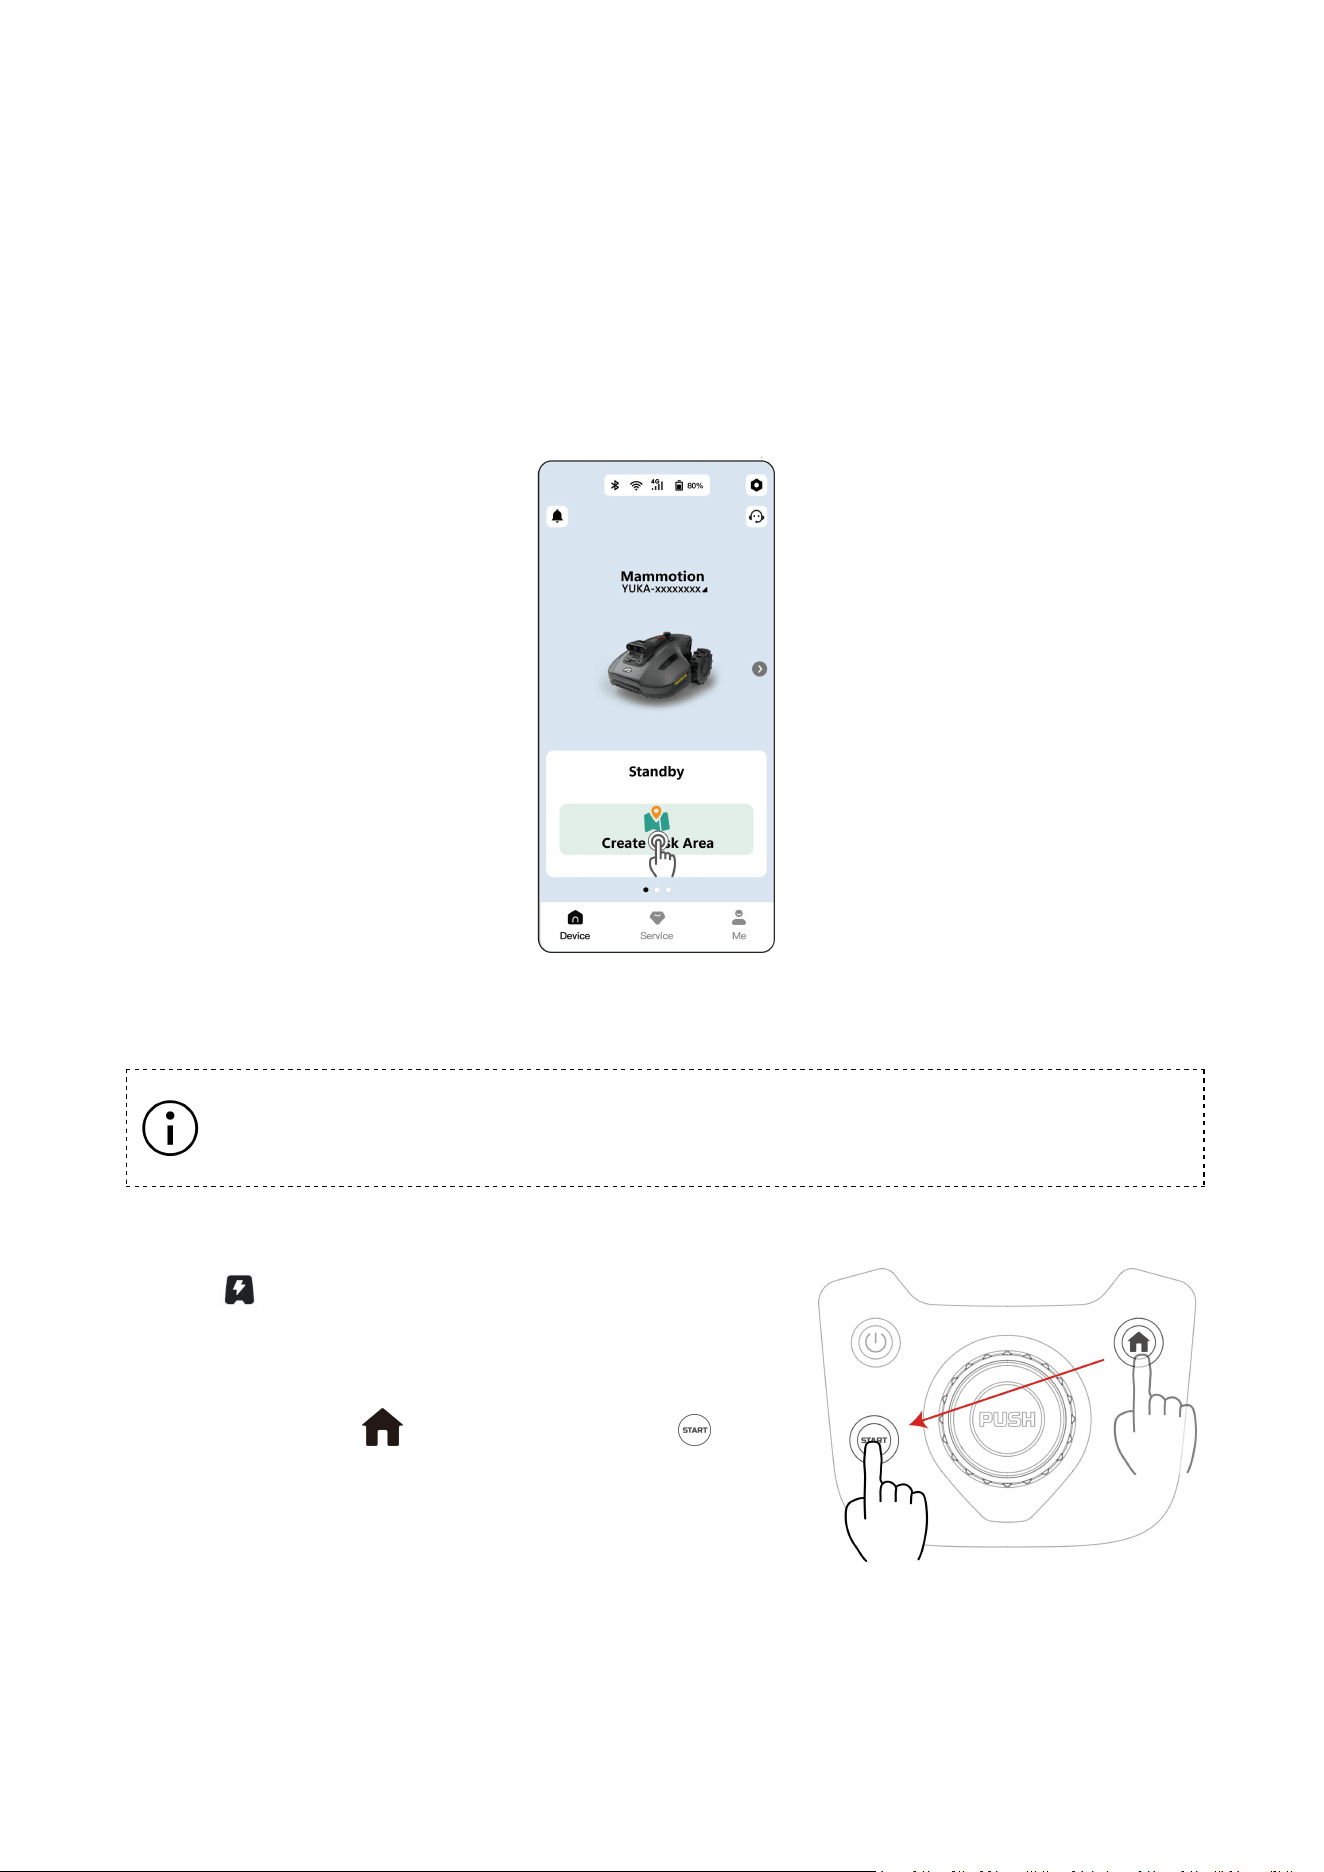
3.6 Mapping and Mowing Your Lawn
1. Tap Create Task Area on the Home page.
2. Read and follow the in-app instructions to verify your robot is ready to map.
3. Tap Start Mapping to start map your lawn.
4. Tap Mow to start mowing after completing mapping.
3.7 Recharging
NOTE
The robot must be in a task area to go to recharge.
To Recharge
Tap on the Map page in the Mammotion app.
OR
Press the button on the robot, then press to send
the robot to the charging station.
- 20 -
4 Daily Mowing
4.1 DropMow
DropMow is used for one-off mowing of unmapped lawns or for touch-up mowing outside of
mapped areas.
Recommended uses include:
Mowing areas that the robot cannot normally reach.
Temporary mowing tasks that don't require a full map.
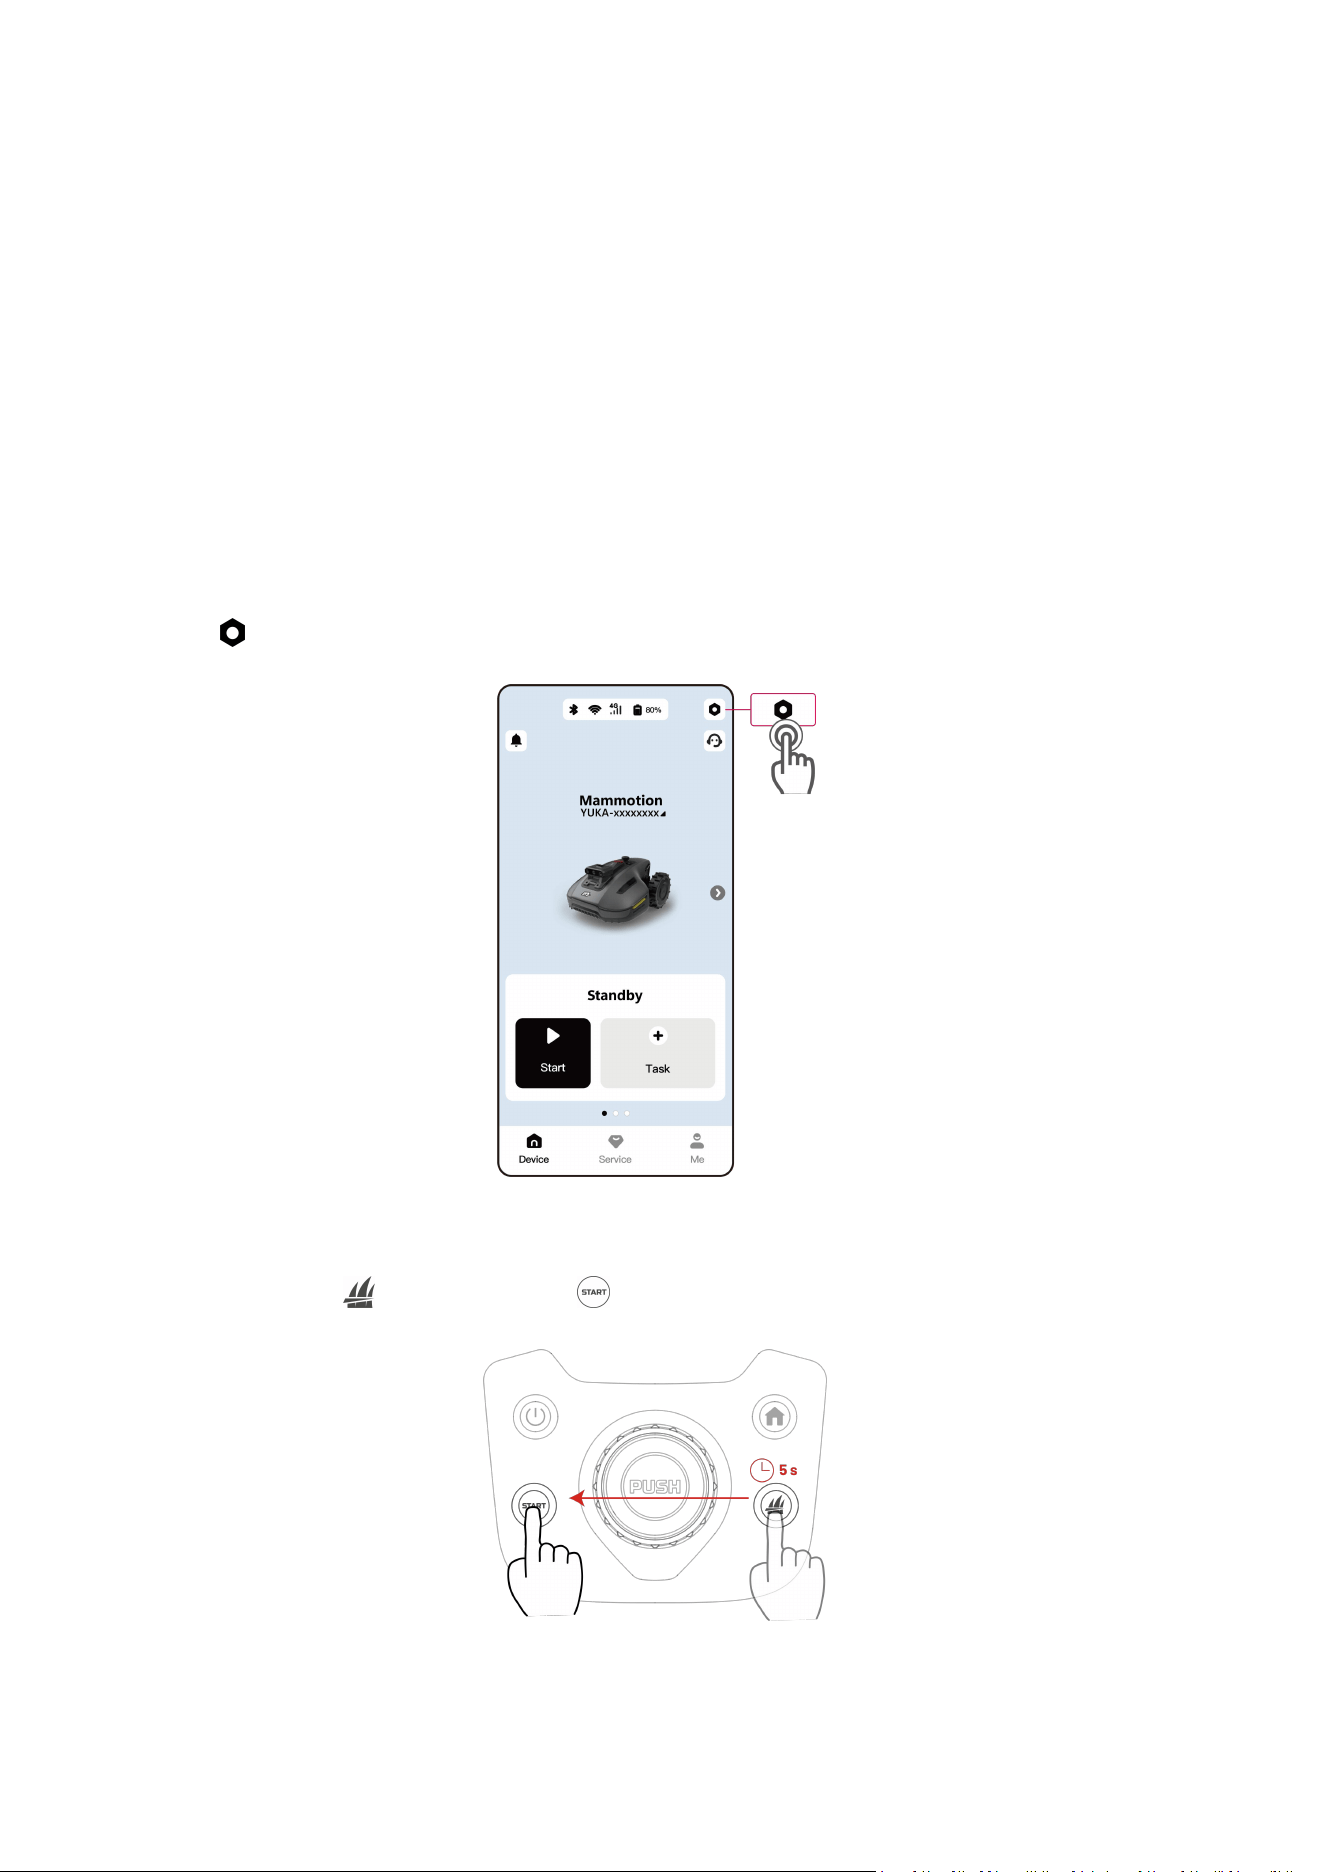
To Use DropMow:
Tap > Beta Features > DropMow through the app.
OR
Press and hold for 5s, then press on the robot.

- 21 -
4.2 Regular Task (Custom Settings)
To Customize your Mowing Task:
1. Tap the robot image to access the Map page.
2. Tap Mow to access the task page.
3. Tap Task Area to select the area that you want to mow.
4. Tap Settings to configure task settings.
5. Tap Start to begin mowing.
- 22 -
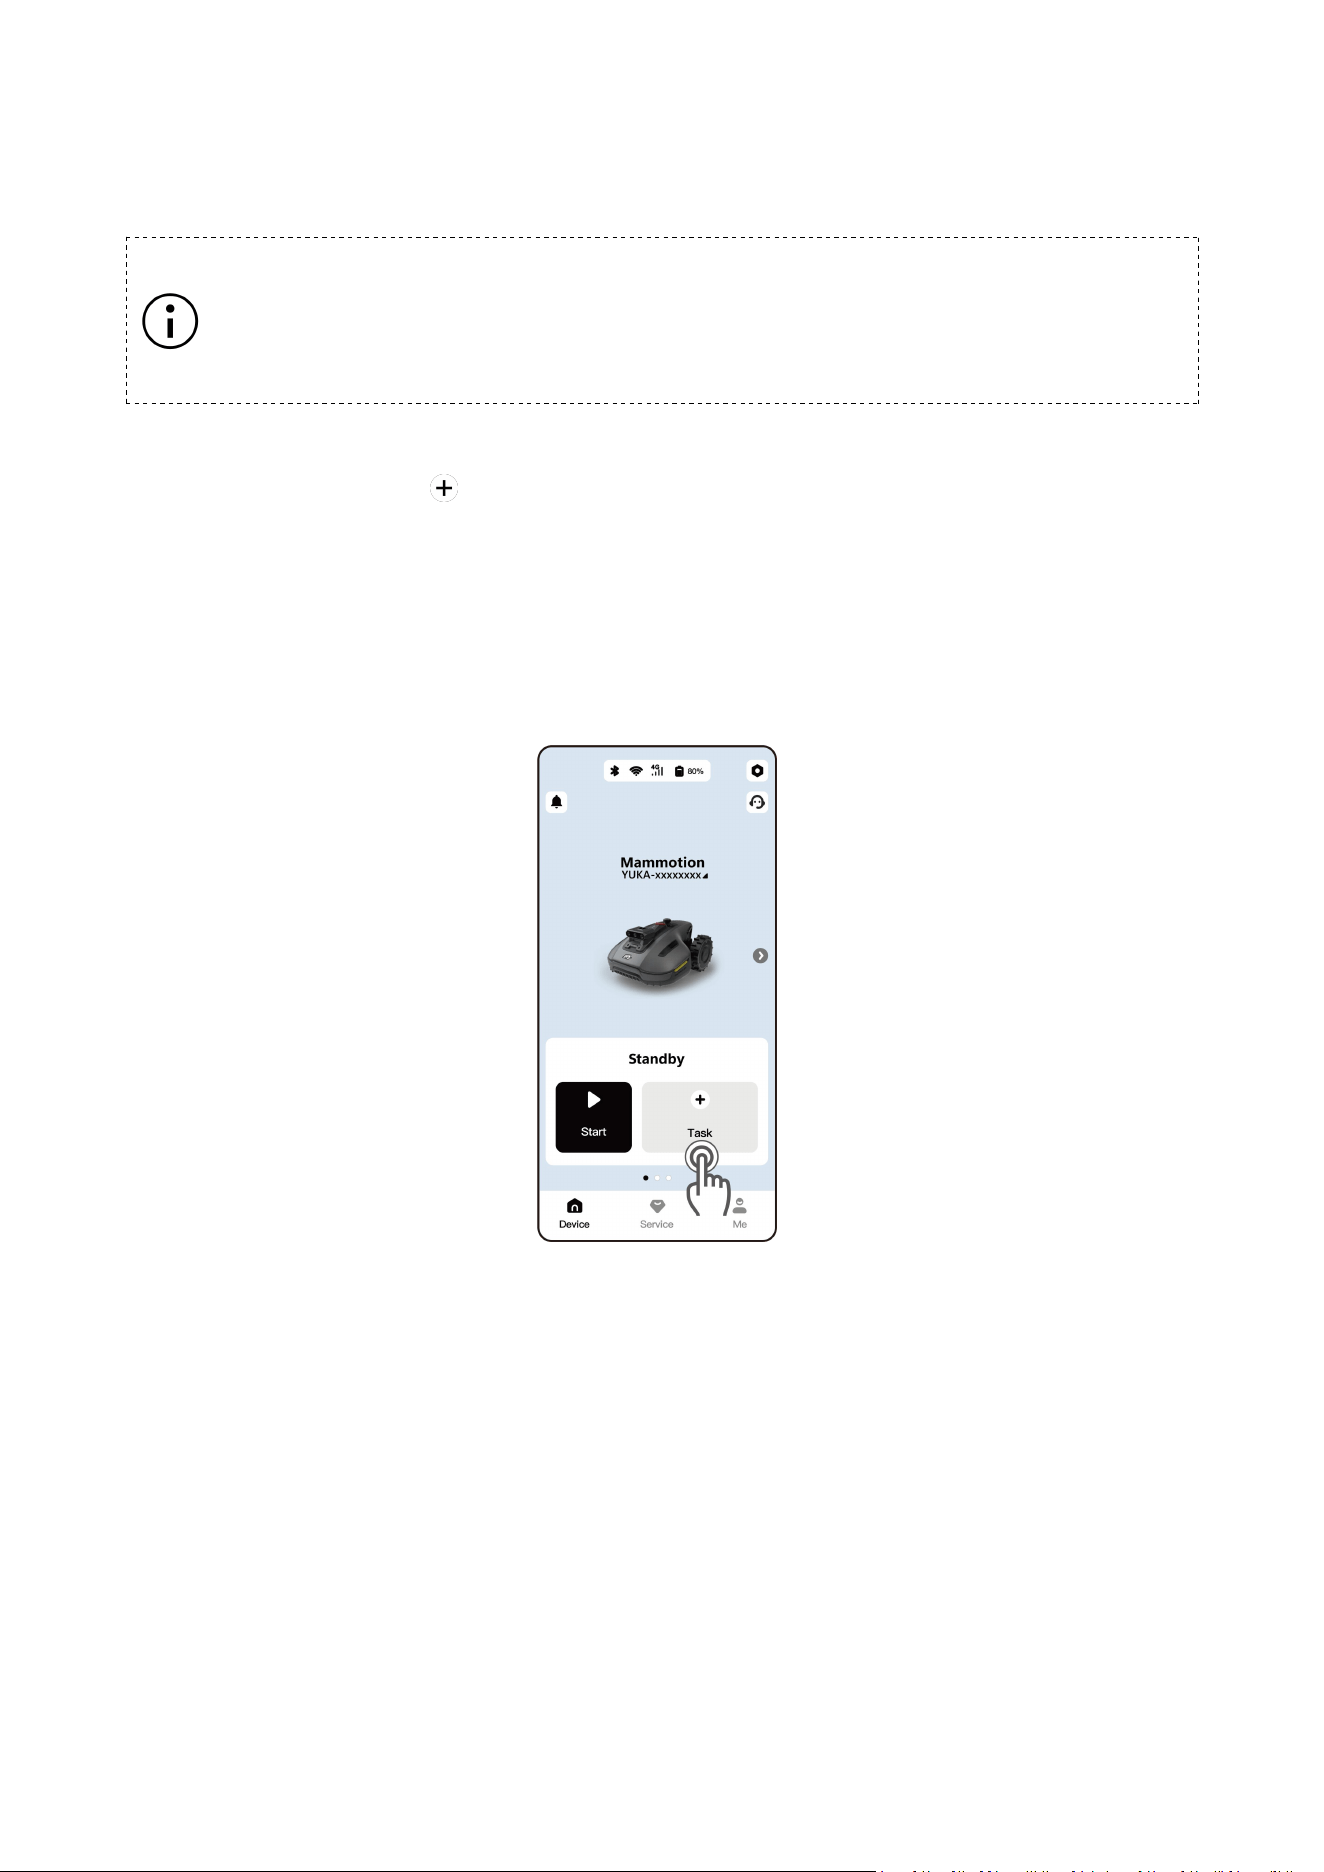
4.3 Scheduled Task
NOTE
Scheduled tasks cannot be created while the robot is working.
Scheduled tasks can be set after a task area has been created.
To Schedule an Automatic Mowing Task:
1. On the Home page, tap if no task has been created yet.
2. Tap Task Area to select the area to mow.
3. Tap Settings to configure parameters.
4. Tap Schedule to set the date and time, then tap Save.
5. Finally, tap Save again to confirm and save your scheduled task.
- 23 -
5 Mammotion App
With the Mammotion app, you can fully customize, manage, and monitor your robot, allowing
you to control your mowing experience from anywhere.
5.1 Map Elements
Virtual Fence
A virtual fence acts as an invisible barrier, defining perimeters or restricting access to areas
that you don't want the robot to go.
Recommended uses include:
Lawns with unclear or undefined perimeters.
Water features like pools or ponds.
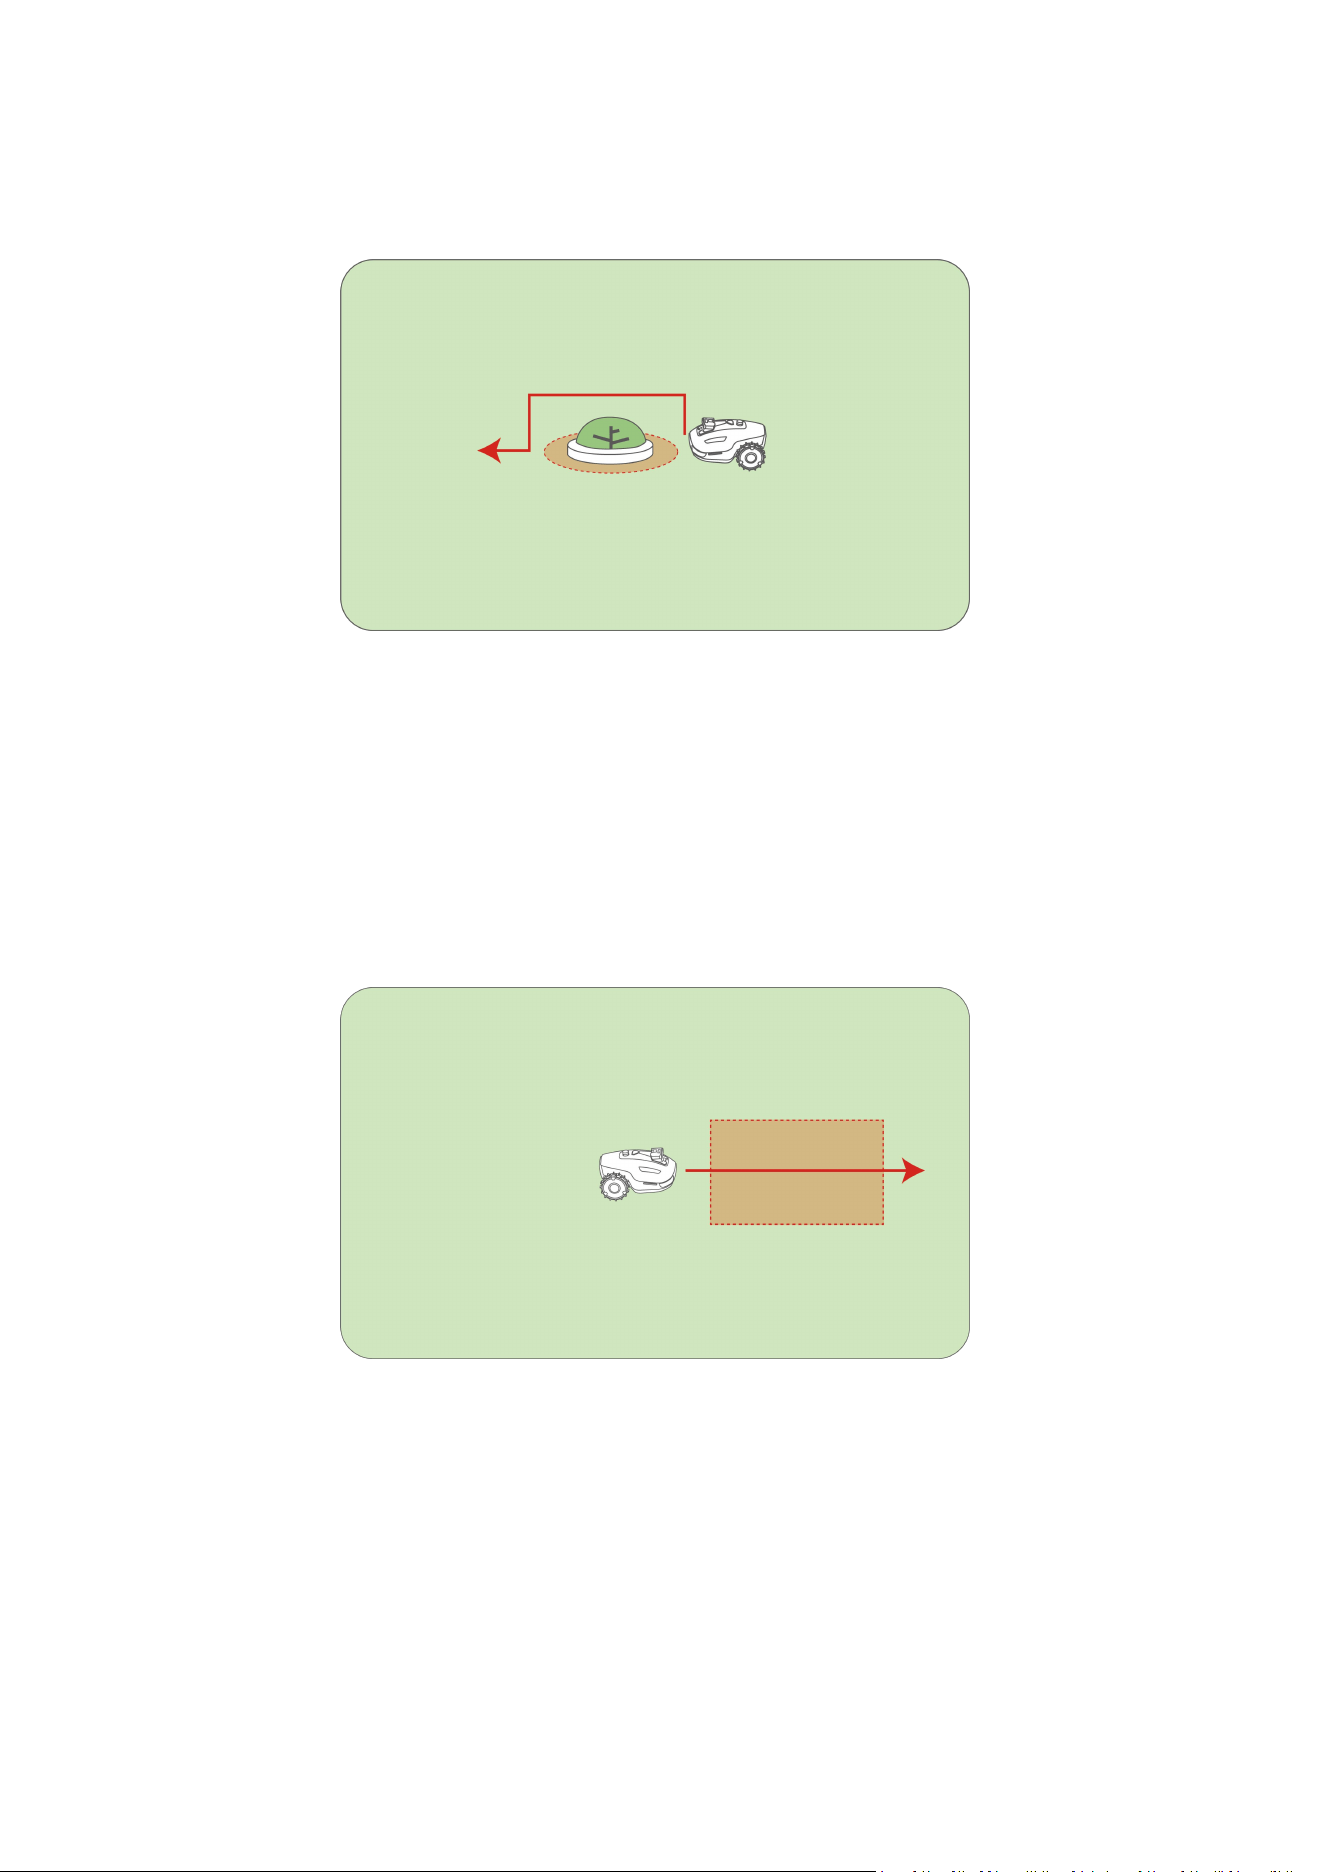
No-go Zone
A no-go zone is an area you want your robot to completely avoid. They are crucial for
protecting your robot from damage and keeping it away from sensitive or hazardous areas.
The robot will not mow within no-go zones.
Recommended uses include:
Low flowerbeds, especially those lower than 20 cm (7.8 in).
Water edges, such as ponds or swimming pools, especially where there is no clear
boundary.
Transparent objects, such as mosquito nets or glass doors.
Small or low-lying obstacles, e.g., clotheslines, tent ropes, or water pipes.
Pet houses.
- 24 -
High-value or delicate plants, including crops and ornamental plants.
Irrigation equipment, such as hoses and sprinklers.
No-stop Zones
A no-stop zone is an area where the robot turns off its obstacle avoidance and does not stop
for any obstacles while going to a task area or other location, and when going to recharge.
They are useful for complex, but safe areas where the robot may get stuck otherwise.
Recommended uses include:
Lawn areas that may be mistakenly recognized as invalid due to seasonal changes.
Areas with low, safe obstacles.

- 25 -
Adding a Virtual Fence / No-go Zone / No-stop Zone
1. Tap the robot image on the Home page to access the Map page.
2. Tap Map.
3. Tap Create.
4. Select Virtual Fence / No-go Zone / No-stop Zone and follow the in-app instructions to
finish adding.
5.2 Mowing Settings
Cutting Path Mode
Select the optimal mode based on your lawn’s condition and desired look under Mow >
Settings > Cutting Path Mode.
Perimeter Laps Only: Only mows the lawn edges.
Zigzag Path: Creates classic striped lines.
Chess Board Path: Mows in a crisscross pattern for a dense, even finish.
Adaptive Zigzag Path: The robot automatically adjusts the path for efficiency.
Pattern
Add text or images to your map to personalize your lawn and express yourself. On the map, go
to Create > Pattern to add a pattern.

- 26 -
5.3 Safety & Protection
Obstacle Detection
Adjust the robot's responsiveness to objects and varying terrain in its path. You can select one
of three sensitivity levels under Mow > Settings > Obstacle Detection Mode:
Sensitive: Increases the robot's sensitivity to both standard obstacles and non-grassy
areas (e.g. pavement, gravel). Use this mode on complex lawns.
Standard: Detects and avoids common obstacles (e.g., toys, furniture) encountered
during mowing. This is the recommended default setting.
Off: Disables obstacle detection. Use only in specific, controlled environments where
detection is unnecessary or interferes with operation.
Rain Detection
Your robot is equipped with built-in rain sensors. When enabled, the robot will automatically
stop mowing and return to the charging station when rain is detected.
Enable this feature in Settings > Rain Protection.
Wildlife Safety (YUKA mini 2 600 / 1000 / 1000H only)
This feature helps protect nocturnal animals during nighttime operation. You can set the robot
to perform Low-Speed Mowing or Stop Mowing entirely during night hours.
Enable this feature in Settings > Wildlife Safety.
5.4 Security & Tracking
Geo-fence Alarm
The app will send you a push notification if the robot moves more than 50 m (164 ft) away from
its designated task area, alerting you to potential unauthorized movement.
To use, go to Me > Find My Device and enable Location Notifications.
GPS Theft Tracking
If your robot is missing, you can track its location in real-time via GPS, provided the robot was
linked to the Mammotion app.
To use, go to Me > Find My Device and enable Location Recorder.
- 27 -
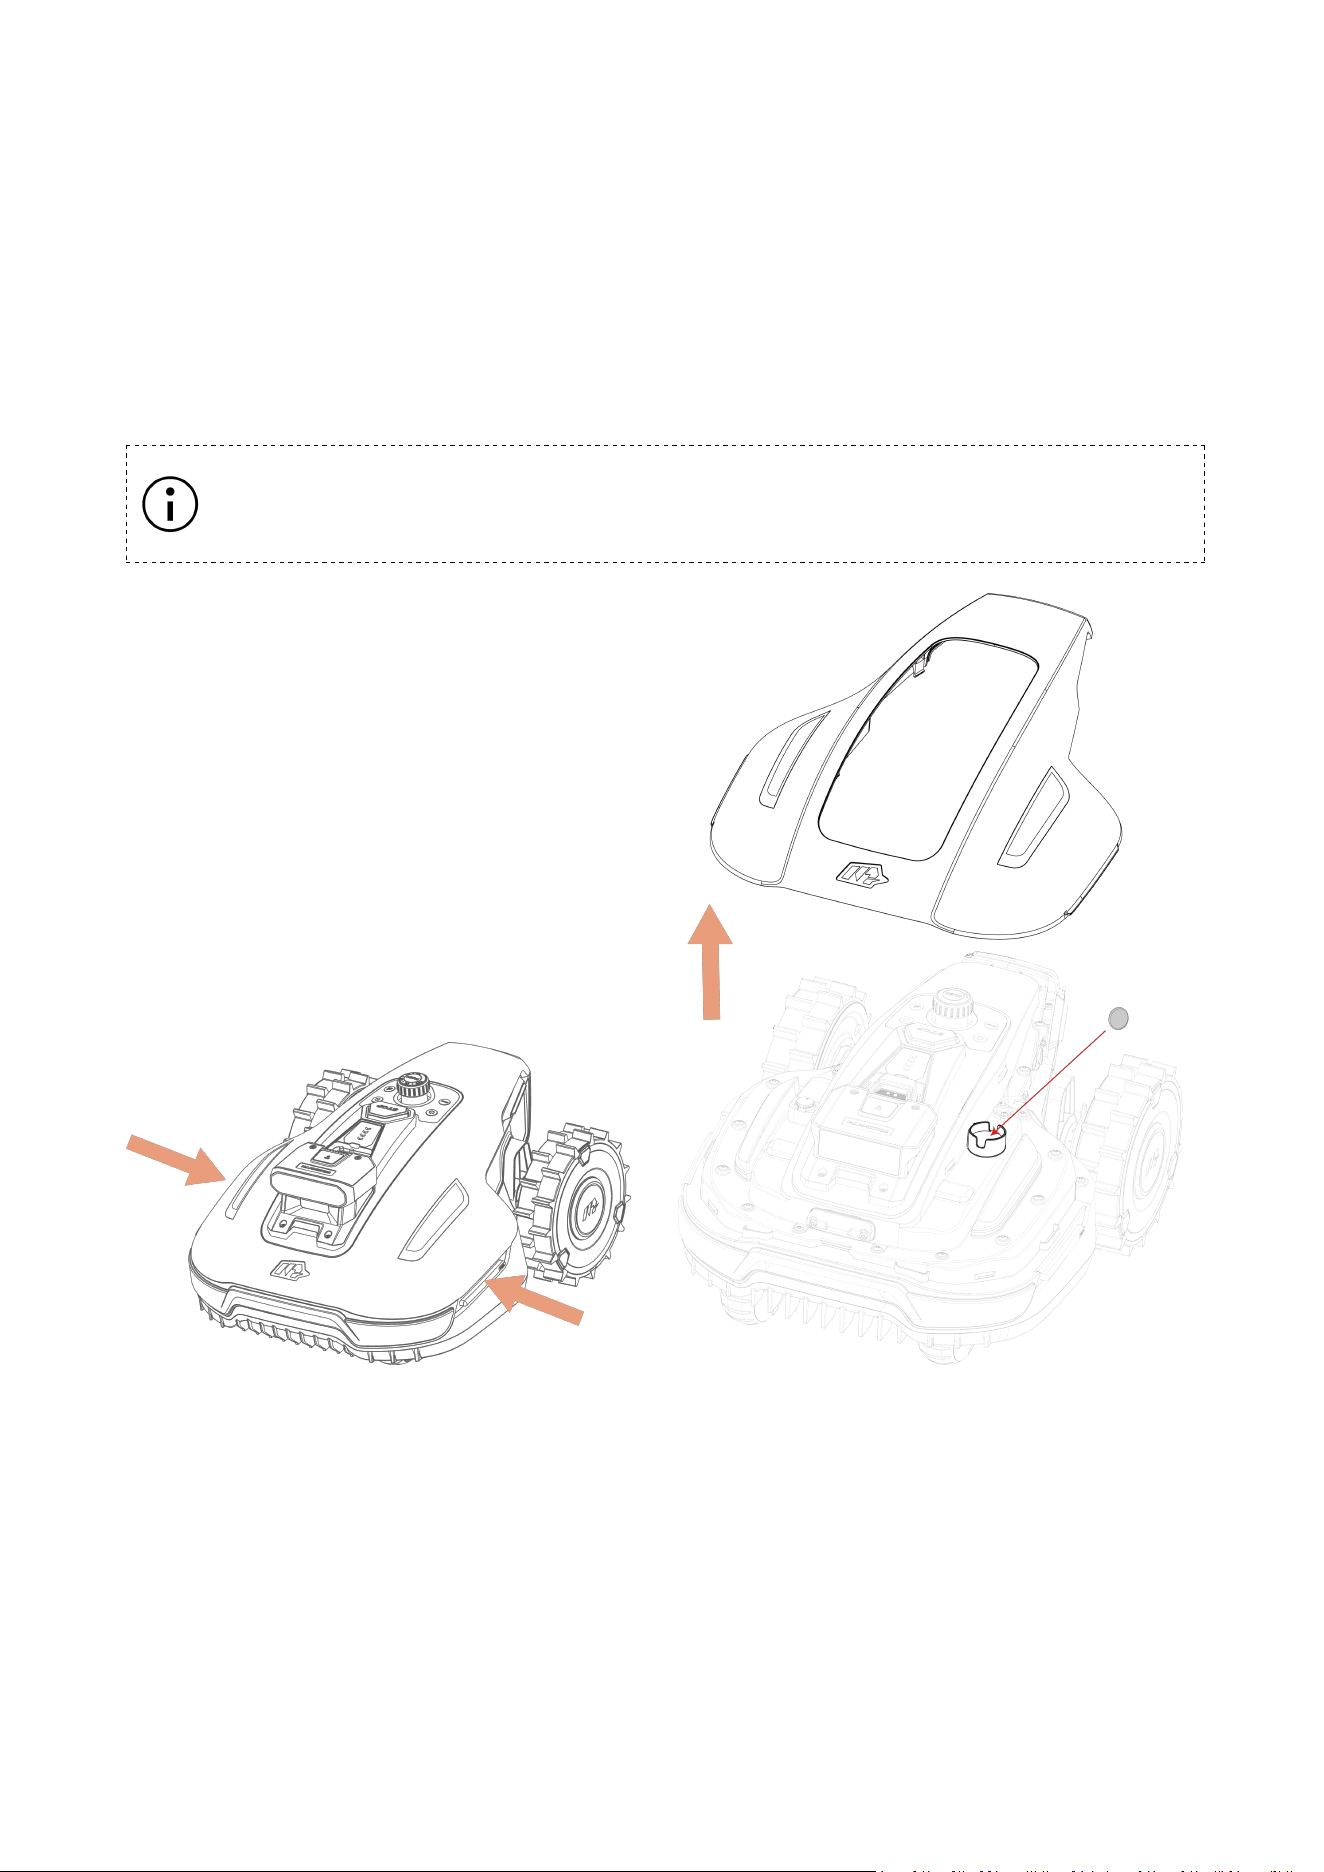
AirTag Compatibility
The robot supports installing an AirTag inside the housing.
1. Remove the robot’s top cover.
2. Place and secure the AirTag in the designated mounting area.
3. Reinstall the top cover and ensure it is properly latched.
NOTE
AirTag is not included. The Mammotion app does not support AirTag functionality.
- 28 -
5.5 Upload Logs
If you encounter any issues during use, you can upload the corresponding logs to help our
technical support team diagnose and resolve the problem efficiently.
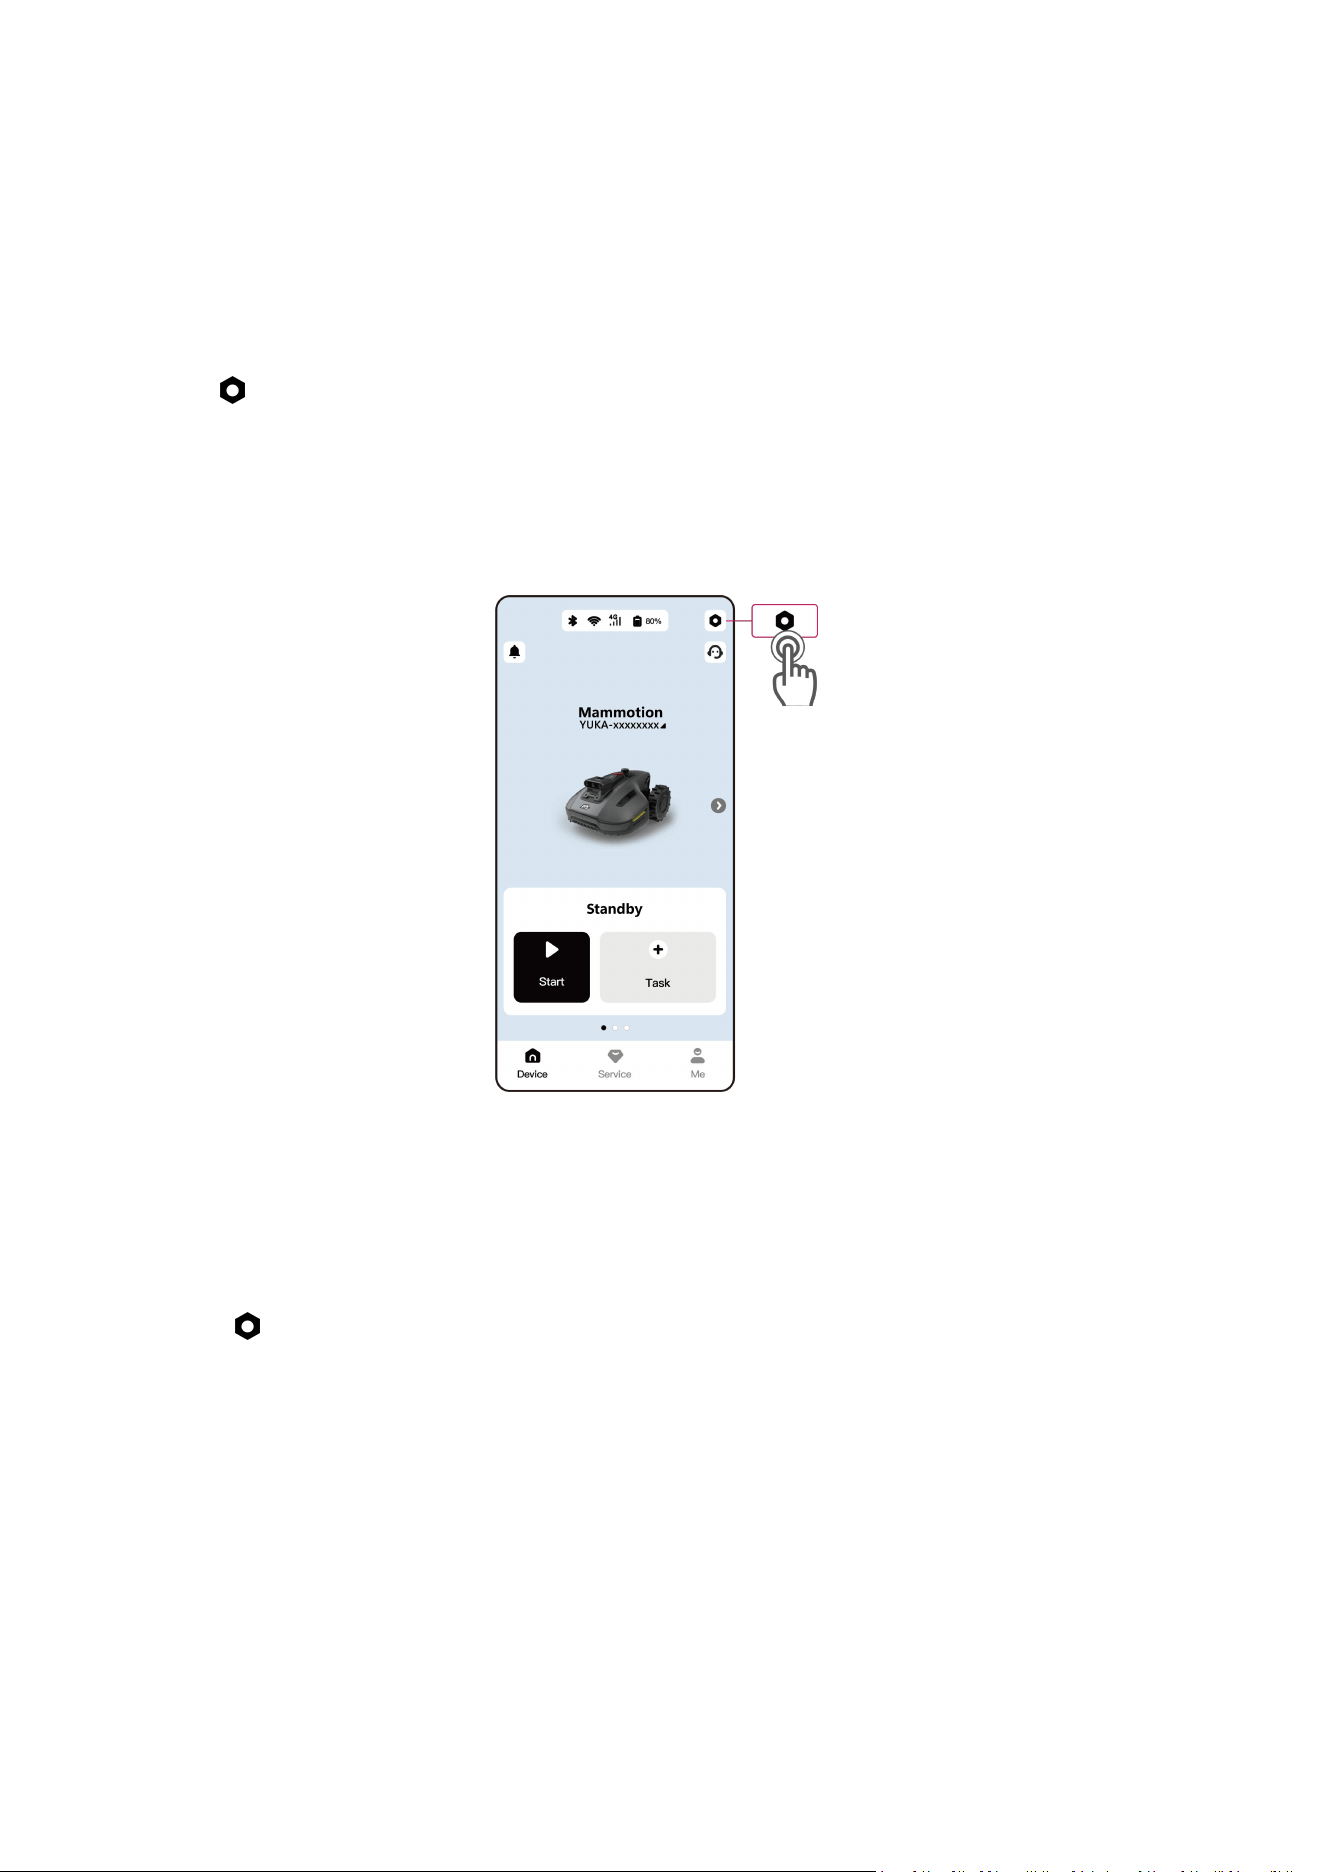
To Upload Logs
1. Tap to enter the Settings page.
2. Tap Upload Logs and follow the in-app instructions to complete the upload.
OR
Go to Me > Upload Logs, and follow the in-app instructions to complete the upload.
5.6 Update Firmware
For optimal experience, ensure your robot is updated to the latest firmware version.
To Update Firmware:
1. Go to > Device Information > Robot Version to update the firmware.
2. Ensure the robot is connected to a stable network.
3. During the update, please avoid exiting the app, performing other operations, or turning
off the robot.
- 29 -
6 Maintenance
To maintain optimal mowing performance and extend the lifespan of your robot, Mammotion
advises performing regular inspections and maintenance. For safety, always wear protective
clothing such as trousers and work shoes; avoid wearing open sandals or going barefoot
during maintenance.
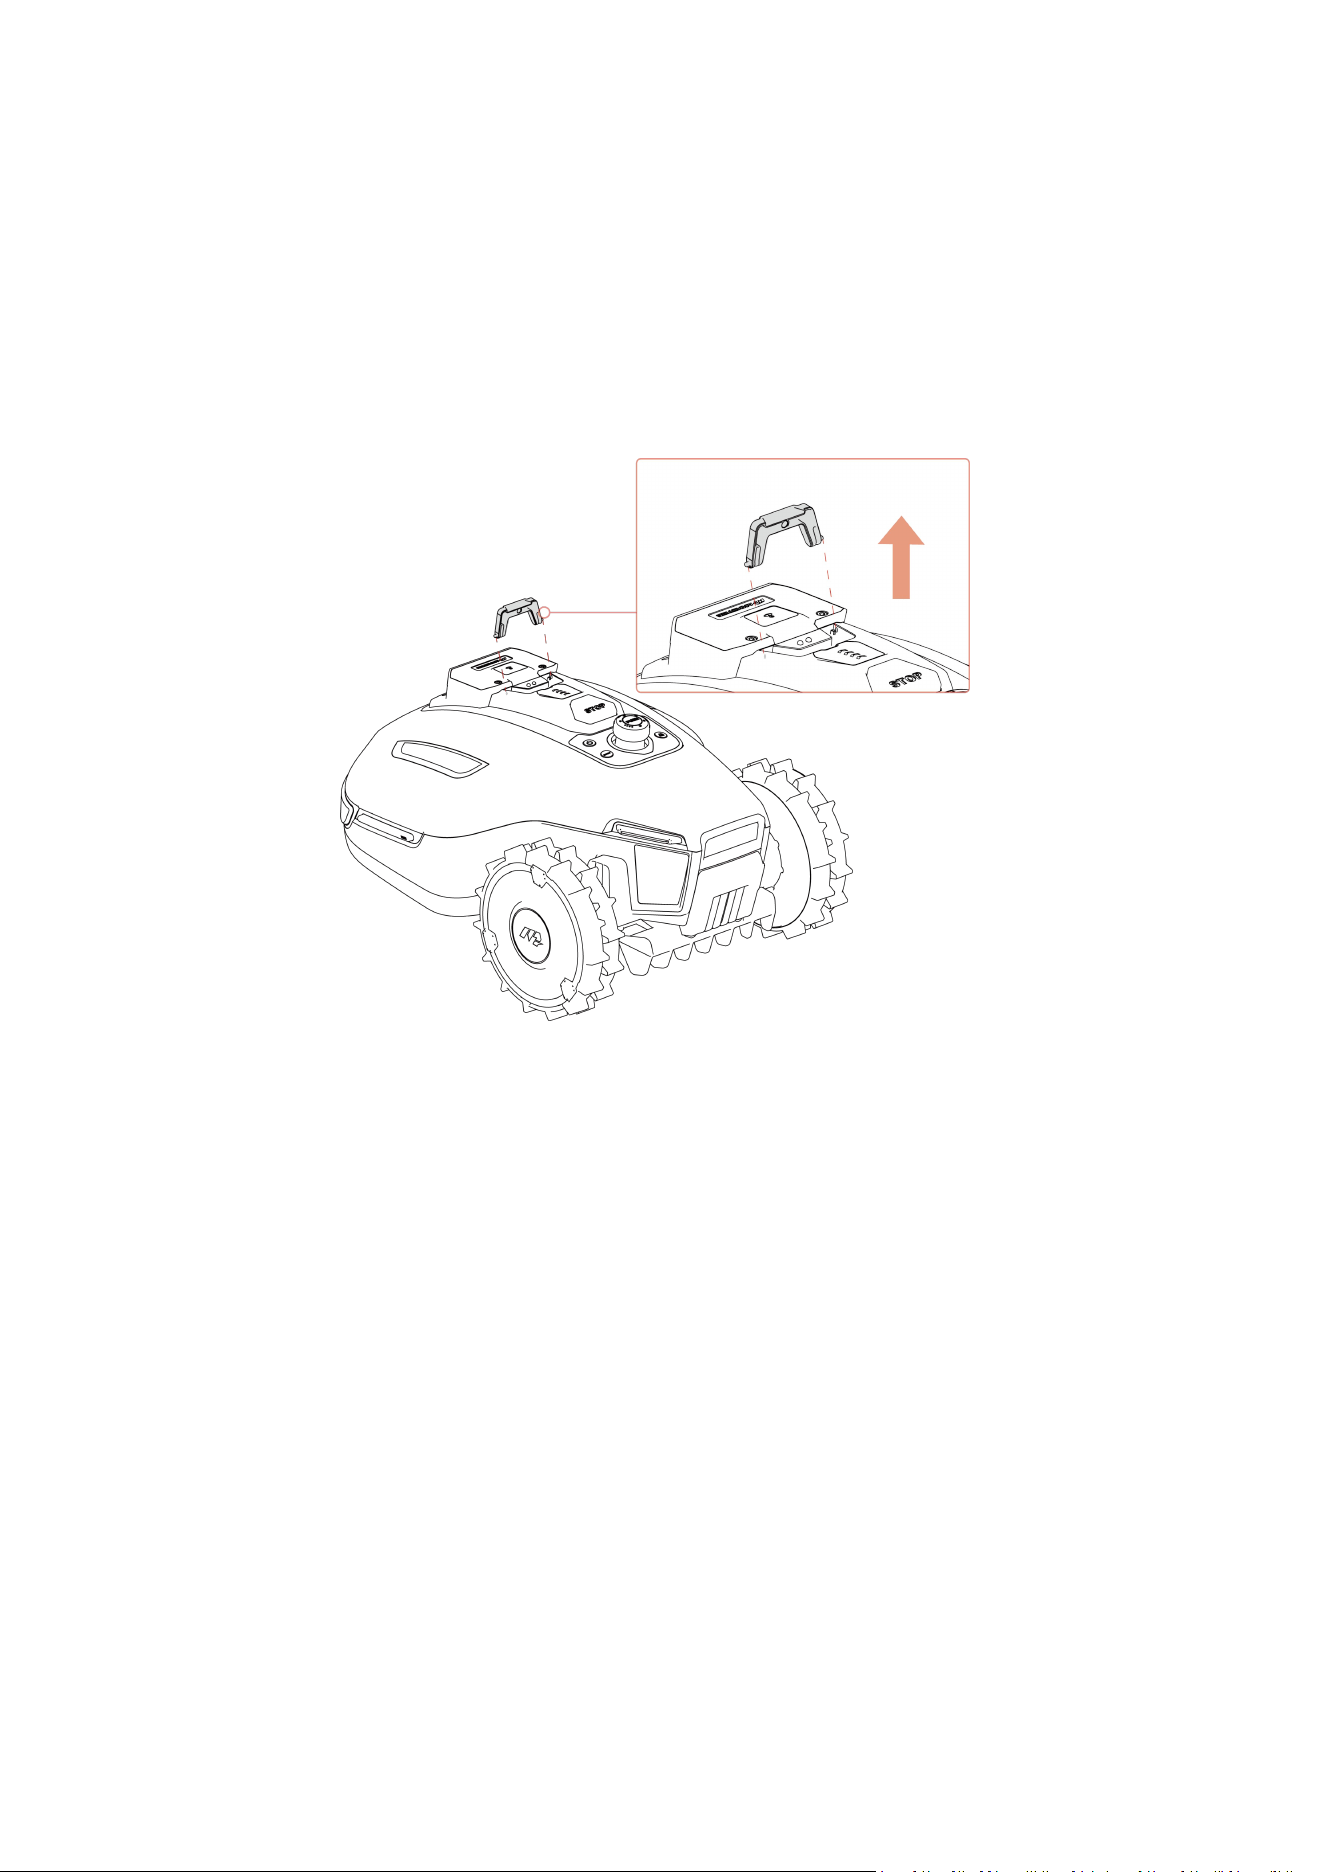
Before maintenance, turn off the robot and remove the security key.
DO NOT use a high-pressure washer or solvents to clean the robot.
After washing, ensure that the robot is placed on the ground in its normal orientation, not
upside down.
DO NOT reverse the robot to wash the chassis. If you do reverse it for cleaning purposes,
make sure to return it to its proper orientation afterward. This precaution is necessary to
prevent water from leaking into the motor and potentially affecting normal operation.
- 30 -
6.1 Cleaning
Robot
WARNING
Ensure the robot is completely powered off before beginning any cleaning work.
Always turn off the robot before turning it upside down.
When turning the robot upside down, handle it with care to avoid damaging the
vision module or LiDAR module.
Housing
Use a soft brush or a damp cloth to clean the robot's housing. Avoid using alcohol, gasoline,
acetone, or other corrosive or volatile solvents, as they may damage the robot’s appearance
and internal components.
Bottom
Wear protective gloves while cleaning the chassis and cutting disc. Use a brush to remove
debris. Check for blade damage and ensure that the blades and cutting disc can rotate freely.
DO NOT use sharp objects to clean the bottom.
Wheels
Clean the wheels using a brush or water hose. Remove the mud if any.
Vision Camera / LiDAR Module
Wipe the vision camera lens / LiDAR module with a microfiber cloth to remove any stains.
Charging Station Cleaning
Unplug the charging station before cleaning or performing maintenance on the charging
station. Use a brush and cloth to clean the infrared transmitter and the charging contact.
- 31 -
6.2 Cutting Blades Maintenance
WARNING
Always wear protective gloves when replacing the blades. DO NOT use an electric
screwdriver during installation.
When replacing the blades, replace all the screws at the same time to ensure
optimal cutting performance.
After installing, ensure the cutting blades can all rotate freely.
To ensure optimal performance during long-term storage, keep the hub motor shaft dry
and clean. Regular maintenance of the motor shaft helps prevent dirt and moisture
buildup, which can affect the motor’s function. The motor has an expected lifespan of 1500
hours of operation.
Cutting blades are considered wear parts and should be replaced if they become severely
worn. It is recommended to replace the blades every 3 months or after 150 hours of use.
For thicker grass, more frequent blade replacement may be necessary.
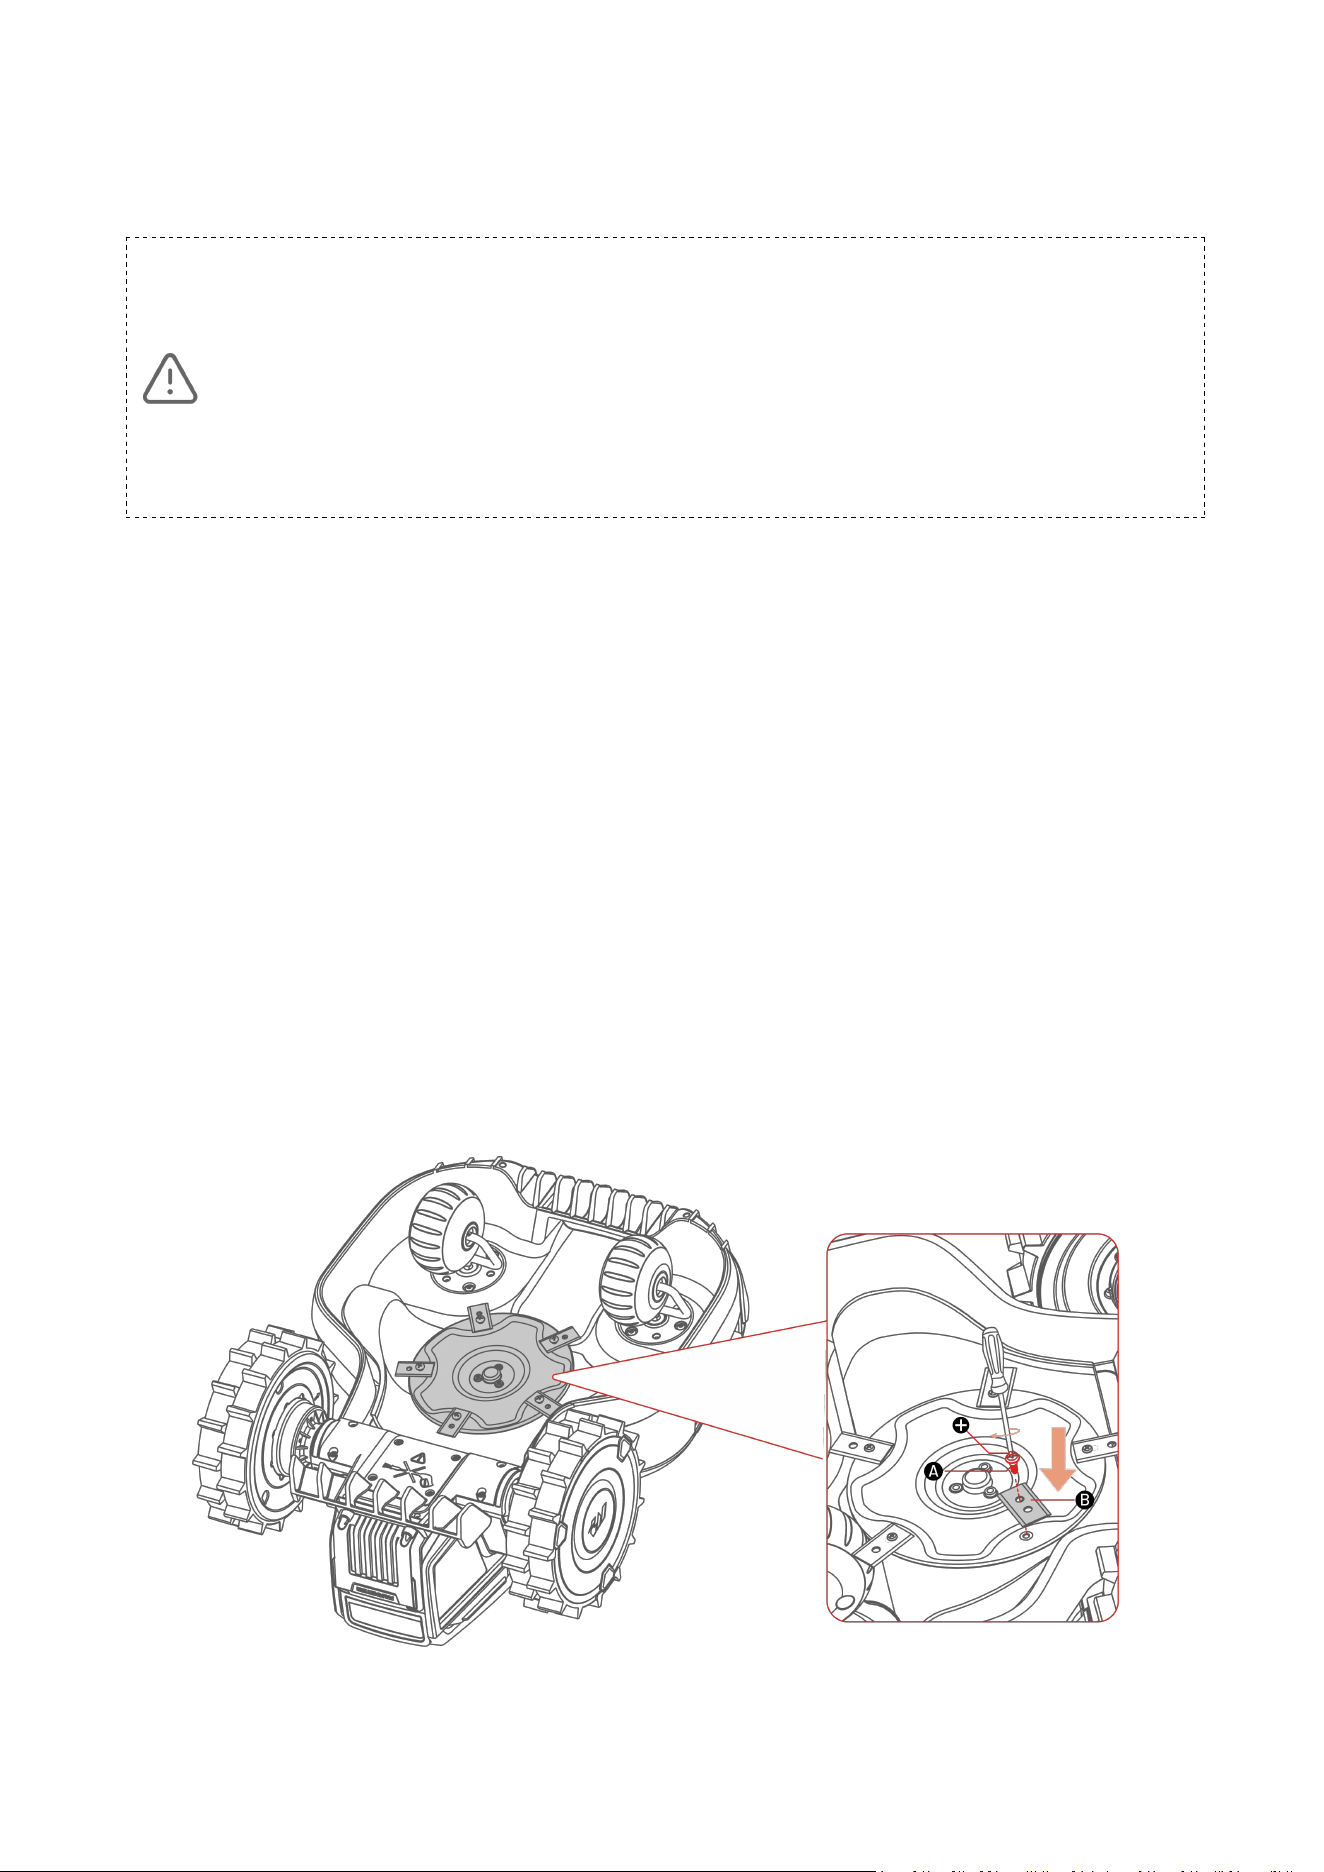
Replacing the Cutting Blades
1. Turn off the robot.
2. Place the robot on a soft, clean surface and turn it upside down. Take care to not put
pressure on the vision module / LiDAR module.
3. Remove the old cutting blades with the included screwdriver using the Phillips bit.
4. Install the new cutting blades (B) using the included screws (A). Ensure that the blades can
rotate freely and are securely installed.

- 32 -
6.3 Battery Maintenance
Charge the robot to at least 80% before long-term storage to prevent battery over-
discharge.
Recharge the robot to at least 80% every 90 days, even when it is not in use.
Ensure the charging ports on the robot are clean and dry before storing or charging.
6.4 Storage
To ensure your robot is in optimal condition for the next mowing season, store the robot and
charging station properly.
Storing the Robot
If the ambient temperature drops below -10°C (14°F), keep the robot indoors.
1. Remove the robot from the charging station and ensure the battery level is at least 80%.
2. Turn off the robot.
3. Clean the robot with a damp cloth or soft brush. DO NOT turn the robot upside down to
clean its chassis with water.
4. Leave the robot to dry. DO NOT turn it upside down during this process.
5. Apply anti-corrosion lubricant to the charging pads. DO NOT apply the chemicals to any
other parts of the robot, especially metal contact areas, except for the connectors.
6. Lubricate the front wheels using the included lubricant.
7. Store the robot indoors.
Storing the Charging Station
If the ambient temperature drops below -20°C (-4°F), keep the charging station indoors.
1. Disconnect the power supply.
2. Remove the stakes.
3. Use a brush and cloth to clean the charging station thoroughly.
4. Store the charging station and the power supply indoors.
- 33 -
7 Transportation and Moving
For long-distance transportation, Mammotion recommends using the original packaging for
both the robot and the charging station.
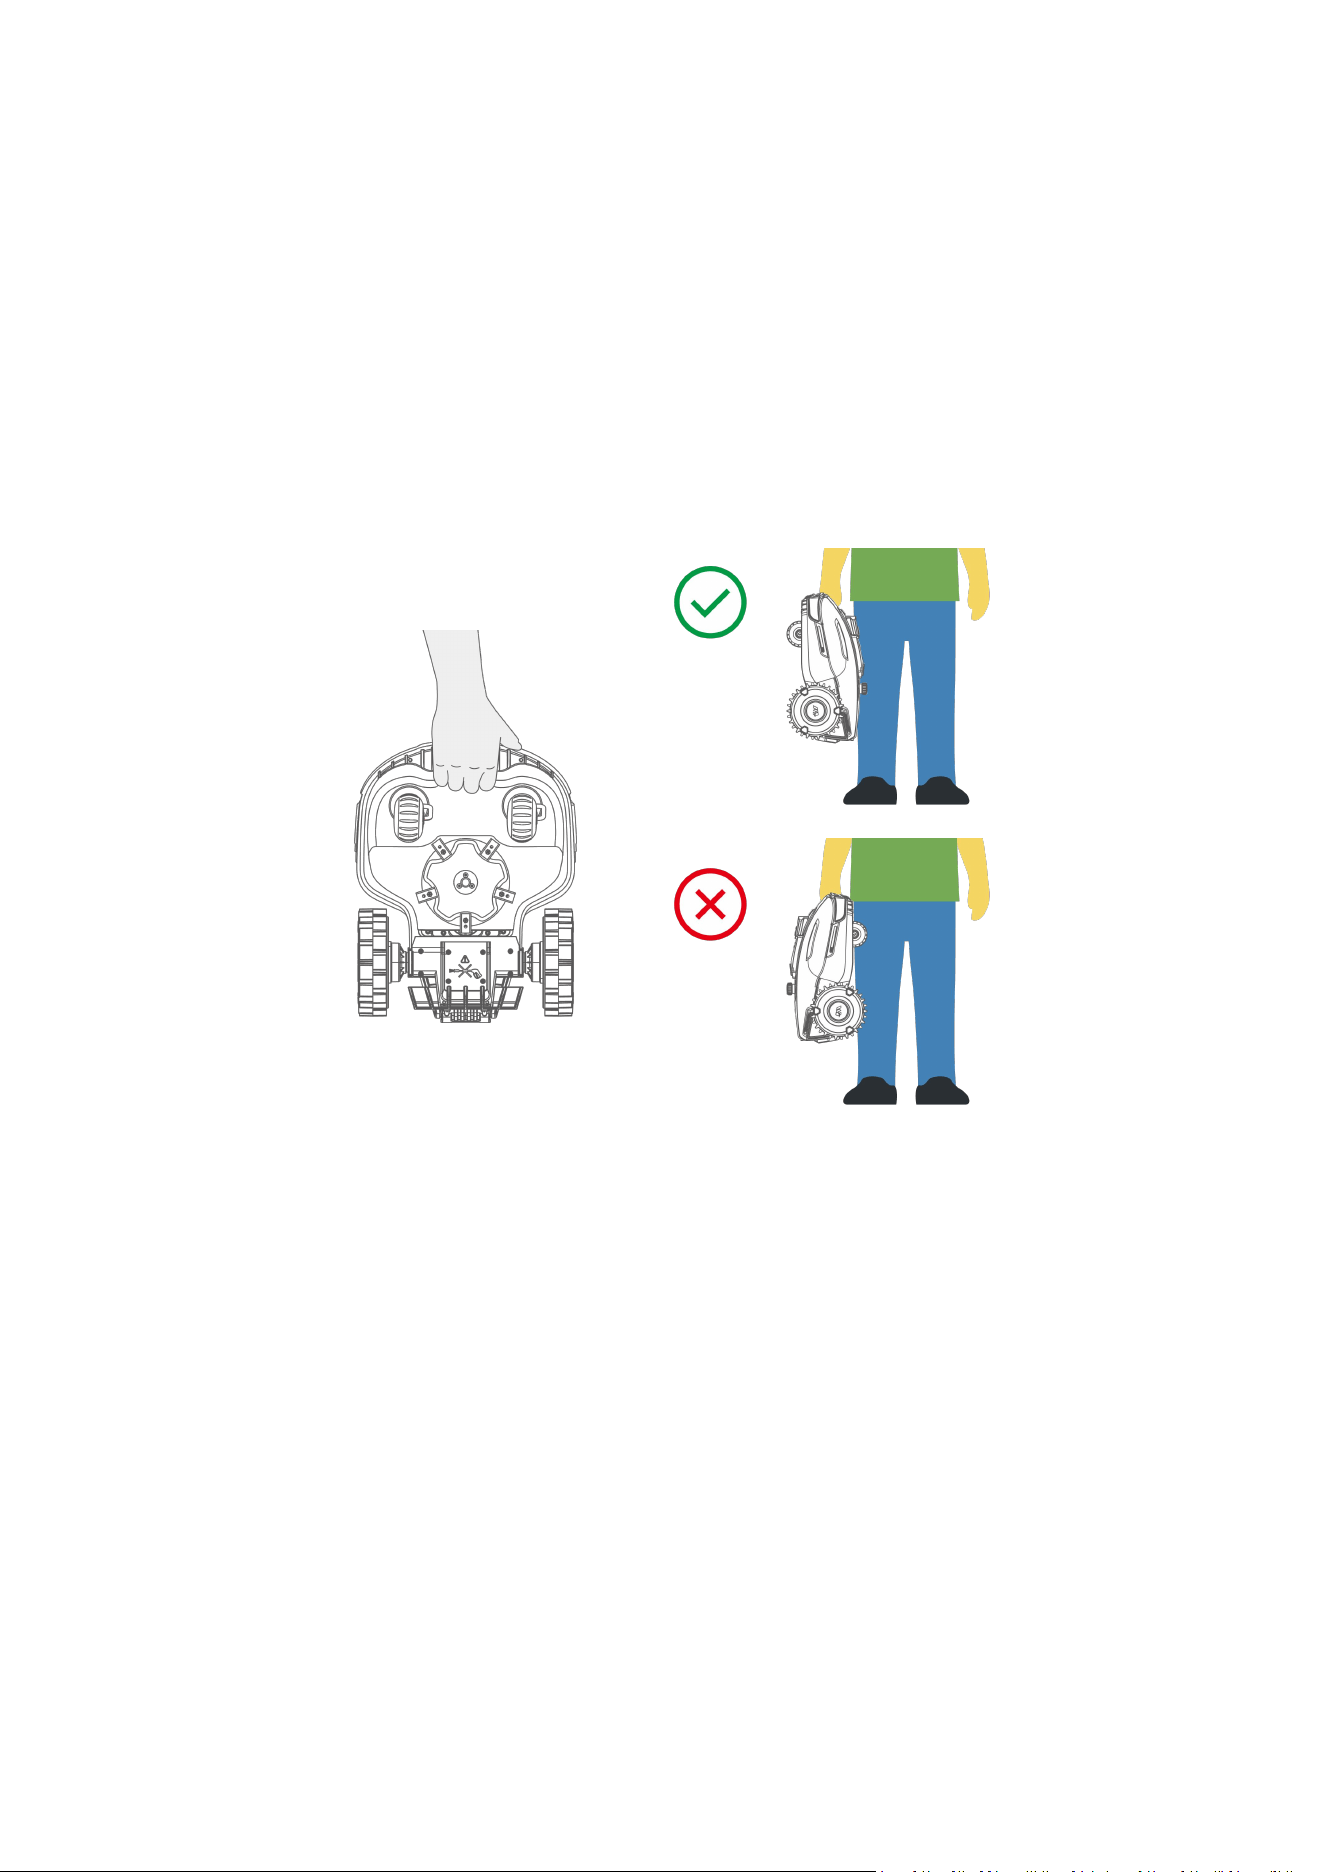
To Safely Move the Robot:
1. Turn off the robot.
2. Lift the robot using its handle.
3. Keep the cutting disc away from your body.
- 34 -
8 Disposal
When disposing of the product, please obey the local regulations and requirements.
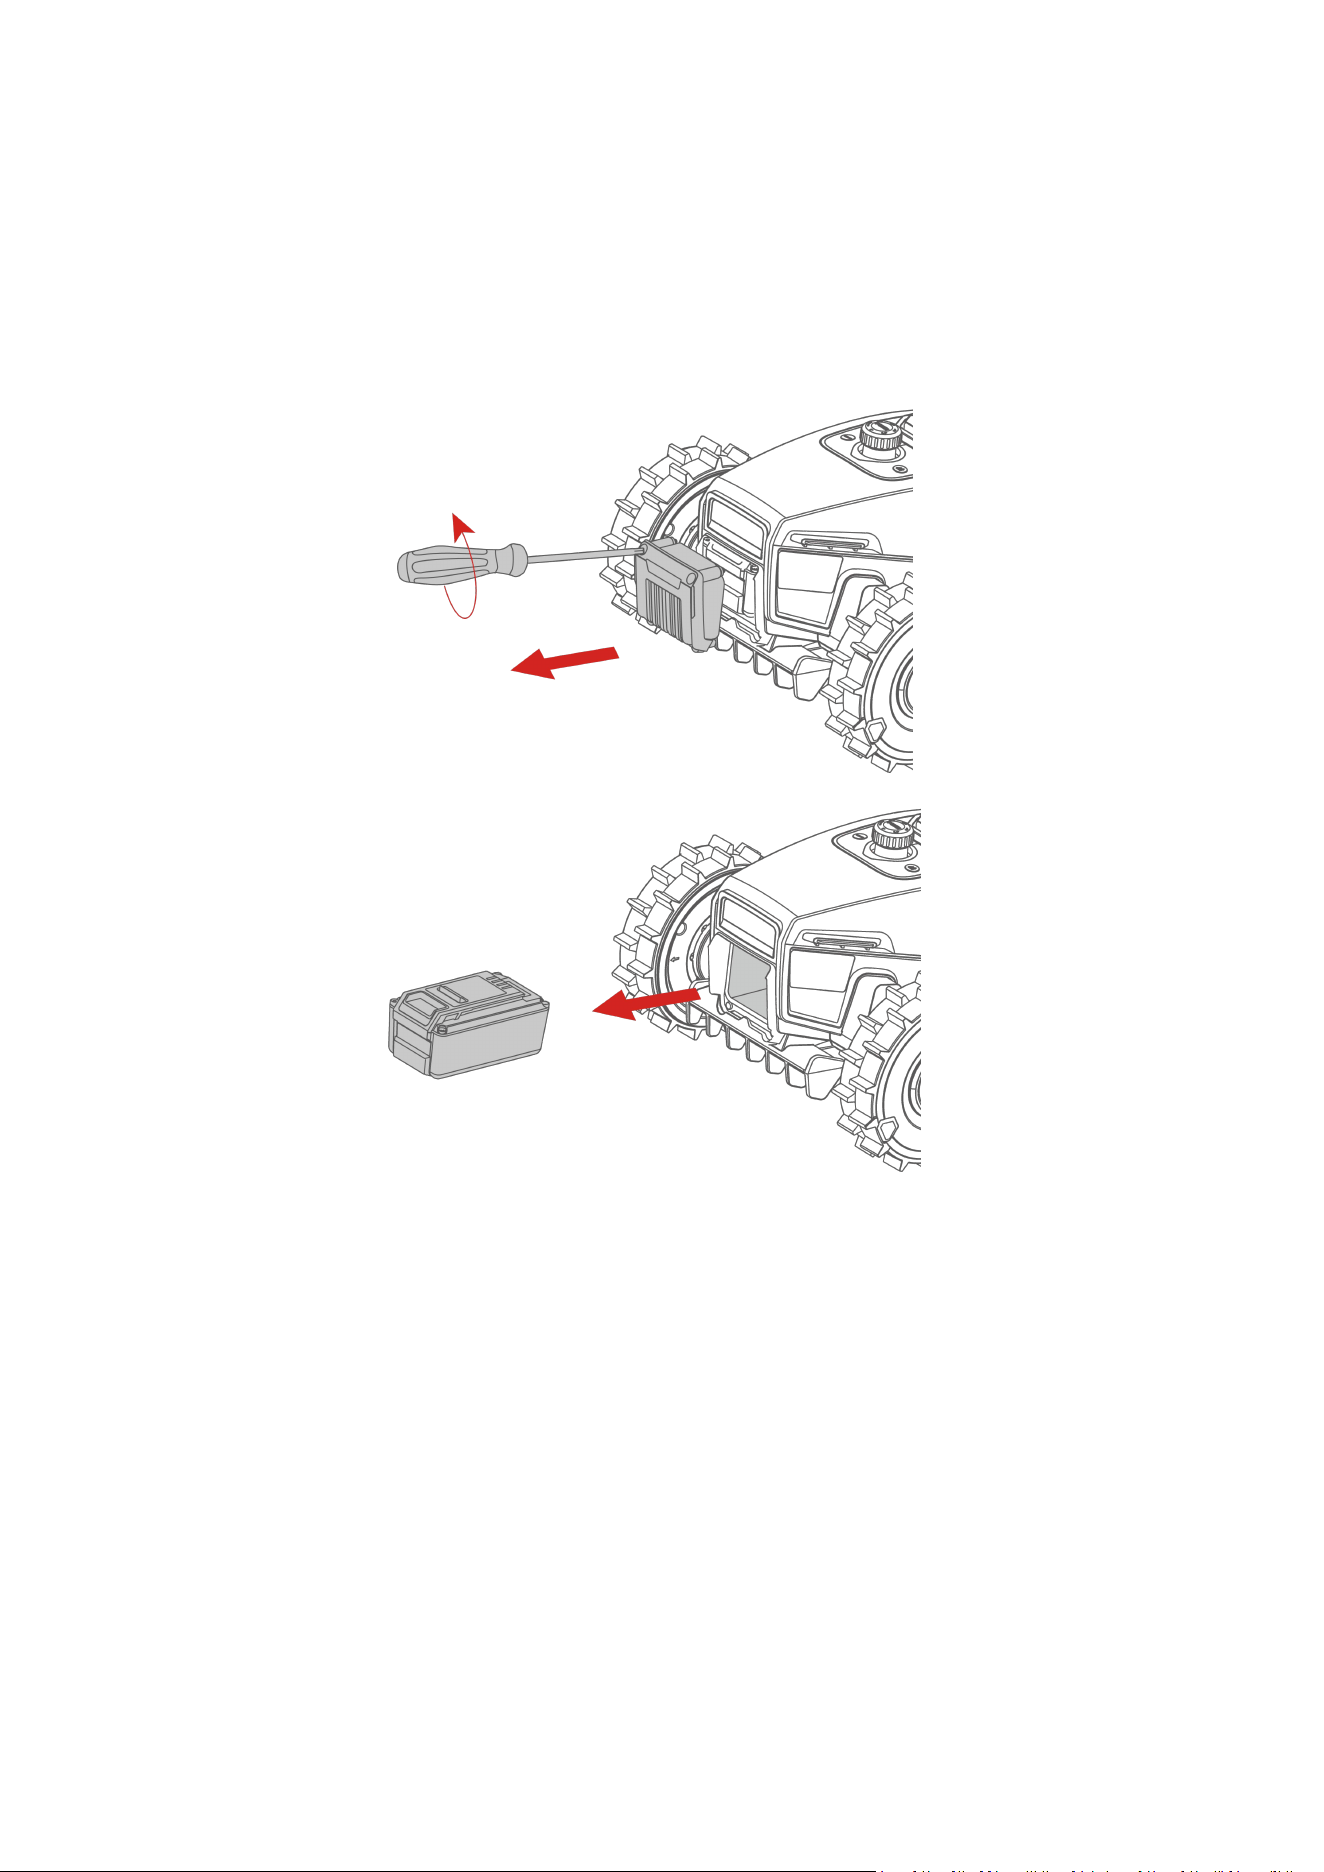
Do not dispose of batteries with regular household waste. Remove the battery and return it to a
collection point.

- 35 -
9 Product Specifications
9.1 General Specifications
Parameters
YUKA mini 2
500
800
600
1000
1000H
Model
YMVS3
YMVS4
YM2S2
YM2S1
YM2H1
Mowing Area
500 m
2
(0.12 acre)
800 m
2
(0.19 acre)
600 m
2
(0.15 acre)
1,000 m
2
(0.25 acre)
Max. Multi-zone
Management
5
10
Engine
2 Wheel-drive
Max Slope
Inside Task
Area
45% (24°)
Max Slope at
Edge
20% (11.3°)
Vertical
Obstacle
Passing Ability
35 mm (1.4 in)
Cutting Width
190 mm (7.5 in)
Cutting Disc
1
Cutting Height
Adjustment
20-60 mm (0.8-2.4 in)
50-90 mm (2-3.5 in)
Charging Time
115 min
115 min
135 min
Mowing Time
per Charge
120 min
105 min
125 min

- 36 -
Parameters
YUKA mini 2
500
800
600
1000
1000H
Auto-recharge
YES
Positioning &
Navigation
Triple-Camera AI Vision
System
360° LiDAR Module & AI Vision
Obstacle
Avoidance
Triple-Camera AI Vision
System
360° LiDAR Module & AI Vision
Voice Control
Alexa & Google Home
Connectivity
Bluetooth (Enabled by default)
Wi-Fi (Enabled by default)
4G (Requires a 4G module. Comes standard on YUKA mini 2 800)
A-weighted
Sound Power
Level
L
WA
=65 dB, K
WA
=3 dB
A-weighted
Sound Pressure
Level
L
PA
=57 dB, K
PA
=3 dB
Waterproof
Robot & Charging Station: IPX6
Rain Detection
YES
OTA Updates
YES
GPS Theft
Tracking
YES
Geo-fence
Alarm
YES
Vision Geo-
fence
YES

- 37 -
Parameters
YUKA mini 2
500
800
600
1000
1000H
Vision
Monitoring
YES
Recommended
Operation
Temperature
5-40 °C (41-104 °F)
Recommended
Storage
Temperature
-10-40 °C (14-104 °F)
Net Weight
About 10.6 kg (23 lbs.)
About 10.9 kg (24 lbs.)
Dimensions (L x
W x H)
525 x 413 x 281 mm (20.7 x 16.3 x 11.1 in)
9.2 Operating Bands Specifications (For EU Models)
Robot
Category
Frequency Range (MHz)
Maximum Transmitter Power (dBm)
BLE
2400-2483.5
<20
Wi-Fi
2400-2483.5
<20
5550-5700
<20
5745-5825
<13.98
GNSS
1559-1610
1164-1300*
/
*NOTE: YUKA mini 2 500 / 600 / 1000 / 1000H do not support this operating frequency.

- 38 -
4G Module (Model: MC230)
This table is only for YUKA mini 2 800.
Category
Frequency Range (MHz)
Maximum Transmitter Power (dBm)
LTE Band 1
Tx: 1920-1980
Rx: 2110-2170
25
LTE Band 3
Tx: 1710-1785
Rx: 1805-1880
25
LTE Band 7
Tx: 2500-2570
Rx: 2620-2690
25
LTE Band 8
Tx: 880-915
Rx: 925-960
25
LTE Band 20
Tx: 832-862
Rx: 791-821
25
LTE Band 28A
Tx: 703-736
Rx: 758-791
25
LTE Band 28B
Tx: 718-748
Rx: 773-803
25
LTE Band 38
Tx: 2570-2620
Rx: 2570-2620
25
LTE Band 40
Tx: 2300-2400
Rx: 2300-2400
25

- 39 -
9.3 Battery Specifications
Parameters
YUKA mini 2
500
800
1000
1000H
600
Battery charger
Model: TS-A081-2703002
Input: 100-240 V~, 50/60
Hz, Max. 2 A
Output: 27 Vdc, 3 A, 81 W
Model: TS-A081-2703002/ ADS-81EJ-27-5
Input: 100-240 V~, 50/60 Hz, Max. 2 A
Output: 27 Vdc, 3 A, 81 W
Battery
21.6 Vdc, 4.5 Ah, 97.2 Wh
21.6 Vdc, 6.1 Ah, 137.76 Wh
21.6 Vdc, 4.5 Ah,
97.2 Wh
Battery Model
MWBT06S02P-03
MWBT06S02P-
01/MWBT06S02P-06
MWBT06S02P-
03/MWBT06S02
P-07
Robot
Input: 27 Vdc, 3 A
Charging Station
Model: CHG2310
Input: 27 Vdc, 81 W
Output: 27 Vdc, 3 A
Charging
Temperature
4-45 °C (39-113 °F)
WARNING: Only use the power adapter provided with this product to recharge the battery.

- 40 -
10 Warranty
Shenzhen Mammotion Innovation Co., Ltd warrants that this product will be free from material
and workmanship defects under normal use in accordance with the product materials
published by Mammotion during the warranty period. The published product materials include
but are not limited to the user manual, quick start guide, specifications, disclaimers, and in-
app notifications.The warranty period varies for different products and parts. Refer to the
table below for your product:
YUKA mini 2 500 / 800:
Component
Warranty
Battery
3 Years
Motor
Vision Module
PCBA
Lift Module
Charging Station
YUKA mini 2 600 / 1000 / 1000H:
Component
Warranty
Battery
3 Years
Motor
LiDAR Module
Vision Module
PCBA
Lift Module
Charging Station

- 41 -
If the product does not function as warranted during the warranty period, please contact
Mammotion customer service for assistance.
For products purchased from a local dealer, please reach out to the dealer first.
Users must present a valid proof of purchase, receipt, or order number (for Mammotion
Direct Sales). The Serial Number of the product is crucial for initiating warranty service.
Mammotion will make every effort to address concerns through phone calls, email, or
online chat.
In some cases, Mammotion may advise you to download or install specific software
updates.
If issues persist, you may need to send the product to Mammotion or a local Mammotion-
appointed service center for further assessment.
The warranty period for the product begins from the original date of purchase indicated
on the sales receipt or invoice.
For pre-ordered products, the warranty period begins from the shipping date from the
local warehouse.
Mammotion requires users to arrange the shipment by themselves if they would like to
send their product to a local service center or Mammotion for further assessment.
Mammotion will repair and replace the product at no cost if the problem falls under the
warranty. If not, Mammotion or designated service center may charge a fee accordingly.
Examples of Faults Not Covered Under Warranty:
Failure to follow the instructions outlined in the user manual.
If the product arrives damaged during shipment and is not rejected upon delivery, or if no
official documentation confirming the damages is provided by the shipping company.
Inability to provide evidence of damage occurring during transit.
Product malfunction due to accidents, misuse, abuse, natural disasters like floods, fires,
earthquakes, exposure to food or liquid spills, improper charging, or other external factors.
Damage resulting from using the product in ways not permitted or intended as specified
by Mammotion.
Modification of the product or its components that significantly alters functionality or
capabilities without obtaining written permission from Mammotion.
Loss, damage, or unauthorized access to your data.
Signs of tampering or alteration on product labels, serial numbers, etc.
Failure to provide a valid proof of purchase from Mammotion, such as a receipt or invoice,
or if there is evidence of forgery or document tampering.
SHENZHEN MAMMOTION INNOVATION CO., LTD
www.mammotion.com
Copyright © 2025, MAMMOTION All Rights Reserved.
If you have any feedback on the user manual, please feel free to contact us at: doc.suppor[email protected].
