USER GUIDE
MULTI GRILL & GRIDDLE

2
IMPORTANT
SAFEGUARDS
When using an electrical appliance,
basic safety precautions should
always be followed, including
the following:
1. IMPORTANT: Read all instructions
carefully before first use.
2. Do not touch hot surface. The metal
housing will become hot during use.
Use handle only.
3. CAUTION: To reduce the risk
of electric shock, cook only on
removable plates.
4. Use tongs or other heat safe utensils
to remove food. Do not lift appliance.
5. Close supervision is necessary
when any appliance is used by
or near children.
6. To protect against electrical shock,
do not immerse cord, plug, or cooker
body in water or other liquid.
7. Unplug from outlet when not in use
and before cleaning. Allow to cool
before putting on or taking off parts,
and before cleaning the appliance.
8. Do not operate any appliance with
a damaged cord or plug or after the
appliance malfunctions or has been
damaged in any manner. Return
appliance to the nearest authorized
service facility for examination,
repair, or adjustment.
9. The use of accessory attachments
not recommended by the appliance
manufacturer may cause injuries.
10. Intended for countertop use only
as directed. Not for stovetop use.
11. Do not use the appliance for other
than intended use.
12. Do not use outdoors.
13. Do not let cord touch hot surfaces or
hang over the edge of table or counter.
14. WARNING: Spilled food can cause
serious burns. Keep appliance and
cord away from children. Never drape
cord over edge of counter, never use
outlet below counter, and never use
with an extension cord.
15. Prior to first use, please make
sure that the electrical rating of
the appliance is in conformity
with the current electric rating.
16. Plug cord into wall outlet.
To disconnect, switch
appliance off, then remove
plug from wall outlet.
17. To reduce the risk of electric shock,
cook only in removable container.
DO NOT cook food directly in the
unit base.
18. DO NOT place on or near
a hot gas or electric burner,
or in a heated oven.
19. SAVE THESE INSTRUCTIONS
Do not throw away. Read
before operating your new
Contact Grill & Griddle.
Keep for future reference.
20. In order to ensure safe operation
and optimum performance,please
read the entire Instruction/Care
& Use Booklet.
21. Extreme caution must be used
when moving an appliance
containing hot oil or other
hot liquids.
22. To disconnect, turn the unit off,
then remove the plug from the
wall outlet.
SAVE THESE
INSTRUCTIONS
FOR
HOUSEHOLD
USE ONLY
SPECIAL CORD SET INSTRUCTIONS:
A short power-supply cord is provided
to reduce the risks resulting from
becoming entangled in or tripping
over a longer cord. Longer extension
cords may be used if care is exercised.
If a long extension cord is used,the
marked electrical rating of the extension
cord should be at least as great as the
electrical rating of the appliance, and
the longer cord should be arranged so
that it will not drape over the countertop
or tabletop where it can be pulled on
by children or animals or tripped over.

3
HEALTHY
COOKING
STARTS WITH
GREENPAN
Since pioneering healthy ceramic nonstick
in 2007, we’ve dedicated ourselves to
unique advances that make cooking
better for everyone. From healthy ceramic
nonstick cookware to revolutionary home
appliances, our groundbreaking designs
deliver remarkable performance so you
can focus on the flavor. Enjoy!
What’s Included
Important Tips
Instructions
for Use
Cooking Positions
Cooking Tips
Cooking Guide
Cleaning &
Maintenance
Troubleshooting
Warranty
CONTENTS
04
05
06
08
09
10
11
12
14
4
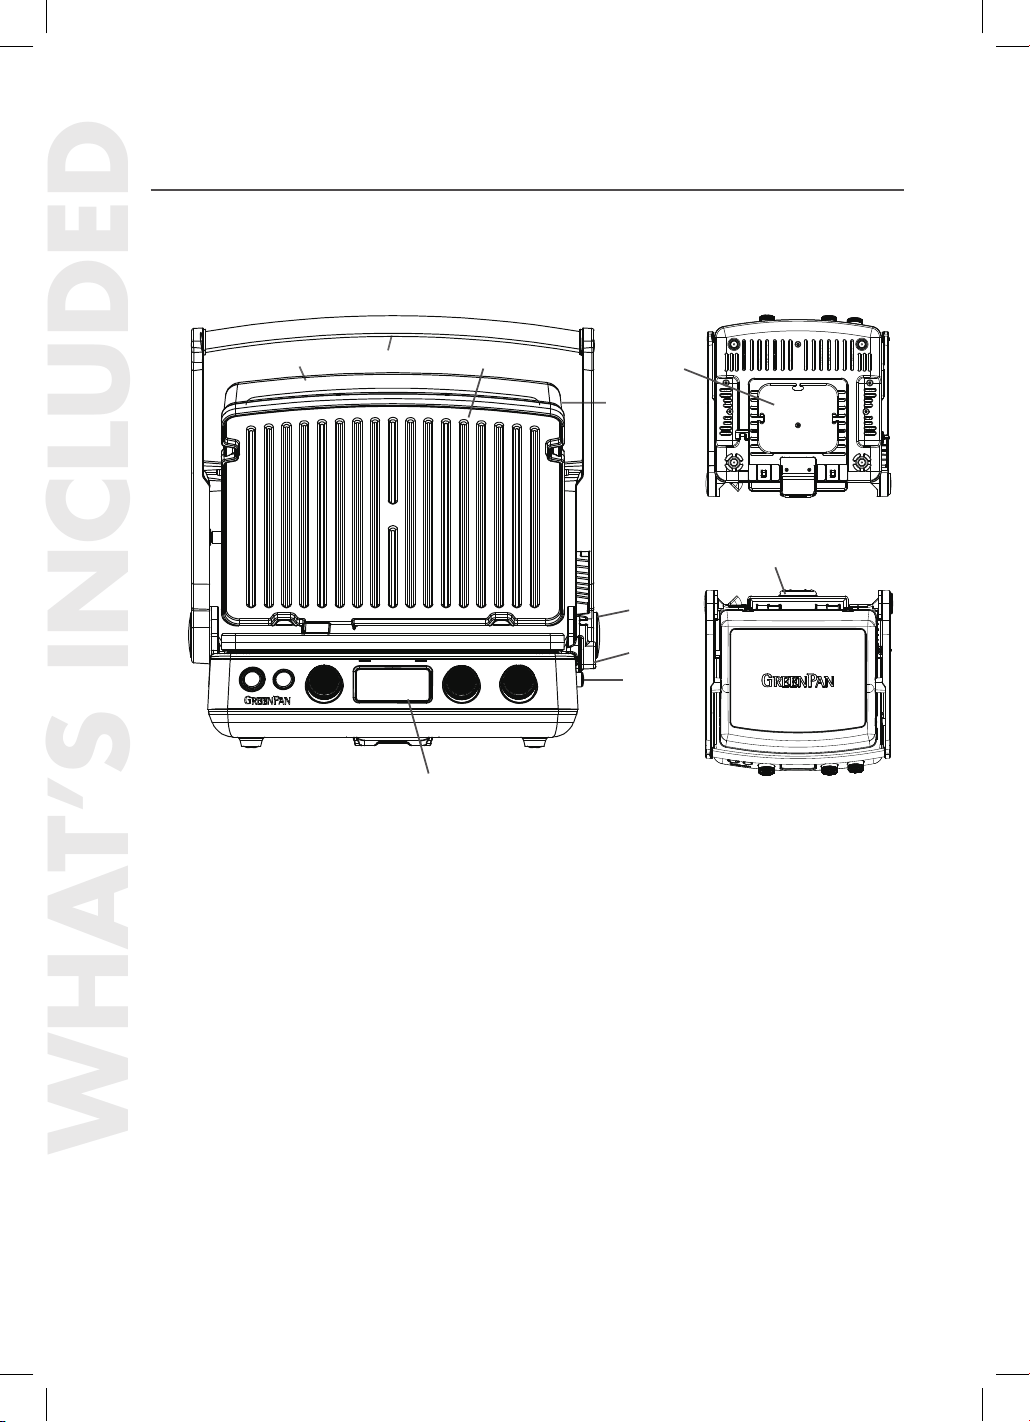
WHAT’S INCLUDED
A. Base & Cover
Solid construction with a stainless steel
design and self-adjusting cover.
B. Handle
Panini-style handle to help adjust cover
to accommodate thickness of food.
C. Adjustable Height Settings
& Locking Mechanism
Features preset height positions for melting.
Locks cover closed to store.
D. Control Panel
Start/stop and sear buttons; dial controls
and LCD display screen.
E. Reversible Grill/Griddle Plates
Removable and reversible Thermolon™
Volt Ceramic Nonstick Plates.
F. Drip Tray
Collects grease and removes from base
for easy cleanup.
G. Plate Release Buttons
Push in to release and remove
cooking plates.
H. Hinge Release Button
Allows cover to extend back
to the Flat Position.
I. Cord Storage
Conveniently located underneath
to hide away the cord.
NOTE: DO NOT ATTEMPT TO PICK UP
MULTI GRILL & GRIDDLE FROM HANDLE.
THIS IS NOT INTENDED FOR CARRYING.
PLEASE PICK UP FROM THE BASE OF
THE UNIT.
A.
B.
G.
H.
WHAT’S INCLUDED
E.
C.
I.
F.
D.
G.
5
BEFORE FIRST USE
1. Read all instructions and important safeguards.
2. Remove all packaging materials and check that all items have been received
in good condition.
3. Tear up all plastic bags and dispose of properly as they can pose a suffocation
or choking risk to children.
4. Wipe body clean with a damp cloth.
NOTE: Do not use harsh abrasive cleaners, scouring pads or products that are not
considered safe to use on nonstick coatings. If washing in the dishwasher, a slight
discoloration to the plates and accessories may occur. This is cosmetic only and
will not affect performance. THIS APPLIANCE IS FOR HOUSEHOLD USE ONLY.
5. Thoroughly clean the ceramic nonstick plates and drip tray. The ceramic nonstick
plates and drip tray are dishwasher safe.
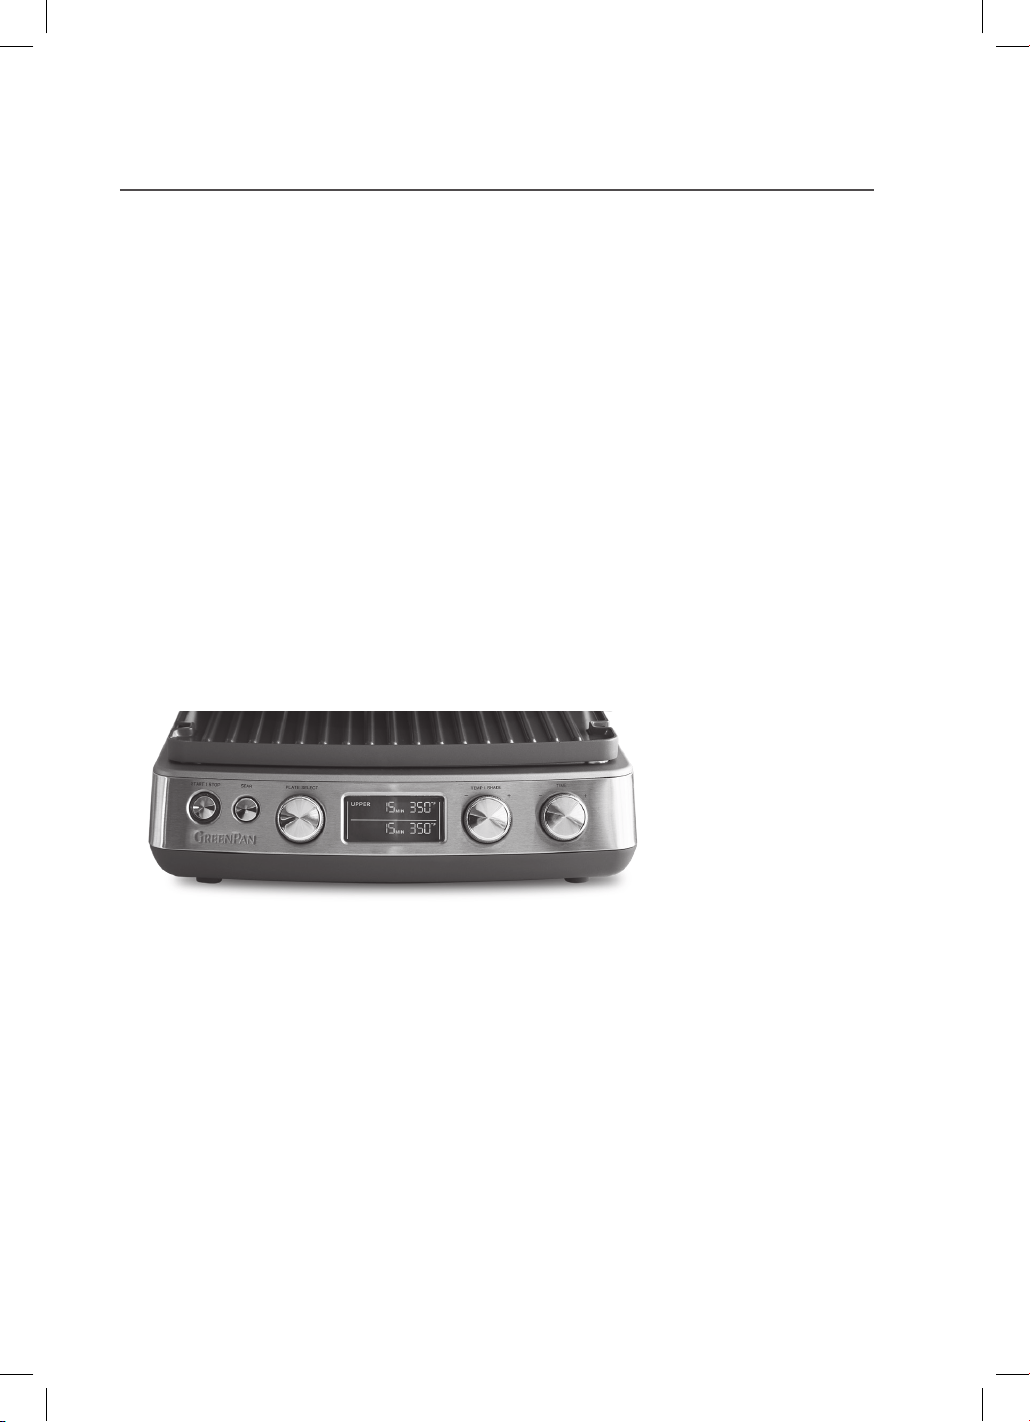
START/STOP BUTTON: Press to power on
the unit, start the preheating cycle, pause, or
continue the cooking cycle.
SEAR: Instantly get max power to get the
perfect finish.
TIME: Dial in the perfect time for your meal.
PLATE SELECT:
Select the plate or plates
for your task—upper, lower, both, or waffle
(waffle plates sold separately).
TEMP/SHADE: Adjust the temperature or
waffle shade (waffle plates sold separately).
KNOW YOUR CONTROL PANEL
IMPORTANT TIPS

6
INSTRUCTIONS FOR USE
OPERATION
Once your Multi Grill & Griddle is properly assembled, plug the cord into a standard
electrical outlet and you will be ready to get cooking. The LCD will illuminate, after any
button or dial is selected, but no cooking function is selected yet. To turn on the product
for function selection, press the Start/Stop button.
Put your Multi Grill & Griddle in the preferred cooking position and use the temperature
control to choose your cooking temperature. Settings range from Low (175°F) to High
(450°F). If you wish to use the Multi Grill & Griddle in the flat position but you do not
need the entire surface, it is recommended that you use the bottom plate.
NOTE: To change the temperature between °C and °F, press and hold the START/STOP
button and SEAR button simultaneously for 6 seconds.
SELECTING PLATES & TEMPERATURE
• To start using your Multi Grill & Griddle turn the plate select dial to select which plate(s)
you need to adjust the settings for.
• Select “Lower” or “Upper” if you want to select a different temperature for each plate.
Select “Both” if want to adjust the setting of both plates simultaneously.
• Default timer and temperature will appear on the LCD display.
• Turn the dial to adjust your temperature.
• To adjust your countdown timer, turn the dial to select the number of minutes.
• Press the start button, and you will notice the LCD screen will display “PREHEAT”
and bars running from left to right.
• Once it’s done preheating, it will beep three times and the “PREHEAT” disappears
and the minutes will start blinking.
• Press start to start the timer counting down and add your food to the plate(s).
NOTE: You can select a continuous “ON” mode; however, the unit has a 60-minute
auto-shutoff feature. Turn the power back on if more time is needed.
• When the countdown timer runs out, the Multi Grill & Griddle will beep three times.
The time will reset to the previously selected values and will start flashing to indicate
that it’s ready to start the next cycle.
• To stop cooking, select the plate to turn off, then turn the temperature dial to beyond
minimum value, “OFF” will display for the selected plate. If both plates are during
cooking or preheat, pressing Start/Stop button will turn off the product.
GETTING STARTED

7
DURING USE
As the Multi Grill & Griddle will become hot during use, always use caution when operating
the Multi Grill & Griddle. Always use the front handle to open the Multi Grill & Griddle, as
this part of the handle is designed to stay cool to the touch while cooking. The top cover will
become hot during use.
DO NOT TOUCH THE COVER OR ARMS
DURING OR IMMEDIATELY AFTER COOKING
The top cover should not be touched during or immediately after cooking.
Use an oven mitt if you need to adjust the cover to prevent burns.
The base of the Multi Grill & Griddle will be very hot too. If you need to move the
Multi Grill & Griddle for any reason allow the Multi Grill & Griddle to cool before
handling (at least 30 minutes).
NOTE: During first use, the Multi Grill & Griddle may have a slight odor and it
may smoke a little. This is perfectly normal and will disappear with use.
SEAR FUNCTION
You can sear foods at 500°F for up to 2 minutes. Pressing the Sear button will toggle among
UPPER/LOWER/BOTH/No action. Pressing it once will have “SEAR” appear on the upper
plate section. Pressing it a second time will have “SEAR“ appear on the lower plate section.
The third press will have “SEAR” appear on both upper and lower plate sections. Fourth press
will have “SEAR” disappear on both upper and lower plate section.
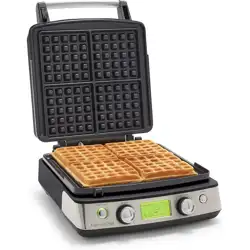
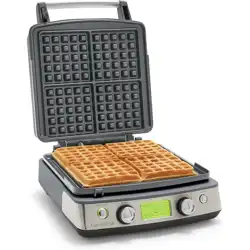
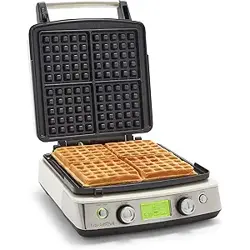
WAFFLE FUNCTION
NOTE: Waffle plates sold separately.
To use your Multi Grill & Griddle to make waffles, insert both waffle plates. Select waffle plate
and choose the waffle shade level from 1 to 7. The time is preset for you. After adding the
batter, close the cover and press start/stop button to start cooking. You will hear 3 beeps
when the waffle is done (approximately 5 to 9 minutes). Prepare the next batch or turn off.
• Allow waffle batter to rest for a few minutes before pouring onto hot Waffle Plates.
• Add a light coating of cooking oil to the plates prior to the first waffle.
Do not use cooking spray or low smoke point oils.
• Waffles are best when made fresh, but can also be frozen for later use
(wrap separately) and reheated in toaster or oven.
• For evenly sized waffles, pour batter into the center of the waffle plate
and spread out to the edges of the plate.
• Be careful not to overfill the waffle plates.
• Always clean your Waffle Plates after each use.
INSTRUCTIONS FOR USE
GETTING STARTED
8
COOKING
POSITIONS
To get started, place the GreenPan Multi Grill
& Griddle on a clean, flat surface. The Multi
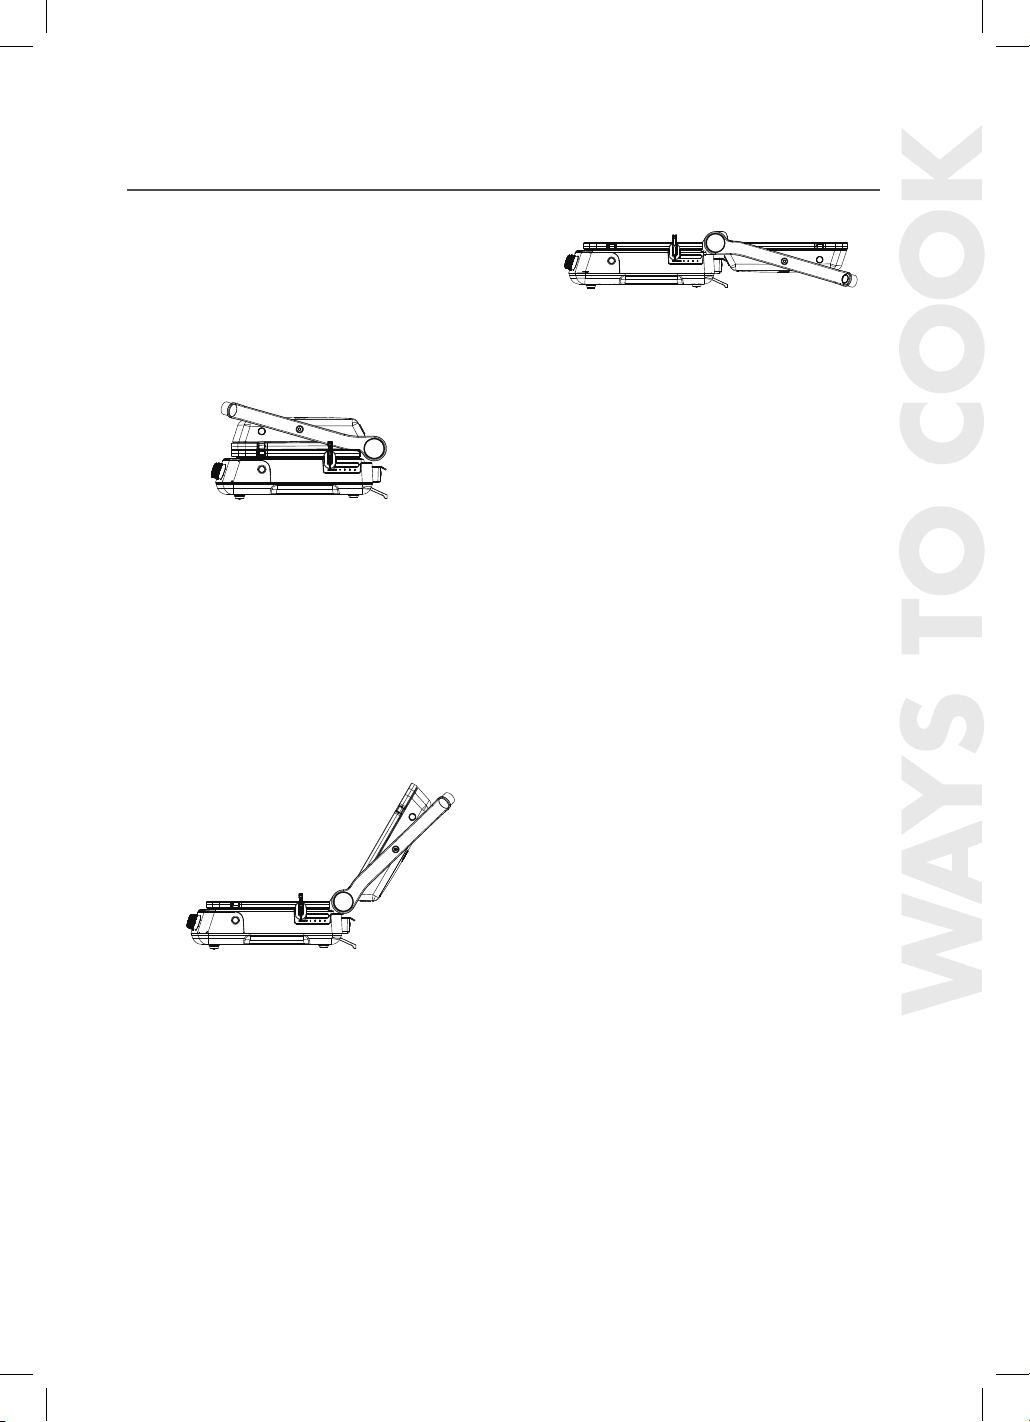
Grill & Griddle has three different positions:
1. CLOSED POSITION – Top plate/cover
rests flat on lower plate/base. This is the
standard starting and heating position for
the Contact Griddle or Panini Press functions.
NOTE: When you unpack the Multi Grill
& Griddle, the cover will be in the Locked
Position. To unlock, use the slider to move
to the Open Position. Please do not attempt
to open the cover at any point during the
operation or while the slider is in the
Locked Position.
2. OPEN POSITION – Top plate/cover is open.
Open the cover to this position before using
the Multi Grill & Griddle as a Contact Griddle
or a Panini Press. To adjust the Multi Grill &
Griddle into the Open Position, lift the handle
until you feel it move to a steady position.
The griddle will remain in the steady position
until you close the cover or move it to the Flat
Open Griddle Position. The top plate/cover
will stay in an upright position until you lower
the handle for cooking. When you lower the
handle for cooking the hinge will self-release
to allow the top plate/cover to lie flat on your
food and ensure total contact so your food
cooks evenly.
COOKING POSITIONS
WAYS TO COOK
3. FLAT POSITION – Top plate/cover
is opened so that the top and lower
plates are level and create a single
cooking surface.
When opening the cover to the Flat
Position, hold onto the handle, press
the cover release button on the right
of the unit and pull the handle back
until the grill touches the countertop.
Remember to put the drip tray into
position to support the upper grill
at the center.
INSTALLING
COOKING PLATES
The Multi Grill & Griddle should be off
and cooled. Put the Multi Grill & Griddle
in the Flat Position.
Insert each plate individually. Find the
metal holding brackets at the center
of the housing. Tilt the back end of the
plate and line up the cutouts with the
metal brackets. Slide the plate beneath
the brackets and push down on the front
end of the plate. You should hear it snap
into place. Turn the Multi Grill & Griddle
180° and install the second plate into
the upper housing the same way.
REMOVING
COOKING PLATES
The Multi Grill & Griddle should be
off and cooled.
Put your Multi Grill & Griddle in the Flat
Position. Find the plate release buttons
on one side. Press one button firmly
and the cooking plate will pop up from
the base. Grab the cooking plate with
both hands, slide it from under the metal
brackets and lift from the base. Press
on the other button to release the other
cooking plate the same way.
9
EXPLORE
NEW CULINARY
TERRITORY
The Multi Grill & Griddle delivers ultimate
versatility with many different cooking
modes. Use it as a Contact Grill, Contact
Griddle, Panini Press, Open Grill, or Open
Griddle, or grill on one side and griddle
on the other.
Keep Multi Grill & Griddle closed while
preheating and wait until preheat mode
is complete.
CONTACT GRIDDLE (CLOSED POSITION)
Perfect for sausages, boneless chicken
and veggies, the Contact Griddle saves
time because you’re griddling both sides
of your food at once.
NOTE: Keeping your food to the same
thickness will ensure it all cooks evenly
in Closed Positions.
CONTACT GRILL (CLOSED POSITION)
Get classic sear marks faster with the
Closed Grill Position. That means faster
burgers, steaks, pork chops, and so
much more.
PANINI PRESS (CLOSED POSITION)
Crispy paninis and wraps are easy with
the Multi Grill & Griddle. You can apply
light pressure to the handle to press your
food to your liking.
FLAT GRILL (OPEN POSITION)
Bring outdoor flavor inside with the
Flat Grill Position. Just open the cover
flat against the counter. This position
utilizes two grill plates to deliver a
COOKING TIPS
COOKING TIPS
full-sized healthy ceramic nonstick grill.
FLAT GRIDDLE (OPEN POSITION)
Flat Griddle refers to using both griddle
plates with the cover flat against the
counter to create a spacious flat top
cooking surface. This setting is perfect
for a huge array of options, including
classics like french toast and pancakes
to everyday cooking like chicken
and veggies.
MIXED GRILL & GRIDDLE
(OPEN POSITION)
Mix it up for your meal with both
grill and griddle plates in the Open
Position. Grill breakfast sausage and
make eggs at the same time, grill
meats while searing veggies, fish and
chips, fajitas…the options are endless.
WAYS TO COOK
10
COOKING GUIDE
COOKING GUIDE
Food Plate Open/
Closed
Suggested Temp & Time
Bacon Grill or
Griddle
Open Place bacon on cold plates. Turn to 450°F. Cook until desired
crispiness. Should take about 15 mins for 1 lb. of bacon
(using the Flat Position).
Beef, Boneless
Steak
Grill Both When cooking in the Closed Position, preheat to SEAR. Put the steaks
on the preheated lower grill plate. Using the adjustable hinge, set the
upper plate so it’s just touching the steak, but not pressing it. Sear for
2 mins, then the grill will reset to 450°F. Cook for 2 to 5 mins
depending on the thickness of the steak and desired doneness.
When using the Open or Flat Positions, preheat to 450°F. Put the
steaks on the preheated grill plates. Cook for about 4 to 6 mins per
side, depending on the thickness of the steaks and desired doneness.
Chicken
Breast
Grill Both When cooking in the Closed Position, preheat to 400°F. Cook for
7 to 9 mins in the Closed Position, or 8 to 10 mins per side in the
Flat Position. (Internal temperature should be 175°F—juices will run
clear with no signs of pink.
Fish Steaks Grill Both 400°F, 6 to 7½ mins when grilling in the Closed Position. 7 to 8 mins
per side in the Flat Position.
Hamburgers Grill Closed 450°F. Put the burgers on the preheated lower grill plate. Using the
adjustable hinge, set the upper plate so it’s just touching the burgers,
but not pressing it.
Sausages
(uncooked)
Grill or
Griddle
Both 450°F. Put the links on the preheated grill/griddle plates—the grill ribs
are perfect for holding the links in plate and allow for easy turning
for even cooking. Grill for about 5 mins per side in the Open Position
or about 12 mins (turning halfway through) in the Closed Position,
depending on the thickness of the sausages.
Panini Grill or
Griddle
Closed Preheat both plates to 350°F. Put the prepared sandwiches on the
preheated lower grill/griddle plates. Close the top. Cook sandwiches
for about 4 to 6 mins depending on the thickness of sandwiches
Open-Faced
Sandwiches
Grill or
Griddle
Closed Preheat lower plate to 350°F, upper plate to 450°F. Put the prepared
sandwiches on the preheated lower grill/griddle plate. Using the
cover height adjuster, close the upper plate until it is sitting right
above the top of the sandwich, not touching it. Cook sandwich
and cheese on top is fully melted and lightly browned.
Quesadillas Grill or
Griddle
Closed Preheat both plates to 400°F. Put the prepared quesadilla on
the preheated lower plate. Close the top and using the cover
height adjuster, set the upper plate so it is just sitting on top of
the quesadillas. Grill for about 2 to 3 mins, depending on the
thickness and filling of the quesadillas.
Eggs Griddle Open 350°F. Break the eggs onto the hot griddle plates. Flip once
whites are set, about 2 to 3½ mins, and remove when cooked
to desired doneness.
French Toast Griddle Open 350°F. Flip after 2 to 3 mins, depending on thickness.
Cook for an additional 2 to 3 mins.
Vegetables Grill Both 400°F. Grill until tender. This will vary depending on the types
of vegetables used, but should take between 20 and 30 mins.
Pizza Grill Closed Grill dough on SEAR with the unit closed. Then let the temperature
revert to 450°F. Open to add toppings and using the cover height
adjuster, close the upper plate until it’s sitting above the top of the
pizza, but not touching it. Cook until cheese/toppings are melted
and browned, 10 to 15 mins.
NOTE: These are suggested times only and may vary based on ingredients, temperatures, and personal
preference. Always check internal meat temperatures with a food thermometer for safety.
11
STORAGE
Ensure the Multi Grill & Griddle is cool and
dry before storing. Wrap the power cord
around the cord wrap underneath the unit.
Have one set of plates assembled in the unit.
Slide the height mechanism to the locked
position. Store the unit either horizontally or
vertically with the other set of plates nearby.
BEFORE
RETURNING
YOUR GREENPAN
PRODUCT
If you are experiencing problems with
your GreenPan Multi Grill & Griddle,
we suggest that you call GreenPan
customer service at 877-926-6526
before returning the product.
A representative can confirm whether
the product is under warranty and
advise on next steps.
USER
MAINTENANCE
• While your plates are metal utensil safe,
we recommend using plastic, silicone,
or wooden utensils to prolong the life
of your ceramic nonstick plates.
• Never leave plastic utensils in contact
with the hot plates.
• Between meals, wipe off food buildup
through grease channels and into the drip
tray. Remove any residue with a paper
towel before starting your next meal.
• Allow the Multi Grill & Griddle to cool
completely (at least 30 minutes) before
cleaning.
CLEANING &
MAINTENANCE
Before cleaning, always unplug your
Multi Grill & Griddle and allow it to cool.
Remove and dispose of grease and fats
that have accumulated in the drip tray.
Press the plate release buttons to remove
the plates for cleaning. Make sure the
cooking plates have cooled completely
before handling (at least 30 minutes).
Cooking plates are dishwasher safe.
Do not scrape the cooking plates with
metallic objects like knives or forks and
do not use a scouring pad for cleaning.
Doing so can damage the plates’
ceramic nonstick coating.
If you’ve cooked seafood with the Multi Grill
& Griddle, wipe the cooking plate with
lemon juice to avoid transferring seafood
flavor to your next meal. The base, cover
and control knob can be wiped clean
with a soft, dry cloth.For tougher messes,
dampen cloth.
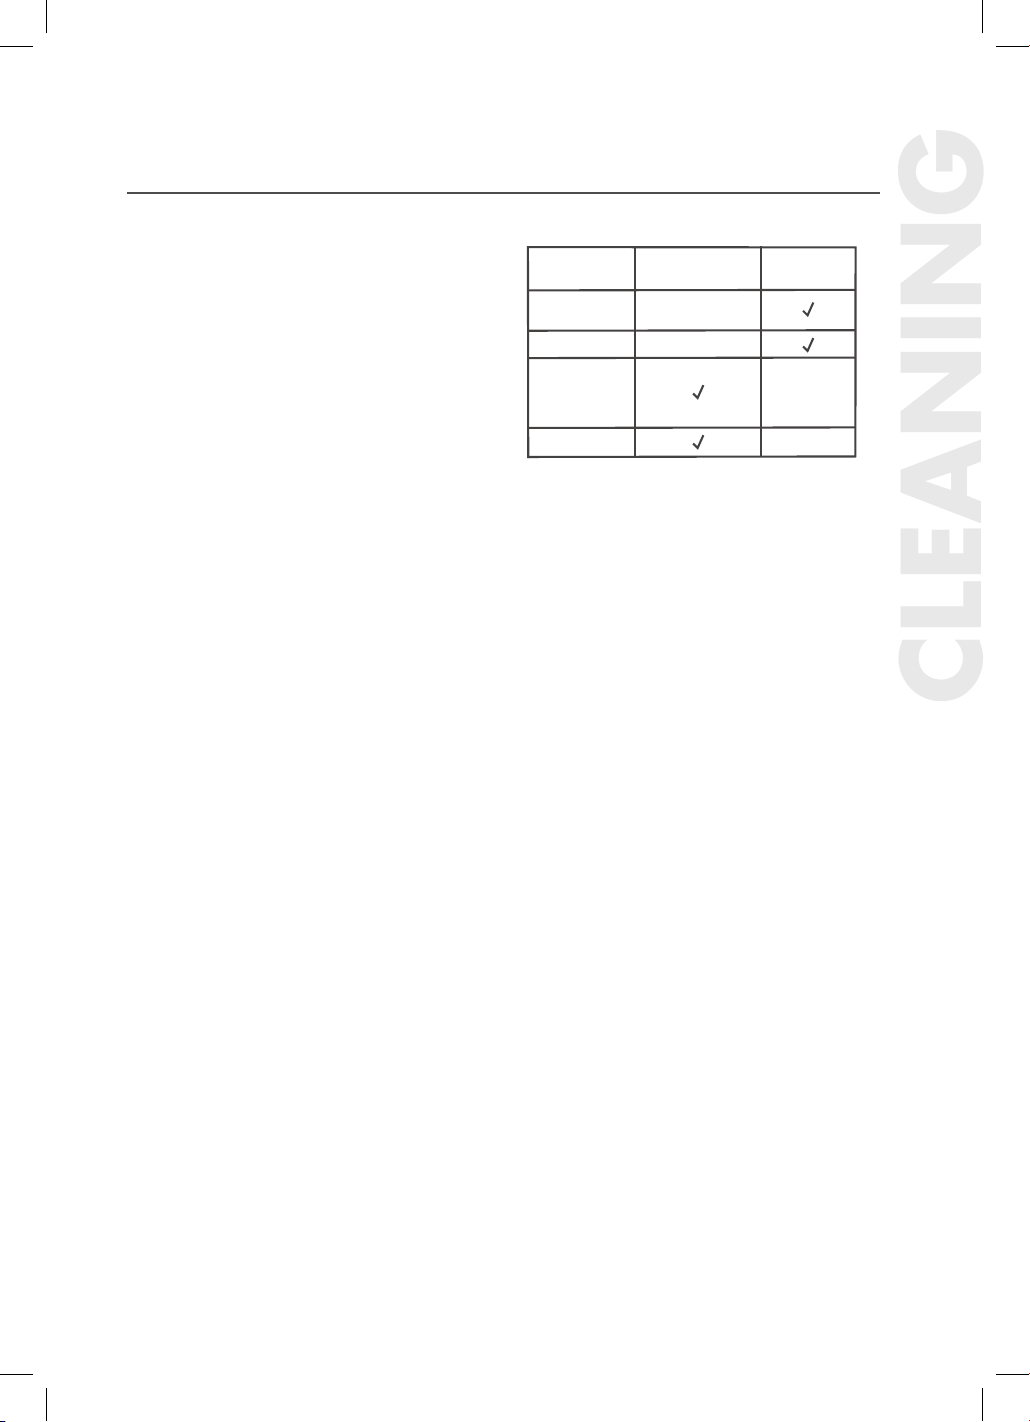
See below table for cleaning guidance.
Refrain from using scouring pads,
powders, or chemical detergents.
Part Dishwasher &
Hand wash safe
Wipe with
damp cloth
Splash
Guard
Base
Interchangeable
Grill/
Griddle
Plates
Drip Trays
CLEANING & MAINTENANCE
CLEANING
13
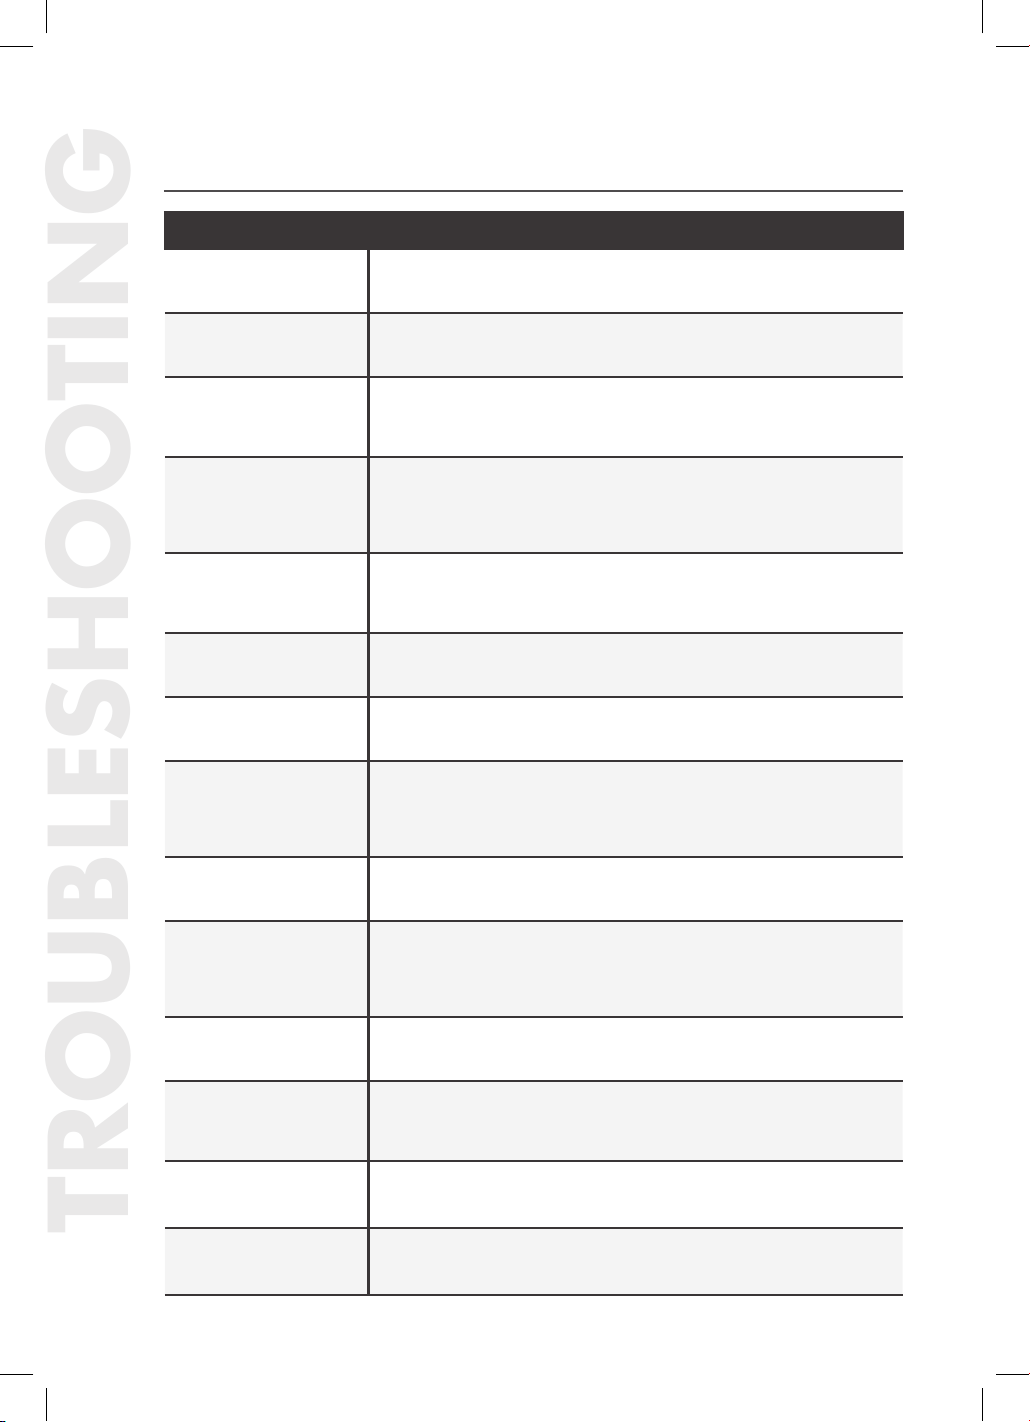
Issue Solution
Error Code: E1- E6 Contact Customer Service.
Unit does not turn on Contact Customer Service.
Display is blank
Check the connection to the wall outlet. Press any button to wake
it up. If problem persists, try using a different outlet.
The Start/Stop backlight
is not illuminated and
the display is blank
If the unit is plugged in, the Start/Stop backlight should be
illuminated. If problem persists, try using a different outlet.
Please note, timer does not begin to count down until you
press the Start/Stop button to start timer.
I do not know when
preheat is complete
The unit will beep three times, the "PREHEAT" will disappear
from the display, and the minutes will start blinking.
The unit shut off Be sure to hit start after preheating is complete.
Cover is not opening To unlock, move the slider to the Open Position.
Unable to lay unit
to Flat Position
Hold onto the handle and press the cover release button on the
right of the unit and pull the handle back until the grill touches the
countertop. Remember to put the drip tray into position to support
the upper grill at the center.
Difficulties
removing plates
Press the release buttons on the sides.
Difficulties
inserting plates
Find the metal holding brackets at the center of the housing.
Tilt the back end of the plate and line up the cutouts with the metal
brackets. Slide the plate beneath the brackets and push down on
the front end of the plate. You should hear it snap into place.
Unit turns on, but the
plate(s) does not heat up
Turn the unit off and wait for it to cool. Remove and re-insert
the plate(s) into proper position.
Can't turn off one
of the plates
To stop cooking, select the plate to turn off, then turn the
temperature dial to beyond minimum value. "OFF" will display
for the selected plate.
Do I need to use
the default time
and temperature?
No. Use the time and temperature dials to customize your settings.
Unable to change the
temperature between
°C and °F
Press and hold the START/STOP button and SEAR button
simultaneously for 6 seconds.
TROUBLESHOOTING
TROUBLESHOOTING
13
TROUBLESHOOTING
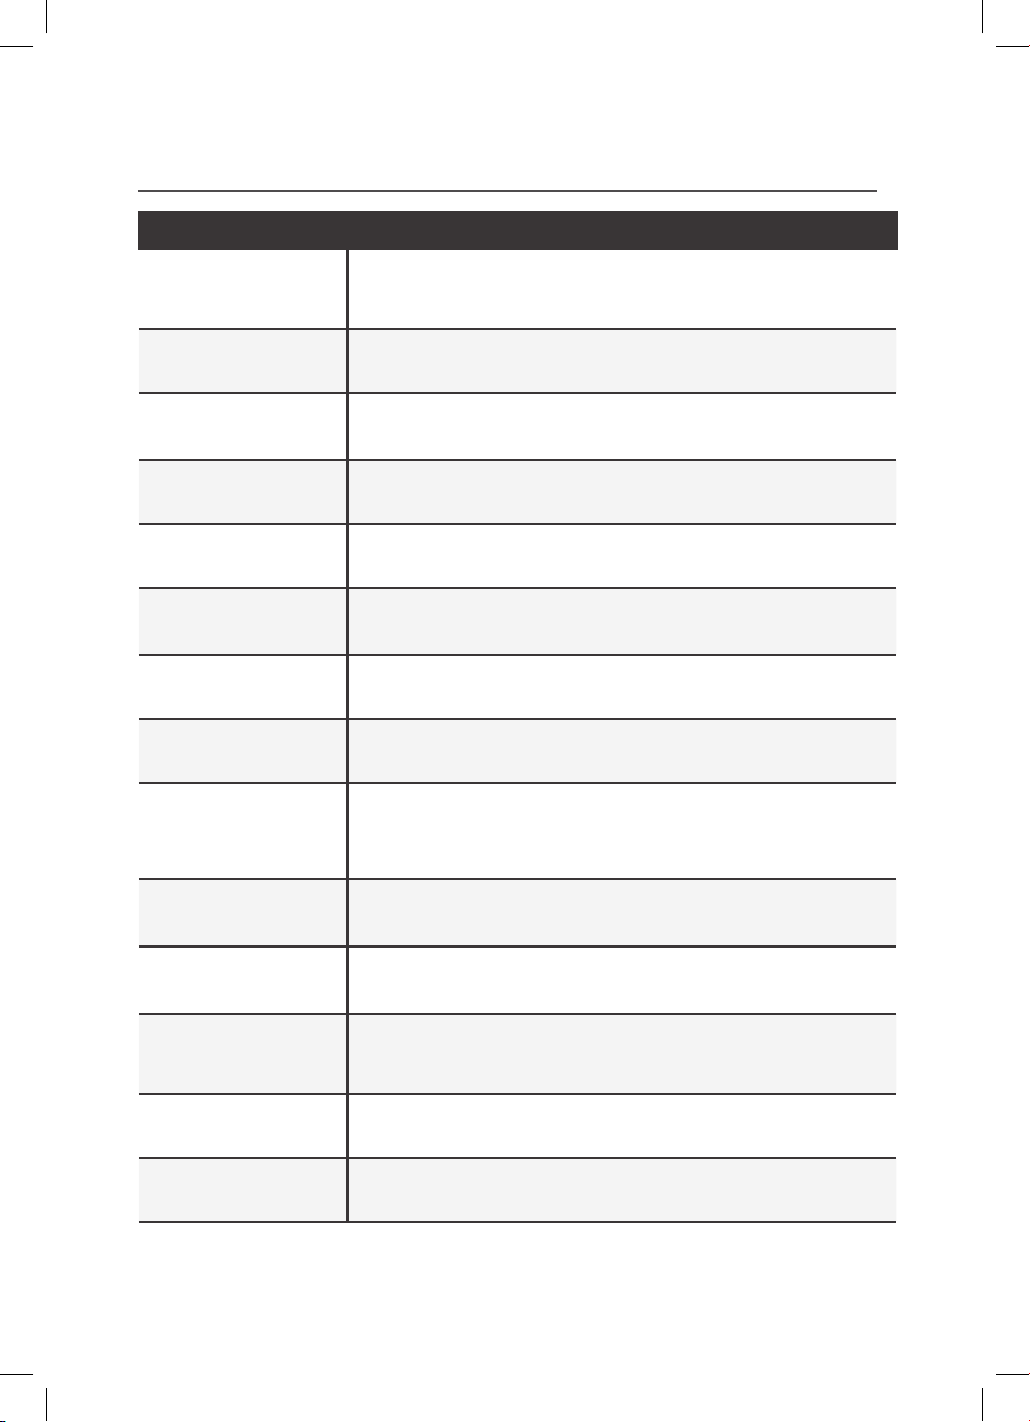
Issue Solution
Food is overcooked/
undercooked
Decrease/increase cooking time and temperature or check C&U
for an alternate mode.
Waffle Plates were not
included in package
Waffle plates are available for purchase on the GreenPan website.
The grill is not closing all
the way/there is
a gap in the plates
Using the slider on the right, adjust the top plate to the Closed Position.
My food is getting
crushed by the top plate
Using the slider on the right, adjust the top plate to the desired height.
Top plate is not
getting hot
Be sure the plate selector dial is set to upper plate or both.
The bottom plate is
cooking faster/hotter
than the top plate
This is normal.
Bottom plate is not
getting hot
Be sure the plate selector dial is set to lower plate or both.
The Sear stops after
a couple of minutes
This is normal. Sear is programmed for a maximum of 2 minutes
to provide that perfect finish on any food.
Unit gets hot
during use
The unit will become hot during use. Always use caution when
operating the unit. Always use the front handle to open the unit,
as this part of the handle is designed to stay cool to the touch
while cooking.
The oil/grease
is spilling on
the countertop
Be sure to empty and clean the drip tray as often as needed
and after each use.
Uncertain about
which accessories
are dishwasher safe
Reversible grill/griddle plates, waffle plates (sold separately),
and drip tray are dishwasher safe.
Scratches on plates after
constant daily use
While your plates are metal utensil safe, we recommend using
plastic, silicone, or wooden utensils to prolong the life of your
ceramic nonstick plates.
Unit has a slight odor
and smokes a little
This is perfectly normal during first use and will disappear with use.
Power cord is in the way
during storage
Store the power cord underneath the unit in the convenient wrap.

14
LIMITED WARRANTY
GreenPan Electrics are covered by a limited
warranty against defects in materials and
workmanship, beginning on the date you
receive the product and lasting for two years.
If your GreenPan Electrics product has a
defect covered by the limited warranty during
the warranty period, The Cookware Company
(USA), LLC will, at its sole option, replace
the product or provide a refund. Further
information on the warranty claim process,
exclusions from warranty coverage, and
other terms can be found in the complete
limited warranty for this product, available
online at greenpan.us/warranty.
TERMS OF SALE;
ARBITRATION
The terms on which The Cookware Company
(USA), LLC sells GreenPan Electrics are
available online at greenpan.us/pages/terms-
of-sale (the “Terms”). The Terms contain very
important information regarding your rights
and obligations, as well as conditions,
limitations, and exclusions that may apply
to you. Please read them carefully.
In particular, the Terms provide that, by
your purchase of this product, you and
The Cookware Company (USA), LLC are
agreeing to give up any rights to litigate
in a court or before a jury, or to participate
in a class action or representative action
with respect to a claim. Other rights that
you would have if you went to court may
also be unavailable or limited in arbitration.
Any claim, dispute, or controversy between
you and The Cookware Company (USA),
LLC arising from or relating in any way to
your purchase of products or services will
be resolved exclusively and finally by
binding arbitration.
The arbitration will be administered by the
American Arbitration Association (“AAA”)
in accordance with the Consumer Arbitration
Rules (the “AAA Rules”) then in effect,
except as modified hereby. (The AAA
Rules are available at adr.org or by calling
the AAA at 1-800-778-7879.) The Federal
Arbitration Act will govern the interpretation
and enforcement of this arbitration and
waiver provision.
The Cookware Company (USA), LLC will
be responsible for the AAA filing fee of
any such proceeding. Other than your right
to pursue a claim in small claims court, as
described in the Terms, the arbitrator will
have exclusive authority to resolve any
dispute relating to arbitrability and/or
enforceability of this arbitration provision,
including any unconscionability challenge
or any other challenge that the arbitration
provision or these Terms are void, voidable
or otherwise invalid. The arbitrator will
be empowered to grant whatever relief
would be available in court under law or in
equity. Any award of the arbitrator(s) will
be final and binding on each of the parties
and may be entered as a judgment in any
court of competent jurisdiction. Attorney
fee shifting in this case is governed by the
Terms. You agree to an arbitration on an
individual basis. In any dispute, NEITHER
YOU NOR THE COOKWARE COMPANY
(USA), LLC WILL BE ENTITLED TO JOIN
OR CONSOLIDATE CLAIMS BY OR
AGAINST OTHER CUSTOMERS IN COURT
OR IN ARBITRATION OR OTHERWISE
PARTICIPATE IN ANY CLAIM AS A CLASS
REPRESENTATIVE, CLASS MEMBER OR IN
A PRIVATE ATTORNEY GENERAL CAPACITY.
The arbitral tribunal may not consolidate
more than one person’s claims and may
not otherwise preside over any form of a
representative or class proceeding. The
arbitral tribunal has no power to consider
the enforceability of this class arbitration
waiver and any challenge to the class
arbitration waiver may only be raised in
a court of competent jurisdiction.
If any provision of the arbitration agreement
described herein and in the Terms is found
unenforceable, the unenforceable provision
will be severed and the remaining arbitration
terms will be enforced.
WARRANTY
15
WARRANTY
NOTES

1400031921