Owner’s Manual & Safety Instructions
Save This Manual Keep this manual for the safety warnings and precautions, assembly,
operating, inspection, maintenance and cleaning procedures. Write the product’s date code in the back of
the manual (or month and year of purchase if product has no number). Keep this manual and the receipt in
a safe and dry place for future reference. 26f
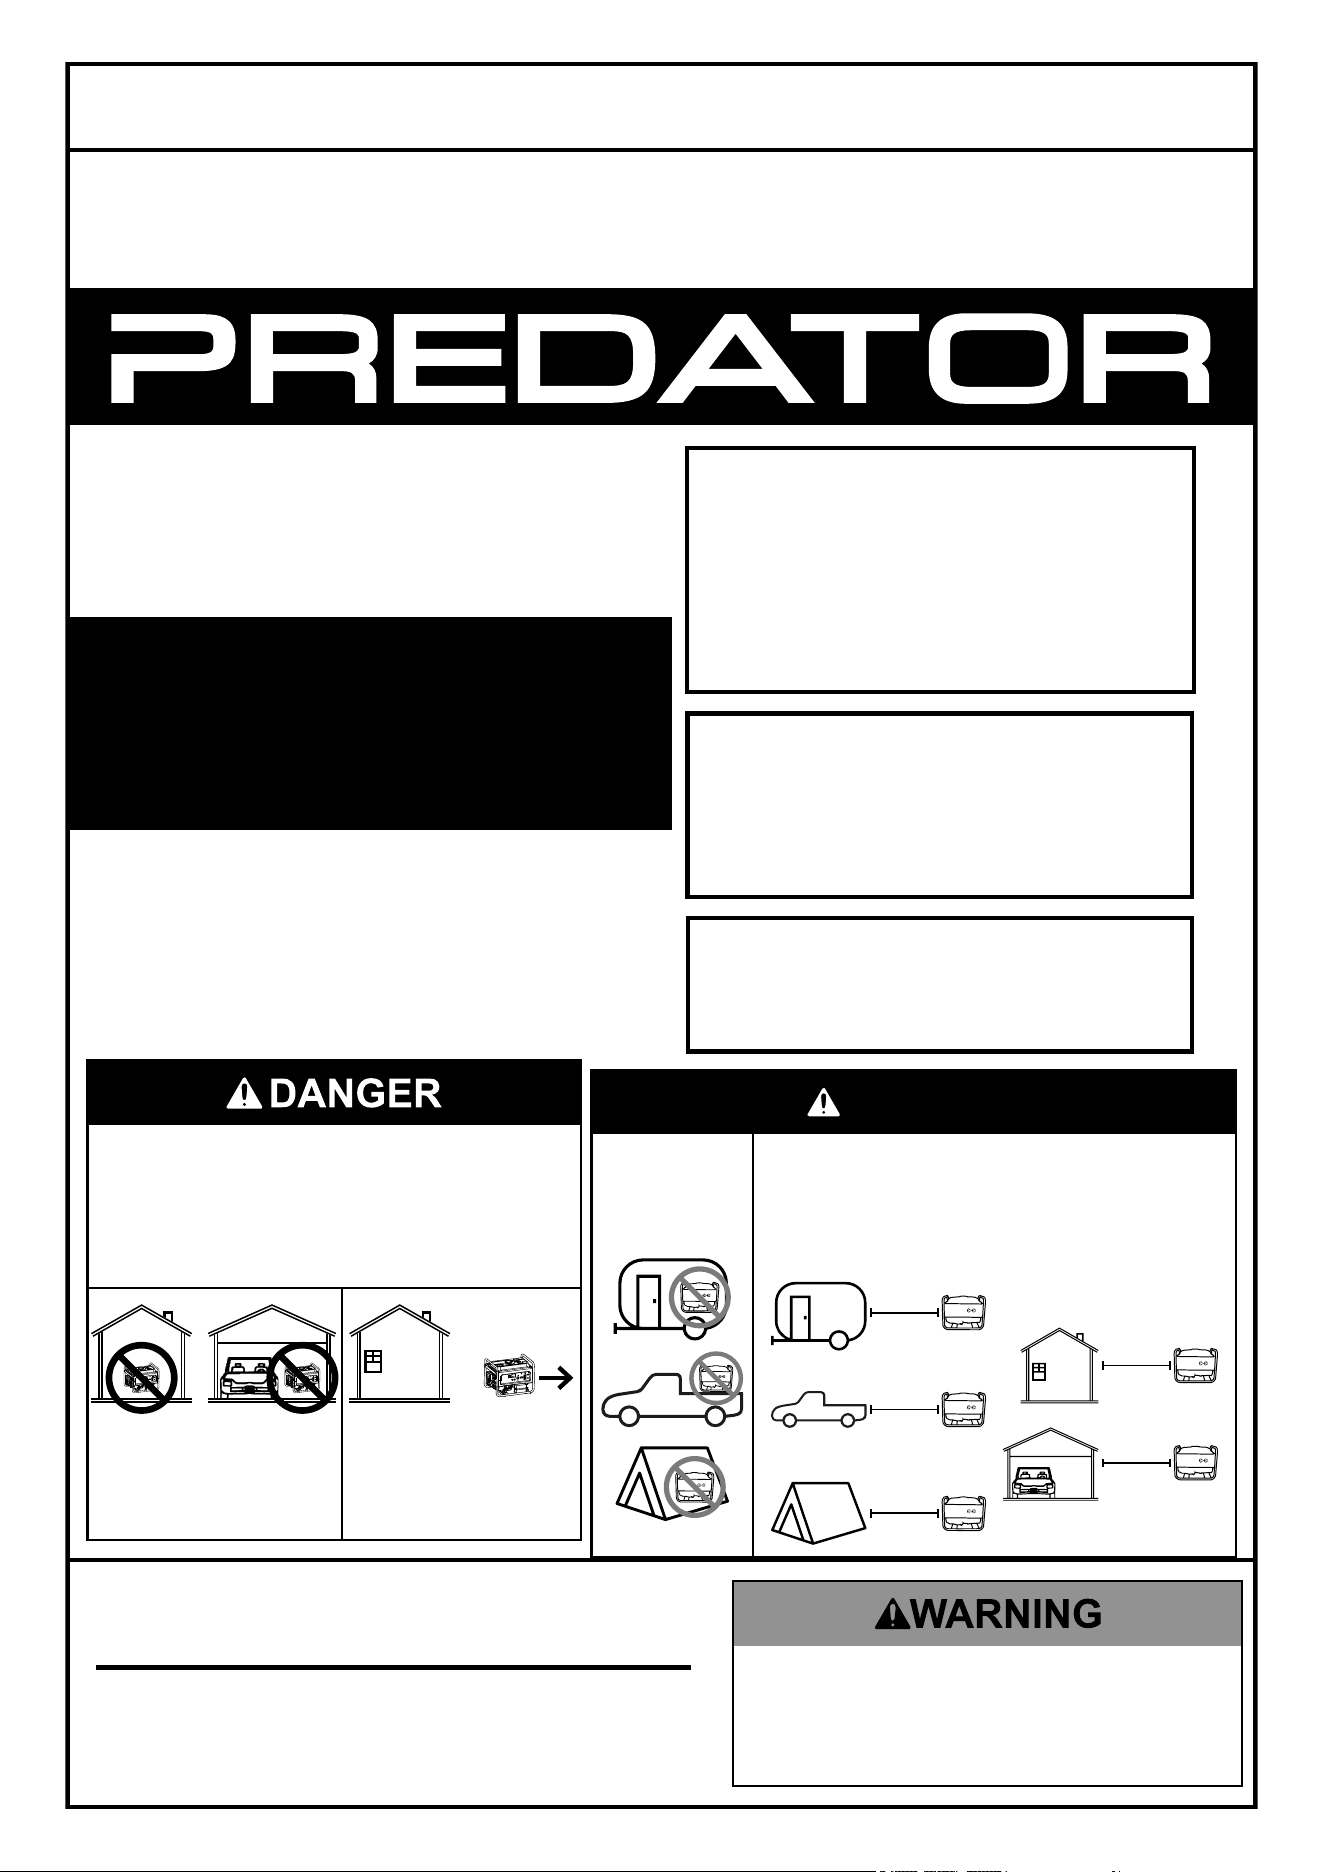
using a generator indoors Can
KiLL yOu in MinuTeS.
Generator exhaust contains
carbon monoxide. This is a poison
you cannot see or smell.
neVer use inside
a home or garage,
eVen iF doors and
windows are open.
Only use OuTSiDe
and far away from
windows, doors,
and vents.
When unpacking, make sure that the product is intact and
undamaged. If any parts are missing or broken, please
visit harborfreight.com/customer-support/contact-us
as soon as possible.
Copyright
©
2025 by Harbor Freight Tools
®
. All rights reserved.
No portion of this manual or any artwork contained herein may be reproduced in
any shape or form without the express written consent of Harbor Freight Tools.
Diagrams within this manual may not be drawn proportionally. Due to continuing
improvements, actual product may differ slightly from the product described herein.
Tools required for assembly and service may not be included.
read this material before using this product.
Failure to do so can result in serious injury.
SaVe THiS ManuaL.
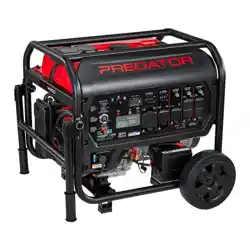
14,500 WATT
EFI TRI-FUEL
GENERATOR
DanGer
Do not use
in trailers,
truck beds,
or tents.
use at least 20 feet away from people,
animals, and structures with exhaust
pointed
away. Generator will produce
carbon monoxide when burning
gas, propane, or natural Gas.
20′
20′
20′
20′
20′
73151
FOr yOur SaFeTy
iF yOu SMeLL GaS:
1. Don’t touch electrical switches.
2. Extinguish any open flame.
3. Immediately call your gas supplier.
WarninG: Improper installation,
adjustment, alteration, service, or
maintenance can cause injury or property
damage. Refer to this manual. For
assistance or additional information consult
a qualified service technician, service
agency, manufacturer, or the gas supplier.
FOr yOur SaFeTy
Do not store gasoline or other
flammable vapors and liquids in the
vicinity of this or any other generator .
11,000 GASOLINE RUNNING WATTS
14,500 MAX GASOLINE STARTING WATTS
10,000 PROPANE RUNNING WATTS
13,000 MAX PROPANE STARTING WATTS
9,000 NG RUNNING WATTS
11,000 MAX NG STARTING WATTS
Visit our website at:
https://www.harborfreight.com
email our product Support at:
®

Page 2
For product assistance, please visit harborfreight.com/customer-support/contact-us
73151
Table of Contents
Specifications ...............................................................3
Safety ...........................................................................4
Setup ...........................................................................13
Operation .....................................................................18
Maintenance ................................................................ 30
Troubleshooting ...........................................................35
Component List and Diagram ......................................38
Warranties ...................................................................43
Page 3
For product assistance, please visit harborfreight.com/customer-support/contact-us
73151
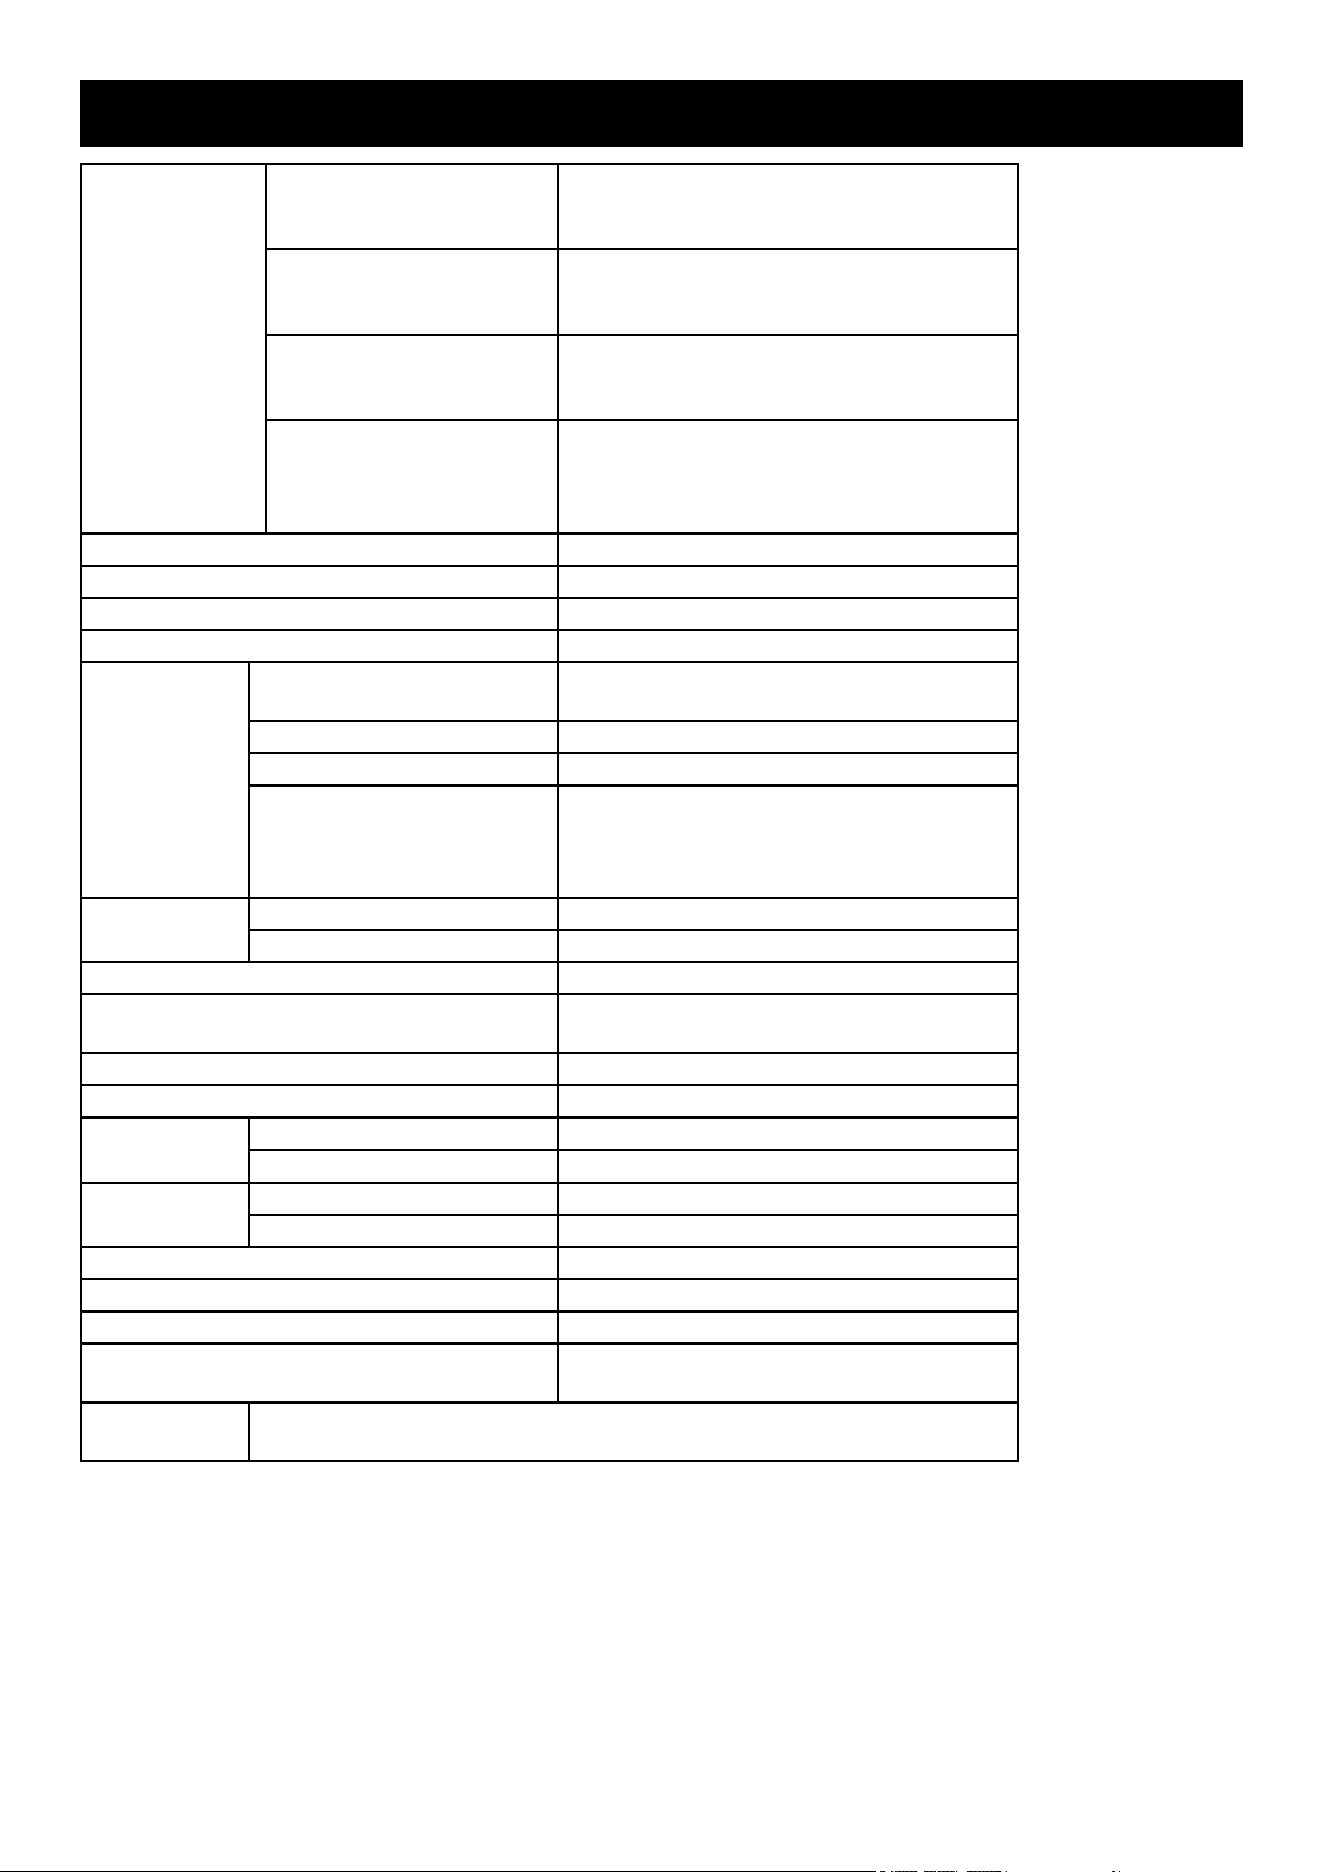
Specifications
Generator
AC Output
(Gasoline)
120 / 240 VAC, 60 Hz, 91.67/ 45.83 A, 1 Phase
11000 Running Watts
14500 Maximum Starting Watts
AC Output
Propane)
120 / 240 VAC, 60 Hz, 83.3 / 41.7 A, 1 Phase
10000 Running Watts
13000 Maximum Starting Watts
AC Output
(Natural Gas)
120 / 240 VAC, 60 Hz, 75.0 / 37.5 A, 1 Phase
9000 Running Watts
11000 Maximum Starting Watts
Receptacles
4 x 120 VAC, 20 A GFCI
1 x 120 VAC, 30 A Twist Lock L5-30R
1 x 120 / 240 VAC, 30 A Twist Lock L14-30R
1 x 120 / 240 VAC, 50 A NEMA 14-50R
Displacement 500 cc
Compression Ratio 8.5:1
Engine Type Horizontal Single Cylinder, 4-stroke, OHV
Cooling System Forced air cooled
Fuel
Type
87+ octane, stabilizer-treated unleaded
Gasoline; Propane or Natural Gas
Gasoline Tank 9.77 Gallon / 37 Liter
Propane Tank 40 lb tank minimum
Natural Gas
Fuel Rating: 1000 BTU /cu ft
Minimum Fuel Supply Size: 1/2"
Supply Pressure: 5~9 WC (1.2-2.24 KPa)
Maximum Flow Rate: 125000 BTU / hr
Engine Oil
Type SAE 10W-30
Capacity 1.4 Quart / 1.3 Liter
Run Time @ 50% Load with full gasoline tank 11.5 hours
Run Time @ 50% Load with
100 lb Propane tank
16.5 hours
Sound Level at 23 feet, 50% load 78.5 dB (A)
Bore x Stroke 94 mm x 72 mm
Spark Plug
Type LG / Torch F7RTJC or equivalent
Gap 0.031"– 0.039"
Valve
Clearance
Intake 0.002"– 0.004"
Exhaust 0.002"– 0.004"
Engine Speed 3600 RPM
Electric Start Battery 12 V – 14 Ah Lead-Acid Non-Spillable
Remote Control Battery 3V CR2032
Internal Battery
3V CR2032
Contains non-replaceable batteries
Battery
Charger
Input: 100 –240 VAC, 50 / 60 Hz, 0.5 A Max
•
Output: 14 VDC, 0.8 A
Cable Length: 5.9 feet
Ï
The emissions control system for this Engine is warranted for standards set by the
U.S. Environmental Protection Agency and by the California Air Resources Board (also known as CARB). For warranty
information, refer to the last pages of this manual.
In reference to the remote: Changes or modifications not expressly approved by Harbor Freight Tools
could void the user’s authority to operate the equipment. FCC ID: 2BCTA-SA00004-1
Page 4
For product assistance, please visit harborfreight.com/customer-support/contact-us
73151
SaFeTy OperaTiOn MainTenanCeSeTup
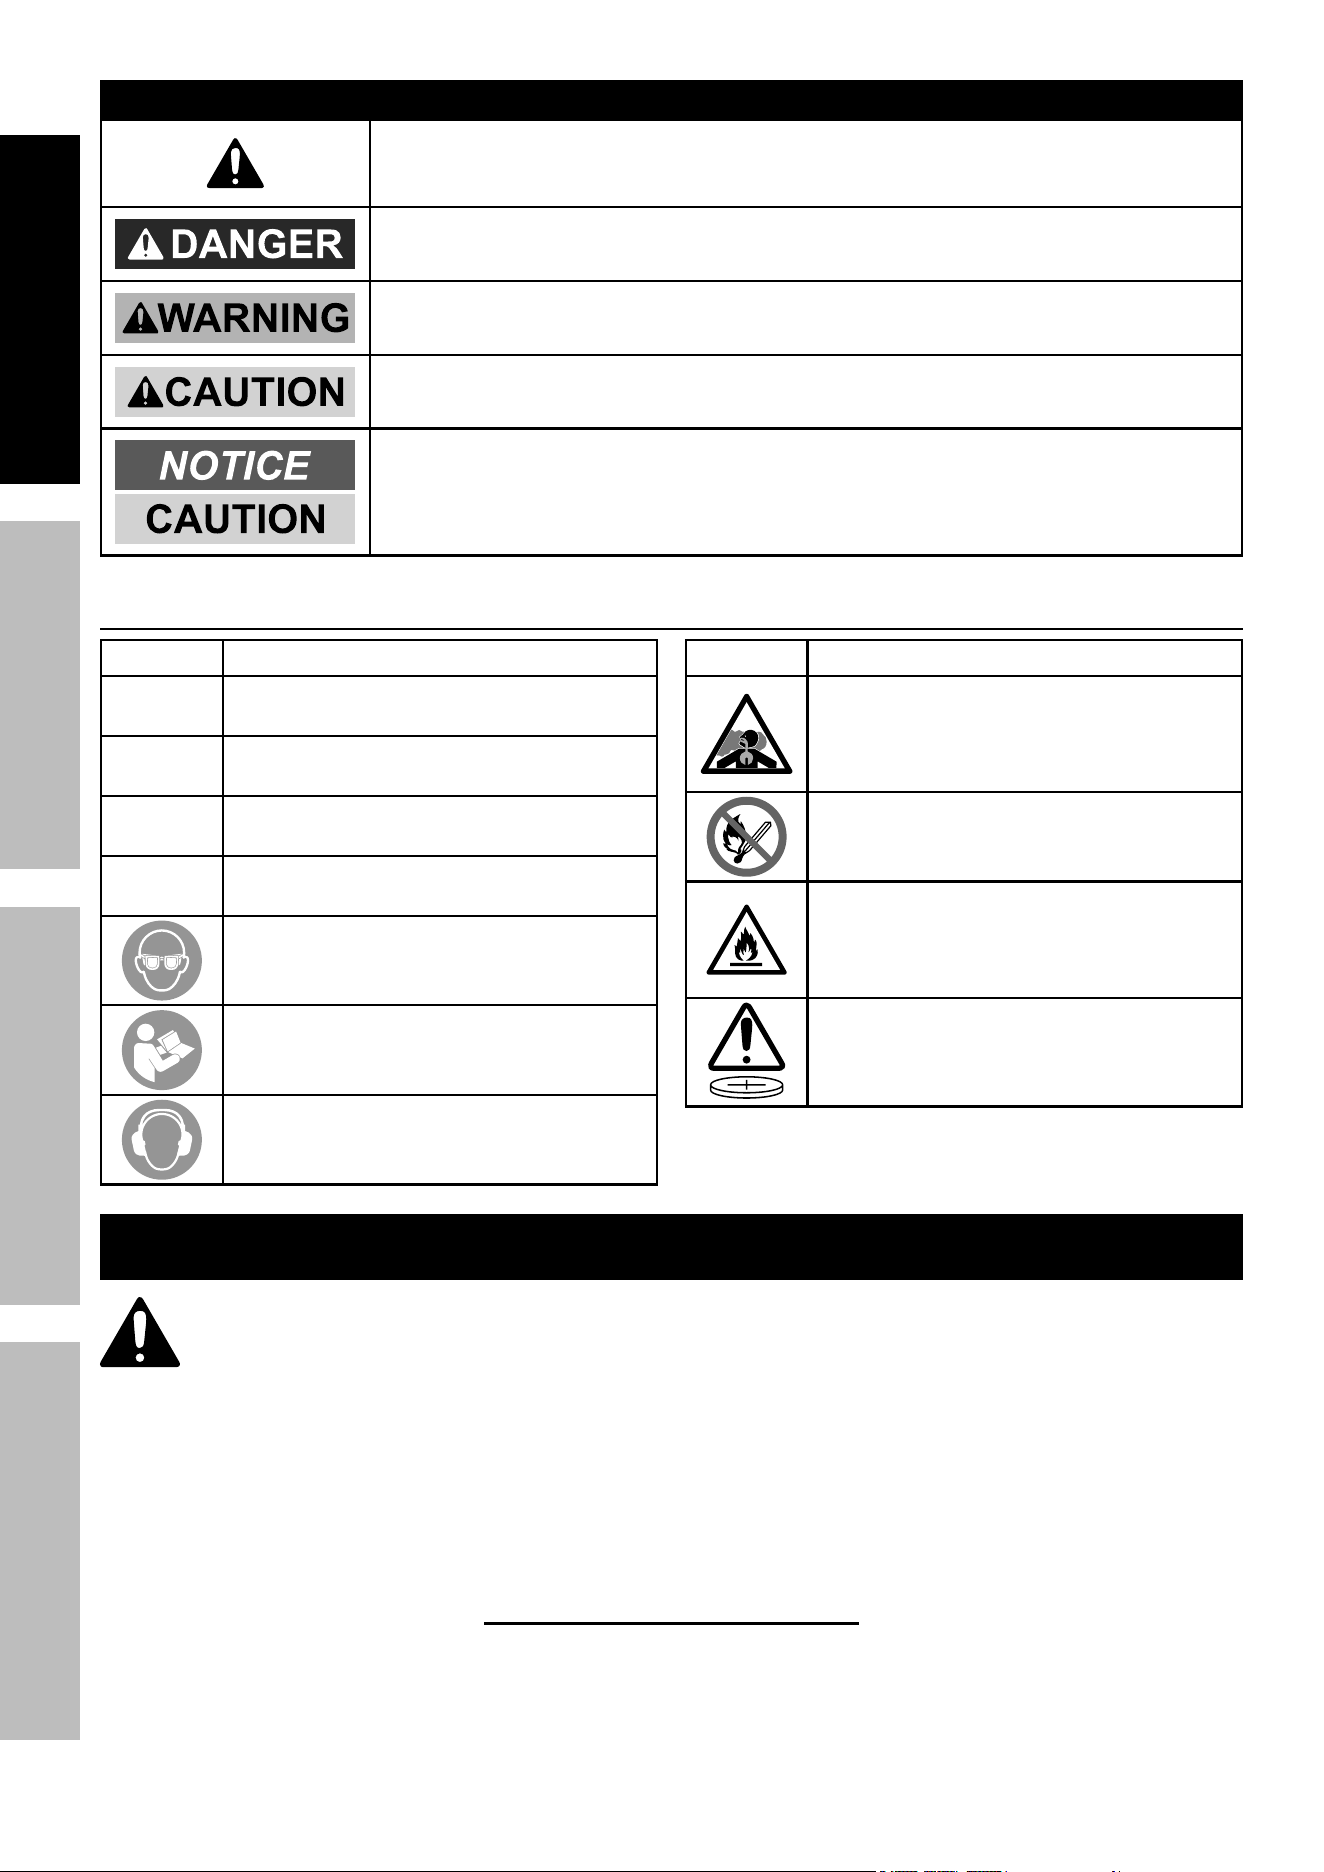
WarninG SyMBOLS anD DeFiniTiOnS
This is the safety alert symbol. It is used to alert you to potential
personal injury hazards. Obey all safety messages that
follow this symbol to avoid possible injury or death.
Indicates a hazardous situation which, if not avoided,
will result in death or serious injury.
Indicates a hazardous situation which, if not avoided,
could result in death or serious injury.
Indicates a hazardous situation which, if not avoided,
could result in minor or moderate injury.
Addresses practices not related to personal injury.
Symbol Definitions
Symbol property or Statement
eFi
Electronic Fuel Injection
rpM
Revolutions Per Minute
Hp
Horsepower
aWG
American Wire Gauge
WARNING marking concerning
Risk of Eye Injury. Wear ANSI-approved
safety goggles with side shields.
Read the manual before
set-up and/or use.
WARNING marking concerning
Risk of Hearing Loss.
Wear hearing protection.
Symbol property or Statement
WARNING marking concerning
Risk of Respiratory Injury.
Operate engine OUTSIDE and far away
from windows, doors, and vents.
WARNING marking concerning
Risk of Fire while handling fuel.
Do not smoke while handling fuel.
WARNING marking concerning
Risk of Fire. Do not refuel while
operating. Keep flammable
objects away from engine.
WARNING: Contains coin battery.
iMpOrTanT SaFeTy inSTruCTiOnS
WarninG! read all instructions. Failure to follow all instructions listed below may
result in fire, serious injury and/or DeaTH.
The warnings and precautions discussed in this manual cannot cover all possible
conditions and situations that may occur. It must be understood by the operator that
common sense and caution are factors which cannot be built into this product, but must
be supplied by the operator.
This manual contains important instructions that should be followed during
installation and maintenance of the generator and any batteries.
SaVe THeSe inSTruCTiOnS
Page 5
For product assistance, please visit harborfreight.com/customer-support/contact-us
73151
SaFeTyOperaTiOnMainTenanCe SeTup
iF yOu SMeLL GaS
1. nO FLaMeS Or SparKS!
Immediately put out all smoking
materials and other open flames.
Do not operate lights, appliances,
telephones, or cell phones.
Flames or sparks from these sources
can trigger an explosion or a fire.
2. LeaVe THe area iMMeDiaTeLy!
Get everyone out of the area where
you suspect gas is leaking.
3. SHuT OFF THe GaS. Turn off the
main gas supply valve on your
propane tank, or the shutoff valve
on the natural gas source if it is
safe to do so. To close the valve,
turn it to the right (clockwise).
4. repOrT THe LeaK. From a
neighbor’s home or other nearby
building away from the gas leak, call
your propane retailer or local gas
company right away. If you can’t reach
your propane retailer or gas company,
call 911 or your local fire department.
5. DO nOT reTurn TO THe area
until your propane retailer, the gas
company, emergency responder,
or qualified service technician
determines that it is safe to do so.
6. GeT yOur SySTeM CHeCKeD.
Before you attempt to use your
generator your propane retailer, the
gas company, or a qualified service
technician must check your entire
system to ensure that it is leak-free.
Can yOu SMeLL iT?
Propane smells like rotten eggs, a
skunk’s spray, or a dead animal. Some
people may have difficulty smelling
propane due to their age (older people
may have a less sensitive sense of
smell); a medical condition; or the effects
of medication, alcohol, tobacco, or drugs.
ODOr LOSS. On rare occasions,
propane can lose its odor. Several
things can cause this including:
•
The presence of air, water, or rust
in a propane tank or cylinder.
•
The passage of leaking
propane through the soil.
Natural Gas itself is odorless and
tasteless, but a chemical is added to
give it an odor in order to help detect
leaks quickly. Natural Gas is lighter
than air and will collect in higher areas.
Since there is a possibility of odor
loss or problems with your sense
of smell, you should respond
immediately to even a faint odor
of propane or natural gas.
GaS DeTeCTOrS
Under some circumstances, you may
not smell a propane or natural gas leak.
Propane and natural gas detectors
(not included) sound an alarm if they
sense propane or natural gas in the
air. They can provide an additional
measure of security. You should
consider the purchase of one or
more detectors for your home.
GuiDeLineS regarding propane
or natural gas detectors:
•
Buy only units that are listed
under the latest Underwriters
Laboratories (UL) standard.
•
Follow the manufacturer’s
instructions regarding installation
and maintenance.
•
Never ignore the smell of
propane or natural gas, even if no
detector is sounding an alarm.
GeneraTOr MainTenanCe
LeaVe iT TO THe eXperTS.
Only a qualified service technician has
the training to install, inspect, service,
maintain, and repair your generator.
Have your generator and propane or
natural gas system inspected annually.
DO nOT Try TO MODiFy Or repair
valves, regulators, connectors, controls,
or other generator and cylinder/tank parts.
Doing so creates the risk of a gas leak
that can result in property damage,
serious injury, or death.
FOr naTuraL GaS SySTeMS,
fuel system
pipes and hoses must
be
leak-free and
of adequate size to
maintain specified supply pressure
and volume flow rate under varying
generator load conditions.
CO anD yOur SaFeTy
WHaT iS CarBOn MOnOXiDe (CO)?
You can’t taste or smell CO, but it is
a very dangerous gas. High levels of
CO can come from engine exhaust
fumes, appliances that are not operating
correctly, or from a venting system
or chimney that becomes blocked.
CO Can Be DeaDLy! High levels of CO
can make you dizzy or sick. In extreme
cases, CO can cause brain damage
or death. Symptoms of CO poisoning
include: headache, dizziness, fatigue,
shortness of breath, and nausea.
iF yOu SuSpeCT CO iS
preSenT, aCT iMMeDiaTeLy!
1. If you or a family member shows
physical symptoms of CO poisoning,
get everyone out of the area and call
911 or your local fire department.
2. If it is safe to do so, turn off
any appliances you suspect
may be releasing CO.
3. If no one has symptoms, but you
suspect that CO is present, call your
propane retailer,
the gas company,
or a qualified service technician to
check CO levels and your propane
or natural gas equipment.
CO DeTeCTOrS Can iMprOVe
SaFeTy. For an extra measure
of safety, consider installing a CO
detector (not included) listed by
UL on each level of your home.
TO HeLp reDuCe THe riSK
OF CO pOiSOninG:
•
Have a qualified service technician
check your propane appliances and
venting systems annually, preferably
before the heating season.
•
Install UL-listed CO detectors
on every level of your home.
•
Never use a gas oven or range-top
burners to provide space heating.
•
DO nOT uSe THe GeneraTOr
inDOOrS Or in any enCLOSeD
SpaCe Or in any OTHer
area Or SiTuaTiOn THaT
WiLL aLLOW CarBOn
MOnOXiDe TO aCCuMuLaTe.
•
Never use a barbecue grill
(propane or charcoal) indoors
for cooking or heating.
•
Regularly check your appliance
exhaust vents for blockage.
runninG OuT OF GaS
DOn’T run OuT OF GaS.
SeriOuS SaFeTy HaZarDS,
inCLuDinG Fire Or
eXpLOSiOn, Can reSuLT.
•
If an appliance valve or a gas line is
left open, a leak could occur when the
system is recharged with propane.
•
a LeaK CHeCK iS reQuireD.
In many states, a propane retailer or
a qualified service technician must
perform a leak check of your propane
system before turning on the gas.

Page 6
For product assistance, please visit harborfreight.com/customer-support/contact-us
73151
SaFeTy OperaTiOn MainTenanCeSeTup
propane & natural Gas precautions
1. Propane and Natural Gas systems must be
installed and used in strict conformance with NFPA
58 (Liquefied Petroleum Gas Code), NFPA 54
(National Fuel Gas Code), manufacturer’s
recommendations, and all relevant local,
state, and federal codes and regulations.
2. Propane, Natural Gas, and Gasoline fuel and fumes
are flammable, and potentially explosive. Use
proper fuel storage and handling procedures. Do
not store fuel or other flammable materials nearby.
3. Fire and explosion hazard. Never use a Gas
container, Propane connector hose, Propane
tank, Natural Gas connector hose, or any other
fuel item that appears to be damaged.
4. Fire and explosion hazard. Only use approved
propane tanks with an Overfilling Prevention
Device (OPD) valve. Keep the tank in a vertical
position with the valve on top and placed at
ground level on a flat surface. Do not allow tanks
to be near any heat source. When transporting
and storing, turn the propane tank valve to the
fully closed position and disconnect the tank.
Make sure to always cover the generator inlet
and tank outlet with protective plastic caps.
5. Connect Propane tank using provided attachment
kit only. Kit includes 1.5 meter (4.9 ft) hose.
Place tank as far away from Generator as
hose allows and away from engine exhaust.
Do not place tank above Generator.
6. Connect to Natural Gas source using
PREDATOR
®
1/2″ Natural Gas Quick Connect
Hose Kit only, item 70491 (not included). Kit
includes 7.6 meter (25 ft) Hose. Do not use
Natural Gas Hose with any other appliances.
7. Fire and explosion hazard. If there is a strong
smell of Propane or Natural Gas while operating
the generator, fully close the Propane tank
valve or Natural Gas shutoff valve and shut
down the Generator immediately. Once the
Propane / Natural Gas is off, use soapy water
to check for leaks on the hose and connections
on the tank valve and the generator. Do not
smoke or light a cigarette or check for leaks
using any open flame source such as a match
or lighter. If a leak is found, contact a qualified
technician to inspect and repair the Propane or
Natural Gas system before using the generator.
8. Generator will produce carbon monoxide when
burning gasoline, Natural Gas, or Propane.
9. When exchanging Propane tanks, be sure the
tank connector is the same size and thread.
10. Propane will freeze skin. Prevent leaking
Propane from contacting skin at all times.
11. Propane and Natural Gas are is highly
flammable and explosive.
12. Propane is heavier than air and will accumulate
in low places. Naural Gas is lighter than
air and will accumulate in high places.
13. Propane and Natural Gas has have a distinctive
odor added to help detect potential leaks. This odor
can diminish over time or due to other factors.
14. Keep Propane tanks in an upright position.
15. In case of a Propane or Natural Gas fire, do not
attempt to extinguish unless the fuel supply can
be shut off safely. Leave the area immediately
and call 911 or your local fire department.
16. Keep the Propane tank, Propane hose, and
Natural Gas hose away from engine exhaust.
17. Gas line must have shut-off valve
before hose connection.
18. Do not insert any object other than the
matching plug into the quick-disconnect
coupling. This may cause the coupling to
leak, disconnect, or otherwise fail.
19. Do not allow the hose to be kinked, pinched,
twisted, or torqued during installation.
20. Protect hose and fittings from dust
and dirt while disconnected.

Page 7
For product assistance, please visit harborfreight.com/customer-support/contact-us
73151
SaFeTyOperaTiOnMainTenanCe SeTup
Set up precautions
1. Gasoline fuel and fumes are flammable, and
potentially explosive. Use proper fuel storage
and handling procedures. Do not store fuel
or other flammable materials nearby.
2. Have multiple ABC class fire extinguishers nearby.
3. Operation of this equipment may create sparks that
can start fires around dry vegetation.
A spark arrestor may be required. The operator
should contact local fire agencies for laws or
regulations relating to fire prevention requirements.
4. Set up and use only on a flat, level,
well-ventilated surface.
5. All connections and conduits from the Generator
to the load must only be installed by trained and
licensed electricians, and in compliance with all
relevant local, state, and federal electrical codes and
standards, and other regulations where applicable.
6. Connections for standby power to a building
electrical system must be made by a qualified
electrician. The connection must isolate the
generator power from utility power, and must comply
with all applicable laws and electrical codes.
7. A transfer switch should be installed by a
licensed electrician in compliance with all
applicable laws and electrical codes.
8. Wear ANSI-approved safety goggles, heavy-duty
work gloves, and dust mask/respirator during set up.
9. Use only lubricants and fuel recommended
in the Specifications chart of this manual.
10. Improper connections to a building electrical system
can allow electrical current from the generator
to backfeed into the utility lines. Such backfeed
may electrocute utility company workers or others
who contact the lines during a power outage,
and the generator may explode, burn, or cause
fires when utility power is restored. Consult
the utility company and a qualified electrician if
intending to use the generator for back up power.
11. Do not operate the Generator before grounding.
The Generator must be earth-grounded
in accordance with all relevant electrical
codes and standards before operation.
12. Install carbon monoxide alarm(s) with
battery backup in nearby buildings according
to manufacturer’s instructions.
Page 8
For product assistance, please visit harborfreight.com/customer-support/contact-us
73151
SaFeTy OperaTiOn MainTenanCeSeTup
Operating precautions
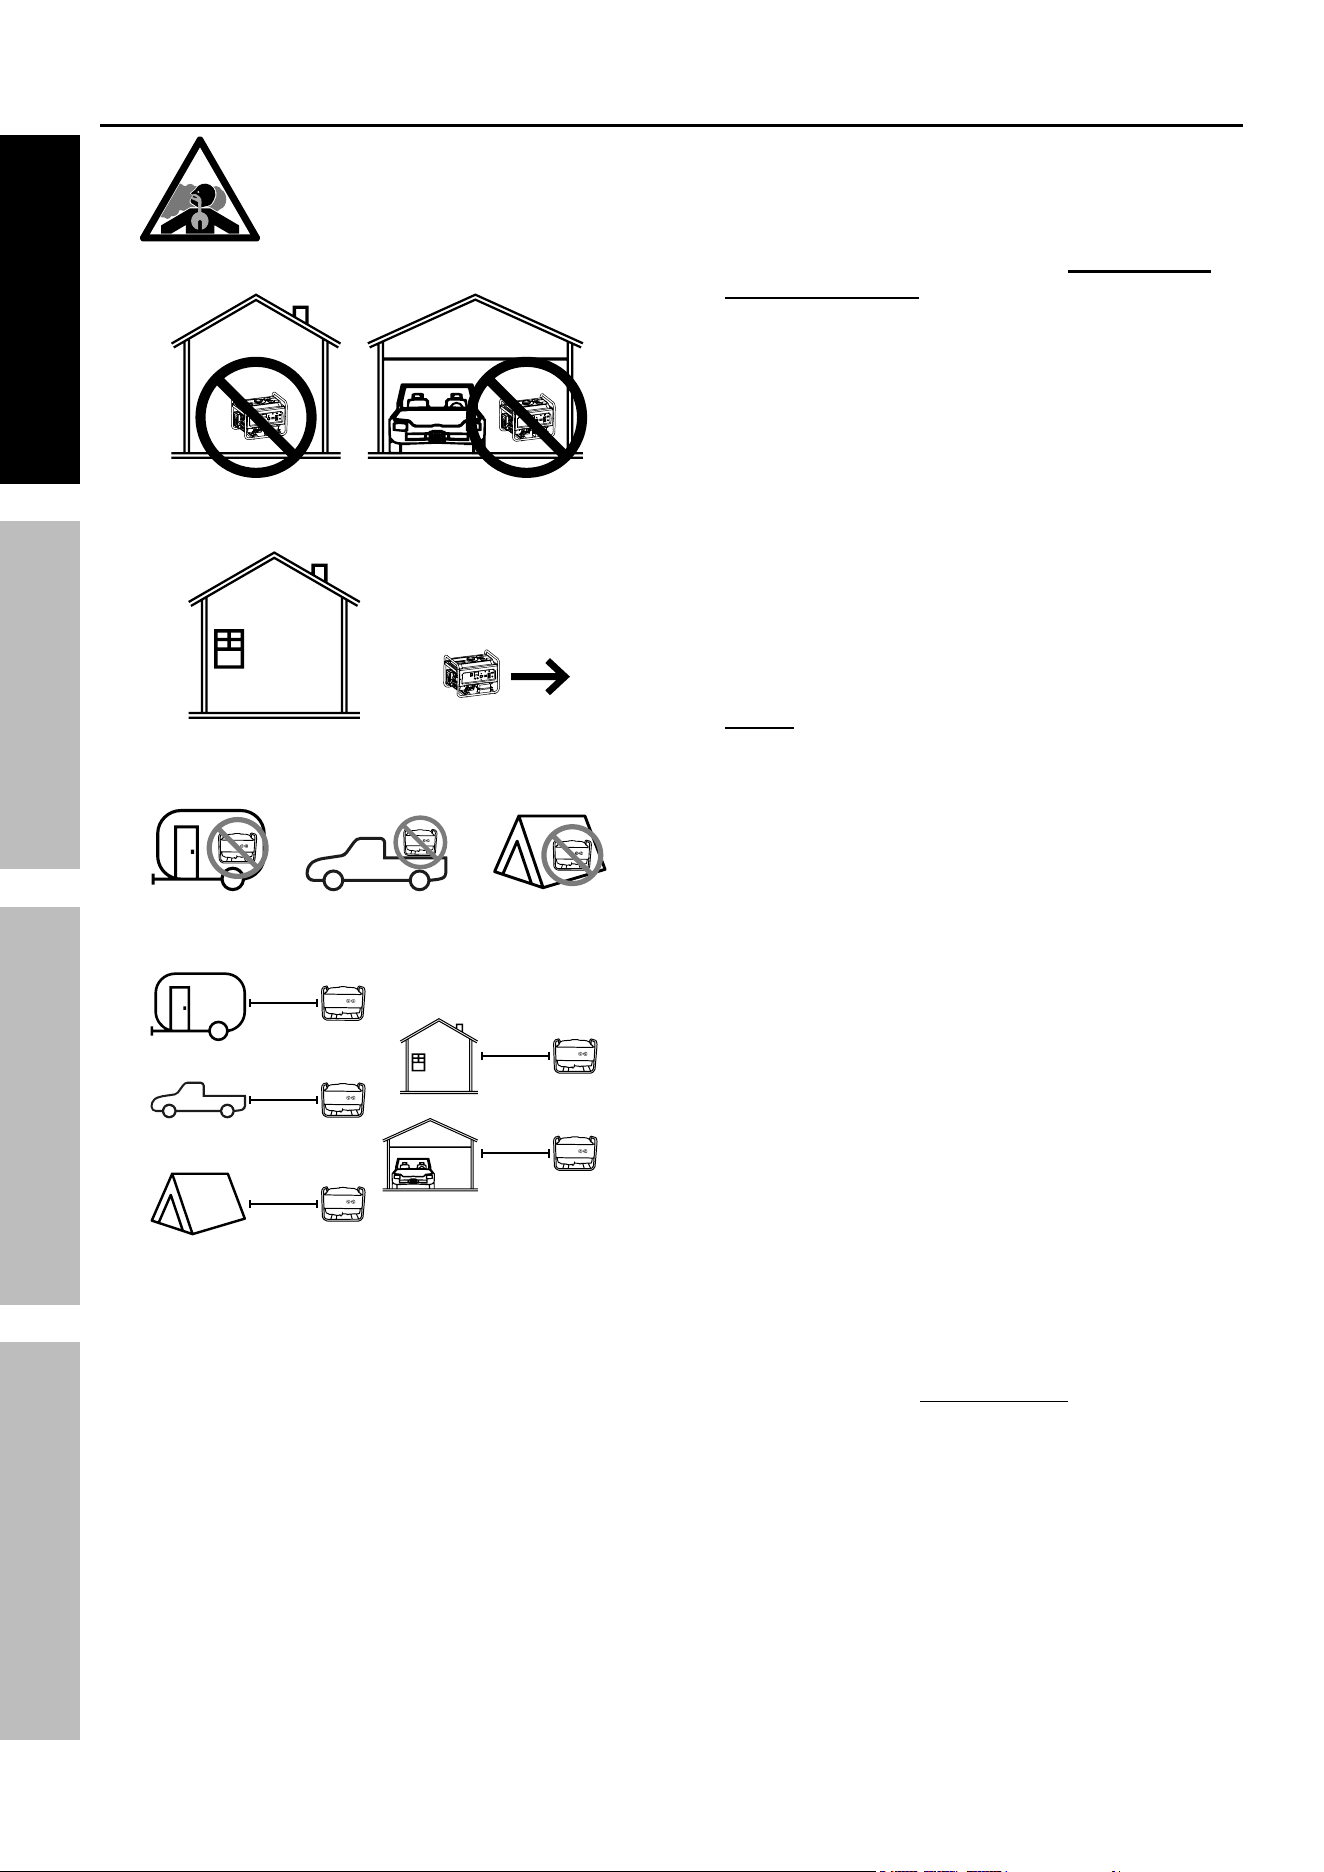
1. CarBOn MOnOXiDe HaZarD
using a generator indoors
Can KiLL yOu in MinuTeS.
Generator exhaust contains
carbon monoxide. This is a poison
you cannot see or smell.
NEVER use inside a home or garage,
EVEN IF doors and windows are open.
Only use OUTSIDE and far away from windows,
doors, and vents.
Do not use in trailers, truck beds, or tents.
20′
20′
20′
20′
20′
Use at least 20 feet away from people,
animals, and structures with exhaust pointed
away. Engine will still produce carbon
monoxide, even when burning other fuels.
CarBOn MOnOXiDe SHuTOFF
DanGer! TO preVenT SeriOuS
inJury anD DeaTH FrOM
CarBOn MOnOXiDe inHaLaTiOn:
The Carbon Monoxide sensor is an additional
layer of protection only. Do not use the
Generator in any area or situation that will
allow carbon monoxide to accumulate.
• FLASHING RED LIGHT:
Dangerous levels of carbon monoxide gas have
built up and generator will shutoff.
Leave immediately until area has aired
out. Move Generator to well-ventilated
area before operation.
• FLASHING YELLOW LIGHT:
Carbon monoxide sensor malfunction.
Sensor needs service. Do not use the
Generator until the sensor is working
properly. For technical questions,
please call 1-800-444-3353.
nOTe: Yellow light flashes once after
starting to indicate passing self-check
and is functioning normally.
Carbon Monoxide sensor must only be serviced
by qualified technician to restore it to original
settings. Do not modify or tamper with the
Carbon Monoxide sensor. not following these
instructions can result in death or serious injury
due to Carbon Monoxide sensor malfunction.
2. Never use a generator indoors, including in
garages, basements, crawl spaces and sheds.
Opening doors and windows or using fans will NOT
prevent carbon monoxide build up in the home.
3. When using generators, keep them outdoors
and far away from open doors, windows,
and vents to avoid toxic levels of carbon
monoxide from building up indoors.
4. If you start to feel sick, dizzy, or weak while
using a generator, get to fresh air right away.
The carbon monoxide from generators can
quickly lead to full incapacitation and death.
5. Keep children away from the equipment,
especially while it is operating.
6. Keep all spectators at least six feet
from the Engine during operation.
7. Fire Hazard! Do not fill fuel tank while engine is
running. Do not operate if gasoline has been spilled.
Clean spilled gasoline before starting engine.
Do not operate near pilot light or open flame.
8. Do not touch engine during use.
Let engine cool down after use.
9. Never store fuel or other flammable
materials near the engine.

Page 9
For product assistance, please visit harborfreight.com/customer-support/contact-us
73151
SaFeTyOperaTiOnMainTenanCe SeTup
10. If the plugged in product operates abnormally
or unusually slow, immediately stop using the
generator as a power source. Read and adhere
to the instruction manual of the product to be
powered to make sure that it can be safely and
efficiently powered by a portable generator.
11. Before connecting an appliance or power cord
to the generator: Make sure that it is in good
working order. Faulty appliances or power cords
can create a potential for electrical shock.
12. Do not exceed the maximum power rating of the
generator. Make sure that the total electrical rating
of the all of the tools or appliances plugged into
the generator at the same time does not exceed
that of the generator. Check that the startup surge
will not be beyond the limit of the Generator.
13. Avoid substantially overloading which will trip
the circuit breaker. Slightly overloading the
generator may not trip the circuit breaker,
but will lead to premature generator failure.
14. Do not attempt to connect or disconnect
load connections while standing in water,
or on wet or soggy ground.
15. Do not touch electrically energized parts of
the Generator and interconnecting cables
or conductors with any part of the body, or
with any non-insulated conductive object.
16. Connect the Generator only to a load or
electrical system (120 volt or 240 volt) that is
compatible with the electrical characteristics
and rated capacities of the Generator.
17. GFCI PRECAUTIONS
Test Ground Fault Circuit Interrupter (GFCI)
receptacles (if equipped) before each use as follows:
a. Disconnect all devices from the Generator.
b. Start the engine.
c. Press Test button on receptacle
to trip the GFCI device.
d. The Reset button should extend, cutting
off electricity to the receptacle.
e. If above test fails, do not use receptacle
until it is repaired or replaced.
f. Press Reset button in for use.
18. The Generator must be grounded before use.
an ungrounded Generator has an
increased risk of electric shock. Refer
to Grounding on page 13.
19. Insulate all connections and disconnected wires.
20. Guard against electric shock. Prevent body contact
with grounded surfaces such as pipes,
radiators, ranges, and refrigerators.
Only use a suitable means of transport and
lifting devices with sufficient weight bearing
capacity when transporting the generator.
21. Secure the generator on transport vehicles to
prevent it from rolling, slipping, and tilting.
22. Industrial applications must follow
OSHA requirements.
23. Do not leave the generator unattended when it is
running. Turn off the generator (and remove safety
keys, if available) before leaving the work area.
24. The generator can produce high noise levels.
Prolonged exposure to noise levels
above 85 dBA is hazardous to hearing.
Wear ear protection when operating thegenerator
or when working nearby while it is operating.
25. Wear ANSI-approved safety glasses,
hearing protection, and NIOSH-approved
dust mask/respirator during use.
26. People with pacemakers should consult their
physician(s) before use. Electromagnetic fields in
close proximity to a heart pacemaker could cause
pacemaker interference or pacemaker failure.
Caution is necessary when near the
engine’s magneto or recoil starter.
27. Use only accessories that are recommended
by Harbor Freight Tools for your model.
Accessories that may be suitable for one
piece of equipment may become hazardous
when used on another piece of equipment.
28. Do not operate in explosive atmospheres,
such as in the presence of flammable
liquids, gases, or dust. Gasoline-powered
engines may ignite the dust or fumes.
29. Stay alert, watch what you are doing and
use common sense when operating this
generator. Do not use while tired or under the
influence of drugs, alcohol or medication.
30. Dress properly. Do not wear loose clothing or
jewelry. Keep hair, clothing and gloves away
from moving parts. Loose clothes, jewelry or
long hair can be caught in moving parts.
31. Parts, especially exhaust system components,
get very hot during use. Stay clear of hot parts.
32. Do not cover the generator during operation.
33. Keep the stop / start remote control away from
children. Do not place in tight spaces with other
objects that may actuate the remote buttons and
send an undesired start signal to the generator.
34. Keep the engine, generator, and
surrounding area clean at all times.
35. Do not smoke, or allow sparks, flames,
or other sources of ignition around the
equipment, especially when refuelling.
36. Use the generator, accessories, etc., in
accordance with these instructions and in the
manner intended for the particular type of
equipment, taking into account the working
conditions and the work to be performed.
Use of the equipment for operations different from
those intended could result in a hazardous situation.
37. Do not operate the generator with known
leaks in the engine’s fuel system.
Page 10
For product assistance, please visit harborfreight.com/customer-support/contact-us
73151
SaFeTy OperaTiOn MainTenanCeSeTup
38. When spills of fuel or oil occur, they must be
cleaned up immediately. Dispose of fluids and
cleaning materials as per any local, state, or
federal codes and regulations. Store oil rags in
a bottom-ventilated, covered, metal container.
39. Keep hands and feet away from moving parts.
Do not reach over or across
equipment while operating.
40. Before use, check for misalignment or binding of
moving parts, breakage of parts, and any other
condition that may affect the equipment’s operation.
if damaged, have the generator serviced
before using. Many accidents are caused
by poorly maintained equipment.
41. Use the correct generator for the application.
Do not modify the generator or its engine,
and do not use the generator for a
purpose for which it is not intended.
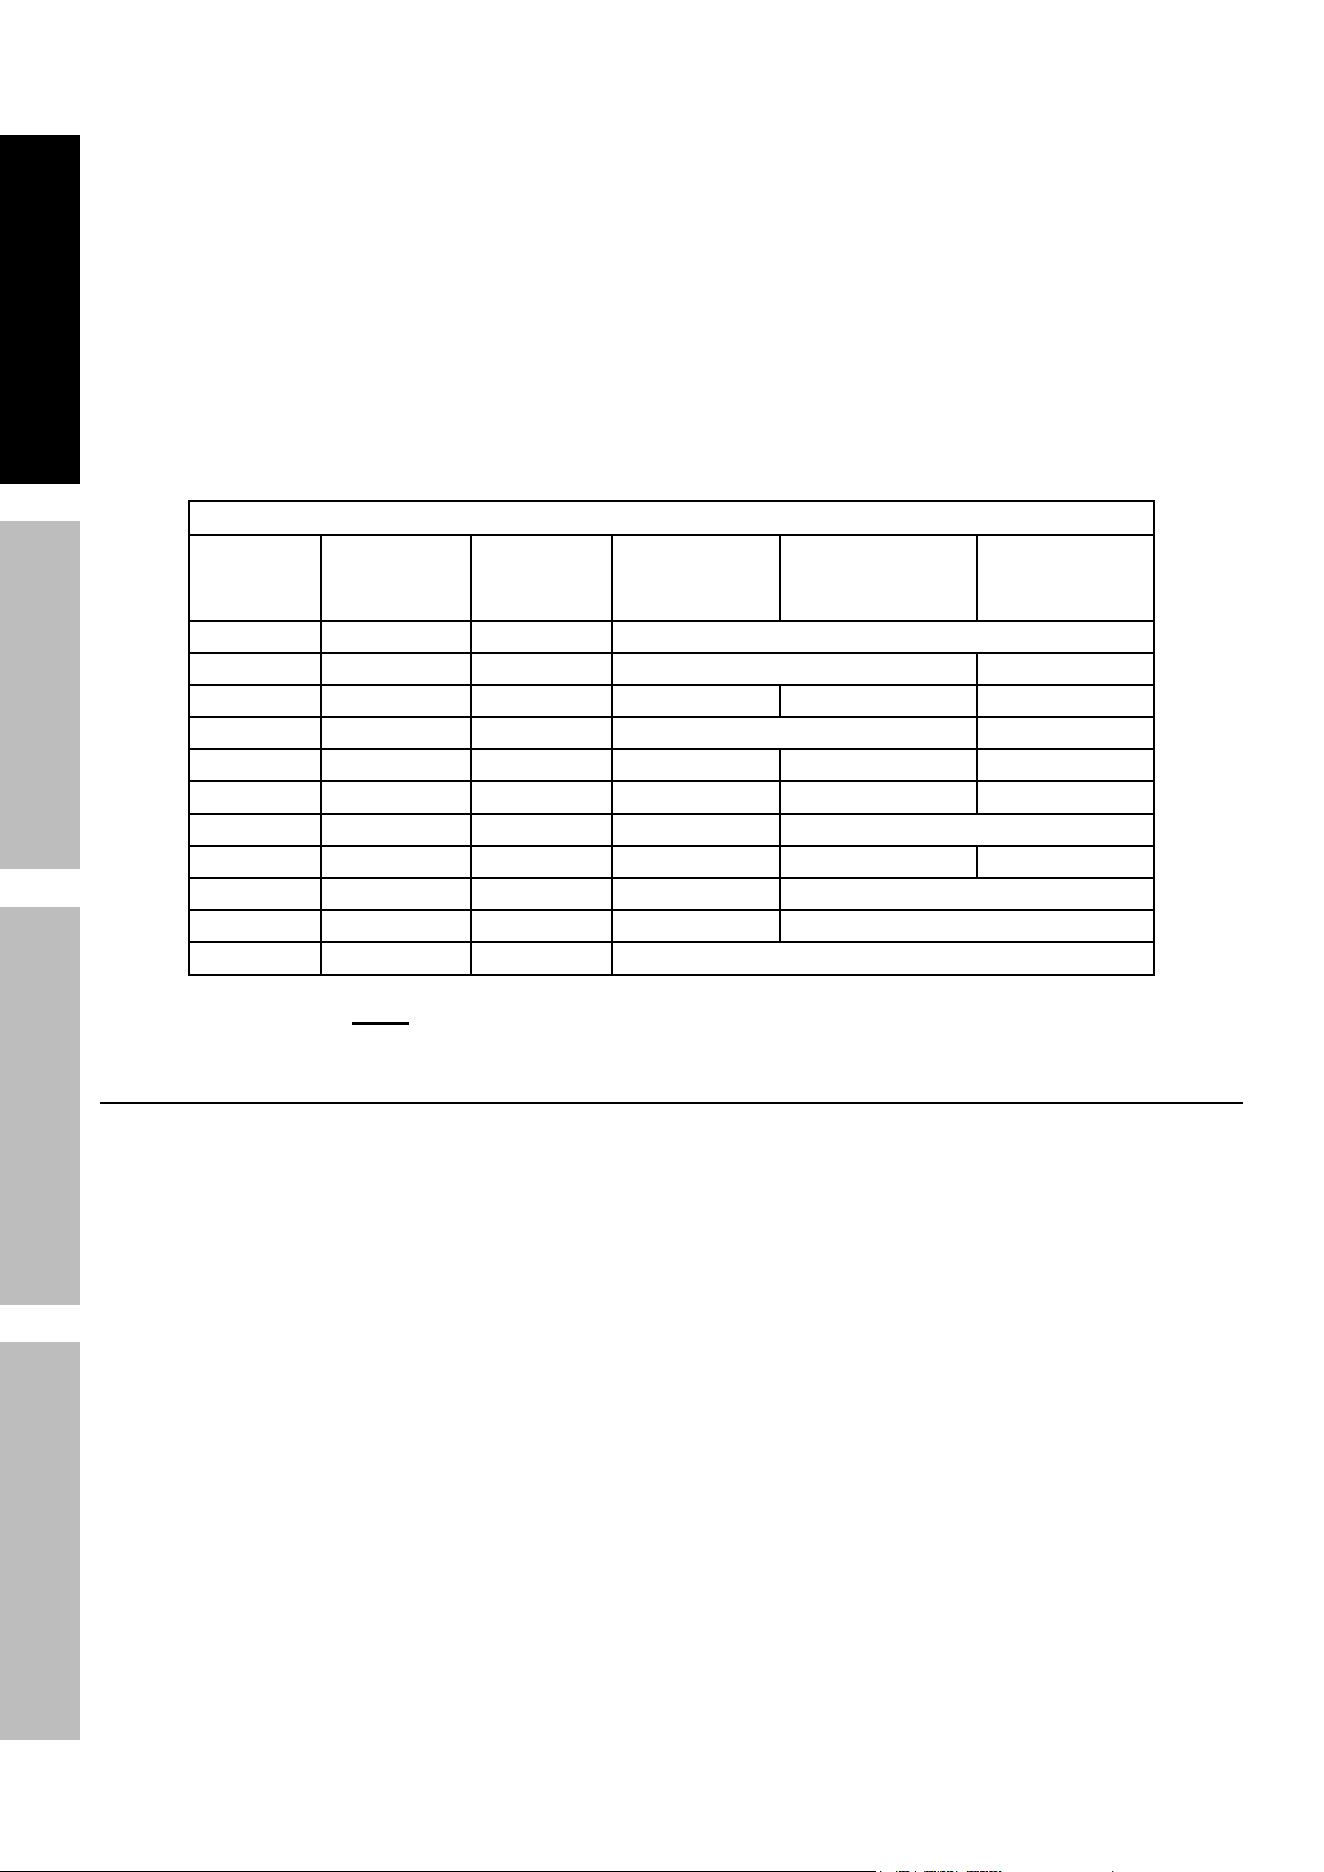
42. Extension Cord - Make sure your extension cord is
in good condition. When using an extension cord, be
sure to use one heavy enough to carry the current
your product will draw. An undersized extension
cord will cause a drop in line voltage resulting in loss
of power and overheating.
The table below shows the correct cord size to use
depending on cord length and nameplate ampere
rating. If in doubt, use the next heavier gauge.
The smaller the gauge number, the heavier the cord.
reCOMMenDeD MiniMuM Wire GauGe FOr eXTenSiOn COrDS
CurrenT
(aMpS)
Load @
120V
(WaTTS)
Load @
240V
(WaTTS)
20 ~ 50 ft 50 ~ 75 ft 75 ~ 100 ft
2 240 480 18 AWG
4 480 960 18 AWG 16 AWG
6 720 1440 18 AWG 16 AWG 14 AWG
8 960 1920 16 AWG 12 AWG
10 1200 2400 16 AWG 14 AWG 12 AWG
15 1800 3600 14 AWG 12 AWG 10 AWG
20 2400 4800 12 AWG 10 AWG
25 3000 6000 12 AWG 10 AWG 8 AWG
30 3600 7200 10 AWG 8 AWG
45 5400 10800 6 AWG 4 AWG
50 6000 12000 4 AWG
note: Do not use extension cords less than 20 feet in length.
Battery Charger / Maintainer Precautions
1. Do not expose Battery Charger / Maintainer
to rain or snow.
2. Use of an attachment not recommended
or sold by the Battery Charger / Maintainer
manufacturer may result in a risk of fire,
electric shock, or injury to persons.
3. To reduce risk of damage to electric plug
and cord, pull by plug rather than cord when
disconnecting Charger / Maintainer.
4. Do not operate Charger / Maintainer with damaged
cord or plug – replace the cord or plug immediately.
5. Do not operate Charger / Maintainer if it has received
a sharp blow, been dropped, or otherwise damaged
in any way; take it to a qualified serviceman.
6. Do not disassemble Charger / Maintainer –
take it to a qualified technician when service
or repair is required. Incorrect reassembly
may result in a risk of electric shock or fire.
7. To reduce risk of electric shock, unplug
Charger / Maintainer from outlet before
attempting any maintenance or cleaning.
8. Locate Charger / Maintainer as far away
from Generator as power cord permits.
9. Maintain labels and nameplates on the
Charger / Maintainer. These carry important
safety information. If unreadable or missing,
contact Harbor Freight Tools for a replacement.
10. Unplug the Battery Charger / Maintainer from its
electrical outlet before connecting its power cord
to the Generator, or performing any inspection,
maintenance, or cleaning procedures.
11. Do not use Charger / Maintainer while tired or under
the influence of drugs, alcohol or medication.
Page 11
For product assistance, please visit harborfreight.com/customer-support/contact-us
73151
SaFeTyOperaTiOnMainTenanCe SeTup
Button/Coin Battery Safety
WarninG
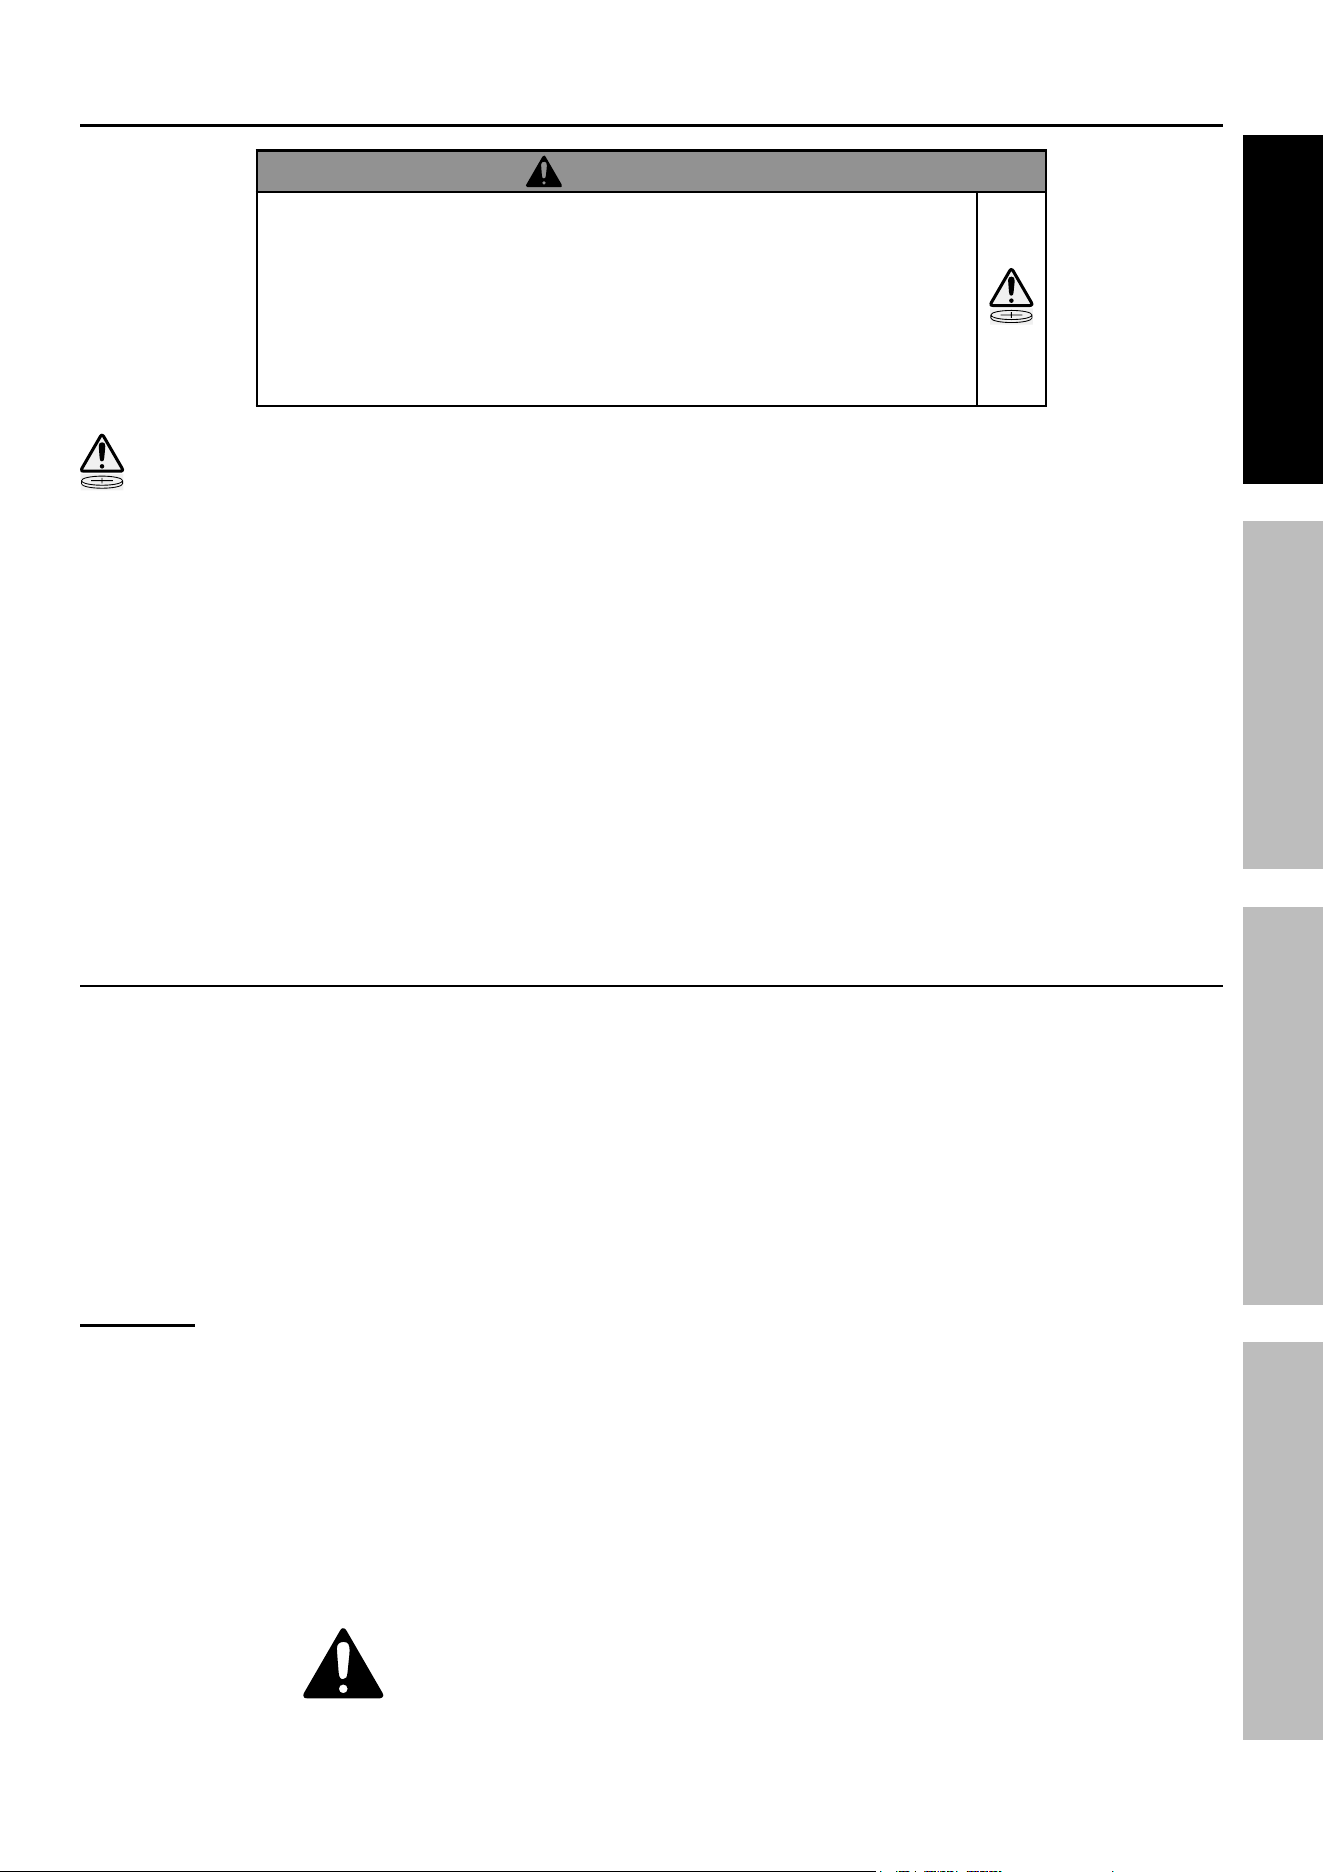
• inGeSTiOn HaZarD: This product contains
a button cell or coin battery.
• DeaTH or serious injury can occur if ingested.
• A swallowed button cell or coin battery can cause
internal Chemical Burns in as little as 2 hours.
• Keep new and used batteries OuT OF reaCH OF CHiLDren
• Seek immediate medical attention if a battery is suspected
to be swallowed or inserted inside any part of the body.
This symbol means:
inGeSTiOn HaZarD: This product contains a
button cell or coin battery.
1. Remove and immediately recycle or dispose
of used batteries according to local regulations
and keep away from children. Do NOT dispose
of batteries in household trash or incinerate.
2. Even used batteries may cause
severe injury or death.
3. Call a local poison control center
for treatment information.
4. Non-rechargeable batteries are not to be recharged.
5. Do not force discharge, recharge, disassemble,
heat above 185° Fahrenheit or incinerate. Doing
so may result in injury due to venting, leakage
or explosion resulting in chemical burns.
6. Ensure the batteries are installed correctly
according to polarity (+ and -).
7. Do not mix old and new batteries, different
brands or types of batteries, such as alkaline,
carbon-zinc, or rechargeable batteries.
8. Remove and immediately recycle or dispose of
batteries from equipment not used for an extended
period of time according to local regulations.
9. Always completely secure the battery compartment.
If the battery compartment does not close
securely, stop using the product, remove the
batteries, and keep them away from children.
Service precautions
1. Before service, maintenance, or cleaning:
a. unplug all devices from the generator.
b. push the engine Switch to the OFF position.
c. Disconnect the battery.
d. allow the engine to completely cool.
e. Then, remove the spark plug cap
from the spark plug.
f. properly ground engine/equipment.
See Grounding on page 13.
WarninG! TO preVenT SeriOuS inJury
FrOM inJeCTiOn, Fire, anD eXpLOSiOn:
Depressurize fuel system before servicing it.
Remove ignition sources from area. Seek medical
attention immediately after injection injury.
2. Depressurize fuel system before servicing it,
Refer to Depressurize Fuel System on page 35.
3. Keep all safety guards in place and in
proper working order. Safety guards include
muffler, air cleaner, mechanical guards,
and heat shields, among other guards.
4. Make sure the Engine Switch is in the OFF”
position before moving the unit and before
performing any service, maintenance,
or cleaning procedures on the unit.
5. Keep all electrical equipment clean and dry.
Replace any wiring where the insulation is
cracked, cut, abraded, or otherwise degraded.
Replace terminals that are worn, discolored, or
corroded. Keep terminals clean and tight.
6. Do not alter or adjust any part of the
equipment or its engine that is sealed by the
manufacturer or distributor. Only a qualified
service technician may adjust parts that may
increase or decrease governed engine speed.
7. Wear ANSI-approved safety goggles,
heavy-duty work gloves, and
dust mask/respirator during service.
8. Maintain labels and nameplates on the equipment.
These carry important information.
If unreadable or missing, contact
Harbor Freight Tools for a replacement.
SaVe THeSe inSTruCTiOnS.

Page 12
For product assistance, please visit harborfreight.com/customer-support/contact-us
73151
SaFeTy OperaTiOn MainTenanCeSeTup
9. Have the equipment serviced by a qualified repair
person using only identical replacement parts.
This will ensure that the safety of the equipment
is maintained. Do not attempt any service or
maintenance procedures not explained in this
manual or any procedures that you are uncertain
about your ability to perform safely or correctly.
10. Store equipment out of the reach of children.
11. Follow scheduled engine and
equipment maintenance.
refueling:
1. Turn off the generator before refilling
the fuel tank. Do not refill the fuel tank
while the engine is running or hot.
2. Do not smoke, or allow sparks, flames,
or other sources of ignition around the
equipment, especially when refueling.
3. To prevent fuel leakage and fire hazard, Do Not fill
fuel tank to the top.
Leave a little room for the fuel to expand as needed.
4. Refuel in a well-ventilated area only.
5. Wipe up any spilled fuel and allow excess
to evaporate before starting engine.
To prevent fire, do not start the engine
while the smell of fuel hangs in the air.
6. Do not connect Propane or Natural Gas fuel
sources to the Generator while operating with
gasoline. Shut down Generator and allow to
cool before connecting alternate fuel type.
Starting Battery Service:
1. Starting battery service must be performed
only by a qualified technician. Keep
other people away from battery.
2. When replacing battery, use the following type
battery: 12V, 14Ah sealed, lead-acid type.
3. Do not dispose of battery in a fire.
The battery can explode.
4. Do not open or mutilate the battery. Battery contains
acid which can cause blindness, burns, and is toxic.
5. Battery may explode or cause fire if shorted.
When working around batteries:
a. Remove watches, rings, or other metal objects,
b. Use tools with insulated handles, and
c. Do not lay tools or metal parts on top of batteries
Page 13
For product assistance, please visit harborfreight.com/customer-support/contact-us
73151
SaFeTyOperaTiOnMainTenanCe SeTup
Set Up / Assembly
read the enTire iMpOrTanT SaFeTy inFOrMaTiOn section at the beginning of this manual
including all text under subheadings therein before set up or use of this product.
TO preVenT SeriOuS inJury anD Fire: Operate only with proper spark arrestor installed.
Operation of this equipment may create sparks that can start fires around dry vegetation.
a spark arrestor may be required. The operator should contact local fire agencies for laws
or regulations relating to fire prevention requirements.
note: For additional information regarding
the parts listed in the following pages, refer to the
Assembly Diagram near the end of this manual.
nOTiCe: This Generator is not intended to power
sensitive electronic equipment without the addition
of an appropriate line conditioner and surge
protector (both not included). Sensitive electronic
equipment includes, but is not limited to,
audio/video equipment, some television sets,
computers, and printers. Sensitive electronic
equipment should be operated on approved inverter-
type generators or pure sine wave generators.
Grounding
The Generator must be properly grounded in
accordance with all relevant electrical codes and
standards before operation. In many locations, local
code will not require this generator to be grounded
when used with cord and plug equipment plugged
directly into the receptacles on the generator. However,
your local regulations may require the generator to be
grounded. Contact a licensed electrician or consult
local authorities regarding local grounding requirements.
If grounding is required, have the unit grounded by a
qualified electrician if you are not qualified to do so.
General grounding instructions are as follows:
Use one of the following as the grounding electrode:
Pipe or conduit, minimum 3/4 in. diameter, minimum
8 ft. long. If steel, it must have anti-corrosion coating.
Rod, stainless steel or copper- or zinc-coated steel,
minimum 5/8 in. diameter, minimum 8 ft. long.
For additional information on grounding methods,
please see the National Electrical Code.
nOTiCe: There is a permanent conductor
between the portable generator stator winding
(Neutral Conductor) and the frame.
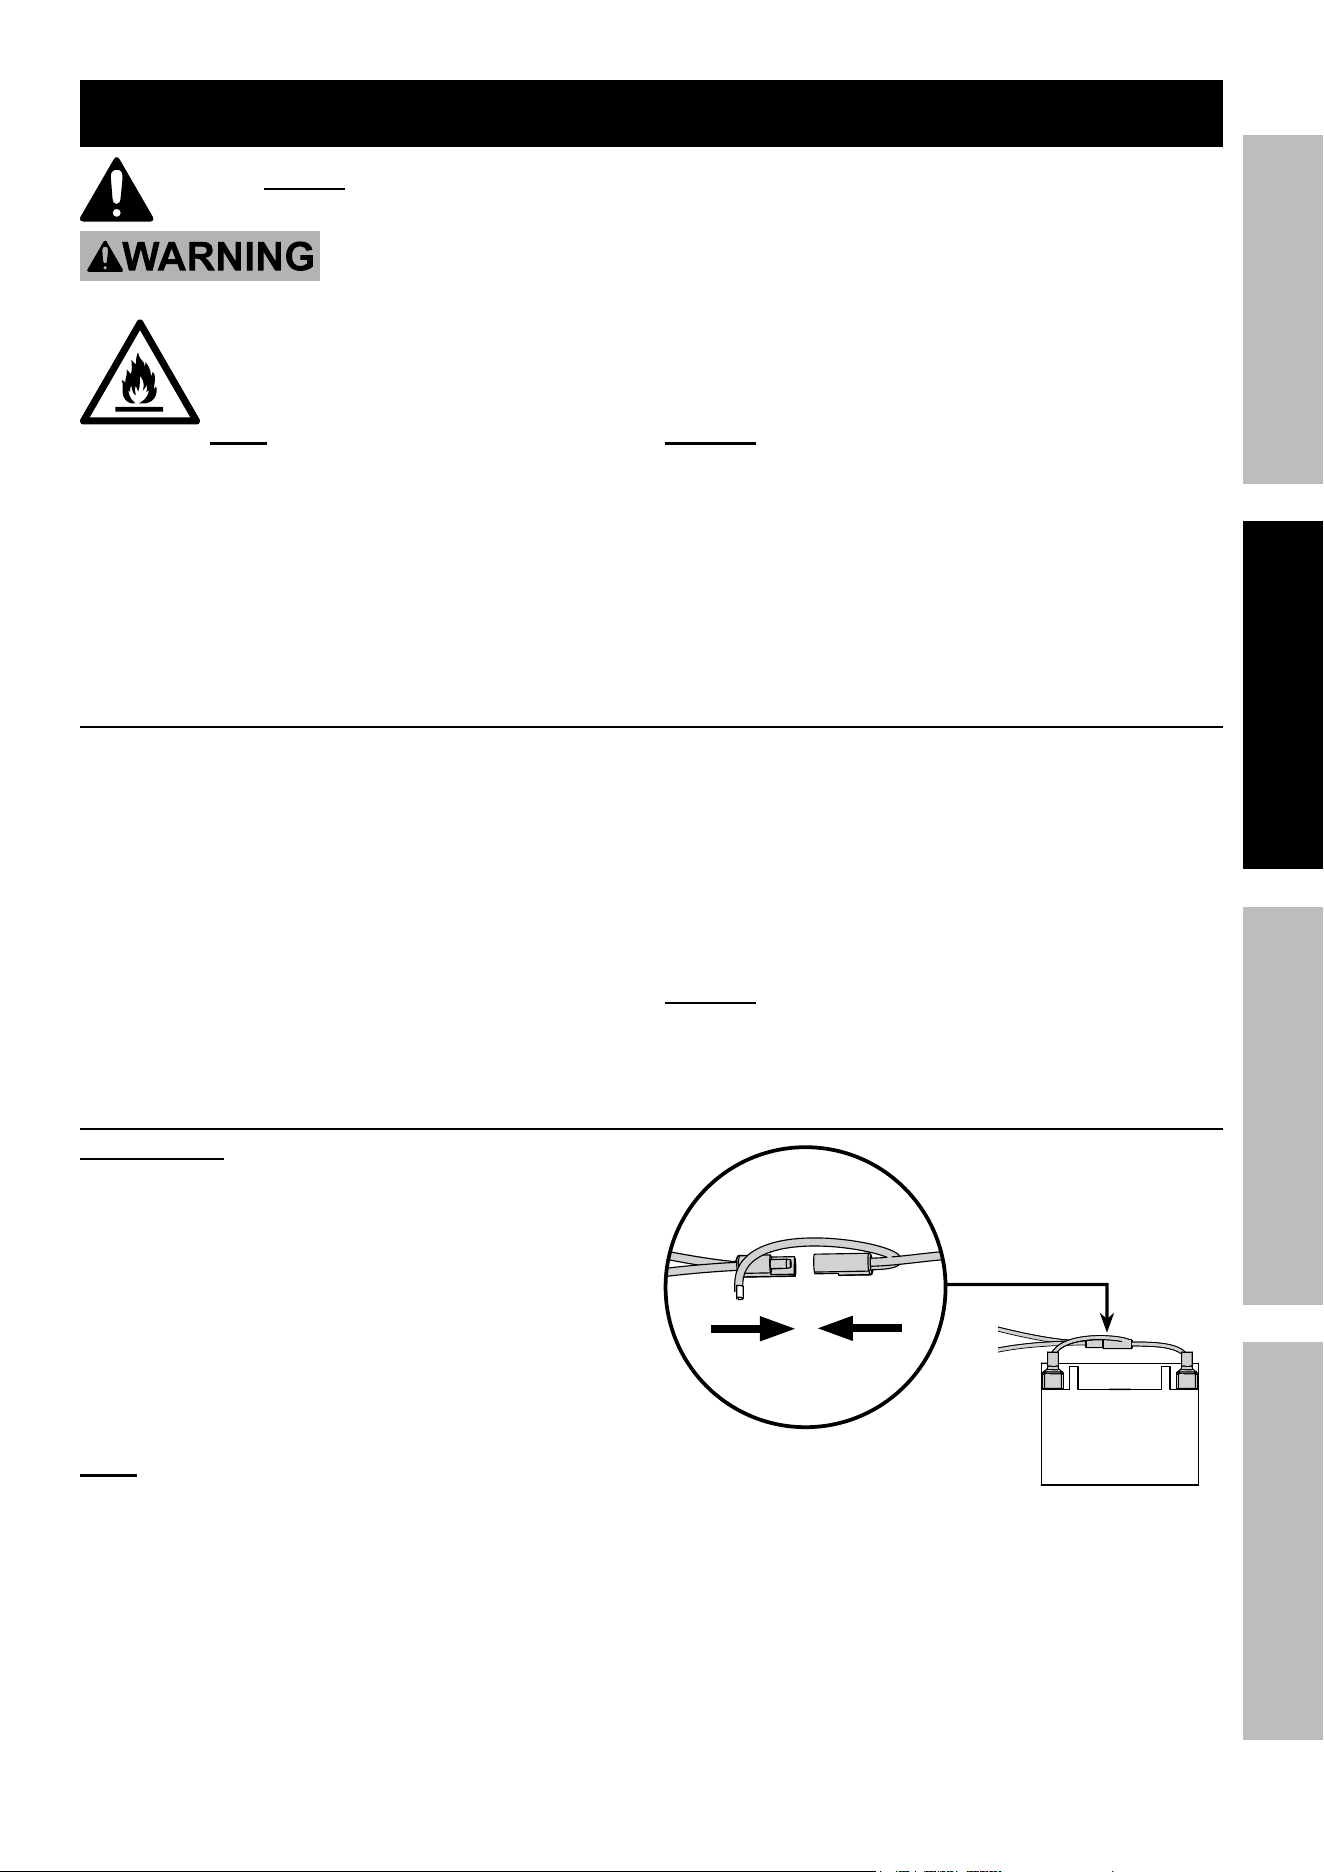
12 VDC Battery Connection
iMpOrTanT! For the eFi system and for Manual
Start, the included 12 VDC Battery must be
connected and charged to start with all fuel types.
For the electric start and auto-choke functions,
or to operate on Propane or Natural Gas
fuel, the included 12 VDC Battery must be
connected and charged before first use.
1. Push Engine Switch to OFF position.
2. Connect the two ends of the Battery
Quick Connector together.
note: The built-in charging circuit charges
the Battery while the Engine is running. Turn
the Engine Switch off and use the Battery
Charger / Maintainer to keep the Battery charged
when the Generator is not in use or in storage.
Refer to 12 VDC Battery: in Storage on page 34.
Page 14
For product assistance, please visit harborfreight.com/customer-support/contact-us
73151
SaFeTy OperaTiOn MainTenanCeSeTup
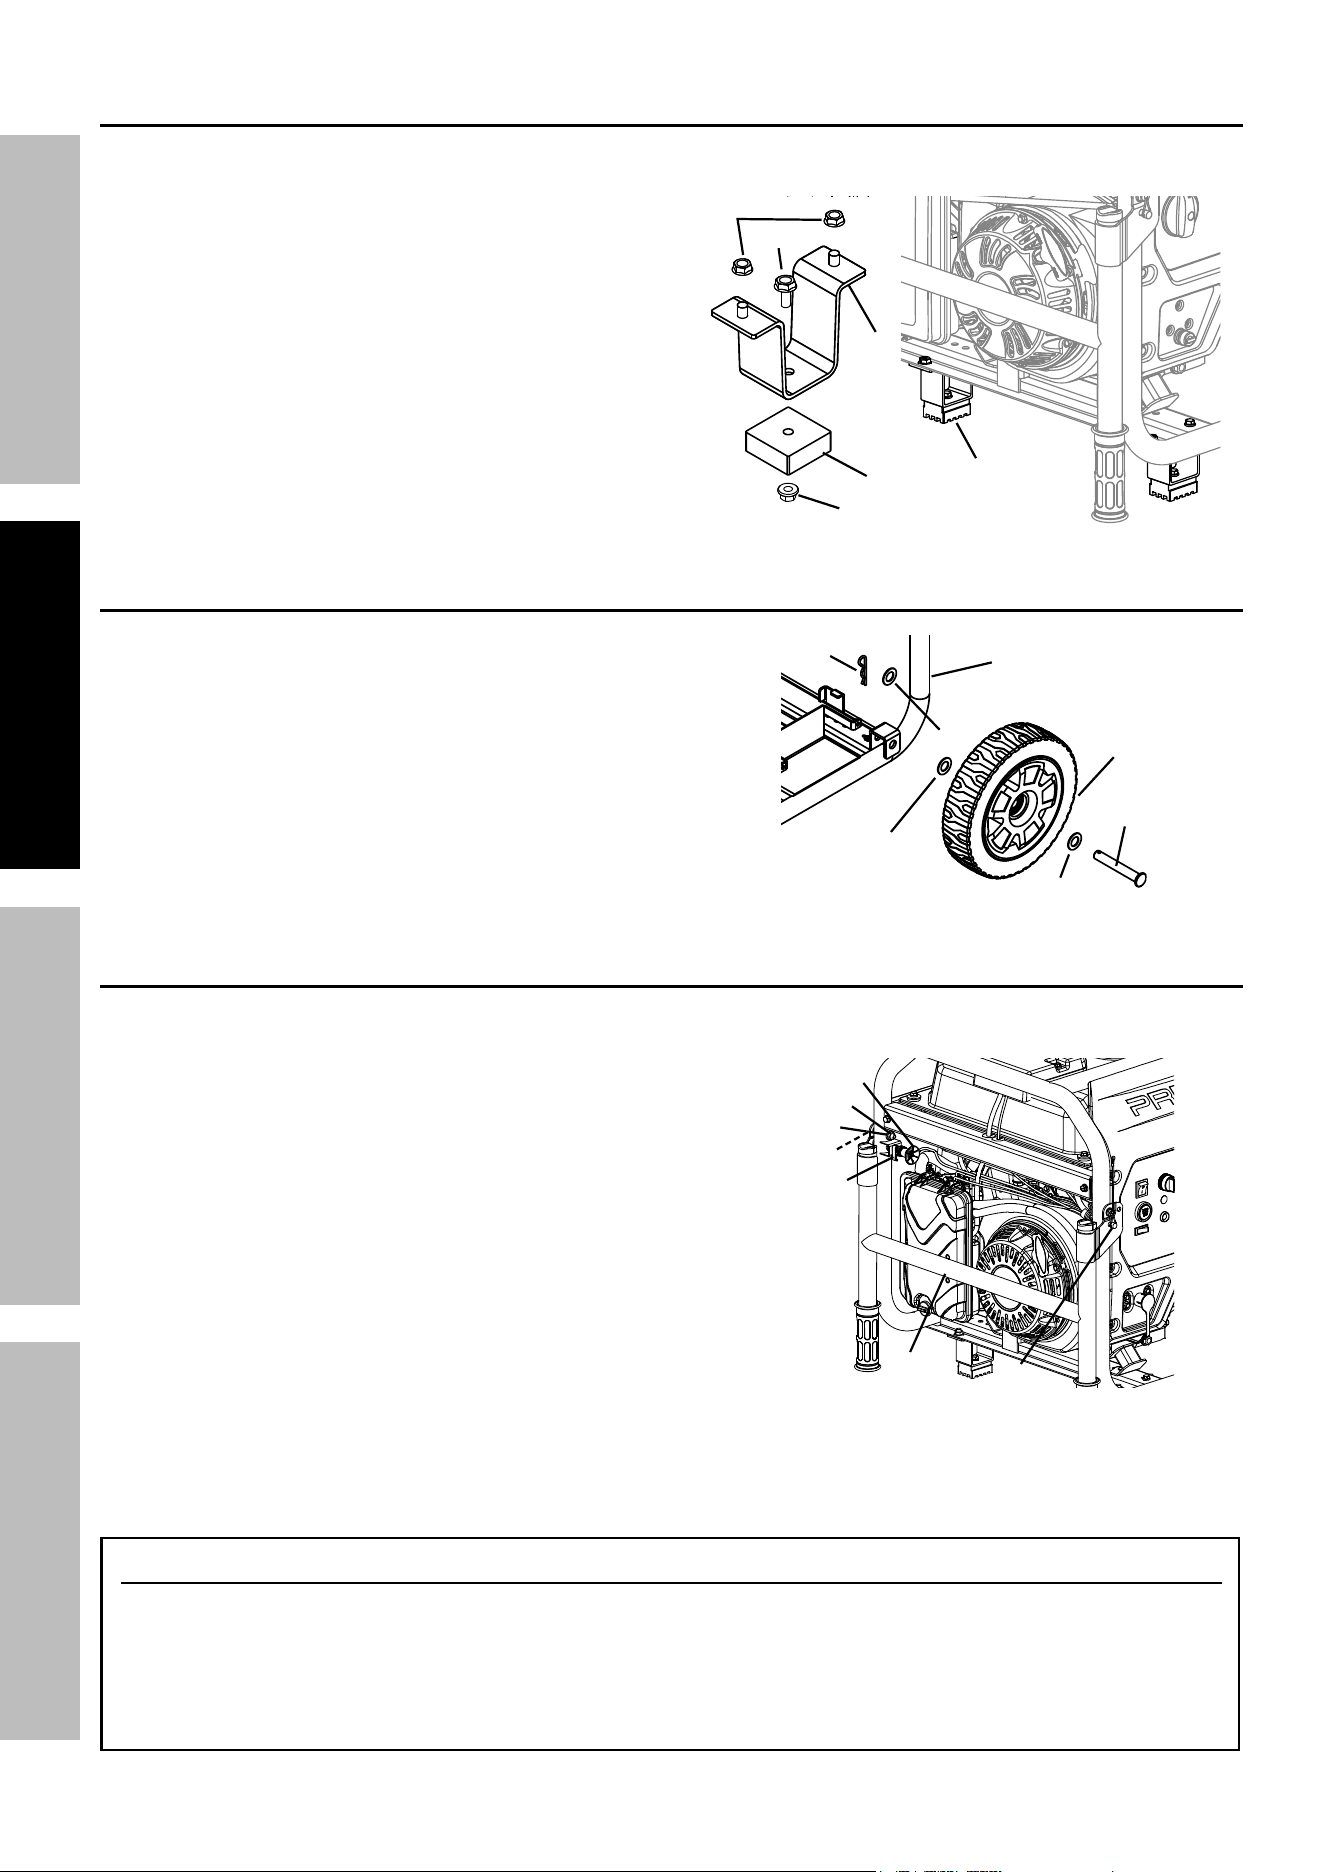
Foot assembly
The Feet are installed on the air filter side of the Generator.
1. Prepare a set of 4 x 4 blocks on level ground. With
assistance, place the Generator on the blocks.
2. Secure one Foot (140) onto a Foot Bracket (139)
using a Hex Bolt (137) and Hex Flange
Nut (138). Repeat for other Foot and Bracket.
3. Align studs on Foot Bracket assembly with
holes on bottom of Generator frame and secure
in place with two Hex Flange Nuts (138).
Repeat for other Foot Bracket assembly.
140
137
139
138
141
Foot
assembly
in place
Wheel assembly
1. Slide one Wheel (122) and two Flat Washers (121)
onto a Wheel Axle (120), one Washer on each side
of Wheel.
2. Insert the Wheel Axle through the bracket
on the bottom of the Generator frame (146).
Place a third Flat Washer onto the Axle and
secure all in place with an R-Clip (123).
3. Repeat steps 1 and 2 for other Wheel assembly.
120
122
123
121
121
121
146
Handle assembly
The Handle is installed on the air filter side of the Generator.
1. Align the holes in the brackets on
the Handle (124) with the holes
on the Generator frame.
2. Fasten in place using a Step Bolt (125)
and Washer (127) Flange Lock Nut (128),
one set on each side of Handle.
3. Remove and discard the yellow shipping clip
located on the Handle Release Pin (153).
4. Insert the Locking Pin (130) into the hole on the right
side of the Generator frame.
130
124
125
127
128
153
Shipping
Clip
Handle Operation
1. To unfold the Handle for use, first remove the
Locking Pin, then pull out the Handle Release
Pin and lift the Handle up. With the Handle lifted
into position, release the Handle Release Pin,
then insert the Locking Pin back into place.
2. To fold the Handle down after use, first remove
the Locking Pin, then pull out the Handle Release
Pin and push the Handle down. With the Handle
in position, release the Handle Release Pin,
then insert the Locking Pin back into place.
Page 15
For product assistance, please visit harborfreight.com/customer-support/contact-us
73151
SaFeTyOperaTiOnMainTenanCe SeTup
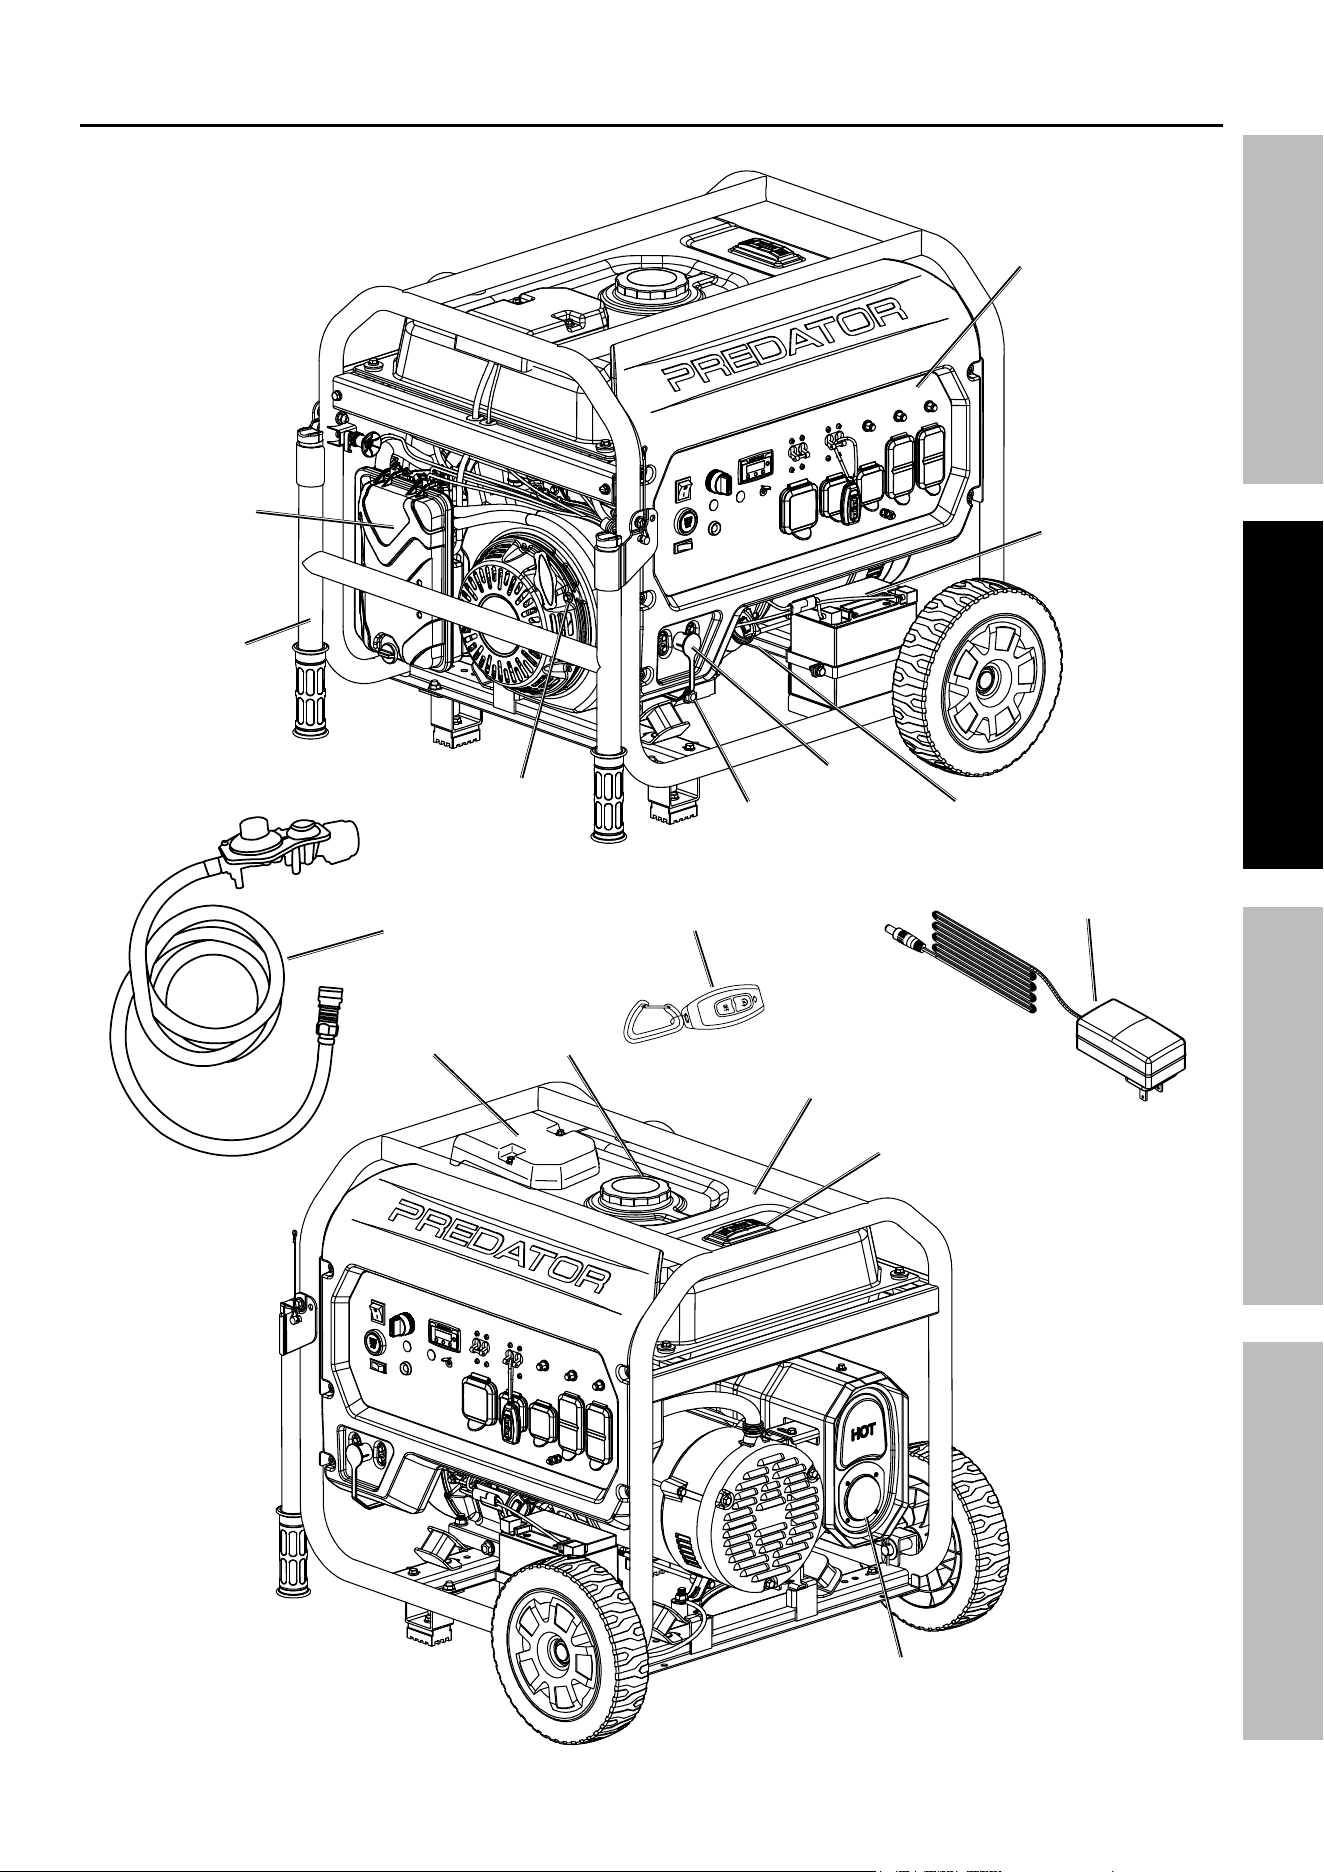
Components and Controls
Fuel Cap
Fuel pump
Fuel Gauge
Muffler
Fuel Tank
remote
Control
Battery
Charger / Maintainer
propane
attachment
Kit
Control
panel
Handle
Battery
Starter
Handle
Propane /
naturalGas
inlet
air Filter
Oil Fill
Cap / Dipstick
Oil
Drain plug
Page 16
For product assistance, please visit harborfreight.com/customer-support/contact-us
73151
SaFeTy OperaTiOn MainTenanCeSeTup
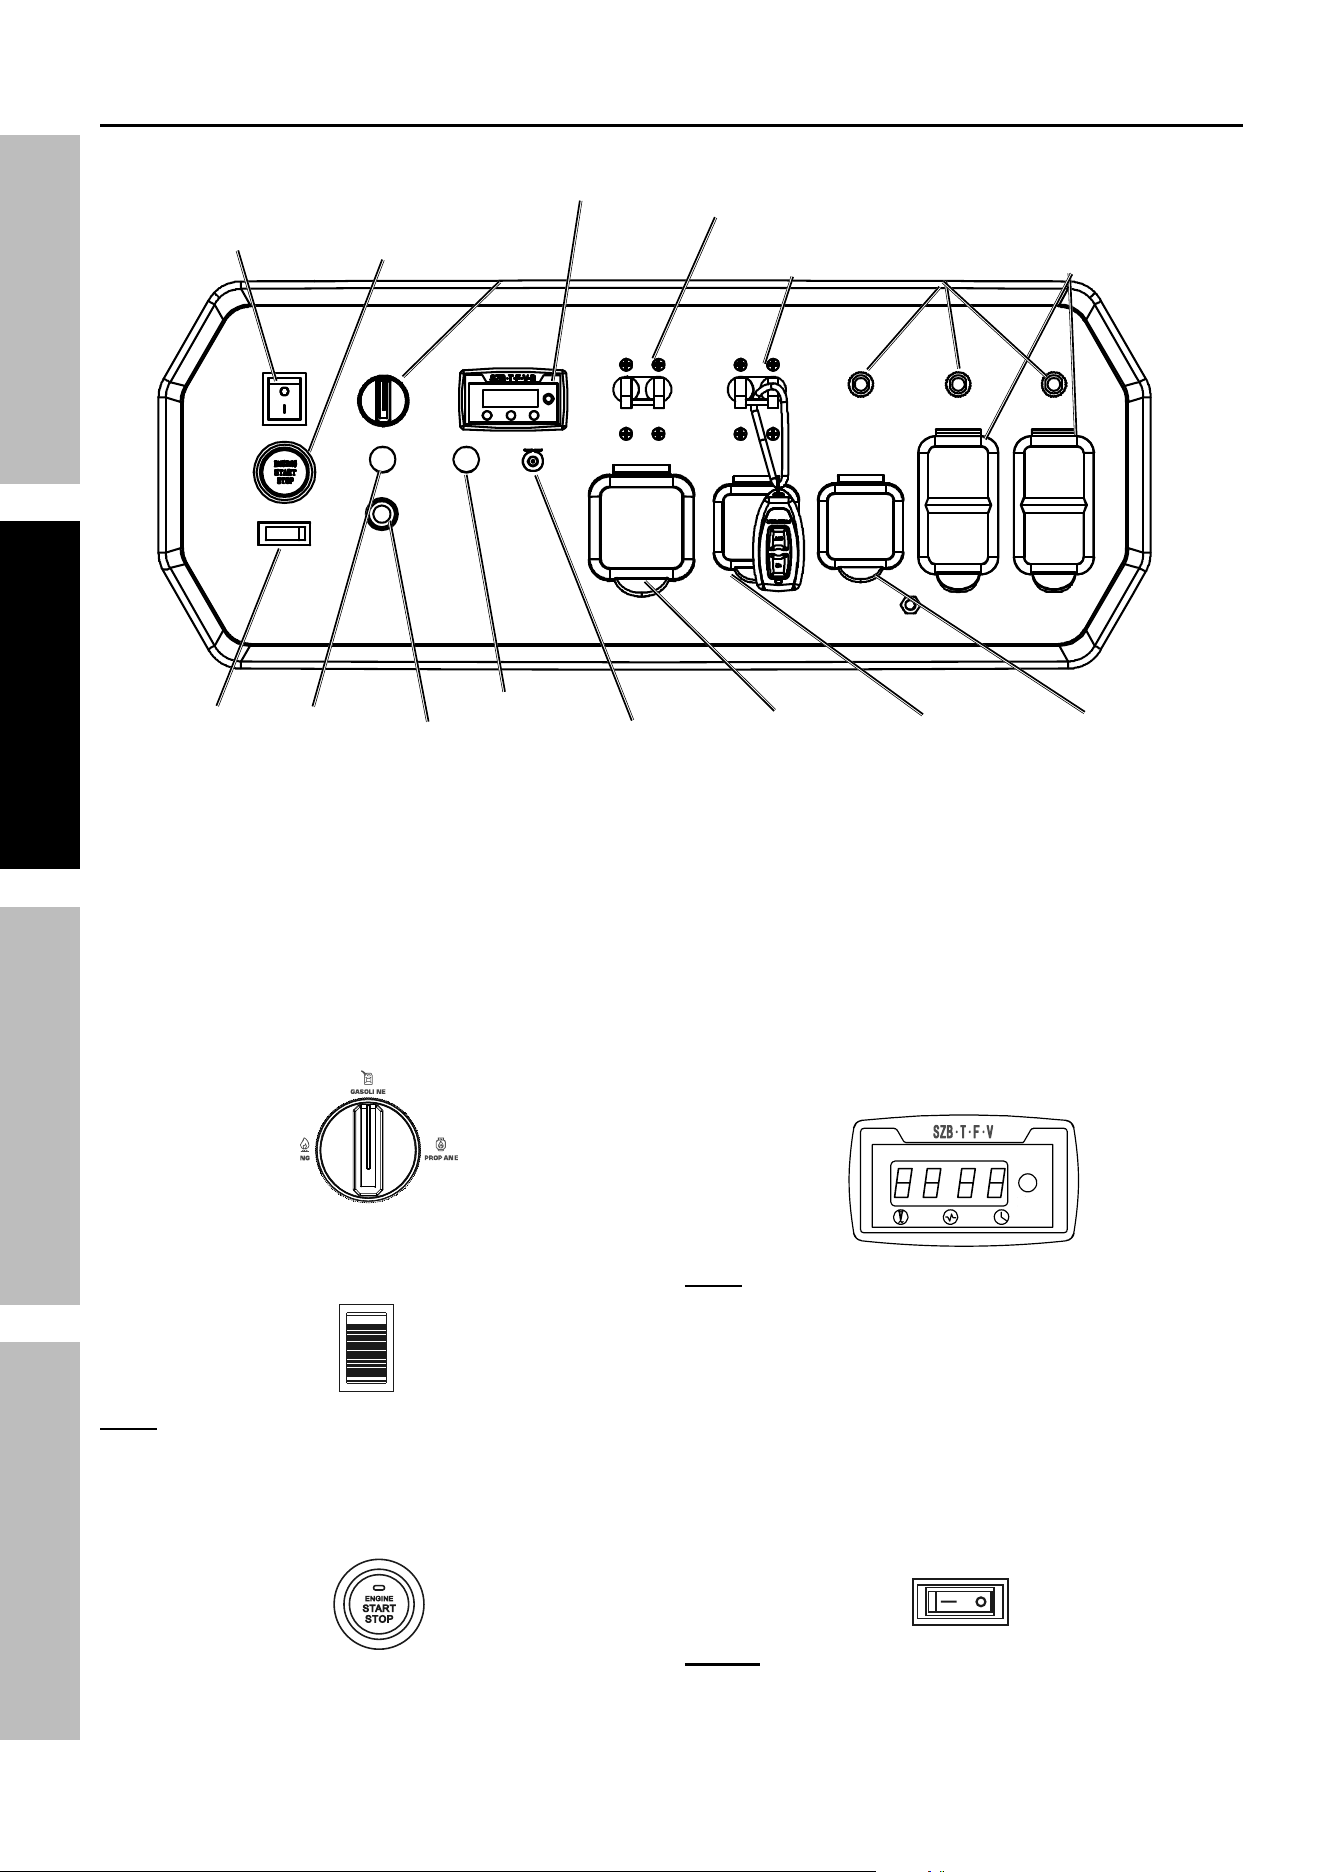
Components and Controls (continued)
Fuel
Selector
Switch
120 VAC
20 A GFCI
receptacles
(5-20r)
Low Oil
alert
eFi alert
engine
Stop / Start
Switch
automatic
idle Down
Switch
engine Switch
120 / 240 VAC
50 A Receptacle
(14-50r)
120 / 240 VAC
30 A Receptacle
(L14-30r)
120 VAC 30 A
receptacle
(L5-30r)
aC Breaker
50 A 120 / 240 V
Digital
Display
aC Breaker
30 A 120 / 240 V aC Breaker
Battery
Charging
port
CO Sensor alert
Control panel
The following are descriptions of the controls
on the Control Panel. Your Generator has
sockets to power your products with circuit
breakers to protect the voltage flow.
1. Fuel Selector Switch: Used to select from three
fuel types - Gasoline, Propane, or Natural Gas.
2. engine Switch: Push to On position to enable
starting remotely, electrically, or manually.
On
OFF
note: The included 12VDC Battery must be
connected and charged for system to operate.
3. Engine Stop / Start Switch: Used to
start and stop the Engine.
4. Digital Display: Press the Mode Button to
cycle through the Display’s functions:
• Voltage
(Displays U + voltage reading. Example: "U240")
• Frequency
(Displays F + frequency reading. Ex.: "F60")
• Current session runtime
• Total (accumulated) runtime
MODE
note: Every 50 hours, a blinking maintenance
reminder will appear on the screen (P050, P100,
P150, etc.) See Page 30 for maintenance
schedule. To clear a maintenance reminder, press
and hold the Mode Button for 5 seconds.
5. automatic idle Down Switch: Used to turn the
Engine Idle function ON or OFF. In ON position
Engine speed (and frequency) is reduced when no
load is detected. Engine runs at full speed (and
frequency) when load above 75 W is applied.
On OFF
notice: Turn Automatic Idle Switch OFF
when connected load is less than 300 W.
Page 17
For product assistance, please visit harborfreight.com/customer-support/contact-us
73151
SaFeTyOperaTiOnMainTenanCe SeTup
6. CO Sensor alert: Flashing red light indicates
dangerous levels of carbon monoxide gas
have built up. Flashing yellow light indicates
a carbon monoxide sensor malfunction.
Refer to Carbon Monoxide Shutoff on
page 25 for further information.
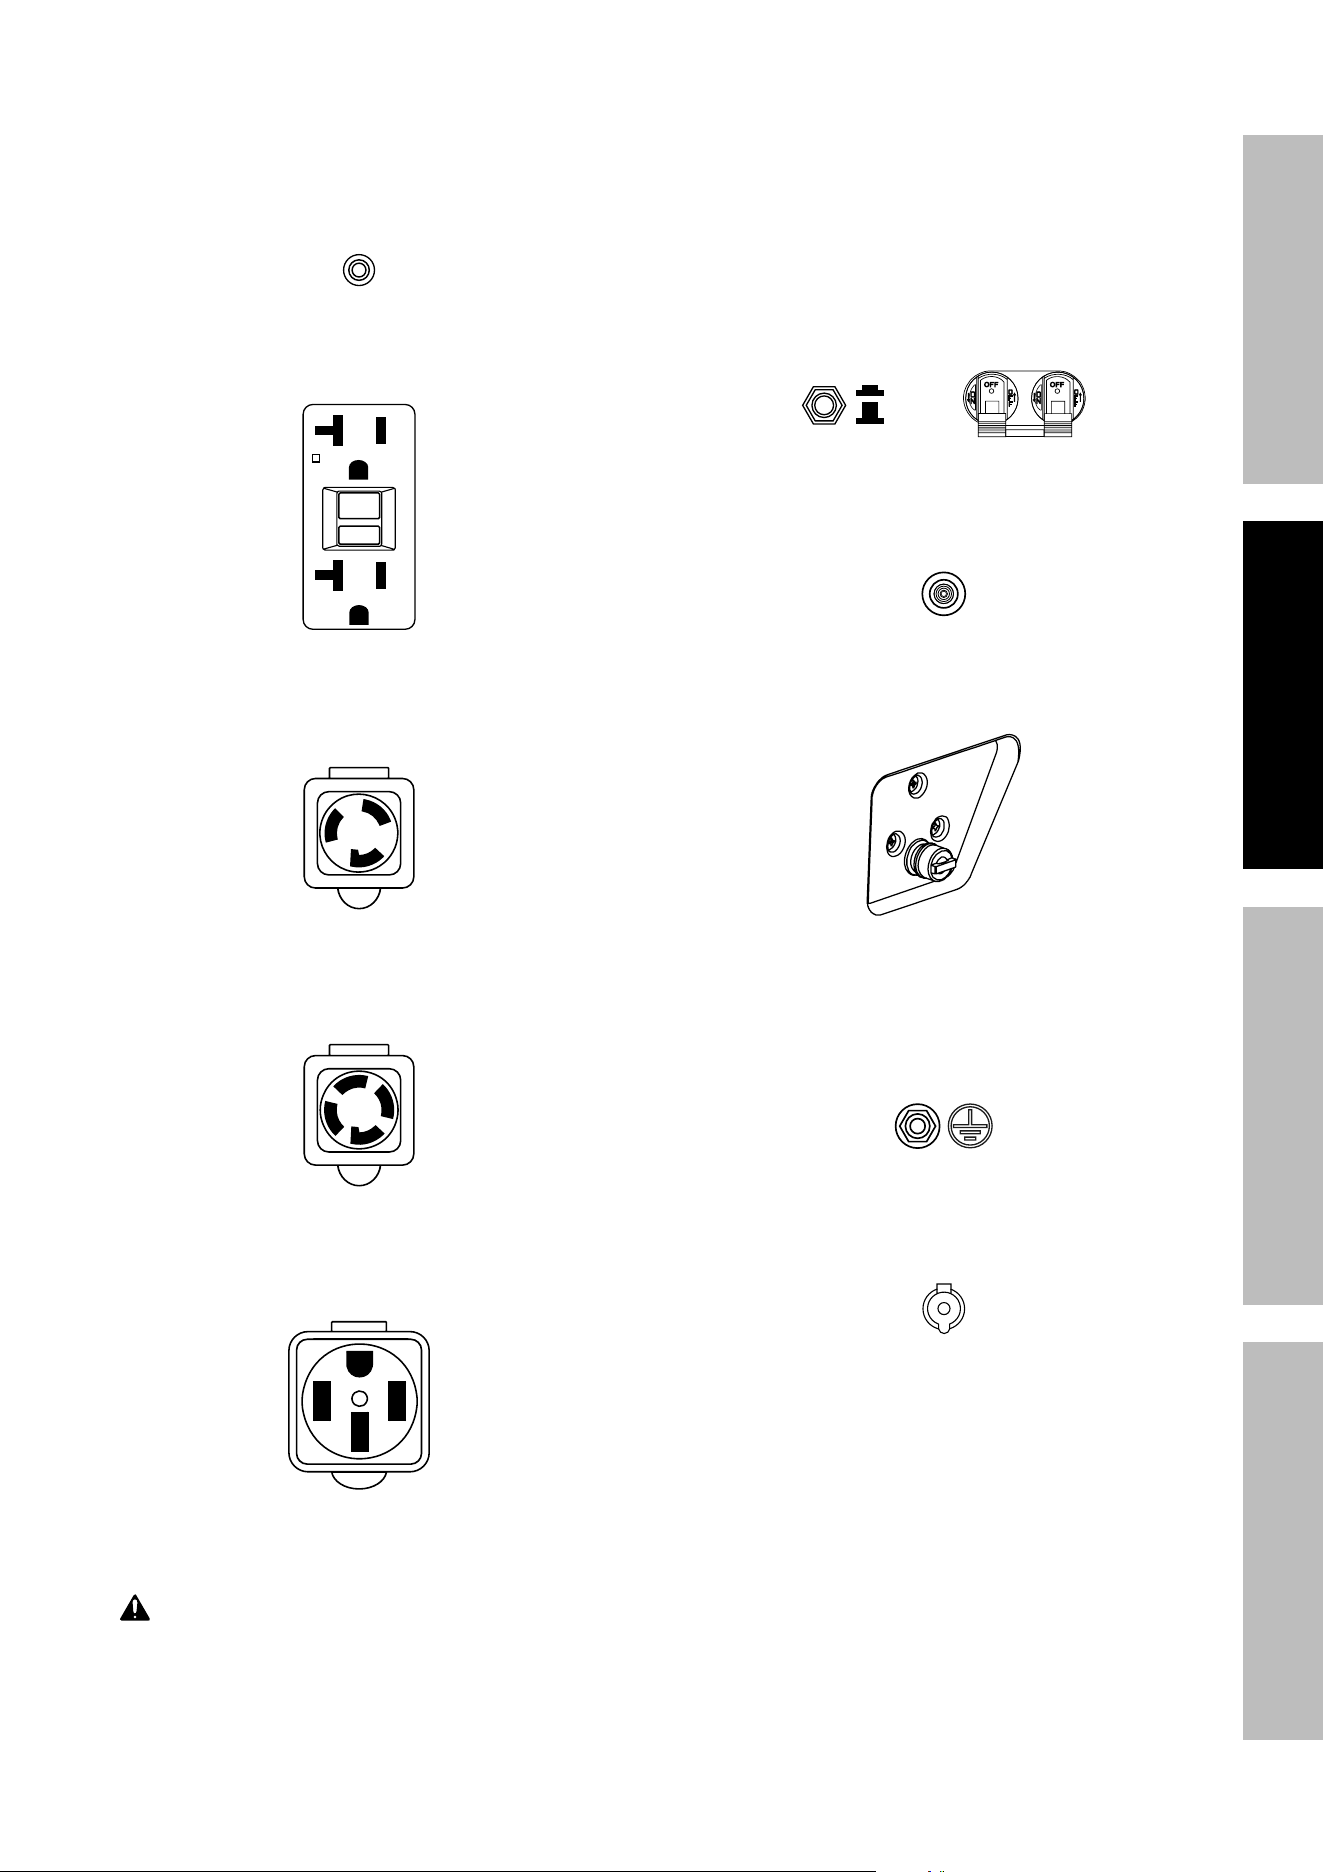
7. aC receptacles: The Generator contains several
AC Receptacles to power tools and equipment.
a.
reSeT
TeST
reSeT
TeST
3-Prong, duplex
120 volt GFCI receptacle
(NEMA 5-20R)
b. 3-Prong, twistlock,
120 volt 30 A receptacle
(NEMA L5-30R)
c. 4-Prong, twistlock,
120 / 240 volt 30 A receptacle
(NEMA L14-30R)
d. 4-Prong, 120 / 240 volt,
50 A receptacle
(NEMA 14-50R)
WarninG! TO preVenT SeriOuS inJury:
Connect tools and equipment only to the Receptacle
(120 volt or 240 volt) that is compatible with the
electrical characteristics and rated capacities
of the tools and equipment being used.
8. Circuit Breakers: The circuit breaker protects
the Generator from overloading. The rating of
the breaker and the load it protects are marked
near the breaker. Should any of the Circuit
Breakers trip, the Generator will stop the electricity
output. If this happens, unplug all loads from
the Generator. Then, turn the tripped Circuit
Breaker to ON and re-attach loads gradually.
note: For push-type Circuit Breakers allow a
few minutes for cool-down before resetting.
On
OFF
9. Low Oil alert: If the Engine oil level is too
low, the LOW OIL ALERT light turns on and
the Engine will automatically shut off.
10. propane and natural Gas Connector: Used to
connect Propane / Natural Gas hose to Generator.
11. Grounding Terminal: Prior to each use, set
up the ground wire (not included) connection to
the Grounding Terminal to properly ground the
Generator. Refer to Grounding on page 13
for instructions on grounding the Generator.
12. Battery Charging port: Used to charge
the 12 VDC Generator Battery using the
provided Battery Charger / Maintainer.
13. eFi alert: If any fault detected in the EFI system, the
EFI Alert will blink in certain pattern to indicate the
fault detected, see Troubleshooting on page 35.
Page 18
For product assistance, please visit harborfreight.com/customer-support/contact-us
73151
SaFeTy OperaTiOn MainTenanCeSeTup
Operation
read the enTire iMpOrTanT SaFeTy inFOrMaTiOn section at the beginning of this manual
including all text under subheadings therein before set up or use of this product.
pre-Start Checks
Only operate the generator outside and at least 20 feet away from people, animals, and structures, with
exhaust pointed away. Inspect Engine and Generator looking for damaged, loose, and missing parts
before set up and starting. If any problems are found, do not use equipment until fixed properly.
Checking and Filling engine Oil
nOTiCe: Generator is shipped without engine
oil. engine’s crankcase MuST be filled with
oil before first use. your Warranty is VOiD if
the engine’s crankcase is not properly filled
with oil before first use and before each use
thereafter. Before each use, check the oil level.
engine will not start with low or no engine oil.
1. Make sure the Engine is stopped and is level.
2. Clean the top of the Oil Fill Cap / Dipstick
and the area around it. Remove the
Cap / Dipstick by turning it counterclockwise
and wipe it off with a clean, lint free rag.
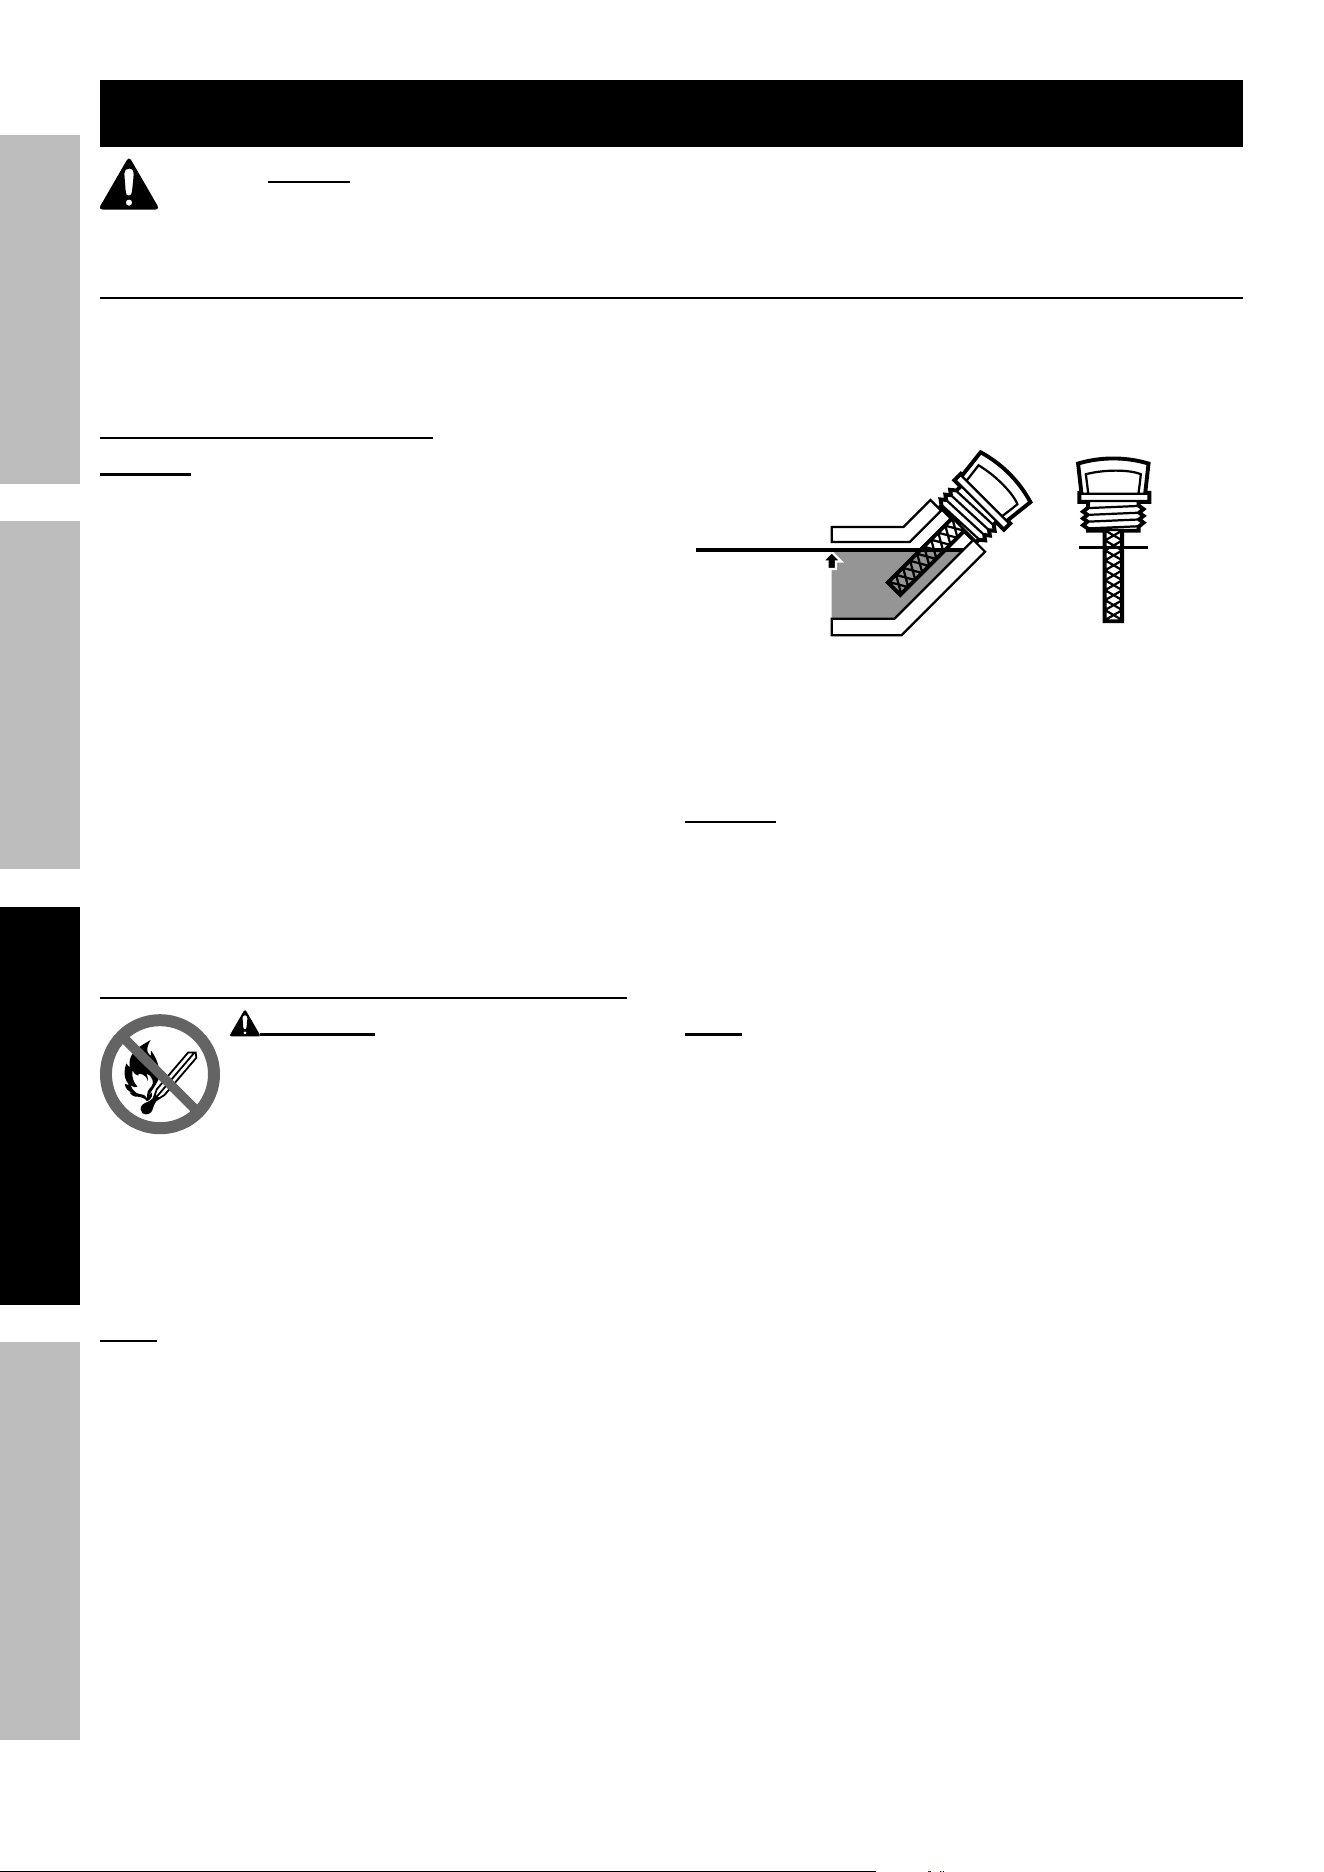
3. Add the appropriate type of oil until the oil level is at
the proper level. SAE 10W-30 oil is recommended
for general use. The SAE Viscosity Grade chart on
page 32 in the Maintenance section shows other
viscosities to use in different average temperatures.
Full Level
Full Level
4. Reinsert the Dipstick without threading it in and
remove it to check the oil level. The oil level
should be up to the edge of the hole as shown.
5. Thread the Oil Fill Cap / Dipstick back in clockwise.
nOTiCe: Do not run the engine with too little oil.
engine will shut off if engine oil level is too low.
For Gasoline Operation : Checking and Filling Fuel
WarninG! TO preVenT SeriOuS
inJury FrOM Fire:
Fill the fuel tank in a well-ventilated area
away from ignition sources. If the Engine
is hot from use, shut the Engine off and
wait for it to cool before adding fuel. Do not smoke.
1. Clean the Fuel Cap and the area around it.
2. Unscrew and remove the Fuel Cap.
3. Remove the Strainer and remove any dirt
and debris. Then replace the Strainer.
note: Do not use gasoline containing more than
10% ethanol (e10). Do not use e85 ethanol. add fuel
stabilizer to the gasoline or the Warranty is VOiD.
note: Do not use gasoline that has been stored in a
metal fuel container or a dirty fuel container. it can
cause particles to enter the carburetor, affecting
engine performance and/or causing damage.
4. If needed, fill the Fuel Tank to about 1 inch under
the fill neck of the Fuel Tank with 87 octane or
higher unleaded gasoline that has been treated
with a fuel stabilizer additive. Follow fuel stabilizer
manufacturer’s recommendations for use.
5. Replace the Fuel Cap.
6. Wipe up any spilled fuel and allow excess
to evaporate before starting engine.
To prevent FIRE, do not start the engine
while the smell of fuel hangs in the air.
Page 19
For product assistance, please visit harborfreight.com/customer-support/contact-us
73151
SaFeTyOperaTiOnMainTenanCe SeTup
For propane Operation : Connecting Propane Tank
a. propane and natural Gas systems must be installed and used in strict conformance with
nFpa 58 (Liquefied petroleum Gas Code), nFpa 54 (national Fuel Gas Code), manufacturer's
recommendations, and all relevant local, state, and federal codes and regulations.
b. The Propane tank capacity must be minimum 40 lb or larger to avoid tank freezing during
use. Tank must conform to the standard as listed in Setup precautions section.
c. propane tanks that use a liquid withdrawal system cannot be
used with this Generator.
d. Verify the re-qualification date on the tank has not expired.
e. Connect Propane tank using provided attachment kit only. Kit includes
1.5 meter (4.9 ft) Hose. place tank as far away from Generator as Hose allows
and away from engine exhaust. Do not place tank above Generator.
Do not use included propane Hose with any other appliances.
f. all new tanks or used tanks that have not been plugged or kept closed
must be purged of air and moisture by a propane supplier prior to filling.
g. position the tank so the connection between the tank valve and the
Propane / Natural Gas Inlet will not cause sharp bends or kinks in the Hose.
h. inspect the propane Hose before every use.
Do not use damaged equipment. if damage is detected,
have the problem corrected before further use.
WarninG! eXpLOSiOn HaZarD.
TO preVenT SeriOuS inJury:
Do not start the engine if the smell of
Propane hangs in the air. Close the
propane tank valve and disconnect
the Propane hose from the Generator when not in use.
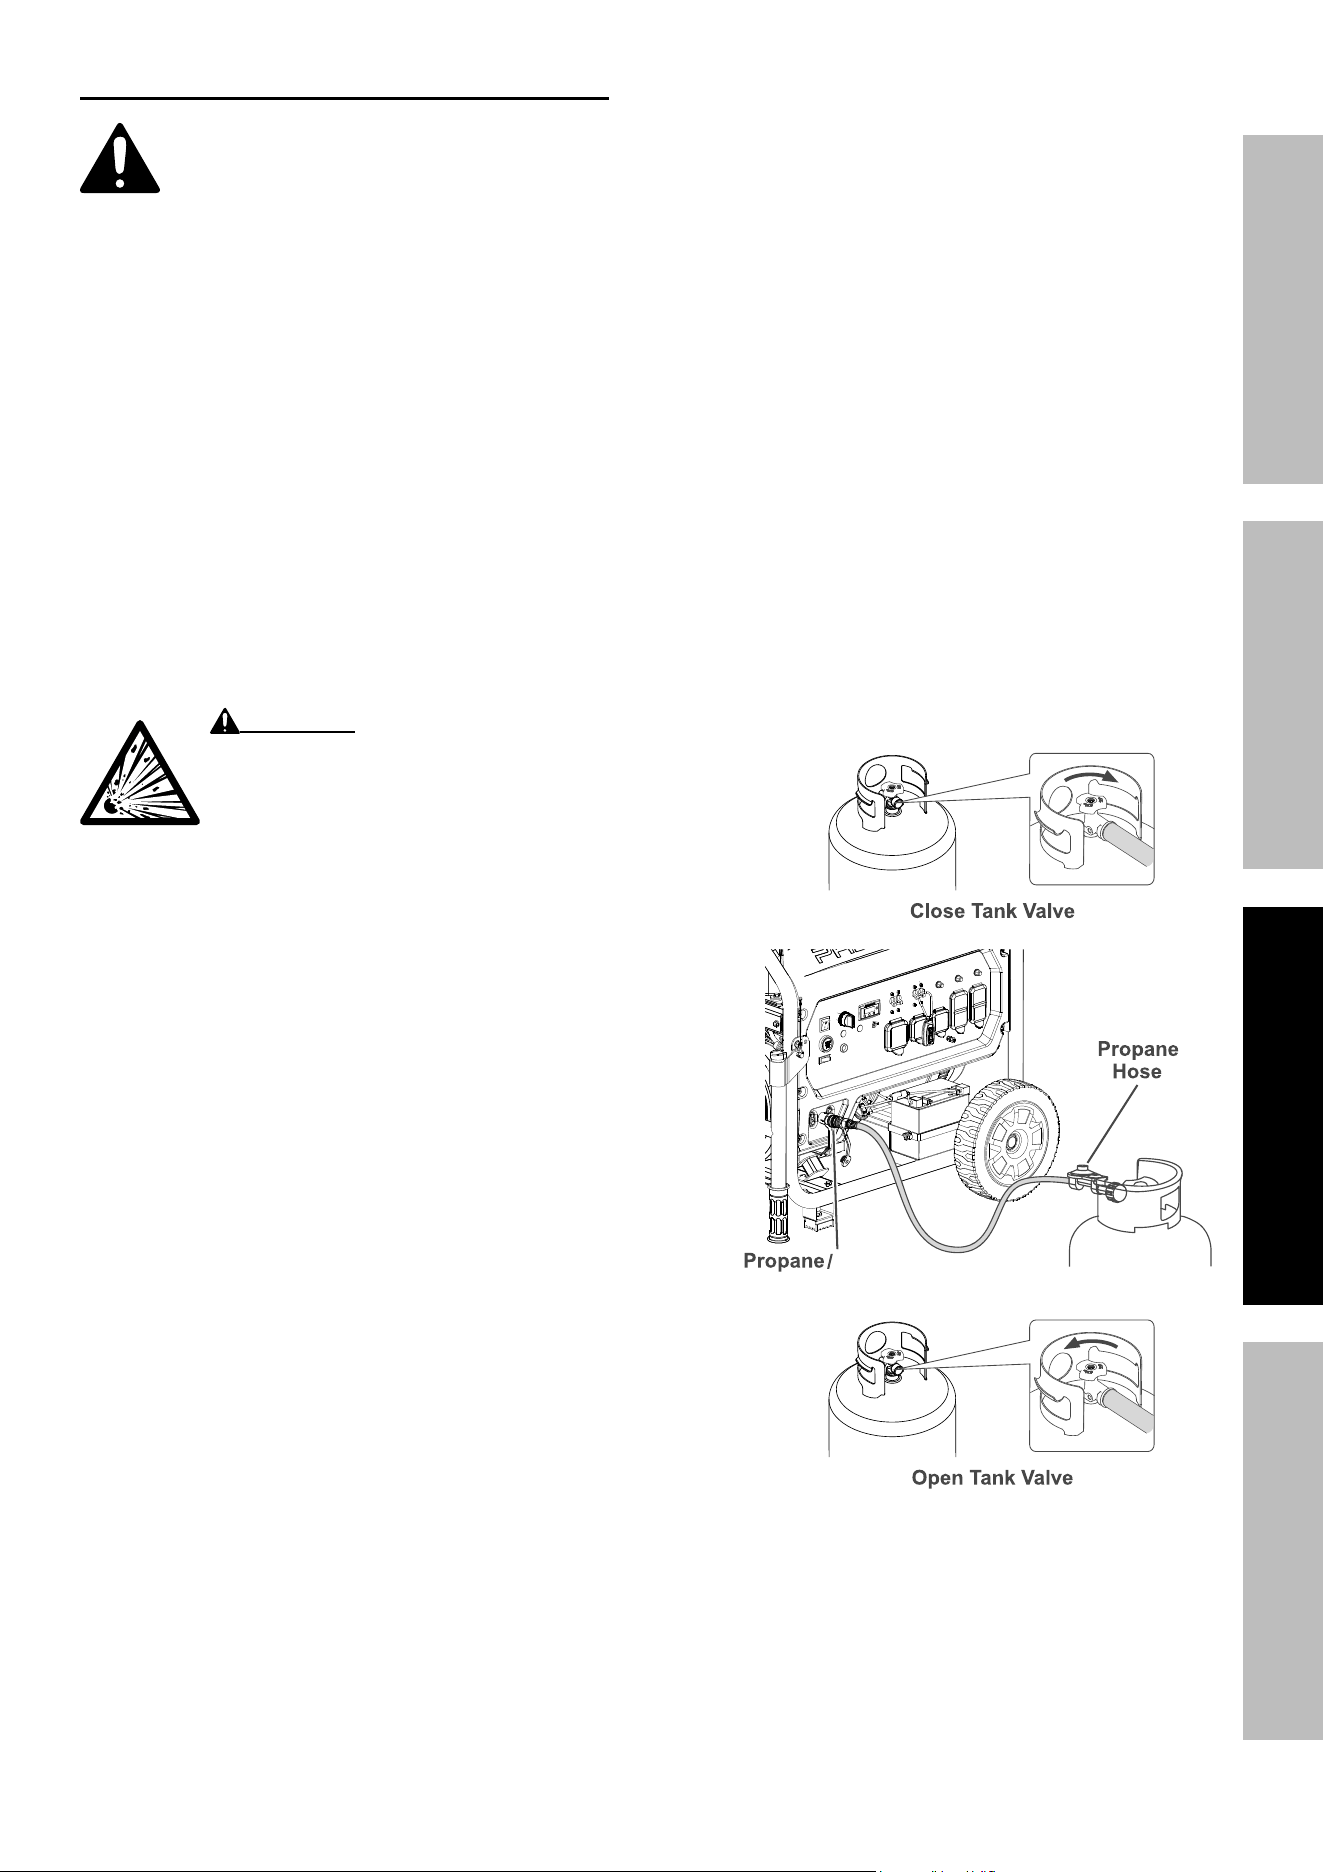
1. Turn the Generator OFF and place on a
flat surface in a well ventilated area.
2. Verify that the propane tank valve
is in the fully closed position.
3. Attach the Quick Connect Adapter on the
Propane Hose to the Propane / Natural
Gas Inlet on the Generator.
4. Remove the safety plug or cap from
the propane tank valve.
5. Attach the other end of the Hose to the Propane
connector on the tank. Hand tighten clockwise
to a positive stop. To prevent damage, do not
use a wrench or tool to tighten the connector.
6. Turn the propane tank valve to the fully open
position. Check for leaks by applying soapy water
to all connections. Look for bubbles. If bubbles
are present at connections, close the propane tank
valve and tighten connections. Open the valve
and recheck connections. If a leak continues or
is not at a connection do not use the Generator.
Have the problem corrected before further use.
Natural Gas Inlet
Page 20
For product assistance, please visit harborfreight.com/customer-support/contact-us
73151
SaFeTy OperaTiOn MainTenanCeSeTup
For natural Gas Operation : Connecting to Natural Gas Source
a. Propane and Natural Gas systems must be installed and used in strict conformance with
nFpa 58 (Liquefied petroleum Gas Code), nFpa 54 (national Fuel Gas Code), manufacturer's
recommendations, and all relevant local, state, and federal codes and regulations.
b. natural Gas source must meet requirements listed in Specifications chart on page 3.
c. Connect to natural Gas source using preDaTOr
®
1/2" natural Gas Quick
Connect Hose Kit only, item 70491 (not included). Kit includes
7.6 meter (25 ft) Hose. Do not use natural Gas Hose with any other appliances.
d. an natural Gas shutoff valve (not included) must be installed
before connecting the natural Gas Hose. Do not connect
natural Gas Hose directly to the natural Gas source.
e. position the Generator so the connection between the natural Gas shutoff valve
and the Propane / Natural Gas Inlet will not cause sharp bends or kinks in the Hose.
f. Make sure the natural Gas source location and the natural Gas Hose allow
the Generator to be located at least 20 feet from any occupied spaces.
g. inspect the natural Gas Hose before every use. Do not use damaged equipment.
if damage is detected, have the problem corrected before further use.
WarninG! eXpLOSiOn HaZarD. TO preVenT SeriOuS inJury:
Do not start the engine if the smell of Natural Gas hangs in the air. Close the
NG shutoff valve and disconnect the Natural Gas hose from the Generator when not in use.
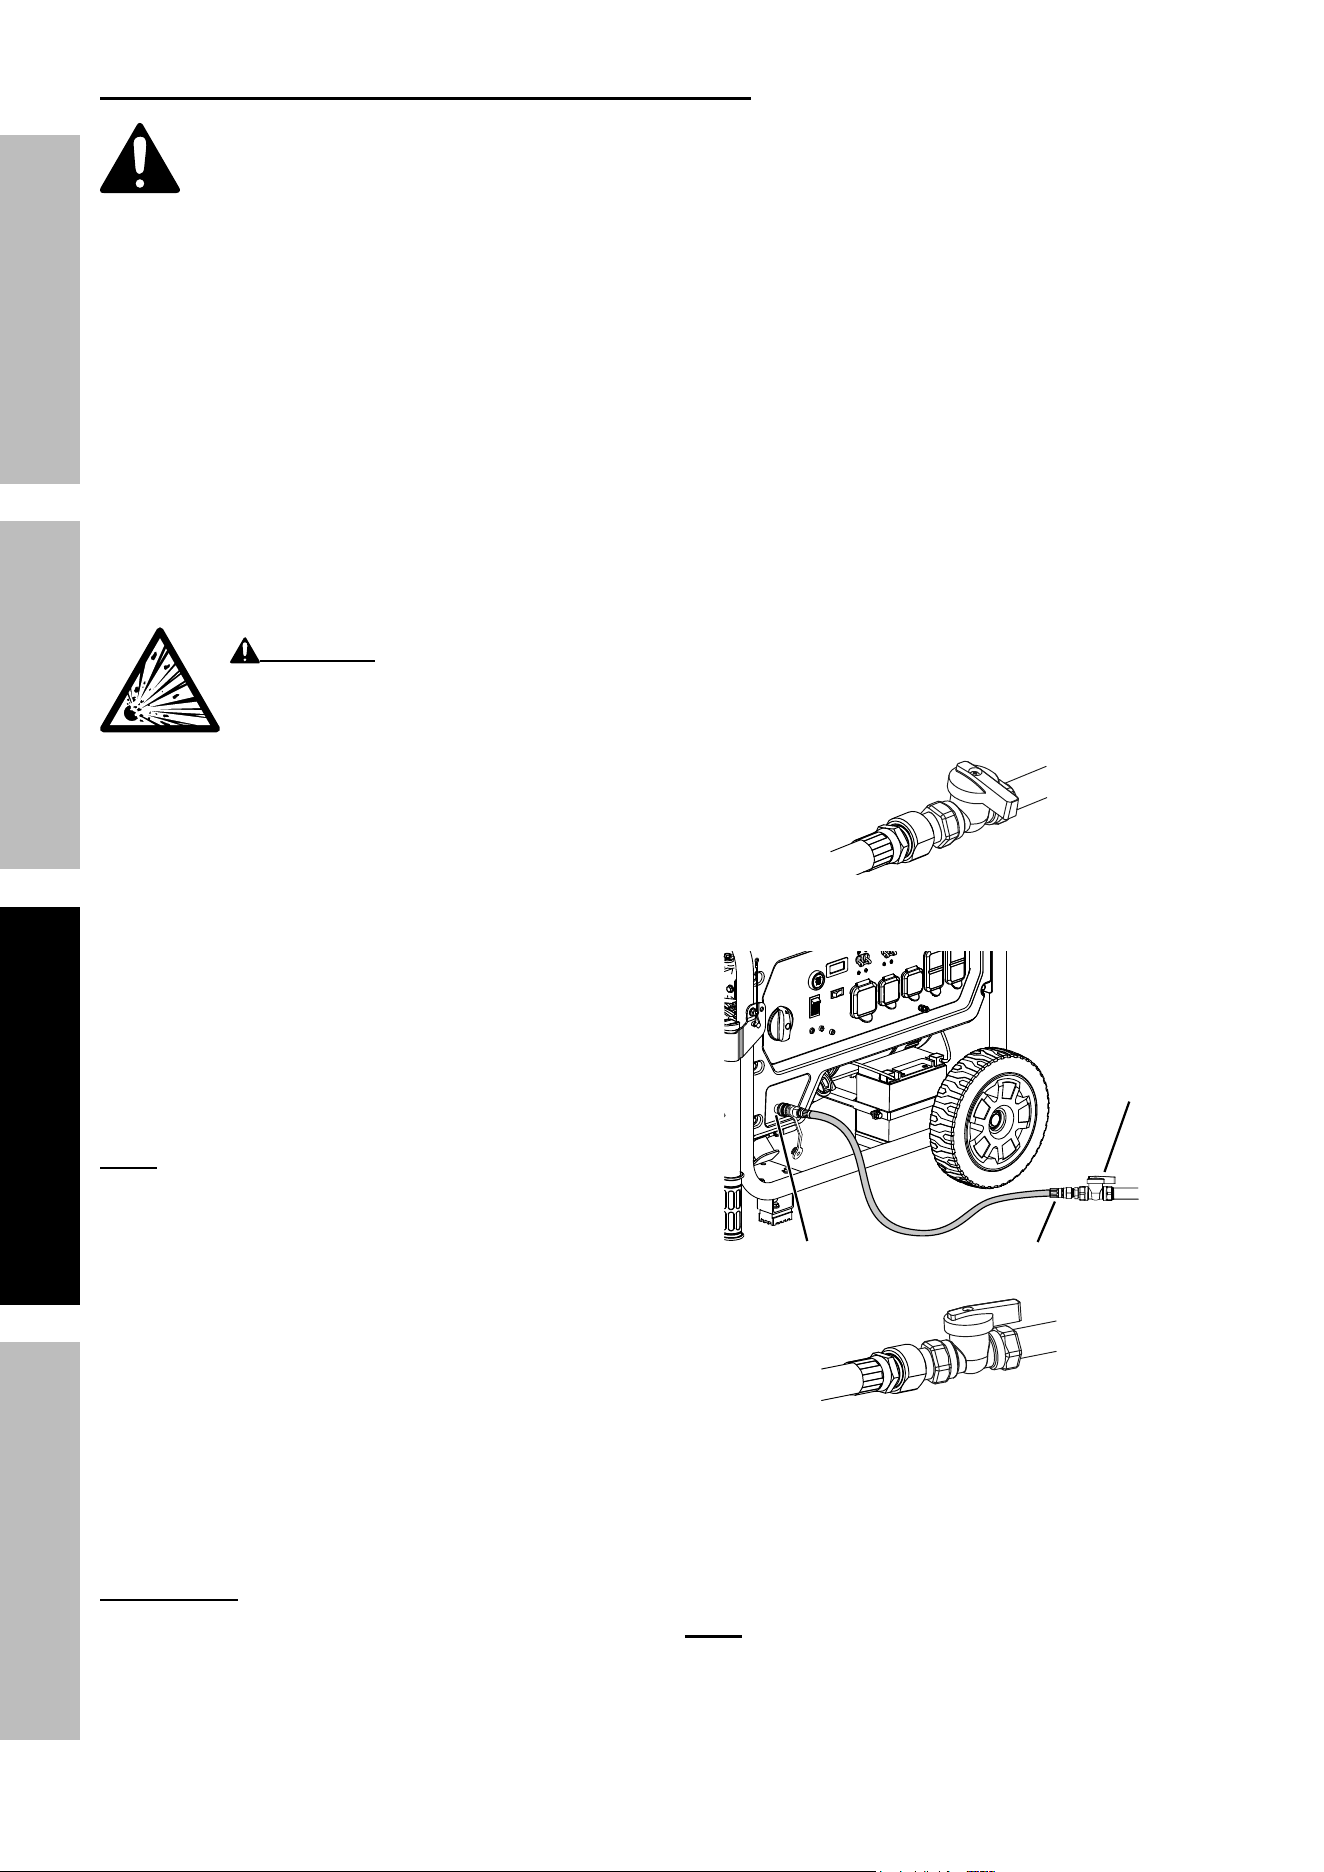
1. Turn the Generator OFF and place on a
flat surface in a well ventilated area.
2. Verify that the Natural Gas shutoff valve
is in the fully closed position.
3. Attach the Quick Connect Adapter on the
Natural Gas Hose to the Propane / Natural
Gas Inlet on the Generator.
4. Connect the Coupling from the Natural Gas Hose
Kit to the shutoff valve, then connect the
Natural Gas Hose assembly to Coupling.
note: natural gas pipe sealant, joint
compound, or the proper type of pTFe tape
must be used OnLy for the connection
from the Coupling to the shutoff valve.
5. Turn the Natural Gas shutoff valve to the fully open
position. Check for leaks by applying soapy water
to all connections and joints. Look for bubbles.
If bubbles are present at connections, close the
shutoff valve and tighten connections. Open the
valve and recheck connections. If a leak continues
or is not at a connection do not use the Generator.
Have the problem corrected before further use.
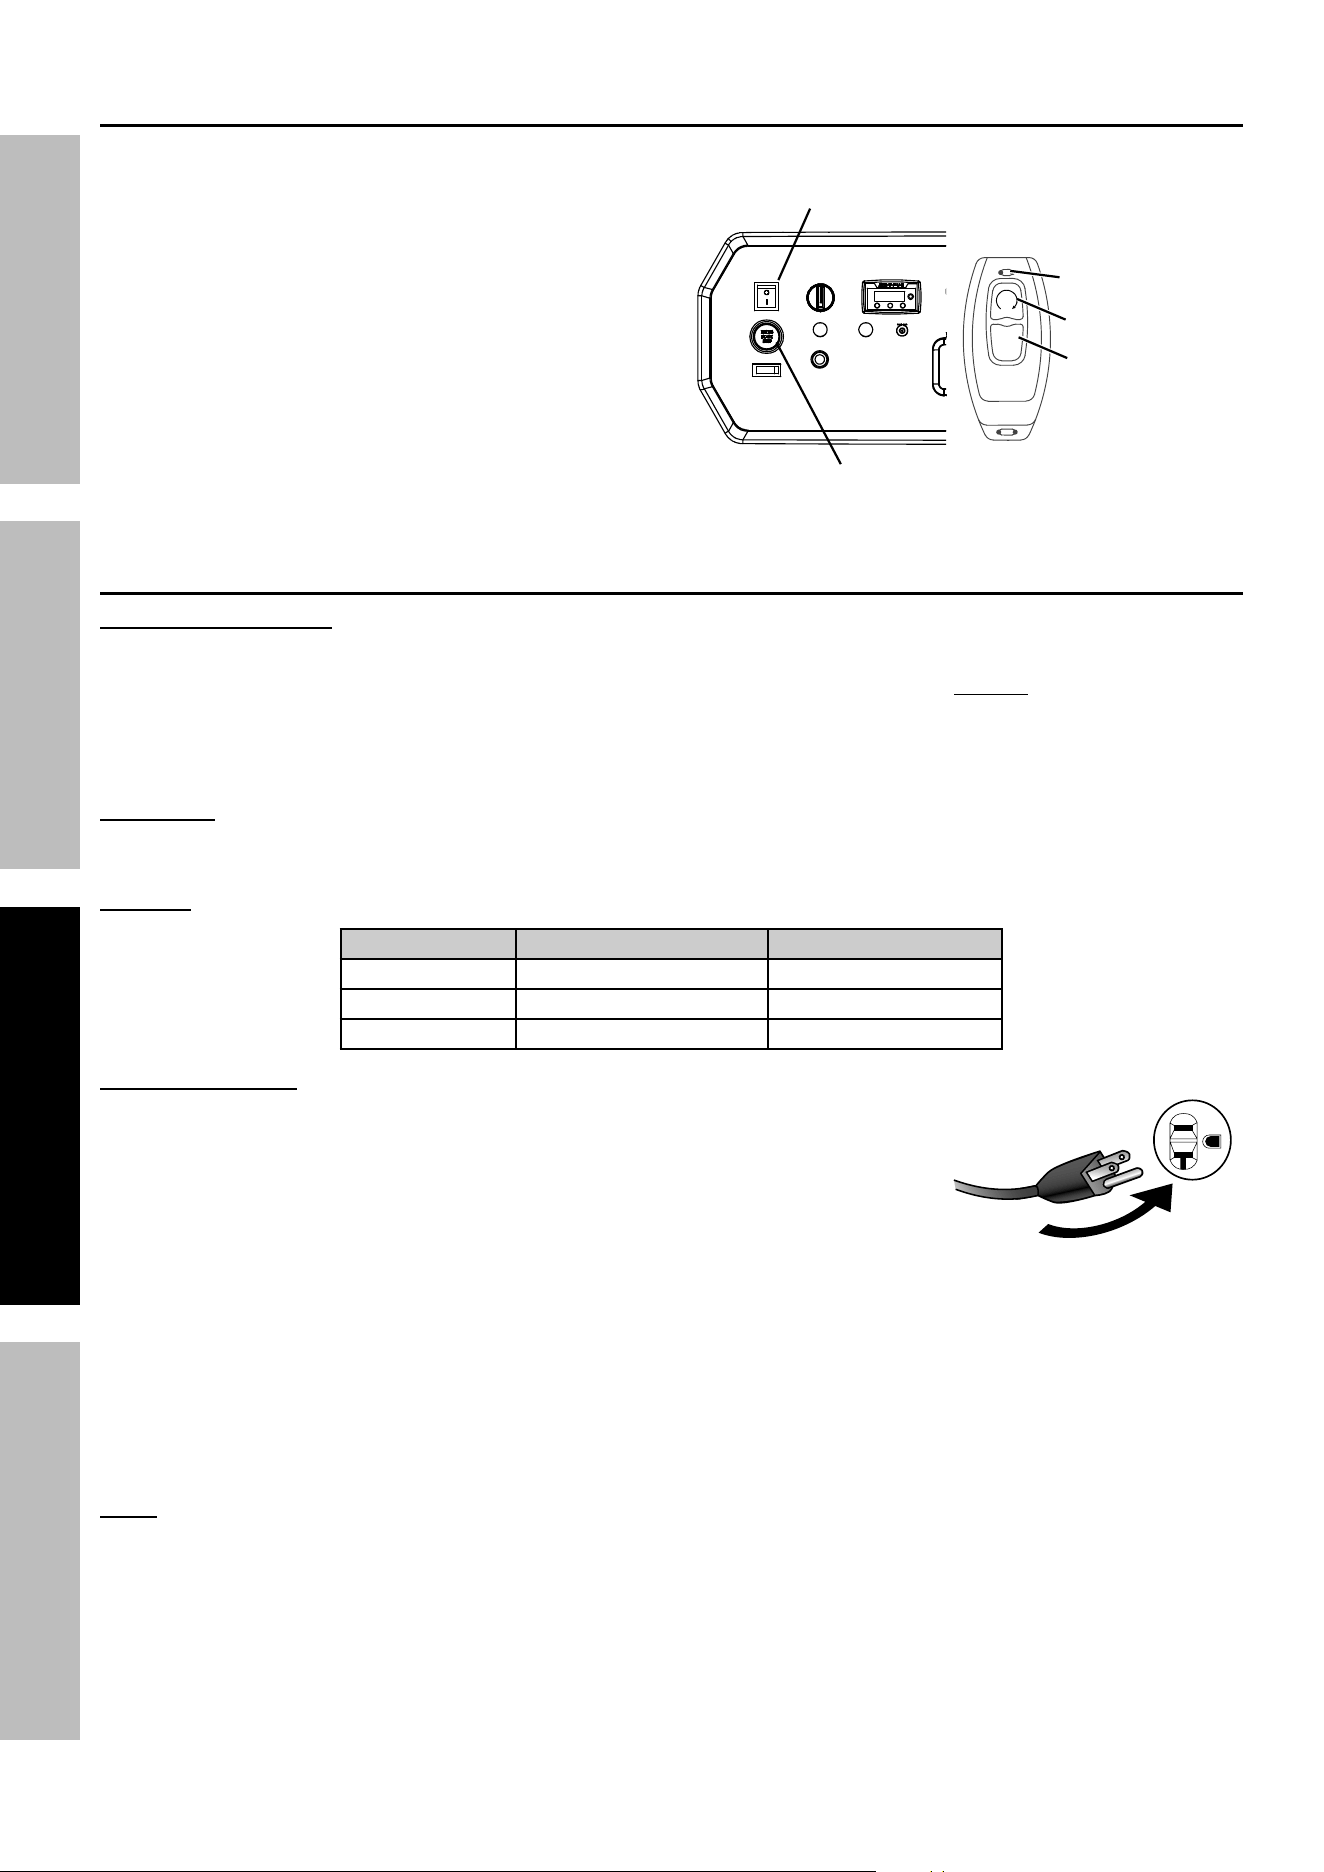
remote Start
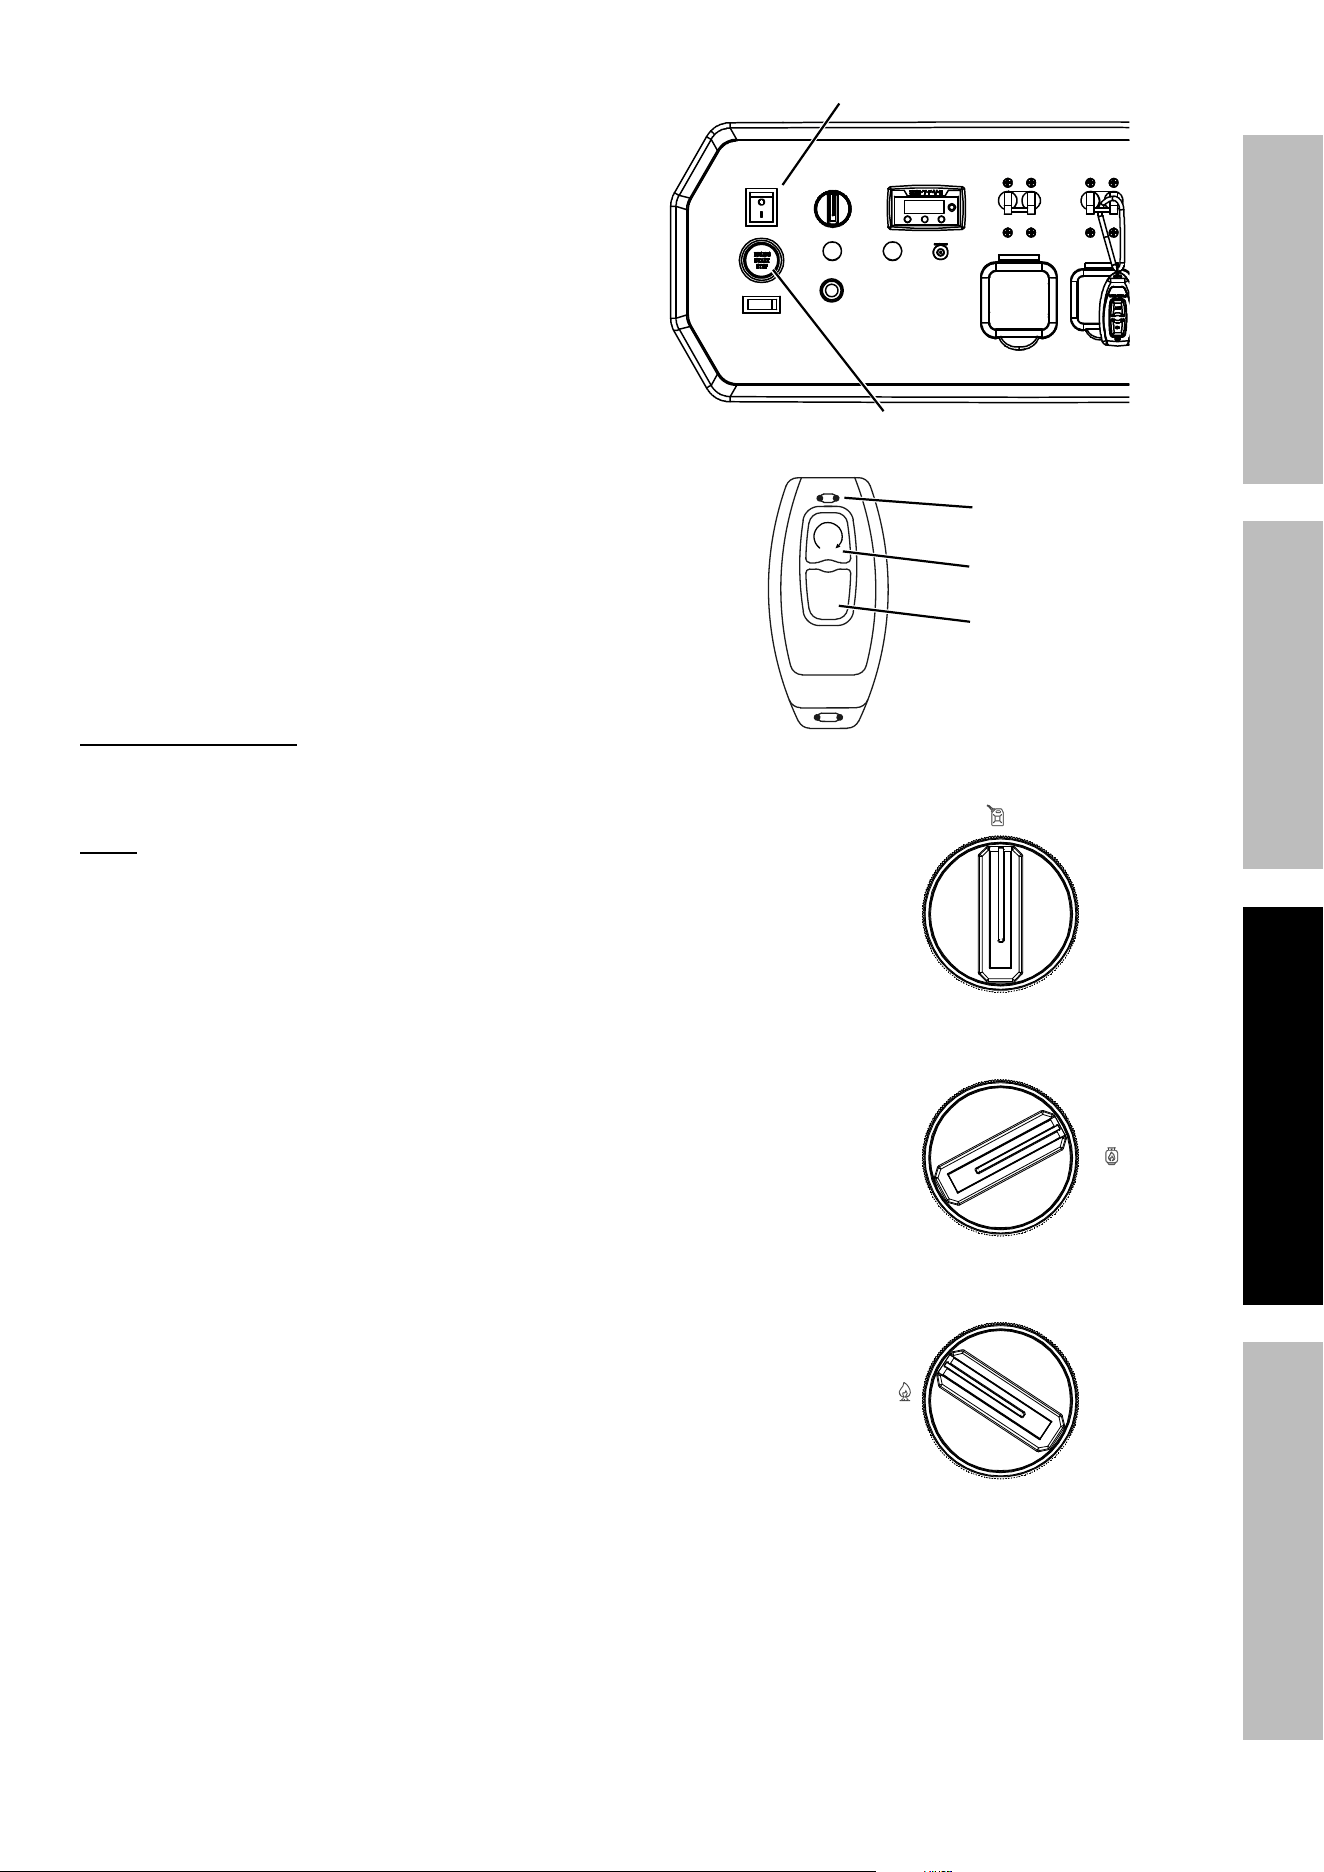
The Start / Stop Remote Control will operate up
to approximately 100 feet in distance from the
Generator. The distance at which the Remote will
function may be adversely affected by obstructions
between the Generator and the Remote Control.
note: The operational range of the Remote Control may
decrease as the battery in the Remote become depleted.
Remote replacement battery: CR2032
Propane / Natural
Gas inlet
natural Gas
Hose
natural Gas
Shutoff Valve
Close natural
Gas
Open natural Gas
Page 21
For product assistance, please visit harborfreight.com/customer-support/contact-us
73151
SaFeTyOperaTiOnMainTenanCe SeTup
Reprogramming the Start/Stop Remote Control
If the Start/Stop Remote Control is
replaced or needs to be paired to the
generator, follow this procedure:
1. Push the Engine Switch
to the ON position.
2. Push and hold the Engine Start /
Stop Switch for 15 seconds until the
Switch Indicator Light flashes green
and red, then release the Switch.
3. Push the 2x button on the Stop/Start Remote
Control. It will pair with Generator and the Switch
Indicator Light on the Generator will stop flashing.
Fuel Selector Switch
Turn the Fuel Selector Switch on the Control
Panel to the desired fuel setting.
note: The included 12VDC Battery must be
connected and charged for system to operate.
1. To operate the Generator on gasoline turn the
Fuel Selector Switch to the GASOLINE setting.
2. To operate the Generator on Propane turn the Fuel
Selector Switch to the PROPANE setting.
3. To operate the Generator on Natural Gas turn the
Fuel Selector Switch to the Natural Gas setting.
2x
OFF
remote Control
activation Light
OFF Button
On (2x) Button
engine Switch
Engine Stop / Start
Switch
NATURAL
GAS
PROPANE
GASOLINE
Page 22
For product assistance, please visit harborfreight.com/customer-support/contact-us
73151
SaFeTy OperaTiOn MainTenanCeSeTup
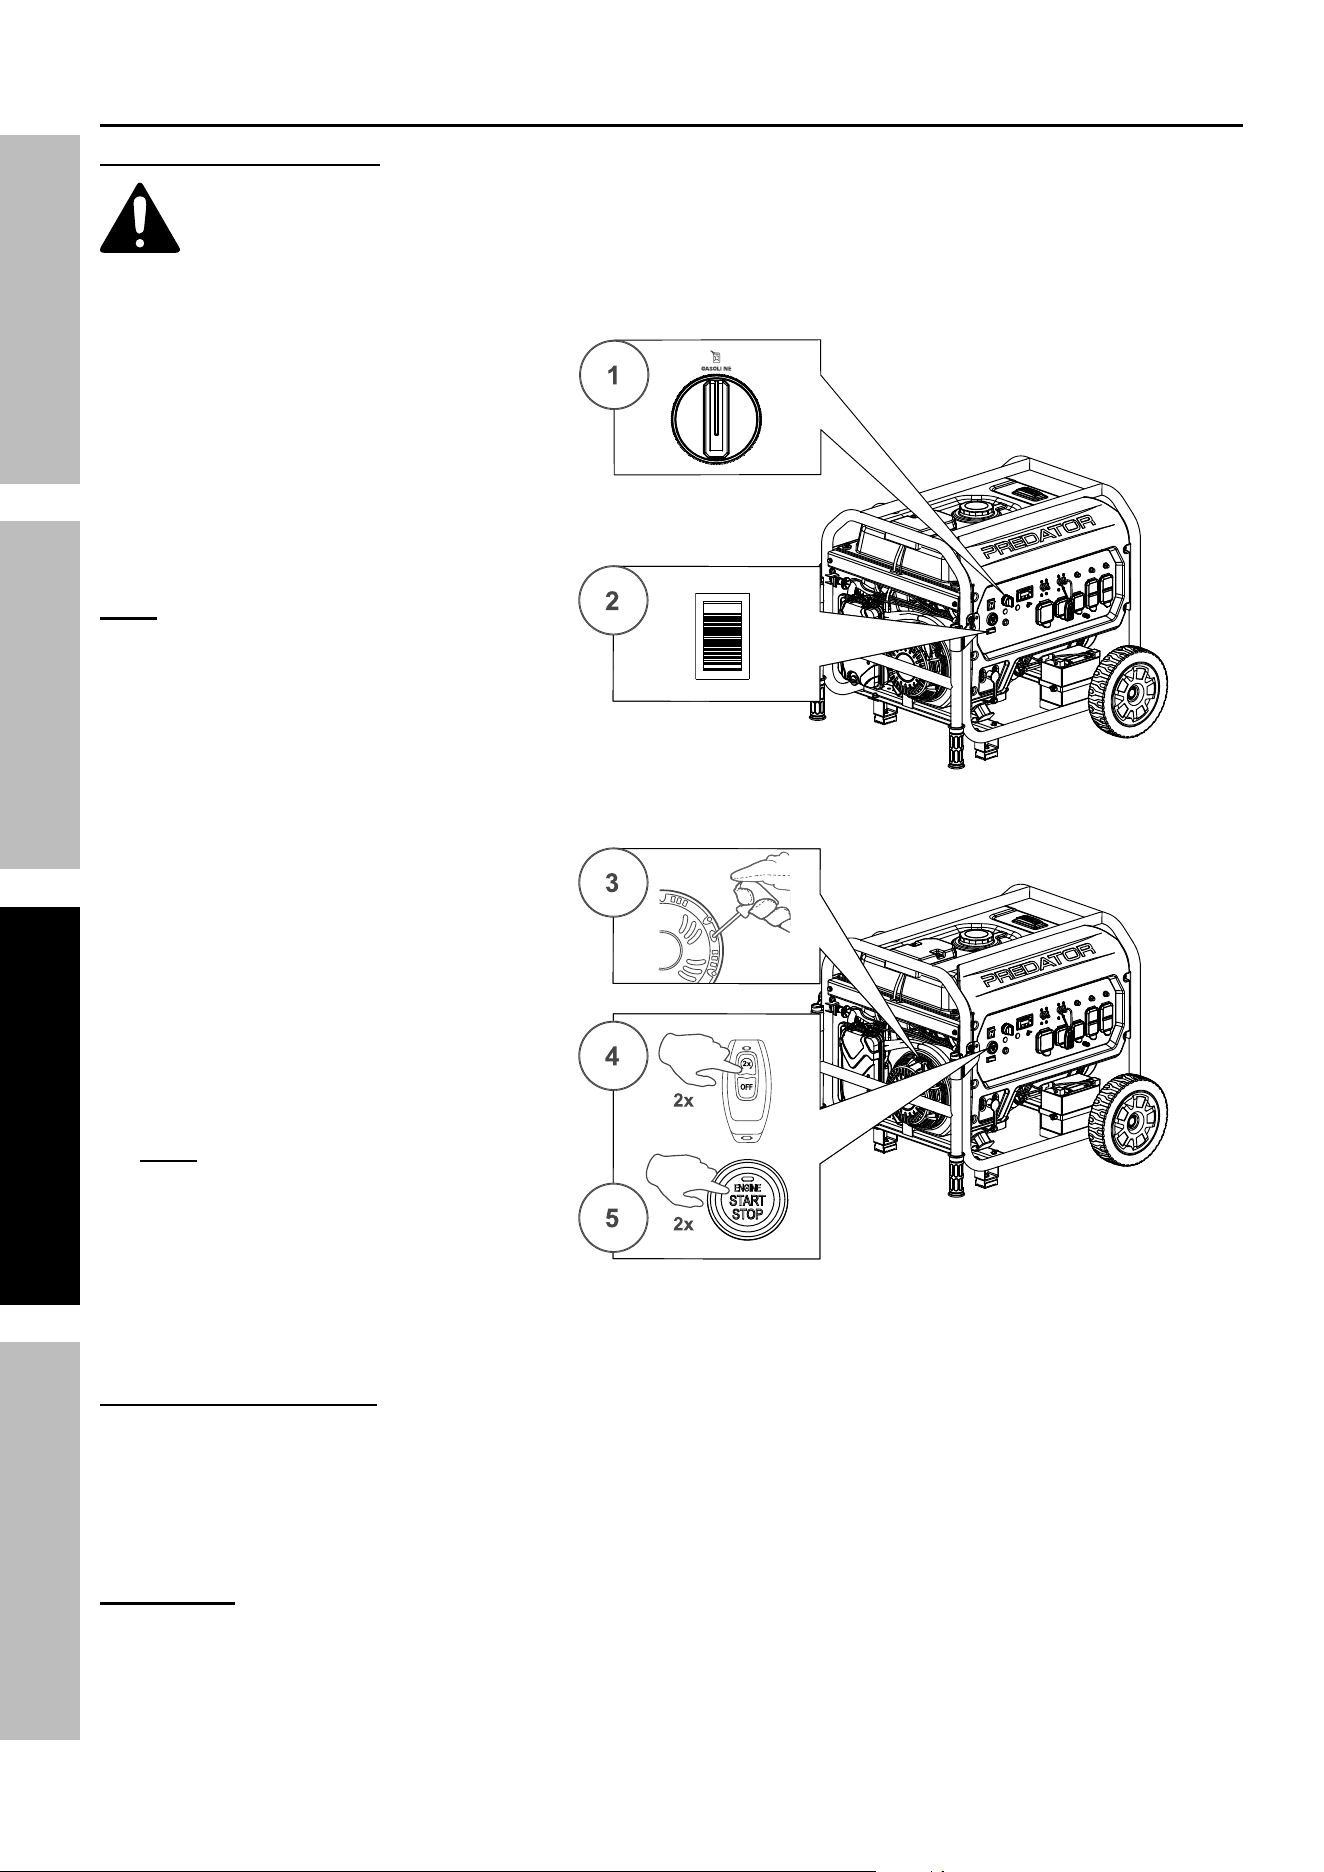
Starting the engine – Gasoline Operation
Before Starting the engine
a. inspect the generator and engine.
b. Disconnect all electrical loads from the generator.
c. Fill the engine with the proper amount and type of
both stabilizer-treated unleaded gasoline and oil.
d. Make sure Battery is connected and charged.
1. Turn the Fuel Selector Switch
to the GASOLINE setting.
2. Push the Engine Switch
to the ON position.
note: The included 12VDC Battery
must be connected and charged for
system to operate.
Select a starting method:
3. Manual Start: Pull the Starter
Handle gently until resistance is felt.
Allow Cable to retract fully and
then pull it quickly. Repeat until
the Engine starts. Do not let the
Starter Handle snap back against
the housing. Hold it as it recoils
so it doesn't hit the housing.
4. remote Start: Slowly press
and release the 2x Button on
the Stop / Start Remote Control
twice.
note: If a CO shutoff event
has occurred the remote start
capability will be disabled until
the Generator Engine has been
restarted by another method.
5. electric Start: Slowly press
and release the Engine Start / Stop
Switch twice.
if engine does not start:
• Check engine oil level.
Engine will not start with low or no engine oil.
• Check spark arrestor cleanliness.
Engine will not start if spark arrestor is clogged.
• Check 12VDC Battery.
Engine will not start if battery is low or is disconnected.
iMpOrTanT: Allow the Engine to run at no load for five minutes after each start-up so that the Engine can stabilize.
ON
OFF
Page 23
For product assistance, please visit harborfreight.com/customer-support/contact-us
73151
SaFeTyOperaTiOnMainTenanCe SeTup
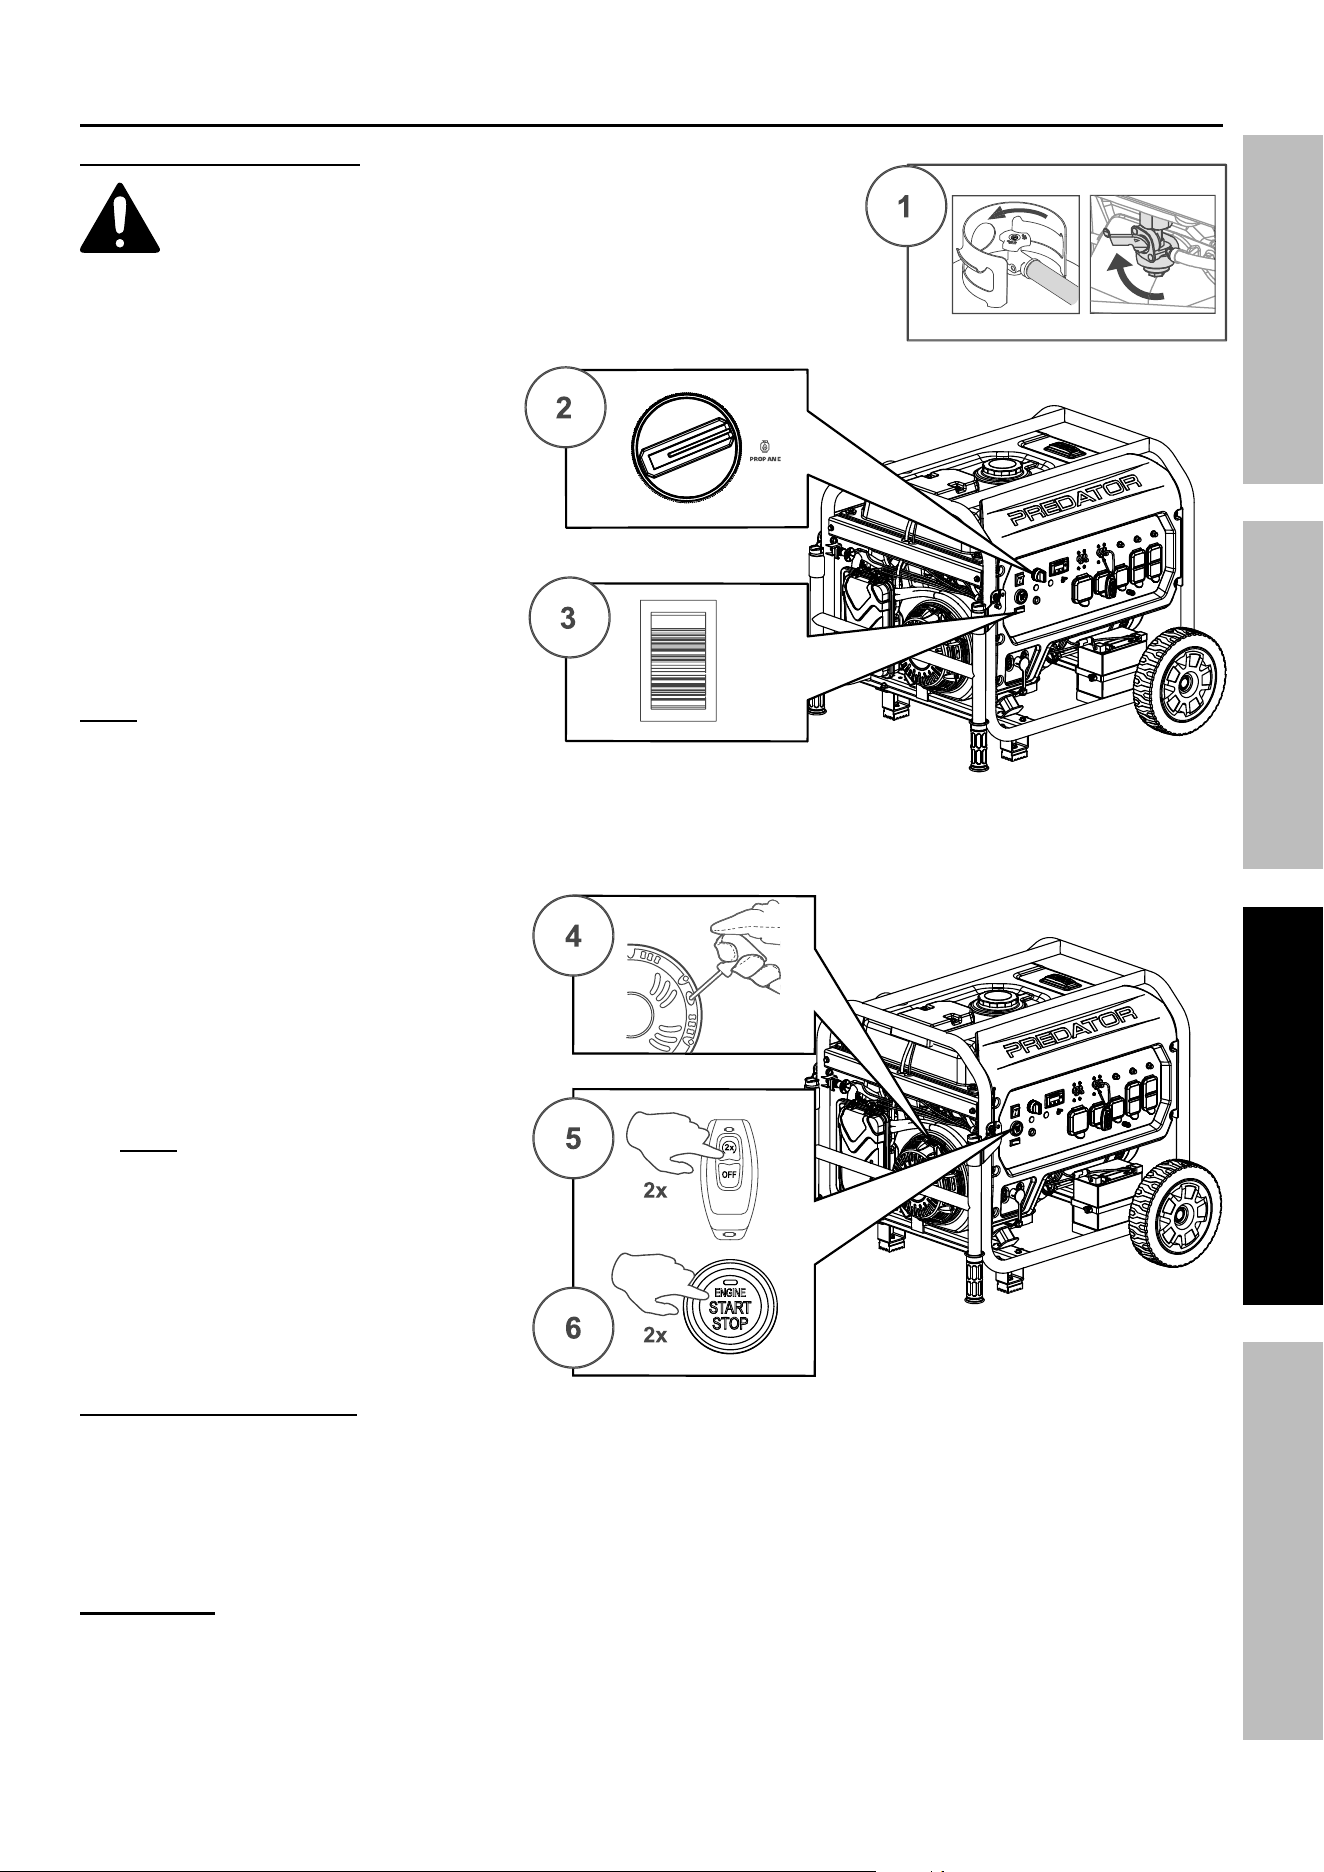
Starting the Engine – Propane Operation
Before Starting the engine
a. inspect the generator and engine.
b. Disconnect all electrical loads from the generator.
c. Make sure the propane hose is correctly connected
to the generator and propane tank.
d. Make sure Battery is connected and charged.
1. Fully open the valve on the
Propane tank. Close gasoline
Gasoline Valve if open.
2. Turn the Fuel Selector Switch
to the PROPANE setting.
3. Push the Engine Switch
to the ON position.
note: For the generator to Start,
the included 12 VDC Battery must
be connected and charged.
Select a starting method:
4. Manual Start: Pull the Starter
Handle gently until resistance is felt.
Allow Cable to retract fully and
then pull it quickly. Repeat until
the Engine starts. Do not let the
Starter Handle snap back against
the housing. Hold it as it recoils
so it doesn’t hit the housing.
5. remote Start: Slowly press and
release the 2x Button on the
Stop / Start Remote Control twice.
note: If a CO shutoff event has
occurred the remote start capability will
be disabled until the Generator Engine
has been restarted by another method.
6. electric Start: Slowly press
and release the Engine
Start / Stop Switch twice.
if engine does not start:
• Check engine oil level.
Engine will not start with low or no engine oil.
• Check spark arrestor cleanliness.
Engine will not start if spark arrestor is clogged.
• Check 12VDC Battery.
Engine will not start if battery is low or is disconnected.
iMpOrTanT: Allow the Engine to run at no load for five minutes after each start-up so that the Engine can stabilize.
2x
2x
ON
OFF
OFF
Page 24
For product assistance, please visit harborfreight.com/customer-support/contact-us
73151
SaFeTy OperaTiOn MainTenanCeSeTup
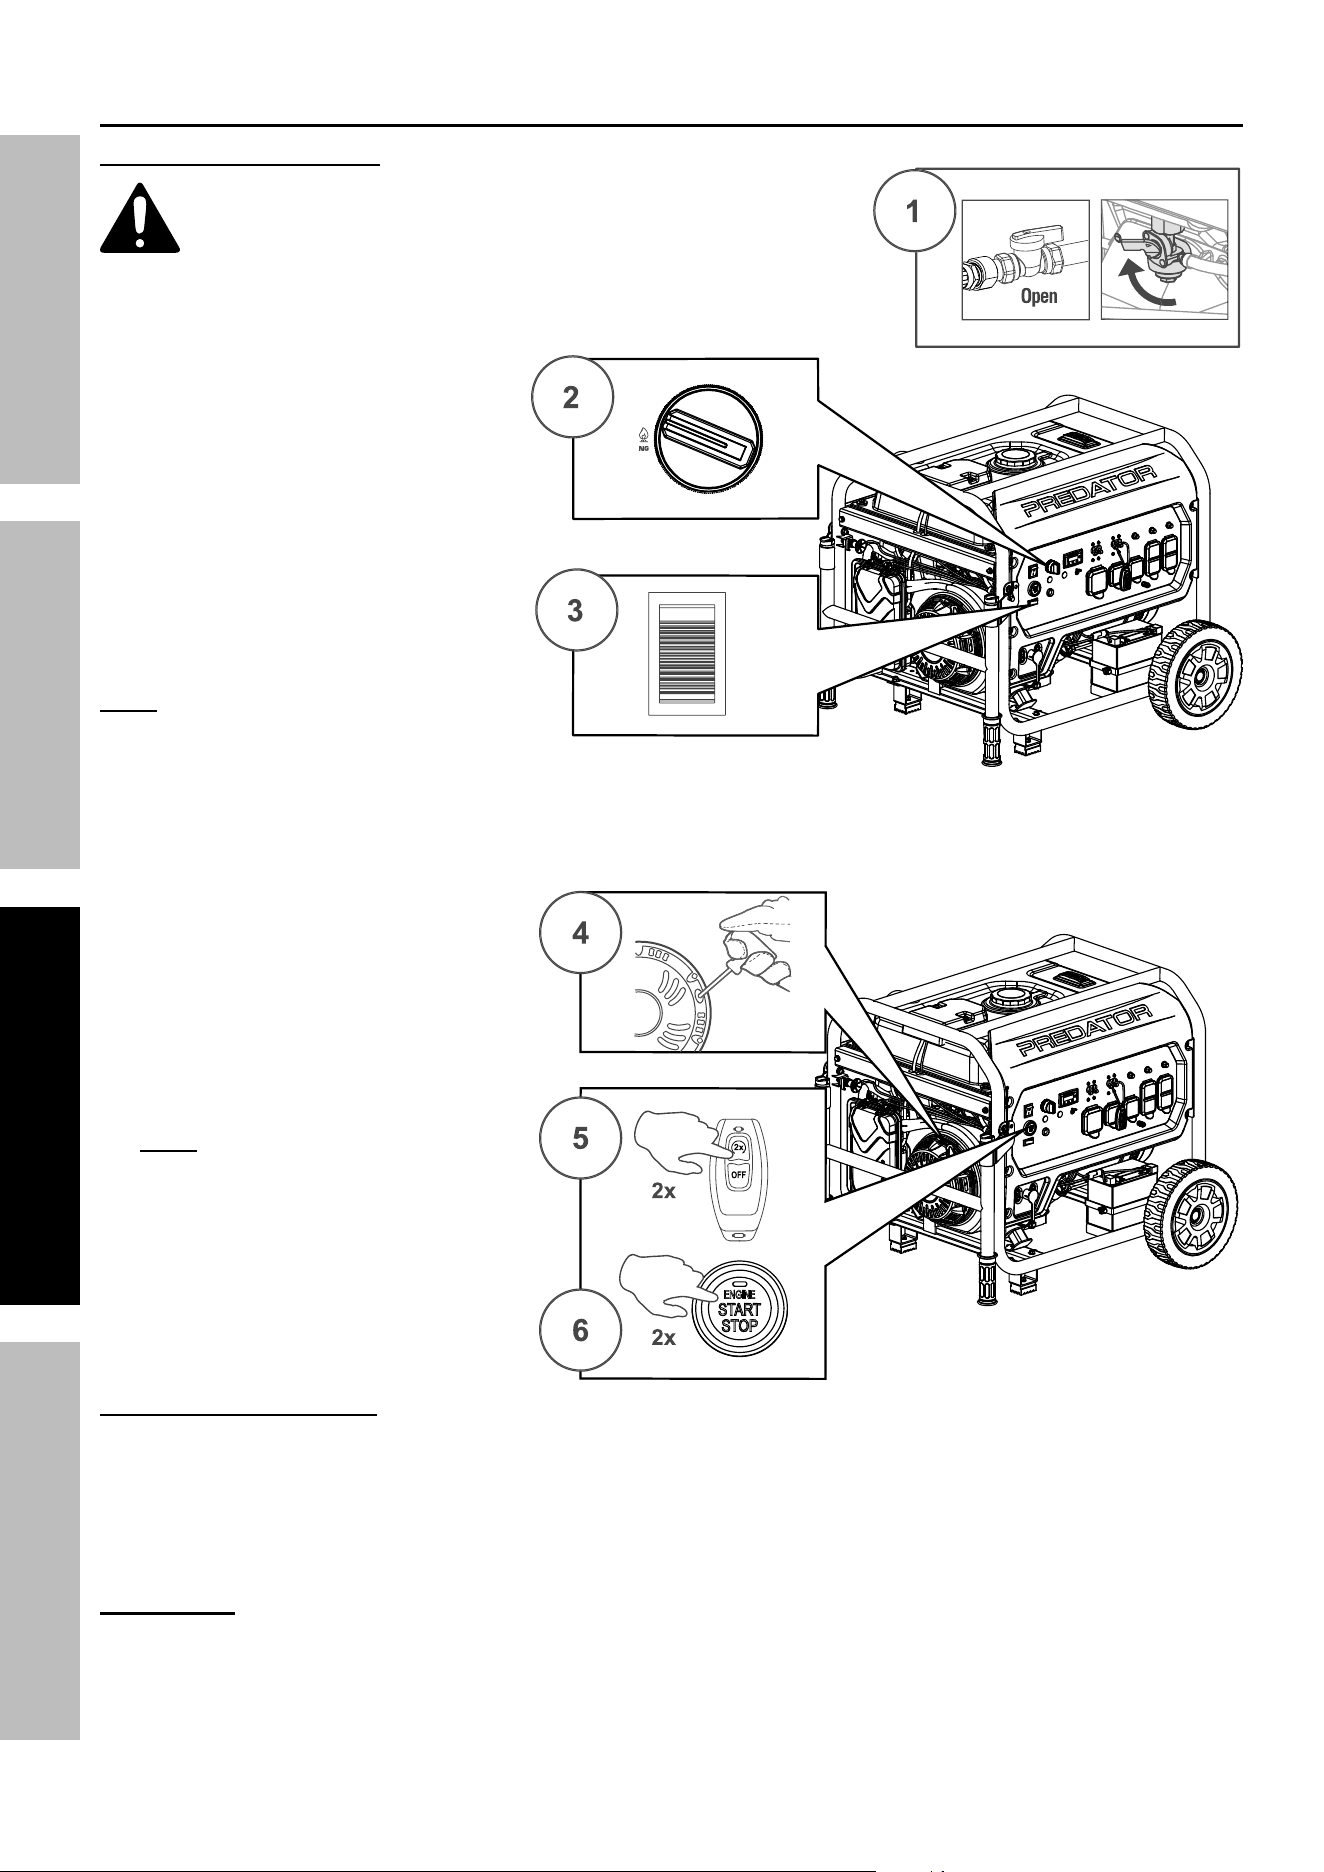
Starting the engine – natural Gas Operation
Before Starting the engine
a. inspect the generator and engine.
b. Disconnect all electrical loads from the generator.
c. Make sure the natural Gas hose is correctly connected
to the generator and the natural Gas source.
d. Make sure Battery is connected and charged.
1. Fully open the Natural Gas
shutoff valve. Close gasoline
Gasoline Valve if open.
2. Turn the Fuel Selector Switch
to the Natural Gas setting.
3. Push the Engine Switch
to the On position.
note: For the generator to Start,
the included 12 VDC Battery must
be connected and charged.
Select a starting method:
4. Manual Start: Pull the Starter
Handle gently until resistance is felt.
Allow Cable to retract fully and
then pull it quickly. Repeat until
the Engine starts. Do not let the
Starter Handle snap back against
the housing. Hold it as it recoils
so it doesn’t hit the housing.
5. remote Start: Slowly press and
release the 2x Button on the
Stop / Start Remote Control twice.
note: If a CO shutoff event has
occurred the remote start capability will
be disabled until the Generator Engine
has been restarted by another method.
6. electric Start: Slowly press
and release the Engine
Start / Stop Switch twice.
if engine does not start:
• Check engine oil level.
Engine will not start with low or no engine oil.
• Check spark arrestor cleanliness.
Engine will not start if spark arrestor is clogged.
• Check 12VDC Battery.
Engine will not start if battery is low or is disconnected.
iMpOrTanT: Allow the Engine to run at no load for five minutes after each start-up so that the Engine can stabilize.
2x
2x
ON
OFF
Page 25
For product assistance, please visit harborfreight.com/customer-support/contact-us
73151
SaFeTyOperaTiOnMainTenanCe SeTup
Switching Fuel Sources
Fire and explosion hazard. DO nOT add gasoline to the fuel tank or connect a propane Hose or
natural Gas hose to the generator while the generator is in operation.
The fuel source can be switched while the Engine is running if a propane tank or
natural gas source is connected to the Generator BEFORE operation.
Switching from Gasoline to propane or natural Gas
1. iMpOrTanT: Disconnect all electrical loads from the Generator
before switching from one fuel type to another.
2. Fully open the valve on the Propane tank or the Natural Gas shutoff valve.
3. Close the gasoline Gasoline Valve on the Engine.
4. Turn the Fuel Selector Switch to the PROPANE or Natural Gas setting.
note: When switching from gasoline to Propane or Natural Gas operation the Engine may run rough for a few
seconds. If the Engine stops when switching fuel sources, the unit may be restarted using either fuel source.
Switching from Propane or Natural Gas to Gasoline
iMpOrTanT: Disconnect all electrical loads from the Generator
before switching from one fuel type to another.
1. Turn the Fuel Selector Switch to the GASOLINE setting.
2. Turn the Propane tank valve or the Natural Gas shutoff valve to the fully closed position.
Break-in period
a. Breaking-in the Engine will help to ensure proper equipment and Engine operation.
b. The break-in period will last about 30 hours of use.
DO NOT exceed 75% of the Generator’s running wattage during this period.
• Change the engine oil after this period.
Under normal operating conditions subsequent maintenance follows
the schedule explained in the MainTenanCe section.
CarBOn MOnOXiDe SHuTOFFCarBOn MOnOXiDe SHuTOFF
DanGer! TO preVenT SeriOuS inJury anD DeaTH FrOM CarBOn MOnOXiDe inHaLaTiOn:
The Carbon Monoxide sensor is an additional layer of protection only.
DO nOT uSe THe GeneraTOr inDOOrS Or in any enCLOSeD SpaCe Or in any OTHer
area Or SiTuaTiOn THaT WiLL aLLOW CarBOn MOnOXiDe TO aCCuMuLaTe.
• FLASHING RED LIGHT:
Dangerous levels of carbon monoxide gas
have built up. Leave immediately until
area has aired out. Move Generator to
well-ventilated area before operation.
• FLASHING YELLOW LIGHT:
Carbon monoxide sensor malfunction.
Sensor needs service. Call 1-800-444-3353 as
soon as possible. Do not use the Generator until
the sensor is working properly.
NOTE: Yellow light flashes once
after starting to indicate passing self-
check and is functioning normally.
The Carbon Monoxide sensor must only be serviced by a qualified technician to restore it to
original settings. Do not modify or tamper with the Carbon Monoxide sensor. not following these
instructions can result in death or serious injury due to Carbon Monoxide sensor malfunction.
Page 26
For product assistance, please visit harborfreight.com/customer-support/contact-us
73151
SaFeTy OperaTiOn MainTenanCeSeTup
reprogramming the Start/Stop remote Control
If the Start/Stop Remote Control is replaced or needs to be paired to the generator, follow this procedure:
1. Push the Engine Switch to
the ON position.
2. Push and hold the Engine Start /Stop Switch for
up to 15 seconds until the Switch Indicator Light
flashes green and red, then release the Switch.
3. Push the 2x button on the Stop/Start Remote
Control. It will pair with Generator and the Switch
Indicator Light on the Generator will turn to green.
Connecting electrical Loads to the Generator
Calculate power Draw
Power draw can be calculated by multiplying volts and amps. The resulting number is wattage.
• The total combined load through the outlets on the Generator must not exceed the running power of
the unit. Never exceed the running wattage for the Generator or any outlet amperage rating.
• Refer to appliance/tool owner’s manuals to determine the wattage of electrical load devices.
• Long power cords and extension cords draw additional power. Keep cord length at a minimum.
WarninG! Never exceed the rated capacity for this Generator, as serious damage to the Generator and/or
appliances, tools, and equipment could result from an overload. Starting and running wattage requirements should
always be calculated when matching this Generator’s wattage capacity to the appliance, tool, or equipment.
nOTiCe: Starting and running wattages vary depending on fuel used to operate Generator. Refer to chart:
Fuel Starting Watts running Watts
Gasoline 14,500 Maximum 11,000
Propane 13,000 Maximum 10,000
Natural Gas 11,000 Maximum 9,000
Wattage estimates
Refer to your device documentation for start-up and running wattage requirements.
Check nameplate wattages on all loads before connecting to Generator.
Plug the power cord of the 120 / 240 volt appliance/tool into the appropriate Outlet
on the Generator. Plug in appliances from largest to smallest load.
a. Connect the items that require the most wattage first.
b. Connect “inductive” load appliances, tools, and equipment next. Inductive
loads are small hand tools and some small appliances.
c. Connect any lights next.
d. Voltage sensitive appliances, tools, and equipment should be the last to be connected to the Generator.
Plug voltage sensitive items such as TVs, DVD players, microwaves, and cordless telephones into a
UL
®
Listed voltage surge protector (not included). Then, connect the surge protector into the Generator.
iMpOrTanT! Failure to connect and operate appliances, tools, and equipment in this sequence can cause
damage to the Generator, appliances, tools, and equipment and will void the Warranty of this Generator.
note: Do not allow the Generator to completely run out of fuel with devices attached.
a Generator’s output may sharply spike as it runs out of fuel, causing damage to attached devices.
Engine Switch
Engine Stop / Start
Switch
2x
OFF
Remote Control
Activation Light
OFF Button
ON (2x) Button
Plug Load In
Page 27
For product assistance, please visit harborfreight.com/customer-support/contact-us
73151
SaFeTyOperaTiOnMainTenanCe SeTup
Low Oil indicator
1. If the Engine oil level is too low, the LOW OIL ALERT light turns on and the Engine will automatically shut off.
2. The Engine cannot be restarted until the proper amount of oil has been added. Add the appropriate
type of oil until the oil level is at the proper level. SAE 10W-30 oil is recommended for general use.
nOTiCe: Do not run the engine with too little oil. engine will shut off if engine oil level is too low.
automatic idle Down Switch
1. Turn the Automatic Idle Switch ON to limit noise and fuel consumption. Engine speed (and frequency) are
reduced when no load is detected. Engine runs at full speed (and frequency) when load above 75 W is applied.
note: Turn Automatic Idle Switch OFF when connected load is less than 300 W.
2. Turn the Automatic Idle Switch OFF to operate Engine at full speed:
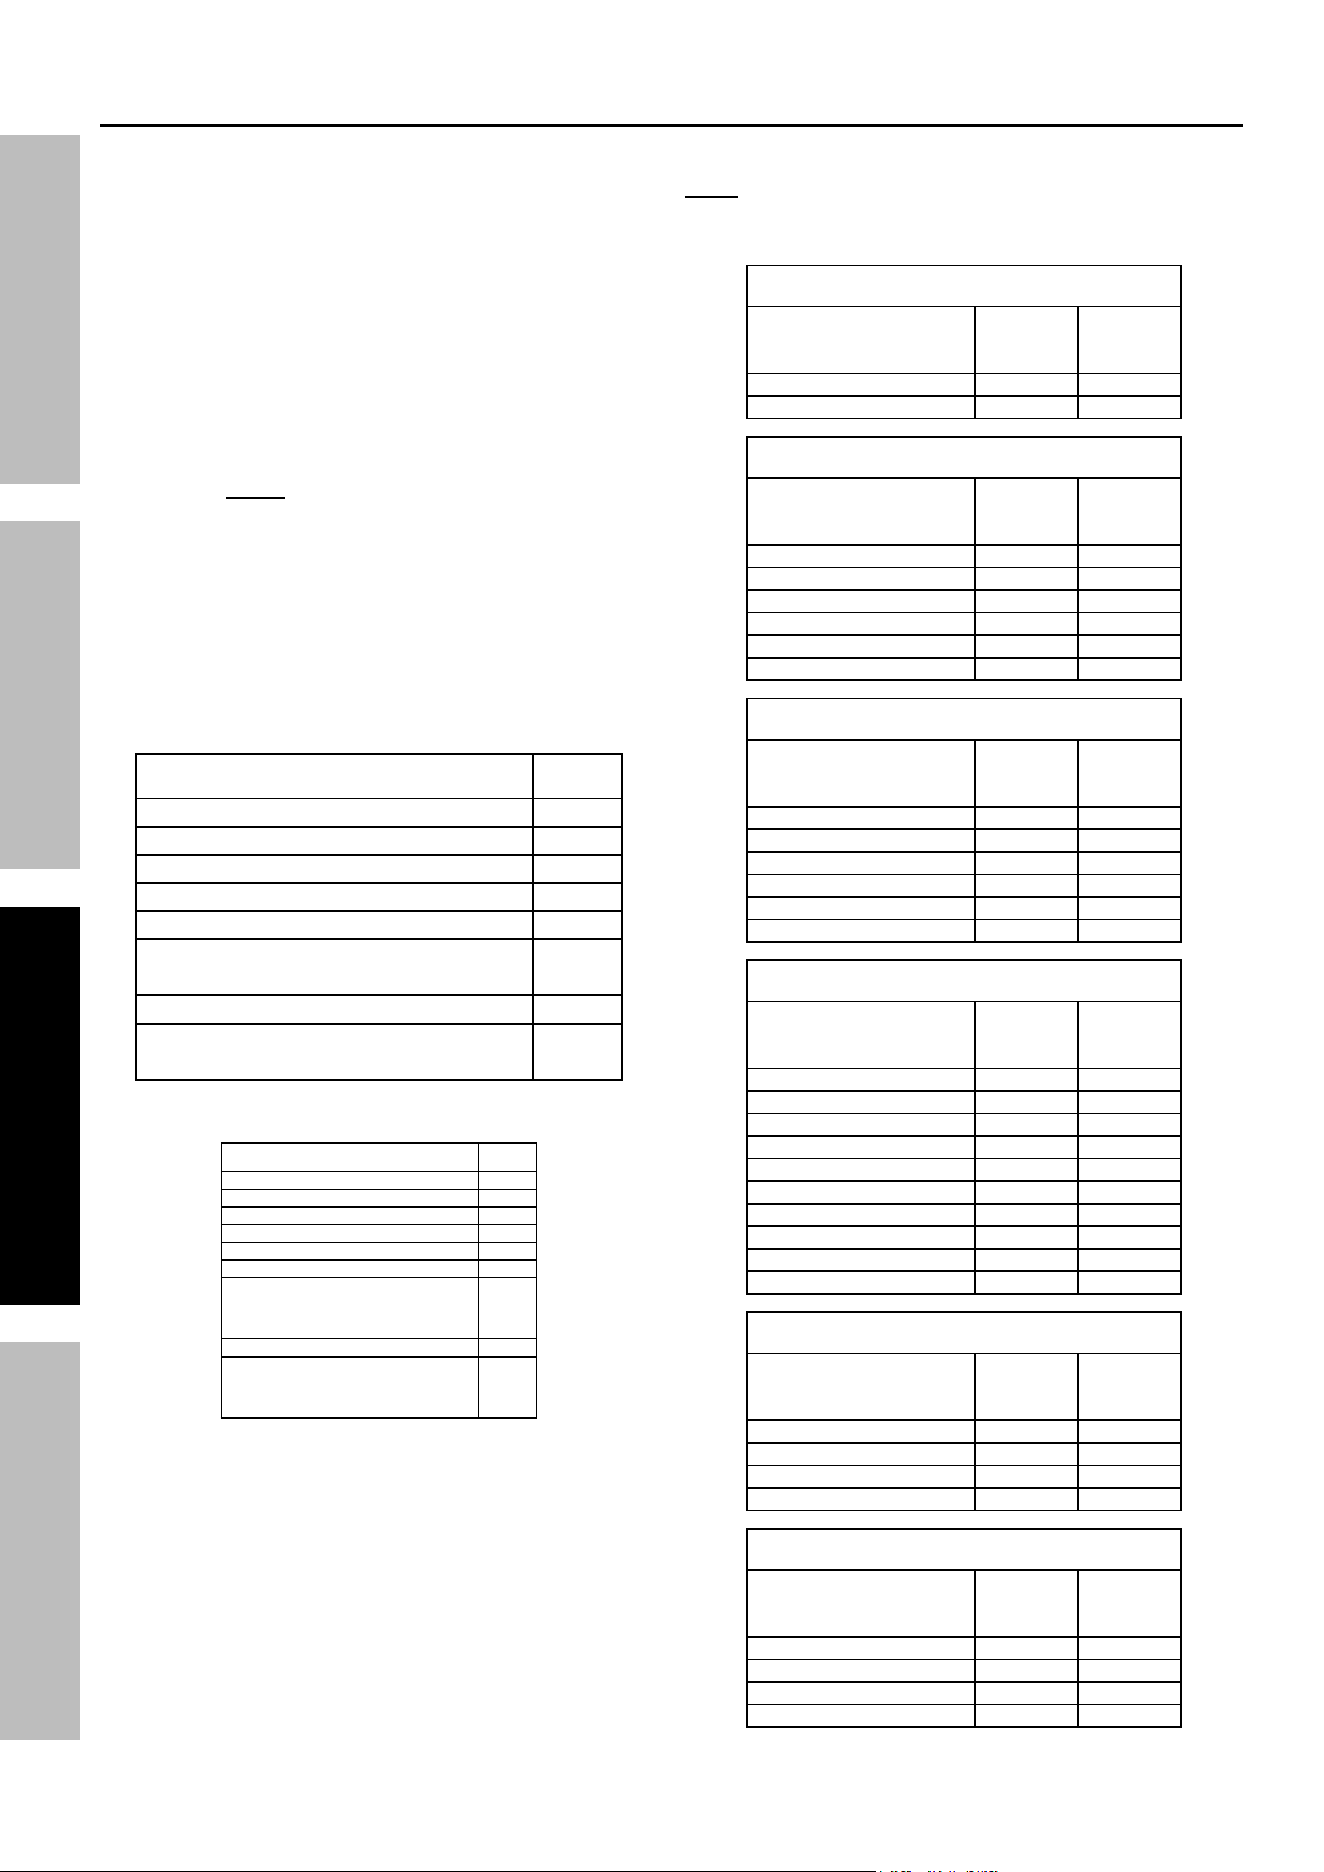
a. when starting b. when a heavy load is applied
evenly distributed
over outlets:
iF any CirCuiT BreaKerS Trip CHeCK THe FOLLOWinG:
3. Make sure that ALL circuit breakers are reset
before starting the Generator again.
4. Adjust the plugs so the loads are
shared across outlet circuits.
To achieve rated output from the Generator,
distribute loads over outlets.
Page 28
For product assistance, please visit harborfreight.com/customer-support/contact-us
73151
SaFeTy OperaTiOn MainTenanCeSeTup
Calculating Total Wattage of Devices used with the Generator
Before using the Generator, check that the products
you want to plug into the unit are below the rated and
maximum wattage ratings of the Generator. Use the
Wattage Calculation Table below, and the watts listed on
your products, to help calculate multiple wattage totals.
To use the table:
1. Add up the Running Watts for all items you
would like to use at any given time.
2. Make sure that this total is under the 11,000
Gasoline/10,000 Propane/9,000 Natural
Gas running wattage of the Generator.
3. Find the single highest starting watts for
the selected items and add to the total.
4. Make sure that this total is under the 14,500
Gasoline/13,000 Propane/11,000 Natural Gas
max. starting wattage of the Generator.
5. Plug in and turn on products from
largest wattage to smallest.
Wattage Calculation Table
equipment
running
Watts
Total running Watts
(must be less than
11,000 Gasoline/10,000 propane/9,000 natural Gas)
Largest additional Start-up Watts
Total Startup Watts needed for all loads
(must be less than 14,500 Gasoline/13,000
propane/11,000 natural Gas))
Example
equipment
running
Watts
Electric Water Heater (2,000 + 0) 2,000
Television (400 + 0) 400
Lawn Mower (1,200 + 1,200) 1,200
Hand Drill (600 + 600) 600
Total running Watts
(must be less than
11,000 Gasoline/
10,000 propane/9,000 natural Gas)
4,200
Largest additional Start-up Watts
1,200
Total Startup Watts needed for all loads
(must be less than
14,500 Gasoline/
13,000 propane/11,000 natural Gas)
5,400
A generator that is rated more than the minimum
required max. starting watts will last much longer than
a generator that only supplies the exact watts needed.
To Calculate Wattage:
Volts and amps can be multiplied together
to get watts (volts x amps = watts).
To Calculate Additional Start-Up Watts
(If They Are Not Listed)
For equipment with a motor: Use the rated watts
amount as an estimate of additional Start-up Watts.
For most lights or heaters:
there are no additional start-up watts.
Wattage Estimate Charts
Note: Wattages listed below are estimates for that
type of equipment only. Check nameplate wattages
on all loads before connecting to Generator.
eMerGenCy
Device
running
Watts
additional
Start-up
Watts
Refrigerator/Freezer 700 1500
Radio 100 0
JOB SiTe
Device
running
Watts
additional
Start-up
Watts
Air Compressor - 1/2 HP 1000 1000
Table Saw - 10″ 1700 1300
Belt Sander - 3″ 1200 1200
Hand Drill - 1/2″ 600 600
Halogen Work Light 1000 0
Reciprocating Saw 900 900
reCreaTiOn
Device
running
Watts
additional
Start-up
Watts
AM/FM Radio 100 0
Electric Grill 1700 0
Inflator Pump 50 100
CD/DVD Player 100 0
Box Fan - 20″ 200 200
Coffee Maker 600 0
HOuSeHOLD
Device
running
Watts
additional
Start-up
Watts
Computer w/ Monitor 800 0
Electric Clothes Dryer 5500 500
Electric Range 2100 0
Electric Water Heater 2000 0
Light Bulb - 100 watts 100 0
Microwave - 1000 watts 1000 200
Sump Pump - 1/2 HP 1000 1100
Television 400 0
Washing Machine 1100 1100
Well Pump - 1/2 HP 1000 1000
LaWn & GarDen
Device
running
Watts
additional
Start-up
Watts
Hedge Trimmer 400 400
Pressure Washer 1200 1200
Lawn Mower 1200 1200
Edger 1000 1000
HeaTinG & COOLinG
Device
running
Watts
additional
Start-up
Watts
Central AC - 10,000 BTU 1500 1500
Furnace Fan - 1/2 HP 900 1400
Space Heater 1800 0
Window AC - 10,000 BTU 1200 600
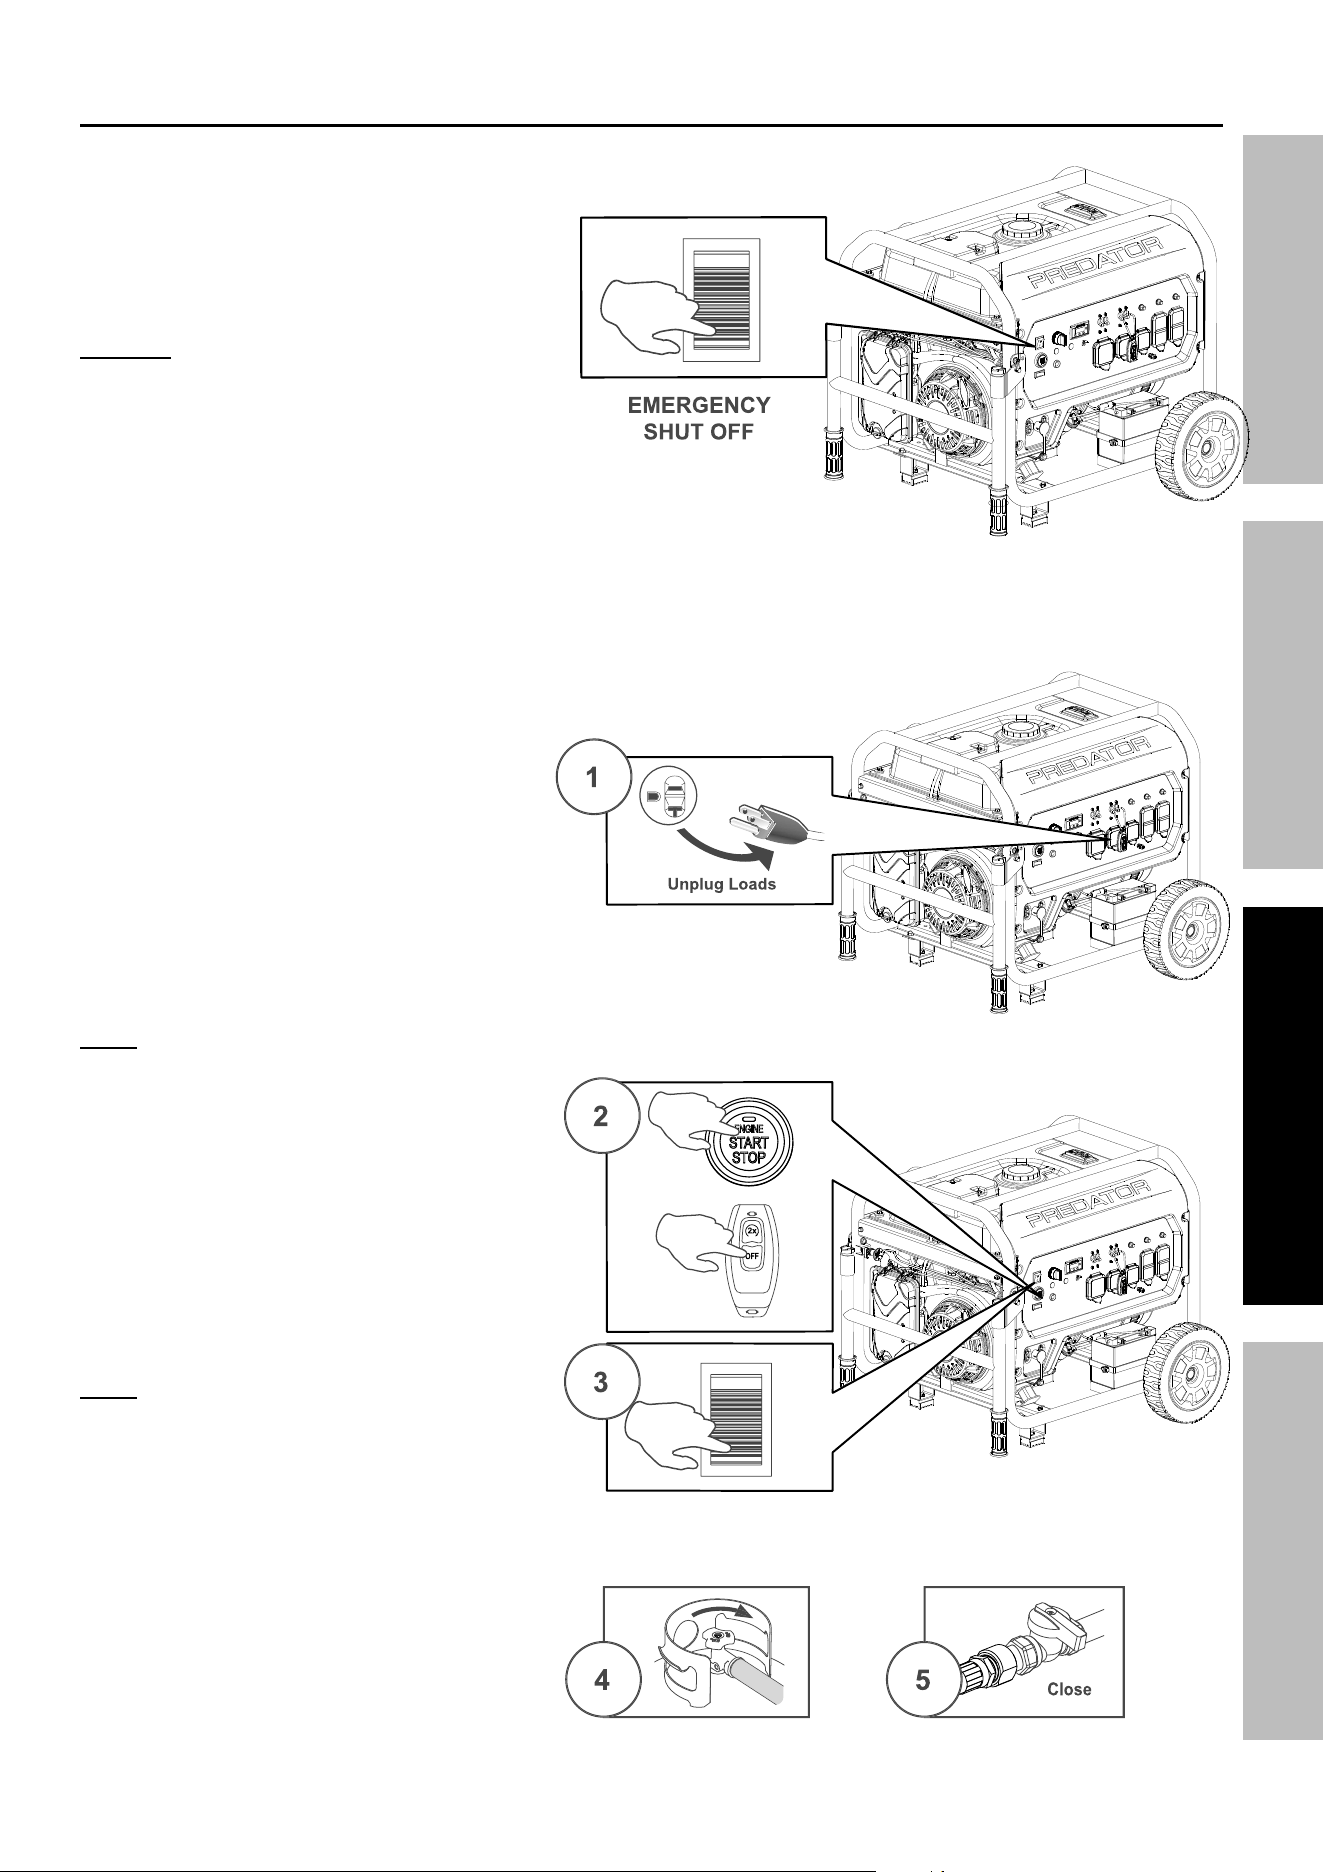
Page 29
For product assistance, please visit harborfreight.com/customer-support/contact-us
73151
SaFeTyOperaTiOnMainTenanCe SeTup
Stopping the engine
To stop the Engine in an emergency,
push the Engine Switch to OFF.
nOTiCe: Generator shutoff under load may
damage the Generator and attached equipment.
Under normal conditions, use the following procedure to shut off the Generator:
1. Turn all electrical load
devices off and unplug
them from the Generator.
2. Slowly press and release the
Engine Start/Stop Switch. Or
slowly press and release the OFF
button on the Stop / Start Remote
Control. Turn the Fuel Selector
Switch to the STORAGE position.
note: When the Generator is turned
OFF using the Stop / Start Switch or
Remote Control, the Generator enters
standby mode and can be restarted
remotely using procedures indicated
in starting section. If Generator is not
started within 12 hours the Controller
shuts down completely to save the
battery. Push the Engine Switch to OFF
then ON to reactivate standby mode.
3. Push the Engine Switch
to the OFF position.
note: Turn the EngineSwitch off
when the Generator is not in use
to prevent draining the Battery.
4. If operating on Propane, turn the propane
tank valve to the fully closed position.
5. If operating on Natural Gas, turn the Natural
Gas shutoff valve to the closed position.
ON
OFF
ON
OFF
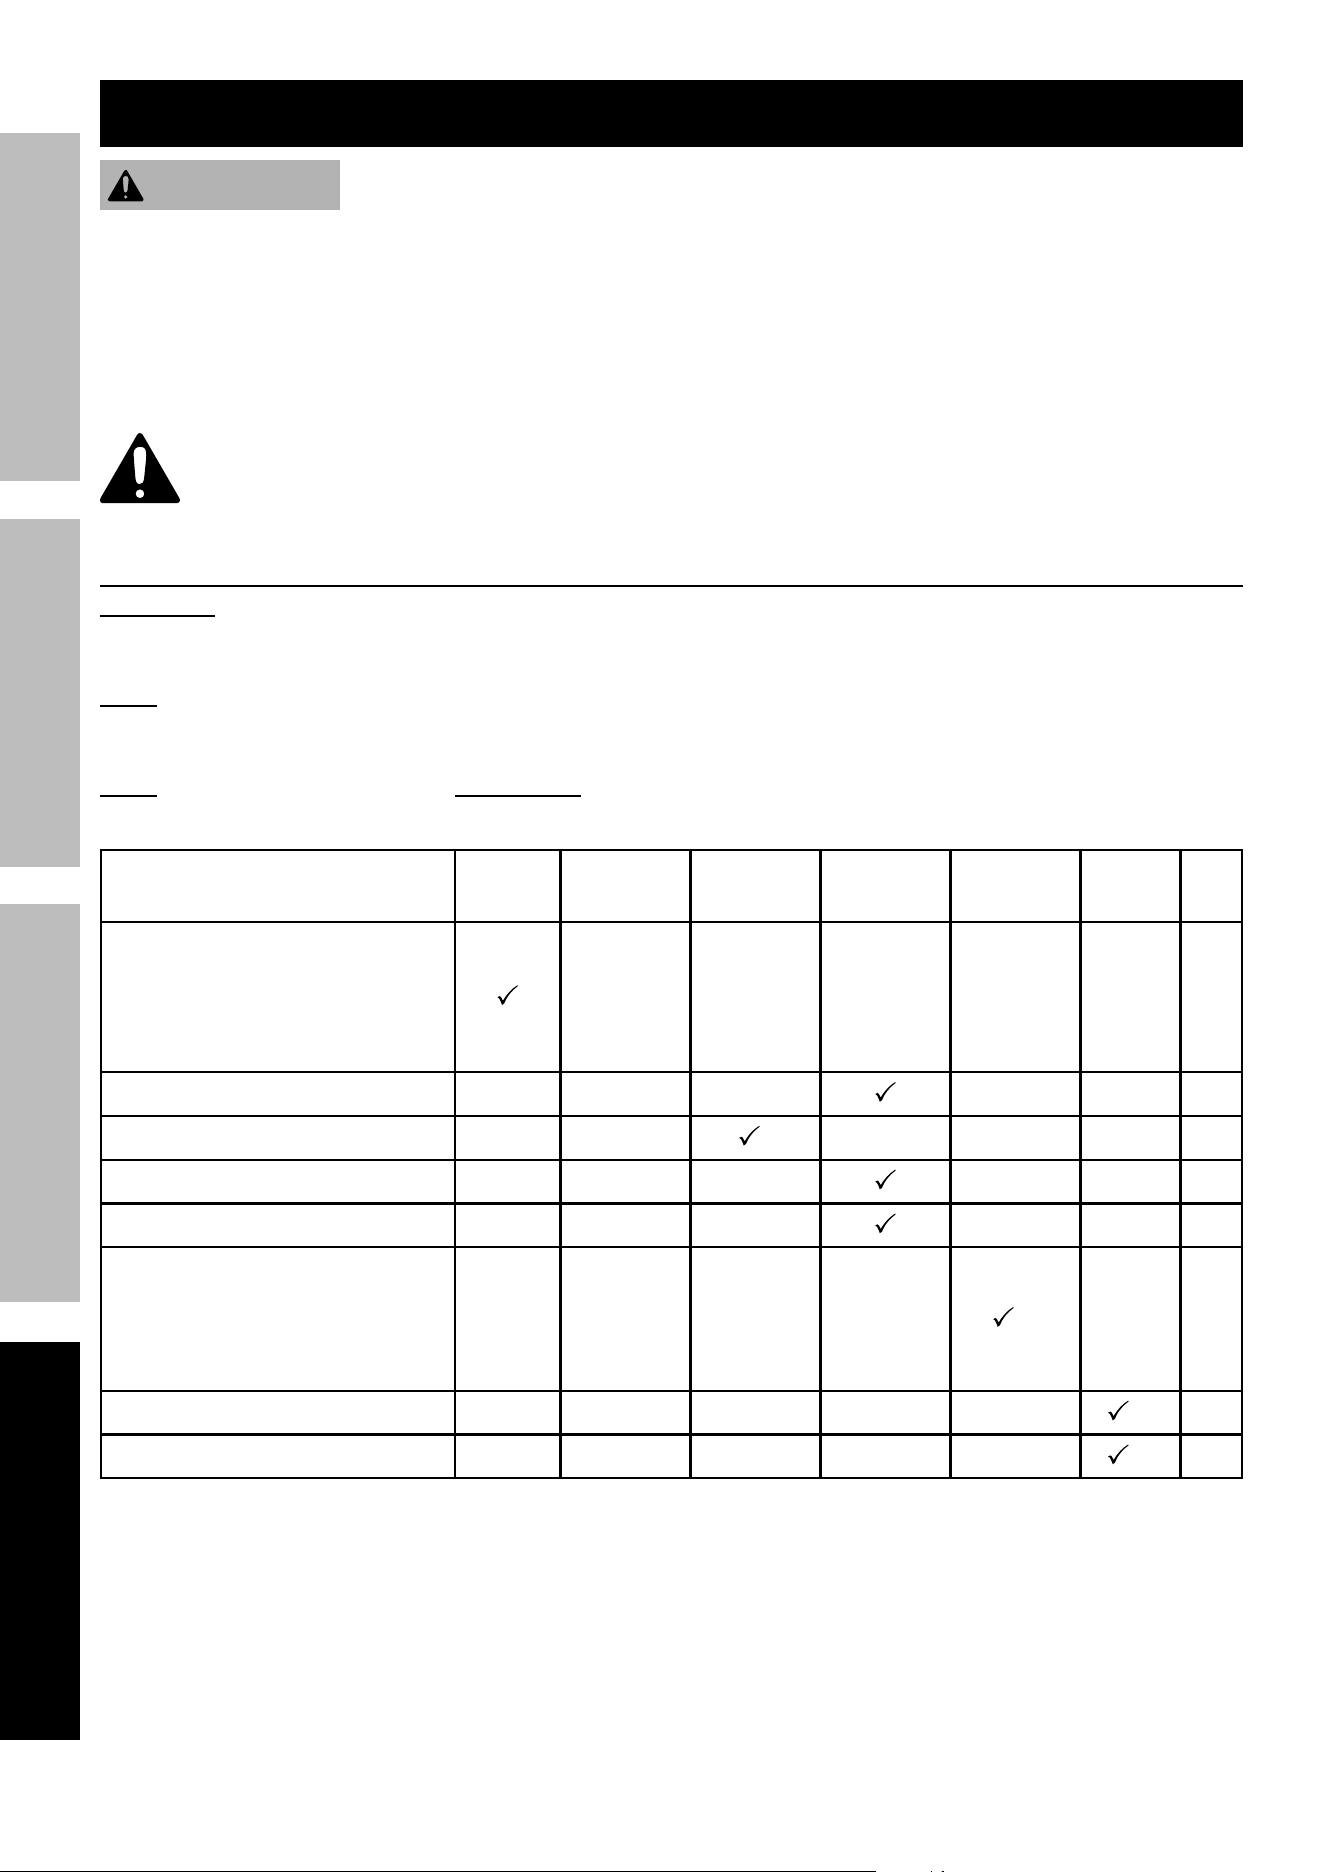
Page 30
For product assistance, please visit harborfreight.com/customer-support/contact-us
73151
SaFeTy OperaTiOn MainTenanCeSeTup
Maintenance
WarninG
TO preVenT SeriOuS inJury FrOM aCCiDenTaL STarTinG:
push the engine Switch of the equipment to the OFF position, wait for the engine to cool, and disconnect
the spark plug cap before performing any inspection, maintenance, or cleaning procedures.
TO preVenT SeriOuS inJury FrOM eQuipMenT FaiLure:
Do not use damaged equipment. if abnormal noise, vibration, or
excess smoking occurs, have the problem corrected before further use.
Follow all service instructions in this manual. The engine may fail critically if not serviced properly.
Many maintenance procedures, including any not detailed in this manual, will need to be performed
by a qualified technician for safety. if you have any doubts about your ability to safely service the
equipment or engine, have a qualified technician service the equipment instead.
Cleaning, Maintenance, and Lubrication Schedule
WarninG! TO preVenT SeriOuS inJury FrOM inJeCTiOn, Fire, anD
eXpLOSiOn: Depressurize fuel system before servicing it. Remove ignition sources
from area. Seek medical attention immediately after injection injury.
note: This maintenance schedule is intended solely as a general guide. If performance decreases or if
equipment operates unusually, check systems immediately. The maintenance needs of each piece of equipment
will differ depending on factors such as duty cycle, temperature, air quality, fuel quality, and other factors.
note: The following procedures are in addition to the regular checks and maintenance
explained as part of the regular operation of the engine and equipment.
procedure
Before
each use
Monthly or
every 8 hr.
of use
every 3 mo.
or 50 hr.
of use
every 6 mo.
or 100 hr.
of use
yearly or
every 300 hr.
of use
every
2 years
page
1. Brush off outside of engine
2. Check engine oil level
3. Check air filter
4. Check Propane / Natural
Gas hose assembly
18
Change engine oil
32
Clean/replace air cleaner
*
32
Check and clean spark arrestor
32
Check and clean spark plug
33
1. Check/adjust valve clearance
2. Clean fuel tank, strainer
and carburetor
3. Clean carbon build-up from
combustion chamber
**
–
Replace fuel line if necessary
**
–
Change Fuel Filter at Fuel Pump.
**
*Service more frequently when used in dusty areas.
**These items should be serviced by a qualified technician.
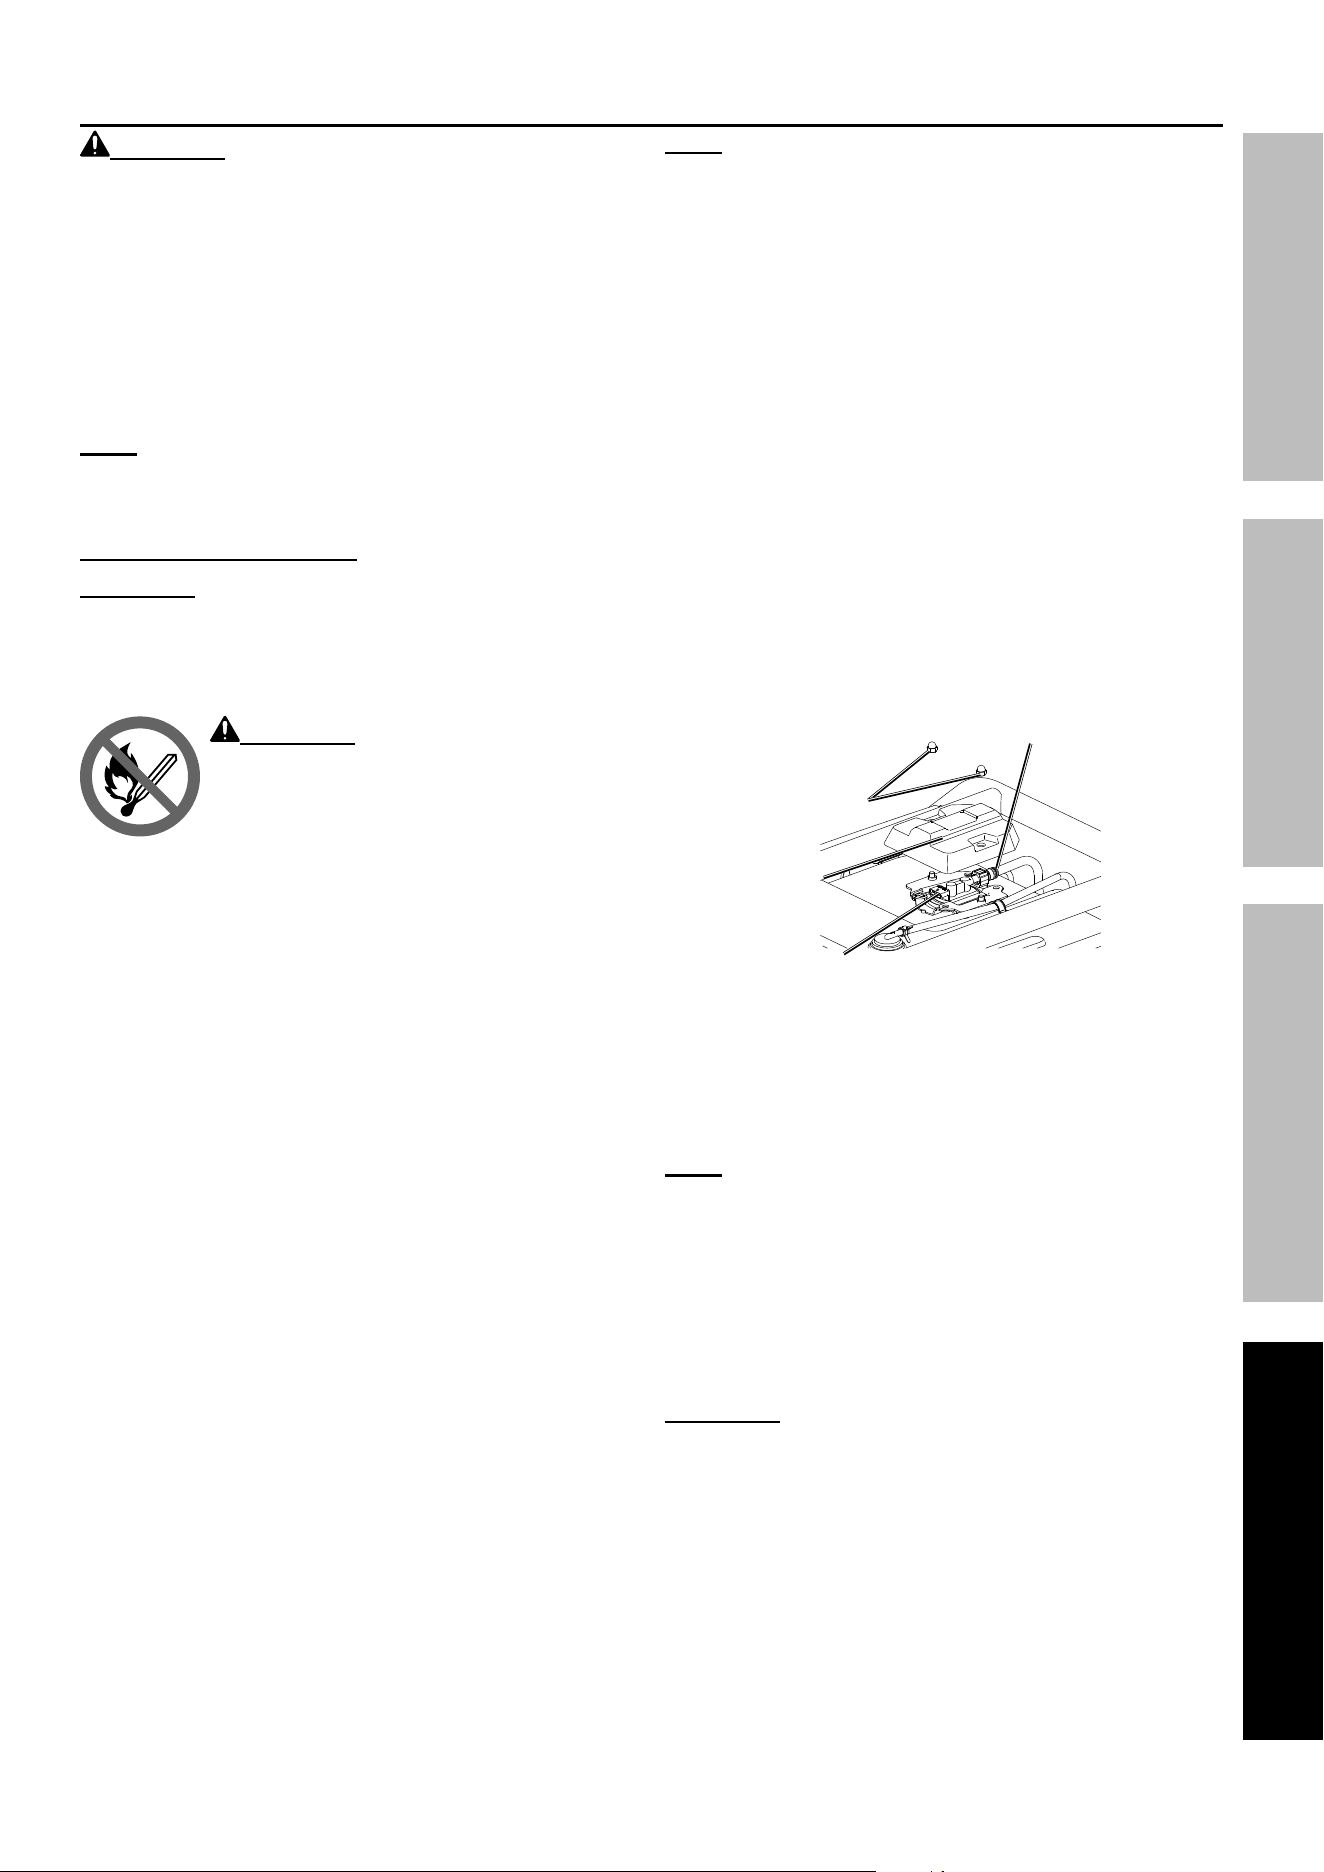
Page 31
For product assistance, please visit harborfreight.com/customer-support/contact-us
73151
SaFeTyOperaTiOnMainTenanCe SeTup
Checking and Filling Fuel
WarninG! TO preVenT SeriOuS inJury FrOM
Fire:
Fill tank in a well-ventilated area away from
ignition sources. if the engine is hot from
use, shut the engine off and wait for it to
cool before adding fuel. Do not smoke.
1. Clean the Fuel Cap and the area around it.
2. Unscrew and remove the Fuel Cap.
3. Remove the Strainer and remove any dirt
and debris. Then replace the Strainer.
note: Do not use gasoline containing more than
10% ethanol (e10). Do not use e85 ethanol.
add fuel stabilizer or the Warranty is VOiD.
note: Do not use gasoline that has been stored in a
metal fuel container or a dirty fuel container. it can
cause particles to enter the fuel injector, affecting
engine performance and/or causing damage.
4. If needed, fill the Fuel Tank to about 1 inch
under the fill neck with 87 octane or higher
unleaded gasoline that has been treated with
a fuel stabilizer additive. Follow fuel stabilizer
manufacturer’s recommendations for use.
5. Replace the Fuel Cap.
6. Wipe up any spilled fuel and allow excess
to evaporate before starting engine.
To prevent FIRE, do not start the engine
while the smell of fuel hangs in the air.
Depressurize Fuel System
WarninG! TO preVenT SeriOuS inJury
FrOM inJeCTiOn, Fire, anD eXpLOSiOn:
Depressurize fuel system before servicing it.
Remove ignition sources from area. Seek medical
attention immediately after injection injury.
WarninG! TO preVenT SeriOuS
inJury FrOM Fire:
Service fuel system in a well-ventilated
area away from ignition sources. If the
engine is hot from use, shut the engine off
and wait for it to cool before servicing. Do not smoke.
Have a dry chemical (class B) fire extinguisher nearby.
1. Turn engine off.
2. Unplug all devices from the generator.
3. Turn the Engine Switch to the OFF position.
4. Allow the engine to completely cool.
5. properly ground Generator.
See Grounding on page 13.
6. Remove two Nuts.
7. Remove Cover.
8. Disconnect fuel pump power connector only.
DO nOT DiSCOnneCT FueL Line yeT.
Fuel Line Connector
nut
Cover
power Connector
9. Turn Engine Switch to its “ON” position.
10. Select Gasoline Fuel Selector Switch.
11. Try to start Engine. See Starting the Engine
on page 24. Engine may start briefly.
Fuel System is now depressurized.
note: Engine will shutdown immediately if started.
EFI Alert indicator may indicate an error.
12. Turn Engine Switch to the OFF position.
13. Service fuel system as needed.
14. After service:
a. Connect Fuel Pump Power Connector.
b. Replace Nuts, Cover and reassemble Generator.
WarninG! TO preVenT SeriOuS inJury:
Assemble Generator fully before use.
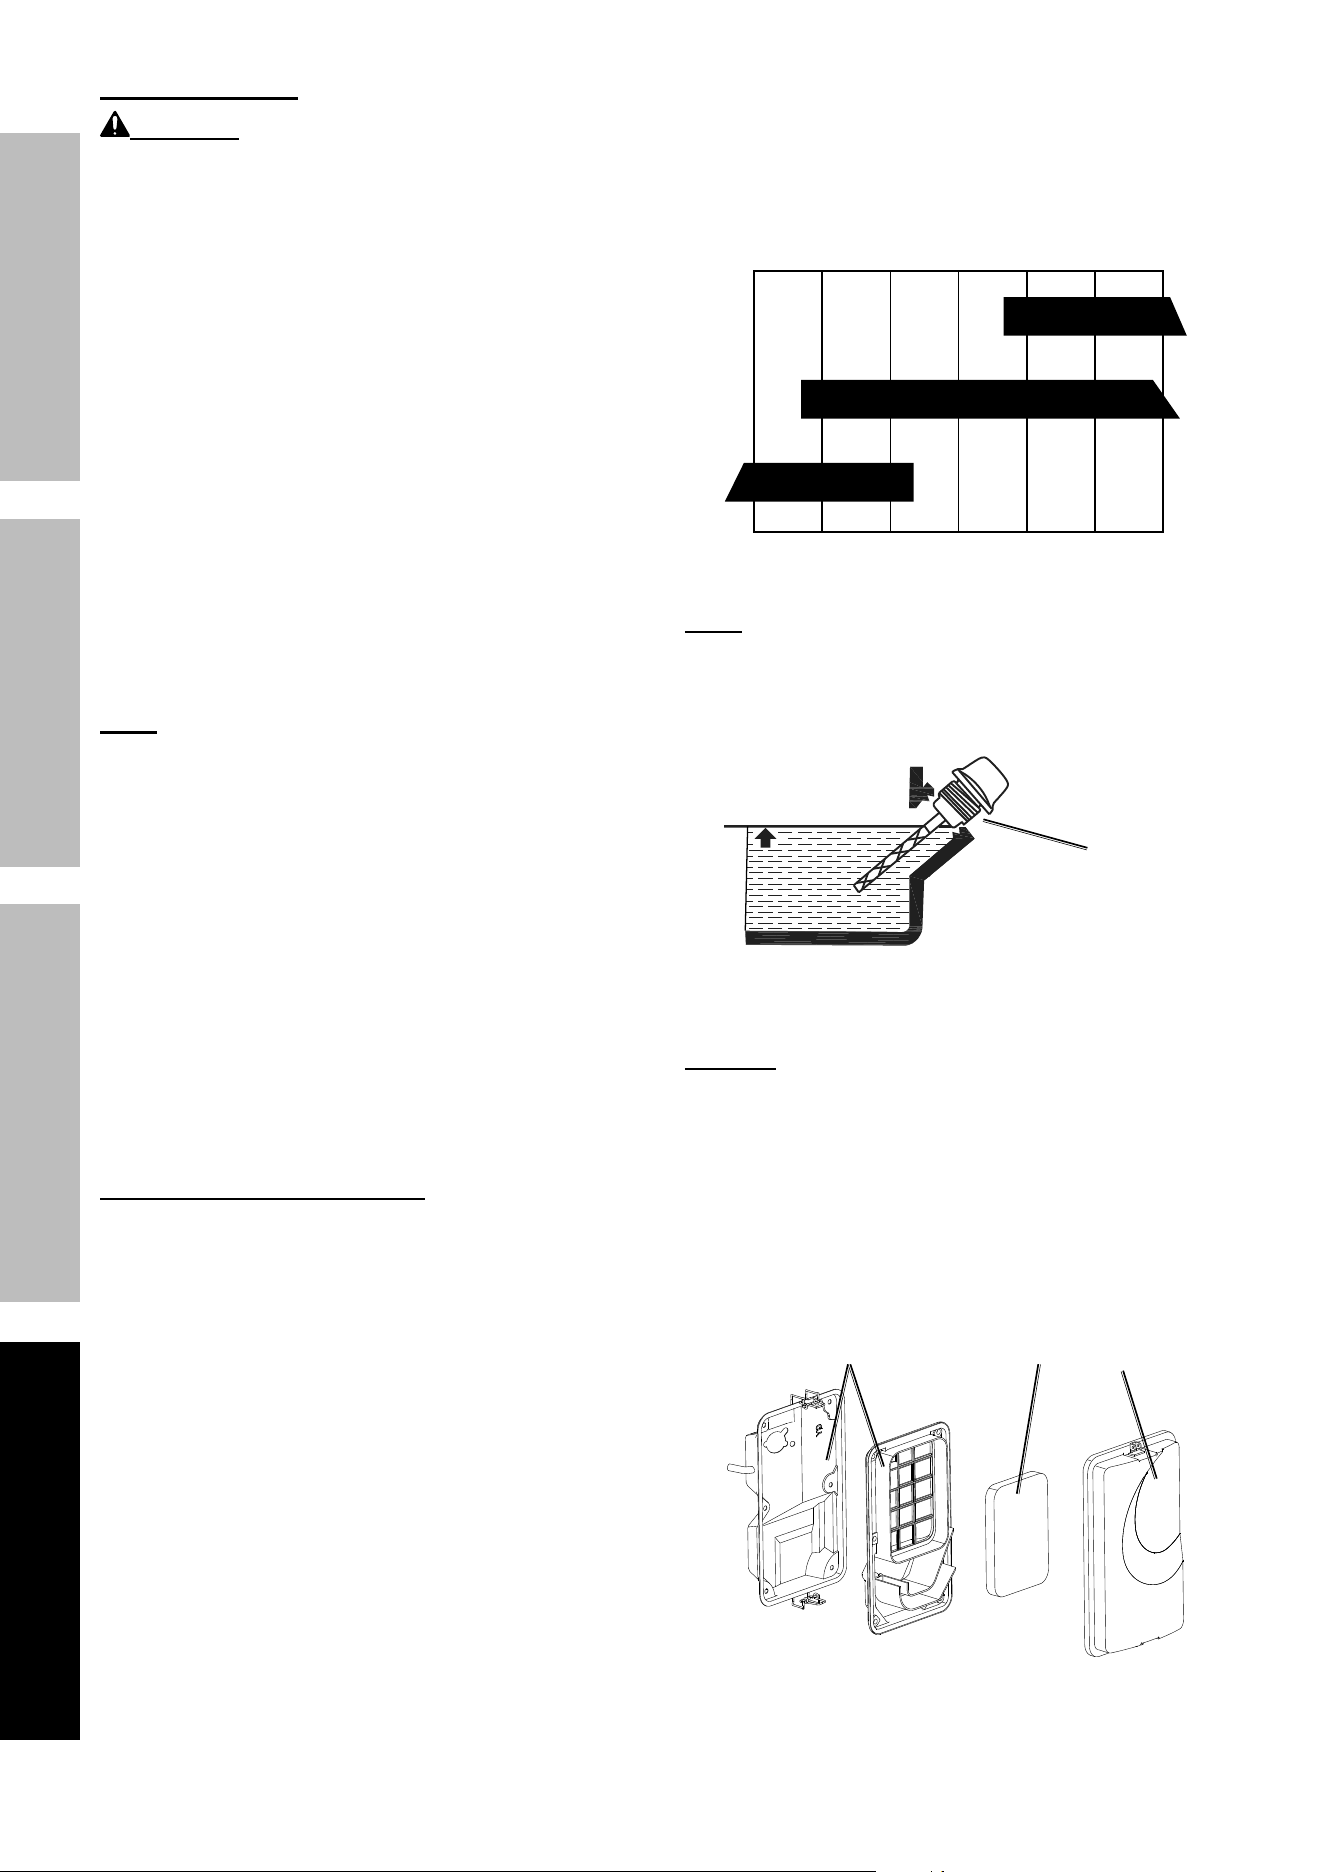
Page 32
For product assistance, please visit harborfreight.com/customer-support/contact-us
73151
SaFeTy OperaTiOn MainTenanCeSeTup
engine Oil Change
CauTiOn! Oil is very hot during operation and can cause burns. Wait for engine to cool before changing oil.
1. Make sure the Engine is stopped and is level.
2. Close the gasoline Gasoline Valve.
3. Place an oil drain pan under the Generator
and center under the Oil Drain Plug. Remove
the Oil Drain Plug, tilt the Generator slightly
to facilitate drainage and wait for oil to
drain completely. Recycle used oil.
4. Tilt the Generator and replace the Oil
Drain Plug, then set the Generator
back down on a level surface.
5. Clean the top of the Oil Fill Cap / Dipstick
and the area around it. Remove the
Cap / Dipstick, turning it counterclockwise.
6. Add the appropriate type of oil until the oil
level is at the proper level. SAE 10W-30 oil is
recommended for general use.
note: Do not thread the dipstick in
when checking the oil level.
The SAE Viscosity Grade chart shows other
viscosities to use in different average temperatures.
10W-30
30
5W-30
-20 0 20 40 60 80 100°F
Sae Viscosity Grades
average outdoor temperature
note: Make sure Generator is level when adding oil to
prevent overfilling which could cause engine damage.
7. Check the oil level. The oil level should be
up to the edge of the hole as shown.
Full Level
Oil Fill
Cap / Dipstick
8. Thread the Oil Fill Cap / Dipstick back in clockwise
and replace the Access Panel and Oil Drain Door.
nOTiCe: Do not run the engine with too little oil.
engine will not start with low or no engine oil.
air Filter element Maintenance
1. Remove the Air Filter Cover and the
air filter elements and check for dirt.
Clean as described below.
2. Cleaning:
• For “paper” filter elements:
To prevent injury from dust and debris,
wear ANSI-approved safety goggles,
NIOSH-approved dust mask/respirator, and
heavy-duty work gloves. In a well-ventilated
area away from bystanders, use pressurized
air to blow dust out of the air filter.
• For foam filter elements:
Wash the element in warm water and
mild detergent several times. Rinse.
Squeeze out excess water and allow it to dry
completely. Soak the filter in lightweight oil
briefly, then squeeze out the excess oil.
3. Install the cleaned filter.
4. Secure the Air Filter Cover before use.
air Cleaner
Cover
Foam Filter
air Cleaner
Housing
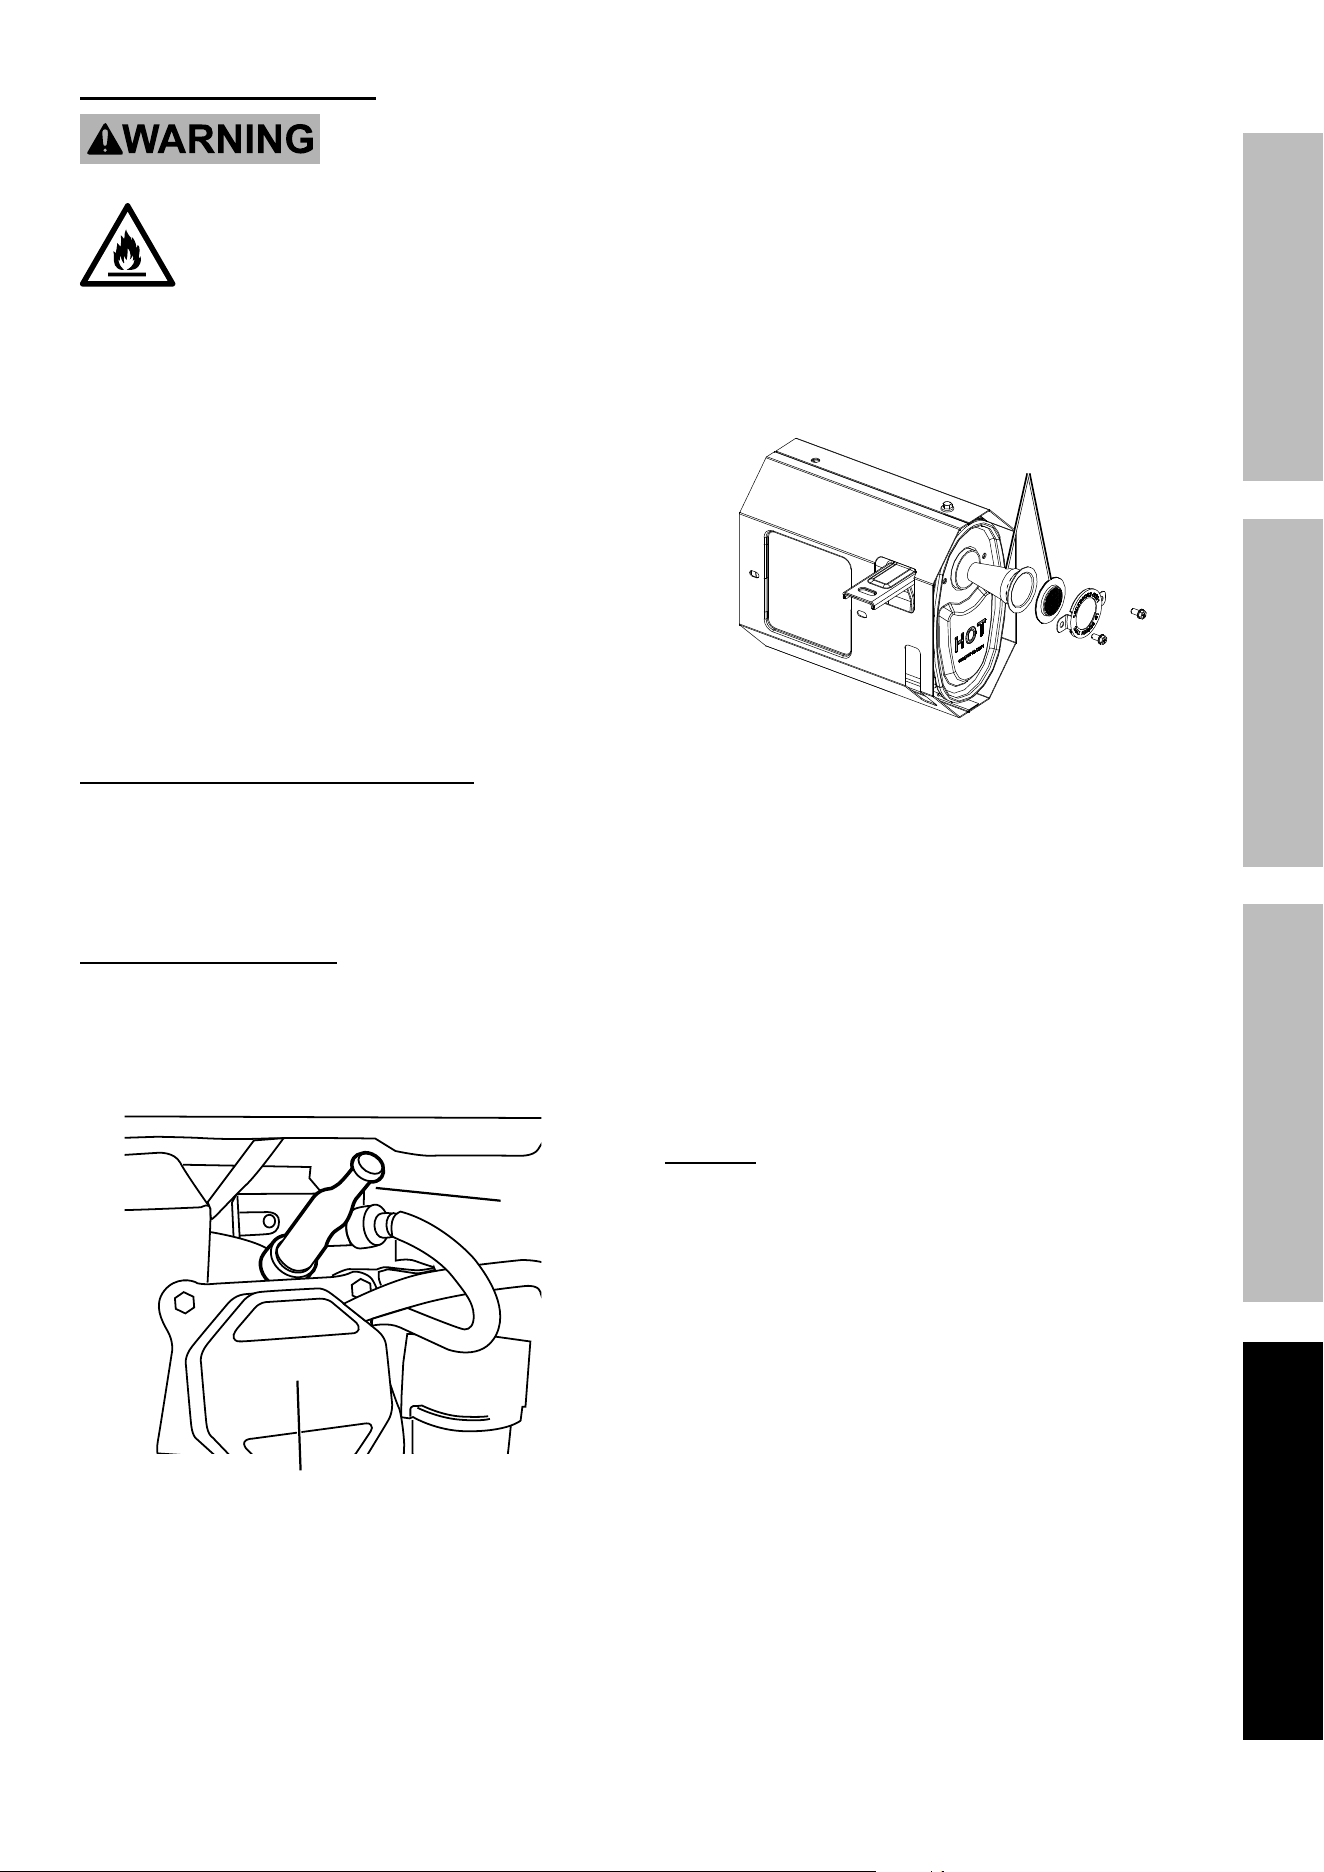
Page 33
For product assistance, please visit harborfreight.com/customer-support/contact-us
73151
SaFeTyOperaTiOnMainTenanCe SeTup
Spark arrestor Maintenance
TO preVenT SeriOuS inJury anD Fire: Operate only with proper spark arrestor installed.
Operation of this equipment may create sparks that can start fires around dry vegetation.
a spark arrestor may be required. The operator should contact local fire agencies for laws or
regulations relating to fire prevention requirements.
1. Allow the Generator to cool completely.
2. Remove Spark Arrestor from end of exhaust.
3. Clean the Spark Arrestor using a wire brush
(sold separately). Replace Arrestor if damaged.
4. WarninG! TO preVenT SeriOuS inJury
FrOM aCCiDenTaL BruSH Fire, secure
Spark arrestor back in place immediately
after cleaning and before further operation.
Spark
arrestor
remote Control Battery replacement
1. Loosen screw(s) and open battery compartment.
2. Remove battery and dispose of properly.
3. Insert battery in correct polarity, close
compartment and tighten screw(s).
Spark plug Maintenance
1. Disconnect Spark Plug Cap from end of plug.
Clean out debris from around Spark Plug.
2. Use a spark plug wrench to remove the Spark Plug.
Cylinder
assembly
Spark
plug Cap
3. Inspect the Spark Plug:
If the electrode is oily, clean it using a clean, dry rag.
If the electrode has deposits on it, polish it using
emery paper. If the white insulator is cracked or
chipped, the Spark Plug needs to be replaced.
nOTiCe: Use only F7RTJC type spark
plug or equivalent. Using an incorrect
spark plug may damage the engine.
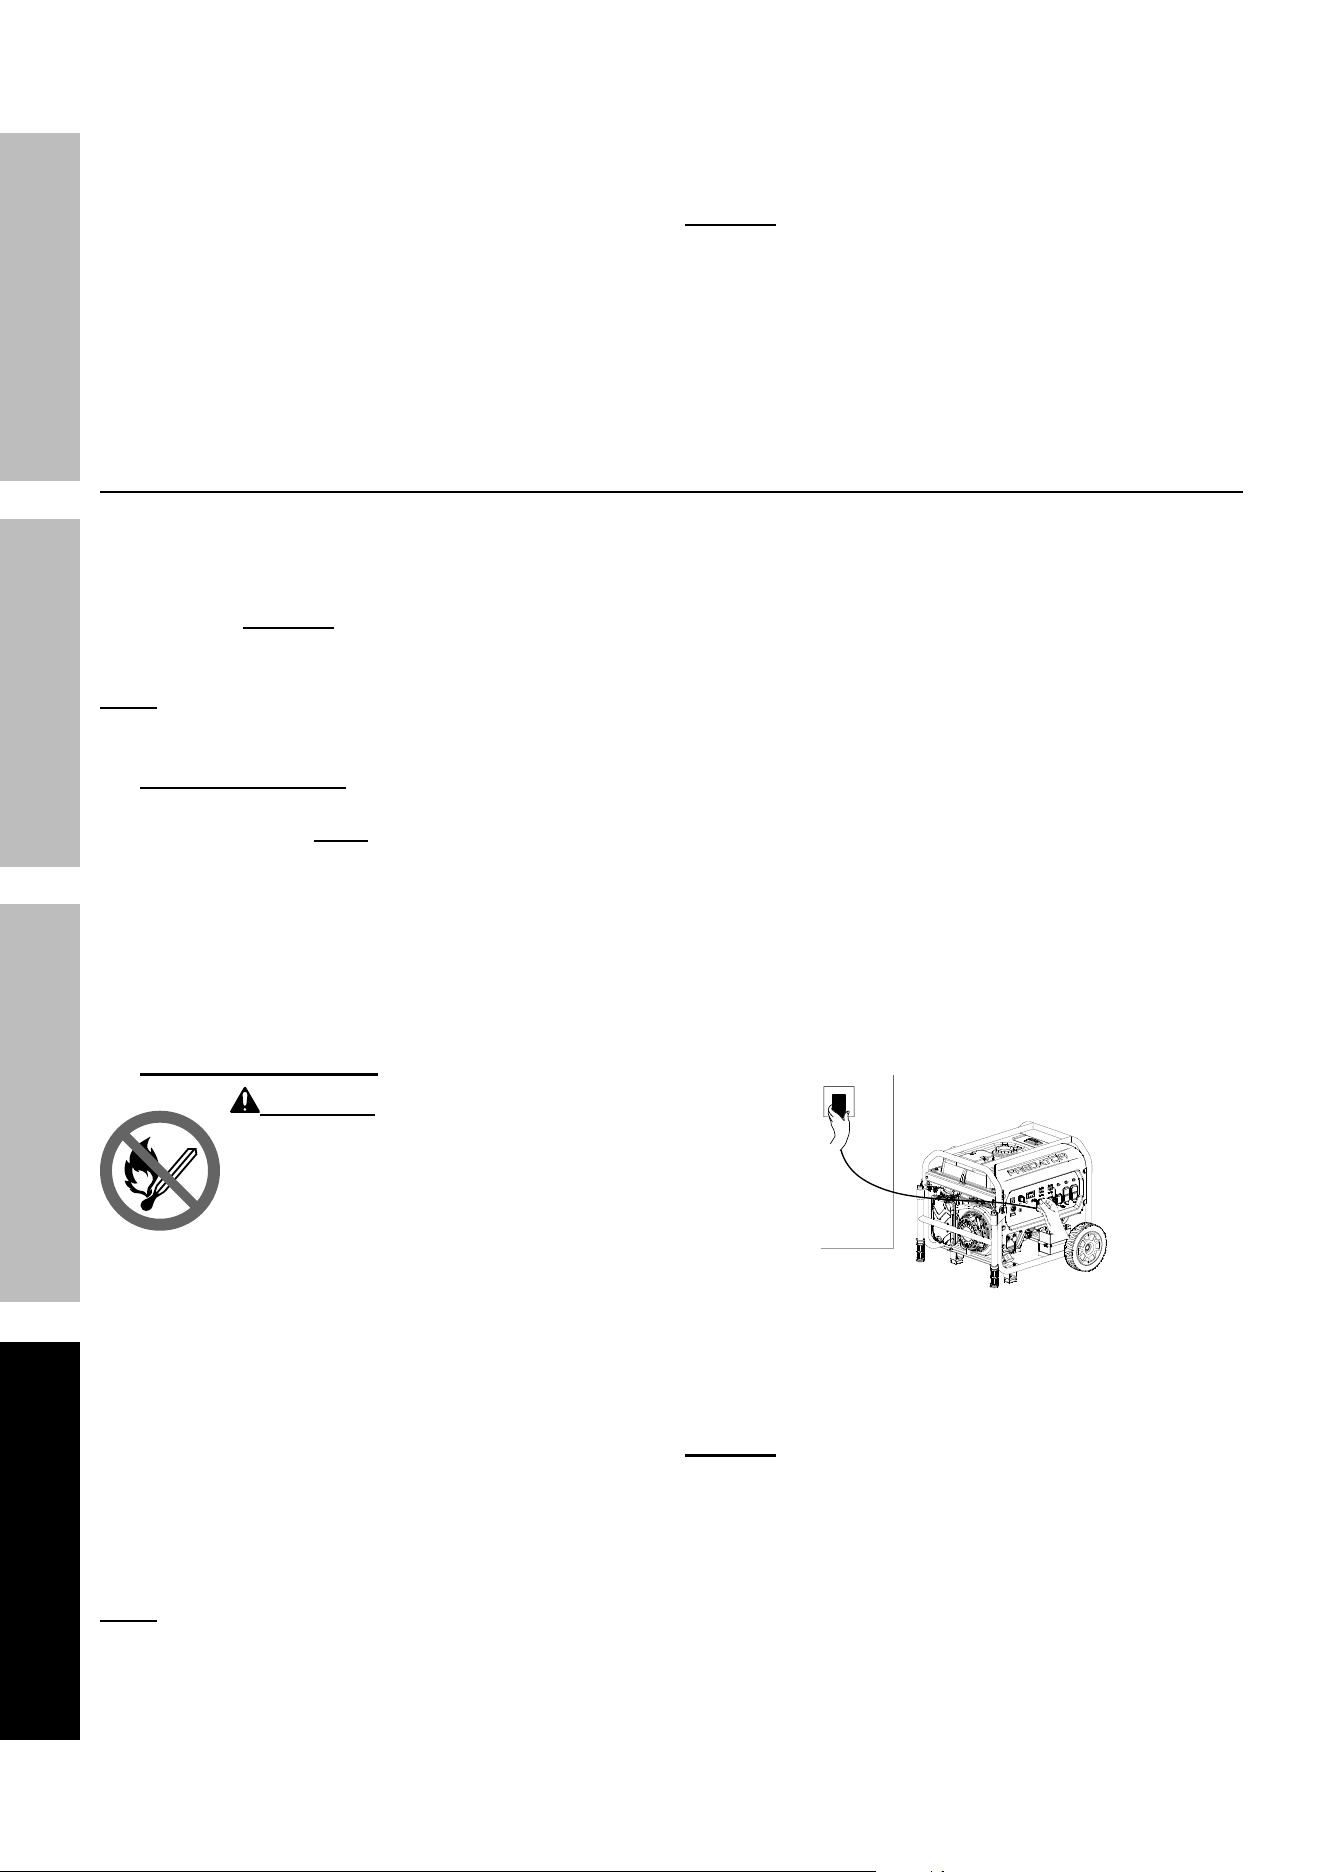
Page 34
For product assistance, please visit harborfreight.com/customer-support/contact-us
73151
SaFeTy OperaTiOn MainTenanCeSeTup
4. When installing a new spark plug,
adjust the plug’s gap to the specification on the
Specifications chart. Do not pry against the
electrode — the spark plug can be damaged.
5. Apply anti-seize material to Spark Plug threads.
Install the new spark plug or
the cleaned spark plug into the engine.
• Gasket-style:
Finger-tighten until the gasket
contacts the cylinder head,
then tighten about 1/2-2/3 turn more.
• non-gasket-style:
Finger-tighten until the plug
contacts the cylinder head,
then tighten about 1/16 turn more.
nOTiCe: Tighten the spark plug properly.
if loose, the spark plug will cause the
engine to overheat.
if overtightened, the threads in the
engine block will be damaged.
6. Apply dielectric spark plug boot protector
(not included) to the end of the spark plug
and reattach the cap securely.
Storage
When the equipment is to remain idle for longer than
20 days, prepare the engine for storage as follows:
1. CLeaninG:
Wait for engine to cool, then clean engine with
dry cloth. nOTiCe: Do not clean using water.
The water will gradually enter the
engine and cause damage.
note: Keep the Propane / Natural Gas Inlet
covered during cleaning and storage.
2. FueL:
Gasoline Treatment
To protect the fuel tank during storage,
fill the tank with fresh gasoline that has
been treated with a fuel stabilizer additive.
Follow fuel stabilizer manufacturer’s
recommendations for use. refer to
Checking and Filling Fuel on page .
aged gasoline that has not been treated with
stabilizer ahead of time must be safely drained
away and not run through the engine.
Draining the Fuel Tank
WarninG! TO preVenT SeriOuS
inJury FrOM Fire:
Drain tank in a well-ventilated area away
from ignition sources. if the engine
is hot from use, shut the engine off and
wait for it to cool before draining fuel.
Do not smoke.
WarninG! Wear anSi-approved safety goggles
and heavy-duty, chemical resistant work
gloves before setting up transfer pump.
a. You will need a gasoline-safe transfer
pump - sold separately.
b. Insert the suction tube to the deepest
point of the Generator’s Fuel Tank.
c. Place the delivery hose into a gasoline-safe
container (not included) in which to pump fuel.
Do not place receiving container higher than
the pump location. Do not overfill container.
note: Know and obey city and state laws for proper
disposal of oil and gasoline. Dispose of properly in
accordance with all local laws and regulations.
3. LuBriCaTiOn:
a. Change engine oil.
b. Clean out area around spark plug.
Remove spark plug and pour one tablespoon of
engine oil into cylinder through spark plug hole.
c. Replace spark plug, but leave
spark plug cap disconnected.
d. Pull Starter Handle to distribute oil in cylinder.
Stop after one or two revolutions when you
feel the piston start the compression stroke
(when you start to feel resistance).
4. 12 VDC BATTERY:
When Generator is not in use or
will be stored for extended periods,
use the Battery Charger / Maintainer
provided to maintain the Battery:
a. Plug the Charger / Maintainer power cord into
the Battery Charging Port on the Generator.
b. Plug the Charger / Maintainer
into an electrical outlet.
c. Disconnect the Charger / Maintainer
before using the Generator.
5. STOraGe area:
Cover and store in a dry, level, well-ventilated
area out of reach of children. Storage area should
also be away from ignition sources, such as
water heaters, clothes dryers, and furnaces.
nOTiCe: During extended storage periods the
Engine must be started every 3 months and allowed
to run for 15 – 20 minutes or the Warranty is VOID.
6. aFTer STOraGe:
Before starting the Engine after storage, keep in
mind that untreated gasoline will deteriorate quickly.
Drain the Fuel Tank and change to fresh fuel if
untreated gasoline has been sitting for a month,
if treated gasoline has been sitting beyond the
fuel stabilizer’s recommended time period,
or if the Engine does not start.
Page 35
For product assistance, please visit harborfreight.com/customer-support/contact-us
73151
SaFeTyOperaTiOnMainTenanCe SeTup
Troubleshooting
problem possible Causes probable Solutions
Engine will not start FUEL RELATED:
1. No fuel in tank or Fuel Pump failure.
2. No fuel flow.
3. Battery depleted – must be charged
and connected to start.
4. Gasoline with more than 10% ethanol
used. (E15, E20, E85, etc.)
5. Low quality or deteriorated, old gasoline.
6. Clogged Fuel Filter.
7. Dirty fuel passageways.
8. Propane tank is too small or empty.
9. Improper Natural Gas rating
(pressure and flow).
FUEL RELATED:
1. Fill fuel tank with fresh 87+ octane stabilizer-treated
unleaded gasoline and Check fuel pump operation.
Do not use Foline with more than 10%
ethanol (e15, e20, e85, etc.).
2. Move Fuel Selector Switch to desired fuel type. For
Propane / Natural Gas fuel, make sure Propane tank
valve or Natural Gas shutoff valve is fully open.
3. Battery must be connected and
charged for generator operation
4. Clean out ethanol rich gasoline from fuel system.
Replace components damaged by ethanol. Use fresh
87+ octane stabilizer-treated unleaded gasoline only.
Do not use gasoline with more than
10% ethanol (e15, e20, e85, etc.).
5. Use fresh 87+ octane stabilizer-treated
unleaded gasoline.
Do not use gasoline with more than
10% ethanol (e15, e20, e85, etc.).
6. Replace Fuel Filter at Fuel Pump.
7. Clean out passageways using fuel additive.
Heavy deposits may require further cleaning.
8. Use 40 lb. tank or larger; make sure
tank is full and fully open valve.
9. Make sure the Natural Gas supply system can meet the
requirements indicated in the Specification Section .
IGNITION (SPARK) RELATED:
1. Engine Switch at OFF position.
2. Disconnected Battery.
3. Low Oil
4. Spark plug cap not connected securely.
5. Spark plug electrode wet or dirty.
6. Incorrect spark plug gap.
7. Spark plug cap broken.
8. Incorrect spark timing or
faulty ignition system.
IGNITION (SPARK) RELATED:
1. Push Engine Switch to ON position.
2. Make sure battery is connected and charged
3. Make sure the oil level is at proper level.
4. Connect spark plug cap properly.
5. Clean spark plug.
6. Correct spark plug gap.
7. Replace spark plug cap.
8. Have qualified technician diagnose/
repair ignition system.
COMPRESSION RELATED:
1. Cylinder not lubricated.
Problem after long storage periods.
2. Loose or broken spark plug.
(Hissing noise will occur
when trying to start.)
3. Loose cylinder head or damaged
head gasket. (Hissing noise will
occur when trying to start.)
4. Engine valves or tappets
mis-adjusted or stuck.
ENGINE OIL RELATED:
1. Low engine oil.
2. Engine is over filled with oil.
3. Engine mounted on slope,
triggering low oil shutdown.
COMPRESSION RELATED:
1. Pour tablespoon of oil into spark plug hole. Crank
engine a few times and try to start again.
2. Tighten spark plug.
If that does not work, replace spark plug.
If problem persists, may have head
gasket problem – see #3.
3. Tighten head.
If that does not remedy problem, replace head gasket.
4. Have qualified technician adjust/
repair valves and tappets.
ENGINE OIL RELATED:
1. Fill engine oil to proper level. Check engine
oil before EVERY use.
2. Remove excess oil. Fill engine oil to proper level.
See Checking and Filling Engine Oil on page 18
3. Operate engine on level surface. Check engine oil level.
Page 36
For product assistance, please visit harborfreight.com/customer-support/contact-us
73151
SaFeTy OperaTiOn MainTenanCeSeTup
problem possible Causes probable Solutions
Engine will not
start (continued)
SPARK ARRESTOR RELATED:
Spark Arrestor clogged with soot.
SPARK ARRESTOR RELATED:
Clean and replace Spark Arrestor.
ELECTRIC OR REMOTE START RELATED:
1. No battery or defective battery installed.
2. Engine Start/Stop Switch flashes
red – Battery is low.
3. Electric start fuse (10A) is blown.
4. Stop/Start Remote Control is
not paired with Generator.
5. Generator not picking up Stop/Start
Remote Control signal consistently.
6. Engine not restarting remotely after CO
shutdown event.
7. EFI System Related.
ELECTRIC OR REMOTE START RELATED:
1. Install a new battery.
2. Charge battery with Battery Charger / Maintainer or
start Generator manually and allow to run for 5 hours.
3. Replace fuse with similar size fuse.
4. Pair Remote Control to Generator. Refer to page 21.
5. Replace the Remote Control battery; press on Remote
Button longer; stay within operational range of Remote.
6. After a CO shutdown event, the remote start
capability will be disabled until the Engine
has been first restarted non-remotely.
7. EFI Alert Indicator Flashes: See EFI Alert Indicator
Light pattern table to identify the root cause
Engine misfires 1. Spark plug cap loose.
2. Incorrect spark plug gap or
damaged spark plug.
3. Defective spark plug cap.
4. Old or low quality gasoline.
5. Incorrect compression.
1. Check cap and wire connections.
2. Re-gap or replace spark plug.
3. Replace spark plug cap.
4. Use only fresh 87+ octane stabilizer-treated
unleaded gasoline.
Do not use gasoline with more than
10% ethanol (e15, e20, e85, etc.).
5. Diagnose and repair compression. Use engine will
not start: COMpreSSiOn reLaTeD section.
Engine stops suddenly 1. Carbon Monoxide level high. Red light
on Carbon Monoxide Sensor illuminates.
2. CO Sensor Alert flashes yellow continually
shortly after starting.
3. CO Sensor Alert flashes yellow continually
after longer period of operation.
4. Low oil shutdown.
5. Fuel tank empty or full of impure or low
quality gasoline.
6. EFI Alert Indicator flashes.
7. Faulty magneto.
8. Disconnected or improperly
connected spark plug cap.
9. Unintentional shutdown signal sent
from Stop/Start Remote Control.
10. If using Natural Gas: inadequate fuel
pressure / flow.
11. If using Propane: Propane tank
empty or Propane tank too small.
1. Leave area immediately and allow area to ventilate
thoroughly. Only operate generator outside.
2. Carbon monoxide sensor malfunction.
Sensor needs service. Call 1-800-444-3353 as
soon as possible. Do not use the Generator
until the sensor is working properly.
3. Make sure to operate Generator within
rated ambient temperature; maintain
minimum 5 ft. clearance from all sides.
4. Fill engine oil to proper level. Check
engine oil before EVERY use.
5. Fill fuel tank with fresh 87+ octane stabilizer treated
unleaded gasoline.
Do not use gasoline with more than 10%
ethanol (E15, E20, E85, etc.).
6. See EFI Alert Indicator Light pattern
table to identify the root cause
7. Have qualified technician service magneto.
8. Secure spark plug cap.
9. Store the Remote Control in a safe
location and away from children.
10. Ensure Natural Gas fuel pressure and
flow meet Generator requirements. Refer
to Specifications on page 3.
11. Replace empty Propane tank with full tank.
Replace small Propane tank with correct tank
size. Refer to Specifications on page 3.
Engine stops when
under heavy load
1. Dirty air filter
2. Engine running cold.
1. Clean or replace element.
2. Allow engine to warm up prior to operating equipment.
Page 37
For product assistance, please visit harborfreight.com/customer-support/contact-us
73151
SaFeTyOperaTiOnMainTenanCe SeTup
problem possible Causes probable Solutions
Engine knocks 1. Old or low quality gasoline.
2. Engine overloaded.
3. Incorrect spark timing, deposit
buildup, worn engine, or other
mechanical problems.
1. Fill fuel tank with fresh 87+ octane stabilizer-treated
unleaded gasoline.
Do not use gasoline with more than
10% ethanol (e15, e20, e85, etc.).
2. Do not exceed equipment’s load rating.
3. Have qualified technician diagnose and service engine.
Engine backfires 1. Impure or low quality gasoline.
2. Engine too cold.
3. Intake valve stuck or overheated engine.
4. Incorrect timing.
1. Fill fuel tank with fresh 87+ octane stabilizer-treated
unleaded gasoline.
Do not use gasoline with more than
10% ethanol (e15, e20, e85, etc.).
2. Use cold weather fuel and oil additives
to prevent backfiring.
3. Have qualified technician diagnose and service engine.
4. Check engine timing.
Attached device
doesn’t have power
1. Device not plugged in properly.
2. Circuit Breaker tripped.
3. GFCI activated.
4. Product needs service.
1. Turn off and unplug the device,
then plug it back in again and turn on.
2. Turn off and unplug device, reset Circuit
Breaker, plug in device and turn on.
3. Turn off and unplug device. Test GFCI
receptacle. If functioning properly reset
GFCI, plug in device and turn on.
4. Have product repaired.
Attached device
begins to operate
abnormally
1. Problem with device.
2. Rated load capacity exceeded.
1. Immediately unplug device.
Have device repaired by a qualified
technician, or replace device.
2. Lower the number of items plugged into the
Generator to stay within the rated capacity,
or use a more powerful generator.
Follow all safety precautions whenever diagnosing or servicing the generator or engine.
eFi Fault indicator Codes
The EFI Alert Light flashes indicating a fault with the engine. The Fault Code can be identified by the
flashing frequency of the EFI Alert Light. The following table describes the Blink Pattern of a Fault Code:
note: The EFI Alert Light turns ON 4 seconds and OFF 2 seconds before
and after displaying the Fault Code(s) Blink Pattern.
note: “·” indicates short blink (0.25 seconds) and “-” indicates long blink (1.2 seconds).
note: For multiple faults, a 2 second pause occurs between codes.
Blink pattern Fault Code Fault Description
· · 2 TPS (Throttle Position Sensor) Error.
· · · 3 Hall (Engine Position and
Speed) Sensor Error.
· · · · · · 6 EFI System voltage is too high.
- · 11 Fuel Injector Error.
- · · · 13 Fuel Pump Error.
- · · · · · 15 Ignition Module Error.
- · · · · · · · 17 Oxygen Sensor Error.
- - · · · · · · · 27 Throttle Stepper Motor Error.
For additional support, please call 1-800-444-3353.
Page 38
For product assistance, please visit harborfreight.com/customer-support/contact-us
73151
SaFeTy OperaTiOn MainTenanCeSeTup
part Description Qty
1 Hex Socket Flange Face Bolt - Small Series
4
2 Cover Subassembly, Cylinder Head
1
3 Stop Engine Piece Subassembly
1
4 Strainer, Breath Groove
1
5 Gasket, Breath Groove
1
6 Cylinder Head Cover Gasket
1
7 Hex Socket Flange Face Bolt - Small Series
2
8 Rocker Subassembly, Valve
2
9 Shaft Subassembly Rocker
2
10 Rotator, Valve
2
11 Clamp, Valve Lock
4
12 Seat, Valve Spring
2
13 Hex Socket Flange Face Bolt - Small Series
1
14 Cylinder Head Cover Pin Limit Plate
1
15 Head Subassembly, Cylinder
1
16 Valves Set
1
17 Gasket, Cylinder Head
1
18 Position Pin - Type A
2
19 Ring Assembly, Piston
1
20 Piston
1
21 Pin, Piston
1
22 Clip, Piston Pin
2
23 Rod, Connecting
1
24 Crankcase Subassembly.
1
25 Stud Bolt (Bm=2D)
2
26 Gasket, Inlet
1
27 Plate, Carburetor Insulator
1
28 Carburetor Seal Gasket
1
29 ECU Assembly
1
30 Air Cleaner Seal Gasket
1
31 High Pressure Fuel Tube Subassembly
1
32 Air Cleaner
1
33 Nut With Flange
2
34 Gasket, Muffler
1
35 Stud Bolt (Bm=2D)
2
36 Type 1 Nut
2
37 Stopper
1
38 Collector, Fuel Steam
1
39 Shroud, Cylinder Body
1
40 Plug, End
1
41 Hex Socket Flange Face Bolt - Small Series
9
42 Seal, Oil
1
43 Cover, Crankcase
1
44 Dipstick Subassembly, Oil
1
45 Seal Strip
1
46 Gasket, Crankcase
1
47 Deep Groove Ball Bearing - P53
1
48 Position Pin - Type A
2
49 Crankshaft Assembly
1
50 Deep Groove Ball Bearing - P6
2
51 Balancing Shaft
1
part Description Qty
52 Wire Clip
3
53 Bolt, Drain Plug
2
54 Seal, Oil
1
55 Flywheel Subassembly
1
56 Impeller
1
57 Pulley, Starter
1
58 Nut, Flywheel
1
59 Stop Detent
1
60 Manual Starting Assembly
1
61 Hex Socket Flange Face Bolt - Small Series
5
62 Pipe Clamp
2
63 Tube, Breather
1
64 Cylinder Head Bolt
4
65 Sensor, Temperature
1
66 Spring, Valve
2
67 Guide, Seal
1
68 Hex Socket Flange Face Bolt - Small Series
1
69 Plug, Rubber
1
70 Starting Motor Assembly
1
71 Hex Socket Flange Face Bolt - Small Series
2
72 Sensor, Engine Oil
1
73 Hex Socket Flange Face Bolt - Small Series
2
74 Nut With Flange
1
75 Coil, Ignition
1
76 Hex Socket Flange Face Bolt - Small Series
2
77 ECU Harness
1
78 Small Spiral Narrow Band Collar - Type A
2
79 Duct, Air
2
80 Sheath
2
81 Plug, Spark
1
82 Camshaft Assembly
1
83 Tappet, Valve
2
84 Lifter Subassembly, Valve
2
85 Seal Strip
1
86 Flat Washer
2
87 Cover, Fuel Tank
1
88 Strainer Fuel
1
89 Fuel Tank Decorated Plate
1
90 Valve, One Way
1
91 Pipe Clamp
3
92 Hose, Fuel Steam Rubber
1
93 Protective Rubber Sleeve
2
94 Hex Socket Flange Face Bolt - Small Series
2
95 Hex Socket Flange Face Bolt - Small Series
4
96 Built-In Electronic Fuel Pump
1
97 Cross Recessed Countersunk Head Screw
(Grade 4.8)
2
98 Leveler Assembly, Oil
1
99 Hex Socket Flange Face Bolt - Large Series
- Grade B
4
100 Flat Washer - Grade A
4
101 Sleeve, Fuel Tank Rubber
4
Component List and Diagram
Component List
Page 39
For product assistance, please visit harborfreight.com/customer-support/contact-us
73151
SaFeTyOperaTiOnMainTenanCe SeTup
part Description Qty
102 Bush
4
103 Fuel Tank
1
104 Pipe Clamp
3
105 Hose, Air Cleaner Rubber
1
106 Hex Socket Flange Face Bolt - Small Series
3
107 Guide Cover
1
108 Valve, One Way
1
109 Muffler Assembly
1
110 Hose, Air Cleaner Rubber
1
111 Nut With Flange 2
112 Hex Socket Flange Face Bolt - Small Series 2
113 Wire, Anode 1
114 Wire, Cathode 1
115 Battery 1
116 Thermal Baffle 1
117 Clamp, Battery 1
118 Hex Socket Flange Face Bolt - Large Series
- Grade B
2
119 Thermal Baffle 1
120 Shaft, Front Wheel 2
121 Flat Washer - Grade A 6
122 Wheel, Front 2
123 Cotter Pin 2
124 Handle Tube Assembly 1
125 Hex Step Bolt 2
126 Plug, End 2
127 Wave Elastic Washer 2
128 Type 2 All Metal Hex Lock Nut With Flange 2
129 Strap 1
130 Pin Shaft 1
131 Sleeve, Handle Rubber 2
132 Hex Socket Flange Face Bolt - Small Series 1
133 Support Air Cleaner 1
134 Hex Socket Flange Face Bolt - Large Series
- Grade B
2
135 Crosspiece Subassembly 1
136 Protective Rubber Sleeve 2
137 Hex Socket Flange Face Bolt - Small Series 2
138 Type 2 All Metal Hex Lock Nut With Flange 4
139 Support Engine Frame Shock Absorption 2
140 Seat, Engine Frame Shock Absorption 2
141 Nut With Flange 2
142 Nut With Flange - Fine Thread 4
143 Cushion, Engine Frame 4
144 Nut With Flange 4
145 Hex Socket Flange Face Bolt - Large Series
- Grade B
4
146 Frame Assembly, Engine 1
147 Seat, Engine Frame Shock Absorption 4
part Description Qty
148 Small Spiral Narrow Band Collar - Type A 2
149 Fuel Rail Assembly 1
150 Cross-Recessed Pan Head Screw 4
151 Dust-Proof Cap 1
152 Nut 1
153 Pin Shaft 1
154 Pipe Clamp 1
155 Nut Stator 2
156 Standard Spring Washer 2
157 Flat Washer - Grade A 2
158 Motor Assembly 1
159 Motor Support 1
160 Cross-Recessed Pan Head Screw 4
161 Grounding 1
162 Hex Socket Flange Face Bolt - Small Series 1
163 Stator Bolt 2
164 Stator Bolt 4
165 Band 1
166 Shroud, Motor 1
167 Hex Socket Flange Face Bolt - Small Series 1
168 Stopper, Motor Right Cover 1
169 Hex Socket Flange Face Bolt - Small Series 1
170 Thermal Baffle 1
171 Flat Washer - Grade A 1
172 Bolt Rotor 1
173 Regulator, Voltage 1
174 Hex Socket Flange Face Bolt - Small Series 2
175 Motor Tail Cover 1
176 Hex Socket Flange Face Bolt - Small Series 3
177 Seat, Panel 1
178 Carbon Monoxide Alarm 1
179 Pressure Plate 1
180 Self-Tapping Screw 2
181 Hex Socket Central Stud Pan Head Screw 5
182 Charger Module 1
183 Panel Subassembly, Control 1
184 Nut With Flange 6
185 Control Module 1
186 Cross-Recessed Pan Head Self-Tapping
Screw
2
187 Hex Socket Flange Face Bolt - Small Series 3
188 Buffering Pad Support 2
189 Grounding 1
190 External Teeth Serrated Lock Washer 1
191 Controller, Electronic 1
192 Oxygen Sensor 1
193 Coil Subassembly, Charge 1
194 Hex Socket Flange Face Bolt - Small Series 2
195 Clamp, Charge Coil 1
196 Hex Socket Flange Face Bolt - Small Series 1
Component List (continued)
The component list and assembly diagram are shown for reference only.
To view all currently available replacement parts, please visit harborfreight.com/parts
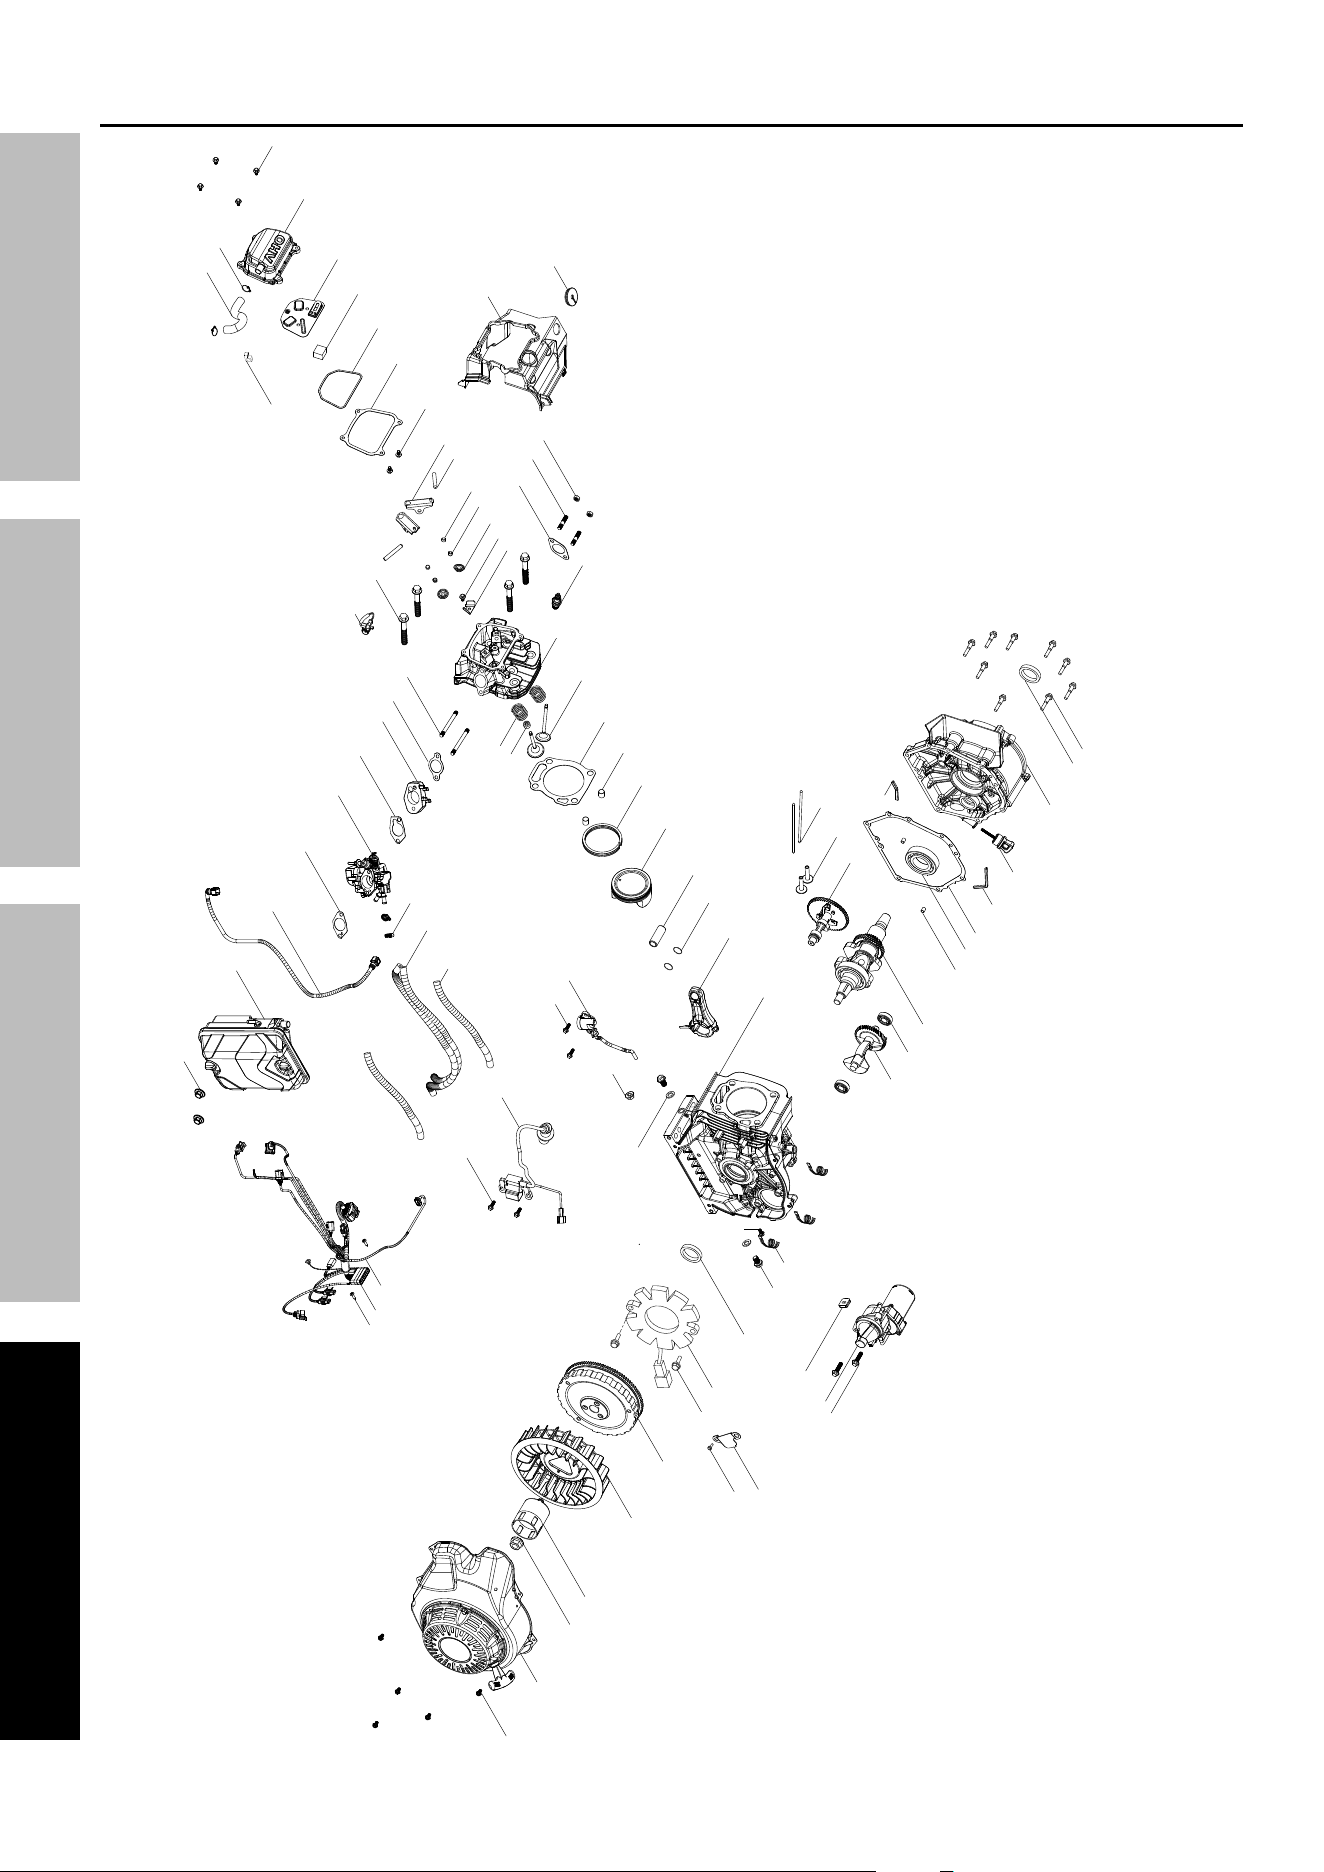
Page 40
For product assistance, please visit harborfreight.com/customer-support/contact-us
73151
SaFeTy OperaTiOn MainTenanCeSeTup
assembly Diagram
1
2
3
4
5
6
7
8
9
10
11
12
13
14
15
16
17
18
19
20
21
22
23
24
25
26
27
28
29
30
31
32
33
34
35
36
39
40
41
42
43
44
45
46
47
48
49
50
51
52
53
54
55
56
57
58
60
61
62
63
64
65
66
67
68
69
70
71
72
73
74
75
76
77
78
79
80
81
82
83
84
85
86
160
191
59
193
194
195
196
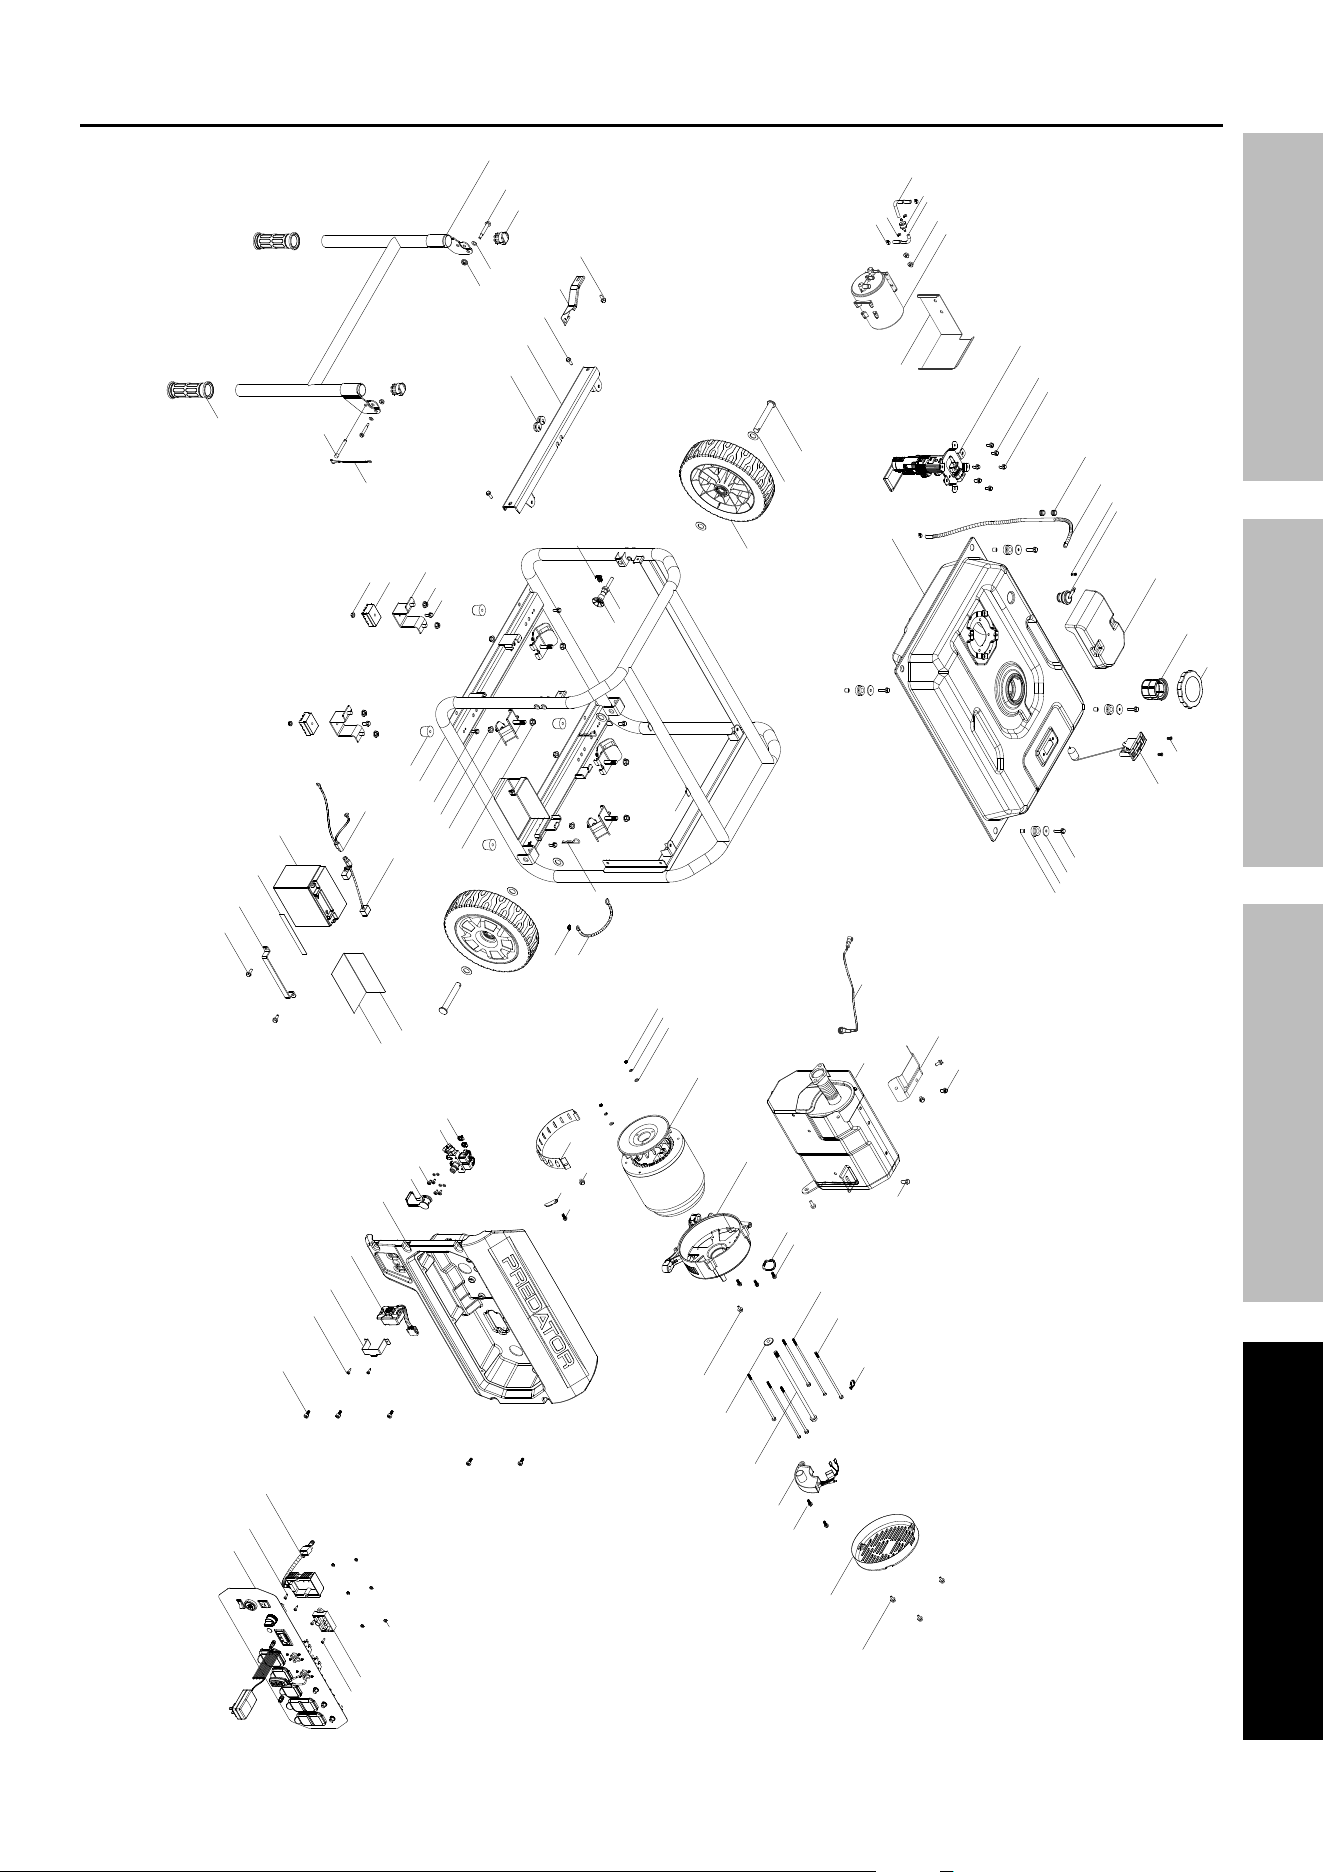
Page 41
For product assistance, please visit harborfreight.com/customer-support/contact-us
73151
SaFeTyOperaTiOnMainTenanCe SeTup
assembly Diagram (continued)
87
88
89
90
91
92
93
94
95
96
97
98
99
100
101
102
103
106
107
109
112
113
114
115
116
117
118
119
120
121
122
123
124
125
126
127
128
129
130
131
132
133
134
135
136
138
137
139
140
141
142
143
144
145
146
147
148
149
150
151
152
153
154
177
178
179
180
181
182
183
184
185
186
155
156
157
158
159
161
162
163
164
165
166
167
168
169
171
172
173
174
175
176
187
170
160
188
189
190
38
111
110
108
105
91
104
37
192

Page 42
For product assistance, please visit harborfreight.com/customer-support/contact-us
73151
SaFeTy OperaTiOn MainTenanCeSeTup
pLeaSe reaD THe FOLLOWinG CareFuLLy
THE MANUFACTURER AND/OR DISTRIBUTOR HAS PROVIDED THE COMPONENT LISTS AND ASSEMBLY
DIAGRAMS IN THIS MANUAL AS A REFERENCE TOOL ONLY. NEITHER THE MANUFACTURER OR
DISTRIBUTOR MAKES ANY REPRESENTATION OR WARRANTY OF ANY KIND TO THE BUYER THAT HE
OR SHE IS QUALIFIED TO MAKE ANY REPAIRS TO THE PRODUCT, OR THAT HE OR SHE IS QUALIFIED
TO REPLACE ANY PARTS OF THE PRODUCT. IN FACT, THE MANUFACTURER AND/OR DISTRIBUTOR
EXPRESSLY STATES THAT ALL REPAIRS AND PARTS REPLACEMENTS SHOULD BE UNDERTAKEN BY
CERTIFIED AND LICENSED TECHNICIANS, AND NOT BY THE BUYER. THE BUYER ASSUMES ALL RISK
AND LIABILITY ARISING OUT OF HIS OR HER REPAIRS TO THE ORIGINAL PRODUCT OR REPLACEMENT
PARTS THERETO, OR ARISING OUT OF HIS OR HER INSTALLATION OF REPLACEMENT PARTS THERETO.
Record product’s Date Code Here:
note: If product has no date code, record month and year of purchase instead.
note: Some parts are listed and shown for illustration purposes only, and are not available
individually as replacement parts. Specify UPC 193175566867 when ordering parts.
FCC STaTeMenT FOr THe reMOTe
nOTiCe: The user is cautioned that changes or modifications not expressly approved by the
party responsible for compliance could void the user‘s authority to operate the equipment.
This device complies with Part 15 of the FCC Rules. Operation is subject to the following two
conditions: (1) this device may not cause harmful interference, and (2) this device must accept
any interference received, including interference that may cause undesired operation.
note: This equipment has been tested and found to comply with the limits for a Class B digital device, pursuant
to Part 15 of the FCC Rules. These limits are designed to provide reasonable protection against harmful
interference in a residential installation. This equipment generates, uses and can radiate radio frequency energy
and, if not installed and used in accordance with the instructions, may cause harmful interference to radio
communications. However, there is no guarantee that interference will not occur in a particular installation.
If this equipment does cause harmful interference to radio or television reception,
which can be determined by turning the equipment off and on, the user is encouraged
to try to correct the interference by one or more of the following measures:
• Re-orient or relocate the receiving antenna.
• Increase the separation between the equipment and receiver.
• Connect the equipment into an outlet on a circuit different from that to which the receiver is connected.
• Consult the dealer or an experienced radio/TV technician for help.

Page 43
For product assistance, please visit harborfreight.com/customer-support/contact-us
73151
SaFeTyOperaTiOnMainTenanCe SeTup
Warranties
Limited 90 Day Warranty (retail)
Harbor Freight Tools Co. makes every effort to assure that its products meet high quality and durability standards,
and warrants to the original purchaser that this product is free from defects in materials and workmanship for the
period of 90 days from the date of purchase. This warranty does not apply to damage due directly or indirectly,
to misuse, abuse, negligence or accidents, repairs or alterations outside our facilities, criminal activity, improper
installation, normal wear and tear, or to lack of maintenance. We shall in no event be liable for death, injuries
to persons or property, or for incidental, contingent, special or consequential damages arising from the use of
our product. Some states do not allow the exclusion or limitation of incidental or consequential damages, so
the above limitation of exclusion may not apply to you. THIS WARRANTY IS EXPRESSLY IN LIEU OF ALL
OTHER WARRANTIES, EXPRESS OR IMPLIED, INCLUDING THE WARRANTIES OF MERCHANTABILITY
AND FITNESS, EXCEPT FOR THE EMISSIONS CONTROL SYSTEM WARRANTY BELOW.
To take advantage of this warranty, the product or part must be returned to us with transportation charges prepaid.
Proof of purchase date and an explanation of the complaint must accompany the merchandise. If our
inspection verifies the defect, we will either repair or replace the product at our election or we may elect to
refund the purchase price if we cannot readily and quickly provide you with a replacement. We will return
repaired products at our expense, but if we determine there is no defect, or that the defect resulted from
causes not within the scope of our warranty, then you must bear the cost of returning the product.
This warranty gives you specific legal rights and you may also have other rights which vary
from state to state. HFT also warrants that the emissions control system on your engine is
designed, built, and equipped so that it conforms to the United States Environmental Protection
Agency’s (EPA) emissions requirements in effect at the time of manufacture.

Page 44
For product assistance, please visit harborfreight.com/customer-support/contact-us
73151
SaFeTy OperaTiOn MainTenanCeSeTup
emissions Control System Warranty
The California Air Resources Board and Harbor Freight Tools (HFT) are pleased to explain the emissions control
system warranty on your [Model Year] and engine powered equipment. In California, new equipment that uses Small
Off-Road Engine must be designed, built, and equipped to meet the State’s stringent anti-smog standards. HFT must
warrant that the emissions control system on your Small Off-Road Engine and engine powered equipment will be free
from defects in material and workmanship for two (2) years, provided there has been no abuse, neglect, or improper
maintenance of your Small Off-Road Engine or engine powered equipment. HFT also warrants that the emissions
control system on your engine is designed, built, and equipped so that it conforms to the United States Environmental
Protection Agency’s (EPA) emissions requirements in effect at the time of manufacture.
Your emissions control system may include parts such as: carburetor or fuel-injection system, the ignition system,
catalytic converter, fuel lines, fuel tanks, fuel caps, valves, canisters, filters, hoses, belts, clamps, connectors, and other
emission-related assemblies or components.
Where a warrantable condition exists, HFT will repair or replace, at our option, your engine at no cost to you,
including diagnosis, parts and labor.
ManuFaCTurer’S WarranTy COVeraGe
This emissions control system is warranted for two years. If any emission-related part on your engine is defective,
the part will be repaired or replaced by HFT.
OWner’S WarranTy reSpOnSiBiLiTieS
As the Small Off-Road Engine and engine powered equipment owner, you are responsible for the performance
of the required maintenance listed in your Owner’s Manual. HFT recommends that you retain all receipts covering
maintenance on your Small Off-Road Engine/equipment, but HFT cannot deny warranty solely for the lack of receipts
or for your failure to ensure the performance of all scheduled maintenance.
As the Small Off-Road Engine and engine powered equipment owner, you should however be aware that HFT may
deny you warranty coverage if your Small Off-Road Engine or engine powered equipment or a part has failed due to
abuse (including failure to follow the fuel use instructions contained in this manual), neglect, improper maintenance,
or unapproved modifications.
You are responsible for presenting your Small Off-Road Engine or engine powered equipment to HFT as soon as
the problem exists. To obtain warranty repair or replacement, either: (a) contact HFT Product Support at 1-800-444-3353
or [email protected] or (b) bring the Small Off-Road Engine or engine powered equipment to your
nearest Harbor Freight Tools retail store. The nearest Harbor Freight Tools retail store can be found on the internet at
https://www.harborfreight.com. The warranty repairs or replacement should be completed in a reasonable amount of
time, not to exceed 30 days.
If you have a question regarding your warranty coverage, you should contact HFT Product Support at 1-800-444-3353
GeneraL eMiSSiOnS WarranTy COVeraGe
a) The warranty period begins on the date the engine or equipment is delivered to an ultimate purchaser. The
warranty period is two years.
b) HFT warrants to the ultimate purchaser and each subsequent owner that the engine is:
1. Designed, built, and equipped so as to conform with the applicable United States Environmental Protection
Agency’s (EPA) emissions requirements in effect at the time of manufacture and all applicable regulations
adopted by the California Air Resources Board; and
2. Free from defects in materials and workmanship that cause the failure of a warranted part to be identical in
all material respects to the part as described in the engine manufacturer’s application for certification for a
period of two years.
c) The warranty on emissions-related parts is as follows:
1. Any warranted part that is not scheduled for replacement as required maintenance in the written instructions
provided is warranted for the warranty period stated above. If any such part fails during the period of warranty
coverage, it will be repaired or replaced by HFT. Any such part repaired or replaced under the warranty will
be warranted for the remaining warranty period.
2. Any warranted part that is scheduled only for regular inspection in the written instructions is warranted for
the warranty period stated above. A statement in the written instructions to the effect of “repair or replace

Page 45
For product assistance, please visit harborfreight.com/customer-support/contact-us
73151
SaFeTyOperaTiOnMainTenanCe SeTup
as necessary” does not reduce the period of warranty coverage. Any such part repaired or replaced under
warranty will be warranted for the remaining warranty period.
3. Any warranted part that is scheduled for replacement as required maintenance in the written instructions will
be warranted for the period of time prior to the first scheduled replacement point for that part. If the part fails
prior to the first scheduled replacement, the part will be repaired or replaced by HFT. Any such part repaired
or replaced under warranty will be warranted for the remainder of the period prior to the first scheduled
replacement point for the part.
4. At no charge to the owner, repair or replacement of any warranted part under the warranty will be performed
at a retail store or by HFT shipping the product for repair.
5. Notwithstanding the provisions herein, warranty services or repairs will be provided at all retail stores or by
contacting HFT Product Support at 1-800-444-3353 or [email protected].
6. The owner will not be charged for diagnostic labor that leads to the determination that a warranted part is in
fact defective, provided that such diagnostic work is performed at a retail store.
7. HFT is liable for damages to other engine components proximately caused by a failure under warranty of any
warranted part.
8. Throughout the engine’s and emission control system’s warranty period stated above, HFT will maintain a
supply of warranted parts sufficient to meet the expected demand for such parts and will obtain additional
parts if that supply is exhausted.
9. Any replacement part may be used in the performance of any warranty maintenance or repairs and will
be provided without charge to the owner. Manufacturer-approved replacement parts that do not increase
emissions will be used in the performance of any warranty maintenance or repairs and will be provided
without charge to the owner. Such use will not reduce the warranty obligations of HFT.
10. Add-on or modified parts that are not exempted by the California Air Resources Board may not be used. The
use of any non-exempted add-on or modified parts will be grounds for disallowing a warranty claim. HFT is
not liable to warrant failures of warranted parts caused by the use of a non-exempted add-on or modified
part.
11. HFT will provide any documents that describe its warranty procedures or policies upon request of the
Executive Officer.
d) Emission Warranty Component List.
1. Fuel Metering System
a. Carburetor and its internal parts (and/or
pressure regulator or fuel injection system).
b. Fuel tank.
c. Cold start enrichment system.
d. Air/fuel ratio feedback and control system.
2. Air Induction System
a. Controlled hot air intake system.
b. Intake manifold.
c. Air filter.
3. Ignition System
a. Spark plugs.
b. Magneto ignition system.
c. Spark advance/retard system.
4. Catalyst System (if so equipped)
a. Exhaust pipe stud/exhaust manifold.
b. Thermal reactor.
c. Catalytic converter (if so equipped).
5. Particulate Controls
a. Traps, filters, precipitators, and any other
device used to capture particulate emissions.
6. Miscellaneous Items Used in Above Systems
a. Vacuum, temperature and time sensitive
valves and switches.
b. Hoses, belts, connectors, and assemblies.
7. Evaporative Emission Control System
a. Fuel tank.
b. Fuel caps, valves, canisters, filters, vapor
hoses, clamps, connectors, belts, and
assemblies.
8. Air Injection System (if so equipped)
a. Air pump or pulse valve.
b. Valves affecting distribution of flow.
c. Distribution manifold.
HFT provides with each product written instructions for the maintenance and use of the product by the owner.

Page 46
For product assistance, please visit harborfreight.com/customer-support/contact-us
73151
SaFeTy OperaTiOn MainTenanCeSeTup

Page 47
For product assistance, please visit harborfreight.com/customer-support/contact-us
73151
SaFeTyOperaTiOnMainTenanCe SeTup

26677 agoura road • Calabasas, Ca 91302 • 1-800-444-3353