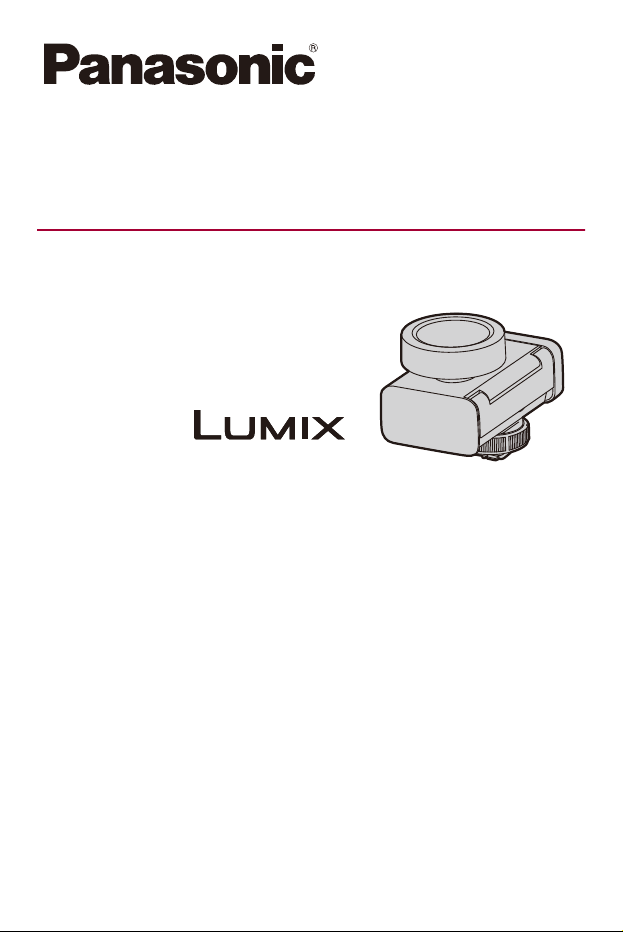
Operating Instructions / Owner’s Manual
<Complete Guide>
Digital Shotgun Microphone
Model No.
DMW-DMS1
Please read these instructions carefully before using this product.
DVQP3481ZA
F0226TN0
until
2024/07/01

2
About Operating Instructions
This document, “Operating Instructions / Owner’s Manual <Complete
Guide>”, includes detailed explanations of the functions and operations of
the unit.
•
The external design and specifications of this product, as described in this
document, may differ from the actual product.
•
Illustrations used in this document may differ from the actual product and the actual
images displayed on the product.
•
Images used in this document are sample pictures used to explain the functions and
effects.
Symbols Used in This Document
Notification classification symbols
In this document, notifications are classified and described using the following
symbols:
: Notifications and supplementary items regarding specifications
: Related functions and information

3
Contents
About Operating Instructions 2
Introduction 4
Precautions..................................................................................5
Standard Accessories..................................................................7
Names of Parts ............................................................................8
Getting Started 10
Attaching to the Camera ............................................................11
Attaching the Wind Screen ........................................................13
Using the Digital Shotgun Microphone 15
Using the Backup Audio Recording Function ............................16
Setting Input Gain ......................................................................18
Setting the Recording Level.......................................................19
Reducing the Noise Caused by Wind ........................................21
Reducing the Noise That Occurs Around You...........................22
Switching Directionality..............................................................23
Frequency responses and directionality pattern diagrams ................ 25
Materials 31
Cautions for Use ........................................................................32
Specifications.............................................................................35


Introduction – Precautions
5
Precautions
This unit is a Digital shotgun microphone for Panasonic digital cameras.
By using in combination with a digital camera, it is possible to make
superior-quality audio recordings, high-resolution audio recordings, and
backup audio recordings (4ch audio recording).
Furthermore, by using in combination with a digital camera that supports
float recording, it is also possible to make 32-bit float recordings capable of
high-quality audio recordings without having to make settings for the
recording level.
Compatible models (As of February 2026)
Compatible models:
DC-S1M2
*
, DC-S1M2ES
*
, DC-S1RM2
*
, DC-S5M2
*
, DC-S5M2X
*
* Use with the firmware on the Digital Camera updated to the most recent version.
DC-S5M2/DC-S5M2X models do not support float audio recording or backup audio
recording (4ch audio recording).
•
For the latest information on the firmware or to download/update the firmware, visit
the following support site:
https://panasonic.jp/support/global/cs/dsc/download/index4.html
(English only)
•
For the latest information on compatible devices, see the operating instructions,
catalogue or website of the digital camera.

Introduction – Precautions
6
Handling the unit
Do not subject the unit to strong vibration or impact. Those actions
may result in malfunctions and failure.
Sand and dirt may cause the unit to malfunction. When using the unit
in an environment such as a beach, take steps to protect it from sand
and dirt.
When using the unit on rainy days or on a beach, take care to keep
the unit dry.
This unit is neither dust-proof nor splash-resistant. If by any chance
water droplets, etc. are splashed on the unit, wipe them off with a dry
cloth. If the unit fails to function correctly, consult your dealer or
Panasonic.
Remove dirt and dust from the microphone condenser if any gets on
it. Dirt and dust may have an adverse effect on microphone
performance.
Please also read the manual of your digital camera.
•
Please be advised that Panasonic is not liable for any damage directly or
indirectly caused by use or malfunction of this product.
•
The external design and specifications of this product, as described in this
document, may differ from the actual product due to improvements made.

Introduction – Standard Accessories
7
Standard Accessories
Check the supplied items. (Product numbers correct as of February 2026.)
Wind screen
DVZE1067Z
Pouch
DVPY1026Z
•
Consult the dealer or Panasonic if you lose the supplied accessories. (You can
purchase the accessories separately.)
•
Fibers from the wind screen or pouch can become attached to the unit.
Before use, if fibers are attached, remove them with a blower, etc.
Introduction – Names of Parts
8
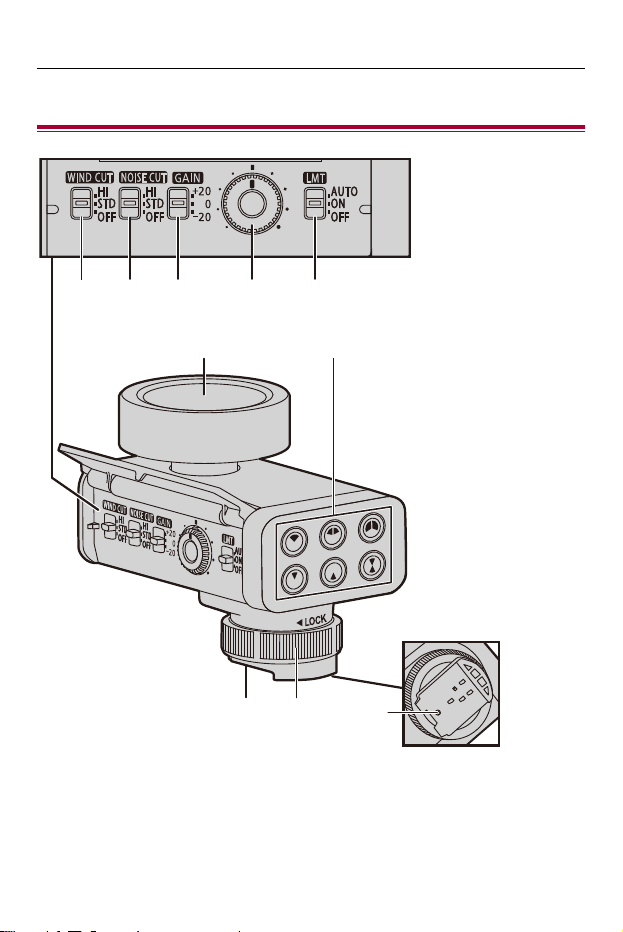
Names of Parts
(1) (2) (3) (5)
(8) (9)
(10)
(6) (7)
(4)

Introduction – Names of Parts
9
(1) WIND CUT switch
(2) NOISE CUT switch
(3) GAIN switch
(4) AUDIO LEVEL dial
(5) LMT switch
(6) Microphone condenser
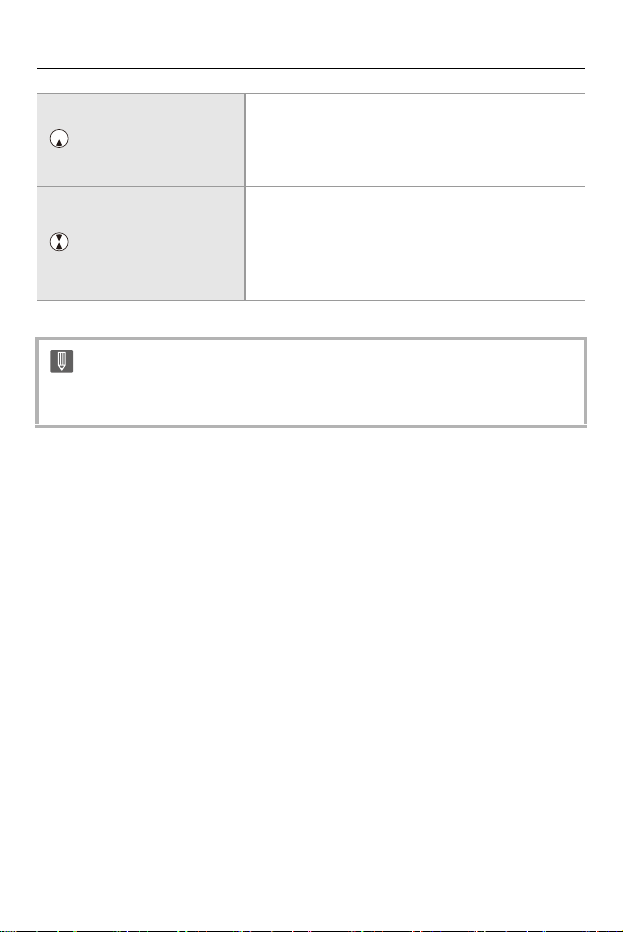
(7) Directivity buttons
: Forward directionality cardioid
: Stereo
: Wide stereo
: Forward directionality supercardioid
: Rearward directionality supercardioid
: Bidirectional supercardioid
(8) Hot shoe mount
(9) Lock ring
(10) Lock pin

Getting Started – Attaching to the Camera
11
Attaching to the Camera
Confirm that the camera is off. Attaching or removing the microphone while
the camera is on may result in malfunction.
1
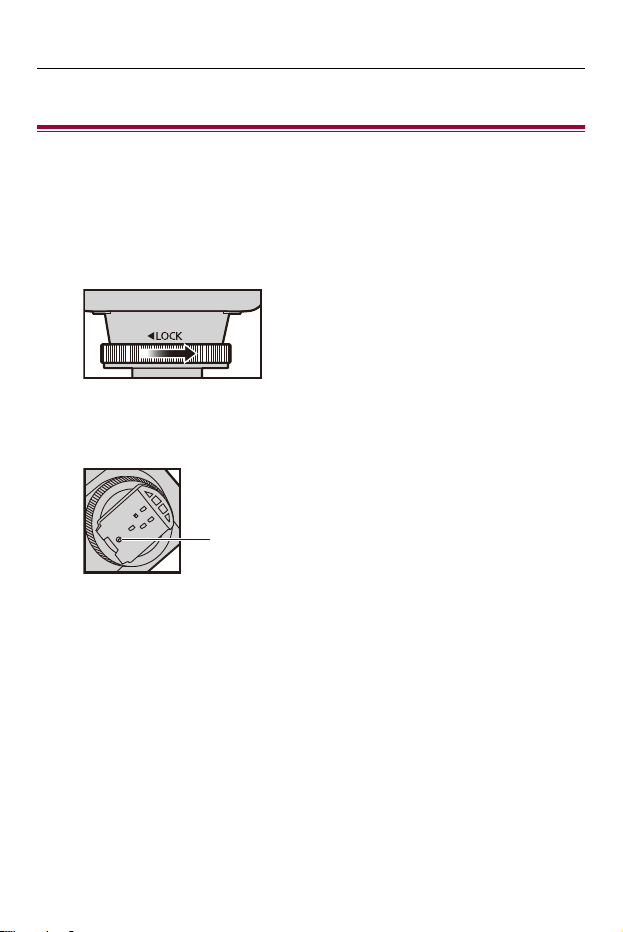
Turn the lock ring in the direction opposite to [2 LOCK]
until it stops.
•
Check that the lock pin is retracted.
Do not attempt to attach the microphone to a digital camera while the lock pin
is protruding. This may cause malfunction.
(A) Lock pin
•
Do not apply more force than necessary to the lock ring.
•
Do not touch the contacts with your fingers, fittings, etc.
(A)
Getting Started – Attaching to the Camera
12
2
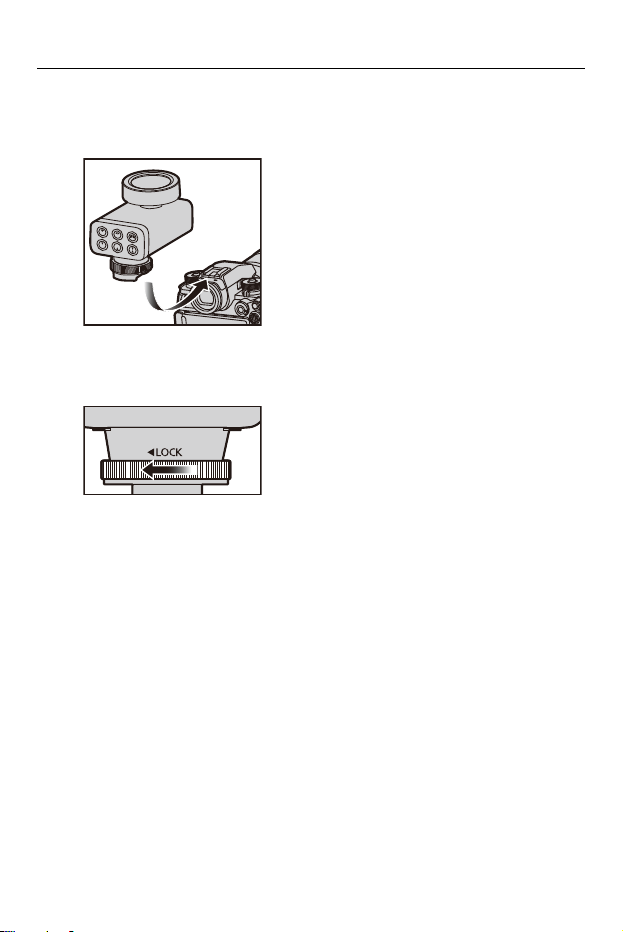
Slide the microphone into the hot shoe until it clicks
securely into place.
3
Turn the lock ring in the [2 LOCK] direction until it
stops.
• When removing the microphone, turn the lock ring in the direction
opposite to [2 LOCK] and remove the microphone.
Getting Started – Attaching the Wind Screen
13
Attaching the Wind Screen
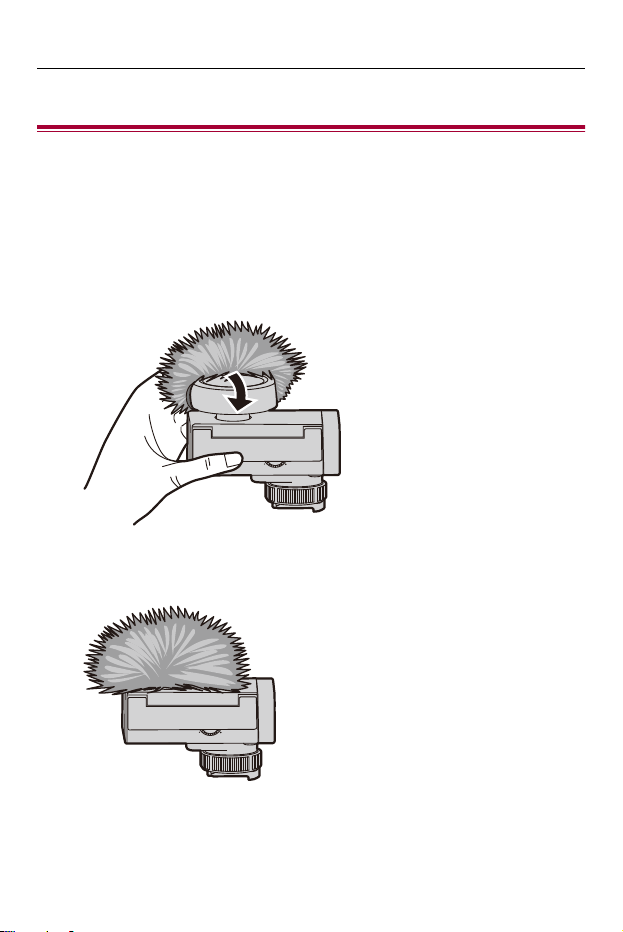
Attach the wind screen if you want to cut out the sound of wind. It is
effective in reducing the noise of wind.
1
Catch one side of the wind screen under the
microphone condenser and hold in place with a finger,
then draw the other side of the wind screen over the
microphone condenser to fit it.
2
Check that the fitting part of the wind screen is
completely fitted under the microphone condenser.
Getting Started – Attaching the Wind Screen
14
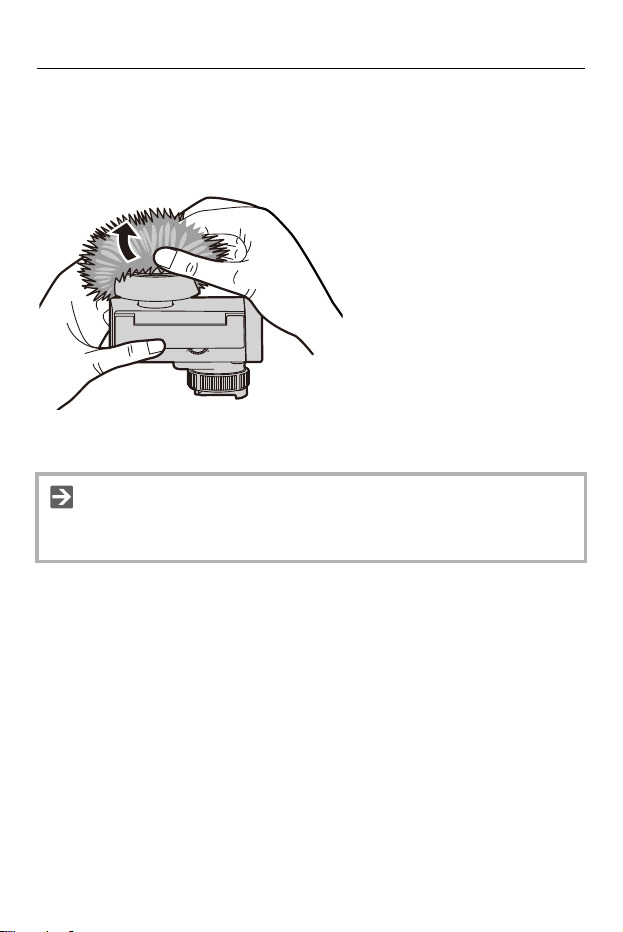
Removing the Wind Screen
With the microphone itself secured, peel the wind screen off
from the side of the microphone condenser.
•
Do not pull on the fluff of the wind screen to remove the wind screen.
•
Refer to “Cautions for Use” for information about the handling and care of the
wind screen. (The Wind Screen: 33, Cleaning: 34)

15
Using the Digital Shotgun
Microphone
This unit can be used by turning the power of the digital camera [ON] while
this unit is mounted on the digital camera.
•
The operational sound of the switch operation may be recorded or the sound may
get interrupted, such as when the switch is operated during the recording of a motion
picture.
≥ Using the Backup Audio Recording Function: 16
≥ Setting Input Gain: 18
≥ Setting the Recording Level: 19
≥ Reducing the Noise Caused by Wind: 21
≥ Reducing the Noise That Occurs Around You: 22
≥ Switching Directionality: 23

Using the Digital Shotgun Microphone – Using the Backup Audio Recording Function
16
Using the Backup Audio Recording
Function
When using digital cameras compatible with 4ch audio recordings, you can
make backup audio recordings to CH3 and CH4.
Refer to the Operating Instructions for the digital camera for details.
Digital cameras compatible with 4ch audio recording (As of February 2026)
DC-S1M2, DC-S1M2ES, DC-S1RM2
The following two backup audio recording modes can be selected with the menus on
the digital camera.
CH1 and CH2 record according to the directionality of the microphone. (Switching
Directionality: 23)
[DMS1
BACKUP1]
The following types of audio are recorded to CH3/CH4
irrespective of the noise reduction setting and directional mode.
This is recommended when you want to pick up ambient sounds.
•
CH3: Records with directionality across all the full range
•
CH4: Records with directionality across all the full range
(records sounds 20 dB smaller than CH3)
[DMS1
BACKUP2]
Records sounds 20 dB smaller than the audio recorded with CH1
and CH2.
•
CH3: Records with the same directionality as CH1 (records
sounds 20 dB smaller)
•
CH4: Records with the same directionality as CH2 (records
sounds 20 dB smaller)

Using the Digital Shotgun Microphone – Using the Backup Audio Recording Function
17
•
Backup audio recording is not a means of preventing the distortion that occurs
when audio is input at high volumes.
•
When [DMS1 BACKUP1] is selected, the WIND CUT and NOISE CUT settings
for CH3/CH4 are not used.
Using the Digital Shotgun Microphone – Setting Input Gain
18
Setting Input Gain
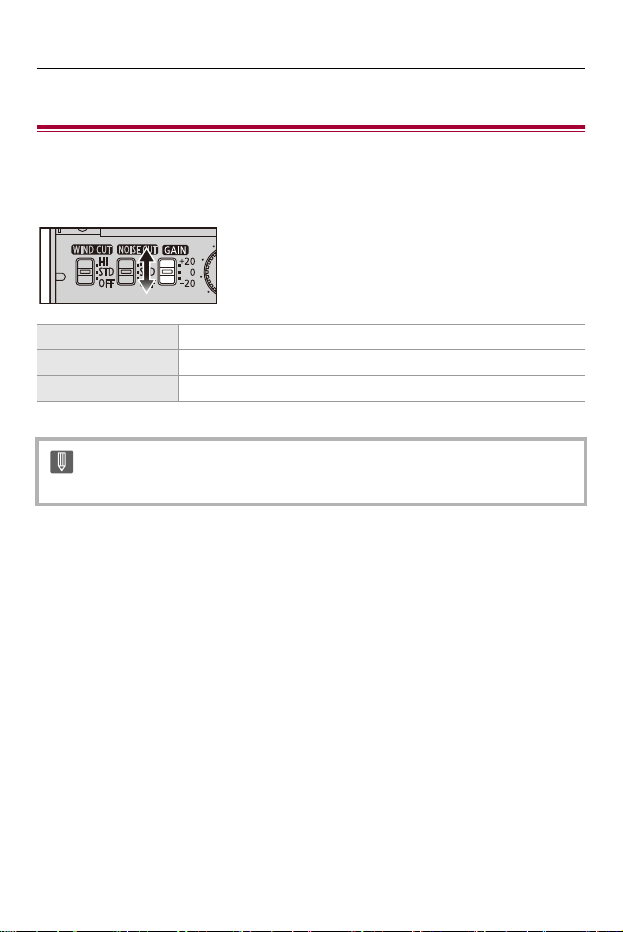
You can change the input gain with the GAIN switch.
Set the input gain with the GAIN switch.
[+20] +20 dB
[0] 0 dB (Default setting, standard level)
[−20] −20 dB
•
Input gain cannot be changed during 32-bit float recording.
Using the Digital Shotgun Microphone – Setting the Recording Level
19
Setting the Recording Level
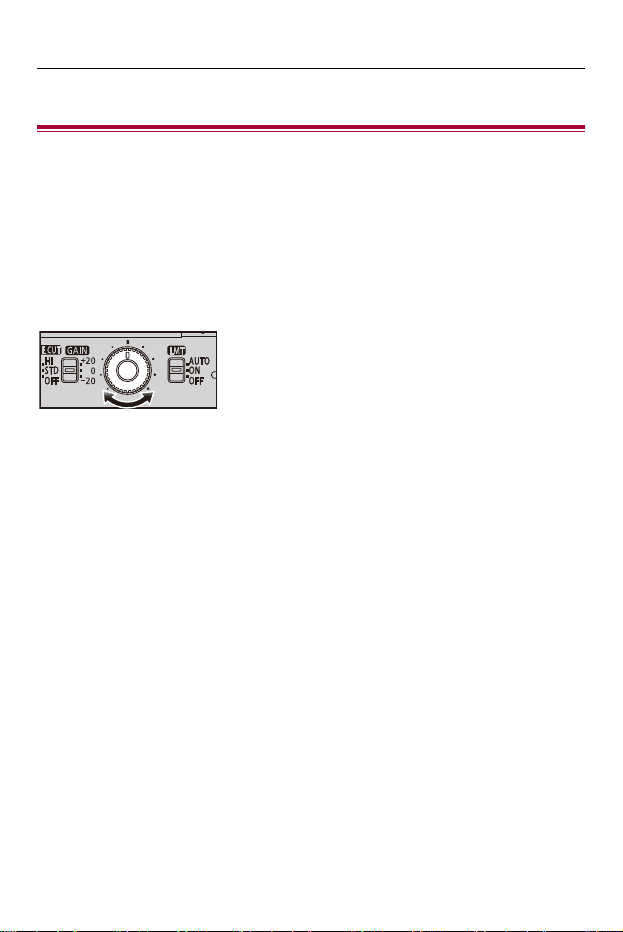
Set the recording level for audio.
Turn the AUDIO LEVEL dial to set the recording level
(volume).
•
Setting the level while checking with headphones connected to the digital camera or
the digital camera microphone level display is recommended.
•
Sound is muted if you turn the dial all the way to the left.
Using the Digital Shotgun Microphone – Setting the Recording Level
20
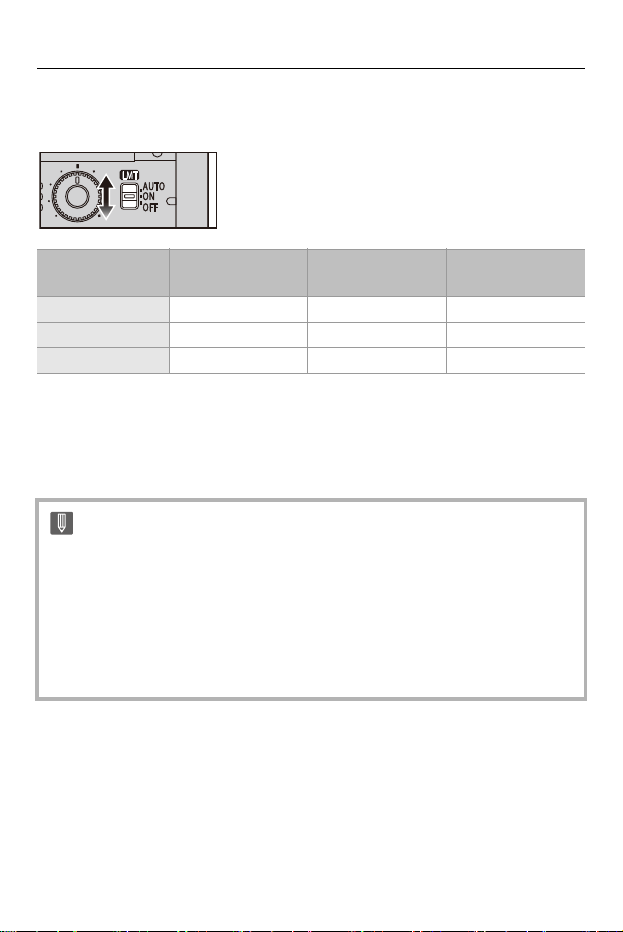
Setting the Limiter
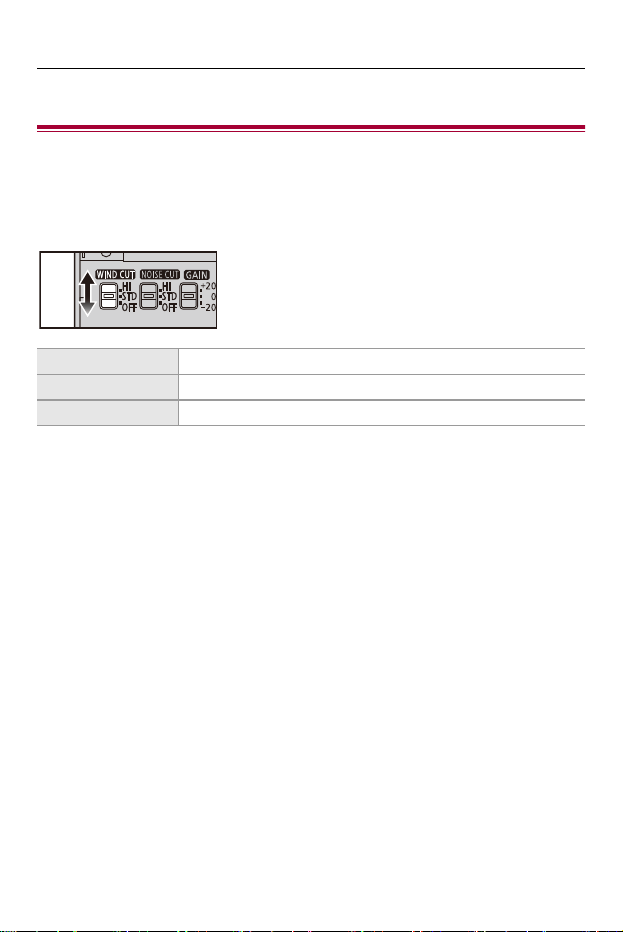
Set the limiter with the LMT switch.
•
When the limiter is enabled, it makes sure the volume does not exceed a certain
level, and this prevents distortion.
•
By setting the recording level to automatic, recording level and input gain will be
fixed.
LMT switch Limiter
Sound recording
level setting
Standard level
[AUTO] Enabled Automatic 74 dBSPL
[ON] Enabled Manual 94 dBSPL
[OFF] Disabled Manual 94 dBSPL
•
The recording level of the built-in microphone of the digital camera and the [MIC]
terminal cannot be set.
•
Recording levels other than mute cannot be changed during 32-bit float
recording.
•
The limiter setting is not used during 32-bit float audio recording.
•
The recording volume may vary if you switch between float format and linear
format.
Using the Digital Shotgun Microphone – Reducing the Noise Caused by Wind
21
Reducing the Noise Caused by Wind
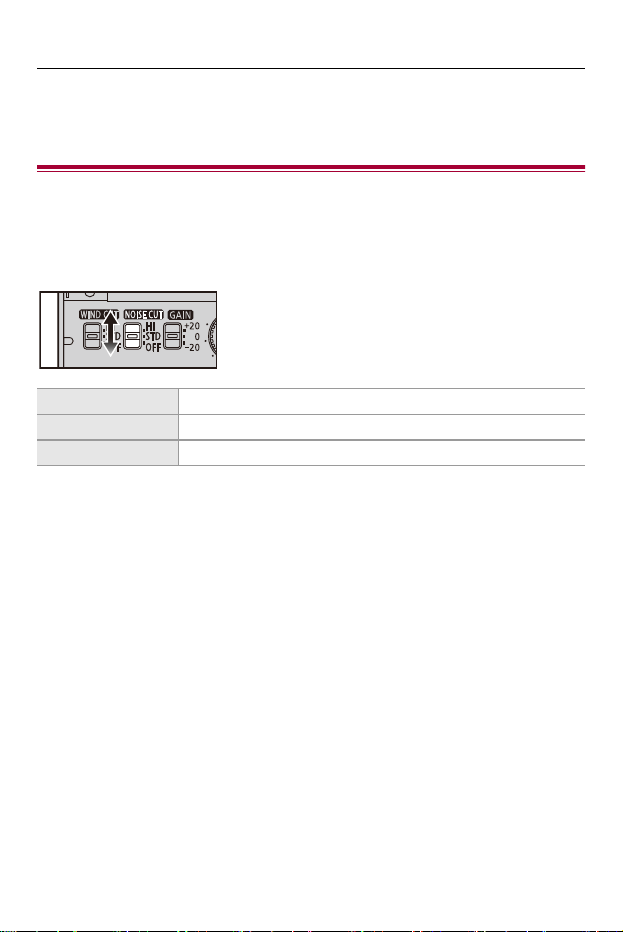
This reduces the noise that occurs when wind hits the microphone. Set to
[OFF] if there is a noticeable change in sound quality.
Set the WIND CUT switch to [HI] or [STD].
[HI] Reduces wind noise by reducing low-pitched sounds.
[STD] Reduces wind noise while maintaining sound quality.
[OFF] Disables the function.
Using the Digital Shotgun Microphone – Reducing the Noise That Occurs Around You
22
Reducing the Noise That Occurs Around
You
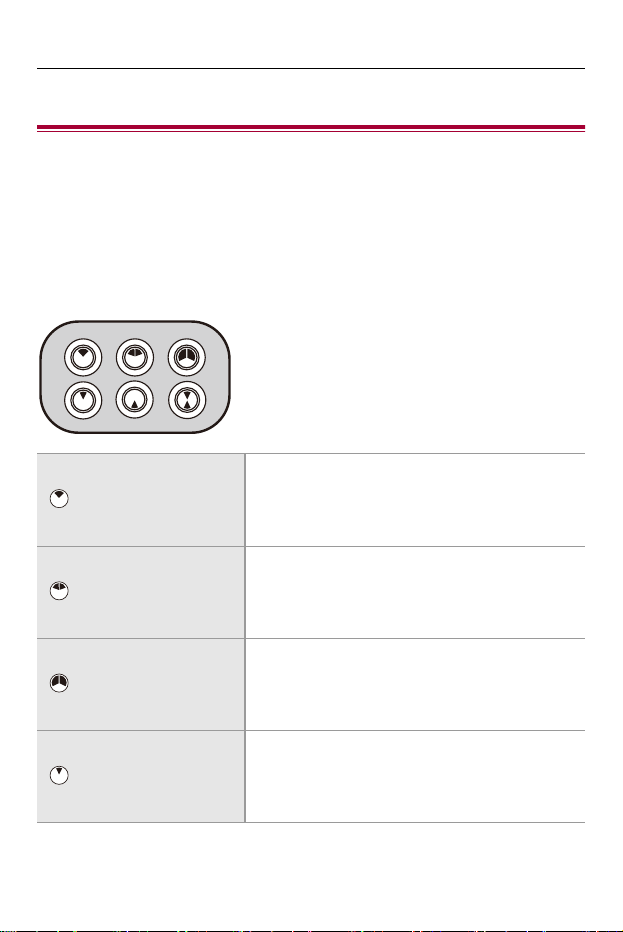
This reduces noisy ambient sounds and harsh noises. Set to [OFF] if there
is a noticeable change in sound quality.
Set the NOISE CUT switch to [HI] or [STD].
[HI] Reduces noise by increasing the noise reduction effect.
[STD] Reduces noise while maintaining sound quality.
[OFF] Disables the function.
Using the Digital Shotgun Microphone – Switching Directionality
23
Switching Directionality
≥ Frequency responses and directionality pattern diagrams: 25
You can switch directionality to match the audio you want to record and the
situation.
Press the directivity button.
•
The directivity button you set lights.
Forward directionality
cardioid
Records sound naturally while keeping a certain
amount of ambient sound.
•
Recommended for outdoor recording,
conversations, etc.
Stereo
Places emphasis on the forward direction for
recordings that have a sense of presence.
•
Recommended for live street performances,
studio recordings, etc.
Wide stereo
Places emphasis on the breadth of the space for
recordings that have a sense of presence.
•
Recommended for public presentations, sports
events, etc.
Forward directionality
supercardioid
Clearly records the sounds from in front while
suppressing sounds from the sides and the rear.
•
Recommended for places with loud noises and
inside where there is a lot of reverberation.
Using the Digital Shotgun Microphone – Switching Directionality
24
Rearward
directionality
supercardioid
Clearly records the sounds from the rear while
suppressing sounds from the sides and the front.
•
Recommended for occasions when you are
narrating as you are recording, etc.
Bidirectional
supercardioid
Clearly records the sounds from in front and the
rear while suppressing sounds from the sides.
•
Recommended for recording interviews, etc.,
when there is interaction between the
photographer and the subject.
•
The brightness of the directivity buttons can be changed with the menus on the
camera. Refer to the Operating Instructions for the digital camera for details.
Using the Digital Shotgun Microphone – Switching Directionality
25
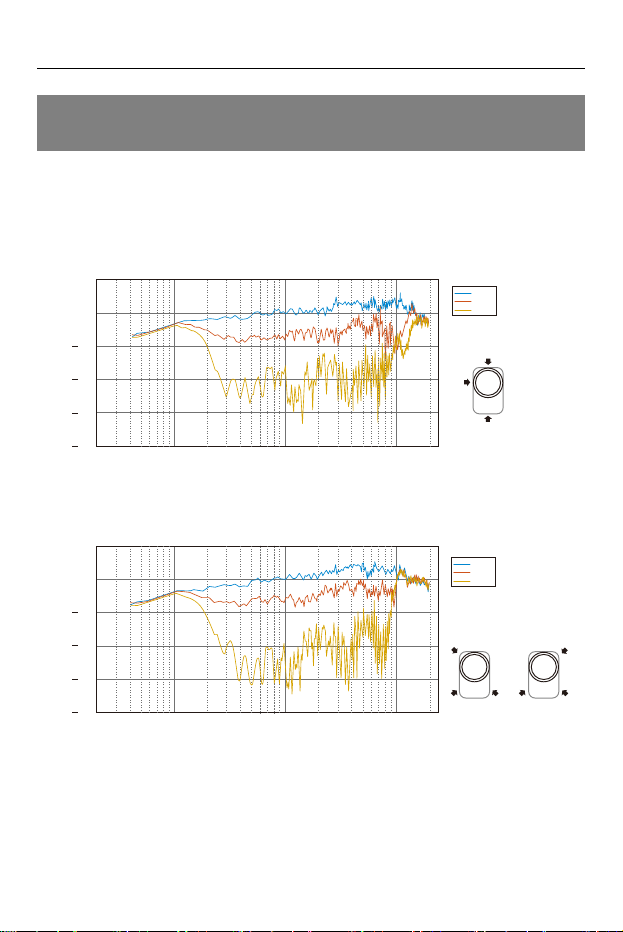
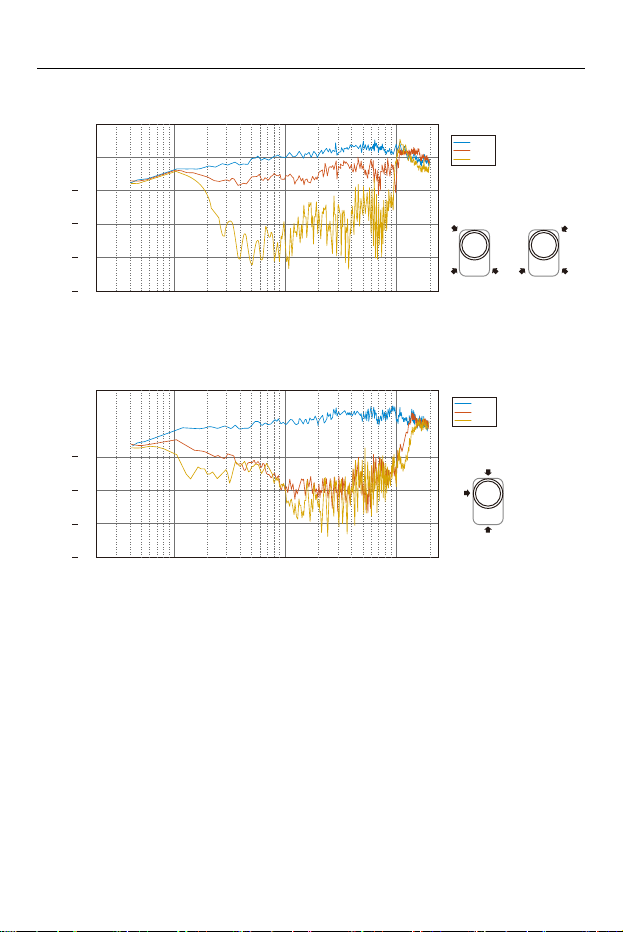
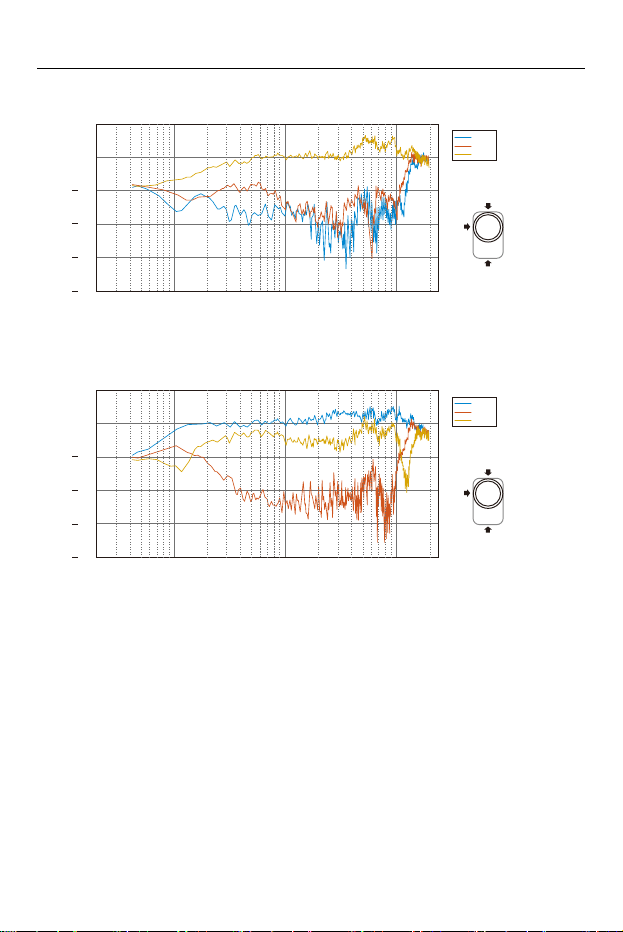
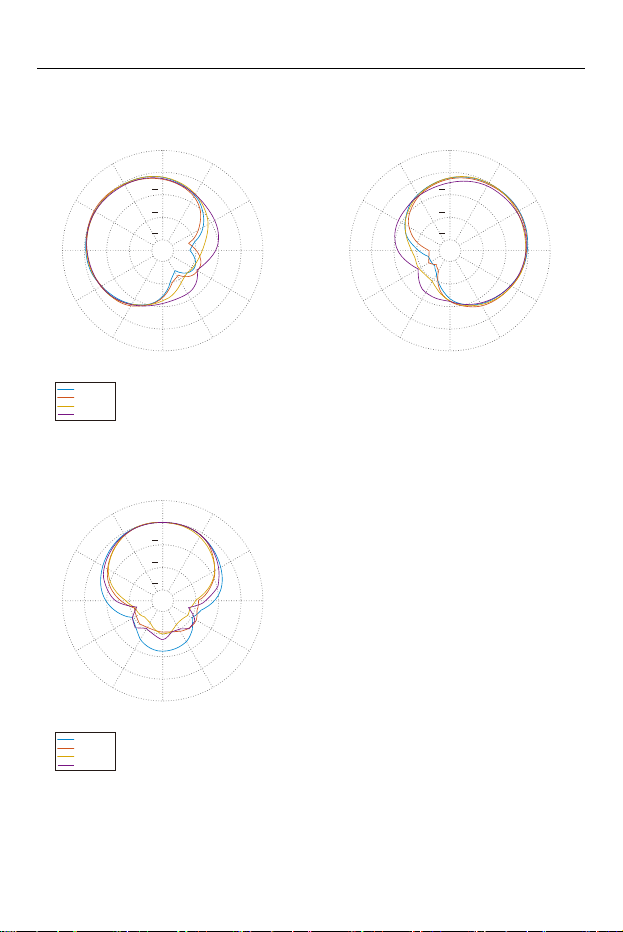
Frequency responses and directionality pattern
diagrams
Frequency Responses
(A) Frequency (Hz)
(B) Response (dB)
•
Set to “Forward directionality cardioid”
•
Set to “Stereo”
0
10
20
(B)
(A)
30
40
10
100
1000
10000
0°
90°
180°
0°
90°
180°
0
10
20
(B)
(A)
30
40
10
100
1000
10000
45°
135°
225°
45°
135°
45°
135°225°225°
Lch Rch
Using the Digital Shotgun Microphone – Switching Directionality
28
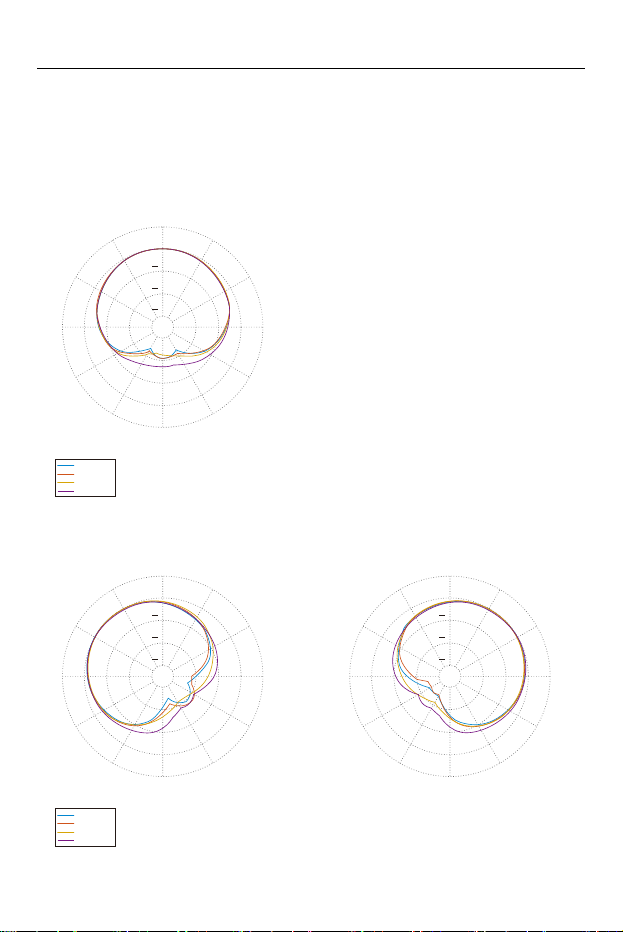
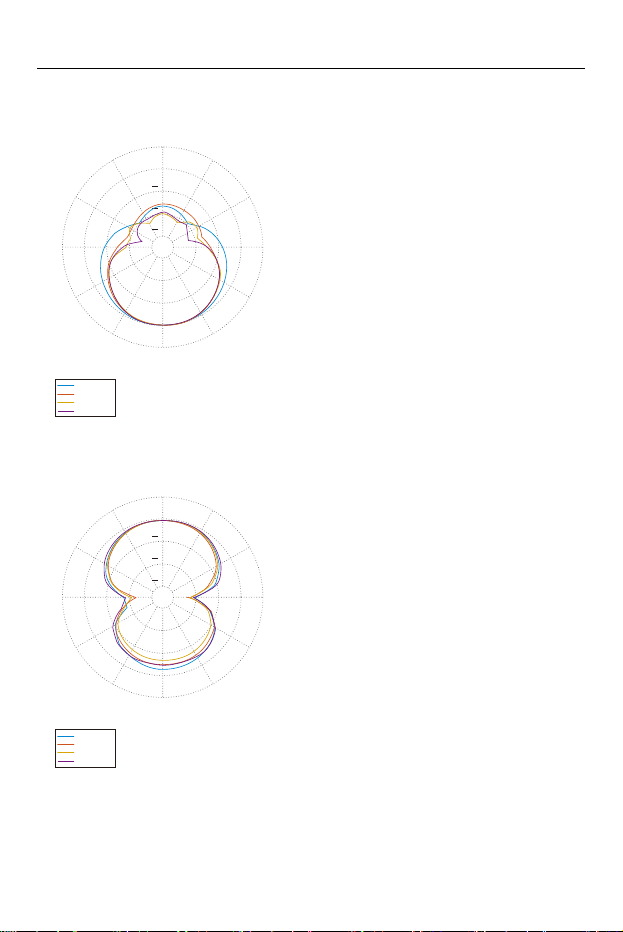
Directionality Pattern
(C) Front
(D) Rear
•
Set to “Forward directionality cardioid”
•
Set to “Stereo”
500Hz
1000Hz
4000 Hz
8000 Hz
0°
0dB
10
20
30
30°
150°
60°
120°
90°
150°
60°
120°
90°
30°
180°
(C)
(D)
0°
0dB
10
20
30
30°
150°
60°
120°
90°
150°
60°
120°
90°
30°
180°
(C)
(D)
500Hz
1000Hz
4000 Hz
8000 Hz
0°
0dB
10
20
30
30°
150°
60°
120°
90°
150°
60°
120°
90°
30°
180°
(C)
(D)
Using the Digital Shotgun Microphone – Switching Directionality
29
•
Set to “Wide stereo”
•
Set to “Forward directionality supercardioid”
0°
0dB
10
20
30
30°
150°
60°
120°
90°
150°
60°
120°
90°
30°
180°
(C)
(D)
500Hz
1000Hz
4000 Hz
8000 Hz
0°
0dB
10
20
30
30°
150°
60°
120°
90°
150°
60°
120°
90°
30°
180°
(C)
(D)
500Hz
1000Hz
4000 Hz
8000 Hz
0°
0dB
10
20
30
30°
150°
60°
120°
90°
150°
60°
120°
90°
30°
180°
(C)
(D)
Using the Digital Shotgun Microphone – Switching Directionality
30
•
Set to “Rearward directionality supercardioid”
•
Set to “Bidirectional supercardioid”
500Hz
1000Hz
4000 Hz
8000 Hz
0°
0dB
10
20
30
30°
150°
60°
120°
90°
150°
60°
120°
90°
30°
180°
(C)
(D)
500Hz
1000Hz
4000 Hz
8000 Hz
0°
0dB
10
20
30
30°
150°
60°
120°
90°
150°
60°
120°
90°
30°
180°
(C)
(D)


Materials – Cautions for Use
32
Cautions for Use
About the unit
Do not use this unit near radio transmitters or high-voltage lines.
•
Noise may be present in images and sound recorded near radio transmitters or
high-voltage lines. Perform recording in locations away from them.
Keep the unit away from insecticide sprays and other volatile
substances.
•
Exposure to such substances may cause damage to the external case and the text
and symbols printed on the unit.
Do not leave the unit in contact with any items made of rubber or PVC
for prolonged periods of time.
Do not carry by this microphone when it is attached to the digital
camera.
•
Under no circumstances should the unit be used or stored in any of the following
locations since doing so may cause trouble in operation or malfunctioning:
– In direct sunlight or on a beach in summer
– In locations with high temperatures and humidity levels or where changes in
temperature and humidity are acute
– In locations with high concentrations of sand, dust or dirt
– Where there is fire
– Near heaters, air conditioners or humidifiers
– Where water may make the unit wet
– Where there is vibration
– Inside a vehicle

Materials – Cautions for Use
33
•
Do not drop the unit, knock it into other objects or subject it to any other kind of
strong impact or shock.
•
When recording a motion picture, the digital camera or lens sounds or other
operating noise may be recorded. If the sound from the lens is particularly bothering,
set the camera to manual focus during use.
•
If the terminals are dirty they can cause faulty connections. Wipe clean with a soft
dry cloth before connecting.
•
Do not attach or remove the microphone with the power of the digital camera turned
[ON].
•
If you start video recording immediately after turning on the digital camera, a period
with no sound may be recorded at the beginning.
•
Before use, check that the microphone is recording normally.
•
Do not disassemble or modify this unit.
The Wind Screen
•
Be sure to hold the microphone body firmly while you are attaching or removing the
wind screen.
The joint of the microphone condenser is a floating-style construction, so this means
it can be unstable.
•
The wind screen is not waterproof so take care that it does not get wet when it is
raining or while you are at the beach.
•
Contact noises may be recorded if you touch the fluff of the wind screen with your
fingers, etc., while you are recording videos.
•
Do not pull on the fibers of the wind screen. This may cause the fibers to fall out.
•
When not using the wind screen for a long time, remove it from the microphone body
and store it.
•
Check that fibers from the wind screen are not attached to the lens or camera body.
Before use, if fibers are attached, remove them with a blower, etc.
•
Keep the wind screen out of reach of children to prevent swallowing.

Materials – Cautions for Use
34
Cleaning
When cleaning, wipe the unit with a dry soft cloth.
•
When the unit is soiled badly, it can be cleaned by wiping the dirt off with a wrung wet
cloth, and then with a dry cloth.
•
Do not use solvents such as benzine, thinner, alcohol, kitchen detergents, etc., to
clean the unit, as these may damage the external case and the text and symbols
printed on the unit.
•
When using a chemical cloth, be sure to follow the accompanying instructions.
•
If the wind screen is wet, remove it from the microphone body and hang it out to dry
in the shade.
•
If the wind screen is dirty, lightly wash it with water and hang it out to dry in the
shade.

Materials – Specifications
35
Specifications
The specifications are subject to change for performance enhancement.
Input
≥ Microphone type
4ch Electret Condenser Microphone Array
≥ Directional modes
Forward directionality cardioid, forward directionality supercardioid, rearward
directionality supercardioid, bidirectional supercardioid, stereo (90°), wide stereo
(120°)
≥ WIND CUT
OFF, STD, HI
≥ NOISE CUT
OFF, STD, HI
≥ GAIN
−20 dB, 0 dB, +20 dB (fixed to 0 dB when float recording)
≥ AUDIO LEVEL
−18 dB to +12 dB (fixed to 0 dB when float recording)
≥ LMT
OFF, ON, AUTO (disabled when float recording)

Materials – Specifications
36
Audio characteristics
*1
≥ Sensitivity
−12 dBFS (0 dB=1 V/Pa, 1 kHz)
≥ Frequency response
40 Hz to 20 kHz
≥ Maximum input sound pressure level
122 dBSPL or more
≥ SN ratio
77 dB or more
≥ Dynamic range
105 dB or more
*1 Under the following conditions:
Forward directionality cardioid mode, WIND CUT=STD, NOISE CUT=STD,
48 kHz/32 bit floating
Output
≥ Sampling frequency/bit length/number of channels
Linear
48 kHz/24 bit/2ch, 96 kHz/24 bit/2ch
48 kHz/24 bit/4ch
*2
Floating
48 kHz/32 bit/2ch, 96 kHz/32 bit/2ch
48 kHz/32 bit/4ch
*2
*2 When backup audio recording of CH3/CH4 is performed

Materials – Specifications
37
Backup audio recording
≥ Backup 1
CH3: All directions, CH4: All directions (−20 dB)
≥ Backup 2
CH3: Same directionality as CH1 (−20 dB), CH4: Same directionality as CH2
(−20 dB)
External dimensions
Approx. 45.0 mm (W)×63.7 mm (H)×73.7 mm (D)
[1.77″ (W)×2.51″ (H)×2.90″ (D)]
(excluding the projecting parts)
Mass (weight)
Approx. 100
g
/0.22 lb
Operating temperature
−10 °C to 40 °C (14 oF to 104 oF)
Operating humidity
10 %RH to 80 %RH
The symbols on this product (including the accessories) represent the
following:
DC