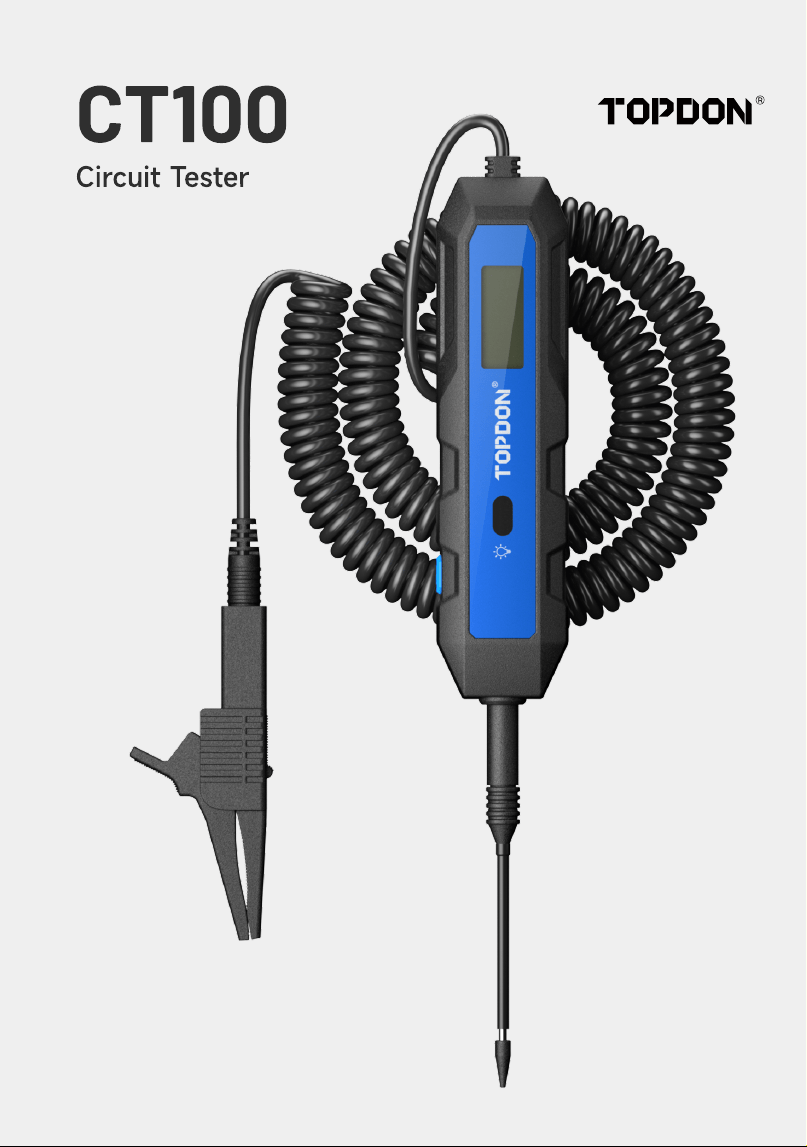
CT100
Circuit Tester
CONTENTS
EN FR ES DE IT PT
REVISION HISTOR
SAFETY IS ALWAYS THE FIRST PRIORITY!
WHAT'S IN THE BOX?
PRODUCT OVERVIEW
GETTING STARTE
POLARITY DETECTIO
VOLTAGE MEASUREMEN
LOAD TES
TROUBLESHOOTIN
SPECIFICATION
FA
WARRANT
COMPLIANCE INFORMATIO
1
1
57
1
1
1
1
1
1
1
1
1
1
1
2
2
2
2
2
2
2
2
2
2
2
2
2
3
3
3
3
3
3
3
3
3
3
3
3
4
4
4
4
4
4
4
4
4
4
4
4
4
4
5
5
5
5
5
5
5
5
5
5

ENGLISH
REVISION HISTORY
Versio
1.0
Dat
2026-04
Descriptio
Initial Release
SAFETY IS ALWAYS THE FIRST PRIORITY!
For your safety, the safety of others, and to prevent damage to the product, read and fully
understand all safety instructions before use
Always wear approved safety goggles to prevent damages
Do not expose the product to direct sunlight or high temperatures. Avoid explosive gases,
vapors, dust, or smoking near the vehicle
Do not disassemble the product. Improper disassembly may void the warranty or result in
accidents or personal injury
Do not cut or submerge the cords in water. Electrical shock may occur
Do not use on AC circuits, computers under load, or airbags
Do not shake or drop the tester. Internal components may be damaged
Supervision is required when this device is used by children or individuals with reduced
physical, sensory, or mental abilities, or those lacking experience and knowledge
Handle the probe carefully as its tip is sharp and can cause injury
Exercise caution near ignition components such as the ignition coil, distributor cap, ignition
wires, and spark plugs. High voltage may occur while the engine is running
Be careful when working near live or exposed wires, especially in or near an open breaker
panel.
4
WHAT’S IN THE BOX
CT100 Teste
Adapter
2 mm Prob
Carrying Bag
Alligator Cli
Quick User Guide
PRODUCT OVERVIEW
1
2
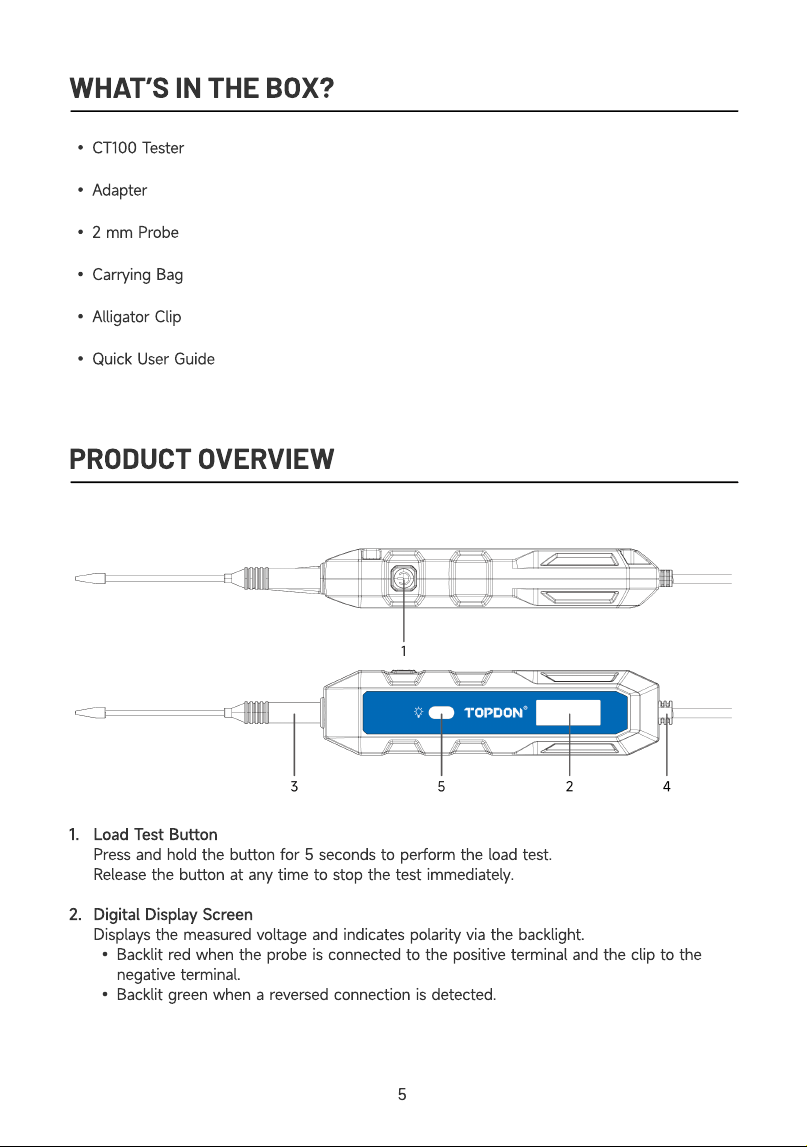
Load Test Butto
Press and hold the button for 5 seconds to perform the load test
Release the button at any time to stop the test immediately
Digital Display Scree
Displays the measured voltage and indicates polarity via the backlight
Backlit red when the probe is connected to the positive terminal and the clip to the
negative terminal
Backlit green when a reversed connection is detected.
5
3
4
5
Probe En
Connects to the test probe for measurement
Clip En
Connects to the test clip for measurement
Voltage Indicator Windo
The built-in lamp lights up during the load test, and its brightness varies according to the
detected voltage.
GETTING STARTED
1
2
3
4
5
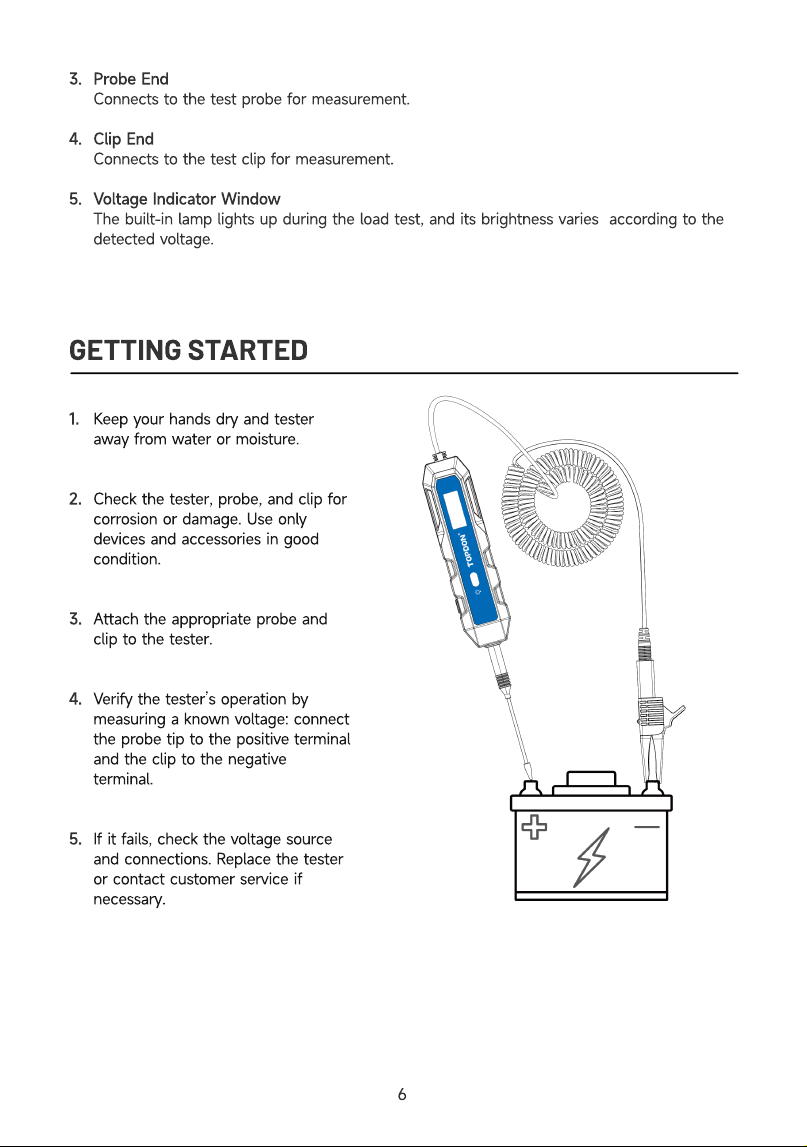
Keep your hands dry and tester
away from water or moisture
Check the tester, probe, and clip for
corrosion or damage. Use only
devices and accessories in good
condition
Attach the appropriate probe and
clip to the tester
Verify the tester’s operation by
measuring a known voltage: connect
the probe tip to the positive terminal
and the clip to the negative
terminal
If it fails, check the voltage source
and connections. Replace the tester
or contact customer service if
necessary
6
POLARITY DETECTION
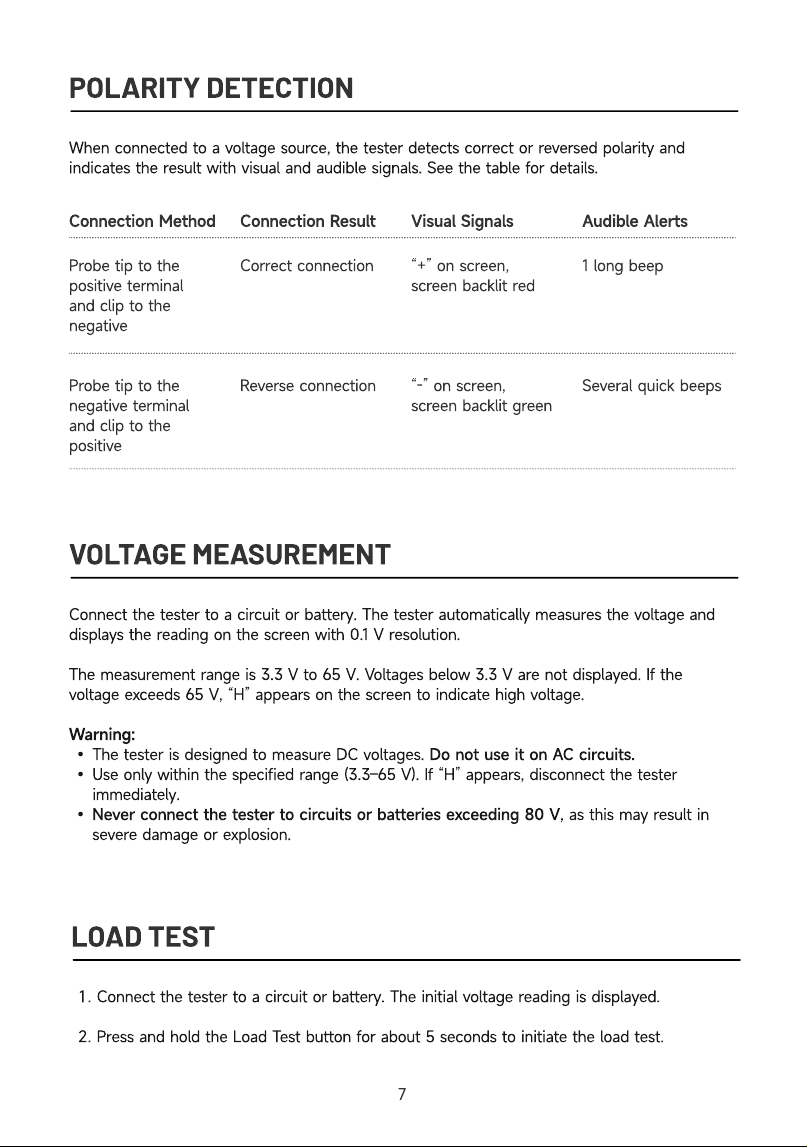
When connected to a voltage source, the tester detects correct or reversed polarity and
indicates the result with visual and audible signals. See the table for details
Visual Signals Audible Alerts
Probe tip to the
positive terminal
and clip to the
negativ
Probe tip to the
negative terminal
and clip to the
positive
Correct connectio
Reverse connection
“+” on screen,
screen backlit re
“-” on screen,
screen backlit green
1 long bee
Several quick beeps
VOLTAGE MEASUREMENT
Connection Method Connection Result
Connect the tester to a circuit or battery. The tester automatically measures the voltage and
displays the reading on the screen with 0.1 V resolution
The measurement range is 3.3 V to 65 V. Voltages below 3.3 V are not displayed. If the
voltage exceeds 65 V, “H” appears on the screen to indicate high voltage
Warning
The tester is designed to measure DC voltages. Do not use it on AC circuits
Use only within the specified range (3.3–65 V). If “H” appears, disconnect the tester
immediately
Never connect the tester to circuits or batteries exceeding 80 V, as this may result in
severe damage or explosion
LOAD TEST
Connect the tester to a circuit or battery.
T
he initial voltage reading is displayed
Press and hold the
L
oad
T
est button for about
5
seconds to initiate the load test.
7
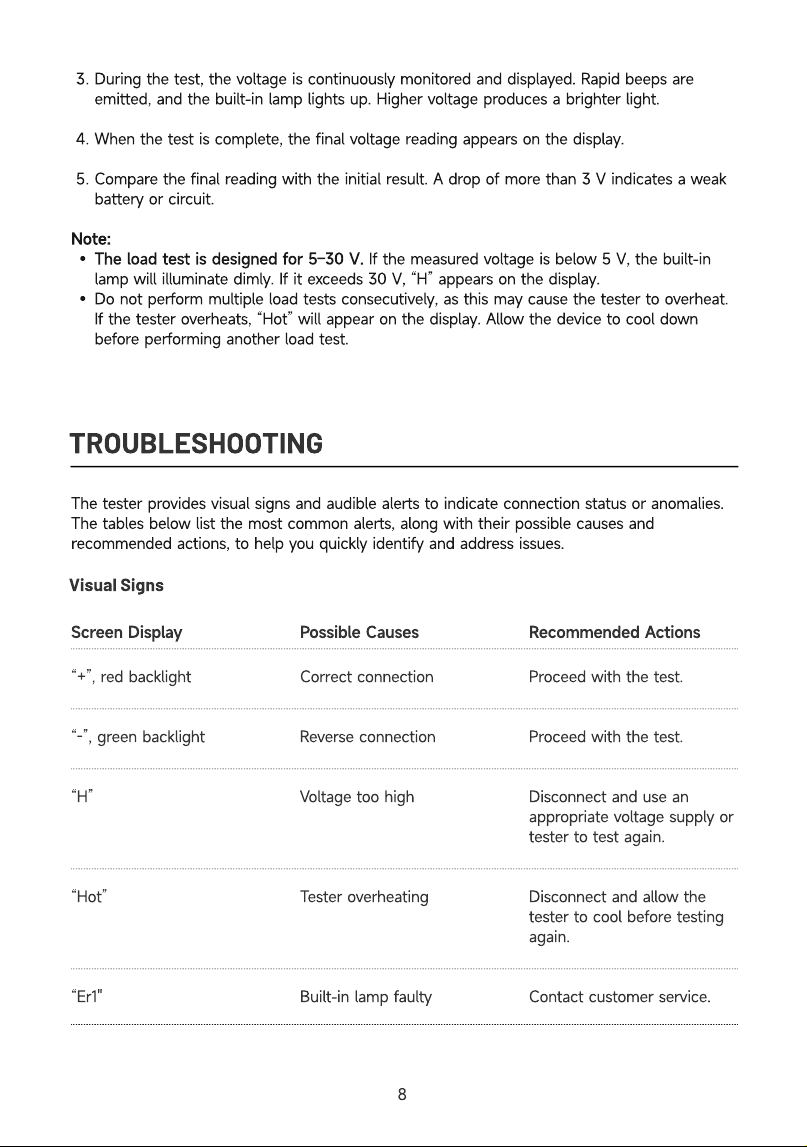
During the test, the voltage is continuously monitored and displayed. Rapid beeps are
emitted, and the built-in lamp lights up. Higher voltage produces a brighter light
When the test is complete, the final voltage reading appears on the display
Compare the final reading with the initial result. A drop of more than 3 V indicates a weak
battery or circuit
Note
The load test is designed for 5–30 V. If the measured voltage is below 5 V, the built-in
lamp will illuminate dimly. If it exceeds 30 V, “H” appears on the display
Do not perform multiple load tests consecutively, as this may cause the tester to overheat.
If the tester overheats, “Hot” will appear on the display. Allow the device to cool down
before performing another load test
TROUBLESHOOTING
The tester provides visual signs and audible alerts to indicate connection status or anomalies.
The tables below list the most common alerts, along with their possible causes and
recommended actions, to help you quickly identify and address issues.
Visual Signs
Screen Display
Po
ssi
b
le
C
a
u
ses
R
ec
omm
en
d
e
d
A
c
t
i
o
ns
“+”, red backlight
“-”, green backlight
“H”
“Hot”
“Er1"
Correct connection
Reverse connection
Voltage too high
Tester overheating
Built-in lamp faulty
Proceed with the test.
Proceed with the test.
Disconnect and use an
appropriate voltage supply or
tester to test again.
Disconnect and allow the
tester to cool before testing
again.
Contact customer service.
8
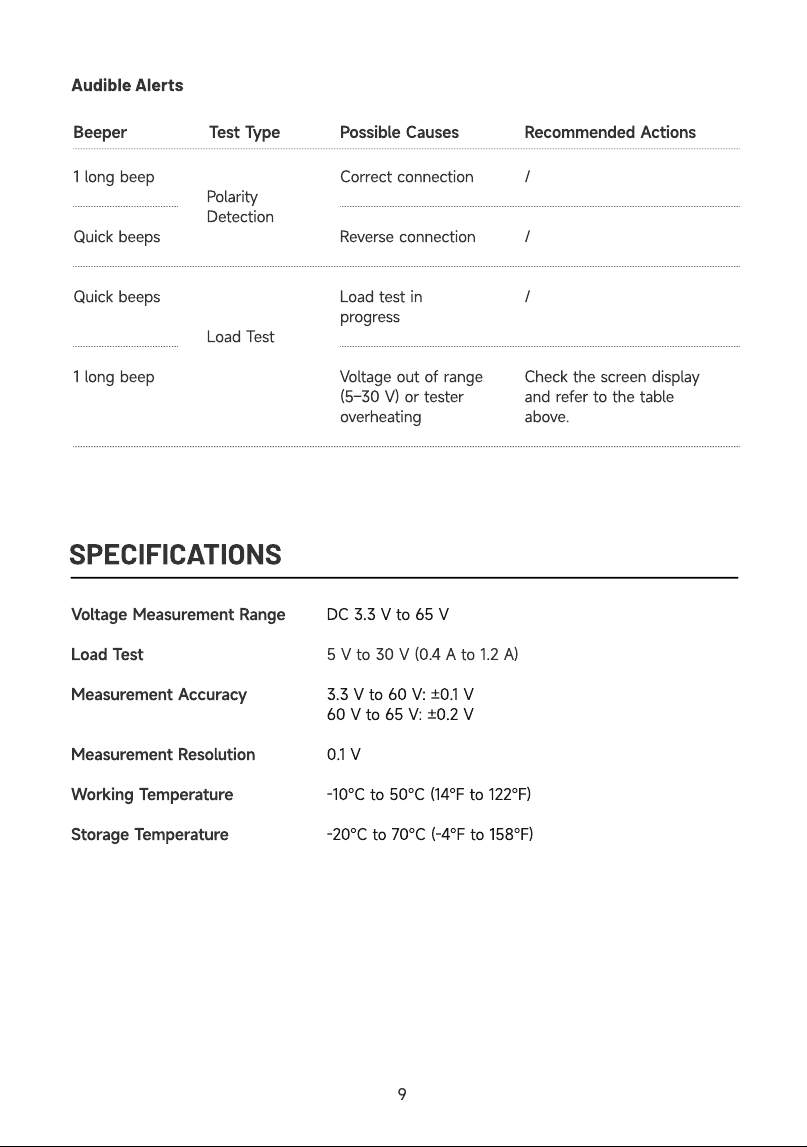
Audible Alerts
1 long beep
Quick beeps
Quick beeps
1 long beep
Polarity
Detection
Load Test
SPECIFICATIONS
Correct connection
Reverse connection
Load test in
progress
Voltage out of range
(5–30 V) or tester
overheating
Recommended Actions
/
/
/
Check the screen display
and refer to the table
above.
Beeper Test Type Possible Causes
Voltage Measurement Range
Load Test
Measurement Accuracy
Measurement Resolution
Working Temperature
Storage Temperature
DC 3.3 V to 65 V
5 V to 30 V (0.4 A to 1.2 A
3.3 V to 60 V: ±0.1 V
60 V to 65 V: ±0.2 V
0.1 V
-10℃ to 50℃ (14℉ to 122℉)
-20℃ to 70℃ (-4℉ to 158℉)
9
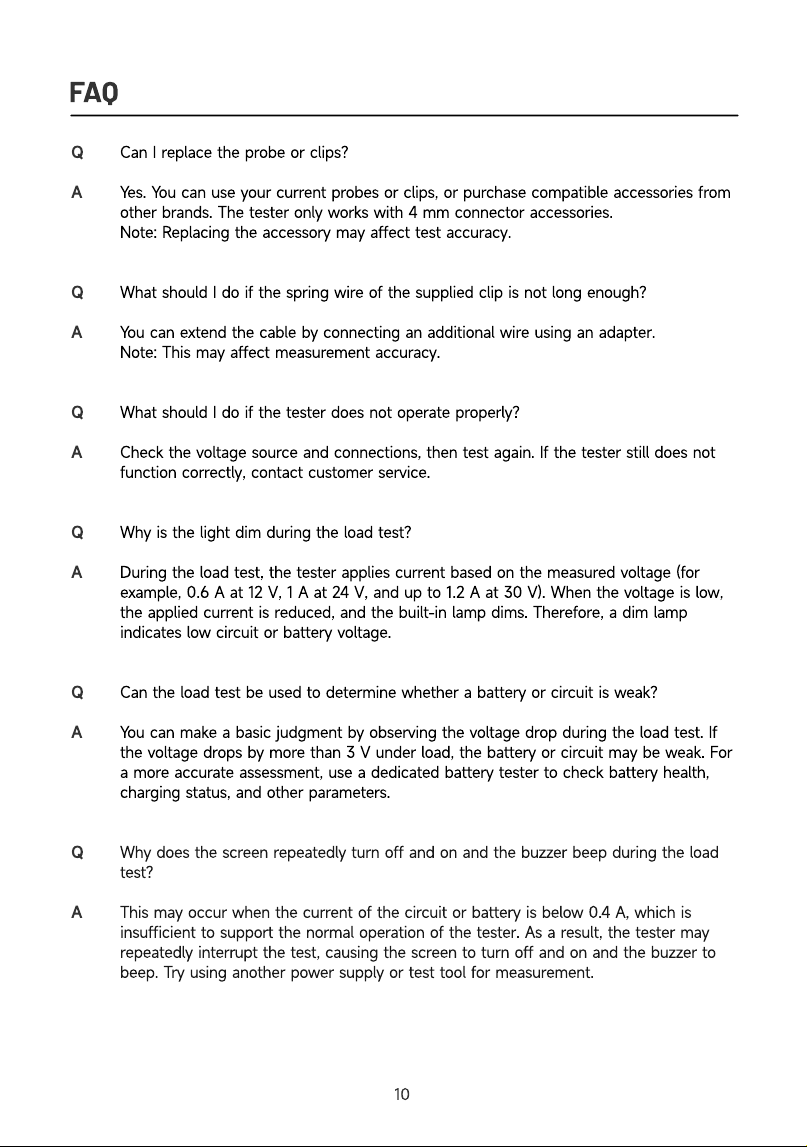
FAQ
Q
A
Q
A
Q
A
Q
A
Q
A
Can I replace the probe or clips?
Yes. You can use your current probes or clips, or purchase compatible accessories from
other brands. The tester only works with 4 mm connector accessories.
Note: Replacing the accessory may affect test accuracy.
What should I do if the spring wire of the supplied clip is not long enough?
You can extend the cable by connecting an additional wire using an adapter.
Note: This may affect measurement accuracy.
What should I do if the tester does not operate properly?
Check the voltage source and connections, then test again. If the tester still does not
function correctly, contact customer service.
Why is the light dim during the load test?
During the load test, the tester applies current based on the measured voltage (for
example, 0.6 A at 12 V, 1 A at 24 V, and up to 1.2 A at 30 V). When the voltage is low,
the applied current is reduced, and the built-in lamp dims. Therefore, a dim lamp
indicates low circuit or battery voltage.
Can the load test be used to determine whether a battery or circuit is weak?
You can make a basic judgment by observing the voltage drop during the load test. If
the voltage drops by more than 3 V under load, the battery or circuit may be weak. For
a more accurate assessment, use a dedicated battery tester to check battery health,
charging status, and other parameters.
Why does the screen repeatedly turn off and on and the buzzer beep during the load
test
This may occur when the current of the circuit or battery is below 0.4 A, which is
insufficient to support the normal operation of the tester. As a result, the tester may
repeatedly interrupt the test, causing the screen to turn off and on and the buzzer to
beep. Try using another power supply or test tool for measurement.
10
WARRANTY
TOPDON's One-Year Limited Warranty
TOPDON warrants to its original purchaser that the company's products will be free from
defects in material and workmanship for 12 months from the date of purchase (Warranty
Period).
For the defects reported during the Warranty Period, TOPDON will either repair or replace the
defective part or product according to its technical support analysis and confirmation.
TOPDON shall not be liable for any incidental or consequential damages arising from the
device's use, misuse, or installation.
If there is any conflict between the TOPDON warranty policy and local laws, the local laws
shall prevail.
This limited warranty is void under the following conditions
• Misused, disassembled, altered, or repaired by unauthorized stores or technicians.
• Careless handling and/or improper operation.
Notice: All information in this manual is based on the latest information available at the time
of publication and no warranty can be made for its accuracy or completeness. TOPDON
reserves the right to make changes at any time without notice.
11

FRANÇAIS
HISTORIQUE DES RÉVISIONS
Versio
1.0
Dat
2026-04
Descriptio
Version initiale
LA SÉCURITÉ EST TOUJOURS LA PRIORITÉ ABSOLUE !
Pour votre sécurité, celle des autres et pour éviter d’endommager le produit, lisez et
comprenez toutes les instructions de sécurité avant utilisation
Portez toujours des lunettes de sécurité agréées pour éviter tout dommage
Ne pas exposer le produit au soleil direct ou à des températures élevées. Évitez les gaz,
vapeurs ou poussières explosives, et ne fumez pas près du véhicule
Ne pas démonter le produit. Un démontage incorrect peut annuler la garantie ou provoquer
des accidents ou blessures
Ne pas couper ou immerger les câbles dans l’eau. Risque de choc électrique
Ne pas utiliser sur des circuits AC, des ordinateurs sous charge ou des airbags
Ne pas secouer ni laisser tomber le testeur. Les composants internes peuvent être
endommagés
Une surveillance est requise si l’appareil est utilisé par des enfants ou des personnes ayant
des capacités physiques, sensorielles ou mentales réduites, ou une expérience limitée
Manipulez la sonde avec précaution, sa pointe est tranchante et peut provoquer des
blessures
Faites attention près des composants d’allumage tels que bobine, distributeur, fils
d’allumage et bougies. Une haute tension peut survenir moteur en marche
Fais attention lorsque tu travailles à proximité de fils sous tension ou dénudés, surtout dans
ou près d’un tableau électrique ouvert.
13
QU'Y A-T-IL DANS LA BOÎTE ?
Testeur CT10
Adaptateu
Sonde de 2 m
Sac de transpor
Pince crocodil
Guide de démarrage rapid
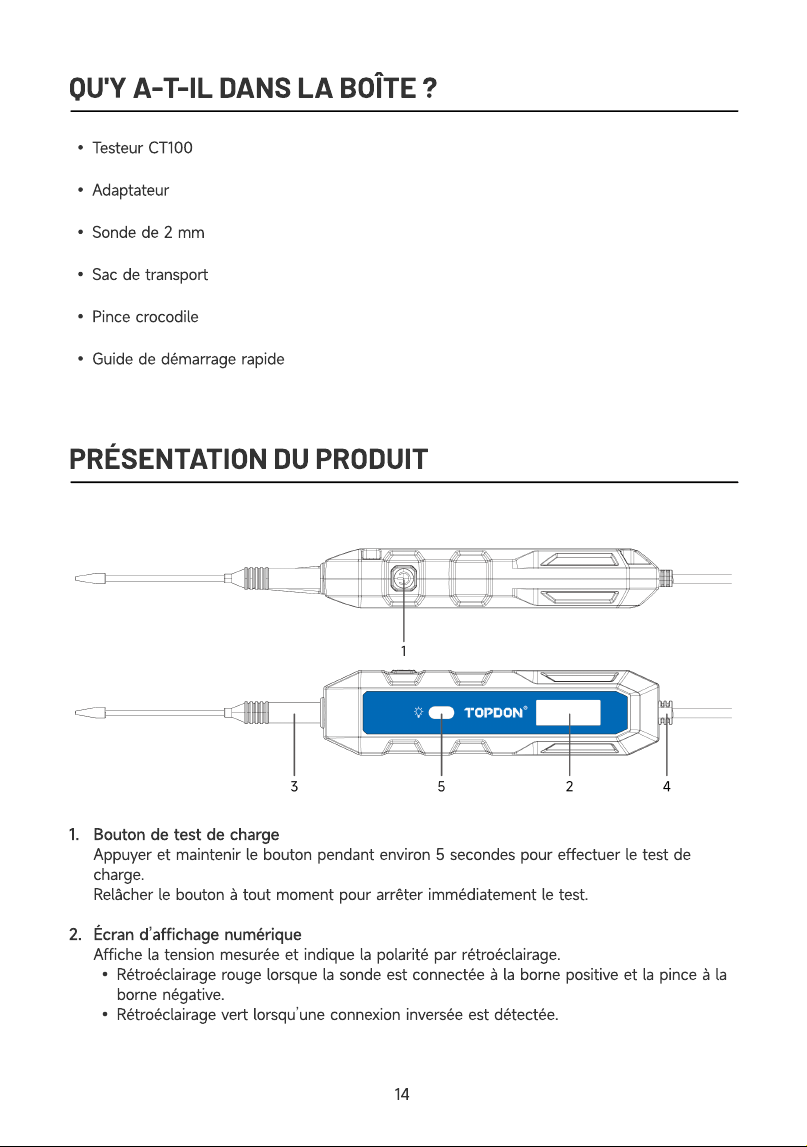
PRÉSENTATION DU PRODUIT
1
2
Bouton de test de charg
Appuyer et maintenir le bouton pendant environ 5 secondes pour effectuer le test de
charge
Relâcher le bouton à tout moment pour arrêter immédiatement le test
Écran d’affichage numériqu
Affiche la tension mesurée et indique la polarité par rétroéclairage
Rétroéclairage rouge lorsque la sonde est connectée à la borne positive et la pince à la
borne négative
Rétroéclairage vert lorsqu’une connexion inversée est détectée.
14
3
4
5
Extrémité de la sond
Se connecte à une sonde de test pour la mesure
Extrémité de la pinc
Se connecte à une pince de test pour la mesure
Fenêtre indicatrice de tensio
La lampe intégrée s’allume pendant le test de charge et sa luminosité varie en fonction de
la tension détectée.
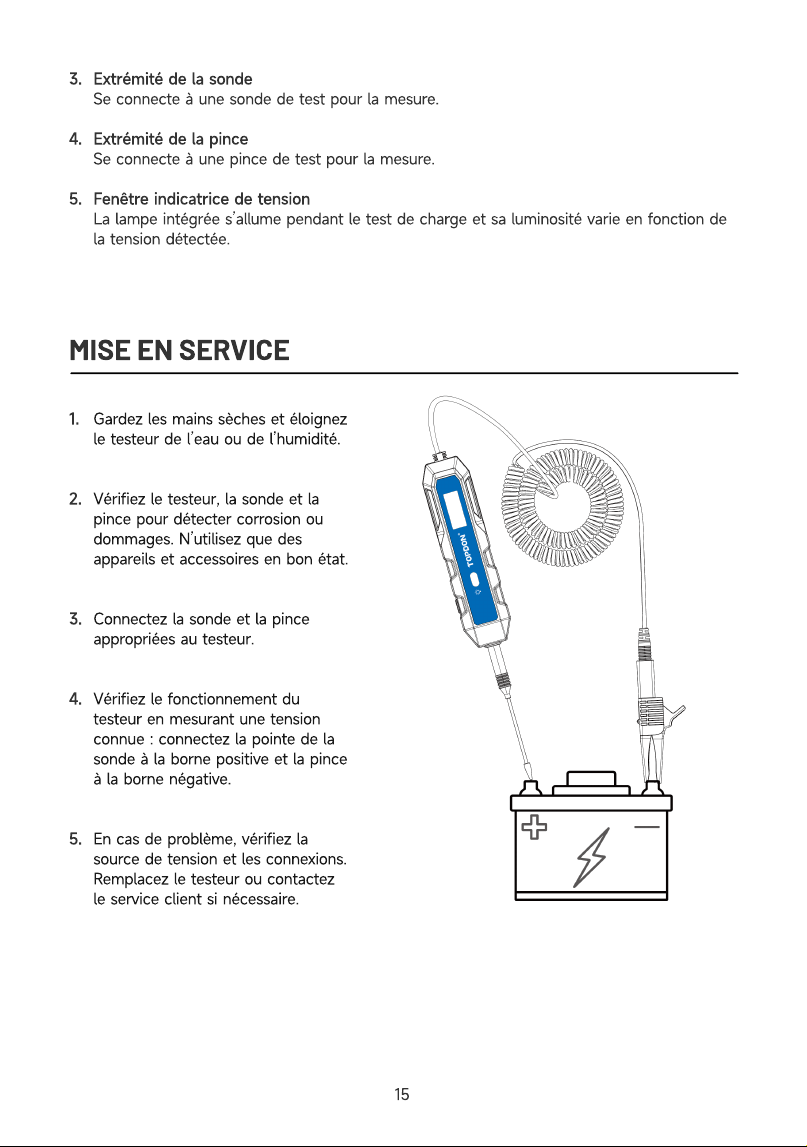
MISE EN SERVICE
1
2
3
4
5
Gardez les mains sèches et éloignez
le testeur de l’eau ou de l’humidité
Vérifiez le testeur, la sonde et la
pince pour détecter corrosion ou
dommages. N’utilisez que des
appareils et accessoires en bon état
Connectez la sonde et la pince
appropriées au testeur
Vérifiez le fonctionnement du
testeur en mesurant une tension
connue : connectez la pointe de la
sonde à la borne positive et la pince
à la borne négative
En cas de problème, vérifiez la
source de tension et les connexions.
Remplacez le testeur ou contactez
le service client si nécessaire
15
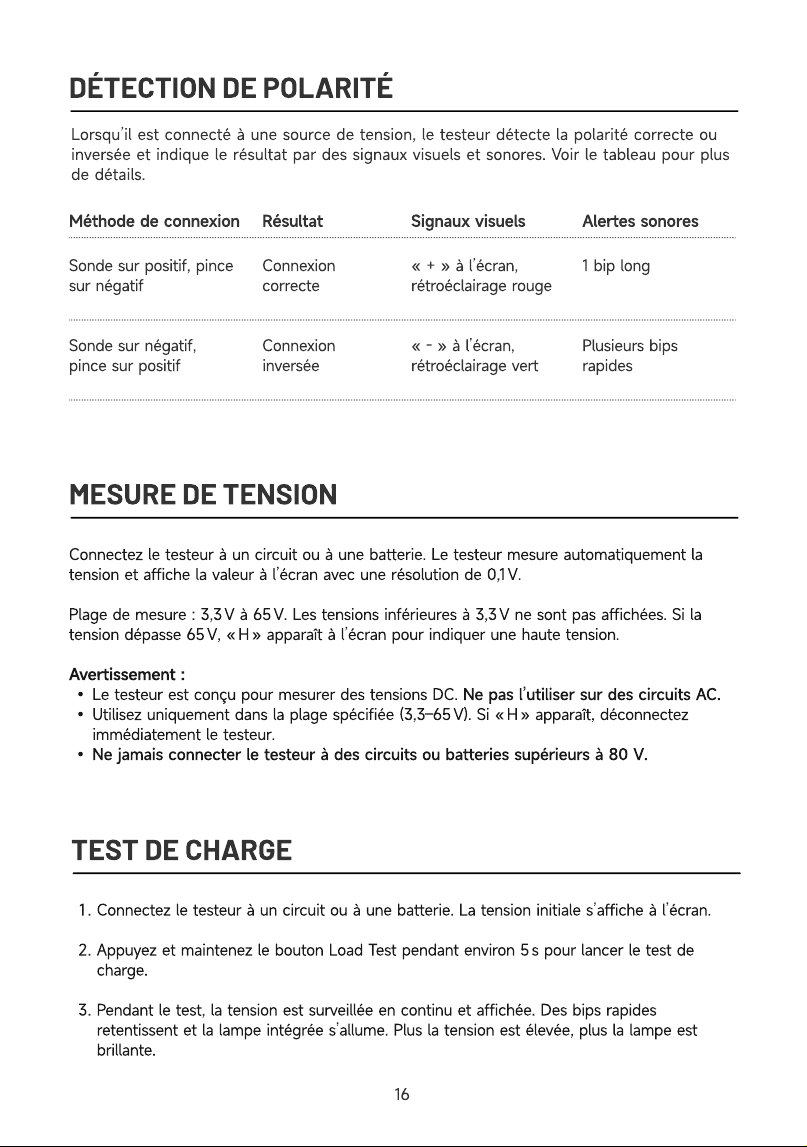
DÉTECTION DE POLARITÉ
Lorsqu’il est connecté à une source de tension, le testeur détecte la polarité correcte ou
inversée et indique le résultat par des signaux visuels et sonores. Voir le tableau pour plus
de détails.
Méthode de connexion Résultat Signaux visuels Alertes sonores
Sonde sur positif, pince
sur négati
Sonde sur négatif,
pince sur positif
Connexion
correct
Connexion
inversée
« + » à l’écran,
rétroéclairage roug
« - » à l’écran,
rétroéclairage vert
1 bip lon
Plusieurs bips
rapides
MESURE DE TENSION
Connectez le testeur à un circuit ou à une batterie. Le testeur mesure automatiquement la
tension et affiche la valeur à l’écran avec une résolution de 0,1 V
Plage de mesure : 3,3 V à 65 V. Les tensions inférieures à 3,3 V ne sont pas affichées. Si la
tension dépasse 65 V, « H » apparaît à l’écran pour indiquer une haute tension
Avertissement
Le testeur est conçu pour mesurer des tensions DC. Ne pas l’utiliser sur des circuits AC
Utilisez uniquement dans la plage spécifiée (3,3–65 V). Si « H » apparaît, déconnectez
immédiatement le testeur
Ne jamais connecter le testeur à des circuits ou batteries supérieurs à 80 V
TEST DE CHARGE
Connectez le testeur à un circuit ou à une batterie. La tension initiale s’affiche à l’écran
Appuyez et maintenez le bouton Load Test pendant environ 5 s pour lancer le test de
charge
Pendant le test, la tension est surveillée en continu et affichée. Des bips rapides
retentissent et la lampe intégrée s’allume. Plus la tension est élevée, plus la lampe est
brillante.
16
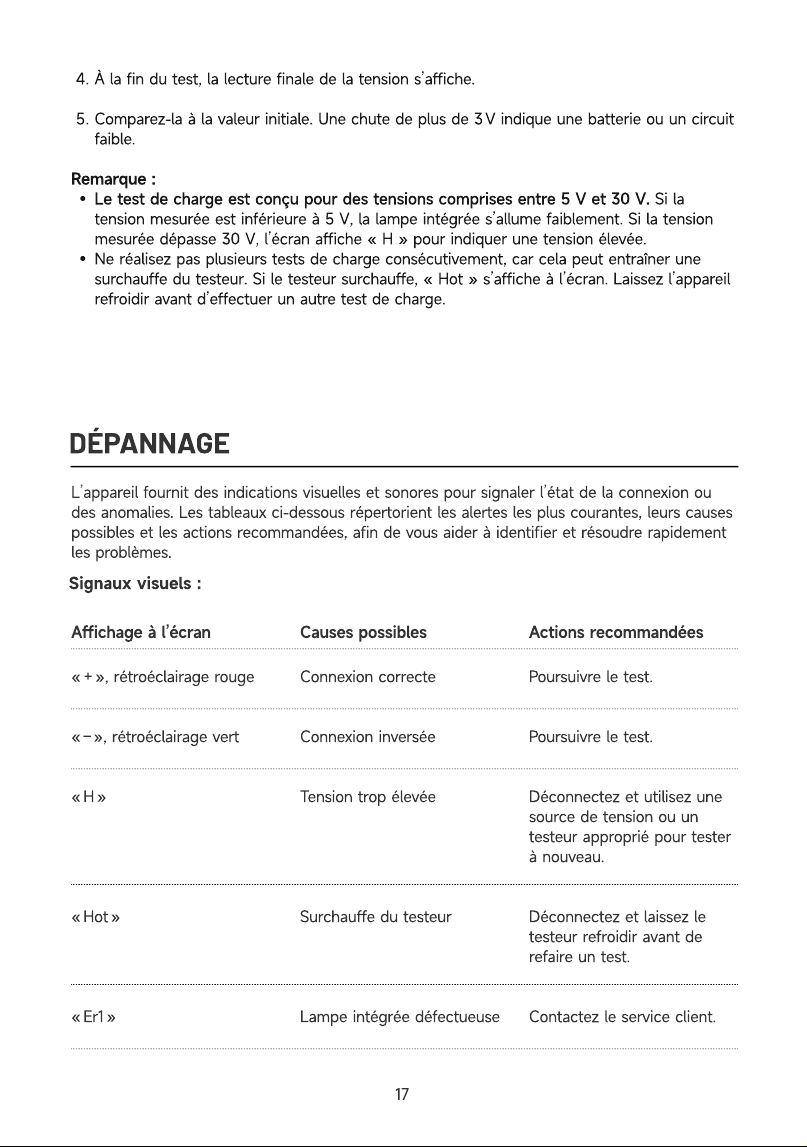
À la fin du test, la lecture finale de la tension s’affiche
Comparez-la à la valeur initiale. Une chute de plus de 3 V indique une batterie ou un circuit
faible
Remarque
Le test de charge est conçu pour des tensions comprises entre 5 V et 30 V. Si la
tension mesurée est inférieure à 5 V, la lampe intégrée s’allume faiblement. Si la tension
mesurée dépasse 30 V, l’écran affiche « H » pour indiquer une tension élevée
Ne réalisez pas plusieurs tests de charge consécutivement, car cela peut entraîner une
surchauffe du testeur. Si le testeur surchauffe, « Hot » s’affiche à l’écran. Laissez l’appareil
refroidir avant d’effectuer un autre test de charge
DÉPANNAGE
L’appareil fournit des indications visuelles et sonores pour signaler l’état de la connexion ou
des anomalies. Les tableaux ci-dessous répertorient les alertes les plus courantes, leurs causes
possibles et les actions recommandées, afin de vous aider à identifier et résoudre rapidement
les problèmes.
Signaux visuels :
Affichage à l’écran
C
a
us
e
s
poss
i
b
le
s
Ac
t
i
o
n
s
rec
omm
an
d
ée
s
« + », rétroéclairage roug
« – », rétroéclairage ver
« H
« Hot
« Er1 »
Connexion correct
Connexion inversé
Tension trop élevé
Surchauffe du testeu
Lampe intégrée défectueuse
Poursuivre le test
Poursuivre le test
Déconnectez et utilisez une
source de tension ou un
testeur approprié pour tester
à nouveau
Déconnectez et laissez le
testeur refroidir avant de
refaire un test
Contactez le service client.
1
7
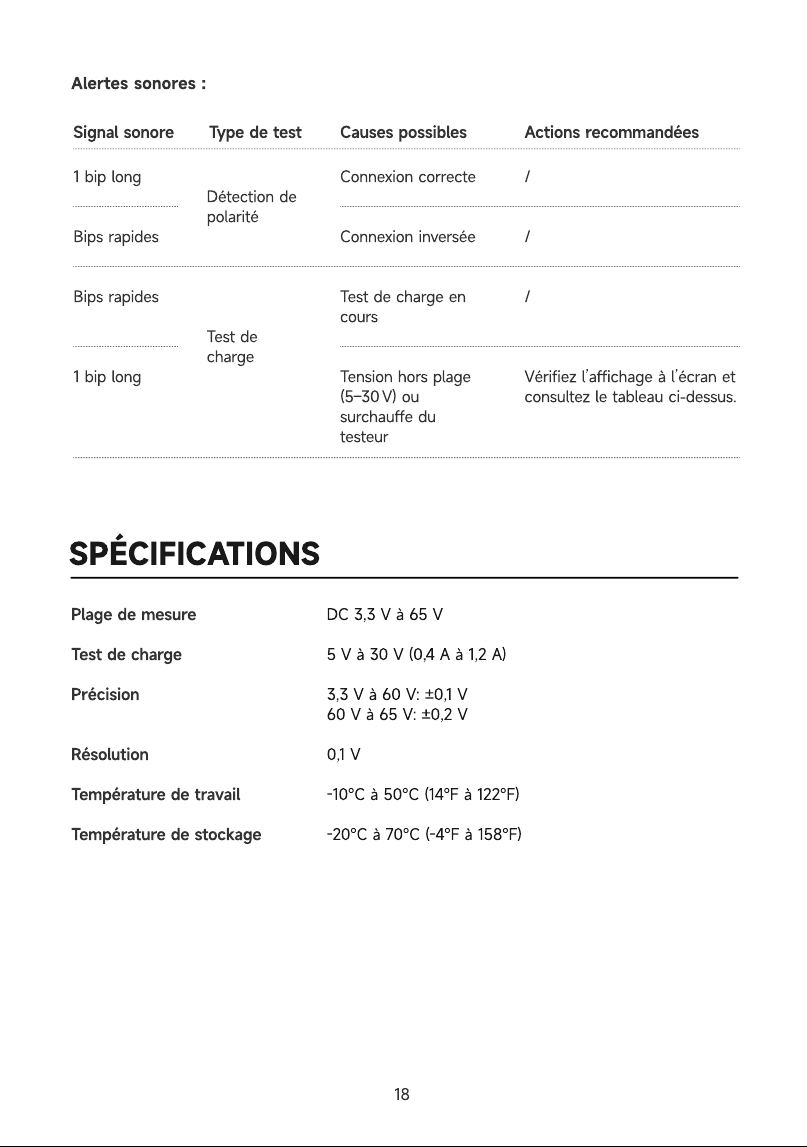
Alertes sonores :
Signal sonore Type de test
1 bip lon
Bips rapide
Bips rapide
1 bip lon
Détection de
polarit
Test de
charge
SPÉCIFICATIONS
Causes possibles
Connexion correct
Connexion inversé
Test de charge en
cour
Tension hors plage
(5–30 V) ou
surchauffe du
testeur
Actions recommandées
/
/
/
Vérifiez l’affichage à l’écran et
consultez le tableau ci-dessus.
Plage de mesur
Test de charg
Précisio
Résolutio
Température de travai
Température de stockage
DC 3,3 V à 65
5 V à 30 V (0,4 A à 1,2 A
3,3 V à 60 V: ±0,1
60 V à 65 V: ±0,2
0,1
-10℃ à 50℃ (14℉ à 122℉
-20℃ à 70℃ (-4℉ à 158℉
18
FAQ
Q
Q
R
Q
Q
R
Q
R
Puis-je remplacer la sonde ou les pinces
Oui. Vous pouvez utiliser vos sondes ou pinces actuelles, ou acheter des accessoires
compatibles d’autres marques. Le testeur ne fonctionne qu’avec des accessoires à
connecteur de 4 mm.
Remarque : Le remplacement des accessoires peut affecter la précision des mesures
Que faire si le fil ressort de la pince fournie est trop court
Vous pouvez rallonger le câble en ajoutant un fil via un adaptateur. Remarque : Cela
peut affecter la précision de la mesure
Que faire si le testeur ne fonctionne pas correctement
Vérifiez la source de tension et les connexions. Si le testeur ne fonctionne toujours pas
correctement, contactez le service client
Pourquoi la lumière est-elle faible pendant le test de charge
Pendant le test de charge, le testeur applique un courant en fonction de la tension
mesurée (0,6 A à 12 V, 1 A à 24 V, jusqu’à 1,2 A à 30 V). Une tension faible réduit le
courant appliqué et la lampe intégrée s’éteint partiellement. Une lampe faible indique
donc une tension faible du circuit ou de la batterie
Le test de charge permet-il de déterminer si une batterie ou un circuit est faible
Vous pouvez estimer l’état de la batterie ou du circuit en observant la chute de tension
lors du test de charge. Si la tension chute de plus de 3 V sous charge, la batterie ou le
circuit peut être faible. Pour une évaluation plus précise, utilisez un testeur de batterie
dédié pour vérifier l’état, la charge et d’autres paramètres
Pourquoi l’écran s’éteint-il et se rallume-t-il à plusieurs reprises et le buzzer émet-il un
bip pendant le test de charge
Cela peut se produire lorsque le courant du circuit ou de la batterie est inférieur à 0,4
A, ce qui est insuffisant pour assurer le fonctionnement normal du testeur. En
conséquence, le testeur peut interrompre le test à plusieurs reprises, provoquant
l’extinction et le rallumage de l’écran et l’émission d’un bip par le buzzer. Essayez
d’utiliser une autre alimentation ou un autre outil de test.
19
GARANTIE
Garantie limitée d'un an de TOPDO
TOPDON garantit à l'acheteur initial que les produits de la société sont exempts de tout défaut
matériel et de fabrication pendant 12 mois à compter de la date d'achat (période de garantie)
Pour les défauts signalés pendant la période de garantie, TOPDON réparera ou remplacera la
pièce ou le produit défectueux selon l'analyse et la confirmation de son support technique
TOPDON ne sera pas responsable des dommages accessoires ou indirects résultant de
l'utilisation, de la mauvaise utilisation ou du montage de l'appareil
S'il y a un conflit entre la politique de garantie de TOPDON et les lois locales, les lois locales
prévaudront
Cette garantie limitée est nulle dans les conditions suivantes
• Mauvaise utilisation, démontage, modification ou réparation par des magasins ou des
techniciens non autorisés
• Manipulation négligente et violation des règles de fonctionnement
Avis : Toutes les informations contenues dans ce manuel sont basées sur les dernières
informations disponibles au moment de la publication et aucune garantie ne peut être donnée
quant à leur exactitude ou leur exhaustivité. TOPDON se réserve le droit d'apporter des
modifications à tout moment sans préavis.
20

ESPAÑOL
HISTORIAL DE REVISIONES
Versió
1.0
Fech
2026-04
Descripció
Lanzamiento inicial
¡LA SEGURIDAD ES SIEMPRE LA MÁXIMA PRIORIDAD!
Por su seguridad, la de los demás y para evitar daños al producto, lea y comprenda todas
las instrucciones de seguridad antes de usarlo
Use siempre gafas de seguridad aprobadas para evitar daños
No exponga el producto a la luz solar directa ni a altas temperaturas. Evite gases, vapores
o polvo explosivo, y no fume cerca del vehículo
No desmonte el producto. Un desmontaje incorrecto puede anular la garantía o causar
accidentes o lesiones
No corte ni sumerja los cables en agua. Riesgo de descarga eléctrica
No use en circuitos de CA, computadoras bajo carga o airbags
No sacuda ni deje caer el probador. Los componentes internos pueden dañarse
Se requiere supervisión si el dispositivo lo usan niños o personas con capacidades físicas,
sensoriales o mentales reducidas, o experiencia limitada
Maneje la sonda con cuidado; la punta es afilada y puede causar lesiones
Tenga precaución cerca de componentes de encendido como la bobina, el distribuidor, los
cables de encendido y las bujías. Puede haber alta tensión con el motor en marcha
Ten cuidado al trabajar cerca de cables con corriente o expuestos, especialmente dentro o
cerca de un panel eléctrico abierto.
22
¿QUÉ HAY EN LA CAJA?
Probador CT10
Adaptado
Sonda de 2 m
Bolsa de transport
Pinza de cocodril
Guía rápida de usuari
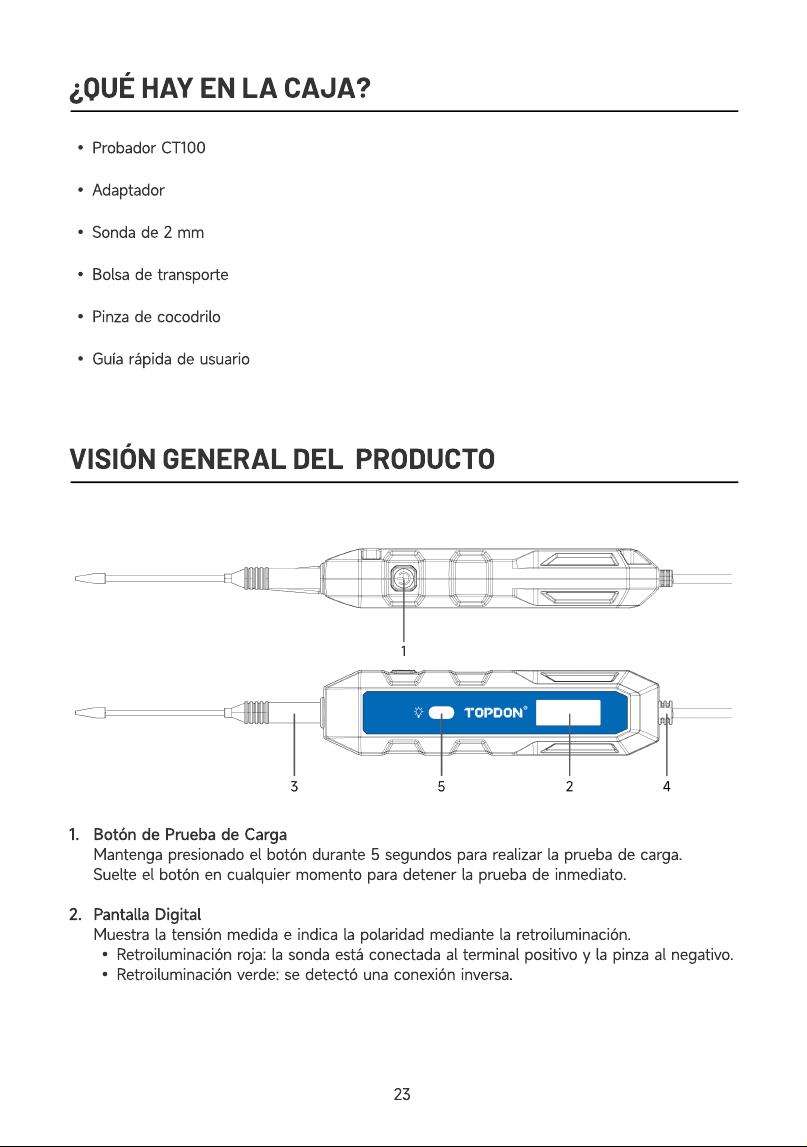
VISIÓN GENERAL DEL PRODUCTO
1
2
Botón de Prueba de Carg
Mantenga presionado el botón durante 5 segundos para realizar la prueba de carga
Suelte el botón en cualquier momento para detener la prueba de inmediato
Pantalla Digita
Muestra la tensión medida e indica la polaridad mediante la retroiluminación
Retroiluminación roja: la sonda está conectada al terminal positivo y la pinza al negativo
Retroiluminación verde: se detectó una conexión inversa.
23
3
4
5
Extremo de la Sond
Se conecta a la sonda de prueba para medir
Extremo de la Pinz
Se conecta a la pinza de prueba para medir
Ventana indicadora de voltaj
La lámpara integrada se enciende durante la prueba de carga y su brillo varía según el
nivel de voltaje detectado.
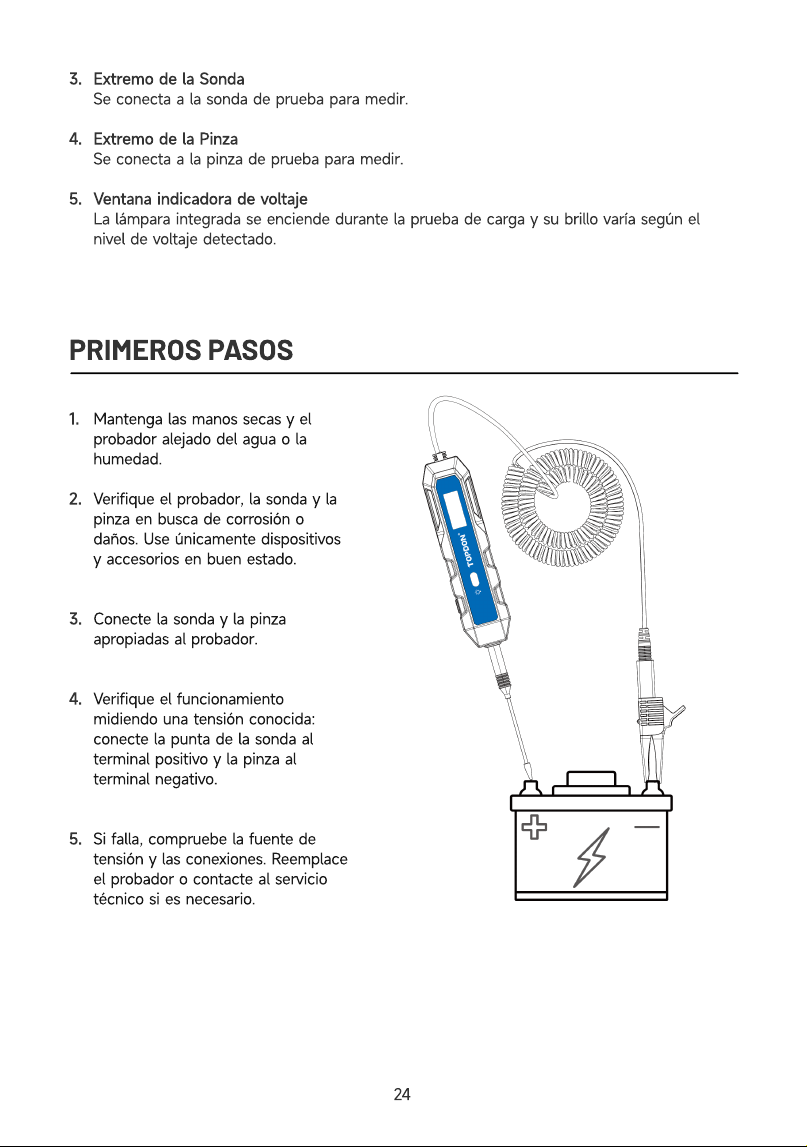
PRIMEROS PASOS
1
2
3
4
5
Mantenga las manos secas y el
probador alejado del agua o la
humedad
Verifique el probador, la sonda y la
pinza en busca de corrosión o
daños. Use únicamente dispositivos
y accesorios en buen estado
Conecte la sonda y la pinza
apropiadas al probador
Verifique el funcionamiento
midiendo una tensión conocida:
conecte la punta de la sonda al
terminal positivo y la pinza al
terminal negativo
Si falla, compruebe la fuente de
tensión y las conexiones. Reemplace
el probador o contacte al servicio
técnico si es necesario
24

DETECCIÓN DE POLARIDAD
Al conectarse a una fuente de tensión, el probador detecta la polaridad correcta o inversa
y la indica mediante señales visuales y sonoras. Consulte la tabla para más detalles.
S
e
ñal
e
s
V
i
sual
e
s Al
e
r
t
as
S
ono
ras
Punta de sonda al
terminal positivo y
pinza al negativ
Punta de sonda al
terminal negativo y
pinza al positivo
Conexión correct
Conexión inversa
“+” en la pantalla,
retroiluminación roj
“-” en la pantalla,
retroiluminación
verde
1 pitido larg
Varios pitidos cortos
MEDICIÓN DE VOLTAJE
Método de Conexión
R
e
sul
t
a
do
Conecte el probador a un circuito o batería. El probador mide automáticamente la tensión y
muestra la lectura en la pantalla con resolución de 0,1 V
El rango de medición es de 3,3 V a 65 V. Tensiones inferiores a 3,3 V no se muestran. Si la
tensión supera los 65 V, aparece « H » en la pantalla para indicar alta tensión
Advertencias
El probador está diseñado para medir voltajes de CC. No lo use en circuitos de CA.
Use únicamente dentro del rango especificado (3,3–65 V). Si aparece « H », desconecte el
probador de inmediato.
Nunca conecte el probador a circuitos o baterías superiores a 80 V, ya que esto puede
causar daños graves o explosión
PR
U
E
B
A DE CAR
G
A
Conecte el probador a un circuito o batería. Se mostrará la lectura inicial de tensión
Mantenga presionado el botón de Test de Carga durante unos 5 segundos para iniciar la
prueba.
2
5
Durante la prueba, la tensión se supervisa y muestra continuamente. Se emiten bips
rápidos y se enciende la lámpara integrada. A mayor tensión, la lámpara se ilumina más
Al finalizar, la lectura final de tensión aparecerá en la pantalla
Compare la lectura final con la inicial. Una caída de más de 3 V indica que la batería o el
circuito puede estar débil
Nota
La prueba de carga está diseñada para 5–30 V. Si la tensión medida es inferior a 5 V, la
lámpara integrada se iluminará débilmente. Si supera los 30 V, aparece « H » en la pantalla
No realice varias pruebas de carga consecutivas, ya que esto puede provocar
sobrecalentamiento del probador. Si ocurre, aparecerá “Hot” en la pantalla. Espere a que el
dispositivo se enfríe antes de realizar otra prueba de carga
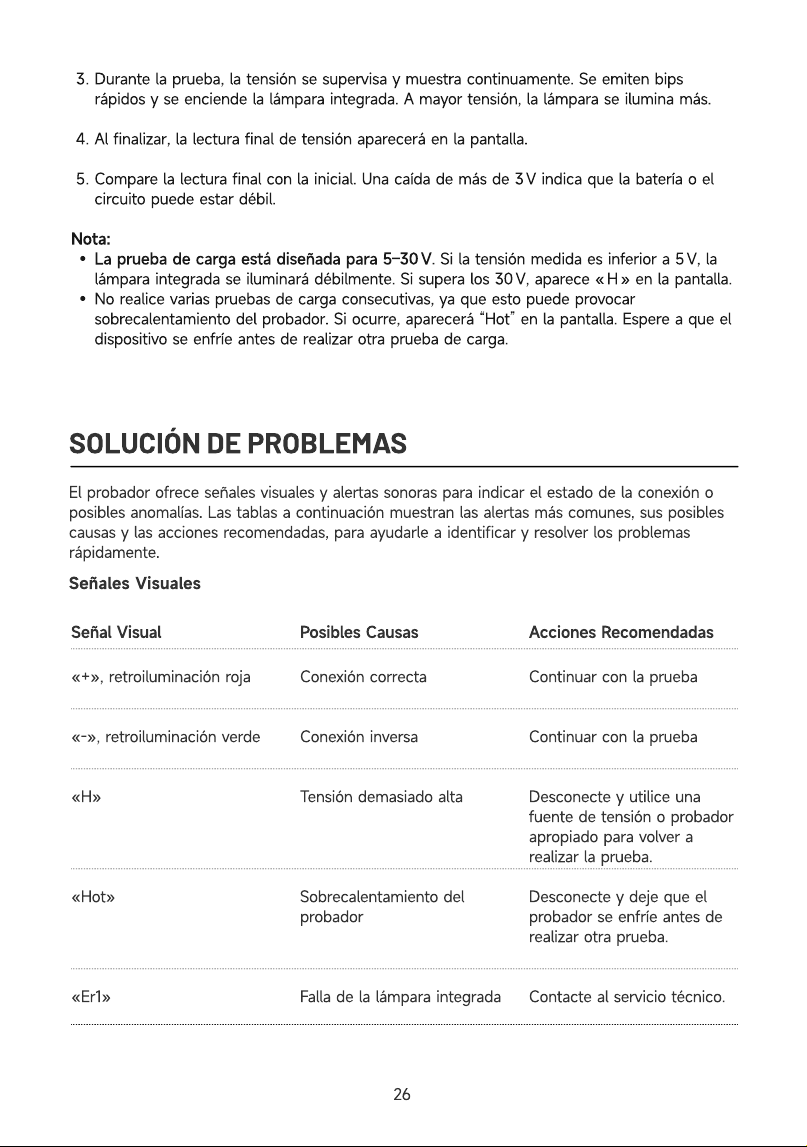
SOLUCIÓN DE PROBLEMAS
El probador ofrece señales visuales y alertas sonoras para indicar el estado de la conexión o
posibles anomalías. Las tablas a continuación muestran las alertas más comunes, sus posibles
causas y las acciones recomendadas, para ayudarle a identificar y resolver los problemas
rápidamente.
Señales Visuale
Señal
Visual Posibles
Causas Acciones
Recomendadas
«+», retroiluminación roj
«-», retroiluminación verd
«H
«Hot
«Er1»
Conexión correct
Conexión invers
Tensión demasiado alt
Sobrecalentamiento del
probado
Falla de la lámpara integrada
Continuar con la prueb
Continuar con la prueb
Desconecte y utilice una
fuente de tensión o probador
apropiado para volver a
realizar la prueba
Desconecte y deje que el
probador se enfríe antes de
realizar otra prueba
Contacte al servicio técnico.
26
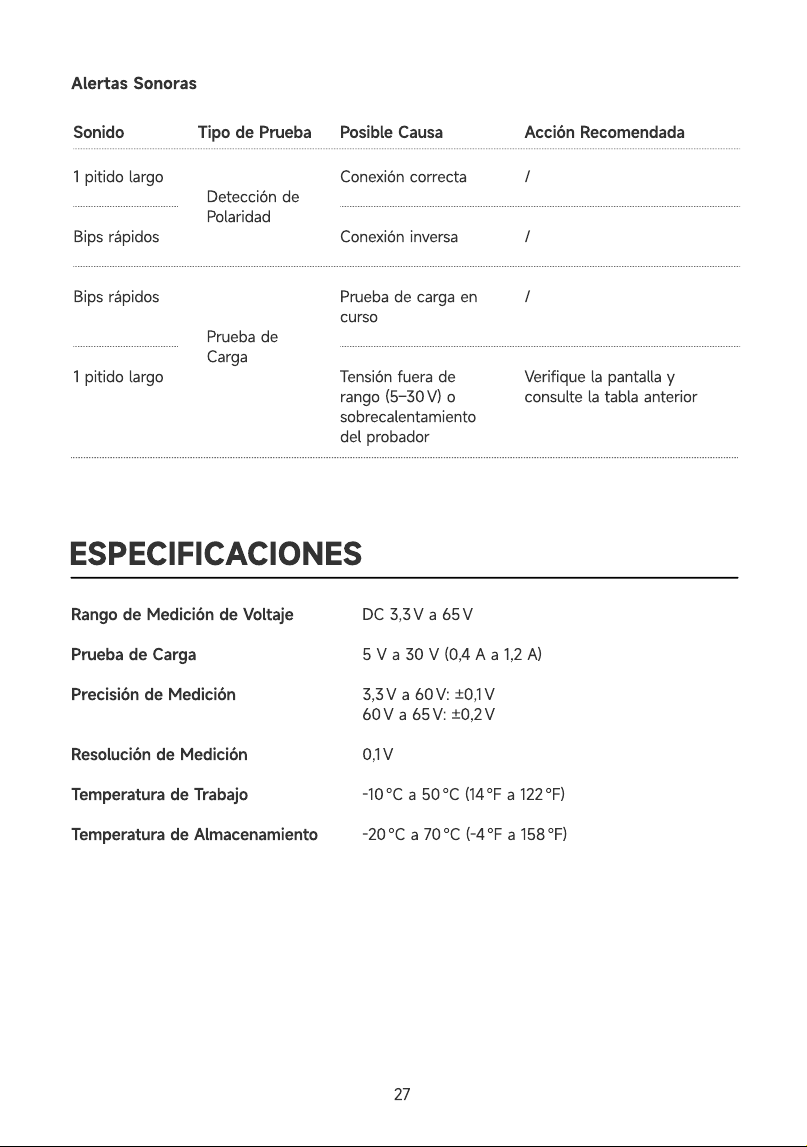
Alertas Sonoras
Sonido Tipo de Prueba Posible Causa Acción Recomendada
1 pitido larg
Bips rápido
Bips rápido
1 pitido larg
Detección de
Polaridad
Prueba de
Carg
Conexión correct
Conexión invers
Prueba de carga en
curs
Tensión fuera de
rango (5–30 V) o
sobrecalentamiento
del probador
/
/
/
Verifique la pantalla y
consulte la tabla anterior
ESPECIFICACIONES
Rango de Medición de Voltaj
Prueba de Carg
Precisión de Medició
Resolución de Medició
Temperatura de Trabaj
Temperatura de Almacenamient
DC 3,3 V a 65
5 V a 30 V (0,4 A a 1,2 A
3,3 V a 60 V: ±0,1
60 V a 65 V: ±0,2
0,1
-10 ℃ a 50 ℃ (14 ℉ a 122 ℉
-20 ℃ a 70 ℃ (-4 ℉ a 158 ℉
27
PREGUNTAS FRECUENTES
R
R
¿Puedo reemplazar la sonda o las pinzas
Sí. Puede usar las sondas o pinzas actuales, o adquirir accesorios compatibles de otras
marcas. El probador solo funciona con accesorios con conector de 4 mm
Nota: Reemplazar el accesorio puede afectar la precisión de la prueba
¿Qué hacer si el resorte de la pinza suministrada no es lo suficientemente largo
Puede alargar el cable conectando un cable adicional mediante un adaptador
Nota: Esto puede afectar la precisión de la medición
¿Qué hacer si el probador no funciona correctamente
Revise la fuente de voltaje y las conexiones. Si el probador sigue sin funcionar
correctamente, contacte al servicio de atención al cliente
¿Por qué la luz está tenue durante la prueba de carga
Durante la prueba de carga, el probador aplica corriente según la tensión medida (por
ejemplo, 0,6 A a 12 V, 1 A a 24 V y hasta 1,2 A a 30 V). Cuando la tensión es baja, la
corriente aplicada disminuye y la lámpara integrada se atenúa. Por lo tanto, una
lámpara tenue indica que la tensión del circuito o la batería es baja
¿Se puede usar la prueba de carga para determinar si una batería o circuito está débil
Puede hacer una evaluación básica observando la caída de tensión durante la prueba
de carga. Si la tensión cae más de 3 V bajo carga, la batería o el circuito puede estar
débil. Para una evaluación más precisa, utilice un probador de baterías dedicado para
comprobar la salud de la batería, el estado de carga y otros parámetros
¿Por qué la pantalla se apaga y enciende repetidamente y el zumbador emite un pitido
durante la prueba de carga
Esto puede ocurrir cuando la corriente del circuito o la batería es inferior a 0,4 A, lo
que no es suficiente para garantizar el funcionamiento normal del probador. Como
resultado, el probador puede interrumpir la prueba repetidamente, haciendo que la
pantalla se apague y encienda y que el zumbador emita un pitido. Use otra fuente de
alimentación o herramienta de prueba.
28
GARANTÍA
Garantía limitada de un a ño para TOPDO
TOPDON asegura a sus compradores originales que los productos de la empresa estarán libres
de defectos de materiales y mano de obra durante un período de 12 meses a partir de la fecha
de compra (Período de Garantía)
Para los defectos reportados durante el período de garantía, TOPDON analizará y confirmará,
reparará o reemplazará las piezas o productos defectuosos de acuerdo con su soporte técnico
TOPDON no será responsable de ningún daño accidental o consecuente causado por el uso,
mal uso o instalación del dispositivo.
Si hay conflictos entre la política de garantía de TOPDON y las leyes locales, prevalecerán las
leyes locales
Esta garantía limitada no es válida en los siguientes casos
• Uso indebido, desmontaje, modificación o reparación de tiendas o técnicos no autorizados
• Manejo de errores e irregularidades operativas.
Nota: Toda la información contenida en este manual se basa en la información más reciente
disponible en el momento de su publicación y no garantiza su exactitud o exhaustividad.
TOPDON se reserva el derecho de cambiarla en cualquier momento sin previo aviso
29

DEUTSCH

ÄNDERUNGSHISTORIE
Versio
1.0
Datu
2026-04
Beschreibun
Erstveröffentlichung
SICHERHEIT STEHT IMMER AN ERSTER STELLE!
Zu Ihrer Sicherheit, zur Sicherheit anderer und zum Schutz des Geräts lesen und verstehen
Sie bitte alle Sicherheitsanweisungen vor der Verwendung
Tragen Sie stets zugelassene Schutzbrillen, um Verletzungen zu vermeiden
Setzen Sie das Gerät keiner direkten Sonneneinstrahlung oder hohen Temperaturen aus.
Vermeiden Sie explosive Gase, Dämpfe, Staub oder Rauchen in der Nähe des Fahrzeugs
Öffnen Sie das Gerät nicht. Unsachgemäßes Auseinanderbauen kann die Garantie
erlöschen lassen oder zu Unfällen und Verletzungen führen
Kabel nicht schneiden oder ins Wasser tauchen – es besteht Stromschlaggefahr
Nicht an Wechselstromkreisen, unter Last stehenden Computern oder Airbags verwenden
Tester nicht schütteln oder fallen lassen – interne Komponenten können beschädigt
werden
Bei Verwendung durch Kinder oder Personen mit eingeschränkten körperlichen,
sensorischen oder geistigen Fähigkeiten oder mangelnder Erfahrung ist Aufsicht
erforderlich
Handsonde vorsichtig behandeln, die Spitze ist scharf und kann Verletzungen verursachen
Vorsicht in der Nähe von Zündkomponenten wie Zündspule, Verteilerkappe, Zündkabeln
und Zündkerzen – bei laufendem Motor kann Hochspannung auftreten
Seien Sie vorsichtig, wenn Sie in der Nähe von stromführenden oder freiliegenden
Leitungen arbeiten, insbesondere in oder in der Nähe eines offenen Sicherungskastens.
31
WAS IST IN DER BOX?
CT100 Teste
Adapter
2-mm-Prüfspitz
Tragetasch
Krokodilklemm
Schnellstartanleitun
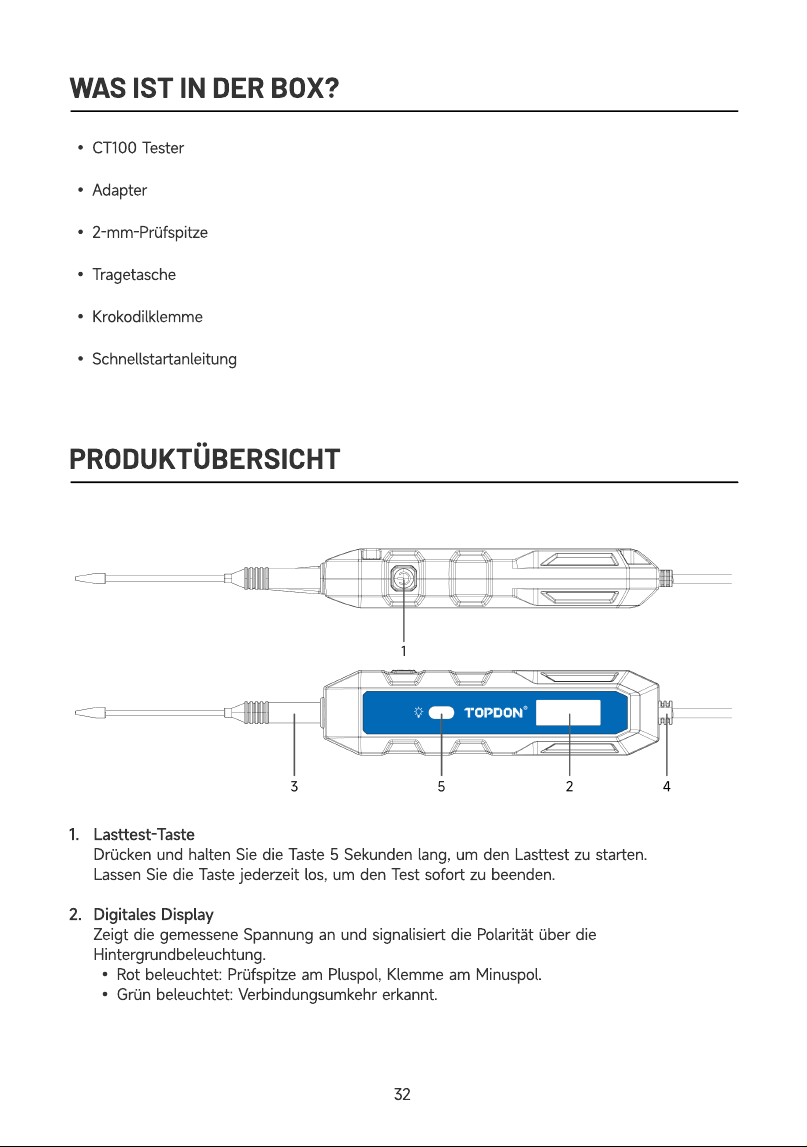
PRODUKTÜBERSICHT
1
2
Lasttest-Tast
Drücken und halten Sie die Taste 5 Sekunden lang, um den Lasttest zu starten
Lassen Sie die Taste jederzeit los, um den Test sofort zu beenden
Digitales Displa
Zeigt die gemessene Spannung an und signalisiert die Polarität über die
Hintergrundbeleuchtung
Rot beleuchtet: Prüfspitze am Pluspol, Klemme am Minuspol
Grün beleuchtet: Verbindungsumkehr erkannt.
32
3
4
5
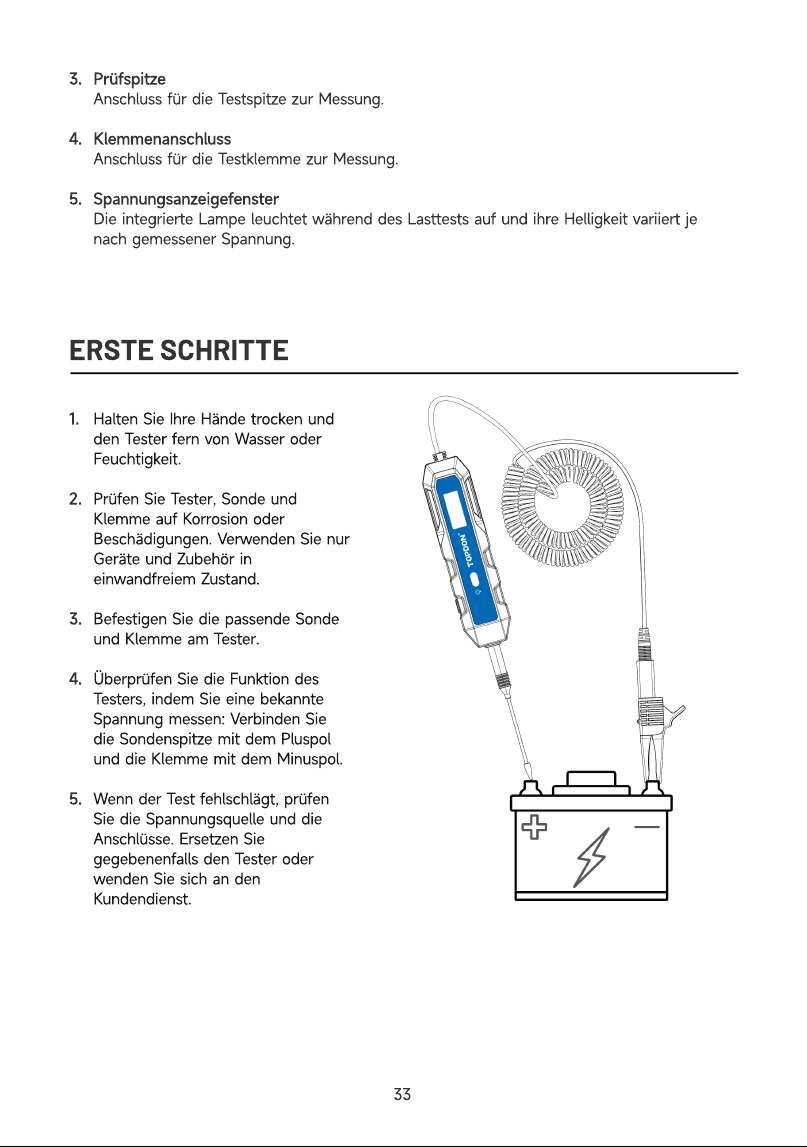
Prüfspitz
Anschluss für die Testspitze zur Messung
Klemmenanschlus
Anschluss für die Testklemme zur Messung
Spannungsanzeigefenste
Die integrierte Lampe leuchtet während des Lasttests auf und ihre Helligkeit variiert je
nach gemessener Spannung.
ERSTE SCHRITTE
1
2
3
4
5
Halten Sie Ihre Hände trocken und
den Tester fern von Wasser oder
Feuchtigkeit
Prüfen Sie Tester, Sonde und
Klemme auf Korrosion oder
Beschädigungen. Verwenden Sie nur
Geräte und Zubehör in
einwandfreiem Zustand
Befestigen Sie die passende Sonde
und Klemme am Tester
Überprüfen Sie die Funktion des
Testers, indem Sie eine bekannte
Spannung messen: Verbinden Sie
die Sondenspitze mit dem Pluspol
und die Klemme mit dem Minuspol
Wenn der Test fehlschlägt, prüfen
Sie die Spannungsquelle und die
Anschlüsse. Ersetzen Sie
gegebenenfalls den Tester oder
wenden Sie sich an den
Kundendienst
33
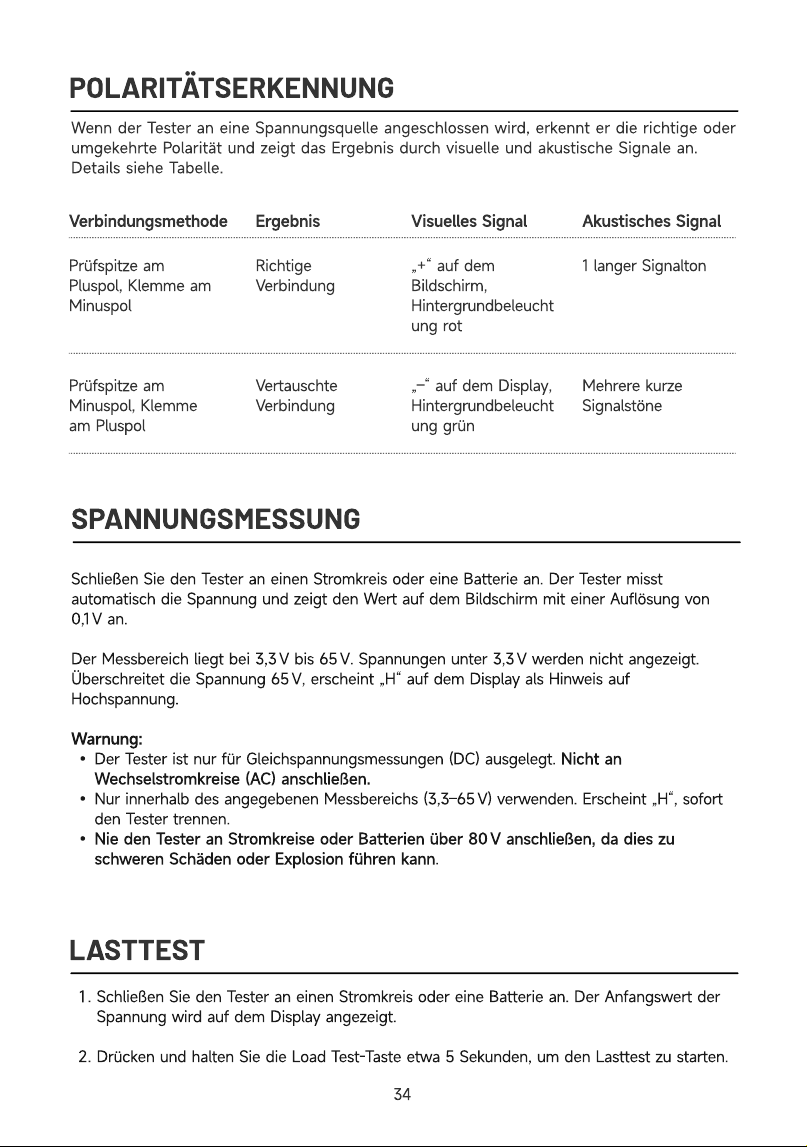
POLARITÄTSERKENNUNG
Wenn der Tester an eine Spannungsquelle angeschlossen wird, erkennt er die richtige oder
umgekehrte Polarität und zeigt das Ergebnis durch visuelle und akustische Signale an.
Details siehe Tabelle.
Verbindungsmethode Ergebnis Visuelles Signal Akustisches Signal
Prüfspitze am
Pluspol, Klemme am
Minuspo
Prüfspitze am
Minuspol, Klemme
am Pluspol
Richtige
Verbindun
Vertauschte
Verbindung
„+“ auf dem
Bildschirm,
Hintergrundbeleucht
ung ro
„–“ auf dem Display,
Hintergrundbeleucht
ung grün
1 langer Signalto
Mehrere kurze
Signalstöne
SPANNUNGSMESSUNG
LASTTES
T
Schließen Sie den Tester an einen Stromkreis oder eine Batterie an. Der Tester misst
automatisch die Spannung und zeigt den Wert auf dem Bildschirm mit einer Auflösung von
0,1 V an
Der Messbereich liegt bei 3,3 V bis 65 V. Spannungen unter 3,3 V werden nicht angezeigt.
Überschreitet die Spannung 65 V, erscheint „H“ auf dem Display als Hinweis auf
Hochspannung
Warnung
Der Tester ist nur für Gleichspannungsmessungen (DC) ausgelegt. Nicht an
Wechselstromkreise (AC) anschließen
Nur innerhalb des angegebenen Messbereichs (3,3–65 V) verwenden. Erscheint „H“, sofort
den Tester trennen
Nie den Tester an Stromkreise oder Batterien über 80 V anschließen, da dies zu
schweren Schäden oder Explosion führen kann
Schließen Sie den Tester an einen Stromkreis oder eine Batterie an. Der Anfangswert der
Spannung wird auf dem Display angezeigt
Drücken und halten Sie die Load Test-Taste etwa 5 Sekunden, um den Lasttest zu starten.
3
4
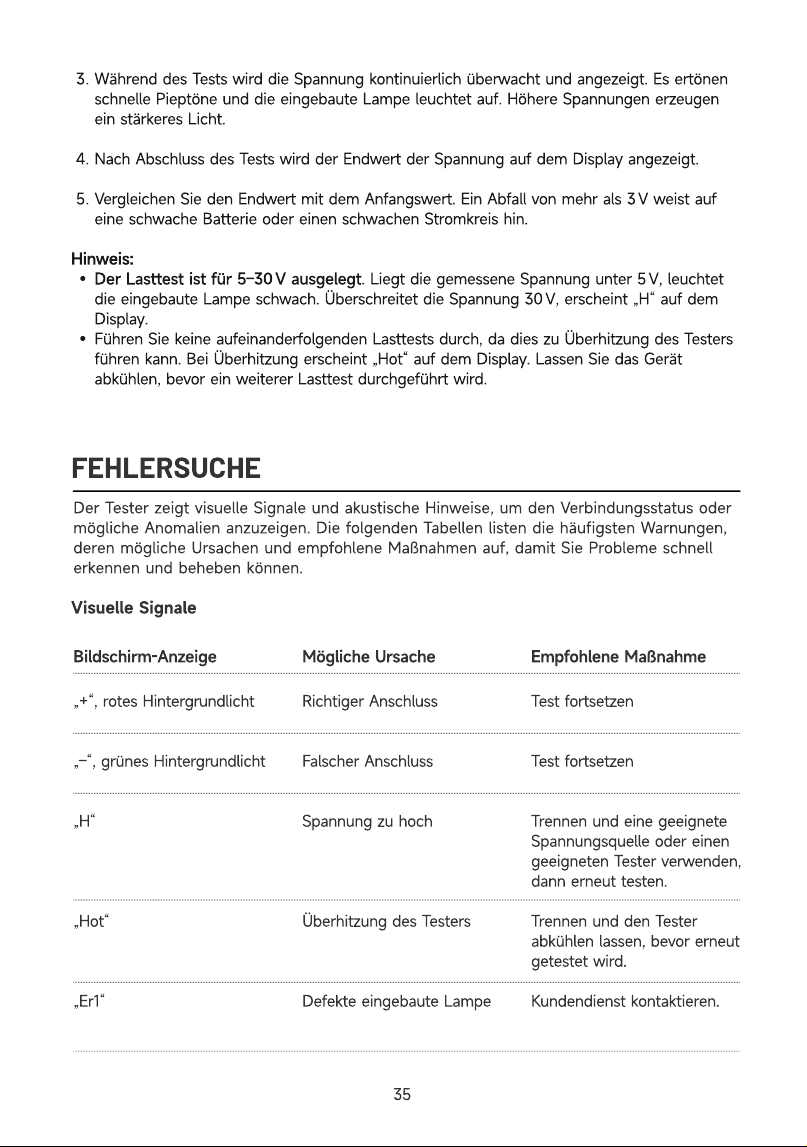
Während des Tests wird die Spannung kontinuierlich überwacht und angezeigt. Es ertönen
schnelle Pieptöne und die eingebaute Lampe leuchtet auf. Höhere Spannungen erzeugen
ein stärkeres Licht
Nach Abschluss des Tests wird der Endwert der Spannung auf dem Display angezeigt
Vergleichen Sie den Endwert mit dem Anfangswert. Ein Abfall von mehr als 3 V weist auf
eine schwache Batterie oder einen schwachen Stromkreis hin
Hinweis
Der Lasttest ist für 5–30 V ausgelegt. Liegt die gemessene Spannung unter 5 V, leuchtet
die eingebaute Lampe schwach. Überschreitet die Spannung 30 V, erscheint „H“ auf dem
Display
Führen Sie keine aufeinanderfolgenden Lasttests durch, da dies zu Überhitzung des Testers
führen kann. Bei Überhitzung erscheint „Hot“ auf dem Display. Lassen Sie das Gerät
abkühlen, bevor ein weiterer Lasttest durchgeführt wird
FEHLERSUCHE
Der Tester zeigt visuelle Signale und akustische Hinweise, um den Verbindungsstatus oder
mögliche Anomalien anzuzeigen. Die folgenden Tabellen listen die häufigsten Warnungen,
deren mögliche Ursachen und empfohlene Maßnahmen auf, damit Sie Probleme schnell
erkennen und beheben können
Visuelle Signale
Bildschirm-Anzeige Mögliche
Ursache Empfohlene
Maßnahme
„+“, rotes Hintergrundlich
„–“, grünes Hintergrundlich
„H
„Hot
„Er1“
R
ichtiger Anschlus
F
alscher Anschlus
Spannung zu hoc
Ü
berhitzung des Tester
D
efekte eingebaute
L
ampe
Test fortsetze
Test fortsetze
Trennen und eine geeignete
Spannungsquelle oder einen
geeigneten Tester verwenden,
dann erneut testen
Trennen und den Tester
abkühlen lassen, bevor erneut
getestet wird
Kundendienst kontaktieren.
3
5
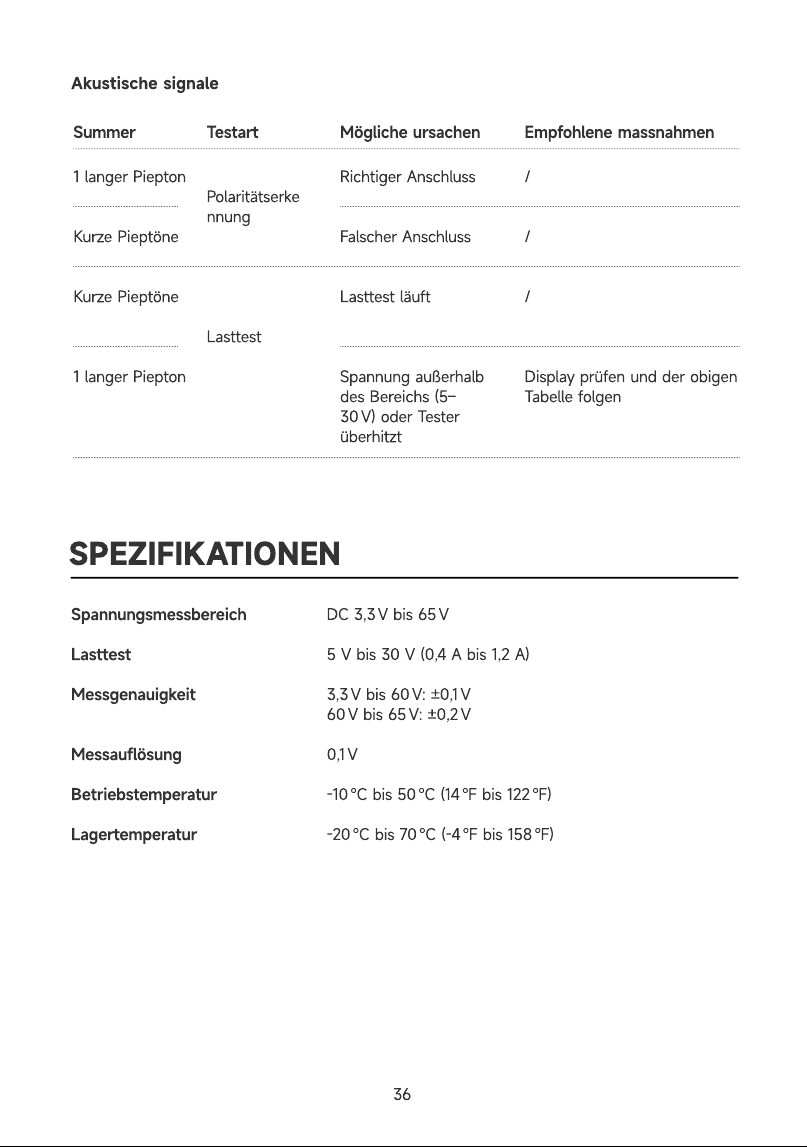
Akustische signale
Mögliche ursachen
1 langer Piepto
Kurze Pieptön
Kurze Pieptön
1 langer Piepto
Richtiger Anschlus
Falscher Anschlus
Lasttest läuf
Spannung außerhalb
des Bereichs (5–
30 V) oder Tester
überhitzt
Polaritätserke
nnun
Lasttest
SPEZIFIKATIONEN
Empfohlene massnahmen
/
/
/
Display prüfen und der obigen
Tabelle folgen
Summer Testart
Spannungsmessbereic
Lasttes
Messgenauigkei
Messauflösun
Betriebstemperatu
Lagertemperatu
DC 3,3 V bis 65
5 V bis 30 V (0,4 A bis 1,2 A
3,3 V bis 60 V: ±0,1
60 V bis 65 V: ±0,2
0,1
-10 °C bis 50 °C (14 °F bis 122 °F
-20 °C bis 70 °C (-4 °F bis 158 °F
36
FAQ
A
A
A
F
A
A
Kann ich die Prüfspitze oder Klemmen austauschen
Ja. Sie können Ihre aktuellen Sonden oder Klemmen verwenden oder kompatibles
Zubehör anderer Marken kaufen. Der Tester funktioniert nur mit 4 mm-Steckverbindern
Hinweis: Ein Austausch des Zubehörs kann die Messgenauigkeit beeinflussen
Was tun, wenn das Federkabel der mitgelieferten Klemme nicht lang genug ist
Sie können das Kabel verlängern, indem Sie eine zusätzliche Leitung über einen
Adapter anschließen
Hinweis: Dies kann die Messgenauigkeit beeinträchtigen
Was tun, wenn der Tester nicht richtig funktioniert
Überprüfen Sie die Spannungsquelle und die Anschlüsse. Funktioniert der Tester
weiterhin nicht korrekt, wenden Sie sich an den Kundendienst
Warum ist die Lampe während des Lasttests schwach
Während des Lasttests gibt der Tester einen Strom entsprechend der gemessenen
Spannung ab (z. B. 0,6 A bei 12 V, 1 A bei 24 V und bis zu 1,2 A bei 30 V). Bei niedriger
Spannung wird der Strom reduziert und die eingebaute Lampe dunkler. Eine dunkle
Lampe weist daher auf niedrige Stromkreis- oder Batteriespannung hin
Kann der Lasttest verwendet werden, um festzustellen, ob eine Batterie oder ein
Stromkreis schwach ist
Eine grobe Einschätzung können Sie durch Beobachtung des Spannungsabfalls
während des Lasttests treffen. Fällt die Spannung unter Last um mehr als 3 V, kann die
Batterie oder der Stromkreis schwach sein. Für eine genauere Beurteilung verwenden
Sie einen speziellen Batterietester, um Batteriezustand, Ladezustand und andere
Parameter zu prüfen
Warum schaltet sich der Bildschirm während des Lasttests wiederholt ein und aus und
der Summer ertönt
Dieses Problem kann auftreten, wenn der Strom im Stromkreis oder in der Batterie
unter 0,4 A liegt und somit nicht ausreicht, um den normalen Betrieb des Testgeräts zu
gewährleisten. Dadurch kann der Test wiederholt unterbrochen werden, was dazu führt,
dass sich der Bildschirm ein- und ausschaltet und der Summer ertönt. Verwenden Sie
zur Messung bitte eine andere Stromquelle oder ein anderes Testgerät.
37
GARANTIE
TOPDONs Einjährige Eingeschränkte Garanti
TOPDON garantiert seinem ursprünglichen Käufer, dass die Produkte des Unternehmens für 12
Monate ab Kaufdatum frei von Material- und Verarbeitungsfehlern sind (Garantiezeitraum)
Für die während der Garantiezeit gemeldeten Mängel wird TOPDON das defekte Teil oder
Gerät gemäß seiner Analyse und Bestätigung des technischen Supports entweder reparieren
oder ersetzen
TOPDON haftet nicht für Neben- oder Folgeschäden, die durch den Gebrauch, den Missbrauch
oder die Montage des Geräts entstehen
Bei Widersprüchen zwischen der TOPDON-Gewährleistungsrichtlinie und den örtlichen
Regelungen haben die örtlichen Regelungen bevorzugte Stellung
Diese eingeschränkte Garantie erlischt unter den folgenden Bedingungen
• Missbrauch, Demontage, Änderung oder Reparatur durch nicht autorisierte Geschäfte oder
Techniker
• Unachtsame Handhabung und Verletzung des Betriebs
Notiz: Alle Informationen in dieser Anleitung basieren auf den neuesten Informationen, die zum
Zeitpunkt der Veröffentlichung verfügbar waren, und es kann keine Garantie für ihre
Genauigkeit oder Vollständigkeit übernommen werden. TOPDON behält sich das Recht vor,
jederzeit ohne Vorankündigung Änderungen vorzunehmen.
38

ITALIANO
STORIA DELLE REVISIONI
Version
1.0
Dat
2026-04
Descrizion
Prima pubblicazione
LA SICUREZZA È SEMPRE LA PRIMA PRIORITÀ!
Per la vostra sicurezza, per la sicurezza degli altri e per evitare danni al prodotto, leggere e
comprendere completamente tutte le istruzioni di sicurezza prima dell’uso
Indossare sempre occhiali di sicurezza approvati per prevenire lesioni
Non esporre il prodotto alla luce solare diretta o ad alte temperature. Evitare gas esplosivi,
vapori, polvere o fumo nelle vicinanze del veicolo
Non smontare il prodotto. Uno smontaggio improprio può invalidare la garanzia o causare
incidenti o lesioni personali
Non tagliare i cavi né immergerli in acqua. Potrebbe verificarsi una scossa elettrica
Non utilizzare su circuiti CA, su computer sotto carico o su airbag
Non scuotere né far cadere il tester. I componenti interni potrebbero danneggiarsi
È necessaria la supervisione quando il dispositivo è utilizzato da bambini o da persone con
ridotte capacità fisiche, sensoriali o mentali, oppure con esperienza o conoscenze limitate
Maneggiare la sonda con cautela: la punta è affilata e può causare lesioni
Prestare attenzione vicino ai componenti di accensione, come bobina di accensione, calotta
del distributore, cavi di accensione e candele. Durante il funzionamento del motore può
essere presente alta tensione
Fai attenzione quando lavori vicino a cavi sotto tensione o esposti, soprattutto all’interno o
in prossimità di un quadro elettrico aperto.
40
CONTENUTO DELLA CONFEZIONE
Tester CT10
Adattator
Punta di prova da 2 m
Borsa per il trasport
Morsetto a coccodrill
Guida rapida all’us
PANORAMICA DEL PRODOTTO
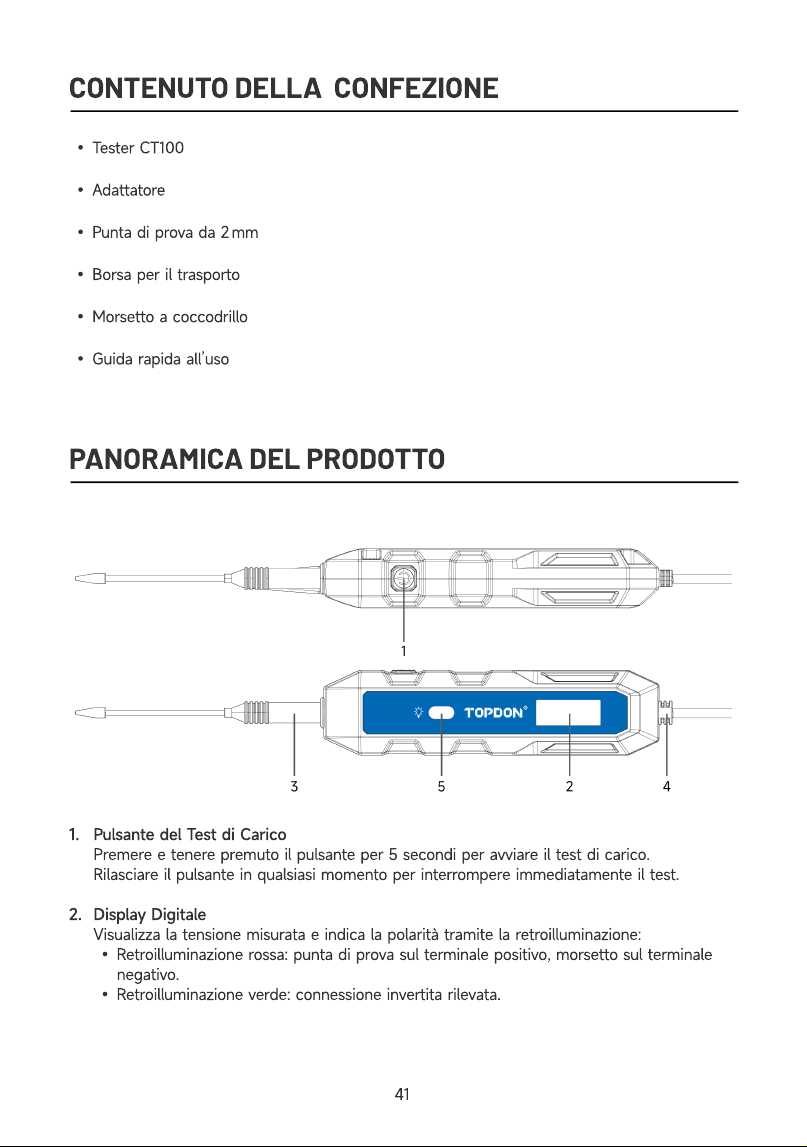
1
2
Pulsante del Test di Caric
Premere e tenere premuto il pulsante per 5 secondi per avviare il test di carico
Rilasciare il pulsante in qualsiasi momento per interrompere immediatamente il test
Display Digital
Visualizza la tensione misurata e indica la polarità tramite la retroilluminazione
Retroilluminazione rossa: punta di prova sul terminale positivo, morsetto sul terminale
negativo
Retroilluminazione verde: connessione invertita rilevata.
41
3
4
5
Estremità della sond
Collegata alla sonda di misura per effettuare le rilevazioni
Estremità del morsett
Collegata al morsetto di misura per effettuare le rilevazioni
Finestra indicatore di tension
La lampada integrata si accende durante il test di carico e la sua luminosità varia in base al
livello di tensione rilevato.
INIZIO RAPIDO
1
2
3
4
5
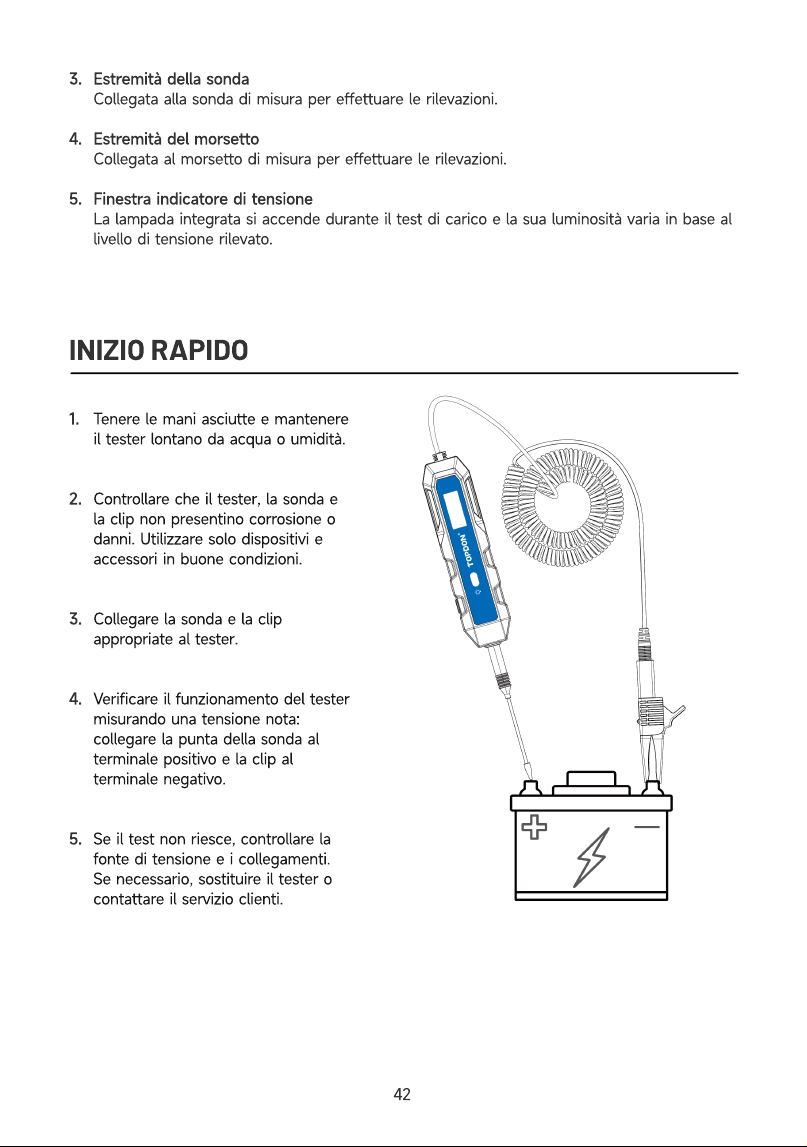
Tenere le mani asciutte e mantenere
il tester lontano da acqua o umidità
Controllare che il tester, la sonda e
la clip non presentino corrosione o
danni. Utilizzare solo dispositivi e
accessori in buone condizioni
Collegare la sonda e la clip
appropriate al tester
Verificare il funzionamento del tester
misurando una tensione nota:
collegare la punta della sonda al
terminale positivo e la clip al
terminale negativo
Se il test non riesce, controllare la
fonte di tensione e i collegamenti.
Se necessario, sostituire il tester o
contattare il servizio clienti
42
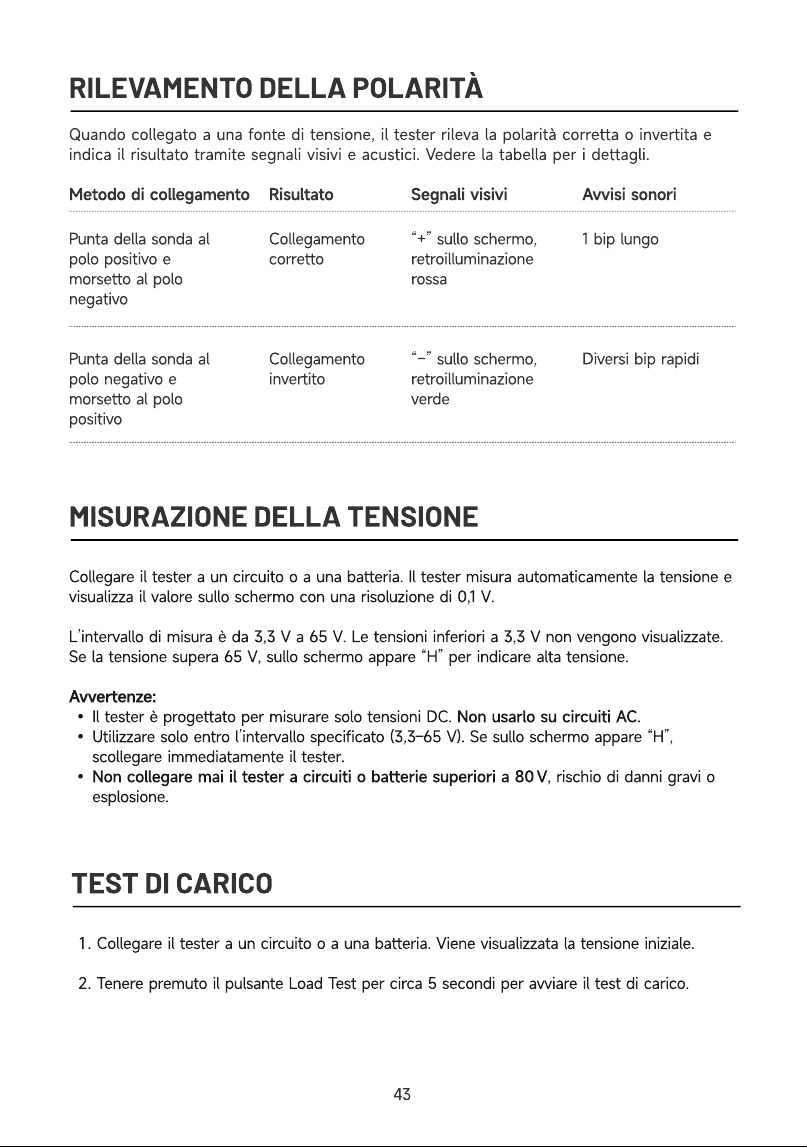
RILEVAMENTO DELLA POLARITÀ
Quando collegato a una fonte di tensione, il tester rileva la polarità corretta o invertita e
indica il risultato tramite segnali visivi e acustici. Vedere la tabella per i dettagli.
Metodo di collegamento Risultato Segnali visivi Avvisi sonori
Punta della sonda al
polo positivo e
morsetto al polo
negativ
Punta della sonda al
polo negativo e
morsetto al polo
positivo
Collegamento
corrett
Collegamento
invertito
“+” sullo schermo,
retroilluminazione
ross
“−” sullo schermo,
retroilluminazione
verde
1 bip lung
Diversi bip rapidi
MISURAZIONE DELLA TENSIONE
Collegare il tester a un circuito o a una batteria. Il tester misura automaticamente la tensione e
visualizza il valore sullo schermo con una risoluzione di 0,1 V
L’intervallo di misura è da 3,3 V a 65 V. Le tensioni inferiori a 3,3 V non vengono visualizzate.
Se la tensione supera 65 V, sullo schermo appare “H” per indicare alta tensione
Avvertenze
Il tester è progettato per misurare solo tensioni DC. Non usarlo su circuiti AC
Utilizzare solo entro l’intervallo specificato (3,3–65 V). Se sullo schermo appare “H”,
scollegare immediatamente il tester
Non collegare mai il tester a circuiti o batterie superiori a 80 V, rischio di danni gravi o
esplosione.
TEST DI CARICO
Collegare il tester a un circuito o a una batteria. Viene visualizzata la tensione iniziale
Tenere premuto il pulsante Load Test per circa 5 secondi per avviare il test di carico.
4
3

Durante il test, la tensione viene monitorata continuamente e visualizzata sul display.
Vengono emessi rapidi segnali acustici e la lampada integrata si accende. Una tensione più
alta produce una luce più intensa
Al termine del test, sul display appare la tensione finale.
Confrontare il valore finale con quello iniziale. Una caduta superiore a 3 V indica una
batteria o un circuito debole
Nota
Il test di carico è progettato per una tensione compresa tra 5 e 30 V. Se la tensione
misurata è inferiore a 5 V, la lampada integrata si illumina debolmente. Se supera 30 V, sul
display appare “H”
Non eseguire più test di carico consecutivi, poiché ciò potrebbe far surriscaldare il tester.
Se il tester si surriscalda, sul display apparirà “Hot”. Attendere che il dispositivo si raffreddi
prima di eseguire nuovamente il test di carico
RISOLUZIONE DEI PROBLEMI
Il tester fornisce segnali visivi e avvisi sonori per indicare lo stato dei collegamenti o eventuali
anomalie. Le tabelle sottostanti elencano gli avvisi più comuni, insieme alle possibili cause e
alle azioni consigliate, per aiutarti a identificare e risolvere rapidamente i problemi.
Segnali visivi
Display sullo schermo Possibili cause Azioni consigliate
“+”, retroilluminazione ross
“-”, retroilluminazione verd
“H”
“Hot”
“Er1"
Procedere con il tes
Procedere con il tes
Scollegare e utilizzare una
fonte di tensione appropriata
o un altro tester per ripetere
la misura
Scollegare e lasciare
raffreddare il tester prima di
eseguire nuovamente il test
Contattare il servizio clienti
Connessione corrett
Connessione invertit
Tensione troppo alt
Surriscaldamento del teste
Malfunzionamento della
lampada integrata
44
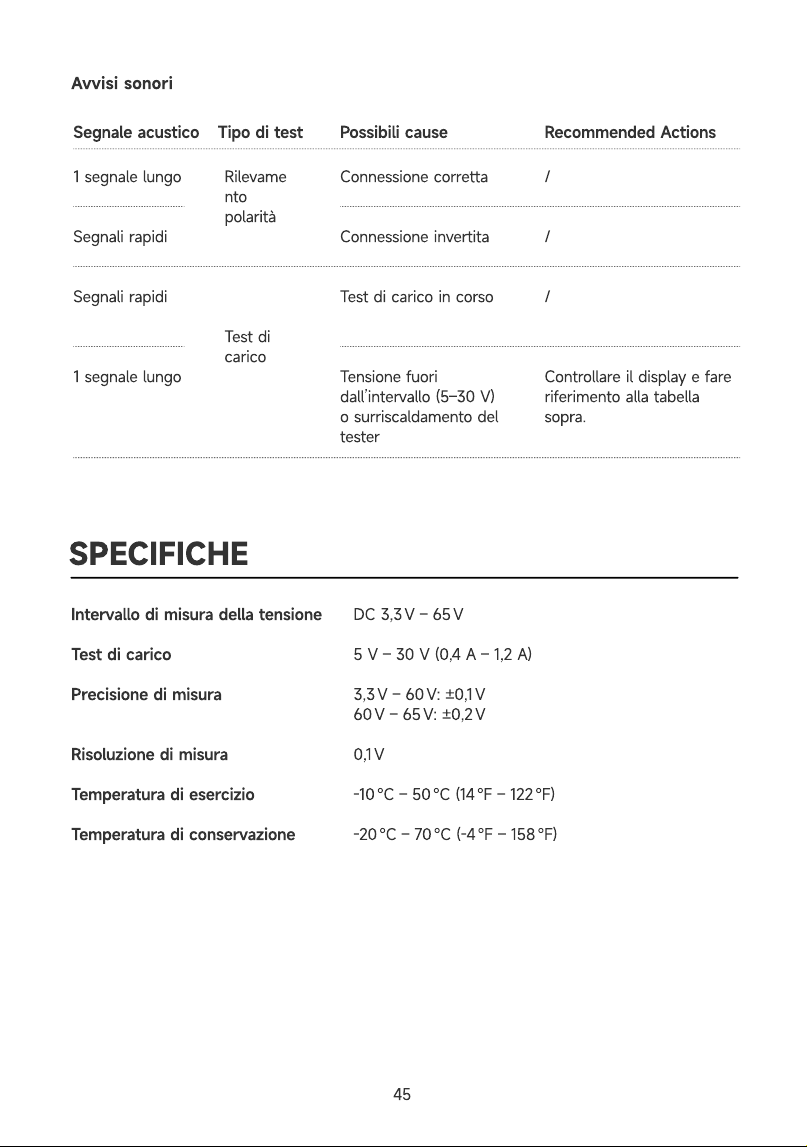
Avvisi sonori
Possibili cause Recommended Actions
1 segnale lung
Segnali rapid
Segnali rapid
1 segnale lung
Rilevame
nto
polarit
Test di
carico
Connessione corretta
Connessione invertit
Test di carico in cors
Tensione fuori
dall’intervallo (5–30 V)
o surriscaldamento del
tester
/
/
/
Controllare il display e fare
riferimento alla tabella
sopra.
SPECIFICHE
Intervallo di misura della tension
Test di caric
Precisione di misura
Risoluzione di misur
Temperatura di esercizi
Temperatura di conservazion
DC 3,3 V – 65
5 V – 30 V (0,4 A – 1,2 A
3,3 V – 60 V: ±0,1
60 V – 65 V: ±0,2
0,1
-10 ℃ – 50 ℃ (14 ℉ – 122 ℉
-20 ℃ – 70 ℃ (-4 ℉ – 158 ℉
Segnale acustico Tipo di test
45
FAQ
R
R
R
Posso sostituire la sonda o i morsetti
Sì. È possibile utilizzare le sonde o le clip attuali, oppure acquistare accessori
compatibili di altri marchi. Il tester funziona solo con accessori dotati di connettore da 4
mm
Nota: la sostituzione degli accessori può influire sulla precisione della misura
Cosa devo fare se il filo a molla del morsetto fornito non è abbastanza lungo
È possibile prolungare il cavo collegando un filo aggiuntivo tramite un adattatore
Nota: questo può influire sulla precisione della misurazione
Cosa devo fare se il tester non funziona correttamente
Controllare la fonte di tensione e i collegamenti. Se il tester continua a non funzionare
correttamente, contattare il servizio clienti
Perché la luce è debole durante il test di carico
Durante il test di carico, il tester applica una corrente basata sulla tensione misurata (ad
esempio, 0,6 A a 12 V, 1 A a 24 V e fino a 1,2 A a 30 V). Quando la tensione è bassa, la
corrente applicata si riduce e la lampada integrata si attenua. Pertanto, una lampada
fioca indica una bassa tensione del circuito o della batteria
Il test di carico può essere utilizzato per determinare se una batteria o un circuito è
debole
È possibile fare una valutazione di base osservando la caduta di tensione durante il test
di carico. Se la tensione scende di oltre 3 V sotto carico, la batteria o il circuito
potrebbero essere deboli. Per una valutazione più precisa, utilizzare un tester per
batterie dedicato per controllare lo stato di salute della batteria, lo stato di carica e altri
parametri
Perché lo schermo si spegne e si riaccende ripetutamente e il buzzer emette un
segnale acustico durante il test di carico
Questo problema può verificarsi quando la corrente del circuito o della batteria è
inferiore a 0,4 A, insufficiente a garantire il normale funzionamento del tester. Di
conseguenza, il test può interrompersi ripetutamente, causando lo spegnimento e la
riaccensione dello schermo e l’attivazione del segnale acustico del buzzer. Si consiglia
di utilizzare un’altra alimentazione o un altro strumento di test per la misurazione.
46
GARANZIA
Garanzia limitata di un anno di TOPDO
TOPDON garantisce al suo acquirente originale che i prodotti dell'azienda saranno esenti da
difetti di materiale e lavorazione per 12 mesi dalla data di acquisto (Periodo di garanzia)
Per i difetti segnalati durante il periodo di garanzia, TOPDON riparerà o sostituirà la parte o il
prodotto difettoso in base all'analisi e alla conferma del supporto tecnico
TOPDON non sarà responsabile per eventuali danni incidentali o consequenziali derivanti
dall'uso, uso improprio o montaggio del dispositivo
In caso di conflitto tra la politica di garanzia TOPDON e le leggi locali, prevarranno le leggi
locali
Questa garanzia limitata è nulla nelle seguenti condizioni
• Usato in modo improprio, smontato, alterato o riparato da negozi o tecnici non autorizzati.
• Manipolazione negligente e violazione dell'operazione
Avviso: tutte le informazioni contenute in questo manuale si basano sulle ultime informazioni
disponibili al momento della pubblicazione e non può essere fornita alcuna garanzia per la sua
accuratezza o completezza. TOPDON si riserva il diritto di apportare modifiche in qualsiasi
momento senza preavviso
47

PORTUGUÊS
HISTÓRICO DE REVISÕES
Versã
1.0
Dat
2026-04
Descriçã
Lançamento Inicial
A SEGURANÇA SEMPRE VEM EM PRIMEIRO LUGAR!
Para sua segurança, a segurança de terceiros e para evitar danos ao produto, leia e
compreenda completamente todas as instruções de segurança antes do uso
Use sempre óculos de proteção aprovados para evitar acidentes
Não exponha o produto à luz solar direta ou altas temperaturas. Evite gases explosivos,
vapores, poeira ou fumar próximo ao veículo
Não desmonte o produto. Desmontagens inadequadas podem invalidar a garantia ou
causar acidentes ou ferimentos
Não corte nem mergulhe os cabos em água. Pode ocorrer choque elétrico
Não utilize em circuitos AC, computadores sob carga ou airbags
Não sacuda nem deixe o testador cair. Componentes internos podem ser danificados
É necessária supervisão quando o dispositivo for usado por crianças ou por pessoas com
limitações físicas, sensoriais ou mentais, ou com experiência ou conhecimento reduzidos
Manuseie a sonda com cuidado: a ponta é afiada e pode causar ferimentos
Tenha cuidado próximo a componentes de ignição, como bobina, tampa do distribuidor,
cabos de ignição e velas. Alta tensão pode ocorrer com o motor em funcionamento
Tenha cuidado ao trabalhar perto de fios energizados ou expostos, especialmente dentro
ou perto de um quadro elétrico aberto.
49
O QUE TEM NA CAIXA?
Testador CT10
Adaptado
Sonda de 2 m
Bolsa de transport
Clip jacar
Guia rápido do usuári
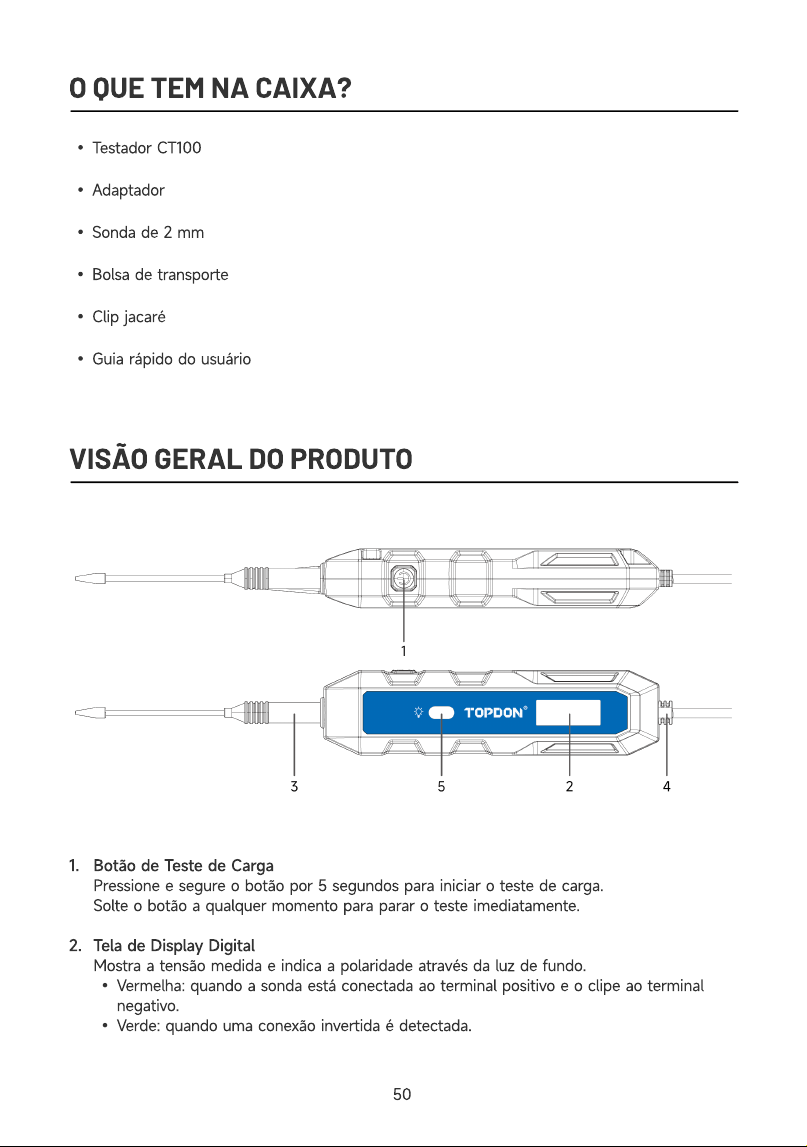
VISÃO GERAL DO PRODUTO
1
2
Botão de Teste de Carg
Pressione e segure o botão por 5 segundos para iniciar o teste de carga
Solte o botão a qualquer momento para parar o teste imediatamente
Tela de Display Digita
Mostra a tensão medida e indica a polaridade através da luz de fundo
Vermelha: quando a sonda está conectada ao terminal positivo e o clipe ao terminal
negativo
Verde: quando uma conexão invertida é detectada.
50
3
4
5
Ponta da Sond
Conecta-se à sonda de teste para realizar medições
Ponta do Clip
Conecta-se ao clipe de teste para realizar medições
Janela Indicadora de Tensã
A lâmpada integrada acende durante o teste de carga e o seu brilho varia de acordo com
o nível de tensão detetado.
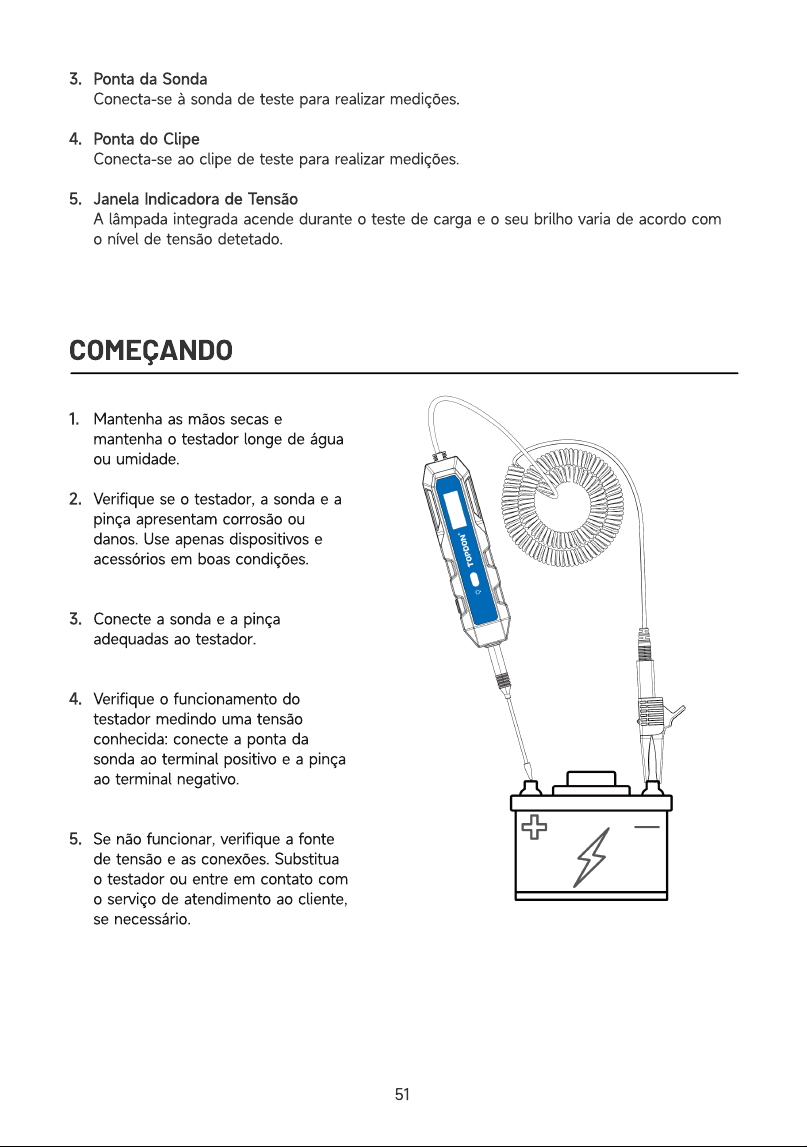
COMEÇANDO
1
2
3
4
5
Mantenha as mãos secas e
mantenha o testador longe de água
ou umidade
Verifique se o testador, a sonda e a
pinça apresentam corrosão ou
danos. Use apenas dispositivos e
acessórios em boas condições
Conecte a sonda e a pinça
adequadas ao testador
Verifique o funcionamento do
testador medindo uma tensão
conhecida: conecte a ponta da
sonda ao terminal positivo e a pinça
ao terminal negativo
Se não funcionar, verifique a fonte
de tensão e as conexões. Substitua
o testador ou entre em contato com
o serviço de atendimento ao cliente,
se necessário
51
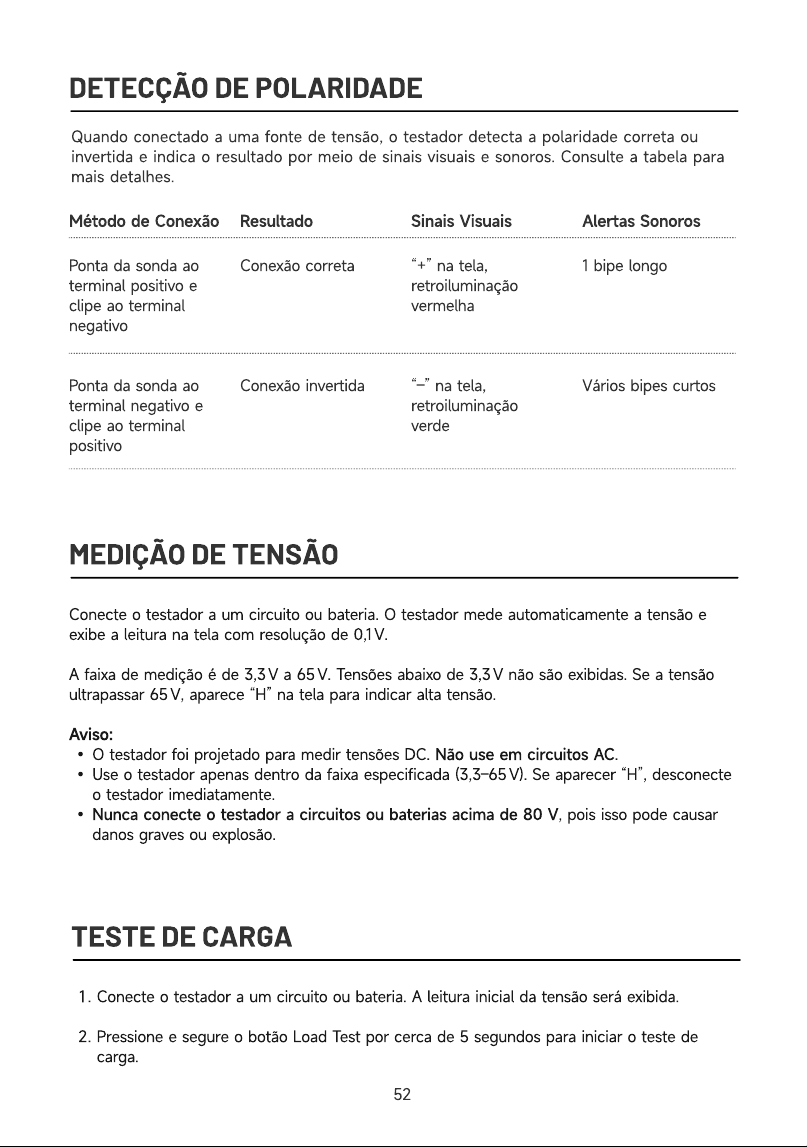
DETECÇÃO DE POLARIDADE
Quando conectado a uma fonte de tensão, o testador detecta a polaridade correta ou
invertida e indica o resultado por meio de sinais visuais e sonoros. Consulte a tabela para
mais detalhes.
Sinais Visuais Alertas Sonoros
Ponta da sonda ao
terminal positivo e
clipe ao terminal
negativ
Ponta da sonda ao
terminal negativo e
clipe ao terminal
positivo
Conexão corret
Conexão invertida
“+” na tela,
retroiluminação
vermelh
“–” na tela,
retroiluminação
verde
1 bipe long
Vários bipes curtos
MEDIÇÃO DE TENSÃO
Método de Conexão Resultado
Conecte o testador a um circuito ou bateria. O testador mede automaticamente a tensão e
exibe a leitura na tela com resolução de 0,1 V
A faixa de medição é de 3,3 V a 65 V. Tensões abaixo de 3,3 V não são exibidas. Se a tensão
ultrapassar 65 V, aparece “H” na tela para indicar alta tensão
Aviso
O testador foi projetado para medir tensões DC. Não use em circuitos AC
Use o testador apenas dentro da faixa especificada (3,3–65 V). Se aparecer “H”, desconecte
o testador imediatamente
Nunca conecte o testador a circuitos ou baterias acima de 80 V, pois isso pode causar
danos graves ou explosão
TESTE DE CARGA
Conecte o testador a um circuito ou bateria. A leitura inicial da tensão será exibida
Pressione e segure o botão Load Test por cerca de 5 segundos para iniciar o teste de
carga.
5
2
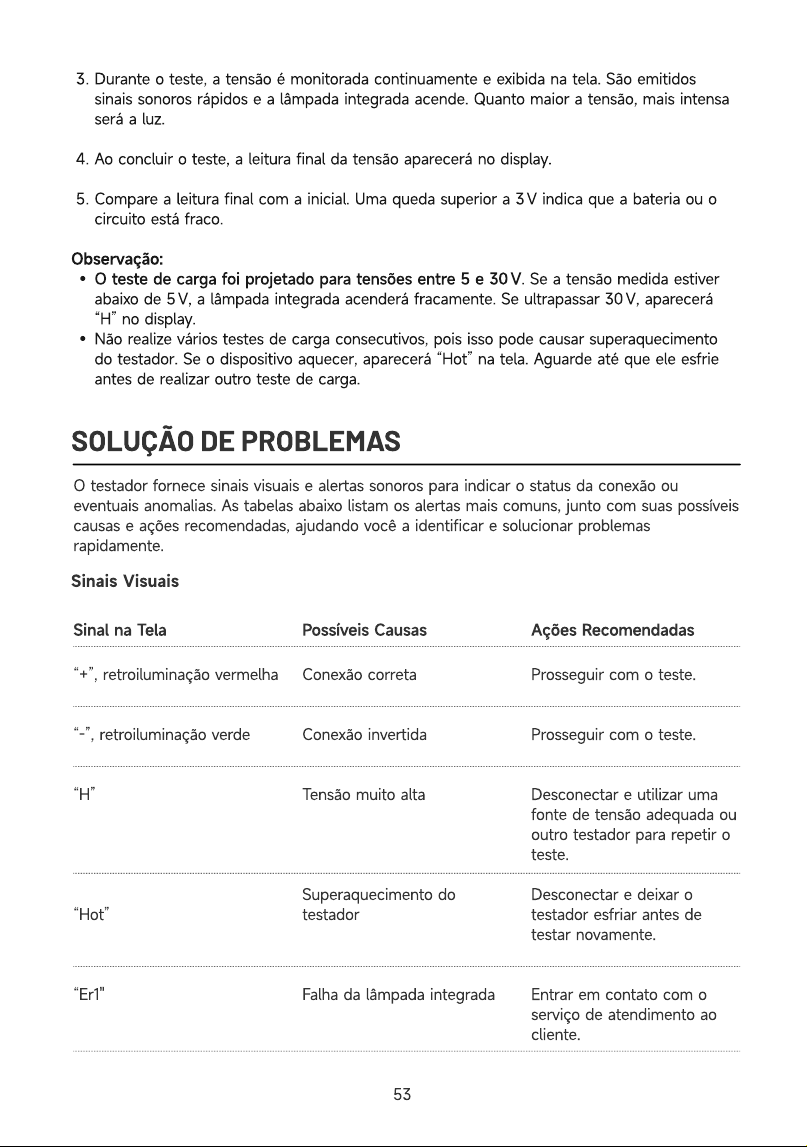
Durante o teste, a tensão é monitorada continuamente e exibida na tela. São emitidos
sinais sonoros rápidos e a lâmpada integrada acende. Quanto maior a tensão, mais intensa
será a luz
Ao concluir o teste, a leitura final da tensão aparecerá no display
Compare a leitura final com a inicial. Uma queda superior a 3 V indica que a bateria ou o
circuito está fraco
Observação
O teste de carga foi projetado para tensões entre 5 e 30 V. Se a tensão medida estiver
abaixo de 5 V, a lâmpada integrada acenderá fracamente. Se ultrapassar 30 V, aparecerá
“H” no display
Não realize vários testes de carga consecutivos, pois isso pode causar superaquecimento
do testador. Se o dispositivo aquecer, aparecerá “Hot” na tela. Aguarde até que ele esfrie
antes de realizar outro teste de carga
SOLUÇÃO DE PROBLEMAS
O testador fornece sinais visuais e alertas sonoros para indicar o status da conexão ou
eventuais anomalias. As tabelas abaixo listam os alertas mais comuns, junto com suas possíveis
causas e ações recomendadas, ajudando você a identificar e solucionar problemas
rapidamente.
Sinais Visuais
Sinal
na
Tela Possíveis
Causas Ações
Recomendadas
“+”, retroiluminação vermelh
“-”, retroiluminação verd
“H”
“Hot”
“Er1"
Conexão corret
Conexão invertid
Tensão muito alt
Superaquecimento do
testado
Falha da lâmpada integrada
Prosseguir com o teste
Prosseguir com o teste
Desconectar e utilizar uma
fonte de tensão adequada ou
outro testador para repetir o
teste
Desconectar e deixar o
testador esfriar antes de
testar novamente
Entrar em contato com o
serviço de atendimento ao
cliente.
53
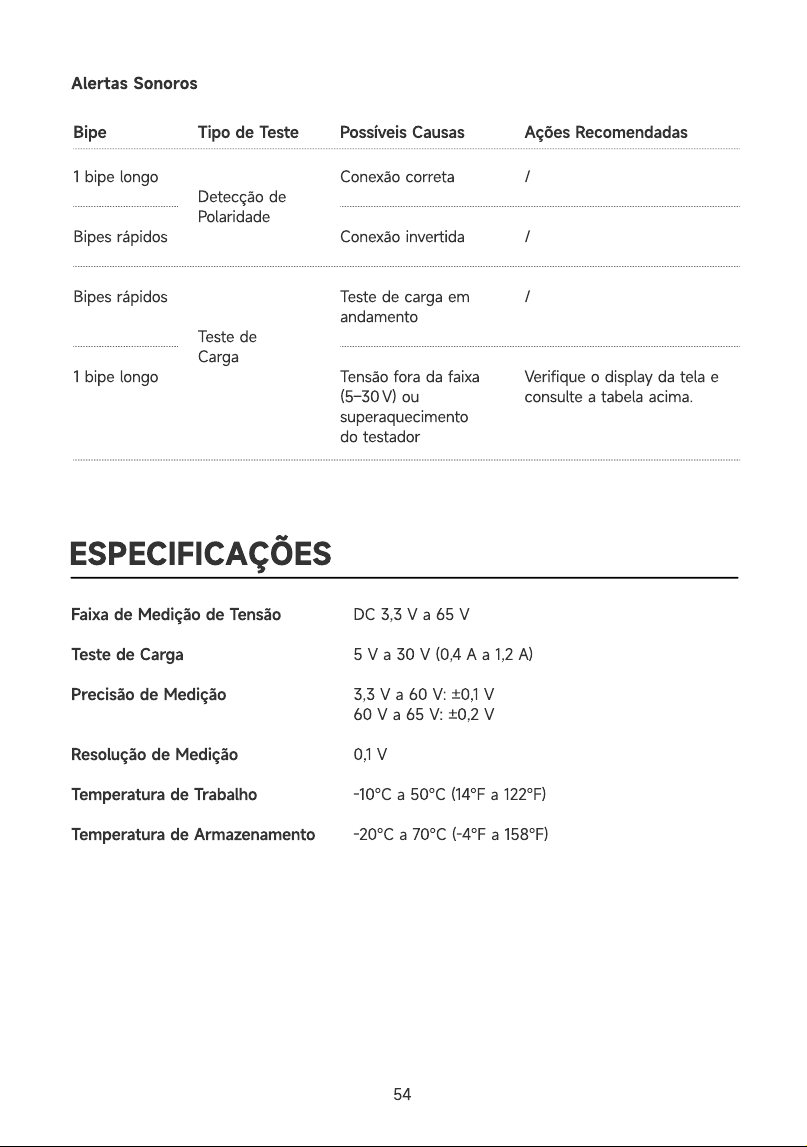
Alertas Sonoros
Possíveis Causas Ações Recomendadas
1 bipe long
Bipes rápido
Bipes rápido
1 bipe long
Detecção de
Polaridad
Teste de
Carga
Conexão correta
Conexão invertid
Teste de carga em
andament
Tensão fora da faixa
(5–30 V) ou
superaquecimento
do testador
/
/
/
Verifique o display da tela e
consulte a tabela acima.
ESPECIFICAÇÕES
Faixa de Medição de Tensã
Teste de Carg
Precisão de Mediçã
Resolução de Mediçã
Temperatura de Trabalh
Temperatura de Armazenament
DC 3,3 V a 65
5 V a 30 V (0,4 A a 1,2 A
3,3 V a 60 V: ±0,1
60 V a 65 V: ±0,2
0,1
-10℃ a 50℃ (14℉ a 122℉
-20℃ a 70℃ (-4℉ a 158℉
Bipe Tipo de Teste
54
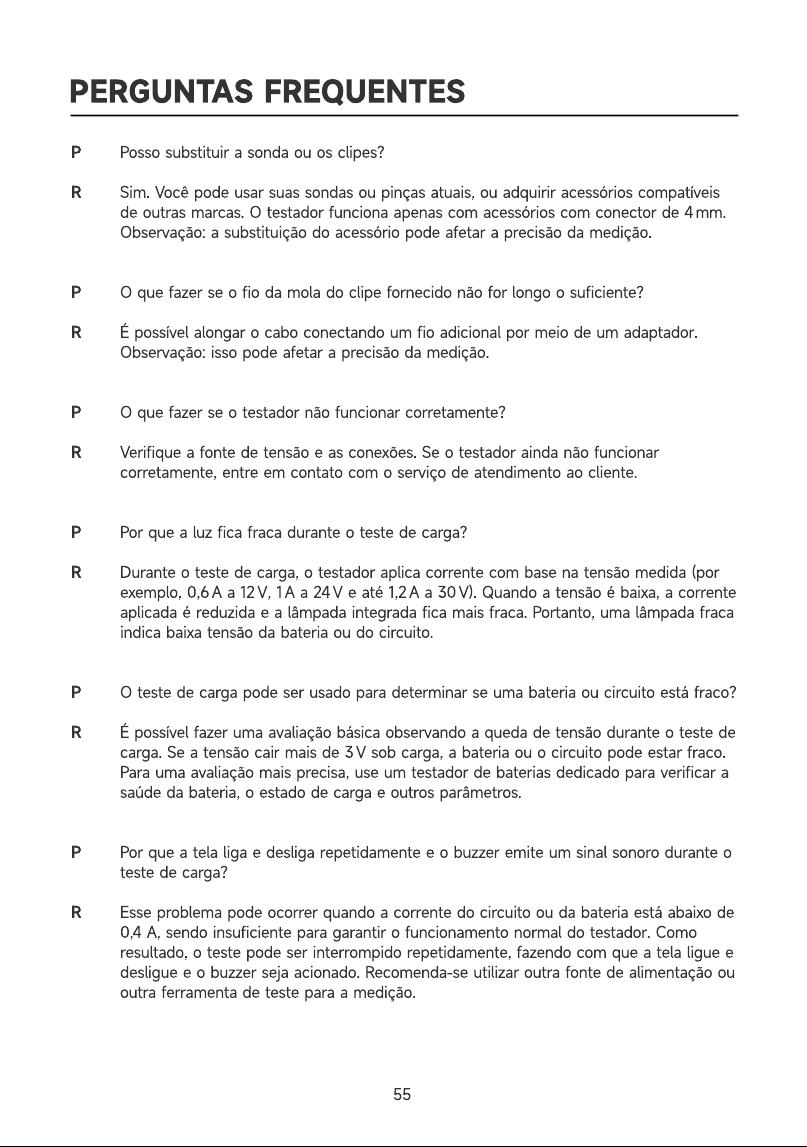
PERGUNTAS FREQUENTES
R
R
Posso substituir a sonda ou os clipes
Sim. Você pode usar suas sondas ou pinças atuais, ou adquirir acessórios compatíveis
de outras marcas. O testador funciona apenas com acessórios com conector de 4 mm
Observação: a substituição do acessório pode afetar a precisão da medição
O que fazer se o fio da mola do clipe fornecido não for longo o suficiente
É possível alongar o cabo conectando um fio adicional por meio de um adaptador
Observação: isso pode afetar a precisão da medição
O que fazer se o testador não funcionar corretamente
Verifique a fonte de tensão e as conexões. Se o testador ainda não funcionar
corretamente, entre em contato com o serviço de atendimento ao cliente
Por que a luz fica fraca durante o teste de carga
Durante o teste de carga, o testador aplica corrente com base na tensão medida (por
exemplo, 0,6 A a 12 V, 1 A a 24 V e até 1,2 A a 30 V). Quando a tensão é baixa, a corrente
aplicada é reduzida e a lâmpada integrada fica mais fraca. Portanto, uma lâmpada fraca
indica baixa tensão da bateria ou do circuito
O teste de carga pode ser usado para determinar se uma bateria ou circuito está fraco
É possível fazer uma avaliação básica observando a queda de tensão durante o teste de
carga. Se a tensão cair mais de 3 V sob carga, a bateria ou o circuito pode estar fraco.
Para uma avaliação mais precisa, use um testador de baterias dedicado para verificar a
saúde da bateria, o estado de carga e outros parâmetros
Por que a tela liga e desliga repetidamente e o buzzer emite um sinal sonoro durante o
teste de carga
Esse problema pode ocorrer quando a corrente do circuito ou da bateria está abaixo de
0,4 A, sendo insuficiente para garantir o funcionamento normal do testador. Como
resultado, o teste pode ser interrompido repetidamente, fazendo com que a tela ligue e
desligue e o buzzer seja acionado. Recomenda-se utilizar outra fonte de alimentação ou
outra ferramenta de teste para a medição.
55
GARANTIA
Garantia Limitada de Um Ano TOPDO
A TOPDON garante a seu comprador original que os produtos da empresa serão livres de
defeitos materiais e de confecção por 12 meses a partir da data de compra (Período de
Garantia)
Para defeitos reportados durante o Período de Garantia, a TOPDON irá ou consertar ou
substituir o componente ou produto defeituoso de acordo com a análise e confirmação de seu
suporte técnico
A TOPDON não se responsabiliza por quaisquer danos incidentais ou consequentes
decorrentes do uso, uso indevido ou montagem do dispositivo
Se houver qualquer conflito entre a política de garantia TOPDON e as leis locais, as leis locais
devem prevalecer
Esta garantia limitada é anulada sob as seguintes condições
• Uso indevido, desmontagem, alteração ou consertos por lojas ou técnicos não autorizados
• Manejo descuidado e/ou operação indevida
Aviso: Todas as informações neste manual são baseadas nas informações disponíveis mais
recentes durante o momento de sua publicação e nenhuma garantia pode ser feita sobre sua
exatidão ou integridade. A TOPDON se reserva o direito de fazer alterações a qualquer
momento sem aviso
56
COMPLIANCE INFORMATION
FCC Statemen
This device complies with Part 15 of the FCC Rules. Operation is subject to the following two
conditions
(1) This device may not cause harmful interference, an
(2) This device must accept any interference received, including interference that may cause
undesired operation
CAN ICES-003(B) / NMB-003(B
Warning: This device may emit electromagnetic interference. Ensure proper installation and
operation to minimize interference with other devices. This device complies with the Canadian
EMC requirements for Class B digital devices.
57