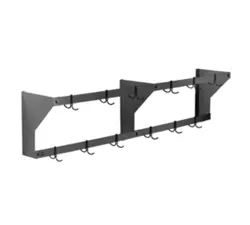

ASSEMBLY INSTRUCTIONS
Wall Mounted Pot Rack
1) Flat Bars
Attach flat bar to front of all brackets with hardware,
as shown in figure 1. Hand-tighten cap nuts until all
flat bars are installed.
2) Mounting
Square flat bars with wall brackets and tighten
hardware. Mount to wall*. Refer to figure 2 for
bracket mounting locations.
Assembly is complete.
Note: Depending on length purchased,
the pot rack will have 2, 3,
or 4 wall brackets.
gure 2
EG9841 Revised 04/24
Eagle Foodservice Equipment, Eagle MHC, and SpecFAB
®
are divisions of Eagle Group. ©2024 by the Eagle Group
• 100 Industrial Boulevard, Clayton, Delaware 19938-8903 U.S.A.
• Phone: 302/653-3000 • 800/441-8440 • Fax: 302/653-2065
• www.eaglegrp.com • www.eaglemhc.com
INSTRUCTION SHEET
#306802
CAUTION
INSPECT CONTENTS IMMEDIATELY AND FILE CLAIM WITH DELIVERING
CARRIER FOR ANY DAMAGE
. SAVE YOUR BOX AND ALL PACKING MATERIALS.
YOU ARE RESPONSIBLE FOR DAMAGE TO YOUR UNIT IF RETURNED IMPROPERLY PACKED.
Parts (quantities)
Flat Bar 2 2 2 2 2 2 2 2 2 2
Left Bracket 1 1 1 2 2 2 3 3 3 3
Right Bracket 1 1 1 1 1 1 1 1 1 1
Screw 4 4 4 6 6 6 8 8 8 8
Flat Washer 4 4 4 6 6 6 8 8 8 8
Lock Washer 4 4 4 6 6 6 8 8 8 8
Cap nut 4 4 4 6 6 6 8 8 8 8
Pot Rack length:
36˝ 48˝ 60˝ 72˝ 84˝ 96˝ 108˝ 120˝ 134˝ 144˝
Part
description:
* Note: Wall mounted units must be attached to a properly
constructed and sound wall. For walls constructed
of wood or steel studs, the mounting points must be
directly on the stud or suitable in-wall grounds of
plywood or sheet metal. Eagle Group cannot be held
responsible for the failure of the device or any other
devices due to improper installation.
gure 1
(overhead view)
BRACKET MOUNTING LOCATIONS
(End)