
Operang Instrucons for the
AirShip II
Wireless

1
FCC STATEMENT
This device complies with Part 15 of the FCC Rules. Operaon is subject to the following two condions:
(1) This device may not cause harmful interference, and
(2) This device must accept any interference received, including interference that may cause
undesired operaon.
NOTE: This equipment has been tested and found to comply with the limits for a Class B digital Device, pursuant to Part 15 of the
FCC Rules. These limits are designed to provide reasonable protecon against harmful interference in a residenal installaon.
This equipment generates, uses and can radiate radio frequency energy and, if not installed and used in accordance with the
instrucons, may cause harmful interference to radio communicaons. However, there is no guarantee that the interference will
not occur in a parcular installaon. If this equipment does cause harmful interference to radio or television recepon, which can
be determined by turning the equipment o and on, the user is encouraged to try and correct the interference by one or more of
the following measures:
Reorient or relocate the receiving antenna.
Increase the separaon between the equipment and receiver.
Connect the equipment into an outlet on a circuit dierent from that to which the receiver is connected.
Consult the dealer or an experienced radio/TV technician for help.

2
AirShip II
Wireless
AirShip II is our newest state of the art zero compression wireless connecon for use with the latest Serie S
and many more RELs to come. Our goal with this design is to deliver a true hardwired quality of connecon
wirelessly. We have prided ourselves on our ability to deliver extremely high levels of sound quality and rock
solid wireless connecon protocols since our rst wireless design over a decade ago. AirShip II surpasses
any earlier design using a 5.8 gigahertz signal, a frequency previously reserved for military use by the US
military and NATO. It results in the fastest, most transparent wireless the design team has ever experienced
and verges on hardwired transparency levels.
Ultra-high quality wireless confers a number of benets to the REL owner, notably, freedom of placement.
This permits extreme performance without the cumbersome tether of a cable, perming ideal placement
without being limited by the length of a wire and can lead to a beer sounding, less cluered experience.
This gives you the ability to place subs in distant corners, along glass walls, or on hardwood oors allows for
a superior experience, sonically and aesthecally.
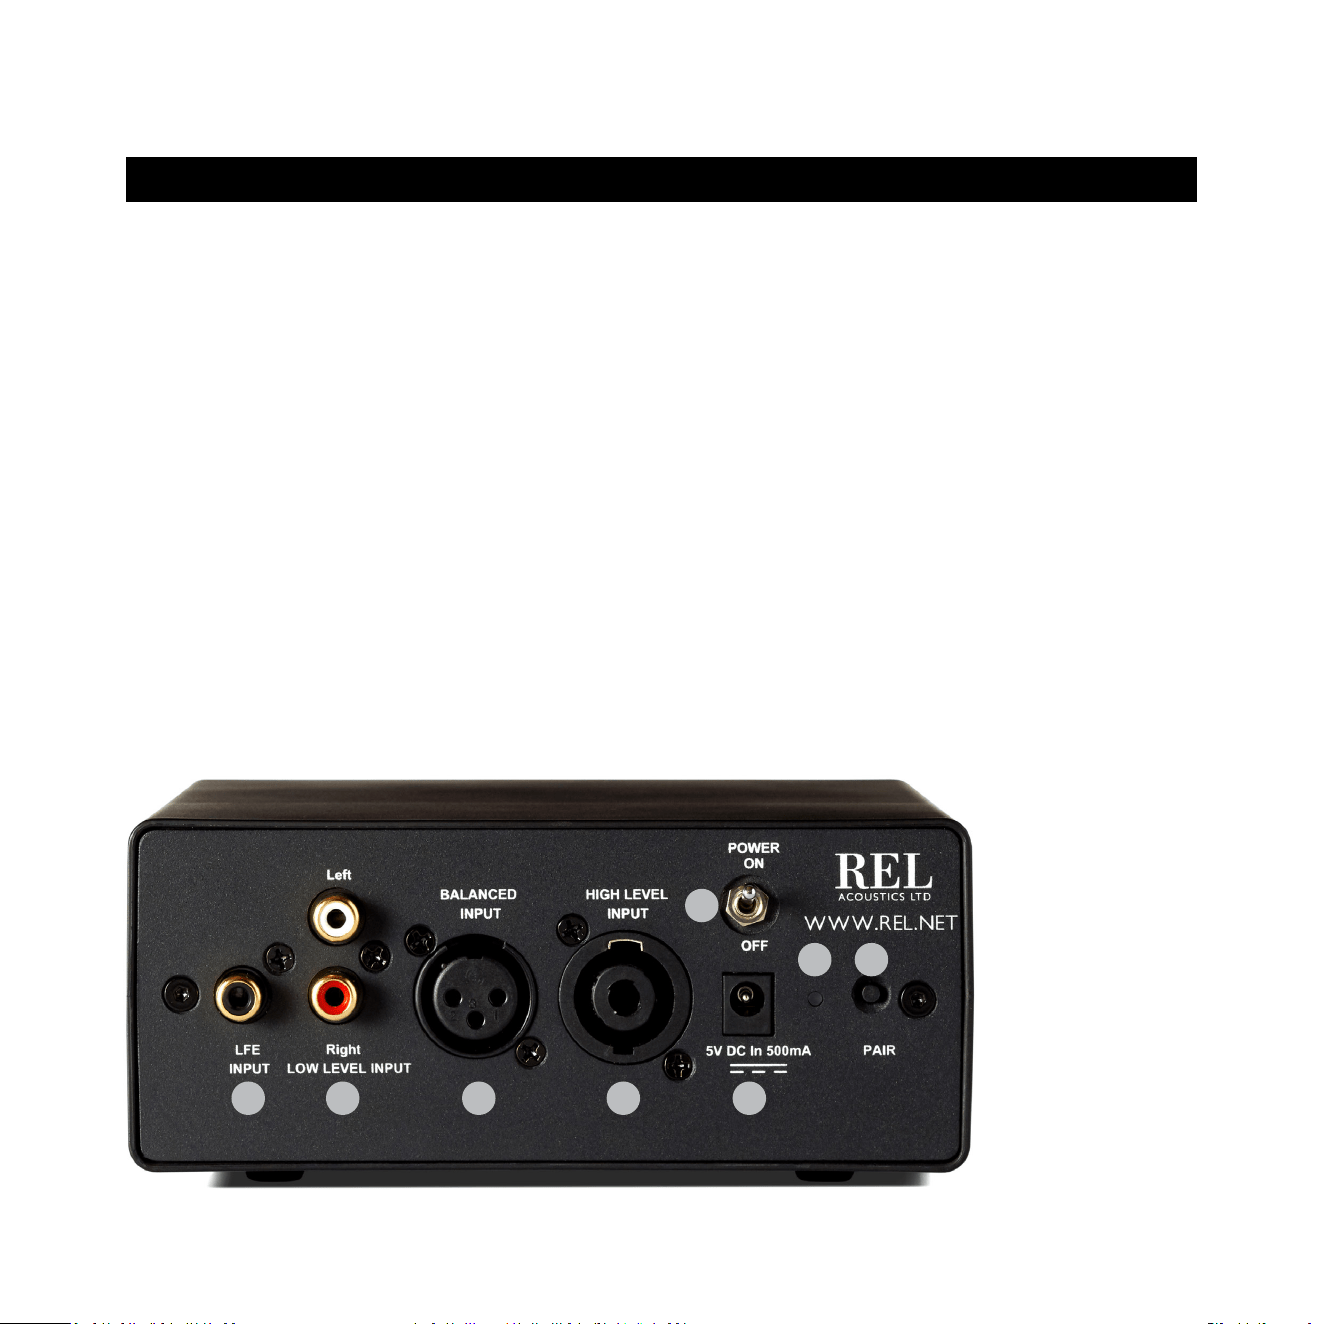
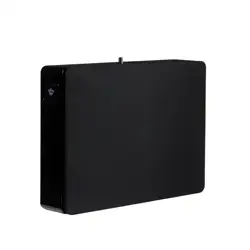
REL AirShip II Transmier
1 Power Switch: Used to turn on and o REL AirShip II transmier.
2 .1/LFE RCA INPUT: Used to connect to the .1/LFE output from a home theater processor. Should be used
in conjuncon with REL HIGH-LEVEL connecon for the ulmate theater experience.
3 LOW LEVEL RCA INPUTS: Used to connect to a stereo output from a stereo pre-amp or home
theater processor.
4 BALANCED .1/LFE INPUT: Used to connect to the balanced .1/LFE output from a home theater processor
with XLR cables.
5 HIGH-LEVEL INPUT (Neutrik® Speakon® Socket): Use to connect HIGH-LEVEL to the main front amplier
speaker terminals.
6 Power Adapter Socket: DC input socket that accepts a detachable power adapter.
7 PAIR LED: Indicates whether the REL AirShip II transmier is paired with the receiver or not.
8 Pair Buon: Used to pair REL AirShip II transmier with REL cabinet.
3
REL AirShip II Panel Connecon Legend
1
2 3 4 5 6
7 8
4
4
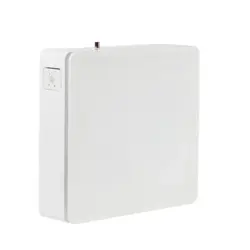
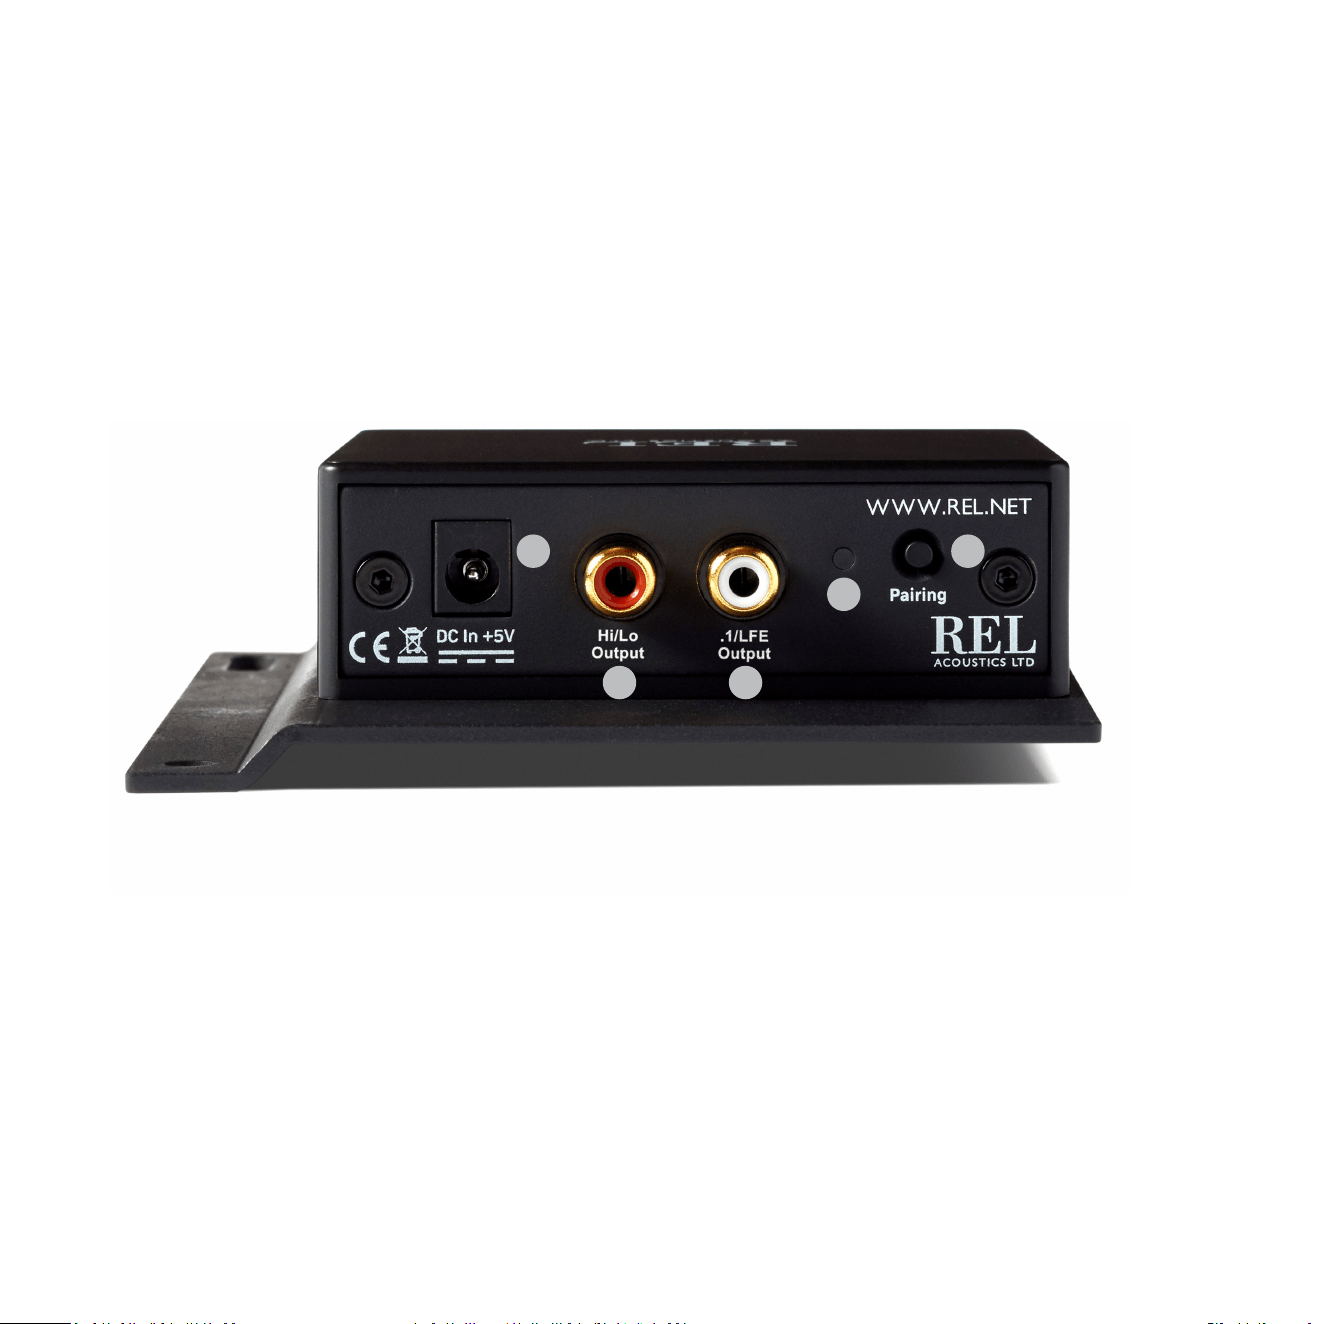
REL AirShip II Receiver
1 LED: Indicates whether the REL AirShip II receiver is paired with the transmier or not.
2 Pair Buon: Used to pair REL AirShip II receiver with REL cabinet.
3 Power Adapter Socket: DC input socket that accepts a detachable power adapter.
4 HI/LO OUTPUT: RCA output to be connected to LOW-LEVEL input of Serie S.
5 .1/LFE OUTPUT: RCA output to be connected to .1/LFE input of Serie S.
1
2
54
3
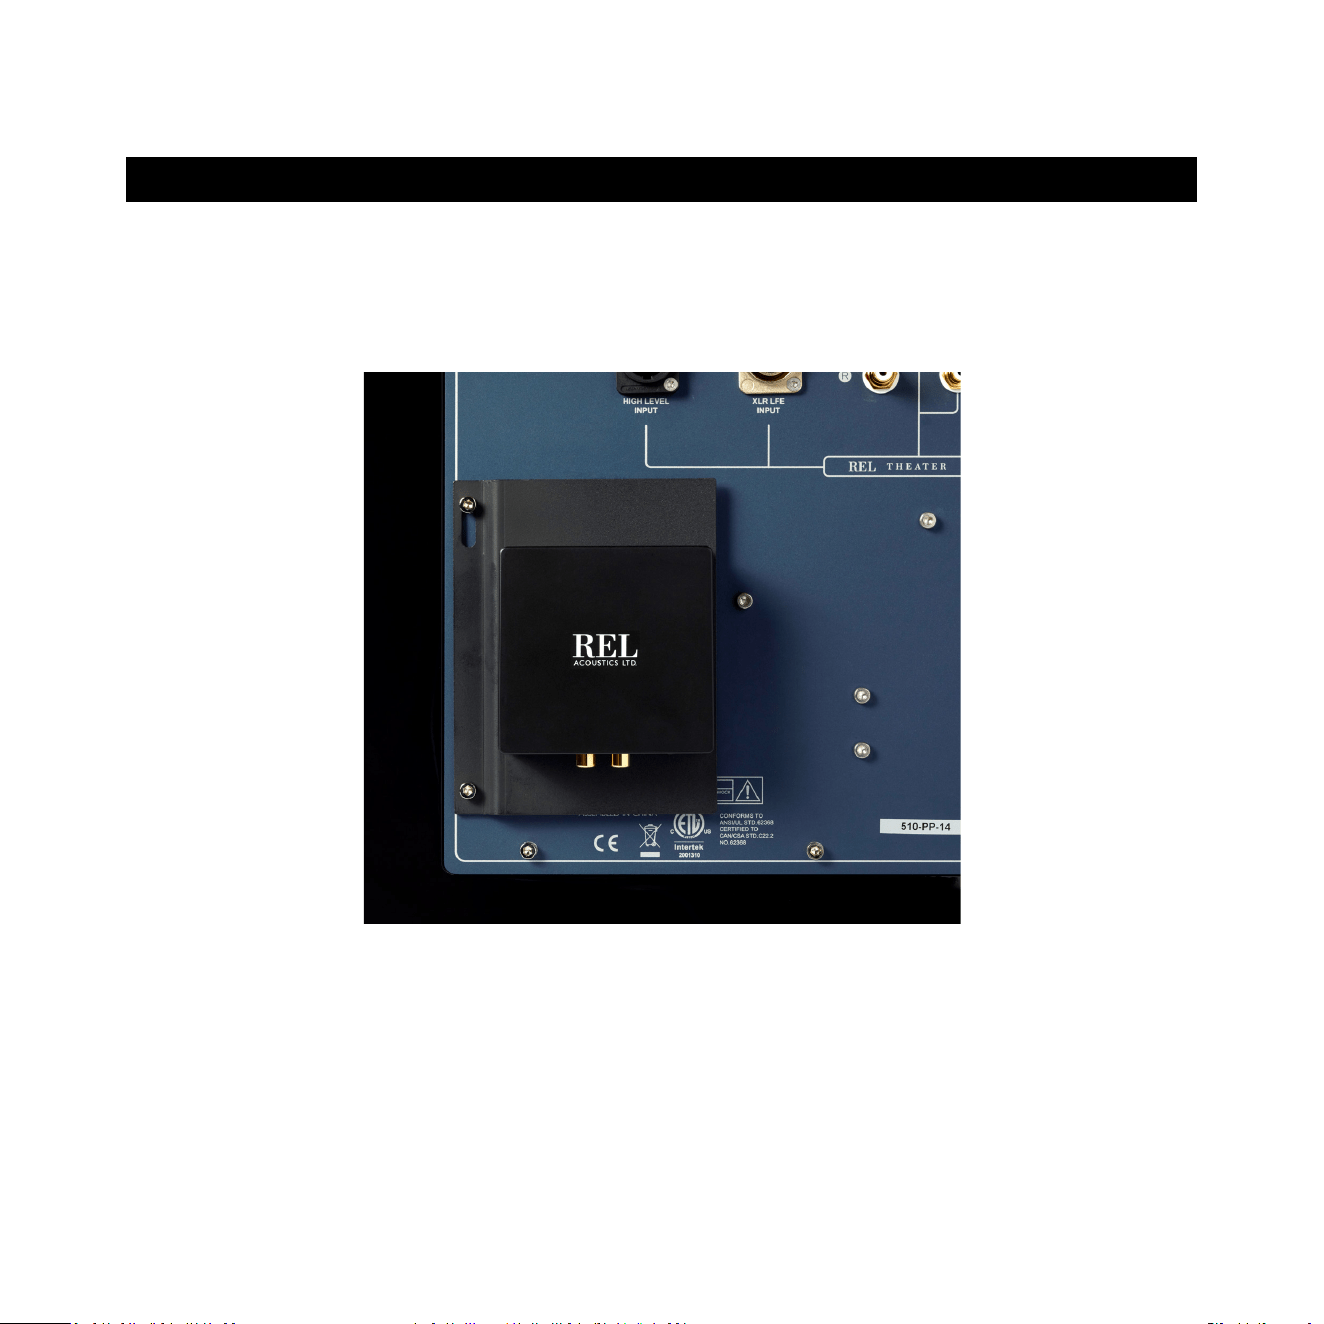
The receiver and bracket shall be mounted to the back panel of the Serie S using the same fasteners that
hold the amplier panel in place. Make sure the electrical interface is fully engaged to ensure proper
performance and the mounng screws need to be ght. See photo below.
Loosen and remove the two lowest fasteners on along the lower le edge of the amplier panel. You will
need a 3mm hex (Allan) wrench. Then align the holes in the mounng bracket with the holes in the panel.
Replace the fasteners and ghten.
Do not remove the transmier from the bracket
Using the supplied RCA to RCA cable, connect Hi/low Output of the receiver to the Hi/Low RCA input on the
REL and the LFE Output on the receiver to the LFE RCA input on the REL.
5
Mounng Up

The REL AirShip II wireless is intended to be used with the Serie S Sub-Bass System. The transmier and
receiver will require power from an AC wall plug using the power adapter cables supplied.
It is not possible to use the AirShip II wireless connecon and a direct connecon simultaneously. Using
both wired and wireless connecons simultaneously could result in damage and voids all warranes.
Always switch your system o before disconnecng any wires.
The transmier can be placed near an amplier, pre-amp or processor source. Make sure the electrical
interface is fully engaged to ensure proper performance.
There must be at least 12 inches between AirShip II and other wireless sources.
AirShip II permits simultaneous use of our new 5.8 gigahertz connecon for both HIGH-LEVEL connecon
AND the .1/LFE needed for high quality theater. In this way, both 2-channel music and mul-channel theater
are supported simultaneously meaning the REL owner can use their REL without adjusng anything further
to any form of music or theater.
Our HIGH-LEVEL input is designed to accept the stereo (two-channel) signals from the speaker terminals
of your receiver, integrated amplier or power amplier(s). This has the advantage of ensuring that your
subwoofer receives exactly the same signal as the main speakers, which means that the character of the
bass from the main system is carried forward into our Sub-Bass System. Along with our extremely fast,
natural sounding Filter Circuits, AirShip II ensures you receive the benets of REL’s superior system integraon
since RELs are known the world over for their perfect, rich integraon without the ability to sonically locate
the subwoofer’s origin.
For top theater performance, the .1/LFE circuit is granted its own dedicated wireless channel which allows
for the largest, most dynamic special eects in theater to be properly replicated in all their glory. AirShip II
delivers 2 channels in parallel, one for music and theatre in HIGH-LEVEL (or LOW-LEVEL, increasingly needed
for acve wireless speakers for example) and a second channel for .1/LFE in theater use.
6
Connecng Up

When both are used correctly, normal theater transforms because the cold, edgy sound most theaters
deliver becomes rich and full-bodied. Dialogue and atmospheric eects take on new drama and realism
because the full range of sounds are provided every moment of the movie by our HIGH-LEVEL, whilst the
.1/LFE channel delivers extra emphasis during the 15-20 minutes of a movie that this channel is acve.
Truly the best of both worlds.
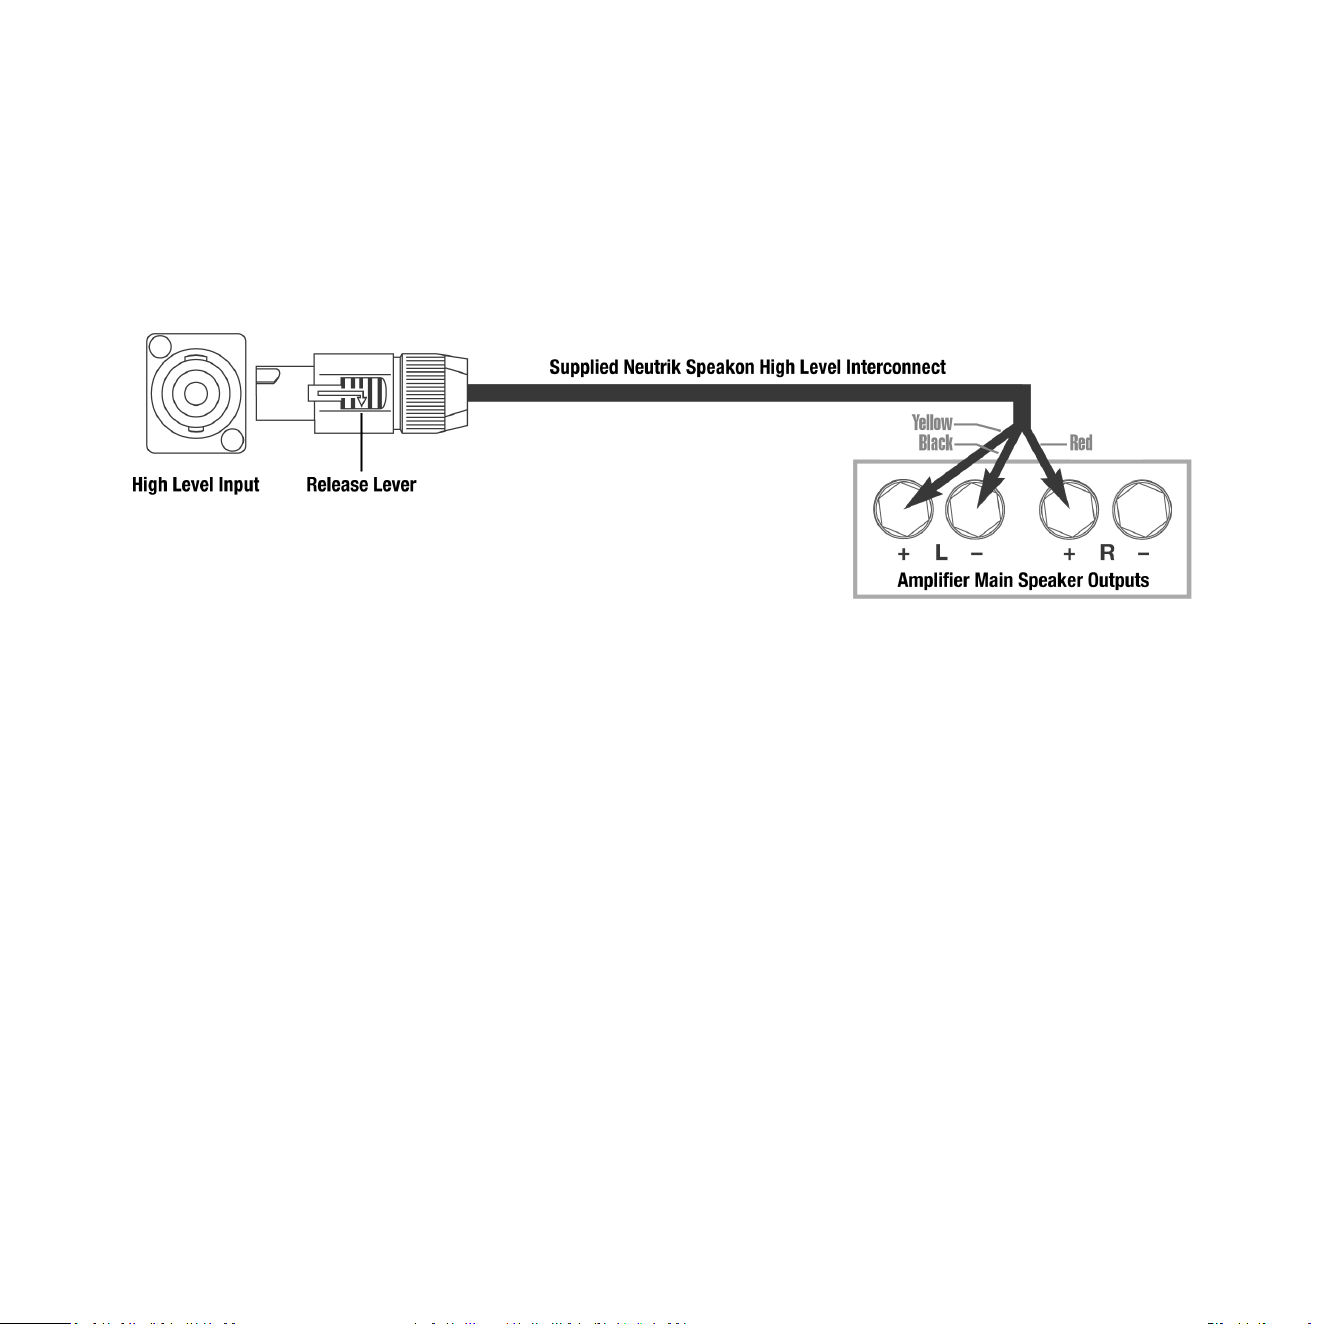
HIGH-LEVEL connecon, using the enclosed cable with the Neutrik Speakon connector, is always the rst
choice. This connecon can be made without aecng the performance of the amplier because the REL’s
amplier input impedance is 150,000 ohms, in eect not producing any addional demand whatsoever on
the rest of your system.
Connecng to the Power Amplier Using the Speakon HIGH-LEVEL INPUT
To engage the Neutrik Speakon plug, insert fully into socket and rotate clockwise unl locked.
To remove the Neutrik Speakon plug, grip body of plug, place thumb on chrome lever, move lever backwards,
rotate plug anclockwise quarter turn and withdraw.
The following are ways to connect to common amplier types. There is more detailed connecon informaon
at User Guides on REL.net.
Please note: Since REL AirShipII uses an external AC to DC converter, it does not have an connecon to
earth ground, so a connecon with the BLACK wire of the high level cable OR the collar of an RCA connecon
must be made to the stereo, or home theater system.
7
8
• The standard HIGH-LEVEL hook up procedure is: aach the red wire to the amplier’s right posive
speaker output terminal; aach the yellow wire to the amplier’s le posive speaker output terminal;
aach the black wire to whichever of the amplier’s ground output terminals is convenient; plug the
Speakon connector into the AirShip II wireless transmier’s HIGH-LEVEL input.
Standard HIGH-LEVEL
9
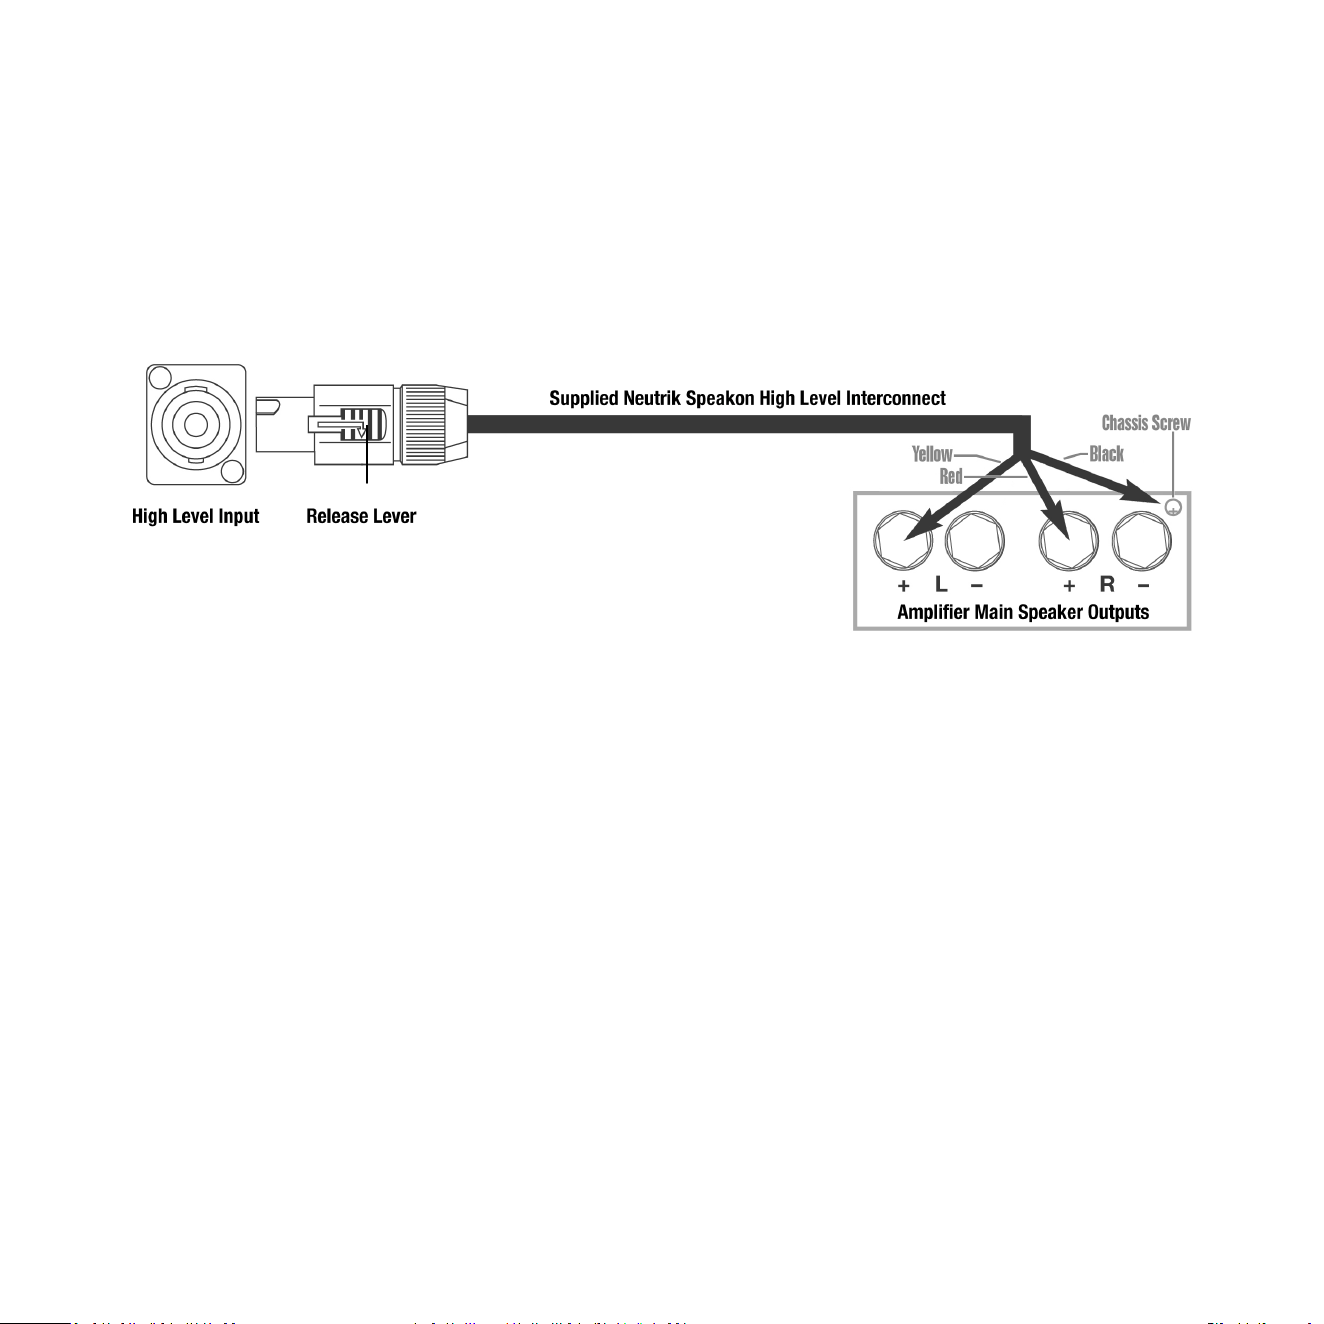
• For dierenal (i.e. fully balanced) ampliers using one REL, simply use the standard connecng scheme
with the excepon of connecng the black wire to chassis ground (i.e. a metal bolt or screw, preferably
not painted or anodized, on the chassis of the power amp or receiver), not to a negave speaker terminal,
and then connecng into the HIGH-LEVEL input on the AirShip II wireless transmier. Please contact your
dealer should there be any quesons concerning this or any other hookup procedure.
NOTE: The REL AirShipII transmier is equipped with internal circuitry to allow seamless connecon to
Class-D (digital) main ampliers. If connecng to a Class-D amplier, follow the above connecon procedure
for dierenal ampliers.
Dierenal (i.e. Fully Balanced)
10
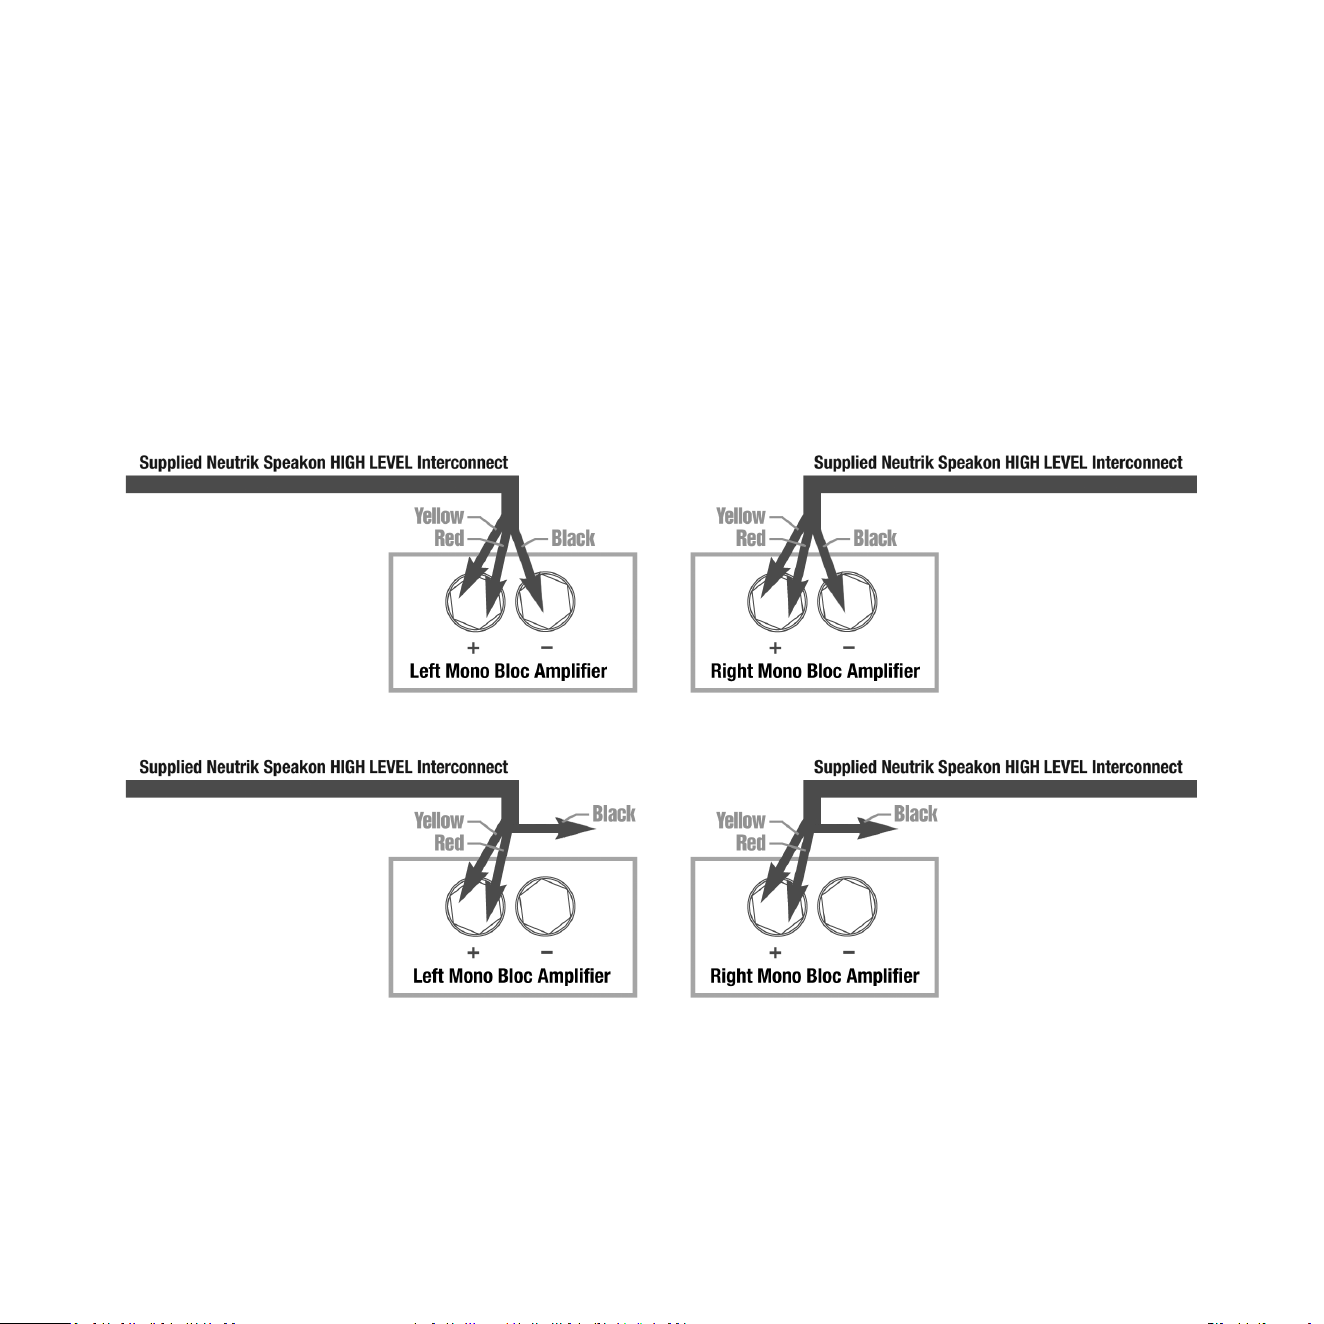
• If connecng RELs to Mono Bloc ampliers, we strongly advocate using two (2) RELs, one for each
amplier. Connect the black wire of each REL to the negave speaker terminal of the corresponding
amplier channel; twist together the red and yellow wires of each REL separately and connect each pair to
the posive speaker terminal of the corresponding amplier channel. In some instances, this will
result in exceponally high gain (output) from the RELs. If it seems simply too high in gain, please remove
either the red or yellow wire from the twisted pair. This will reduce output by half and restore a natural
dynamic. If the amplier is of balanced dierenal design, please follow the instrucons in the secon
above labeled Dierenal Connecon.
Mono Bloc
Mono Bloc Dierenal
11
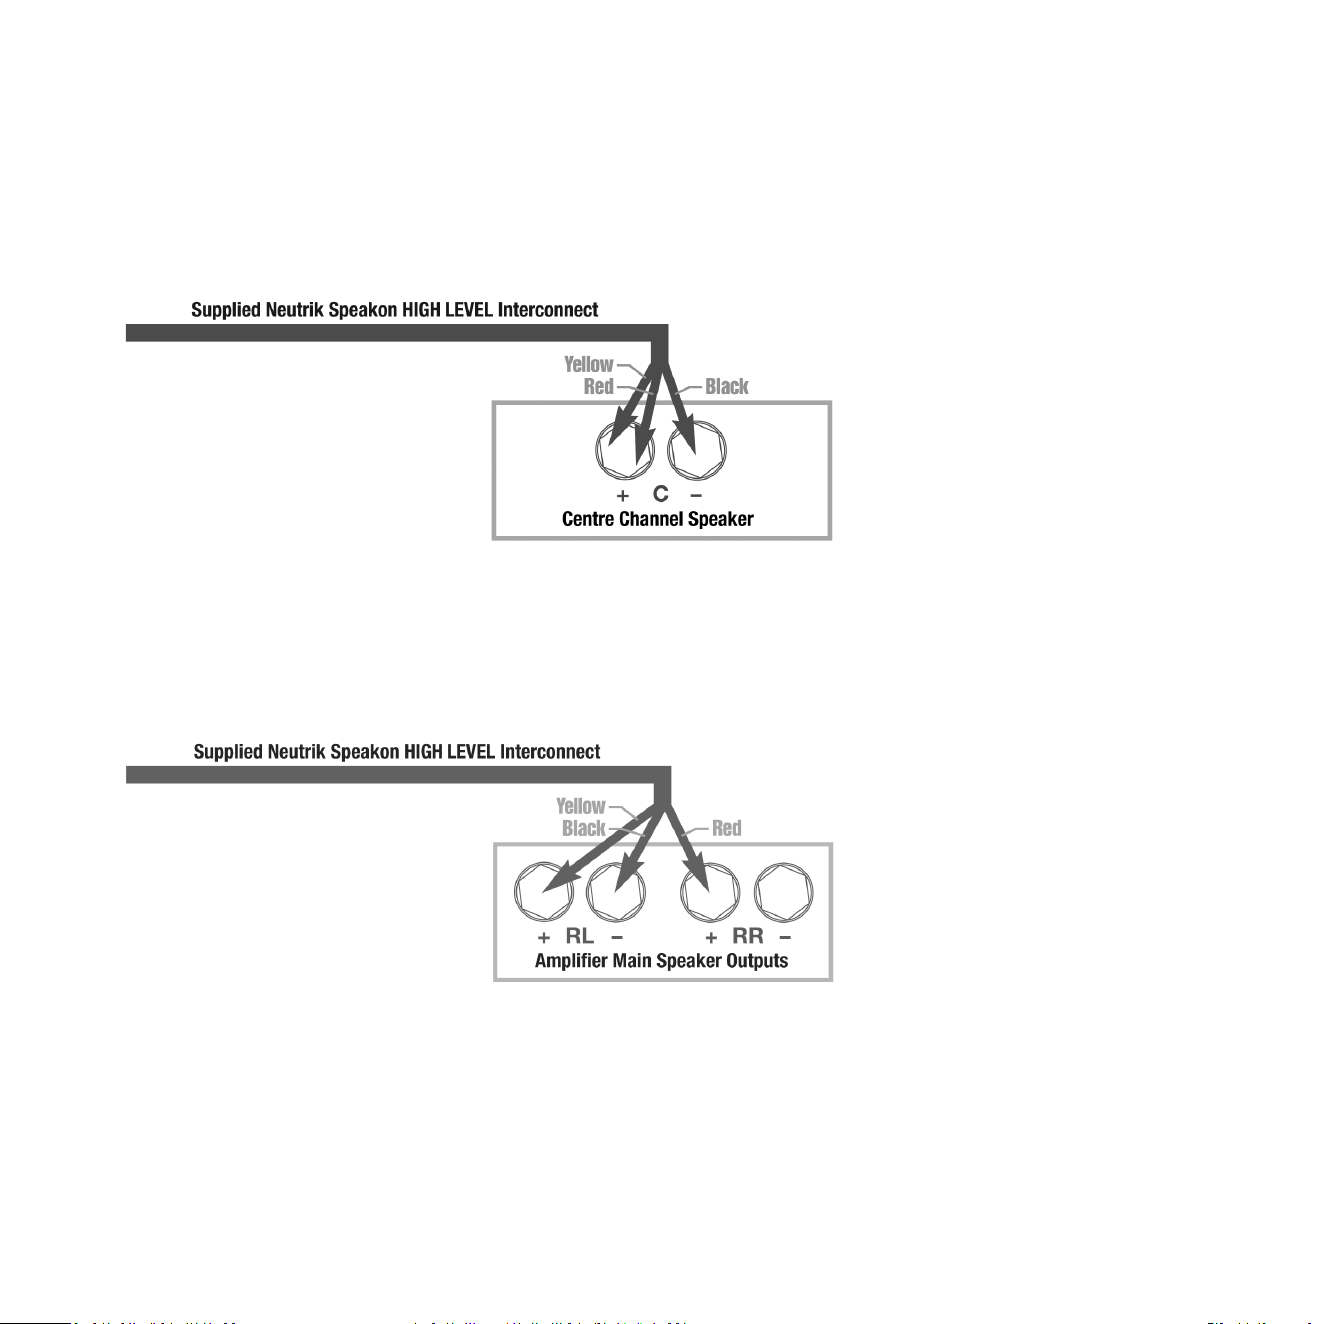
• If connecng a single REL as a dedicated center channel sub, connect the black wire of the REL to the
negave center channel speaker terminal; twist together the red and yellow wires and connect this pair
to the posive center channel speaker terminal.
• If connecng a REL as a dedicated rear channel sub, connect the black wire of the REL to either the le
rear or right rear negave speaker terminal; connect the yellow wire to the le rear posive speaker
terminal; connect the red wire to the right rear posive speaker terminal. If the amplier is of balanced
dierenal design, please follow the instrucon in the secon above labeled Dierenal Connecon.
When connecng to a home cinema system where a .1/LFE channel output is present, connect a single
phono or XLR cable between the sub output of the processor/receiver and the .1/LFE input jack on the
AirShip II wireless transmier.
Dedicated Centre Channel
Dedicated Rear Channel

12
REL Theater Reference™ Home Cinema Applicaons
For home theater systems, once the standard set-up for two-channel outlined above is complete, the LFE
output from the processor or receiver should be connected to the .1/LFE input and appropriate volume
adjustments made using the .1/LFE LEVEL control. For this conguraon, you must set the processor to the
“large” or “full range” seng for the le and right speakers in order for the REL to receive the bass signal
via the HIGH-LEVEL cable. In this conguraon, the REL provides support for both the le and right speakers
for two-channel listening, and support for the LFE when lms are playing. Most processors will allow you
to defeat the subwoofer output when listening in the two-channel mode. The eect of this set-up is one of
greatly increased dynamics in the mid-bass range, no bass bloat, and a greater degree of space and ming
from the special audio eects.
The .1/LFE input is via an XLR, or RCA jack that connects to the .1/LFE output of a home cinema
amplier/processor.

The AirShip II wireless transmier and receiver should be paired with each other from the factory. When the
power is applied to both units, you should nd that the LED on each unit is on. If this is not the case, then it
will be necessary to pair them together. Follow the instrucons below to pair the transmier to the receiver.
1 Make sure that the transmier AC to DC wall plug supply is connected to an AC outlet, and that the barrel
connector is connected to the transmier.
2 Make sure that the receiver AC to DC wall plug supply is connected to an AC outlet, and that the barrel
connector is connected to the receiver.
3 Turn the transmier power switch on and a blue LED on the input face of the transmier will indicate the
unit is on by blinking in the standby paern which is one ash per second.
4 Turn the receiver power switch on.
5 At this point the transmier and receiver should nd each other and pair together. This will be indicated
by the “Pair” LEDs on both the transmier and control panel staying lit (no ashing).
6 In the event that the transmier and receiver do not automacally pair, simply exercise the momentary
“Pair” buons on the transmier and the receiver.
Status LED Indicator
Paired Connuously on
Standby Blinks once per second
Care and Polishing
The enclosures are best maintained by using a light automove spray-on wax and a micro ber cloth. Take
care not to spray the aluminum badge. Do not place objects, such as drinks on top of your REL AirShip II
transmier. Never use a dry cloth on this nish.
Technical
The AirShip II transmier provides true REL Theater Reference™ connecvity, perming both HIGH-LEVEL
and LFE channels to be wirelessly fed to Serie S. This occurs with virtually zero delay and a complete
absence of compression.
13
Pairing

14
Input Connectors: High-Level Neutrik Speakon, L/R Low-Level RCA, LFE single phono RCA,
LFE balanced XLR
Input Impedance
HIGH-LEVEL: 150k ohms
LOW-LEVEL: 10k ohms
RCA .1/LFE: 10k ohms
XLR .1/LFE: 10k ohms
Wireless output power: Less than -3dBm
Wireless eecve distance: 50 (10 meters) with clear line of site
Mains Input Voltage: 5V DC, 5.5mm circular connector, posive center
Power consumpon: 600 mWas
Dimensions (WHD): Transmier 6 x 6 x 2 5/8 in., (152.4 x 152.4 x 66.7 mm)
Receiver 5 1/2 x 4 5/16 x 1 3/16 in., (139.7 x 109.5 x 30 mm)
Finish: Black
Supplied Accessories
Power Adapter: X2
High Level cable: 3 meter in length
Dual RCA Cable: 2 meter in length
In the interest of product improvement, REL Acouscs Limited reserves the right to alter these specicaons
without noce.
AirShip II Transmier Specicaons

REL Acouscs Limited
North Road, Bridgend Industrial Estate . Bridgend, CF31 3TP . United Kingdom
Telephone: +44 (0)1 656 768 777 . Fax: +44 (0) 1 656 766 093
Web: www.rel.net