Passive Speakers
User manual

▪ Introduction
▪ Speaker positioning and installation
▪ Speaker positioning
▪ Speaker positioning – room eects
▪ Speaker positioning – using port plugs
▪ Speaker positioning – inward angle
▪ Speaker and stand foot options
▪ Speaker connections
▪ Using and caring for speakers
▪ Amplifier power and speaker power handling
▪ Speaker grilles
▪ Running-In
▪ Care and maintenance
▪ Warranty
2 Passive Speakers User manual

3
Introduction
Welcome, and many thanks for putting your music in our hands.
Back in 1977, Dynaudio’s founder, Wilfried Ehrenholz, was dissatisfied by the hi-fi speakers he’d been listening to,
so he began the Dynaudio story by building his own: mounting drivers made by other companies in modified o-
the-shelf cabinets, and blending the systems with his own crossover designs. But Wilfried still wasn’t satisfied. He
came to realise that he could only get the speaker performance he aspired to if he designed and made as many
components as possible himself. And we all know there’s sometimes only one way to get something right: do it
yourself.
Your new Dynaudio speakers have a direct link back to Wilfried’s commitment to retaining control of all the vital
components, design, engineering and manufacture. And that, in today’s interconnected and badge-engineered
commercial world, makes Dynaudio a very unusual organisation.
The paragraphs and illustrations of Dynaudio user manuals will help you get the best from your speakers and
should provide all the guidance you need. But if you have further questions there are extensive support and FAQ
resources available via the Dynaudio website.
Dynaudio manuals start with a little housekeeping and a few obligatory notes of caution, and continue with
sections on speaker positioning, speaker connections, speakers in use, and speaker care.
CAUTION!
High sound-pressure levels
Listening to high sound pressure levels over extended periods can damage hearing.
CAUTION!
Floor spikes
Some Dynaudio speakers and stands are equipped with floor spikes. Floor spikes can cause injury or damage
sensitive surfaces if not handled carefully.
CAUTION!
Speakers on stands
Speakers mounted on floor stands should always be restrained on the stand top-plate by rubber pads or similar
adhesive materials. Speakers mounted on stands without top-plate restraint can fall and potentially cause injury.
4 Passive Speakers User manual

Note
To maintain the long-term aesthetic quality of your speakers, excessively warm, cold, or humid locations should
be avoided. Similarly, direct sunlight or excessive artificial light can aect the colour of the natural wood veneers
used on speaker cabinets.
Introduction 5

Speaker positioning and installation
At Dynaudio we appreciate that speakers should fit with your environment and lifestyle, not the other way around,
so our speakers make no unusual room positioning demands. Even so, every listening room has its own acoustic
character and is uniquely furnished, so there are always choices to be made to help ensure that your speakers
can give their best. Don’t be afraid to experiment with adjusting the speaker positioning, and listening carefully,
until you have it just right to your ears.
Speaker positioning
Speaker stands or wall mounting
Dynaudio speakers designed to sit on speaker stands can often also be placed on shelves, wall brackets or
furniture units. Speaker stands, however, are likely to provide both the best performance and enable the greatest
flexibility in positioning. They will also place the speakers at the correct height – approximately head height when
listening. If you’d rather install your speakers on shelves, brackets or furniture units there are a few things to
consider:
▪ Installing speakers on shelves, wall brackets or furniture units will lessen your ability to adjust speaker positioning. Make
sure to read the General Layout paragraphs before deciding on shelf or bracket locations.
▪ Installing speakers on shelves, wall brackets or furniture units will result in increased bass volume and potentially less
focussed stereo images due to reflections from the nearby back wall.
▪ The height of your speakers is important. They should be positioned approximately at head height when listening. Both
speakers of the pair should be mounted at the same height.
▪ Shelves, brackets and furniture units should be easily able to support the weight of the speakers and be both rigid and
non-resonant. Shelves or brackets attached to stud-work and plasterboard walls are unlikely to provide adequate strength
or rigidity. If you’re unsure of your wall’s suitability, or of your ability to install shelf or bracket hardware, check with a
qualified professional.
▪ Furniture that incorporates large unsupported panels might not be suitable for speaker mounting as the vibrations from the
speakers can cause sympathetic panel vibrations. Similarly, locating speakers within furniture alcoves can result in a
resonant air volume around and behind the speaker that could colour the sound.
Using speaker stands
If your Dynaudio speakers are supplied with stands, or you intend to use alternative Dynaudio stands, please
follow the assembly instructions supplied with them. If you have lost the instructions, you can download them free
of charge from the support section of the Dynaudio website. Instructions for using the feet supplied with the
stands are also available.
If you intend to user speaker stands from an alternative manufacturer, please follow the assembly instructions
supplied with them.
We always recommend that speakers mounted on stands are restrained on the stand-top plate by rubber pads or
similar adhesive materials. Speakers mounted on stands without top-plate restraint can fall and potentially cause
injury.
General layout – stereo systems
In the majority of cases, stereo speakers should be between 2 m and 4 m (6 ft and 13 ft) apart. If the speakers
are too close together, the stereo image will lack scale; if they’re too far apart, the image might have a weak
central focus. The distance from the loudspeakers to the listening area should be similar to, or slightly more than,
their distance apart. The closer the listening area is to the loudspeakers, the closer the speakers can be to each
other. Paying attention to the stereo image will help dictate optimum speaker positioning. Diagram 1 illustrates
basic speaker positioning.
6 Passive Speakers User manual
A≤B
BB
A
Diagram 1: Basic speaker positioning
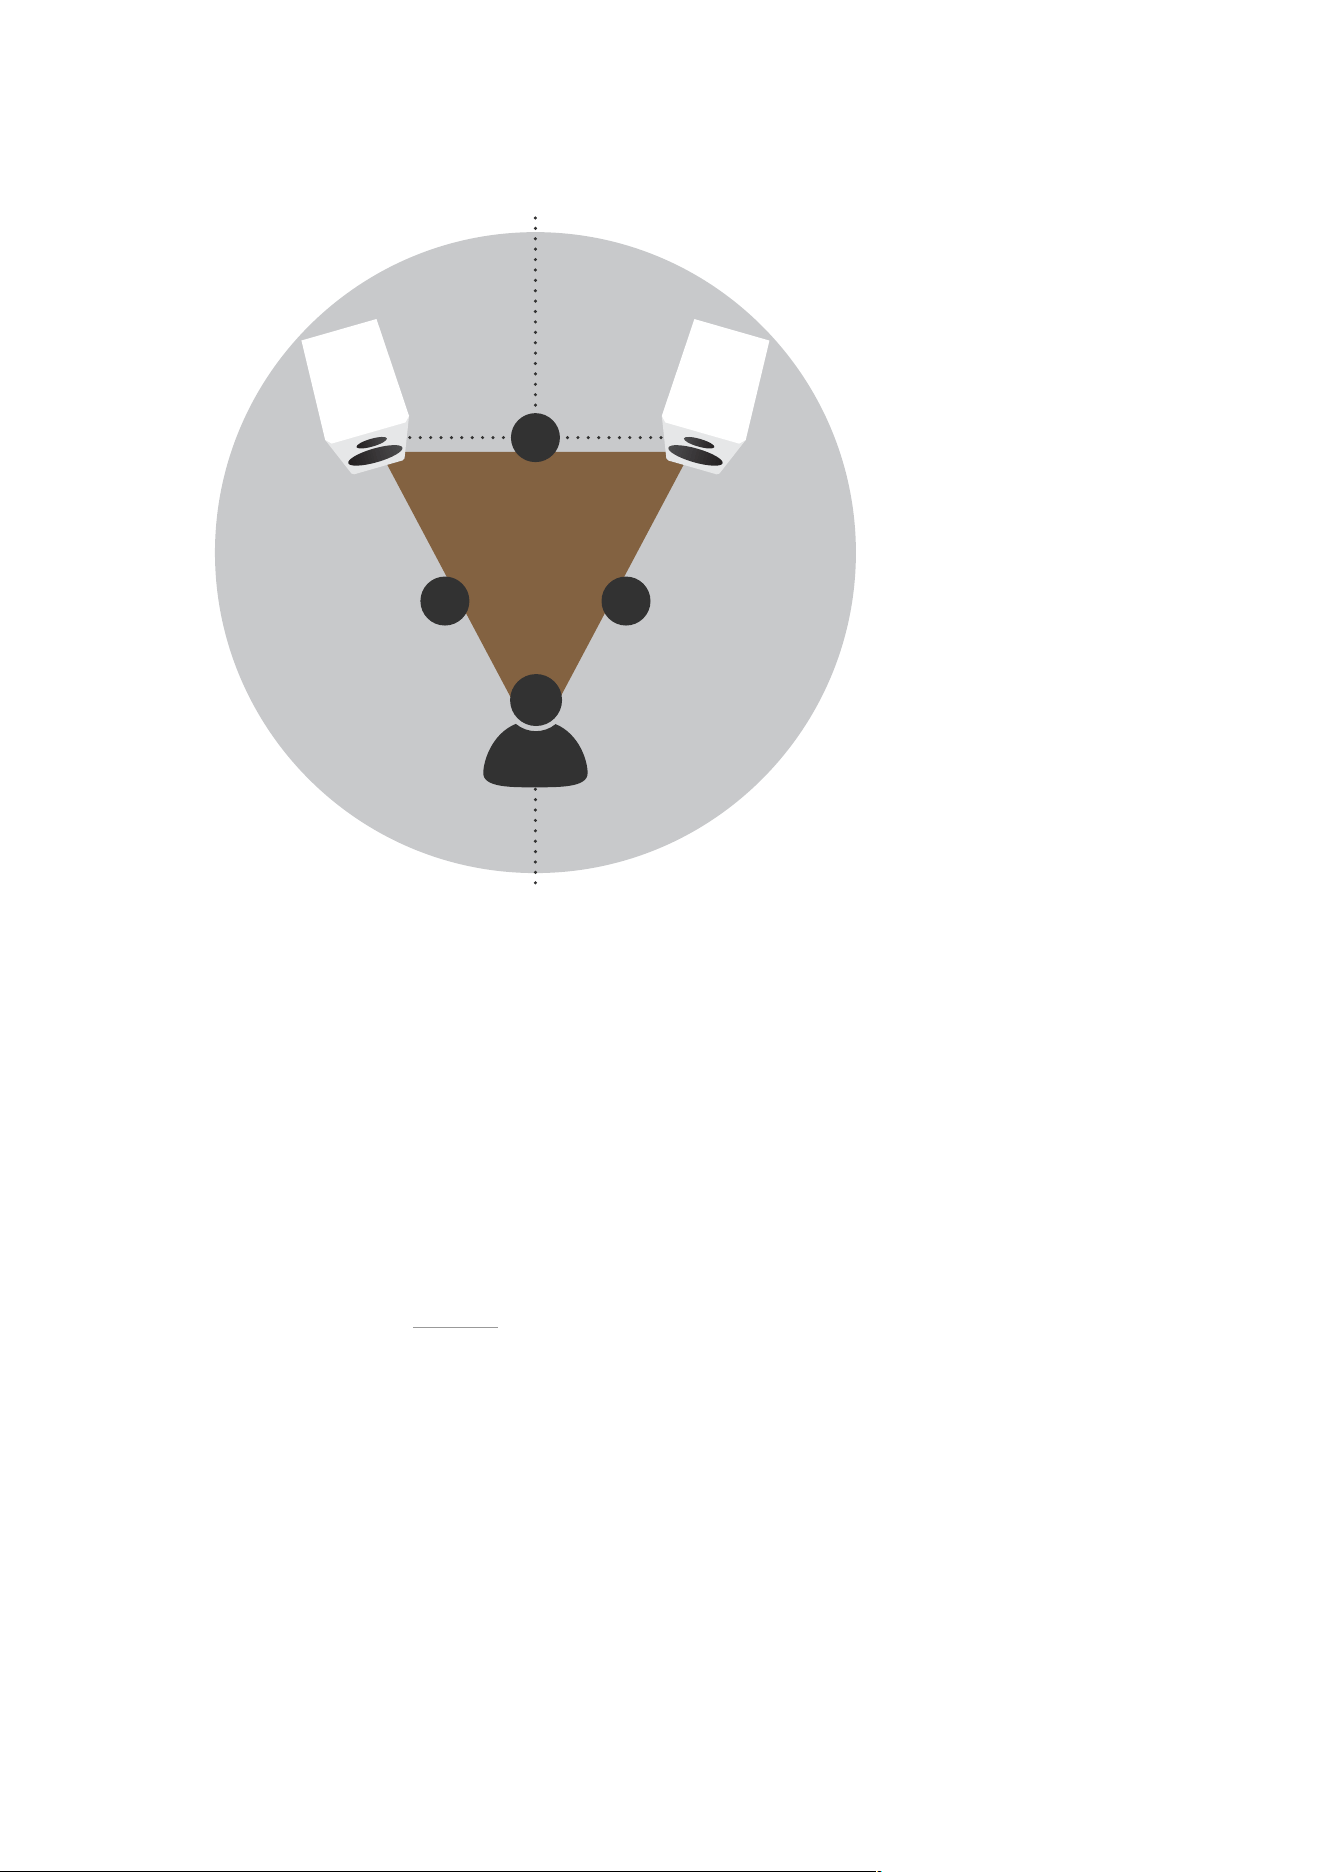
General Layout – multi-channel systems
In home-cinema systems, the locations of the centre- and front-channel speakers are the most important. The
location of surround-channel speakers is less critical. However, to experience a film soundtrack the way its sound
designer intended, the surround-channel speakers should be positioned appropriately. Diagram 2 illustrates multi-
channel speaker positioning.
Front-channel speakers
The front-channel speakers in a home-cinema system should be located either side of the screen. The top of the
speakers should be approximately level with, or slightly above, the screen’s horizontal centre-line, and each
speaker should be between 15 cm (6 in) to 60 cm (2 ft) away from the screen’s sides. The surround-channel in
home-cinema systems tends to stretch stereo images so the front-channel speakers can be located a little closer
together than in traditional stereo systems. Front channel audio can also become ‘detached’ from the video if the
speakers are too far apart. Diagram 2 illustrates multi-channel speaker positioning.
Centre-channel speaker
The centre-channel speaker in a multi-channel home-cinema system can be located either directly above or
below the screen on its vertical centre line. If the screen is located relatively high on the wall, the centre-channel
speaker should always be located beneath. Diagram 2 illustrates multi-channel speaker positioning.
Surround-channel speakers
Surround-channel speakers in a home cinema system are sometimes described as rear-channel speakers. In 5.1
systems (five speakers and one subwoofer), the surround-channel speakers should in fact be placed either side
of the listening area, just above head height. In systems with more than two surround channels, the extra
speakers go behind the listening position, so deserve the title ‘rear’. Diagram 2 illustrates multi-channel speaker
positioning.
Speaker positioning and installation 7
90° 90°
150° 150°
3 3
4 4
30° 30°
0°
1 1
2
5
Diagram 2: Multi-channel speaker positioning
Speaker positioning – room eects
Every loudspeaker radiates sound energy not only forward but also to the side and, particularly at lower
frequencies, to the rear. As a result, reflections from the room boundaries occur that interfere with the speaker’s
forward radiation. When loudspeakers are positioned too close to room boundaries their performance is aected.
Even with your speakers placed away from room boundaries, the material and acoustic character of the
boundaries will still have an eect on the sound. Try to ensure that immediate surroundings of each speaker have
similar acoustic qualities. Dierent acoustic qualities would be heavy curtains and bare walls, for example. The
sound of any speaker will also be influenced by the furniture and other large objects within the listening room, and
the material of its construction and wall covering. For example, a large room with little furniture and hard wall
surfaces will result in a bright, diuse sound, while a room with carpet, curtains and soft furnishings will result in a
more focussed and less lively sound.
Dynaudio speakers are designed to perform at their best when positioned as far from any walls as possible.
Ideally, try to aim for a minimum distance of 50 cm (18 in) from each speaker to any wall. Diagram 3 illustrates
room boundary distances.
8 Passive Speakers User manual
B
A
A, B≥0.5m
A≠B
Diagram 3: Distance to walls
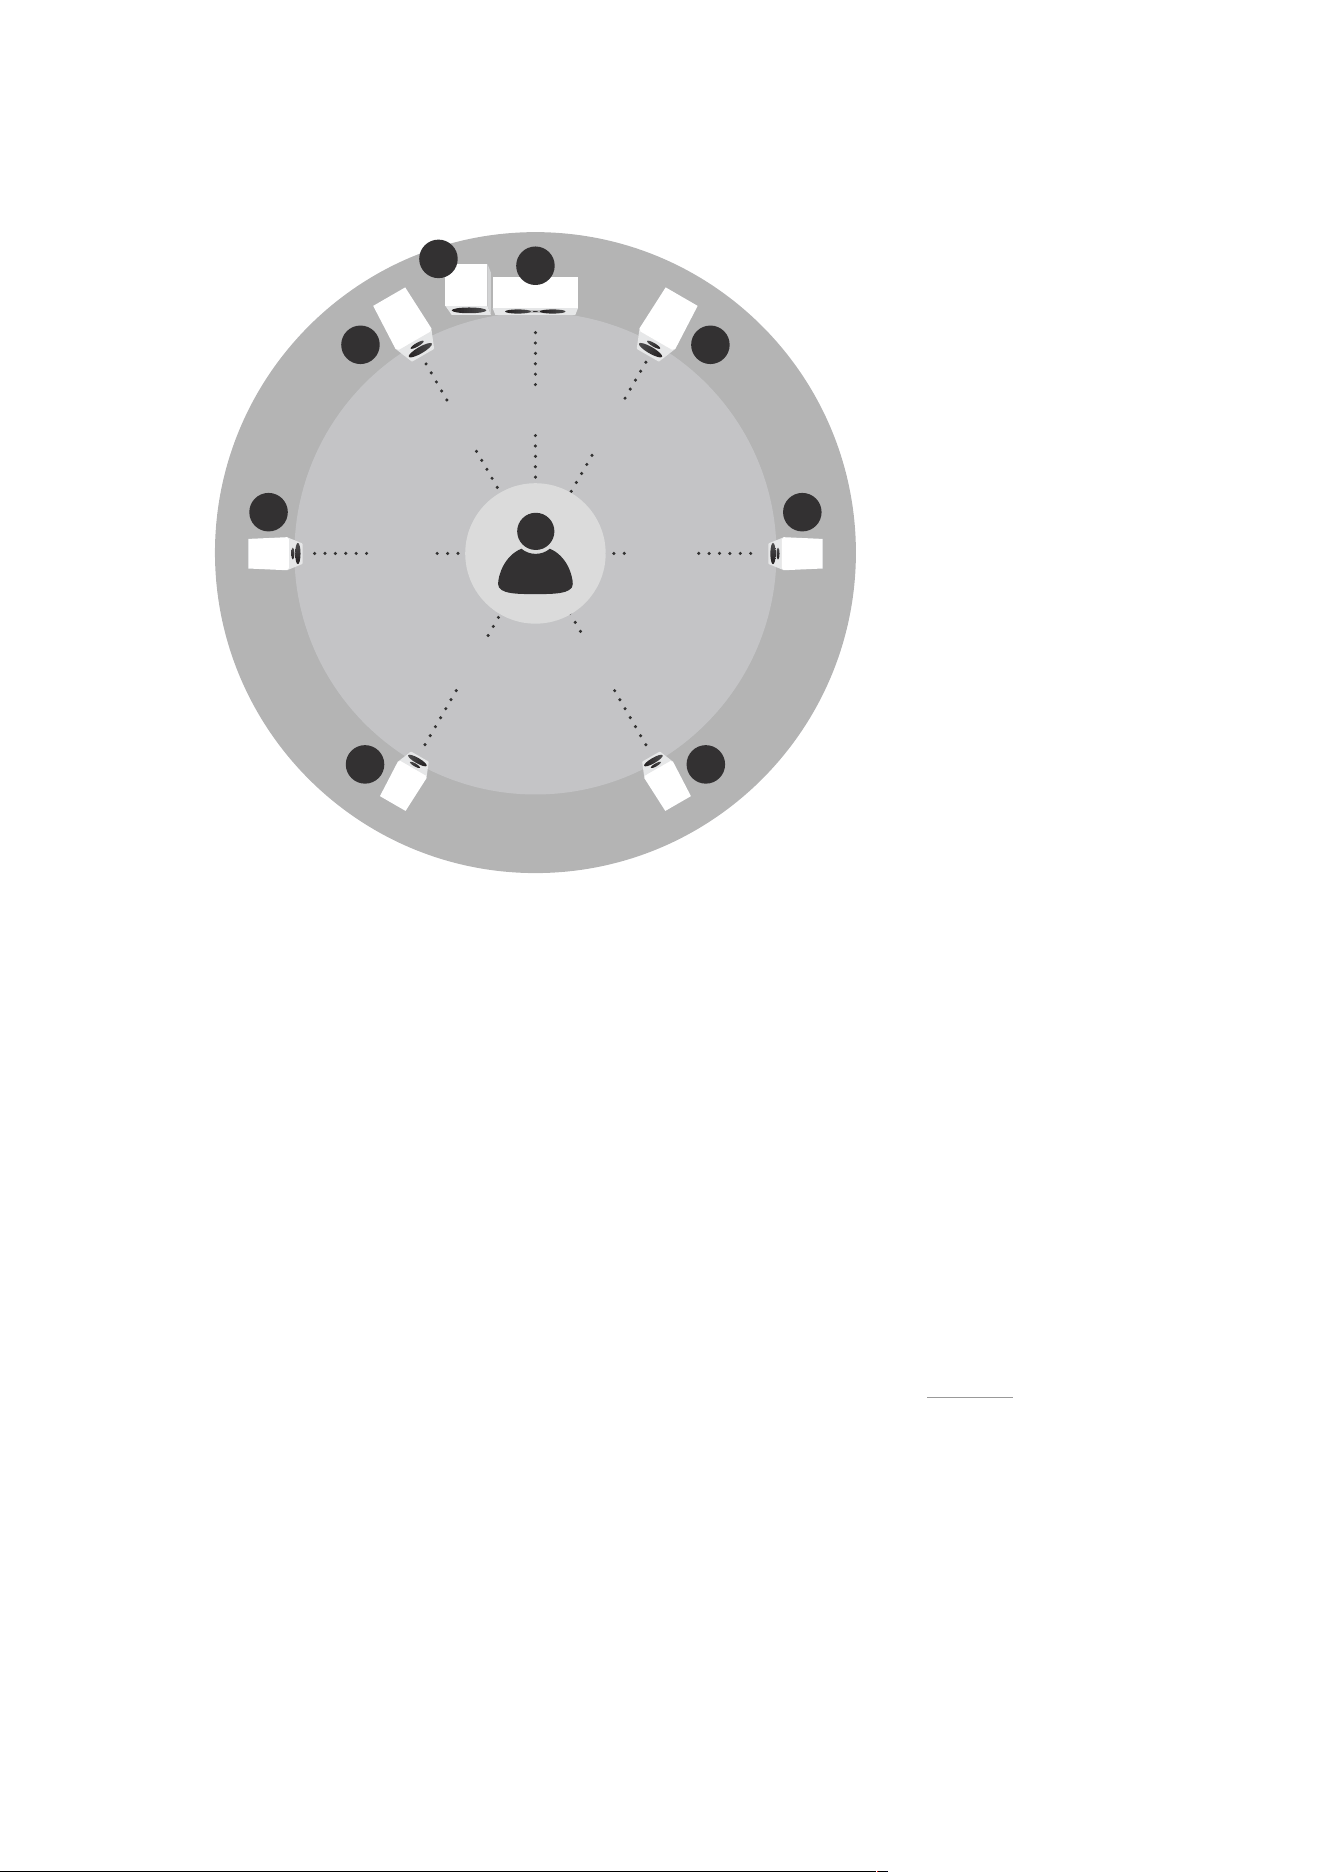
Speaker positioning – using port plugs
If your Dynaudio speakers have reflex ports and are supplied with foam plugs, these can be fitted to reduce the
bass emphasis that may be apparent if the speakers are placed close to room boundaries. Some Dynaudio port
plugs can be split to provide optional levels of bass volume reduction. For mild bass reduction, fit only the outer
foam ring by sliding it in the port tube so that it sits just inside the flared port exit – making sure it retains its shape
to minimise airflow turbulence. For more extreme bass reduction, fit the complete plug so that the port is blocked.
Diagram 4 illustrates the use of port plugs.
Speaker positioning and installation 9
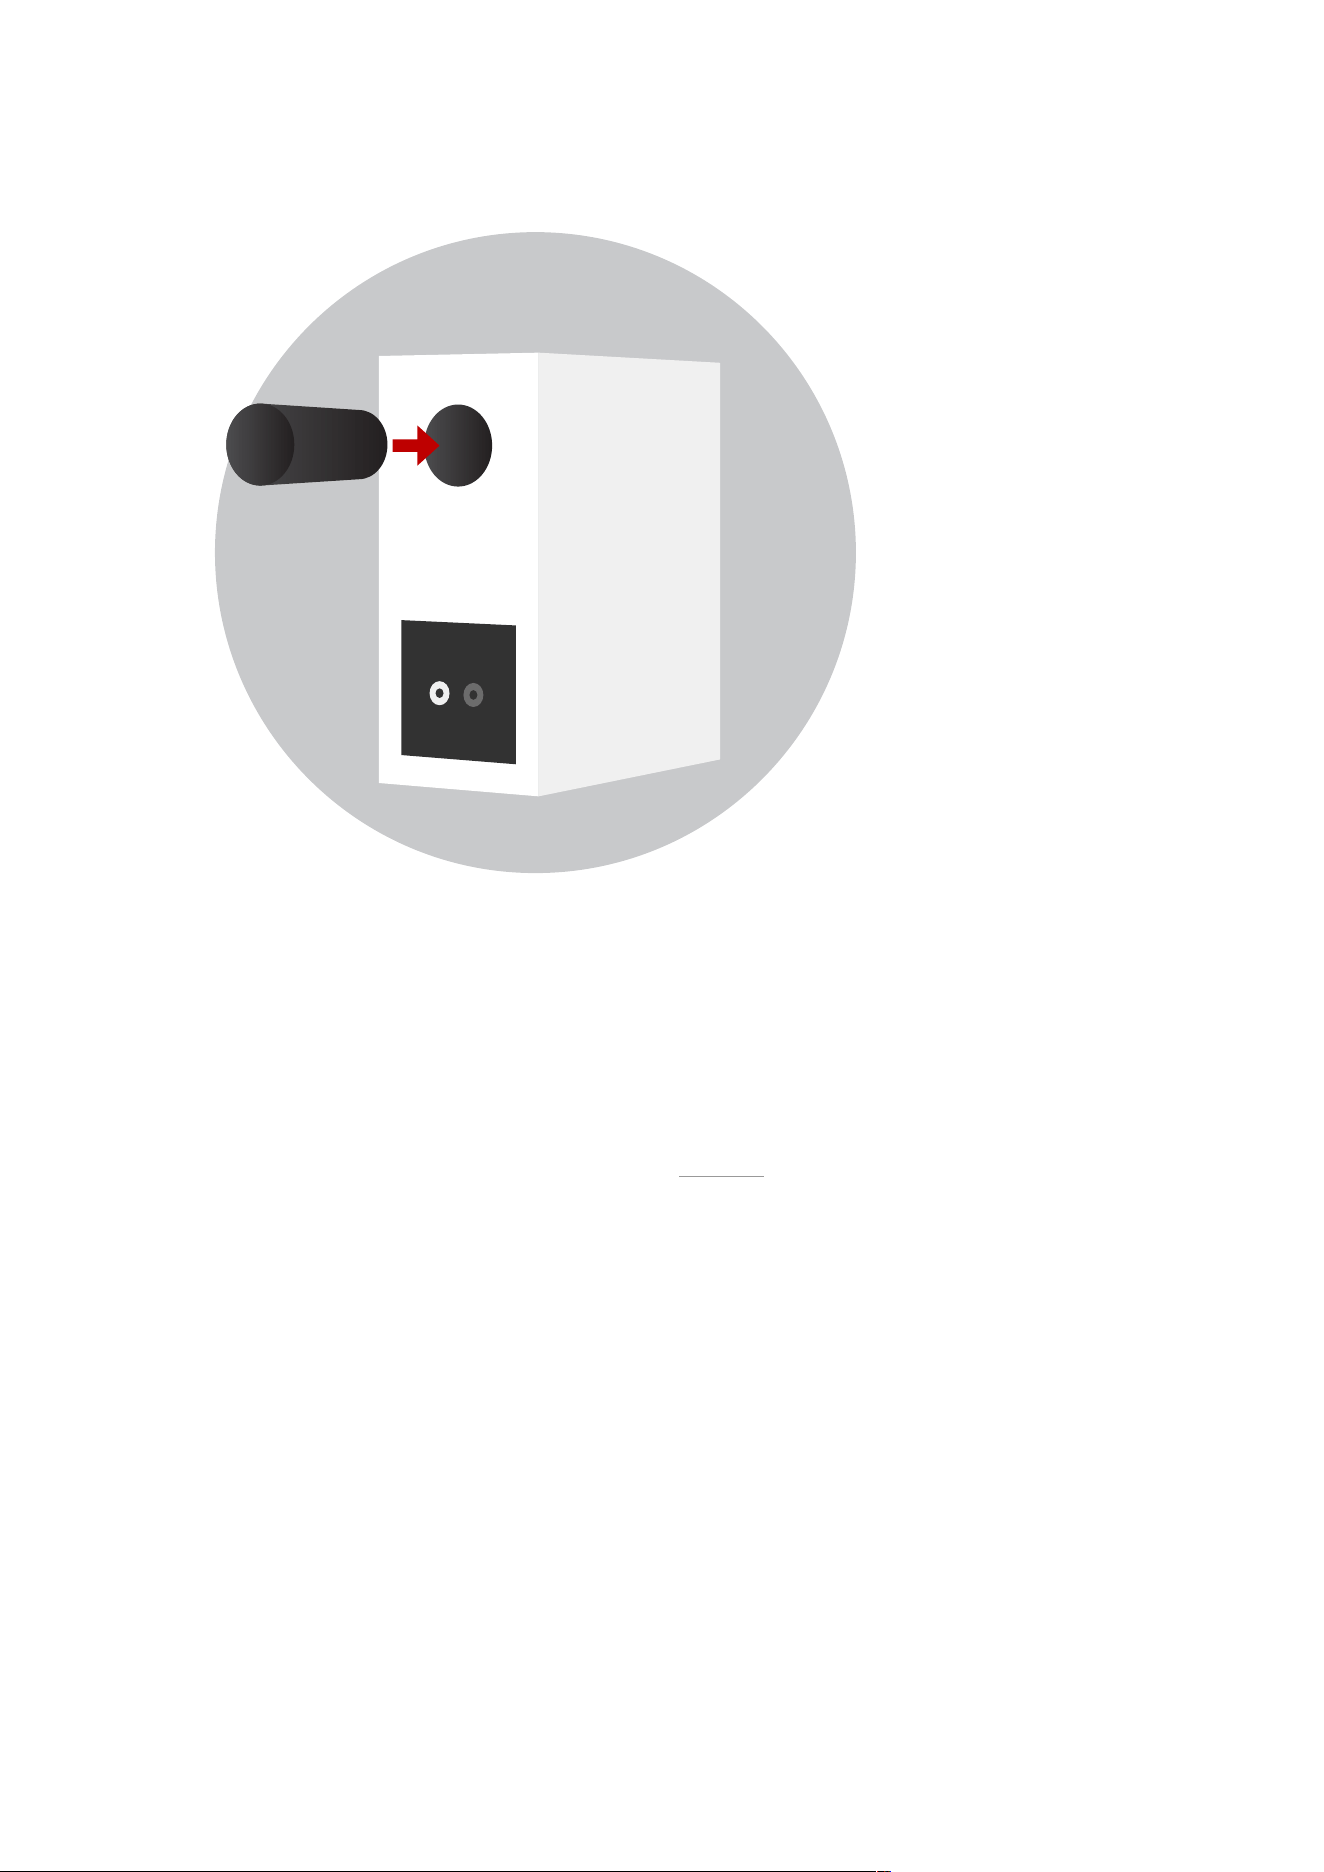
Diagram 4: Reflex port foam plugs
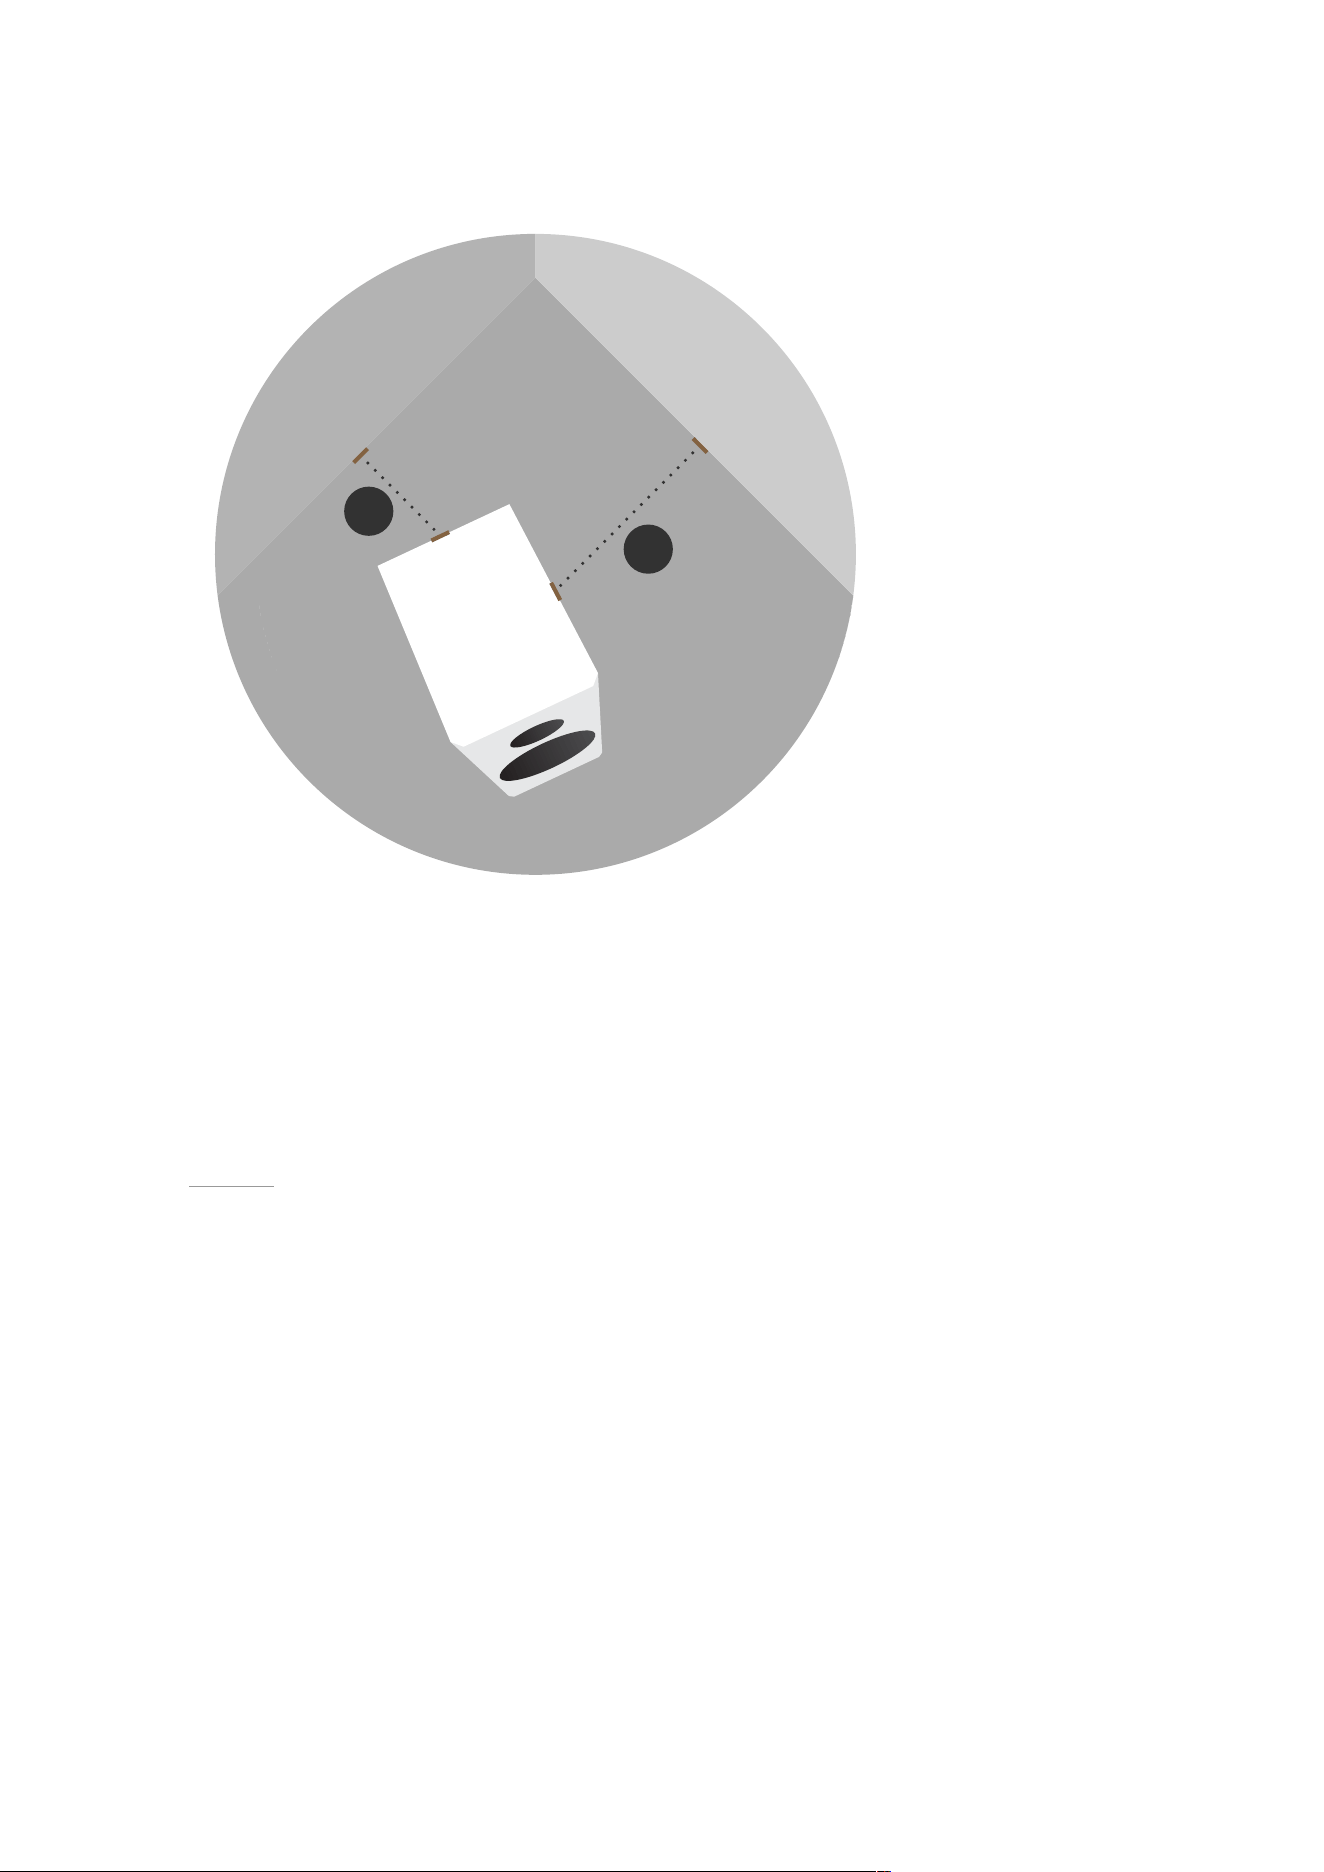
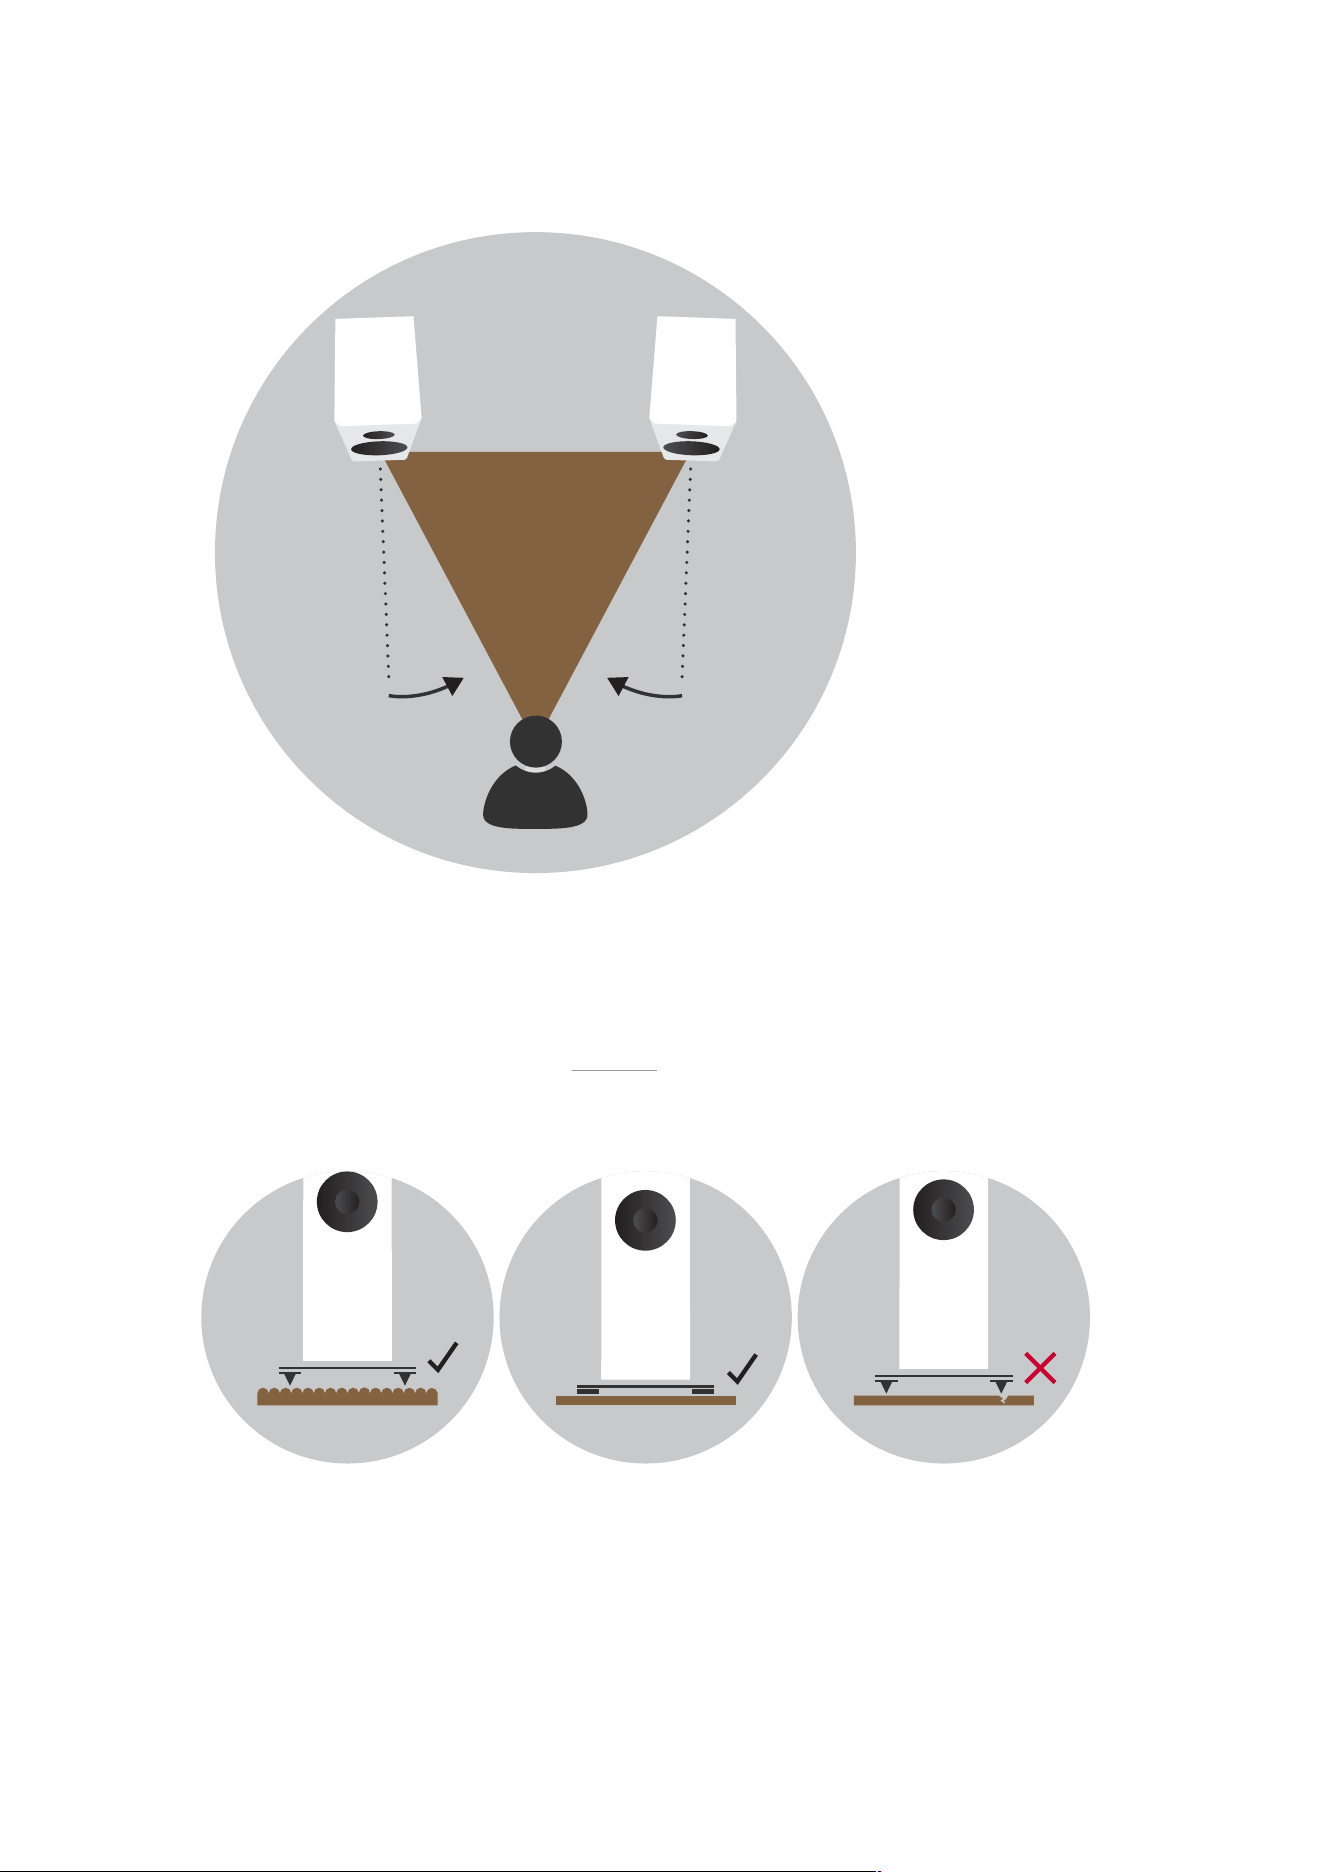
Speaker positioning – inward angle
There is no rule that speakers must be angled inward, but depending on the dimensions and acoustic character
of your listening room, it could improve the stereo image focus. Experiment and trust your ears – you’ll definitely
know when it sounds its best.
Speakers used for front channels in home-cinema systems are less likely to benefit from inward angling as the
centre-channel speaker tends to control the central image. Diagram 5 illustrates inward angle.
10 Passive Speakers User manual
A≤B
Diagram 5: Angle inwards loudspeakers to improve imaging
Speaker and stand foot options
Dynaudio floor-standing speakers and Dynaudio floor-stands intended for stand-mount speakers are supplied with
two foot options: floor spikes and rubber feet. Diagram 6 illustrates the use of floor spikes and rubber feet.
Diagram 6: Use of floor spikes and rubber feet
Spikes are designed for use on carpets and rugs. They pierce the carpet to rest on the floor surface beneath,
providing the speaker or stand with a solid foundation. When using floor spikes ensure that the spike length
Speaker positioning and installation 11

extends enough that the bottom of the speaker or stand is well clear of the carpet.
Spikes can also be used on non-carpeted floors with metallic discs (such as coins) placed between the spike tips
and the floor. In this case the length of spike extending beneath the speakers or stands should be minimised.
The rubber feet are for when speakers or stands are used on uncovered wooden or tile floors. Make sure the
length of foot adjustment extending beneath the speakers or stands is minimised.
Spikes or rubber feet should be adjusted so that the speakers or stands are vertical and don’t rock.
Always take great care when installing floor spikes or when moving speakers or stands
with floor spikes fitted.
Never tilt a speaker or stand with floor spikes or rubber feet fitted so that its entire
weight rests on one or two spikes or feet.
12 Passive Speakers User manual

Speaker connections
The type of speaker cable you use can aect audio performance. While it isn’t absolutely necessary to use
specialised cables, in general quality speaker cable will give the best results. In any case, the cable used should
have a conductor cross-sectional area of at least 1.5 mm
2
– and performance may begin to suer if cable length
exceeds a maximum of around 15 m. The cable length to each speaker of a stereo pair should be approximately
the same.
Your Dynaudio retailer will be able to oer advice on speaker cable that will suit both your electronics and your
Dynaudio speakers.
Your Dynaudio speakers’ connection terminals can accommodate stripped cables, 4 mm banana plugs or cable
spades. Emit series speakers support only stripped cables and banana plugs. Most modern amplifiers
incorporate terminals that provide similar connection options.
Begin by connecting the cable to the terminals on the speaker cabinet. Ensure that conductors marked ‘positive’
are connected to the positive (red) speaker terminals and that cable conductors marked ‘negative’ are connected
to the negative (black) speaker terminals. The process of speaker connection varies depending on the type of
cable connectors in use:
▪ 4 mm plugs: Insert the plugs directly into the end of the speaker terminals. The terminals don’t need to be tightened,
but it’s good practice to do it anyway to minimise any chance of mechanical buzzing.
▪ Stripped cables: Fully unscrew the speaker terminals and insert the stripped cable ends into the holes through the
terminal posts. Make sure that no stray cable strands are left free. It will help to twist the stripped cable strands together.
Tighten the terminals down securely onto the stripped cable. It’s good practice to check terminals for tightness soon after
they are initially tightened and occasionally thereafter.
▪ Cable spades: Fully unscrew the speaker terminals and position each cable spade arm either side of a terminal post.
Secure the cable spades by securely tightening the terminals. It’s good practice to check terminals for tightness soon
after they are initially tightened and occasionally thereafter.
Once cables are connected to the speakers, they can be connected to the amplifier speaker output terminals.
Make sure the amp is switched o, connect the cables from the left speaker to the left-channel amplifier terminals
and the cables from the right speaker to the right-channel amplifier terminals. For multi-channel home-cinema
systems with surround- and centre-channel outputs, connect each speaker to the appropriately marked amp
terminals.
Ensure in every case that cable conductors marked “positive” are connected to the
positive (red) amplifier and speaker terminals and that cable conductors marked
“negative” are connected to the negative (black) amplifier and speaker terminals.
Diagram 7 illustrates speaker connections.
Speaker connections 13

Diagram 7: Basic speaker positioning
14 Passive Speakers User manual

Using and caring for speakers
Amplifi
er power and speaker power handling
Every Dynaudio speaker has a power-rating specification, and we always suggest using this for guidance on
maximum amplifier power. As a rough guide we suggest a minimum amplifier power of around 20% of a speaker’s
power rating per channel to ensure the amp can drive hard without producing potentially speaker-damaging
distortion. Your Dynaudio retailer will always be able to oer advice on suitable amplifiers for your speakers.
The golden rule is to reduce the volume if ever the sound becomes distorted. Distortion is a sure sign that
damage to either speakers or amplifier is likely.
Speaker grilles
Many Dynaudio speakers have removable front grilles. Their use is really a matter of personal preference, but there
are a few factors to consider. First, drive-unit diaphragms, especially tweeters, are delicate and can easily be
damaged by inquisitive fingers. If you have young children, grilles are probably best left fitted. Second, even
though grilles are designed to have a minimal influence on performance, the sound quality of your speakers may
be marginally improved without them. We suggest removing the grilles for serious listening and replacing them at
other times.
Some Dynaudio speaker grilles are attached magnetically while others are use plastic plugs and corresponding
sockets. In either case, grilles are removed simply by gently pulling them away from the cabinet front panel. Grille
replacement is the reverse procedure.
Running-In
The moving parts of a newly manufactured Dynaudio loudspeaker have been acoustically checked after
production, but nevertheless are not as flexible as they need to be for optimum results to be realised. The higher
the quality of any driver system, the more demanding the loudspeaker will be regarding time for running in the
system.
A newly unpacked Dynaudio loudspeaker therefore requires several weeks running/ playing to reach its optimum
performance capability. After that period, a couple of minutes before every listening session will be helpful to
“warm up” the loudspeakers.
Care and maintenance
Dynaudio speakers don’t require any special treatment apart from the kind of care that you would invest in any
valuable items in your home.
Use a soft, dry or very slightly damp cloth to clean the cabinet and other non-functional components. You should
always avoid touching the tweeter dome. Dust can be removed from bass and midrange driver diaphragms using
a soft brush. Fabric grilles are best cleaned with a soft brush. We do not recommend use of any cleaning or
polishing fluids or sprays.
Using and caring for speakers 15

Warranty
Dynaudio provides a transferable limited manufacturer’s warranty. This warranty only covers faults or defects in
materials and production. Damage caused as a result of abuse, misuse or defective electronics isn’t covered.
All warranty claims must be accompanied by a copy of the original purchase invoice, and warranties are only valid
in the country or market of original origin or distribution. Should warranty service be required, it must be arranged
for in the country of purchase by an authorised Dynaudio dealer.
16 Passive Speakers User manual