
QUICK START GUIDE
DEFENDER EMPOWER APP
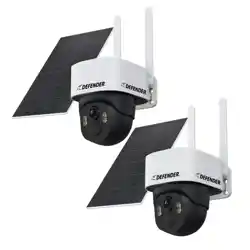
4G LTE SOLAR POWERED 2K+ AI FRONTIER PTZ

TABLE OF CONTENTS
SETTING UP YOUR SERVICE ..............................................................................3
BASIC NAVIGATION ..........................................................................................5
LOCAL RECORDING SETUP ............................................................................... 8
SHARE APP ACCESS ........................................................................................... 9
SETTING UP MOTION DETECTION .................................................................14
SURVEILLANCE AREA SETTING ......................................................................15
SETTING UP NIGHT VISION ............................................................................16
SIREN DETERRENCE SETTINGS ....................................................................... 17
SETTING UP NOTIFICATIONS .........................................................................18
PLAYBACK .......................................................................................................19
LOW BATTERY ALARM ...................................................................................21
TWO-WAY TALK MODE ...................................................................................22
3
SETTING UP YOUR SERVICE
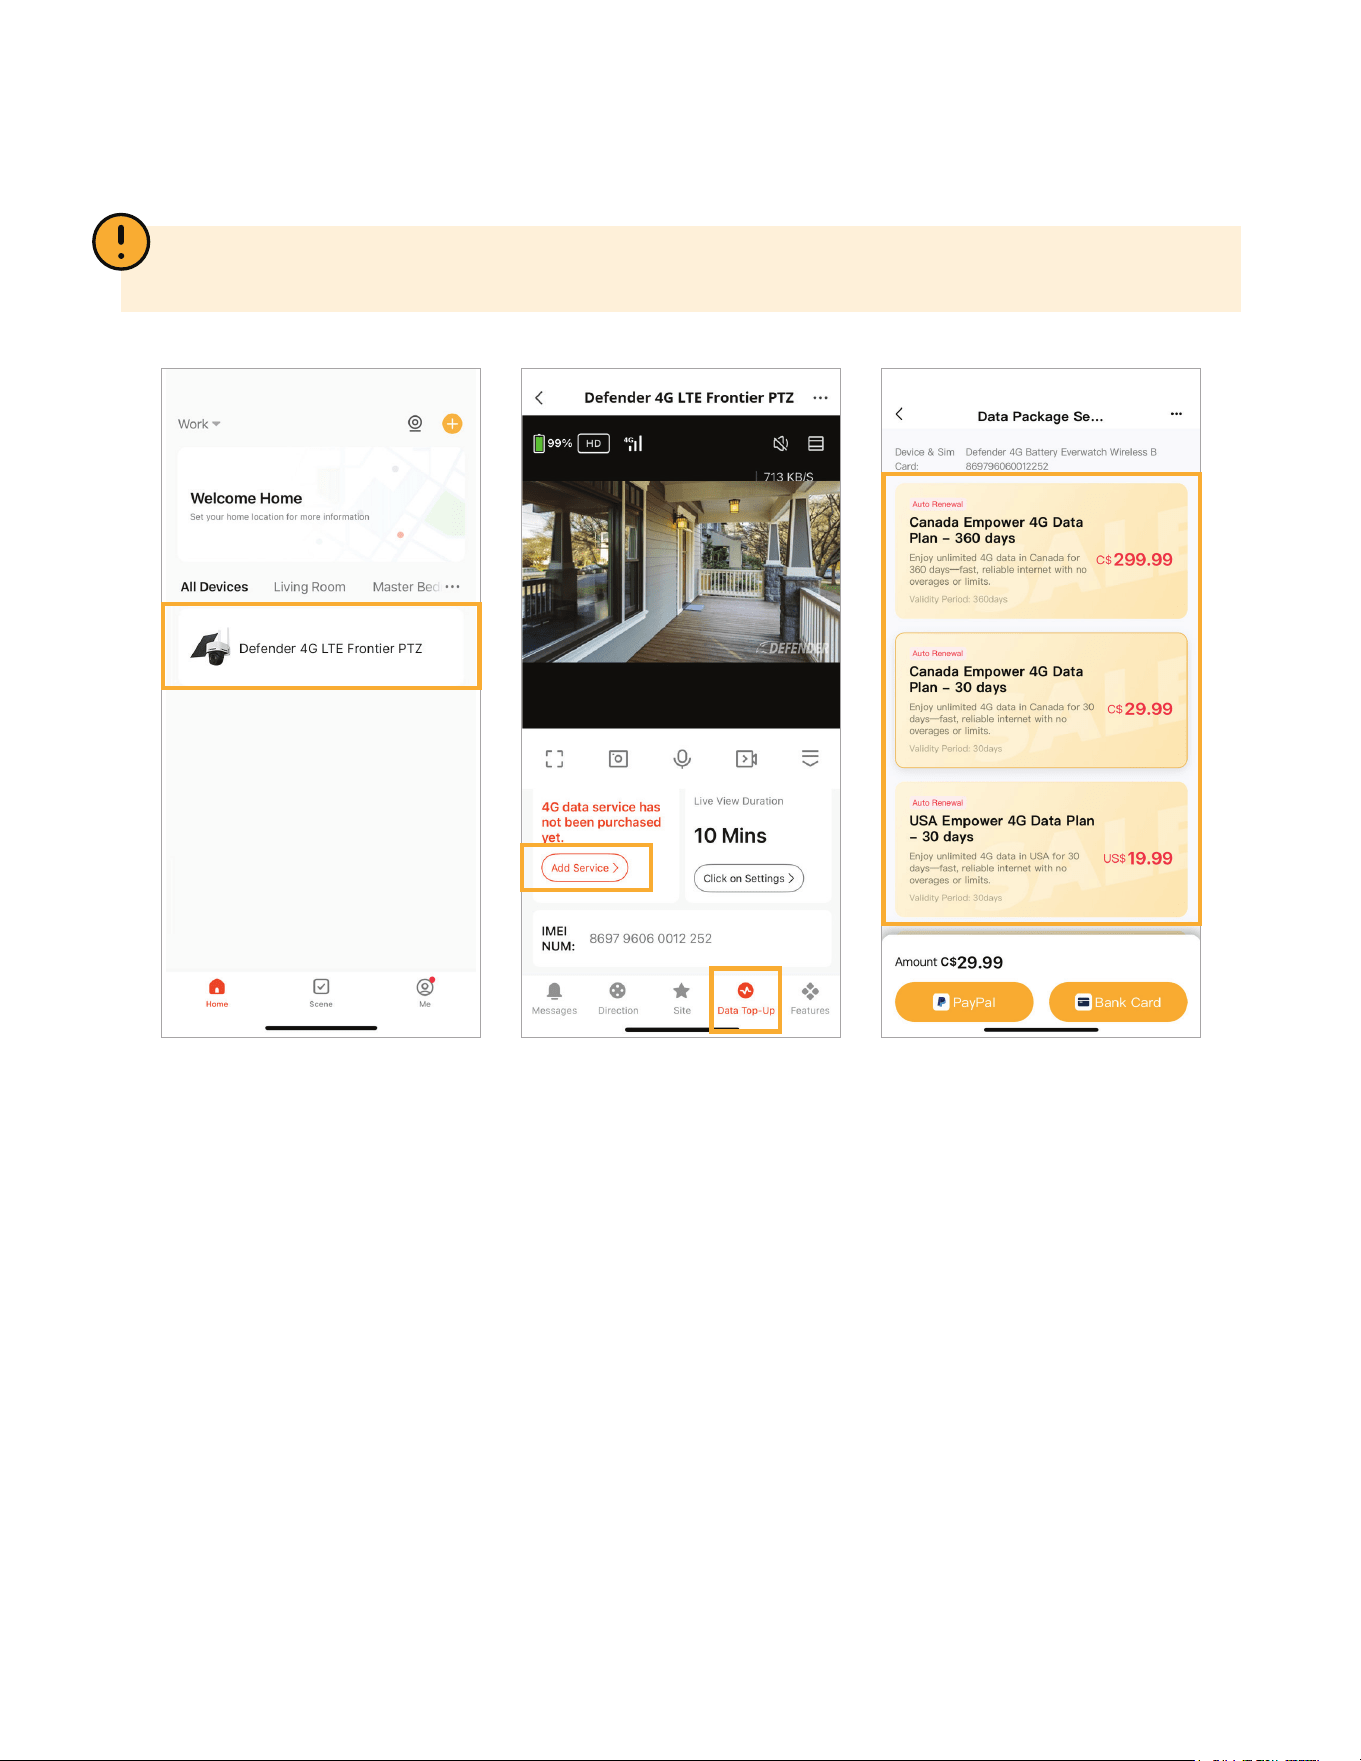
IMPORTANT: 4G LTE Solar Powered 2K+ AI Frontier PTZ does not connect to Wi-Fi, it requires a data
plan. To active your data plan, follow the steps below.
Launch your App and tap on
your Defender AI Frontier PTZ
camera.
Tap ‘Data Top-Up’.
Then ‘Add Service’.
Choose your preferred data plan,
making sure to select the one for
the country where the camera will
be used and select your preferred
payment method.
4
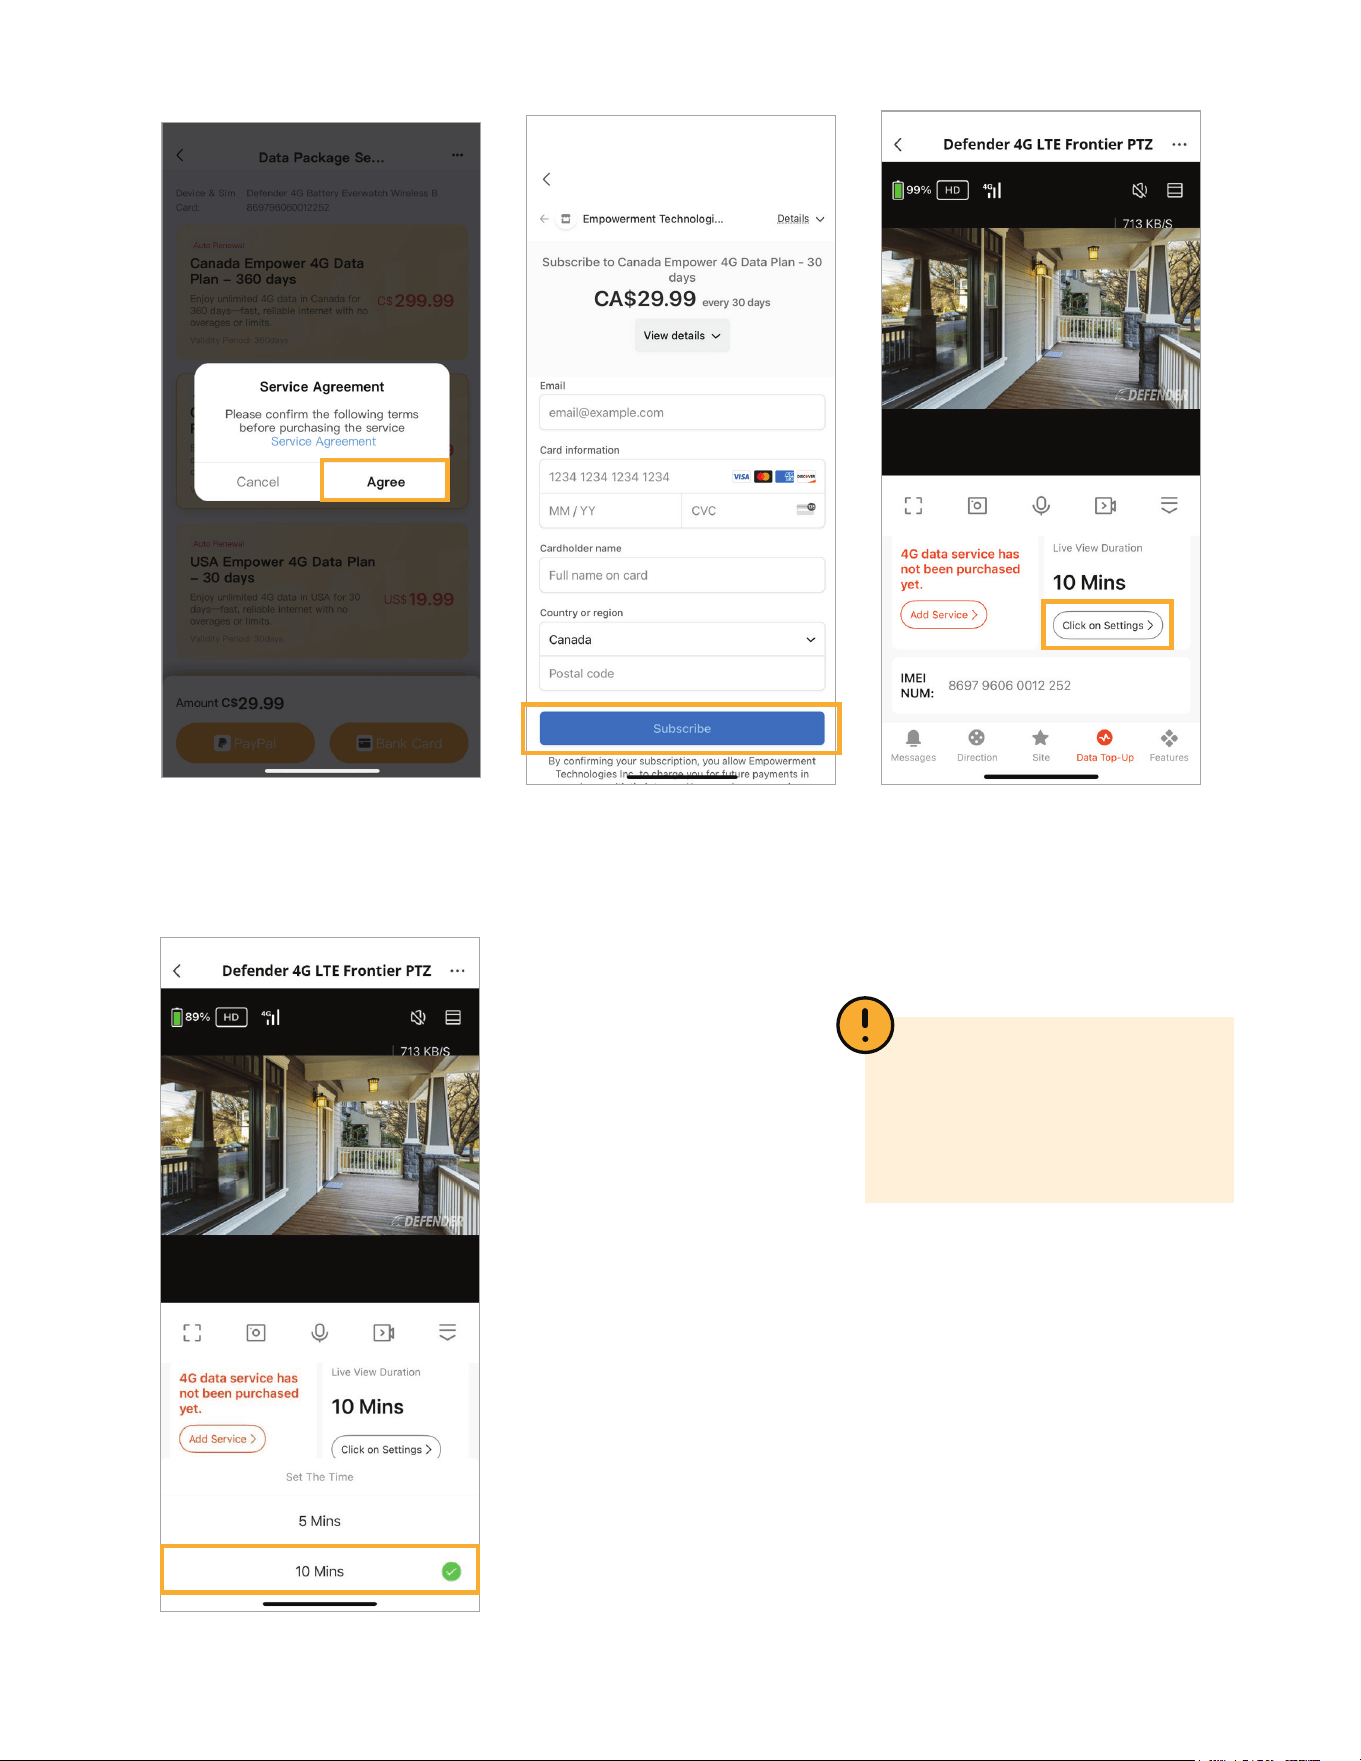
Agree to the terms and
conditions.
Enter in your information and
select ‘Subscribe’.
Once the plan is activated,
users can adjust how long
each camera remains in live
view when manually activated
by tap, ‘Click on Settings’.
For example, if set to 10
minutes, the live view will
automatically turn o after 10
minutes to conserve data and
battery. Before shutting o, a
prompt will appear asking if
you’d like to continue viewing.
If no action is taken within 15
seconds, the camera will enter
sleep mode and return to the
camera list page.
PLEASE NOTE: After your
service is added, the app will
update to show your current
plan in place of the “Add
Service” section.
5
BASIC NAVIGATION
The Defender Empower App allows you to remotely view live and pre-recorded video, save and
share footage, share App access and receive customized notications. Other App functions may
not be supported.
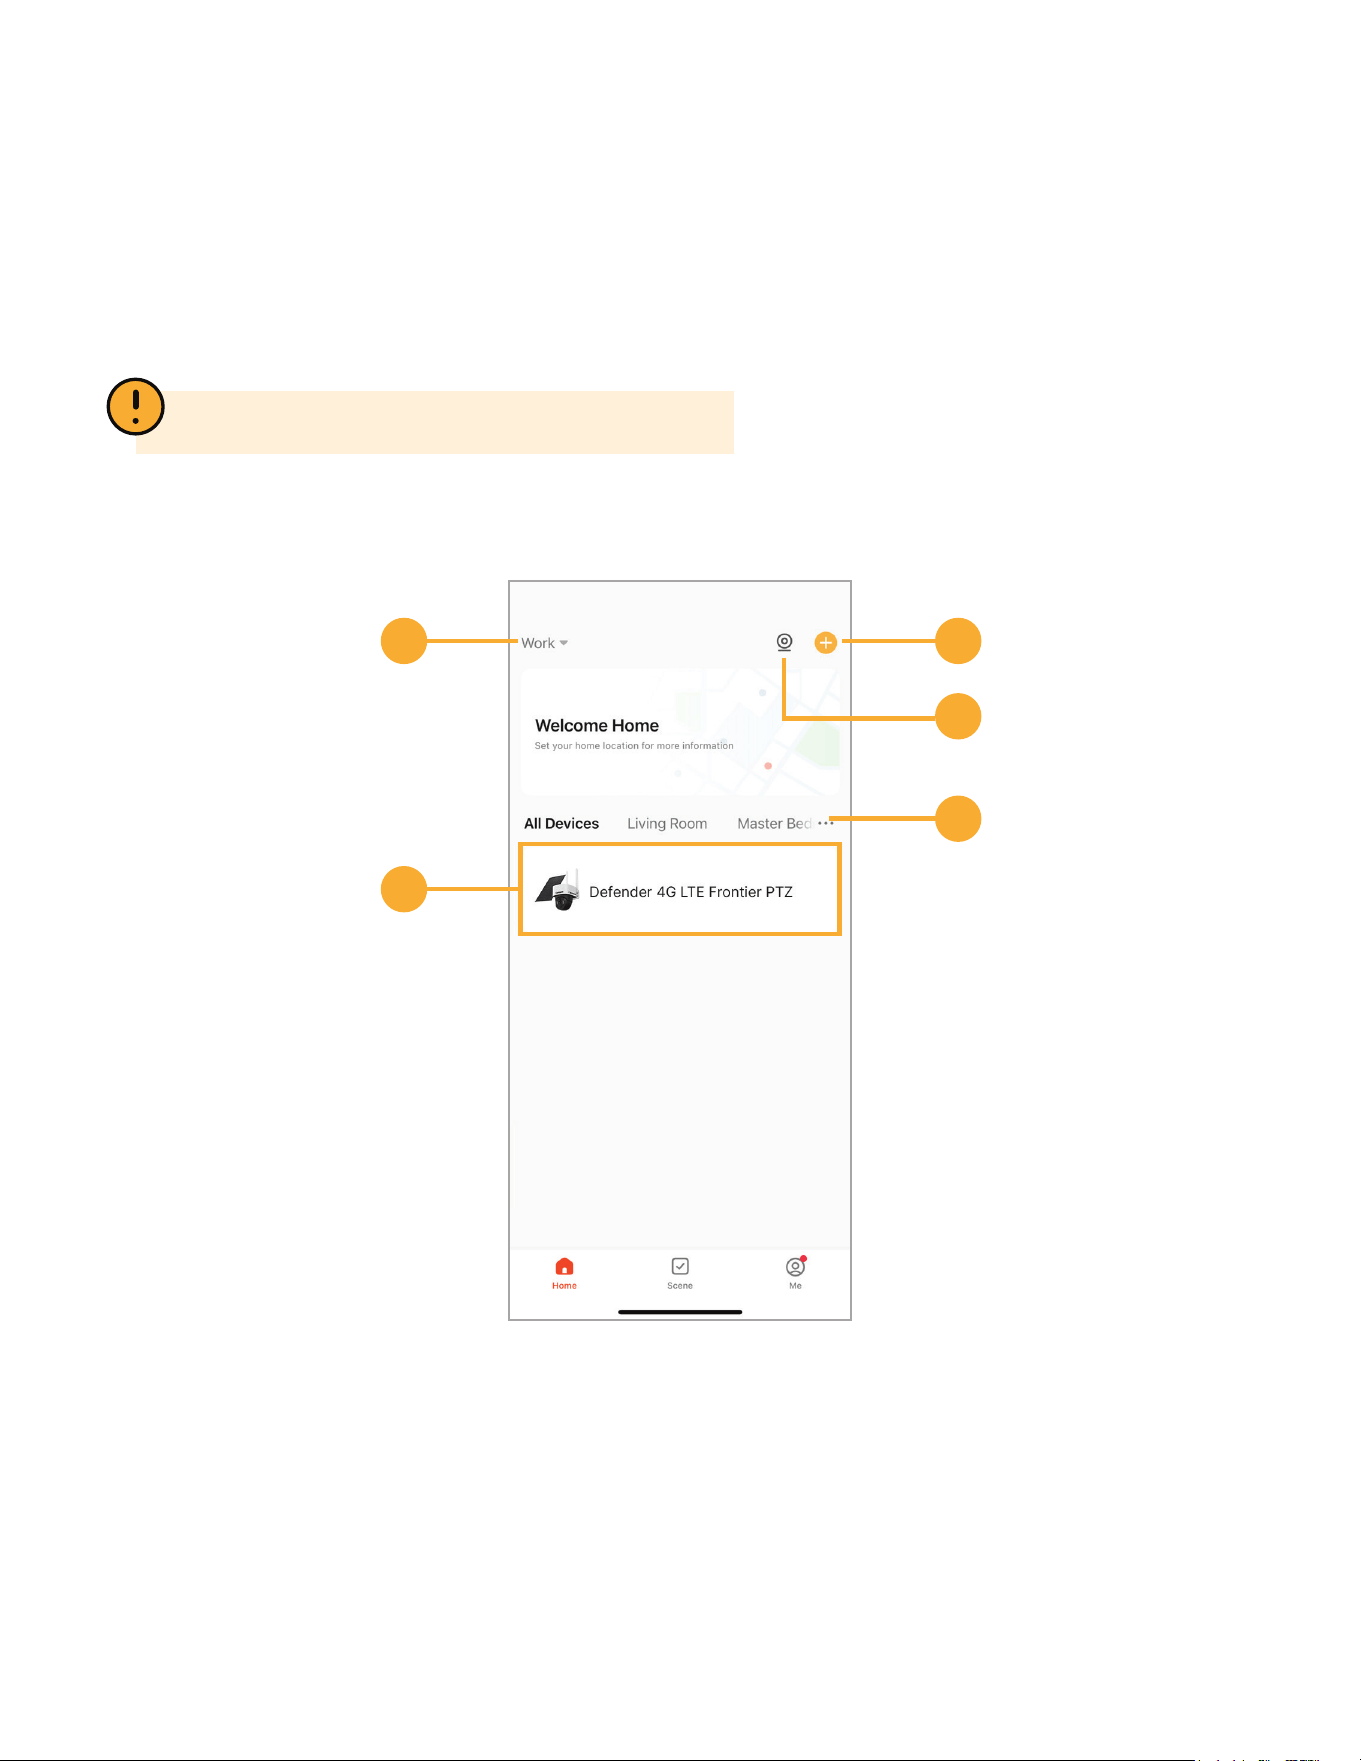
HOMEPAGE
1 3
5
4
2
1. Home Name
2. Added Devices (*Device may not be exactly as shown)
3. Add Device / Create Scene
4. Multiview (available only when two or more cameras are connected)
5. Device Management
PLEASE NOTE: Actual app screen layout may dier.
6
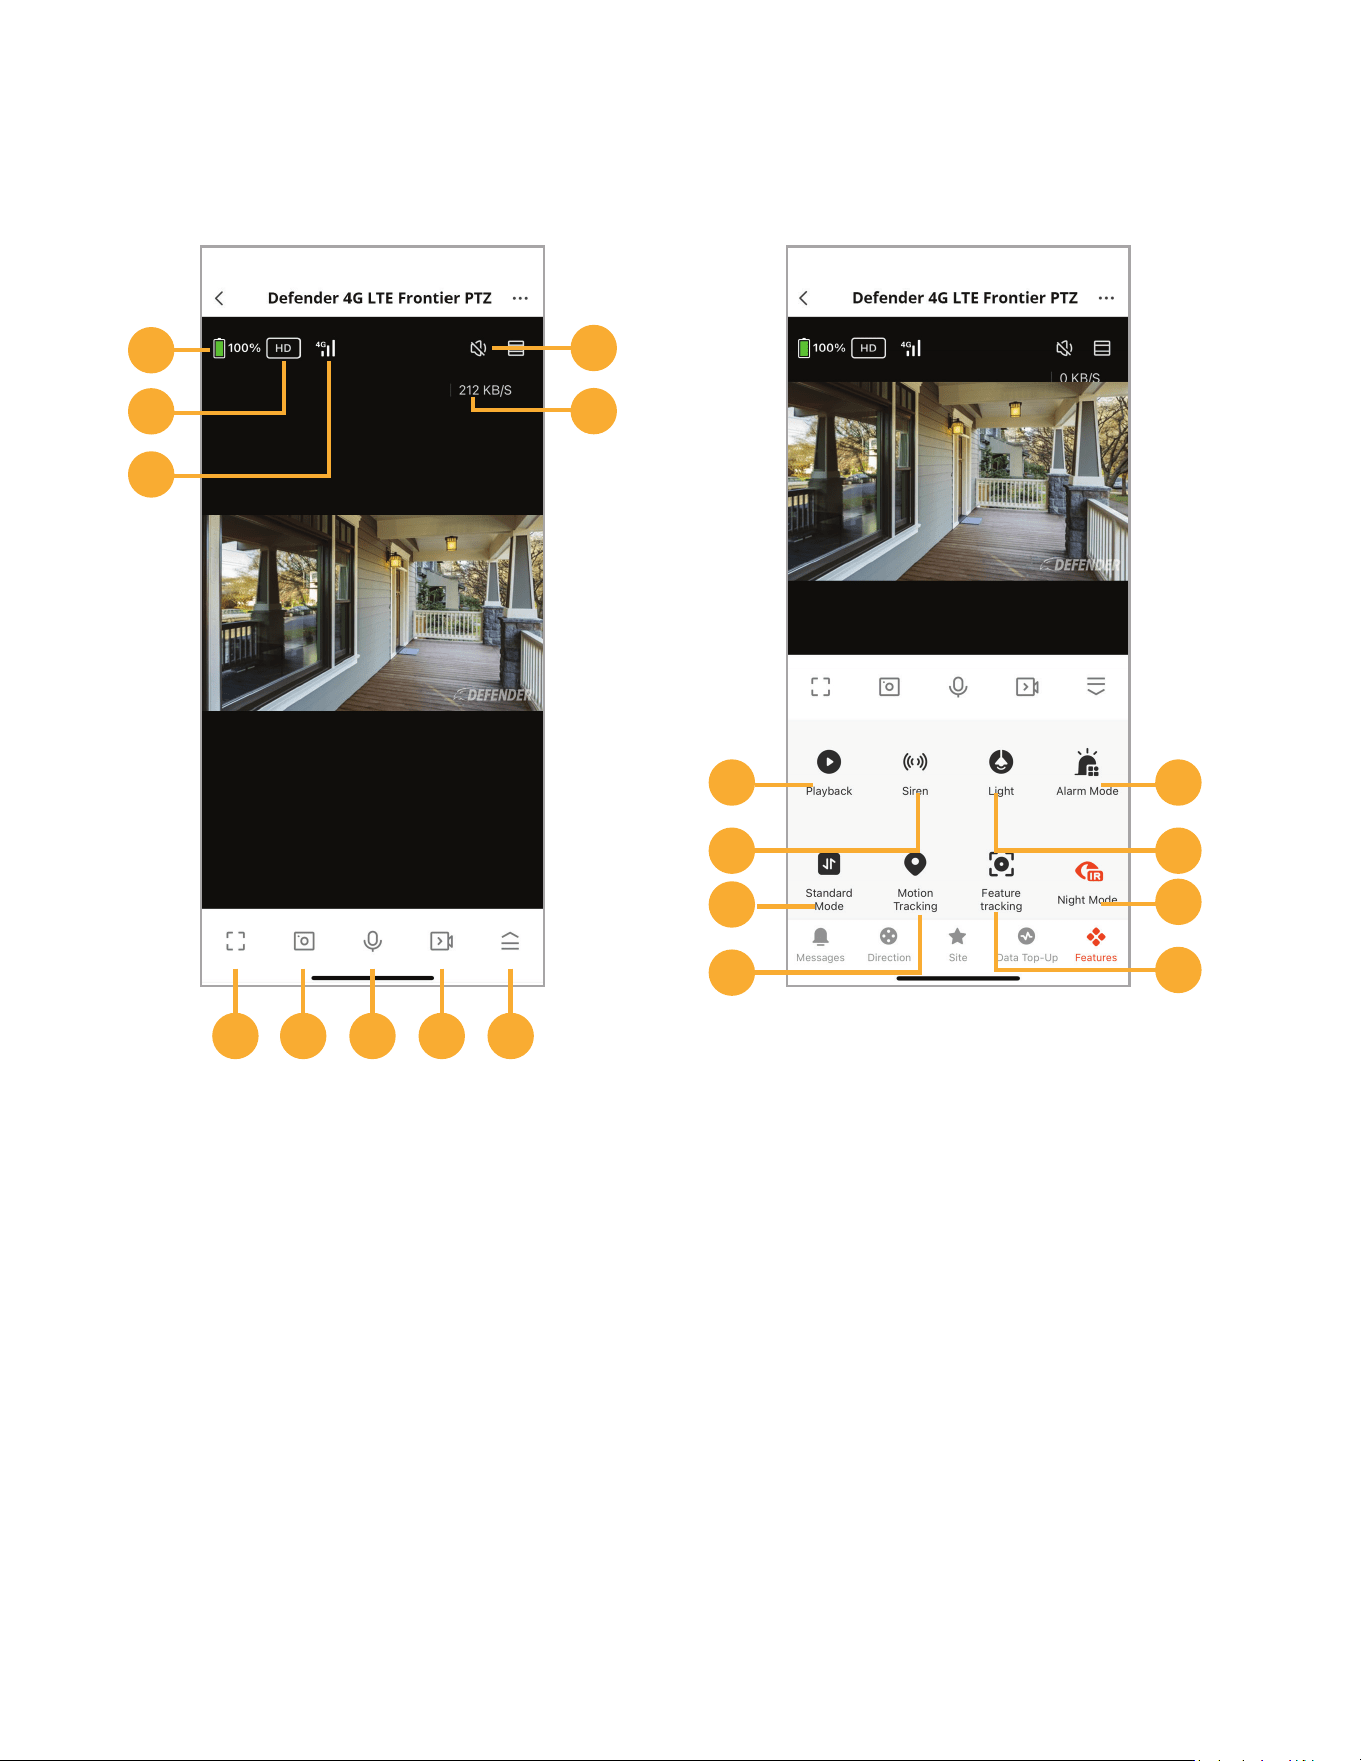
CAMERA LIVE VIEW MENU
1
4
5
2
3
12
14
16
18
6 7 8 9 10
1. Battery Life
2. Toggle between HD and SD
3. Data Signal Strength
4. Audio On/O
5. Video Streaming Data Rate
6. Full Screen Mode
7. Snapshot
8. Two-Way Talk
9. Instant Record
10. Open Menu
11. Playback
12. Siren
13. Standard/ Flow Mode: Switch to
Flowing Mode for smoother video when
the 4G connection is unstable
14. Enable/Disable Motion Tracking
15. Alarm Mode
16. Spotlight
17. Night Vision Modes
18. Feature Tracking: When enabled, the
camera will automatically zoom in on
the object most likely to be a human.
This eect only applies to the live view;
recordings will not include the zoom
11
13
15
17
7
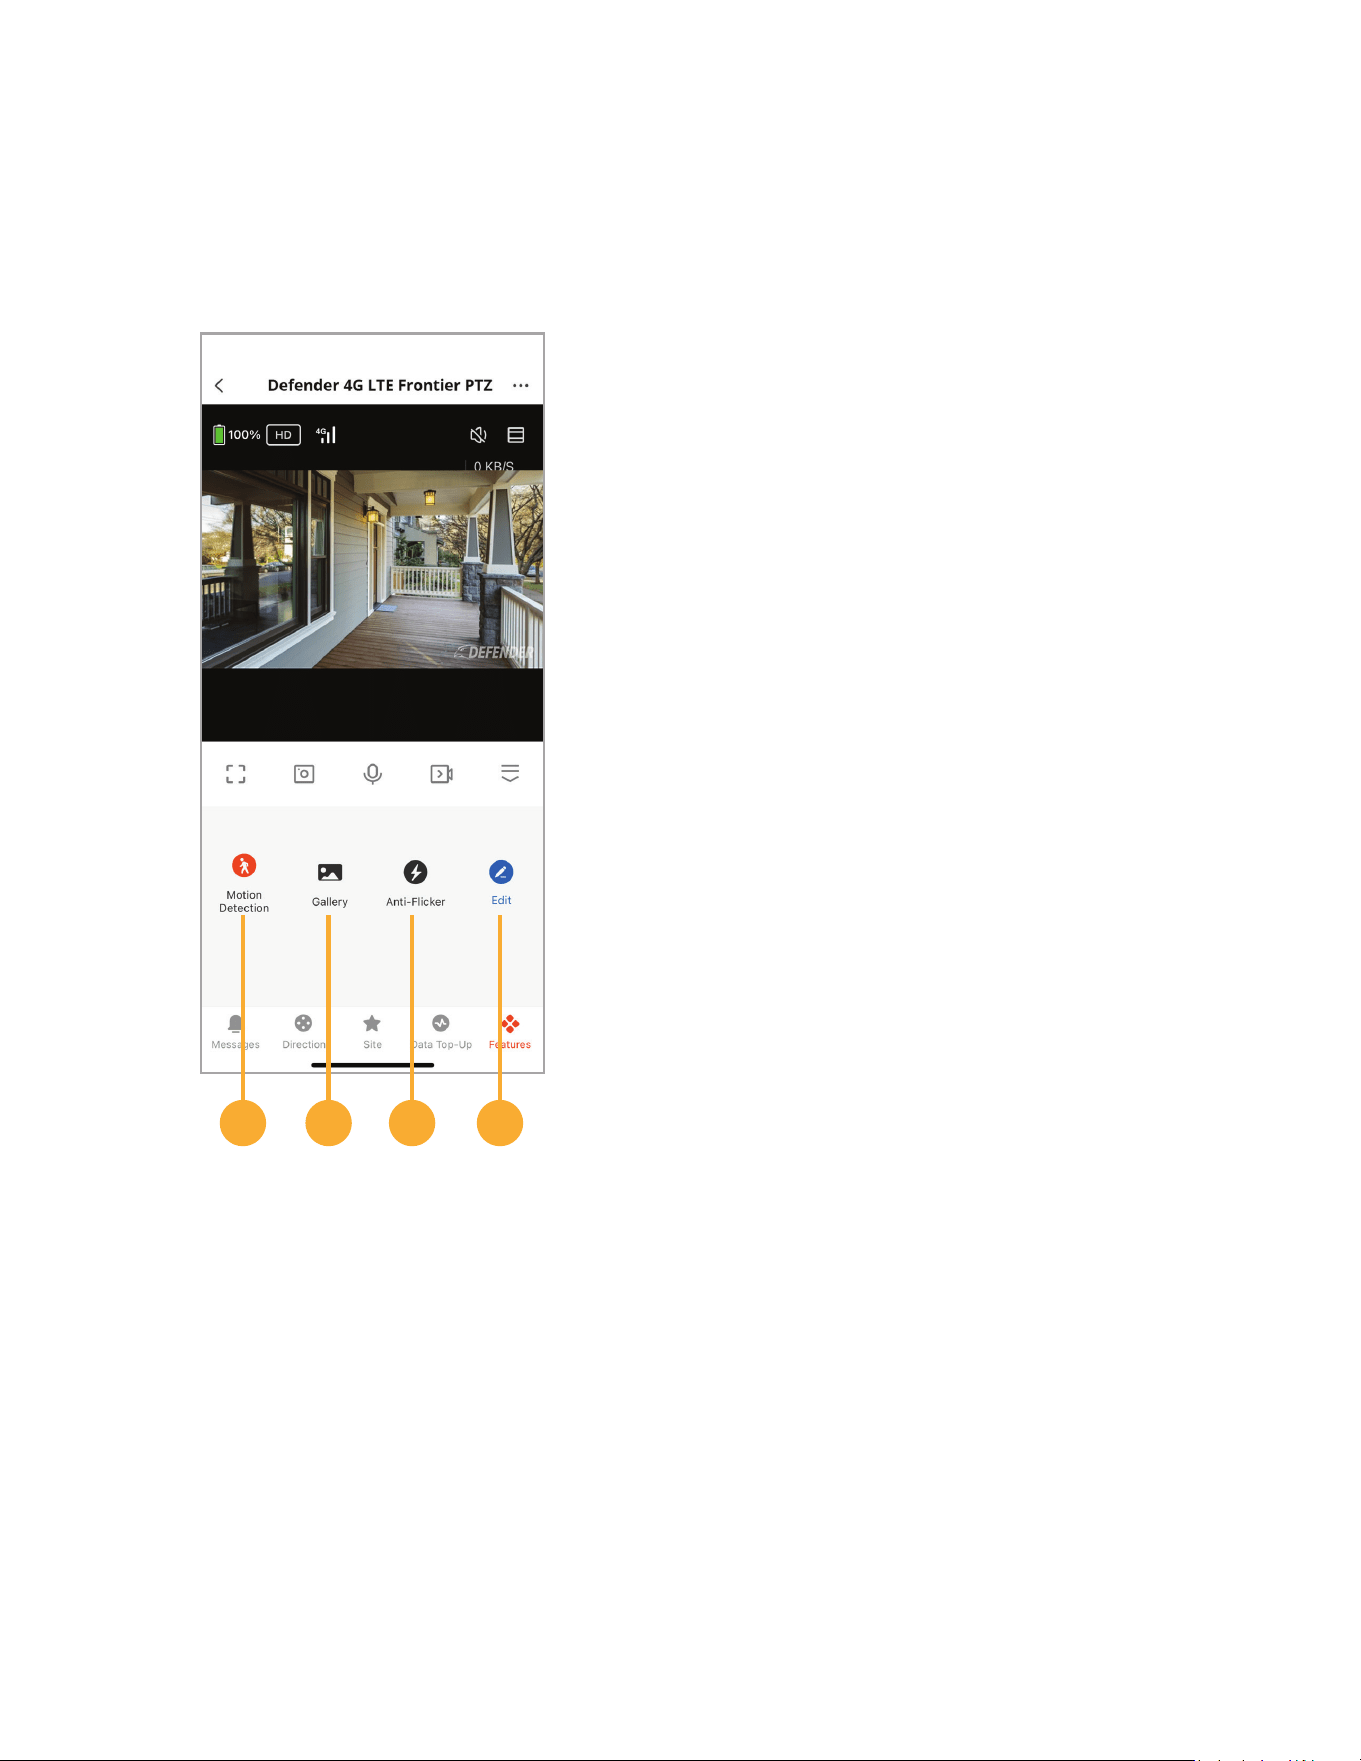
CAMERA LIVE VIEW MENU CONTINUED
19 20 21 22
19. Enable/Disable Motion Detection
20. Picture and Video Gallery
21. Anti-Flicker
22. Edit Features Listed On Menu
8
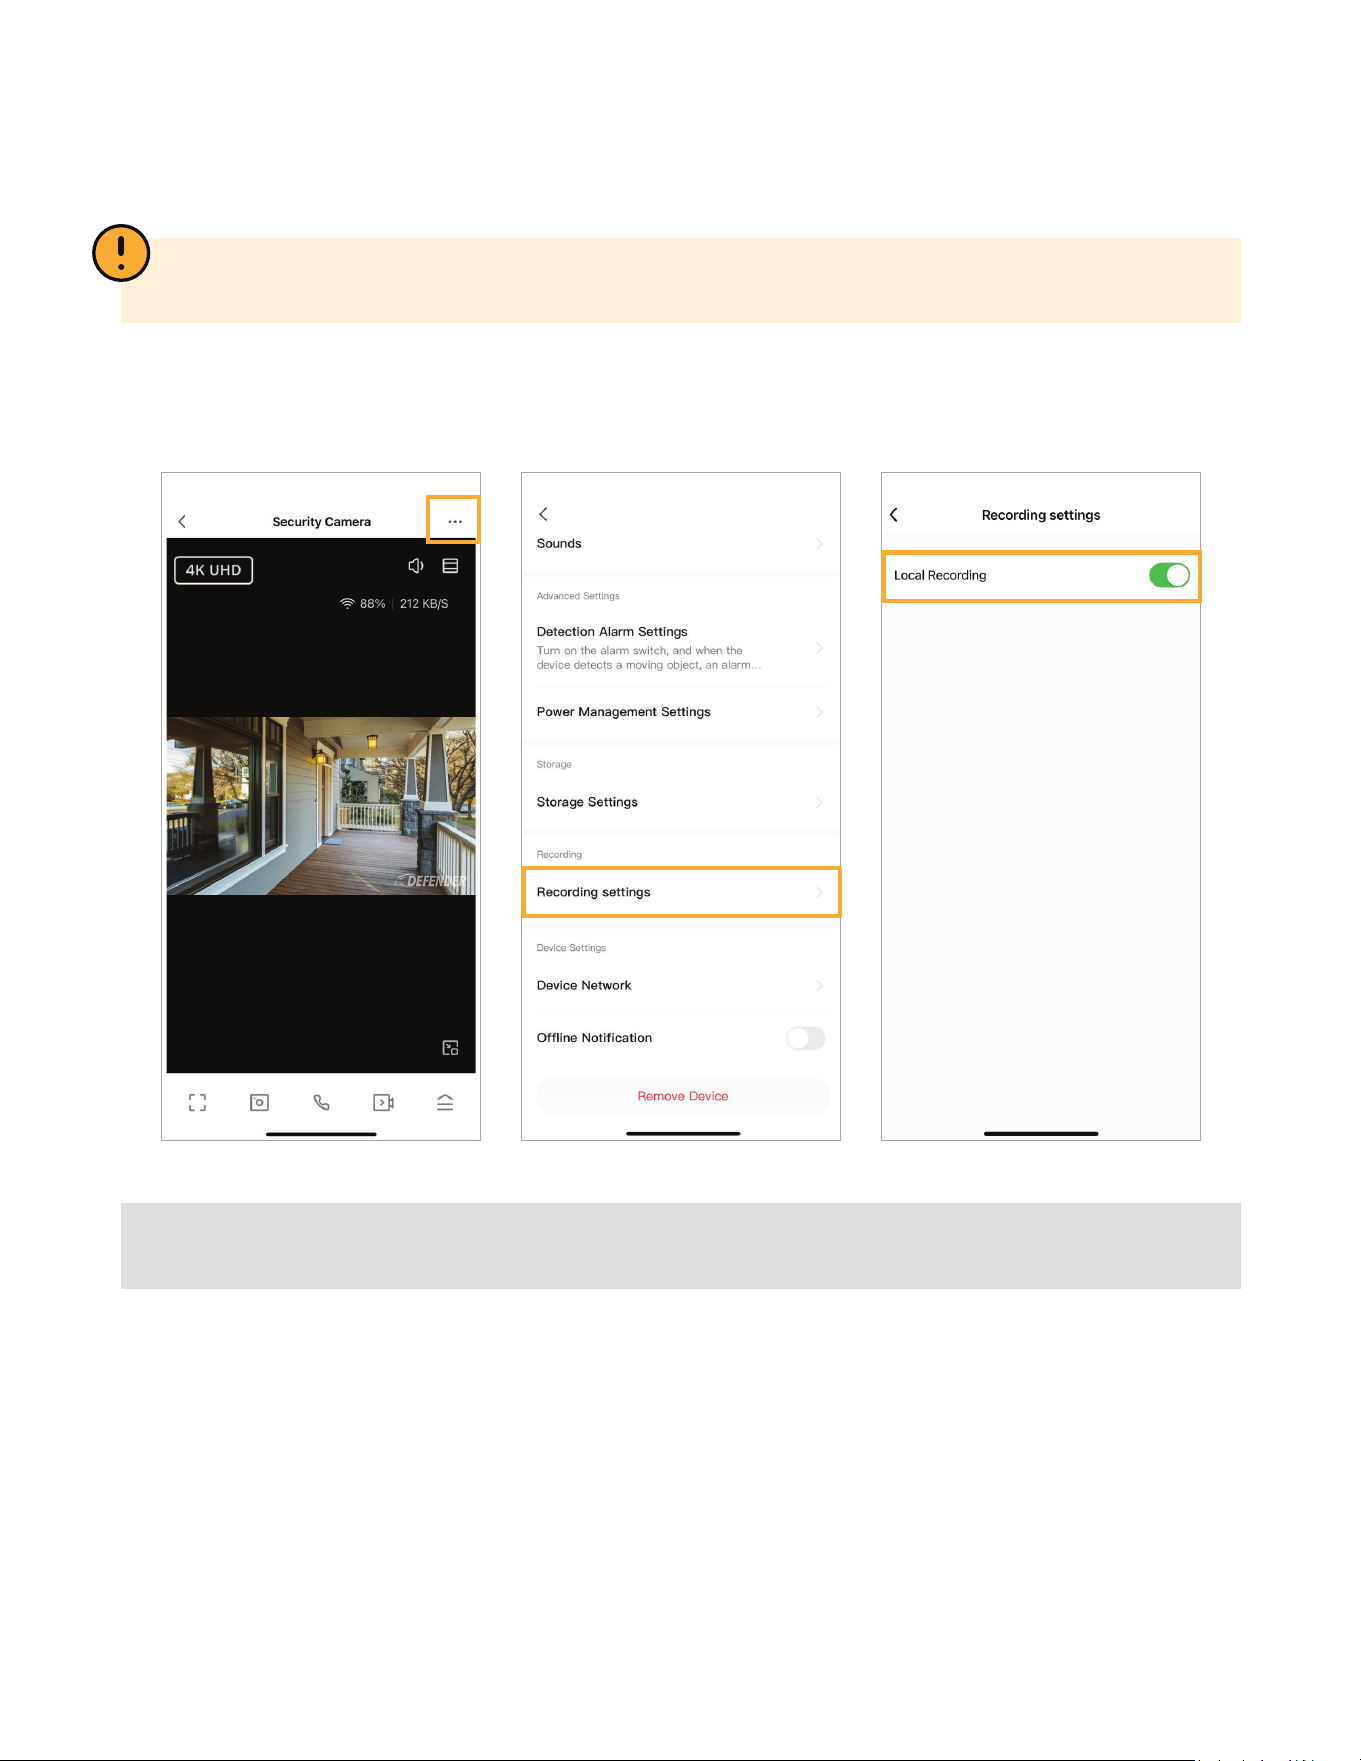
LOCAL RECORDING SETUP
To enable local recording to an SD card, from the home screen select the camera you wish to adjust
the setting for. Next select ( · · · ) in the top right. Select Recording Settings and toggle on Local
Record.
NOTE: Continuous recording is not supported on 4G LTE Solar Powered 2K+ AI Frontier PTZ in order to
prolong battery life. Recording Settings are only available when a SD card is inserted.
NOTE: Once the SD card is full, the camera will continue to record by
overwriting older footage.
9
SHARE APP ACCESS
There are two options to share App Access. Option 1- Share account access, allowing you to share all
cameras connected to the account. If you wish only to share one camera, please see option 2.
IMPORTANT: Before sharing App Access, each user will need to download the Defender Empower
App and create their own account.
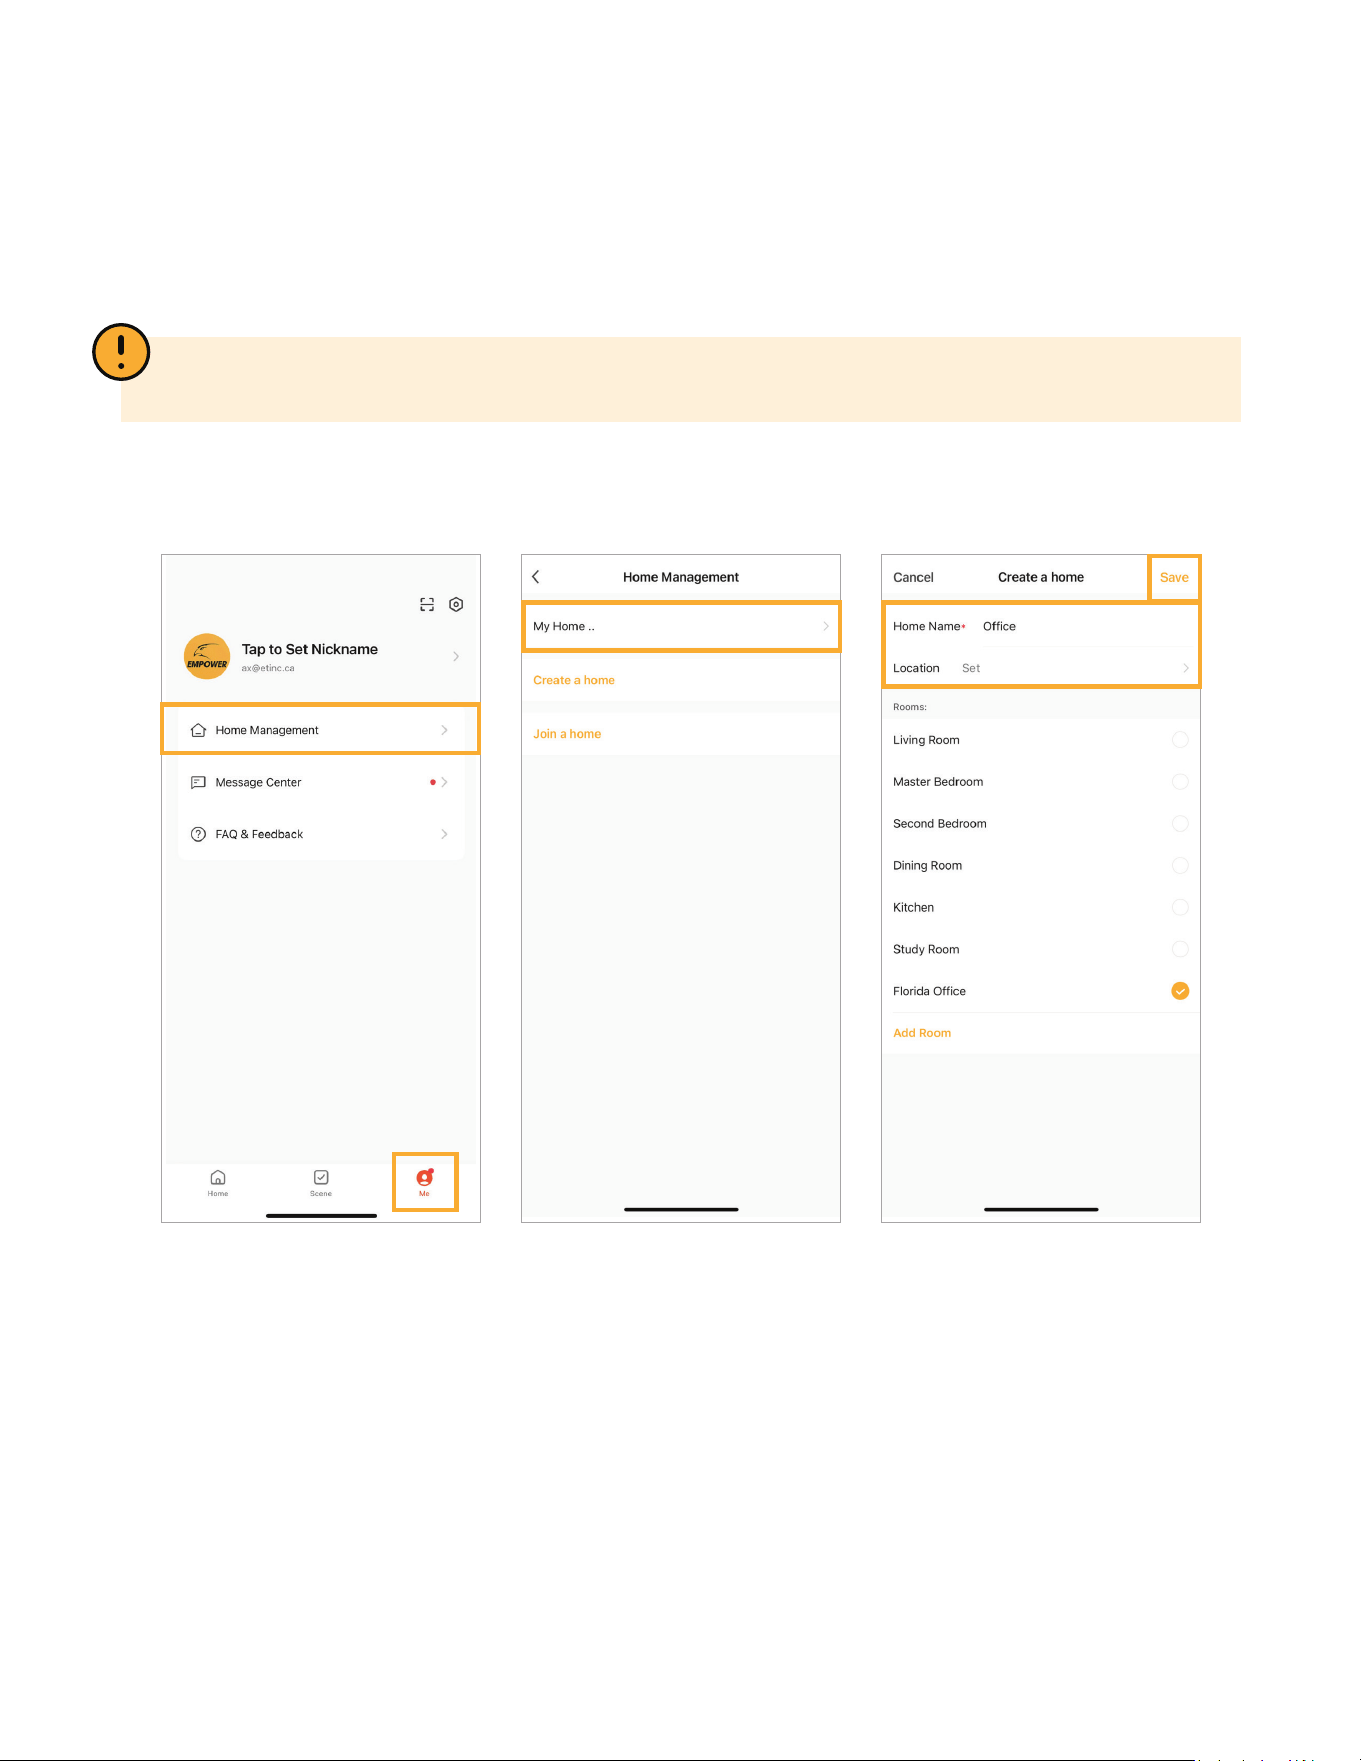
OPTION 1
Launch your App and tap on
‘Me’ then tap
‘Home Management’.
Tap ‘My home’. Enter a Home Name and Location.
Select only one ‘Room’ location or
create a custom room by tapping
“Add Room”. Tap ‘Save’.

10
Tap ‘Done’. Tap on the device location you
would like to share.
Tap ‘Add Member’.
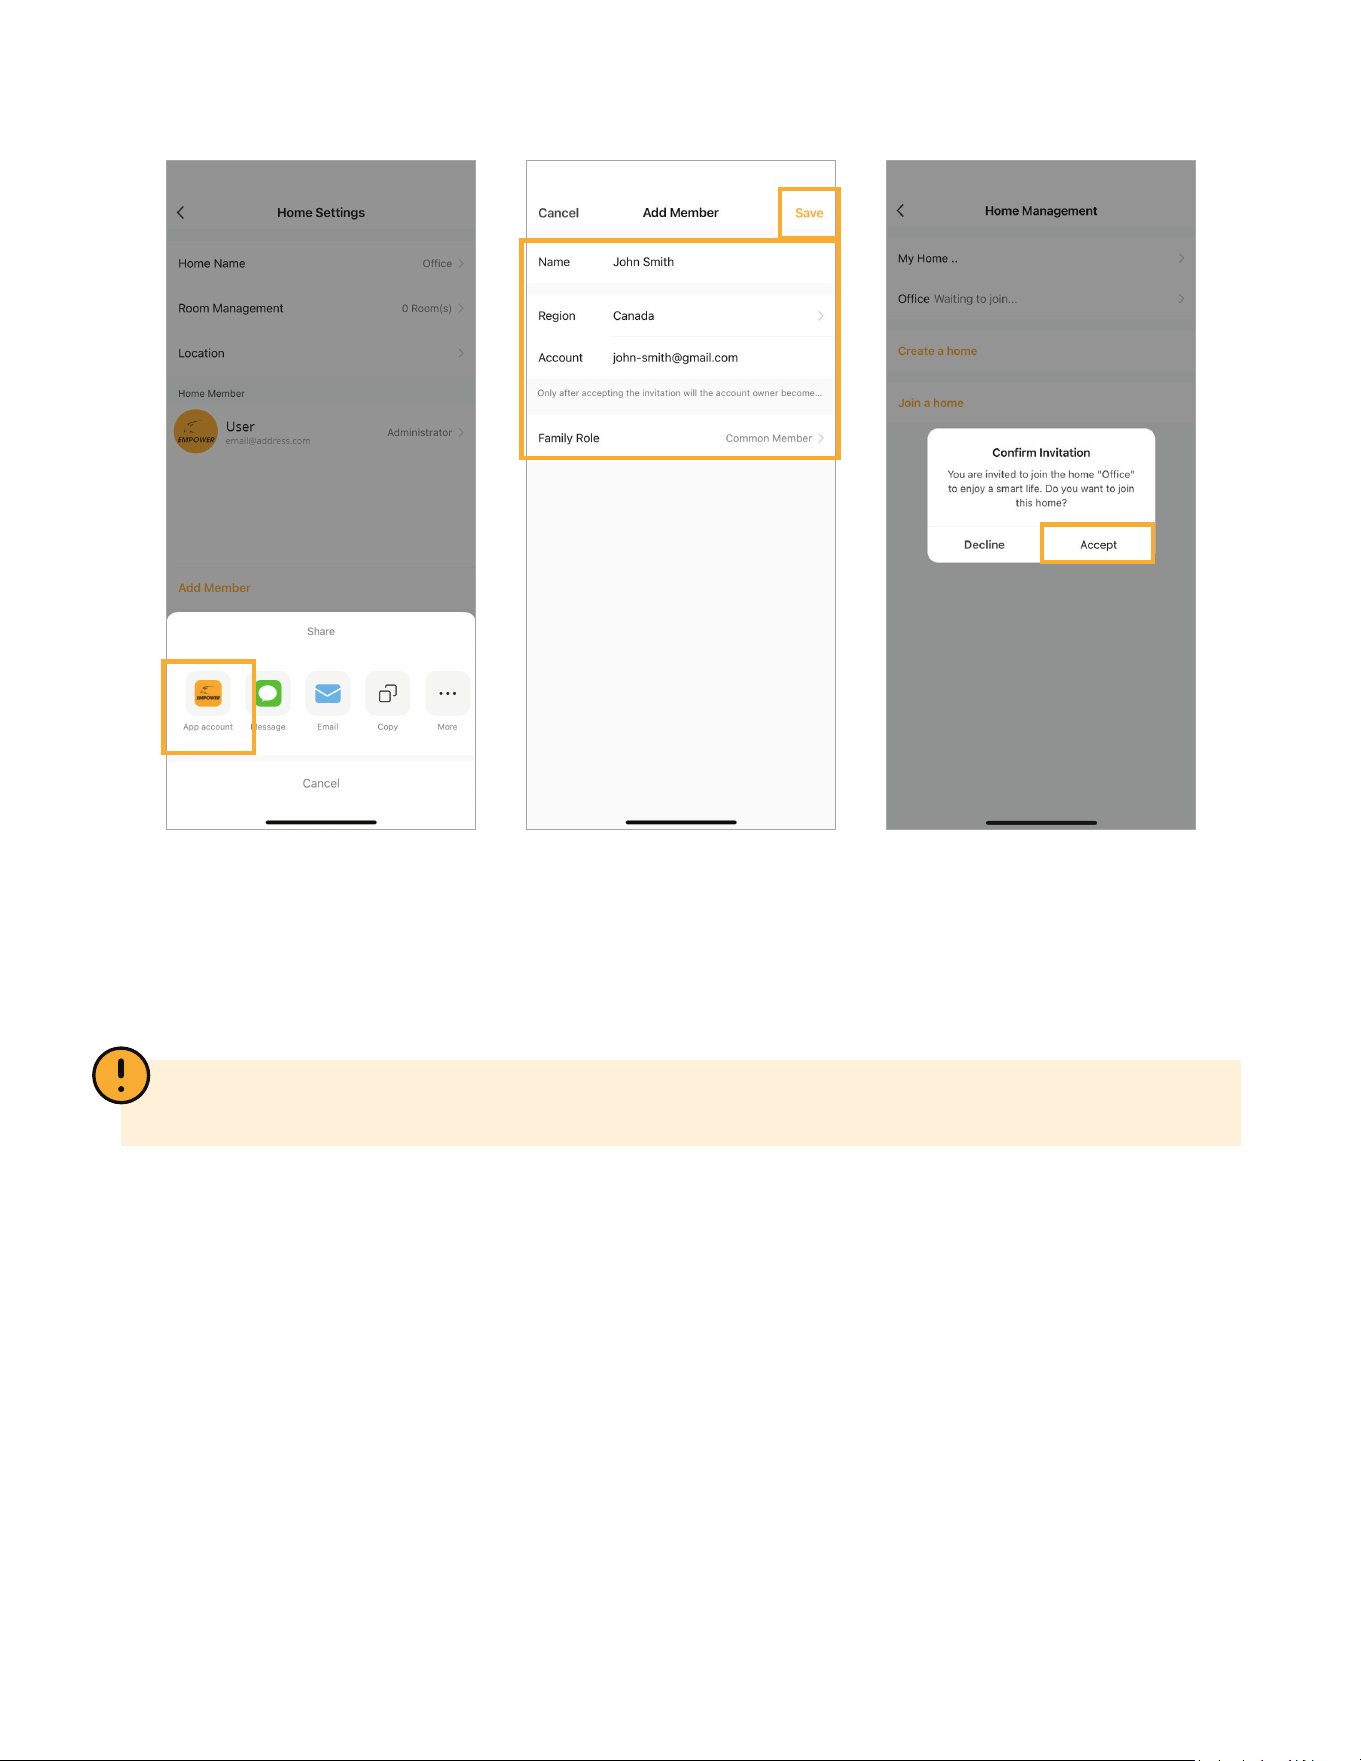
11
Tap the Defender Empower
App account.
Fill in the other user’s account
information to share App ac-
cess, then tap ‘Save’.
The other user is required to tap
“Accept” in their app account to
conrm the invitation.
PLEASE NOTE: If you select Common Member, the user will only have access to view the camera. To
allow full access, switch to Administrator.
12
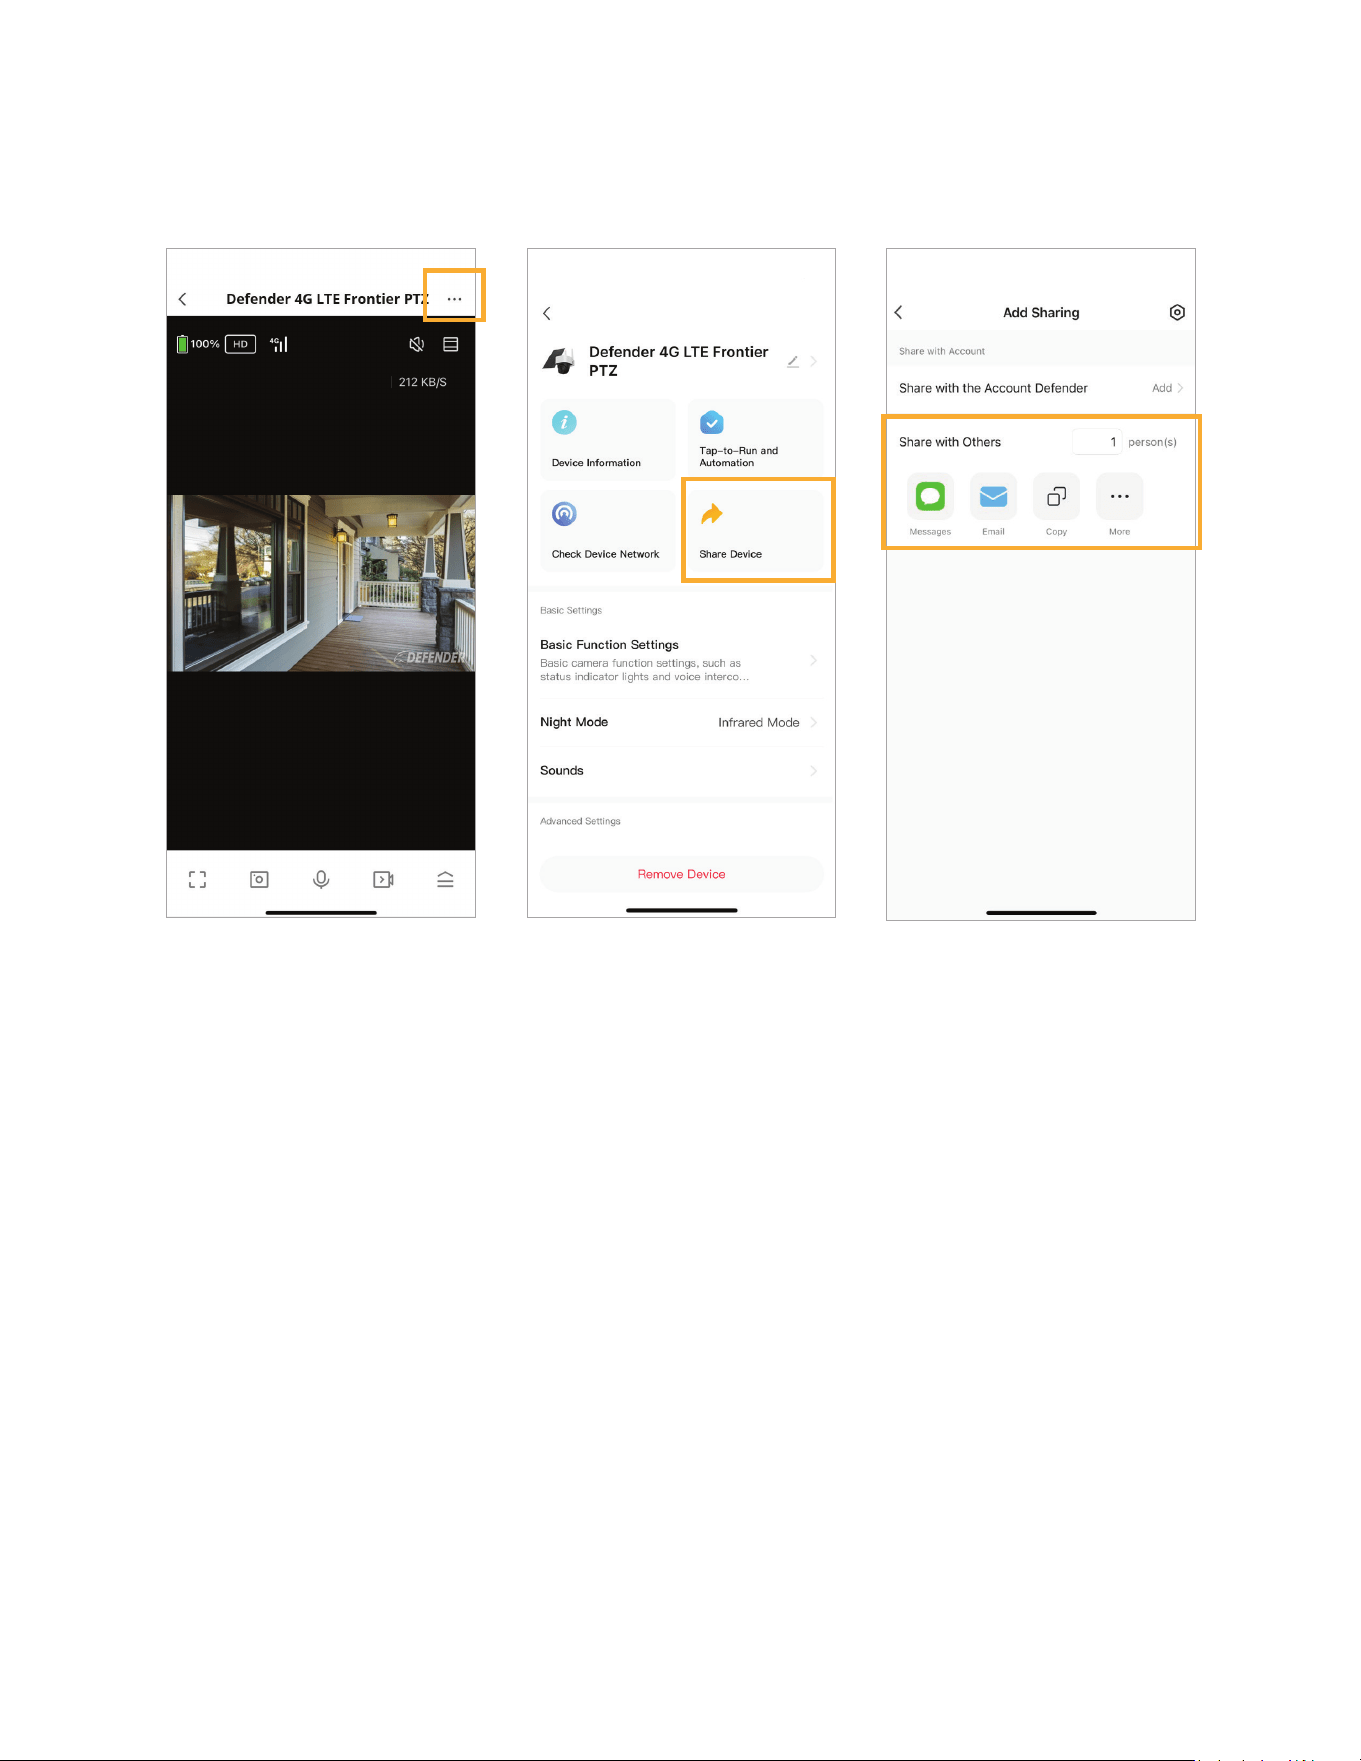
OPTION 2 - SHARE ACCESS TO ONE CAMERA ONLY.
From the live view screen, tap
the 3 dots (···).
Select ‘Share Device’. Select the method you wish to
share access, for example by
text or email.
13
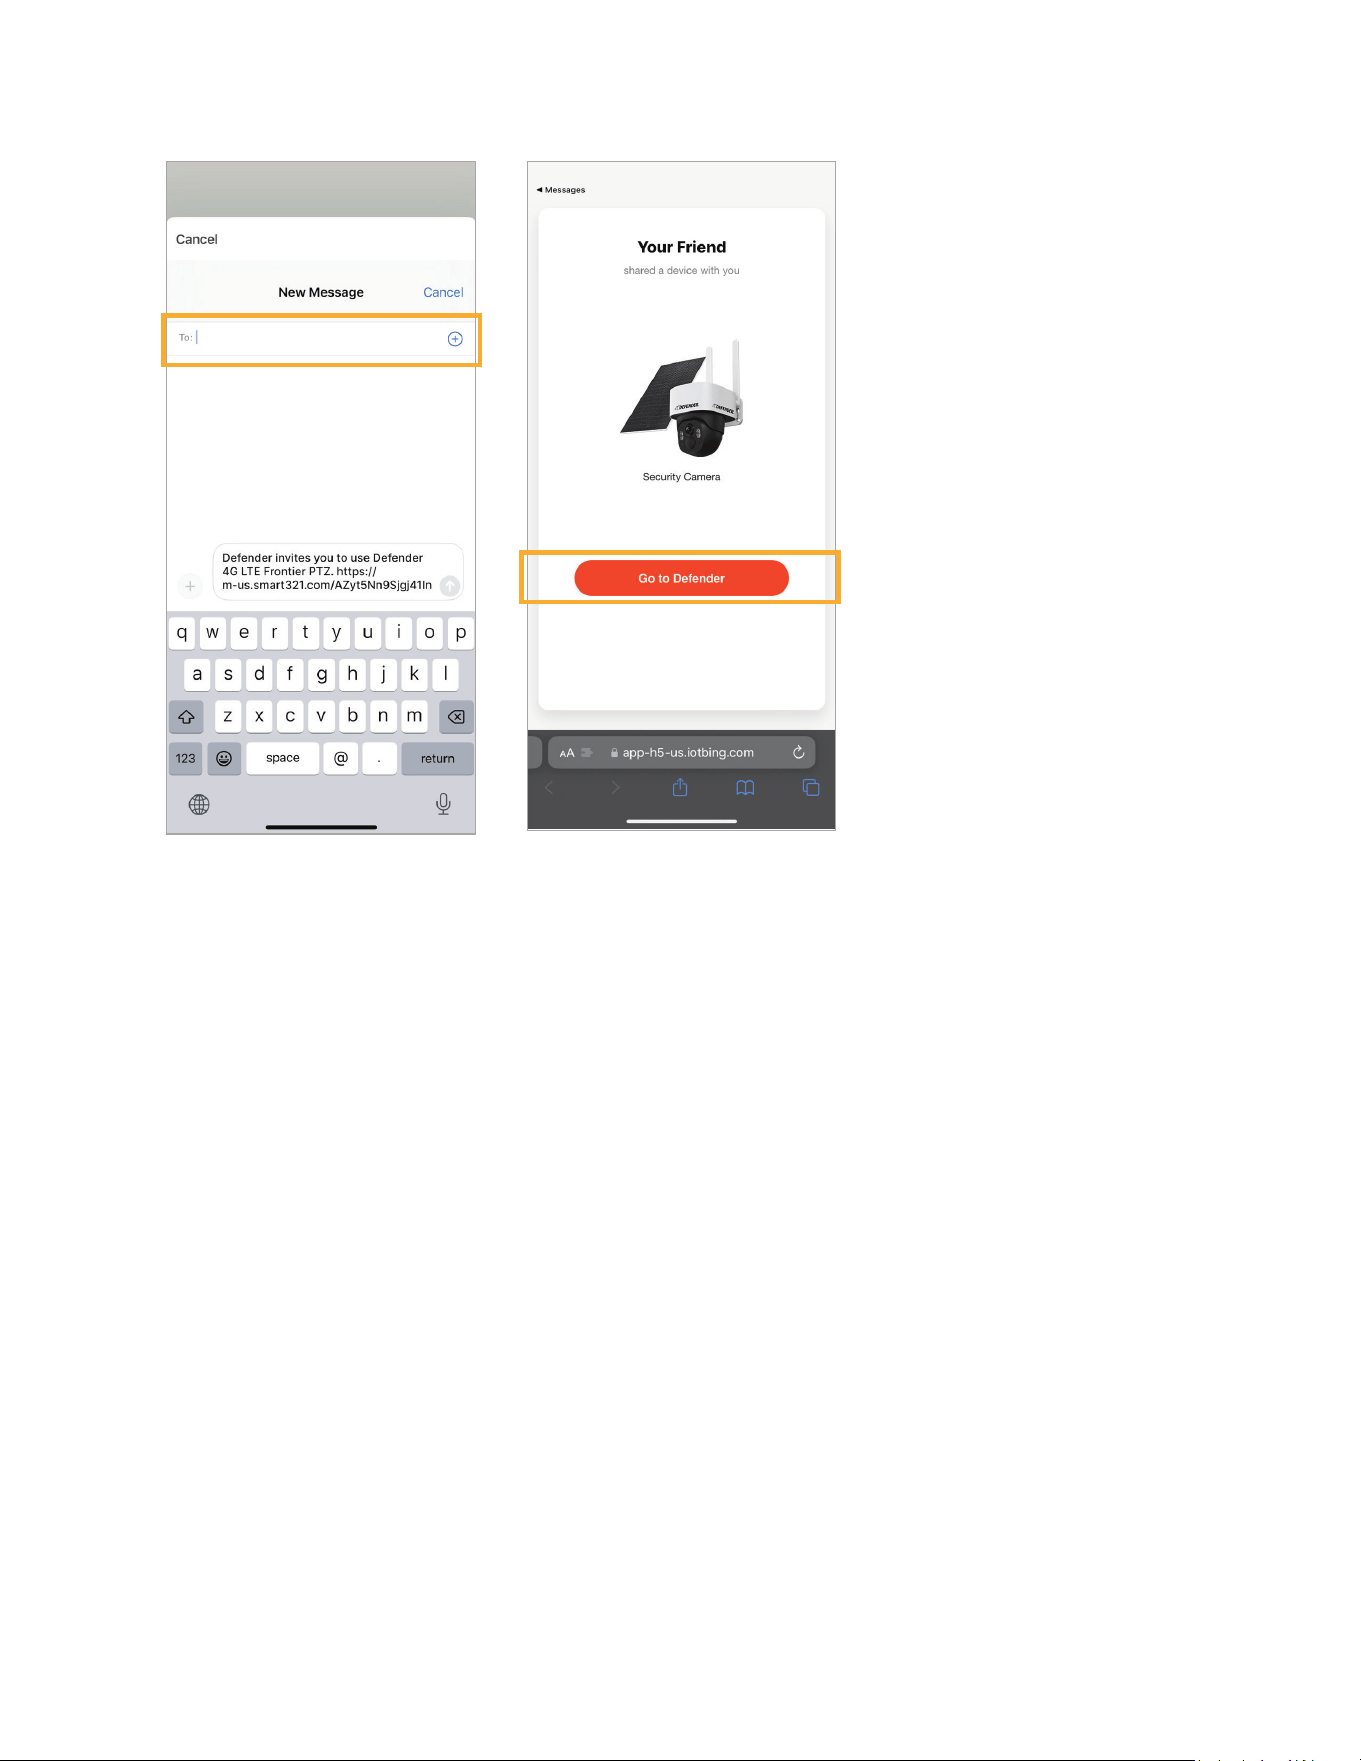
Enter the information of the
person you wish to share
access with.
The other user will get a message
with a link, and click “Go to
Defender” The other user can
now accept the share request.

14
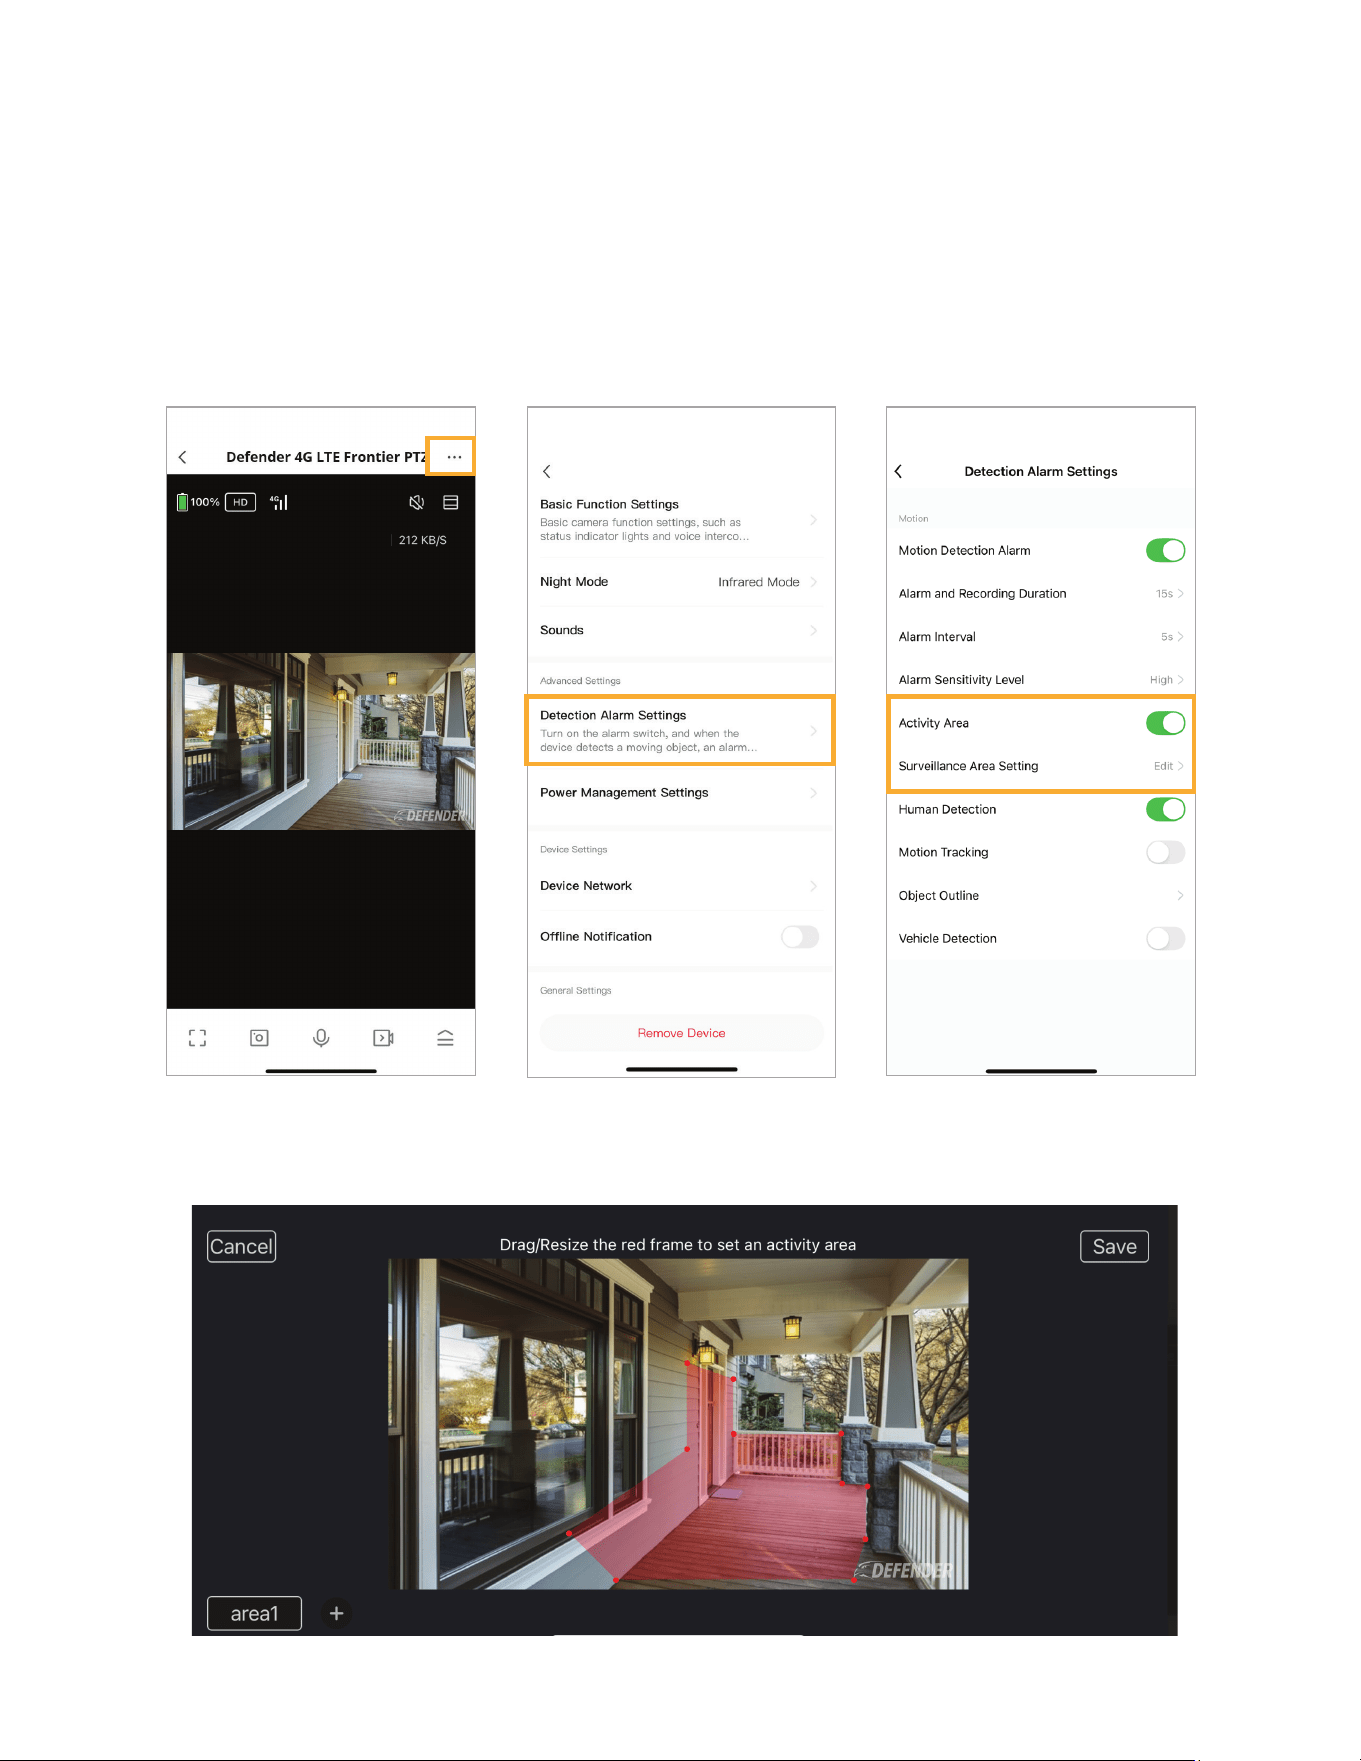
SETTING UP MOTION DETECTION
To access Detection Settings, navigate to the live view screen, tap ( · · · ), and select Detection Alarm
Settings. To access detection settings, enable Motion Detection Alarm.
*Repeat for each camera.
Alarm and Recording Duration – Allows users to set how long the camera records after detecting mo-
tion, with a maximum duration of 120 seconds per event.
Alarm Interval – The time gap between consecutive recording events. After each event, the camera
enters a 5-second sleep mode during which it cannot be reactivated. This is designed to prevent contin-
uous triggering from a single event.
Object Outline – This feature allows users to enable a visual frame around detected objects, highlight-
ing them on the camera display.
Motion Tracking – Allows the camera to automatically pan and tilt to follow movement, whether it’s a
person or vehicle, based on the user’s selected settings.
Human and Vehicle Detection – Enables users to customize which types of motion trigger recordings
and alerts. You can choose to detect humans, vehicles, or both. If neither option is selected, the camera
will record all motion events by default.
15
SURVEILLANCE AREA SETTING
To access the Surveillance Area Setting, navigate to the live view screen, tap ( · · · ), and select Detection
Alarm Settings.
Toggle on Activity Area. Select Edit.
Drag the circles to set your motion detection area. The areas highlighted will detect motion. To add
additional areas, tap the + icon. Select Save to conrm your changes.
16
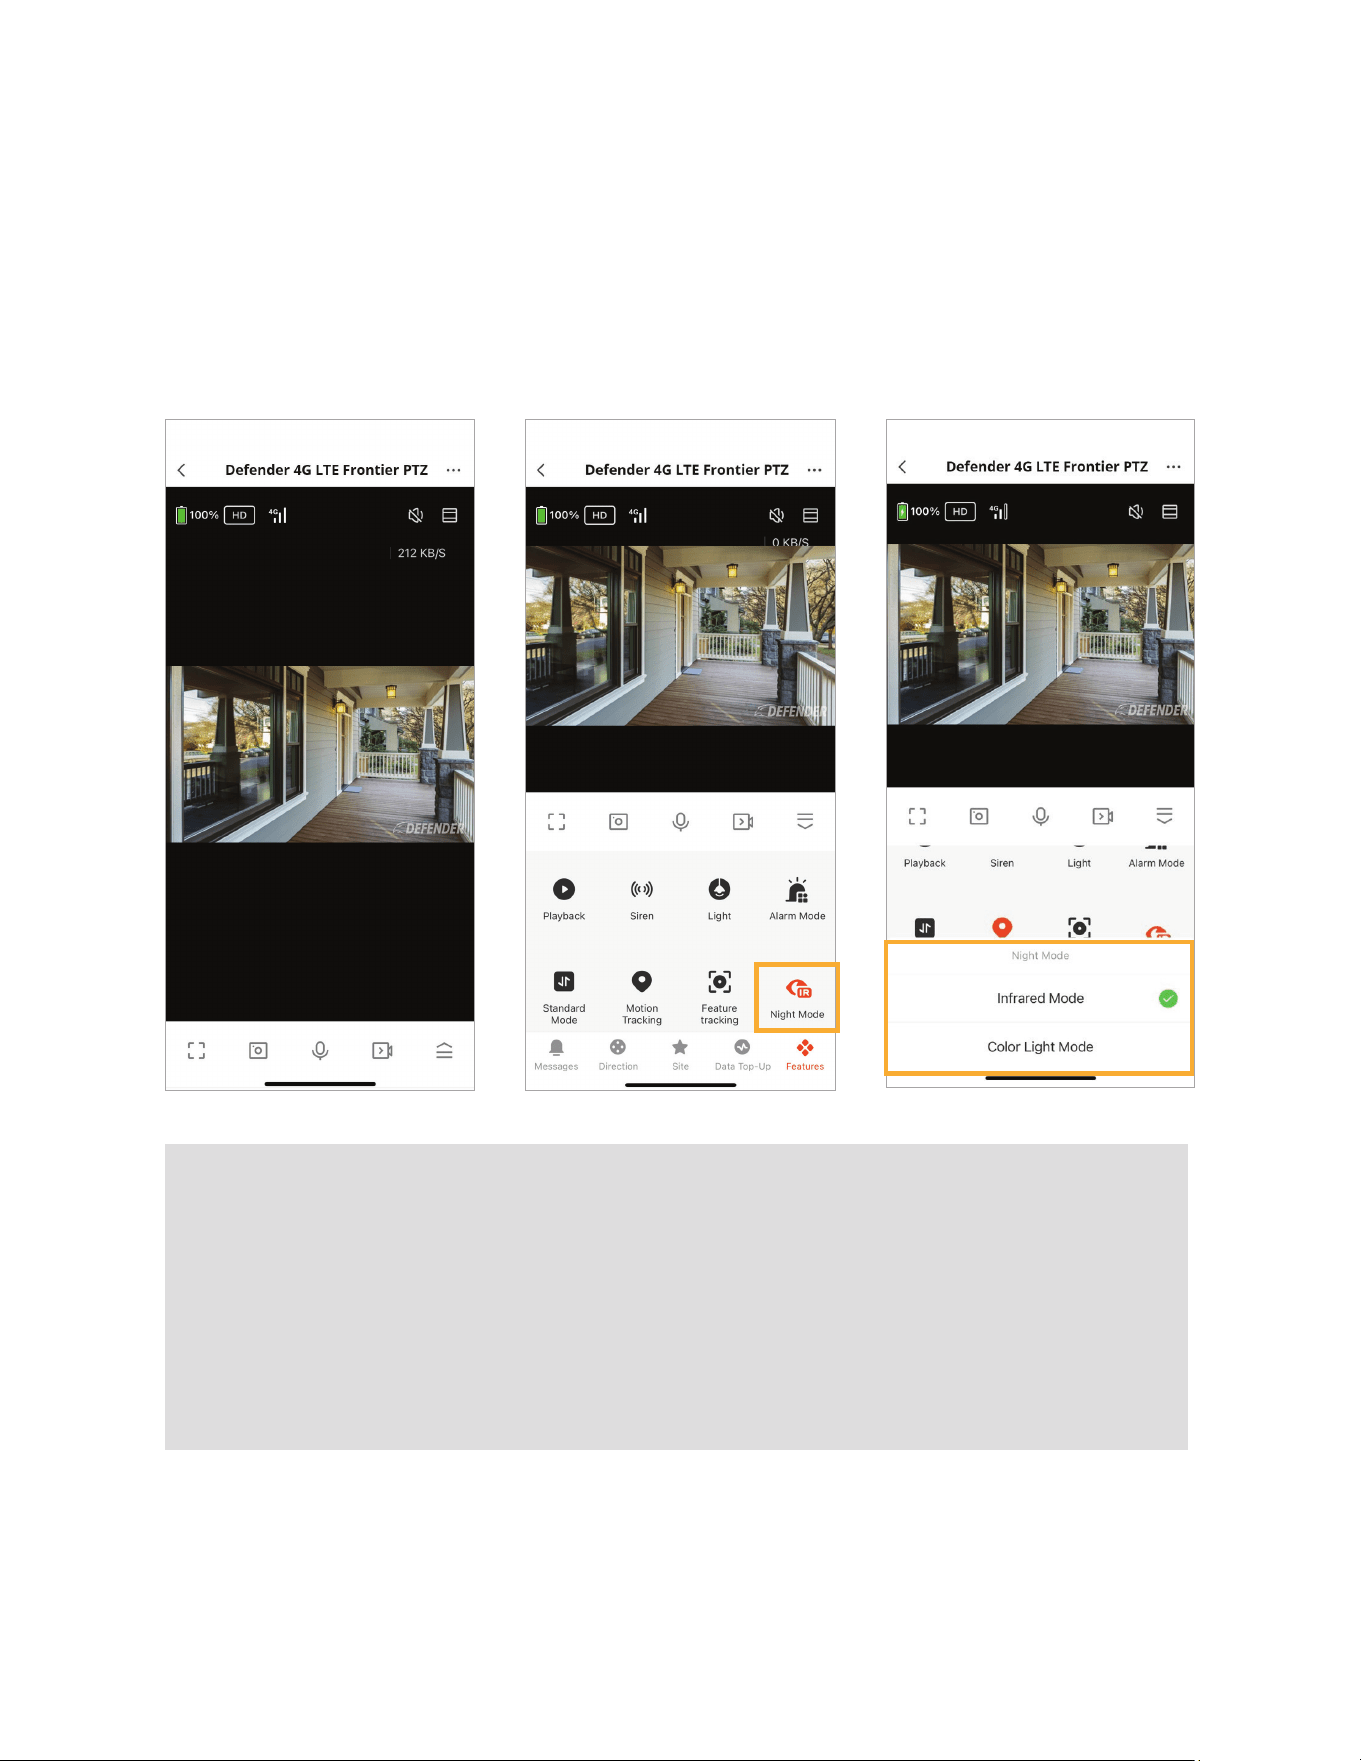
SETTING UP NIGHT VISION
To access Night Vision settings, from the Live View Screen, tap (up arrows icon) and select Night
Mode. Select your preferred night vision mode.
*Repeat for each camera.
INFRARED MODE
The image will be in black and white.
COLOR LIGHT MODE
The spotlight will activate to provide full-color night vision when the camera is being viewed
live or when motion is detected, triggering recording. All recordings will be in color. The spot-
light will turn o to conserve battery when the camera is not being viewed live or when no
motion is detected.
17
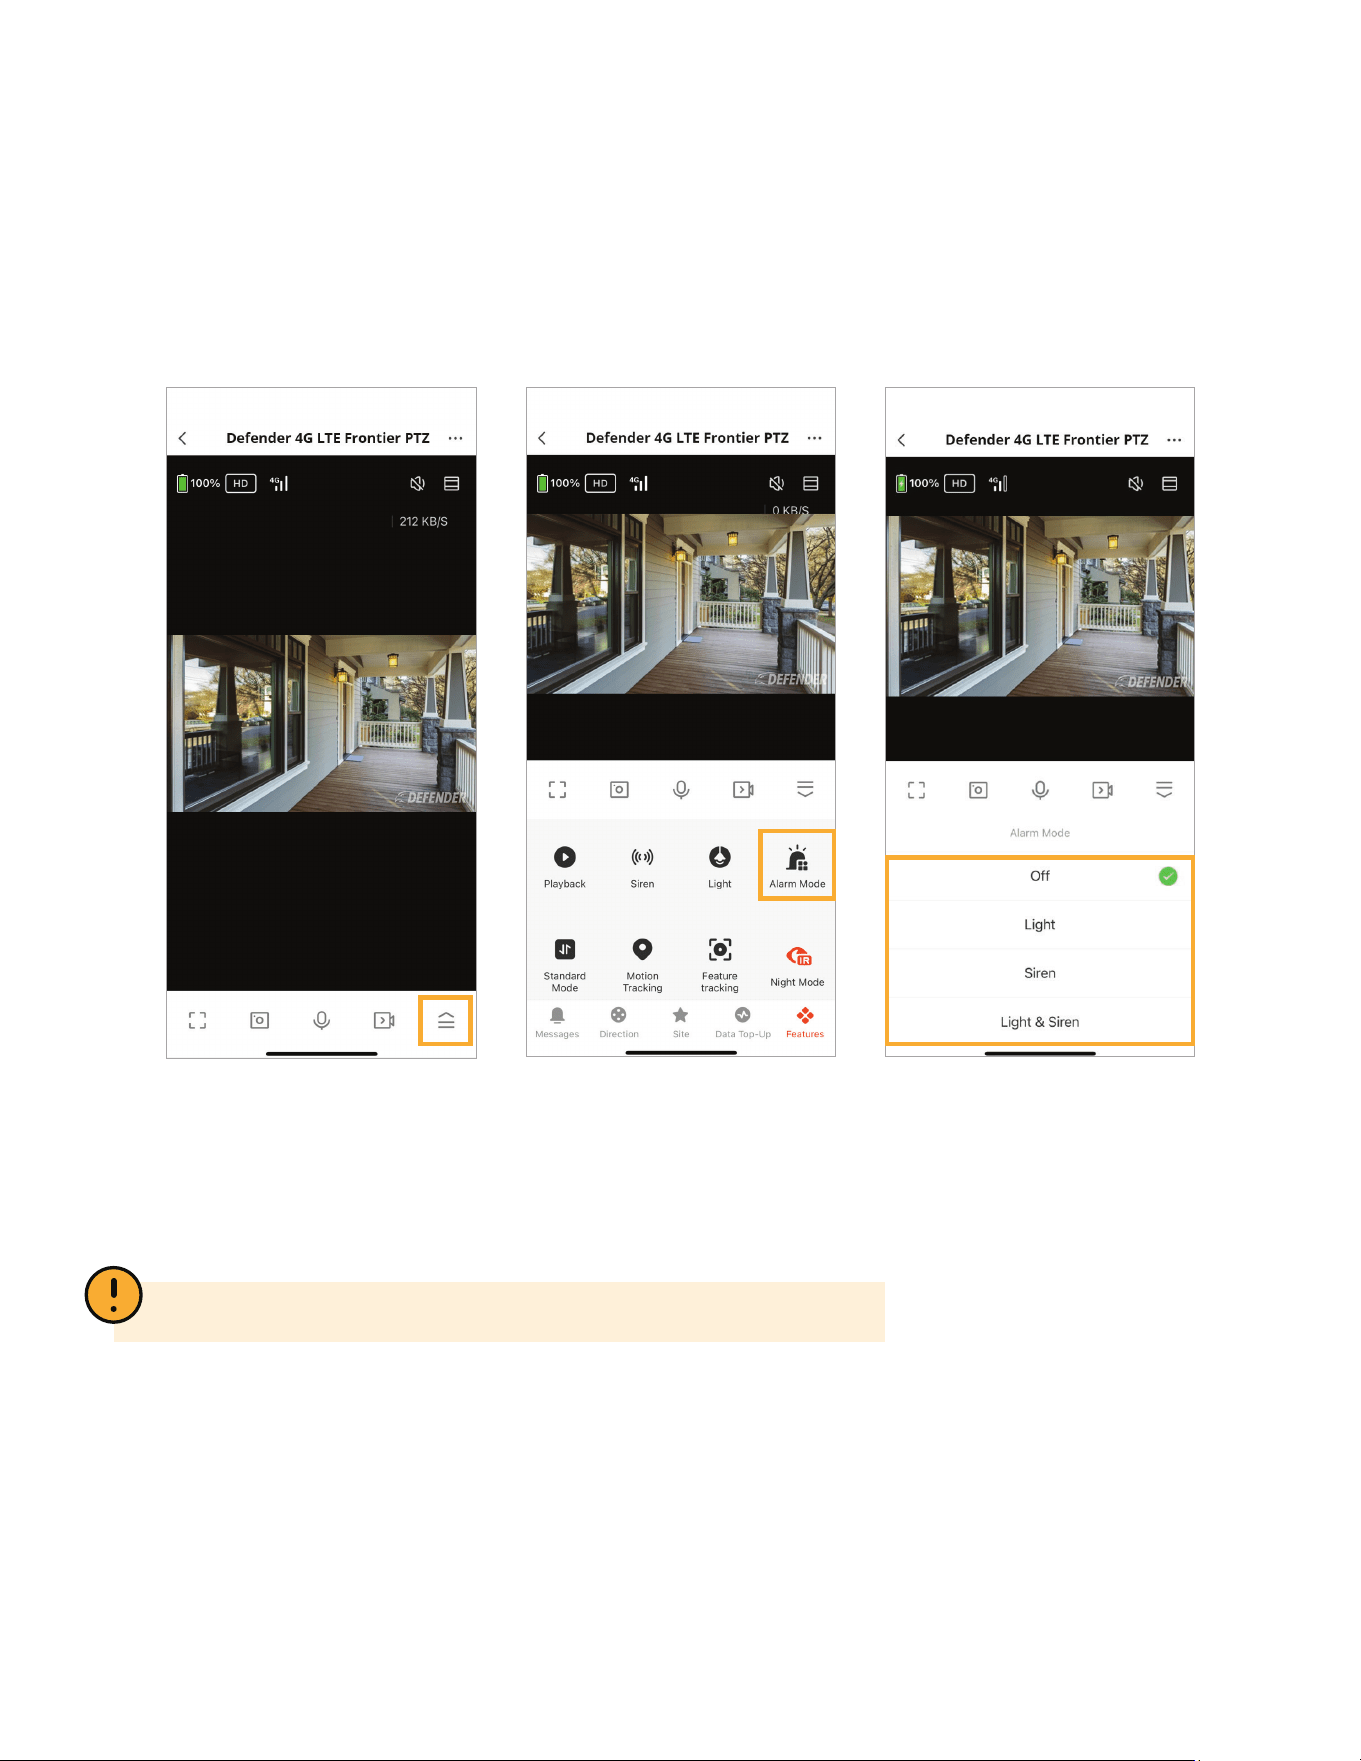
SIREN DETERRENCE SETTINGS
To access Siren settings, from the Live View Screen, tap (up arrows icon) and select Alarm Mode.
Light: Enables the spotlight to turn on based on the users preferred motion detection settings. The
spotlight will remain on for 10 seconds.
Siren: Enables the siren to turn on based on the users preferred motion detection settings. The
siren will remain on for 10 seconds.
Important: The alarm is loud, please use caution when activating.

18
SETTING UP NOTIFICATIONS
IMPORTANT: Alarm and Message Push with image notications are on by default. If this is your preferred
setting, skip this step.
To turn o Notications from the Home Screen, select Me. Select the Settings icon and select App
Notications. Select your preferred notication settings.

19
PLAYBACK
You have two ways to access recordings in the Defender Empower app, direct playback or via mo-
tion notications (See Notications section)
OPTION ONE:
Step 1: On the live view
page, tap to open the
control panel menu. Tap
“Playback” .
Step 2: From this page, select
your desired date to start
viewing recorded footage.
Tap > Select date.
PLEASE NOTE: Days with no
recording, will be greyed out.
Dates with recording will
appear black.
Step 3: Scroll left to right to
view recordings, displayed
by vertical blue lines. Pinch
to zoom in and out of your
timeline.
20
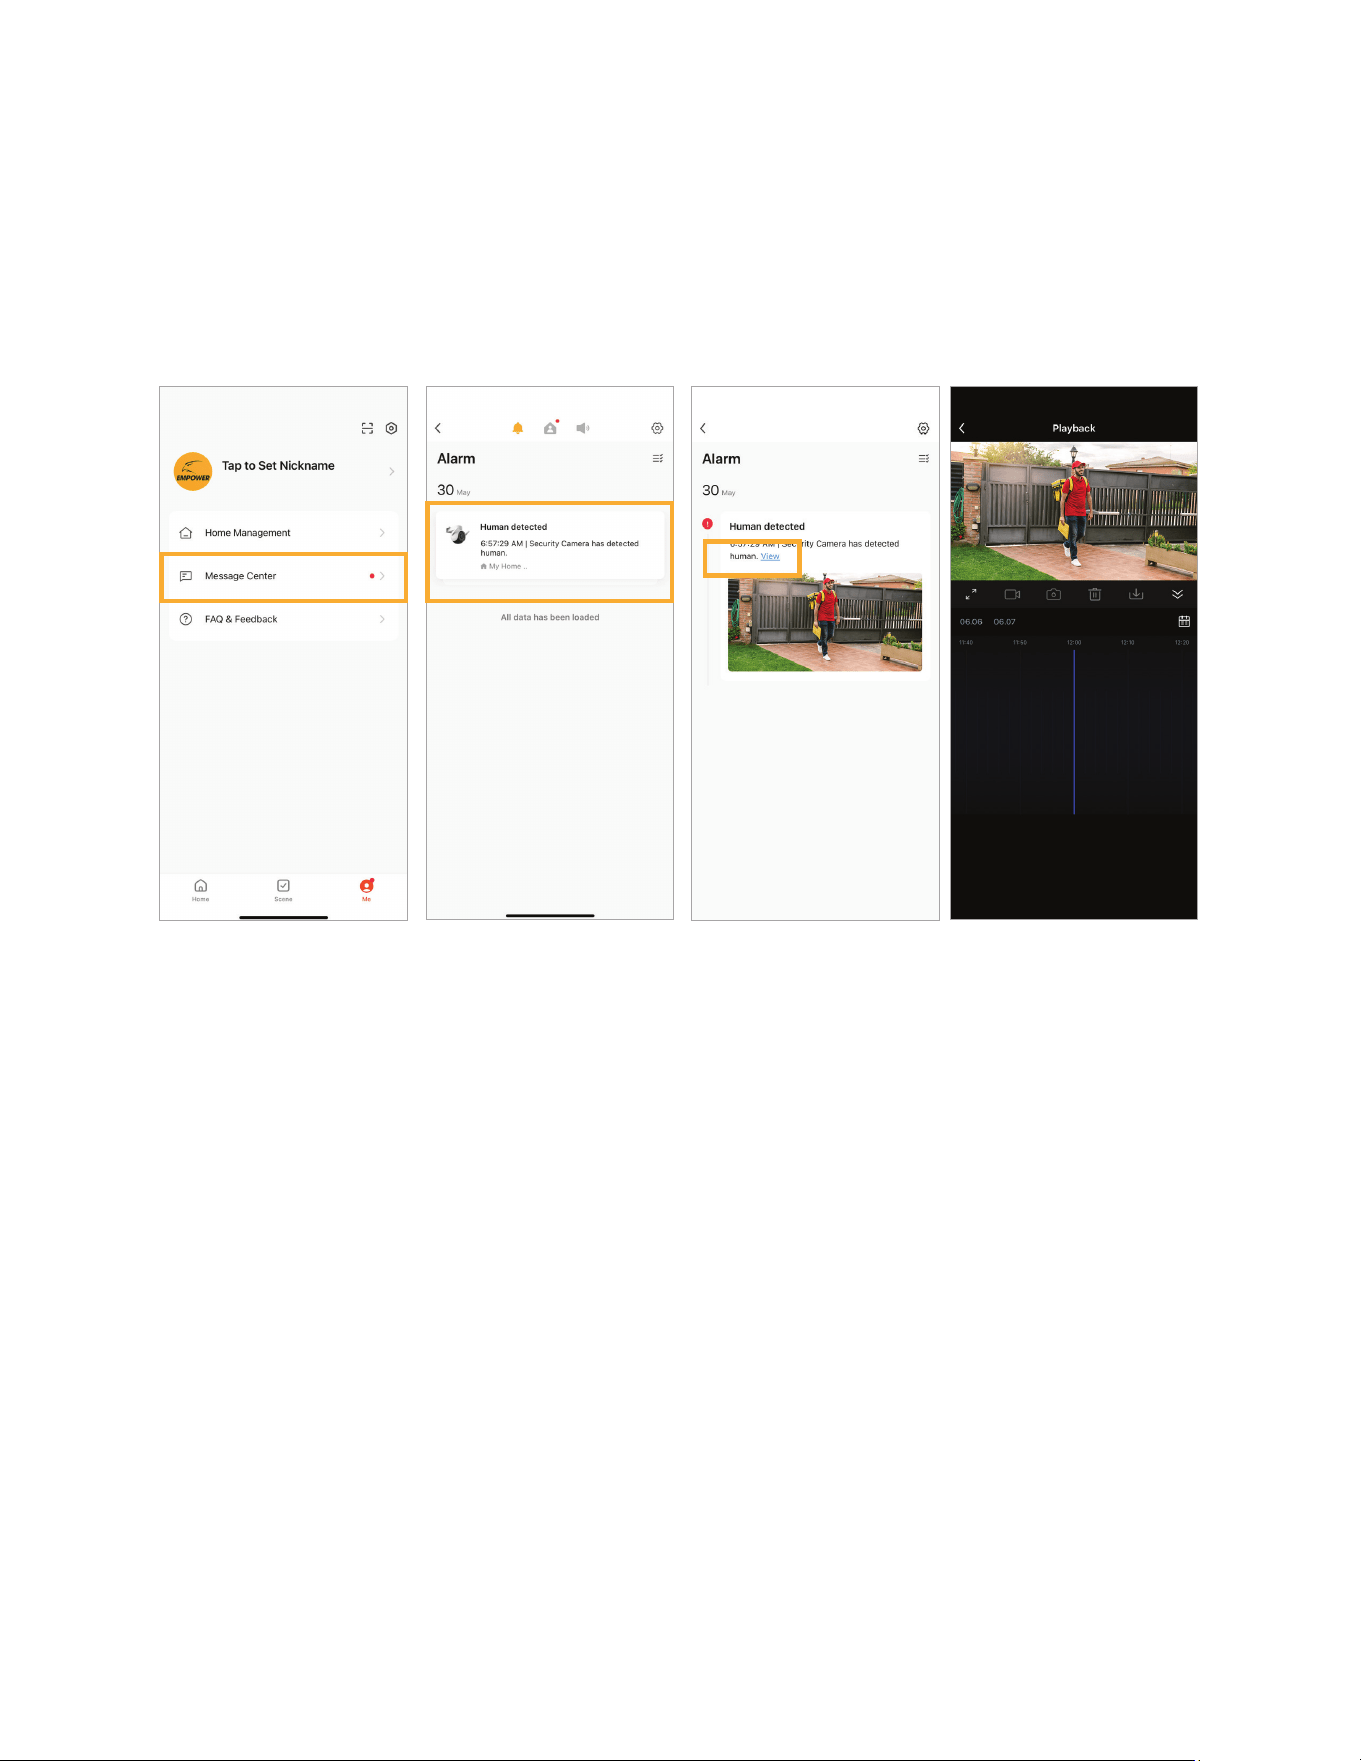
OPTION TWO:
With notications enabled, you can view your playback directly from notications. If you select a
notication that the camera is currently recording, selecting view will display the live view of the camera.
From the live view screen, select Me, select Message Center and select the camera you wish to view
notications for. Tap view, to view the playback.
21
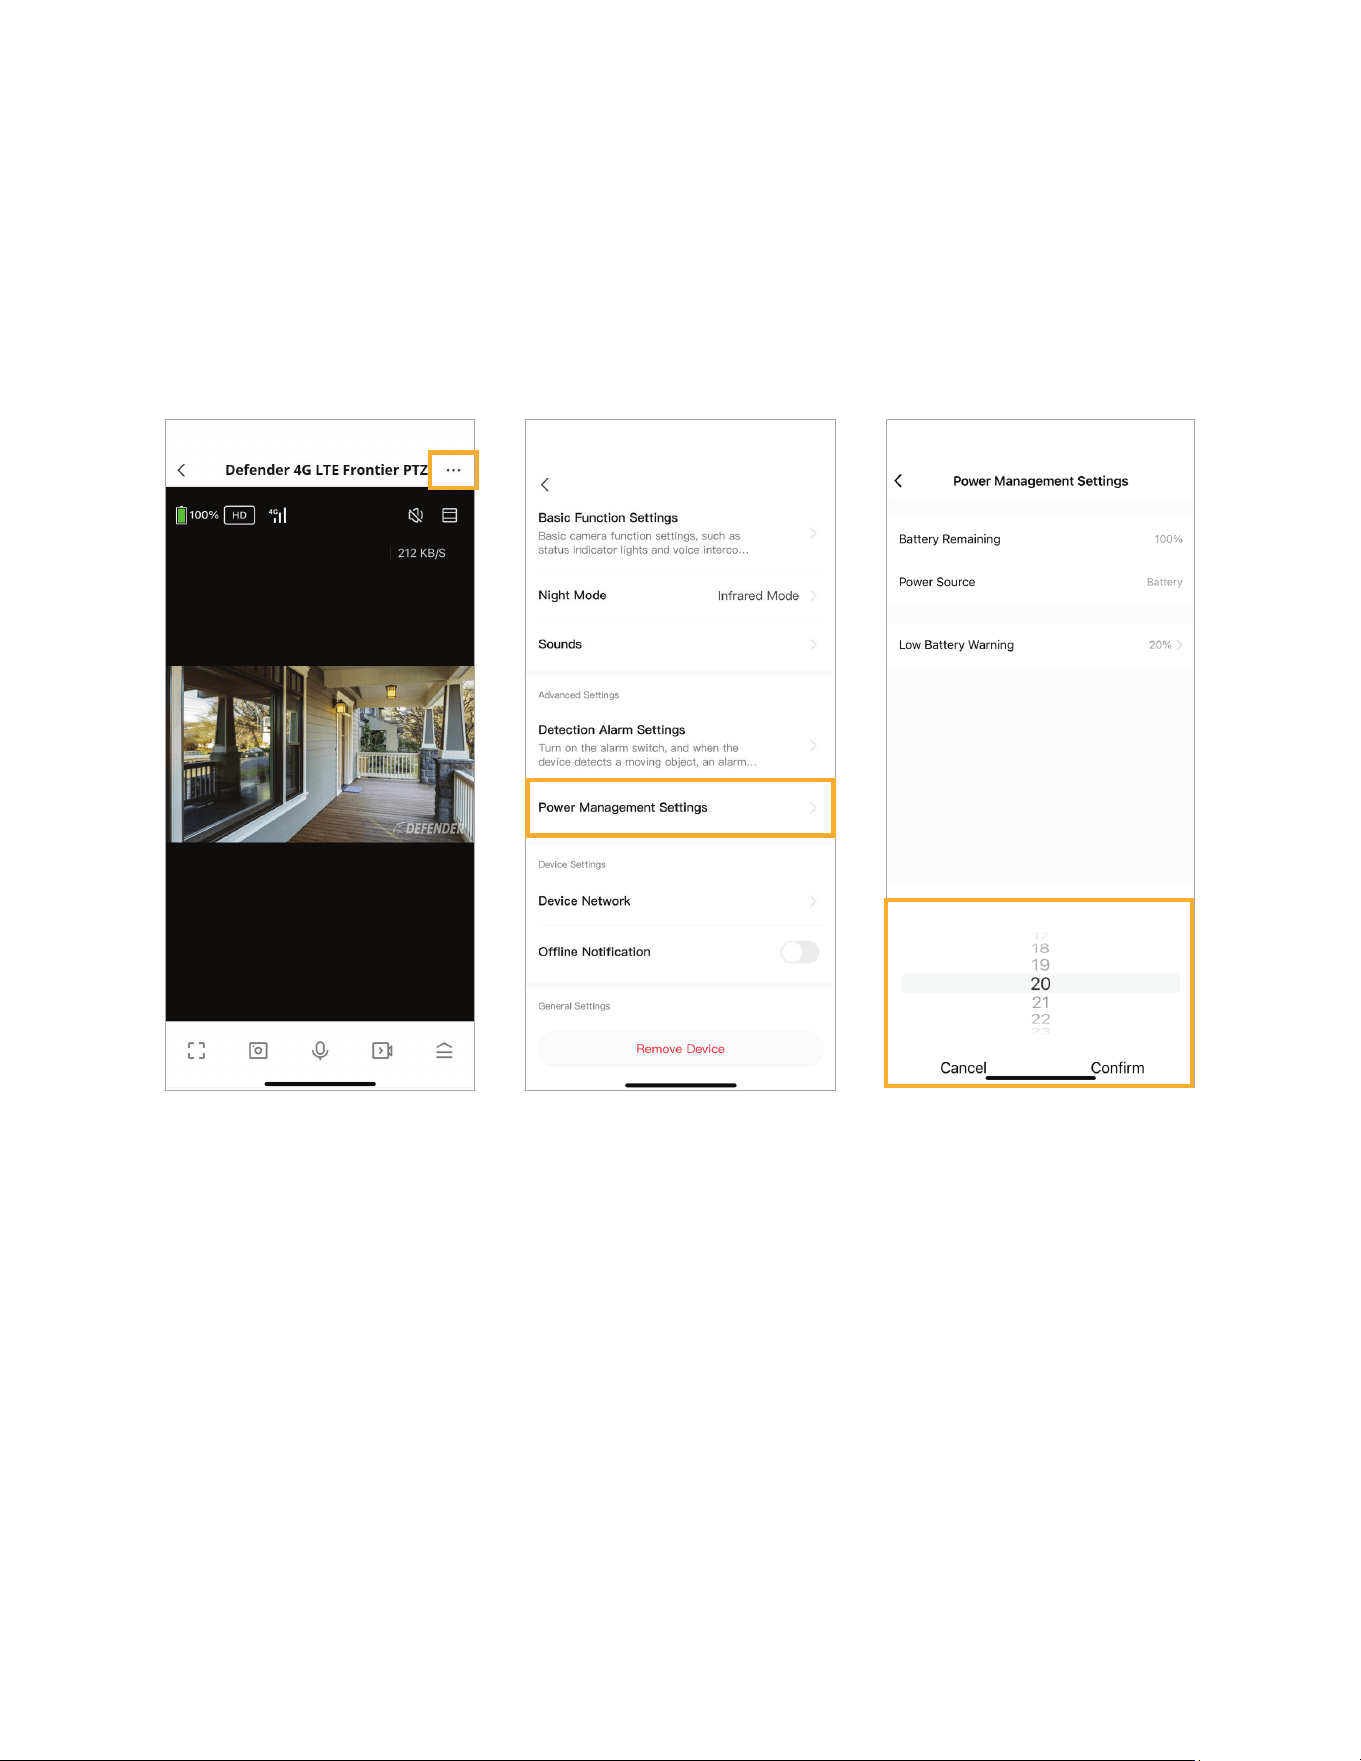
LOW BATTERY ALARM
For your peace of mind, we recommend setting a Low Battery Alarm in the Defender Empower App
to be reminded when your camera battery is low. To maximize the battery life of your camera, we
recommend keeping your battery charged at all times by connecting to the solar panel. Low Battery
Alarm is set to alert at 20% battery by default.
Step 1: From the live view
page, tap (···)
Step 2: Tap “Power Manage-
ment Settings”.
Step 3: Tap “Set the Low
Battery Warning”. Select what
battery life percent you wish
to start receiving notications
of low battery. Tap “Conrm”
to save.
22
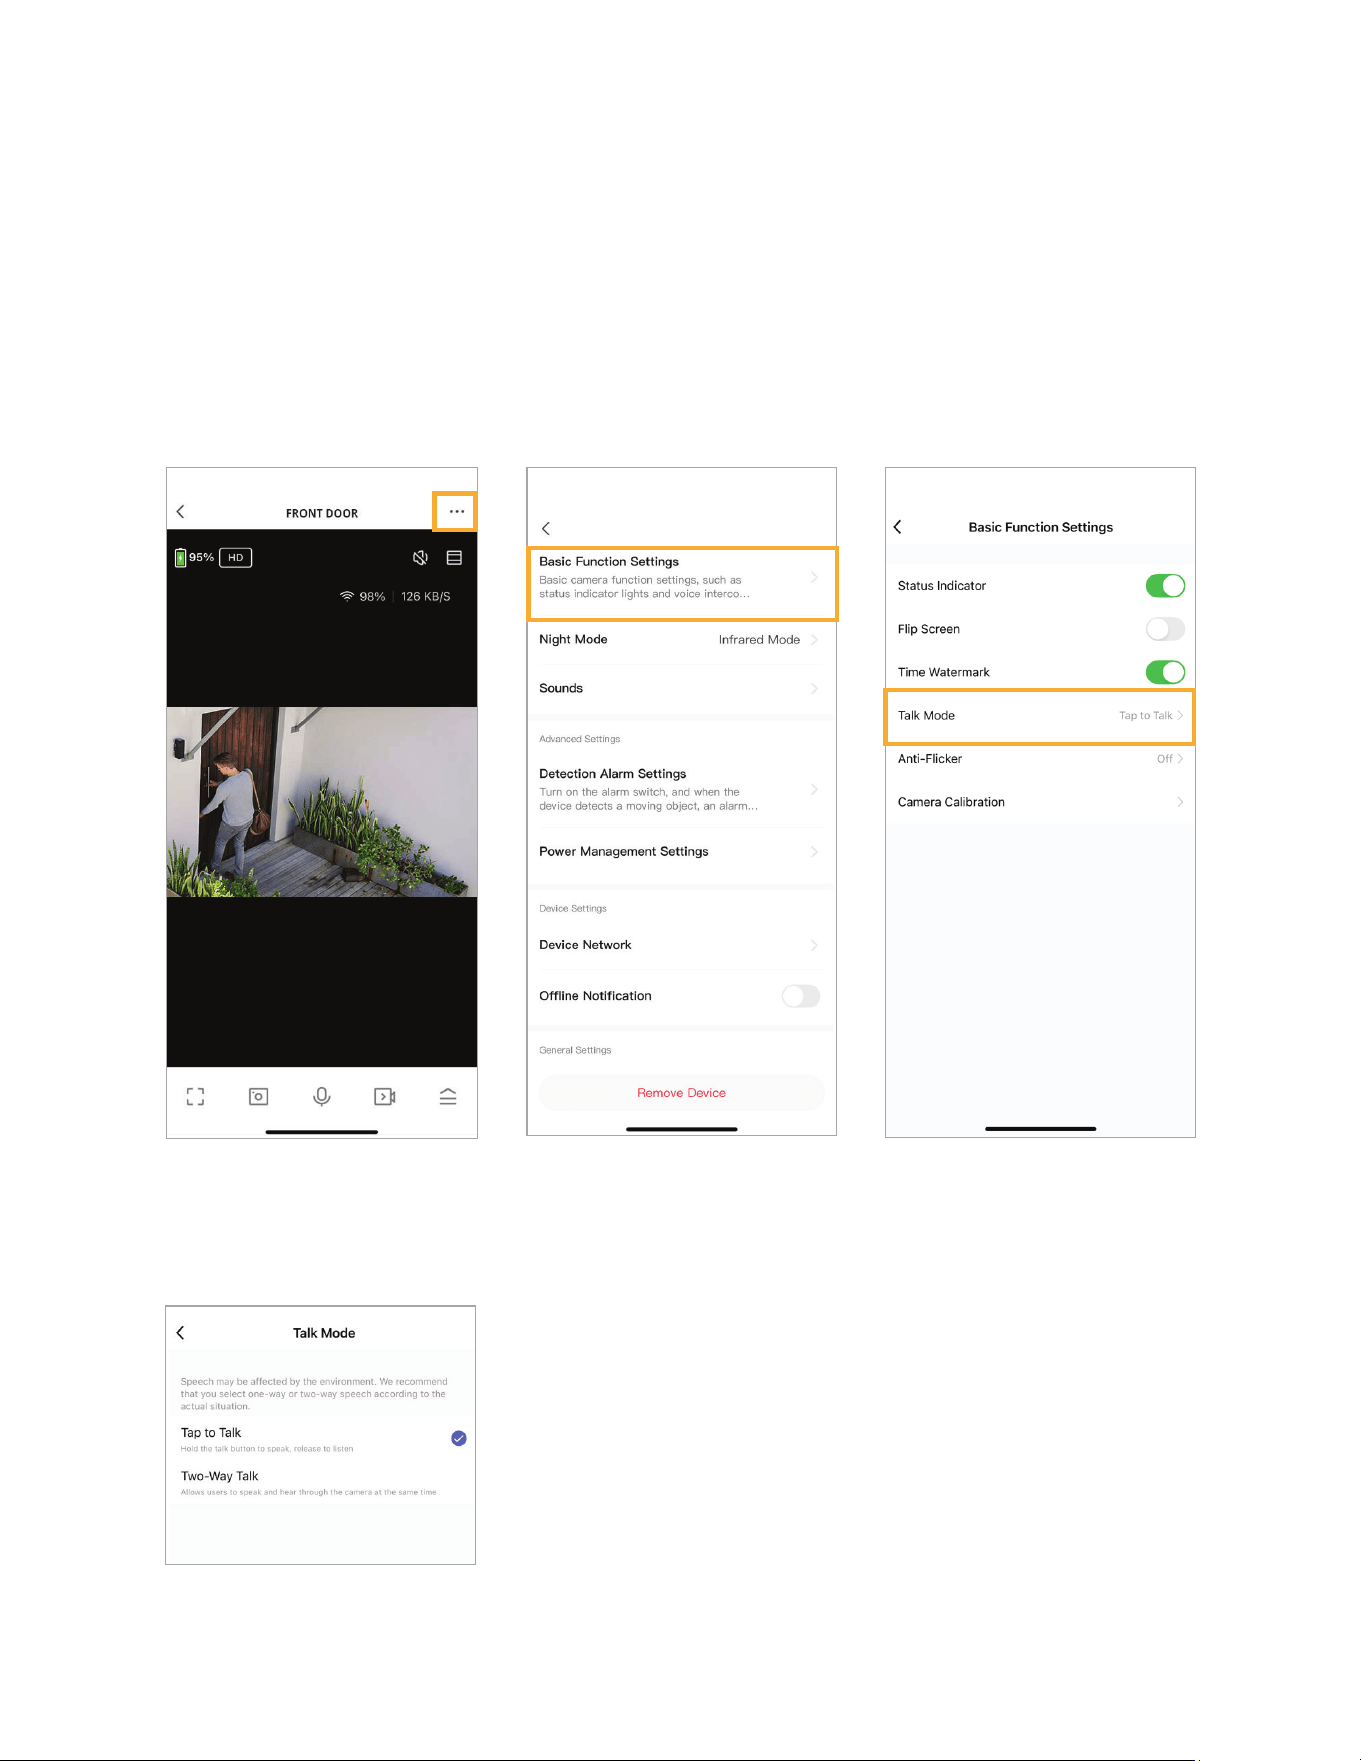
TWO-WAY TALK MODE
You have two option to select between two-way and one-way talk mode.
1. Two-Way Talk – Speak and listen simultaneously. This is ideal for having conversations through
the camera from the App.
2. One-Way Communication – You can either hear from the camera or speak through the camera
at any moment, but not at the same time. This mode should be used when you are using the talk
function close to your camera to avoid echoing and noise.
Step 1: From the live view
page, tap (···) at the top right
corner to go to settings.
Step 4: Select your preferred
setting.
Step 2: Tap “Basic Function
Settings”.
Step 3: Tap “Talk Mode” to edit.
23
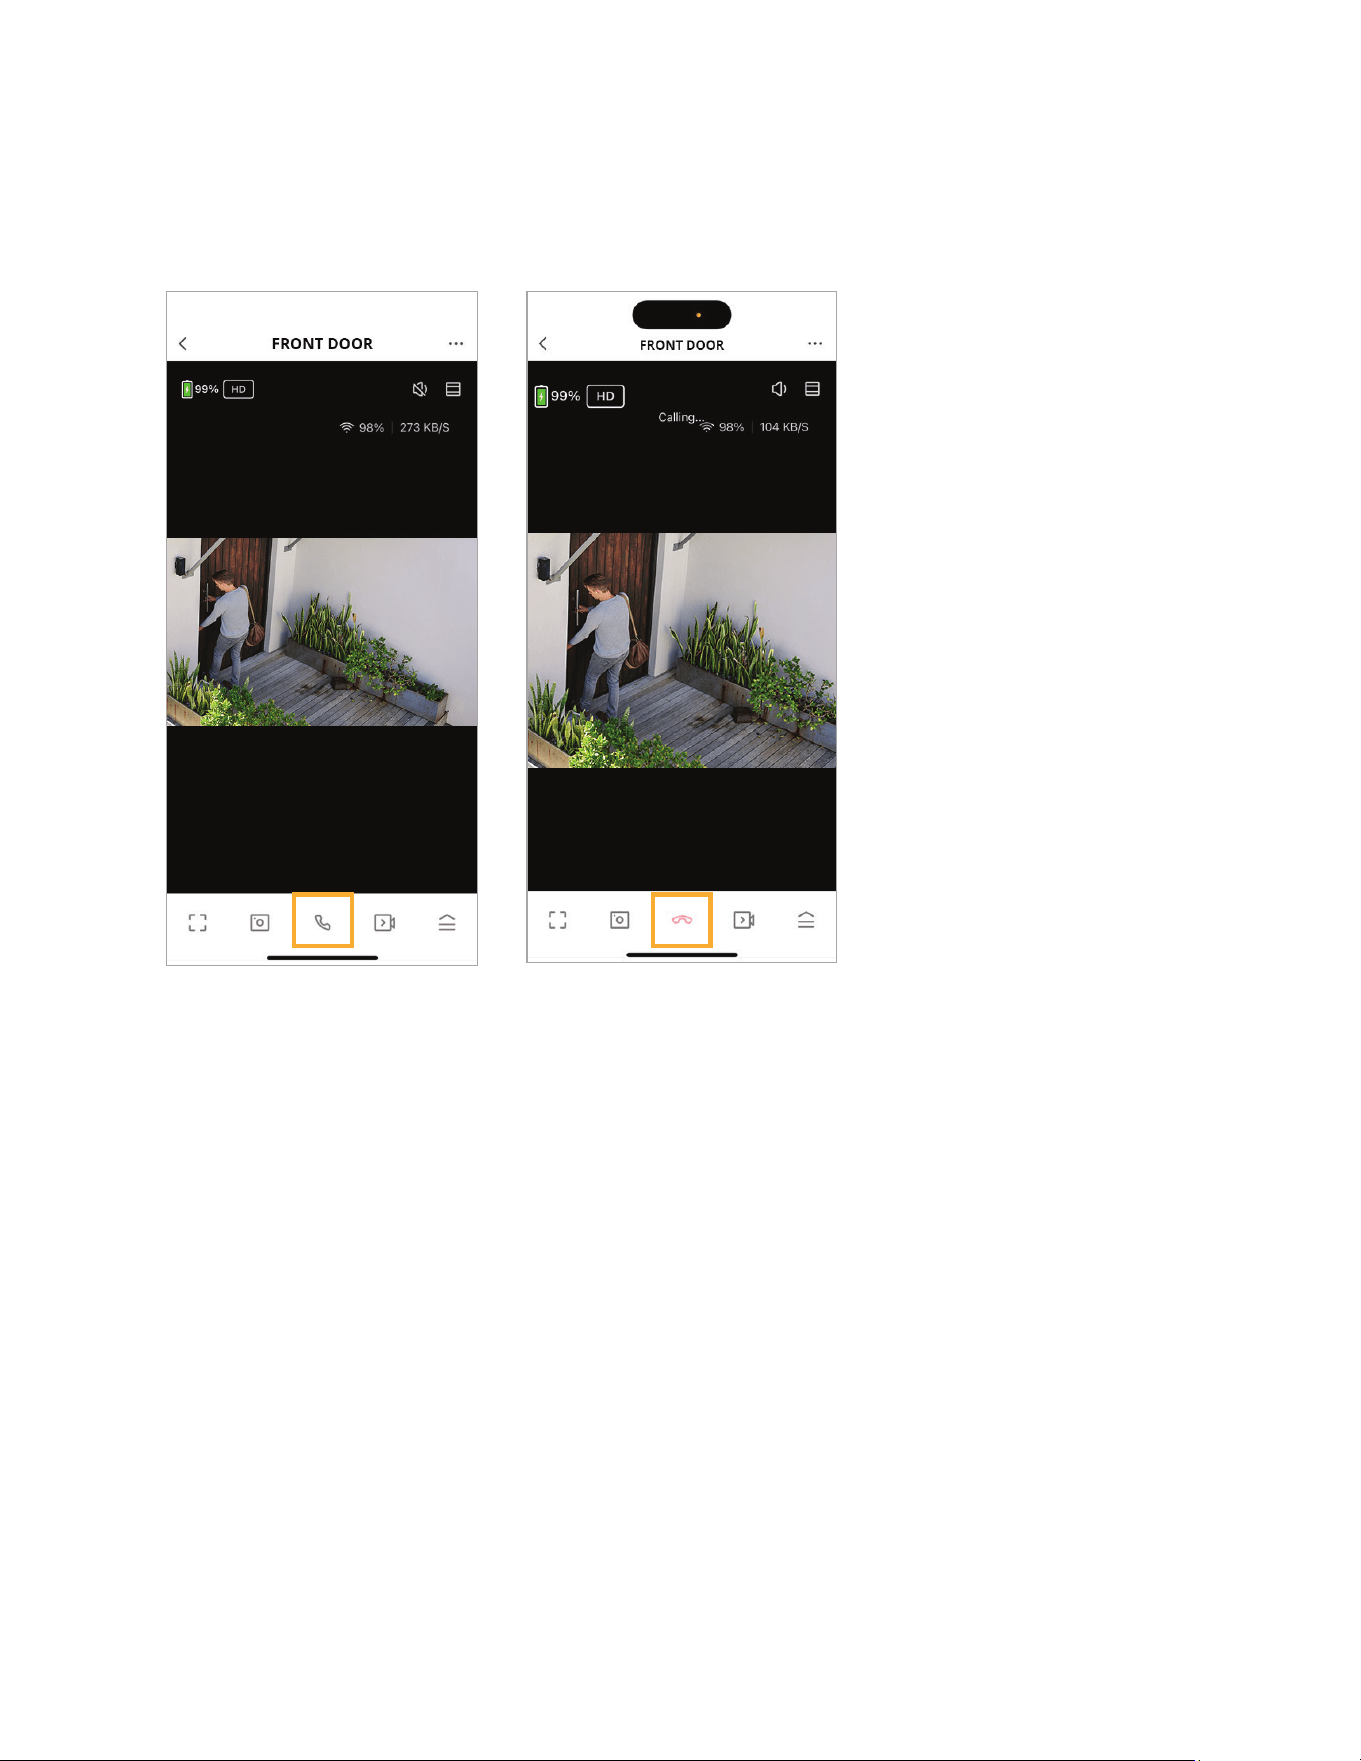
Step 1: Tap the Phone button
in live view to start two-way
talk.
Step 2: Start talking when the
Phone symbol turns red. Tap
the Phone symbol again to
hang up.
TWO-WAY TALK
To use Two-Way talk, select the camera you wish to communicate with.
24
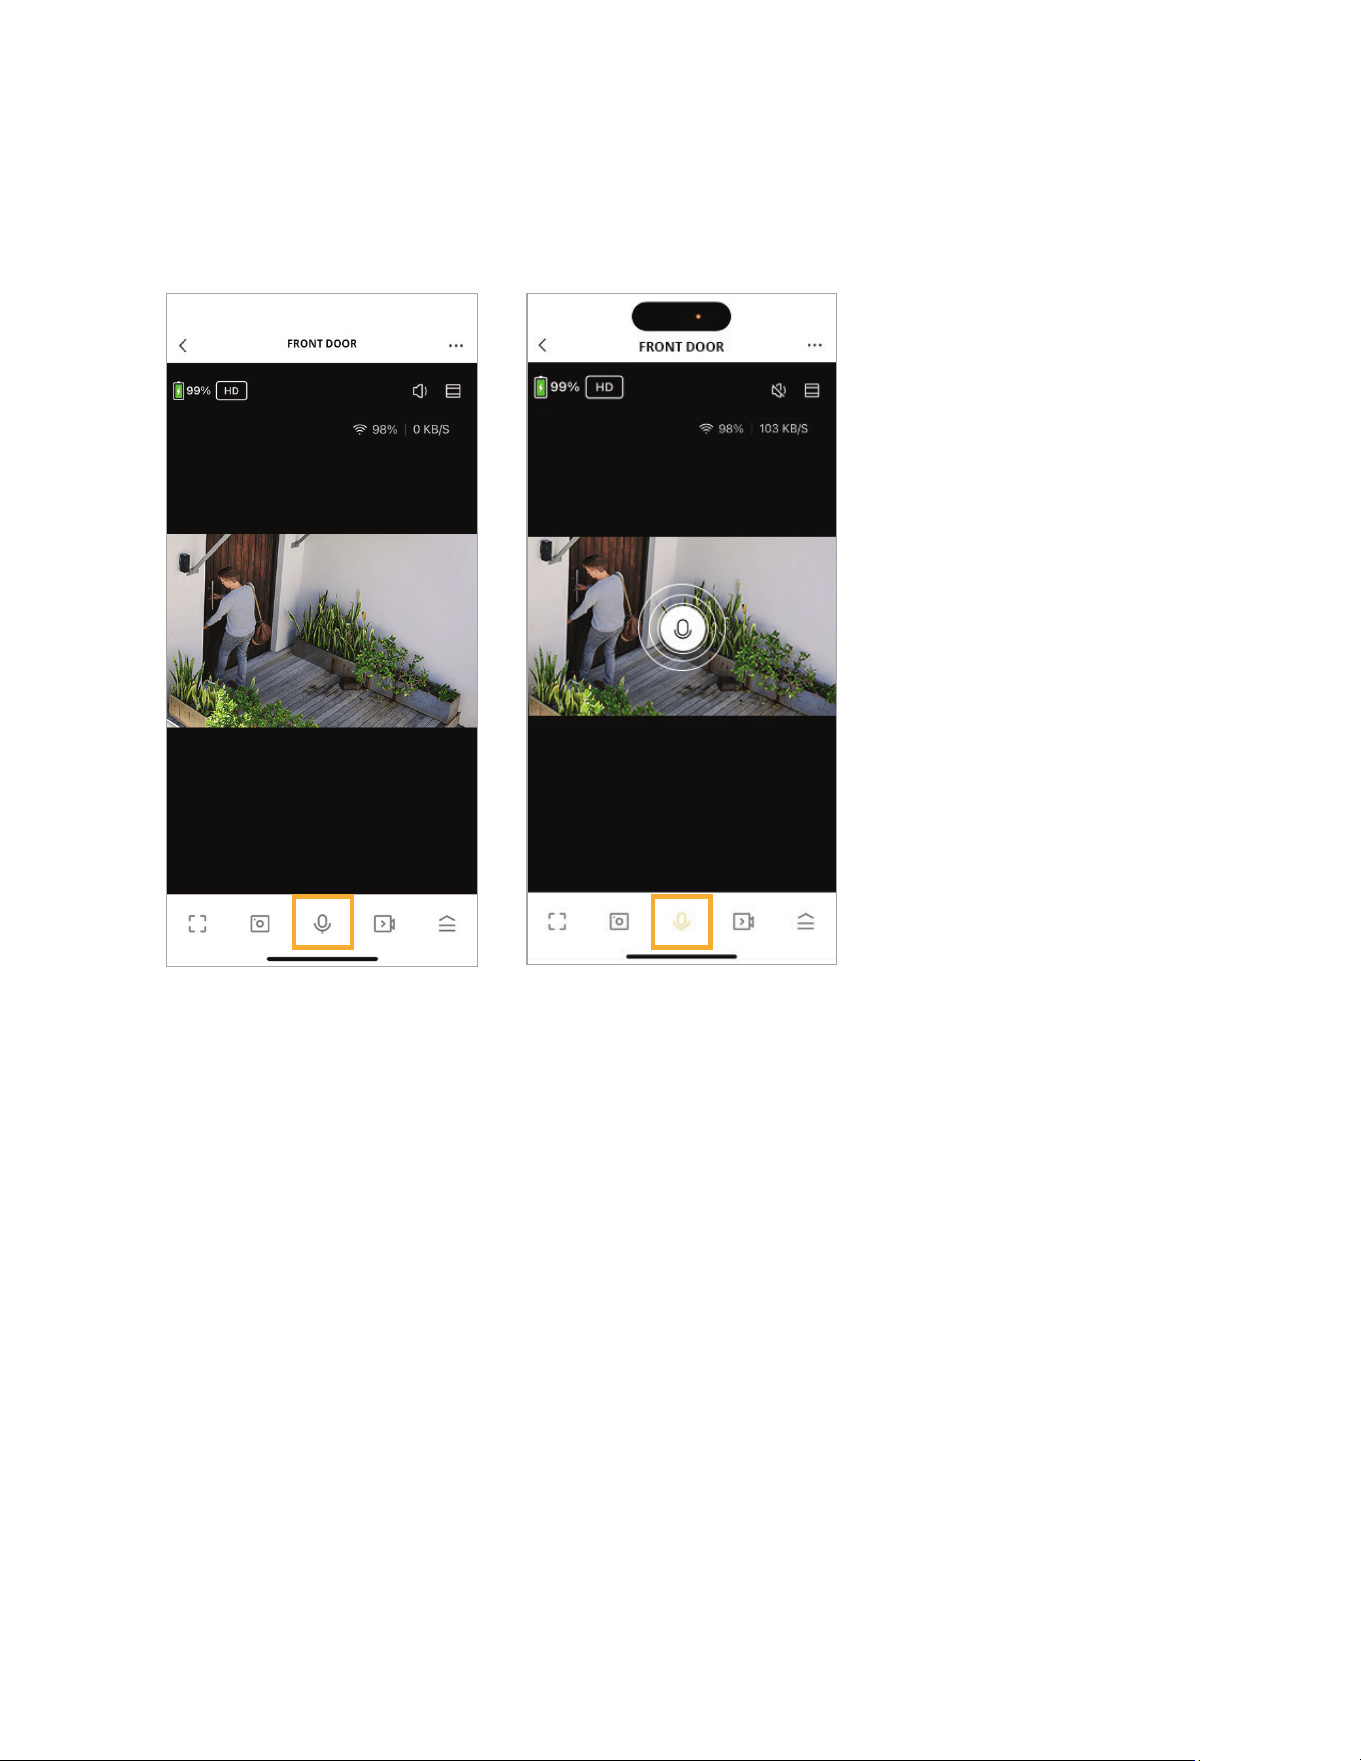
Step 1: Tap and hold the
microphone button in live view
to activate the microphone
Step 2: Start talking when the
microphone symbol appears.
Release the microphone
button to nish talking.
ONE-WAY COMMUNICATION
Select the Camera you wish to communicate with.

DefenderCameras.com
©2025 DEFENDER®. All rights reserved. DEFENDER®, the DEFENDER® logo and other DEFENDER®
marks may be registered. All other Trademarks are the property of their respective owners.
Defender is continuously enhancing our products to bring customers the best user experience.
We reserve the right to change models, conguration, or specications without notice or liability.
Product may not be exactly as shown. DEFENDER® does not endorse any DEFENDER® products
for illegal activities. DEFENDER® is not responsible or liable in any way for any damage, vandalism,
theft or any other action that may occur while a DEFENDER® product is in use by the purchaser.
REV01 05282024