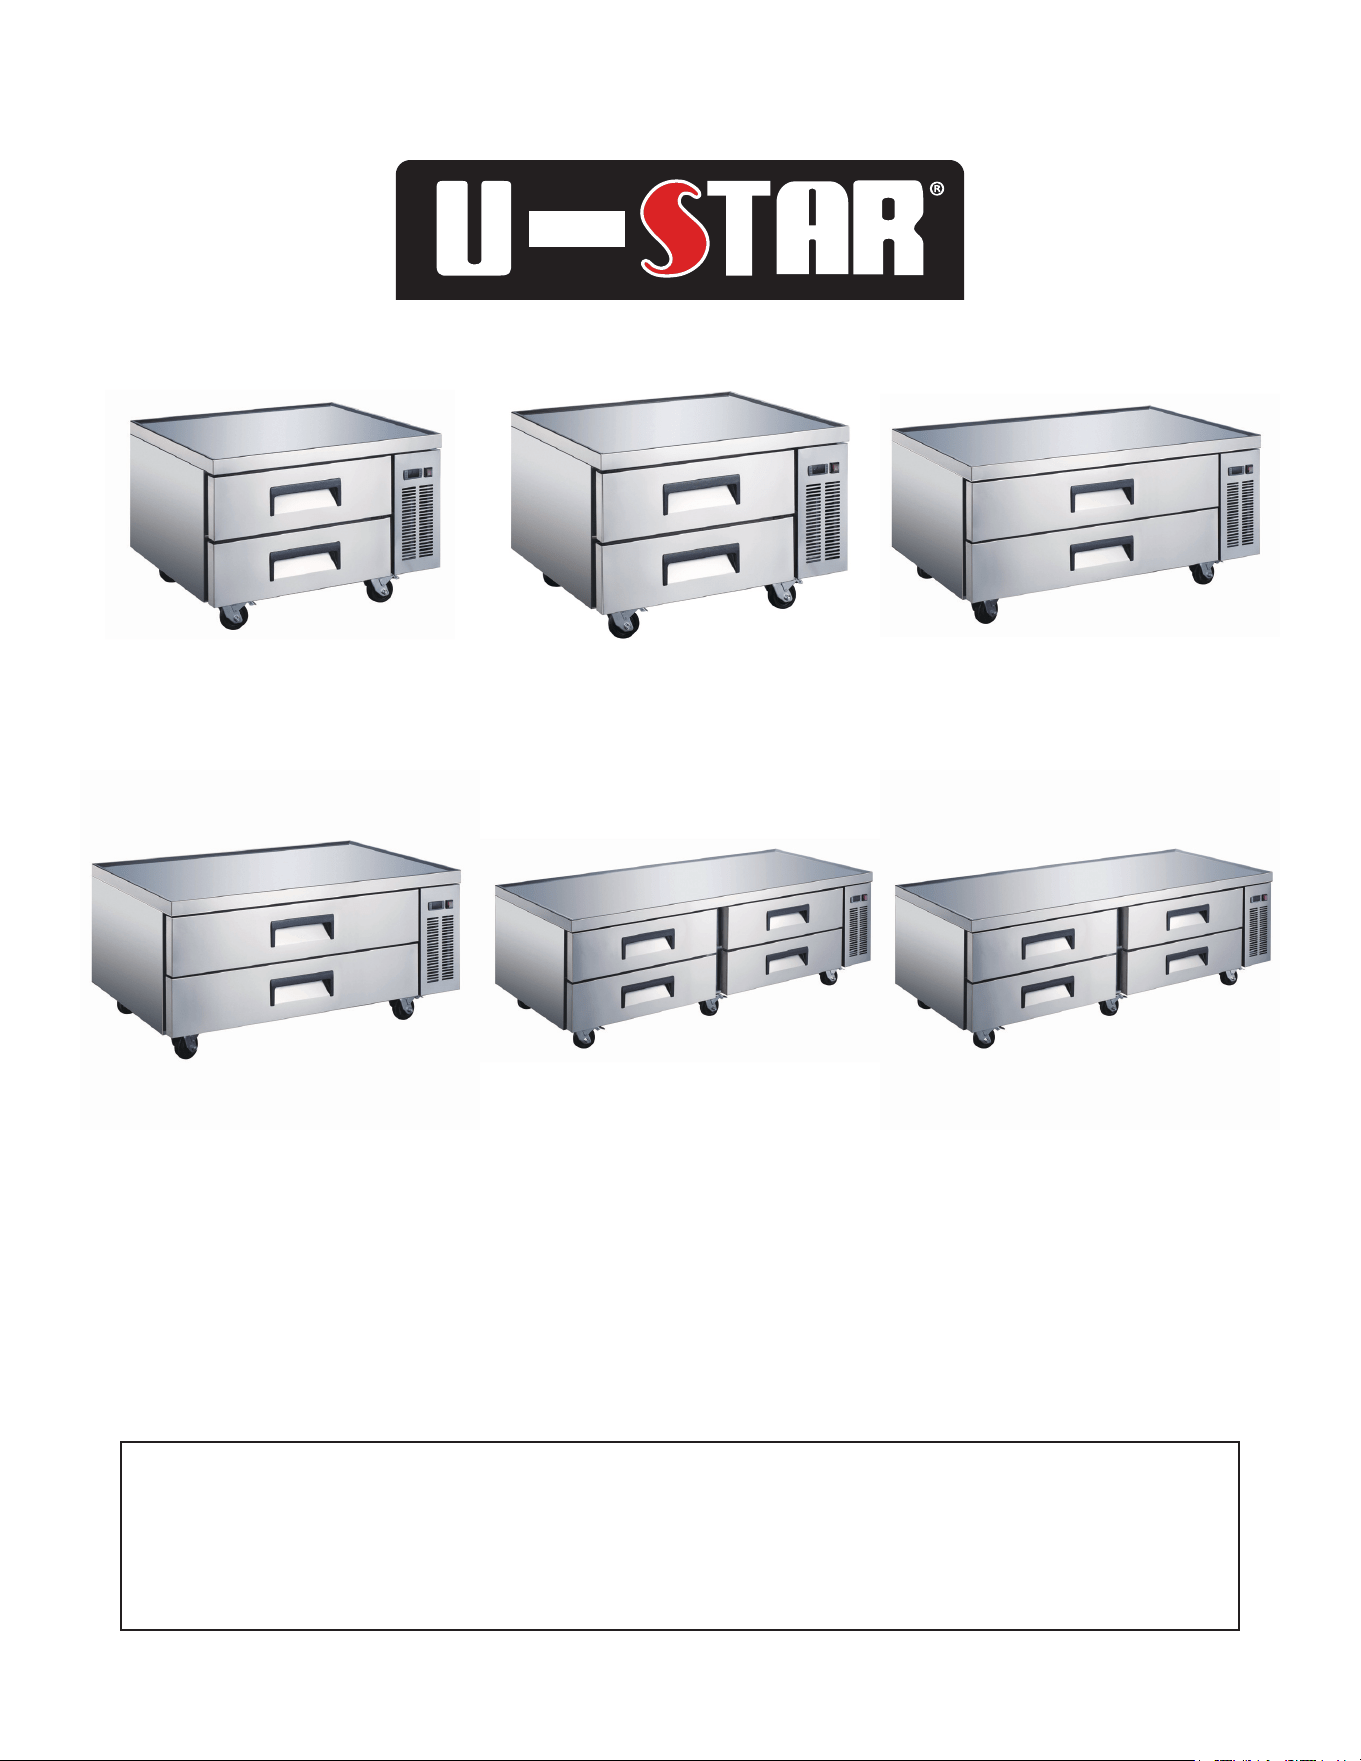
Refrigerated Chef Base
Instruction Manual
This manual contains important information regarding your unit. Please read
this manual thoroughly prior to equipment set-up, operation, and maintenance.
Failure to comply with regular maintenance guidelines outlined in this manual
may void the warranty.
USCB-36 USCB-48 USCB-52
2 Drawers - 36”, 6.5 cu. ft. 2 Drawers - 48”, 9.3 cu. ft. 2 Drawers - 52”, 10.6 cu. ft.
USCB-60 USCB-72 USCB-84
2 Drawers - 60”, 12.7 cu. ft 4 Drawers - 72”, 15.9 cu. ft. 4 Drawers - 84”, 19.1 cu. ft.
Admiral Craft® Equipment Corporation © 2025
3355 Enterprise Avenue - Suite 160 - Ft. Lauderdale, FL 33331 | Tel: 1.877.672.7740 | www.admiralcraft.com
IMPORTANT SAFEGUARDS
Please pay close attention to the safety notices in this section. Disregarding these notices may lead to
serious injury and/or damage to the unit.
WARNING
DANGER: Risk of re or explosion - Flammable refrigerant used.
DANGER: Risk of re or explosion - Do not puncture refrigerant tubing.
• To be repaired only by trained service personnel.
• Consult the manual/owner’s guide before attempting to service
this product.
• All safety precautions must be followed.
• Follow handling instructions carefully in compliance with local
government regulations.
ATTENTION
• To minimize shock and re hazards, be sure not to overload outlet. Please designate one outlet for
your unit.
• DO NOT use extension cords.
• DO NOT put your hands under the unit when the unit is required to be moved.
• DO NOT attempt to remove or repair any component unless instructed by factory.
• Make sure that the unit is not resting on or against the electrical cord and plug.
• DO NOT hang on the drawers.
• DO NOT allow children to climb, stand or hang on the shelves in the refrigerator. They could
damage the refrigerator and seriously injure themselves.
• DO NOT store any ammable and explosive gas or liquids inside the unit.
• DO NOT attempt to alter or tamper with the electrical cord.
UNPLUG CORD
• To minimize shock and re hazards, do not plug or unplug the cord with wet hands.
• During maintenance and cleaning, unplug the unit.
• When the unit is not in use for a long period of time, please unplug the unit from the outlet.
• After unplugging the unit, wait at least 10 minutes before re-plugging it.
* Failure to do so could cause damage to the compressor.
PROPER GROUNDING REQUIRED
• To minimize shock and re hazards, make sure that the unit is properly grounded.
• CAUTION: DO NOT connect the grounding wire to a water or gas pipe.
VENTILATION
• Make sure that there is proper ventilation around the unit in the area where it will operate.
• CAUTION: Unit needs more than 8” (20 cm) from the cabinet to the wall.
• DO NOT completely enclose the back of the cabinet. Prepare an air vent to the outside.
APPLIANCE DISPOSAL
• When recycling appliance please make sure that the refrigerants are handled according to local and
national codes, requirements and regulations.
2 | Refrigerated Chef Base Instruction Manual

REFRIGERANT DISPOSAL
• Your old refrigerator may have a cooling system that uses “Ozone Depleting” chemicals. If you are
throwing away your old refrigerator, make sure the refrigerant is removed for proper disposal by a
qualied service technician. If you intentionally release any refrigerants you can be subject to nes
and imprisonment under the provisions of the environmental regulations.
BEFORE INSTALLATION:
• If the unit has recently been transported please let unit stand still for a minimum of 24 hours before
plugging it in.
• Make sure that the desired temperature is reached before loading the unit product.
• Make sure all accessories are installed (i.e. shelves, shelf clips, casters) before plugging the unit in.
• Please read through the manual in its entirety.
UNCRATING
TOOLS REQUIRED
• Adjustable Wrench
• Phillips Screwdriver
• Level
RECOMMENDATIONS:
1. Remove the outer packaging, (cardboard and bubbles or Styrofoam corners and clear plastic).
2. Inspect for concealed damage.
* Immediately le a claim with the freight carrier if there is damage.
3. Move your unit as close to the nal location as possible before removing the wooden skid.
CABINET LOCATION GUIDELINES:
• Install the unit on strong and leveled surfaces
* Unit may make unpleasant noises if surface is uneven
* Unit may malfunction if surface is uneven
• Install the unit in an indoor, well-ventilated area
* Unit performs more efciently in a well-ventilated area
* For best performance, please maintain clearance of 8” (20 cm) from the back of the unit
* Outdoor use may cause decreased efciency and damage to the unit
• Avoid installation in a high humidity and/or dusty area
* Humidity could cause unit to rust and decrease efciency of the unit
* Dust collected on condenser coil will cause unit to malfunction. Clean the condenser at least
once a month with a brush or clean cloth
• Select a location away from heat and moisture-generating equipment
* High ambient temperatures will cause the compressor to overwork, leading to higher energy bills
and gradual breakdown of the unit.
ELECTRICAL:
• WARNING: Compressor warranties are void if compressor burns out due to low voltage.
• WARNING: Power supply cord ground should not be removed.
• WARNING: Do not use electrical appliances inside the food storage compartments of the
appliances unless they are of the type recommended by the manufacturer.
• Before your new unit is connected to a power supply, check the incoming voltage with a voltmeter.
* If anything less than 100% of the rated voltage for operation is noted, correct immediately.
3 | Refrigerated Chef Base Instruction Manual
• All units are equipped with a service cord, and must be powered at the proper operating voltage at
all times. Refer to the cabinet data plate for this voltage.
• If the supply cord is damaged, it must be replaced by a special cord or assembly available from the
manufacturer or its service agent.
• Light Bulbs must be replaced by the same kind of Light Bulbs.
* NOTE: To reference the wiring diagram, remove the front louvered grill, wiring diagram is
positioned on the inside cabinet wall.
• Ensure that the required voltage of the compressor is being supplied at all times.
* Low or high voltage can detrimentally affect the refrigeration unit.
• All units should be plugged into a grounded and properly-sized electrical outlet with appropriate
over-current protection.
• Refer to the electrical requirements on the nameplate.
• Make sure that your unit has its own dedicated outlet.
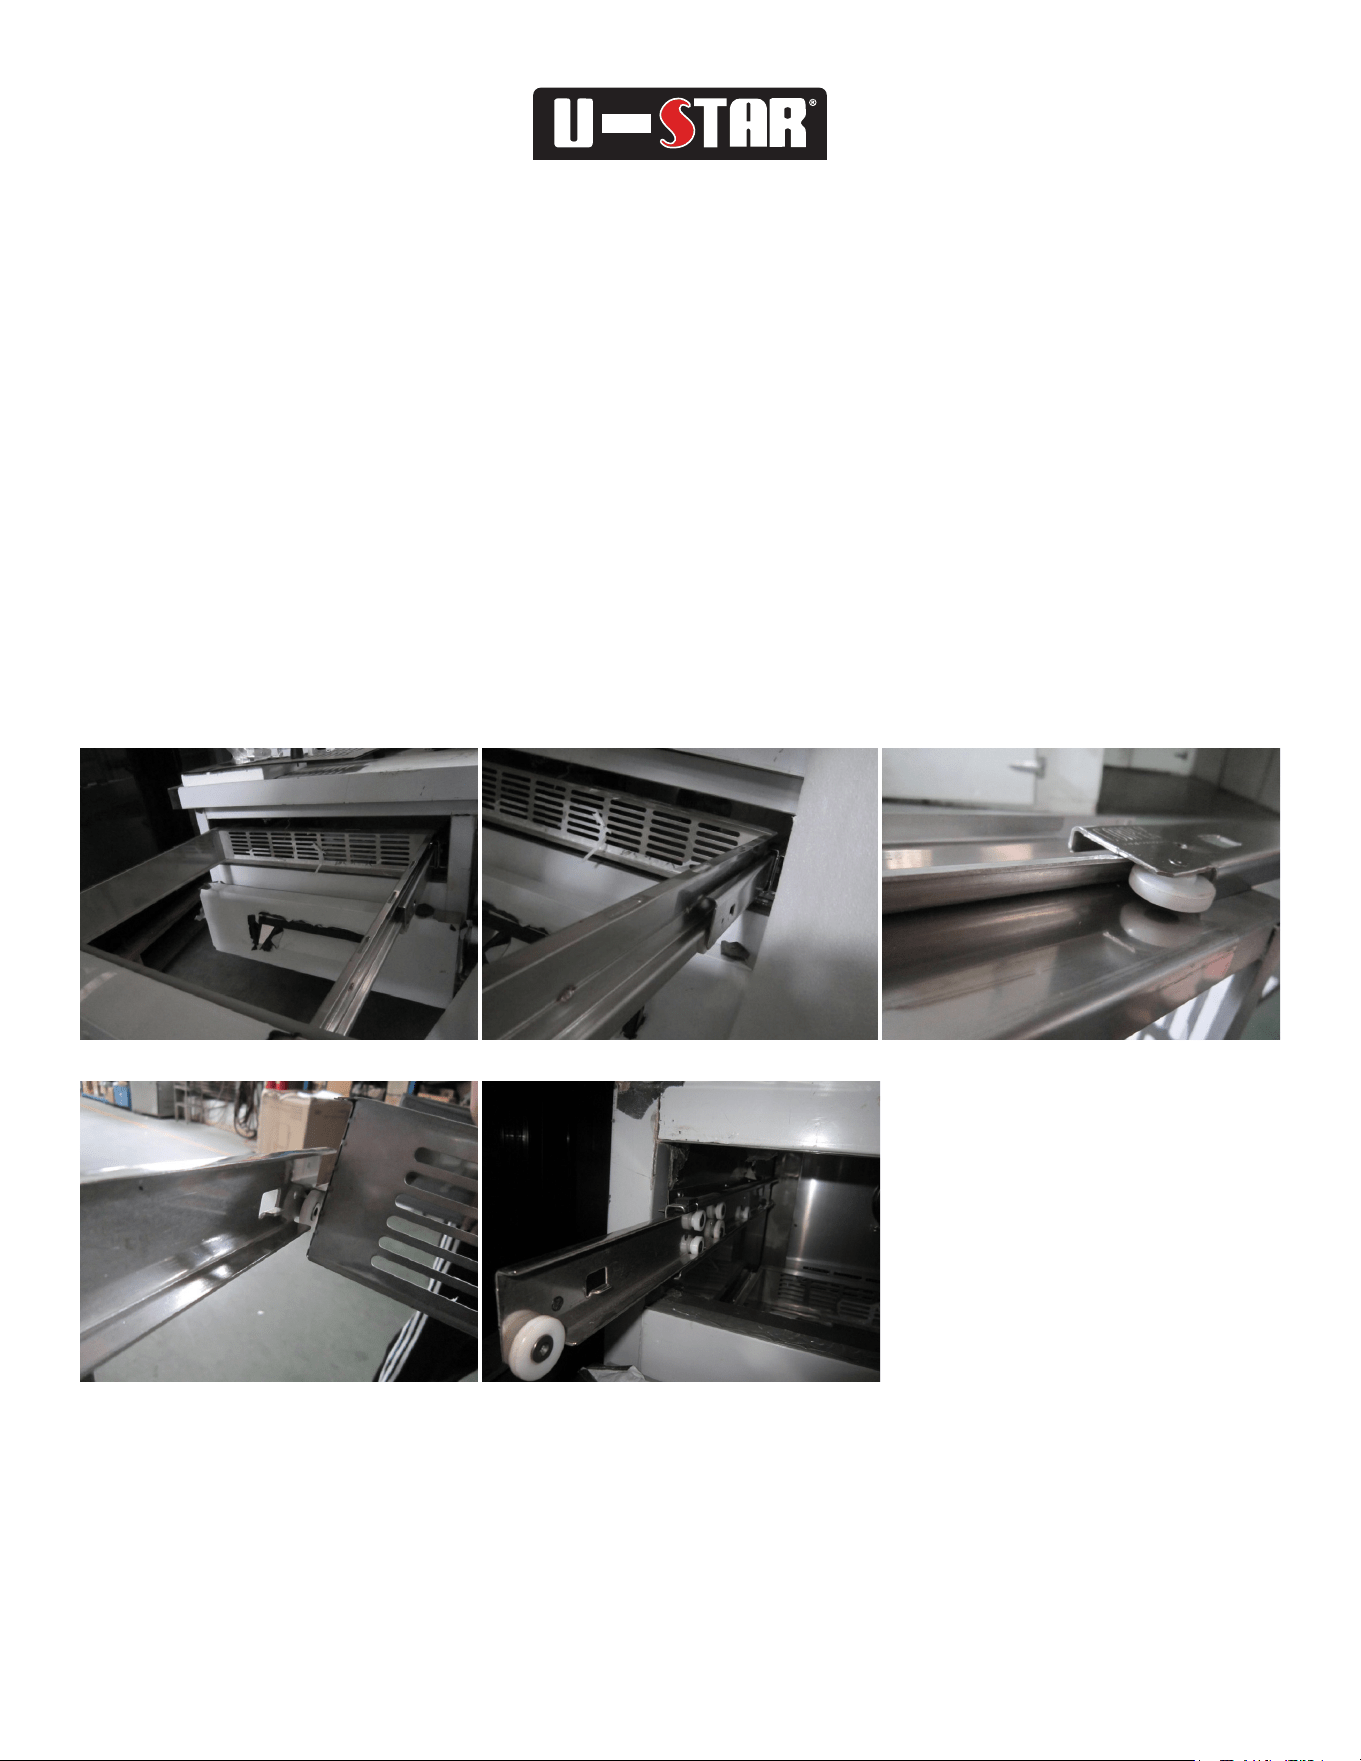
DRAWER REMOVAL
1. Open the drawer
completely.
2. Roller clips will be in the
down position.
3. While holding the sides
of the drawer, use your
hands to lift the side track
of the drawer
4. Lift the drawer. 5. Remove it from the channel.
4 | Refrigerated Chef Base Instruction Manual
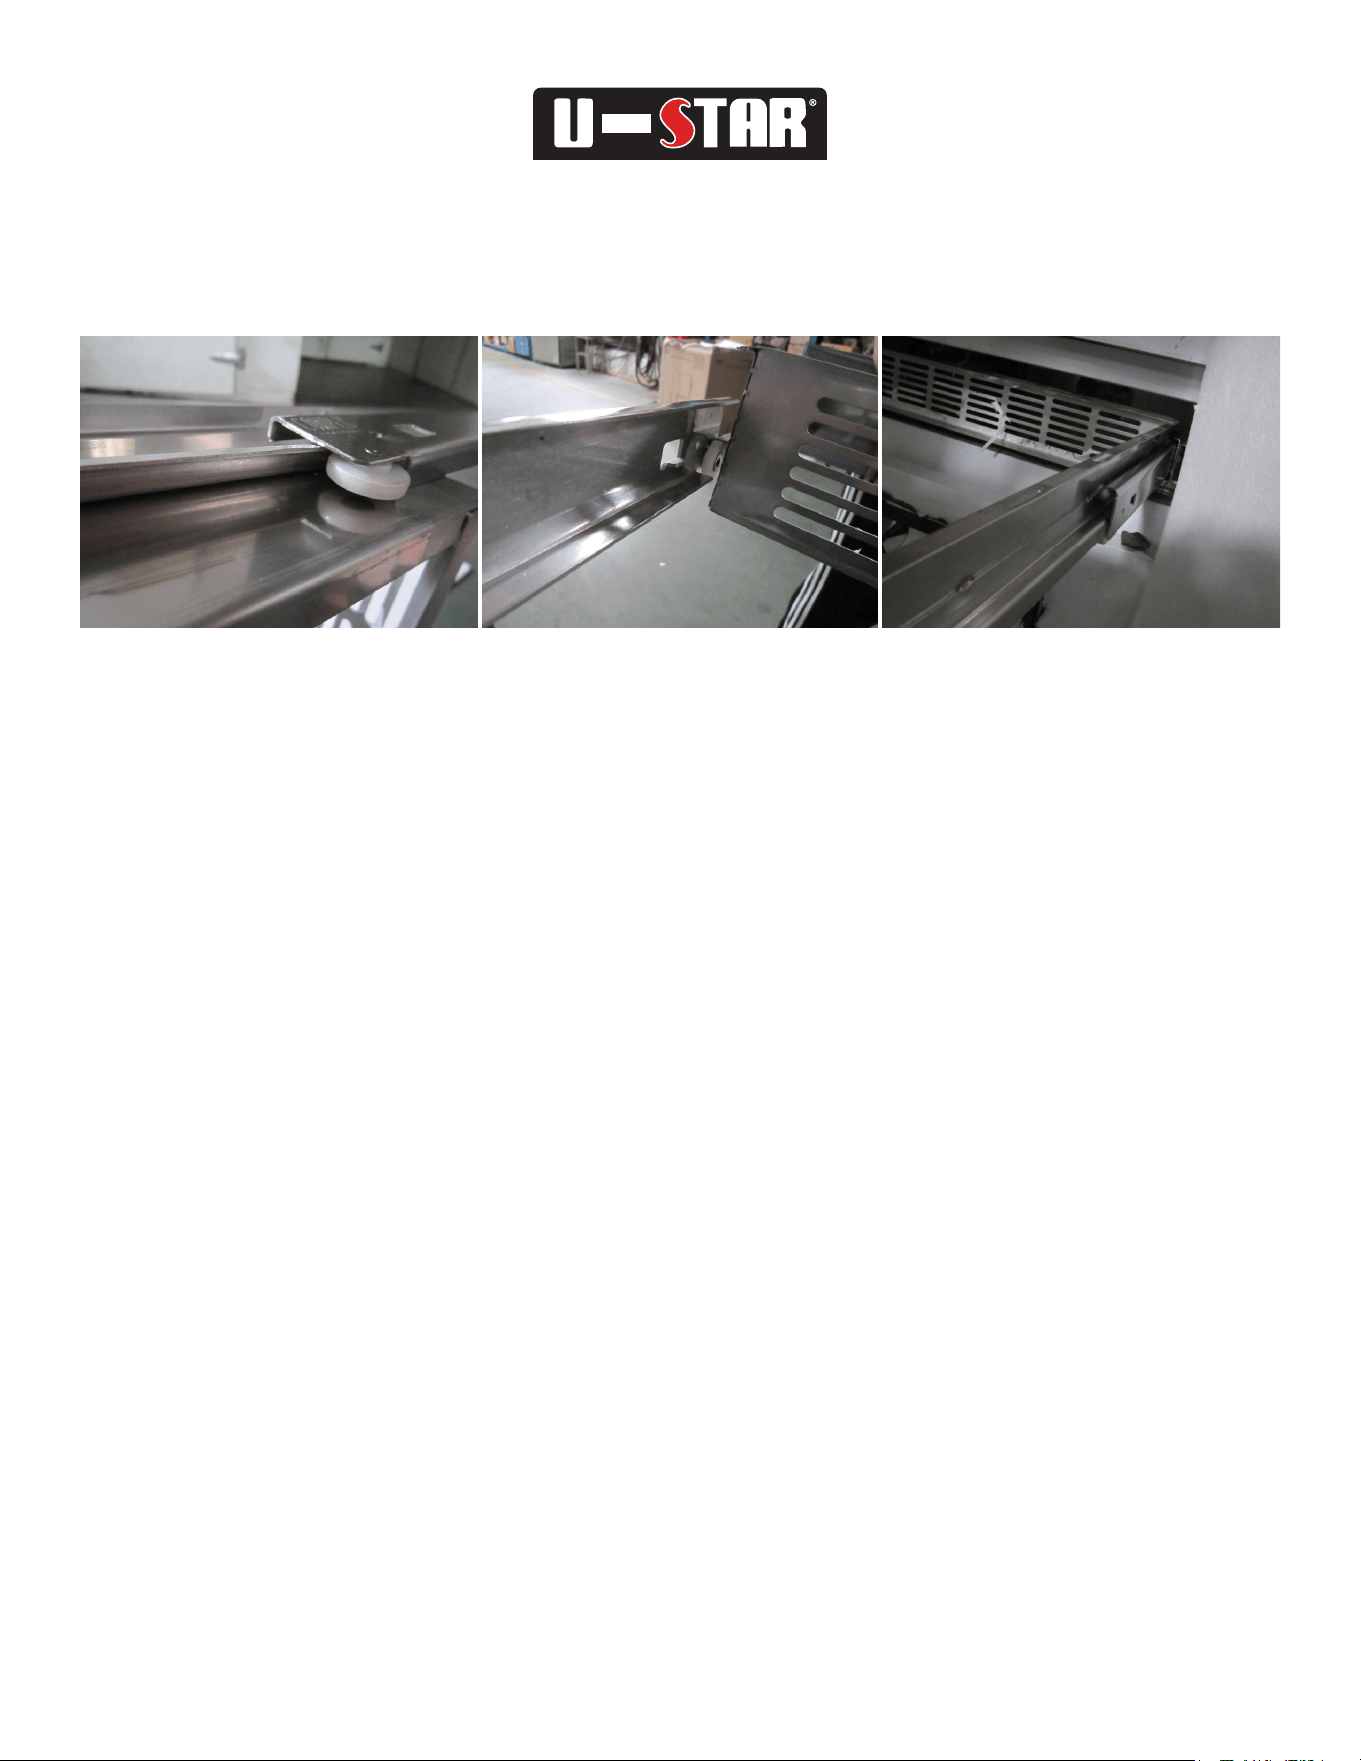
DRAWER INSTALLATION
1. Lower rear rollers into
channel slots.
2. While holding the sides
of the drawer, use your
hands to lift the side track
of the drawer
3. Lift the drawer and remove it
from the channel.
OPERATIONS
STARTUP
1. The compressor is ready to operate. Plug in the cooler.
2. Digital Thermostat is factory-set to give refrigerators an approximate temperature of 35°F. Allow unit
to function several hours, completely cooling cabinet before changing the control setting.
3. Temperature Control Location and Settings.
* Electronic temperature control is located on front of unit
4. Excessive tampering with the control could lead to service difculties.
5. Should it ever become necessary to replace temperature control,
* NOTE: If the unit is disconnected or shut off, wait ve minutes before starting again.
* RECOMMENDATION: Before loading the product, we recommend you run your unit empty for
two to three days. This allows you to be sure electrical wiring and installation are correct and no
shipping damage has occurred. Remember, we do not cover product loss!
MAINTENANCE AND CLEANING
• WARNING: Disconnect power cord before cleaning any parts of the unit.
CLEANING THE CONDENSER COIL
• Required Tools
* Phillips screwdriver
* Stiff bristle brush
* Adjustable wrench
• For efcient operation, it is important that the condenser surface be kept free of dust, dirt, and lint.
• It is recommended to clean the condenser coil and ns at least once per month.
• Clean with a commercial condenser coil cleaner, available from any kitchen equipment retailer. Brush
the condenser ns from top to bottom, not side to side.
• After cleaning, straighten any bent condenser ns with a n comb.
CLEANING THE FAN BLADES AND MOTOR
• If necessary, clean the fan blades and motor with a soft cloth. If it is necessary to wash the fan blades,
cover the fan motor to prevent moisture damage.
5 | Refrigerated Chef Base Instruction Manual

CLEANING THE INTERIOR OF UNIT
• When cleaning the cabinet interior, use a solvent of warm water and mild soap.
• Do not use steel wool, caustic soap, abrasive cleaners, or bleach that may damage the stainless steel
surface.
• Wash door gaskets on a regular basis, preferably weekly. Simply remove door gasket from the frame
of the door, soak in warm water and soap for thirty (30) minutes, dry with soft cloth, and replace.
• Check door gaskets for proper seal after they are replaced.
• Periodically remove the shelves and pilasters from the unit and clean them with mild soap and
warm water. To remove the pilasters, rst remove the shelves and shelf brackets. Then, simply lift the
pilaster up and out.
STAINLESS STEEL CARE AND CLEANING
• CAUTION: Do not use any steel wool, abrasive or chlorine-based products to clean stainless
steel surfaces.
Recommended cleaners for stainless steel:
• Soap, ammonia, and detergent medallion applied with a soft cloth or sponge for routine cleaning.
• Arcal 20, Loc-O-Nu Ecoshine provide a barrier lm for ngerprints and smears.
• Cameo, Talc, Zud First Impression is for stubborn stains and discoloration.
• Rub in the direction of polish lines.
• Easy-Off and De-Grease It oven Aid are excellent for removals on all nishes for grease-fatty acids,
blood, and burnt-on foods.
• Any good commercial detergent can be applied with a sponge or soft cloth to remove grease
and oil.
• Benet, Super Sheen, Sheila Shine are good for restoration/passivation.
Three things that can break down stainless steel’s passivity layer and allow corrosion to occur:
1. Scratches from wire brushes, metal scrapers and steel pads are just a few examples of items that can
be abrasive to stainless steel’s surface.
2. Deposits left on stainless steel can leave spots. Hard water can leave spots. Hard water that is heated
can leave deposits if left to sit for too long. These deposits can cause the passive layer to break down
and rust stainless steel. All deposits left from food prep or service should be removed as quickly as
possible.
3. Chlorides are present in table salt, food and water. Household and industrial cleaners are the worst
type of chlorides to use.
8 Steps to help prevent stainless steel from rusting:
1. Use the correct cleaning tools. Use non-abrasive tools when cleaning your stainless steel products.
The stainless steel’s passive layer will not be harmed by soft cloths and plastic scouring pads.
2. Clean along the polish lines. Polish lines or grain are visible on some stainless steel. Always scrub
parallel to visible lines. Use a plastic scouring pad or soft cloth when the grain is not visible.
3. Use alkaline, alkaline chlorinated or non-chloride containing cleaners. While many traditional
cleaners are loaded with chlorides, the industry is providing an ever-increasing choice of non-
chloride cleaners. If unsure of the chloride content, contact the cleaner supplier. If the present
cleaner contains chlorides, ask for an alternative. Avoid cleaners containing quaternary salts as they
can attack stainless steel, causing pitting and rusting.
4. Water treatment. To reduce deposits, use soft water whenever possible. The installation of certain
lters can be an advantage. Contact a treatment specialist about proper water treatment.
5. Maintain the cleanliness of food equipment. Use cleaners at recommended strength (alkaline,
alkaline chlorinated or non-chloride). Avoid buildup of hard stains by cleaning frequently
6. When using chlorinated cleaners, you must rinse and wipe dry immediately. It is better to wipe
6 | Refrigerated Chef Base Instruction Manual
standing cleaning agents and water as soon as possible. All stainless steel equipment should be
allowed to air dry. Oxygen helps maintain the passivity lm on stainless steel.
7. Hydrochloric acid (muriatic acid) should never be used on stainless steel.
8. Regularly restore/passivate stainless steel.
TROUBLE SHOOTING
Before requesting any service on your unit, please check the following points. Please note that this guide
serves only as a reference for solutions to common problems.
SYMPTOM POSSIBLE CAUSE CORRECTIVE ACTION
Compressor not
running.
Fuse blown or circuit breaker
tripped.
Replace fuse or reset circuit breaker.
Power cord unplugged.
Thermostat set too high.
Plug in power cord. Set thermostat to lower
temperature.
Cabinet in defrost cycle. Wait for defrost cycle to nish.
Condensing unit
runs for long periods
of time.
Excessive amount of warn
product placed in cabinet.
Allow adequate time for product to cool down.
Prolonged door opening or
door ajar.
Ensure doors are closed when not in use. Avoid
opening doors for long periods
of time.
Door gasket(s) not sealing
properly.
Ensure gaskets are snapped in completely.
Remove gasket and wash with soap and water.
Check condition of gasket and replace if
necessary.
Dirty condenser coil. Evaporator
coil iced over.
Clean the condenser coil. Unplug unit and allow
coil to defrost. Make sure thermostat is not set
too cold. Ensure that door gasket(s) are sealing
properly.
Cabinet temperature
is too warm.
Thermostat set too warm. Set thermostat to lower temperature.
Blocking air ow.
Re-arrange product to allow for proper air ow.
Make sure there is at least four inches of clearance
from evaporator.
Excessive amount of warm
product placed in cabinet.
Allow adequate time for product to cool down.
Fuse blown or circuit breaker
tripped.
Replace fuse or reset circuit breaker.
Dirty condenser coil. Clean the condenser coil.
Prolonged door opening or
door ajar.
Ensure doors are closed when not in use. Avoid
opening doors for long periods
of time.
Evaporator coil iced over.
Cabinet is noisy.
Loose part(s). Locate and tighten loose part(s).
Tubing vibration.
Ensure tubing is free from contact with other
tubing orcomponents.
7 | Refrigerated Chef Base Instruction Manual

US091225
REFRIGERATION WARRANTY
TWO-YEAR LIMITED WARRANTY
Admiral Craft Equipment Limited Warranty, Two (2) Year Parts and Labor + Five (5) Year Compressor and Evaporator Pan.
Admiral Craft Equipment Corp. (ACE) warrants its equipment against defects in materials and workmanship, subject to the following
conditions:
• ACE Equipment is warranted for two (2) years, effective from the date of purchase by the original owner. A copy of the
original receipt or other proof of purchase is required to obtain warranty coverage. This warranty applies to the original
owner only and is not assignable.
• Should any product fail to function in its intended manner under normal use within the limits dened in this warranty,
at ACE’s discretion, such product will be repaired, replaced with a refurbished unit, or replaced with a new unit by ACE,
after defective unit has been inspected and defect has been conrmed.
THE FOLLOWING CONDITIONS ARE NOT COVERED BY THIS WARRANTY:
• Equipment failure relating to improper installation, improper utility connection or supply and problems due to
improper ventilation.
• Equipment that has not properly been maintained, damage from improper cleaning, and water damage to controls.
• Equipment that has not been used in an appropriate manner, or has been subject to misuse, neglect, abuse, accident,
alteration, negligence, damage during transit, delivery or installation, re, ood, riot, or act of God.
• Equipment that has the model number or serial number removed or altered.
• Equipment on which the security seal has been broken.
ACE does not assume any liability for extended delays in replacing any item beyond its control. This warranty does not apply
to rubber and non-metallic synthetic parts that may need to be replaced due to normal usage, wear, or lack of preventative
maintenance.
This warranty covers products shipped into the 48 contiguous United States, Hawaii, and metropolitan areas of Alaska and Canada.
Warranty coverage on products used outside the 48 contiguous United States, Hawaii and metropolitan areas of Alaska and Canada
may vary. Contact ACE for details at 1-877-672-7740.
If the equipment has been changed, altered, modied, or repaired without express written permission from ACE, then the
manufacturer shall not be liable for any damages to any person or to any property, which may result from the use of this equipment
thereafter. This equipment is intended for commercial use only and this warranty is void if equipment is used in other than a
commercial application.
WARRANTY CLAIMS & SERVICE
For warranty and non-warranty related issues please call ACE at 1-877-672-7740 to speak to technical support.
• When calling please have your model number, serial number, and proof of purchase ready.
• To purchase replacement parts, receive online technical support or ll out a warranty claim visit www.admiralcraft.com
• It is not necessary to contact the place where you originally purchased your product from.
“THE FOREGOING WARRANTY IS IN LIEU OF ANY AND ALL WARRANTIES EXPRESSED OR IMPLIED
INCLUDING ANY IMPLIED WARRANTY OF MERCHANTABILITY OR FITNESS FOR PARTICULAR PURPOSES AND
CONSTITUTES THE ENTIRE LIABILITY OF ACE. IN NO EVENT DOES THE LIMITED WARRANTY EXTEND BEYOND
THE TERMS STATED HEREIN.”
Admiral Craft Equipment Corp. (ACE) reserves the exclusive rights to change or modify this warranty statement or any part herein at
any time without prior notice.
8
Admiral Craft® Equipment Corporation © 2025
3355 Enterprise Avenue - Suite 160 - Ft. Lauderdale, FL 33331 | Tel: 1.877.672.7740 | www.admiralcraft.com