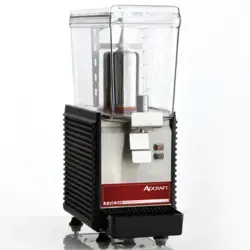
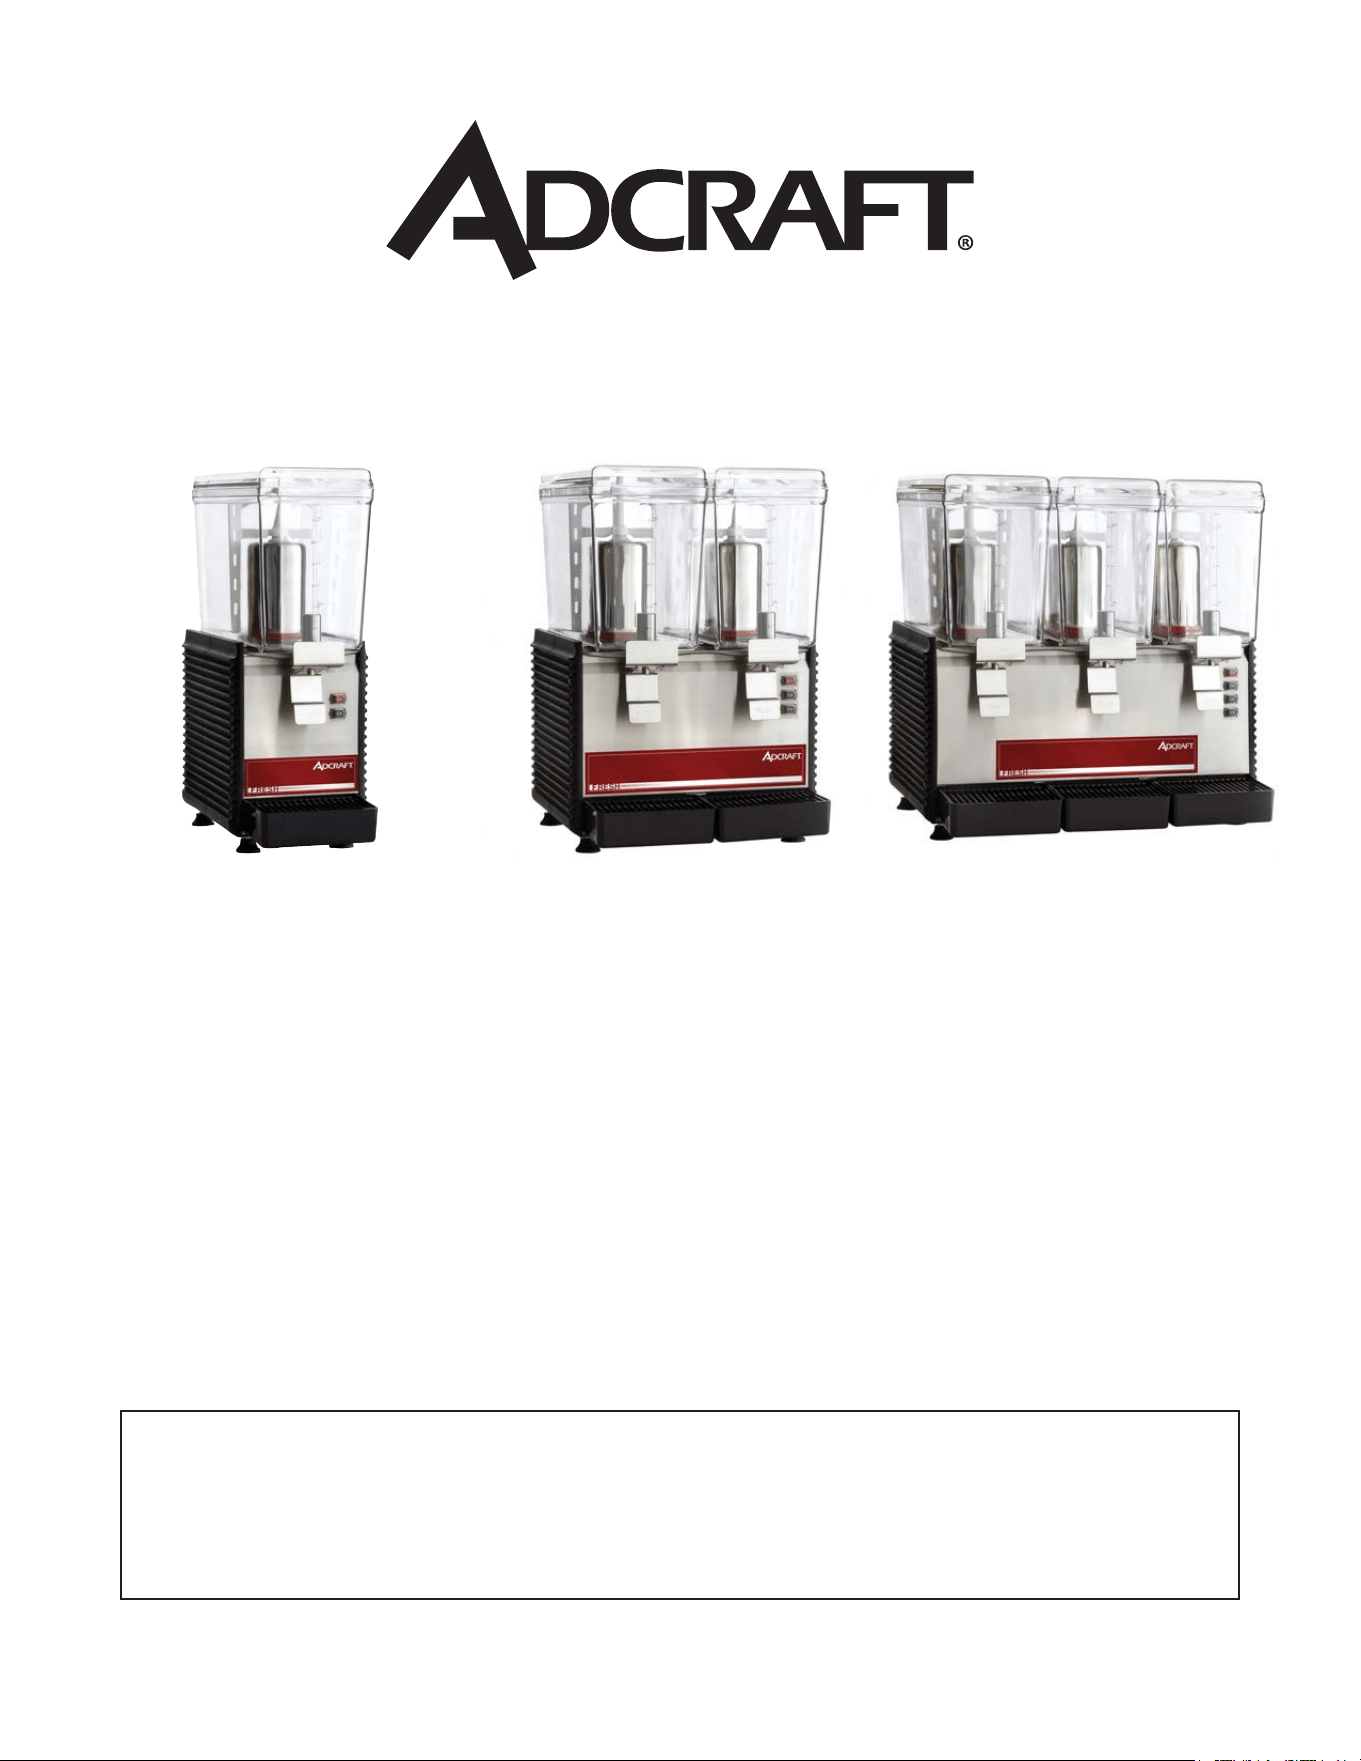
ADC1BRDD ADC2BRDD ADC3BRDD
Single, 3 gal. Double, 6 gal. Triple, 9 gal.
Drink Dispenser
Instruction Manual
This manual contains important information regarding your Adcraft unit.
Please read this manual thoroughly prior to equipment set-up, operation, and
maintenance. Failure to comply with regular maintenance guidelines outlined in
this manual may void the warranty.
Admiral Craft® Equipment Corporation ©
2025
3355 Enterprise Avenue - Suite 160 - Ft. Lauderdale, FL 33331 | Tel: 1.877.672.7740 | www.admiralcraft.com
IMPORTANT SAFEGUARDS
• Please read all the instructions to familiarize yourself with all the parts and operations before use.
• DO NOT leave the appliance unattended during use.
• Children shall NOT play with the appliance.
* This appliance shall NOT BE used by children.
* Keep the appliance and its cord out of reach of children.
• The unit is not intended for use by persons with reduced physical sensory or mental capabilities,
or lack of experience and knowledge unless they have been given supervision or instruction
concerning the use of the appliance by a person responsible for their safety.
• ONLY QUALIFIED PERSONS SHOULD:
* Repair or break into the refrigerating circuit.
* Open and repair the sealed components.
* Open the ventilated enclosures.
• ALWAYS disconnect the power supply:
* BEFORE assembling.
* BEFORE disassembling.
* BEFORE cleaning.
* When not in use and if unit is left unattended
• DO NOT operate the unit with a damaged electrical cord or plug. If the supply cord is damaged,
it must be replaced by the manufacturer, its service agent or similarly qualied persons in order to
avoid a hazard.
• DO NOT install the appliance in a place where it may come in contact with water. This may impair
electricity insulation and cause electric shock or re.
• NEVER expose electrical connectors to any liquids.
• To avoid any electric shock, never plunge the appliance, the cord or plug in water or other liquid.
• Always install the appliance on a rm and at worktable.
• Protect the appliance from direct light and heat. DO NOT install this appliance outdoors.
• Be sure the appliance is installed in an area where the temperature will not go below 50°F (10°C) or
exceed 95°F (35°C).
• DO NOT splash or spray water on the surface of appliance while cleaning the machine.
• The appliance is equipped with a temperature controller inside.
* Every unit is preset at the factory for the recommend temperature between 35.6°F (2°C) to 41°F
(5°C) for chilled drinks.
* DO NOT change the preset without any professional technician’s advice.
MODEL: ADC1BRDD ADC2BRDD ADC3BRDD
VOLTAGE:
120V 120V 120V
HERTZ:
60Hz 60Hz 60Hz
WATTAGE:
440W 580W 880W
DIMENSIONS:
(HxWxD)
23.23” x 8.74” x 24.00” 23.23” x 16.14” x 24.00” 23.23” x 23.58” x 24.00”
590 mm x 222 mm X 452 mm 590 mm x 410 mm X 452 mm 590 mm x 599 mm X 452 mm
UNIT WEIGHT:
39.68 lbs. 63.93 lbs. 80.47 lbs
PLUG:
NEMA 5-15P NEMA 5-15P NEMA 5-15P
2 | Drink Dispenser Instruction Manual
INSTRUCTIONS FOR MACHINE TRANSPORT
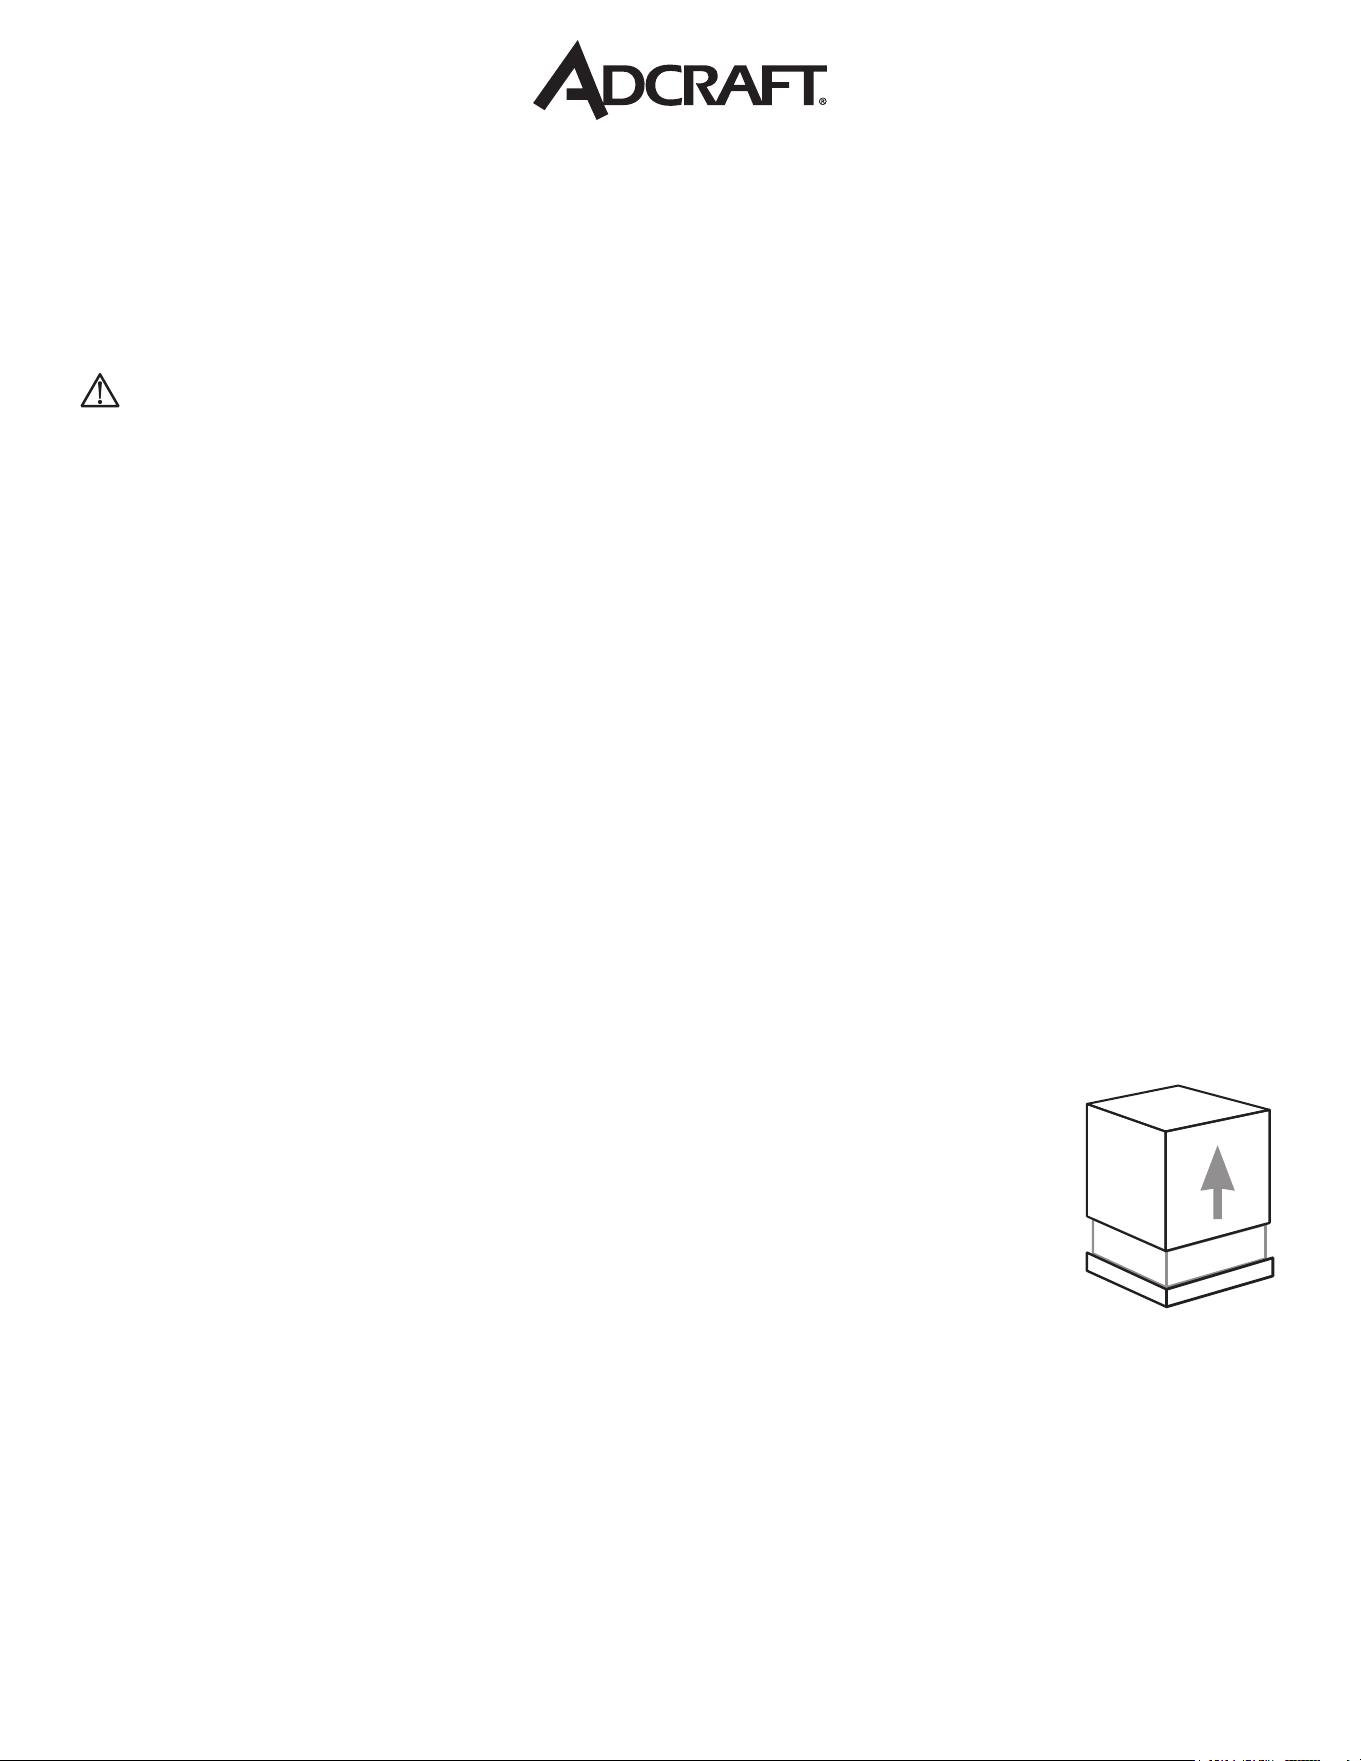
• NOTE: Refrigeration equipment must remain upright to avoid damage to the compressor.
• In order to prevent the oil contained in the compressor from owing into the cooling circuit, it is
necessary to always ship, carry, store and handle this machine in an upright position, following the
instructions located on the packaging.
• Never ship, carry, store or handle unit on its side.
PROPER GROUNDING REQUIRED:
WARNING: THIS UNIT MUST BE PROPERLY ELECTRICALLY GROUNDED TO AVOID POSSIBLE FATAL
ELECTRICAL SHOCK OR SERIOUS INJURY TO THE OPERATOR. THE POWER CORD IS PROVIDED WITH
A THREE PRONG GROUNDED PLUG. IF A THREE-HOLE GROUNDED ELECTRICAL OUTLET IS NOT
AVAILABLE, USE AN APPROVED METHOD TO GROUND THE UNIT.
• DO NOT USE EXTENSION CORDS WITH THIS UNIT.
• DO NOT “GANG” TOGETHER WITH OTHER ELECTRICAL DEVICES ON THE SAME OUTLET.
CONNECTION TO MAIN POWER SUPPLY
• The electrical safety of this machine can only be achieved if the machine is properly connected to
an appropriate grounded receptacle that is in compliance with current national safety standards.
Therefore, the manufacturer cannot be held responsible for damage and/or injury caused by failure
to connect the unit to an appropriate power source.
• For a safe and correct installation, connect the unit to a dedicated outlet.
• DO NOT alter the cord or plug in any way.
• The entire length of the power cord must not, in any way, be compressed, bent or bunched together,
nor may extension cords be used.
• DO NOT obstruct the ventilation and heat dispersion grill vents on the side and rear panels of
the unit. An insufcient ventilation process may reduce the efciency of the machine, causing it to
function inadequately, and cause serious damage to the machine. A minimum of eight inches (20cm)
clearance is necessary on each side and behind the unit.
INSTALLATION:
1. Cut banding straps from box and lift the box off the machine (see Fig.A).
2. Position the machine on a on a rm and at worktable.
3. The machine must be well ventilated.
* Leave an 8” (20 cm) clearance on the sides and back of the machine to allow
proper ventilation.
* Installation of the machine near a heat source should be avoided.
* Some heat sources you should avoid locating this unit too close to are
ovens, coffee machines, cold or frozen beverage dispensers or ice machines
(equipment with compressors that expel hot air through its vents.
* An ambient temperature between 59°F (15°C) and 77°F (25°C) is
recommended.
Figure A
3 | Drink Dispenser Instruction Manual
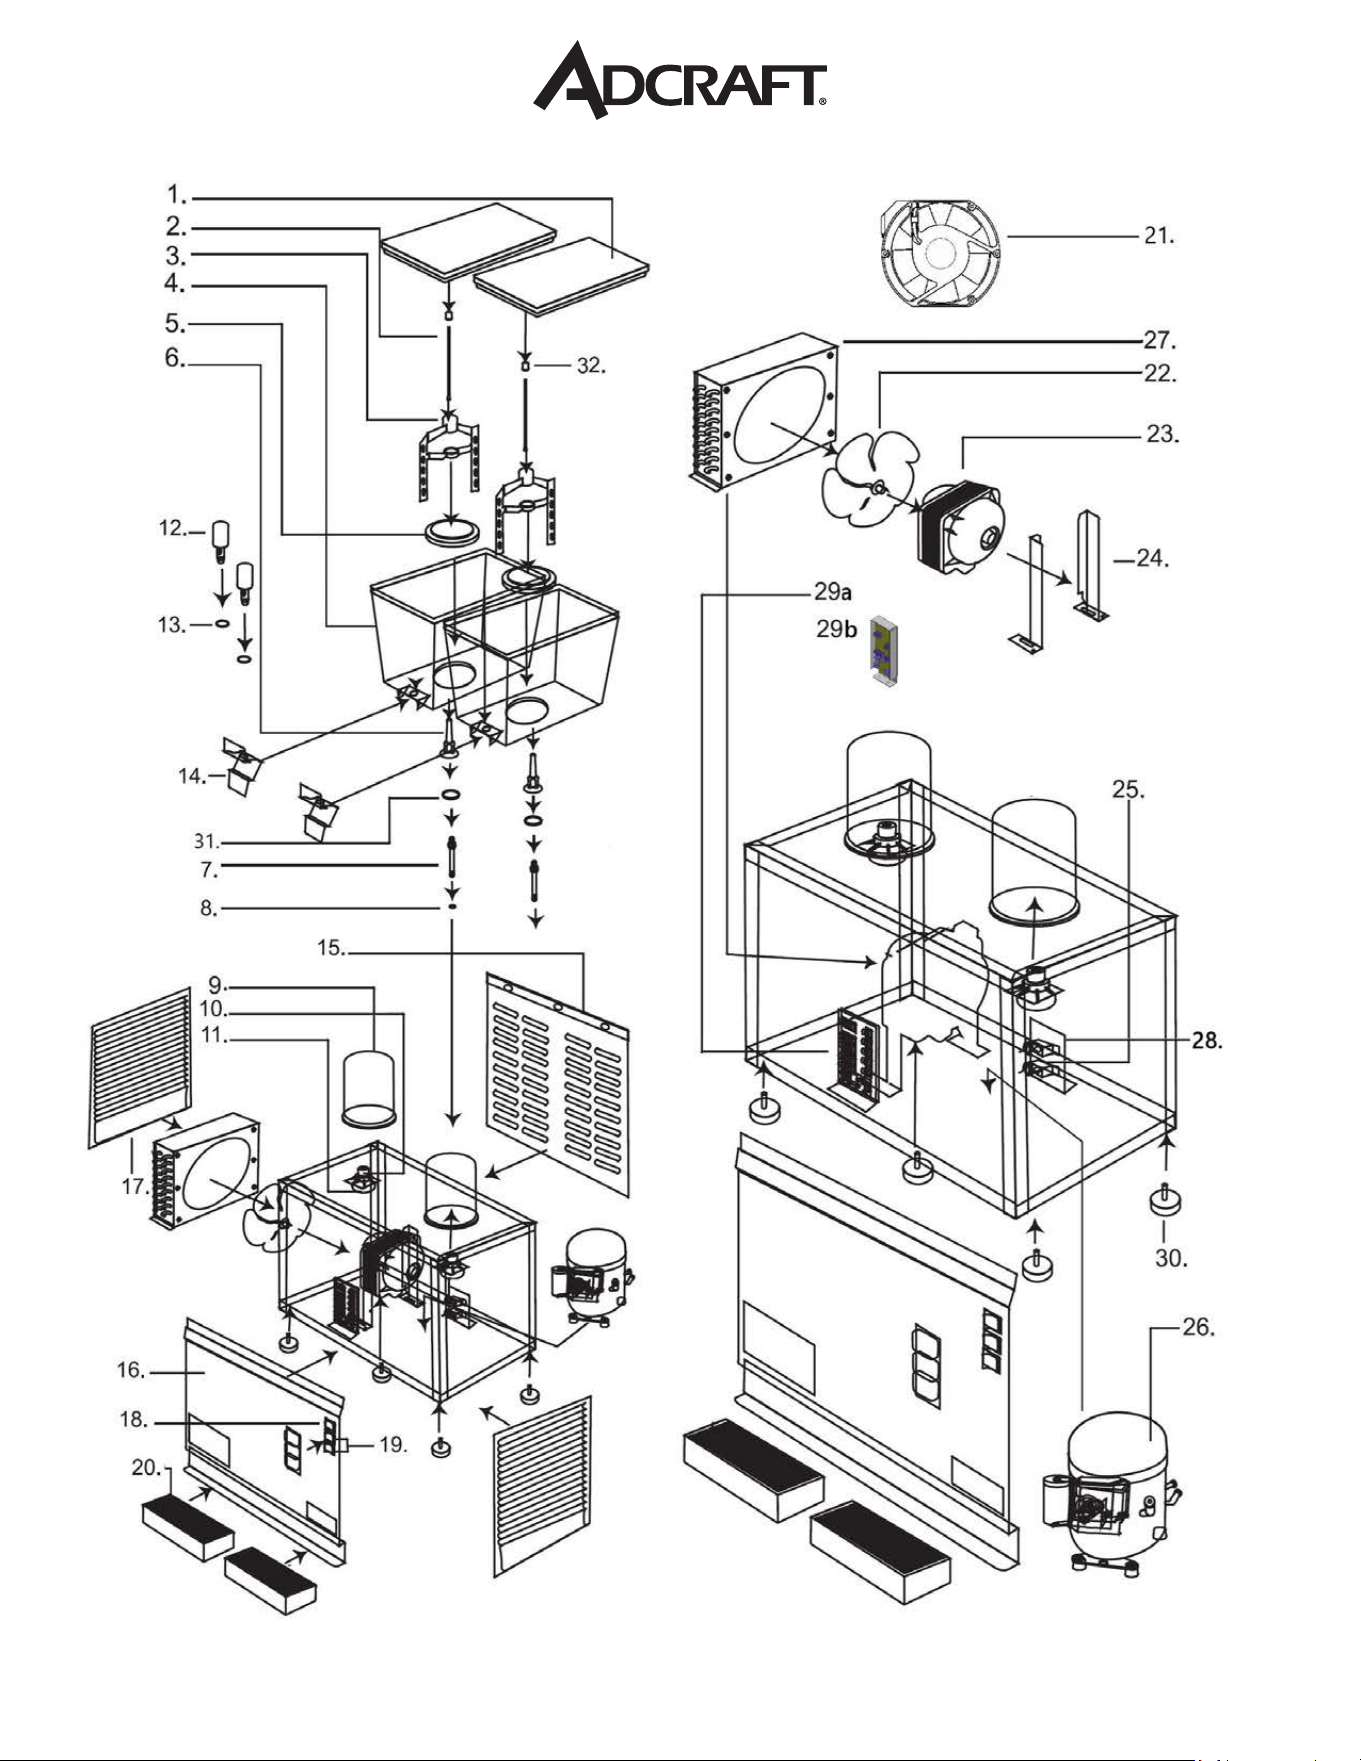
PARTS DIAGRAM
yW>K/'ZD
Z/E</^WE^ZADC1BRDD ADC2BRDDADC3BRDD
4 | Drink Dispenser Instruction Manual
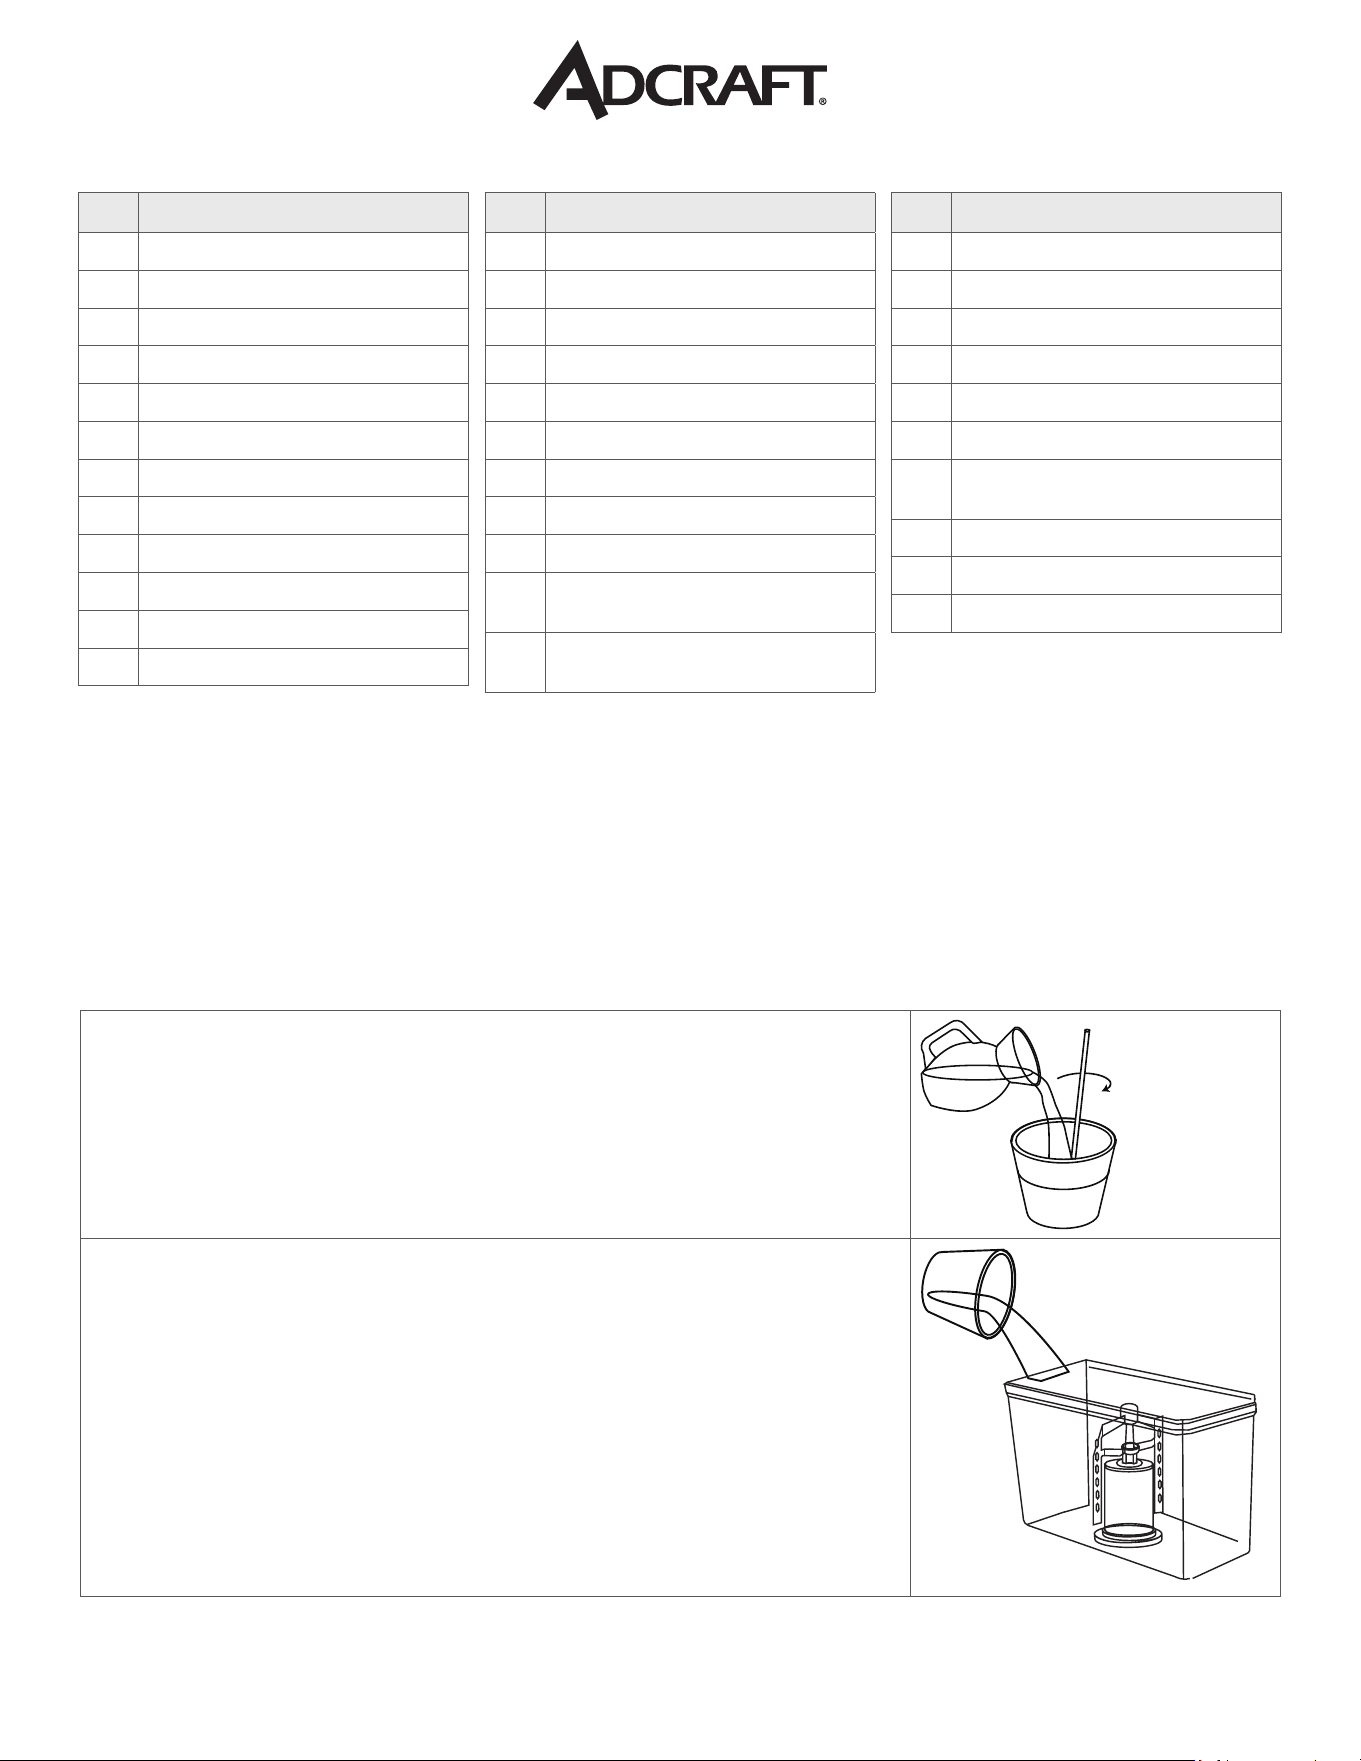
PARTS LIST
NO. DESCRIPTION
1 Bowl Cover
2 Stirring Bar
3 Stirring Paddle
4 PC Bowl
5 Bowl Gasket
6 Covering
7 Fixed Shaft
8 Imminence O-Ring
9 Evaporator
10 Motor Fixed Set
11 Stirring Motor
12 Fluid Pin
NO. DESCRIPTION
13 Spout O-Ring
14 Fixed Metal Plate
15 Back Panel
16 Front Panel
17 Side Panel (Black)
18 Refrigeration Switch (Red)
19 Stirring Switch (Black)
20 Drip Tray
21 6” Fan Motor - Single Unit Only
22 8” Fan Blades - Double &
Triple Units
23 8” Fan Motor- Double &
Triple Units
NO. DESCRIPTION
24 Motor Fixed Set (Right & Left)
25 Temperature Control Switch 110V
26 Compressor
27 Condenser
28 Bracket For Thermostat
29a Terminal Connectors Set
29b Terminal Connectors Set with
Stainless Steel Cover
30 Support Feet
31 O-Ring
32 Cap
FILLING THE BOWLS/TANKS
• DO NOT use carbonated beverages inside the tank.
• This appliance is suitable for any non-carbonated soft drinks, like black tea or orange juice.
• Potable water is also suitable for this unit.
• CAUTION:
* The cover of container should be located in an area not exposed to persons using or attending
this machine.
* Make sure that the mixture of condensed syrup and potable water is well mixed in advance.
* NEVER pour instant beverage powder into the bowl without pre-mix.
1. If using product concentrate (instead of ready-to-use product),
dilute and mix the product with water, according to the directions
given by the manufacturer, in a separate container.
* NEVER pour dry powder, crystals, or concentrate into a
dry bowl.
2. Remove the lid.
* When relling the tank, do not remove the center shaft.
3. Pour the prepared product into the bowl.
* Do not spill any material on lid or on bowl.
* There is a minimum and maximum ll line on the bowl.
* Do not overll or run the unit without enough product.
* Running unit with product below the minimum full line may
cause damage to the unit.
4. Insert the plug into a dedicated electrical outlet.
5 | Drink Dispenser Instruction Manual
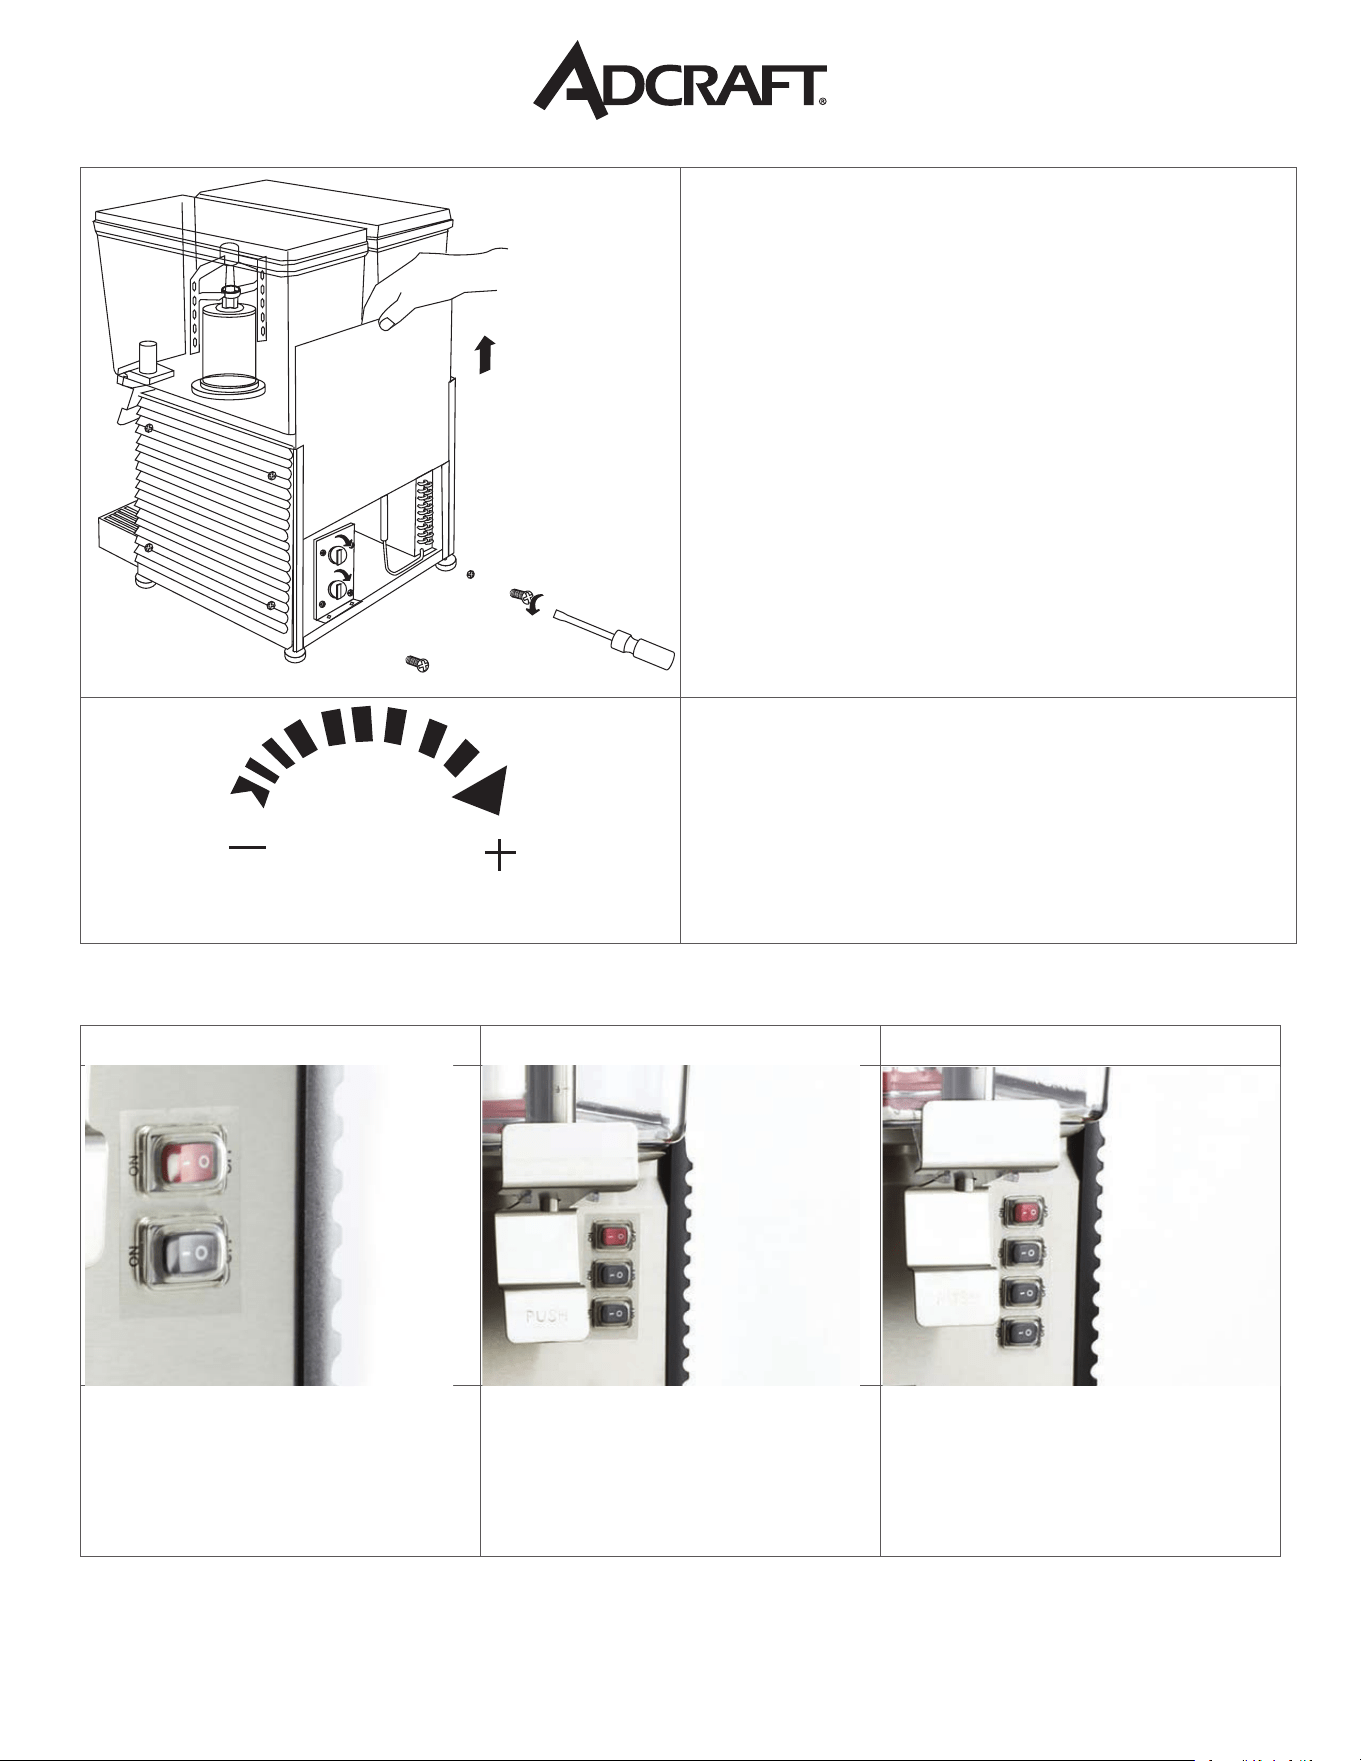
TEMPERATURE CONTROL PANEL
Temperature Controls are located on back of unit.
1. To access Temperature Controls, unscrew the
back panel cover.
2. Lift the panel cover
* A properly tuned system keeps each bowl’s
temperature ≤ 41°F without freezing juices or other
cold beverages with its stirrer paddle rotating.
• Each bowl should be tuned using its specic
cold control adjustment knob or screw port.
• Once an individual bowl is tuned, the
adjustment position should be marked with
a permanent marker & recorded for future
reference.
MIN
MAX
(Coldest)
3. Turn the dial to adjust coldness:
* Clockwise for the Max (Coldest) setting.
* Counter-Clockwise for Minimum Coldness.
4. Replace panel cover and screws after
adjustments are made.
POWER CONTROLS
ADC1BRDD ADC2BRDD ADC3BRDD
Top Red Button - Refrigeration On/Off
Top Black Button - Turns on Spinner
Top Red Button - Refrigeration On/Off
Top Black Button - Turns on Spinner for
the Second Bowl
Second (Black) Button - Turns on
Spinner for the Second Bowl
Top Red Button - Refrigeration On/Off
Top Black Button - Turns on Spinner for
the Second Bowl
Second Black Button - Turns on Spinner
for the Second Bowl
Third Black Button - Turns on Spinner for
the Third Bowl
6 | Drink Dispenser Instruction Manual
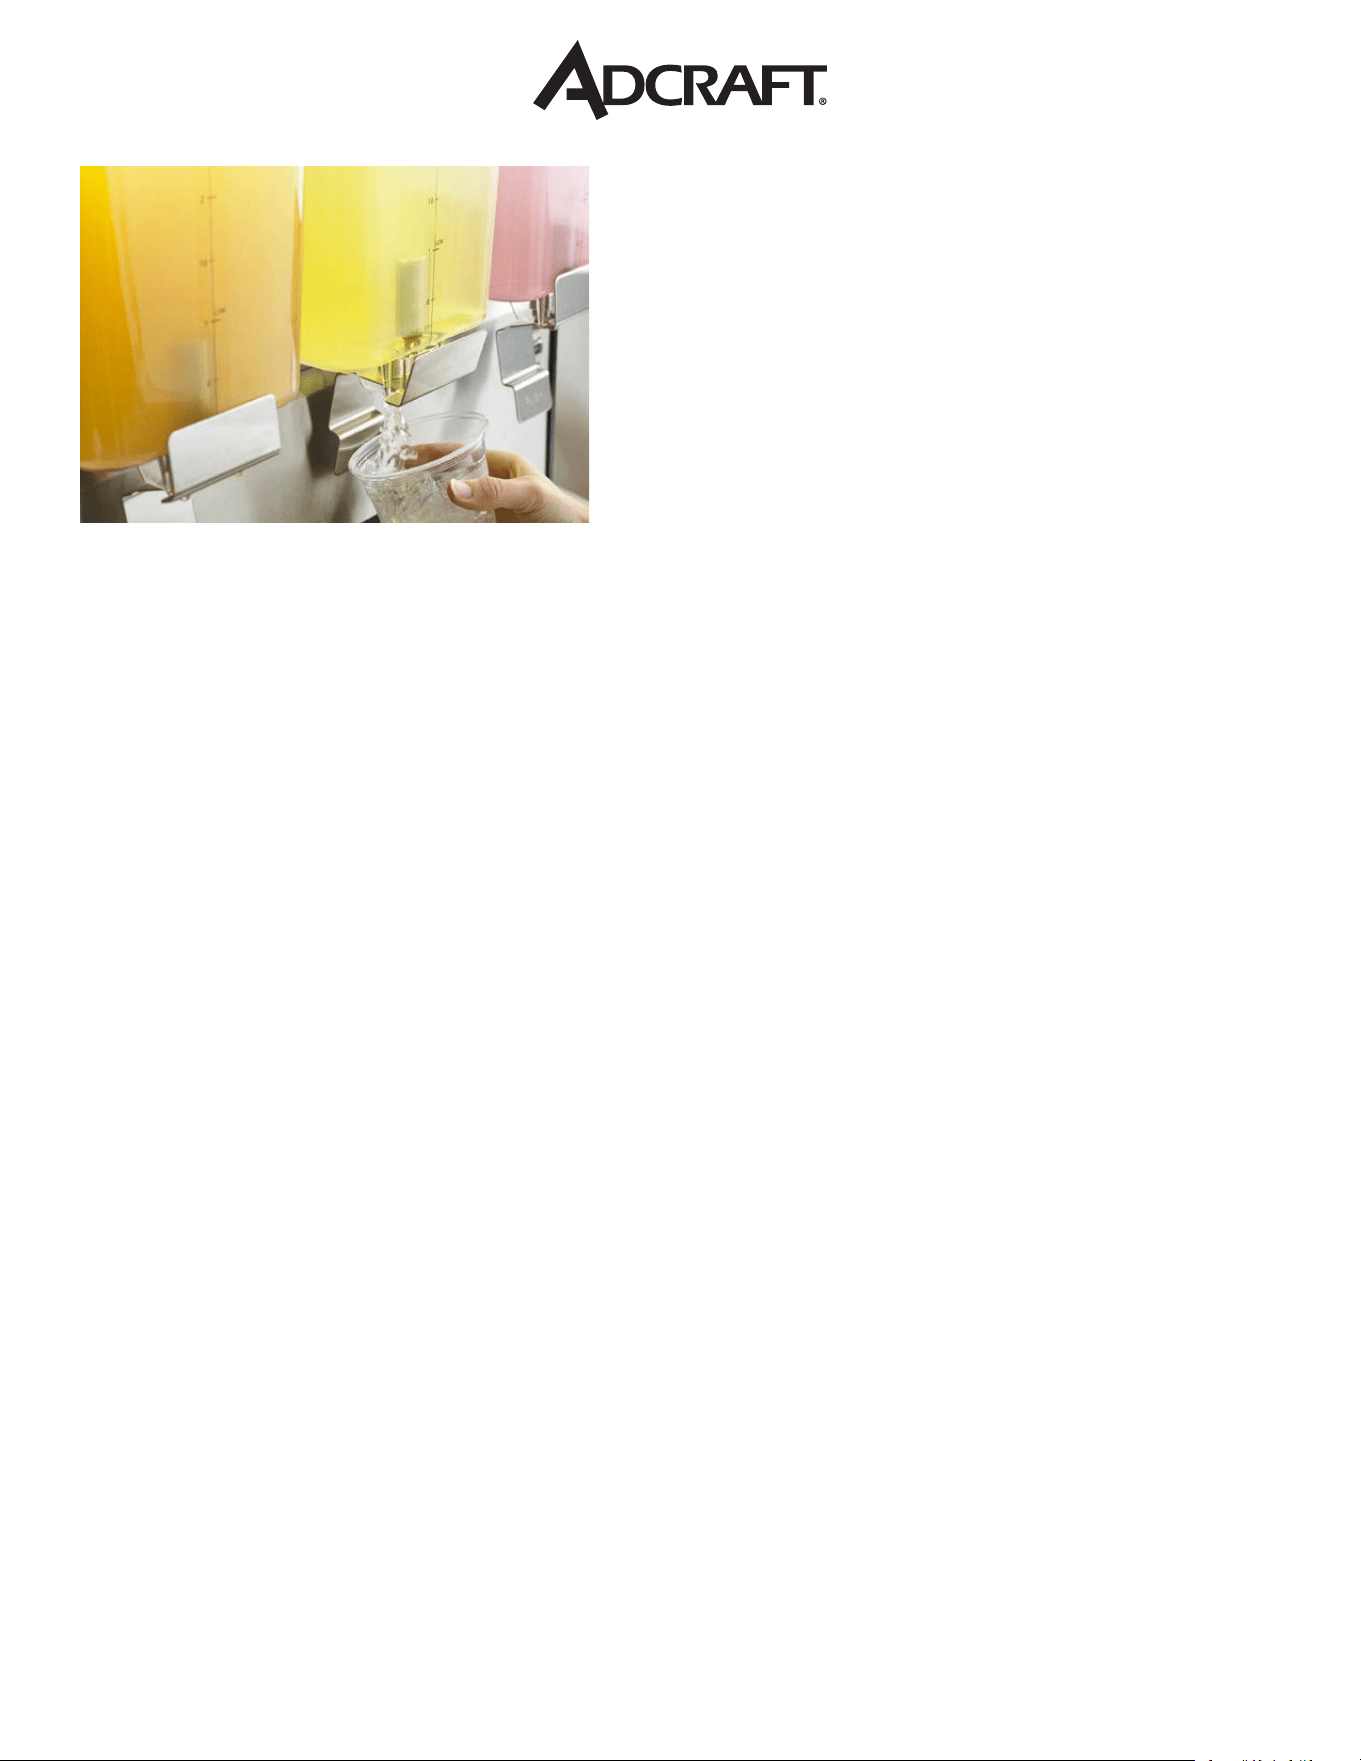
DISPENSING PRODUCT
To dispense the product:
1. Position the cup under the dispensing valve.
2. Push the dispensing lever.
REPAIR AND MAINTENANCE
• Inspection, testing, and repair of electrical equipment should be performed only by qualied service
personnel.
• Where electrical components are being changed, they shall be t for the purpose and to the correct
specication. At all times, the manufacturer’s maintenance and service guidelines shall be followed.
If in doubt, consult the manufacturer’s technical department or qualied service personnel for
assistance.
• Repair and maintenance to electrical components shall include initial safety checks and component
inspection procedures. If a fault exists that could compromise safety, then no electrical supply
shall be connected to the circuit until it is satisfactorily dealt with. If the fault cannot be corrected
immediately but it is necessary to continue operation, an adequate temporary solution shall be used.
This shall be reported to the owner of the equipment, so all parties are advised.
• Initial safety checks shall include:
* That capacitors are discharged: this shall be done in a safe manner to avoid possibility of
sparking;
* That no live electrical components and wiring are exposed while charging, recovering or purging
the system;
* That there is continuity of earth bonding.
• When repairs to sealed components are made:
* During repairs to sealed components, all electrical supplies shall be disconnected from the
equipment being worked upon prior to any removal of sealed covers, etc.
* If it is absolutely necessary to have an electrical supply to equipment during servicing, then a
permanently operating form of leak detection shall be located at the most critical point to warn
of a potentially hazardous situation.
• Particular attention shall be paid to the following to ensure that by working on electrical components,
the casing is not altered in such a way that the level of protection is affected. This shall include
damage to cables, excessive number of connections, terminals not made to original specication,
damage to seals, incorrect tting of glands, etc.
• Ensure that the apparatus is mounted securely.
• Ensure that seals or sealing materials have not degraded to the point that they no longer serve
the purpose of preventing the ingress of ammable atmospheres. Replacement parts shall be in
accordance with the manufacturer’s specications.
• Repair to intrinsically safe components:
* Do not apply any permanent inductive or capacitance loads to the circuit without ensuring that
this will not exceed the permissible voltage and current permitted for the equipment in use.
7 | Drink Dispenser Instruction Manual
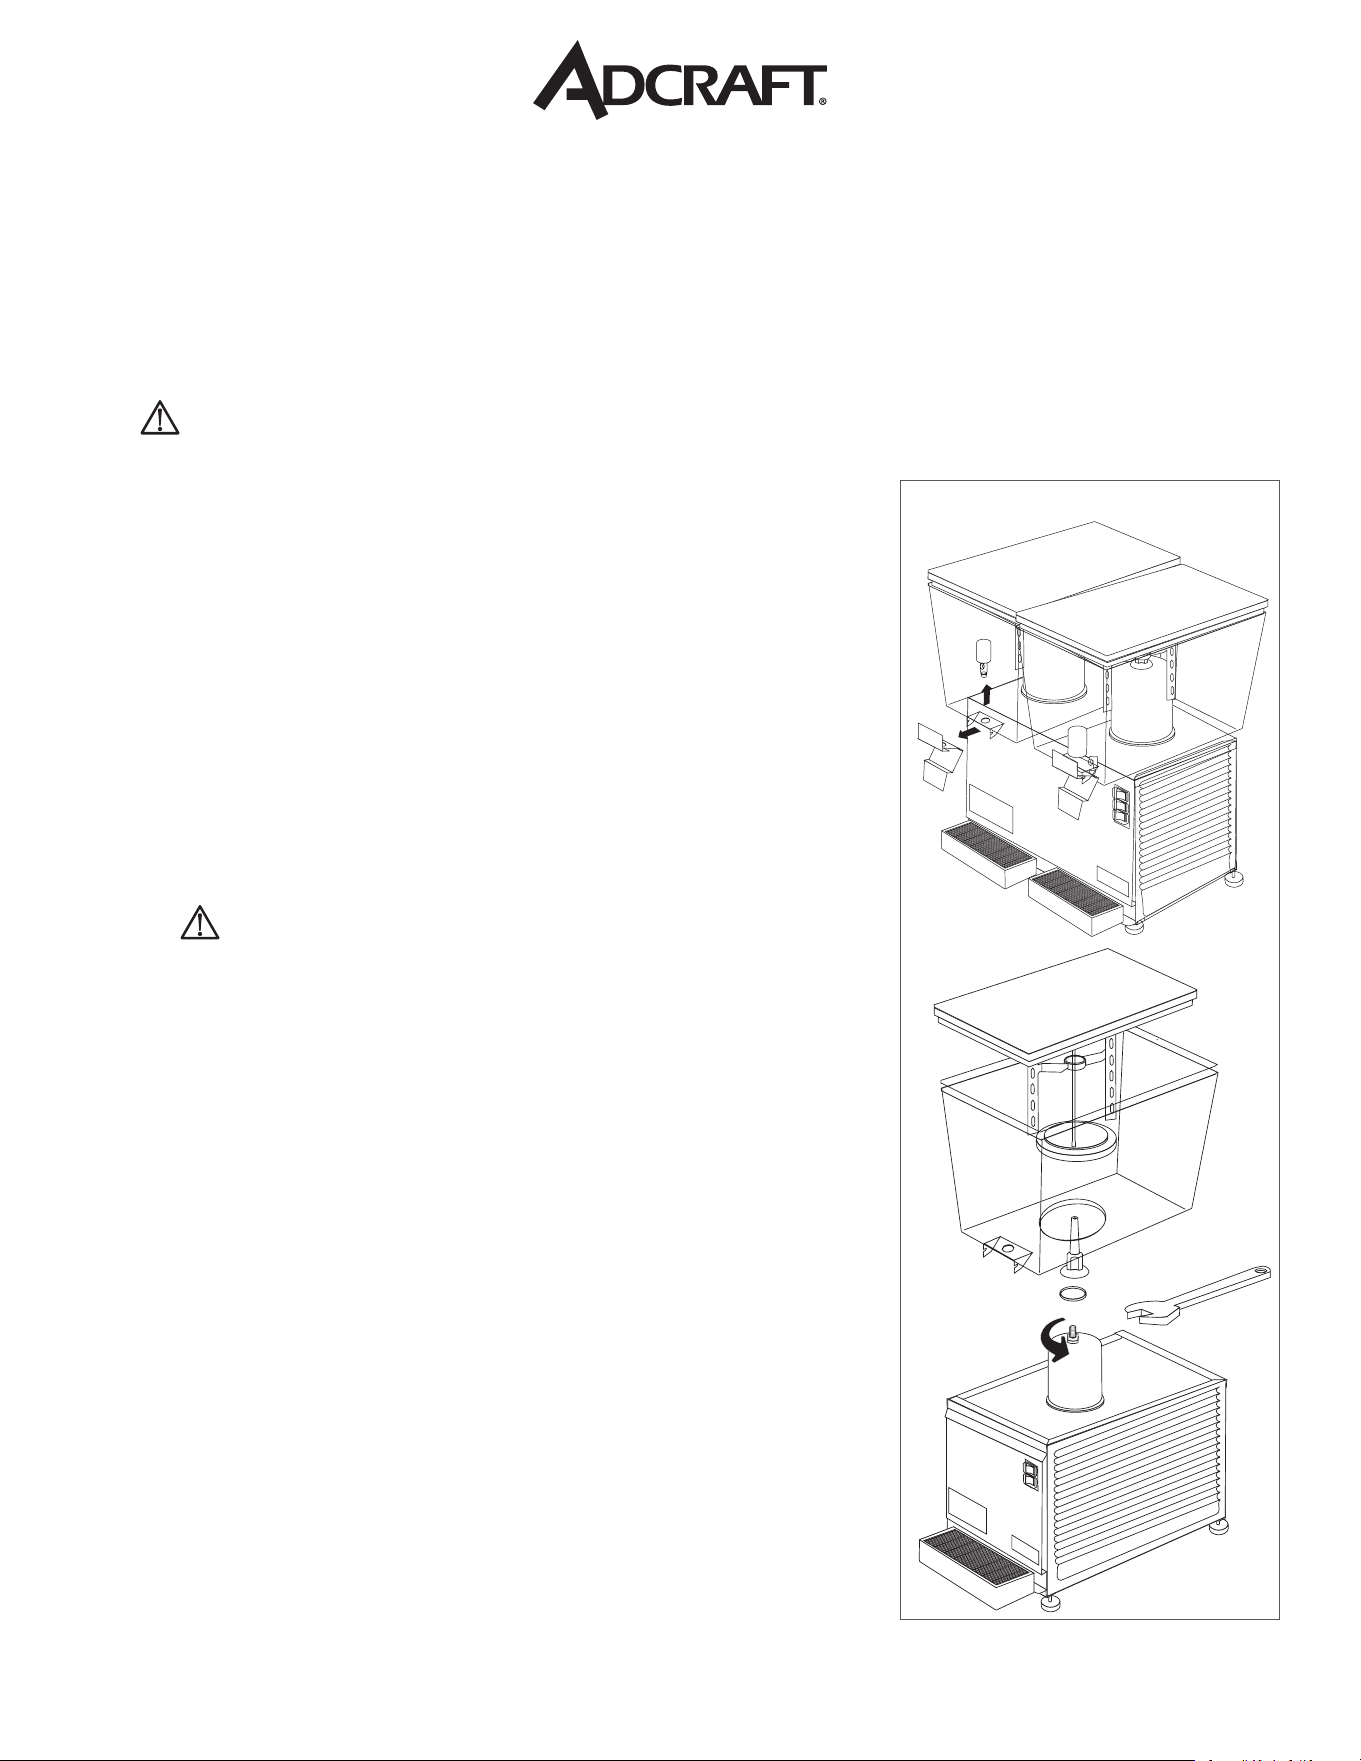
* Intrinsically safe components are the only types that can be worked on while live in the presence
of a ammable atmosphere. The test apparatus shall be at the correct rating.
* Replace components only with parts specied by the manufacturer. Other parts can result in the
ignition of refrigerant in the atmosphere from a leak.
• Check that cabling will not be subject to wear, corrosion, excessive pressure, vibration, sharp edges,
or any other adverse environmental effects. The check shall also take into account the effects of
aging or continual vibration from sources such as compressors or fans.
DAILY CLEANING
• WARNING: Disconnect the unit from its power supply prior to performing any maintenance.
* Failure to do so could result in electric shock, injury from hazardous moving parts or serious
burns from hot surfaces.
• Clean unit daily to optimize performance or when using dairy
products.
• Regular cleaning of bowl components and removing dried-on
beverage solids and pulp from moving sealed parts will result in
maximum efciency.
• It is absolutely necessary to frequently and carefully perform the
cleaning and sanitizing operations as described below.
CAUTION: DO NOT USE ANY POWDERS OR ABRASIVE CLEANING
COMPOUNDS THAT WILL DAMAGE THE FINISH.
1. Remove the bowl lid and drain excess product.
2. Fill the bowl with warm water and ush using dispensing valve until
clear water ows from the spout.
3. Remove the white stirrer and center shaft by lifting up.
* WARNING: DO NOT remove the white stirrer when lling
the bowl with water or beverage!
4. Remove the top part of the uid pin assembly while holding the
lever.
* The pieces will separate.
5. Remove bowl.
* Lift bowl up and over the evaporator.
6. Remove the gasket.
7. Rinse the bowl with warm water and mild detergent.
* DO NOT place in dishwasher or use harsh chemicals.
8. Once rinsed, apply a light coating of food grade grease lubricant
on the gasket and then place the gasket back on the bowl base.
9. Remove the o-ring from the uid-pin and wash both parts
separately, then reassemble the uid-pin.
10. Wipe down the evaporator barrel with a clean, damp cloth.
11. Remove the drip tray and drip tray cover.
12. Pour out any excess product and wash with warm, soapy water.
13. Place drip tray cover back on the drip tray and slide back into
machine.
To Disassemble Unit:
8 | Drink Dispenser Instruction Manual
CLEAN THE CONDENSER - MONTHLY
• WARNING: Disconnect the unit from its power supply prior to performing any maintenance.
* Failure to do so could result in electric shock, injury from hazardous moving parts or serious
burns from hot surfaces.
* Failure to maintain a clean condenser will cause damage to the unit not covered by warranty.
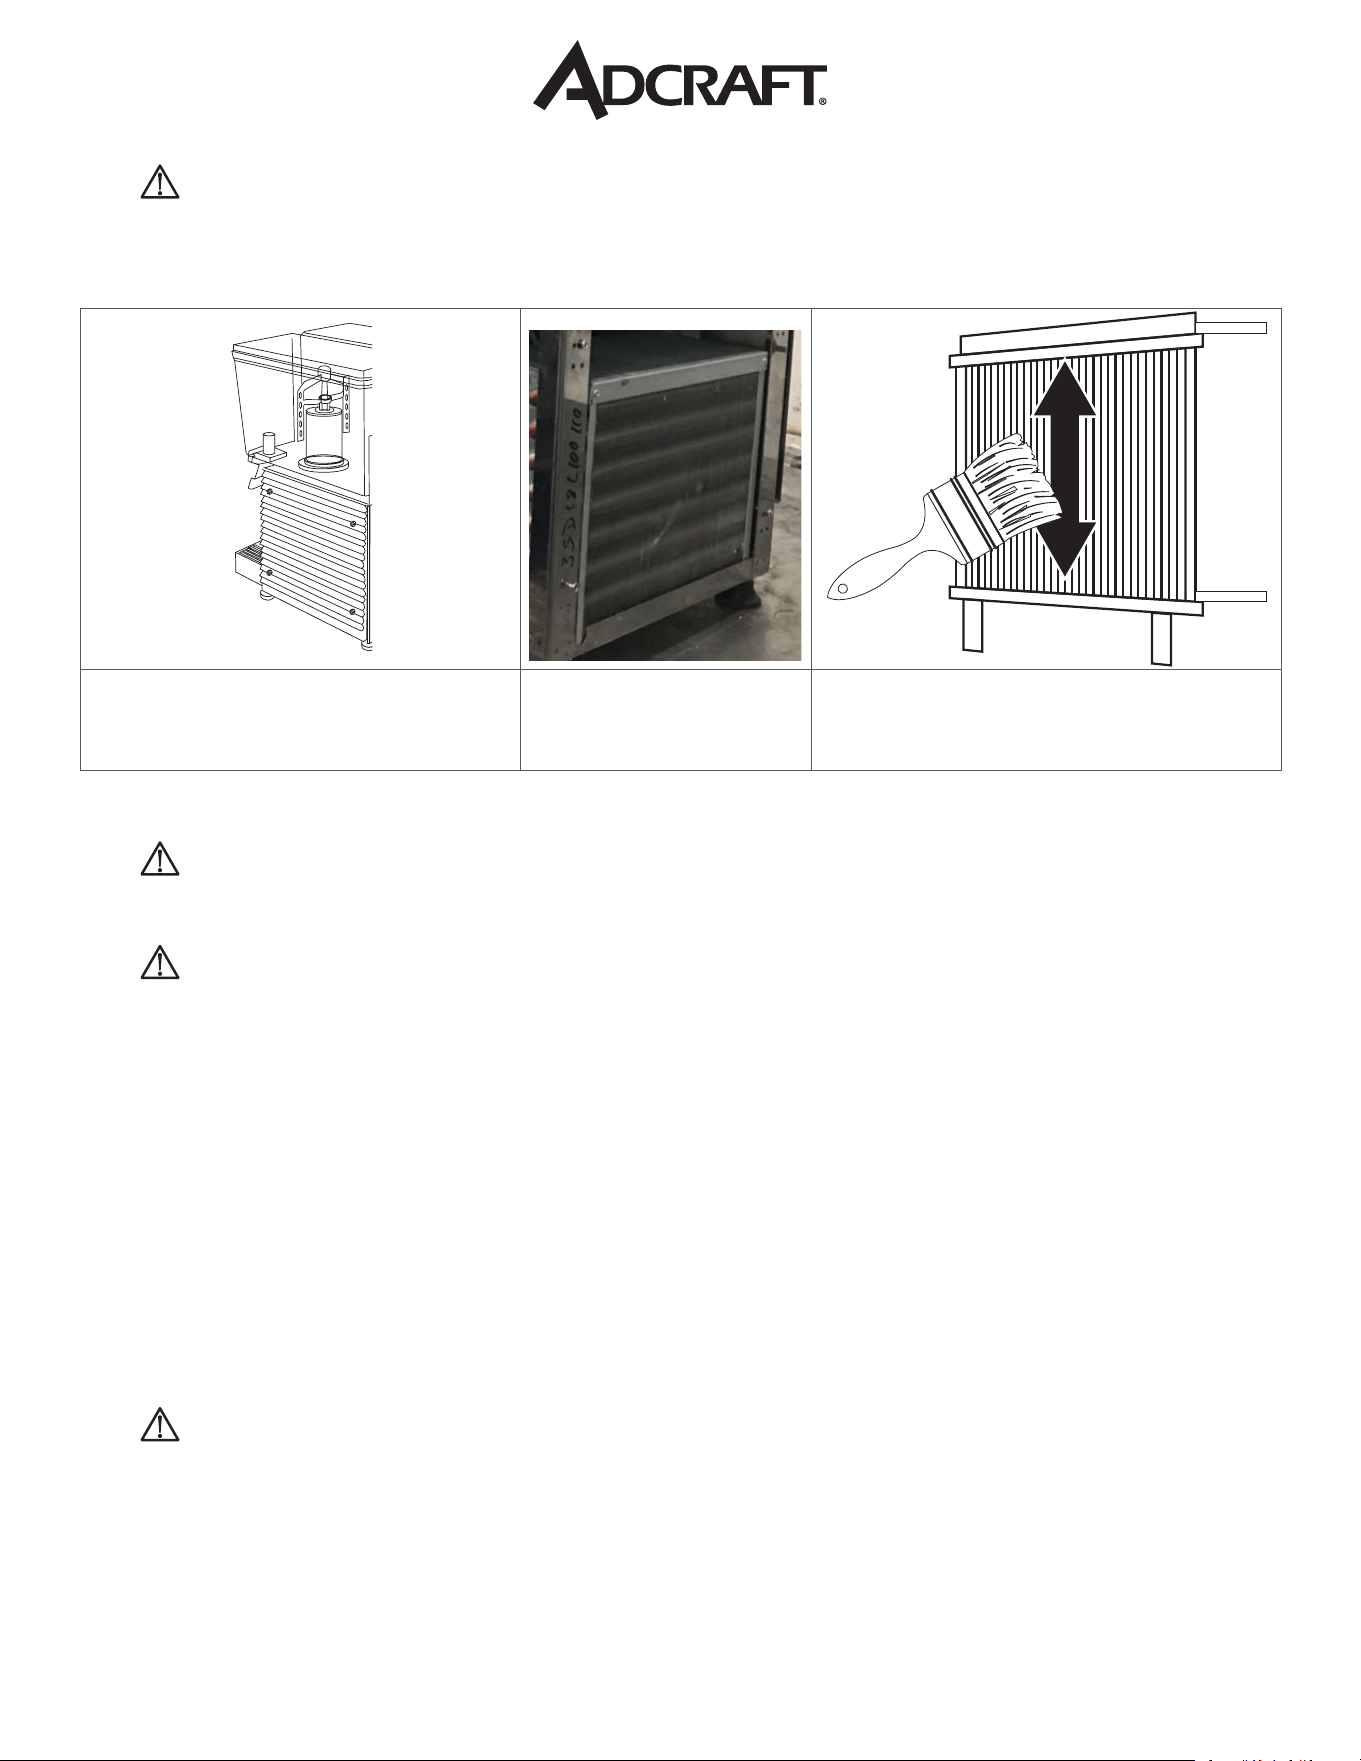
1. To access the Condenser coils,
unscrew the side panel cover.
2. Remove the side
panels.
3. Use a soft bristle brush to clean
the condenser in an up/down
direction.
REMOVING LIME SCALE
• WARNING: Disconnect the unit from its power supply prior to performing any maintenance.
* Failure to do so could result in electric shock, injury from hazardous moving parts or serious
burns from hot surfaces
• WARNING: Wear rubber gloves and safety goggles (and/or face shield) when handling descaler
or sanitizer.
• This procedure must be performed a minimum of once every six months.
REMOVE SCALE DEPOSITS FROM REMOVED PARTS.
1. Mix 16 oz Manitowoc ice machine cleaner / descaler (Model # 9405463) or an equivalent cleaning
agent with one gallon of potable water in a three-compartment sink.
2. Place the plastic parts in the solution and allow to soak for 10-15 minutes.
3. Use a soft bristle brush on heavy scale or mineral buildup as required.
4. Clean scale deposits from surface areas of evaporator and the inside of bowl.
5. Use a clean soft cloth or sponge soaked in cleaner / descaler solution to wipe evaporator surfaces
and the inside of bowl.
* NOTICE: NEVER expose electrical connectors to any liquids.
SANITIZING PROCEDURE
• WARNING: Disconnect the unit from its power supply prior to performing any maintenance
procedures.
* Failure to do so could result in electric shock, injury from hazardous moving parts or serious
burns from hot surfaces.
• This procedure must be performed a minimum of once every six months.
9 | Drink Dispenser Instruction Manual
Sanitize plastic parts:
1. Mix two ounces of Manitowac ice machine sanitizer (Model # 9405653) or an equivalent cleaning
agent with three gallons of potable water in a three compartment sink. Add ve gallons of clear
potable water to third sink compartment.
2. Remove plastic parts from cleaner / descaler solution & rinse in clear potable water.
3. Place the plastic parts in the sanitizer solution and allow to soak for at least one minute.
Sanitize surface areas of evaporator and the inside of bowl:
1. Use a clean sanitizer-soaked towel to wipe and sanitize surface area of evaporator and the inside of
bowl.
2. Manitowoc sanitizer is classied as a no rinse sanitizer. Do not rinse sanitized surfaces of appliance.
* NOTICE: NEVER expose electrical connectors to any liquids.
HOW TO PREVENT FROZEN OR FROSTED EVAPORATOR
• To prevent evaporator from freezing, the drink mixture should always be kept higher than the low
water level limit.
• A frozen evaporator will seriously damage the mixing parts, as well as the stirring motors.
CAUTION:
• If the evaporator is frozen, turn off the power and unplug the appliance rst.
• Make sure the frost or frozen ice is melt completed.
• Never touch the frozen evaporator by hand. It will cause an injury.
• For sanitary reasons, ALWAYS drain out all the leftover mixture. Rell with fresh mixture and start the
appliance again.
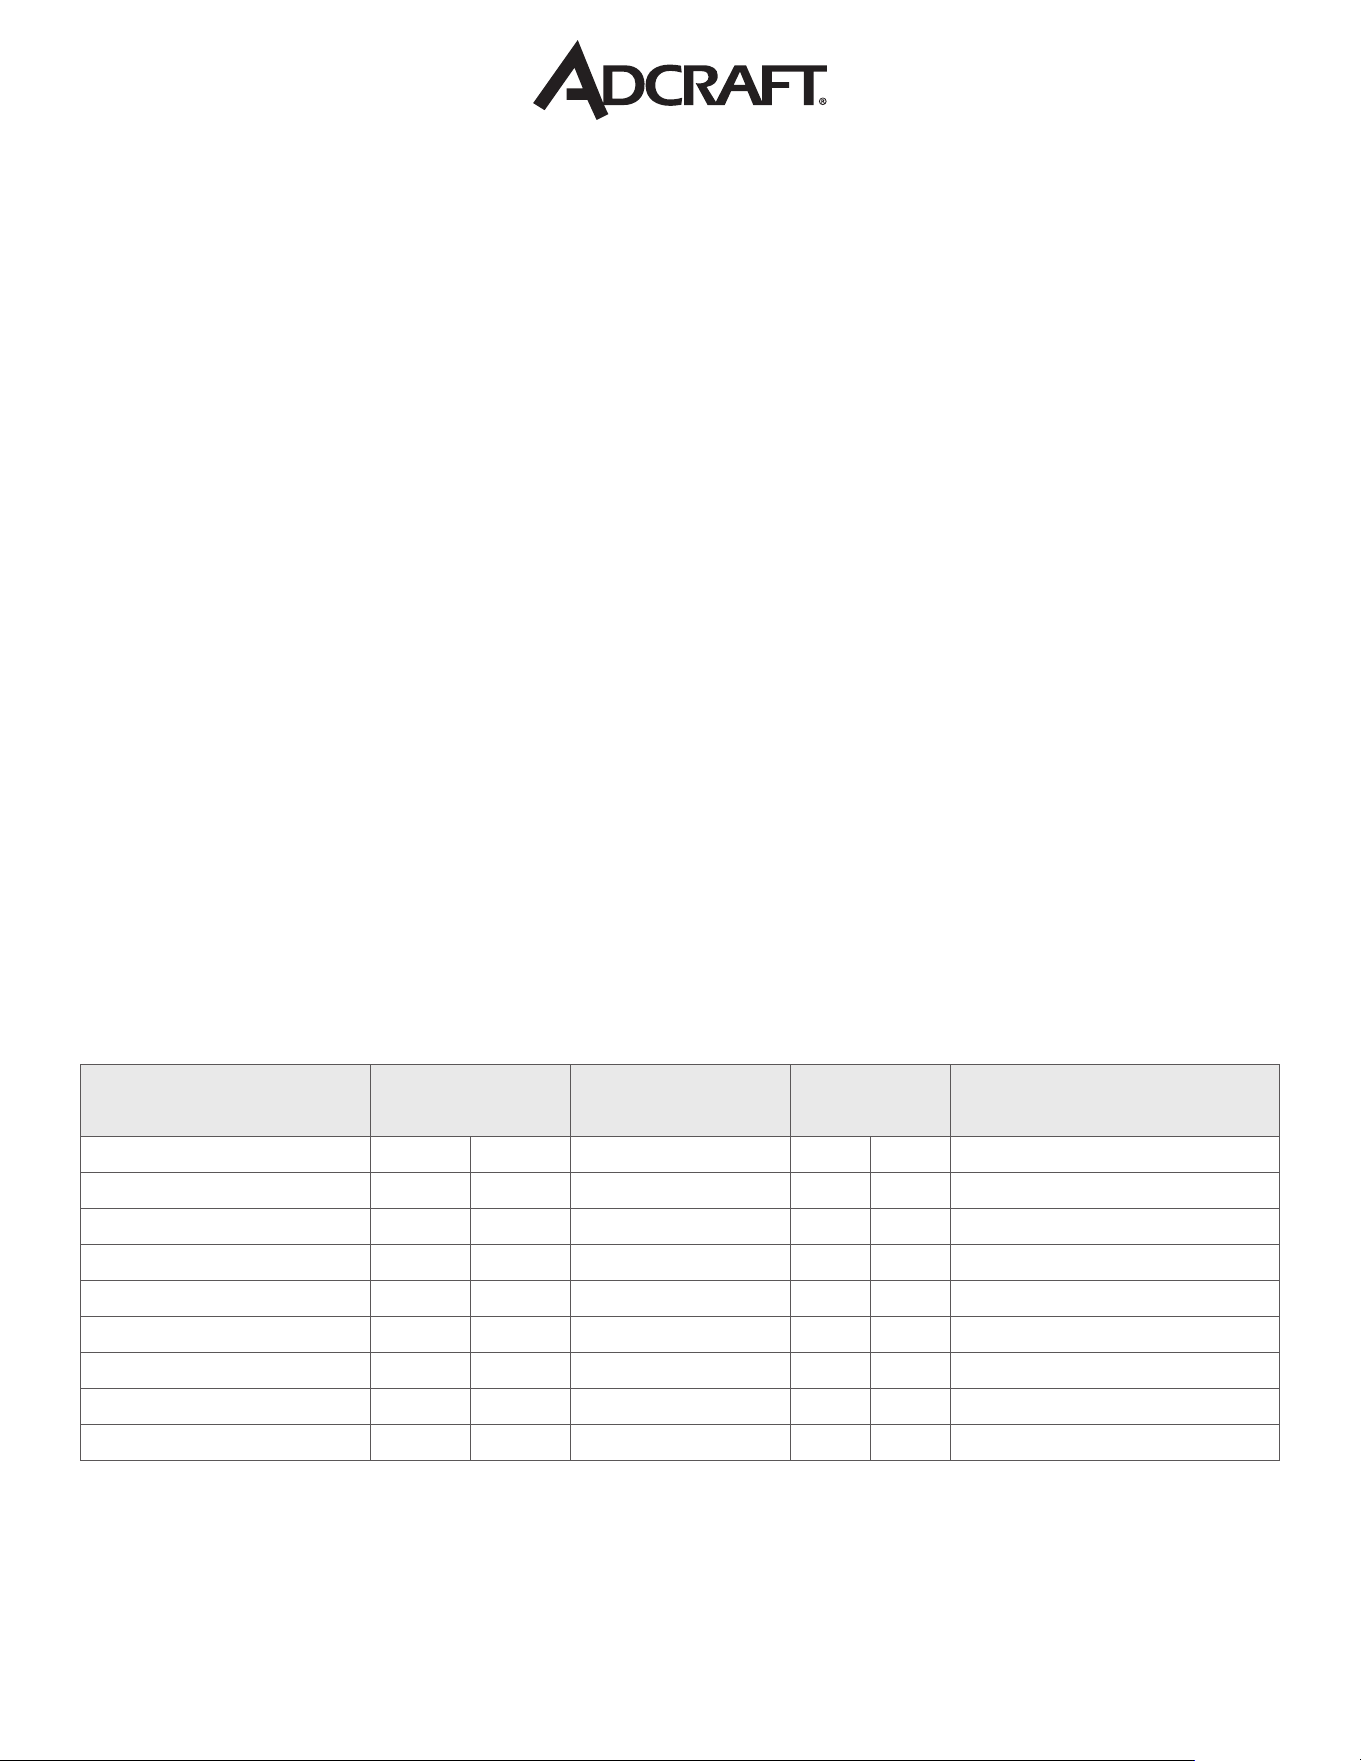
TEST ROOM CLIMATE DEFINITION
• During the test, the test room shall be capable of maintaining values of temperature and humidity
within ±1 °C of the temperature and ±5 units of the relative humidity percentage gures at the
specied climate measuring point(s).
• The exception to this is test-room climate class 3, for which the tolerance of the relative humidity is
instead ±3 units.
TEST ROOM
CLIMATE CLASS
DRY BULB TEMP
RELATIVE HUMIDITY
%
DEW POINT
WATER VAPOR MASS
IN DRY AIR G/KG
˚F ℃ ˚F ℃
0 68 20 50 48.74 9.3 7.3
1 60.8 16 80 54.68 12.6 9.1
8 75.2 24 55 57.92 14.4 10.2
2 71.6 22 65 59.36 15.2 10.8
3 77 25 60 62.06 16.7 12.0
4 86 30 55 68 20 14.8
6 80.6 27 70 69.98 21.1 15.8
5 104 40 40 75.02 23.9 18.8
7 95 35 75 86 30 27.3
NOTE: The water vapor mass in dry air is one of the main points inuencing the performance and the
energy consumption of the cabinets. Therefore the order of the climate class in the table is based
on the water vapor mass column. See also Annex B (ISO 23953-2:2015) to compare lab and store
conditions.
10 | Drink Dispenser Instruction Manual
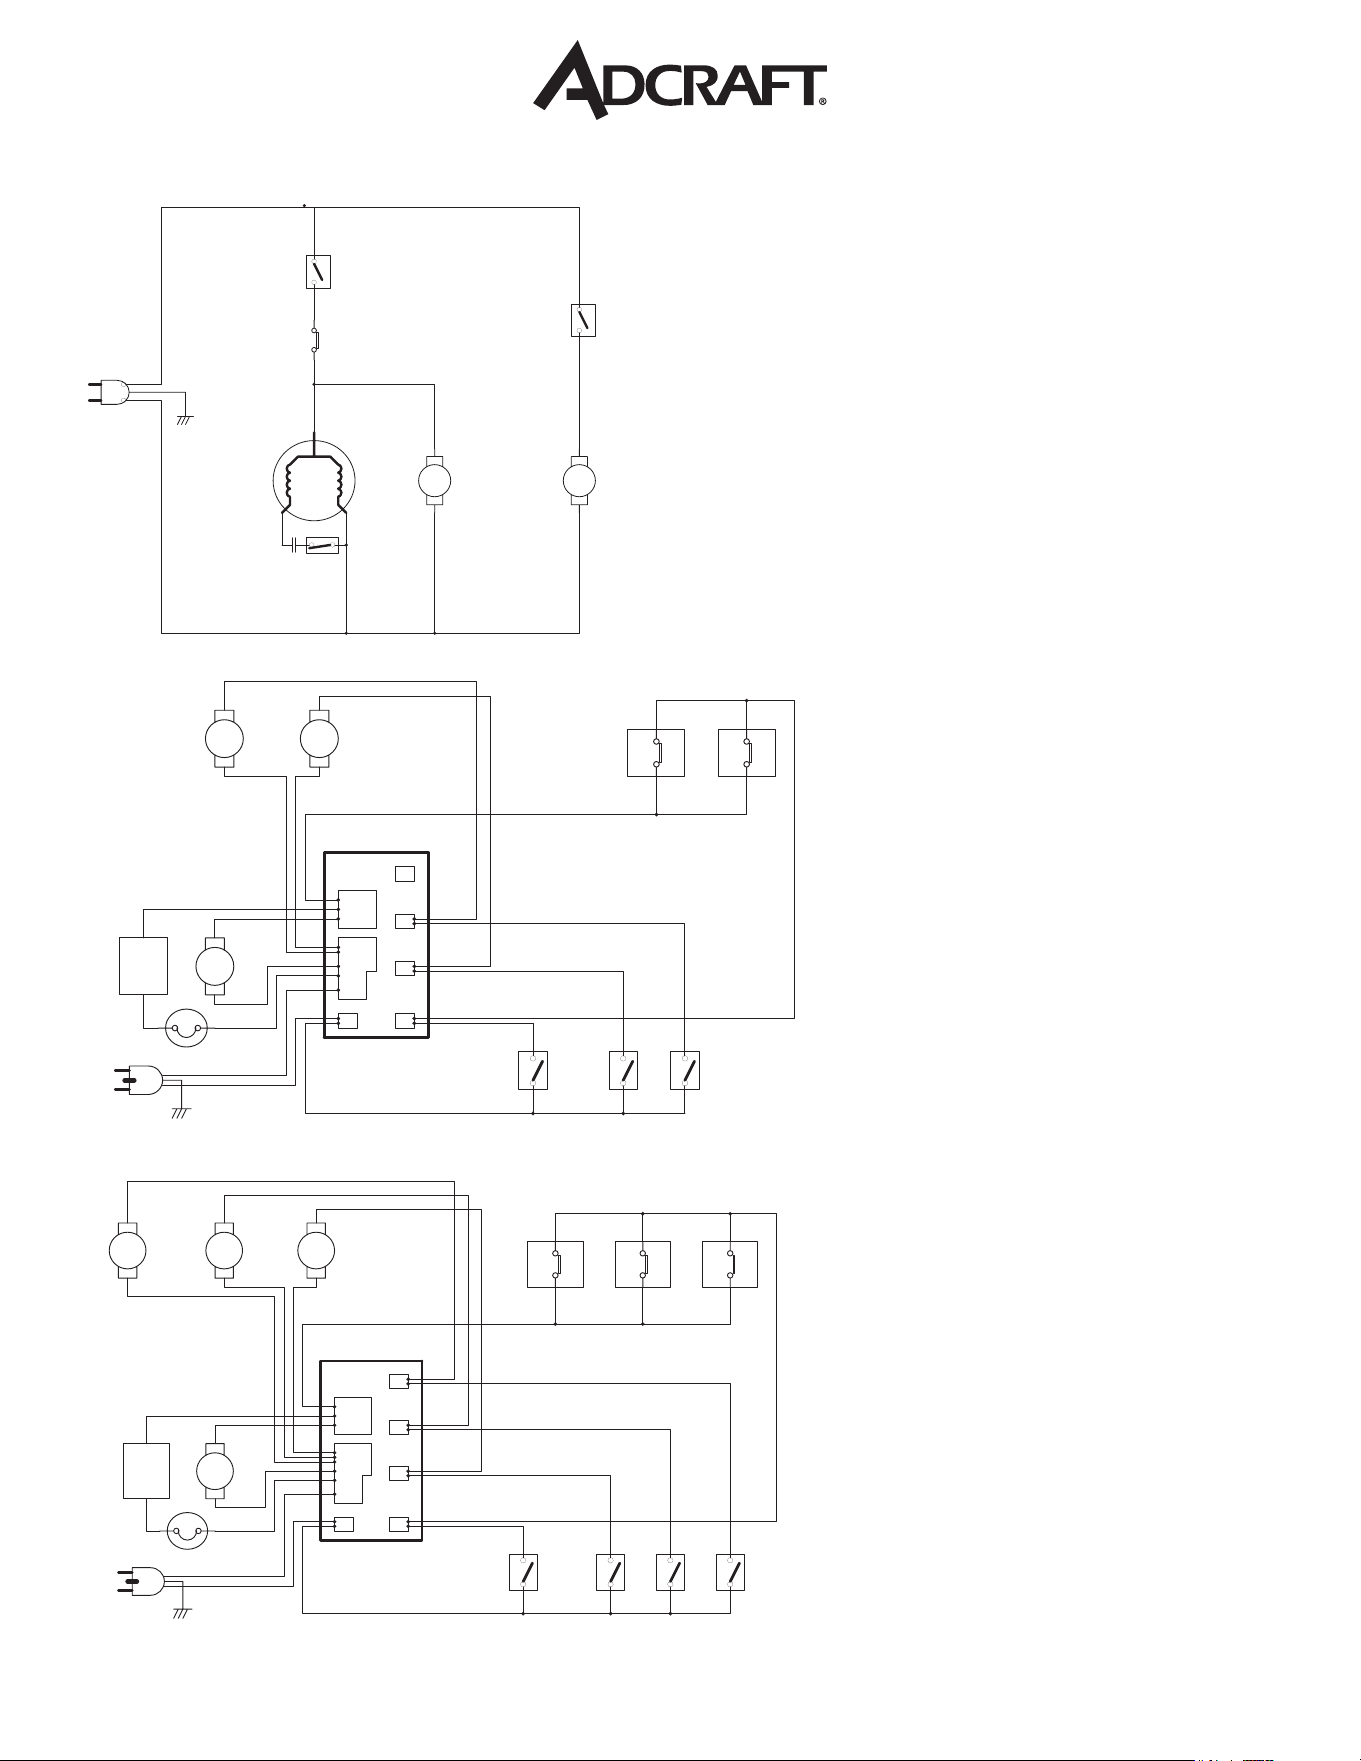
CIRCUIT DIAGRAMS
ADC1BRDD - Single Bowl Unit
COMPRESSOR
SWITCH
TEMPERATURE
FAN
MOTOR
SWITCH
AC L
AC N
STIRRING
SW(1)
Synchronous
MOTOR(1)
SC
C
S R
RELAY
COMPRESSOR
AC PLUG
ADC2BRDD - Double Bowl Unit
SW
STIRRING
MOTOR(A)
SW
TH-SW
STIRRING
MOTOR(B)
SW
TH-SW
FAN
AC PLUG
COMPRESSOR
E
G
I
B
C
JK
OVER LOAD
SW
STIRRING
MOTOR(A)
SW
TH-SW
STIRRING
MOTOR(B)
SW
STIRRING
MOTOR(C)
TH-SW TH-SW
SW
FAN
AC PLUG
COMPRESSOR
E
G
I
B
C
JK
OVER LOAD
8"
ADC3BRDD - Triple Bowl Unit
11 | Drink Dispenser Instruction Manual
1-YEAR LIMITED WARRANTY
Admiral Craft Equipment Corp. (the “Company”) warrants this product (the “Product”) will be free from
failures in material and workmanship for one (1) year from the date of original purchase with proof
of purchase, provided that the Product is operated and maintained in conformity with the Owner’s
Manual. This Limited Warranty is non-transferable. During this period, your exclusive remedy is repair or
replacement without charge of the Product or any component found to be defective at the Company’s
discretion. If the Product or any component is no longer available, the Company will replace it with a
similar one of equal or greater value. This Limited Warranty is void if the Product is used with voltage
other than 120 Volts. THIS WARRANTY IS IN LIEU OF ALL IMPLIED WARRANTIES, INCLUDING
WARRANTIES OF MERCHANTABILITY, FITNESS FOR A PARTICULAR PURPOSE, PERFORMANCE,
OR OTHERWISE, WHICH ARE HEREBY EXCLUDED. IN NO EVENT SHALL THE COMPANY BE LIABLE
FOR ANY DAMAGES, WHETHER DIRECT, INDIRECT, INCIDENTAL, FORESEEABLE, CONSEQUENTIAL,
OR SPECIAL ARISING OUT OF OR IN CONNECTION WITH THIS PRODUCT INCLUDING DAMAGES
ARISING FOR FOOD OR BEVERAGE SPOILAGE CLAIMS.
You may have other legal rights depending upon where you live. Some States or Provinces do not allow
limitations on warranties so the foregoing may not apply to you.
WARRANTY EXCLUSIONS
IMPROPER ELECTRICAL CONNECTIONS:
The Company is not responsible for the repair or replacement of failed or damaged components resulting
from electrical power failure, the use of extension cords, low voltage, or voltage spikes to the Product.
IMPROPER USAGE:
This Limited Warranty does not cover failure or other damages to the Product resulting from (i) improper
usage or installation or failure to clean and/or maintain the Product as set forth in the Owner’s Manual; or
(ii) accident, misuse, abuse, negligence, or modication or alteration of the Product.
CONSUMABLES:
This Limited Warranty does not include consumables or wear-and-tear items such as legs, feet, plastic
component parts, splash shields, lters, gaskets, and non-stick cooking surfaces.
ADJUSTMENTS & CALIBRATIONS:
Leveling, tightening of fasteners, or utility connections normally associated with the original installation are
the responsibility of the dealer, installer, or the end user and not the responsibility of the Company and
will not be considered warranty issues.
If you think the Product has failed, or requires service, within its warranty period, please contact the
Company’s Customer Care Department through our website at: www.admiralcraft.com
“Service” --> “Technical Support Request”. A receipt proving the original purchase date will be required for
all warranty claims, handwritten receipts are not accepted. You may also be required to return the Product
for inspection and evaluation. Return shipping costs are not refundable. The Company is not responsible
for returns lost in transit.
This Limited Warranty is Valid only in the USA and Canada.
12 08.04.25
Admiral Craft® Equipment Corporation ©
2025
3355 Enterprise Avenue - Suite 160 - Ft. Lauderdale, FL 33331 | Tel: 1.877.672.7740 | www.admiralcraft.com

