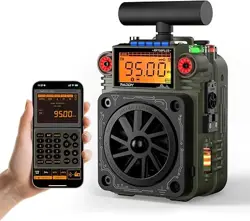
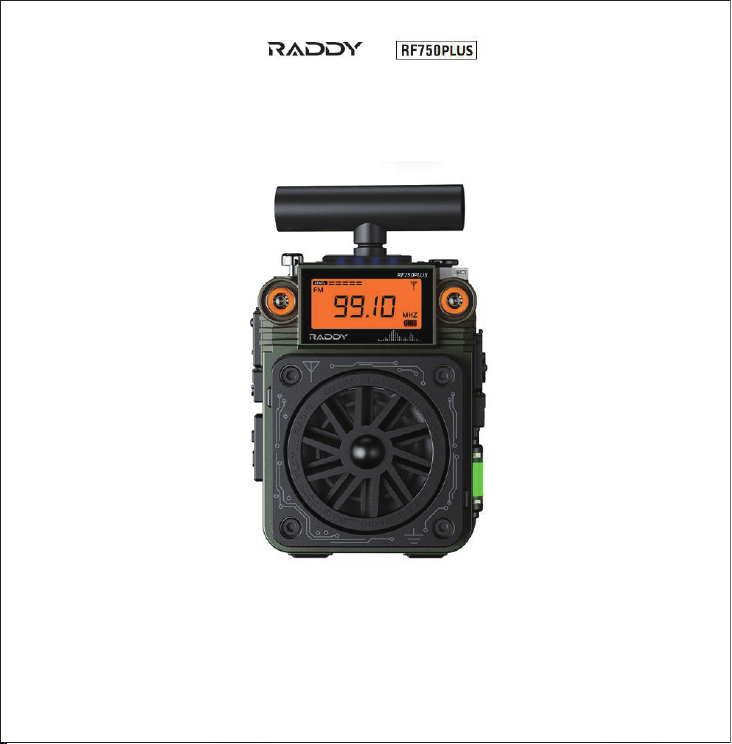
Mini Multi-band Radio/
Bluetooth / TF Card / APP Intelligent Remote Control / SOS Alarm
User Manual
Sustainable innovation and satisfying users’ needs have always been our company’s principle in new
product R&D.
RF750PLUS is a digital tuning mini multi-band/multi-functional radio produced by us with all efforts.
Please read this manual carefully before use.
Thank you for buying our product and please keep this manual properly.
1

Contents
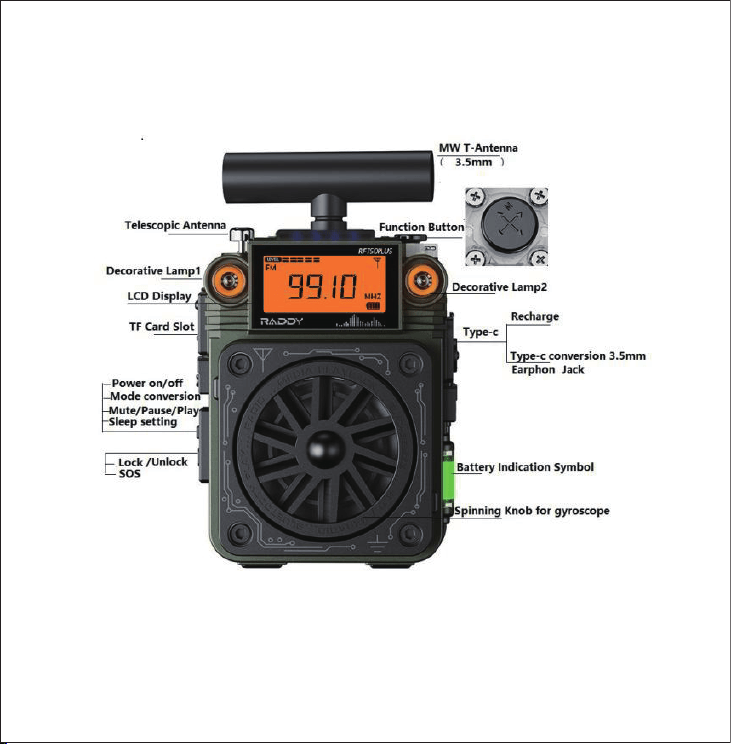
Outside view and functions--------------------2
Power ON/OFF-------------------------------------4
Set the time of auto power off-----------------5
Replacement of Battery--------------------------5
Adjust the volume---------------------------------5
Type-c USB change-------------------------------6
Symbol on LCD-------------------------------------6
Receiving mode------------------------------------7
Set the running time------------------------------11
Set the scheduled power on
/scheduled alarm clock--------------------------12
Set the light------------------------------------------13
Lock/Unlock-----------------------------------------13
Enable/disable the SOS alarm function----14
Connect the earphone
with type-c 3.5mm USB cable-----------------14
Key technical parameters-----------------------15
Matters needing attention-----------------------15
Regarding APP connection---------------------16
1: Outside view and functions
1-1: Functions on the front
2
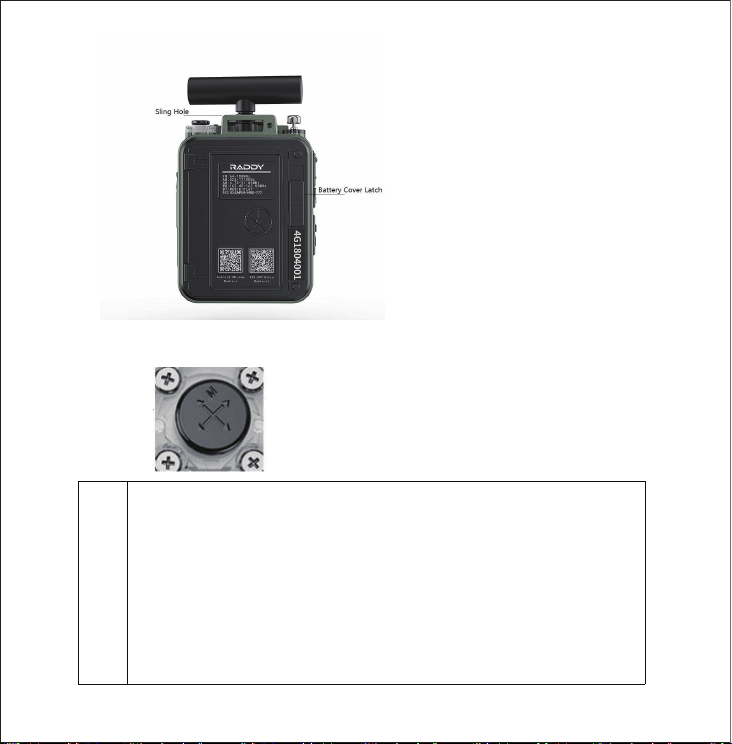
1-3: Buttons on the top
1-2: Functions on the back
M
1: Time mode: Long press it to set the light.
If the radio is connected APP, you can double click it to exit APP connection
quickly.
2: Radio mode: Lightly press it to enter recall memory station (see provision 8.1-8.4).
Double click it to enter Fully automatic search for storage stations.
On Recall memory station mode,after select the deleting station
number,long
Press the button 2 second for deleting the memory station.
Not
on recall memory station state,Long press it to enter select EQ
mode,Lightly press it to elect EQ.
3: TF card mode: Lightly press it to select play modes (see provision 8.6).
3
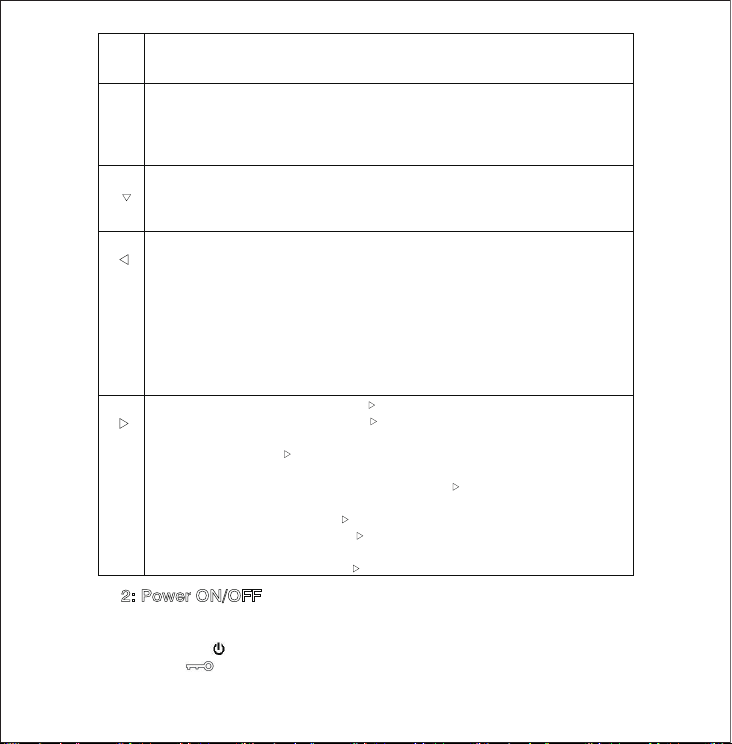
Long press it to enter select EQ mode,Lightly press it to elect EQ.
4: Bluetooth mode: Long press it to enter select EQ mode,Lightly press it to elect EQ.
Double click it to disconnect Bluetooth.
▲
1: Clock display status: At the position of “
▲
”, push it forward. When the symbol of alarm
clock appears, at the position of “
▲
”, push it forward again to set the
alarm clock/auto power on (see provision 10).
2: Working mode: At the position of “
▲
”, push it forward to reduce the volume
progressively.
▼
1: Clock display status: At the position of “
▼
”, push it backward to set the time (see
provision 9).
2: Working mode: At the position of “
▼
”, push it backward to increase the volume
progressively.
◀
1: Set/adjust the time: At the position of “◀”, push it to the right to adjust the time.
2: Radio mode: At the position of “◀”, push it to the right to increase the frequency
progressively.
At the position of “◀”, push it to the right for 2 seconds to search a channel
automatically.
In the mode of taking a channel, at the position of “◀”, push it to the right to select
a channel.
3: TF card mode: at the position of “◀”, push it to the right to select the next song.
At the position of “◀”, push i
t to the right and hold it for fast forward play.
4: Bluetooth mode: at the position of “◀”, push it to the right to select the next song.
▶
1: Set/adjust the time: At the position of “
▶
”, push it to the left to adjust the time.
2: Receiving mode: At the position of “
▶
”, push it to the left to reduce the frequency
progressively.
At the position of “
▶
”, push it to the left for 2 seconds to search a channel
automatically.
In the mode of taking a channel, at the position of “
▶
”, push it to the left to select a
channel.
3: TF card mode: at the position of “
▶
”, push it to the left to select the previous song.
At the position of “
▶
”, push it to the left and hold it for fast backward
play.
4: Bluetooth mode: at the position of “
▶
”, push it to the left to select the previous song.
2: Power ON/OFF
This product uses lithium batteries. Please charge it first before the first use.
The radio is locked in factory by default. Please unlock it first before the first use.
Lightly press “ ” and “SOS” on the left to turn on the screen and show the time display status. The lock
symbol “
” appears on the top right corner of LCD.
In the time display status, double click “SOS” to unlock the radio.
4
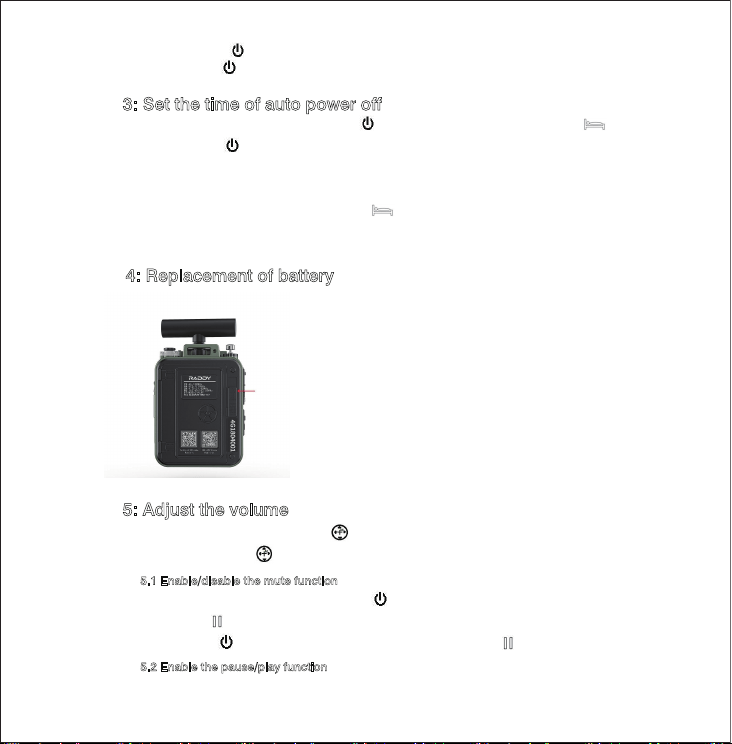
Lightly press “ ” within 10 seconds of unlocking to turn on the radio.
Long press “
” to turn off the radio.
3: Set the time of auto power off
In the time display status, long press “ ” to show the sleep power off symbol “ ”.
Lightly press “
” to select the time of sleep auto power off from 90, 80, 70, 60, 50, 40, 30,
20 and 10 minutes.
The radio is turned on after two seconds of selecting the time of sleep auto power off.
After the radio is turned on, the symbol “
” appears on LCD.
The radio will be turned off automatically at the adjusted time of power off.
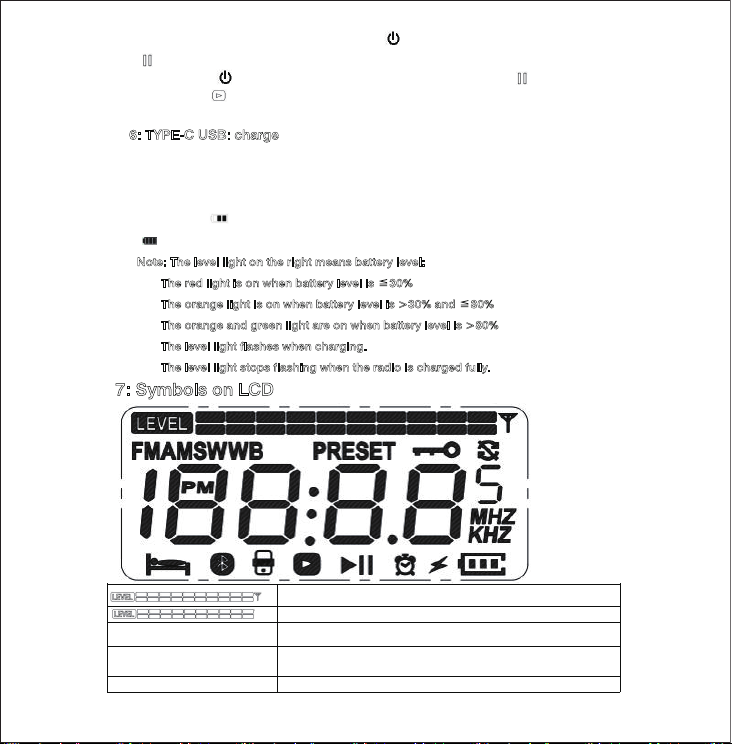
4: Replacement of battery
Push up in direction of arrow to open the battery cover
and replace the BL5C lithium battery
Align the positive and negative contact points of
batteries with the three contact points of battery jar and push
up. Pay attention to the positive and negative anodes. Close
the battery cover.
5: Adjust the volume
When the radio is turned on, push “ ” backward to increase the volume (level 32 is the max
volume) and push “
” forward to reduce the volume (level 0 is the min volume).
5
.1 Enable/disable the mute function
In the Radio receiving mode, lightly press “ ” to enable the mute function.
The symbol “
” appears on LCD.
Lightly press “
” again to disable the mute function. The symbol “ ” disappears.
5
.2 Enable the pause/play function
5
In the TF card/Bluetooth mode, lightly press “ ” to enable the pause function. The symbol
“
” appears on LCD.
Lightly press “
” again to disable the pause function. The symbol “ ” disappears and the
play symbol “
” appears.
6: TYPE-C USB: charge
Charge: We recommend to charge the radio with DC5V/1A-DC3A charger to prevent damage
to the lithium batteries or the radio.
If the lithium batteries are not in use for a long time, please charge them every month.
The symbol “
” flashes after inserting the USB cable, which means it’s charging.
“
” means the radio is charged fully. The time of charging fully is 4-5 hours.
N
ote: The level light on the right means battery level:
The red light is on when battery level is ≦30%
The orange light is on when battery level is >30% and ≦80%
The orange and green light are on when battery level is >80%
The level light flashes when charging.
The level light stops flashing when the radio is charged fully.
7: Symbols on LCD
Signal intensity in the receiving mode
Electric screen in the Bluetooth/TF card mode
FM
Frequency modulation
AM
Amplitude modulation/clock display mode: Morning of 12-hour
system
SW
Short wave reception
6
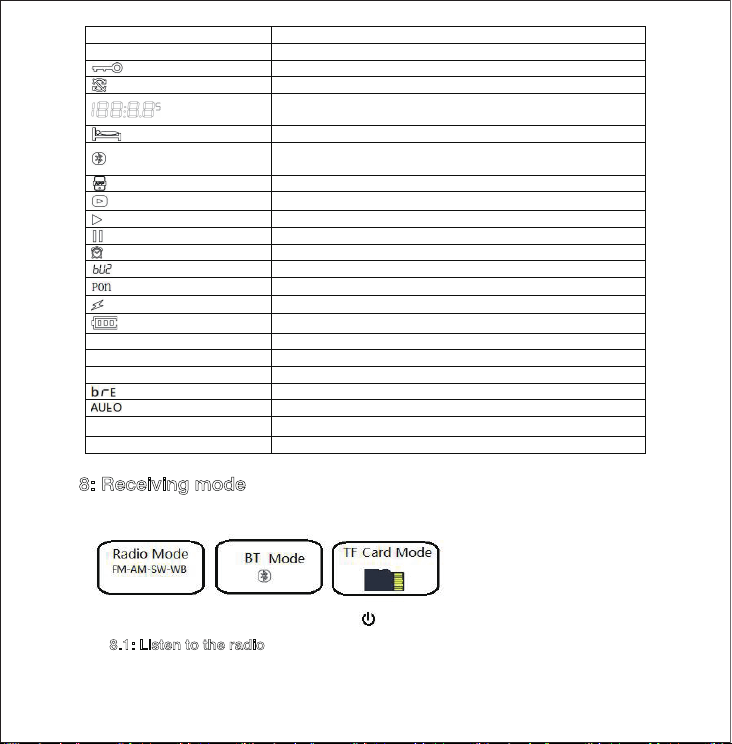
WB
Weather band reception of North American countries
PRESET Search, store/taking channels automatically
All buttons are locked
Shuttle lock
FM mode: frequency display/Bluetooth mode: bt/TF mode: play
time
Sleep symbol
Flashing means searching the Bluetooth device; stopping flashing
means the Bluetooth device connected
APP connection status
TF card play mode
Play
Radio Receiving: mute Bluetooth/TF card: pause
Scheduled power on/scheduled alarm clock
Scheduled alarm clock
Scheduled power on
USB electricity
Charge/battery level
MHZ
Unit
KHZ
Unit
PM
Afternoon of 12-hour system
Flashing mode of decorative lights on the left and right of LCD
The light will be off automatically after 5 seconds
OFF
The light is off
ON
The light is always on
8: Receiving mode
This product supports the following working modes:
When the radio is turned on, double click “
” to switch between the above modes.
8.1: Listen to the radio
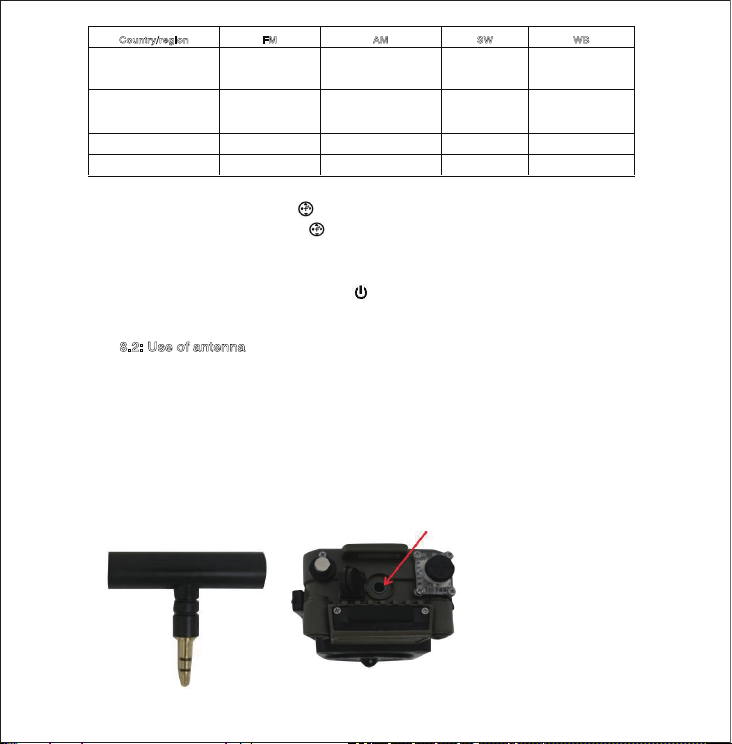
This product supports the following four receiving wave ranges:
7
8
How to select a receiving wave range:
In the time display status, push “
” to the right and hold it for 2 seconds to show a number
from 87.5/87/64/76 on LCD, and push “
” to the left or right to select. The number you select
finally will be the default one.
If you select 87, the radio will receive the ranges in item 2.
When the radio is turned on, double click “
” to switch between the bands.
Note: Unless otherwise specified, the second frequency will be the default one.
8.2: Use of antenna
8.2.1: When receiving FM/SW/WB, you pull out the rod antenna and change the antenna length
to find
the best receiving position.
*Reminder: In case of channel chaos due to strong interference, please shorten the
antenna.
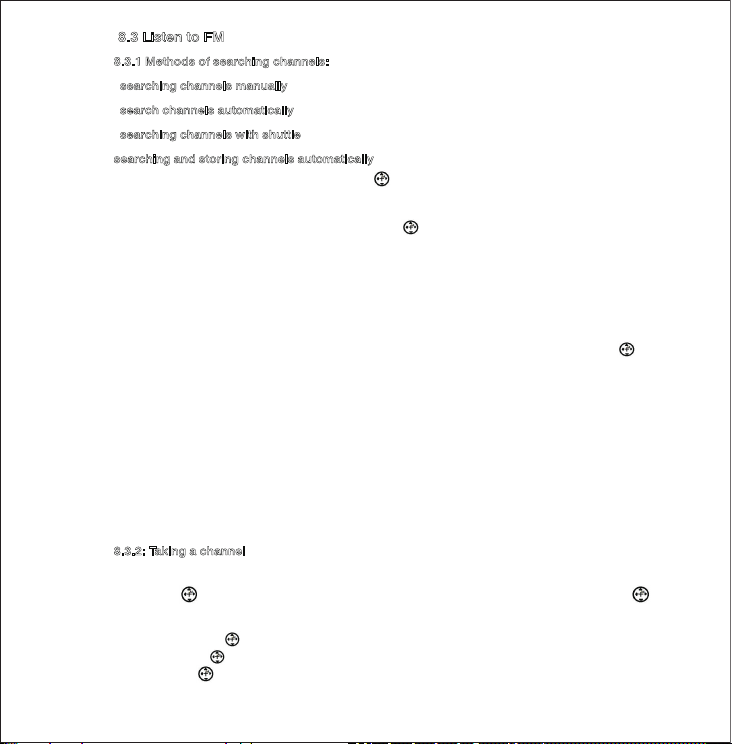
8.2.2: You must insert the standard AM magnetic antenna to receive AM.
You can rotate the AM antenna 360º to find the best receiving effect.
Random option: T-type antenna.
Country/region FM AM SW WB
China/Europe/Korea/Taiw
an
1: 87.5-108.0MHZ
522-1710KHZ (9KHZ)
4.75-21.85MHZ /
North American
countries/Canada/Latin
America/South America
2: 87.0-108.0MHZ 520-1710KHZ (10KHZ) 4.75-21.85MHZ 162.40-162.55MHZ
Japan
3: 76.0-108.0MHZ
522-1710KHZ
(9KHZ)
4.75-21.85MHZ
/
Russia 4: 64.0-108.0MHZ 522-1710KHZ
(9KHZ)
4.75-21.85MHZ /
Open the dustproof plug
and insert the standard
3.5mm T-type antenna
8
8.3 Listen to FM
8.3.1 Methods of searching channels:
searching channels manually
search channels automatically
searching channels with shuttle
searching and storing channels automatically
8.3.1.1: Searching channels manually: push “ ” to the left or right to increase/decrease the
frequency point
8.3.1.2: Searching channels automatically: push “
” to the left or right and hold it to search
channels quickly at the min step value. Stop searching after finding a channel and
play it.
8.3.1.3: Lightly press “LOCK/SOS” to unlock and rotate the shuttle to select a channel.
Note: Select a channel with shuttle in FM mode. The min step value is 0.05MHz.
8.3.1.4: Searching and storing channels automatically: in receiving mode, double click “
” to
search and store channels automatically from the lowest frequency to the highest
frequency.
In the process of searching channels automatically, the address of storing a channel “CH**”
(numbers mean the address of storing a channel) appears on LCD after finding a channel. After a
round of search is finished, search will stop automatically and the first frequency stored will be
played.
*Reminder: Up to 99 channels can be stored, and 297 channels can be stored in total.
8
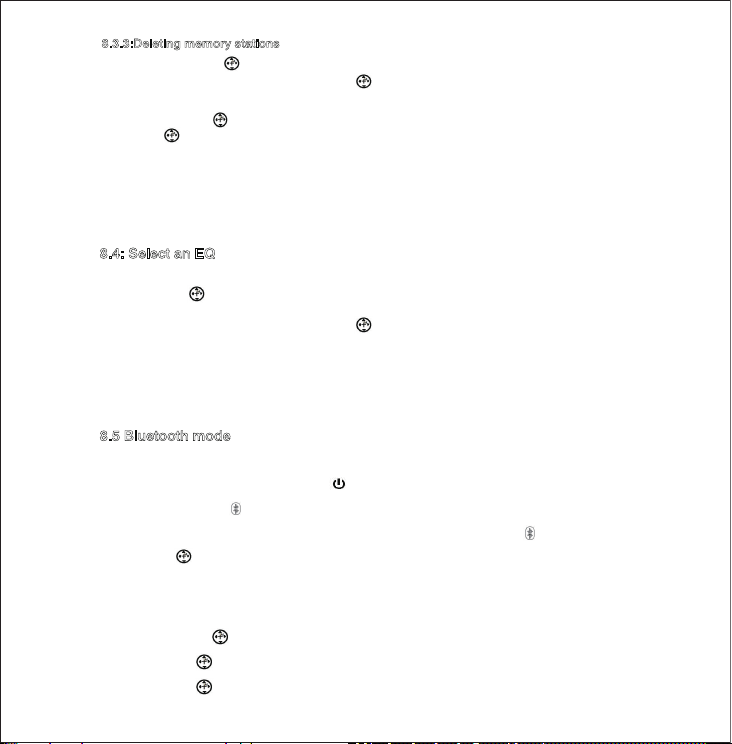
.3.2: Taking a channel
After searching and storing channels automatically according to provision 8.3.1.4, lightly
press “
” to go to the mode of taking a channel. “PRESET” appears on LCD. Push “ ”
to the left or right to take a channel.
Lightly press “
” to exit the mode of taking a channel. “PRESET” disappears. Now you
can push “
” to the left or right to search channels. * “NULL” appears after lightly
pressing “
” means no channel stored.
9
8.3.3:Deleting memory stations
lightly Press the “ ” key to enter the recall memory station mode. The LCD displays the
PRESET symbol. Side-to-side push the “ ” button to select the number of the station to
be deleted.
long press the “ ” button for 2 seconds: dEL & PRESET is blinking.
Press “ ” key to delete the current station. If no operation is performed within 5 seconds,
the station deletion operation exits.
Note: You cannot delete existing stations when they are not in recall station mode.
The deleted preset s
tation number is in the vacant state, and the vacant preset station
number is skipped when the station is fetched.
8.4: Select an EQ
In the Radio receiving mode, and not on recall memory station state
Long press “
” button enter select EQ mode,
“E0......E6” appears on LCD. Lightly press “ ” to elect EQ.
E0: Turn off the EQ
E1: NORMAL, E2: POP, E3: ROCK
E4: JAZZ, E5: CLASSIC, E6: COUNTRY
Notice:after elect the E0 of the EQ,the running lights at the top are turned off.
8.5 Bluetooth mode
Bluetooth name: “RF750 PLUS”
When the radio is working, double click “
” to switch to “BT” mode.
The Bluetooth symbol “
” flashes on LCD, which means waiting for Bluetooth connection.
After clicking on the phone to connect successfully, the Bluetooth symbol “
” always appears.
Double click “
” to ext the Bluetooth mode.
You can use the mobile phone or this product to control the volume or select the previous song
or the next song.
On the radio, push “
” to the right to select the next song
push “
” to the left to select the previous song
push “
” backward to increase the volume
10
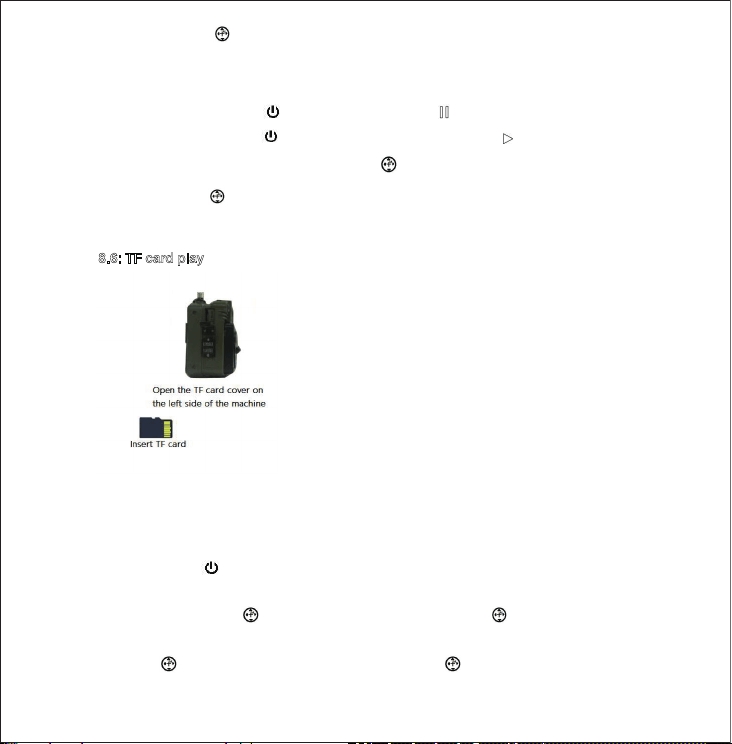
push “ ” forward to reduce the volume
Lightly press “LOCK SOS” to unlock the top and rotate the top to select a song
quickly.
Play/pause: Lightly press “
” to show the pause symbol “ ” on LCD.
Lightly press “
” again to resume play. The play symbol “ ” appears on LCD.
EQ selection: In Bluetooth mode, long press “
” to enter select EQ mode,
Lightly press “ ” to select from six EQ: E1......E6.
E1: NORMAL, E2: POP, E3: ROCK
E4: JAZZ, E5: CLASSIC, E6: COUNTRY
8.6: TF card play
Install the TF card correctly and close the dustproof cover.
Insert the TF card and give priority to the songs in TF card.
Take out the TF card: By lightly pressing the TF card, it will come out automatically.
(Double click “
” to switch to other modes. Or in another mode, double click to switch to the
TF card mode)
On the radio, push “
” to the right to select the next song, push “ ” to the right and hold it
for fast forward
push “
” to the left to select the previous song, push “ ” to the left and hold it for fast
backward
11
push “ ” backward to increase the volume
push “
” forward to reduce the volume
Lightly press “LOCK SOS” to unlock the top and rotate the top to select a song quickly.
Play/pause: Lightly press “
” to show the pause symbol “ ” on LCD.
Lightly press “
” again to resume play. The play symbol “ ” appears on LCD.
EQ selection: In TF card mode, long press “
” button enter to EQ mode
Lightly press “ ” to select from six EQ: E1......E6.
E1: NORMAL, E2: POP, E3: ROCK
E4: JAZZ, E5: CLASSIC, E6: COUNTRY
Selection of play mode
In TF card mode, lightly press “
” to show RA, RO, RF and RR on LCD which have the
meanings as follows:
RA: repeat all; RO: repeat one
RF: repeat file; RR: random
TF card supports up to 256G
TF card supports mp3/WMA/WAV /APE/FLAC
TF card support up 65535 files
Reminder:
In case of sound vibration for reason of song source when playing the music in TF card,
please adjust the volume.
When the radio is working in receiving and Bluetooth mode, if the music in TF card cannot be
played, “Err” appears. If there is something w
rong with song source or the TF card is broken,
please replace it with a normal one.
9: Set the running time
Lightly press “ ” or “LOCK SOS” to enable the clock display.
11
Push “ ” backward and hold it to enable the “hour” to flash. Push “ ” to the left or right to
adjust the hour.
Push “
” backward to enable the “minute” to flash. Push “ ” to the left or right to adjust
the minute.
Push “
” backward and push “ ” to the left or right to select the time system: 12HR/24HR.
Push “
” backward again to confirm the final time.
You can also correct the time in APP mode. Lightly press “
” to correct current
time quickly.
Reminder: “12Hr” time system on LCD: “AM” means morning and “PM” means afternoon.
10: Set the scheduled power on/scheduled alarm clock
Lightly press “ ” or “LOCK SOS” to enable the time display.
Push “
” forward to show the symbol of alarm clock on LCD. Push “ ” forward again and
hold it to enable the hour and the symbol of alarm clock to flash. Push “
” to the left or right to
select the hour.
Push “
” forward to enable the symbol of alarm clock and the minute to flash on LCD. Push
“
” to the left or right to select the minute. Push “ ” forward and push “ ” to the left or right to
select.
After selecting scheduled power on “Pon” or scheduled alarm clock “BU2”, push “
” forward
again to confirm.
D
ifferences between selecting scheduled power on “Pon” and scheduled alarm clock “BU2”:
10.1: Select scheduled power on “Pon”
Push “ ” forward to show the time of auto power off on LCD. Push “ ” to the left or right to
select the time of power off: 10, 20, 30, 40, 50, 60, 70, 80, 90 and FULL (the radio will not be
turned off after being turned on).
Note: The time of power off is calculated in minutes.
Push “
” forward to confirm the final selection.
Note: After selecting the mode of auto power on, if the radio is working in Bluetooth mode before
power off, you should click on Bluetooth device to play after auto power on. After selecting the
time of auto power off after auto power on, the radio will be turned off at the selected time.
The symbol of auto sleep power off “
” appears on LCD.
1
0.2: Select scheduled alarm clock “BU2”
12
Push “ ” forward and then push it to the left or right to select a ringtone: “ ” and “ ”. After
selecting, push “
” forward to confirm.
“BU2” scheduled alarm clock: At the preset time of alarm clock, the alarm clock will ring louder
and louder for 3 minutes every 5 minutes.
By pressing “
” and “ ”, the alarm clock will enter the nap state.
1
0.3: Disable the alarm clock function
Push “ ” forward to disable the alarm clock. The alarm clock symbol “ ” disappears.
11: Set the light
LCD backlight/two decorative lights on the left and right of LCD/key base light/two key lights
on the left/level light on the right
The time of turning on the above lights can be selected as follows:
Lightly press “
” or “LOCK SOS” to enable the time display.
In the time display state, long press “
” for 2 seconds to start the light setting. Push “ ” to
the left or right to select the light mode. The following options can be seen on LCD. The final
selection will be the default one.
N
ote: In the time display state and any light mode, the screen will be off in 10 seconds and enter the
power saving mode.
12: Lock/unlock
This product has two lock switches: 1: top lock “ ”, 2: key & top lock “ ”.
12.1 Enable the top lock: lightly press “LOCK/SOS” to lock the top knob.
The top knob lock “
” appears on LCD, now the knob is locked.
Lightly press “LOCK/SOS” to disable the top knob lock. The top knob lock “
”
disappears.
Options on LCD
Time
ON The light is always on
All lights will be off automatically after 5
seconds
Flash
OFF
The light is off
13
* Note: After LCD is turned on, the top knob will be locked automatically after 5 seconds
in case of no operation and will be used normally after lightly pressing “LOCK/SOS” to
enable the top knob lock “ ”.
12.2 Enable the key and top lock “ ”: double click “LOCK/SOS” to show “ ” on LCD.
Now SOS key can be used normally, while other keys are locked.
Double click “LOCK/SOS” again, and “
” disappears.
The top knob lock “
” disappears, now the top knob can be used normally.
13: Enable/disable the SOS alarm function
Power of emergency function: max output of SOS alarm: >3W; power of flashlight: 1W.
Enable the SOS alarm: Long press “LOCK/SOS” for 2 seconds to enable the SOS alarm.
Disable the SOS alarm: Lightly press “LOCK/SOS” to cancel the SOS alarm.
*
Note: This function can be used even if the radio is locked.
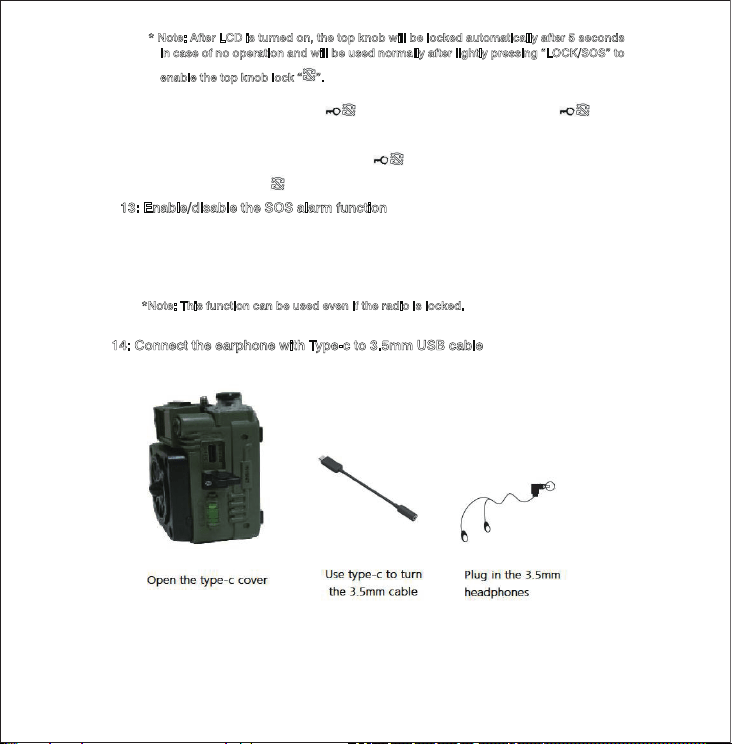
14: Connect the earphone with Type-c to 3.5mm USB cable
Type-c to 3.5mm USB cable can be used to connect the radio to the earphone.
14
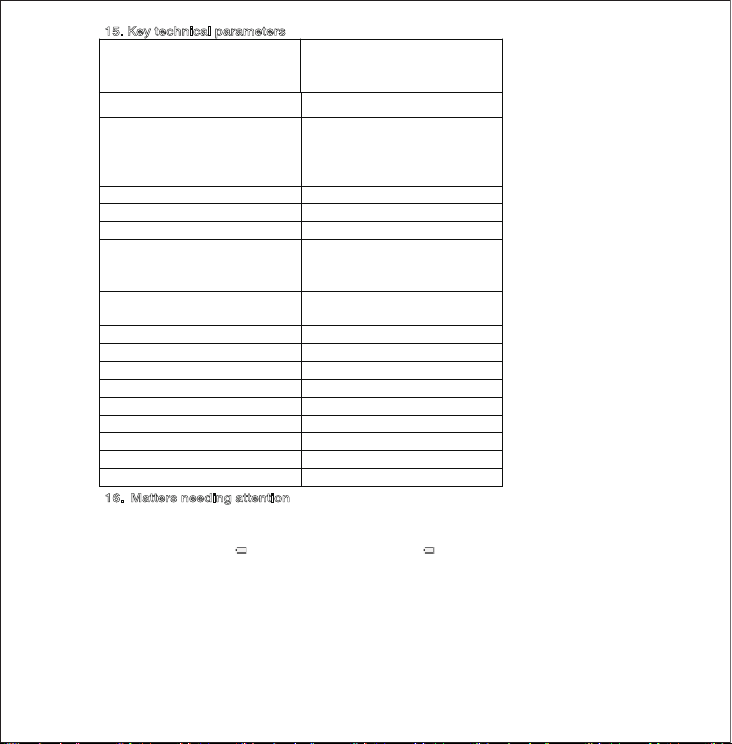
15. Key technical parameters
Receiving range
FM: 87.0-108MHz
AM: 520-1710KHz
SW: 4.75-21.85MHz
WB: 162.40-162.55MHz
Receiving sensitivity
FM≦18dB
AM≦86dB
SW≦30dB
WB≦18dB
Quiescent current ≦50uA
Max current ≦800mA
Speaker 4Ω3W
Signal to noise ratio
FM≧45dB
AM≧35dB
SW≧36dB
Number of channels stored in receiving
mode
297
Bluetooth version
VER 5.2
Bluetooth receiving distance
≤
10m
Min working voltage
3.4V
External input voltage DC5.0V
Lithium battery 3.7V
Play format of TF card MP3
/WMA/WAV /APE/FLAC
Max capacity of TF card 256G
Dimension
56x75x44mm
Weight 226g (including batteries)
16. Matters needing attention
Please comply with the following safety tips to use this product, ensuring safe and reliable use.
♦ Read and know all safety instructions and use information.
♦ When the battery symbol “
” appears or the frame of the symbol “ ” flashes, it means low battery level. Please
charge the battery timely to ensure normal use.
♦
Please use the charging device with input voltage of DC5V/1A-DC3A to charge the battery, or the battery or the device
will be probably damaged.
♦ If the radio is not in use for a long time, please charge it once a month.
♦ Keep the product away from rainwater and damp. Do not drop or splash any liquid onto the product.
♦ Keep the product away from high-temperature heat source. Do not bake or
blow the product at high
temperature.
♦ Avoid direct sunlight for a long time.
15
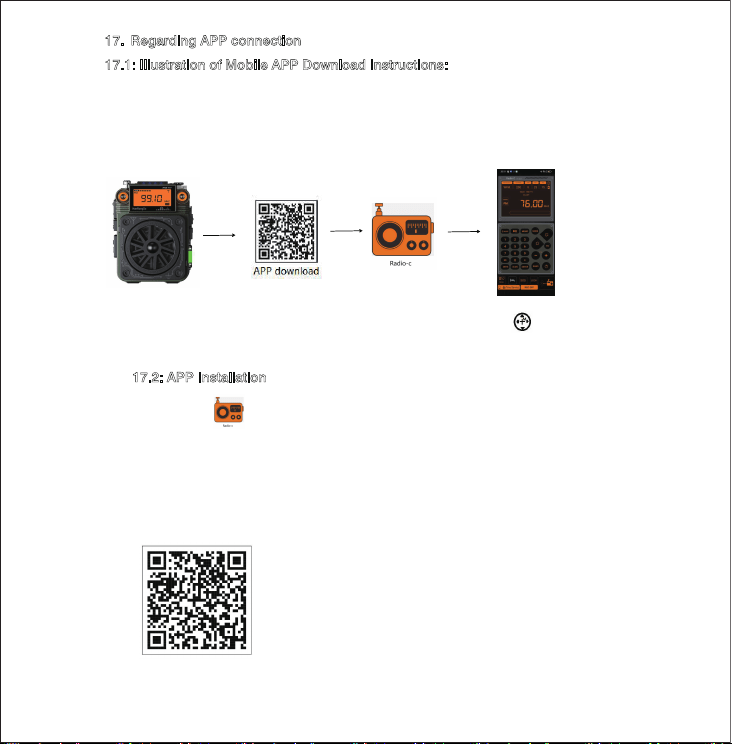
17. Regarding APP connection
17.1: Illustration of Mobile APP Download Instructions:
Step 1: Power on the radio
Step 2: Install the APP software
Step 3: Successful installation on the mobile home screen
Step 4: Click to enter APP mode, then select “RF750 PLUS-BLE” and click to connect.
Exiting APP Connection Operation: In clock display mode, double-click [ ] continuously. The
LCD will display “BLE OFF,” indicating that the APP connection has been terminated.
17.2: APP Installation
If the Radio-c APP has already been downloaded, there is no need to download it again. You
can directly click to connect to the RF750 PLUS-BLE name.
A: For Android and HarmonyOS phones, please scan the following QR code to install the APP.
Android and HarmonyOS phones support installation via the phone's browser to scan the
QR code. For detailed instructions, please refer to [specific instructions17.2.1 ].
B: For Apple devices, please visit the “App Store” and search for “Radio-CT” to download.
For Android and HarmonyOS phones, please scan this QR code to install the APP.
16
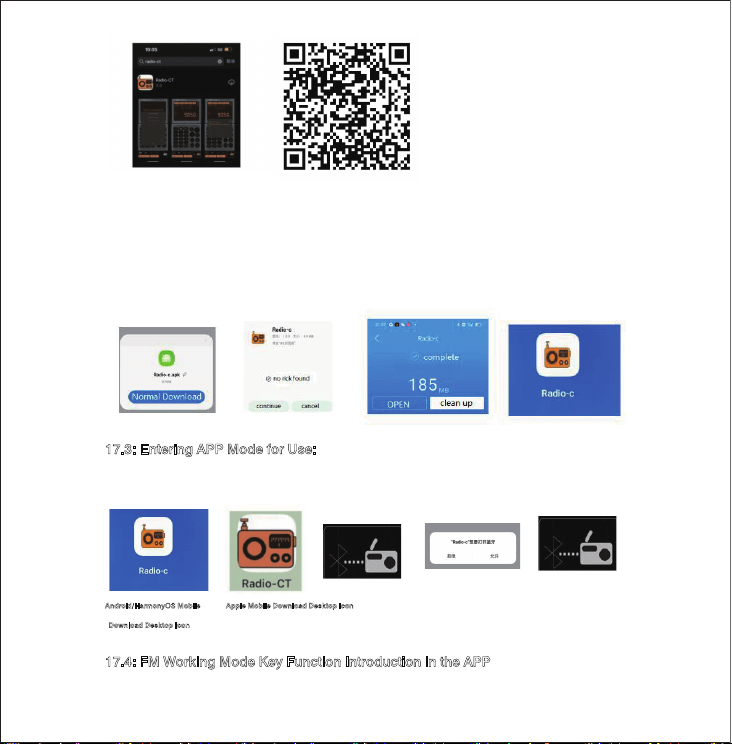
Apple Devices: You can search for “Radio-CT” in the App Store to download and install.
Alternatively, you can scan the QR code above to access the App Store for downloading.
17.2.1: After enabling the browser to scan the installation QR code for RF750 PLUS, follow the
prompts: click “Download,” then click “Continue Installation.” Once the installation is complete,
click “Open Application.” The APP icon will appear on the mobile home screen.
17.3: Entering APP Mode for Use:
Click the APP icon on the mobile home screen to access it. Tap the symbol in the bottom right corner of the
APP interface,
select “Allow,” then click the symbol again. Choose RF750 PLUS-BLE to establish a successful connection.
Android/HarmonyOS Mobile Apple Mobile Download Desktop Icon
Download Desktop Icon
17.4: FM Working Mode Key Function Introduction in the APP
17
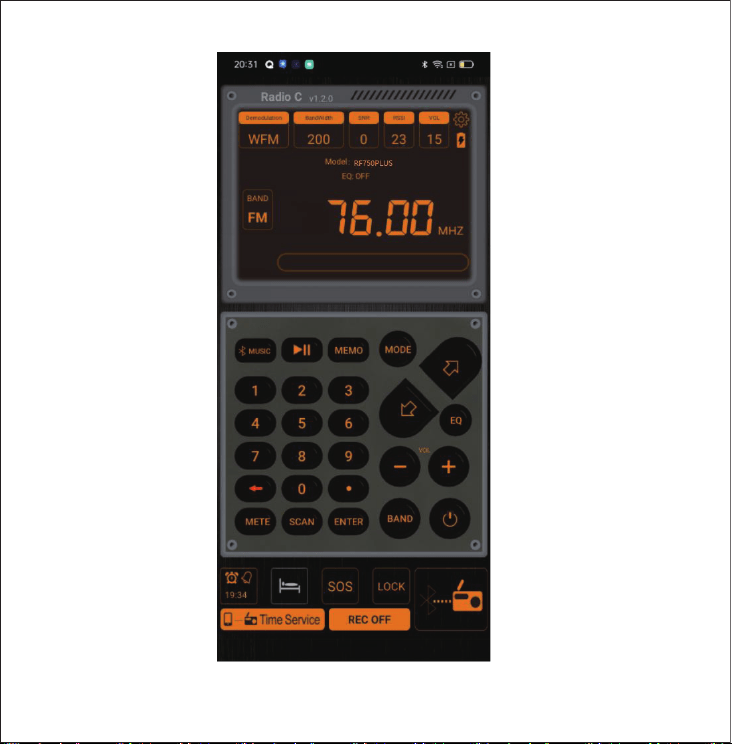
18
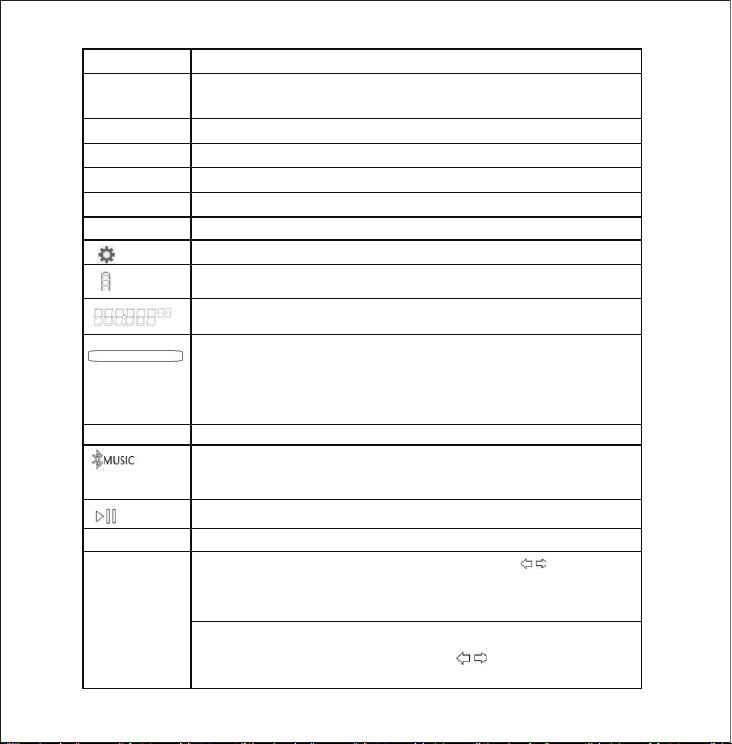
symbol Key function descriptions
Demodulation
WFM
FM Demodulation: WFM, AM/SW Demodulation: AM
WB Demodulation: NFM
Bandwidth 200
Bandwidth
:
200KHz
SNR
Signal to Noise Ratio
RSSI
Receive Sensitivity
VOL ** Sound level Indicator
Band FM
FM Working receive mode[Tap to switch radio bands]
View Device Version
Battery Indicator
Radio freqency display,working mode dispaly
Edit the frequency name: long press
this position, input the present
frequency name according to the language tips.
Such as FM99.1MHZ is the radio station in Longgang of Shenzhen City,
you can store it manually.
Preset **
Recall / Memory station number
Music playback mode switch key
switch to TF card/Bluetooth playback mode
Enable and unmute mute
MHZ,KHZ
Unit
MEMO
Recall station:Tap to enter the Recall mode,Press [ ] to select the
recall station
Tap the MEMO button again to exit the recall station mode.
Manual storage station:Find the target frequency
,
long press
【
MEMO
】
button,“Preset”symbol is blink,press 【 】Select the storage
address number
。
Press and hold [MEMO] to confirm the storage.
19
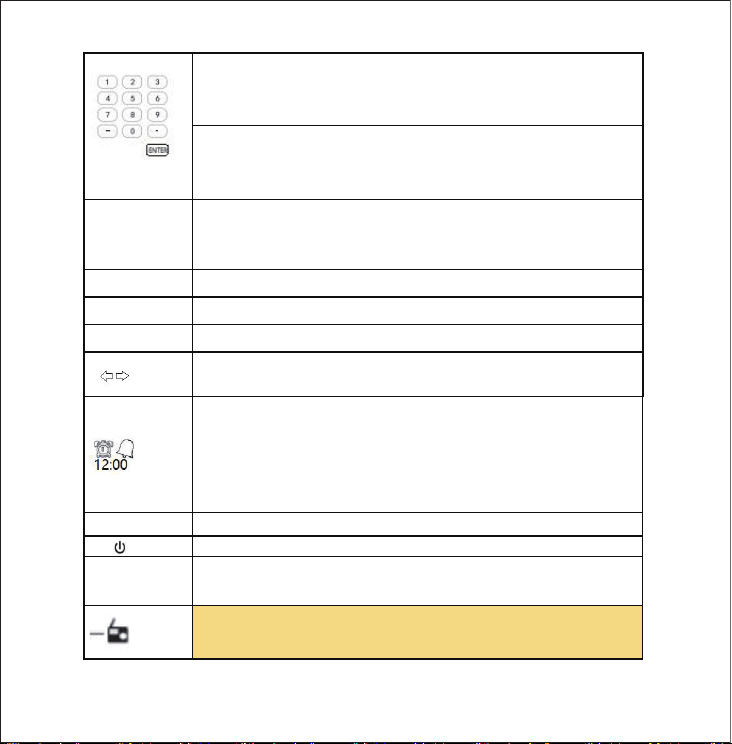
Digital key press frequency: press [ENTER] key first, press the effective
target frequency on the digital keyboard, press [ENTER] key to confirm
that you can directly press the required playback frequency.
Access key: On the numeric keypad, directly click the address number of
the outgoing storage station, press [ENTER] key to confirm. If "Present--"
is displayed, it is empty.
METE
Short-wave receiving mode Fast select to meter wave:
4.75MHz/5.60MHz/7.35MHz/9.90MHz/12.1MHz/
13.87MHz/15.8MHz/17.9MHz/19.1MHz/21.85MHz
SCAN
Long press to enter the automatic search storage station
ENTER
Enter, confirm key
BAND
Tap to switch radio bands
Frequency increment, decrement, deposit station, take station address
number selection
Tap to enable the alarm function. Tap again to disable the alarm function.
Hold down to select:Buzzer/Startup on mode. Click on any mode to enter
the alarm time setting (select the alarm time when the radio arrives at
power on: beep......) , select turn on is arrive at the start time radio turn
on)
VOL + -
VOL+: Volume increases VOL-: Volume decreases
Tap to power on, and tap again to power off.
LOCK
Press and hold [LOCK] to LOCK the radio. Press and hold [Lock] again
to unlock the radio.
The mobile APP connects to the entry button of the RF750PLUS radio.
Press and hold for 2 seconds to exit the APP connection
20
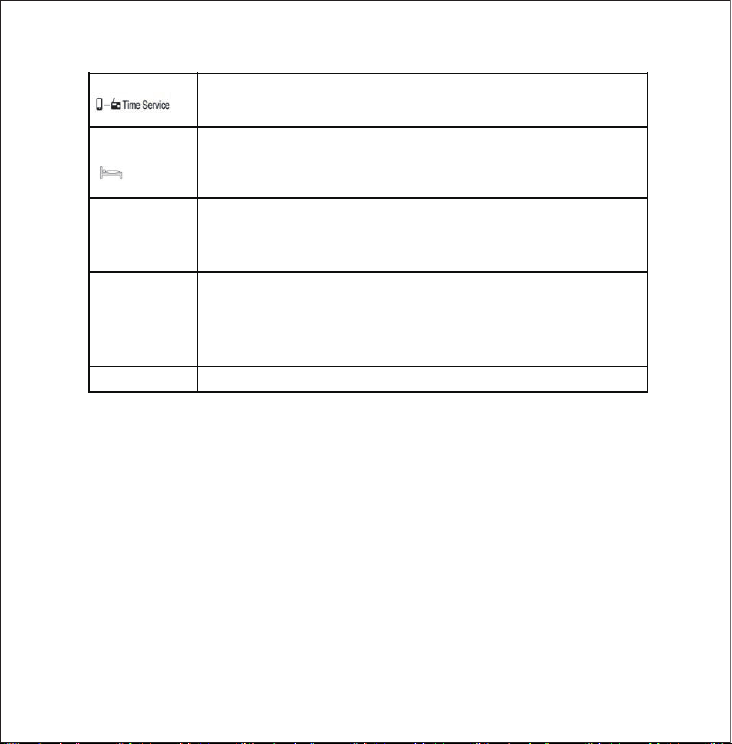
Device calibration time button (you can correct the time displayed on the
radio with one click, consistent with the mobile phone)
Set the automatic shutdown time:
:
10-20-30-40-50-60-70-80-90
(
minute
)
OFF:Indicates to cancel the automatic shutdown time
REC
In radio mode, tap to perform internal recording in radio mode.
Before recording, please insert TF card in the radio, tap to enter recording
mode, tap again to exit recording (after recording can be played on TF
card)
EQ
Select EQ Sound:
E0
:
Analog channel EQ
E1
:
NORMAL E2: POP, E3
:
ROCK
E4: JAZZ E5: CLASSIC, E6: COUNTRY
SOS
long press emits alarm sound. light press cancels the alarm sound
21
20
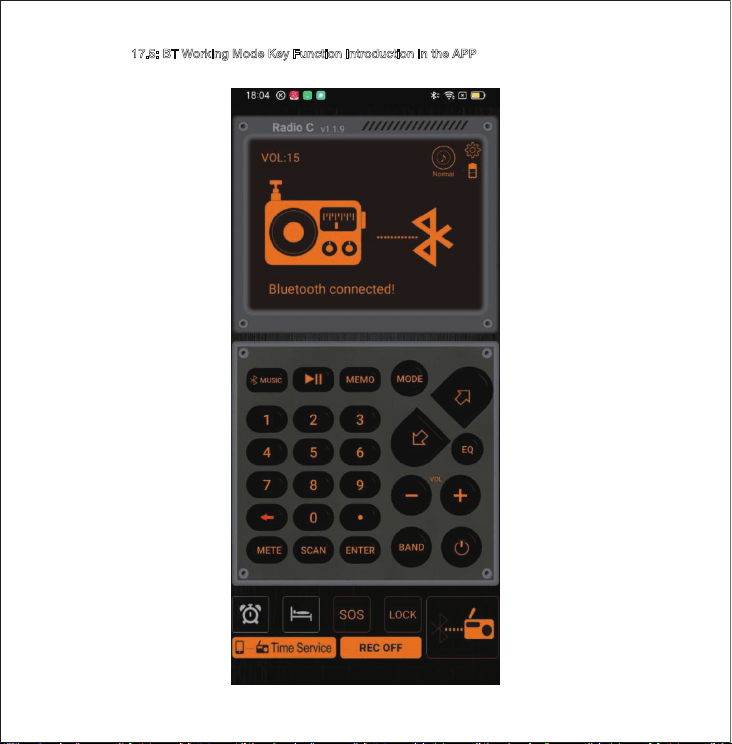
17.5: BT Working Mode Key Function Introduction in the APP
21
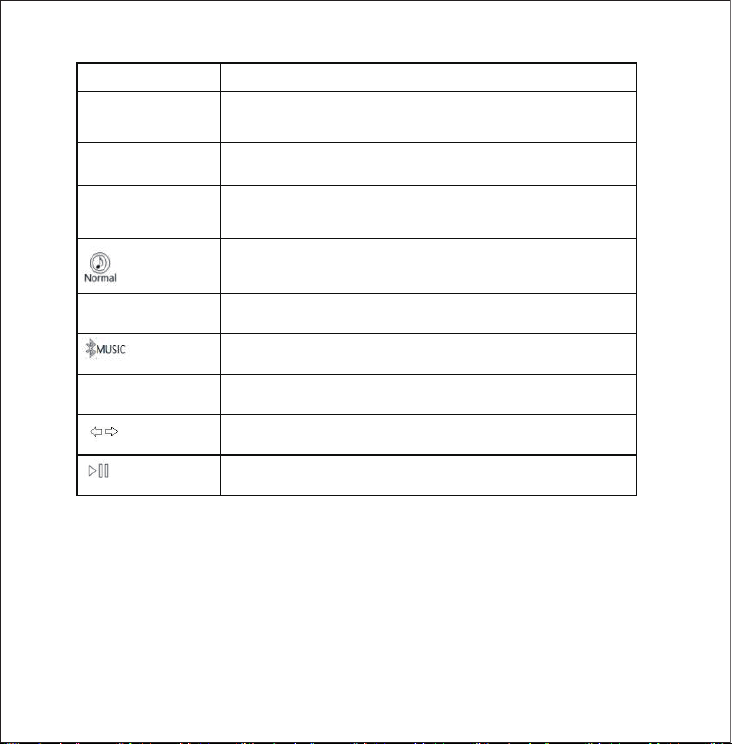
symbol Key function descriptions
Pls open& connect
Bluetooth
Wait for the Bluetooth connection prompt
Bluetooth connected Bluetooth connection succeeded
EQ
E1:NORM AL E2: POP, E3: ROCK
E4: JAZZ E5: CLASSIC, E6: COUNTRY
Directly click on the symbol to select EQ
VOL + -
VOL+: Volume increases VOL-: Volume decreases
M usic playback mode switch key
s
witch to TF card/ Bluetooth playback mode
BAND
Tap to switch radio bands
select PREV,NEXT Song
Play & Pause
22
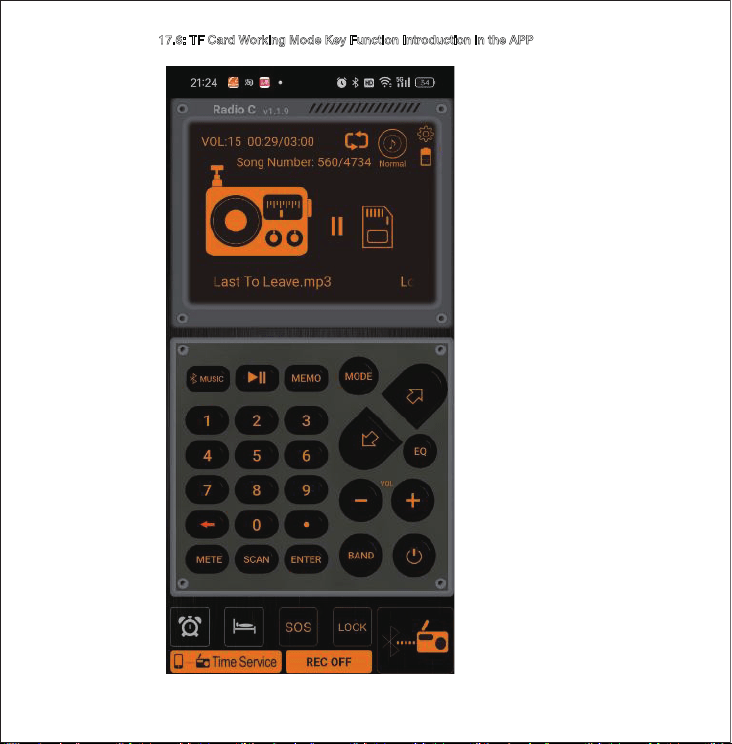
17.6: TF Card Working Mode Key Function Introduction in the APP
23
23
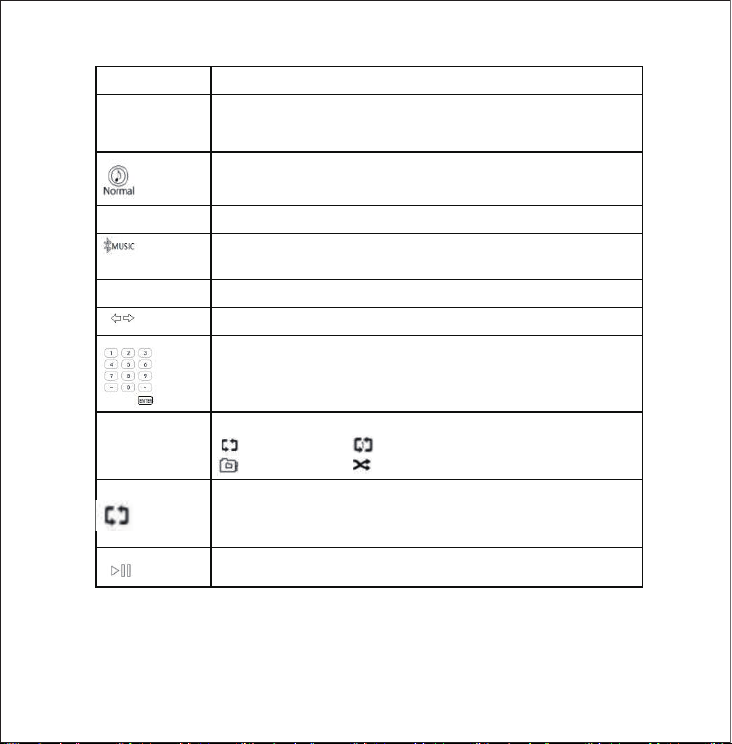
symbol Key function descriptions
EQ
E1:NORM AL E2: POP, E3: ROCK
E4: JAZZ E5: CLASSIC, E6: COUNTRY
Directly click on the symbol to select EQ
VOL + -
VOL+: Volume increases VOL-: Volume decreases
M usic playback mode switch key
switch to TF card/ Bluetooth playback mode
BAND
Tap to switch radio bands
select PREV,NEXT Song
In the TF card playing mod
e, in the number keyboard, directly click
the song serial number, press [ENTER] key to confirm.
M ODE
select playback mode:
repeat all, repeat one,
repeat file, random
Directly click on the symbol to select playback mode
Play & Pause
24