User Manual
Model: CS-806
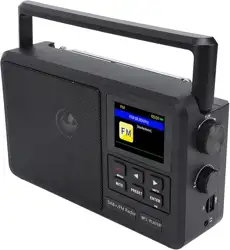
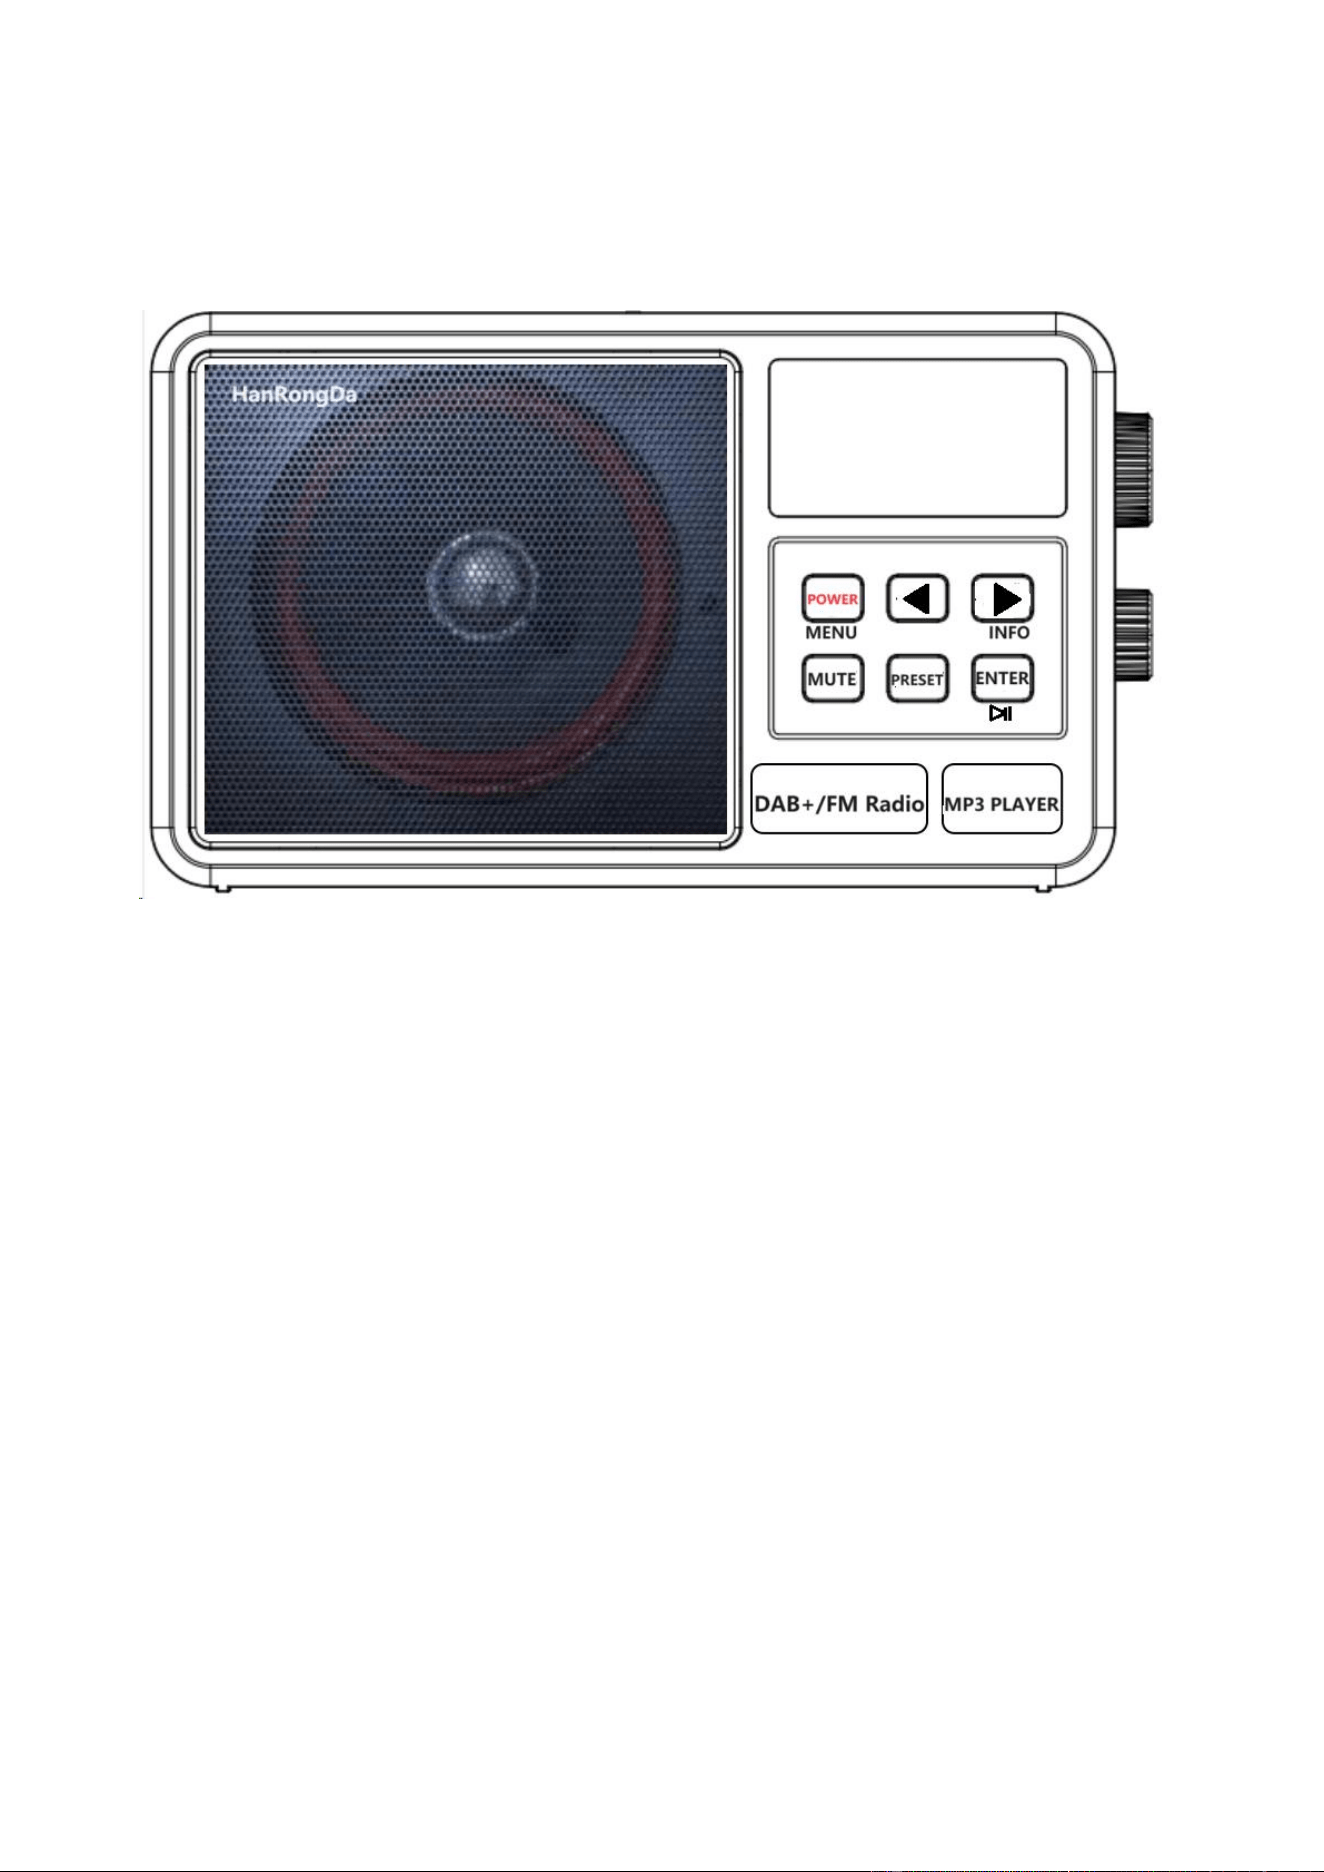
1: Exterior view of the product:
Thank you for your purchasing the product, please read this operation guide carefully before use and keep it
properly.
2: A brief description of product functions:
This is a portable portable multi-functional radio which not only receives traditional FM signal reception but also
receives network radio signals/DAB signal of European countries. It can be used as a Bluetooth speaker and
supports USB/TF card playback. Hope that it will bring more joy to users who like radio!
Rich display contents of the dot matrix screen can give users clear instructions.
TF card supports MP3, WMA, WAV, APE, FLAC, TF format playback of up to 256G.
In radio mode: Automatic search and storage of radio station and large rotation pulley modulation are available.
In radio FM mode, up to 30 radio stations can be stored.
12/24 hour format can be selected.
Sleep shutdown time for a variety of periods can be set.
Power-on at the fixed time can be set.
Large-caliber 4-inch speaker of 4Ω and 8W is adopted and headphones can be used, which can meetdemands of
the majority of users.
With backlight display and backlight brightness setting, users can use it in the darkness.
A variety of intimate human functions, such as one-click mute, are available.
Power supply mode: AC or DC6v (AA1.5*4 dry batteries).
3: Radio switch:
First boot (not connected to network):
The radio has been connected to AC or loaded with four AA batteries.
The screen displays the characters “Boot up and connect to network” (indicating booting and connecting it to the
network).
Configure network? (Whether the network needs to be connected)
----YES/NO (Two options: YES indicates that you need to connectthe networkand NO indicates
that you do not need to connectthe network)
The display shows a hint: “to previous, →to next, SELECT when done”(Press [ ]&[ ] to select it).
Select YES/NO and then press [ENTER] to confirm the selection. The main menu is displayed.
Operations to connect network WIFI (Refer to the following operation description 5.1.1)
If WIFI is connected, please connect the power supply or install the battery
Light press [POWER] and “Boot up and connect to network will be displayed.
Current time will be displayed. After about three seconds, the radio will be started.
Under the boot state, long press [POWER] to turn off the radio and time status will be displayed. After one
minute, the screen will be off and enter the power saving mode.
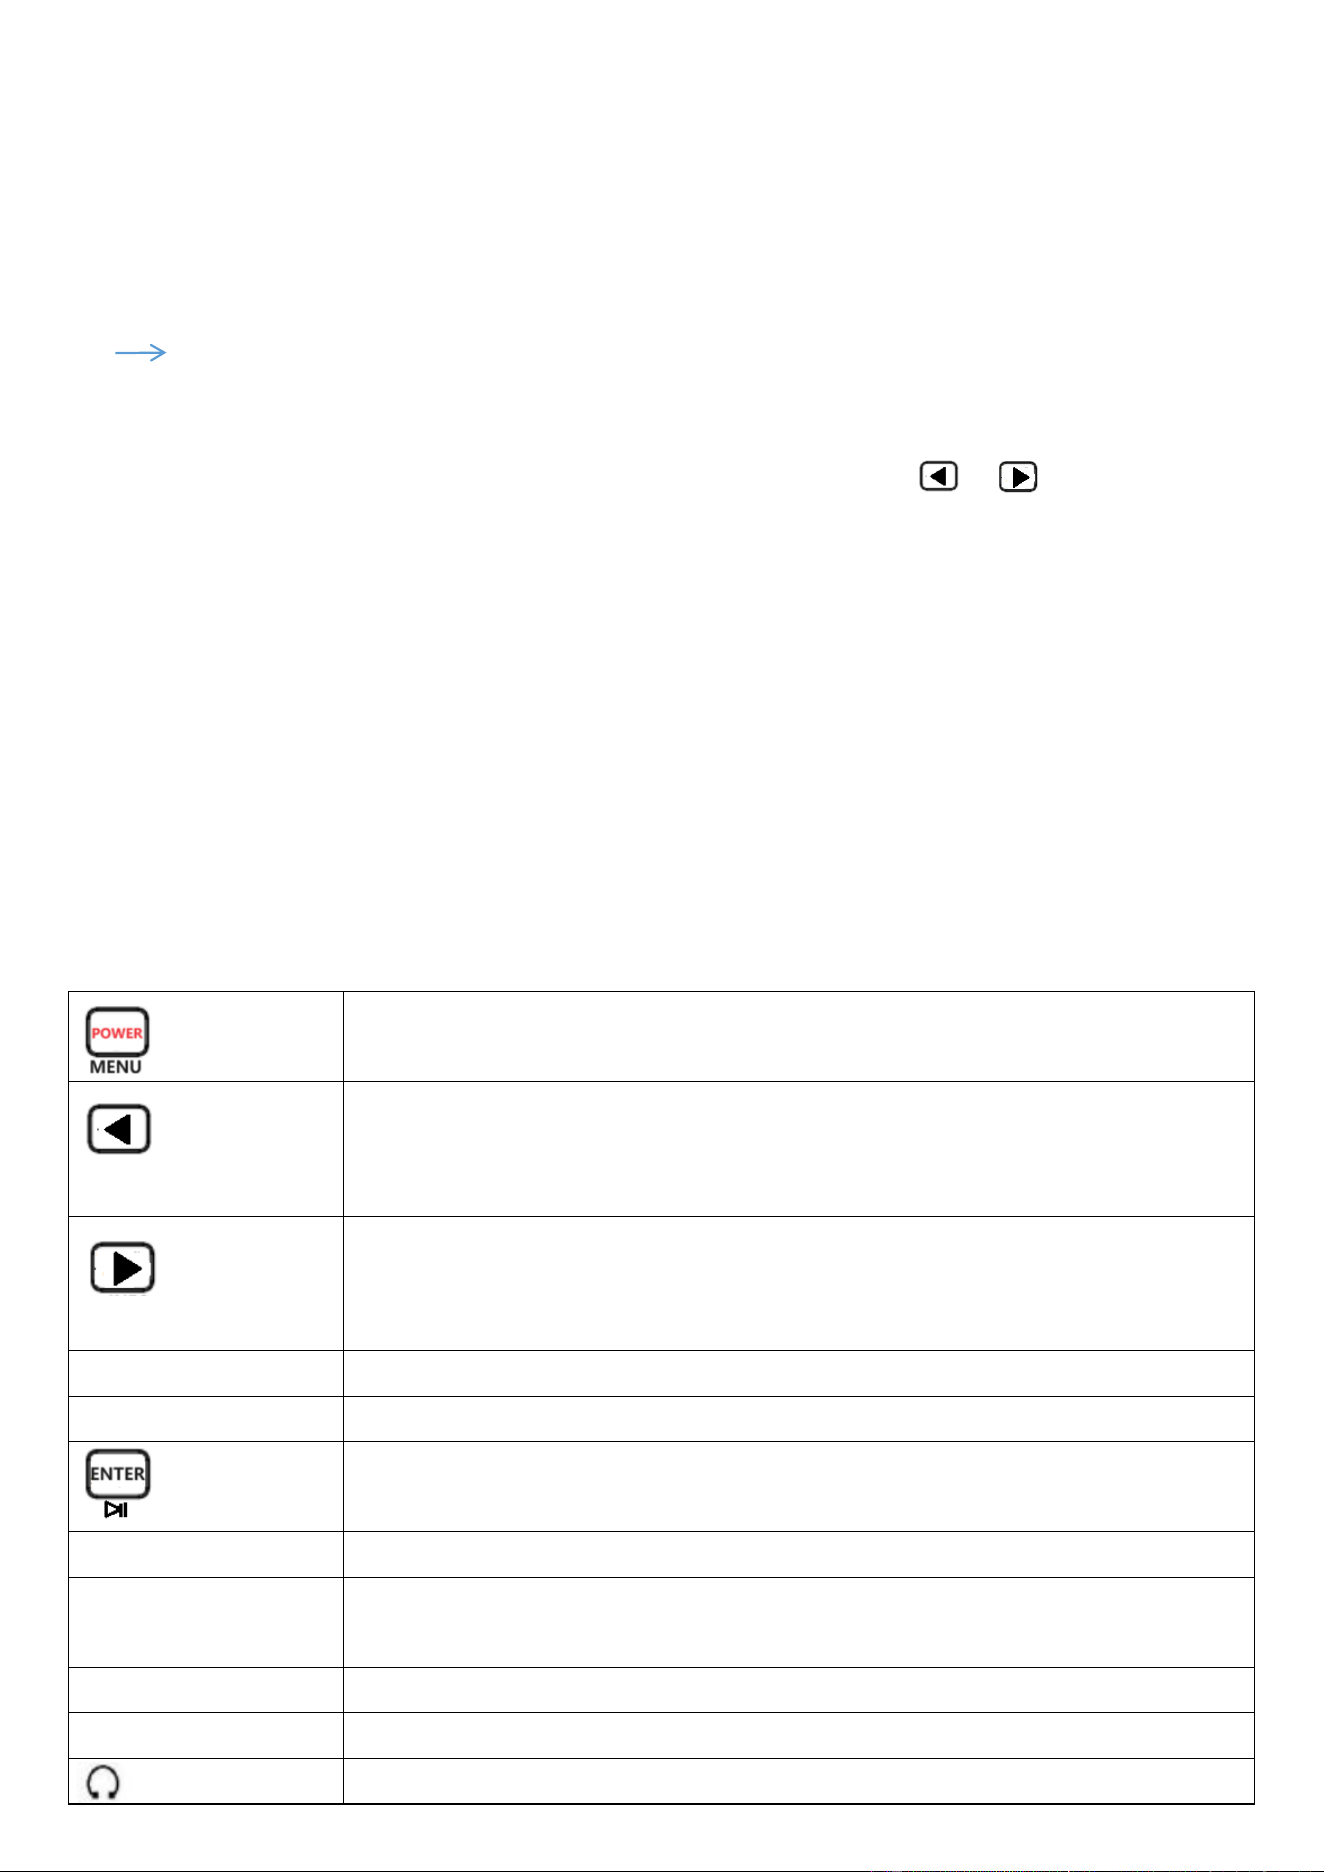
4: Functions of buttons:
On/off button
Enter the main menu
Exit (back)/The selection menu moves to the left.
When music is played, if you select the previous song/play it on USB or TF card, and
long press it, it will be played fast backward.
The selection menu moves to the right.
When music is played, if you select the next song/play it on USB or TF card, and long
press it, it will be played fast forward.
MUTE
Enable or disable the mute function
PRESET
Enter the station fetch list/Enter the manual station storage mode
Confirm
Under music playing mode, this key can switch between pause/play.
AC IN
Plug in AC power cord to provide power to the machine.
[AA*1.5Vx4pcs]
Back of the product
Insert the battery slot with four AA batteries. (Note: the disconnection of AC power
cable will cut off the power supply to the dry battery.)
USB
Insert USB card to play music of USB card
TF
Insert TF card to play music of TF card
3.5mmheadset jack
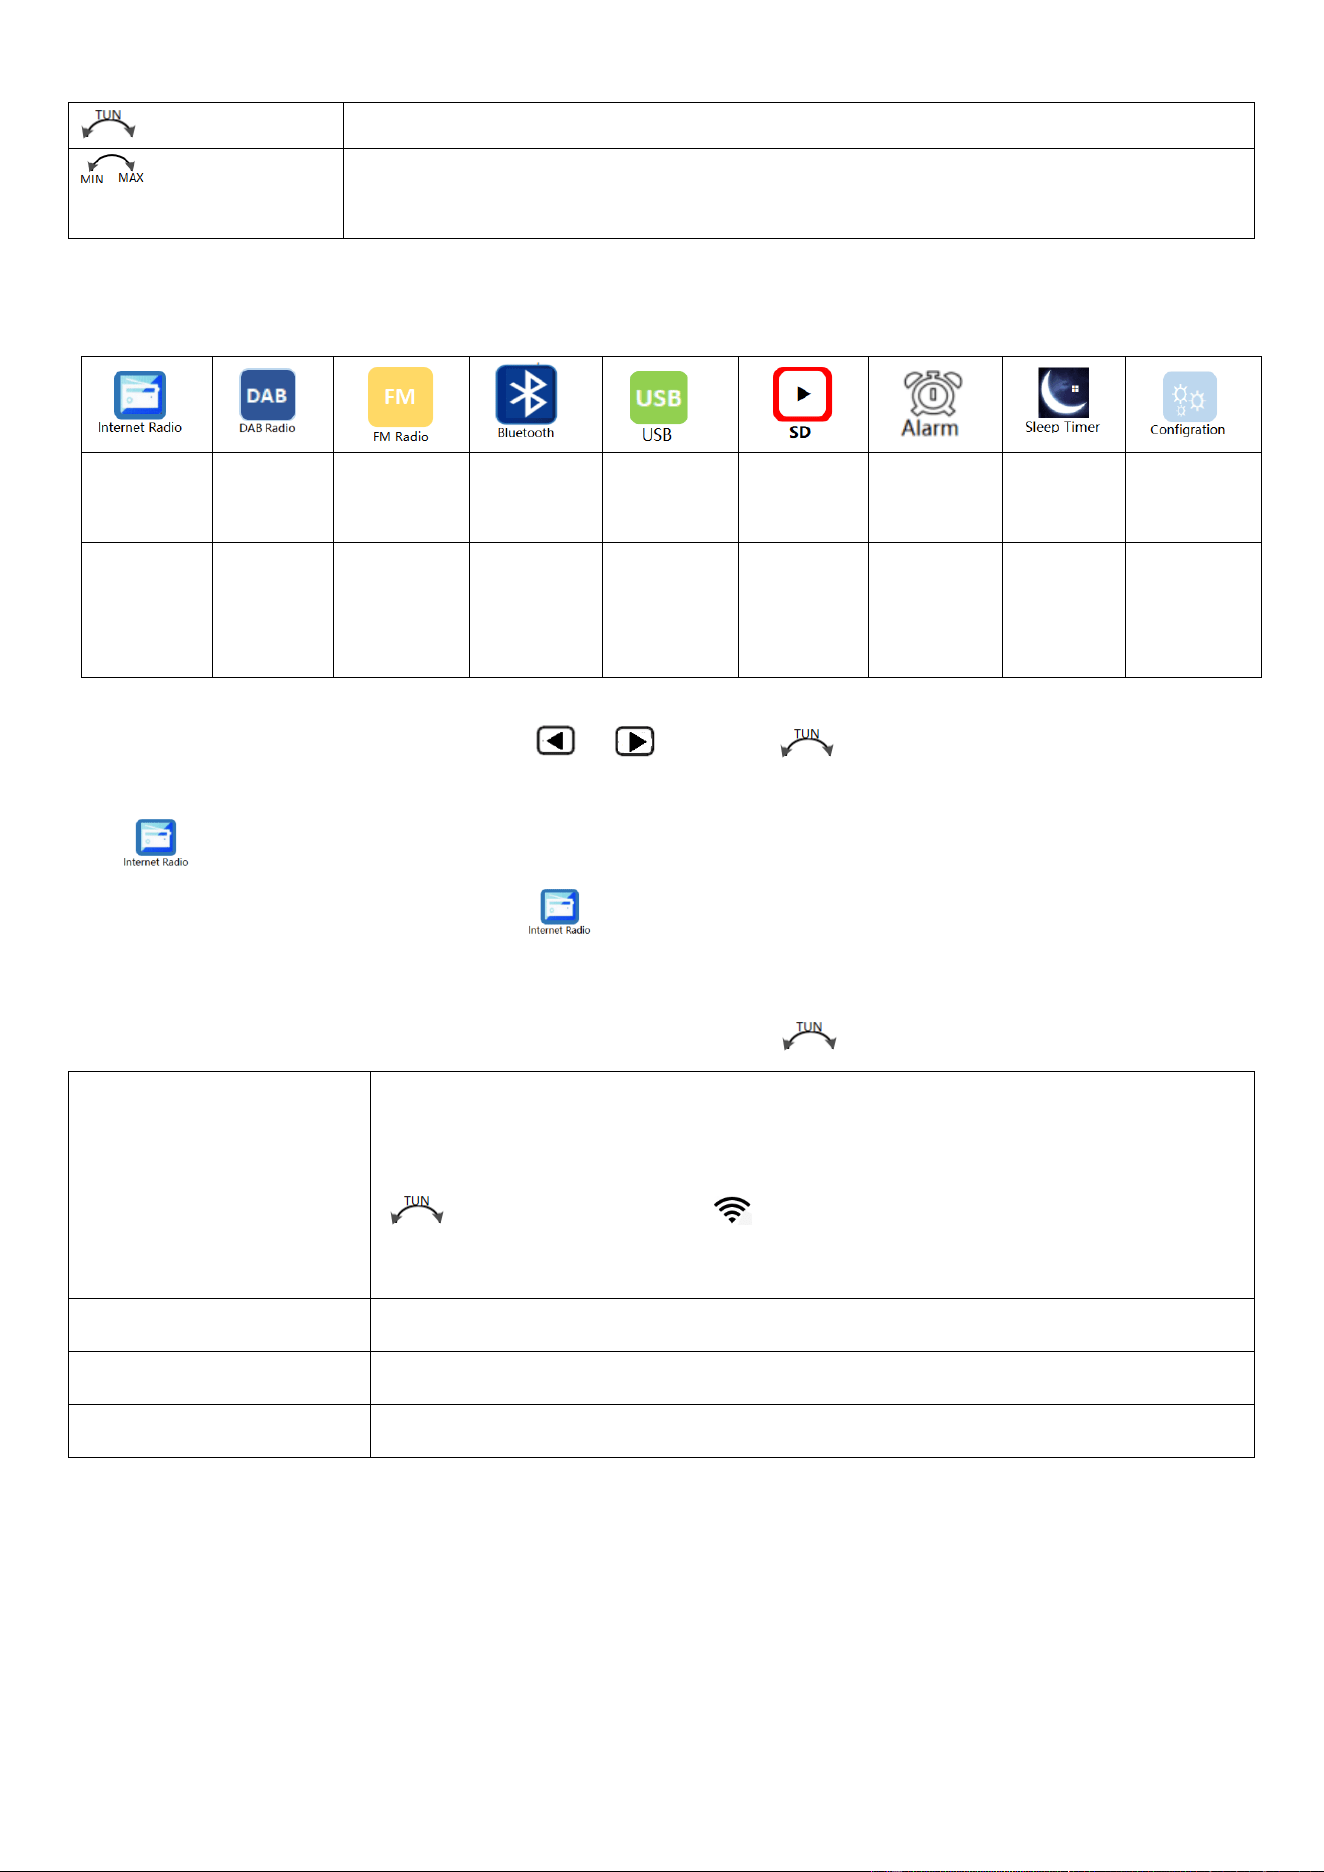
Select the station, select Menu Task and set time......
Volume knob (rotate it clockwise to turn up the sound while rotate it
counterclockwise to turn down the sound)
5: Optional functions of [MENU]
Among the above nine menu, you canlight press [ ]&[ ] or rotate [ ] to selectwork modes and press [ENTER].
5.1: : WI-FI network connection &network radio reception:
5.1.1: WI-FI network connection: Select “ ” and light press [ENTER] to enter Internet radio mode.
If the machine is not connected to the network, it will give you a prompt to connect to the network first.
When the screen displays the following items for selection, please rotate [ ] to select them:
Network,<WLAN Scan>
Short press [ENTER] to select a network account.
LCD will display SCANNING...... and display names of surrounding networks. Rotate
[ ] to select the one with good “ ” signal. Press [Enter] to enter it and input WIFI
password.
WLAN (WPS PBC)
Short press [ENTER] to enter WPS automatic connection.
SSI:[**]
If a network is connected, the IP number of the connected network will be displayed.
Signal[**]
Network signal strength values will be displayed.
Internet
radio
DAB
reception
FM reception
Bluetooth
broadcast
USB play
TF card play
Alarm clock
setting
Sleeping
setting
Configuration
setting
Refer to
details in 5.1
Refer to
details in
5.2
Refer to
details in 5.3
Refer to
details in 5.4
Refer to
details in 5.5
Refer to
details in 5.6
Refer to
details in 5.7
Refer to
details in
5.8
Refer to
details in 5.9
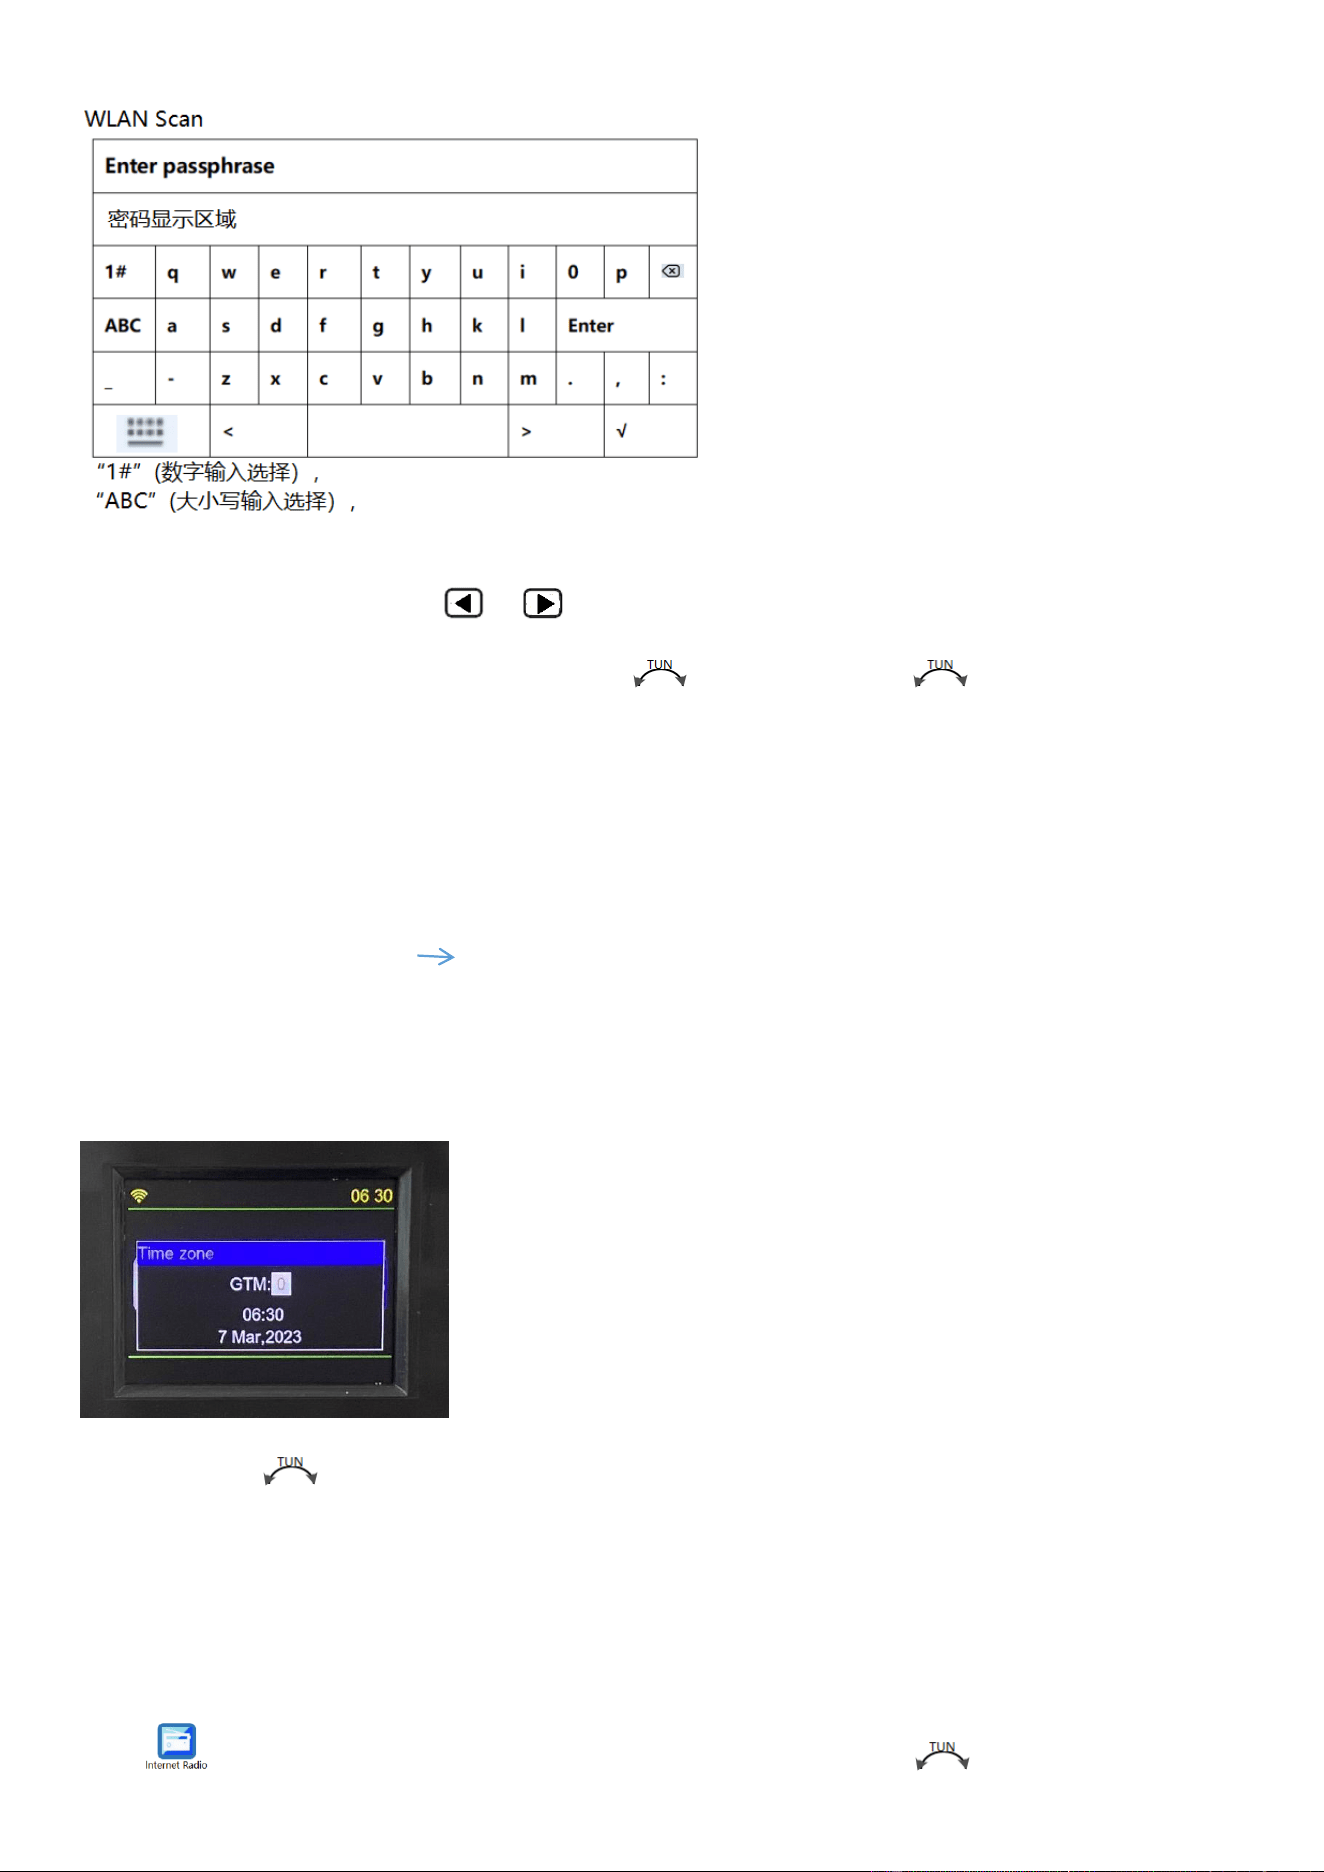
In the password input area, light press [ ]&[ ] to move it up or down or left or right to selection WLAN password
numbers or letters or symbols. You can also clockwise rotate [ ] to select downward. If [ ] is rotated anticlockwise, you
should select upward. Then, please press [ENTER] for confirmation.
※When1#, ABC, abc are selected and [ENTER] is pressed, keyboard style English size word area/various symbols will be
available.
After the correct passwords are entered, please press [ENTER] for confirmation.
LCD will display: “WI-FI connecting.” “WI-FI successful connection” WI-FI.
If the password is entered incorrectly, "Ivalid passphrase" will be displayed.
※After successful connection of WI-FI, LCD will automatically display the following “Time zone setting” window within three
to five seconds.
At that time, rotate [ ] to select time zone in GTM:-12.0, -11.0, -10.0,-9.0,-8.0,-7.0,-6.0,-5.0,-4.0,-3.0,-2.0,-1.0 ,+0,+1.0, +2.0,
+3.0, +4.0, +5.0, +6.0, +7.0, +8.0, +9.0, +10.0, +11.0, +12.0.Afterthe time zone is selected, light press [ENTER] to confirm it.
※: The date displayed will be automatically updated after network is successfully connected.
5.1.2: Network radio reception:
Select“ ” and light press [ENTER] to enter it. The following lists are provided. Rotate [ ] to select them and press
[ENTER] to enter it.
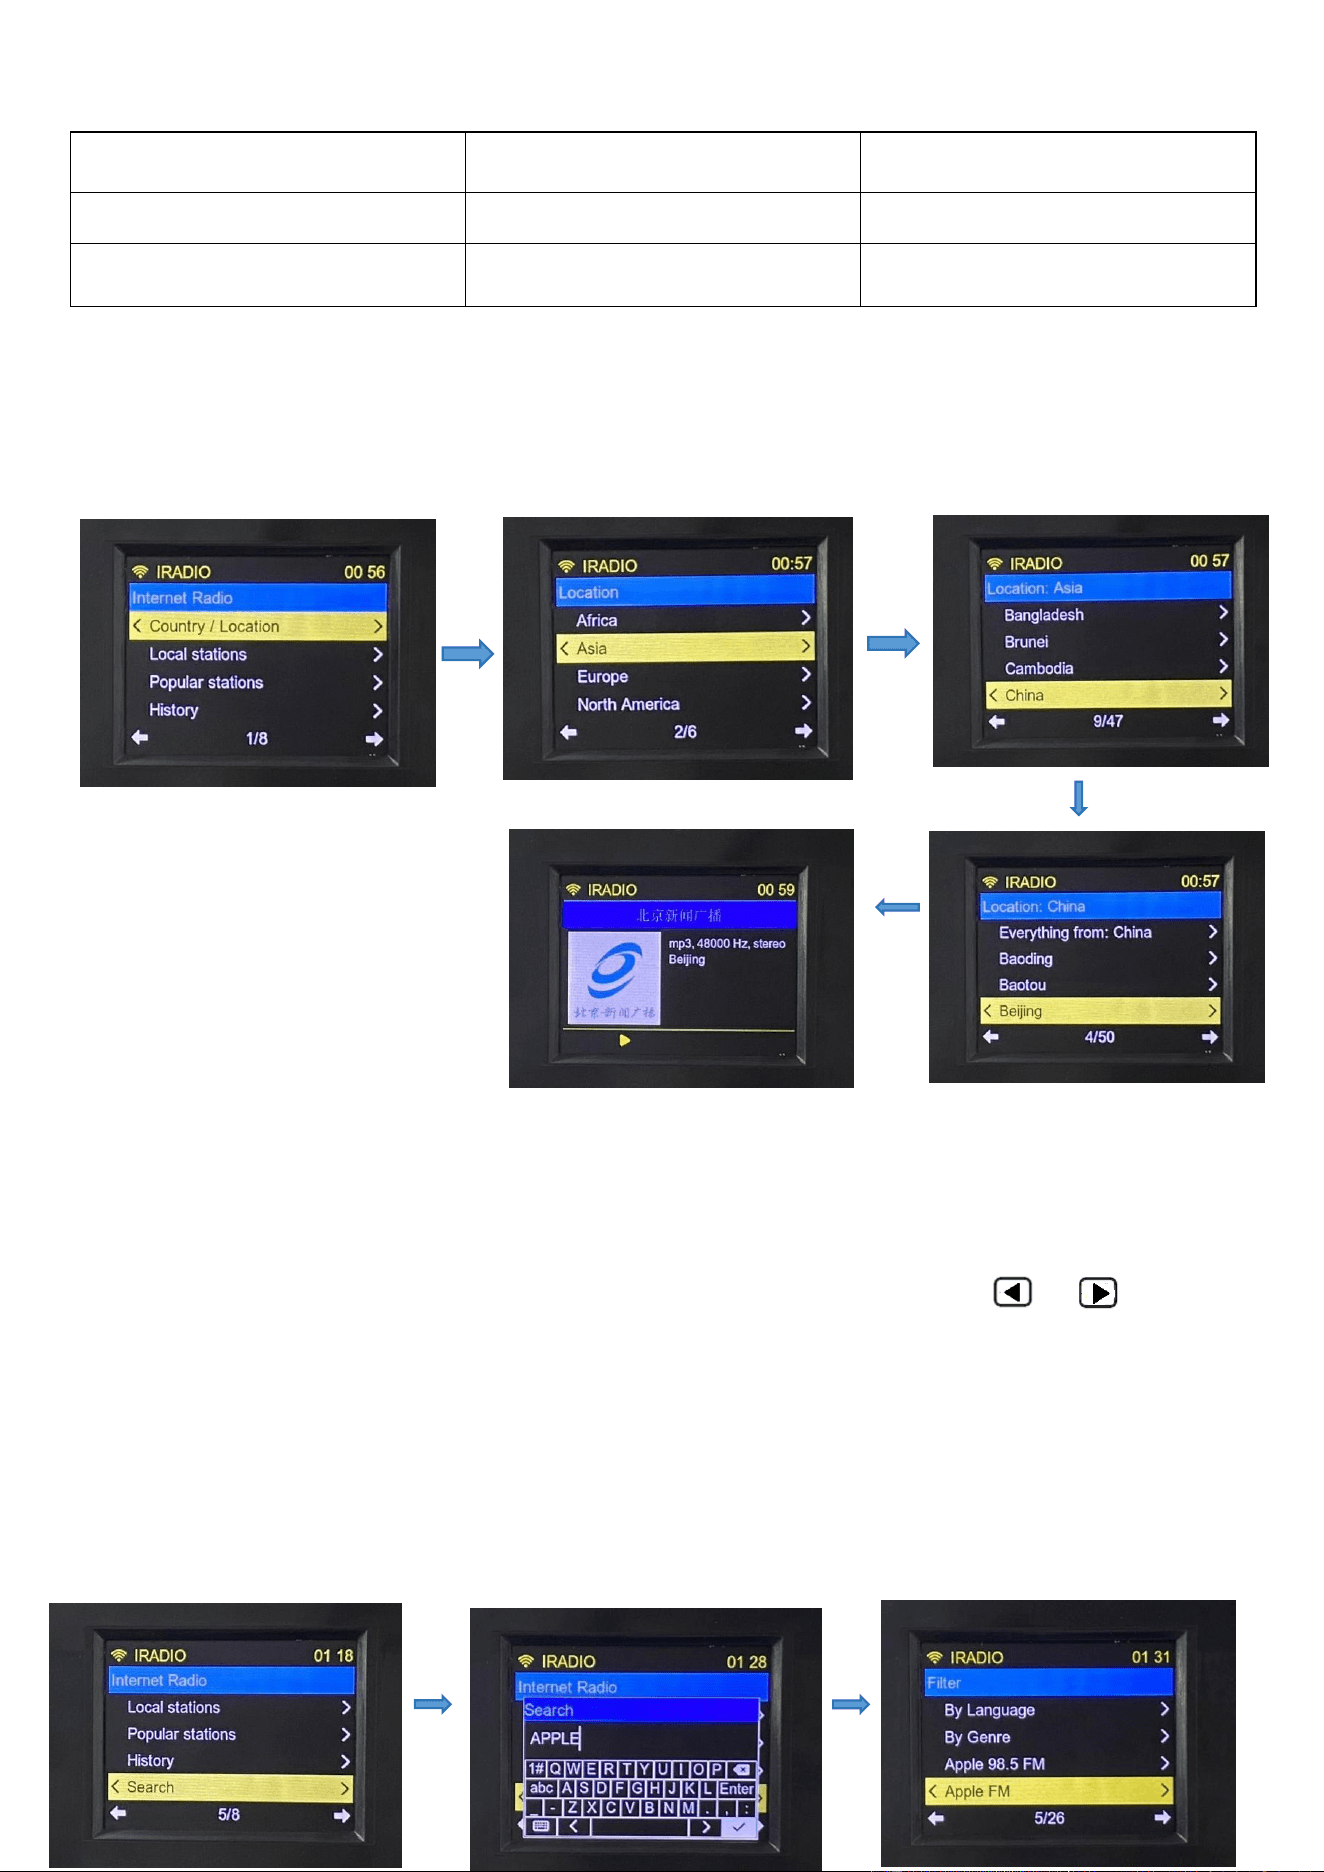
Example: Steps to play “Beijing News Radio” radio station are shown as follows:
Select Country/Location and press [ENTER] to ENTER the region list. Find Asia and then press [ENTER] to enter the country list.
Find China and then press [ENTER] to enter the city list. Find Beijing (Beijing) and press [ENTER] to ENTER the radio station
list. Find “Beijing News Radio” radio station and press [ENTER] to play it. Specific operations are shown as follows:
5.1.3: Steps to search for radio stations in Internet radio (Search)
Example: Steps to play “Apple FM” radio station are shown as follows:
Select Search and press [ENTER] to ENTER the search interface. Press light press [ ]&[ ] to move
up, down, left and tight and enter the name of the radio station. [ENTER] it and input the name and
keywords of the radio station. Long press [ENTER] to search for it. Radio station found will be displayed in
the list of radio station. Then, select “Apple FM” radio station and press [Enter] to play it. The specific steps
are shown in the following figure:
Country/Location 1/8
Local stations 2/8
Popular stations 3/8
History 4/8
Search 5/8
By language 6/8
By genre 7/8
My favorite 8/8
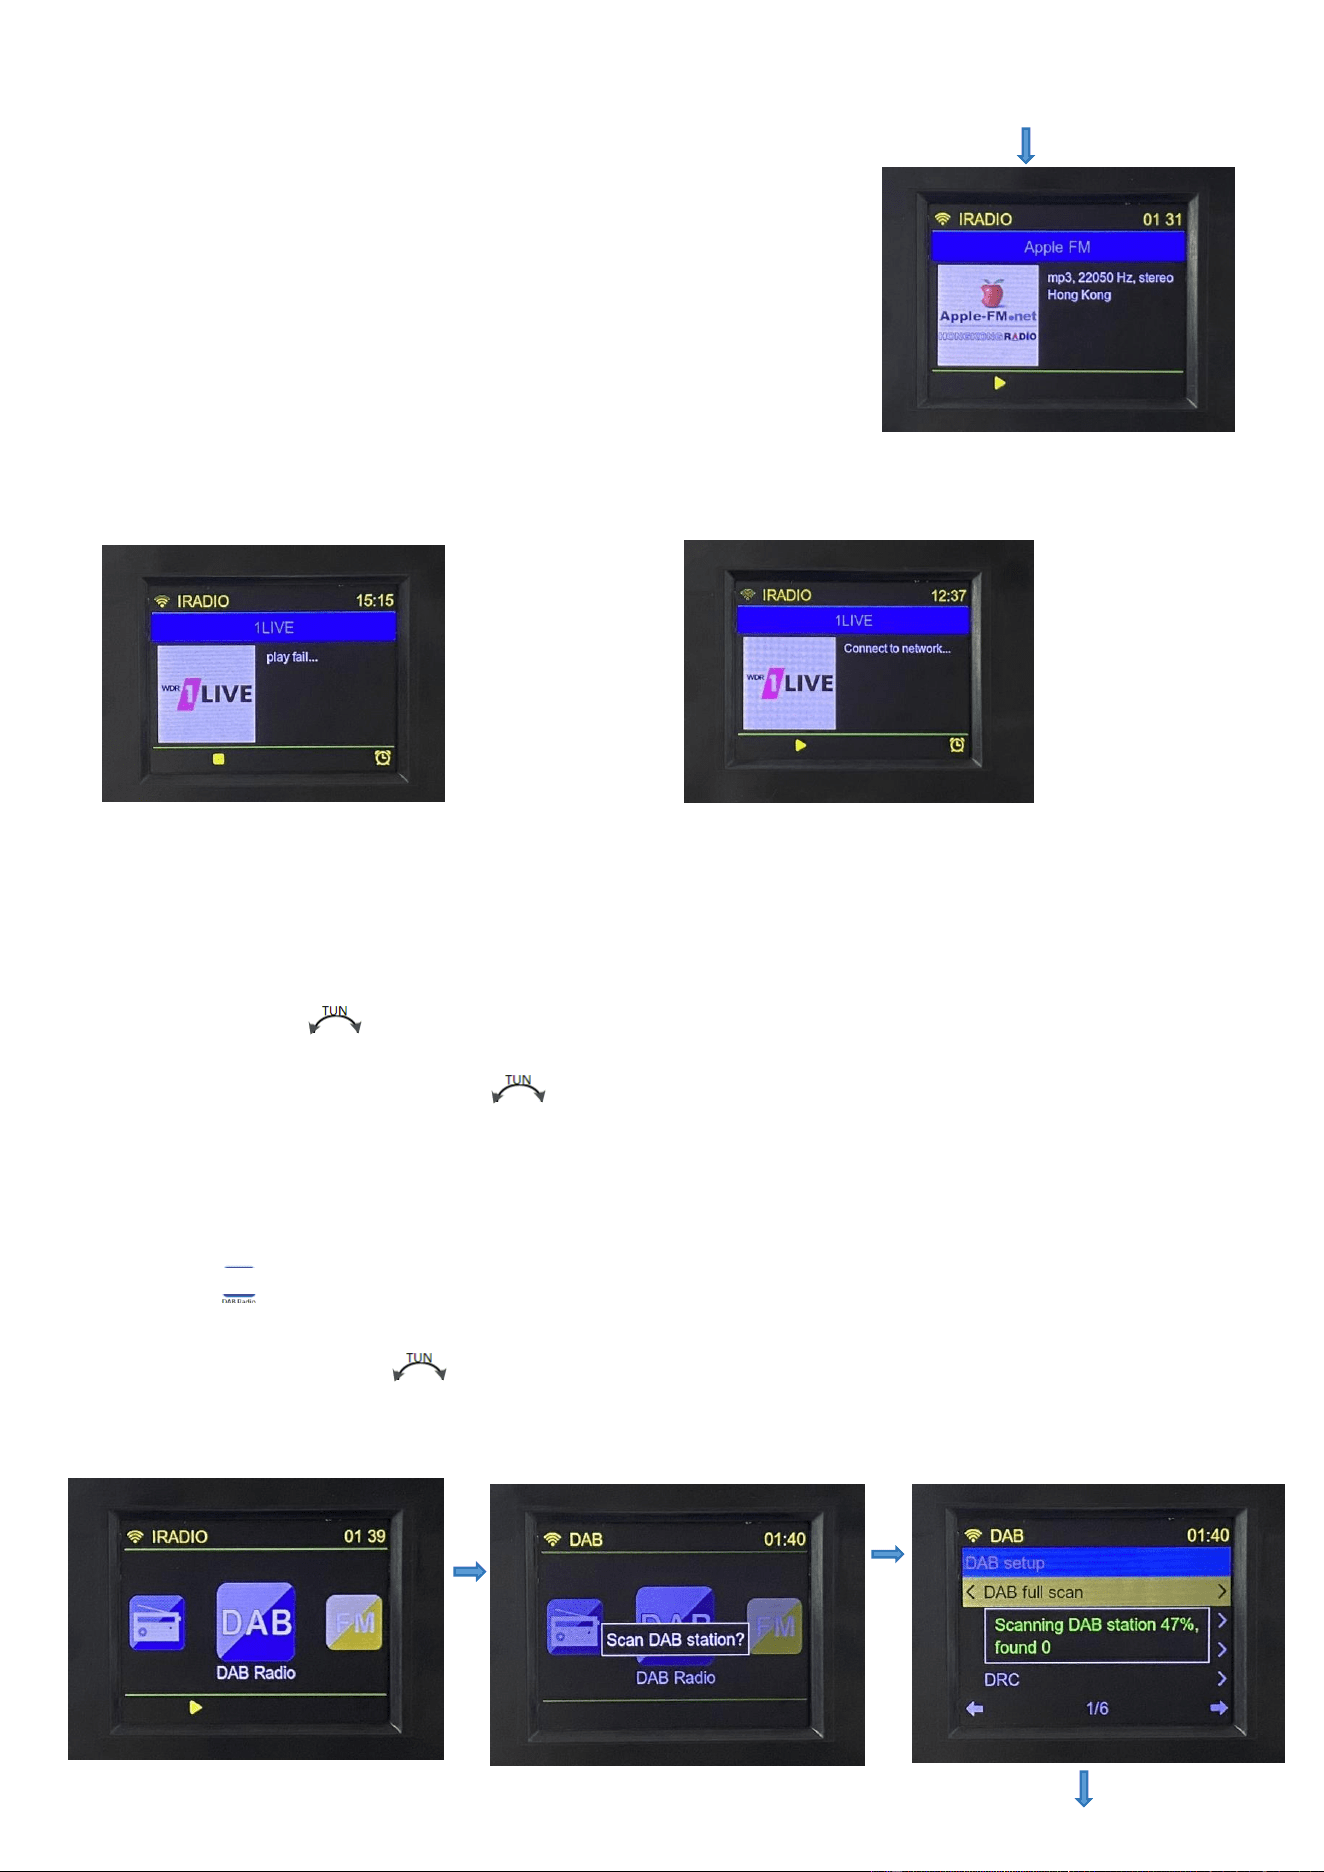
5.1.4. When the radio station fails to play, “play fail” will be displayed. When the network is disconnected, “Connect to
network” will be displayed:
5.1.5. Station storage/station fetch:
Station fetch: light press “[PRESET] to enter the list of station storage. If the radio station is not stored, “empty” will be
displayed.
Station storage: Rotate [ ] to select radio station. Then, short press [ENTER] to store the station. Long press [PRESET]
to display the PRESET STORE. Rotate [ ] to select the station number and light press [ENTER] to confirm it.
“PRESET **SAVED” will be displayed and 30radio stations can be stored.
5.2: Enter DAB for signal reception:
Select “ ” and light press [ENTER] and a hint will pop up to ask whether you will enter DAB automatic station search.
Press [ENTER] to confirm it and the station search interface will be displayed. After radio station is found, the list of radio
stations will be displayed. Rotate [ ] to select radio stations. Press [ENTER] to enter the playback interface according to the
following steps:
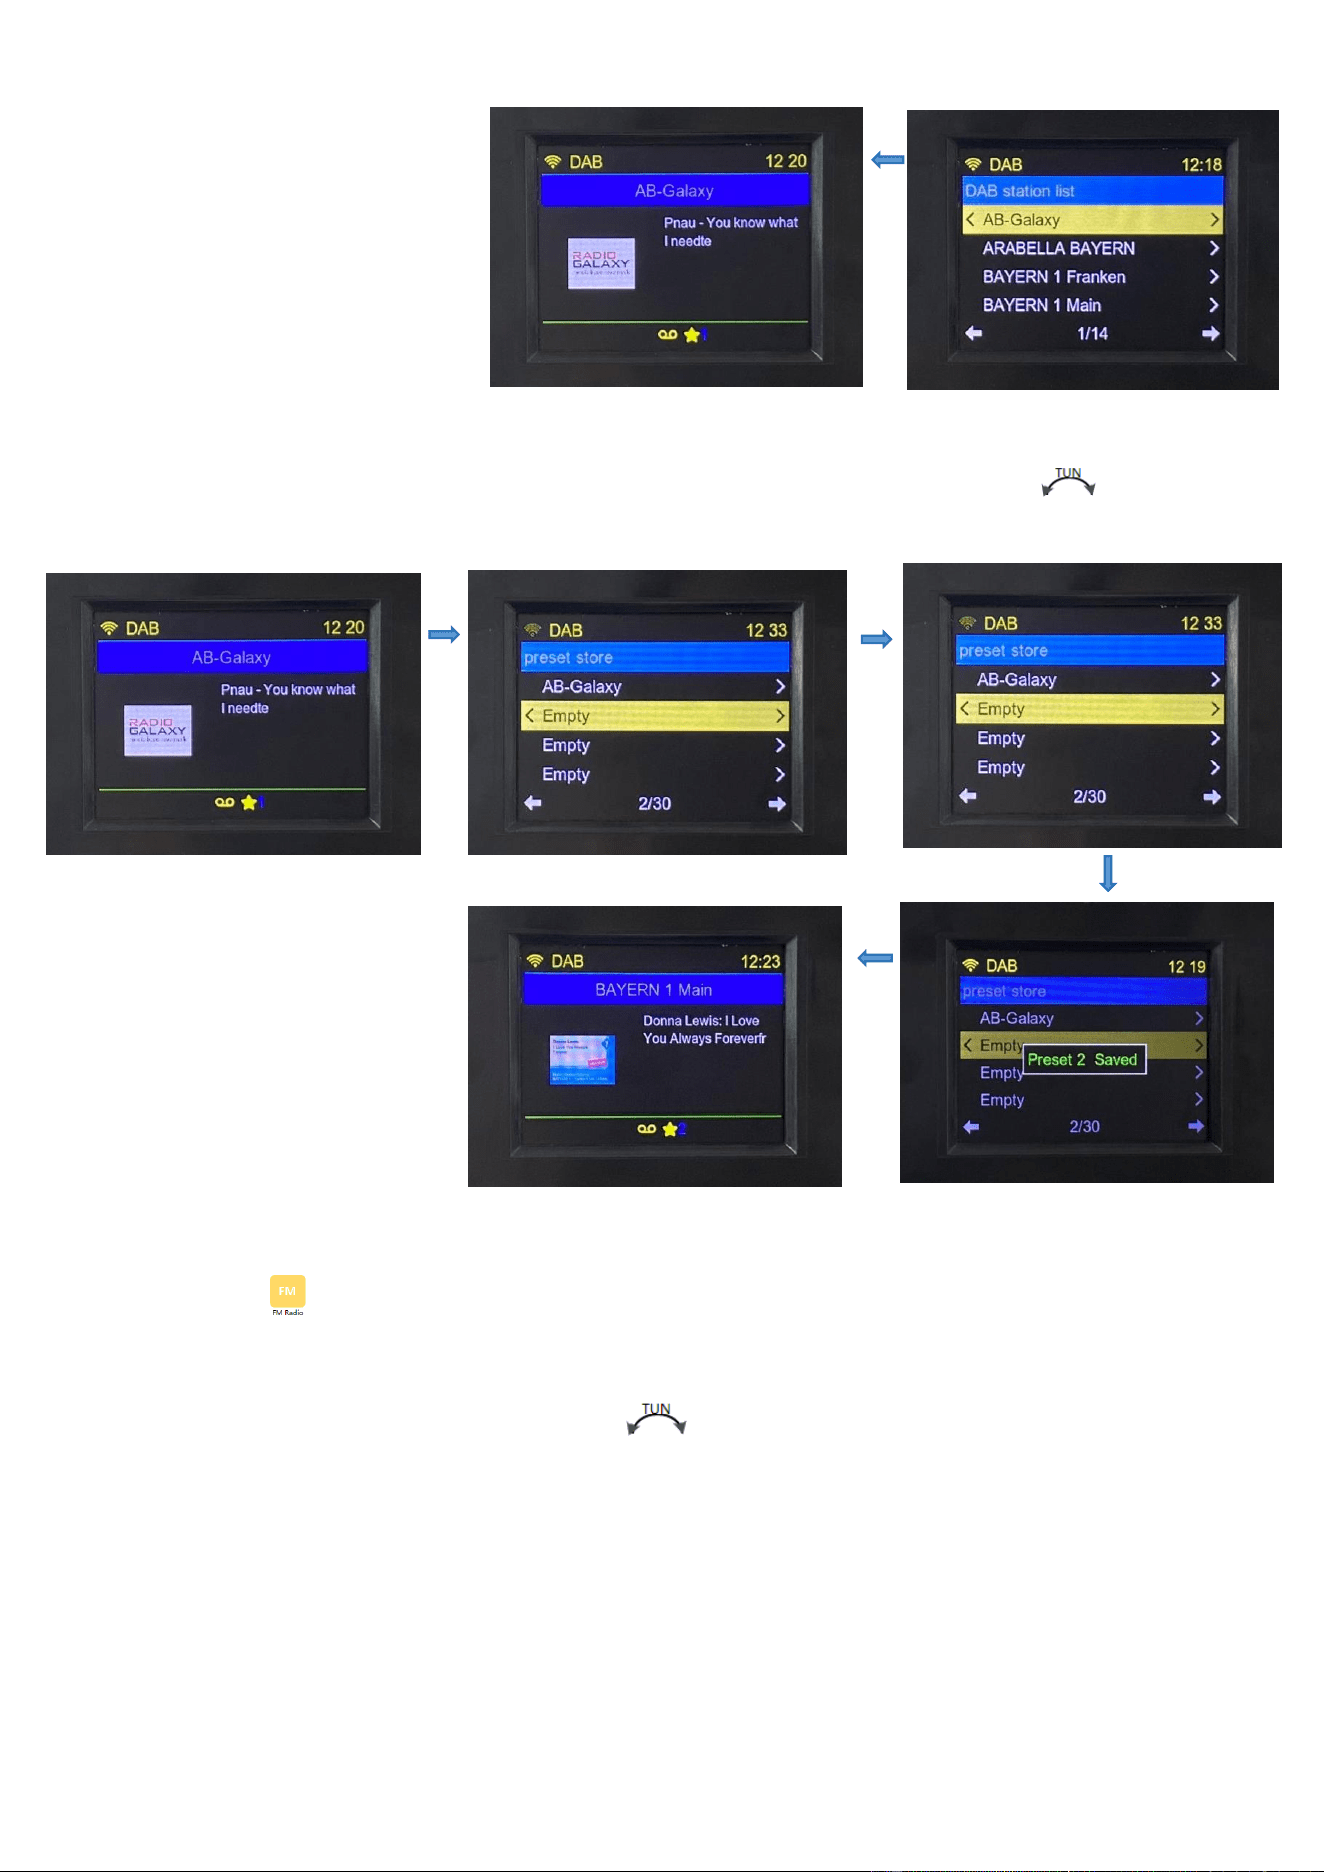
5.2.1: DAB station storage
On DAB playback screen, long press [PRESET] to enter the storage station list. Rotate [ ] to select the
storage station number. Press [ENTER] and “PRESET **SAVED” will be displayed:
5.3: Enter FM for signal playback:
Selection “ ” and press [ENTER] to enter it:
FM radio frequency receiving range: 87.50-108.00MHZ (step value: 0.05MHZ)
5.3.1. Manual control: in the FM mode, rotate [ ] and it will increase and decrease according to the
minimum step value of “0.05MHZ”.
* In tune or play mode... when LCD displays“☆”, it means that the frequency has been saved to the
playlist.
5.3.2: Automatic search and storage of radio station: in FM mode, long press [SCAN] for 2 seconds to enter
automatic scan and search station. The display will display: scan FM radio station, such as: “Scanning FM
station, frequency: 87.5 MHZ, found *” and the station will be automatically deposited to the radio station.
It will searched from the lowest frequency point of the current receiving band to the highest frequency point
and will stop scanning and search automatically.
* Tips: FM can store up to 30 stations. The number of the radio station stored depends on the strength
of local signals.
5.3.3: Manual storage of radio stations: Select your favorite radio station and long press [PRESET].
The screen will display “FM PRESET STORE”. Rotate [ ] to select the station stored. Press [ENTER]
for confirmation.
5.3.4: Station fetch operation:
Radio stations are stored according to steps of 4.3.2 and 4.3.3.
Light press [PRESET] [ ] and LCD will display the “preset list”. Rotate [ ] clockwise and
counterclockwise to adjust the station and select the radio station upward and downward till your
favorite station is selected. Then light press [ENTER] to play the current radio station stored.
5.4: Bluetooth broadcasting
Select “ ” and press [ENTER] to enter it:
Bluetooth connection code of this radio: HRD-806. After the Bluetooth is connected, turn on the
Bluetooth device to listen to music.
Light press [ ]&[ ] to select the previous song and the next song.
Short press [ENTER] to switch between pause and play.
Long press [ENTER] to disconnect BT connection.
5.5: USB play:
Select and press [Enter] to enter it.
Insert USB flash disk correctly to display playback time/song number/total number of songs.
It can support 256G to the maximum and songs of MP3, WMA, WAV, APE, FLAC formats can be
played.
Short press [ ]&[ ] to select the previous song and the next song.
Long press [ ]&[ ] for fast forward and fast backward operations.
Short press [ENTER] to switch between pause and play.
If the USB flash disk is not inserted, “No Device” will be displayed.
5.6: TF card broadcasting:
Select and press [Enter] to enter TF card play mode.
Insert TF card according to the TF card patter “ ”.
LCD display: playback time/song number/total number of songs
Short press [ ]&[ ] to select the previous song and the next song.
Long press [ ]&[ ] for fast forward and fast backward operations.
Short press [ENTER] to switch between pause and play.
It can support 256G to the maximum and songs of MP3, WMA, WAV, APE, FLAC formats can be
played.
If the USB flash disk is not inserted, “No Device” will be displayed.
5.7: Alarm clock setting:
Select and press [Enter] to enter alarm clock setting mode.
5.7.1: Alarm clock setting:
After entering the interface to set the alarm clock, the alarm clock will be closed by default and off will
be displayed. Then, select Alarm 1 to enter the setting interface and save the setting after it is well set.
When the alarm clock is opened, the alarm clock icon will be displayed in the lower right corner as
shown in the following figure:
Enable : Off
Press [Enter] to set alarm clock time. Rotate [ ] to select Off / Daily /
Once /Weekdays / Weekends.
After it is selected, press [ENTER] for confirmation.
Time: 00:00
Set the time of alarm clock.
Rotate [ ] to select the hour of alarm clock.
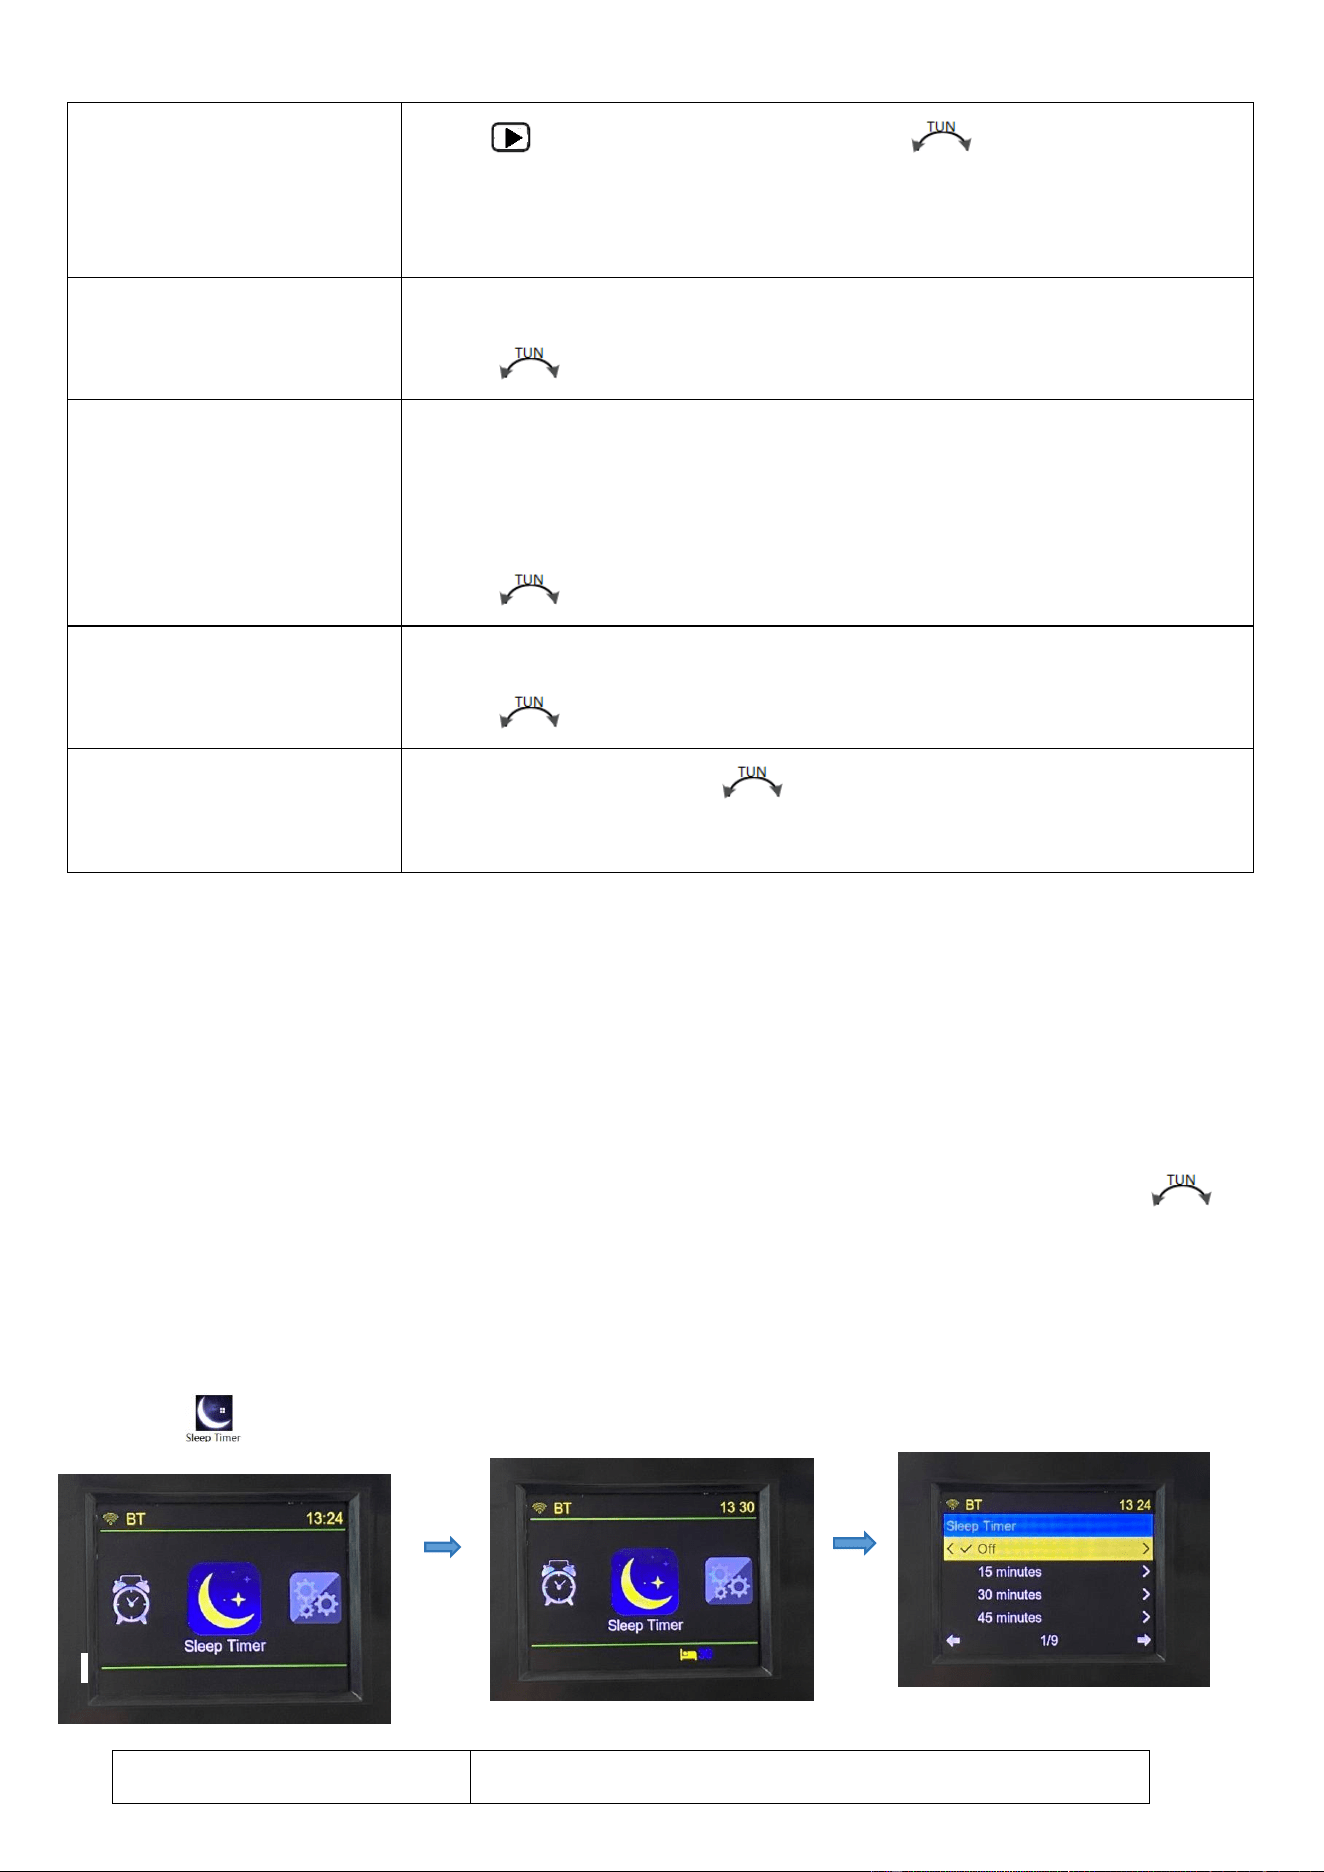
When the startup alarm rings, the alarm clock icon will flash.
5.7.2 Sleepiness setting:
Short press [POWER] to turn off the alarm clock. Light press any button other than [POWER] to enter the
sleepiness state. The sleepiness time is 9minutes, after that, the alarm will ring again.
5.7.3: Close “Alarm” alarm clock:
Return to the alarm clock setting. “off” selected indicates that the alarm clock is not started. Rotate [ ]
to SAVED taskbar ad press [ENTER] for confirmation.
5.8: Setting of sleeping time:
Select and press [Enter] to set sleeping time (automatic shutdown time).
\
Press [ ] and the minute flashes. Rotate [ ] to select minutes of the
alarm clock.
Press [ENTER] for confirmation.
Mode : DAB
Set sound of the alarm clock.
Rotate [ ] to select DAB/FM/BUZZ. Press [ENTER] for confirmation.
Preset last listened
When FM is selected as the alarm clock, you can choose last listened (the
radio station last listened /list of the radio stations stored(or one of the radio
station in the list of radio stations)
Rotate [ ] for selection. Press [ENTER] for confirmation.
Volume:10
Set the sound of alarm clock.
Rotate [ ] for selection. Press [ENTER] for confirmation.
Saved
After it is selected, rotate [ ] to SAVED taskbar. Press [ENTER] for
confirmation.
Off
Close
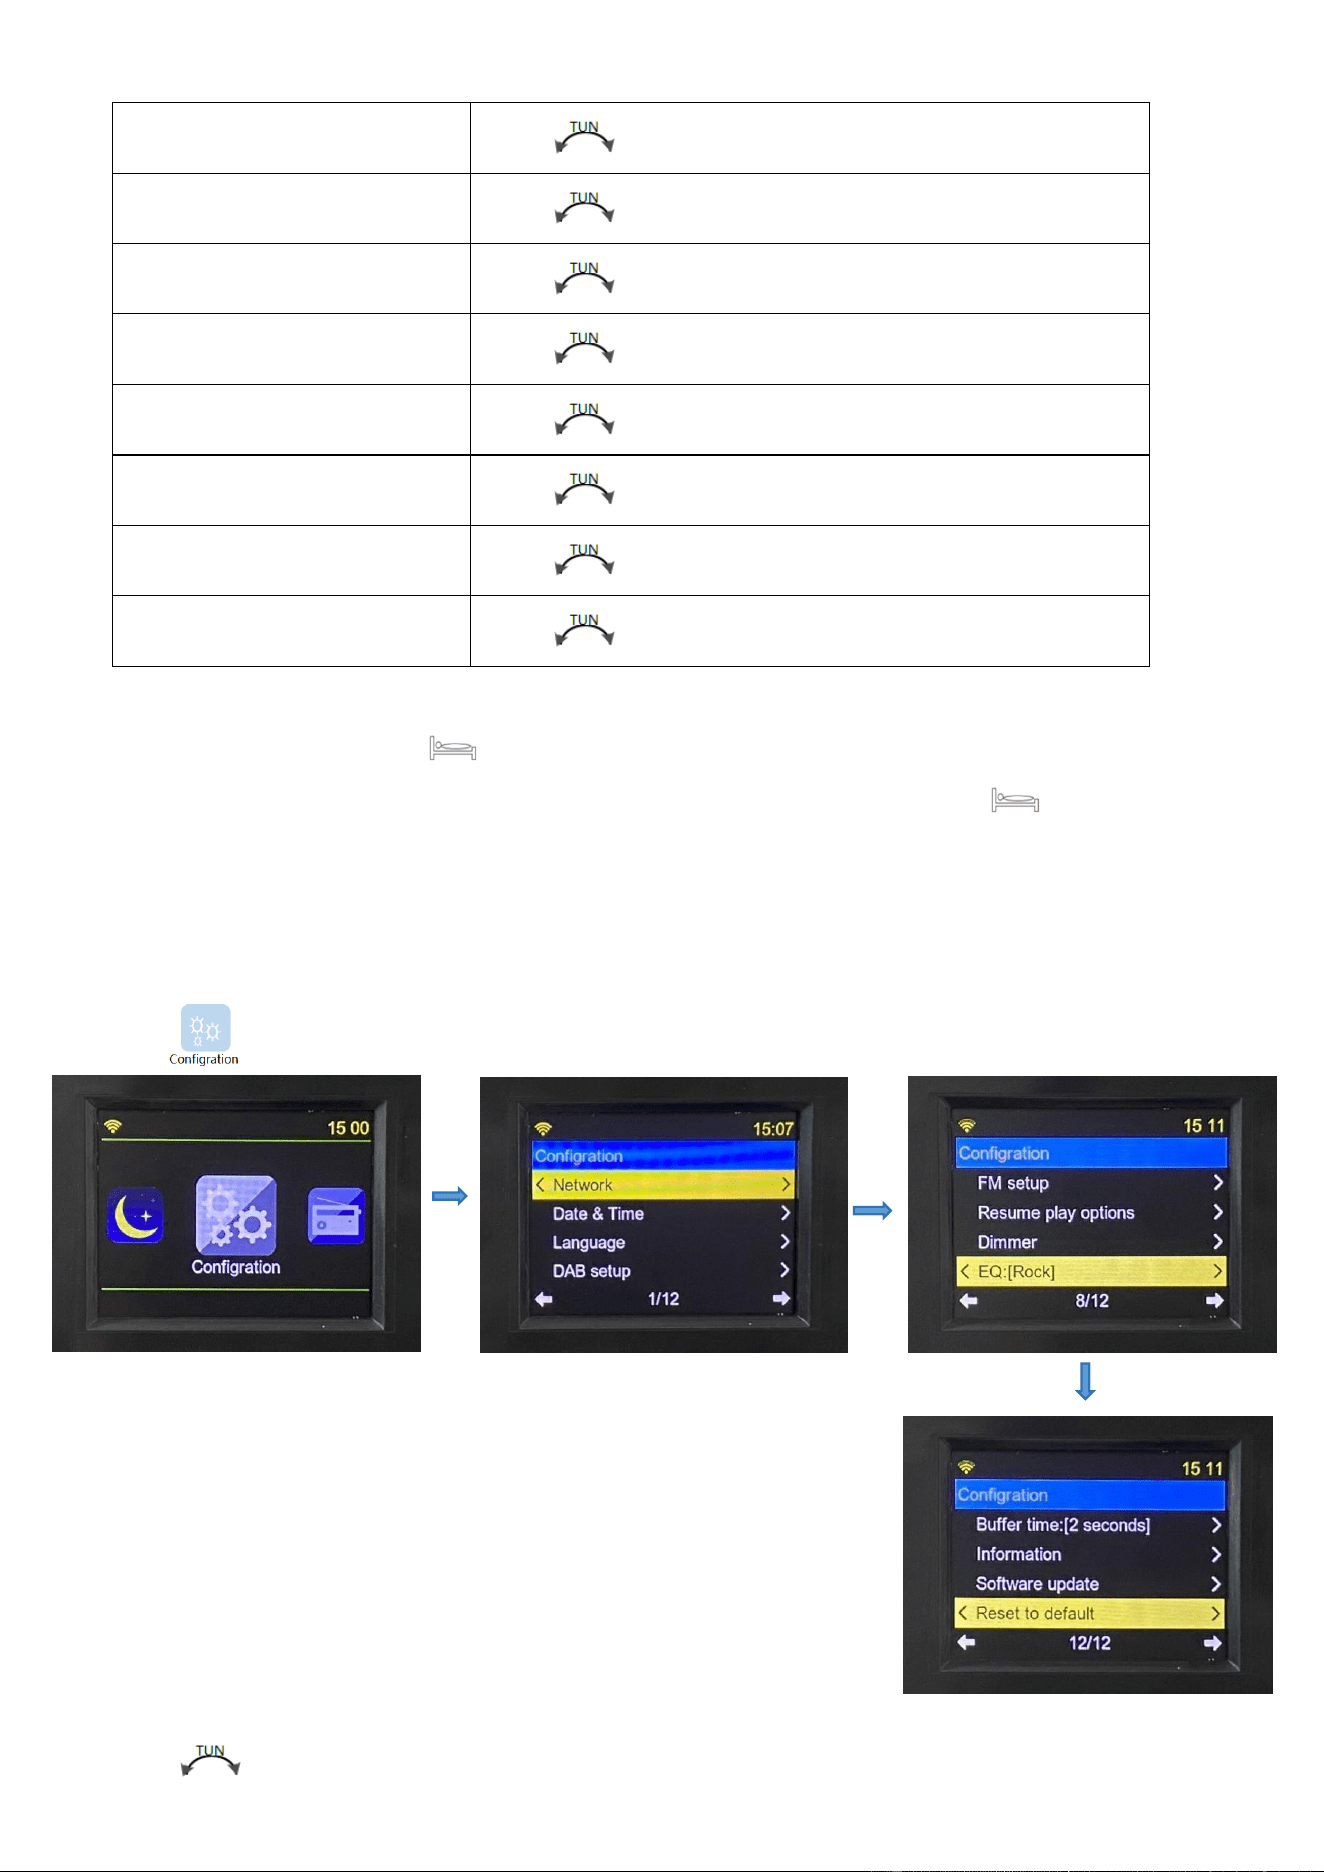
After setting, LCD will display“ ” the countdown between shutdown.
※: It will be automatically off within the automatic sleep shutdown time set. Then, “ ” will disappear
on the LCD.
5.9: Introduction to operations of setting contents:
Select and press [Enter] to enter system setting as shown below:
Rotate [ ] to show the following contents and press [ENTER] for confirmation.
15minutes
Rotate [ ] for selection. Press [ENTER] for confirmation.
30minutes
Rotate [ ] for selection. Press [ENTER] for confirmation.
45minutes
Rotate [ ] for selection. Press [ENTER] for confirmation.
60minutes
Rotate [ ] for selection. Press [ENTER] for confirmation.
90minutes
Rotate [ ] for selection. Press [ENTER] for confirmation.
120minutes
Rotate [ ] for selection. Press [ENTER] for confirmation.
150minutes
Rotate [ ] for selection. Press [ENTER] for confirmation.
180minutes
Rotate [ ] for selection. Press [ENTER] for confirmation.
Network
Date &Time
Language
DAB setup(DAB)
FM setup
Resume play options
Dimmer
EQ
Buffer time:[*seconds]
Information
Software update
Reset to default
5.9.1: The Internet can be connected and time can be updated according to the above operations in 4.1.1.
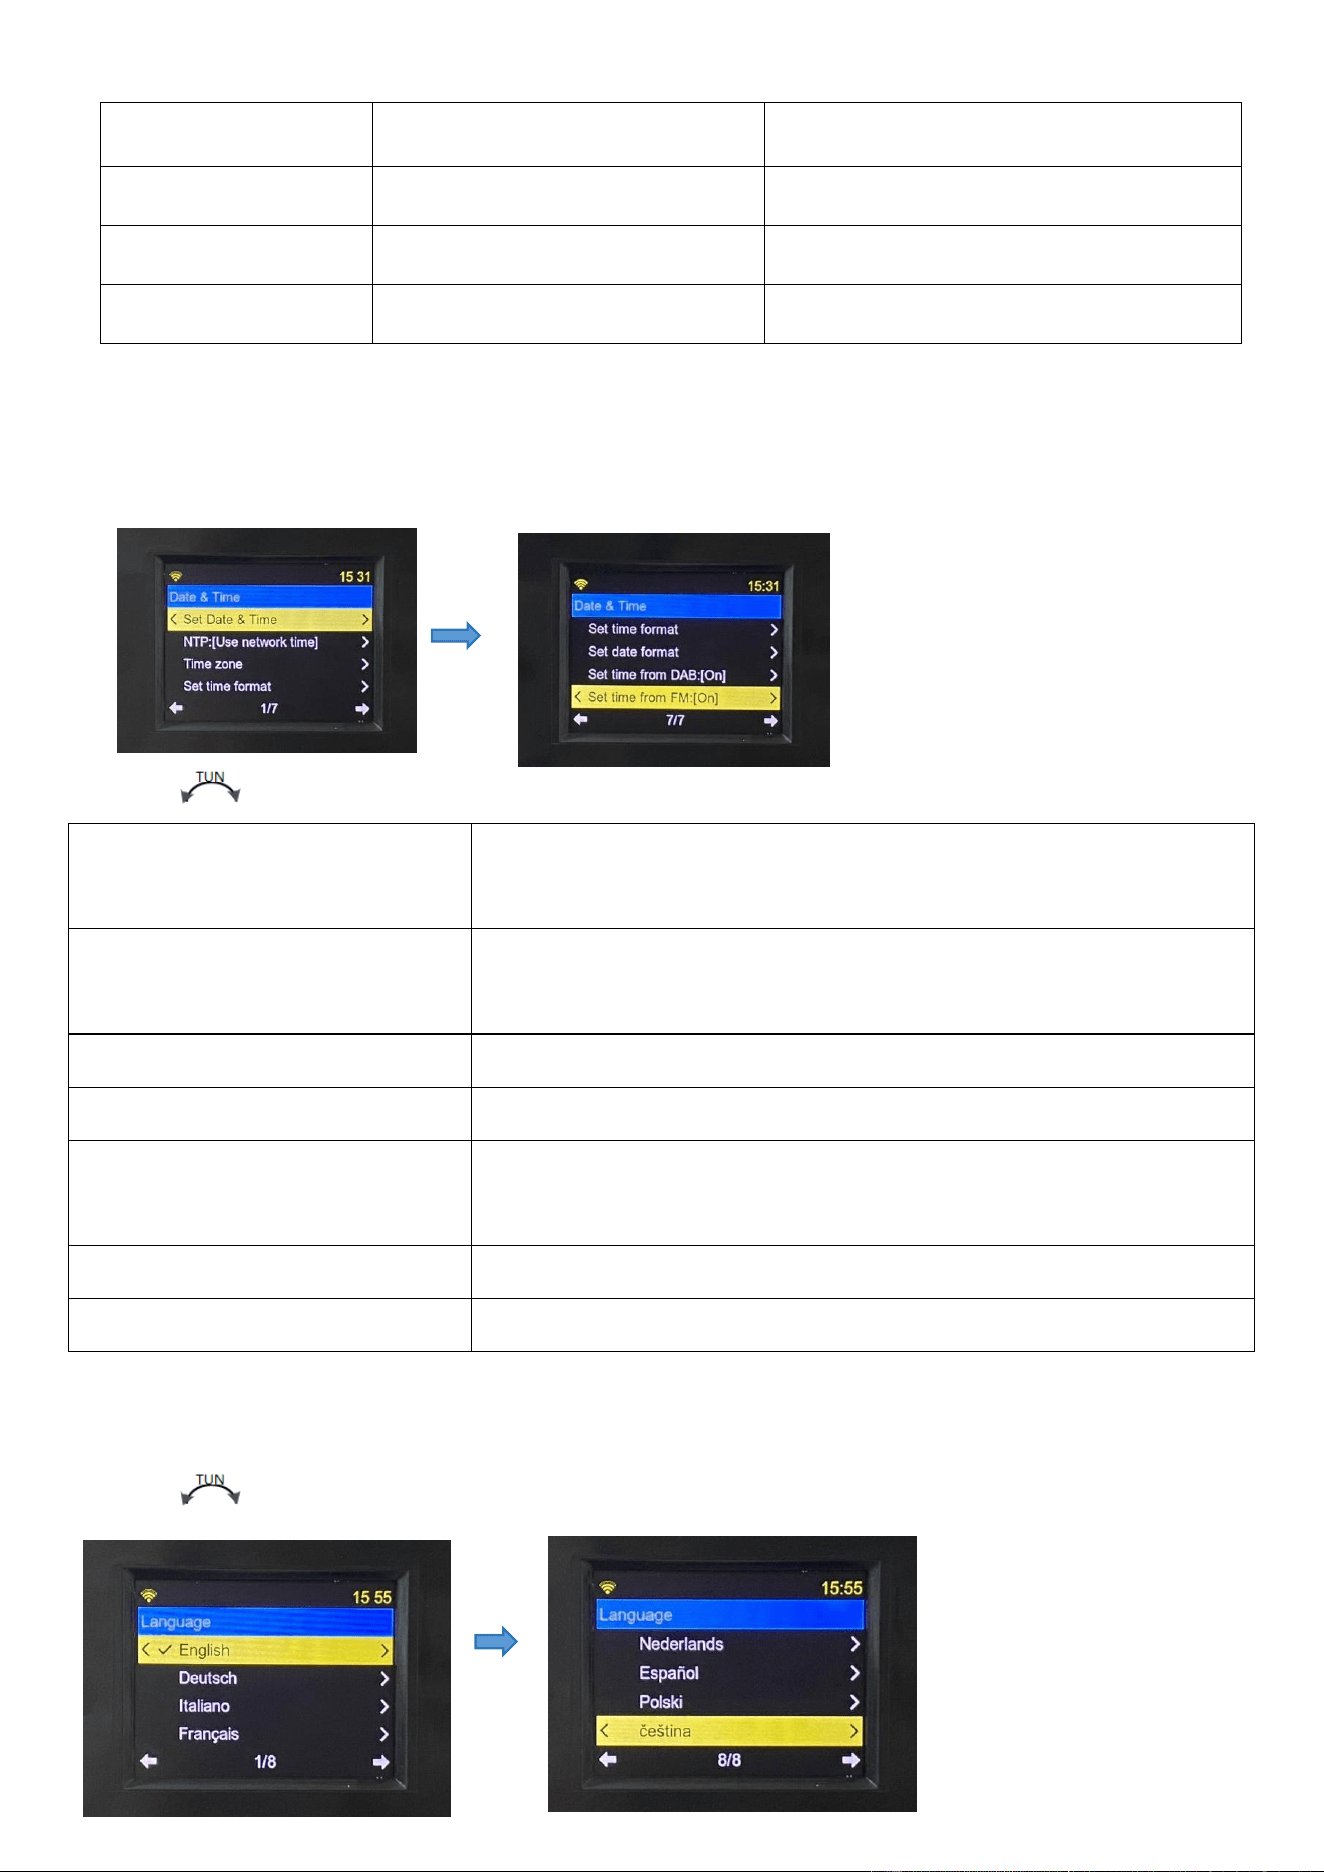
5.9.2: Date & Time:
Rotate [ ] to show the following contents and press [ENTER] to set them.
Set Date and Time
Note: Manually set the time. This operation can be performed when
NTP is set to “DO not use network”.
NTP:[Use network time]
Use network time
Do not use network
Time zone
GTM:±12
Set time formal
12/24 hour
Set date formal
DD/MM/YYYY
MM/DD/YYYY
Set time from DAB:[on]
On/off
Set time from FM:[on]
On/off
5.9.3. Language setting:
Rotate [ ] to enter the following setting and press [ENTER] for selection.
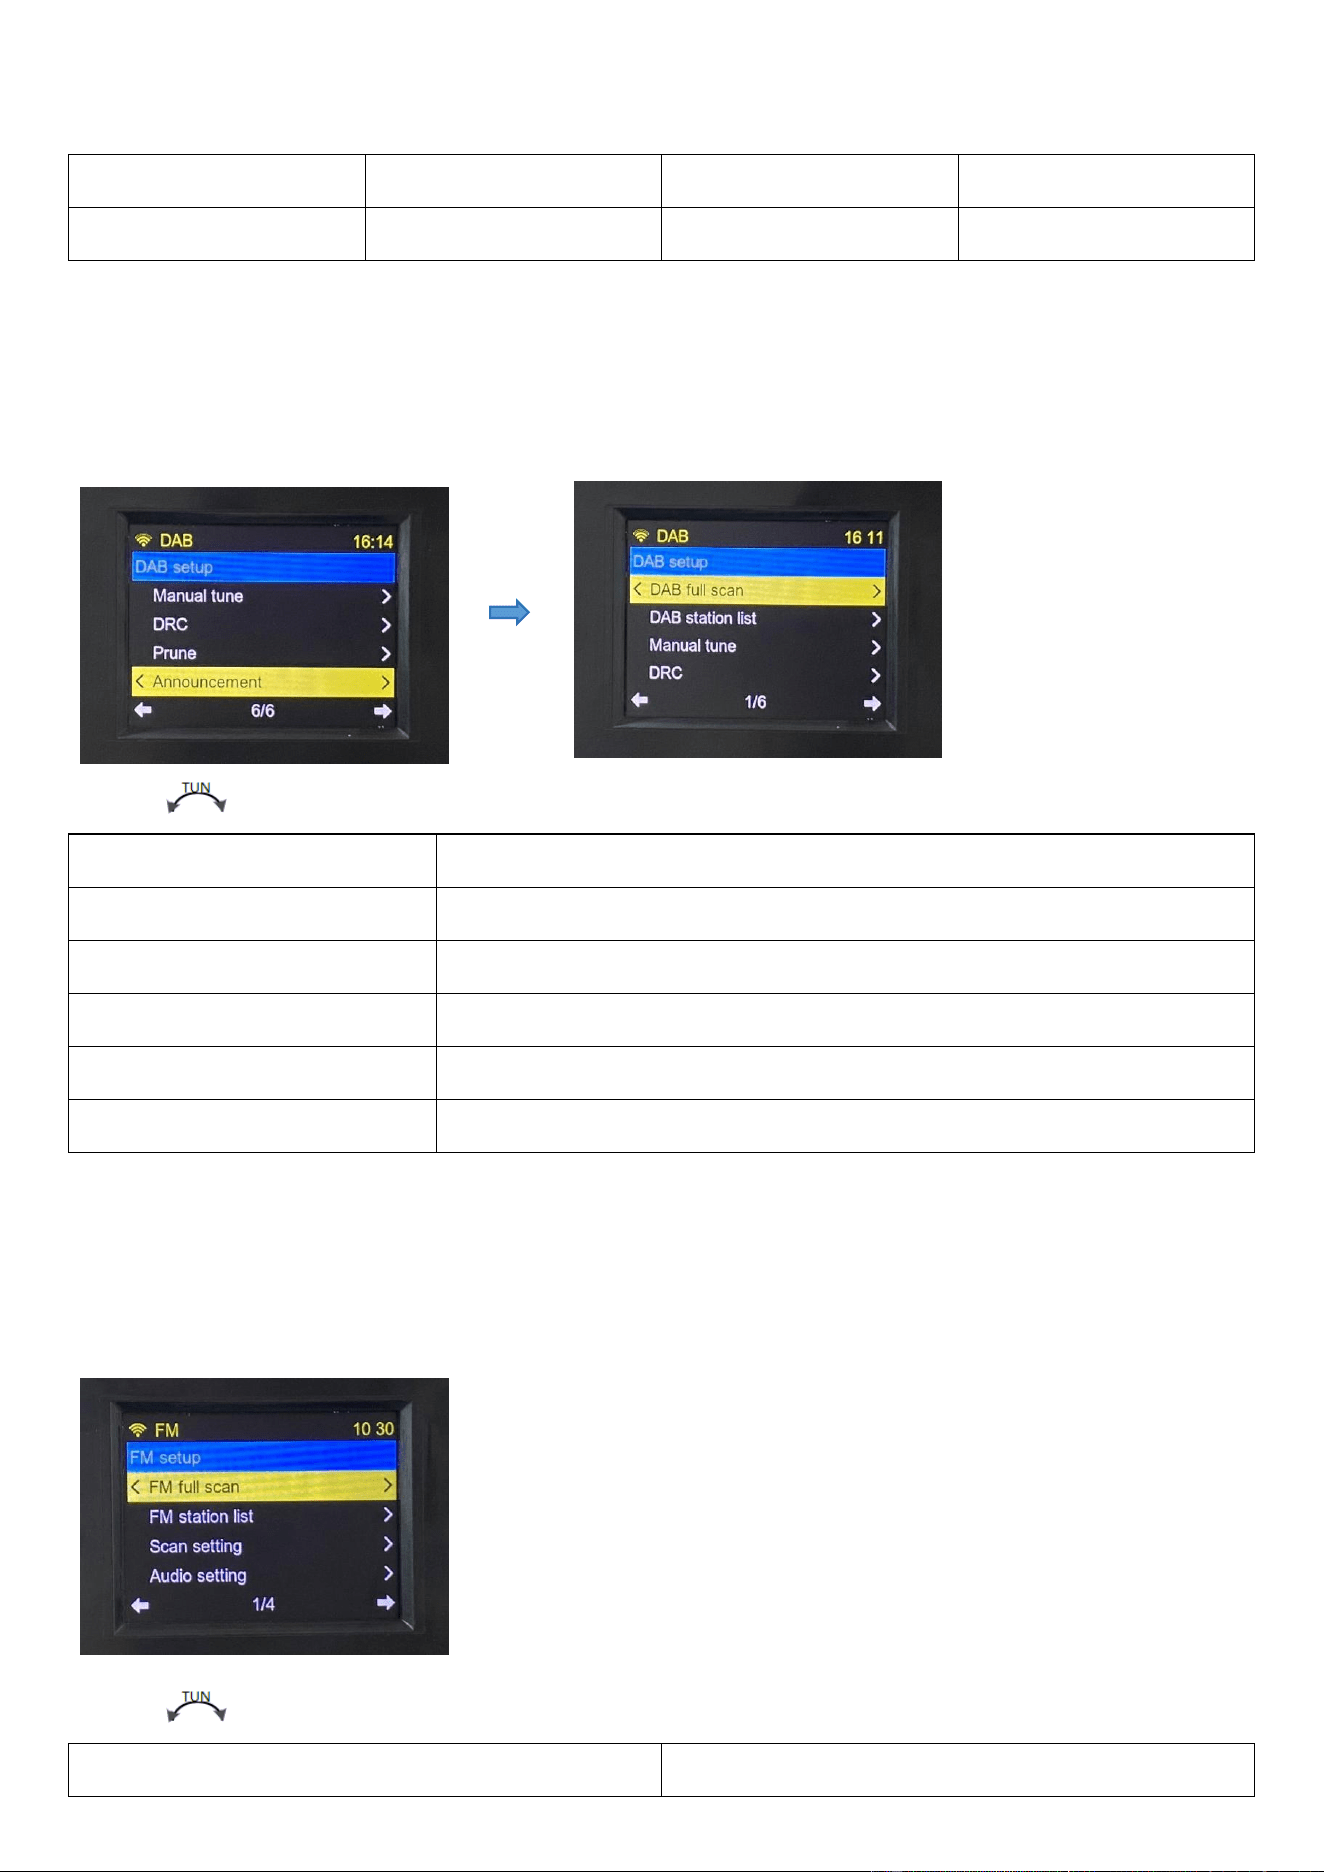
Eight languages can be selected. After they are selected, you can press [ENTER] for confirmation.
English
Deutsch
Ltaliano
Francais
Nederlands
Espanol
Polski
Cestina
5.9.4: DAB setup
Note: The full menu can only be displayed in DAB playback mode and the general menu only displays DAB
full scan and DAB station list.
Rotate [ ] to show the following setting contents. Press [ENTER] for confirmation.
DAB full scan
Automatic station search
DAB station list
List of DAB radio stations
Manual tune
5A 174.928MHZ-13F 239.200MHZ
DRC
Dynamic control range. DRC off/DRC low/DRC high
Prune
YES / NO
Announcement
Off/On/No TA/Only TA
5.9.5: FM setup
Note: The full menu is only displayed in FM playback mode and the general menu only displays FM full
scan and FM station list.
Rotate [ ] to show the following setting contents. Press [ENTER] for confirmation.
FM full scan
Automatic station search
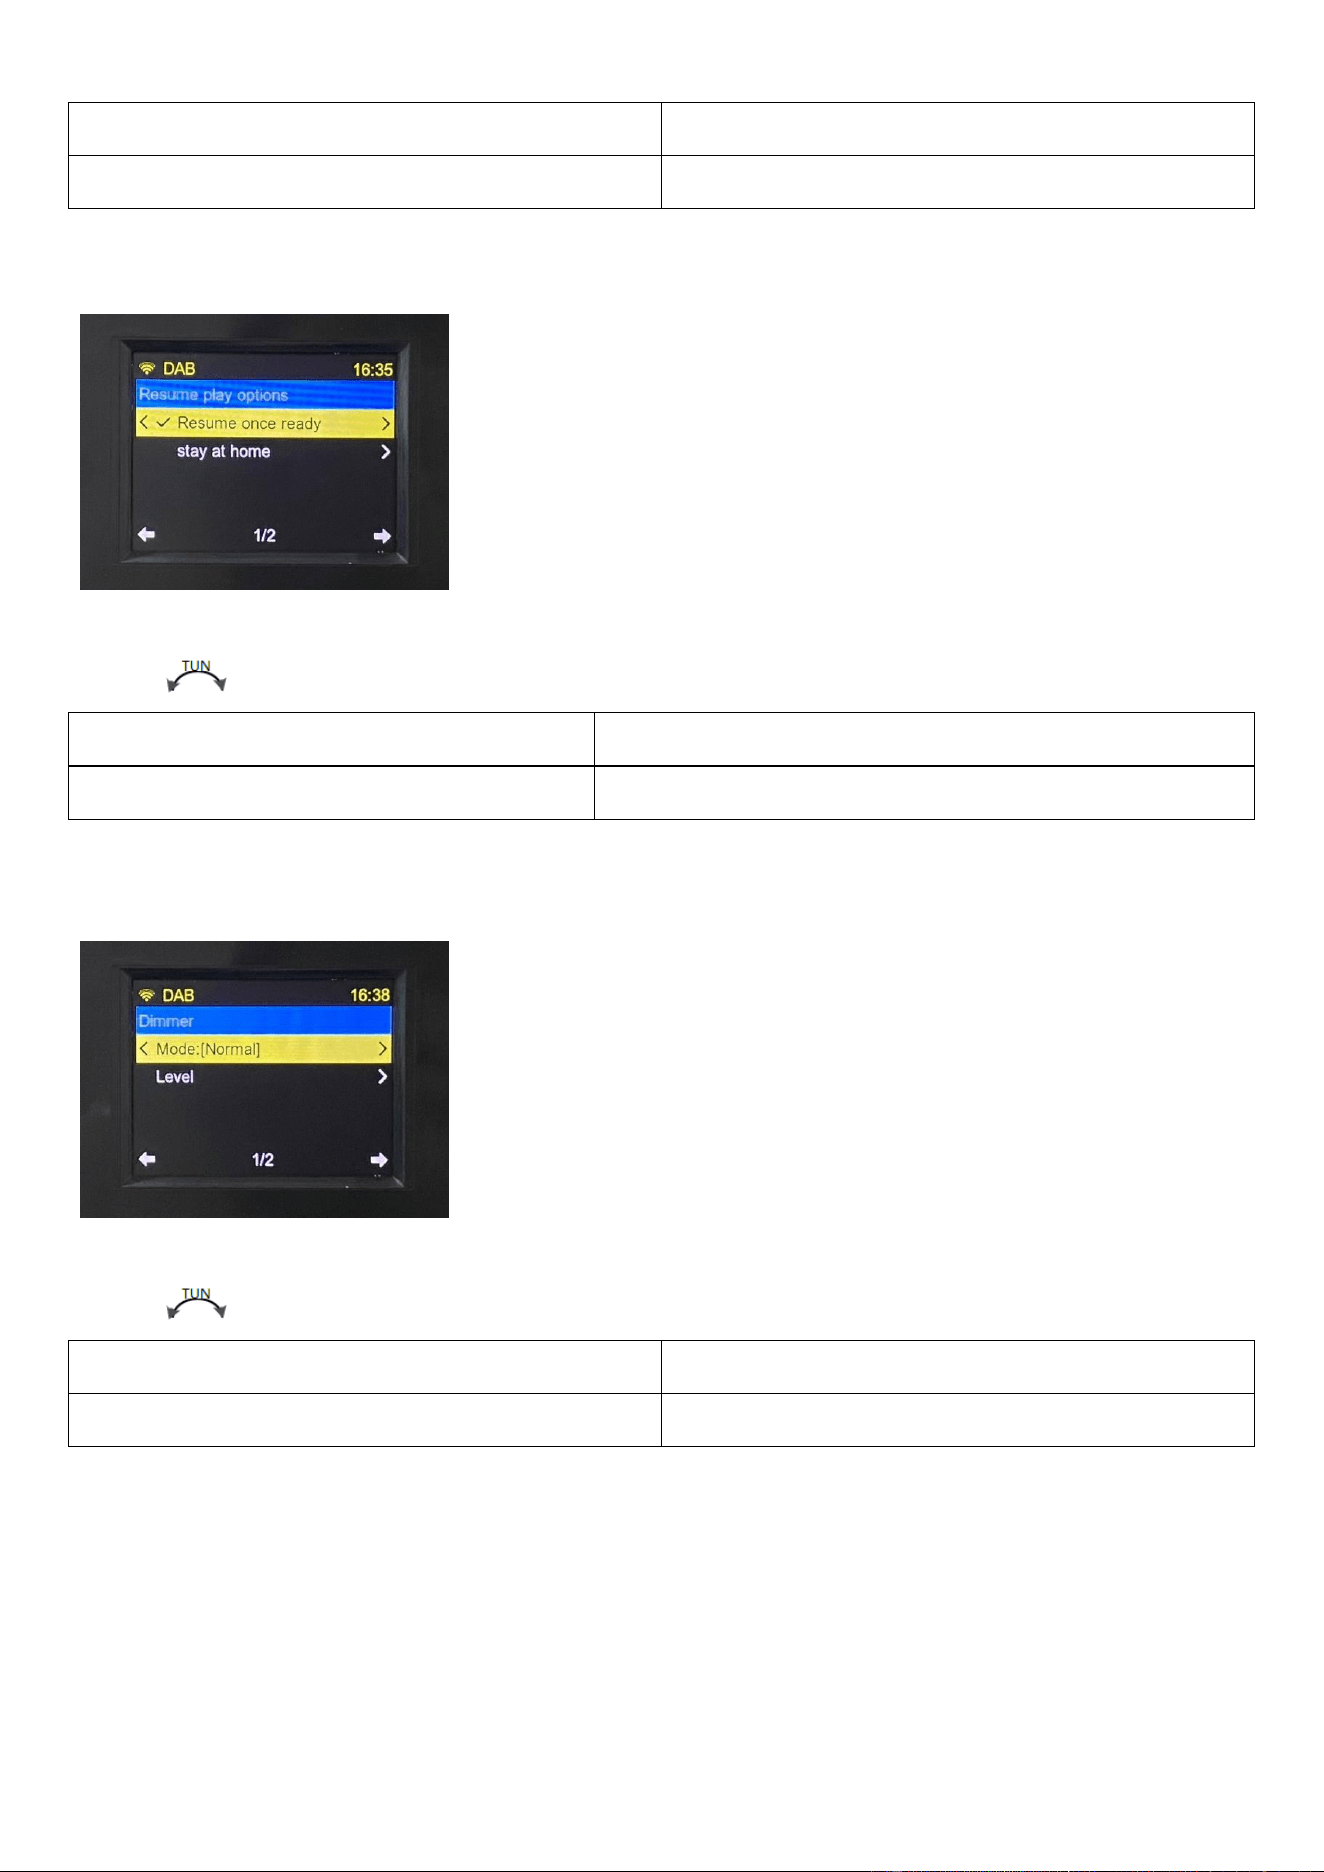
FM station list
Radio stations stored
Scan setting
All station / strong station only
5.9.6. Resume play options
Rotate [ ] to show the following setting contents. Press [ENTER] for confirmation.
Resume once ready
Resume once ready
Stay at home
Turn on the machine to go back to the main screen
5.9.7: Dimmer backlight setting
Rotate [ ] to show the following setting contents. Press [ENTER] for confirmation.
Model:[Dim]
Normal / Dim
Level
Bright:[60%] / Dim:[20%]
5.9.8:EQ sound design setting
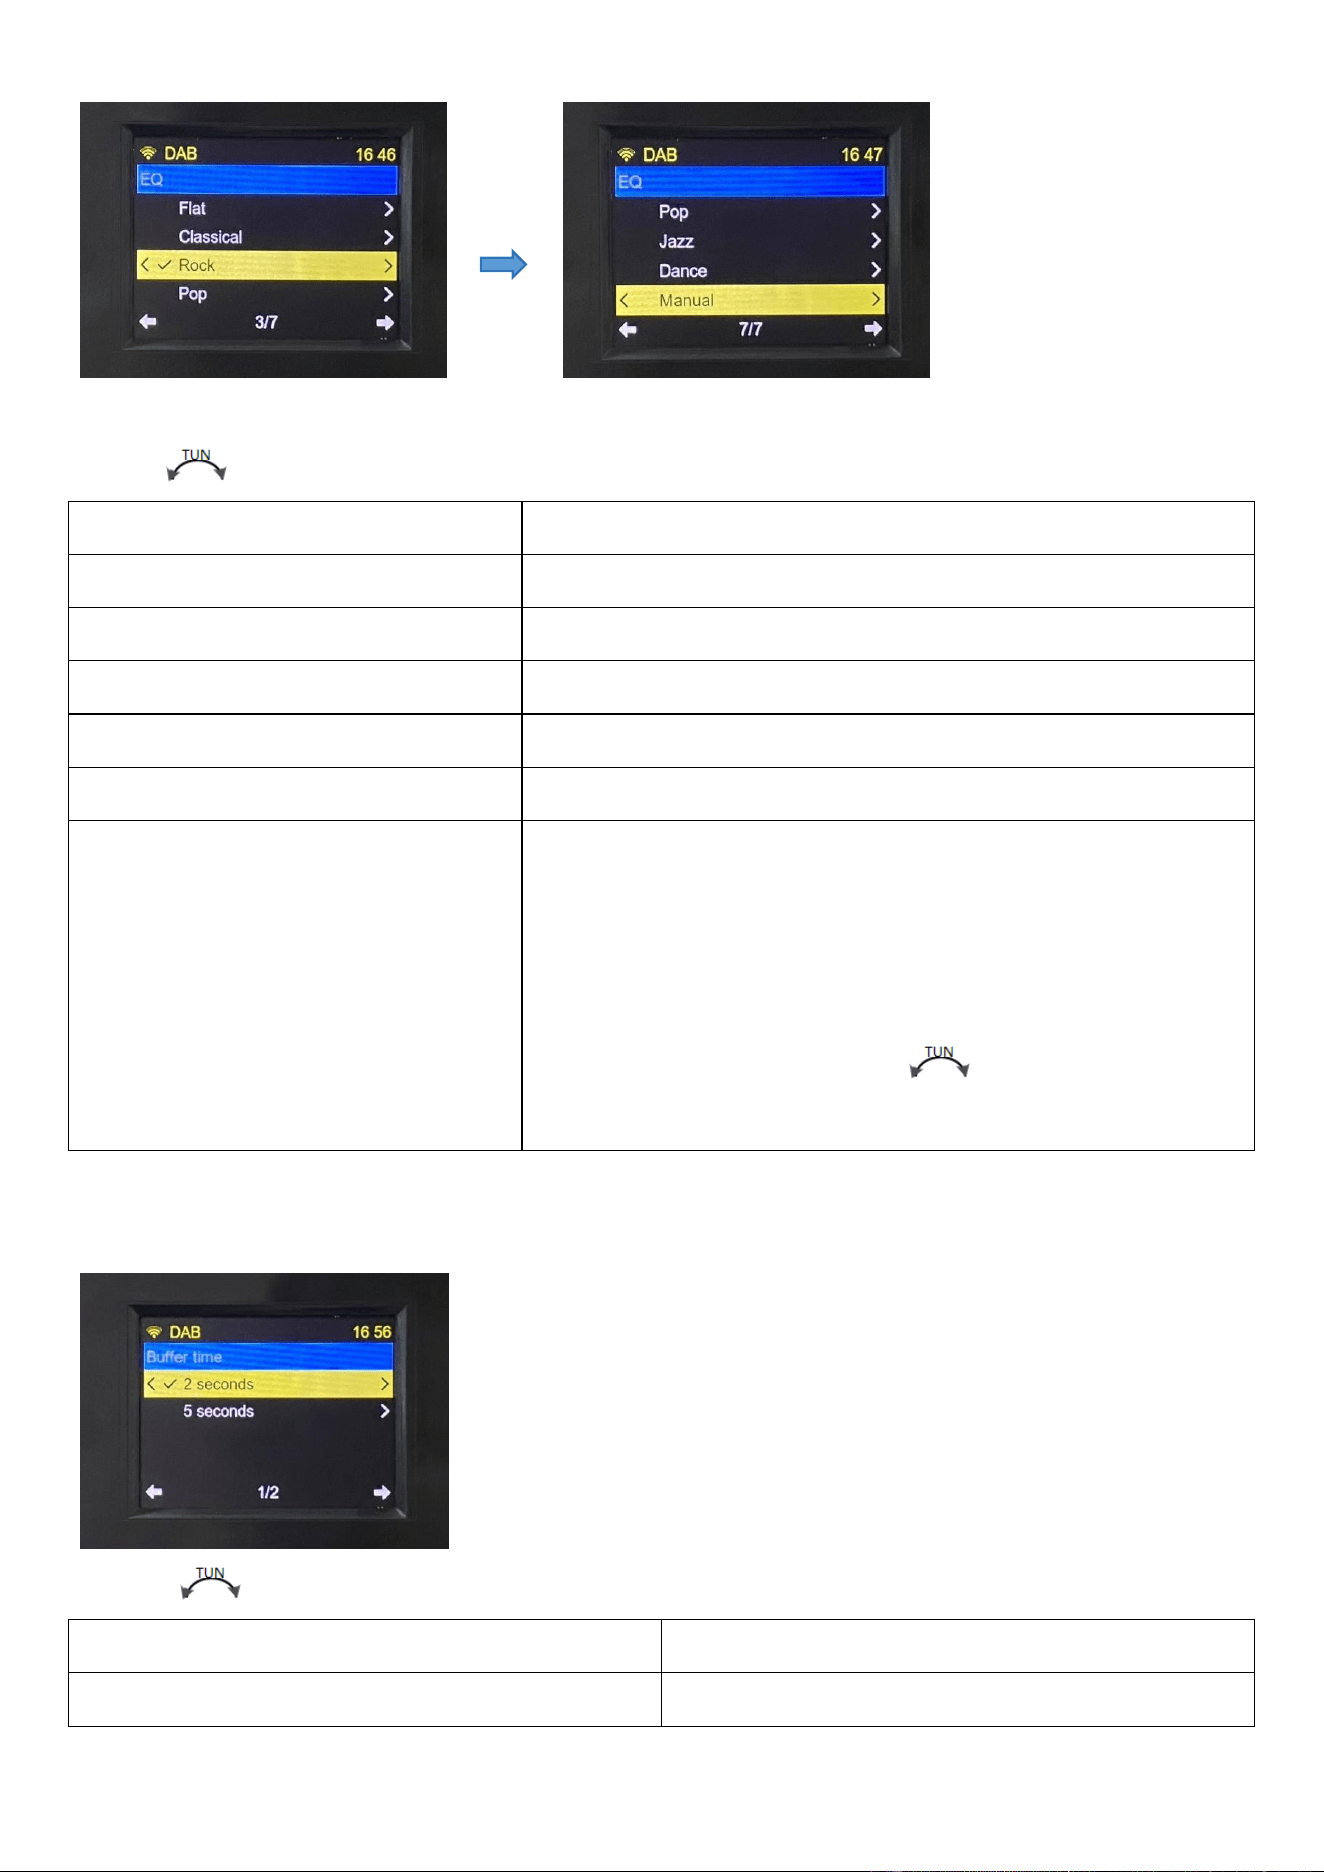
Rotate [ ] to show the following setting contents. Press [ENTER] for confirmation.
Flat
Flat
Classical
Classical
Rock
Rock
Pop
Pop
Jazz
Jazz
Dance
Dance
Manual
Manual adjustment
Light press [ENTER] for selection
Bass
Treble
After it is selected, you can rotate [ ] to select numbers±14.
Press [ENTER] to confirm numbers selected.
5.9.9. Buffer time: [2 seconds] cache time
Rotate [ ] to show the following setting contents. Press [ENTER] for confirmation.
2 seconds
Two minutes
5 seconds
Five minutes
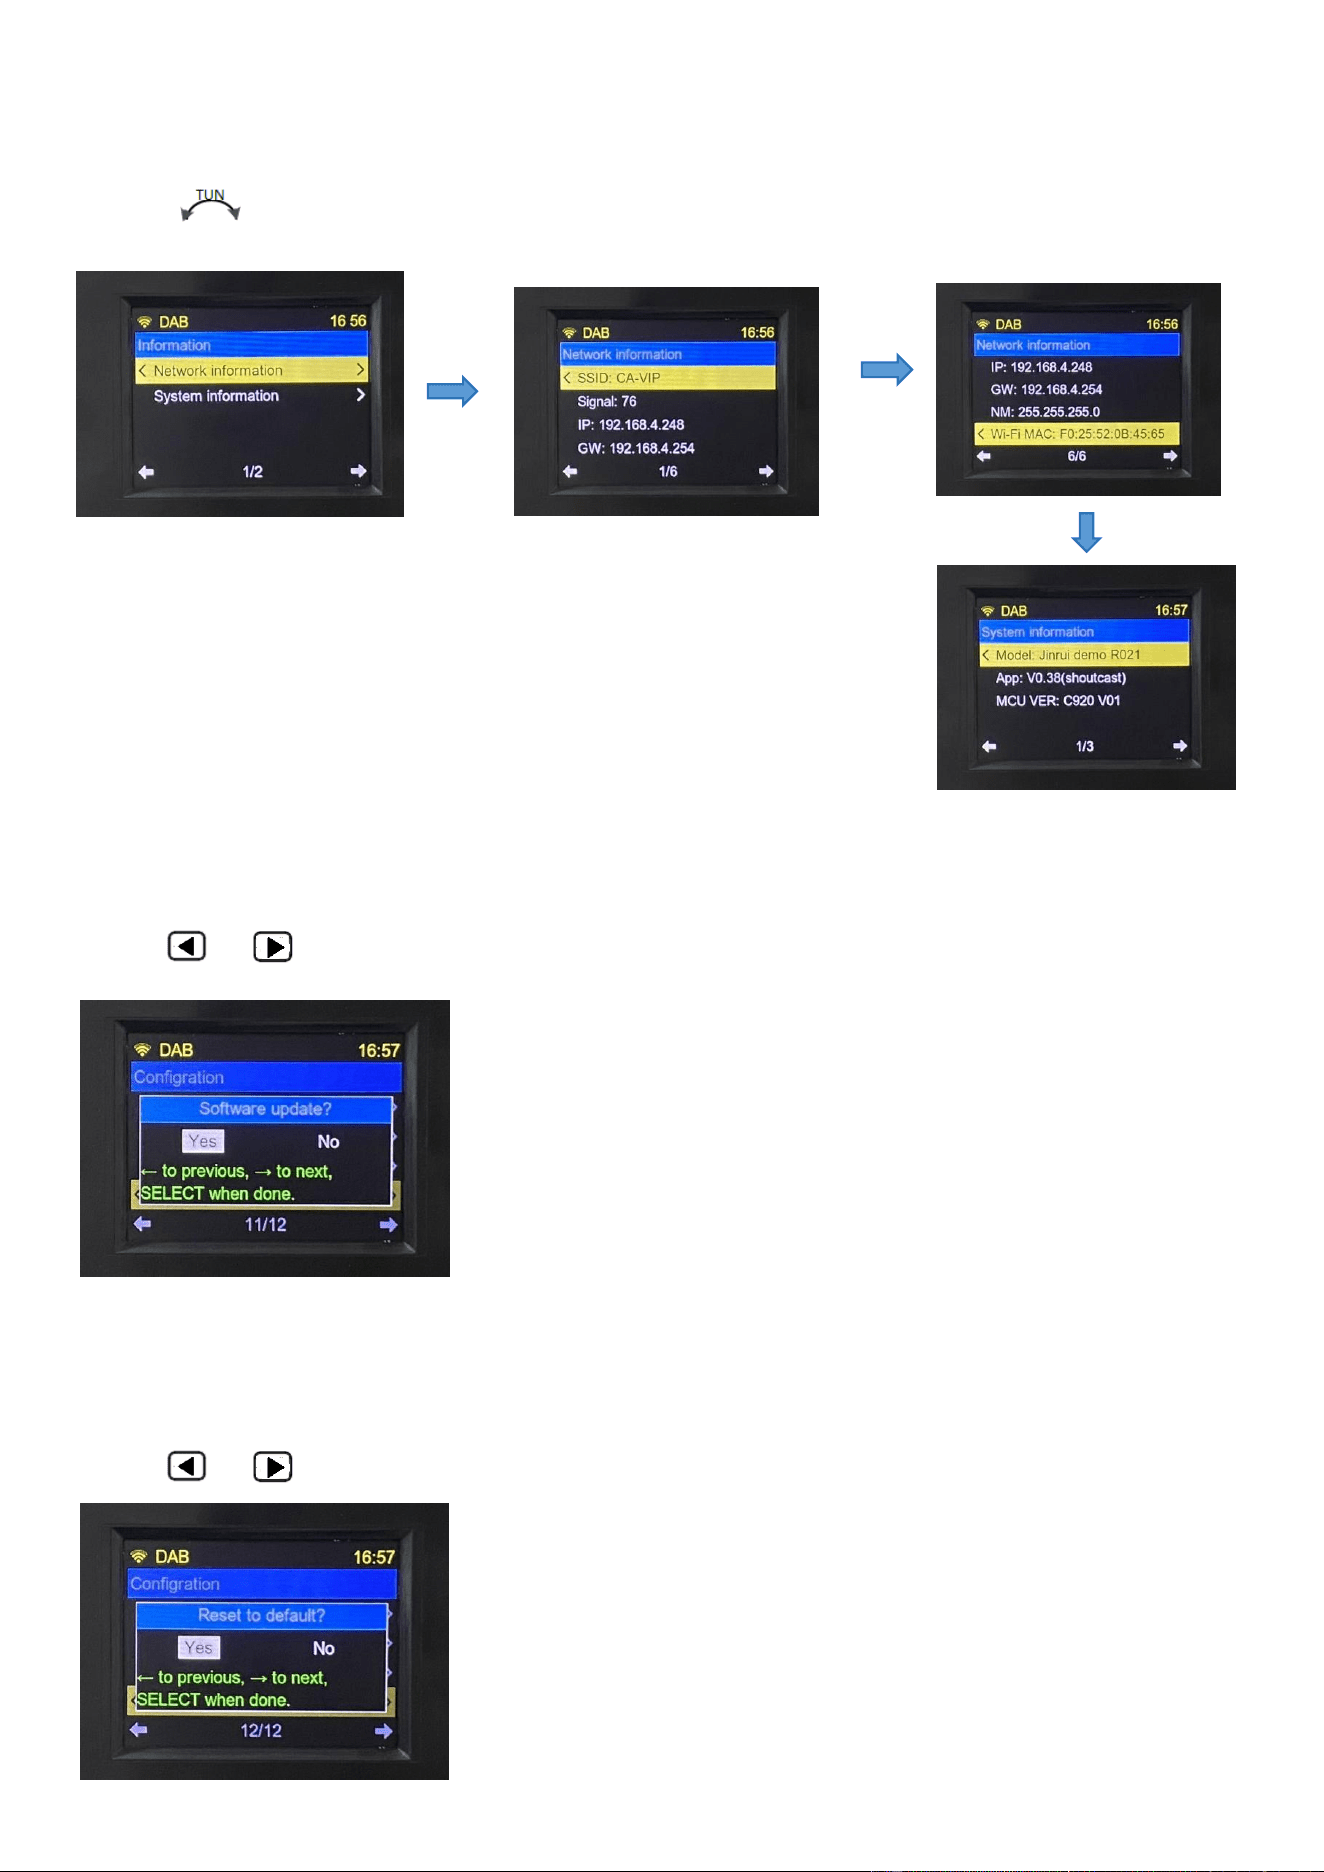
5.9.10.Network information and system information
Rotate [ ] to show the following setting contents. Press [ENTER] for confirmation.
5.9.11: Software update
Press [ ]&[ ] for selection. Press [ENTER] for confirmation.
5.9.12: Reset to default
Press [ ]&[ ] for selection. Press [ENTER] for confirmation.
6: Mute (Mute setting):
In power-on playback mode, light press [MUTE] to turn mute on and the screen will display “ ”.
Light press [MUTE] again to remove mute setting and resume normal playback.
7: Pause/Play:
In music playing mode [SD, Bluetooth, USB], light press [ ] to pause the broadcasting and the screen
will display “PAUSE”.
Light press [ ] again to resume play.
8: Antenna usage:
When receiving FM radio, you can pull out the antenna and change the antenna length to find the
optimum reception position.
*Hint: If there is strong radio station interference, which leads to the appearance of many stations, you
can shorten the rod antenna.
9. Main technical parameters:
Receiving range
FM: 87.5-108MHZ
DAB: 174.928MHZ-239.200MHZ
Receiving sensitivity
FM≦15 dB
DAB≦-48dB
Static current
≤200uA
Maximum current
≤890MA
Loudspeaker
4 寸, 4Ω, 8W
Signal-to-noise ratio
40 dB
Radio station storage capacity
90 (30 radio modes, 30 FM modes, 30 DAB modes)
Bluetooth version
VER 5.0
Bluetooth receiving distance
≤10 meters
DC
DC6V (1.5V×4 AA battery)
AC
220V-240V,50hZ / 110V,60hZ
TF/USB card playback format
Support MP3, WMA, WAV, APE, FLAC formats
Maximum capacity of TF card
256G
Product size
218x128x73mm
Net product weight
826g
10. Matters needing attention:

Before using the product, you should ensure that you can follow basic safety tips as follows so as to ensure
safe and reliable use of the products:
♦ Read and understand all safety guidelines and usage information.
♦ When “ ” of the dry battery appears or the outer frame of “ ” flashes, it means insufficient electric
quantity. Please change the battery so as to ensure normal usage.
♦ If the machine is not used for a long time, please unplug AC power supply and remove the dry battery.
♦ Do not expose this product to rain, moisture, dripping or splashing of any liquid.
♦ Do not expose this product to high temperature heat source and do not roast or blow bake it at high
temperature.
♦ Do not place the product in direct sunlight for a long time.
♦ Do not let the product fall or be hit or put heavy pressure on it.

FCC Warnning:
This equipment has been tested and found to comply with the limits for a Class B digital device,
pursuant to part 15 of the FCC Rules. These limits are designed to provide
reasonable
protection againstharmful interference in a residential installation. This equipment generates,
uses and can radiateradio
frequency
energy
and,
if
not
installed
and
used
in
accordance
with
the
instructions,
maycause
harmful
interference
to
radio
communications.
However,
there
is
no
guarantee
thatinterference
will
not
occur
in
a
particular
installation.
If
this
equipment
does
cause
harmfulinterference to radio or television reception, which can be
determined by turning the equipmentoff
and
on,
the
user
is
encouraged
to
try
to
correct
the
interference
by
one
or
more
of
thefollowing measures:
•
Reorient or relocate the receiving antenna.
•
Increase the separation between the equipment and receiver.
•
Connect the equipment into an outlet on a circuit different from that to which the receiver is
connected.
• Consult the dealer or an experienced radio/TV technician for help.
Caution:
Any
changes
or
modifications
to
this
device
not
explicitly
approved
by
manufacturer
could void your authority to operate this equipment.
This
device
complies
with
part
15
of
the
FCC
Rules.
Operation
is
subject
to
the
following
two
conditions:
(1)This
device
may
not
cause
harmful
interference,
and
(2)
this
device
must
accept
any
interference received, including interference that may cause undesired operation.
This
equipment
complies
with
FCC
radiation
exposure
limits
set
forth
for
an
uncontrolled
environment.
This
equipment
should
be
installed
and
operated
with
minimum
distance
0cm
between the radiator and your body.

