AddCon+ Official Online Manual
AddCon+ is a device that attaches to the left and right controllers of the Meta Quest 3 / 3S /
Pro, adding finger tracking for use in VRChat and similar apps, as well as extra buttons and
a wheel that can also be used in VRChat.
The buttons also support keyboard input, so they can be used as shortcut buttons outside of
VR.
The product page is available at this link.
2026-4 ©Shiftall Inc. All Rights Reserved.
Shiftall Inc.
1. Introduction
Thank you very much for purchasing AddCon+.
Please read this manual carefully and follow the instructions and precautions for proper and
safe use. Before using the product, be sure to read the “Safety Precautions” section.
2. Setup Guide
These are the setup steps for using AddCon+.
● STEP 1
In “Preparation / Before Use,” check the package contents, button locations and names,
charging method, and other basic information.

● STEP 2
Attach AddCon+ to the compatible controllers.
● STEP 3
Install the dedicated AddCon+ software, “AddCon Manager,” from Steam.
● STEP 4
Follow the setup wizard to connect AddCon+ to AddCon Manager via Bluetooth and
calibrate hand tracking.
Using the Setup Wizard
● STEP 5
Configure Button and Wheel Settings.
Button & Wheel Settings
You can start using AddCon+ by following the steps above.
3. Safety Precautions

4. Preparation / Before Use
4.1. Requirements
To use AddCon+, you will need the following:
● A Windows 11 PC that supports SteamVR 2.12.14 or later and has Bluetooth connectivity
Tested Bluetooth adapters : View the list
● A controller compatible with AddCon+
Compatible controllers : View the list
● A USB charger with an output of 5V / 1.0A or higher per port
4.2. Included items
Item
Quantity
AddCon+ Main Unit (Left)
1
AddCon+ Main Unit (Right)
1
USB Charging Cable
1
Safety Precautions / Warranty
1
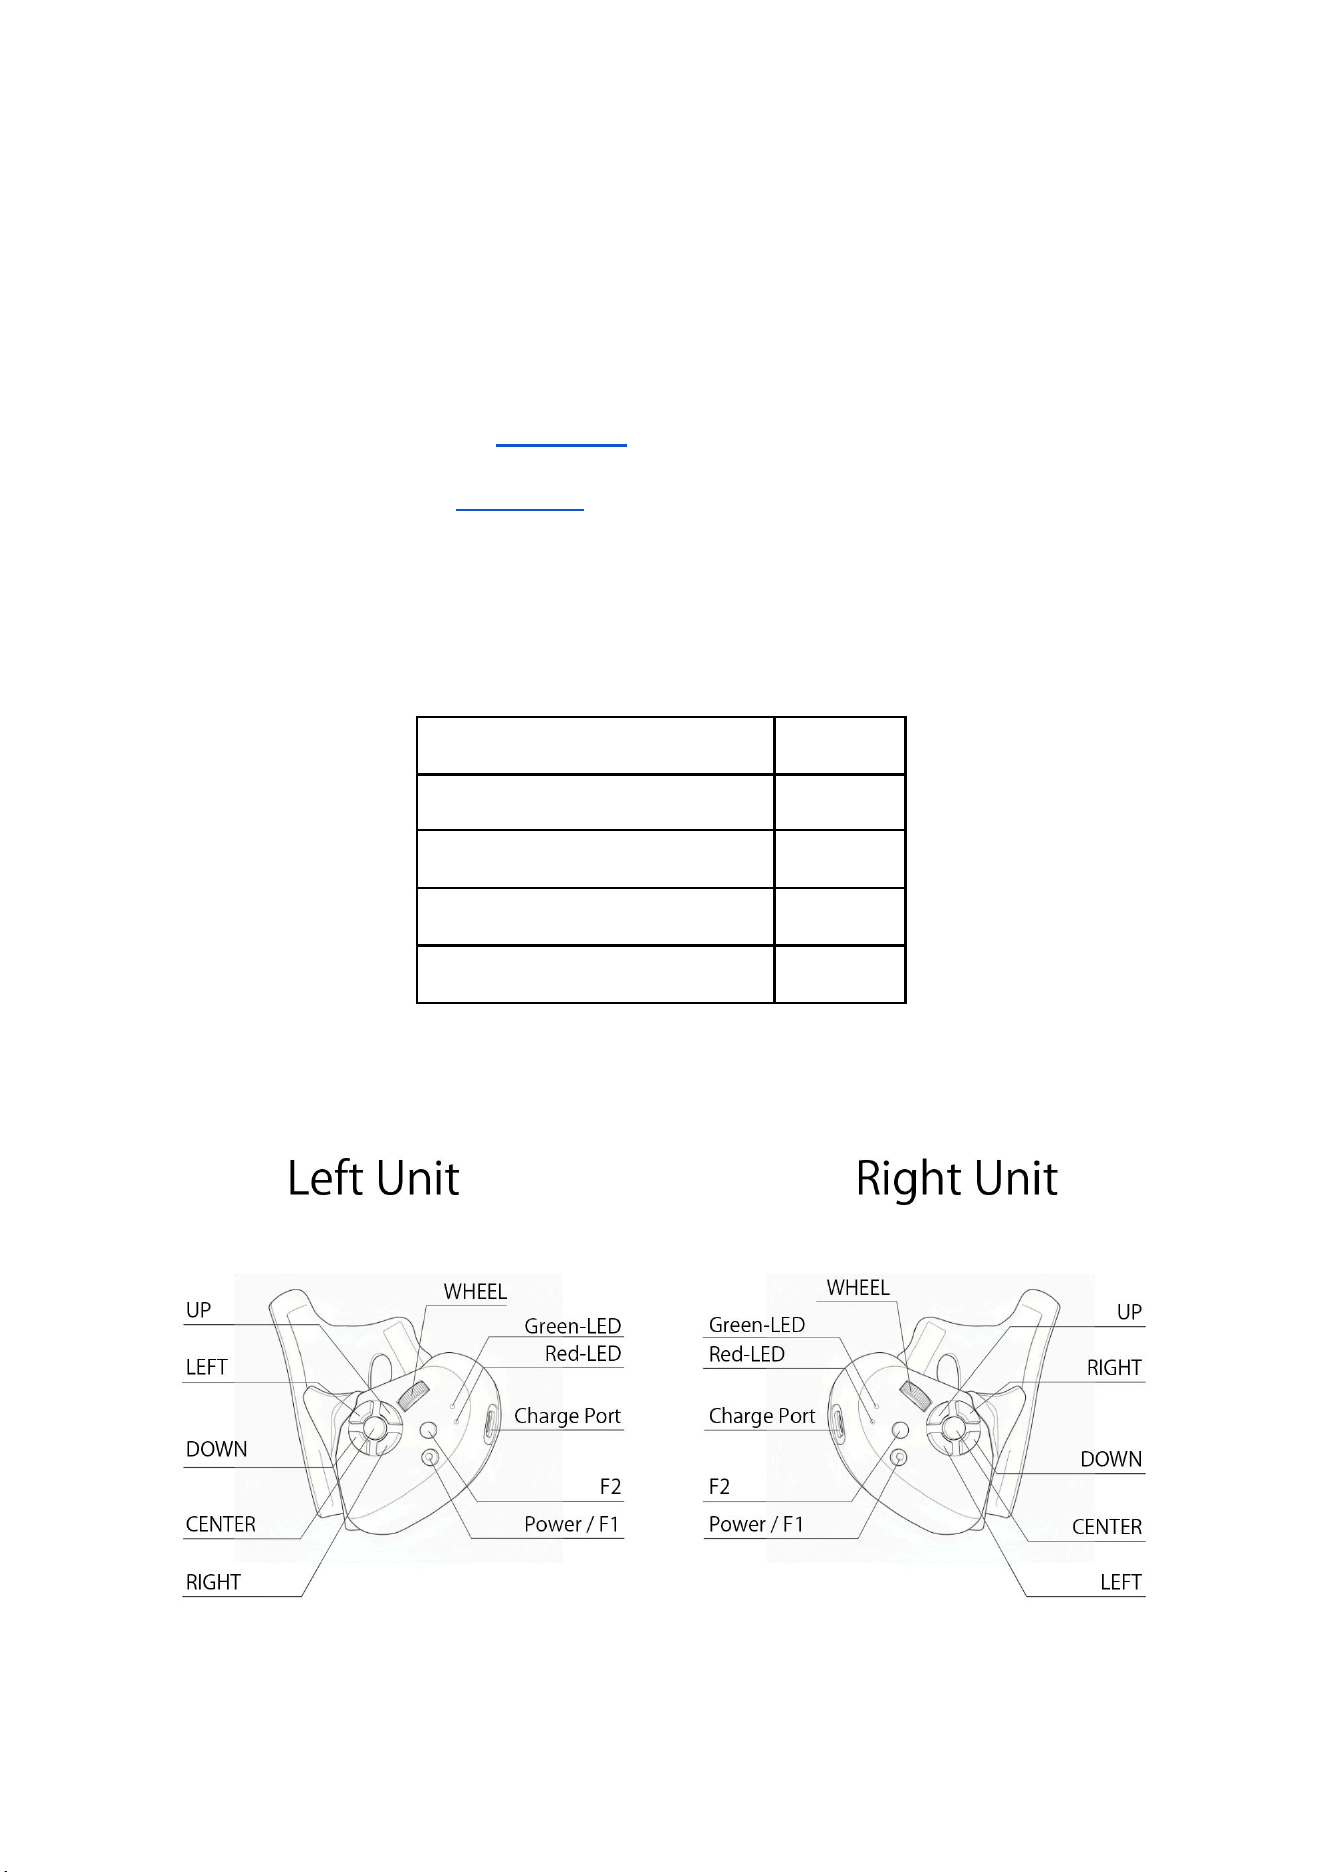
4.3. Names of Each Part of the AddCon+ Unit
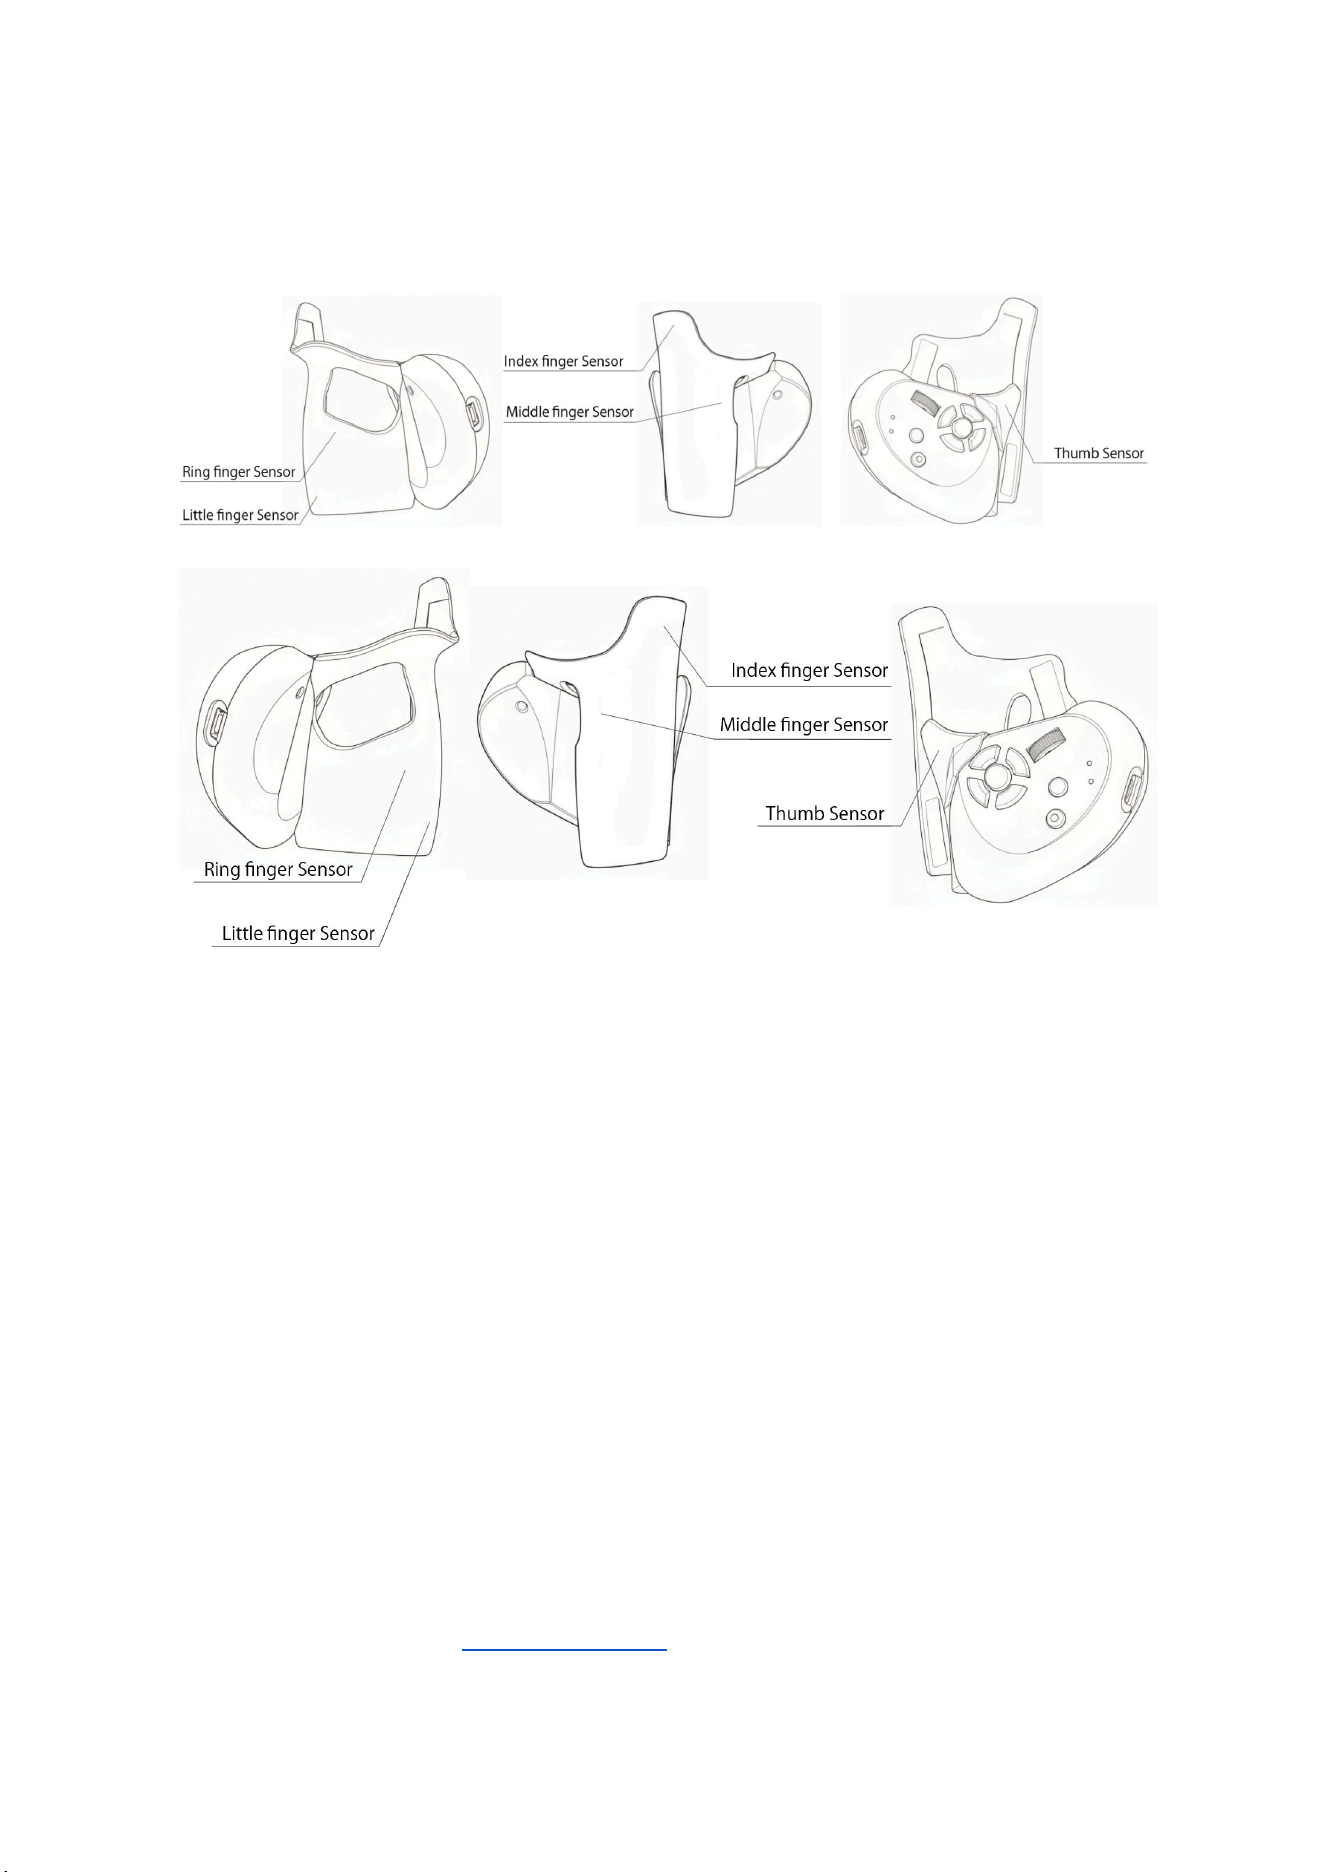
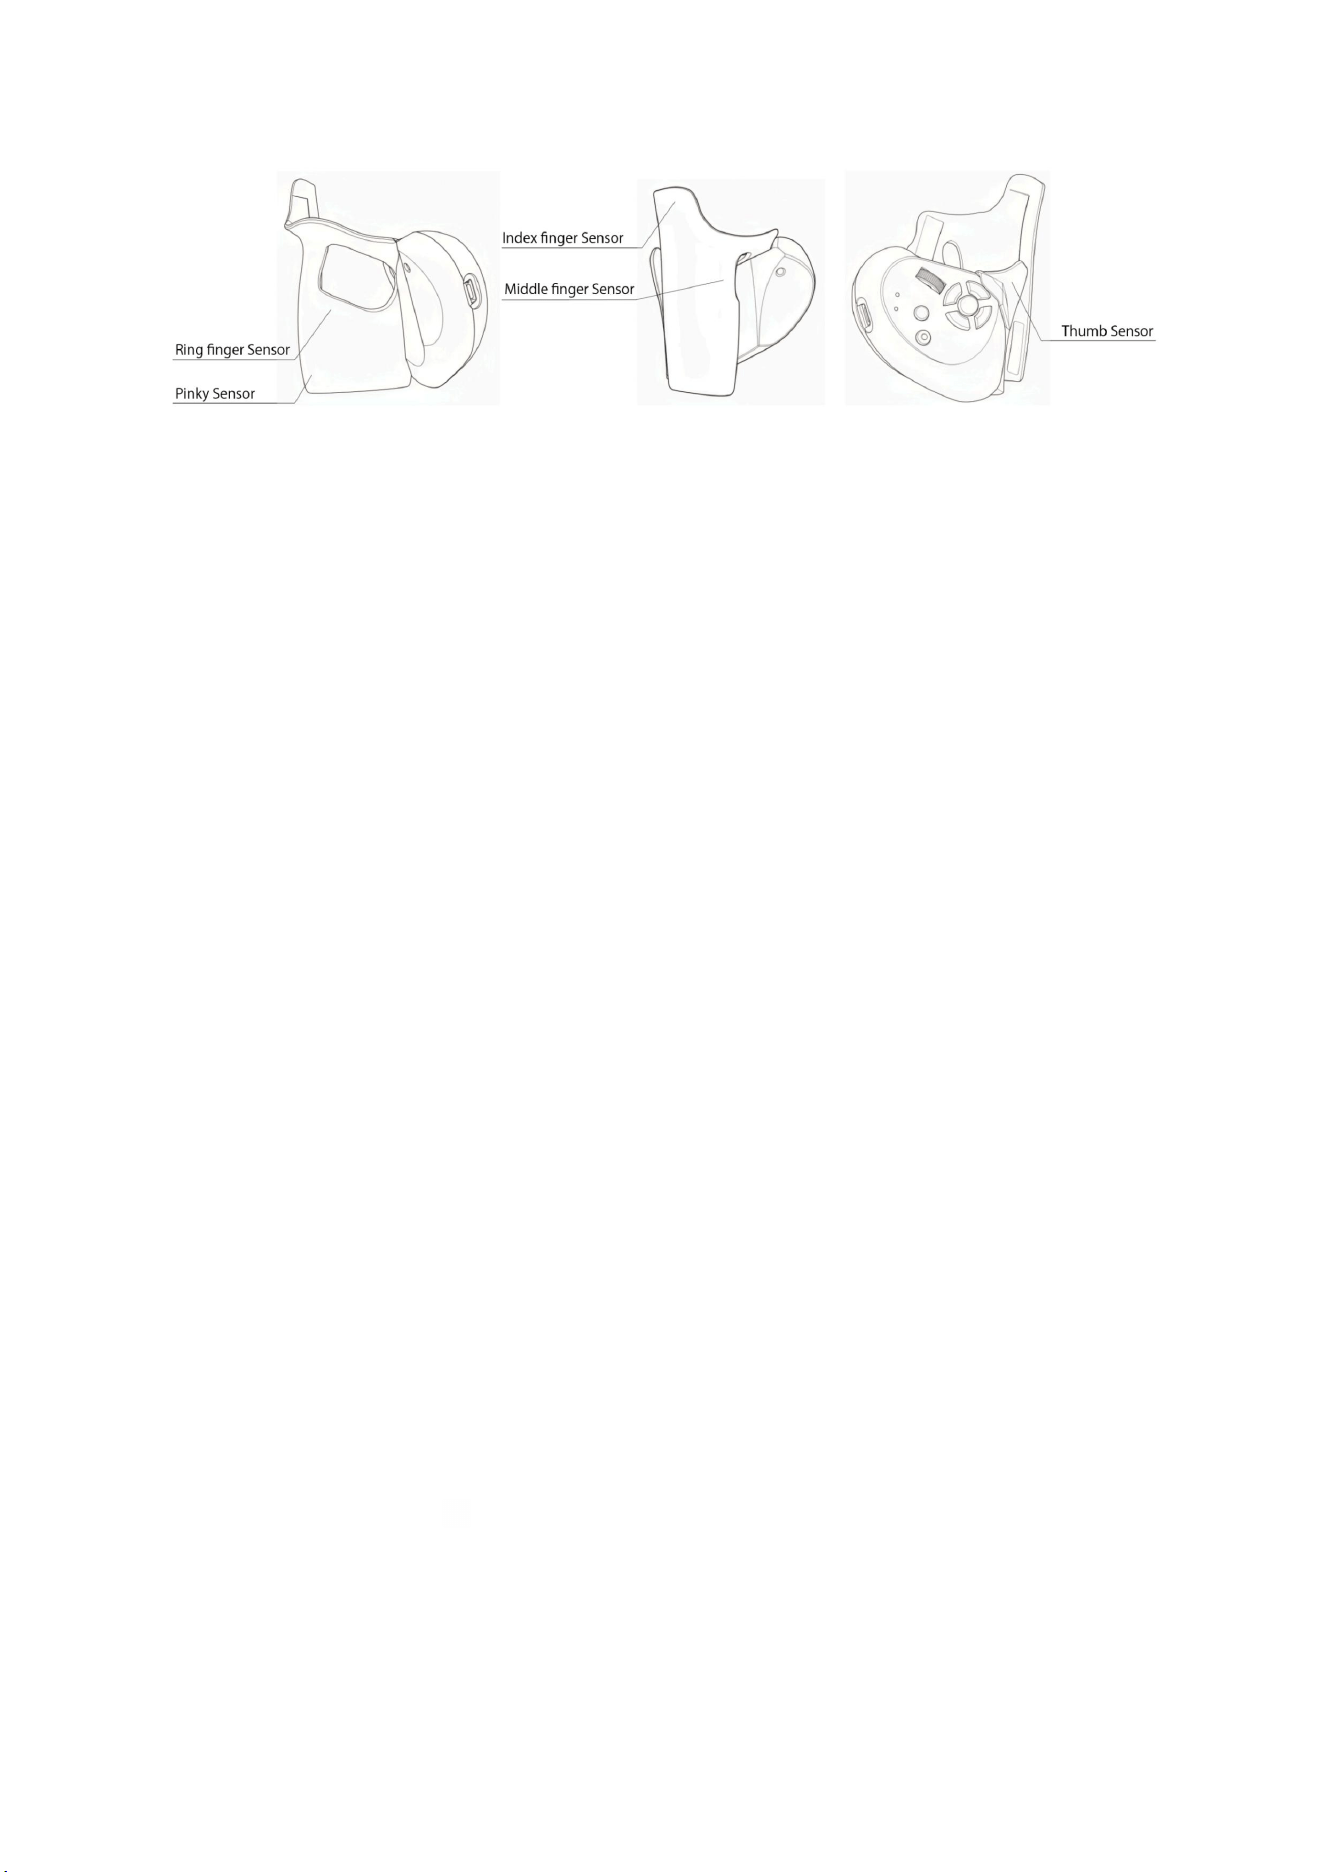
4.4. AddCon+ Touch Sensor Locations
4.5. Charging
Before using AddCon+ for the first time, please charge it first.
Connect the unit to a USB charger using the included USB charging cable.
● The red LED lights up while charging.
● It takes about 2 hours and 30 minutes to fully charge from empty (when the power is
off).
● The red LED turns off when charging is complete.
Note:Hold the USB plug and insert or remove it straight. Do not wiggle it from side to side
or insert it at an angle, as this may deform the connector and cause a malfunction.
Note:Using a USB charger with an output of 5V / 1.0A or less per port may prevent
charging and could cause the USB charger to malfunction, overheat, or catch fire.
【Charging Precautions】
・Charge the product in a location with an appropriate ambient temperature of 10 °C to 35
°C (50 °F to 95 °F).
・Be sure to also read the “Safety Precautions” section.
4.6. How to Operate the Unit
4.6.1. Turning the Power On
Press and hold the Power / F1 button on AddCon+ for about 3 seconds or longer to turn it
on.
After the red LED and green LED light up for 2 seconds, the green LED begins blinking
slowly, indicating that it is waiting for a Bluetooth connection.
4.6.2. Turning the Power Off
While the unit is powered on, press and hold the Power button for about 3 seconds or longer
to turn it off.
Note:If AddCon+ is not connected to AddCon Manager, the unit will automatically turn off
after 20 minutes.
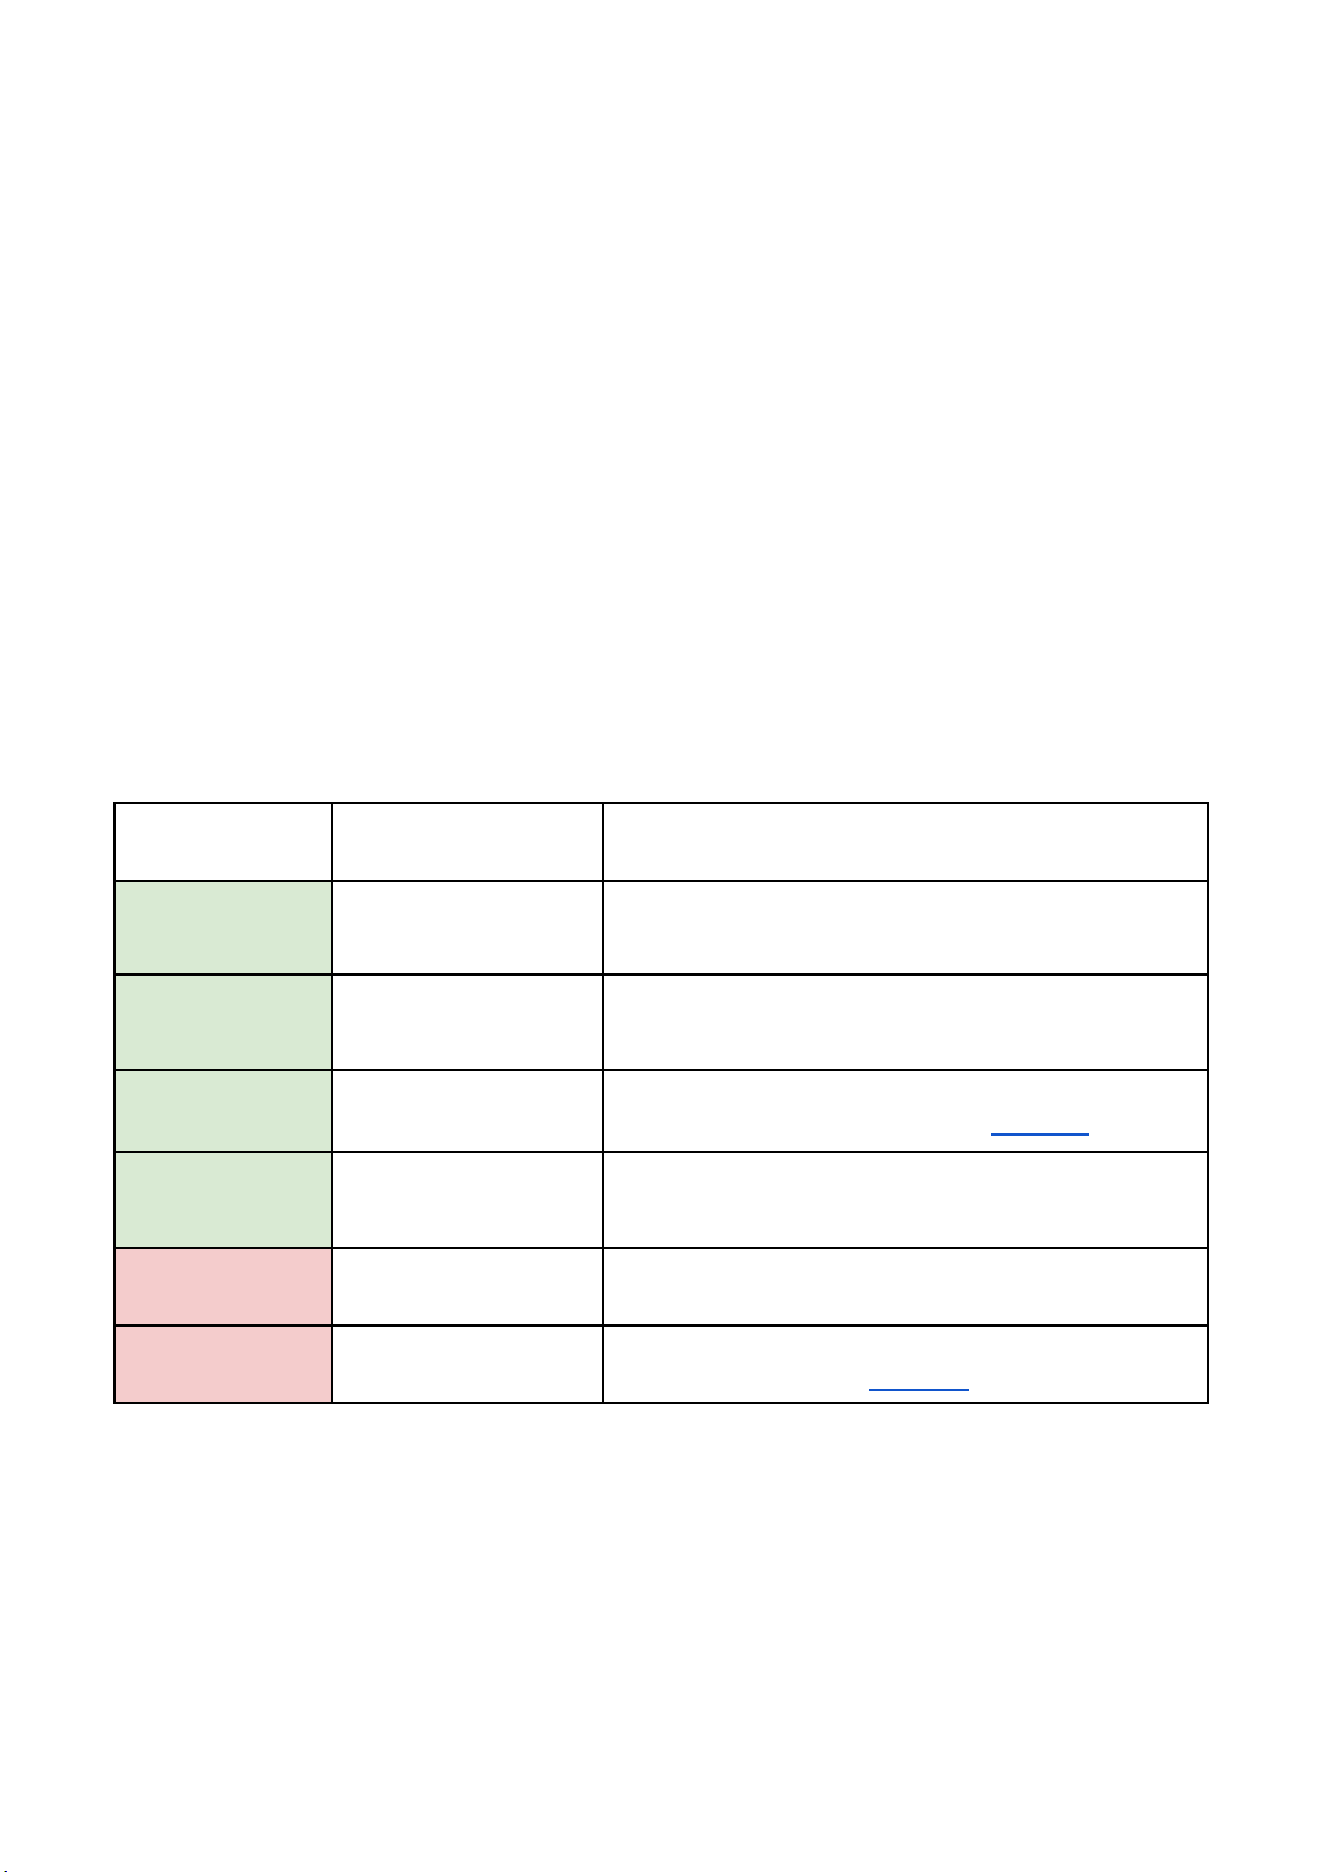
4.7. LED Indicators
LED Color
(Pattern)
Status
Condition
Green
Slow blinking
Waiting for Bluetooth
connection
Not connected via Bluetooth
Green
Two quick blinks
Bluetooth connected
Connected via Bluetooth
Green
Blinking
Firmware update mode
In firmware update mode
Note:If the unit remains in this state, click here.
Green
Very rapid blinking
Firmware update in
progress
Firmware update in progress
Red
Solid
Charging
Battery is charging
Red
Fast blinking
Charging error
An error has occurred during charging
Note:If this state occurs, click here.
5. Attaching to the Controller
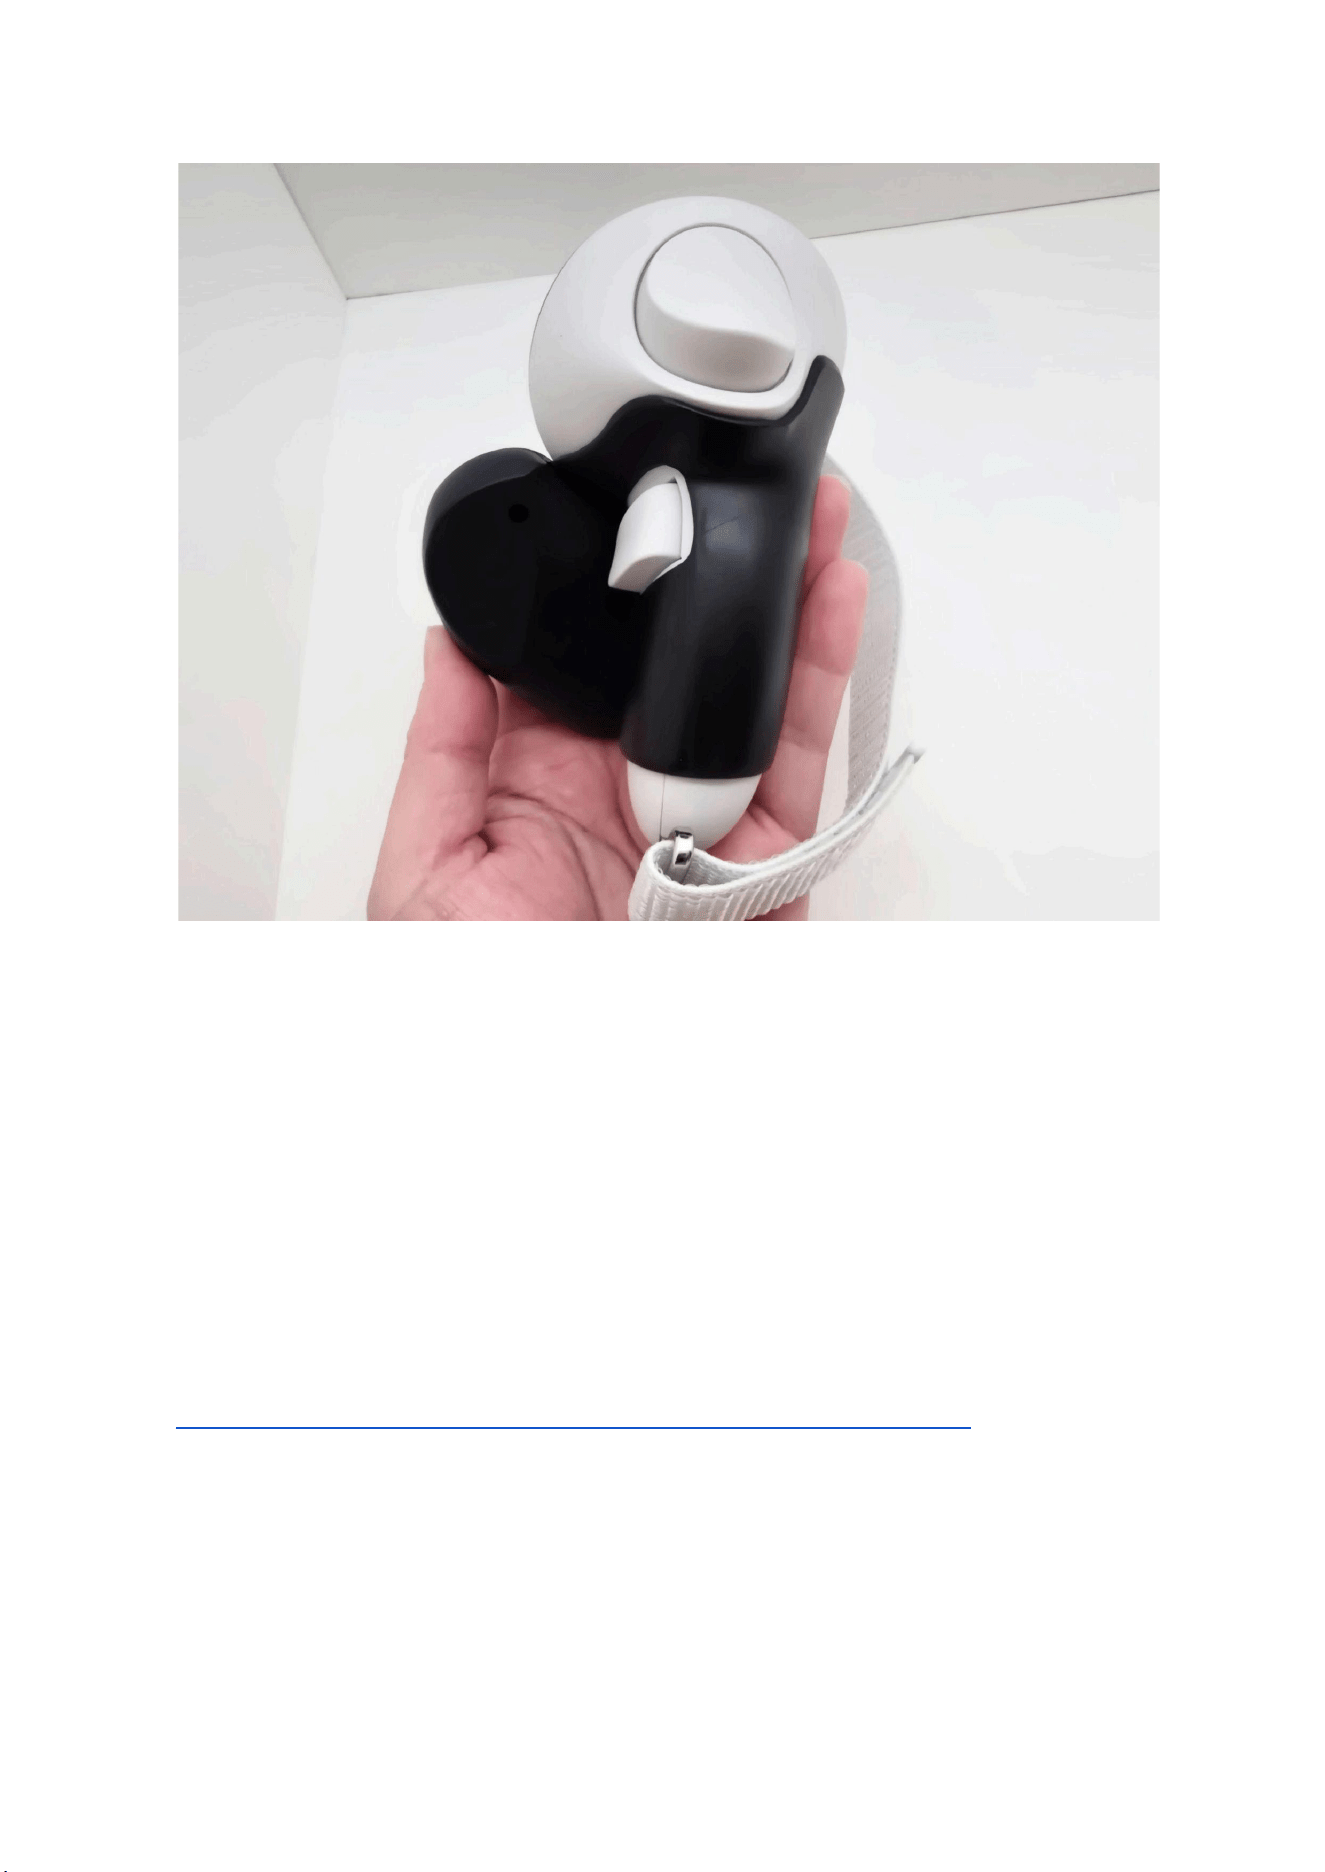
Attach AddCon+ to a compatible controller (hereinafter referred to as the “controller”).
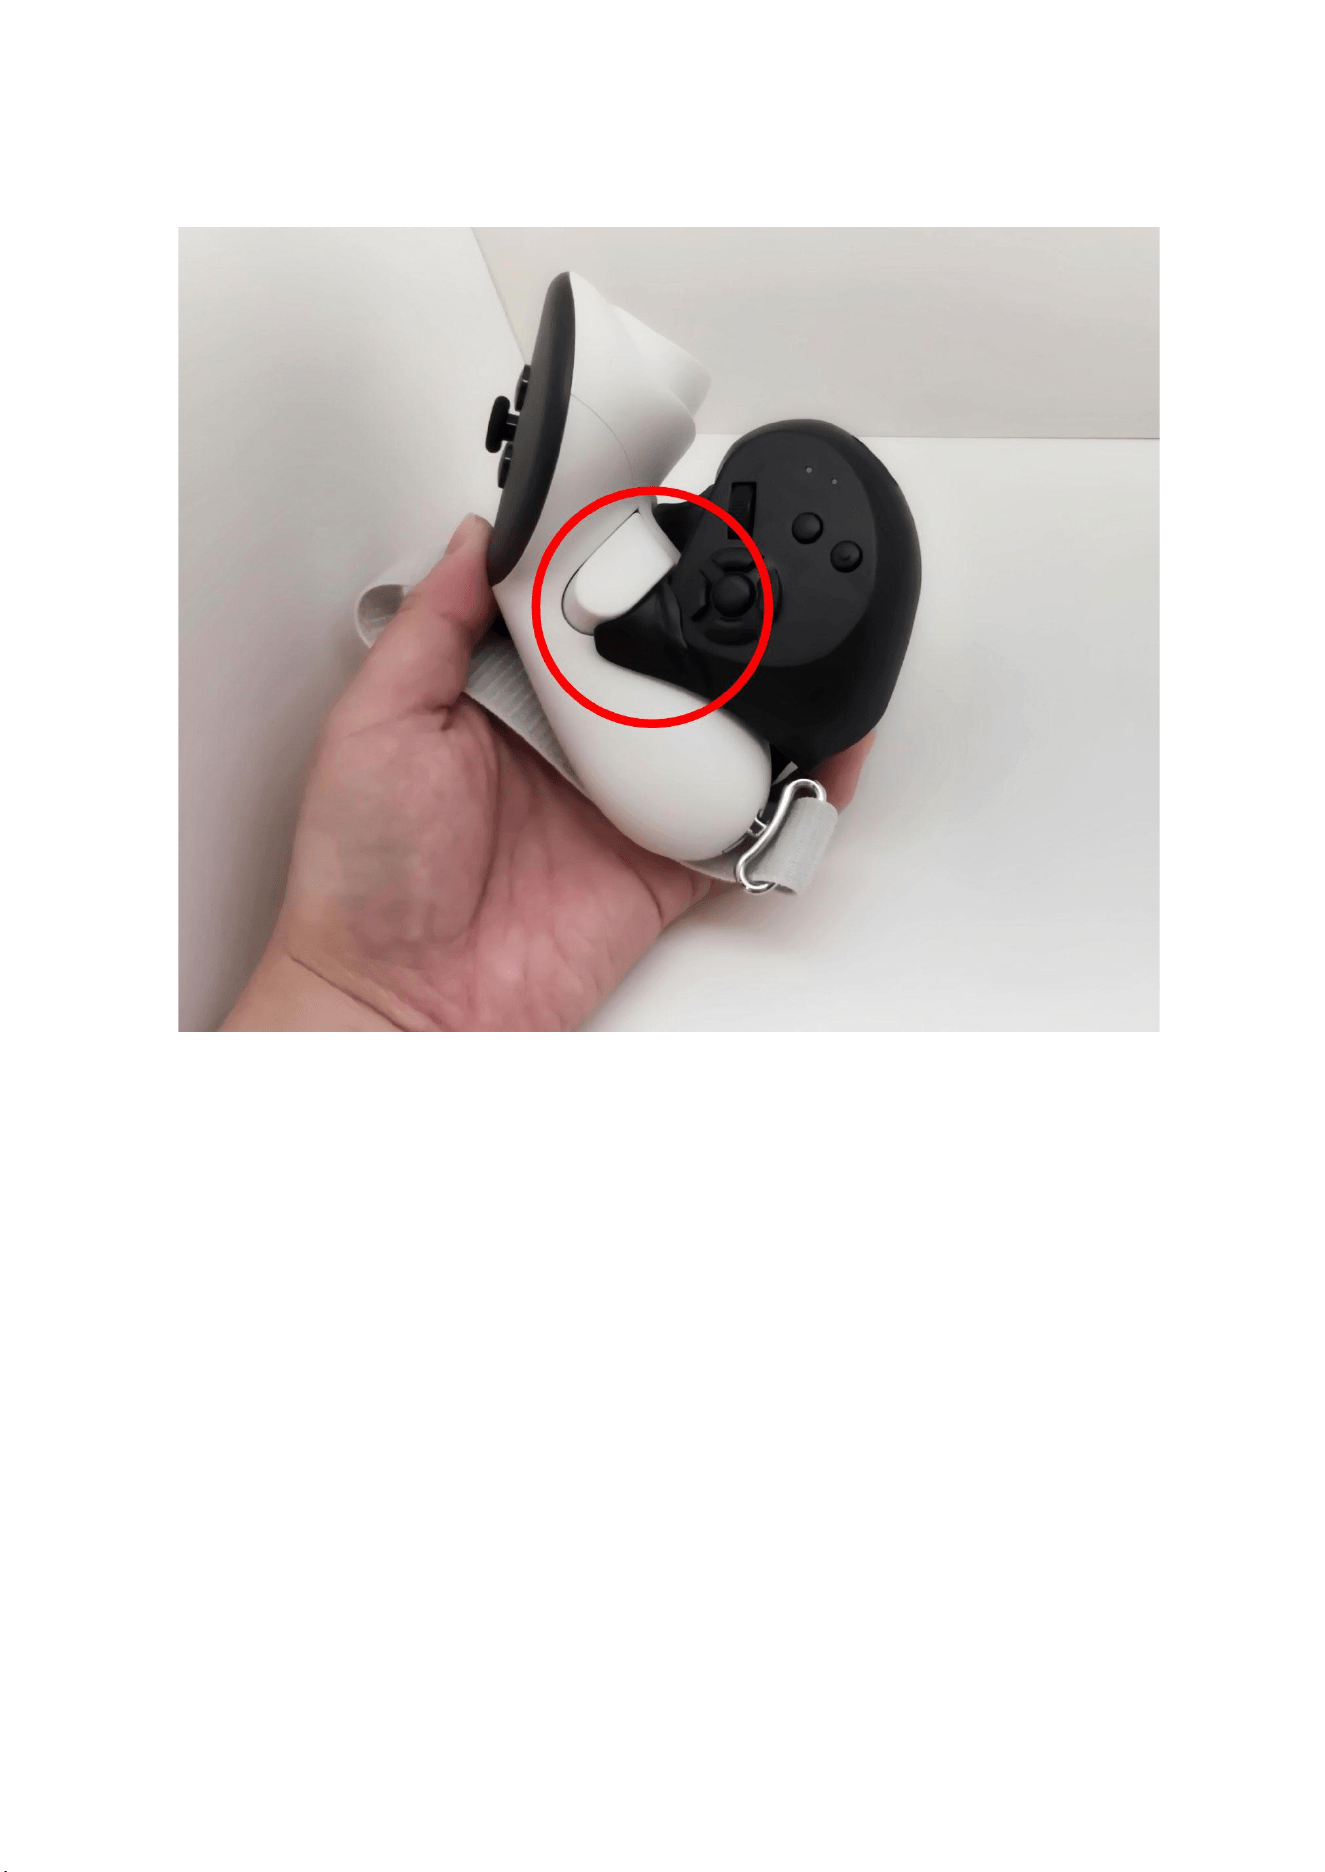
Insert the thumb sensor section under the controller’s grip button.
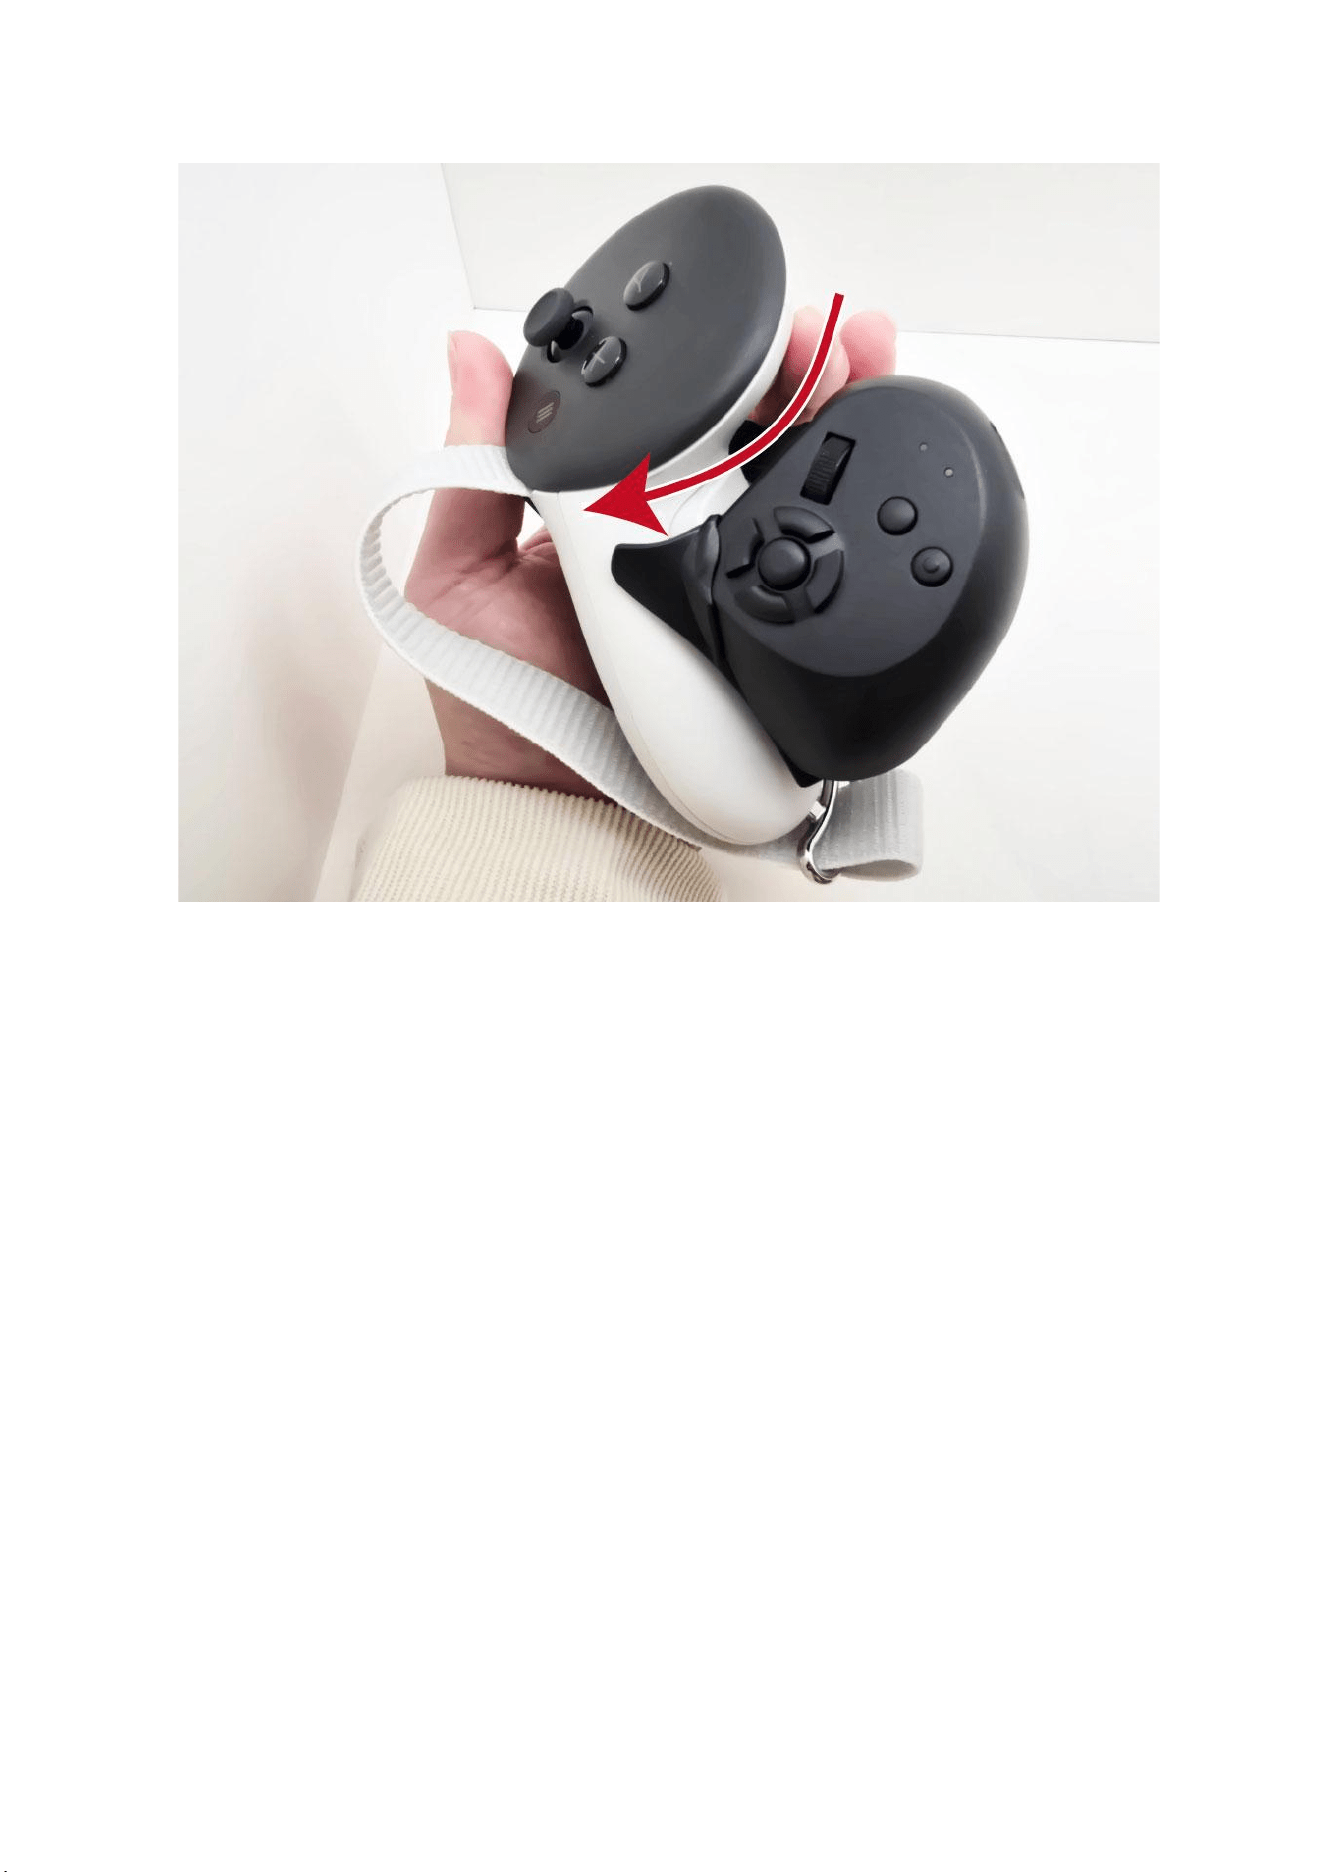
While rotating the unit to the right, move it toward the joystick.
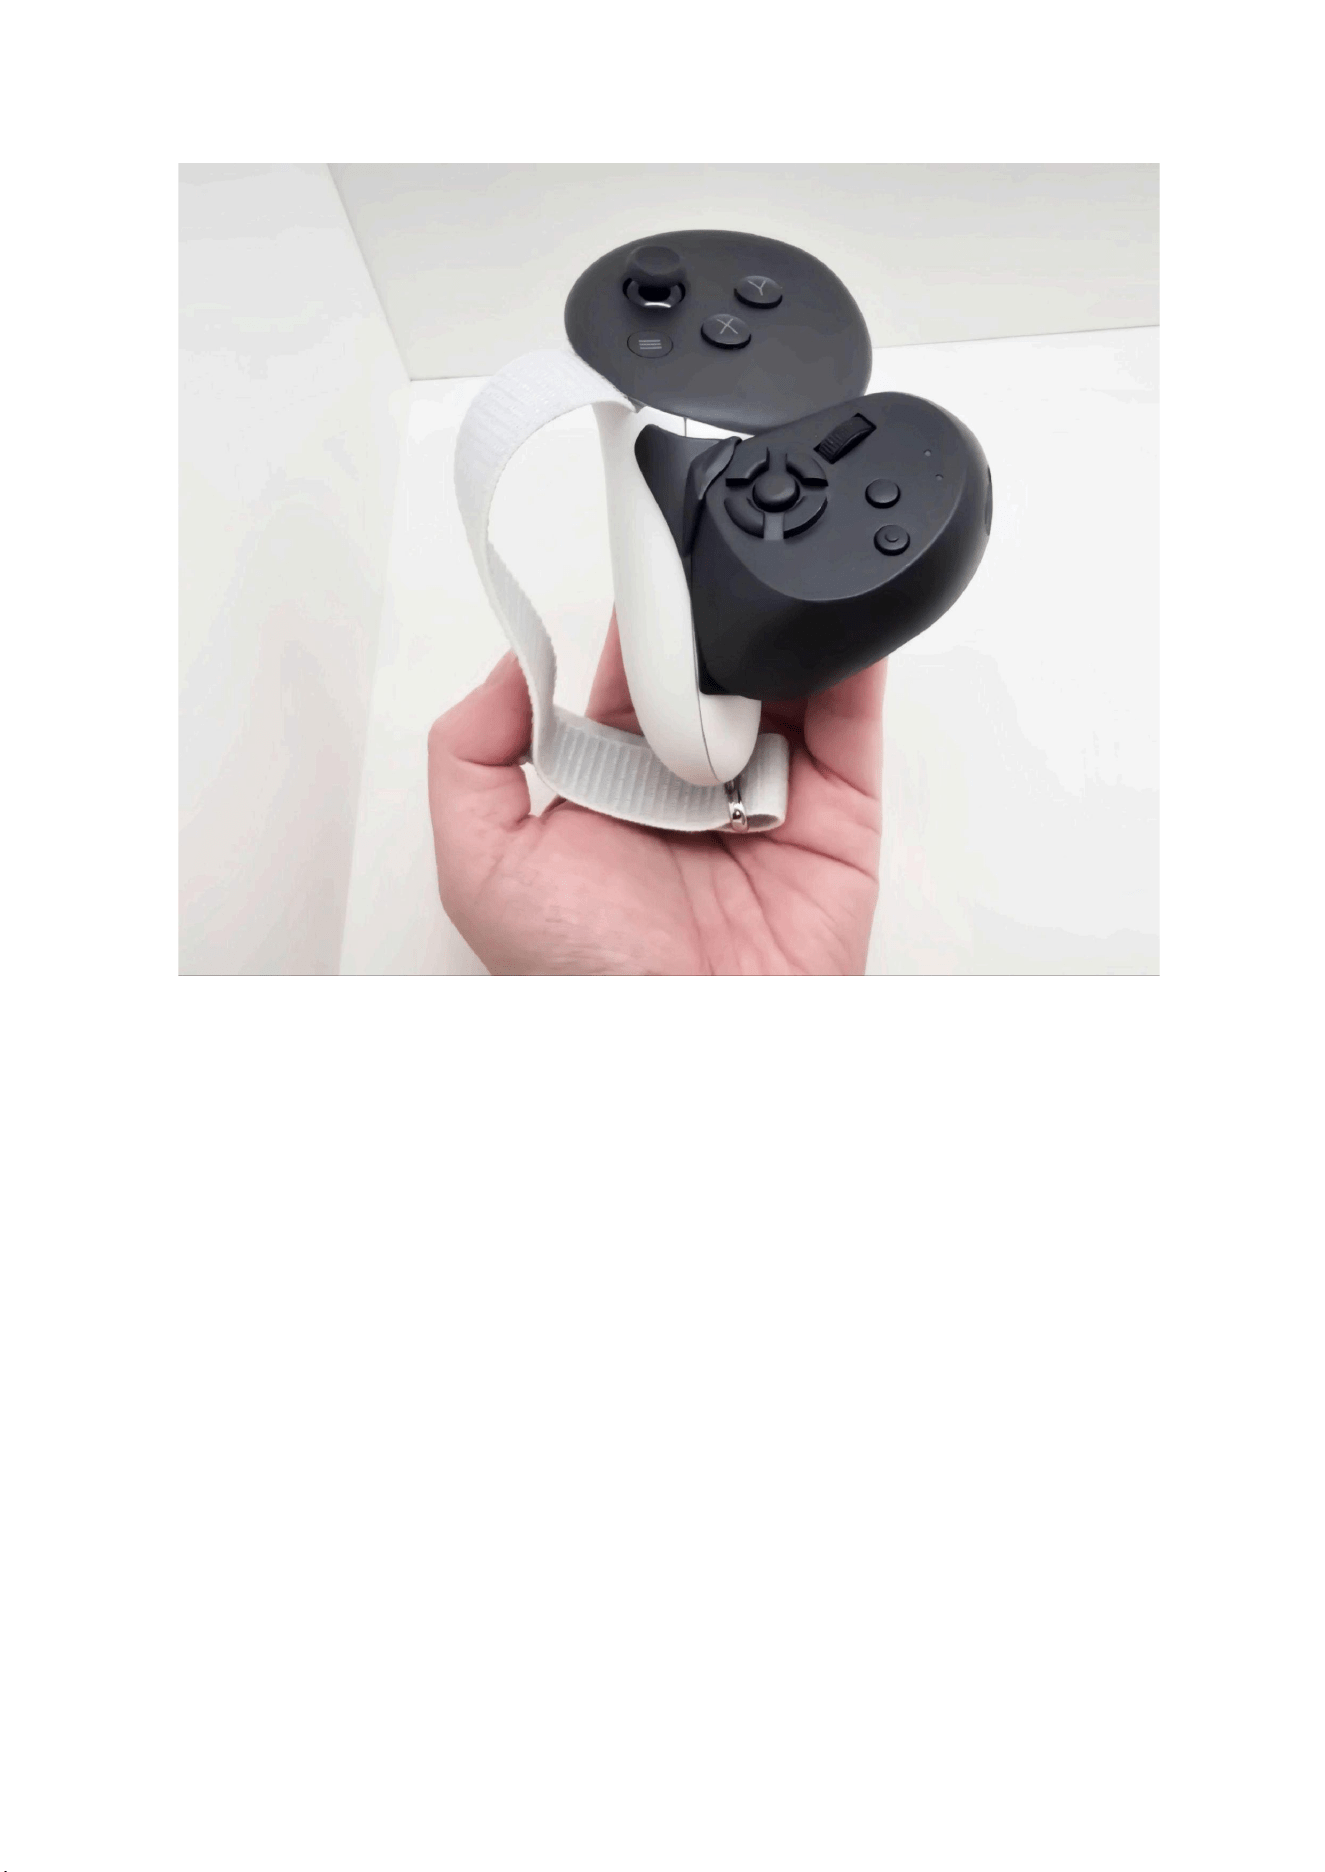
Adjust the position of the unit so that it fits along the controller.
5.1. Tips for Using the Knuckle Straps
If the knuckle straps are tightened too much, your fingers may not reach the AddCon+
buttons. We recommend loosening the straps slightly to ensure easy access to all buttons.
6. Application Setup
6.1. Installing Shiftall AddCon Manager
Install AddCon Manager (hereinafter referred to as the “app”) from Steam.
If Steam is not installed, install it from the Steam website.
https://store.steampowered.com/app/4350400/Shiftall_AddCon_Manager/
6.2. Using the Setup Wizard
6.2.1. Adding Devices
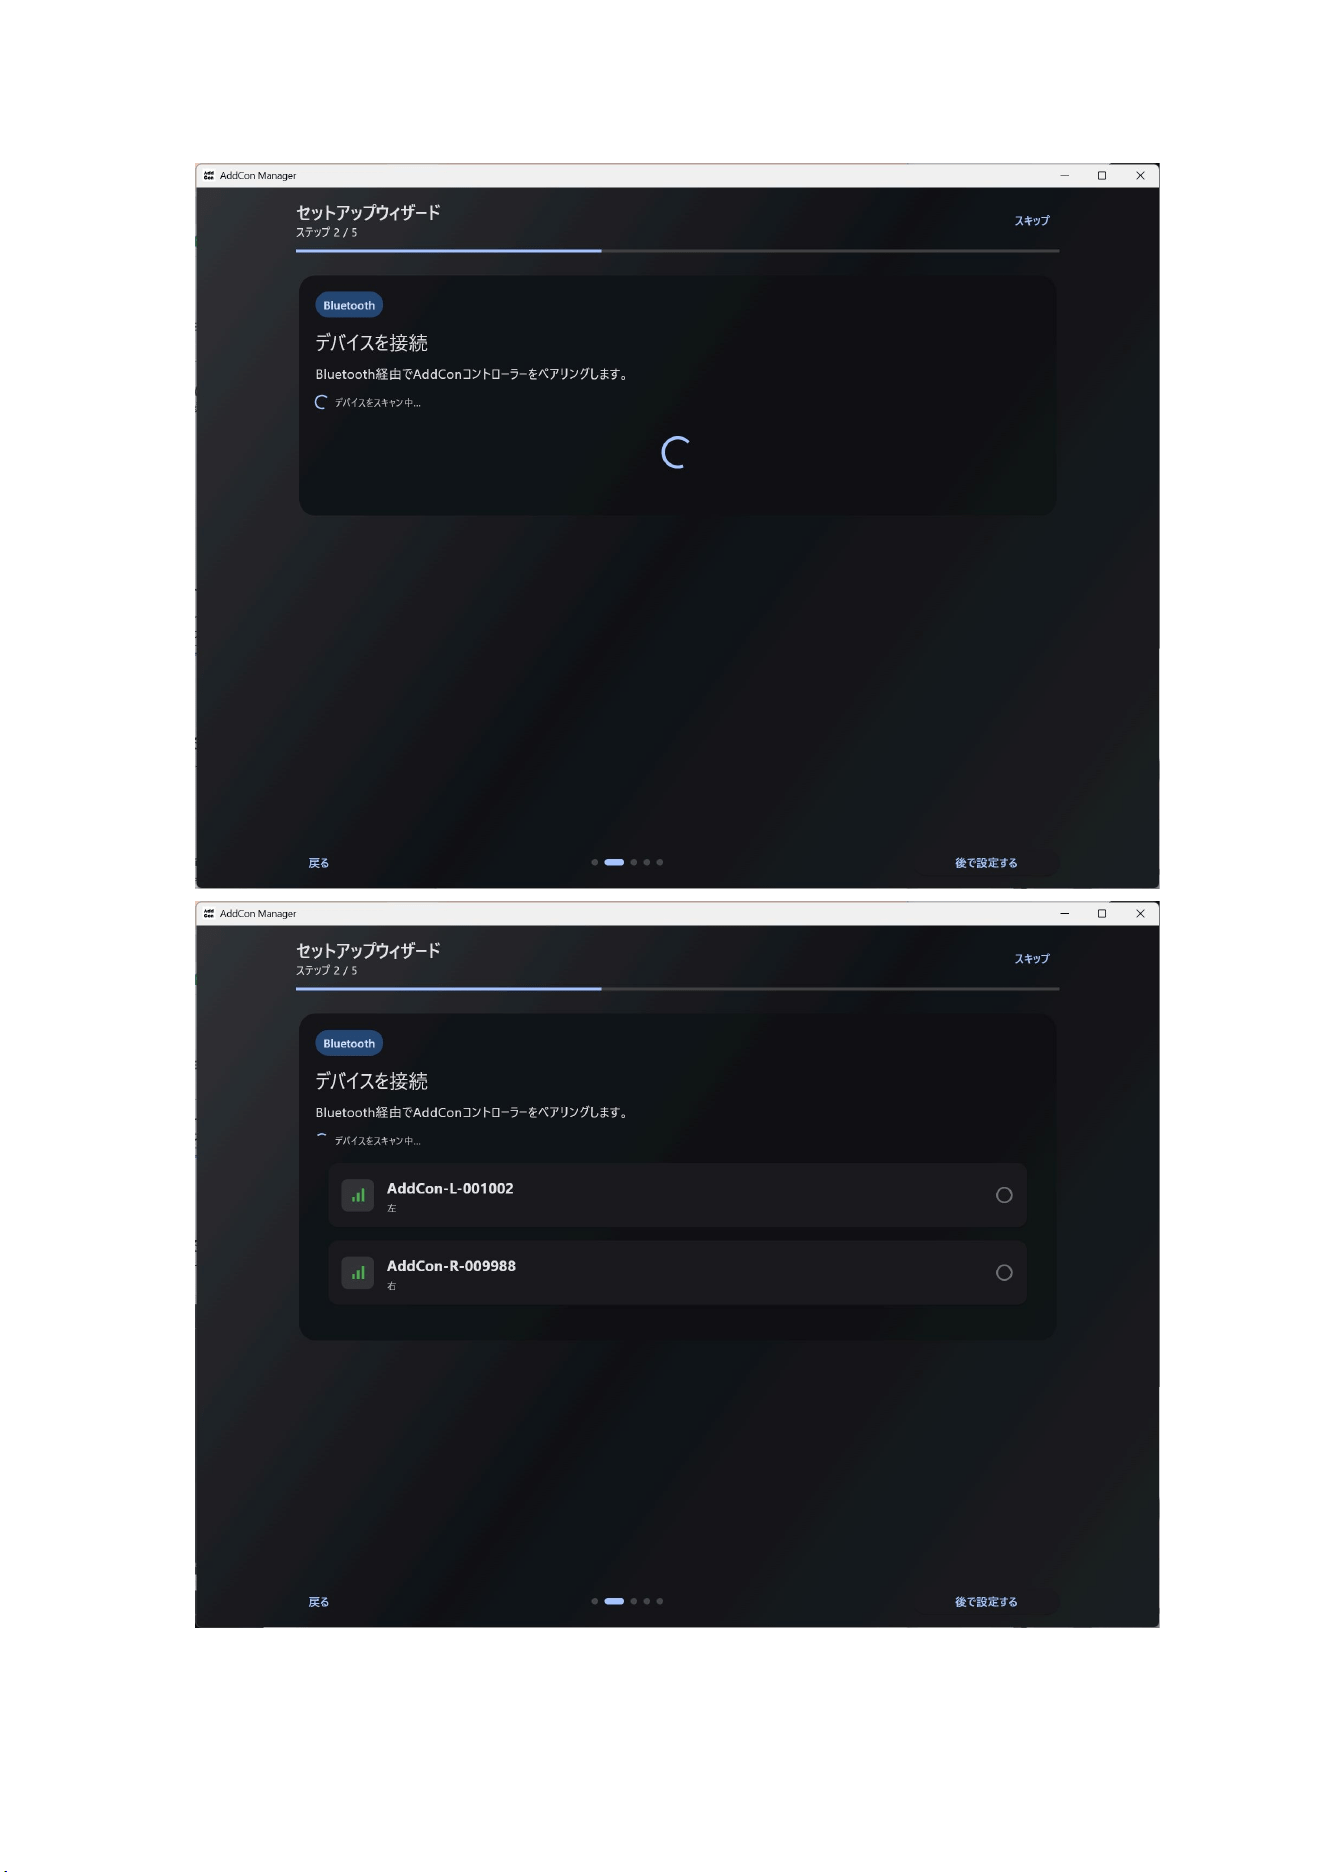
Add your AddCon+ devices on page 2/5 of the setup wizard when you first launch the
app. Turn on the AddCon+, and it will appear in the list.
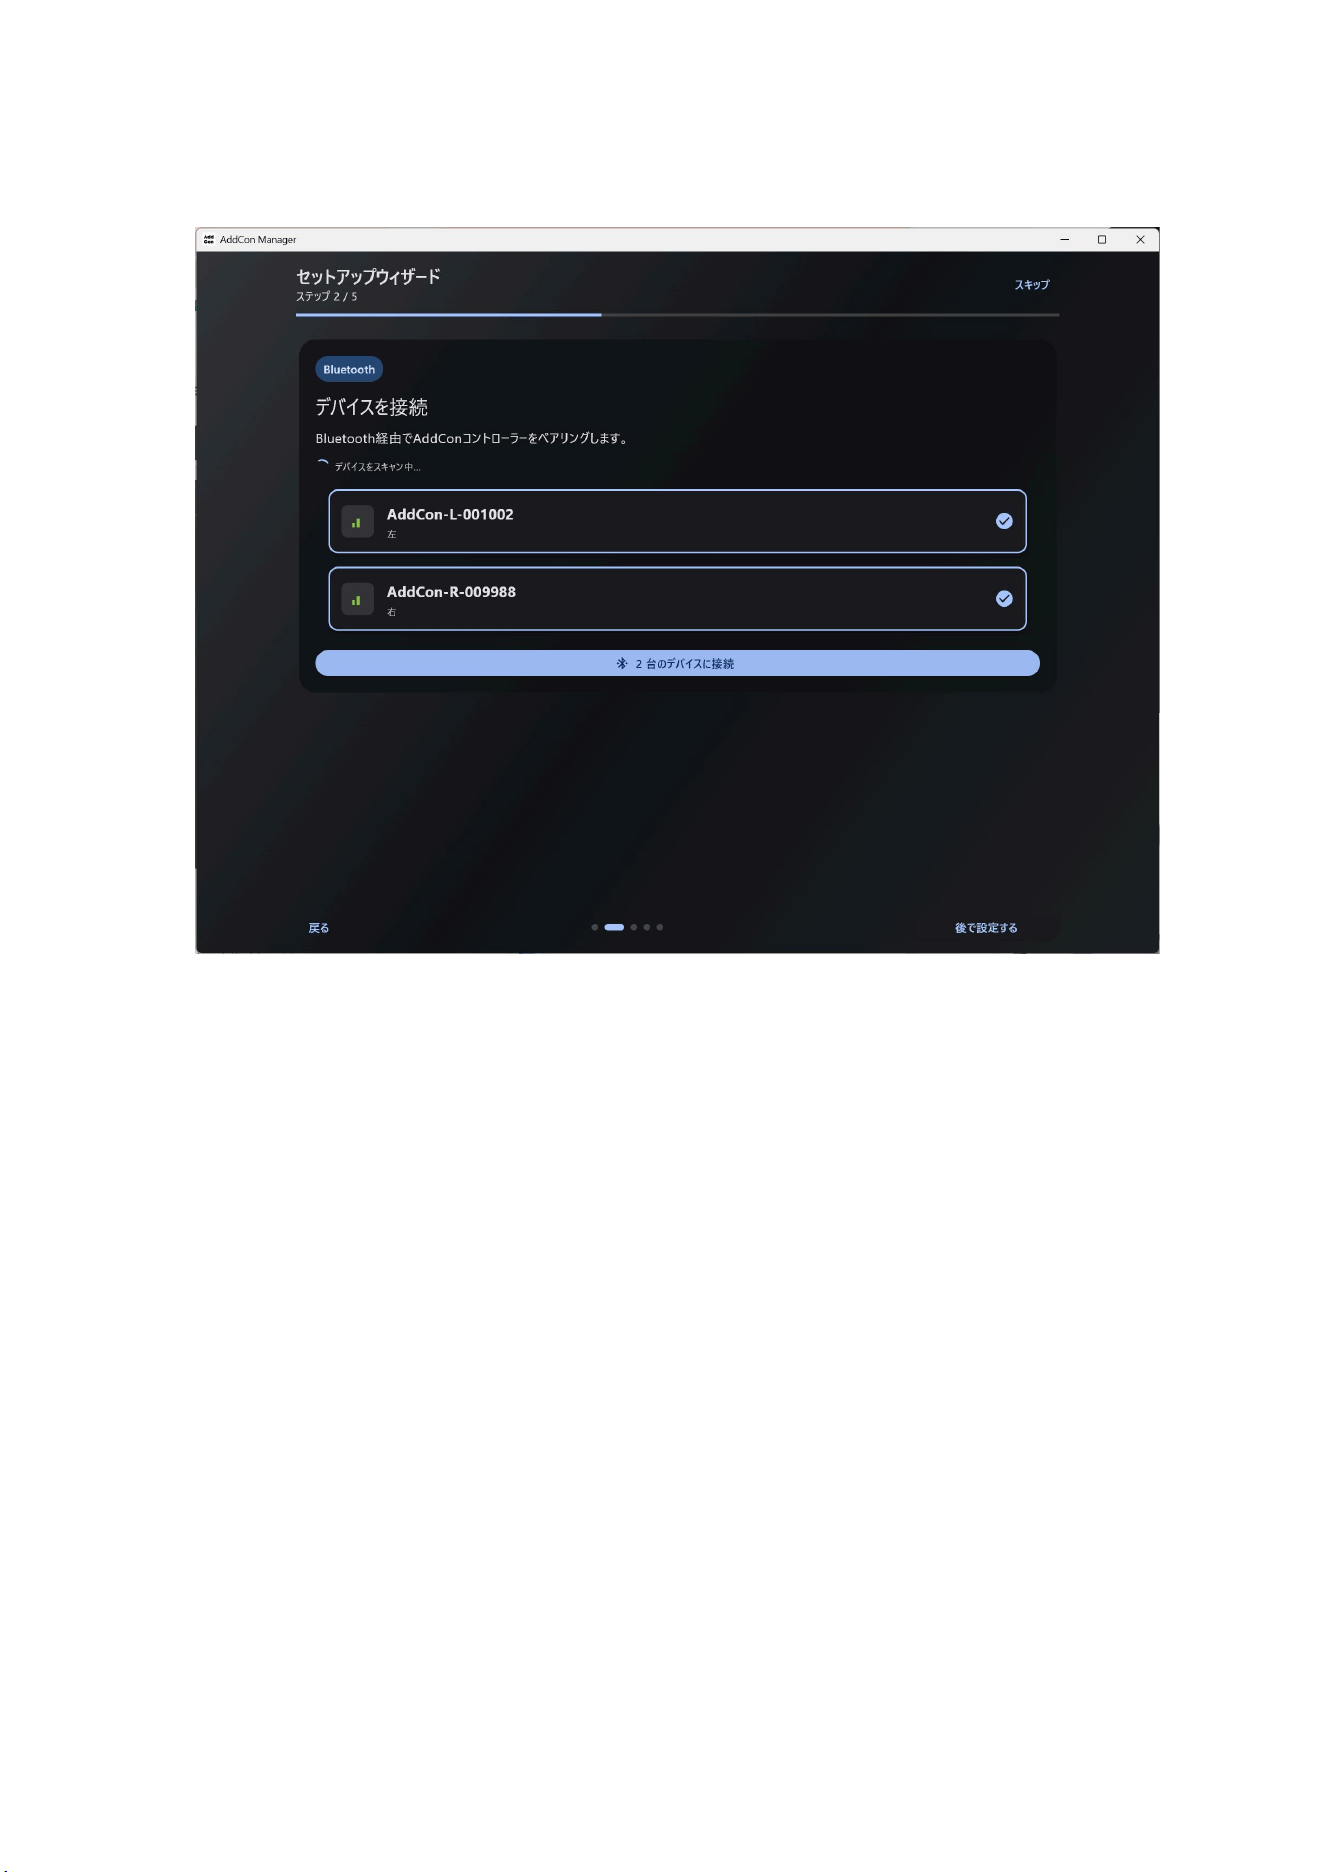
Select two devices and click the "Connect to 2 Devices" button.
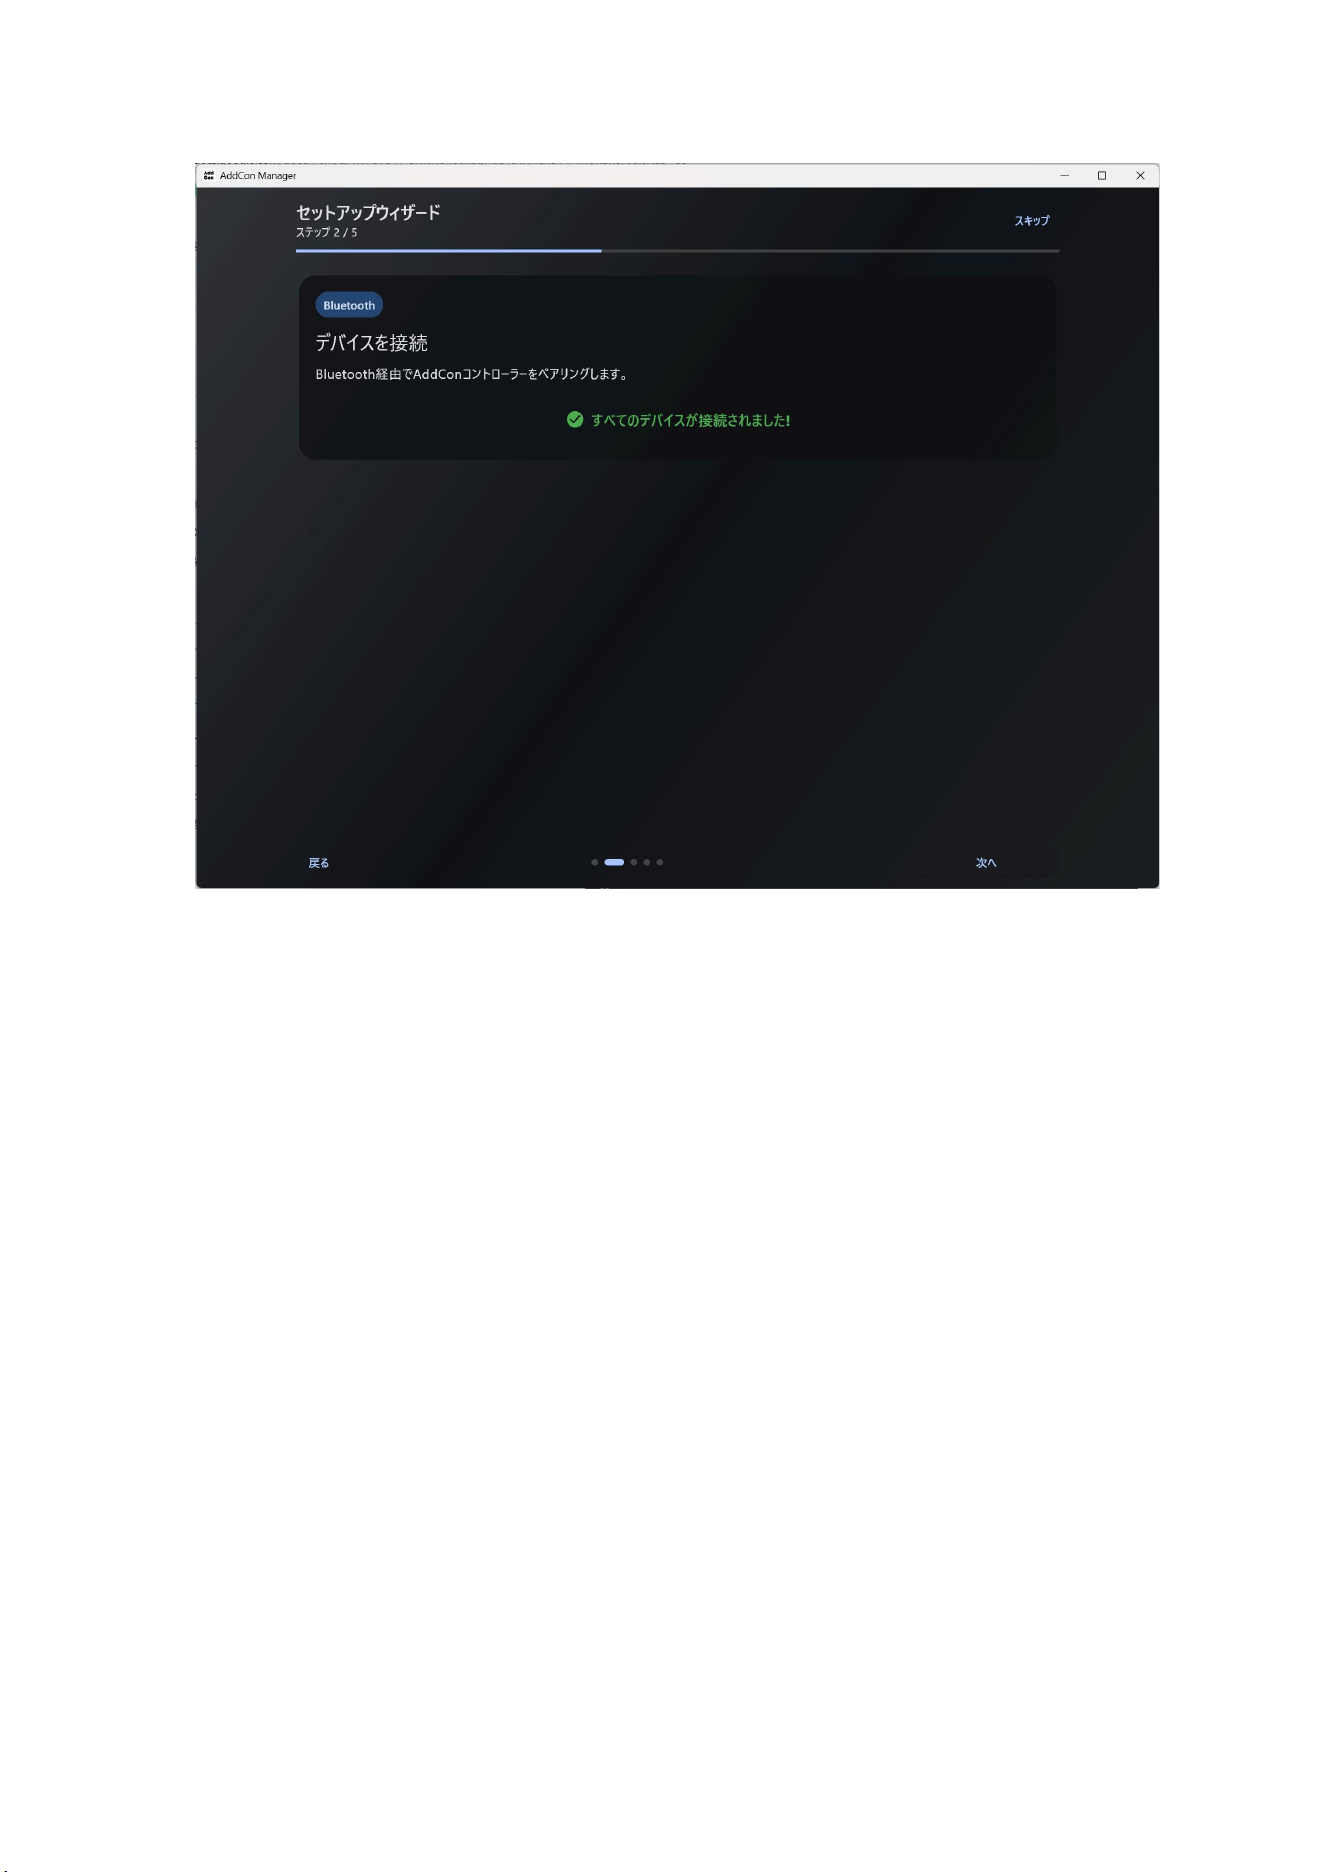
Connection successful.
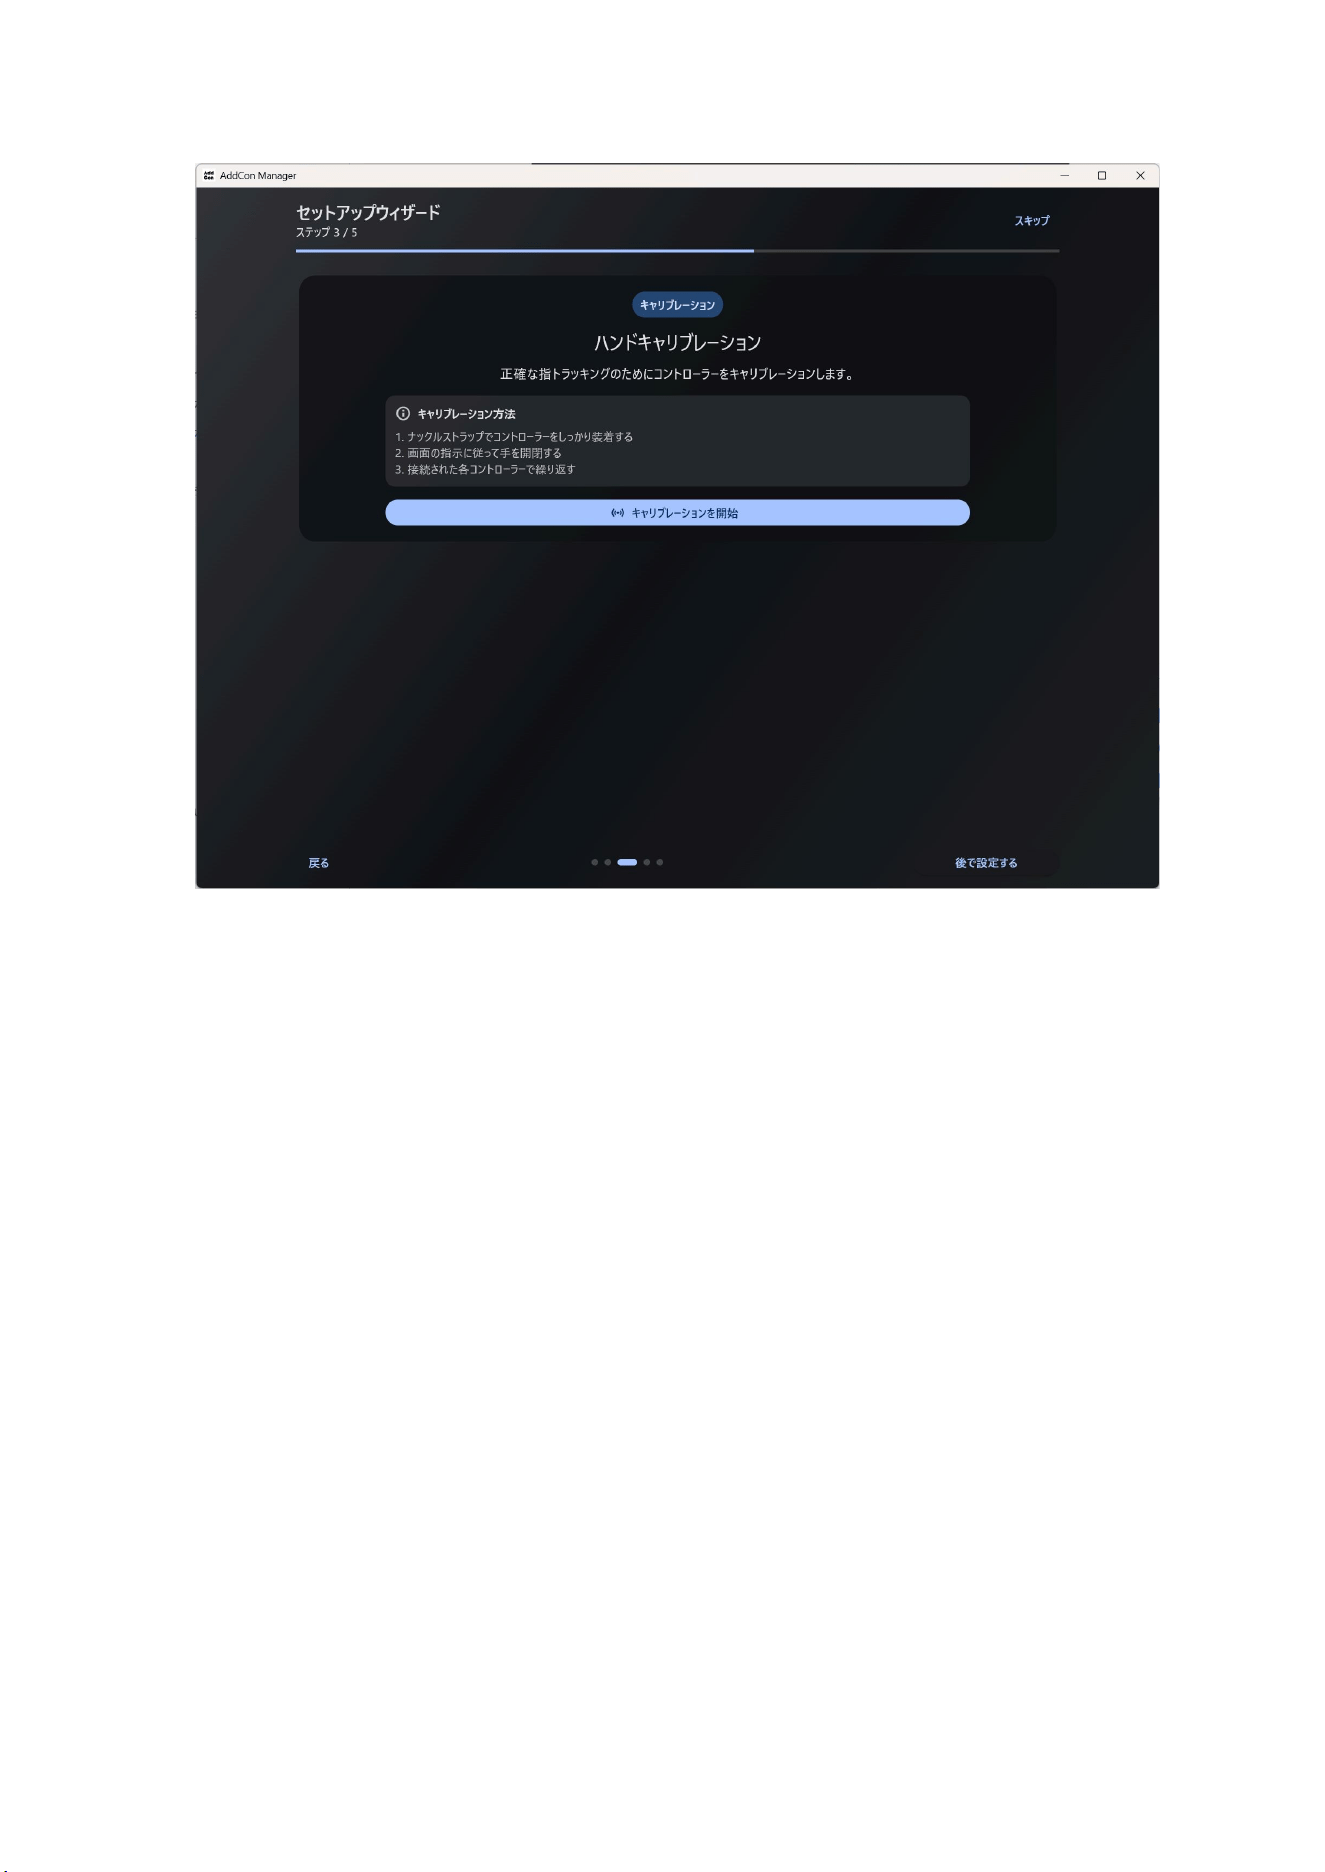
6.2.2. Hand Calibration
Perform hand calibration on page 3/5 of the setup wizard. Click the "Start Calibration"
button.
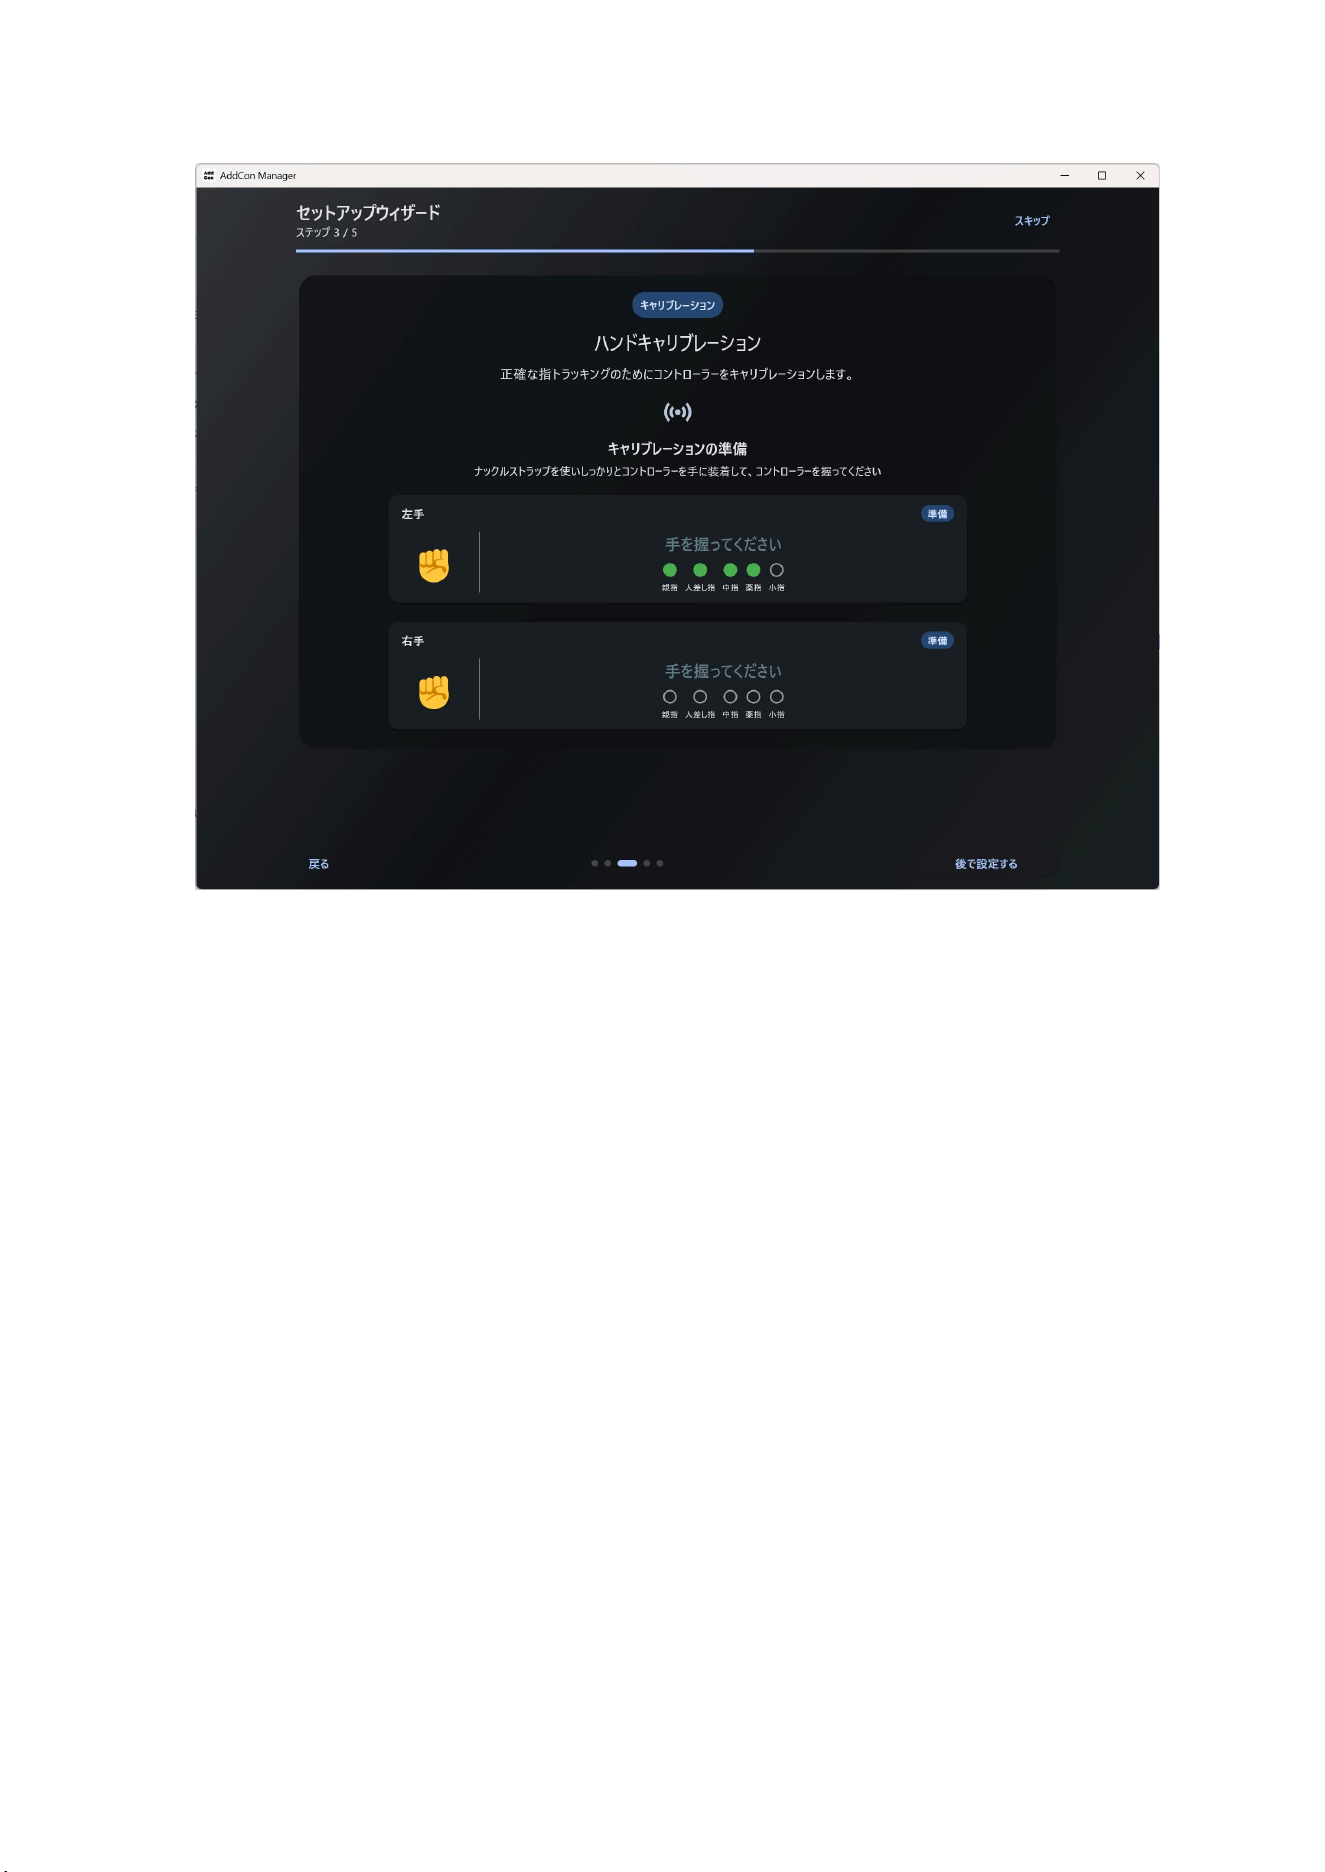
Follow the on-screen instructions to perform hand calibration.
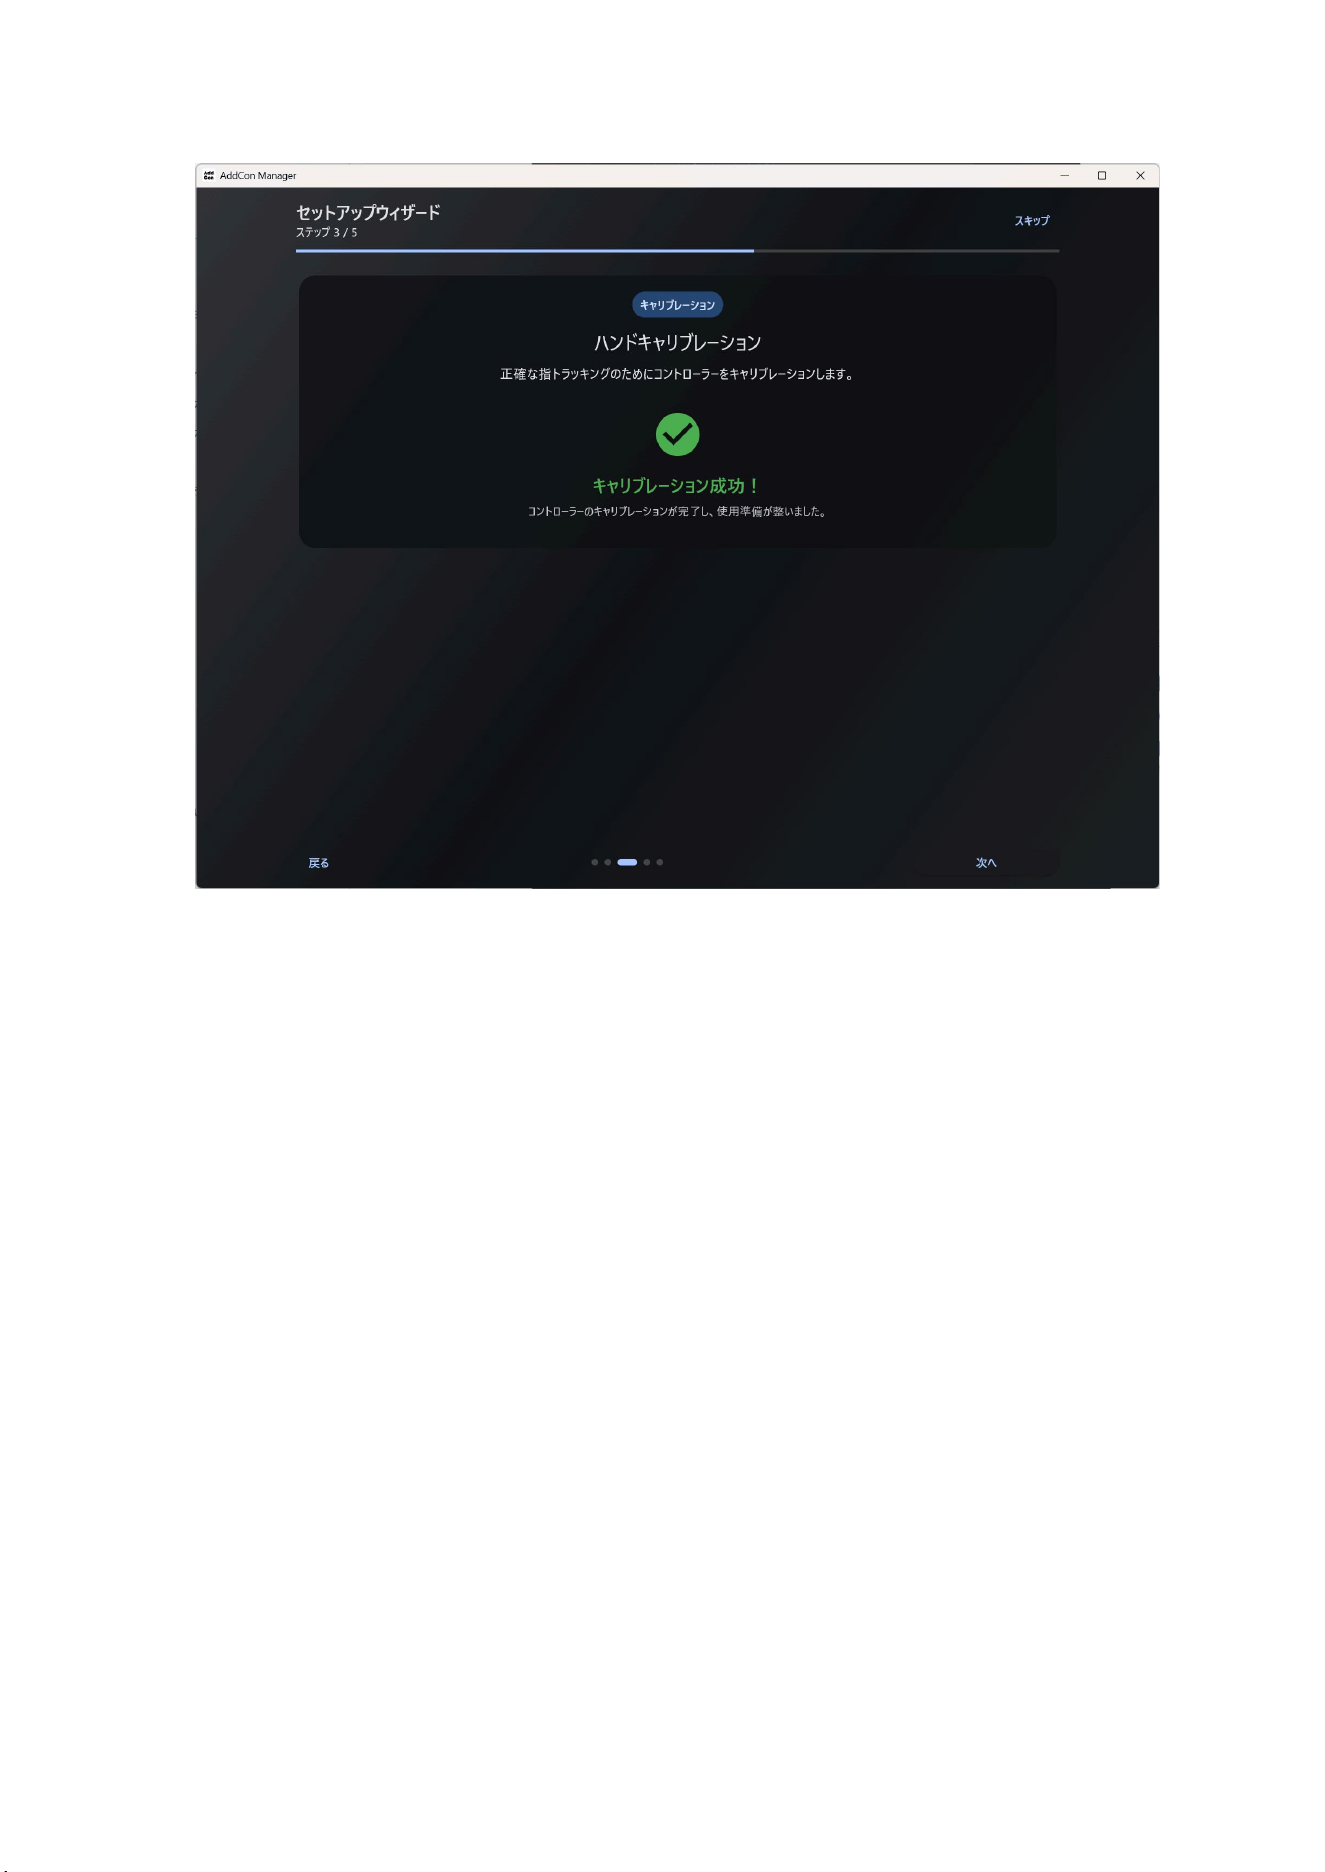
Calibration successful.
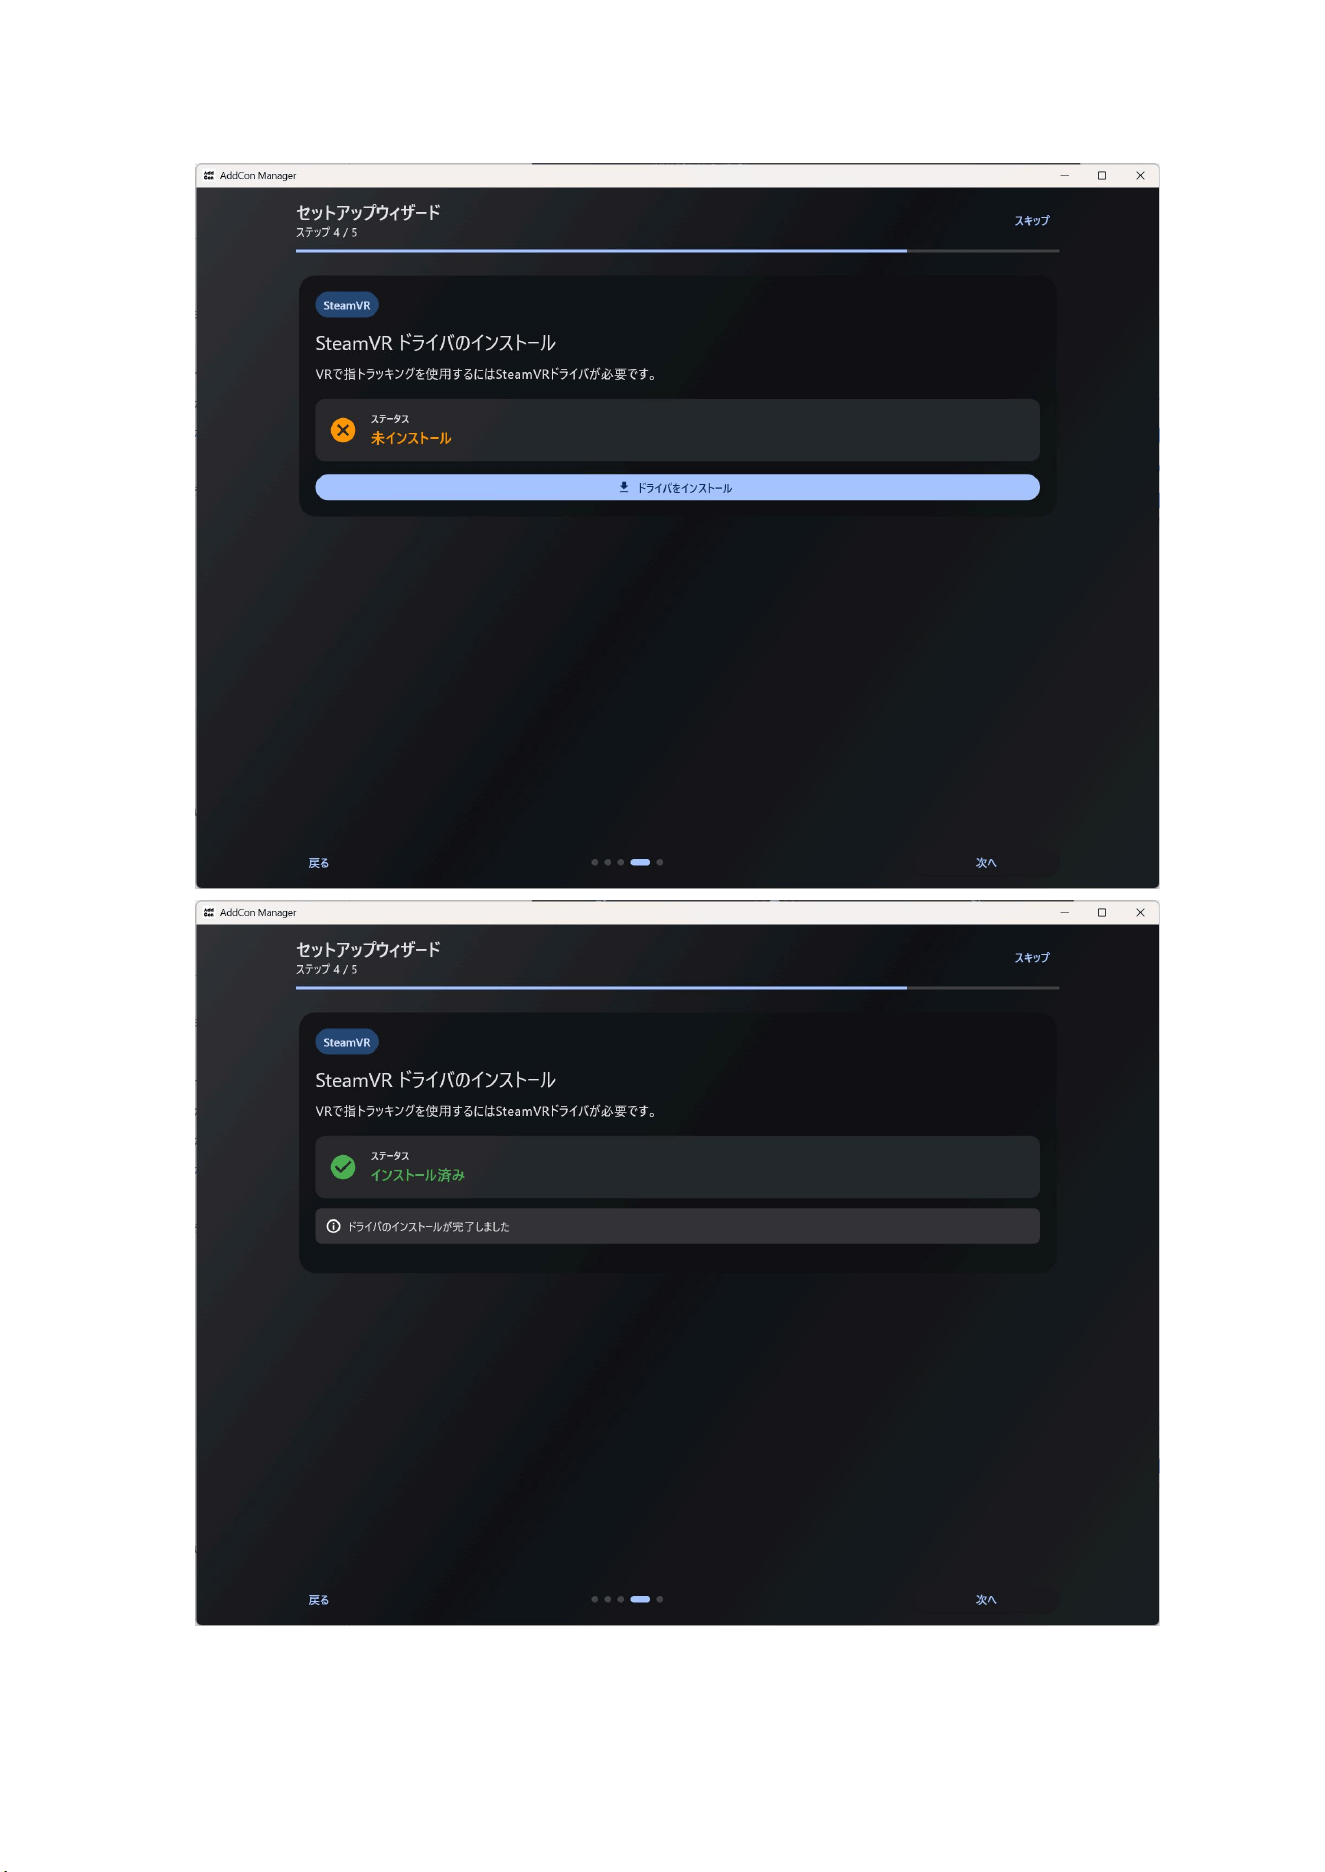
6.2.3. Installing the SteamVR Driver
Install the SteamVR driver. Click the "Install Driver" button.
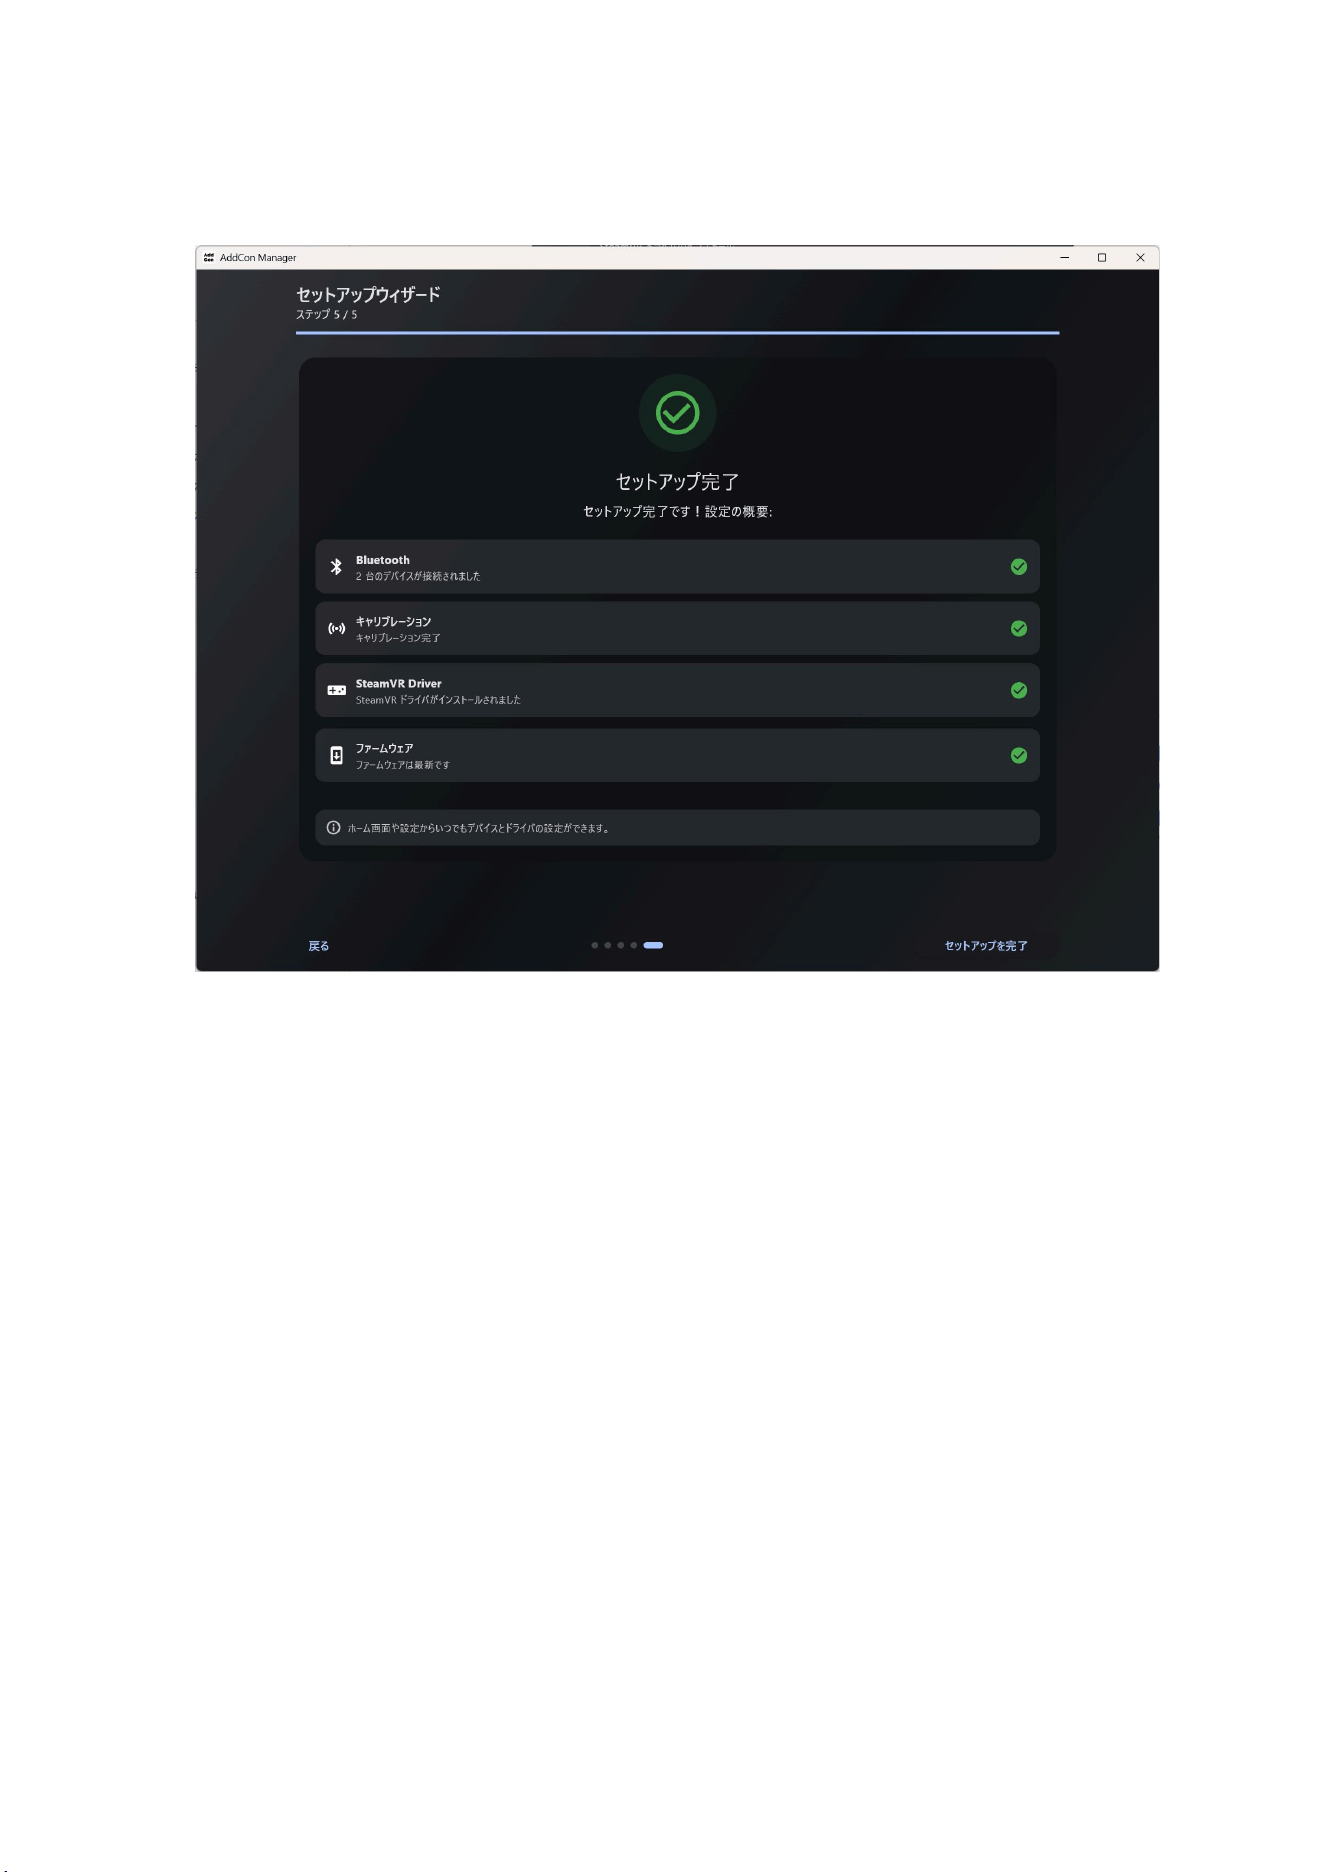
6.2.4. Setup Wizard Complete
Setup is now complete.
6.3. Adding New Devices
This section explains how to pair the AddCon+ outside of the setup wizard.
Select "+ Add Device" from the device list. Turn on the AddCon+, and the two units will
appear on the device scan screen.
You can also turn on the AddCon+ before launching the app.
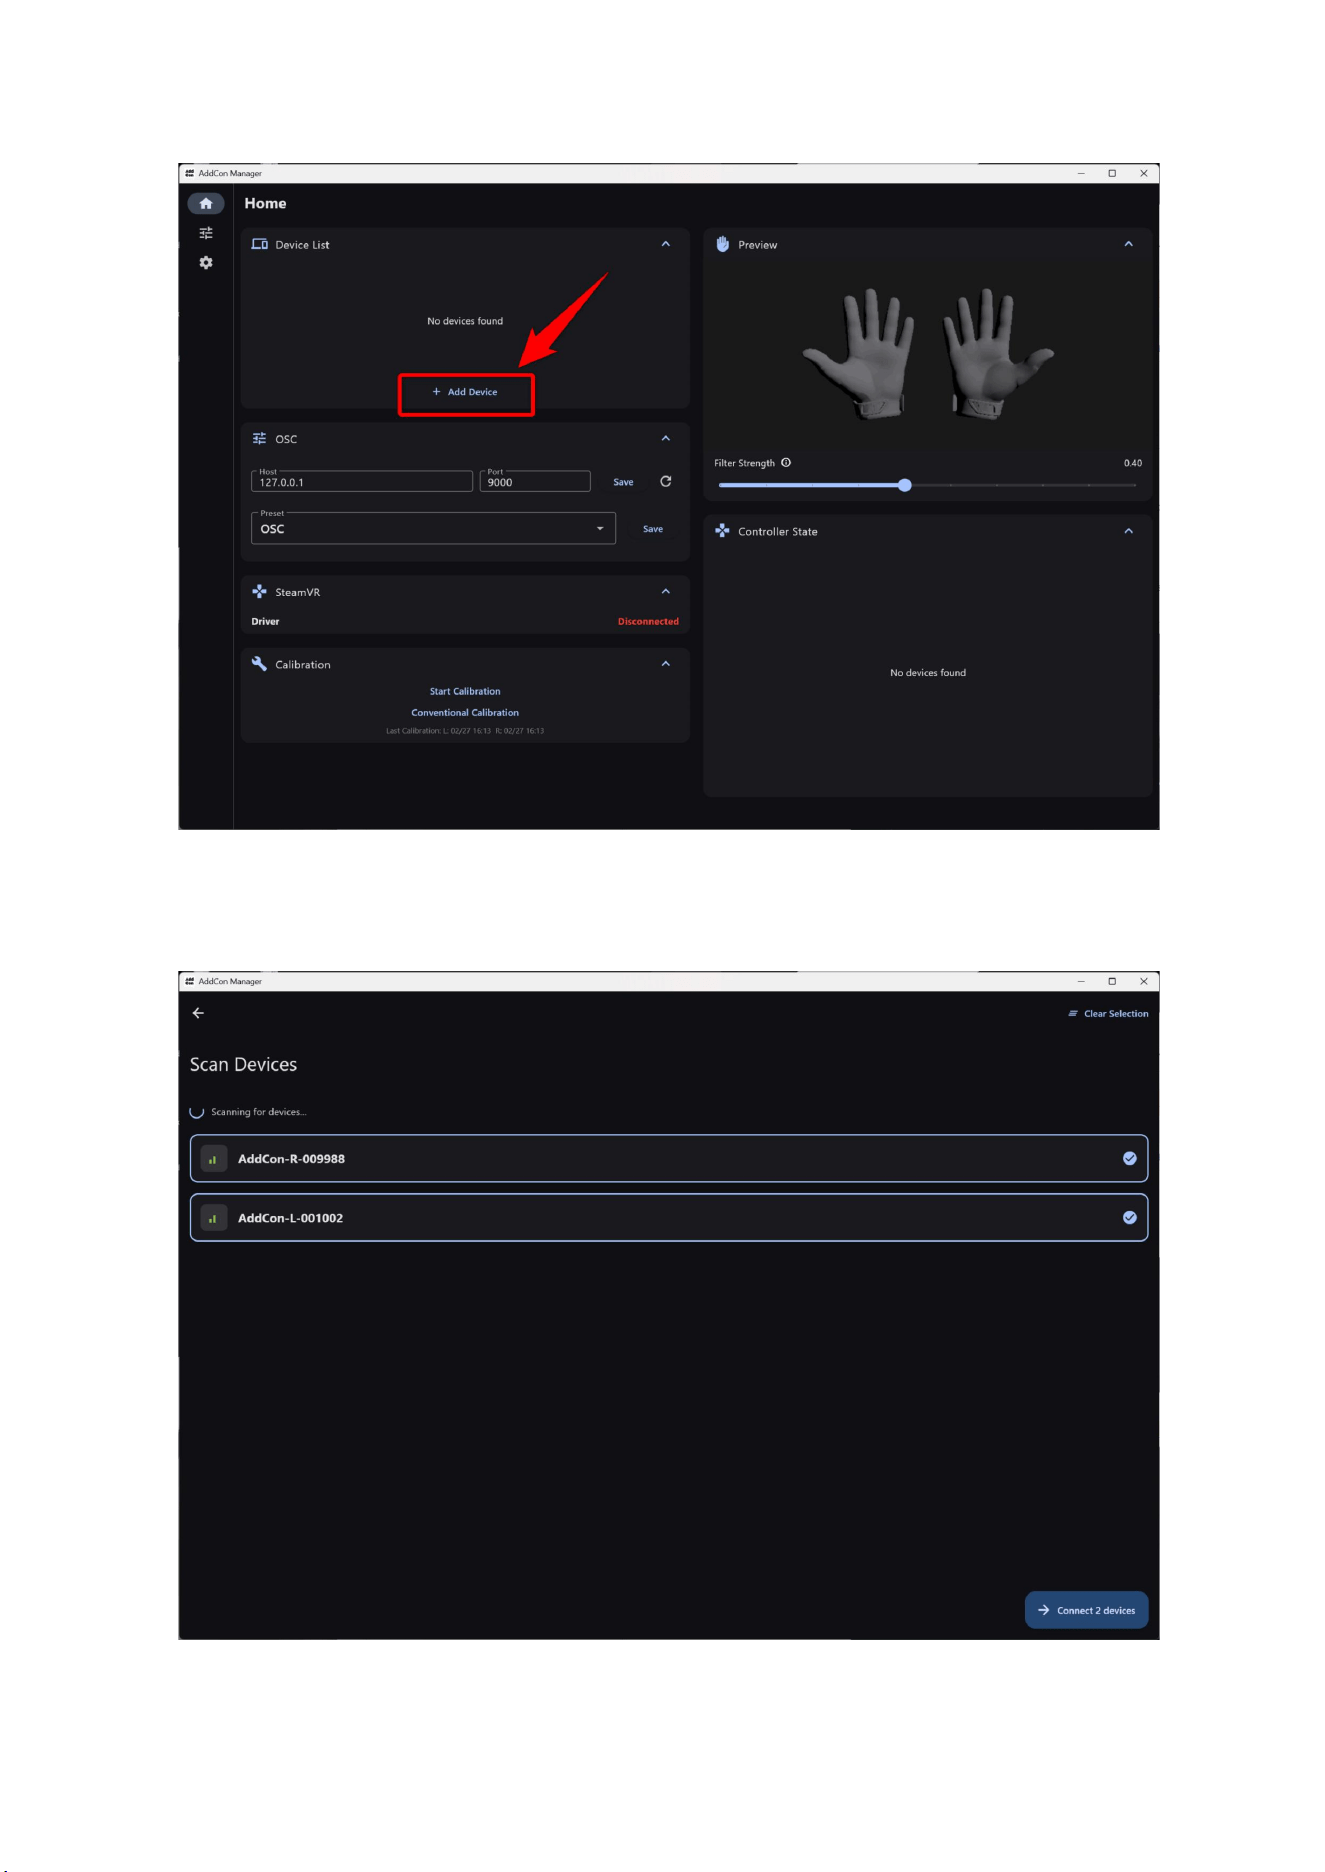
Select the two AddCon+ units and click the "→ Connect to 2 Devices" button at the bottom
right.
Once the connection is complete, click the "Go to Home Screen" button at the bottom.
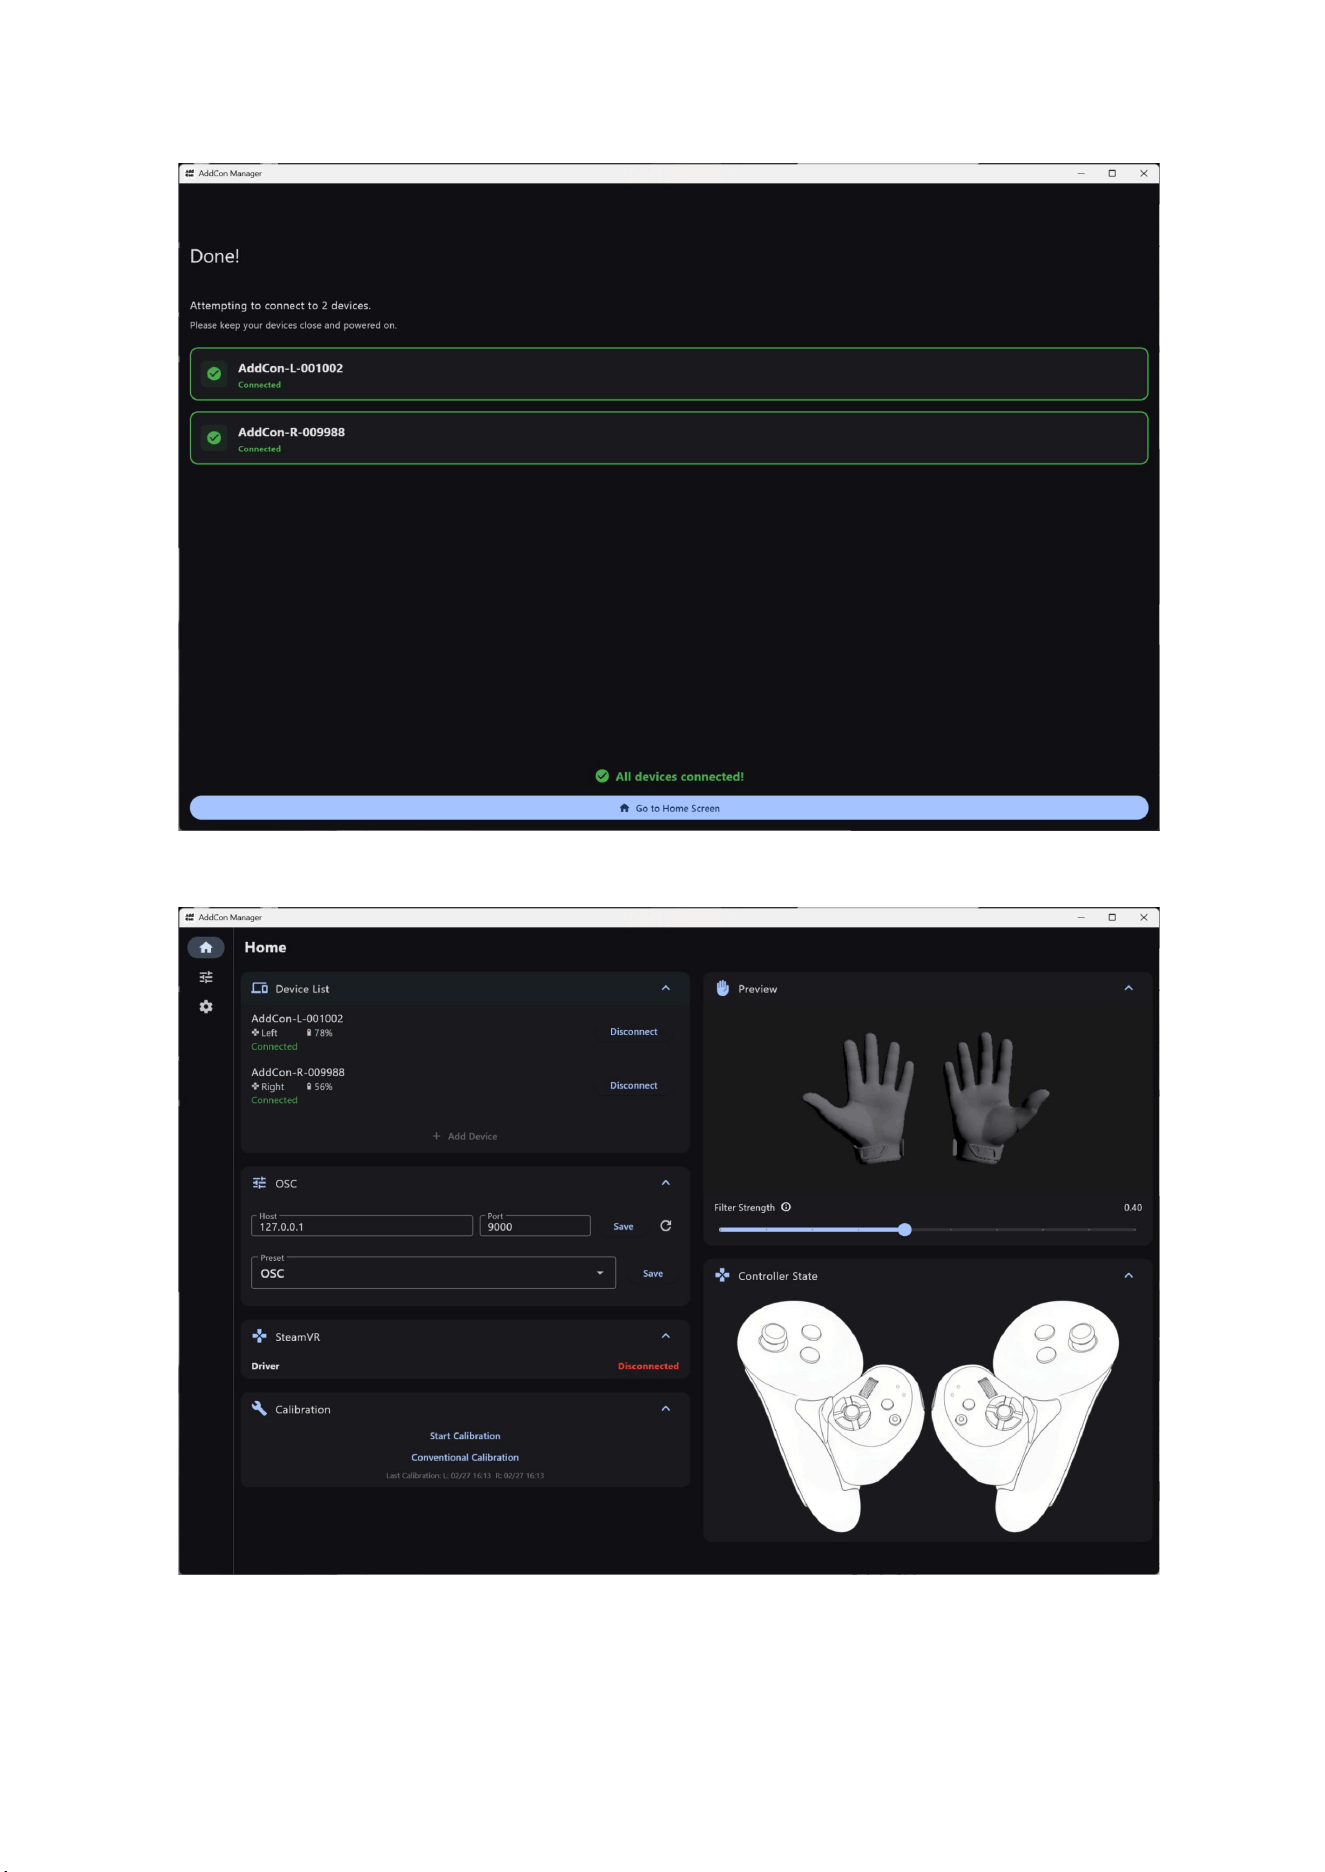
The two paired AddCon+ units will now appear in the device list.
6.4. Firmware Update
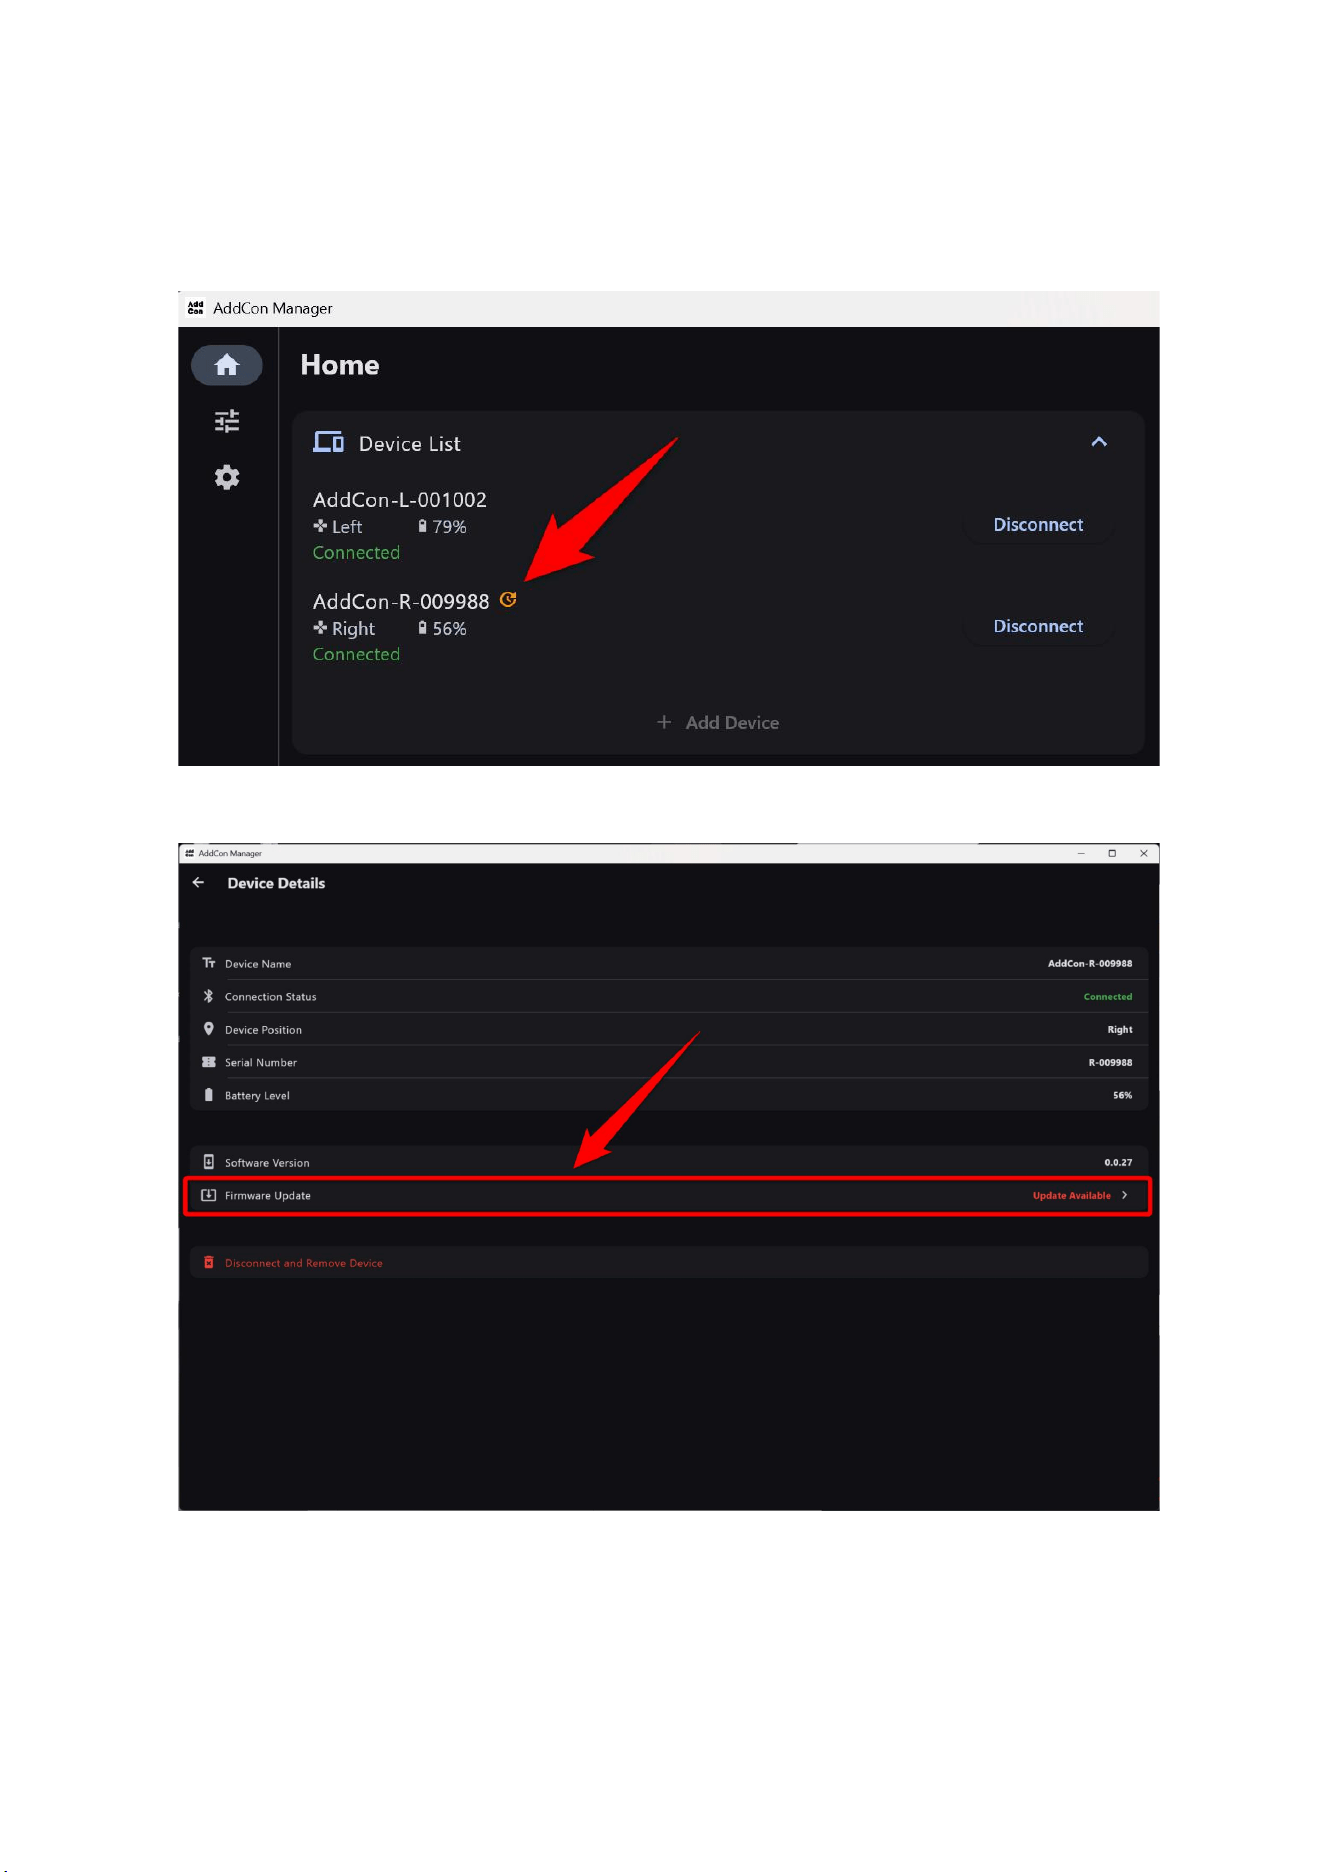
If the firmware on AddCon+ is outdated, a clock icon will appear in the device list. Click the
device displaying this icon.
“Update Available” is shown in the Firmware Update section, so click it.
Click “Start Update” to begin the update. Wait a moment until it is complete.
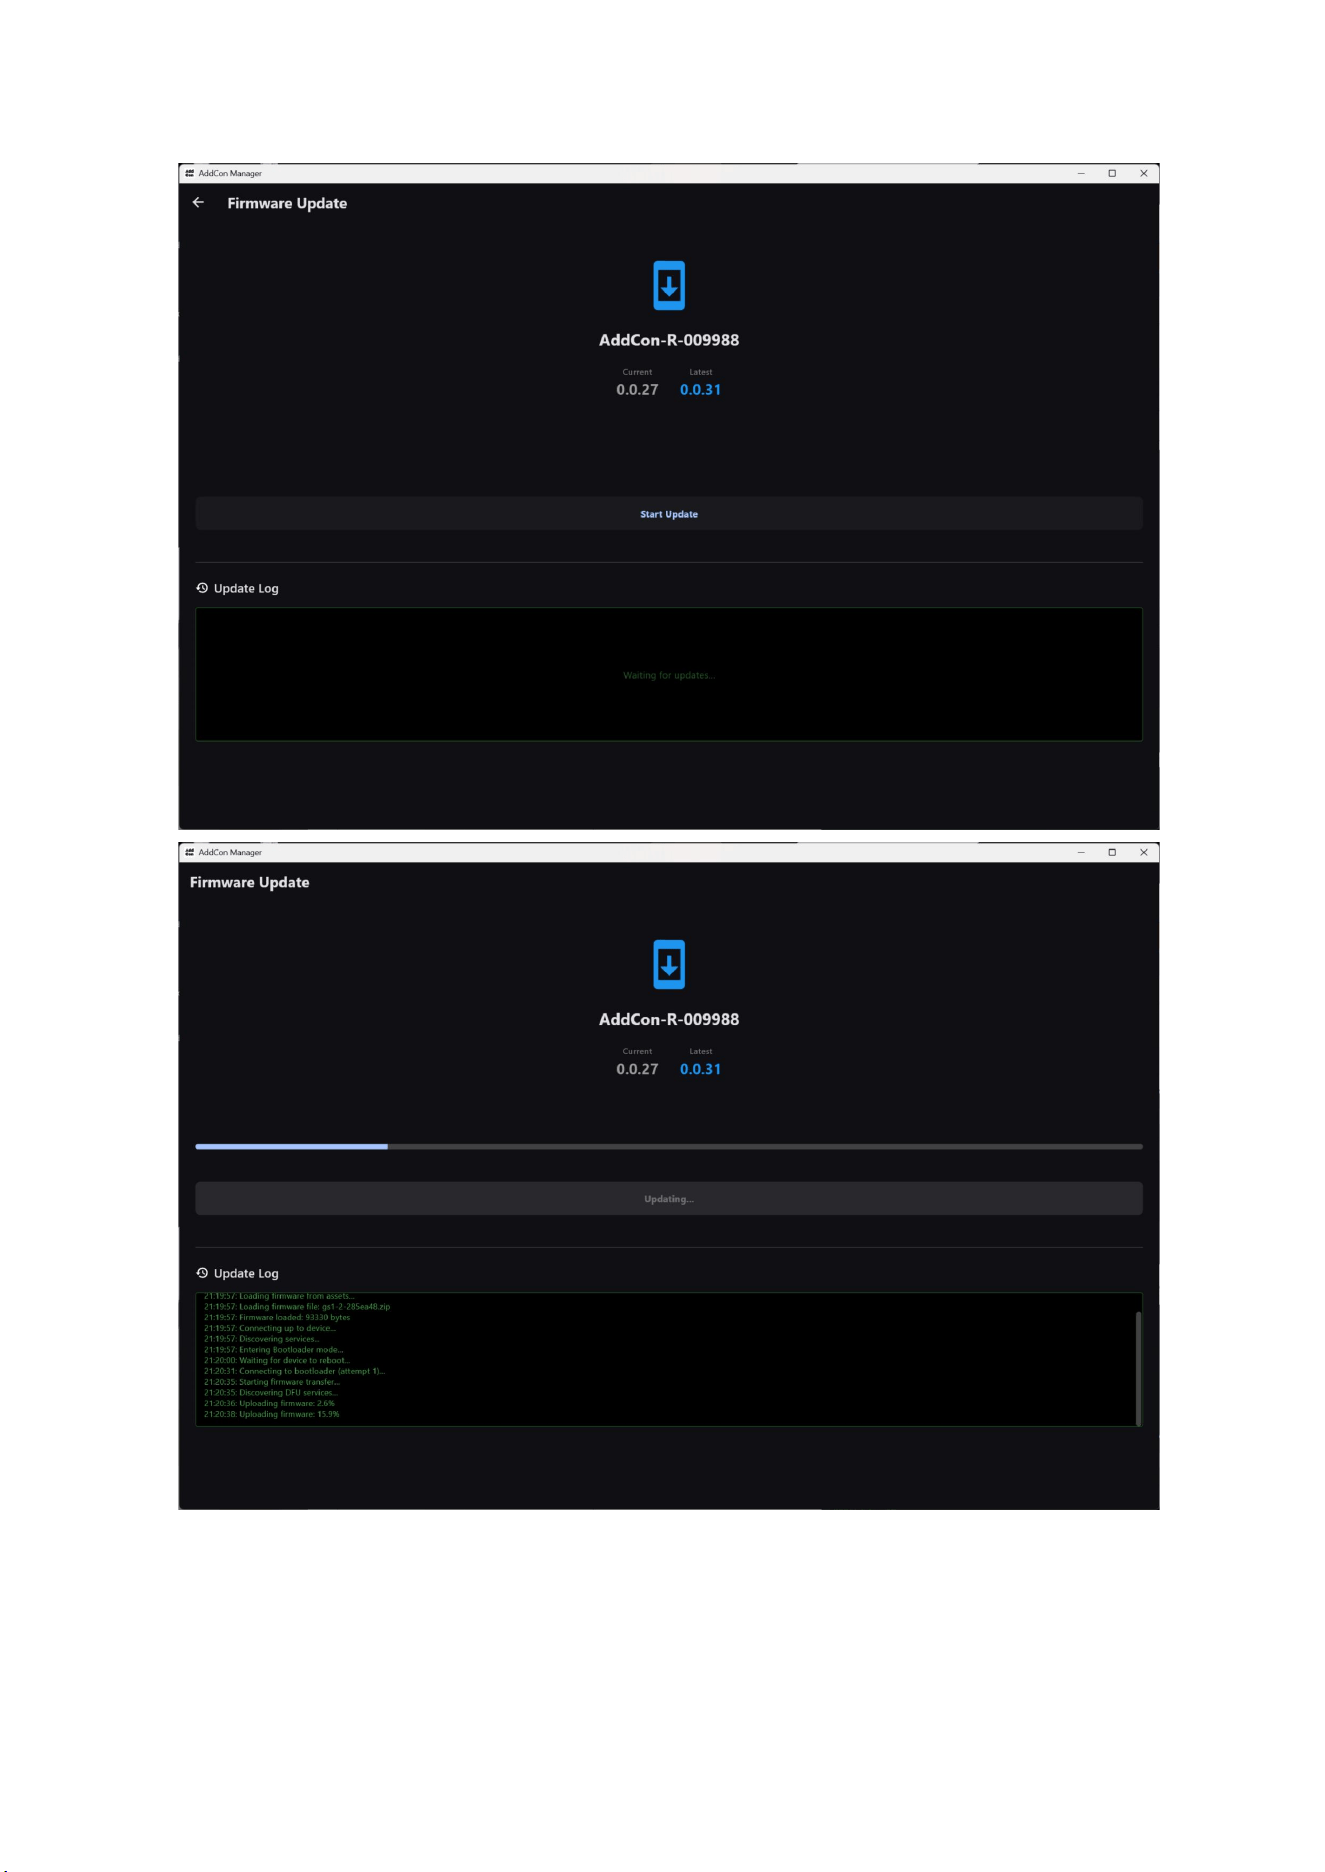
Once the firmware update is complete, click the arrow icon in the upper left to go back.
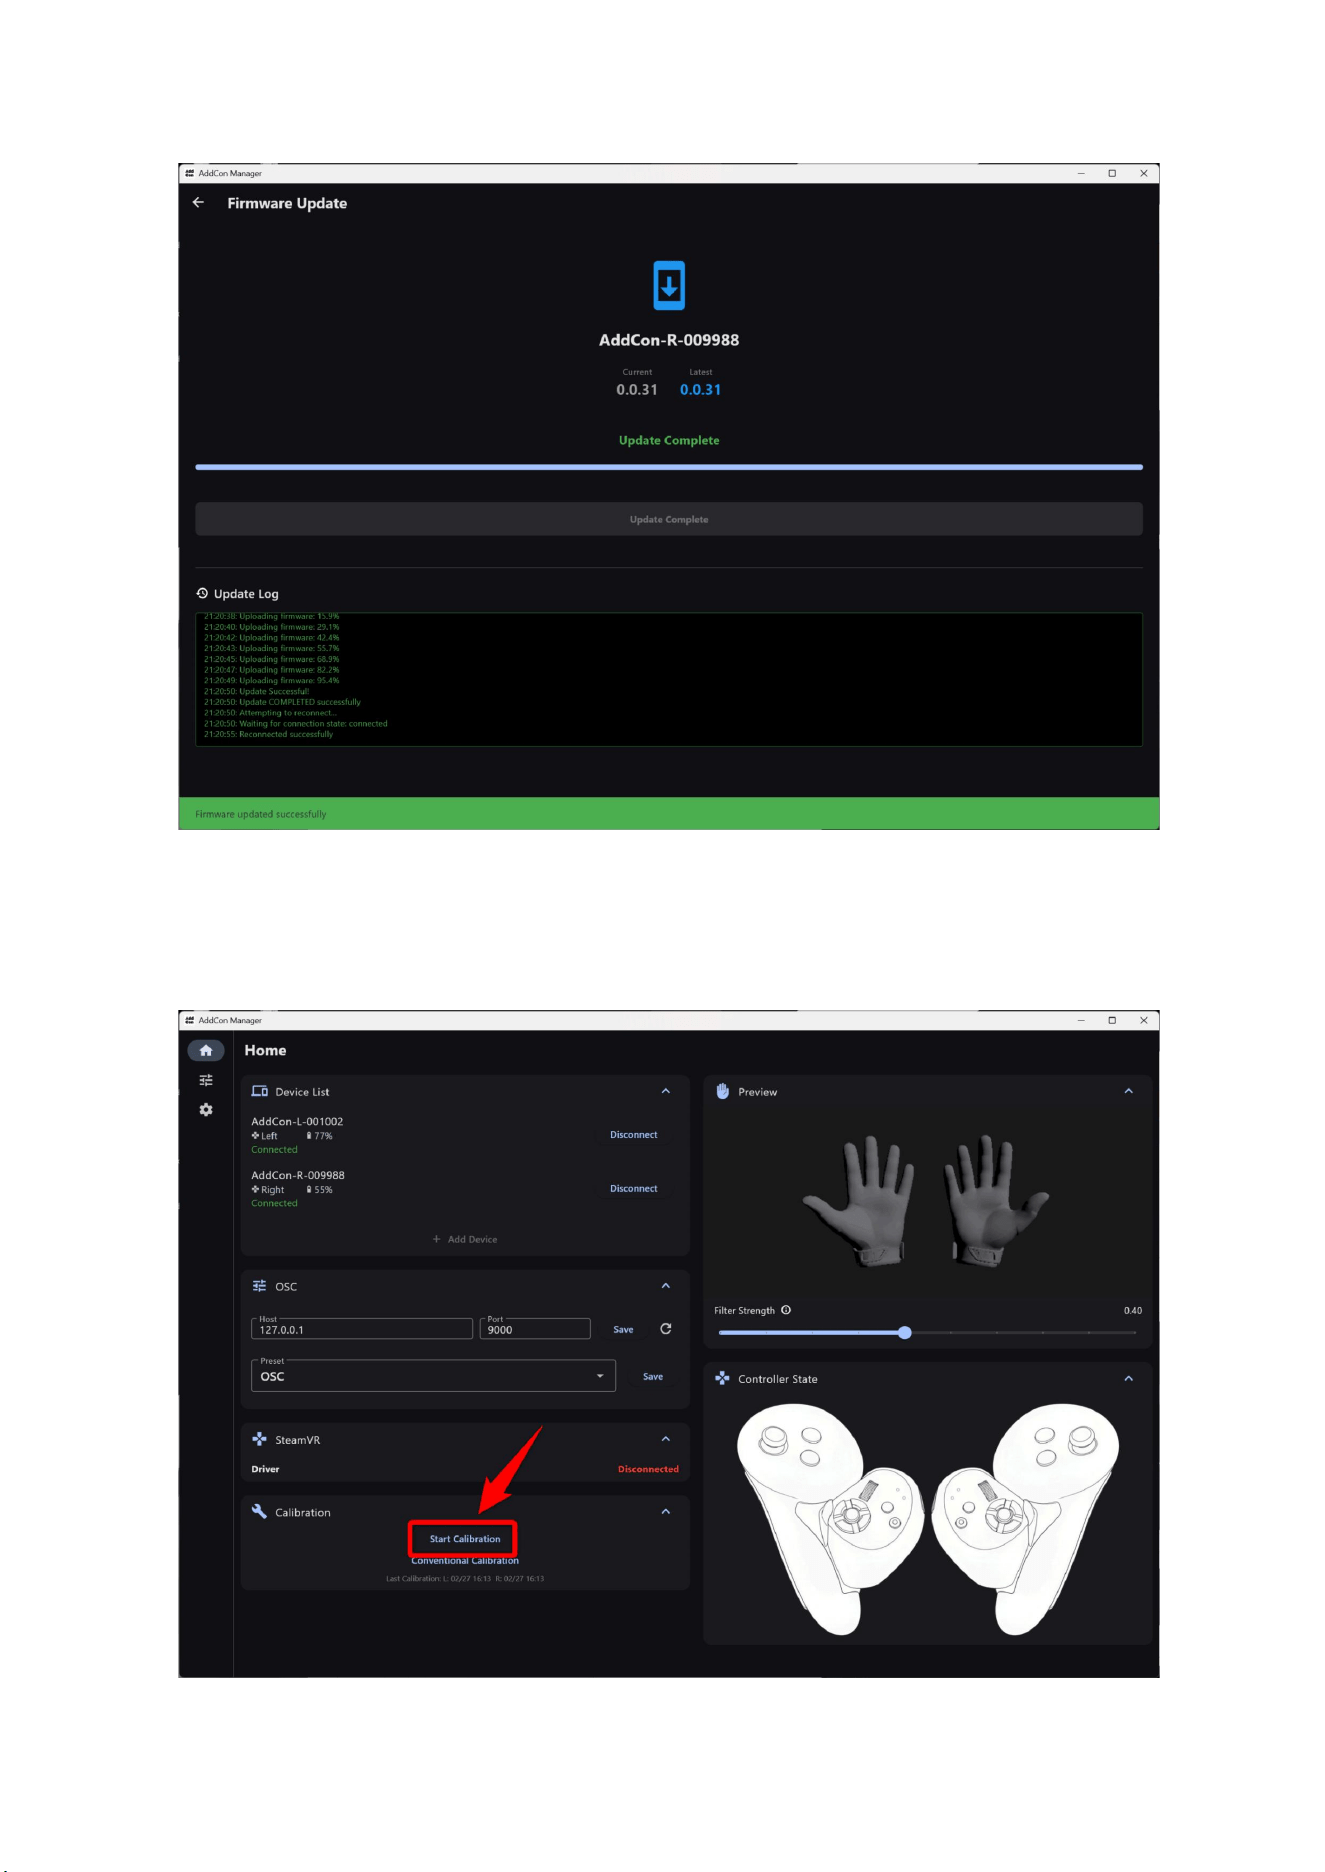
6.5. Calibration
Click the “Start Calibration” button.
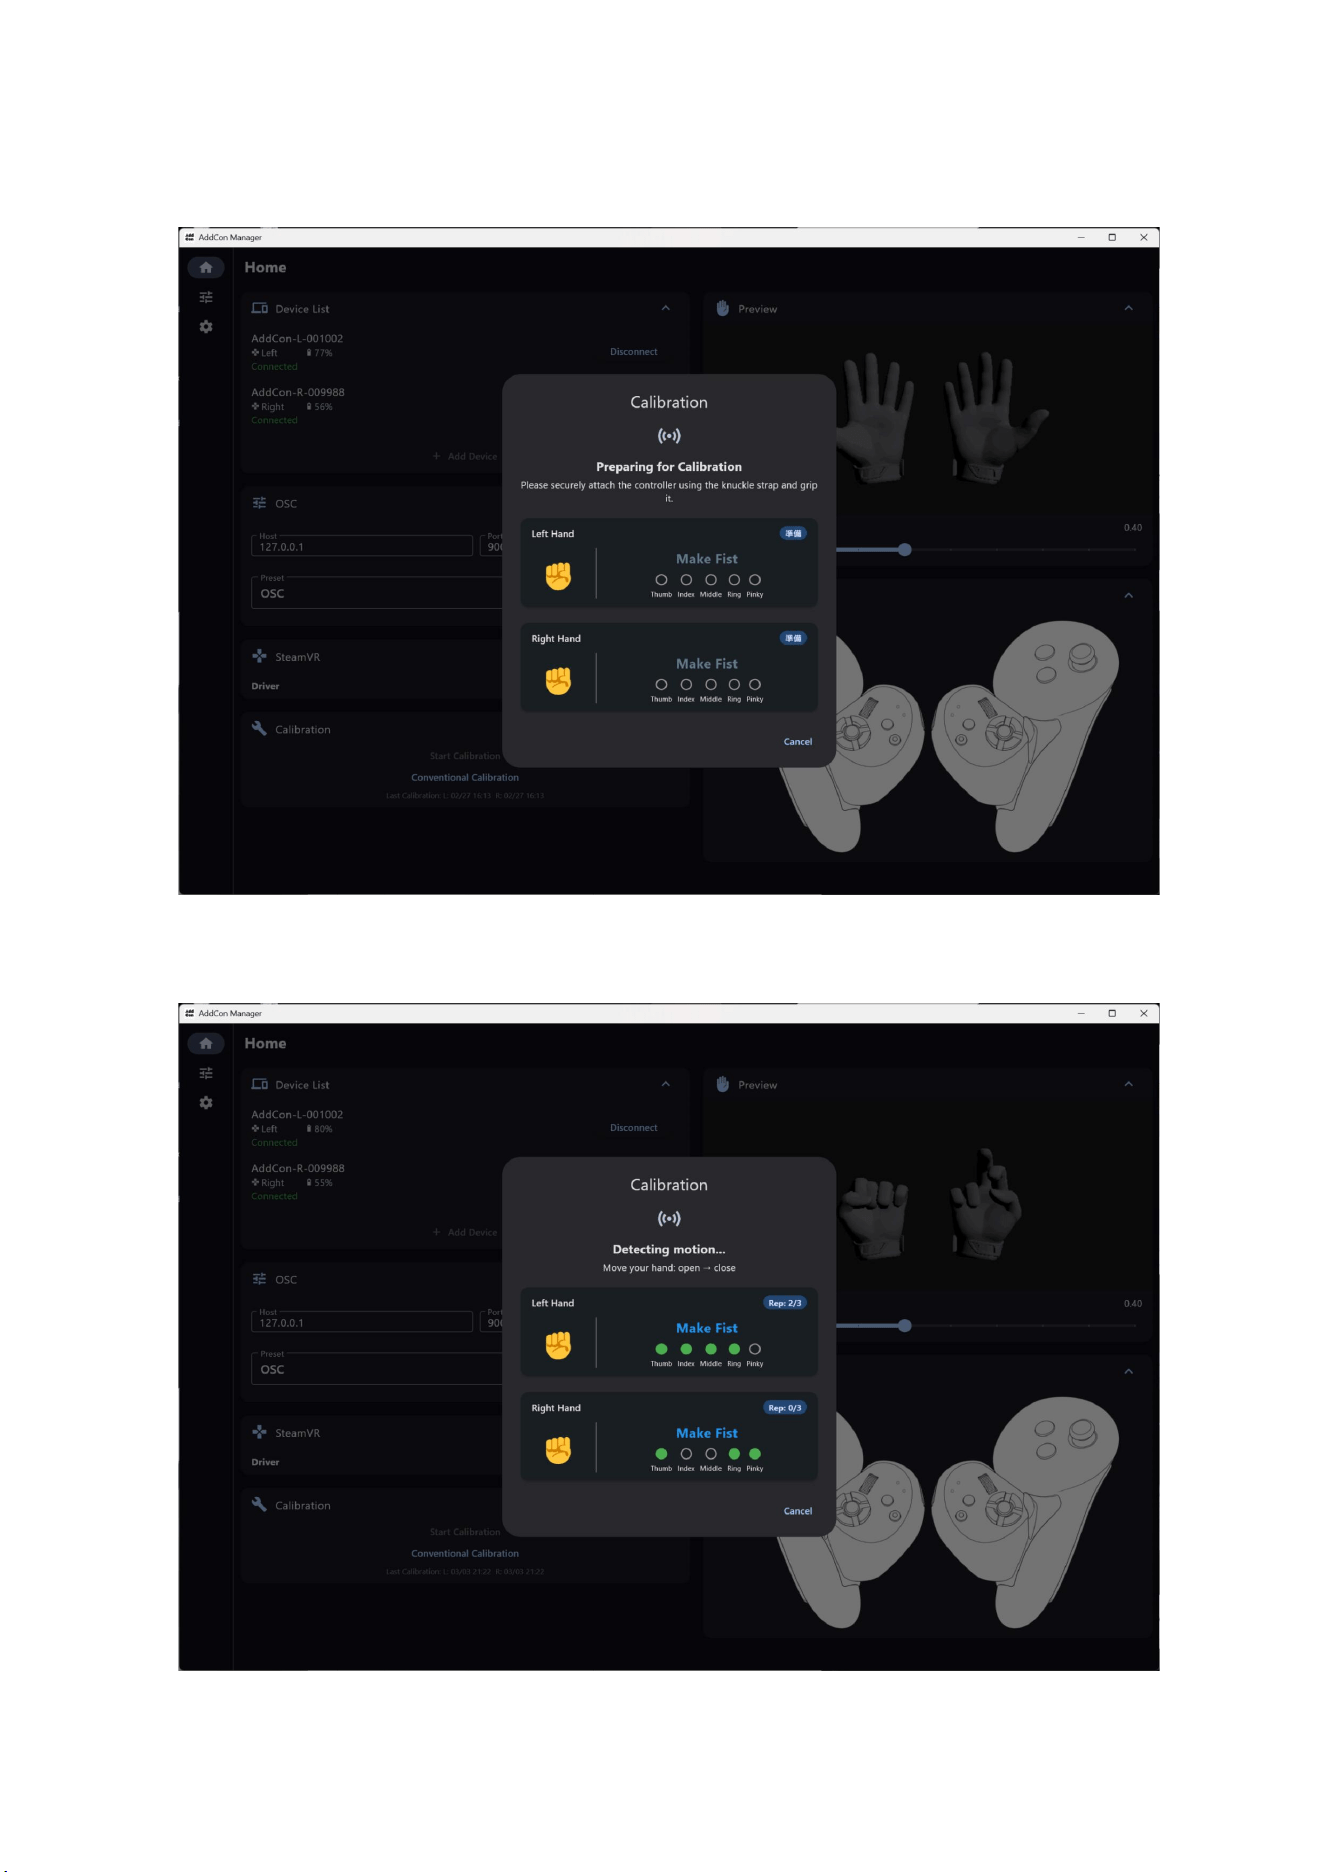
Hold AddCon+ in your hand, then make a fist and open your hand three times.
When the touch sensor detects a gripping motion, the circle turns green. If the circle does
not change color, adjust the position of your finger.
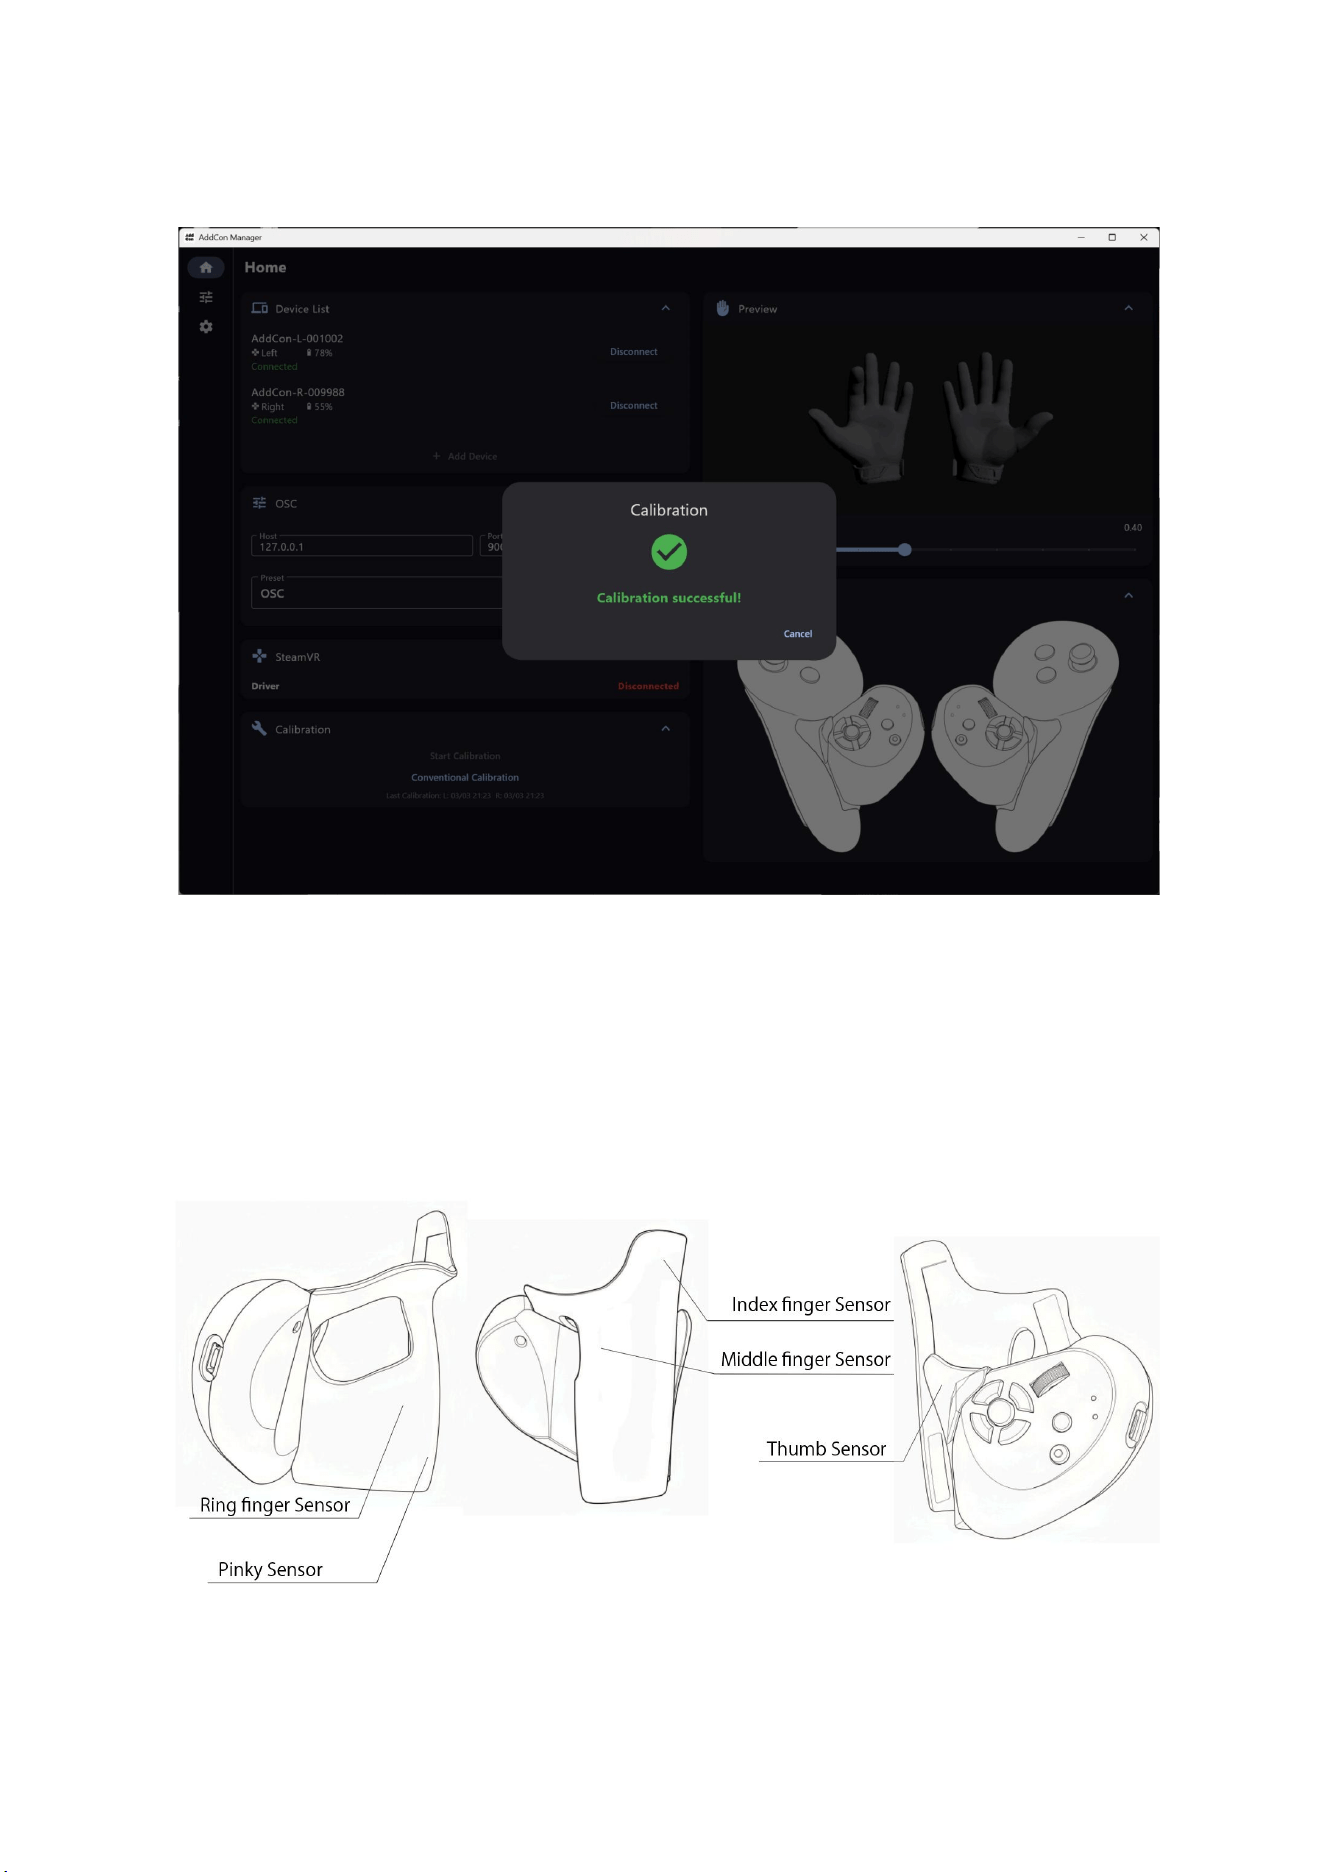
When calibration is successful, this window appears and the app automatically returns to
the home screen.
6.5.1. Calibration Tips
● Your calibration settings are saved in the app. Even if you restart the app or
AddCon+, the most recent calibration data will still be used. If finger tracking doesn’t
feel right, please run calibration again.
● The touch sensors are located in the positions shown in the image.
6.6. Button & Wheel Settings
6.6.1. OSC Button Settings
Click the icon marked as 1 in the image to open the OSC preset settings screen.
Click the list item marked as 2 in the image to change the OSC settings.
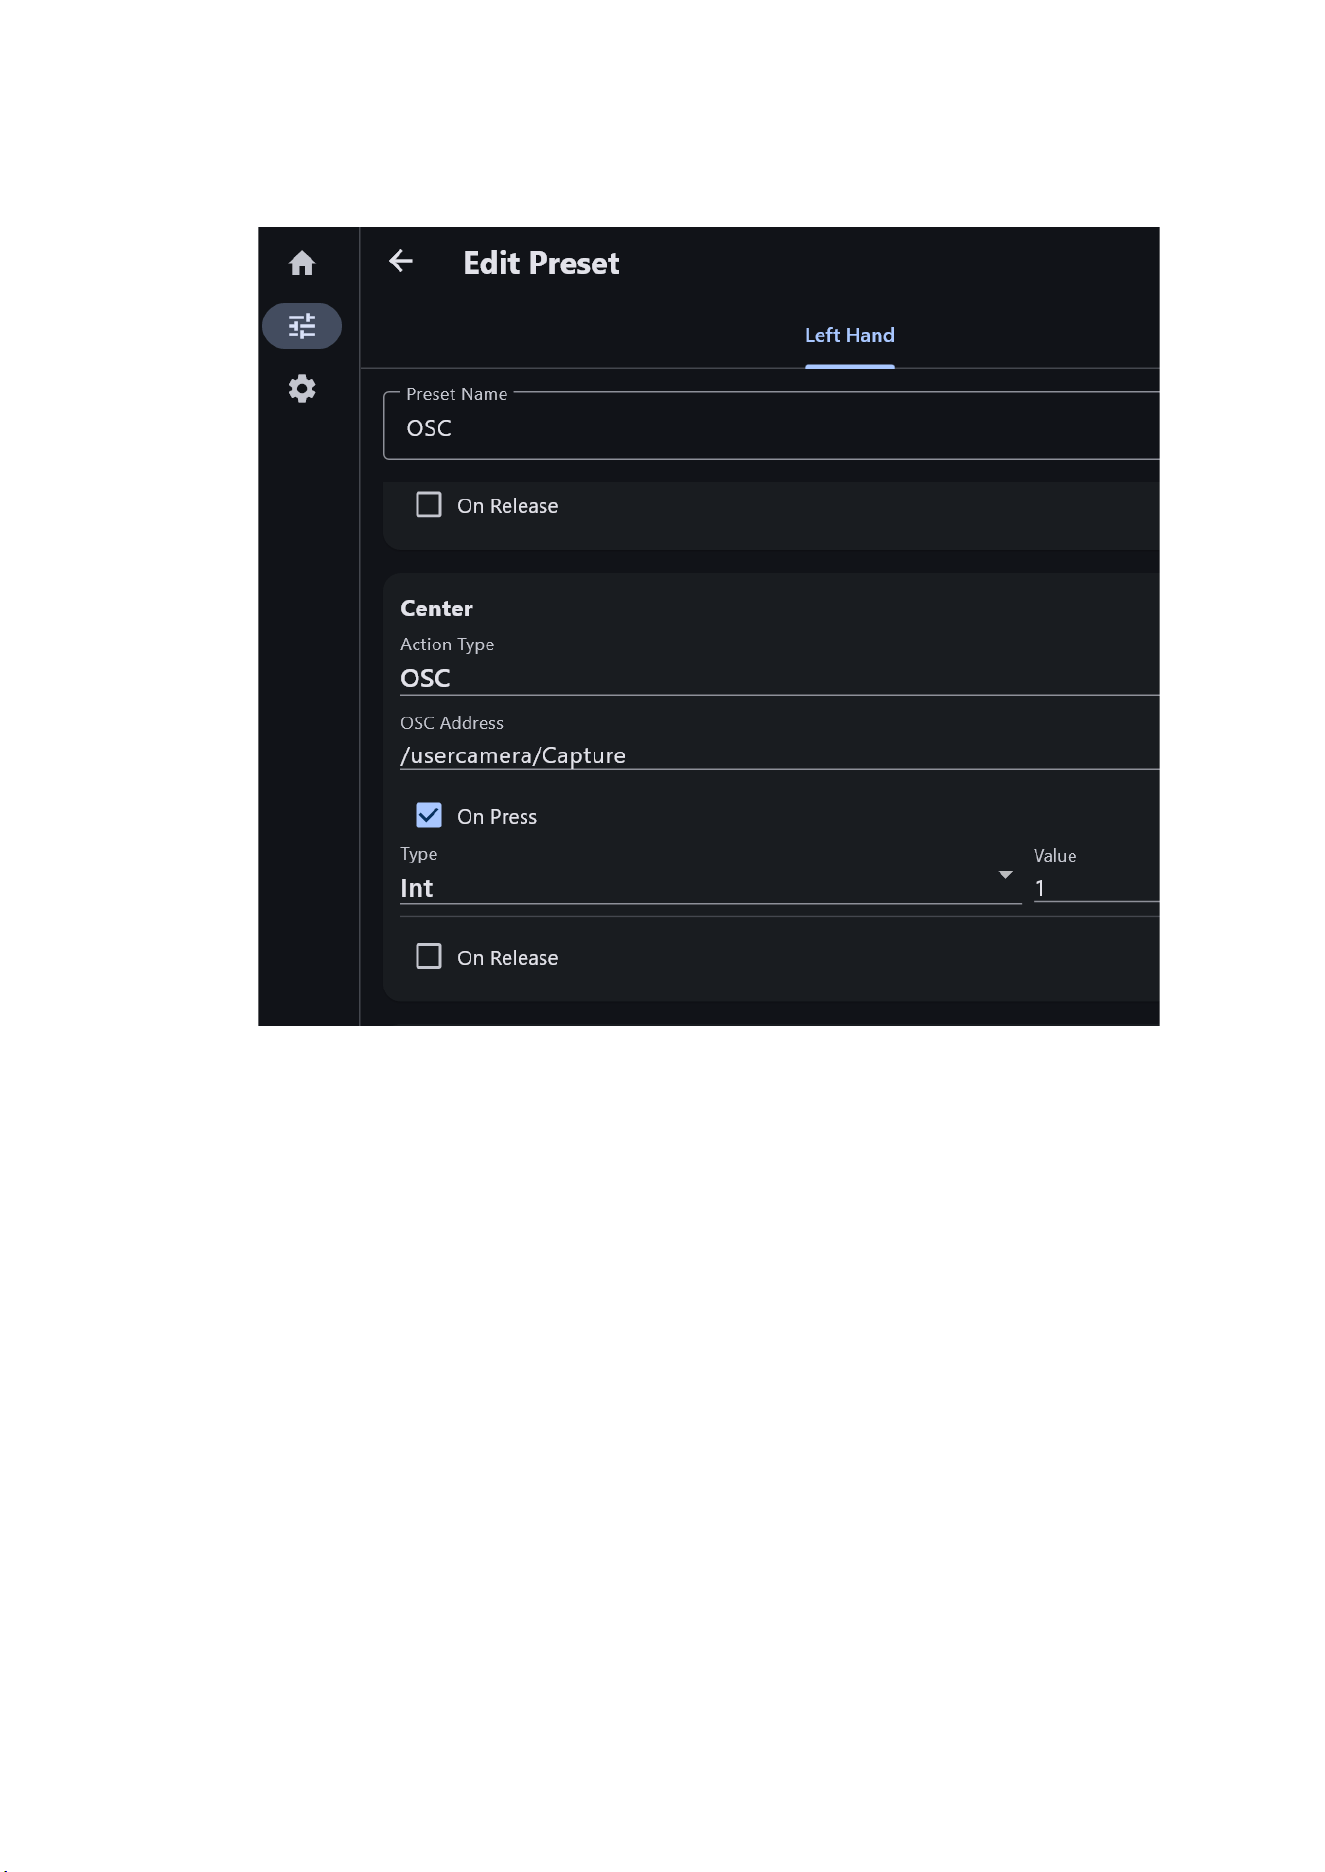
Open “Edit Preset,” then configure the OSC settings for each button.
For example, to assign the Center button to the camera shutter, configure the
Center section as follows:
● Action Type: OSC
● OSC Address: /usercamera/Capture
● On Press:
✅
● Type: Int
● Value: 1
Note:Type and value can also be set to Bool / true.
Note:Choose a preset name that you can easily recognize and remember, as you
will select it from the list on the Home screen later.
After editing the preset, click the save icon in the upper-right corner.
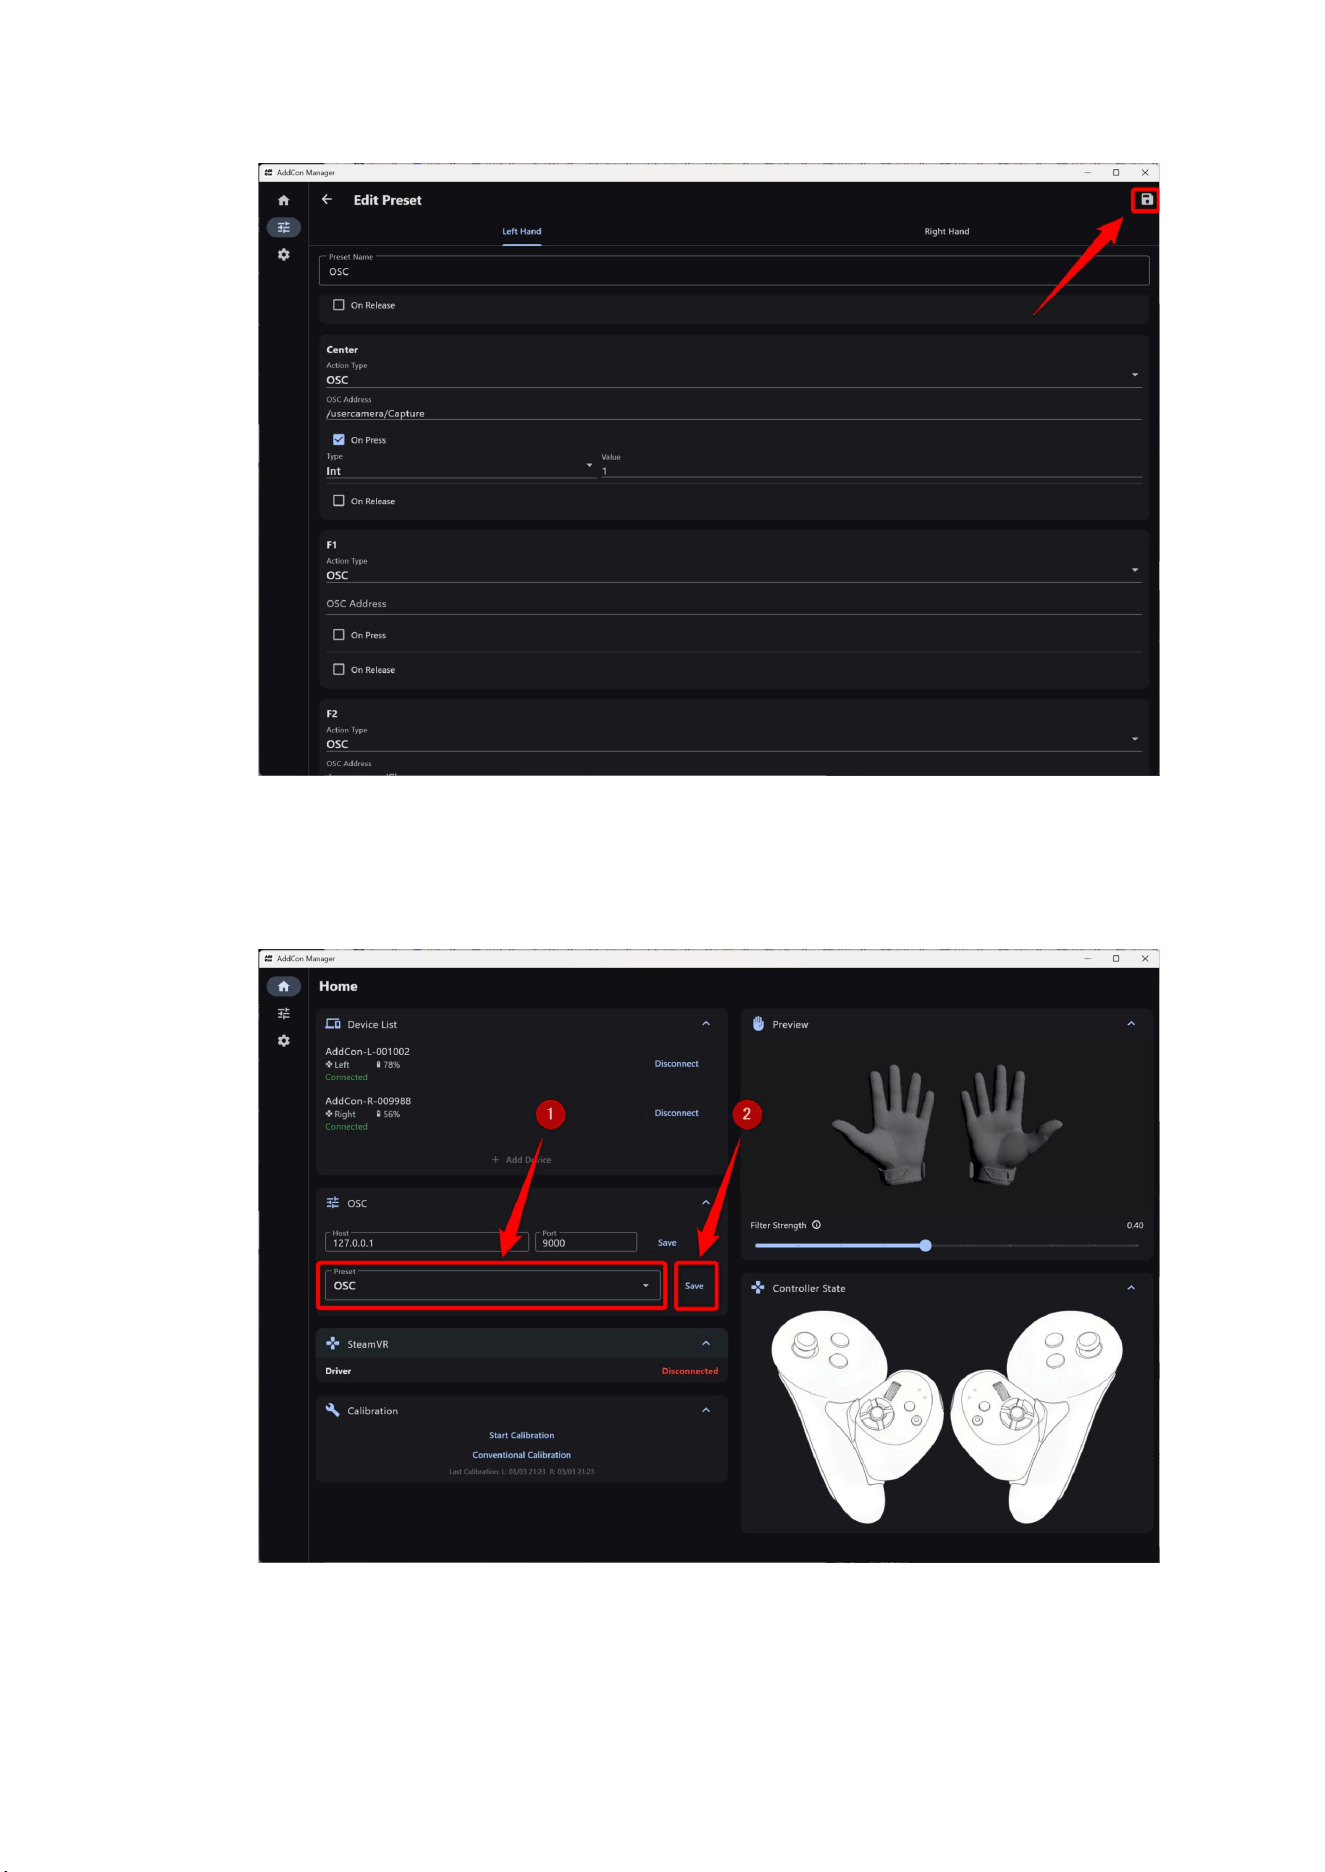
Click the home icon in the upper-left corner to return to the home screen.
For “Preset,” select the preset you edited earlier from the list, then click Save.
You can now use the Center button to trigger the camera shutter in VRChat.
6.6.2. OSC Wheel Settings
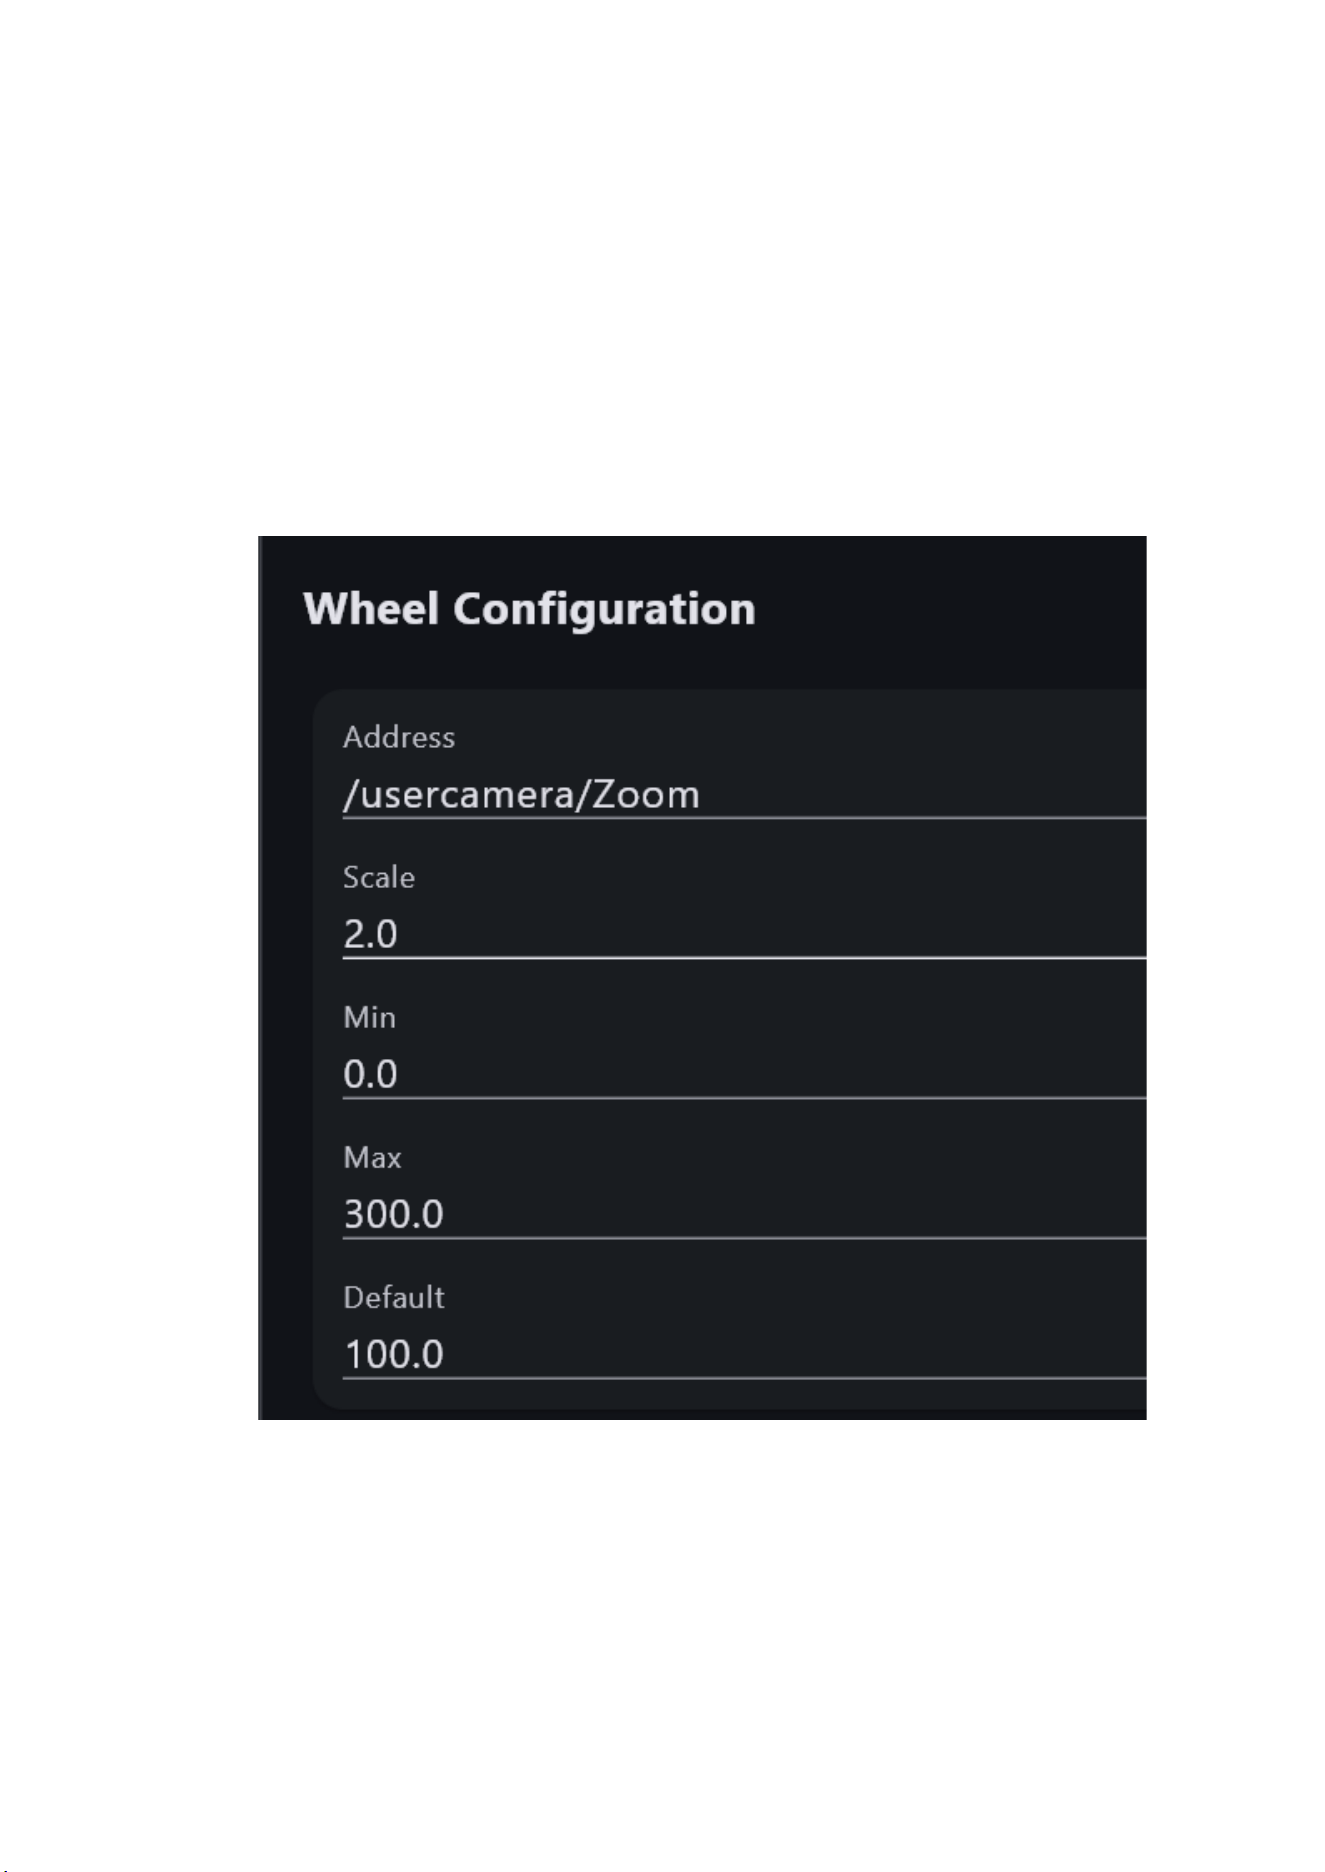
The wheel settings are located at the bottom of the preset settings.
For example, to assign the wheel to camera zoom, configure the wheel section as
follows. Adjust values such as the scale to your preference.
● OSC Address: /usercamera/Zoom
● Scale: 2
● Minimum: 0.0
● Maximum: 300
● Default: 100.0
6.6.2.1. Enabling OSC
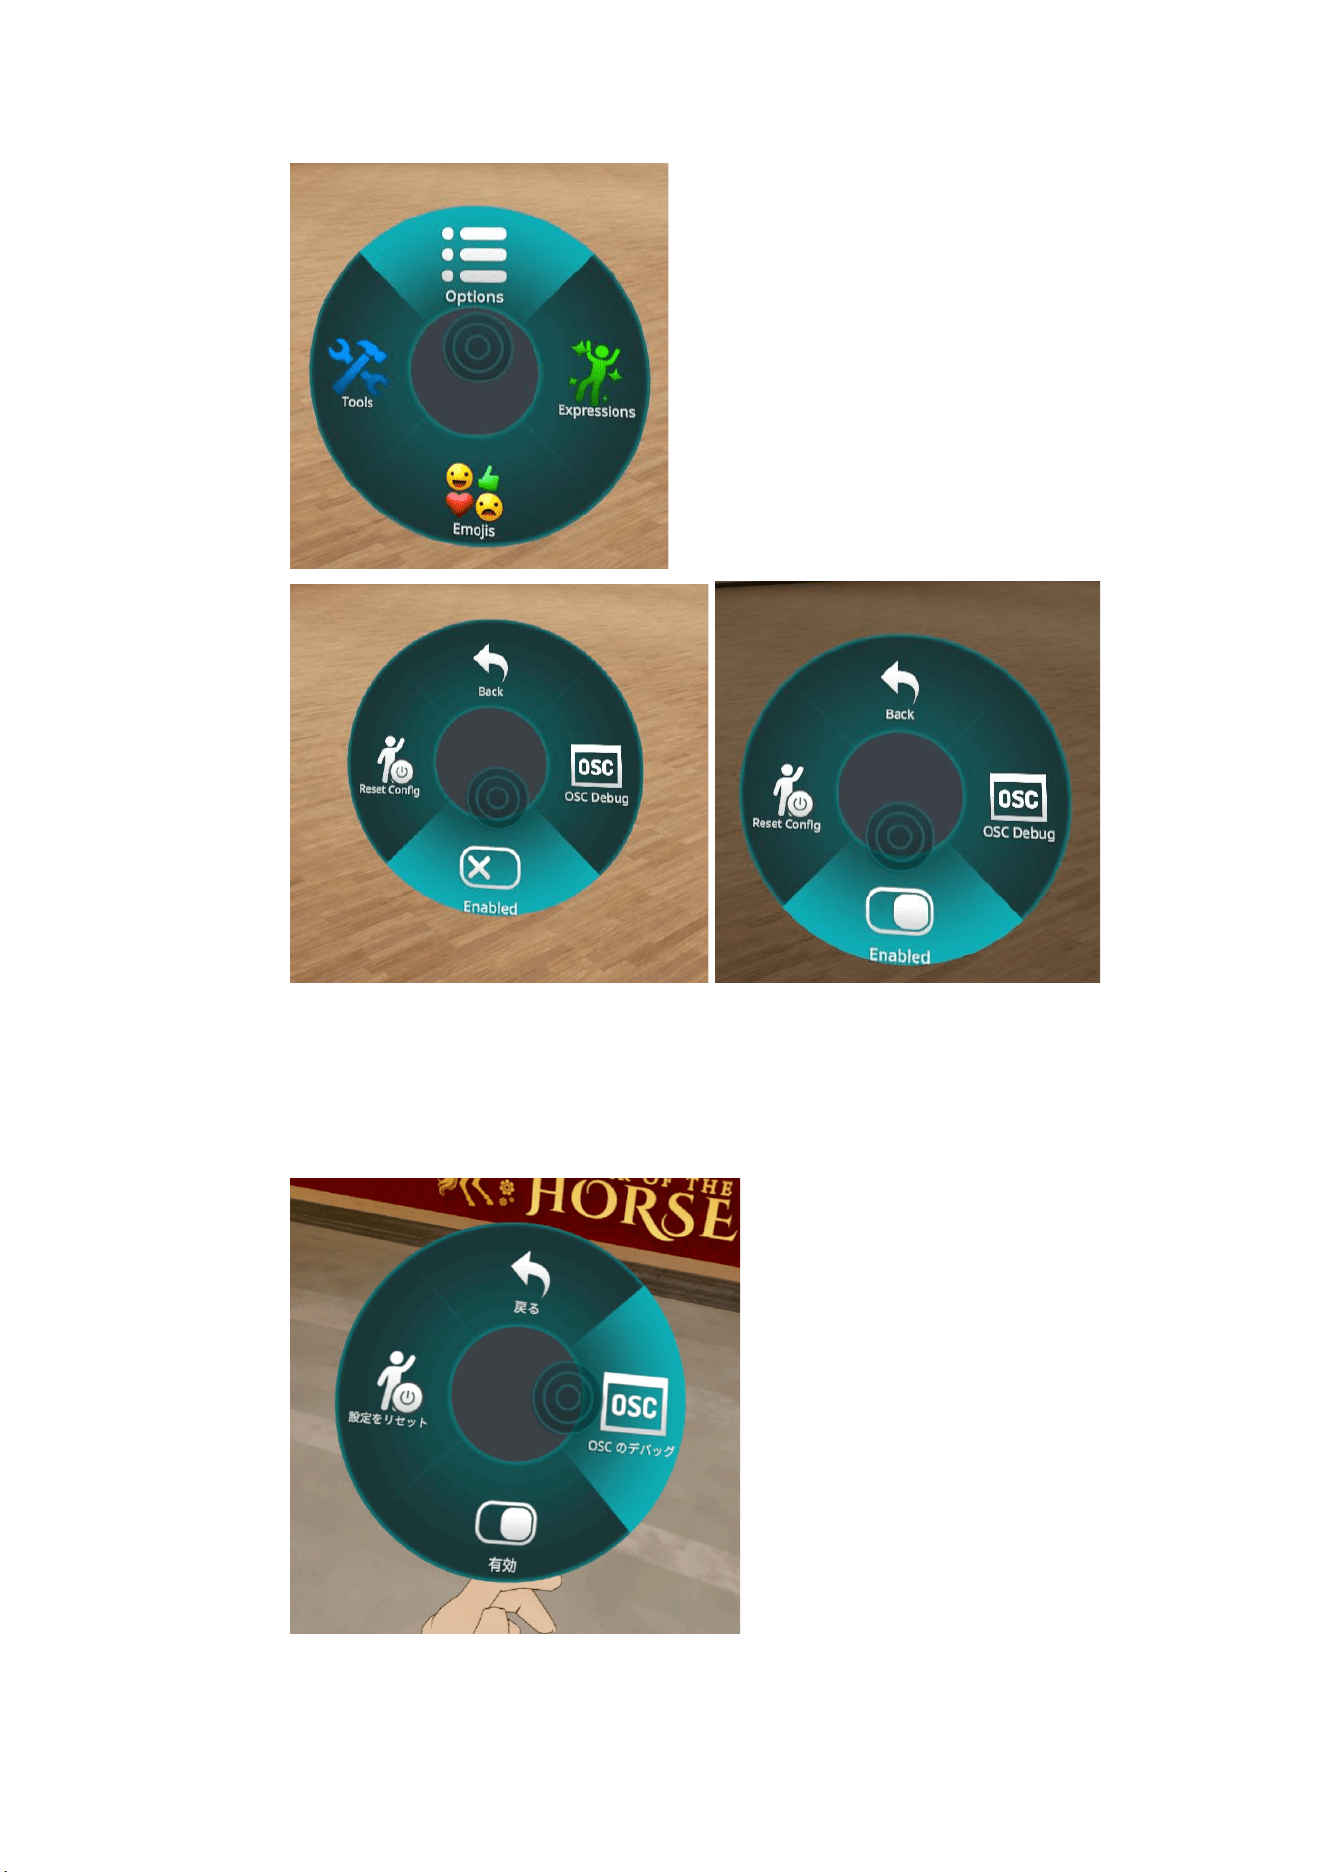
In VRChat, open the Action Menu and select Options → OSC → Enabled.
6.6.2.2. Checking OSC Operation
You can check in VRChat whether OSC input is working properly.
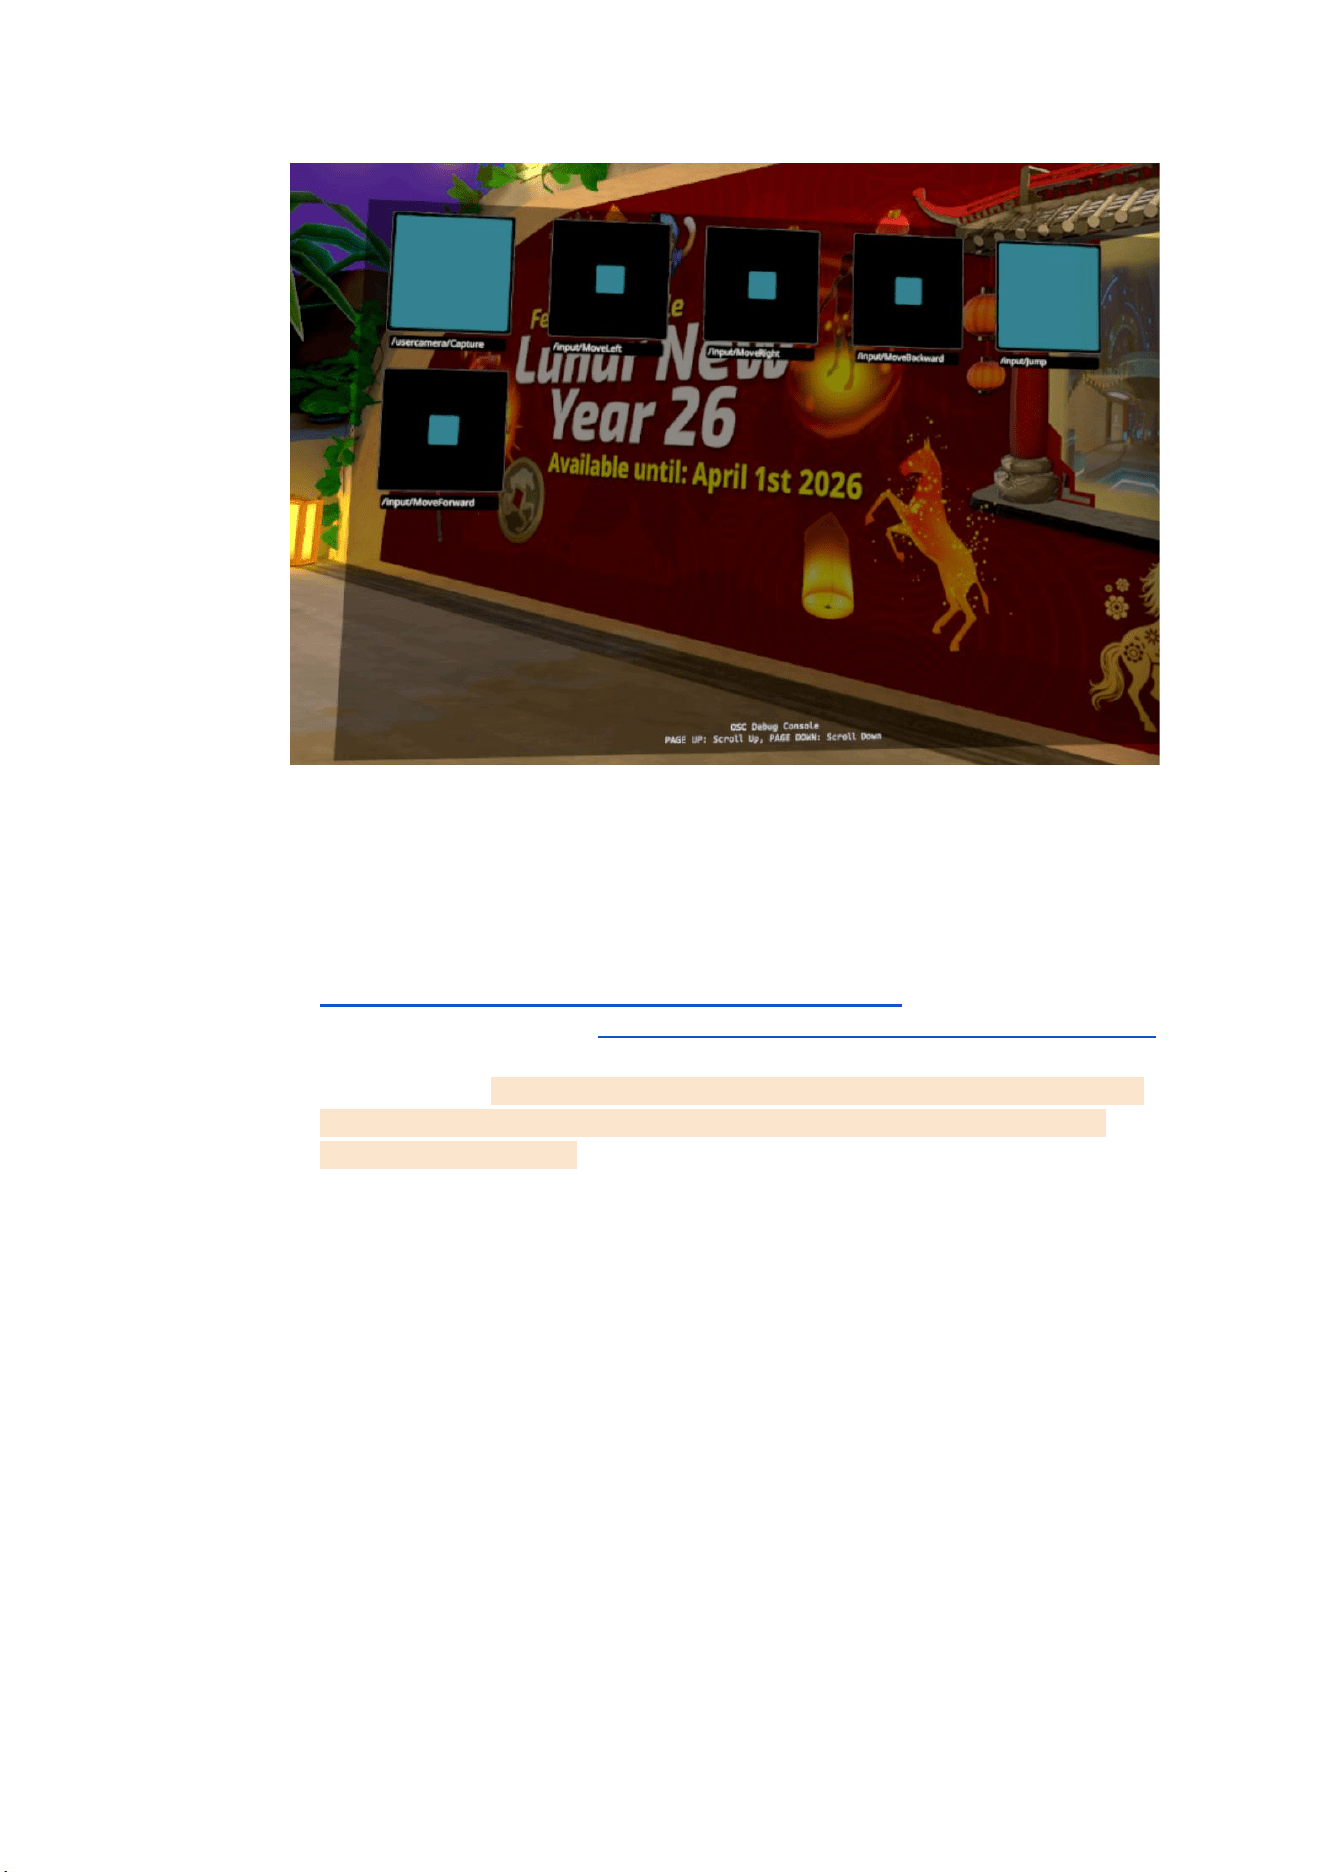
In VRChat, open the Action Menu and select Options → OSC → OSC Debug.
The OSC Debug screen will appear. Press the button on AddCon+ that has OSC
assigned to it, and check whether the input is displayed.
6.6.2.3. OSC TIPS
● For detailed OSC information for VRChat, please refer to the links below.
(Latest information as of February 27, 2026)
Camera-related information
https://docs.vrchat.com/docs/vrchat-202533-openbeta
Input-related information https://docs.vrchat.com/docs/osc-as-input-controller
● As of February 27, 2026, VRChat’s “Close Camera” (/usercamera/Close) has
an issue where pressing a button assigned to “Close Camera” while the
camera is not open will cause the camera to close automatically the
next time it is opened. Please be aware of this when using it.
● The F1 button is also assigned to power on/off. Do not assign this button to a
long-press action, as it will turn off AddCon+.
6.6.3. Keyboard
AddCon+ supports not only OSC but also keyboard input.
You can also configure keyboard settings in the OSC preset settings screen.

Assign keyboard settings to each button.
For example, to assign the copy shortcut “Ctrl+C” to the Center button, configure
the Center section as follows.
● Action Type: Keyboard
● On Press:
✅
● Key: C
● Key Code
● Ctrl:
✅
Note:Choose a preset name that you can easily recognize and remember, as you
will select it from the list on the Home screen later.
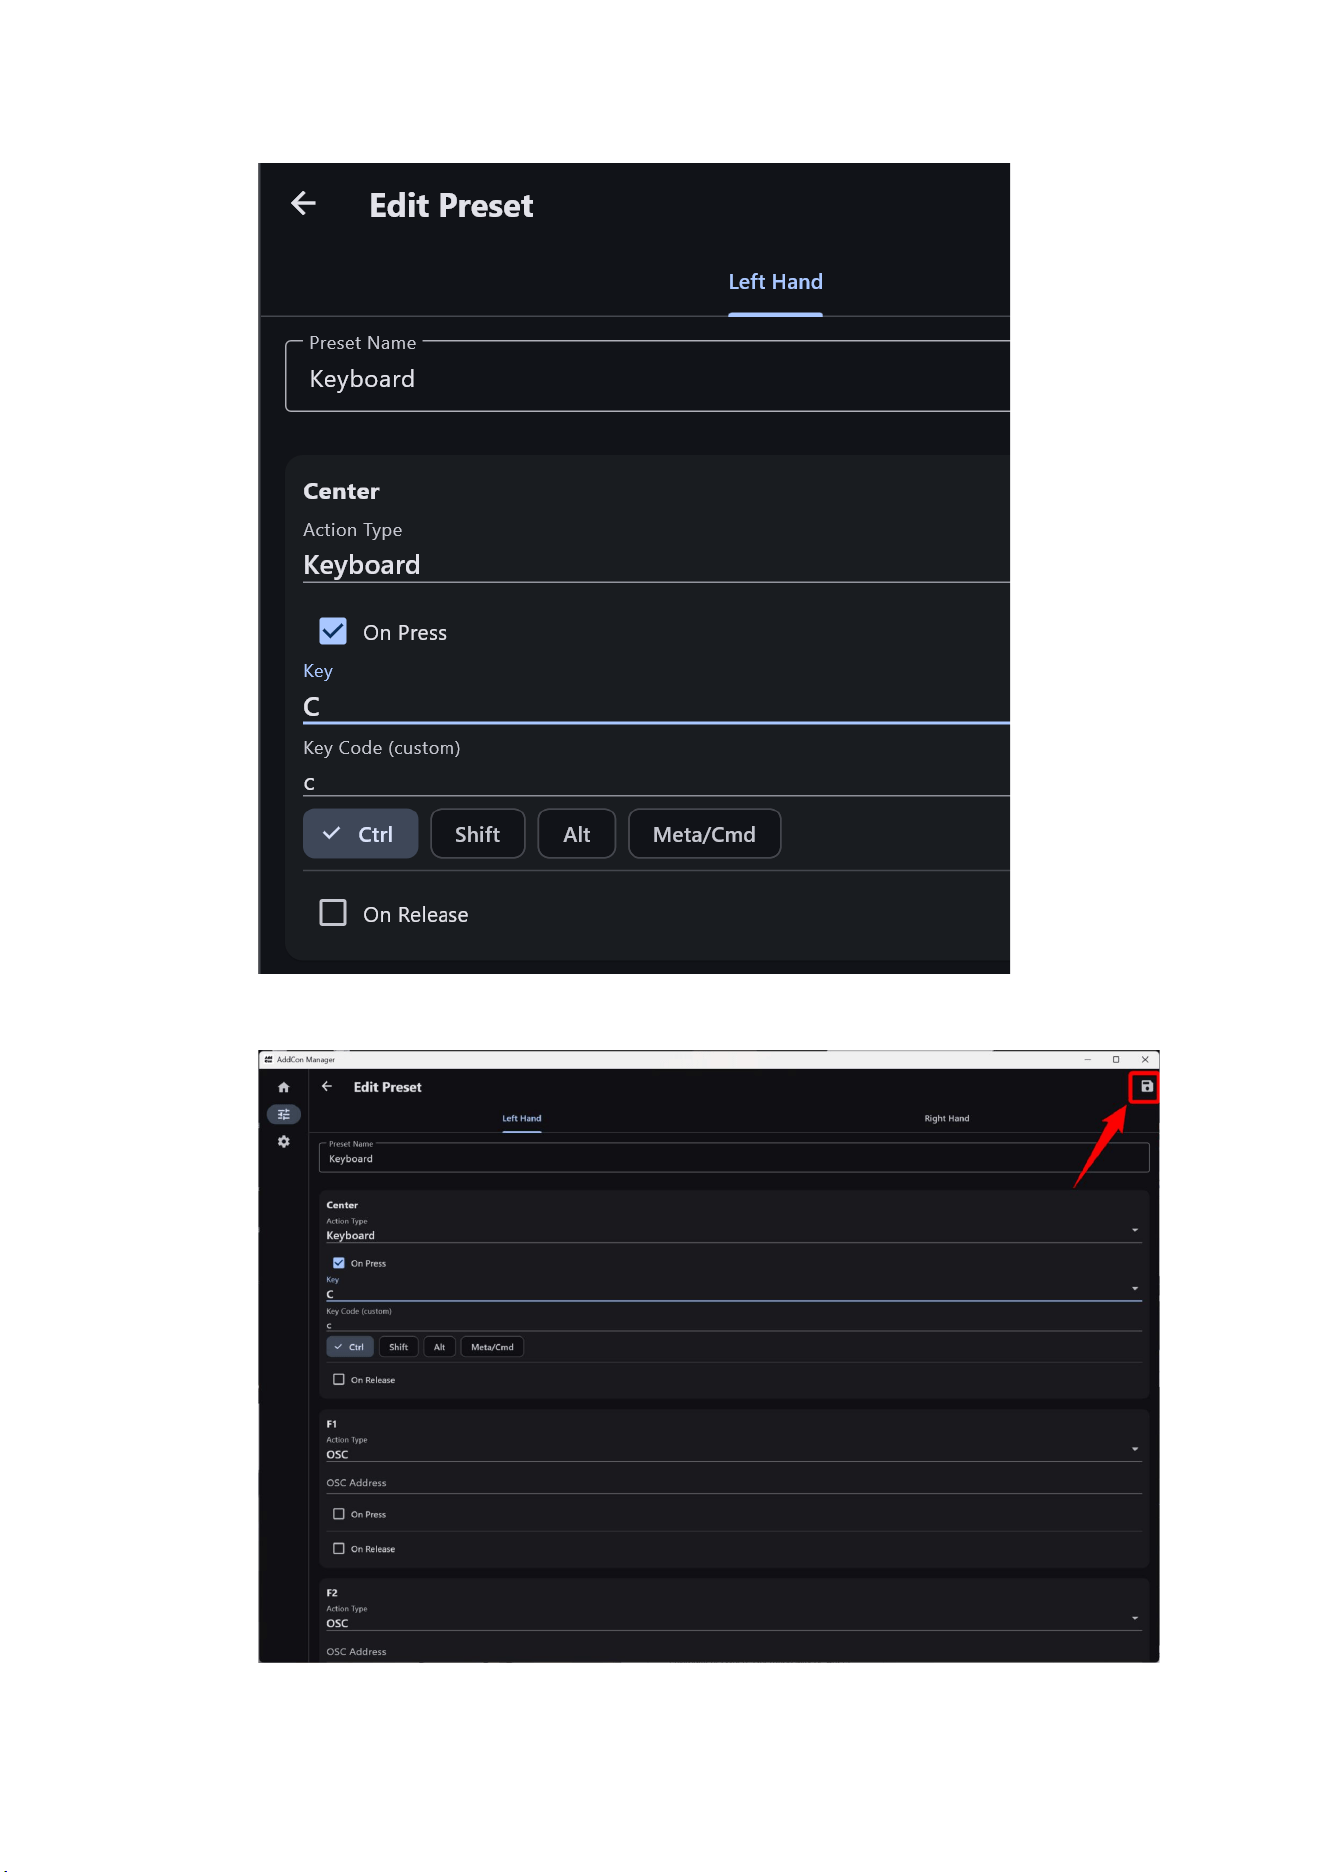
After editing the preset, click the save icon in the upper-right corner.
Click the home icon in the upper-left corner to return to the home screen.
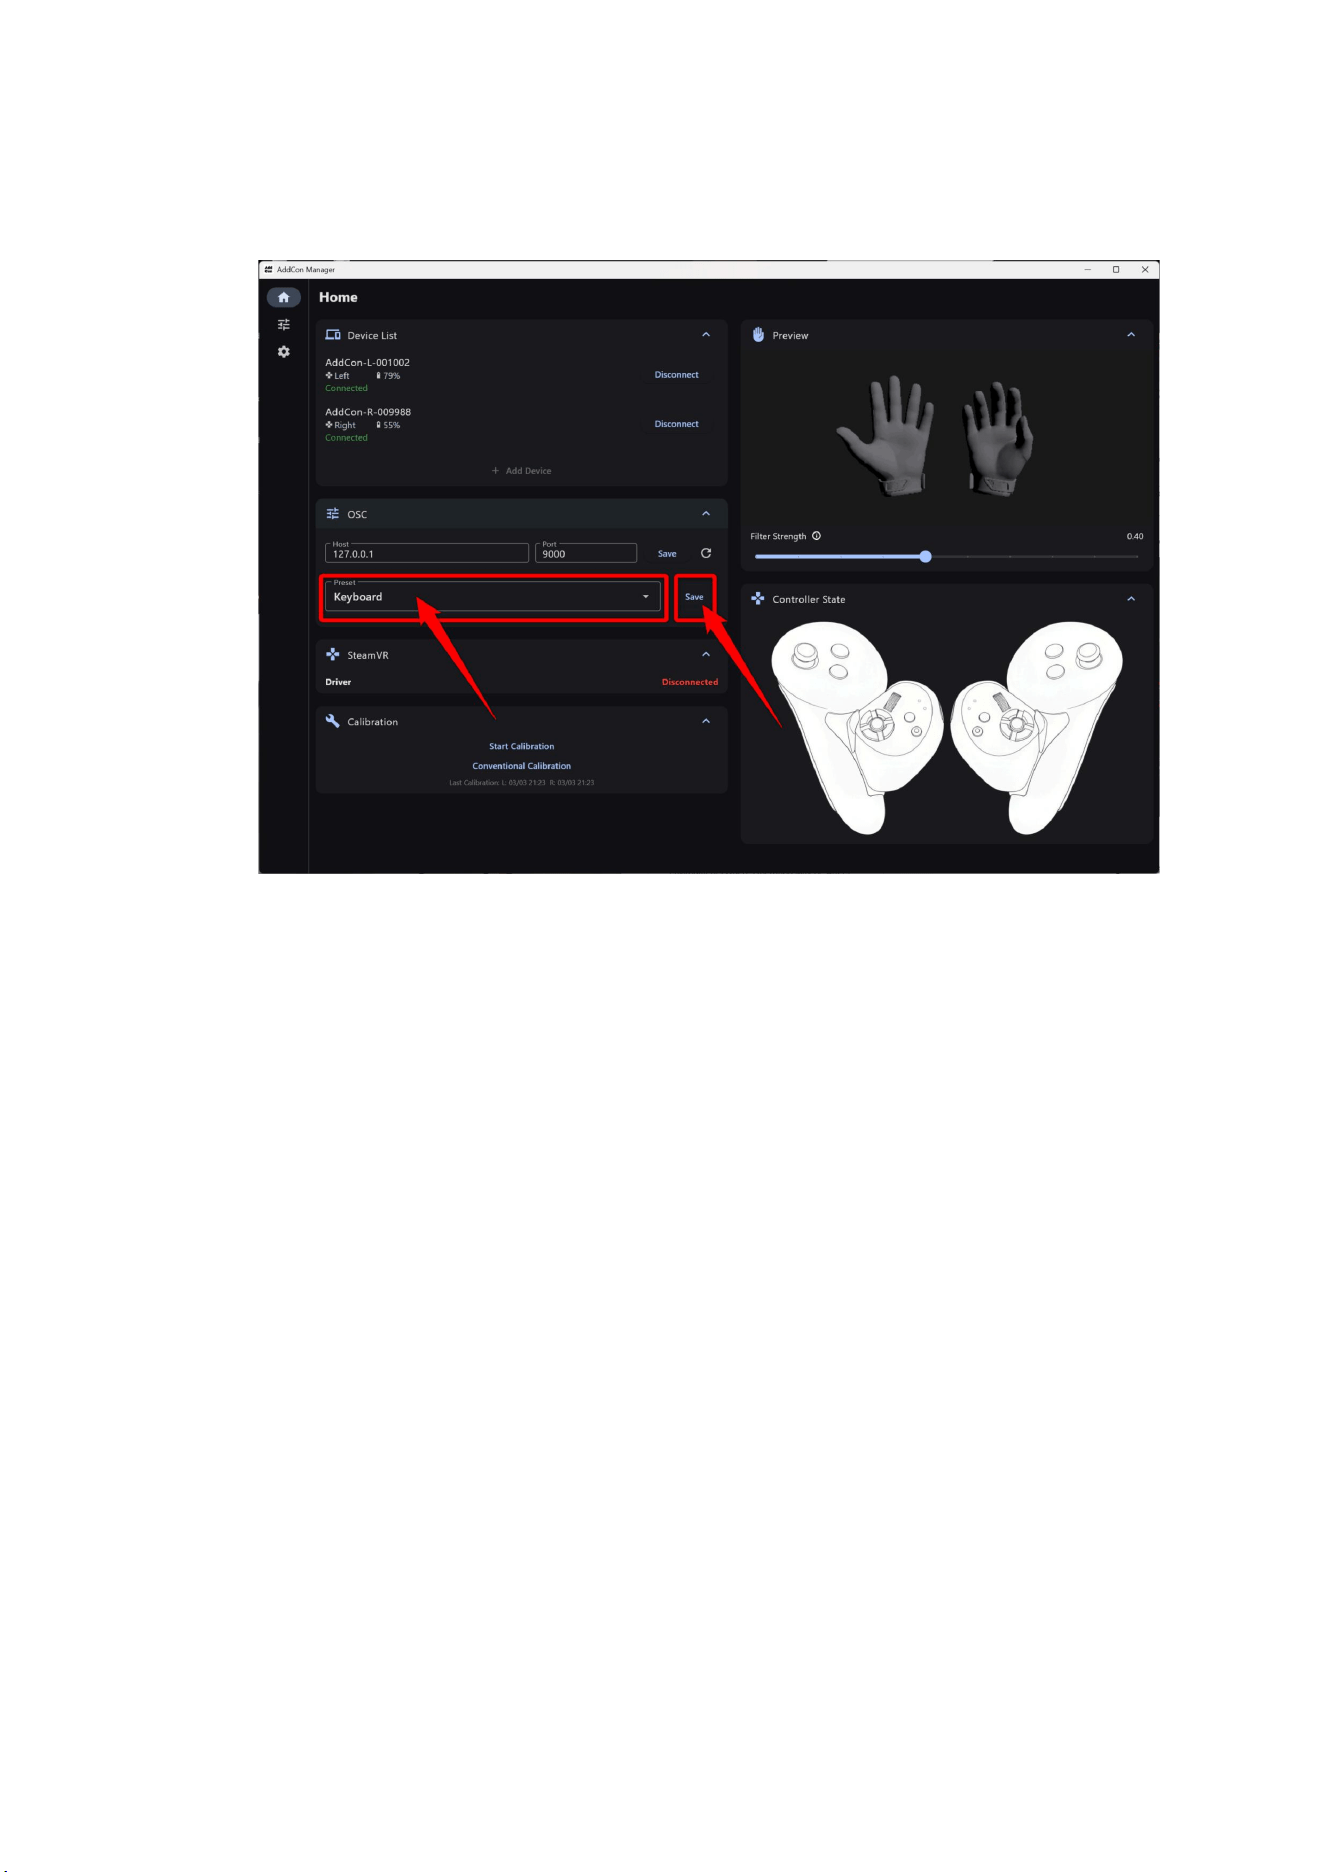
For “Preset,” select the preset you edited earlier from the list, then click Save.
Now, pressing the Center button will enter the copy shortcut, “Ctrl+C.”
6.6.4. OSC & Keyboard
You can also assign both OSC and keyboard input within a single preset.
6.7. Hand Tracking
You can fine-tune finger movement.
Click the gear icon on the left to open the settings screen.
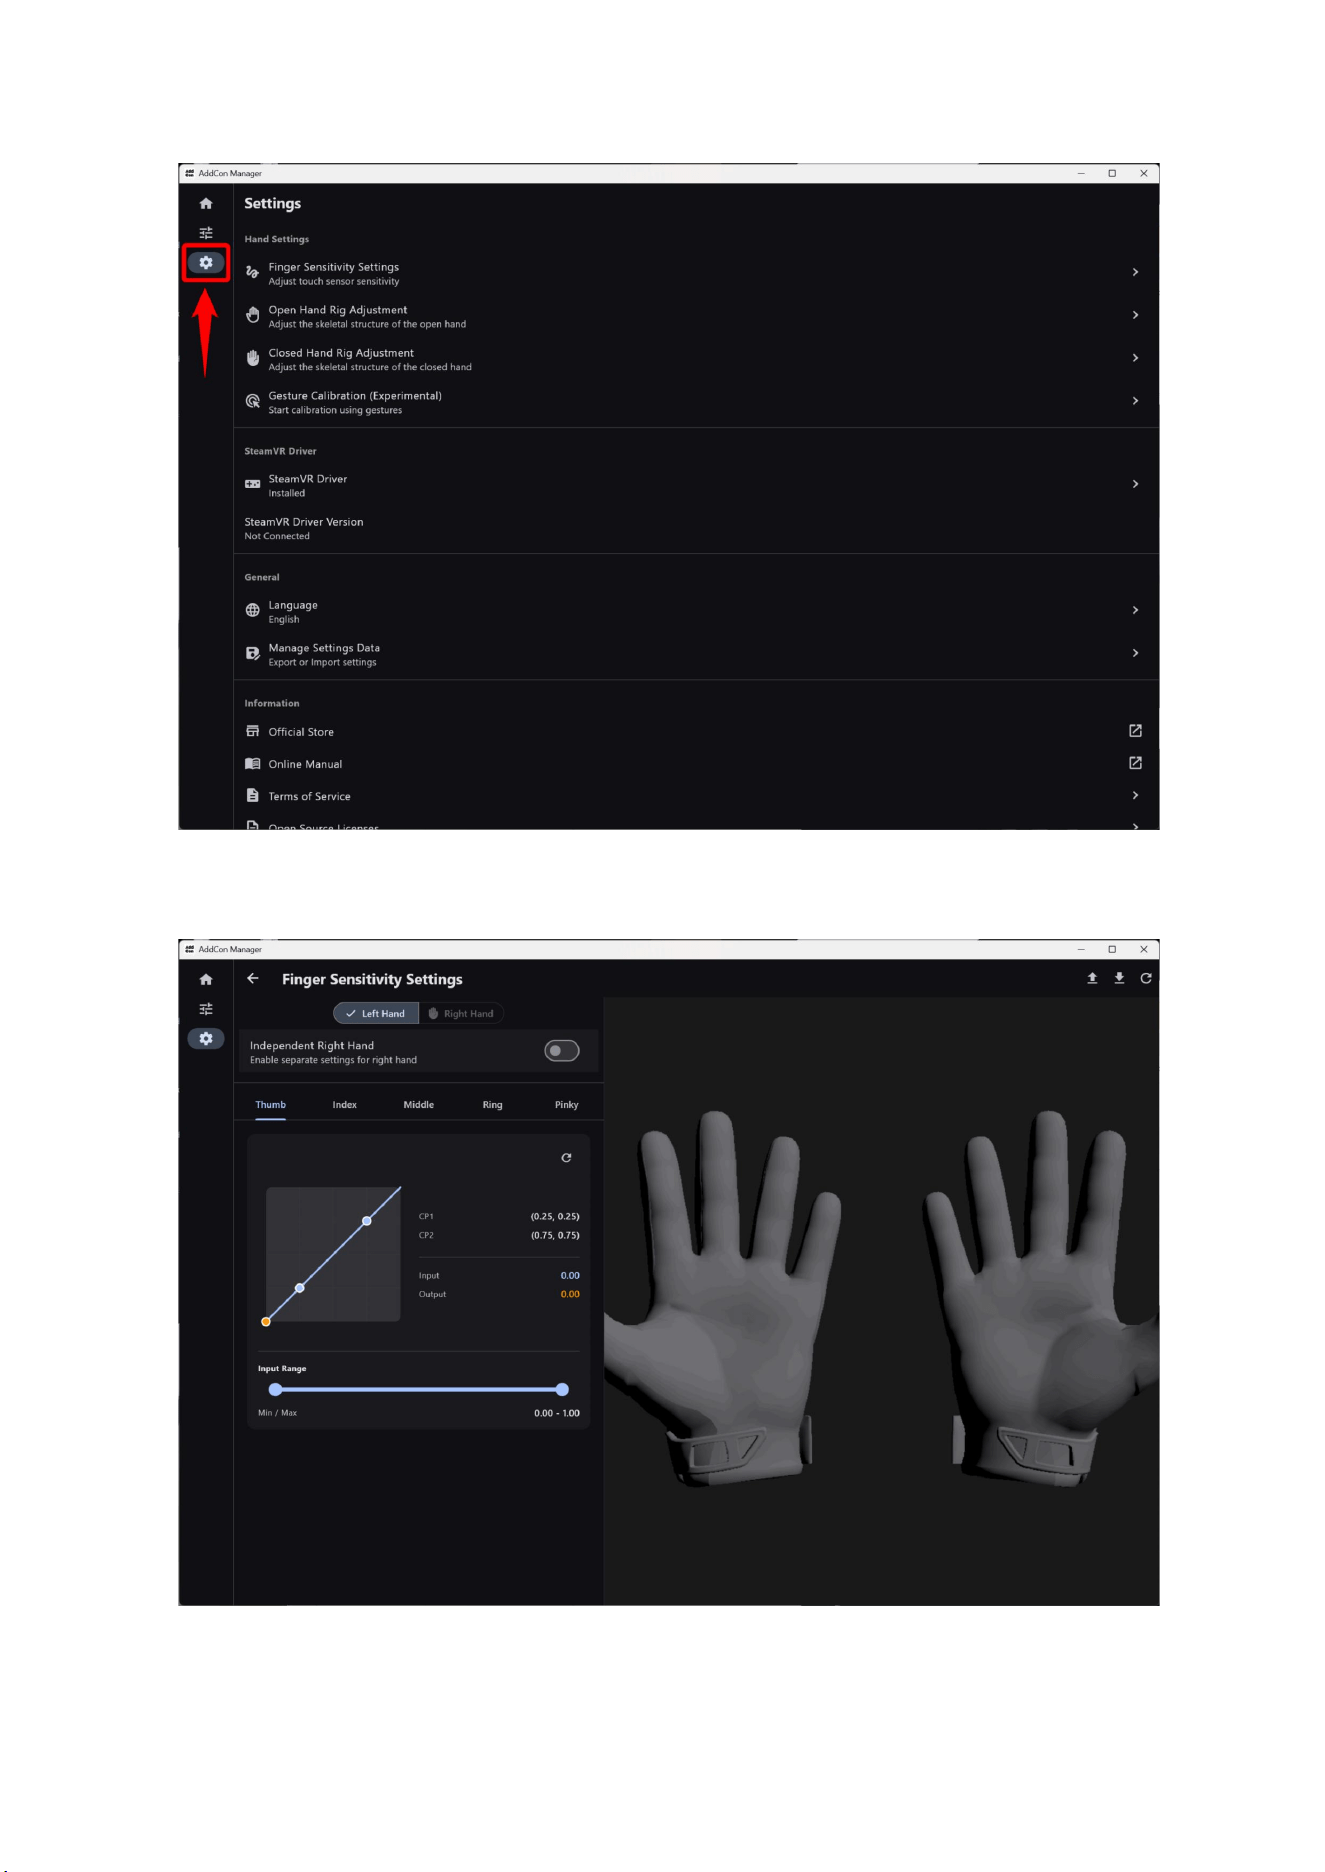
In “Finger Sensitivity Adjustment,” you can adjust the touch sensor sensitivity for each
finger, including the thumb.
In “Open Hand Adjustment,” you can adjust the open-hand position.
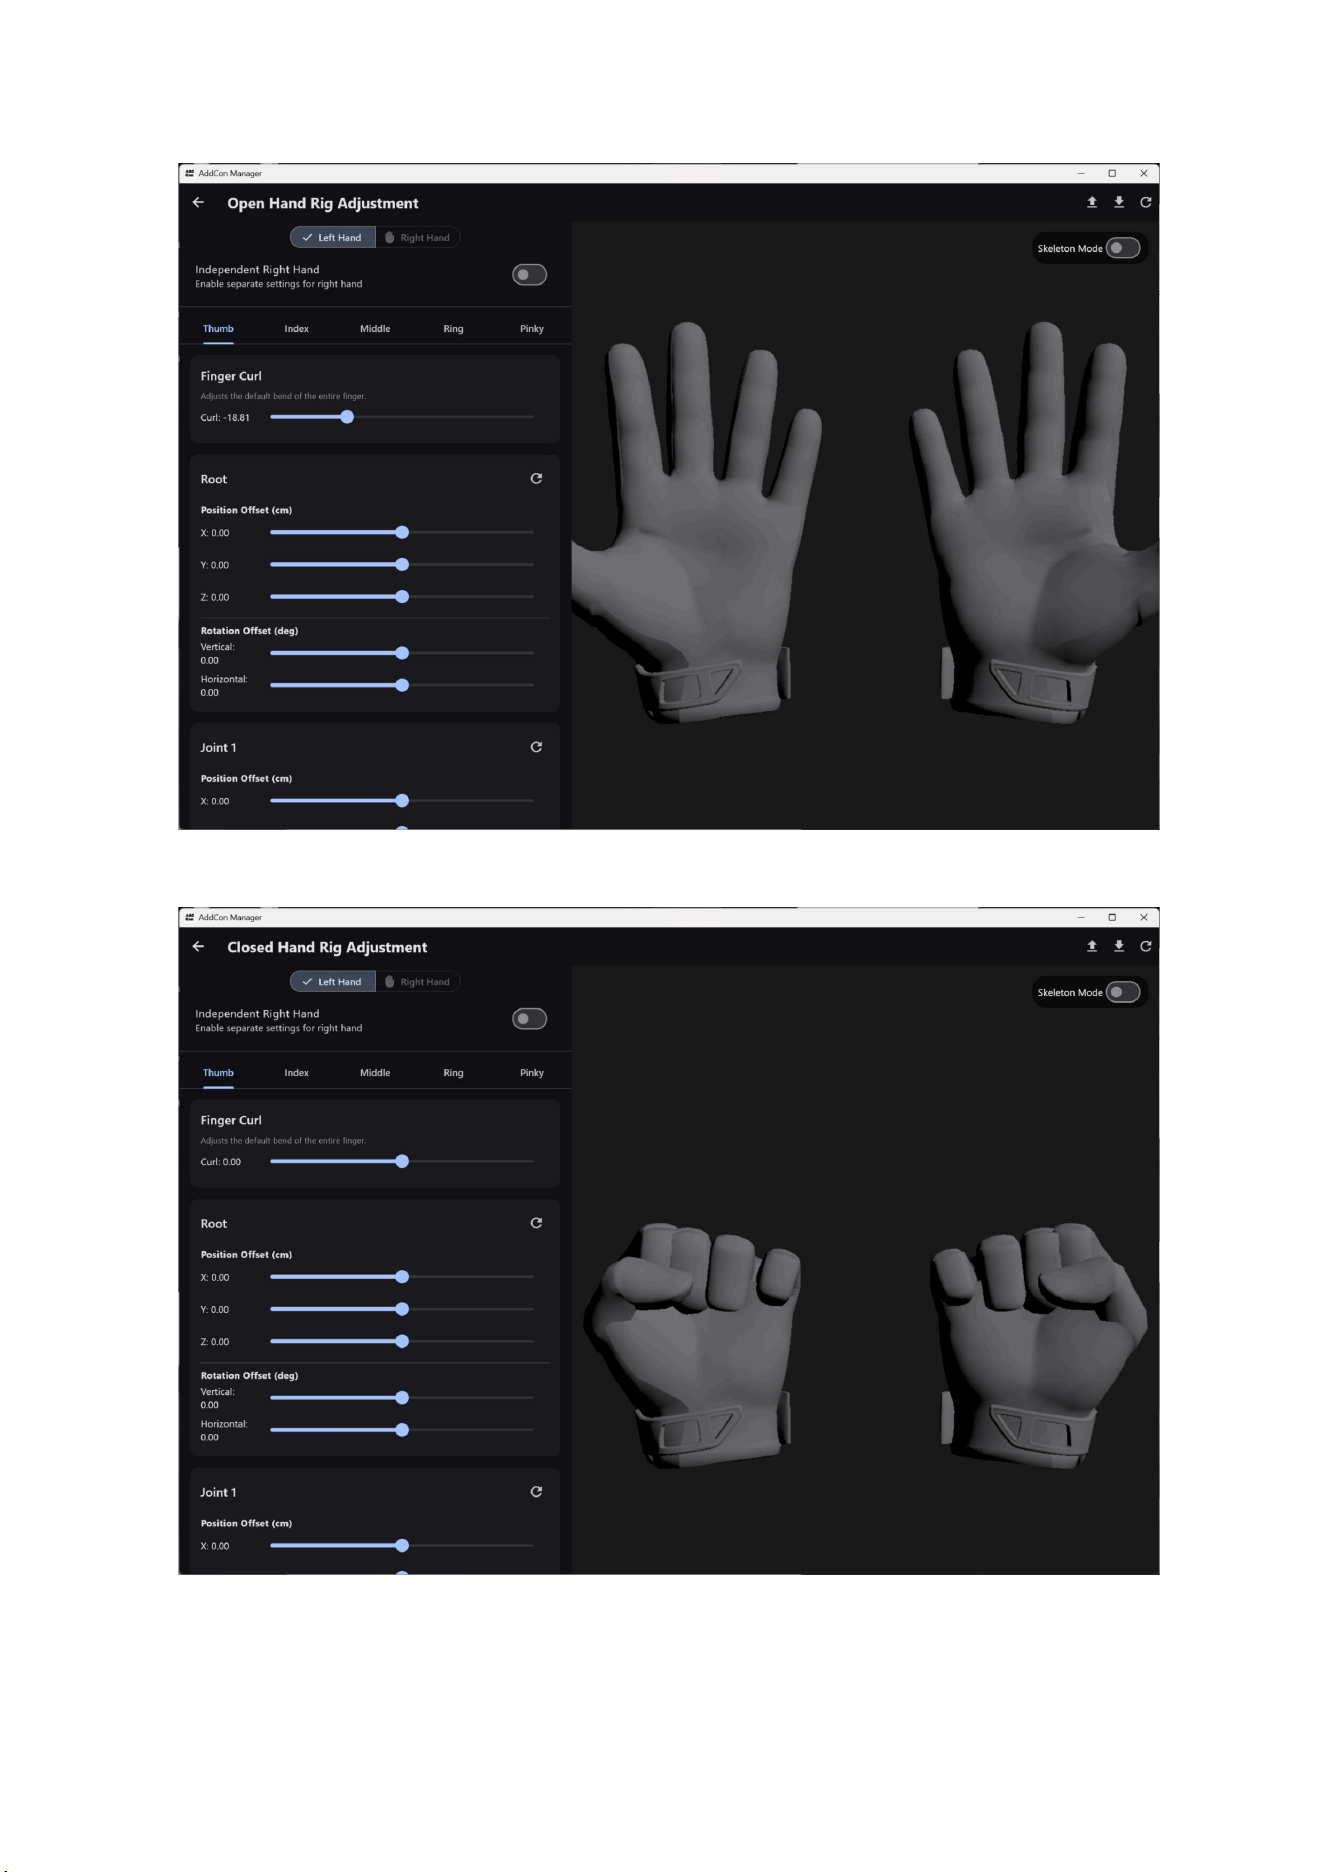
In “Closed Hand Adjustment,” you can adjust the closed-hand position.

7. Usage Notes
7.1. About Bluetooth®
This product has a wireless range of approximately 10 meters in an unobstructed
line-of-sight environment.
Actual operating distance may be shorter than this depending on obstacles, the installation
environment, and PC performance.
7.2. Usage Restrictions
● This product may only be used in Japan and the United States.
● Wireless communication with all Bluetooth®-compatible devices is not guaranteed.
● Bluetooth®-compatible devices used for wireless communication must conform to the
standard specifications established by Bluetooth SIG, Inc. and must be certified.
However, even if a device conforms to the standard specifications, it may not be able
to connect depending on its specifications or settings, and operation methods,
display, and performance are not guaranteed.
● Please note that we accept no responsibility whatsoever for any leakage of data or
information that may occur during wireless communication.
7.3. Environments Where Operation May Be Affected
● Using the product in the following environments may cause communication to be
interrupted or slow down.
○ Near microwave ovens, digital cordless phones, or other devices that use the 2.4
GHz frequency band, such as wireless audio devices or game consoles
○ When the PC connected to this product is blocked by partitions or other obstacles
○ When there is a broadcasting station or similar facility nearby and surrounding
radio waves are too strong
7.4. About Use and Storage Locations
● Do not place the product in locations with extremely high temperatures, such as
areas exposed to direct sunlight or near heating appliances.
● Do not place the product in dusty locations.
● Do not place the product in locations subject to frequent vibration.
● Do not use or place the product in humid locations, such as bathrooms.
7.5. Disposal
● The left and right AddCon+ units contain built-in lithium-ion batteries.
When disposing of the product, do not dispose of it with general household waste
(non-burnable waste). Follow the regulations of your local municipality.
7.6. Cleaning
● Wipe the left and right AddCon+ units with a soft, dry cloth.
● If the left and right AddCon+ units are very dirty, wipe them with a cloth dampened
with water and thoroughly wrung out, then wipe them again with a dry cloth.
● Do not use solvents or chemically treated cloths, such as benzine, thinner, alcohol, or
kitchen detergent, as they may cause the unit to deteriorate.
8. Specifications
Communication
Method
Bluetooth® LE
Battery
Built-in lithium-ion battery
Charging Method
USB Type-C
Charging Time
Approx. 2 hours 30 minutes (when powered off)
Continuous
Operating
Time: Approx. 130 hours
Dimensions
81.1 x 79.3 x 68.1 mm
Weight
Approx. 40 g per hand
Included
Accessories
USB charging cable
Supported OS
Windows 11 / SteamVR 2.12.14 or later
9. FAQ
Question
Answer
What is the warranty
period for this product?
The warranty period for this product is one year from the date of purchase. If the
product was purchased by pre-order, the warranty period is one year from the
shipping date.
The warranty card
does not include the
store name or other
details. Is that okay?
If you purchased the product from the Shiftall website, we have a record of the
purchase date, so the warranty card does not need to be filled out.
If you purchased the product from a retail store or other seller, you can still
receive warranty service within the warranty period by presenting documentation
that proves the purchase date, even if the store name and purchase date are not
written on the warranty card.
What order should I
start the applications
in?
The startup order of the applications does not matter.
You can use AddCon+ even if you start Shiftall AddCon Manager after launching
VRChat.
Which Bluetooth
adapters have been
verified to work?
Verified Built-in PC Wi-Fi / Bluetooth Combo Adapters
● Intel AX201
● Qualcomm FastConnect 7800
Verified USB Bluetooth Adapters
● TP-Link UB500
● TP-Link UB500 Plus
● Buffalo BSBT5D200BK
● Buffalo BSBT5D205BK
● Buffalo BSBT54D205BK
Which controllers have
been verified to work?
Controllers Verified for Installation:
● Meta Quest Touch Plus
● Meta Quest Touch Pro
Which knuckle straps
have been verified to
work?
Verified Knuckle Straps:
For Quest 3 / 3S (Meta Quest Touch Plus Controllers)
● Shiftall Adjustable Knuckle Straps Q3
● Quest Active Straps
● B0CT2YVKWF
● Q3HB1
For Quest Pro (Meta Quest Touch Pro Controllers)
● Aubika controller grips
10. Troubleshooting
Symptom
Cause and Solution
The power does not
turn on
The battery may be empty. Connect the USB charging cable, and once the red
LED lights up to indicate charging has started, press and hold the main button
for about 3 seconds.

After that, perform a forced shutdown by pressing and holding the main button
for 10 seconds, then reconnect the USB charging cable.
If the power still does not turn on after the forced shutdown, disconnect the USB
cable once, then try turning the power on again.
If the issue does not improve after trying the above steps, please contact
support.
Red LED does not
light up while charging
Make sure the USB charging cable is securely connected.
→See 「Charging」
Charge the product in an environment with an ambient temperature of 10 °C to
35 °C (50 °F to 95 °F).
If charging is complete, the red LED will be off.
If the issue does not improve after trying the above steps, please contact
support.
Red LED blinks rapidly
while charging
There may be an issue with the unit’s charging system or battery.
If this issue occurs frequently, please record a video showing the condition of the
unit and contact support.
Green LED keeps
blinking / Firmware
update failed
If the green LED keeps blinking without changing during the firmware update,
the firmware update may not be progressing properly on the unit.
If the unit remains in that state for 2 minutes, it will automatically restart. Please
perform the firmware update again.
When the firmware update is completed successfully, the LED will return to the
normal slow green blinking pattern.
Battery life has
become shorter
If both the charging time and operating time become extremely short, the built-in
battery may be worn out. Please contact support.
Power turns off
automatically
If the unit remains disconnected from AddCon Manager for 20 minutes, it will
automatically power off.
Bluetooth connection
cannot be established
In Windows Settings, turn Bluetooth off once, then turn it back on. Wait 15
seconds after turning it on, then try connecting in AddCon Manager.
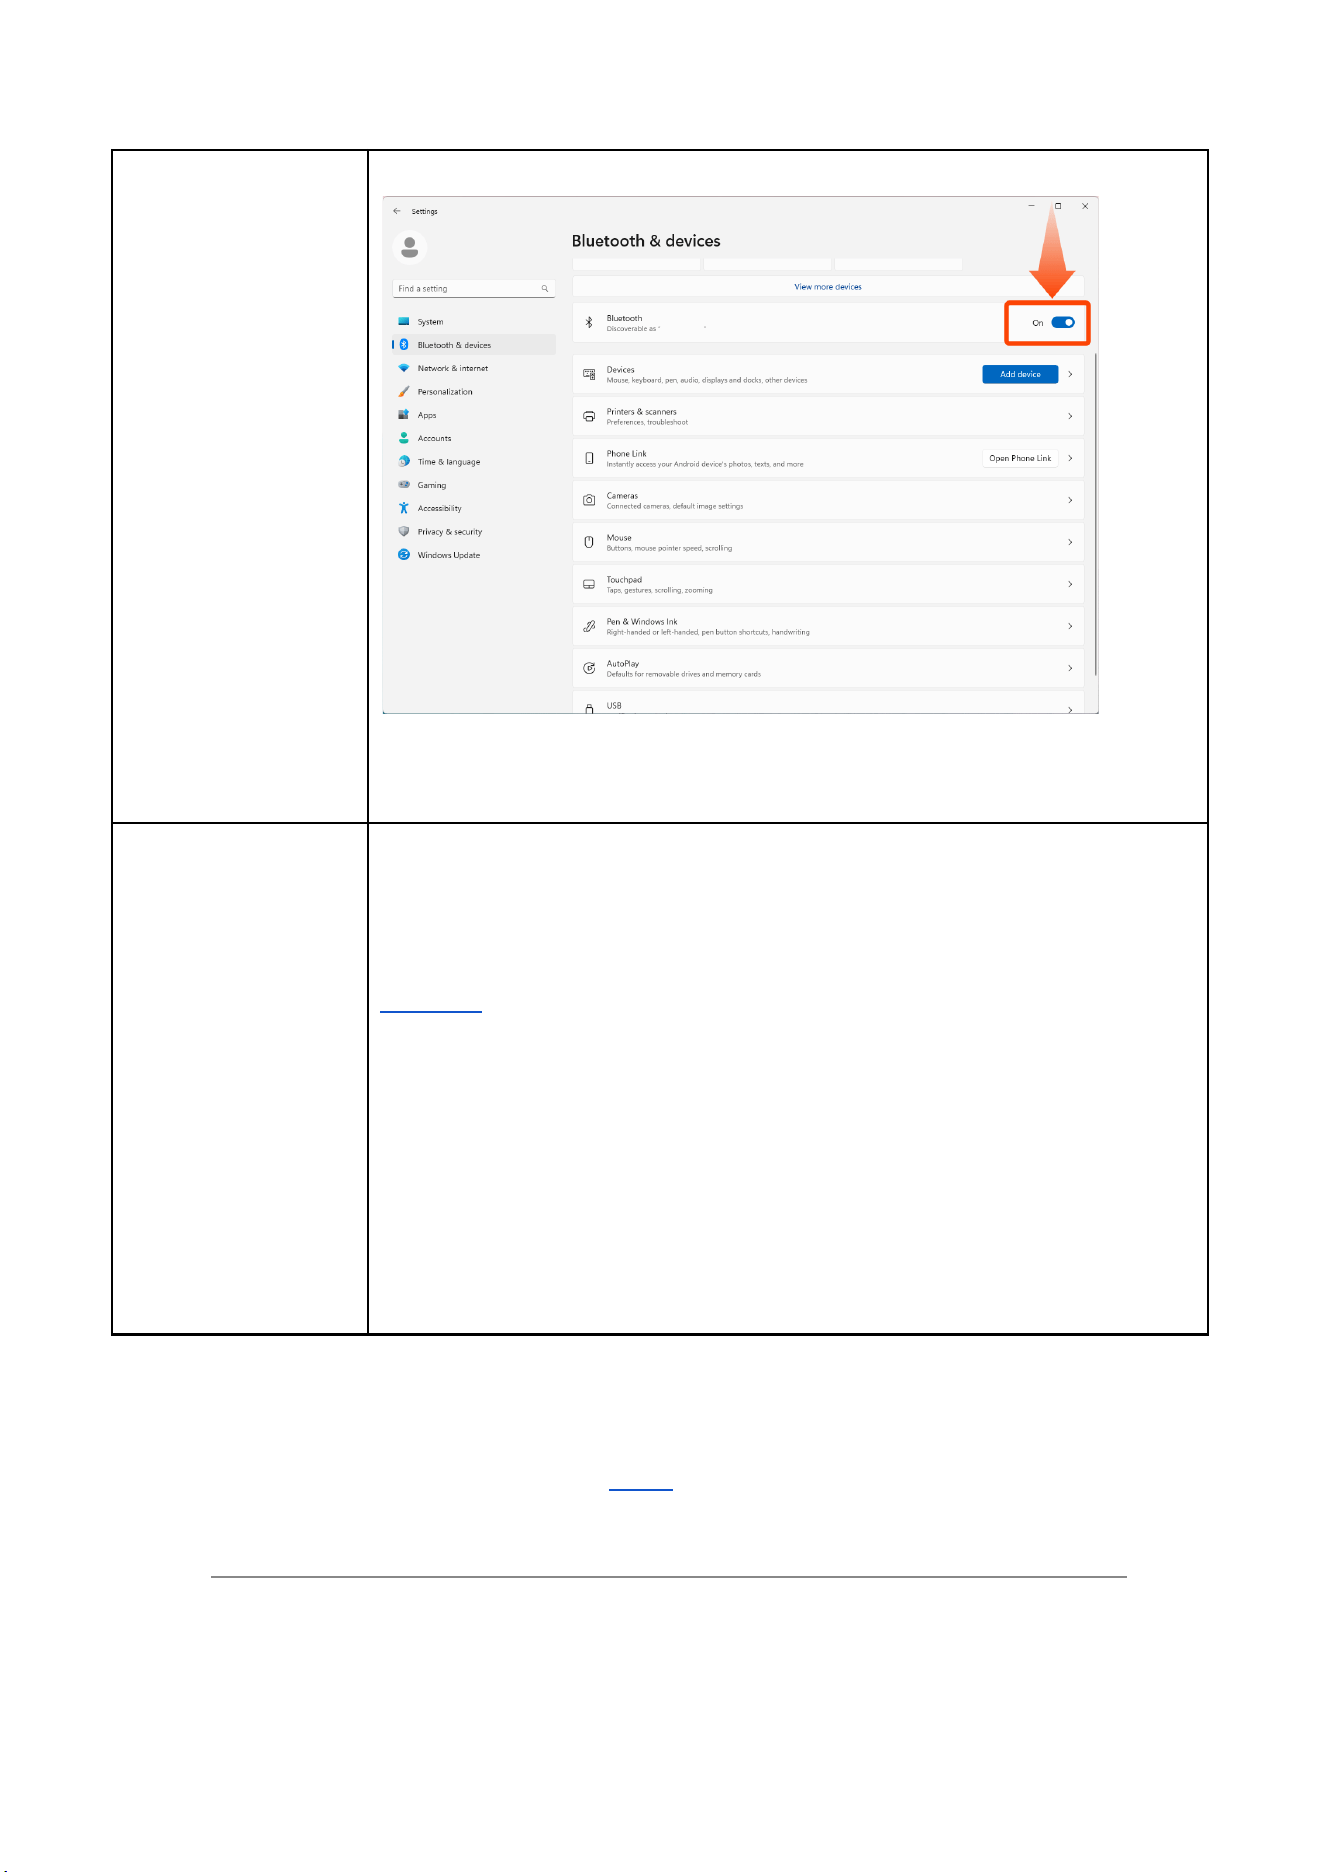
If it still does not connect, try restarting your PC. Restarting the PC can be
effective when Bluetooth is unstable.
Bluetooth connects,
but the connection is
unstable or
disconnects quickly
If the PC and the Bluetooth USB adapter are too close to each other, the
Bluetooth connection may become unstable depending on the environment.
Use a USB 2.0 extension cable to keep the Bluetooth USB dongle a certain
distance away from the PC.
Click here for a USB 2.0 extension cable.
Bluetooth connections may also become unstable in the following situations:
・Your body is positioned in a way that blocks AddCon+
・The Bluetooth USB adapter is covered by objects, or there are metal objects
nearby
・Multiple other Bluetooth devices are connected at the same time
Please move AddCon+ closer to the Bluetooth adapter, connect it to AddCon
Manager, and check whether the same issue still occurs.
For any other inquiries, please contact Shiftall Support.
Shiftall Support is available here.
11. Trademarks and Other Information
● The Bluetooth® word mark and logos are registered trademarks owned by Bluetooth
SIG, Inc., and Shiftall Inc. uses these marks under license.
● Windows is a registered trademark or trademark of Microsoft Corporation in the
United States and/or other countries.
● Other names, company names, product names, and similar terms mentioned in this
manual are trademarks or registered trademarks of their respective owners.
● Certification information is printed on the back of the unit.
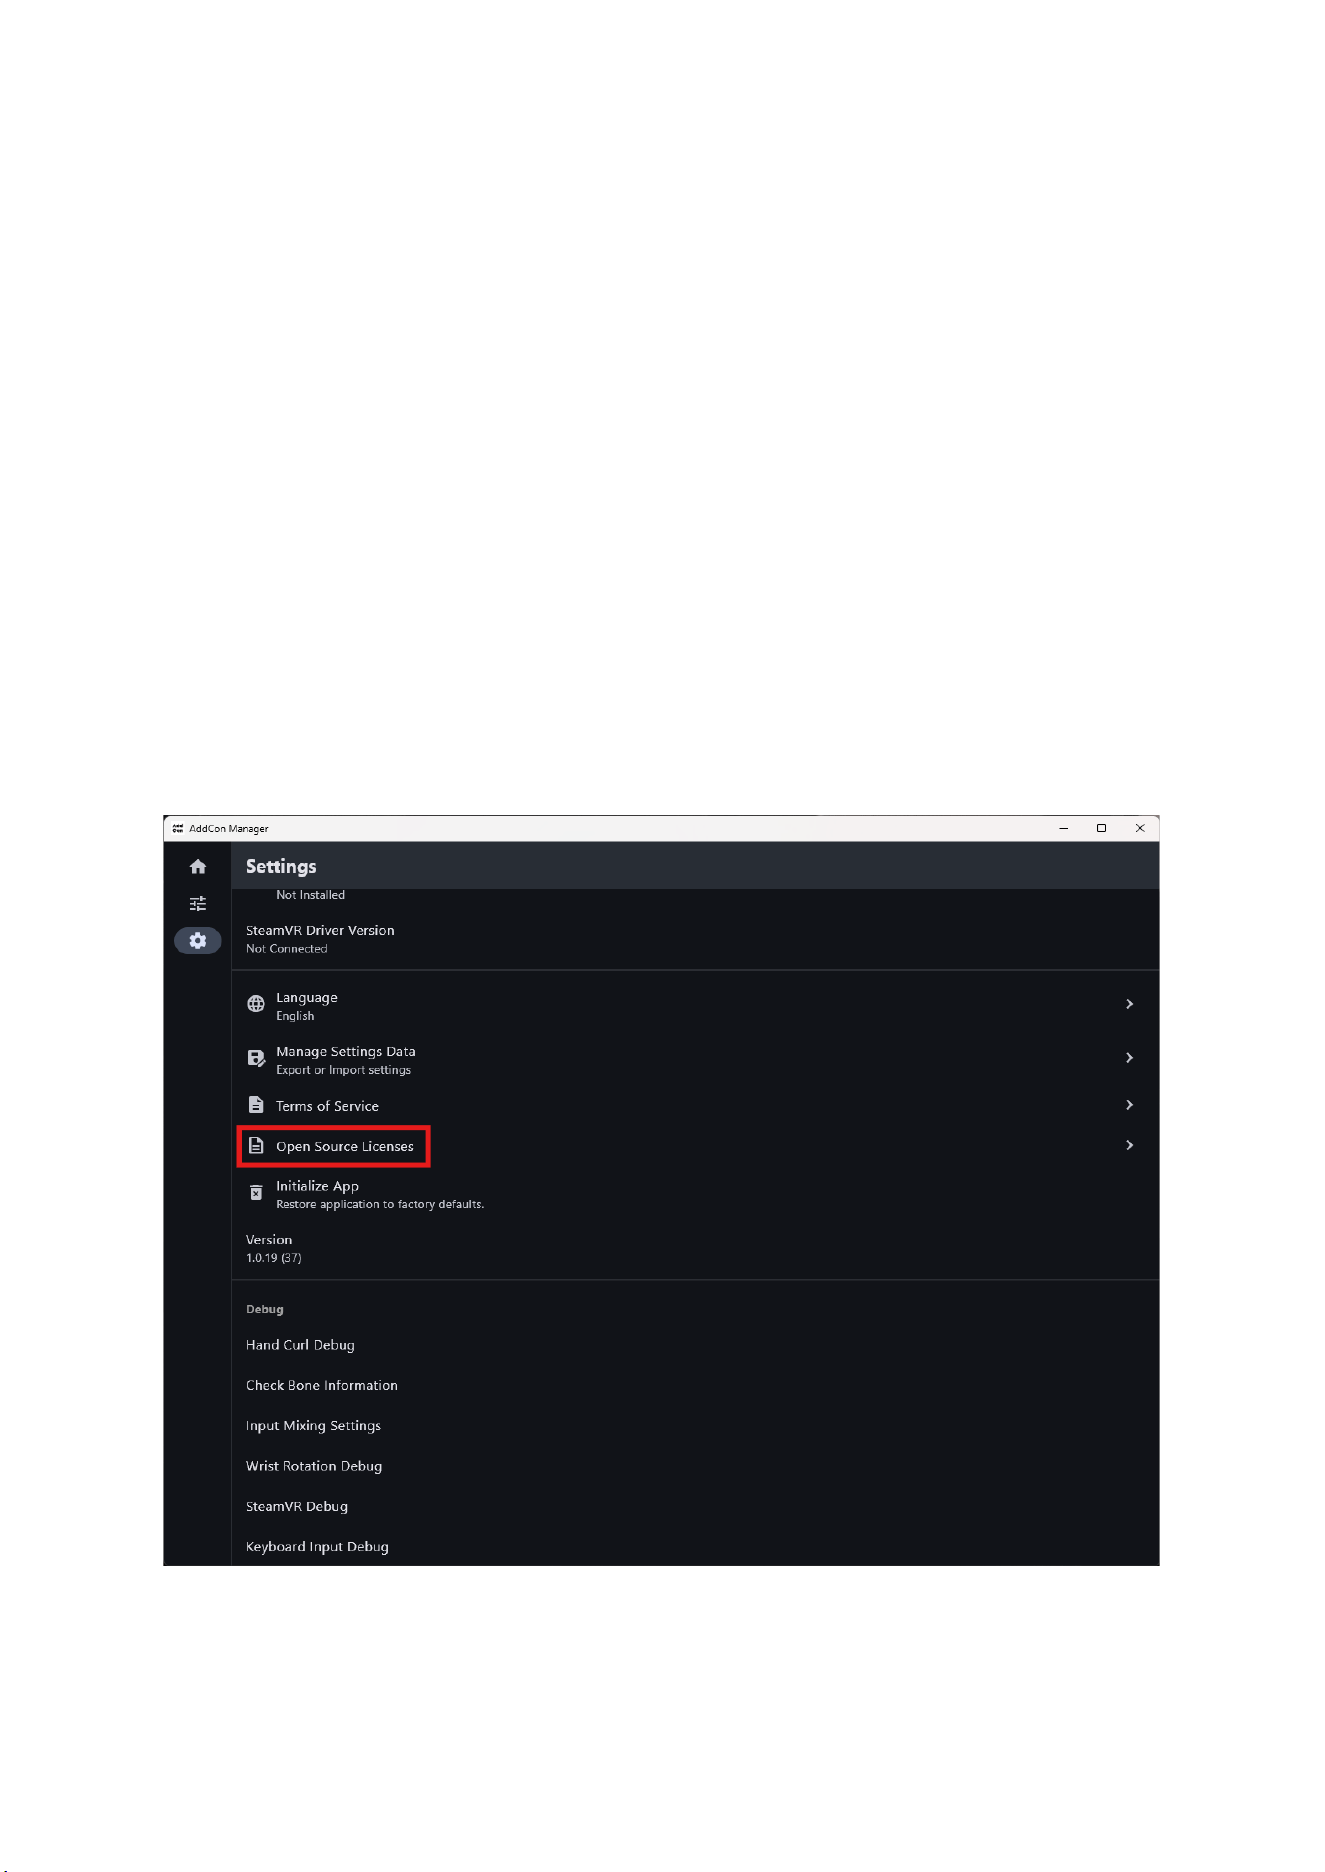
12. Open source software license credit
You can view the license credits for the open-source software used in this product from the
settings menu in the app.

13. FCC CAUTION:
Only for United States of America
This device complies with part 15 of the FCC Rules. Operation is subject to the following two
conditions:
(1) This device may not cause harmful interference, and
(2) this device must accept any interference received, including interference that may cause
undesired operation.
Any Changes or modifications not expressly approved by the party responsible for
compliance could void the user's authority to operate the equipment.
Note: This equipment has been tested and found to comply with the limits for a Class B
digital device, pursuant to part 15 of the FCC Rules. These limits are designed to provide
reasonable protection against harmful interference in a residential installation. This
equipment generates uses and can radiate radio frequency energy and, if not installed and
used in accordance with the instructions, may cause harmful interference to radio
communications.
However, there is no guarantee that interference will not occur in a particular installation. If
this equipment does cause harmful interference to radio or television reception, which can
be determined by turning the equipment off and on, the user is encouraged to try to correct
the interference by one or more of the following measures:
-Reorient or relocate the receiving antenna.
-Increase the separation between the equipment and receiver.
-Connect the equipment into an outlet on a circuit different from that to which the receiver is
connected.
-Consult the dealer or an experienced radio/TV technician for help.
The device has been evaluated to meet general RF exposure requirement. The device can
be used in portable exposure condition without restriction.