Optical Zoom Camera
User Manual (Model No.: DC150RCI)

1
Content
Tips before Use .........................................................................................................2
Functions Description ................................................................................................2
1. Product Appearance .................................................................................3
2. Keys and Functions Explanation ................................................................5
Product Specifications ...............................................................................................6
Camera Operations ...................................................................................................8
1. Installation of Battery and TF Card ............................................................8
2. Preview Screen .........................................................................................9
3. Photo Mode ............................................................................................ 10
4. Camera Settings ...................................................................................... 11
5. Photography Settings .............................................................................. 11
6. Video Settings ......................................................................................... 13
7. System Settings ....................................................................................... 13
8. Playback Settings .................................................................................... 14
Packaging List .......................................................................................................... 15
App usage ................................................................................................................ 15
1. Downloading VD Cam APP ...................................................................... 15
2. Connecting Wi-Fi ..................................................................................... 15
Connection & Charging ............................................................................................ 16
1. Battery Charging ..................................................................................... 16
2. Connecting to Computer ......................................................................... 17
3. Connecting to HD TV ............................................................................... 18
Precautions: ............................................................................................................ 18

2
Tips before Use
Thank you for choosing our product. To ensure optimal usage and satisfaction,
please carefully review the following instructions.
1. This product is a high-definition digital camera with optical zoom capabilities.
2. The Wi-Fi name for this product is DC150RCI_xxxxxxx, with the default
password set to 12345678.
3. This product supports TF cards with a maximum capacity of 256GB. For optimal
video recording performance, we recommend using a U3 high-speed card from
a reputable brand, featuring a minimum read speed of 100Mb/s and a write
speed of 60Mb/s or higher.
4. Format the TF card using the camera for the first-time use, and remember to
back up important files on the TF card.
5. The images in this user manual are provided for reference purposes and may
not precisely match the actual product. Please refer to the actual product
functionality for accurate details.
Functions Description
3
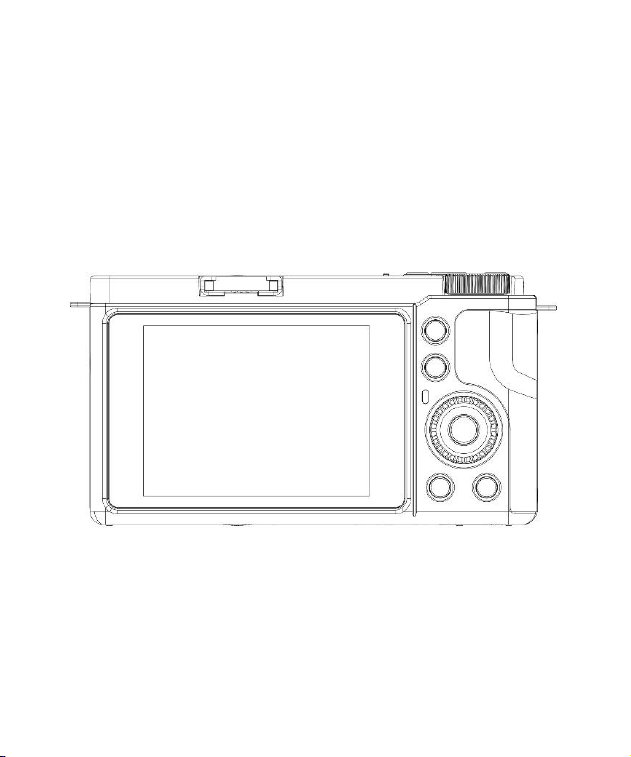
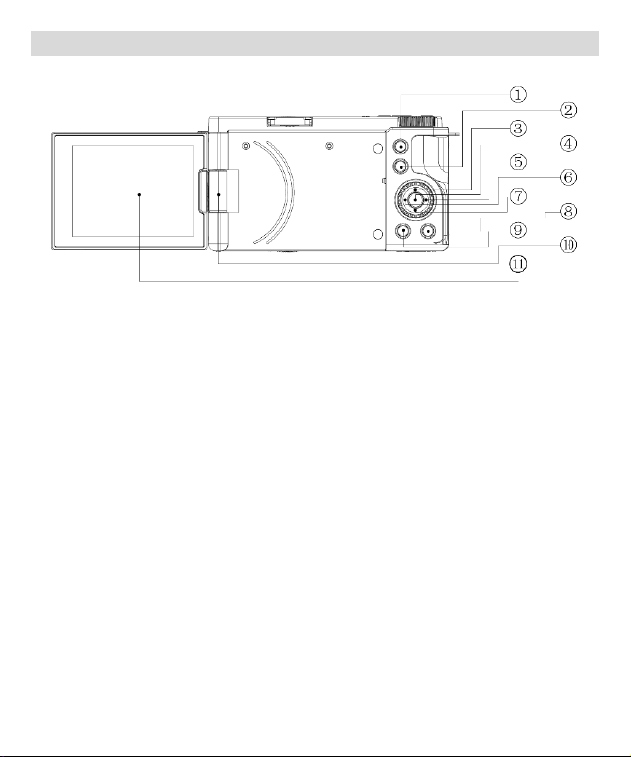
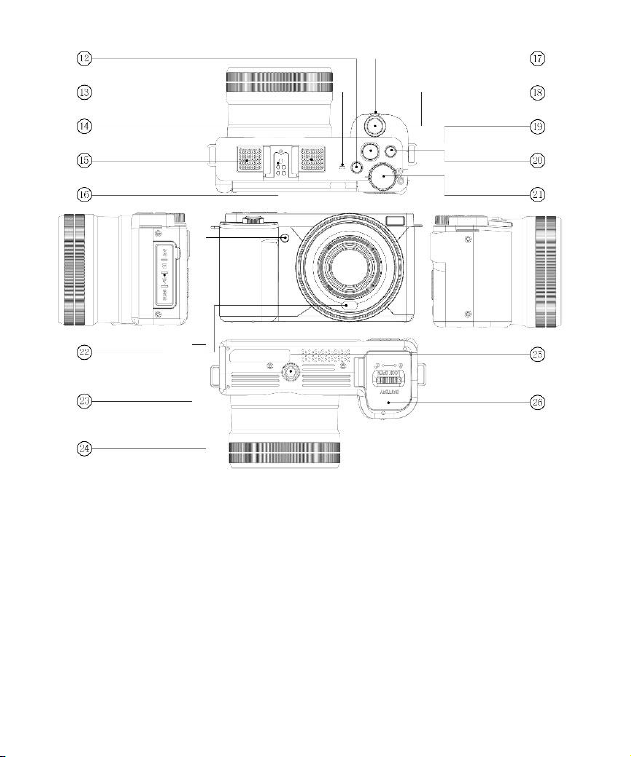
1. Product Appearance
1) Playback button
2) AE/AF LOCK button
3) EV (Exposure Value) function
shortcut key
4) Confirm button
5) LED fill function shortcut key
6) Macro function shortcut key
7) Timer shortcut key
8) Delete button
9) Menu button
10) Indicator light
11) Rotating shaft
4
12) ISO Function button
13) Power on/off Switch
14) MIC
15) Speaker
16) Expansion port
17) W/T button
18) Shutter button
19) Record button
20) DISP (Display) button
21) Mode dial
22) Power indicator light
23) MIC Interface / USB Interface / HD
Interface / TF card
24) Focusing assist light
25) LED fill light
26) Tripod mounting hole
27) Battery cover
5
2. Keys and Functions Explanation
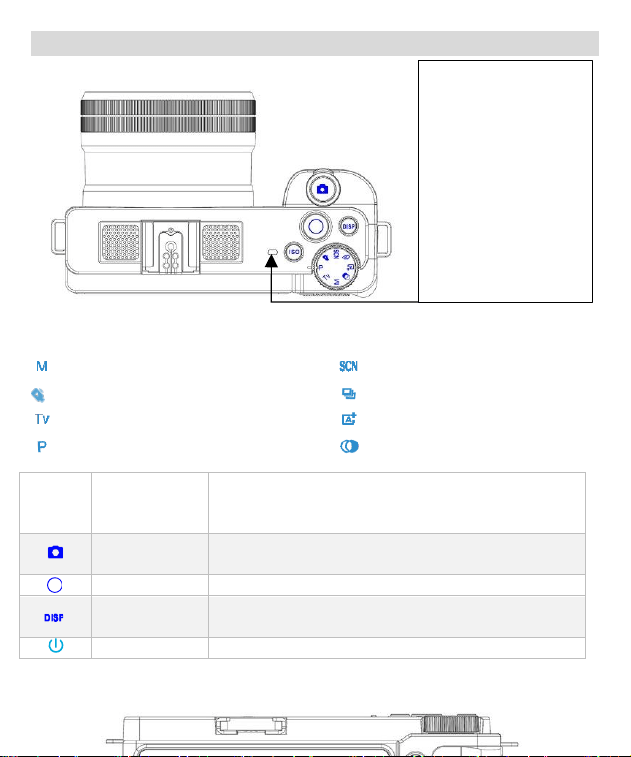
Indicator Lights:
【Red Indicator Light】Stays
on when the battery is
charging and goes off when
the battery is fully charged.
【Green Indicator Light】
Stays on when the device is
powered on; flashes slowly
during recording; When
taking a photo, snap a
picture, and the green light
flashes once.
【Mode Dial】Photography Mode Dial: In the preview screen, manually adjust the dial to the
left or right to select the desired mode for taking photos.
-- Manual Exposure
--Video recording mode
-- Shutter Priority
-- Program Auto Exposure
-- Scene Mode
--Continuous Shooting Mode
-- Intelligent Scene Mode
-- Filter Mode
T/W
zoom in/out
1.During real-time preview, zoom in/out by adjusting left and right.
2.In manual focus mode, adjust focus clarity by moving left and right.
3.During playback, zoom in/out images by adjusting left and right.
Shutter Button
During real-time preview, lightly press for the first stage to
focus, and press firmly for the second stage to take a photo.
Record Button
Quickly start/Stop recording.
DISP Button
Cycle through three screen display modes: normal mode,
simplified mode, and screen-off mode.
Power Button
Short press to turn on or off the device
6
Product Specifications
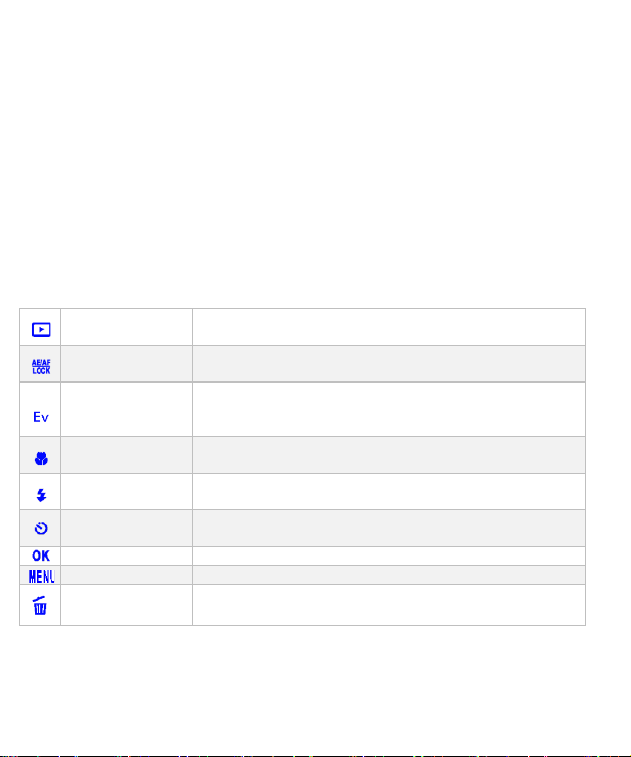
Playback Button
1. Enter playback
2. Return to the previous level.
AE/AF LOCK
Used for AE (Auto Exposure) lock and AF (Auto Focus) focus
lock during photography.
EV Function
Button
1. Quickly access the EV adjustment interface;
2. Up button;
3. Pause or resume recording during video capture.
Macro Function
Button
1. Quickly access the focus mode setting.
2. Left button.
Flash Function
Button
1. Quickly access the LED fill mode setting.
2. right button.
Timer Shortcut
Key
1.Quickly access the timer setting.
2.Down button.
Confirm Button
confirm selections.
Menu Button
Open / Close Menu Settings
Delete Button
1.Quickly enter the delete interface.
2.Delete in Playback Mode

7
Model
DC150RCI
Screen
2.88"IPS TFT
Len
f=4.9~49mm wide: 0.1m~INF Tele: 1.5m~INF
Optical Zoom
10X
Digital Zoom
2X
Photo Resolution
64M /32M/16M/8M
Video Resolution
UHD(4K):2880*2160(24fps) QHD(2K): 2560*1440(30fps)
FHD(1080P):1920*1080(30fps) HD(720P):1280*720(60fps)
VGA: 640*480(120fps)
WIFI
Supports,APP:VD CAM
Metering Mode
Multi, Center, spot
Focus Mode
AF/MF (Auto Focus/Manual Focus)
MIC
Built-in/External MIC
Photo Mode
P (Program Auto Exposure)/TV (Shutter Priority)
M (Manual Exposure)/Filters Mode/A+ (Intelligent Mode)
Continuous Mode/SCN (Scene Mode)
Built-in Features
Electronic Image Stabilization, Focus Assist Lamp, Fill light, Hot
Shoe, Speaker
Other Features
Display flip, Facial recognition, burst mode (3 shots in a row), selfie
mode (with 2-second, 5-second, 10-second timer), AE lock.
Output Interface
HDMI, Type-C, 3.5mm Headphone Jack (External MIC), 2.5mm
Headphone Jack (External Remote Controller - optional)
Memory Card
External TF Card Slot (Supports up to 256GB)
Battery
Dedicated Lithium Battery 3.7V
8
Camera Operations
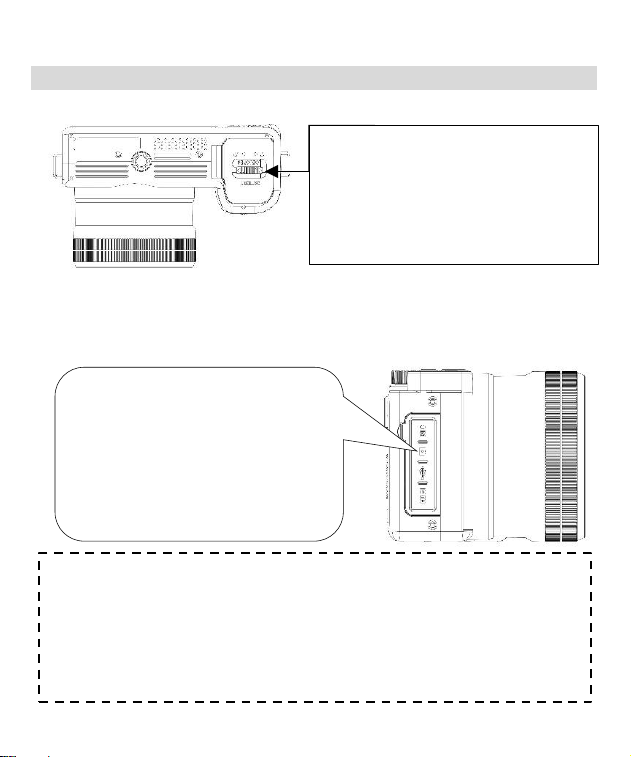
1. Installation of Battery and TF Card
(1) This camera uses a high-capacity rechargeable external Dedicated lithium battery.
Slide open the battery cover carefully. Insert the
battery, ensuring the polarity direction matches
the icons inside the battery compartment. When
you hear a click sound, it indicates the
installation is complete.
(2) The memory card supports a maximum of 256GB storage capacity. To ensure normal
video recording, please use a branded authentic U3 high-speed card (with a read speed of
100Mb/s and a write speed of over 60Mb/s).
Open the rubber cover. Carefully insert
the TF card, aligning it with the polarity
direction indicated inside the TF card
slot. When you hear a click, it means the
TF card is installed.
Note:
Format the TF card using the camera for the first-time use, and remember to back up
important files on the TF card.
Do not remove the TF card during recording, as it may cause data loss or damage to
the device.
9
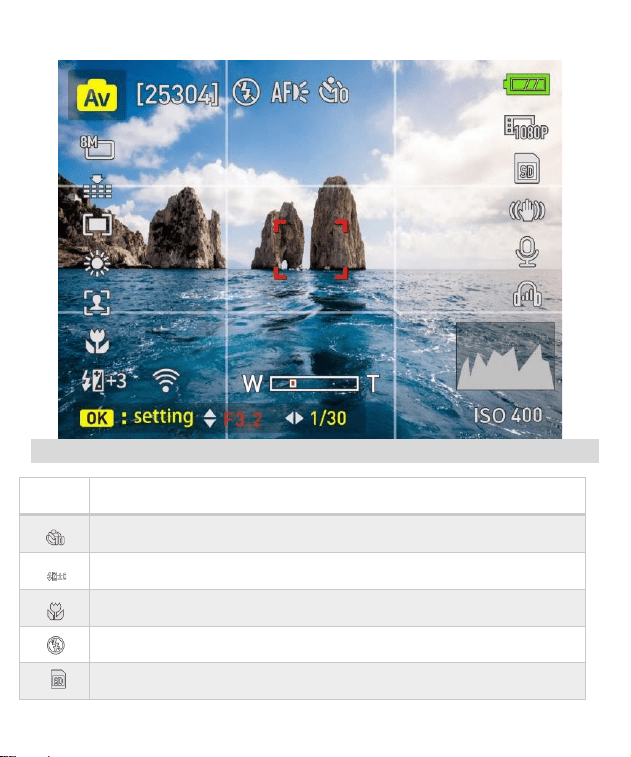
2. Preview Screen
[25304]
Display the number of photos that can be stored and the current available space
on the TF card.
Display the current set timer for timed photography.
Providing four choices: Off, 2 seconds, 5 seconds, and 10 seconds.
Display the current set EV (Exposure Value).
Providing seven choices: +3.0, +2.0, +1.0, +0.0, -1.0, -2.0, -3.0.
Display the current set LED fill light mode.
Providing four choices: Macro (Auto), Macro (Manual), AF, MF (Manual).
Display the current set flash mode.
Providing three choices: Auto, Force On, Force Off.
Display the TF card status.
Three states: Inserted, Not Inserted, and Write Protection.
10
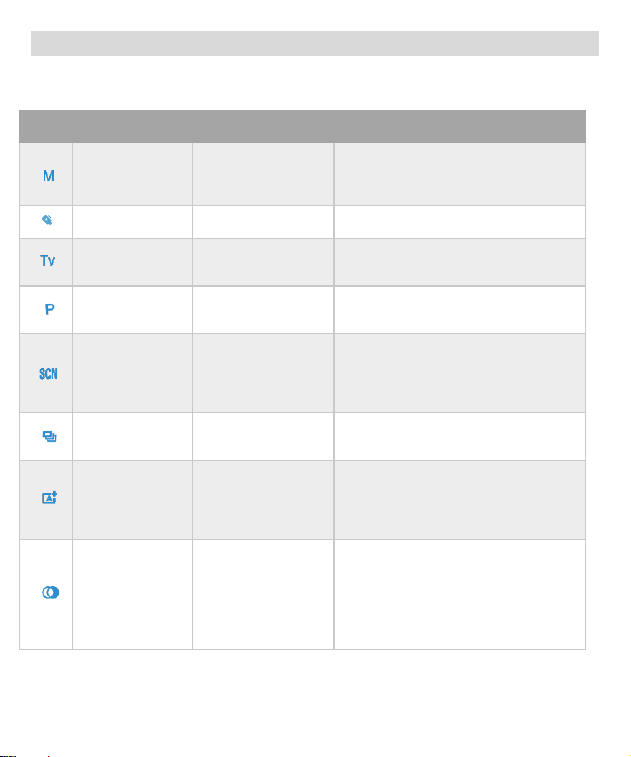
3. Photo Mode
Under the preview screen, slide the mode dial left or right to select the appropriate mode for
taking photos.
Icon
Mode
Instructions
Function
Explanation
Operation instructions
Manual
Exposure
Manually adjust
aperture and
exposure time
Press OK button → Use up and down
buttons to adjust aperture → Use left
and right buttons to set exposure
duration→ OK button to confirm
Video mode
Enter video
recording interface
/
Shutter Priority
Manually set
exposure time
OK button → Use left and right
buttons to adjust exposure time → OK
button to confirm
Program Auto
Automatically
adjust aperture and
exposure time
/
Scene Mode
Offering 10 scene
selections
1. Use left and right keys to select
scene → Press OK button to confirm.
2. Press Menu button → Select scene
→ Use left and right keys to choose
scene → Press OK button to confirm.
Continuous
Mode
Capture three
photos in quick
succession
/
Intelligent
Mode
The camera
automatically
selects the optimal
settings for the
current scene
/
Filter Mode
Provide 11 filter
modes
1. Use left and right keys to select
filter mode → Press OK button to
confirm.
2. Press Menu button → Select filter
effects → Use left and right keys to
choose filter mode → Press OK button
to confirm.
11
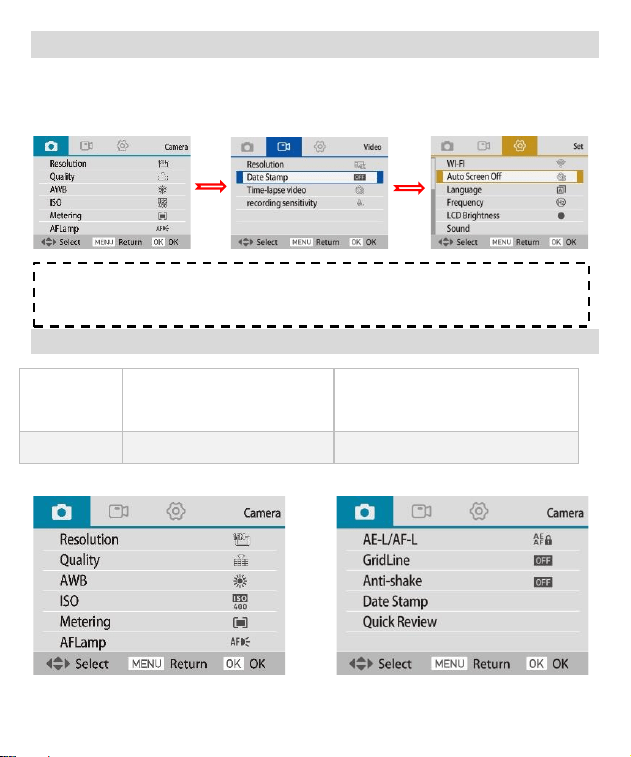
4. Camera Settings
You can make custom settings for the camera. After the camera is turned on, press the menu
button to open the menu. The menu will start under Photo Settings. To move to Video and
System settings press the Right/Flash key.
5. Photography Settings
Resolution
64M(9200*6900)
32M(6480*4860)
16M(4608*3456)
8M(3264*2448)
This setting is not supported in
continuous mode.
Quality
Super Fine, Fine, Normal
This setting is not supported in Filter
Mode.
Note:
The settings may vary depending on the mode selected via the mode dial.

12
AWB
Auto, Daylight, Cloudy,
Tungsten, Fluorescent
This setting is not supported in Scene
Mode, continuous Mode, Filter
Mode, or Intelligent Scene.
ISO
Auto,ISO100,ISO200,ISO400,
ISO800,ISO1600,ISO3200
This setting is not supported in Scene
Mode, continuous Mode, Filter
Mode, TV/M Mode, or Intelligent
Scene.
Metering
Multi, Center, Spot Model
This setting is not supported in
continuous Mode, Scene Mode, Filter
Mode, or Intelligent Scene.
AF Lamp
Auto, Turn On/Turn Off
This setting is not supported in
continuous Mode, Filter Mode, or
Scene Mode.
AE-L/AF-L
AE-L (Auto Exposure Lock)
AF-L (Auto Focus Lock)
AE-L&AF-L (Auto Exposure and
Auto Focus Lock)
This setting is not supported in Scene
Mode, continuous Mode, Filter
Mode, or Intelligent Scene Mode.
Grid Line
Turn On/Turn Off
Anti-shake
Turn On/Turn Off
Date Stamp
Turn On/Turn Off
Quick
Review
Off, 2 seconds, 5 seconds
Color
Only available in Filter mode.
Provides 11 color options
Only available in Filter Mode.
Scene
Selection
Only available in Scene mode.
Provides 10 scene modes
Only available in Scene Mode.
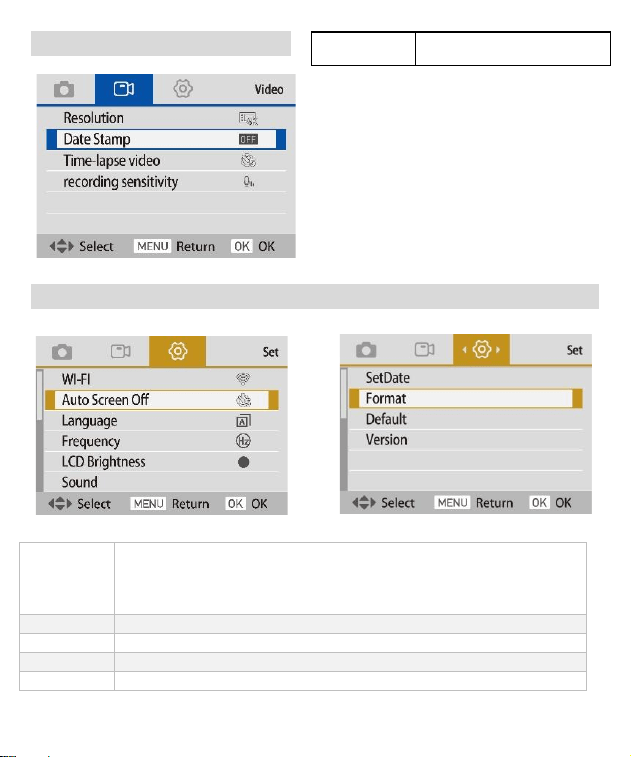
Video
Resolution
4K(2880*2160)
2K(2560*1440)
1080P(1920*1080/60fps)
1080P(1920*1080/30fps)
720P
Date Stamp
Turn On/Turn Off
Time-lapse
video
Off,1 second, 3 seconds, 5
seconds
Recording
Soft, Normal, Strong
13
6. Video Settings
7. System Settings
Wi-Fi
Turn on Wi-Fi Name: DC150RCI+SSID, default password is 12345678
Press the OK button to manually turn off the Wi-Fi hotspot.
Note: if not successfully connected within 2 minutes, the camera will
automatically turn off the Wi-Fi hotspot.
Auto Off
Off, 3 minutes, 5 minutes, 10 minutes
Language
Provides 14 language options to choose from.
Frequency
50Hz、60Hz
Sound
Turn On/Off: Power-on sound, Shutter sound, Operating volume
sensitivity
14
Set Date
Year, Month, Date, Hour, Minute, Second。
Note: Synchronize the date and time with the smartphone system when
connected to Wi-Fi
Format
Cancel or Ok
Note: Clear all files from the TF card. Before performing this operation,
please backup any important files from the TF card.
Default
Cancel or Ok
Note: Restore factory settings
Version
Software Version Number
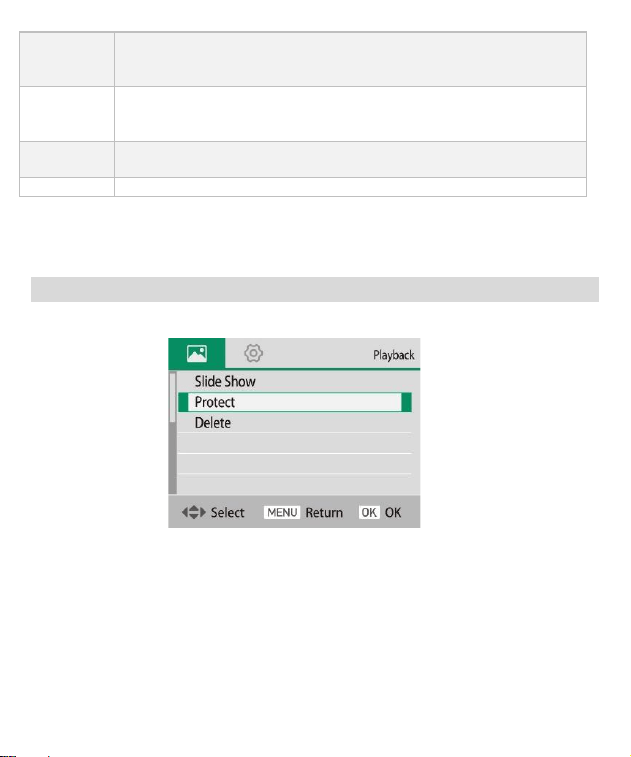
8. Playback Settings
Press the playback button to enter the playback settings interface.
【Slide show】: This feature allows you to start a slideshow of photos. You can set the interval
duration between slides and whether the slideshow should loop.
【Protect】: This function is used to lock photos. Once a photo is locked, it cannot be deleted on
the camera unless it is unlocked. There are four options: Lock Current, Unlock Current, Lock All,
and Unlock All.
【Delete】: This function is used to delete photos and videos. There are two options: Delete
15
Current Photo and Delete All Files.
Packaging List
HD Camera
1pcs
NP-120 battery
1pcs
TYPE-C USB cable
1pcs
HD-D cable
optional
lanyard
optional
tripod
optional
App usage
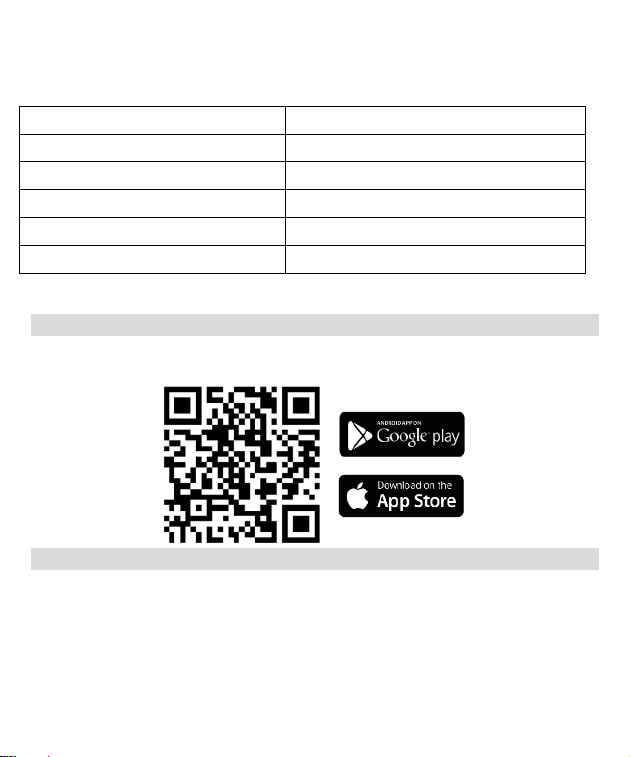
1. Downloading VD Cam APP
Please use the browser to scan the QR code or search for “VD Cam(Video Dimension Camera)”
on App Store. For Android users, search for "VD Cam" on Google Play.
2. Connecting Wi-Fi
① Power on the device.
② Press the menu button → Right-click to select the settings menu bar → Wi-Fi options →
Select to enable Wi-Fi hotspot.
③ Open Wi-Fi on your smartphone, and then search for the Wi-Fi name DC150RCI-SSID
number, enter the default password: 12345678.
④ Open the app, touch connect camera icon.
16
⑤ After connecting, you can adjust settings via your phone, start/stop recording, take photos,
view, and download videos and photos.
Connection & Charging
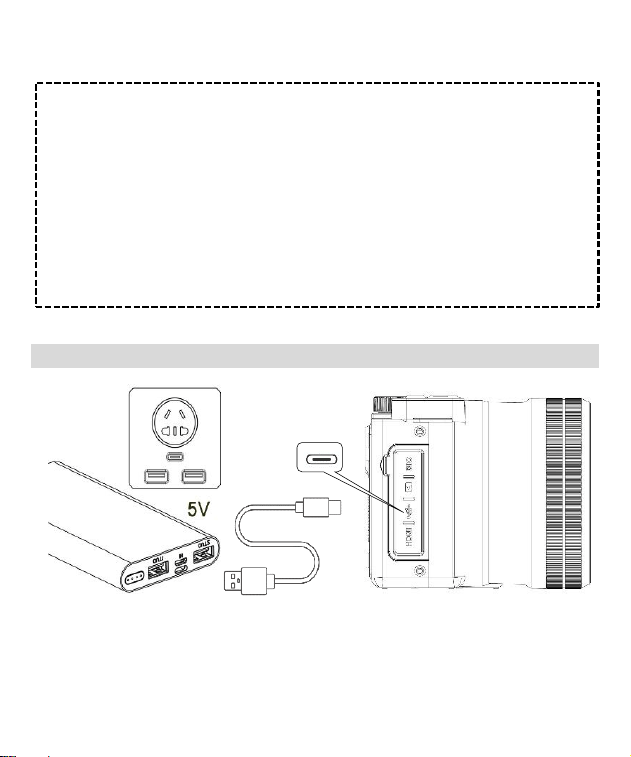
1. Battery Charging
① Connect the USB cable to the charging port on the side of the camera.
② Connect the other end of the USB cable to a suitable USB power adapter or power bank
with a 5V/2A output.
Notes:
⚫ To ensure the normal operation of the camera, it is not recommended to modify the
Wi-Fi name and password.
⚫ There should be no obstacles between the phone and the camera; the maximum
connection distance is about 10 meters.
⚫ After the camera is connected to the phone, you can press the OK button to turn off
the Wi-Fi hotspot.
⚫ Other functions of the camera buttons cannot be used.
⚫ If there is no connection with the phone within 2 minutes, the camera will
automatically turn off the Wi-Fi hotspot.
⚫ If using VPN, switch it off before connecting to the Wi-Fi.
17
③ While charging, the camera indicator light will turn red.
④ When charging is complete, the light will go out. Charging takes approximately 2-3 hours.
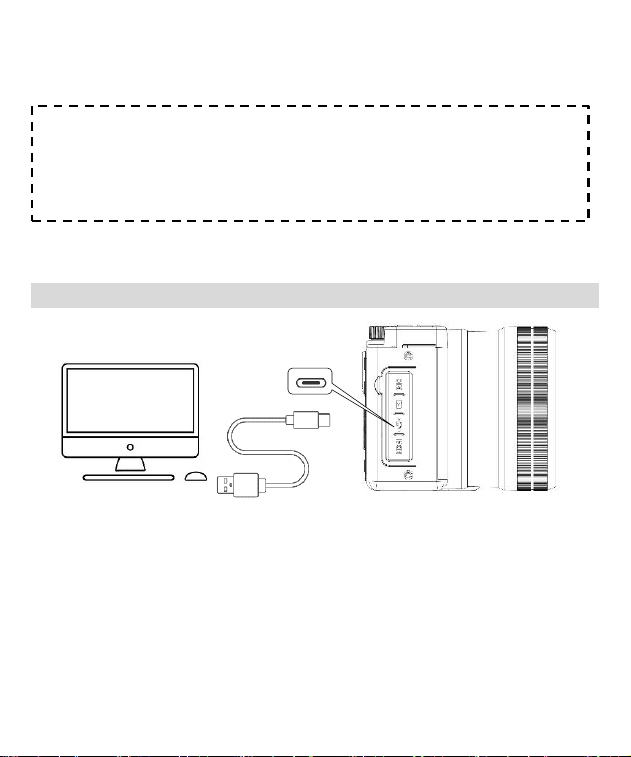
2. Connecting to Computer
The camera can be used as an MSDC or PC camera.
① Power on the device.
② Connect the camera and computer with a USB cable.
③ The MSDC & PC camera options will be displayed on the camera screen, use the up and
down keys to select, then press the OK button to confirm.
Note:
It is recommended to charge the battery once every 3 months when the camera is not
used for a long time. Then discharge the battery to maintain battery life.
18
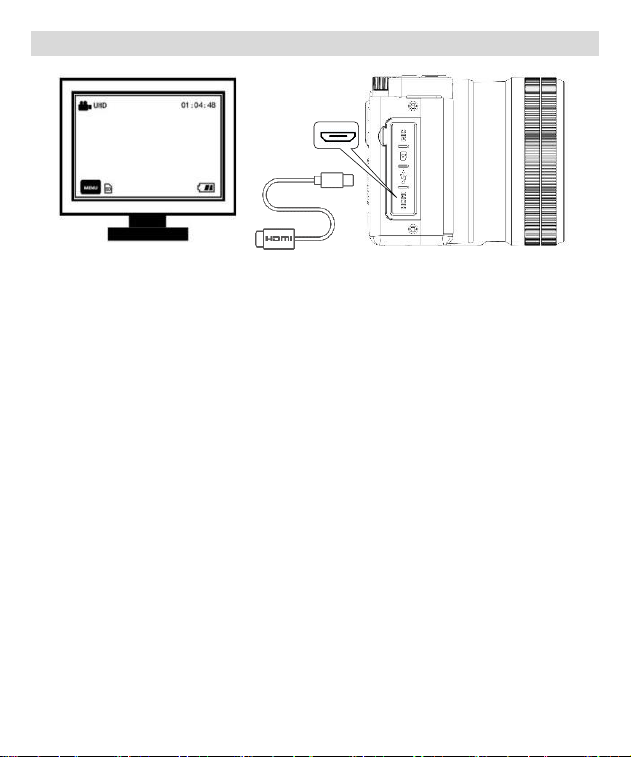
3. Connecting to HD TV
1. Keep the camera powered on.
2. Connect the HD cable to the HD Out port on the camera.
3. Connect the other end of the cable to a High-Definition television.
4. Set the TV's video input source to HDMI to display the preview on the TV.
Precautions
1. Do not expose the device to rain or damp environments.
2. Do not place items containing liquid, such as vases, on the device.
3. Do not expose the battery to excessive heat, sunlight, smoke, fire, or flames.
4. Do not crush or puncture the battery pack. Do not subject the battery pack to any impact or
external force, such as hammering, dropping, or stepping on. Do not short-circuit, and do not
allow metal objects to contact the battery terminals.
5. Do not expose to temperatures exceeding 60°C (140°F), such as direct sunlight or leaving it in
a car parked in the sun. Do not incinerate or dispose of improperly.

19
FCC Warning
This device complies with Part 15 of the FCC Rules. Operation is subject to the following two
conditions:
(1) This device may not cause harmful interference, and (2) this device must accept any
interference received, including interference that may cause undesired operation.
NOTE 1: This equipment has been tested and found to comply with the limits for a Class B digital
device, pursuant to part 15 of the FCC Rules. These limits are designed to provide reasonable
protection against harmful interference in a residential installation. This equipment generates,
uses and can radiate radio frequency energy and, if not installed and used in accordance with
the instructions, may cause harmful interference to radio communications. However, there is no
guarantee that interference will not occur in a particular installation. If this equipment does
cause harmful interference to radio or television reception, which can be determined by turning
the equipment off and on, the user is encouraged to try to correct the interference by one or
more of the following measures:
- Reorient or relocate the receiving antenna.
- Increase the separation between the equipment and receiver.
-Connect the equipment into an outlet on a circuit different from that to which the receiver is
connected.
-Consult the dealer or an experienced radio/TV technician for help.
NOTE 2: Any changes or modifications to this unit not expressly approved by the party
responsible for compliance could void the user's authority to operate the equipment.
The device has been evaluated to meet general RF exposure requirement. The device can be
used in portable exposure condition without restriction.