Induction Cooktop Manual
1019M(P35)
Customer Service: [email protected]
Questions or Concerns?
Mon-Fri 7:30am-4:30pm CST
Owner’s Manual

01
Welcome to Your New Nestiqex Product!
Congratulations on your new Nestiqex kitchen product! We are
committed to providing the highest-quality products and excellent
customer support.
As a U.S.-based distributor, every product we offer meets strict
manufacturing, safety, and performance standards. We offer a
one-year warranty on this product, ensuring your complete
satisfaction.
For questions or assistance, email us directly. To get the fastest
response, include:
Product name and model
Proof of purchase
Complete contact information
Detailed description of the issue, including photos if possible
We also welcome your feedback and suggestions.
The Nestiqex Team
Welcome to the Nestiqex Family!
English
01
Versión en Español
14
02
SPECIFICATIONS
What is Induction Cooking?
Model:
1019M(P35)
Power Source:
208V/60Hz/3Φ
Output:
400W-3500W
Power Levels:
16
Temperature: 176℉-464℉
Weight:
36.3 lbs
Dimensions:
Cord Length:
14.2 in*18.1 in*5 in
5 Feet
1.What is an induction cooktop
An induction cooktop is a kitchen appliance that produces heat directly in the base of the
cookware through electromagnetic induction. It responds quickly and heats efficiently,
making it suitable for boiling, simmering, frying and other common cooking methods.
2.Low-power continuous heating system
This unit uses a low-power, continuous-output heating system rather than the pulsed
(intermittent) heating typical of many standard induction cooktops. Continuous, stable
heating maintains a consistent temperature and achieves more even heat distribution,
resulting in gentler cooking and improved texture and flavor — especially suited for
slow simmering, stews, and applications that require steady heat.
3.Stainless steel body with aluminum-alloy base
The housing is stainless steel and the bottom plate is made from aluminum alloy,
unlike many cooktops that use 201-grade stainless steel for the base. An aluminum
-alloy base is not subject to induction heating of the base itself, which reduces thermal
stress and material fatigue, improves durability, and lowers overall weight — resulting
in a longer service life and a lighter, easier-to-handle appliance.
Induction coil:
9 Inch
03
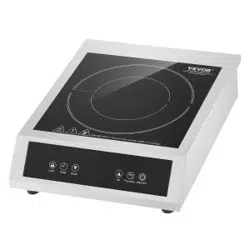
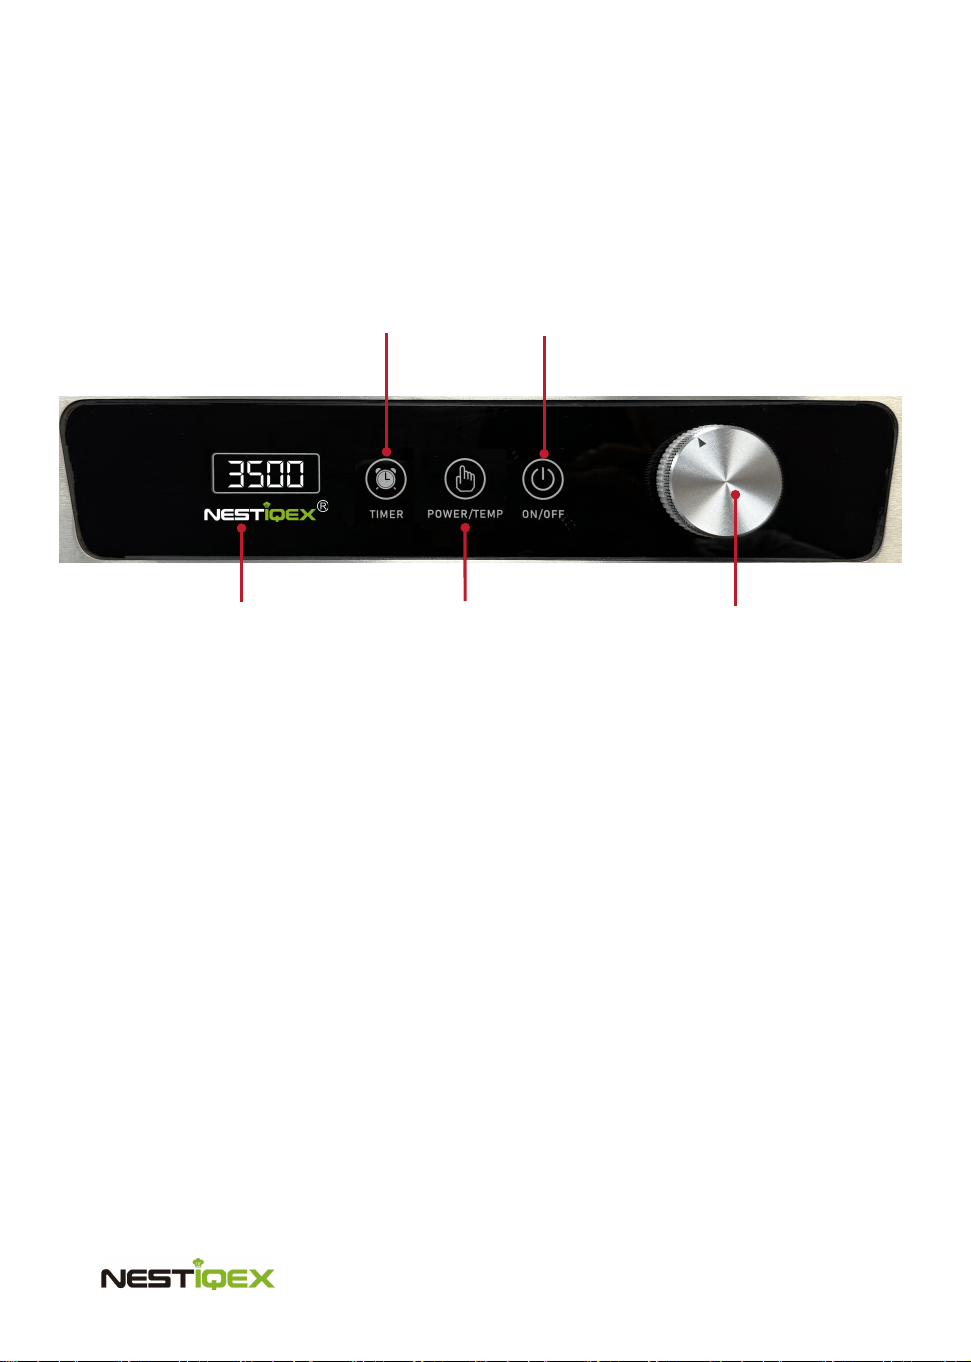
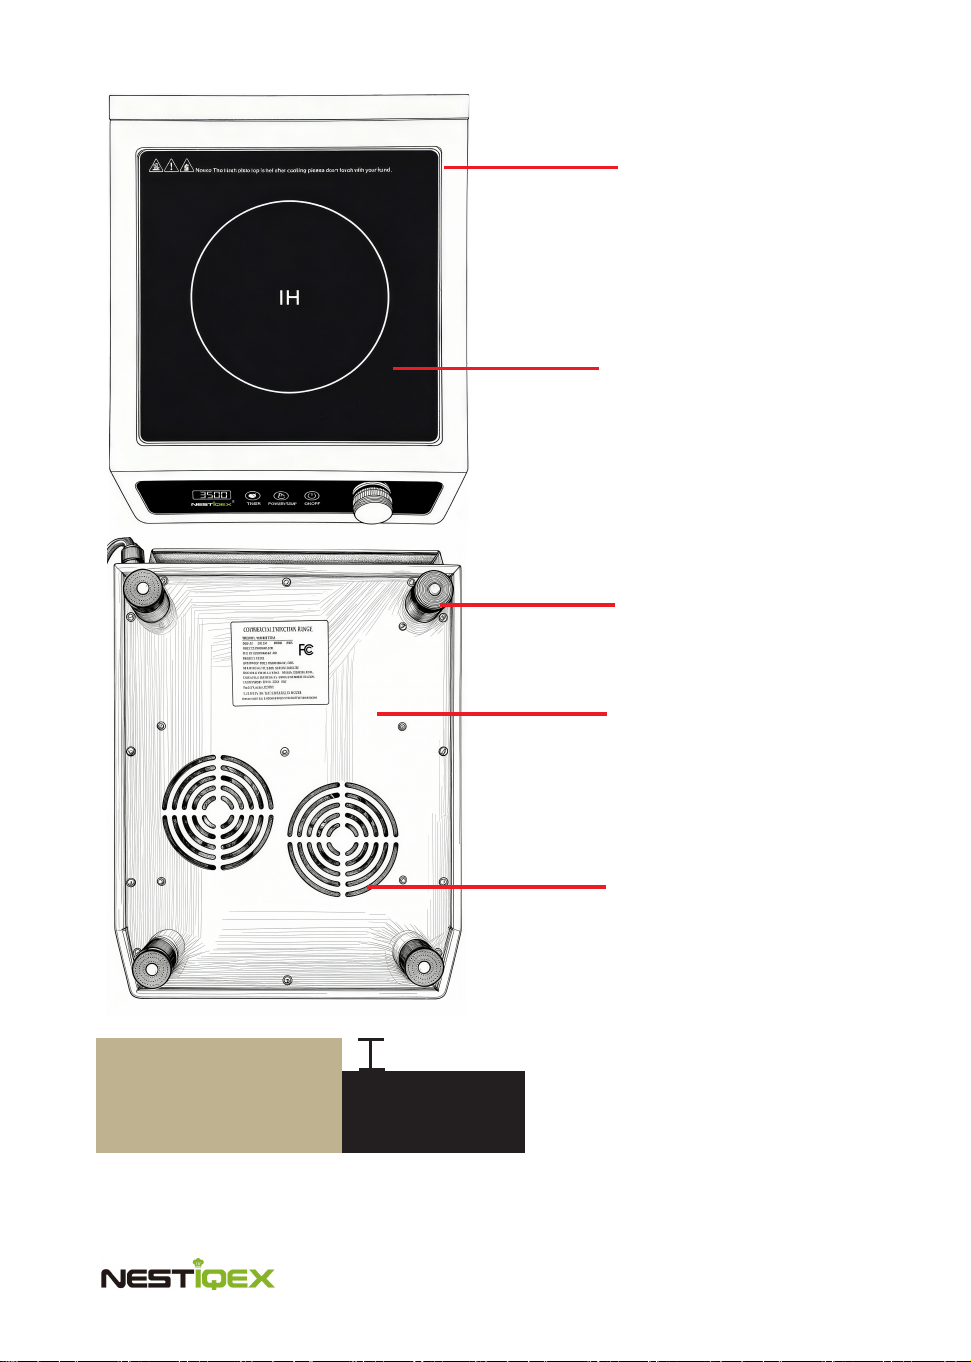
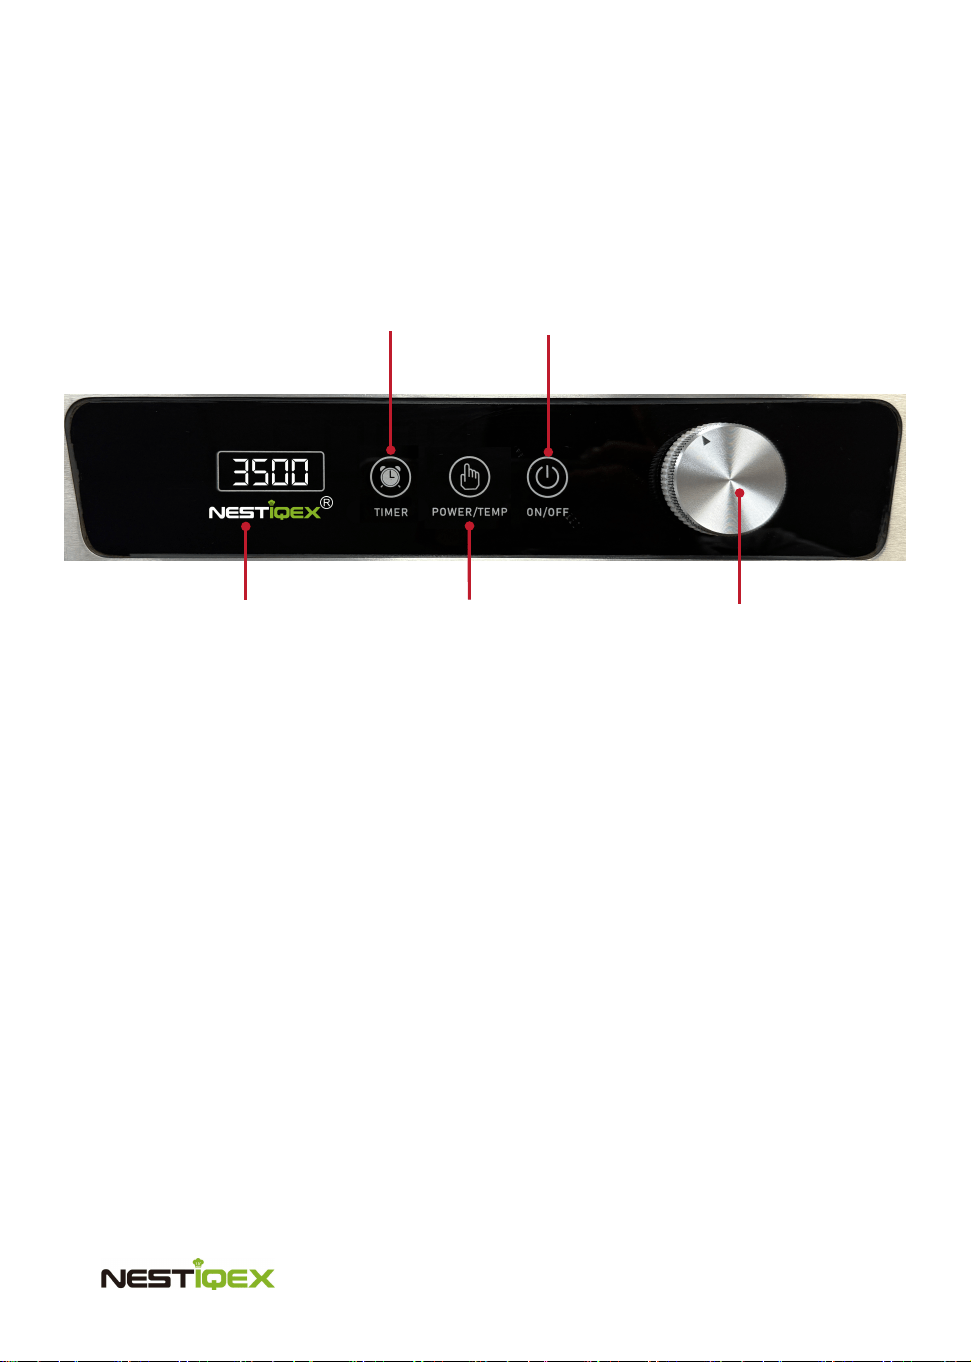
Get to Know Your Induction Cooker
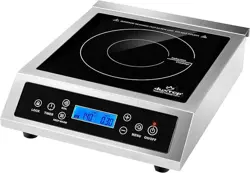
CONTROL PANEL
Digital LED displays, time,
temperatures, and functions
Press to
turn unit
on or off
Press to switch
between Power
and Temperature
modes.
Press to set
cooking time.
Turn the knob to power
the unit on or off.
Continue turning to adjust
timer, power, or temperature.
TIMER Button
Press the TIMER button to activate the timer mode.
The LED display will show the set cooking time.
Use the rotary knob to adjust the timer in increments of 10 minutes.
The timer can be adjusted at any time during cooking.
When the timer expires, the cooktop will beep and the cooling fan will operate as needed.
TEMP/POWER Button
Press the POWER/TEMP button to switch between Power Mode and Temperature Mode.
Power Mode adjusts the heating output in watts, while Temperature Mode maintains a s
pecific cooking temperature.
Use the rotary knob to select the desired power or temperature level.
Rotary Knob
The rotary knob is used to adjust the timer, power, and temperature settings.
Turn the knob clockwise to increase the value or counterclockwise to decrease it.
The knob allows fine and quick adjustments while monitoring the LED display.
04
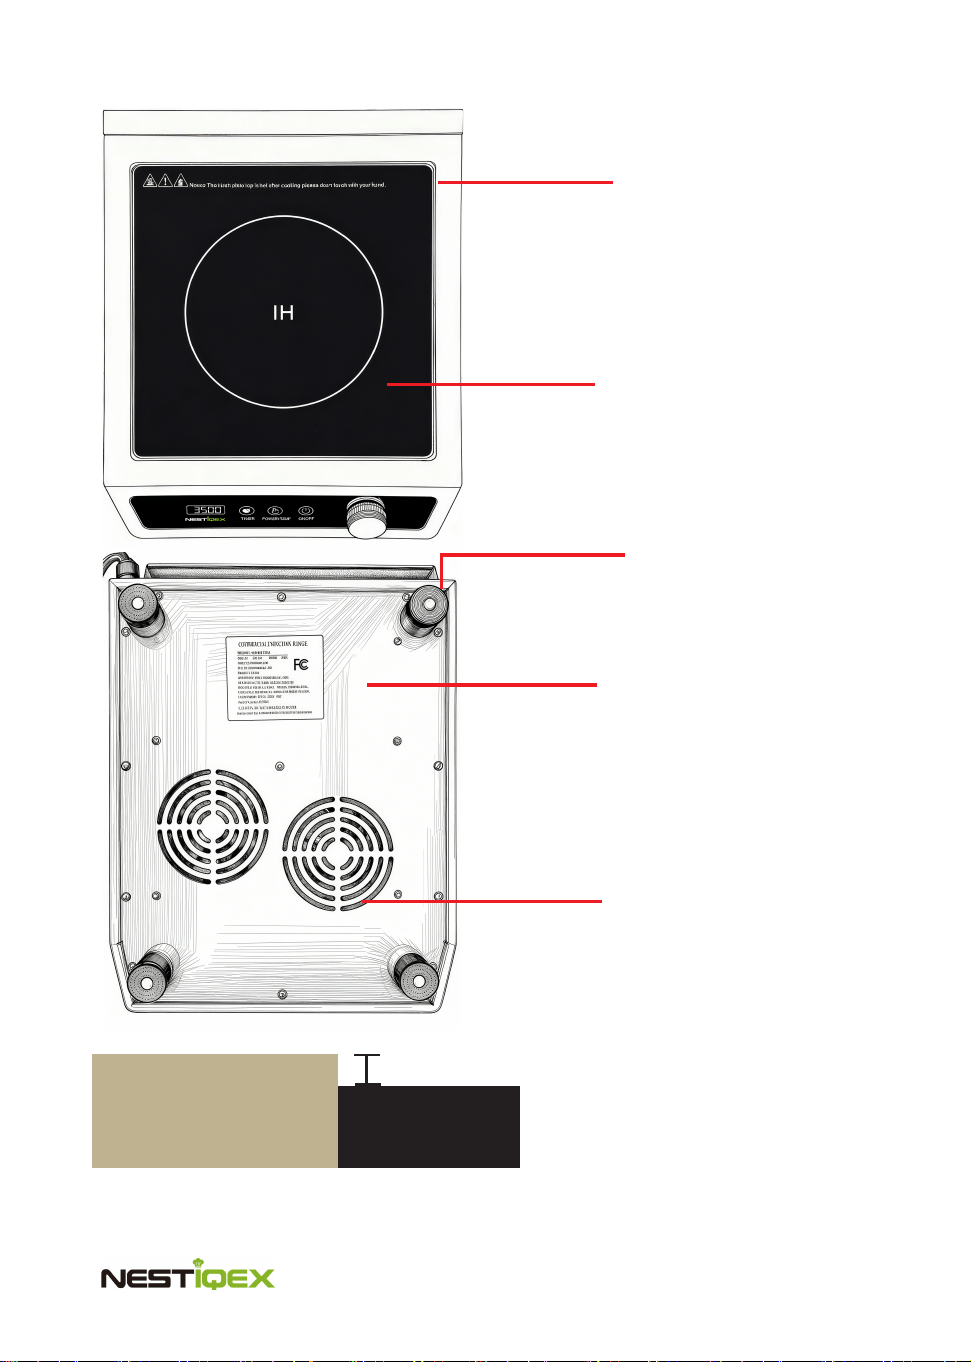
Premium Black Glass Panel
Durable, scratch-resistant, and smooth
surface for easy cleaning; provides
even heat distribution for reliable cooking.
Non-Magnetic Aluminum Alloy Base
This lightweight yet durable non-magnetic
aluminum alloy base effectively shields the
magnetic field induction at the bottom of the
cooktop, protecting internal components and
extending the product’s lifespan.
Dual High-Performance Fans
Efficient, quiet cooling to extend product
life and maintain stable operation.
Non-Slip Feet
Secure placement prevents sliding,
ensuring safety during use.
304 Stainless Steel Housing
High-quality, food-grade stainless steel
protects against rust and adds a sleek,
premium look.
1mm
304 Stainless
Steel Housing
Special Tempered
Black Glass Panel
Built with a 1mm 304 stainless
steel top, raised above the black
crystal glass panel for added
strength and durability.The
elevated design reduces stress
on the glass while maintaining
full heating efficiency and reliable
operation.
05
CAUTION: PROFESSIONAL INSTALLATION REQUIRED
This appliance is designed to operate on a 3500W, 3-phase, 4-wire, 60Hz power supply.
It must be connected to a dedicated circuit by a qualified electrician or professional
technician.
Do not share this circuit with any other equipment.
Improper installation or use may result in damage, electric shock, or fire hazard.
Initial Set-up
After first use or after long-term storage,complete the following steps:
1.Unbox unit and set aside all packaging materials.
2.Read all included documentation and save for future reference.
3.Wipe off all exterior surfaces with a soft,dry towel and confirm that all vents
are free of packaging remnants or other debris.
Installation must be performed by qualified electricians only.
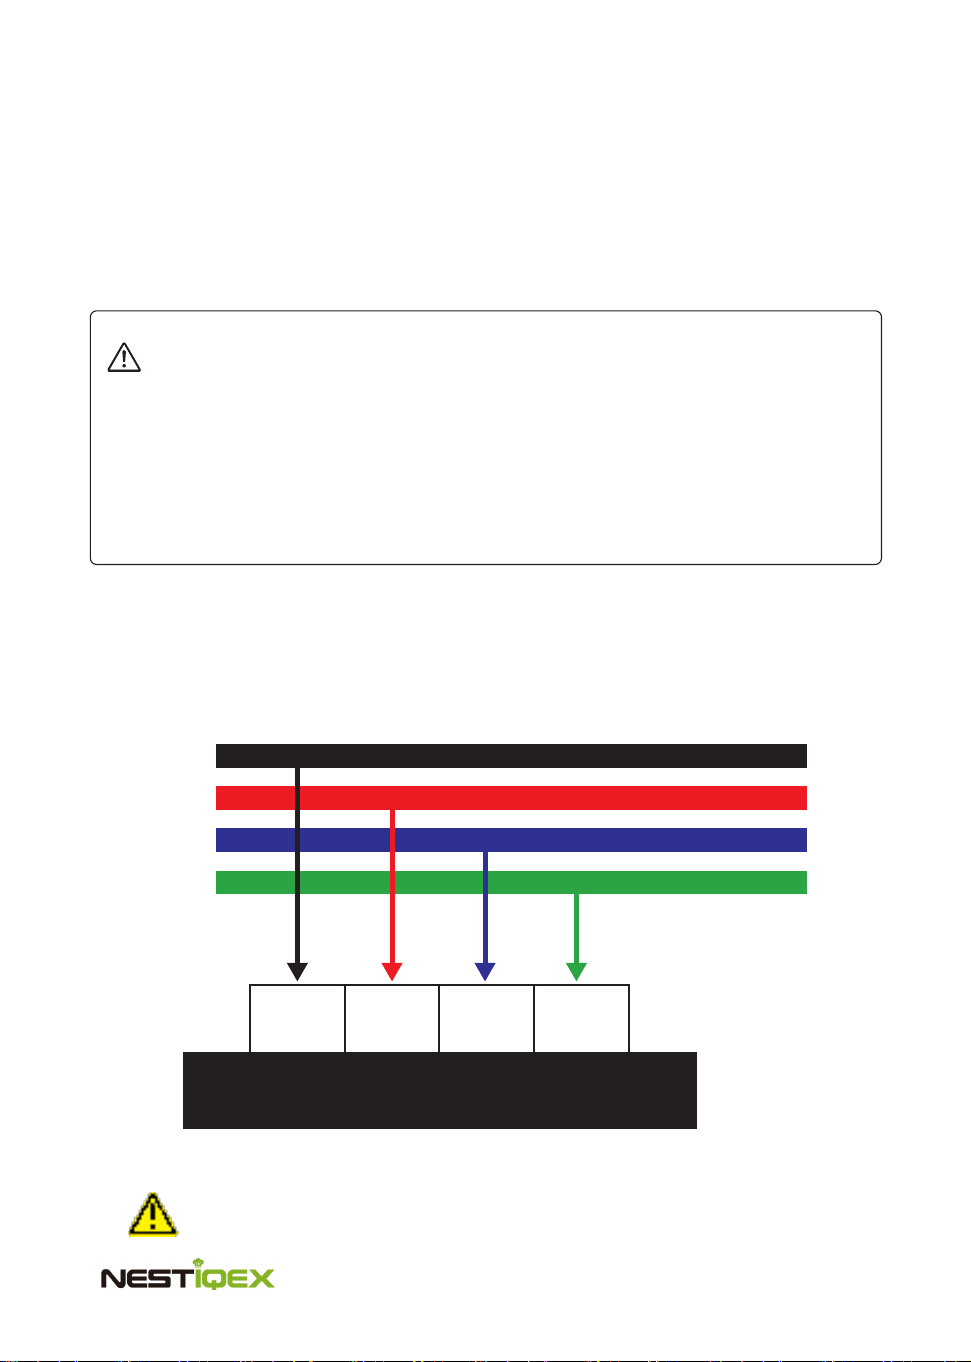
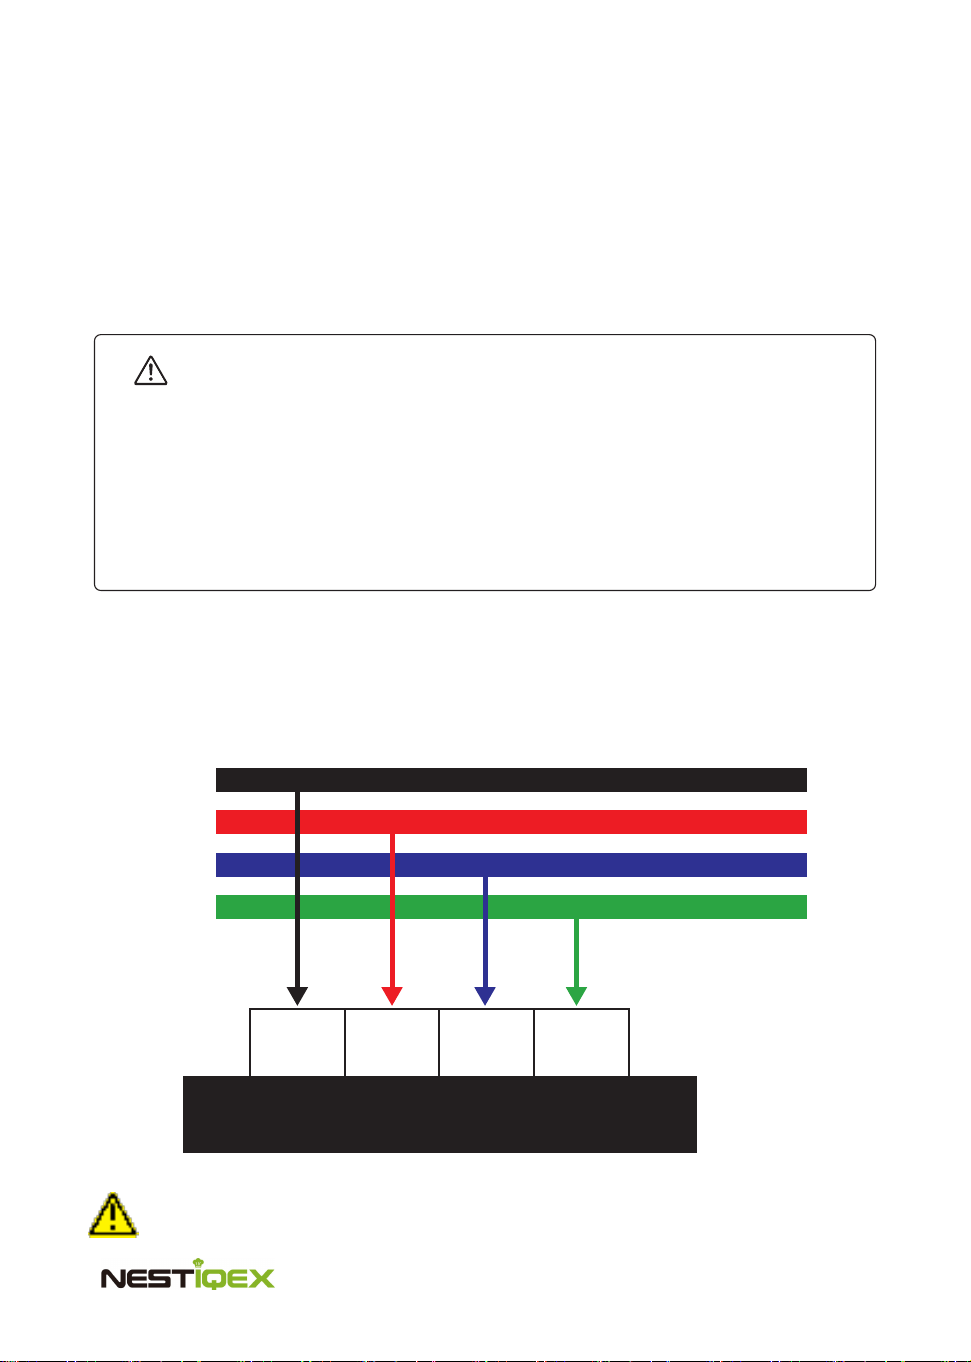
Wiring Instructions (208V~ 3-Phase 60Hz)
Connect L1 (Black), L2 (Red), L3 (Blue), and G (Green) to the terminal block as shown.
This appliance must be installed by a qualified electrician in accordance with local
electrical codes.
L1 L2 L3
G
208V 3-Phase Power Supply
208V 3PH 60Hz
(Black)
(Red)
(Blue)
(Green)

06
1.Place the unit on a stable, level, and dry surface made of non-combustible and non
-metallic material.
2.Ensure a minimum clearance of 6 inches (150 mm) on all sides and above the unit
to allow for proper ventilation and heat dissipation.
3.Before connecting to power, verify that the electrical supply meets the required
rating of 3500W, 3-phase, 4-wire, 60Hz. The power connection must be completed
by a qualified electrician using a dedicated circuit and approved industrial connector.
4.After proper wiring and installation, switch on the main power breaker. The POWER
INDICATOR will illuminate white, indicating the unit is in standby mode.
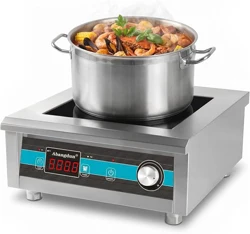
5.Before turning on the cooktop, make sure compatible cookware with ingredients is
properly placed and centered on the heating area.
6.Press the ON/OFF button once to start the unit. The LED DISPLAY will show the
default temperature or power level, and the COOLING FAN will start automatically.
When cooking is finished, press the ON/OFF button again to shut off the unit. The
LED display will turn off, but the cooling fan will continue running until the unit has
cooled to a safe temperature.
· If operating in Timer Mode, the unit will automatically shut off once the
timer expires, allowing the cooling fan to run briefly to cool down the system.
· Always supervise the unit while in operation. Do not preheat empty cookware
on high power — empty pans may heat much faster than expected and cause
damage.
· If the unit does not operate as intended, please refer to the Troubleshooting
section in this manual.
COOKING INSTRUCTIONS
NOTE:
07
This unit offers both TEMPERATURE and POWER MODES for convenient and
efficient cooking, along with an automatic 24-hour TIMER. The POWER and
TEMPERATURE MODES operate independently. You can switch between the
two modes by pressing the TEMP/POWER button.
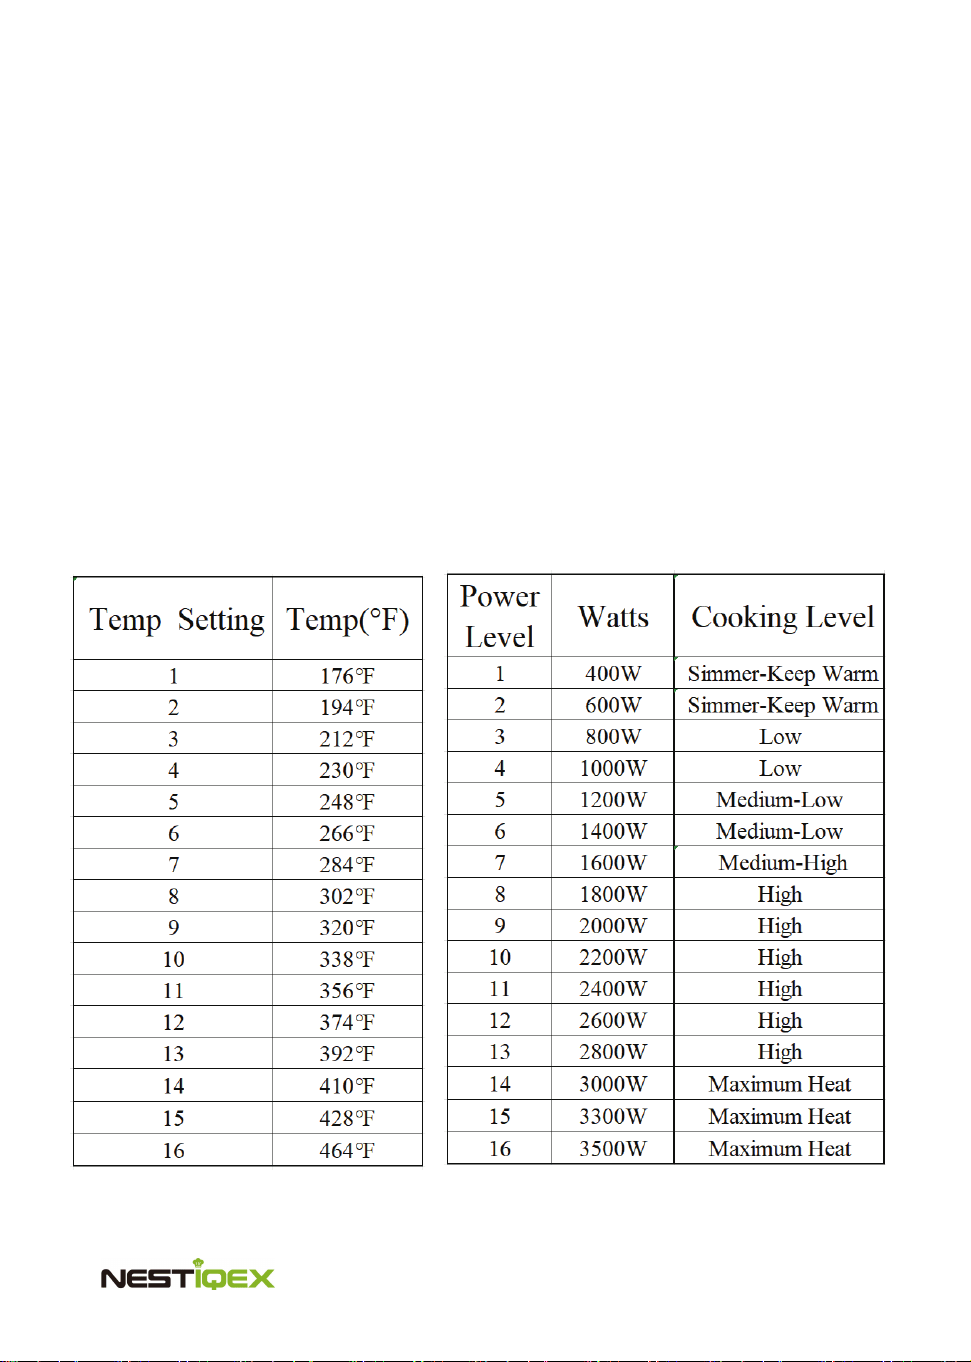
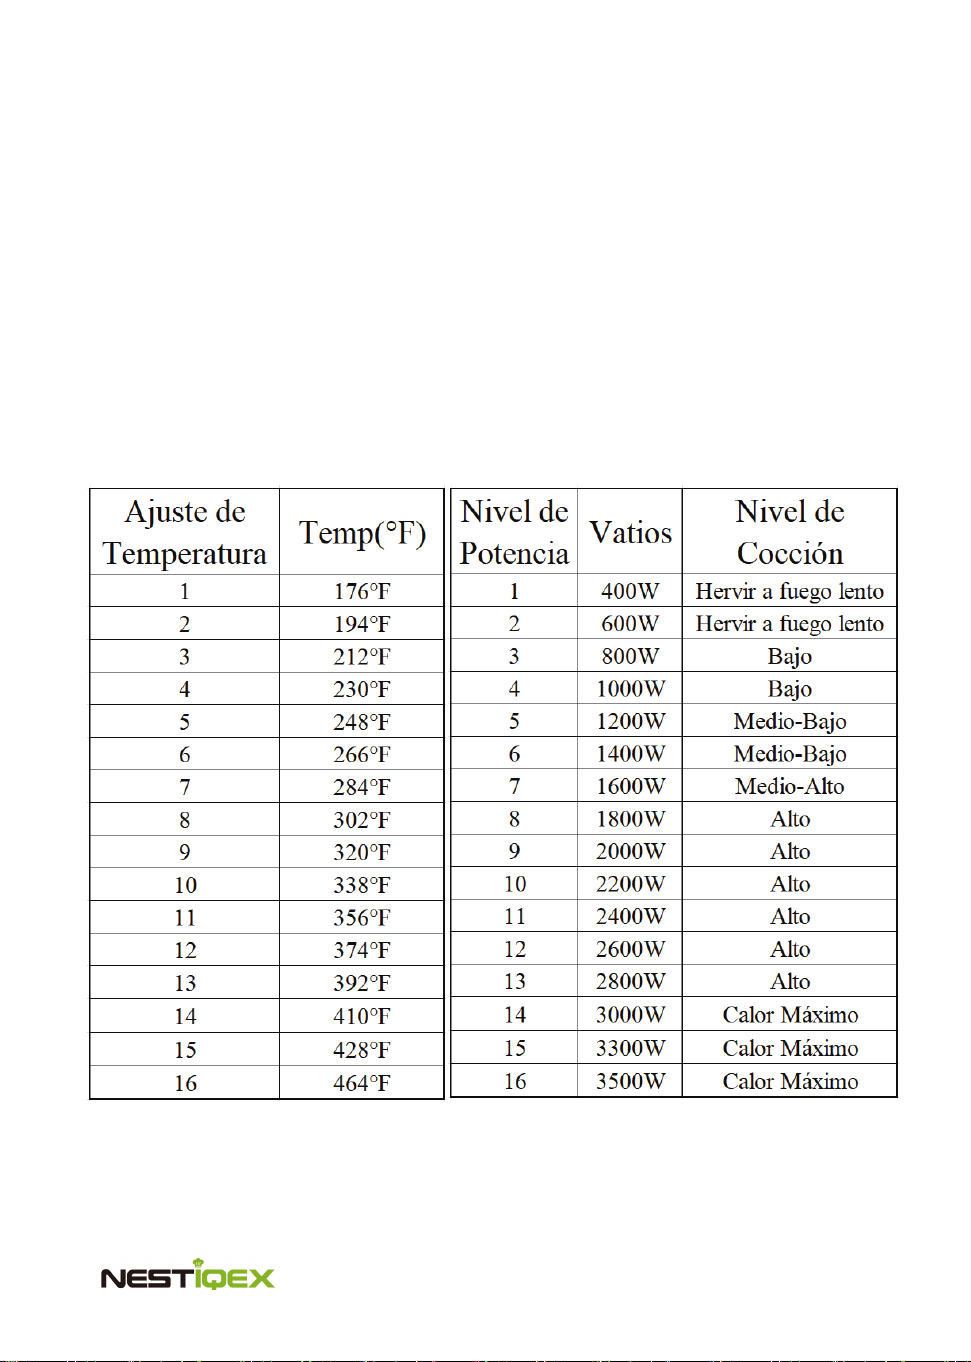
TEMPERATURE MODE
The default temperature setting is 284°F.
Turn the TEMPERATURE KNOB to
adjust the temperature as desired.This
mode offers 16 temperature levels,
allowing you to select the most suitable
heat for various cooking needs.
POWER MODE
The Power Mode is designed for precise
cooking when a specific power level must
be maintained.
The default power setting is 2000W. Turn
the POWER KNOB to adjust the power as
desired.This mode offers 16 power levels,
allowing you to select the most suitable heat
output for various cooking needs.

08
TROUBLESHOOTING GUIDE
Power Mode vs Temperature Mode
Power Mode: For faster heating, ideal for bringing water to a boil. Use when exact
temperature control isn’t required.
Temperature Mode: Preferred for frying or browning. The built-in microprocessor
continuously monitors and regulates the cookware temperature.
Using Power Mode for frying or browning may overheat cookware and, in some cases,
damage the cookware or cooktop.
Temperature Mode Limitations
The temperature sensor is located beneath the glass surface. Displayed temperature is
an estimate, not the exact pan temperature.
Actual temperature varies with cookware type, material, and thickness.
Test and adjust the settings to find the best temperature for your specific cookware
and cooking task.
24-Hour Automatic Timer
Can be used in both Power and Temperature Modes.
Press TIMER until the indicator lights and “0:10” appears. Turn the knob to set time
between 0:10–24:00.
Press TIMER again to adjust the time during operation.
When the timer reaches zero, the cooktop shuts off automatically.
Always unplug the power cord after cooking is complete.
Automatically switches to standby mode
For safety, if the unit operates continuously for 8 hours without any user interaction or
timer setting, it will automatically switch to standby mode.
If a timer is set, the unit beeps five times at the end of the countdown, then powers off.
The cooling fan continues running until the internal temperature reaches a safe level.
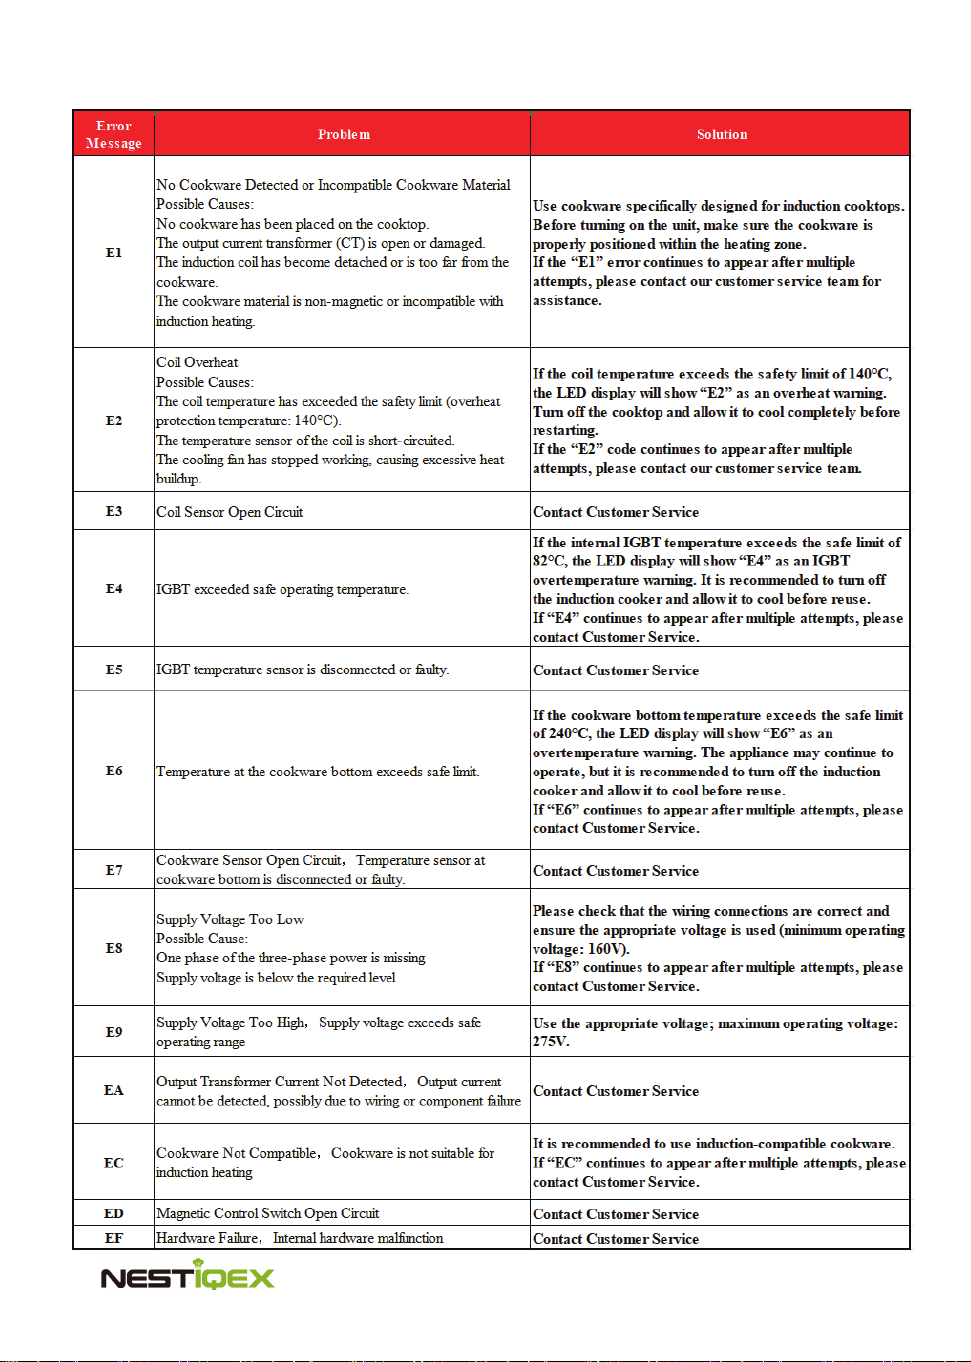
Note
The cooktop will beep and shut off if:
Incompatible cookware is placed on the cooktop, or
No cookware is detected.
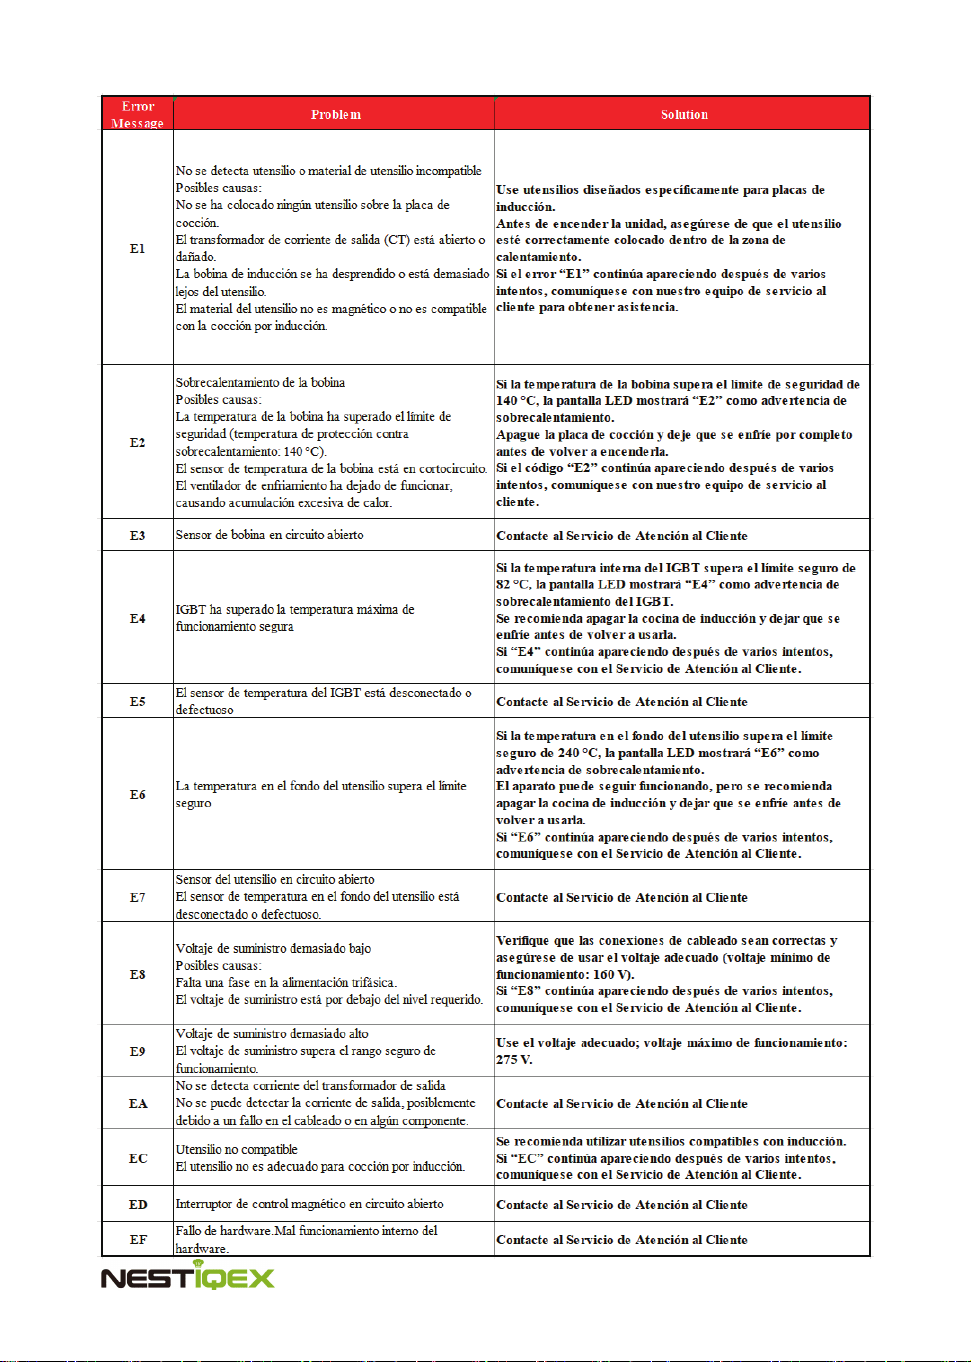
In both cases, the LED display flashes “E1” to indicate the error.
When any of the error messages below is displayed on the LED, the unit will beep at least
once.When the induction cooktop displays an error code, please refer to the “Error Code
Table” below in this manual to find the meaning and recommended solution. In most
cases, the issue can be resolved by checking the power supply, cookware, or operating
environment.For technical issues that cannot be identified or repaired, please contact
our customer service via email. Our support team will provide professional guidance
and assistance.
09
10
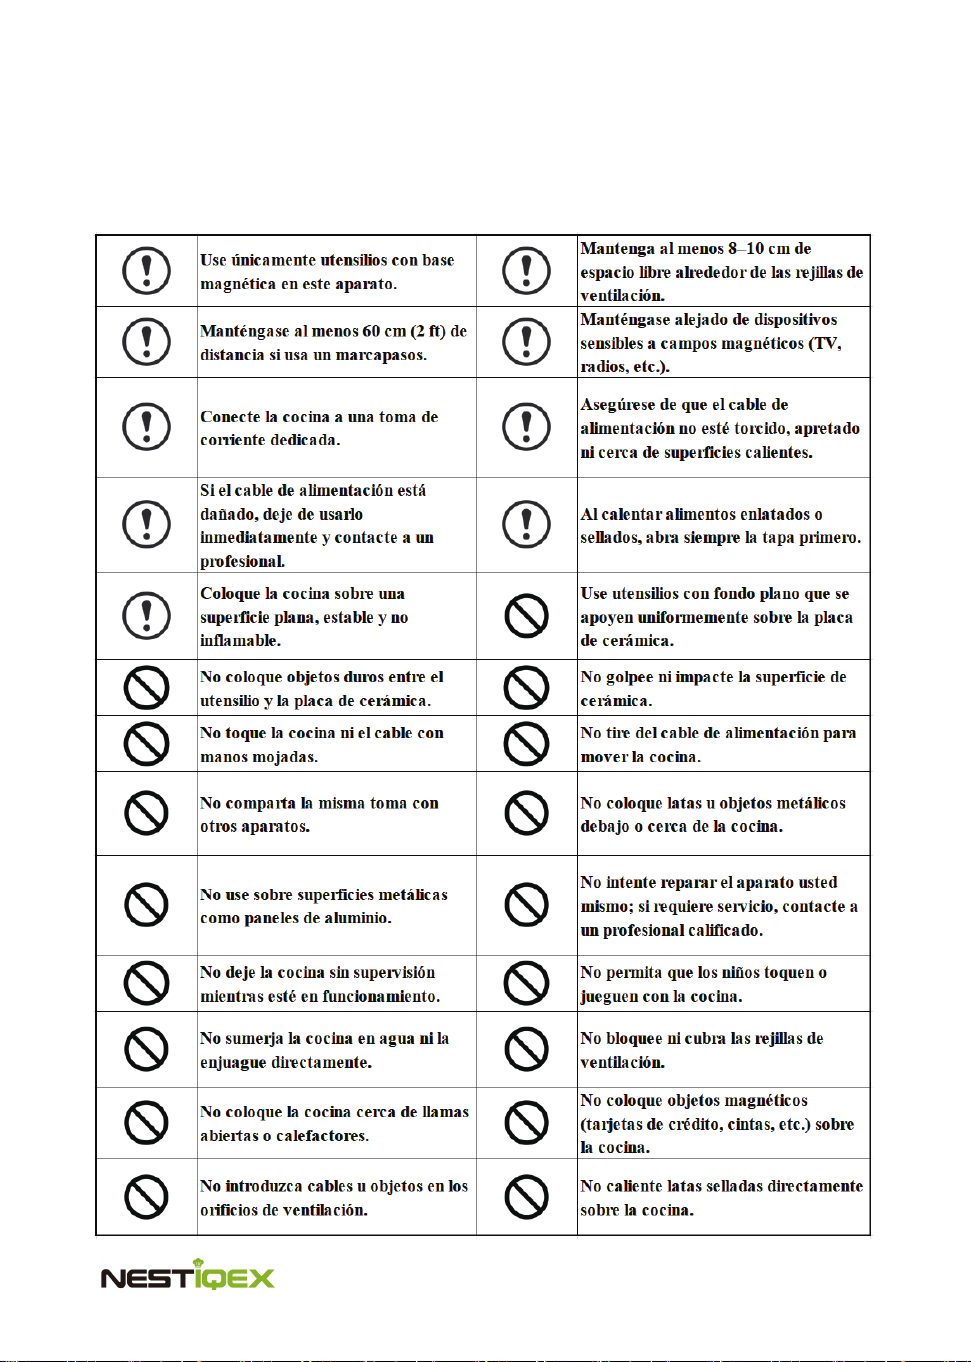
WARNING:
To reduce the risk of fire, electric shock, or injury, please follow all safety instructions
below.Do not modify or remove this warning section.

11
CARE AND MAINTENANCE
DISPOSAL
Prohibited Actions:
Suggested Practices:
Do not place sand, hard particles, or sharp objects on the surface to prevent scratches
or damage.
Do not clean the cooktop surface with metal scouring pads, abrasive cleaners, or solvents.
Do not immerse the cooktop, power cord, or plug in water or any other liquid.
Do not keep the unit plugged in while cleaning or when not in use.
Do not store or clean the unit while it is still hot.
Do not place objects heavier than 120 pounds (≈54.4 kg) on the cooktop surface.
Do not use the unit if the cooktop surface or power cord is damaged.
Do not place the cooktop near other heat sources or flammable, acidic, or alkaline materials.
Do not let the bottom of cookware scratch the ceramic panel.
Do not clean the cooktop with gasoline or corrosive chemicals.
Unplug the power cord before cleaning.
Wipe the cooktop shell and control panel with a soft cloth or a moist cloth with mild liquid
detergent, then let it dry.
Protect the cooktop from dust by covering it when not in use.
Clean the cooktop before storage to maintain its service life.
When this appliance has reached the end of its life, please dispose of it properly. Like
other electrical appliances, it contains valuable materials that can be recycled. Improper
disposal of electronic waste may harm the environment. We ask that you follow the rules
and regulations of your local governing authorities when disposing of electronic
appliances, and locate an authorized recycling facility near you.

12
PRODUCT AFTER-SALES
Warranty Period
This product is covered by a one-year limited warranty starting from the date of
purchase.
The warranty ensures that the product is free from defects in materials and
workmanship under normal use and maintenance.
Exclusions from Warranty Coverage
The following situations are not covered under the warranty:
Inability to provide a valid proof of purchase (e.g., receipt, invoice).
Product damage caused by misuse, negligence, or failure to follow the operating
instructions.
Unauthorized disassembly, modification, or tampering with the manufacture date,
serial number, or product markings.
Damage caused by force majeure events, such as natural disasters, electrical surges,
fires, or accidents.
Loss of original packaging, shipping damage, or breakage of the ceramic plate.
Damage resulting from improper maintenance, cleaning with incorrect methods or
chemicals, or usage outside the specified conditions.
Claims and Service Procedure
To request warranty service, you must provide the original proof of purchase.
Contact our after-sales service team first for all quality or performance issues. Do
not attempt to repair the product yourself.
For product replacement, provide both the original and a copy of the purchase proof.
Ensure that all repairs are performed by authorized professionals using original
replacement parts to maintain warranty validity.
Professional Notes
Unauthorized repairs, modifications, or use of non-original parts will void the
warranty.
Proper usage according to the instruction manual is required to maintain the
warranty.
Any product returned for warranty service must be packaged safely to avoid damage
during transit.
The manufacturer reserves the right to evaluate the product condition and determine
whether it qualifies for warranty service.

13
If you have any questions, concerns, or require assistance not
addressed in this user manual, please contact our customer service
team via email: [email protected]
.
Before using the product:
Carefully read all operating instructions and safety guidelines.
Ensure that the appliance is installed and connected properly
according to the instructions.
Keep the original box, packaging materials, and purchase receipt
in case service, repair, or replacement is required.
Our customer service team is available to provide:
Guidance on proper use and maintenance of the product.
Assistance with troubleshooting common issues.
Support for warranty claims and replacement procedures.
We strongly recommend contacting customer service before
attempting any repairs or modifications yourself, to ensure safety
and maintain warranty validity.
CUSTOMER SERVICE

14
El equipo de Nestiqex
Le damos la bienvenida a la familia Nestiqex.
¡Felicitaciones por su nuevo producto de cocina Nestiqex!
Nos comprometemos a ofrecer productos de la más alta calidad y un
excelente soporte al cliente.
Como distribuidor con sede en EE. UU., cada producto que ofrecemos
cumple con estrictos estándares de fabricación, seguridad y rendimiento.
Ofrecemos una garantía de un año en este producto para garantizar su
completa satisfacción.
Si tiene preguntas o necesita asistencia, contáctenos directamente por
correo electrónico. Para recibir una respuesta más rápida, incluya:
Nombre y modelo del producto
Comprobante de compra
Información de contacto completa
Descripción detallada del problema, incluyendo fotos si es posible
También agradecemos sus comentarios y sugerencias.
English
01
Versión en Español
14

15
ESPECIFICACIONES
Cocción por inducción — ¿Qué es y cómo funciona?
Modelo:
1019M(P50)
Fuente de alimentación:
208V/60Hz/3Φ
Potencia de salida:
400W-3500W
Niveles de potencia:
16
Temperatura:
176℉-464℉
Peso:
36.3 lbs
Dimensiones:
Longitud del cable:
14.2 in*18.1 in*5 in
5 Pies
1. ¿Qué es una placa de inducción?
Una placa de inducción calienta directamente la base del recipiente mediante inducción
electromagnética, ofreciendo un calentamiento rápido y eficiente para hervir, freír o
cocinar a fuego lento.
2. Calentamiento continuo de baja potencia
Este modelo utiliza un sistema continuo de baja potencia, no el calentamiento por pulsos
típico. Mantiene una temperatura estable y distribuye el calor de forma uniforme, ideal
para cocciones suaves y prolongadas.
3. Cuerpo de acero inoxidable y base de aleación de aluminio
El cuerpo es de acero inoxidable y la base de aleación de aluminio, lo que reduce el estrés
térmico, mejora la durabilidad y hace el equipo más ligero y fácil de manejar.
Bobina de inducción:
9 Pulgadas
16
Descubra su cocina de inducción
Panel de control
Pantalla LED digital: tiempo,
temperatura y funciones.
Presione para
encender o
apagar.
Presione para
cambiar entre
Potencia y
Temperatura.
Presione para
ajustar el
tiempo de
cocción.
Gire la perilla para encender o
apagar la unidad. Siga girando
para ajustar el temporizador, la
potencia o la temperatura.
Botón TIMER
Presione TIMER para activar el temporizador.
Ajuste el tiempo con el mando giratorio en incrementos de 10 minutos.
Se puede modificar en cualquier momento.
Al finalizar, la placa emitirá un pitido y el ventilador funcionará según sea necesario.
Botón POWER/TEMP
Presione POWER/TEMP para cambiar entre Modo Potencia y Modo Temperatura.
Modo Potencia: ajuste en vatios.
Modo Temperatura: mantiene la temperatura deseada.
Mando Giratorio
El mando giratorio se utiliza para ajustar los valores del temporizador, la potencia
y la temperatura.
Sentido horario = aumentar, antihorario = disminuir.
17
Panel de vidrio negro premium
Superficie duradera, resistente a rayaduras
y fácil de limpiar; distribuye el calor de
manera uniforme para una cocción
confiable.
Base de Aleación de Aluminio No Magnética
Esta base de aleación de aluminio no mag
-nética, ligera pero resistente, bloquea efica
-zmente la inducción del campo magnético
en la parte inferior de la placa, protegiendo
los componentes internos y prolongando la
vida útil del producto.
Ventiladores duales de alto rendimiento
Enfriamiento eficiente y silencioso que
prolonga la vida útil del producto y
mantiene un funcionamiento estable.
Carcasa de acero inoxidable 304
Acero inoxidable de alta calidad y grado
alimenticio que protege contra la
corrosión y ofrece un acabado
elegante y premium.
1mm
Carcasa de acero
inoxidable 304
Panel de vidrio negro
templado especial
Parte superior de acero inoxidable
304 de 1 mm, elevada sobre el
vidrio negro cristal para mayor
resistencia y eficiencia de
calentamiento.
Patas antideslizantes
Colocación segura que evita
deslizamientos, garantizando la
seguridad durante su uso.
18
PRECAUCIÓN: SE REQUIERE INSTALACIÓN PROFESIONAL
Este aparato está diseñado para funcionar con una fuente de alimentación de 3500W,
trifásica, 4 hilos, 60 Hz.
Debe ser conectado a un circuito dedicado por un electricista calificado o técnico
profesional.
No comparta este circuito con ningún otro equipo.
La instalación o uso incorrecto puede causar daños, descarga eléctrica o riesgo de
incendio.
Configuración inicial
Después del primer uso o tras un almacenamiento prolongado, complete
los siguientes pasos:
Retire la unidad del embalaje y separe todos los materiales de empaque.
Lea toda la documentación incluida y guárdela para referencia futura.
Limpie todas las superficies externas con un paño suave y seco, y confirme
que todas las rejillas estén libres de restos de embalaje u otros residuos.
La instalación debe ser realizada únicamente por electricistas calificados.
Instrucciones de cableado (208 V - Trifásico -60 Hz)
Conecte L1 (Negro), L2 (Rojo), L3 (Azul) y G (Verde) al bloque de terminales según
se muestra.Este aparato debe ser instalado por un electricista calificado de acuerdo con
los códigos eléctricos locales.
L1 L2 L3
G
Alimentación trifásica 208 V, 60 Hz
208 V Trifásico 60 Hz
(Negro)
(Rojo)
(Azul)
(Verde)

19
Esta unidad ofrece modos de TEMPERATURA y POTENCIA para una cocción
conveniente y eficiente, junto con un temporizador automático de 24 horas. Los
modos POTENCIA y TEMPERATURA funcionan de manera independiente. Puede
alternar entre los dos modos presionando el botón TEMP/POWER.
1.Coloque la unidad sobre una superficie estable, nivelada y seca, hecha de material
no combustible y no metálico.
2.Asegure un espacio libre mínimo de 6 pulgadas (150 mm) en todos los lados y
encima de la unidad para permitir una ventilación y disipación de calor adecuadas.
3.Antes de conectarla a la corriente, verifique que el suministro eléctrico cumpla con
la potencia requerida de 3500 W, trifásica, 4 hilos, 60 Hz. La conexión eléctrica debe
ser realizada por un electricista calificado usando un circuito dedicado y un conector
industrial aprobado.
4.Tras la instalación y cableado correctos, encienda el interruptor principal.
El INDICADOR DE POTENCIA se iluminará en blanco, indicando que la unidad está
en modo de espera.
5.Antes de encender la placa, asegúrese de que el utensilio de cocina compatible, con
los ingredientes, esté colocado correctamente y centrado sobre el área de calentamiento.
6.Presione el botón ON/OFF una vez para iniciar la unidad. La PANTALLA LED
mostrará la temperatura o nivel de potencia predeterminado, y el VENTILADOR DE
ENFRIAMIENTO se activará automáticamente. Cuando termine la cocción, presione
nuevamente el botón ON/OFF para apagar la unidad. La pantalla LED se apagará, pero
el ventilador continuará funcionando hasta que la unidad alcance una temperatura segura.
· Si se utiliza en modo temporizador, la unidad se apagará automáticamente
al finalizar el tiempo, permitiendo que el ventilador de enfriamiento funcione
brevemente para enfriar el sistema.
· Siempre supervise la unidad mientras esté en funcionamiento. No
precaliente utensilios vacíos a alta potencia; las sartenes vacías pueden
calentarse más rápido de lo esperado y causar daños.
· Si la unidad no funciona como se espera, consulte la sección de Solución
de problemas en este manual.
INSTRUCCIONES DE COCCIÓN
NOTA:
20
MODO TEMPERATURA
La temperatura predeterminada es 284 °F.
Gire el MANDO DE TEMPERATURA para
ajustar la temperatura deseada.
Este modo ofrece 16 niveles de temperatura,
permitiendo seleccionar el calor más
adecuado según el tipo de cocción.
POWER MODE
El modo Potencia está diseñado para una
cocción precisa cuando se debe mantener
un nivel de potencia específico.
La potencia predeterminada es 2000 W.
Gire el MANDO DE POTENCIA para
ajustar la potencia deseada.Este modo ofrece
16 niveles de potencia, permitiendo
seleccionar la salida de calor más adecuada
según el tipo de cocción.

21
TROUBLESHOOTING GUIDE
Modo de Potencia vs Modo de Temperatura
Modo de Potencia: Calienta más rápido, ideal para hervir agua. Úselo cuando no se
requiera un control de temperatura exacto.Modo de Temperatura: Preferido para freír o
dorar. El microprocesador incorporado monitorea y regula continuamente la temperatura
del utensilio.Usar el modo de potencia para freír o dorar puede sobrecalentar los utensilios
y, en algunos casos, dañarlos o dañar la placa.
Limitaciones del Modo de Temperatura
El sensor de temperatura se encuentra debajo de la superficie de vidrio. La temperatura
mostrada es una estimación, no la temperatura exacta del utensilio.La temperatura real
varía según el tipo, material y grosor del utensilio.Pruebe y ajuste la configuración para
encontrar la temperatura óptima para su utensilio y tipo de cocinado.
Temporizador Automático de 24 Horas
Puede usarse en los modos de Potencia y Temperatura.Presione TIMER hasta que se
ilumine el indicador y aparezca “0:10”. Gire la perilla para ajustar el tiempo entre
0:10–24:00.Presione TIMER nuevamente para ajustar el tiempo durante la operación.
Cuando el temporizador llegue a cero, la placa se apagará automáticamente.Desenchufe
siempre el cable de alimentación después de cocinar.
Cambio automático al modo de espera
Por seguridad, si el equipo funciona de forma continua durante 8 horas sin ninguna
interacción del usuario ni configuración del temporizador, cambiará automáticamente
al modo de espera.Si se ha configurado un temporizador, la unidad emitirá cinco pitidos
al finalizar la cuenta regresiva y luego se apagará.El ventilador de enfriamiento seguirá
funcionando hasta que la temperatura interna alcance un nivel seguro.
Nota
La placa emitirá un pitido y se apagará si:
Se coloca un utensilio incompatible, o
No se detecta ningún utensilio.
En ambos casos, el LED parpadea “E1” para indicar el error.
Cuando se muestre alguno de los códigos de error a continuación en el LED, la unidad emitirá
al menos un pitido.
Cuando la placa de inducción muestre un código de error, consulte la “Tabla de Códigos de Error”
a continuación en este manual para conocer su significado y la solución recomendada. En la
mayoría de los casos, el problema se puede resolver comprobando la alimentación, los utensilios
o el entorno de operación.
Para problemas técnicos que no puedan identificarse o solucionarse, comuníquese con nuestro
servicio de atención al cliente por correo electrónico. Nuestro equipo de soporte proporcionará
orientación y asistencia profesional.
22
23
ADVERTENCIA:
Para reducir el riesgo de incendio, descarga eléctrica o lesiones, siga todas las instrucciones de
seguridad a continuación.
No modifique ni retire esta sección de advertencia.

24
CUIDADO Y MANTENIMIENTO
ELIMINACIÓN
Acciones prohibidas:
Prácticas recomendadas:
No coloque arena, partículas duras ni objetos afilados sobre la superficie para evitar
rayaduras o daños.
No limpie la superficie de la cocina con esponjas de metal, limpiadores abrasivos o
disolventes.
No sumerja la cocina, el cable de alimentación ni el enchufe en agua u otros líquidos.
No deje la unidad conectada a la corriente durante la limpieza o cuando no esté en uso.
No almacene ni limpie la unidad mientras esté caliente.
No coloque objetos que pesen más de 120 libras (≈54,4 kg) sobre la superficie de la
cocina.
No use la unidad si la superficie de la cocina o el cable de alimentación están dañados.
No coloque la cocina cerca de otras fuentes de calor o materiales inflamables, ácidos o
alcalinos.
Evite que el fondo de los utensilios raspe el panel de cerámica.
No limpie la cocina con gasolina o productos químicos corrosivos.
Desenchufe la unidad antes de limpiarla.
Limpie la carcasa y el panel de control con un paño suave o un paño húmedo con
detergente
líquido suave, luego deje secar.
Proteja la cocina del polvo cubriéndola cuando no esté en uso.
Limpie la cocina antes de almacenarla para prolongar su vida útil.
Cuando el aparato haya llegado al final de su vida útil, dispóngalo de manera
adecuada.
Como otros aparatos eléctricos, contiene materiales valiosos que pueden reciclarse.
La eliminación incorrecta de residuos electrónicos puede dañar el medio ambiente.
Siga las normas y regulaciones locales para la eliminación de aparatos electrónicos
y ubique
un centro de reciclaje autorizado cercano.

25
SERVICIO POSTVENTA DEL PRODUCTO
Período de Garantía:
Este producto cuenta con una garantía limitada de un año a partir de la fecha de compra.
La garantía asegura que el producto esté libre de defectos de materiales y fabricación
bajo un uso y mantenimiento normales.
Exclusiones de la Garantía
No están cubiertos los siguientes casos:
Imposibilidad de proporcionar prueba de compra válida (por ejemplo, recibo o factura).
Daños al producto causados por uso indebido, negligencia o incumplimiento de las
instrucciones de operación.
Desmontaje, modificación o manipulación no autorizada, incluyendo fecha de
fabricación, número de serie o marcas del producto.
Daños por fuerza mayor, como desastres naturales, sobrecargas eléctricas, incendios
o accidentes.
Pérdida del empaque original, daños por envío o rotura de la placa de cerámica.
Daños por mantenimiento inadecuado, limpieza con métodos o químicos incorrectos,
o uso fuera de las condiciones especificadas.
Procedimiento de Reclamos y Servicio:
Para solicitar el servicio de garantía, debe proporcionar la prueba de compra original.
Contacte primero a nuestro equipo de servicio postventa para cualquier problema de
calidad o rendimiento. No intente reparar el producto por su cuenta.
Para reemplazo del producto, proporcione tanto el original como una copia de la
prueba de compra.
Asegúrese de que todas las reparaciones sean realizadas por profesionales autorizados
utilizando piezas originales para mantener la validez de la garantía.
Notas Profesionales:
Las reparaciones, modificaciones o uso de piezas no originales anulan la garantía.
Es obligatorio un uso adecuado según el manual de instrucciones para mantener
la garantía.
Cualquier producto devuelto para servicio de garantía debe estar empaquetado de
manera segura para evitar daños durante el transporte.
El fabricante se reserva el derecho de evaluar el estado del producto y determinar
si califica para el servicio de garantía.

26
Si tiene alguna pregunta, inquietud o necesita asistencia que no se
aborde en este manual, contacte a nuestro equipo de servicio al
cliente por correo electrónico: [email protected]
Antes de usar el producto:
Lea cuidadosamente todas las instrucciones de operación
y pautas de seguridad.
Asegúrese de que el aparato esté instalado y conectado
correctamente según las instrucciones.
Conserve la caja original, materiales de embalaje y recibo de
compra en caso de requerir servicio, reparación o reemplazo.
Nuestro equipo de servicio al cliente puede brindar:
Orientación sobre el uso y mantenimiento adecuado del producto.
Asistencia para resolver problemas comunes.
Apoyo en reclamos de garantía y procedimientos de reemplazo.
Recomendamos contactar al servicio al cliente antes de intentar
reparaciones o modificaciones por su cuenta, para garantizar la
seguridad y mantener la validez de la garantía.
SERVICIO AL CLIENTE

NESTIQEX LLC
623 WHEELER ST SEATTLE WA 98109-2243
After-sales service e-mail:
Made In China
1019(P35)