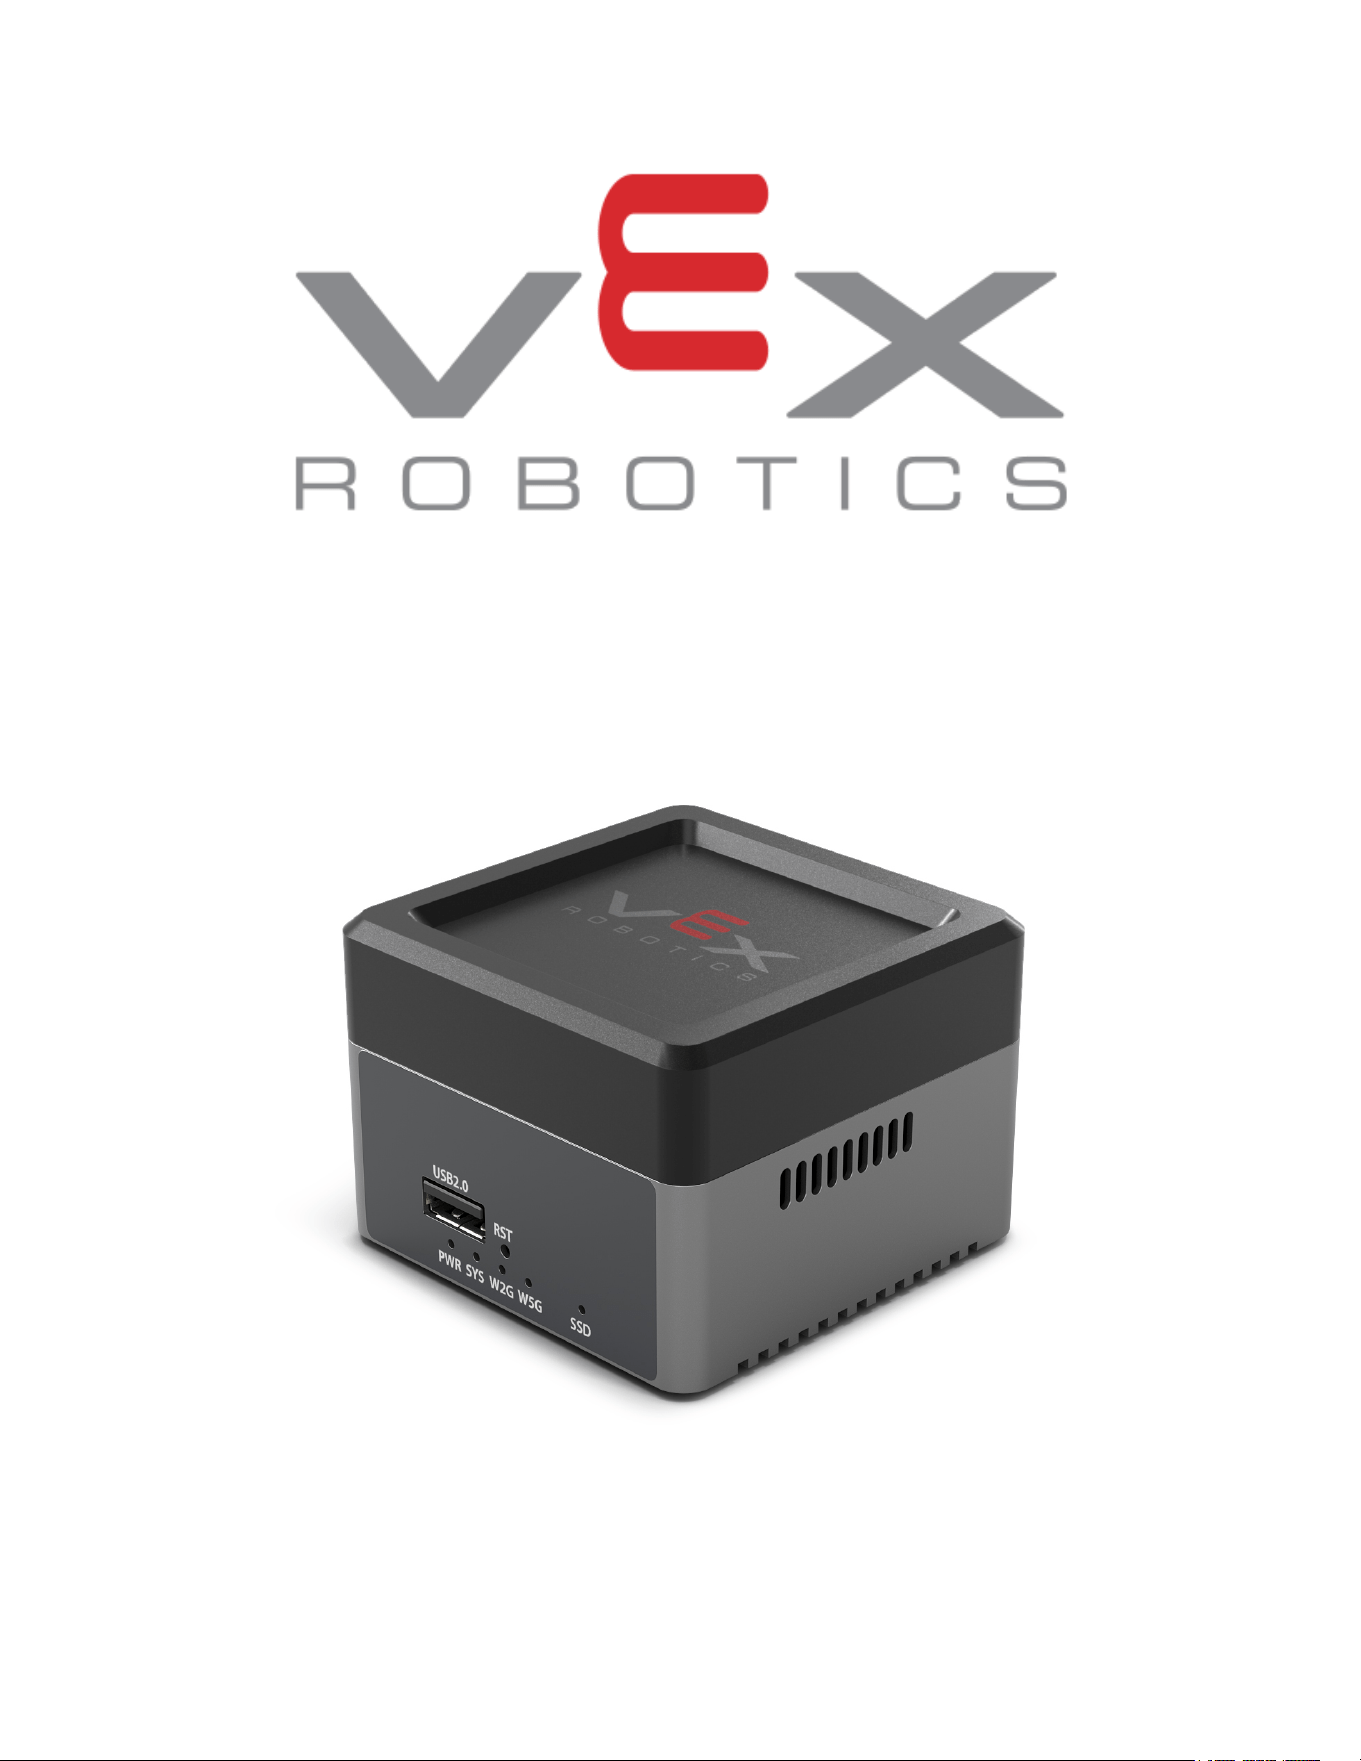
VEXnet Server P/N: 210-8909
Users Manual

Table Of Contents
1. Product Description
2. RF Certification
3. Safety
4. Getting Started
5. Classroom Quick Setup
6. Classroom Complete Setup
7. School Infrastructure Setup
8. Restarting the VEXnet Server
9. Resetting to Factory Default
10. Update Options
11. Technical Details
1. Product Description
The VEXnet Server locally hosts the complete VEX teaching ecosystem so classrooms and
schools can teach, build, code and learn regardless of your internet availability. It provides a
local copy of all VEX content in many languages which can be accessed via a browser.
The VEXnet Server can additionally be used to help host VEX Competition events. This
provides software, wired and wireless network connections as needed for small events.
The
VEXnet Server only used at Industrial residential and forbid use at residential condition

2. RF Certification
3. Safety
Use the VEXnet Server only as described in this manual.
● Connect only the supplied 12V USB-C power adapter. Standard 5V USB-C power
adapters will not power the VEXnet Server correctly.
● Connect the power adapter to a nearby, easily accessible power outlet.
● Use the VEXnet Server indoors only, on a stable surface, and keep it away from water,
rain, excessive humidity, heat sources, and direct sunlight.
● Use the VEXnet Server only in ambient temperatures from 0 °C to 40 °C (32 °F to 104
°F).
● Do not use the VEXnet Server if the power adapter, power cable, enclosure, or
connectors appear damaged.
● Do not open, disassemble, modify, or attempt to repair the VEXnet Server. Service
should be performed only by qualified personnel.
● Do not disconnect power during a firmware or content update.
● Do not use the VEXnet Server where wireless devices are prohibited.
● Keep the VEXnet Server and its power adapter at least 15 cm (6 inches) away from
pacemakers and other implanted medical devices. If you suspect interference, turn off
the device and consult a physician.
4. Getting Started
There are three ways to get started. All three methods provide user access to VEX content at
vexnet.com
1. Classroom Quick Start
a. Provides a wireless and wired network
b. No user configuration needed
c. Anyone with the username and password can join wirelessly
2. Classroom Complete Setup
a. Provides a wireless and wired network
b. Setup an administrator account with a username and password

c. Change the wireless network name and password
d. Recommended for use with Tournament Manager at VEX Events
3. School Infrastructure Setup
a. Requires a School network and IT Support
b. Connects to a School network via ethernet
c. Setup an administrator account with a username and password
d. Requires a DNS redirect to the VEXnet Server
e. Optionally disable VEXnet Wi-Fi
f. Setup automatic content updates
5. Classroom Quick Setup
Classroom Quick Start
● Provides a wireless and wired network
● No user configuration needed
● Anyone with the username and password can join wirelessly
Instructions
1. Connect the VEXnet Server to the supplied 12V USB-C Adapter.
2. Connect to the default wireless network
a. Network VEXnet
b. Password vex12345
3. Open a browser and go to vexnet.com
4. Periodic updates are recommended. See the Update Options section for more
information.
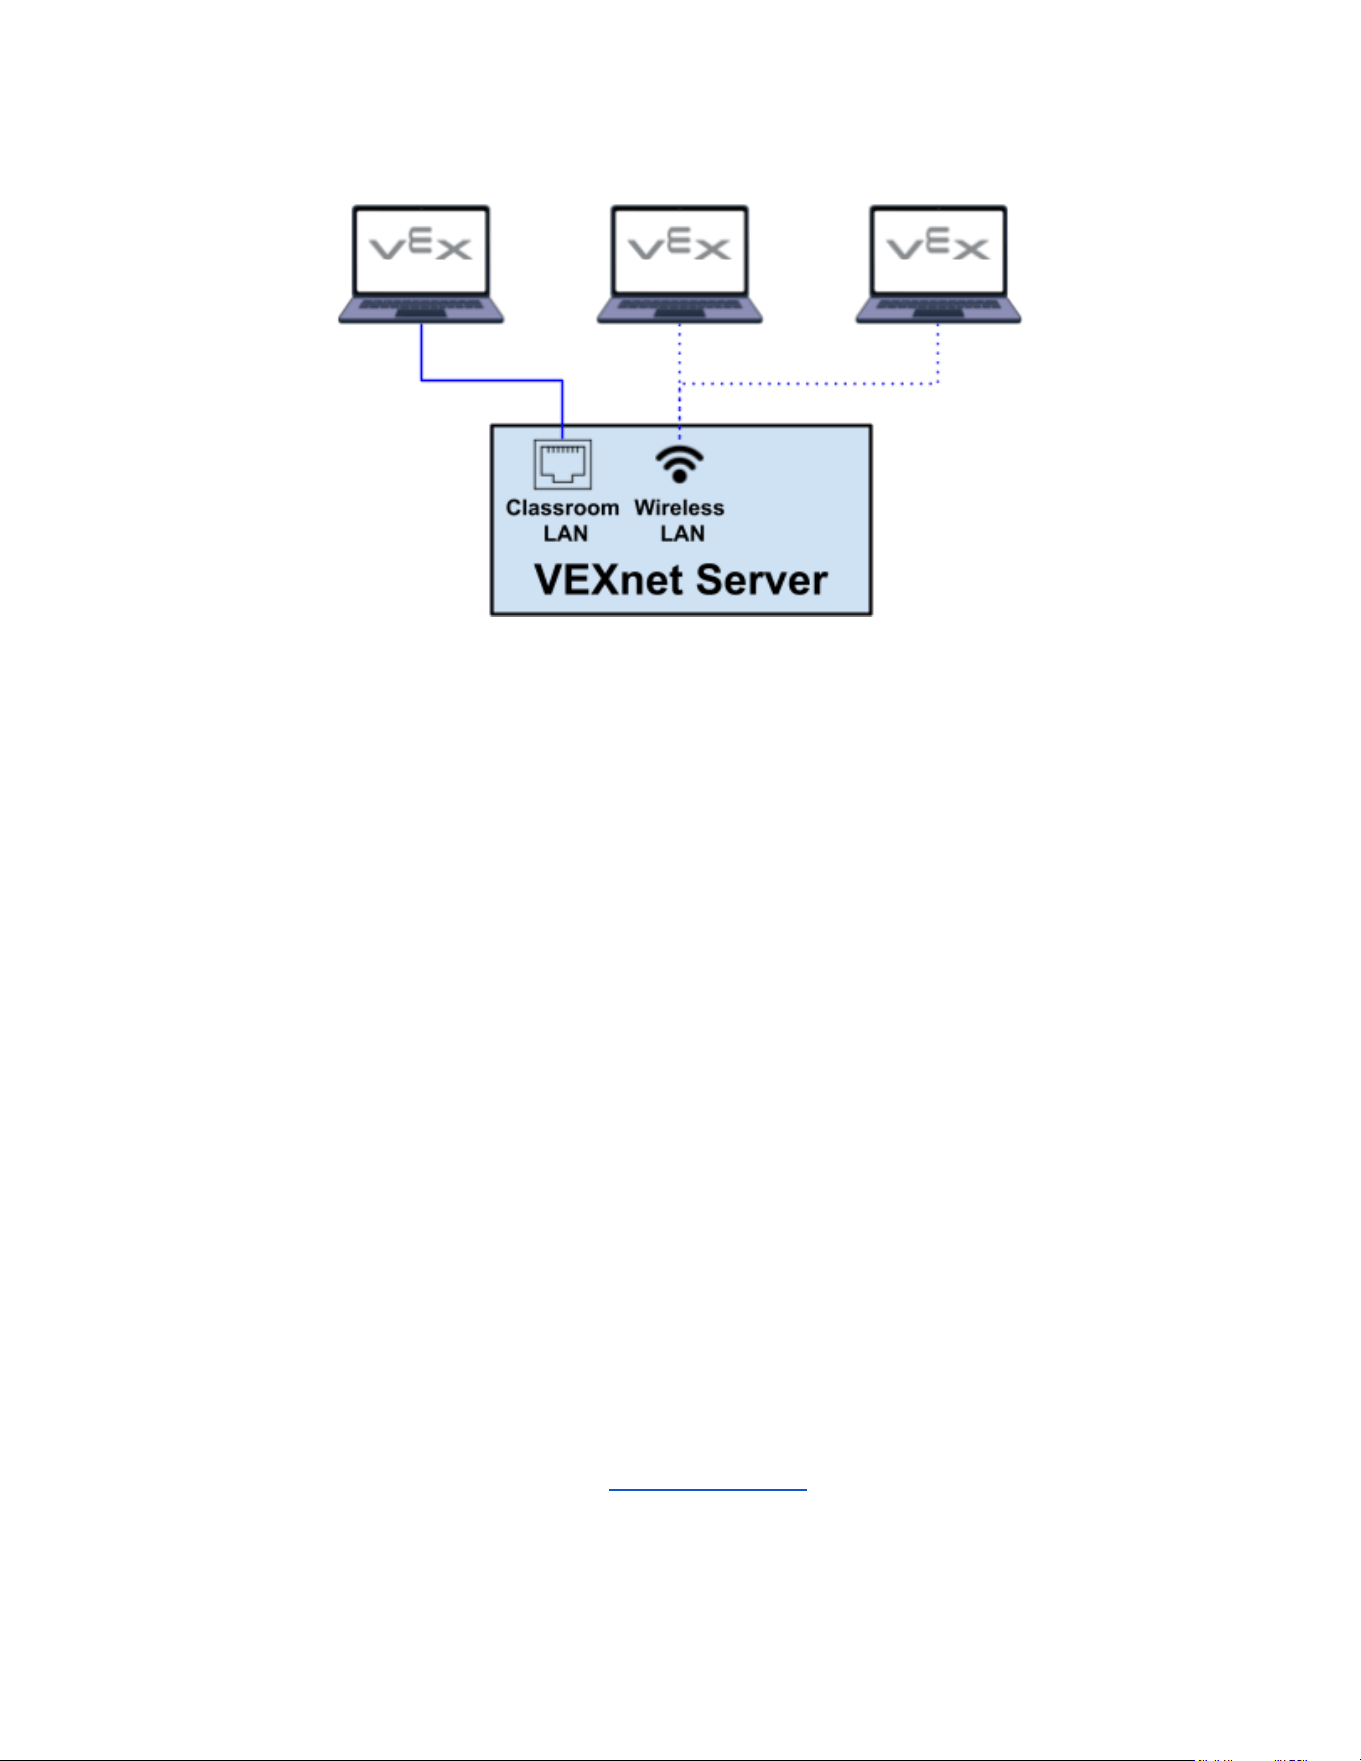
Diagram 1: Classroom Quick Setup
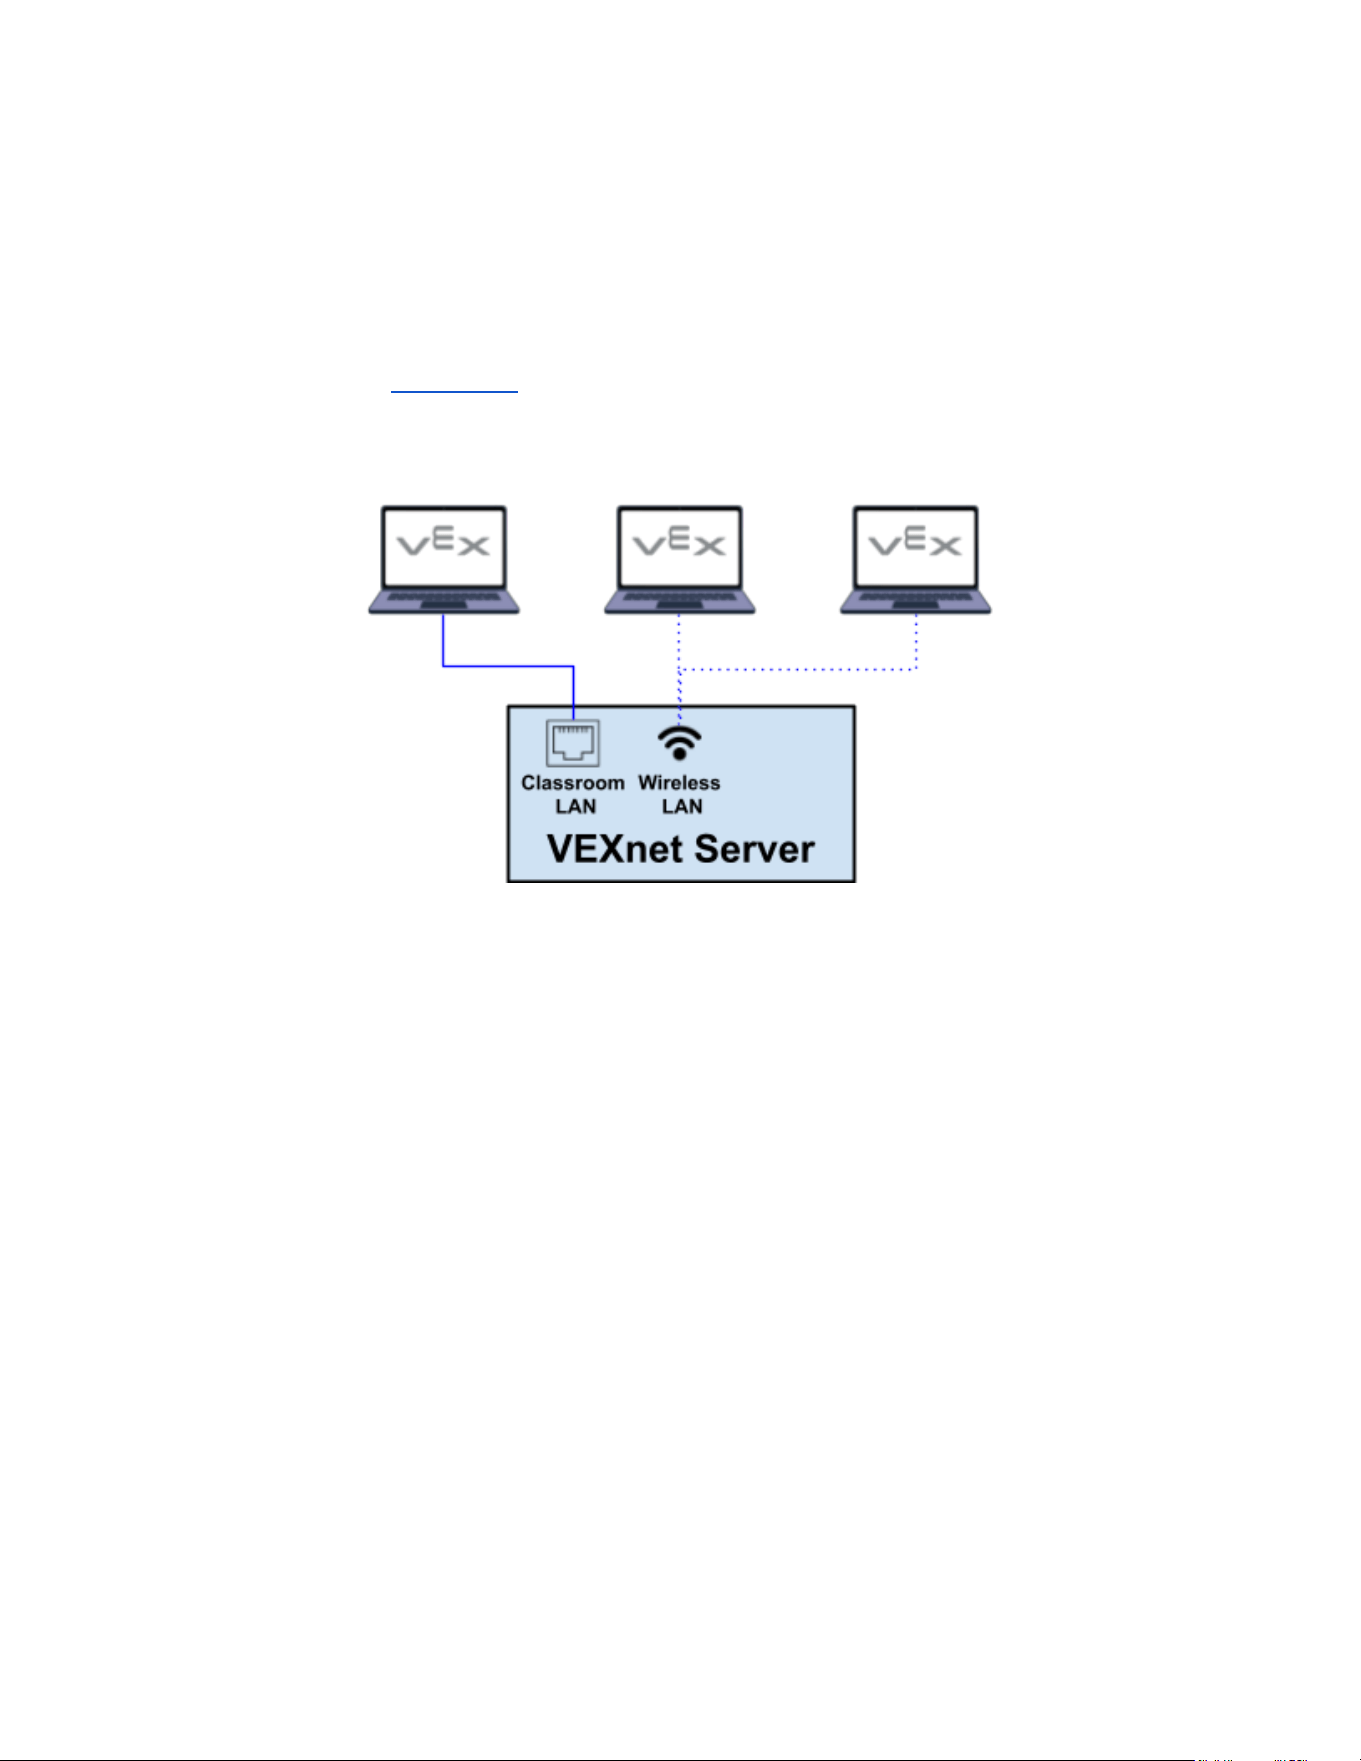
6. Classroom Complete Setup
Classroom Complete Setup
● Provides a wireless and wired network
● Setup an administrator account with a username and password
● Change the wireless network name and password
● Recommended for use with Tournament Manager at VEX Events
Instructions
1. Initial Connection
a. Connect the VEXnet Server to the supplied 12V USB-C Adapter.
Note: Normal USB-C Power Adapters are 5V and will not work.
b. Connect to the default Wi-Fi network
i. Network VEXnet
ii. Password vex12345
2. Admin Configuration
a. Open a browser and go to admin.vexnet.com
b. You will be prompted to press the reset button once to confirm physical access
c. Create an Admin username and password
d. (optional) Rename with wireless network name and password
e. (optional) Make any other changes listed
3. Connect Users
a. Access the wireless VEXnet network or connect to the Classroom LAN network
b. Open a browser
c. GO to vexnet.com
4. Periodic updates are recommended. See the Update Options section for more
information.
Diagram 1: Class Complete Setup
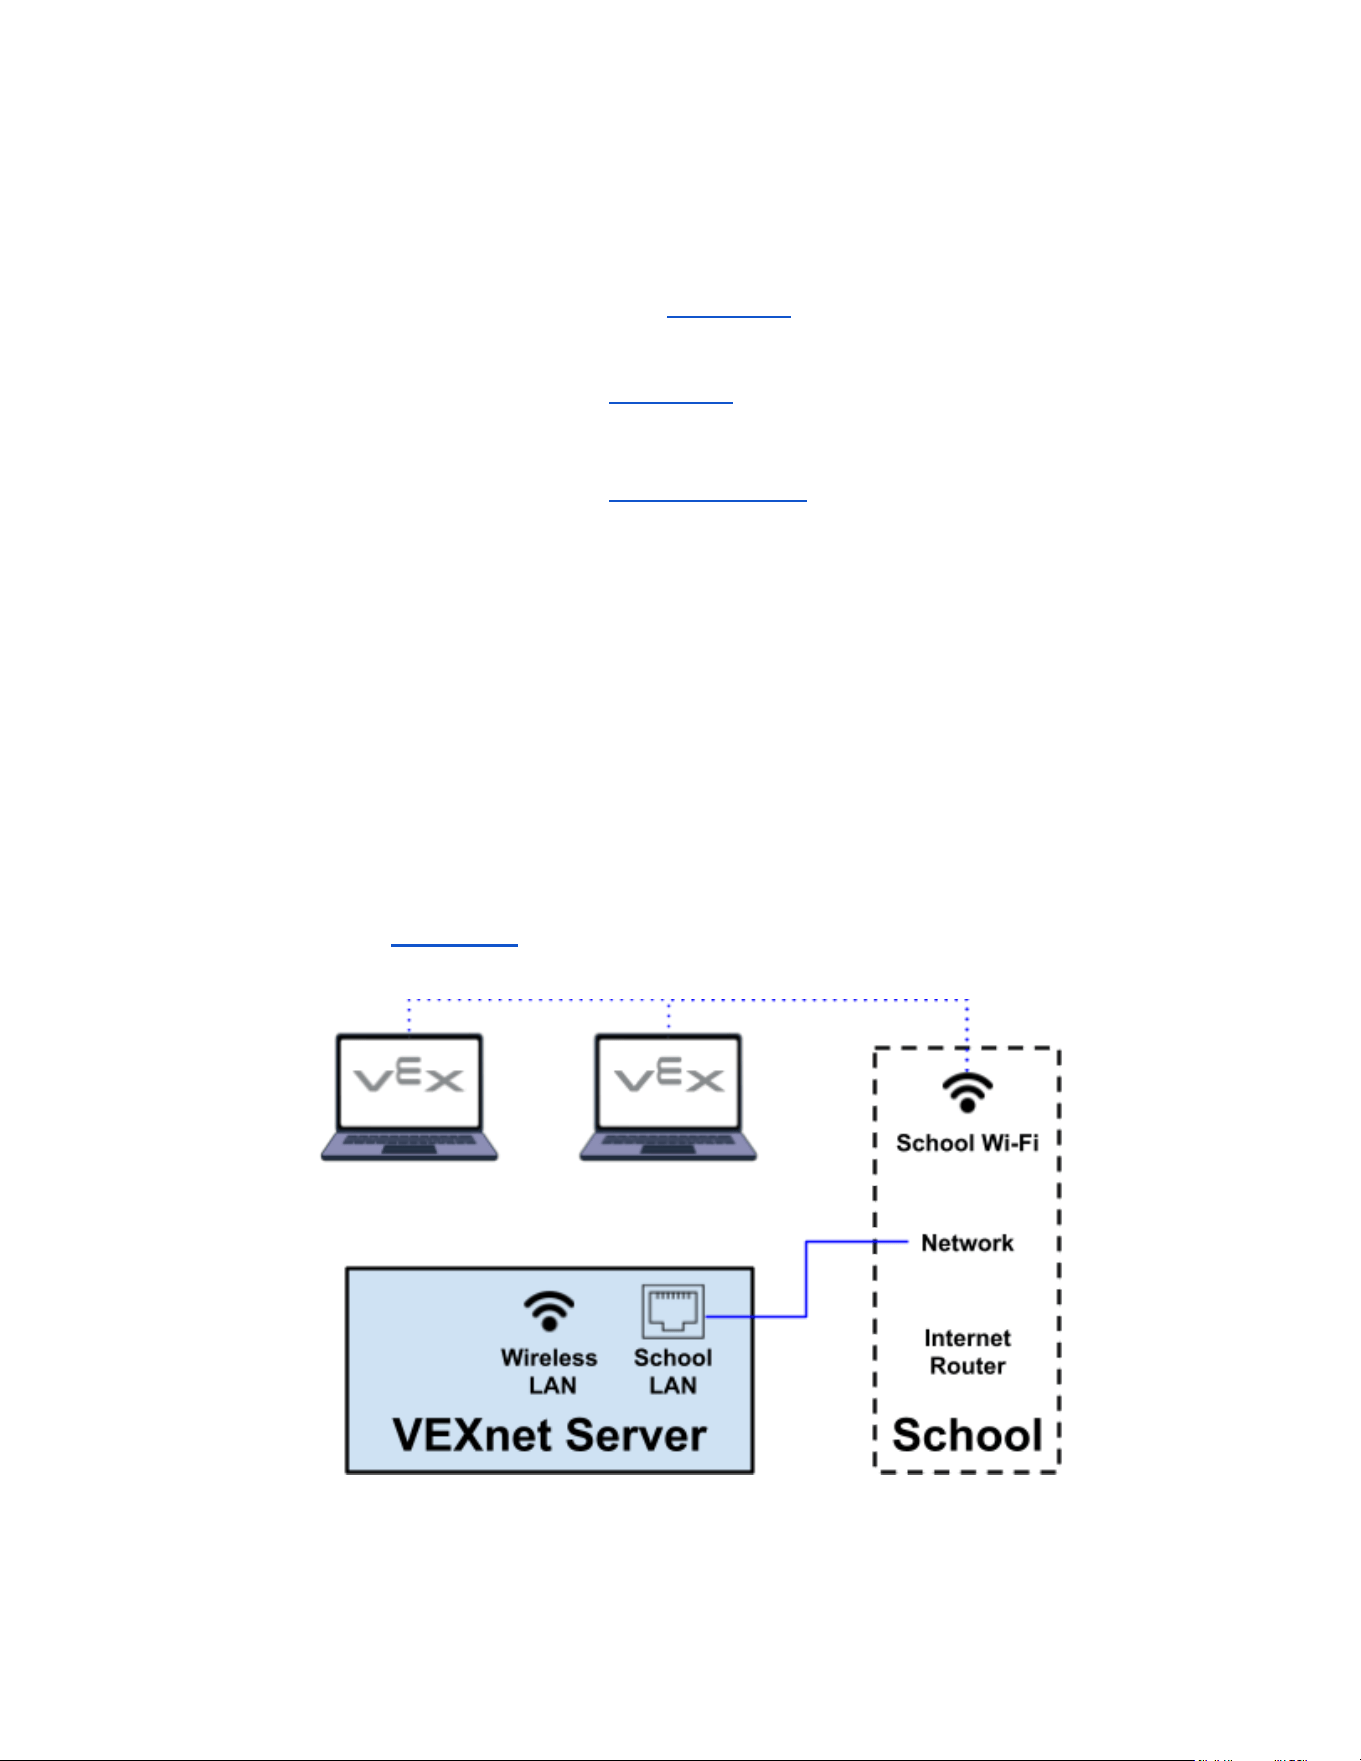
7. School Infrastructure Setup
School Infrastructure Setup
● Requires a School network and IT Support
● Connects to a School network via ethernet
● Setup an administrator account with a username and password
● Requires a DNS redirect to the VEXnet Server
● Optionally disable VEXnet Wi-Fi
● Setup automatic content updates
Instructions
1. Initial Connection
a. Connect the VEXnet Server to the supplied 12V USB-C Adapter.
Note: Normal USB-C Power Adapters are 5V and will not work.
b. Connect the VEXnet Server’s School LAN port to the School Network with an
ethernet cable
c. Find the VEXnet Server's IP Address on your School Network
i. Check your school router or DHCP client list for a device named “VEXnet”
ii. Note the IP Address, you’ll need this for the next step
d. Modify the School DNS to point vexnet.com to the VEXnet Server’s IP Address
e. Connect to the School Network
f. Open a browser and go to vexnet.com (unless automatically directed there)
2. Admin Configuration
a. Open a browser and go to admin.vexnet.com
b. You will be prompted to press the reset button once to confirm physical access
c. Create an Admin username and password
d. (recommended) Perform an Update Now to ensure the VEX content is up-to-date
e. (optional) Adjust the Automatic Update settings as needed
f. (optional) Rename with wireless network name and password
g. (optional) Review and change other options as needed
3. Connect Users
a. Access the wireless or wired School Network
b. Open a browser
c. GO to vexnet.com
Diagram 2: School Infrastructure Setup

8. Restarting the VEXnet Server
Reasons to Restart the VEXnet Server
● You are experiencing difficulties with wireless connectivity
● The device is responding slowly or not at all
Instructions
1. Make sure the VEXnet Server is powered on. Look for a (color) LED on the front of the
unit.
2. The reset button is located on the front of the device.
3. Press and release the reset button briefly.
a. Do Not hold the reset button On
4. Wait for the device to restart and the LED to turn Green
5. If difficulties still persist, proceed to Resetting to Factory Default
9. Resetting to Factory Default
Reasons to Reset to Factory Default
● Network password has been lost, or
● Setup from scratch is desired.
Instructions
1. Make sure the VEXnet Server is powered on. Look for a (color) LED on the front of the
unit.
2. Press and hold the reset button for at least 10 seconds.
a. Wait for the LED starts blinking RED
b. Release the button
3. Wait for the device to reset and the LED to turn Green
4. Follow the Classroom Setup or School Setup instructions

10. Update Options
Choosing Manual or Automatic Updates
● Classrooms will typically use a Manual Update process.
● Schools will typically use the Automatic Update process.
Manual Update Instructions
1. Cellular Service
a. Connect an internet connected iOS or Android device to VEXnet’s Wi-Fi
b. Go to vexnet.vex.com
c. Follow the instructions for Cellular Update which will involve installing an app
d. Note that cellular data usage may incur service provider fees
2. USB Storage Device
a. Requires a USB Storage Device of at least ____ GB
b. Go to vexnet.vex.com
c. Follow the instructions for USB Update
3. Ethernet
a. Requires a wired network with internet access
b. Disconnect any Classroom LAN connection
c. Connect the School LAN to a network with internet access
d. Go to vexnet.vex.com
e. Follow the instructions for Ethernet Update
Automatic Update Instructions
1. Ensure the School LAN port is connected to a network with internet access
2. Open a browser on the same network and go to admin.vexnet.com
3. You will be prompted to press the reset button once to confirm physical access
4. Select Ethernet Update
5. Change the Automatic Update Settings:
a. Time-of-day
b. Day-of-week
c. Bandwidth limits
6. Optionally select “Update Now” for a maximum speed update

11. Technical Details
Network Operation
The intended network function of the VEXnet Server is to provide Wi-Fi and/or LAN access to
VEX content served from local storage on the device. Client devices connect to the VEXnet
Server and access locally hosted services and content through the client-access network.
Supported VEX service requests are resolved to the local server address. Local DHCP, DNS
response, and captive-portal response functions, where used, are provided only to direct client
devices to locally hosted services on the VEXnet Server.
Within the local client-access network, client devices may communicate with other devices on
the same local network as supported by the active configuration. This local network
communication does not provide internet access and does not cause the device to operate as a
general-purpose router, broadband gateway, bridge, repeater, or mesh-networking device.
Limitations
The VEXnet Server will not perform general-purpose router functions such as bridging traffic
between networks, acting as an internet gateway, extending an existing Wi-Fi network,
operating as a repeater or mesh node, or sharing broadband access between connected
devices.
User Capacity
● The wireless network has been tested with 50 simultaneous users
● The wired network should handle 200 simultaneous users
LED Indications
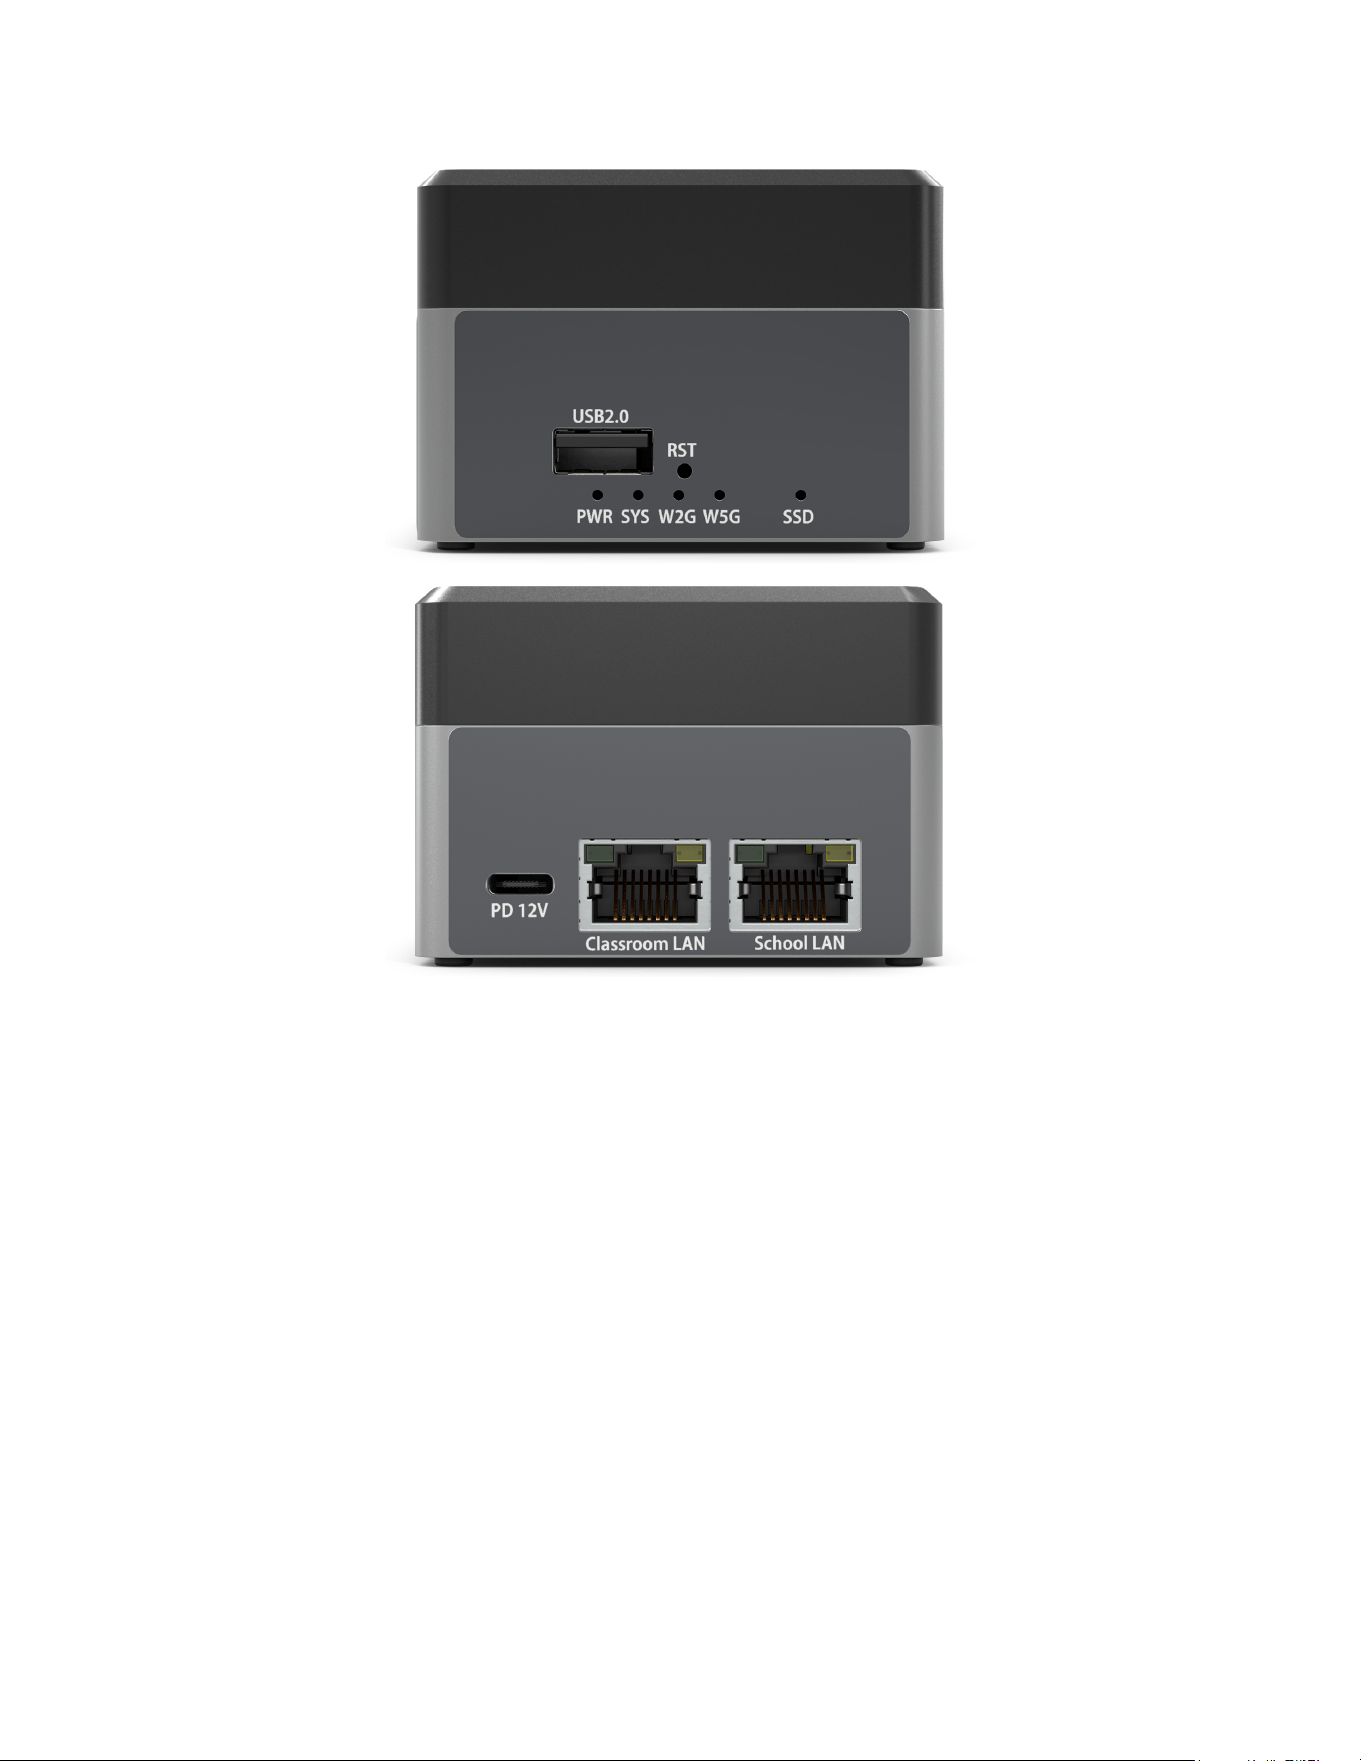
● PWR Solid red means 12 V input power is present.
● SYS Blinking green during startup. Solid green when the device is operational.
● W2G Flashes blue with Wi-Fi 2.4 GHz traffic.
● W5G Flashes blue with Wi-Fi 5 GHz traffic.
● SSD Flashes blue with VEXnet storage access.
Administrator Configuration
Admin configuration is available at admin.vexnet.com

● Setting a new Username and Password are required on first use.
● In the case that the Admin Username and/or Password is lost, see the section Reset to
Factory Default.
Allowable changes are
1. Admin user name
2. Admin password
3. Wi-Fi enabled or disabled
4. SSID: Wi-Fi network name
5. Wi-Fi password
6. Install firmware updates
7. Install content updates
8. Configure Automatic Updates (School LAN only)
Wireless LAN (Wi-Fi)
Equipment: No additional equipment is required
Wireless LAN Usage
● Client devices may access locally hosted VEXnet content
● Client devices can be used with VEX Tournament Manager
Network Details
● Wireless clients may communicate with other devices on the same local network
● Resolves all VEX domains locally to 10.3.141.1
● DHCP hands clients 10.3.141.1 as both their gateway and DNS
● DHCP hands out addresses in the range 10.3.141.50–10.3.141.200
● Wireless clients are on the 10.3.141.0/24 subnet
● OS captive portal checks (Android, iOS, Windows, Firefox) land on the VEXnet Server
Classroom LAN Port (Host)
Equipment: Can be used with network switches to connect more than one device
Classroom LAN Usage
● Client devices may access locally hosted VEXnet content
● Client devices can be used with VEX Tournament Manager
Wireless Usage
● VEXnet wireless can be used in conjunction with Classroom LAN
● VEXnet wireless client devices may access locally hosted VEXnet content
● VEXnet wireless is On by Default and can be disabled in the Admin Configuration
● VEXnet wireless can be used with VEX Tournament Manager

Network Details
● Classroom LAN and WiFi are one connected network
● Classroom LAN and WiFi clients may communicate with other devices on the same local
network
● Resolves all VEX domains locally to 10.3.141.1
● DHCP hands clients 10.3.141.1 as both their gateway and DNS
● DHCP hands out addresses in the range 10.3.141.50–10.3.141.200
● Wired and wireless clients are on the same 10.3.141.0/24 subnet
● OS captive portal checks (Android, iOS, Windows, Firefox) land on the VEXnet Server
School LAN Port (Client)
Equipment: Requires School Network equipment.
School LAN Usage
● School LAN is a Client to the School Network.
● School Network client devices may access locally hosted VEXnet content
● School LAN can be used to automatically keep the VEX content on the device
up-to-date.
● Do not connect to the Classroom LAN while using School LAN. Only one LAN port can
be active at a time.
Wireless Usage
● VEXnet wireless can be used in conjunction with School LAN
● VEXnet wireless client devices may access locally hosted VEXnet content
● VEXnet wireless is On by Default and can be disabled in the Admin Configuration
● VEXnet wireless is on a separate network from the School LAN network
Network Details
● Device receives an IP address from the school network's DHCP server on the School
LAN port
● The school network must direct vexnet.com to the VEXnet Server’s IP address

FCC Caution:
This device complies with part 15 of the FCC Rules. Operation is subject to the following two conditions: (1) this
device may not cause harmful interference, and (2) this device must accept any interference received, including
interference that may cause undesired operation.
Any changes or modifications not expressly approved by the party responsible for compliance could void the user's
authority to operate the equipment.
NOTE: This equipment has been tested and found to comply with the limits for a Class A digital device, pursuant to
part 15 of the FCC Rules. These limits are designed to provide reasonable protection against harmful interference
when the equipment is operated in a commercial environment. This equipment generates, uses, and can radiate radio
frequency energy and, if not installed and used in accordance with the instruction manual, may cause harmful
interference to radio communications. Operation of this equipment in a residential area is likely to cause harmful
interference in which case the user will be required to correct the interference at his own expense.
To maintain compliance with FCC’s RF Exposure guidelines, This equipment should be installed and operated
with minimum distance between 20cm the radiator your body: Use only the supplied antenna.