Questions, problems, missing parts? Before returning to the store,
call Home Decorators Collection Customer Service
8 a.m. - 7 p.m., EST, Monday-Friday, 9 a.m. - 6 p.m., EST, Saturday.
1-800-986-3460
HOMEDEPOT.COM/HOMEDECORATORS
THANK YOU
We appreciate the trust and condence you have placed in Home Decorators Collection through the purchase of this ceiling fan. We strive
to continually create quality products designed to enhance your home. Visit us online to see our full line of products available for your home
improvement needs. Thank you for choosing Home Decorators Collection!
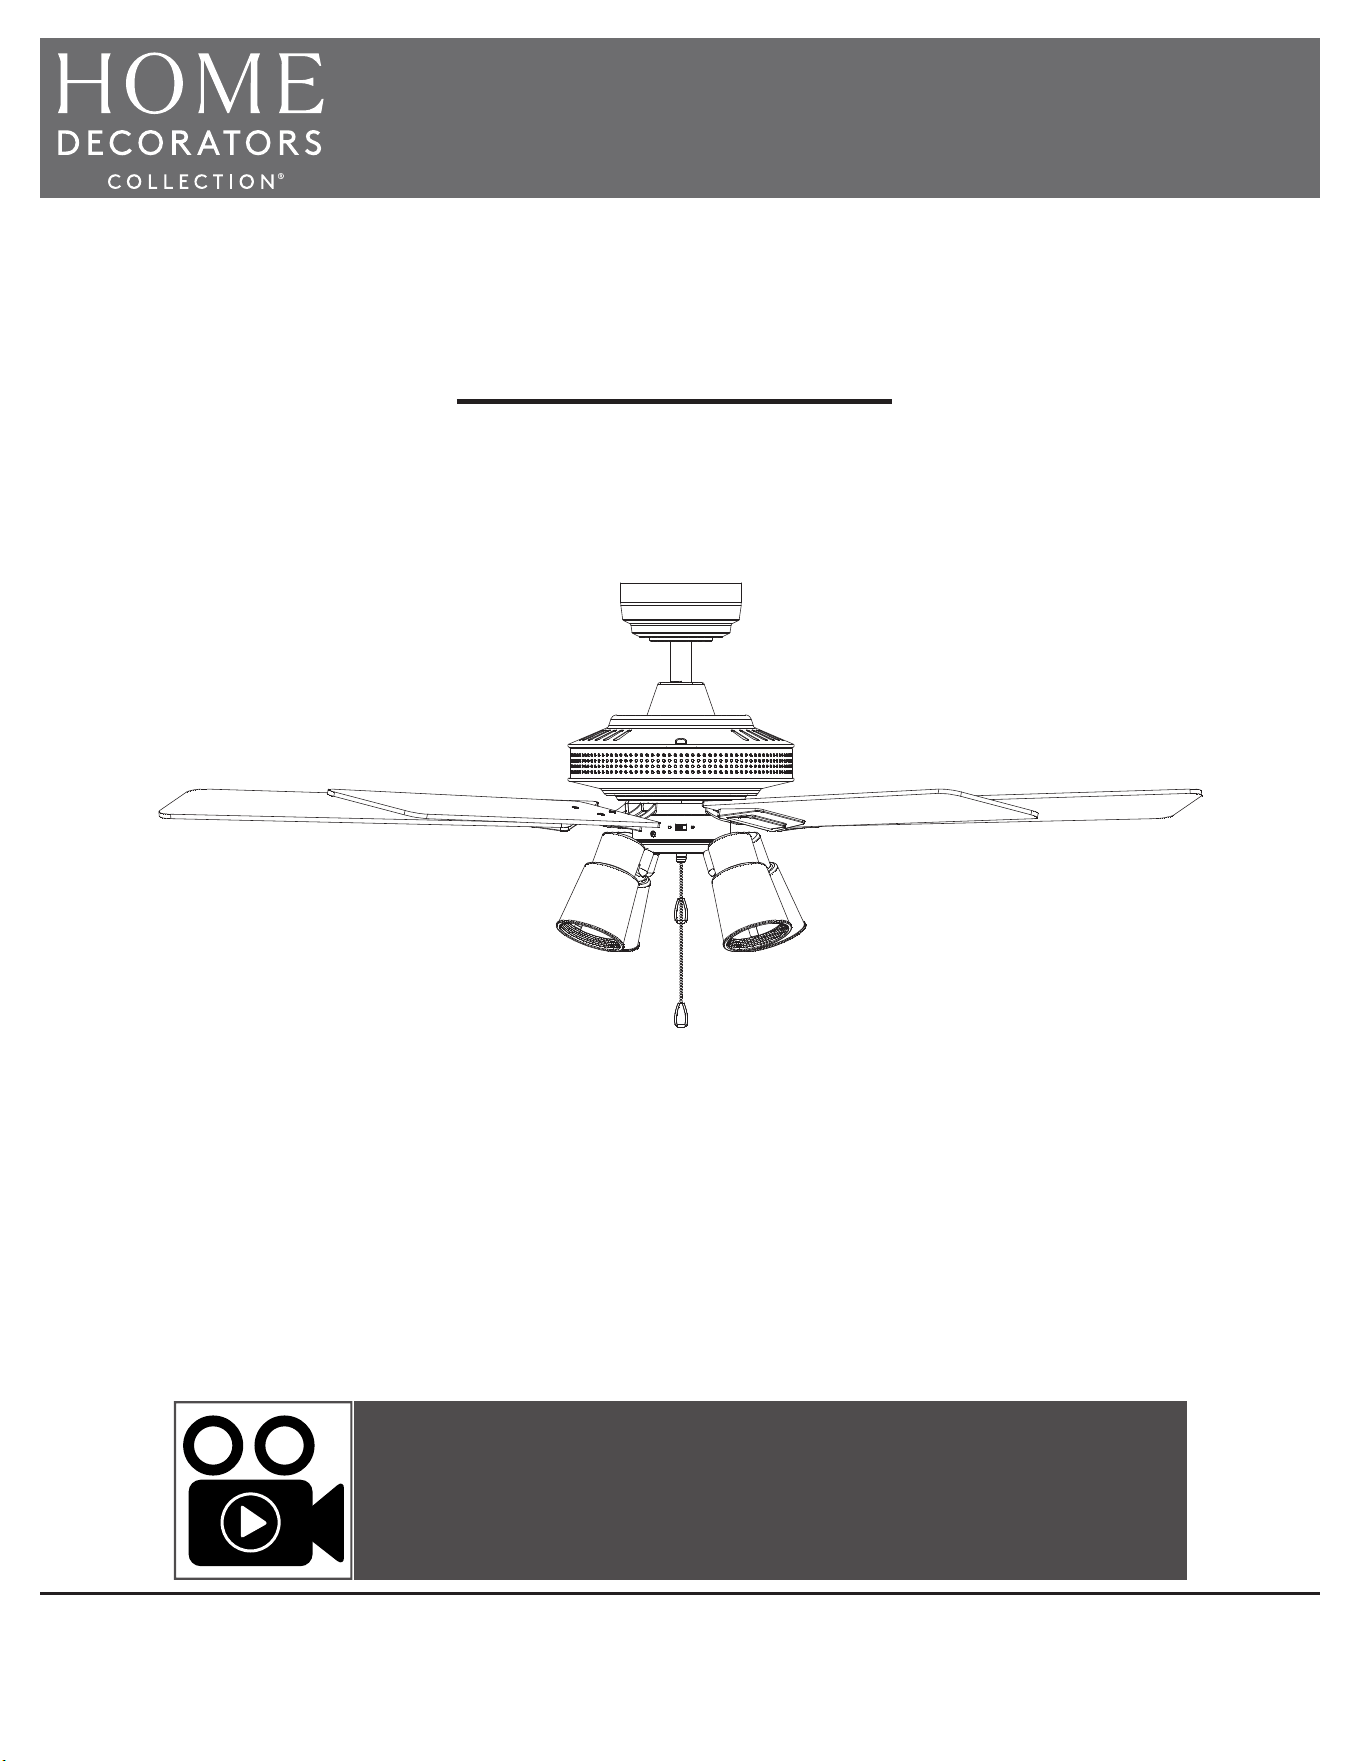
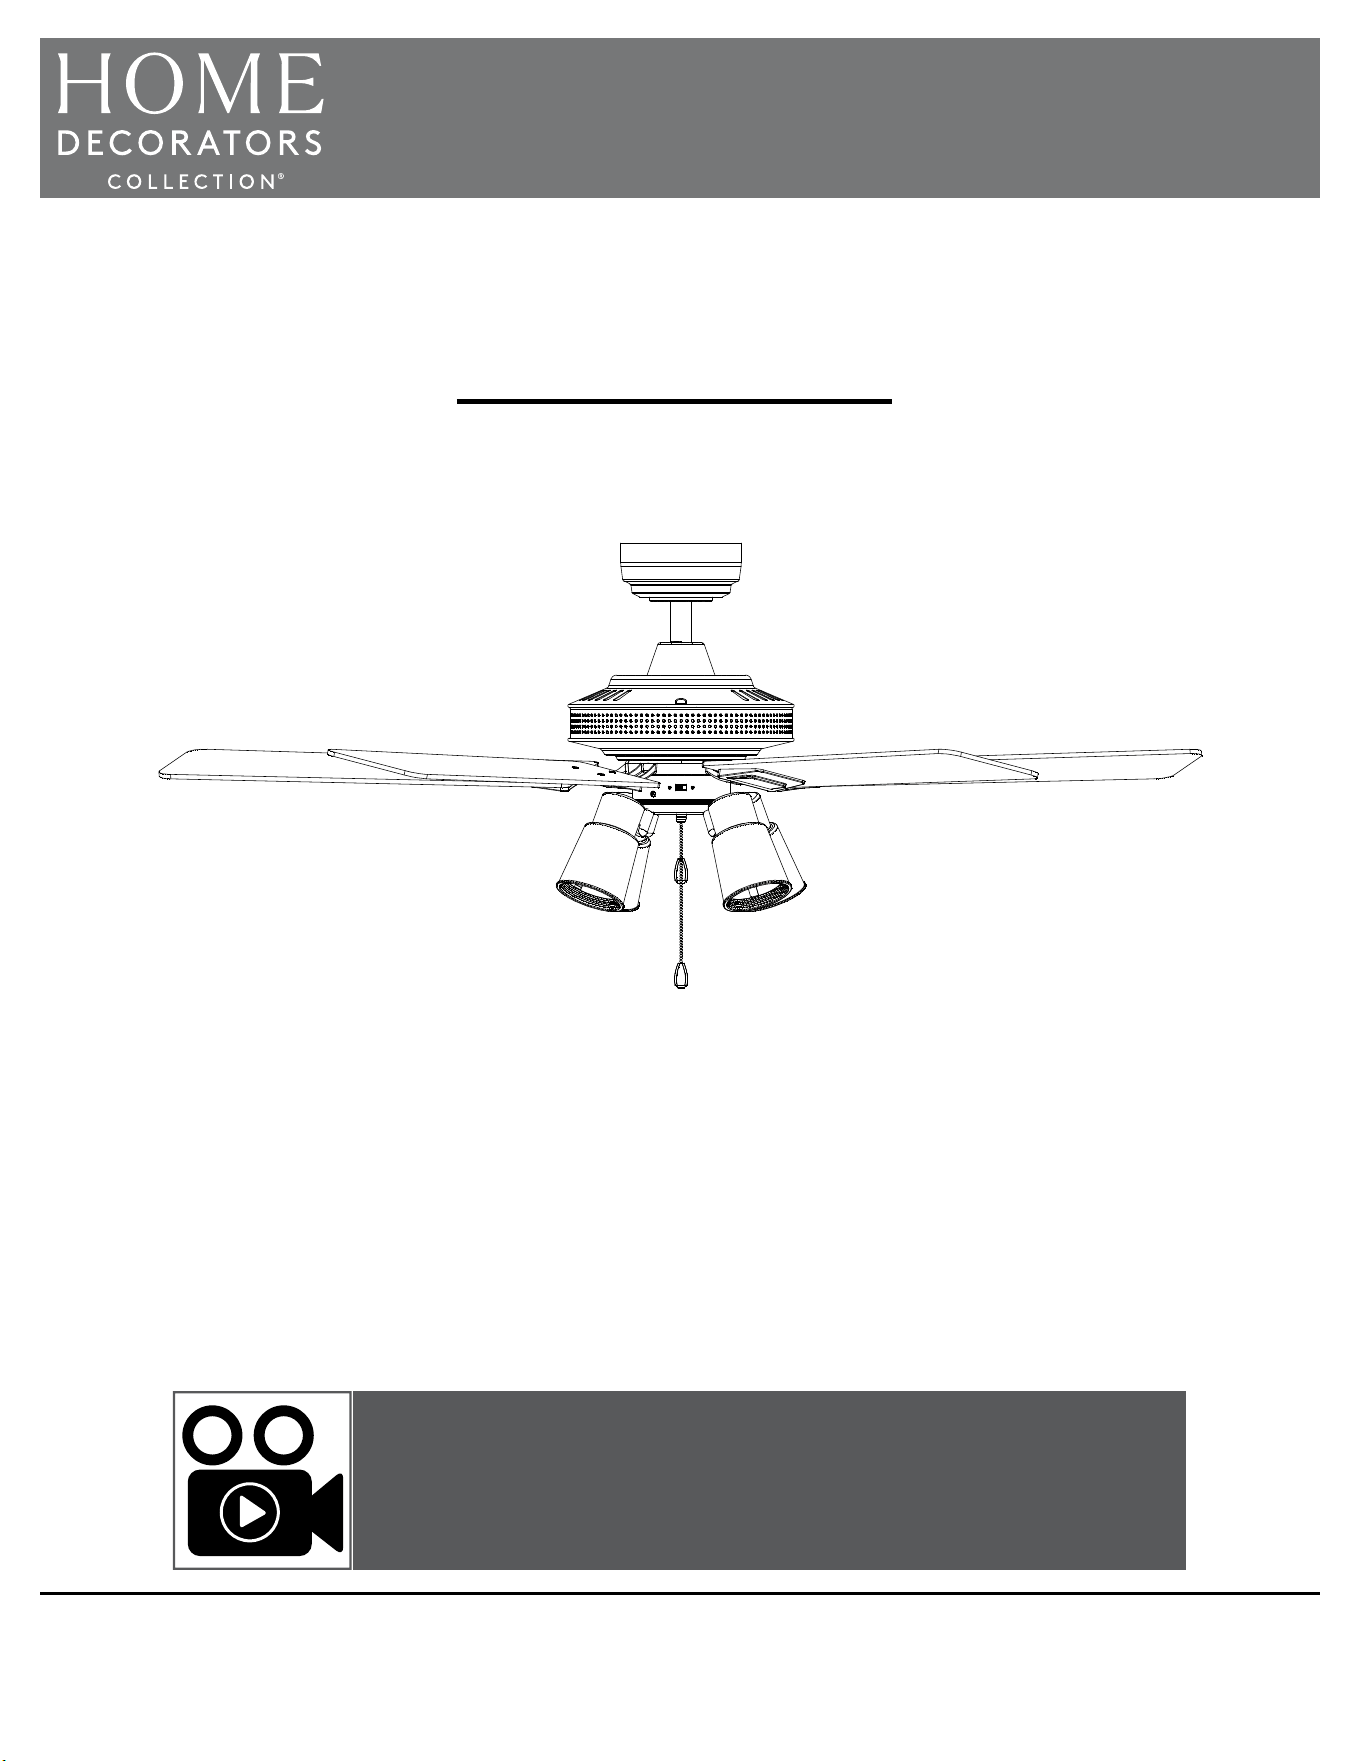
USE AND CARE GUIDE
MATTEO 52-INCH CEILING FAN
Item #1007 532 491
Model #56044
UL Model #EF200T(C)-52
To view an instructional video on how to install this product:
1. Go to www.homedepot.com and enter either the Item or Model number, found in the top
right corner of the cover of this instruction manual, in the search eld.
2. Click on your product from the list of search results and click on the video link in the
“Product Overview” section.
2
Table of Contents ................................................................ 2
Safety Information ...............................................................2
Warranty ............................................................................... 3
Pre-Installation ....................................................................3
Installation ............................................................................6
Assembly ..............................................................................7
Operation ...........................................................................13
Care and Cleaning ............................................................. 14
Troubleshooting .................................................................14
Safety Information
Table of Contents
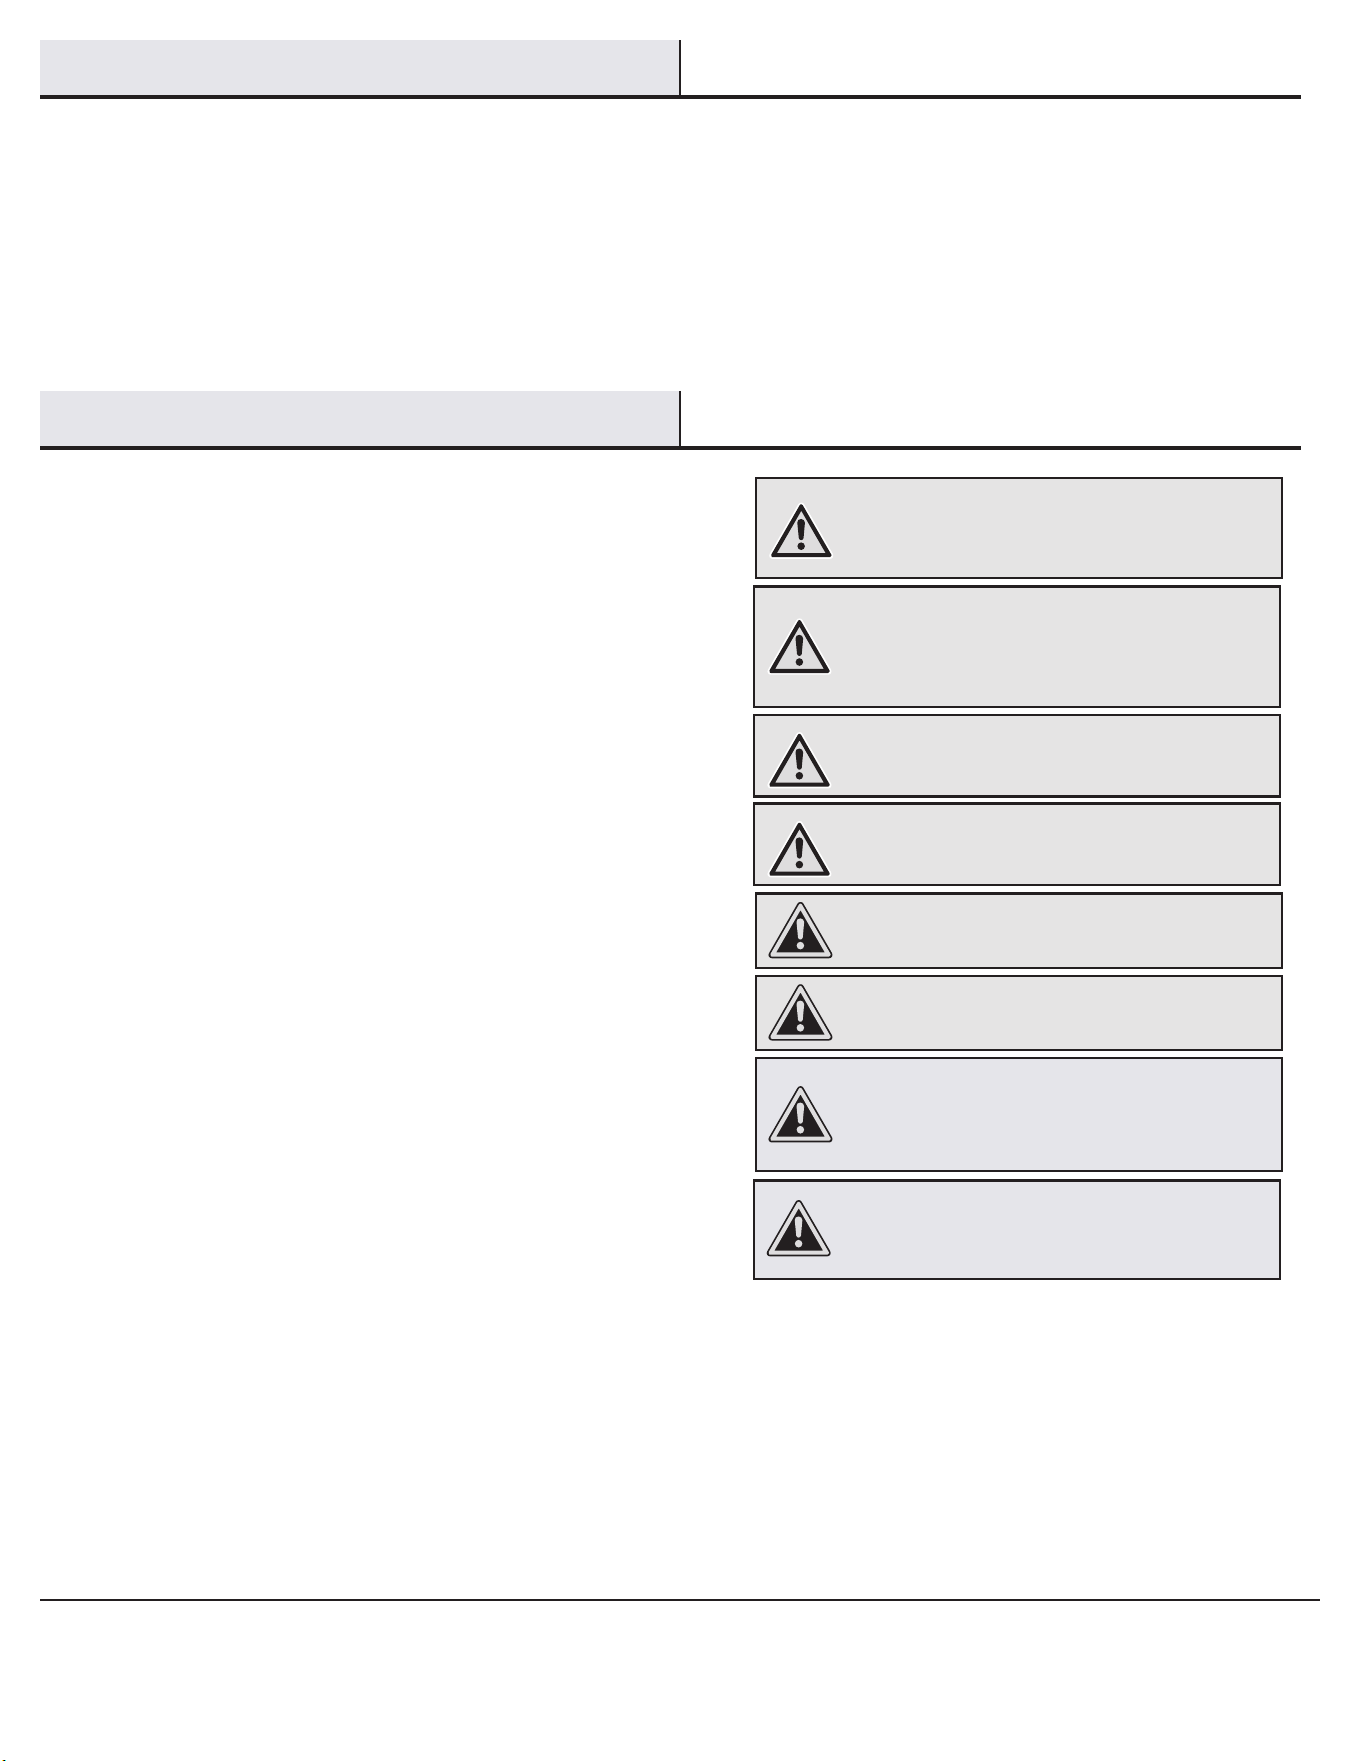
1. To reduce the risk of electric shock, ensure the electricity has been
turned off at the circuit breaker or fuse box before you begin.
2. All wiring must be in accordance with the National Electrical Code
ANSI/NFPA 70 and local electrical codes. Electrical installation
should be performed by a qualified licensed electrician.
3. The outlet box and support structure must be securely mounted
and capable of reliably supporting 35 lb (15.9 kg). Use only UL
Listed outlet boxes marked “Acceptable for Fan Support of 35 lb
(15.9 kg) or less”.
4. Do not operate the reversing switch while the fan blades are in
motion. You must turn the fan off and stop the blades before you
reverse the blade direction.
5. Do not place objects in the path of the blades.
6. To avoid personal injury or damage to the fan and other items, use
caution when working around or cleaning the fan.
7. Electrical diagrams are for reference only. Light kits that are not
packed with the fan must be UL Listed and marked suitable for
use with the model fan you are installing. Switches must be UL
general-use switches. Refer to the instructions packaged with the
light kits and switches for proper assembly.
8. After making electrical connections, spliced conductors should be
turned upward and pushed carefully up into the outlet box. The
wires should be spread apart with the grounded conductor and the
equipment-grounding conductor on one side of the outlet box and
the ungrounded conductor on the other side of the outlet box.
9. All set screws must be checked and retightened where
necessary before installation.
WARNING: To reduce the risk of personal injury, do
not bend the blade brackets (also referred to as
anges) during assembly or after installation. Do
not insert objects in the path of the blades.
WARNING: To avoid possible electrical shock, turn
the electricity off at the main fuse box before
wiring. If you feel you do not have enough electrical
wiring knowledge or experience, contact a licensed
electrician.
WARNING: Electrical diagrams are for reference
only. Optional use of any light kit shall be UL Listed
and marked suitable for use with this fan.
CAUTION: To reduce the risk of personal injury, use
only the screws provided with the outlet box.
READ AND SAVE THESE INSTRUCTIONS.
CAUTION: Changes or modications not expressly
approved by the party responsible for compliance
could void the user’s authority to operate the
equipment.
CAUTION: Do NOT use this fan with a dimmer
switch or wall control. Using a dimmer switch or
wall control will damage the fan.
WARNING: To reduce the risk of re or electric
shock, do not use this fan with any other solid-
state speed control device.
CAUTION: The fan must be mounted with a
minimum of 7 ft (2.1 m) clearance from the trailing
edge of the blades to the oor.
3
HOMEDEPOT.COM/HOMEDECORATORS
Please contact 1-800-986-3460 for further assistance.
Pre-Installation
Warranty
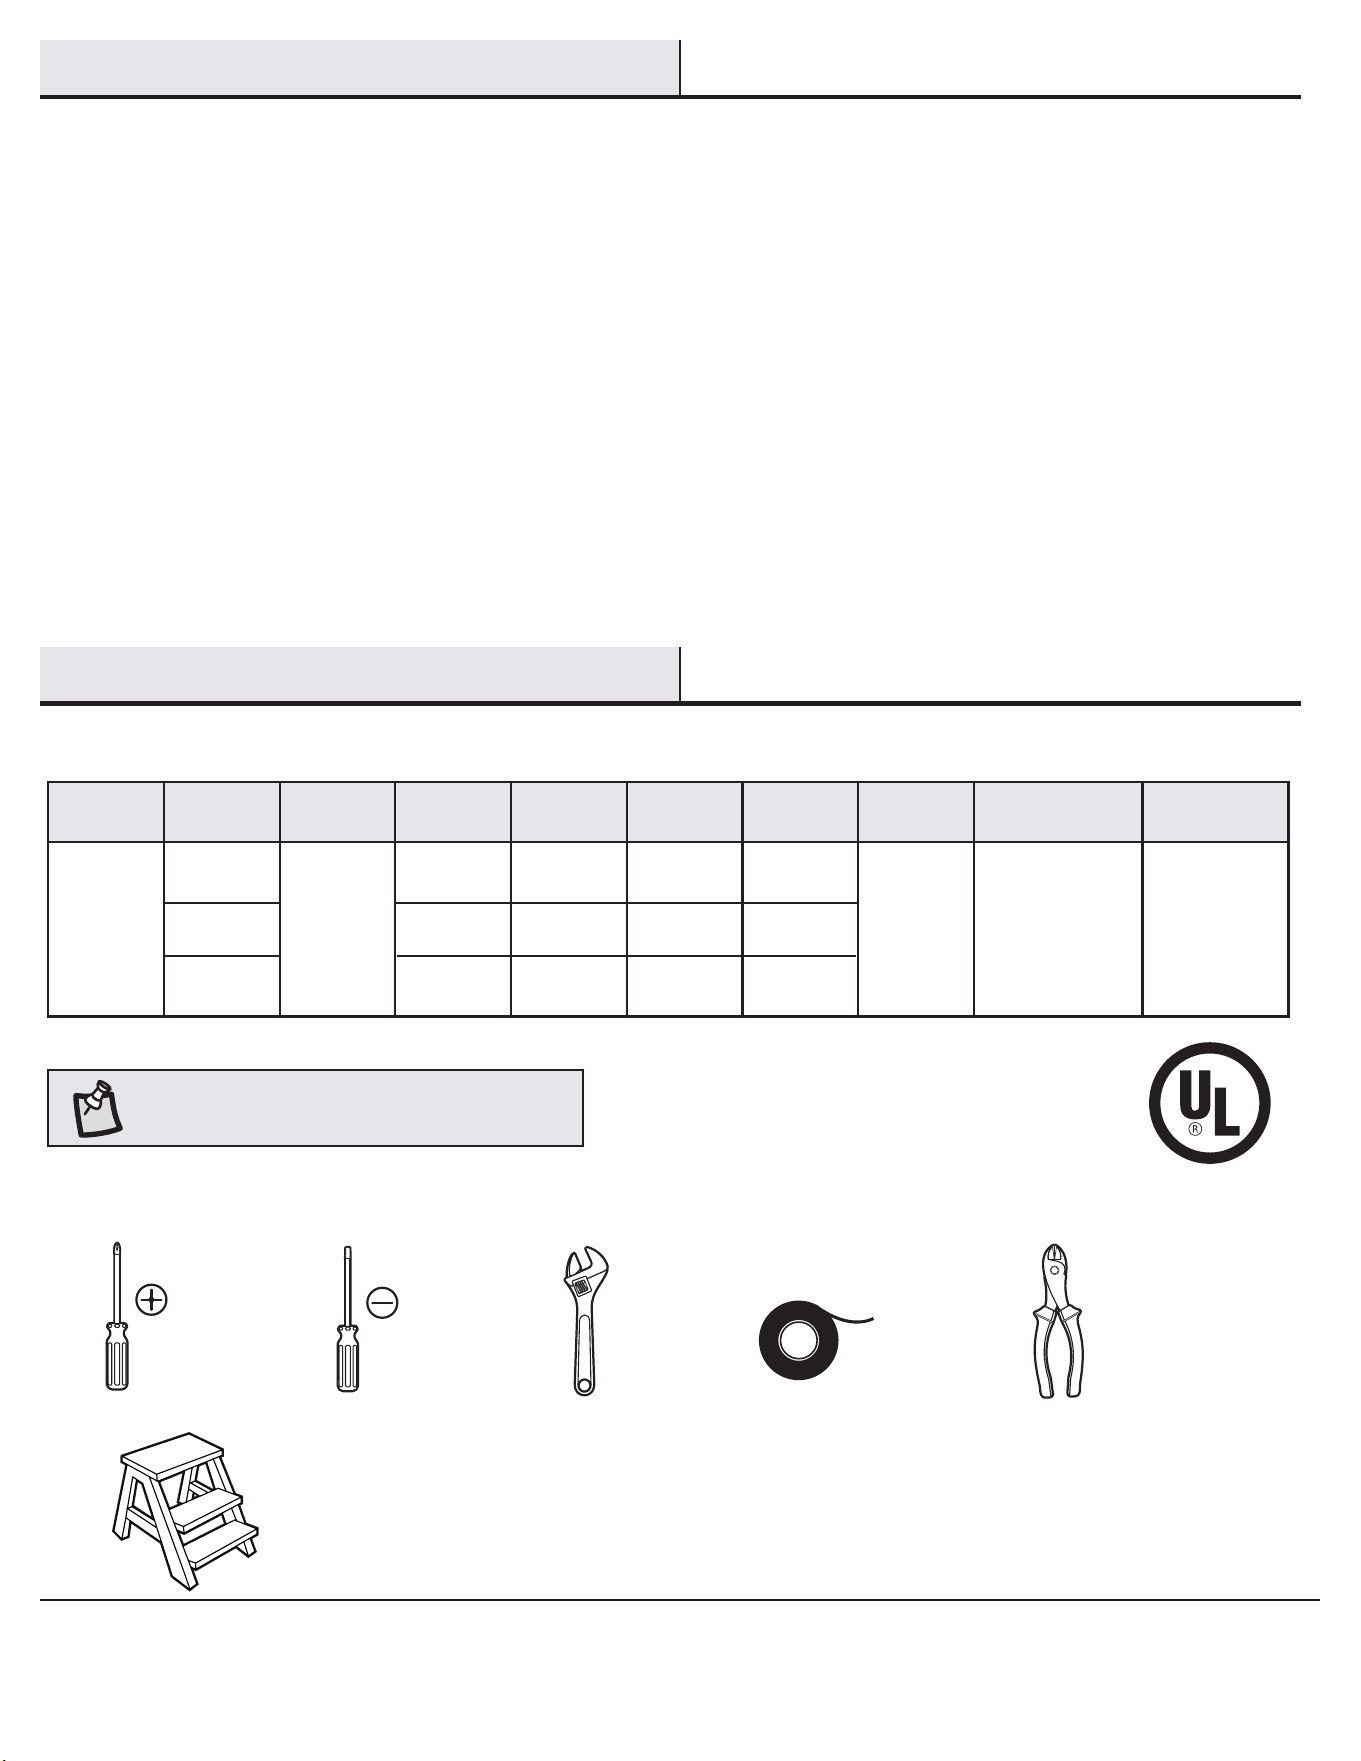
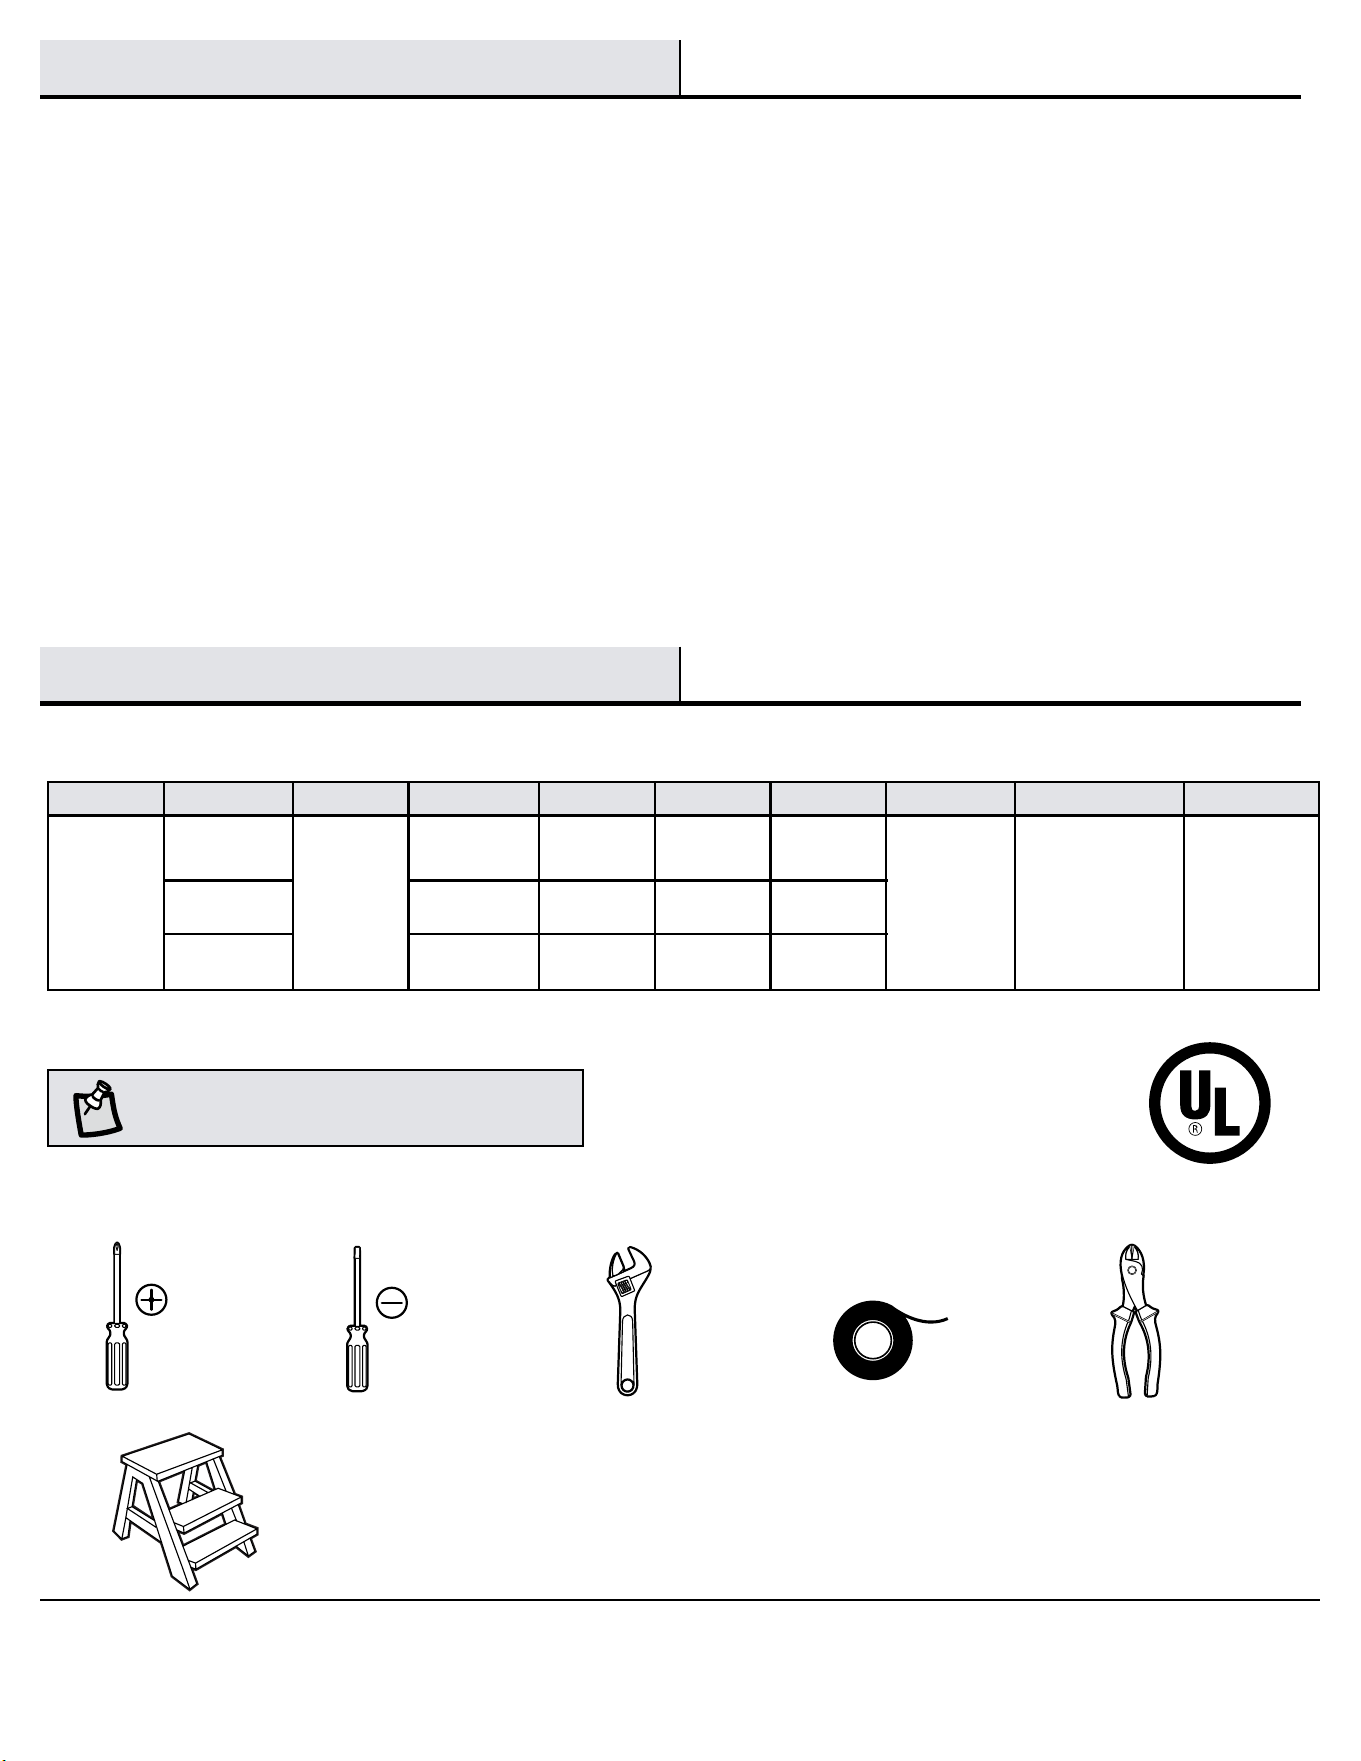
SPECIFICATIONS
TOOLS REQUIRED
NOTE: These are approximate measures. They do not
include the amps and wattage used by the light kit.
Phillips
screwdriver
Flat blade
screwdriver
Adjustable
wrench
Electrical
tape
Wire
cutter
Step ladder
Size Speed Volts Amps Watts RPM CFM
Net
Weight
Gross
Weight
Cube Feet
52 in.
Low
Medium
High
120
0.22
0.38
0.54
9.59
28.83
64.14
53
96
139
1549.6
2894.05
4158.91
17.86 lb
(8.1 kg)
23.81 lb
(10.80 kg)
2.27 cu. ft.
The supplier warrants the fan motor to be free from defects in workmanship and material present at time of shipment from the factory for a lifetime
after the date of purchase by the original purchaser. The supplier also warrants that all other fan parts, excluding any glass or acrylic blades, to be
free from defects in workmanship and material at the time of shipment from the factory for a period of two years after the date of purchase by the
original purchaser. We agree to correct such defects without charge or at our option replace with a comparable or superior model if the product is
returned. To obtain warranty service, you must present a copy of the receipt as proof of purchase. All costs of removing and reinstalling the product
are your responsibility. Damage to any part, such as by accident, misuse, improper installation, or by afxing any accessories, is not covered by
this warranty. Because of varying climatic conditions this warranty does not cover any changes in brass nish, including rusting, pitting, corroding,
tarnishing, or peeling. Brass nishes of this type give their longest useful life when protected from varying weather conditions. A certain amount of
“wobble” is normal and should not be considered a defect. Servicing performed by unauthorized persons shall render the warranty invalid. There is
no other express warranty. Home Decorators Collection hereby disclaims any and all warranties, including but not limited to those of merchantability
and tness for a particular purpose to the extent permitted by law. The duration of any implied warranty which cannot be disclaimed is limited to the
time period as specied in the express warranty. Some states do not allow a limitation on how long an implied warranty lasts, so the above limitation
may not apply to you. The retailer shall not be liable for incidental, consequential, or special damages arising out of or in connection with product
use or performance except as may otherwise be accorded by law. Some states do not allow the exclusion of incidental or consequential damages,
so the above exclusion or limitation may not apply to you. This warranty gives specic legal rights, and you may also have other rights which vary
from state to state. This warranty supersedes all prior warranties. Shipping costs for any return of product as part of a claim on the warranty must
be paid by the customer.
Contact the Customer Service Team at 1-800-986-3460 or visit www.HomeDepot.com/homedecorators.
4
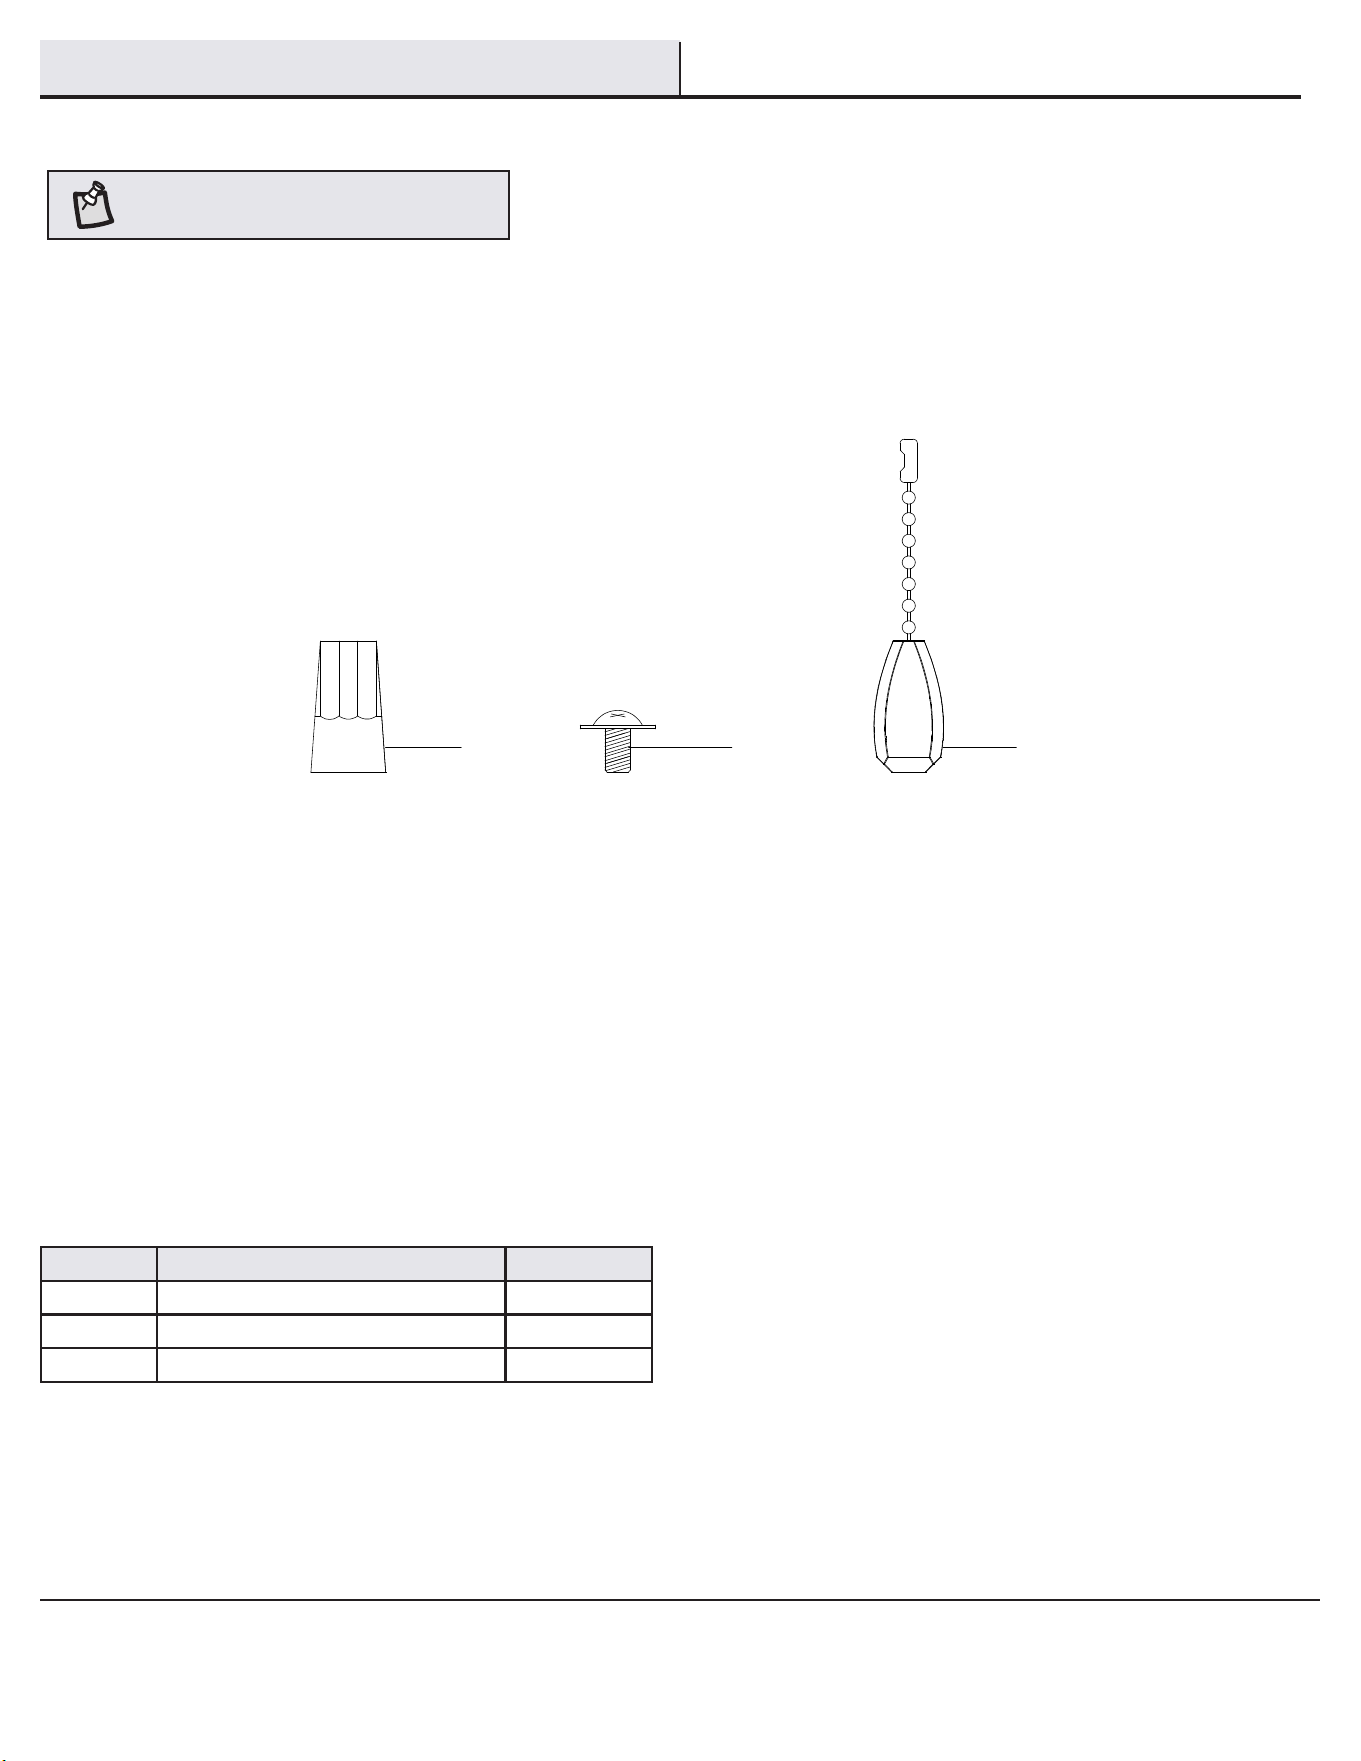
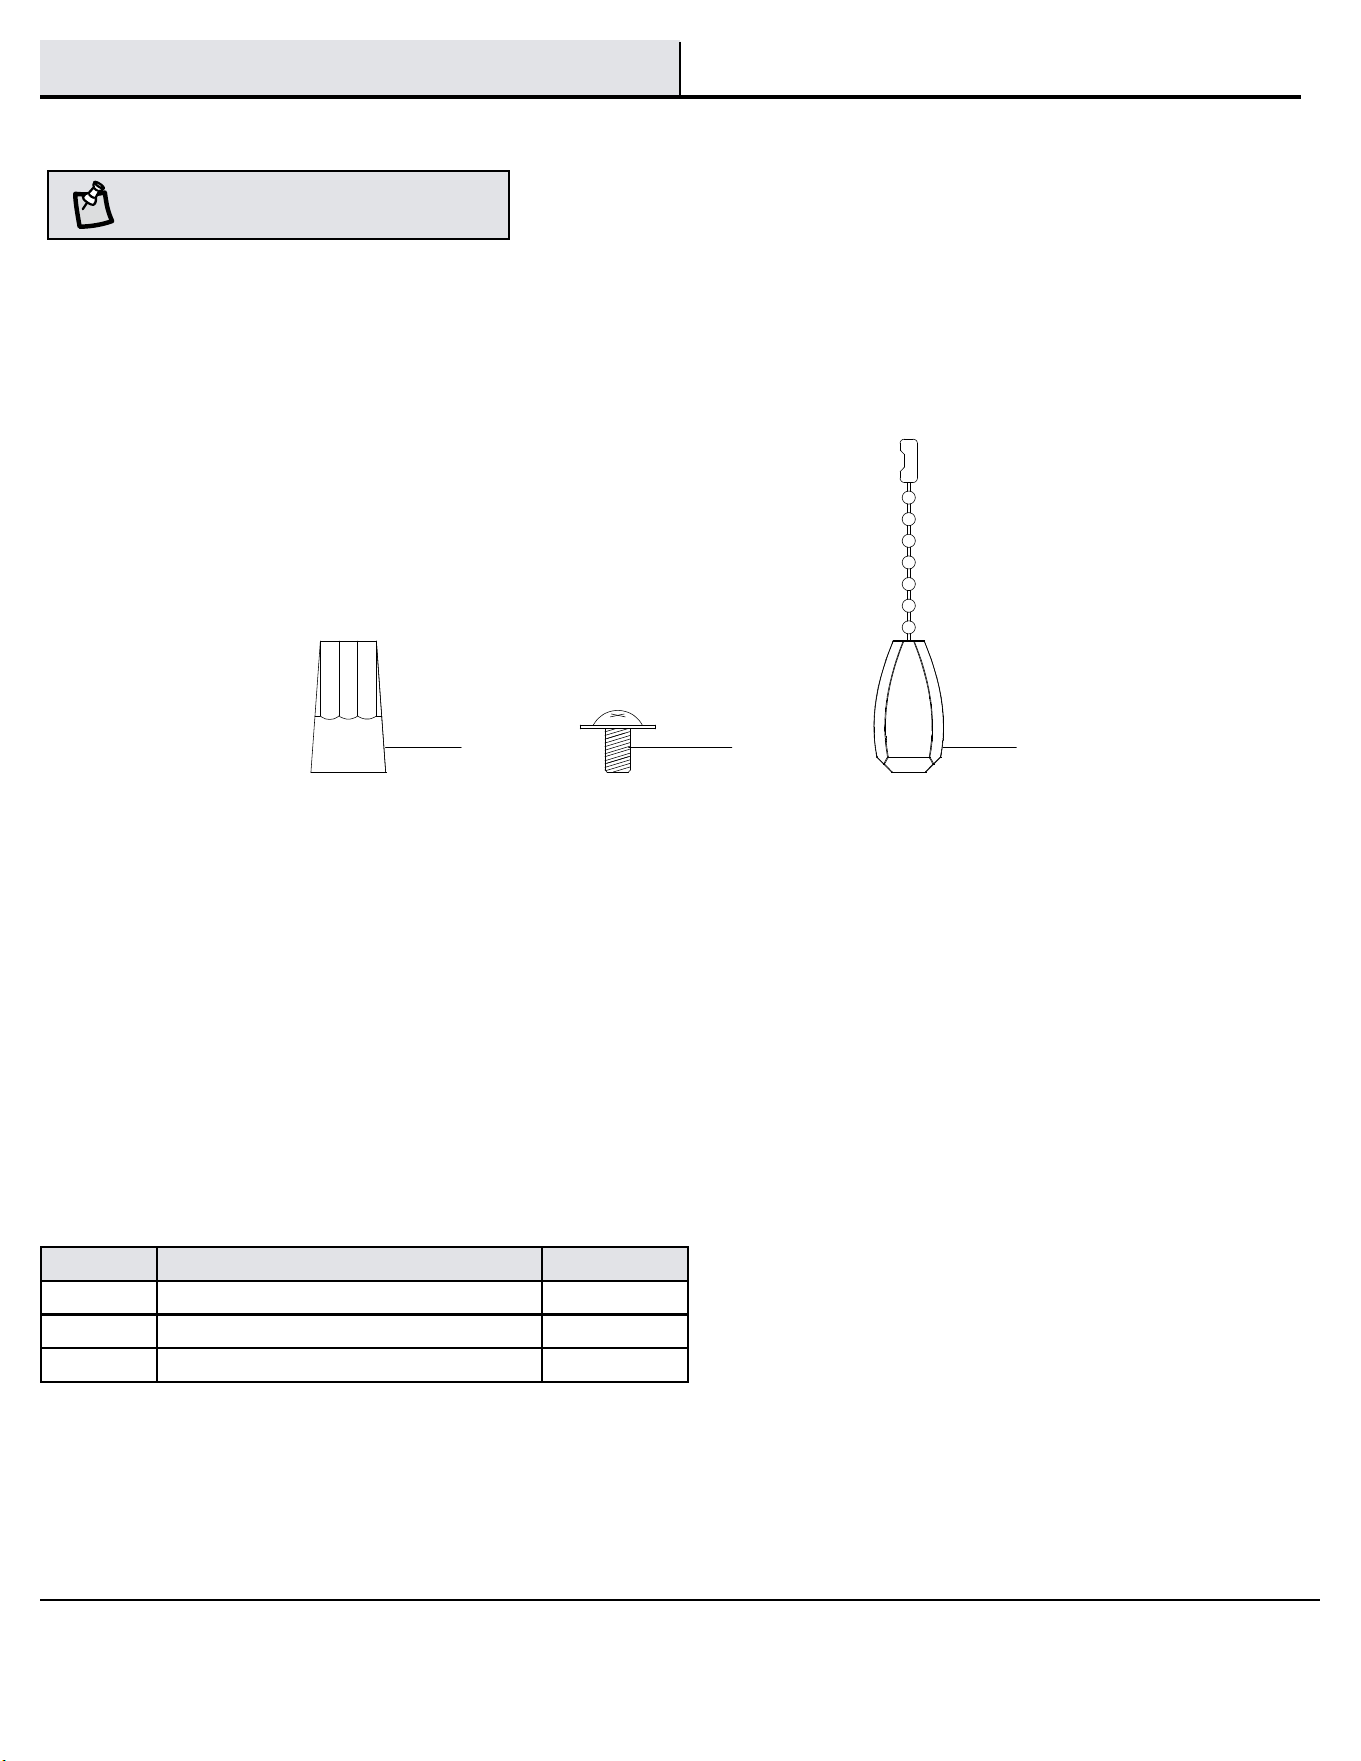
Part Description Quantity
AA Wire connecting nut 3
BB Blade screws 15
CC Pull chain extensions 2
Pre-Installation (continued)
HARDWARE INCLUDED
NOTE: Hardware not shown to actual size.
AA BB
CC
5
HOMEDEPOT.COM/HOMEDECORATORS
Please contact 1-800-986-3460 for further assistance.
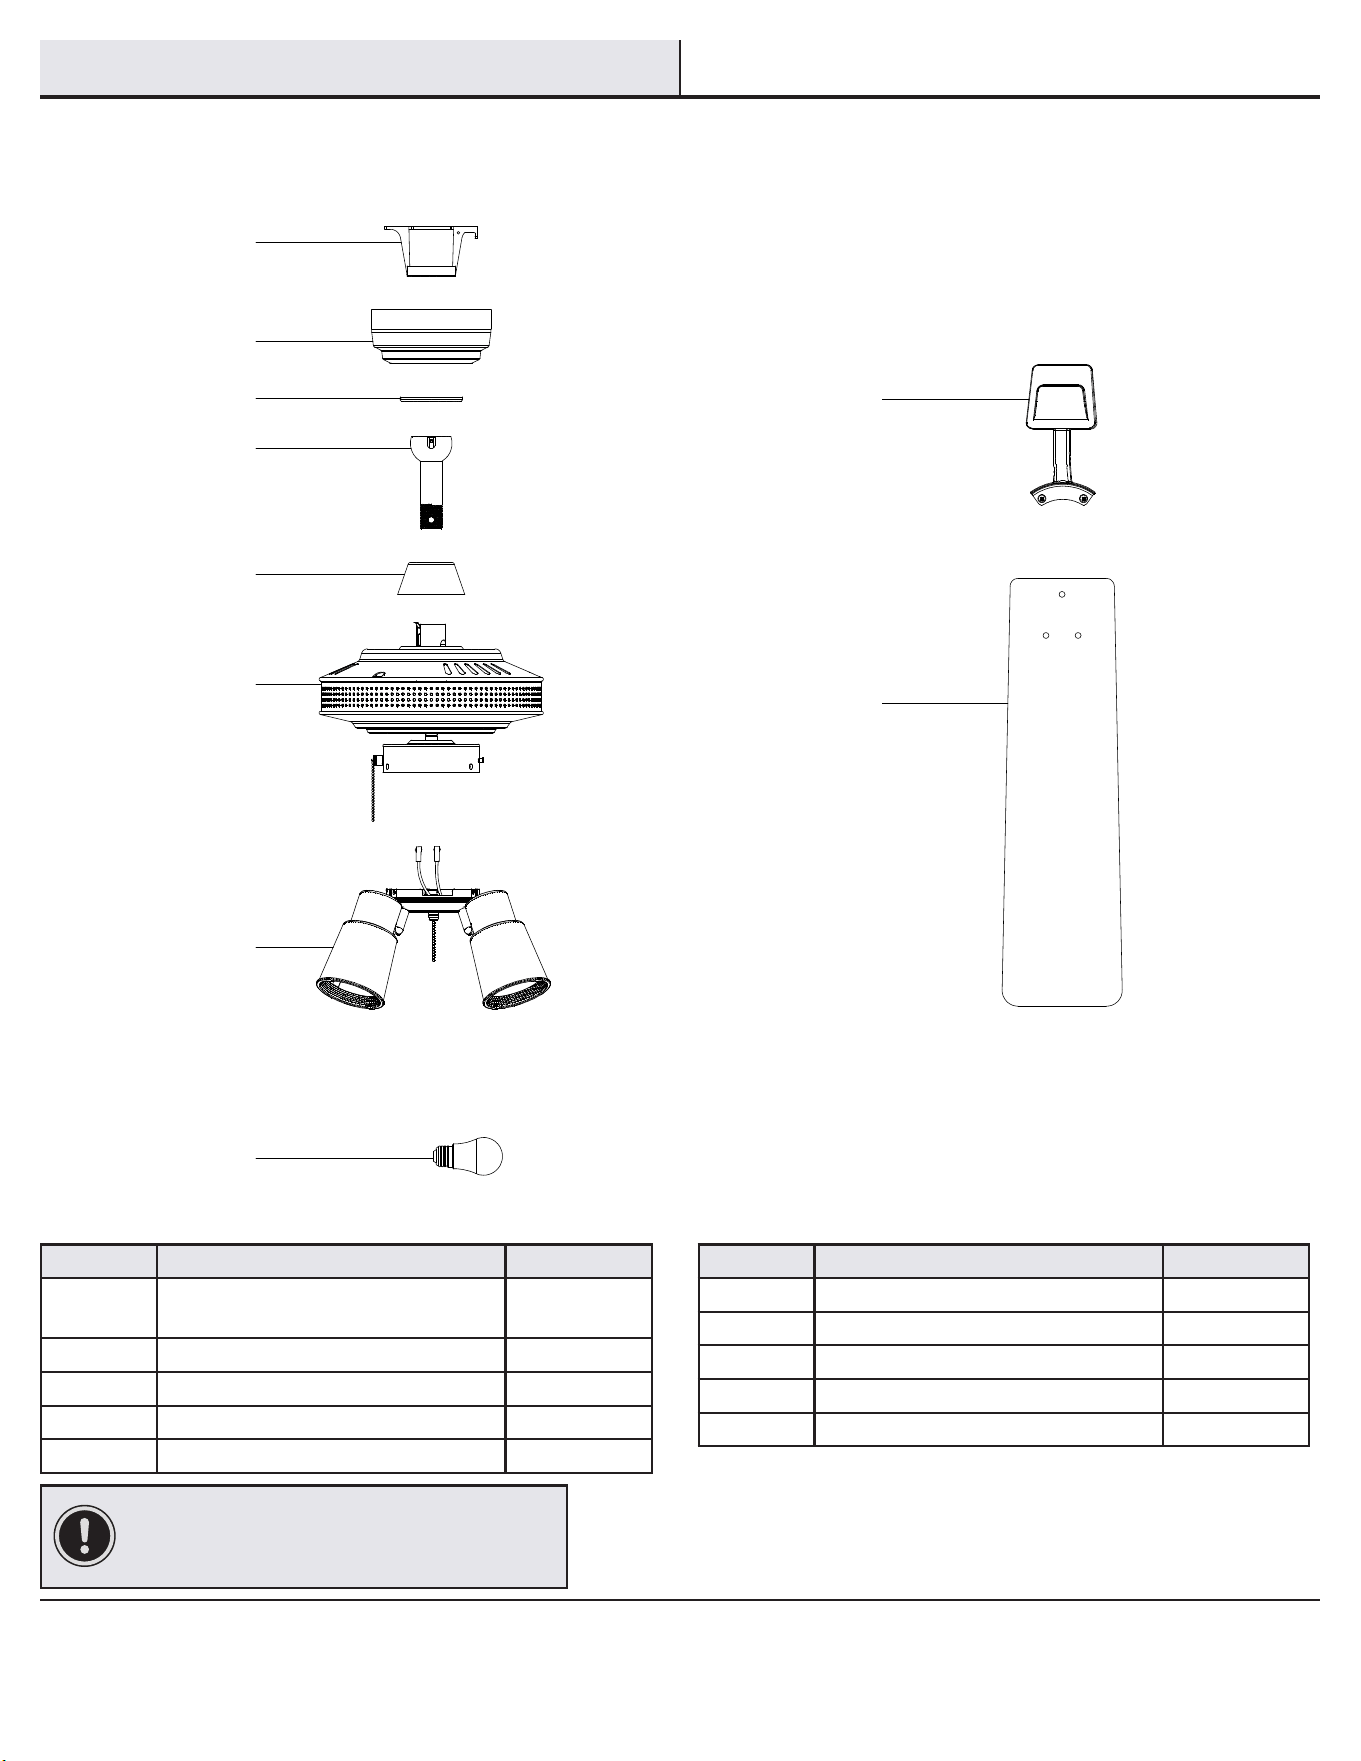
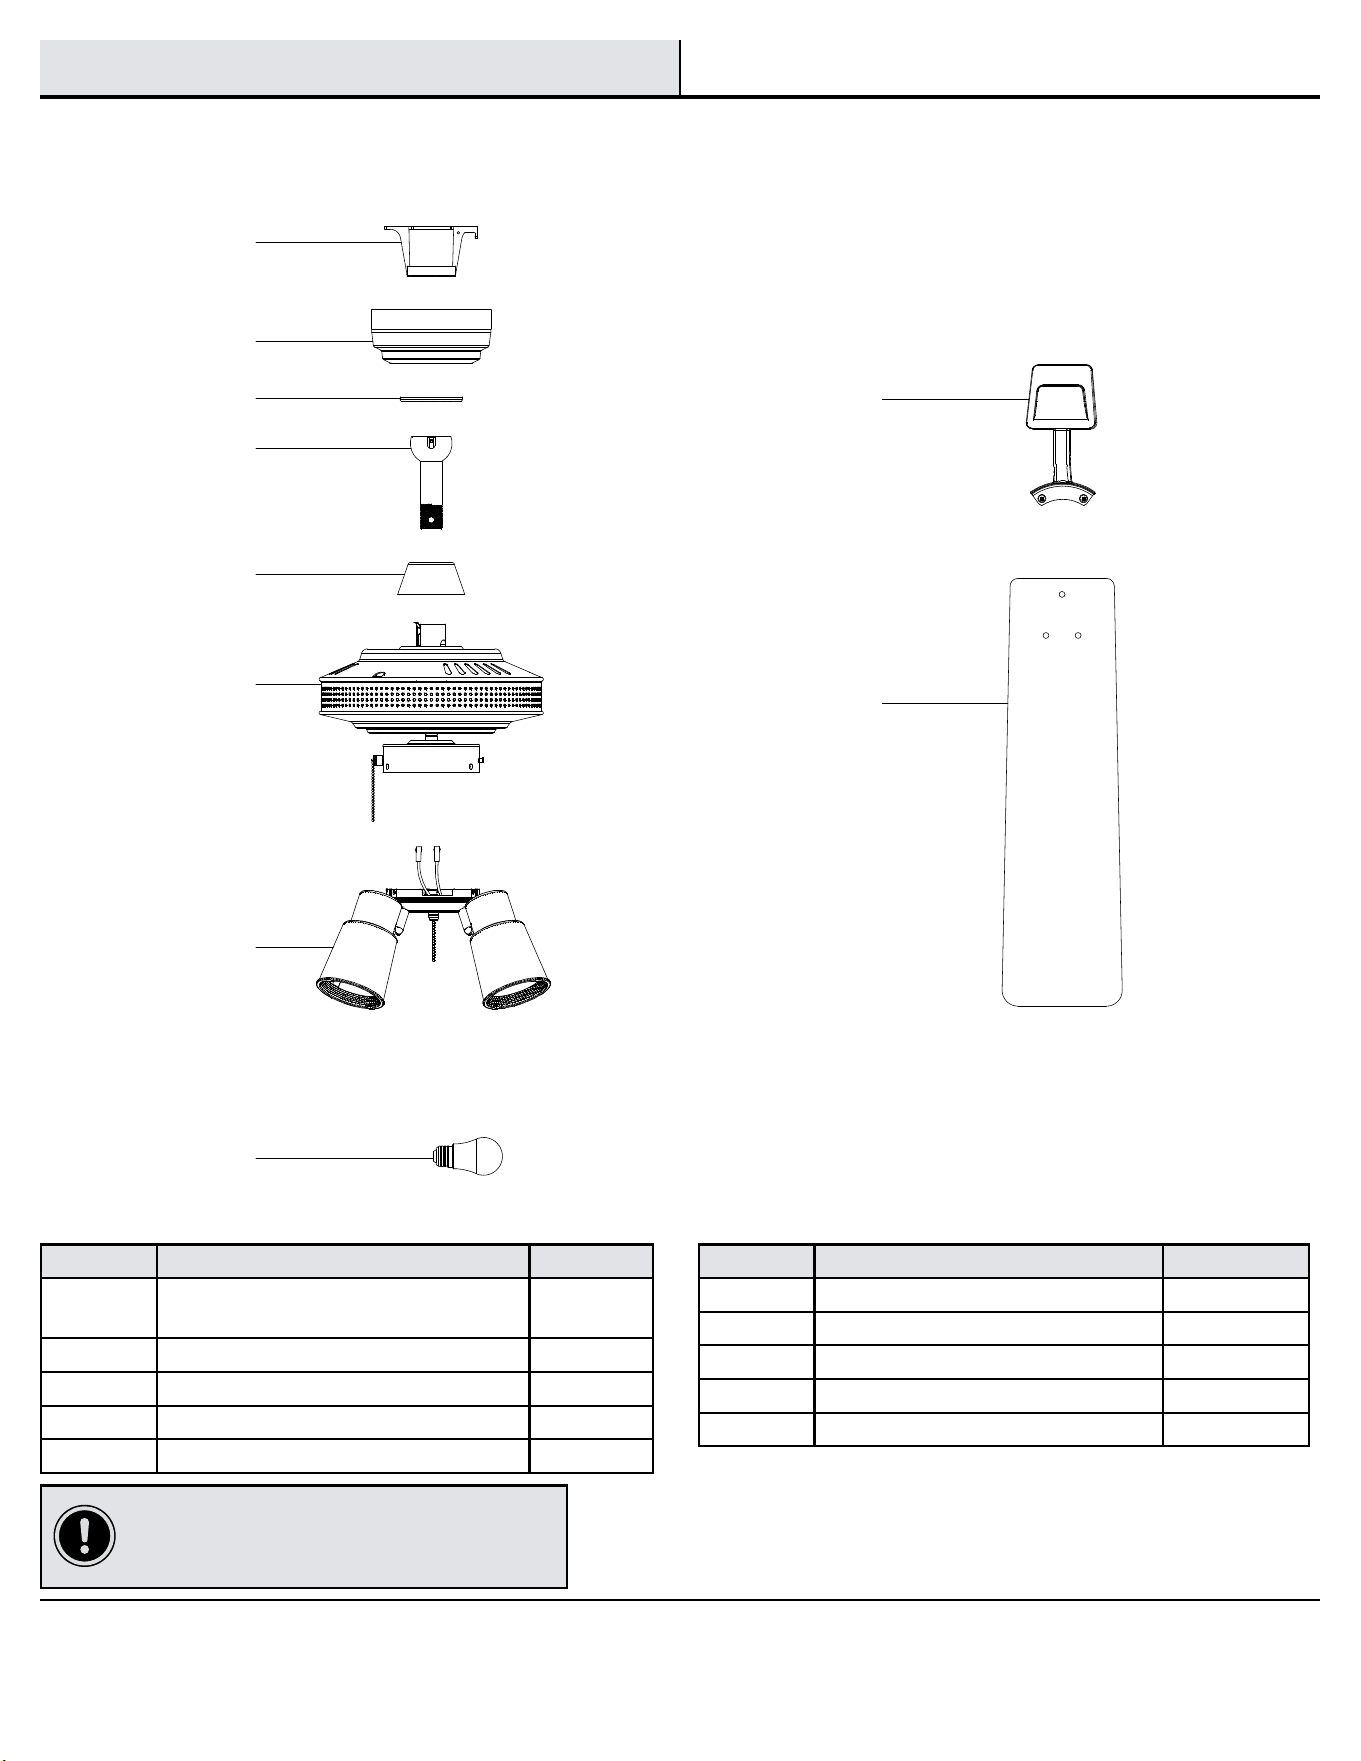
Part Description Quantity
A
Slide-on mounting bracket
(inside canopy)
1
B Canopy 1
C Canopy bottom cover 1
D Ball/downrod assembly 1
E Coupler cover 1
Part Description Quantity
F Fan motor assembly 1
G Light kit tter assembly 1
H LED bulb 4
I Blade bracket 5
J Blade 5
IMPORTANT: This product and/or components are
governed by one or more of the following U.S. Patents:
5,947,436; 5,988,580; 6,010,110; 6,046,416, 6,210,117
and other patents pending.
Pre-Installation (continued)
PACKAGE CONTENTS
A
B
C
D
E
F
G
H
I
J
6
Installation
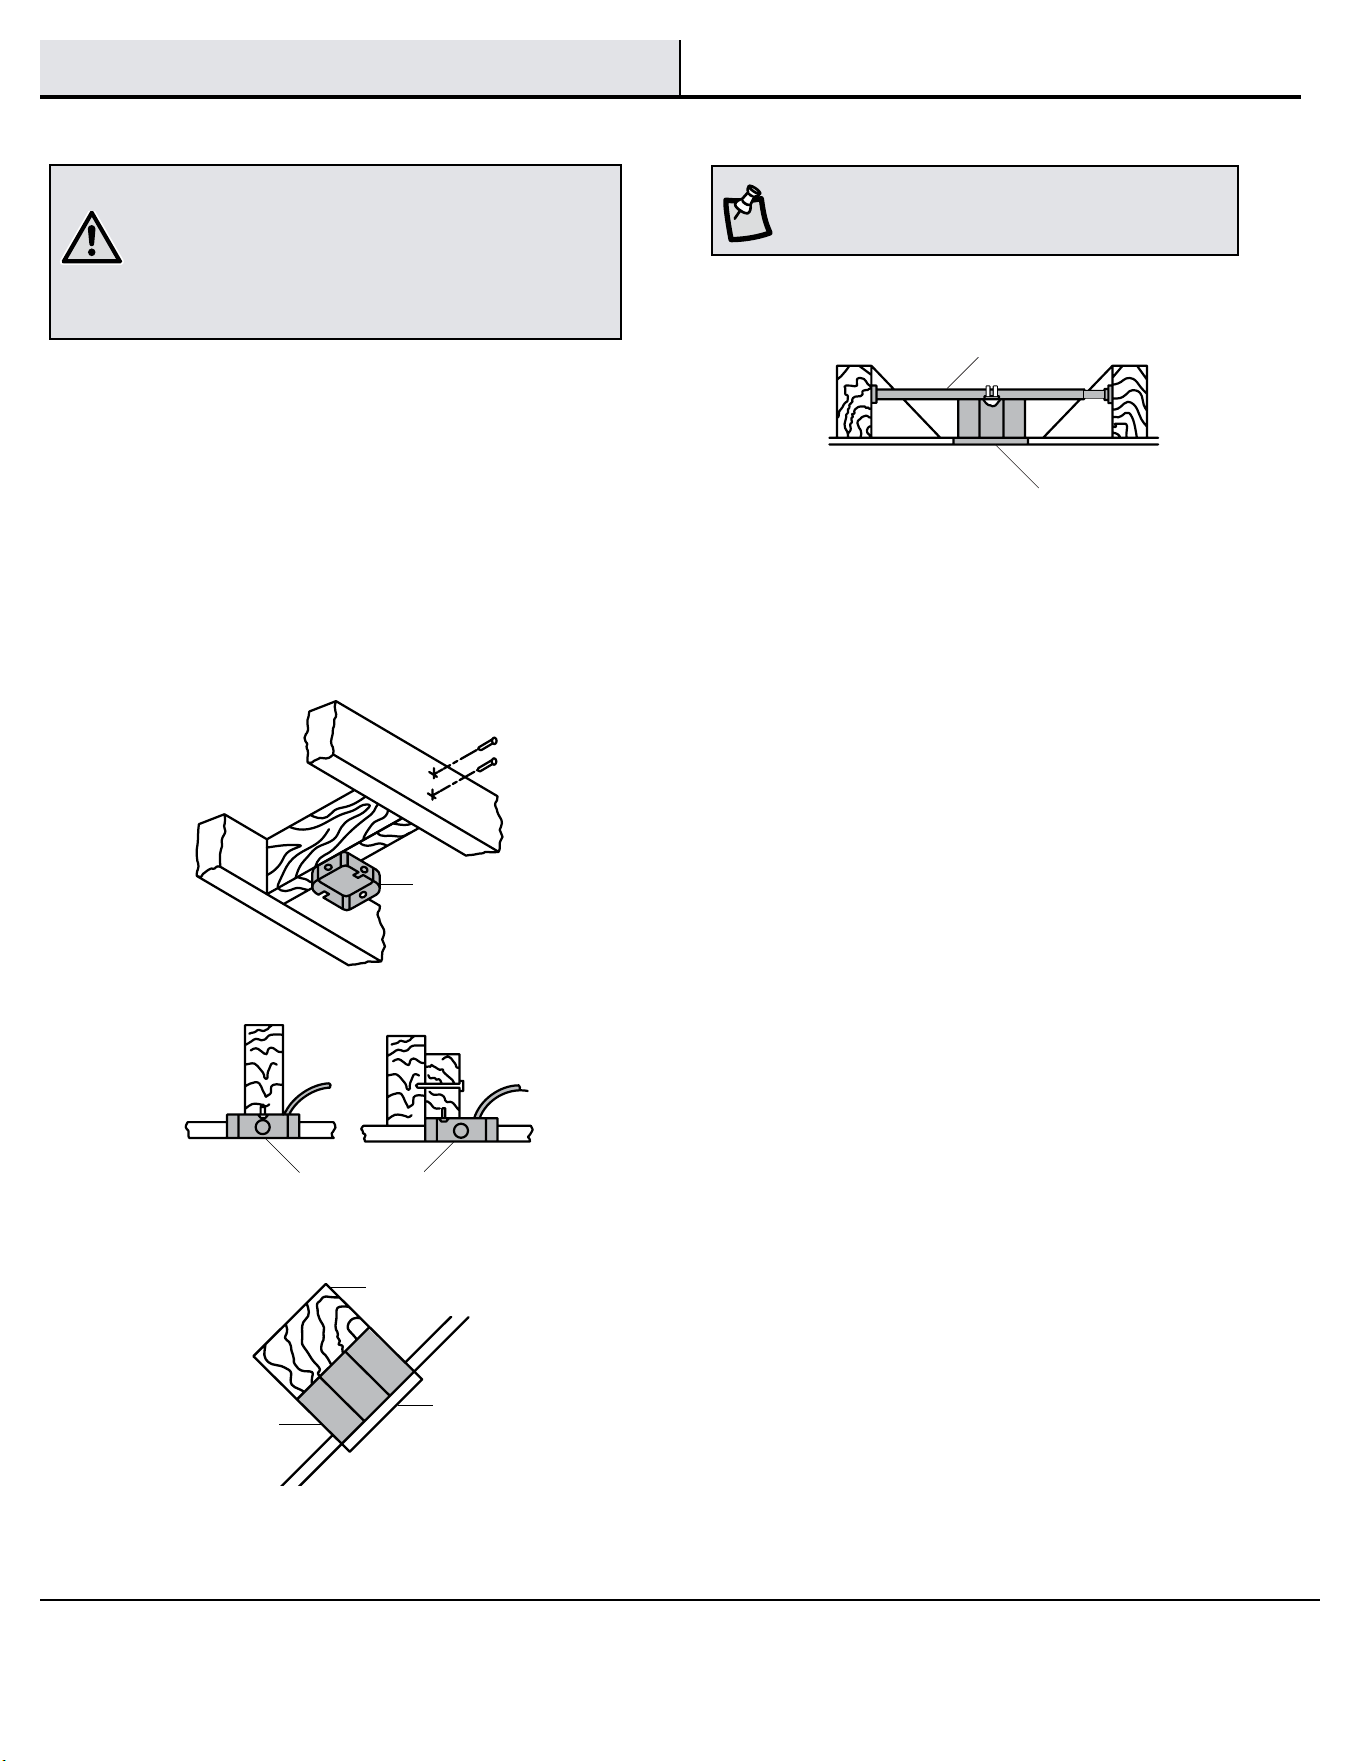
MOUNTING OPTIONS
WARNING: To reduce the risk of re, electric shock
or personal injury, mount to an outlet box marked
“Acceptable for fan support of 35 lb (15.9 kg) or less”,
and use screws provided with the outlet box. An outlet
box commonly used for the support of lighting xtures
may not be acceptable for fan support and may need to
be replaced. If in doubt, consult a qualied electrician.
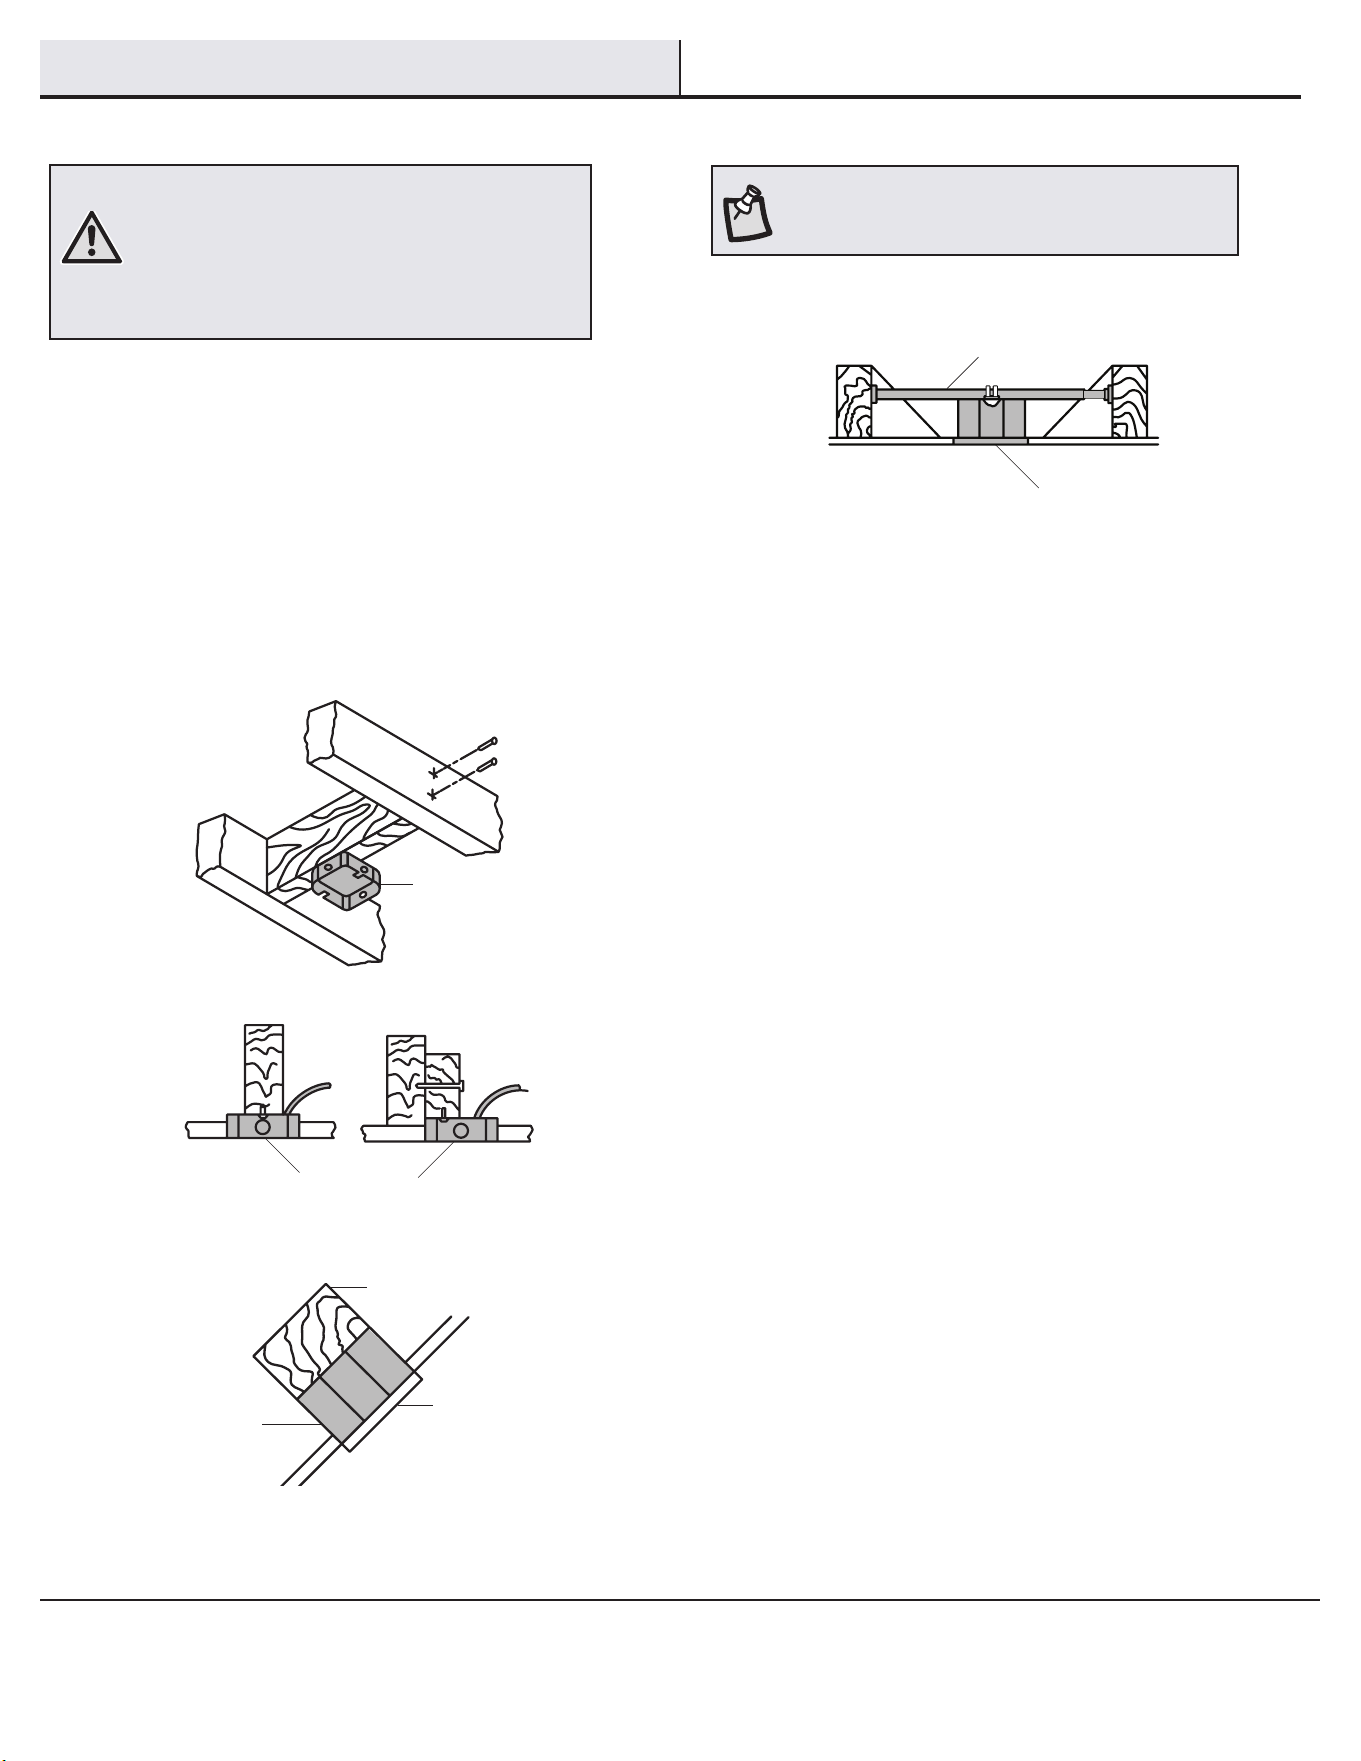
If your ceiling fan does not have an existing UL Listed mounting
box, then install one using the following instructions:
□ Disconnect the power by removing the fuses or turning off
the circuit breakers.
□ Secure the outlet box directly to the building structure. Use
the appropriate fasteners and materials. The outlet box and
its bracing must be able to fully support the weight of the
moving fan (at least 35 lb). Do not use a plastic outlet box.
The illustrations below show three different ways to mount the
outlet box.
If the canopy (B) touches the ball/downrod assembly (D), then remove
the canopy bottom cover (C), and turn the canopy (B) 180° before
attaching the canopy (B) to the mounting plate.
To hang your fan where there is an existing xture but no ceiling joist,
you may need an installation hanger bar as shown above
(available at any Home Depot store).
NOTE: You may need a longer ball/downrod to maintain
proper blade clearance when installing on a steep, sloped
ceiling. The maximum angle allowable is 20° away from
horizontal.
Outlet Box
Outlet Box
Recessed
Outlet
Box
Provide Strong
Support
Ceiling
Mounting
Plate
Outlet Box
Hanger Bar
7
HOMEDEPOT.COM/HOMEDECORATORS
Please contact 1-800-986-3460 for further assistance.
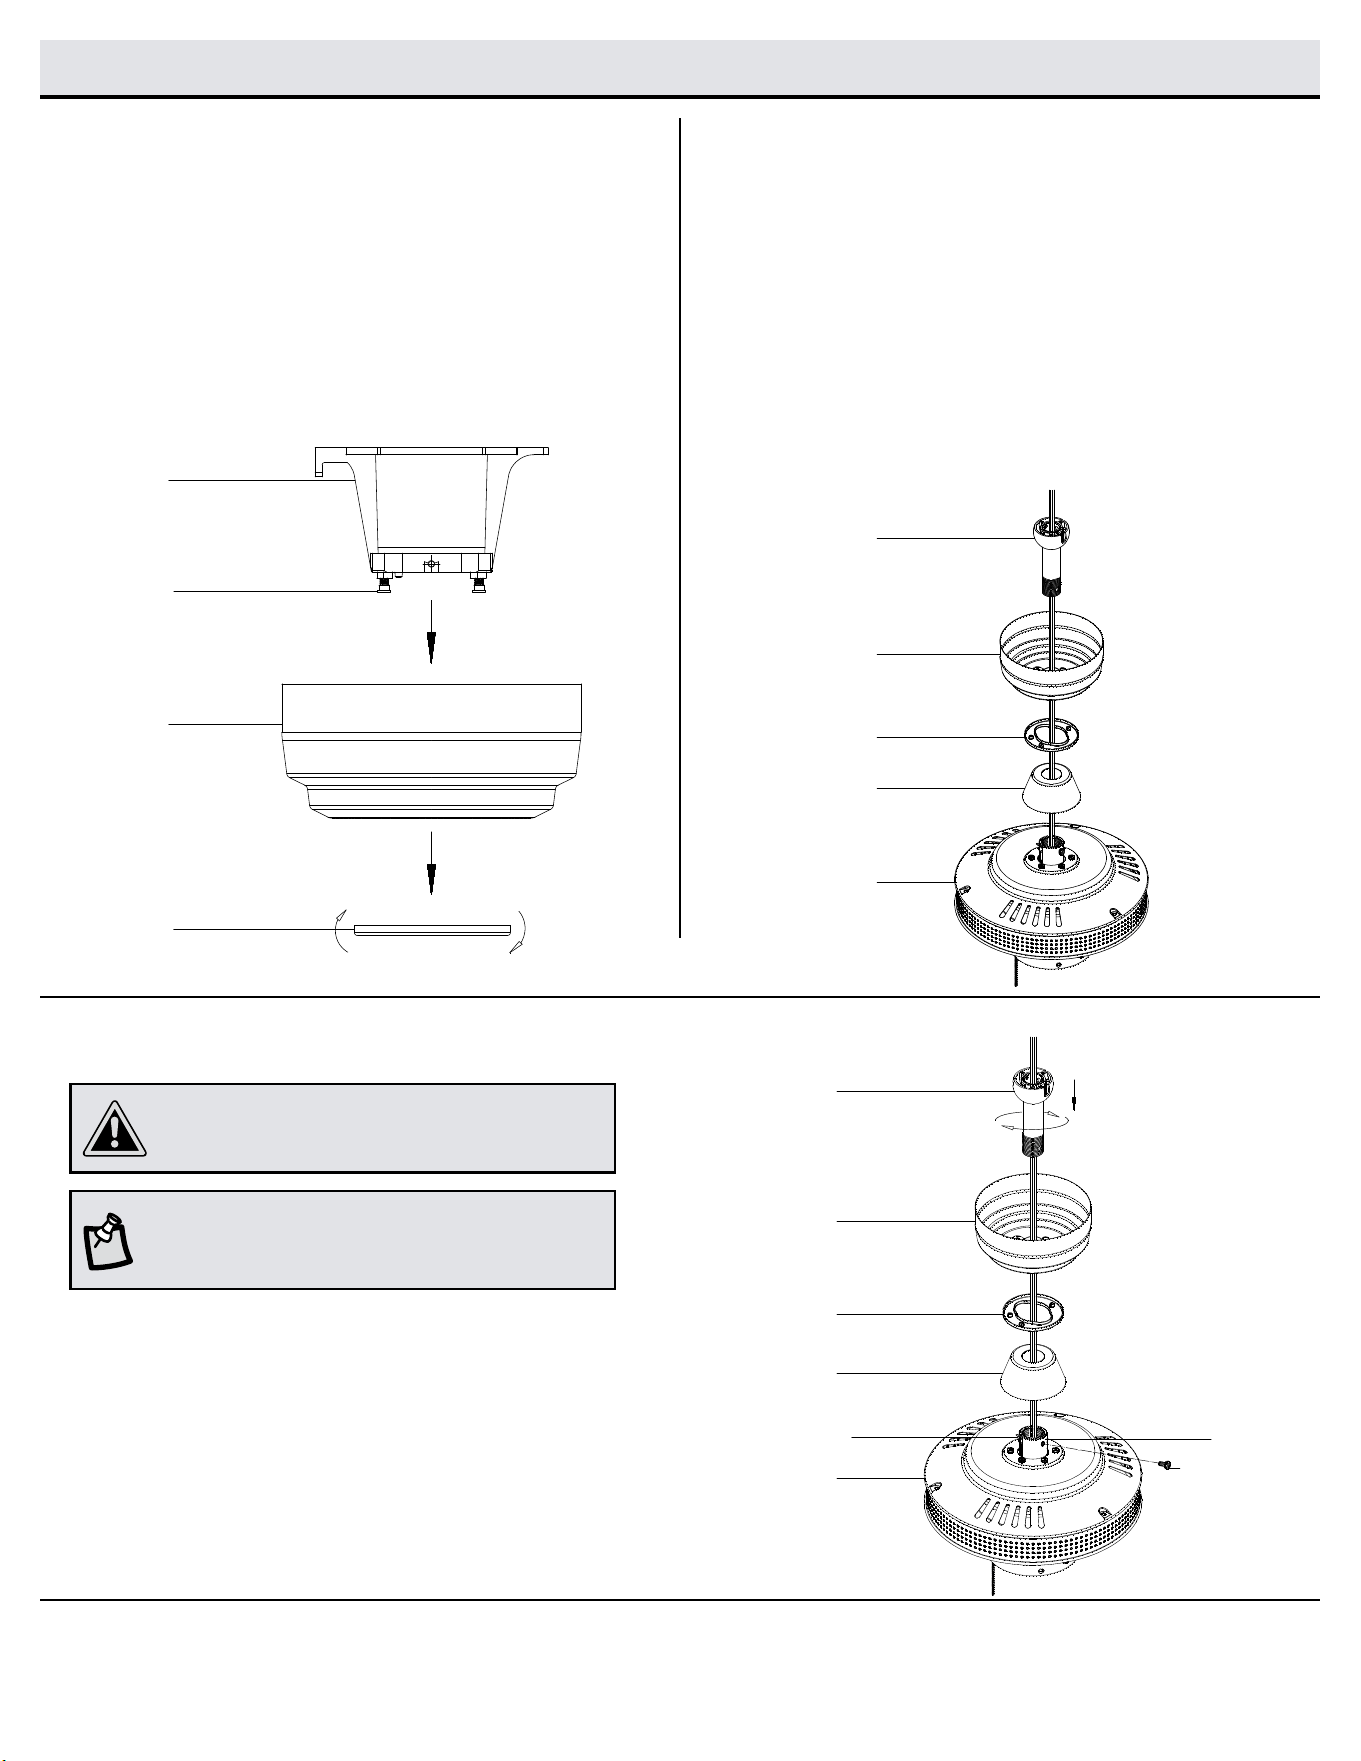
Assembly - Standard Ceiling Mount
Assembling the fan
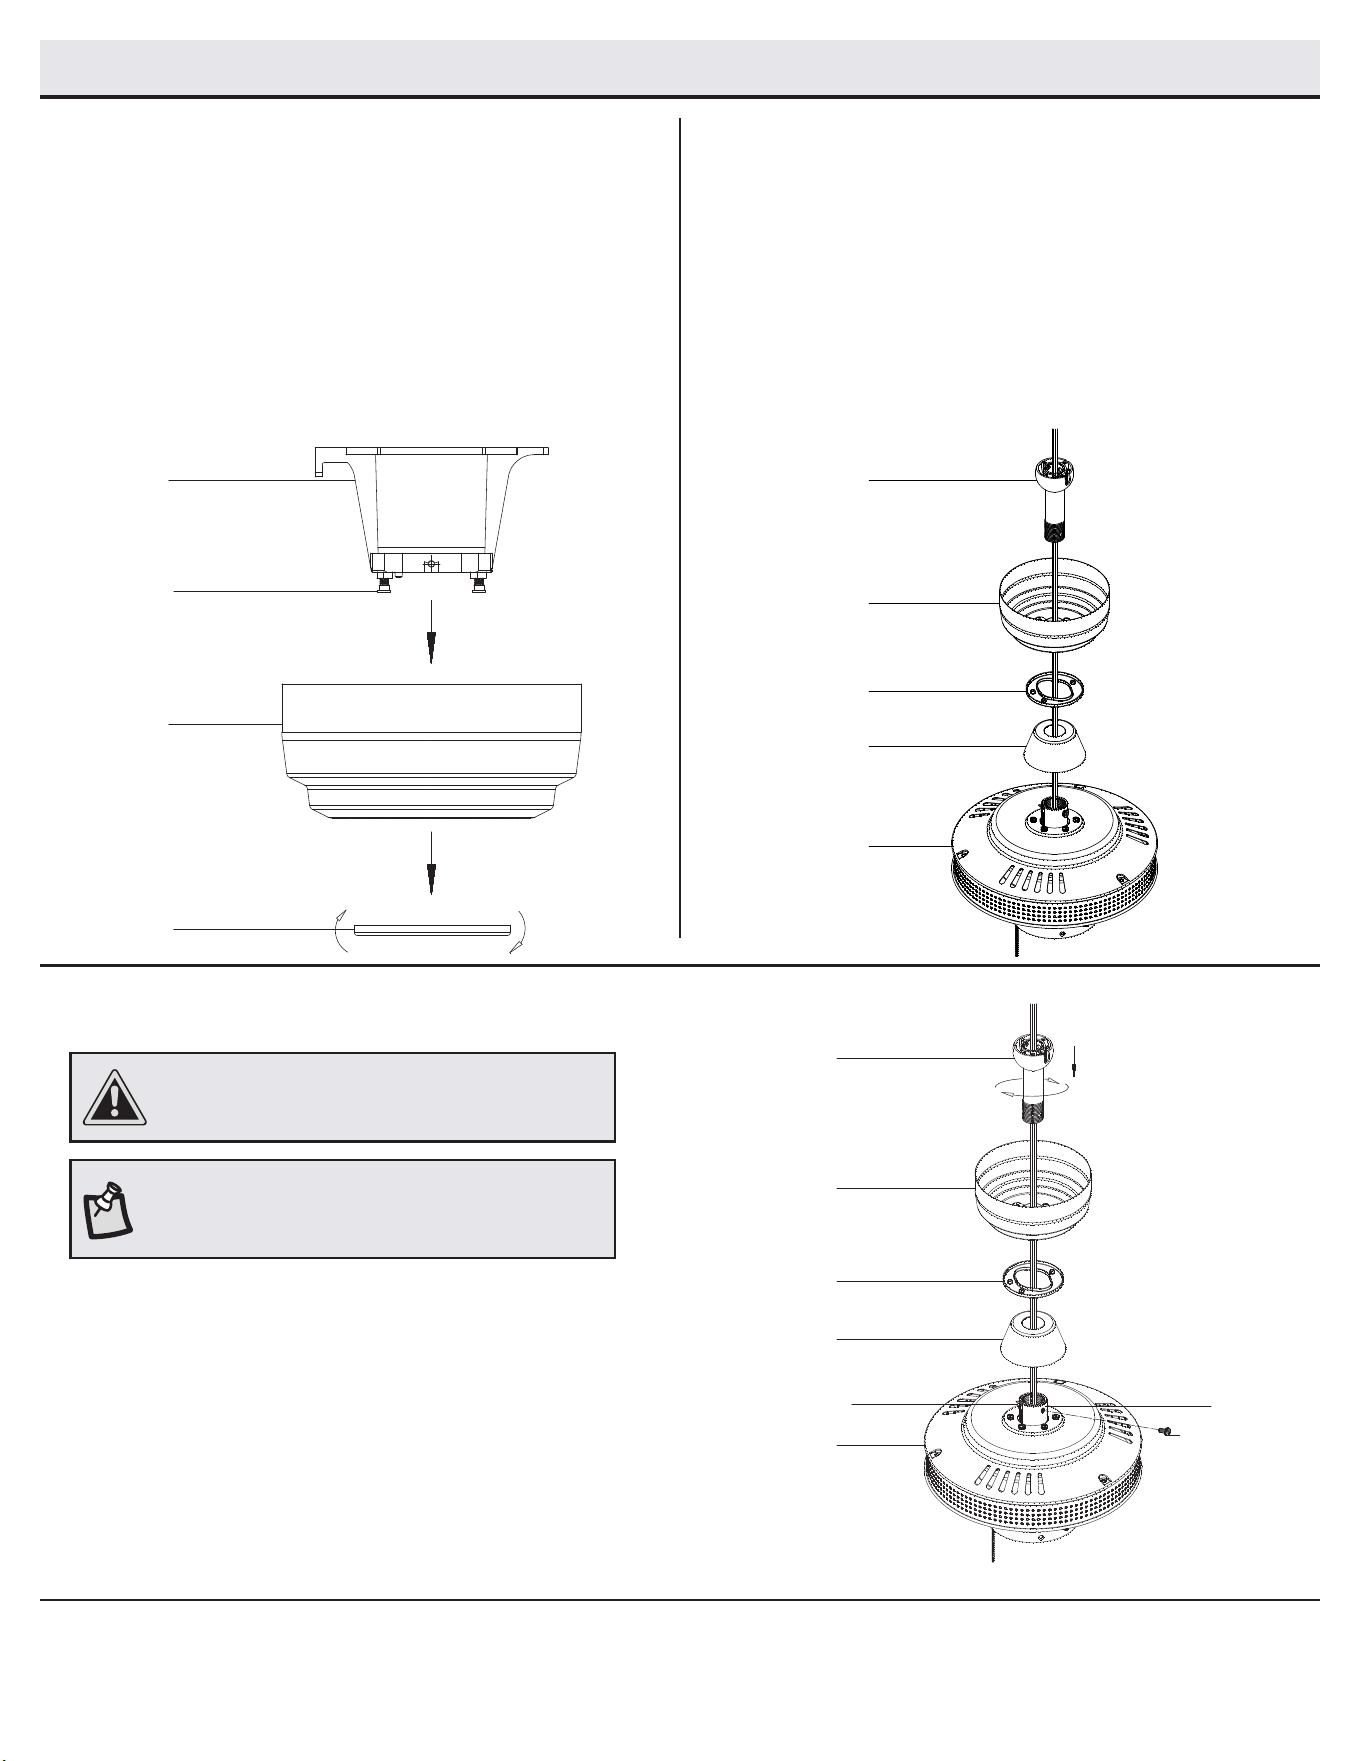
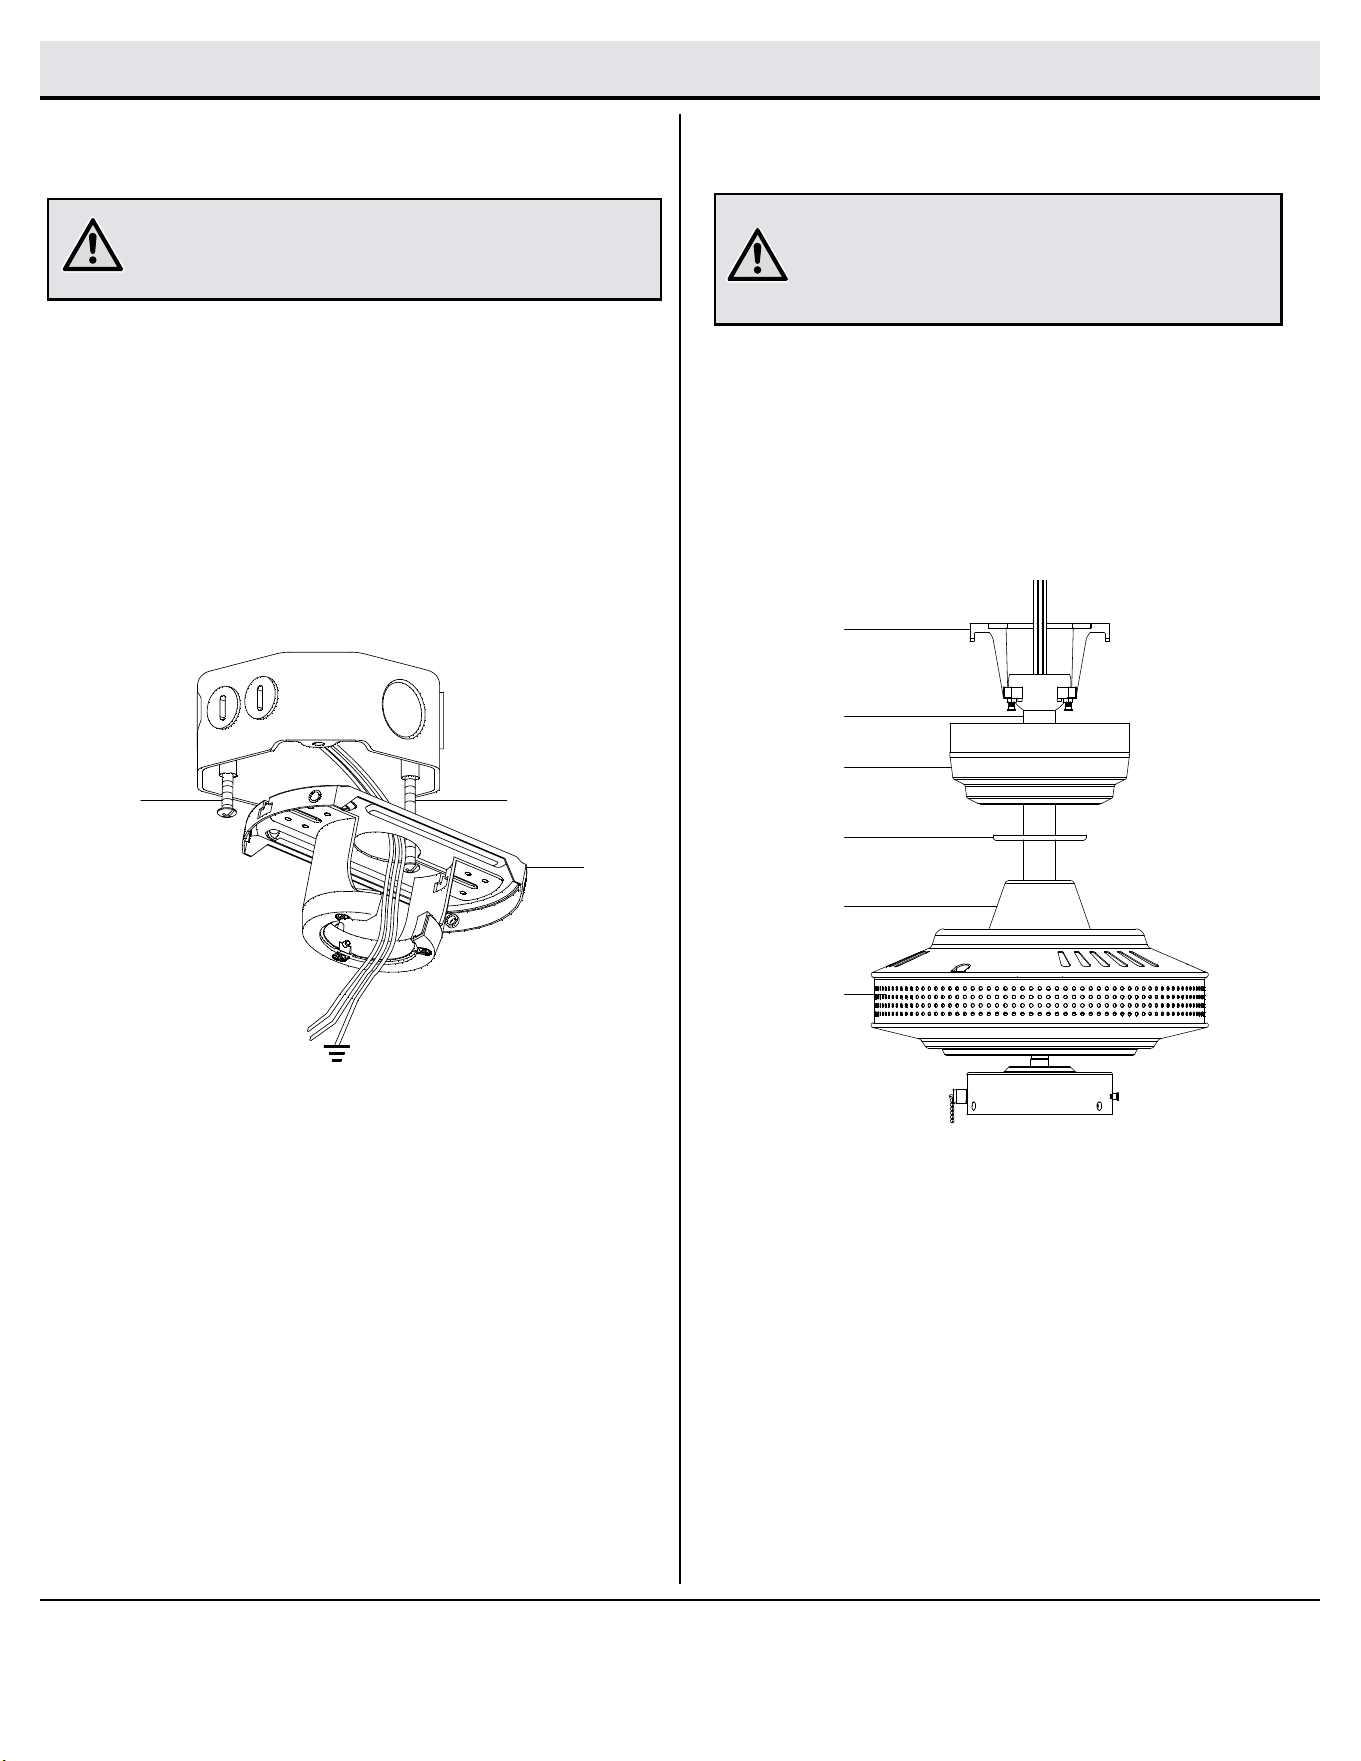
3
□ Remove the set screw (RR) by turning it counterclockwise.
□ Install the ball/downrod assembly (D) by inserting it into the mo-
tor collar (TT), and turning it clockwise until it is tight.
□ Reinstall the set screw (RR) by turning clockwise until tight.
NOTE: This fan is equipped with a safety tab (SS).
Should the set screw (RR) ever become loose while the
fan is running in reverse, the safety tab (SS) will engage
and stop the fan from falling.
CAUTION: To ensure wobble-free operation and to avoid
damage to the fan, the ball/downrod assembly (D) and
the set screw (RR) must be completely tightened.
Routing the wiresPreparing for mounting
□ Route the wires exiting the top of the fan motor assembly (F)
through the center of the coupler cover (E) and the canopy
bottom cover (C).
□ Make sure the opening of the canopy (B) is on top and insert
the ball/downrod (D) through the canopy (B).
□ Route the wires exiting the top of the fan motor assembly (F)
through the ball/downrod (D) as shown.
21
□ Remove the canopy bottom cover (C) from the canopy (B) by
turning the bottom cover counterclockwise until it unlocks.
□ Loosen the two canopy screws (FF) located in the bottom of the
mounting bracket (A).
□ Turn the canopy (B) counterclockwise to remove the mounting
bracket (A) from the canopy (B).
A
FF
B
C
D
B
C
E
F
RR
TT
SS
D
B
C
E
F
8
Assembly - Hanging the Fan
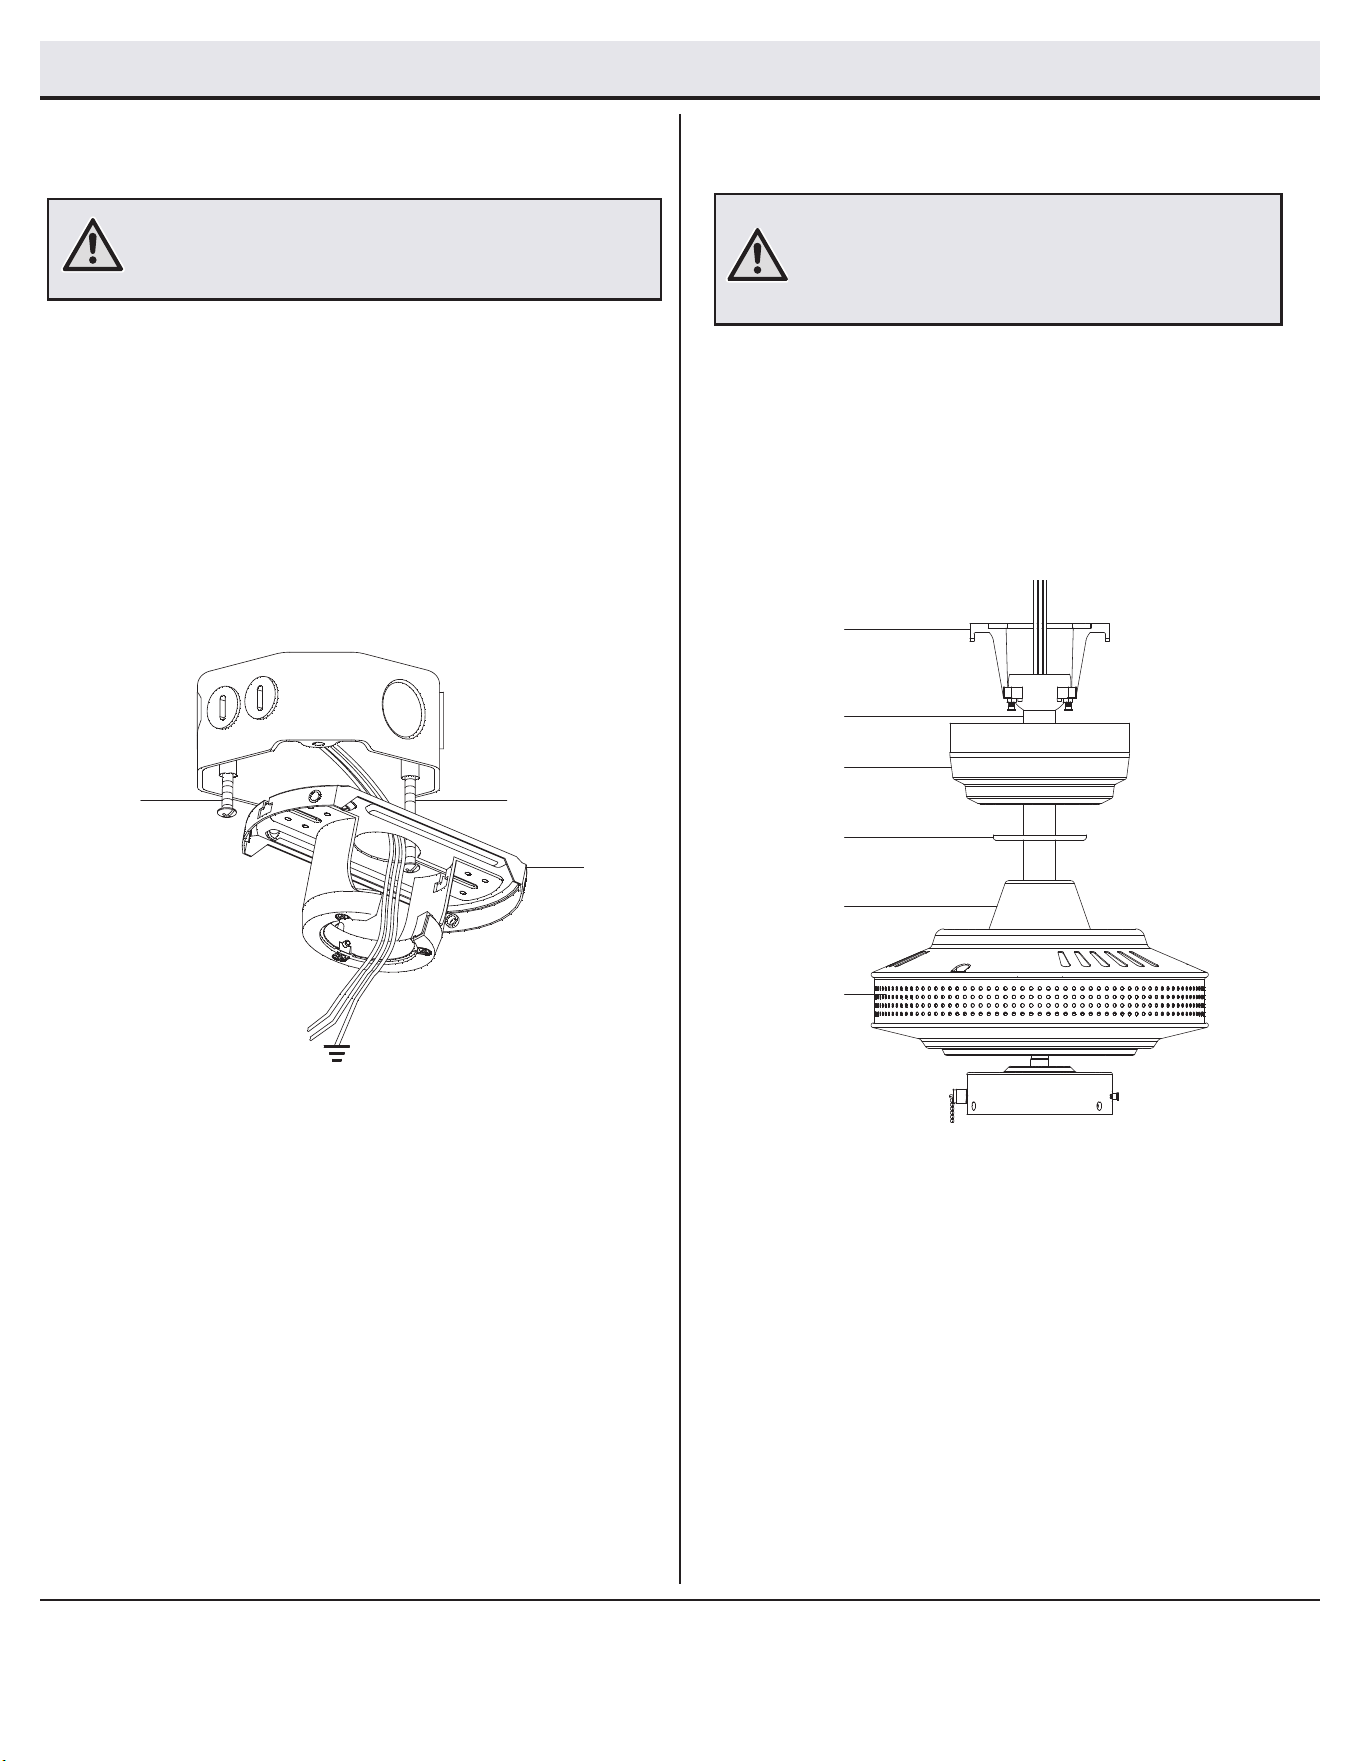
Attaching the fan to the
electrical box
Hanging the fan
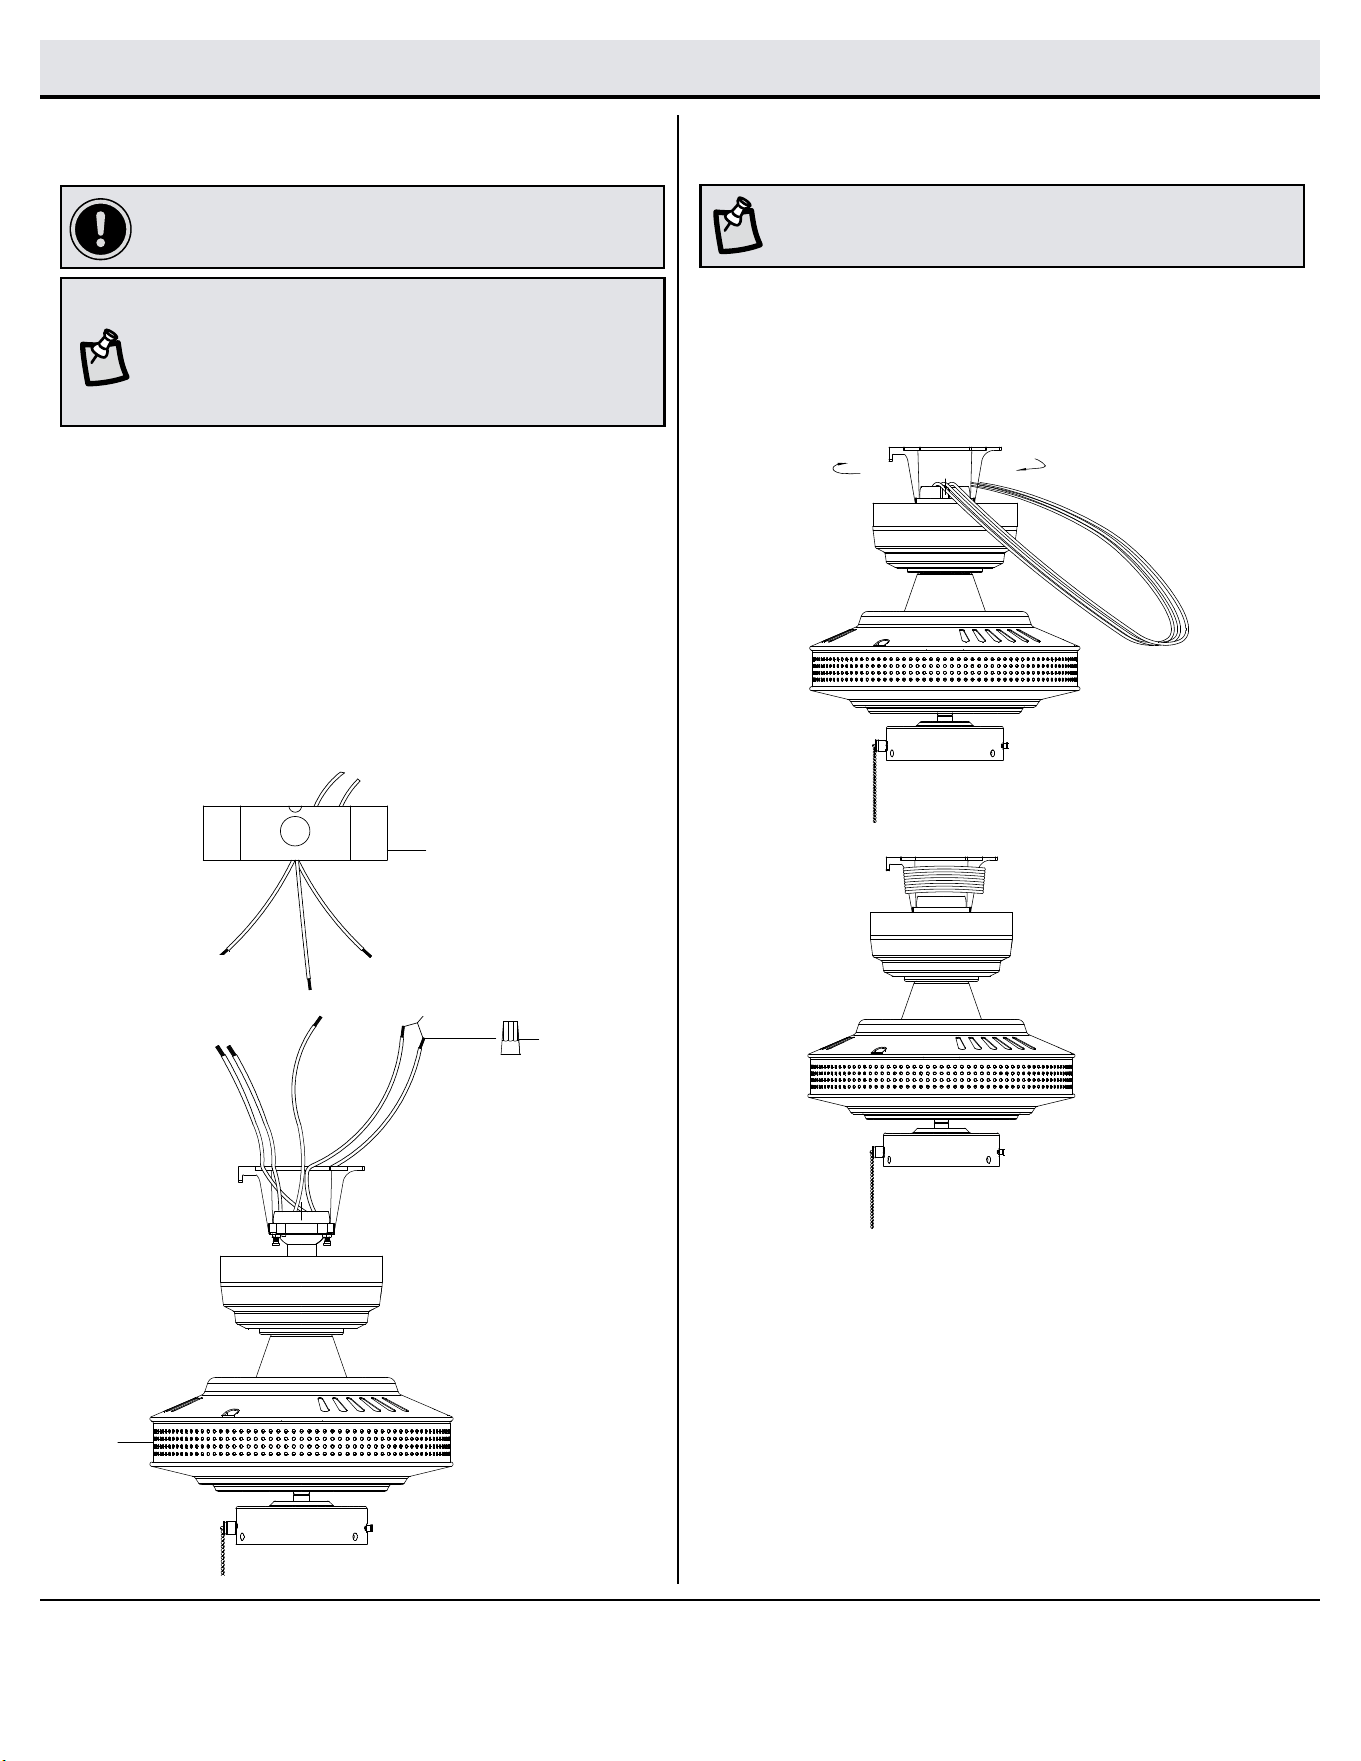
□ Pass the 120-Volt supply wires through the center hole in the
mounting bracket (A).
□ Install the ceiling mounting bracket on the outlet box by sliding
the mounting bracket (A) over the two screws (II) provided with
the outlet box. If necessary, use leveling washers (not included)
between the mounting bracket (A) and the outlet box. Note that
the at side of the mounting bracket (A) is toward the outlet box.
□ Securely tighten the two mounting screws (II).
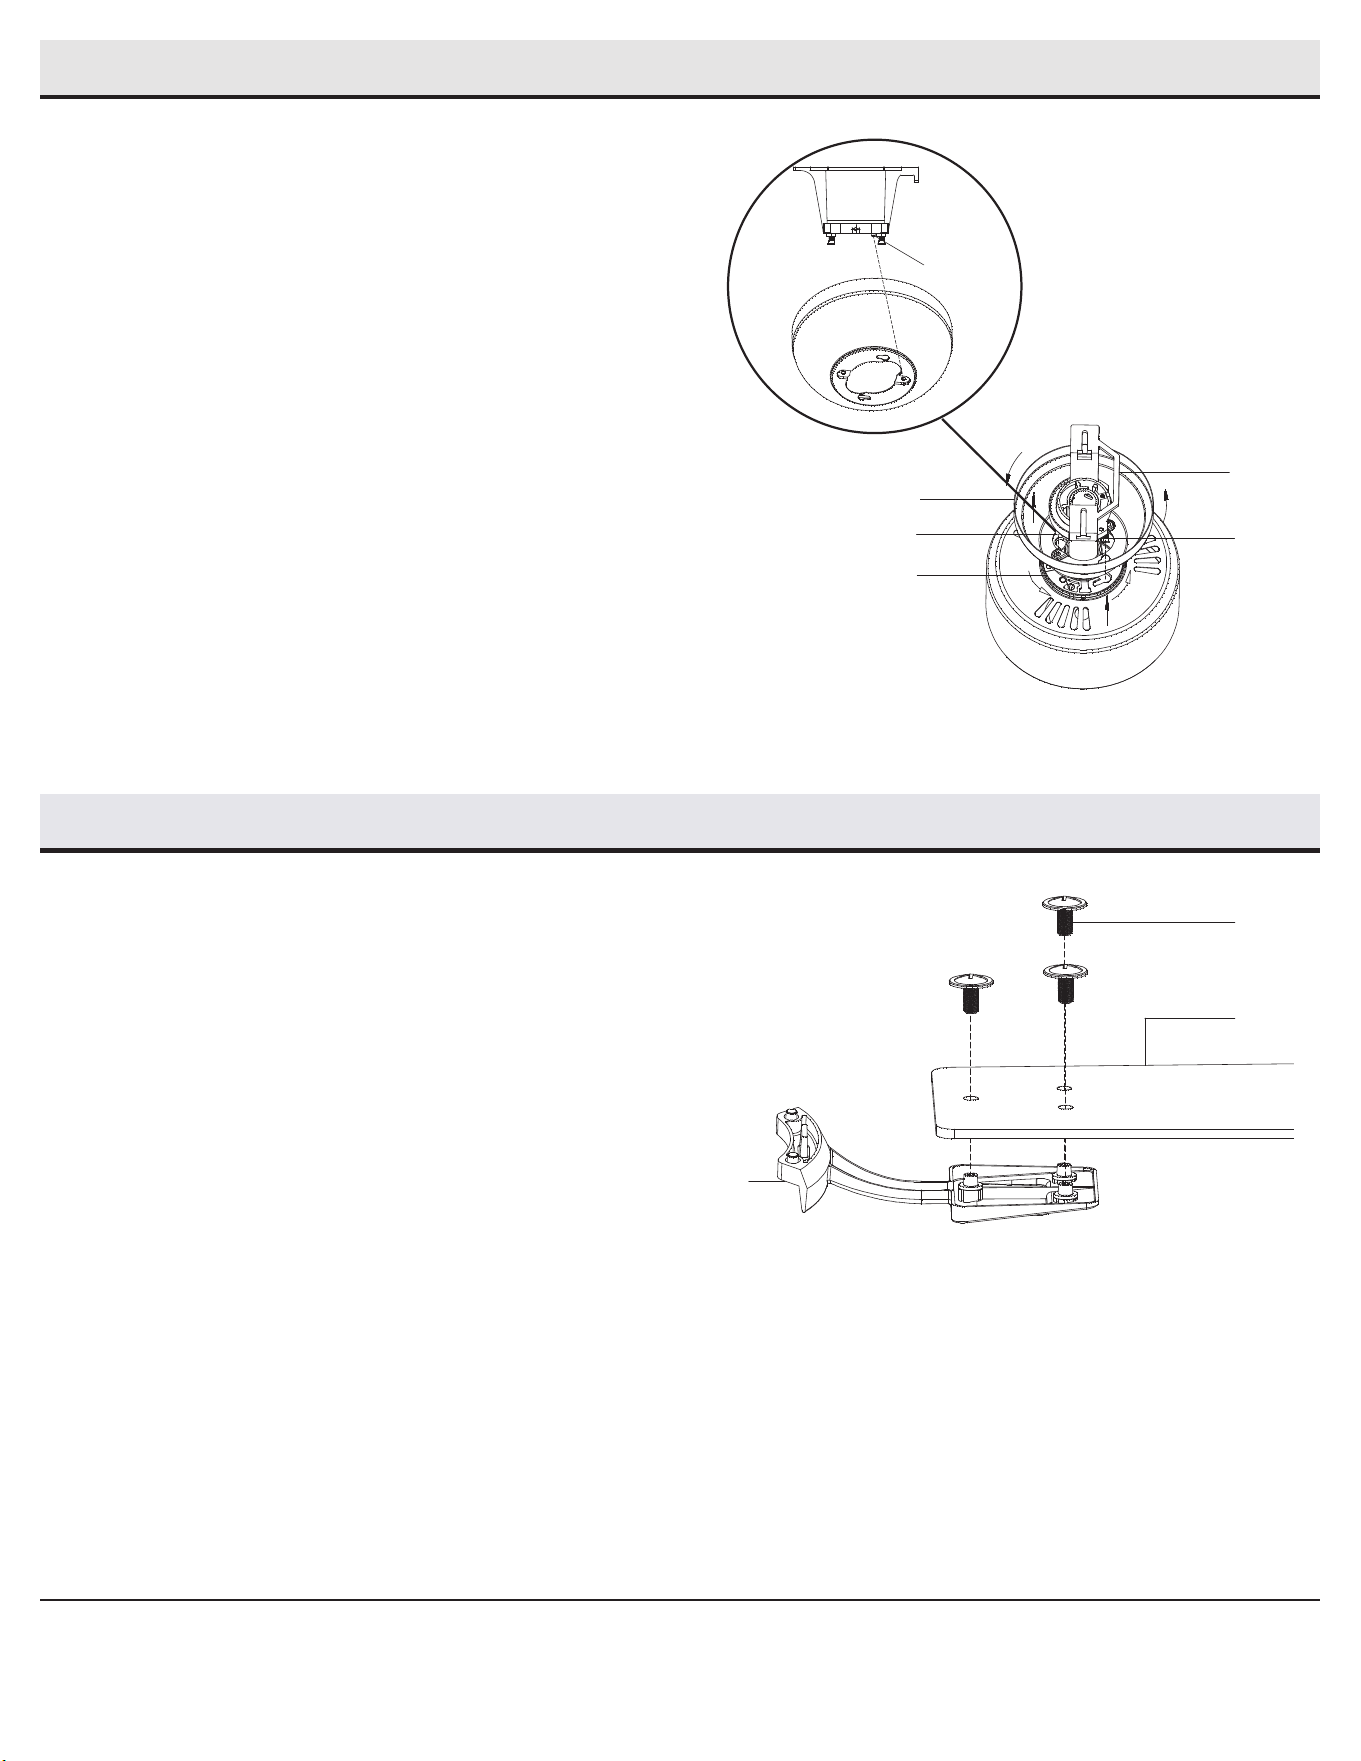
1
2
WARNING: To reduce the risk of re, electric shock or personal
injury, mount to an outlet box marked “Acceptable for fan
support of 35 lb (15.9 kg) or less”, and use screws provided
with the outlet box.
□ Carefully lift the fan motor assembly (F) up to the slide-on
mounting bracket (A).
□ Seat the hanger ball portion of the ball/downrod (D) in the
slide-on mounting bracket (A) socket. Ensure that the tab on
the slide-on mounting bracket (A) socket is properly seated in
the groove in the hanger ball.
WARNING: When using the standard ball/downrod mounting,
the tab in the ring at the bottom of the mounting bracket
must rest in the groove of the hanger ball. Failure to properly
seat the tab in the groove may result in fan wobble issues
and potentially damage the wiring.
II
II
A
A
D
B
C
E
F
9
HOMEDEPOT.COM/HOMEDECORATORS
Please contact 1-800-986-3460 for further assistance.
Assembly - Hanging the Fan (continued)
3
4
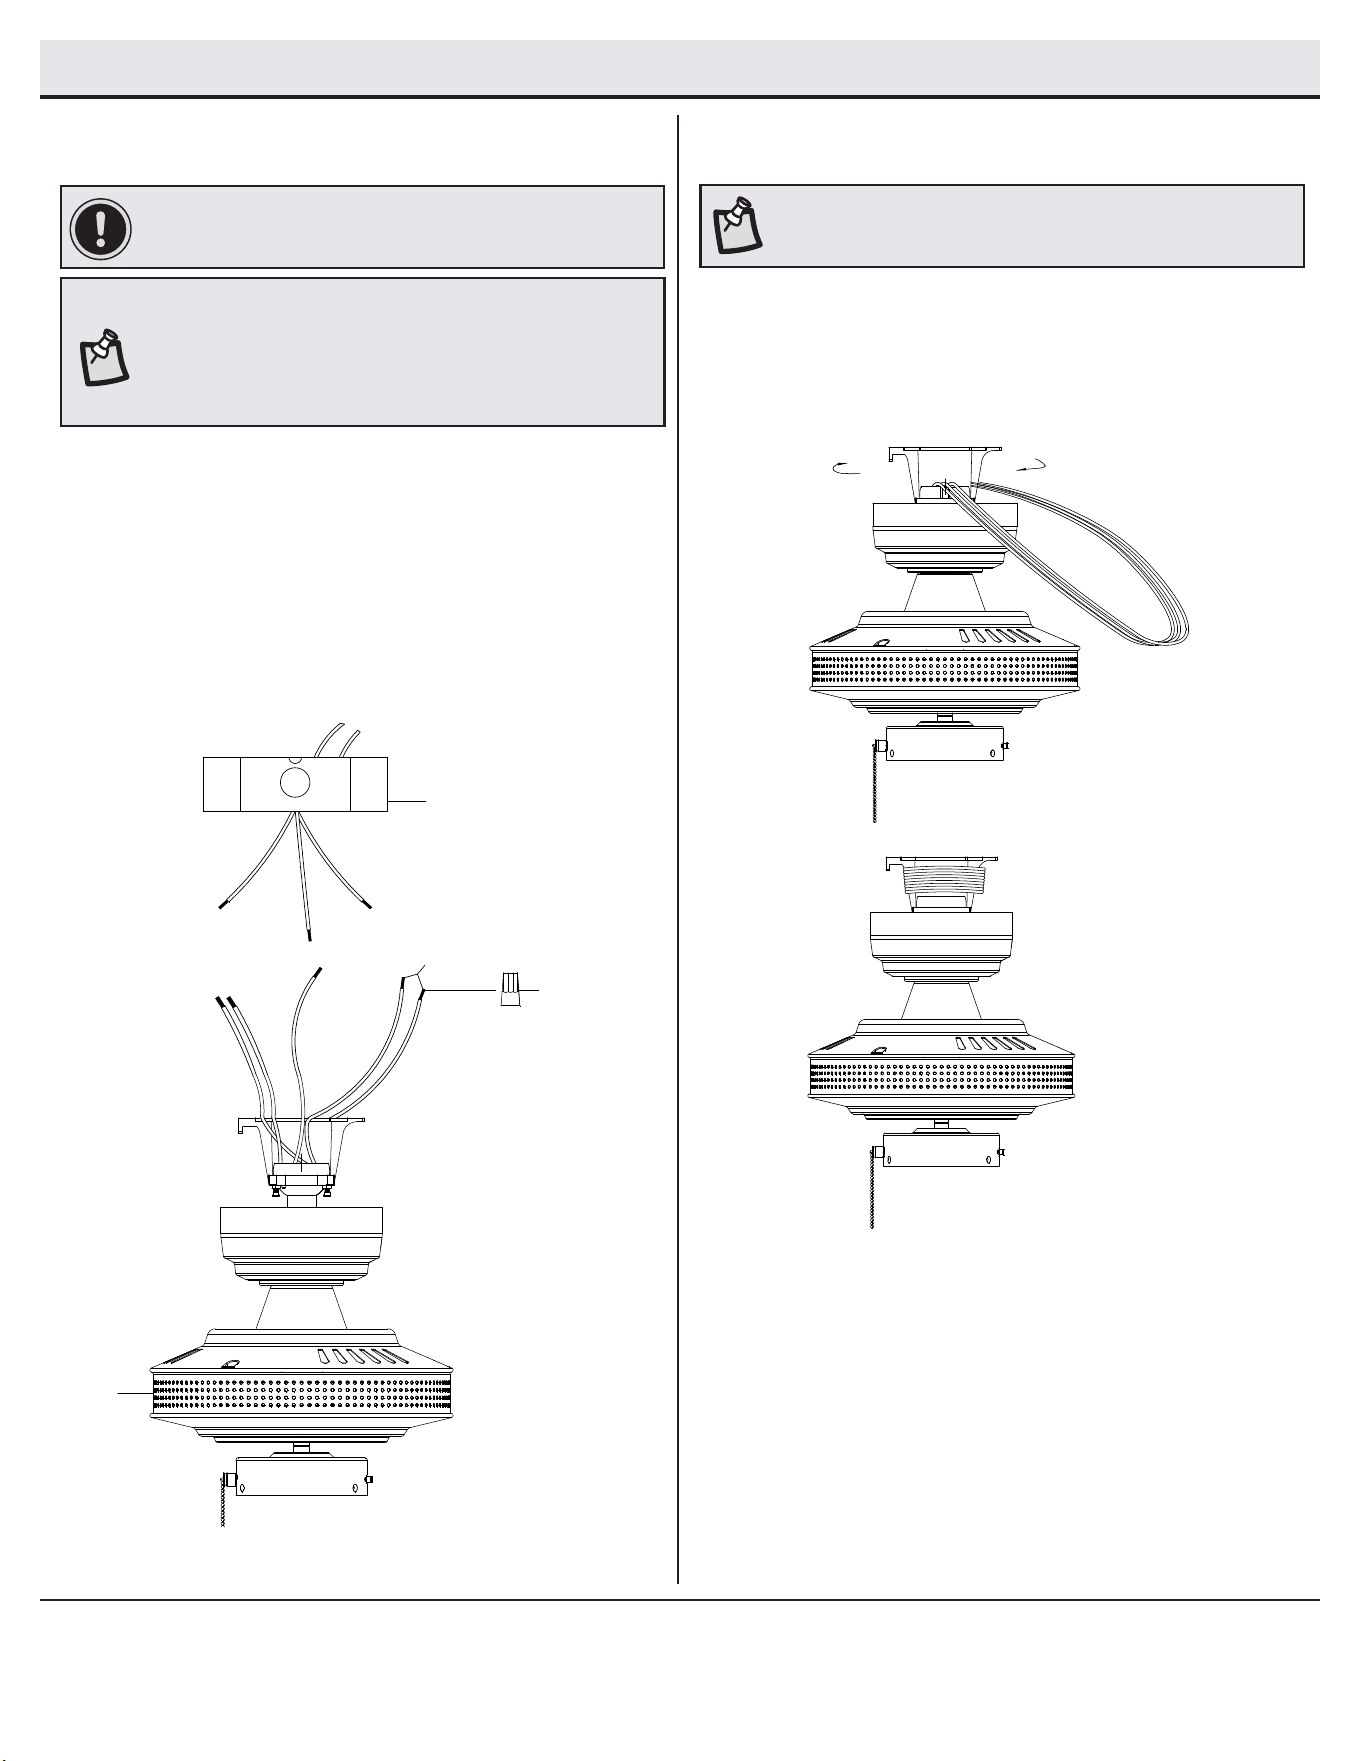
Wrapping the extra wire
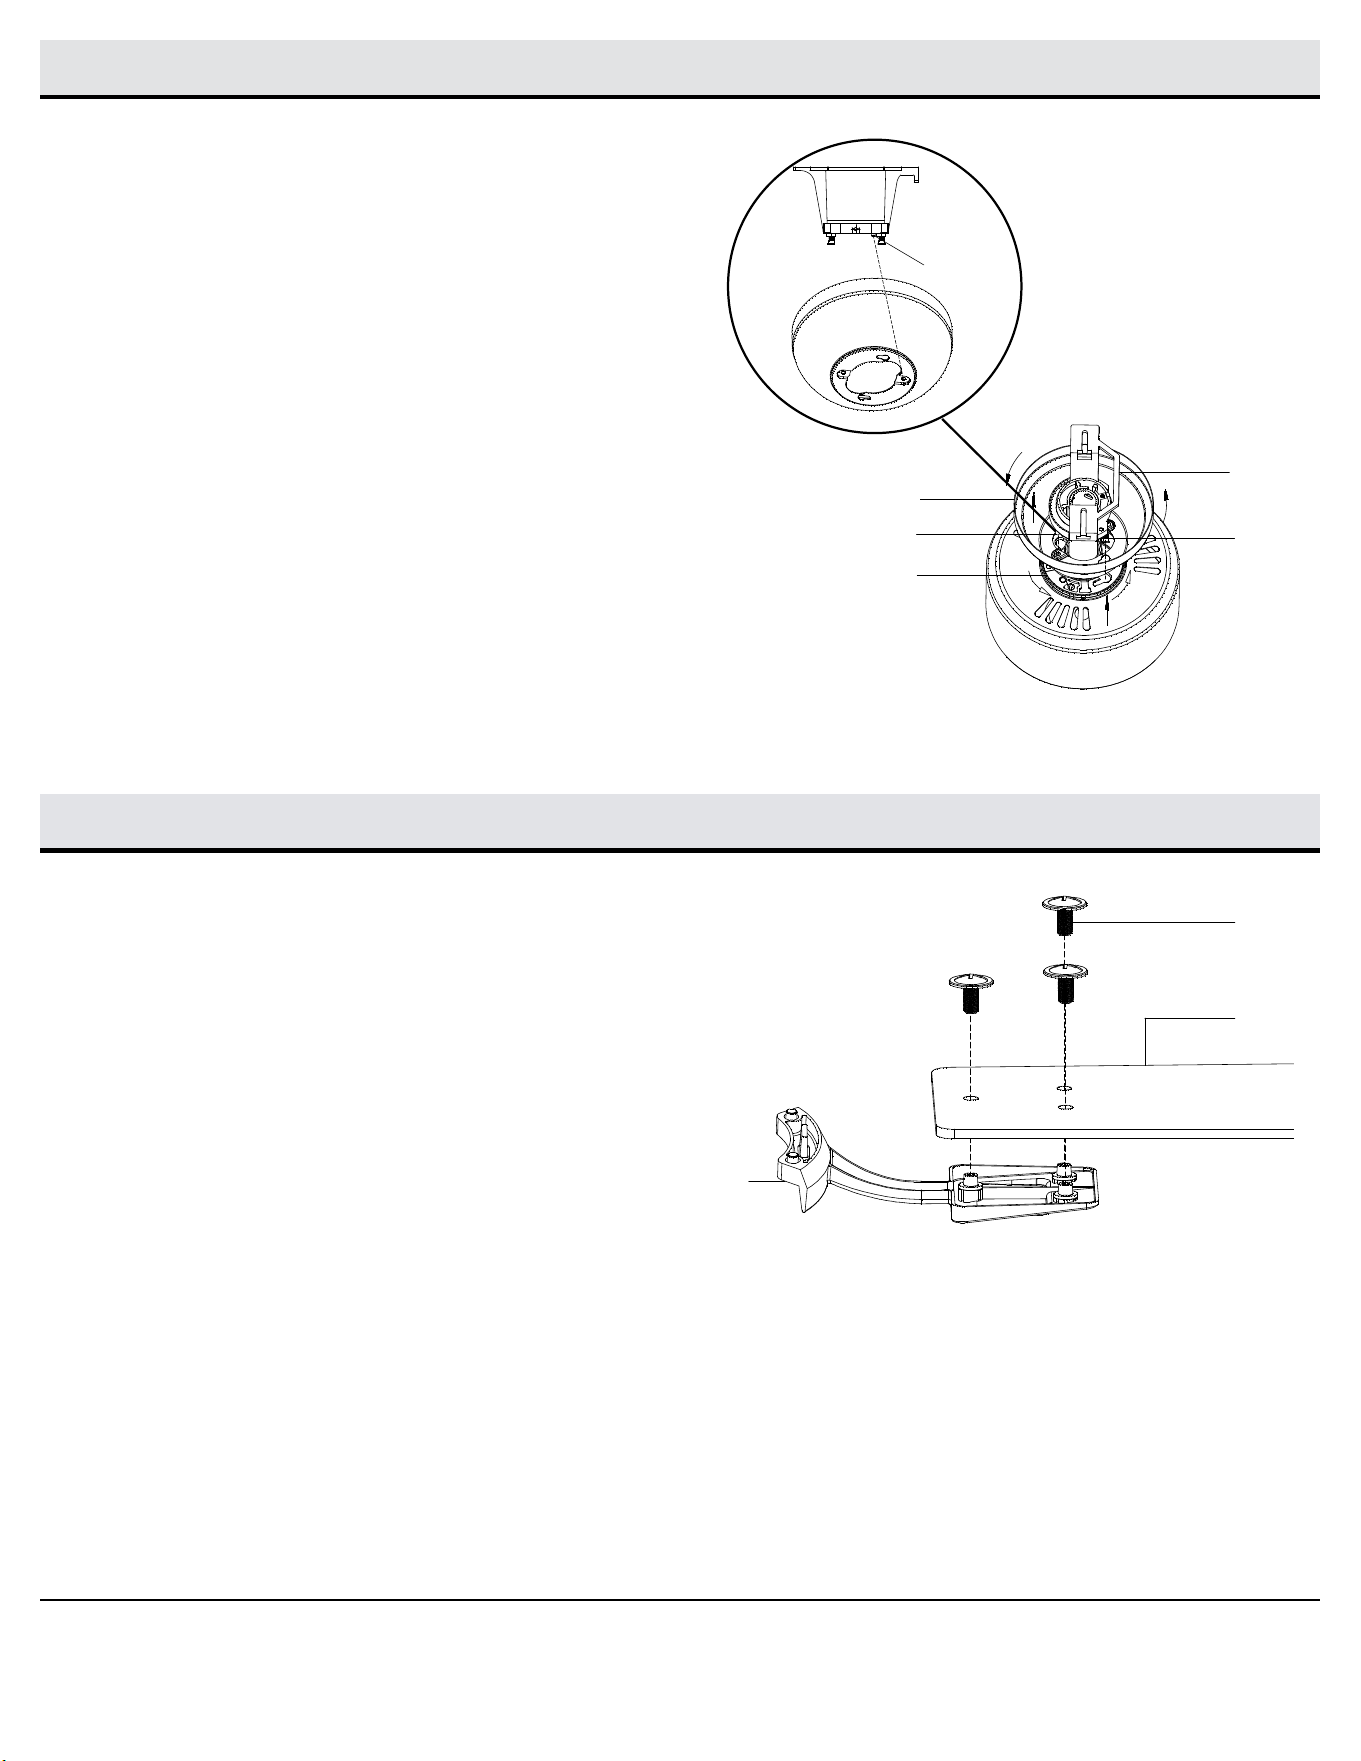
□ Gently wrap the excess wire around the mounting bracket.
□ Secure with electrical tape.
NOTE: Follow this step ONLY if you did not cut the extra length off
from the wires coming from the ceiling fan.
Making the electrical connection
IMPORTANT: Use the wire connecting nuts (AA) supplied with
your fan. Secure the connectors with electrical tape and ensure
there are no loose strands or connections.
□ Connect the fan motor white wires to the household white wire
using a wire connecting nut (AA).
□ Connect the fan motor black and blue wires to the household
black wire using a wire connecting nut (AA).
□ Connect the fan motor green wires to the household green or bare
wire using a wire connecting nut (AA).
□ Secure each wire connecting nut (AA) using electrical tape.
□ Turn the wire connecting nut (AA) upward and push the wiring into
the outlet box (MM).
NOTE: The fan comes with 54 in. lead wires for use with an
extended ball/downrod assembly. If using the 4.5 in. ball/
downrod assembly (D) provided, you can cut the lead wires to
your desired length (no shorter than 12 in.). This will make extra
room in the canopy (B). If you do not wish to cut the wires, you
will need to neatly wrap them.
Outlet box
in the ceiling
(MM)
F
AA (x3)
Black
Black
Blue
Green or Bare
Green
White
10
Assembly - Attaching the Fan Blades
5
Assembly - Hanging the Fan (continued)
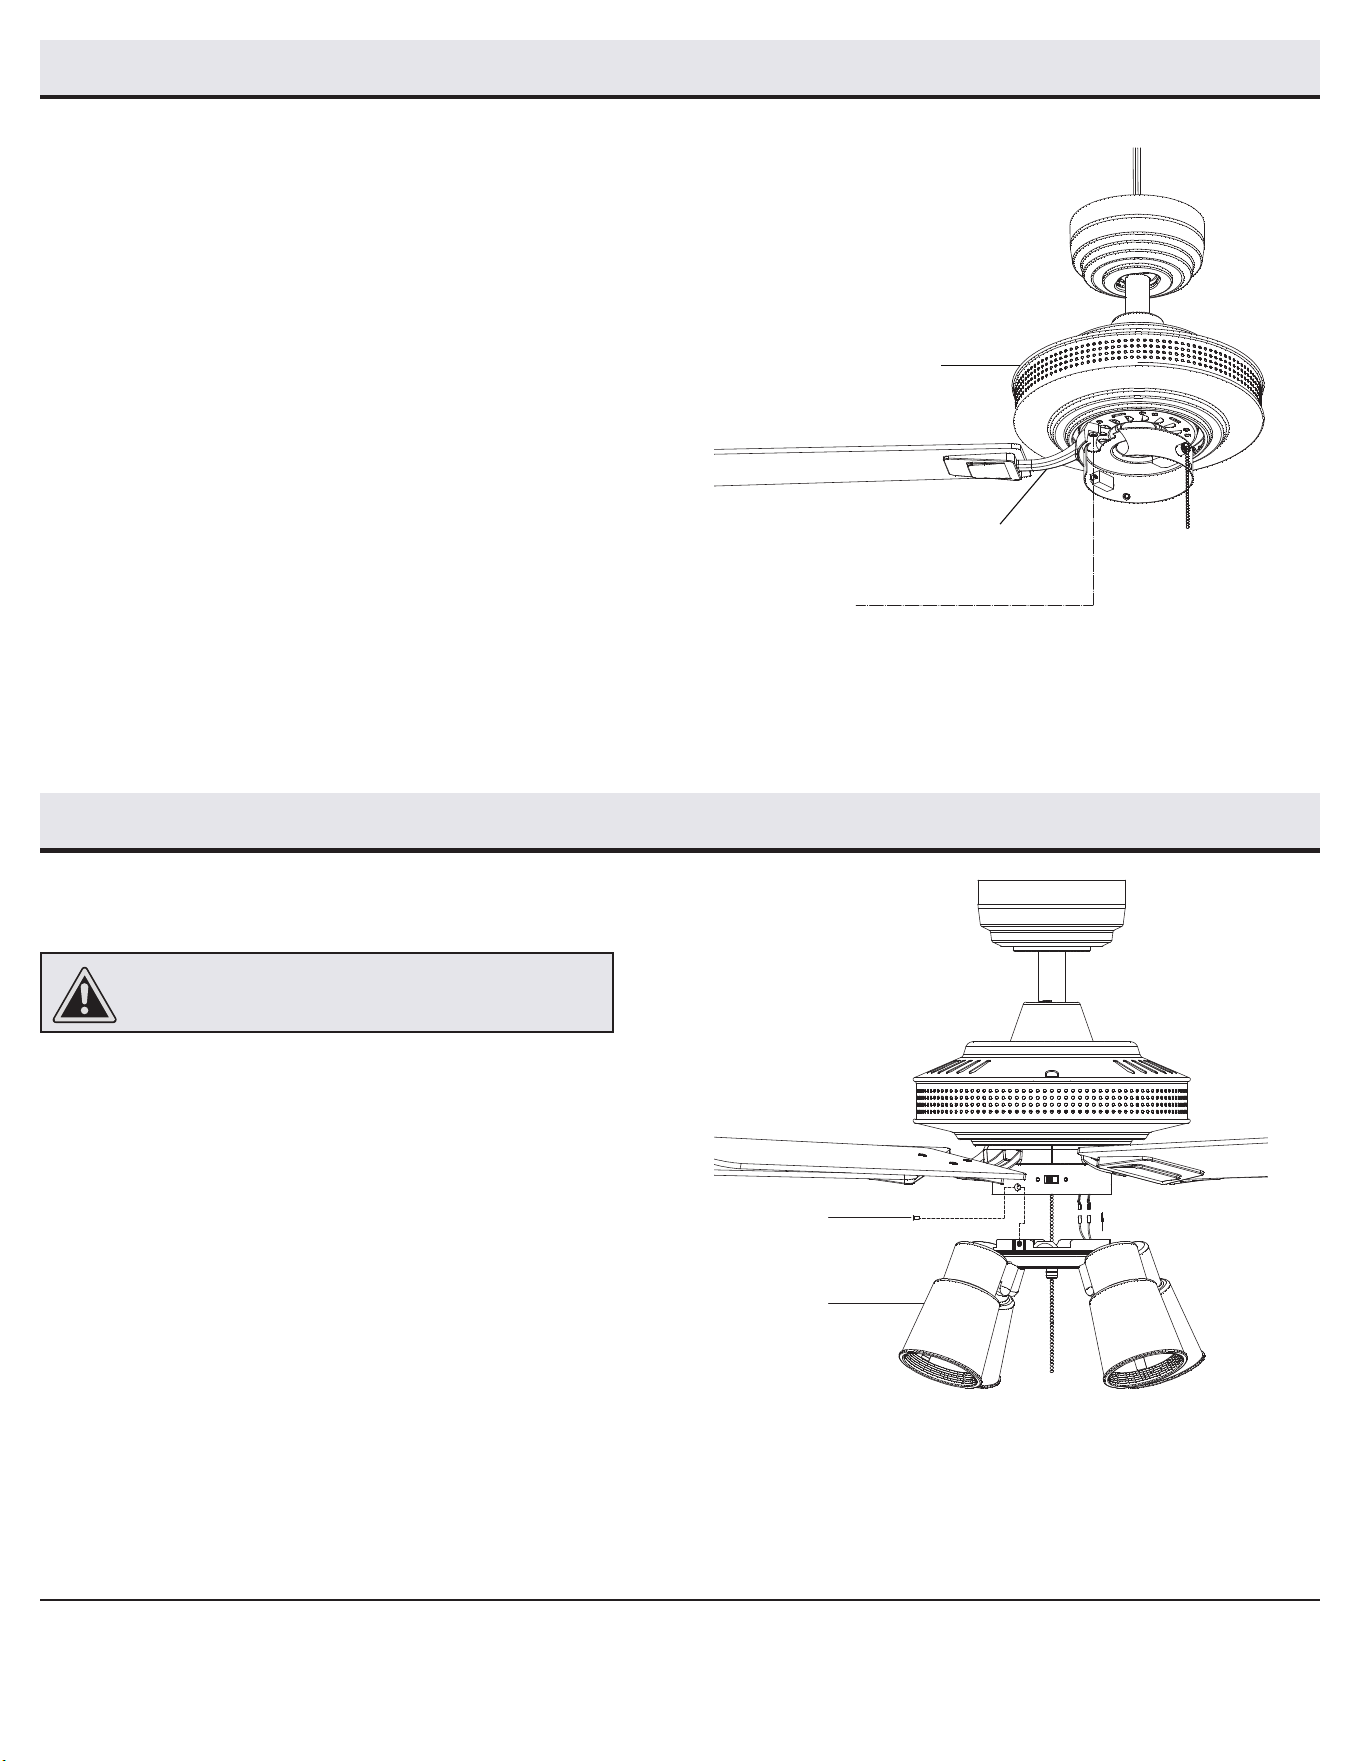
Attaching the canopy
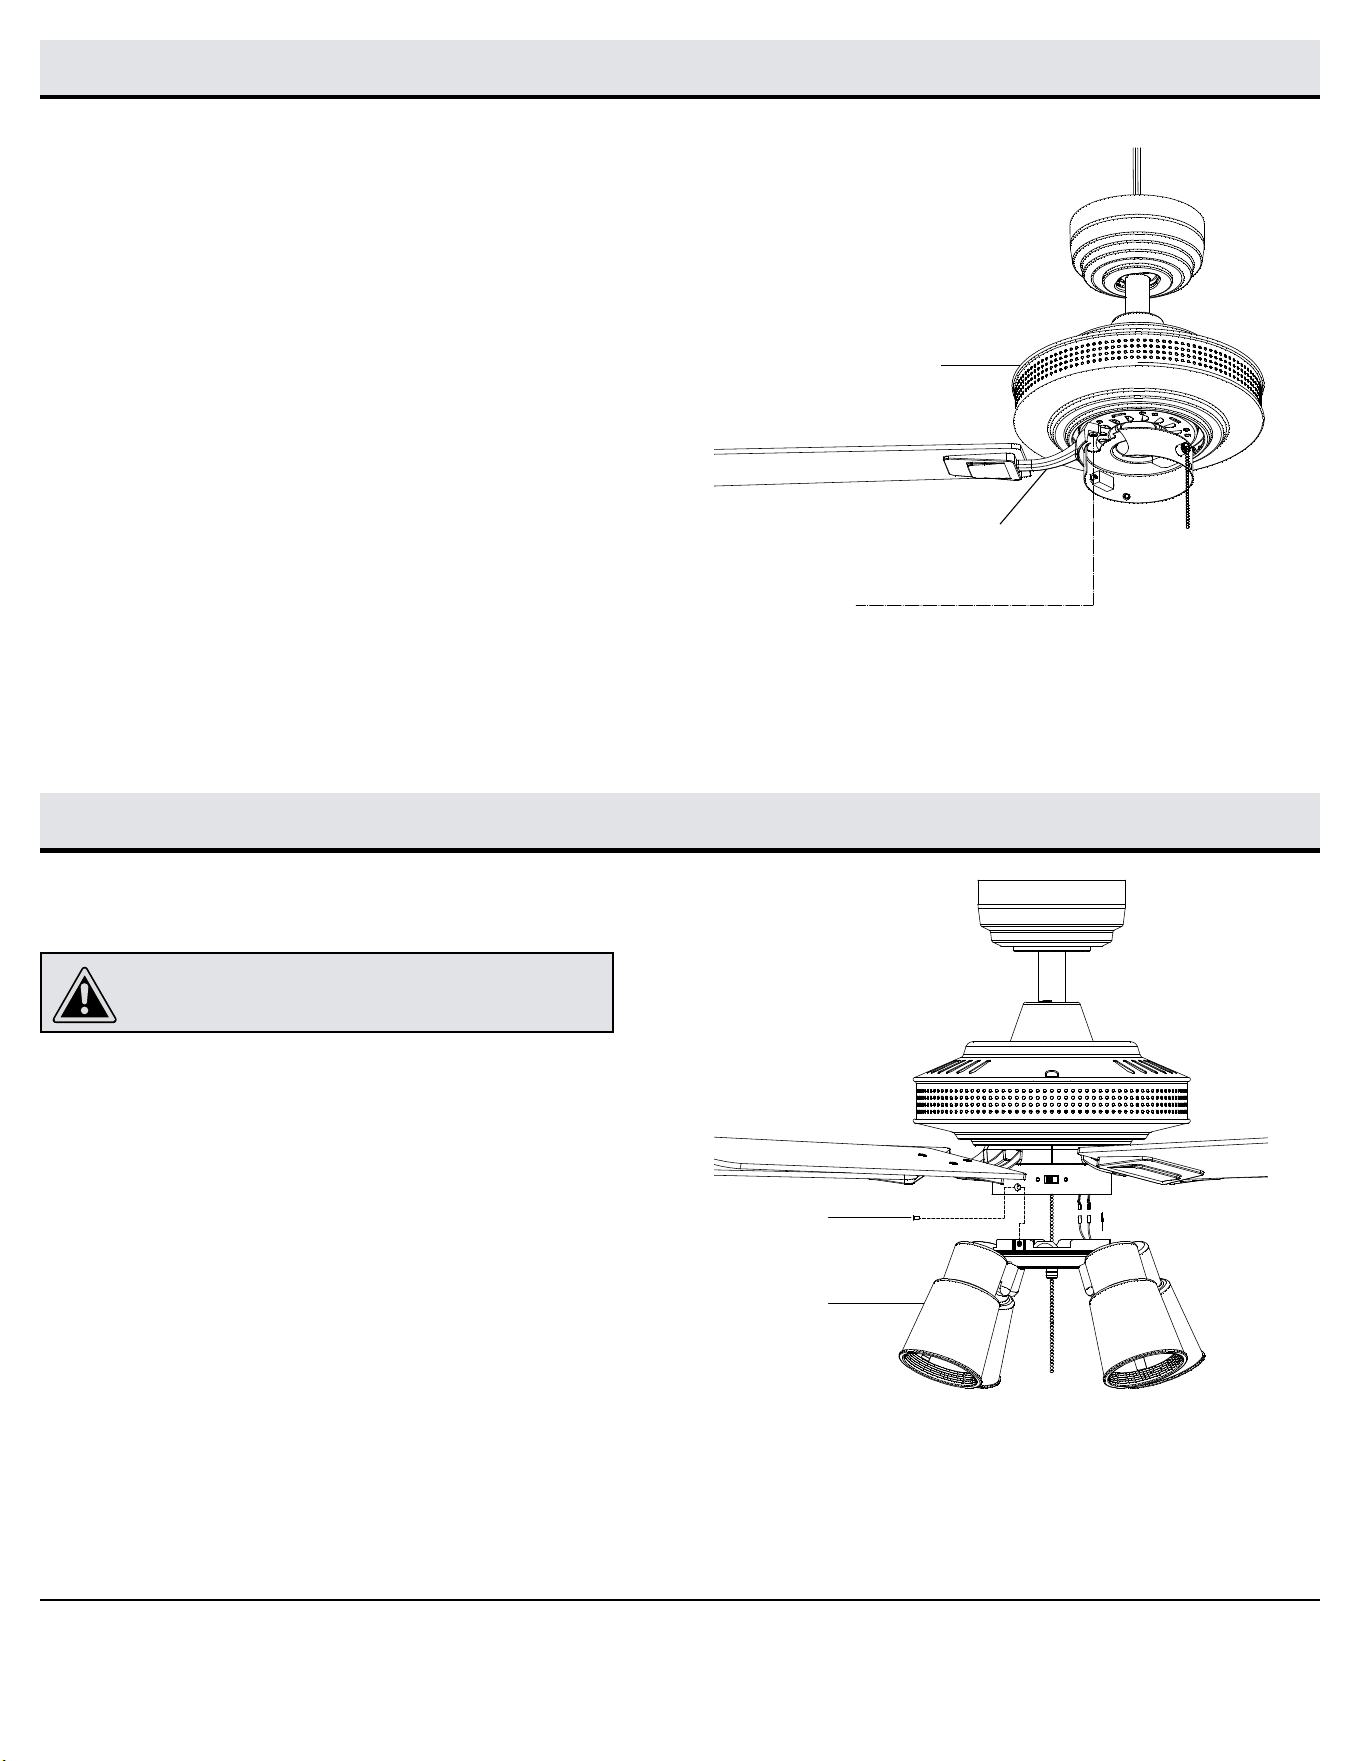
□ Align the locking slots of the canopy (B) with the two screws
(FF) and alignment post (EE) in the mounting bracket (A).
□ Push up the canopy (B) and turn clockwise until the alignment
post (EE) engages to the round hole and the screws (FF)
engage to the key slots.
□ Firmly tighten the two mounting screws (FF).
□ Install the canopy bottom cover (C) by aligning the cover slots
with screws in the bottom of the canopy (B). Rotate the canopy
bottom cover (C) clockwise to lock in place.
EE
EE
FF
A
C
B
1
Attaching the blades to the
blade brackets
□ Attach a blade (J) to the blade bracket (I) by aligning the
holes on the blade (J) and blade bracket (I) and inserting the
screws (BB) into the holes.
□ Tighten each screw to secure the blade (J).
□ Repeat this step for each blade (J) and blade bracket (I).
I
BB
J
11
HOMEDEPOT.COM/HOMEDECORATORS
Please contact 1-800-986-3460 for further assistance.
Assembly - Attaching the Fan Blades
Assembly - Attaching the Light Kit
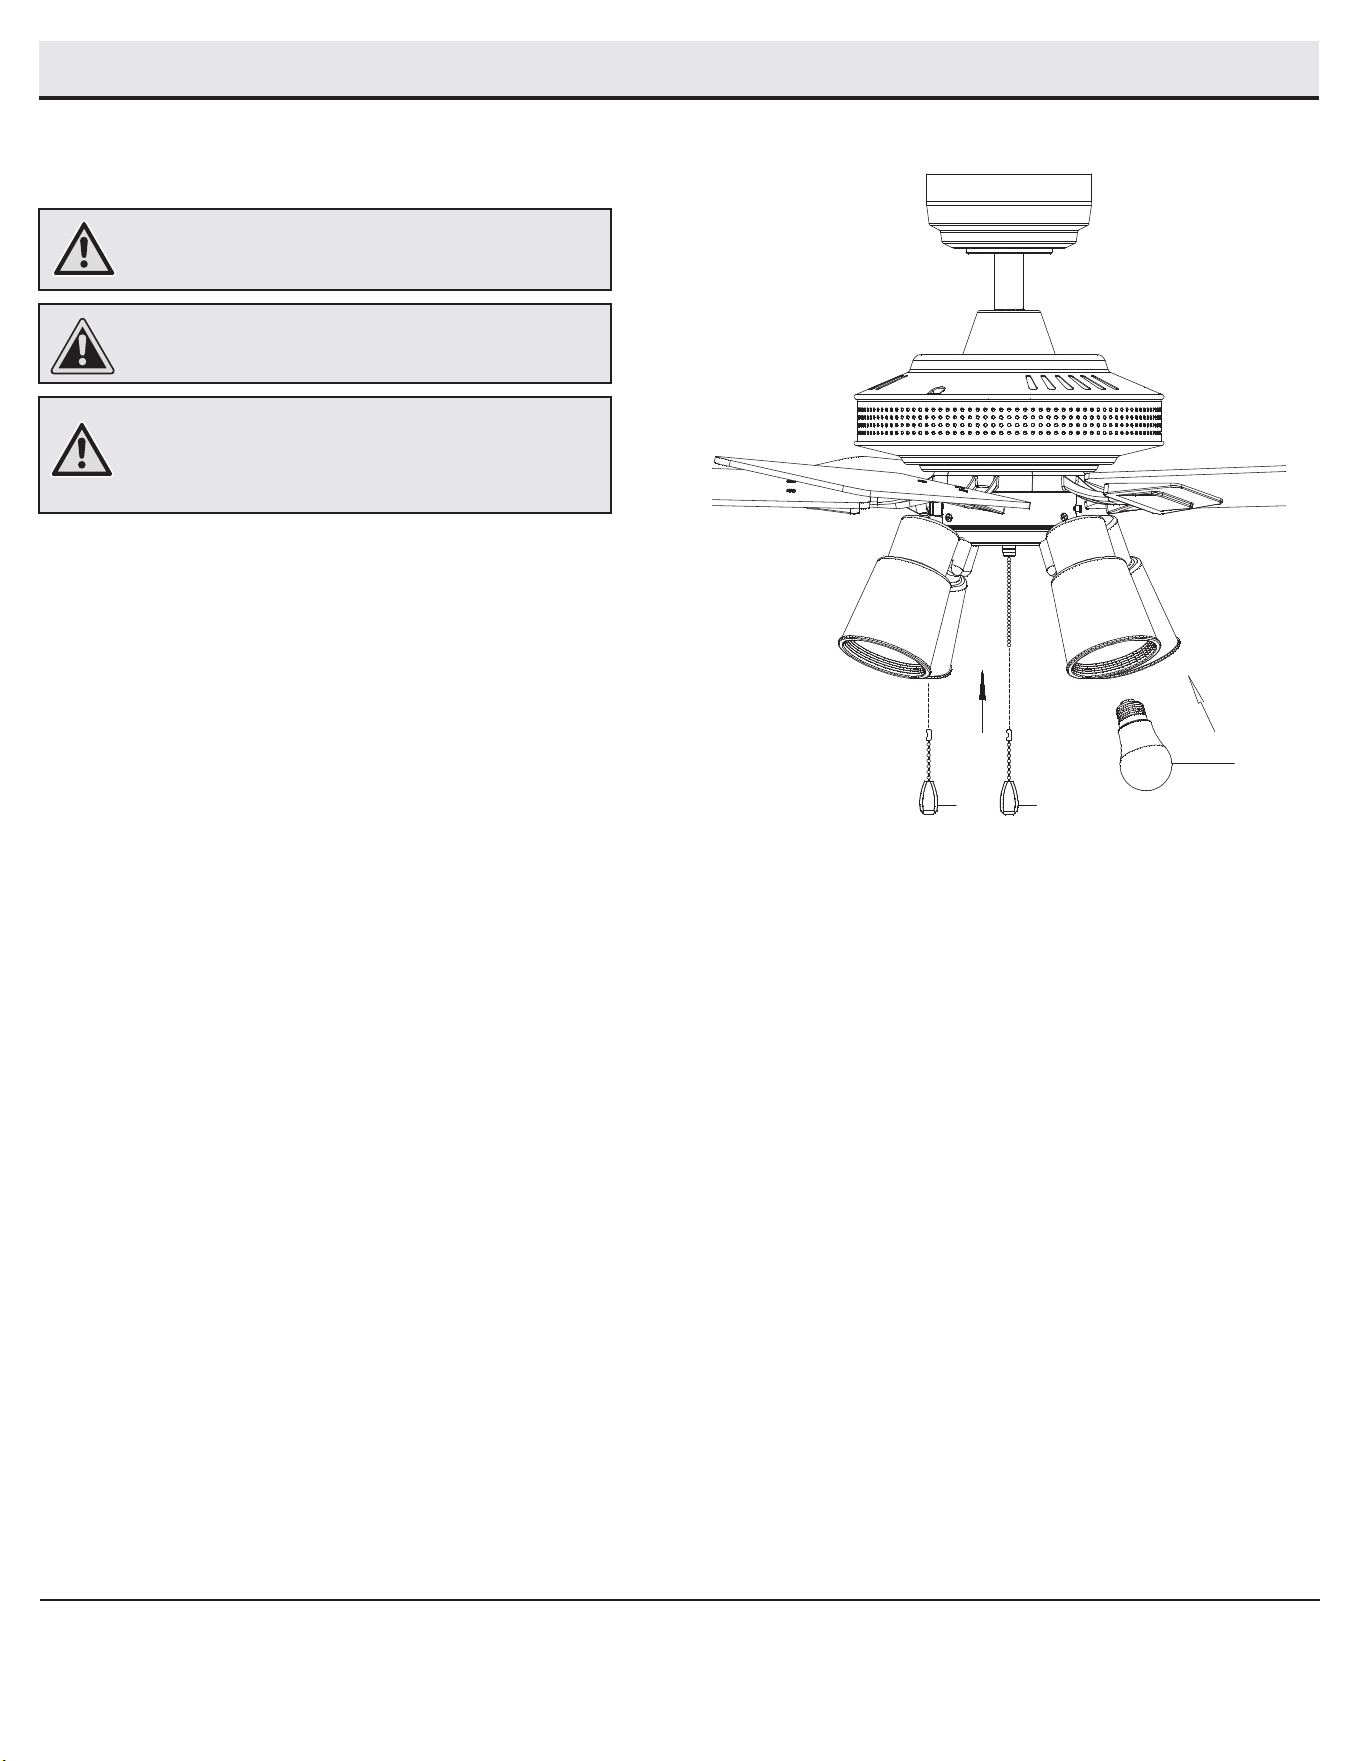
Attaching the light kit
1
□ Remove the three screws (HH) from the light kit tter
assembly (G).
□ Connect the wires exiting the bottom of the motor
assembly (F) by connecting the molded adaptor plugs
together (blue to blue, white to white).
□ Slide the light kit (G) into the fan motor assembly (F), and
secure it using the three screws (HH) that were removed
in the rst step.
CAUTION: To reduce the risk of electric shock, disconnect
the electrical supply circuit to the fan before installing the
light kit.
2
Attaching the blade assemblies
to the motor
□ Insert the pre-assembled screws (GG) on the blade bracket (I)
into the holes on the bottom of the fan motor assembly (F) and
tighten.
□ Repeat this step for the remaining blade assemblies.
GG
I
F
HH
G
12
Assembly - Attaching the Light Kit
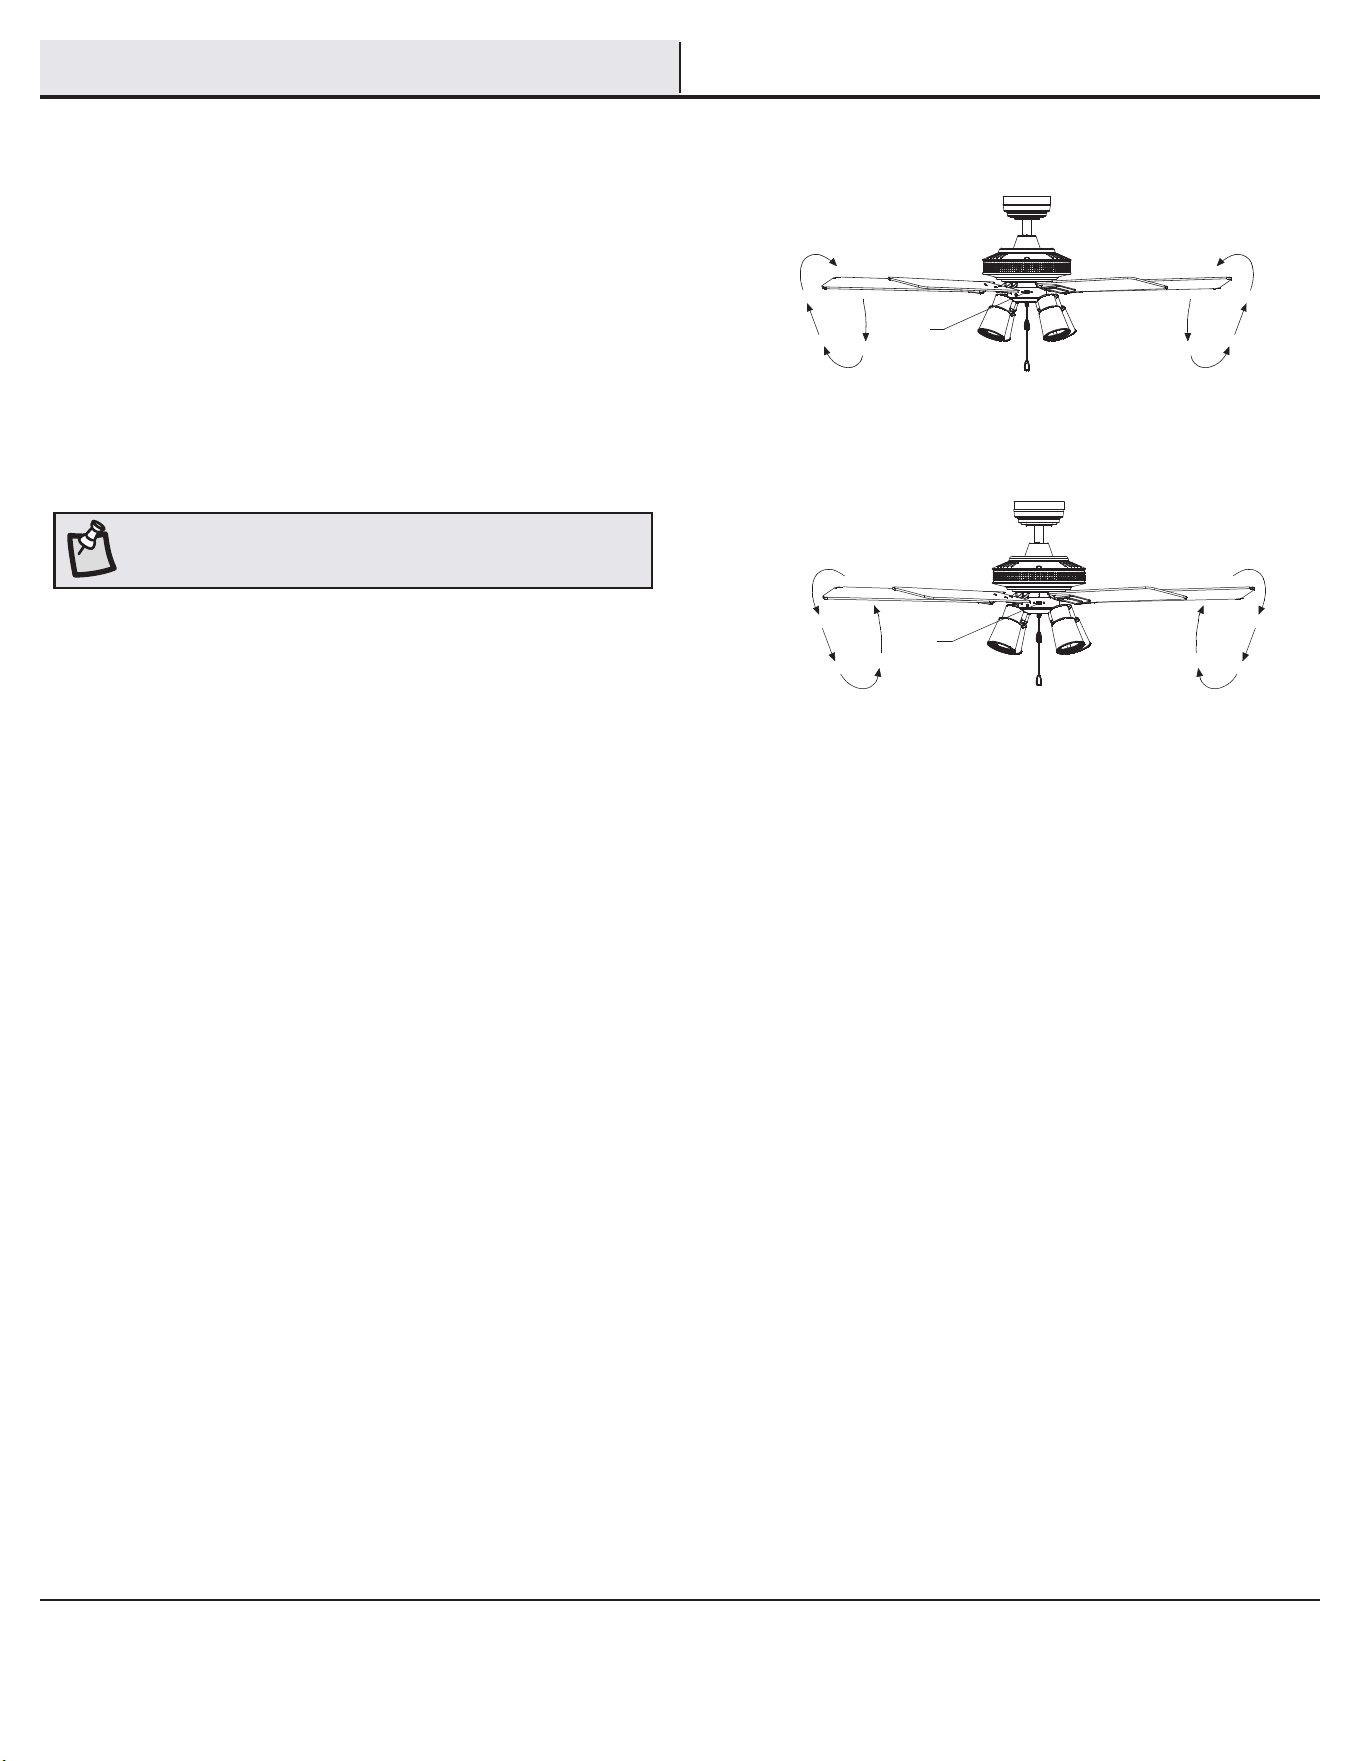
Installing the bulbs
2
□ With power off, install the four bulbs (H) by twisting them
into the light bulb sockets.
□ Attach the pull chain extensions (CC).
CAUTION: Make sure the power is off before attaching or
removing the bulb.
WARNING: Allow the bulb to cool completely before
removing.
CAUTION: Over lamping the fan will result in the fan lights
shutting down until the proper wattage bulbs are installed.
Reset the lights by turning off the power, replacing the bulbs
with the correct wattage bulbs, and turn the power on.
CC
CC
H
13
HOMEDEPOT.COM/HOMEDECORATORS
Please contact 1-800-986-3460 for further assistance.
Operation
Turn on the power and check the operation of the fan. The pull
chain controls the fan speeds as follows:
1 pull - High, 2 pulls - Medium, 3 pulls - Low, 4 pulls - off
The appropriate speed settings for warm or cool weather depends
on factors such as the room size, ceiling height, and number of
fans.
The fan is shipped from the factory with the reversing switch
positioned to circulate air downward. If airow is desired in the
opposite direction, turn your fan off and wait for the blades to stop
turning, then slide the reversing switch (XX) (located in switch cup)
to the opposite position, and turn the fan on again. The fan blades
will turn in the opposite direction and reverse airow.
A. Warm weather - (Forward) A downward airow creates a cooling
effect. This allows you to set your air conditioner on a warmer
setting without affecting your comfort.
B. Cool weather - (Reverse) An upward airow moves warm air off
of the ceiling. This allows you to set your heating unit on a cooler
setting without affecting your comfort.
NOTE: Wait for the fan to stop before reversing the direction of
blade rotation.
A. Warm weather
B. Cool weather
XX
XX
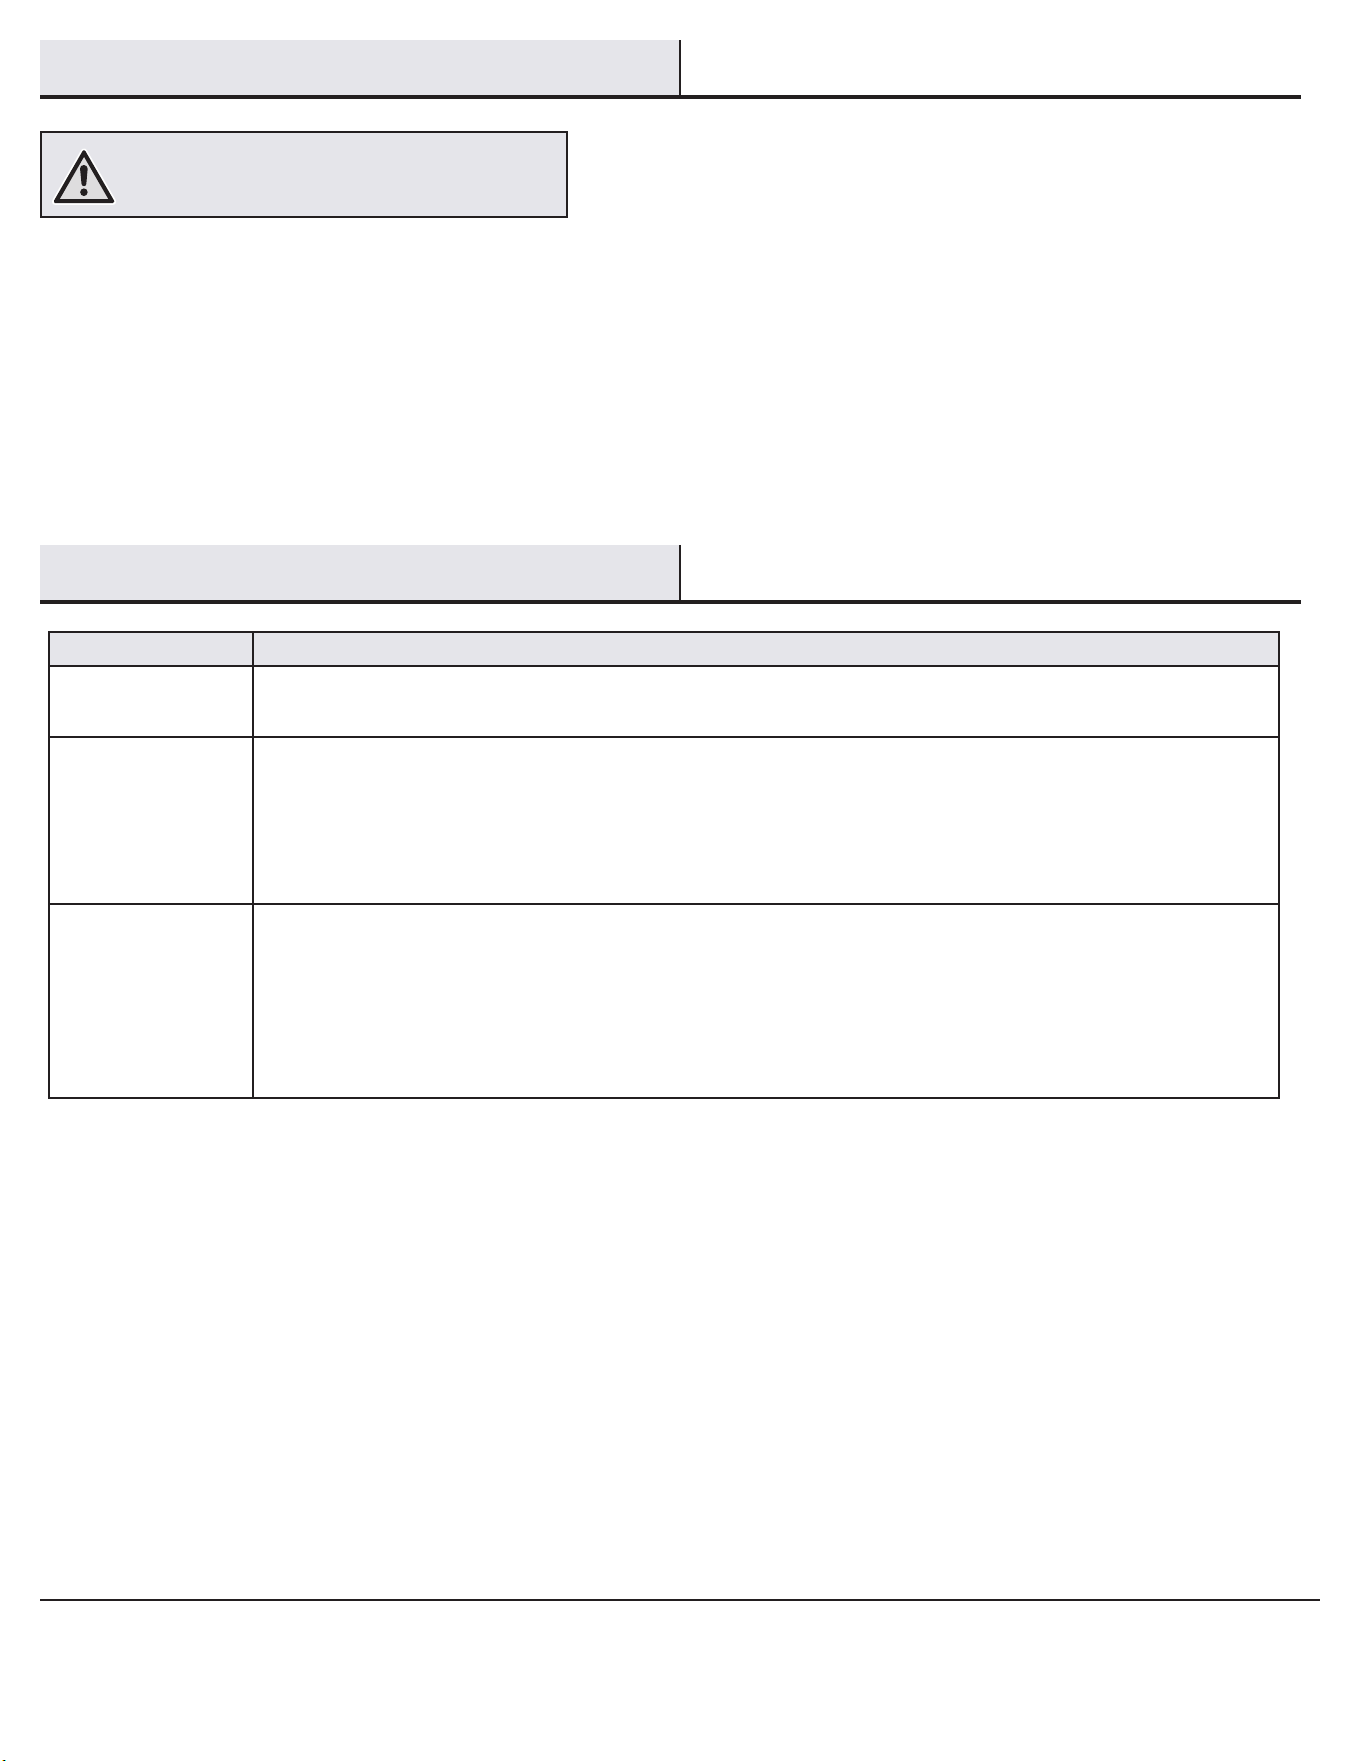
14
Troubleshooting
Problem Solution
The fan will not start. □ Check the main and branch circuit fuses or breakers.
□ Check the line wire connections to the fan and switch wire connections in the switch housing.
The fan is noisy. □ Ensure all motor housing screws are snug.
□ Ensure the screws that attach the fan blade bracket to the motor hub are tight.
□ Ensure the wire nut connections are not rattling against each other or the interior wall of the switch housing.
□ Allow a 24-hour “breaking in” period. Most noises associated with a new fan disappear during this time.
□ Ensure the canopy is a short distance from the ceiling. It should not touch the ceiling.
□ Ensure your outlet box is secure and rubber isolator pads were used between the mounting plate and outlet box.
The fan wobbles. □ Check that all blade and blade arm screws are secure.
□ Most fan wobble problems are caused when blade levels are unequal. Check this level by selecting a point on
the ceiling above the tip of one of the blades. Measure from a point on the center of the blade to the point on the
ceiling. Rotate the fan until the next blade is positioned for measurement, and measure from the same point on
each blade to the ceiling. Repeat for each blade. Any measurement deviation should be within 1/8 in. Run the fan
for ten minutes. If the fan continues to wobble please contact Customer Service and a balancing kit will be sent
to you at no charge.
□ Because of the fan’s natural movement, some connections may become loose. Check the support connections, brackets, and blade
attachments twice a year. Make sure they are secure. It is not necessary to remove the fan from the ceiling.
□ Clean your fan periodically to help maintain its new appearance over the years. Do not use water when cleaning, as this could damage
the motor, or the wood, or possibly cause an electrical shock. Use only a soft brush or lint-free cloth to avoid scratching the nish. The
plating is sealed with a lacquer to minimize discoloration or tarnishing.
□ You can apply a light coat of furniture polish to the wood for additional protection and enhanced beauty. Cover small scratches with a
light application of shoe polish.
□ You do not need to oil your fan. The motor has permanently-lubricated sealed ball bearings.
WARNING: Make sure the power is off before cleaning
your fan.
Care and Cleaning

Questions, problems, missing parts? Before returning to the store,
call Home Decorators Collection Customer Service
8 a.m. - 7 p.m., EST, Monday-Friday, 9 a.m. - 6 p.m., EST, Saturday.
1-800-986-3460
HOMEDEPOT.COM/HOMEDECORATORS
Retain this manual for future use.
¿Preguntas, problemas, piezas faltantes? Antes de devolver a la tienda,
llama al Servicio al Cliente de Home Decorators Collection, de lunes a viernes de 8:00 a.m. a
7:00 p.m. (hora del Este), y los sábados de 9:00 a.m. a 6:00 p.m. (hora del Este).
1-800-986-3460
HOMEDEPOT.COM/HOMEDECORATORS
GRACIAS
Apreciamos la plena conanza depositada en Home Decorators Collection al comprar este ventilador de techo. Nos esforzamos en crear
continuamente productos de calidad diseñados para mejoras del hogar. Visítanos por Internet para ver nuestra línea completa de productos
disponibles a n de satisfacer la necesidades de mejoras de tu hogar. ¡Gracias por elegir Home Decorators Collection!
GUÍA DE USO Y MANTENIMIENTO
VENTILADOR DE TECHO MATTEO DE 52 PLG (1.32 M)
Artículo # 1007 532 491
Modelo Núm. 56044
Modelo Núm. EF200T(C)-52 aprobado por UL
Para ver un video instructivo sobre cómo instalar este producto:
1. Visita www.homedepot.com e ingresa en el campo de búsqueda el número del modelo o artículo
que aparece en la esquina superior derecha de la portada de este manual de instrucciones.
2. Haz clic sobre tu producto en la lista de resultados de la búsqueda y después sobre el enlace de
video en la sección “Product Overview” [Información general del producto].
2
Tabla de contenido .............................................................. 2
Información de seguridad...................................................2
Garantía ................................................................................3
Preinstalación ......................................................................3
Instalación ............................................................................6
Ensamblaje ...........................................................................7
Funcionamiento .................................................................13
Mantenimiento y limpieza .................................................14
Solución de problemas .....................................................14
Información de seguridad
Tabla de contenido
1. Para disminuir el riesgo de descarga eléctrica, asegúrate de
desconectar la electricidad en el cortacircuitos o en la caja de
fusibles antes de comenzar.
2. Todo el cableado tiene que cumplir con el Código Nacional de
Electricidad ANSI/NFPA 70 y con los códigos eléctricos locales. La
instalación eléctrica debe hacerse por un electricista calificado
con licencia.
3. La caja eléctrica y estructura de soporte tienen que montarse de
forma segura para poder sostener con conanza 35 lb (15.9 kg). Usa
solo cajas eléctricas aprobadas por UL y marcadas como “Apropiada
para sostener ventiladores de 35 lb (15.9 kg) o menos”.
4. No uses el interruptor de reversa mientras las aspas del ventilador
estén en movimiento. Tienes que apagar el ventilador y detener las
aspas antes de invertir su dirección de giro.
5. No coloques objetos en la trayectoria de las aspas.
6. Para evitar lesiones personales o daños al ventilador y a otros
objetos, ten cuidado al limpiarlo o al trabajar cerca de él.
7. Los diagramas eléctricos son solo para referencia. Los kits de luces
no empaquetados con el ventilador tienen que estar aprobados
por UL y marcados como apropiados para usar con el modelo
de ventilador que estás instalando. Los interruptores deben ser
interruptores UL de uso general. Para ensamblar bien, consulta las
instrucciones adjuntas a los kits de luces e interruptores.
8. Después de concluir las conexiones eléctricas, debes voltear los
conductores empalmados hacia arriba y meterlos con cuidado en
la caja eléctrica. Los cables deben estar separados, con el cable a
tierra y el conductor a tierra del equipo hacia uno de los lados de
la caja eléctrica y el conductor sin conexión a tierra hacia el lado
opuesto.
9. Antes de la instalación, todos los tornillos de fijación tienen
que comprobarse y reajustarse donde sea necesario.
ADVERTENCIA: Para reducir el riesgo de lesiones personales,
no dobles los soportes de las aspas (también llamados
“bridas”) durante o después de la instalación. No coloques
objetos en la trayectoria de las aspas.
ADVERTENCIA: Para evitar una posible descarga eléctrica,
desconecta la electricidad en la caja principal de fusibles
antes de cablear. Si crees que no tienes suciente
conocimiento o experiencia sobre cableado eléctrico,
contacta a un electricista certicado.
ADVERTENCIA: Los diagramas eléctricos son solo para
referencia. El uso opcional de cualquier kit de luces debe
estar aprobado por UL y estar marcado como adecuado
para ser usado con este ventilador.
PRECAUCIÓN: Para reducir el riesgo de lesiones
personales hay que usar sólo los tornillos incluidos con
la caja eléctrica.
LEE Y GUARDA ESTAS INSTRUCCIONES.
PRECAUCIÓN: Los cambios o modicaciones sin previa
aprobación expresa de la parte responsable de su
cumplimiento podrían anular el derecho del usuario a
operar el equipo.
PRECAUCIÓN: NO usar este ventilador con control de pared
ni con un interruptor de regulador de intensidad luminosa.
Usar un control de pared o un interruptor con regulador de
intensidad luminosa dañará este ventilador.
ADVERTENCIA: Para reducir el riesgo de incendio o
descarga eléctrica, no utilices este ventilador con ningún
otro dispositivo de estado sólido para control de velocidad.
PRECAUCIÓN: El ventilador tiene que montarse con
separación mínima de 7 pies (2.1 m) entre el
borde trasero
de las aspas y el piso.
3
HOMEDEPOT.COM/HOMEDECORATORS
Para asistencia adicional, llama al 1-800-986-3460.
Preinstalación
Garantía
ESPECIFICACIONES
HERRAMIENTAS NECESARIAS
NOTA: Estas medidas son aproximadas. No incluyen el
amperaje ni el vataje consumido por el kit de luces.
Destornillador
Phillips
Destornillador
plano
Llave ajustable
Cinta de
electricista
Pinza
cortacables
Escalera de tijera
Tamaño Velocidad Voltios Amperes Vatios RPM CFM Peso neto Peso bruto Pies
3
1.32 m
(52 plg)
Baja
Media
Alta
120
0.22
0.38
0.54
9.59
28.83
64.14
53
96
139
1549.6
2894.05
4158.91
17.86 lb
(8.1 kg)
23.81 lb
(10.80 kg)
2.27 pies³
El proveedor garantiza de por vida, a partir de la fecha de adquisición por el comprador original, que el motor del ventilador no presenta defectos de
fabricación ni de materiales al momento del envío desde la fábrica. El proveedor también garantiza, por dos años a partir de la fecha de adquisición por el
comprador original, que todas las demás piezas del ventilador, sin incluir las aspas de vidrio o acrílicas, no presentarán ningún defecto de fabricación ni
de material al momento del envío desde la fábrica. Si el producto es devuelto, aceptamos reparar tales defectos sin cargo alguno o, a nuestra discreción,
reemplazarlo por un modelo similar o superior. Para obtener servicio de garantía tiene que presentar una copia del recibo como comprobante de compra.
Todos los costos de retiro y reinstalación del producto correrán por cuenta del cliente. Los daños a cualquier pieza por accidente, instalación o uso
inadecuado, o por montar cualquier accesorio, no están cubiertos por esta garantía. Puesto que las condiciones climáticas pueden variar, esta garantía
no cubre ningún cambio del acabado en latón, como óxido, perforación, corrosión, manchas o descascaramiento. Este tipo de acabados en latón tiene
una vida útil prolongada si se lo protege contra las condiciones climáticas cambiantes. Cierta “oscilación” es normal y no debe considerase un defecto.
Cualquier servicio prestado por personal no autorizado invalidará la garantía. No hay ninguna otra garantía expresa. Por este medio, Home Depot Decorators
Collection se exime de cualquier garantía, incluyendo pero sin limitarse a, aquellas de comercialización e idoneidad para determinado propósito en el
alcance permitido por la ley. La duración de cualquier garantía implícita que no pueda exonerarse se limita al plazo especicado en la garantía explícita.
Algunos estados no permiten limitaciones sobre la duración de las garantías implícitas, así que es posible que la limitación anterior no se aplique en su
caso. El minorista no será responsable por daños incidentales, emergentes ni especiales derivados del uso o funcionamiento del producto, excepto en los
casos en los que la ley así lo disponga. Algunos estados no permiten excluir ni limitar daños directos o indirectos, así que es posible que la limitación o
exclusión anterior no se aplique en este caso. Esta garantía otorga derechos legales especiales al cliente y es posible que también goce de otros derechos
que pueden variar según el estado. Esta garantía sustituye a todas las garantías anteriores. Los costos de envío en cualquier devolución de productos como
parte de una reclamación tienen que ser pagados por el cliente.
Comuníquese con el equipo de servicio al cliente por el 1-800-986-3460 o visite www.HomeDepot.com/homedecorators.
4
Pieza Descripción Cantidad
AA Tuerca para conectar cables 3
BB Tornillos de aspas 15
CC Extensiones de la cadena del interruptor 2
Preinstalación (continuación)
HERRAJES INCLUIDOS
NOTA: Los herrajes no se muestran en
tamaño real.
AA BB
CC
5
HOMEDEPOT.COM/HOMEDECORATORS
Para asistencia adicional, llama al 1-800-986-3460.
Pieza Descripción Cantidad
A
Soporte de montaje deslizante
(dentro de la cubierta)
1
B Cubierta 1
C Tapa del fondo de la cubierta 1
D Conjunto del tubo bajante/esfera 1
E Cubierta del acoplador 1
Pieza Descripción Cantidad
F Conjunto del motor del ventilador 1
G Conjunto de montaje del kit de luces 1
H Bombilla LED 4
I Soporte de aspa 5
J Aspa 5
IMPORTANTE: Este producto o sus componentes están
protegidos por una o más de las siguientes patentes de
los EE. UU.: 5,947,436; 5,988,580; 6,010,110; 6,046,416,
6,210,117, así como otras patentes pendientes.
Preinstalación (continuación)
CONTENIDO DEL PAQUETE
A
B
C
D
E
F
G
H
I
J
6
Instalación
OPCIONES DE MONTAJE
ADVERTENCIA: Para reducir el riesgo de incendio, descarga eléctrica
o lesiones personales, instala solo en una caja eléctrica clasicada
como “apropiada para sostener ventiladores de 35 lb (15.9 kg) o
menos” y usa los tornillos que vienen con ella. Las cajas eléctricas
utilizadas comúnmente para el soporte de lámparas pueden no
servir como soporte de ventilador y tal vez deban reemplazarse. En
caso de duda, consulta a un electricista calicado.
Si tu ventilador de techo no tiene una caja de montaje aprobada por UL,
instálala siguiendo las instrucciones a continuación:
□ Desconecta la electricidad retirando los fusibles o apagando los
cortacircuitos.
□ Asegura la caja eléctrica directamente a la estructura de la edicación.
Usa los sujetadores y materiales apropiados. La caja eléctrica y su
soporte tienen que ser aptos para sostener completamente el peso
en movimiento del ventilador (al menos 35 lb = 15.9 kg). No uses una
caja eléctrica de plástico.
Las ilustraciones a continuación muestran tres formas distintas de montar
la caja eléctrica.
Si la cubierta (B) toca el conjunto del tubo bajante/esfera (D), hay que
retirar la tapa inferior decorativa (C) de la cubierta y girar esta (B) 180º
antes de jarla (B) a la placa de montaje.
Para colgar el ventilador donde ya haya una lámpara pero ninguna viga
de techo, tal vez necesites una barra para instalación colgante como
se muestra arriba (disponible en cualquier tienda de The Home Depot).
NOTA: Tal vez necesites un tubo bajante/esfera más largo para
mantener la altura mínima adecuada de las aspas, al instalar el
ventilador en un techo inclinado. El ángulo máximo permitido es
20º desde la línea horizontal.
Outlet Box
Outlet Box
Recessed
Outlet
Box
Provide Strong
Support
Ceiling
Mounting
Plate
Outlet Box
Hanger Bar
Caja eléctrica
Caja eléctrica
Caja eléctrica
Provee
un soporte fuerte
Placa
de montaje
en techo
Caja
eléctrica
empotrada
Barra para colgar
7
HOMEDEPOT.COM/HOMEDECORATORS
Para asistencia adicional, llama al 1-800-986-3460.
Ensamblaje - Montaje estándar en techo
Cómo ensamblar el ventilador
3
□ Gira a la izquierda el tornillo de jación (RR) para quitarlo.
□ Instala el conjunto tubo bajante/esfera (D) insertándolo en el collarín
del motor (TT) y girándolo hacia la derecha hasta quedar apretado.
□ Vuelva a instalar el tornillo de jación (RR) girándolo hacia la
derecha hasta que quede apretado.
NOTA: Este ventilador está equipado con una pestaña de
seguridad (SS). Si el tornillo de jación (RR) se aoja mientras el
ventilador está funcionando en reversa, la pestaña de seguridad
(SS) se enganchará y evitará que el ventilador se caiga.
PRECAUCIÓN: Para asegurarte de que no haya oscilación y evitar
dañar el ventilador, el conjunto de tubo bajante/esfera (D) y el
tornillo del jación (RR) tienen que estar completamente ajustados.
Cómo tender los cablesPreparación para el montaje
□ Inserta los cables que salen por la parte superior del conjunto
del motor del ventilador (F) a través del centro de la cubierta
del acoplador (E) y de la tapa inferior de la cubierta (C).
□ Asegura que la abertura de la cubierta (B) esté sobre la parte
superior e inserta el tubo bajante/esfera (D) a través de la
cubierta (B).
□ Pasa los cables que salen por la parte superior del conjunto
del motor del ventilador (F) a través del tubo bajante/esfera
(D), como se muestra.
21
□ Retira la tapa inferior (C) de la cubierta (B) girándola hacia la
izquierda hasta liberarla.
□ Aoja los dos tornillos de la cubierta (FF) ubicados en la parte
inferior del soporte de montaje (A).
□ Gira la cubierta (B) hacia la izquierda para retirar el soporte de
montaje (A) de la cubierta (B).
A
FF
B
C
D
B
C
E
F
RR
TT
SS
D
B
C
E
F
8
Ensamblaje - Cómo colgar el ventilador
Cómo jar el ventilador
a la caja eléctrica
Cómo colgar el ventilador
□ Pasa los cables de suministro de 120 V a través del oricio
central en el soporte de montaje (A).
□ Instala el soporte de montaje de techo sobre la caja eléctrica
deslizando el soporte de montaje (A) sobre los dos tornillos (II)
suministrados con la cajaeléctrica. Si es necesario, usa arandelas
niveladoras (no incluidas) entre el soporte de montaje (A) y la caja
eléctrica. Fíjate que el lado plano del soporte de montaje (A) esté
hacia la caja eléctrica.
□ Aprieta rmemente los dos tornillos de montaje (II).
1
2
ADVERTENCIA: Para reducir el riesgo de incendio, descarga eléctrica o
lesiones personales, instala solo en una caja eléctrica clasicada como
“apropiada para sostener ventiladores de 35 lb (15.9 kg) o menos” y usa
los tornillos que vienen con ella.
□ Levanta con cuidado el conjunto del motor del ventilador (F)
hasta el soporte deslizante de montaje (A).
□ Coloca la esfera del soporte del conjunto del tubo bajante/
esfera (D) en la base del soporte de montaje deslizante (A).
Asegúrate de que la pestaña en la base del soporte de
montaje deslizante (A) encaje bien dentro de la ranura de la
esfera de soporte.
ADVERTENCIA: Cuando uses el conjunto del tubo bajante/esfera
estándar, la pestaña en el aro en la parte inferior del soporte de
montaje debe encajar en la ranura de la bola de soporte. Si la
pestaña no queda bien asentada en la ranura, el ventilador pudiera
afrontar problemas de bamboleo y dañarse el cableado.
II
II
A
A
D
B
C
E
F
9
HOMEDEPOT.COM/HOMEDECORATORS
Para asistencia adicional, llama al 1-800-986-3460.
Ensamblaje - Cómo colgar el ventilador (continuación)
3
4
Cómo enrollar el cable sobrante
□ Con cuidado, enrolla el exceso de cable alrededor del soporte
de montaje.
□ Asegúralo con cinta de electricista.
NOTA: Siga este paso SOLO si no cortó el cable sobrante del
ventilador de techo.
Cómo hacer las conexiones eléctricas
IMPORTANTE: Usa las tuercas de conexión de cables (AA) incluidas con tu
ventilador. Sujeta los conectores con cinta de electricista y asegúrate de
que no haya conexiones ni cables sueltos.
□ Conecta los cables blancos del motor del ventilador al cable blanco
del hogar usando una tuerca de conexión de cables (AA).
□ Conecta los cables negro y azul del motor del ventilador al cable
negro del hogar usando una tuerca de conexión de cables (AA).
□ Conecta los cables verdes del motor del ventilador al cable verde
o pelado del hogar usando una tuerca de conexión de cables (AA).
□ Asegura cada tuerca de conexión de cables (AA) con cinta de
electricista.
□ Gira la tuerca de conexión de cables (AA) hacia arriba y coloca el
cableado dentro de la caja eléctrica (MM).
NOTA: El ventilador viene con cables terminales de 54 plg (137 cm)
para usar con un conjunto extendido de tubo bajante/esfera. Si usas
el conjunto extendido de tubo bajante/esfera (D) de 4.5 plg (11.4 cm)
incluido, puedes recortar los cables terminales al largo deseado (no
menos de 12 plg (30.5 cm)). Esto dejará más espacio en la cubierta (B).
Si no quieres cortar los cables, deberás enrollarlos cuidadosamente.
Outlet box
in the ceiling
(MM)
F
AA (x3)
Black
Black
Blue
Green or Bare
Green
White
Caja
eléctrica
en techo (MM)
Verde o pelado
Verde
Blanco
Negro
Negro
Azul
10
Ensamblaje - Cómo jar las aspas del ventilador
5
Ensamblaje - Cómo colgar el ventilador (continuación)
Cómo montar la cubierta
□ Alinea las ranuras de cierre de la cubierta (B) con los dos tornillos (FF)
y el poste de alineación (EE) del soporte de montaje (A).
□ Empuja hacia arriba la cubierta (B) y gírala hacia la derecha hasta
que el poste de alineación (EE) se enganche en el oricio redondo y
los tornillos (FF) en las ranuras tipo ojo de cerradura.
□ Aprieta rmemente los dos tornillos de montaje (FF).
□ Instala la tapa inferior decorativa (C) alineando sus ranuras con los
tornillos en la parte inferior de la cubierta (B). Gira la tapa inferior
de la cubierta (C) hacia la derecha para jarla en su lugar.
EE
EE
FF
A
C
B
1
Cómo jar las aspas a los soportes de las aspas
□ Fija un aspa (J) al soporte del aspa (I) alineando los agujeros en
el aspa (J) y el soporte del aspa (I) e insertando los tornillos (BB)
en los agujeros.
□ Aprieta cada tornillo para asegurar el aspa (J).
□ Repite este paso para cada aspa (J) y soporte (I).
I
BB
J
11
HOMEDEPOT.COM/HOMEDECORATORS
Para asistencia adicional, llama al 1-800-986-3460.
Ensamblaje - Cómo jar las aspas del ventilador
Ensamblaje - Cómo instalar el kit de luces
Cómo instalar el kit de luces
1
□ Quita los tres tornillos (HH) del conjunto del soporte del kit de
luces (G).
□ Conecta los cables que salen de la parte inferior del conjunto del
motor (F), uniendo los enchufes con adaptadores moldeados (azul
con azul, blanco con blanco).
□ Desliza el conjunto del kit de luces (G) dentro del conjunto del
motor del ventilador (F) y asegúralo con los tres tornillos (HH) que
se quitaron en el primer paso.
PRECAUCIÓN: Para disminuir el riesgo de descarga eléctrica,
desconecta el circuito de energía del ventilador antes de instalar
el kit de luces.
2
Cómo conectar los ensamblajes
de las aspas al motor
□ Inserta los tornillos preensamblados (GG) en el soporte del aspa (I)
en los oricios en la parte inferior del conjunto del motor del
ventilador (F) y apriétalos.
□ Repite este paso para ensamblar las aspas restantes.
GG
I
F
HH
G
12
Ensamblaje - Cómo instalar el kit de luces
Cómo instalar las bombillas
2
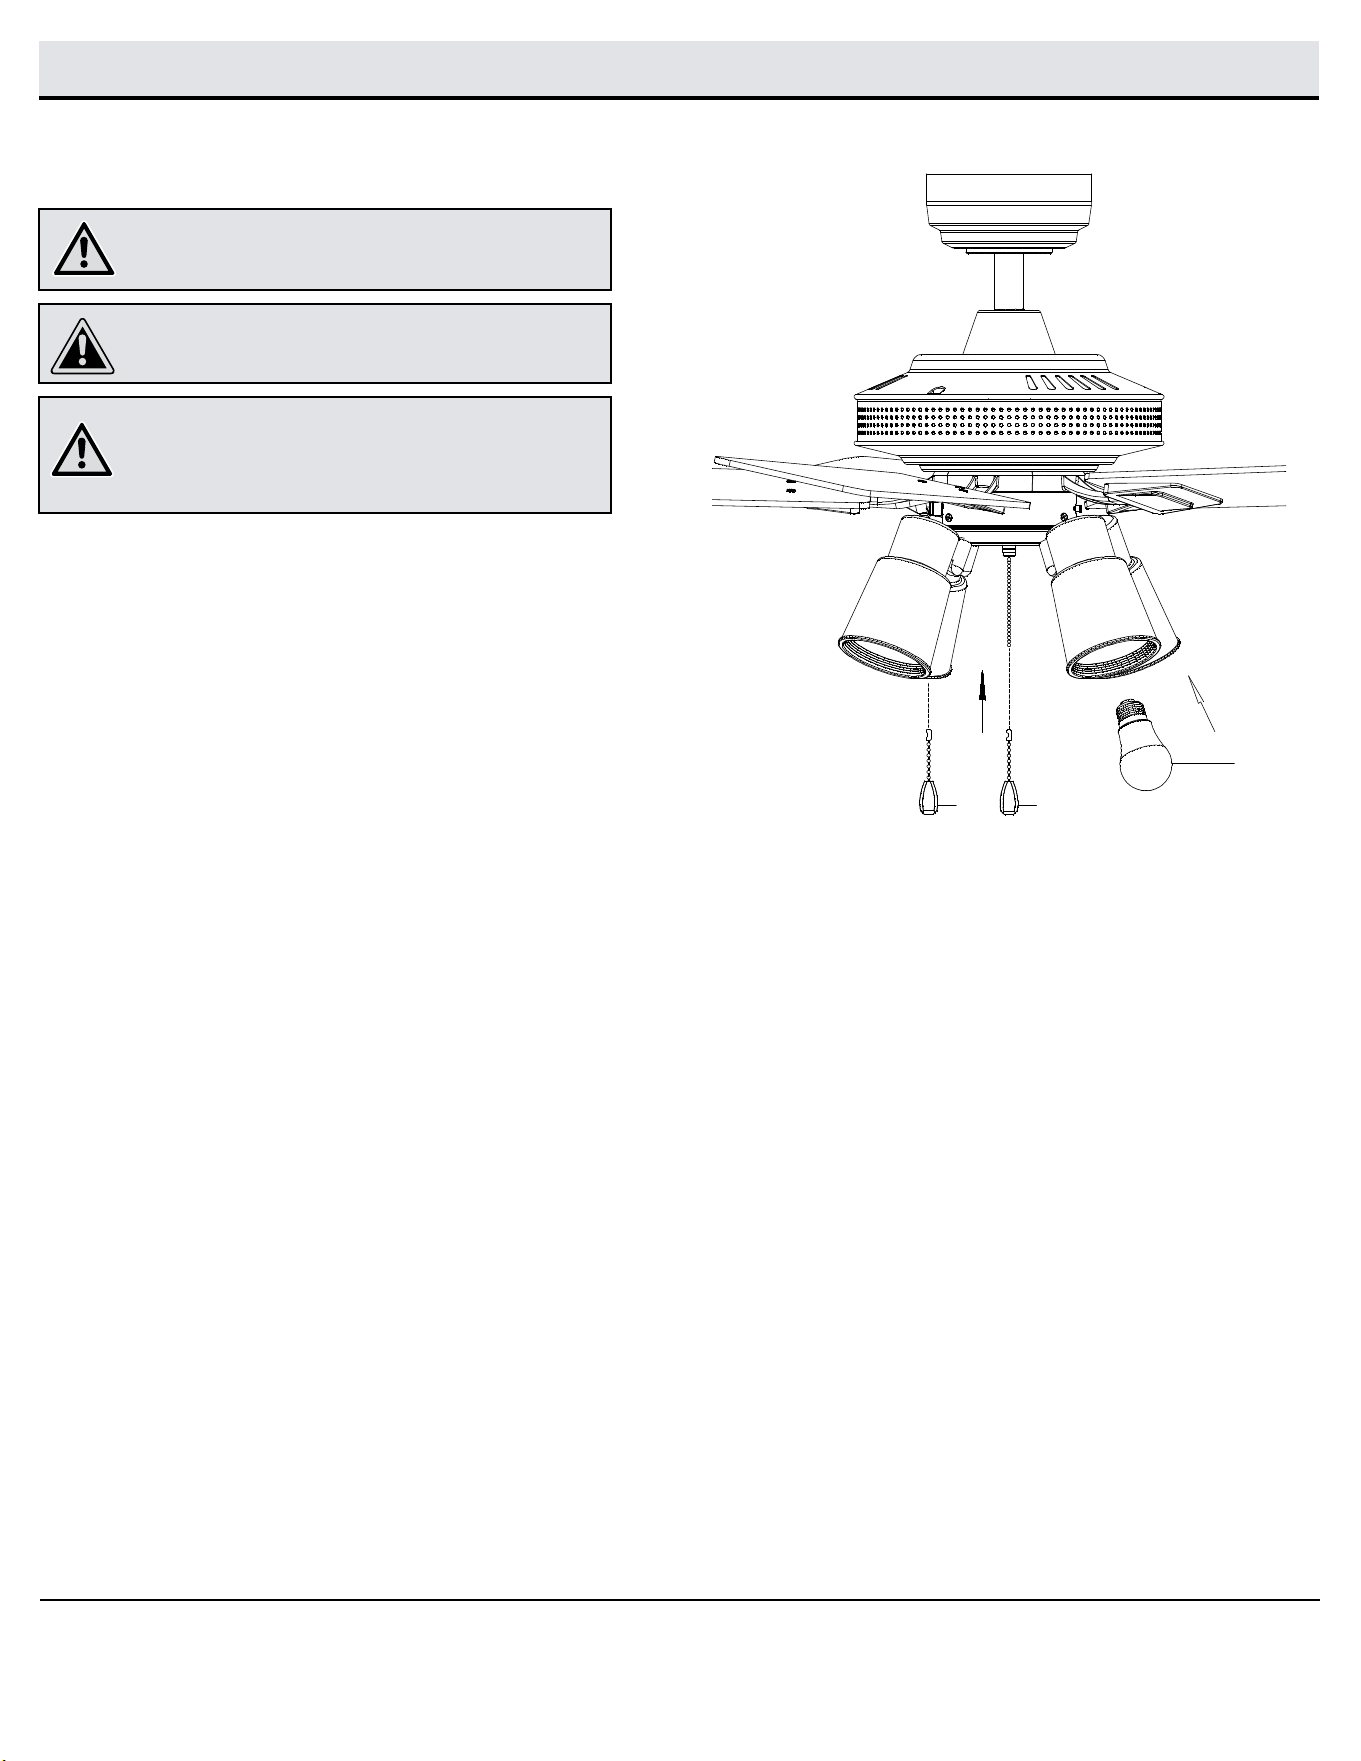
□ Con la electricidad desconectada, instala las cuatro bombillas
(H) enroscándolas en los portabombillas.
□ Instala las extensiones de cadena del interruptor (CC).
PRECAUCIÓN: Asegúrate de que la electricidad esté desconectada
antes de montar o retirar la bombilla.
ADVERTENCIA: Espera a que las bombillas se enfríen
completamente antes de removerlas.
PRECAUCIÓN: Colocar bombillas de vataje incorrecto hará que las
luces del ventilador se apaguen hasta que se instale las bombillas
adecuadas. Para cambiar las luces, apaga la electricidad, reemplaza
las bombillas por otras del vataje correcto y vuelve a conectar la
electricidad.
CC
CC
H
13
HOMEDEPOT.COM/HOMEDECORATORS
Para asistencia adicional, llama al 1-800-986-3460.
Funcionamiento
Conecta la electricidad y comprueba el funcionamiento del ventilador.
El interruptor de cadena controla las velocidades del ventilador de la
siguiente manera:
Al halar 1 vez: alta; 2 veces: media; 3 veces: baja; y 4 veces: apagado
Las conguraciones de velocidad apropiadas para clima cálido o frío
dependen de factores como tamaño de la habitación, altura del techo y
cantidad de ventiladores.
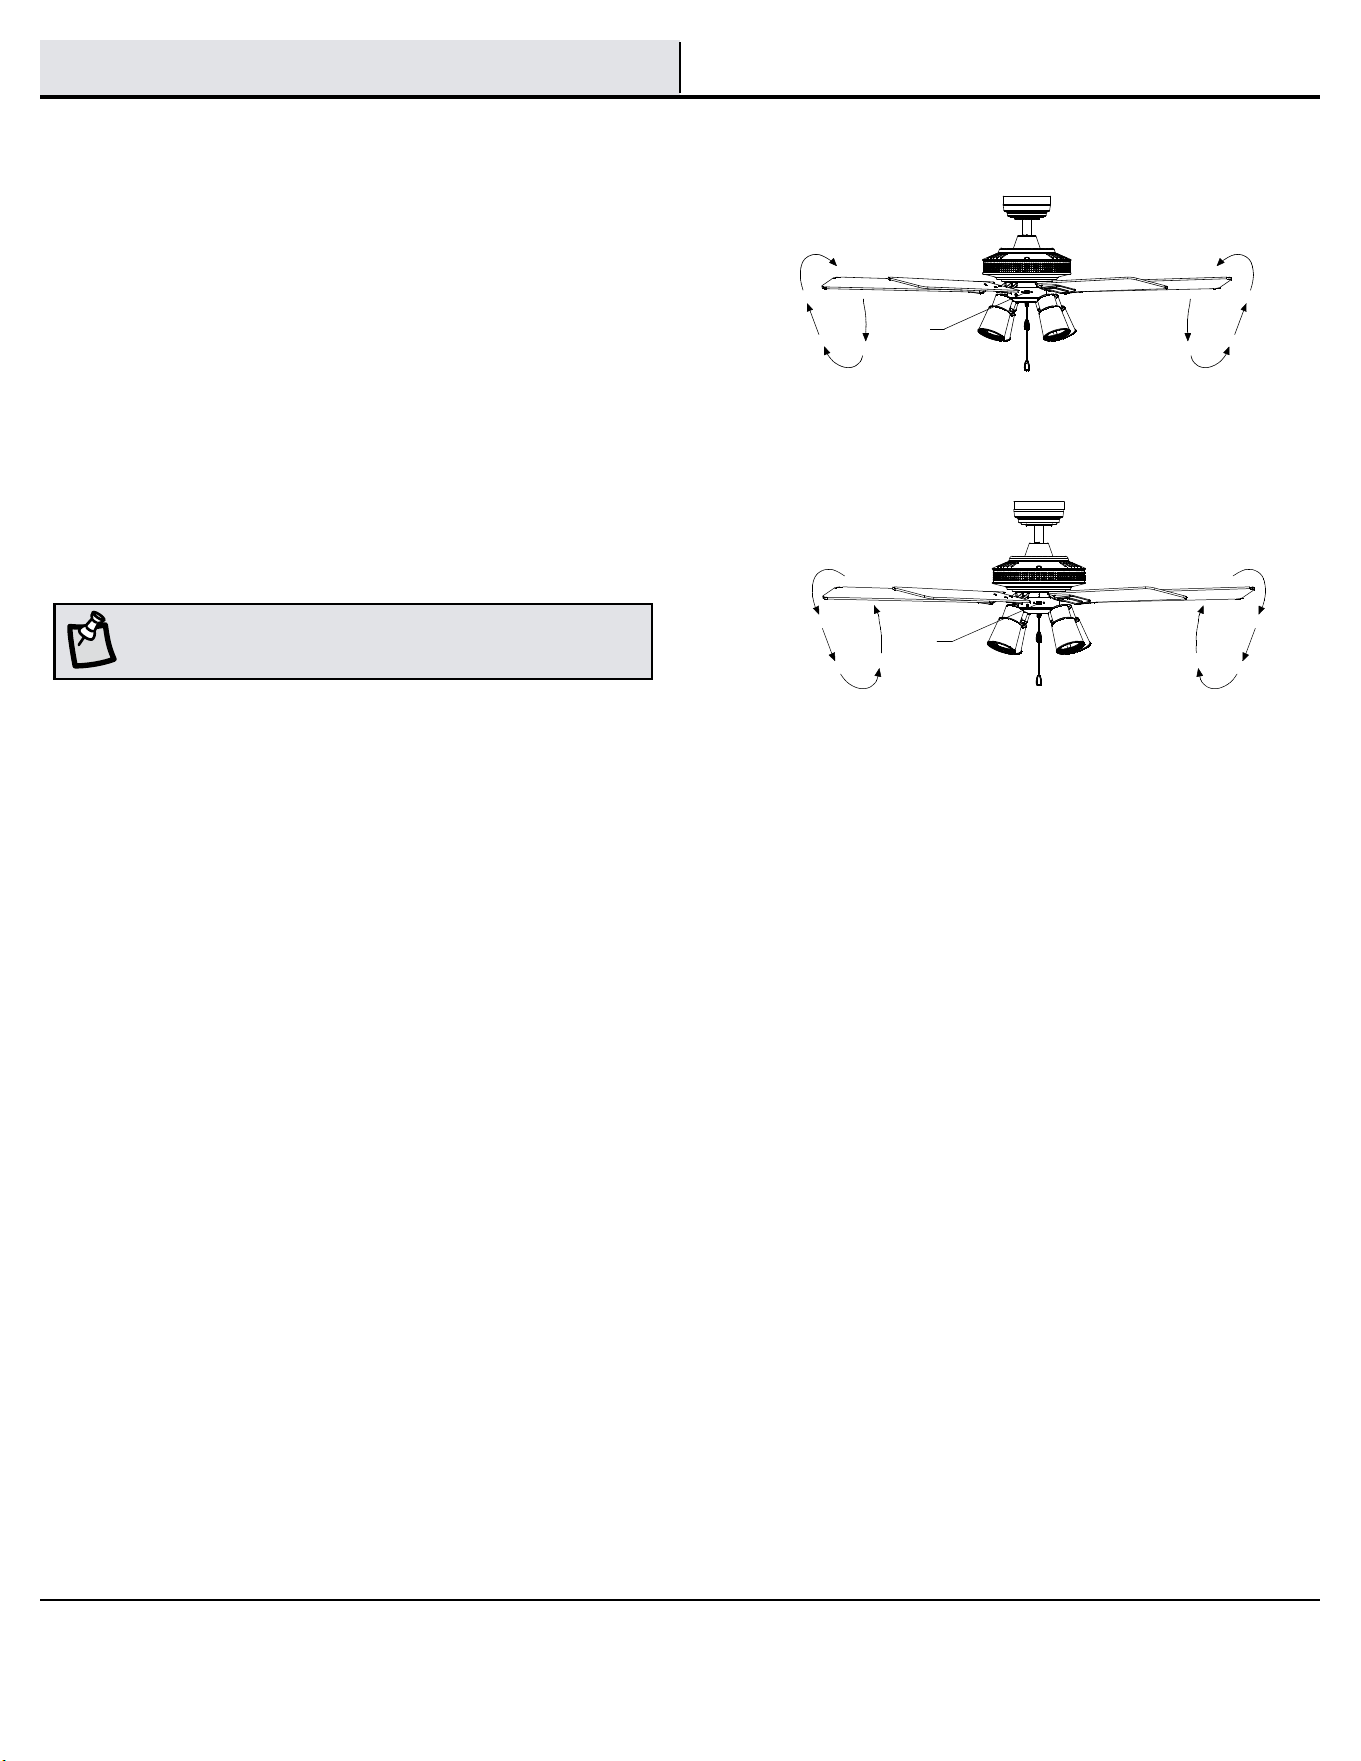
El ventilador se envía desde la fábrica con el interruptor de reversa
colocado para hacer circular el aire hacia abajo. Si deseas dirigir la
corriente de aire en la dirección contraria, apaga el ventilador y espera
que las aspas se detengan; seguidamente desliza el interruptor de
reversa (XX) (ubicado en la caja del interruptor) hacia la dirección
opuesta y vuelve a encender el ventilador. Las aspas del ventilador
girarán en sentido contrario e invertirán la corriente de aire.
A. Clima cálido - (Hacia adelante) Un ujo de aire descendente surte
un efecto refrescante. Esto te permite congurar tu equipo de aire
acondicionado a una temperatura más alta sin afectar tu comodidad.
B. Clima frío - (Reversa) Un ujo de aire hacia arriba desplaza el aire
cálido lejos del cielo raso. Esto te permite congurar la unidad de
calefacción a una temperatura más baja sin afectar tu comodidad.
NOTA: Espera a que se detenga el ventilador antes de invertir la
dirección de giro de las aspas.
A. Clima cálido
B. Clima frío
XX
XX
14
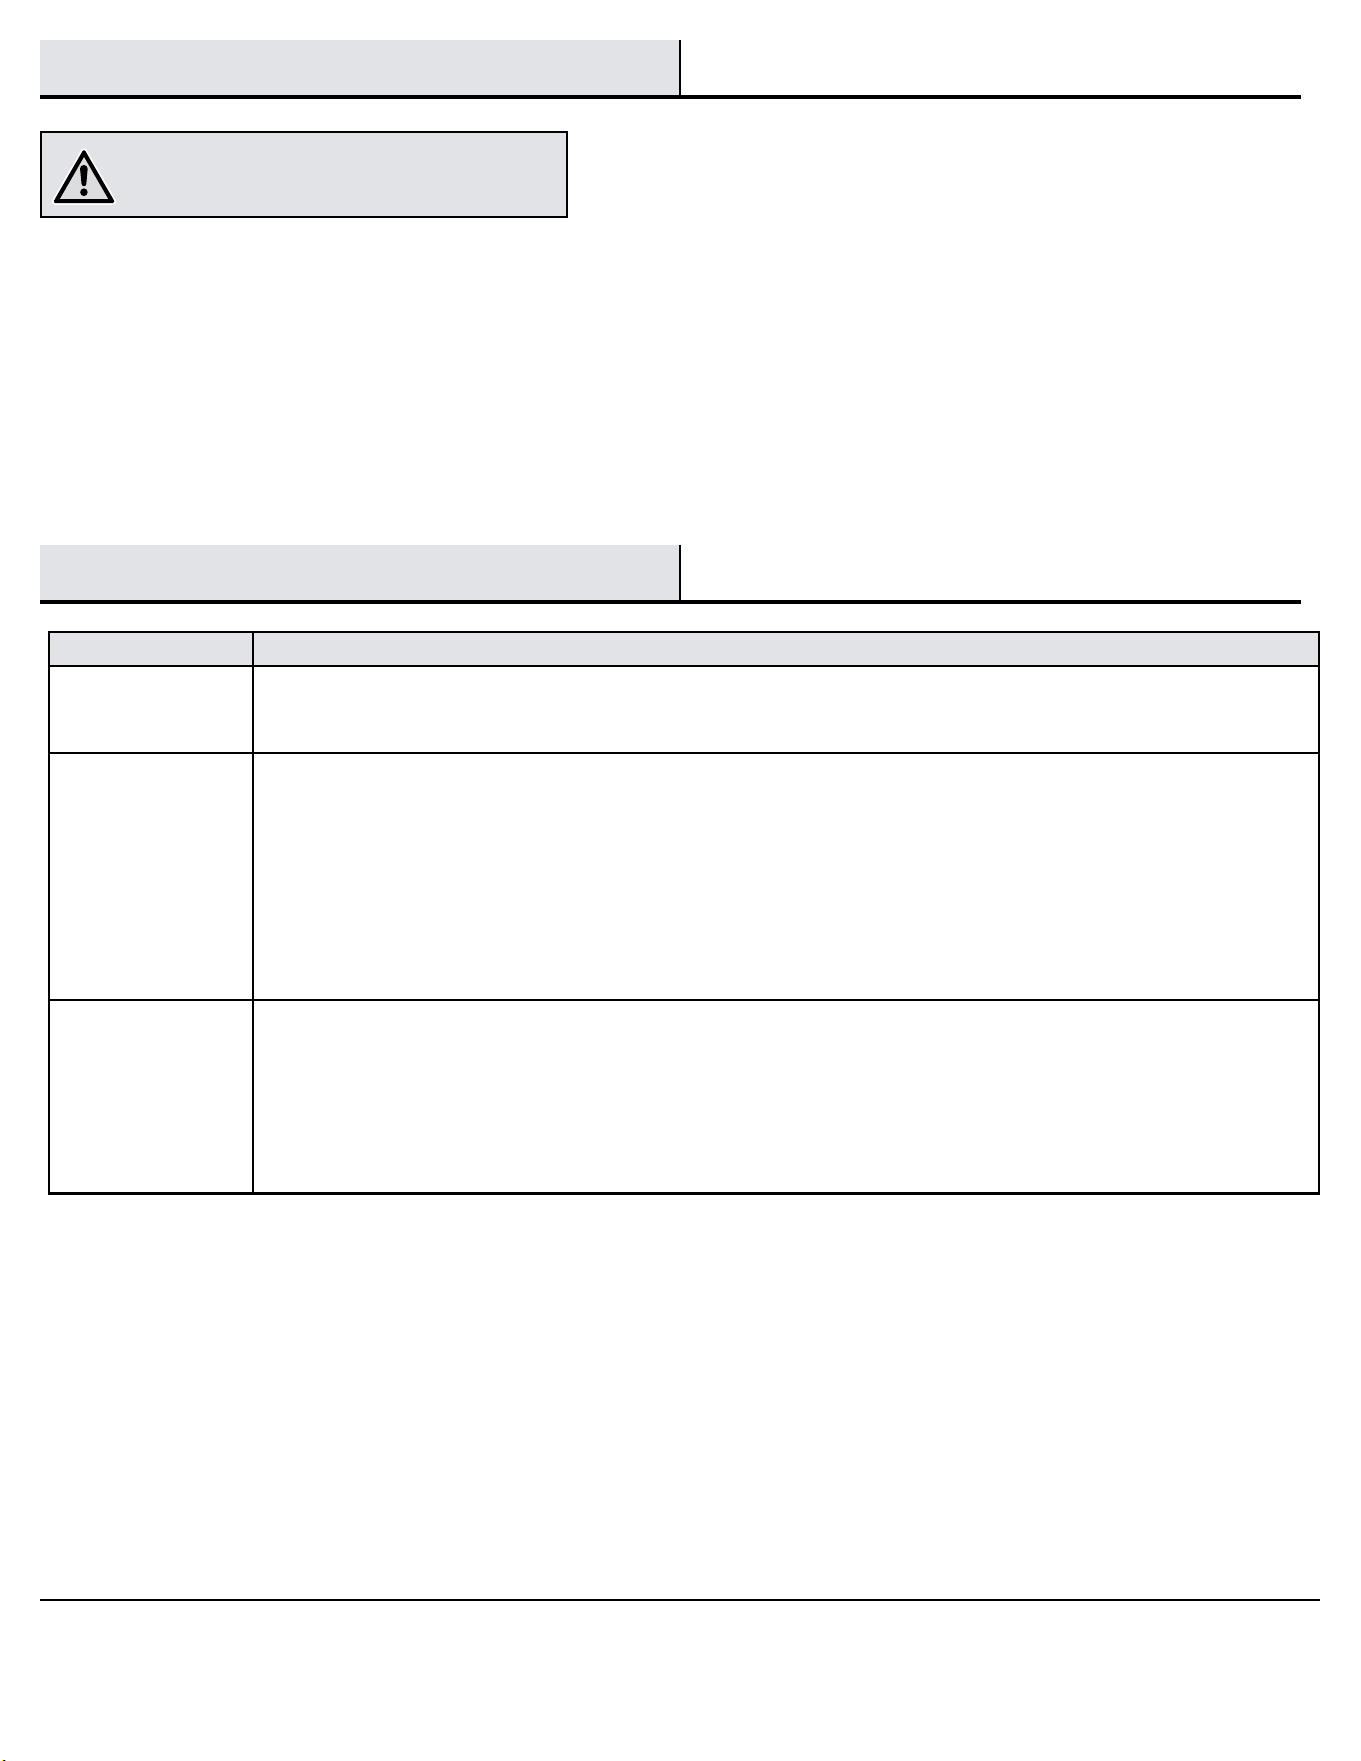
Solución de problemas
Problema Solución
El ventilador
no enciende.
□ Verica los fusibles o disyuntores principales y secundarios.
□ Verica las conexiones de cables en línea al ventilador y las conexiones de cables del interruptor en la caja
correspondiente.
El ventilador
hace ruido.
□ Asegúrate de que todos los tornillos de la carcasa del motor estén ajustados.
□ Verica que los tornillos que unen el soporte de aspa al cubo del motor estén bien apretados.
□ Asegura que las conexiones de tuerca de cable no choquen unas con otras ni con la pared interior de la caja del
interruptor.
□ Deja que transcurra un período de “adaptación” de 24 horas. La mayoría de los ruidos asociados con un ventilador
nuevo desaparecen en ese período.
□ Controla que la cubierta quede a corta distancia del techo. No debe tocar el techo.
□ Asegúrate de que la caja eléctrica quede bien ajustada y se hayan instalado almohadillas aislantes de goma entre la
placa de montaje y la caja eléctrica.
El ventilador oscila. □ Verica que todas las aspas y los tornillos de sus brazos estén bien ajustados.
□ La mayoría de los problemas de oscilación del ventilador se debe a que las aspas no están al mismo nivel. Verica
este nivel seleccionando un punto en el cielo raso sobre la punta de una de las aspas. Mide desde un punto en el
centro de cada aspa a un punto en el techo. Rota el ventilador hasta que la siguiente aspa esté en posición para
medir y mide desde el mismo punto en cada aspa hasta el cielo raso. Repite el procedimiento para cada aspa. Las
desviaciones de la medición no deben pasar de 1/8 plg (0.32 cm) durante diez minutos. Si el ventilador continúa
oscilando, comunícate con el servicio al cliente y te enviarán un kit de compensación de aspas, sin costo alguno.
□ Debido al movimiento natural del ventilador, algunas conexiones pueden aojarse. Revisa dos veces al año las conexiones de soporte,
los soportes y los accesorios de las aspas. Comprueba que estén seguros. No es necesario desmontar el ventilador del techo.
□ Hay que limpiar el ventilador con frecuencia para que luzca como nuevo al paso de los años. No usar agua para limpiarlo. Esto puede
dañar el motor o la madera e incluso provocar una descarga eléctrica. Usa solo un cepillo suave o un paño sin pelusas para evitar rayar
el acabado. El revestimiento está sellado con laca para minimizar la decoloración u opacidad.
□ Puedes aplicar a la madera una na capa de pulimento para muebles y dar así más protección y belleza. Cubre los rayones diminutos
con una ligera aplicación de lustrador para calzado.
□ No necesitas lubricar tu ventilador. El motor tiene cojinetes de bola sellados y permanentemente lubricados.
ADVERTENCIA: Asegúrate de que la corriente esté apagada
antes de limpiar el ventilador.
Mantenimiento y limpieza

Problema Solución
El ventilador
no enciende.
□ Verica los fusibles o disyuntores principales y secundarios.
□ Verica las conexiones de cables en línea al ventilador y las conexiones de cables del interruptor en la caja
correspondiente.
El ventilador
hace ruido.
□ Asegúrate de que todos los tornillos de la carcasa del motor estén ajustados.
□ Verica que los tornillos que unen el soporte de aspa al cubo del motor estén bien apretados.
□ Asegura que las conexiones de tuerca de cable no choquen unas con otras ni con la pared interior de la caja del
interruptor.
□ Deja que transcurra un período de “adaptación” de 24 horas. La mayoría de los ruidos asociados con un ventilador
nuevo desaparecen en ese período.
□ Controla que la cubierta quede a corta distancia del techo. No debe tocar el techo.
□ Asegúrate de que la caja eléctrica quede bien ajustada y se hayan instalado almohadillas aislantes de goma entre la
placa de montaje y la caja eléctrica.
El ventilador oscila. □ Verica que todas las aspas y los tornillos de sus brazos estén bien ajustados.
□ La mayoría de los problemas de oscilación del ventilador se debe a que las aspas no están al mismo nivel. Verica
este nivel seleccionando un punto en el cielo raso sobre la punta de una de las aspas. Mide desde un punto en el
centro de cada aspa a un punto en el techo. Rota el ventilador hasta que la siguiente aspa esté en posición para
medir y mide desde el mismo punto en cada aspa hasta el cielo raso. Repite el procedimiento para cada aspa. Las
desviaciones de la medición no deben pasar de 1/8 plg (0.32 cm) durante diez minutos. Si el ventilador continúa
oscilando, comunícate con el servicio al cliente y te enviarán un kit de compensación de aspas, sin costo alguno.
¿Preguntas, problemas, piezas faltantes? Antes de devolver a la tienda,
llama al Servicio al Cliente de Home Decorators Collection, de lunes a viernes de 8:00 a.m. a 7:00 p.m. (hora del Este),
y los sábados de 9:00 a.m. a 6:00 p.m. (hora del Este).
1-800-986-3460
HOMEDEPOT.COM/HOMEDECORATORS
Conserva este manual para uso en el futuro.