USE AND CARE GUIDE
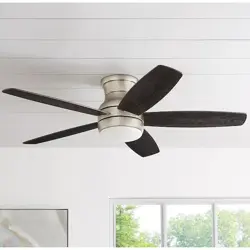
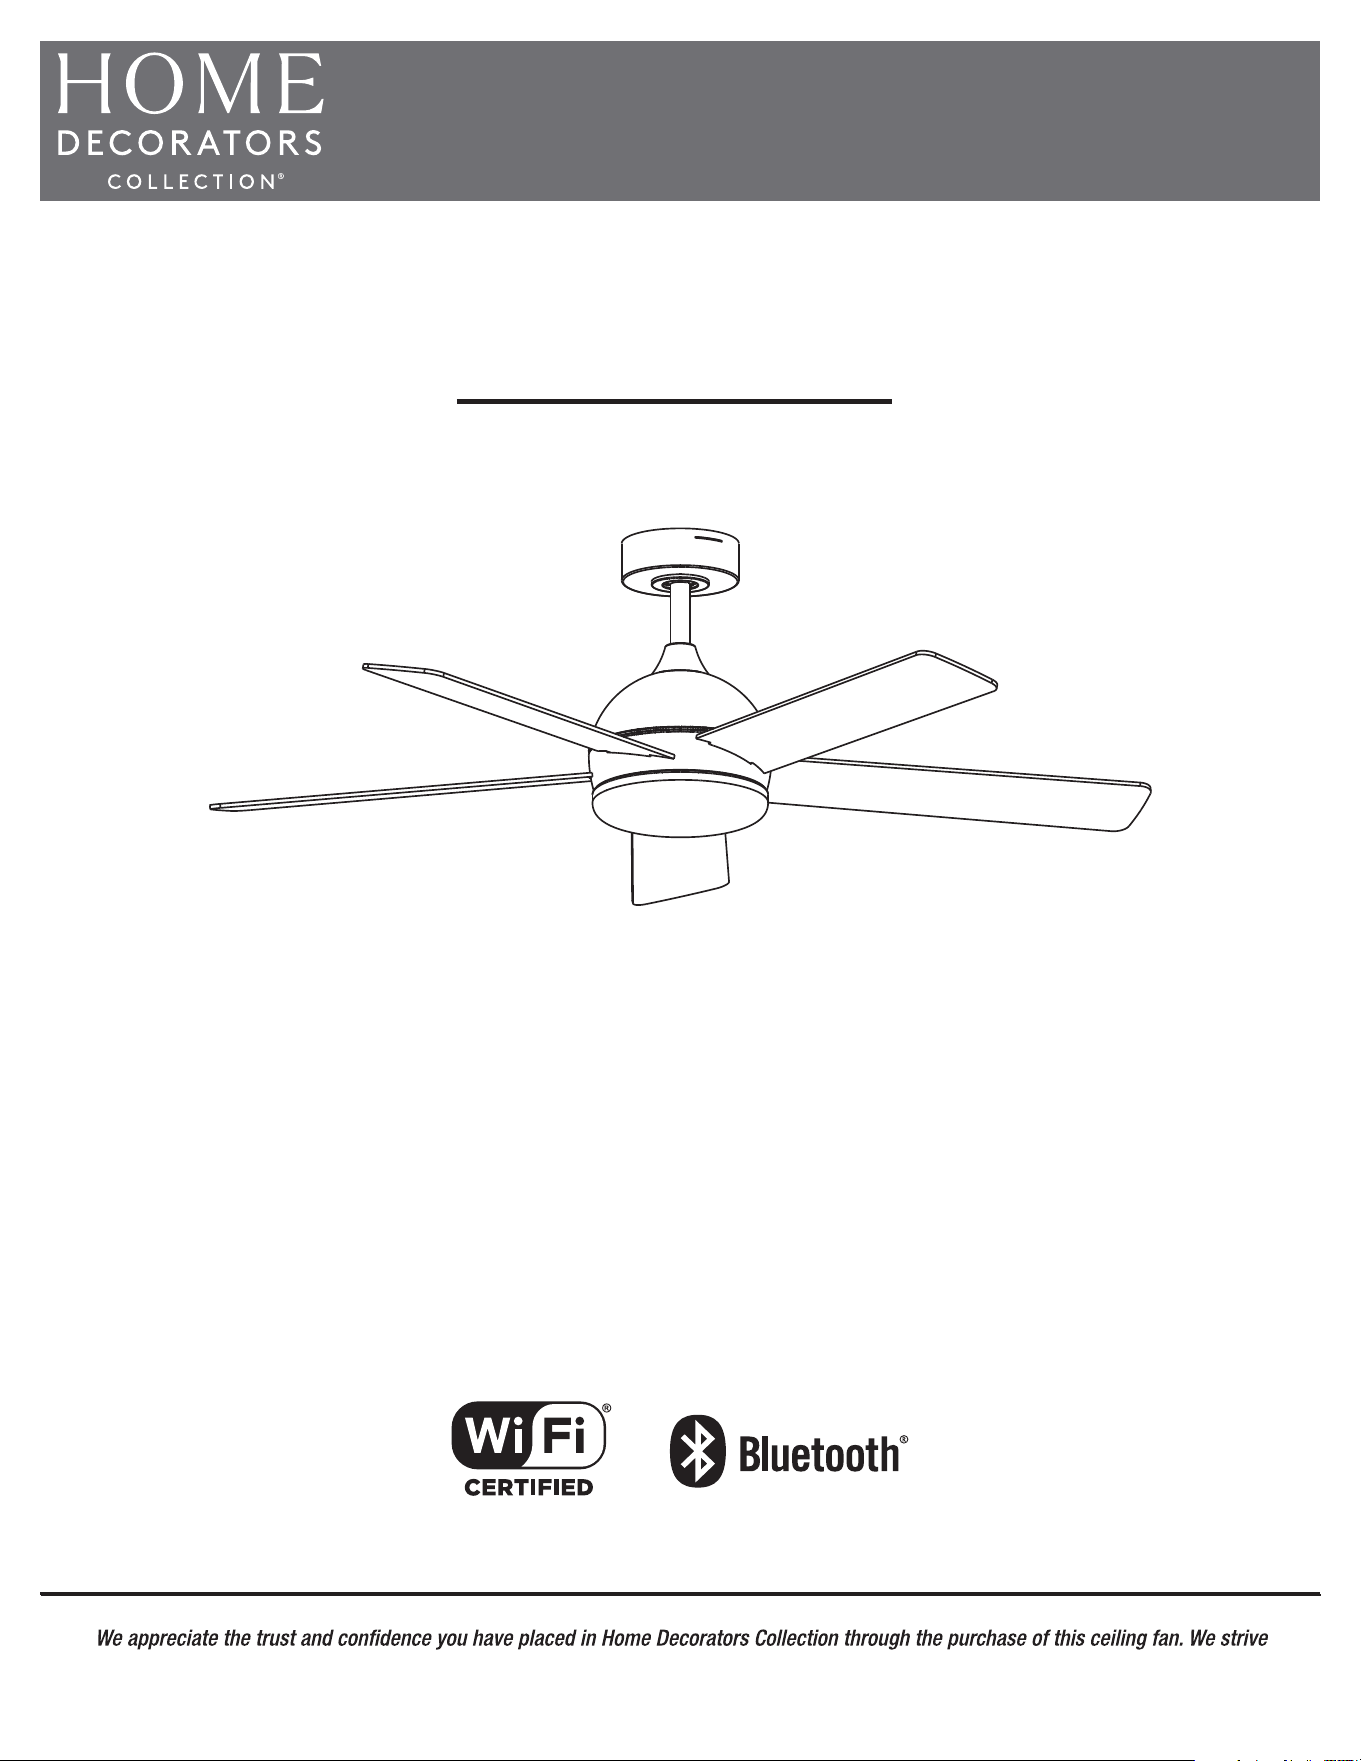
CARLEY 52-INCH SMART CEILING FAN
Questions, problems, missing parts? Before returning to the store,
call Home Decorators Collection Customer Service
8 a.m. - 7 p.m., EST, Monday-Friday, 9 a.m. - 6 p.m., EST, Saturday.
1-800-986-3460
HOMEDEPOT.COM/Hubspace
SKU# 1008962820 1008926738 1008962368
Model #CF2003-W, CF2003-B, CF2003-N
THANK YOU
to continually create quality products designed to enhance your home. Visit us online to see our full line of products available for your home
improvement needs. Thank you for choosing Home Decorators Collection!
2
1. To reduce the risk of electric shock, ensure the electricity has been
turned off at the circuit breaker or fuse box before you begin.
2. All wiring must be in accordance with the National Electrical Code
ANSI/NFPA 70-1999 and local electrical codes. Electrical installation
should be performed by a qualied licensed electrician.
3. To reduce the risk of re, electric shock, or personal injury, mount to
outlet box marked acceptable for fan support of 35 lbs (15,87 kg ) on
less and use mounting screws provided with the outlet box. Most
outlet boxes commonly used for the support of lighting xtures are
not acceptable for fan support and may need to be replaced. Consult
a qualied electrician if in doubt. The xing means for attachment to
the ceiling such as hooks or other devices shall be xed with a
sufcient strength to withstand 4 times the weight of the ceiling fan.
4. To reduce the risk of injury to persons,install fan so that the blade is
at least 7 ft (2.1m) above the oor.
5. Do not operate the reversing switch while the fan blades are in
motion. You must turn the fan off and stop the blades before you
reverse the blade direction.
6. Do not place objects in the path of the blades.
7. To avoid personal injury or damage to the fan and other items, use
caution when working around or cleaning the fan.
8. After making electrical connections, spliced conductors should be
turned upward and pushed carefully up into the outlet box. The
wires should be spread apart with the grounded conductor and the
equipment-grounding conductor on one side of the outlet box.
The ungrounded conductor on the other side of the outlet box.
9. All setscrews must be checked and retightened where necessary
before installation.
To reduce the risk of injury to persons, not intended for use by persons
(including children) with reduced physical, sensory or mental capabilities,
or lack of experience and knowledge, unless they have been given supervision
or instruction concerning use of the fan by a person responsible for their safety.
Children should be supervised to ensure that they do not play with the fan.
WARNING: To reduce the risk of personal injury,
do not bend the blade brackets (also referred to as
anges) during assembly or after installation. Do not
insert objects in the path of the blades.
WARNING: To avoid possible electrical shock,
turn the electricity off at the main fuse box before
wiring. If you feel you do not have enough electrical
wiring knowledge or experience, contact a licensed
electrician.
WARNING: To reduce the risk of re or electric shock,
do not use this fan with any solid state speed control
device.
CAUTION: To reduce the risk of personal injury,
use only the screws provided with the outlet box.
WARNING:
shock, this fan should only be used with fan speed
control part no. D-SLF-A19-01-A, manufactured by
LEEDARSON LIGHTING CO., LTD.
WARNING: To reduce the risk of re or electric shock,
this fan must be installed with an isolating wall switch.
WARNING: All replacement of parts and the mounting
of the safety suspension system device shall be
performed by qualied licensed electricians.
WARNING: To reduce the risk of personal injury, if
unusual oscillating movement is observed, immediately
stop using the ceiling fan and contact with a qualied
licensed electrician.
Table of Contents ................................................................ 2
Safety Information............................................................... 2
Warranty ............................................................................... 3
Pre-Installation .................................................................... 5
Installation............................................................................ 6
Assembly.............................................................................. 7
Operation ........................................................................... 13
Care and Cleaning............................................................. 16
Troubleshooting.................................................................17
Table of Contents
3
HOMEDEPOT.COM/Hubspace
Please contact 1-800-986-3460 for further assistance.
Warranty
Contact the Customer Service Team at 1-800-986-3460 or visit HOMEDEPOT.COM/Hubspace.
The supplier warrants the fan motor to be free from defects in workmanship and material present at time of shipment from the factory for a lifetime
after the date of purchase by the original purchaser. The supplier also warrants that all other fan parts, excluding any glass or acrylic blades, to be
free from defects in workmanship and material at the time of shipment from the factory for a period of two years after the date of purchase by the
original purchaser. We agree to correct such defects without charge or at our option replace with a comparable or superior model if the product is
returned. To obtain warranty service, you must present a copy of the receipt as proof of purchase. All costs of removing and reinstalling the product
are your responsibility. Damage to any part, such as by accident, misuse, improper installation, or by afxing any accessories, is not covered by
this warranty. Because of varying climatic conditions this warranty does not cover any changes in brass nish, including rusting, pitting, corroding,
tarnishing, or peeling. Brass nishes of this type give their longest useful life when protected from varying weather conditions. A certain amount of
"wobble" is normal and should not be considered a defect. Servicing performed by unauthorized persons shall render the warranty invalid. There is
no other express warranty. Home Decorators Collection hereby disclaims any and all warranties, including but not limited to those of merchantability
and tness for a particular purpose to the extent permitted by law. The duration of any implied warranty, which cannot be disclaimed, is limited
to the time period as specied in the express warranty. Some states do not allow a limitation on how long an implied warranty lasts, so the above
limitation may not apply to you. The retailer shall not be liable for incidental, consequential, or special damages arising out of or in connection with
product use or performance except as may otherwise be accorded by law. Some states do not allow the exclusion of incidental or consequential
damages, so the above exclusion or limitation may not apply to you. This warranty gives specic legal rights, and you may also have other rights that
vary from state to state. This warranty supersedes all prior warranties. Shipping costs for any return of product as part of a claim on the warranty
must be paid by the customer.
Wireless Protocol
Apple and the Apple logos are trademarks of Apple, Inc., registered in
the U.S., and other countries. App Store is a service mark of Apple Inc. Google and Google Play are trademarks of Google LLC.
Changes or modications to this unit not expressly approved by the party responsible for compliance could void the user’s authority to operate
the equipment.
NOTE: This equipment has been tested and found to comply with the limits for a Class B digital device, pursuant to Part 15 of the FCC Rules.
These limits are designed to provide reasonable protection against harmful interference in a residential installation. This equipment generates
uses and can radiate radio frequency energy and, if not installed and used in accordance with the instructions, may cause harmful interference
to radio communications.
However, there is no guarantee that interference will not occur in a particular installation. If this equipment does cause harmful interference to
radio or television reception, which can be determined by turning the equipment off and on, the user is encouraged to try to correct the interfer-
ence by one or more of the following measures:
Reorient or relocate the receiving antenna.
Increase the separation between the equipment and receiver.
Connect the equipment into an outlet on a circuit different from that to which the receiver is connected.
Consult the dealer or an experienced radio/TV technician for help.
This equipment complies with FCC radiation exposure limits set forth for an uncontrolled environment. This equipment should be installed and
operated with a minimum distance of 20cm between the radiator & your body. This transmitter must not be co-located or operating in conjunc-
tion with any other antenna or transmitter.
FCC compliance information is listed as below:
Responsible party: Leedarson America, Inc.
Responsible party address: 300 Technology Court SE Suite 100, Smyrna, GA 30082
Telephone number: (678) 293-8382
FCC Warning
Safety Information
4
Pre-Installation
SPECIFICATIONS
TOOLS REQUIRED
Phillips
screwdriver
Flat blade
screwdriver
Adjustable
wrench
Electrical
tape
Wire cutter Step ladder
5003280
Size Speed Volts Amps Watts RPM CFM
Net
Weight
Gross
Weight
Cu. Ft.
52 in. 120
0.06
0.08
0.12
0.17
0.27
0.4
1
2
3
4
5
6
2.6
3.6
6.5
10
18
28
65
80
105
125
155
177
1700
2300
3100
3700
4600
5500
14.77bs
(6.7kg)
20.06lbs
(9.1 kg)
1.993
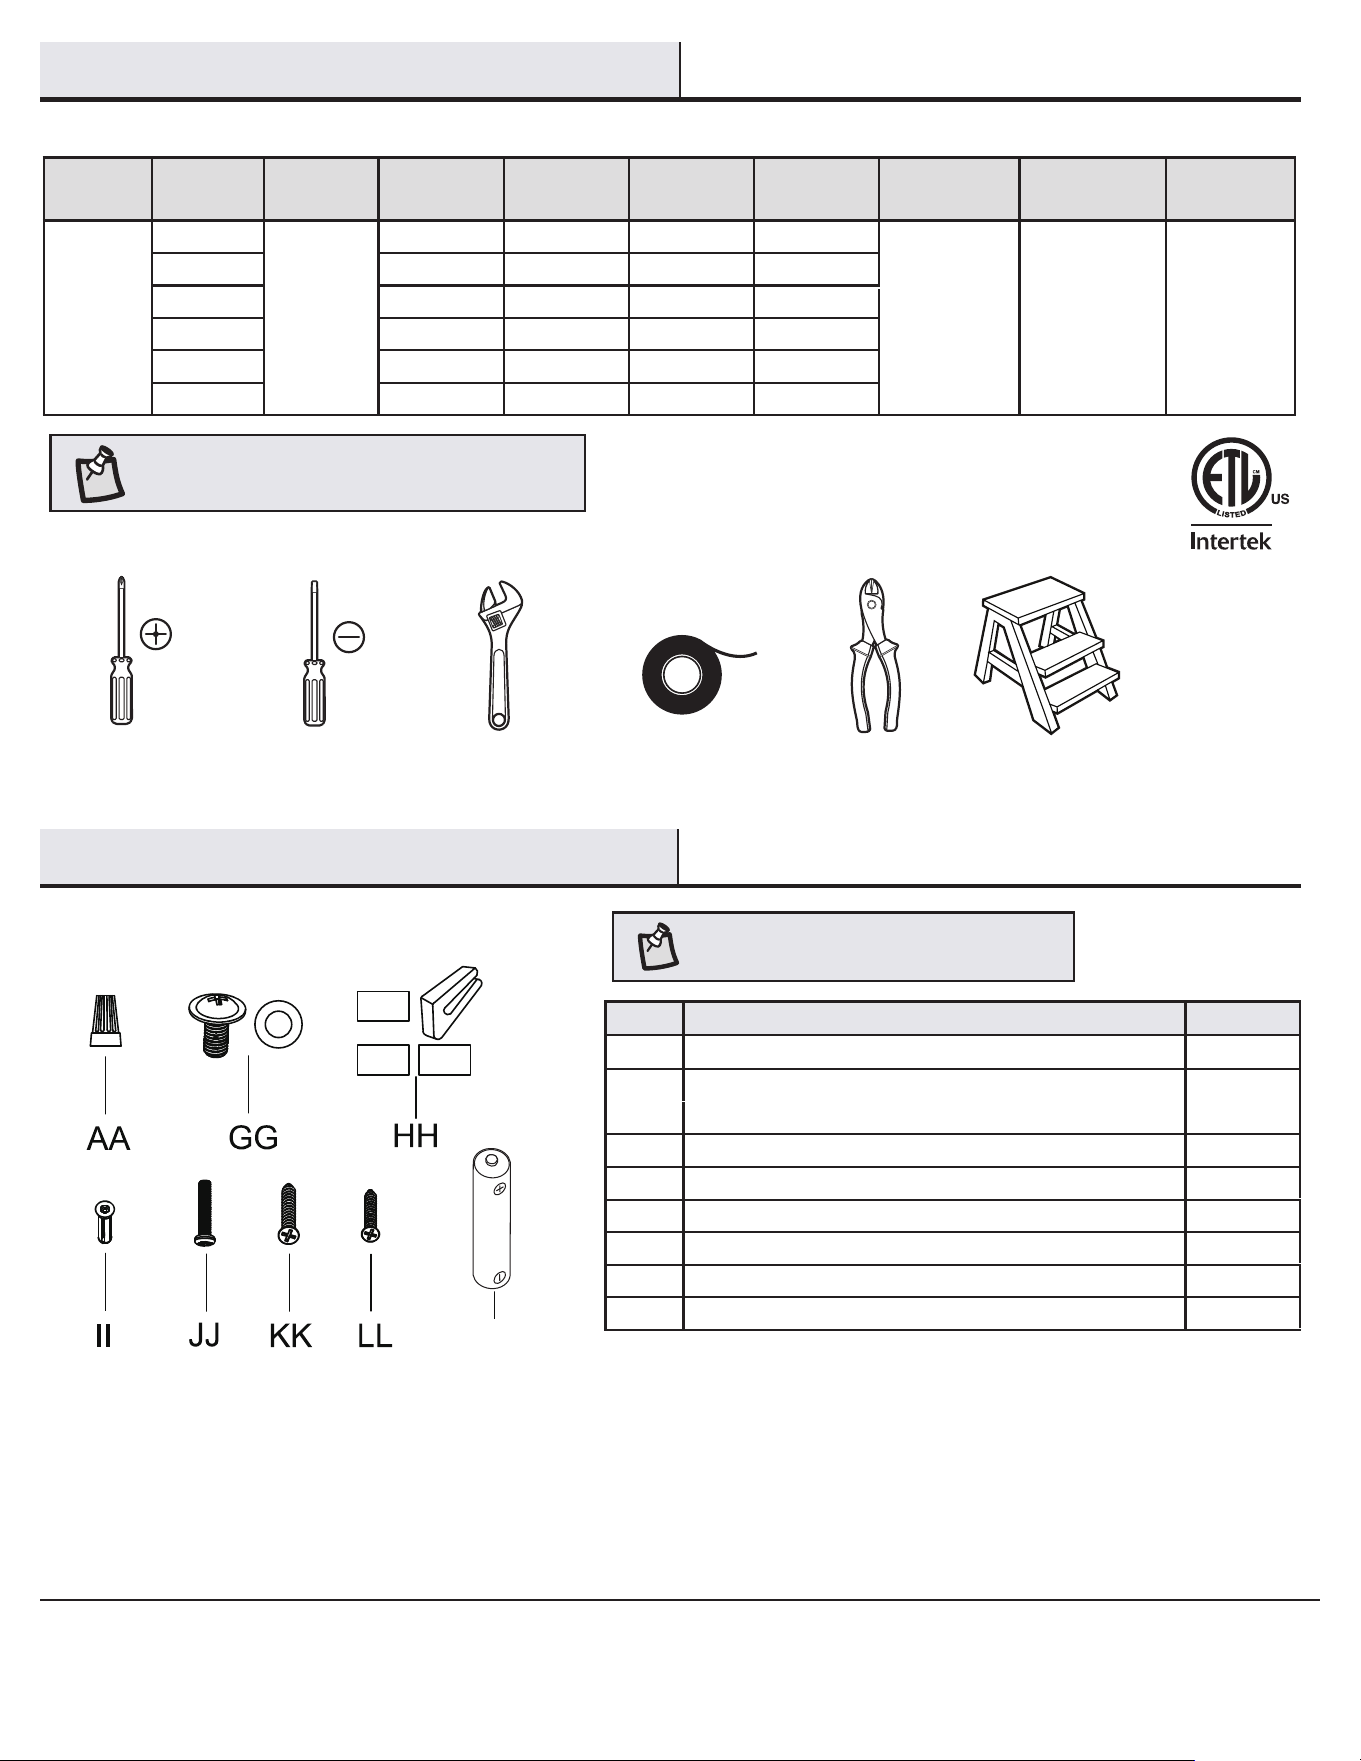
NOTE: These are approximate measures. They do not
include the amps and wattage used by the light kit.
HARDWARE INCLUDED
NOTE: Hardware not shown to actual size.
Pre-Installation (continued)
Part Description Quantity
AA Wire nut (P4) 3
HH
Extra blades attachment screws (3/16-24∗12mm)
Extra blades attachment washer
1
GG
JJ
Screw - 4 (#6-32)
Screw - 5 (ST3.5*13)
2
I I
Balancing 1
KK
2
LL
2
2
Dry wall anchor
Screw - 6 (ST3*18)
MM
2
AAA battery
MM
light housing
Blade
Canopy
Hanger ball (preassembled)
Canopy cover
Downrod (preassembled)
Coupling cover
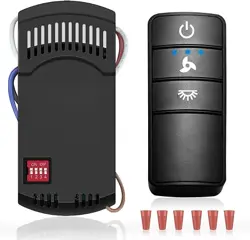
Remote control receiver
Pre-Installation (continued)
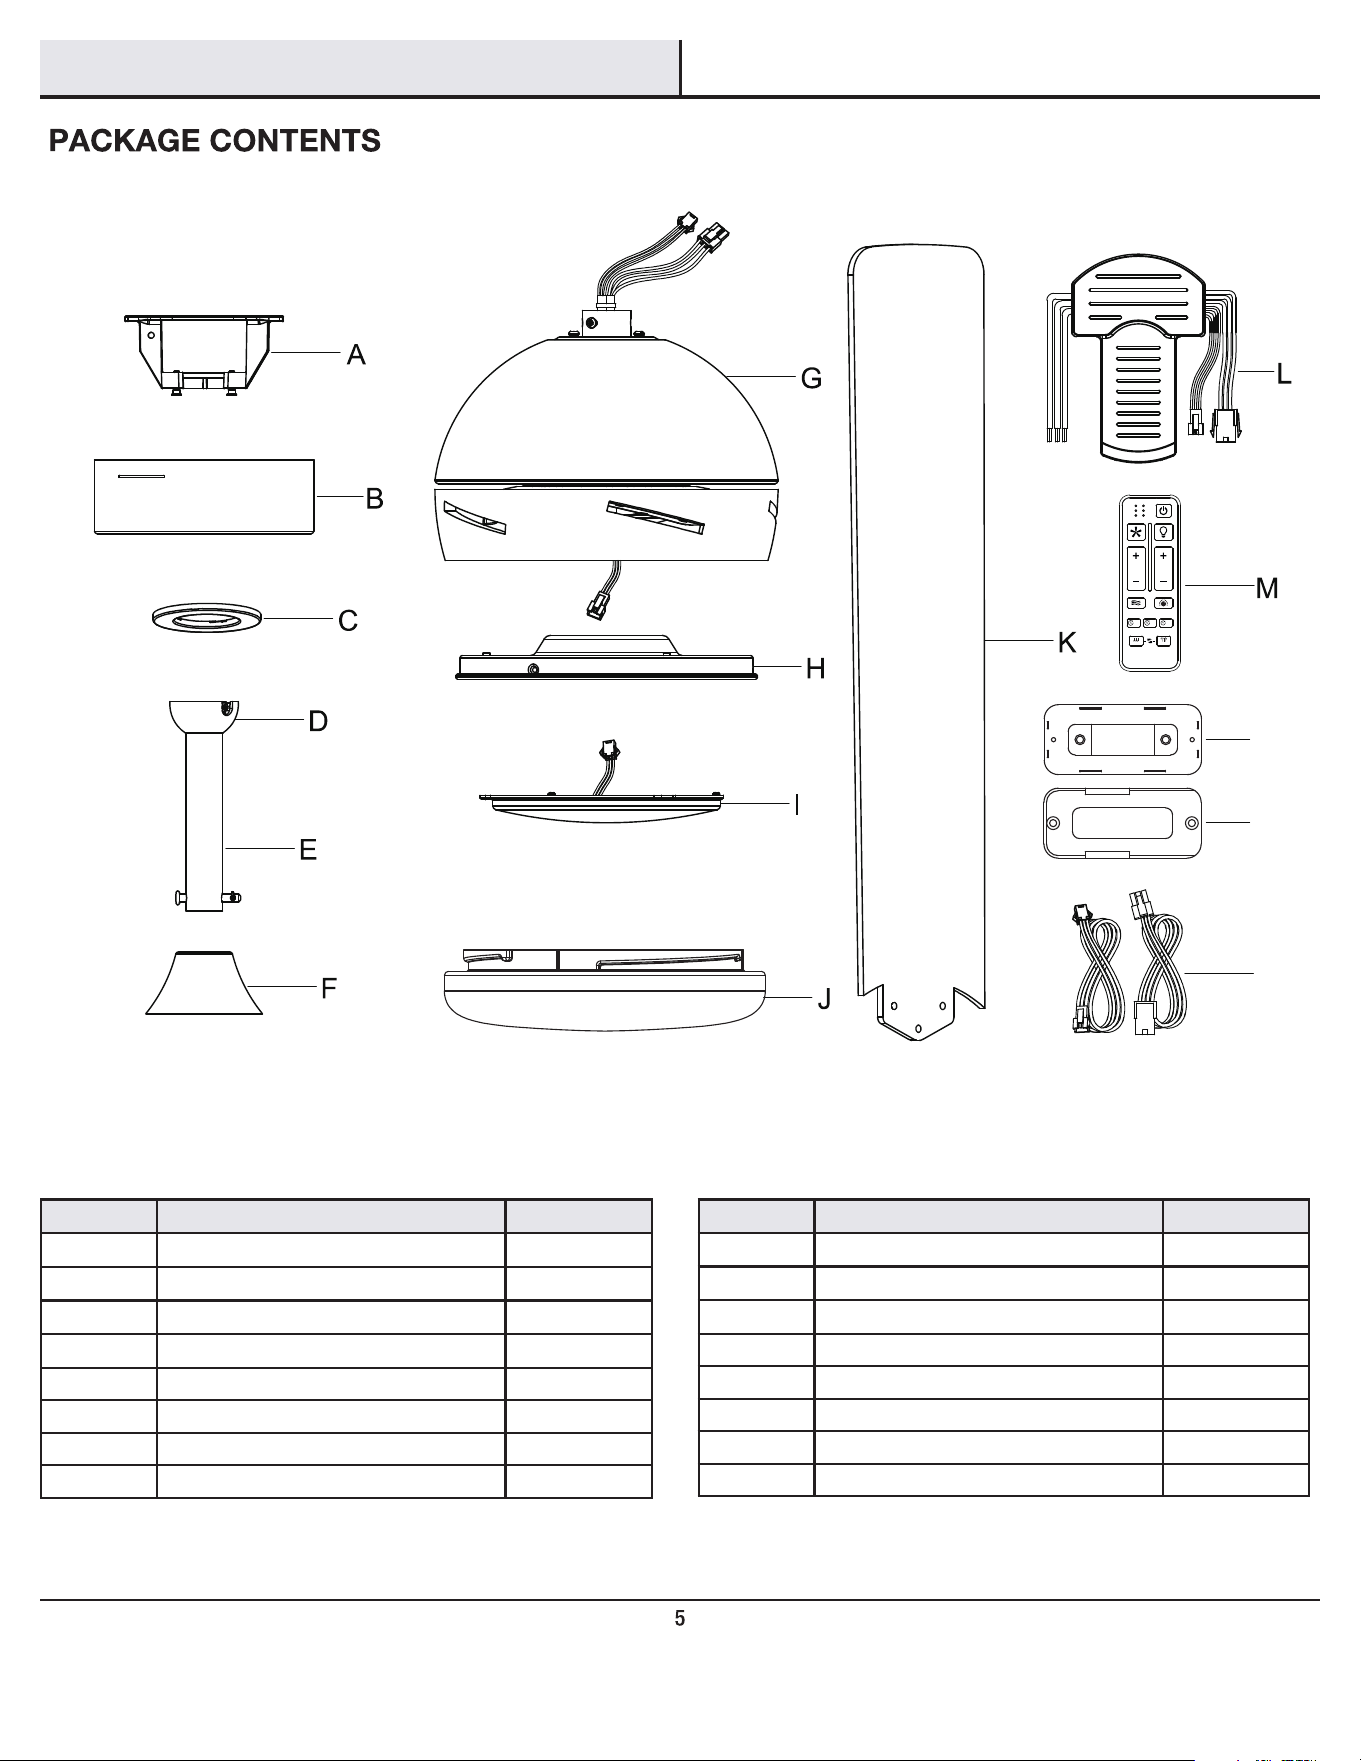
Part Description Quantity
A Mounting bracket 1
B 1
C 1
D 1
E
G
1
1
F
H
LED module
1
1
Part Description Quantity
Plastic shade
1
1
I
5
J
1
K
O
M
Remote control
Remote cradle
1
1
P Extension wire 1
L
N
Remote holder plate 1
HOMEDEPOT.COM/Hubspace
Please contact 1-800-986-3460 for further assistance.
Fan-motor assembly
BREEZE
COLOR TEMP.
TIMER
FAN DIRECTION
HOLD 3 SEC.
SUMMER WINTER
ON / OFF
ON / OFF
6 SPEED BRIGHTNESS
ALL
HR
2
HR
4
HR
8
N
O
P
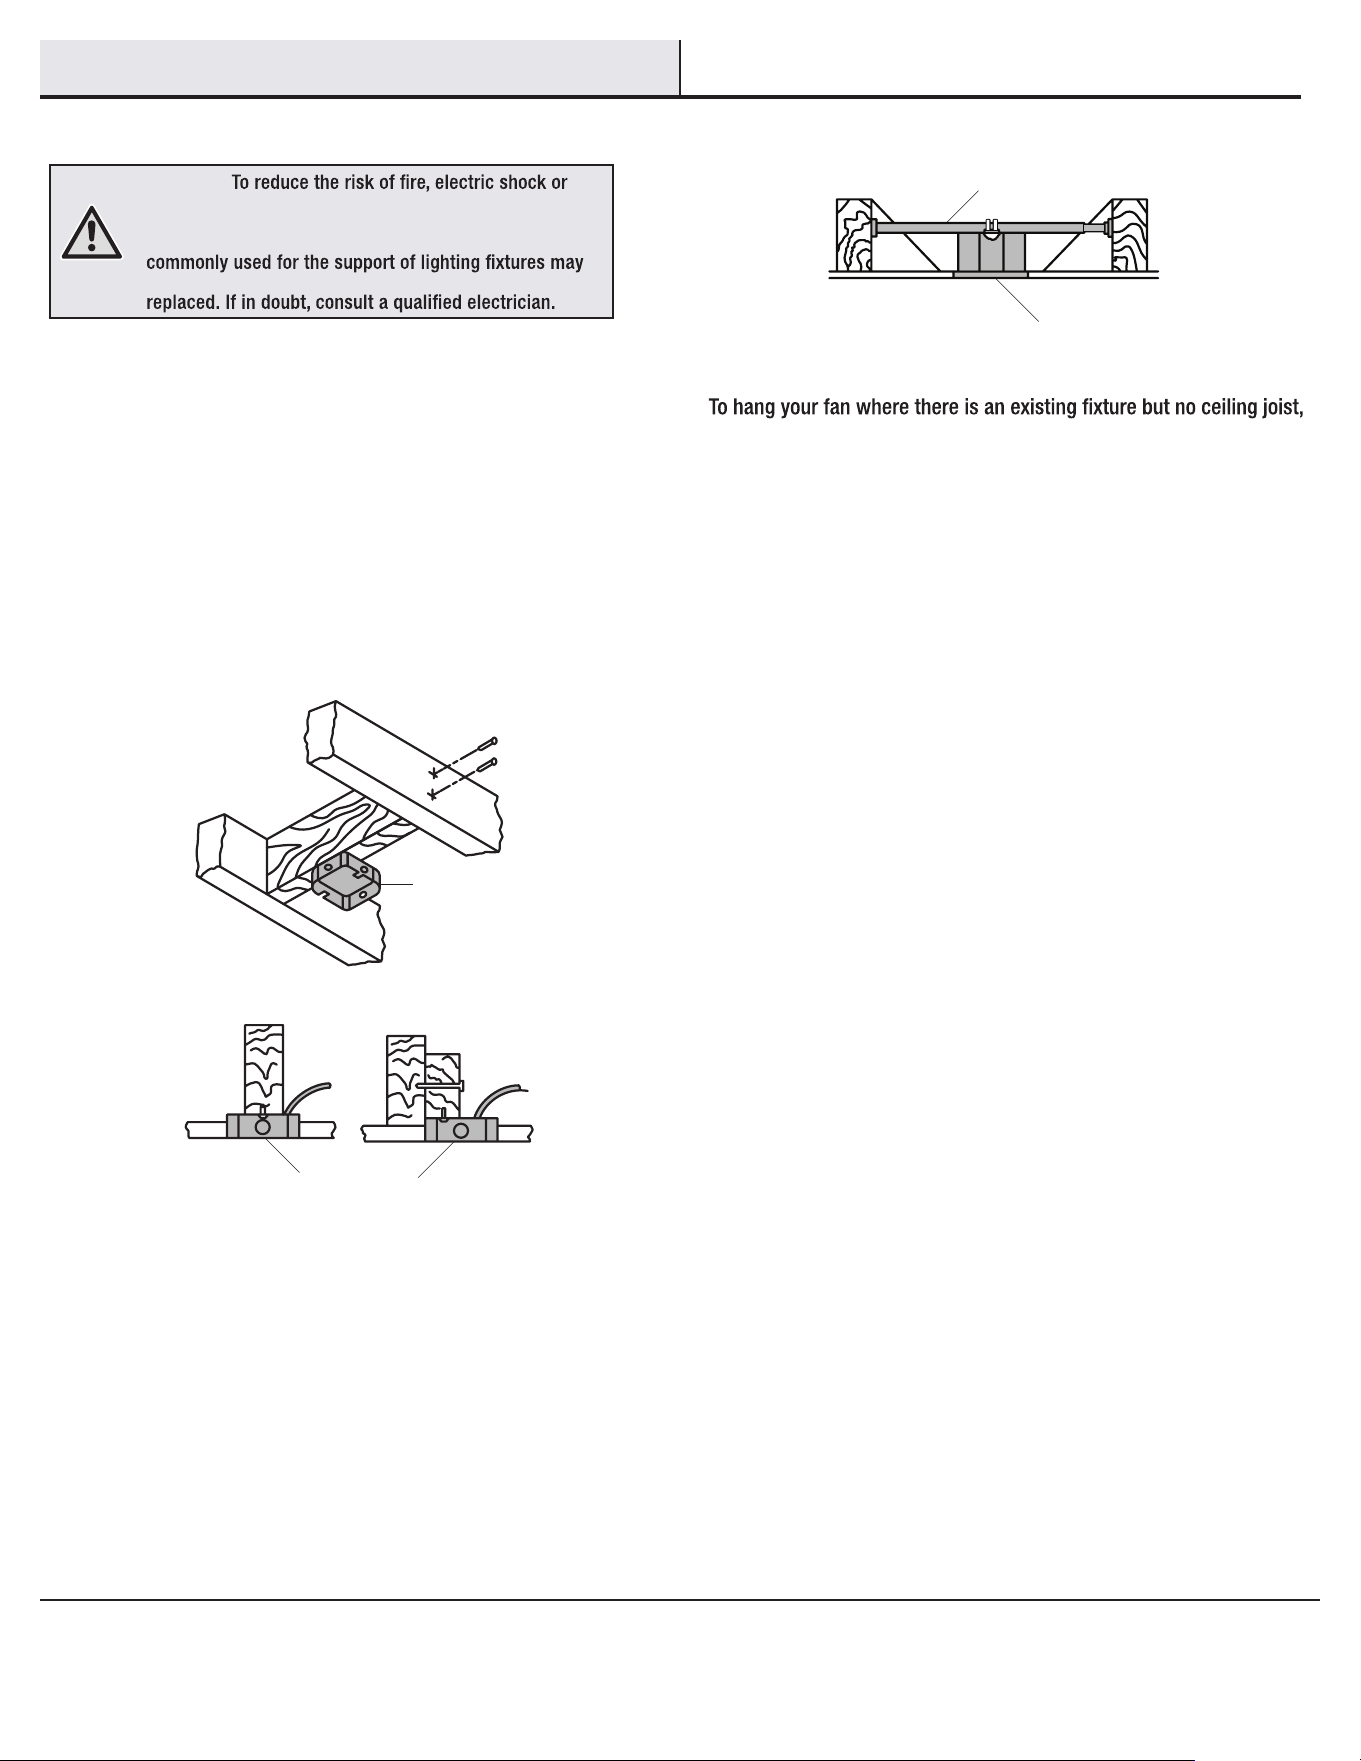
If your ceiling fan does not have an existing UL-listed outlet
box, then install one using the following instructions:
Disconnect the power by removing the fuses or turning off
the circuit breakers.
Secure the outlet box directly to the building structure. Use
the appropriate fasteners and materials. The outlet box and
support structure must be securely mounted and capable of
reliably supporting 35 lbs. (15.9 kg). Use only UL Listed
outlet boxes marked“Acceptable for Fan Support of 35 lbs.
(15.9 kg)or less." Do not use a plastic outlet box.
The illustrations below show two different ways to mount the
outlet box.
□
□
6
Installation
MOUNTING OPTIONS
WARNING:
personal inju ry, mount to outlet box marked “A cceptable
for fan suppor t of 35 lbs. (15.9 kg) or less”, and use
screws provided with the outlet box. An outlet box
not be acceptable for fan support and may need to be
you may need an installation hanger bar as shown above
(available at any Home Depot store).
Outlet Box
Outlet Box
Outlet Box
Hanger Bar
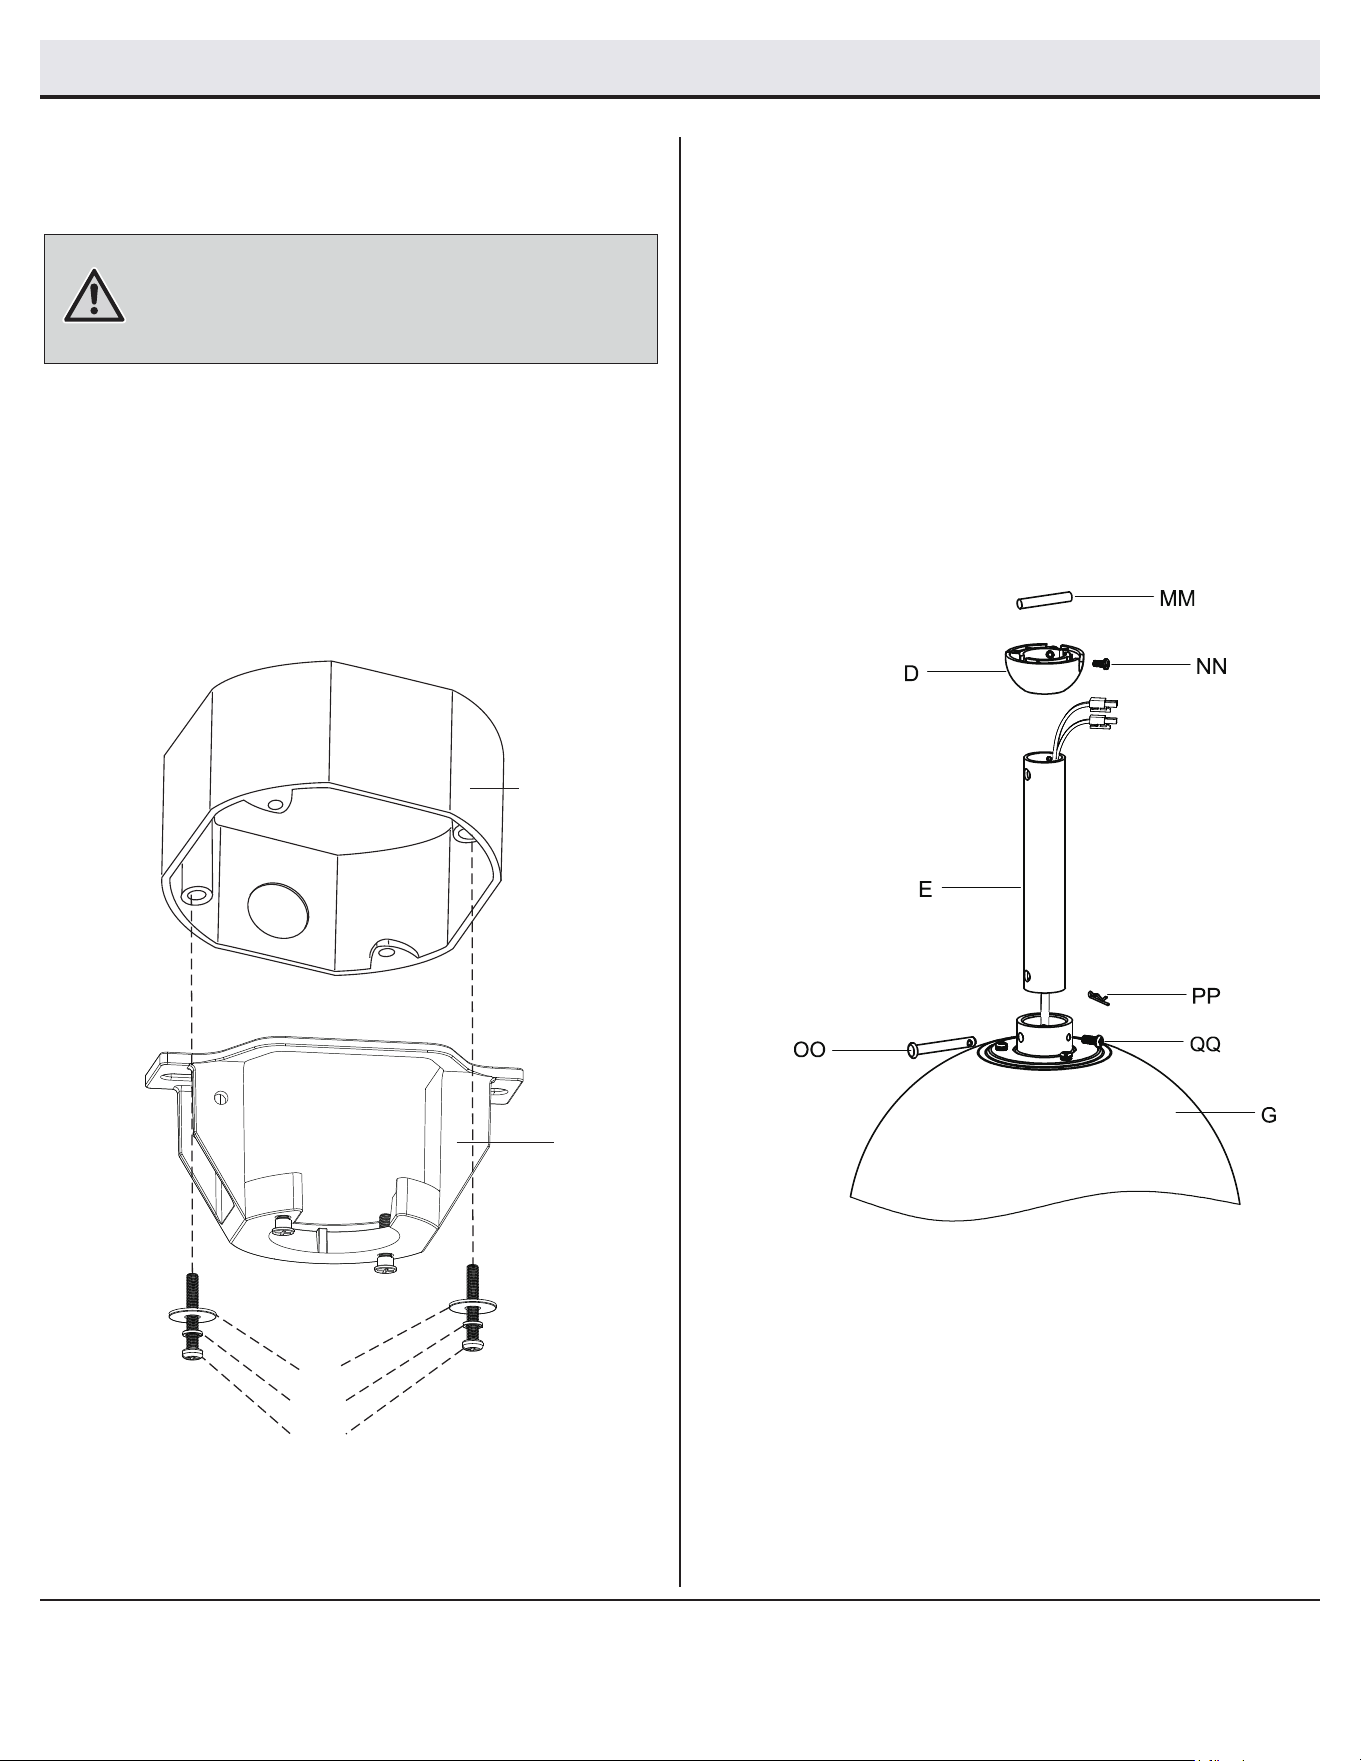
DD
FF/EE
BB/CC
Outlet Box
Align 2pcs screws (BB/CC, not included) through washers
(EE/FF, not included) and then install screws (BB/CC,
not included) through mounting bracket (A) onto the outlet box.
Figure 1
Install the mounting bracket to the
outlet box
A
1
WARNING:
To reduce the risk of fire, electric shock, or other
personal injury, mount the fan only to an outlet box or supporting
system marked acceptable for fan support and use the mounting
screws provided with the outlet box.
HOMEDEPOT.COM/Hubspace
Please contact 1-800-986-3460 for further assistance.
7
□
□
Assembly - Hanging the Fan
Figure 2
□
Loosen the two fan motor assembly coupling set screws
□
□
Remove the hitch pin (PP) and lock pin (OO) from the
downrod (E). Remove the hanger ball (D) from the
downrod (E) by loosening the hanger ball set screw
(NN), and removing the cross pin (MM), then sliding
the hanger ball (D) off of the downrod (E).
Attaching the downrod to the fan
motor assembly
Carefully feed the fan wires from the fan motor assembly (G)
up through the downrod(E). Thread the downrod (E) into the
fan motor assembly (G) coupling. Align the holes and reattach
the lock pin (OO) and the hitch pin (PP).Tighten the set
screws (QQ).
2
(QQ) from the fan motor assembly (G) coupling.
If outlet box has thread holes, please use the screws - M4x25
(BB, not included), washer - D4(FF, not included) and washer -
D15(DD, not included).
If outlet box dosen't have thread holes, please use the screws
-ST4.8x77 (CC, not included), washer - D5(EE, not included)
and washer - D15(DD, not included).
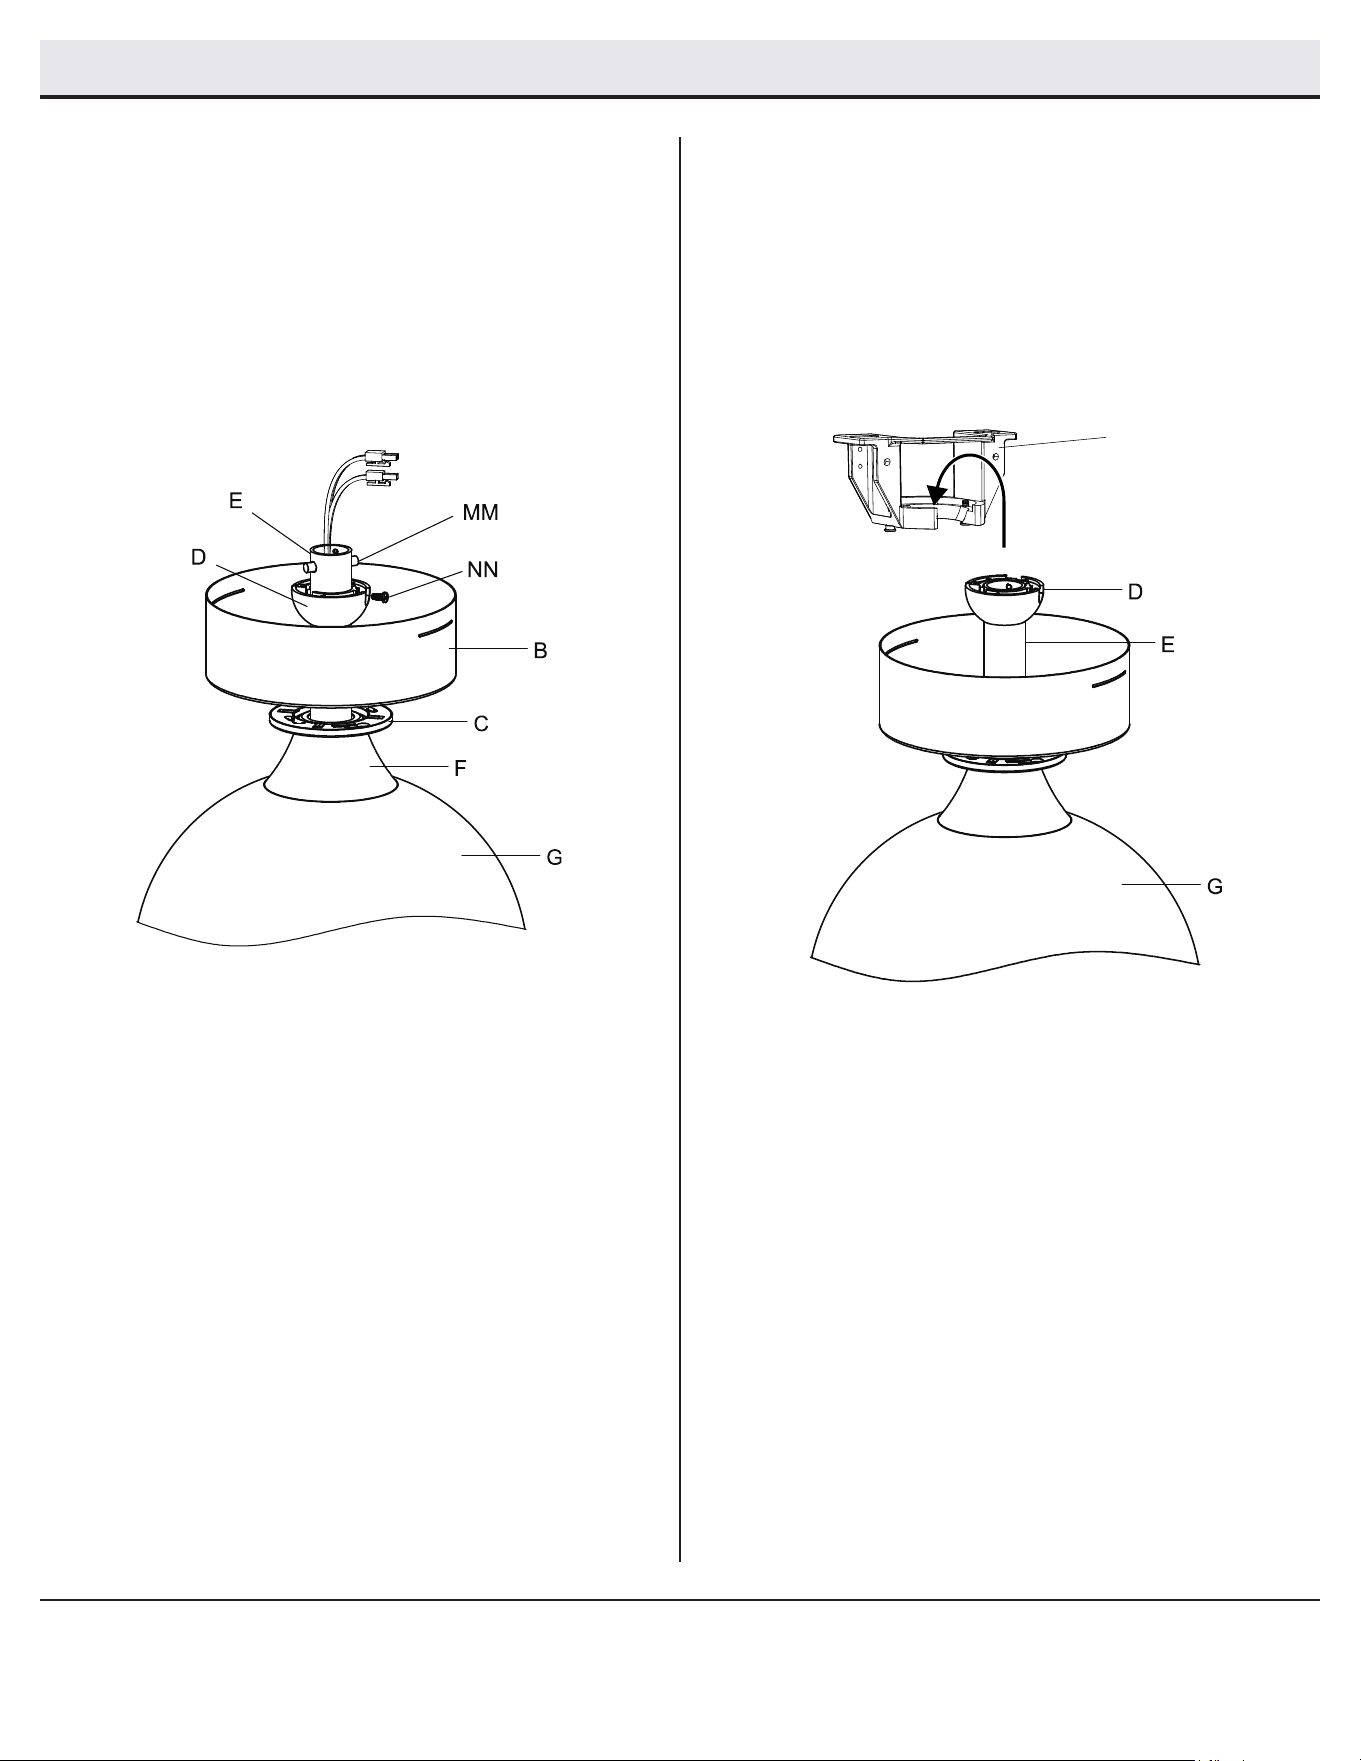
Figure 4
Attaching the coupling cover, and
canopy to the downrod
3
Slip the coupling cover (F), canopy cover (C) and canopy (B)
onto the downrod (E).
Carefully reinstall the hanger ball (D) onto the downrod (E),
and ensure that the cross pin (MM) is in the correct position,
the hanger ball set screws (NN) are tight, and the wires are
not twisted.
Hanging the fan motor assembly to the
mounting bracket
4
□
Lift the fan motor assembly (G) into position, and place
the hanger ball (D) into the mounting bracket (A). Rotate
the fan motor assembly (G) until the groove of the hanger ball
(D) drops into the registration slot and seats rmly.
The downrod (E) should not be able to rotate if this is done
correctly.
A
8
Assembly - Hanging the Fan (continued)
Figure 3
□
□
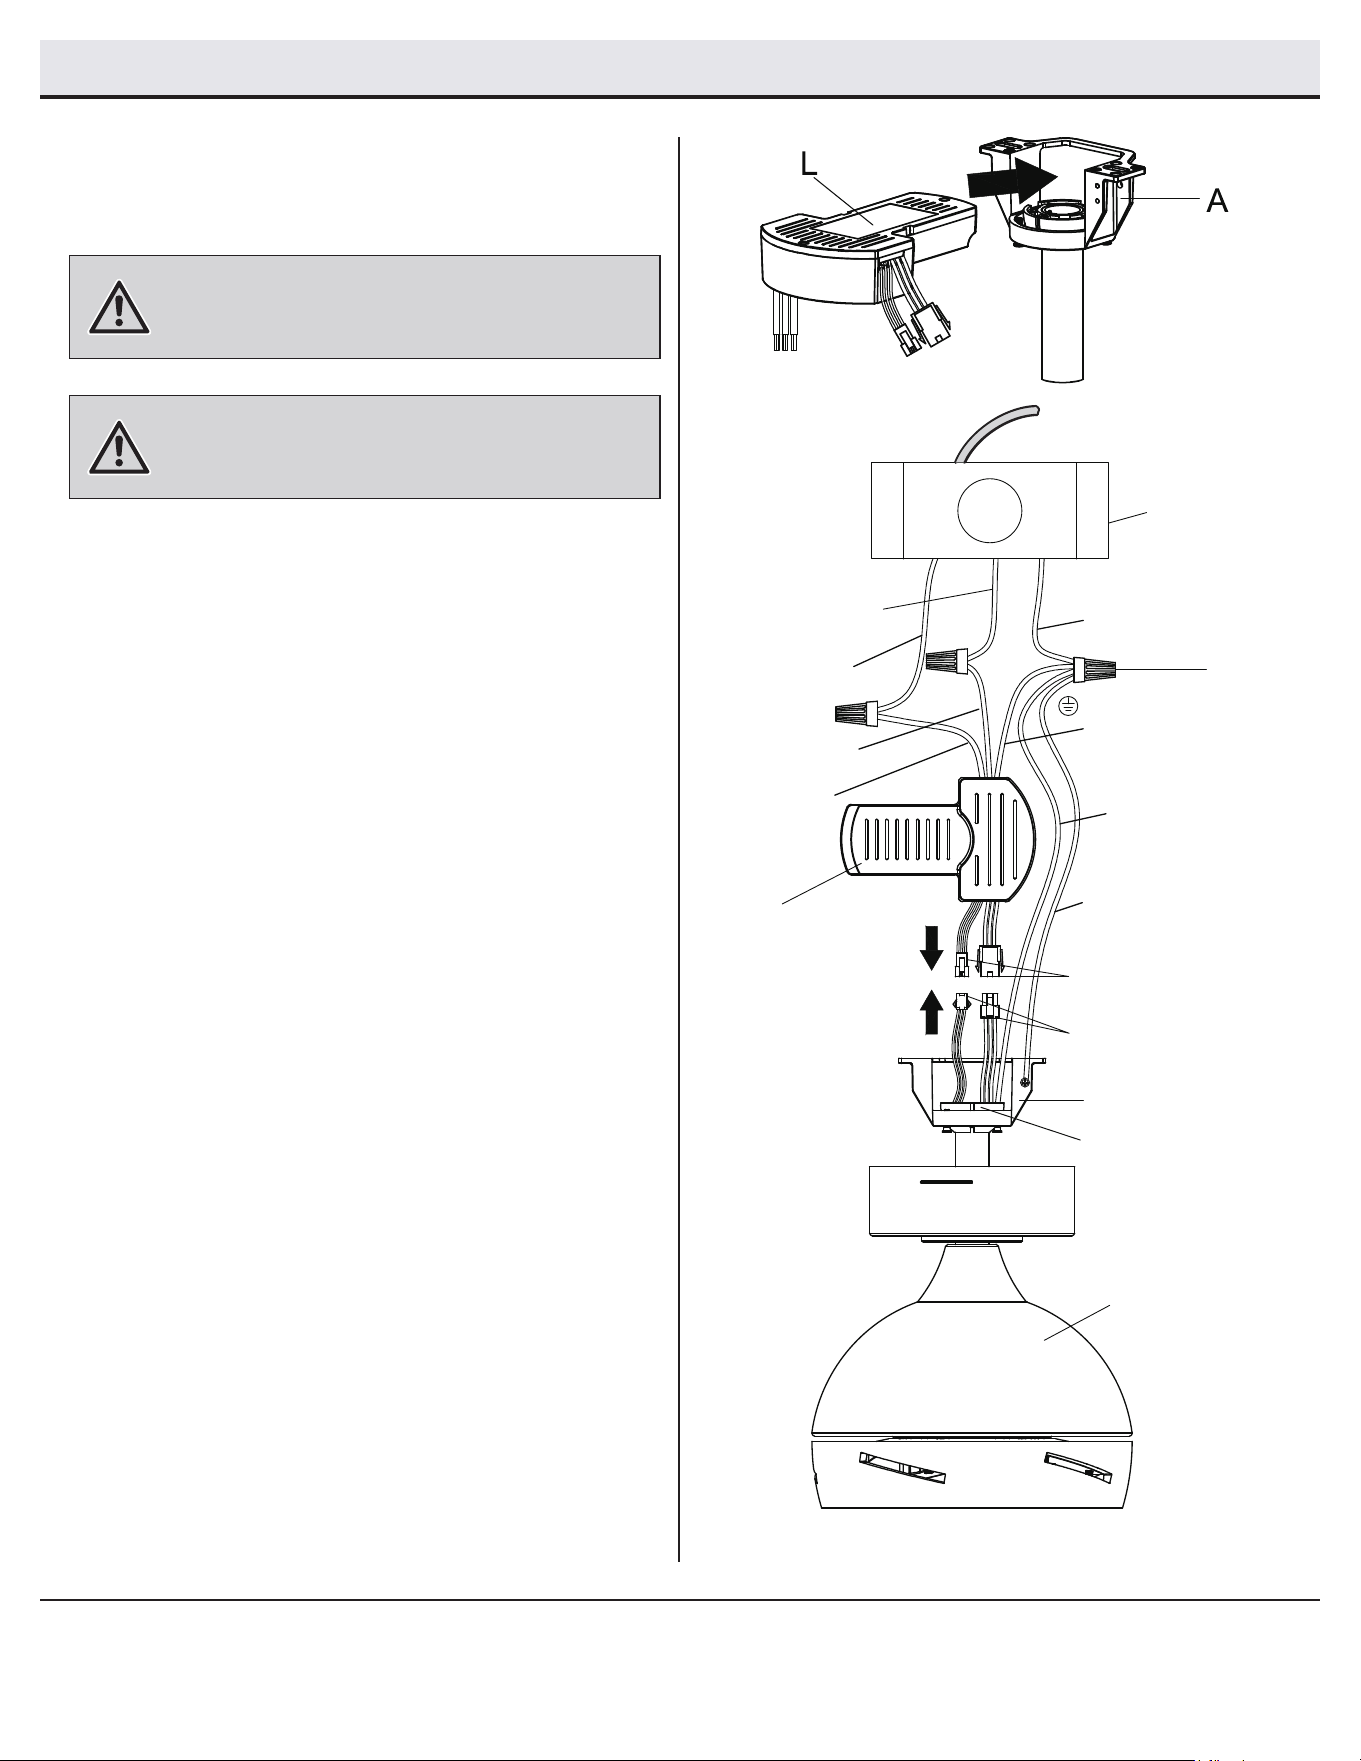
Figure 6
Figur
This side up
e 5
WARNING:
WARNING:
Follow the steps below to connect the fan to your house
supply wires. Secure the wire nuts (AA) supplied with the
electrical hardware by wrapping the connections with
electrical tape.
To avoid possible electrical shock, ensure the
electricity is turned off at the circuit breaker or main fuse box
before wiring.
Check to see that all connections are tight,
including the ground, and that no bare wire is visible at the
wire nuts, except for the ground wire.
□ Insert the receiver (L) into the mounting bracket (A ) with
□
□
□
□
□
□
Plug one lead wire of light (with 3P small male connector)
and one lead wire of fan (with 3P big male connector) to
the corresponding female connector on the receiver (L).
Connect the black (120V line voltage) wire from the outlet
box to the black wire from the receiver (L).
Connect the white (120V neutral voltage) wire from the
outlet box to the white wire from the receiver (L).
Connect the green (120V ground) wire from the outlet box
to the green wires from the hanger ball (D), mounting
bracket (A) and receiver (L).
Secure the wire connection with the wire nut (AA) provided
with the electrical hardware.
After connecting the wires, spread them apart so that the
green and white wires are on one side of the outlet box.
HOMEDEPOT.COM/Hubspace
5
Making the electrical connections
the at side of the receiver (L) facing the ceiling.
9
Assembly - Hanging the Fan (continued)
Please contact 1-800-986-3460 for further assistance.
120V Line
voltage-Black
120V Ground-Green
Receiver
Ground-Green
Hanger ball
Ground-Green
Mounting bracket
Ground-Green
Female Connector
Male Connector
AA
L
A
D
G
Fan Line
voltage-Black
Fan Neutral
voltage-White
120V Neutral
voltage-White
Outlet Box
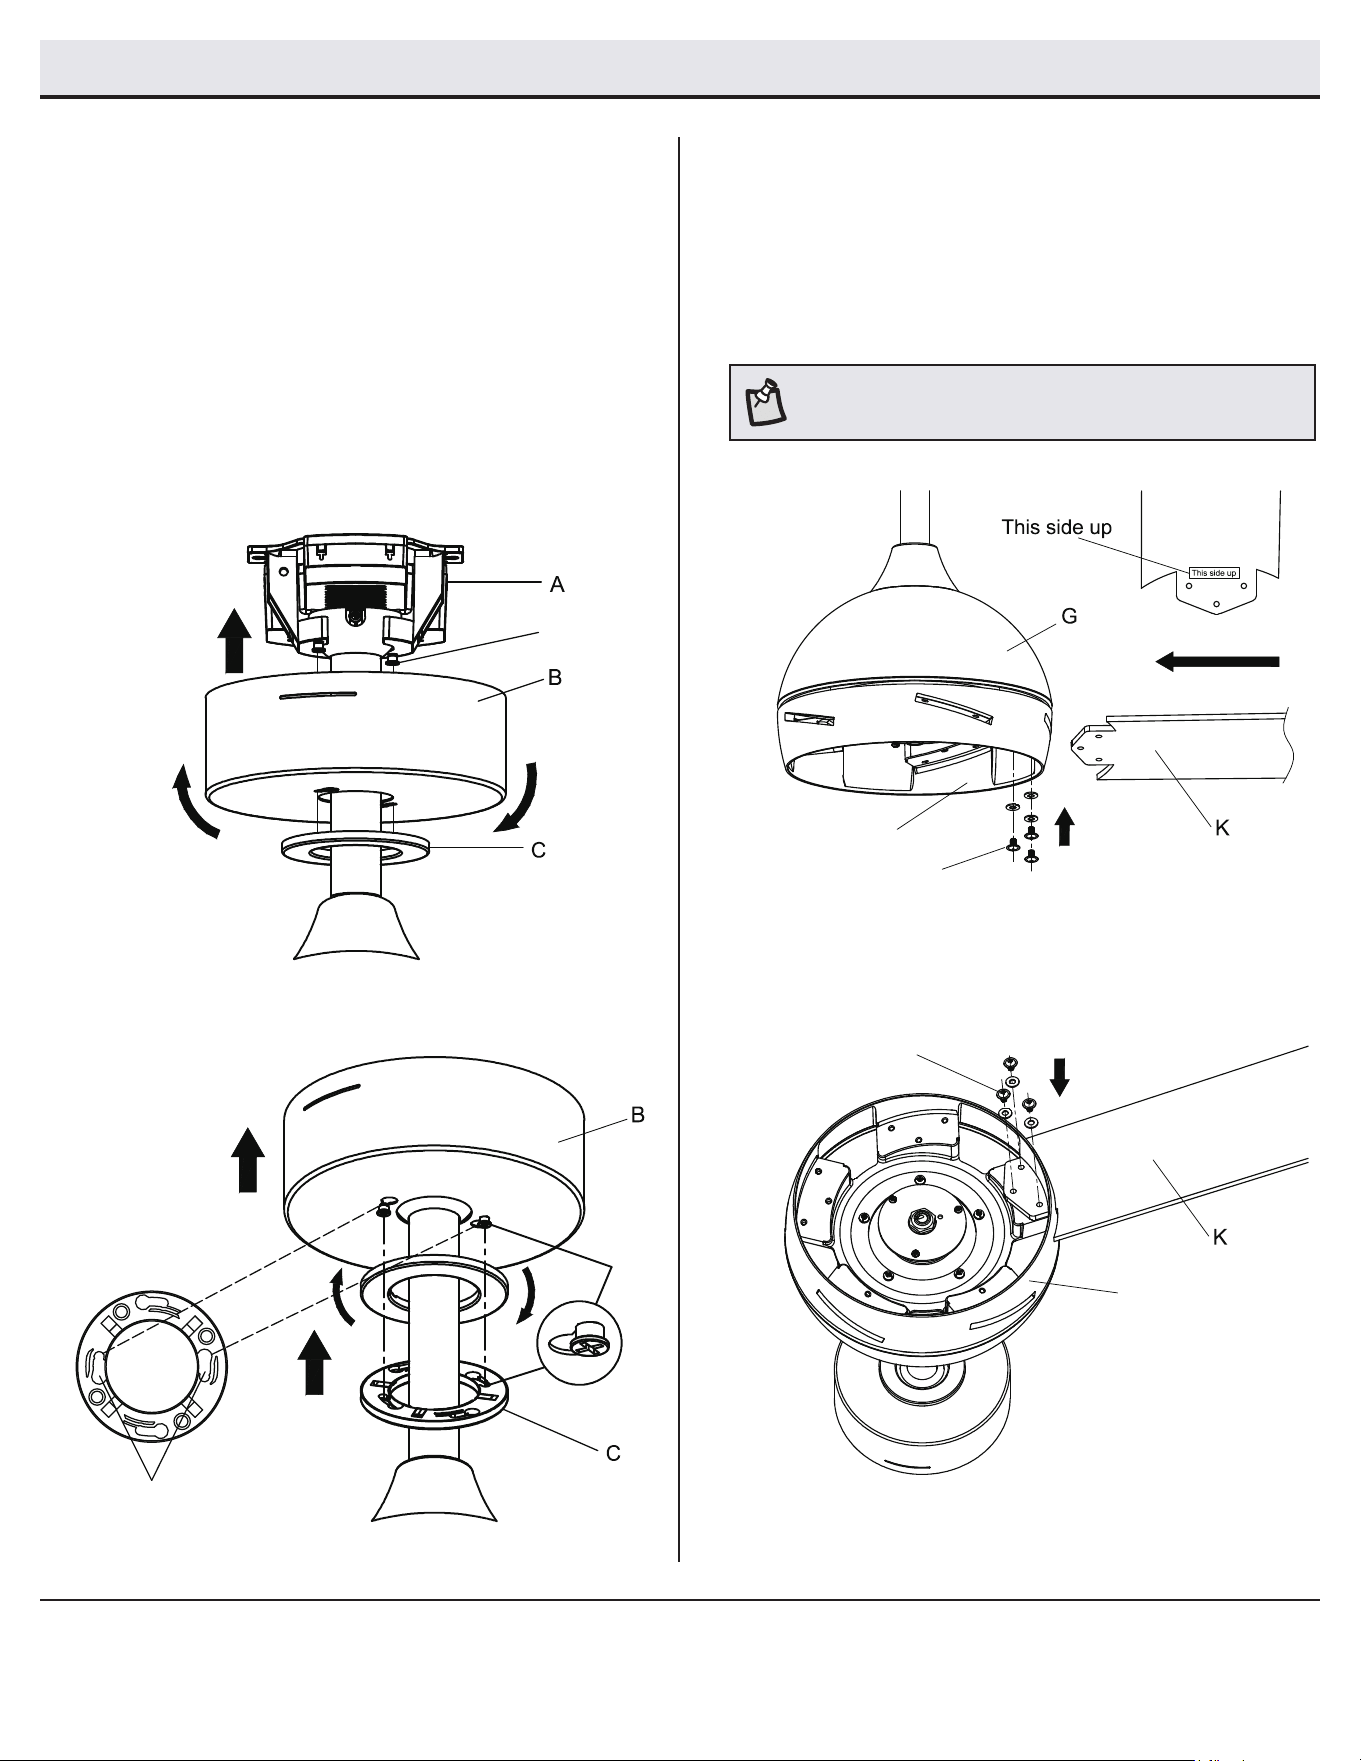
Figure 7
Securing the canopy to the mounting
bracket
6
Loosen two mounting bracket screws ( RR) away from the
mounting bracket (A) leaving about 3/4in. spacing.
Attach the canopy (B) key shape hole to the mounting bracket
screws (RR) previously unscrewed and clockwise rotate the
canopy (B) clockwise.
Tighten the mounting bracket screws (RR ).
Align the key holes on the inside of the canopy cover (C) with
the screws (RR). Push up the canopy cover(C) until the screw
(RR) heads engage to the key holes on the canopy cover (C),
and rotate the canopy cover (C) counterclockwise until it is
attached to the bottom of the canopy (B) tightly.
RR
□
□
□
□
10
Assembly - Hanging the Fan (continued)
The key shape
hole inside
Figure 8
SS
GG
SS
Install the blades
7
□
□
□
Remove all blade screws (GG) from the rotary plate (SS) of fan-motor
assembly (G).
Insert the blades (K) into holes of the rotary plate (SS) in place.
Reattach all blade screws through the blade washers and tighten
all screws to make sure the blades (K) are secure.
Figure 10
Figure 9
NOTE:
The blade with "this side up" label must face upwards,
otherwise it cannot be installed correctly.
GG
11
HOMEDEPOT.COM/Hubspace
Please contact 1-800-986-3460 for further assistance.
Figure 11
Assembly - Hanging the Fan (continued)
□
□
□
□
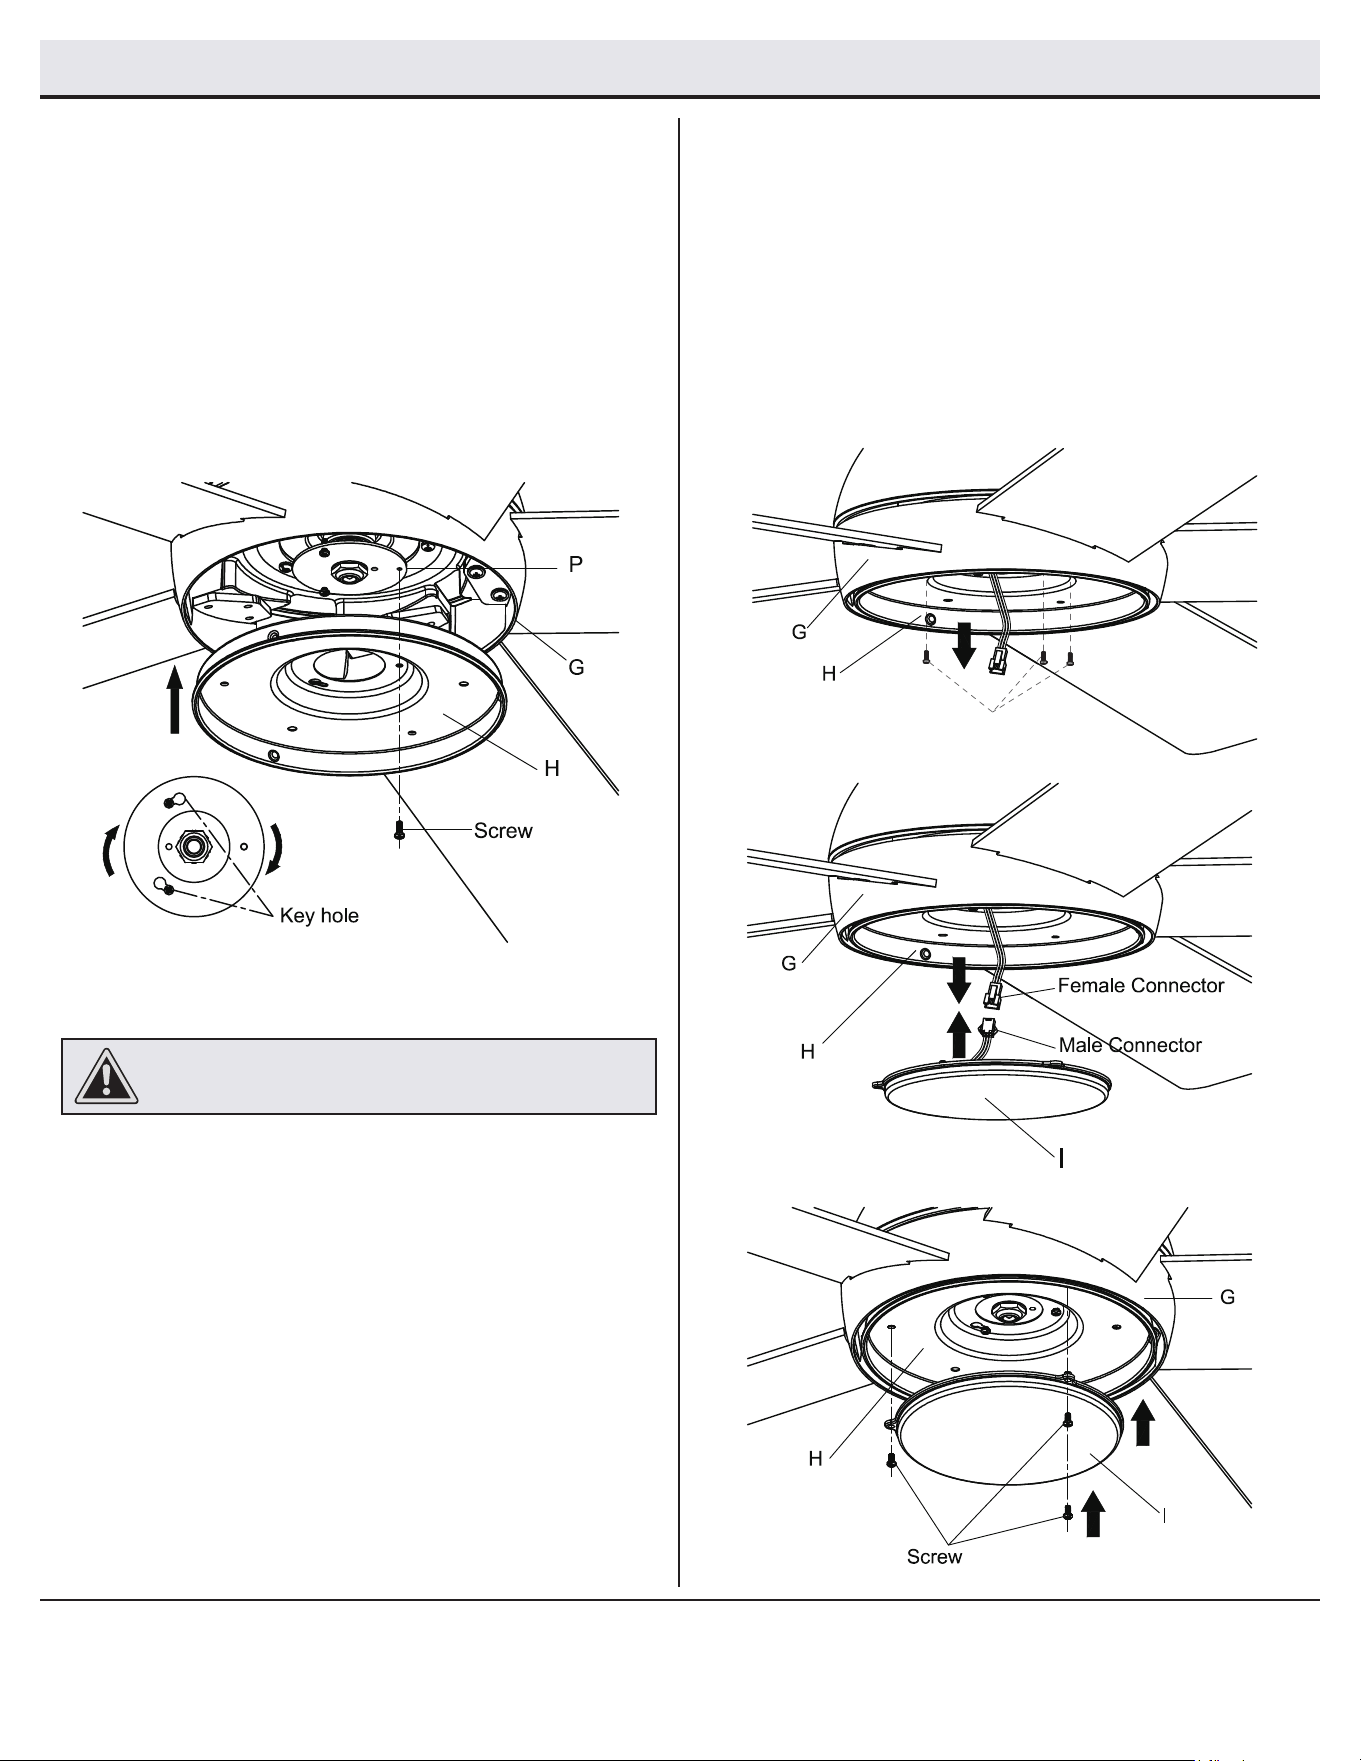
Remove one screw from the connecting plate (P) of fan-motor
assembly (G). And loosen the remaining 2 screws, leaving about
3/4in. space.
Locate the key holes of light housing(H).
Place two key holes of light housing (H) to the mounting screw
that was loosened on the connect plate (P).
Reattach 1pc screw through light housing (H) in place to the
connecting plate (P).
Tighten 3pcs screws until light housing (H) is secure.
□
□
□
□
□
□
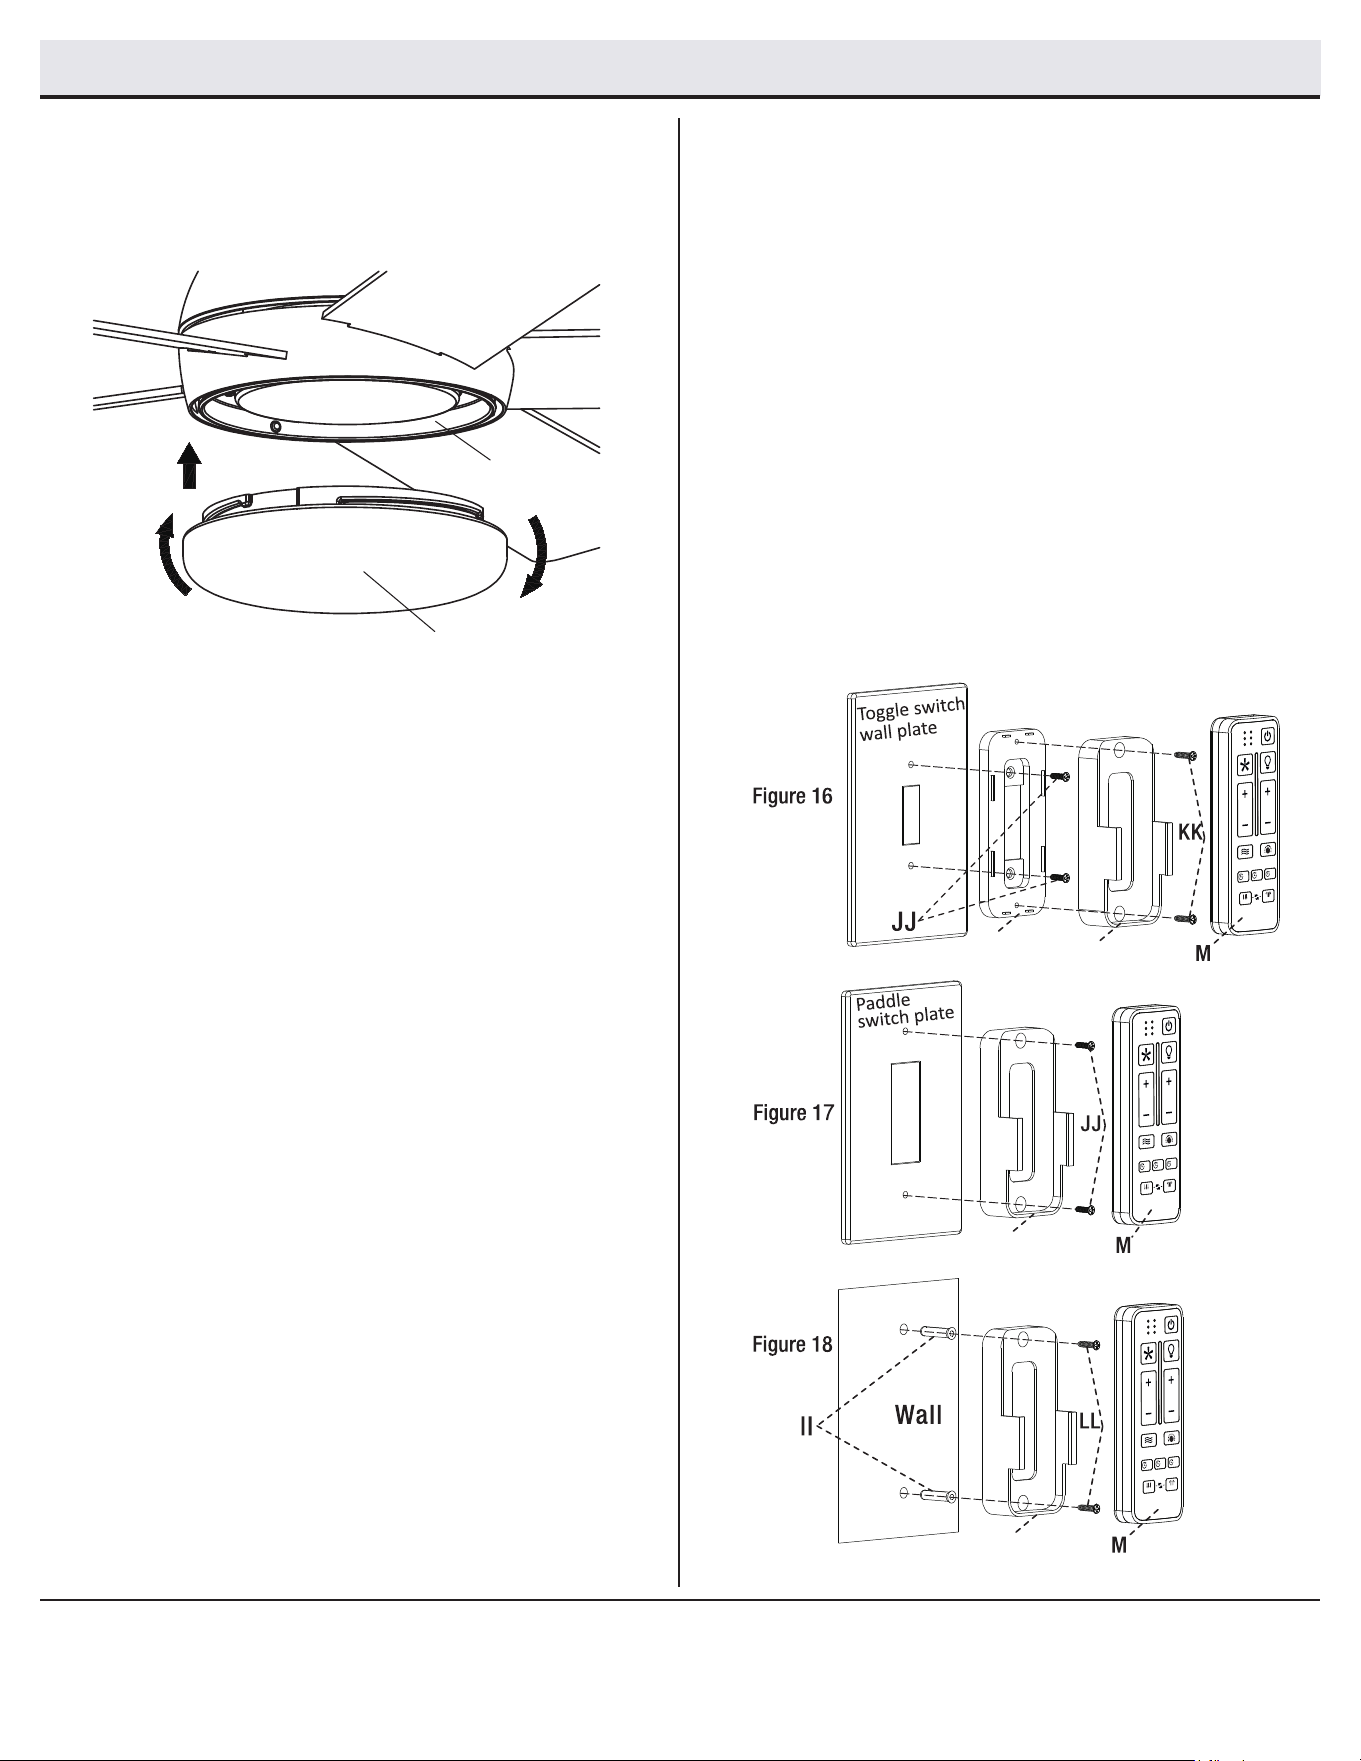
Remove 3pcs pre-installed screws from the inside of the light
housing pan (H). Figure 12.
Connect the male connector from the LED module (I) to the female
connector from the fan-motor assembly (G). Figure 13.
Locate 3pcs screw holes of LED module (I) in line with the screw
holes of light housing (H).
Reattach 3pcs screws through the screw holes of LED module (I).
Figure 14.
Tighten the screws until LED module (I) is secure.
Install the light housing Install the LED module
9
8
CAUTION: To reduce the risk of electric shock, disconnect the
electrical circuit to the fan before installing light kit.
Figure 12
Figure 13
Figure 14
screws
12
Figure 15
Assembly - Hanging the Fan (continued)
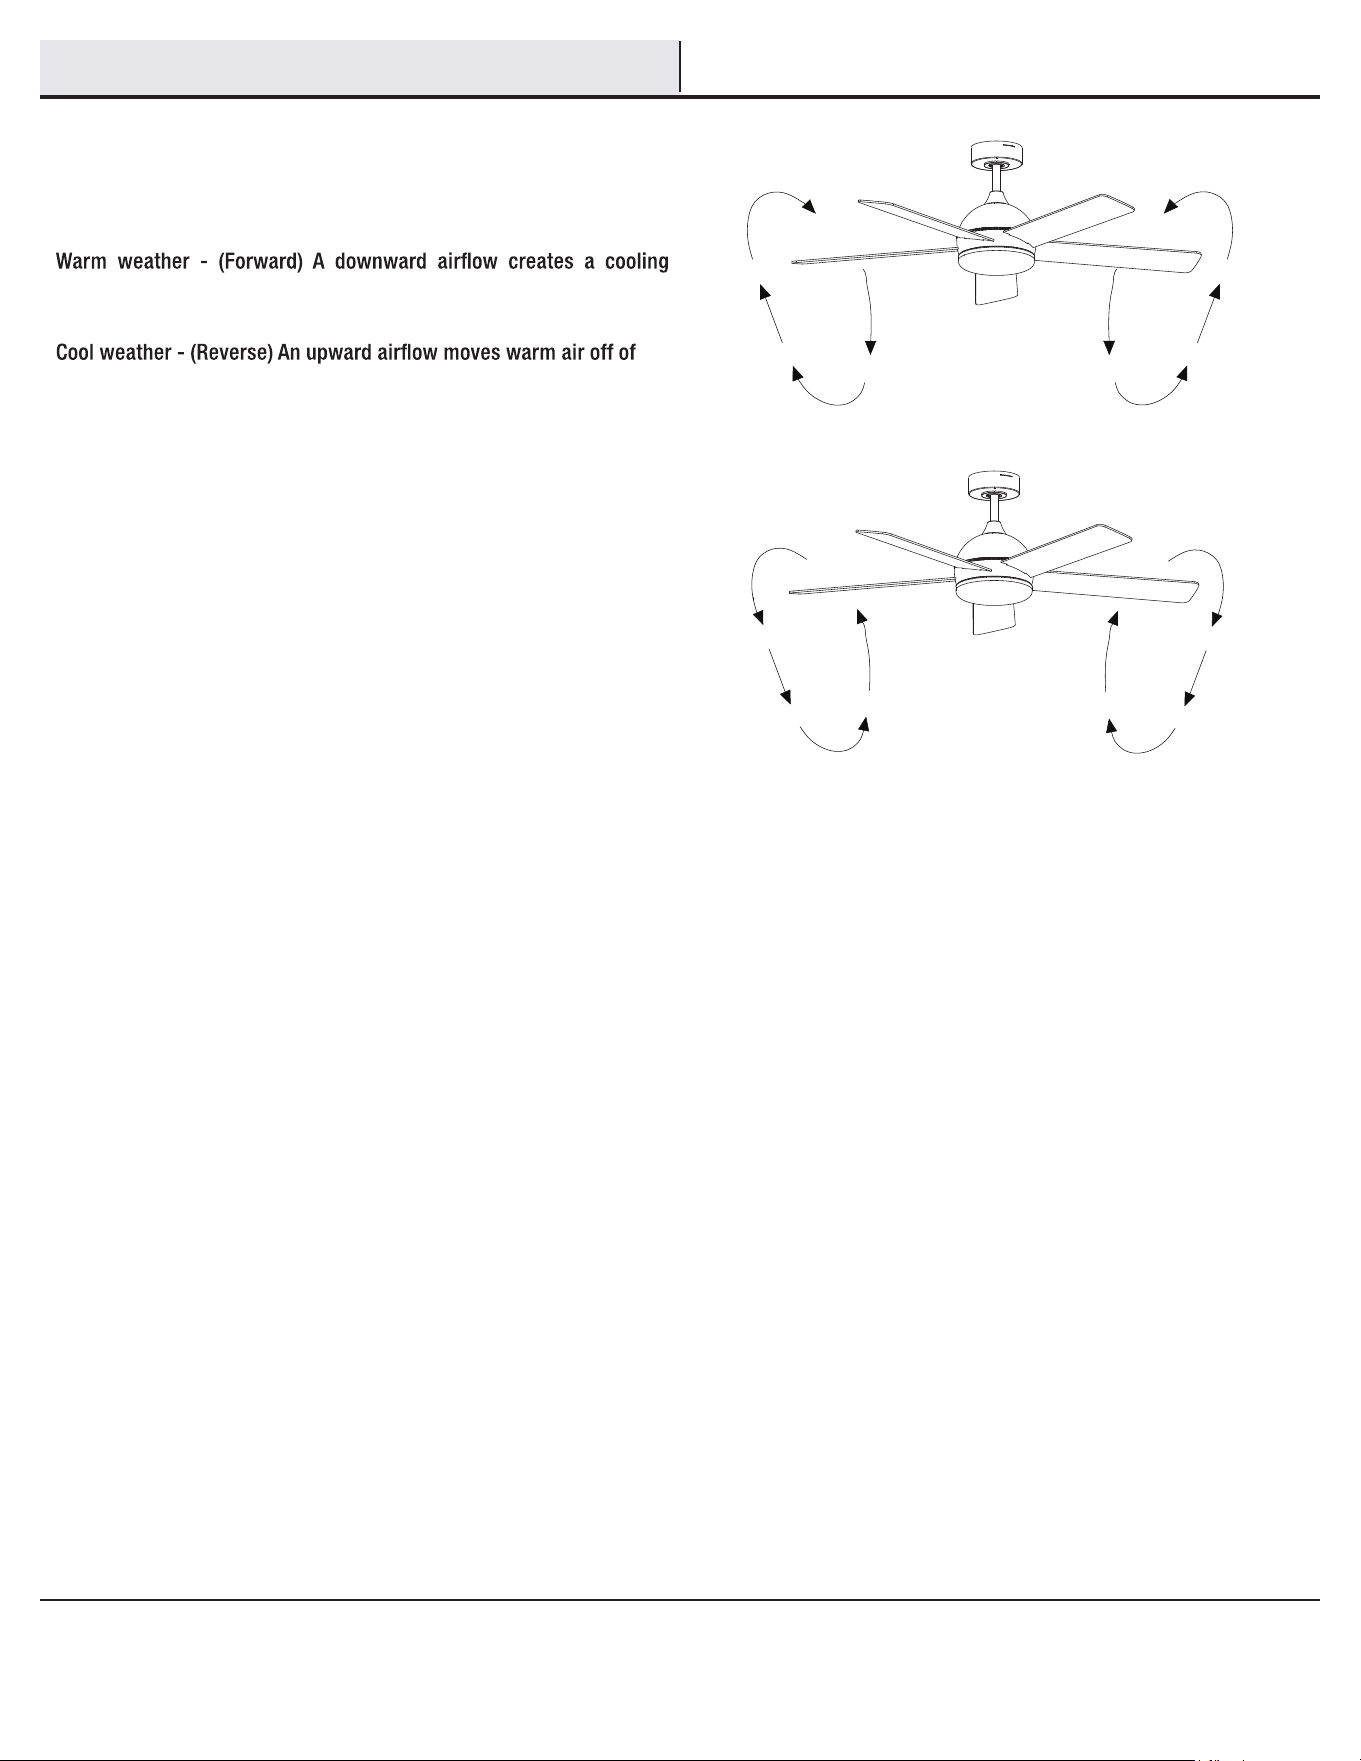
□ Rotate the Plastic shade (J) clockwise until it is secure. Figure 15.
Install the Plastic shade Mount the remote control cradle
11
10
□
□
Insert screws (JJ) through the remote cradle (O) into the Toggle
Switch screw holes and tighten each screw.
Insert screws (KK) through the remote holder plate (N) into the
remote cradle (O) and tighten each screw.
Install scenarios 1: Over Toggle Switch via screws Figure 16.
□
Insert screws (JJ) through the remote holder plate (N)into the
Paddle Switch screw holes and tighten each screw.
Install scenarios 2 : Over Paddle Switch via screws Figure 17.
□
□
Using the remote cradle (O) as a guide, mark the two holes locations.
Drill two holes at the marked locations and install two dry wall
anchors (II) in each of the marked locations.
Insert screws (LL) through the remote holder plate (N) into the dry
wall anchors (II) and tighten each screw.
Install scenarios 3 : Direct to Wall via screws and dry wall anchors
Figure 18.
N
O
N
N
H
J
BREEZE
COLOR TEMP.
TIMER
FAN DIRECTION
HOLD 3 SEC.
SUMMER WINTER
ON / OFF
ON / OFF
6 SPEED BRIGHTNESS
ALL
HR
2
HR
4
HR
8
BREEZE
COLOR TEMP.
TIMER
FAN DIRECTION
HOLD 3 SEC.
SUMMER WINTER
ON / OFF
ON / OFF
6 SPEED BRIGHTNESS
ALL
HR
2
HR
4
HR
8
BREEZE
COLOR TEMP.
TIMER
FAN DIRECTION
HOLD 3 SEC.
SUMMER WINTER
ON / OFF
ON / OFF
6 SPEED BRIGHTNESS
ALL
HR
2
HR
4
HR
8
13
HOMEDEPOT.COM/Hubspace
Please contact 1-800-986-3460 for further assistance.
Using the remote cradle (O) as a guide, mark the two holes locations.
Drill two holes at the marked locations and install two dry wall
anchors (II) in each of the marked locations.
Insert screws (LL) through the remote holder plate (N) into the dry
wall anchors (II) and tighten each screw.
Remote Operation
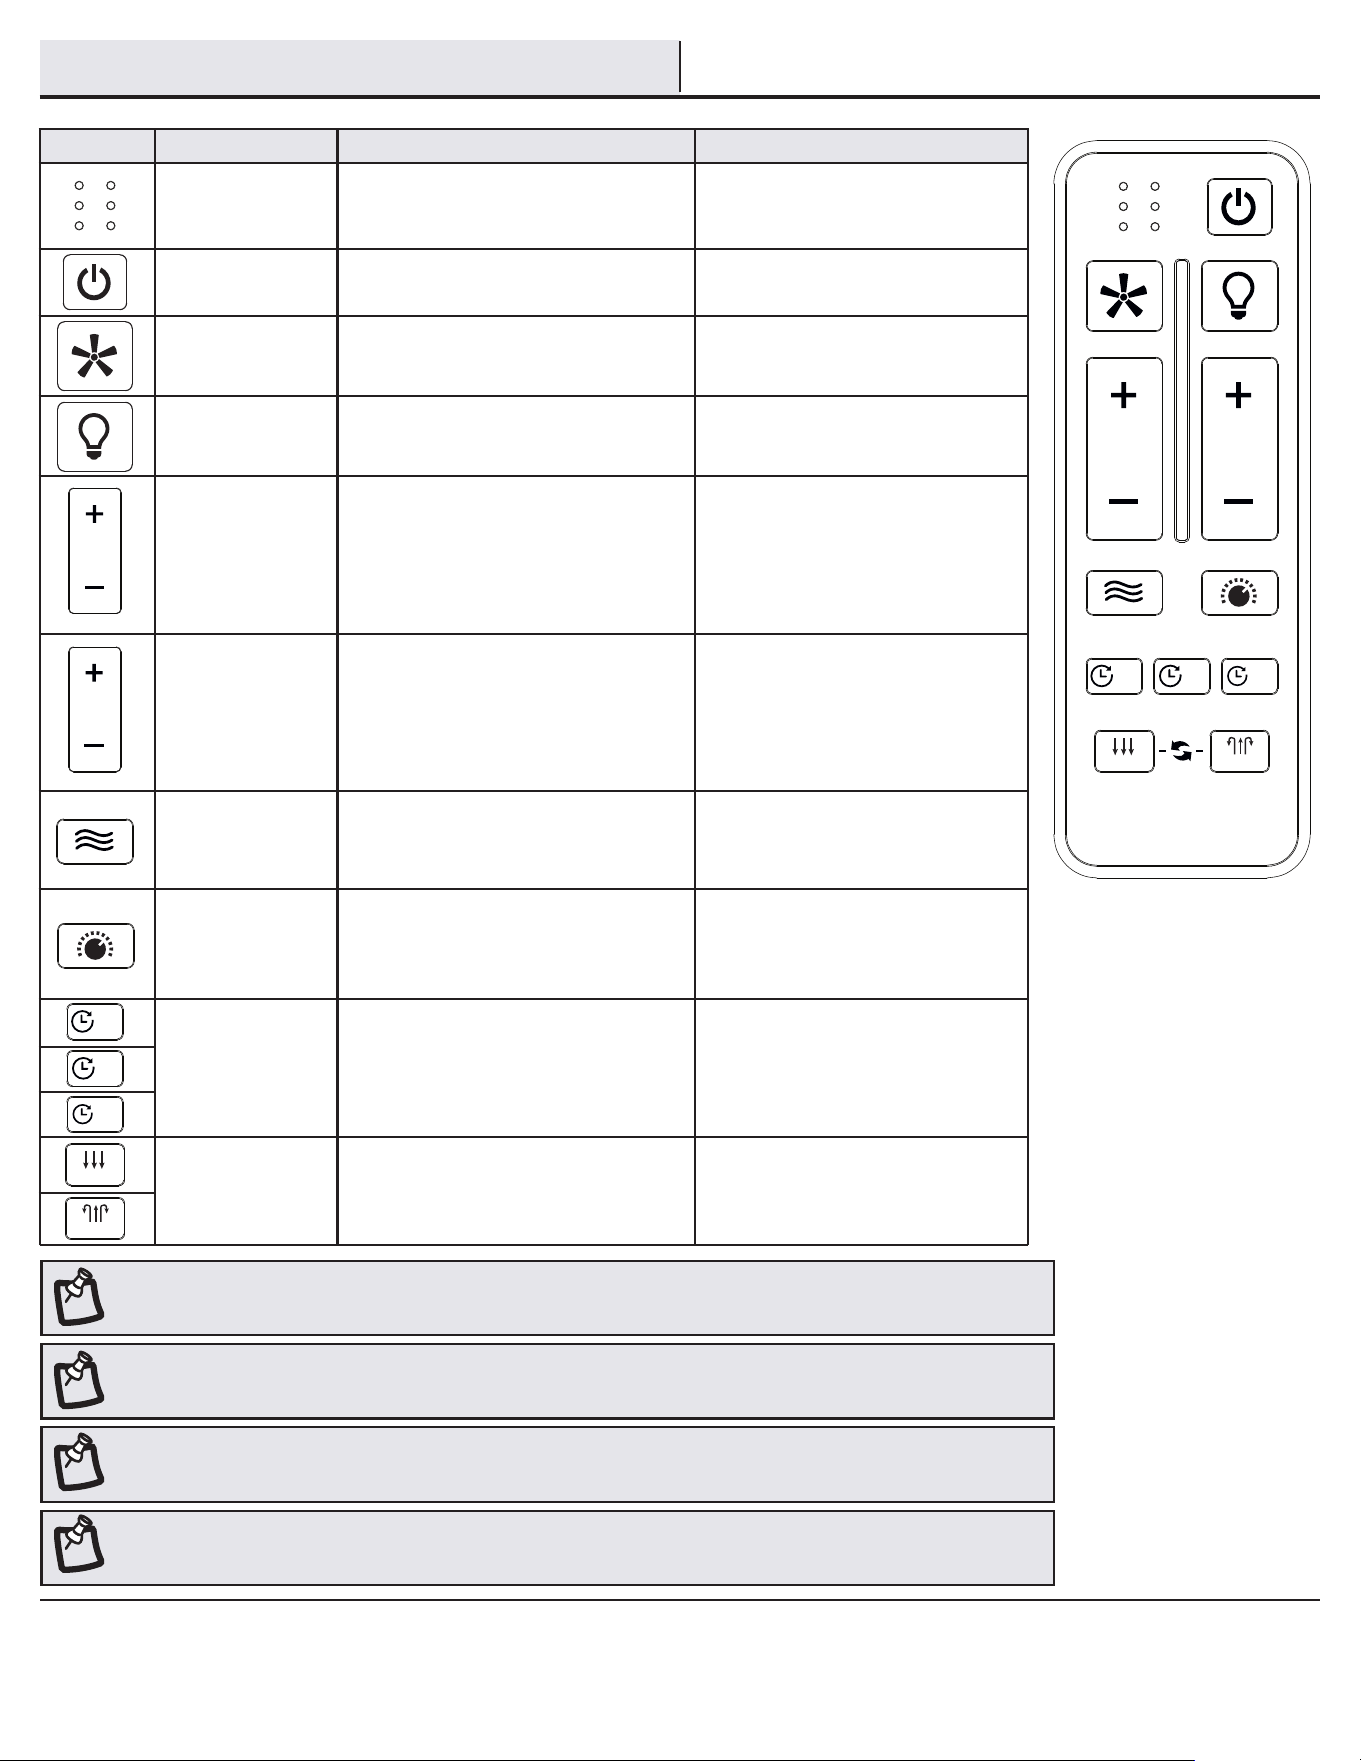
Warm weather
Cool weather
Remote control
Your fan is equipped with a remote control to operate the speed and
lights of your new ceiling fan.
effect. This allows you to set your air conditioner on a warmer setting
without affecting your comfort.
the
ceiling. This allows you to set your heating unit on a cooler setting
without affecting your comfort.
14
NOTE: Ceiling fan power on within 30 seconds, press and hold the light power button above 5 seconds to pair between
remote and ceiling fan or cancel the pairing.
NOTE: On start up your ceiling fan will oscillate back and forth. This is NORMAL OPERTATION for DC ceiling fan as it goes
through its calibration cycle. The fan is NOT DEFECTIVE.
NOTE: Press and hold the fan power button above 5 second to reset factory default setting, reset status will be closed
after 2 seconds. Factory default setting: 3000K, 100% brightness, fan foreward ,fan speed is level 6.
NOTE: Disconnect the power supply or wall control switch as a way to override intelligent or remote control.
Remote Operation
Icon Button Name Action Notes
Light ON/OFF
Short press to turn light on/off
Long press for 5 seconds to initiate
pairing process
The brightness and CCT will be
same as your last setting when
turned on.
Fan ON/OFF
If pressing while the light is off; the
light will turn on the last setting of
brightness and CCT.
The factory default is 100%.
Short press to adjust color
temperature
The default CCT is 3000K.
There are 6 color temperatures to
choose from: 2700K, 3000K, 3500K,
4000K, 5000K and 6500K.
Short press to turn the fan on/off
Long press for 5 seconds to reset factory
default setting
Brightness Change
Color Temperature
(CCT) Change
Fan Direction
Comfort Breeze
Short or long press to enter breeze
mode.
Long press for 3 seconds again to exit
breeze mode.
In breeze mode, the fan speed
will vary (increase or decrease)
automatically. The fan will not be set
to a xed speed in this mode.
Short press to select the desired timer
Long press for 3 seconds to cancel timer
The timer is set for the fan.
The default fan speed is level 6.
Fan Speed
Timer Buttons
6 Speed LED
Change the fan speed will light
up different quantity of indicators
All ON/OFF
Short press to turn the Fan and light
on/off
Short Press the button “+”to increase
fan speed
Short Press the button “-”to decrease
an speedf
Short Press the button “+”to increase
light brightness
Short Press the button“-”to decrease
light
Hold for 3 seconds to increase or
decrease light level at a smooth curve
brightness
Long press for 3 seconds to change
fan direction downward
Long press for 3 seconds to change
fan direction upward
BREEZE
COLOR TEMP.
TIMER
FAN DIRECTION
HOLD 3 SEC.
SUMMER WINTER
ON / OFF
ON / OFF
6 SPEED BRIGHTNESS
ALL
HR
2
HR
4
HR
8
6 SPEED
BRIGHTNESS
COLOR TEMP.
BREEZE
HR
2
HR
4
HR
8
SUMMER
WINTER
15
HOMEDEPOT.COM/Hubspace
Please contact 1-800-986-3460 for further assistance.
xxxx - xxxx
xxxx - xxxx
xxxx - xxxx
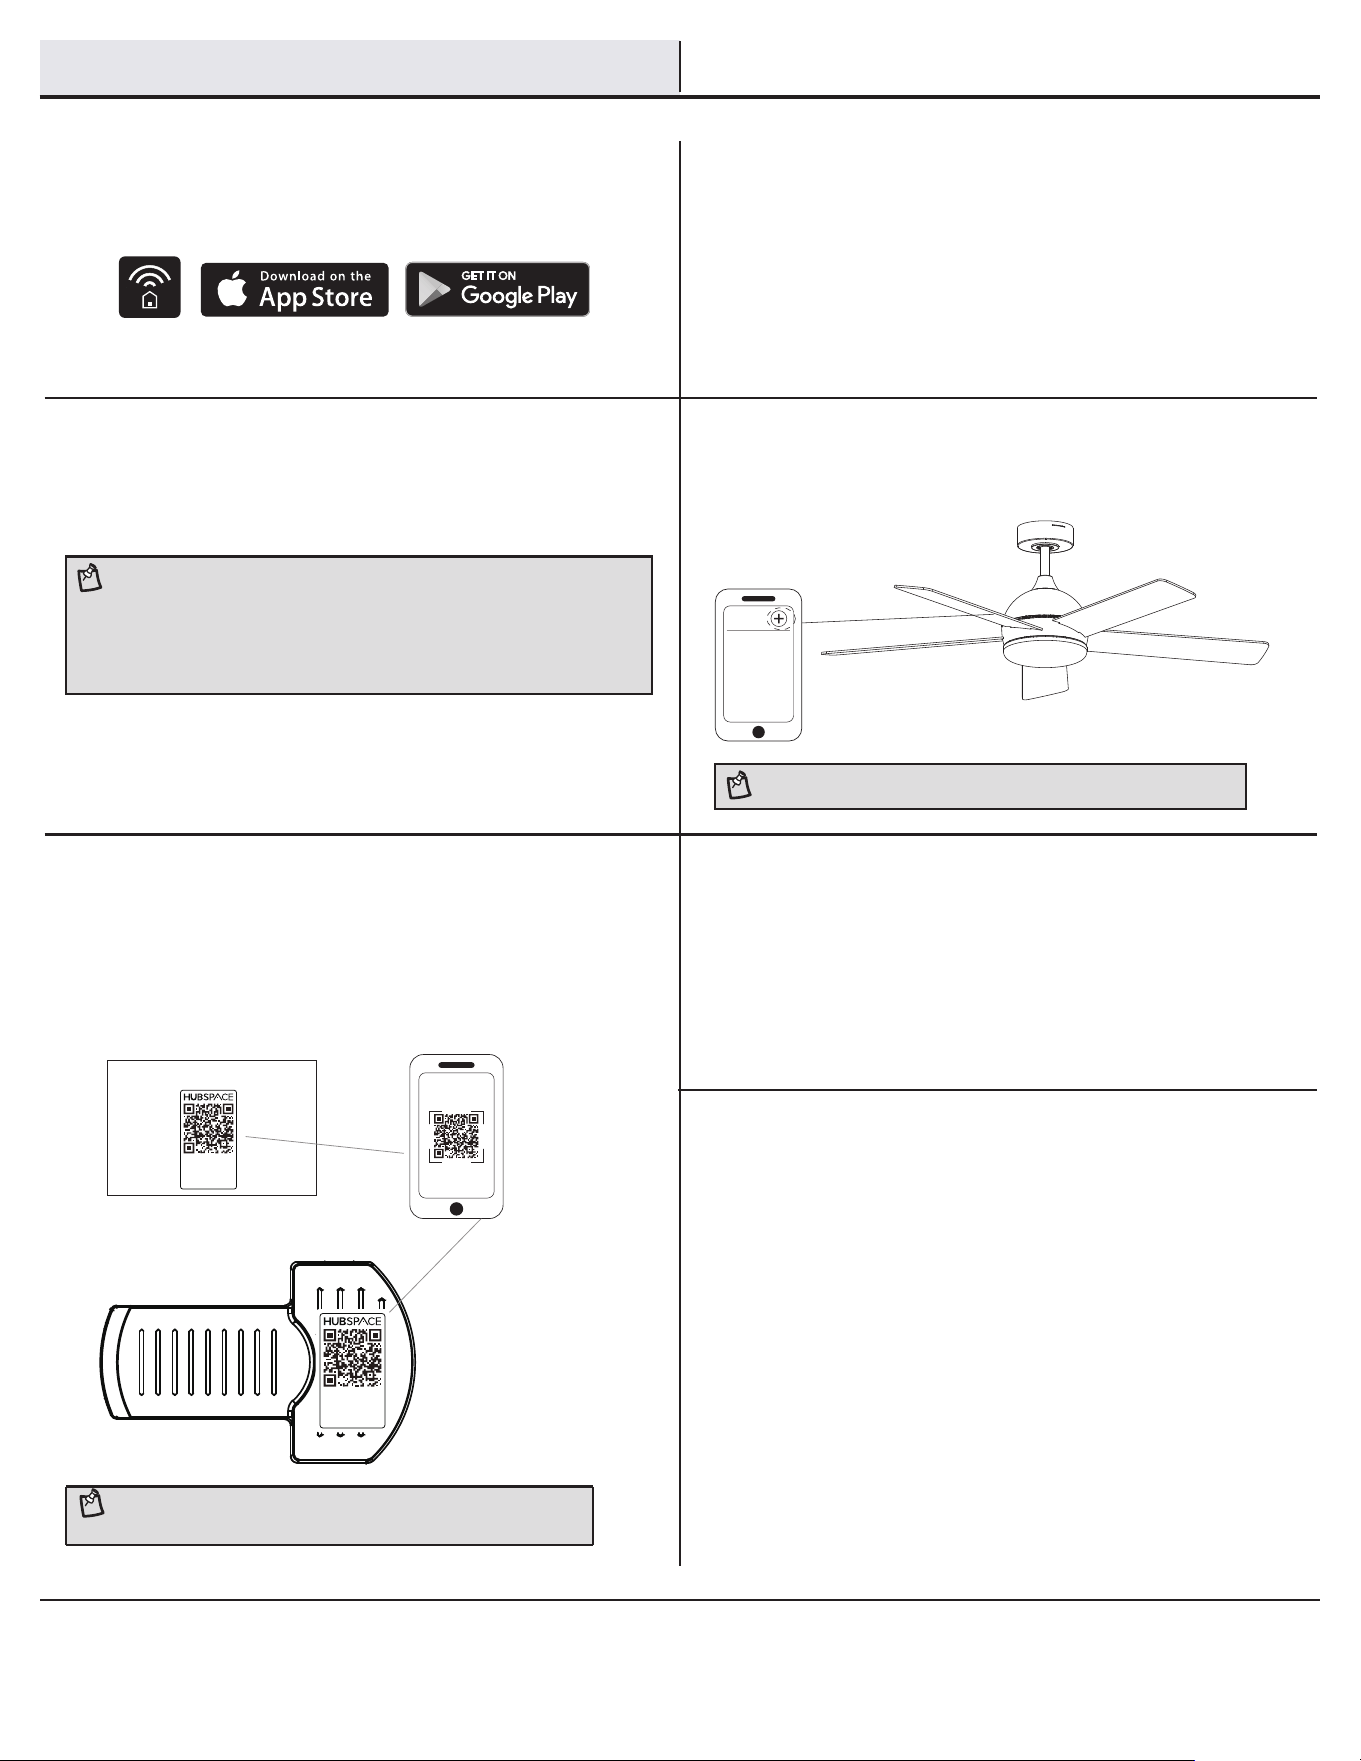
Download the Hubspace™ app from
1
the App Store or the Google Play
Create an account to sign in or log in
2
Store.
if you already have an account.
For more information on the Hubspace app,
visit hubspace.com/Hubspace.
Connect your ceiling fan to power
3
and follow the instructions on the
Tap the ‘+’ button in the upper right
4
app screen.
corner to add your ceiling fan.
Scan the QR Code Using Your Smart Ceiling Fan
5 6
□
Scan the QR code in the quick start guide or on
the ceiling fan. To scan the QR code on the
ceiling fan, diffuser needs to be removed.
Please follow step 1 in the Installations.
□
□
Turn your smart ceiling fan on or off from the Home
page on the Hubspace app.
To set a schedule or timer, tap the name of the
smart ceiling fan on the Home page. You will see
options for setting Schedules and Auto-Off Timers.
Set up your Voice Assistant
7
□
You can connect your smart ceiling fan to Google
Home and Alexa from the Hubspace app.
Or, you can sign in to Alexa app or Google Home
and connect to your Hubspace devices from there.
NOTE:If the QR code cannot be scanned, you can enter the
HUBSPACE APP QUICK START GUIDE
code manually. Tap Enter Code and follow the instructions.
NOTE:
□
This Hubspace device requires a 2.4GHz Wi-Fi channel.
Hubspace only shows Wi-Fi networks that your device can use.
□
If you do not see your Wi-Fi network name when you attempt to
connect your devices, please check your router settings or move
your product closer to your Wi-Fi router.
My Home
NOTE: Bluetooth access is required for device setup.
Smart Setup Operation
xxxx - xxxx
xxxx - xxxx
xxxx - xxxx
16
Voice Commands
Alexa
When you want to... Ask Alexa to...
Turn on the fan only. … turn on <device name> fan power.
Turn off the fan only. … turn off <device name> fan power.
Turn on the light only. … turn on <device name> light power.
Turn off the light only. … turn off <device name> light power.
Change the brightness. ... Set <device name> brightness to 100%.
… Set <device name> light to 10%.
… Make <device name> dimmer.
… Make <device name> brighter.
… Dim <device name>.
… Brighten <device name>.
… Dim <group name>.
… Brighten <group name>.
Change the White Temperature. … Change <device name> to Cool White.
… Change <device name> to Warm White.
… Change <device name> to Daylight White.
… Change <device name> to White.
Change the fan speed. … Set <device name> speed to fastest.
… Set <device name> speed to fast.
… Set <device name> speed to medium.
… Set <device name> speed to slow.
… Increase <device name> speed.
… Decrease <device name> speed.
Turn on Comfort Breeze. … Turn on Comfort Breeze on <device name>
When you want to... Ask Google to...
Turn on the fan only. … turn on <device name> fan power.
Turn off the fan only. … turn off <device name> fan power.
Turn on the light only. … turn on <device name> light power.
Turn off the light only. … turn off <device name> light power.
Change the brightness. ... Set <device name> brightness to 75%.
… Set <device name> light to 25%.
… Brighten <device name>.
… Dim <device name>.
… Brighten <room name>.
… Dim <room name>.
Change the White Temperature. … Change <device name> to Ivory.
… Change <device name> to Daylight.
… Change <device name> to Cool White.
… Change <device name> to Warm White.
... Change <device name> to Incandescent.
Change the fan speed. … Set <device name> speed to fastest.
… Set <device name> speed to fast.
… Set <device name> speed to medium.
… Set <device name> speed to slow.
… Increase <device name> speed.
… Decrease <device name> speed.
Turn on Comfort Breeze. … Turn on Comfort Breeze on <device name>
Google
The Ossa 52 in. LED Indoor Smart Color Changing Ceiling Fan works with Alexa and Google Assistant.
This section lists some of the voice commands you can use. To view these and other commands, go to http://hubspaceconnect.com.
□ Because of the fan’s natural movement, some connections may become loose. Check the support connections, brackets, and blade
attachments twice a year. Make sure they are secure. It is not necessary to remove the fan from the ceiling.
□ Clean your fan periodically to help maintain its new appearance over the years. Do not use water when cleaning, as this could damage
plating is sealed with a lacquer to minimize discoloration or tarnishing.
□ You can apply a light coat of furniture polish to the wood for additional protection and enhanced beauty. Cover small scratches with a
light application of shoe polish.
□ You do not need to oil your fan. The motor has permanently-lubricated sealed ball bearings.
WARNING: Make sure the power is off before cleaning
your fan.
Care and Cleaning
17
Troubleshooting
Problem Solution
The fan will not start. 1. Check to make sure the wall switch is in the on position if applicable.
2. Check the main and branch circuit fuses or breakers.
3. Make sure your device is connected to a power source.
4. Check the battery in the remote control, the transmitter and receiver are matched.
1. Make sure the fan was not damaged prior to installation.
2. Ensure the screws that attach the fan blade bracket to the motor hub are tight.
3. Ensure the hanging units are xed and tight.
4. Ensure the glass shade is secure.
5. Ensure the motor assembly does not contain any debris.
1. Due to different weight and density of blades, the blades cannot be replaced by other type or it will effect its
balance while working.
2. Ensure the screws that attach the fan blade bracket to the motor hub are tight.
3. Ensure the hanging units are xed and tight.
4. If the above are normal, you can adjust the device according to the guide of balancing kit.
The fan is noisy.
The fan wobbles
1. Check the power connection from the fan to the electrical power supply;
2. Check if the terminal from the LED module is connected properly.
3. Check if the LED Module is damaged.
Lighting source
is not working
Make sure no disturbance from same frequency controller, you may rematch the device according to guidance.
Ceiling fan is
uncontrollable by
remote device
This is normal start-up procedure for DC motor fans. The partial movement during start-up is the result of the DC
motor aligning the internal magnetic poles for proper motor operation. This design saves electricity and allows the
fan to operate much quieter than standard AC motor fans.
Fan moves backwards
and forwards when
turned on.
NOTE: Make sure the power is off before maintenance
NOTE: On start up your ceiling fan will oscillate back and forth.
The Balancing Kit should only be used if there is an unacceptable amount of fan wobble after completing all the steps in your Owner’s Manual
under "Attaching the Fan Blades."
1.Turn the fan on and set the speed control setting to a speed at which the wobble is the greatest.
2. Turn off the fan and allow it to come to a complete stop. Select one blade and place the balance clip on it, halfway between the blade holder
and the blade tip on the trailing edge of the blade.
3.Turn the fan on.Note whether the wobble has increased or decreased.Turn the fan off, move the clip to another blade, and retest.Repeat
this procedure on all blades noting the blade on which the greatest improvement is achieved.
4. Move the clip back to the blade that showed the greatest improvement.Move the clip inward and outward on this blade and operate the fan
to nd the position where the clip gives the greatest improvement.
5.Remove the clip and install a balancing weight to the top of the blade along the centerline near the point where the clip was positioned.
6.If the fan wobble problem has not been corrected you may wish to try to improve the balancing further by using the balancing clip and
additional weights.
The guide of balancing kit
This is NORMAL OPERATION for DC ceiling fan as it goes
through its calibration cycle. The fan is NOT DEFECTIVE.
HOMEDEPOT.COM/Hubspace
Please contact 1-800-986-3460 for further assistance.
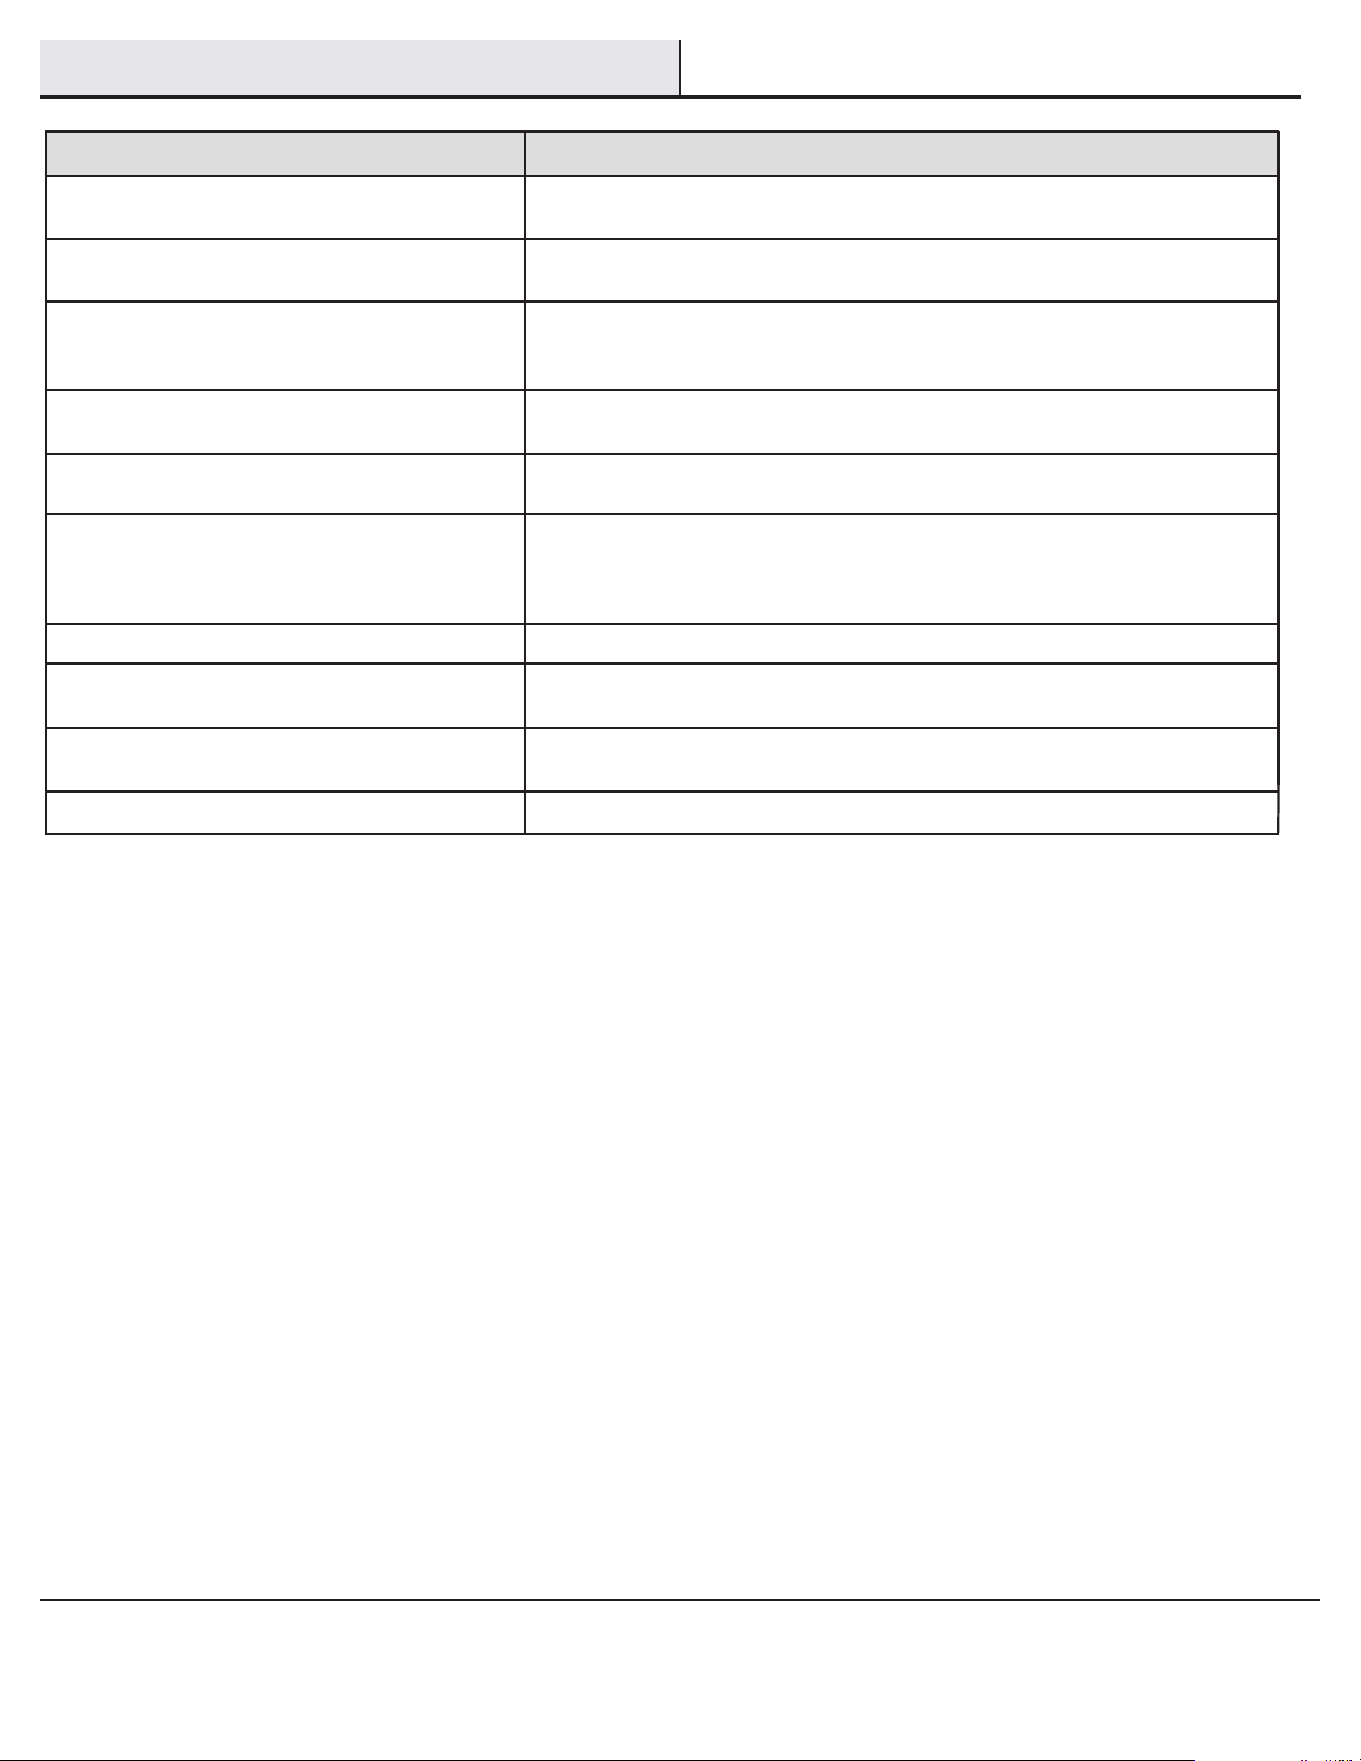
Problem Solution
My Hubspace device is not
connecting to Wi-Fi.
Make sure your device is connected to a power source. Your Internet
connection or Wi-Fi network may be down.
My device cannot nd any
Wi-Fi networks.
Make sure you have a 2.4GHz capable Wi-Fi network within range of the
device you are trying to add.
Yes. Use the app on a phone with an Internet connection like LTE. The phone
must be within Bluetooth range of your Hubspace device and have Bluetooth
enabled.
It is on the ceiling fan housing. A copy of the QR code is also included in your device’s
documentation.
Under the QR code are numbers. You can enter those in manually instead of
scanning the code.
1. Make sure the device is connected to power.
2. In the Hubspace app, tap +, then Add Device.
3. On the Scan Device screen, tap the Search button in the lower right corner.
4. Follow the onscreen instructions.
Scan the QR code and it will transfer to your account.
My device is in a location that
does not have Wi-Fi. Can I still
use it with the Hubspace app?
I cannot nd the QR code.
The QR code has become damaged. How do I add the
device?
I lost my QR code. How do I add a device?
The device is on another account. How do I transfer it?
Make sure your Wi-Fi signal strength is sufcient. You may need to move
your router, use mesh Wi-Fi, or Wi-Fi extenders.
My device is ofine for long periods of time.
Turn off Bluetooth on your phone and turn it back on. Then, scan the QR
code. If the problem persists, turn your phone off and on, then try again.
The device is on and I scanned the QR code, but the
app cannot connect to it.
No. Each product has a unique QR code.Can I scan the same QR code to add multiple products?
Troubleshooting
18

Questions, problems, missing parts? Before returning to the store,
call Home Decorators Collection Customer Service
8 a.m. - 7 p.m., EST, Monday-Friday, 9 a.m. - 6 p.m., EST, Saturday
1-800-986-3460
HOMEDEPOT.COM/Hubspace
Retain this manual for future use.