User Manual
A23
support.it@tomzontoys.com
support.es@tomzontoys.com
support.jp@tomzontoys.com
support.de@tomzontoys.com
support.fr@tomzontoys.com
support.uk@tomzontoys.com
Email: [email protected]
Web: www.tomzontoys.com
FB: www.facebook.com/tomzonofficial
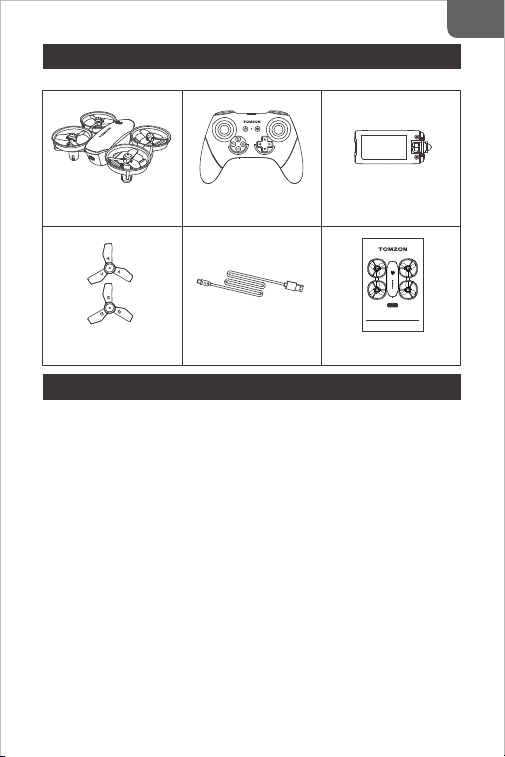
Pack List
Safety Reminder
Drone
Propeller (A / B) USB Charging Cable User Manual
Remote Control Battery
01
User Manual
A23
support.it@tomzontoys.com
support.es@tomzontoys.com
support.jp@tomzontoys.com
support.de@tomzontoys.com
support.fr@tomzontoys.com
support.uk@tomzontoys.com
Email: [email protected]
Web: www.tomzontoys.com
FB: www.facebook.com/tomzonofficial
EN
1. It is prohibited to use any type of unmanned aerial vehicle (UAV) within the
area centered on the airport runway with a radius of 5,000 meters to
ensure that the electromagnetic environment requirements for aviation
radio are met. When radio control instructions are issued by the relevant
national competent authorities, remote control equipment and UAVs shall
not be used.
2. Please use the UAV indoors or in a warm, sunny, and windless outdoor
environment. Use is prohibited under high temperature, low temperature,
strong wind, thunderstorm, and other harsh weather conditions.
3. Users shall use the toy with caution, as skill is required to control flight and
avoid collisions with the user, objects, or third parties. Ensure the required
flight space/area is free of obstacles (whether used indoors or outdoors),
and that the toy remains within the line of sight of the operator at all times,
within the maximum operating distance.
4. After the UAV is activated, do not touch high-speed gears, propellers, or
other components. Avoid loose clothing or hair from being entangled in
the rotor blades, and never fly the UAV near the face.
5. It is recommended that adult supervisors instruct children on how to safely
operate and fly the toy.
6. It is recommended to retain the user manual.
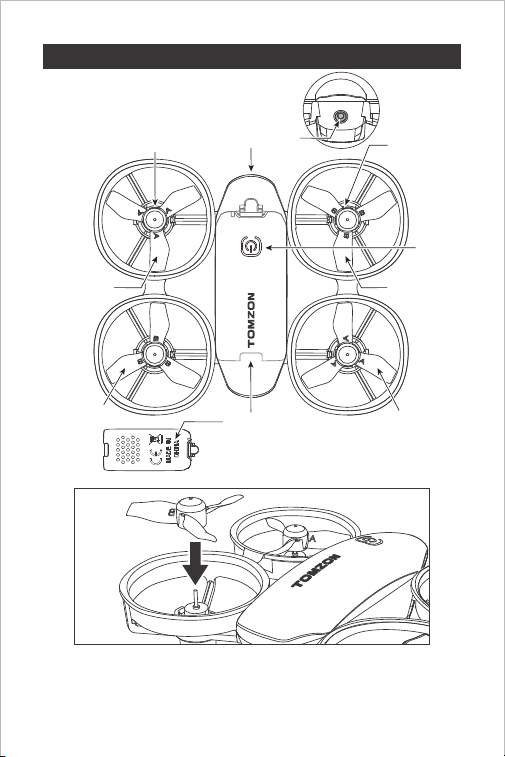
Tips:
The aircraft has two types of propellers (“A” and “B”) marked A and B.
Please match the Mark “A” or “B” while replacing the propeller.
Product Description
Drone
Power
Switch
Indicator Light
Propeller A
Propeller A
Forward Motor
(Correspond to Propeller A)
Tilt Motor
(Correspond
to Propeller B)
02
Battery
Propeller B
Propeller B
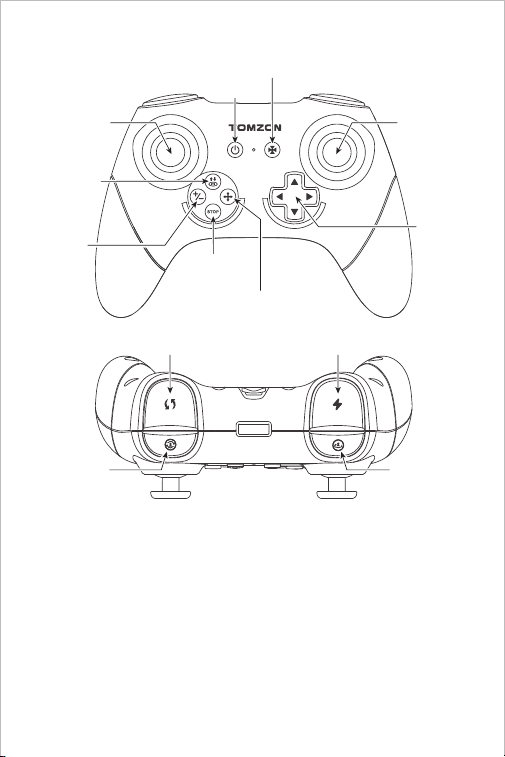
Tips:
The drone supports two control modes: Mode 1 and 2.
Note:
Mode 1 is the default setting. Please press “Set speed” button and turn
on the remote control to switch to Mode 2. Take Mode 1 for example to
introduce the control method of the drone.
Mode 1: Use the left joystick to make the drone fly up / down, rotate
left / right; use the right joystick to make the drone up / down /
left / right.
Mode 2: Use the left joystick to rotate to the front / rear / left / right; use
the right joystick to make the drone fly up / down / left / right.
Remote Control
03
Left
Joystick
Right
Joystick
Speed
Switch
Headless Mode
Emergency
Stop
One-button
Takeoff /
Landing
Power
Calibrate
360° Rotation
Rotation
WASD
Fine-
tuning
Light On / Off
Orbit Flight
Note:
1. Please use the original charger for charging. Do not use other chargers.
2. Keep the battery away from high temperature, open fire or electric
heater; otherwise, damage or explosion may occur.
3. If the product is long idled, please charge it bi-monthly to keep the
battery in active condition.
4. Do not charge the battery on carpets, and other flammable items to
avoid fire.
Battery
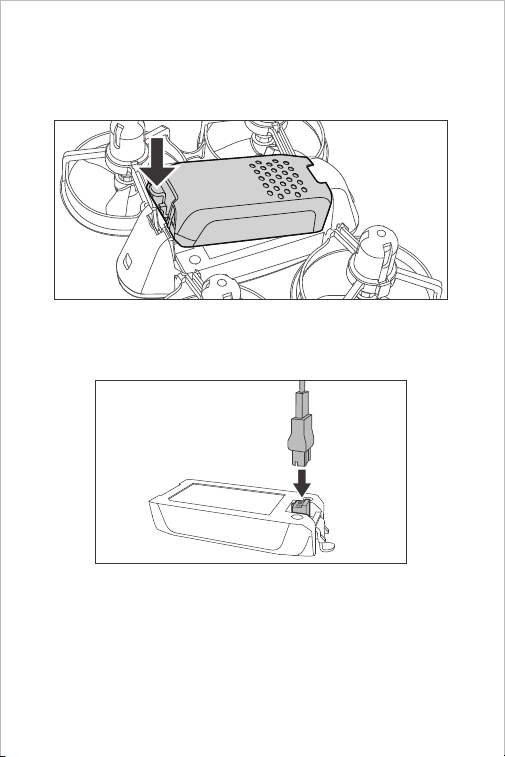
Battery Installation and Charging
1. Place the battery in the drone and buckle it as shown in picture below:
2. Recharge the battery as shown in picture below:
USB charger indicator turns red during charging. Once charging is
done, the charger indicator turns off.
04
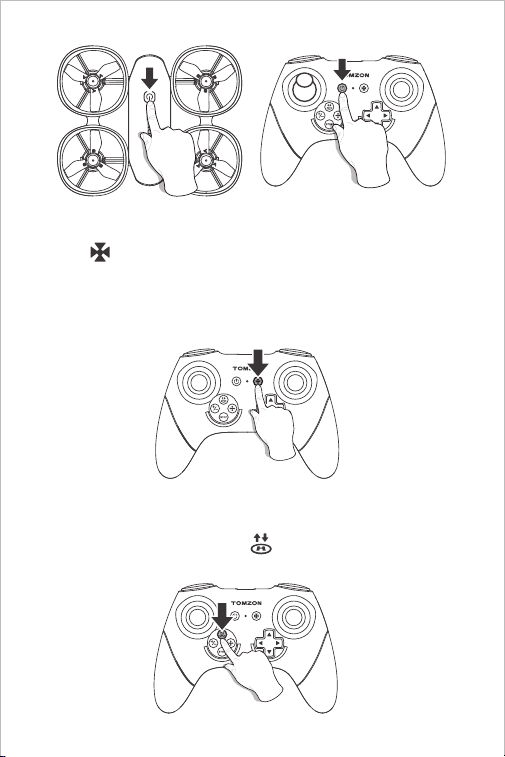
1. Long press the power button on upper cover to turn on the drone
and indicator flashes; then place the drone on a horizontal ground.
2. Turn on the remote control and it pairs the drone automatically. The
pairing is complete when the remote control beeps. At this time, the
Indicator lights of the remote control and the drone are always on.
Quick Start
Frequency Match
05
Tips:
1. Please ensure that the batteries of the drone and remote controller
are fully charged before flight. Otherwise, the drone cannot take off
in low-battery mode.
2. Different types of batteries, such as acidic batteries and alkaline
batteries, or new and old batteries must not be mixed. Batteries
should be installed according to the correct polarity.
3. The supporting power supply or battery charger should be inspected
regularly to check whether there is damage to the power cord, plug,
shell or other components. If any damage is found, it must not be
used continuously until the fault is repaired.
4. Non-rechargeable batteries must not be recharged.
5. Rechargeable batteries can only be recharged by persons aged 8 or
above. Rechargeable batteries should be removed from the toy
before charging.
6. Please remove the battery when the drone is left unused for a long
time, and exhausted batteries should also be removed.
7. The power terminals must not be short-circuited.
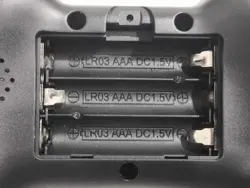
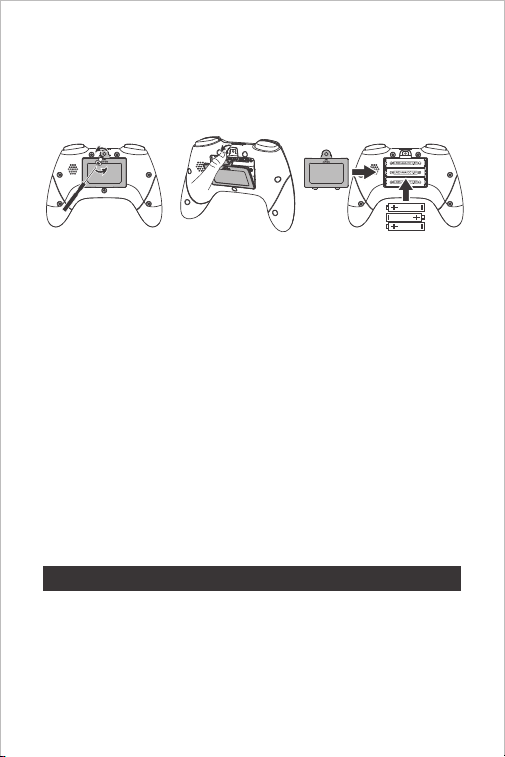
Battery Installation of Remote control
Use a screwdriver to remove the screws of the battery compartment
cover,Open the battery cover of remote control and install 3 AAA
batteries (not included in the packaging) as shown in picture below:
Step 1 Step 2
Takeoff and Landing
Method 1
Press “ ” (calibrate button) to start calibration. The indicator light
flashes rapidly during calibration and after the calibration is completed,
the indicator light is always on.
When drone falls, please calibrate it again (place the drone on
horizontal ground during calibration).
Calibration
As shown in picture below, press “ ” (one button takeoff / landing)
to take off (when drone takes off, press this button to land).
06
Unlock Takeoff / Landing
Tips:
The motor should only be stopped in case of emergency to
reduce the risk of damage.
Flight
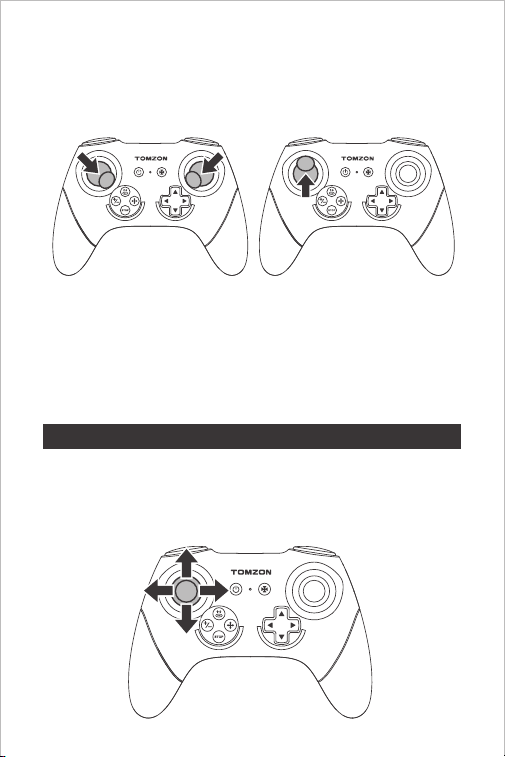
Note: Take remote control Mode 1 for example.
Use the “left joystick” to control the height and rotation of the drone
during flight.
High Speed and Rotation
Emergency Stop
Method 2
In case of emergency, press and hold the "STOP" button for 1 second,
the drone stops working and falls.
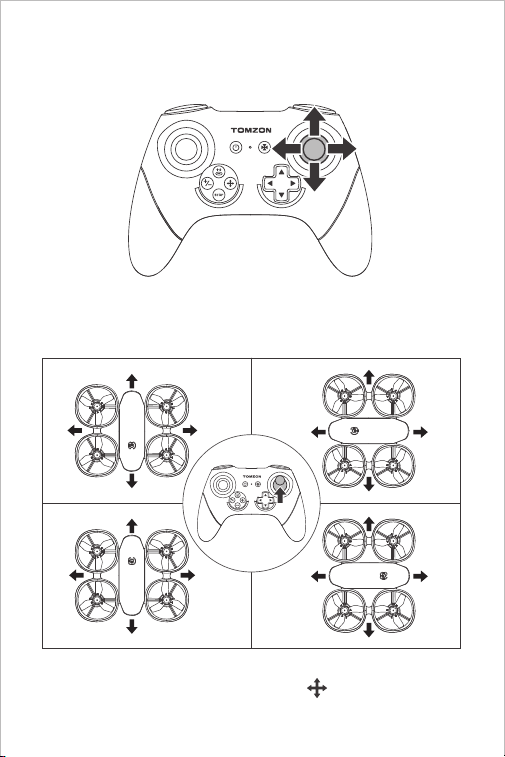
As shown in picture below, push both joysticks simultaneously to
unlock the drone, then push the left one upwards to take off (after the
drone takes off, push the right one downwards to land).
07
Tips:
The default is head-on mode, please press “ ” (headless mode
button) to switch to headless mode.
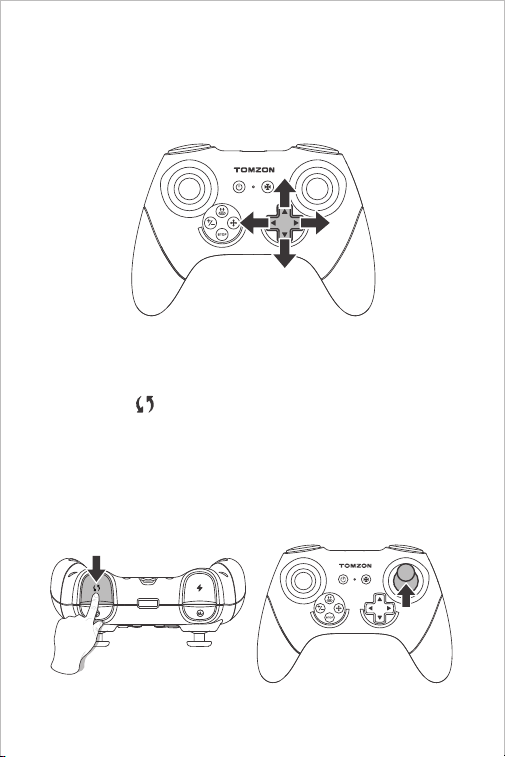
Use “right joystick” to control the left / right direction during flight.
Front / Rear, Left / Right
The drone flies at a fixed direction and does not change with the
direction of the drone, as shown in picture below:
Headless Mode
08
Front
Front
Rear
Rear
Right
Right
Left
Front
Rear
RightLeft
Left
Front
Rear
RightLeft
09
Tips:
To make the drone rotate in the other direction, push the right joystick
to the other direction in Step 2.
If the drone is tilted to certain direction, instead of a stable state, press
the fine-tuning button after takeoff to the opposite flight direction to
reach the stable state.
Fine-tuning
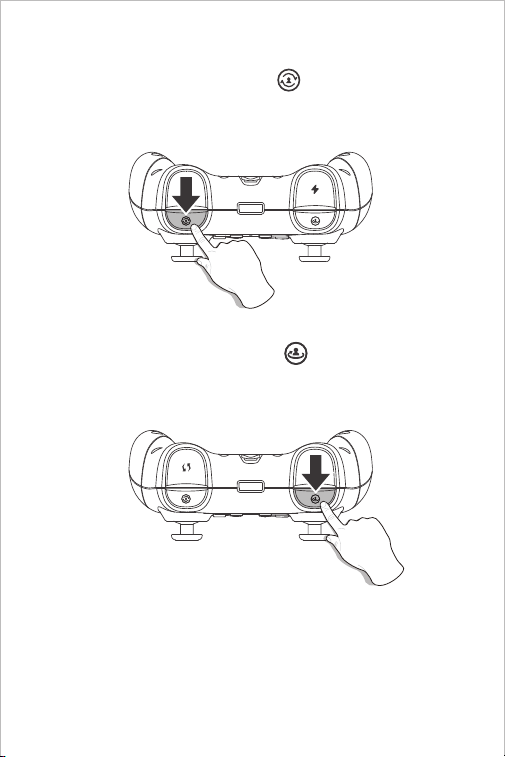
3D Rotation
Step 1: Press “ ” (rotate button) to enter the rotation mode and the
remote control beeps continuously.
Step 2: Push the right joystick upwards and the drone immediately
rotates forward 360°.
Aerobatic Flight
Step 1 Step 2
10
Tips:
1. In this mode, only the up / down process of drone can be controlled.
2. The drone exits this mode automatically when you push the right
joystick.
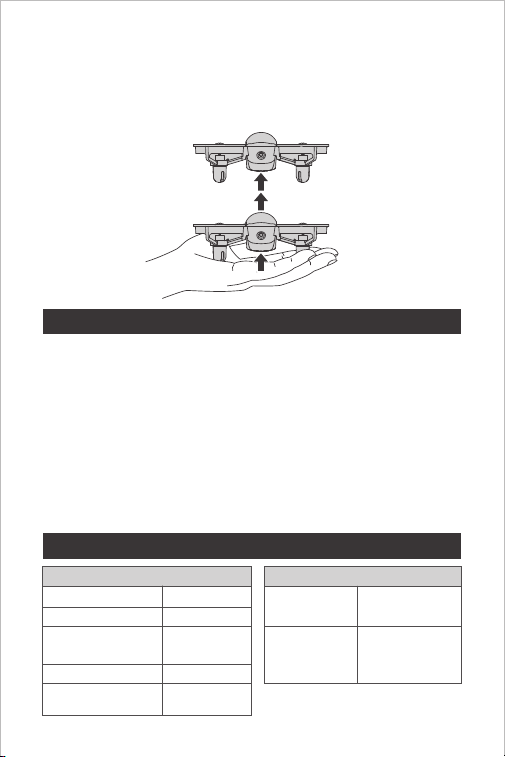
As shown in picture below, shot press “ ” (rotation button) to
enable / disable the rotation mode, and the remote control makes a
"beep" sound. In this mode, the drone rotates at a fixed speed.
Rotation Mode
As shown in picture below, short press “ ” (orbit flight button) to
enable / disable the orbit flight mode, and the remote control makes a
"beep" sound. In this mode, the drone flies along a circular orbit.
Orbit Flight Mode
11
Safety
Specification
The drone can take off automatically after being thrown manually.
Please connect the drone to the remote control and calibrate it, then
hold the drone in your hand and toss it into the air. As shown in
picture below:
Throw Mode
When voltage is lower than 3.5V, the indicator of the drone flashes
slowly in red and the remote control beeps, and the drone lands
automatically when the battery runs out. Be careful of the battery
power during the flight.
Low Battery Alarm
When the drone loses connection with the remote control, it lands
automatically and the remote control beeps. Please make sure the
drone is in your line of sight.
Takeoff Weight
Working Frequency
Working
Temperature
Battery
Max. Distance of
Remote Control
31g
2.4G
3.85V 380MAH
0-40°
30M
Working
Frequency
Battery of
Remote
Control
2.4G
3*AAA batteries
Low Signal Alarm
Drone
Remote Control

FCC
NOTE: This equipment has been tested and found to comply
with the limits for a Class B digital device, pursuant to part 15 of
the FCC Rules. These limits are designed to provide reasonable
protection against harmful interference in a residential
installation. This equipment generates uses and can radiate
radio
frequency energy and, if not installed and used in accordance
with the instructions, may cause harmful interference to radio
communications. However, there is no guarantee that
interference will not occur in a particular installation. If this
equipment does cause harmful interference to radio or television
reception, which can be determined by turning the equipment off
and on, the user is encouraged to try to correct the interference
by one or more of the following measures:
- Reorient or relocate the receiving antenna.
- Increase the separation between the equipment and receiver.
- Connect the equipment into an outlet on a circuit different from
that to which the receiver is connected.
- Consult the dealer or an experienced radio/TV technician for
help
Changes or modifications not expressly approved by the party
responsible for compliance could void the user's authority to
operate the equipment.
This device complies with Part 15 of the FCC Rules. Operation is
subject to the following two conditions:
(1) this device may not cause harmful interference, and (2) this
device must accept any interference received, including
interference that may cause undesired operation.
RF warning for portable device:
The device has been evaluated to meet general RF exposure requirement.
The device can be used in portable exposure condition without restriction.
214-111913
MADE IN CHINA
V08.26.07
This toy is recommended for children 8 years of age and older. To ensure that the
child’s play is both safe and fun, please read the operating instruction and the general
safety rules with your child.
· Keep eyes, face, fingers and hair away from the rotor blade, tail blade and
gear, as they will rotate at very high speed while the aircraft is flying.
· Adult supervision is recommended when the aircraft is being operated.
DANGER
Only suitable
for age 8+
Warning: The product should only be used by adults and children over 8 years. Adult
supervision is required for children under 8 years.
Hinweis: Dieses Produkt ist für die Erwachsene und die Kinder ab 8 Jahren. Die Kinder
unter 8 Jahren müssen von Erwachsenen beaufsichtigt werden.
Avertissement: Ce produit est destiné aux adultes et aux enfants de plus de 8 ans. Les
enfants de moins de 8 ans doivent être surveillés par des adultes.
Avvertimento: questo prodotto è destinato all'uso per i adulti e bambini di età superiore ai 8
anni. I bambini di età inferiore ai 8 anni devono essere sorvegliati da un adulto.
Advertencia: Este producto es para adultos y niños mayores de 8 años. Los niños menores
de 8 años deben ser supervisados por adultos.
警告: この製品は、大人と8歳以上の子供には使用対象です。8歳未満の子供は大人の監視が
必 要です。
CAUTION
WARNING
Model: A23
Remote Control: TR1
Manufacturer: Shenzhen Potensic Intelligent Co., Ltd.
Address: 7/F, Building A5, Nanshan Intelligent Park, Nanshan District, Shenzhen, CN
Charging: 5V 1A
Battery information: 3.85V 380mAh 1.46Wh
Battery: 3*1.5V*AAA IC: 29543-A23FCC ID: 2BK8B-TR1