CAUTION: To reduce the risk of injury, user must read and understand this
operator’s manual. Save these instructions for future reference.
108SD14K
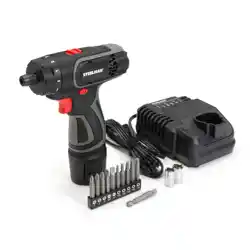
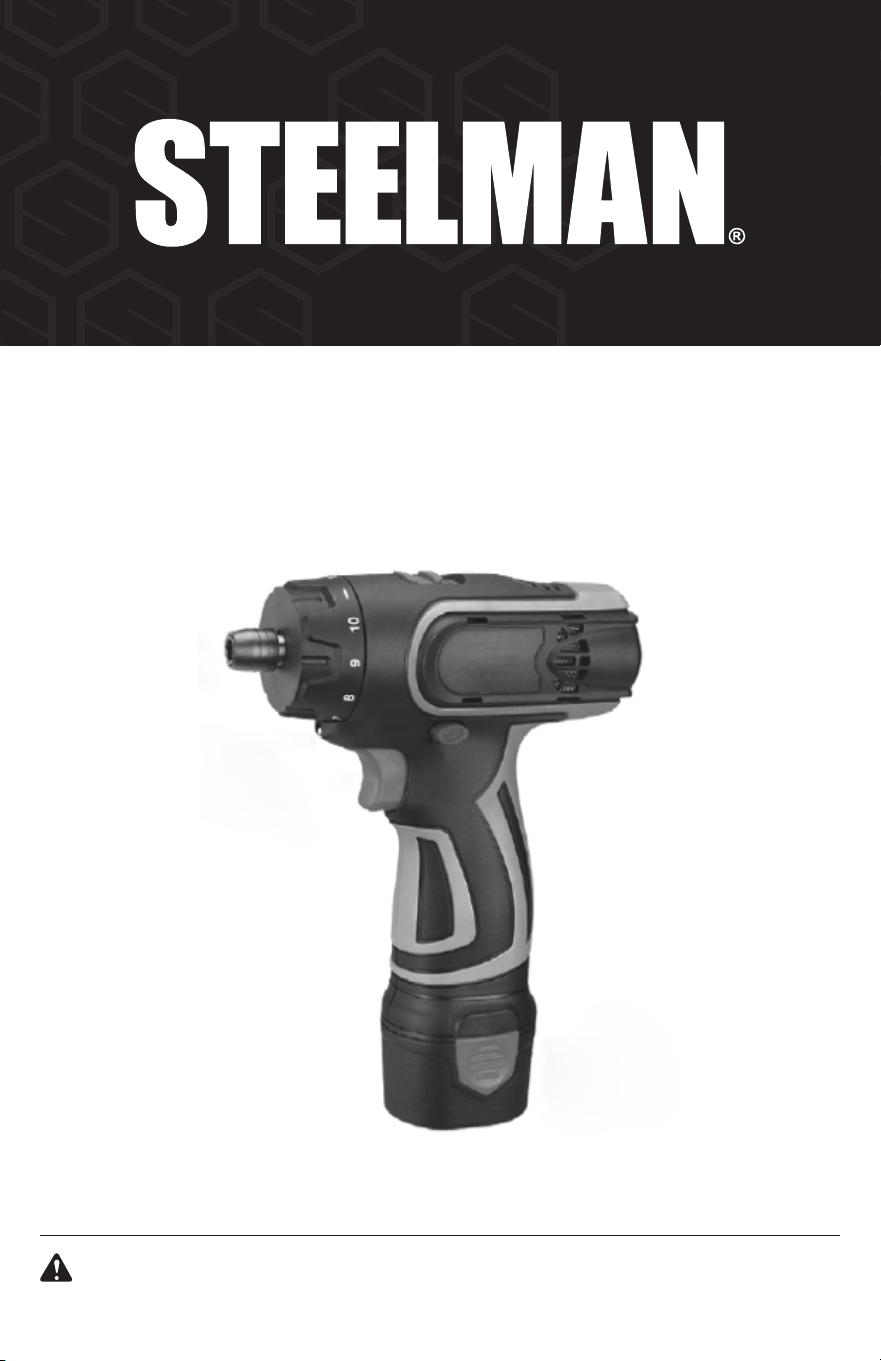
10.8V CORDLESS SCREWDRIVER KIT
OPERATOR’S MANUAL

2
TABLE OF CONTENTS
SAFETY AND WARNINGS ���������������������������������������������������������������������������������������������������������������������������������� 2-3
POWER TOOL USE AND CARE ��������������������������������������������������������������������������������������������������������������������������� 3-4
BATTERY TOOL USE AND CARE ���������������������������������������������������������������������������������������������������������������������������� 4
SERVICE ����������������������������������������������������������������������������������������������������������������������������������������������������������������4
DRILL SAFETY WARNINGS �����������������������������������������������������������������������������������������������������������������������������������5
SCREWDRIVER SAFETY WARNING �����������������������������������������������������������������������������������������������������������������������5
SPECIAL SAFETY INSTRUCTION FOR CHARGER AND BATTERY PACK ������������������������������������������������������������� 5-6
SPECIFIC SAFETY RULES / SYMBOLS ������������������������������������������������������������������������������������������������������������������ 7
CHARGING TIME ���������������������������������������������������������������������������������������������������������������������������������������������������7
SPECIFICATIONS ��������������������������������������������������������������������������������������������������������������������������������������������������� 7
PRODUCT FEATURES �������������������������������������������������������������������������������������������������������������������������������������������� 7
BATTERY AND CHARGING �������������������������������������������������������������������������������������������������������������������������������� 8-9
OPERATION ����������������������������������������������������������������������������������������������������������������������������������������������������� 9-10
MAINTENANCE ���������������������������������������������������������������������������������������������������������������������������������������������������10
WARRANTY ���������������������������������������������������������������������������������������������������������������������������������������������������������11
SAFETY AND WARNINGS
GENERAL POWER TOOL SAFETY WARNINGS
Reference this manual for all safety warnings and precautions, operating and maintenance
procedures, parts list and diagrams. Keep your invoice with this manual and write your invoice
number on the inside of the front cover. Keep the manual and invoice in a safe, dry place for
future reference.
This power tool is intended to be used for drilling holes and tightening or unscrewing screws.
This power tool may not be used to do other things out of the desired scope.
The term "power tool" in the warning refers to your mains-operated (corded) power tool or
battery-operated (cordless) power tool.
CAUTION: To reduce the risk of injury, user must read and understand operator’s manual.
Save these instructions for future reference.
WARNING: Be sure to read and understand all safety instructions in this manual, including
all safety alert symbols such as “danger’’, “warning”, and “caution” before using this cart.
Failure to follow all instructions listed below may result in serious personal injury.
WORK AREA SAFETY
1. Keep work area clean and well lit. Cluttered or dark areas invite accidents.
2. Do not operate power tools in explosive atmospheres, such as in the presence of
flammable liquids, gases or dust. Power tools create sparks which may ignite the dust
or fumes.
3. Keep children and bystanders away while operating a power tool. Distractions can cause
you to lose control.

3
ELECTRICAL SAFETY
1. Power tool plugs must match the outlet. Never modify the plug in any way. Do not use
any adapter plugs with earthed (grounded) power tools. Unmodified plugs and matching
outlets will reduce risk of electric shock.
2. Avoid body contact with earthed or grounded surfaces, such as pipes, radiators, ranges
and refrigerators. There is an increased risk of electric shock if your body is earthed
or grounded.
3. Do not expose power tools to rain or wet conditions. Water entering a power tool will
increase the risk of electric shock.
4. Do not abuse the cord. Never use the cord for carrying, pulling or unplugging the power
tool. Keep cord away from heat, oil, sharp edges or moving parts. Damaged or entangled
cords increase the risk of electric shock.
5. When operating a power tool outdoors, use an extension cord suitable for outdoor use.
Use of a cord suitable for outdoor use reduces the risk of electric shock.
6. If operating a power tool in a damp location is unavoidable, use a residual current device
(RCD) protected supply. Use of an RCD reduces the risk of electric shock.
7. Hold power tool by insulated gripping surfaces, when performing an operation where the
fastener may contact hidden wiring or its own cord. Fasteners contacting a “live” wire
may make exposed metal parts of the power tool “live” and could give the operator an
electric shock.
PERSONAL SAFETY
1. Stay alert. Watch what you are doing and use common sense when operating a power
tool. Do not use a power tool while you are tired or under the influence of drugs, alcohol
or medication. A moment of inattention while operating power tools may result in serious
personal injury.
2. Use personal protective equipment. Always wear eye protection. Protective equipment
such as a dust mask, non-skid safety shoes, hard hat or hearing protection used for
appropriate conditions will reduce personal injuries.
3. Prevent unintentional starting. Ensure the switch is in the off-position before connecting to
power source and / or battery pack, picking up or carrying the tool. Carrying power tools
with your finger on the switch or energizing power tools that have the switch on
invites accidents.
4. Remove any adjusting key or wrench before turning the power tool on. A wrench or a key
left attached to a rotating part of the power tool may result in personal injury.
5. Do not overreach. Keep proper footing and balance at all times. This enables better
control of the power tool in unexpected situations.
6. Dress properly. Do not wear loose clothing or jewelry. Keep your hair and clothing away
from moving parts. Loose clothes, jewelry or long hair can be caught in moving parts.
7. If devices are provided for the connection of dust extraction and collection facilities,
ensure these are connected and properly used. Use of dust collection can reduce dust-
related hazards.
8. Do not let familiarity gained from frequent use of tools allow you to become complacent
and ignore tool safety principles. A careless action can cause severe injury within a
fraction of a second.
9. Recommended for the operator to wear hearing protection.

4
POWER TOOL USE AND CARE
1. Do not force the power tool. Use the correct power tool for your application. The correct
power tool will do the job better and safer at the rate for which it was designed.
2. Do not use the power tool if the switch does not turn it on and off. Any power tool that
cannot be controlled with the switch is dangerous and must be repaired.
3. Disconnect the plug from the power source and / or remove the battery pack, if
detachable, from the power tool before making any adjustments, changing accessories,
or storing power tools. Such preventive safety measures reduce the risk of starting the
power tool accidentally.
4. Store idle power tools out of the reach of children and do not allow persons unfamiliar
with the power tool or these instructions to operate the power tool. Power tools are
dangerous in the hands of untrained users.
5. Maintain power tools and accessories. Check for misalignment or binding of moving
parts, breakage of parts and any other condition that may affect the power tool’s
operation. If damaged, have the power tool repaired before use. Many accidents are
caused by poorly maintained power tools.
6. Keep cutting tools sharp and clean. Properly maintained cutting tools with sharp cutting
edges are less likely to bind and are easier to control.
7. Use the power tool, accessories and tool bits etc. in accordance with these
instructions, taking into account the working conditions and the work to be performed.
Use of the power tool for operations different from those intended could result in a
hazardous situation.
8. Keep handles and grasping surfaces dry, clean and free from oil and grease. Slippery
handles and grasping surfaces do not allow for safe handling and control of the tool in
unexpected situations.
BATTERY TOOL USE AND CARE
1. Recharge only with the charger specified by the manufacturer. A charger that is suitable
for one type of battery pack may create a risk of fire when used with another battery pack.
2. Use power tools only with specifically designated battery packs. Use of any other battery
packs may create a risk of injury and fire.
3. When battery pack is not in use, keep it away from other metal objects, like paper clips,
coins, keys, nails, screws or other small metal objects, that can make a connection from
one terminal to another. Shorting the battery terminals together may cause burns or a fire.
4. Under abusive conditions, liquid may be ejected from the battery; avoid contact.
If contact accidentally occurs, flush with water. If liquid contacts eyes, additionally seek
medical help. Liquid ejected from the battery may cause irritation or burns.
5. Do not use a battery pack or tool that is damaged or modified. Damaged or modified
batteries may exhibit unpredictable behavior resulting in explosion or risk of injury.
6. Do not expose a battery pack or tool to fire or excessive temperature. Exposure to fire or
temperature above 265°F (130°C) may cause explosion.
7. Follow all charging instructions and do not charge the battery pack or tool outside the
Charging improperly or at temperatures outside the specified range may damage the
battery and increase the risk of fire.

5
SERVICE
1. Have your power tool serviced by a qualified repair person using only identical
replacement parts. This will ensure that the safety of the power tool is maintained.
2. Never service damaged battery packs. Service of battery packs should only be performed
by the manufacturer or authorized service providers.
DRILL SAFETY WARNINGS
1. To ensure the designed operational integrity of power tools, do not remove installed cover
or screws.
2. Use your tool at lower input than specified on the nameplate, otherwise, the finish may be
spoiled and working efficiency reduced by motor overload.
3. Do not wipe plastic parts with solvent. Solvent such as gasoline, thinner, benzene, carbon
tetrachloride, alcohol, ammonia and oil containing chloric annex may damage and crack
plastic parts. Wipe plastic parts with a soft cloth lightly dampened with soap water.
4. Use clamps or other practical ways to secure and support the work piece to a stable
platform. Holding the work by hand or against your body is unstable and may lead to a
loss of control.
5. Use only accessories that are recommended by the manufacturer for your model.
Accessories that may be suitable for one tool may create a risk of injury when used on
another tool.
SCREWDRIVER SAFETY WARNINGS
Hold power tool by insulated gripping surfaces, when performing an operation where the
fastener may contact hidden wiring. Fasteners contacting a “live” wire may make exposed
metal parts of the power tool “live” and could give the operator an electric shock.
SPECIAL SAFETY INSTRUCTION FOR CHARGER AND BATTERY PACK
If under extreme conditions any electrolyte should escape from the battery, it’s essential to
avoid contact with skin. If electrolyte does come into contact with your skin, rinse it o with
water. In the event of electrolyte contact with your eyes, it’s essential to consult a doctor.
1. To reduce risk of injury, charge only specific type rechargeable battery packs. Other types
of battery packs may burst causing personal injury and damage.
2. Before using charger, read all instructions and cautionary markings on battery packs and
chargers.
3. Do not expose charger to rain or snow.
4. To reduce the risk of damage to electric plug and cord, pull by plug rather than cord when
disconnecting charger.
5. Use of an attachment not recommended or sold by the charger manufacturer may result
in a risk of fire, electric shock, or injury to persons.
6. Make sure cord is located so that it will not be stepped on, tripped on, tripped over, or
otherwise subjected to damage or stress.
7. Do not operate charger with damaged cord or plug. Replace them immediately.
8. Do not operate charger if it has received a sharp blow, been dropped, or otherwise
damaged in any way, take it to qualified center.

6
9. To reduce risk of electric shock, unplug charger from outlet before attempting any
maintenance or cleaning. Turning off controls will not reduce this risk.
10. Do not disassemble charger or battery pack, take it to a qualified service center while
repair is required. Incorrect reassembling may result in a risk of electric shock or fire.
11. Do not charge battery pack when temperature is below 32ºF (0ºC) or above 104ºF (40ºC).
12. Do not attempt to use a set-up transformer, an engine generator or DC power receptacle.
13. Do not allow anything to cover or clog the charger vents.
14. Always cover the battery pack terminals with the battery pack cover when the battery
pack is not in use.
15. Do not short the battery pack.
16. Do not touch the terminals with any conductive material.
17. Avoid storing battery pack in a container with other metal objects such as nails,
coins, etc.
18. Do not expose battery pack to water or rain. A battery pack short can use large current flow
overheating, possible burns and even a breakdown.
19. Do not store the machine and battery pack in locations where the temperature may reach
or exceed 122ºF (50ºC).
20. Do not incinerate the battery pack even if it is severely damaged or completely worn out.
The battery pack can explode in a fire.
21. Be careful not to drop, shake or strike battery pack.
22. Do not charge inside a box or container of any kind. The battery pack must be placed in a
well ventilated area during charging.
23. Do not leave batteries unused for extended period of time. Recharge the battery every 3-6
months and bring Li-Ion battery to 40-80% charge level before storage.
24. Li-Ion batteries are sensitive to high temperature and should be kept in a cool and dry
location. Do not store or use in direct light exposure. Ideal temperature for operation and
storage is below 77ºF (25ºC).
25. For extension of the battery lifetime, the lithium-ion battery is designed with the protection
function to stop the output. In the cases described below, when using this product, even
if you are pulling the switch, the motor may stop. This is not malfunction but the result of
the protection function.
26. This product is designed with low voltage protection, which prevents the tool from over
discharging and prolongs battery’s lifespan.
• When the battery power remaining runs out, the motor stops.
• If the tool is overloaded, the motor may stop. In this case, release the switch of the
tool and eliminate the causes of overloading. After that you can use it again.
• If the battery is overheated under overload work, the battery power may stop. In this
case stop using the battery and let the battery cool. After that you can use it again.
7
MODEL
108SD14K
RATED VOLTAGE
10.8V d.c.
NO-LOAD SPEED
Low: 0~360 RPM
High: 0~1550 RPM
MAX TORQUE
240 kg-cm / 23.5 Nm /
17 ft. lb.
TOOL WEIGHT
1.5 lbs (0.68 kg)
BATTERY WEIGHT
0.41 lbs (0.19 kg)
CAPACITY
1/4" (6.35 mm)
VIBRATION
9.48 ft/s
2
(2.89 m/s
2
)
NOISE
84.5 dB
SPECIFICATIONS
CHARGER
BATTERY PACK
MODEL #:
108LC70
10.8 V
1.5 Ah 60 min
2.0 Ah 70 min
2.5 Ah 80 min
Minutes Auto Cut-O
Charging Time (approximately)
CHARGING TIME
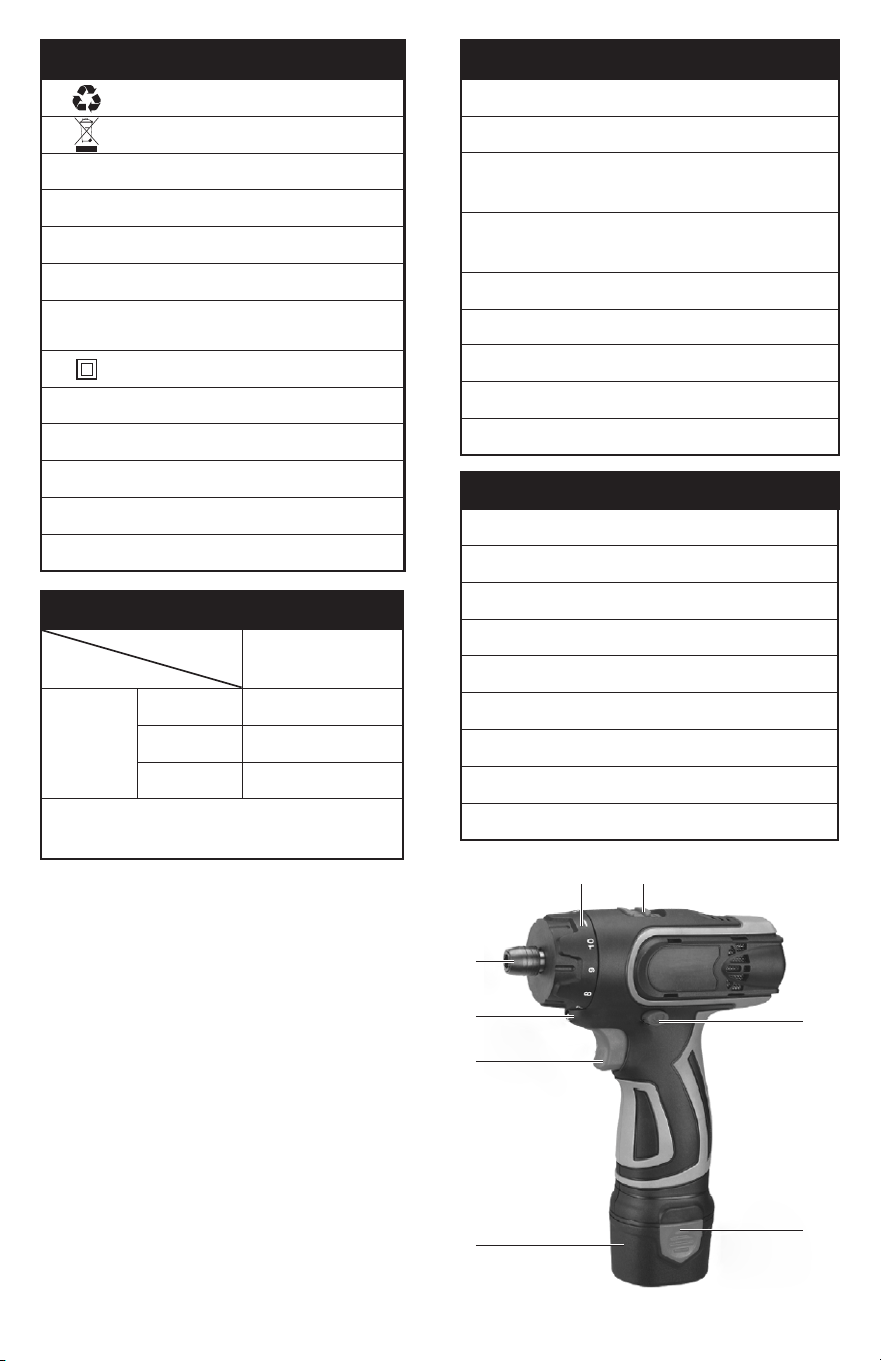
# DESCRIPTION
1 Bit Holder
2 LED
3 Main Switch
4 Battery Pack
5 Torque Adjustment Ring
6 High / Low Speed Rod
7 Forward / Reverse Rod
8 Battery Locking Tabs
PRODUCT FEATURES
65
2
3
4
7
1
8
The charging time may vary from the
battery life and room temperature.
Recycle
Do not throw away
a�c�
Alternating Current
W
Watts
mm
Millimeter
kg-cm
Kilograms - Centimeter
RPM
Revolutions / Reciprocations
Per Minute
Class II Tool
V
Volts
Hz
Hertz
kg
Kilograms
d�c
Direct Current
ft� lb�
Foot-Pound
SPECIFIC SAFETY RULES / SYMBOLS
8
BATTERY AND CHARGING
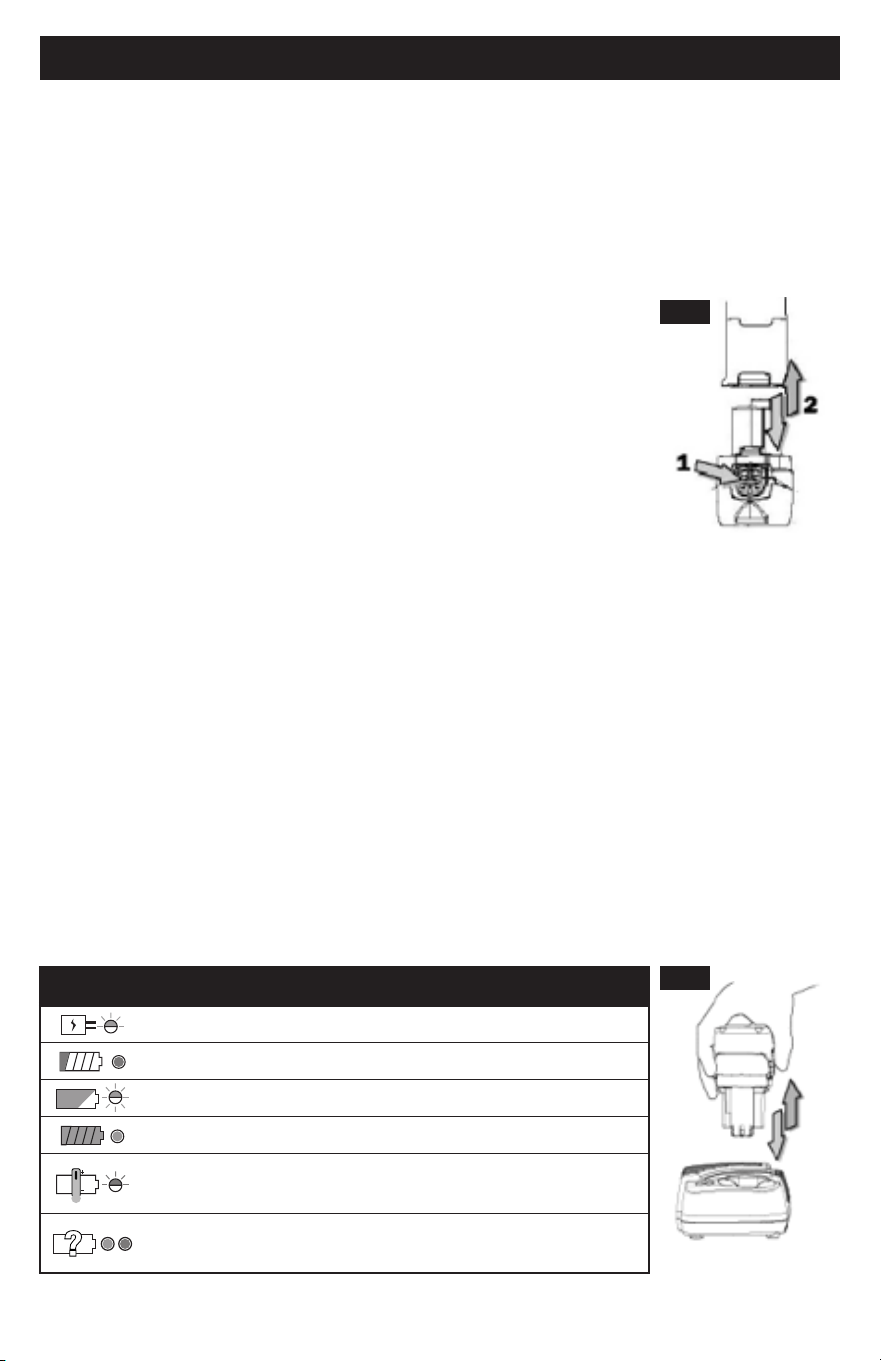
REMOVING OR INSTALLING BATTERY PACK (FIG� 1)
1. Always switch off the machine before inserting or removing of the battery pack.
2. To remove the battery pack, push the button on the battery pack and pull the tool unit
from the battery pack in the direction. (See Fig. 1)
3. To insert the battery pack, align the tool unit slides with the battery pack sliding groove
and push the tool unit into place. The tool unit can be slid into the battery pack in two
directions.
4. Do not force the battery pack into the tool unit.
If the battery pack does not slide in easily, it is not being
inserted correctly.
FIG� 1
FIG� 2
CHARGING THE BATTERY PACK (FIG� 2)
5. Plug the fast charger into the power source.
6. Slide the battery pack into the charger as the arrow direction shown on the charger.
7. Your new battery pack is not charged and needs to be charged before use.
8. Push the battery pack into place and make sure the red light on the charger is “ON”.
The battery pack is now starting the charging cycle. (See Fig. 2)
9. After the charging cycle finished, the light will turn to green. The battery pack is now ready
for use.
10. Always use the specified charger to charge the battery. When the battery pack is inserted
into the charger correctly, the red light will come on and charging will begin.
11. When you charge a new battery pack or a battery pack which has not been used for
a long period, it may not accept a full charge. This is a normal condition and does not
indicate a problem. You can recharge the battery pack fully after discharging it completely
a couple of times.
12. Unplug the charger from the power source after finishing the charge.
13. Please remove the battery from the unplugged charger for storage.
BATTERY CHARGER LIGHT MEANINGS
Power On (Green light ashes slowly)
Battery Low (Red light stays illuminated)
Battery Charged 80% (Green light ashes rapidly)
Battery Charged 100% (Green light stays illuminated)
Battery Pack Temperature is Too Hot or Too Cold
(Red light ashes slowly)
Battery Pack Malfunction
(Red and Green lights stay illuminated)
80%
9
FIG� 3
ADDITIONAL BATTERY WARNINGS
1. Charger should be plugged into a 100-240V a.c. outlet only.
2. If the battery pack is too hot or too cold, the charger will not fast charge the battery pack
and the red indicator light will be “blinking”. When the battery pack temperature returns
between 32ºF (0ºC) and 122ºF (50ºC), the charger will automatically begin charging.
3. If both red and green indicator lights are “ON” the battery pack either does not comply or
is defective. Please contact your retailer.
4. Do not charge the battery pack in the rain, snow or high temperature environment.
5. Do not charge battery pack when environment temperature is below 32ºF (0ºC) or above
104ºF (40ºC).
6. If battery pack is below 32ºF (0ºC), before charging bring into warm indoors and keep the
battery pack in the room for one hour to warm up before using the battery pack.
7. Remove the plug after finishing the charge.
8. The charger should be cooled at least one hour after continuous charging of three times.
9. Do not use generator for charging the battery pack.
OPERATION
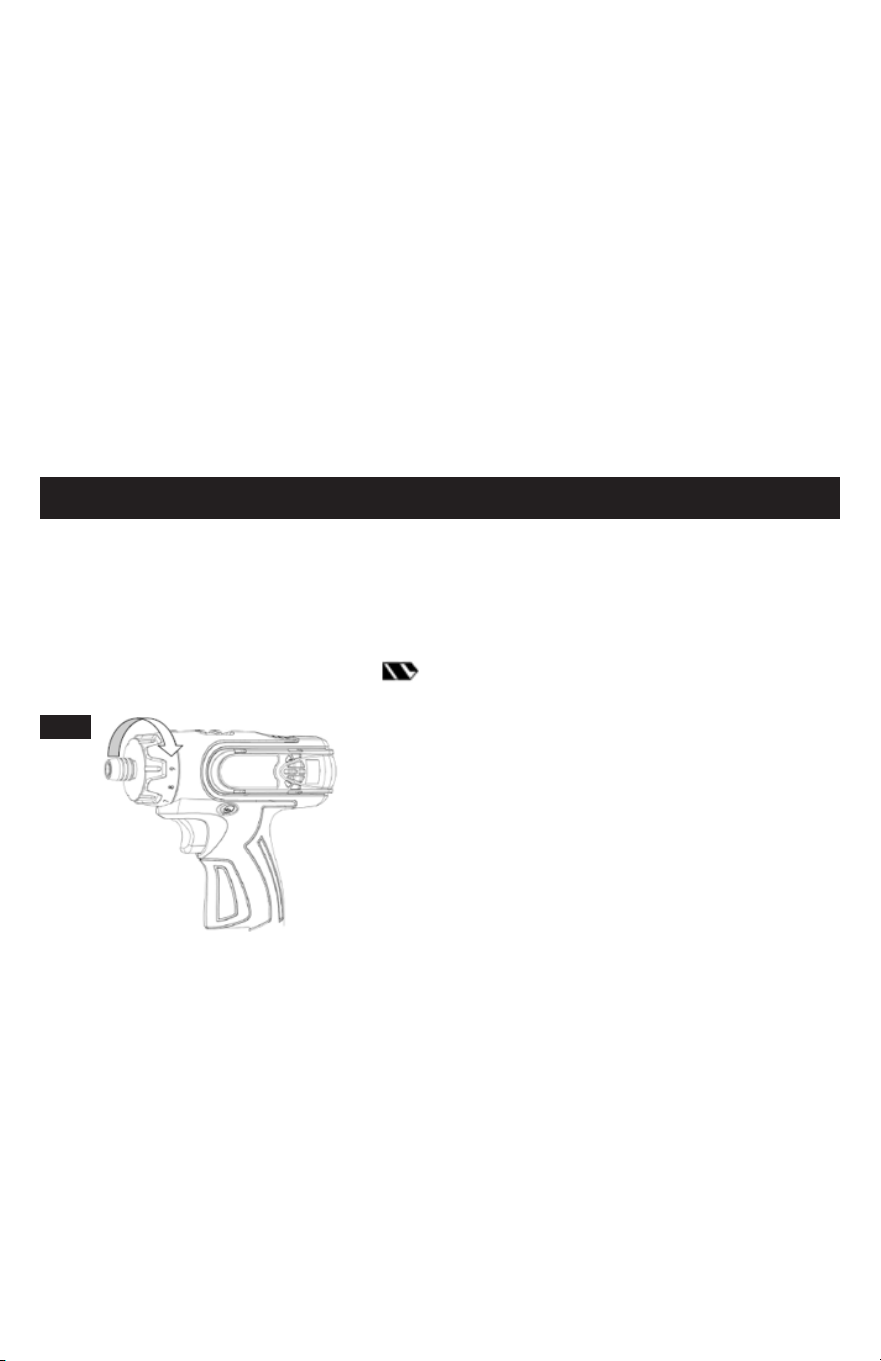
TORQUE SETTINGS (FIG� 3)
1. There are total of 10 sections plus 1 drill of torque settings on the tool. Adjust the proper
setting to the job.
2. For drilling application, use the maximum torque setting.
3. Adjust the torque ring to select the sign for the maximum torque position if you
would like to drill.
INSTALLING OR REMOVING BITS (FIG� 4-5)
1. Always be sure that the machine is switched off and the battery pack is removed before
installing or removing the bit.
2. To install the bit, pull the retainer in the direction of the arrow and insert the bit into the
retainer as far as it will go. Then release the retainer to secure the bit.
NOTE: (See Fig. 4) If the bit is not inserted deep enough into the retainer, the retainer will
not return to its original position and the bit will not be secured. In this case, try-inserting
the bit according to the instructions above.
3. To remove the bit, pull the retainer in the direction of the arrow and pull the bit out firmly.
4. For reversing the machine, (See Fig. 5) use the forward / reverse bar on the drive unit.
The directions of the rotation are also shown on the face of the bar.
5. Always check the direction of rotation before operation.
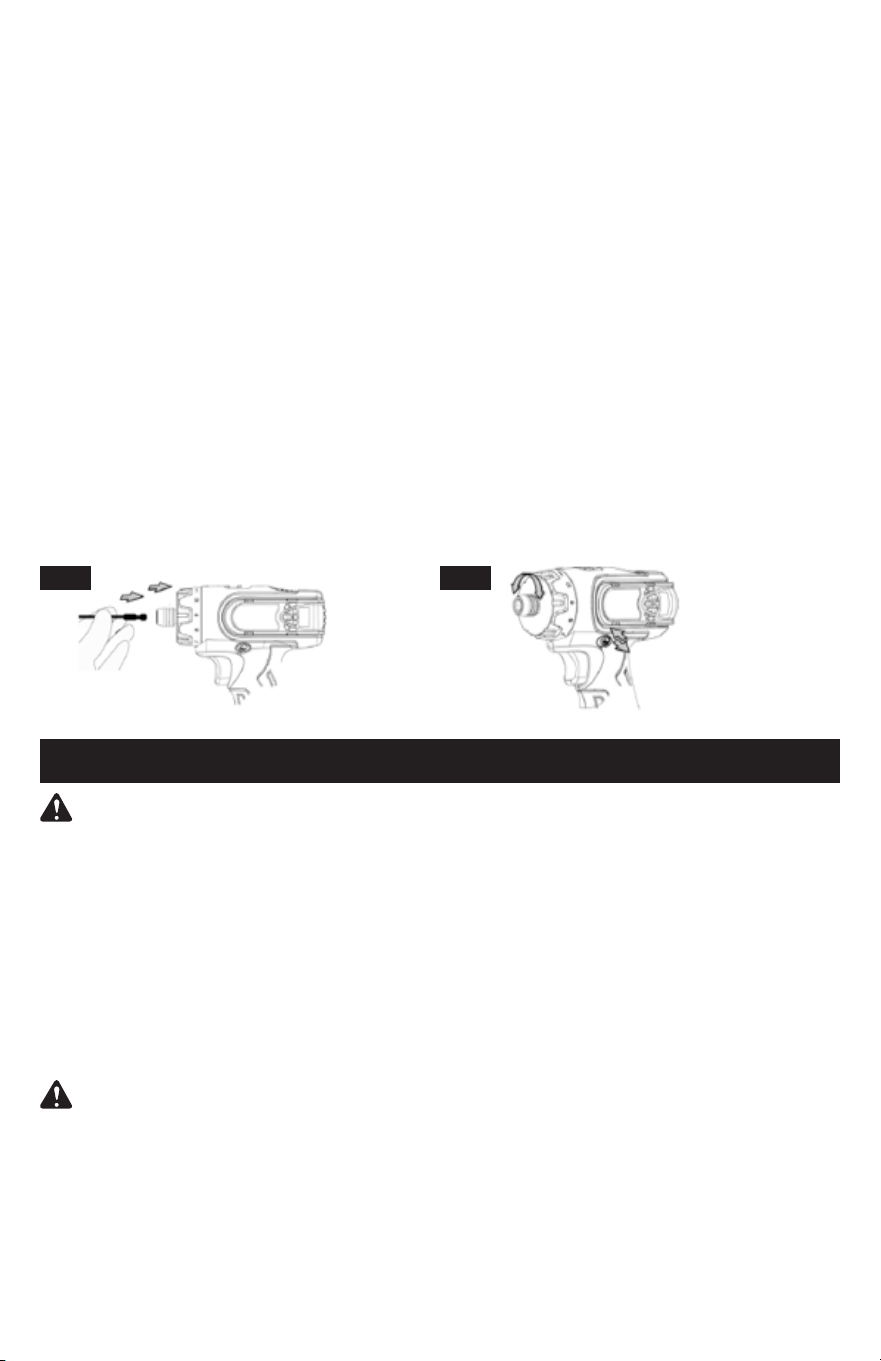
10
6. Use the forward / reverse bar only after the machine comes to a complete stop. Changing
the direction of rotation before the machine stops may damage the machine.
7. Hold the machine firmly and place the point of driver bit in the screw head. Apply
forward pressure to the machine to the extent that the bit will not slip off the screw and
turn the machine on to start operation.
8. The manner of holding the machine or the material of driving position to be tightened
will affect the torque. Operating the machine at low speed will cause a reduction in the
tightening torque.
• Use the proper bit for the proper application.
• Hold the machine pointed straight at the screw. If you tighten the screw for a time
longer than it needs, the screw or the driver bit may be overstressed, stripped,
damaged, etc. Before starting your job, always perform a test operation to determine
the proper tightening time for your screw. When tightening a standard screw in a
steel plate, the proper tightening torque can be obtained in an extremely short time.
• When the battery pack is discharged almost completely, voltage will drop and the
tightening torque will be reduced.
• Driver bit or socket bit: Failure to use the correct size driver bit or socket bit will
cause a reduction in the tightening torque.
• For driving a bolt: Even though the torque coefficient and the class of bolt are the
same, the proper tightening torque will differ according to the diameter of the bolt.
MAINTENANCE
WARNING: To reduce the risk of injury, always unplug the charger and remove the battery
pack from the charger or tool before performing any maintenance. Never disassemble the
tool, battery pack or charger. Contact service facility for ALL repairs.
MAINTAINING TOOL
Keep your tool, battery pack and charger in good repair by adopting a regular maintenance
program. Inspect your tool for issues such as undue noise, misalignment or binding of moving
parts, breakage of parts, or any other condition that may aect the tool operation. Return the
tool, battery pack, and charger to service facility for repair. If the tool does not start or operate
at full power with a fully charged battery pack, clean the contacts on the battery pack. If the
tool still does not work properly, return the tool, charger and battery pack, to service facility for
repairs.
WARNING: To reduce the risk of personal injury and damage, never immerse your tool,
battery pack or charger in liquid or allow a liquid to ow inside them.
CLEANING
Clean dust and debris from vents. Keep handles clean, dry and free of oil or grease. Use only
mild soap and a damp cloth to clean, since certain cleaning agents and solvents are harmful to
plastics and other insulated parts. Some of these include gasoline, turpentine, lacquer thinner,
paint thinner, chlorinated cleaning solvents, ammonia and household detergents containing
ammonia. Never use ammable or combustible solvents around tools.
FIG� 4 FIG� 4

11
For questions / comments, technical assistance or repair parts,
Please call toll free at: 1-855-706-1550 (M-F 6am - 4:30pm PST)
Before sending a unit back for repair, an RMA (return materials authorization) number must be
obtained and written on the outer shipping box. Please submit a ticket online at http://www.
steelmantools.com/contacts to receive an RMA number. We will determine if the unit needs
to come in for repairs or replacement. Warranty claims that cannot be processed through the
point of purchase and any other product related questions should be addressed directly to
JS Products.
WARRANTY
90 DAY
LIMITED
WARRANTY
This STEELMAN
®
product is backed by a 90 Day Limited Warranty.
This warranty covers manufacturer defects and workmanship. The
warranty excludes misuse or abuse and normal wear and tear.
Exclusion is not allowed in some states and may not apply. This
warranty gives you specic legal rights, and you may have other
rights, which vary from state to state.

JS PRODUCTS • 6445 MONTESSOURI STREET • LAS VEGAS, NV 89113
CUSTOMER SERVICE: 1-855-706-1550 • WWW�STEELMANTOOLS�COM
03.25.2022