1. Place your Digital Air Fryer Oven on a flat, level surface.
2. Move oven 2 to A inches away from the wall or from any objects on the countertop. Do not use on heat-sensitive surfaces.
NOTE: OBJECTS SHOULD NOT BE STORED ON THE TOP OF THE OVEN. IF THEY ARE, REMOVE ALL OBJECTS BEFORE YOU TURN ON YOUR OVEN. THE EXTERIOR WALLS GET VERY HOT WHEN IN USE. KEEP OUT OF REACH OF CHILDREN.
3. Check that the crumb tray is in place and that there is nothing in the oven.
4. Plug the power cord into wall outlet.
Before the first use, make sure all the wrapping materials removed from the cavity to prevent burning risk. To use the air fryer oven for the first time, it should be heated for fifteen minutes to remove unpleasant odor. Smoke may be emitted during the heating process.
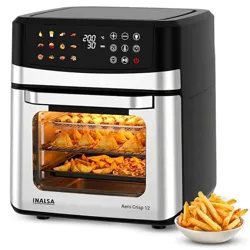
GETTING TO KNOW YOUR SMART AIR FRYER OVEN
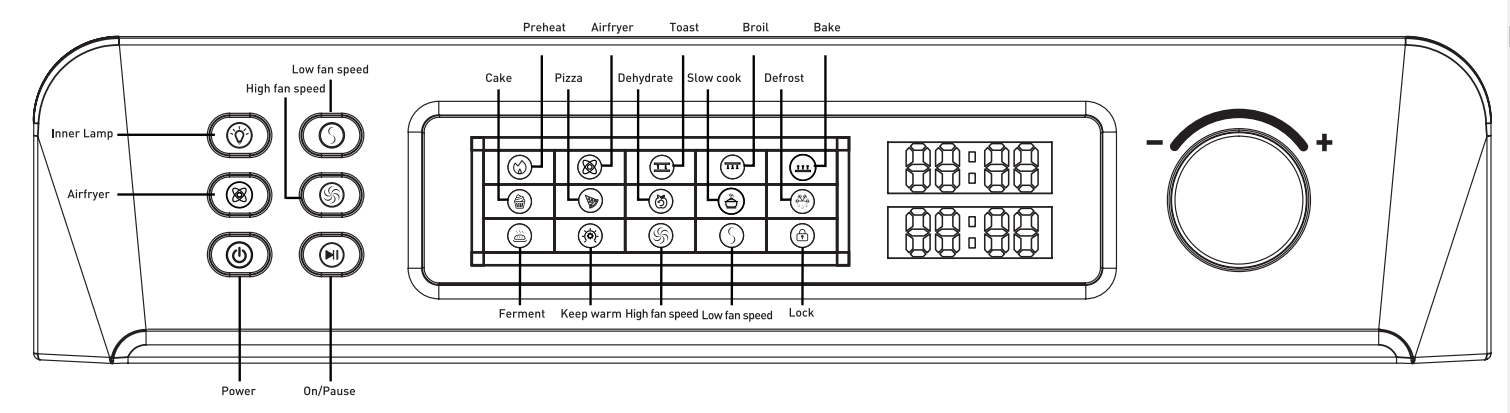
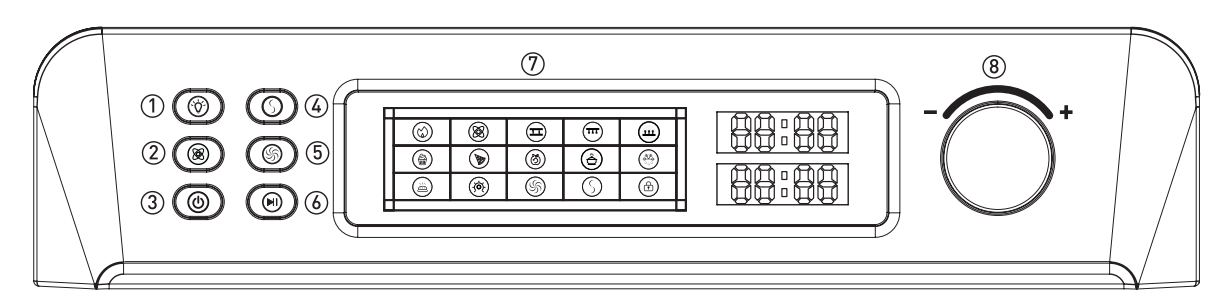
1. Control Panel
Large LED, dial and intuitive buttons make the unit easy to use.
2. Inner Light
Inner light allows you to see how the food is cooking .
3. Micro-switch
When you open the oven door during cooking, the oven will automatically pause cooking.The oven will resume cooking when the oven door is closed.
4. Rack/Tray Positions
5. Viewing Window
Large viewing window allows you to keep an eye on cooking progress.
6. Cool-Touch Handle
Handle is designed to stay cool during cooking.
7. Wire Rack
8. Air Fryer Basket
Use the basket when using the AirFry, Broil or Dehydrate functions to optimize your cooking results. We recommend setting the air fryer basket in the baking/drip pan.
9. Baking/Drip Pan
A baking/drip pan is included for your convenience. Use alone when baking or roasting. Use the baking/drip pan with air fryer basket when air frying, broiling or dehydrating.
10. Crumb Tray
The oven comes with a standard crumb tray. The tray can be removed from the bottom of the oven for cleaning.
PANEL DISPLAY
GETTING TO KNOW YOUR CONTROL PANEL
1. Inner Light Button(
Press to turn on/off the inner light. The inner light can be used with all cooking functions
2. AirFry Button
Press to turn on/off the AirFry function.
3. Power Button
Press to turn on/off the oven.
This button can also be used to pause or cancel cooking. The oven will return to standby mode when you press this button to cancel cooking.
4. Low Fan Speed Button
Press to turn on/off the Low Fan Speed.
The low fan speed is automatically set when cooking in Toast/Roast/Broil/Bake/Pizza/Cake/Slow Cook / Defrost / Fermentation /Keep warm functions.
5. High Fan Speed Button
Press to turn on/off the High Fan Speed.
The High Fan Speed is automatically set when cooking in Airfryer/Dehydrate functions.
6. Start/Pause/Cancel Button
Press to start, pause or cancel a cooking function. Button will flash once the oven has finished cooking.
Press during cooking to change cooking temperature or time.
Press and hold for 5 seconds to cancel or reset the cooking function.
Note: When you open the oven door during cooking, the oven will automatically pause cooking. The oven will resume cooking when the oven door is closed.
7. LED Screen
Displays cooking functions, temperature, timer, fan speed, lock etc.
8. Control Knob
Turn the knob to change cooking functions. The current function will flash on the display.
After pressing the control knob , turn the knob to change temperature/time.
Turn clockwise to increase and counterclockwise to decrease temperature/time.
After a function or setting is selected, press the knob to confirm the selection.
OPERATING YOUR OVEN
To operate the oven, follow these simple steps:
Place the appropriate rack, pan, and/or basket in the recommended position.
The power bottom light ring will flash once it is connected. Press this button, enter setting mode and the button will light up,. Use the Control Knob to scroll through functions.
Press Control Knob to confirm your desired cooking function when it starts illuminating.
When the temperature setting illuminates on the screen, turn the Control Knob to set cooking temperature and press Control Knob again to confirm.
When the timer illuminates on the screen, turn the Control Knob to set the desired time and Control Knob again to confirm.
The Start/Stop button will flash while the LED screen will display the selected or default temperature and time.
Press Start/Stop button to begin cooking. The Start/Stop button will light up, indicating that the cooking process has started.
When the countdown timer reaches 0:00, the oven will beep five times and the heating element will turn off.
NOTE:
The cooking process can be canceled before the countdown timer reaches 0:00 by pressing Start/Stop.
The oven will stop cooking if you open the oven door, and will resume cooking when the oven door is closed.
NOTE: After cooking, the fan will continue running for 1 minute for cooling purposes. You can select the use of High or Low Speed Fan. Once the cooling fan turns off, the oven will return to Standby mode.
ADJUSTING THE TIME, TEMPERATURE, OR FUNCTION DURING COOKING CYCLE
To change cooking time: Press Start/Pause button during the cooking cycle to unlock the function. Use the Control Knob to add or reduce time, press the Start/Pause button and the newly adjusted time will be displayed before cooking resumes.
To change cooking temperature: Press Start/Pause button during the cooking cycle to unlock the function. Press the Control Knob 2S until the current temperature flashes. Turn the Control Knob to adjust the temperature and cooking will resume at the new temperature setting.
To change function: Press Start/Stop 3S to stop the current cooking program, the oven will beep once to unlock the function. Turn and press the Selector Dial to select another function, set the time and temperature before pressing Start/Stop again to resume the cooking cycle.
STANDBY MODE
All lights will be OFF while on Standby mode.
The power consumption is less than 0.5W on Standby mode.
When the cooking cycle has finished, the oven will automatically enter Standby mode after 3 minutes.
The oven will automatically enter Standby mode if the cooking process has not started after 3 minutes.
When the Standby mode is off, the oven will return to the last cooking settings.
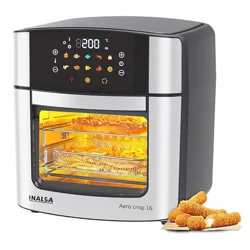
The chart below lists recommended portions, cooking times and temperatures for various types of food that can be air fried in the AirFryer Oven. If portions exceed recommendations, you can toss the food occasionally while cooking to ensure the crispiest, most even results. Smaller amounts of food may require less time. For best AirFry results, use the oven light to periodically check on food.
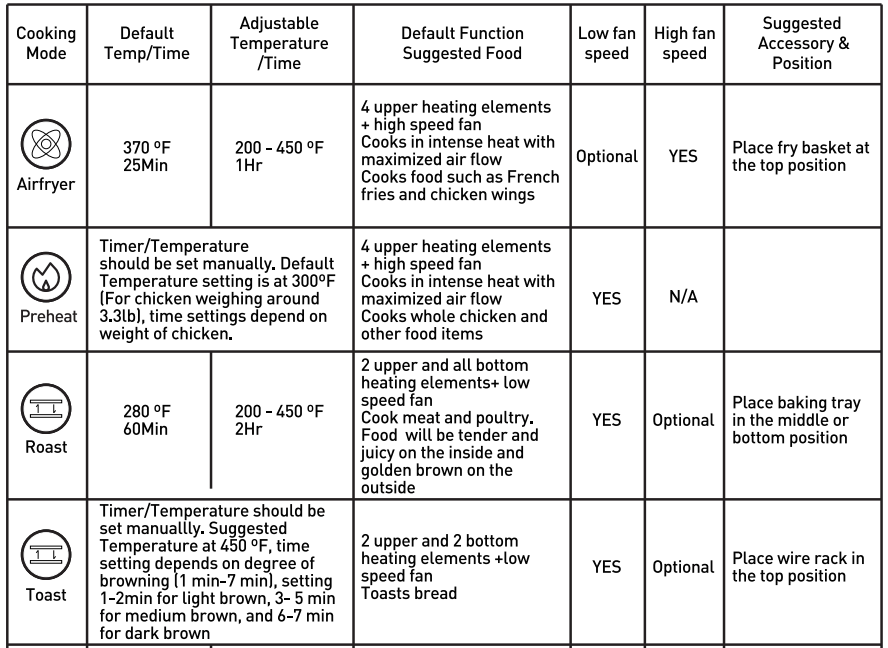
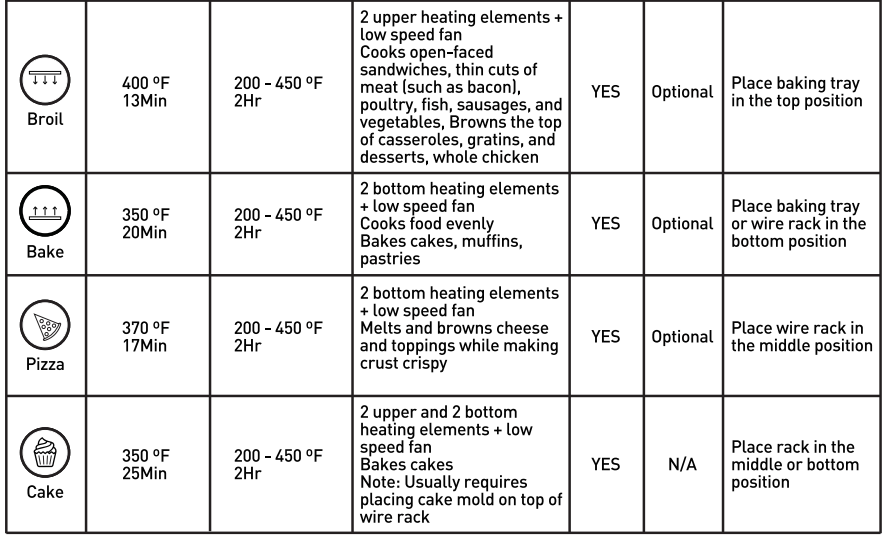
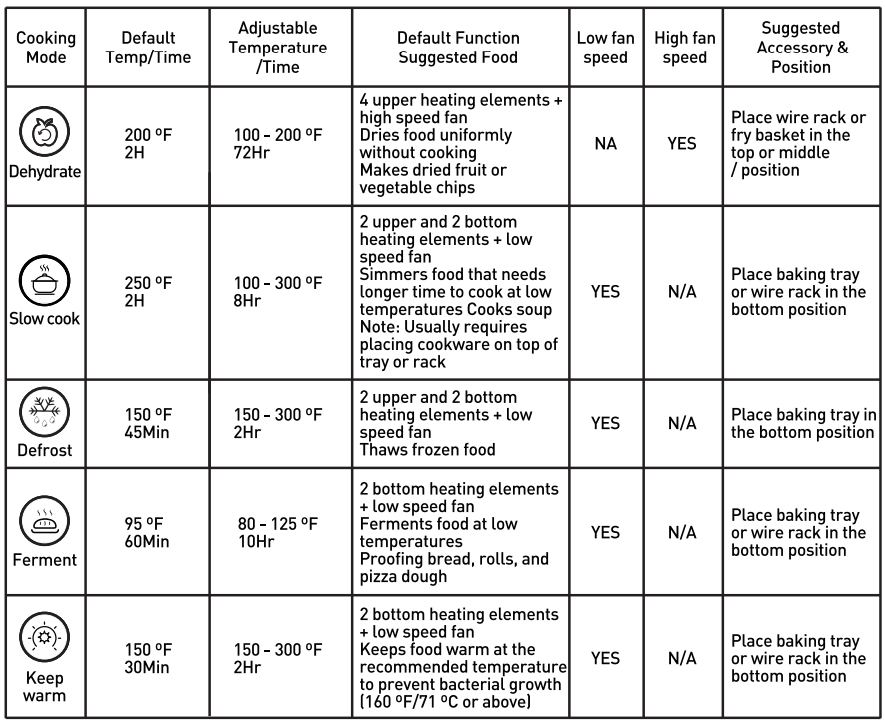
Quick Reference Guide on Cooking Functions
NOTE:
Temperature can be adjusted in increments of +/-10 °F. For the Ferment function, temperature can be adjusted in increments of +/- 5 °F
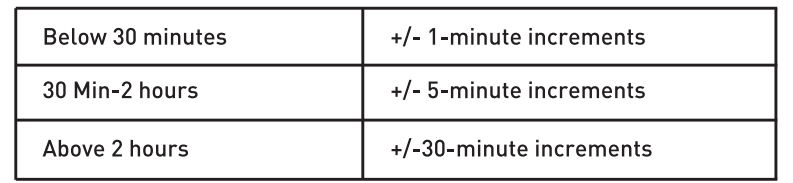
Time can be adjusted in increments of +/- 1,5,30 minutes (see chart).
The menu is automatically set with high or low speed fan. The previous settings will be canceled if you press the Low or High speed fan again. The fan cannot be turned OFF.
Time Increment Chart
Note: Not all cooking functions have a cooking time beyond 2 hours.
DEHYDRATE CHART
CLEANING AND MAINTENANCE
• Always unplug the oven from the electrical outlet and allow it to cool completely before cleaning.
• Do not use abrasive cleaners, as they will damage the finish. Simply wipe the exterior with a clean, damp cloth and dry thoroughly. Apply the cleansing agent to a cloth, not directly onto the oven, before cleaning.
• To clean interior walls, use a damp cloth and a mild liquid soap solution or a spray solution on a sponge. Remove any residue from cleaners with a clean, damp rag. Never use harsh abrasives or corrosive products. These could damage the oven surface. Never use steel wool pads, etc., on interior of oven.
• Cleaning the accessories:
Baking/drip pan and crumb tray should be hand washed, Oven rack and fryer bastet are dishwasher safe.
• After cooking greasy foods and once your oven has cooled, always clean top of oven interior. If this is done on a regular basis, your oven will perform like new. Removing the grease will help to keep toasting consistent, cycle after cycle.
• To remove crumbs, slide out the crumb tray and discard crumbs. Wipe clean and replace. To remove baked-on grease, soak the tray in hot, sudsy water or use non-abrasive cleaners. Never operate the oven without the crumb tray in place.
• Any other servicing should be performed by an authorized service representative.
TROUBLESHOOTING
Operationums
Why won't my unit turn on?
Make sure your unit is plugged into a functional outlet.
Make sure the oven door is closed.
Why does the fan continue running after cooking?
The fan continues running for cooling purposes.
Why does the light turn off?
The light only stays on for 20 seconds each time the light button is pressed to conserve energy.
Why the Mechanical buttons have malfunction and do not work?
Do not press the mechanical buttons too hard, tap it gently.
Programming
Can I change my cooking function when the unit is already cooking?
You need to first interrupt the current cooking function by pressing Start/Stop. The unit will return to selection menu and desired cooking function can be set.
Can I adjust the time or temperature when the unit is already cooking?
Yes. Simply turn the Selector Dial during cooking to add time. To change the temperature, press the Selector Dial and use the Dial to increase/decrease temperature when it illuminates on the screen.
Cooking
Why is my food not crispy or fried evenly?
Some food may require more oil than others. If the food is not crispy enough, spray, brush or add some oil on the food.
Make sure food is spread evenly in one single layer in the air fryer basket with no overlap. If food still overlaps, toss or flip food halfway through cooking cycle.
Put in the food for additional cooking time. Make sure to check periodically until food reaches desired brownness. Do not leave oven unattended.
Why is my food undercooked?
If you put too much food in the basket, try with smaller batches of food and single layers, rather than stacking food on top of each other.
The temperature might be too low. Use the Selector Dial to increase temperature.
Why does condensation and steam come out of my unit?
When preparing greasy foods, oil may leak into the pan to produce steam. This will not affect the unit or the end result. It may fog up the viewing window on the sides or corners
When preparing foods with a high moisture content, the water evaporates out of the food and causes condensation. This will not affect the unit or the end result It may fog up the viewing window on the sides or corners.
The pan, basket, or bottom of oven may contain grease residue from previous use. Make sure to clean the pan properly after each use.
Cleaning
Are the parts dishwasher safe?
The baking/drip pan and the air fryer basket are dishwasher safe
Do not put the crumb tray or wire rack in the dishwasher. Hand-wash with warm, sudsy water instead.
How do I clean tough-to -remove food residue from my accessories?
To remove baked-on grease, soak the accessories in hot, sudsy water or use a non-abrasive cleaner.
NOTE:
E1: Problem: Temperature sensor short Reason: Temperature sensor damage. Solution: Replace with new temperature sensor.
E2: Problem: Temperature sensor not functioning. Reason: Loose or damaged temperature Solution: Replace with new temperature sensor.