User ManualOperating Instructions
PARTS & ACCESSORIES
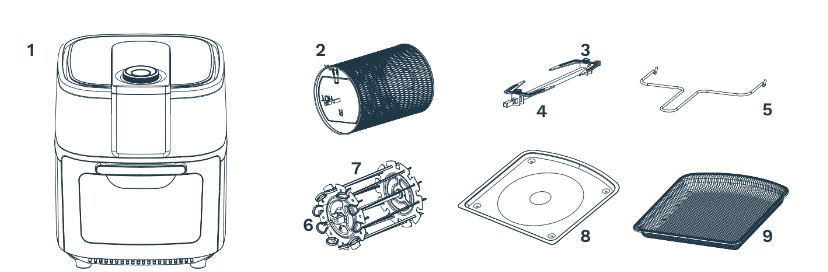
1. Main unit
2. Rotating basket
Great for fries, roasting nuts and other snacks. Use the rotisserie fetch tool to place the basket into unit.
3. & 4. Rotisserie shaft, forks & set screws
Used for roasts and whole chicken. Force the shaft lengthwise through the meat, making sure the shaft is at the center of the meat. Slide the forks onto the shaft from either end of the shaft, then lock them in place with set screws. There are indentations on the shaft for the set screws. You can adjust the screws closer to the middle of the shaft if needed, but do not slide the screws outward towards the ends from the indentations.
Note: Make sure roast or chicken is not too large to rotate freely within the air fryer. The largest chicken or roast should not exceed lbs.
5. Rotisserie fetch tool
Fetch the cooked roast and chicken that cooked by rotisserie or skewer methods. Place the fetch tool under the rotisserie shaft and lift left first, then gently extract the food.
6. Skewers
Great for all your kebab recipes, meat, fish and veggies.
7. Adjustable skewer rack
Used for making kebab.
Use the set screws to fit the skewer racks to the shaft.
8. Removable drip tray
Cook with the removable drip tray in place for easy clean-ups.
9. Dehydrating racks
Can be used not only for dehydration but also for cooking crispy snacks or reheating pizza.
Note:
- Make sure that your rotisserie air fryer has been shipped with the components that you ordered as some accessories may be sold separately). Check everything carefully before use. If any part is missing or damaged, do not use this product. Contact the local dealer that you buy this product.
- Some accessories may not be included with the purchase.
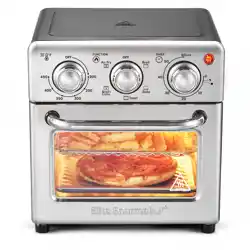
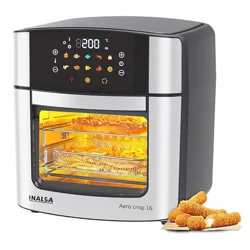
CONTROL PANEL
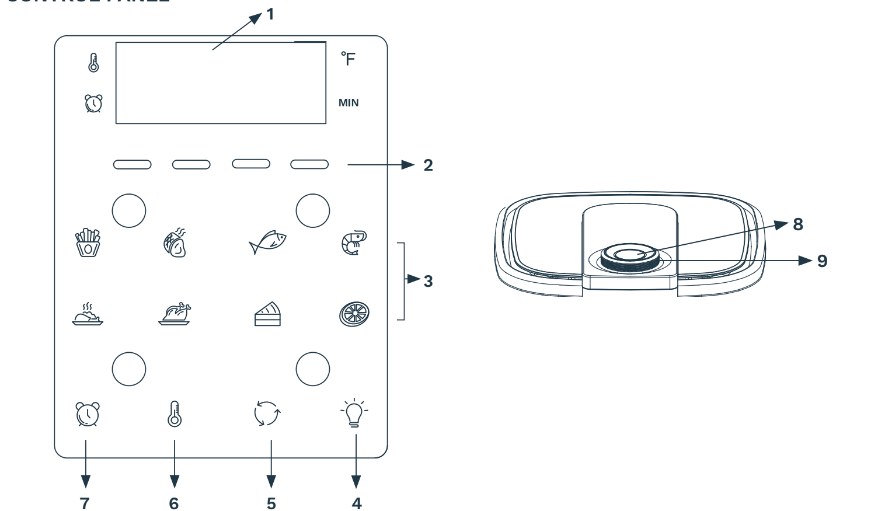
1. LED Digital Display
The display will switch between temperature and time remaining during the cooking process.
2. Running Lights
The Running Lights will blink in sequence during cooking and continue blinking up to 20 seconds once the unit is shut down.
3. Cooking Presets
Set time and temperature to a default setting for a particular food. You may over- ride these presets with Time and Temperature buttons.
4. Internal Light
The internal light helps you check cooking progress while the unit is in operation. Note: When you open the door during cooking, the cooking will be paused. The internal light will illuminate.
5. Rotation Button
Select this button when using the rotisserie mode. The icon will blink while the unit is in use.
6. Temperature Control Buttons
Raise or lower cooking temperature by 10°F intervals starting from 150°F to 400°F. Dehydration is from 90°F to 170°F.
7. Time Control Buttons
Set the cooking time from 1 to 60 minutes in all modes except when in dehydrating. It will take 30 minute intervals and an operating time from 2 to 24 hours to dehydrate the food.
8. Power/Start/ Stop Button
Once the unit is plugged in, the Power button will light up. Press the Power button, the full panel will be illuminated. Press the Power button again, the cooking starts at the default temperature of 370°F and will cook for 15 minutes. Press the Power button at any time during the cooking process to shut down the unit, with the display going dark immediately and the running light going dark within 20 seconds. The fan will continue running for 20 seconds to cool down the unit and then stop.
9. Time & Temp Control Dial.
Rotate the Time and Temperature dial (on the top of the air fryer) clockwise to increase the time/temperature and counterclockwise to decrease the time/temperature.
BEFORE USING FOR THE FIRST TIME
- Read all warning stickers and labels.
- Remove all packing materials, labels and stickers.
- Wash the parts and accessories used in the cooking process with warm soapy water. Only the accessories can be washed in dishwasher.
- Wipe the inside and outside of the cooking unit with a clean moist cloth.
Note:
- Do not wash or submerge the unit in water.
- When using this unit, do not fill any cooking vessel with oil or liquid of any kind. This unit cooks with hot air only.
PREPARING FOR USE
- Place the appliance on a stable, level, horizontal and heat resistant surface.
- Select the cooking accessory for your recipe.
- The rotisserie air fryer is designed to cook a wide variety of foods. The below table provided within this manual and will help you get great results. Please refer to this information for proper time/ temperature settings and proper food quantities.
- Use the Preset button to select the cooking mode by referring to below cooking chart.

Note:
- Once you are familiar with the rotisserie air fryer you may want to experiment by yourself.
- Cooking time for whole roasted chicken will vary by weight. Use meat thermometer to check internal temperature as per chart above.
COOKING WITH THE ROTISSERIE AIR FRYER
- Place the ingredients on the air flow rack, or in the rotating mesh basket or other rotisserie accessories.
- Put the air flow rack, rotating mesh basket or rotisserie spit into the unit and shut the unit door. Connect the power cord to an outlet.
- Put the food into the rotating mesh basket or the rotisserie, then press the Power button.
- Select the Preset mode or manually set the temperature & the time.
- Press the Power button to start the cooking.
- When cooking is completed, use the rotisserie fetch tool or wear mitts to take the food out. Fetch tool can also be used with the rotisserie spit.
Note:
- When time is up, cooking will stop. The fan will continue to run for 20 seconds to cool down the unit.
- Disconnect the device and leave the unit cool down completely before any cleaning or maintenance.
- Make sure the ingredients cooked to a golden-yellow color rather than dark or brown. Remove burnt remnants.
- You may open the air fryer door to view the rotisserie at any time during the process to check the progress.
- Foods that are smaller in size usually require a slightly shorter cooking time than the larger ones.
- Large quantities of food only require a slightly longer cooking time than smaller quantities.
- Flipping or turning the smaller size foods halfway through the cooking process, assure that all the pieces are evenly fired.
- Mist a bit of vegetable oil to fresh potatoes before cooking for a crispier result.
- Snacks normally cooked in air fryer can also be cooked in this rotisserie air fryer.
- Place a baking tin or air fryer dish in the rotisserie air fryer when baking a cake, quiche, or other fragile / filled foods.
- You can use the rotisserie air fryer to reheat foods by setting the temperature to 300°F degree.
Warning:
- If the unit emits black smoke, unplug the unit immediately. Do not remove the foods until the smoking stops emitting.
- To avoid product damage & personal injury, do not use the air fryer door as a place to rest a hot fry basket filled with food. The hot fry basket could damage the air fryer door or cause the unit to tip.
- During the cooking process, the rotating mesh basket and other accessories will become very hot.
- When you remove it to check on the progress, make sure you have a trivet or a heat resistant surface nearly to set it down on. Do not place the rotating mesh basket directly on a counter top or table.
- Cooking accessories will get hot during the air frying. Wear mitts and handle with care to avoid any injuries.
- Do not put anything on top of the appliance.
- Do not cover the air vents on the top and back of the unit.
- Do not fill any cooking vessel with oil or liquid of any kind.
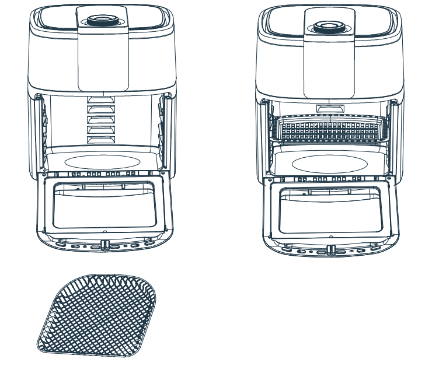
PLACE AIR FLOW RACKS INTO THE UNIT
- Insert the drip tray into bottom of the unit.
- Place the air flow racks into the unit by sliding through the side grooves and onto the back lip.
- To cook food faster or more crisply, place the air flow racks closer to the top heating element.
- Place the air flow racks at middle height for even cooking.
PLACE THE ROTISSERIE SHAFT AND SKEWERS RACKS
- Place the two skewer racks at each end of the rotisserie shaft. Make sure the set screws are on the outer side of the rotisserie shaft.
- Slightly tighten the set screws. Do not over tighten the set screws, as you may need to adjust the tightness after inserting the skewers.
- Carefully poke the skewers through the food.
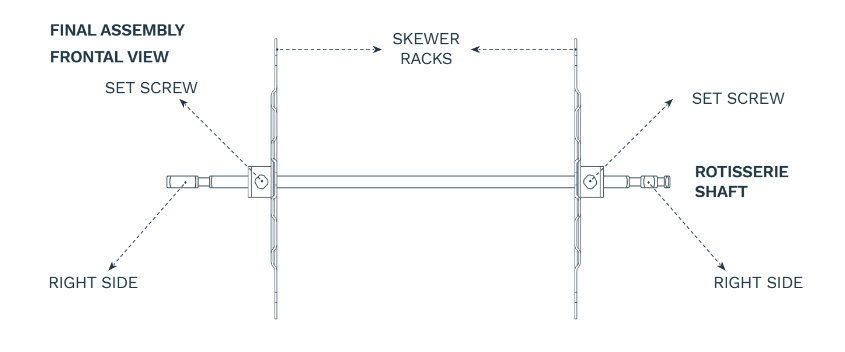
ASSEMBLE THE ROTISSERIE SPIT
- Insert each skewer point through the holes on the left skewer rack.
- Squeeze the clip-end of each skewer as you insert into the opposite skewer rack slot to secure.
- Release the clip to securely rest in slot.
- Repeat step 3 through step 6 in a uniform manner around the skewer rack. Make sure the skewers are evenly spaced.
- Tighten the set screws to make sure they are securely in place.
- Use caution while inserting the spit into the unit to prevent getting poked by the skewer ends.
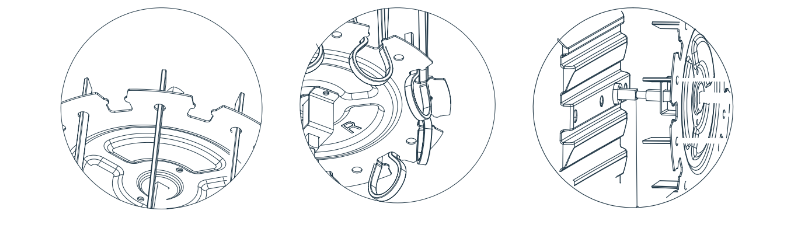
PLACE THE ROTISSERIE SPIT OR ROTATING MESH BASKET INTO THE UNIT
- Insert the left side of the assembled spit or basket first into the rotisserie shaft socket. Make sure the rotisserie shaft is in place to engage rotation.
- Place the right side onto the hanger.

REMOVE THE ROTISSERIE SPIT OR ROTATING BASKET FROM THE UNIT
- Open the unit door to pause cooking cycle or turn the unit off by pressing the Power button.
- Insert the rotisserie fetch tool beneath the rotisserie shaft.
- Lift the right side of the rotisserie fetch tool at a slight angle to clear the bracket, then shift the right until the left side of the shaft slides out of the rotisserie.
- Carefully remove the rotisserie food from the air fryer.
Cleaning and Maintenance
Clean the rotisserie air fryer after each use. The rotating mesh basket and other accessories are made of durable stainless steel and are dishwasher safe. Do not use abrasive solvents or utensils to clean any part of the appliance.
- Remove the power cord from the wall socket. Make sure the appliance is thoroughly cooled before the cleaning.
- Wipe the housing of the appliance with a warm moist cloth and mild detergent.
- Clean both sides of the unit door with a cloth damped by warm soapy water. Do not soak or submerge the door in water. Do not wash the door in dishwasher.
- Clean the interior of the appliance with a nonabrasive sponge.
- Remove the food residue from the upper screen with a cleaning brush if needed.
- Dry the appliance parts completely.
- Store the appliance in a clean and dry place.
Troubleshooting
The Rotisserie air fryer does not work.
- The appliance is not plugged in.
- Plug the power cord into the wall socket.
- You haven’t set the preparation time & temperature.
- With the mesh basket in place, set the temperature and time of the unit. Check that the door is closed.
Food is not cooked.
- The rotating mesh basket is over loaded.
- Use smaller batches for more even frying.
- The temperature is set too low.
- Set the temperature higher.
Food is not fried evenly.
- Some foods need to be turned during the cooking process.
- Turn the foods during the cooking process.
White smoke comes out from the unit.
- Oil is being used.
- Wipe down the accessories to remove the excess oil.
- Accessories have excess grease residue from previous cooking.
- Clean the unit accessories after each use.
French fries are not fried evenly.
- Wrong type of potato is being used.
- Use fresh and firm potatoes.
- Potatoes are not rinsed properly during the preparation.
- Use cut sticks and pat dry to remove the excess starch on the potatoes.
Fries are not crispy.
- Raw fries have too much water.
- Dry potato sticks properly before misting oil.
- Cut sticks smaller. Add a bit more oil.