SRV 7450WH
SRV 7485WH
EN
ROBOTIC VACUUM CLEANER
Translation of the original manual

SRV 7450WH
SRV 7485WH
A
1
2
3
9
10
11
12
13
14
8
4
5
6
7
A
18
26 27 28
15
16
17
22
23
19
20
21
24
25
B
1
2
3
4
5
7
8
9
6
C
1
7
3
2
4
5
6
D
E3
E1 E2
F1 F2
G1 G2
G3
H1 H2
H3 I
J1 J2
- 1 -
01/2025
2025, .
EN
Robotic Vacuum Cleaner
User Manual
Important Safety Instructions
READ CAREFULLY AND STORE FOR FUTURE USE.
• This appliance may be only used by children aged 8years
and older and by persons with physical, sensory or mental
impairments or lack of experience and knowledge, if they
are supervised or have been instructed on the safe use of
the appliance and understand the potential hazards.
• Children must not play with the appliance. Cleaning and
maintenance must not be performed by unsupervised
children.
• If the power cord of the collection station or charging
station is damaged, have it replaced in aprofessional
service centre in order to prevent adangerous situation. It is
forbidden to use the appliance with adamaged power cord,
collection station or charging station.
• Prior to cleaning or maintenance, always disconnect the
appliance from the power socket and turn it off using the
main power switch.
• The appliance must only be used with the collection
container (model SRV 7485WH) or with the charging
station (SRV 7450WH) supplied with the appliance.
WARNING:
Do not use the collection container or charging
station to charge batteries or appliances that are not
designed for this purpose.
ROBOTIC VACUUM CLEANER
- 2 -
01/2025
2025, .
• Connect the collection station or power adapter only to
apower socket withaprotective contact.
. . . . . . . . . . . . . . . . . . . . . . . . . . . . . . . . . . . . . . . . . . . . . . . . . . . . . . . . . . . . . . . . . . . . . . . . . . . . . . . . . . . . . . . . . . . . . . . . . . . . . . . . . . . . . . . . . . . . . . . . . . . . . . . . . . . . . . . . . . . .
Electrical Safety
• Before connecting the charging station adapter or the power cord of the collection station to apower socket, check that the technical details on the
rating label match the electrical voltage in the socket.
• Connect the power adapter or power cord only to aproperly grounded socket. Do not use an extension cord.
• Do not disconnect the power adapter or power cord from the socket by pulling on the power cord. This could damage the power adapter / power
cord or the socket. Disconnect the power adapter or power cord from the power socket by pulling the plug.
• Do not lay the power cord of the power adapter or the power cord of the collection station over sharp objects. Make sure that the cord does not hang
over the edge of the table or touch aheated or hot surface.
• Keep the power adapter or power cord dry.
• Do not connect or disconnect the power adapter or power cord to or from the power socket with wet hands.
• Do not uncover the electronic parts of the robotic vacuum cleaner or its battery. They do not contain any components repairable by the user. Have
the appliance serviced by qualified persons.
• To prevent possible electric shock, do not spray the robotic vacuum cleaner, the power supply unit or the power adapter with water or immerse it in
water or other liquids.
• Do not use the robotic vacuum cleaner when it is not working correctly, if it has been damaged or has been submerged in water.
• To avoid the danger of injury by electrical shock, do not repair the robotic vacuum cleaner yourself or make any adjustments to it. All repairs should
be carried out by an authorised service centre. Tampering with the robotic vacuum cleaner during the warranty period may void the warranty.
• Prior to cleaning or maintenance, always disconnect the robotic vacuum cleaner from the power socket and turn it off using the main power switch.
Safety in Use
• This robotic vacuum cleaner is designed for use in households, offices and similar types of areas. Do not use it in industrial surroundings or outdoors.
• The robotic vacuum cleaner is not intended for vacuuming water and, therefore, must not be used in damp or wet areas, for example in laundries,
bathrooms or around swimming pools. If it were to come into contact with water, the internal electronics of the vacuum cleaner would be destroyed.
• Do not use the robotic vacuum cleaner to vacuum the following items:
– smouldering cigarettes, burning or flammable items, matches or ash;
– water and other liquids;
– sharp items, e.g. splinters, needles, pins, etc.;
– flour, wall plaster and other building materials;
– larger pieces of paper or plastic bags, which can easily block the suction opening.
• Do not expose the robotic vacuum cleaner to direct sunlight and do not place it near an open fire or appliances that are asource of heat.
• Do not use the robotic vacuum cleaner on narrow raised surfaces such as tables, wardrobes, etc. If the vacuum cleaner does not have sufficient
space for manoeuvring, it may fall and be damaged.
• Only use the robotic vacuum cleaner with original accessories from the manufacturer.
• Ensure that the robotic vacuum cleaner has adust filter correctly installed in the dust container before use.
• Before putting the robotic vacuum cleaner into operation, check that the entry door into your flat or house is closed. From the floor surfaces remove
clothing, paper, toys, power or extension cords and other items that the vacuum cleaner could suck in or catch. Lift curtains and drapes that reach to
the floor so that they do not get caught in the vacuum cleaner.
• Do not place any items on to the robotic vacuum cleaner and do not step or sit on it.
• If the robotic vacuum cleaner is running, watch out for children and household pets.
• When the robotic vacuum cleaner is running, ensure that the air outlet openings are not covered and that the suction opening is not blocked.
Otherwise, the robotic vacuum cleaner may be damaged.
• Follow the cleaning andmaintenance instructions provided inthis user manual.
Laser
• The laser sensor meets the laser safety class according to standard EN 60825-1.
• When using, handling or performing maintenance tasks on the robotic vacuum cleaner with alaser sensor, always adhere to the following
instructions:
– Prior to any handling, switch off the robotic vacuum cleaner using the main power switch.
– Do not point the laser beam at people.
– Do not look into the direct or reflected beam of the laser.
– Modifications or repairs of the laser sensor that are not performed by an authorised service centre are forbidden.
Warning:
Not following the instructions contained in this user'smanual may result in dangerous irradiation!
. . . . . . . . . . . . . . . . . . . . . . . . . . . . . . . . . . . . . . . . . . . . . . . . . . . . . . . . . . . . . . . . . . . . . . . . . . . . . . . . . . . . . . . . . . . . . . . . . . . . . . . . . . . . . . . . . . . . . . . . . . . . . . . . . . . . . . . . . . . .
- 3 -
01/2025
2025, .
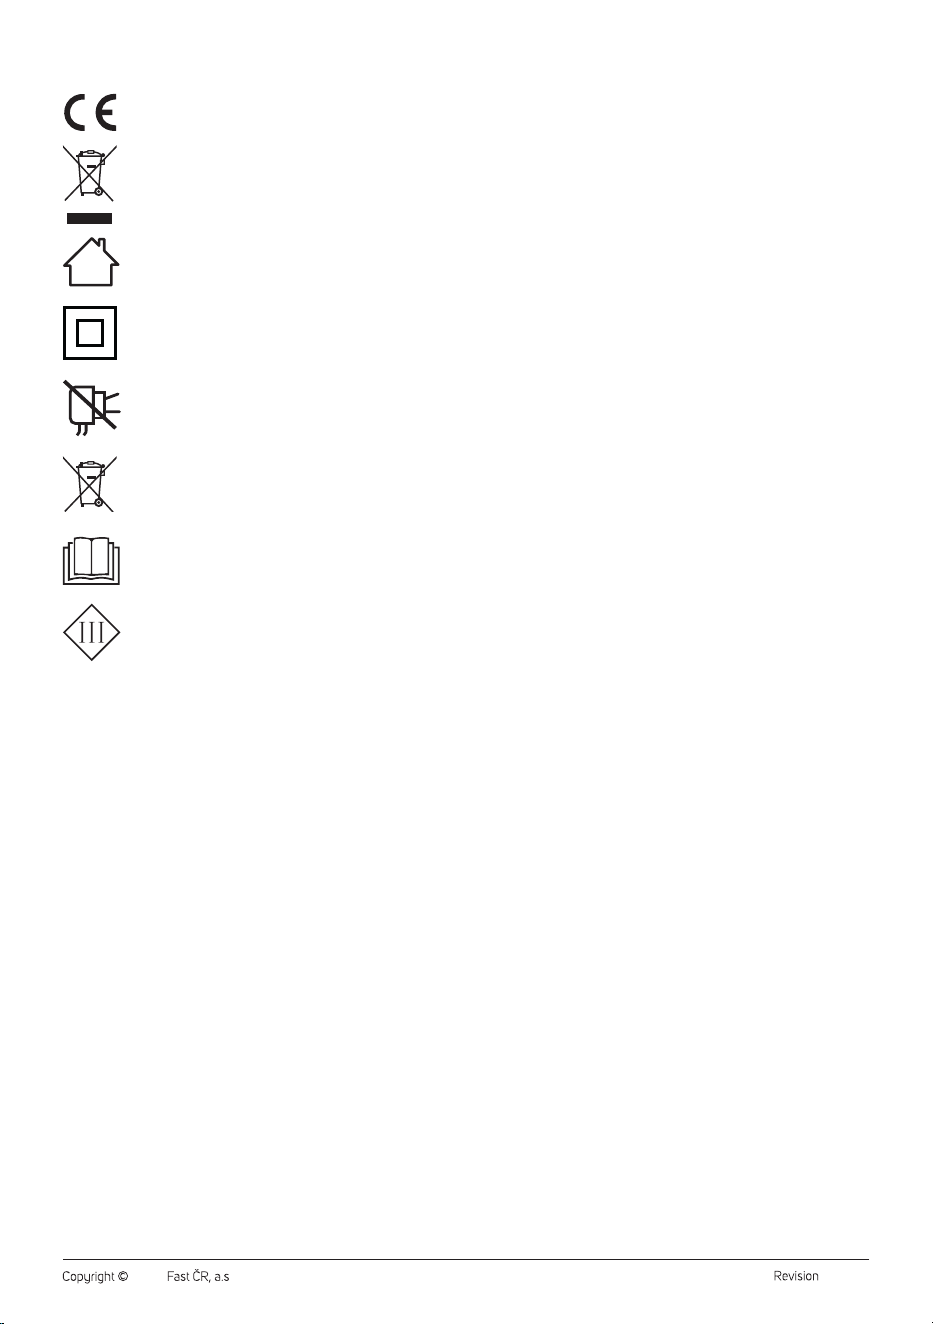
EXPLANATION OF SYMBOLS PLACED ON THE PRODUCT OR INTHE ACCOMPANYING DOCUMENTATION
The product meets all the basic requirements of the applicable EU directives.
This symbol on products or original documents means that used electric or electronic products must not be added to ordinary municipal
waste.
The product is intended for household use only. The product is not intended for outdoor use.
Safety Class for Electric Shock Protection:
Class II – Electric shock protection is provided by double or heavy-duty insulation.
This symbol indicates that the appliance must not be used if the power plug is damaged.
BATTERY DISPOSAL
Before disposing of the product or returning it to adesignated collection point, ensure that the battery is removed. Before removing the
battery, it is necessary to start the vacuum cleaner and wait until it is completely flat. The battery contains environmentally harmful
substances and should not be disposed of in regular household waste. Proper disposal shall be ensured by the relevant collection point.
Read the user'smanual.
Product with protection class III:
The appliance is designed for alow safe voltage. Electric shock protection is provided by alow safe voltage.
. . . . . . . . . . . . . . . . . . . . . . . . . . . . . . . . . . . . . . . . . . . . . . . . . . . . . . . . . . . . . . . . . . . . . . . . . . . . . . . . . . . . . . . . . . . . . . . . . . . . . . . . . . . . . . . . . . . . . . . . . . . . . . . . . . . . . . . . . . . .

- 4 -
01/2025
2025, .
• Thank you for purchasing our SENCOR product; we hope it will serve
to your satisfaction.
• Prior to using this appliance, please read the user manual thoroughly,
even in cases when you are already familiar with the use of similar
types of appliances. Use the appliance only as described in this
user manual. Keep the manual for future reference. If you pass the
appliance on to another person, ensure that this user manual is
included.
• Carefully unpack the appliance and make sure not to discard any part
of the packaging material until you have found all its components. It
is recommended to keep the original packaging, packing material,
receipt and confirmation of the extent of the seller'sliability or warranty
certificate at least for the duration of the legal right of defective
performance or quality guarantee. When transporting the appliance,
we recommend packaging it again in the original box provided by the
manufacturer.
. . . . . . . . . . . . . . . . . . . . . . . . . . . . . . . . . . . . . . . . . . . . . . . . . . . . . . . . . . . . . . . . . . . .
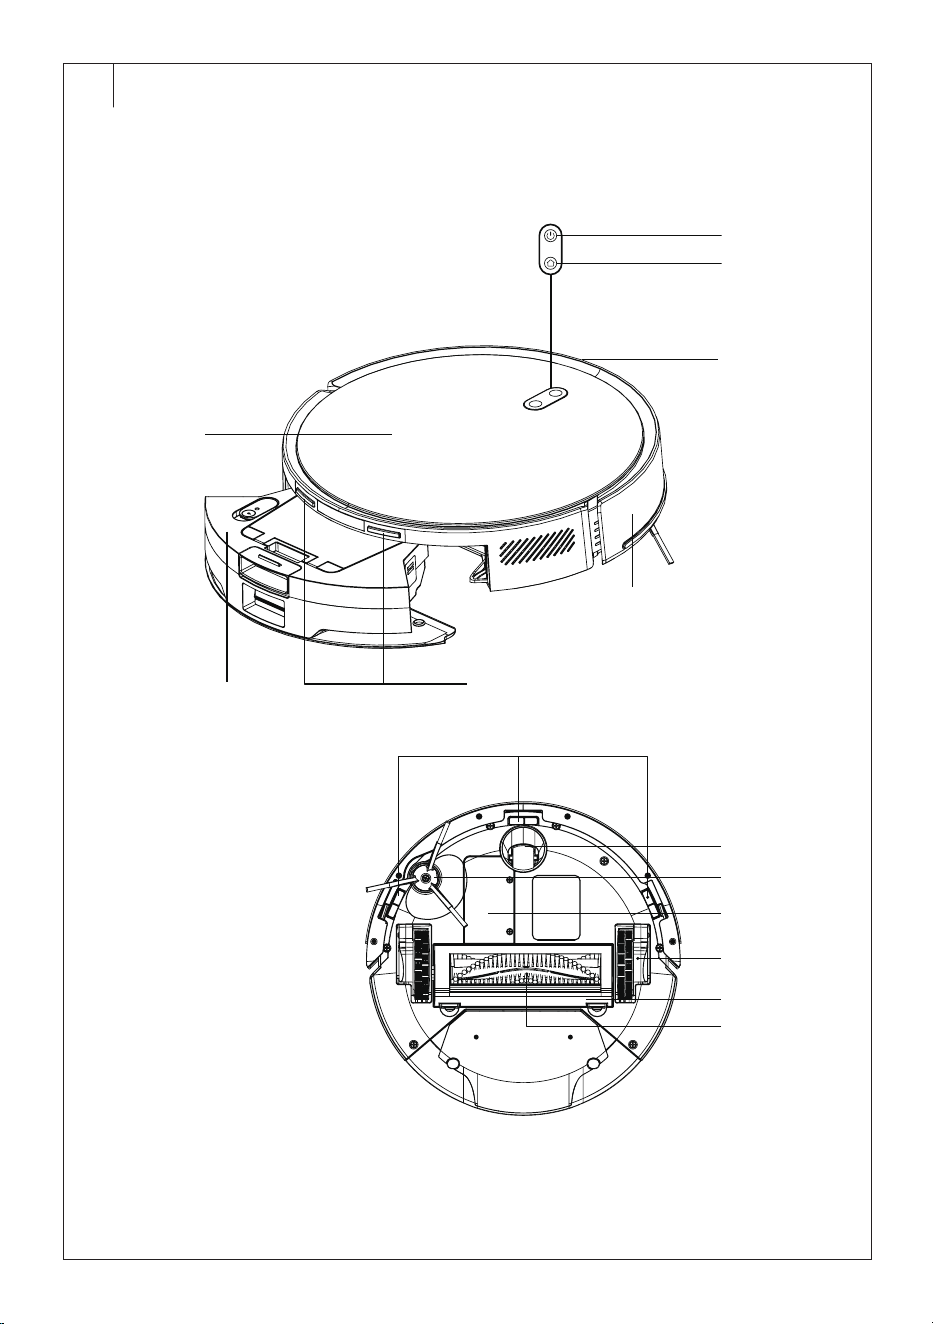
DESCRIPTION OF THE ROBOTIC VACUUM CLEANER
A1 button (turning on/off /
starting automatic cleaning)
A2 send to collection station /
charging station button
A3 Laser sensor (located in
thefront part)
A4 Bumper
A5 Charging contacts
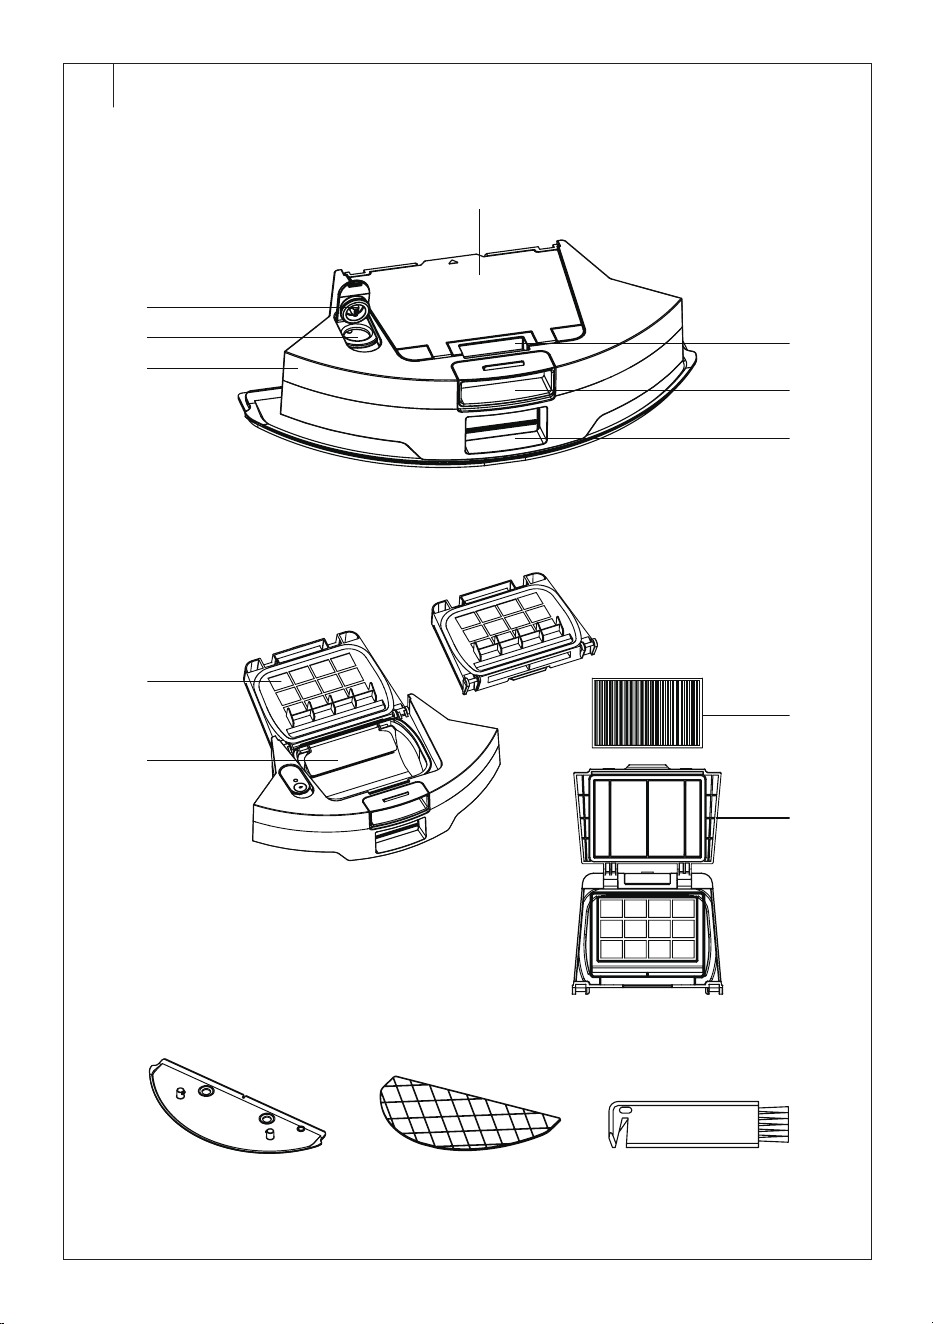
A6 Combination 2-in-1 dust
container with water tank
A7 Top cover
A8 Anti-fall sensors
A9 Front swivel wheel
A10 Side rotary brush
A11 Battery (located under cover)
A12 Travel wheels
A13 Rotating brush frame
A14 Rotating brush
A15 Water tank opening cover
A16 Water tank filler opening
A17 Water tank
A18 HEPA filter compartment
A19 Dust container opening lock
A20 2-in-1 dust container release
button
A21 Suction hole
A22 Coarse filter
A23 Dust container interior
A24 HEPA filter
A25 HEPA filter compartment lid
A26 Mop sleeve holder
A27 Mop sleeve
A28 Cleaning brush
. . . . . . . . . . . . . . . . . . . . . . . . . . . . . . . . . . . . . . . . . . . . . . . . . . . . . . . . . . . . . . . . . . . .
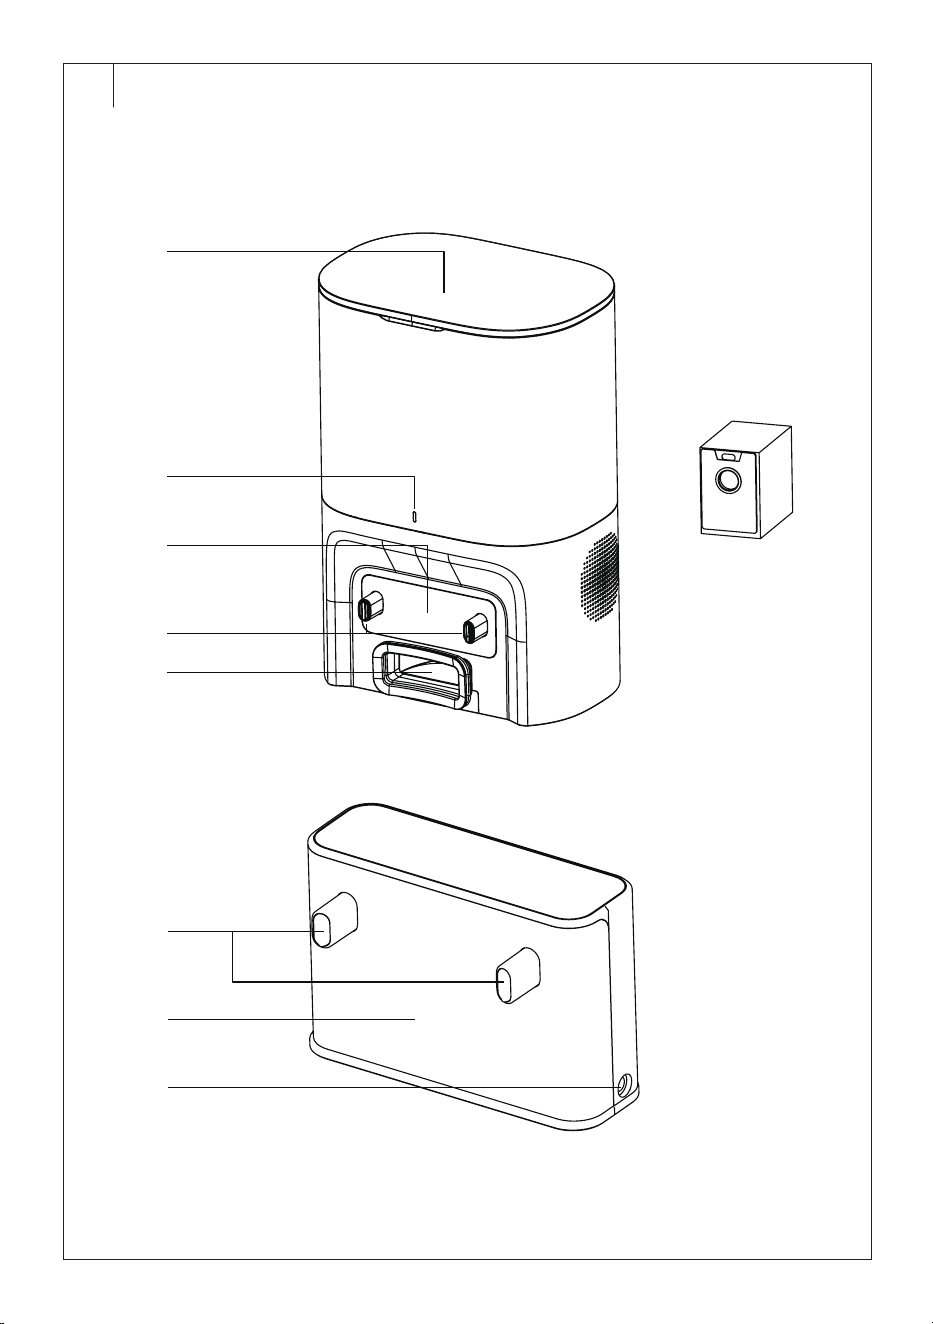
DESCRIPTION OF THE COLLECTION STATION
B1 Lid of the collection station
B2 Indicator
B3 Signal transmission point
B4 Charging contacts
B5 Suction opening
B6 Dust bag
. . . . . . . . . . . . . . . . . . . . . . . . . . . . . . . . . . . . . . . . . . . . . . . . . . . . . . . . . . . . . . . . . . . .
DESCRIPTION OF THE CHARGING STATION
B7 Charging contacts
B8 Signal transmission point
B9 Socket for mains adapter
connection
. . . . . . . . . . . . . . . . . . . . . . . . . . . . . . . . . . . . . . . . . . . . . . . . . . . . . . . . . . . . . . . . . . . .
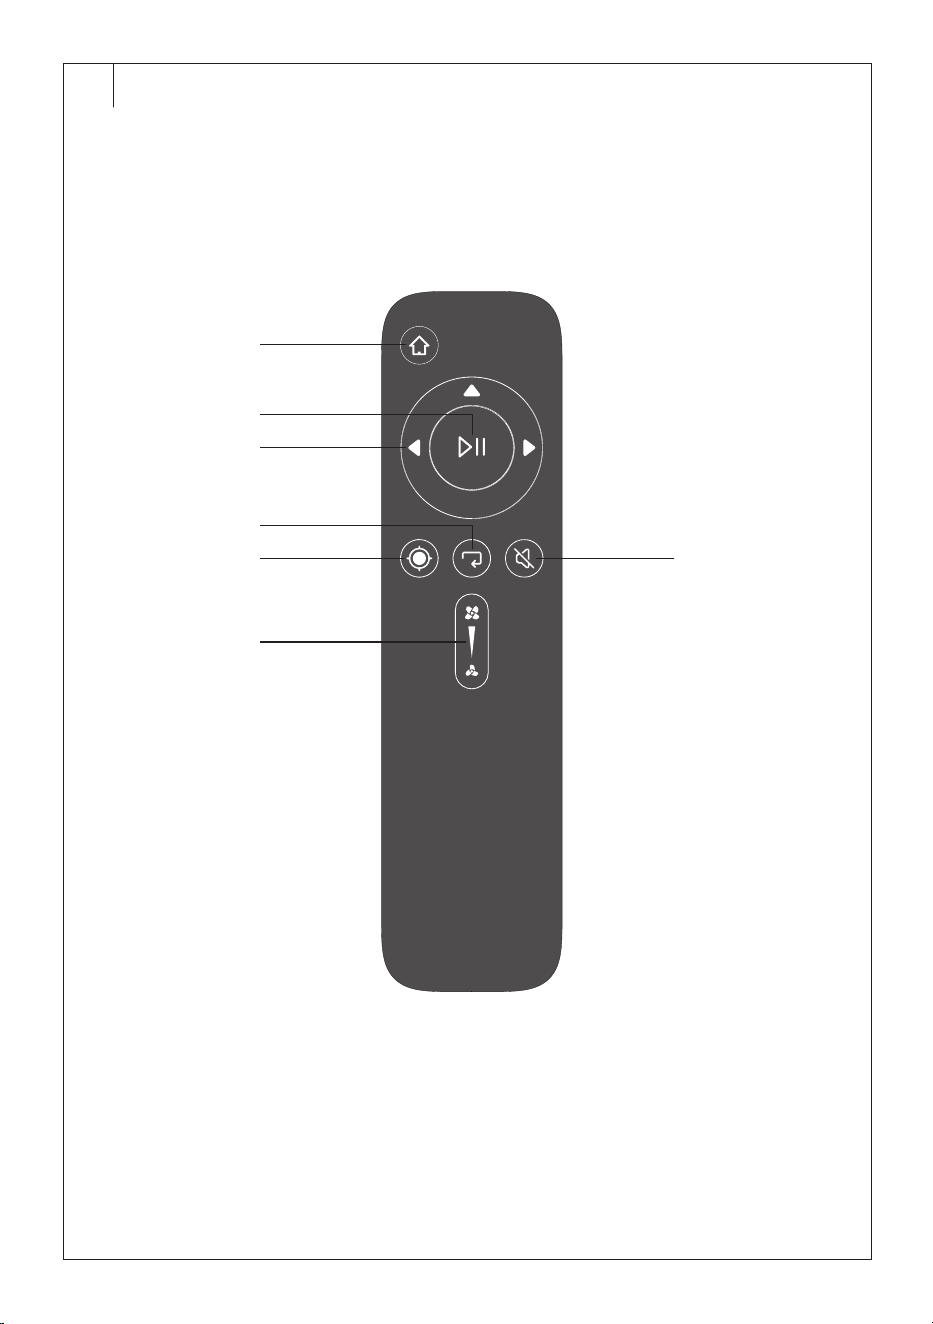
REMOTE CONTROL DESCRIPTION
C1 button send to collection
station / charging station
button
C2 Button button to start
automatic cleaning / interrupt
cleaning
C3 Forward/left/right/backward
movement buttons
C4 button to start cleaning
along the walls
C5 button to start cleaning the
selected area
C6 Button to adjust suction power
C7 button to turn off the
sound signal
. . . . . . . . . . . . . . . . . . . . . . . . . . . . . . . . . . . . . . . . . . . . . . . . . . . . . . . . . . . . . . . . . . . .
SRV 7485WH PACKAGE CONTENTS
• Robotic Vacuum Cleaner
• Collection station
• Remote control
• Mop sleeve holder
• Mopping sleeve (3 pcs)
• HEPA filter (2 pcs: 1 filter installed on the vacuum cleaner; 1 spare
HEPA filter)
• Side rotary brush (2 pcs: 1 installed on the vacuum cleaner; 1 spare
side rotary brush)
• Dust bag (3 pcs: 1 bag installed in the station; 2 spare bags)
• Cleaning brush
• AAA batteries (2 pcs)
. . . . . . . . . . . . . . . . . . . . . . . . . . . . . . . . . . . . . . . . . . . . . . . . . . . . . . . . . . . . . . . . . . . .
SRV 7450WH PACKAGE CONTENTS
• Robotic Vacuum Cleaner
• Charging station with mains adapter
• Remote control
• Mop sleeve holder
• Mopping sleeve (3 pcs)
• HEPA filter (2 pcs: 1 filter installed on the vacuum cleaner; 1 spare
HEPA filter)
• Side rotary brush (2 pcs: 1 installed on the vacuum cleaner; 1 spare
side rotary brush)
• Cleaning brush
• AAA batteries (2 pcs)
Note:
For the SRV 7450WH the collection station can be
purchased separately. The model name of the collection
station is: SRX 7413. Please contact your dealer.
. . . . . . . . . . . . . . . . . . . . . . . . . . . . . . . . . . . . . . . . . . . . . . . . . . . . . . . . . . . . . . . . . . . .
PURPOSE OF USE AND FEATURES OF THE ROBOTIC VACUUM
CLEANER
• The SRV 7485WH robotic vacuum cleaner is supplied with
acollection station that is also used for charging. The robotic vacuum
cleaner is supplied with acharging station.
• The robotic vacuum cleaner is intended for cleaning various types
of hard floors such as wooden or laminate floating floors, tiles, vinyl,
etc. and carpets with alow pile height. While vacuuming, it effectively
combines various routes to optimally clean the entire floor area.
• The main rotary brush effectively removes hair, animal fur, etc. The
side rotary brush brushes dirt out of hard-to-reach places along walls
and furniture and out of corners. The motorised rubber castors protect
sensitive floors against scratching and can travel over threshold strips
up to aheight of 1.8 cm and ride on to a1.8 cm high carpet.
• The suspended bumper enables the vacuum cleaner to dampen the
approach to an obstacle and to efficiently clean around it. The infrared
sensors in the front bumper prevent the robotic vacuum cleaner from
colliding with obstacles. Safe operation in rooms with stairs is made
possible by the bottom anti-stair-fall sensors.
• The vacuum cleaner is equipped with GYRO MAPPING function
(orientation in space), which can identify the space geometry of,
aroom in which it is cleaning, thereby the vacuum cleaner is able to
better clean the floor. The vacuum cleaner is also equipped with laser
navigation by means of which it maps out each room and then starts
to clean it systematically. Both functions are built-in and cannot be
affected in any way.
. . . . . . . . . . . . . . . . . . . . . . . . . . . . . . . . . . . . . . . . . . . . . . . . . . . . . . . . . . . . . . . . . . . .
ROBOTIC VACUUM CLEANER CLEANING MODES
Automatic Cleaning Mode
The robotic vacuum cleaner dynamically plans the cleaning path
according to the map created by scanning andgradually completes the
cleaning of different zones. Ineach zone, the robotic vacuum cleaner
first starts cleaning along the edges and then cleans the rest in azigzag
EN
Robotic Vacuum Cleaner
User Manual
- 5 -
01/2025
2025, .
pattern. After finishing the cleaning, the robotic vacuum cleaner will
automatically return to the collection station / charging station.
Note:
Prior to starting the robotic vacuum cleaner, always check
that it is charged and that all obstacles, foreign objects,
cables, etc. have been removed from the area.
Note:
You can select additional cleaning modes of the robotic
vacuum cleaner directly in the app or on the remote control.
. . . . . . . . . . . . . . . . . . . . . . . . . . . . . . . . . . . . . . . . . . . . . . . . . . . . . . . . . . . . . . . . . . . .
PREPARING THE ROBOTIC VACUUM CLEANER
• Take the robotic vacuum cleaner and all its accessories out of the
packaging. Check that you have removed all the parts.
• Check the robotic vacuum cleaner and its accessories for damage.
• Remove protective film and advertising labels from the robotic vacuum
cleaner and all accessories, including protective tapes that may be
placed on the robotic vacuum cleaner.
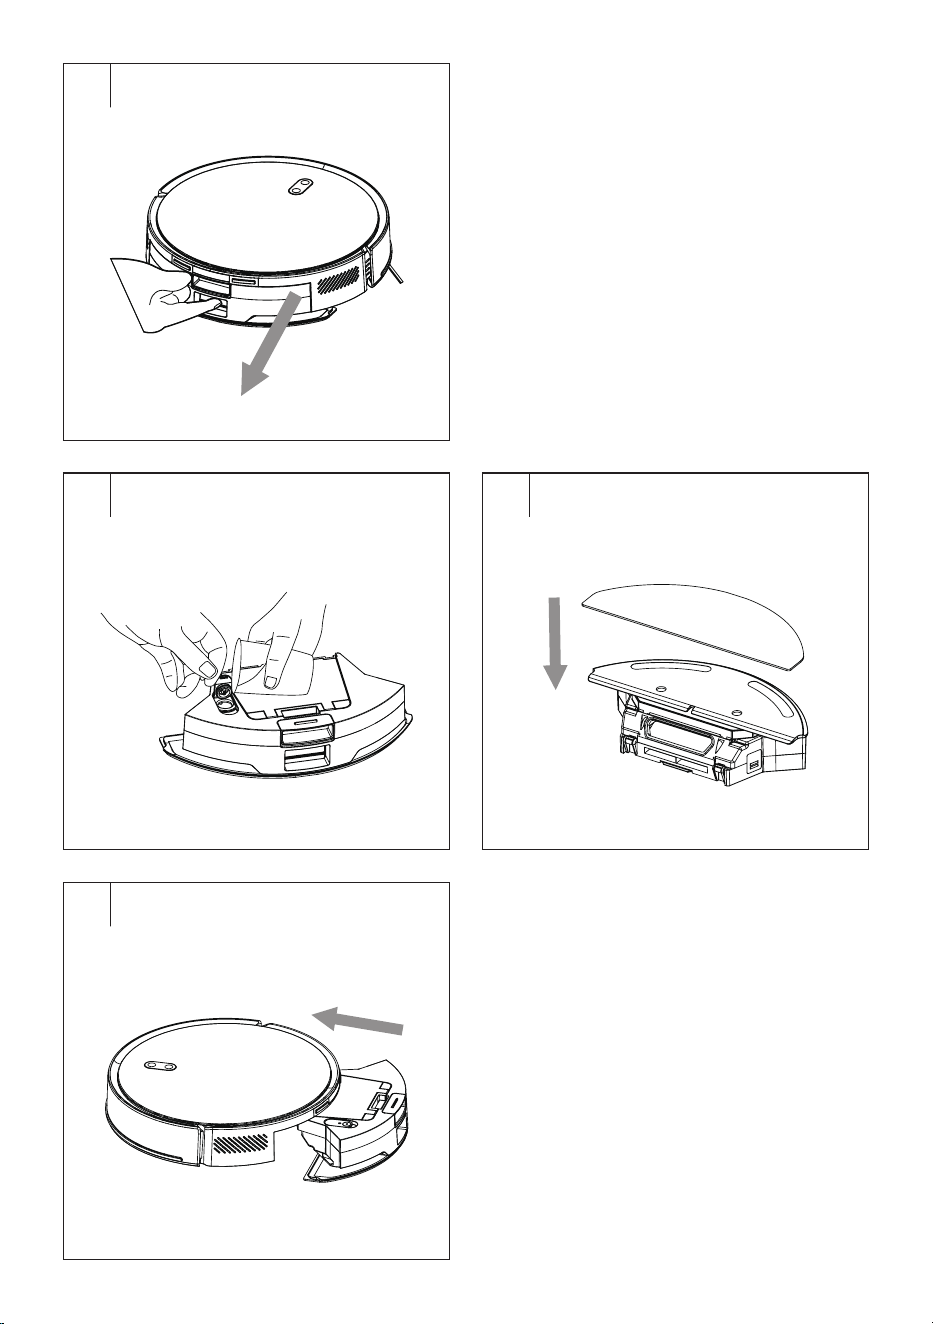
Installing the Side Rotary Brush
• The side rotary brush is intended for smooth floor surfaces and
ensures effective cleaning in corners, along walls and around furniture.
• Turn the vacuum cleaner upside down. Fit the rotary brush on the pin
provided and secure it with ascrew. Turn the vacuum cleaner back to
the operating position.
• When using the vacuum cleaner to clean rooms with carpets, remove
the rotary brush. To remove it, follow the same steps in reverse order.
. . . . . . . . . . . . . . . . . . . . . . . . . . . . . . . . . . . . . . . . . . . . . . . . . . . . . . . . . . . . . . . . . . . .
COMBINATION 2-IN-1 DUST CONTAINER WITH WATER TANK
The combination dust container with water tank enables the floor to be
vacuumed and wiped at the same time. The robotic vacuum cleaner
vacuums dirt and dust from the floor and then wipes it. Depending on the
intended use of the robotic vacuum cleaner, it is necessary to pour water
into the water tank and to attach the holder with the mop sleeve.
Using the Robotic Vacuum Cleaner Only for Vacuuming
1. When using the robotic vacuum cleaner only for vacuuming, before
using it, ensure that the dust container is inserted in the vacuum
cleaner and that it is empty.
2. To be able to remove the dust container, press the dust container
release button and pull the dust container out of the vacuum cleaner
– see figure D.
3. Insert the dust container into the robotic vacuum cleaner so that
the dust container lid is pointing upwards and the outlet is pointing
outwards. Gently push down on the dust container from behind until
you hear aclick. This indicates that the dust container is correctly
secured in the vacuum cleaner.
Using the Robotic Vacuum Cleaner for Vacuuming and Wiping the Floor
In order to use the robotic vacuum cleaner for vacuuming and wiping the
floor at the same time, it is necessary to put water into the water tank
and to attach the holder with the mop sleeve on to the bottom side of the
water tank.
1. Remove the dust container from the robotic vacuum cleaner
by pressing the dust container release button and pull the dust
container out of the vacuum cleaner.
2. Release the water tank cover and pour water into the water tank
through the opening – see figure E1. Close the cover tightly.
Note:
For mopping, we recommend using clean water. If you use
acleaning agent, it may foam up and thereby worsen the
dripping of the water on to the sleeve, or potentially cause
smudges on the floor after it dries.
3. Put the mop sleeve on to the holder – see figure E2. We recommend
soaking and rinsing out the sleeve slightly before putting it on. This
speeds up the soaking process and subsequent mopping of the floor.
4. Attach the holder to the container from below. Gently push down on
the holder until you hear aclick. This indicates that the holder with
the mop sleeve is correctly secured.
5. Insert the dust container into the robotic vacuum cleaner so that
the dust container lid is pointing upwards and the outlet is pointing
outwards – see figure E3. Gently push down on the dust container
from behind until you hear aclick. This indicates that the dust
container is correctly secured in the vacuum cleaner.
Warning:
Do not use the robotic vacuum cleaner to vacuum
and wipe door mats, runners, etc. Before vacuuming
carpets, it is necessary to remove the holder with the
mop sleeve.
. . . . . . . . . . . . . . . . . . . . . . . . . . . . . . . . . . . . . . . . . . . . . . . . . . . . . . . . . . . . . . . . . . . .
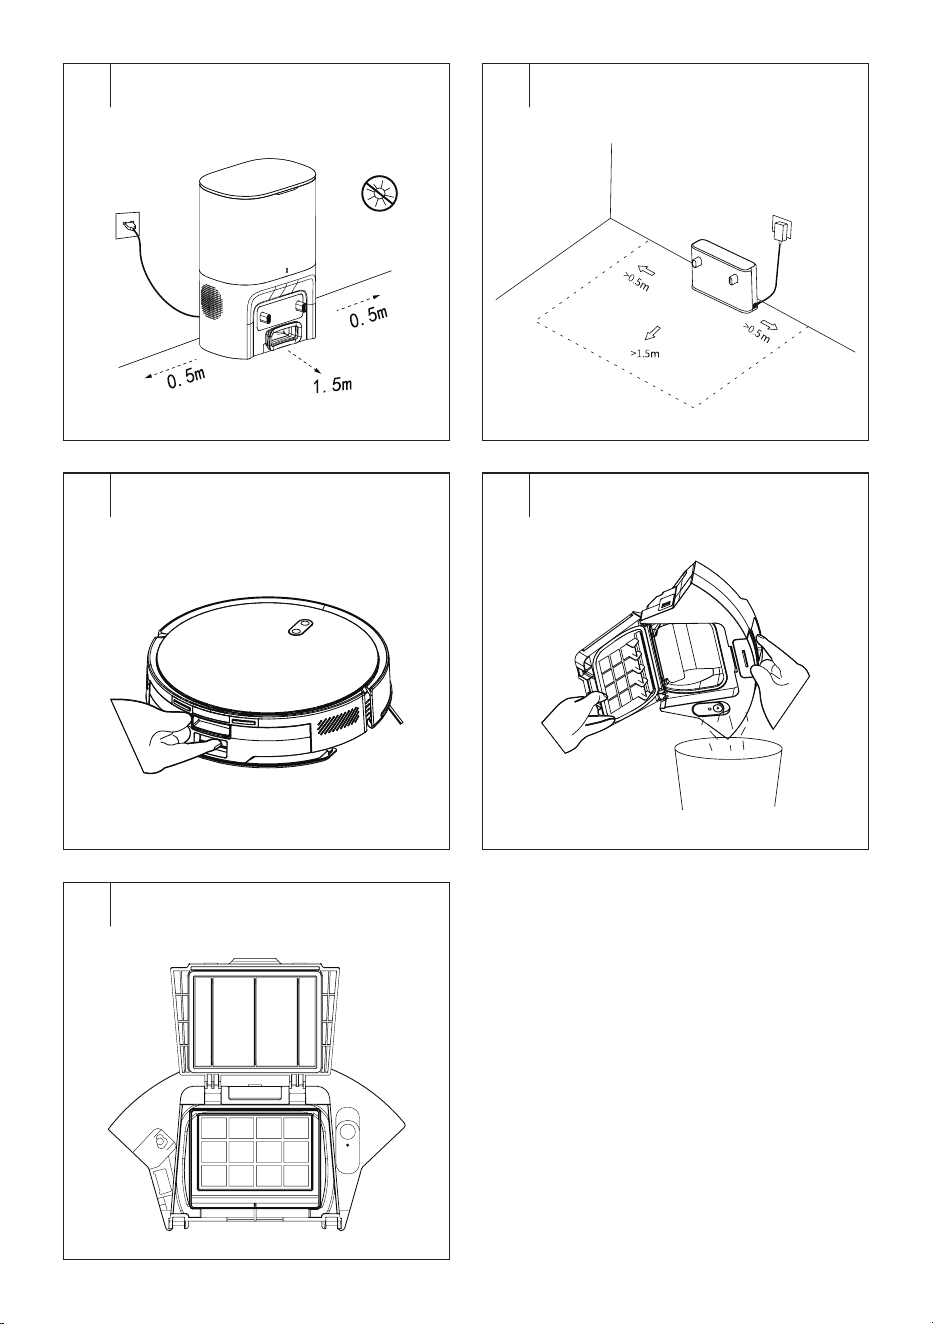
LOCATION OF THE COLLECTION STATION / CHARGING STATION
• The collection station / charging station is used toautomatically
recharge the battery and the vacuum cleaner must have good access
to it.
• Place the collection station / charging station against awall on ahard,
horizontal anddry surface withinreach of the mains socket – see
figure F1 (collection station) or F2 (charging station). Ensure that there
are no steps or obstacles within 0.5 m to the left andright and 1.5 m in
front of the collection station / charging station that would prevent the
vacuum cleaner from locating the collection station/ charging station
and docking successfully.
• Connect the power cord connector to the socket of the collection
station / charging station and plug the male plug into the power
socket. Position the power cord so that it will not get tangled in the
rotary brushes of the vacuum cleaner.
• If you will not be using the vacuum cleaner for along time, disconnect
the collection station / charging station from the power socket
andstore it in adry, clean andcool place.
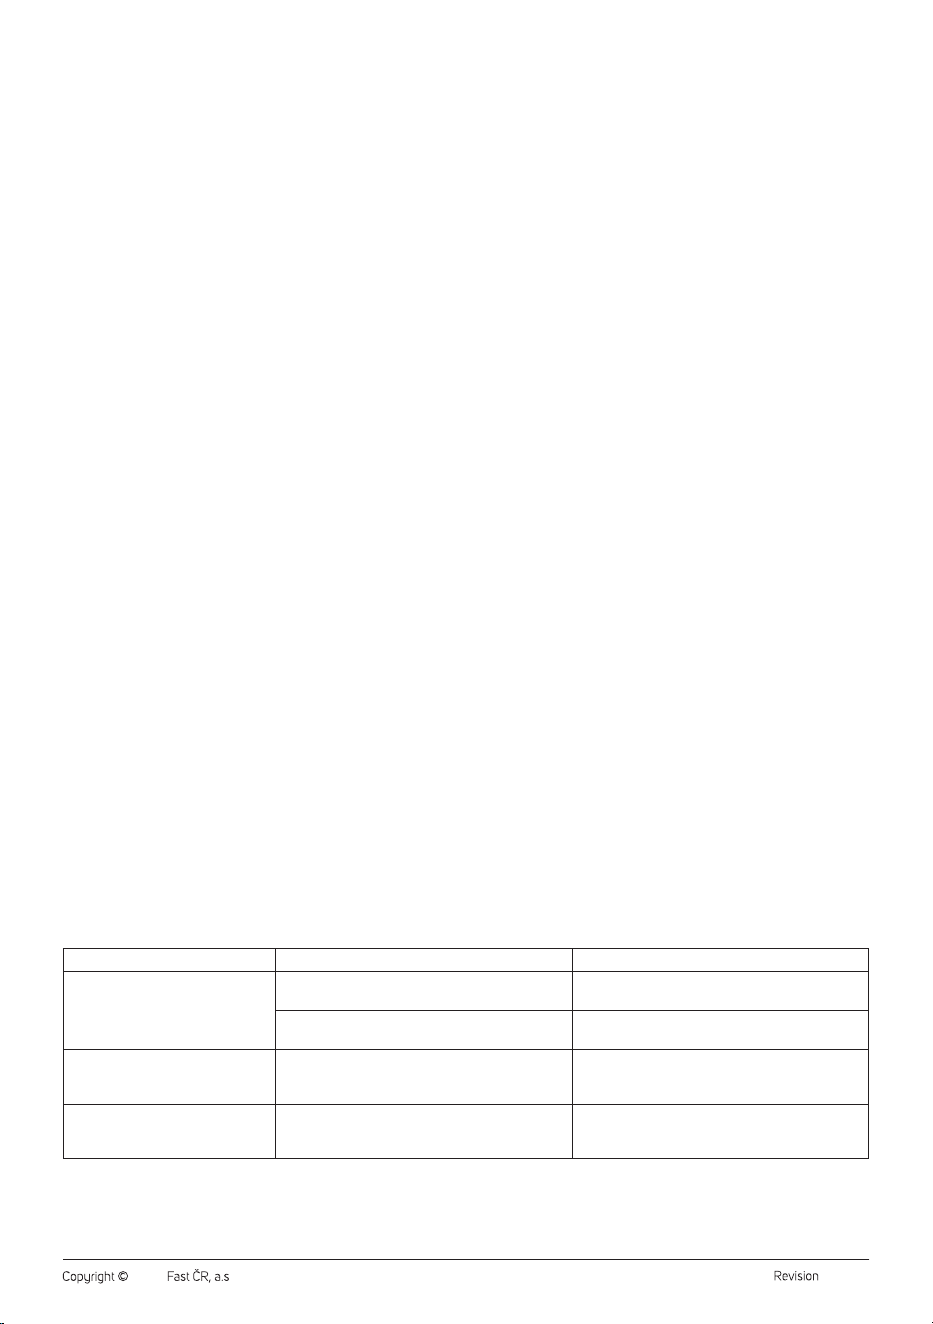
The collection station indicator
Indicator status Meaning
On. Normal operation.
Off. The collection station is not plugged in to the
mains socket.
It is flashing
slowly.
The robotic vacuum cleaner is charging.
It is flashing
quickly.
The dust bag is not inserted correctly.
Abnormal operation of the internal fan.
Note:
The indicator goes off when the robotic vacuum cleaner is
fully charged.
. . . . . . . . . . . . . . . . . . . . . . . . . . . . . . . . . . . . . . . . . . . . . . . . . . . . . . . . . . . . . . . . . . . .
CHARGING THE ROBOTIC VACUUM CLEANER
The vacuum cleaner can be charged in the collection station / charging
station, which the vacuum cleaner automatically seeks out when it has
finished cleaning.
If the robotic vacuum cleaner is in the collection station, it will activate
automatically andthere is no need to turn it on.
Charging the Vacuum Cleaner for the First Time
Before first use, it is necessary to fully charge the robotic vacuum cleaner.
Allow the robotic vacuum cleaner to charge for up to 12 hours.
Grasp the vacuum cleaner and manually place it into the collection station
so that the charging contacts on the underside of the vacuum cleaner and
the charging contacts on the dust collection station are connected. When
the contacts are connected, the charging process will start.
Automatic Charging
• The robotic vacuum cleaner utilises the automatic charging function
whenever it finishes cleaning and in cases, where during operation, it
detects that the battery is low. Therefore, the robotic vacuum cleaner
will start to actively seek out the collection station / charging station. It
is thus important that it is always connected to apower source and is
freely accessible for the vacuum cleaner so that it can dock in it.
• The robotic vacuum cleaner can be sent to be charged also by
pressing the charging button directly on the vacuum cleaner, in the
application or on the remote control. In such acase, the operation of
- 6 -
01/2025
2025, .
the robotic vacuum cleaner will stop and it will seek out the collection
station / charging station.
• After docking in the collection station / charging station, the charging
cycle will commence. Acomplete charge takes approximately 5 to
6 hours. The actual charging time depends on the power level of the
battery at the start of the charging process.
• Full charge ensures up to 140 minutes of operation (low suction power
set).
• In the event that the charging contacts are disconnected during the
charging cycle, the vacuum cleaner will move away from the charging
station and then re-dock itself to resume the charging process, unless
it is prevented from doing so by an obstacle.
• In the event of apower outage, the charging cycle will be interrupted
and will continue after the power supply is renewed.
• In the event that the maximum charging current is exceeded, the
charging process will be automatically interrupted.
• In the event that the robotic vacuum cleaner is discharged completely,
e.g. because the vacuum cleaner failed to seek out or dock in the
collection station, it is necessary to put it there manually.
. . . . . . . . . . . . . . . . . . . . . . . . . . . . . . . . . . . . . . . . . . . . . . . . . . . . . . . . . . . . . . . . . . . .
BEFORE FIRST USE
Before the first cleaning after the robotic vacuum cleaner is fully charged,
we recommend performing aso-called quick mapping, when the robotic
vacuum cleaner will load amap of all rooms of all rooms to be cleaned
later. Therefore, leave all the doors of the rooms that you will want to
clean in the future open so that the vacuum cleaner can access them.
You'll be prompted to do this in theapp the first time you clean.
. . . . . . . . . . . . . . . . . . . . . . . . . . . . . . . . . . . . . . . . . . . . . . . . . . . . . . . . . . . . . . . . . . . .
CONTROLLING THE VACUUM CLEANER USING ITS BUTTONS
The buttons on the vacuum cleaner are used for basic control. For
advanced control, operate your robotic vacuum cleaner via the mobile
app or remote control. You will find more information further in the user
manual.
Switching the Robotic Vacuum Cleaner On/Off
• Press and hold the button for 3 seconds to turn the robotic vacuum
cleaner on. The backlight of the button lights up. The robotic vacuum
cleaner will switch to the stand-by mode.
• Press and hold the button for 3 seconds to turn the robotic vacuum
cleaner off. The backlight of the button will go out. The robotic vacuum
cleaner is turned off.
Note:
It is not possible to turn off the robotic vacuum cleaner
during the charging process.
Starting Automatic Cleaning
While the robotic vacuum cleaner is in stand-by mode, press the
button and the robotic vacuum cleaner will start automatic cleaning.
Note:
The robotic vacuum cleaner does not start cleaning if the
battery charge status is less than 15%. Wait until the robotic
vacuum cleaner is fully charged.
Pausing the Cleaning Process
If the button is pressed during the operation of the robotic vacuum
cleaner then the operation of the robotic vacuum cleaner will be paused.
Pressing the button again will resume its operation.
Sleep Mode (only in-app activation possible)
The robotic vacuum cleaner will switch to sleep mode after 10 minutes
of inactivity if it is outside the charging station. And the indicator lights
will turn off. By pressing the button or restarting in the app, the robot
vacuum cleaner switches to stand-by mode.
Note:
The robotic vacuum cleaner will not switch to sleep mode
while charging.
If the robotic vacuum cleaner is in sleep mode for more than
12hours, it will automatically turn off.
Charging
Press the button briefly if you need to send the robotic vacuum
cleaner for charging. This will end the currently running cleaning process.
By pressing the button again, the robotic vacuum cleaner will start to
actively seek out the collection station/charging station to dock.
. . . . . . . . . . . . . . . . . . . . . . . . . . . . . . . . . . . . . . . . . . . . . . . . . . . . . . . . . . . . . . . . . . . .
OPERATION USING THE REMOTE CONTROL
Push down the latch of the cover on the rear side of the remote control to
release it and remove the cover.
Insert two AAA type (1,5 V) batteries into the remote control. When
inserting the batteries ensure the correct polarity as shown inside the
battery compartment. Put the cover back on and click it into place.
In the event that the batteries are flat, replace them with new ones. Do not
combine various types of batteries or new and old batteries.
The signal range of the remote control is approximately 6 m.
When replacing batteries, first remove the flat batteries and then insert
the new ones.
Note:
Never combine flat and new batteries nor various types of
batteries.
Starting Cleaning
1. Automatic cleaning: Press the button to start automatic cleaning.
2. To clean aselected place: Press the button to start cleaning the
selected area.
3. Cleaning Along the Wall Mode: Press the button to start cleaning
along the walls.
4. Manual cleaning: Use the direction buttons on the remote control to
start manual cleaning andmove the vacuum cleaner forward/back/
left/right.
Pausing the Cleaning Process
If the button is pressed during the operation of the robotic vacuum
cleaner then the operation of the robotic vacuum cleaner will be paused.
Pressing the button again will resume its operation.
End of Cleaning/Charging
If you need to end the cleaning, press the button , the robotic vacuum
cleaner will stop, end the cleaning process, seek out the collection station
/ charging station and dock in it.
Setting the Suction Power
Set the desired suction power using the suction power setting buttons.
The button reduces the suction power, the button increases the
suction power.
. . . . . . . . . . . . . . . . . . . . . . . . . . . . . . . . . . . . . . . . . . . . . . . . . . . . . . . . . . . . . . . . . . . .
OPERATION USING THE MOBILE APPLICATION
The robotic vacuum cleaner can be controlled via the Sencor HOME
application.
Download the application to your smartphone, register and control your
robotic vacuum cleaner via the application.
If you already have the application installed, add the robotic vacuum
cleaner to your devices.
Note:
Make sure you have both location services and Bluetooth
enabled in the phone settings for the app.
Adding the Robotic Vacuum Cleaner to the Device List via Bluetooth
You can add the robotic vacuum cleaner to the Sencor HOME app by
pairing via Bluetooth.
1. Enable Bluetooth on your mobile phone.
2. Turn on the robotic vacuum cleaner.
- 7 -
01/2025
2025, .
3. Reset Wi-Fi. Press andhold the and buttons
simultaneouslyon the robotic vacuum cleaner for 5seconds to reset
the Wi-Fi function. Both buttons start flashing.
4. Open the app and on the app'shome page, click the “+” icon.
5. The device itself will offer the “Do not add / Go to add” options.
6. Click on “Go to add” and the app will automatically guide you
through the addition.
Note:
If the Bluetooth connection fails or is not possible, make
sure there are no solid obstacles between your phone and
the robotic vacuum cleaner and that the two devices are
close together.
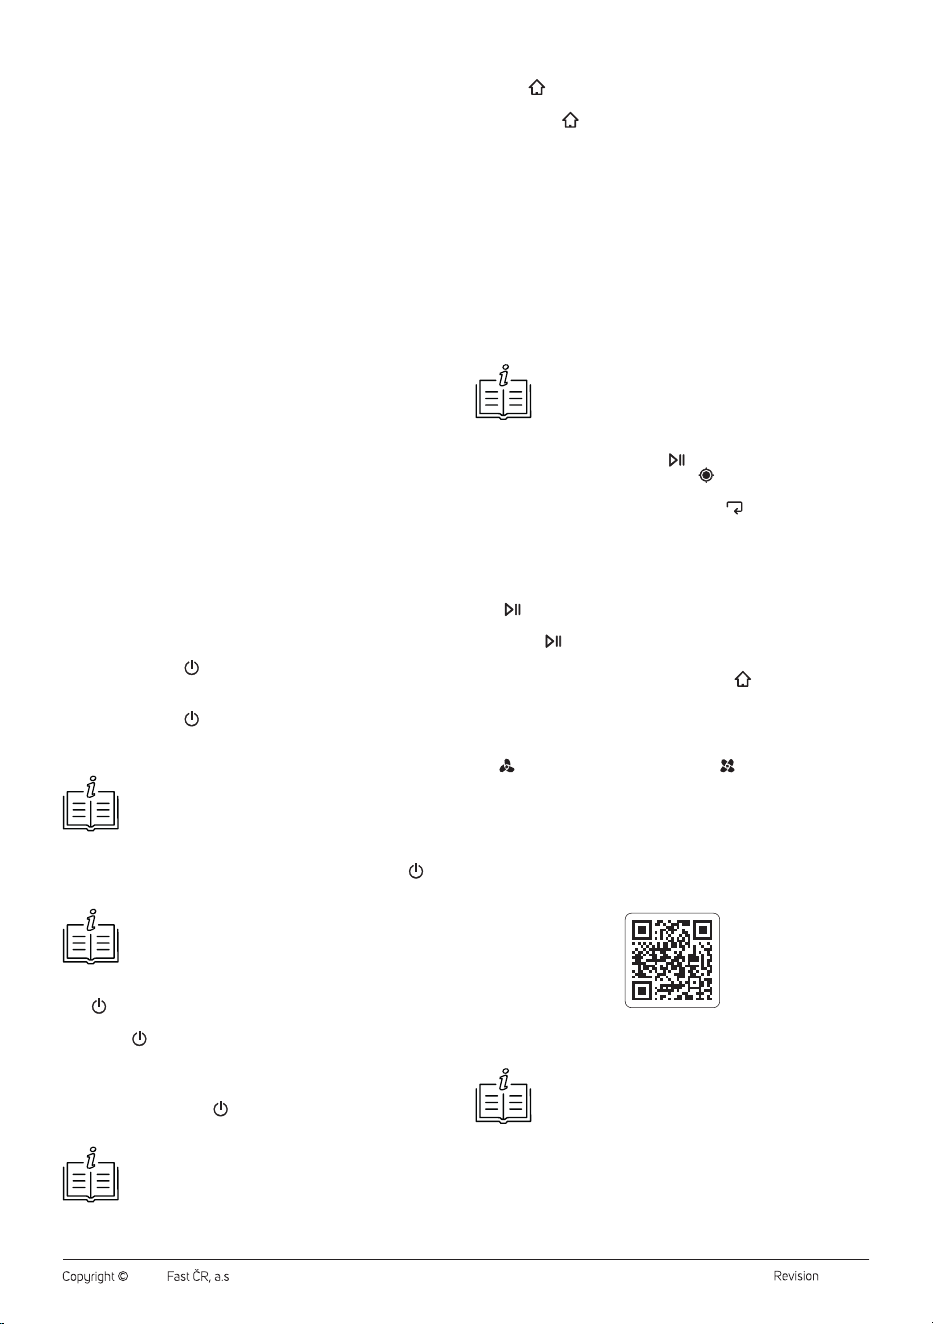
Adding the Robotic Vacuum Cleaner to the Device List via aQR Code
The robotic vacuum cleaner can also be added to the Sencor HOME
application using the QR code provided below. On the home screen of the
application, click on the “+” icon and on the Add device screen, click on
the [–] icon in the top right corner.
After scanning the QR code, you will be prompted to select aWi-Fi
network. Select the network, enter your password andclick “Next”.
You will be prompted toreset the device. Press andhold the and
buttons simultaneouslyon the robotic vacuum cleaner for 5seconds to
reset the Wi-Fi function. Both buttons start flashing. This means that the
robotic vacuum cleaner is ready for pairing. Instructions can also be found
on the application screen.
Inthe application, confirm that the Wi-Fi light is blinking, then click “Next”.
Click on “Connect”. Then in the Wi-Fi settings on your mobile device
connect the Wi-Fi to the robotic vacuum cleaner. Then return to the
application and wait until the pairing of the robotic vacuum cleaner is
complete.
In the device list on the main screen, click on the icon of the robotic
vacuum cleaner to enter control centre.
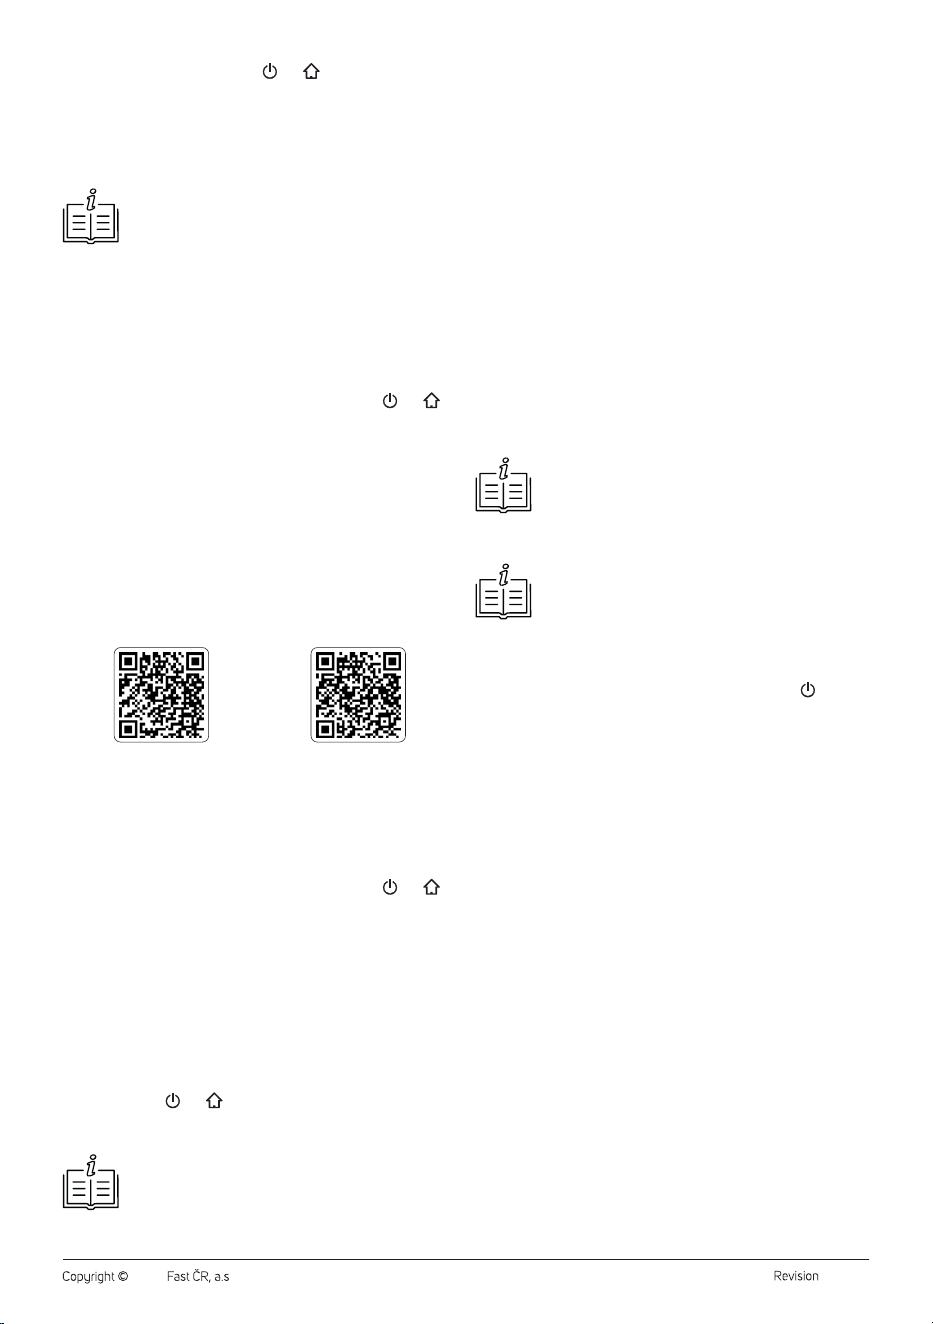
QR Code for Adding the Control Panel of the Robotic Vacuum Cleaner to
the Application Sencor HOME
SRV7450WH SRV 7485WH
Manually Adding the Robotic Vacuum Cleaner to the Device List
On the main screen, click on “Add Device” or the “+” in the top right
corner, and then click on “Add Device”.
Ascreen with appliance categories and alist of appliances will appear.
Click on “Robotic vacuum cleaners” and select the robotic vacuum
cleaner model from the list of products.
On the next screen, you will be prompted toselect aWi-Fi network.
Select the network, enter your password andclick “Next”.
You will be prompted toreset the device. Press andhold the and
buttons simultaneouslyon the robotic vacuum cleaner for 5seconds to
reset the Wi-Fi function. Both buttons start flashing. This means that the
robotic vacuum cleaner is ready for pairing. Instructions can also be found
on the application screen.
Inthe application, confirm that the Wi-Fi light is blinking, then click “Next”.
Click on “Connect”. Then in the Wi-Fi settings on your mobile device
connect the Wi-Fi to the robotic vacuum cleaner. Then return to the
application and wait until the pairing of the robotic vacuum cleaner is
complete.
In the device list on the main screen, click on the icon of the robotic
vacuum cleaner to enter control interface.
Wi-Fi Reset
Press andhold the and buttons simultaneouslyon the robotic
vacuum cleaner for 5seconds to reset the Wi-Fi function. Both buttons
start flashing.
Note:
We recommend that you turn off mobile data in your
mobile phone settings when connecting to Wi-Fi.
Robotic Vacuum Cleaner Functions
The list below shows the most important functions of the robotic vacuum
cleaner that can only be set in the app:
– cleaning scheduling (timer),
– all map work, including setting restricted areas and virtual walls,
– activation/deactivation of power boost on carpet,
– language selection and volume setting of voice messages,
– switching the vacuum cleaner buttons backlight off/on (do not
disturb mode),
– setting the intensity of mopping, etc.
. . . . . . . . . . . . . . . . . . . . . . . . . . . . . . . . . . . . . . . . . . . . . . . . . . . . . . . . . . . . . . . . . . . .
DUST AND DIRT COLLECTION STATION (SRV 7485WH only)
The collection station is equipped with adust bag into which the robotic
vacuum cleaner empties the contents of the dust container after the
cleaning is completed, or if it detects that the dust container is full. In this
case, the robot vacuum cleaner locates the collection station and drives
to it so that the opening in the dust container is aligned with the suction
opening at the bottom of the collection station. Once contact is made, both
openings open and pressure sucks the contents of the container into the
dust bag. The openings are then closed and the robotic vacuum cleaner
will start charging or continue cleaning.
To ensure proper operation of the collection station, make sure it is
connected to power.
Note:
After parking in the station, the vacuum cleaner will
automatically start charging and the indicator lights on
boththe vacuum cleaner and the station will slowly blink
during charging. When charging is complete, the indicator
light will turn off.
Note:
For the SRV 7450WH the collection station can be
purchased separately. The model name of the collection
station is: SRX 7413. Please contact your dealer.
. . . . . . . . . . . . . . . . . . . . . . . . . . . . . . . . . . . . . . . . . . . . . . . . . . . . . . . . . . . . . . . . . . . .
CLEANING AND MAINTENANCE
Before cleaning, always turn off the vacuum cleaner with the button,
place it outside the collection station / charging station and disconnect it
from the power supply.
Never use abrasive cleaning agents, solvents, etc. for cleaning.
Neglecting cleaning and maintenance may negatively affect the working
order of the vacuum cleaner and lead to its reduced performance.
. . . . . . . . . . . . . . . . . . . . . . . . . . . . . . . . . . . . . . . . . . . . . . . . . . . . . . . . . . . . . . . . . . . .
ROBOTIC VACUUM CLEANER
Emptying the Dust Container (model SRV 7485WH)
On the SRV 7485WH model, the container is automatically emptied into
the collection container both after every use and also during the cleaning
process when the vacuum cleaner detects the maximum amount of dirt
and dust in the container. It is possible to set how frequently the dust
container will be emptied out.
Emptying the Dust Container (model SRV 7450WH)
1. To remove the dust container, press the dust container release
button and pull the dust container out of the vacuum cleaner – see
figure G1.
2. Take the dust container over agarbage bin and turn it upside down
so that the lid of the dust container points downwards.
3. Press the dust container lid release button and carefully tilt open the
lid. Dump the contents of the dust container into the garbage bin –
see figure G2.
4. Close the lid and gently push on it until you hear aclick. This
indicates that the lid is properly secured in place.
Cleaning the Dust Container
1. To remove the dust container, press the dust container release
button and pull the dust container out of the vacuum cleaner – see
figure G1.
2. Pull the lid the HEPA filter compartment andremove the HEPA filter
– see figureG3.
3. Shake the HEPA filter and remove the dirt with asoft brush or dry
cloth. In the event of heavy soiling, you can vacuum them out using
- 8 -
01/2025
2025, .
adifferent vacuum cleaner with an attached brush nozzle. Do not
wash the HEPA filter in water. This may damage the appliance. In
the event that the HEPA filter is already heavily soiled or deformed,
replace it with anew one. We recommend replacing the HEPA filter
based on the frequency of use at least once every six months.
4. Wipe the coarse filter with aslightly dampened sponge and wipe dry
with aclean cloth.
5. Press the dust container lid lock andopen the lid. Wipe the dust
container out using alightly dampened sponge and wipe dry using
aclean wiping cloth. If necessary, you can pour asmall amount of
water into the dust container and wipe it out with asponge. Then
thoroughly wipe it dry using aclean wiping cloth. Close the cover.
Press gently until you hear aclick.
6. Insert the HEPA filter in the compartment in the box andclose the
box tothe lid. Gently push down on the lid until you hear aclick.
7. Close the dust container lid. Gently push down on the lid until you
hear aclick.
Warning:
Prior to inserting the dust container into the robotic
vacuum cleaner, always make sure that all the parts
are clean and completely dry. Otherwise, the robotic
vacuum cleaner may be damaged.
Cleaning the Water Tank and Mop Sleeve
To prevent the formation of moulds and damaging microorganisms that
may cause unpleasant odours and be damaging to health, it is necessary
to clean the water tank, mop sleeve holder and the mop sleeve after
every use.
1. Carefully release the mop sleeve holder and remove it from the
bottom of the robotic vacuum cleaner.
2. Carefully remove the mop sleeve from the holder.
3. In order to be able to remove the dust container, press the dust
container release button and pull the dust container out of the
vacuum cleaner.
4. Take the dust container over awash basin or sink and release the
water tank cover. Turn the container upside down and allow the
water remaining in the water tank to flow out. If necessary, gently
shake the water tank to ensure that all the water has flowed out.
5. Leave the water tank cover open and allow the water tank to dry out
in adry and well ventilated location.
6. Wipe the mopping sleeve holder using alightly dampened sponge
and wipe dry using aclean wiping cloth.
7. Hand wash the mopping sleeve in lukewarm water with asmall
amount of fine washing powder, wring it out by hand and allow
it to dry naturally. Do not wash the mopping sleeve in awashing
machine or dry it in aclothes dryer.
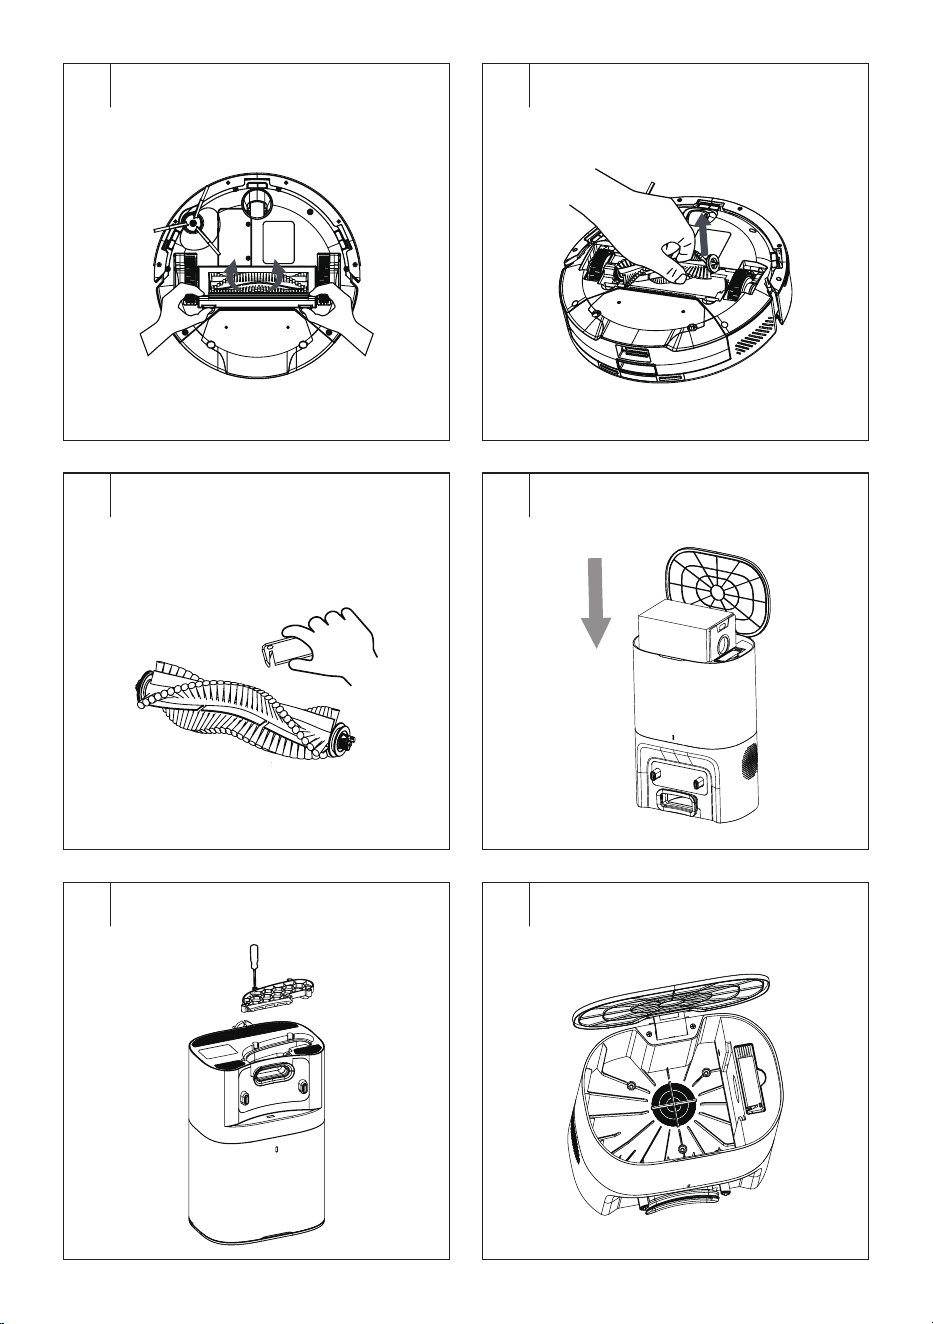
Cleaning the Central Rotary Brush
We recommend that you regularly clean the central rotary brush, at
least once per week, to ensure the constant suction power of the robotic
vacuum cleaner. Hair and lint on the brush can reduce the performance of
the robotic vacuum cleaner as well as its efficiency.
1. Turn the robotic vacuum cleaner upside down.
2. Press the lock of the central rotary brush cover – see figure H1;
and remove the cover and then the rotary brush from the vacuum
cleaner – see figure H2.
3. Use adry wiping cloth to clean out the area in which the rotary
brush is housed. Check and clean out the suction opening. Dirt and
dust that accumulates around the suction opening may reduce the
suction power of the vacuum cleaner.
4. Remove any dirt (dust, wound on hair, animal fur, etc.) from the
rotary brush – see figure H3.
5. Insert the rotary brush back into the vacuum cleaner and put on the
cover. Gently push down on the cover until you hear aclick. This
indicates that the cover is properly secured in place.
Cleaning the Side Rotary Brush
1. Remove the side rotary brush by pulling it upwards.
2. Remove any dust and dirt from the location where the brushes were
mounted.
3. Remove all dust and dirt from the brush. If necessary you may wash
the brush under running water. If the bristles were deformed while
the vacuum cleaner was running, dip them in warm water to allow
them to return to their original shape. Allow the brush to dry before
reattaching to the vacuum cleaner.
4. After cleaning, attach it back.
Cleaning the Sensors
The sensors on the robotic vacuum cleaner are important for its proper
control and safe operation. It is therefore important that you clean them
regularly andkeep them ingood condition.
Wipe the sensors using asoft dry wiping cloth or cotton bud.
Cleaning the Outer Surface of the Robotic Vacuum Cleaner
Regularly wipe the surface of the vacuum cleaner using asoft dry wiping
cloth. Clean the front swivel wheel, motorised castors, suction hole, rotary
brush and the bottom sensors at least once per week or more frequently.
First remove any coarser dirt from the front swivel wheel and the
motorised castors. Then clean them around their entire perimeter using
alightly dampened cloth and wipe them dry. Do not forget to also clean
the area around the castors.
Replacing the HEPA Filter
1. Take out the dust container and open the HEPA filter compartment.
Take out theHEPA filter.
2. Insert the new HEPA filter into the compartment.
3. Close the box tothe lid. Gently push down on the lid until you hear
aclick.
Note:
The wear and tear status of the HEPA filter can be
monitored in the mobile application.
Replacing the Side Brush
The rotary brush wears out during use. After acertain time it is necessary
to replace the used brush with new one. To order anew brush, please
contact your vendor or an authorised service centre.
1. Loosen the screw of the side rotary brush and remove the old side
rotary brush from the vacuum cleaner by pulling it upwards.
2. Insert the new side rotary brush into the robotic vacuum cleaner and
secure with the screw.
Battery Replacement
In the event that you need to replace the battery, proceed as follows:
1. Make sure that the vacuum cleaner is turned off using the button.
Turn the vacuum cleaner upside down.
2. Using ascrewdriver, loosen the screws of the battery cover, remove
it and carefully remove the battery.
3. Connect the new battery and insert it into the internal area. The
battery can only be connected in one way. The connector is coded
and cannot be turned around.
4. Put on the bottom cover and secure it in place using the screws. Turn
the vacuum cleaner back to the operating position.
5. Place the vacuum cleaner into the collection station and allow the
battery to charge to full capacity.
Note:
The robotic vacuum cleaner is supplied with the battery
already inserted.
. . . . . . . . . . . . . . . . . . . . . . . . . . . . . . . . . . . . . . . . . . . . . . . . . . . . . . . . . . . . . . . . . . . .
COLLECTION STATION
Cleaning the Collection Station
Clean the outer surface of the collection station using asoft dry cloth.
Replacing the Dust Bag
Keep an eye on the bag fill level is so you can replace it. When replacing
it, proceed as follows:
1. Open the cover of the collection station.
2. Hold the bag holder andgently pull it up – see figureI. This will close
the dust bag inlet and keep dust and dirt safely contained in the dust
bag.
3. Dispose of the used dust bag in standard communal waste.
- 9 -
01/2025
2025, .
4. Place the new dust bag into the collection container. It is important
that the inlet opening in the bag is aligned with the outlet opening in
the inner space of the collection container.
5. Close the cover.
Cleaning the Sensors
Sensors at the collection station are important for its safe operation. It is
therefore important that you clean them regularly andkeep them ingood
condition.
Wipe the infrared sensors andcharging contacts with adry soft cloth or
cotton swab.
Cleaning the Collecting Channel and Filter Port
If, after replacing the dust bag, the emptying efficiency of the dust
container is still low, the collection channel and filter port will need to be
inspected and cleaned.
1. Make sure the collection station is disconnected from the power
source.
2. Turn the collection station upside down, unscrew the screws of the
collection channel cover andremove it – see figureJ1.
3. Check the dust channel for blockages from foreign objects. Remove
any dirt, dust or foreign objects. Reattach the cover and secure
in place with the screws. Turn the collection station back to the
operating position.
4. Open the lid and remove the dust bag. Check the filter port – see
figure J2; if it is not blocked by foreign objects. Remove any dirt,
dust or foreign objects andclean the filter port. Put the dust bag back
in and close the lid.
. . . . . . . . . . . . . . . . . . . . . . . . . . . . . . . . . . . . . . . . . . . . . . . . . . . . . . . . . . . . . . . . . . . .
CLEANING THE CHARGING STATION
Cleaning the Charging Station
Clean the outer surface of the collection station using asoft dry cloth.
Cleaning the Sensors
The sensors on the charging station are important for its operation. It is
therefore important that you clean them regularly andkeep them ingood
condition.
Wipe the infrared sensors andcharging contacts with adry soft cloth or
cotton swab.
. . . . . . . . . . . . . . . . . . . . . . . . . . . . . . . . . . . . . . . . . . . . . . . . . . . . . . . . . . . . . . . . . . . .
LONG-TERM STORAGE
• When not using the vacuum cleaner for an extended period of time,
do the following:
• Clean the vacuum cleaner as described in chapter CLEANING AND
MAINTENANCE.
• Disconnect the collection station / charging station from the mains
socket. Store the vacuum cleaner with all its accessories in adry,
clean and cool place.
• It is recommended to charge the vacuum cleaner every 3 months as
this will extend the lifetime of the built-in battery.
• Remove the battery from the remote control.
. . . . . . . . . . . . . . . . . . . . . . . . . . . . . . . . . . . . . . . . . . . . . . . . . . . . . . . . . . . . . . . . . . . .
TROUBLESHOOTING
Problem Cause Solution
The vacuum cleaner is not charging
itself.
The charging contacts are not touching. Check that the contacts are touching when inserting
the vacuum cleaner into the charging station.
The charging station is disconnected from the power
source.
Insert the power adapter into apower socket and
keep the charging station permanently connected.
The vacuum cleaner is stuck in
asingle location.
The vacuum cleaner has become entangled in
wires/cables lying on the ground, in curtains or other
foreign objects on the carpet.
The vacuum cleaner will always attempt to free itself
on its own, however, we recommend to remove it by
hand from the stuck location.
The vacuum cleaner returned to the
charging station without completing
the cleaning process.
The vacuum cleaner detected alow battery charge
level and automatically returned to the charging
station to recharge.
This is anormal occurrence. Allow the vacuum
cleaner to recharge.
- 10 -
01/2025
2025, .
Problem Cause Solution
The vacuum cleaner does not
perform the cleaning process
automatically as scheduled.
The vacuum cleaner is not switched on and cannot
perform the cleaning process as scheduled.
Swich on the vacuum cleaner.
The vacuum cleaner battery is almost flat. Allow the vacuum cleaner to recharge.
The vacuum cleaner has become stuck or is blocked
by aforeign object.
Switch off the vacuum cleaner, empty out the dust
container. Turn the vacuum cleaner upside down and
remove dust and dirt from the castors and brushes.
The robotic vacuum cleaner did not
clean the entire space or reach all
the rooms.
There may have been achange of layout (shift of
furniture), opening the door to an unmapped room.
Inthe app, reset the current map andlet the robotic
vacuum cleaner perform aquick mapping of the
complete area again.
The remote control doesn't work.
(Recommended distance is 5 m.)
Batteries are flat. Replace the batteries in the remote control.
The vacuum cleaner battery is almost flat. Allow the vacuum cleaner to recharge.
The remote signal receiver on the vacuum cleaner
or the signal transmitter on the remote control is
blocked or soiled.
Wipe the signal receiver and transmitter using
aclean wiping cloth.
The remote control signal is being interfered with by
another device in its vicinity.
Do not use the remote control in the vicinity of
devices with an infrared signal.
Whilst the vacuum cleaner is
running, vacuuming locations
are being left out, its travel path is
chaotic, it is travelling in the opposite
direction or seems to vacuum the
same places over and over again.
The floor is too smooth, the central wheel slides on
the floor, the vacuum cleaner is on acarpet with too
high apile, or the vacuum cleaner travels over low
obstacles, thresholds and strips, and this affects its
decision making process regarding the cleaning area
in the entire home.
We recommend closing the doors of individual rooms
and ato allow them to be cleaned individually. The
vacuum cleaner is equipped with afunction for the
identification of asingle room. It will return to its
starting location.
The floor is washed and polished or too smooth,
which reduces friction between the wheels and
the floor.
We recommend cleaning the floor after it has been
waxed.
Cables, foreign objects on the floor affect the
operation of the vacuum cleaner.
Prior to starting the vacuum cleaner, it is important
to remove from the floor any cables, slippers, toys
and other foreign objects to reduce the number of
obstacles, which the vacuum cleaner will need to
drive around.
Dirt remains on the floor after
cleaning is finished.
The central rotary brush is blocked. Clean out the central rotary brush and move the
robotic vacuum cleaner into an open area.
The side rotary brush is blocked. Clean out the side rotary brush and move the robotic
vacuum cleaner into an open area.
The combination 2-in-1 dust container is not correctly
inserted in the robotic vacuum cleaner.
Insert the combination 2-in-1 dust container into the
robotic vacuum cleaner.
The dust container is full, the HEPA filter is clogged or
the central rotary brush is dirty.
Empty out the dust container, clean the HEPA filter
and the central rotary brush.
It is not possible to switch on the
vacuum cleaner.
The battery is depleted. Allow the battery to fully charge.
The vacuum cleaner has problems
with movement on the floor.
Front swivel wheel is blocked. Clean out the front swivel wheel and move the
robotic vacuum cleaner into an open area.
The vacuum cleaner will seek out
the charging station but does not
dock in it.
The charging station is blocked or is too far away, it is
not connected to apower source; foreign objects are
caught on the mop sleeve holder or the mop sleeve
is rolled up.
Place the charging station into an open area and
place the robotic vacuum cleaner into its vicinity and
turn it on; insert the plug of the power adapter into
apower socket; clean out the mop sleeve holder and
straighten out the mop sleeve.
The vacuum cleaner is not behaving
normally.
Internal fault. Switch off the robotic vacuum cleaner and then
switch it on again and start it. If the problem
persists, turn off the vacuum cleaner and contact an
authorised service centre.
Abnormal sounds are made during
the cleaning process.
Aforeign object has become stuck to the central
rotary brush, side rotary brush or on the central
swivel wheel.
Switch off the robotic vacuum cleaner and remove
the foreign object.
The water tank does not release
water into the sleeve or is only
releasing asmall amount of water.
There is an insufficient amount of water in the water
tank; the sleeve is excessively soiled; the holder is
not inserted.
Refill the water tank with water; clean the sleeve;
correctly insert the mop sleeve holder.
The water tank is releasing too much
water.
The water tank is not in its place; the water outlet is
set to maximum.
Check that the water tank is properly inserted; adjust
the water outlet using the application.
- 11 -
01/2025
2025, .
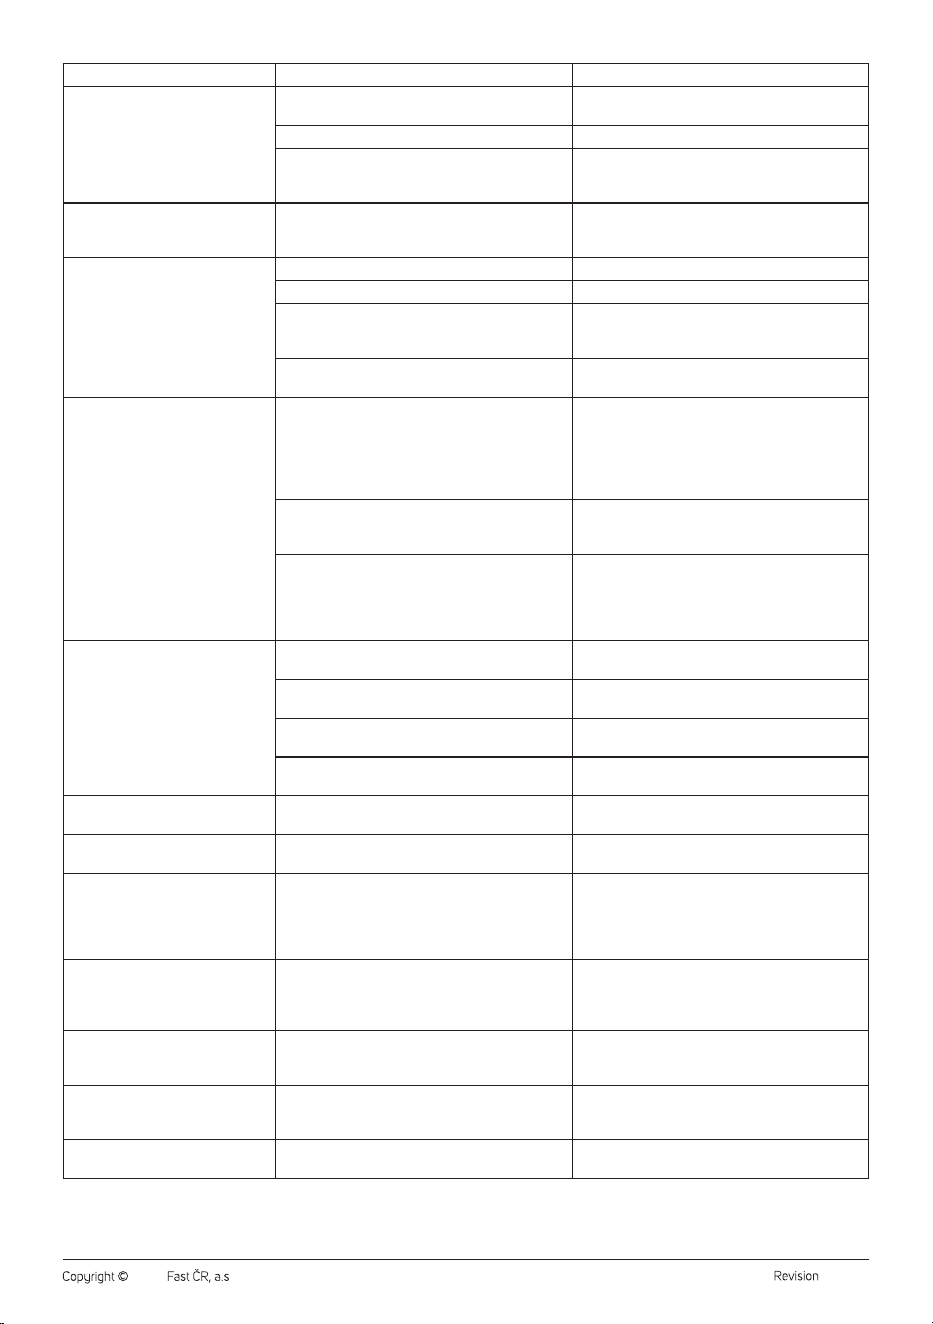
Problem Cause Solution
It is not possible to connect to the
application.
Abnormal Wi-Fi network, incorrect Wi-Fi password
or abnormal behaviour of the application.
Check whether the robotic vacuum cleaner is
within range of the Wi-Fi network; enter the correct
password or reset the Wi-Fi; download and install the
latest version of the application.
The vacuum cleaner is not able to
return to the charging station.
The distance from the charging station is too large. If the charging station is too far away, it is possible
that the robotic vacuum cleaner will not be able
to find it. Put the robotic vacuum cleaner into the
charging station manually.
. . . . . . . . . . . . . . . . . . . . . . . . . . . . . . . . . . . . . . . . . . . . . . . . . . . . . . . . . . . . . . . . . . . . . . . . . . . . . . . . . . . . . . . . . . . . . . . . . . . . . . . . . . . . . . . . . . . . . . . . . . . . . . . . . . . . . . . . . . . .
TECHNICAL SPECIFICATIONS
Robotic Vacuum Cleaner
Power input of the robotic vacuum cleaner ............................................................................................................................................................................................20 V~ 0.6 A
Rated power ....................................................................................................................................................................................................................................................................45 W
Battery .................................................................................................................................................................................................................................. Li-ion / 14.4 V/ 2,600 mAh
Dimensions (diameter × height) ...........................................................................................................................................................................................................Ø 320 x 83 mm
Weight .............................................................................................................................................................................................................................................................................3.3 kg
Operating time per single charge ........................................................................................................................................................................................................................ 140 min
Dust container capacity ...................................................................................250 ml
Water tank capacity ......................................................................................... 300 ml
Collection Station (model SRV 7485WH)
Input voltage ............................................................................................220–240 V~
Input frequency.............................................................................................50/60 Hz
Output voltage ..........................................................................................................20 V
Output current ........................................................................................................ 0.6 A
Rated power .........................................................................................................650 W
Dust bag volume ......................................................................................................3.5 l
Dimensions ............................................................................. 228 × 162 × 330mm
Weight ......................................................................................................................1.8 kg
Charging Station (model SRV 7450WH)
Input voltage .............................................................................................20 V~ 0.6 A
Output .........................................................................................................................12 W
Dimensions ..............................................................................149.5 × 52 × 100mm
Charging Station Adapter (model SRV 7450WH)
Input voltage .............................................100–240 V~ 50–60 Hz 0,35 AMAX
Input voltage ..........................................................................20.0 V~ 0.6 A12.0 W
Protection level ....................................................................................................... IP20
Text and technical specifications are subject to change.
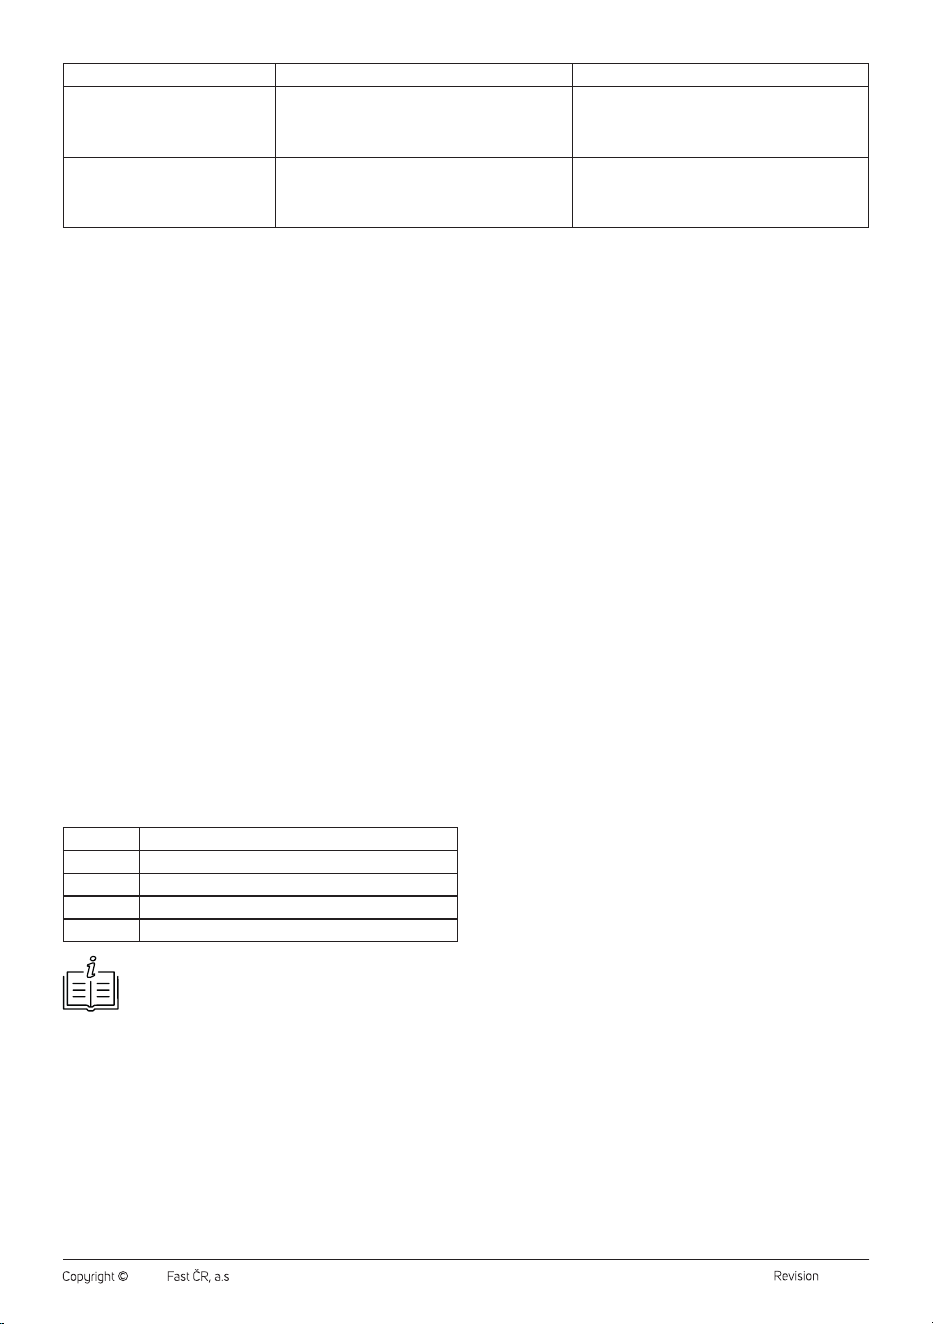
Original consumable accessories
SRX 7401 Spare battery
SRX 7402 Set of mops (3 pcs)
SRX 7403 Spare side brush (2 pcs)
SRX 7404 HEPA filter
SRX 7409 Dust bag (5 pcs)
Note:
For the SRV 7450WH the collection station can be
purchased separately. The model name of the collection
station is: SRX 7413. Please contact your dealer.
SENCOR hereby declares that the SRV 7450WH and SRV 7485WH
radio type devices comply with Directive 2014/53/EU. The full text of the
EU Declaration of Conformity is available at: www.sencor.eu.
. . . . . . . . . . . . . . . . . . . . . . . . . . . . . . . . . . . . . . . . . . . . . . . . . . . . . . . . . . . . . . . . . . . .
INSTRUCTIONS AND INFORMATION ON DISPOSAL OF USED
PACKAGING MATERIAL
Dispose of used packaging material at the location designated by the
municipality for waste disposal.
DISPOSAL OF USED ELECTRICAL AND ELECTRONIC EQUIPMENT
Used electrical andelectronic products must not be added to ordinary
municipal waste. For proper disposal and recycling of these products,
deliver them to designated collection points. Alternatively, in some
European Union states or other European countries the products can be
returned to the local retailer when buying an equivalent new product. By
properly disposing of this product, you help preserve valuable natural
resources and contribute to preventing potential negative impacts on the
environment and human health resulting from improper waste disposal.
For further details, contact your local authorities or the nearest collection
point. Fines may be imposed for improper disposal of this type of waste in
accordance with national regulations.
For Business Entities in European Union States
To dispose of electric or electronic equipment, request necessary
information from your retailer or supplier.
Disposal in Other Countries Outside the European Union
If you wish to dispose of this product, request the necessary information
about the correct disposal method from the local council or from your
retailer.
. . . . . . . . . . . . . . . . . . . . . . . . . . . . . . . . . . . . . . . . . . . . . . . . . . . . . . . . . . . . . . . . . . . .
Changes to text and technical parameters are reserved.

- 12 -
01/2025
2025, .