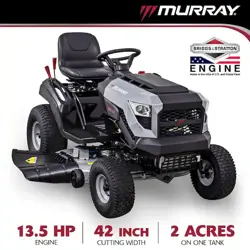
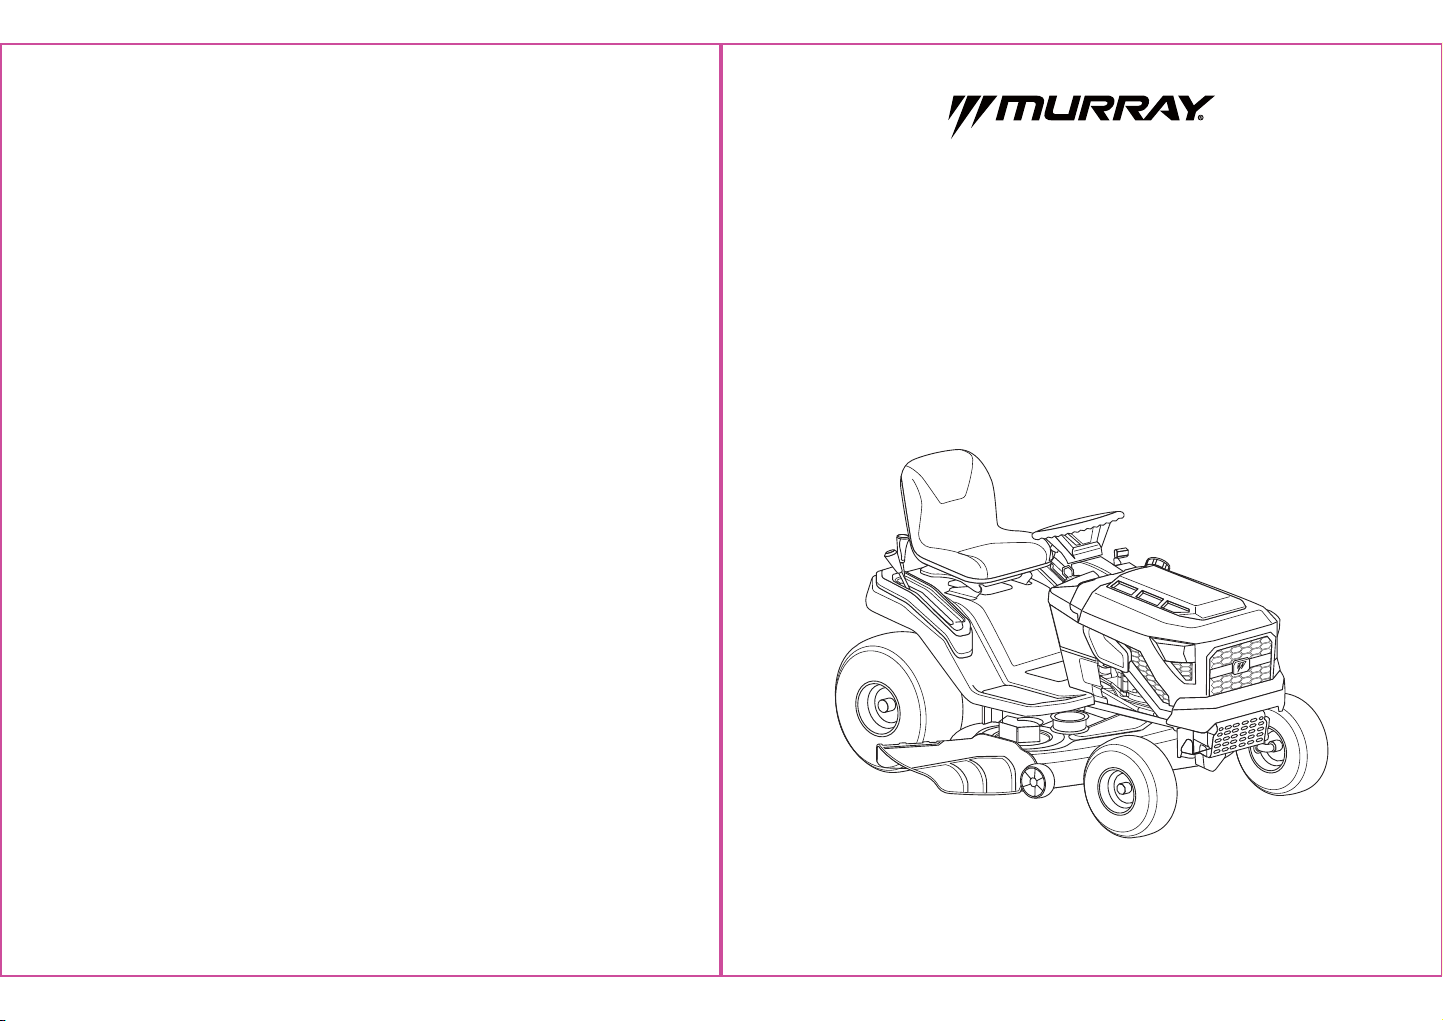
MT100 LAWN
TRACTOR
Model #MYT4213500
Operator’s Manual
Customer Service Number: 855-693-2582 | www.murray.com
2
MT100 LAWN TRACTOR
TABLE OF CONTENTS
3
MT100 LAWN TRACTOR
1. General Information
2 .
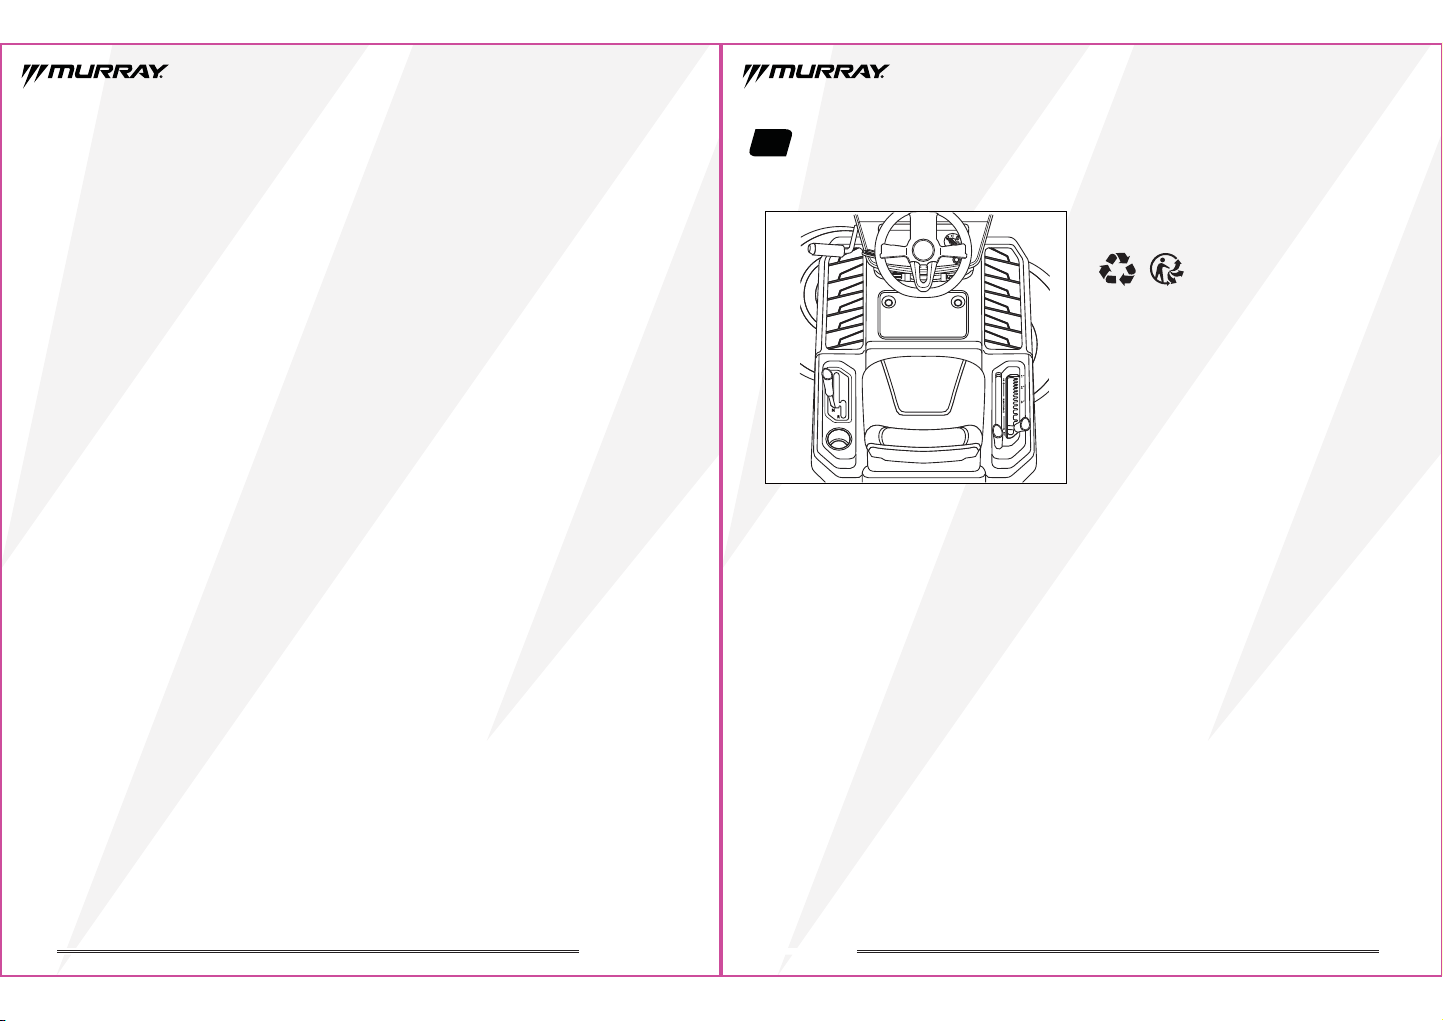
LEFT and RIGHT are referenced from the operator's position.
LR
The use of Important and Note in the text shows
clarifications, exceptions, or alternatives to the procedures.
All language translations of this document derive from the
initial English source file.
Recycle all packaging, used oil, and batteries according to
applicable government regulations.
SECTION 1
General Information ................................ 3
SECTION 2
Operator Safety........................................4
..................................4
.............................4
.............4
...............................................5
Save These Instructions
Slope Identification Guide
Safety Alert Symbol and Signal Words
Safety Decals
Safety Instructions ........................................6
SECTION 3
Assembly Instructions.............................8
Operating Instructions
...............................18
SECTION 6
Maintenance ...........................................24
Maintenance Schedule ...............................24
Cleaning the Tractor...................................25
Assemble the Steering Wheel
Assemble the Left Deck Anti-scalp Wheel
Assemble the Seat
Connect the Battery
Check/Adjust the Tire Pressure
Features and Controls
Operating the Tractor
Operating Area
Safety Interlock System Tests
Engine
Assemble the Air Duct Ring
SECTION 4
SECTION 5
Assemble the Dashboard Cover
.......................9
...........................9
......................10
......10
.....................................11
...................................11
.....................12
..........................13
..........................15
.........................................15
.......................16
.....................................................16
Cleaning the Mower Deck
...........................25
Removing the Cutting Deck
.........................27
Adjusting the Tension in the Deck Belt
..........28
Changing the Deck Belt
..............................28
Changing the Drive Belt
..............................29
Replacing the Cutting Blades
.......................29
Sharping the Blade
.....................................30
Checking the Tire Pressure
Battery Maintenance
Leveling the Cutting Deck
...........................26
...........................30
..................................30
Adjusting the Transaxle Brake
......................31
Checking the Mower Blade Stop Time
Changing the Engine Oil
...........32
.............................32
Changing the Air Filter
................................33
Checking the Spark Plugs
............................33
Pushing the Tractor By Hand
........................34
Towing with the Tractor
..............................34
Transport
Storage
Troubleshooting
Troubleshooting the Tractor
SECTION 7
SECTION 8
SECTION 9
.................................................35
.....................................................36
.....................................37
........................37
SECTION 11
Disposal ...................................................41
SECTION 12
Warranty .................................................42
SECTION 10
Specifications..........................................39
Specifications Chart ...................................39
............................40
Power Ratings Disclaimer
4
MT100 LAWN TRACTOR
2. Operator Safety
Save These Instructions
Save these instructions for future reference. This manual
contains safety information to make you aware of the
hazards and risks associated with the product and how to
avoid them. It also contains important instructions that must
be obeyed during the initial set-up, operation,
and maintenance of the product.
This product is designed and intended for cutting well
maintained grass and is not intended for other purposes.
It is important that you read and understand these instruc-
tions before you attempt to start or operate this equipment.
Make sure that you are fully familiar with the controls and
the correct use of the product.
Know how to stop the unit and disengage controls quickly.
Slope Identification Guide
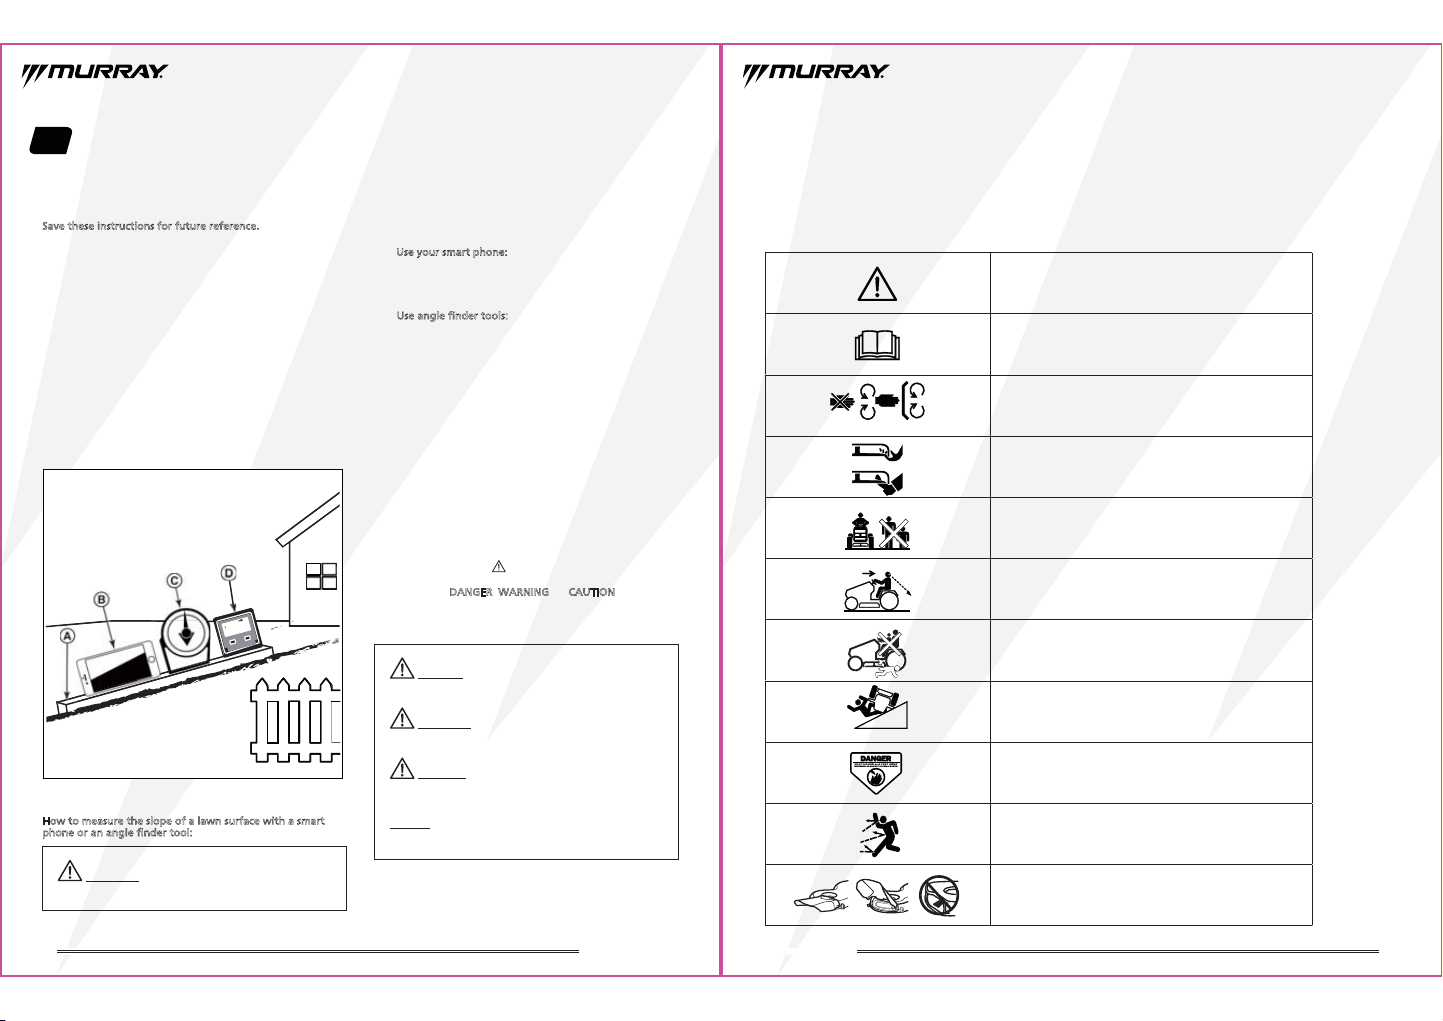
Fig. 1
How to measure the slope of a lawn surface with a smart
phone or an angle finder tool:
WARNING:
Do not operate on slopes greater
than 10 degrees.
1. Use a straight edge at least two (2) feet long (A, Fig. 1).
A 2x4 or a straight piece of metal works well.
2. Angle finder tools.
a. Use your smart phone: Many smart phones (B, Fig. 1)
have an in-clinometer (angle finder) located under the
compass application (app). Or, search an app store for
an in-clinometer app.
b. Use angle finder tools: Angle finder tools
(C and D, Fig. 1) are available at local hardware stores
or online (also called in-clinometer, protractor, angle
meter, or angle gauge). Dial type (C) or digital type
(D) work, others may not. Read and obey the user
instructions supplied with the angle finder tool.
3. Put the two (2) feet long straight edge along the steepest
part of the lawn slope. Put the board up and down the
slope.
4. Lay the smart phone or angle finder tool on the straight
edge and read the angle in degrees. This is the slope of
your lawn.
Safety Alert Symbol and
Signal Words
The safety alert symbol in this manual identifies safety
information about hazards that can result in personal injury.
A signal word (DANGER
, WARNING, or CAUTION) is used
with the alert symbol to indicate the likelihood and the
potential severity of injury. In addition, a hazard symbol
may be used to represent the type of hazard.
DANGER:
indicates a hazard which, if not avoided,
will result in death or serious injury.
WARNING: indicates a hazard which, if not avoided,
could result in death or serious injury.
CAUTION: indicates a hazard which, if not avoided,
could result in minor or moderate injury.
5
MT100 LAWN TRACTOR
Safety Decals
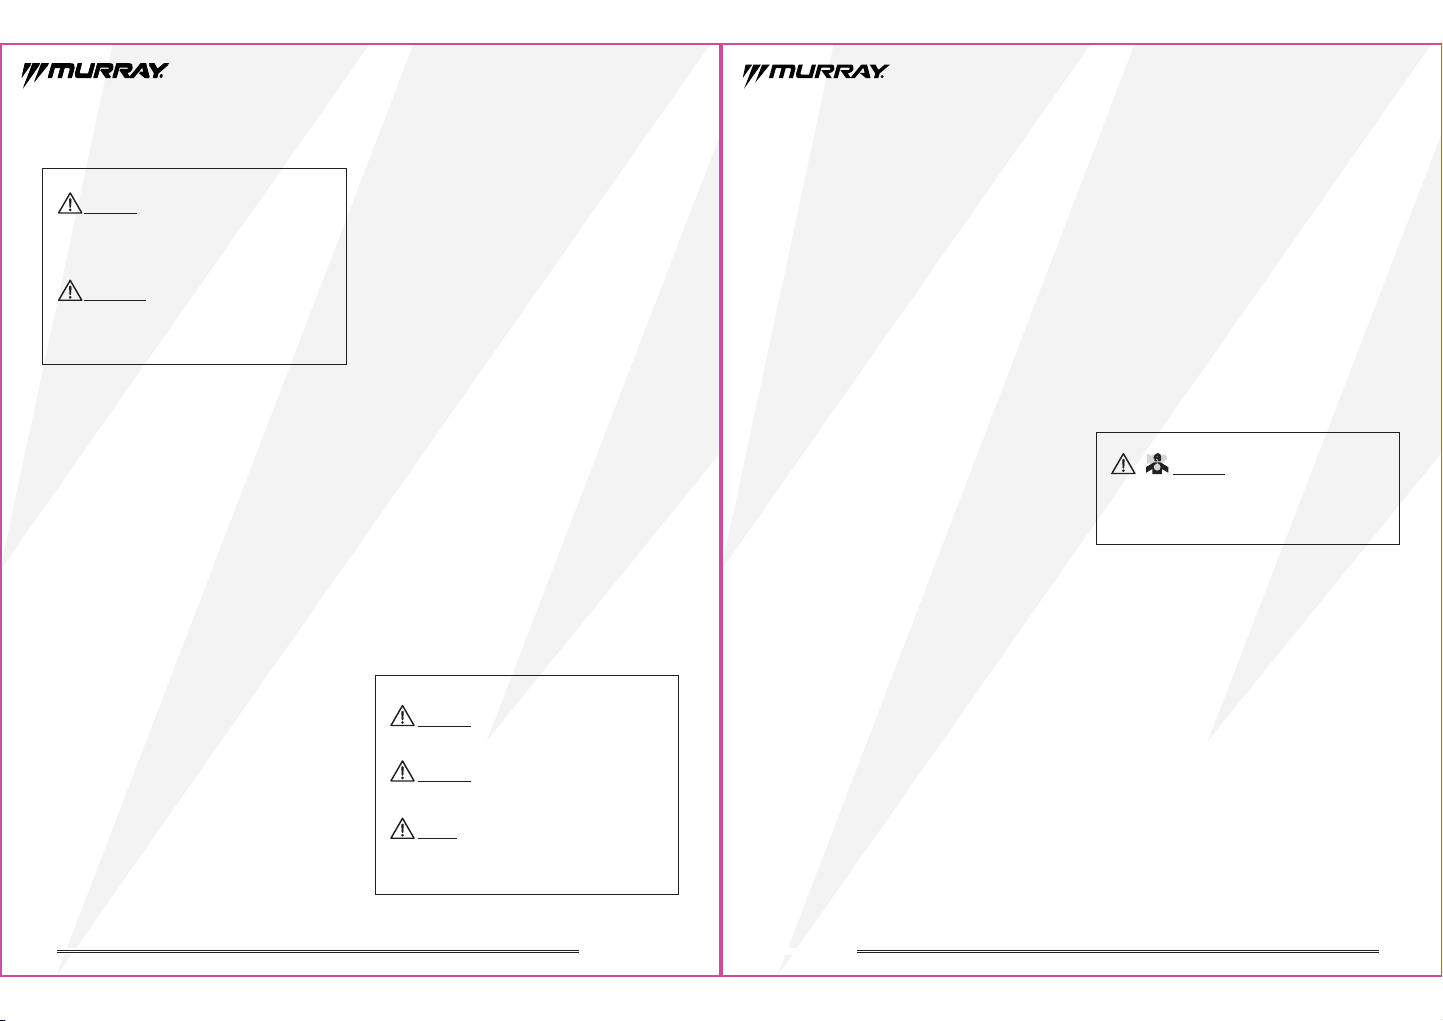
The following safety symbols appear on this product. Before you operate the mower, please study them and learn their meaning.
IMPORTANT: If the safety decals become worn or damaged, and cannot be read, order replacement decals from your authorized
service center.
Safety alert symbol
Read operator’s manual
Maintain safety devices
Avoid amputation injury
Keep bystanders away
Look behind while backing
Never carry children
Avoid steep slopes
Keep hands and feet away
Avoid thrown objects
Do not operate the mower without the discharge chute in
its proper place.
Symbol Explanation
NOTICE: indicates information considered important but
not hazard-related.
6
MT100 LAWN TRACTOR
WARNING: Read and follow all safety rules and
instructions in this manual before attempting to operate
this machine. Failure to comply with these instructions
may result in personal injury.
IMPORTANT: This machine is capable of amputating
hands and feet and throwing objects. Failure to observe
the following safety instructions could result in serious
injury or death.
Safety Instructions
General Information
• Read, understand, and follow instructions and warnings
in this manual and on the machine, engine and
attachments.
• Only allow operators who are responsible, trained,
familiar with the instructions, and physically capable to
operate the machine.
• Do not carry passengers and keep bystanders away.
• Do not operate the machine while under the influence of
alcohol or drugs.
Preparation Before Operating
• Clear the operating area of any objects which could be
thrown by or interfere with operation of the machine.
• Keep the area of operation clear of all bystanders,
particularly small children. Stop the machine and
attachment(s) if anyone enters the area.
• Do not operate the machine without the entire grass
catcher, discharge chute, or other safety devices in place
and functioning properly. Check frequently for signs of
wear or deterioration and replace as needed.
• Wear appropriate personal protective equipment such as
safety glasses, hearing protection, and footwear.
Operating
• Only operate the engine in well ventilated areas. Exhaust
gases contain carbon monoxide, a deadly poison.
• Only operate the machine in daylight or good artificial
light.
• Avoid holes, ruts, bumps, rocks, or other hidden hazards.
Uneven terrain could overturn the machine, or cause
operator to lose their balance or footing.
• Do not put hands or feet near rotating parts or under the
machine. Keep clear of the discharge opening at all times.
• Do not direct discharge material toward anyone. Avoid
discharging material against a wall or obstruction.
Material may ricochet back toward the operator. Stop the
blade(s) when crossing gravel surfaces.
• Do not leave a running machine unattended. Always park
on level ground, disengage the blades, set parking
brake, and stop engine.
• Do not mow in reverse unless absolutely necessary. Always
look down and behind before and while backing.
Children Specific
• Tragic accidents can occur if the operator is not alert to
the presence of children. Children are often attracted to
the machine and the mowing activity. Never assume that
children will remain where you last saw them.
• Keep children out of the operating area and under the
watchful care of a responsible adult other than the
operator.
• Do not carry children, even with the blade(s) shut off.
Children could fall off and be seriously injured or
interfere with safe machine operation. Children who have
been given rides in the past could suddenly appear in the
mowing area for another ride and be run over or backed
over by the machine.
Slope Specific
7
MT100 LAWN TRACTOR
• Travel in the manufacturer recommended direction on
slopes. Use caution while operating near drop-offs.
• Avoid mowing wet grass.
• Do not operate machine under any condition where
traction, steering, or stability is in question. Tires could
slide even if the wheels are stopped.
• Always keep the machine in gear when going down
slopes. Do not coast downhill.
• Avoid starting and stopping on slopes. Avoid making
sudden changes in speed or direction. Make turns slowly
and gradually.
• Use extra care while operating machine with a grass
catcher or other attachment(s). They can affect the
stability of the machine.
Fire and Fuel Specific
• Extinguish all cigarettes, cigars, pipes and other sources of
ignition.
• Use only an approved fuel container.
• Do not remove fuel cap or add fuel with the engine
running or while hot.
• Do not refuel indoors or in enclosed spaces.
• Do not store the machine or fuel container, or refuel,
where there is an open flame, spark, or pilot light such as
on a water heater or other appliance.
• If fuel is spilled, do not attempt to start the engine and
avoid creating any source of ignition until fuel vapors
have dissipated.
• To help prevent fires: keep machine free of grass, leaves,
or other debris build up; clean up oil or fuel spillage and
remove any fuel soaked debris; allow machine to cool
before storing.
• Use extra care in handling gasoline and other fuels. They
are flammable and vapors are explosive.
Hauling
• Use full width ramps for loading and unloading a machine
for transport.
Towing
• Follow the manufacturer’s recommendation for weight
limits for towed equipment and towing on slopes.
Service
• Keep machine in good working order. Replace worn or
damaged parts.
• Use caution when servicing blades. Wrap the blade(s) or
wear gloves. Replace damaged blades. Do not repair or
alter blade(s).
• Disconnect spark plug wire(s) and the negative battery
cable before making any repairs.
• Operate equipment ONLY outdoors.
• Keep exhaust gas from entering a confined area through
windows, doors, ventilation intakes, or other openings.
WARNING: Running engine gives off carbon
monoxide, an odorless,colorless, poisonous gas.
Breathing carbon monoxide cancause headaches, fatigue,
dizziness, vomiting, confusion,seizures, nausea,
fainting or death.
WARNING: Do not operate on slopes greater than
10 degrees.
NOTICE: This tractor is not designed to travel at
WARNING: Slopes are a major factor related to
accidents. Operation on slopes requires extra caution.
high speeds up slopes. If the user attempts to travel up
slope in any gear higher than third, the tractor will
have difficultly, if not an inability, to travel up the slope.
8
MT100 LAWN TRACTOR
3. Assembly Instructions
NOTICE: This lawn tractor is shipped without gas in
the engine.
WARNING: If any parts are damaged or missing,
do not operate this product until the parts are replaced.
Use of this product with damaged or missing parts could
result in serious personal injury.
WARNING: Do
not attempt to modify this product or
create accessories not recommended for use with this
product. Any such alteration or modification is misuse and
could result in a hazardous condition leading to possible
serious personal injury.
WARNING: To prevent accidental starting that could
cause serious personal injury, always disconnect the engine
spark plug boot from the spark plug when assembling
parts.
WARNING: Never operate the tractor without the
proper safety devices, guards, and chute in place and
working. Never operate the tractor with damaged safety
devices. Operating the tractor with missing or damaged
parts can result in serious personal injury.
Some parts of your new lawn tractor have not been
completely installed for shipping purposes. To ensure safe
and proper operation, all parts and hardware must be
assembled as instructed below using appropriate tools to
ensure proper tightness.
Carefully remove the product and any accessories from the
package. Make sure that all items listed in the Packing List
are included.
Inspect the product carefully to make sure no damage
occurred during shipping.
If any parts are damaged or missing, please call
855-693-2582 for assistance.
1
1
1
1
1
1
Tractor
Seat Assembly
Steering Wheel Assembly
Dashboard Cover
Oil Drain Sleeve
Deck Anti-scalp Wheel Assembly
Air Duct Ring
Key
Bolt for steering wheel assembly
2
1
Tractor operator's manual
Engine operator's manual
Wrench
1
1
1
2
Packing list Qty
9
MT100 LAWN TRACTOR
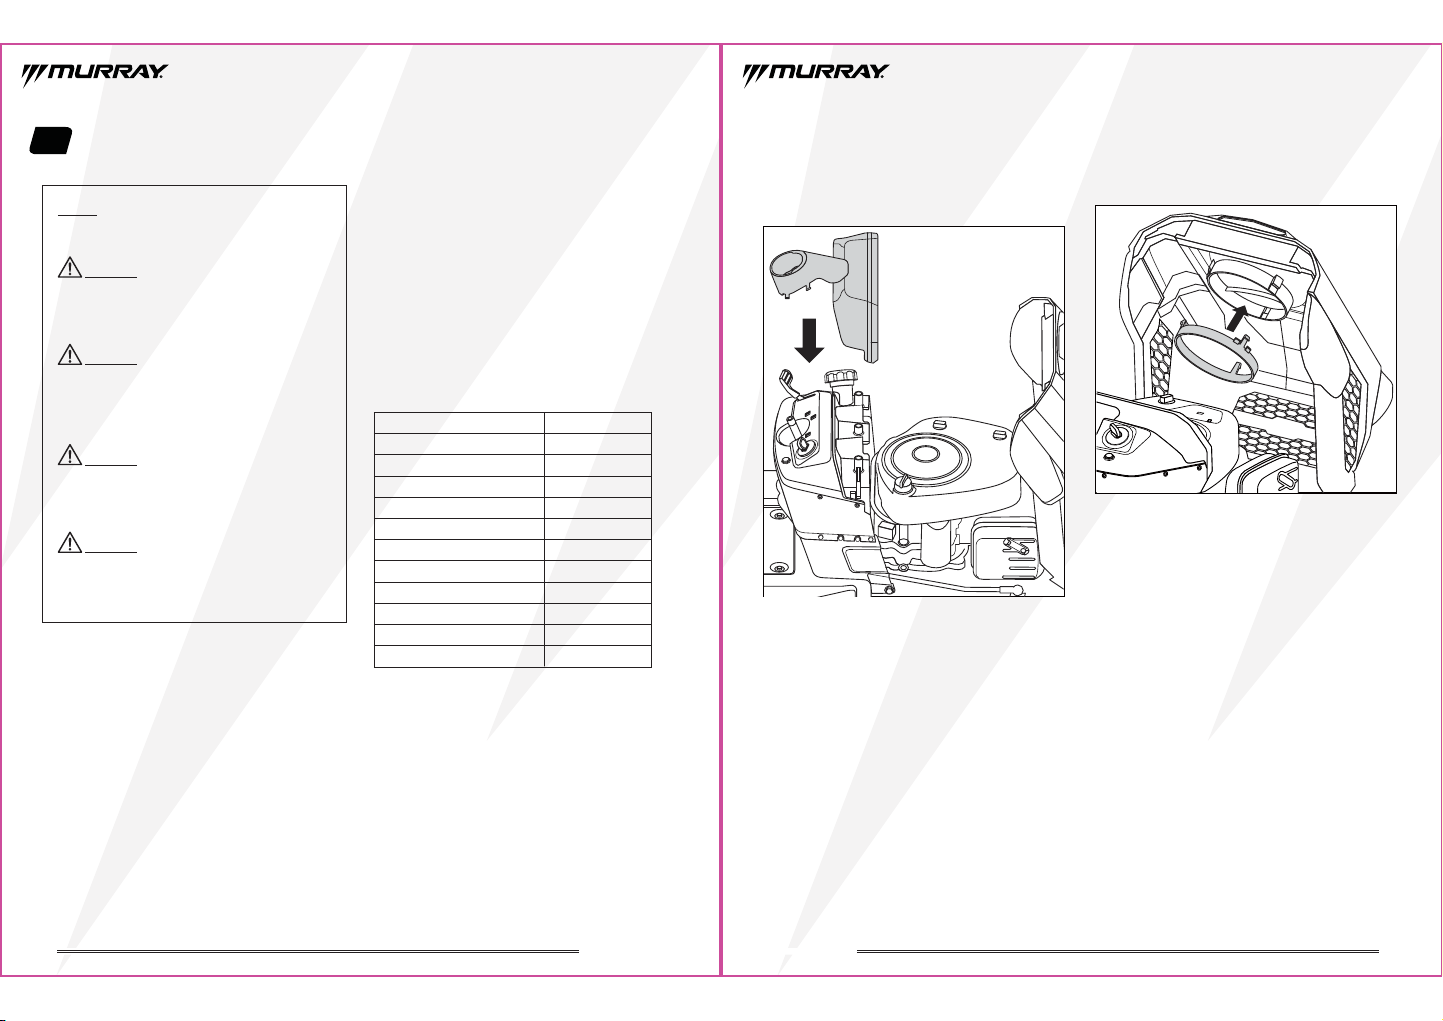
Assemble the Dashboard
Cover
1. Open the engine shroud and install the dashboard cover
into place. (Fig. 2)
Fig. 2
Assemble the Air Duct Ring
1. Open the engine shroud and install the air duct ring into
the inside of the engine shroud. (Fig. 3)
Fig. 3
10
MT100 LAWN TRACTOR
NOTICE: The bottom of the deck anti-scalp wheels
should
NOTICE: The left and right wheels should be set at the
same positions.
NOTICE: The
right wheel has already been assembled
in
the factory.
be positioned approximately 1/8 in. - 1/2 in. off the
ground
when the mower is at the desired cutting height. This will
minimize the chance of scalping the lawn in most
situations.
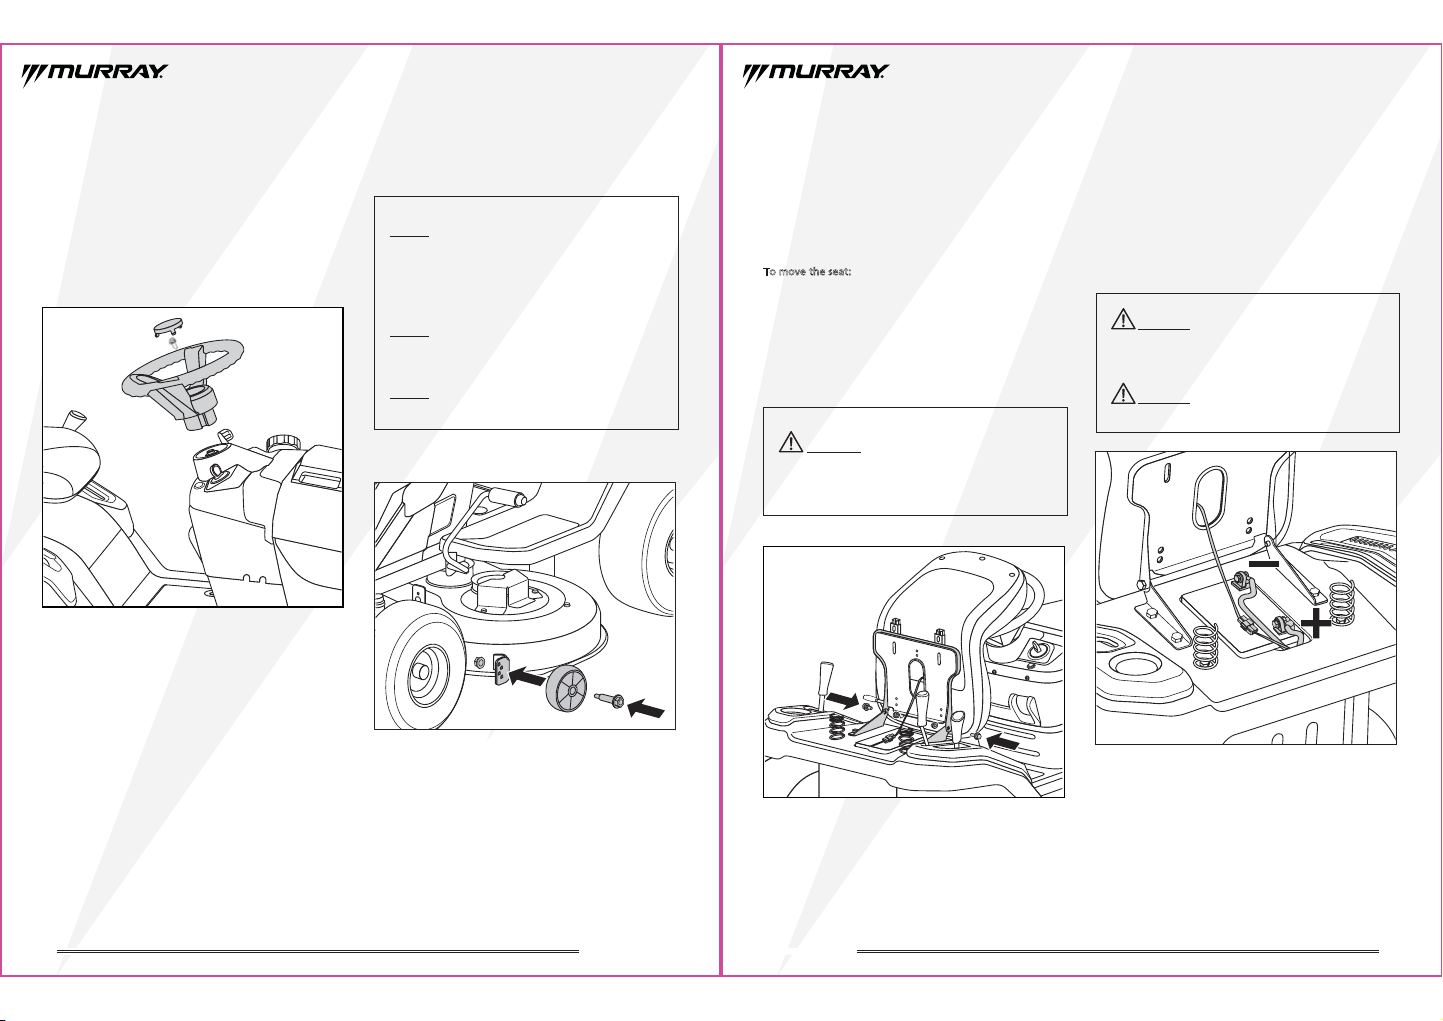
Assemble the Steering
Wheel
1. Align the steering wheel with the steering shaft, slide the
steering wheel down the shaft until into position, and
secure the steering wheel with the bolt provided to a
torque of 15-19 ft-lbs. (Fig. 4)
2. Place the steering wheel cap over the center of the
steering wheel, and push downward until it snaps into
place.
Fig. 4
Assemble the Left Deck
Anti-scalp Wheel
1.
Secure the left anti-scalp wheel with the bolt and nut
provided to a torque of 22-26 ft-lbs.(Fig. 5)
Fig. 5
11
MT100 LAWN TRACTOR
WARNING: Be sure the seat is locked into place
before operating the mower. A seat that is not secure can
cause the operator to shift and lose control of the mower
and result in possible death or serious personal injury.
WARNING: When attaching battery cables, always
connect the positive cable to its terminal FIRST, and then
connect the negative cable.
WARNING:
Incorrect connection will cause serious
damage to the battery.
Assemble the Seat
1. Connect the seat to the mower base with bolts and
nuts provided.(Fig. 6)
2. Adjust the seat position to ensure you are able to fully
depress the brake pedal before operating the mower.
3. Connect the seat switch.
T
o move the seat:
1. Pull back on the seat adjustment lever at the left of the
seat.
2. While holding the lever, slide the seat forward or
backward to the desired position.
3. Release the lever and make sure the seat is locked in
position.
Fig. 6
Connect the Battery
The battery is under the operator’s seat. To connect the
battery cables, proceed as follows:
1. Attach the positive cable (red) to the positive battery
terminal using the bolt and nut to a torque of 2-4 ft-lbs.
2. Attach the negative cable (black) to the negative battery
terminal using the bolt and nut to a torque of 2-4
ft-lbs.(Fig. 7)
Fig. 7
12
MT100 LAWN TRACTOR
Check/Adjust the Tire Pressure
Recommended tire pressure:
• Set the front tires to 14 psi
• Set the rear tires to 10 psi
Fig. 8
NOTICE: To ensure that the grass is cut level, the right and left front tires must be set to the same pressure. The same is
true for the right and left rear tires.
14 psi
10 psi
13
MT100 LAWN TRACTOR
4. Features and Controls
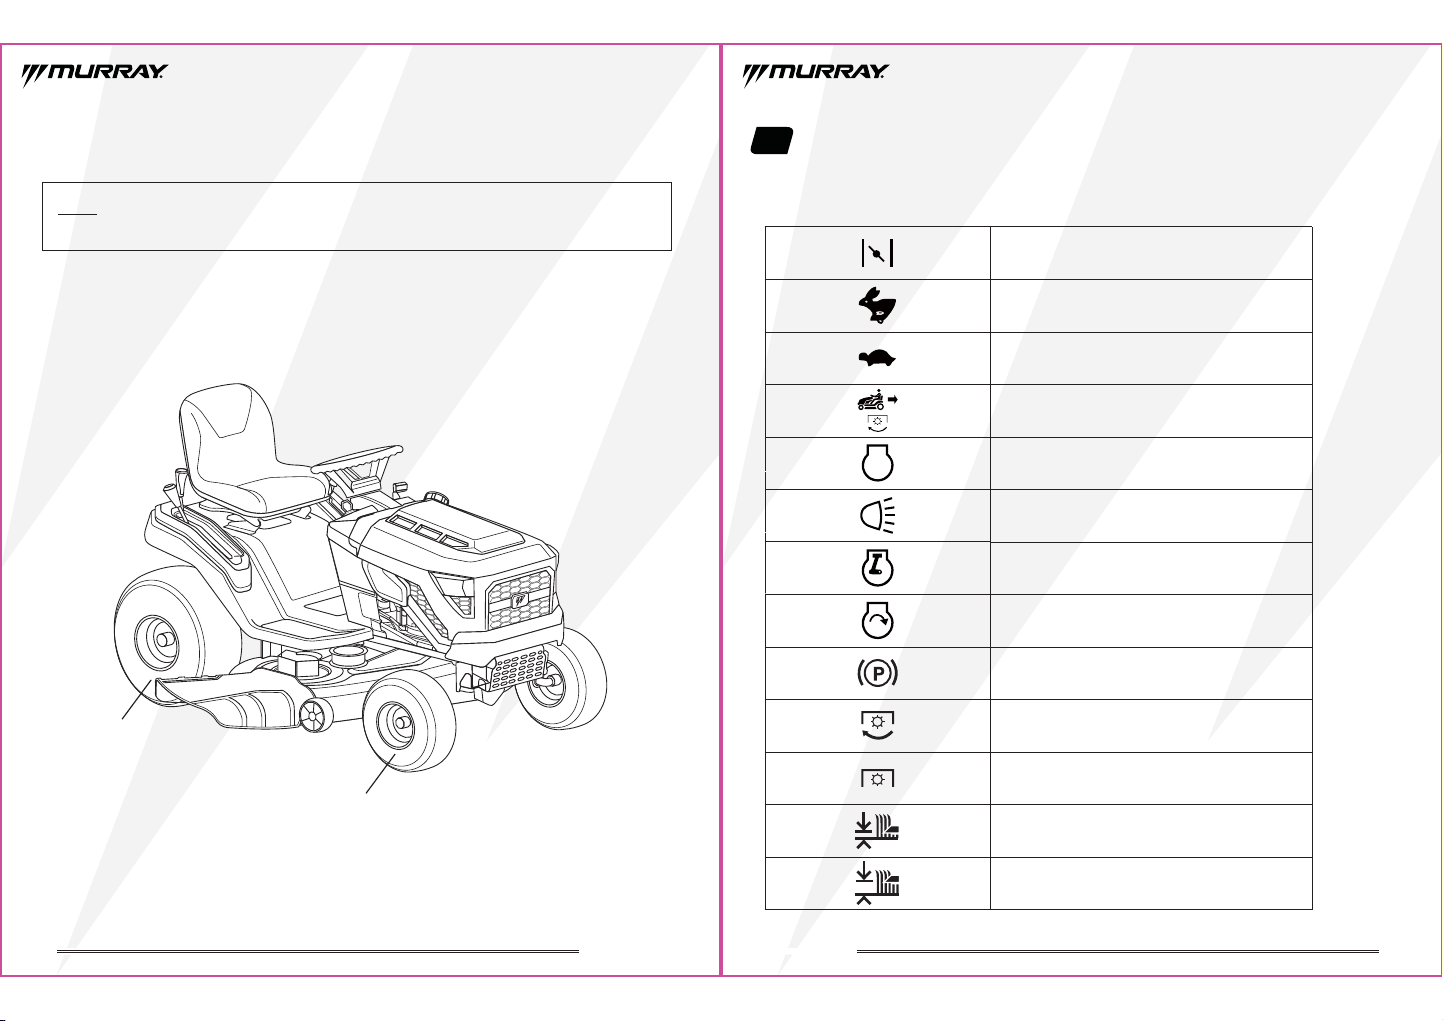
The following control symbols appear on this product. Before you operate the mower, please study them and learn their meaning.
Choke
FAST throttle position
SLOW throttle position
Override button to allow mowing in reverse
OFF ignition position
HEADLIGHTS ignition position
RUN ignition position
START ignition position
Parking brake
PTO ON (blades engaged)
PTO OFF (blades disengaged)
SHORT grass height
LONG grass height
Symbol Explanation
STOP
14
MT100 LAWN TRACTOR
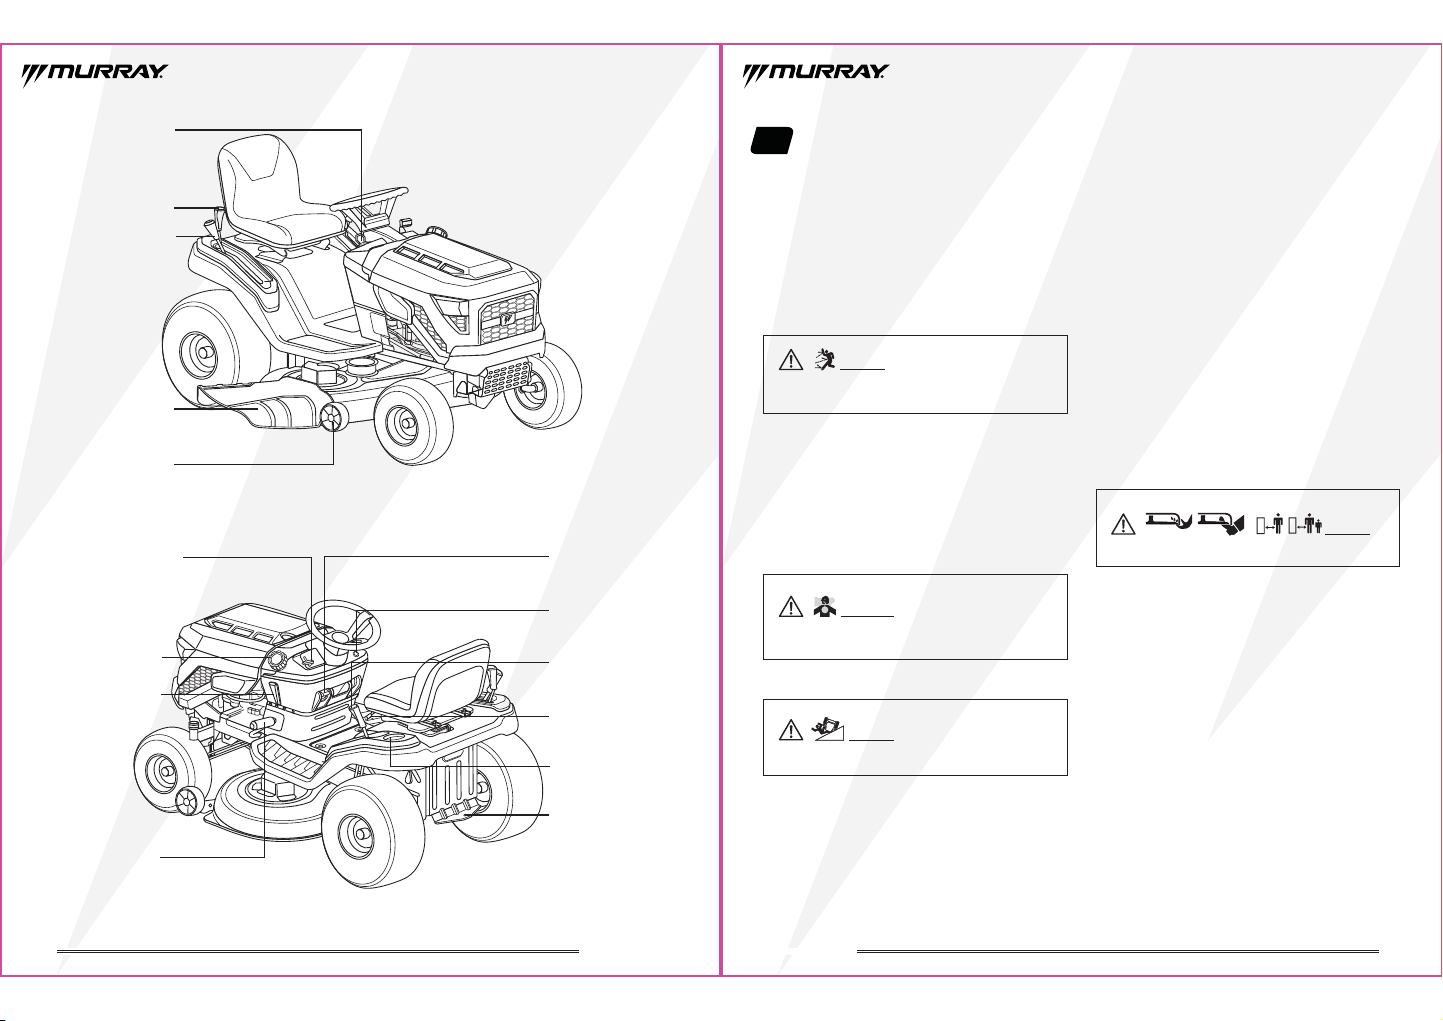
PTO lever
(Blade engagement lever)
Height of cut lever
Ignition
Side discharge chute
Anti-scalp wheel
Throttle choke lever
Fuel tank cap
Fuel tank fill window
Brake
Clutch
Parking brake pedal
Hitch
Cup holder
Gear shifter lever
Parking brake lever
Mow-in-reverse button
15
MT100 LAWN TRACTOR
5. Operating the Tractor
Read the Operator Safety section before you operate this
machine. Make sure that you know the controls and how to
stop the unit.
Operating Area
• Know the area where you plan to operate the mower.
• Make sure that the area is free of unwanted material
that could be picked up by the blades and thrown.
• Do not operate the machine without the complete grass
catcher, discharge chute, or other safety devices in place
and functioning properly. Check frequently for signs of
wear or deterioration and replace as needed.
• Clear the operating area of any objects which could be
thrown by or interfere with the operation of the
machine.
• Move the machine outside, before you start the
engine.
• Note all slopes and drop-offs.
• Mow up and down slopes not across.
• Reduce speed and be careful on slopes.
• Do not operate on slopes over 10 degrees.
• Give yourself a minimum of two mower widths of
clearance around water, retaining walls, or drop-offs.
DANGER:
Operating on slopes, or near water,
or drop-offs can result in loss of control and roll-over.
• Avoid mowing wet grass.
• Do not operate the machine under any condition where
traction, steering, or stability is in question. Tires could
slide even if the wheels are stopped.
• Avoid starting and stopping on slopes.
• Avoid making sudden changes in speed or direction.
• Make turns slowly and gradually.
• Be careful while operating the machine with a grass
catcher or other attachment(s). They can affect the
stability of the machine.
• Follow the manufacturer's recommendation for weight
limits for towed equipment and towing on slopes.
• See Towing with the Tractor section
• Make sure that the operating area is clear of bystanders,
especially children.
• Stop the mower when children or others are near.
• Keep children out of the operating area and under the
watchful care of a responsible adult.
• Do not carry passengers, especially children, even with
the blade(s) shut off. Children can fall off and be
seriously injured or interfere with the safe machine
operation. Children who have been given rides in the
past can suddenly appear in the mowing area for
another ride and be run over or backed over by the
machine.
• Use care when approaching blind corners, shrubs, trees, or
other objects that obscure vision.
DANGER: This
rider mower is capable of amputating hands and feet.
DANGER:
This machine is capable of throwing
objects that could injure bystanders or cause damage to
buildings.
WARNING:
Engines give off carbon monoxide,
an odorless, colorless, poisonous gas. Breathing carbon
monoxide can cause nausea, fainting, or death.
Seat adjustment lever
Fig. 9
Fig. 10
16
MT100 LAWN TRACTOR
SAE 30 - Below 40 °F (4 °C) the use of SAE 30 will
result in hard starting.
10W-30 - Above 80 °F (27 °C) the use of 10W-30 can
cause increased oil consumption. Check oil level more
frequently.
A
A
B
B
C
C
D
D
E
E
5W-30
Synthetic 5W-30
Vanguard® Synthetic 15W-50
DANGER: Mowing in reverse can be
hazardous to bystanders. Tragic accidents can occur if the
operator is not alert to the presence of children. DO NOT
activate the Mow In Reverse (MIR) Option if children are
present. Children are often attracted to the machine and
the mowing activity.
WARNING: If the machine does not pass the five
tests below do not operate the machine. See an authorized
service center
Safety Interlock System
Tests
This machine is equipped with a Safety Interlock System.
Do not attempt to bypass or tamper with the switches and
devices.
Test 1 — Engine will NOT crank if:
• Power Take Off (PTO) lever is ENGAGED, OR
• Brake pedal is NOT fully pushed down
(parking brake OFF)
Test 2 — Engine will crank and start if:
• PTO lever is DISENGAGED, AND
• Brake pedal is fully pushed down (parking brake ON).
Test 3 — Engine will SHUT OFF if:
• Operator rises off seat with PTO lever ENGAGED, OR
• Operator rises off seat with brake pedal NOT fully
pushed down (parking brake OFF).
Test 4 — Mower Blade Stopping Time Check
The mower blades and mower drive belt will come to a
complete stop in five seconds after the PTO lever is
DISENGAGED. If the mower drive belt does not stop in five
seconds, see an authorized service center.
Test 5 — Mow In Reverse (MIR) Option Check
• The engine will SHUT OFF when reverse travel is
attempted with the PTO lever ENGAGED and MIR button
NOT depressed while reversing. See Mow In Reverse
(MIR) Option section.
Engine
Check and Add Engine Oil
Use Briggs & Stratton
®
Warranty Certified oils for best
performance. Other high-quality detergent oils are
acceptable if classified for service SF, SG, SH, SJ or higher.
Do not use special additives.
Outdoor temperatures determine the proper oil viscosity for
the engine. Use the chart to select the best viscosity for the
outdoor temperature range expected.
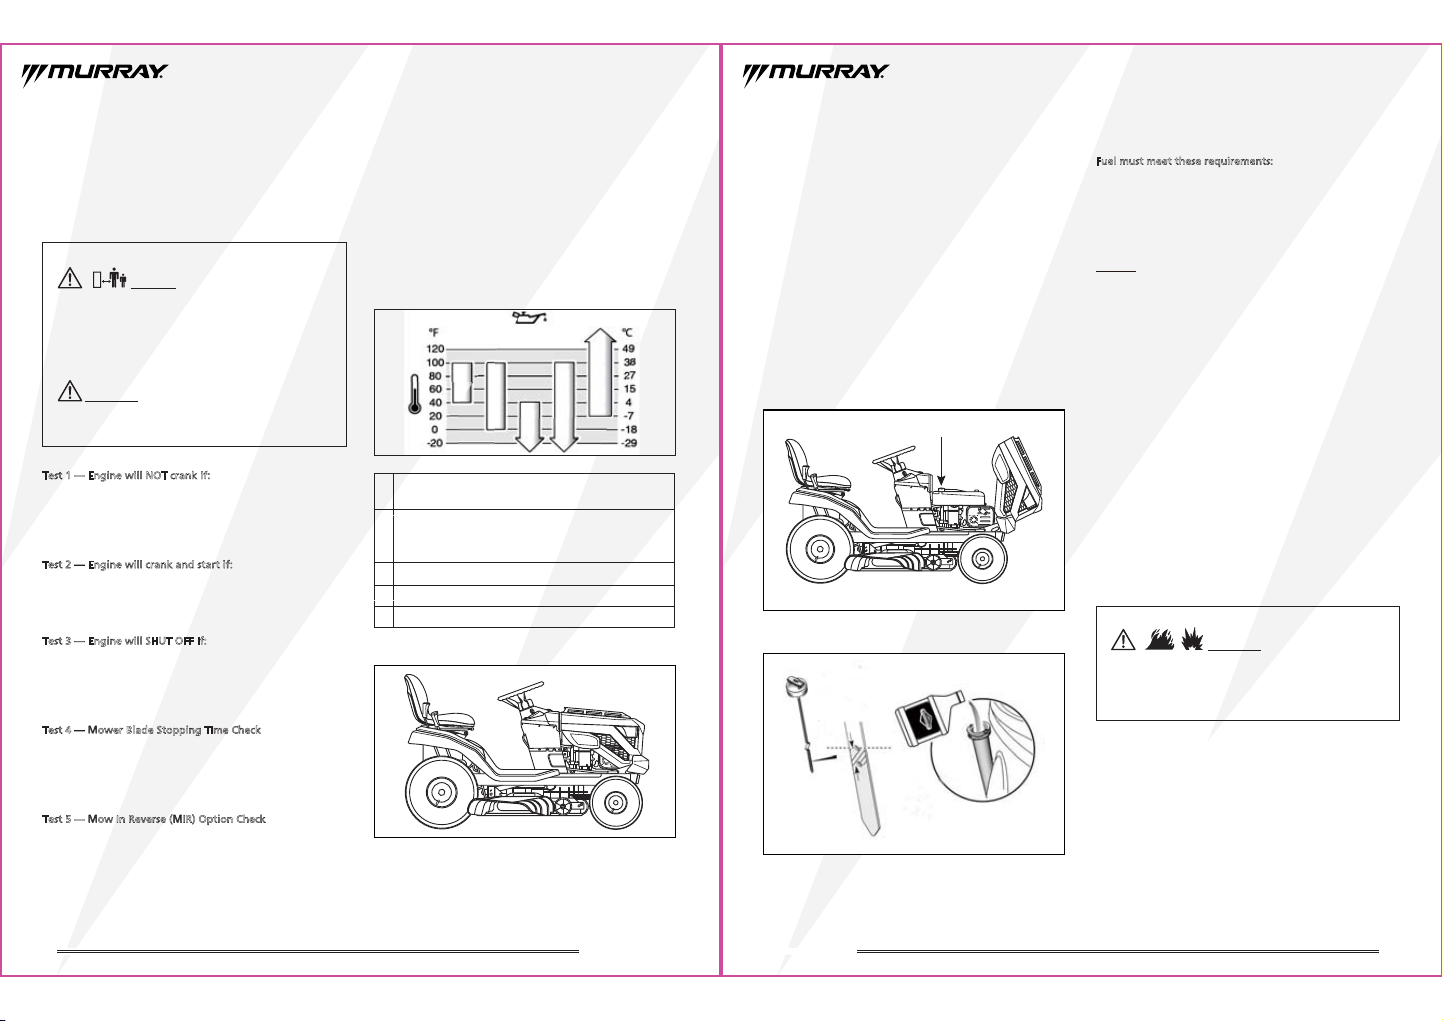
1. Put the unit on a level surface as shown in Fig. 11.
Fig. 11
17
MT100 LAWN TRACTOR
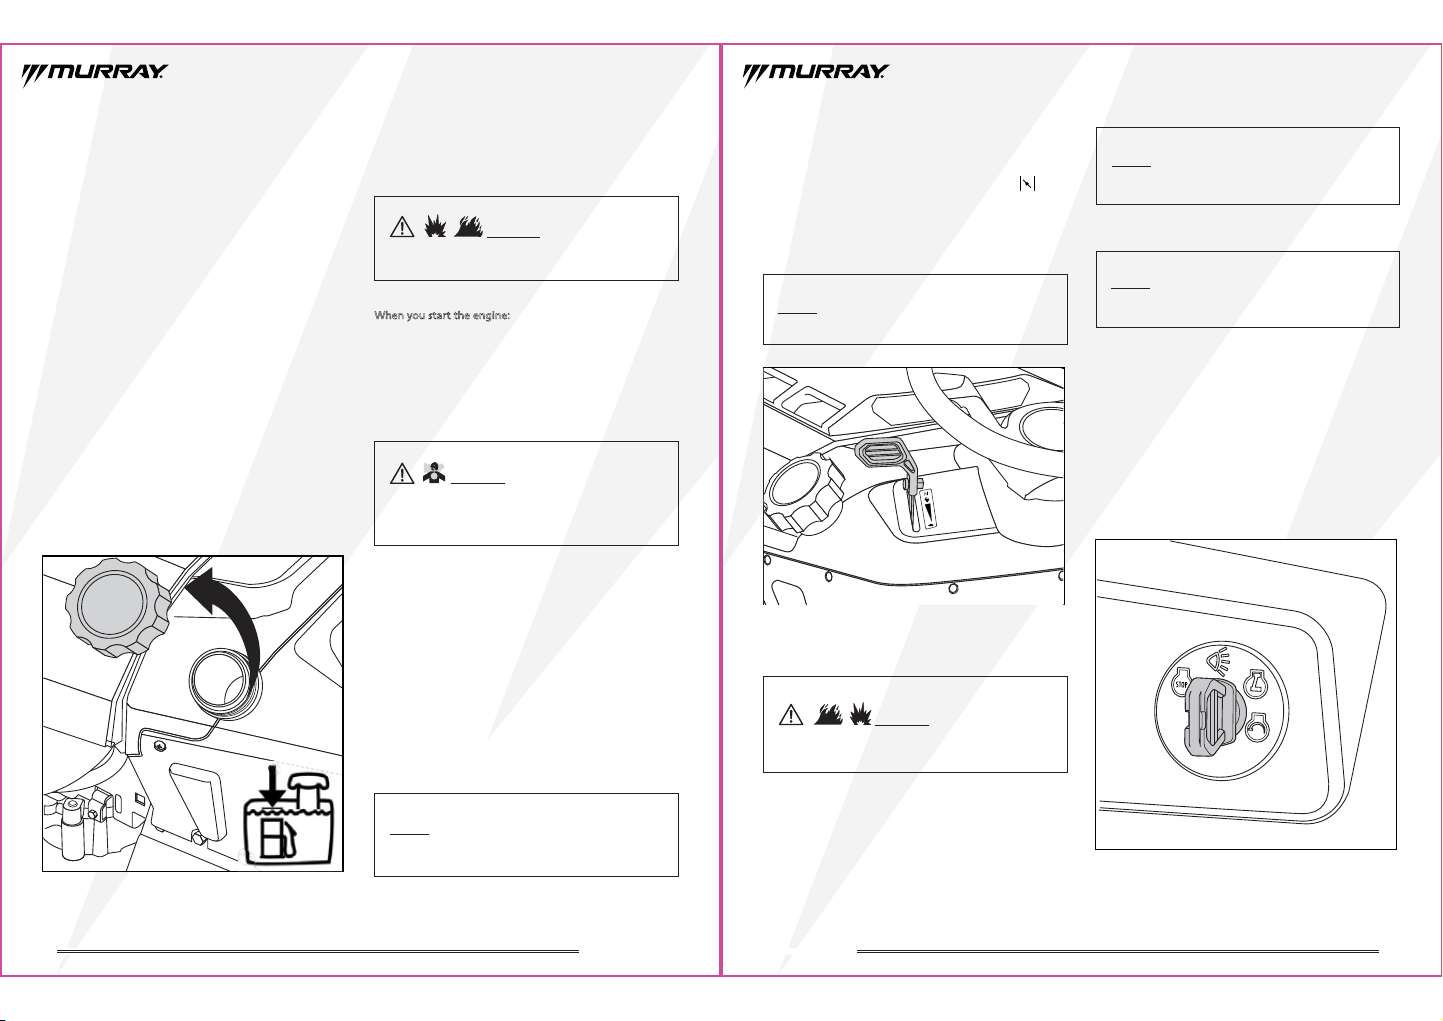
2. Stop the engine and remove the key. Make sure that the
oil fill area is clean.
3. Remove the dipstick (Fig. 12 & Fig. 13). Wipe clean the
remaining oil from the dipstick.
4. Install and tighten the dipstick.
5. Remove the dipstick again, and check the oil level.
6. Make sure that the oil level is at the top of the FULL mark
on the dipstick.
7. If the oil level is FULL, install and tighten the dipstick.
8. If the oil level is LOW, add oil into the oil fill tube.
(Fig. 13)
9. Wait one minute, and check the oil level again.
10. Install and tighten the dipstick.
Fig. 12
Fig. 13
Fuel Recommendation
Fuel must meet these requirements:
• Clean, fresh, unleaded gasoline.
•
A minimum of 87 octane. For high altitude use, see section
below.
• Gasoline with up to 10% ethanol (gasohol) is acceptable.
NOTICE: Do not use unapproved gasoline, such as E15 and
E85. Do not mix oil in gasoline or modify the engine to run
on alternate fuels. Use of unapproved fuels will damage the
engine components, which will not be covered under
warranty.
To protect the fuel system from gum formation, mix a fuel
stabilizer into the fuel. See Storage section. All fuel is not the
same. If start or performance problems occur, change fuel
providers or brands. This engine is certified to operate on
gasoline.
High Altitude
At altitudes over 5,000 feet (1524 meters), a minimum of 85
octane gasoline is acceptable.
For carbureted engines, high altitude adjustment is required
to maintain performance. Operation without this adjust-
ment will cause decreased performance, increased fuel
consumption, and increased emissions. Contact a Briggs &
Stratton Authorized Service Center for high altitude
adjustment information. Operation of the engine at
altitudes below 2,500 feet (762 meters) with the high
altitude adjustment is not recommended.
Add Fuel
WARNING: Fuel and its vapors are
extremely flammable and explosive. Always handle fuel
with extreme care. Failure to observe these safety
instructions can cause fire or explosion which could result
in severe burns or death.
Engine oil dipstick
18
MT100 LAWN TRACTOR
WARNING:Fuel and its vapors are
extremely flammable and explosive. Fire or explosion can
cause severe burns or death.
NOTICE: In the event of an emergency, turn the ignition
switch to the OFF position. This will STOP the engine.
See Stop the Engine section.
WARNING:Engines give off carbon
monoxide-an odorless,colorless, poisonous gas.Breathing
carbon monoxide can cause nausea, fainting, or death.
Fire or explosion can cause severe burns or death.
When Adding Fuel
• Stop the engine and let the engine cool at least 3
minutes before you remove the fuel cap.
• Extinguish all cigarettes, cigars, pipes, and other sources
of ignition.
• Fill the fuel tank outdoors or in a well-ventilated area.
• Do not overfill the fuel tank. To allow for expansion of
the fuel, do not fill above the bottom of the fuel tank
neck.
• Keep fuel away from sparks, open flames, pilot lights,
heat, and other ignition sources.
• Check fuel lines, tank, cap, and fittings frequently for
cracks or leaks. Replace if necessary.
• If fuel spills, wait until it evaporates before you start the
engine and avoid creating any source of ignition.
• Use only an approved fuel container.
1. Remove any debris from the fuel cap area.
2. Remove the fuel cap. (Fig.14)
3. Fill the fuel tank with fuel. Monitor the level of fuel by
looking at the see-through window on the left of the
tractor. DO NOT fill above the bottom of the fuel
tank neck.
4. Install the fuel cap.
Fig. 14
Operating Instructions
Start the Engine
When you start the engine:
• Make sure that the spark plug, muffler, fuel cap, and air
filter are installed correctly.
• Do not crank the engine with spark plug removed.
• If the engine floods, move the throttle to the FAST
position and crank until the engine starts.
• Start and operate the engine outdoors.
• Do not start or operate the engine in an enclosed area,
even if doors or windows are open.
1. Check the oil level. See Check and Add Engine Oil section.
2. Insert the key into the ignition switch.
3. If the blades are engaged, disengage the blades.
4. Fully depress the brake pedal.
5. Move the throttle to the FAST position.
6. Turn the key to the START position and hold until the
engine starts. After the engine starts, release the key. It
will return to the run position.
19
MT100 LAWN TRACTOR
WARNING:Fuel and its vapors are
extremely flammable and explosive. Fire or explosion can
cause severe burns or death.
NOTICE: In the event of an emergency, turn the ignition
switch to the OFF position. This will STOP the engine.
NOTICE:
The headlights will quickly drain the battery
if
the headlights are left on and the engine is off.
NOTICE:
When operating the mower with the cutting
blade engaged, move the throttle to the FAST position.
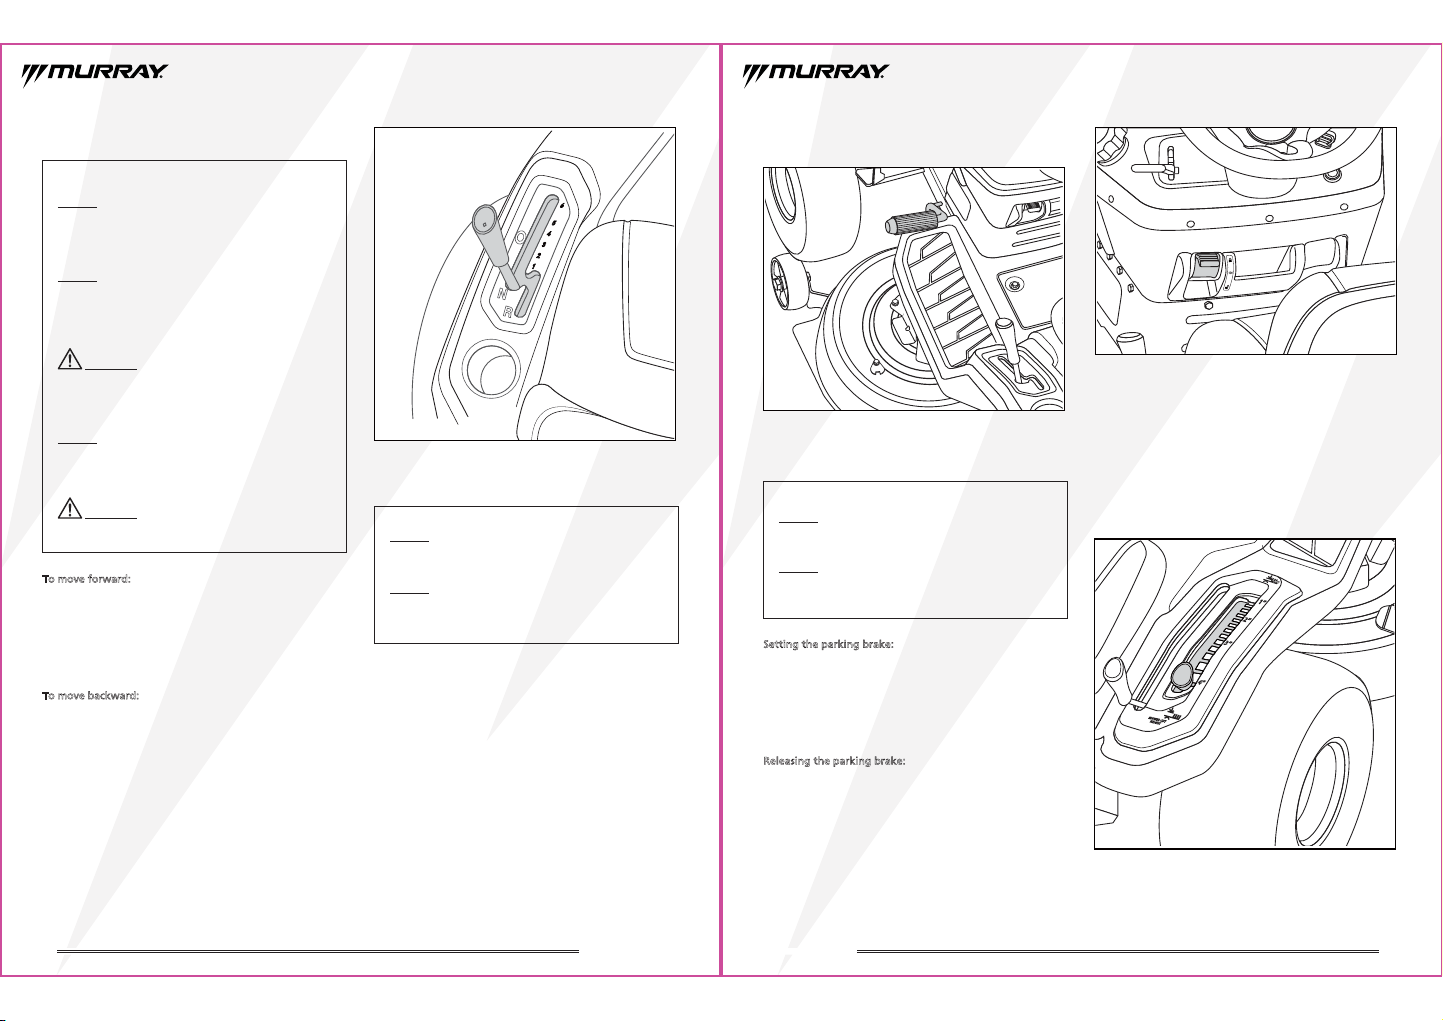
Using the Throttle/Choke Lever
The throttle / choke lever is located on the left side of the
mower’s dash panel. When starting the engine that is cold,
push the throttle fully forward into the "CHOKE"
position. (Fig. 15)
The purpose of the choke is to restrict the flow of air so that
the fuel-air mixture is made richer (more fuel, less air) which
aids in starting the engine. After starting the engine, move
the throttle downwards to the FAST position.
Fig. 15
Stop the Engine
• Do not choke the carburetor to stop the engine.
1. If the blades are engaged, disengage the blades.
2. Shift into neutral.
3. Move the throttle to the SLOW position.
4. Turn the ignition key to the OFF position. Remove the
key.
5. Engage the parking brake.
Using the Headlights
Engine on
1. To turn on the headlights, turn the key from the RUN
position to the HEADLIGHT position. (Fig.16)
2. To turn off the headlights, turn the key from the HEAD
LIGHT position to the RUN position.
Engine off
1. To turn on the headlights, turn the key to the HEAD
LIGHT position.
2. To turn off the headlights, turn the key to the STOP
position.
Fig. 16
Reference symbol explanations in the Features and Controls
section on page 13.
20
MT100 LAWN TRACTOR
NOTICE: Always use the brake pedal to bring the mower
to a complete stop before shifting.
NOTICE: Do not use the brake pedal to control the travel
speed of the mower. Doing so will result in premature
wear of drive belt.
NOTICE:
This mower is not equipped with a gas pedal.
The travel speed of the mower is controlled by the gear
position and throttle position.
NOTICE: First-time operators should become completely
familiar with the mower’s operation and controls before
operating the mower in higher speed positions.
NOTICE: Do not attempt to shift gears when the moweris
in motion. Serious damage to the mower’s transmission
could result. Always use the brake pedal to bring the
mower to a complete stop before shifting.
WARNING: Sharp turns can affect control of the
mower. ALWAYS slow the mower before making sharp
turns.
WARNING: Always start the tractor in neutral.
Shifting Gears
To move forward:
1. First bring the mower to a complete stop.
2. Slowly move the shifter lever to the desired gear. There
are six forward gears.
3. Slowly release your foot off the brake pedal.
To move backward:
1. First bring the mower to a complete stop.
2. Look behind before backing up.
3. Slowly move the shifter lever to reverse gear.
4. Slowly release your foot off the brake pedal.
Fig. 17
Using the Brake
21
MT100 LAWN TRACTOR
NOTICE: The parking brake pedal must be depressed to
start the engine.
NOTICE:
The parking brake must be set if the operator
leaves the seat with the engine running or the engine
will automatically shut off.
Depress the brake pedal to slow the mower and bring it to a
stop. (Fig. 18)
Fig. 18
Using the Parking Brake
Setting the parking brake:
1. Fully depress the brake pedal.
2. Raise the parking brake lever all the way up into the lock
position. (Fig. 19)
3. Release the brake pedal to allow the parking brake to
engage.
Releasing the parking brake:
1. Fully depress the brake pedal.
2. Lower the parking brake lever all the way down into the
unlock position.
3. Release the brake pedal to allow the parking brake to
disengage.
Fig. 19
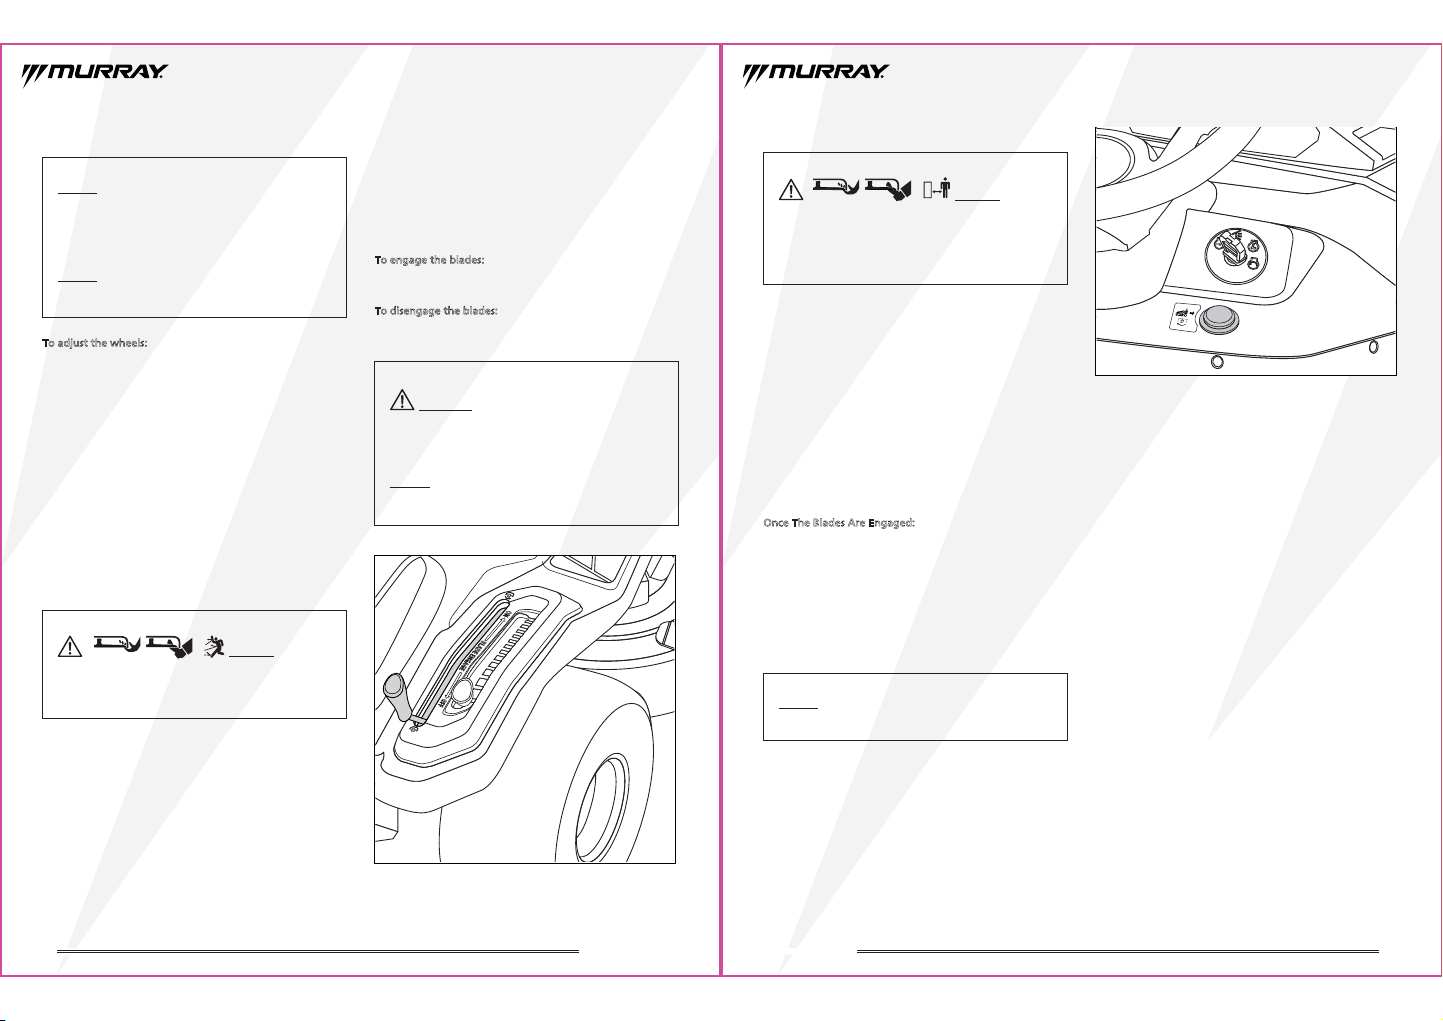
Adjusting the Mower Cutting Height
The height of cut lever is located on the mower’s right
fender. It is used to change the height of the cutting deck.
The height (the blade to the ground) can be adjusted from
1” to 4” (13 height positions).
To change the height of cut, move the lever out of the
notch, then up or down to the position that is best suited
for your application. (Fig. 20)
Fig. 20
22
MT100 LAWN TRACTOR
Adjusting the Deck Anti-Scalp Wheels
To adjust the wheels:
1. Park the mower on a level surface and engage the
parking brake.
2. Stop the engine and remove the key. Allow blades to
come to a complete stop.
3. Set the deck to the desired height setting.
4. Remove the bolt and nut holding the wheel in place.
5. Move the wheel to a position that’s approximately
1/8 in. - 1/2 in. off the ground.
6. Replace the bolt and nut; tighten securely. Torque nut to
4-6 ft. lbs.
7. Repeat steps 4-5 for the other side.
Mowing
• Only operate the machine in daylight hours or good
artificial light.
• Avoid holes, ruts, bumps, rocks, or other hidden
hazards. Uneven terrain can overturn the machine or
cause the operator to lose their balance or footing.
• Do not direct discharge material toward anyone. Avoid
discharging material against a wall or obstruction as
material may ricochet back toward the operator.
• Stop the blade(s) when crossing gravel surfaces.
• Do not leave a running machine unattended. Always
park on level ground, disengage the attachment, set the
parking brake, stop the engine, and remove the key.
The PTO lever is located on the mower’s right fender.
Engaging the PTO lever transfers power to the cutting
blades.
To engage the blades:
• Move the lever all the way forward.
To disengage the blades:
• Move the lever all the way backward. (Fig. 21)
Fig. 21
WARNING:
The engine will STOP when reverse travel
is attempted with the PTO lever ENGAGED and MIR button
NOT depressed while reversing. See Mow In Reverse
(MIR) Option section.
NOTICE:
The PTO lever must be DISENGAGED when
starting the engine.
DANGER: This machine
is capable of amputating hands and feet, and throwing
objects. Failure to obey the safety instructions could
result in serious injury or death.
23
MT100 LAWN TRACTOR
Mow In Reverse (MIR) Option
• Keep children out of the operating area and under the
watchful care of a responsible adult.
• Do not carry passengers, especially children, even with
the blade(s) shut off. Children can fall off and be
seriously injured or interfere with safe machine
operation. Children who have been given rides in the
past can suddenly appear in the mowing area for
another ride and be run over or backed over by the
machine.
• Do not mow in reverse unless absolutely necessary.
Always look down and behind before and while
backing.
• If the machine mows in reverse without engaging the
MIR Option, see an authorized service center
immediately.
Once The Blades Are Engaged:
1. Depress and hold brake/clutch pedal to stop forward
travel.
2. Press and hold M-I-R button. (Fig. 22)
3. Shift gear into reverse.
4. Release M-I-R button.
5. Slowly release brake/clutch pedal.
DANGER: Mowing in
reverse can be hazardous to bystanders. Tragic accidents
can occur if the operator is not alert to the presence of
children. Children are often attracted to the machine and
the mowing activity. Never assume that children will
remain where you last saw them.
NOTICE: Remove the key to restrict access to the MIR
Option.
Fig. 22
Mowing Tips
• Mowing should always be done with the throttle in the
FAST position for optimal cutting results.
• Keep the blades sharp. Jagged cuts increase the likelihood
of the tip of the grass blade browning or developing a
disease.
• After completing a pass in your lawn, overlap the previous
pass by approximately 2 – 3”.
• Change the direction you mow each time you mow to
prevent ruts form developing in your lawn.
• Set the mower cut height at the recommended setting for
the type of grass in your lawn. Cutting your lawn too
short will prevent it from deepening its root system as the
grass will use its energy to regrow the grass blades, rather
than the root system. A deep root system will allow the
grass to find nutrients and water in the soil, especially in
periods of drought.
• Raise the mower cut height during the summer or periods
of drought.
• Do not cut during the hottest part of the day. Doing so
stresses the grass.
• Follow the “1/3 Rule”. Take off no more than 1/3 of the
grass blade length at a time.
• When cutting long, thick grass, it may be necessary to
shift into a lower gear. It may also be necessary to go
back over the cut area a second time.
• Do not cut wet grass. The grass will be less likely to clump
together and more likely to be standing upright, which
will result in a clean, even cut.
NOTICE: The bottom of the deck anti-scalp wheels
should
be positioned approximately 1/8 in. - 1/2 in. off the ground
when the mower is at the desired cutting height. This will
minimize the chance of scalping the lawn in most
situations.
NOTICE: The left and right wheels should be set at the
same positions.
24
MT100 LAWN TRACTOR
25
MT100 LAWN TRACTOR
*Whichever comes first.
WARNING: Improper maintenance, or failure to
correct a problem before operation
, can cause malfunction
and could result in serious personal injury.
CAUTION:
Before performing any type of
maintenance/service, disengage the blades, shut off the
engine, and wait until all moving parts have come to a
complete stop. Disconnect the spark plug wire and keep
it away from the spark plug. Always wear safety glasses
while performing any adjustments or repairs.
NOTICE: Refer to engine operator’s manual for detailed
engine maintenance.
NOTICE:
If you are unsure how to perform any of the
maintenance items, please contact customer service
855-693-2582 or a qualified service center for assistance.
6. Maintenance
Before adjustments and repairs:
• Use ONLY the correct tools.
• DO NOT tamper with the governor spring, links, or other
parts to increase engine speed.
• Replacement parts must be of the same design and
installed in the same position as the original parts. Other
parts may not perform as well, may damage the unit, void
the warranty, and may result in injury.
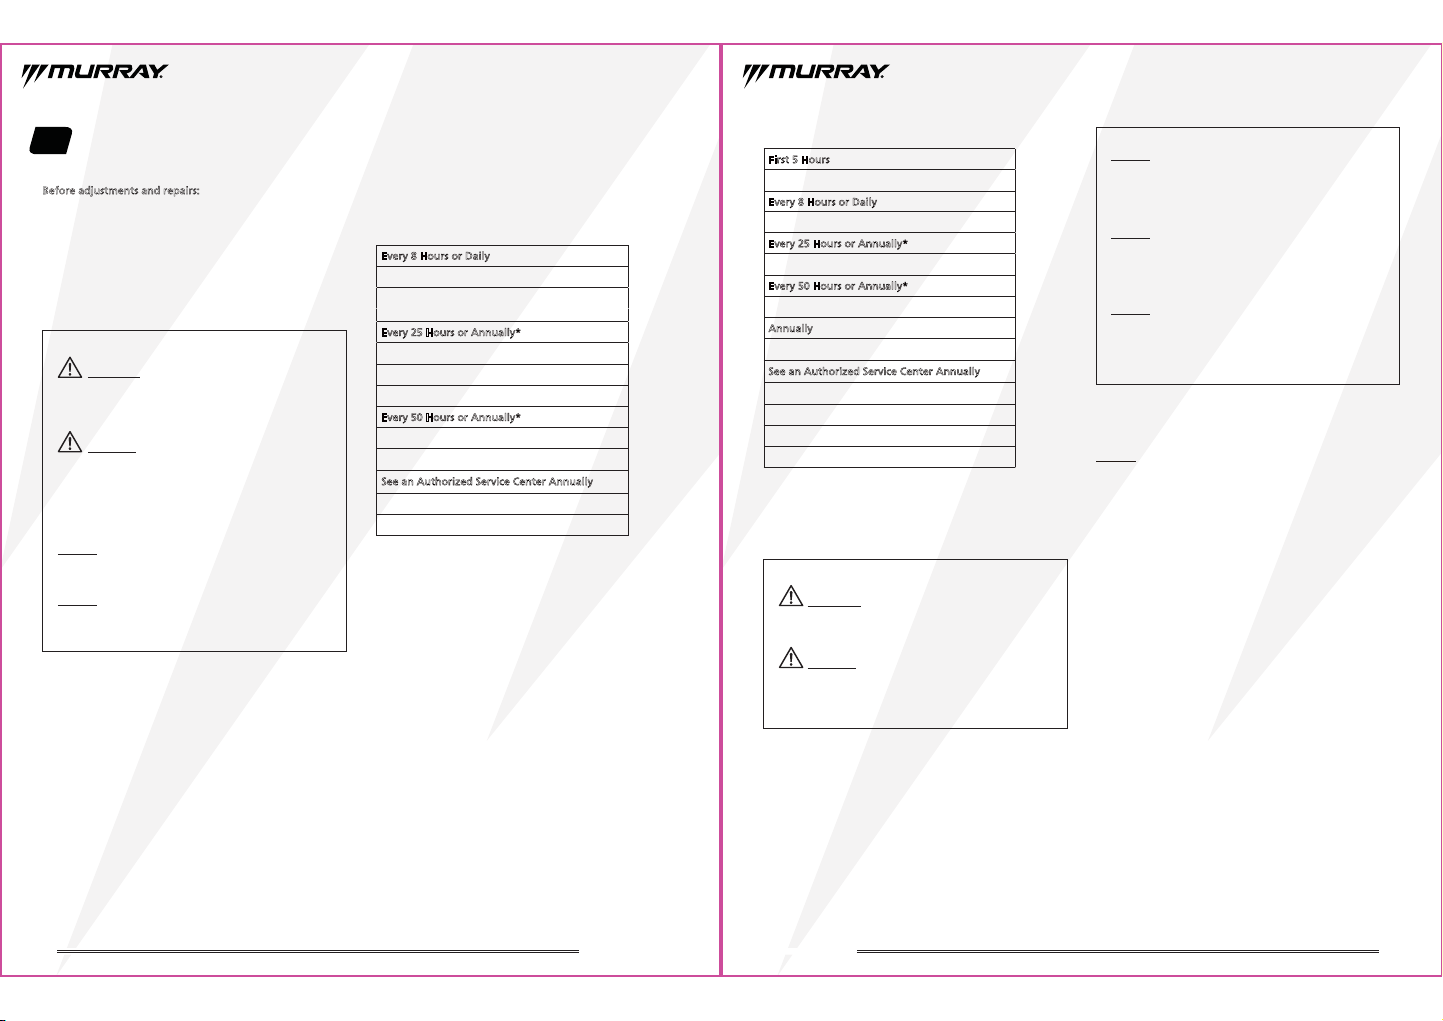
Maintenance Schedule
*Whichever comes first.
**Check the mower blades more often in regions with
sandy soils or high dust conditions.
Every 8 Hours or Daily
Check the safety interlock system.
Remove any debris from the tractor,
mower deck, and engine compartment.
Every 25 Hours or Annually*
Check the tire pressure.
Check the mower blade stopping time.
Check for loose hardware on the tractor.
Every 50 Hours or Annually*
Clean the battery and cables.
Check the tractor brakes.
See an Authorized Service Center Annually
Lubricate the tractor.
Check the mower blades.**
RIDER AND MOWER
First 5 Hours
Change the engine oil.
Every 8 Hours or Daily
Check the engine oil level.
Every 25 Hours or Annually*
Clean the air filter.
Every 50 Hours or Annually*
Change the engine oil.
Annually
Replace the air filter.
See an Authorized Service Center Annually
Inspect the muffler.
Replace the spark plugs.
Replace the fuel filter.
Clean the air cooling system.
ENGINE
Cleaning the Tractor
• Clean under the hood and around the engine, including
the engine intake screen, exhaust manifold, muffler, and
muffler shield.
• Clean the top of the deck and around belts and pulleys.
• Clean around and near the transmission.
CAUTION: Do not use pressure washer or garden
hose to clean your tractor other than to clean the
underside of the deck. It may cause damage to electrical
components, spindles, pulleys, bearings, or the engine.
WARNING:Let the tractor to cool for at least five
minutes before cleaning. Exercise caution to avoid burns.
NOTICE: Debris can accumulate anywhere on the tractor,
especially on horizontal surfaces. Additional
cleaning
may be necessary when mowing in dry conditions
or when
mulching.
NOTICE: Fuel leaks/spills, oil leaks/spills, and excess
lubrication can also become collection sites for debris.
Immediate repair and cleaning up oil or fuel spills can
help reduce fire hazards.
NOTICE: Avoid using solvents when cleaning plastic parts.
Most plastics are susceptible to damage from various
types of commercial solvents and may be damaged by
their use. Use clean cloths to remove dirt, dust, oil,
grease, etc.
Cleaning the Mower Deck
NOTICE: The mower ONLY comes with a washout port
block-off plate. A washout port and garden hose quick
disconnect are NOT included and must be purchased
separately.
A “Universal Deck Wash Kit” that includes a washout port
and garden hose quick disconnect can be purchased from
The Home Depot. Store SKU #1003930707 or similar.
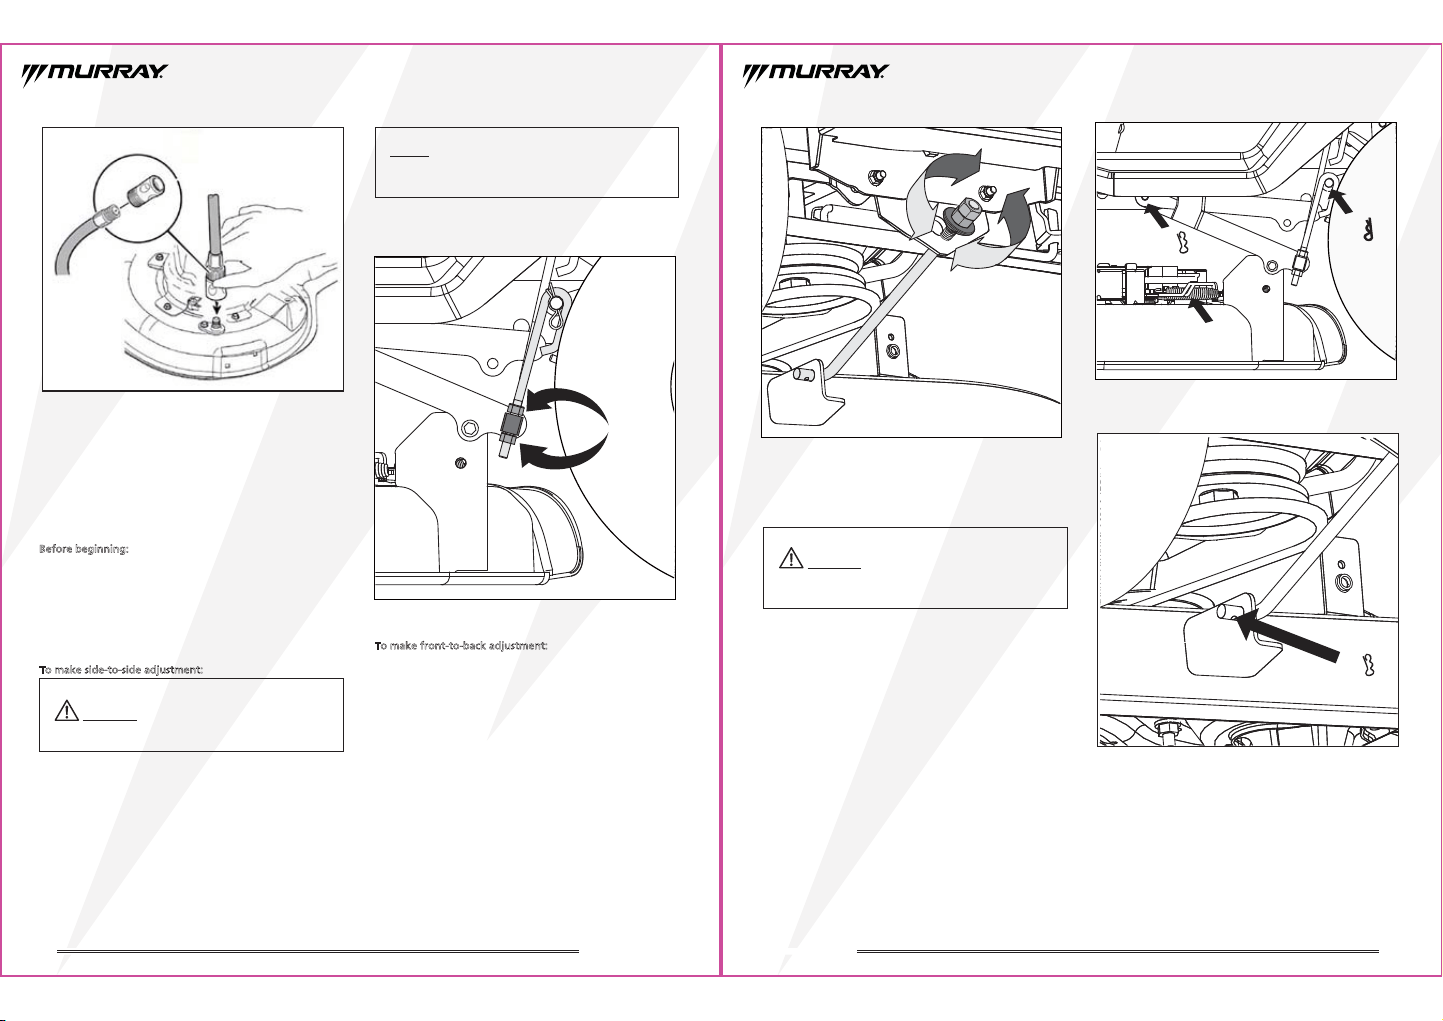
1. Put the tractor on a smooth level surface.
2. Attach the quick disconnect to the garden hose and then
connect to the washout port on the mower deck.
3. Turn the water ON.
4. Start the engine.
5. Set the Height-of-Cut to the lowest position.
6. Engage the Power Take-Off (PTO) to activate the mower
blades. The rotation of the blades and the water will
clean the bottom of the mower deck.(Fig. 23)
7. Disengage the PTO.
8. Stop the engine.
9. Turn the water OFF.
10. Remove the garden hose and quick disconnect from the
washout port.
27
MT100 LAWN TRACTOR
26
MT100 LAWN TRACTOR
Fig. 23
Fig. 24
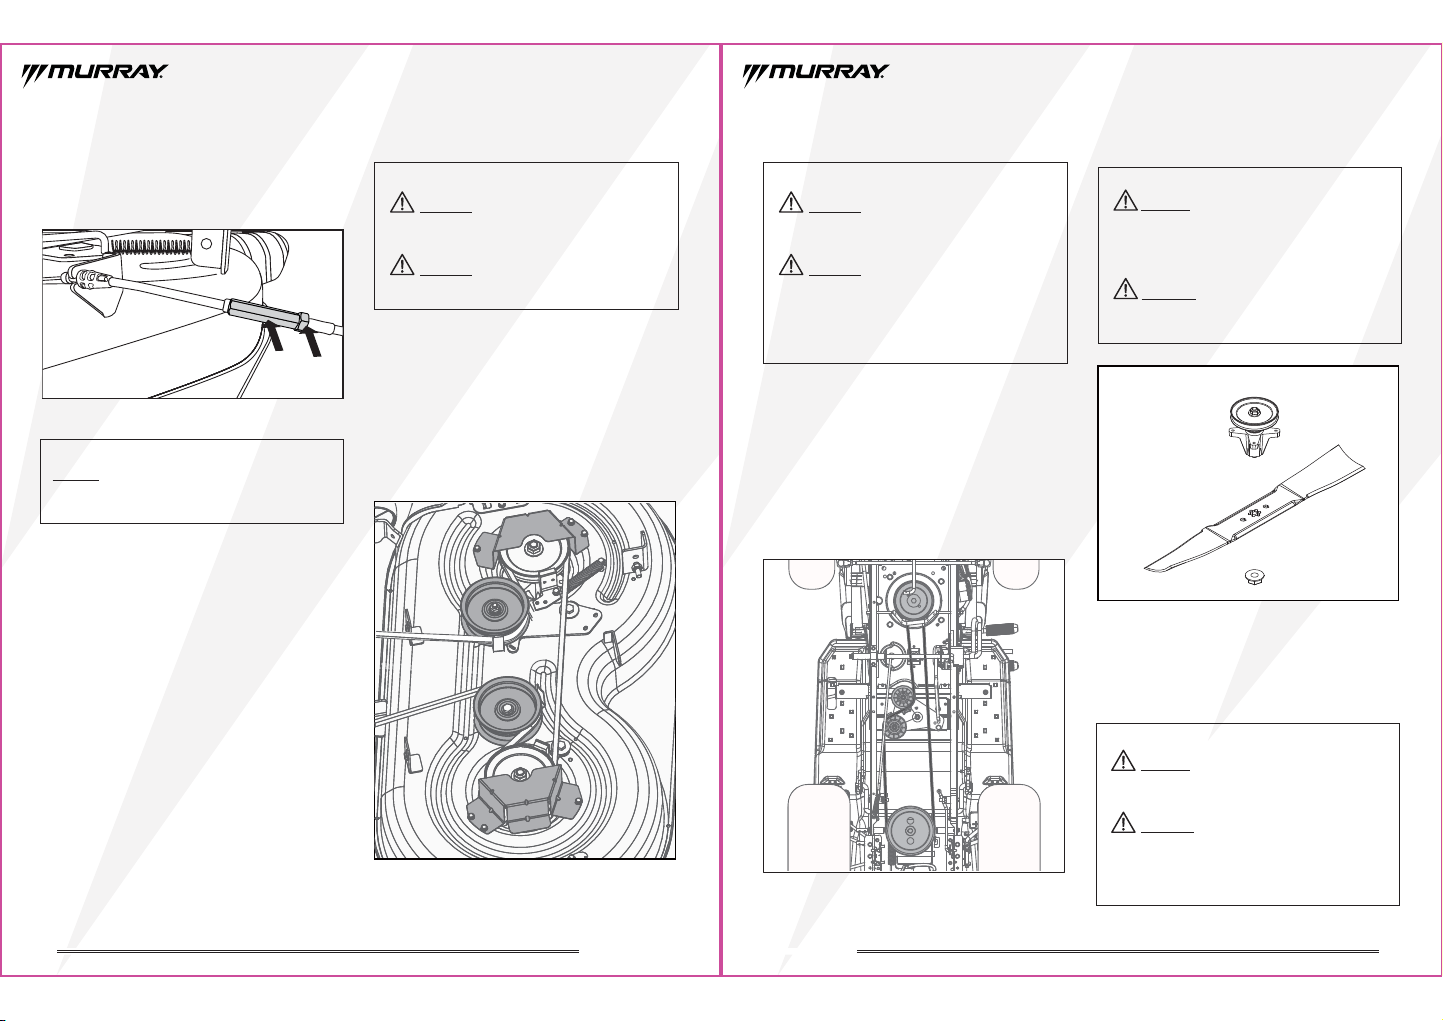
To make front-to-back adjustment:
1. Position the right blade so that the ends now point
toward the front and back ofthe tractor.
2. Measure the distance from the tip of the blade to the
ground. For optimal cutting results, the front tip of the
blade should be from 1/4 in. to 3/8 in. lower than the rear
tip.
3. If front-to-back adjustment is needed, after loosing the
outer jam nut, turn the inner adjustment nut clockwise to
raise or counterclockwise to lower the front of the
cutting deck. (Fig. 25)
4.
Measure again to verify the front tip is now 1/4 in. to 3/8 in.
lower than the rear tip. If not, continue to adjust and
measure until they are.
5. Without moving the inner adjustment nut, re-tighten the
outer jam nut to secure the inner adjustment nut in
place. (Fig. 25)
a
Leveling the Cutting Deck
If your lawn appears unevenly cut after using the tractor,
the cutting deck may need adjusting. Before deciding that
leveling the cutting deck is necessary, make sure the tires
are properly inflated to the recommended PSI when
mowing.
Before beginning:
1. Make sure the tractor is in neutral.
2. Stop the engine, engage the parking brake, and remove
the key.
3. Raise the height of the cutting deck to its highest
position.
To make side-to-side adjustment:
1. Position the blades so that the ends point toward the
sides of the mower.
2. Measure the distance from the bottom, outside tip
(cutting tip) of the blade to the ground. Measure the left
blade's cutting tip to the ground and the right blade's
cutting tip to the ground. If the measurements are more
than 3/16" off, proceed to the next step.
3. Turn the adjustment nuts up to raise or down to lower
the left side of the cutting deck. (a, Fig. 24)
NOTICE: If raising the side, you will need to turn the top
adjustment nut first. If lowering, turn the bottom nut
first.
WARNING:
Tractor blades are sharp. Wrap the blade
or wear gloves, and use extra caution when servicing them.
4. Measure again. The deck is properly balanced when both
blade tip measurements taken earlier are equal
Fig. 25
Removing the Cutting Deck
• Removing the deck will make it easier to replace belts,
pulleys, and blades.
1. Make sure the tractor is in neutral.
2. Stop the engine, engage the parking brake, and remove
the key.
3. Lower the deck to its lowest position.
4. Disconnect the cable spring (a, Fig. 26) that connects the
deck to the tractor.
5. Remove the 5 hitch pins, 2 on the left (b and c, Fig. 26),
2 on the right (the same position as shown on left), and
1 on the front (d, Fig. 27) that secure the deck in place.
6. Slip the deck belt off the drive pulley assembly.
7. Slide the deck out from under the tractor.
8. Reverse the process to reattach the deck to the tractor.
WARNING:Tractor blades are sharp. Wrap the blade
or wear gloves, and use extra caution when servicing
them.
Fig. 26
Fig. 27
a
c
b
d
29
MT100 LAWN TRACTOR
28
MT100 LAWN TRACTOR
WARNING: Stop the engine, engage the parking brake, and
remove the key.
Fig. 29
WARNING:
Belts on your tractor are subject to wear
and should be replaced if any signs of wear are present.
WARNING:
Stop the engine, engage the parking
brake, and remove the key.
Changing the Deck Belt
1. Remove the deck. Refer to the “Removing the Cutting
Deck” section.
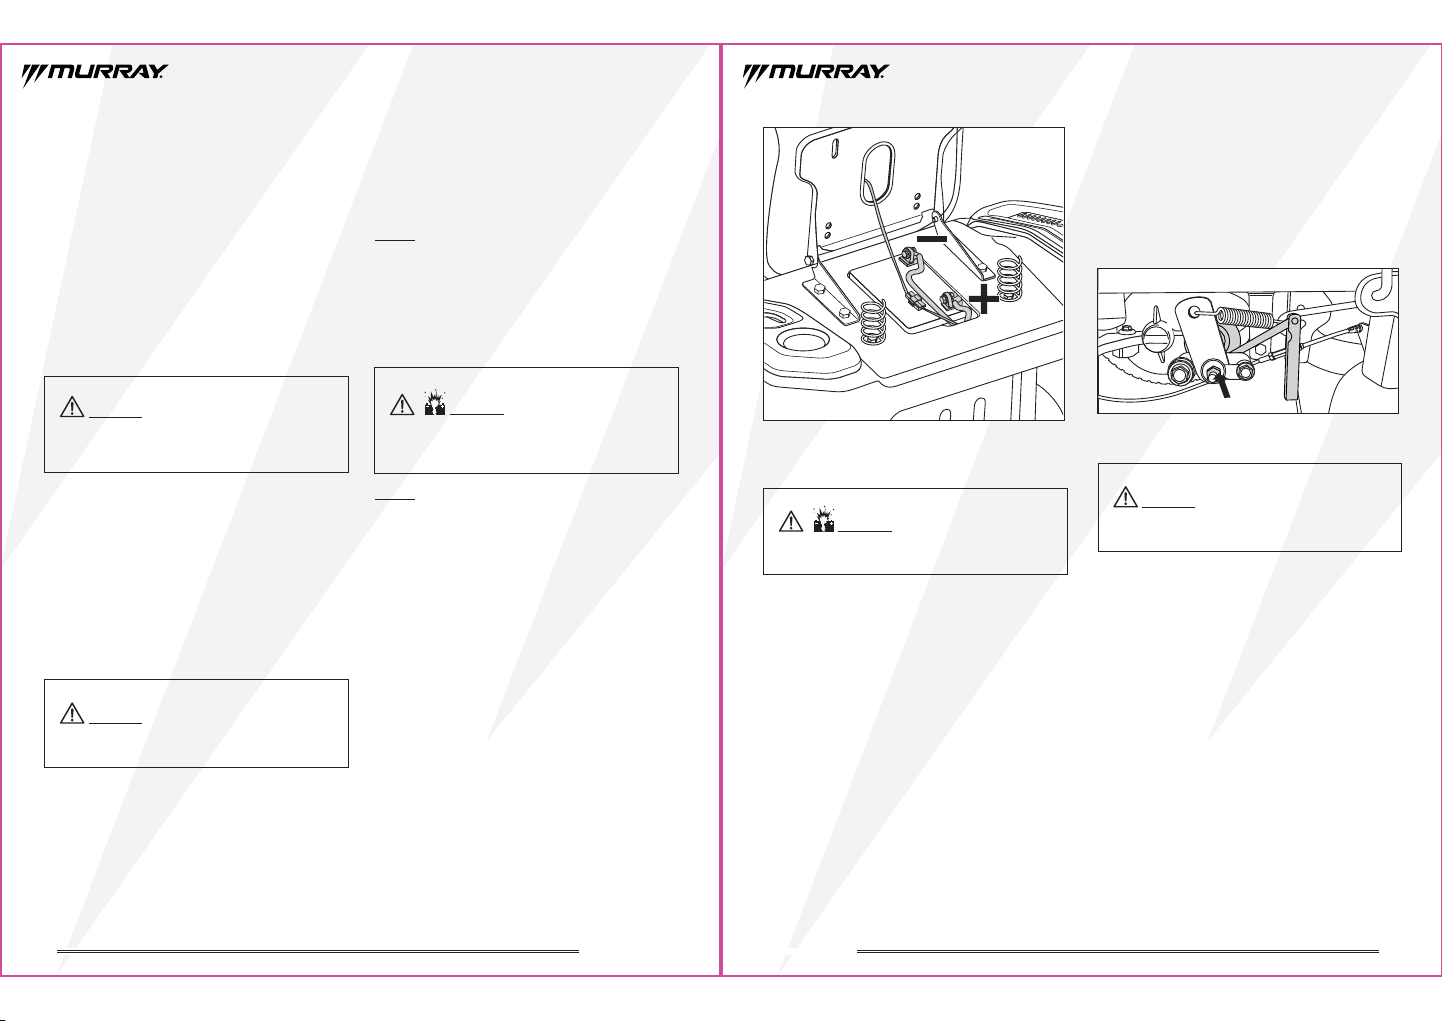
2. Remove the two belt protective covers (a, Fig. 29) by
removing the six screws that fasten them to the deck.
3. Remove the fixed pulley(b,Fig.29) and tension pulley
(c,Fig.29).
4. Carefully remove the deck belt from around the pulleys.
5. Reverse the process to reattach a new deck belt to the
deck.
Adjusting the Tension in the
Deck Belt
If you notice a deterioration in cutting performance, it may
be necessary to adjust the tension in the deck cable.
Fig.28
1. The deck cable is set at the factory with no exposed
threads showing behind the jam nut (b).(Fig.28)
2. To increase the cable tension, unthread the extension
nut (a) 1/8 in.
3. Re-tighten the jam nut up against the extension nut.
Now 1/8 in. of exposed threads should be showing
behind the jam nut.
4. If this was not adequate, repeat the process above until
there is adequate tension in the deck belt.
5. Make sure the cable is not tensioned too tight.
a
a
c
b
Fig. 30
WARNING:
If necessary, raise the tractor by placing
on a lift or using a jack and jack stands. Make sure the
tractor is properly secured and the parking brake is set
before proceeding. Failure to properly secure the tractor
could cause it to fall, resulting in death or possible serious
personal injury.
WARNING:
Stop the engine, engage the parking
brake, and remove the key.
Changing the Drive Belt
1. Remove the deck. Refer to the “Removing the Cutting
Deck” section.
2. Remove the drive pulley assembly (a, Fig. 30) by removing
the bolt that fastens it to the engine output shaft.
3. Remove the two pulleys (b and c, Fig. 30) by removing
the nuts that fastens them to the mounting bracket.
4. Slip the belt off the transmission pulley. (d, Fig. 30)
5. Reverse the process to reattach a new drive belt to the
tractor.
a
b
c
d
CAUTION:
WARNING:
If raising the mower to access the blades,
make sure the mower is properly secured and the parking
brake is set before proceeding. Failure to properly secure
the mower could cause it to fall, resulting in death or
possible serious personal injury.
If necessary, raise the mower by placing
it on a lift or using a jack and jack stands.
CAUTION:
Only use replacement blades authorized
by the manufacturer of your tractor. Use of blades not
authorized is hazardous and may damage your riding
mower.
Replacing the Cutting Blades
Fig. 31
1. Shut off the engine, remove the key, and engage the
parking brake
2. Raise the height of the cutting deck to its highest
position to allow access to blades.
WARNING:
Tractor blades are sharp. Wrap the blade
or wear gloves, and use extra caution when servicing them.
a
b
30
MT100 LAWN TRACTOR
31
MT100 LAWN TRACTOR
WARNING:Ensure blade is properly seated and the
blade nut is tightened to the torque specifications above.
Failure to properly attach the blade could cause it to
come loose and result in possible serious personal injury.
WARNING: A poorly balanced blade will cause
excessive vibration, may damage the tractor, and
result in personal injury.
WARNING:
Stop the engine, park the tractor on level
ground, disengage the parking brake, and remove the key.
Make sure the brake rotor is cool before adjusting.
3. Use a blade removal tool (not provided) to prevent the
blade from turning.
4. Loosen the blade nut by turning it counterclockwise (as
viewed from bottom of the mower) using a 24 mm
wrench or socket (not provided).
5. Remove the blade nut and blade. (Fig. 31)
6. When replacing or re-installing the blade, be sure to
install the blade with the side with a part number
stamped in it facing the ground
7. Thread the blade nut on the shaft and finger tighten.
8. Torque the blade nut down clockwise using a torque
wrench (not provided) to ensure the bolt is properly
tightened. The recommended torque for the blade nut is
70-85 ft lbs.
9. Repeat with the second blade.
Sharping the Blade
1. To properly sharpen the cutting blades, remove equal
amounts of metal from both ends of the blades along the
cutting edges. Always grind each cutting blade edge
equally to maintain proper blade balance.
2. Test the blade’s balance using a blade balancer
(not provided). Grind metal from the heavy side until it
balances evenly.
WARNING: When you remove or install
battery cables, always disconnect the NEGATIVE (black)
cable FIRST and reconnect it LAST. If not done in this order,
the positive terminal can be shorted to the frame by a tool.
Checking the Tire Pressure
For the correct traction and the best mowing performance,
make sure that the front tires are inflated to 14 psi and the
rear tires inflated to 10 psi. Also, see “Tire Pressure” in the
Specifications section.
NOTICE: There can be a difference in tire inflation pressure
from the "Maximum Inflation" shown on the side of the
tires.
Battery Maintenance
Replacing the Battery and Cleaning the
Battery and Battery Cables
NOTICE: DO NOT remove or connect the battery cable while
the engine is ON.
1. STOP the engine. Remove the key.
2. Disconnect the NEGATIVE (-) cables from the battery first.
(Fig. 32)
3. Disconnect the POSITIVE (+) cables from the battery last.
4. Clean the battery surface with baking soda and water.
5. Use a wire brush and terminal cleaner to clean the
battery terminals and cable ends.
6. Lubricate the battery terminals with petroleum jelly or
non-conducting grease.
7. Install the battery.
8. Connect the POSITIVE (+) cables to the battery first.
9. Connect the NEGATIVE (-) cables to the battery last.
Fig. 32
Charging the Battery
A dead battery or one too weak to start the engine can be
the result of a defect in the charging system or other
electrical components. If there are doubts about the cause
of the problem, see an Authorized Service center.
WARNING:
Keep open flames and sparks away
from the battery. Gasses from the battery are very
explosive.
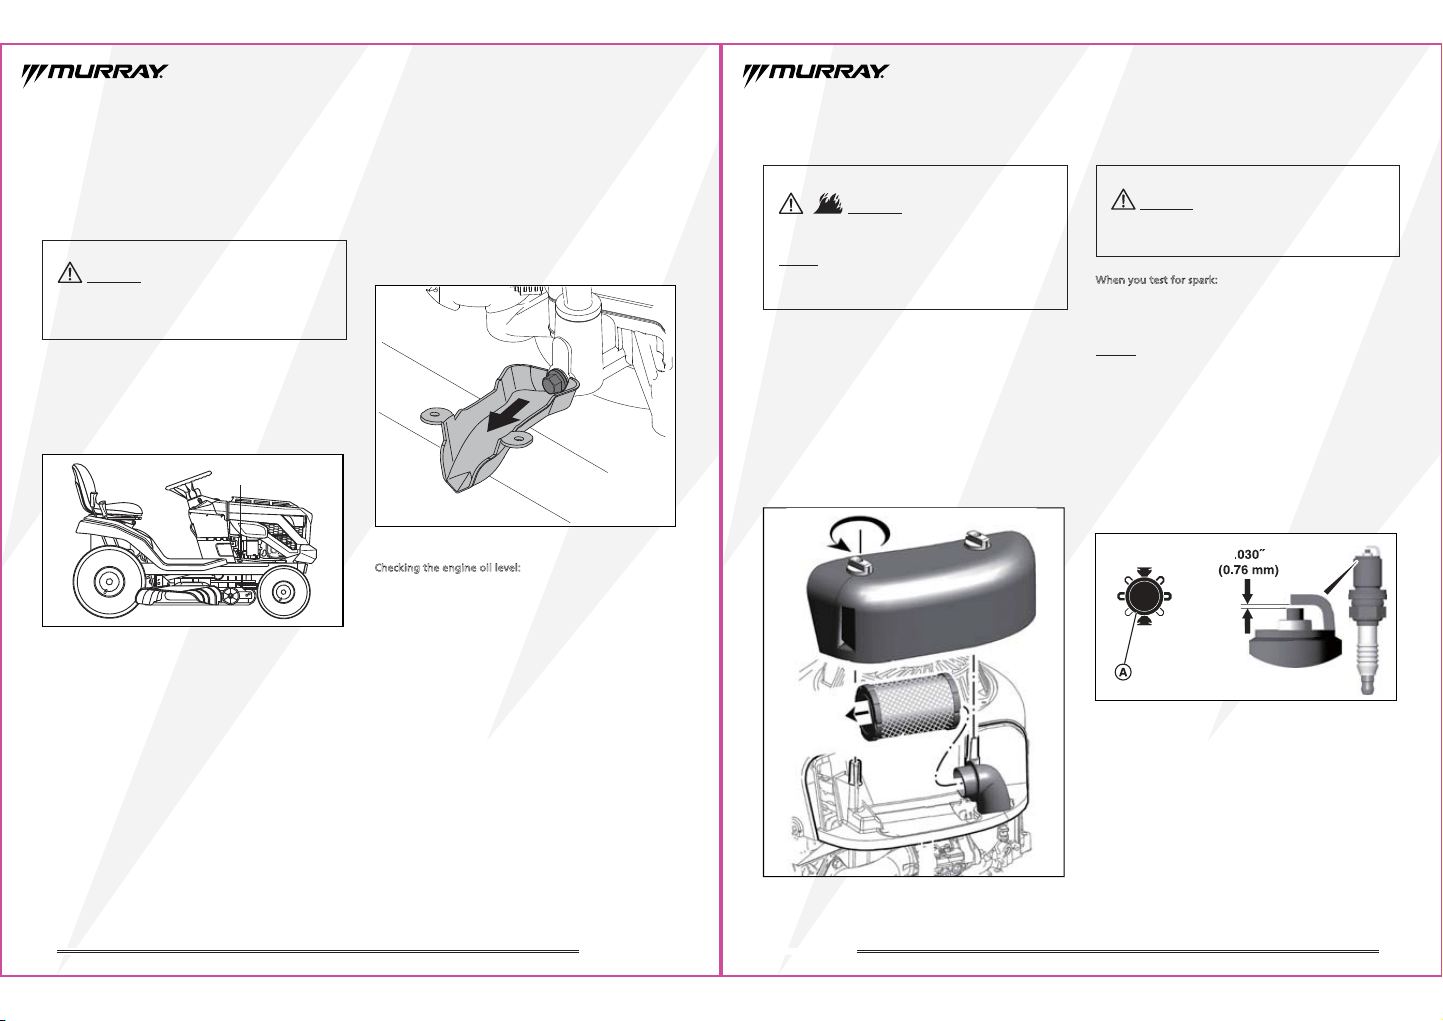
Adjusting the Transaxle Brake
The transaxle is equipped with a brake rotor and brake
pads. Over time the brake pads will wear, and it will be
necessary to adjust the brake to ensure the brake/parking
brake works properly. If you notice that the unit doesn’t
stop as quickly as it once did or the tractor does not stay in
place when the parking brake is engaged, the transaxle
brake may need adjusting.
Fig. 33
1. Remove the right rear tire to allow easy access to the
brake.
2. While rocking the brake rotor (a) back and forth slowly
tighten nut (b) until it’s not possible to move the brake
rotor.(Fig.33)
3. Loosen nut (b) 2/3 turn and leave as the final setting.
4. As an alternative to a 2/3 turn, use a 0.5mm feeler gauge
to set the brake pad 0.5mm off the brake rotor.
5. First loosen the nut (b).
6. Insert a 0.5mm feeler gauge (c), from the side, into the
gap between the brake rotor (a) and brake pad.
7. Tighten the nut until the 0.5mm feeler gauge is snug
between the brake rotor and brake pad but can still be
removed.
c
a
b
32
MT100 LAWN TRACTOR
33
MT100 LAWN TRACTOR
Fig. 35
Checking the engine oil level:
1. Remove the dipstick. Wipe off the remaining oil from
the dipstick.
2. Install and tighten the dipstick.
3. Remove the dipstick again, and check the oil level.
4. Make sure that the oil level is at the top of the FULL mark
on the dipstick.
5. If the oil level is FULL, install and tighten the dipstick.
6. If the oil level is LOW, add oil into the oil fill tube.
7. Wait one minute, and check the oil level again.
8. Install and tighten the dipstick.
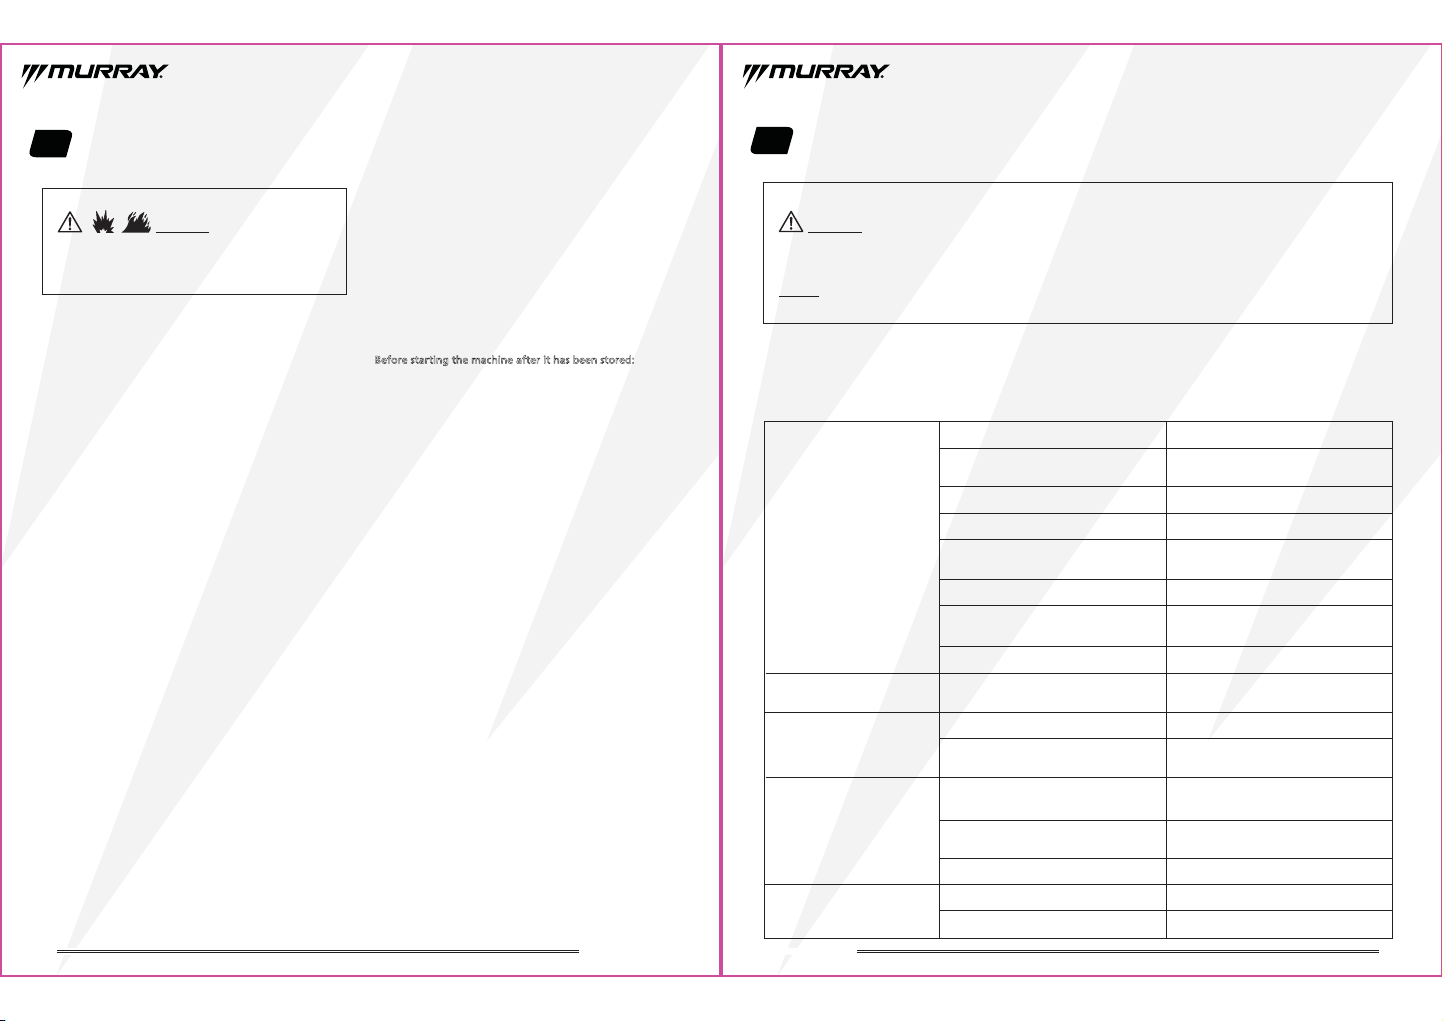
3. Place the oil drain sleeve (included with tractor) under
the drain plug. (Fig. 35)
4. Place a collection container below the oil drain sleeve.
5. Remove the drain plug.
6. After the oil has drained, re-install the oil drain plug
tightly.
7. Refill the engine with new oil.
Changing the Engine Oil
1. Put the unit on a level surface as shown in Fig. 34.
2. Stop the engine and remove the key.
Fig. 34
Oil drain plug
WARNING:If the mower blade does not STOP in 5
seconds or less, the clutch must be adjusted. DO NOT
operate the machine until the adjustment has been
corrected by an authorized service center.
Checking the Mower Blade
Stop Time
WARNING:DO NOT start or operate
the engine without an air filter as it is a fire hazard.
NOTICE: DO NOT use pressurized air or solvents to clean
the air filter. Pressurized air can damage the filter and
solvents will dissolve it.
Changing the Air Filter
1. Loosen the fasteners and remove the cover. (Fig. 36)
2. Remove the air filter
3. Clear unwanted material or debris that can get into the
carburetor throat.
4. Lightly tap the air filter on a hard surface to loosen
debris. If the air filter is dirty, replace it.
5. Install the air filter.
6. Install the cover and tighten the fasteners.
Fig. 36
Checking the Spark Plug
When you test for spark:
• Use an approved spark plug tester.
• DO NOT check for spark with the spark plug removed.
NOTICE: Spark plugs have different heat ranges. It is import-
ant that the correct spark plug is used, otherwise, engine
damage can occur. Replace the spark plug with the same
type or equivalent one.
Checking the Spark Plug Gap
Use a spark plug feeler gauge (A, Fig. 37) to check the gap
between the two electrodes. When the gap is correct, the
gauge will drag slightly as you pull it through the gap.
To adjust the spark plug gap, use a spark plug gauge and
gently bend the curved electrode. Make sure that you do
not touch the center electrode or the porcelain.
Fig. 37
Install the Spark Plug
Tighten the spark plug with your fingers, and then, tighten
it with a wrench.
• 180 in-lbs, OR
• 1/2 turn when you install the original spark plug, OR
• 1/4 turn when you install a new spark plug.
WARNING: Unintentional sparking can result in fire
or electric shock. Unintentional start-up can result in
entanglement, traumatic amputation, or laceration.

34
MT100 LAWN TRACTOR
35
MT100 LAWN TRACTOR
Pushing the Tractor By Hand
Pushing the tractor may be necessary for moving the tractor
into and out of a garage or shed. It may also be necessary
for loading into and out of a trailer.
1. Disengage the Power-Take-Off (PTO).
2. STOP the engine. See Stop the Engine.
3. Shift the transmission into neutral.
4. The rider can be pushed by hand.
Towing with the Tractor
•
Attach equipment ONLY at the hitch point.
•
The total towed weight (trailer and load) must not
exceed 400 lbs. and a must not exceed a tongue weight
(up or down) of 20 lbs.
•
When towing, do not operate on slopes greater than 5
degrees. The weight of the towed equipment on slopes
can cause loss of traction and loss of control.
•
DO NOT let children or others in or on towed equipment.
•
DO NOT shift to neutral and coast down hill
7. Transport
• Empty the fuel tank with a suction pump before
tranporting the machine. Start the engine and let it run
until it has used up all remaining gasoline.
• Close the fuel cap firmly.
• Let the engine to cool down before transporting.
• Use full width ramps for loading and unloading a machine
for transport.
• Use extra care when loading or unloading the machine
into a trailer or truck. This machine should not be driven
up or down ramp(s), because the machine could tip over,
causing serious personal injury. The machine must be
pushed manually on ramp(s) to load or unload properly.
36
MT100 LAWN TRACTOR
37
MT100 LAWN TRACTOR
WARNING: Before performing any type of maintenance, disengage all controls and stop the engine. Wait until all
moving parts have come to a complete stop. Disconnect spark plug wire and ground it against the engine to prevent
unintended starting. Always wear safety glasses during operation or while performing any adjustments or repairs.
NOTICE:
If you can't solve the problem, take the tractor to an authorized service center for assistance.
9. Troubleshooting
The engine will not start.
The engine starts hard or runs
poorly.
The engine knocks.
Excessive oil consumption.
The engine exhaust is black. The air filter is dirty.
The choke is closed. Open the choke.
Refer to the Changing the Air Filter section.
The fuel mixture is too rich.
Low oil level.
The engine is too hot.
Incorrect grade of oil.
Too much oil in crankcase. Drain excess oil.
Refer to the Changing Engine Oil
section.
Check the engine fins, blower screen,
and air filter.
Incorrect grade of oil. Refer to the Changing Engine Oil
section.
Check and add oil as required.
Clean the air filter.
The brake pedal is not pushed down.
The fuel tank is empty.
The PTO lever is in ON position.
The engine is flooded.
The battery terminals are dirty.
The battery is discharged or dead.
The shifter lever is in reverse gear.
Move the shifter lever to the neutral position.
Loose or broken wiring.
Charge or replace the battery.
Visually check wiring. If wires are frayed or
broken, see an authorized service center.
R
efer to Replacing the Battery and Cleaning
the Battery and Battery Cables section.
Disengage the choke.
Fully push down on the brake pedal.
Move the PTO lever to the OFF position.
If engine is hot, let it cool, and then fill the
fuel tank again.
PROBLEM LOOK FOR REMEDY
Troubleshooting the Tractor
8. Storage
• Store away from furnaces, stoves, water heaters, or
other appliances that have pilot lights or other ignition
sources because they can ignite fuel vapors.
Tractor
Disengage the Power Take-Off (PTO), set the parking brake,
remove the key, and let the machine cool.
If you remove the battery, the battery life will increase.
Make sure that the battery is in a cool, and dry location, and
keep it fully charged. If the battery is left in the unit,
disconnect the negative cable.
Fuel System
Fuel can become stale when kept in a storage container for
more than 30 days. Each time you fill the container with
fuel,add STA-BIL 360°
®
PROTECTION™ to the fuel as
specified by the manufacturer’s instructions. This keeps fuel
fresh and decreases fuel-related problems or contamination
in the fuel system.
It is not necessary to drain fuel from the engine when
STA-BIL 360°
®
PROTECTION™ is added as instructed. Before
storage, turn the engine ON for 2 minutes to move the fuel
and stabilizer through the fuel system.
Before starting the machine after it has been stored:
• Check all fluid levels. Check all maintenance items.
• Do all recommended checks and procedures found in this
manual.
• Fully charge the battery.
• Drive the tractor without a load to make certain all the
tractor systems are functioning properly.
WARNING: Never store the unit with
fuel in an enclosed, non-ventilated structure. Fuel vapors
can travel to an ignition source (such as a furnace,
water heater, etc.) and cause an explosion.
38
MT100 LAWN TRACTOR
39
MT100 LAWN TRACTOR
The mower cut is uneven.
The engine starts, and the rider
drives, but the mower will not
cut.
The engine is not at the operating
temperature.
The Power-Take Off (PTO) is disengaged. Engage the PTO.
START the engine, and let it warm for
several minutes.
The tires are not correctly inflated.
The engine speed is too slow.The mower cut looks rough.
The engine stalls easily with the
mower engaged.
The ground speed is too fast.
The engine speed is too slow.
The ground speed is too fast.
Dirty or clogged air filter.
Height-of-Cut is set too low.
Refer to the Changing the Air Filter section.
Cut tall grass at maximum Height-of-Cut
during first pass.
Slow down.
Set to FAST throttle.
Refer to the Checking the Tire Pressure
section.
Slow down.
Set to FAST throttle.
NOTICE: For all other problems, contact an authorized service center.
The engine runs, but the rider
will not drive.
The rider steers hard or handles
poorly.
The transmission is in neutral.
The parking brake is engaged.
Incorrect tire inflation. Refer to the Checking the Tire Pressure
section.
Disengage the parking brake.
Depress the brake and move the shifter
lever into a forward gear.
10. Specifications
Engine
Model Briggs & Stratton E1350
Displacement 30.5 in
3
(500 cc)
Horsepower 13.5 hp
Cylinders Single
Recommended Fuel 87 Octane Unleaded Gasoline
Oil Filter Type None
Spark Plug Gap 0.030 in.
Spark Plug Torque
Spark Plug Manufacturer
Air Filter Manufacturer
Spark Plug Part Number
Air Filter Part Number
180 lb-in
Briggs & Stratton
491055
Briggs & Stratton
796031
Transmission
Front Travel Speed 0-5.5 mph
Reverse Travel Speed 0-2.0 mph
Mower Deck
Cutting Width 42 in.
Cutting Height 1 in. - 4 in. (approximately), 13 positions
NO. of Blades / Lift 2 / standard lift
Blade Part Number 2105200368A
TRACTOR MODEL MT100
Specifications Chart
41
MT100 LAWN TRACTOR
40
MT100 LAWN TRACTOR
Fuse
Electrical System
Charging System Capacity 9 Amp
20 Amp
Battery Cold Cranking Amps ≥200 CCA
Battery Voltage 12V
Battery Type BCI Group U1
Dimensions & Weight
Length 65 in.
Width 52 in.
Width (with side discharge chute up) 44 in.
Height 41 in.
Weight 392 lbs.
Capacity
Engine Oil Capacity 1.5 qt (1.4l)
Fuel Tank Capacity 1.4 US gal
Power Ratings Disclaimer
Power Ratings: The gross power rating for individual gasoline engine models is labeled in accordance with SAE (Society of
Automotive Engineers) code J1940 Small Engine Power & Torque Rating Procedure, and is rated in accordance with SAE J1995.
Torque values are derived at 2600 RPM for those engines with “rpm” called out on the label and 3060 RPM for all others;
horsepower values are derived at 3600 RPM. The gross power curves can be viewed at www.BRIGGSandSTRATTON.COM. Net
power values are taken with exhaust and air cleaner installed whereas gross power values are collected without these
attachments. Actual gross engine power will be higher than net engine power and is affected by, among other things, ambient
operating conditions and engine-to-engine variability. Given the wide array of products on which engines are placed, the gasoline
engine may not develop the rated gross power when used in a given piece of power equipment. This difference is due to a variety
of factors including, but not limited to, the variety of engine components (air cleaner, exhaust, charging, cooling, carburetor,
fuel pump, etc.), application limitations, ambient operating conditions (temperature, humidity, altitude), and engine-to-engine
variability. Due to manufacturing and capacity limitations, Briggs & Stratton may substitute an engine of higher rated power for
this engine.
Chassis
Front Tire Size 15 in. x 6.00 in. - 6 in.
Rear Tire Size 20 in. x 8.00 in. - 8 in.
Front Tire Pressure 14 psi
Rear Tire Pressure 10 psi
Turning Radius 18 in.
11. Disposal
• Gasoline and oil are hazardous waste. Dispose of these materials properly.
• Do not pour gas or oil into the ground or into household garbage. Contact your local recycling authority.
• Some recycling centers will accept gas and oil and will recondition it or recycle it safely. Your city’s government official should be
able to direct you to the right recycling place. Then, call the recycling location in advance to see if they have any instructions
that you’ll need to follow.
• If disposing of entire tractor, contact your local metal scrap yard.
42
MT100 LAWN TRACTOR
12. Warranty
A. REGISTRATION: Please register your Murray MT100 lawn tractor within 60 days of the date of purchase.
Go to dayenorthamerica.com/warranty to register.
B. GENERAL PROVISIONS:
The warranties described below are provided by Daye, North America, Inc. (“Manufacturer”) to
the original purchaser of a new Murray MT100 lawn tractor (“Equipment”) from The Home Depot. Under this limited warranty,
the Manufacturer will repair or replace, at its option, any covered part which is found to be defective in material or workman
ship during the applicable warranty term. Warranty service must be performed by a service center authorized by the
Manufacturer to service the type of Equipment involved, which will use only new or remanufactured parts or components
furnished by the Manufacturer. Warranty service will be performed without charge to the purchaser for parts or labor. The
purchaser will be responsible, however, for any transportation of the Equipment to and from the service center’s place of
business, for any premium charged for overtime labor requested by the purchaser of the Equipment, and for any service and/or
maintenance not directly related to any defect covered under the warranties below. If the Equipment is sold to someone else
during the warranty term, the limited warranty is transferable to the new owner. After registering, print or save a copy of the
warranty number and other relevant information for your records. The warranty number and other relevant information must
be transferred to the new owner.
C. WHAT IS WARRANTED:
All parts of the Equipment except tires and batteries are warranted for the number of years specified
below. Warranty statements required by law covering engine emission-related parts and components, which shall not be less
than the engine warranty, are found in the Briggs & Stratton Operator’s Manual delivered with the Equipment.
D. WHAT IS NOT WARRANTED – THE MANUFACTURER IS NOT RESPONSIBLE FOR THE FOLLOWING:
(1) Any Equipment that has
been altered or modified in ways not approved by the Manufacturer; (2) Depreciation or damage caused by normal wear, lack
of reasonable and proper maintenance, failure to follow operating instructions, misuse, neglect, negligence, lack of proper
protection during storage, or accident; (3) Normal maintenance parts and service; (4) If used for racing or any other competitive
activity.
E. SECURING WARRANTY SERVICE:
To secure warranty service, the purchaser must (1) Report the product defect to the Murray
customer care line at 855-693-2582 and request repair within the applicable warranty term, (2) Present evidence of the warranty
start date, and (3) Make the Equipment available to an authorized service center within a reasonable period of time.
F. LIMITATION OF IMPLIED WARRANTIES AND OTHER REMEDIES:
The manufacturer shall not be liable for any incidental or
consequential damages of any kind resulting from the purchase, use or misuse of, or inability to use the Equipment including
incidental, special, consequential or similar damages or loss of profits, or for any claim brought against the purchaser by any
other party. There are no express warranties other than those set forth herein. Any warranty implied by state law shall be
effective for any product only for the duration of the warranty term. Note: some states or jurisdictions do not allow the
exclusion or limitation of incidental or consequential damages or limitations on how long an implied warranty lasts, so the
above limitations or exclusion may not apply to you. This warranty gives you specific legal rights, and you may also have other
rights that vary from state to state or jurisdiction to jurisdiction.
G. HOME DEPOT WARRANTY:
Unless The Home Depot mower protection plan is purchased separately, The Home Depot makes no
warranty of its own and The Home Depot has no authority to make any representation or promise on behalf of the
Manufacturer, or to modify the terms or limitations of this warranty in any way.
https://www.homedepot.com/c/Home_Depot_Protection_Plan_Coverage_Details.
H. WARRANTY PERIOD:
*Attachments/Accessories whether purchased on the same order as the Equipment or purchased separately will be covered by the
respective Attachments/Accessories particular warranty term.
Model Name Model Number
MYT4213500MT100
Warranty Term
2 years from the date of purchase
TRACTOR
CORTACÉSPED
MT100
Modelo #MYT4213500
Manual del Usuario
Número de Atención al Cliente: 855-693-2582 | www.murray.com
2
TRACTOR CORTACÉSPED MT100 TRACTOR CORTACÉSPED MT100
SECCIÓN 1
Información General ............................... 3
SECCIÓN 2
Seguridad del Operador.........................4
.............................4
..............4
.................................................5
.............................6
Guarde Estas Instrucciones
Guía de Identificación de Pendientes
Símbolo de Alerta de Seguridad y Palabras de
Advertencia
Calcomanías de Seguridad
Instrucciones de Seguridad.............................7
SECCIÓN 3
Instrucciones de Armado........................9
Instrucciones de Funcionamiento
.................19
SECCIÓN 6
Mantenimiento.......................................25
Programa de Mantenimiento.......................25
Limpiar el Tractor.......................................26
Ensamblaje del Volante
Ensamblaje de la Rueda Antideslizante de
Cubierta Izquierda
Ensamblaje del Asiento
Conectar la Batería
Revisar/Ajustar la Presión de las Ruedas
Funciones y Controles
Operando el Tractor
Área de Funcionamiento
Pruebas del Sistema de Bloqueo de Seguridad
Motor
Ensamblaje del Aro del Conducto de Aire
SECCIÓN 4
SECCIÓN 5
Ensamblaje del Cobertor del Tablero
.............10
......10
...............................11
......................................11
...............................12
.....................................12
........13
..........................14
.............................16
.............................16
..17
.......................................................17
TABLA DE CONTENIDOS
3
Nivelar la Cubierta de Corte
........................27
Ajuste de la Tensión en la Correa de Cubierta
...29
Limpiar la Cubierta del Cortacésped
..............26
Quitar la Cubierta de Corte
..........................28
Cambiar la Correa de la Cubierta
..................29
Cambiar la Correa de Transmisión
.................30
Reemplazar las Cuchillas de Corte
.................30
Afilar las Cuchillas
......................................31
Revisar la Presión de las Ruedas
Mantenimiento de la Batería
Revisar el Tiempo de Parada de las Cuchillas
del Tractor Cortacésped
Cambiar el Aceite del Motor
....................31
.......................31
Ajuste del Freno de Transmisión
...................32
..............................33
........................33
Cambiar el Filtro de Aire
.............................34
Revisar las Bujías
........................................34
Empujar el Tractor con las Manos
.................35
Remolcar con el Tractor
...............................35
Transporte
Almacenamiento
Solución de Problemas
Solución de Problemas del Tractor
SECCIÓN 7
SECCIÓN 8
SECCIÓN 9
...............................................36
....................................37
..........................38
................38
SECCIÓN 11
Desecho ..................................................42
SECCIÓN 12
Garantía..................................................43
SECCIÓN 10
Especificaciones....................................40
Tabla de Especificaciones............................40
..41
Descargo de Responsabilidad de la Potencia
1. Información General
La IZQUIERDA y DERECHA son referenciadas desde la posición
del operador.
ID
El uso de Importante y Aviso en el texto muestra aclaraciones,
excepciones o alternativas a los procedimientos.
Todas las traducciones de este documento derivan del
archivo original en inglés
.
Recicle todo el embalaje, aceite usado y baterías de acuerdo
con las regulaciones gubernamentales aplicables.
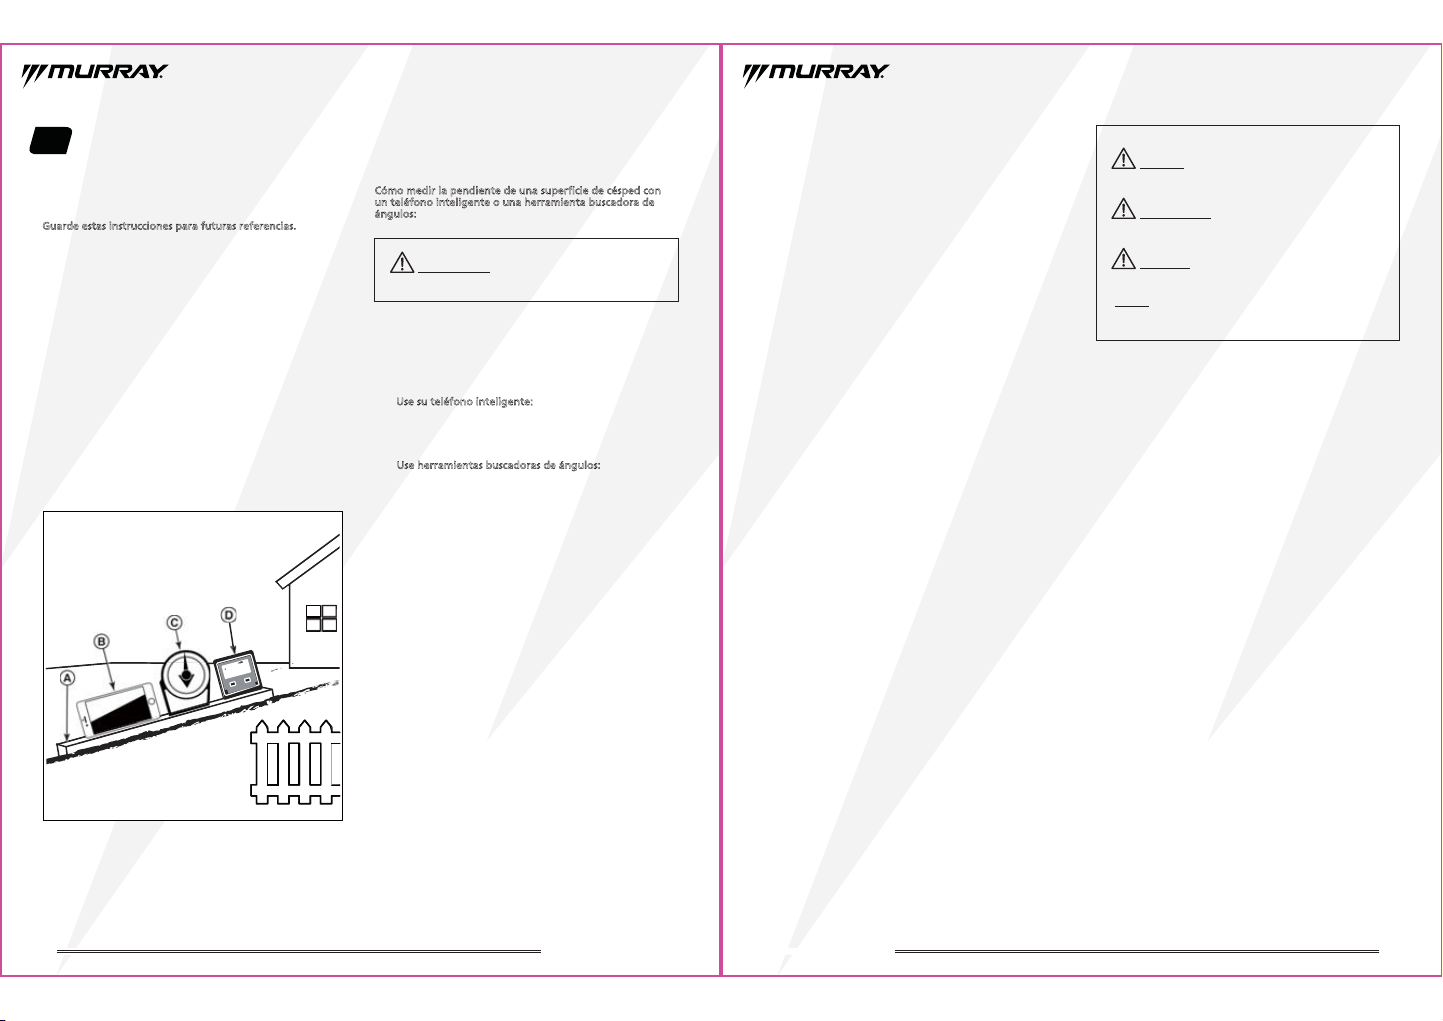
2. Seguridad del Operador
Guarde Estas Instrucciones
Guarde estas instrucciones para futuras referencias. Este
manual contiene información de seguridad para hacerle
conocer los peligros y riesgos asociados con el producto y
cómo evitarlos. También contiene instrucciones importantes
que deben obedecerse durante la instalación, operación y
mantenimiento inicial del producto.
Este producto está diseñado y destinado a cortar el césped
bien cuidado y no está destinado a otros fines.
Es importante que usted lea y entienda estas instrucciones
antes de intentar encender u operar este equipo.
Asegúrese de estar totalmente familiarizado con los
controles y el uso correcto del producto.
Debe saber cómo detener la unidad y desactivar los
controles rápidamente.
Guía de Identificación de
Pendientes
Fig. 1
ADVERTENCIA:
No lo opere en pendientes
superiores a 10 grados.
Cómo medir la pendiente de una superficie de césped con
un teléfono inteligente o una herramienta buscadora de
ángulos:
1. Use un borde recto de al menos sesenta (60) centímetros
de largo (A, Fig. 1). Un 2x4 o una pieza recta de metal
funcionan muy bien.
2. Herramientas buscadoras de ángulos.
a. Use su teléfono inteligente:
Muchos teléfonos inteligentes
(B, Fig. 1) tiene un inclinómetro (buscador de ángulos) s
ituado bajo la aplicación (app) de brújula. Si no, puedes
buscar una app inclinómetro en la tienda de aplicaciones.
b. Use herramientas buscadoras de ángulos:
Las
herramientas buscadoras de ángulos (C y D, Fig. 1) se
encuentran disponibles en las ferreterías locales u online
(también se conocen como inclinómetro, transportador,
medidor de ángulo o indicador de ángulo). Sirven tanto
tipo dial (C) como tipo digital (D), otros tal vez no sirvan.
Lea y obedezca las instrucciones proporcionadas con la
herramienta buscadora de ángulos.
3. Coloque el borde recto de sesenta (60) centímetros a lo
largo de la parte más empinada de la pendiente del
césped. Coloque la tabla arriba y abajo de la pendiente.
4. Coloque el teléfono inteligente o herramienta buscadora
de ángulos en el borde recto y lea el ángulo en grados.
Esta es la pendiente de su césped.
Símbolo de Alerta de
Seguridad y Palabras de
Advertencia
El símbolo de alerta de seguridad en este manual identifica
la información de seguridad sobre los peligros que pueden
resultar en lesiones personales. Las palabras de advertencia
(PELIGRO, ADVERTENCIA o CUIDADO) se usan con el símbolo
de alerta para indicar la probabilidad de la gravedad
potencial de la lesión. Además, los símbolos de peligro
pueden ser usados para representar el tipo de peligro
PELIGRO:
indica un peligro que, si no se evita, va a
resultar en la muerte o lesiones graves.
ADVERTENCIA: indica un peligro que, si no se evita,
podría resultar en la muerte o lesiones graves.
CUIDADO: indica un peligro que, si no se evita,
podría resultar en lesiones menores o moderadas.
AVISO: indica información que se considera importante
pero no relacionada con peligros.
TRACTOR CORTACÉSPED MT100 TRACTOR CORTACÉSPED MT100
4 5
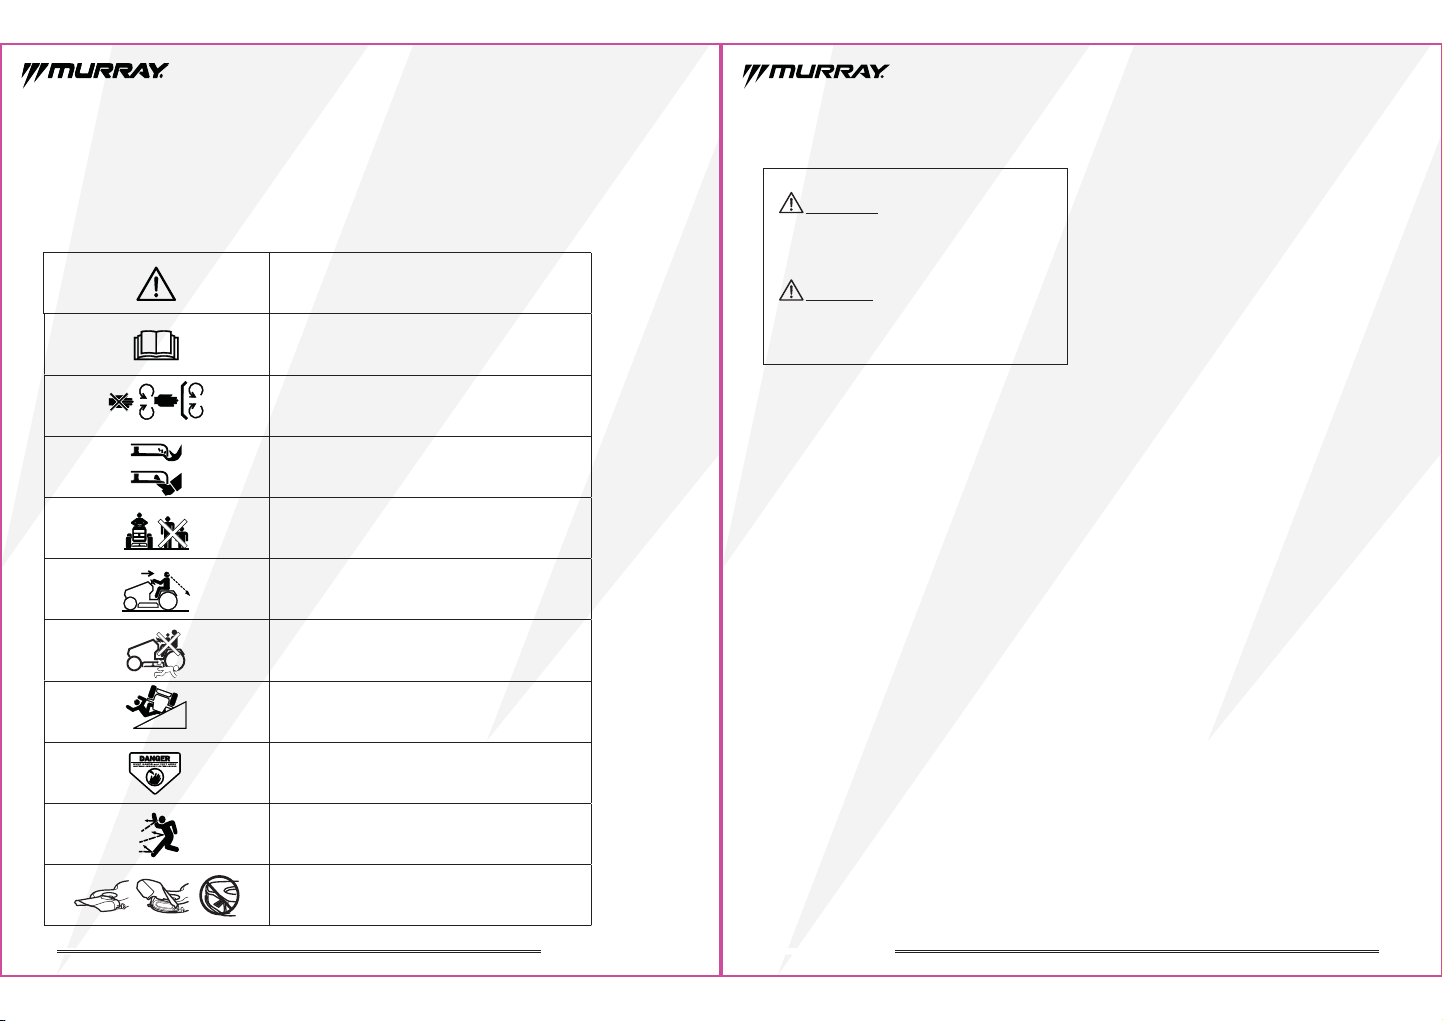
6 7
ADVERTENCIA: Lea y siga todas las normas de
seguridad e instrucciones en este manual antes de
intentar operar esta máquina. El incumplimiento de estas
instrucciones podría resultar en lesiones personales.
IMPORTANTE: Esta máquina es capaz de amputar
manos y piernas y de arrojar objetos. El incumplimiento
de las siguientes instrucciones de seguridad podría
resultar en lesiones graves o la muerte.
Instrucciones de Seguridad
Información General
• Lea, entienda y siga las instrucciones y advertencias en
este manual y en la máquina, motor e implementos.
• Sólo permita que la usen personas responsables,
entrenadas, familiarizadas con las instrucciones y
físicamente capaces de operar la máquina.
• No lleve pasajeros y mantenga alejadas a otras personas.
• No opere la máquina bajo los efectos del alcohol o las
drogas.
Preparación Antes de Operarla
• Despeje el área de operación de cualquier objeto que
podría ser arrojado o que podría interferir con la
operación de la máquina.
• Mantenga el área de operación libre de todas las
personas, especialmente niños pequeños. Detenga la
máquina y los implementos si alguien entra en el área.
• No opere la máquina sin que todo el colector de césped,
el conducto de descarga u otros dispositivos de seguridad
estén en su lugar y estén funcionando correctamente.
Compruebe con frecuencia si hay señales de desgaste o
deterioro y reemplácelos según sea necesario.
• Use el equipo de protección personal apropiado como
gafas de seguridad, protección para los oídos y calzado.
Operación
• Sólo opere el motor en áreas bien ventiladas. Los gases de
escape contienen monóxido de carbono, un veneno mortal.
• Sólo opere la máquina a la luz del día o con buena luz
artificial.
• Evite los agujeros, baches, bultos, rocas u otros peligros
escondidos. Los terrenos irregulares podrían derribar la
máquina o causar que el usuario pierda su equilibrio.
• No coloque sus manos o pies cerca de las piezas giratorias
o debajo de la máquina. Manténgase alejado de la
abertura de descarga en todo momento.
• No dirija el material de descarga hacia nadie. Evite
descargar el material contra una pared u obstrucción. El
material podría rebotar hacia el usuario. Detenga las
cuchillas al cruzar superficies de gravilla.
• No deje una máquina en marcha desatendida. Siempre
estacione en un terreno plano, desactive las cuchillas,
coloque el freno de mano y pare el motor.
• No corte el césped en marcha atrás a menos que sea
absolutamente necesario. Siempre mire hacia abajo y
hacia atrás antes de dar marcha atrás.
Específico Sobre los Niños
• Pueden ocurrir accidentes trágicos si el usuario no está
alerta a la presencia de los niños. Los niños usualmente se
sienten atraídos por la máquina y la actividad de cortar el
césped. Nunca asuma que los niños permanecerán donde
los vio por última vez.
• Mantenga a los niños alejados del área de operación y
bajo el cuidado vigilante de un adulto responsable que no
sea el usuario.
• No lleve a niños en la máquina, incluso cuando las
cuchillas estén apagadas. Los niños podrían caerse y
resultar gravemente heridos o interferir con la operación
segura de la máquina. A los niños a los que han llevado
de paseo en el pasado podrían aparecer de repente en el
área de cortar el césped para que los lleven de nuevo y
podrían atropellados o pasados por encima por la máquina.
Calcomanías de Seguridad
Los siguientes símbolos de seguridad aparecen en este producto. Antes de que opere el cortacésped, por favor, estúdielos y apren-
da sus significados.
IMPORTANTE: Si las calcomanías de seguridad se desgastan o dañan y no pueden ser leídas, ordene calcomanías de reemplazo de su
centro de servicio autorizado.
Símbolo de alerta de seguridad
Lea el manual del usuario
Mantenga dispositivos de seguridad
Evite amputaciones
Mantenga alejadas a otras personas
Mire detrás de usted antes de ir en reversa
Nunca lleve a niños
Evite las pendientes pronunciadas
Mantenga las manos y los pies alejados
Evite los objetos arrojados
No opere el cortacésped sin que el conducto de descarga
esté en su lugar
Símbolo Explicación
TRACTOR CORTACÉSPED MT100 TRACTOR CORTACÉSPED MT100
9
3. Instrucciones de Armado
AVISO: Este tractor cortacésped se envía sin gas
en el motor.
ADVERTENCIA:
Si cualquier parte de daña o se pierde,
no opere este producto hasta que las partes sean
reemplazadas. Usar este producto con partes dañadas o
faltantes podría resultar en una lesión personal grave.
ADVERTENCIA: No intente modificar este producto
ni crear accesorios que no sean recomendados para usarse
con este producto. Cualquier alteración o modificación
constituye un mal uso y podría resultar en condiciones
peligrosas que pueden llevar a una posible lesión personal
grave.
ADVERTENCIA: Para prevenir arranques accidentales
que podrían causar lesiones personales graves, siempre
desconecte el arranque de bujía del motor cuando
ensamble partes.
ADVERTENCIA: Nunca opere el tractor sin que los
dispositivos de seguridad adecuados, los protectores y el
conducto estén en su lugar y funcionando. Nunca opere
el tractor con dispositivos de seguridad dañados. Operar
el tractor con partes faltantes o dañadas puede resultar
en una lesión personal grave.
Algunas partes de su nuevo tractor cortacésped no se han
instalado completamente para propósitos de envío. Para
asegurar un funcionamiento seguro y adecuado, todas las
partes y hardware deben ensamblarse como se indica abajo
usando las herramientas adecuadas para asegurar un ajuste
adecuado.
Retire con cuidado el producto y cualquier accesorio del
paquete. Asegúrese de que estén incluidos todos los artícu-
los mencionados en la Lista de Contenidos.
Revise el producto con cuidado para asegurarse de que no
haya ocurrido ningún daño durante el envío.
Si cualquier parte está dañada o falta, por favor, llame al
855-693-2582 para obtener ayuda.
1
1
1
1
1
1
Tractor
Conjunto del Asiento
Conjunto del Volante
Cobertor del Tablero
Manga del Drenaje de Aceite
Conjunto de Ruedas
Antideslizantes de Cubierta
Aro del Conducto de Aire
Manual del usuario del tractor
Manual del usuario del motor
Llave Inglesa
1
1
1
2
Llave
Perno de Montaje del Volante
2
1
Lista de Contenidos Cant.
ADVERTENCIA: Las pendientes son un factor
importante relacionado con los accidentes. Operar la
máquina en pendientes requiere precauciones adicionales.
ADVERTENCIA:
No lo opere en pendientes superiores
a 10 grados.
AVISO:
Este tractor no está diseñado para desplazarse
a altas velocidades en pendientes. Si el usuario intenta subir
una pendiente en cualquier marcha superior a la tercera,
el tractor tendrá dificultades, si no incapacidad, para subir
la pendiente.
Específico de la Pendiente
• Viaje en la dirección recomendada por el fabricante en las
pendientes. Tenga cuidado al operar la máquina cerca de
bajadas.
• Evite cortar el césped mojado.
• No opere la máquina bajo cualquier condición en que la
tracción, manejo o estabilidad estén en dudas. Las llantas
podrían deslizarse incluso si las ruedas están detenidas.
• Siempre mantenga la máquina en marcha cuando baje
pendientes. No viaje cuesta abajo.
• Evite iniciar el vehículo y detenerlo en pendientes. Evite
hacer cambios repentinos en la velocidad o dirección.
Haga giros lenta y gradualmente.
• Tenga cuidado especial al operar la máquina con un
colector de césped u otros implementos. Ellos pueden
afectar la estabilidad de la máquina.
Específicos de Incendios y el Combustible
• Apague todos los cigarrillos, cigarros, pipas y otras fuentes
de ignición.
• Use sólo un contendor de combustible aprobado.
• No retire el tapón de combustible o agregue combustible
con el motor encendido o mientras esté caliente.
•
No cargue combustible en el interior o en espacios cerrados.
• No guarde la máquina o el contenedor de combustible, ni
cargue combustible, done haya una llama abierta, chispa
o luz piloto como en un calentador de agua u otro
electrodoméstico.
• Si se derrama combustible, no intente encender el motor y
evite crear cualquier fuente de ignición hasta que los
vapores de combustible se hayan disipado.
• Para ayudar a prevenir incendios: mantenga la máquina
libre de césped, hojas u otros desechos acumulados;
limpie los derrames de petróleo o combustible y elimine
cualquier desecho empapado en combustible; permita
que la máquina se enfríe antes de guardarla.
• Tenga un cuidado especial al manipular la gasolina y otros
combustibles. Son inflamables y sus vapores son explosivos.
Arrastre
• Use rampas de ancho completo para cargar y descargar
una máquina para su transporte
Remolque
• Siga las recomendaciones del fabricante para saber los
límites de peso por los equipos remolcados y el remolque
en pendientes.
Servicio
• Mantenga la máquina en buenas condiciones de
funcionamiento. Reemplace las partes desgastadas o
dañadas.
• Tenga cuidado al realizar el mantenimiento de las
cuchillas. Envuelva las cuchillas o use guantes. Reemplace
las cuchillas dañadas. No repare o altere las cuchillas.
• Desconecte los cables de las bujías y el cable negativo de
la batería antes de realizar alguna reparación.
• SÓLO opere el equipo al aire libre.
• Evite que los gases de escape entren a un espacio cerrado
a través de ventanas, puertas, conductos de ventilación u
otras aberturas.
ADVERTENCIA: El motor en marcha emite
monóxido de carbono, un gas inodoro, incoloro y tóxico.
Respirar monóxido de carbono puede causar dolores de
cabeza, fatiga, mareo, vómitos, confusión, convulsiones,
nausea, desmayo o muerte.
TRACTOR CORTACÉSPED MT100 TRACTOR CORTACÉSPED MT100
8
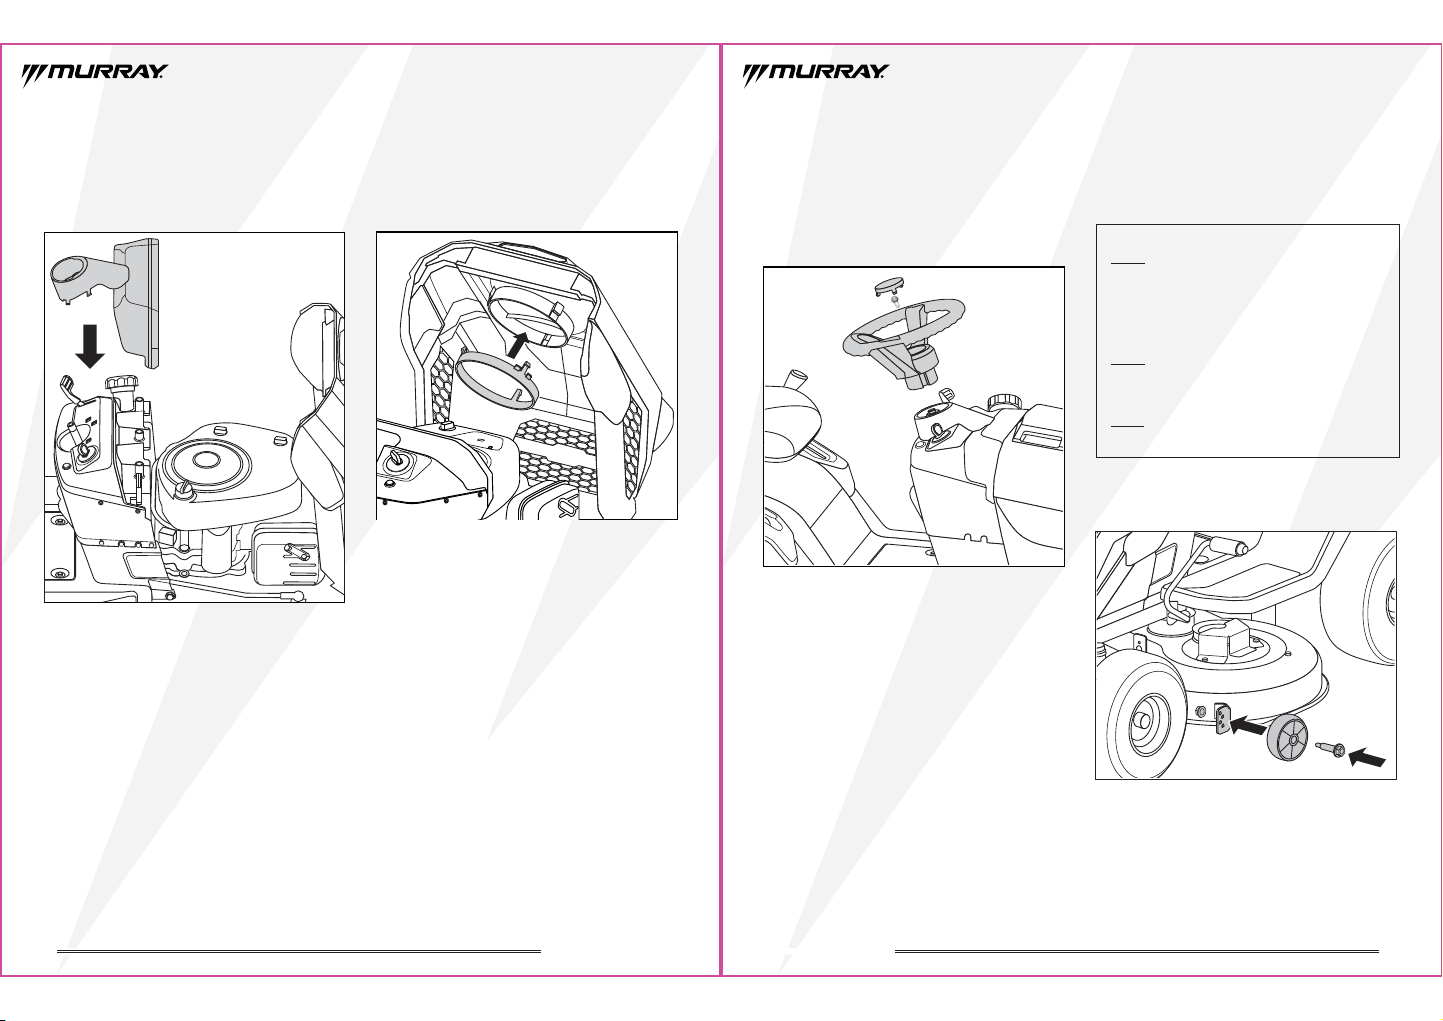
10 11
AVISO: La parte de abajo de las ruedas antideslizantes de
AVISO: Las ruedas izquierda y derecha deben estar
colocadas en la misma posición.
AVISO: La rueda derecha ya ha sido ensamblada en la
fábrica.
cubierta debe colocarse a aproximadamente 1/8 in. - 1/2 in.
del suelo cuando el tractor esté a la altura de corte deseada.
Esto va a disminuir la probabilidad de arrancar el césped en
la mayoría de los casos.
Ensamblaje del Volante
1. Alinee el volante con el eje de dirección, deslice el
volante por el eje hasta que esté en su posición y asegure
el volante con el tornillo proporcionado con un par de
torsión de 15 a 19 lb-pie. (Fig. 4)
2. Coloque la tapa del volante sobre el centro del volante y
empuje hacia abajo hasta que encaje en su sitio.
Fig. 4
Ensamblaje de la Rueda
Antideslizante de Cubierta
Izquierda
1.
Asegure la rueda antideslizante izquierda con el tornillo
y la tuerca proporcionados con un par de torsión de 22 a
26 lb-pie. (Fig. 5)
Fig. 5
Ensamblaje de la Cobertura
del Tablero
1. Abra la cubierta del motor e instale el cobertor del
tablero en su lugar. (Fig. 2)
Fig. 2
Ensamblaje del Aro del
Conducto de Aire
1. Abra la cubierta del motor e instale el aro del conducto
de aire adentro de la cubierta del motor. (Fig. 3)
Fig. 3
TRACTOR CORTACÉSPED MT100 TRACTOR CORTACÉSPED MT100
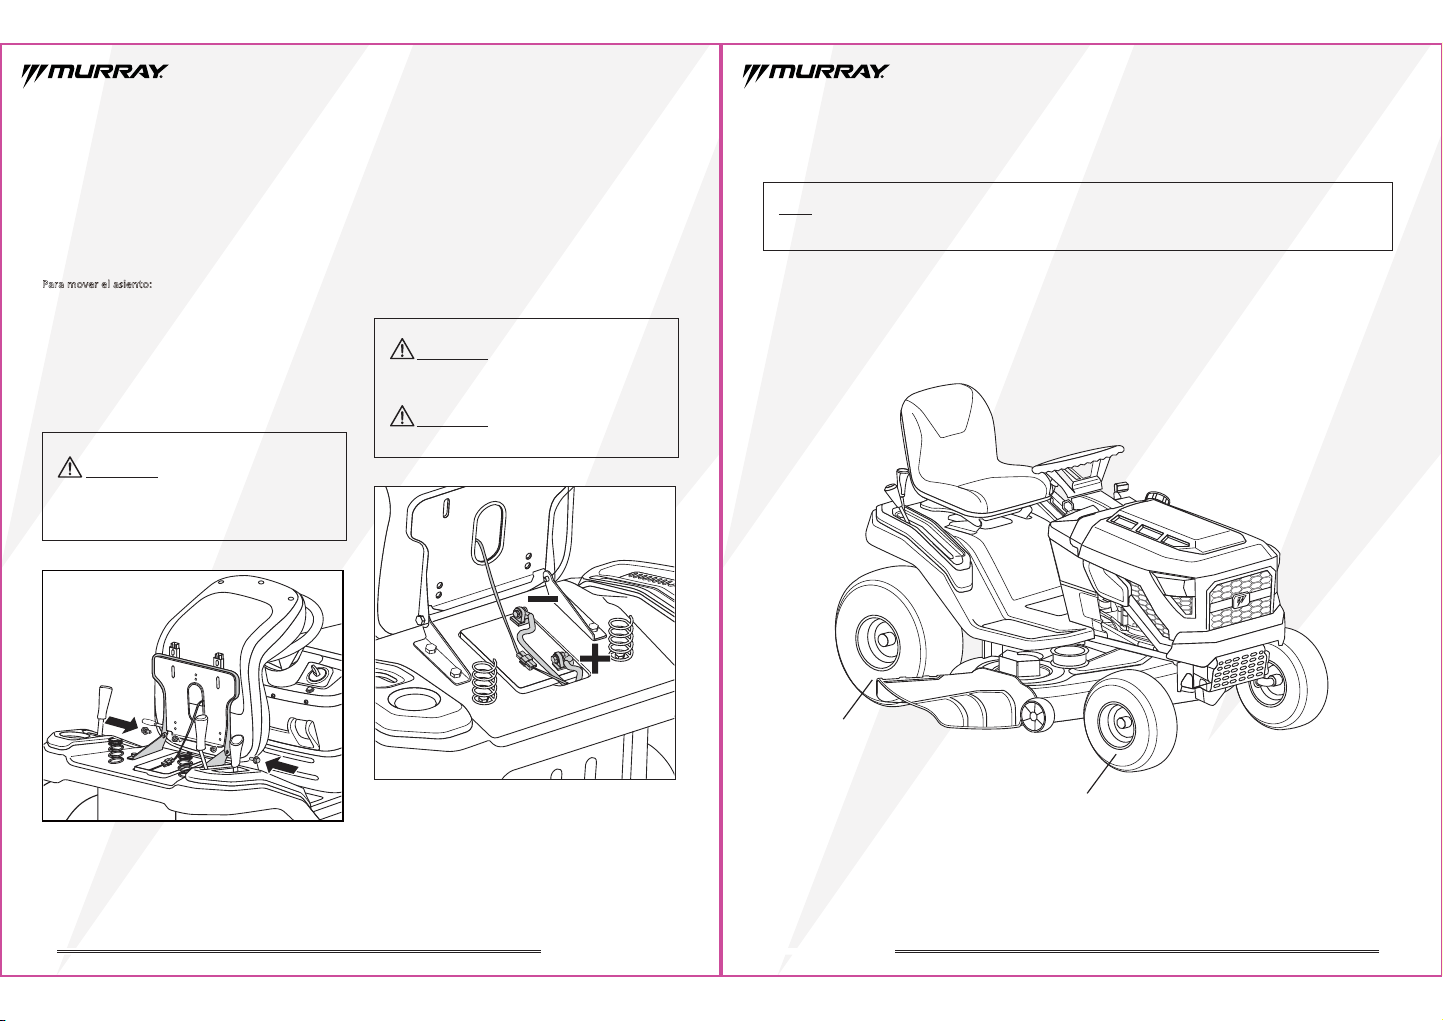
12 13
Revisar/Ajustar la Presión de las Ruedas
Presión Recomendada de las Ruedas:
• Ajuste las ruedas frontales a 14 psi.
• Ajuste las ruedas traseras a 10 psi.
Fig. 8
AVISO: Para asegurar que el césped se corte parejo, las ruedas frontales izquierda y derecha deben ajustarse a la misma
presión. Lo mismo es cierto para las ruedas traseras izquierda y derecha.
14 psi
10 psi
ADVERTENCIA: Asegúrese de que el asiento esté
fijado en su lugar antes de operar el tractor. Los asientos
que no están fijados pueden causar que el operador se
mueva y pierda el control del tractor cortacésped y dé
lugar a una posible muerte o lesión personal grave.
Ensamblaje del Asiento
1. Conecte el asiento a la base del cortacésped con los
tornillos y tuercas proporcionados. (Fig. 6)
2. Ajuste la posición del asiento para asegurar que usted
pueda presionar completamente el pedal del freno antes
de operar el tractor.
3. Conecte el interruptor del asiento.
Para mover el asiento:
1. Tire de la palanca de ajuste del asiento a la izquierda del
asiento.
2. Mientras sostiene la palanca, deslice el asiento hacia
adelante o hacia atrás a la posición deseada.
3. Suelte la palanca y asegúrese de que el asiento esté
fijado en su posición.
Fig. 6
Conectar la Batería
La batería se encuentra debajo del asiento del operador.
Para conectar los cables de la batería, proceda de la
siguiente manera:
1. Conecte el cable positivo (rojo) al terminal positivo de la
batería usando el tornillo y la tuerca con un par de
torsión de 2 a 4 lb-pie..
2. Conecte el cable negativo (negro) al terminal negativo de
la batería usando el tornillo y la tuerca con un par de
torsión de 2 a 4 lb-pie . (Fig. 7)
Fig. 7
TRACTOR CORTACÉSPED MT100 TRACTOR CORTACÉSPED MT100
ADVERTENCIA: Al conectar los cables de la batería,
siempre conecte el cable positivo a su terminal PRIMERO
y luego conecte el cable negativo.
ADVERTENCIA:
Una conexión incorrecta va a causarle
daños graves a la batería.
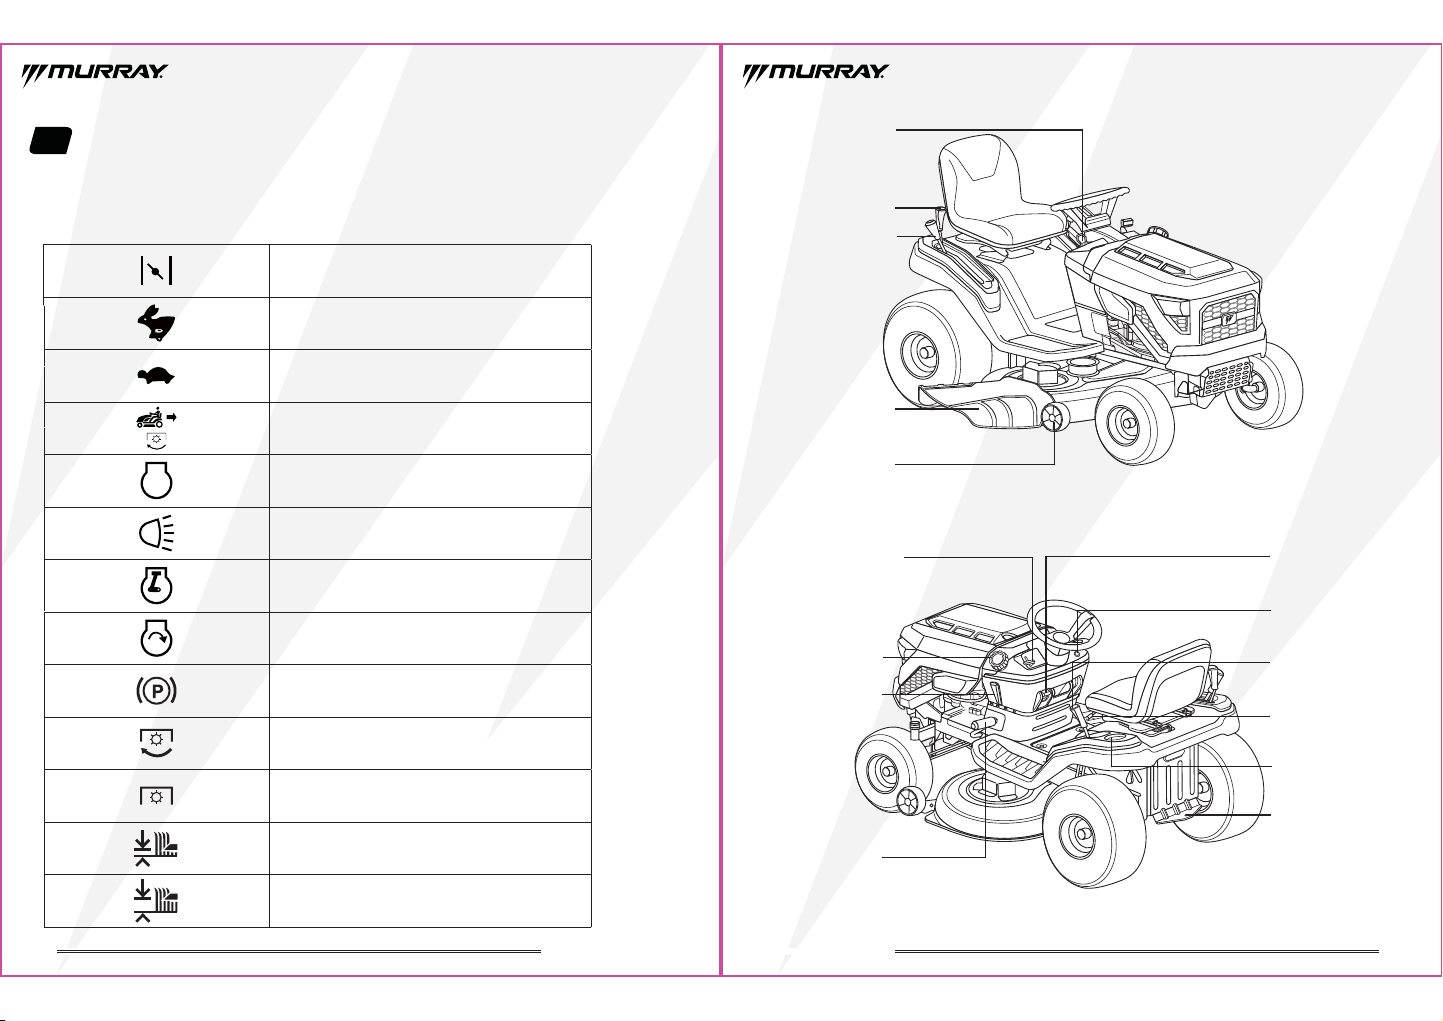
15
Palanca de PTO (palanca de
activación de cuchillas)
Palanca de altura de corte
Encendido
Conducto de descarga de lado
Rueda antideslizante
Palanca del estrangulador
del acelerador
Tapa del tanque
de combustible
Ventana de llenado
del tanque
Freno
Embrague
Pedal del freno de mano
Enganche
Posavasos
Palanca de cambios
Palanca del freno de mano
Botón de cortar el césped
en reversa
Palanca de ajuste del asiento
Fig. 9
Fig. 10
14
4. Funciones y Controles
Los siguientes símbolos de control aparecen en este producto. Antes de que opere el cortacésped, por favor, estúdielos y aprenda
sus significados.
Estrangulador
Posición RÁPIDA del Acelerador
Posición LENTA del Acelerador
Botón de anulación para permitir cortar el césped en reversa
Posición de ignición APAGADO
Posición de ignición de las LUCES
Posición de ignición AVANZAR
Posición de ignición INICIAR
Freno de mano
Toma de Fuerza ENCENDIDO (cuchillas activadas)
Toma de Fuerza APAGADO (cuchillas desactivadas)
Altura de césped CORTA
Altura de césped LARGA
Símbolo Explicación
STOP
TRACTOR CORTACÉSPED MT100 TRACTOR CORTACÉSPED MT100
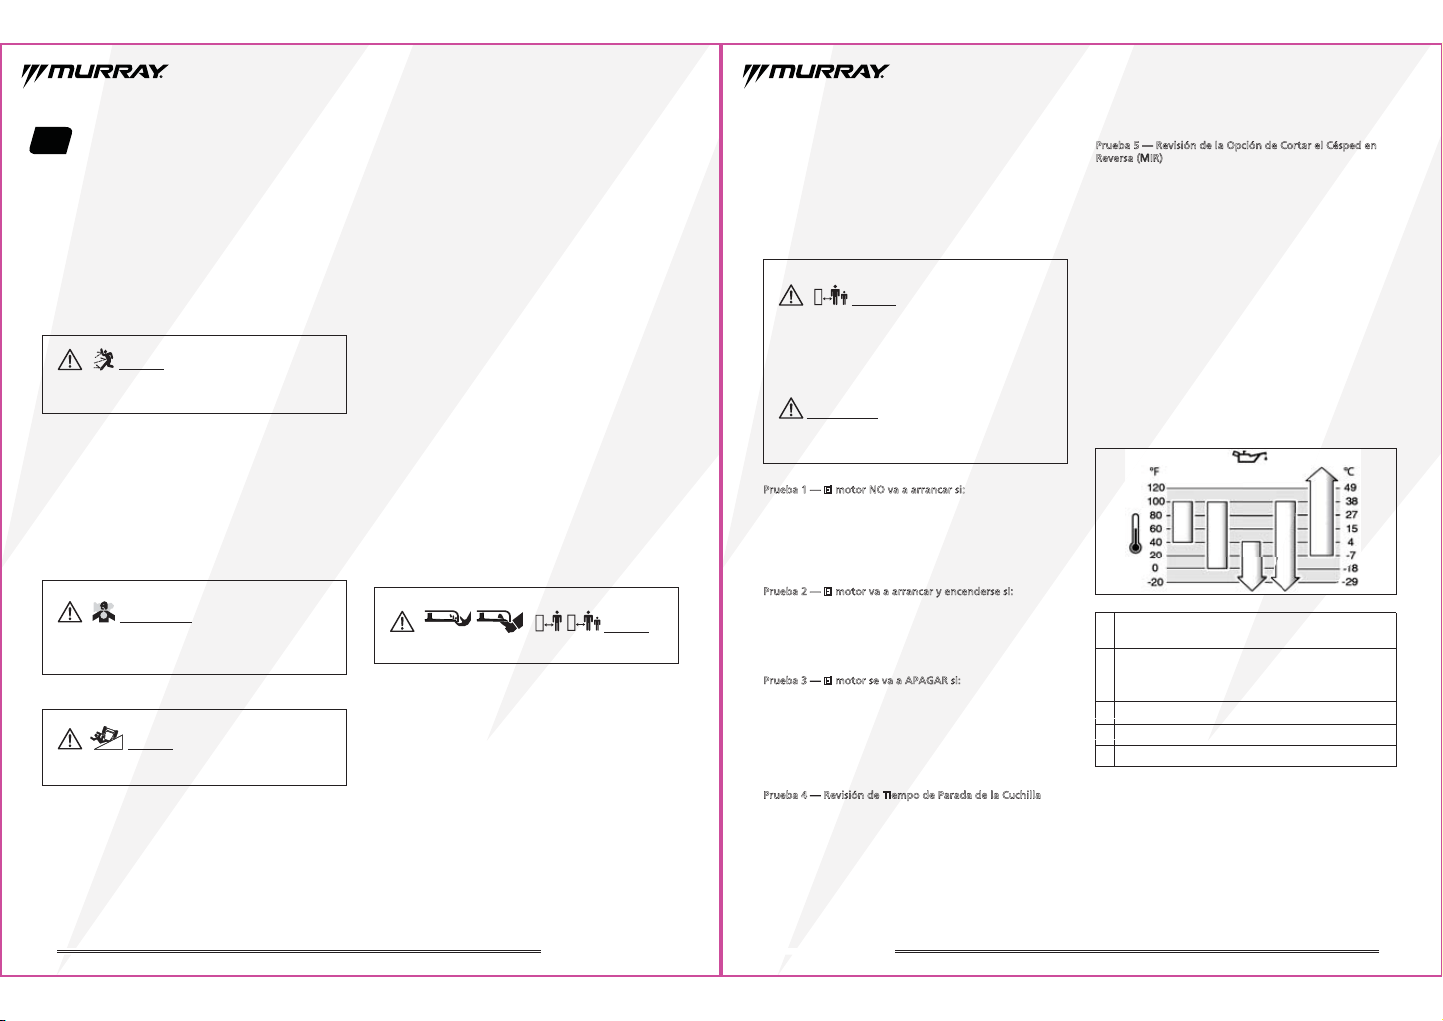
16 17
SAE 30 - Por debajo de 40 °F (4 °C), el uso de SAE 30
tendrá como resultado un arranque difícil.
10W-30 - Por encima de 80 °F (27 °C), el uso de
10W-30 puede causar un aumento en el consumo de
aceite. Revise el nivel de aceite con más frecuencia.
A
A
B
B
C
C
D
D
E
E
5W-30
5W-30 Sintético
15W-50 Sintético Vanguard
®
PELIGRO:
Cortar el césped en reversa puede
ser peligroso para las personas presentes. Pueden ocurrir
accidentes trágicos si el usuario no está alerta a la presencia
de los niños. NO active la opción de Cortar el Césped en
Reversa (MIR, por sus siglas en inglés) si hay niños presentes.
Los niños usualmente se sienten atraídos por la máquina y
la actividad de cortar el césped.
ADVERTENCIA: Si la máquina no pasa las cinco
pruebas de abajo, no la opere. Vea a un centro de servicio
autorizado.
Probar el Sistema de
Bloqueo de Seguridad
Esta máquina está equipada con un Sistema de Bloqueo de
Seguridad. No intente eludir o alterar los interruptores y
dispositivos.
Prueba 1 — El motor NO va a arrancar si:
•
La palanca de Toma de Fuerza (PTO, por sus siglas en inglés)
está ACTIVADA, O.
• El pedal de freno NO está totalmente presionado
(freno de mano APAGADO)
Prueba 2 — El motor va a arrancar y encenderse si:
• La palanca de Toma de Fuerza está DESACTIVADA Y
• El pedal de freno está totalmente presionado
(freno de mano ENCENDIDO).
Prueba 3 — El motor se va a APAGAR si:
• El operador se levanta del asiento con la palanca de la
Toma de Fuerza está ACTIVADA O
• El operador se levanta del asiento con el pedal de freno
NO presionado completamente
(freno de mano APAGADO).
Prueba 4 — Revisión de Tiempo de Parada de la Cuchilla
Las cuchillas y la correa de transmisión del tractor
cortacésped van a detenerse por completo cinco segundos
después de que la palanca de la Toma de Fuerza esté
DESACTIVADA. Si la correa de transmisión del tractor
cortacésped no se detiene en cinco segundos, vea a un
centro de servicio autorizado.
Prueba 5 — Revisión de la Opción de Cortar el Césped en
Reversa (MIR)
• El motor se va a APAGAR cuando se intente un despla
zamiento hacia atrás con la palanca de Toma de Fuerza
ACTIVADA y el botón de MIR NO presionado al ir en
reversa. Vea la Opción de Cortar el Césped en Reversa
(MIR, por sus siglas en inglés).
Motor
Revisar y Agregar Aceite de Motor
Use los aceites Briggs & Stratton
®
con Garantía Certificada
para obtener un mejor rendimiento. Otros aceites detergen-
tes de alta calidad son aceptables si son de clasificación de
servicio SF, SG, SH, SJ o mayor. No use aditivos especiales.
Las temperaturas exteriores determinan la viscosidad del
aceite adecuada para el motor. Use la tabla para seleccionar
la mejor viscosidad para el rango esperado de temperatura
exterior.
5. Operando el Tractor
Lea la sección de Seguridad del Operador antes de operar
esta máquina. Asegúrese de conocer los controles y cómo
detener la unidad.
Área de Funcionamiento
•
Conozca el área donde planea operar el tractor cortacésped.
• Asegúrese de que el área esté libre de materiales no
deseados que podrían ser recogidos por las cuchillas y
arrojados.
• No opere la máquina sin que todo el colector de césped,
el conducto de descarga u otros dispositivos de seguridad
estén en su lugar y estén funcionando correctamente.
Compruebe con frecuencia si hay señales de desgaste o
deterioro y reemplácelos según sea necesario.
• Despeje el área de operación de cualquier objeto que
podría ser arrojado o que podría interferir con la
operación de la máquina.
• Mueva la máquina hacia afuera antes de encender el
motor.
• Tenga en cuenta todas las pendientes y desniveles
• Corte el césped hacia arriba y hacia abajo en las
pendientes, no de lado a lado.
• Reduzca la velocidad y tenga cuidado en las pendientes.
• No lo opere en pendientes superiores a 10 grados.
PELIGRO:
Operar en pendientes o cerca del
agua o desniveles puede hacerle perder el control y volcarse.
• Mantenga un mínimo de dos tractores cortacésped de
ancho de separación alrededor del agua, muros de
contención o caídas.
• Evite cortar el césped mojado.
• No opere la máquina bajo cualquier condición en que la
tracción, manejo o estabilidad estén en dudas. Las
llantas podrían deslizarse incluso si las ruedas están
detenidas.
• Evite iniciar el vehículo y detenerlo en pendientes.
• Evite hacer cambios repentinos en la velocidad o
dirección.
• Haga giros lenta y gradualmente.
• Tenga cuidado al operar la máquina con un colector de
césped u otros implementos. Ellos pueden afectar la
estabilidad de la máquina.
• Siga las recomendaciones del fabricante para saber los
límites de peso por los equipos remolcados y el
remolque en pendientes.
• Vea la sección de Remolcar con el Tractor
• Asegúrese de que el área de funcionamiento esté libre de
personas observando, especialmente niños.
• Detenga el tractor cuando haya niños u otras personas
cerca.
• Mantenga a los niños alejados del área de operación y
bajo el cuidado vigilante de un adulto responsable.
• No lleve pasajeros, especialmente a niños, incluso
cuando las cuchillas estén apagadas. Los niños pueden
caerse y resultar gravemente heridos o interferir con la
operación segura de la máquina. A los niños a los que
han llevado de paseo en el pasado pueden aparecer de
repente en el área de cortar el césped para que los
lleven de nuevo y podrían atropellados o pasados por
encima por la máquina.
• Tenga cuidado al acercarse a esquinas ciegas, arbustos,
árboles u otros objetos que bloqueen la vista.
PELIGRO: Este
tractor cortacésped es capaz de amputar manos y pies.
PELIGRO:
Esta máquina es capaz de arrojar
objetos que podrían lastimar a otras personas presentes o
podría causar daños a construcciones.
ADVERTENCIA:
Los motores emiten monóxido
de carbono, un gas inodoro, incoloro y tóxico. Respirar
monóxido de carbono puede causar nausea, desmayo o
muerte.
TRACTOR CORTACÉSPED MT100 TRACTOR CORTACÉSPED MT100
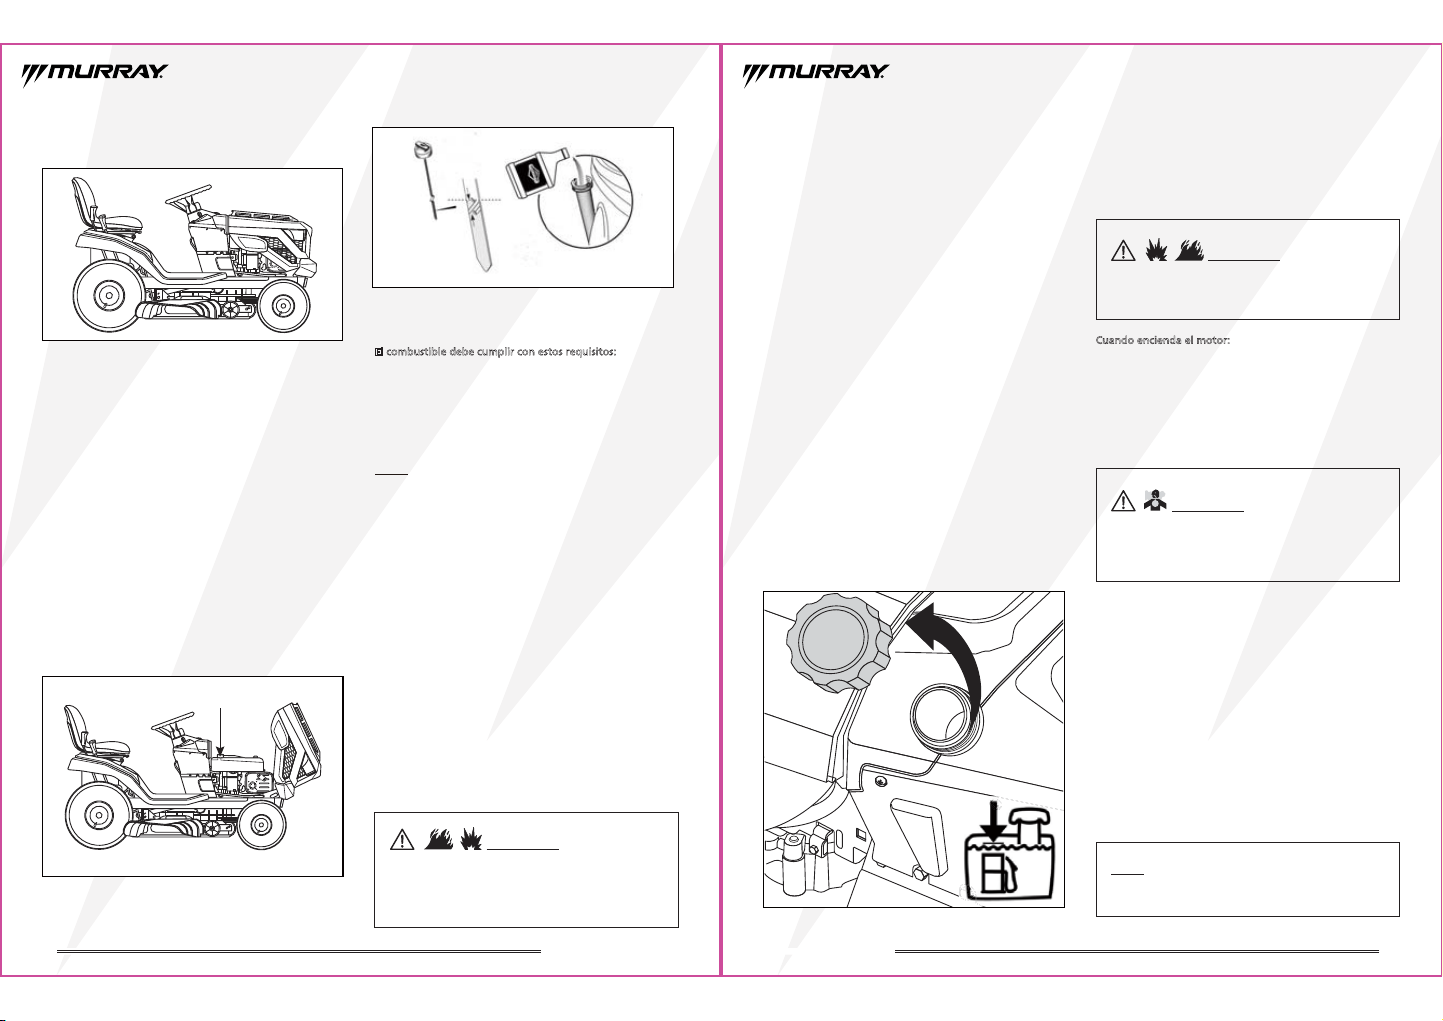
18 19
ADVERTENCIA: El combustible y sus
vapores son extremadamente inflamables y explosivos.
Los incendios o explosiones pueden causar quemaduras
graves o la muerte.
AVISO: En el caso de una emergencia, gire el interruptor
de encendido a la posición APAGADO. Esto va a DETENER
el motor. Vea la sección de Detener el Motor.
ADVERTENCIA:
Los motores emiten monóxido
de carbono, un gas inodoro, incoloro y tóxico. Respirar
monóxido de carbono puede causar nausea, desmayos o
la muerte. Los incendios o explosiones pueden causar
quemaduras graves o la muerte.
Al Añadir Combustible
• Apague el motor y deje que se enfríe por al menos 3
minutos antes de quitar el tapón de combustible.
• Apague todos los cigarrillos, cigarros, pipas y otras
fuentes de ignición.
• Llene el tanque de combustible al aire libre o en un área
bien ventilada.
• No rebose el tanque de combustible. Para permitir la
expansión del combustible, no llene por encima de la
parte inferior del cuello del tanque de combustible.
• Mantenga el combustible alejado de las chispas, llamas
abiertas, luces piloto, calor y otras fuentes de ignición.
• Compruebe si las líneas, el tanque, el tapón y los
accesorios de combustible tienen grietas o filtraciones.
Reemplace lo que sea necesario.
• Si se derrama combustible, espere hasta que se evapore
antes de encender el motor y evite crear alguna fuente
de ignición.
• Use sólo un contendor de combustible aprobado.
1. Elimine los residuos del área del tapón de combustible.
2. Quite el tapón de combustible. (Fig. 14)
3. Llene el tanque con combustible. Monitoree el nivel de
combustible mirando por la ventana transparente en la
parte izquierda del tractor. NO lo llene por encima de la
parte inferior del cuello del tanque de combustible.
4. Coloque el tapón de combustible.
Fig. 14
Instrucciones de
Funcionamiento
Encender el Motor
Cuando encienda el motor:
• Asegúrese de que la bujía, el silenciador, el tapón de
combustible y el filtro de aire estén colocados
correctamente.
• No encienda el motor si no tiene la bujía.
• Si el motor se inunda, mueva el acelerador a la posición
RÁPIDA e intente encenderlo hasta que arranque.
• Arranque y opere el motor al aire libre.
• No arranque ni opere el motor en un área cerrada,
incluso si las puertas o ventanas están abiertas.
1. Revise el nivel del aceite. Vea la sección de Revisar y
Agregar Aceite de Motor.
2. Inserte la llave en el interruptor de encendido.
3. Si las cuchillas están activadas, desactive las cuchillas.
4. Presione por completo el pedal del freno.
5. Mueva el acelerador a la posición RÁPIDA.
6.
Gire la llave a la posición de INICIAR y manténgala hasta
que el motor arranque. Después de que arranque el
motor, saque la llave. Va a volver a la posición de avanzar.
1. Coloque la unidad en una superficie nivelcomo se
muestra en la Fig.11.
Fig. 11
2. Apague el motor y saque la llave. Asegúrese de que el
área de llenado de aceite esté limpia.
3. Remueva la varilla del aceite (Fig. 12 y Fig. 13). Limpie el
resto del aceite de la varilla del aceite.
4. Coloque y apriete la varilla del aceite.
5. Remueva la varilla de nuevo y revise el nivel de aceite.
6. Asegúrese de que el nivel de aceite esté en la parte
superior de la marca de FULL en la varilla del aceite.
7. Si el nivel de aceite está FULL, coloque y apriete la varilla
del aceite.
8. Si el nivel de aceite está BAJO (LOW), agregue aceite al
tubo de llenado de aceite. (Fig. 13)
9. Espere un minuto y revise el nivel de aceite de nuevo.
10. Coloque y apriete la varilla del aceite.
Fig. 12
Fig. 13
Recomendación de Combustible
El combustible debe cumplir con estos requisitos:
• Gasolina limpia, fresca y sin plomo.
• Un mínimo de 87 octanos. Para uso a gran altitud, vea la
sección de abajo.
• La gasolina con un máximo de 10% etanol (gasóleo) es
aceptable.
AVISO: No use gasolina no aprobada, tales como E15 y E85.
No mezcle aceite en la gasolina ni modifique el motor para
que funcione con combustibles alternativos. El uso de
combustibles no aprobados va a dañar los componentes del
motor, que no estará cubierto por la garantía.
Para proteger el sistema de combustible de la formación de
goma, mezcle un estabilizador de combustible en el combus-
tible. Vea la sección de Almacenamiento. No todos los
combustibles son iguales. Si ocurren problemas de inicio o
rendimiento, cambie los proveedores o marcas de combusti-
ble. Este motor está certificado para funcionar con gasolina.
Gran Altitud
En altitudes superiores a 5.000 pies (1524 metros), es
aceptable la gasolina de un mínimo de 85 octanos.
Para los motores con carburador, se requiere un ajuste de
gran altitud para mantener el rendimiento. Operar sin este
ajuste va a causar una disminución del rendimiento, un
aumento del consumo del combustible y un aumento de las
emisiones. Contacte a un Centro de Servicio Autorizado de
Briggs & Stratton para obtener información sobre el ajuste
de gran altitud. No se recomienda el funcionamiento del
motor en altitudes por debajo de los 2.500 pies (762) metros
con el ajuste de gran altitud.
Añadir Combustible
ADVERTENCIA: El combustible y sus
vapores son extremadamente inflamables y explosivos.
Siempre maneje el combustible con sumo cuidado. El
incumplimiento de estas instrucciones de seguridad
puede causar un incendio o explosión que podría resultar
en quemaduras graves o la muerte.
Varilla de medición de
aceite del motor
TRACTOR CORTACÉSPED MT100 TRACTOR CORTACÉSPED MT100
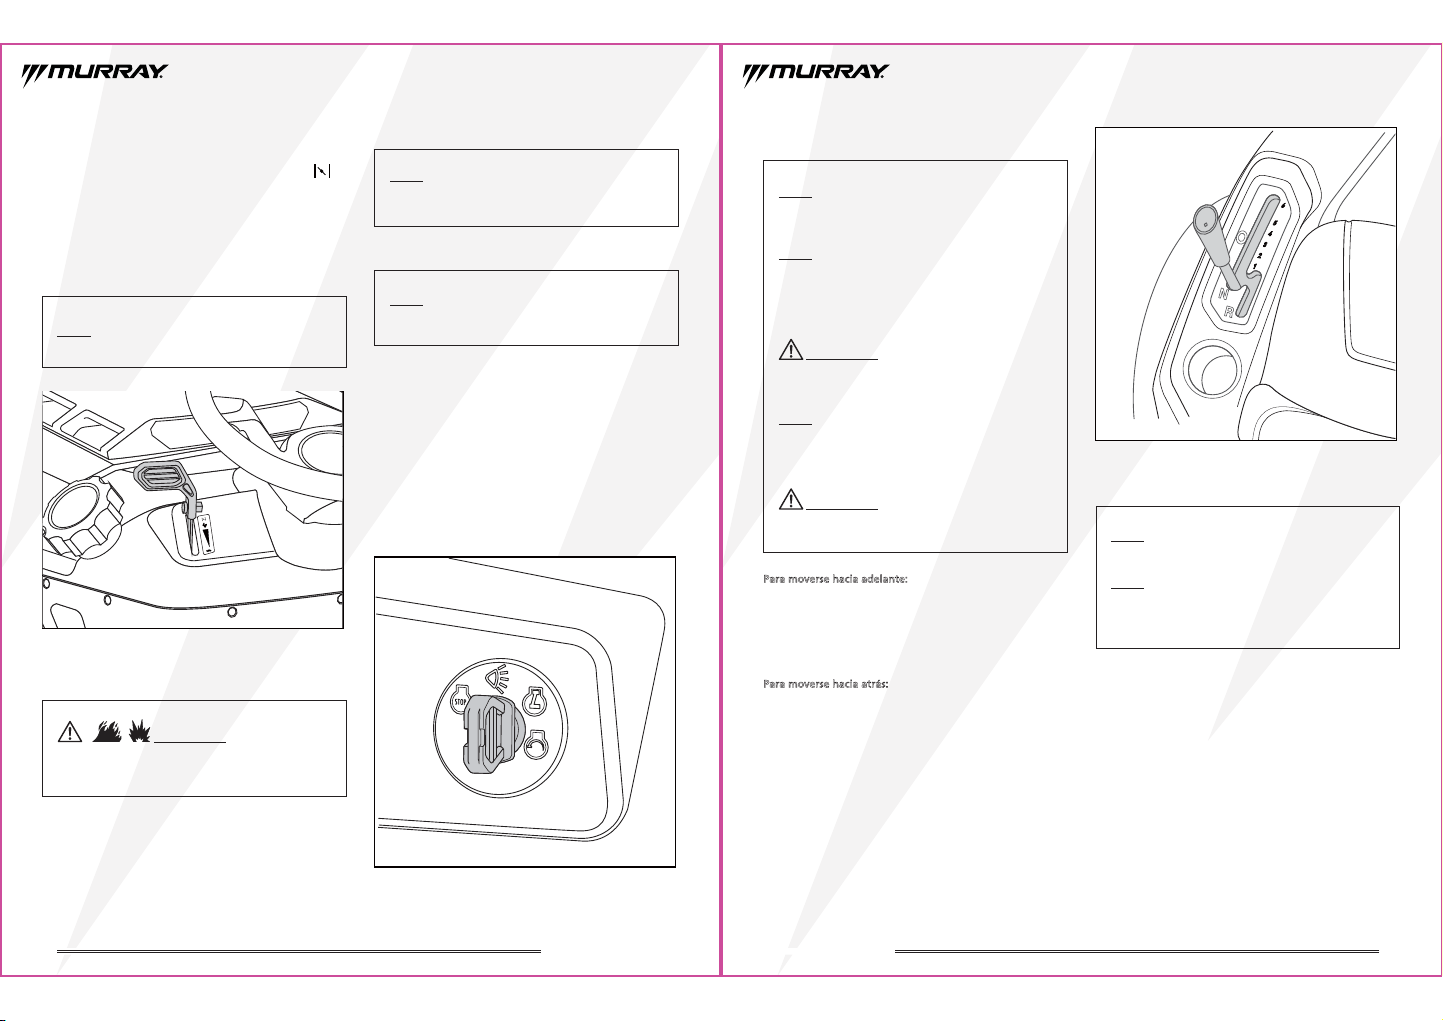
20 21
AVISO: Siempre use el pedal del freno para frenar por
completo el tractor antes de cambiar de velocidad.
AVISO: No use el pedal del freno para controlar la
velocidad de viaje del tractor cortacésped. Hacer esto
resultará en un desgaste prematuro de la correa de
transmisión.
AVISO:
Este tractor cortacésped no está equipado con un
pedal de gas. La velocidad de viaje del tractor cortacésped
no es controlada por la posición de marcha y del acelerador.
AVISO:
No intente cambiar de velocidad cuando el tractor
se esté moviendo. Esto podría resultar en un daño grave
para la transmisión del tractor. Siempre use el pedal del
freno para frenar por completo el tractor antes de cambiar
de velocidad.
AVISO:
Los que usan el tractor por primera vez deberían
familiarizarse por completo con el funcionamiento y los
controles del tractor cortacésped antes de operar el mismo
en las posiciones de mayor velocidad.
ADVERTENCIA: Los giros bruscos pueden afectar el
control del tractor cortacésped. SIEMPRE baje la velocidad
del tractor cortacésped antes de hacer giros bruscos.
ADVERTENCIA: Siempre encienda el tractor en
punto muerto.
Cambiar de Velocidad
Para moverse hacia adelante:
1. Primero frene por completo el tractor cortacésped.
2. Mueva lentamente la palanca de cambio de velocidad a
la marcha deseada. Hay seis marchas hacia adelante.
3. Levante lentamente su pie del pedal del freno.
Para moverse hacia atrás:
1. Primero frene por completo el tractor cortacésped.
2. Mire detrás de usted antes de ir en reversa.
3. Mueva lentamente la palanca de cambio de velocidad a
la marcha en reversa.
4. Levante lentamente su pie del pedal del freno.
Fig. 17
Usar el Freno
ADVERTENCIA: El combustible y sus
vapores son extremadamente inflamables y explosivos.
Los incendios o explosiones pueden causar quemaduras
graves o la muerte.
AVISO: En el caso de una emergencia, gire el interruptor
de encendido a la posición APAGADO. Esto va a DETENER
el motor.
AVISO: Los focos delanteros van a agotar rápidamente la
batería si se dejan encendidos y el motor está apagado.
AVISO:
Al operar el tractor cortacésped con las cuchillas
activadas, mueva el acelerador a la posición RÁPIDA.
Usar la Palanca del Acelerador/Estrangulador
La palanca del acelerador/estrangulador se encuentra en el
lado izquierdo del tablero de instrumentos del tractor
cortacésped. Al encender el motor cuando está frío, empuje
el acelerador totalmente hacia adelante hasta “ESTRANGU-
LADOR” (CHOKE).(Fig. 15)
El propósito del estrangulador es de restringir el flujo de
aire para que la mezcla de combustible-aire sea más rica
(más combustible, menos aire), lo que ayuda a encender el
motor. Luego de encender el motor, mueva el acelerador
hacia abajo a la posición RÁPIDA.
Fig. 15
Detener el Motor
• No estrangule el carburador para detener el motor.
1. Si las cuchillas están activadas, desactive las cuchillas.
2. Cambie a punto muerto.
3. Mueva el acelerador a la posición LENTA.
4. Gire la llave de encendido a la posición de APAGADO.
Retire la llave.
5. Ponga el freno de mano.
Usar los Focos Delanteros
Motor Encendido
1. Para encender los focos delanteros, gire la llave de la
posición de AVANZAR a la posición de LUCES. (Fig. 16)
2. Para apagar los focos delanteros, gire la llave de la
posición de LUCES a la posición de AVANZAR.
Motor Apagado
1. Para encender los focos delanteros, gire la llave a la
posición de LUCES.
2. Para apagarlos focos delanteros, gire la llave de la
posición de DETENER.
Fig. 16
Las explicaciones de los símbolos de referencia están en la
sección de Funciones y Controles en la página 13.
TRACTOR CORTACÉSPED MT100 TRACTOR CORTACÉSPED MT100
22 23
Ajustar las Ruedas Antideslizantes de
Cubierta
Para ajustar las ruedas:
1. Estacione el tractor cortacésped en un terreno plano y
ponga el freno de mano.
2. Apague el motor y saque la llave. Permita que las
cuchillas se detengan por completo.
3. Coloque la cubierta a la altura deseada.
4. Saque el tornillo y la tuerca que sostienen la rueda en su
lugar.
5. Mueva la rueda a una posición que esté
aproximadamente a 1/8 in. - 1/2 in. del suelo.
6. Reemplace el tornillo y la tuerca y apriete firmemente.
Atornille la tuerca a 4-6 ft. lb.
7. Repita los pasos 4-5 para el otro lado.
Cortar el Césped
• Sólo opere la máquina a la luz del día o con buena luz
artificial.
• Evite los agujeros, baches, bultos, rocas u otros peligros
escondidos. Los terrenos irregulares pueden derribar la
máquina o causar que el usuario pierda su equilibrio.
• No dirija el material de descarga hacia nadie. Evite
descargar el material contra una pared u obstrucción ya
que el material podría rebotar hacia el usuario.
• Detenga las cuchillas al cruzar superficies de gravilla.
• No deje una máquina en marcha desatendida. Siempre
estacione en un terreno plano, desactive los implementos,
coloque el freno de mano, detenga el motor y saque la llave.
La palanca de Toma de Fuerza se encuentra en el guard-
abarros derecho del tractor cortacésped. Activar la palanca
de Toma de Fuerza le transfiere el poder a las cuchillas de
corte.
Para activar las cuchillas:
• Mueva la palanca completamente hacia adelante.
Para desactivar las cuchillas:
• Mueva la palanca completamente hacia atrás. (Fig. 21)
Fig. 21
ADVERTENCIA:
El motor se va a DETENER cuando se
intente un desplazamiento hacia atrás con la palanca de
Toma de Fuerza ACTIVADA y el botón de MIR NO presionado
al ir en reversa. Vea la Opción de Cortar el Césped en Reversa
(MIR, por sus siglas en inglés).
AVISO:
La palanca de Toma de Fuerza debe estar
DESACTIVADA al encender el motor.
PELIGRO: Esta máquina
es capaz de amputar manos y piernas y de arrojar objetos.
El incumplimiento de las instrucciones de seguridad podría
resultar en lesiones graves o la muerte.
AVISO: El pedal del freno de mano debe estar presionado
para encender el motor.
AVISO: El freno de mano debe estar colocado si el
operador se levanta del asiento con el motor encendido
o el motor se va a apagar automáticamente.
AVISO: La parte de abajo de las ruedas antideslizantes de
cubierta debe colocarse a aproximadamente 1/8 in. - 1/2 in.
del suelo cuando el tractor esté a la altura de corte deseada.
Esto va a disminuir la probabilidad de arrancar el césped en
la mayoría de los casos.
AVISO: Las ruedas izquierda y derecha deben estar
colocadas en la misma posición.
Presione el pedal de freno para bajar la velocidad del tractor
cortacésped hasta frenarlo. (Fig. 18)
Fig. 18
Usar el Freno de Mano
Poner el freno de mano:
1. Presione por completo el pedal del freno.
2. Levante la palanca del freno de mano todo lo que da
hasta la posición de bloqueo. (Fig. 19)
3. Suelte el pedal del freno para permitir que el freno de
mano se active.
Soltar el freno de mano:
1. Presione por completo el pedal del freno.
2. Baje la palanca del freno de mano todo lo que da hasta
la posición de desbloqueo.
3. Suelte el pedal del freno para permitir que el freno de
mano se desactive.
Fig. 19
Ajustar la Altura de Corte del Tractor
Cortacésped
La palanca de altura de corte se encuentra en el guardabar-
ros derecho del tractor cortacésped. Se usa para cambiar la
altura de la unidad de corte. La altura (de la cuchilla con el
suelo) se puede ajustar de 1” a 4” (13 posiciones de altura).
Para cambiar la altura del corte, mueva la palanca fuera de
la ranura, y luego hacia arriba o abajo a la posición que sea
la más adecuada para su aplicación. (Fig. 20)
Fig. 20
TRACTOR CORTACÉSPED MT100 TRACTOR CORTACÉSPED MT100
24
25
ADVERTENCIA: El mantenimiento incorrecto o no
corregir un problema antes de operar la máquina pueden
causar un mal funcionamiento y tener como resultado
una lesión personal grave.
CUIDADO:
Antes de realizar cualquier tipo de
mantenimiento/servicio, desactive las cuchillas, apague el
motor y espere hasta que todas las partes móviles se
hayan detenido por completo. Desconecte el cable de la
bujía y manténgalo alejado de la bujía. Siempre use gafas
de seguridad al realizar cualquier ajuste o reparación.
AVISO: Consulte el manual del usuario del motor para
obtener detalles sobre el mantenimiento del motor.
AVISO: Si usted no está seguro sobre cómo realizar
cualquiera de los pasos de mantenimiento, por favor,
contacte al servicio de atención al cliente al 855-693-2582
o a un centro de servicio calificado para brindar asistencia.
6. Mantenimiento
Antes de los ajustes y reparaciones:
• Use SÓLO las herramientas correctas.
• NO altere el resorte del regulador, eslabones u otras
partes para aumentar la velocidad del motor.
• Las piezas de repuesto deben ser del mismo diseño y
deben colocarse en la misma posición que las piezas
originales. Otras piezas podrían no funcionar igual de
bien, podrían dañar la unidad, anular la garantía y podría
causar lesiones.
Programa de Mantenimiento
*Lo que ocurra primero.
**Revise las cuchillas del tractor cortacésped más seguido
en las regiones con suelos arenosos o condiciones de
mucho polvo.
Cada 8 horas o a diario
Revise el sistema de bloqueo de seguridad.
Elimine cualquier desecho del tractor, de la
cubierta del cortacésped y del compartimiento
del motor.
Cada 25 horas o anualmente*
Revise la presión de las ruedas.
Revise el tiempo de parada de las cuchillas del
tractor cortacésped.
Compruebe si hay piezas sueltas en el tractor.
Cada 50 horas o anualmente*
Limpie la batería y los cables.
Revise los frenos del tractor.
Vea a un Centro de Servicio Autorizado
Anualmente Lubrique el tractor.
Revise las cuchillas del tractor cortacésped.**
CONDUCTOR Y TRACTOR
Opción de Cortar el Césped en Reversa (MIR)
• Mantenga a los niños alejados del área de operación y
bajo el cuidado vigilante de un adulto responsable.
• No lleve pasajeros, especialmente a niños, incluso
cuando las cuchillas estén apagadas. Los niños pueden
caerse y resultar gravemente heridos o interferir con la
operación segura de la máquina. A los niños a los que
han llevado de paseo en el pasado pueden aparecer de
repente en el área de cortar el césped para que los
lleven de nuevo y podrían atropellados o pasados por
encima por la máquina.
• No corte el césped en marcha atrás a menos que sea
absolutamente necesario. Siempre mire hacia abajo y
hacia atrás antes de dar marcha atrás.
• Si la máquina está cortando el césped en reversa sin
activar la Opción de MIR, vea a un centro de servicio
autorizado.
Una vez que las cuchillas estén activadas:
1. Presione y mantenga presionado el pedal de freno/em
brague para dejar de moverse hacia adelante.
2. Presione y mantenga presionado el botón M-I-R. (Fig. 22)
3. Cambie a marcha atrás.
4. Suelte el botón M-I-R.
5. Libere lentamente el pedal de freno/embrague.
PELIGRO: Cortar el
césped en reversa puede ser peligroso para las personas
presentes. Pueden ocurrir accidentes trágicos si el usuario
no está alerta a la presencia de los niños. Los niños
usualmente se sienten atraídos por la máquina y la
actividad de cortar el césped. Nunca asuma que los niños
permanecerán donde los vio por última vez.
AVISO: Retire la llave para restringir el acceso a la Opción
de MIR.
Fig. 22
Consejos para Cortar el Césped
• Cortar el césped siempre debe hacerse con el acelerador
en la posición RÁPIDA para obtener resultados de corte
óptimos.
• Mantenga las cuchillas afiladas. Los cortes irregulares
aumentan la probabilidad de que las briznas de pasto se
oscurezcan o contraigan una enfermedad.
• Después de pasar por todo el césped, pase de nuevo por
unas 2 – 3”.
• Cambie la dirección en que corta el césped cada vez que
lo corte para evitar que se desarrollen surcos en su jardín.
• Fije la altura de corte del tractor cortacésped al ajuste
recomendado para cualquier tipo de césped en su jardín.
Cortar su césped muy corto va a impedir que se
profundice su sistema de raíces ya que el césped va a usar
su energía para regenerar las briznas de pasto en vez del
sistema de raíces. Un sistema de raíces profundo permitirá
que el césped consiga los nutrientes y el agua en la tierra,
especialmente en los períodos de sequía.
• Eleve la altura de corte del tractor cortacésped durante el
verano o los períodos de sequía.
• No realice el corte durante las horas más calientes del día.
Hacer esto estresa el césped.
• Siga la “Regla de 1/3”. No corte más de 1/3 del largo de la
brizna de pasto a la vez.
• Al cortar césped largo y grueso, puede que sea necesario
cambiar a una velocidad más lenta. También puede que
sea necesario pasar por el área de corte una segunda vez.
• No corte el césped mojado. El césped tendrá menos
posibilidades de agruparse y más posibilidades de
mantenerse erguido, lo que resulta en un corte limpio y
parejo.
TRACTOR CORTACÉSPED MT100 TRACTOR CORTACÉSPED MT100
2726
*Lo que ocurra primero.
Primeras 5 horas
Cambie el aceite del motor.
Cada 8 horas o a diario
Cambie el nivel del aceite del motor.
Cada 25 horas o anualmente*
Limpie el filtro de aire.
Cada 50 horas o anualmente*
Cambie el aceite del motor.
Anualmente
Reemplace el filtro de aire.
Vea a un Centro de Servicio Autorizado Anualmente
Inspeccione el silenciador.
Reemplace las bujías.
Reemplace el filtro de combustible.
Limpie el sistema de refrigeración por aire.
MOTOR
Limpiar el Tractor
• Limpie bajo el capó y alrededor del motor, incluyendo la
pantalla de toma de aire del motor, el colector de escape,
el silenciador y el escudo del silenciador.
• Limpie la parte de arriba de la cubierta y alrededor de las
correas y poleas.
• Limpie alrededor y cerca de la transmisión.
CUIDADO: No use una lavadora a presión o una
manguera de jardín para limpiar su tractor excepto para
limpiar la parte de abajo de la cubierta. Podría causarle
daños a los componentes eléctricos, ejes, poleas,
rodamientos o al motor.
ADVERTENCIA: Deje que el tractor se enfríe por al
menos cinco minutos antes de limpiarlo. Tenga cuidado
para evitar quemarse.
AVISO: Los desechos pueden acumularse en cualquier
parte del tractor, especialmente en las superficies
horizontales. Puede que se necesite una limpieza
adicional al cortar el césped en condiciones secas o al
cubrir con mantillo.
AVISO: Evite usar disolventes al limpiar las partes de
plástico. La mayoría de los plásticos son susceptibles a
daños de varios tipos de disolventes comunes y pueden
dañarse con su uso. Use paños limpios para quitar la
suciedad, polvo, aceite, grasa, etc.
AVISO:
Las fugas/derrames de combustible, fugas/derrames
de aceite y el exceso de lubricación también pueden
convertirse en sitios de acumulación de desechos. Reparar
de inmediato y limpiar los derrames de aceite o
combustible puede ayudarle a reducir los riesgos de incendio.
Limpiar la Cubierta del
Cortacésped
AVISO: El cortacésped SÓLO viene con una placa de bloqueo
de puerto de lavado. Los puertos de lavado y mangueras de
jardín de desconexión rápida NO se incluyen y deben ser
comprados por separado.
Se puede comprar un “Universal Deck Wash Kit” (Kit de
Lavado de Cubierta Universal), que incluye un puerto de
lavado y manguera de jardín de desconexión rápida, en The
Home Depot. SKU #1003930707 en la tienda o similar.
1. Coloque el tractor en una superficie suave y nivelada.
2. Conecte la desconexión rápida a la manguera de jardín y
luego conéctelo al puerto de lavado en la cubierta del
tractor cortacésped.
3. ABRA la llave de agua.
4. Encienda el Motor
5. Coloque la Altura de Corte en la posición más baja.
6. Inicie la Toma de Poder (PTO, por sus siglas en inglés)
para activar las cuchillas del tractor cortacésped. La
rotación de las cuchillas y el agua van a limpiar la parte
de abajo de la cubierta del tractor cortacésped. (Fig. 23)
7. Desactive la PTO.
8. Apague el Motor
9. CIERRE la llave de agua.
10. Quite la manguera de jardín y la desconexión rápida del
puerto de lavado.
TRACTOR CORTACÉSPED MT100 TRACTOR CORTACÉSPED MT100
Fig. 23
Nivelar la Cubierta de Corte
Si su jardín parece estar cortado de manera irregular
después de usar el tractor, la cubierta de corte podría
necesitar algún ajuste. Antes de decidir que la nivelación de
la cubierta de corte es necesaria, asegúrese de que las
llantas estén debidamente infladas al PSI recomendado al
cortar el césped.
Antes de comenzar:
1.
Asegúrese de siempre encender el tractor en punto muerto.
2.
Apague el motor, ponga el freno de mano y retire la llave.
3.
Eleve la altura de la cubierta de corte a su posición más alta.
Para hacer ajustes de lado a lado:
1. Coloque las cuchillas para que los extremos apunten
hacia los lados del tractor cortacésped.
2. Mida la distancia desde la punta exterior inferior (punta
de corte) de la cuchilla hasta el suelo. Mida la punta de
corte de la cuchilla izquierda hasta el piso y la punta de
corte de la cuchilla derecha hasta el piso. Si las medidas
tienen más de 3/16" de diferencia, proceda al siguiente
paso.
3. Gire las tuercas de ajuste de arriba para elevar o de abajo
para bajar el lado izquierda de la cubierta de corte.
(a, Fig. 24)
AVISO: Si levanta el lado, usted necesitará girar la tuerca
de ajuste de arriba primero. Si lo baja, gire la tuerca de
abajo primero.
ADVERTENCIA:
Las cuchillas del tractor son afiladas.
Envuelva la cuchilla o use guantes y tenga mucho cuidado
al hacerles mantenimiento.
Fig. 24
Para hacer ajustes de adelante hacia atrás:
1. Coloque la cuchilla izquierda para que los extremos
ahora apunten hacia la parte delantera y trasera del
tractor cortacésped.
2. Mida la distancia desde la punta de la cuchilla hasta el
suelo. Para obtener resultados de corte óptimos, la punta
de adelante debe ser entre 1/4 in. y 3/8 in. más abajo que
la punta de atrás.
3. Si se necesita el ajuste de adelante hacia atrás, después
de aflojar la tuerca de seguridad exterior, gire la tuerca
de ajuste interna en el sentido de las agujas del reloj para
elevar o en el sentido contrario a las agujas del reloj para
bajar la parte delantera de la cubierta de corte. (Fig. 25)
4. Mida de nuevo para verificar que la punta de adelante
ahora está entre 1/4 in. y 3/8 in. más abajo que la punta
de atrás. Si no es así, siga ajustando y midiendo hasta que
esté bien.
a
4.
Mida de nuevo. La cubierta está correctamente equilibrada
cuando las medidas de ambas puntas de la cuchilla
tomadas antes son iguales.
28 29
TRACTOR CORTACÉSPED MT100 TRACTOR CORTACÉSPED MT100
ADVERTENCIA: Apague el motor, ponga el freno de
mano y retire la llave.
ADVERTENCIA:
Las correas en su tractor están sujetas
al desgaste y deben ser reemplazadas si tienen algún signo
de desgaste.
Fig. 29
Cambiar la Correa de la
Cubierta
1. Quite la cubierta. Consulte la sección de “Quitar la
Cubierta de Corte”.
2. Retire las dos fundas protectoras de las correas (a, Fig. 29)
al retirar los seis tornillos que las aseguran a la cubierta.
3. Retire la polea fija (b, Fig. 29) y la polea de tensión
(c, Fig. 29).
4. Retire con cuidado la correa de la cubierta de alrededor
de las poleas.
5. Revierta el proceso para conectar una nueva correa a la
cubierta.
a
a
c
b
5. Sin mover la tuerca de ajuste interna, vuelva a apretar la
tuerca de seguridad externa para asegurar la tuerca de
ajuste interna en su lugar. (Fig. 25)
Fig. 25
Quitar la Cubierta de Corte
• Quitar la cubierta hará que sea más fácil reemplazar las
correas, poleas y cuchillas.
1.
Asegúrese de siempre encender el tractor en punto muerto.
2.
Apague el motor, ponga el freno de mano y retire la llave.
3. Baje la cubierta a su posición más baja.
4. Desconecte el resorte del cable (a, Fig. 26) que conecta la
cubierta al tractor.
5. Retire los 5 pasadores de enganche, 2 en la izquierda
(b y c, Fig. 26), 2 en la derecha (la misma posición que se
muestra en la izquierda) y 1 al frente (d, Fig. 27) que
aseguran la cubierta en su lugar.
6. Deslice la correa de la plataforma fuera del conjunto de
la polea de transmisión.
Ajuste de la Tensión en la
Correa de Cubierta
Si nota un deterioro en el rendimiento de corte, puede ser
necesario ajustar la tensión en el cable de cubierta.
Fig. 28
1. El cable de la cubierta se fija en la fábrica sin hilos expuestos
que se muestran detrás de la tuerca de mermelada (b).(Fig.28)
2. Para aumentar la tensión del cable, desenrosque la tuerca de
extensión (a) 1/8 pulg.
3.
Vuelva a apretar la tuerca de mermelcontra la tuerca de
extensión. Ahora 1/8 pulgadas. Los hilos expuestos deben
mostrarse detrás
de la tuerca de mermelada.
4. Si esto no era adecuado, repita el proceso anterior hasta que
haya una tensión adecuada en la correa de la cubierta.
5. Asegúrese de que el cable no esté tensado demasiado.
Fig. 26
Fig. 27
ADVERTENCIA: Las cuchillas del tractor son afiladas.
Envuelva la cuchilla o use guantes y tenga mucho cuidado
al hacerles mantenimiento.
ADVERTENCIA: Detenga el motor, active el freno de
estacionamiento y retire la llave.
d
a
c
b
7. Deslice la cubierta hacia afuera desde debajo del tractor.
8. Revierta el proceso para volver a conectar la cubierta al
tractor.
a
b
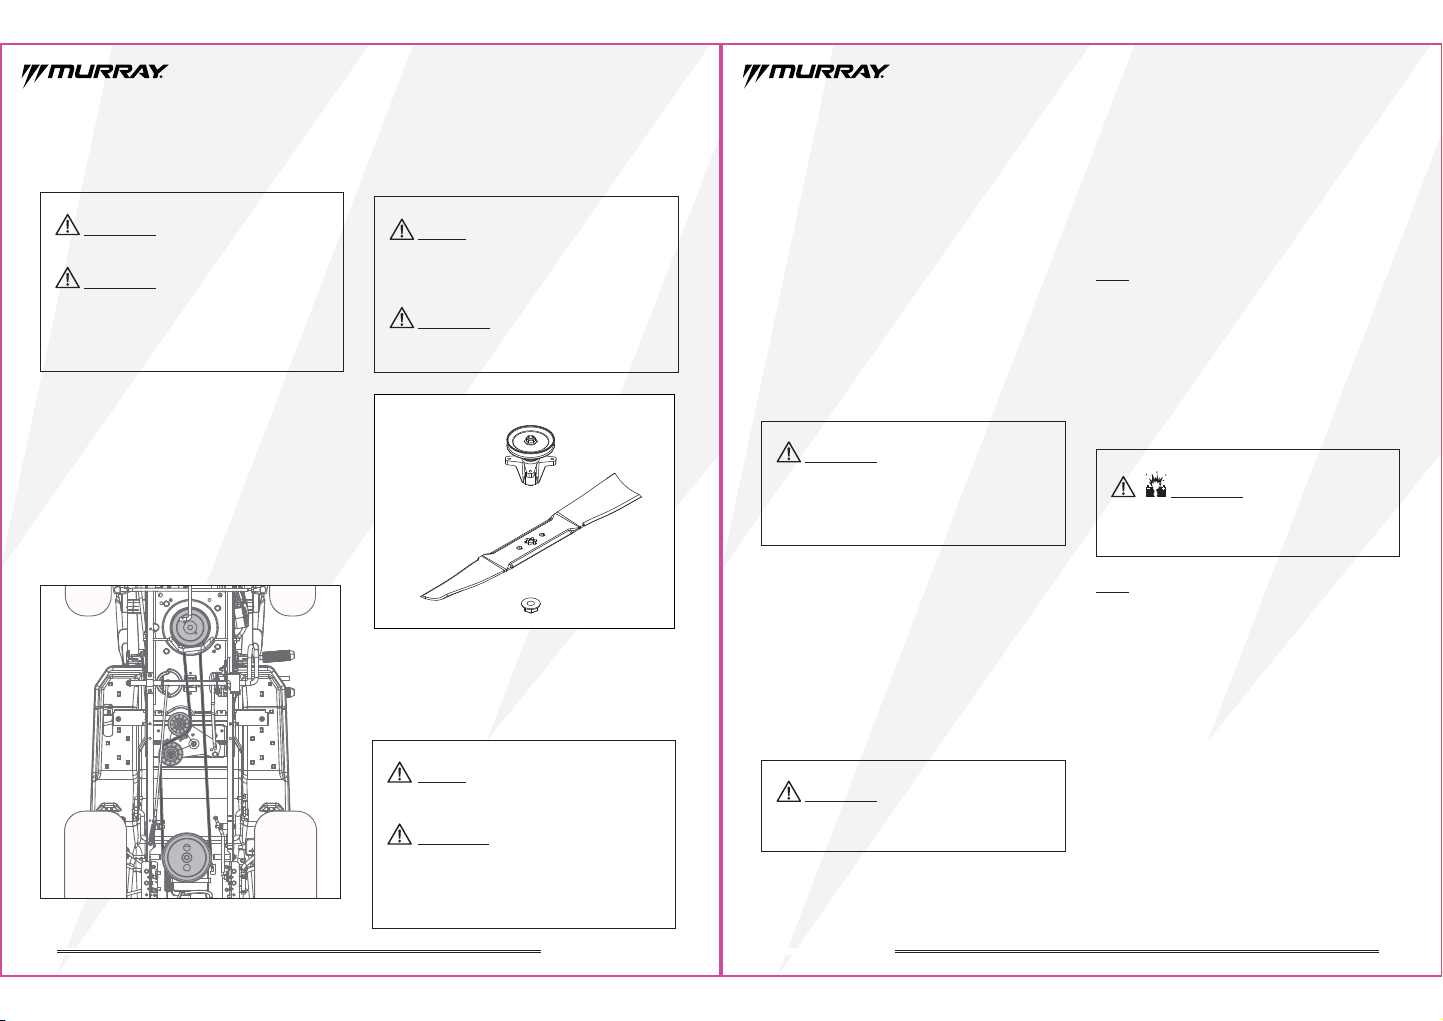
30 31
ADVERTENCIA: Asegúrese de que las cuchillas estén
correctamente colocadas y que la tuerca de la cuchilla
esté apretada según las especificaciones de torsión de
arriba. No colocar debidamente la cuchilla podría hacer
que se suelte, resultando en una posible lesión personal
grave.
ADVERTENCIA: Una cuchilla mal equilibrada causará
una vibración excesiva, podría dañar el tractor cortacésped
y resultar en una lesión personal.
3. Use una herramienta de extracción de cuchillas
(no incluida) para impedir que las cuchillas se giren.
4. Afloje la tuerca de las cuchillas al girarla en sentido
contrario a las aguas del reloj (como se ve desde la parte
de abajo del cortacésped) usando una llave o tubo de
24 mm (no incluidos).
5.
Retire la tuerca de las cuchillas y luego la cuchillas. (Fig. 31)
6. Al reemplazar o reinstalar las cuchillas, asegúrese de
instalar la cuchilla con el lado con el número de pieza
estampado mirando hacia el suelo.
7. Enrosque la tuerca de la cuchilla en el eje y apriete con
los dedos.
8. Gire la tuerca de la cuchilla en sentido de las agujas del
reloj usando una llave de tuerca (no incluida) para
asegurar que la tuerca esté apretada correctamente. La
rotación recomendada para la tuerca de la cuchilla es de
70-85 ft lb.
9. Repita lo mismo con la segunda cuchilla.
Afilar las Cuchillas
1. Para afilar correctamente las cuchillas de corte, quite
cantidades iguales de metal de ambos lados de las
cuchillas a lo largo de los bordes cortantes. Siempre afile
cada cuchilla de corte igual para mantener un balance
adecuado de cuchillas.
2. Pruebe el balance de las cuchillas usando un equilibrador
de cuchillas (no incluido). Muela el metal desde el lado
pesado hasta que se equilibre de manera uniforme.
ADVERTENCIA: Cuando retire o instale los
cables de la batería, siempre desconecte el cable
NEGATIVO (negro) PRIMERO y reconéctelo de ÚLTIMO.
Si no se hace en este orden, el terminal positivo puede
ser cortocircuitado al marco por una herramienta.
Revisar la Presión de las
Ruedas
Para obtener una tracción correcta y el mejor rendimiento
de cortado de césped, asegúrese de que las ruedas delan-
teras estén infladas a 14 psi y las ruedas traseras estén
infladas a 10 psi. Además, vea “Presión de las Ruedas” en la
sección de Especificaciones.
AVISO: Puede haber una diferencia en la presión de inflado
de las ruedas del “Inflado Máximo” que se muestra en los
costados de las ruedas.
Mantenimiento de la
Batería
Reemplazar la Batería y Limpiar la Batería y
los Cables de la Batería
AVISO: NO retire o conecte el cable de la batería mientras el
motor esté ENCENDIDO.
1. APAGUE el Motor Retire la llave.
2. Desconecte los cables NEGATIVOS (-) de la batería
primero. (Fig. 32 )
3.
Desconecte los cables POSITIVOS (+) de la batería de último.
4. Limpie la superficie de la batería con bicarbonato de
sodio y agua.
5. Use un cepillo de alambre y limpiador de terminal para
limpiar los terminales de la batería y los extremos de los
cables.
6. Lubrique los terminales de la batería con vaselina o grasa
no conductora.
7. Instale la batería.
8. Conecte los cables POSITIVOS (+) de la batería primero.
9. Conecte los cables NEGATIVOS (-) de la batería de último.
CUIDADO
:
ADVERTENCIA:
Si eleva el tractor cortacésped para
acceder a las cuchillas, asegúrese de que esté debidamente
asegurado y que el freno de mano esté puesto antes de
seguir adelante. No asegurar debidamente el tractor
cortacésped podría hacer que se caiga, resultando en la
muerte o una posible lesión personal grave.
De ser necesario, eleve el tractor
cortacésped con un gato y soportes de gato.
CUIDADO:
Sólo use cuchillas de reemplazo autorizadas
por el fabricante de su tractor. El uso de cuchillas no
autorizadas es peligroso y podría dañar su tractor
cortacésped.
Reemplazar las Cuchillas de
Corte
Fig. 31
1.
Apague el motor, retire la llave y ponga el freno de mano.
2. Eleve la altura de la cubierta de corte a su posición más
alta para permitir el acceso a las cuchillas.
ADVERTENCIA:
Las cuchillas del tractor son afiladas.
Envuelva la cuchilla o use guantes y tenga mucho cuidado
al hacerles mantenimiento.
ADVERTENCIA: Apague el motor, ponga el freno de
mano y retire la llave.
ADVERTENCIA:
De ser necesario, eleve el tractor con
un gato y soportes de gato. Asegúrese de que el tractor
esté debidamente protegido y que el freno de mano esté
colocado antes de continuar. No asegurar debidamente el
tractor podría hacer que se caiga, resultando en la muerte
o una posible lesión personal grave.
Fig. 30
Cambiar la Correa de
Transmisión
1. Quite la cubierta. Consulte la sección de “Quitar la
Cubierta de Corte”.
2. Retire los ensamblajes de la polea de transmisión
(a, Fig. 30) al retirar los pernos que los aseguran al eje de
salida del motor.
3. Retire las dos poleas (b y c, Fig. 30) al retirar las tuercas
que las aseguran al soporte de montaje.
4. Quite la correa de la polea de transmisión. (d, Fig. 30)
5. Revierta el proceso para conectar una nueva correa de
transmisión al tractor.
a
b
c
d
TRACTOR CORTACÉSPED MT100 TRACTOR CORTACÉSPED MT100
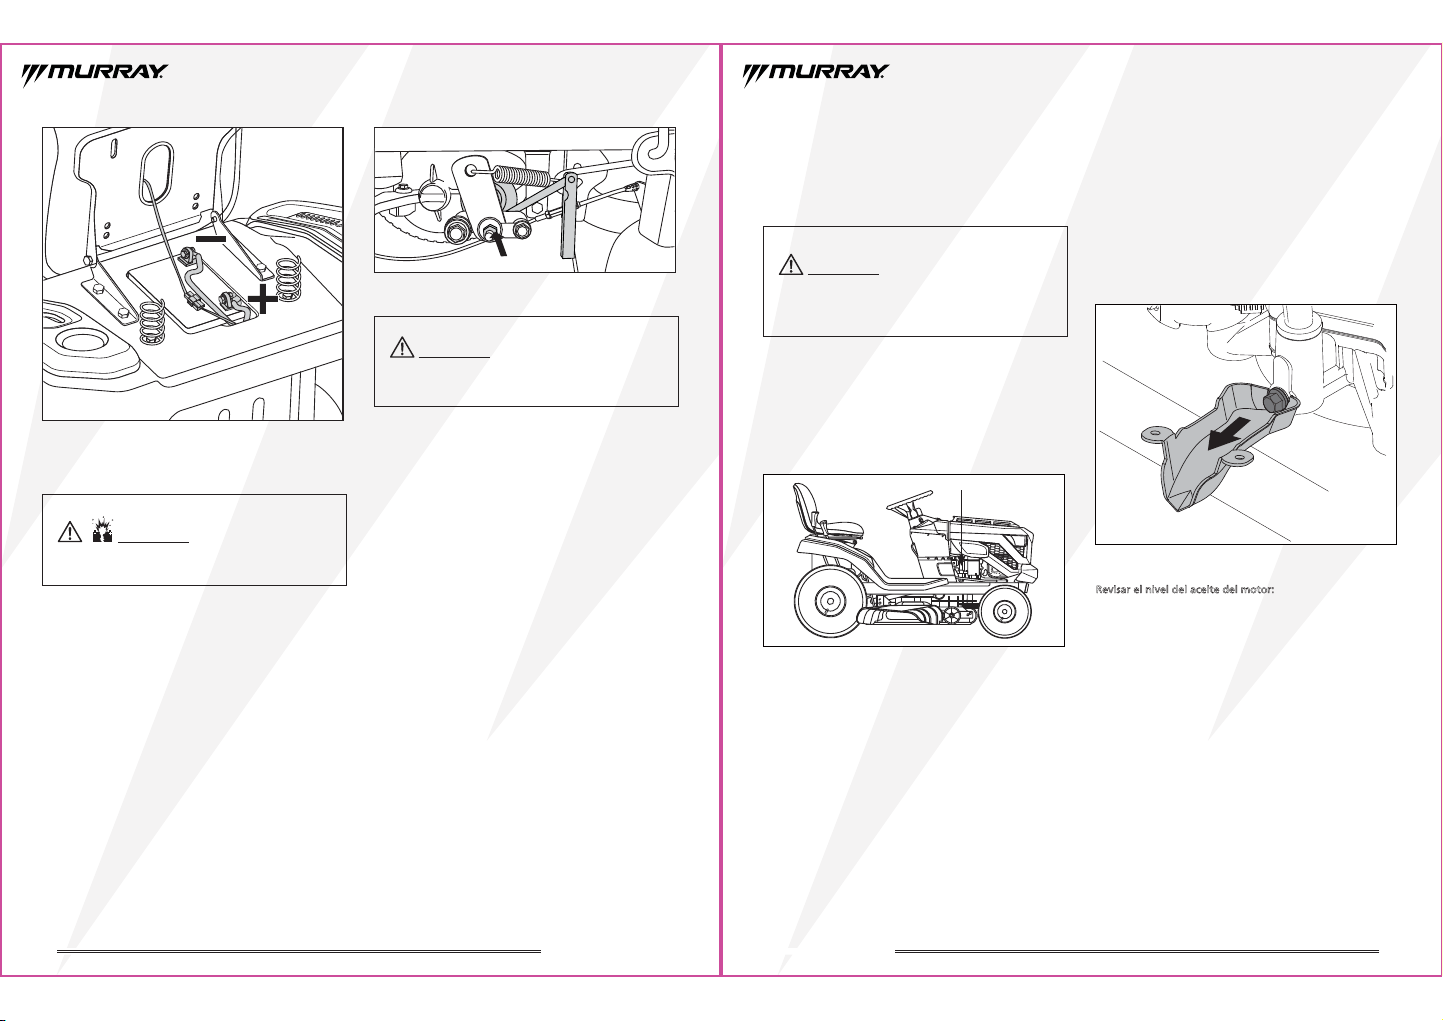
32 33
Fig. 32
Cargar la Batería
Las baterías muertas o que son muy débiles para encender el
motor pueden ser el resultado de un defecto en el sistema
de carga u otros componentes eléctricos. Si tiene alguna
duda sobre la causa del problema, vea a un centro de
Servicio Autorizado.
ADVERTENCIA: Mantenga las llamas abiertas
y las chipas alejadas de la batería. Los gases de la batería
son muy explosivos.
Fig. 33
1. Retire el neumático trasero derecho para facilitar el
acceso al freno.
2. Mientras que balanel el rotor del freno (a) hacia adelante
y hacia atrás lentamente apriete tuerca (b) hasta que no
es posible mover el rotor del freno.(Fig.33)
3. Afloaflola la tuerca (b) 2/3 girar y dejar como el ajuste
final.
4. Como alternativa a una vuelta de 2/3, utilice un medidor
de sensación de 0,5 mm para ajustar la almode de freno
de 0,5 mm fuera del rotor del freno.
5. Primero aflola la tuerca (b).
6. Inserte un medidor de sensación de 0,5 mm (C), desde el
lado, en el espacio entre el rotor de freno (a) y la pastilla
de freno.
7. Aprila la tuerca hasta que el medidor del feeler de
0,5 mm esté ajustado entre el rotor del freno y la pastilla
de freno, pero todavía se puede quitar.
Ajuste del Freno de Transmisión
El transaxle está equipado con un rotor de freno y pastillas de
freno. Con el tiempo las pastillas de freno se desgast, y será
necesario ajustar el freno para asegurarse de que el
freno/freno de estacionamiento funciona correctamente. Si
nota que la unidad no se detiene tan rápido como antes o
que el tractor no se queda en su lugar cuando se activa el
freno de estacionamiento, es posible que deba ajustar el freno
transversal.
Revisar el Tiempo de Parada
de las Cuchillas del Tractor
Cortacésped
ADVERTENCIA:
Si la cuchilla del motor no se DETIENE
en 5 segundos o menos, se debe ajustar el embrague. NO
opere la máquina hasta que el ajuste haya sido corregido
por un centro de servicio autorizado.
Fig. 35
Revisar el nivel del aceite del motor:
1. Retirar la varilla del aceite. Limpie el resto del aceite de la
varilla del aceite.
2. Coloque y apriete la varilla del aceite.
3. Remueva la varilla de nuevo y revise el nivel de aceite.
4. Asegúrese de que el nivel de aceite esté en la parte
superior de la marca de FULL en la varilla del aceite.
5. Si el nivel de aceite está FULL, coloque y apriete la varilla
del aceite.
6. Si el nivel de aceite está BAJO (LOW), agregue aceite al
tubo de llenado de aceite.
7. Espere un minuto y revise el nivel de aceite de nuevo.
8. Coloque y apriete la varilla del aceite.
3. Coloque la manga del drenaje de aceite (incluida con el
tractor cortacésped) debajo del tapón de drenaje. (Fig. 35)
4. Coloque un recipiente de recolección debajo de la manga
del drenaje de aceite.
5. Retire el tapón de drenaje.
6. Después de que el aceite se haya drenado, vuelva a
colocar el tapón de drenaje firmemente.
7. Llene el motor con el aceite nuevo.
Cambiar el Aceite del Motor
1. Coloque el aceite en una superficie plana como se
muestra en la Fig. 34.
2. Apague el motor y retire la llave
Fig. 34
Tapón de drenaje del aceite
TRACTOR CORTACÉSPED MT100 TRACTOR CORTACÉSPED MT100
ADVERTENCIA: Detener el motor, aparcar el tractor en
el suelo, desconectar el freno de estacionamiento, y quitar la
llave. Asegúrese de que el rotor del freno está fresco antes de
ajustar.
c
a
b
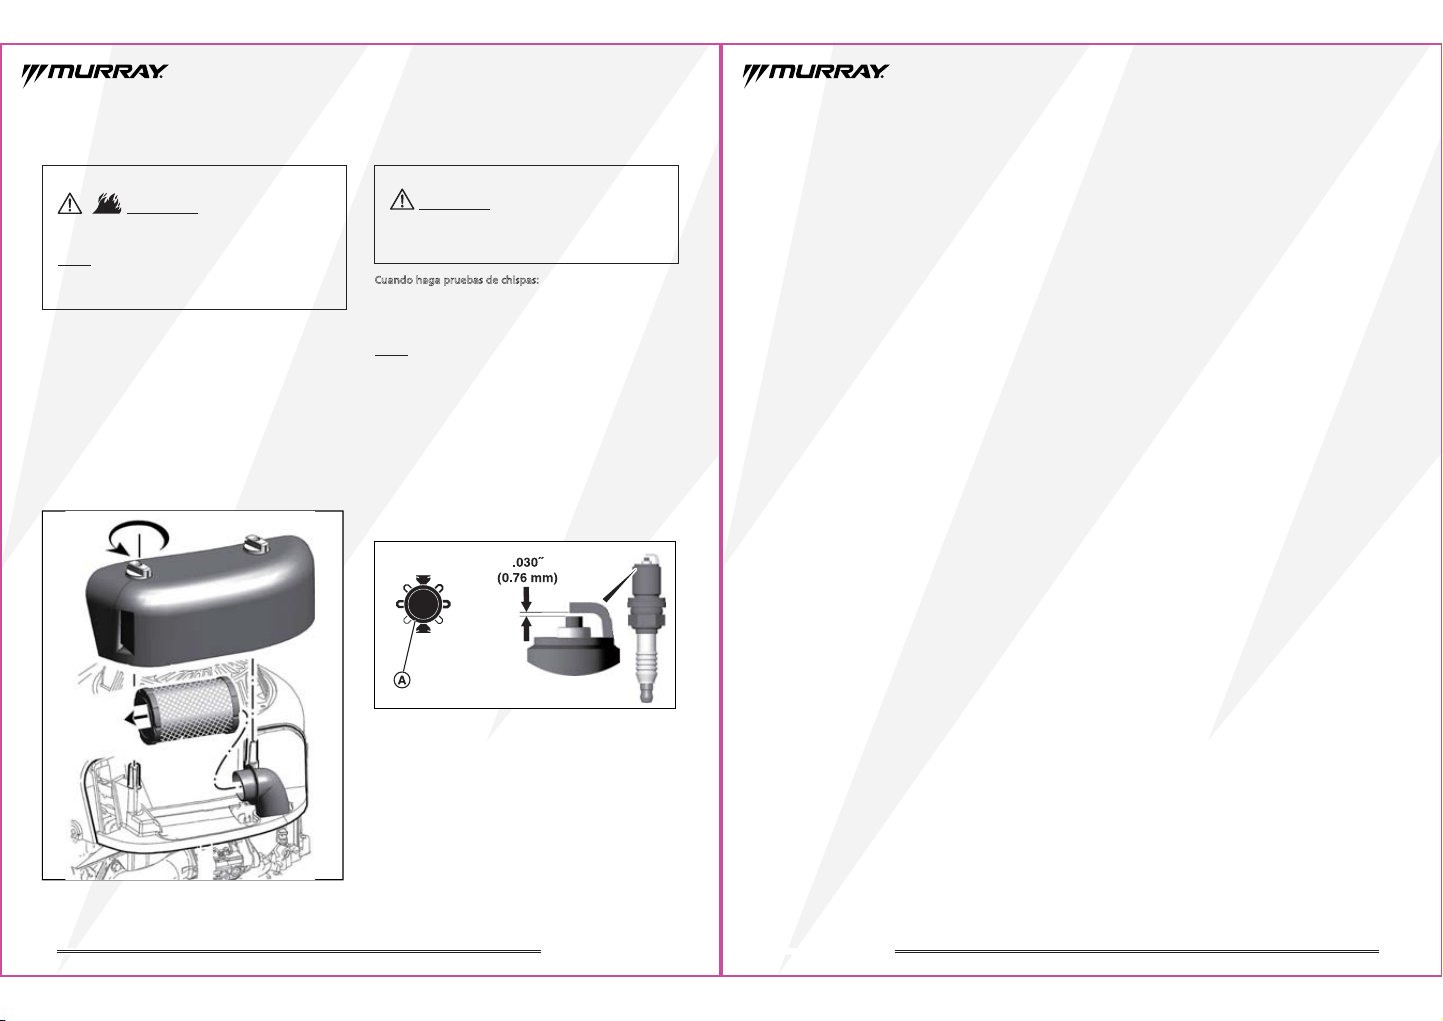
34 35
Remolcar con el Tractor
•
Conecte el equipo SÓLO en el enganche.
• El peso de remolcado total (remolque y carga) no debe
exceder las 400 lb. y no debe exceder un peso de
enganche (arriba o abajo) de 20 lb.
• Al remolcarlo, no lo opere en pendientes superiores a 5
grados. El peso del equipo remolcado en las pendientes
puede causar la pérdida de tracción y la pérdida de
control.
• NO deje que los niños u otros estén adentro o encima del
equipo remolcado.
• NO lo cambie a punto muerto y baje cuesta abajo.
Empujar el Tractor con las
Manos
Empujar el tractor cortacésped podría ser necesario para
moverlo dentro y fuera del garaje o cobertizo. También
podría ser necesario para cargarlo dentro o fuera de un
remolque.
1.
Desactive la Toma de Fuerza (PTO, por sus siglas en inglés).
2. APAGUE el Motor Vea la sección de Detener el Motor.
3. Cambie la transmisión a punto muerto.
4. El tractor puede empujarse con las manos.
ADVERTENCIA: NO encienda u opere el
motor sin un filtro de aire ya que es un riesgo de incendio.
AVISO: NO use aire presurizado o disolventes para limpiar
el filtro de aire. El aire presurizado puede dañar el filtro
y los disolventes lo van a disolver.
Cambiar el Filtro de Aire
1. Afloje las fijaciones y retire la cobertura. (Fig. 36)
2. Retire el filtro de aire.
3. Despeje los materiales o desechos no deseados que
pueden meterse en la garganta del carburador.
4. Golpee con suavidad el filtro de aire contra una
superficie dura para aflojar los desechos. Si el filtro de
aire está sucio, reemplácelo.
5. Coloque el filtro de aire.
6. Coloque la cobertura y apriete las fijaciones.
Fig. 36
Revisar las Bujías
Cuando haga pruebas de chispas:
• Use un probador de bujías aprobado.
• NO haga pruebas de chispas con la bujía retirada.
AVISO: Las bujías tiene diferentes rangos de calor. Es
importante que se use la bujía correcta, de lo contrario, el
motor podría dañarse. Reemplace la bujía con una del
mismo tipo o una equivalente.
Revisar el Espacio de las Bujías
Use un juego de calibrador de bujía (A, Fig. 37) para revisar
el espacio entre los dos electrodos. Cuando el espacio sea
correcto, el calibrador va a arrastrarse ligeramente cuando
tire de él a través del espacio.
Para ajustar el espacio de las bujías, use un calibrador de
bujías y doble suavemente el electrodo curvo. Asegúrese de
no tocar el electrodo del centro o la porcelana.
Fig. 37
Instale la Bujía
Apriete la bujía con sus dedos y luego apriétela con una llave.
• 180 in-lb, O
• 1/2 de giro cuando instale la bujía original, O
• 1/4 de giro cuando instale una nueva bujía.
ADVERTENCIA: Las chipas involuntarias pueden
causar un incendio o descarga eléctrica. El arranque
involuntario puede causar enredos, amputaciones
traumáticas o laceraciones.
TRACTOR CORTACÉSPED MT100 TRACTOR CORTACÉSPED MT100
36 37
8. Almacenamiento
• Almacénelo lejos de calderas, hornos, calentadores de
agua u otros electrodomésticos que tengan luces piloto
u otras fuentes de ignición porque pueden encender los
vapores del combustible.
Tractor
Desactive la Toma de Fuerza (PTO, por sus siglas en inglés),
ponga el freno de mano, retire la llave y deje que la máqui-
na se enfríe.
Si usted saca la batería, la vida de la misma se incrementará.
Asegúrese de que la batería esté en un lugar frío y seco y
manténgala completamente cargada. Si la batería se deja en
la unidad, desconecte el cable negativo.
Sistema de Combustible
El combustible puede volverse rancio cuando se mantiene en
un contenedor de almacenamiento por más de 30 días. Cada
vez que llene el contenedor con combustible, agréguele
STA-BIL 360°
®
PROTECTION™ al combustible según se
especifica en las instrucciones del fabricante. Esto mantiene
el combustible fresco y los problemas relacionados con el
combustible o la contaminación en el sistema de combusti-
ble.
No es necesario drenar el combustible del motor cuando se
agrega STA-BIL 360°
®
PROTECTION™ como se indica.
Antes de almacenar, ENCIENDA el motor por 2 minutos
para mover el combustible y el estabilizador por el sistema
de combustible.
Antes de encender la máquina después de haber sido
almacenada:
• Revise todos los niveles de líquido. Revise todos los
elementos de mantenimiento.
• Haga todas las revisiones y procedimientos recomendados
que se encuentran en este manual.
• Cargue la batería por completo.
• Conduzca el tractor sin ninguna carga para asegurarse de
que todos los sistemas del tractor están funcionando
correctamente.
ADVERTENCIA:
Nunca guarde la unidad
fcon combustible en una estructura cerrada y no ventilada.
Los vapores del combustible pueden viajar a una fuente de
ignición (tales como una caldera, calentador de agua, etc.)
y causar una explosión.
7. Transporte
• Vacíe el tanque de combustible con una bomba aspirante
antes de transportar la máquina. Encienda el motor y deje
que corra hasta que haya usado toda la gasolina restante.
• Cierre el tapón de combustible firmemente.
• Deje que el motor se enfríe antes de transportarlo.
• Use rampas de ancho completo para cargar y descargar
una máquina para su transporte.
• Tenga mucho cuidado al cargar o descargar la máquina en
un remolque o camión. Esta máquina no debe ser
conducida para subir o bajar rampas porque la máquina
podría volcarse, causando lesiones personales graves. Esta
máquina debe ser empujada con las manos en las rampas
para cargarlo o descargarlo correctamente.
TRACTOR CORTACÉSPED MT100 TRACTOR CORTACÉSPED MT100
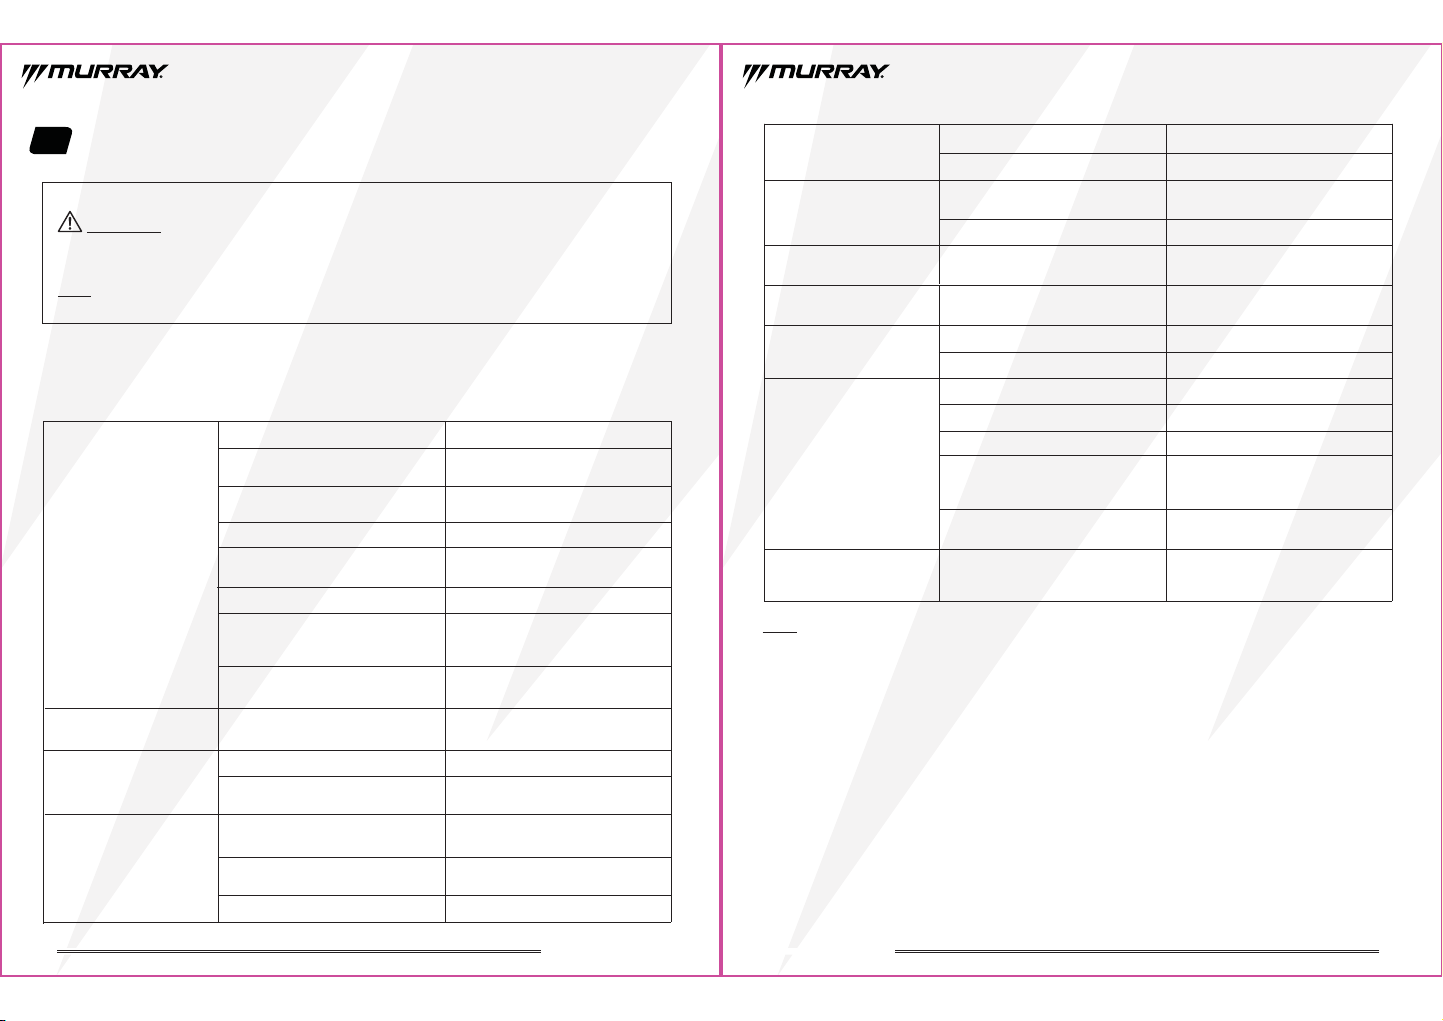
38 39
El corte del tractor cortacésped
no es parejo.
El motor enciende y se puede
manejar pero el cortacésped
no corta.
El motor no tiene la temperatura de
funcionamiento.
La Toma de Poder
(PTO, por sus siglas en inglés)
está desactivada.
Active la PTO.
ENCIENDA el motor y deje que se entibie
por varios minutos.
Las llantas no están infladas correctamente.
La velocidad del motor es muy lenta.El corte del tractor cortacésped
se ve mal.
El motor se para fácilmente con
el cortador de césped activado.
La velocidad de marcha es muy rápida.
La velocidad del motor es muy lenta.
La velocidad de marcha es muy rápida.
Filtro de aire sucio o tapado.
La altura del corte está muy baja.
Revise la sección de Cambiar el Filtro de Aire.
Corte el césped alto a la máxima Altura de
Corte al pasar por primera vez con el tractor
cortacésped.
Reduzca la velocidad.
Colocar el acelerador en RÁPIDO.
Revise la sección de Revisar la Presión de las
Ruedas.
Reduzca la velocidad.
Colocar el acelerador en RÁPIDO.
AVISO: Para todos los otros problemas, contacte a un centro de servicio autorizado.
El motor corre, pero no se deja
manejar.
La dirección está dura o se
maneja mal.
La transmisión está en punto muerto.
El freno de mano está puesto.
Inflado incorrecto de las llantas. Revise la sección de Revisar la Presión de
las Ruedas.
Quite el freno de mano.
Presione el freno y mueva la palanca de
cambios en una marcha delantera.
El escape del motor está negro. El filtro de aire está sucio.
El estrangulador está cerrado. Abra el estrangulador.
Revise la sección de Cambiar el Filtro de Aire.
ADVERTENCIA: Antes de realizar cualquier tipo de mantenimiento, desactive todos los controles y apague el motor.
Espere hasta que las partes móviles se detengan por completo. Desconecte el cable de la bujía y colóquelo contra el motor
para prevenir un arranque no deseado. Siempre use gafas de seguridad al operar la máquina o al realizar cualquier ajuste
o reparación.
AVISO: Si usted no puede resolver el problema, lleve el tractor a un centro de servicio autorizado para obtener ayuda.
9. Solución de Problemas
El motor no arranca.
El motor tiene dificultades en el
arranque o funciona mal.
El motor da golpes.
Consumo excesivo del aceite.
La mezcla de combustible es muy rica.
Bajo nivel de aceite.
El motor está muy caliente.
Grado incorrecto de aceite.
Mucho aceite en el cárter del motor. Drene el aceite en exceso.
Revise la sección de Cambiar el Aceite de
Motor.
Revise las aletas del motor, la pantalla del
ventilador y el filtro de aire.
Grado incorrecto de aceite. Revise la sección de Cambiar el Aceite de
Motor.
Revise y agregue aceite en caso necesario.
Limpie el filtro de aire.
El pedal de freno no se empuja hacia abajo.
El tanque de combustible está vacío.
La palanca de PTO está en la posición de
ENCENDIDO.
El motor está inundado.
Los terminales de la batería están sucios.
La batería está descargada o muerta.
Cables flojos o rotos.
La palanca de cambios está en marcha atrás. Mueva la palanca de cambios a la posición
neutral.
Cambie o reemplace la batería.
Compruebe visualmente los cables. Si los
cables están desgastados o rotos, vea a un
centro de servicio autorizado.
Revise la sección de Reemplazar la Batería y
Limpiar la Batería y los Cables de la Batería.
Desactive el estrangulador.
Presione completamente el pedal del freno.
Mueva la palanca de PTO a la posición de
APAGADO.
Si el motor está caliente, deje que se enfríe y
luego llene el tanque de combustible de nuevo.
PROBLEMA BUSQUE SOLUCIÓN
Solución de Problemas del Tractor
TRACTOR CORTACÉSPED MT100 TRACTOR CORTACÉSPED MT100
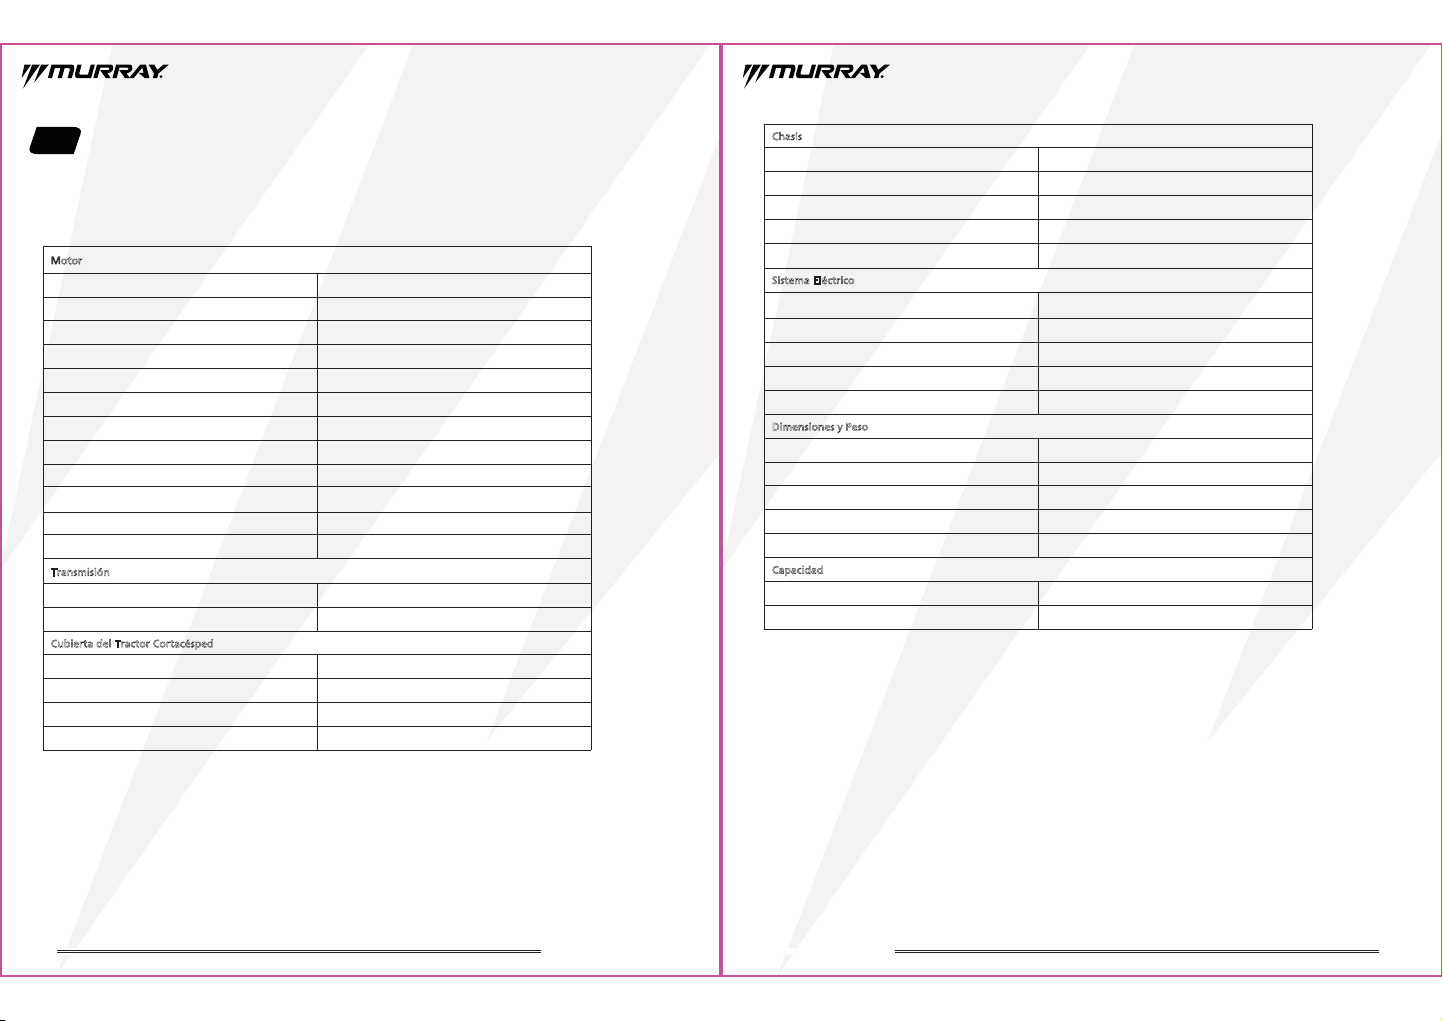
41
Fusible
Sistema Eléctrico
Capacidad del Sistema de Carga 9 Amp
20 Amp
Corriente de Arranque en Frío de la Batería ≥200 CCA
Batería Voltaje 12V
Batería Tipo BCI Group U1
Dimensiones y Peso
Largo 65 in.
Ancho 52 in.
Ancho (con conducto de descarga de lado arriba) 44 in.
Alto 41 in.
Peso 392 lbs.
Capacidad
Capacidad del Aceite de Motor 1.5 qt (1.4l)
Capacidad del Tanque de Combustible 1.4 US gal
Descargo de Responsabilidad de la Potencia
Clasificaciones de Potencia: Le clasificación de potencia bruta para los modelos individuales de motor de gasolina están etiqueta-
dos de conformidad con la SAE (Society of Automotive Engineers) con el código J1940 Procedimiento de Potencia y Torsión del
Motor Pequeño y está clasificado de acuerdo con la SAE J1995. Los valores de torque se derivan en 2600 RPM para aquellos
motores con “rpm” en la etiqueta y 3060 RPM para todos los demás. Los valores de potencia se derivan en 3600 RPM. Las curvas de
potencia curva pueden verse en www.BRIGGSandSTRATTON.COM. Los valores de potencia neta se toman con el escape y el
limpiador de aire instalador mientras que los valores de potencia bruta se obtienen sin estos implementos. La potencia bruta real
del motor será mayor que la potencia neta del motor y se ve afectada por, entre otras cosas, las condiciones ambientales de
funcionamiento y la variabilidad entre los motores. Dada la amplia gama de productos en los que se colocan los motores, el motor
de gasolina podría no desarrollar la potencia bruta clasificada cuando se usa en un determinado equipo de potencia. Esta diferen-
cia se debe a una variedad de factores, incluyendo, pero sin limitarse a, la variedad de componentes del motor (limpiador del aire,
escape, carga, enfriamiento, carburador, bomba de combustible, etc.), limitaciones de aplicación, condiciones ambientales de
funcionamiento (temperatura, humedad, altitud) y la variabilidad entre motores. Debido a las limitaciones de fabricación y
capacidad, Briggs & Stratton podría sustituir un motor de mayor potencia por este motor.
Chasis
Tamaño de Las Ruedas Delanteras 15 in. x 6.00 in. - 6 in.
Tamaño de Las Ruedas Traseras 20 in. x 8.00 in. - 8 in.
Presión de Las Ruedas Delanteras 14 psi
Presión de Las Ruedas Traseras 10 psi
Radio de Giro 18 in.
40
10. Especificaciones
Motor
Modelo Briggs & Stratton E1350
Cilindrada 30.5 in
3
(500 cc)
Potencia 13.5 hp
Cilindros Uno
Combustible Recomendado Gasolina sin Plomo de 87 Octanos
Tipo de Filtro de Aceite Ninguno
Espacio de las Bujías 0.030 in.
Torsión de las Bujías
Fabricante de las Bujías
Fabricante del Filtro de Aire
Número de Pieza de la Bujía
Número de Pieza del Filtro de Aire
180 lb-in
Briggs & Stratton
491055
Briggs & Stratton
796031
Transmisión
Velocidad de Desplazamiento Frontal 0-5.5 mph
Velocidad de Desplazamiento en Reversa 0-2.0 mph
Cubierta del Tractor Cortacésped
Ancho de Corte 42 in.
Altura de Corte 1 in. - 4 in. (aproximadamente), 13 posiciones
No. de Cuchillas / Elevación 2 / elevación estándar
Número de Pieza de las Cuchillas 2105200368A
MODELO DEL TRACTOR MT100
Tabla de Especificaciones
TRACTOR CORTACÉSPED MT100 TRACTOR CORTACÉSPED MT100
43
12. Garantía
A. REGISTRO: Por favor registre su tractor cortacésped Murray MT100 en un plazo de 60 días a partir de la fecha de compra.
Diríjase a dayenorthamerica.com/warranty para registrarse.
B. DISPOSICIONES GENERALES:
Las garantías descritas abajo son proporcionadas por Daye, North America, Inc. (“Fabricante”) al
comprador original del Tractor Cortacésped Murray MT100 (“Equipo”) de The Home Depot.
En virtud de esta garantía limitada, el Fabricante va a reparar o reemplazar, a su elección, cualquier parte cubierta que se
considere defectuosa de material o fabricación durante el período de garantía aplicable. El servicio de garantía debe ser
realizado por un centro de servicio autorizado por el Fabricante para hacerle mantenimiento al tipo de Equipo involucrado, que
sólo usará partes o componentes nuevos o refabricados proporcionados por el Fabricante. El servicio de garantía va a ser
realizado sin cargo para el comprador por partes o trabajo manual. Sin embargo, el comprador va a ser responsable de
cualquier transporte del Equipo hacia y desde el lugar de negocio del centro de servicio, por cualquier prima cobrada por horas
extraordinarias solicitada por el comprador del Equipo, y por cualquier servicio y/o mantenimiento no directamente relacionado
con cualquier defecto cubierto en virtud de las garantías que se indican abajo. Si el Equipo se vende a alguien más durante el
período de garantía, la garantía limitada es transferible al nuevo dueño. Después de hacer el registro, imprima o guarde una
copia del número de garantía y otra información relevante para sus archivos. El número de garantía y otra información
relevante debe ser transferido al nuevo dueño.
C. LO QUE SE GARANTIZA:
Todas las partes del Equipo, excepto las ruedas y las baterías, están garantizadas por el número de años
que se especifica abajo. Las declaraciones de garantía requeridas por la ley que cubren las piezas y componentes relacionadas
con las emisiones del motor, que no serán menores a la garantía del motor, se encuentran en el Manual del Usuario de Briggs &
Stratton que se entrega con el Equipo.
D. LO QUE NO SE GARANTIZA – EL FABRICANTE NO ES RESPONSABLE DE LO SIGUIENTE:
(1) Cualquier Equipo que ha sido alterado
o modificado en maneras que no son aprobadas por el Fabricante; (2) Depreciación o daño causado por el uso normal, la
pérdida de un mantenimiento razonable y adecuado, el incumplimiento de las instrucciones de funcionamiento, uso incorrecto,
abandono, negligencia, falta de protección adecuada durante el almacenamiento o accidentes; (3) Mantenimiento normal de
partes y servicio; (4) Si se usa para carreras o cualquier otra actividad competitiva.
E. ASEGURAR EL SERVICIO DE GARANTÍA:
Para asegurar el servicio de garantía, el comprador debe (1) Reportar el defecto del
producto a la línea de atención al cliente de Murray al 855-693-2582 y solicitar una reparación dentro del período de garantía
aplicable, (2) Presentar evidencia de la fecha de inicio de la garantía y (3) Poner el Equipo a disposición de un centro de servicio
autorizado dentro de un período de tiempo razonable.
F. LIMITACIÓN DE LAS GARANTÍAS IMPLÍCITAS Y OTROS RECURSOS:
El fabricante no será responsable de cualquier daño incidental
o consecuencial de cualquier tipo que resulte de la compra, uso o mal uso de, o la incapacidad de usar el Equipo, incluyendo
daños incidentales, especiales, consecuenciales o similares, o la pérdida de ganancias, o por cualquier reclamo presentado en
contra del comprador por cualquier otra parte. No hay garantías explícitas además de las que están establecidas en la presente.
Cualquier garantía implícita por la ley estatal entrará en vigor para cualquier producto sólo por la duración del período de
garantía. Nota: Algunos estados o jurisdicciones no permiten la exclusión o limitación de daños o restricciones incidentales o
consecuenciales sobre cuánto tiempo dura una garantía implícita, así que las limitaciones o exclusiones precedentes podrían no
aplicarse a usted. Esta garantía le otorga derechos legales específicos y usted también puede tener otros derechos que varían en
cada estado o jurisdicción.
G. GARANTÍA DE HOME DEPOT:
A menos que el plan de protección del tractor cortacésped de The Home Depot sea comprado por
separado, The Home Depot no hace ninguna garantía propia y The Home Depot no tiene la autoridad de hacer ninguna
representación o promesa en nombre del Fabricante o de modificar los términos o restricciones de esta garantía de ninguna
manera. https://www.homedepot.com/c/Home_Depot_Protection_Plan_Coverage_Details.
H. PERÍODO DE GARANTÍA:
*Los Implementos/Accesorios, ya sea que se compren en la misma orden que el Equipo o se compren por separado, serán cubiertos
por el respectivo período de garantía particular de Implementos/Accesorios.
Nombre del Modelo Número de Modelo
MYT4213500MT100
Período de Garantía
2 años a partir de la fecha de compra
42
11. Desecho
• La gasolina y el aceite son un desecho peligroso. Deshágase de estos materiales correctamente.
• No vierta gasolina o aceite en el suelo o en la basura doméstica. Contacte a su autoridad local de reciclaje.
• Algunos centros de reciclaje aceptan gasolina y aceite y lo reacondicionan o lo reciclan con seguridad. El gobierno oficial de su
ciudad debería ser capaz de dirigirlo al lugar de reciclaje correcto. Luego, llame al lugar de reciclaje con antelación si tienen
algunas instrucciones que necesita seguir.
• Si debe deshacerse de todo el tractor, contacte a su depósito local de chatarra.
TRACTOR CORTACÉSPED MT100 TRACTOR CORTACÉSPED MT100