
1
Rangaire: Installation Manual
Product Installation & User Manual


30" Single Wall Oven
OVEN SAFETY .......................................................................................... 1
PARTS AND FEATURES ............................................................................... 4
CONTROL PANEL ...................................................................................... 5
OVEN USE ..............................................................................................14
OVEN CARE ........................................................................................... 32
TROUBLESHOOTING ................................................................................ 46
1
Rangaire: Installation Manual
OVEN SAFETY
State of California Proposition 65 Warnings:
WARNING: This product contains one or more chemicals known to the State of California to cause
cancer.
WARNING: This product contains one or more chemicals known to the State of California to cause
birth defects or other reproductive harm.
We have provided many important safety messages in this manual and on your appliance. Always read
and obey all safety messages.
Your safety and the safety of others are very important.
This is the safety alert symbol.
This symbol alerts you to potential hazards that can kill or hurt you and others. All
safety messages will follow the safety alert symbol and either the word
“DANGER,” “WARNING” or “CAUTION.”
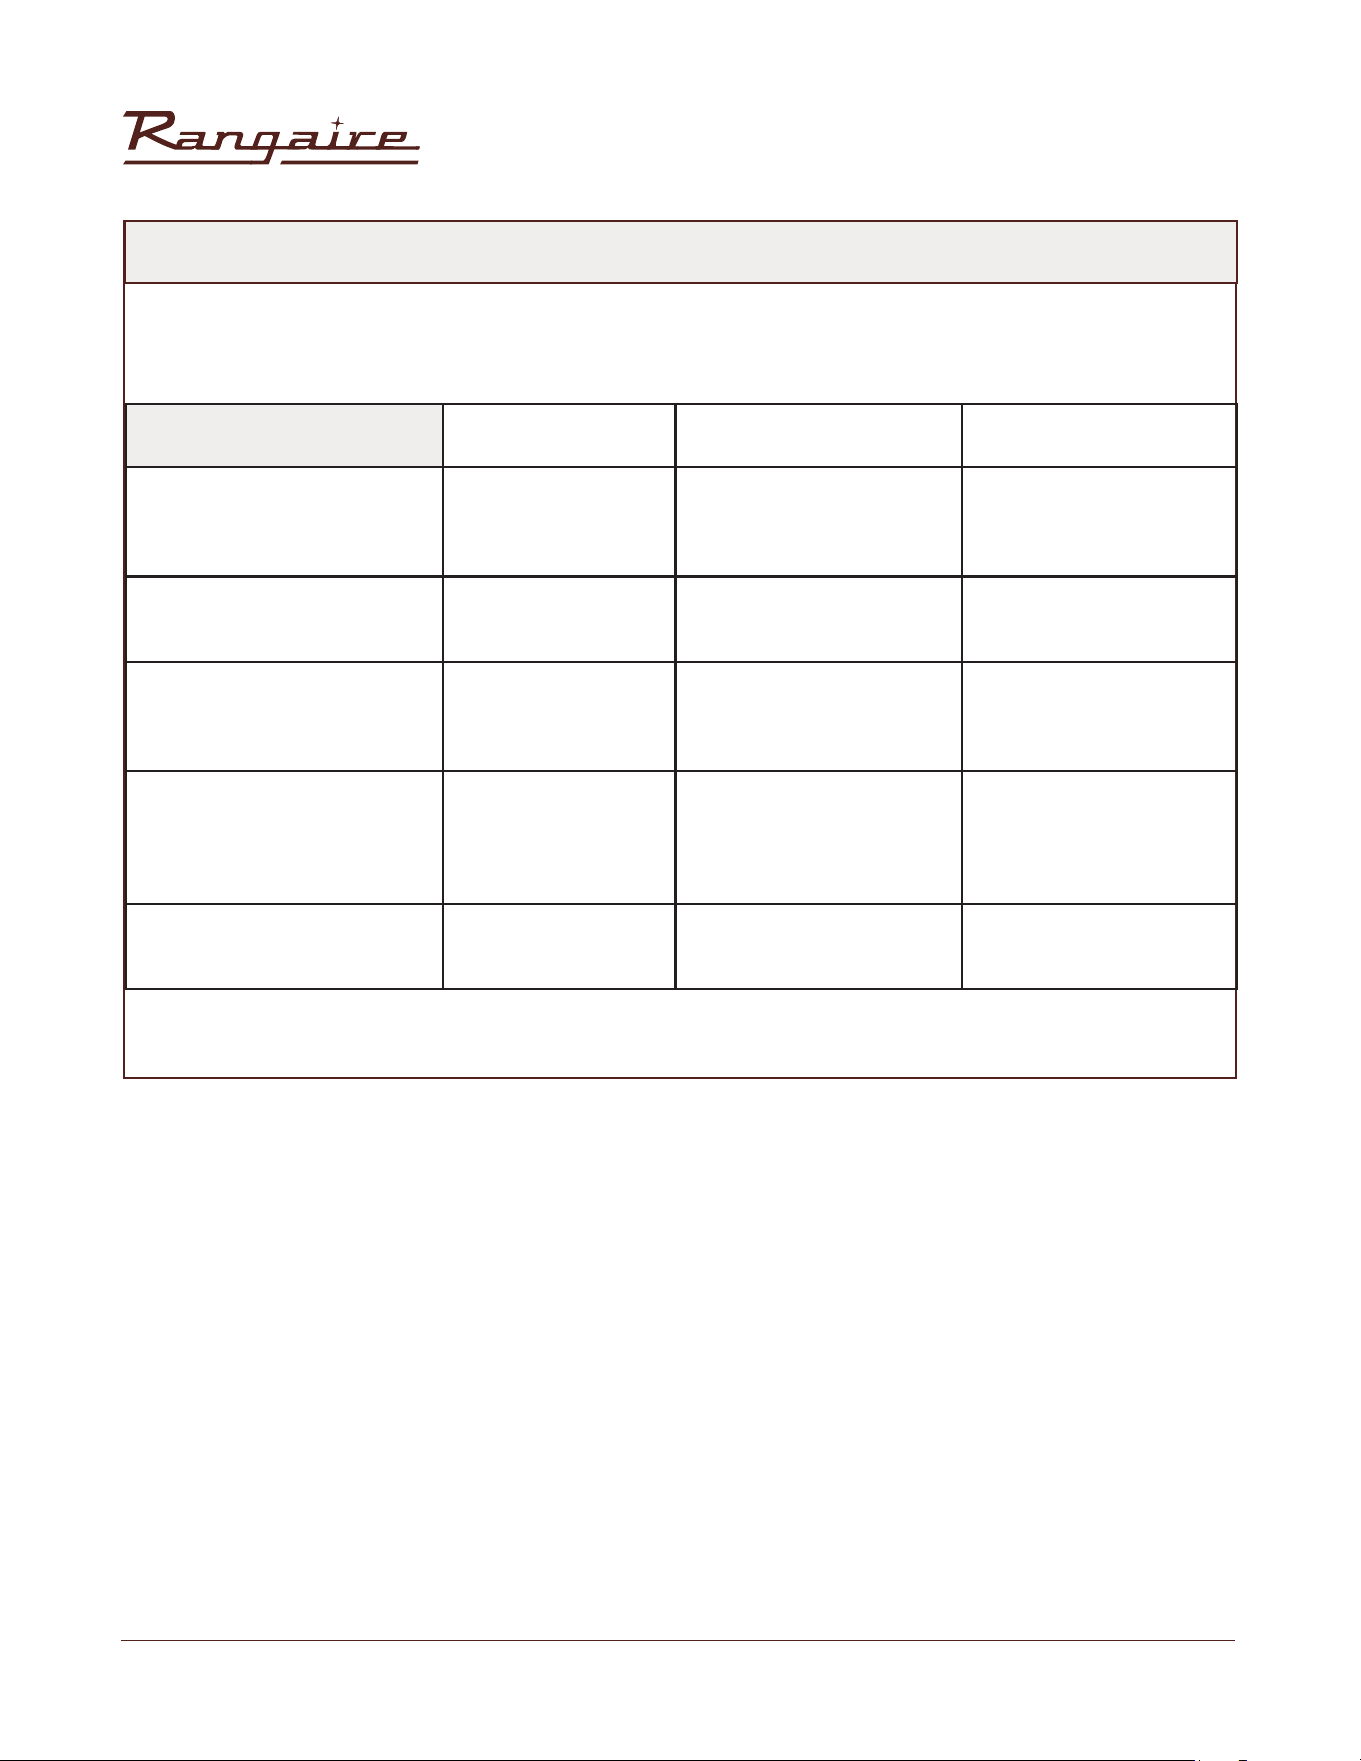
These words mean:
DANGER
WARNING
CAUTION
An imminently hazardous situation. You could be killed or seriously injured if
you don’t immediately follow instructions.
A potentially hazardous situation which, if not avoided, could result in death
or serious bodily injury.
A potentially hazardous situation which, if not avoided, may result in
moderate or minor injury
All safety messages will tell you what the potential hazard is, tell you how to reduce the chance of injury,
and tell you what can happen if the instructions are not followed.
2
Rangaire: Installation Manual
WARNINGS FOR ELECTRIC INSTALLATION
Proper Installation:
This appliance must be properly installed and
electrically grounded by a qualified technician.
Connect only to properly grounded outlet. See
“Grounding Instructions” found in the Installation
Instructions.
• This appliance should be serviced only by
a qualified service technician. Contact
the nearest authorized service center for
examination, repair or adjustment.
• Do not repair or replace any part of the oven
unless specifically recommended. Refer
service to an authorized servicer.
• Do not operate this appliance if it is not
working properly or if it has been damaged,
until an authorized servicer has examined it.
• Install or locate this appliance only in
accordance with the Installation Instructions.
• Use this oven only as intended by the
manufacturer. If you have any questions,
contact the manufacturer.
Installation and service must be performed by a qualified installer or
service agency.
• The models may be powered at 240V or 208V.
• Always disconnect the power before servicing this unit.
• This appliance must be properly grounded.
• Failure to do so could result in death or serious injury.
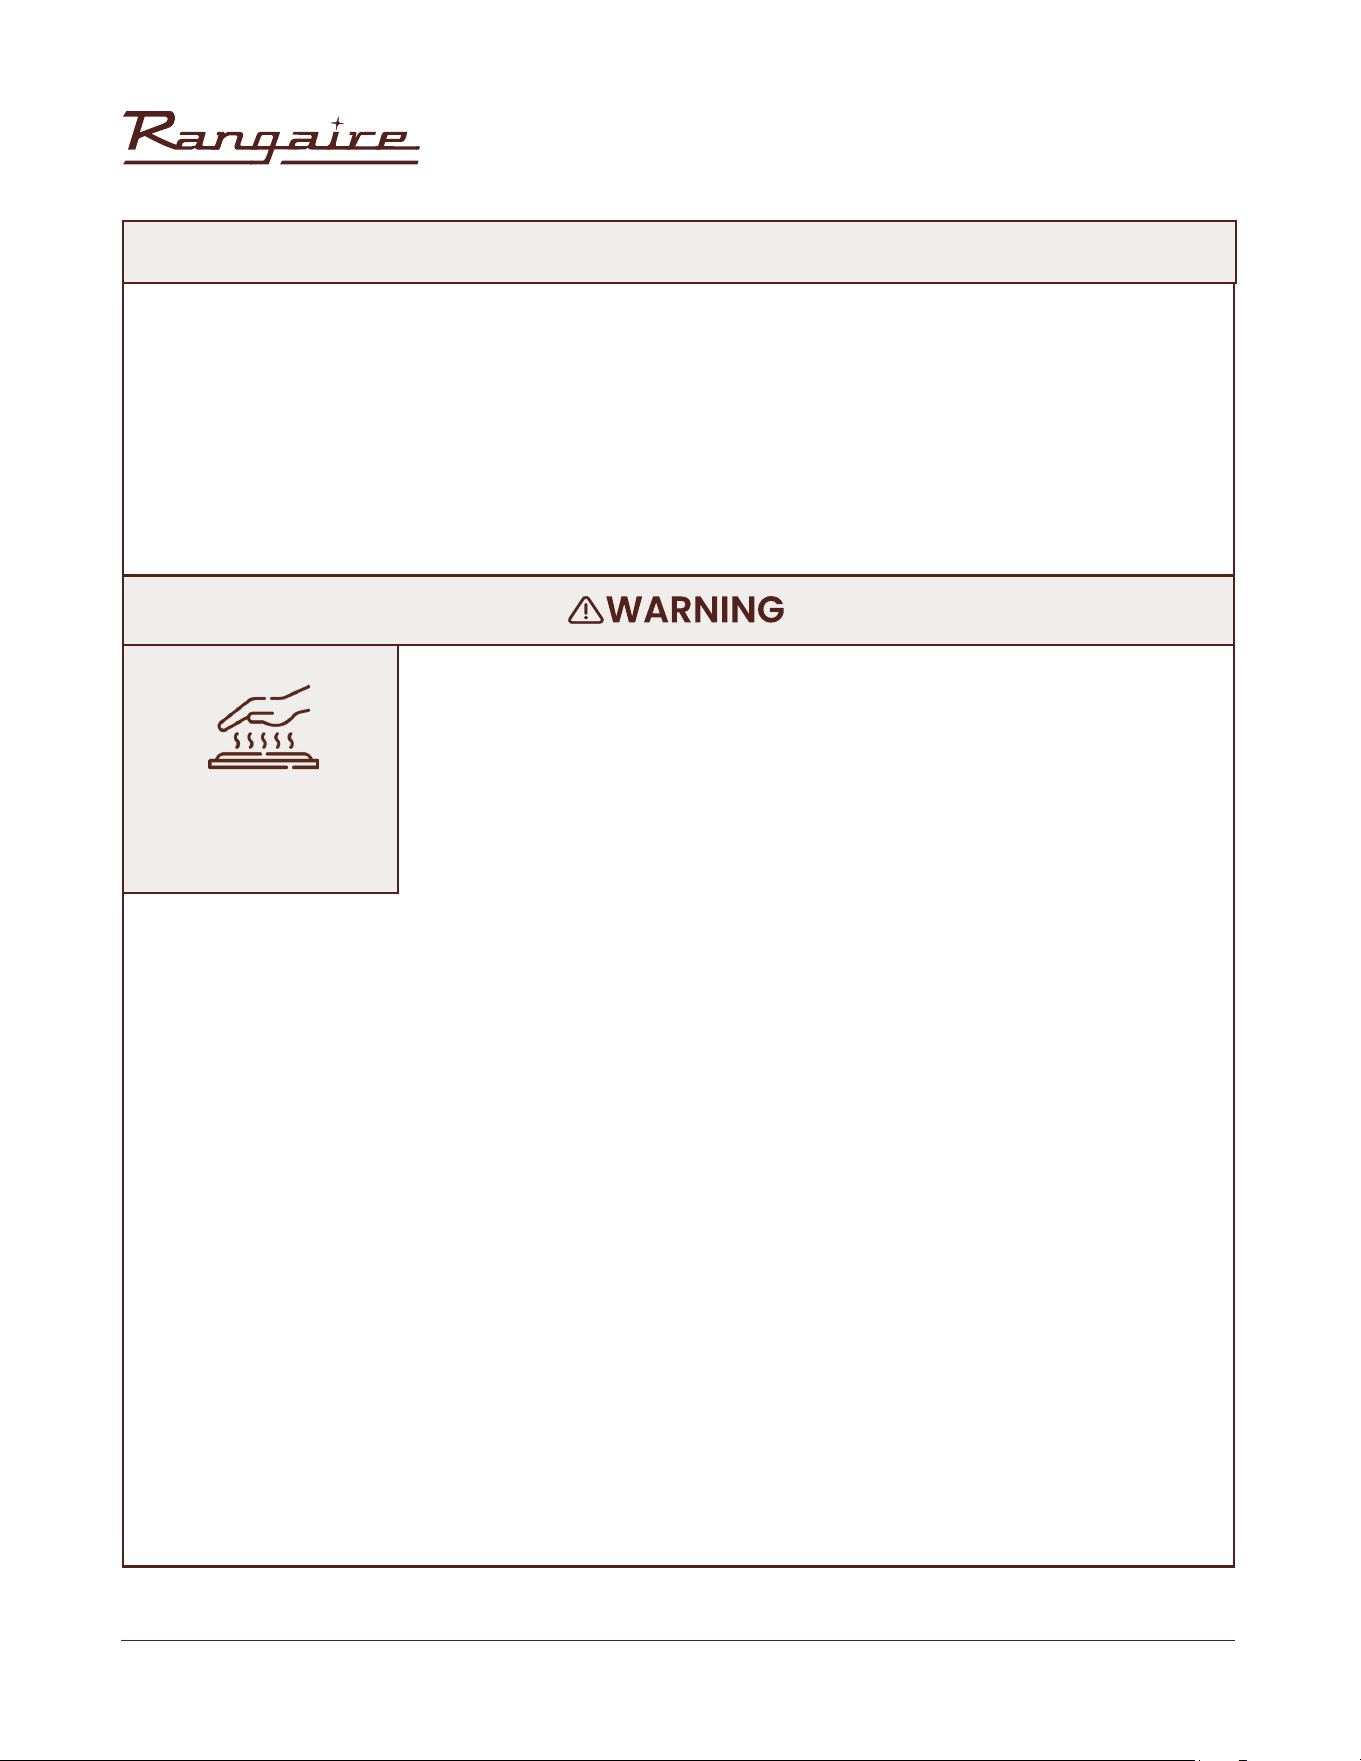
To reduce the risk of fire, electrical shock, injury to persons, or damage when using the oven, follow basic
precautions, including the following:
IMPORTANT SAFETY INSTRUCTIONS
ELECTRICAL SHOCK
HAZARD
3
Rangaire: Installation Manual
IMPORTANT SAFETY INSTRUCTIONS
• Do not cover or block any openings on this
appliance.
• Use this appliance only for its intended use as
described in this manual. Do not use corrosive
chemicals, vapors, or nonfood products in
this appliance. This type of oven is specifically
designed to heat or cook. It is not designed
for industrial or laboratory use. The use of
corrosive chemicals in heating or cleaning will
damage the appliance.
To reduce the risk of fire in the oven
cavity:
• Do not store flammable materials in or near
the oven.
• Do not use water on a grease fire. Smother fire
with dry chemical or foam-type extinguisher.
• It is highly recommended that a fire
extinguisher be readily available and highly
visible next to any cooking appliance.
• Do not overcook food. Carefully attend oven if
paper, plastic or other combustible materials
are placed inside the oven.
• Do not use the cavity for storage purposes. Do
not leave paper products, cooking utensils or
food in the cavity when not being used.
• If materials inside the oven should ignite,
keep oven door closed. Turn oven off and
disconnect the circuit at the circuit breaker
box.
• Be sure the blower fan runs whenever the oven
is in operation. If the fan does not operate, do
not use the oven. Call an authorized service
center.
• Never use the oven to warm or heat a room.
Personal Safety
• Do not allow children to use this appliance
unless closely supervised by an adult.
Children and pets should not be left alone or
unattended in the area where the appliance is
in use. Never allow children to sit or stand on
any part of the oven.
• Do not store items of interest to children above
the oven. If children should climb onto the
appliance to reach these items, they could be
seriously injured.
• For personal safety, wear proper clothing.
Loose fitting or garments with hanging
sleeves should never be worn while using this
appliance.
• Tile long hair so that it doesn't hang loose.
• Do not touch heating elements or interior
surfaces of oven.
• The heating elements may be hot even though
they are dark in color. Interior surfaces of an
oven become hot enough to cause burn.
4
Rangaire: Installation Manual
IMPORTANT SAFETY INSTRUCTIONS
READ AND SAVE THESE INSTRUCTIONS
• During and after use, do not touch or let
clothing or other flammable materials contact
the heating elements or the interior surfaces
of the oven until they have had sufficient time
to cool.
• The trim on the top and sides of the oven door
may become hot enough to cause burns.
• Use care when opening the door. Open the
door slightly to let hot air or steam escape
before removing or replacing food.
• Do not heat unopened food containers.
Build-up of pressure may cause the container
to burst and cause injury.
• Always place oven racks in desired location
while oven is cool. If a rack must be moved
while oven is hot, do not let potholder contact
the hot heating elements.
• Use only dry potholders. Moist or damp
potholders on hot surfaces may result in burns
from steam. Do not let potholder touch hot
heating elements. Do not use a towel or other
bulky cloth.
Safety for the Self-cleaning Oven :
• Before self-cleaning the oven, remove the
broiler pan, oven racks (only when not made
of porcelain), other utensils and excess soft
spillage.
• Confirm that the door locks and will not open
once both selectors are in CLEAN position and
the door lock icon appears. If the door does
not lock, turn the cook mode selector to OFF
and do not run Self-Clean. Call an authorized
servicer.
• Do not clean the door gasket. It is essential for
a good seal. Care should be taken not to rub,
damage, move or remove the door gasket.
• Do not use commercial oven cleaners or oven
liner protective coatings of any kind in or
around any part of the oven.
• Clean only oven parts listed in this manual.
• Other surfaces of the appliance may become
hot enough to cause burns - among these
surfaces are for example: oven vent openings
and surfaces near these openings, oven doors,
and windows of oven doors.
4
Rangaire: Installation Manual
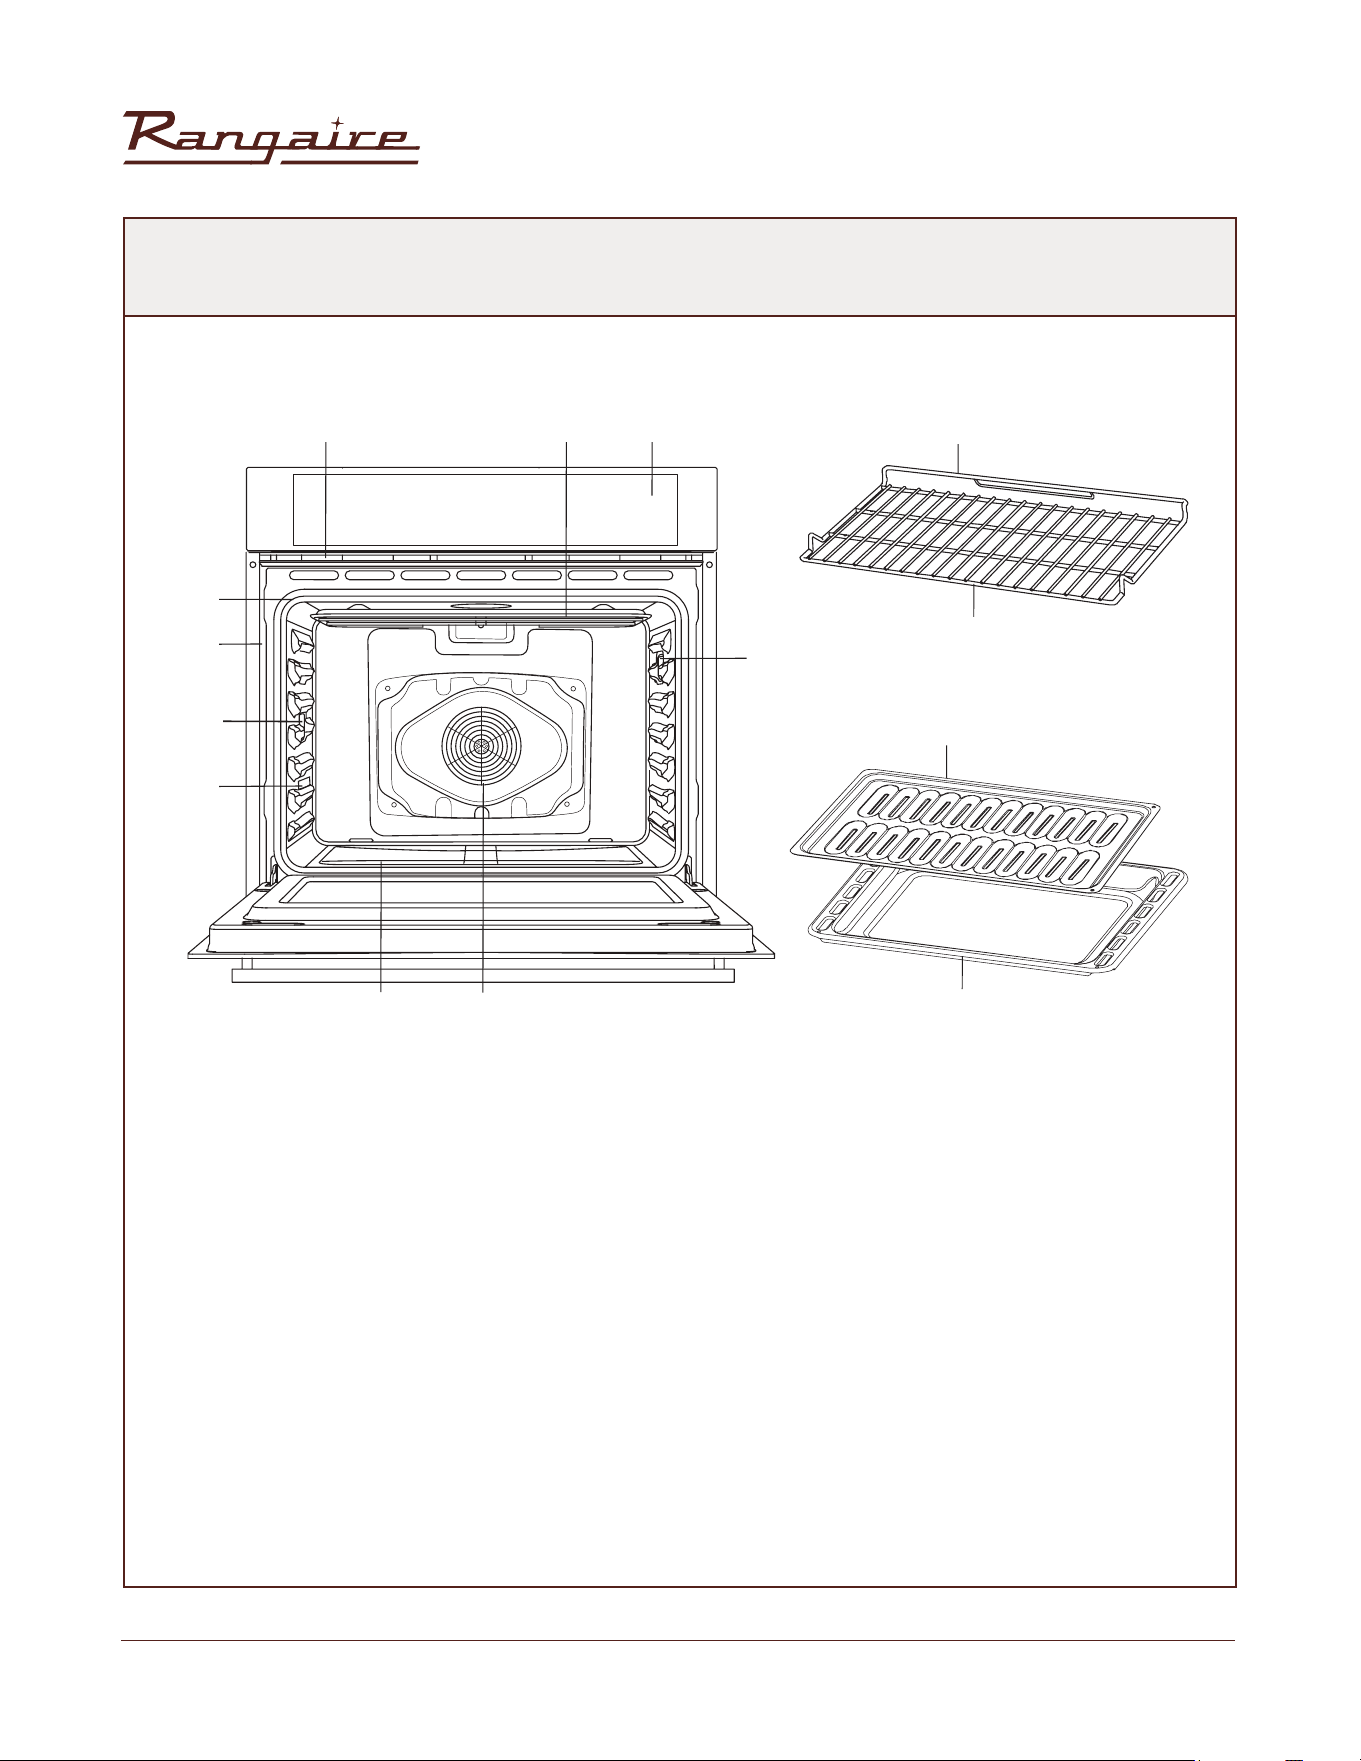
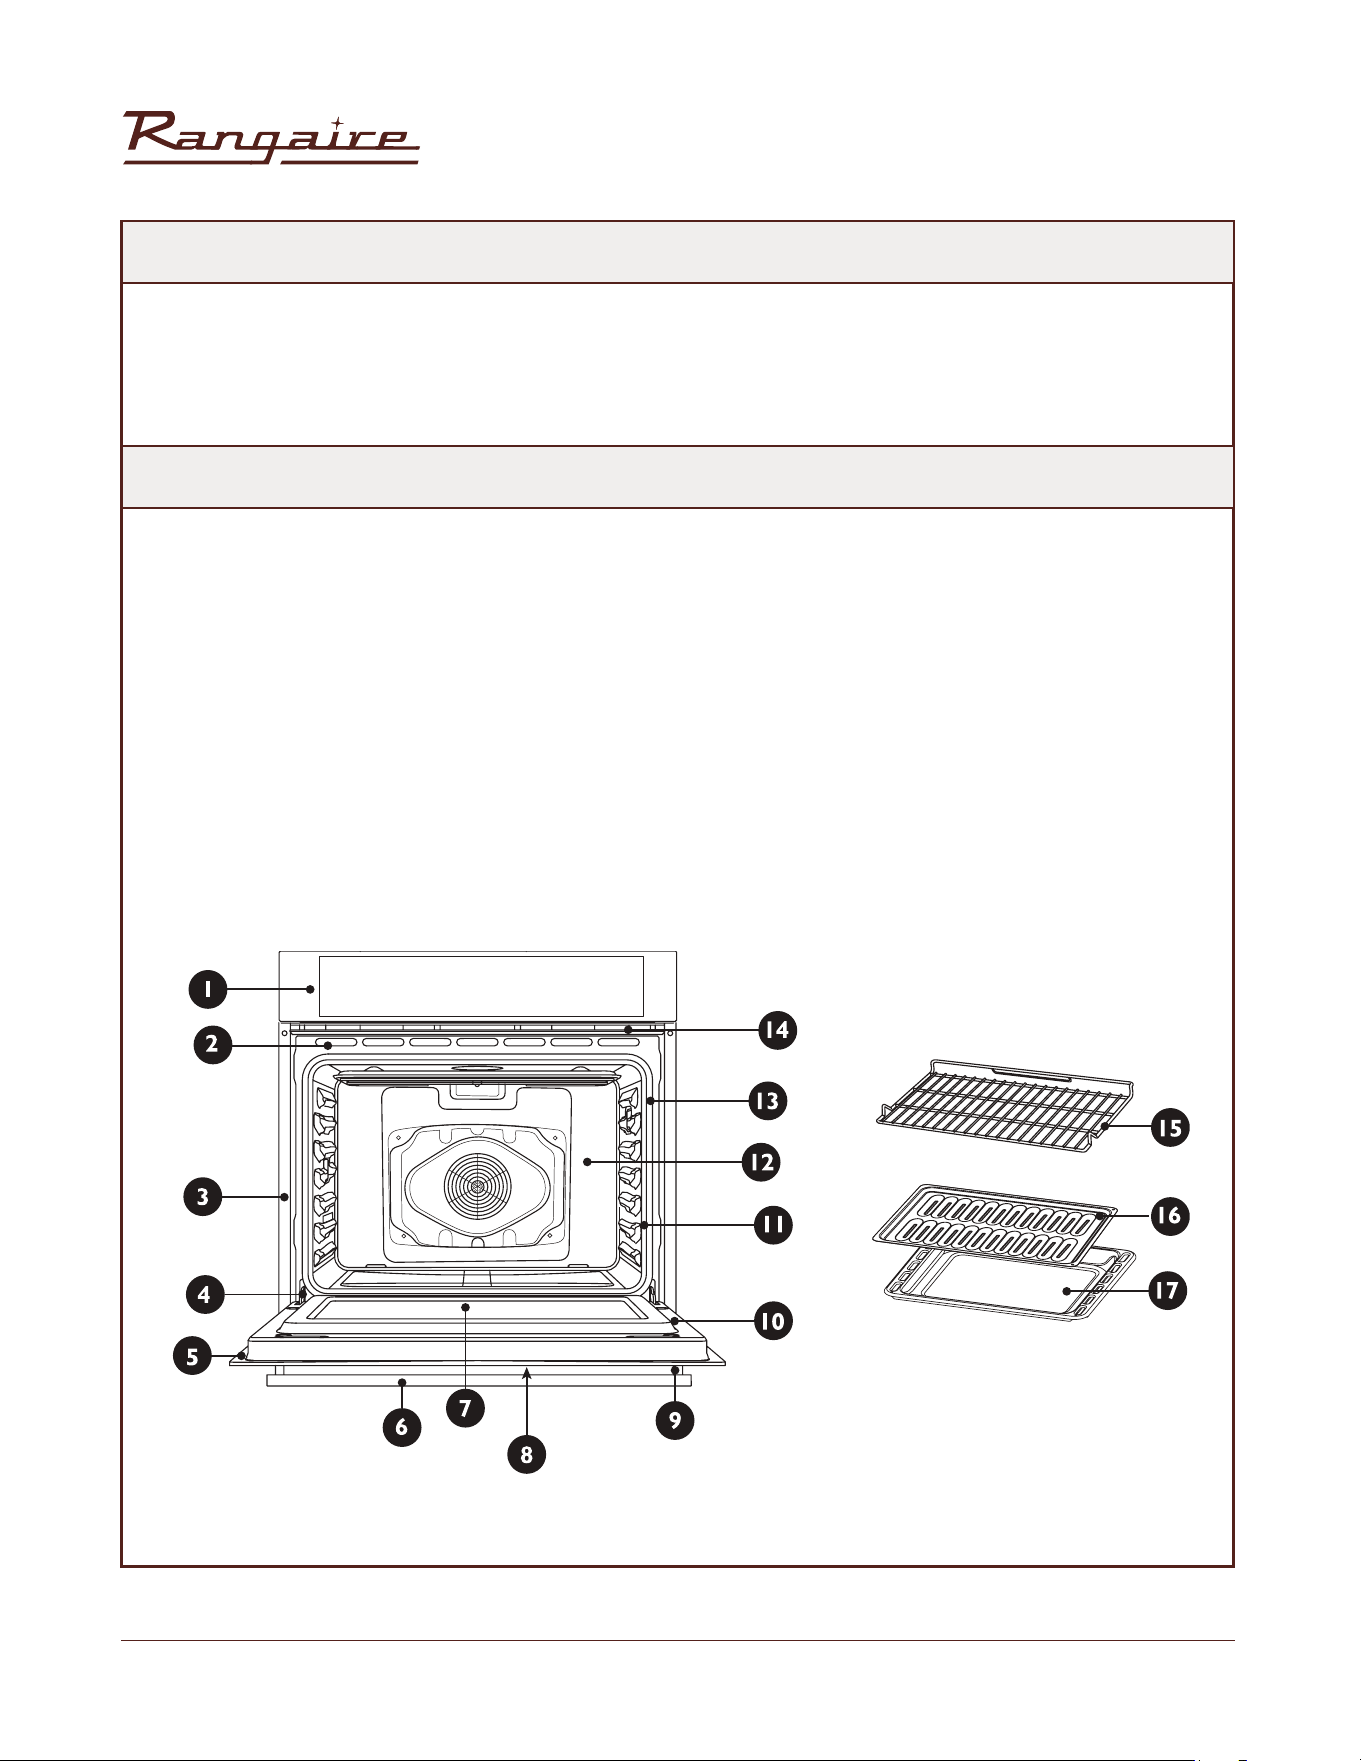
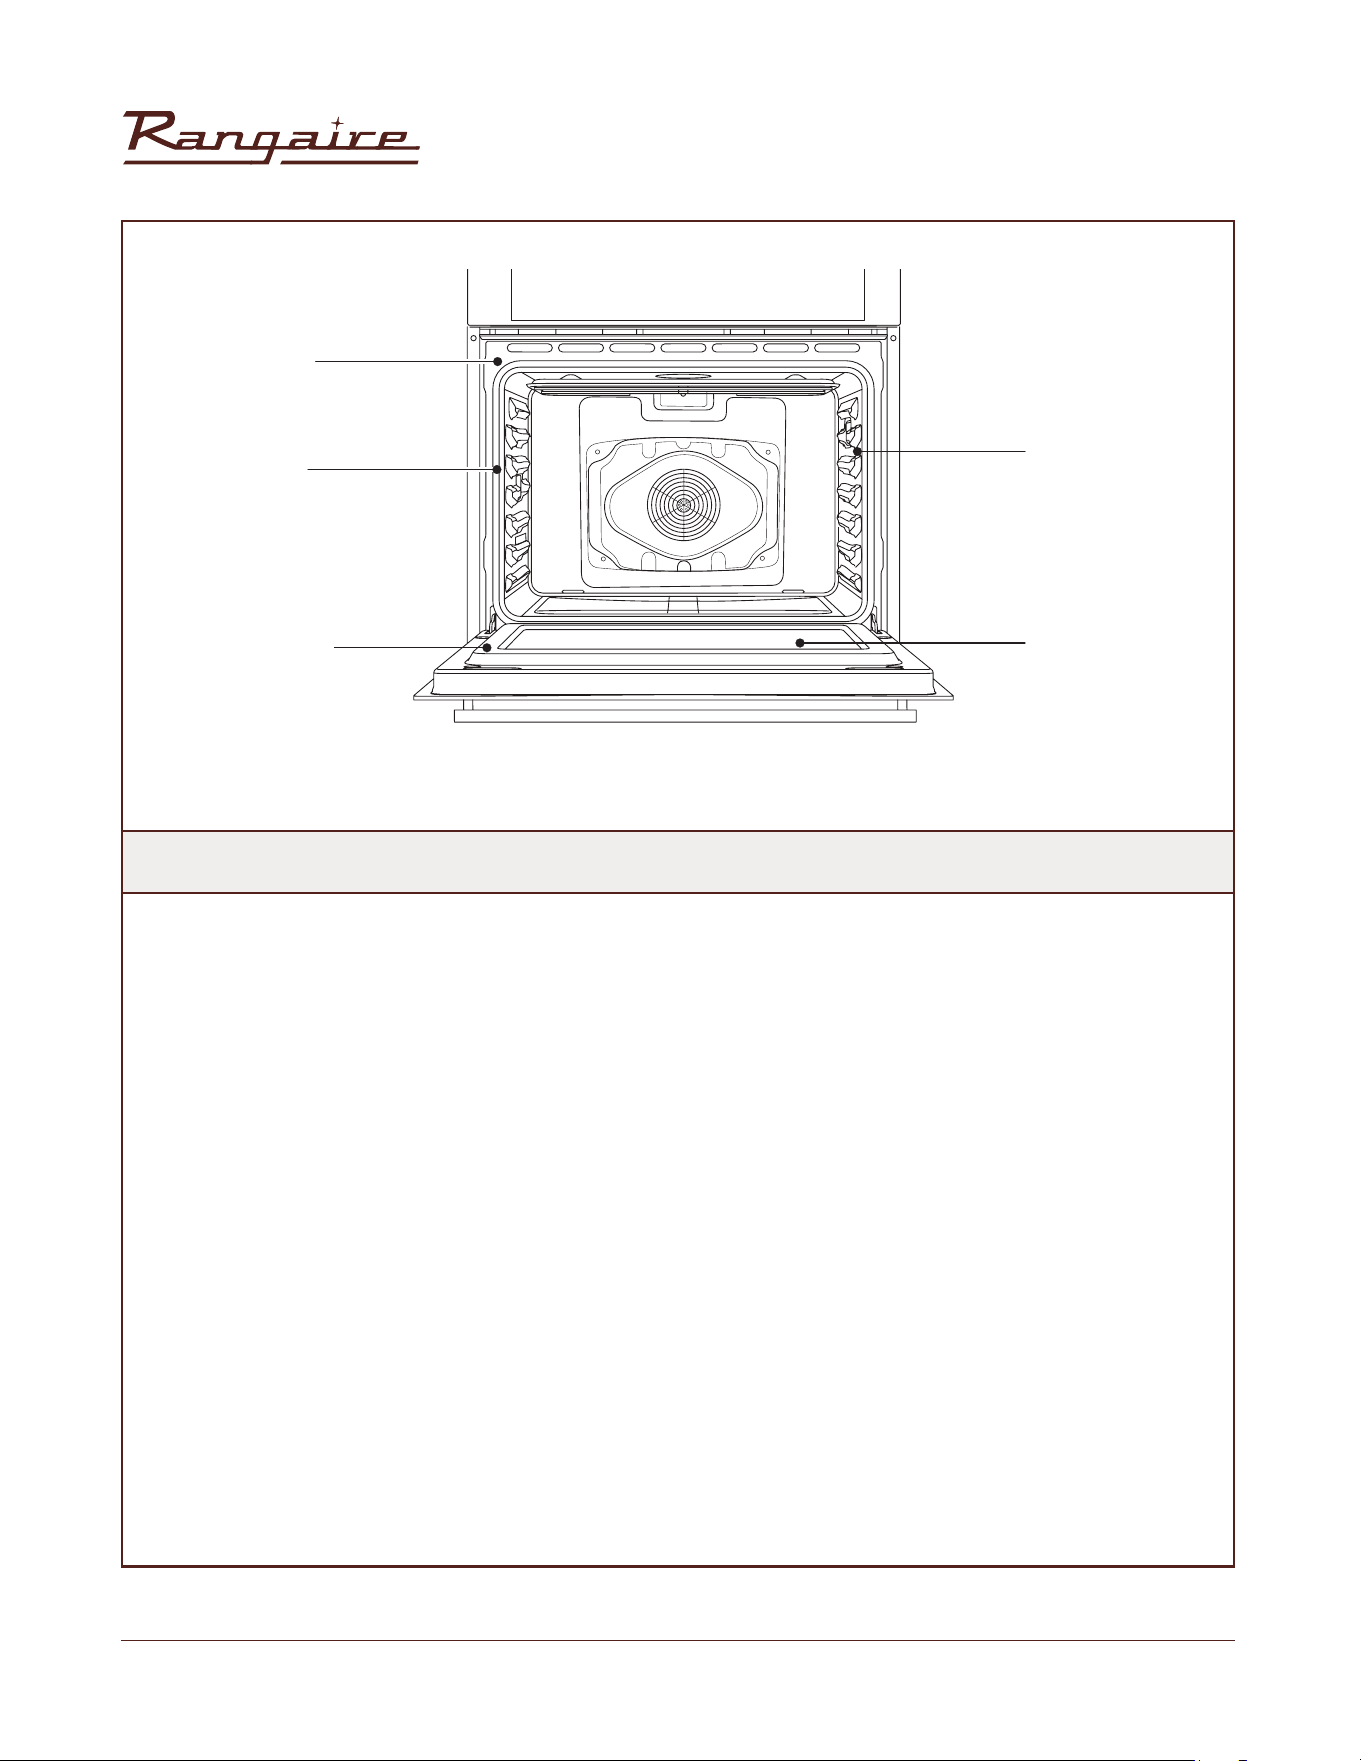
PARTS AND FEATURES
A. Oven Vent
B. Broil Element
C. Control Panel
D. Halogen Light
E. Convection Fan and Element
F. Bottom Element (not visible)
G. Model and Serial # Plate
H. Door Gasket
I. Temperature Probe
J. Oven Rack Back
K. Oven Rack Front
L. Broiler Pan Rack
M. Broiler Pan
h
d
d
g
a
b c
f e
j
l
k
m
i
5
Rangaire: Installation Manual
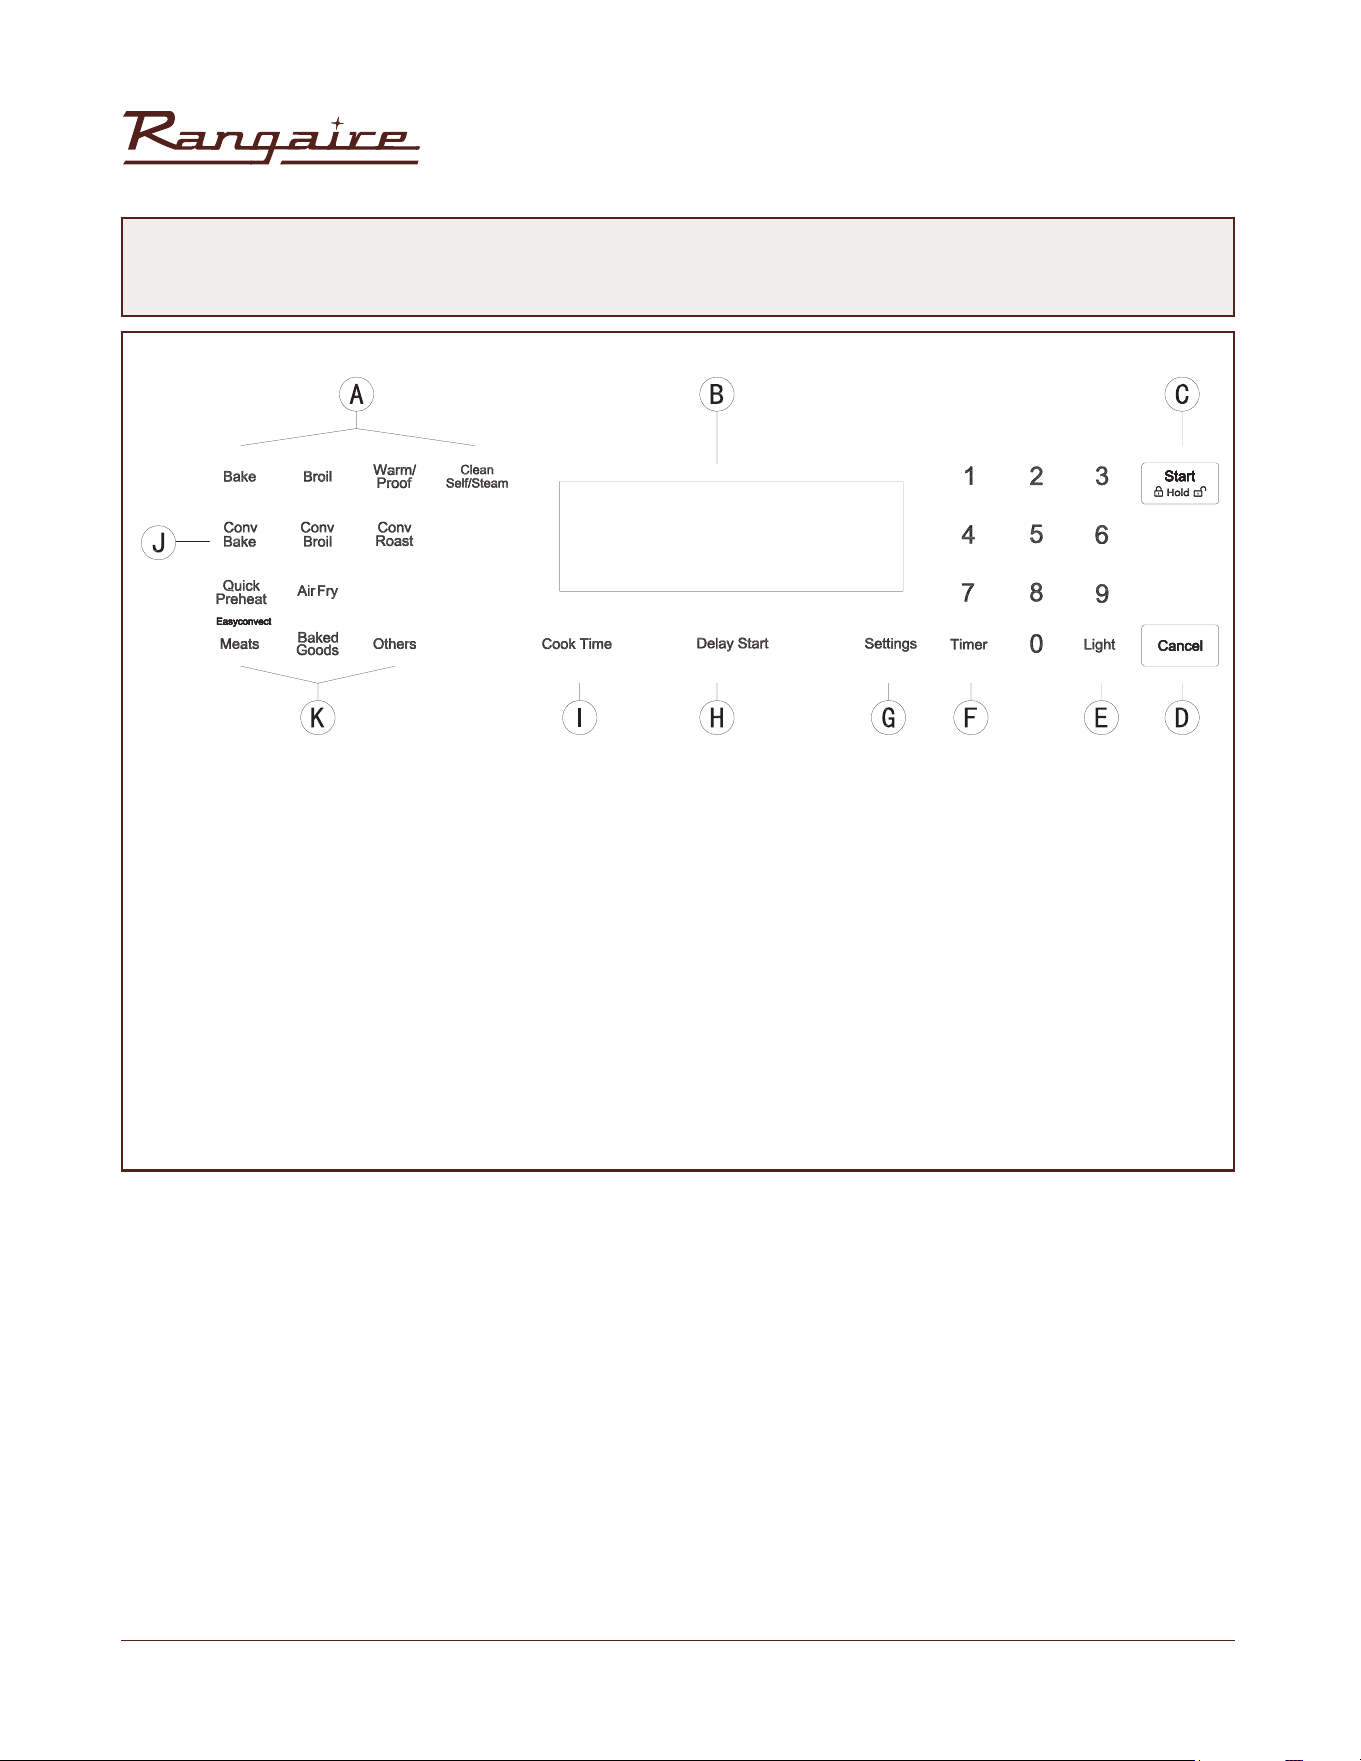
CONTROL PANEL
A. Oven Modes
B. Display
C. Start/Control Lock (hold 3 seconds)
D. Cancel
E. Light
G. Setting
H. Delay Start
I. Cook time
J. Convection Mode
K. Convention Conversion
6
Rangaire: Installation Manual
1. Start: Start button, start operation or start Settings to take effect.
2. Cancel: Cancel button to cancel the current operation
3. Cook time: Bake time button, used to set the bake time.
4. Delay start: The Appointment time button is used to set the start time.
5. Settings: Select system Settings. Press repeatedly to display different Settings.
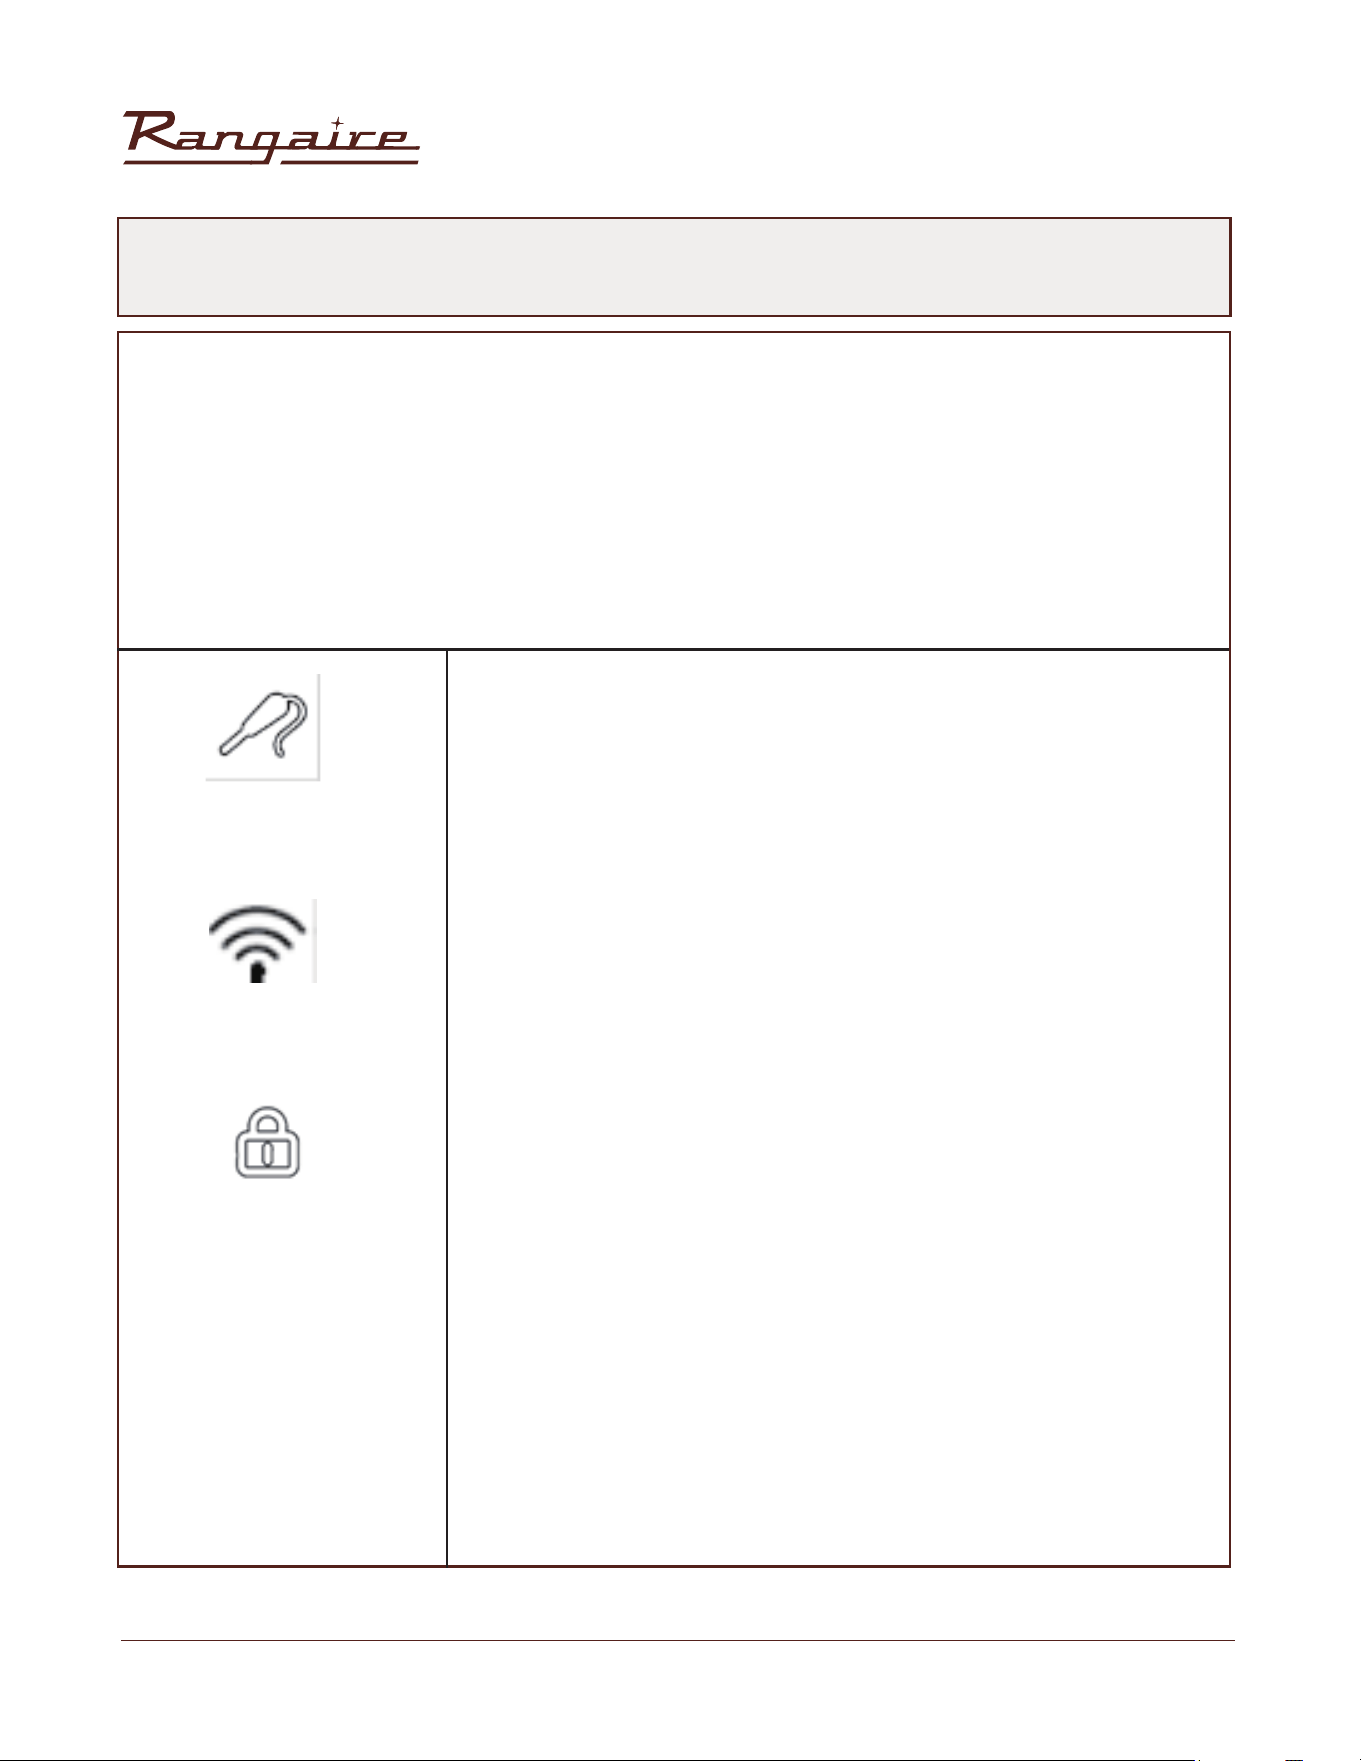
6. Timer: Timer symbol - This symbol is displayed on the LED after the timer function is set.
7. Self clean: Self-cleaning button to start the self-cleaning mode.
Pin symbol - this symbol appears on the display screen when the
system detects a pin(optional).
Wifi symbol (not workable, only reserved), Reserved Wifi interface on
the control board, hold down the Settings button for 3 seconds to enter
the Wifi configuration setting state, blinking until it is stably displayed,
indicating connectivity.
Child lock symbol - the same as locking all keys, the child lock is set, the
display will appear this symbol
1. KEY AND ICON DEFINITIONS
7
Rangaire: Installation Manual
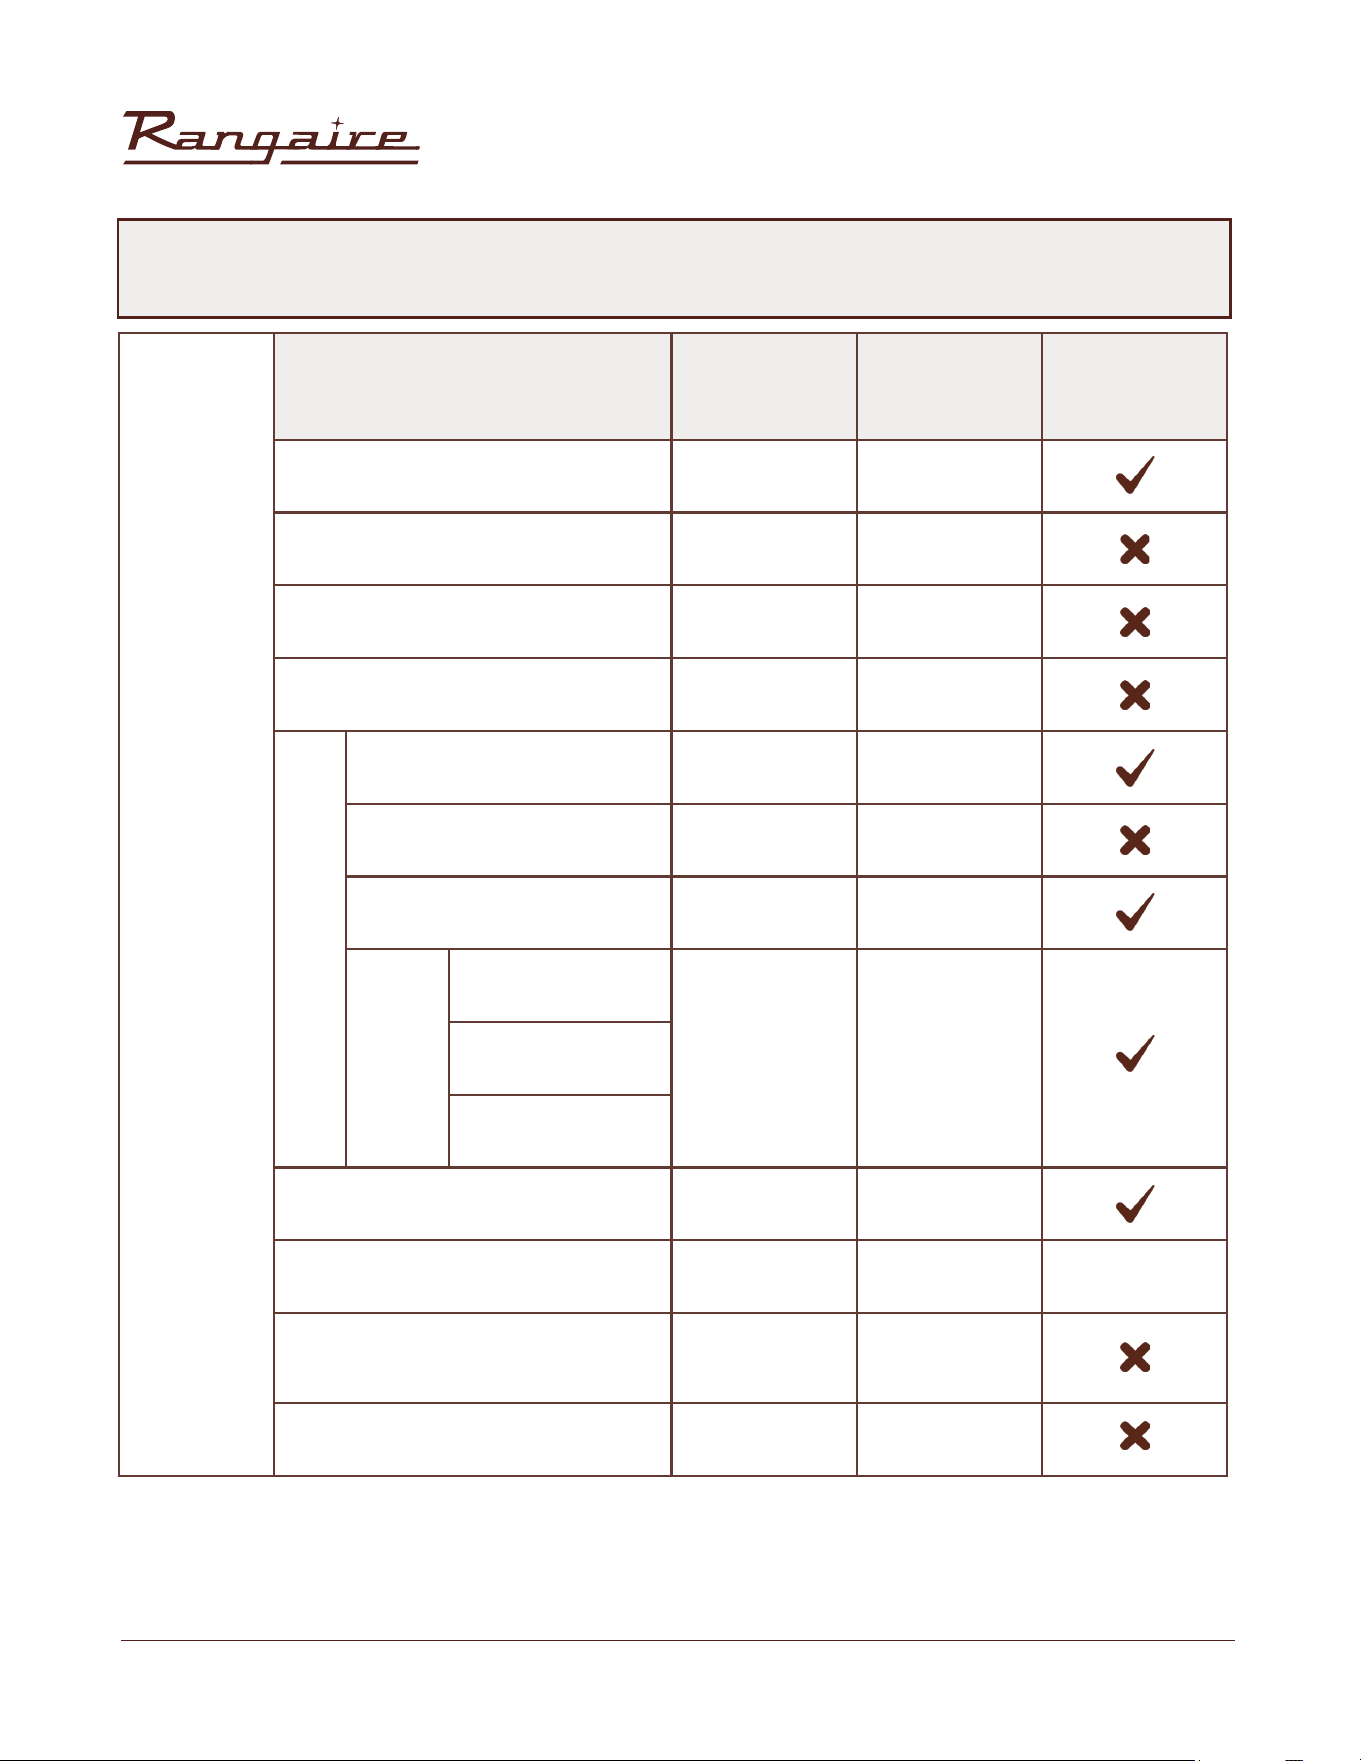
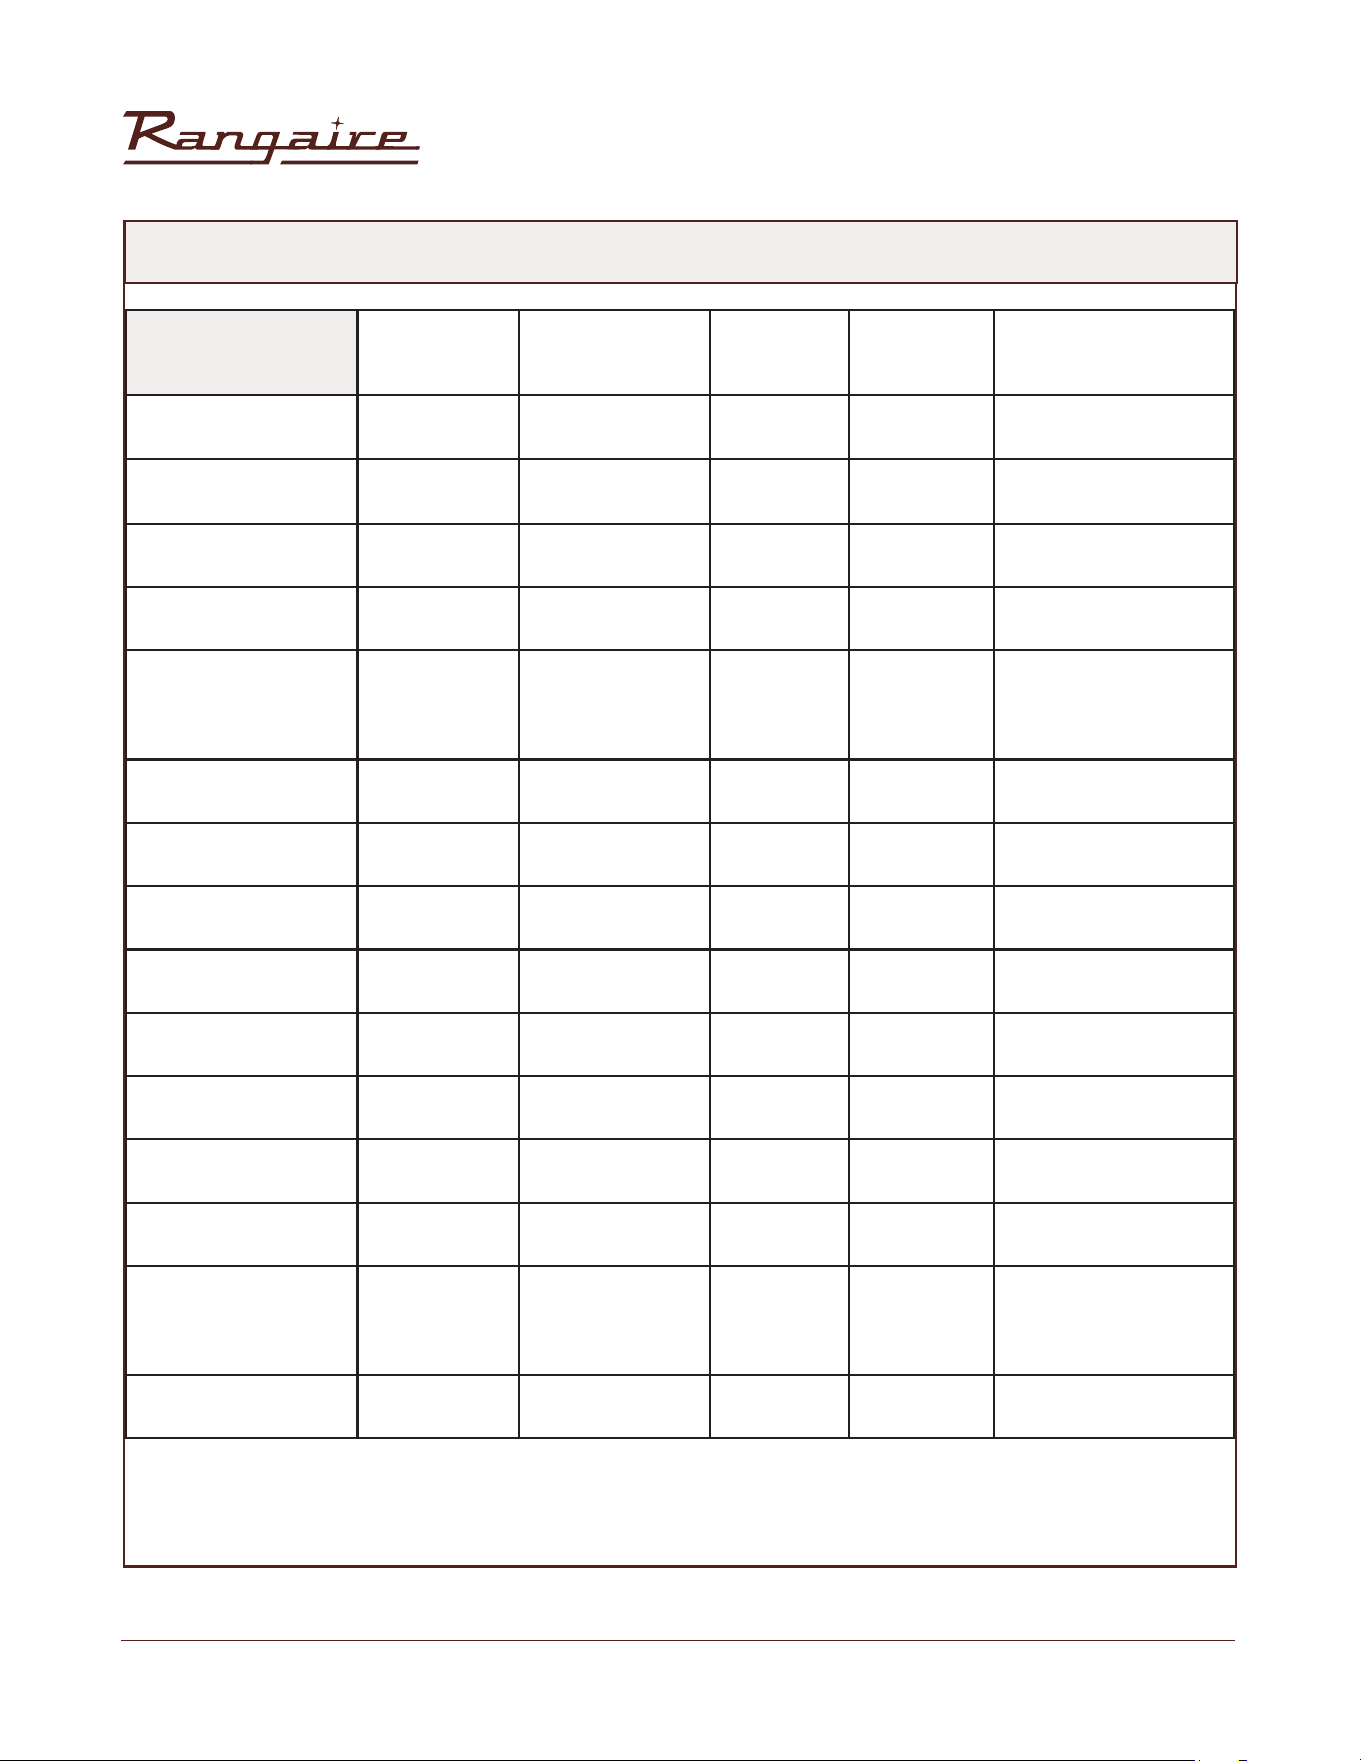
oven Operating Mode
Default
temperature
(
0
F)
Adjustable
range
Preheat phase
Bake 350 170 - 150
Broil Hi Hi Lo
Proof(Press for 3 seconds in
Warm Mode temp)
100 80 - 120
Warm 140 140 - 210
Conv
Convect bake 325 170 - 500
Convect broil 450 170 - 550
Convect roast 325 170 - 550
Easy
Convect
1. Meats
350 170 - 5002. Baked goods
3. Others
Air Fry 420 300 - 450
Self clean No
Core up to 806
0
F
(430
0
c)
Steam clean / /
2. Functional Operation
8
Rangaire: Installation Manual
Note: The preheating stage indicates whether real-time display of temperature is required.
There is a preheating stage: When the actual oven core temperature is less than 170°F, the interface
displays Lo.
When the actual core temperature of the oven is greater than or equal to 170
0
F, the interface displays
the temperature in real time.
When the actual oven core temperature reaches the set value, the interface always displays the set
temperature value.
Non-preheating stage: the set temperature value is always displayed on the heating interface of the
oven from the beginning.
9
Rangaire: Installation Manual
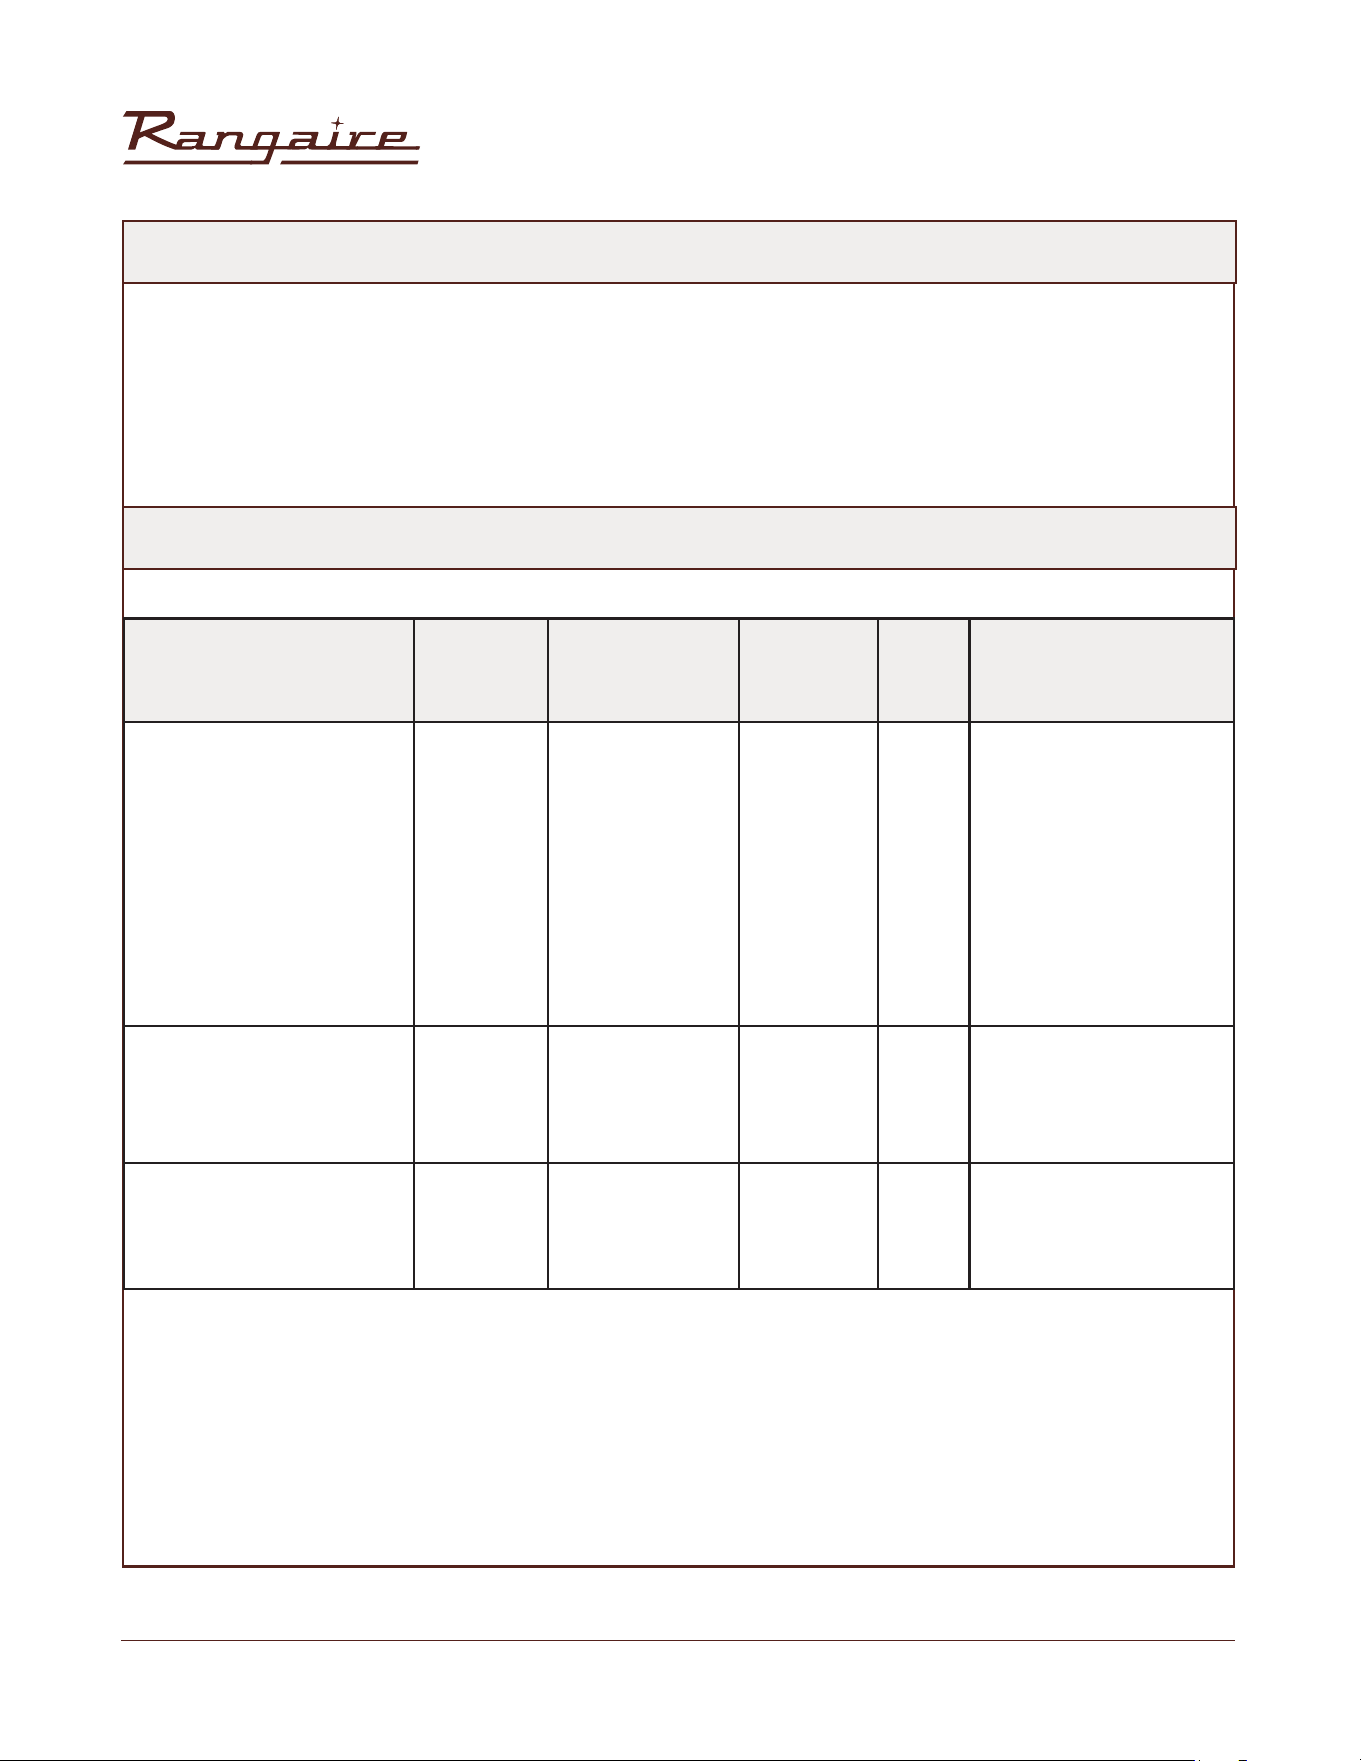
3. Cooking Settings
1. Select the required baking function, touch the button on the display screen, the interface will light
up the function options, and the default temperature and default time will appear on the display
panel.
2. Click Start to Start the operation. When the actual temperature of the furnace core is lower than
170°F, the temperature digital tube only displays Lo. When the actual temperature of the furnace
core is higher than 170°F, the interface needs to display the current temperature in real time. When
the core temperature has reached the set value, the interface will always show that the set value
no longer changes in real time.
3. To set the temperature, you can modify the temperature by touching the corresponding digital
button. The number changes from right to left in turn. If it exceeds the allowed setting range, an
invalid sound "didi" will be emitted when touching the Start button.
4. Set the working time, touch cook time, the time digital tube display --:--, and blink, touch the number
key, the displayed numbers change from right to left, run the setting range (0:00-11:59), if you do not
set this parameter, the oven default 2 hours; If the value exceeds the allowed setting range, the next
operation is not allowed, and the system makes two invalid beeps. After the Cook time is set, the
system prompts you to enter Delay Start or touch start to start the operation
5. To set the appointment function, touch Delay start to set the appointment. The default time is the
current clock time. Delay start indicates when the oven starts to work. After setting, touch the Start
button, and the screen will start the countdown of reservation. If the countdown time exceeds 1
hour, the screen will display in the form of hour/minute. If the countdown time is less than 1 hour, the
display is displayed in the form of minutes per second.
10
Rangaire: Installation Manual
Touch the Self Clean button in the control panel to enable the Self clean mode
After touch self clean button Self Clean, Self Clean icon lights up
1. 2:00 working time 2:00
2. 3:00 working time 3:00
3. 3:30 working time 3:00
Self clean mode
Touch self clean
key
Repeatedly touch the self Clean key to select Clean Time
2:00 3:00 3:30 (Default)
Touch delay time Set start time (optional)
Touch start The door lock motor began to turn
The door lock motor has touched latch, indication that the door has
been locked, and the child lock icon on the screen lights up
Heating starts
Ending End
Other situation
When the self-cleaning cycle is nished and the temperature does
not reach the unlock temperature, manually press the Start button
at this time, and the buzzer prompt will be invalid
4. Self clean mode
11
Rangaire: Installation Manual
• To access the setting function, press the Settings button on the switch panel. There are seven
Settings. You can press the Settings button repeatedly to select the Settings
Touch the Settings once to enter the clock setting. By default, the current time is 12:00. At this time, you
can enter the required time, for example, 11:00, you can touch 1, 1, 0, 0, the original time number first zero,
--:--, and then the number changes from right to left, press the start key to save the current data and
exit, or directly cancel not saving the current data and exit.
Press the Settings button twice. The Interface Displays the default unit to set the temperature unit.
The default unit is Fahrenheit set sound
5. SETTING FUNCTION
SETTING CLOCK:
SETTING TEMP UNIT:
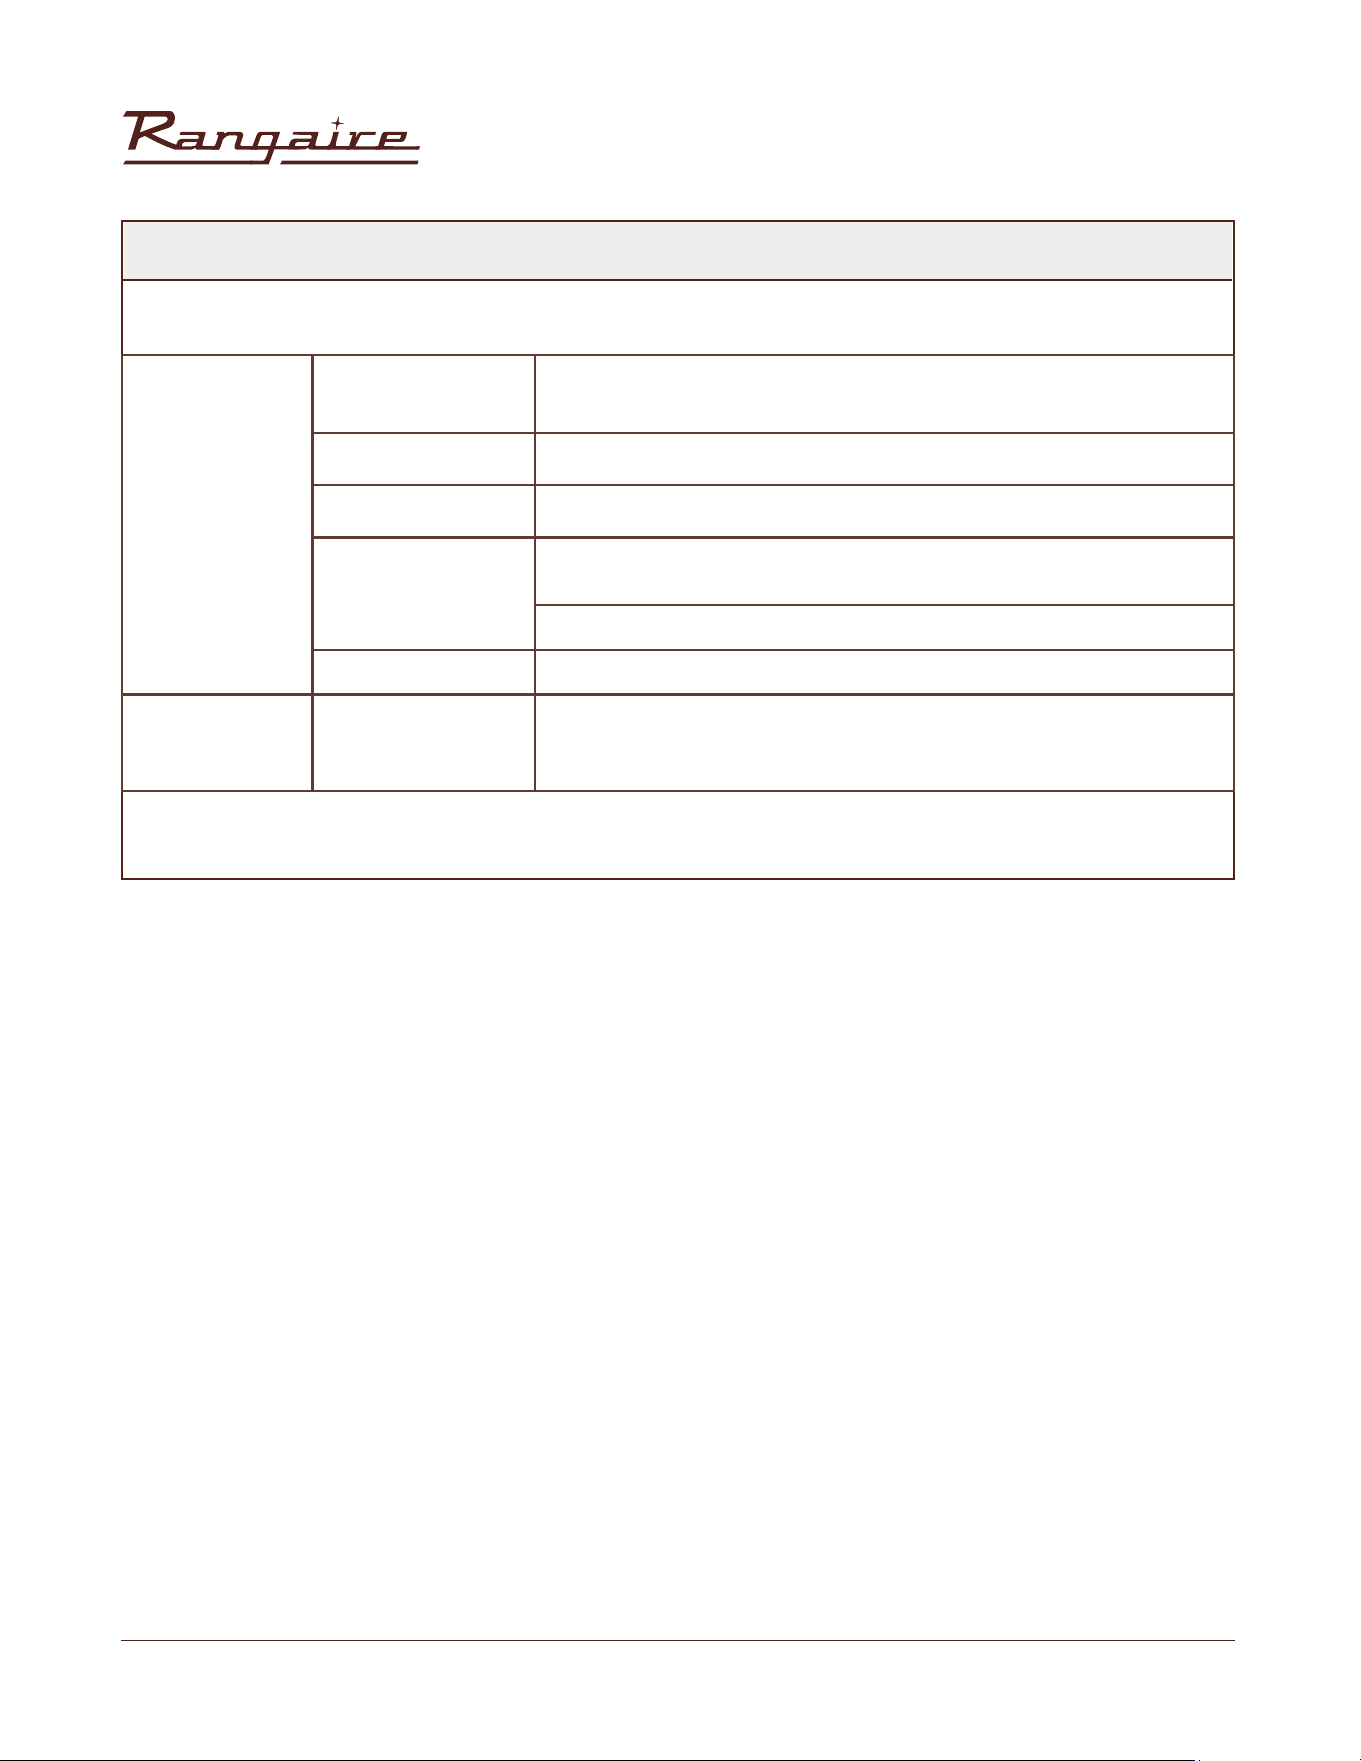
Parameter that
can be set
Touch Settings
repeatedly
Configurable content Default
Clock Touch one Set clock 12:00PM
Temp unit Touch twice Press1:Degree F/C F
Sound Touch three Press1:On/Off On
Calibration Touch four
Press1 to change mode
Then Press3 to increase
Press6 to decrease
00°F (-30°F - 30°F)
Demo mode Touch ve Press1: On/Of Off
12/24 H Touch six Press1: 12 H/24 H 12 H
Sabbath Touch seven Press1: On/Of Off
12
Rangaire: Installation Manual
Sound is used to control whether or not the buttons sound, but the work tone is always present. Press
the Settings button three times. The current sound status is displayed in the middle of the screen. On
indicates that sound is enabled, and Off indicates that sound is disabled. You can switch by touching
the number key 1. Touch the Start key to confirm exit.
This parameter is set to facilitate users to enter the demonstration mode and perform operations
on the interface in any mode. However, heating components such as the electric heat pipe are not
enabled. The default value is OFF. Press the Settings key 5 times to enter the demo, then press the
number key 1 to switch. Touch the Start key to confirm exit
1. When the oven is on standby, touch the "Start" button and hold for 3 seconds. The control panel is
locked.
2. At this time, only the Start key is effective in the control panel, and other keys are invalid. When other
keys are touched, the child lock icon on the screen blinks and an invalid tone is heard concurrently.
3. When the oven enters the working state, touch the "Start" button and hold it for 3 seconds, the
control panel will be locked, except the "Start" button, other keys are invalid, the child lock icon will
flash when touching other keys, if there is no unlock after 3 seconds, return to the current operating
state, touch the "Start" button and hold it for 3 seconds, the child lock will be released, At the same
time, the child lock symbol on the screen disappears
4. The child lock function is only effective in the interface of standby and mode operation, and not in
other Settings interface
SET SOUND:
SETTING DEMO MODE:
6. CHILD KEY FUNCTION
13
Rangaire: Installation Manual
7. THE ALARM FUNCTION
8. ERROR ALARM MESSAGE
Abnormal Temperature sensor: Err1
In any state, if the temperature sensor is open or short, the oven will give an alarm and display Err1. In
this case, cancel can be performed
1. Touch the timer button on the numeric keypad to enter the alarm Settings as shown below:
12 hours is the longest alarm setting allowed. The display mode is in (hours: minutes) and (minutes:
seconds), if the setting time is less than 1 hour, then the system shown in the form of (minutes: seconds),
if the set time more than one hour, then the system shown in the form of (hours: minutes). If you need
to set the alarm after 30 minutes, you only need to touch 3 and 0 on the numeric keypad. After setting,
you need to touch the alarm icon key again to confirm, and the alarm starts to count down.
• Touch the number key3
• Touch the number key0
• Touch timer key to be confirmed
After setting the alarm, enter the alarm countdown. In standby state, the alarm clock is on the digital
tube of the screen. In the running state, the alarm time is not displayed, only the alarm symbol is
displayed
At the end of the countdown, the buzzer rings and the alarm symbol blinks with 00:00 at the same time.
At this time, you can touch any key to cancel the alarm. If there is no touch, the alarm will stop after one
minute, and the alarm icon and 00:00 will stop blinking and disappear
2. Alarm cancellation: just touch the alarm setting button.
14
Rangaire: Installation Manual
NOTE: Any odor that may be detected during this initial use is due to the evaporation of
substances used to protect the oven during storage.
1. Turn the Temperature Control to the highest setting.
2. Turn the Cooking Mode Selection control to a cooking mode.
3. Allow the oven to operate for 30 minutes with the door closed and no food in the cavity.
1. Place bake ware with food on one or both shelves provided with the oven.
2. Press the Oven Mode control for the desired oven function.
3. Use the number keypad to enter the oven temperature.
4. Press START.
• Preheat the oven when using the Bake, Convection Bake and Convection Roast modes.
• Selecting a higher temperature does not shorten the preheat time.
• Preheating is necessary for good results when baking cakes, cookies, pastry and breads.
• Preheating will help to sear roasts and seal in meat juices.
• Place oven racks in their proper position before preheating.
• During preheating, the selected cooking temperature is always displayed.
• A beep will confirm that the oven is preheated and the "PREHEAT" writing will turn off.
4. Turn off the oven, and allow the oven to cool
IMPORTANT: Do not place anything, including dishes, foil and oven trays, on the bottom of the oven
when it is in operation to avoid damaging the enamel.
BEFORE USING THE OVEN
GENERAL
PREHEATING THE OVEN
15
Rangaire: Installation Manual
OPERATIONAL SUGGESTIONS
TO USE THE TEMPERATURE PROBE:
IMPORTANT:
Always unplug and remove the temperature probe from the oven when removing the food.
NOTE:
For meats, the probe tip should be inserted into the center of the thickest part of the meat. Make sure
that the probe tip is not into the fat or touching bone.
Use an oven mittto remove temperature probe.
Do not touch broil element.
Failure to do so can result in burns.
The temperature probe monitors the internal food temperature, which is frequently used as an
indicator of doneness specially for meats and poultry and turns off oven when the internal food
temperature reaches the programmed temperature. The temperature probe will work with all oven
modes except for the Warm/Proof, Sabbath and Self-Clean modes.
• Use the cooking charts, in this manual, as a guide.
• Do not set pans on the open oven door.
• Use the interior oven lights to view the food through the oven door window rather than opening the
door frequently
1. Insert the probe into the food.
2. Place the food into the oven. Keeping the temperature probe as far away from a heat source as
possible, plug the temperature probe into the oven outlet. Close the oven door.
3. Select the oven mode.
Burn Hazard
16
Rangaire: Installation Manual
NOTES:
The internal food temperature can be set between 110°F and 200°F (43°C and 93°C). When the set probe
temperature is reached the oven will turn off.
NOTES:
The probe icon will remain lit in the display until the probe is unplugged.
4. Enter the oven temperature by pressing the numbers on the keypad.
5. Press START. The set oven temperature will appear on the display throughout cooking.
6. Enter the desired internal food temperature by pressing the numbers on the keypad, and then press
START.
7. Press cancel when finished. Unplug the temperature probe and remove food from the oven
17
Rangaire: Installation Manual
UTENSILS
HIGH ALTITUDE BAKING
OVEN RACKS
TO REMOVE OVEN RACKS:
• Glass baking dishes absorb heat. Reduce oven temperature 25°F (15°C) when baking in glass.
• Use pans that produce the desired browning. Th type of finish of the pan will help determine the
amount of browning that will occur.
− Shiny smooth metal or light non stick/anodized pans reflect heat resulting in lighter, more
delicate browning. Cakes and cookies require this type of utensil.
− Dark, rough or dull pans will absorb heat resulting in a browner, crisper crust. Use this type for
pies.
• Do not cook with the empty boiler pan in the oven, as this could effect cooking performance. Store
the broil pan outside of the oven.
When cooking at high altitude, cooking times may be extended.
Pull rack out to the stop position, raise the front edge, and then lift out.
IMPORTANT:
to avoid permanent damage to the porcelain finish, place food or bake ware on an oven rack. Do not
place food or bake ware directly onto the oven door or oven bottom.
• The oven racks can be placed in any of the six height positions with the oven.
• Position racks before turning on the oven.
• Make sure the oven racks are level.
• Oven racks have a stop to keep them from being unintentionally withdrawn fully
18
Rangaire: Installation Manual
TO REPLACE OVEN RACKS:
COMPONENT COOLING FAN
OVEN DOOR
OVEN VENTS
Place oven rack on the wire supports along the sides of the oven. Tilt the front edge up slightly, and
slide rack to the rear until it clears the stop position. Lower the front and slide the rack into the oven.
Activates during any cooking or self-cleaning mode to cool inner components and outer door
surfaces. This air is exhausted through the vent located above the oven door. it continues to run until
components have cooled sufficiently. The cooling fan operates at double speed (or RPM’s) in self-
clean and whenever the internal components temperature becomes high
To avoid oven door glass breakage:
• Do not close the oven door if the racks are not fully inserted into the oven cavity or if bakeware
extends past the front edge of an oven rack.
• Do not set objects on the glass surface of the oven door.
• Do not hit glass surfaces with bake wear or other objects.
• Do not wipe down glass surfaces until the oven has completely cooled
Blocking or covering the oven vents will cause poor air circulation affecting, cooking cleaning and
cooling results.
• Both the upper and lower oven vent(s) allow fresh air to enter the cooling system.
• The lower oven vent also allows hot air to be expelled from the cooling system. Do not wipe down
glass surfaces until the oven has completely cooled
19
Rangaire: Installation Manual
OVEN CONDENSATION AND TEMPERATURE
OVEN TEMPERATURE CONTROL
• It is normal for a certain amount of moisture to evaporate from the food during any cooking process.
The amount depends on the moisture content of the food.
• The moisture may condense on any surface cooler than the inside of the oven, such as the control
panel.
• Your new oven has an electronic temperature sensor to help maintain an accurate temperature.
Your previous oven may have had a mechanical thermostat that drifted gradually over time to a
higher temperature. It is normal that you may need to adjust your favorite recipies when you cooking
in a new oven.
This oven provide accurate tempratures how ever it may cook faster or slower than your previous oven,
so the temprature calibration can be adjested. It can be adjested by digrees fahrenheit or celcius.
A minus sign means the oven will be cooler by the displayed amount. The absence of
a minus sign means the oven will be warmer by the displayed amount.
To Adjust Oven Temperature Calibration:
• Press SETTINGS. The various Options will appear in the display.
• Press number 9 on the keypad. “CALIBRATION” “PRESS 3 TO INCREASE/PRESS
• 6 TO DECREASE” will scroll across the display.
• Press number 3 on the keypad to increase or number 6 to decrease the
• tempraturer in (50F) (30C) increments. The adjustment can be set between 300F (18°C) and -30°F
(-18°C).
• Press settings to save the adjustment, and then exit the temprature calibration menu
ADJUSTMENT F
0
(ADJUSTMENT °C) COOKS FOOD
10°F (6°C) a little more
20°F (12°C) moderately more
30°F (17°C) much more
-10°F (-6°C) a little less
-20°F (-12°C) moderately less
-30°F (-17°C) much less

20
Rangaire: Installation Manual
OVEN MODES
BAKE
BROIL
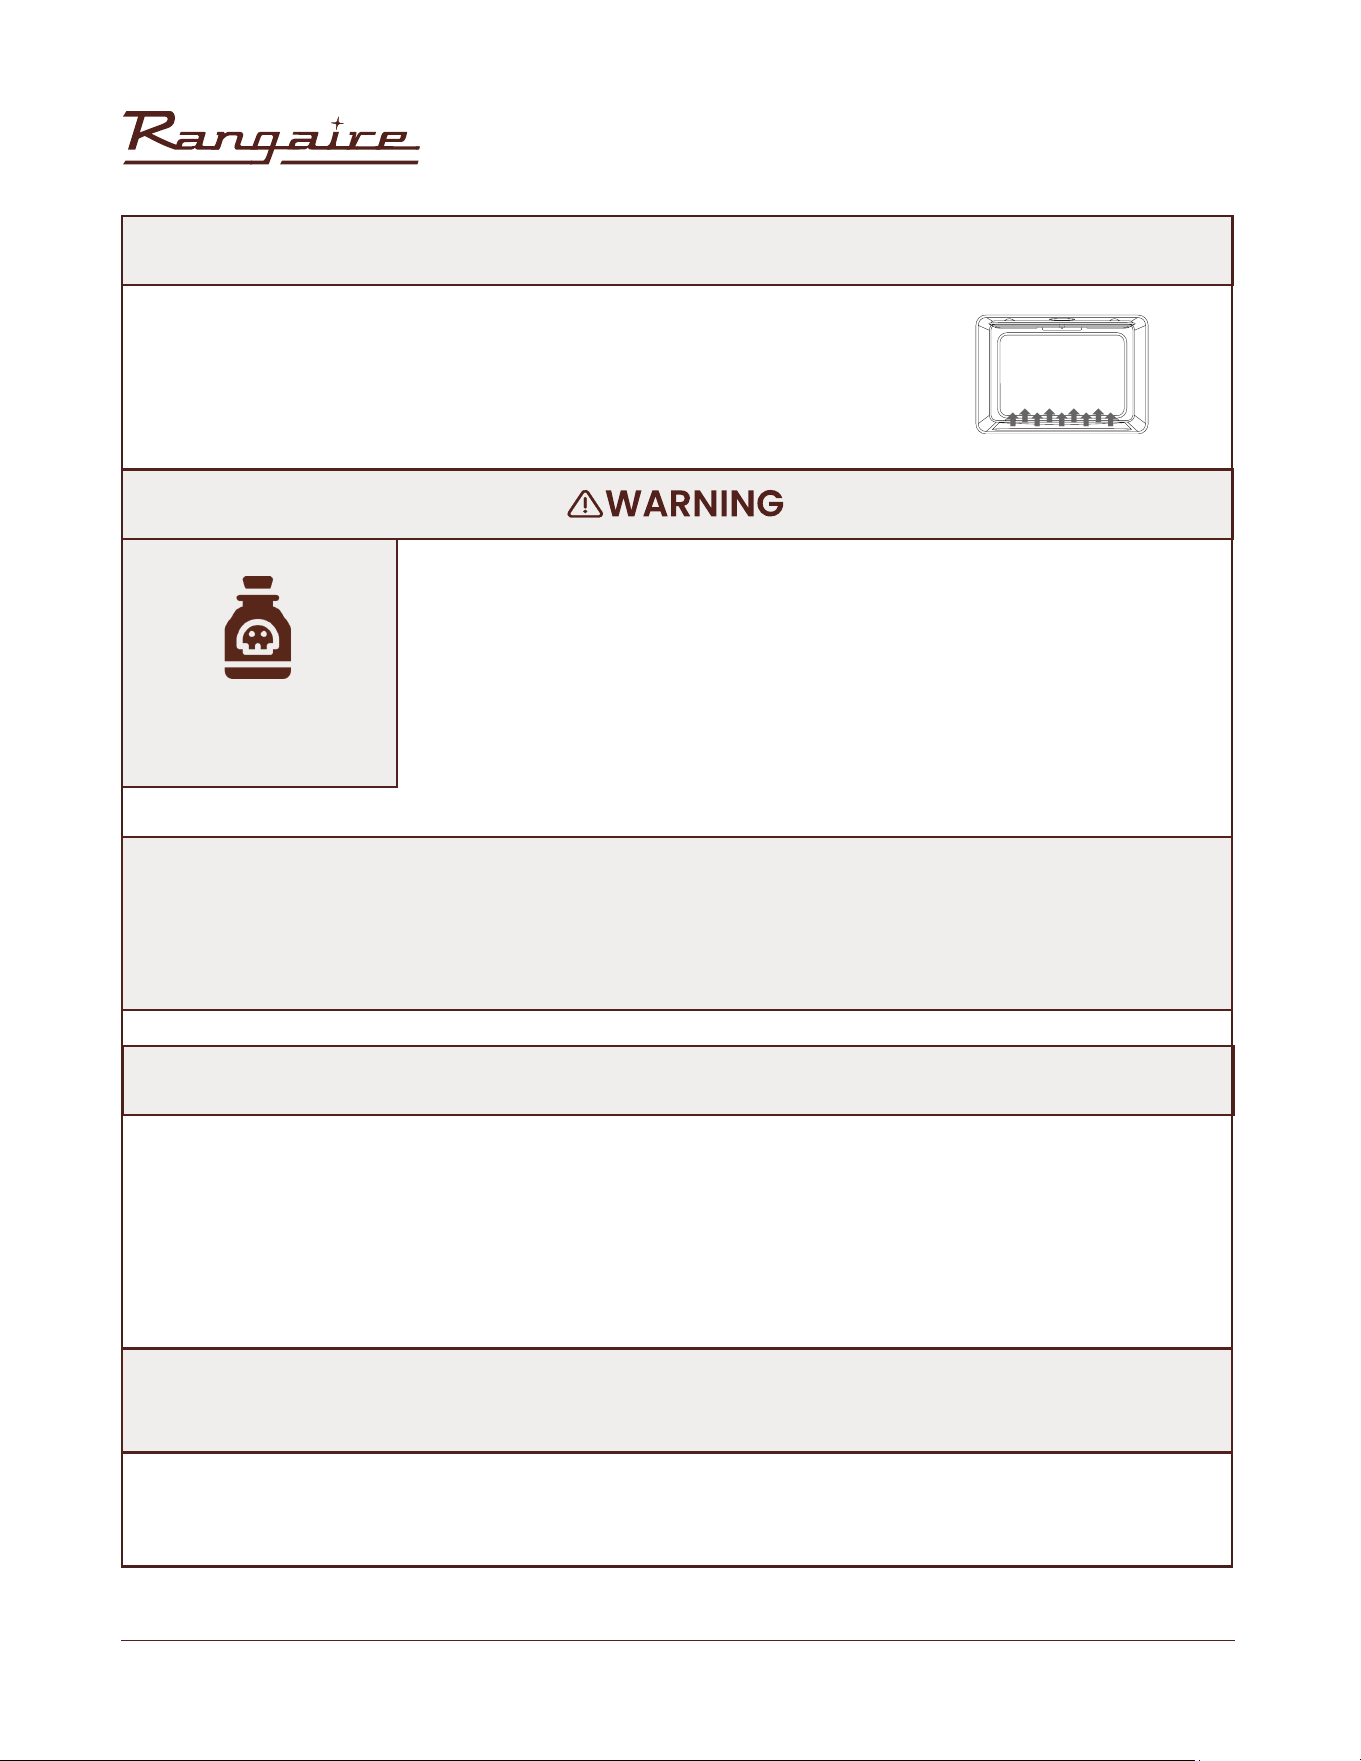
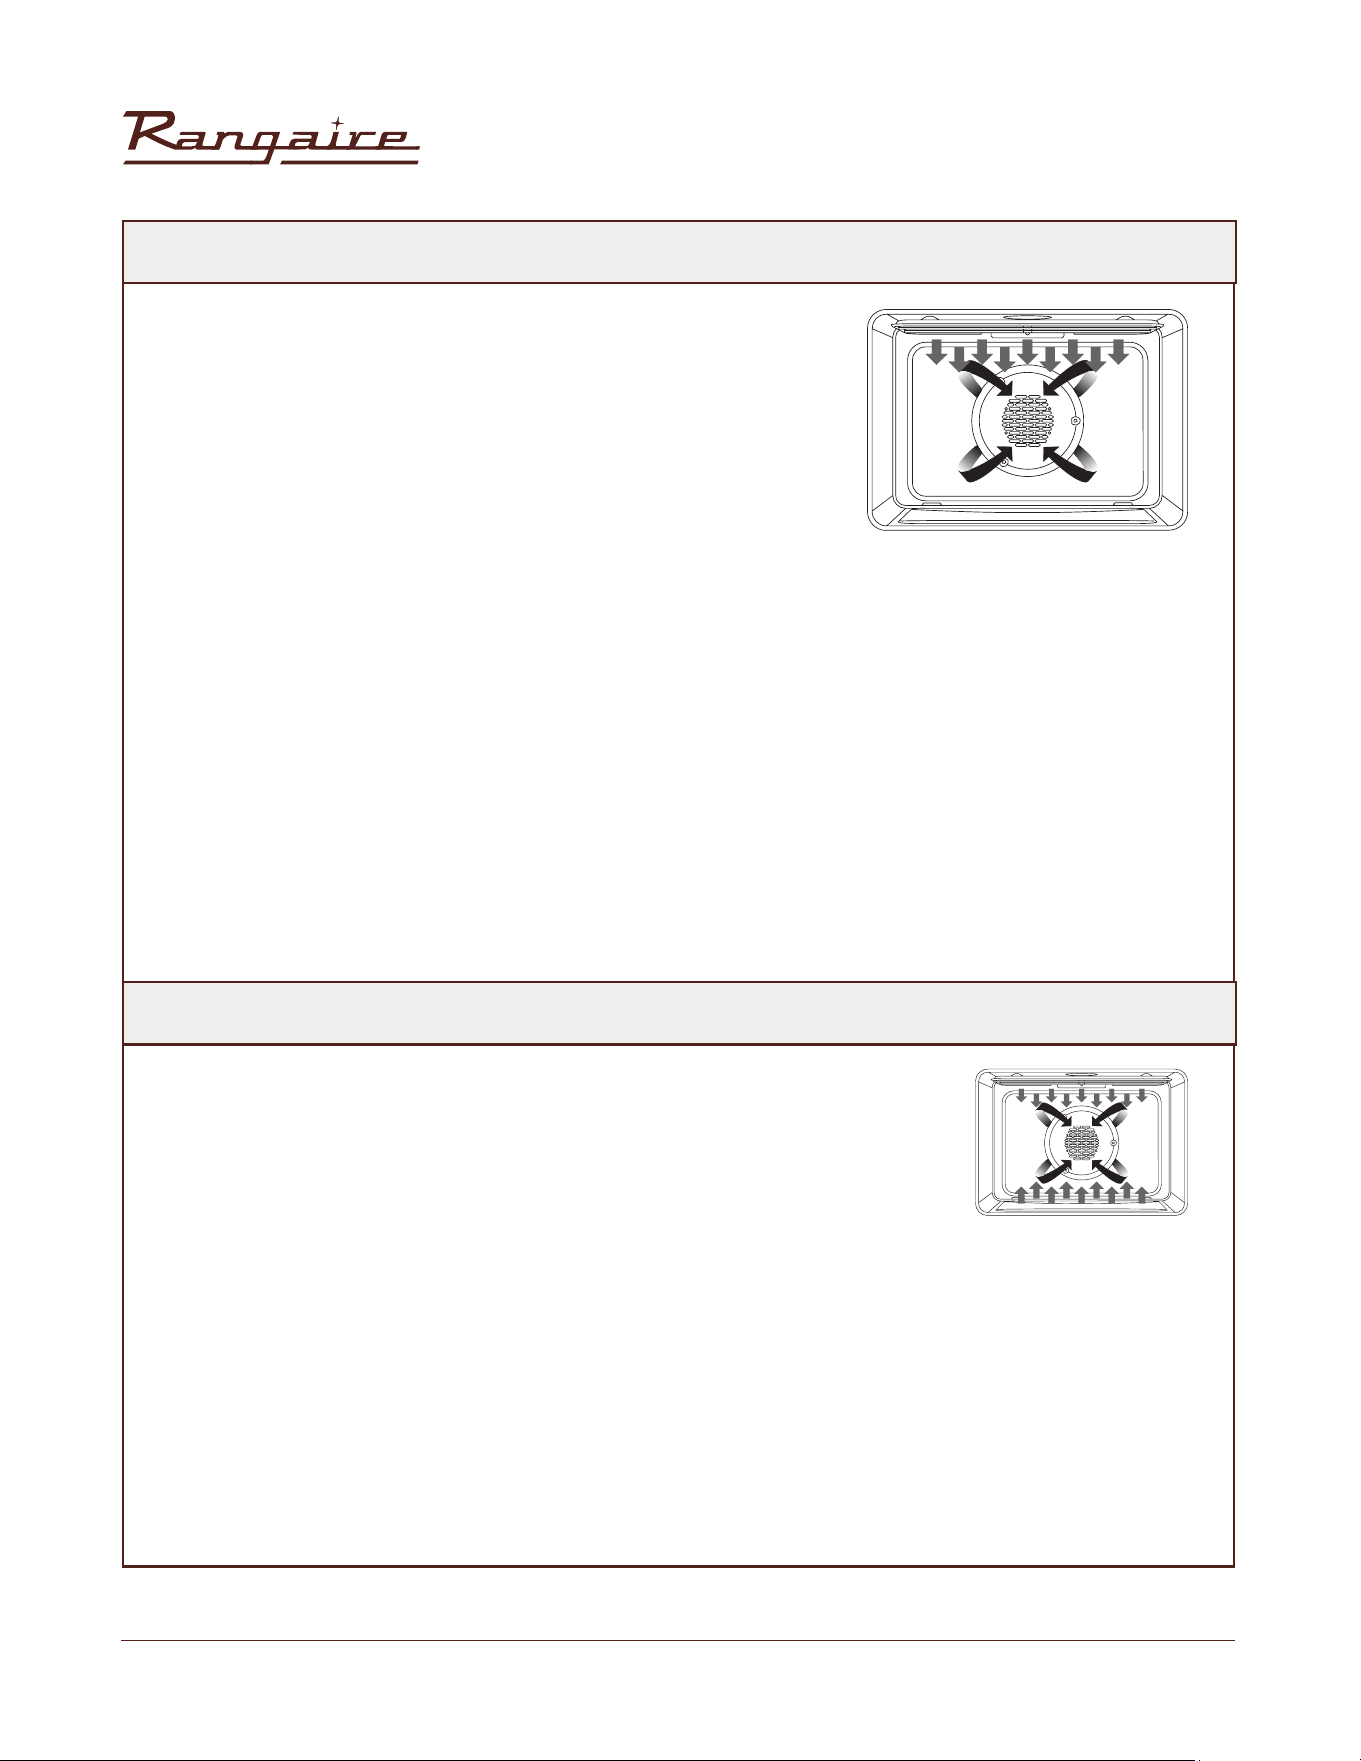
The illustrations show the heating elements and fans used for each oven mode.
Baking is cooking with heated air. Both upper and lower elements in the
oven are used to heat the air but no fan is used to circulate the heat.
Follow the recipe or convenience food directions for baking
temperature, time and rack position. Baking time will vary with the
tremprature of ingredients and the size, shape and finish of the
bakeware.
1. Press BAKE to select the bake mode. “BAKE” will appear in the display
and 350°F (177°C) will be display.
2. Press START, if you wish to cook at 350°F (177°C).OR Enter the desired
temperature by pressing the number keypad, and then press START.
The temperature can be set from 170°F (77°C) to 500°F (260°C).
Broiling uses direct radiant heat to cook food. The lower the
temperature, the slower the cooking. Thicker cuts and unevenly shaped
pieces of meat, fish and poultry may cook better at lower broiling
temperatures.
NOTE: The lower element is concealed under the oven floor.
NOTE: The temperature can be changed at any time during cooking. Press CANCEL to clear the settings.
Select oven mode, then enter the desired temperature by pressing the number keypad, and then press
START.
After selecting an Oven Mode and Temperature, you have the option to set a Cook Time and Start Time
before pressing START. See “Cook Time” and “Start Time.”
3. Press CANCEL when finished baking and remove food from the oven
21
Rangaire: Installation Manual
TO BROIL:
• For best result, use a broiler pan and rack. It is designed to drain juices and help avoid spatter and
smoke.
• For proper draining, do not cover the grid with foil. The bottom of the pan may be lined with
aluminum foil for easier cleaning.
• Trim excess fat to reduce spattering. Slit the remaining fat on the edges to avoid curling.
• Select HI/550°F (288°C) broil for most broiling. Select LO/450°F (232°C) broil for low temperature
broiling of longer cooking foods such as poultry to avoid over browning.
• Pull out oven rack to stop position before turning or removing food. Use tongs to turn food to avoid
losing juices. Very thin cuts of fish, poultry or meat may not need to be turned
• Place the food on the rack in the broiler pan and place pan in the oven. Close the oven door.
• Press BROIŁ for the desired modę. “BROIŁ” and “Set temp or Press START” will appear in the display,
and “550ºF” (288ºC) will be displayed.
• Press START, if you wish to broil at 550°F (288°C). OR Enter the desired temperature by pressing the
number keypad, and then press START. The temperature can be set from 450°F (232°C) to 550°F
(288°C).
• “BROIL” will appear in the display after Start is pressed.
NOTES: Preheating is not necessary.
NOTES:
• The broil temperature can be changed at any time during cooking. Press CANCEL to clear the settings.
Select oven mode, then enter the desired temperature by pressing the number keypad, and then
press START.
• After selecting an Oven Mode and Temperature, you have the option to set a Cook Time and Start
Time before pressing START. See “Cook Time” and “Start Time.”
• Press cancel when finished boiling, and remove food from the oven
22
Rangaire: Installation Manual
Food Poisoning
Hazard
WARM/PROOF
Do not let food sit in oven more than one hour before or after cooking.
Doing so can result in food poisoning or sickness.
WARM
• The Warm mode keeps hot, cooked foods at serving temperature.
• The Proof mode prepares dough for baking by activating the yeast.
Follow the recipe directions as a guide.
1. Press WARM/PROOF. “Warm” and “Set Temp or Press START” and 140°F (60°C) will be displayed.
2. Press START, if you want to Warm food at 140°F (60°C). OR Enter the desired temperature by pressing
the number keypad, and then press START. The temprature can be set from 140
0
F (60
0
c) to (210
0
F)
(99
0
C)
3. “WARM” will appear in the display, once Start is pressed.
IMPORTANT:
Food must be at serving temperature before placing it in the warmed oven. Food may be held up to 1
hour, however, breads and casseroles may become too dry if left in the oven during the Warm function.
For best results, cover food.
NOTES: After selecting an Oven Mode and Temperature, you have the option to set a Cook Time and
Start Time before pressing START. See “Cook Time” and “Start Time.”
4. Place food in the oven and close the door.
5. Press CANCEL when finished and remove food from oven.

23
Rangaire: Installation Manual
TO CANCEL WARM FEATURE:
PROOF
CONVECTION
• Press CANCEL. Remove food from oven.
• Before proofing, place the dough in a lightly greased bowl and cover loosely with wax paper, coated
with shortening. Place on second rack from the bottom and close the oven door.
• Press and hold WARM/PROOF for 3 seconds. “Proof” and “Set Temp or Press START,” and 100°F (38°C)
will be displayed.
• Press START, if you want to Proof dough at 100°F (38°C). OR Enter the desired temperature by pressing
the number keypad, and then press start the temperature can be set from 800F (27
0
C) to 120
0
C
(49
0
C)
• “PROOF” will appear in the display, once Start is pressed.
• Let the dough rise until nearly doubled in size, checking after 20-25 minutes. Proofing time may vary
depending on dough type and quantity.
• .Press CANCEL when finished proofing
• Before second proofing, shape the dough, place it in baking pans and cover loosely with plastic wrap,
coated with cooking spray. Follow the same placement and control steps above. Before baking,
remove the plastic wrap.
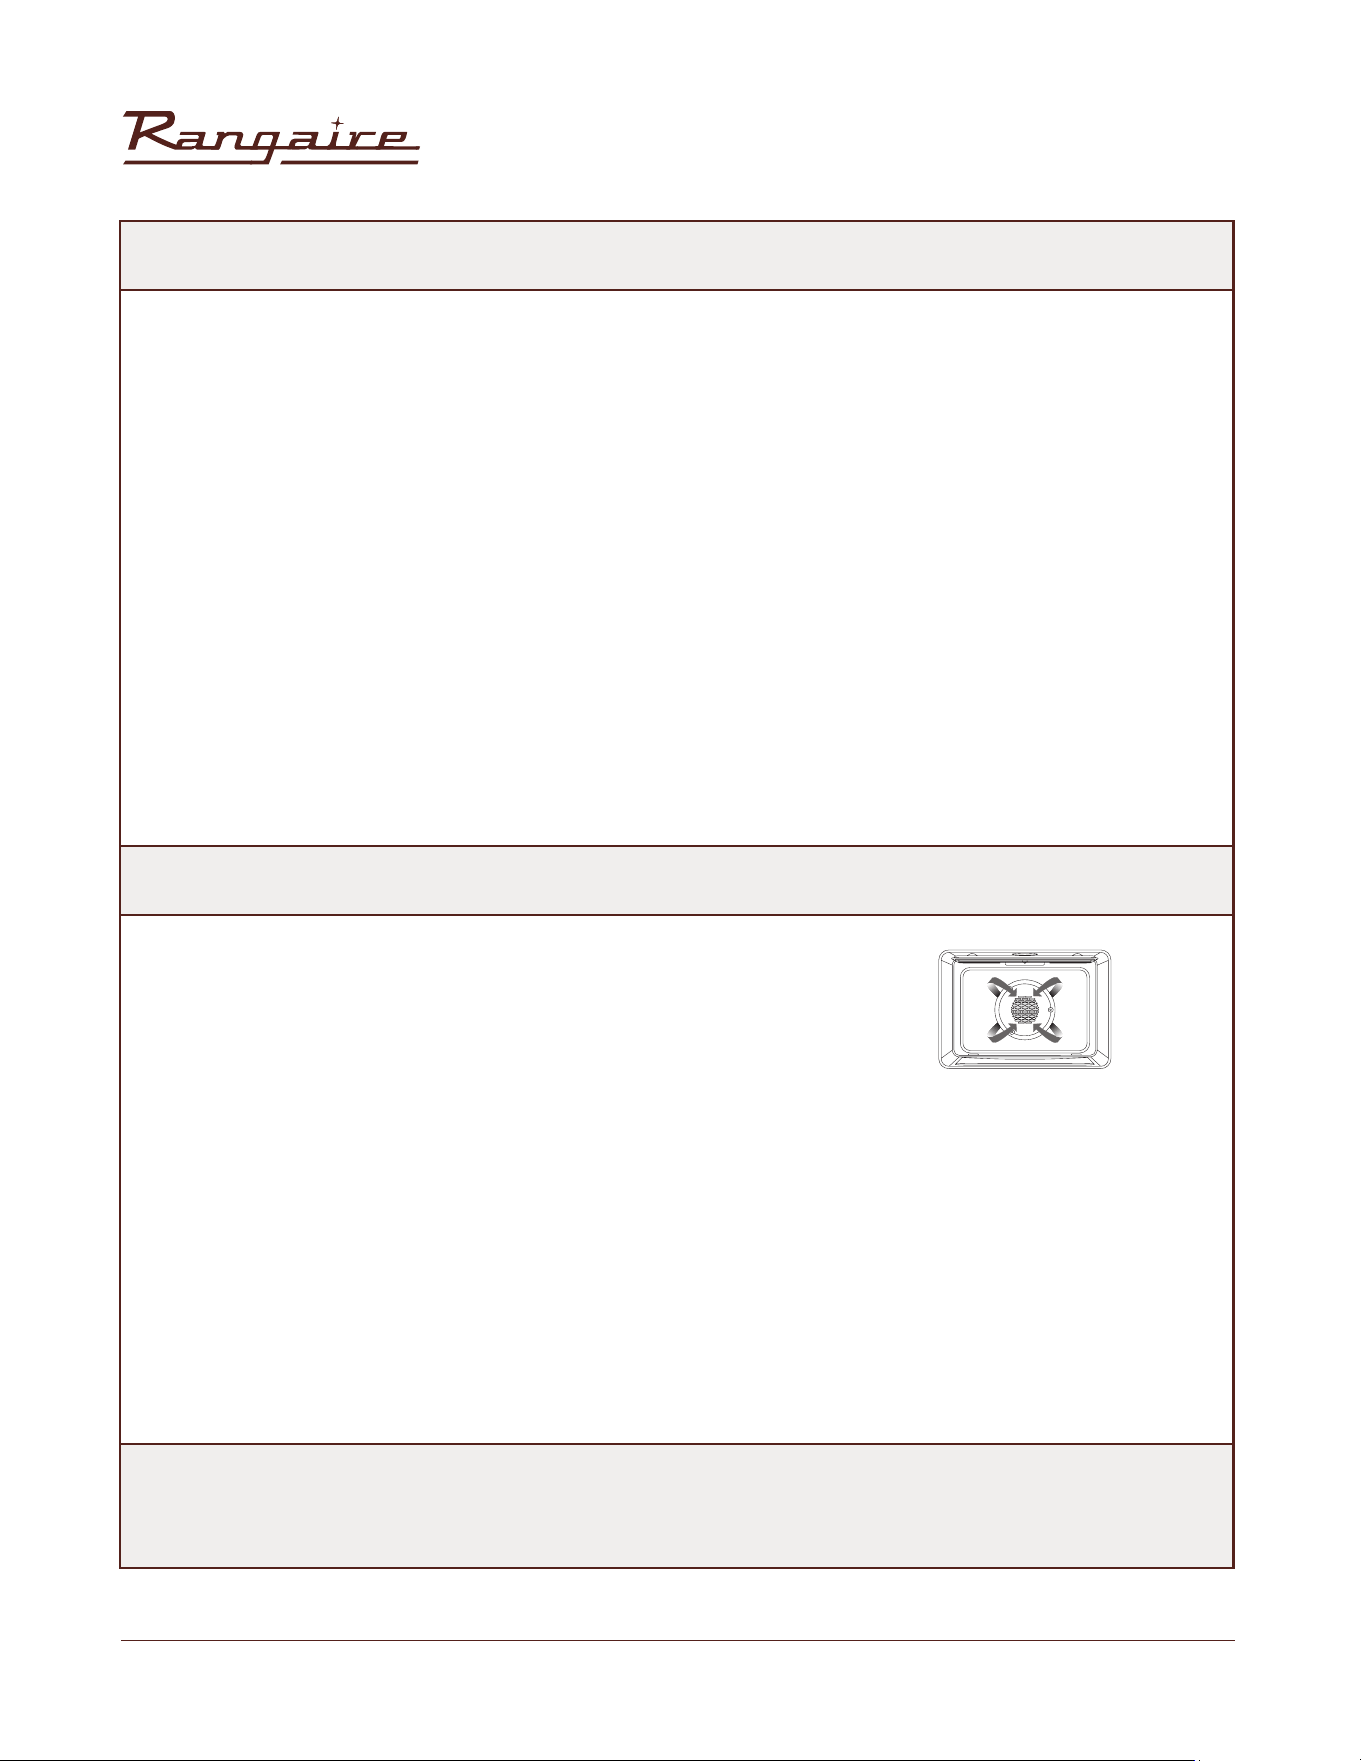
During convection cooking, the fan provides hot air circulation throughout the oven. The movement of
heated air around the food can help to speed up cooking by penetrating the cooler outer surfaces.
In Convection mode, the ring element, bake and broil elements, and the fan operate to heat the oven
cavity. If the oven door is opened during convection cooking or preheating. The fan turns off immediately
and the elements will turn off after 30 seconds. Onced the door is closed, the elements will turn back on.
NOTES:
• After selecting an Oven Mode and Temperature, you have the option to set a Cook Time and Start
Time before pressing START. See “Cook Time” and “Start Time.”
24
Rangaire: Installation Manual
CONVECTION FAN
CONVECTION BAKE
Use Convection bake for single or multiple rack baking. When
convection baking, reduce your recipe baking temperature by
25°F (15°C).
To Set Convection Bake:
1. Press CONVECTION once. “Convection” and “Press 1-3 To Choose” will appear in the display.
2. Press number 1 on the keypad. “Convect Bake” and “Set Temp or Press START” and 325°F (162°C) will be
displayed.
3. Press START If you wish to convection bake at 325°F (162°C).OR Enter the desired temperature by pressing
the number keypad, and then press START. The temperature can be set from 170°F (77°C) to 500°F(260°C)
4. The oven will begin preheating once Start is pressed. A tone will sound when the oven is at the set
temperature.
5. Place the food in the oven and close the oven door when preheat is completed.
6. Press CANCEL when finished, and remove from the oven.
The convection fan operates during any convection mode. When the oven is operating in convection
mode, the fan will turn off automatically when the door is opened.The convection fan always runs during
the pre heat time.
Advantages of Convection Cooking
• Saves time and energy.
• Even baking, browning and crisping are achieved.
• During roasting, juices and flavors are sealed in while the exterior is crisp.
• Yeast breads are lighter, more evenly textured, more golden and crustier lighter.
• Baking on multiple racks at the same time with even results is possible.
• Prepare whole meals at once with no flavor transfer.
• Dehydrates herbs, fruits and vegetables.
• Requires no specialized bake ware.
• Convection broiling allows for extraordinary grilling with thicker cuts of food.
NOTES:
• After selecting an Oven Mode and Temperature, you have the option to set a Cook Time and Start
Time before pressing START. See “Cook Time” and “Start Time.”
25
Rangaire: Installation Manual
1. When convection broiling, enter your normal broiling
temperature. The oven door must be closed when using
Convection Broil.
2. It is not necessary to preheat the oven for Convection Broil.
3. Place the food in the oven and close the oven door.
4. Press CONVECTION once. “Convection and “Press 1-4 To
Choose” will be displayed.
5. Press number 3 on the keypad. “Convect Broil” and “Set
Temp or Press Set temp or press start and 4500c (2320C)
will be displayed.
6. Press START, if you wish to broil at 450°F (232°C).OR Enter
the desired temperature by pressing the number keypad,
and then press START. The temperature can be set from
170°F(77°C) to 550°F(288°C).
7. “Convect Broil” will be displayed, once Start is pressed
8. Press CANCEL when finished, and remove from the oven.
1. Place the food in the oven and close the oven door.
2. Press CONVECTION once. “Convection” and “Press 1-4 To Choose” will be
displayed.
3. Press number 2 on the keypad. “Convect Roast,” “Set Temp or Press
START”, and 325°F (163°C) will be displayed.
4. Press START, if you wish to convection roast at 325°F (163°C). OREnter the
desired temperature by pressing the number keypad, and then press
START. The temperature can be set from 170°F (77°C) to 500°F (260°C).
When Convection roasting, enter your normal roasting
temperature. The roasting time should be 15-30% less than in
conventional cooking. It is not necessary to preheat the oven
for convection roast.
CONVECTION BROIL
CONVECTION ROAST
26
Rangaire: Installation Manual
1. Preheating will start. Once the oven is preheated to the set temperature, the control will beep.
Place the food the in oven and close the oven door.
2. At the end of the set cooking time the oven will turn, off automatically. The alert tone will sound
and cooking sound complete will appear on the display.
3. Press CANCEL when finished and remove food from the oven
CONVECTION CONVERSION
BAKED GOODS AND OTHER FOODS (ONLY)
NOTES:
• After selecting an Oven Mode and Temperature, you have the option to set a Cook Time and Start
Time before pressing START. See “Cook Time” and “Start Time.”
NOTES:
• When using Convection Conversion, enter the normal cooking temperature and time.
• The oven door must be closed before setting Convection Conversion.
NOTES:
• Setting a Cook Time is required for Convection Conversion oven mode. See “Cook Time.”
5. ”Convect Roast” will be displayed, once Start is pressed.
6. Press CANCEL when finished, and remove from the oven.
MEAT (ONLY)
It is not necessary to preheat the oven for the Convection Conversion MEATS option. Preheating can
cause overcooking. If preheat is required for the recipe, add 15 minutes to the Cook Time, and place
food in the oven at the appropriate time.
• Place food the in oven and close the oven door.
• Press CONVECTION once. “Convection” and “Press 1-4 To Choose” will appear in the display.
• Press number 4 on the keypad. “Conv Conversion” and “Press 1-3 To Choose” will appear in display.
• Press the number keypad to select among the 1.MEAT, 2.BAKED GOODS and 3.OTHER FOODS options.
• Press START to confirm the selection "Set temp and press START will appear in the display.
• Enter your normal roasting temperature by pressing the number keypad.
• Enter your normal Cook Time. See “Cook Time,” and then press START.
Convection Conversion
Baked
Goods
Meats
Other
Foods
27
Rangaire: Installation Manual
1. For best results, bake food on a single rack with at least 1" - 1½" (2.5 - 3 cm) space between
utensils and oven walls
2. Use one rack when selecting the bake mode.
3. Check for doneness at the minimum time.
4. Use metal bake ware (with or without a non stick finish.) heatproof glass ceramic pottery or
other utensils suitable for the oven.
5. When using heatproof glass, reduce temperature by 25°F (15°C) from recommended
temperature.
6. Use baking sheets with or without sides or jelly roll plans.
7. Dark metal pans or nonstick coatings will cook faster with more browning. Insulated bake ware
will slightly lengthen the cooking time for most foods.
8. Do not use aluminum foil or disposable aluminum trays to line any part of the oven. Foil is an
excellent heat insulator and heat will be trapped beneath it. This
9. Avoid using the opened door as a shelf to place pans.
10. See Troubleshooting for tips for baking and roasting problems
BAKE TIPS

28
Rangaire: Installation Manual
Reduce recipe baking temperatures by 25°F (15°C)
For best results, foods should be cooked uncovered, in low-sided pans to take advantage of the
forced air circulation. Use shiny aluminum pans for best results unless otherwise specified
Heatproof glass or ceramic can be used. Reduce temperature by another 25°F (15°C) when using
heatproof glass dishes for a total reduction of 50°F (30°C).
Dark metal pans may be used. Note that food may brown faster when using dark metal bake ware.
The number of racks used is determined by the height of the food to be cooked.
Baked items, for the most part cook extremely well in conviction.dont try to convert recipes such as
custards, Quiches,pumpkin pie, or cheese cakes which do not benifit from the convection heating
process. Use the regular base baked process for these foods.
BAKE CHART
CONVECTION BAKE TIPS
FOOD ITEM
RACK
POSITION
TEMP. °F (°C)
(PREHEATED OVEN)
TIME (MIN)
Cake
Cupcakes
Bundt Cake
Angel Food
2
1
1
350 (175)
350 (175)
350 (175)
19-22
40-45
35-39
Pie
2 crust, fresh, 9"
2 crust, frozen fruit, 9"
2
2
375-400 (190-205)
375 (190
45-50
68-78
Cookies
Sugar
Chocolate Chip
Brownies
2
2
2
350-375 (175-190)
350-375 (175-190)
350 (175)
8-10
8-13
29-36
Breads
Yeast bread loaf, 9x5
Yeast rolls
Biscuits
0XǎQV
2
2
2
2
375 (190)
375-400 (190-205)
375-400 (190-205)
425 (220)
18-22
12-15
7-9
15-19
Pizza
Frozen
Fresh
2
2
400-450 (205-235)
475 (246)
23-26
15-18
29
Rangaire: Installation Manual
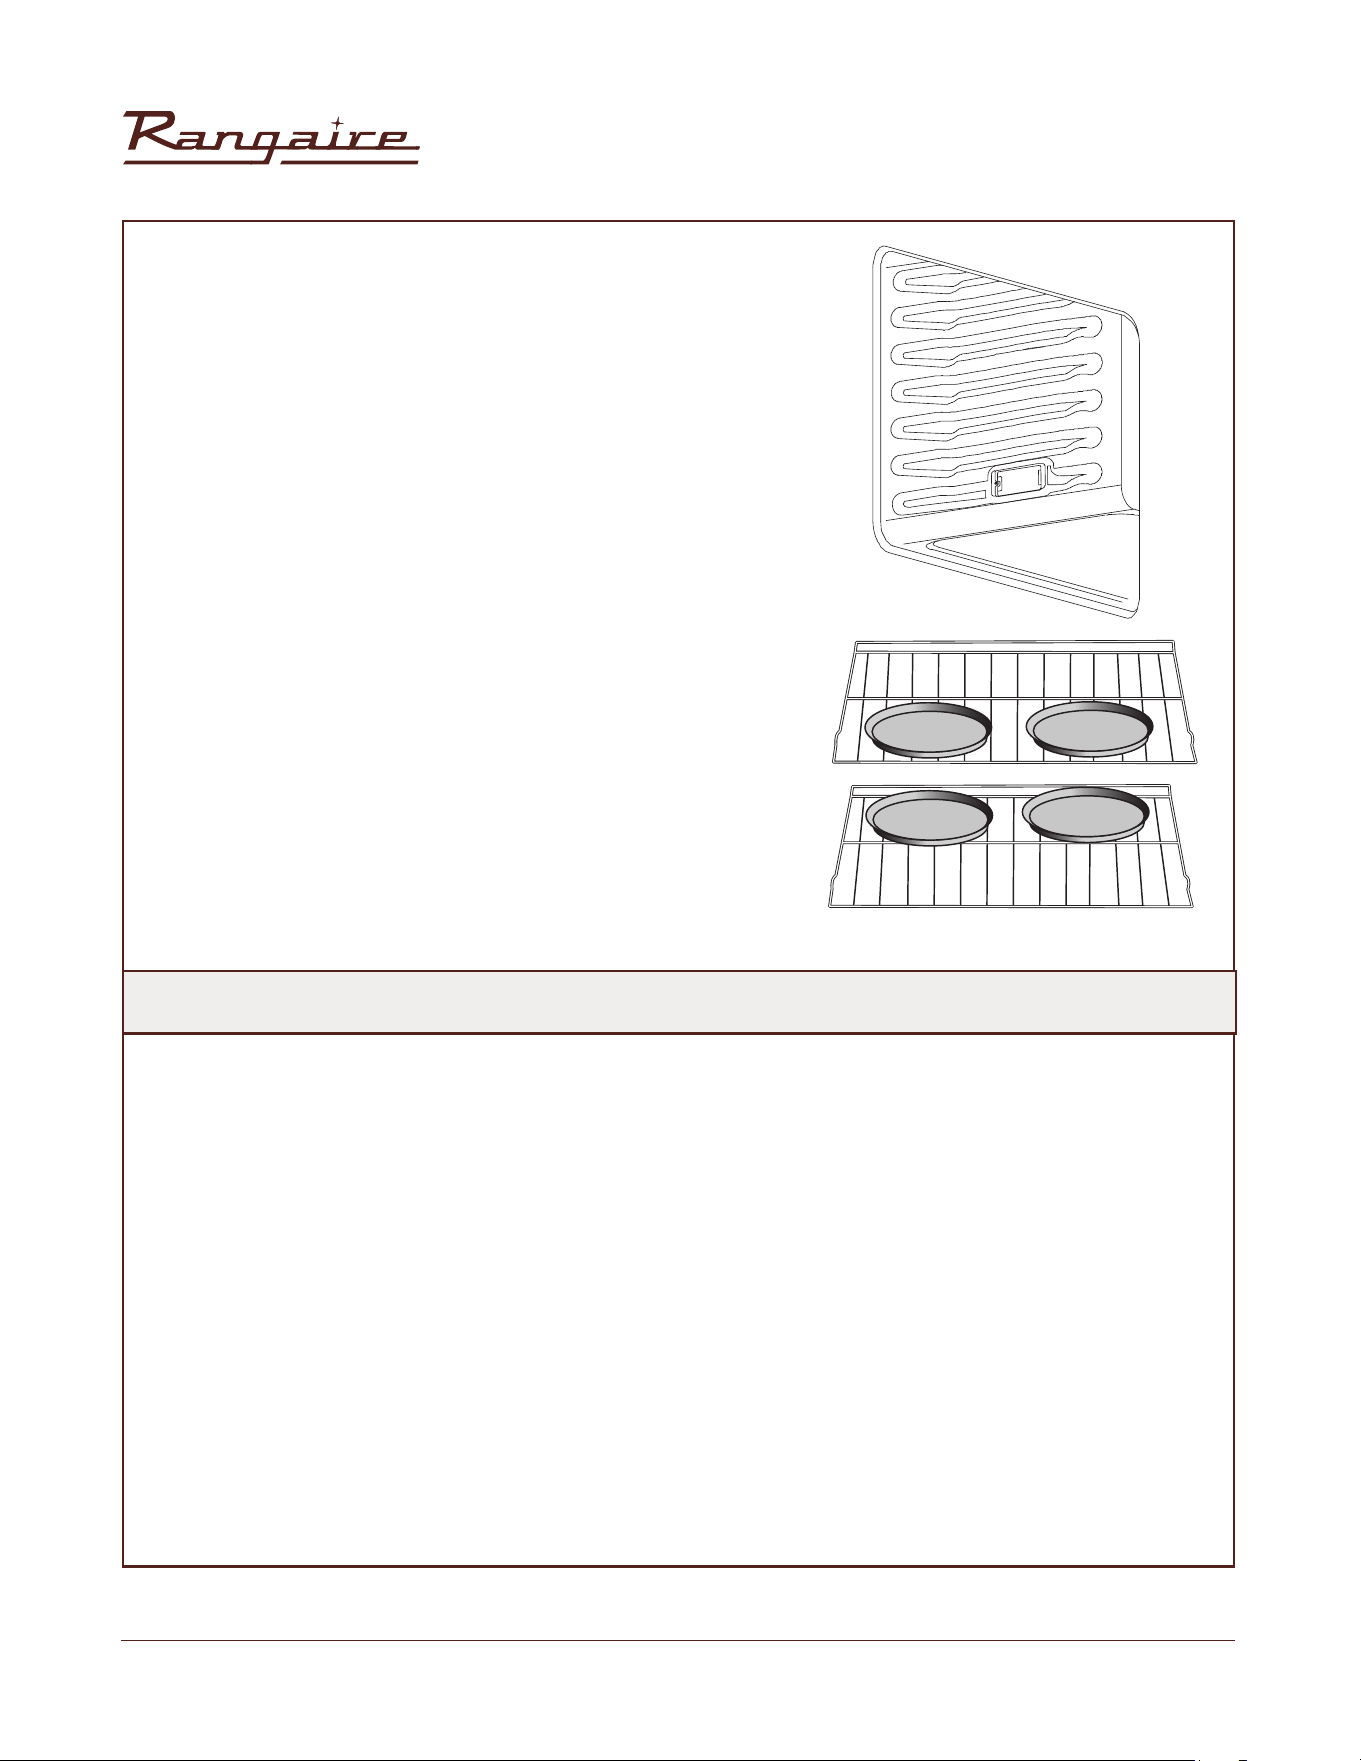
• Multiple rack cooking for oven meals is done on rack
positions 1, 2, 3 , 4 and 5. All six racks can be used for
cookies, biscuits and appetizers.
- 2 Rack baking: Use positions 1 and 3.
- When baking four cake layers at the same time, stagger
pans so that one pan is not directly above another. For
best results, place cakes on front of upper rack and back
of lower rack (See graphic at right). Allow 1" - 1 ½" (2.5 - 3
cm) air space around pans.
• Converting your own recipe can be easy. Choose a
recipe that will work well in convection.
• Reduce the temperature and cooking time if
necessary. It may take some trial and error to achieve
a perfect result. Keep track of your technique for
the next time you want to prepare the recipe using
convection.
• See Troubleshooting for tips for Baking and Roasting
problems.
Appetizers, Biscuits, coffee cakes
Cookies (2 to 4 racks) yeast breads
Cream puffs, Popovers
Casseroles and one dish entrees
Oven Meals (rack positions 1, 2, 3)
Air leavened foods(sufflies, Meringue, Meringue-Topped dessert,Angel food Cakes,Chiffon,cakes)
FOODS RECOMMENDED FOR CONVECTION BAKE MODE:
4
6
5
3
2
1
30
Rangaire: Installation Manual
Reduce standard recipe temperature by 25 ºF (15 °C) for Convection Bake. Temperatures have been
reduced in this chart.
CONVECTION BAKE CHART
FOOD ITEM
RACK
POSITION
TEMP. °F (°C)
(PREHEATED OVEN)
TIME (MIN)
Cake
Cupcakes
Bundt Cake
Angel Food
2
1
1
325 (160)
325 (160)
325 (160)
20-22
43-50
43-47
Pie
2 crust, fresh, 9"
2 crust, frozen fruit, 9"
2
2
350-400 (175-205)
350 (175)
40-52
68-78
Cookies
Sugar
Chocolate Chip
Brownies
2
2
2
325-350 (160-175)
325-350 (160-175)
325 (160)
9-12
8-13
29-36
Breads
Yeast bread loaf, 9x5
Yeast rolls
Biscuits
0XǎQV
2
2
2
2
350 (175)
350-375 (175-190)
375 (190)
400 (205)
18-22
12-15
8-10
17-21
Pizza
Frozen
Fresh
2
2
375-425 (190-220)
450 (232)
23-26
15-18
31
Rangaire: Installation Manual
1. Do not preheat for Convection Roast.
2. Roast in a low-sided, uncovered pan.
3. When roasting whole chickens or turkey, tuck wings behind back and loosely tie legs with
kitchen string.
4. Use the 2-piece broil pan for roasting uncovered.
1. Use the probe or a meat thermometer to determine the internal doneness on “END” temperature
(see cooking chart).
2. Double-check the internal temperature of meat or poultry by inserting meat thermometer into
another position.
3. Large birds may also need to be covered with foil (and pan roasted) during a portion of the
roasting time to prevent over-browning.
4. The minimum safe tremprature for stuffing in poultry is 1650F (750C)
5. After removing the item from the oven, cover loosely with foil for 10 to 15 minutes before carving
if necessary to increase the final food stuff temprature by 5
0
to 10
0
F (3
0
to 6
0
C)
CONVECTION ROAST TIPS
Burn Hazard
Use an oven mitt to remove temperature probe .Do not touch broil element.
Failure to do so can result in burns.
32
Rangaire: Installation Manual
CONVECTION ROAST CHART
CONVECTION ROAST
CHART
WEIGHT
(lb)
OVEN TEMP.
°F (°C)
TIME (MIN)
TIME
(min. per
lb)
INTERNAL
TEMP. °F (°C)
Beef
Rib Roast
4-6 325 (160) 2 16-20
145 (63)
medium rare
Rib Eye Roast,
(boneless)
4-6 325 (160) 2 16-20
145 (63)
medium rare
Rump, Eye, Tip,
Sirloin (boneless)
3-6 325 (160) 2 16-20
145 (63)
medium rare
Tenderloin Roast 2-3 400 (205) 2 15-20
145 (63)
medium rare
Pork
Loin Roast
(boneless or bone in)
5-8 350 (175) 2 16-20
160 (71)
medium
Shoulder 3-6 350 (175) 2 20-25
160 (71)
medium
Poultry
Chicken whole
3-4 375 (190) 2 18-21 180 (82)
Turky, not suffed 12-15 325 (160) 1 10-14 180 (82)
Turky, not suffed 16-20 325 (160) 1 9-11 180 (82)
Turky, not suffed 21-25 325 (160) 1 6-10 180 (82)
Turkey Breast 3-8 325 (160) 1 15-20 170 (77)
Comish Hen 1-1 ½ 350 (175) 2
45-75
total
180 (82)
Lamb
Half Leg
3-4 325 (160) 2 22-27
160 (71)
medium
Whole Leg 6-8 325 (160) 1
28-33
22-27
28-33
170 (77) well
160 (71)
medium
170(77)well
33
Rangaire: Installation Manual
1. Place rack in the required position needed before turning on the oven.
2. Use Convection Broil mode with the oven door closed
3. Do not preheat oven.
4. Use the 2-piece broil pan.
5. Turn meats once halfway through the cooking time (see convection broil chart).
CONVECTION BROIL TIPS
CONVECTION BROIL CHART
FOOD AND
THICKNESS
RACK
POSITION
BROIL
SETTING
°F (°C)
INTERNAL
TEMP. °F
(°C)
TIME
SIDE 1
(MIN.)*
TIME
SIDE 2
(MIN.)*
Beef
Steak (1½" or more)
Medium rare
Medium
Well
Hamburgers (more than 1")
Medium
Well
4
4
4
4
4
450 (235)
450 (235)
450 (235)
550 (290)
550 (290)
145 (65)
160 (71)
170 (77)
160 (71)
170 (77)
9-12
11-13
18-20
8-11
11-13
8-10
10-12
16-17
5-7
8-10
Poultry
Chicken Quarters
Chicken Halves
Chicken Breasts
4
3
4
450 (235)
450 (235)
450 (235)
180 (82)
180 (82)
170 (77)
16-18
25-27
13-15
10-13
15-18
9-13
Pork
Pork Chops (1¼" or more
Sausage - fresh
4
4
450 (235)
450 (235)
160 (71)
160 (71)
12-14
4-6
11-13
3-5
34
Rangaire: Installation Manual
DEHYDRATE TIPS
DEHYDRATE CHART
FOOD PREPARATION
APPROXIMATE
DRYING TIME*
(hrs)
TEST FOR DONENESS
Fruit
Apples
Bananas
Cherries
Oranges Peels
and slices
Pineapple rings
Strawberries
Dipped in ¼ cup lemon
juice and 2 cups water,
¼ slices
Dipped in ¼ cup lemon
juice and 2 cups water,
¼ slices
Wash and towel dry.
For fresh cherries,
remove pits
¼ slice of
orange part of skin
thinly peeled from
oranges
Towel dried
Wash and towel dry.
Sliced ½" thick,
skin (outside) down on
rack
11-15
11-15
10-15
Peels 2-4
Slices: 12-16
Canned: 9-13
Fresh: 8-12
12-17
Slightly pliable
Slightly pliable
Pliable, leathery,
chewy
Orange peel: dry and brittle
Orange slices: skins are dry and
brittle, fruit is
slightly moist
Soft and pliable
Dry, brittle
• The circulating heated air at a lower temperature slowly removes the moisture for food preservation.
• Oven temperature for dehydrating is between 120ºF (50ºC) to 160ºF (70ºC).
• Multiple racks can be used simultaneously.
• Some foods require as much as 14-15 hours of time to fully dehydrate.
• Consult a food preservation book for specific times and the handling of various food.
• This mode is suitable for a variety of fruits, vegetables, herbs and meat strips.
• Drying screens can be purchased at specialty kitchen shops.
• By using paper towels, some food moisture can be absorbed before dehydrating
• begins (such as with sliced tomatoes or sliced peaches).
35
Rangaire: Installation Manual
Vegetable
Peppers
Wash and towel dry.
Remove membrane
of pepper,
coarsely chopped
about
1" pieces
16-20 Leathery with no moisture inside
Mushrooms
Tomatoes
Wash and towel dry.
Cut of stem end. Cut
in to 1/8 slices
Wash and towel dry.
cut the slices , 1/8 thick
dry well
7-12
16-23
Tough and leathery,
dry
Dry, brick red color
Herbs
Oregano, sage
parsley and
thyme, and fennel
Basil
Rinse and dry with
paper towel
Use basil leaves 3 to 4
inches from top. Spray
with water shake off
moisture and pat drive
Dry at 120°F
(60°C) 3-5 hrs
Dry at 120°F
(60°C) 3-5 hrs
Crisp and brittle
Crisp and brittle
BROIL TIPS
1. Place rack in the required position needed before turning on the oven.
2. Use Broil mode with the oven door closed.
3. Preheat oven for 5 minutes before use.
4. Use the 2-piece broil pan.
5. Turn meats once halfway through the cooking time (see convection broil chart).
36
Rangaire: Installation Manual
* Broiling and convection broiling times are approximate and may vary slightly Cooking times
are indicative and also depend on the thickness and the starting temperature of the meat before
cooking
FOOD AND
THICKNESS
RACK
POSITION
BROIL
SETTING
°F (°C)
INTERNAL TEMP.
°F (°C)
TIME
SIDE 1
(MIN.)*
TIME
SIDE 2
(MIN.)*
Beef
Steak (¾"-1)
Medium rare
Medium
Well
5
5
5
5
5
5
145 (65)
160 (71)
160 (71
5-7
6-8
8-10
4-6
5-7
7-9
Hamburgers (¾"-1")
Medium
Well
4
4
5
5
160 (71)
170 (77)
8-11
10-13
6-9
8-10
Poultry
Breast (bone-in)
Thigh (very well done)
4
4
4
3
170 (77)
180 (82)
10-12
28-30
8-10
13-15
Pork
Pork Chops (1")
5 5 160(71) 7-9 5-7
Sausage - fresh
Ham Slice (½")
5
5
5
5
160 (71)
160 (71)
5-7
4-6
3-5
Seafood
Fish Filets, 1"
Buttered
4 4
Cook until
opaque & flakes
easily with fork
10-14 Do not turn
Lamb
Chops (1")
Medium Rare
Medium
Well
5
5
5
5
5
5
145 (63)
160 (71)
170 (77)
2-2,30
4-6
Bread
Garlic Bread, 1" Slices
Garlic Bread, 1" Slices
4
3
5
5
2-2,30
4-6
37
Rangaire: Installation Manual
FOOD SERVICE TEMPERATURE GUIDELINES FROM FSIS
USDA FOOD SAFETY INSPECTION SERVICE
140°F
(60°C)
Ham, precooked
(to Reheat)
165°F
(74°C)
stuffing ( cooked alone or in bird)
145°F
(63°C)
Fresh beef, Veal, Lamb (medium
rare)
Leftovers & Casseroles
160°F
(71°C)
Ground Meat & Meat mixtures
(Beef, Pork, Veal Lamb)
170°F
(77°C)
Fresh beef, Veal, Lamb (well done)
Fresh Pork (medium) Poultry breast
Fresh Ham (raw)
Fresh Pork (well done)
Egg Dishes
180°F
(82°C
Chicken and Turkey (Whole)
Ground Meat & Meat mixtures
(turkey chicken)
Poultry (thighs and wings)
Duck and Goose
MEAT THERMOMETER
On models without a temperature probe, use a meat thermometer to determine whether meat
poultry and fish are cooked to the desired degree of doneness internal temprature not appearance
should be use determined doneness.
NOTE : Egg(alone, not used in a recipe) - cook untill yolk & white are firm
38
Rangaire: Installation Manual
MEAT THERMOMETER
1. Locate the number of the part to be cleaned in the following illustration.
2. Find the part name in the chart
• Use the cleaning method in the left column if the oven is black or white.
• Use the cleaning method in the right column if the oven is stainless steel.
3. Match the letter with the cleaning method
GENERAL CLEANING
GENERAL CLEANING
IMPORTANT:
• before cleaning make sure all controls are off and the oven is cool. Always follow the instructions
printed on the label of the cleaning products.
39
Rangaire: Installation Manual
Part
Cleaning
Method
Part
Cleaning Method
Stainless Steel
Oven
Stainless Steel
Oven
1 Control Panel C-G 10
Interior Oven
Door
2
Door Cooling
Vent
E 11 Oven Front Frame
3 Side Trim D 12 Oven Cavity
4 Bottom Trim D 13 Door Gasket
5 Door Frame E 14
Oven Cooling
Vents
6 Door Handle G 15 Oven Rack
7
Interior Door
Windows
F 16 Broiler Pan Rack
8 Door Front C & J 17 Broiler Pan
9 End Caps D 18
OVEN FINISHES / CLEANING METHODS
The entire oven can be safely cleaned with a soapy sponge, rinsed and dried. If stubborn soil
remains, follow the recommended cleaning methods below.
• Always use the mildest cleaner that will do the job.
• Rub metal finishes the direction of the grain.
• Use clean, soft cloths, sponges or paper towels.
• Rinse thoroughly with a minimum of water so it does not drip into door slots.
• Dry to avoid water marks
The cleaners listed below indicate types of products to use and are not being endorsed. Use all products
according to package directions.
40
Rangaire: Installation Manual
Part Cleaning Method
A Chrome
Plated
Wash with hot sudsy water. Rinse thoroughly and dry. Wash with hot, sudsy water. Rinse
thoroughly and dry. Alternatively, gently rub with Soft Scrub®, Bon-Ami®, Comet®, Brillo®,
or S.O.S.® pads as directed.
Easy-Off® or Dow® Oven Cleaners (cold oven formula) can be used, but they may cause
darkening and discoloration.How ever, chormed racks will lose their shiny finish and perma-
nently change to a metallic gray. hange to a metallic gray.
B Fiberglass
Knit
DO NOT HAND CLEAN GASKET.
C Glass
Spray Windex® or Glass Plus® on to a cloth first, then wipe to clean use Fantastik® or
Formula 409® to remove grease spatters.
D Painted
Clean with hot sudsy water or apply Fantastik® or Formula 409® first to a clean sponge
orpaper towel and wipe clean. Avoid using powdered cleanseres and steal wool pads.
E Porcelain
Immediately wipe up acidic spills like fruit juice, milk and tomato with a dry towel. Do not
use a moistened sponge/towel on hot porcelain. When cool, clean with hot sudsy water or
apply BonAmi® or Soft Scrub® to a damp sponge. Rinse and dry. For stubborn stains, gentry
use Brillo® or S.O.S.® pads. It is normal for porcelain to craze( fine lines) with age due to
exposure from heat and food soil.
) 5HǎHFWLYH
Glass
Clean with hot sudsy water and sponge or plastic scrubber. Rub stubborn stains with vine-
gar, Windex®, ammonia or Bon-Ami® DO NOT USE HARSH ABRASIVES.
G Stainless
Always wipe or rub with grain. Clean with a soapy sponge then rinse and dry. Or, wipe with
Fantastik® or Formula 409® sprayed onto a paper towel. Protect and polish with Stainless
Steel Magic® and a soft cloth. Remove water spots with a cloth dampened with white vin
gar. Use Zud®, Cameo®, Bar Keeper’s Friend® or Revere Ware Stainless Steel Cleaner®, to
remove heat discoloration
This oven features a self-cleaning function that eliminates the need to manually scrub the oven
interior. During self-cleaning, the oven uses very high temperatures, burning soil to a powdery ash.
IMPORTANT: The health of some birds is extremely sensitive to the fumes given off during the Self-
Cleaning cycle. Exposure to the fumes may result in death to certain birds. Always move birds to
another closed and well-ventilated room.
Burn Hazard
• Do not touch the oven during the Self-Cleaning cycle.
• Keep children away from oven during Self-Cleaning cycle.
• Failure to do so can result in burns.
41
Rangaire: Installation Manual
• Keep the kitchen well ventilated during the Self-Cleaning cycle to help get rid of heat, odors and
smoke.
• Keep the kitchen well ventilated during the self cleaning cycle to help get rid of heat orders and
smoke.
• It is common to see smoke and/ or and locational flame up during the self-clean cycle, depending
on the content and amount of soil remaining in the oven. If a flame persists. Turn off the oven and
allow it to before opening the door to wipe up the excessive food soil.
• Do not block the oven vent(s) during the Self-Cleaning cycle. Air must be able to move freely. See
“Oven Vents.”
• Do not clean, rub, damage or move the oven door gasket.
• The door latch is automatically activated after selecting the Self-Clean cycle. “AUTO LOCK” will
appear in the display. This ensure that the oven door can not be opened while the oven interior is at
clean temperature.
• The oven is preset for a 2.5 hour clean cycle However the time can be changed. Suggested clean
times are 2 hours for light soil and between 3.0 hours and 3.5 hours to average to heavy soil.
• Clean mode stops automatically at the end of the set cleaning time
• When the oven heat drops to a safe temperature, the automatic door lock will release and the door
can be opened.
• The oven light does not operate during Clean mode.
• Remove all utensils and bake ware.
• Remove non-porcelain oven racks. If chromed racks are left in the oven during the self clean cycle.
they will permanetly lose the shiny finish and change to a dull dark finish. See " Oven Finshes/
Cleaning Methods" for proper care.
• Wipe up any soft soil spills and grease with paper towels. Excess grease will cause flames and
smoke inside the oven during self-cleaning.
• Be sure oven interior lights are turned off and the light bulbs and lens covers are in place.
• Some areas of the oven such as the oven door edge, oven door window, oven front frame and up to
1½" (2-3 cm) inside the frame do not get hot enough during the cleaning cycle for soil to burn away
and must be cleaned by hand. BEFORE the cycle begins, clean oven interior using a soapy sponge or
plastic scrubber and a solution of detergent and hot water. Rinse and dry all areas thoroughly.
BEFORE SELF-CLEANING
NOTE: Do not rub the oven door gasket.
42
Rangaire: Installation Manual
SELF-CLEAN CYCLE
A minimum 24-hour wait is recommended between cleaning cycles.
• Close the oven door.
• Press SELF CLEAN. “REMOVE RACKS” will scroll in the selected oven text area of the display.
• "2:00 3:00 3:30 will appear in the display.
• Use the number keypad to select the clean level
• If you want to delay the start of the self-cleaning cycle, press DELAY START, and then set a time, by
pressing the number keypad.
• Press START.
• After the door is locked, “SELF CLEAN” will scroll in the selected text area until the clean cycle is
finished.
When the Self-clean Cycle Ends:
Once the oven has completely cooled, remove ash with a damp cloth.
NOTE: To avoid breaking the glass, do not apply a cool, damp cloth to the inner door glass before it
has cooled completely.
Hand clean frame and
area outside gasket
Hand clean 1"
from rack guides
to front of oven
cavity
Hand clean door
window
DO NOT clean
gasket
Hand clean door
area outside gasket
43
Rangaire: Installation Manual
3. Holding the door family, close the oven door completely.
4. Grasping both sides lift up on the oven door while pushing it closed, and then pull it away from the door
frame.
5. Place the door in a protected location
OVEN DOOR REMOVAL
For normal oven use, there is no need to remove the oven door. However, should it become necessary to
remove the door, follow the instructions in this section.
IMPORTANT:
• Make sure oven is cool and that power to the oven has been turned off before removing the door.
• The oven door is heavy and fragile, and the door front is glass. To avoid oven door glass breakage,
use both hands, and grasp only the sides of the oven door to remove. Do not grasp the handle.
• Be sure both levers are securely in place before removing the door
• Do not force door open or closed.
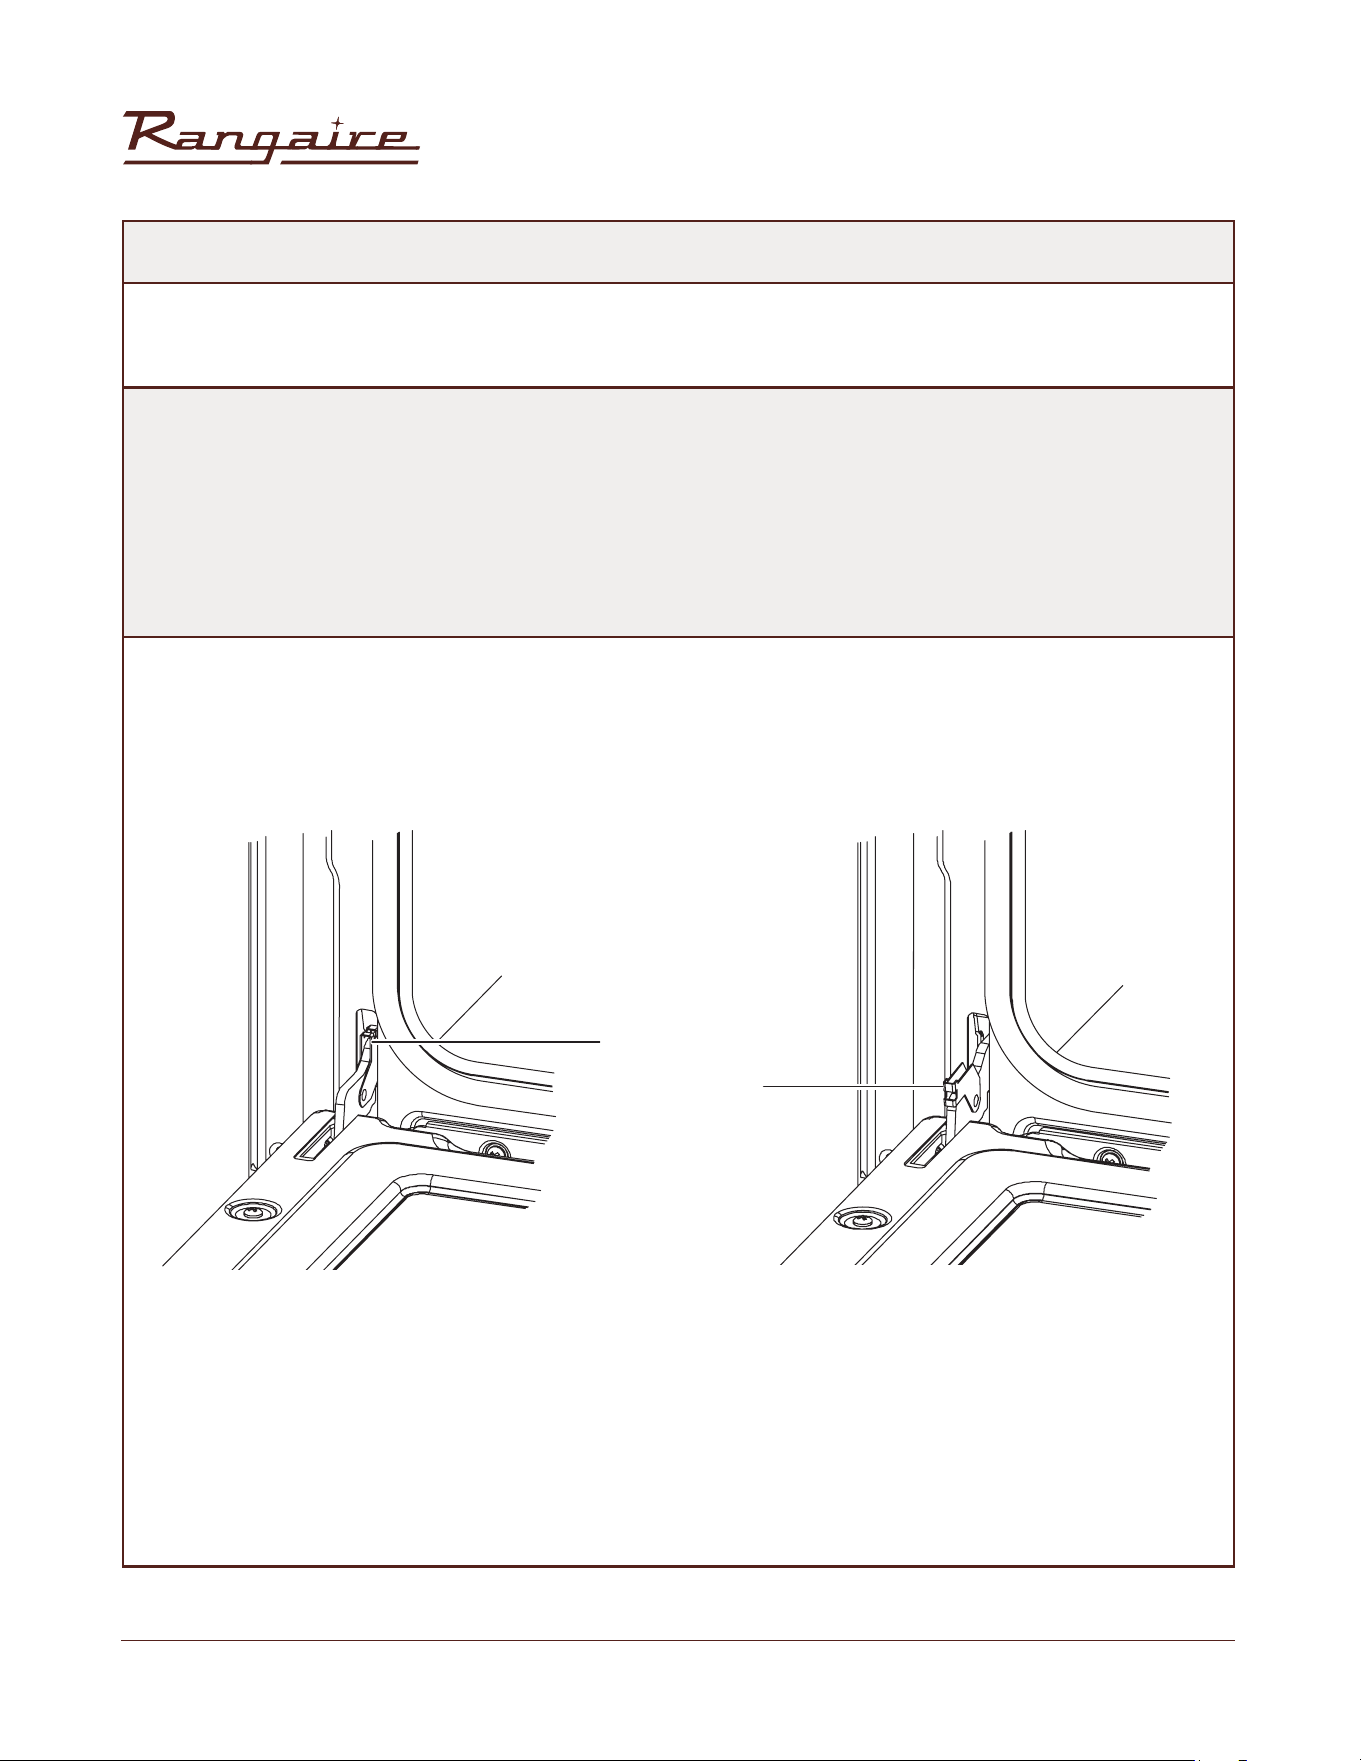
TO REMOVE THE OVEN DOOR:
1. Open the door completely.
2. Flip up the hinge latch on each side. Holding door firmly, close oven
a
a
a Hinge Bracket
44
Rangaire: Installation Manual
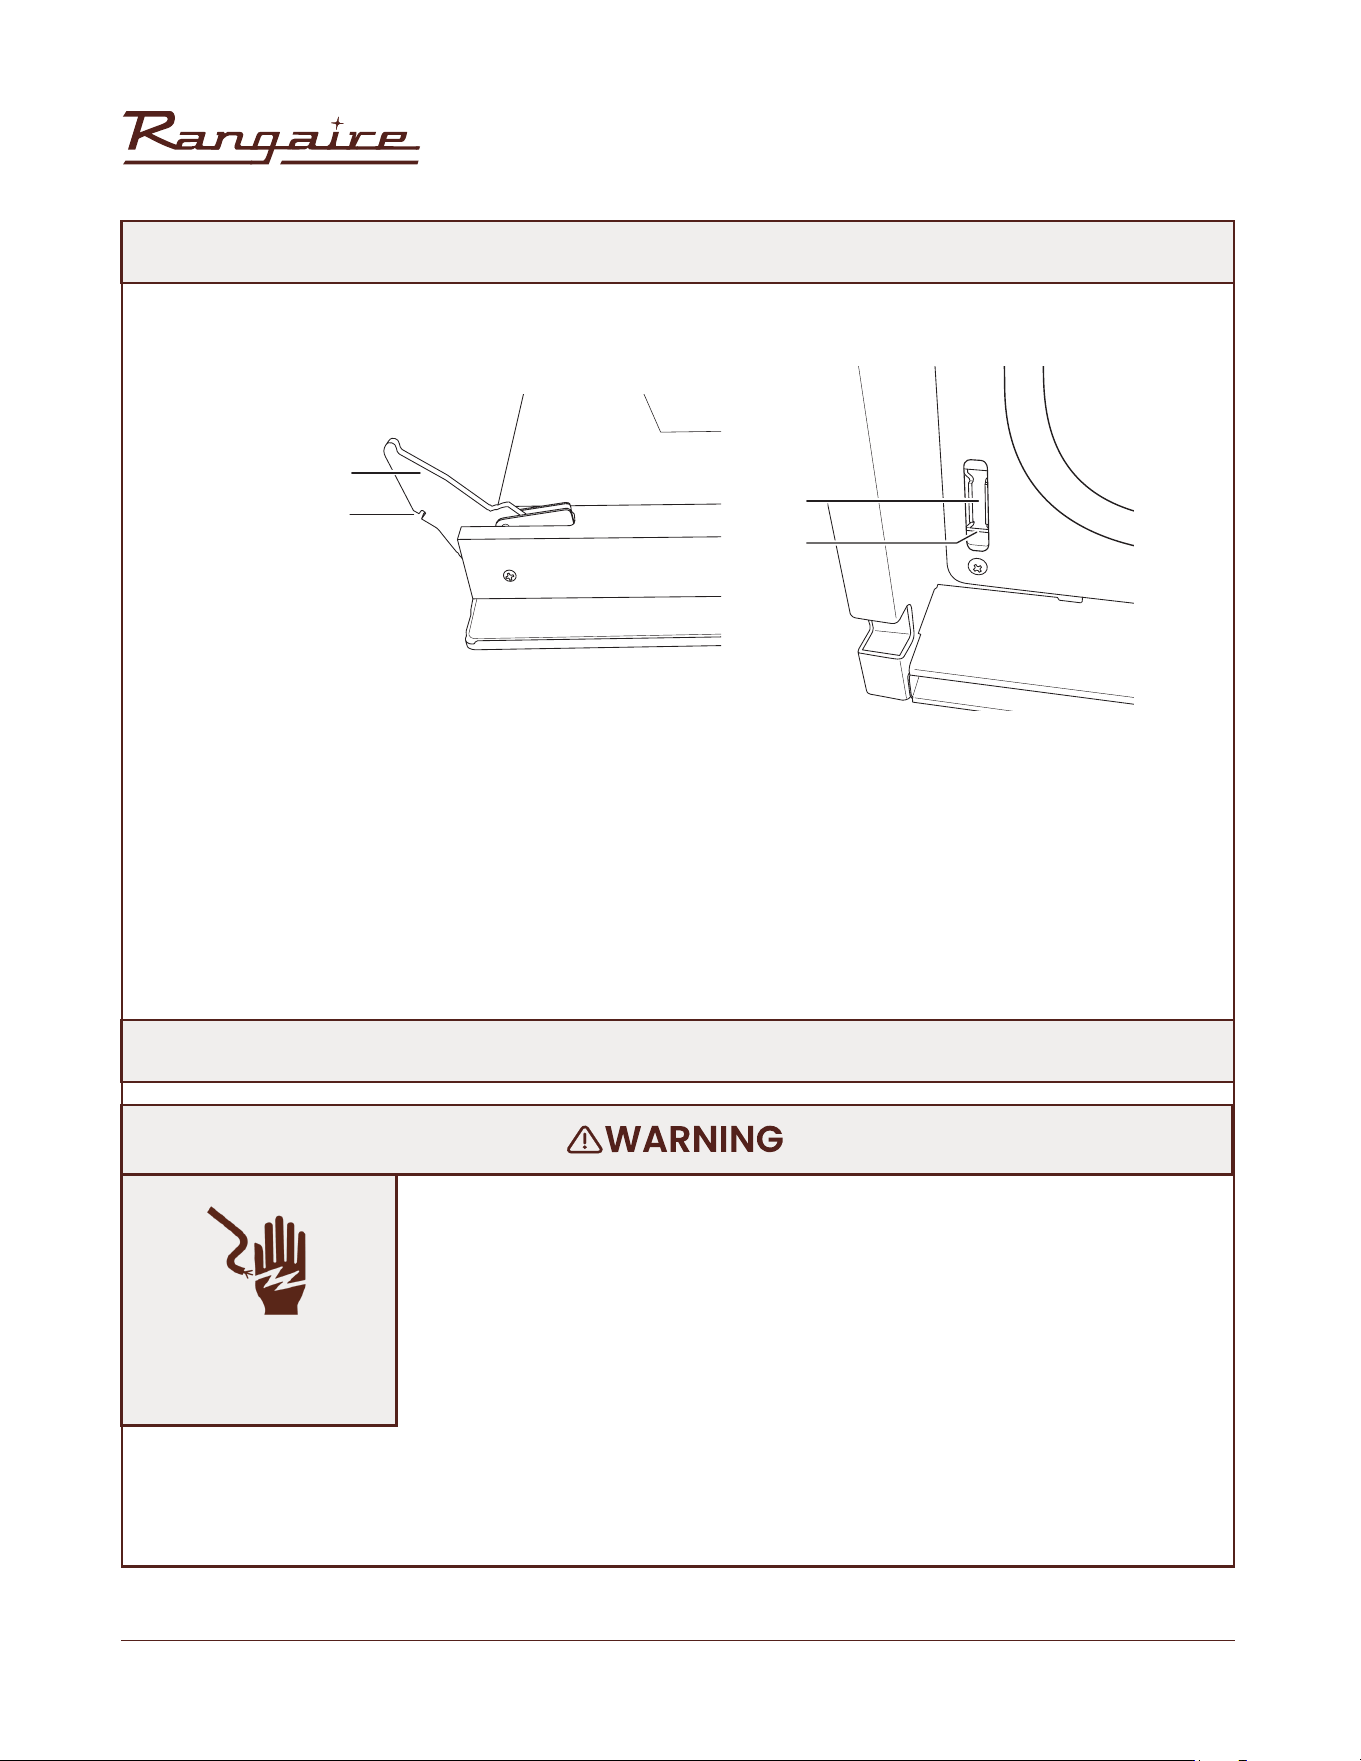
TO REPLACE THE OVEN DOOR:
REPLACING AN OVEN LIGHT
1. Holding the door firmly, insert the upper arms of both hinges in to the slots.
2. Open the oven door.
3. Move the hinge latch on each side back into the locked position.
4. Open and close the door to test that it operates freely. If it does not, repeat the door removal and
replacement process.
5. Close and open the door slowly to assure that it is correctly and securely in place.
NOTE: You should hear a “click” sound when the door is correctly in place.
A. Upper Arm
B. Recess
C. Slots
D. Lip
Electrical Shock
Hazard
• Make sure the oven and lights are cool and power to the oven has been
turned off before replacing the light bulb(s).
• The lenses must be in place when using the oven. The lenses serve to
protect the light bulb from breaking.
• The lenses are made of glass. Handle carefully to avoid breakage.
• Failure to do so could result in death, electric shock, cuts or burns.
The oven light is a standard 25 watt (G9) appliance bulb.
IMPORTANT: Before replacing the bulb, make sure the oven is cool and the controls are turned off.
a
b
c
d
45
Rangaire: Installation Manual
a b
a Light Bulb
b Light Cover
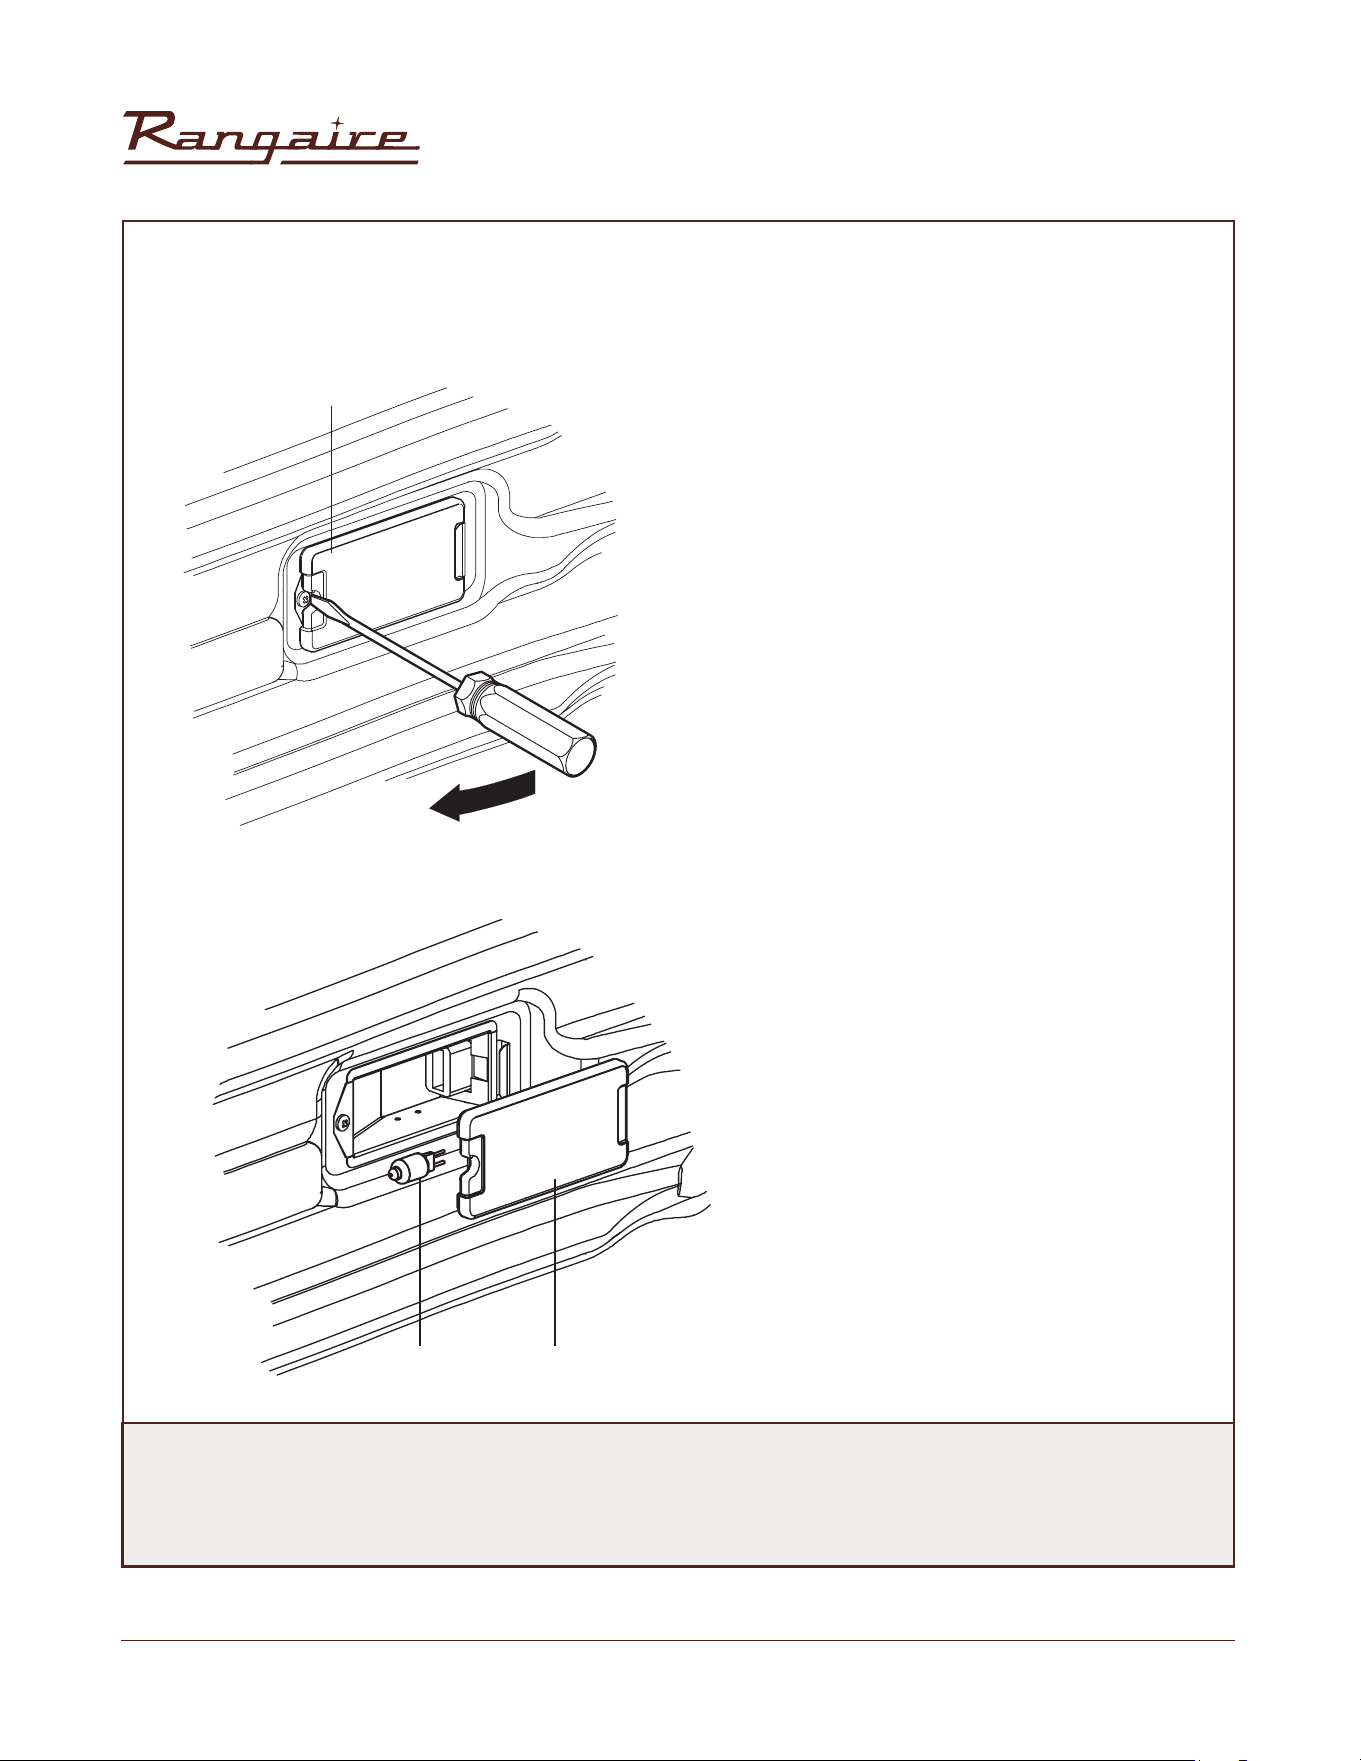
1. Disconnect power at the main power supply (fuse or breaker box).
2. Using a Phillips-head screwdriver, remove the screw, and then remove the cover
A. Light Bulb
B. Light Cover
3. Remove the burned out bulb from the socket.
4. Replace the bulb, and then replace the bulb
cover.
5. Reconnect power at the main power supply (fuse
or breaker box)
NOTES:
• To avoid damage or decreasing the life of the new bulb, do not touch bulb with bare fingers. Wear
cotton gloves or use a tissue when replacing the light bulb.
a
a Light Cover
46
Rangaire: Installation Manual
TROUBLESHOOTING
BAKING AND ROASTING
First try the solutions suggested here to possibly avoid the cost of a service call
With either Bake or Convection Bake and Convection Roast poor results can occur for many reasons other
than a malfunction of the oven. Check the chart below for causes of the most common problems. Since
the size, shape and material of baking utensils directly effect the baking results. The best solution may be
to replace old baking utensils that have darkened and warped with age and use. Check the Baking Charts
for the correct rack position and baking time
BAKING PROBLEM CAUSE
Food browns unevenly
• Oven not preheated
• Aluminum foil on oven rack or oven bottom
• Baking utensil too large for recipe
• Pans touching each other or oven walls
Food too brown on bottom
• Oven not preheated
• Using glass, dull or darkened metal pans
• Incorrect rack position
• Pans touching each other or oven walls
Food is dry or has shrunk
excessively
• Oven temperature too high
• Baking time too long
• Oven door opened frequently
• Pan size too large
Food is baking or roasting too
slowly
• Oven temperature too low
• Oven not preheated
• Oven door opened frequently
• Tightly sealed with aluminum foil
• Pan size too small
Piecrusts do not brown on
bottom or crust is soggy
• Baking time not long enough
• Using shiny steel pans
• Incorrect rack position
• Oven temperature is too low
Cakes play flat and may not be
done inside
• Oven temperature too low
• Incorrect baking time
• Cake tested too soon
• Oven door opened too often
• Pan size may be too large
47
Rangaire: Installation Manual
Cakes high in middle with
crack on top
• Oven temperature too high
• Baking time too long
• Pans touching each other or oven walls
• Incorrect rack position
• Pan size too small
Piecrust edges too brown
• Oven temperature too high
• Edges of crust too thin
OPERATION
PROBLEM POSSIBLE CAUSE SOLUTION
F03 or F04 Error
appears in the
display window.
A problem with latch
mechanism occurred.
Turn off power at the main power supply(fuse or breaker
box), wait a few seconds and turn it back on again. The
oven should run a latch auto–test. If condition persists,
note the code number and call an authorized service
center.
Other F_ Error
appears in the
display window.
Turn off power at the main power supply (fuse or breaker
box), wait a few seconds and turn it back on again. If con-
diction persists, note the code number and call an autho-
rized service center.
The oven
display does not
illuminate.
Turn off power at the main power supply (fuse or breaker
box). Turn breaker back on. If condition persists, call an
authorized service center.
Cooling fan
continues to
run after oven is
turned off
The oven components
have not cooled suffi-
ciently
The fan turn off automatically when the electronic compo-
nents have cooled sufficiently
Oven door is
locked and will
not release, even
after cooling.
Turn the oven off at the circuit breaker and wait a few
seconds. Turn breaker back on. The oven should reset itself
and will be operable.
Oven is not
heating.
No power going to the
oven.
Turn on power at the main power supply (fuse or circuit
breaker box). If condition persists. Call a qualified electri-
cian
Oven Mode or
Temperature not
selected.
Oven Mode or Tem-
perature not selected.
Turn control knobs to select the oven mode and tempera-
ture.
Oven is not
cooking evenly
Oven rack is not in
correct position.
Refer to cook charts for recommended
rack position.
Convection Bake
Mode
Always reduce recipe temperature by 250F 150c when
baking with convention bake mode
48
Rangaire: Installation Manual
PROBLEM POSSIBLE CAUSE SOLUTION
Oven light is
not working
properly
Light bulb is loose
or burned out.
Replace or reinsert the light bulb if loose or defective.
Touching the bulb with fingers may caused the bulb to
burn out
Oven light stays
on.
Oven door does not
close complete
Check for obstruction in oven door. Check to see if hinge is
bent or door switch is broken.
Cannot remove
lens cover on
light.
Lens cover is dirty.
There may be a soil build-up around the lens cover. Wipe
lens cover area with a clean dry towel prior to attempting
to remove the lens cover.
Oven will not
Self- Clean
properly
Oven was still warm
when Cleaning mode
was selected.
Allow the oven to cool before running Self-Cleaning.
Always wipe out loose soils or heavy spillover before run-
ning Self-Cleaning. See Preparing the Oven to Self-Clean.
Oven is heavily
soiled.
If oven is badly soiled set oven for a 4 hour self-cleaning
Clock and timer
are not working
properly.
No power going to the
oven.
Turn on power at the main power supply (fuse or circuit
breaker box). If condition persists, call an authorized ser-
vice Center
Clock or Timer not
set correctly.
See the Clock and Timer sections.
Excessive
moisture
Oven was not properly
preheated.
When using bake mode, preheat the oven first.
Convection Roast will eliminate any moisture in oven (one
of the advantages of convection).
Porcelain chips
Oven racks removed
and replaced incor-
rectly.
When oven racks are removed and replaced, always tilt
racks upward and do not force them to avoid chipping the
porcelain