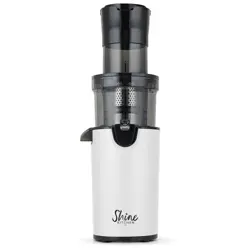
MAX 62oz
MIN 16oz
Model No.: JE120-18M00B
For your safety and correct use of the product, please
read the instructions carefully before use.
USER MANUAL
ZMJ004BK
JUICER MACHINES AND EXTRACTOR

TABLE OF CONTENTS
PREFACE
PREFACE ······························ 1
··············· 2
CHAPTER 1: SAFETY INSTRUCTIONS FOR USE
·················· 3
CHAPTER 2: PARTS AND FUNCTIONS
·················
5
CHAPTER 3: OPERATING INSTRUCTIONS
·················
8
CHAPTER 4: MAINTENANCE AND CARE
·············
9
CHAPTER 5: PRODUCT SAFETY SPECIFICATIONS
·············
9
CHAPTER 6: TROUBLESHOOTING AND SOLUTIONS
Thank you for using the SUNVIVI juicer. In order for you to use and maintain this product correctly,
we have specially compiled this manual. Please read this manual carefully before using the prod-
uct, and keep it properly for future reference.
This manual is only applicable to the SUNVIVI "JE120-18M00B" series juicer. SUNVIVI reserves the final
interpretation rights. All content in this manual is for user reference when using and maintaining
the product. For any matters not covered, users are welcome to consult our customer service
department. We welcome valuable suggestions from users on areas where this manual can be
improved. We hope the SUNVIVI juicer brings warmth, convenience, and health to your life.

CHAPTER 1 SAFETY INSTRUCTIONS FOR USE
1.The input voltage of this product is 120V ~ 60Hz. Please verify before use.
2.This product is a Y connection; if the power cord is damaged, to avoid danger, it must be
replaced by the manufacturer, its maintenance department, or similar professional personnel.
3.If the product requires repair, please contact our customer service department. Do not attempt
to disassemble it yourself to avoid danger.
4.Before disassembling, assembling, or adjusting any part of the product, please ensure that the
power is turned off.
5.Before use, please check if the power cord, plug, juicing net, screw, and other parts are damaged.
If any damage is found, stop using the product and contact our customer service department. Do
not attempt to disassemble or repair it yourself to avoid danger.
6.Before connecting the power supply, please ensure that all detachable parts are properly
installed, and the container lid must be tightly screwed on to avoid leakage or lid detachment
during operation.
7.The product is equipped with intelligent protection components. If the power exceeds a certain
limit, the product will automatically stop for protection. If you wish to continue using it, wait for 1
minute before restarting. This helps extend the product's lifespan.
8.During operation, if an overload or jamming occurs, the product will stop automatically. If restart-
ing still results in jamming, it is recommended to clean the ingredients inside the feeding tube
before continuing use.
9.Ingredients should be cut into small pieces to fit into the feeding tube. For ingredients with pits,
hard seeds, thick skins, or hard shells, please remove them before processing.
10.This product is not suitable for juicing hard or fibrous ingredients such as ice cubes, coconuts, or
sugarcane. Juicing such ingredients may cause clogging or damage to parts, affecting the prod-
uct's lifespan.
11.When adding ingredients, do not apply excessive force when pushing them down. The force
should be just enough to cut the ingredients.
12.During operation, never insert your hand into the feeding tube to avoid injury. Never use any
objects to replace the pusher stick to push ingredients, as this may cause contact with the screw
components and damage the product, especially for the elderly and children.
13.During operation, never bring your eyes close to the feeding tube to prevent accidents.
14.None of the product's accessories should be disinfected in a microwave oven to avoid deforma-
tion and damage from heat. All parts that come into contact with food meet food-grade certifica-
tion requirements and are clean, hygienic, and reliable.
15.After juicing certain ingredients, the filter net, screw, container lid, and other parts may become
discolored, which is normal. The discoloration does not affect the edibility and does not harm
health. If the rotating filter net is damaged, please do not use the machine.
16.Do not immerse the main unit in water or any other liquid, and do not rinse it under water or
other liquids. All parts should not be cleaned at temperatures above 60°C.
17.Do not use steel wool, abrasive cleaners, or corrosive liquids (such as gasoline or acetone) to
clean the product.
18.The product should be stored in a place out of reach of children. Never allow individuals with
physical, sensory, or mental disabilities, or those lacking relevant experience and knowledge
(including children) to use or play with this product.
19.Do not place any parts of this product in a dishwasher for cleaning.
20.This product is only suitable for household use.
21.Do not heat any parts of this product.
2
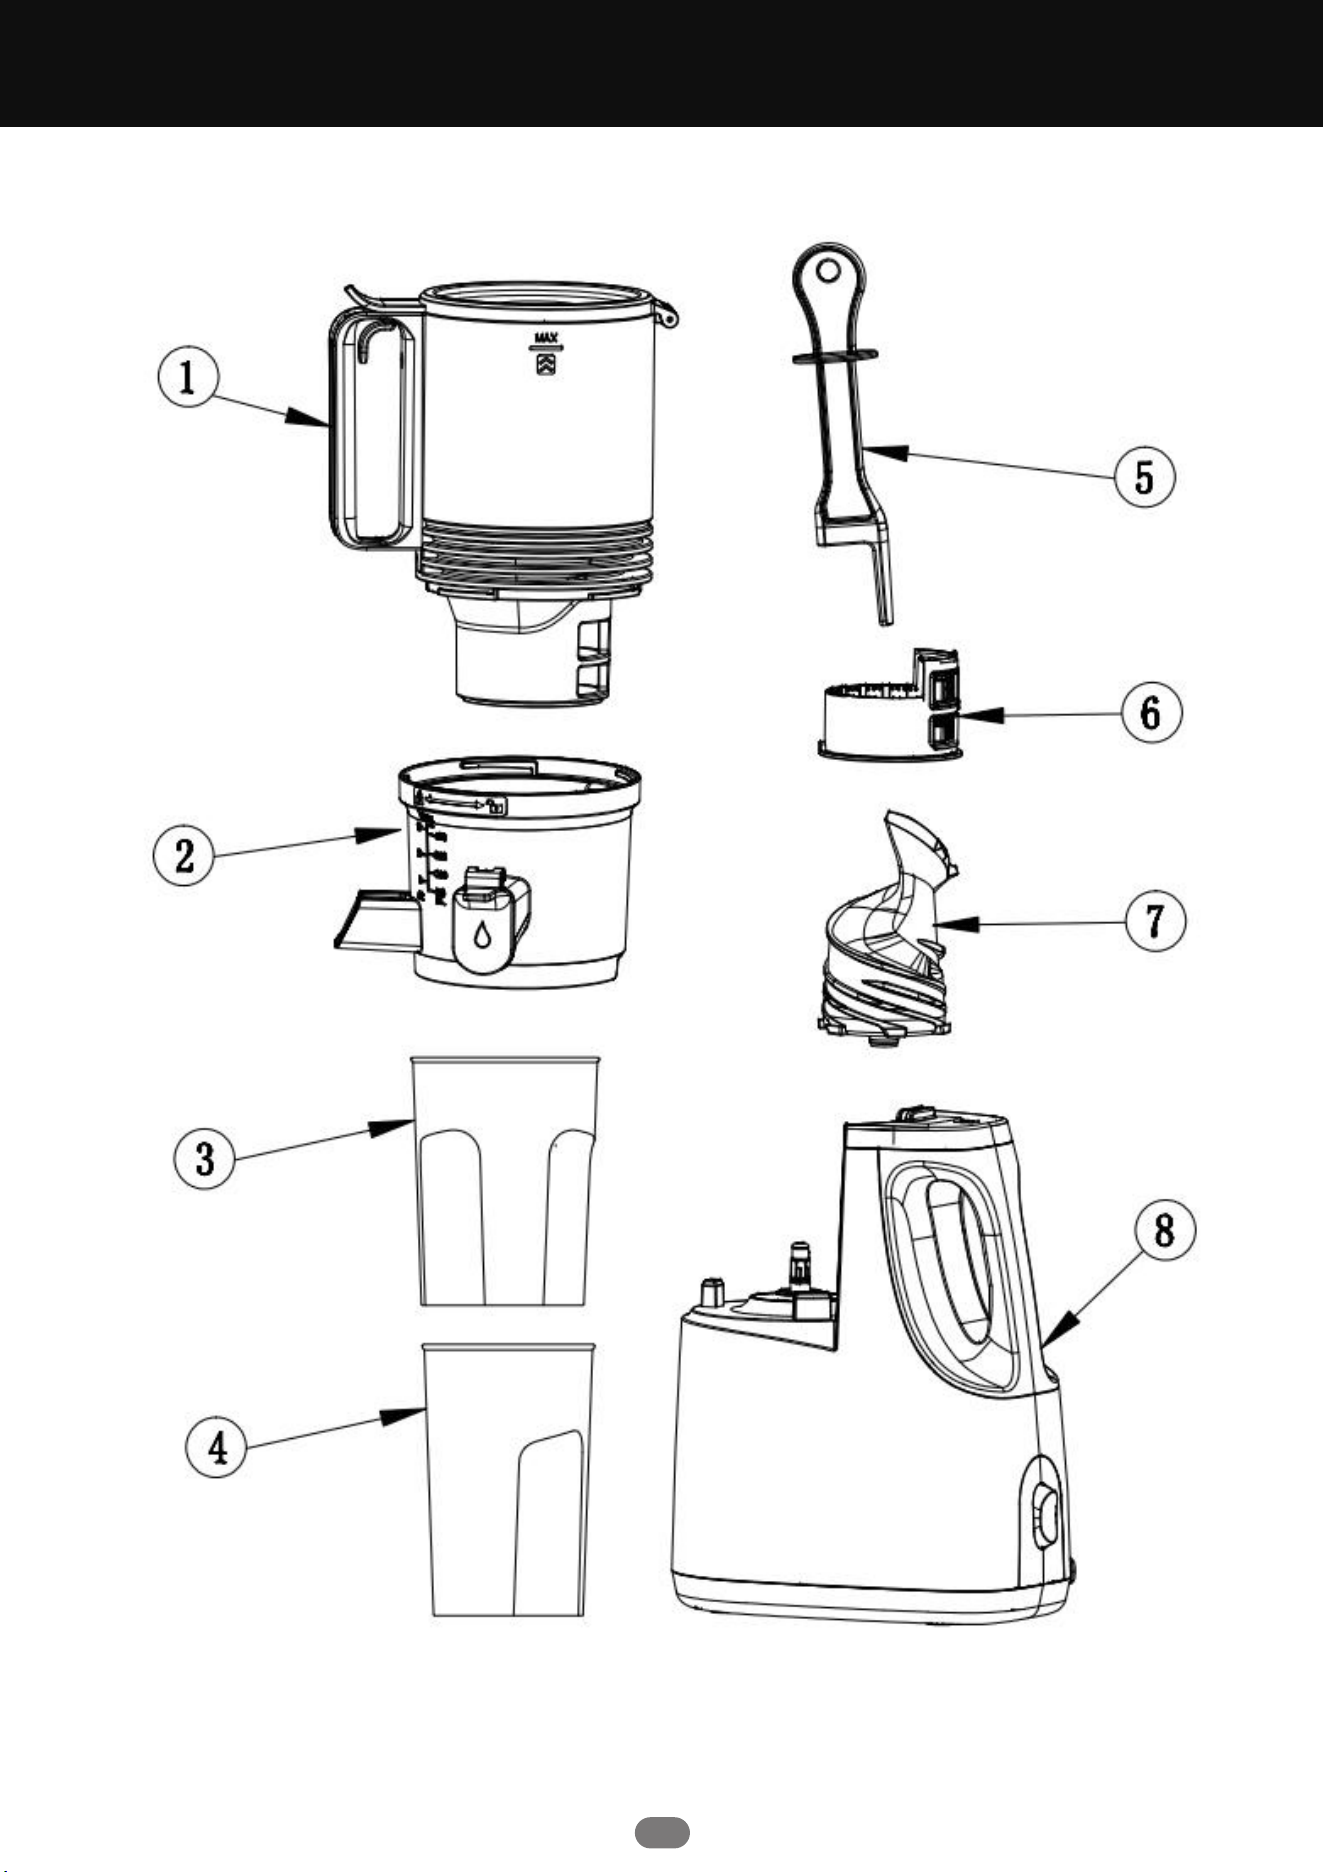
CHAPTER 2 COMPONENTS AND FUNCTIONS
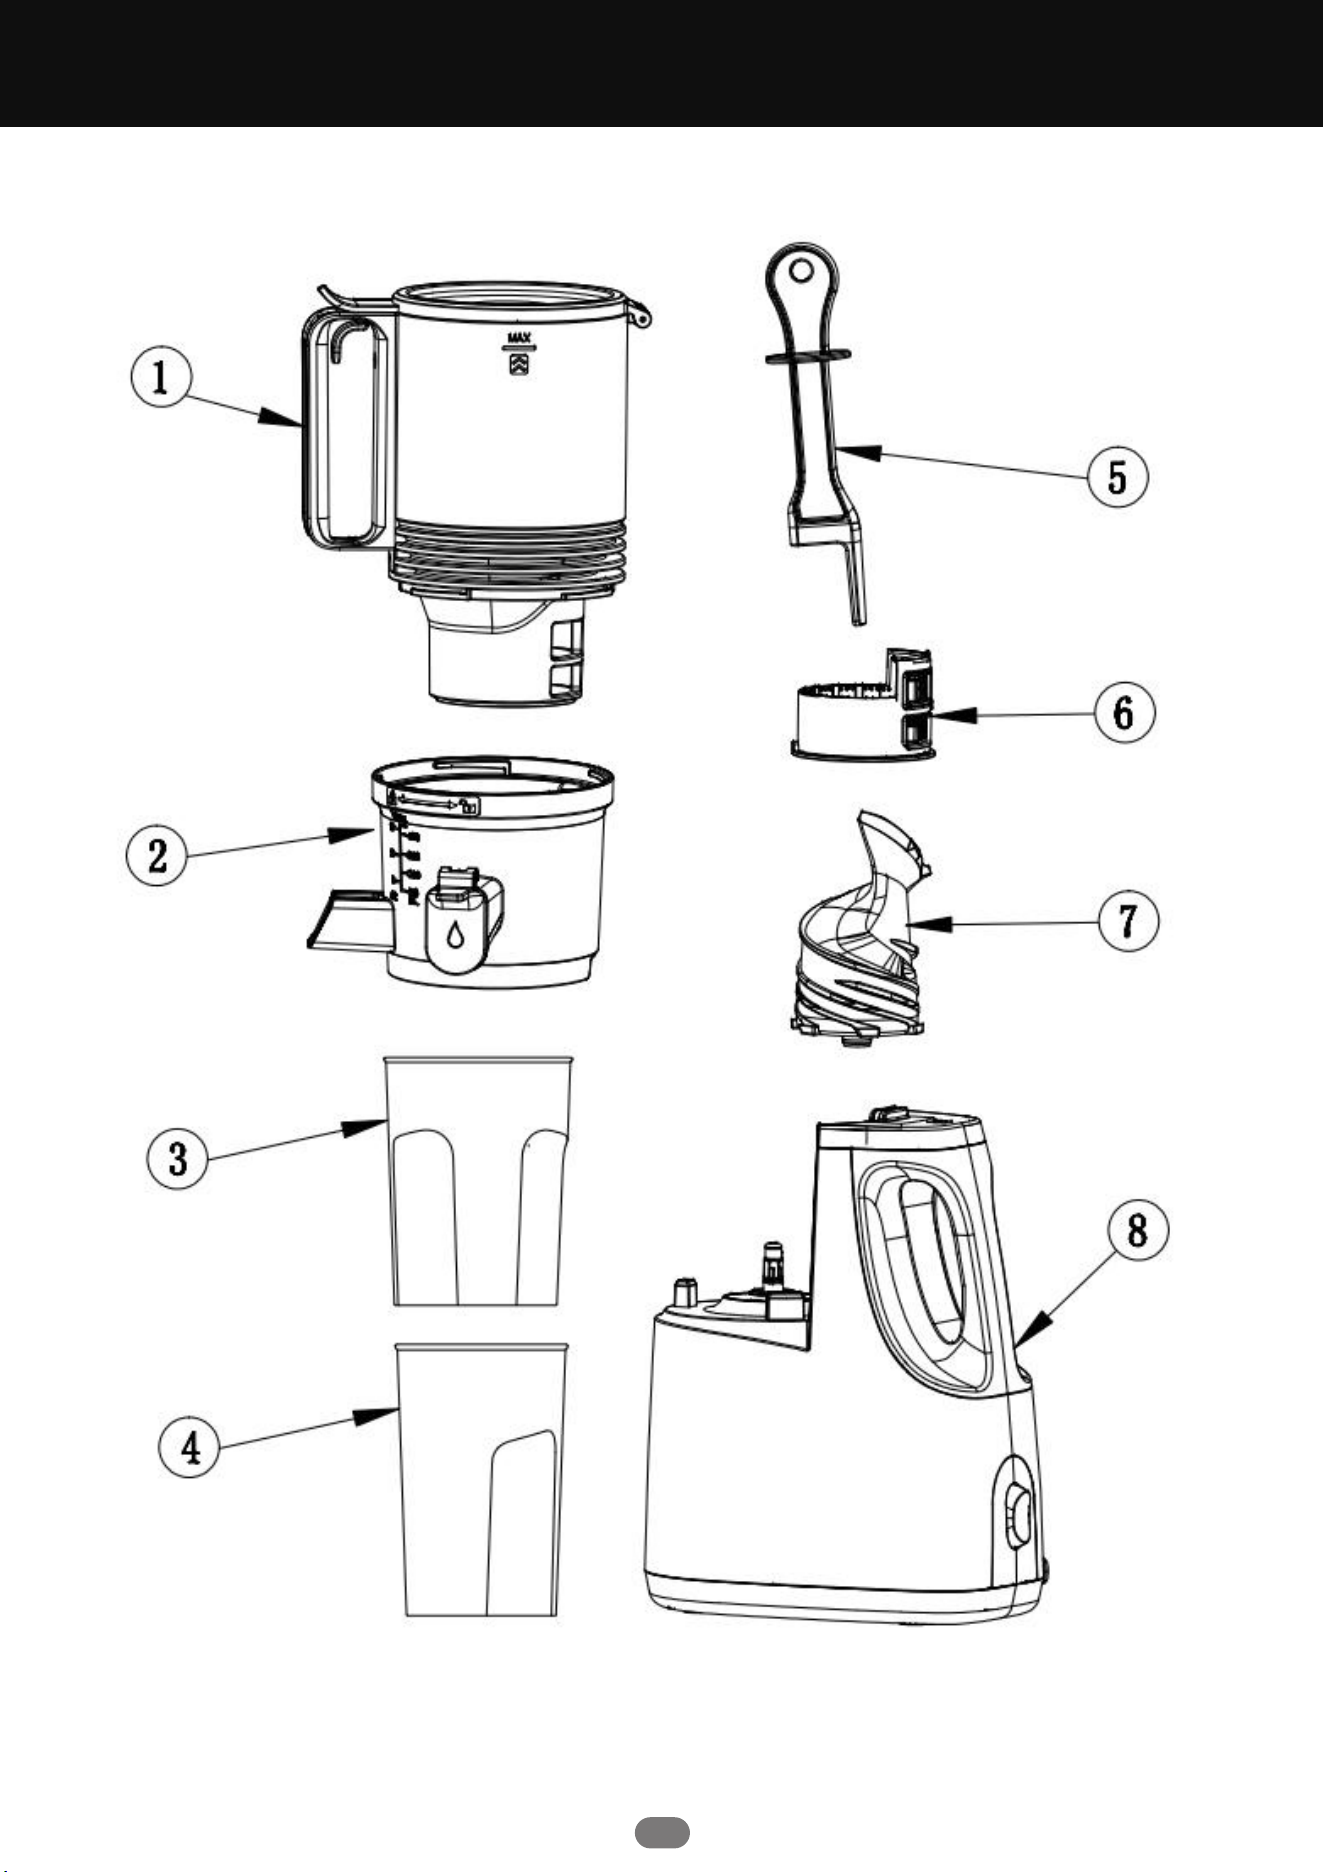
Juicer Functional Components:
Note: The product image should be based on the actual product inside the packaging.
3
CHAPTER 2 COMPONENTS AND FUNCTIONS
Component Name and Function:
4
No. Component Name Function
1
2
Feeding Cup
The main part for juicing; the
top is the feeding port, used
to place ingredients.
3/4 Juice Cup / Pulp Cup
The container for holding
the juice from the juice outlet
/ the pulp expelled from the
pulp outlet.
5 Pusher Stick
Used to slowly push and
press ingredients.
6 Filter Net
The main part for juicing,
separating juice from pulp, and
cleaning the juice and pulp in
the container and filter
net bracket.
7 Screw
The main component for
extracting juice.
8 Main Unit
The main shell, motor, and other
key components that provide
power.
Juicing Cup
The main part for juicing.

CHAPTER 3 USAGE INSTRUCTIONS
5
Before using the product for the first time, please thoroughly clean all parts that come into contact
with food (refer to "Chapter 4: Maintenance and Care").
Button operation instructions: (This product has a safety switch; the product will not work if the lid
is not properly placed.)
Please follow these steps to install and use the product:
Juicing Function (Disassembly is the reverse order of assembly).
Before installing the juicer container, first check if the silicone stopper of the juicing cup is properly
in place. If the silicone stopper is not properly placed, juice will leak out or the amount of juice will
be reduced.
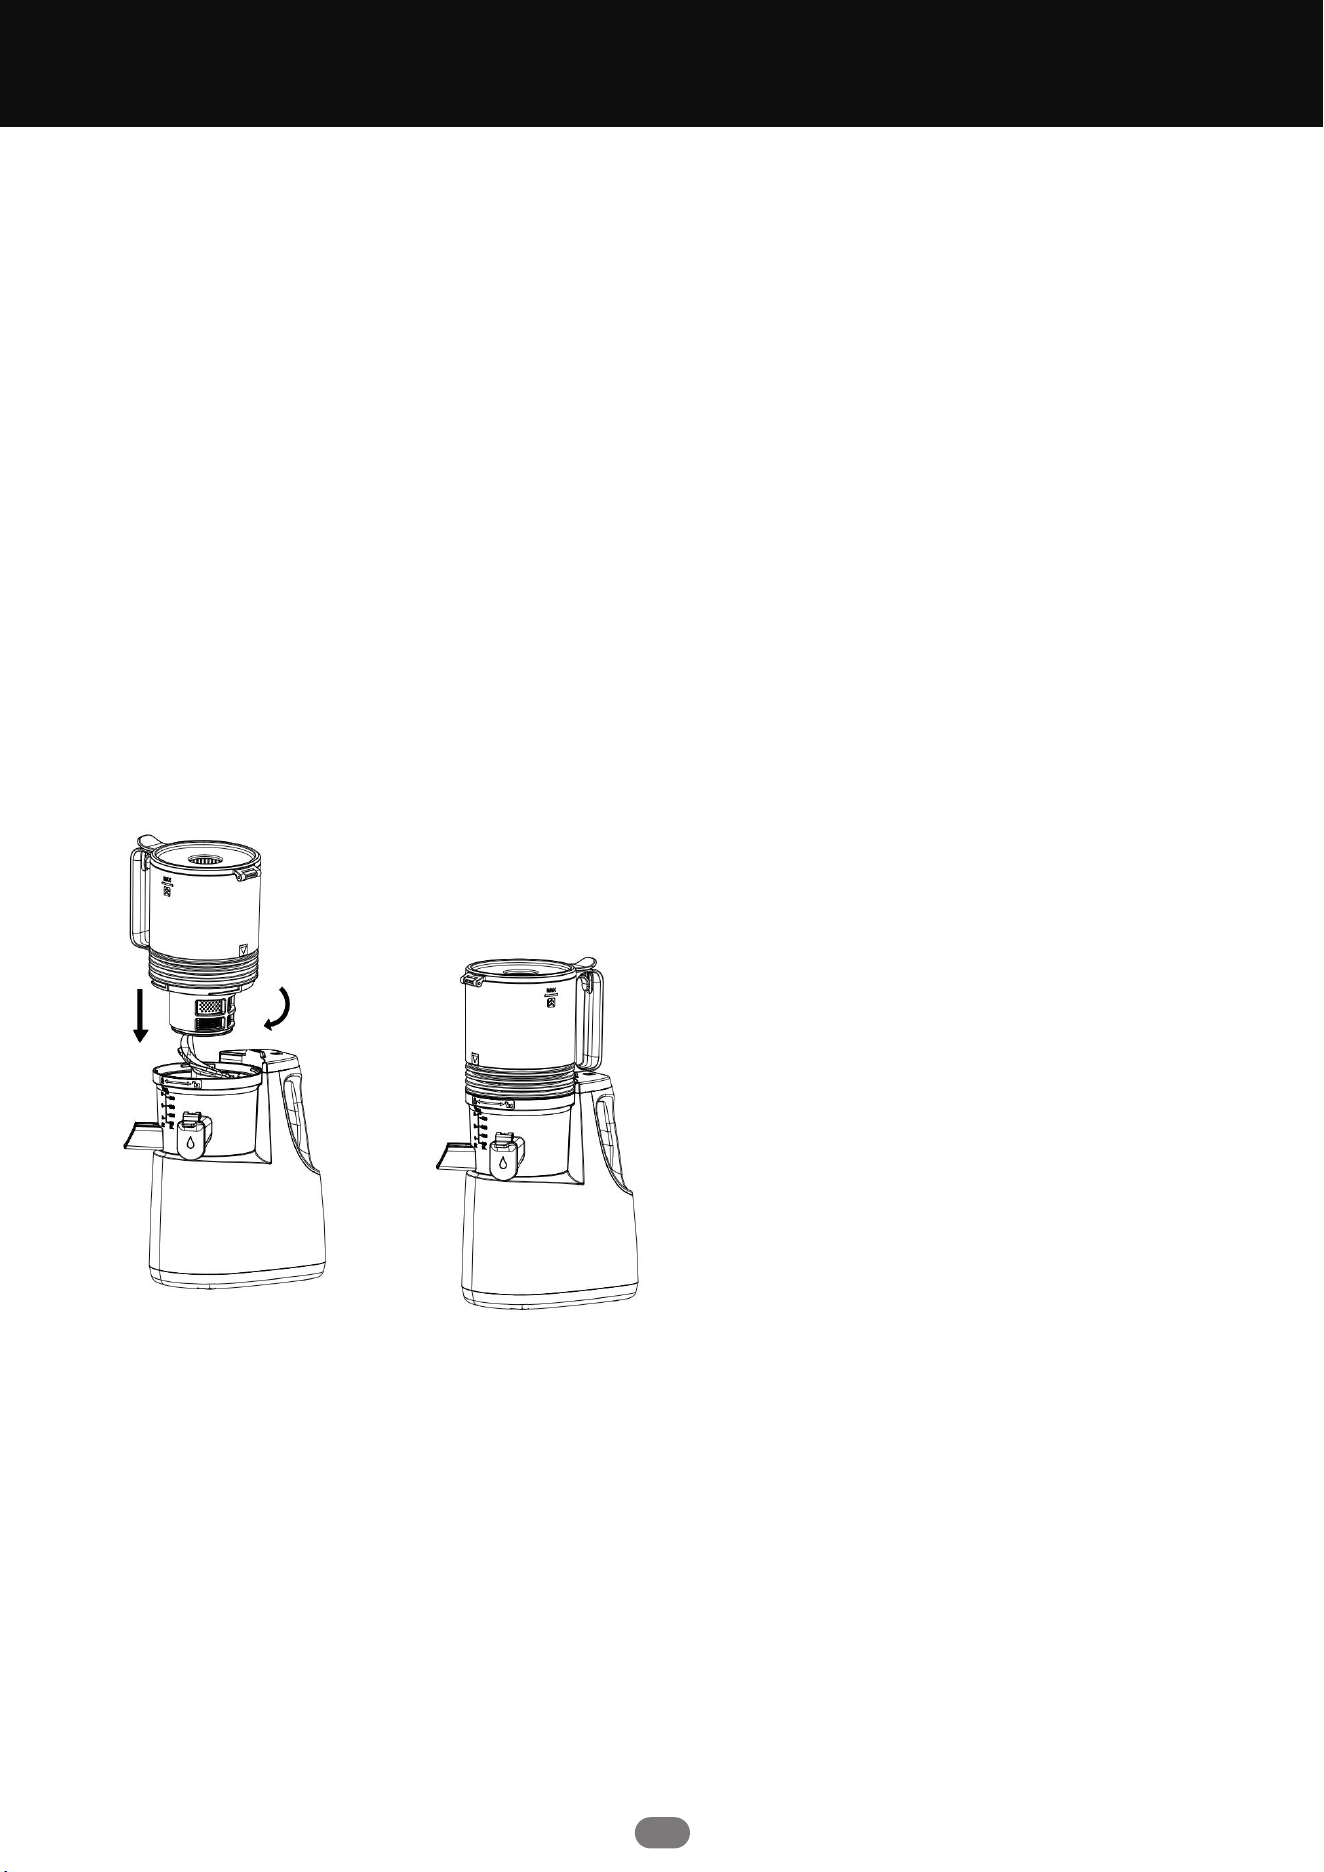
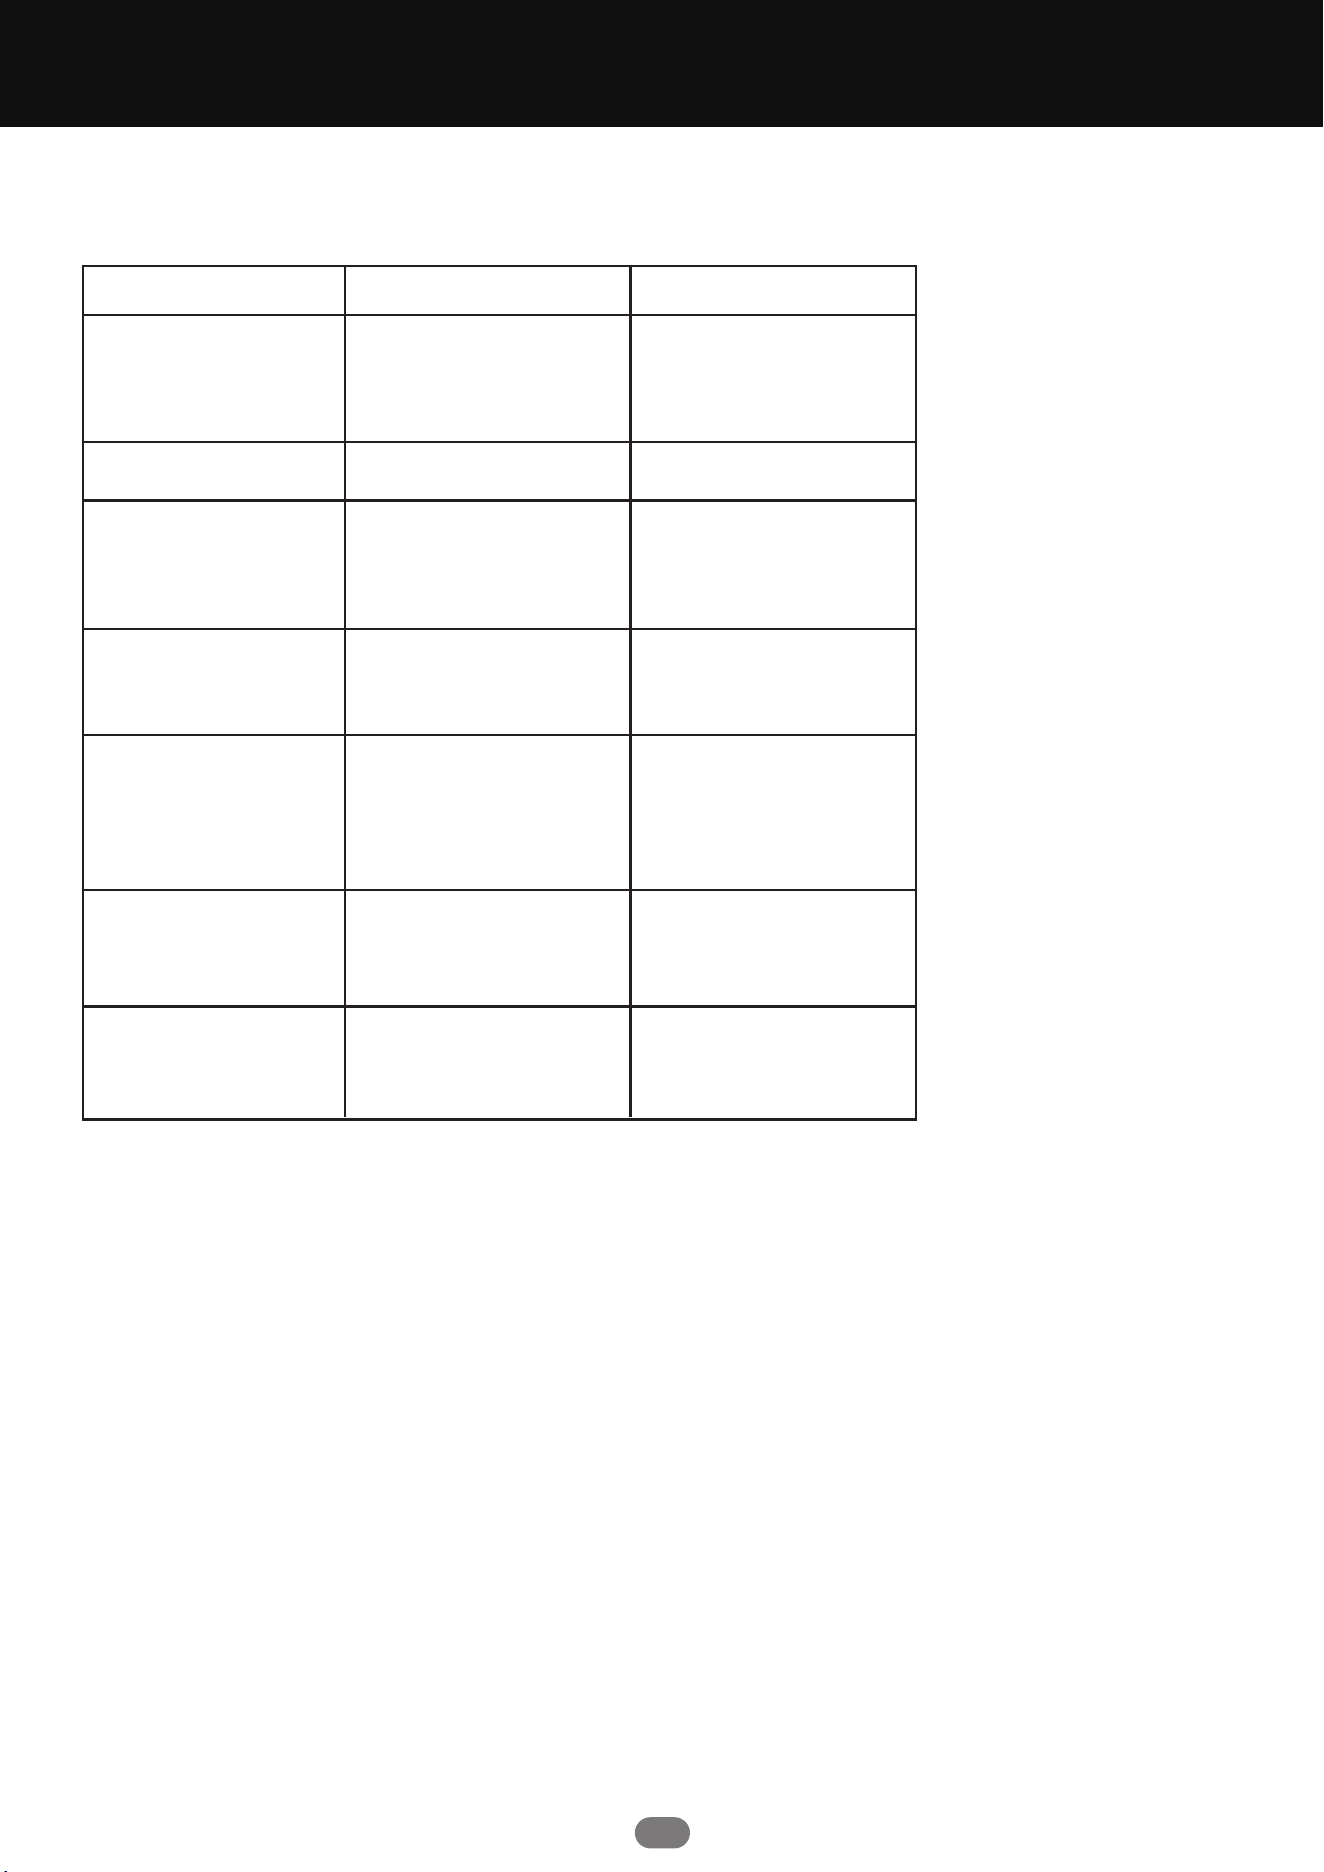
I. Product Usage
1)Align the juicer’s juice outlet with the main unit’s juice outlet slot and place the juicer on the main
unit.
2)Align the juicing screw shaft with the center of the juicing cup, then insert it. Once the screw
shaft is fully inserted, rotate the screw counterclockwise to ensure it is completely engaged with
the main unit's motor shaft.
Juicer Assembly and Usage:
CHAPTER 3 USAGE INSTRUCTIONS
6
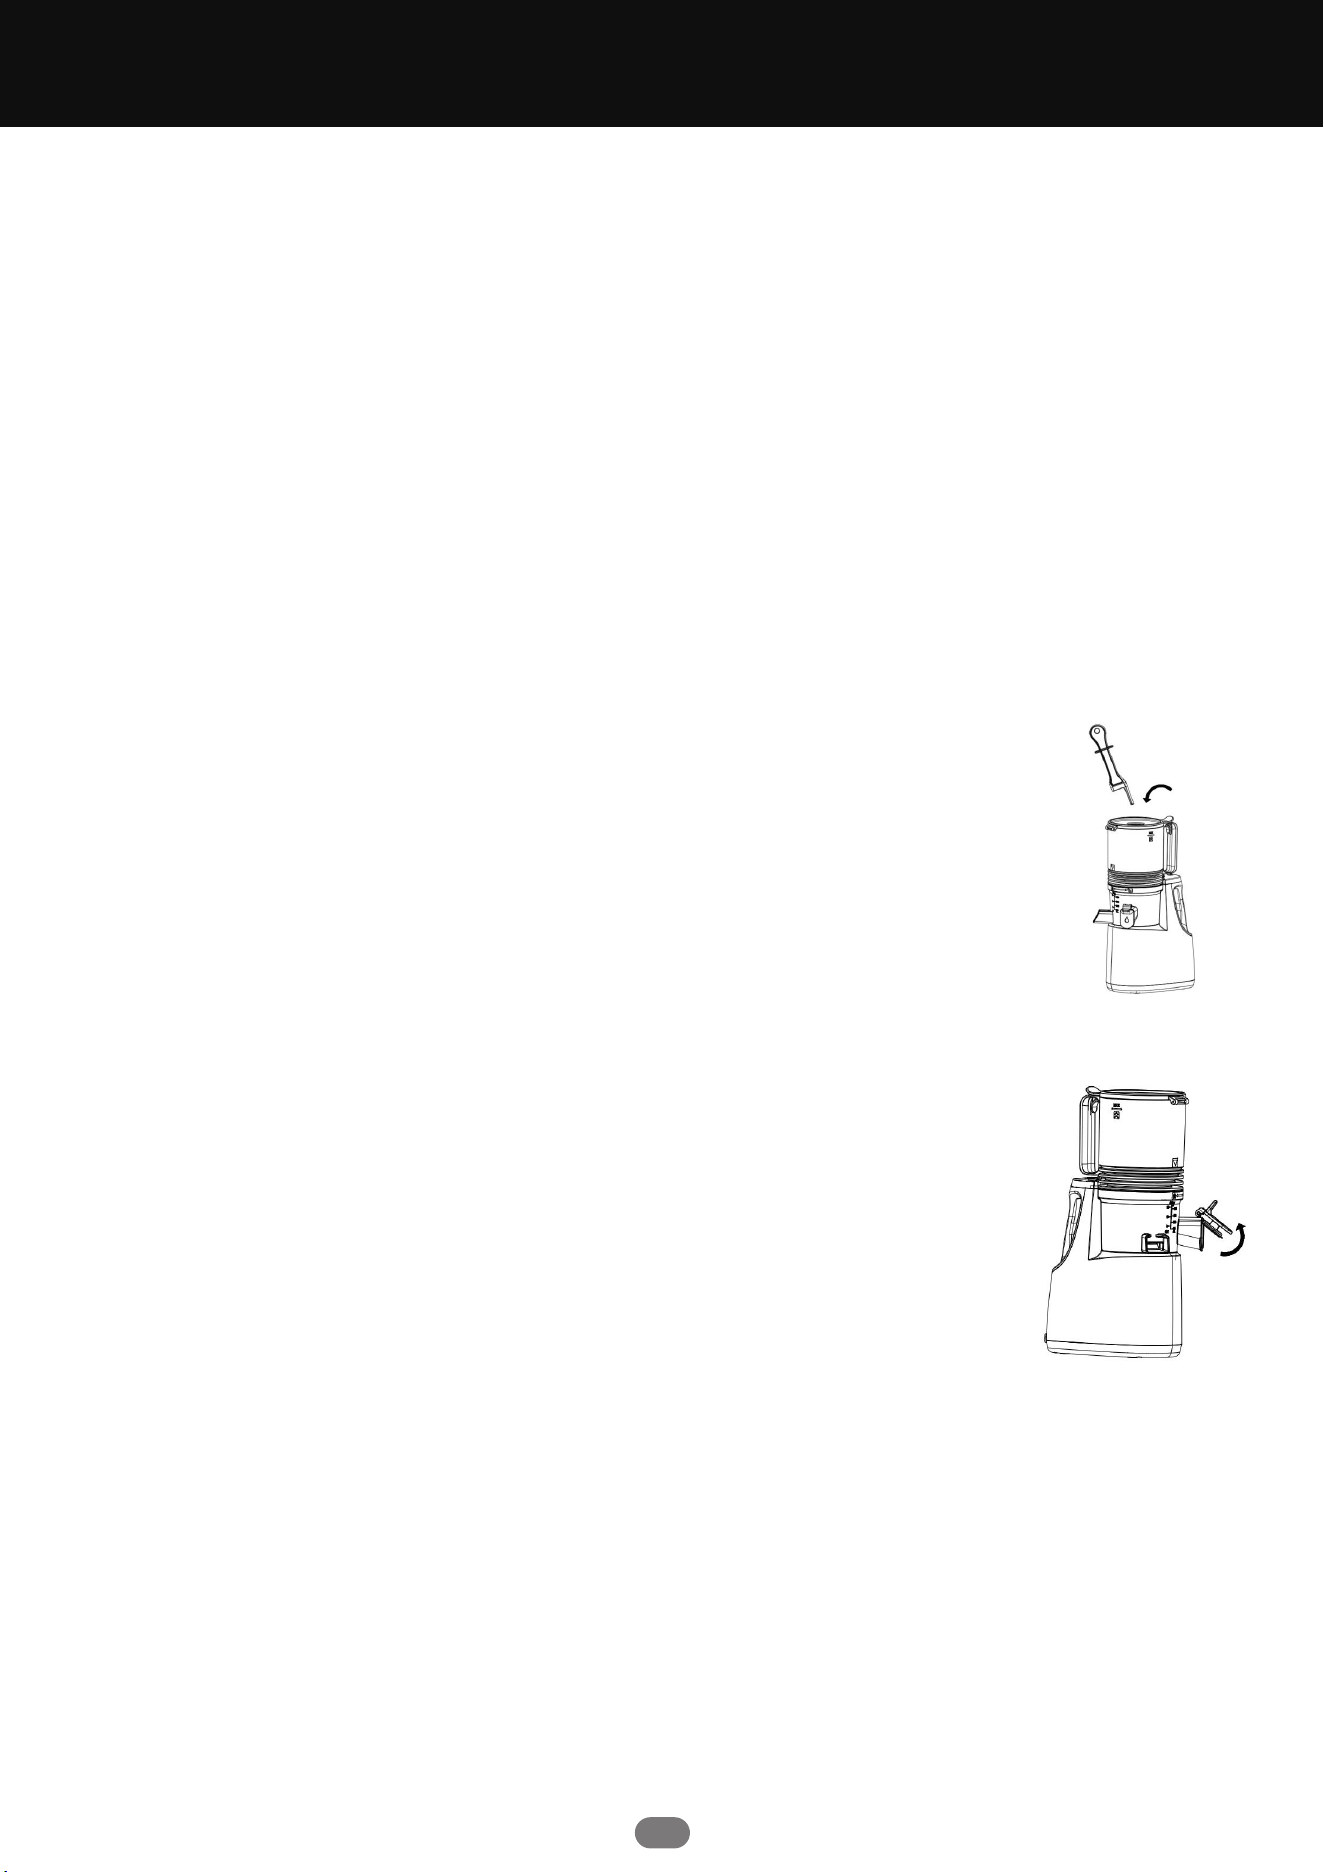
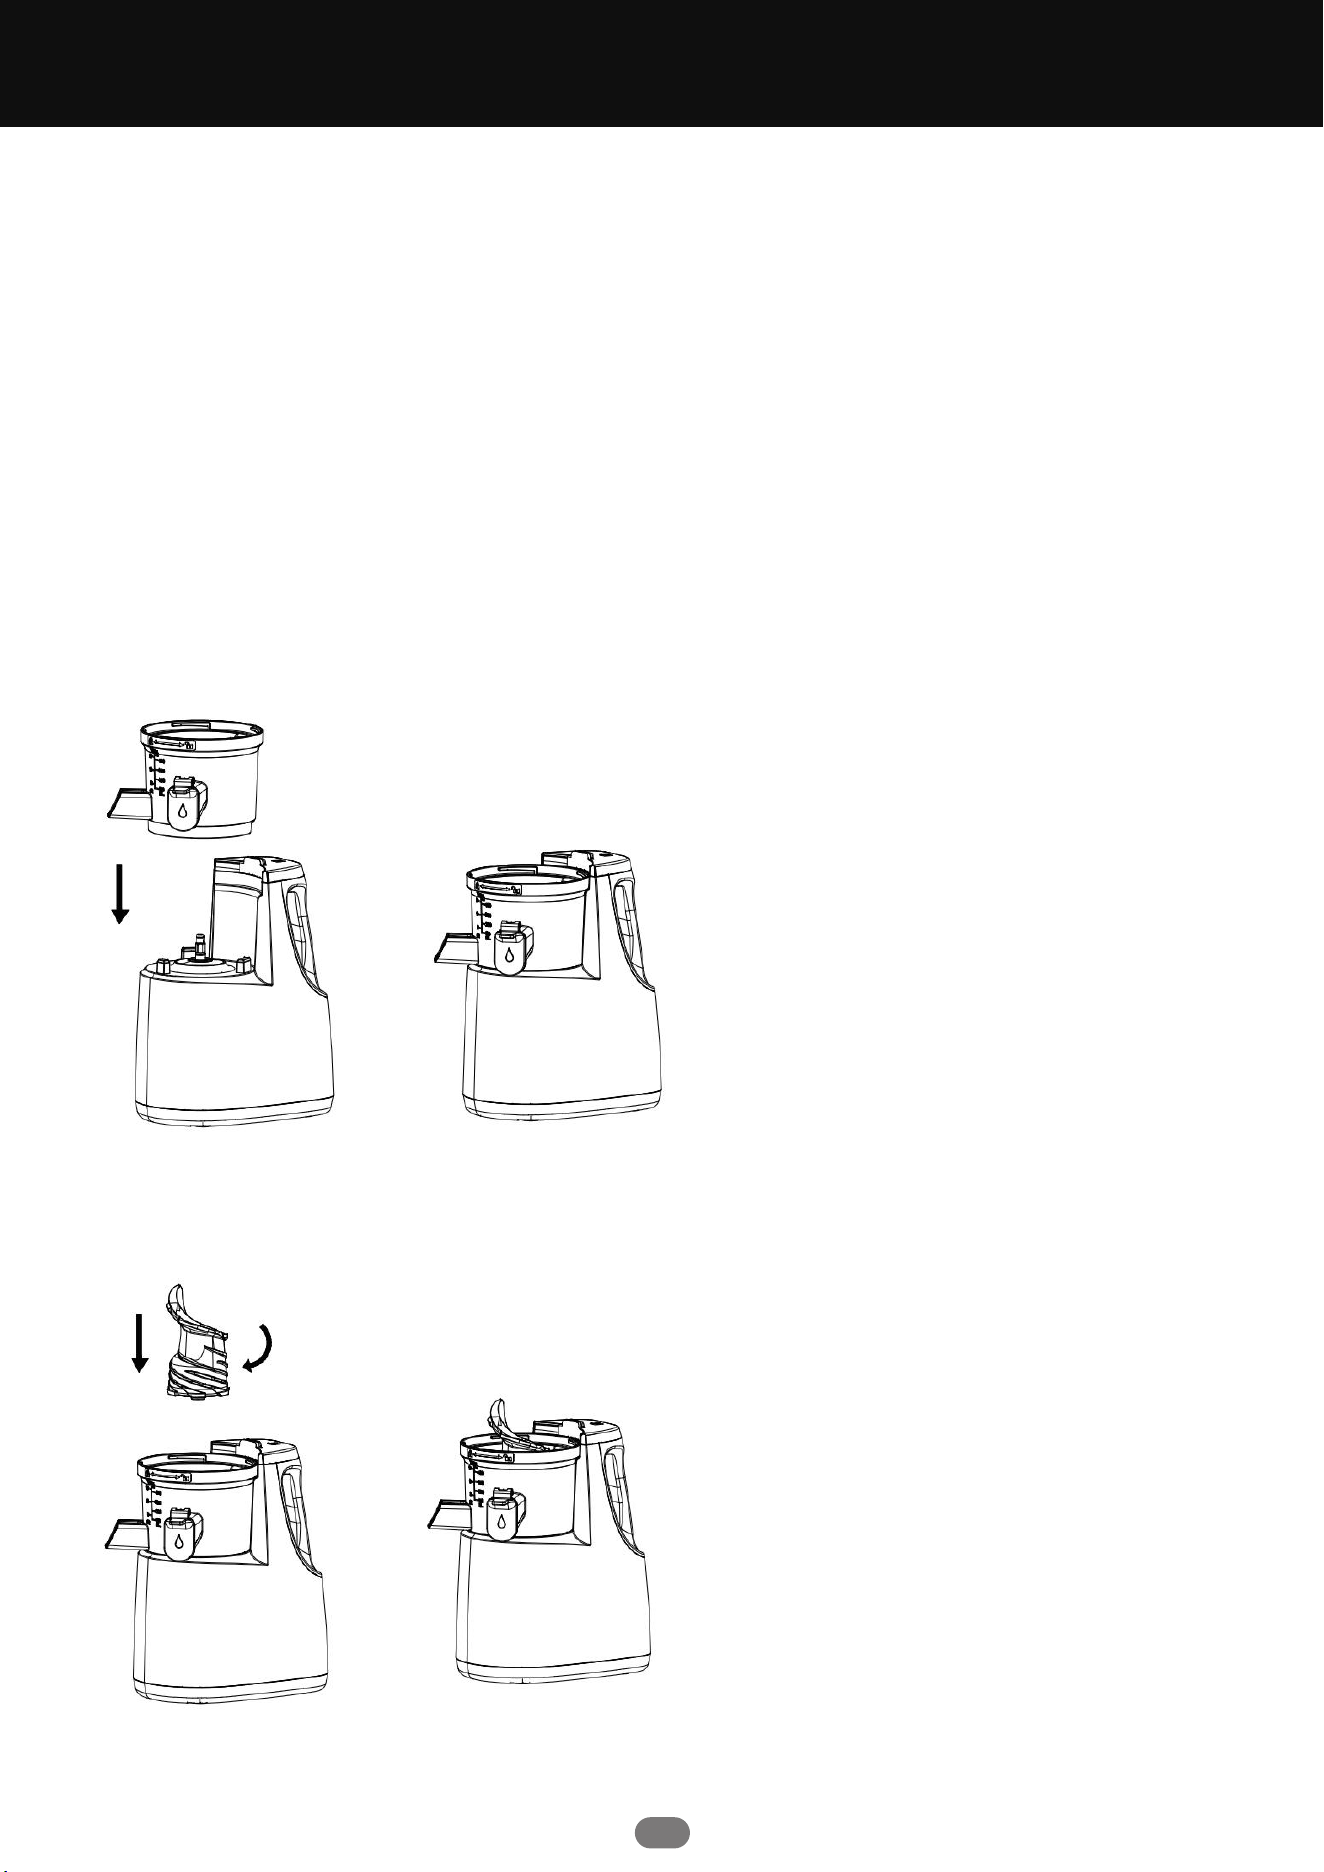
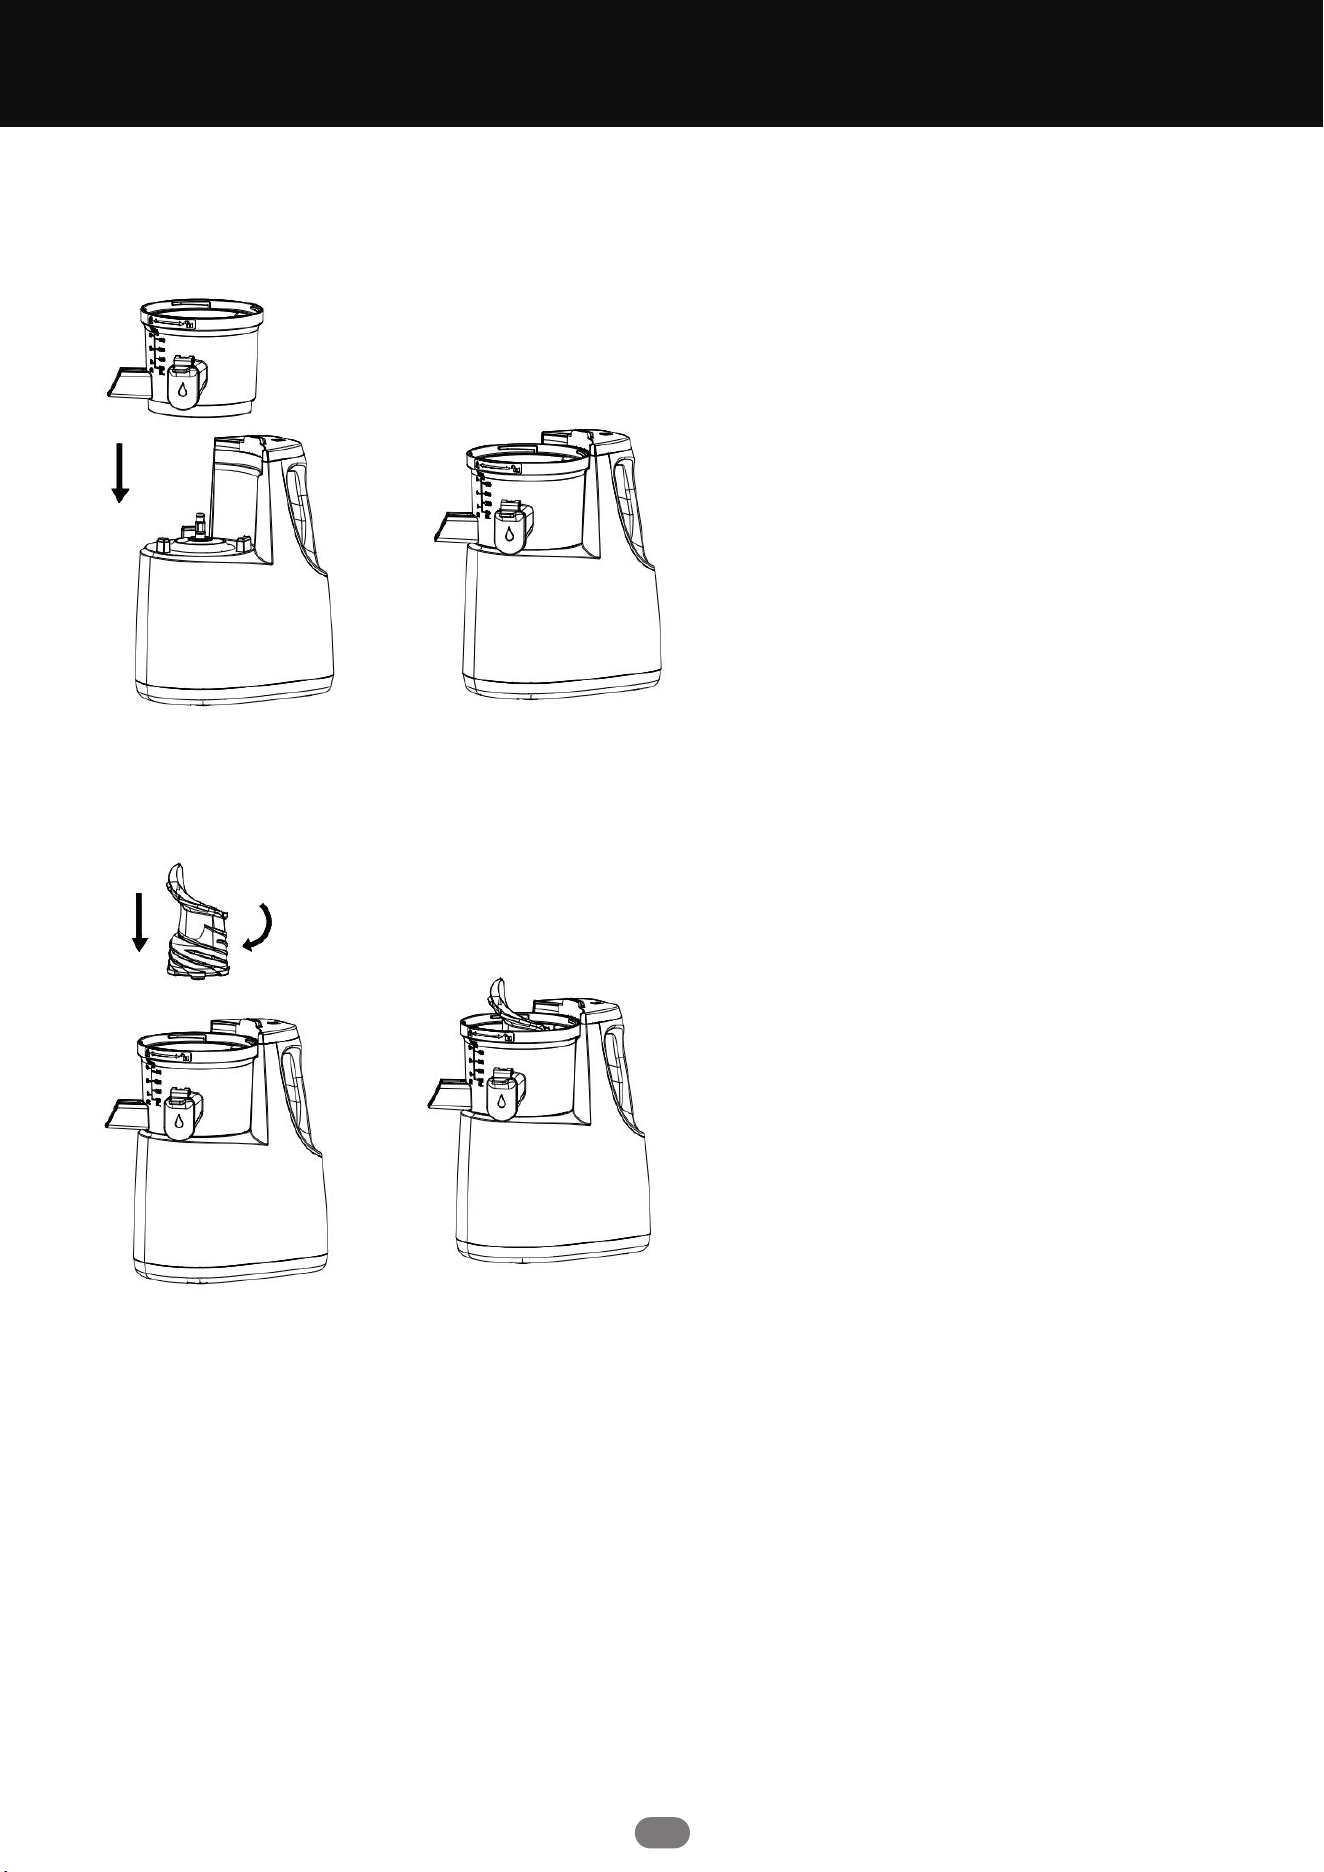
3)Install the filter net by vertically snapping it into the feeding cup as shown in the diagram. Make
sure it is installed flat.
4)Place the feeding cup vertically into the juicing cup, then rotate it to secure it tightly in the
juicing cup.
· Do not insert spoons, chopsticks, or other objects into the feeding port.
CHAPTER 3 USAGE INSTRUCTIONS
7
5)Plug in the power (when the operation switch button is pressed, the motor will
work, indicating the power is connected).
Button operation instructions: (This product has a safety switch; if the feeding cup
is not properly assembled onto the juicing cup, the product will not work.)
· "Start" button: Press the button to the start/forward position, and the product will
begin working. To stop, press the button to the "O/Off" position.
· "Reverse" button: If the pulp is not flowing properly or is blocked, press and hold
the "Reverse" button, and the screw will start rotating in reverse. Release the button
to stop the reverse rotation. Press the "Start" button again to resume normal oper-
ation.
6)Wash the ingredients and cut them into pieces that can fit into the feeding port.
· When juicing spinach, cut it into small sections first and control the feeding speed appropriately.
· For ingredients with seeds, hard pits, thick skins, or hard shells, please remove them first.
· Choose appropriate ingredients, as detailed in Section 2 of "Chapter 3: Usage Instructions."
7)Place the ingredients into the top feeding port of the feeding cup, and use the
pusher stick to slowly push the ingredients in.
· For larger ingredients like apples, or those larger than the feeding port, place the
ingredients into the feeding port and flip them into the juicing cup.
· For smaller ingredients like small tomatoes, mandarins, or peeled pomegran-
ates, place them into the feeding port.
8)During the juicing process, you can adjust the juice outlet handle to
release the juice. Once juicing is complete and no more juice is flowing
from the outlet, gently push the juice outlet handle back to seal it, prevent-
ing any remaining juice from dripping. The juice outlet can also be rotated
to adjust the juice flow and facilitate cleaning.
Wait for the motor and screw to completely stop rotating before removing
and cleaning the juice cup, pulp cup, and other parts.

Chapter 4: Maintenance and Care
8
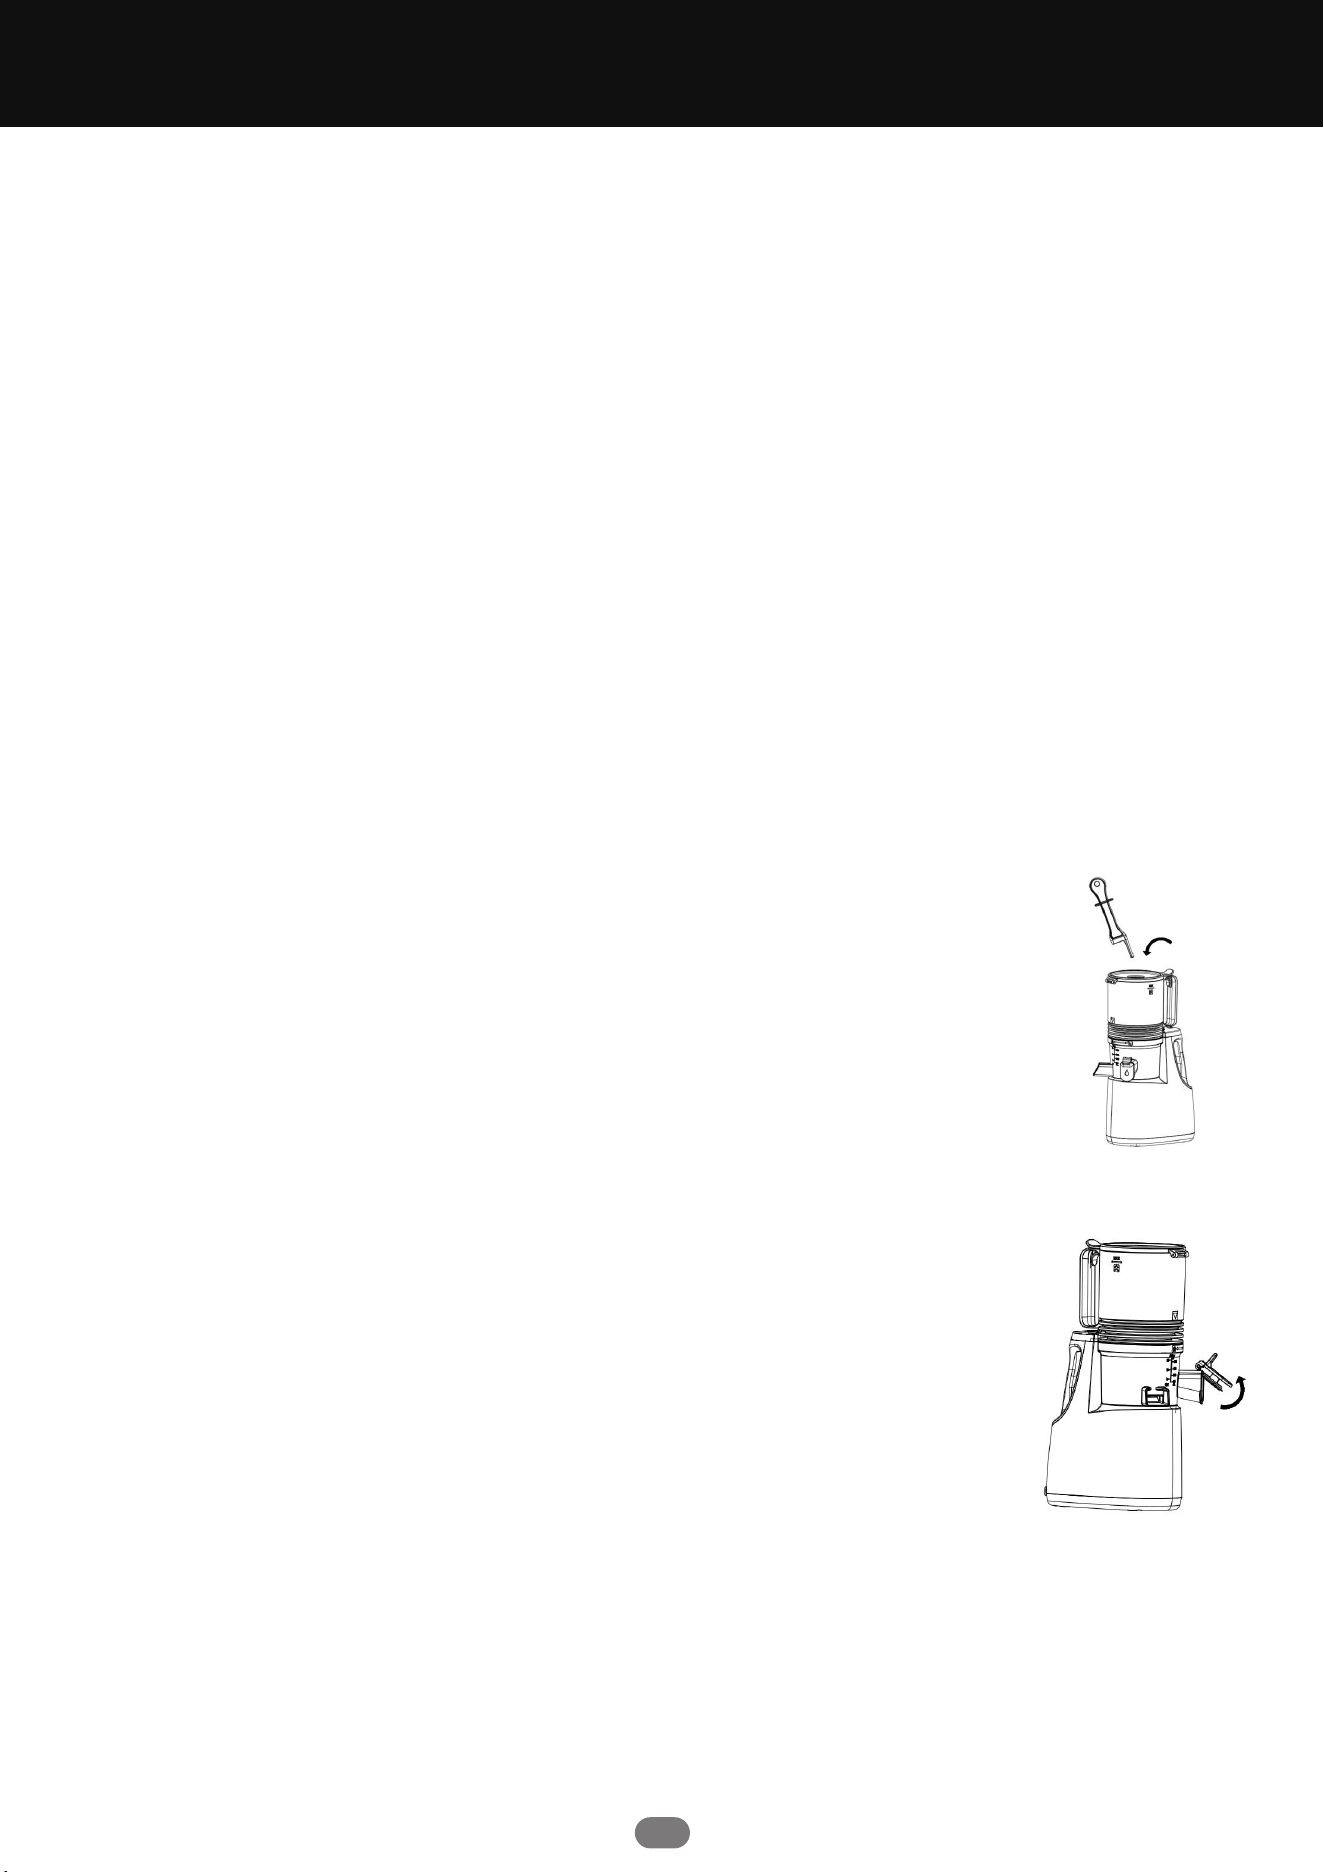
1.Before cleaning the product, press the reverse button, then disconnect the power (if the
reverse button is not pressed, after disconnecting the power, simply rotate the screw clockwise
to remove it).
2.Please clean the product promptly after use.
3.The exterior of the main body can be wiped with a damp cloth. Do not immerse the main body in
water or other liquids, nor should it be rinsed under water or any other liquid.
4.Store this product in a dry place and avoid direct exposure to ultraviolet (UV) light.
5.Before storing the product, ensure it is clean and dry.
6.Refer to the reverse order of assembly instructions when disassembling for cleaning.
Chapter 5: Product Safety Specifications
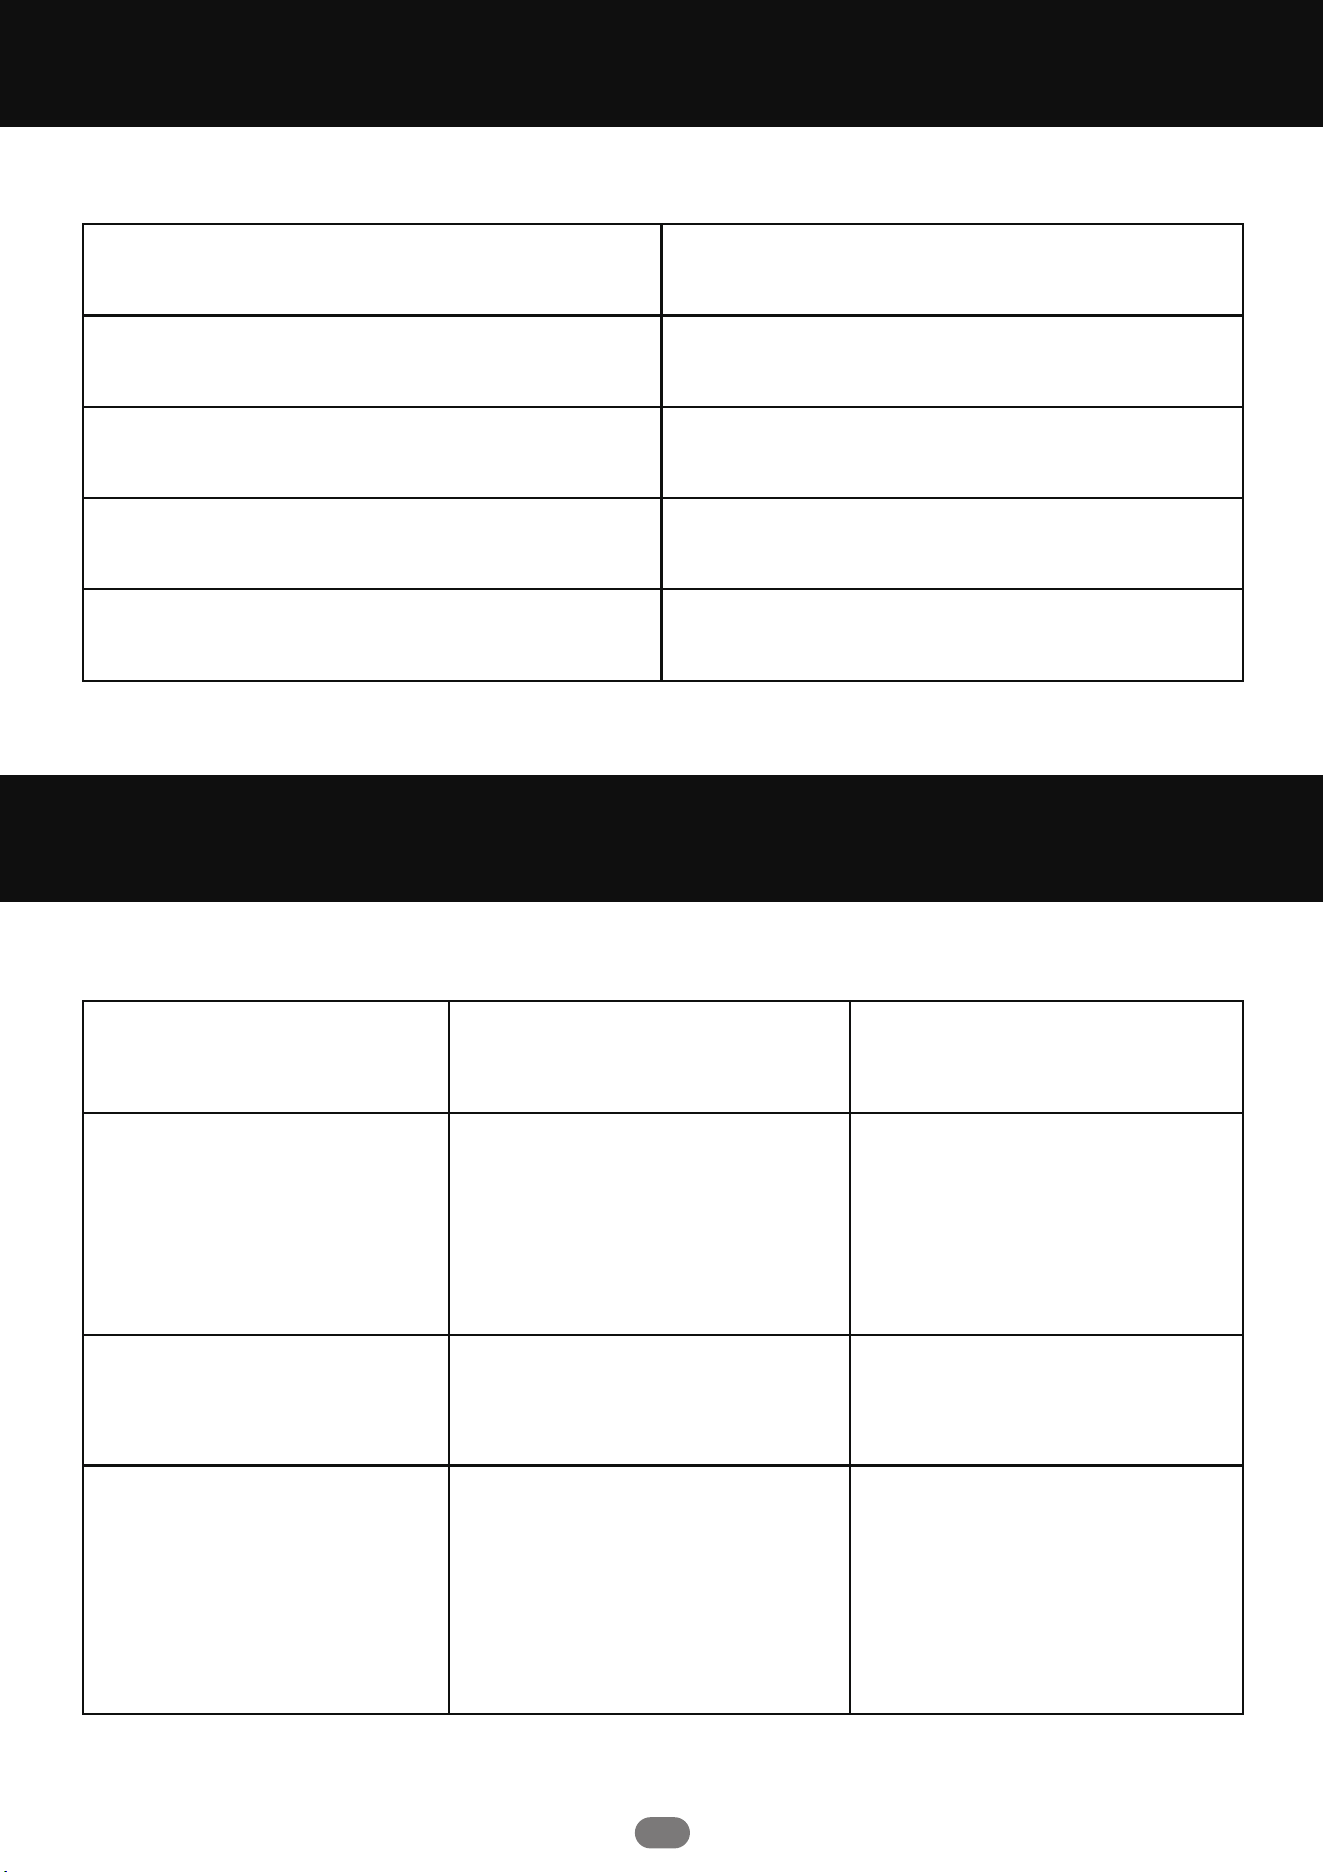
Chapter 6: Fault Analysis and Troubleshooting
9
Rated Voltage
Fault Phenomenon
Product doesn't work after
pressing the power switch
Unpleasant odor emitted from
the motor during the first few uses
Product stops mid-operation
Cause Analysis
1.Power cord not plugged in properly /
Feed cup not assembled correctly
2. Ingredients are too hard, causing
power protection to stop
Normal phenomenon of a new motor
1.Power plug is loose.
2.Too many ingredients added,
overload or jamming caused the
product to stop.
3. The product is in intelligent protection
mode.
Troubleshooting
1. Plug in the power cord properly /
Check the feed cup assembly
2. Replace ingredients or cut them into
smaller pieces before use
If the odor persists after multiple
uses, please take it to the nearest
service center for inspection
1. Reinsert the power plug properly.
2. Reduce the amount of ingredients
added, apply moderate pressure on the
push rod.
3. Turn off the product and wait for a
while before restarting.
Rated Power
Rated Frequency
Continuous Operating Time
Interval Time
120V
150W
60Hz
≤10 minutes
≥5 minutes

Any Problem? Let Us Know.

MAX 62oz
MIN 16oz
Model No.: JE120-18M00B
Para su seguridad y un uso correcto del producto, lea
las instrucciones cuidadosamente antes de usarlo.
USER MANUAL
ZMJ004BK
JUICER MACHINES AND EXTRACTOR

ÍNDICE
PREFACE
PREFACIO ······························ 10
········· 11
CAPÍTULO 1: INSTRUCCIONES DE SEGURIDAD PARA EL USO
·················· 12
CAPÍTULO 2: PARTES Y FUNCIONES
···········
14
CAPÍTULO 3: INSTRUCCIONES DE FUNCIONAMIENTO
···············
17
CAPÍTULO 4: MANTENIMIENTO Y CUIDADO
·············
18
CAPÍTULO 5: ESPECIFICACIONES DE SEGURIDAD
·············
18
CAPÍTULO 6: ANÁLISIS DE FALLAS Y SOLUCIONES
Gracias por utilizar el extractor de jugo SUNVIVI. Para que pueda utilizar y mantener correctamente
este producto, hemos preparado especialmente este manual. Le recomendamos leer cuidadosa-
mente este manual antes de usar el producto y guardarlo adecuadamente para futuras consul-
tas.
Este manual es aplicable únicamente a los extractores de jugo "JE120-18M00B" de la marca SUN-
VIVI. SUNVIVI se reserva el derecho de interpretación final. Todo el contenido de este manual es
solo para referencia del usuario al utilizar y mantener el producto. Para cualquier asunto no cubi-
erto, los usuarios pueden consultar con nuestro departamento de atención al cliente. Agradece-
mos las sugerencias valiosas de los usuarios sobre posibles mejoras de este manual. Esperamos
que el extractor de jugo SUNVIVI traiga calidez, comodidad y salud a su vida.

CAPÍTULO 1 INSTRUCCIONES DE SEGURIDAD PARA EL USO
1.El voltaje de entrada de este producto es 120V ~ 60Hz. Por favor, verifique antes de usar.
2.Este producto tiene una conexión en Y; si el cable de alimentación está dañado, para evitar
peligros, debe ser reemplazado por el fabricante, su departamento de mantenimiento o personal
profesional similar.
3.Si el producto requiere reparación, póngase en contacto con nuestro departamento de atención
al cliente. No intente desarmarlo usted mismo para evitar peligros.
4.Antes de desmontar, montar o ajustar cualquier parte del producto, asegúrese de que la
alimentación esté desconectada.
5.Antes de usarlo, verifique si el cable de alimentación, el enchufe, la malla de exprimido, el tornillo
y otras partes están dañadas. Si encuentra algún daño, deje de usar el producto y póngase en
contacto con nuestro departamento de atención al cliente. No intente desarmarlo ni repararlo
usted mismo para evitar peligros.
6.Antes de conectar la fuente de alimentación, asegúrese de que todas las partes desmontables
estén correctamente instaladas y que la tapa del recipiente esté completamente atornillada para
evitar fugas o que la tapa se desprenda durante el funcionamiento.
7.El producto está equipado con componentes de protección inteligente. Si la potencia excede un
límite, el producto se detendrá automáticamente por protección. Si desea continuar usándolo,
espere 1 minuto antes de reiniciarlo. Esto ayuda a prolongar la vida útil del producto.
8.Durante el funcionamiento, si ocurre sobrecarga o atasco, el producto se detendrá automática-
mente. Si al reiniciar sigue atascado, se recomienda limpiar los ingredientes dentro del tubo de
alimentación antes de continuar usándolo.
9.Los ingredientes deben cortarse en trozos pequeños para que quepan en el tubo de
alimentación. Para ingredientes con huesos, semillas duras, piel gruesa o cáscaras duras, por
favor, retírelos antes de procesarlos.
10.Este producto no es adecuado para exprimir ingredientes muy duros o fibrosos, como cubos de
hielo, cocos o caña de azúcar. Exprimir estos ingredientes puede causar obstrucciones o daños a
las piezas, lo que afectará la vida útil del producto.
11.Al agregar ingredientes, no aplique demasiada fuerza al empujarlos. La fuerza debe ser sufici-
ente para cortar los ingredientes.
12.Durante el funcionamiento, nunca meta la mano en el tubo de alimentación para evitar
lesiones. Nunca use objetos para reemplazar la barra empujadora para empujar los ingredientes,
ya que esto puede causar contacto con los componentes del tornillo y dañar el producto, espe-
cialmente para los ancianos y los niños.
13.Durante el funcionamiento, nunca acerque los ojos al tubo de alimentación para evitar acci-
dentes.
14.Ningún accesorio del producto debe ser desinfectado en un microondas para evitar deforma-
ciones y daños por calor. Todas las partes que entran en contacto con alimentos cumplen con los
requisitos de certificación de grado alimenticio y son limpias, higiénicas y confiables.
15.Después de exprimir ciertos ingredientes, el filtro, el tornillo, la tapa del recipiente y otras partes
pueden teñirse, lo cual es normal. El teñido no afecta la comestibilidad y no perjudica la salud. Si el
filtro rotatorio se daña, no utilice la máquina.
16.No sumerja la unidad principal en agua ni en otros líquidos, ni la enjuague bajo agua u otros
líquidos. No debe limpiarse ninguna parte a temperaturas superiores a 60°C.
17.No utilice estropajos de acero, limpiadores abrasivos o líquidos corrosivos (como gasolina o
acetona) para limpiar el producto.
18.El producto debe almacenarse en un lugar fuera del alcance de los niños. Nunca permita que
personas con discapacidades físicas, sensoriales o mentales, o que carezcan de experiencia y
conocimientos relevantes (incluidos los niños) usen o jueguen con este producto.
19.No coloque ninguna parte de este producto en el lavavajillas para limpiarlo.
20.Este producto es solo para uso doméstico.
21.No debe calentar ninguna parte de este producto.
11
CAPÍTULO 2 COMPONENTES Y FUNCIONES
Componentes funcionales del exprimidor:
Nota: La imagen del producto debe basarse en el producto real dentro del paquete.
12
CAPÍTULO 2 COMPONENTES Y FUNCIONES
Nombre del componente y función:
13
No. Nombre del componente Función
1
2
Taza de alimentación
La parte principal para
exprimir; la parte superior es
la entrada de alimentación,
utilizada para colocar los
ingredientes.
3/4 Taza de jugo / Taza de pulpa
El recipiente para contener el
jugo que sale de la salida de
jugo / la pulpa expulsada de
la salida de pulpa.
5 Barra empujadora
Se usa para empujar y
presionar lentamente los
ingredientes.
6 Filtro
La parte principal para
exprimir el jugo, separando
el jugo de la pulpa y limpiando
el jugo y la pulpa en el recipiente
y el soporte del filtro.
7 Tornillo
El componente principal
para extraer el jugo.
8 Unidad principal
La carcasa principal, motor y
otros componentes clave que
proporcionan potencia.
Taza de jugo
La parte principal para
exprimir el jugo.
CAPÍTULO 3 INSTRUCCIONES DE USO
14
Antes de usar el producto por primera vez, por favor, limpie a fondo todas las partes que entran en
contacto con los alimentos (consulte "Capítulo 4: Mantenimiento y Cuidado").
Instrucciones para el funcionamiento del botón: (Este producto tiene un interruptor de seguridad;
el producto no funcionará si la tapa no está correctamente colocada.)
Por favor, siga los siguientes pasos para instalar y usar el producto:
Función de extracción de jugo (El desmontaje es el orden inverso del montaje).
Antes de instalar el recipiente del exprimidor, primero verifique si el tapón de silicona de la taza de
jugo está correctamente colocado. Si el tapón de silicona no está correctamente colocado, el
jugo se derramará o la cantidad de jugo será reducida.
I. Uso del producto
1)Alinee la salida de jugo del exprimidor con la ranura de salida de jugo de la unidad principal y
coloque el exprimidor sobre la unidad principal.
2)Alinee el eje del tornillo exprimidor con el centro de la taza de jugo y luego insértelo. Una vez
que el eje del tornillo esté completamente insertado, gire el tornillo en sentido antihorario para
asegurarse de que esté completamente encajado en el eje del motor de la unidad principal.
Montaje y uso del exprimidor:
CAPÍTULO 3 INSTRUCCIONES DE USO
15
· No coloque cucharas, palillos u otros objetos en la entrada de alimentación.
3)Instale el filtro colocando el filtro verticalmente en la taza de alimentación según la dirección
mostrada en el diagrama. Asegúrese de que esté instalado de manera plana.
4)Coloque la taza de alimentación verticalmente en la taza de jugo y luego gírela para asegurar-
la firmemente dentro de la taza de jugo.
CAPÍTULO 3 INSTRUCCIONES DE USO
16
5)Conecte la alimentación (cuando se presione el botón de operación, el motor
comenzará a funcionar, lo que indica que la energía está conectada).
Instrucciones para el funcionamiento del botón: (Este producto tiene un interrup-
tor de seguridad; si la taza de alimentación no está correctamente ensamblada
en la taza de jugo, el producto no funcionará.)
Botón "Inicio": Presione el botón hasta la posición de inicio/avance, y el producto
comenzará a funcionar. Para detenerlo, presione el botón hasta la posición "O/A-
pagar".
Botón "Reversa": Si la pulpa no fluye correctamente o está bloqueada, mantenga
presionado el botón "Reversa" y el tornillo comenzará a girar en reversa. Suelte el
botón para detener la rotación en reversa. Presione el botón "Inicio" nuevamente
para reanudar el funcionamiento normal.
6)Lave los ingredientes y córtelos en trozos que puedan caber en la entrada de alimentación.
· Al exprimir espinacas, córtelas en trozos pequeños primero y controle adecuadamente la velocid-
ad de alimentación.
· Para ingredientes con semillas, huesos duros, piel gruesa o cáscaras duras, quítelos primero.
· Elija ingredientes adecuados, como se detalla en la Sección 2 de "Capítulo 3: Instrucciones de uso."
7)Coloque los ingredientes en la parte superior de la entrada de alimentación
de la taza de alimentación y use la barra empujadora para presionar lentam-
ente los ingredientes hacia adentro.
· Para ingredientes más grandes como manzanas, o aquellos más grandes que
la entrada de alimentación, coloque los ingredientes en la entrada de
alimentación y voltee para verterlos en la taza de jugo.
· Para ingredientes más pequeños como tomates pequeños, mandarinas o
granadas peladas, colóquelos en la entrada de alimentación.
8)Durante el proceso de extracción de jugo, puede ajustar la manija de
la salida de jugo para liberar el jugo. Una vez que termine de exprimir y ya
no salga jugo de la salida, empuje suavemente la manija de la salida de
jugo para sellarla, evitando que gotee el jugo restante. La salida de jugo
también se puede rotar para ajustar la cantidad de jugo y facilitar la
limpieza.
Espere a que el motor y el tornillo se detengan completamente antes de
retirar y limpiar la taza de jugo, la taza de pulpa y otras partes.

Capítulo 4: Mantenimiento y cuidado
17
1.Antes de limpiar el producto, presione el botón de reversa, luego desconecte la fuente de
alimentación (si no se presiona el botón de reversa, después de desconectar la alimentación,
simplemente gire el tornillo en sentido horario para retirarlo).
2.Por favor, limpie el producto inmediatamente después de su uso.
3.La parte exterior del cuerpo principal se puede limpiar con un paño húmedo. No sumerja el
cuerpo principal en agua u otros líquidos, ni lo enjuague bajo agua o cualquier otro líquido.
4.Guarde este producto en un lugar seco y evite la exposición directa a la luz ultravioleta (UV).
5.Antes de almacenar el producto, asegúrese de que esté limpio y seco.
6.Consulte el orden inverso de las instrucciones de ensamblaje al desmontar para limpiarlo.
Capítulo 5: Especificaciones de seguridad del producto
Capítulo 6: Análisis de fallos y solución de problemas
18
Voltaje nominal
Potencia nominal
Frecuencia nominal
Tiempo de funcionamiento continuo
Tiempo de intervalo
120V
150W
60Hz
≤10 minutes
≥5 minutes
Fenómeno de fallo
El producto no funciona después
de presionar el interruptor de
encendido
Olor desagradable del motor
durante los primeros usos
El producto se detiene a mitad
de funcionamiento
Análisis de la causa
1.El cable de alimentación no está
enchufado correctamente / El vaso de
alimentación no está bien ensamblado
Los ingredientes son demasiado duros,
lo que causa que la protección de
potencia se detenga
Fenómeno normal de un motor
nuevo
1.El enchufe de alimentación está suelto.
2.Se agregaron demasiados ingredien-
tes, sobrecarga o bloqueo que causó la
detención.
El producto está en modo de protección
inteligente.
Solución de problemas
1.Enchufe correctamente el cable de
alimentación / Verifique el ensamblaje
del vaso de alimentación
2. Cambie los ingredientes o córtelos
en trozos más pequeños antes de
usarlos
Si el olor persiste después de varios
usos, lleve el producto al centro de
servicio más cercano para su
inspección
1.Vuelva a enchufar correctamente el
cable de alimentación.
2.Reduzca la cantidad de ingredientes
agregados, aplique presión moderada
sobre la barra de empuje.
3. Apague el producto y espere un
momento antes de reiniciarlo.

Estamos aquí para ayudar.