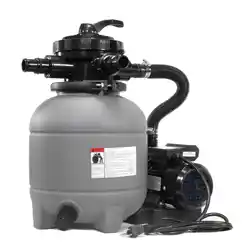


The manual of 13" Platinum Super-Flow Sand Filter Pump System
MODELS:
75132-1 ( Dia.13inch filtering )
SAFETY INFORMATION
Sand Filtration system working principle
Preparation before installation
How to install the filter tank
INSTALLATION
1. The sand filters are designed to work with water at temperature>than 0℃ and <than 45℃.The filter
should never be operated outside of these temperatures or damage may occur.
2. The installation should be carried out in accordance to the safety instructions of swimming pools and t
he specific instructions for each facility
3.The user should make sure that the installation is carried out by qualified authorized persons and that
these persons have first carefully read the following instructions. Incorrectly installed equipment may fail,
causing severe injury or property damage
4.The operating safety of the filter is only guaranteed if the installation and operation instructions are
correctly followed.
5. To reduce the risk of injury, do not permit children to use this product.
6. Chemical spills and fumes can weaken Swimming Pool/ Spa. Corrosion can cause filters and other
equipment to fail, resulting in severe injury or property damage. Do not store pool chemicals near your
equipment.
7. Any modification of the filter requires the prior consent from the supplier’s original replacement parts
and accessories authorized by the manufacturer ensure a high level of safety. The supplier assumes no
liability for the damage and injuries caused by unauthorized replacement parts and accessories.
8. In the event of defective operation or fault, contact the supplier or its nearest authorized service agent
Incoming water from the piping system is automatically directed by the Multiport Valve to the top of the
filter bed. As the water is pumped through the filter sand, dirt and debris are trapped by the filter bed, and
filtered out. The filtered water is returned from the bottom of the filter tank, through the Multiport Valve and
back through the piping system.
1. Position the filter as close to the Swimming Pool/ Spa as possible.
2. The filter should be placed on a level concrete slab, very firm ground, or equivalent. Ensure that the
ground will not subside, preventing any strain from the attached plumbing.
3. Position the filter under consideration of the piping connections, so that it is convenient for operating
and servicing.
4. Ensure that the compliance label is facing the front to allow easy identification in the case of
service difficulties.
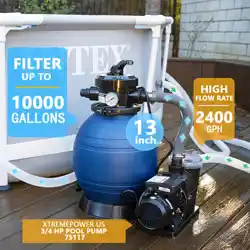
1. Mount the sand tank to sand filter support according to the below instruction.
1
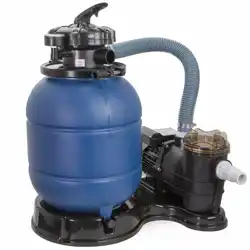
2. Insert the pump base to sand filter support in correct direction.
1
2
Step 1: Put the filter tank upside down.
Step 2:Lift one side and press point 1
like above picture shows.
1
Step 3:Once point 1 is clicked in,then
press point 2 .
2
Step 4: Turn around the base and
filter tank upside.
2
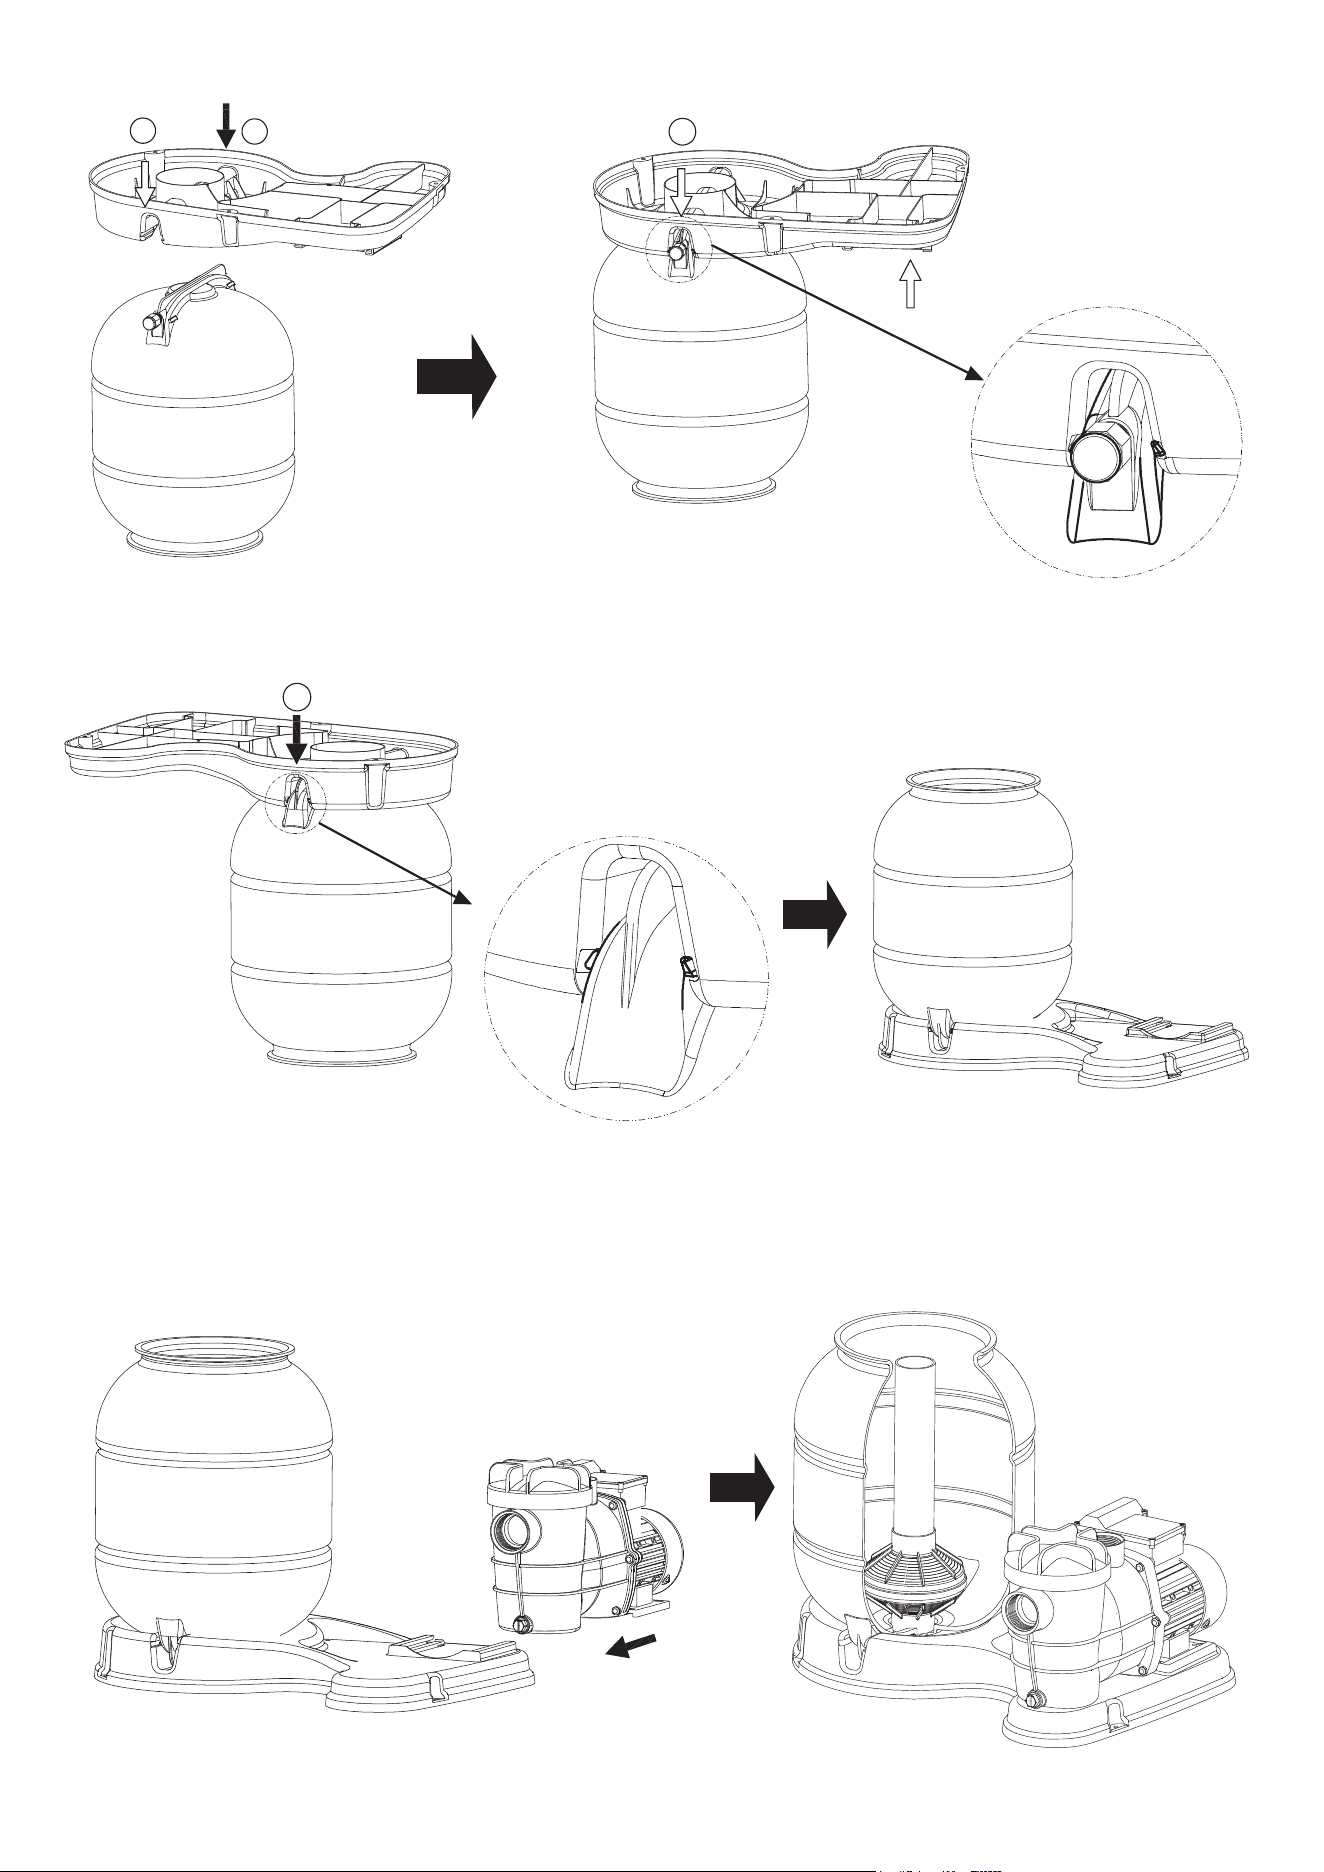
3. Insert the tube with the diffuser body inside the tank as above picture, then place the funnel on the tank’s
mouth and pour the quartz sand into the tank (sand weight 19kg).
4. Take away the funnel, and then clean really carefully the tank’s neck and fix the valve with O-ring through
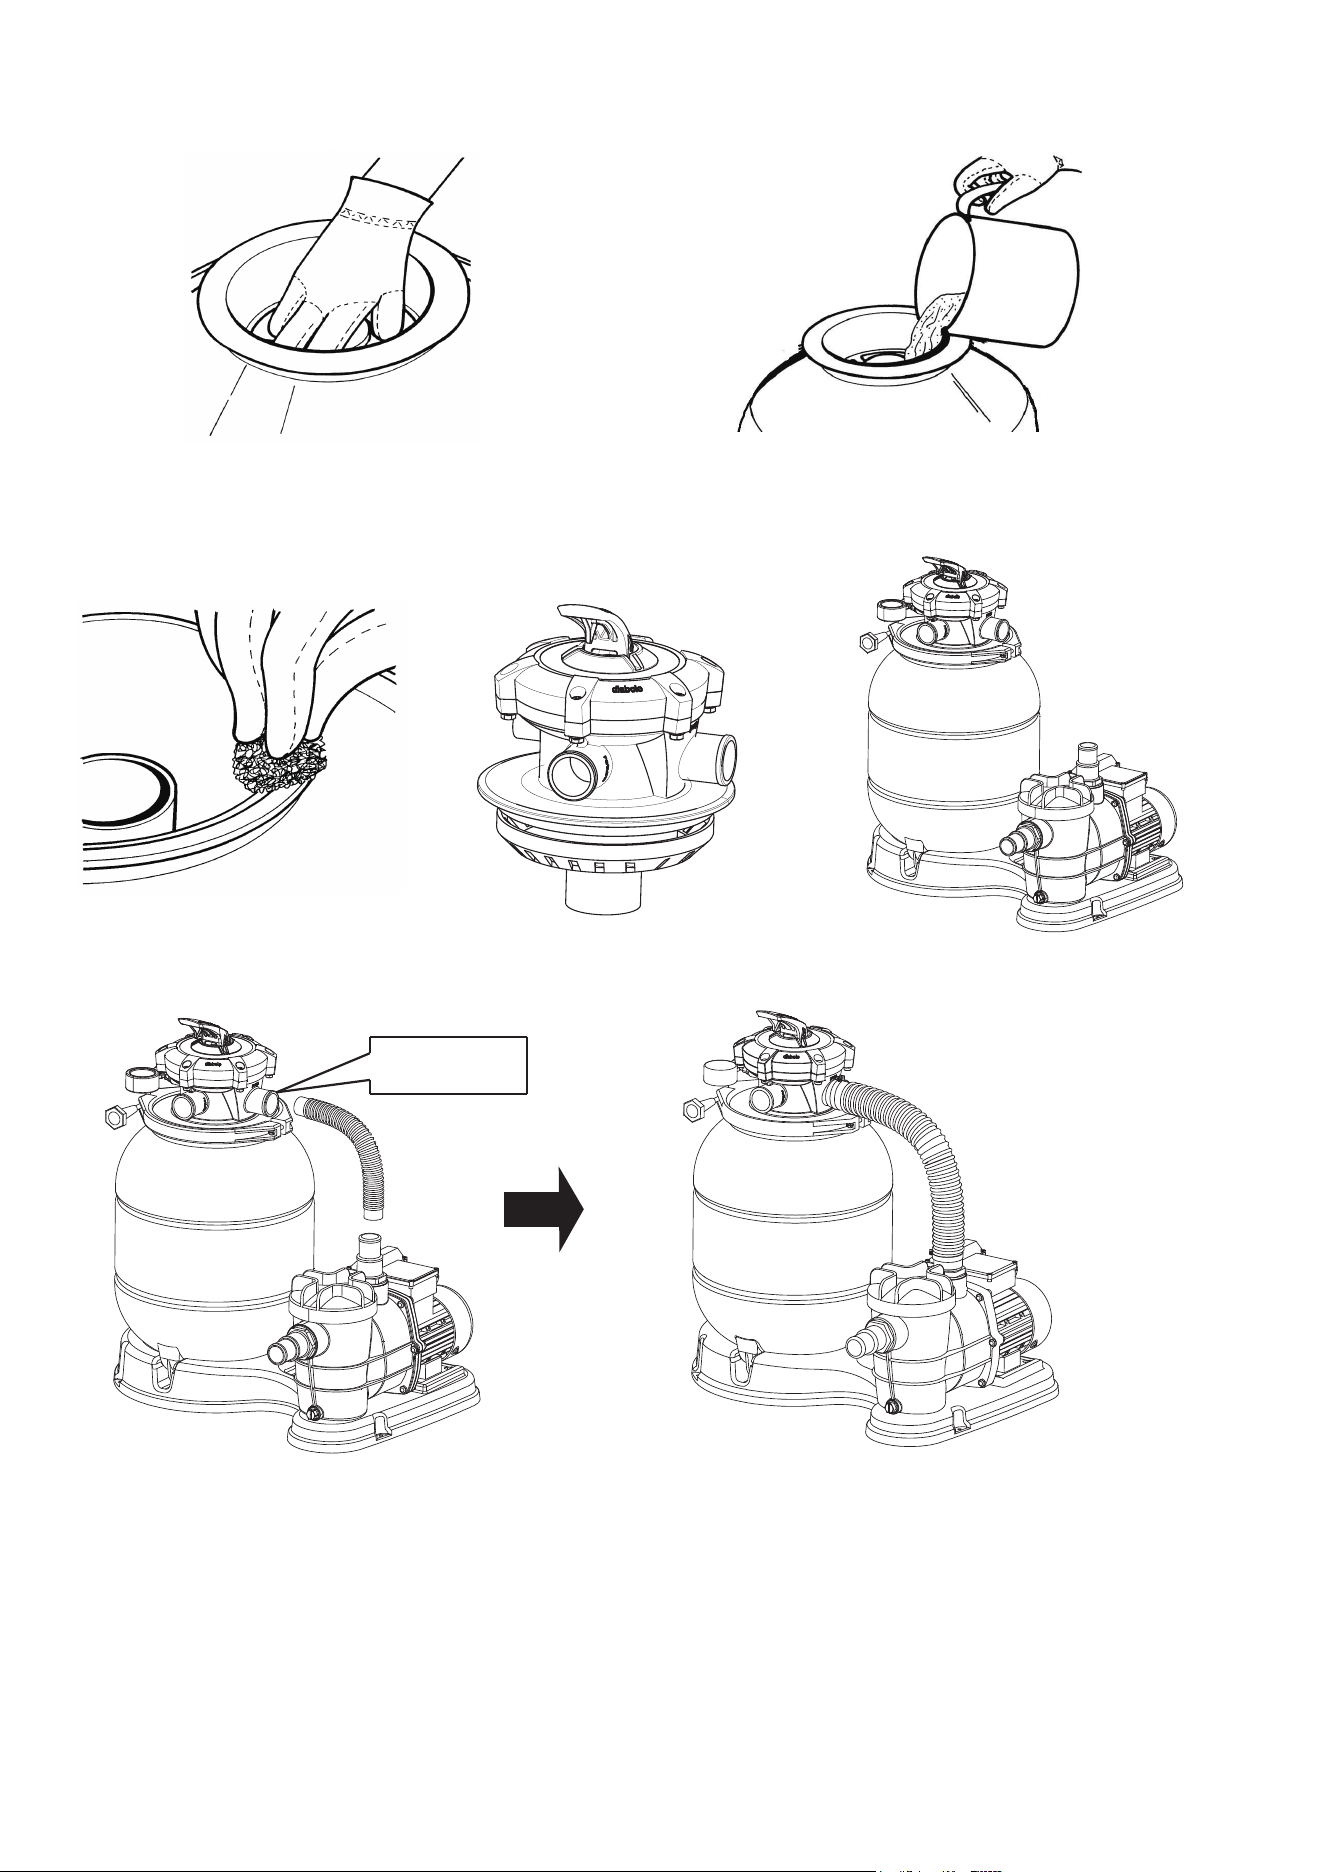
flange clamp set. (the direction of “PUMP” port on valve needs to face pump out port)
5. Connect the sand tank to pump with hose, hose clamps and hose adaptors.
INSTALLATION NOTES:
1. Make sure the filter is worked under the work pressure, and using a pressure control valve when the
system using a booster pump.
2. If the pump position is higher than the water level, it requires to install the back water control valve.
3. If the pump position is lower than the water level, it requires installing an isolation valve. It could stop the
water return back when people do the general inspection.
4. Reducing the connect adaptors and hose connecting bending as less as possible. Decreasing the water
flow scrub, it could reach the maximum effective.
“PUMP”Port
3

5. Ensure solvents are not excessively applied to fittings as this could run into O-ring and create
sealing problems.
6. Do not over tighten fittings or adapters
HOW TO USE
1. Inspect all the connections have been made correct and are secure.
2. Depress top mount valve handle and rotate to BACKWASH position.
3. Prime and start pump according to pump instructions.
NOTE: ALL SUCTION AND DISCHARGE VALVES MUST BE OPENING WHEN STARTING
THE SYSTEM. FAILURE TO DO SO COULD CAUSE SEVERE PERSONAL INJURY.
MAKE SURE THE FILTER VESSEL ARE FULL FILL THE WATER BEFORE START UP THE
PUMP. OR IT WILL CAUSE THE PUMP DAMAGED.
4. Once water flow is steady out the waste line, run the pump for at least 2 minutes. The intial back-washing
of the filer is recommended to remove any impurities of fine sand particles in the sand media.
5. Turn pump off and set valve to RINSE position. Start pump and operate until water in sight glass is clear
----about 1/2 to 1 minute. Turn pump off, set valve to FILTER position and restart pump. Your filter is now
operating in the normal filter mode, filtering particles from the pool water.
NOTES:
FILTER CONTROL VALVE FUNCTIONS:
1. Note the initial pressure gauge reading when the filter is clean. (it will vary from pool depending upon the
pump and general piping system). As the filter removes dirt and impurities from the pool water, the a
ccumulation in the filter will cause the pressure to rise and flow to diminish. When the pressure gauge
reading is 8-10 PSI(0.55-0.69 BAR) higher than the initial “clean” pressure you noted, it is the time to
backwash (clean) the filter.
2. IMPORTANT: To prevent unnecessary strain on piping system and valving, always shut off pump before
switching filter control valve position.
3. To prevent damage to the pump and filter and for proper operation of the system, clean pump strainer and
skimmer baskets regularly.
FILTER - Set valve to FILTER for normal filtering. Also use for regular vacuuming.
BACKWASH- For cleaning filter. When filter pressure gauge rises 8-10 PSI (0.55-0.69 BAR) above
start-up (clean pressure):
Stop the pump, set valve to BACKWASH. Start pump and backwash until water in sight glass is clear.
Approximately 2 minutes or less depending on dirt accumulation. Proceed to RINSE.
RINSE- After backwashing, with pump off, set valve to RINSE. Start pump and operate for about 1/2 to 1
minute. This ensures that all dirty water from backwashing is rinsed out of the filter to waste, preventing
possible return to the pool. Stop pump, set valve to FILTER and start pump for normal filtering.
WASTE- To bypass filter for draining or lowering water level and for vacuuming heavy debris directly
to waste.
4
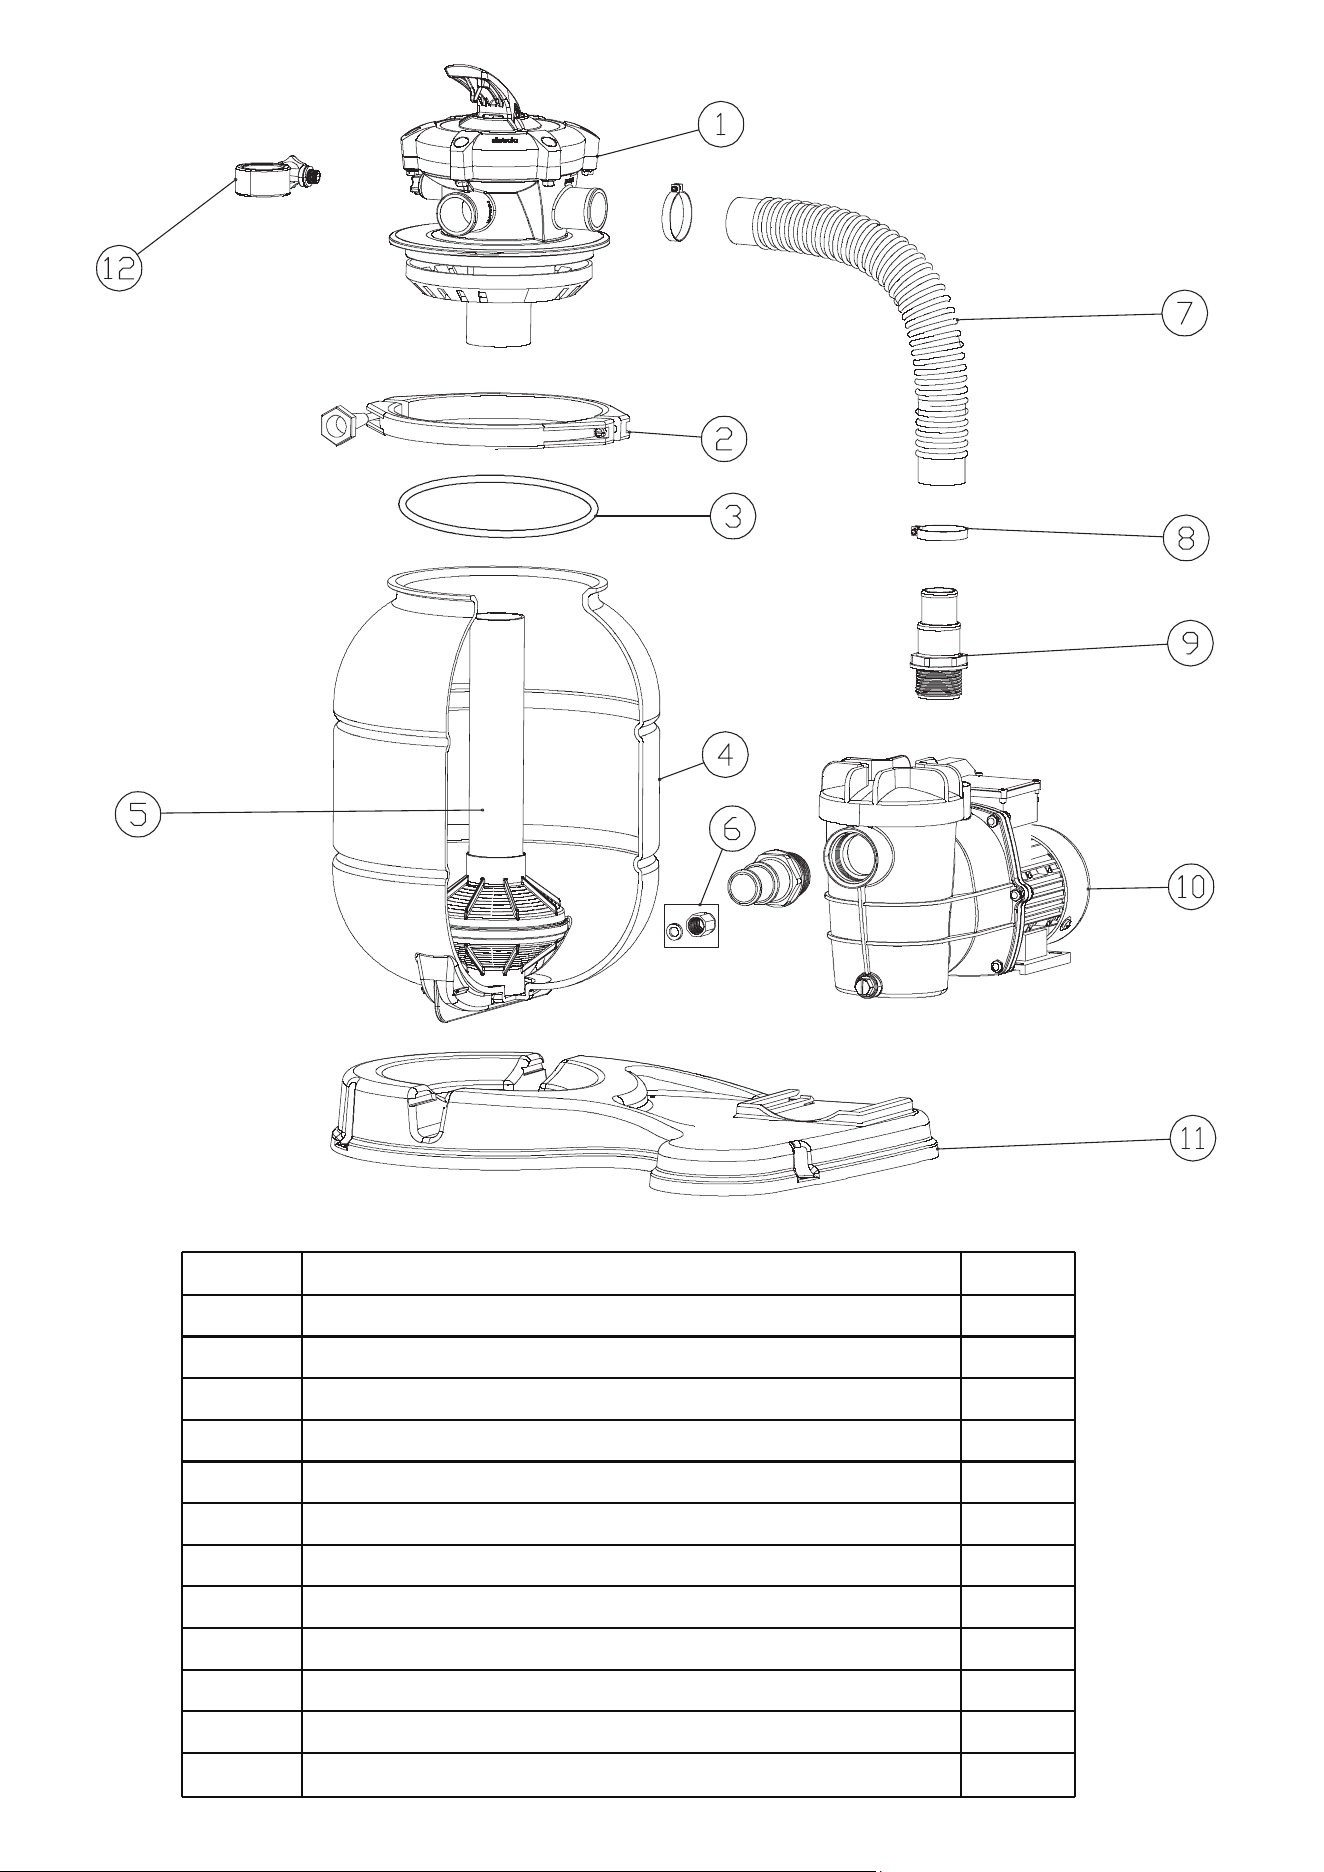
Parts Listing
No. Description
1.5” top valve
Clamp assembly
O ring
Dia.300 sand tank
Diffusor assembly
Drain plug
Hose
Hose clamp
Hose adaptor
260W STARK pump
Sand filter support
Gauge assembly
1
2
3
4
5
6
7
8
9
10
11
12
quantity
1
1
1
1
1
1
1
2
2
1
1
1
5
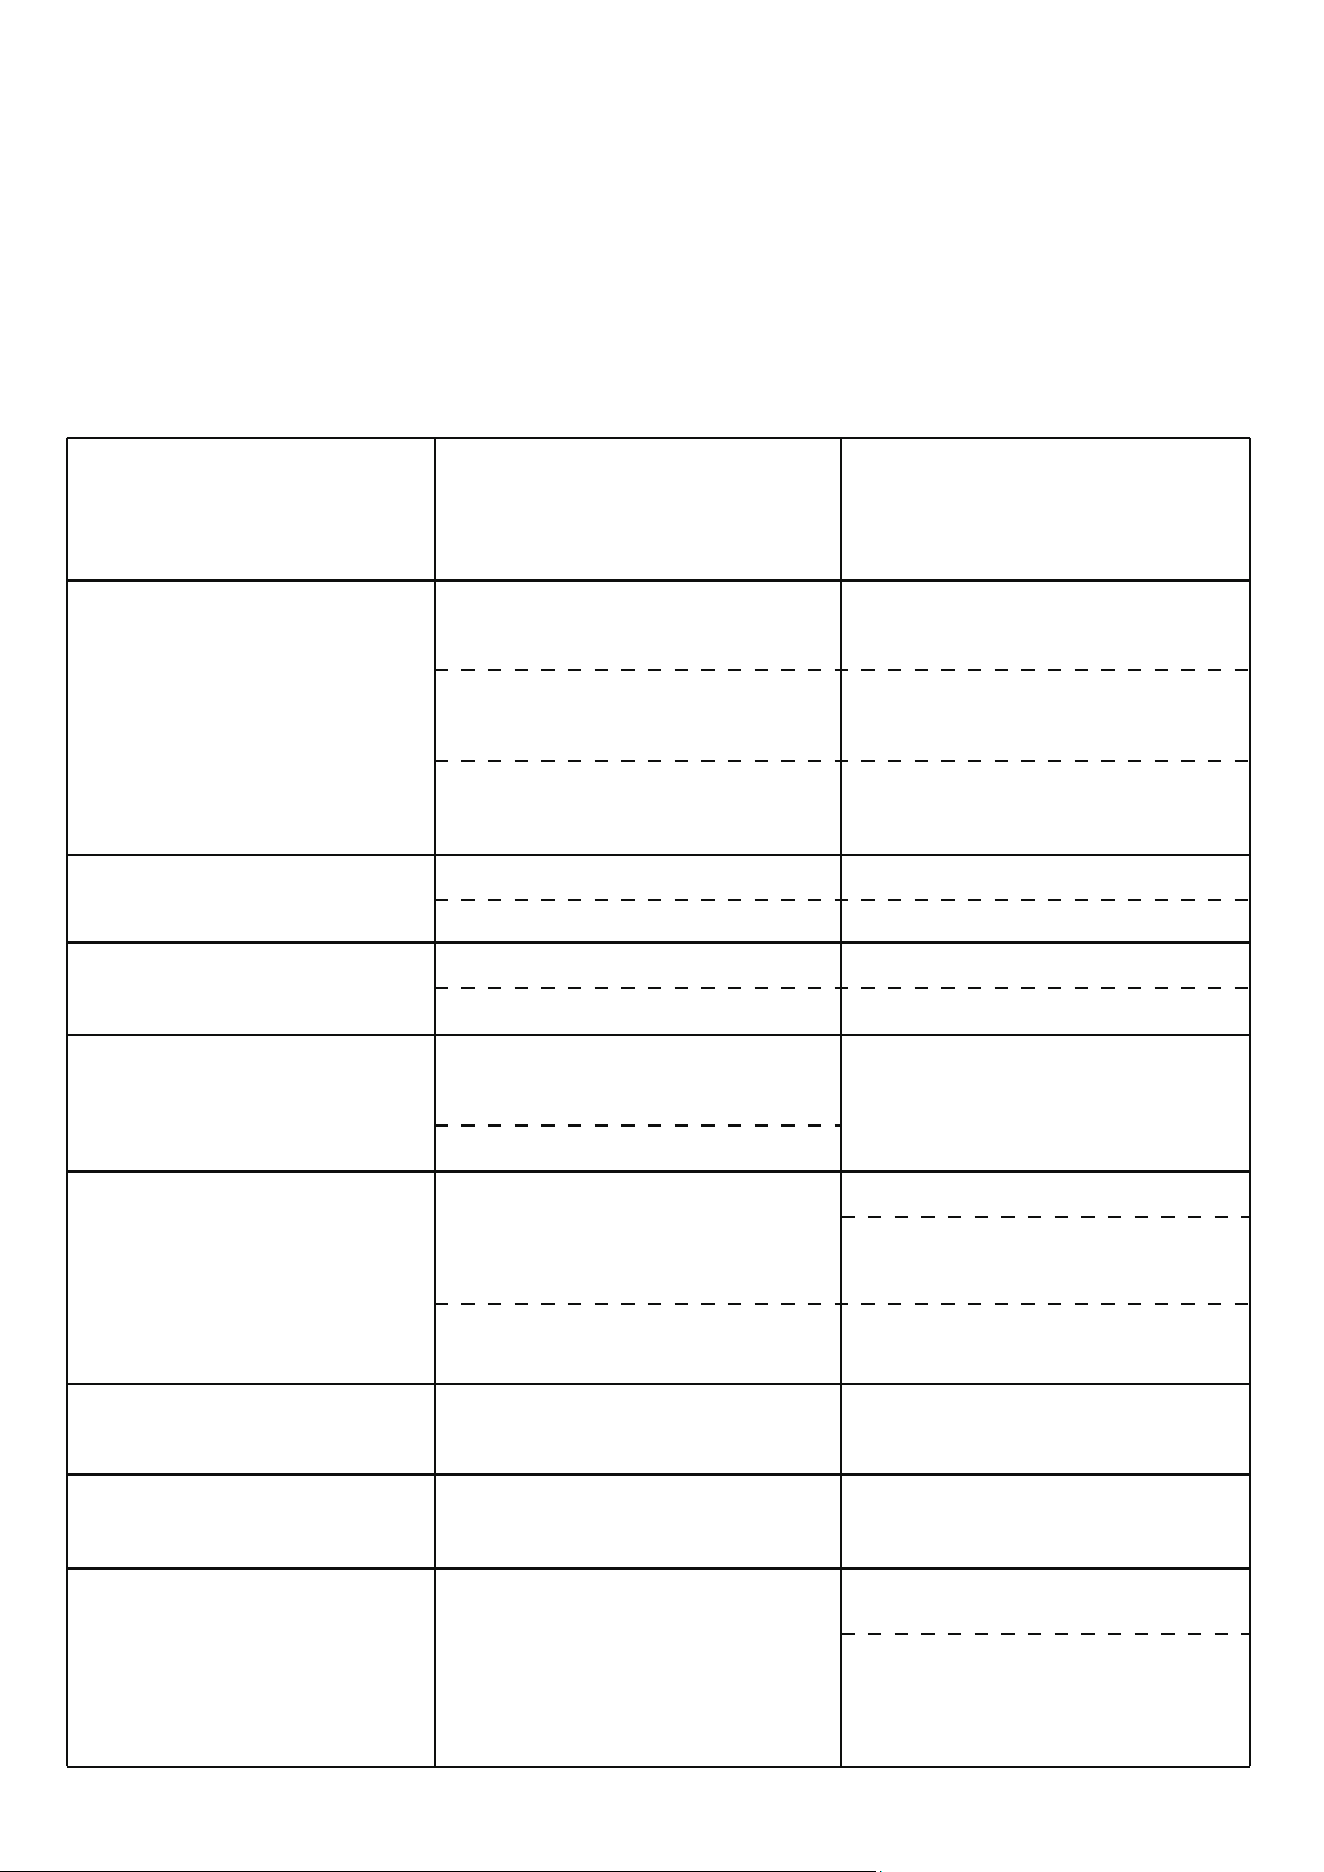
TROUBLESHOOTING AND TECHNICAL SERVICE
PROBLEM CAUSE SOLUTION
This filter and its instructions are designed for domestic use, with no need for professional supervision,
except for exceptional cases. Here we shall describe the problems and causes which may arise after
years of service of the filter that you can repair yourself. If you cannot solve the problem, contact the pool
manufacturer at the telephone indicated in the instructions.
The filter leaks through the
hose terminals
After the filter has started up, there
is no flow in the feedback nozzle.
Intermittent operation
The flow rate of the filter is low.
Water comes out through the
filter opening.
The filter valve leaks through
the drain terminal.
The motor will not start up. There
is no noise or vibration.
The motor does not start up but
a buzzing sound can be heard.
Water leakage.
Motor damaged
Find out where the water is leaking.
Check the hose clamps.
If the leak is between the pump and the
motor, contact the After-Sales Service
of the pool manufacturer.
Contact the After-Sales Service of the
pool manufacturer.
No current in the electric line.
Check that there is current in the
electric line.
Inner coupling damaged due to
improper use of chemical product.
Valve head broken due to improper use.
(over tightening)
Change the valve head. Do not
over tighten.
Change the top valve cover.
Do not put chemical products in the
preliminary filtration skimmer basket.
Low water level on skimmer
Due to use, the filter is dirty.
The connection between the valve
and the filter is dirty.
Clean the sand from the opening. Insert
the coupling on the valve properly and
tighten the metal band firmly.
Metal band is loose.
Perform a backwash.
Prime the filter.The filter is not primed.
Fill the pool and prime the filter.
Prime the filter.The filter is not primed.
Improper connection between the
terminals and the hoses.
The valve is not on the filtration setting.
The filter is above the level of the
unprimed water.
The suction cover or the skimmer
plug have been inserted.
Remove the suction cover or the
skimmer plug.
Place the filter in the correct position
and prime it.
Disconnect the filter and place the
valve on the correct setting.
Place Teflon in the housings. Insert the
hose terminals up until the bottom of
the housing and tighten the clamps.
6

75132-1