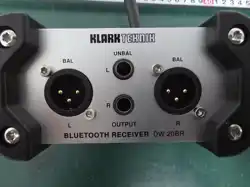
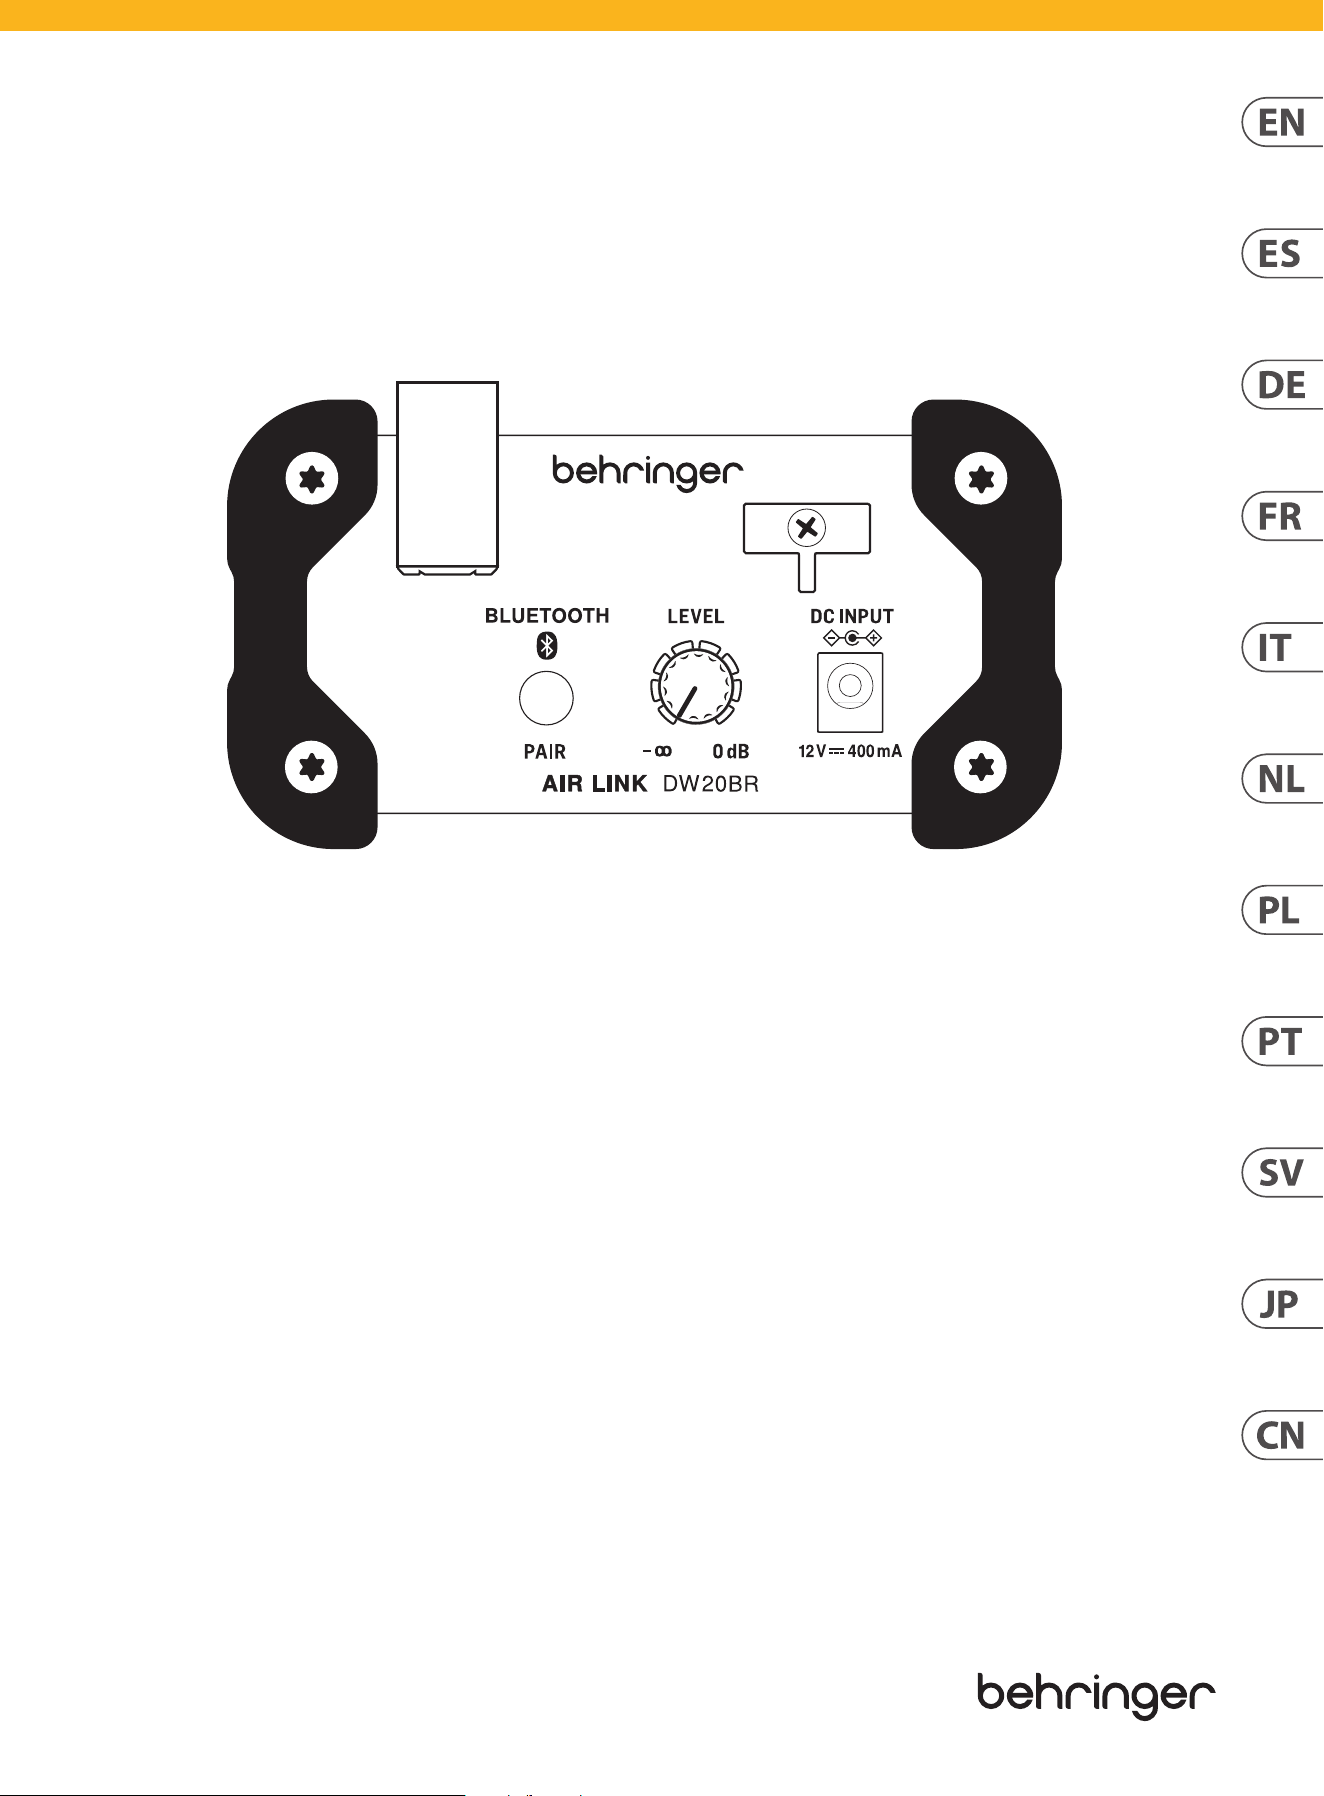
AIR LINK DW20BR
Bluetooth Wireless Stereo Receiver for
High-Performance Stereo Audio Broadcasting
User Manual
V 1.0
2 AIR LINK DW20BR User Manual 3 AIR LINK DW20BR User Manual
(EN) Safety Instructions
Please read these safety instructions carefully and pay close
attention to any warning symbols displayed
on the product and their related safety information
in this instruction.
Terminals marked with this symbol carry
electrical current of sucient magnitude to
constitute risk of electric shock.
Use only high-quality professional speaker
cables with ¼" TS or twist-locking plugs pre-installed. All
other installation or modication should be performed only
by qualied personnel.
This symbol, wherever it appears, alerts you
to the presence of uninsulated dangerous
voltage inside the enclosure voltage that
may be sucient to constitute a
risk of shock.
This symbol, wherever it appears, alerts you
to important operating and maintenance
instructions. Please read full manual.
Caution
To reduce the risk of electric shock, do not
remove the top cover (or the rear section).
No user serviceable parts inside.
Refer servicing to qualied personnel.
Caution
To reduce the risk of re or electric shock,
do not expose this appliance to rain and
moisture. The apparatus shall not be exposed
to dripping or splashing liquids and no objects lled with
liquids, such as vases, shall be placed on the apparatus.
Caution
These service instructions are for use by
qualied service personnel only. To reduce
the risk of electric shock do not perform
any servicing other than that contained in the operation
instructions. Repairs have to be performed by qualied
service personnel.
Warning
Please refer to the information on the
exterior of bottom enclosure for electrical
and safety information before installing or
operating the device.
Warning
To prevent possible hearing damage,
do not listen at high volume levels for
long periods. As a guide to setting the
volume level, check that you can still hear your own
voice, when speaking normally while listening with
the headphones.
1. Read and keep these instructions. Heed all warnings
and follow all instructions.
2. Do not use this apparatus near water (if applicable).
Clean only with dry cloth.
3. Do not block ventilation openings (if applicable). Do
not install in a conned space. Install only according
to manufacturer's instructions.
4. Do not install near any heat sources such as
radiators, heat registers, stoves or other apparatus
(including ampliers) that produce heat. Do not
place naked ame sources, such as lighted candles,
on the apparatus.
5. Do not defeat the safety purpose of the polarized
or grounding-type plug. A polarized plug has two
blades with one wider than the other (only for
USA and Canada). A grounding-type plug has two
blades and a third grounding prong. The wide
blade or the third prong are provided for your
safety. If the provided plug does not t into your
outlet, consult an electrician for replacement of
the obsolete outlet.
6. (If applicable) Protect the power cord from being
walked on or pinched particularly as plugs,
convenience receptacles, and the point where they
exit from the apparatus.
7. Use only attachments and accessories
recommended by the manufacturer.
8. Use only specied carts,
stands, tripods, brackets, or
tables specied by the
manufacturer, or sold
with the apparatus
(if applicable). When a cart
is used, use caution when
moving the
cart/apparatus combination to avoid injury
from tip-over.
9. Unplug during storms, or if not in use for a
long period.
10. Refer all servicing to qualied service personnel.
Servicing is required when the apparatus has been
damaged in any way, such as power-supply cord or
plug is damaged, liquid has been spilled or objects
have fallen into the apparatus, the apparatus has
been exposed to rain or moisture, does not operate
normally, or has been dropped.
11. (If applicable)The apparatus with protective
earthing terminal shall be connected to a MAINS
socket outlet with a protective earthing connection.
12. (If applicable)Where the MAINS plug or an appliance
coupler is used as the disconnect device, the
disconnect device shall remain readily operable.
13. Internal/External Voltage Selectors (if applicable):
Internal or external voltage selector switches, if any,
should only be reset and re-equipped with proper
plug or alternative voltage by a qualied service
technician. Do not attempt to alter this yourself.
14. Class II Wiring (if applicable): To reduce the risk
of electric shock, the external wiring connected to
the terminals with "Class II Wiring" requires Class II
wiring installed by an instructed person
or the use of ready-made leads or cords.
15. Class I Wiring (if applicable): To reduce the risk of
electric shock, the external wiring connected to
the terminals with "Class I Wiring" requires Class I
wiring installed by an instructed person or the use
of ready-made leads or cords.
16. Operating temperature range
5° to 45° C (41° to 113° F).
17. LEGAL DISCLAIMER
The information contained in this Quick Start Guide and
accompanying manual is provided for general guidance
only. While every eort has been made to ensure the
accuracy and reliability of the content at the time of
publication, Music Tribe Global Brands Ltd. (“Music Tribe”)
makes no representations or warranties, express or
implied, as to the completeness, accuracy, or suitability
of the information, descriptions, illustrations, or technical
specications herein.
Music Tribe accepts no liability for any direct, indirect,
incidental, or consequential loss or damage arising from
reliance on the information contained in this document,
including but not limited to loss of data, income, prots, or
business opportunities. Use of the product remains the sole
responsibility of the user.
Product features, design, specications, and visual
representations may be updated or modied without prior
notice in the interest of continuous product improvement.
All third-party trademarks referenced in this guide are the
property of their respective owners. Midas, Klark Teknik,
Lab Gruppen, Lake, Tannoy, Turbosound, TC Electronic,
TC Helicon, Behringer, Bugera, Aston Microphones, and
Coolaudio are trademarks or registered trademarks of Music
Tribe Global Brands Ltd.
© 2025 Music Tribe Global Brands Ltd. All rights reserved.
No part of this document may be reproduced, transmitted,
or used in any form or by any means without prior written
permission from Music Tribe.
LIMITED WARRANTY
For the terms, conditions, and limitations applicable to your
product, including coverage, exclusions, and the duration
of the limited warranty, please refer to the complete
Music Tribe Limited Warranty Policy, available online at:
community.musictribe.com/support
Please retain your proof of purchase,
as it may be required for warranty service.
(ES)
Instrucciones de Seguridad
Por favor, lea estas instrucciones de seguridad
cuidadosamente y preste especial atención a
cualquier símbolo de advertencia mostrado en el
producto y a la información de seguridad relacionada
en estas instrucciones.
Los terminales marcados con este símbolo
transportan corriente eléctrica de magnitud
suciente para constituir un riesgo de
descarga eléctrica. Use únicamente cables de
altavoz profesionales de alta calidad con conectores
preinstalados de ¼" TS o de tipo de bloqueo por torsión.
Cualquier otra instalación o modicación debe ser realizada
únicamente por personal cualicado.
Este símbolo, dondequiera que aparezca, le
alerta sobre la presencia de voltaje peligroso
no aislado dentro de la carcasa, voltaje que
puede ser suciente para constituir un riesgo
de descarga eléctrica.
¡Este símbolo, dondequiera que aparezca, le
alerta sobre importantes instrucciones de
operación y mantenimiento. Por favor, lea el
manual completo.
Precaución
Para reducir el riesgo de descarga
eléctrica, no retire la tapa superior
(o la sección trasera). No hay piezas que el
usuario pueda reparar en el interior. Remita el servicio de
reparación a personal cualicado.
Precaución
Para reducir el riesgo de incendio o descarga
eléctrica, no exponga este aparato a la lluvia
o humedad. El aparato no debe ser expuesto
a líquidos goteando o salpicando y no se deben colocar
objetos llenos de líquidos, como oreros, sobre el aparato.
Precaución
Estas instrucciones de servicio son para uso
exclusivo de personal de servicio cualicado.
Para reducir el riesgo de descarga eléctrica
no realice ningún servicio diferente al contenido en las
instrucciones de operación. Las reparaciones deben ser
realizadas por personal de servicio cualicado.
Advertencia
Consulte la información en el exterior de la
carcasa inferior para información eléctrica y
de seguridad antes de instalar o operar
el dispositivo.
Advertencia
Para prevenir posibles daños auditivos, no
escuche a niveles de volumen altos durante
períodos prolongados. Como guía para
establecer el nivel de volumen, asegúrese de que aún
pueda oír su propia voz al hablar normalmente mientras
usa los auriculares.
1. Lea y conserve estas instrucciones.
Preste atención a todas las advertencias y siga todas
las instrucciones.
2. No utilice este aparato cerca del agua (si aplica).
Límpielo sólo con un paño seco.
3. No bloquee las aberturas de ventilación
(si aplica). No instale en un espacio connado.
Instale sólo de acuerdo con las instrucciones
del fabricante.
4. No instale cerca de fuentes de calor tales como
radiadores, registros de calor, estufas u otros
aparatos (incluidos amplicadores) que produzcan
calor. No coloque fuentes de llamas abiertas, como
velas encendidas, sobre el aparato.
5. No anule el propósito de seguridad del enchufe
polarizado o con conexión a tierra. Un enchufe
polarizado tiene dos cuchillas, una más ancha que
la otra (sólo para EE.UU. y Canadá). Un enchufe
de tipo conexión a tierra tiene dos cuchillas y una
tercera espiga de conexión a tierra. La cuchilla
ancha o la tercera espiga se proporcionan para su
seguridad. Si el enchufe proporcionado no encaja
en su tomacorriente, consulte a un electricista para
reemplazar el tomacorriente obsoleto.
6. (Si aplica) Proteja el cable de alimentación para
evitar que sea pisado o pinzado, particularmente
en los enchufes, receptáculos de conveniencia y el
punto de salida del aparato.
7. Utilice sólo accesorios y complementos
recomendados por el fabricante.
8. Utilice sólo carros, soportes,
trípodes, abrazaderas o
mesas especicadas por el
fabricante o vendidas con el
aparato (si aplica). Cuando
se utilice un carro, tenga
cuidado al mover la
combinación de carro/aparato para evitar lesiones
por vuelco.
9. Desconecte durante tormentas o si no va a utilizarse
durante un período prolongado.
10. Remita todo el servicio de mantenimiento a
personal de servicio cualicado. Se requiere servicio
de mantenimiento cuando el aparato ha sido
dañado de alguna forma, como cuando el cable
de alimentación o el enchufe están dañados, se
ha derramado líquido o han caído objetos en el
aparato, ha estado expuesto a lluvia o humedad, no
funciona normalmente, o se ha caído.
11. (Si aplica) El aparato con terminal de tierra
protectora debe estar conectado a un enchufe de
red (MAINS) con conexión de tierra protectora.
12. (Si aplica) Cuando el enchufe de red o un acoplador
de aparato se utilice como dispositivo de
desconexión, el dispositivo de desconexión debe
permanecer fácilmente operable.
13. Selectores de voltaje interno/externo (si aplica):
Los interruptores de selección de voltaje interno
o externo, si los hay, sólo deben ser reajustados
y reacondicionados con el enchufe adecuado o
un voltaje alternativo por un técnico de servicio
cualicado. No intente alterarlo usted mismo.
14. Cableado de Clase II (si aplica): Para reducir el
riesgo de descarga eléctrica, el cableado externo
conectado a los terminales con "Cableado de Clase
II" requiere un cableado de Clase II instalado por
una persona instruida o el uso de cables o cordones
prefabricados.
15. Cableado Clase I (si aplica): Para reducir el riesgo de
descarga eléctrica, el cableado externo conectado
a los terminales con “Cableado Clase I” requiere
cableado Clase I instalado por una persona instruida
o el uso de conductores o cables prefabricados.
16. Rango de temperatura de operación de
5° a 45° C (41° a 113° F).
NEGACIÓN LEGAL
La información contenida en esta Guía de Inicio Rápido
y el manual adjunto se proporciona únicamente como
orientación general. Si bien se ha hecho todo lo posible
para garantizar la exactitud y abilidad del contenido en el
momento de la publicación, Music Tribe Global Brands Ltd.
("Music Tribe") no hace declaraciones ni garantías, expresas
o implícitas, sobre la integridad, exactitud o idoneidad de la
información, descripciones, ilustraciones o especicaciones
técnicas contenidas en este documento.
Music Tribe no asume ninguna responsabilidad por
cualquier pérdida o daño directo, indirecto, incidental o
consecuente derivado de la conanza en la información
contenida en este documento, incluyendo, pero no
limitado a, la pérdida de datos, ingresos, benecios u
oportunidades de negocio. El uso del producto sigue siendo
responsabilidad exclusiva del usuario.
Las características del producto, el diseño, las
especicaciones y las representaciones visuales pueden
actualizarse o modicarse sin previo aviso en interés de la
mejora continua del producto.
Todas las marcas comerciales de terceros mencionadas en
esta guía son propiedad de sus respectivos dueños. Midas,
Klark Teknik, Lab Gruppen, Lake, Tannoy, Turbosound,
TC Electronic, TC Helicon, Behringer, Bugera, Aston
Microphones y Coolaudio son marcas comerciales o marcas
registradas de Music Tribe Global Brands Ltd.
© 2025 Music Tribe Global Brands Ltd. Todos los derechos
reservados. Ninguna parte de este documento puede
reproducirse, transmitirse o utilizarse de ninguna forma
o por ningún medio sin el permiso previo por escrito de
Music Tribe.
GARANTÍA LIMITADA
Para conocer los términos, condiciones y limitaciones
aplicables a su producto, incluyendo la cobertura,
exclusiones y duración de la garantía limitada,
consulte la Política de Garantía Limitada de
Music Tribe, disponible en línea en: community.musictribe.
com/support
Conserve su comprobante de compra, ya que puede ser
necesario para el servicio de garantía.
4 AIR LINK DW20BR User Manual 5 AIR LINK DW20BR User Manual
(DE) Sicherheitshinweise
Bitte lesen Sie diese Sicherheitshinweise sorgfältig durch
und achten Sie besonders auf alle auf dem Produkt
angebrachten Warnsymbole sowie auf die entsprechenden
Sicherheitsinformationen in dieser Anleitung.
Anschlüsse, die mit diesem Symbol
gekennzeichnet sind, führen elektrischen
Strom in einer Stärke, die ein Risiko eines
elektrischen Schlags darstellen kann.
Verwenden Sie ausschließlich hochwertige professionelle
Lautsprecherkabel mit vormontierten ¼"-TS- oder
Drehverriegelungssteckern. Alle weiteren Installationen
oder Modikationen dürfen nur von qualiziertem
Fachpersonal durchgeführt werden.
Dieses Symbol, wo immer es erscheint, weist
auf das Vorhandensein einer nicht isolierten
gefährlichen Spannung im Gehäuse hin, die
stark genug sein kann, um einen
elektrischen Schlag zu verursachen.
Dieses Symbol, wo immer es erscheint, weist
auf wichtige Bedienungs- und
Wartungshinweise hin. Bitte lesen Sie das
vollständige Handbuch.
Vorsicht
Um das Risiko eines elektrischen Schlags
zu verringern, entfernen Sie nicht die
obere Abdeckung (oder den hinteren
Abschnitt). Im Inneren benden sich keine vom Benutzer
zu wartenden Teile. Überlassen Sie Wartungsarbeiten
qualiziertem Fachpersonal.
Vorsicht
Um das Risiko von Feuer oder elektrischem
Schlag zu reduzieren, setzen Sie dieses
Gerät weder Regen noch Feuchtigkeit aus.
Das Gerät darf nicht Tropf- oder Spritzwasser ausgesetzt
werden, und es dürfen keine mit Flüssigkeiten gefüllten
Objekte, wie z.B. Vasen, auf das Gerät gestellt werden.
Vorsicht
Diese Wartungsanweisungen sind nur für
qualiziertes Fachpersonal bestimmt. Um
das Risiko eines elektrischen Schlags zu
verringern, führen Sie keine Wartungsarbeiten durch, die
über die im Betriebshandbuch enthaltenen Anweisungen
hinausgehen. Reparaturen müssen von qualiziertem
Fachpersonal durchgeführt werden.
Warnung
Bitte beachten Sie die Informationen auf der
Außenseite des unteren Gehäuses bezüglich
elektrischer und sicherheitstechnischer
Hinweise, bevor Sie das Gerät installieren oder in
Betrieb nehmen.
Warnung
Um mögliche Hörschäden zu vermeiden,
hören Sie nicht über längere Zeiträume
bei hoher Lautstärke. Als Richtlinie für die
Lautstärkeeinstellung stellen Sie sicher, dass Sie Ihre eigene
Stimme beim normalen Sprechen noch hören können,
während Sie Kopfhörer verwenden.
1. Lesen und bewahren Sie diese Anweisungen auf.
Beachten Sie alle Warnhinweise und folgen Sie allen
Anweisungen.
2. Verwenden Sie dieses Gerät nicht in der Nähe von
Wasser (falls zutreend). Reinigen Sie es nur mit
einem trockenen Tuch.
3. Blockieren Sie keine Lüftungsönungen
(falls zutreend). Installieren Sie das Gerät nicht in
einem engen Raum. Installieren Sie es nur gemäß
den Anweisungen des Herstellers.
4. Installieren Sie das Gerät nicht in der Nähe von
Wärmequellen wie Heizkörpern, Heizregistern, Öfen
oder anderen Geräten (einschließlich Verstärkern),
die Wärme erzeugen. Stellen Sie keine oenen
Flammenquellen wie brennende Kerzen auf das
Gerät.
5. Setzen Sie nicht die Sicherheitsfunktion des
polarisierten oder geerdeten Steckers außer Kraft.
Ein polarisierter Stecker hat zwei Stifte, von denen
einer breiter ist als der andere (nur für USA und
Kanada). Ein geerdeter Stecker hat zwei Stifte
und einen dritten Erdungsstift. Der breite Stift
oder der dritte Stift dient Ihrer Sicherheit. Wenn
der mitgelieferte Stecker nicht in Ihre Steckdose
passt, wenden Sie sich an einen Elektriker, um die
Steckdose auszutauschen.
6. (Falls zutreend) Schützen Sie das Netzkabel davor,
überfahren oder geknickt zu werden, insbesondere
an Steckern, Steckdosen und dem Austrittspunkt
aus dem Gerät.
7. Verwenden Sie nur Zubehör und Zusatzgeräte, die
vom Hersteller empfohlen werden.
8. Verwenden Sie nur Wagen,
Ständer, Stative,
Halterungen oder Tische,
die vom Hersteller
speziziert oder mit dem
Gerät verkauft wurden (falls
zutreend). Seien Sie beim Bewegen der
Kombination Wagen/Gerät vorsichtig, um
Verletzungen durch Umkippen zu vermeiden.
9. Trennen Sie das Gerät während Gewittern oder
wenn es längere Zeit nicht verwendet wird
vom Stromnetz.
10. Überlassen Sie alle Wartungsarbeiten qualiziertem
Fachpersonal. Eine Wartung ist erforderlich,
wenn das Gerät in irgendeiner Weise beschädigt
wurde, z.B. wenn das Netzkabel oder der Stecker
beschädigt ist, Flüssigkeit verschüttet oder
Gegenstände in das Gerät gefallen sind, das Gerät
Regen oder Feuchtigkeit ausgesetzt war, nicht
normal funktioniert oder fallen gelassen wurde.
11. (Falls zutreend) Das Gerät mit
Schutzerdungsklemme muss an eine Netzsteckdose
mit Schutzerdung angeschlossen werden.
12. (Falls zutreend) Wenn der Netzstecker oder ein
Gerätestecker als Trennvorrichtung verwendet
wird, muss die Trennvorrichtung leicht zugänglich
bleiben.
13. Interne/Externe Spannungswähler
(falls zutreend): Interne oder externe
Spannungswahlschalter dürfen nur von
qualiziertem Fachpersonal auf die richtige
Spannung eingestellt und mit dem passenden
Stecker versehen werden. Versuchen Sie nicht, dies
selbst zu ändern.
14. Klasse-II-Verkabelung (falls zutreend): Um das
Risiko eines elektrischen Schlags zu verringern,
muss die externe Verkabelung, die mit den als
"Klasse-II-Verkabelung" gekennzeichneten
Klemmen verbunden wird, entweder von
einer unterwiesenen Person installiert oder es
müssen vorgefertigte Leitungen oder Kabel
verwendet werden.
15. Klasse-I-Verdrahtung (falls zutreend): Zur
Reduzierung des Risikos eines elektrischen Schlags
erfordert die externe Verdrahtung, die an die
mit „Klasse-I-Verdrahtung“ gekennzeichneten
Klemmen angeschlossen ist, eine durch eine
unterwiesene Person installierte Klasse-I-
Verdrahtung oder die Verwendung vorgefertigter
Leitungen oder Kabel
16. Betriebstemperaturbereich von 5° bis 45° C
(41° bis 113° F).
HAFTUNGSAUSSCHLUSS
Die Informationen in diesem Schnellstart-Handbuch und
dem begleitenden Handbuch dienen
ausschließlich als allgemeine Orientierung.
Obwohl alle Anstrengungen unternommen wurden, um die
Genauigkeit und Zuverlässigkeit der Inhalte zum Zeitpunkt
der Veröentlichung sicherzustellen, gibt Music Tribe
Global Brands Ltd. („Music Tribe“) keine ausdrücklichen
oder stillschweigenden Zusicherungen oder Garantien
hinsichtlich der Vollständigkeit, Genauigkeit oder Eignung
der hier enthaltenen Informationen, Beschreibungen,
Abbildungen oder technischen Spezikationen.
Music Tribe übernimmt keine Haftung für direkte, indirekte,
zufällige oder Folgeschäden, die sich aus dem Vertrauen
auf die in diesem Dokument enthaltenen Informationen
ergeben, einschließlich, aber nicht beschränkt auf
Datenverlust, Einkommensverluste, Gewinneinbußen oder
entgangene Geschäftsmöglichkeiten. Die Nutzung des
Produkts erfolgt ausschließlich auf eigene Verantwortung
des Benutzers.
Produkteigenschaften, Design, Spezikationen und visuelle
Darstellungen können im Interesse der kontinuierlichen
Produktverbesserung ohne vorherige Ankündigung
aktualisiert oder geändert werden.
Alle in diesem Handbuch erwähnten Marken Dritter sind
Eigentum ihrer jeweiligen Inhaber. Midas, Klark Teknik,
Lab Gruppen, Lake, Tannoy, Turbosound, TC Electronic,
TC Helicon, Behringer, Bugera, Aston Microphones und
Coolaudio sind Marken oder eingetragene Marken von
Music Tribe Global Brands Ltd.
© 2025 Music Tribe Global Brands Ltd. Alle Rechte
vorbehalten. Kein Teil dieses Dokuments darf ohne
vorherige schriftliche Genehmigung von Music Tribe
reproduziert, übertragen oder in irgendeiner Form oder auf
irgendeine Weise verwendet werden.
BESCHRÄNKTE GARANTIE
Die geltenden Bedingungen, Einschränkungen und den
Umfang Ihrer Produktgarantie, einschließlich Abdeckung,
Ausschlüsse und Dauer der beschränkten Garantie,
nden Sie in der vollständigen Music Tribe Garantiepolitik
unter: community.musictribe.com/support
Bitte bewahren Sie Ihren Kaufbeleg auf, da dieser für den
Garantieservice erforderlich sein kann.
(FR) Instructions de Sécurité
Veuillez lire attentivement ces instructions de sécurité
et prêter une attention particulière à tout symbole
d'avertissement aché sur le produit ainsi qu'aux
informations de sécurité associées dans ce manuel.
Les bornes marquées avec ce symbole
transportent un courant électrique d'une
intensité susante pour constituer un risque
de choc électrique. Utilisez uniquement des
câbles d'enceinte professionnels de haute qualité avec des
prises ¼" TS ou à verrouillage par rotation préinstallées.
Toute autre installation ou modication doit être eectuée
uniquement par du personnel qualié.
Ce symbole, où qu'il apparaisse, vous alerte
de la présence d'une tension dangereuse non
isolée à l'intérieur du boîtier, une tension qui
pourrait être susante pour constituer un
risque de choc électrique.
Ce symbole, où qu'il apparaisse, vous alerte
de la présence d'instructions importantes
concernant l'utilisation et l'entretien.
Veuillez lire attentivement le
manuel complet.
Précaution
Pour réduire le risque de choc électrique,
ne retirez pas le couvercle supérieur (ou
la partie arrière). Aucune pièce réparable
par l'utilisateur à l'intérieur. Conez toute réparation à du
personnel qualié.
Précaution
Pour réduire le risque d'incendie ou de choc
électrique, n'exposez pas cet appareil à la
pluie ni à l'humidité. L'appareil ne doit pas
être exposé à des éclaboussures ou à des projections de
liquide et aucun objet rempli de liquide, tel qu'un vase, ne
doit être posé sur l'appareil.
Précaution
Ces instructions de service sont destinées
uniquement au personnel de maintenance
qualié. Pour réduire le risque de choc
électrique, ne réalisez aucun entretien autre que celui
mentionné dans le manuel d'utilisation. Les réparations
doivent être eectuées par du personnel qualié.
Avertissement
Veuillez consulter les informations gurant
sur l'extérieur du boîtier inférieur pour
connaître les informations électriques et de
sécurité avant d'installer ou d'utiliser l'appareil.
Avertissement
Pour prévenir les risques de lésions auditives,
évitez d'écouter à des niveaux de volume
élevés pendant de longues périodes. Comme
guide pour régler le volume, assurez-vous de pouvoir
encore entendre votre propre voix en parlant normalement
tout en écoutant avec des écouteurs.
1. Lisez et conservez ces instructions. Respectez tous
les avertissements et suivez toutes les instructions.
2. N'utilisez pas cet appareil à proximité de l'eau (le cas
échéant). Nettoyez uniquement avec un chion sec.
3. Ne bloquez pas les ouvertures de ventilation (le cas
échéant). N'installez pas dans un espace conné.
Installez uniquement selon les instructions du
fabricant.
4. N'installez pas l'appareil près de sources de chaleur
telles que radiateurs, registres de chaleur, poêles
ou autres appareils (y compris les amplicateurs)
produisant de la chaleur. Ne placez pas de sources
de ammes nues, comme des bougies allumées, sur
l'appareil.
5. Ne contournez pas la fonction de sécurité de la
che polarisée ou de type mise à la terre. Une che
polarisée possède deux broches, l'une plus large
que l'autre (uniquement pour les États-Unis et le
Canada). Une che de mise à la terre possède deux
broches et une troisième broche de mise à la terre.
La broche large ou la troisième broche est fournie
pour votre sécurité. Si la che fournie ne s'insère
pas dans votre prise, contactez un électricien pour
remplacer la prise obsolète.
6. (Le cas échéant) Protégez le cordon d'alimentation
contre les piétinements et les pincements, en
particulier au niveau des ches, des prises de
courant de commodité et à leur point de sortie de
l'appareil.
7. Utilisez uniquement les accessoires spéciés par le
fabricant.
8. Utilisez uniquement les
chariots, supports, trépieds,
équerres ou tables spéciés
par le fabricant ou vendus
avec l'appareil (le cas
échéant). Lorsqu'un chariot
est utilisé, soyez prudent
lors du déplacement de l'ensemble chariot/appareil
an d'éviter les blessures par basculement.
9. Débranchez l'appareil pendant les orages ou s'il
reste inutilisé pendant une longue période.
10. Conez toutes les réparations à du personnel
qualié. Une réparation est nécessaire lorsque
l'appareil a été endommagé d'une quelconque
manière, par exemple si le cordon d'alimentation ou
la che est endommagé, si du liquide a été renversé
ou si des objets sont tombés dans l'appareil, si
l'appareil a été exposé à la pluie ou à l'humidité, ne
fonctionne pas normalement ou est tombé.
11. (Le cas échéant) L'appareil avec une borne de mise à
la terre de protection doit être connecté à une prise
de courant MAINS avec une connexion de mise à la
terre de protection.
12. (Le cas échéant) Lorsqu'une che de secteur ou un
coupleur d'appareil est utilisé comme dispositif
de déconnexion, le dispositif de déconnexion doit
rester facilement accessible.
13. Sélecteurs de tension internes/externes (le cas
échéant): Les sélecteurs de tension internes ou
externes, s'ils existent, doivent uniquement être
réinitialisés et recongurés avec la che appropriée
ou une tension alternative par un technicien
qualié. N'essayez pas de modier cela vous-même.
14. Câblage de Classe II (le cas échéant):
Pour réduire le risque de choc électrique, le câblage
externe connecté aux bornes indiquées "Classe II"
doit être un câblage de Classe II installé par une
personne qualiée ou utiliser des câbles ou cordons
préfabriqués.
15. Câblage de Classe I (le cas échéant) : An de réduire
le risque de choc électrique, le câblage externe
connecté aux bornes avec « Câblage de Classe I »
nécessite un câblage de Classe I installé par une
personne qualiée ou l’utilisation de ls ou cordons
préfabriqués.
16. Plage de température de fonctionnement de
5° à 45° C (41° à 113° F).
DÉNI LÉGAL
Les informations contenues dans ce Guide de démarrage
rapide et le manuel joint sont fournies uniquement à
titre indicatif. Bien que tous les eorts aient été faits pour
garantir l'exactitude et la abilité du contenu au moment
de la publication, Music Tribe Global Brands Ltd. ("Music
Tribe") ne fait aucune déclaration ni garantie, expresse
ou implicite, quant à l'exhaustivité, l'exactitude ou
l'adéquation des informations, descriptions, illustrations ou
spécications techniques contenues dans ce document.
Music Tribe décline toute responsabilité pour toute perte
ou dommage direct, indirect, accessoire ou consécutif
résultant de la conance accordée aux informations
contenues dans ce document, y compris, mais sans s'y
limiter, la perte de données, de revenus, de prots ou
d'opportunités commerciales. L'utilisation du produit reste
la seule responsabilité de l'utilisateur.
Les caractéristiques du produit, le design, les spécications
et les représentations visuelles peuvent être mis à jour
ou modiés sans préavis dans le cadre de l'amélioration
continue du produit.
Toutes les marques de tiers mentionnées dans ce
guide sont la propriété de leurs détenteurs respectifs.
Midas, Klark Teknik, Lab Gruppen, Lake, Tannoy,
Turbosound, TC Electronic, TC Helicon, Behringer, Bugera,
Aston Microphones et Coolaudio sont des marques
commerciales ou des marques déposées de Music Tribe
Global Brands Ltd.
© 2025 Music Tribe Global Brands Ltd. Tous droits réservés.
Aucune partie de ce document ne peut être reproduite,
transmise ou utilisée sous quelque forme ou par quelque
moyen que ce soit sans l'autorisation écrite préalable de
Music Tribe.
GARANTIE LIMITÉE
Pour connaître les termes, conditions et limitations
applicables à votre produit, y compris la couverture,
les exclusions et la durée de la garantie limitée,
veuillez consulter la Politique de Garantie Limitée de Music
Tribe, disponible en ligne à l'adresse suivante: community.
musictribe.com/support
Veuillez conserver votre preuve d'achat, car elle pourrait
être requise pour bénécier du service de garantie.
6 AIR LINK DW20BR User Manual 7 AIR LINK DW20BR User Manual
(NL) Veiligheidsinstructies
Lees deze veiligheidsinstructies zorgvuldig door en
let goed op alle waarschuwingssymbolen die op het
product worden weergegeven en op de gerelateerde
veiligheidsinformatie in deze handleiding.
Klemmen gemarkeerd met dit symbool
voeren elektrische stroom van een zodanige
sterkte dat er gevaar voor een elektrische
schok bestaat. Gebruik uitsluitend
hoogwaardige professionele luidsprekerkabels met vooraf
gemonteerde ¼" TS- of draaivergrendelingsstekkers. Alle
overige installaties of wijzigingen mogen uitsluitend door
gekwaliceerd personeel worden uitgevoerd.
Dit symbool, waar het ook verschijnt,
waarschuwt voor de aanwezigheid van een
niet-geïsoleerde gevaarlijke spanning
binnenin de behuizing die voldoende kan
zijn om een schokgevaar te veroorzaken.
Dit symbool, waar het ook verschijnt, wijst
op belangrijke bedienings- en
onderhoudsinstructies. Lees de
volledige handleiding.
Voorzichtig
Om het risico op een elektrische schok te
verminderen, verwijder niet de bovenste
afdekking (of het achterpaneel). Er
bevinden zich geen door de gebruiker te onderhouden
onderdelen binnenin. Laat onderhoud over aan
gekwaliceerd personeel.
Voorzichtig
Om het risico op brand of elektrische
schokken te verminderen, stel dit apparaat
niet bloot aan regen of vocht. Het apparaat
mag niet worden blootgesteld aan druppelend of spattend
water en er mogen geen voorwerpen die met vloeistof zijn
gevuld, zoals vazen, op het apparaat worden geplaatst.
Voorzichtig
Deze onderhoudsinstructies zijn
uitsluitend bedoeld voor gekwaliceerd
servicepersoneel. Om het risico op een
elektrische schok te verminderen, voer geen onderhoud
uit anders dan beschreven in de bedieningsinstructies.
Reparaties moeten worden uitgevoerd door
gekwaliceerd personeel.
Waarschuwing
Raadpleeg de informatie op de buitenkant
van de onderbehuizing voor elektrische en
veiligheidsinformatie voordat u het apparaat
installeert of gebruikt.
Waarschuwing
Om mogelijke gehoorschade te
voorkomen, luister niet langdurig op
hoge volumeniveaus. Als richtlijn voor
het instellen van het volume: controleer of u uw eigen
stem nog normaal kunt horen terwijl u luistert met een
hoofdtelefoon.
1. Lees en bewaar deze instructies. Volg alle
waarschuwingen op en volg alle instructies.
2. Gebruik dit apparaat niet in de buurt van water
(indien van toepassing). Reinig alleen met een
droge doek.
3. Blokkeer geen ventilatieopeningen (indien van
toepassing). Installeer niet in een afgesloten
ruimte. Installeer alleen volgens de instructies van
de fabrikant.
4. Installeer niet in de buurt van warmtebronnen
zoals radiatoren, warmtekanalen, fornuizen of
andere apparaten (inclusief versterkers) die warmte
produceren. Plaats geen open vlambronnen, zoals
brandende kaarsen, op het apparaat.
5. Omzeil de veiligheidsfunctie van de gepolariseerde
of geaarde stekker niet.
Een gepolariseerde stekker heeft twee bladen,
waarvan één breder is dan de andere (alleen
voor de VS en Canada). Een geaarde stekker heeft
twee bladen en een derde aardpen. Het brede
blad of de derde pen is er voor uw veiligheid.
Als de meegeleverde stekker niet in uw stopcontact
past, raadpleeg dan een elektricien om het
verouderde stopcontact te vervangen.
6. (Indien van toepassing) Zorg ervoor dat het
netsnoer niet wordt belopen of afgeklemd,
met name bij stekkers, contactdozen en het punt
waar het snoer het apparaat verlaat.
7. Gebruik alleen accessoires en hulpstukken
aanbevolen door de fabrikant.
8. Gebruik alleen karretjes,
standaarden, statieven,
beugels of tafels die
gespeciceerd zijn door de
fabrikant of verkocht
worden samen met het
apparaat (indien van
toepassing).
Wees voorzichtig bij het verplaatsen van de
combinatie karretje/apparaat om letsel door
kantelen te voorkomen.
9. Trek de stekker uit het stopcontact tijdens onweer
of als het apparaat lange tijd niet wordt gebruikt.
10. Laat al het onderhoud uitvoeren door
gekwaliceerd servicepersoneel. Onderhoud
is vereist als het apparaat op enigerlei wijze is
beschadigd, bijvoorbeeld als het netsnoer of de
stekker beschadigd is, er vloeistof is gemorst of
objecten in het apparaat zijn gevallen, het apparaat
is blootgesteld aan regen of vocht, niet normaal
functioneert of is gevallen.
11. (Indien van toepassing) Apparaten met een
beschermende aarding moeten worden
aangesloten op een MAINS-stopcontact met een
beschermende aardverbinding.
12. (Indien van toepassing) Wanneer de
MAINS-stekker of een apparaatkoppeling als
ontkoppelingsmiddel wordt gebruikt, moet
het ontkoppelingsmiddel gemakkelijk te
bedienen blijven.
13. Interne/Externe spanningsselectoren
(indien van toepassing): Interne of externe
spanningsschakelaars mogen alleen worden
ingesteld en voorzien van de juiste stekker of
alternatieve spanning door een gekwaliceerde
technicus. Probeer dit niet zelf te wijzigen.
14. Klasse II-bekabeling (indien van toepassing): Om
het risico op een elektrische schok te verminderen,
vereist externe bekabeling verbonden met
terminals met "Klasse II-bekabeling" installatie
door een geïnstrueerde persoon of het gebruik van
kant-en-klare kabels of snoeren.
15. Klasse I-bekabeling (indien van toepassing): Om
het risico op elektrische schokken te verminderen,
vereist de externe bekabeling die is aangesloten
op de aansluitklemmen met “Klasse I-bekabeling”
Klasse I-bekabeling die is geïnstalleerd door
een geïnstrueerd persoon of het gebruik van
voorgemonteerde draden of kabels.
16. Bedrijfstemperatuurbereik: 5° tot 45° C
(41° tot 113° F).
WETTELIJKE ONTKENNING
De informatie in deze Snelstartgids en de bijbehorende
handleiding wordt uitsluitend verstrekt als algemene
richtlijn. Hoewel alle inspanningen zijn geleverd om de
nauwkeurigheid en betrouwbaarheid van de inhoud ten
tijde van publicatie te garanderen, geeft Music Tribe Global
Brands Ltd. ("Music Tribe") geen verklaringen of garanties,
expliciet of impliciet, met betrekking tot de volledigheid,
nauwkeurigheid of geschiktheid van de hierin opgenomen
informatie, beschrijvingen, illustraties of technische
specicaties.
Music Tribe aanvaardt geen aansprakelijkheid voor
enige directe, indirecte, incidentele of gevolgschade
die voortvloeit uit het vertrouwen op de informatie in
dit document, inclusief maar niet beperkt tot verlies
van gegevens, inkomsten, winst of zakelijke kansen.
Het gebruik van het product blijft de exclusieve
verantwoordelijkheid van de gebruiker.
Producteigenschappen, ontwerp, specicaties en visuele
weergaven kunnen zonder voorafgaande kennisgeving
worden bijgewerkt of gewijzigd in het belang van continue
productverbetering.
Alle in deze gids vermelde handelsmerken van derden
zijn eigendom van hun respectieve eigenaren. Midas,
Klark Teknik, Lab Gruppen, Lake, Tannoy, Turbosound,
TC Electronic, TC Helicon, Behringer, Bugera, Aston
Microphones en Coolaudio zijn handelsmerken of
geregistreerde handelsmerken van Music Tribe
Global Brands Ltd.
© 2025 Music Tribe Global Brands Ltd. Alle rechten
voorbehouden. Geen enkel deel van dit document mag
worden gereproduceerd, verzonden of gebruikt in welke
vorm of op welke manier dan ook zonder voorafgaande
schriftelijke toestemming van Music Tribe.
BEPERKTE GARANTIE
Voor de voorwaarden, beperkingen en toepasselijke
dekking van uw product, inclusief uitsluitingen en de duur
van de beperkte garantie, raadpleeg het volledige Music
Tribe Garantiebeleid, online beschikbaar op: community.
musictribe.com/support
Bewaar uw aankoopbewijs, aangezien dit nodig kan zijn
voor garantie service.
(IT) Istruzioni di Sicurezza
Si prega di leggere attentamente queste istruzioni di
sicurezza e prestare particolare attenzione a tutti i simboli
di avvertimento visualizzati sul prodotto e alle relative
informazioni sulla sicurezza contenute in questo manuale.
I terminali contrassegnati con questo
simbolo trasportano corrente elettrica di
intensità suciente da costituire un rischio
di scossa elettrica. Utilizzare esclusivamente
cavi per altoparlanti professionali di alta qualità con
connettori ¼" TS o twist-lock preinstallati.
Qualsiasi altra installazione o modica deve essere
eettuata solo da personale qualicato.
Questo simbolo, ovunque appaia, avvisa
della presenza di una tensione pericolosa
non isolata all'interno dell'involucro,
sucientemente elevata da costituire un
rischio di scossa elettrica.
Questo simbolo, ovunque appaia, segnala
importanti istruzioni operative e di
manutenzione. Si prega di leggere il
manuale completo.
Precauzione
Per ridurre il rischio di scosse elettriche,
non rimuovere il coperchio superiore (o la
parte posteriore). Non vi sono parti riparabili
dall'utente all'interno. Adare l'assistenza a personale
qualicato.
Precauzione
Per ridurre il rischio di incendio o scossa
elettrica, non esporre questo apparecchio a
pioggia o umidità. L'apparecchio non deve
essere esposto a gocciolamenti o spruzzi e nessun oggetto
pieno di liquidi, come vasi, deve essere posto sopra di esso.
Precauzione
Queste istruzioni di servizio sono
destinate esclusivamente a personale
qualicato. Per ridurre il rischio di scosse
elettriche, non eseguire interventi di manutenzione diversi
da quelli descritti nel manuale operativo. Le riparazioni
devono essere eettuate da personale qualicato.
Avvertenza
Fare riferimento alle informazioni
sull'esterno della parte inferiore
dell'involucro per le informazioni elettriche e
di sicurezza prima di installare o utilizzare il dispositivo.
Avvertenza
Per prevenire possibili danni all'udito,
non ascoltare a livelli di volume elevati
per periodi prolungati. Come guida per
impostare il volume, assicurarsi di poter ancora sentire la
propria voce mentre si parla normalmente con le cue
indossate.
1. Leggere e conservare queste istruzioni.
Prestare attenzione a tutti gli avvertimenti
e seguire tutte le istruzioni.
2. Non utilizzare questo apparecchio vicino all'acqua
(se applicabile). Pulire solo con un panno asciutto.
3. Non ostruire le aperture di ventilazione
(se applicabile). Non installare in spazi
ristretti. Installare solo secondo le istruzioni
del produttore.
4. Non installare vicino a fonti di calore come
radiatori, registri di calore, stufe o altri apparecchi
(inclusi amplicatori) che producono calore. Non
posizionare fonti di amme libere, come candele
accese, sull'apparecchio.
5. Non annullare la funzione di sicurezza della
spina polarizzata o con messa a terra. Una spina
polarizzata ha due poli, uno più largo dell'altro (solo
per USA e Canada). Una spina con messa
a terra ha due poli e un terzo per la messa a terra. Il
polo largo o il terzo polo sono presenti per la vostra
sicurezza. Se la spina fornita non
si inserisce nella vostra presa, contattare
un elettricista per la sostituzione della
presa obsoleta.
6. (Se applicabile) Proteggere il cavo di alimentazione
da schiacciamenti o piegature, soprattutto in
prossimità di spine, prese di corrente e al punto di
uscita dall'apparecchio.
7. Utilizzare solo accessori e dispositivi raccomandati
dal produttore.
8. Utilizzare solo carrelli,
supporti, treppiedi,
stae o tavoli specicati dal
produttore o venduti con
l'apparecchio
(se applicabile). Quando si
utilizza un carrello, prestare
attenzione nello spostare la combinazione carrello/
apparecchio per evitare ribaltamenti e lesioni.
9. Scollegare durante i temporali o se non si utilizza
per un lungo periodo.
10. Adare tutte le riparazioni a personale qualicato.
L'assistenza è necessaria quando l'apparecchio è
stato danneggiato in qualsiasi modo, ad esempio se
il cavo di alimentazione o la spina sono danneggiati,
se è stato versato liquido o sono caduti oggetti
nell'apparecchio, se l'apparecchio è stato esposto
a pioggia o umidità, non funziona normalmente o
è caduto.
11. (Se applicabile) L'apparecchio dotato di morsetto
di terra protettivo deve essere collegato a una
presa di corrente MAINS con collegamento di terra
protettivo.
12. (Se applicabile) Quando la spina di rete
o un connettore dell'apparecchio è utilizzato come
dispositivo di disconnessione,
il dispositivo di disconnessione deve rimanere
facilmente accessibile.
13. Selettori di tensione interni/esterni
(se applicabile): Gli interruttori selettori
di tensione interni o esterni, se presenti,
devono essere reimpostati e dotati di spina
appropriata o tensione alternativa solo da
personale tecnico qualicato. Non tentare di
modicarli autonomamente. Cablaggio di Classe
II (se applicabile): Per ridurre il rischio di scossa
elettrica, il cablaggio esterno collegato ai terminali
con "Classe II" deve essere un cablaggio di Classe II
installato da personale qualicato oppure devono
essere utilizzati cavi o conduttori prefabbricati.
14. Cablaggio di Classe II (se applicabile): Per ridurre
il rischio di scosse elettriche, il cablaggio esterno
collegato ai terminali con “Cablaggio di Classe II”
richiede cablaggio di Classe II installato da una
persona istruita oppure l’uso di conduttori o cavi
preassemblati.
15. Cablaggio di Classe I (se applicabile): Per ridurre
il rischio di scosse elettriche, il cablaggio esterno
collegato ai terminali con “Cablaggio di Classe
I” richiede cablaggio di Classe I installato da una
persona istruita oppure l’uso di conduttori o cavi
preassemblati.
16. Gamma di temperatura di esercizio: da 5° a 45° C (da
41° a 113° F).
DISCLAIMER LEGALE
Le informazioni contenute in questa Guida Rapida e nel
manuale allegato sono fornite esclusivamente a scopo
orientativo. Pur avendo fatto ogni sforzo per garantire
l'accuratezza e l'adabilità dei contenuti al momento
della pubblicazione, Music Tribe Global Brands Ltd. ("Music
Tribe") non rilascia dichiarazioni né garanzie, espresse
o implicite, in merito alla completezza, accuratezza o
idoneità delle informazioni, descrizioni, illustrazioni o
speciche tecniche qui contenute.
Music Tribe non si assume alcuna responsabilità per
eventuali perdite o danni diretti, indiretti, accidentali o
consequenziali derivanti dall'adamento alle informazioni
contenute in questo documento, inclusa, ma non limitata a,
perdita di dati, reddito, protti o opportunità commerciali.
L'uso del prodotto resta di esclusiva responsabilità
dell'utente.
Le caratteristiche del prodotto, il design, le speciche
e le rappresentazioni visive possono essere aggiornate
o modicate senza preavviso nell'interesse del
miglioramento continuo del prodotto.
Tutti i marchi di terze parti citati in questa guida sono di
proprietà dei rispettivi titolari. Midas, Klark Teknik, Lab
Gruppen, Lake, Tannoy, Turbosound, TC Electronic,
TC Helicon, Behringer, Bugera, Aston Microphones e
Coolaudio sono marchi o marchi registrati di Music Tribe
Global Brands Ltd.
© 2025 Music Tribe Global Brands Ltd. Tutti i diritti riservati.
Nessuna parte di questo documento può essere riprodotta,
trasmessa o utilizzata in qualsiasi forma o con qualsiasi
mezzo senza la previa autorizzazione scritta di Music Tribe.
GARANZIA LIMITATA
Per i termini, le condizioni e le limitazioni applicabili al tuo
prodotto, inclusa la copertura, le esclusioni e la durata della
garanzia limitata, fai riferimento alla Politica di Garanzia
Limitata di Music Tribe, disponibile online su: community.
musictribe.com/support
Conserva la prova d'acquisto, poiché potrebbe essere
richiesta per il servizio di garanzia.
8 AIR LINK DW20BR User Manual 9 AIR LINK DW20BR User Manual
(PL)
Instrukcje bezpieczeństwa
Proszę uważnie przeczytać te instrukcje bezpieczeństwa
i zwrócić szczególną uwagę na wszystkie symbole
ostrzegawcze wyświetlane na produkcie oraz powiązane
informacje o bezpieczeństwie zawarte w tej instrukcji.
Terminale oznaczone tym symbolem
przewodzą prąd elektryczny o natężeniu
wystarczającym do spowodowania ryzyka
porażenia prądem elektrycznym. Używaj
wyłącznie wysokiej jakości profesjonalnych kabli
głośnikowych z fabrycznie zamontowanymi wtykami ¼" TS
lub typu twist-lock. Wszelkie inne instalacje lub
modykacje powinny być wykonywane wyłącznie przez
wykwalikowany personel.
Ten symbol, gdziekolwiek się pojawi,
ostrzega o obecności nieizolowanego
niebezpiecznego napięcia wewnątrz
obudowy, które może być wystarczające do
spowodowania ryzyka porażenia prądem.
Ten symbol, gdziekolwiek się pojawi,
wskazuje na ważne instrukcje dotyczące
obsługi i konserwacji. Prosimy o przeczytanie
całego podręcznika.
Ostrożność
Aby zmniejszyć ryzyko porażenia prądem
elektrycznym, nie zdejmuj górnej pokrywy
(ani tylnej sekcji). Wewnątrz nie ma części
serwisowanych przez użytkownika. Naprawy należy
powierzyć wykwalikowanemu personelowi.
Ostrożność
Aby zmniejszyć ryzyko pożaru lub porażenia
prądem elektrycznym, nie narażaj
urządzenia na działanie deszczu ani wilgoci.
Urządzenie nie może być narażone na kapanie lub rozpryski
cieczy, a na urządzeniu nie należy umieszczać żadnych
przedmiotów wypełnionych cieczą, takich
jak wazony.
Ostrożność
Te instrukcje serwisowe są przeznaczone
wyłącznie dla wykwalikowanego
personelu serwisowego. Aby zmniejszyć
ryzyko porażenia prądem elektrycznym, nie wykonuj
żadnych czynności serwisowych innych niż te opisane w
instrukcji obsługi. Naprawy muszą być wykonywane przez
wykwalikowany personel.
Ostrzeżenie
Przed instalacją lub użytkowaniem
urządzenia należy zapoznać się z
informacjami elektrycznymi i dotyczącymi
bezpieczeństwa umieszczonymi na zewnętrznej stronie
dolnej obudowy.
Ostrzeżenie
Aby zapobiec możliwym uszkodzeniom
słuchu, nie słuchaj przy wysokim poziomie
głośności przez dłuższy czas. Jako
wskazówkę przy ustawianiu poziomu głośności upewnij
się, że nadal możesz usłyszeć własny głos, mówiąc
normalnie podczas korzystania ze słuchawek.
1. Przeczytaj i zachowaj te instrukcje.
Przestrzegaj wszystkich ostrzeżeń i stosuj się
do wszystkich instrukcji.
2. Nie używaj tego urządzenia w pobliżu wody
(jeśli dotyczy). Czyść tylko suchą ściereczką.
3. Nie blokuj otworów wentylacyjnych (jeśli dotyczy).
Nie instaluj w zamkniętej przestrzeni. Instaluj
zgodnie z instrukcjami producenta.
4. Nie instaluj w pobliżu źródeł ciepła, takich jak
grzejniki, rejestry ciepła, piece lub inne urządzenia
(w tym wzmacniacze) wytwarzające ciepło. Nie
umieszczaj źródeł otwartego ognia, takich jak
zapalone świece, na urządzeniu.
5. Nie usuwaj zabezpieczeń wtyczki spolaryzowanej
lub z uziemieniem. Wtyczka spolaryzowana ma dwa
bolce, z których jeden jest szerszy (dotyczy tylko
USA i Kanady). Wtyczka uziemiająca ma dwa bolce i
trzeci bolec do uziemienia.
Szerszy bolec lub trzeci bolec zapewnia
bezpieczeństwo. Jeśli dostarczona wtyczka nie
pasuje do gniazdka, skonsultuj się z elektrykiem w
celu wymiany gniazdka.
6. (Jeśli dotyczy) Chroń przewód zasilający przed
nadepnięciem lub przygnieceniem, szczególnie
w okolicach wtyczek, gniazdek i punktu
wyjścia z urządzenia.
7. Używaj wyłącznie akcesoriów i wyposażenia
zalecanego przez producenta.
8. Używaj wyłącznie wózków,
stojaków, statywów,
uchwytów lub stołów
określonych przez
producenta lub
sprzedawanych z
urządzeniem (jeśli dotyczy).
Zachowaj ostrożność podczas przemieszczania
zestawu wózek/urządzenie, aby uniknąć obrażeń
spowodowanych przewróceniem się.
9. Odłącz urządzenie od zasilania podczas burz lub
jeśli nie będzie używane przez dłuższy czas.
10. Powierz wszelkie naprawy wykwalikowanemu
personelowi serwisowemu. Naprawa jest
konieczna, gdy urządzenie zostało uszkodzone
w jakikolwiek sposób, np. jeśli uszkodzony został
przewód zasilający lub wtyczka, ciecz została
rozlana na urządzenie lub do niego wpadła,
urządzenie było wystawione na działanie deszczu
lub wilgoci, nie działa prawidłowo lub upadło.
11. (Jeśli dotyczy) Urządzenie z ochronnym zaciskiem
uziemiającym musi być podłączone do gniazda
sieciowego (MAINS) z połączeniem ochronnym.
12. (Jeśli dotyczy) Gdy wtyczka sieciowa lub sprzętowe
złącze jest używane jako urządzenie odłączające,
urządzenie odłączające musi być łatwo dostępne.
13. Wewnętrzne/zewnętrzne selektory napięcia (jeśli
dotyczy): Wewnętrzne lub zewnętrzne przełączniki
napięcia powinny być resetowane i wyposażone w
odpowiednią wtyczkę lub alternatywne napięcie
tylko przez wykwalikowanego technika. Nie
próbuj tego zmieniać samodzielnie.
14. Okablowanie klasy II (jeśli dotyczy):
Aby zmniejszyć ryzyko porażenia prądem,
okablowanie zewnętrzne podłączane do zacisków
oznaczonych "Okablowanie klasy II" musi być
instalowane przez osobę przeszkoloną lub przy
użyciu gotowych przewodów lub kabli.
15. Okablowanie klasy I (jeśli dotyczy): Aby zmniejszyć
ryzyko porażenia prądem, zewnętrzne okablowanie
podłączone do zacisków oznaczonych jako
„Okablowanie klasy I” wymaga okablowania klasy
I zainstalowanego przez osobę przeszkoloną lub
użycia gotowych przewodów lub kabli.
16. Zakres temperatury pracy: od 5° do 45° C
(41° do 113° F).
ZASTRZEŻENIA PRAWNE
Informacje zawarte w niniejszym Podręczniku Szybkiego
Startu i towarzyszącej instrukcji obsługi są dostarczane
wyłącznie w celach ogólnych. Pomimo dołożenia wszelkich
starań w celu zapewnienia dokładności i wiarygodności
treści w momencie publikacji, Music Tribe Global Brands
Ltd. („Music Tribe”) nie składa żadnych oświadczeń
ani gwarancji, wyraźnych ani dorozumianych, co do
kompletności, dokładności lub przydatności zawartych
tutaj informacji, opisów, ilustracji czy specykacji
technicznych.
Music Tribe nie ponosi odpowiedzialności za jakiekolwiek
bezpośrednie, pośrednie, przypadkowe lub wynikowe
straty lub szkody wynikające z polegania na informacjach
zawartych w tym dokumencie, w tym, ale nie wyłącznie,
za utratę danych, dochodów, zysków lub możliwości
biznesowych. Korzystanie z produktu pozostaje wyłączną
odpowiedzialnością użytkownika.
Funkcje produktu, projekt, specykacje i wizualizacje mogą
zostać zaktualizowane lub zmienione bez wcześniejszego
powiadomienia w celu ciągłego doskonalenia produktu.
Wszystkie znaki towarowe stron trzecich wymienione
w niniejszym przewodniku należą do ich odpowiednich
właścicieli. Midas, Klark Teknik, Lab Gruppen, Lake, Tannoy,
Turbosound, TC Electronic, TC Helicon, Behringer, Bugera,
Aston Microphones i Coolaudio to znaki towarowe lub
zastrzeżone znaki towarowe należące do Music Tribe Global
Brands Ltd.
© 2025 Music Tribe Global Brands Ltd. Wszelkie prawa
zastrzeżone. Żadna część tego dokumentu nie może być
reprodukowana, przesyłana ani używana w jakiejkolwiek
formie ani w żaden sposób bez uprzedniej pisemnej zgody
Music Tribe.
OGRANICZONA GWARANCJA
Aby zapoznać się z warunkami, ograniczeniami i zakresem
gwarancji na Twój produkt, w tym zakresem ochrony,
wyłączeniami i czasem trwania ograniczonej gwarancji,
zapoznaj się z pełną Polityką Gwarancji Ograniczonej
Music Tribe, dostępną online na: community.musictribe.
com/support
Zachowaj dowód zakupu, ponieważ może być wymagany
do skorzystania z usług gwarancyjnych.
(PT) Instruções de Segurança
Por favor, leia estas instruções de segurança com atenção e
preste especial atenção a todos os símbolos de advertência
exibidos no produto e às informações de segurança
relacionadas contidas neste manual.
Os terminais marcados com este símbolo
transportam corrente elétrica de magnitude
suciente para representar risco de choque
elétrico. Utilize apenas cabos de alto-falante
prossionais de alta qualidade com conectores ¼" TS ou de
travamento por torção pré-instalados. Todas as outras
instalações ou modicações devem ser realizadas apenas
por
pessoal qualicado.
Este símbolo, onde quer que apareça, alerta
para a presença de tensão perigosa não
isolada dentro do invólucro que pode ser
suciente para representar risco de choque
elétrico.
Este símbolo, onde quer que apareça, alerta
para instruções importantes de operação e
manutenção. Por favor, leia o manual
completo.
Precaução
Para reduzir o risco de choque elétrico,
não remova a tampa superior (ou a seção
traseira). Não há peças que possam ser
reparadas pelo usuário no interior. Encaminhe o serviço de
manutenção para pessoal qualicado.
Precaução
Para reduzir o risco de incêndio ou choque
elétrico, não exponha este aparelho à chuva
ou à umidade. O aparelho não deve ser
exposto a respingos ou gotejamentos de líquidos e nenhum
objeto cheio de líquido, como vasos, deve ser colocado
sobre o aparelho.
Precaução
Estas instruções de serviço destinam-
se apenas ao pessoal de manutenção
qualicado. Para reduzir o risco de
choque elétrico, não realize nenhum serviço além dos
procedimentos contidos nas instruções de operação.
Reparos devem ser realizados por pessoal qualicado.
Aviso
Consulte as informações no exterior da parte
inferior do invólucro para obter informações
elétricas e de segurança antes de instalar ou
operar o dispositivo.
Aviso
Para evitar possíveis danos auditivos, não
escute em níveis de volume elevados por
períodos prolongados. Como orientação para
ajustar o volume, verique se você ainda consegue ouvir
sua própria voz ao falar normalmente enquanto utiliza
fones de ouvido.
1. Leia e mantenha estas instruções. Atenda a todos os
avisos e siga todas as instruções.
2. Não utilize este aparelho próximo à água
(se aplicável). Limpe apenas com pano seco.
3. Não bloqueie as aberturas de ventilação
(se aplicável). Não instale em espaços
connados. Instale apenas conforme as instruções
do fabricante.
4. Não instale perto de fontes de calor, como
radiadores, registros de calor, fogões ou outros
aparelhos (incluindo amplicadores) que produzam
calor. Não coloque fontes de chama aberta, como
velas acesas, sobre o aparelho.
5. Não anule o propósito de segurança do plugue
polarizado ou com aterramento. Um plugue
polarizado possui duas lâminas, sendo uma mais
larga que a outra (somente para EUA e Canadá). Um
plugue com aterramento possui duas lâminas e um
terceiro pino para aterramento. A lâmina larga ou o
terceiro pino são fornecidos para sua segurança. Se
o plugue fornecido não se encaixar na sua tomada,
consulte um eletricista para substituir a tomada
antiga.
6. (Se aplicável) Proteja o cabo de alimentação para
que não seja pisado ou pressionado, especialmente
em plugues, tomadas e no ponto de saída do
aparelho.
7. Utilize apenas acessórios e dispositivos
recomendados pelo fabricante.
8. Utilize apenas carrinhos,
suportes, tripés, suportes
de parede ou mesas
especicados pelo
fabricante ou vendidos com
o aparelho
(se aplicável). Ao utilizar um carrinho, tenha
cuidado ao mover a combinação carrinho/aparelho
para evitar tombamentos e ferimentos.
9. Desconecte o aparelho durante tempestades ou se
não for utilizá-lo por um longo período.
10. Encaminhe toda manutenção para pessoal
qualicado. A manutenção é necessária quando o
aparelho for danicado de qualquer forma, como
quando o cabo de alimentação ou plugue estiver
danicado, líquido for derramado ou objetos caírem
sobre o aparelho, o aparelho for exposto à chuva
ou à umidade, não funcionar normalmente ou tiver
sofrido quedas.
11. (Se aplicável) O aparelho com terminal de
aterramento de proteção deve ser conectado a
uma tomada de rede (MAINS) com conexão de
aterramento de proteção.
12. (Se aplicável) Quando o plugue de rede ou
um acoplador de aparelho for usado como
dispositivo de desconexão, este deve permanecer
facilmente acessível.
13. Seletores de voltagem internos/externos
(se aplicável): Os seletores de voltagem
internos ou externos, se existirem, devem ser
reajustados e equipados com o plugue apropriado
ou voltagem alternativa apenas por técnicos
qualicados. Não tente alterar isso por conta
própria.
14. Fiação de Classe II (se aplicável): Para reduzir o risco
de choque elétrico, a ação externa conectada
aos terminais indicados como "Classe II" deve ser
instalada por pessoa instruída ou utilizar cabos ou
os prontos para uso.
15. Fiação Classe I (se aplicável): Para reduzir o risco
de choque elétrico, a ação externa conectada aos
terminais com “Fiação Classe I” requer ação Classe
I instalada por uma pessoa instruída ou o uso de
cabos ou condutores pré-fabricados.
16. Faixa de temperatura de operação de 5° a 45° C (41°
a 113° F).
LEGAL RENUNCIANTE
As informações contidas neste Guia de Início Rápido e
no manual correspondente são fornecidas apenas para
orientação geral. Embora todos os esforços tenham sido
feitos para garantir a precisão e conabilidade do conteúdo
no momento da publicação, a Music Tribe Global Brands
Ltd. ("Music Tribe") não faz declarações ou garantias,
expressas ou implícitas, quanto à integridade, precisão
ou adequação das informações, descrições, ilustrações ou
especicações técnicas aqui contidas.
A Music Tribe não assume nenhuma responsabilidade por
qualquer perda ou dano direto, indireto, incidental ou
consequente decorrente da conança nas informações
contidas neste documento, incluindo, mas não se limitando
a, perda de dados, renda, lucros ou oportunidades de
negócios. O uso do produto permanece de responsabilidade
exclusiva do usuário.
As características do produto, design, especicações
e representações visuais podem ser atualizadas ou
modicadas sem aviso prévio, visando a melhoria contínua
do produto.
Todas as marcas registradas de terceiros mencionadas neste
guia são propriedade de seus respectivos proprietários.
Midas, Klark Teknik, Lab Gruppen, Lake, Tannoy,
Turbosound, TC Electronic, TC Helicon, Behringer, Bugera,
Aston Microphones e Coolaudio são marcas comerciais ou
marcas registradas da Music Tribe Global Brands Ltd.
© 2025 Music Tribe Global Brands Ltd. Todos os direitos
reservados. Nenhuma parte deste documento pode ser
reproduzida, transmitida ou utilizada de qualquer forma
ou por qualquer meio sem a permissão prévia por escrito
da Music Tribe.
GARANTIA LIMITADA
Para obter informações sobre os termos, condições e
limitações aplicáveis ao seu produto, incluindo cobertura,
exclusões e duração da garantia limitada, consulte a
Política de Garantia Limitada da Music Tribe, disponível
online em: community.musictribe.com/support
Guarde o seu comprovante de compra, pois pode ser
necessário para o serviço de garantia.
10 AIR LINK DW20BR User Manual 11 AIR LINK DW20BR User Manual
(SV) Säkerhetsinstruktioner
Vänligen läs dessa säkerhetsinstruktioner noggrant och var
särskilt uppmärksam på alla varningssymboler som visas
på produkten samt den relaterade säkerhetsinformationen
i denna manual.
Terminaler märkta med denna symbol leder
elektrisk ström av tillräcklig styrka för att
innebära risk för elektrisk stöt. Använd
endast högkvalitativa professionella
högtalarkablar med förmonterade ¼" TS- eller
vridlåsanslutningar. Alla andra installationer eller
ändringar ska endast utföras av kvalicerad personal.
Denna symbol, var den än visas, varnar för
förekomst av oisolerad farlig spänning inne i
höljet som kan vara tillräckligt för att utgöra
en risk för elektrisk stöt.
Denna symbol, var den än visas, påminner
om viktiga instruktioner för drift och
underhåll. Läs hela manualen.
Försiktighet
För att minska risken för elektrisk
stöt, ta inte bort det övre locket (eller
bakpanelen). Det nns inga delar inuti
som användaren själv kan underhålla. Överlåt service till
kvalicerad personal.
Försiktighet
För att minska risken för brand eller elektrisk
stöt, utsätt inte apparaten för regn eller fukt.
Apparaten får inte utsättas för droppande
eller stänkande vätskor och inga föremål fyllda med vätska,
såsom vaser, får placeras på apparaten.
Försiktighet
Dessa serviceinstruktioner är endast
avsedda för kvalicerad servicepersonal.
För att minska risken för elektrisk stöt,
utför inte någon annan service än den som beskrivs i
driftsinstruktionerna. Reparationer måste utföras av
kvalicerad personal.
Varning
Se informationen på utsidan av den
nedre delen av höljet för elektrisk och
säkerhetsrelaterad information innan du
installerar eller använder enheten.
Varning
För att undvika eventuell hörselskada, lyssna
inte på hög volym under längre perioder.
Som en riktlinje för volyminställning,
kontrollera att du fortfarande kan höra din egen röst
medan du pratar normalt med hörlurarna på.
1. Läs och behåll dessa instruktioner. Följ alla
varningar och instruktioner.
2. Använd inte denna apparat nära vatten (om
tillämpligt). Rengör endast med en torr trasa.
3. Blockera inte ventilationsöppningar (om
tillämpligt). Installera inte i ett trångt utrymme.
Installera endast enligt tillverkarens instruktioner.
4. Installera inte nära värmekällor såsom element,
värmeäktar, spisar eller andra apparater (inklusive
förstärkare) som avger värme. Placera inga öppna
lågor, såsom tända ljus, på apparaten.
5. Försök inte kringgå säkerhetsfunktionen i en
polariserad eller jordad kontakt. En polariserad
kontakt har två stift, varav ett är bredare än det
andra (gäller endast USA och Kanada). En jordad
kontakt har två stift och en tredje jordningsstift.
Det breda stiftet eller det tredje stiftet är där för
din säkerhet. Om den medföljande kontakten inte
passar i ditt uttag, kontakta en elektriker för att
byta ut uttaget.
6. (Om tillämpligt) Skydda nätkabeln från att trampas
på eller klämmas, särskilt vid kontakter, eluttag och
utgångspunkten från apparaten.
7. Använd endast tillbehör och utrustning som
rekommenderas av tillverkaren.
8. Använd endast vagnar,
ställ, stativ, fästen eller
bord specicerade
av tillverkaren eller
sålda tillsammans
med apparaten
(om tillämpligt). Var
försiktig när du yttar
vagn/apparat-kombinationen för att undvika
skador från vältning.
9. Koppla ur apparaten vid åskväder eller om den inte
ska användas under en längre tid.
10. Överlåt all service till kvalicerad servicepersonal.
Service krävs när apparaten har skadats på något
sätt, till exempel om nätkabeln eller kontakten är
skadad, vätska har spillts eller föremål har fallit in i
apparaten, apparaten har utsatts för regn eller fukt,
inte fungerar normalt, eller har tappats.
11. (Om tillämpligt) Apparater med
skyddsjordningsterminal måste anslutas till ett
eluttag med skyddsjordning.
12. (Om tillämpligt) Om nätkontakten eller en
apparatkoppling används som frånkopplingsenhet,
ska frånkopplingsenheten vara lätt att använda.
13. Interna/externa spänningsväljare (om tillämpligt):
Interna eller externa spänningsväljare ska endast
återställas och utrustas med rätt kontakt eller
alternativ spänning av kvalicerad tekniker. Försök
inte ändra detta själv.
14. Klass II-ledningsdragning (om tillämpligt): För
att minska risken för elektrisk stöt, måste extern
ledningsdragning som ansluts till terminaler
märkta "Klass II" antingen installeras av en
kvalicerad person eller använda färdigmonterade
ledningar eller kablar.
15. Klass I-kablage (om tillämpligt): För att minska
risken för elektriska stötar kräver den externa
kablage som ansluts till terminaler märkta med
“Klass I-kablage” Klass I-kablage installerad av
en instruerad person eller användning av färdiga
ledningar eller kablar
16. Driftstemperaturområde: 5° till 45° C
(41° till 113° F).
FRISKRIVNINGSKLAUSUL
Informationen i denna Snabbstartsguide och den
medföljande manualen tillhandahålls endast som allmän
vägledning. Trots att alla ansträngningar har gjorts för att
säkerställa innehållets noggrannhet och tillförlitlighet
vid publiceringstillfället, gör Music Tribe Global Brands
Ltd. ("Music Tribe") inga utfästelser eller garantier,
vare sig uttryckliga eller underförstådda, angående
fullständigheten, riktigheten eller lämpligheten av den
information, beskrivningar, illustrationer eller tekniska
specikationer som nns häri.
Music Tribe tar inget ansvar för någon direkt, indirekt,
tillfällig eller följdskada som uppstår på grund av tillit
till informationen i detta dokument, inklusive men
inte begränsat till förlust av data, inkomst, vinst eller
aärsmöjligheter. Användningen av produkten är helt och
hållet användarens ansvar.
Produktens egenskaper, design, specikationer och
visuella representationer kan uppdateras eller ändras
utan föregående meddelande i syfte att ständigt förbättra
produkten.
Alla tredjepartsvarumärken som nämns i denna guide
tillhör sina respektive ägare. Midas, Klark Teknik,
Lab Gruppen, Lake, Tannoy, Turbosound, TC Electronic,
TC Helicon, Behringer, Bugera, Aston Microphones och
Coolaudio är varumärken eller registrerade varumärken
som tillhör Music Tribe Global Brands Ltd.
© 2025 Music Tribe Global Brands Ltd. Alla rättigheter
förbehållna. Ingen del av detta dokument får reproduceras,
överföras eller användas i någon form eller på något sätt
utan föregående skriftligt tillstånd från Music Tribe.
BEGRÄNSAD GARANTI
För de villkor, begränsningar och omfattning
som gäller för din produkt, inklusive täckning,
undantag och garantiperiodens längd, hänvisas till Music
Tribes fullständiga garanti policy, tillgänglig online
på: community.musictribe.com/support
Spara ditt inköpsbevis, eftersom det kan behövas
för garantiservice.
(JP) 安全上のご注意
本書の安全上の注意をよくお読みいただ
き、製品に表示されている警告シンボル
および関連する安全情報に十分ご注意く
ださい。
このシンボルが表示されている
端子には、感電の危険を引き起
こすのに十分な電流が流れてい
ます。事前に取り付けられた ¼" TS または
ツイストロック式プラグを備えた高品質な
プロフェッショナルスピーカーケーブルの
みを使用してください。その他の設置や改
造は、必ず資格を有する技術者によって行
ってください。
このシンボル が表示されている
場合、筐体内部に絶縁されてい
ない危険な電圧が存在して
おり、感電のリスクがあることを警告し
ています。
このシンボル が表示されている
場合、重要な操作およびメンテ
ナンスの指示があることを示し
ています。必ずマニュアル全文をお読みく
ださい。
注意
感電のリスクを減らすために、
トップカバー (またはリアパネ
ル) を取り外さないでください。内部には
ユーザーがサービスできる部品はありませ
ん。サービスは資格を有する技術者に依頼
してください。
注意
火災または感電のリスクを減ら
すために、本機器を雨や湿気に
さらさないでください。液体の滴下や飛
沫がかからないようにし、花瓶など液体
を含む物体を本機器の上に置かないでく
ださい。
注意
これらのサービスに関する指示
は、資格を有するサービス担当
者のみが使用することを目的としていま
す。感電のリスクを減らすため、取扱説明
書に記載されている操作以外のサービスは
行わないでください。修理は資格を有する
サービス担当者が行ってください。
警告
デバイスの設置または操作を行
う前に、筐体下部外側に表示さ
れている電気および安全情報をご参照く
ださい。
警告
聴覚損傷を防ぐために、高音
量で長時間聞き続けないでく
ださい。ボリューム設定の目安として、
ヘッドホンを着用中でも通常の声で自分の
声が聞こえることを確認してください。
1. 本書をよく読み、保管してください。
すべての警告に従い、指示を守ってく
ださい。
2. 本機器を水の近くで使用しないでくだ
さい (該当する場合)。乾いた布のみで
掃除してください。
3. 通気口をふさがないでください (該当
する場合)。密閉された空間には設置
しないでください。必ずメーカーの指
示に従って設置してください。
4. ラジエーター、ヒーター、ストーブ、
またはその他の熱を発生する機器 (ア
ンプを含む) の近くに設置しないでく
ださい。点灯中のろうそくなど、裸火
を機器の上に置かないでください。
5. 極性プラグまたは接地型プラグの安全
機能を無効にしないでください。極性
プラグは一方の刃がもう一方より広
くなっています (米国およびカナダの
み)。接地型プラグは二つの刃と第三
の接地ピンを備えています。広い刃ま
たは第三ピンは安全のためのもので
す。付属のプラグがコンセントに合わ
ない場合は、電気技師に依頼してコン
セントを交換してください。
6. (該当する場合) 電源コードを踏んだ
り挟んだりしないように特に注意し、
プラグ、コンセント、および機器か
らの出入口付近では特に注意してく
ださい。
7. メーカーが推奨する付属品やアクセサ
リーのみを使用してください。
8. メーカーが指定し
た、または本機器と
一緒に販売されたキ
ャスター、スタン
ド、三脚、ブラケッ
トまたはテーブルの
みを使用してください (該当する場合)
。キャスターを使用する場合は、機器
を移動する際に転倒による怪我を防ぐ
ため注意してください。
9. 雷雨時や長期間使用しない場合は、電
源プラグを抜いてください。
10. 全ての修理は資格を有するサービス担
当者に依頼してください。以下の場合
は修理が必要です: 電源コードまたは
プラグが損傷している、液体がこぼれ
た、物体が機器に落下した、機器が雨
や湿気にさらされた、正常に動作しな
い、または落下した場合。
11. (該当する場合) 保護接地端子を備えた
機器は、保護接地接続を備えた主電源
ソケットに接続する必要があります。
12. (該当する場合) 主電源プラグまたは機
器カプラーが切断装置として使用され
る場合、その装置は容易に操作可能な
状態にしておく必要があります。
13. 内部/外部電圧セレクター (該当する場
合): 内部または外部の電圧切り替えス
イッチがある場合は、資格を有する技
術者のみが正しいプラグまたは電圧で
設定し直してください。自分で変更し
ようとしないでください。
14. クラスII配線 (該当する場合): 感電のリ
スクを減らすため、"クラスII配線" と
マークされた端子に接続する外部配線
は、資格を有する者によって取り付け
るか、または既製のリード線またはコ
ードを使用してください。
15. クラス I 配線(該当する場合):感
電のリスクを低減するため、「クラ
ス I 配線」と表示された端子に接続さ
れる外部配線は、指示を受けた者に
よって設置されたクラス I 配線、また
は既製のリード線やコードの使用が必
要です。
16. 使用温度範囲: 5°~45° C (41°~113° F)。
法的放棄
本クイックスタートガイドおよび付属のマ
ニュアルに記載されている情報は、あくま
で一般的な参考情報として提供されていま
す。発行時点で内容の正確性と信頼性を
確保するために最大限の努力を払ってお
りますが、Music Tribe Global Brands Ltd. ("Music
Tribe") は、本書に記載されている情報、説
明、図解、技術仕様の完全性、正確性、ま
たは適合性について、明示的または黙示的
な保証を一切行いません。
Music Tribe は、本書の情報を信頼したこと
によるデータの損失、収益の損失、利益の
損失、または事業機会の喪失を含むがこれ
に限定されない、いかなる直接的、間接
的、付随的、または結果的な損害について
も責任を負いません。製品の使用は、使用
者自身の責任となります。
製品の機能、デザイン、仕様、およびビジ
ュアル表現は、継続的な製品改良のため、
予告なく更新または変更される場合があ
ります。
本ガイドに記載されているすべての第三
者商標は、それぞれの所有者に帰属し
ます。Midas、 Klark Teknik、 Lab Gruppen、 Lake、
Tannoy、 Turbosound、 TC Electronic、TC Helicon、
Behringer、 Bugera、 Aston Microphones、 および
Coolaudio は、Music Tribe Global Brands Ltd. の商
標または登録商標です。
© 2025 Music Tribe Global Brands Ltd. 無断転載
禁止。本書のいかなる部分も、Music Tribe
の事前の書面による許可なく、複製、
送信、または使用することはできません。
限定保証
お使いの製品に適用される保証の条件、範
囲、制限事項(補償内容、除外事項、保証
期間を含む)については、Music Tribe の完
全な限定保証ポリシーをご参照ください。
オンラインで以下のサイトからご確認いた
だけます: community.musictribe.com/support
保証サービスを受ける際に購入証明書が必
要となる場合がありますので、大切に保管
してください。
12 AIR LINK DW20BR User Manual 13 AIR LINK DW20BR User Manual
(CN)安全说明
请仔细阅读这些安全说明, 并特别注意产品
上显示的任何警告符号及本说明中的相关安
全信息。
产品输出端子带有此标志表示此
端子具有大电流, 存在触电危险。
仅限使用带有 1/4’ TS 或扭锁式插
头的高品质专业扬声器线。 与这些端子连接
的外部导线需要由经过指导的人员来安装和
使用厂家提供的导线或指定的导线。
此标志提醒您, 产品内存在未绝缘
的危险电压, 有触电危险。
此标志提醒您查阅所附的重要的
使用及维修说明。 请阅读有关
手册。
小心
为避免着火或触电危险, 请勿将此
产品置于雨淋或潮湿中。 此产品也
不可受液体滴溅, 盛有液体的容器也不可置
于其上, 如花瓶等。
小心
维修说明仅是给合格的专业维修
人员使用的。 为避免触电危险, 除
了使用说明书提到的以外, 请勿进行任何其
他维修。 所有维修均须由合格的专业人员进
行操作。
警告
为了防止可能的听力损伤,请勿长
时间以高音量收听。作为音量调节
的参考,请检查在正常说话时,您是否仍能听
到自己的声音。
1. 请阅读, 保存, 遵守所有的说明, 注意所
有的警示。
2. 请勿在靠近水的地方使用本产品。请用
干布清洁本产品。
3. 请勿堵塞通风孔, 安装本产品时请遵照
厂家的说明, 通风孔不要覆盖诸如报纸,
桌布和窗帘等物品而妨碍通风。
4. 请勿将本产品安装在热源附近, 如暖气
片, 炉子或其它产生热量的设备 (包括功
放器)。 产品上不要放置裸露的火焰源,
如点燃的蜡烛。
5. 如果产品附带接地插头, 请勿移除接地
插头的安全装置, 接地插头是由火线和
零线两个插片及一个接地插片构成。 如
随货提供的插头不适合您的插座, 请找
电工更换一个合适的插座。
6. 妥善保护电源线, 使其不被践踏或刺破,
尤其注意电源插头, 多用途插座接设备
连接处。
7. 请只使用厂家指定的附属设备和配件。
8. 请只使用厂家指定的
或随货销售的手推车,
架子, 三角架, 支架和
桌子等。 若使用手推
车来搬运设备, 请注
意安全放置设备, 以
避免手推车和设备倾
倒而受伤。
9. 遇闪电雷鸣或长期不使用本设备时,
请拔出电源插头。
10. 如果电源线或电源插头受损, 液体流入
或异物落入设备内, 设备遭雨淋或受潮,
设备不能正常运作或被摔坏等, 设备受
损需进行维修时, 所有维修均须由合格
的维修人员进行维修。
11. 如果产品附带接地插头, 本产品应当连
接到带保护接地连接的电网电源输出插
座上, 确保连接电源时一定有可靠的接
地保护。
12. 若电源插头或器具耦合器用作为断路
装置, 应当保证它们处于随时可方便操
作状态。
13. 本产品仅适合用
于海拔 2000 米以下和非热
带气候条件下的地区。
法律声明
本快速入门指南及随附手册中的信息仅供一
般参考。 尽管我们已尽最大努力确保内容在
发布时的准确性和可靠性, 但 Music Tribe Global
Brands Ltd. (“Music Tribe”) 不对本文件中包含的
信息、 描述、 插图或技术规格的完整性、 准
确性或适用性作出任何明示或暗示的陈述或
保证。
Music Tribe 不对因依赖本文件中的信息而导致
的任何直接、 间接、 附带或后果性损失或损害
承担任何责任, 包括但不限于数据丢失、 收入
损失、 利润损失或商业机会损失。 产品的使用
完全由用户自行承担责任。
产品功能、 设计、 规格和视觉呈现可能会在
不事先通知的情况下进行更新或修改, 以实
现产品的持续改进。
本指南中提及的所有第三方商标均为其各自
所有者的财产。 Midas、 Klark Teknik、 Lab Gruppen、
Lake、 Tannoy、 Turbosound、 TC Electronic、 TC Helicon、
Behringer、 Bugera、 Aston Microphones 和 Coolaudio
均为 Music Tribe Global Brands Ltd. 的商标或注
册商标。
© 2025 Music Tribe Global Brands Ltd. 保留所有权
利。 未经 Music Tribe 事先书面许可, 不得以任
何形式或任何方式复制、传输或使用本文件
的任何部分。
保修条款
有关您的产品适用的条款、条件和限制, 包括
保修范围、 排除项和有限保修期限, 请参阅
Music Tribe 的完整有限保修政策, 可在线访问:
community.musictribe.com/support
请妥善保管您的购买凭证, 因其可能在保修
服务时需要提供。
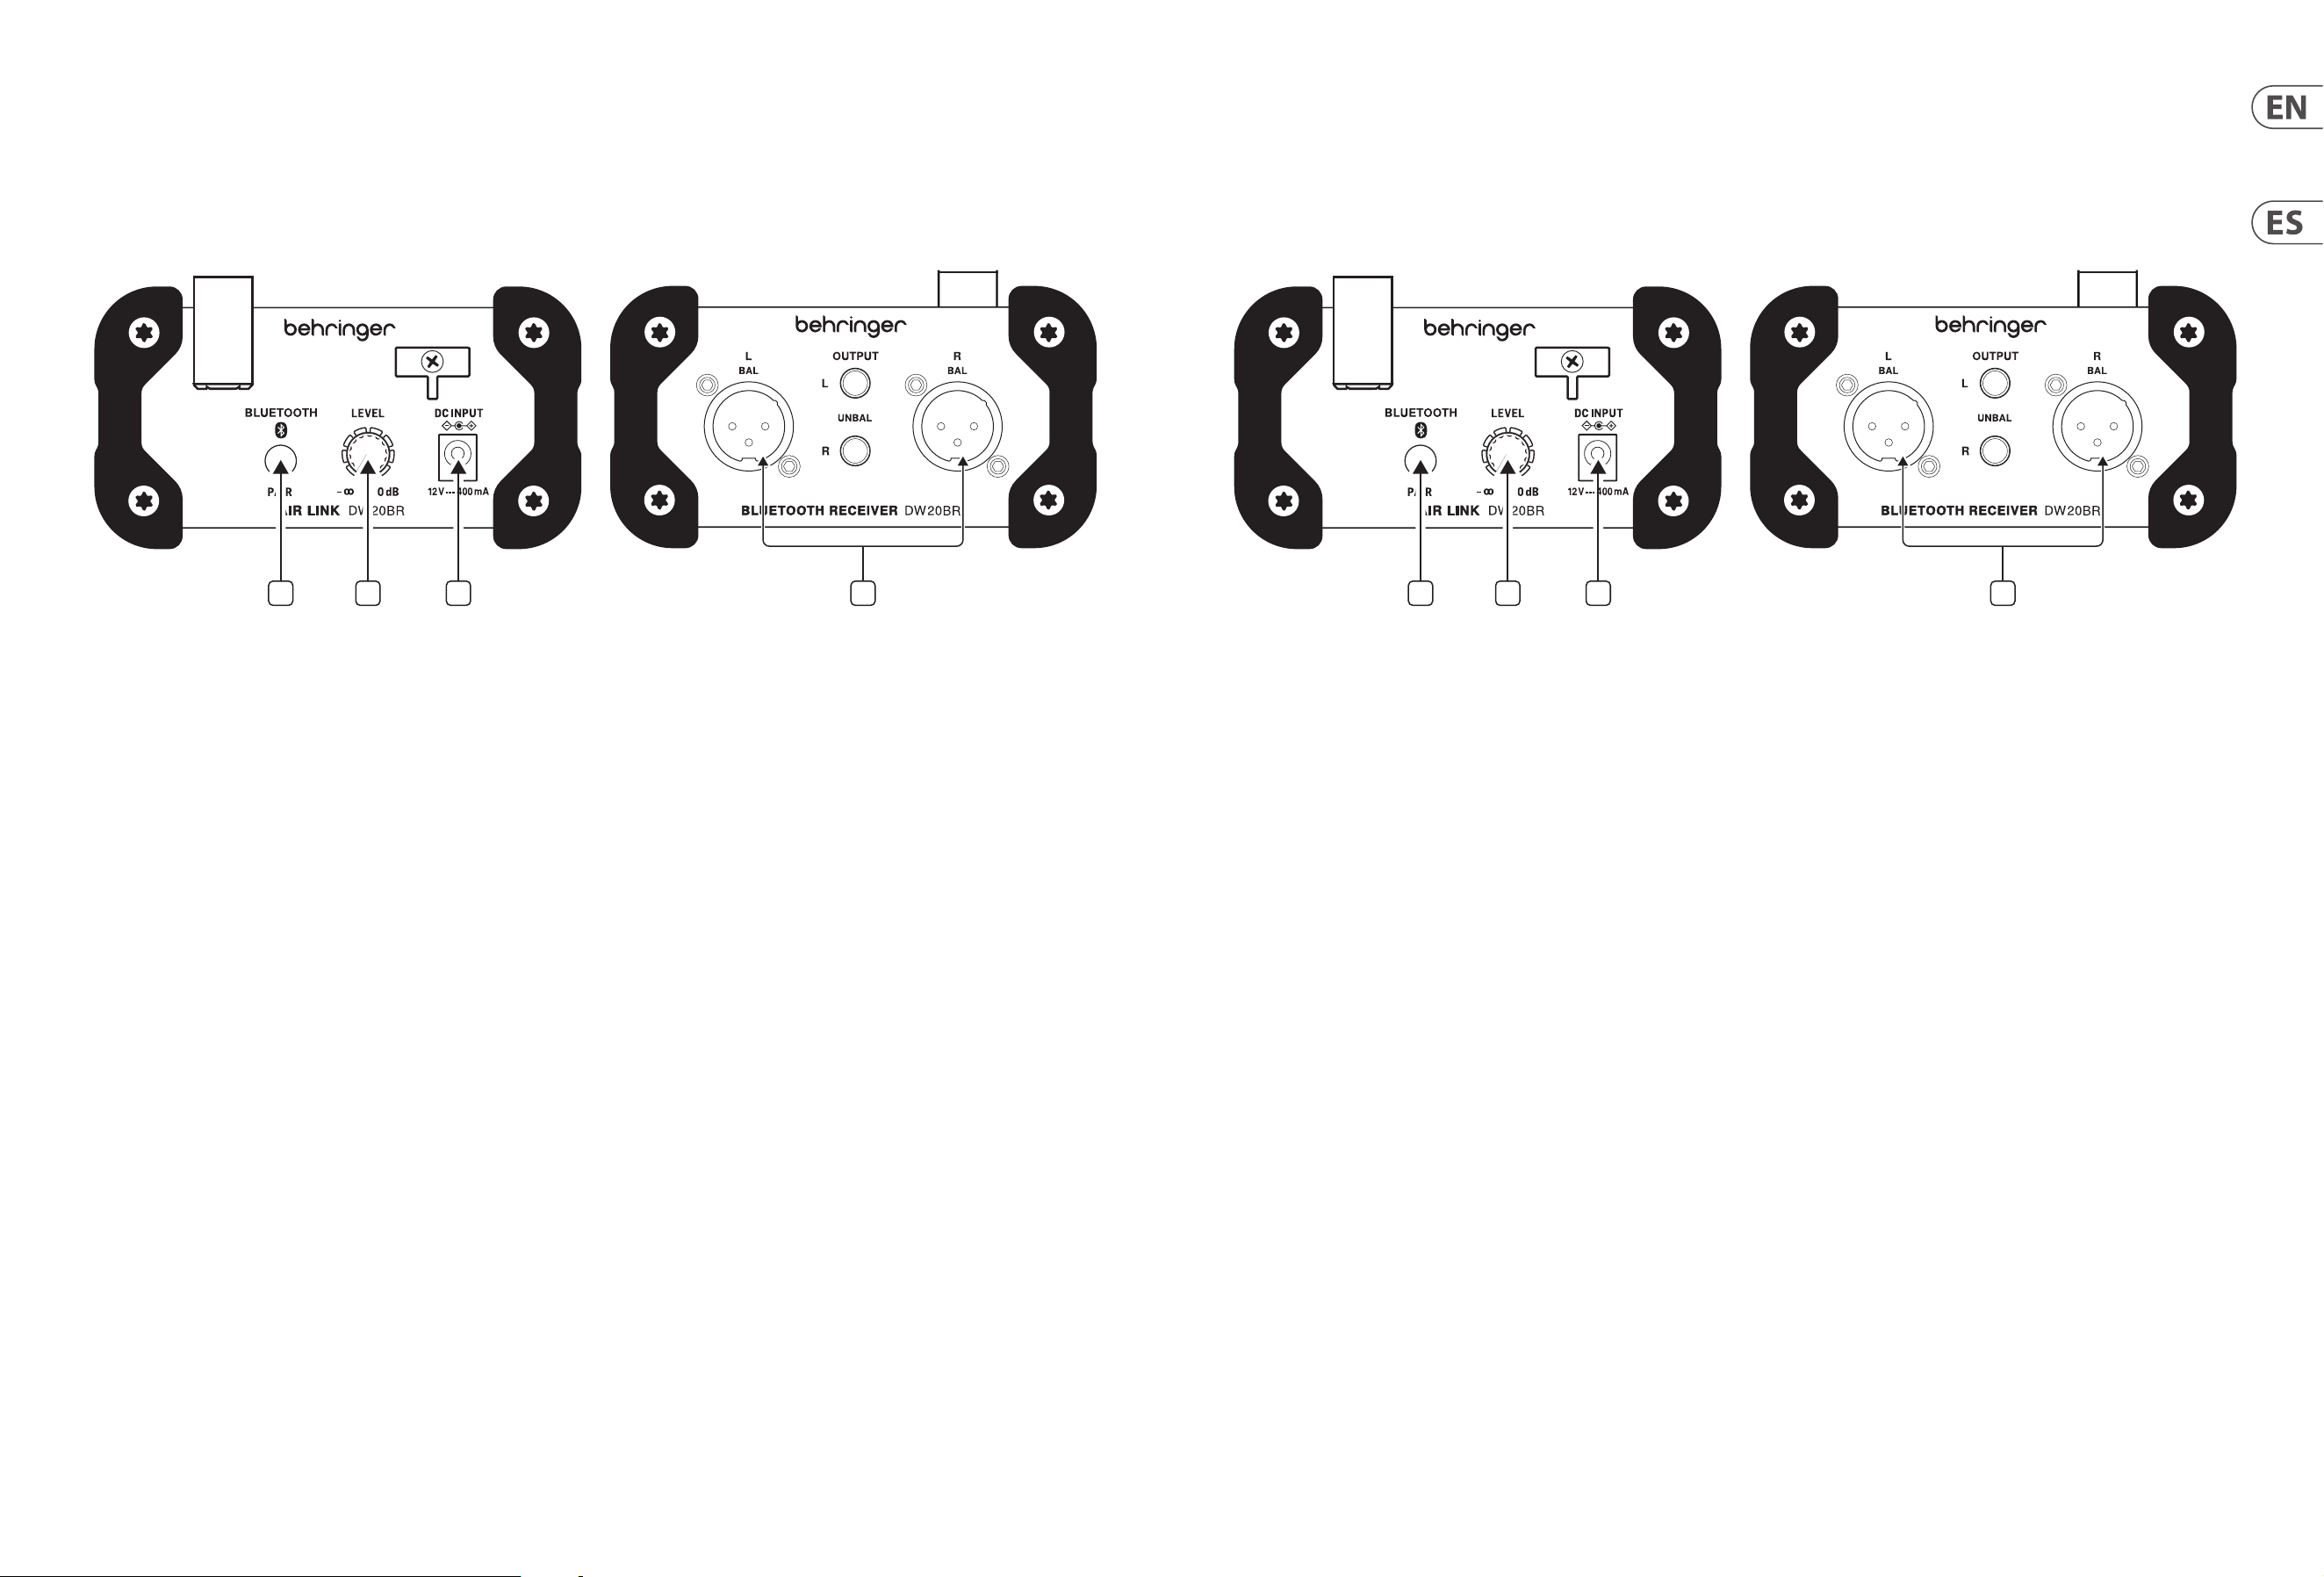
14 AIR LINK DW20BR User Manual 15 AIR LINK DW20BR User Manual
(EN)
Step 1: Controls
AIR LINK DW20BR Controls
1. PAIR button – enables the unit to become available for pairing by pressing
and holding the button for 5 seconds. The LED ring will indicate the
current status. See the Getting Started section for details.
2. LEVEL knob – adjusts the volume of the signal sent to the output jacks.
3. DC INPUT – accepts the included power adapter.
4. OUTPUTS – connect to an amp, powered speakers, or mixer via balanced XLR
or unbalanced ¼" TS cables.
Step 2: Getting started
1. Connect the DW20BR to a mixer or speaker system with either XLR
or ¼" cables. Keep the volume on the speaker or mixer channel turned all
the way down to avoid popping noises. Do not connect the power cable yet.
2. On your smartphone or tablet, activate Bluetooth and scan for available devices.
3. Connect the power adapter to the DW20BR and to a power outlet.
The unit will turn on automatically and try to pair with the most recently
connected device.
4. To connect a new device, press and hold the PAIR button for 5 seconds.
The LED ring will ash quickly to indicate that it is ready to pair.
5. Select the DW20BR from the list of available items in the Bluetooth settings
menu of your Bluetooth device. The DW20BR LED will light solid with no
ashing to indicate successful connection.
Note - disable cellular reception when streaming audio from a cell phone.
6. Start playing audio from your Bluetooth device. Adjust the volume on the
Bluetooth device, then turn up the LEVEL knob so that the speaker or mixer
receives a strong signal.
7. Turn up the volume on your speaker, mixer, amps, etc. until you reach the
desired listening level.
Connection Notes:
• If your Bluetooth audio device is compatible, Play/Pause can be toggled with
a short press of the PAIR button on the DW20BR while the Bluetooth stream
is active.
• Audio cannot stream from a single Bluetooth device to multiple DW20BR
units simultaneously.
• If you have already connected to one DW20BR unit and want to switch to
another unit, follow these steps:
• On an Android device, delete the rst unit from the Bluetooth device
list, then perform a new search/pair as described above.
• On an iOS device, it is possible for 2 units to appear connected in the
Bluetooth settings menu. In this case, you can select which unit will
receive audio via the music application's settings. Both units will have
the name “Behringer DW20BR”.
1 2 3 4
(ES)
Paso 1: Controles
AIR LINK DW20BR Controles
1. PAIR button – permite que la unidad esté disponible para emparejar
presionando y manteniendo presionado el botón durante 5 segundos.
El anillo LED indicará el estado actual. Consulte la sección Introducción para
obtener más detalles.
2. LEVEL knob – ajusta el volumen de la señal enviada a las tomas de salida.
3. DC INPUT – acepta el adaptador de corriente incluido.
4. OUTPUTS – conéctelo a un amplicador, altavoces autoamplicados o
mezclador mediante cables XLR balanceados o TS de ¼" no balanceados.
Paso 2: Puesta en marcha
1. Conecte el DW20BR a un mezclador o sistema de altavoces con cables XLR o
de ¼". Mantenga el volumen del altavoz o del canal del mezclador al mínimo
para evitar ruidos de estallido. No conecte el cable de alimentación todavía.
2. En su teléfono inteligente o tableta, active Bluetooth y busque los
dispositivos disponibles.
3. Conecte el adaptador de corriente al DW20BR y a una toma de corriente.
La unidad se encenderá automáticamente e intentará emparejarse con el
dispositivo conectado más recientemente.
4. Para conectar un nuevo dispositivo, mantenga presionado el botón
EMPAREJAR durante 5 segundos. El anillo LED parpadeará rápidamente para
indicar que está listo para emparejarse.
5. Seleccione el DW20BR de la lista de elementos disponibles en el menú de
conguración de Bluetooth de su dispositivo Bluetooth. El LED DW20BR se
iluminará sin parpadear para indicar una conexión exitosa.
Nota - Desactive la recepción celular cuando transmita audio desde un
teléfono celular.
6. Comience a reproducir audio desde su dispositivo Bluetooth. Ajuste el
volumen en el dispositivo Bluetooth, luego suba la perilla LEVEL para que el
altavoz o el mezclador reciba una señal fuerte.
7. Suba el volumen de su altavoz, mezclador, amplicadores, etc. hasta que
alcance el nivel de audición deseado.
Notas de conexión:
• Si su dispositivo de audio Bluetooth es compatible, la reproducción / pausa se
puede alternar presionando brevemente el botón PAIR en el DW20BR mientras
la transmisión Bluetooth está activa.
• El audio no puede transmitirse desde un solo dispositivo Bluetooth a varias
unidades DW20BR simultáneamente.
• Si ya se ha conectado a una unidad DW20BR y desea cambiar a otra unidad,
siga estos pasos:
• En un dispositivo Android, elimine la primera unidad de la lista
de dispositivos Bluetooth, luego realice una nueva búsqueda /
emparejamiento como se describe arriba.
• En un dispositivo iOS, es posible que aparezcan 2 unidades conectadas
en el menú de conguración de Bluetooth. En este caso, puede
seleccionar qué unidad recibirá audio a través de la conguración
de la aplicación de música. Ambas unidades tendrán el nombre
“Behringer DW20BR”.
1 2 3 4
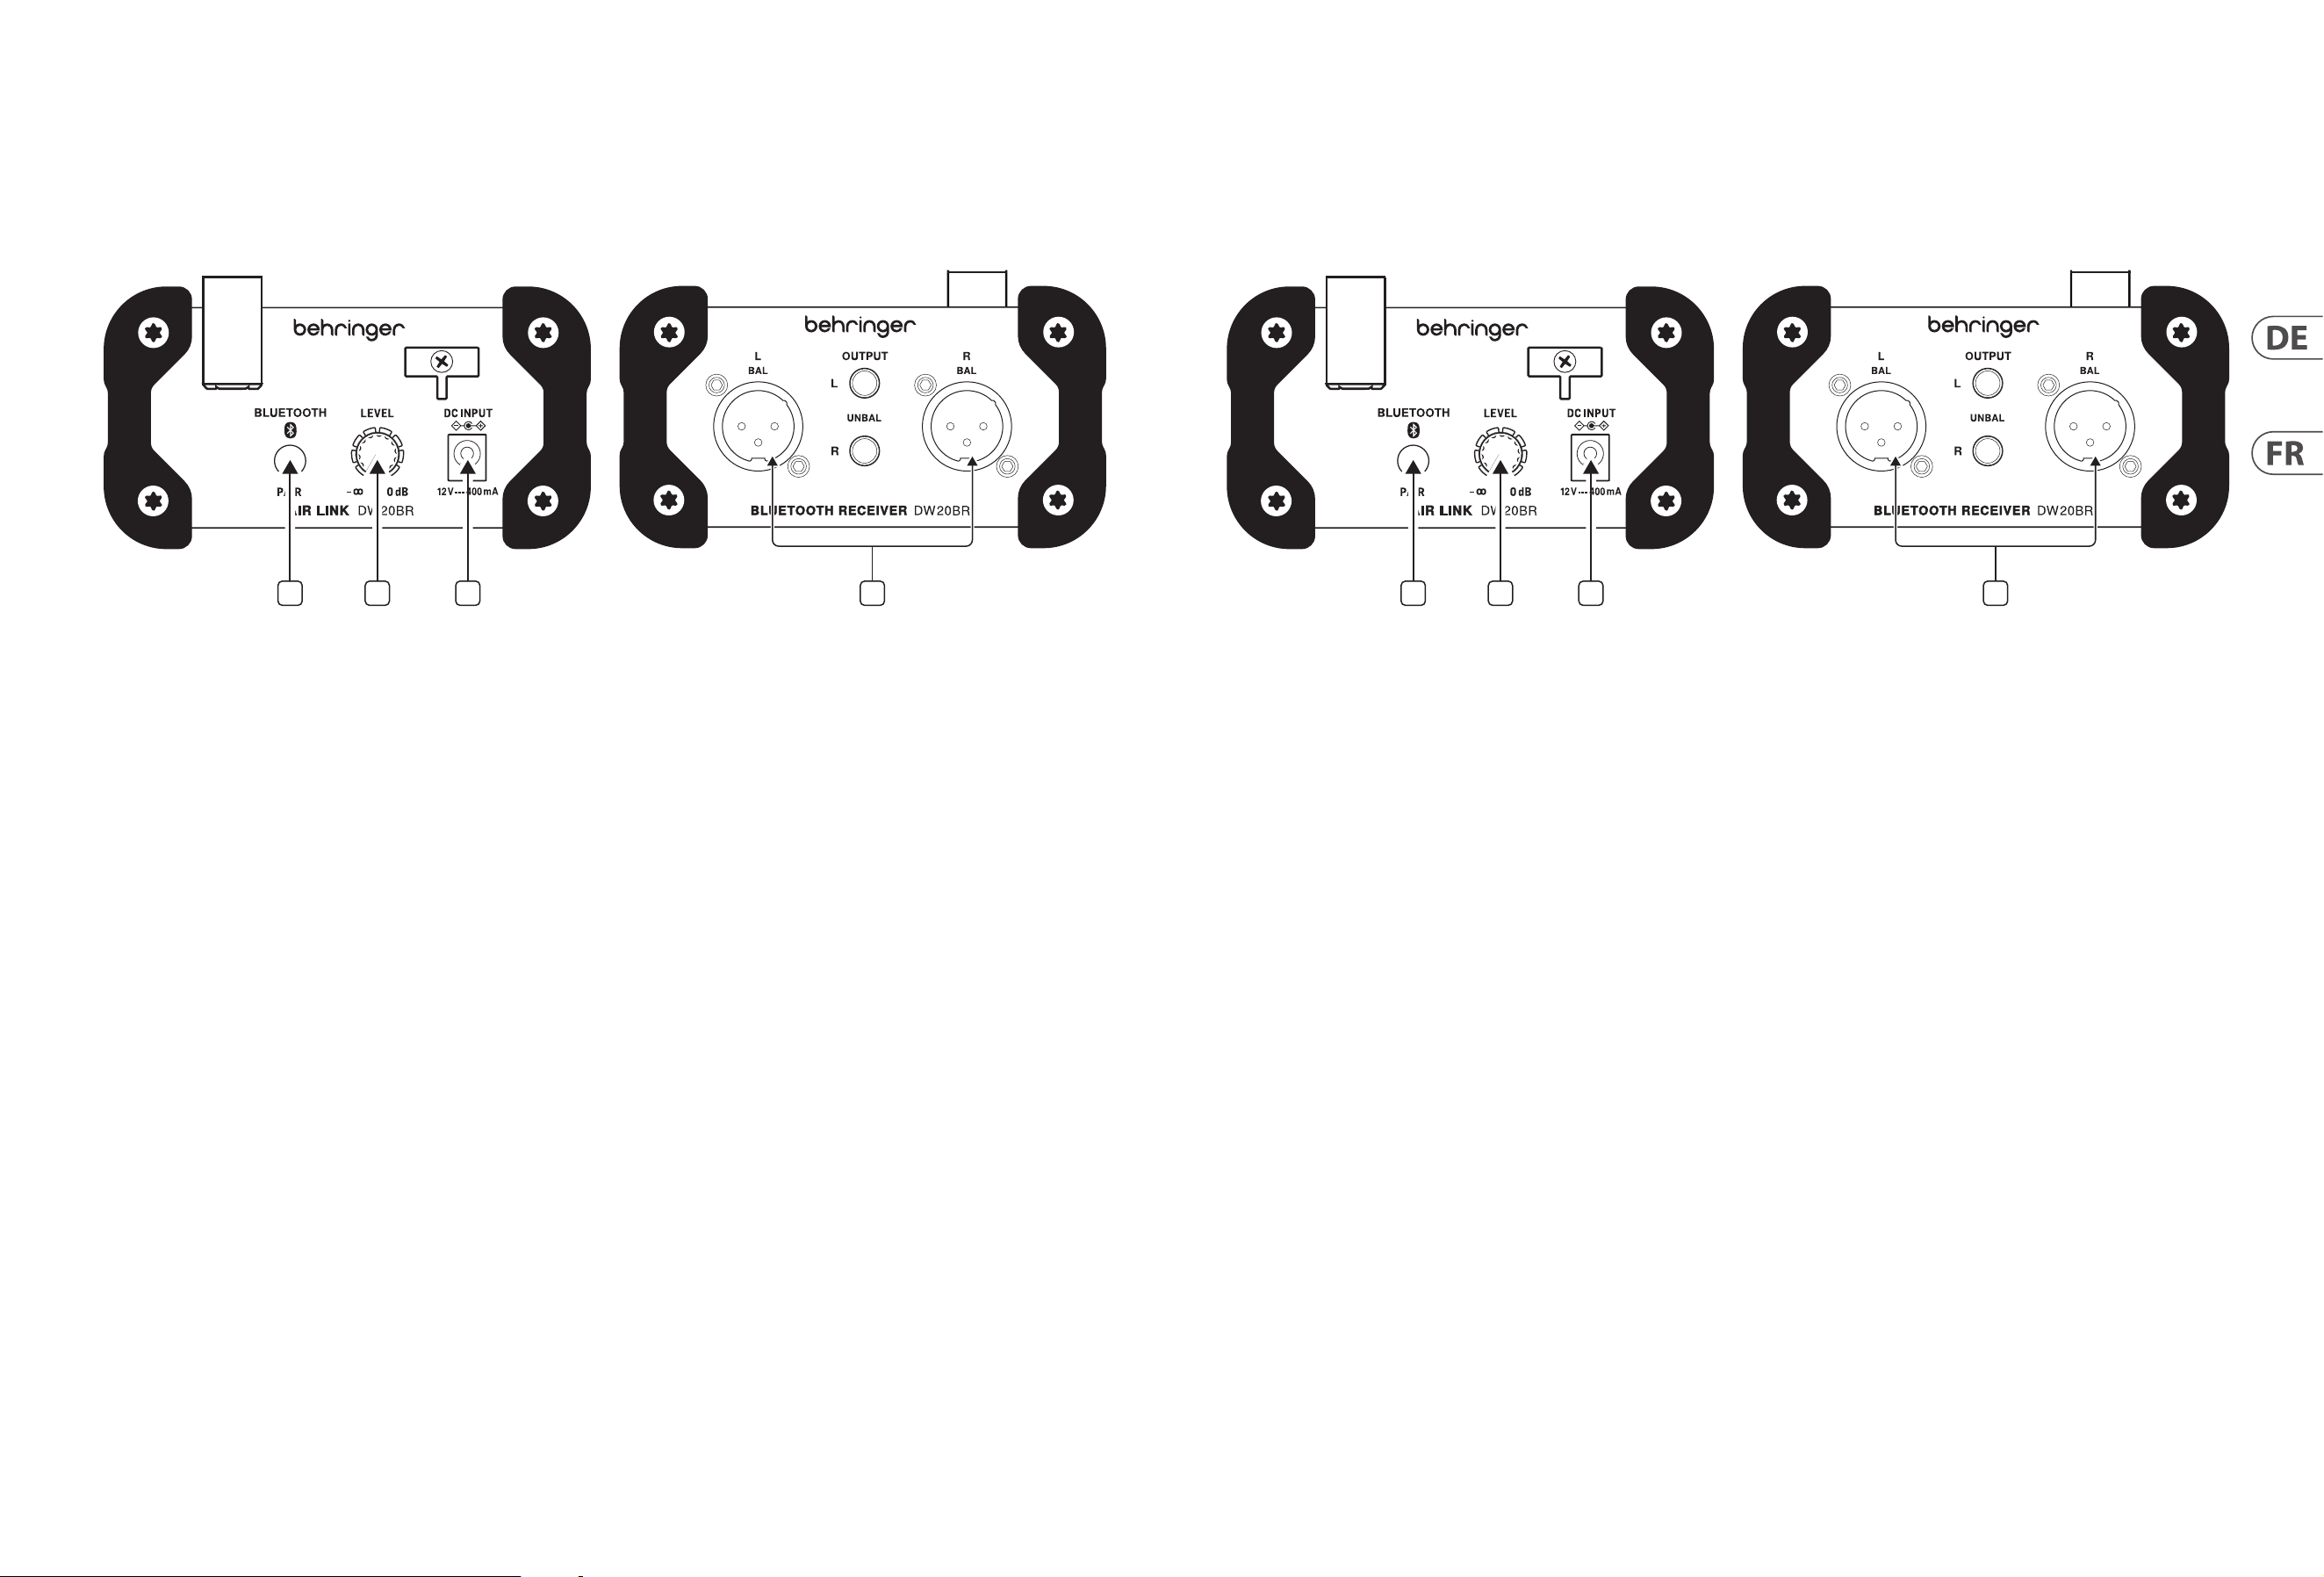
16 AIR LINK DW20BR User Manual 17 AIR LINK DW20BR User Manual
1. PAIR button - Ermöglicht die Kopplung des Geräts, indem die Taste
5 Sekunden lang gedrückt gehalten wird. Der LED-Ring zeigt den aktuellen
Status an. Weitere Informationen nden Sie im Abschnitt Erste Schritte.
2. LEVEL knob - Stellt die Lautstärke des an die Ausgangsbuchsen gesendeten
Signals ein.
3. DC INPUT - akzeptiert das mitgelieferte Netzteil.
4. OUTPUTS - Über symmetrische XLR- oder unsymmetrische ¼" TS-Kabel
an einen Verstärker, Aktivlautsprecher oder Mixer anschließen.
Schritt 2: Erste Schritte
1. Schließen Sie den DW20BR mit XLR- oder ¼"-Kabeln an ein Mischpult- oder
Lautsprechersystem an. Halten Sie die Lautstärke am Lautsprecher- oder
Mischerkanal ganz herunter, um Knallgeräusche zu vermeiden. Schließen Sie
das Netzkabel noch nicht an.
2. Aktivieren Sie auf Ihrem Smartphone oder Tablet Bluetooth und suchen Sie
nach verfügbaren Geräten.
3. Schließen Sie das Netzteil an den DW20BR und an eine Steckdose an. Das
Gerät schaltet sich automatisch ein und versucht, eine Verbindung mit dem
zuletzt angeschlossenen Gerät herzustellen.
4. Um ein neues Gerät anzuschließen, halten Sie die PAIR-Taste 5 Sekunden lang
gedrückt. Der LED-Ring blinkt schnell, um anzuzeigen, dass er zum Koppeln
bereit ist.
5. Wählen Sie den DW20BR aus der Liste der verfügbaren Elemente im Bluetooth-
Einstellungsmenü Ihres Bluetooth-Geräts aus. Die DW20BR-LED leuchtet
dauerhaft und blinkt nicht, um eine erfolgreiche Verbindung anzuzeigen.
Hinweis - Deaktivieren Sie den Mobilfunkempfang, wenn Sie Audio von einem
Mobiltelefon streamen.
6. Starten Sie die Audiowiedergabe von Ihrem Bluetooth-Gerät. Stellen Sie die
Lautstärke am Bluetooth-Gerät ein und drehen Sie dann den LEVEL-Regler so,
dass der Lautsprecher oder das Mischpult ein starkes Signal empfängt.
7. Erhöhen Sie die Lautstärke Ihres Lautsprechers, Mischpults, Verstärkers usw.,
bis Sie den gewünschten Hörpegel erreicht haben.
Verbindungshinweise:
• Wenn Ihr Bluetooth-Audiogerät kompatibel ist, kann Wiedergabe /
Pause durch kurzes Drücken der PAIR-Taste am DW20BR umgeschaltet werden,
während der Bluetooth-Stream aktiv ist.
• Audio kann nicht gleichzeitig von einem einzelnen Bluetooth-Gerät auf
mehrere DW20BR-Geräte gestreamt werden.
• Wenn Sie bereits eine Verbindung zu einer DW20BR-Einheit hergestellt haben
und zu einer anderen Einheit wechseln möchten, gehen Sie folgendermaßen vor:
• Löschen Sie auf einem Android-Gerät das erste Gerät aus der
Bluetooth-Geräteliste und führen Sie dann wie oben beschrieben eine
neue Suche / ein neues Paar durch.
• Auf einem iOS-Gerät können 2 Geräte im Bluetooth-Einstellungsmenü
verbunden angezeigt werden. In diesem Fall können Sie über die
Einstellungen der Musikanwendung auswählen, welches Gerät Audio
empfangen soll. Beide Einheiten tragen den Namen „Behringer DW20BR“.
(DE)
Schritt 1: Bedienelemente
AIR LINK DW20BR Bedienelemente
1 2 3 4
(FR)
Etape 1: Réglages
AIR LINK DW20BR Réglages
1. PAIR button - permet à l’appareil de devenir disponible pour l’appairage en
appuyant sur le bouton et en le maintenant enfoncé pendant
5 secondes. L’anneau LED indiquera l’état actuel. Consultez la section Mise en
route pour plus de détails.
2. LEVEL knob - règle le volume du signal envoyé aux prises de sortie.
3. DC INPUT - accepte l’adaptateur secteur inclus.
4. OUTPUTS - se connecter à un ampli, des enceintes ampliées ou une table de
mixage via des câbles XLR symétriques ou TS asymétriques ¼".
Etape 2: Mise en oeuvre
1. Connectez le DW20BR à une table de mixage ou à un système de
haut-parleurs avec des câbles XLR ou ¼". Gardez le volume du haut-parleur
ou du canal de la table de mixage au minimum pour éviter les bruits
de claquement. Ne connectez pas encore le câble d’alimentation.
2. Sur votre smartphone ou tablette, activez Bluetooth et recherchez les
appareils disponibles.
3. Connectez l’adaptateur secteur au DW20BR et à une prise de courant.
L’unité s’allumera automatiquement et essaiera de se coupler avec le dernier
appareil connecté.
4. Pour connecter un nouvel appareil, maintenez le bouton PAIR enfoncé
pendant 5 secondes. L’anneau LED clignotera rapidement pour indiquer qu’il
est prêt à être couplé.
5. Sélectionnez le DW20BR dans la liste des éléments disponibles dans le menu
des paramètres Bluetooth de votre appareil Bluetooth. La LED DW20BR
s’allumera en continu sans clignoter pour indiquer que la connexion a réussi.
Remarque - désactiver la réception cellulaire lors de la diusion audio à partir
d’un téléphone portable.
6. Démarrez la lecture audio à partir de votre appareil Bluetooth. Réglez le
volume sur le périphérique Bluetooth, puis montez le bouton LEVEL pour que
le haut-parleur ou la table de mixage reçoive un signal fort.
7. Augmentez le volume de votre haut-parleur, mixeur, amplis, etc. jusqu’à ce
que vous atteigniez le niveau d’écoute souhaité.
Notes de connexion:
• Si votre appareil audio Bluetooth est compatible, Play / Pause peut être
basculé en appuyant brièvement sur le bouton PAIR du DW20BR pendant que
le ux Bluetooth est actif.
• L’audio ne peut pas être diusé d’un seul périphérique Bluetooth vers
plusieurs unités DW20BR simultanément.
• Si vous êtes déjà connecté à une unité DW20BR et que vous souhaitez passer à
une autre unité, procédez comme suit:
• Sur un appareil Android, supprimez le premier appareil de la liste
des appareils Bluetooth, puis eectuez une nouvelle recherche /
paire comme décrit ci-dessus.
• Sur un appareil iOS, il est possible que 2 unités apparaissent
connectées dans le menu des paramètres Bluetooth. Dans ce cas,
vous pouvez sélectionner l’unité qui recevra l’audio via les paramètres
de l’application musicale. Les deux unités porteront le nom
«Behringer DW20BR».
1 2 3 4
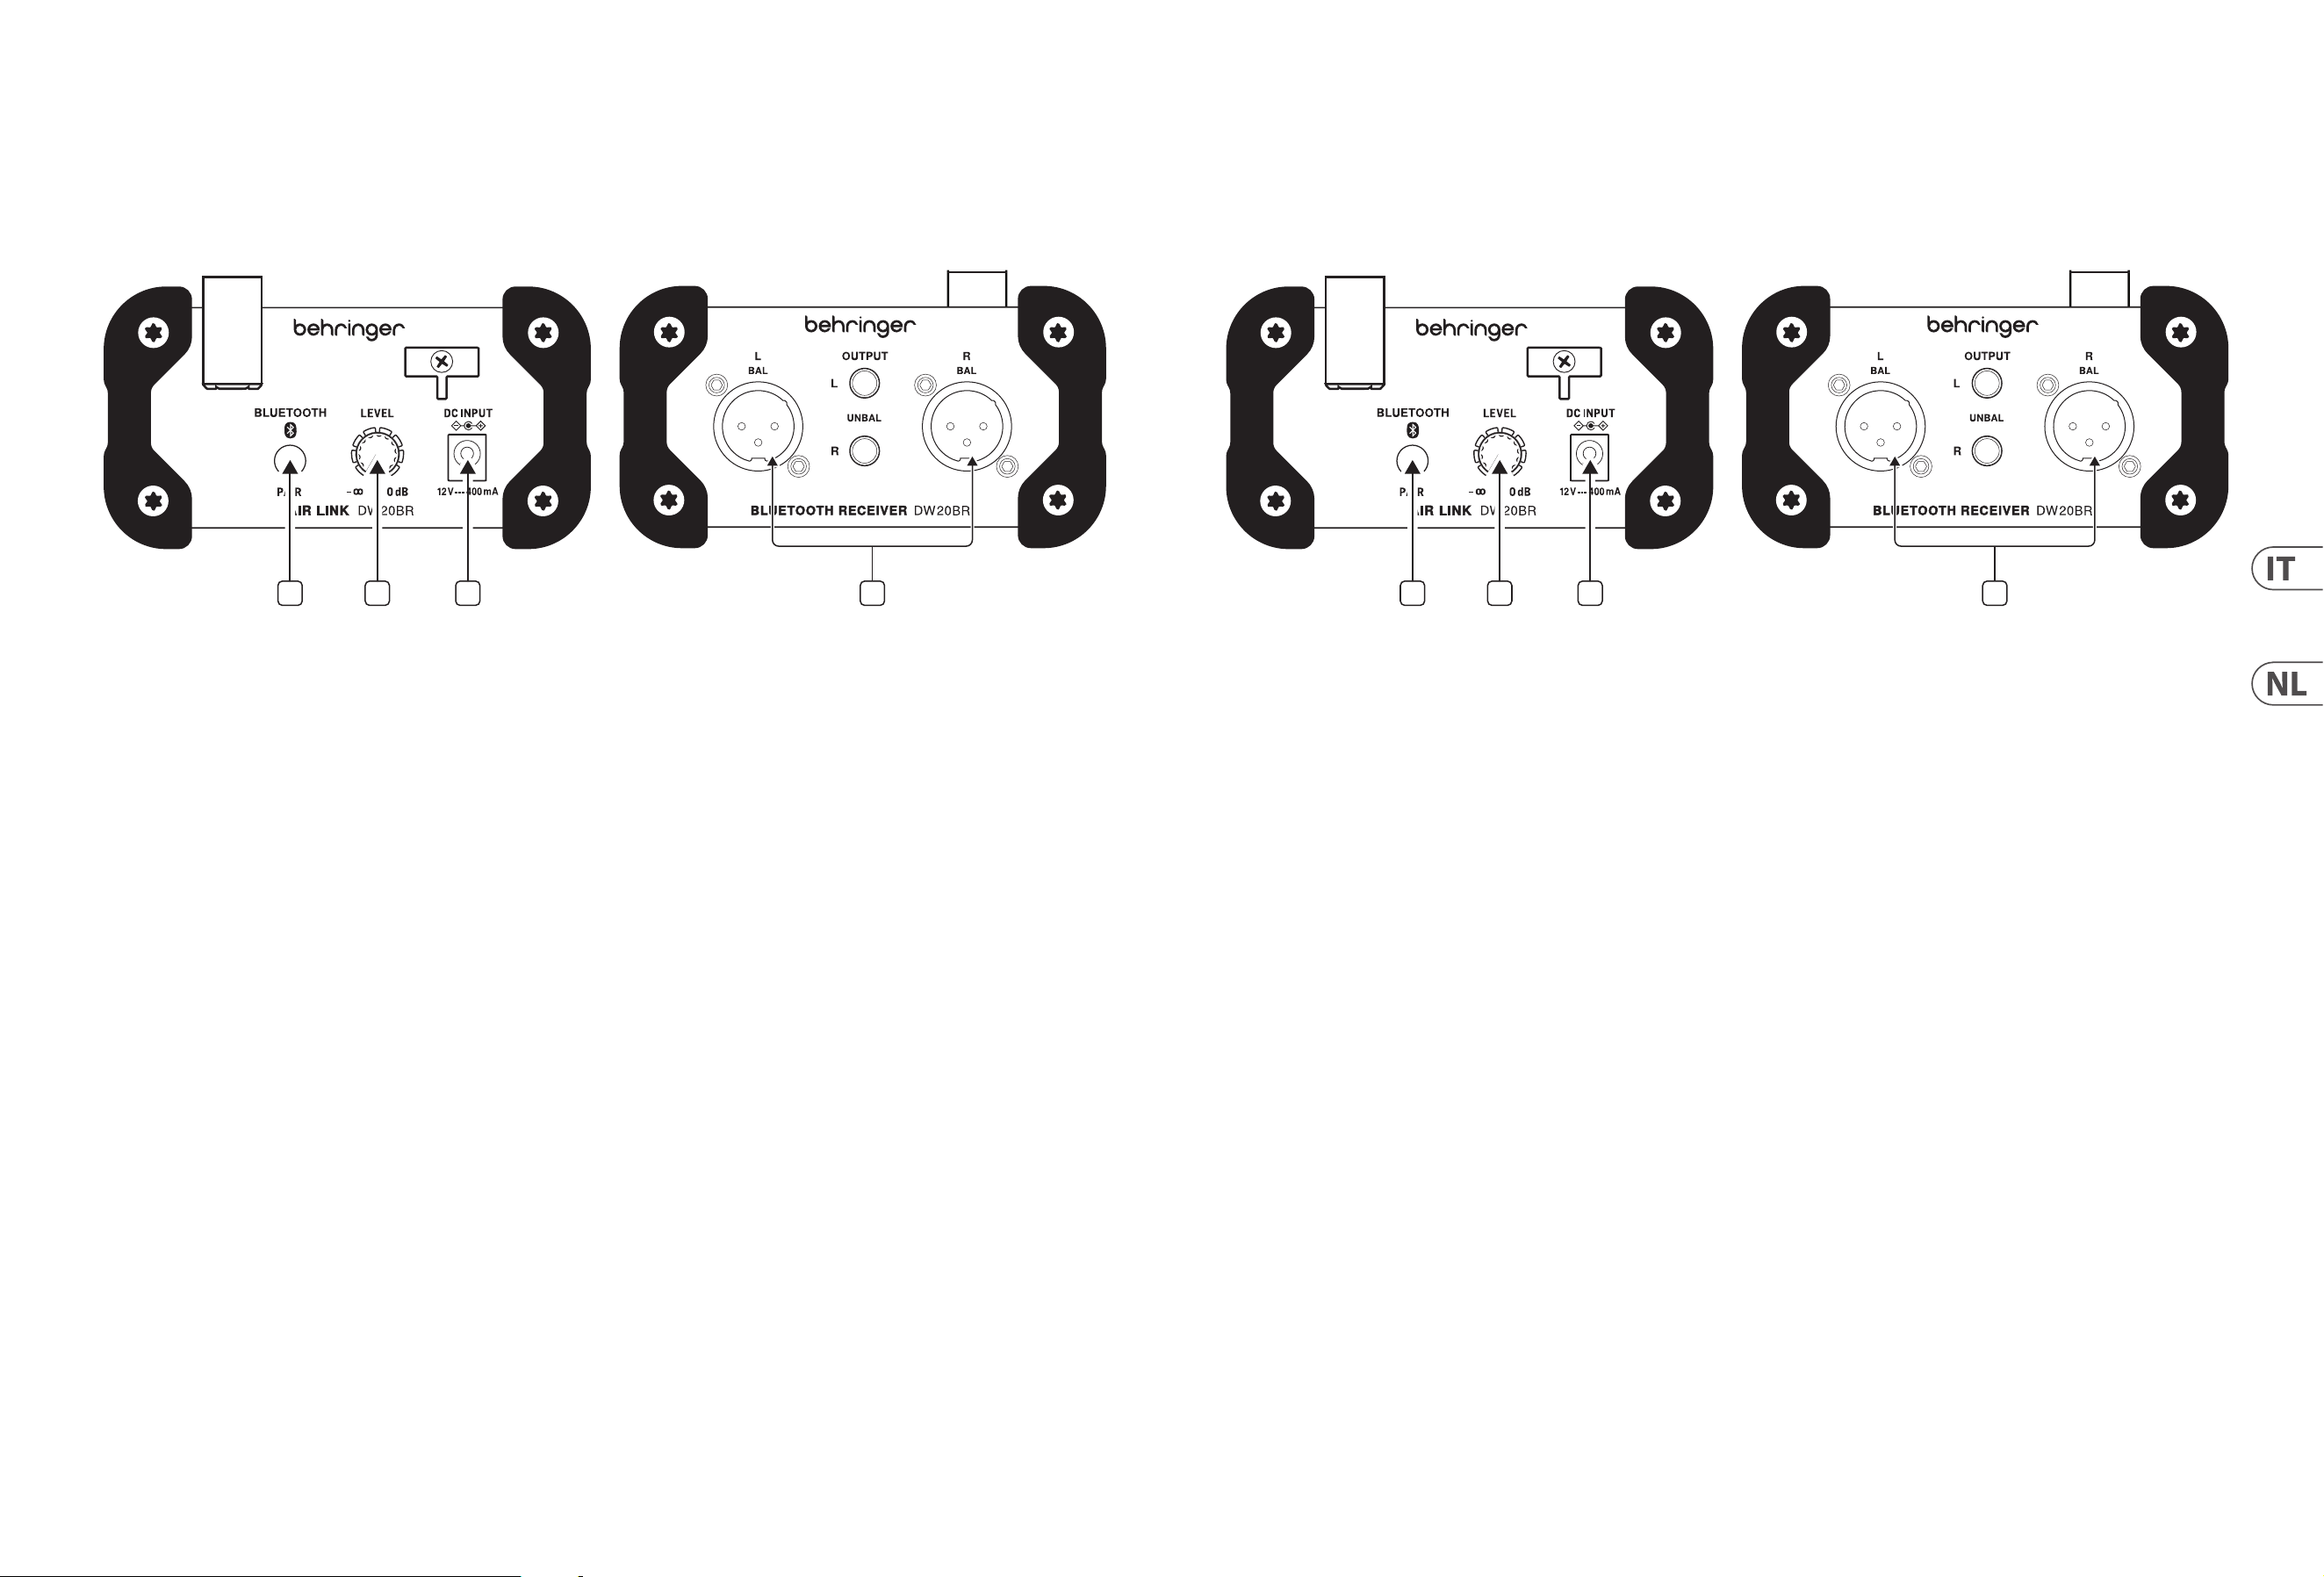
18 AIR LINK DW20BR User Manual 19 AIR LINK DW20BR User Manual
1. PAIR button - consente all’unità di rendersi disponibile per l’associazione
premendo e tenendo premuto il pulsante per 5 secondi. L’anello LED indicherà
lo stato corrente. Vedere la sezione Guida introduttiva per i dettagli.
2. LEVEL knob - regola il volume del segnale inviato ai jack di uscita.
3. DC INPUT - accetta l’adattatore di alimentazione incluso.
4. OUTPUTS - collegare a un amplicatore, altoparlanti amplicati o mixer
tramite cavi XLR bilanciati o cavi TS da ¼" non bilanciati.
Passo 2: Iniziare
1. Collegare il DW20BR a un mixer o un sistema di altoparlanti con cavi XLR o ¼".
Tenere il volume dell’altoparlante o del canale del mixer completamente
abbassato per evitare rumori di scoppio. Non collegare ancora il cavo
di alimentazione.
2. Sul tuo smartphone o tablet, attiva il Bluetooth e cerca i dispositivi disponibili.
3. Collegare l’adattatore di alimentazione al DW20BR e a una presa di corrente.
L’unità si accenderà automaticamente e proverà ad accoppiarsi con il
dispositivo connesso più di recente.
4. Per connettere un nuovo dispositivo, tieni premuto il pulsante PAIR per
5 secondi. L’anello LED lampeggerà rapidamente per indicare che è pronto
per l’accoppiamento.
5. Seleziona il DW20BR dall’elenco degli elementi disponibili nel menu delle
impostazioni Bluetooth del tuo dispositivo Bluetooth. Il LED DW20BR si
accenderà in modo sso senza lampeggiare per indicare la connessione riuscita.
Nota - disabilitare la ricezione cellulare durante lo streaming audio da un
telefono cellulare.
6. Inizia a riprodurre l’audio dal tuo dispositivo Bluetooth. Regolare il volume
sul dispositivo Bluetooth, quindi alzare la manopola LEVEL in modo che
l’altoparlante o il mixer riceva un segnale forte.
7. Alza il volume dell’altoparlante, del mixer, degli amplicatori, ecc. Fino a
raggiungere il livello di ascolto desiderato.
Note di connessione:
• Se il tuo dispositivo audio Bluetooth è compatibile, Play / Pause può essere
attivato o disattivato con una breve pressione del pulsante PAIR sul DW20BR
mentre lo streaming Bluetooth è attivo.
• L’audio non può essere trasmesso da un singolo dispositivo Bluetooth a più
unità DW20BR contemporaneamente.
• Se sei già connesso a un’unità DW20BR e desideri passare a un’altra unità,
segui questi passaggi:
• Su un dispositivo Android, elimina la prima unità dall’elenco dei
dispositivi Bluetooth, quindi esegui una nuova ricerca / accoppiamento
come descritto sopra.
• Su un dispositivo iOS, è possibile che 2 unità appaiano connesse
nel menu delle impostazioni Bluetooth. In questo caso, è possibile
selezionare quale unità riceverà l’audio tramite le impostazioni
dell'applicazione musicale. Entrambe le unità avranno il nome
“Behringer DW20BR”.
(IT)
Passo 1: Controlli
AIR LINK DW20BR Controlli
1 2 3 4
(NL)
Stap 1: Bediening
AIR LINK DW20BR Bediening
1. PAIR button - stelt het apparaat in staat om te koppelen door de knop
5 seconden ingedrukt te houden. De LED-ring geeft de huidige status aan.
Zie het gedeelte Aan de slag voor details.
2. LEVEL knob - past het volume aan van het signaal dat naar de uitgangsjacks
wordt gestuurd.
3. DC INPUT - accepteert de meegeleverde voedingsadapter.
4. OUTPUTS - aansluiten op een versterker, luidsprekers met eigen voeding of
mixer via gebalanceerde XLR of ongebalanceerde ¼" TS-kabels.
Stap 2: Aan de slag
1. Sluit de DW20BR aan op een mixer of luidsprekersysteem met XLR- of
¼"-kabels. Houd het volume op de luidspreker of het mixerkanaal helemaal
laag gedraaid om ploende geluiden te voorkomen. Sluit de voedingskabel
nog niet aan.
2. Activeer Bluetooth op uw smartphone of tablet en scan naar beschikbare apparaten.
3. Sluit de voedingsadapter aan op de DW20BR en op een stopcontact.
Het apparaat wordt automatisch ingeschakeld en probeert te koppelen met
het meest recent verbonden apparaat.
4. Om een nieuw apparaat te verbinden, houdt u de PAIR-knop gedurende
5 seconden ingedrukt. De LED-ring knippert snel om aan te geven dat hij klaar
is om te koppelen.
5. Selecteer de DW20BR uit de lijst met beschikbare items in het Bluetooth-
instellingenmenu van uw Bluetooth-apparaat. De DW20BR-LED zal continu
oplichten zonder te knipperen om een succesvolle verbinding aan te geven.
Notitie - schakel mobiele ontvangst uit bij het streamen van audio vanaf een
mobiele telefoon.
6. Begin met het afspelen van audio vanaf uw Bluetooth-apparaat. Pas het
volume op het Bluetooth-apparaat aan en draai vervolgens de LEVEL-knop
omhoog zodat de luidspreker of mixer een sterk signaal ontvangt.
7. Draai het volume op uw luidspreker, mixer, versterkers, enz. Omhoog totdat u
het gewenste luisterniveau bereikt.
Aansluitingen:
• Als uw Bluetooth-audioapparaat compatibel is, kan Play / Pause worden
omgeschakeld door kort op de PAIR-knop op de DW20BR te drukken terwijl de
Bluetooth-stream actief is.
• Audio kan niet van een enkel Bluetooth-apparaat naar meerdere DW20BR-
apparaten tegelijk worden gestreamd.
• Als u al verbinding heeft gemaakt met een DW20BR-unit en u wilt
overschakelen naar een andere unit, volgt u deze stappen:
• Verwijder op een Android-apparaat de eerste eenheid uit de lijst met
Bluetooth-apparaten en voer vervolgens een nieuwe zoekopdracht /
koppeling uit zoals hierboven beschreven.
• Op een iOS-apparaat is het mogelijk dat 2 apparaten verbonden worden
weergegeven in het Bluetooth-instellingenmenu. In dit geval kunt
u selecteren welk toestel audio ontvangt via de instellingen van
de muziekapplicatie. Beide units krijgen de naam “Behringer DW20BR”.
1 2 3 4
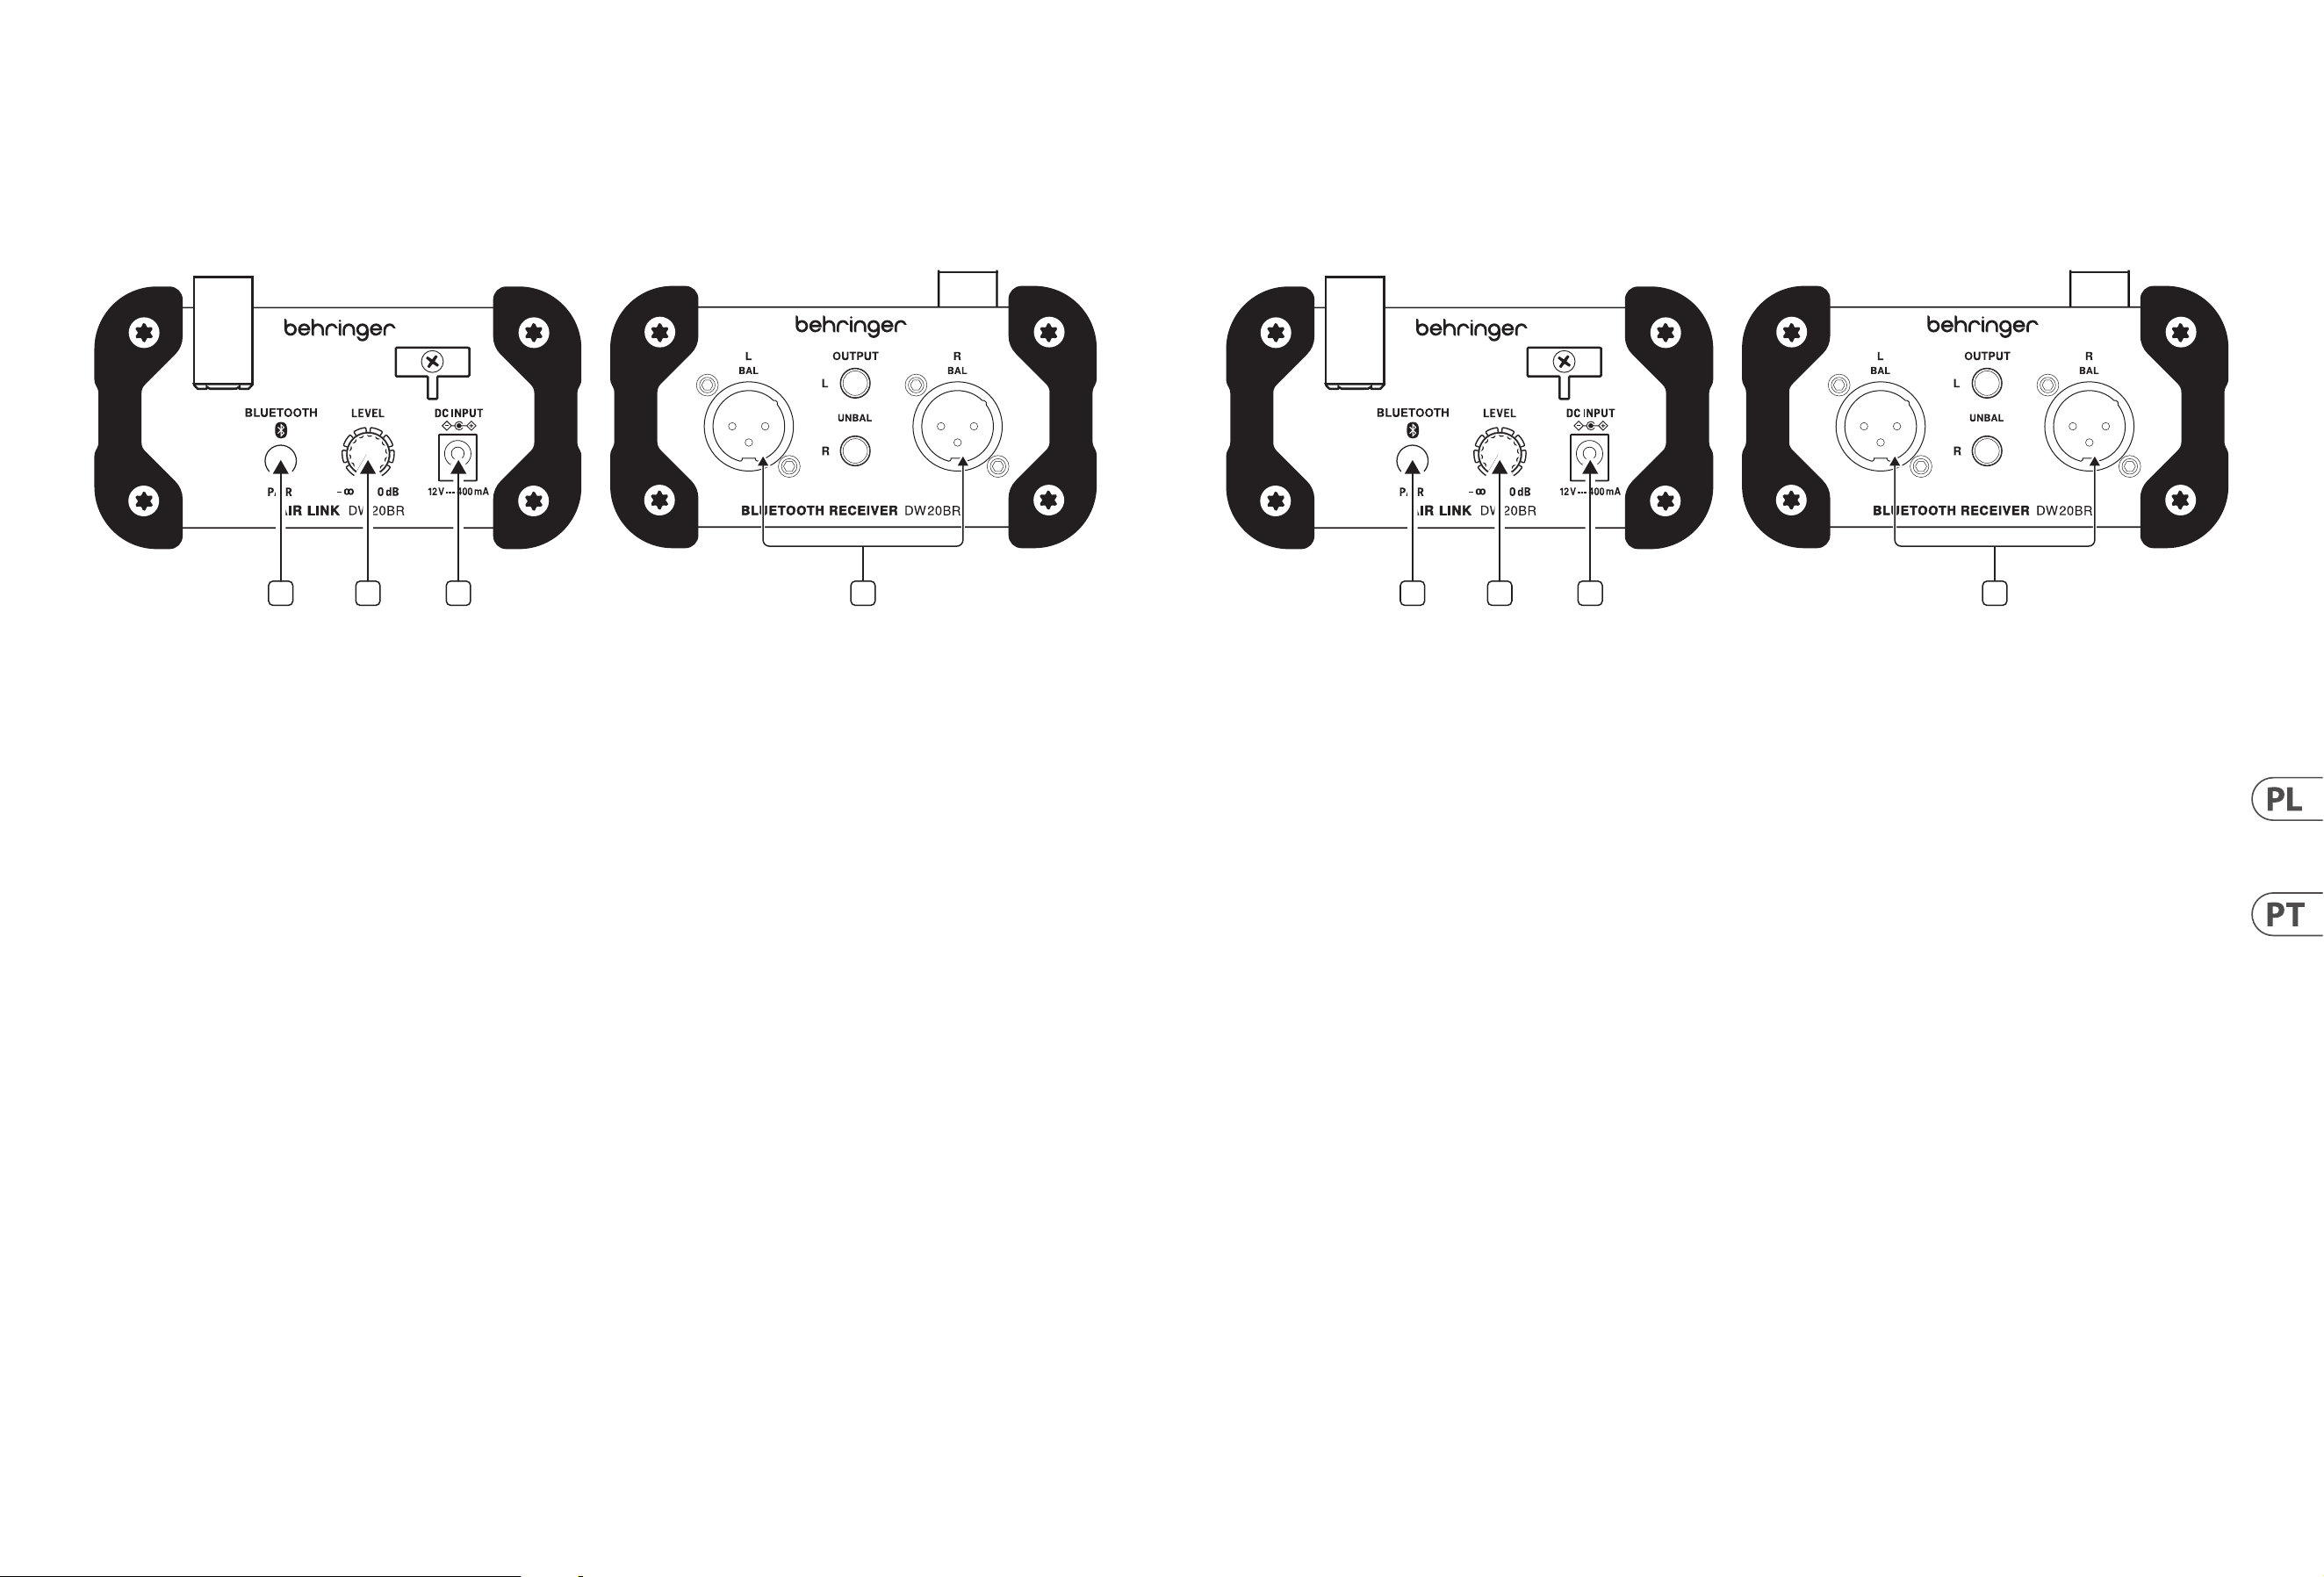
20 AIR LINK DW20BR User Manual 21 AIR LINK DW20BR User Manual
(PL)
Krok 1: Sterowanica
AIR LINK DW20BR Sterowanica
1. PAIR button - umożliwia udostępnienie urządzenia do parowania poprzez
naciśnięcie i przytrzymanie przycisku przez 5 sekundy. Pierścień LED
wskaże aktualny stan. Szczegółowe informacje można znaleźć w sekcji
Pierwsze kroki.
2. LEVEL knob - reguluje głośność sygnału wysyłanego do gniazd wyjściowych.
3. DC INPUT - akceptuje dołączony zasilacz.
4. OUTPUTS - podłącz do wzmacniacza, aktywnych głośników lub miksera
przez zbalansowane XLR lub niezbalansowane kable ¼" TS.
Krok 2: Pierwsze kroki
1. Podłącz DW20BR do miksera lub systemu głośnikowego za pomocą kabli XLR
lub ¼". Ustaw głośność na głośniku lub kanale miksera maksymalnie w dół,
aby uniknąć trzasków. Nie podłączaj jeszcze przewodu zasilającego.
2. Na smartfonie lub tablecie aktywuj Bluetooth i wyszukaj dostępne urządzenia.
3. Podłącz zasilacz do DW20BR i do gniazdka elektrycznego. Urządzenie włączy
się automatycznie i spróbuje sparować z ostatnio podłączonym urządzeniem.
4. Aby podłączyć nowe urządzenie, naciśnij i przytrzymaj przycisk PAIR przez
5 sekundy. Pierścień LED zacznie szybko migać, wskazując, że jest gotowy
do sparowania.
5. Wybierz DW20BR z listy dostępnych elementów w menu ustawień Bluetooth
urządzenia Bluetooth. Dioda DW20BR zaświeci się na stałe bez migania, co
oznacza udane połączenie.
Uwaga- wyłącz odbiór sieci komórkowej podczas przesyłania dźwięku z
telefonu komórkowego.
6. Rozpocznij odtwarzanie dźwięku z urządzenia Bluetooth. Wyreguluj głośność
na urządzeniu Bluetooth, a następnie podkręć pokrętło LEVEL, aby głośnik lub
mikser otrzymał silny sygnał.
7. Zwiększ głośność głośnika, miksera, wzmacniaczy itp., Aż osiągniesz żądany
poziom odsłuchu.
Uwagi dotyczące połączenia:
• Jeśli Twoje urządzenie audio Bluetooth jest kompatybilne, Play / Pause można
przełączać krótkim naciśnięciem przycisku PAIR na DW20BR, gdy strumień
Bluetooth jest aktywny.
• Dźwięk nie może być przesyłany strumieniowo z jednego urządzenia
Bluetooth do wielu jednostek DW20BR jednocześnie.
• Jeśli podłączyłeś już jedną jednostkę DW20BR i chcesz przełączyć się na inną
jednostkę, wykonaj następujące czynności:
• Na urządzeniu z systemem Android usuń pierwsze urządzenie z listy
urządzeń Bluetooth, a następnie przeprowadź nowe wyszukiwanie /
sparuj zgodnie z powyższym opisem.
• Na urządzeniu z systemem iOS 2 jednostki mogą być wyświetlane
jako połączone w menu ustawień Bluetooth. W takim przypadku
możesz wybrać, które urządzenie będzie odbierać dźwięk w
ustawieniach aplikacji muzycznej. Obie jednostki będą nosić nazwę
„Behringer DW20BR”.
1 2 3 4
(PT)
Passo 1: Controles
AIR LINK DW20BR Controles
1. PAIR button - permite que a unidade que disponível para emparelhamento
pressionando e segurando o botão por 5 segundos. O anel de LED indicará o
status atual. Consulte a seção Introdução para obter detalhes.
2. LEVEL knob - ajusta o volume do sinal enviado para os conectores de saída.
3. DC INPUT - aceita o adaptador de alimentação incluído.
4. OUTPUTS - conecte a um amplicador, alto-falantes amplicados ou mixer
via cabos XLR balanceados ou TS não balanceados de ¼".
Passo 2: Primeiros Passos
1. Conecte o DW20BR a um mixer ou sistema de alto-falantes com cabos XLR
ou ¼". Mantenha o volume do alto-falante ou canal do mixer no mínimo para
evitar ruídos de estalo. Não conecte o cabo de alimentação ainda.
2. Em seu smartphone ou tablet, ative o Bluetooth e procure dispositivos disponíveis.
3. Conecte o adaptador de alimentação ao DW20BR e a uma tomada elétrica.
A unidade será ligada automaticamente e tentará emparelhar com o
dispositivo conectado mais recentemente.
4. Para conectar um novo dispositivo, pressione e segure o botão PAIR por
5 segundos. O anel de LED piscará rapidamente para indicar que está pronto
para o emparelhamento.
5. Selecione o DW20BR na lista de itens disponíveis no menu de congurações
de Bluetooth do seu dispositivo Bluetooth. O LED DW20BR cará aceso sem
piscar para indicar uma conexão bem-sucedida.
Nota - desativa a recepção de celular ao transmitir áudio de um telefone celular.
6. Comece a reproduzir o áudio do seu dispositivo Bluetooth. Ajuste o volume
no dispositivo Bluetooth e aumente o botão LEVEL para que o alto-falante ou
mixer receba um sinal forte.
7. Aumente o volume do alto-falante, mixer, amplicadores, etc. até atingir o
nível de audição desejado.
Notas de conexão:
• Se o seu dispositivo de áudio Bluetooth for compatível, Reproduzir /
Pausar pode ser alternado com um toque curto do botão PAIR no DW20BR
enquanto o uxo de Bluetooth está ativo.
• O áudio não pode ser transmitido de um único dispositivo Bluetooth para
várias unidades DW20BR simultaneamente.
• Se você já se conectou a uma unidade DW20BR e deseja alternar para outra
unidade, siga estas etapas:
• Em um dispositivo Android, exclua a primeira unidade da lista de
dispositivos Bluetooth e, em seguida, execute uma nova busca /
par conforme descrito acima.
• Em um dispositivo iOS, é possível que 2 unidades apareçam conectadas
no menu de congurações do Bluetooth. Nesse caso, você pode selecionar
qual unidade receberá o áudio por meio das congurações do aplicativo
de música. Ambas as unidades terão o nome “Behringer DW20BR”.
1 2 3 4
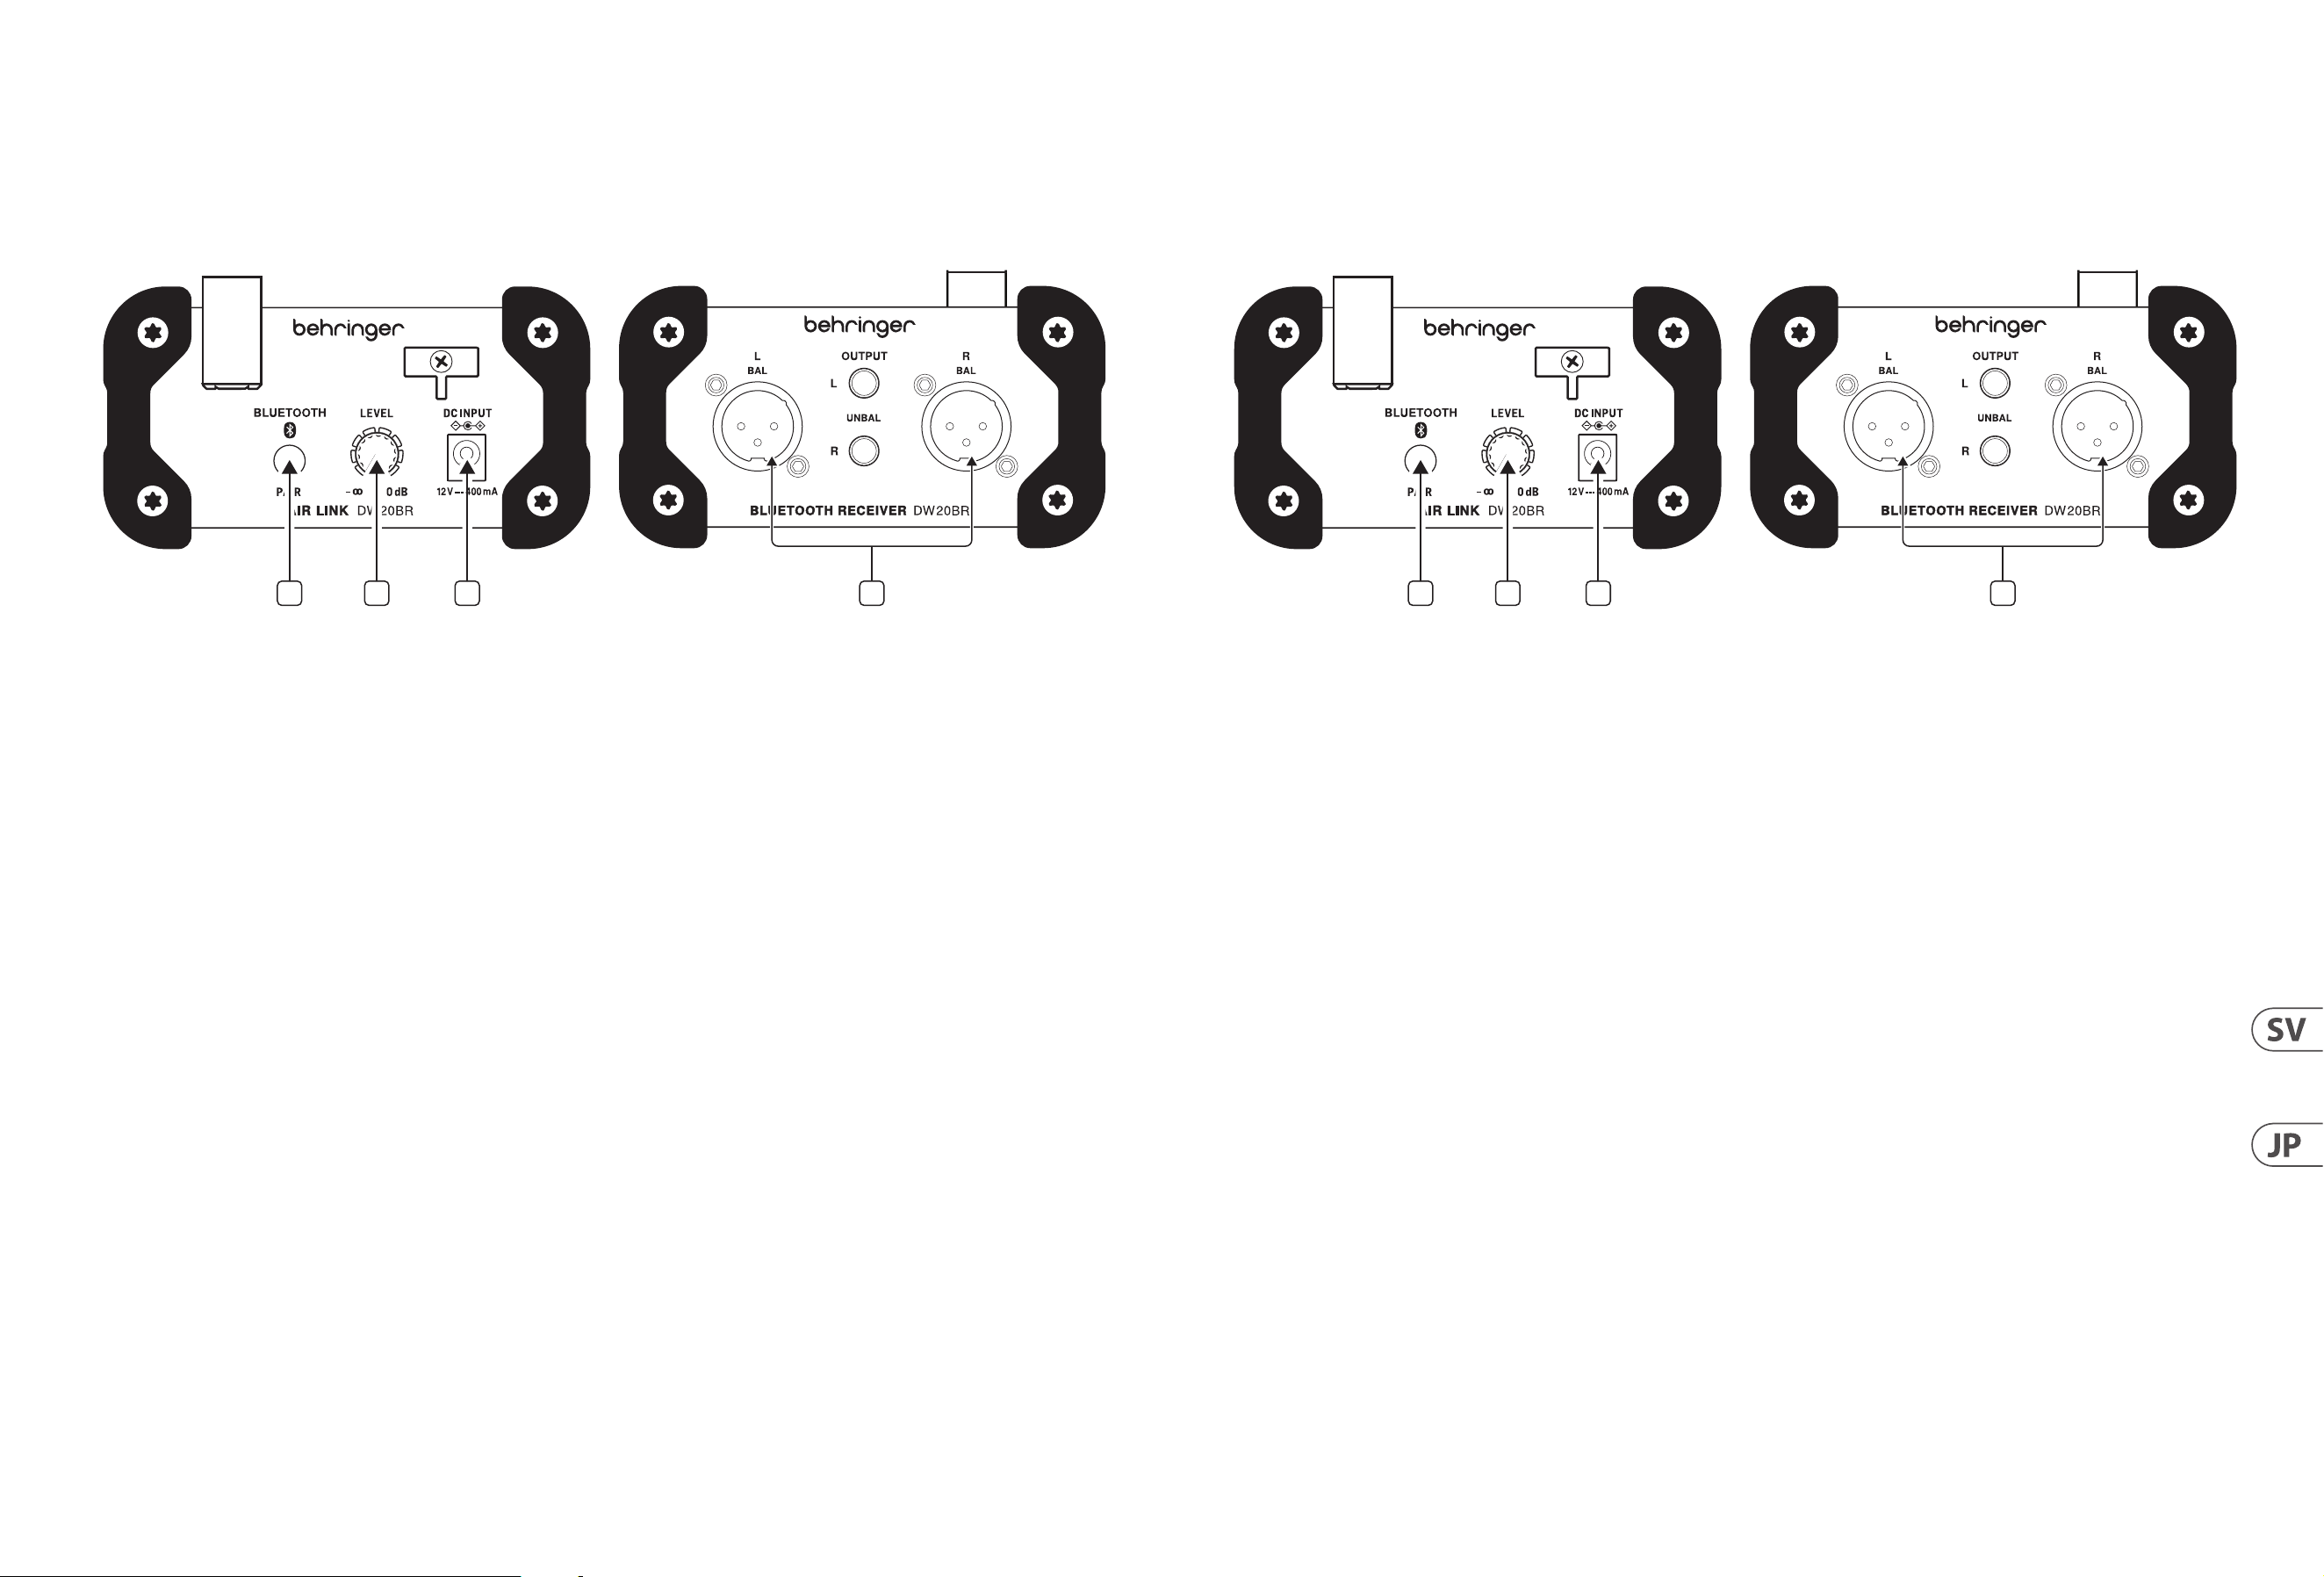
22 AIR LINK DW20BR User Manual 23 AIR LINK DW20BR User Manual
1. PAIR button - gör att enheten blir tillgänglig för ihopparning genom
att hålla in knappen i 5 sekunder. LED-ringen indikerar aktuell status.
Se avsnittet Komma igång för mer information.
2. LEVEL knob - justerar volymen på signalen som skickas till utgångarna.
3. DC INPUT - accepterar den medföljande nätadaptern.
4. OUTPUTS - anslut till en förstärkare, högtalare eller mixer via balanserade
XLR eller obalanserade cables and ¼" TS-kablar.
Steg 2: Komma igång
1. Anslut DW20BR till en mixer eller högtalarsystem med antingen XLR- eller
cables ¼"-kablar. Håll volymen på högtalaren eller mixerkanalen vänd hela
vägen för att undvika knäppande ljud. Anslut inte strömkabeln ännu.
2. På din smartphone eller surfplatta aktiverar du Bluetooth och söker efter
tillgängliga enheter.
3. Anslut nätadaptern till DW20BR och till ett eluttag. Enheten slås på
automatiskt och försöker para ihop med den senast anslutna enheten.
4. För att ansluta en ny enhet, håll ned PAIR-knappen i 5 sekunder. LED-ringen
blinkar snabbt för att indikera att den är redo att paras ihop.
5. Välj DW20BR från listan över tillgängliga objekt i Bluetooth-inställningsmenyn
på din Bluetooth-enhet. DW20BR LED lyser fast utan att blinka för att indikera
att anslutningen är lyckad.
Notera- inaktivera mobilmottagning när du strömmar ljud från en mobiltelefon.
6. Börja spela upp ljud från din Bluetooth-enhet. Justera volymen på Bluetooth-
enheten och vrid sedan upp LEVEL-ratten så att högtalaren eller mixern får en
stark signal.
7. Höj volymen på din högtalare, mixer, förstärkare etc. tills du når
önskad lyssningsnivå.
Anslutningsanmärkningar:
• Om din Bluetooth-ljudenhet är kompatibel kan Play / Pause växlas med ett
kort tryck på PAIR-knappen på DW20BR medan Bluetooth-strömmen är aktiv.
• Ljud kan inte strömma från en enda Bluetooth-enhet till era
DW20BR-enheter samtidigt.
• Om du redan har anslutit till en DW20BR-enhet och vill byta till en
annan enhet, följ dessa steg:
• På en Android-enhet, ta bort den första enheten från Bluetooth-
enhetslistan och gör sedan en ny sökning / par enligt beskrivningen ovan.
• På en iOS-enhet är det möjligt att två enheter visas anslutna i
Bluetooth-inställningsmenyn. I det här fallet kan du välja vilken enhet
som ska ta emot ljud via musikapplikationens inställningar.
Båda enheterna kommer att ha namnet “Behringer DW20BR”.
(SV)
Steg 1: Kontroller
AIR LINK DW20BR Kontroller
1 2 3 4
1. PAIR button – ボタンを 5 秒間押し続けると、ユニットをペアリングでき
るようになります。LED リングは現在のステータスを示します。詳細に
ついては、「はじめに」セクションを参照してください。
2. LEVEL knob – 出力ジャックに送信される信号の音量を調整します。
3. DC INPUT – 付属の電源アダプターを受け入れます。
4. OUTPUTS – バランス XLR またはアンバランス ¼" TS ケーブル を 介して、
アンプ、パワードスピーカー、またはミキサーに接続します。
ステップ 2: はじめに
1. DW20BR を XLR または ¼" ケーブルでミキサーまたは スピーカー
システムに接 続します。ポップノイズを避けるために、スピーカ
ーまたはミキサーチャンネルの音量を完全に下げたままにし
ます。電源ケーブルはまだ接続しないでください。
2. ス マ ートフォン ま た はタ ブ レットで 、Bluetooth をアクティブに
し て 、利 用 可 能 な デ バ イ ス を ス キ ャ ン し ま す 。
3. 電源アダプタを DW20BR と 電 源 コ ン セ ン ト に 接 続 し ま す 。ユ ニ
ットは自動的にオンになり、最後に接続されたデバイスとのペ
アリング を試 みます。
4. 新しいデバイスを接続するには、PAIR ボタンを 5 秒間押し続け
ます。LED リングがすばやく点滅して、ペアリングの準備ができ
たことを示します。
5. Bluetooth デバイスの Bluetooth 設 定 メニューで 使 用可 能 なアイテ
ムのリストから DW20BR を選 択します。DW20BR LED は 、接 続 が 成
功したことを示すために点滅せずに点灯します。
注意 - 携帯電話からオーディオをストリーミングするときに携帯
電 話 の 受 信を 無 効にします。
6. Bluetooth デバイス からオー ディオの 再 生 を 開 始します。
Bluetoothデバイスの 音 量を調 整してか ら 、LEVEL ノブを上げて、
スピーカーまたはミキサーが強い信号を受信するようにします。
7. 希望のリスニングレベルに達するまで、スピーカー、ミキサー、
アンプ などの 音 量を 上 げ ま す。
接続に関する注意:
• Bluetooth オーディオデバイスに互換性がある場合は、
Bluetooth ストリームがアクティブなときに DW20BR の PAIR
ボタンを短く押すだけで再生/一時停止を切り替えることがで
きます。
• オーディオを単一 の Bluetooth デバイスから複数の DW20BR ユニ
ットに同時にストリーミングすることはできません。
• すでに 1 つの DW20BR ユ ニットに 接 続 していて、別 の ユ ニットに
切り替えたい場合は、次の手順に従います。
• Android デバイスでは、Bluetooth デバイスリストから最 初の
ユ ニ ッ ト を 削 除 し て か ら 、上 記 の よ う に 新 し い 検 索 / ペ ア リ
ングを実行します。
• iOS デバイスでは、Bluetooth 設定メニューに 2 台のユ ニッ
トが 接 続されているように見える場 合 が あります。この
場 合 、音 楽 ア プ リ ケ ー シ ョ ン の 設 定 で 音 声 を 受 信 す る ユ
ニットを 選 択 で きま す。どちら の ユ ニットにも「Behringer
DW20BR」という名前が付けられます。
(JP)
ステップ 1: コントロール
AIR LINK DW20BR コントロール
1 2 3 4
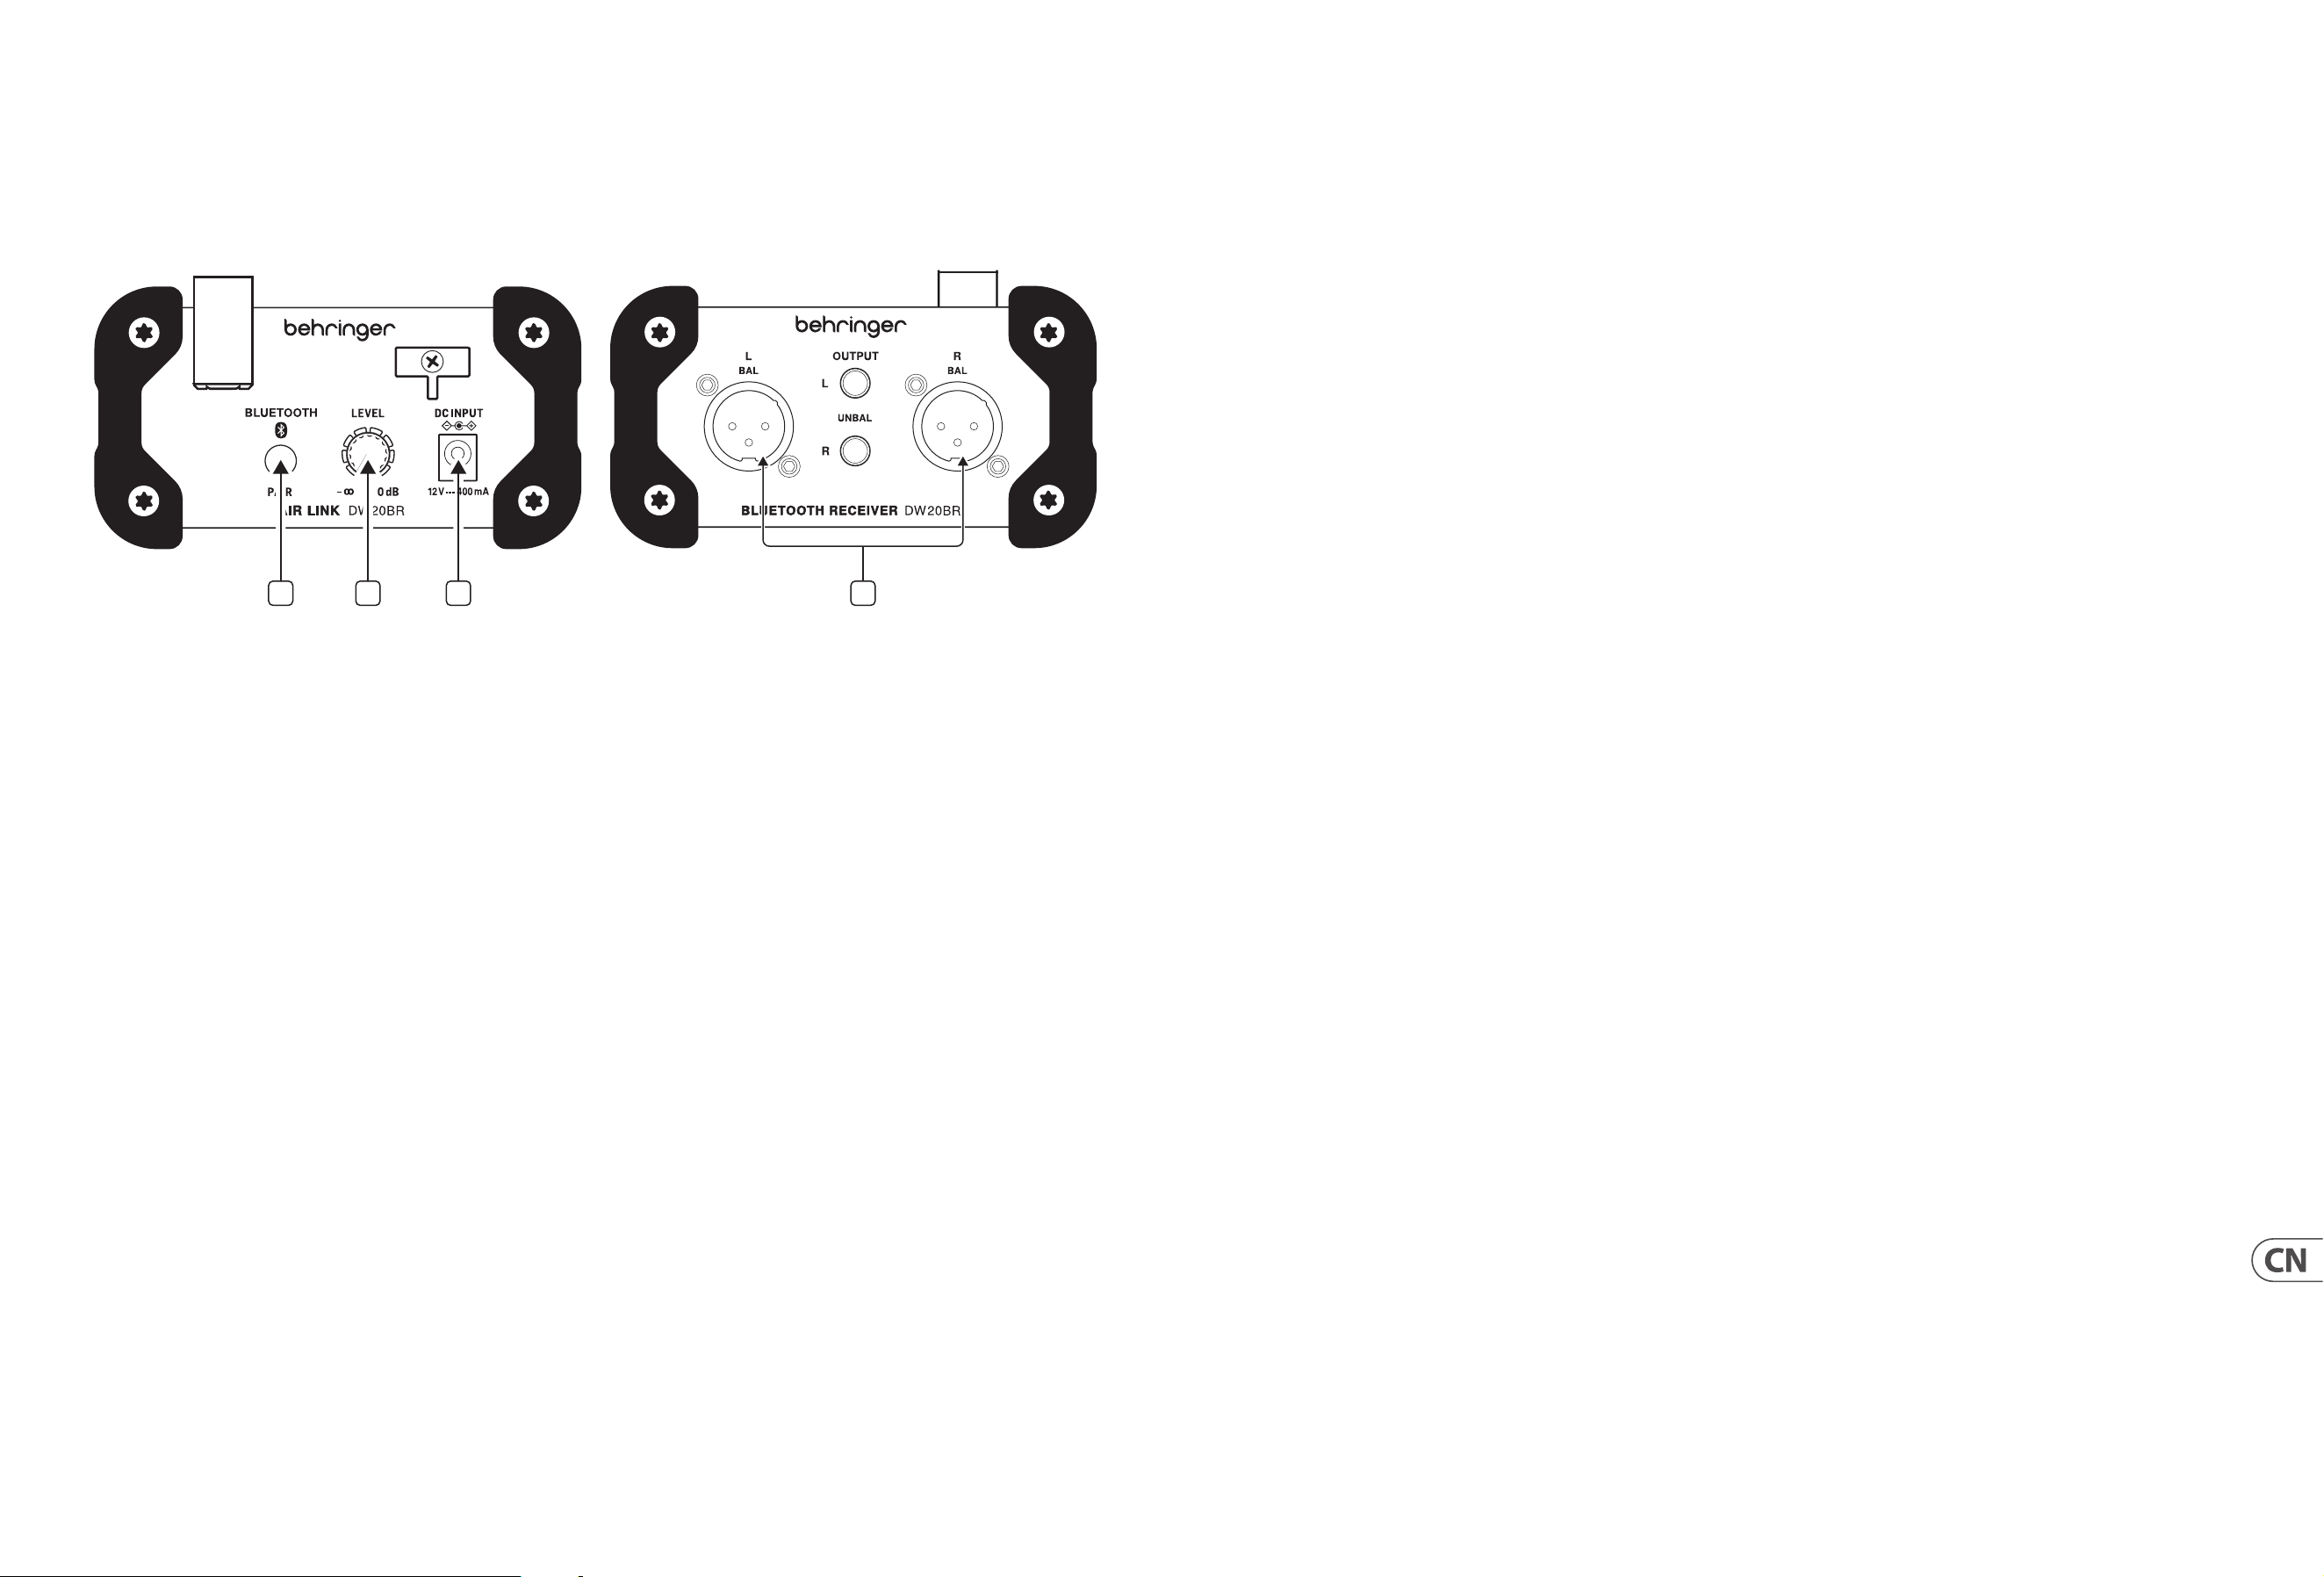
24 AIR LINK DW20BR User Manual 25 AIR LINK DW20BR User Manual
(CN)
第一步: 控制
AIR LINK DW20BR 控制
1. PAIR button – 按住按钮 5 秒钟, 可以将设备配对。 LED 环将指示当前
状态。 有关详细信息, 请参见“入门”部分。
2. LEVEL knob – 调整发送到输出插孔的信号的音量。
3. DC INPUT – 接受随附的电源适配器。
4. OUTPUTS – 通过平衡的 XLR 或不平衡的 ¼" TS 电缆连接到放大器,
有源扬声器或调音台。
第二步: 使用
1. 使用 XLR 或 ¼" 电缆将 DW20BR 连接到调音台或扬声器系统。
将扬声器或调音台上的音量调到最低, 以免产生杂音。 请勿连
接电源线。
2. 在智能手机或平板电脑上, 激活蓝牙并扫描可用设备。
3. 将电源适配器连接至 DW20BR 和电源插座。 本机将自动打开并
尝试与最近连接的设备配对。
4. 要连接新设备, 请按住 PAIR 按钮 5 秒钟。 LED 环将快速闪烁以指
示已准备好配对。
5. 从蓝牙设备的蓝牙设置菜单中的可用项目列表中选择 DW20BR。
DW20BR LED 指示灯将持续亮起, 而不会闪烁以指示连接成功。
注意 -从手机流式传输音频时禁用蜂窝接收。
6. 开始从蓝牙设备播放音频。 调节蓝牙设备上的音量, 然后向上
转动 LEVEL 旋钮, 使扬声器或混音器接收到较强的信号。
7. 调高扬声器, 调音台, 放大器等的音量, 直到达到所需的聆
听水平。
连接注意事项:
• 如果您的蓝牙音频设备兼容, 则在蓝牙流处于活动状态时,
短按 DW20BR 上的 PAIR 按钮可以切换播放/暂停。
• 音频不能同时从单个蓝牙设备流到多个 DW20BR 单元。
• 如果您已经连接到一个 DW20BR 设备, 并想切换到另一设备,
请按照以下步骤操作:
• 在 Android 设备上, 从 Bluetooth 设备列表中删除第一个设备,
然后如上所述执行新的搜索/配对。
• 在 iOS 设备上, Bluetooth 设置菜单中可能有 2 个设备显
示为已连接。 在这种情况下, 您可以选择将通过音乐应
用程序的设置接收音频的设备。 两台设备的名称均为
“Behringer DW20BR”。
1 2 3 4
27 AIR LINK DW20BR User Manual26 AIR LINK DW20BR User Manual
Specications
Note: The ¼" output level is 6 dB lower than the XLR outputs
Operation Ambient Temperature up to 45°C
Outputs
Connectors Balanced XLR, unbalanced ¼"
Impedance 240 Ω
Max. output level 4 dBu @ 1 kHz
Bluetooth
Frequency range 2402 - 2480 MHz
Channel number 79
Bluetooth version 5.1
Receiver range Up to 30 m (100 ft)
Output power Class 2, ≤10 dBm
Supported codec SBC, aptX HD, ACC, aptX
Supported proles AVRCP 1.4, A2DP 1.2
System
Frequency response 20 Hz to 20 kHz (+0/-2 dB)
THD + N (distortion) 0.05% @ 1 kHz
Signal-to-noise ratio >90 dB
Power adaptor 12 V DC, 400 mA, center positive
Physical
Dimensions (H x W x D)
Without bumpers or antenna 54 x 108 x 103 mm (2.1 x 4.3 x 4.1")
With bumpers, without antenna 63 x 118 x 112 mm (2.5 x 4.6 x 4.4")
With bumpers, upright antenna 212 x 118 x 126 mm (8.3 x 4.6 x 5.0")
Weight incl. bumpers and antenna 0.6 kg (1.3 lbs)
Dados Técnicos
Nota: El nivel de salida de ¼" es 6 dB más bajo que las salidas XLR.
Temperatura ambiente de funcionamiento hasta 45°C
Salidas
Conectores XLR balanceado, desequilibrado de ¼"
Impedancia 240 Ω
Max. nivel de salida 4 dBu a 1 kHz
Bluetooth
Rango de frecuencia 2402 - 2480 MHz
Numero de canal 79
Versión de bluetooth 5.1
Alcance del receptor Hasta 30 m (100 pies)
Potencia de salida Clase 2, ≤10 dBm
Códec compatible SBC, aptX HD, ACC, aptX
Perles compatibles AVRCP 1.4, A2DP 1.2
Sistema
Respuesta frecuente 20 Hz a 20 kHz (+0/-2 dB)
THD + N (distorsión) 0.05% a 1 kHz
Relación señal-ruido >90 dB
Adaptador de corriente 12 V CC, 400 mA, centro positivo
Físico
Dimensiones (Al x An x Pr)
Sin parachoques ni antena 54 x 108 x 103 mm (2,1 x 4,3 x 4,1")
Con parachoques, sin antena 63 x 118 x 112 mm (2,5 x 4,6 x 4,4")
Con parachoques, antena vertical. 212 x 118 x 126 mm (8,3 x 4,6 x 5,0")
Peso incl. parachoques y antena 0.6 kg (1.3 lbs)
Technische Daten
Hinweis: Der 6,3-mm-Ausgangspegel ist 6 dB niedriger als bei den XLR-Ausgängen
Betriebsumgebungstemperatur bis zu 45°C
Ausgänge
Anschlüsse Symmetrisches XLR, unsymmetrisch ¼"
Impedanz 240 Ω
max. Ausgangspegel 4 dBu @ 1 kHz
Bluetooth
Frequenzbereich 2402 - 2480 MHz
Kanal Nummer 79
Bluetooth-Version 5.1
Empfängerreichweite Bis zu 30 m (100 Fuß)
Ausgangsleistung Klasse 2, ≤10 dBm
Unterstützter Codec SBC, aptX HD, ACC, aptX
Unterstützte Prole AVRCP 1.4, A2DP 1.2
System
Frequenzgang 20 Hz bis 20 kHz (+0/-2 dB)
Klirrfaktor + N (Verzerrung) 0.05% bei 1 kHz
Signal-Rausch-Verhältnis >90 dB
Netzteil 12 V DC, 400 mA, Mitte positiv
Physisch
Abmessungen (H x B x T)
Ohne Stoßfänger oder Antenne 54 x 108 x 103 mm (2,1 x 4,3 x 4,1")
Mit Stoßfängern, ohne Antenne 63 x 118 x 112 mm (2,5 x 4,6 x 4,4")
Mit Stoßfängern, aufrechter Antenne 212 x 118 x 126 mm (8,3 x 4,6 x 5,0")
Gewicht inkl. Stoßstangen
und Antenne
0.6 kg (1.3 lbs)
Caractéristiques Techniques
Remarque: le niveau de sortie ¼" est inférieur de 6 dB aux sorties XLR
Température ambiante de fonctionnement jusqu'à 45°C
Les sorties
Connecteurs XLR symétrique, asymétrique ¼"
Impédance 240 Ω
Max. niveau de sortie 4 dBu à 1 kHz
Bluetooth
Gamme de fréquences 2402 - 2480 MHz
Le numéro de canal 79
Version Bluetooth 5.1
Portée du récepteur Jusqu'à 30 m (100 pi)
Puissance de sortie Classe 2, ≤10 dBm
Codec pris en charge SBC, aptX HD, ACC, aptX
Prols pris en charge AVRCP 1.4, A2DP 1.2
Système
Fréquence de réponse 20 Hz à 20 kHz (+0/-2 dB)
THD + N (distorsion) 0.05% à 1 kHz
Rapport signal sur bruit >90 dB
Adaptateur secteur 12 V CC, 400 mA, centre positif
Physique
Dimensions (H x L x P)
Sans pare-chocs ni antenne 54 x 108 x 103 mm (2,1 x 4,3 x 4,1")
Avec pare-chocs, sans antenne 63 x 118 x 112 mm (2,5 x 4,6 x 4,4")
Avec pare-chocs, antenne verticale 212 x 118 x 126 mm (8,3 x 4,6 x 5,0")
Poids incl. pare-chocs et antenne 0.6 kg (1.3 lbs)
29 AIR LINK DW20BR User Manual28 AIR LINK DW20BR User Manual
Speciche
Nota: il livello di uscita da ¼" è inferiore di 6 dB rispetto alle uscite XLR
Funzionamento Temperatura ambiente no a 45°C
Uscite
Connettori XLR bilanciato, sbilanciato ¼"
Impedenza 240 Ω
massimo livello di uscita 4 dBu @ 1 kHz
Bluetooth
Intervallo di frequenze 2402 - 2480 MHz
Numero di canale 79
Versione Bluetooth 5.1
Gamma del ricevitore Fino a 30 m (100 piedi)
Potenza di uscita Classe 2, ≤10 dBm
Codec supportati SBC, aptX HD, ACC, aptX
Proli supportati AVRCP 1.4, A2DP 1.2
Sistema
Risposta in frequenza Da 20 Hz a 20 kHz (+0/-2 dB)
THD + N (distorsione) 0.05% a 1kHz
Rapporto segnale-rumore >90 dB
Adattatore di alimentazione 12 V CC, 400 mA, positivo centrale
Fisico
Dimensioni (A x L x P)
Senza paraurti o antenna 54 x 108 x 103 mm (2,1 x 4,3 x 4,1")
Con paraurti, senza antenna 63 x 118 x 112 mm (2,5 x 4,6 x 4,4")
Con paraurti, antenna verticale 212 x 118 x 126 mm (8,3 x 4,6 x 5,0")
Peso incl. paraurti e antenna 0.6 kg (1.3 lbs)
Specicaties
Opmerking: het uitgangsniveau van ¼" is 6 dB lager dan de XLR-uitgangen
Bediening Omgevingstemperatuur tot 45°C
Uitgangen
Connectoren
Gebalanceerde XLR,
ongebalanceerd ¼"
Impedantie 240 Ω
Maximaal uitgangsniveau 4 dBu @ 1 kHz
Bluetooth
Frequentiebereik 2402 - 2480 MHz
Kanaal nummer 79
Bluetooth-versie 5.1
Ontvangerbereik Tot 30 m (100 ft)
Uitgangsvermogen: Klasse 2, ≤10 dBm
Ondersteunde codec SBC, aptX HD, ACC, aptX
Ondersteunde proelen AVRCP 1.4, A2DP 1.2
Systeem
Frequentierespons 20 Hz tot 20 kHz (+0/-2 dB)
THD + N (vervorming) 0.05% @ 1 kHz
Signaal - ruis verhouding >90 dB
Stroomadapter 12 V DC, 400 mA, midden positief
Fysiek
Afmetingen (H x B x D)
Zonder bumpers of antenne 54 x 108 x 103 mm (2,1 x 4,3 x 4,1")
Met bumpers, zonder antenne 63 x 118 x 112 mm (2,5 x 4,6 x 4,4")
Met bumpers, staande antenne 212 x 118 x 126 mm (8,3 x 4,6 x 5,0")
Gewicht incl. gewicht bumpers en 0.6 kg (1.3 lbs)
Dados Técnicos
Nota: O nível de saída de ¼" é 6 dB menor do que as saídas XLR
Temperatura ambiente de operação de até 45°C
Saídas
Conectores XLR balanceado, ¼" não balanceado
Impedância 240 Ω
Máx. nível de saída 4 dBu @ 1 kHz
Bluetooth
Alcance de frequência 2402 - 2480 MHz
Número do canal 79
Versão bluetooth 5.1
Alcance do receptor Até 30 m (100 pés)
Potência de saída Classe 2, ≤10 dBm
Codec Suportado SBC, aptX HD, ACC, aptX
Pers suportados AVRCP 1.4, A2DP 1.2
Sistema
Resposta de freqüência 20 Hz a 20 kHz (+0/-2 dB)
THD + N (distorção) 0.05% @ 1 kHz
A relação sinal-ruído >90 dB
Adaptador de energia 12 V DC, 400 mA, centro positivo
Fisica
Dimensões (A x L x P)
Sem pára-choques ou antena 54 x 108 x 103 mm (2,1 x 4,3 x 4,1")
Com pára-choques, sem antena 63 x 118 x 112 mm (2,5 x 4,6 x 4,4")
Com amortecedores, antena vertical 212 x 118 x 126 mm (8,3 x 4,6 x 5,0")
Peso incl. pára-choques e antena 0.6 kg (1.3 lbs)
Specykacja
Uwaga: Poziom wyjściowy ¼" jest o 6 dB niższy niż na wyjściach XLR
Temperatura otoczenia podczas pracy do 45°C
Wyjścia
Złącza
Zbalansowany XLR,
niezbalansowany ¼"
Impedancja 240 Ω
Maks. poziom wyjściowy 4 dBu przy 1 kHz
Bluetooth
Zakres częstotliwości 2402 - 2480 MHz
Numer kanału 79
Wersja Bluetooth 5.1
Zasięg odbiornika Do 30 m (100 stóp)
Moc wyjściowa Klasa 2, ≤10 dBm
Obsługiwany kodek SBC, aptX HD, ACC, aptX
Obsługiwane prole AVRCP 1.4, A2DP 1.2
System
Pasmo przenoszenia 20 Hz do 20 kHz (+0/-2 dB)
THD + N (zniekształcenie) 0.05% przy 1 kHz
Stosunek sygnału do szumu >90 dB
Zasilacz 12 V DC, 400 mA, dodatni środek
Fizyczny
Wymiary (wys. x szer. x gł.)
Bez zderzaków i anteny 54 x 108 x 103 mm (2,1 x 4,3 x 4,1")
Ze zderzakami, bez anteny 63 x 118 x 112 mm (2,5 x 4,6 x 4,4")
Ze zderzakami, pionową anteną 212 x 118 x 126 mm (8,3 x 4,6 x 5,0")
Waga wraz z zderzaki i antena 0.6 kg (1.3 lbs)
31 AIR LINK DW20BR User Manual30 AIR LINK DW20BR User Manual
技術仕様
注: ¼" 出力レベルは XLR 出力より 6 dB 低くなります
動作周囲温度 45°C まで
出力
コネクタ
バランス XLR 、ア ン バ ラ ン ス ¼"
インピーダンス
240 Ω
最大 出力レベル
4 dBu @ 1 kHz
ブルートゥース
周波数範囲
2402 - 2480 MHz
チャンネル 番 号 79
Bluetooth バージョン 5.1
レシーバー範 囲 最大 30 m (100 フィート)
出力電力 クラス 2、≤10 dBm
サポートされているコーデック SBC, aptX HD, ACC, aptX
サポートされているプロファイル AVRCP 1.4、 A2DP 1.2
システム
周波数応答
20 Hz~20 kHz(+ 0 /-2 dB)
THD + N(歪み) 0.05% @ 1 kHz
信号対雑音比
>90 dB
電源アダプター
12 V DC、400 mA 、セ ン タ ー ポ ジ
ティブ
物理的
寸 法( 高 さ x 幅 x 奥行き)
バンパーやアンテナなし
54 x 108 x 103 mm (2.1 x 4.3 x 4.1")
バ ン パ ー あ り 、ア ン テ ナ な し
63 x 118 x 112 mm (2.5 x 4.6 x 4.4")
バ ン パ ー 付 き 、直 立 ア ン テ ナ
212 x 118 x 126 mm (8.3 x 4.6 x 5.0")
重量込み バンパーとアンテナ
0.6 kg (1.3 lbs)
Specikationer
Obs: ¼" utgångsnivån är 6 dB lägre än XLR -utgångarna
Drift Omgivningstemperatur upp till 45°C
Utgångar
Anslutningar Balanserad XLR, obalanserad ¼"
Impedans 240 Ω
Max. utgångsnivå 4 dBu @ 1 kHz
Blåtand
Frekvensomfång 2402 - 2480 MHz
Kanalnummer 79
Bluetooth -version 5.1
Mottagarens räckvidd Upp till 30 m (100 fot)
Uteekt Klass 2, ≤10 dBm
Codec som stöds SBC, aptX HD, ACC, aptX
Proler som stöds AVRCP 1.4, A2DP 1.2
Systemet
Frekvenssvar 20 Hz till 20 kHz (+0/-2 dB)
THD + N (distorsion) 0.05% @ 1 kHz
Signal-brus-förhållande >90 dB
Strömadapter 12 V DC, 400 mA, mittpositiv
Fysisk
Mått (H x B x D)
Utan stötfångare eller antenn 54 x 108 x 103 mm (2,1 x 4,3 x 4,1 tum)
Med stötfångare, utan antenn 63 x 118 x 112 mm (2,5 x 4,6 x 4,4 tum)
Med stötfångare,
upprättstående antenn
212 x 118 x 126 mm (8,3 x 4,6 x 5,0 tum)
Vikt inkl. stötfångare och antenn 0.6 kg (1.3 lbs)
技术参数
注意: ¼" 输出电平比 XLR 输出低 6 dB
工作环境温度高达 45°C
产出
连接器
平衡 XLR, 不平衡 ¼"
阻抗
240 Ω
最高 输出水平 4 dBu @ 1 kHz
蓝牙
频率范围 2402 - 2480 MHz
频道编号 79
蓝牙版本 5.1
接收范围 高达 30 m (100 ft)
输出功率 2 级, ≤10 dBm
支持的编解码器 SBC, aptX HD, ACC, aptX
支 持 的 个人 资 料 AVRCP 1.4, A2DP 1.2
系统
频率响应
20 Hz 至 20 kHz (+0 /-2 dB)
THD + N (失真) 0.05% @ 1 kHz
信噪比
>90 dB
电源适配器
12 V DC, 400 mA, 中央正极
物理
尺寸 (高 x 宽 x 深)
没有保险杠或天线
54 x 108 x 103 mm (2.1 x 4.3 x 4.1")
带保险杠, 不带天线
63 x 118 x 112 mm (2.5 x 4.6 x 4.4")
带保险杠, 垂直天线
212 x 118 x 126 mm (8.3 x 4.6 x 5.0")
含重量 保险杠和天线 0.6 kg (1.3 lbs)
32 AIR LINK DW20BR User Manual 33 AIR LINK DW20BR User Manual
Other important information
1. Product Registration
To ensure optimal service and support, we encourage you
to register your Music Tribe product immediately after
purchase at musictribe.com. Registration allows us to
provide faster and more ecient assistance in the event
of a service request or warranty claim. It also ensures that
you receive important product updates, safety notices,
and documentation relevant to your product.
During registration, you will also have access to the full
terms and conditions of our Limited Warranty.
Please note that warranty coverage and consumer rights
may vary by country or jurisdiction. Refer to the terms
applicable in your region at the time of registration or via
our support portal.
2. Technical Support and Malfunctions
If you experience a malfunction or require assistance,
and a Music Tribe Authorized Reseller is not available in
your area, please refer to the list of Authorized Fulllers
available under the “Support” section at musictribe.com.
If your country is not listed, we recommend using our
Online Support resources as a rst step, which may help
resolve your issue without the need for a return.
For warranty-related matters, please ensure you submit
an online warranty claim before returning the product.
Unauthorized returns or unregistered claims may result in
processing delays or denial of warranty coverage.
3. Unauthorized Repairs and
Modications
To preserve warranty coverage, do not open, disassemble,
or attempt to repair the product yourself. Repairs or
modications performed by unauthorized persons
or service centers will void the warranty and may
compromise product safety or performance.
Before connecting your unit to a power source, ensure that
the input voltage matches the rating indicated on your
product. Incorrect voltage may cause permanent damage
and void the warranty.
If the fuse requires replacement, only use fuses of the same
type and rating. Use of incorrect fuses may create a re or
safety hazard and will invalidate all warranty protection.
4. Proper Use and Environment
Ensure that your Music Tribe product is used in accordance
with the product manual and within the recommended
operating conditions. Exposure to excessive moisture,
dust, heat, or impact may result in malfunction and void
the warranty.
1. Registro del Producto
Para garantizar un servicio y soporte óptimos,
le recomendamos registrar su producto Music Tribe
inmediatamente después de la compra en musictribe.com.
El registro nos permite brindar asistencia más rápida y
eciente en caso de una solicitud de servicio o reclamación
de garantía. También asegura que reciba actualizaciones
importantes del producto, avisos de seguridad y
documentación relevante para su producto.
Durante el registro, también tendrá acceso a los términos
y condiciones completos de nuestra Garantía Limitada.
Tenga en cuenta que la cobertura de la garantía y los
derechos del consumidor pueden variar según el país o la
jurisdicción. Consulte los términos aplicables en su región
en el momento del registro o a través de nuestro portal
de soporte.
2. Soporte Técnico y Fallos
Si experimenta una falla o necesita asistencia y no hay
un Distribuidor Autorizado de Music Tribe en su área,
consulte la lista de Centros Autorizados disponible en la
sección "Soporte" en musictribe.com.
Si su país no está en la lista, le recomendamos utilizar
nuestros recursos de Soporte en Línea como primer
paso, lo que podría ayudarle a resolver su problema sin
necesidad de una devolución. Para asuntos relacionados
con la garantía, asegúrese de enviar una reclamación
de garantía en línea antes de devolver el producto.
Las devoluciones no autorizadas o reclamaciones
no registradas pueden resultar en demoras en el
procesamiento o en la denegación de la cobertura
de garantía.
3. Reparaciones y Modicaciones
No Autorizadas
Para mantener la cobertura de garantía, no abra,
desmonte ni intente reparar el producto por su cuenta.
Las reparaciones o modicaciones realizadas por personas
no autorizadas o centros de servicio no autorizados
anularán la garantía y pueden comprometer la seguridad
o el rendimiento del producto.
Antes de conectar su unidad a una fuente de alimentación,
asegúrese de que el voltaje de entrada coincida con el
indicado en su producto. Un voltaje incorrecto puede
causar daños permanentes y anular la garantía.
Si el fusible necesita ser reemplazado, utilice únicamente
fusibles del mismo tipo y clasicación. El uso de fusibles
incorrectos puede generar riesgos de incendio o seguridad
y anulará toda la protección de garantía.
4. Uso Adecuado y Medio Ambiente
Asegúrese de que su producto Music Tribe se use de
acuerdo con el manual del producto y dentro de las
condiciones operativas recomendadas. La exposición a
humedad excesiva, polvo, calor o impactos puede provocar
fallos y anular la garantía.
1. Produktregistrierung
Um optimalen Service und Support zu gewährleisten,
empfehlen wir Ihnen, Ihr Music Tribe-Produkt direkt
nach dem Kauf unter musictribe.com zu registrieren.
Die Registrierung ermöglicht es uns, im Falle einer
Serviceanfrage oder Garantieanspruchs schneller und
ezienter zu helfen. Sie stellt außerdem sicher, dass Sie
wichtige Produktaktualisierungen, Sicherheitshinweise
und relevante Dokumentationen erhalten.
Während der Registrierung haben Sie auch Zugri
auf die vollständigen Bedingungen unserer
beschränkten Garantie.
Bitte beachten Sie, dass der Garantieumfang und die
Verbraucherrechte je nach Land oder Rechtsraum
variieren können. Bitte konsultieren Sie die für Ihre Region
geltenden Bedingungen zum Zeitpunkt der Registrierung
oder über unser Support-Portal.
2. Technischer Support
und Fehlfunktionen
Sollten Sie eine Fehlfunktion feststellen oder
Unterstützung benötigen und in Ihrer Region kein
autorisierter Music Tribe-Händler verfügbar sein,
konsultieren Sie bitte die Liste der autorisierten
Servicezentren im Bereich "Support" auf musictribe.com.
Falls Ihr Land nicht aufgeführt ist, empfehlen wir die
Nutzung unserer Online-Support-Ressourcen als ersten
Schritt, da dies Ihr Problem möglicherweise ohne
Rücksendung lösen kann. Bei Garantiefragen stellen
Sie bitte sicher, dass Sie einen Online-Garantieantrag
einreichen, bevor Sie das Produkt zurücksenden. Nicht
autorisierte Rücksendungen oder nicht registrierte
Ansprüche können zu Verzögerungen oder Ablehnung der
Garantieleistung führen.
3. Nicht autorisierte Reparaturen
und Modikationen
Um die Garantieabdeckung zu erhalten, önen,
zerlegen oder reparieren Sie das Produkt nicht selbst.
Reparaturen oder Modikationen durch nicht autorisierte
Personen oder Servicezentren führen zum Erlöschen der
Garantie und können die Sicherheit oder Leistung des
Produkts beeinträchtigen.
Bevor Sie Ihr Gerät an eine Stromquelle anschließen,
stellen Sie sicher, dass die Eingangsspannung der auf dem
Produkt angegebenen entspricht. Eine falsche Spannung
kann dauerhafte Schäden verursachen und die Garantie
erlöschen lassen.
Falls die Sicherung ersetzt werden muss, verwenden
Sie nur Sicherungen desselben Typs und derselben
Nennwerte. Die Verwendung ungeeigneter Sicherungen
kann zu Brand- oder Sicherheitsrisiken führen und hebt
den Garantieanspruch auf.
4. Richtige Verwendung und Umgebung
Stellen Sie sicher, dass Ihr Music Tribe-Produkt gemäß
dem Produkthandbuch und innerhalb der empfohlenen
Betriebsbedingungen verwendet wird. Eine übermäßige
Einwirkung von Feuchtigkeit, Staub, Hitze oder Stößen
kann zu Fehlfunktionen führen und die Garantie
erlöschen lassen.
Important information
Aspectos importantes
Weitere wichtige
Informationen
1. Enregistrement du Produit
Pour garantir un service et un support optimaux,
nous vous encourageons à enregistrer votre produit Music
Tribe immédiatement après l'achat sur musictribe.com.
L'enregistrement nous permet de fournir une assistance
plus rapide et plus ecace en cas de demande de service
ou de réclamation de garantie. Il garantit également que
vous receviez des mises à jour importantes sur le produit,
des avis de sécurité et de la documentation pertinente.
Lors de l'enregistrement, vous aurez également accès aux
conditions générales complètes de notre Garantie Limitée.
Veuillez noter que la couverture de la garantie et les droits
des consommateurs peuvent varier selon le pays ou la
juridiction. Consultez les conditions applicables dans votre
région au moment de l'enregistrement ou via notre portail
d'assistance.
2. Support Technique et Pannes
Si vous rencontrez une panne ou avez besoin d'assistance
et qu'aucun Revendeur Agréé Music Tribe n'est disponible
dans votre région, veuillez consulter la liste des Centres
Autorisés disponible dans la section "Support" sur
musictribe.com.
Si votre pays ne gure pas dans la liste, nous vous
recommandons d'utiliser nos ressources de Support en
Ligne en premier recours, ce qui pourrait résoudre votre
problème sans nécessiter un retour. Pour les questions de
garantie, veuillez soumettre une réclamation de garantie
en ligne avant de retourner le produit. Les retours non
autorisés ou les réclamations non enregistrées peuvent
entraîner des retards de traitement ou un refus de
couverture de garantie.
3. Réparations et Modications
Non Autorisées
Pour préserver la couverture de garantie, ne démontez
pas et ne tentez pas de réparer le produit vous-même.
Les réparations ou modications eectuées par des
personnes ou des centres de service non autorisés
annuleront la garantie et peuvent compromettre la
sécurité ou les performances du produit.
Avant de connecter votre unité à une source
d’alimentation, assurez-vous que la tension d’entrée
correspond à celle indiquée sur votre produit. Une tension
incorrecte peut causer des dommages permanents et
annuler la garantie.
Si le fusible doit être remplacé, utilisez uniquement des
fusibles du même type et de la même valeur nominale.
L'utilisation de fusibles inappropriés peut créer un risque
d'incendie ou de sécurité et annulera toute protection
de garantie.
4. Utilisation Appropriée
et Environnement
Assurez-vous que votre produit Music Tribe est utilisé
conformément au manuel du produit et dans les
conditions d’exploitation recommandées. Une exposition
excessive à l’humidité, à la poussière, à la chaleur ou aux
chocs peut entraîner un dysfonctionnement et annuler
la garantie.
1. Registrazione del Prodotto
Per garantire un servizio e un supporto ottimali,
ti invitiamo a registrare il tuo prodotto Music Tribe
immediatamente dopo l'acquisto su musictribe.com.
La registrazione ci consente di fornire assistenza più
rapida ed eciente in caso di richiesta di servizio o
reclamo in garanzia. Garantisce inoltre che tu riceva
aggiornamenti importanti sul prodotto, avvisi di sicurezza
e documentazione pertinente.
Durante la registrazione, avrai anche accesso ai termini
e condizioni completi della nostra Garanzia Limitata.
Si prega di notare che la copertura della garanzia e i diritti
dei consumatori possono variare a seconda del paese o
della giurisdizione. Consulta i termini applicabili nella tua
regione al momento della registrazione o tramite il nostro
portale di supporto.
2. Supporto Tecnico e Malfunzionamenti
Se riscontri un malfunzionamento o hai bisogno di
assistenza e non è disponibile un Rivenditore Autorizzato
Music Tribe nella tua zona, consulta l'elenco dei Centri
Autorizzati nella sezione "Supporto" su musictribe.com.
Se il tuo paese non è elencato, ti consigliamo di utilizzare
le nostre risorse di Supporto Online come primo passo,
poiché potrebbero aiutarti a risolvere il problema senza la
necessità di un reso. Per questioni relative alla garanzia,
assicurati di inviare una richiesta di garanzia online prima
di restituire il prodotto. I resi non autorizzati o le richieste
non registrate possono causare ritardi nell'elaborazione
o il riuto della copertura della garanzia.
3. Riparazioni e Modiche
Non Autorizzate
Per mantenere la copertura della garanzia, non aprire,
smontare o tentare di riparare il prodotto da solo.
Le riparazioni o modiche eettuate da persone o centri
di assistenza non autorizzati annulleranno la garanzia
e potrebbero compromettere la sicurezza o le prestazioni
del prodotto.
Prima di collegare l'unità a una fonte di alimentazione,
assicurati che la tensione di ingresso corrisponda a quella
indicata sul prodotto. Una tensione errata può causare
danni permanenti e annullare la garanzia.
Se è necessario sostituire il fusibile, utilizzare solo fusibili
dello stesso tipo e valore nominale. L'uso di fusibili errati
può creare un rischio di incendio o sicurezza e invaliderà
tutta la protezione della garanzia.
4. Uso Adeguato e Ambiente
Assicurati che il tuo prodotto Music Tribe venga
utilizzato in conformità con il manuale del prodotto
e nelle condizioni operative consigliate. L'esposizione
a umidità eccessiva, polvere, calore o urti può causare
malfunzionamenti e annullare la garanzia.
1. Productregistratie
Om optimale service en ondersteuning te garanderen,
raden we u aan om uw Music Tribe-product direct na
aankoop te registreren op musictribe.com. Registratie
stelt ons in staat om sneller en eciënter hulp te bieden
bij een serviceverzoek of garantieclaim. U ontvangt ook
belangrijke productupdates, veiligheidswaarschuwingen
en relevante documentatie.
Tijdens de registratie krijgt u ook toegang tot de volledige
voorwaarden van onze Beperkte Garantie.
Houd er rekening mee dat garantievoorwaarden en
consumentenrechten per land of rechtsgebied kunnen
verschillen. Raadpleeg de toepasselijke voorwaarden in
uw regio op het moment van registratie of via
ons supportportaal.
2. Technische Ondersteuning
en Storingen
Als u een storing ervaart of hulp nodig heeft en er
geen geautoriseerde Music Tribe-verkoper in uw regio
beschikbaar is, raadpleeg dan de lijst met geautoriseerde
servicecentra in de sectie "Support" op musictribe.com.
Als uw land niet is vermeld, raden we aan om eerst onze
online ondersteuningsbronnen te gebruiken, omdat deze
mogelijk uw probleem kunnen oplossen zonder dat een
retourzending nodig is. Voor garantiekwesties dient u
een online garantieclaim in te dienen voordat u het
product retourneert. Niet-geautoriseerde retourzendingen
of niet-geregistreerde claims kunnen vertragingen
veroorzaken of de garantie ongeldig maken.
3. Niet-geautoriseerde Reparaties
en Wijzigingen
Om de garantie te behouden, mag u het product
niet openen, demonteren of zelf proberen te
repareren. Reparaties of wijzigingen uitgevoerd door
niet-geautoriseerde personen of servicecentra zullen
de garantie ongeldig maken en kunnen de veiligheid of
prestaties van het product in gevaar brengen.
Controleer vóór het aansluiten op een stroombron
of de ingangsspanning overeenkomt met de waarde die
op uw product is aangegeven. Een verkeerde spanning
kan permanente schade veroorzaken en de garantie
ongeldig maken.
Als de zekering vervangen moet worden, gebruik
dan alleen zekeringen van hetzelfde type en dezelfde
specicatie. Het gebruik van onjuiste zekeringen kan
brand- of veiligheidsrisico’s veroorzaken en zal de garantie
laten vervallen.
4. Juiste Gebruik en Omgeving
Zorg ervoor dat uw Music Tribe-product wordt gebruikt
volgens de handleiding en binnen de aanbevolen
bedrijfsomstandigheden. Blootstelling aan overmatige
vochtigheid, stof, hitte of schokken kan storingen
veroorzaken en de garantie ongeldig maken.
Informations importantes
Informazioni importanti
Belangrijke informatie
34 AIR LINK DW20BR User Manual 35 AIR LINK DW20BR User Manual
Other important information
1. Rejestracja Produktu
Aby zapewnić optymalną obsługę i wsparcie,
zalecamy rejestrację produktu Music Tribe zaraz po
zakupie na stronie musictribe.com. Rejestracja umożliwia
nam szybszą i bardziej efektywną pomoc w przypadku
zgłoszenia serwisowego lub roszczenia gwarancyjnego.
Gwarantuje również otrzymywanie ważnych aktualizacji
produktu, powiadomień o bezpieczeństwie i
istotnej dokumentacji.
Podczas rejestracji uzyskasz również dostęp do pełnych
warunków naszej Ograniczonej Gwarancji.
Należy pamiętać, że zakres gwarancji i prawa
konsumenckie mogą się różnić w zależności od kraju
lub jurysdykcji. Sprawdź warunki obowiązujące
w Twoim regionie w momencie rejestracji lub poprzez
nasz portal wsparcia.
2. Wsparcie Techniczne i Awarie
Jeśli doświadczasz awarii lub potrzebujesz pomocy,
a autoryzowany sprzedawca Music Tribe nie jest dostępny
w Twoim regionie, zapoznaj się z listą autoryzowanych
serwisów w sekcji „Wsparcie” na stronie musictribe.com.
Jeśli Twojego kraju nie ma na liście, zalecamy w pierwszej
kolejności skorzystanie z naszych zasobów wsparcia
online, które mogą pomóc w rozwiązaniu problemu
bez konieczności zwrotu produktu. W przypadku
kwestii gwarancyjnych należy złożyć internetowe
zgłoszenie gwarancyjne przed odesłaniem produktu.
Nieautoryzowane zwroty lub niezgłoszone roszczenia
mogą powodować opóźnienia w procesie lub
odrzucenie gwarancji.
3. Nieautoryzowane Naprawy
i Modykacje
Aby zachować gwarancję, nie otwieraj, nie demontuj ani
nie próbuj samodzielnie naprawiać produktu. Naprawy
lub modykacje przeprowadzane przez nieautoryzowane
osoby lub serwisy unieważnią gwarancję i mogą wpłynąć
na bezpieczeństwo lub wydajność produktu.
Przed podłączeniem urządzenia do źródła zasilania
upewnij się, że napięcie wejściowe odpowiada
wartości podanej na produkcie. Nieprawidłowe
napięcie może spowodować trwałe uszkodzenie
i unieważnienie gwarancji.
Jeśli konieczna jest wymiana bezpiecznika, używaj
wyłącznie bezpieczników o tym samym typie i
parametrach. Użycie nieprawidłowych bezpieczników
może powodować zagrożenie pożarowe lub
bezpieczeństwa i spowoduje utratę ochrony gwarancyjnej.
4. Prawidłowe Użytkowanie
i Środowisko
Upewnij się, że produkt Music Tribe jest używany zgodnie
z instrukcją obsługi i w zalecanych warunkach eksploatacji.
Narażenie na nadmierną wilgoć, kurz, ciepło lub uderzenia
może prowadzić do awarii i unieważnienia gwarancji.
1. Registro do Produto
Para garantir um serviço e suporte ideais, recomendamos
que você registre seu produto Music Tribe imediatamente
após a compra em musictribe.com. O registro nos
permite fornecer assistência mais rápida e eciente
em caso de solicitação de serviço ou reivindicação de
garantia. Também garante que você receba atualizações
importantes do produto, avisos de segurança
e documentação relevante.
Durante o registro, você também terá acesso aos termos
e condições completos da nossa Garantia Limitada.
Observe que a cobertura da garantia e os direitos do
consumidor podem variar de acordo com o país ou
jurisdição. Consulte os termos aplicáveis à sua região
no momento do registro ou através do nosso portal
de suporte.
2. Suporte Técnico e Falhas
Se você encontrar um problema ou precisar de assistência
e não houver um Revendedor Autorizado Music Tribe
disponível em sua região, consulte a lista de Centros
Autorizados na seção "Suporte" em musictribe.com.
Se o seu país não estiver na lista, recomendamos o uso
dos nossos recursos de Suporte Online como primeiro
passo, pois isso pode ajudar a resolver o seu problema sem
a necessidade de devolução. Para questões de garantia,
certique-se de enviar uma solicitação de garantia online
antes de devolver o produto. Devoluções não autorizadas
ou reivindicações não registradas podem causar atrasos no
processamento ou recusa na cobertura da garantia.
3. Reparos e Modicações
Não Autorizados
Para manter a cobertura da garantia, não abra, desmonte
ou tente reparar o produto por conta própria. Reparos ou
modicações feitas por pessoas não autorizadas ou centros
de serviço não autorizados anularão a garantia e podem
comprometer a segurança ou o desempenho do produto.
Antes de conectar sua unidade a uma fonte de energia,
certique-se de que a voltagem de entrada corresponde
à indicada no produto. Voltagem incorreta pode causar
danos permanentes e anular a garantia.
Se for necessário substituir o fusível, use apenas fusíveis
do mesmo tipo e classicação. O uso de fusíveis incorretos
pode criar risco de incêndio ou segurança e invalidará toda
a proteção da garantia.
4. Uso Adequado e Ambiente
Certique-se de que seu produto Music Tribe seja usado
de acordo com o manual do produto e dentro das
condições de operação recomendadas. Exposição excessiva
à umidade, poeira, calor ou impacto pode causar falhas
e anular a garantia.
1. Produktregistrering
För att säkerställa optimal service och support
rekommenderar vi att du registrerar din Music Tribe-
produkt omedelbart efter köpet på musictribe.com.
Registreringen gör det möjligt för oss att ge snabbare
och eektivare support vid serviceförfrågningar eller
garantianspråk. Du får även viktiga produktuppdateringar,
säkerhetsmeddelanden och relevant dokumentation.
Vid registreringen får du också tillgång till de fullständiga
villkoren för vår Begränsade Garanti.
Observera att garantitäckning och konsumenträttigheter
kan variera beroende på land eller jurisdiktion. Se de
villkor som gäller i din region vid registreringen eller via
vår supportportal.
2. Teknisk Support och Fel
Om du upplever ett fel eller behöver hjälp och en
auktoriserad Music Tribe-återförsäljare inte är tillgänglig
i ditt område, vänligen se listan över auktoriserade
servicecenter under avsnittet "Support" på
musictribe.com.
Om ditt land inte nns med på listan rekommenderar
vi att du först använder våra online-supportresurser,
eftersom de kan hjälpa dig att lösa problemet utan att
behöva returnera produkten. För garantiärenden,
se till att skicka in ett online-garantianspråk innan
du returnerar produkten. Obehöriga returer eller
icke-registrerade anspråk kan leda till förseningar eller
avslag på garantitäckning.
3. Obehöriga Reparationer
och Modieringar
För att behålla garantin ska du inte öppna, demontera
eller försöka reparera produkten själv. Reparationer
eller modieringar som utförs av obehöriga personer
eller servicecenter gör garantin ogiltig och kan påverka
produktens säkerhet eller prestanda.
Innan du ansluter enheten till en strömkälla, se till att
ingångsspänningen matchar den som anges på produkten.
Felaktig spänning kan orsaka permanent skada och
ogiltigförklara garantin.
Om säkringen behöver bytas ut, använd endast säkringar
av samma typ och klassicering. Användning av felaktiga
säkringar kan orsaka brand- eller säkerhetsrisker och
upphäver all garantitäckning.
4. Rätt Användning och Miljö
Se till att din Music Tribe-produkt används enligt
produktmanualen och inom de rekommenderade
driftsförhållandena. Exponering för överdriven fukt,
damm, värme eller stötar kan leda till fel och göra
garantin ogiltig.
Outras Informações
Importantes
Ważna informacja
1. 製品登録
最適なサービスとサポートを確保する
ため、購入後すぐに musictribe.com
で Music Tribe 製品を登録することをお勧め
します。登録することで、サービスリク
エストや保証請求の際に迅速かつ効率的
なサポートを受けることができます。
また、重要な製品アップデート、安全
通知、および関連するドキュメントも受
け取ることができます。
登録時には、限定保証の全条件にもアク
セスできます。
保証の適用範囲や消費者の権利は、国や
地域によって異なる場合があります。
登録時またはサポートポータルで、お住
まいの地域に適用される条件を確認して
ください。
2. 技術サポートと不具合
製品の不具合が発生したりサポートが必
要な場合、お住まいの地域に Music Tribe
認定販売店がない場合は、musictribe.com
の「サポート」セクションに記載されて
いる認定サービス提供者のリストをご確
認ください。
お住まいの国がリストにない場合、まず
はオンラインサポートの利用をお勧めし
ます。これにより、返品せずに問題を解
決できる可能性があります。保証に関す
る問題については、製品を返送する前に
必ずオンライン保証請求を提出してくだ
さい。未承認の返品や未登録の請求は、
処理の遅延や保証の拒否につながる可能
性があります。
3. 非認可の修理および改造
保証を維持するために、製品を開封、
分解、または自分で修理しないでくださ
い。非認可の人物やサービスセンターに
よって行われた修理や改造は、保証を無
効にし、製品の安全性や性能に影響を及
ぼす可能性があります。
電源に接続する前に、入力電圧が製品に
記載されている定格と一致していること
を確認してください。不適切な電圧は、
製品の損傷や保証の無効化につながる可
能性があります。
ヒューズを交換する必要がある場合は、
必ず同じ種類と定格のヒューズを使用
してください。不適切なヒューズの使用
は、火災や安全上のリスクを引き起こ
し、すべての保証が無効になります。
4. 適切な使用と環境
Music Tribe 製品は、取扱説明書に従い、
推奨される動作条件内で使用してくださ
い。過度の湿気、ほこり、熱、衝撃への
暴露は故障の原因となり、保証が無効に
なる可能性があります。
1. 产品注册
为了确保最佳的服务和支持, 我们建议您在
购买后立即在 musictribe.com 注册您的 Music
Tribe 产品。 注册后, 我们可以更快、 更高效地
协助您处理服务请求或保修索赔。 此外,
您还可以收到重要的产品更新、 安全通知和
相关文档。
在注册过程中, 您还可以访问完整的有限保
修条款和条件。
请注意, 保修范围和消费者权益可能因国家
或地区而有所不同。 请在注册时或通过我们
的支持门户查询适用于您所在地区的条款。
2. 技术支持与故障处理
如果您的设备发生故障或需要帮助, 并且您
所在地区没有 Music Tribe 授权经销商, 请在
musictribe.com 的 “支持” 部分查阅授权服务
提供商列表。
如果您的国家不在列表中, 我们建议您首先
使用在线支持资源, 这可能有助于在无需退
货的情况下解决问题。 对于保修相关事宜,
请在退回产品之前确保提交在线保修索赔。
未经授权的退货或未注册的索赔可能导致
处理延误或保修无效。
3. 未授权维修与修改
为了保持保修有效, 请勿自行拆卸、 分解或
维修产品。 未经授权的人员或服务中心进行
的维修或修改将导致保修失效, 并可能影响
产品的安全性或性能。
在连接电源之前, 请确保输入电压与产品上
标注的额定电压匹配。 不正确的电压可能会
导致永久性损坏并使保修失效。
如果需要更换保险丝, 请仅使用相同类型和
额定值的保险丝。 使用不正确的保险丝可
能会导致火灾或安全隐患, 并使所有保修
无效。
4. 正确使用与环境
请确保您的 Music Tribe 产品按照产品手册
使用, 并在推荐的操作条件下运行。 暴露于
过度潮湿、 灰尘、 高温或冲击可能会导致故
障并使保修失效。
その他の重要な情報
其他的重要信息
Viktig information
FEDERAL COMMUNICATIONS
COMMISSION COMPLIANCE
INFORMATION
Responsible Party Name: Empower Tribe Innovations US Inc.
Address: 901 Grier Dr. Las Vegas, NV, 89119, USA
Email Address: [email protected]
This equipment has been tested and found to comply with the limits for a Class B digital device,
pursuant to part 15 of the FCC Rules. These limits are designed to provide reasonable protection
against harmful interference in a residential installation. This equipment generates, uses and can
radiate radio frequency energy and, if not installed and used in accordance with the instructions,
may cause harmful interference to radio communications. However, there is no guarantee that
interference will not occur in a particular installation. If this equipment does cause harmful
interference to radio or television reception, which can be determined by turning the equipment
off and on, the user is encouraged to try to correct the interference by one or more of the
following measures:
Reorient or relocate the receiving antenna.
Increase the separation between the equipment and receiver.
Connect the equipment into an outlet on a circuit different from that to which the receiver is
connected.
Consult the dealer or an experienced radio/TV technician for help.
This equipment complies with Part 15 of the FCC rules. Operation is subject to the following
two conditions:
(1) this device may not cause harmful interference, and
36
AIR LINK DW20BR User Manual
(2) this device must accept any interference received, including interference that may cause
undesired operation.
Important information:
Changes or modifications to the equipment not expressly approved by Music Tribe can void the
user’s authority to use the equipment.
Caution!
The manufacturer is not responsible for any radio or TV interference caused by unauthorized
modification to this equipment.
Such modifications could void the user authority to operate the equipment.
FCC RF Radiation Exposure Statement:
1. This Transmitter must not be co-located or operating in conjunction with any other
antenna or transmitter.
2. This equipment complies with FCC RF radiation exposure limits set forth for an
uncontrolled environment. This equipment should be installed and operated with
minimum distance of 20 centimeters between the radiator and your body.
Caution!
This device contains licence-exempt transmitter(s)/receiver(s) that comply with Innovation,
Science and Economic Development Canada’s licence-exempt RSS(s). Operation is subject to
the following two conditions:
1. This device may not cause interference.
2. This device must accept any interference, including interference that may cause undesired
operation of the device.
This equipment complies with IC radiation exposure limits set forth for an uncontrolled
environment. This equipment should be installed and operated with minimum distance 20cm
between the radiator and your body.
L’émetteur/récepteur exempt de licence contenu dans le présent appareil est conforme aux CNR
d’Innovation, Sciences et Développement économique Canada applicables aux appareils radio
exempts de licence. L’exploitation est autorisée aux deux conditions suivantes :
1. L’appareil ne doit pas produire de brouillage;
2. L’appareil doit accepter tout brouillage radioélectrique subi, même si le brouillage est
susceptible d’en compromettre le fonctionnement
3
7
AIR LINK DW20BR User Manual

Cet appareil est conforme à IC l’exposition aux rayonnements limites fixées pour un
environnement non contrôlé. Cet appareil doit être installé et utilisé avec une distance minimale
de 20 cm entre le radiateur et votre corps. Cet transmetteur ne doit pas être co-situé ou opérant en
liaison avec toute autre antenne ou transmetteur.
Hereby, Music Tribe declares that this product is in compliance with Directive 2014/35/EU,
Directive 2014/30/EU, Directive 2011/65/EU and Amendment 2015/863/ EU, Directive
2012/19/EU, Regulation 519/2012 REACH SVHC and Directive 1907/2006/EC.
Full text of EU DoC is available at https://community.musictribe.com/
EU Representative: Empower Tribe Innovations DE GmbH Address: Otto-Brenner-Strasse 4a,
47877 Willich, Germany
UK Representative: Empower Tribe Innovations UK Ltd. Address: 5 Brindley Road Old
Trafford, Manchester, United Kingdom, M16 9UN
Correct disposal of this product: This symbol indicates that this product must not
be disposed of with household waste, according to the WEEE Directive (2012/19/EU) and your
national law. This product should be taken to a collection center licensed for the recycling of
waste electrical and electronic equipment (EEE). The mishandling of this type of waste could
have a possible negative impact on the environment and human health due to potentially
hazardous substances that are generally associated with EEE. At the same time, your cooperation
in the correct disposal of this product will contribute to the efficient use of natural resources. For
more information about where you can take your waste equipment for recycling, please contact
your local city office, or your household waste collection service.
3
8
AIR LINK DW20BR User Manual