


1
MODEL:QL-60INCH
This is the original instruction, please read all manual instructions carefully
before operating. VEVOR reserves a clear interpretation of our user
manual. The appearance of the product shall be subject to the product you
received. Please forgive us that we won't inform you again if there are any
technology or software updates on our product.
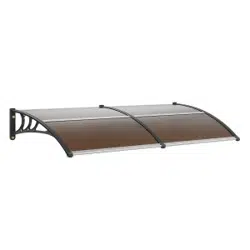
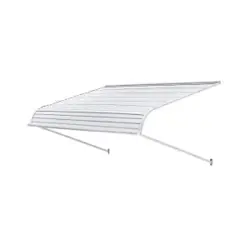
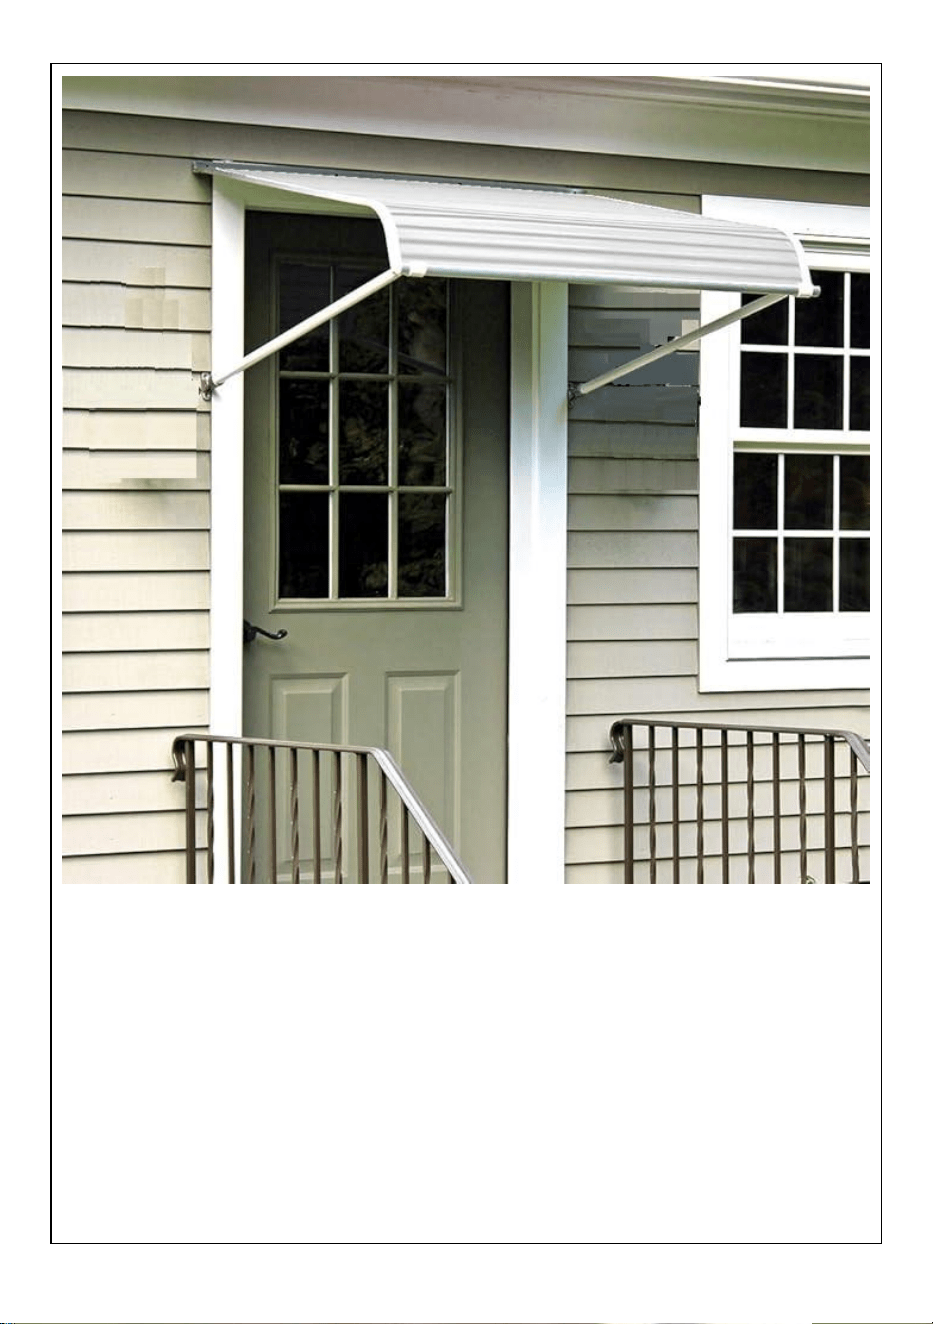
METAL DOOR AWNING

2
SAFETY INSTRUCTIONS
WARNING:
Read this material before using this product. Failure to do so can
result in serious injury.
Assembly precautions
1. Assemble only according to these instructions. Improper assembly can
create hazards.
2. Wear ANSI-approved safety goggles and heavy-duty work gloves
during assembly.
3. Keep the assembly area clean and well-lit.
4. Keep bystanders out of the area during assembly.
5. Do not assemble if tired or when under the influence of alcohol, drugs
or medication.
6. The product capabilities apply to properly and completely assembled
products only.
7. Assemble on a flat, level, hard and smooth surface capable of safely
supporting the Metal Door Awning.
8. For additional information regarding the parts listed in the following
pages, please refer to the Assembly Diagram of this manual. Unwrap
and separate all parts in a clean work area.
Use precautions
1. DO NOT SIT OR STAND ON THIS ITEM.
2. This product is not a toy. Do not allow children to play with or near this
item.
3. Do not exceed specified weight capacities.
4. Use only on a flat, level, hard, and smooth surface that can safely
support a fully loaded Metal Door Awning.
5. Use as intended only.
6. Do not use if parts are loose or damaged.
7. Spare parts such as screws are available.
SAVE THIS MANUAL

3
PARTS LIST
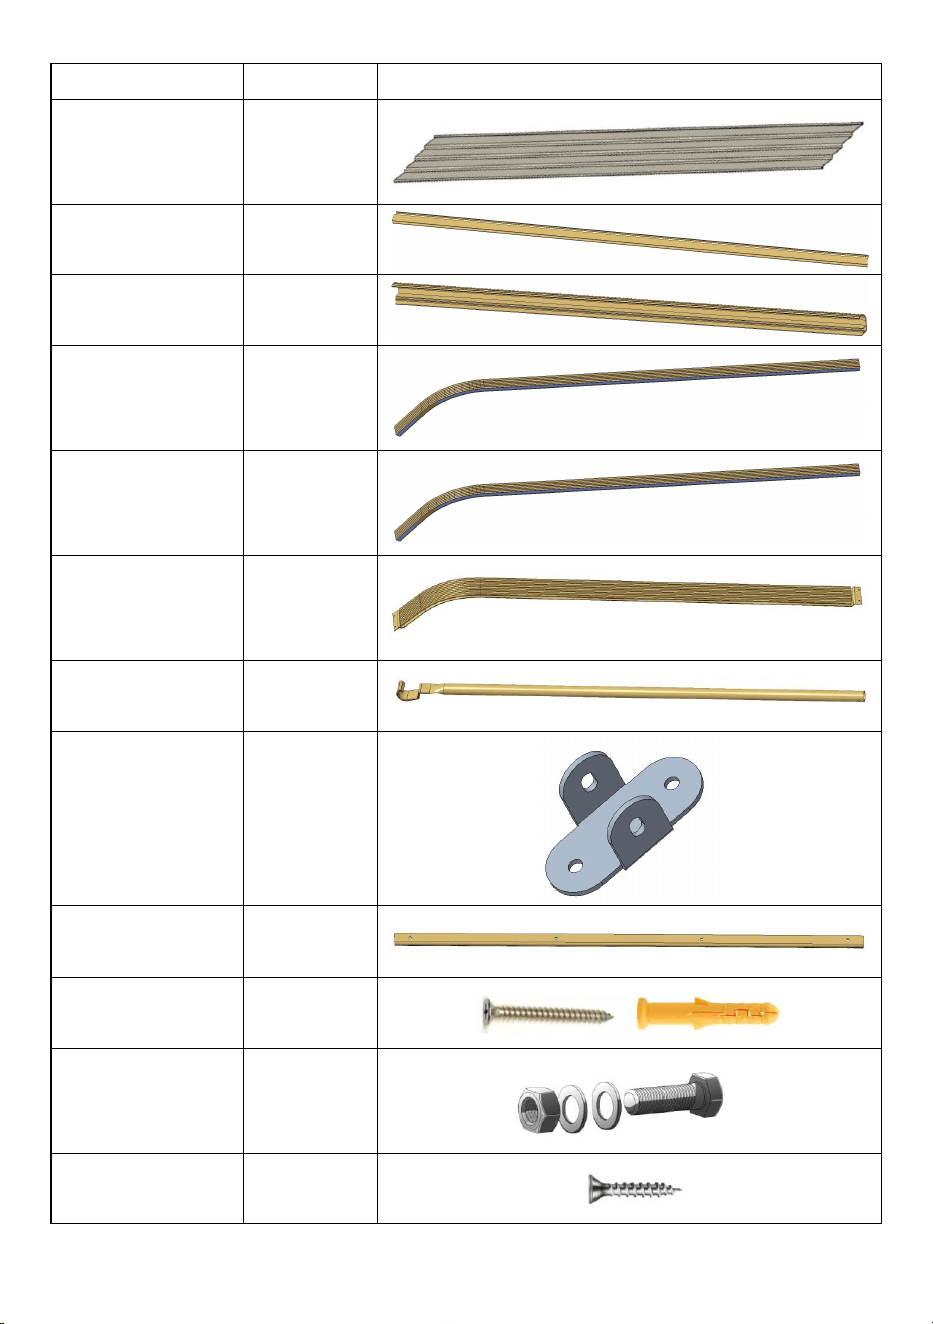
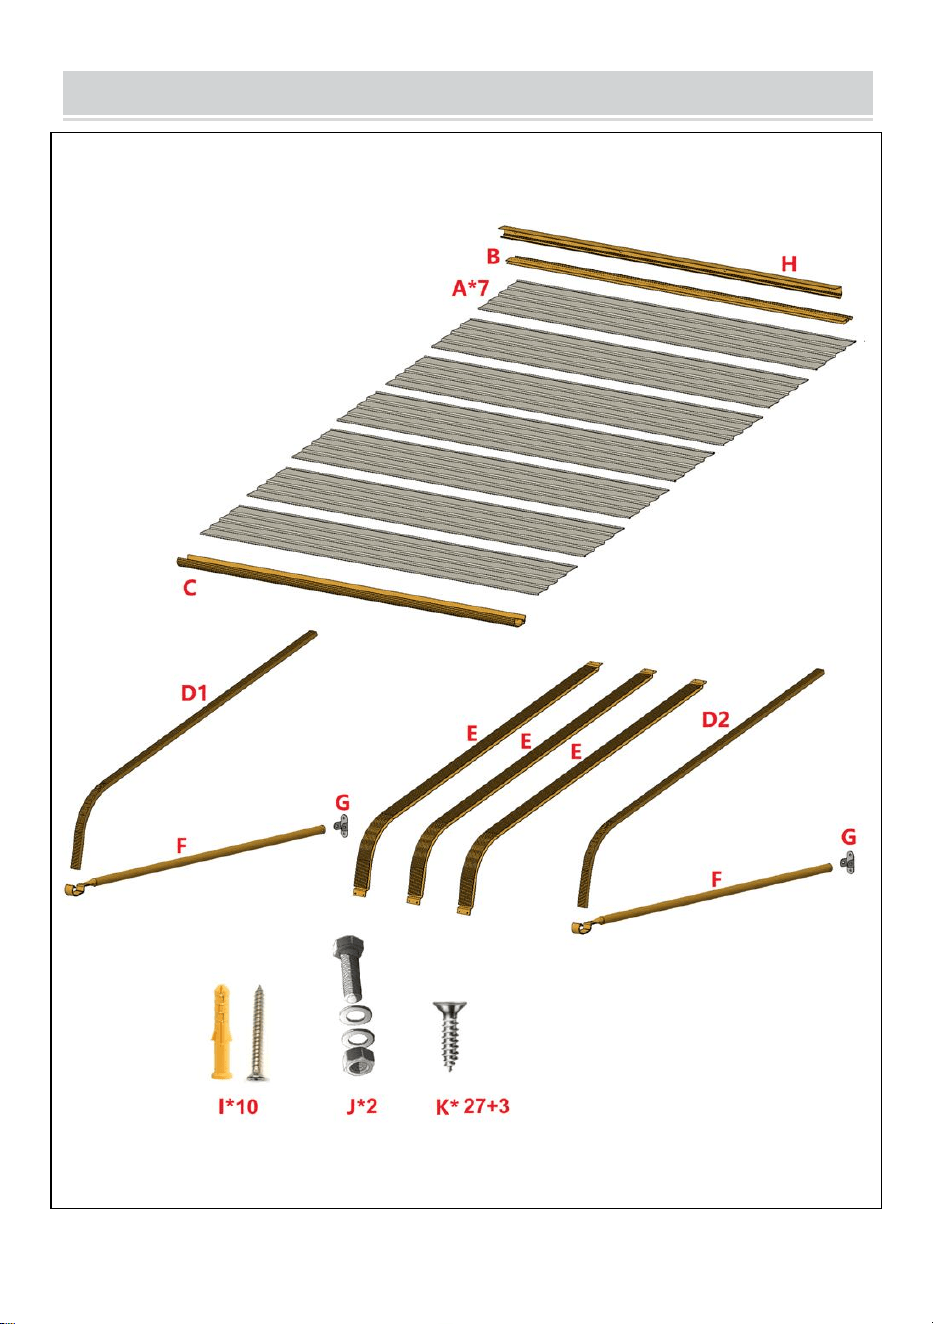
4
Serial number
Quantity
Part picture
A
7
B
1
C
1
D1
1
D1
1
E
3
F
2
G
2
H
1
I
10
J
2
K
27+3

5
ASSEMBLY STEP
Use screw(J*2) to fasten the tube(F*2) and the fixing part(G*2) together.
G*2
F*2
J*2
1
Fasten the tube.

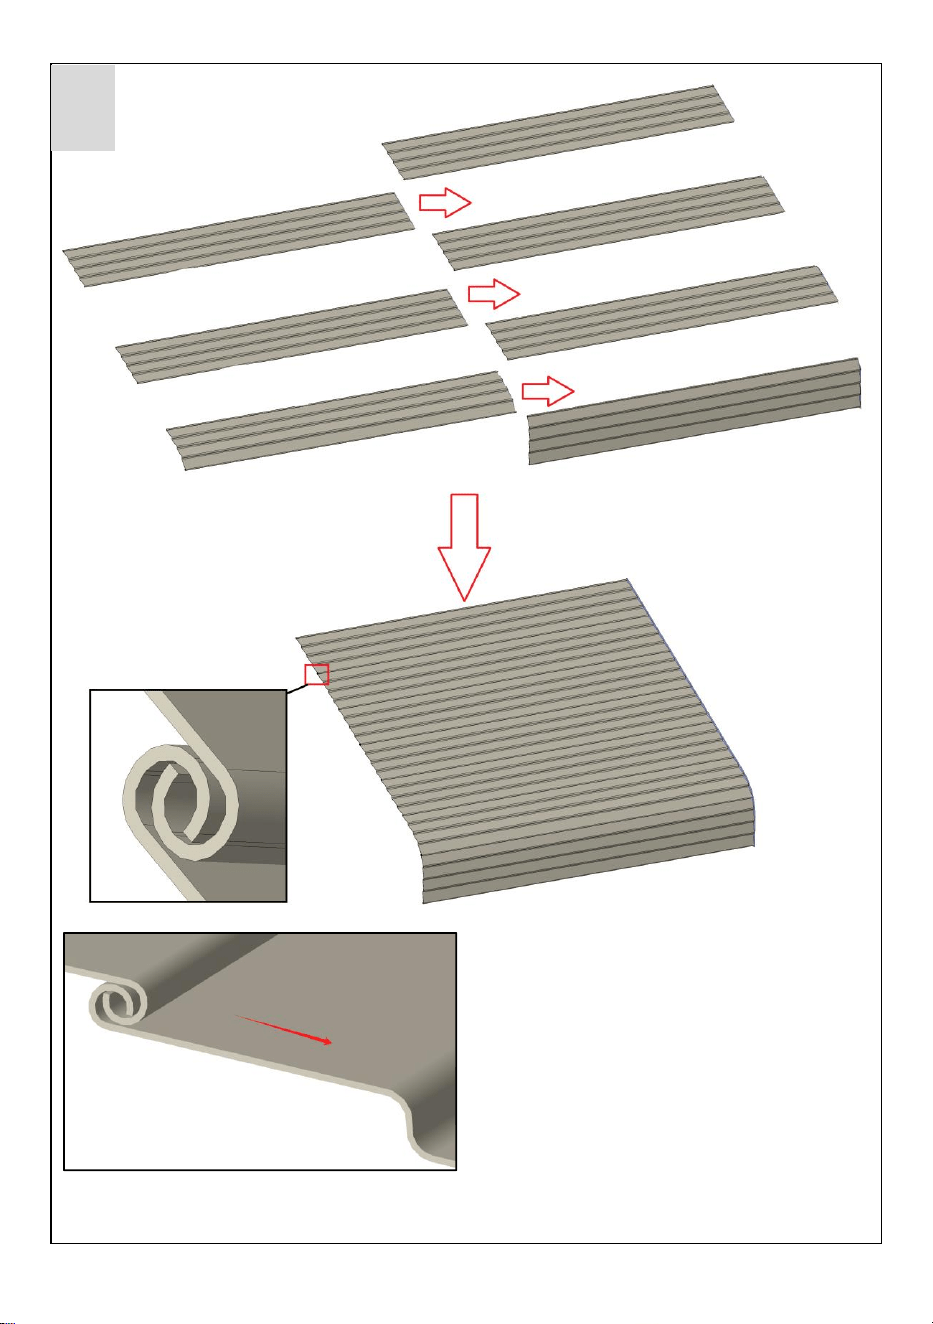
6
Insert the aluminum alloy sheets(A*7) into each other in the direction of the arrow.
A*7
2
Assemble the aluminum alloy sheets.

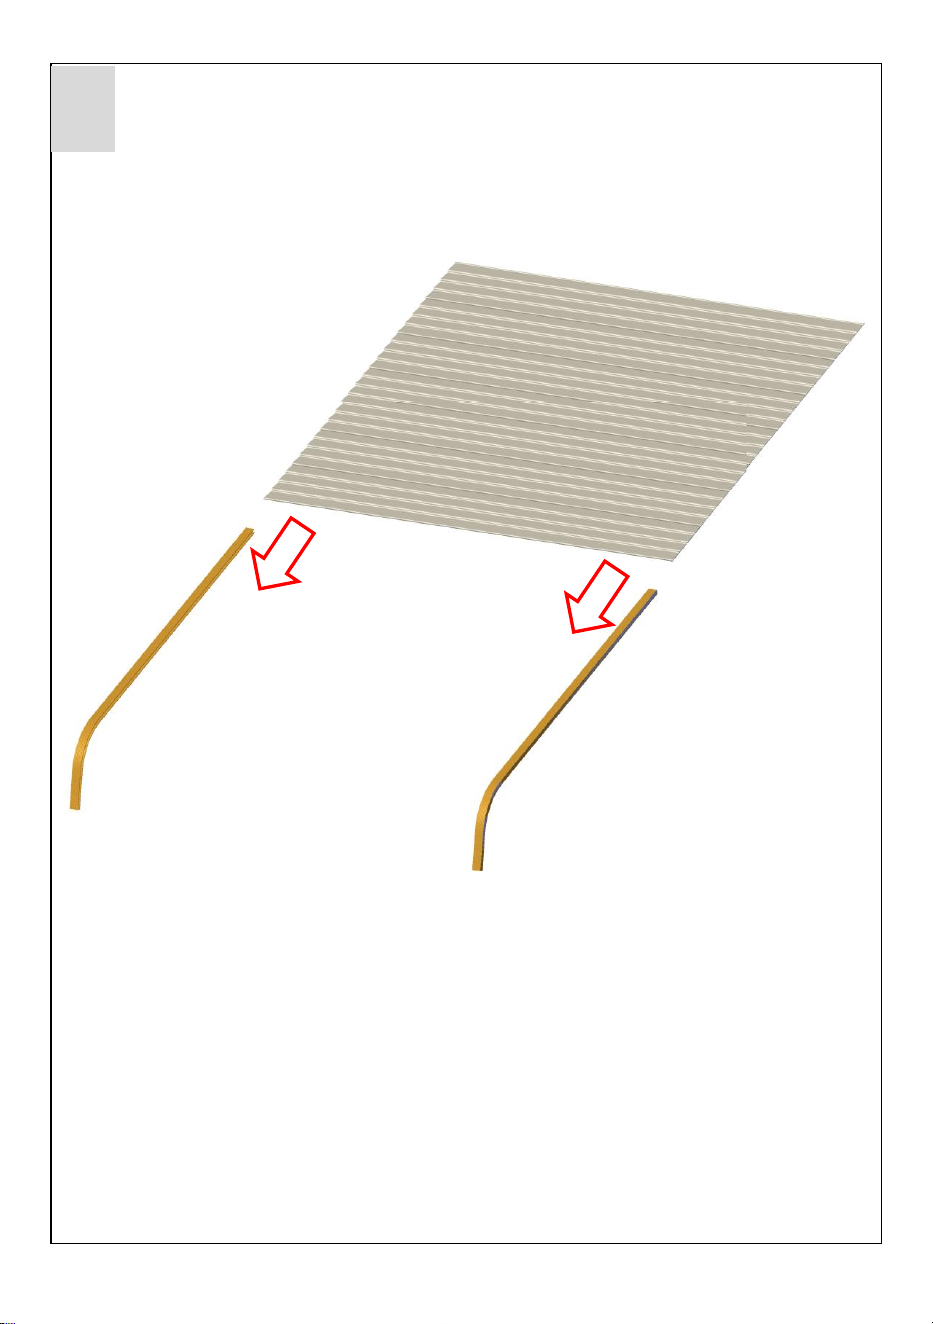
7
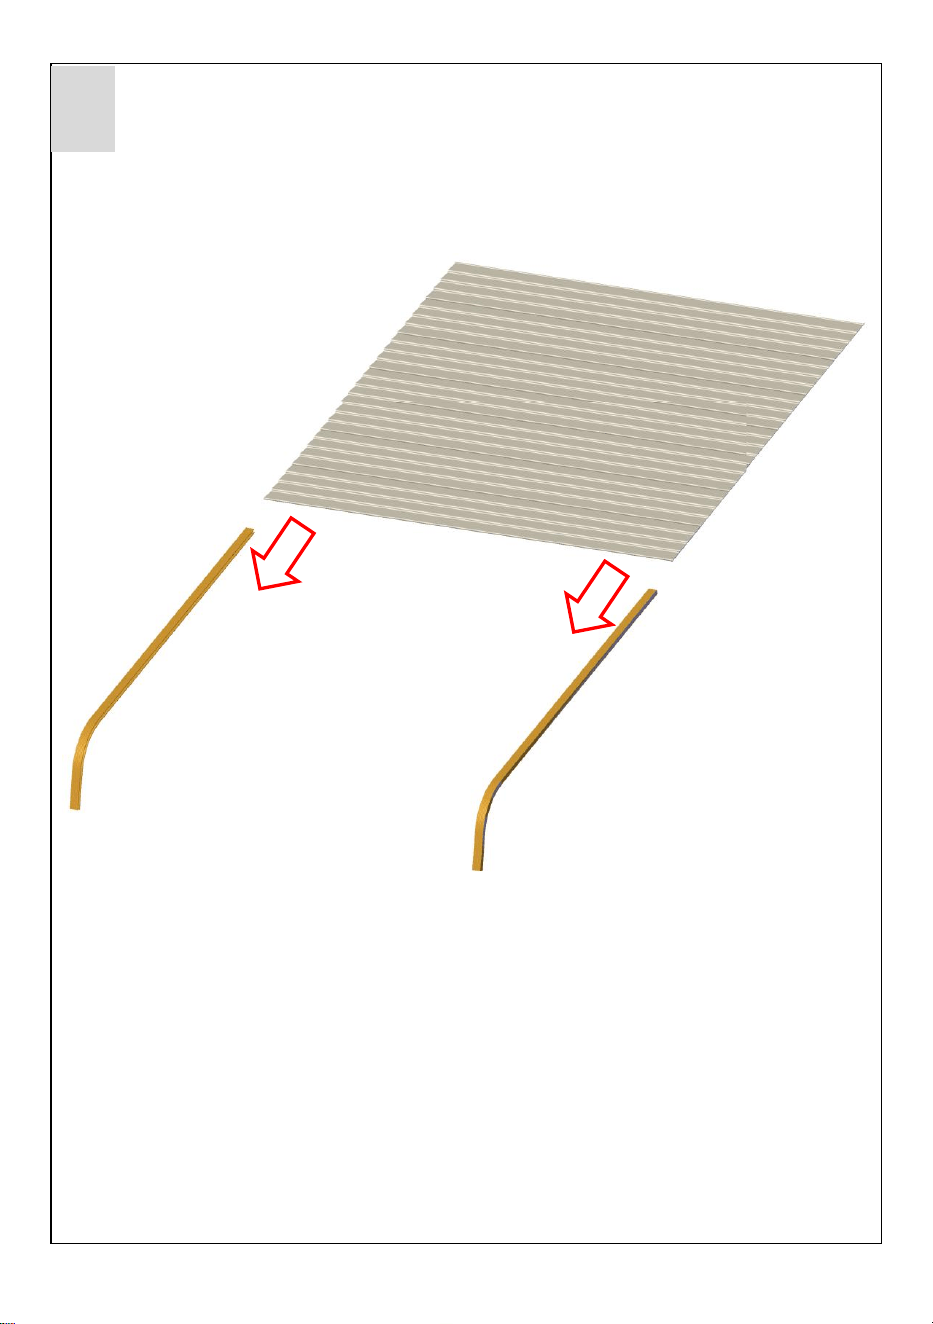
Insert the aluminum alloy sheet(A) into D1 and D2 in the direction of the arrow.
D1
D2
3
Assemble the aluminum alloy sheets.

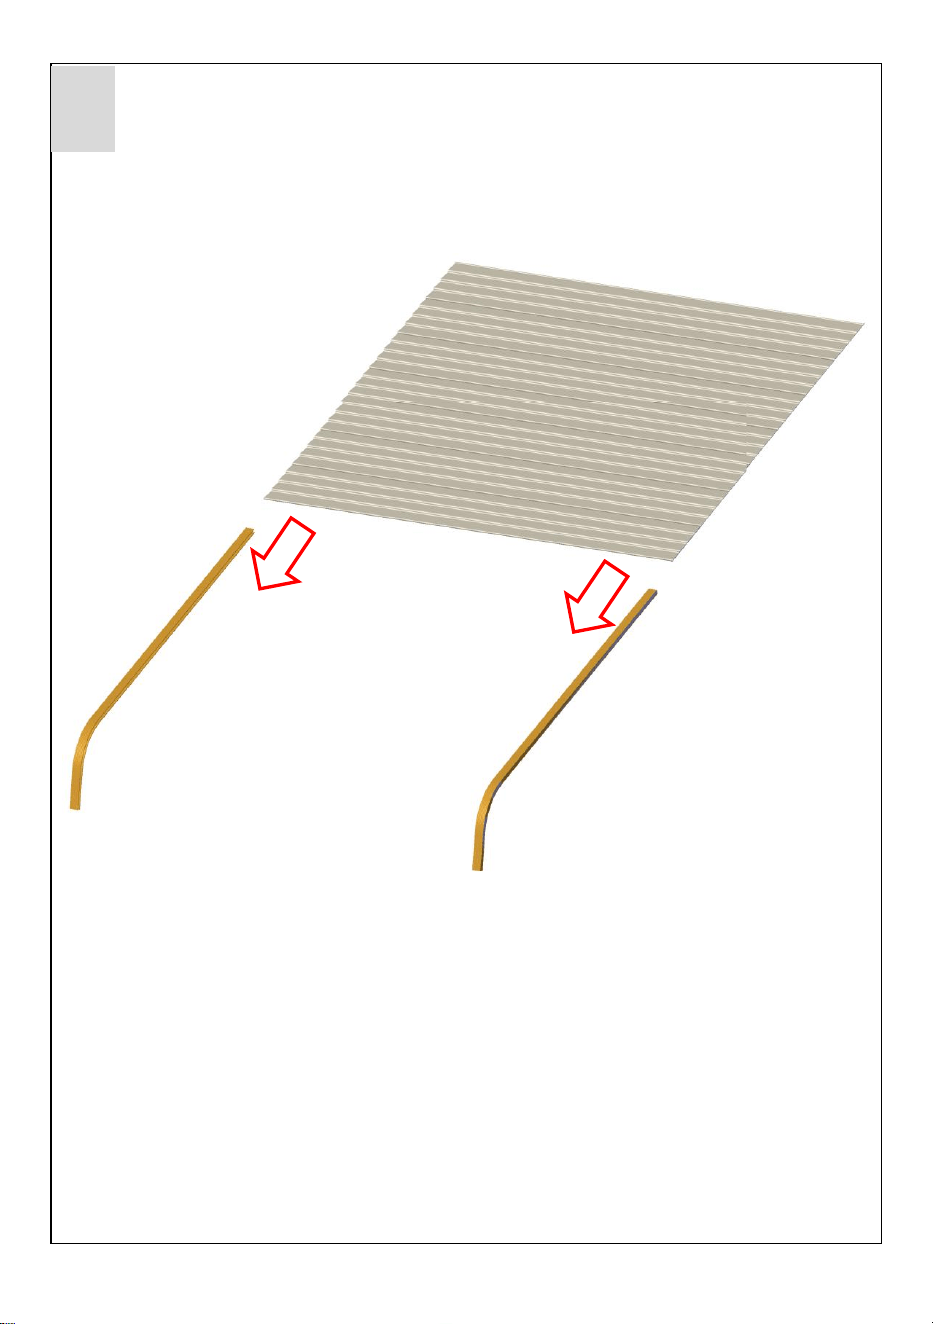
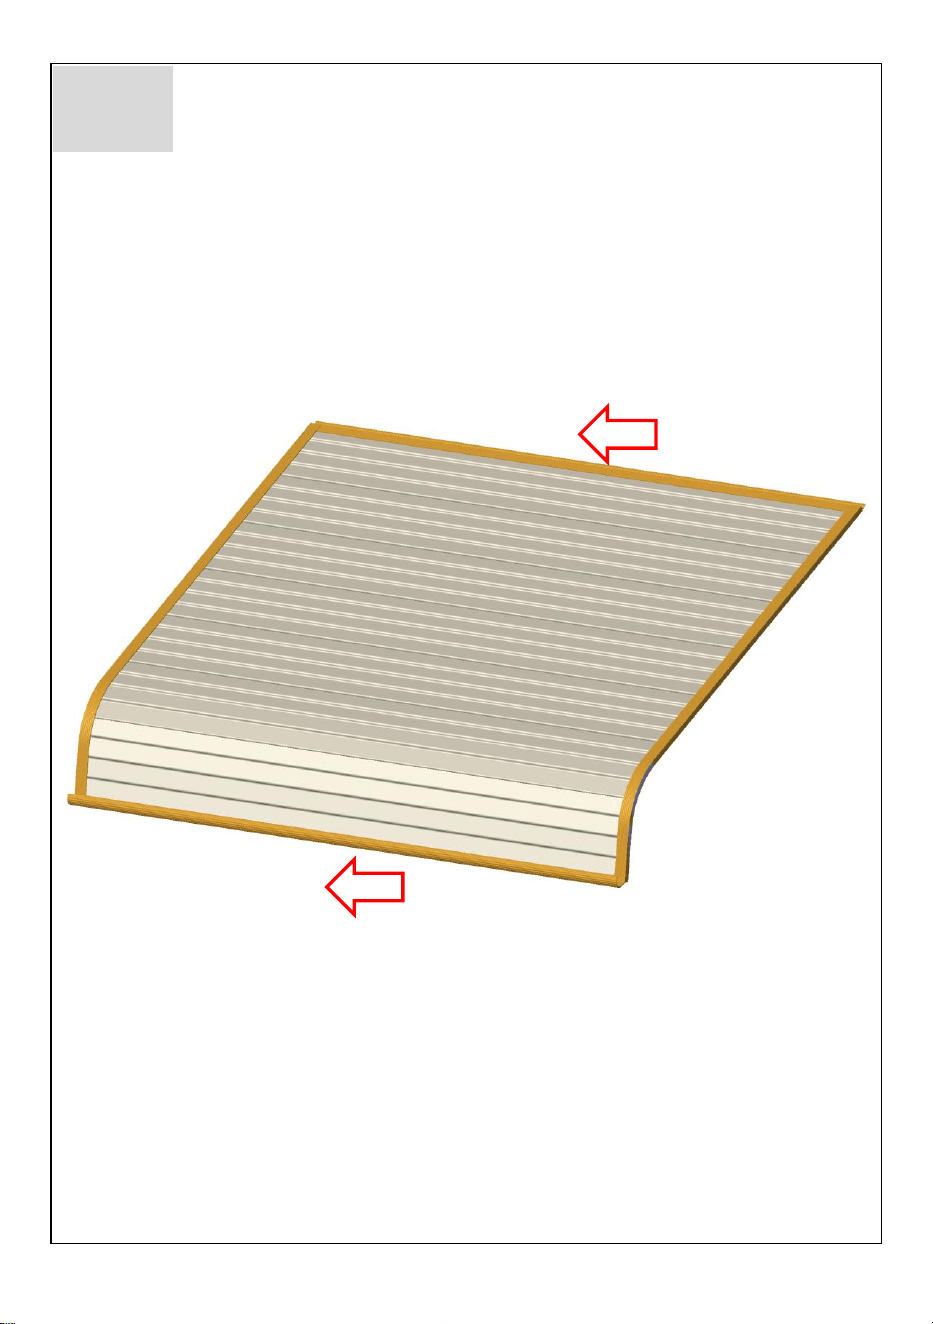
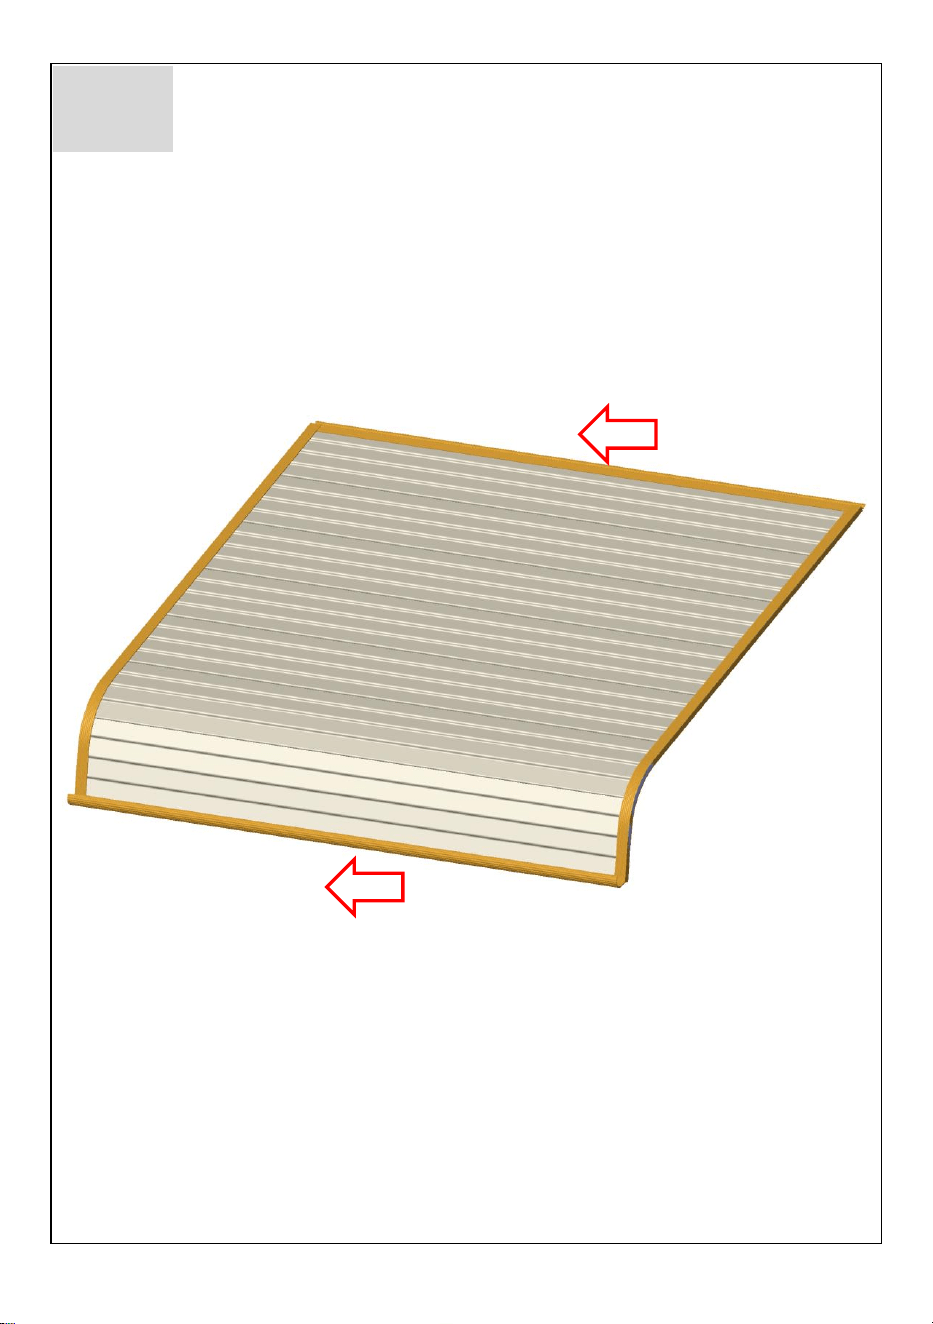
8
Insert parts B and C into the aluminum alloy sheet(A).
B
C
4-1
Assemble the aluminum alloy sheets.
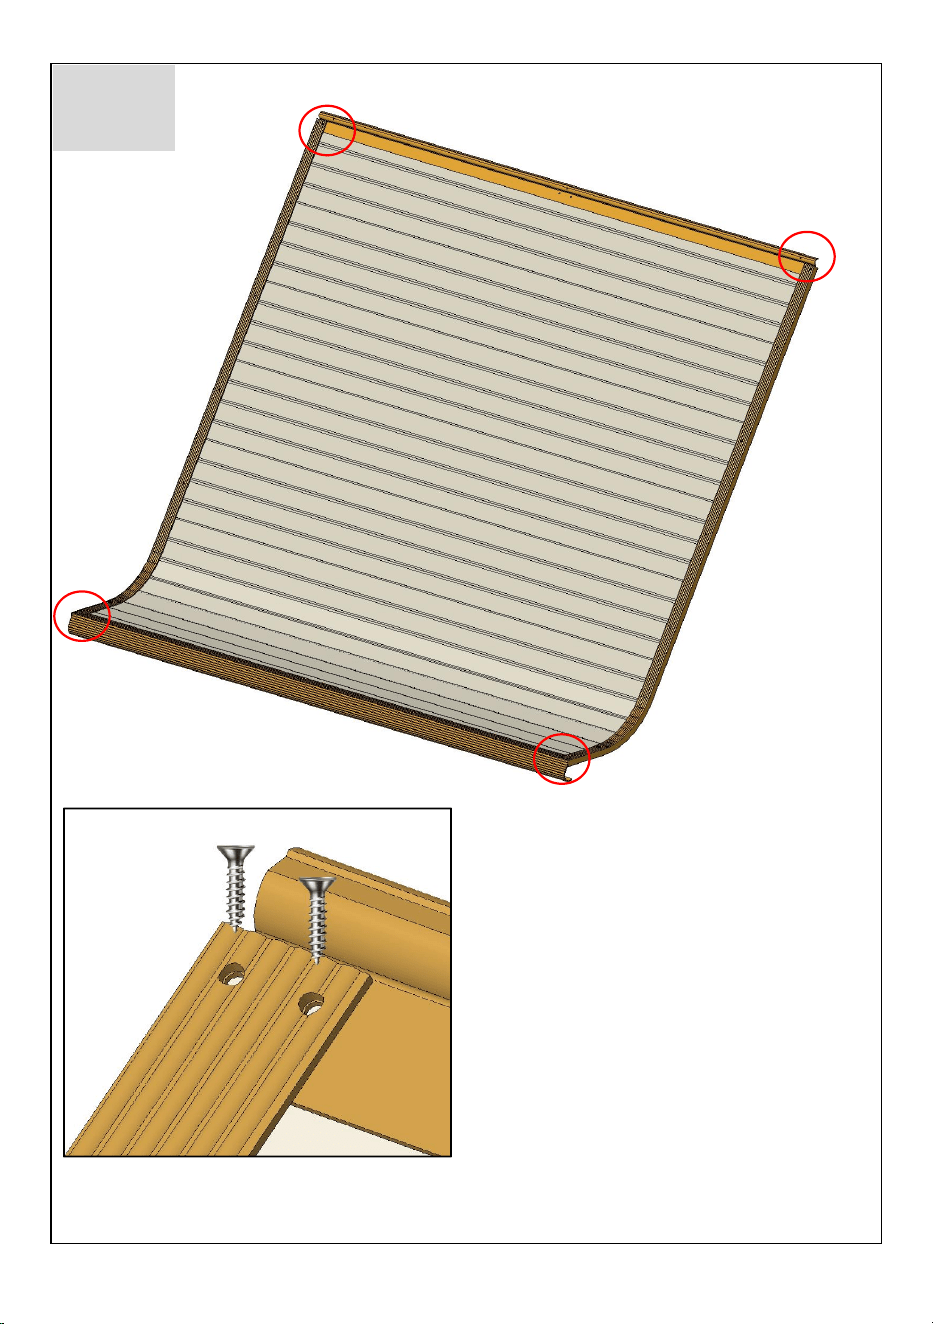
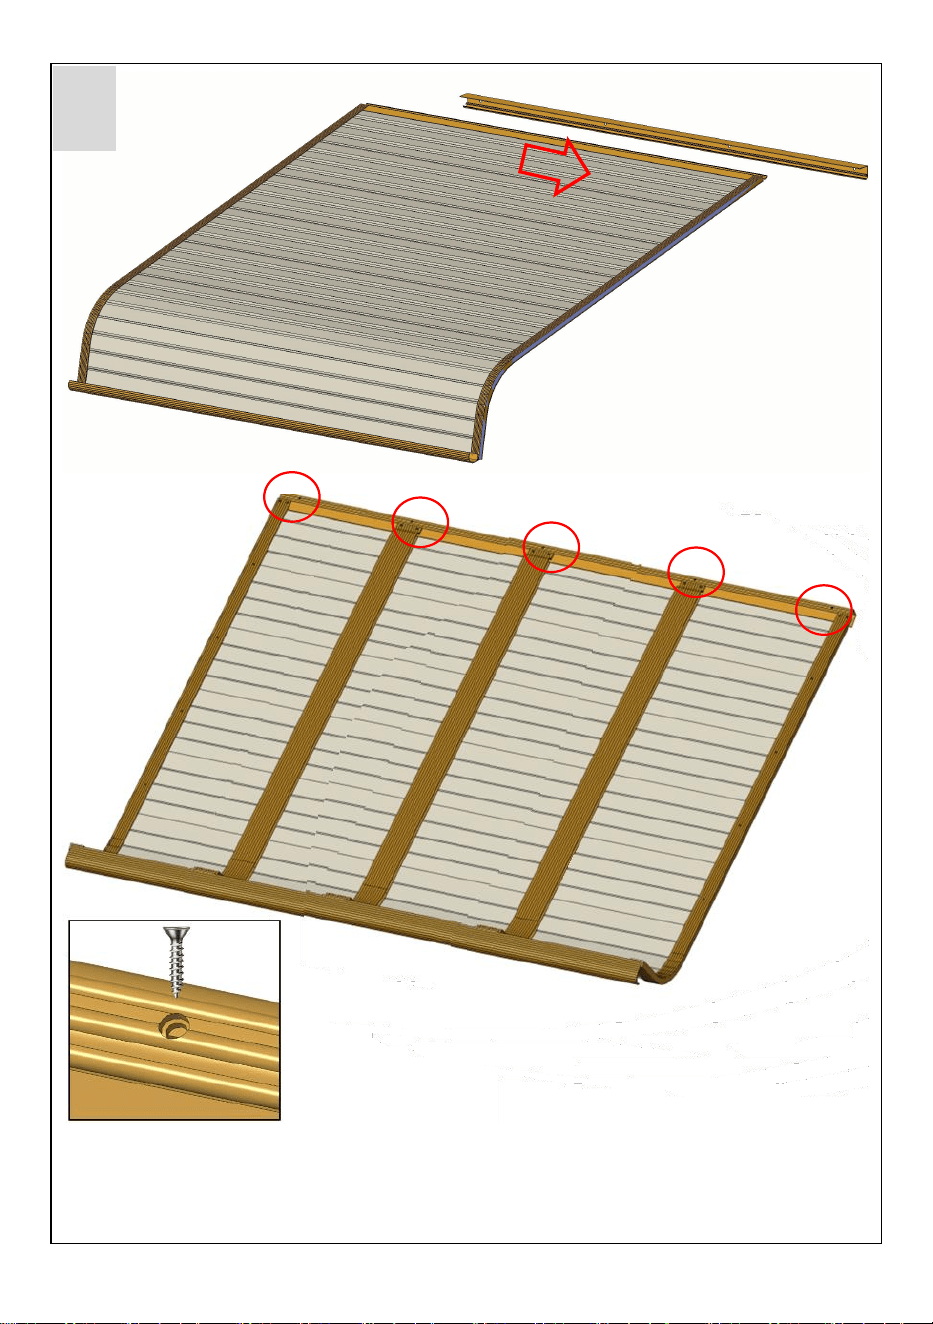
9
1.Turn the whole product over; 2.Fix it with screws(K*8).
K
4-2
Assemble the aluminum alloy sheets.
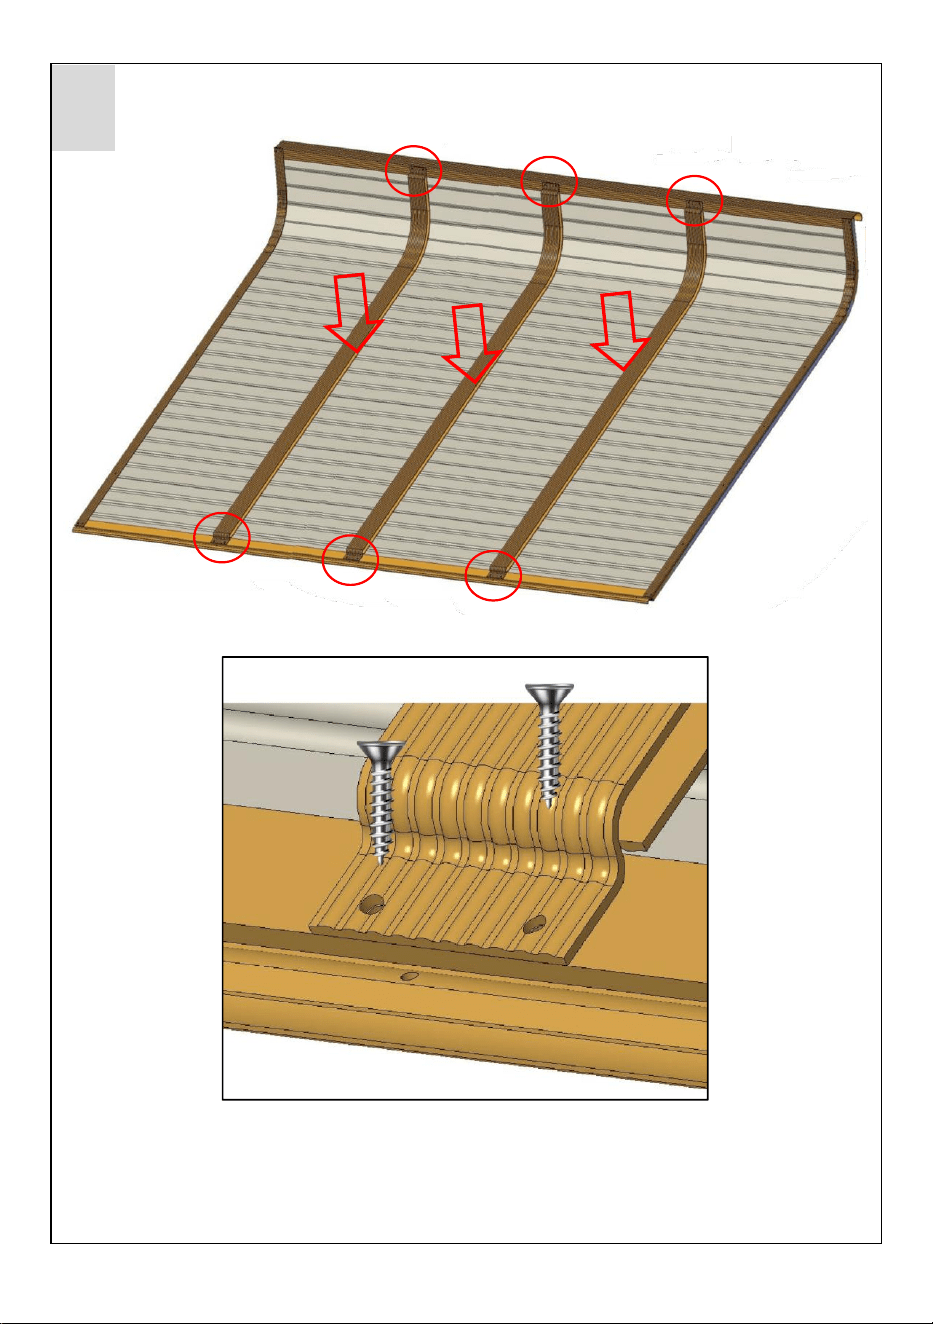
10
Install part E in the middle position of the aluminum alloy sheet and fix it with
screws(K*12).
K
K
E
5
Insert the aluminum alloy sheets.

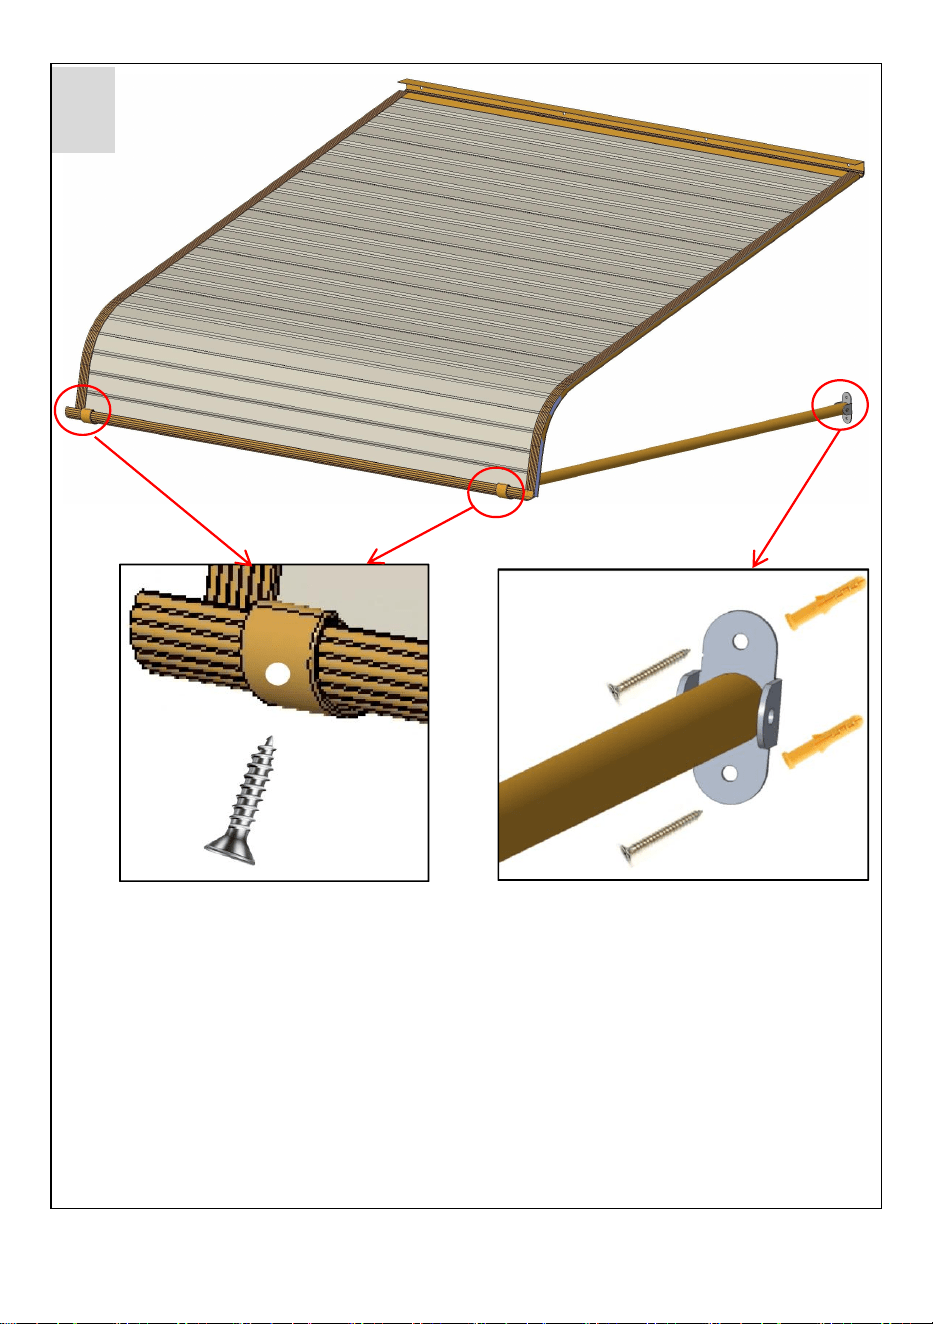
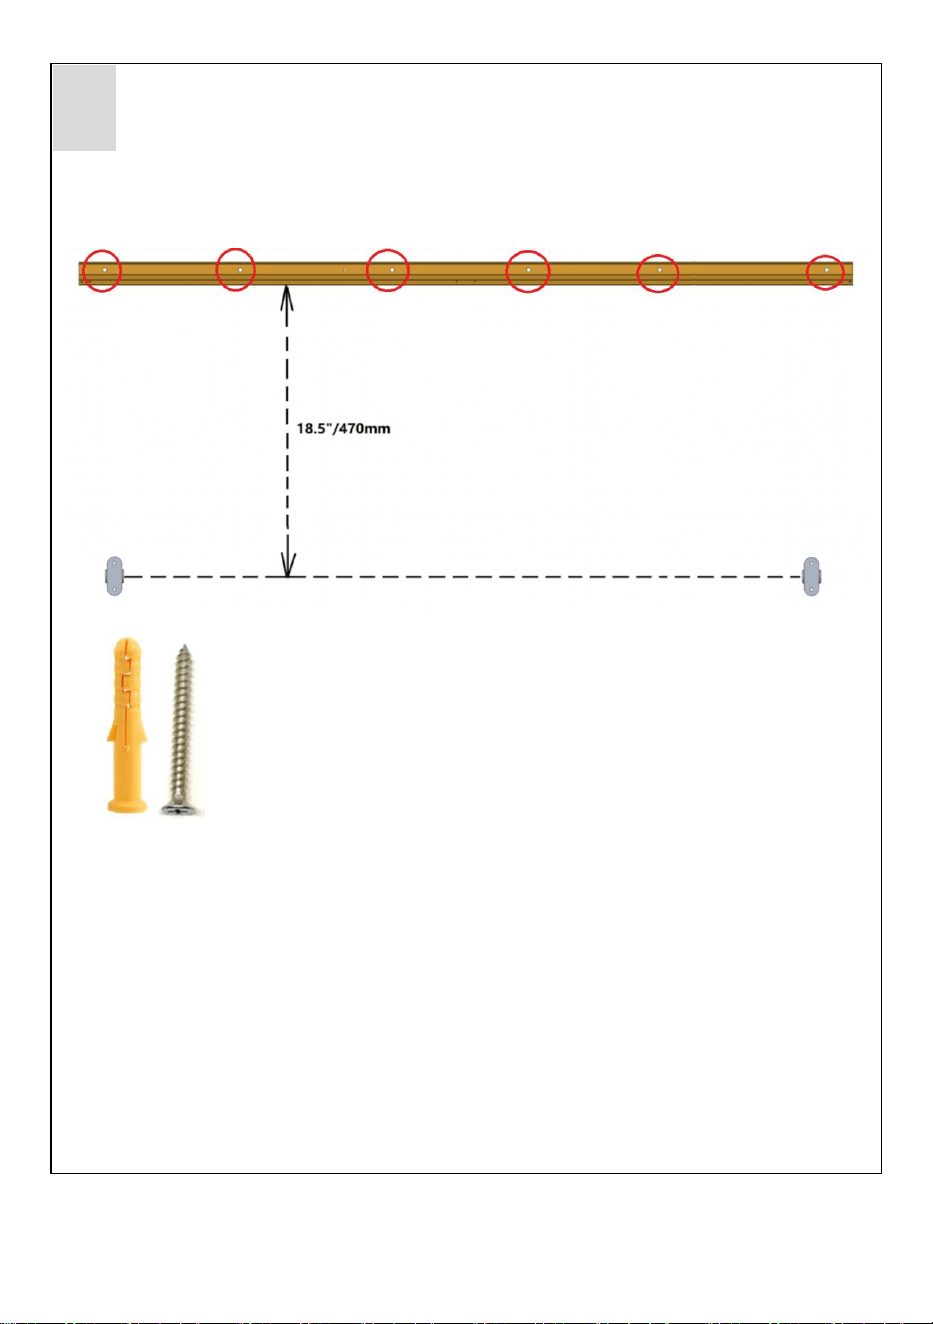
11
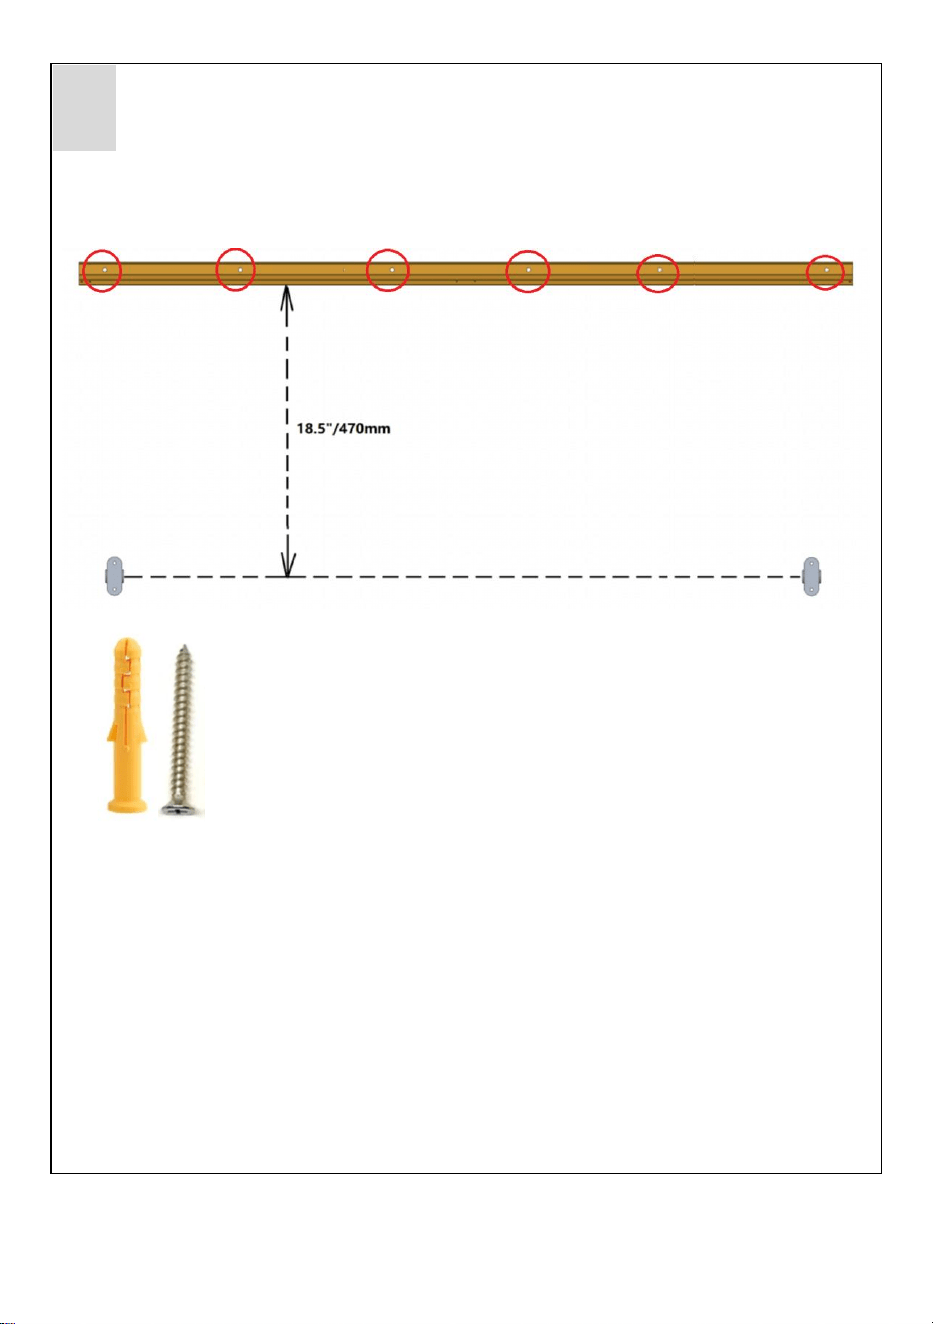
First, mark the positioning holes on the wall for part H according to the above -
recommended dimensions. Then, drill holes in the wall using a ø6~ø8mm drill bit.
Next, insert plastic plugs into the holes. Finally, install part H on the wall using wall
- floor nails(I*6).
H
I*6
6
Drill holes in the wall.

12
Insert the aluminum alloy sheet into part H.
Lock the parts with screw(K*5).
Note: There are 5 screw holes here, and you only need to fasten 2 of them.
H
7
Install the Metal Door Awning on the wall.
K*5

13
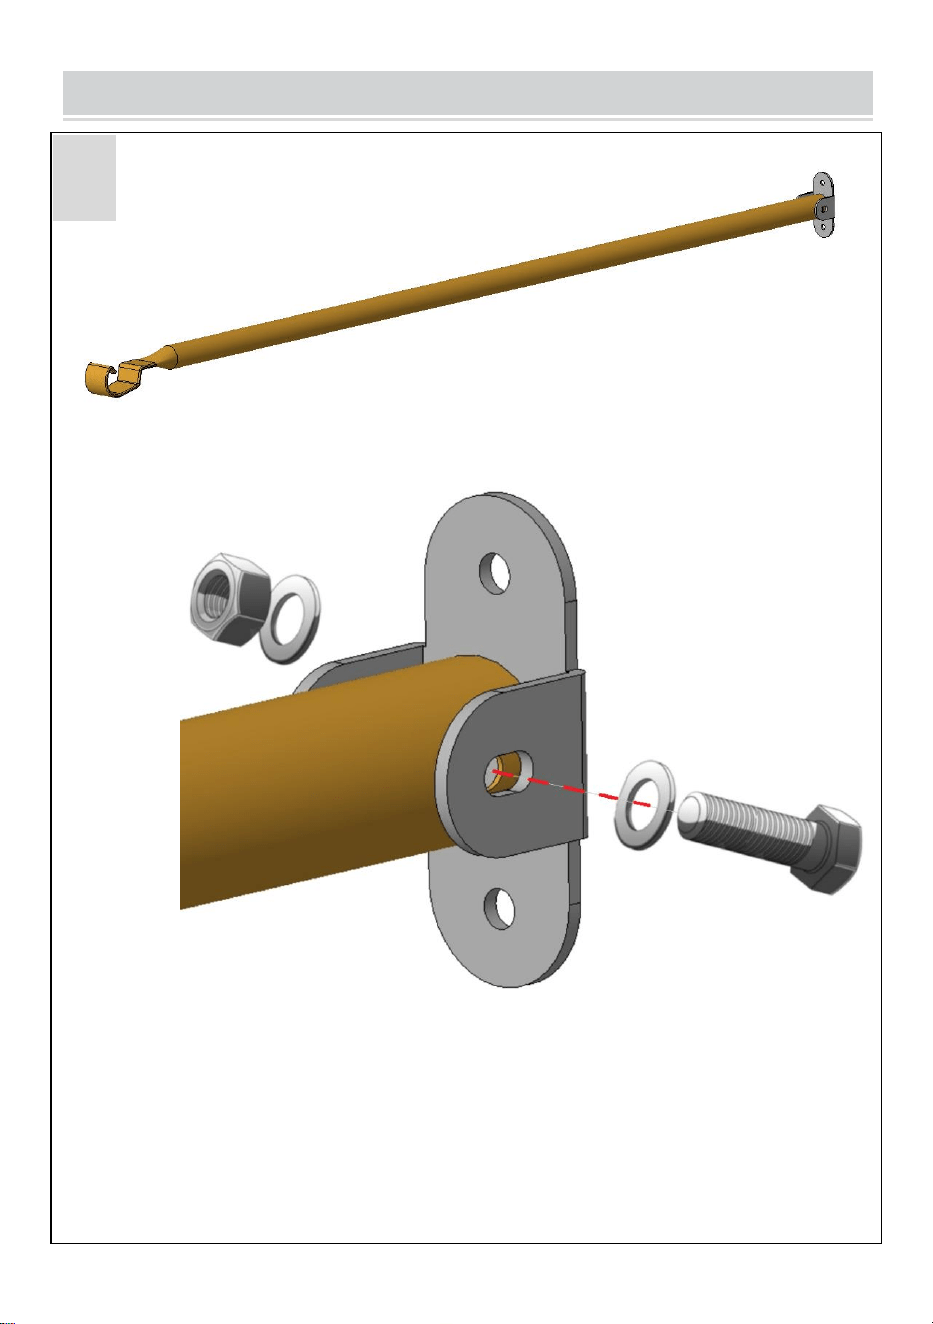
1.Attach part(F*2) to the product.
2.Determine a suitable position by taking into account the actual sizes of the
product and the door. Then, mark the positions of the fixing holes of part G on the
wall.
3.Drill holes in the wall, insert plastic components, and then use screws to fix the
product to the wall.
F
K*2
I*4
8
Install the Metal Door Awning on the wall.
14

15
Snow Loads
The aluminum door canopies are manufactured
from the highest - quality components available
on the market today. They are designed to
withstand normal weather conditions, including
rain, sleet, snow, and wind. However, they are
not designed to endure winds exceeding 30
miles per hour, snow loads of more than 12
inches of heavy, wet snow, or 24 inches of light
snow. Additionally, they cannot withstand the
impact force of snow and ice falling from an
upper roof or piling up. This product will deliver
excellent performance as long as it is installed
correctly and used within its designed load -
bearing limits.
Please remove snow promptly during use.

16
PRODUCT PARAMETER
Model
QL-60INCH
Material
Aluminum alloy
Colour
Silver
Shading area
60*42inch(1524*1066mm)
Maximum suitable width for
doors/windows
47.2inch/1200mm
Manufacturer:Shanghaimuxinmuyeyouxiangongsi
Address:Shuangchenglu803nong11hao1602A-1609shi,baoshanqu,
shanghai200000CN.
ECREP:E-CrossStuGmbH. MainzerLandstr.69,60329FrankfurtamMain.
UKREP:YHCONSULTINGLIMITED. C/OYHConsultingLimitedOffice147,
CenturionHouse, LondonRoad, Staines-upon-Thames, Surrey, TW184AX
ImportedtoAUS:SIHAOPTYLTD.
1ROKEVASTREETEASTWOODNSW2122Australia
ImportedtoUSA:SanvenTechnologyLtd.
Suite250,9166AnaheimPlace,RanchoCucamonga,CA91730


Technical Support and E-Warranty Certificate
www.vevor.com/support


1
MODEL:QL-60INCH
This is the original instruction, please read all manual instructions carefully
before operating. VEVOR reserves a clear interpretation of our user
manual. The appearance of the product shall be subject to the product you
received. Please forgive us that we won't inform you again if there are any
technology or software updates on our product.
METAL DOOR AWNING

2
SAFETY INSTRUCTIONS
WARNING:
Read this material before using this product. Failure to do so can
result in serious injury.
Assembly precautions
1. Assemble only according to these instructions. Improper assembly can
create hazards.
2. Wear ANSI-approved safety goggles and heavy-duty work gloves
during assembly.
3. Keep the assembly area clean and well-lit.
4. Keep bystanders out of the area during assembly.
5. Do not assemble if tired or when under the influence of alcohol, drugs
or medication.
6. The product capabilities apply to properly and completely assembled
products only.
7. Assemble on a flat, level, hard and smooth surface capable of safely
supporting the Metal Door Awning.
8. For additional information regarding the parts listed in the following
pages, please refer to the Assembly Diagram of this manual. Unwrap
and separate all parts in a clean work area.
Use precautions
1. DO NOT SIT OR STAND ON THIS ITEM.
2. This product is not a toy. Do not allow children to play with or near this
item.
3. Do not exceed specified weight capacities.
4. Use only on a flat, level, hard, and smooth surface that can safely
support a fully loaded Metal Door Awning.
5. Use as intended only.
6. Do not use if parts are loose or damaged.
7. Spare parts such as screws are available.
SAVE THIS MANUAL
3
PARTS LIST

4
Serial number
Quantity
Part picture
A
7
B
1
C
1
D1
1
D1
1
E
3
F
2
G
2
H
1
I
10
J
2
K
27+3

5
ASSEMBLY STEP
Use screw(J*2) to fasten the tube(F*2) and the fixing part(G*2) together.
G*2
F*2
J*2
1
Fasten the tube.
6
Insert the aluminum alloy sheets(A*7) into each other in the direction of the arrow.
A*7
2
Assemble the aluminum alloy sheets.

7
Insert the aluminum alloy sheet(A) into D1 and D2 in the direction of the arrow.
D1
D2
3
Assemble the aluminum alloy sheets.

8
Insert parts B and C into the aluminum alloy sheet(A).
B
C
4-1
Assemble the aluminum alloy sheets.

9
1.Turn the whole product over; 2.Fix it with screws(K*8).
K
4-2
Assemble the aluminum alloy sheets.

10
Install part E in the middle position of the aluminum alloy sheet and fix it with
screws(K*12).
K
K
E
5
Insert the aluminum alloy sheets.

11
First, mark the positioning holes on the wall for part H according to the above -
recommended dimensions. Then, drill holes in the wall using a ø6~ø8mm drill bit.
Next, insert plastic plugs into the holes. Finally, install part H on the wall using wall
- floor nails(I*6).
H
I*6
6
Drill holes in the wall.

12
Insert the aluminum alloy sheet into part H.
Lock the parts with screw(K*5).
Note: There are 5 screw holes here, and you only need to fasten 2 of them.
H
7
Install the Metal Door Awning on the wall.
K*5

13
1.Attach part(F*2) to the product.
2.Determine a suitable position by taking into account the actual sizes of the
product and the door. Then, mark the positions of the fixing holes of part G on the
wall.
3.Drill holes in the wall, insert plastic components, and then use screws to fix the
product to the wall.
F
K*2
I*4
8
Install the Metal Door Awning on the wall.

14

15
Snow Loads
The aluminum door canopies are manufactured
from the highest - quality components available
on the market today. They are designed to
withstand normal weather conditions, including
rain, sleet, snow, and wind. However, they are
not designed to endure winds exceeding 30
miles per hour, snow loads of more than 12
inches of heavy, wet snow, or 24 inches of light
snow. Additionally, they cannot withstand the
impact force of snow and ice falling from an
upper roof or piling up. This product will deliver
excellent performance as long as it is installed
correctly and used within its designed load -
bearing limits.
Please remove snow promptly during use.

16
PRODUCT PARAMETER
Model
QL-60INCH
Material
Aluminum alloy
Colour
Silver
Shading area
60*42inch(1524*1066mm)
Maximum suitable width for
doors/windows
47.2inch/1200mm
Manufacturer:Shanghaimuxinmuyeyouxiangongsi
Address:Shuangchenglu803nong11hao1602A-1609shi,baoshanqu,
shanghai200000CN.
ECREP:E-CrossStuGmbH. MainzerLandstr.69,60329FrankfurtamMain.
UKREP:YHCONSULTINGLIMITED. C/OYHConsultingLimitedOffice147,
CenturionHouse, LondonRoad, Staines-upon-Thames, Surrey, TW184AX
ImportedtoAUS:SIHAOPTYLTD.
1ROKEVASTREETEASTWOODNSW2122Australia
ImportedtoUSA:SanvenTechnologyLtd.
Suite250,9166AnaheimPlace,RanchoCucamonga,CA91730


Technical Support and E-Warranty Certificate
www.vevor.com/support


1
MODEL:QL-60INCH
This is the original instruction, please read all manual instructions carefully
before operating. VEVOR reserves a clear interpretation of our user
manual. The appearance of the product shall be subject to the product you
received. Please forgive us that we won't inform you again if there are any
technology or software updates on our product.
METAL DOOR AWNING

2
SAFETY INSTRUCTIONS
WARNING:
Read this material before using this product. Failure to do so can
result in serious injury.
Assembly precautions
1. Assemble only according to these instructions. Improper assembly can
create hazards.
2. Wear ANSI-approved safety goggles and heavy-duty work gloves
during assembly.
3. Keep the assembly area clean and well-lit.
4. Keep bystanders out of the area during assembly.
5. Do not assemble if tired or when under the influence of alcohol, drugs
or medication.
6. The product capabilities apply to properly and completely assembled
products only.
7. Assemble on a flat, level, hard and smooth surface capable of safely
supporting the Metal Door Awning.
8. For additional information regarding the parts listed in the following
pages, please refer to the Assembly Diagram of this manual. Unwrap
and separate all parts in a clean work area.
Use precautions
1. DO NOT SIT OR STAND ON THIS ITEM.
2. This product is not a toy. Do not allow children to play with or near this
item.
3. Do not exceed specified weight capacities.
4. Use only on a flat, level, hard, and smooth surface that can safely
support a fully loaded Metal Door Awning.
5. Use as intended only.
6. Do not use if parts are loose or damaged.
7. Spare parts such as screws are available.
SAVE THIS MANUAL

3
PARTS LIST

4
Serial number
Quantity
Part picture
A
7
B
1
C
1
D1
1
D1
1
E
3
F
2
G
2
H
1
I
10
J
2
K
27+3

5
ASSEMBLY STEP
Use screw(J*2) to fasten the tube(F*2) and the fixing part(G*2) together.
G*2
F*2
J*2
1
Fasten the tube.

6
Insert the aluminum alloy sheets(A*7) into each other in the direction of the arrow.
A*7
2
Assemble the aluminum alloy sheets.
7
Insert the aluminum alloy sheet(A) into D1 and D2 in the direction of the arrow.
D1
D2
3
Assemble the aluminum alloy sheets.

8
Insert parts B and C into the aluminum alloy sheet(A).
B
C
4-1
Assemble the aluminum alloy sheets.

9
1.Turn the whole product over; 2.Fix it with screws(K*8).
K
4-2
Assemble the aluminum alloy sheets.

10
Install part E in the middle position of the aluminum alloy sheet and fix it with
screws(K*12).
K
K
E
5
Insert the aluminum alloy sheets.

11
First, mark the positioning holes on the wall for part H according to the above -
recommended dimensions. Then, drill holes in the wall using a ø6~ø8mm drill bit.
Next, insert plastic plugs into the holes. Finally, install part H on the wall using wall
- floor nails(I*6).
H
I*6
6
Drill holes in the wall.
12
Insert the aluminum alloy sheet into part H.
Lock the parts with screw(K*5).
Note: There are 5 screw holes here, and you only need to fasten 2 of them.
H
7
Install the Metal Door Awning on the wall.
K*5

13
1.Attach part(F*2) to the product.
2.Determine a suitable position by taking into account the actual sizes of the
product and the door. Then, mark the positions of the fixing holes of part G on the
wall.
3.Drill holes in the wall, insert plastic components, and then use screws to fix the
product to the wall.
F
K*2
I*4
8
Install the Metal Door Awning on the wall.
14

15
Snow Loads
The aluminum door canopies are manufactured
from the highest - quality components available
on the market today. They are designed to
withstand normal weather conditions, including
rain, sleet, snow, and wind. However, they are
not designed to endure winds exceeding 30
miles per hour, snow loads of more than 12
inches of heavy, wet snow, or 24 inches of light
snow. Additionally, they cannot withstand the
impact force of snow and ice falling from an
upper roof or piling up. This product will deliver
excellent performance as long as it is installed
correctly and used within its designed load -
bearing limits.
Please remove snow promptly during use.

16
PRODUCT PARAMETER
Model
QL-60INCH
Material
Aluminum alloy
Colour
Silver
Shading area
60*42inch(1524*1066mm)
Maximum suitable width for
doors/windows
47.2inch/1200mm
Manufacturer:Shanghaimuxinmuyeyouxiangongsi
Address:Shuangchenglu803nong11hao1602A-1609shi,baoshanqu,
shanghai200000CN.
ECREP:E-CrossStuGmbH. MainzerLandstr.69,60329FrankfurtamMain.
UKREP:YHCONSULTINGLIMITED. C/OYHConsultingLimitedOffice147,
CenturionHouse, LondonRoad, Staines-upon-Thames, Surrey, TW184AX
ImportedtoAUS:SIHAOPTYLTD.
1ROKEVASTREETEASTWOODNSW2122Australia
ImportedtoUSA:SanvenTechnologyLtd.
Suite250,9166AnaheimPlace,RanchoCucamonga,CA91730


Technical Support and E-Warranty Certificate
www.vevor.com/support


1
MODEL:QL-60INCH
This is the original instruction, please read all manual instructions carefully
before operating. VEVOR reserves a clear interpretation of our user
manual. The appearance of the product shall be subject to the product you
received. Please forgive us that we won't inform you again if there are any
technology or software updates on our product.
METAL DOOR AWNING

2
SAFETY INSTRUCTIONS
WARNING:
Read this material before using this product. Failure to do so can
result in serious injury.
Assembly precautions
1. Assemble only according to these instructions. Improper assembly can
create hazards.
2. Wear ANSI-approved safety goggles and heavy-duty work gloves
during assembly.
3. Keep the assembly area clean and well-lit.
4. Keep bystanders out of the area during assembly.
5. Do not assemble if tired or when under the influence of alcohol, drugs
or medication.
6. The product capabilities apply to properly and completely assembled
products only.
7. Assemble on a flat, level, hard and smooth surface capable of safely
supporting the Metal Door Awning.
8. For additional information regarding the parts listed in the following
pages, please refer to the Assembly Diagram of this manual. Unwrap
and separate all parts in a clean work area.
Use precautions
1. DO NOT SIT OR STAND ON THIS ITEM.
2. This product is not a toy. Do not allow children to play with or near this
item.
3. Do not exceed specified weight capacities.
4. Use only on a flat, level, hard, and smooth surface that can safely
support a fully loaded Metal Door Awning.
5. Use as intended only.
6. Do not use if parts are loose or damaged.
7. Spare parts such as screws are available.
SAVE THIS MANUAL

3
PARTS LIST

4
Serial number
Quantity
Part picture
A
7
B
1
C
1
D1
1
D1
1
E
3
F
2
G
2
H
1
I
10
J
2
K
27+3

5
ASSEMBLY STEP
Use screw(J*2) to fasten the tube(F*2) and the fixing part(G*2) together.
G*2
F*2
J*2
1
Fasten the tube.

6
Insert the aluminum alloy sheets(A*7) into each other in the direction of the arrow.
A*7
2
Assemble the aluminum alloy sheets.
7
Insert the aluminum alloy sheet(A) into D1 and D2 in the direction of the arrow.
D1
D2
3
Assemble the aluminum alloy sheets.

8
Insert parts B and C into the aluminum alloy sheet(A).
B
C
4-1
Assemble the aluminum alloy sheets.

9
1.Turn the whole product over; 2.Fix it with screws(K*8).
K
4-2
Assemble the aluminum alloy sheets.

10
Install part E in the middle position of the aluminum alloy sheet and fix it with
screws(K*12).
K
K
E
5
Insert the aluminum alloy sheets.

11
First, mark the positioning holes on the wall for part H according to the above -
recommended dimensions. Then, drill holes in the wall using a ø6~ø8mm drill bit.
Next, insert plastic plugs into the holes. Finally, install part H on the wall using wall
- floor nails(I*6).
H
I*6
6
Drill holes in the wall.

12
Insert the aluminum alloy sheet into part H.
Lock the parts with screw(K*5).
Note: There are 5 screw holes here, and you only need to fasten 2 of them.
H
7
Install the Metal Door Awning on the wall.
K*5
13
1.Attach part(F*2) to the product.
2.Determine a suitable position by taking into account the actual sizes of the
product and the door. Then, mark the positions of the fixing holes of part G on the
wall.
3.Drill holes in the wall, insert plastic components, and then use screws to fix the
product to the wall.
F
K*2
I*4
8
Install the Metal Door Awning on the wall.

14

15
Snow Loads
The aluminum door canopies are manufactured
from the highest - quality components available
on the market today. They are designed to
withstand normal weather conditions, including
rain, sleet, snow, and wind. However, they are
not designed to endure winds exceeding 30
miles per hour, snow loads of more than 12
inches of heavy, wet snow, or 24 inches of light
snow. Additionally, they cannot withstand the
impact force of snow and ice falling from an
upper roof or piling up. This product will deliver
excellent performance as long as it is installed
correctly and used within its designed load -
bearing limits.
Please remove snow promptly during use.

16
PRODUCT PARAMETER
Model
QL-60INCH
Material
Aluminum alloy
Colour
Silver
Shading area
60*42inch(1524*1066mm)
Maximum suitable width for
doors/windows
47.2inch/1200mm
Manufacturer:Shanghaimuxinmuyeyouxiangongsi
Address:Shuangchenglu803nong11hao1602A-1609shi,baoshanqu,
shanghai200000CN.
ECREP:E-CrossStuGmbH. MainzerLandstr.69,60329FrankfurtamMain.
UKREP:YHCONSULTINGLIMITED. C/OYHConsultingLimitedOffice147,
CenturionHouse, LondonRoad, Staines-upon-Thames, Surrey, TW184AX
ImportedtoAUS:SIHAOPTYLTD.
1ROKEVASTREETEASTWOODNSW2122Australia
ImportedtoUSA:SanvenTechnologyLtd.
Suite250,9166AnaheimPlace,RanchoCucamonga,CA91730


Technical Support and E-Warranty Certificate
www.vevor.com/support


1
MODEL:QL-60INCH
This is the original instruction, please read all manual instructions carefully
before operating. VEVOR reserves a clear interpretation of our user
manual. The appearance of the product shall be subject to the product you
received. Please forgive us that we won't inform you again if there are any
technology or software updates on our product.
METAL DOOR AWNING

2
SAFETY INSTRUCTIONS
WARNING:
Read this material before using this product. Failure to do so can
result in serious injury.
Assembly precautions
1. Assemble only according to these instructions. Improper assembly can
create hazards.
2. Wear ANSI-approved safety goggles and heavy-duty work gloves
during assembly.
3. Keep the assembly area clean and well-lit.
4. Keep bystanders out of the area during assembly.
5. Do not assemble if tired or when under the influence of alcohol, drugs
or medication.
6. The product capabilities apply to properly and completely assembled
products only.
7. Assemble on a flat, level, hard and smooth surface capable of safely
supporting the Metal Door Awning.
8. For additional information regarding the parts listed in the following
pages, please refer to the Assembly Diagram of this manual. Unwrap
and separate all parts in a clean work area.
Use precautions
1. DO NOT SIT OR STAND ON THIS ITEM.
2. This product is not a toy. Do not allow children to play with or near this
item.
3. Do not exceed specified weight capacities.
4. Use only on a flat, level, hard, and smooth surface that can safely
support a fully loaded Metal Door Awning.
5. Use as intended only.
6. Do not use if parts are loose or damaged.
7. Spare parts such as screws are available.
SAVE THIS MANUAL

3
PARTS LIST

4
Serial number
Quantity
Part picture
A
7
B
1
C
1
D1
1
D1
1
E
3
F
2
G
2
H
1
I
10
J
2
K
27+3
5
ASSEMBLY STEP
Use screw(J*2) to fasten the tube(F*2) and the fixing part(G*2) together.
G*2
F*2
J*2
1
Fasten the tube.

6
Insert the aluminum alloy sheets(A*7) into each other in the direction of the arrow.
A*7
2
Assemble the aluminum alloy sheets.

7
Insert the aluminum alloy sheet(A) into D1 and D2 in the direction of the arrow.
D1
D2
3
Assemble the aluminum alloy sheets.

8
Insert parts B and C into the aluminum alloy sheet(A).
B
C
4-1
Assemble the aluminum alloy sheets.

9
1.Turn the whole product over; 2.Fix it with screws(K*8).
K
4-2
Assemble the aluminum alloy sheets.

10
Install part E in the middle position of the aluminum alloy sheet and fix it with
screws(K*12).
K
K
E
5
Insert the aluminum alloy sheets.

11
First, mark the positioning holes on the wall for part H according to the above -
recommended dimensions. Then, drill holes in the wall using a ø6~ø8mm drill bit.
Next, insert plastic plugs into the holes. Finally, install part H on the wall using wall
- floor nails(I*6).
H
I*6
6
Drill holes in the wall.

12
Insert the aluminum alloy sheet into part H.
Lock the parts with screw(K*5).
Note: There are 5 screw holes here, and you only need to fasten 2 of them.
H
7
Install the Metal Door Awning on the wall.
K*5

13
1.Attach part(F*2) to the product.
2.Determine a suitable position by taking into account the actual sizes of the
product and the door. Then, mark the positions of the fixing holes of part G on the
wall.
3.Drill holes in the wall, insert plastic components, and then use screws to fix the
product to the wall.
F
K*2
I*4
8
Install the Metal Door Awning on the wall.

14

15
Snow Loads
The aluminum door canopies are manufactured
from the highest - quality components available
on the market today. They are designed to
withstand normal weather conditions, including
rain, sleet, snow, and wind. However, they are
not designed to endure winds exceeding 30
miles per hour, snow loads of more than 12
inches of heavy, wet snow, or 24 inches of light
snow. Additionally, they cannot withstand the
impact force of snow and ice falling from an
upper roof or piling up. This product will deliver
excellent performance as long as it is installed
correctly and used within its designed load -
bearing limits.
Please remove snow promptly during use.

16
PRODUCT PARAMETER
Model
QL-60INCH
Material
Aluminum alloy
Colour
Silver
Shading area
60*42inch(1524*1066mm)
Maximum suitable width for
doors/windows
47.2inch/1200mm
Manufacturer:Shanghaimuxinmuyeyouxiangongsi
Address:Shuangchenglu803nong11hao1602A-1609shi,baoshanqu,
shanghai200000CN.
ECREP:E-CrossStuGmbH. MainzerLandstr.69,60329FrankfurtamMain.
UKREP:YHCONSULTINGLIMITED. C/OYHConsultingLimitedOffice147,
CenturionHouse, LondonRoad, Staines-upon-Thames, Surrey, TW184AX
ImportedtoAUS:SIHAOPTYLTD.
1ROKEVASTREETEASTWOODNSW2122Australia
ImportedtoUSA:SanvenTechnologyLtd.
Suite250,9166AnaheimPlace,RanchoCucamonga,CA91730


Technical Support and E-Warranty Certificate
www.vevor.com/support


1
MODEL:QL-60INCH
This is the original instruction, please read all manual instructions carefully
before operating. VEVOR reserves a clear interpretation of our user
manual. The appearance of the product shall be subject to the product you
received. Please forgive us that we won't inform you again if there are any
technology or software updates on our product.
METAL DOOR AWNING

2
SAFETY INSTRUCTIONS
WARNING:
Read this material before using this product. Failure to do so can
result in serious injury.
Assembly precautions
1. Assemble only according to these instructions. Improper assembly can
create hazards.
2. Wear ANSI-approved safety goggles and heavy-duty work gloves
during assembly.
3. Keep the assembly area clean and well-lit.
4. Keep bystanders out of the area during assembly.
5. Do not assemble if tired or when under the influence of alcohol, drugs
or medication.
6. The product capabilities apply to properly and completely assembled
products only.
7. Assemble on a flat, level, hard and smooth surface capable of safely
supporting the Metal Door Awning.
8. For additional information regarding the parts listed in the following
pages, please refer to the Assembly Diagram of this manual. Unwrap
and separate all parts in a clean work area.
Use precautions
1. DO NOT SIT OR STAND ON THIS ITEM.
2. This product is not a toy. Do not allow children to play with or near this
item.
3. Do not exceed specified weight capacities.
4. Use only on a flat, level, hard, and smooth surface that can safely
support a fully loaded Metal Door Awning.
5. Use as intended only.
6. Do not use if parts are loose or damaged.
7. Spare parts such as screws are available.
SAVE THIS MANUAL

3
PARTS LIST

4
Serial number
Quantity
Part picture
A
7
B
1
C
1
D1
1
D1
1
E
3
F
2
G
2
H
1
I
10
J
2
K
27+3

5
ASSEMBLY STEP
Use screw(J*2) to fasten the tube(F*2) and the fixing part(G*2) together.
G*2
F*2
J*2
1
Fasten the tube.

6
Insert the aluminum alloy sheets(A*7) into each other in the direction of the arrow.
A*7
2
Assemble the aluminum alloy sheets.

7
Insert the aluminum alloy sheet(A) into D1 and D2 in the direction of the arrow.
D1
D2
3
Assemble the aluminum alloy sheets.
8
Insert parts B and C into the aluminum alloy sheet(A).
B
C
4-1
Assemble the aluminum alloy sheets.

9
1.Turn the whole product over; 2.Fix it with screws(K*8).
K
4-2
Assemble the aluminum alloy sheets.

10
Install part E in the middle position of the aluminum alloy sheet and fix it with
screws(K*12).
K
K
E
5
Insert the aluminum alloy sheets.
11
First, mark the positioning holes on the wall for part H according to the above -
recommended dimensions. Then, drill holes in the wall using a ø6~ø8mm drill bit.
Next, insert plastic plugs into the holes. Finally, install part H on the wall using wall
- floor nails(I*6).
H
I*6
6
Drill holes in the wall.

12
Insert the aluminum alloy sheet into part H.
Lock the parts with screw(K*5).
Note: There are 5 screw holes here, and you only need to fasten 2 of them.
H
7
Install the Metal Door Awning on the wall.
K*5

13
1.Attach part(F*2) to the product.
2.Determine a suitable position by taking into account the actual sizes of the
product and the door. Then, mark the positions of the fixing holes of part G on the
wall.
3.Drill holes in the wall, insert plastic components, and then use screws to fix the
product to the wall.
F
K*2
I*4
8
Install the Metal Door Awning on the wall.

14

15
Snow Loads
The aluminum door canopies are manufactured
from the highest - quality components available
on the market today. They are designed to
withstand normal weather conditions, including
rain, sleet, snow, and wind. However, they are
not designed to endure winds exceeding 30
miles per hour, snow loads of more than 12
inches of heavy, wet snow, or 24 inches of light
snow. Additionally, they cannot withstand the
impact force of snow and ice falling from an
upper roof or piling up. This product will deliver
excellent performance as long as it is installed
correctly and used within its designed load -
bearing limits.
Please remove snow promptly during use.

16
PRODUCT PARAMETER
Model
QL-60INCH
Material
Aluminum alloy
Colour
Silver
Shading area
60*42inch(1524*1066mm)
Maximum suitable width for
doors/windows
47.2inch/1200mm
Manufacturer:Shanghaimuxinmuyeyouxiangongsi
Address:Shuangchenglu803nong11hao1602A-1609shi,baoshanqu,
shanghai200000CN.
ECREP:E-CrossStuGmbH. MainzerLandstr.69,60329FrankfurtamMain.
UKREP:YHCONSULTINGLIMITED. C/OYHConsultingLimitedOffice147,
CenturionHouse, LondonRoad, Staines-upon-Thames, Surrey, TW184AX
ImportedtoAUS:SIHAOPTYLTD.
1ROKEVASTREETEASTWOODNSW2122Australia
ImportedtoUSA:SanvenTechnologyLtd.
Suite250,9166AnaheimPlace,RanchoCucamonga,CA91730


Technical Support and E-Warranty Certificate
www.vevor.com/support


1
MODEL:QL-60INCH
This is the original instruction, please read all manual instructions carefully
before operating. VEVOR reserves a clear interpretation of our user
manual. The appearance of the product shall be subject to the product you
received. Please forgive us that we won't inform you again if there are any
technology or software updates on our product.
METAL DOOR AWNING

2
SAFETY INSTRUCTIONS
WARNING:
Read this material before using this product. Failure to do so can
result in serious injury.
Assembly precautions
1. Assemble only according to these instructions. Improper assembly can
create hazards.
2. Wear ANSI-approved safety goggles and heavy-duty work gloves
during assembly.
3. Keep the assembly area clean and well-lit.
4. Keep bystanders out of the area during assembly.
5. Do not assemble if tired or when under the influence of alcohol, drugs
or medication.
6. The product capabilities apply to properly and completely assembled
products only.
7. Assemble on a flat, level, hard and smooth surface capable of safely
supporting the Metal Door Awning.
8. For additional information regarding the parts listed in the following
pages, please refer to the Assembly Diagram of this manual. Unwrap
and separate all parts in a clean work area.
Use precautions
1. DO NOT SIT OR STAND ON THIS ITEM.
2. This product is not a toy. Do not allow children to play with or near this
item.
3. Do not exceed specified weight capacities.
4. Use only on a flat, level, hard, and smooth surface that can safely
support a fully loaded Metal Door Awning.
5. Use as intended only.
6. Do not use if parts are loose or damaged.
7. Spare parts such as screws are available.
SAVE THIS MANUAL

3
PARTS LIST

4
Serial number
Quantity
Part picture
A
7
B
1
C
1
D1
1
D1
1
E
3
F
2
G
2
H
1
I
10
J
2
K
27+3

5
ASSEMBLY STEP
Use screw(J*2) to fasten the tube(F*2) and the fixing part(G*2) together.
G*2
F*2
J*2
1
Fasten the tube.

6
Insert the aluminum alloy sheets(A*7) into each other in the direction of the arrow.
A*7
2
Assemble the aluminum alloy sheets.
7
Insert the aluminum alloy sheet(A) into D1 and D2 in the direction of the arrow.
D1
D2
3
Assemble the aluminum alloy sheets.
8
Insert parts B and C into the aluminum alloy sheet(A).
B
C
4-1
Assemble the aluminum alloy sheets.

9
1.Turn the whole product over; 2.Fix it with screws(K*8).
K
4-2
Assemble the aluminum alloy sheets.

10
Install part E in the middle position of the aluminum alloy sheet and fix it with
screws(K*12).
K
K
E
5
Insert the aluminum alloy sheets.
11
First, mark the positioning holes on the wall for part H according to the above -
recommended dimensions. Then, drill holes in the wall using a ø6~ø8mm drill bit.
Next, insert plastic plugs into the holes. Finally, install part H on the wall using wall
- floor nails(I*6).
H
I*6
6
Drill holes in the wall.

12
Insert the aluminum alloy sheet into part H.
Lock the parts with screw(K*5).
Note: There are 5 screw holes here, and you only need to fasten 2 of them.
H
7
Install the Metal Door Awning on the wall.
K*5

13
1.Attach part(F*2) to the product.
2.Determine a suitable position by taking into account the actual sizes of the
product and the door. Then, mark the positions of the fixing holes of part G on the
wall.
3.Drill holes in the wall, insert plastic components, and then use screws to fix the
product to the wall.
F
K*2
I*4
8
Install the Metal Door Awning on the wall.

14

15
Snow Loads
The aluminum door canopies are manufactured
from the highest - quality components available
on the market today. They are designed to
withstand normal weather conditions, including
rain, sleet, snow, and wind. However, they are
not designed to endure winds exceeding 30
miles per hour, snow loads of more than 12
inches of heavy, wet snow, or 24 inches of light
snow. Additionally, they cannot withstand the
impact force of snow and ice falling from an
upper roof or piling up. This product will deliver
excellent performance as long as it is installed
correctly and used within its designed load -
bearing limits.
Please remove snow promptly during use.

16
PRODUCT PARAMETER
Model
QL-60INCH
Material
Aluminum alloy
Colour
Silver
Shading area
60*42inch(1524*1066mm)
Maximum suitable width for
doors/windows
47.2inch/1200mm
Manufacturer:Shanghaimuxinmuyeyouxiangongsi
Address:Shuangchenglu803nong11hao1602A-1609shi,baoshanqu,
shanghai200000CN.
ECREP:E-CrossStuGmbH. MainzerLandstr.69,60329FrankfurtamMain.
UKREP:YHCONSULTINGLIMITED. C/OYHConsultingLimitedOffice147,
CenturionHouse, LondonRoad, Staines-upon-Thames, Surrey, TW184AX
ImportedtoAUS:SIHAOPTYLTD.
1ROKEVASTREETEASTWOODNSW2122Australia
ImportedtoUSA:SanvenTechnologyLtd.
Suite250,9166AnaheimPlace,RanchoCucamonga,CA91730


Technical Support and E-Warranty Certificate
www.vevor.com/support