Window Mull Kit Installation
Instructions
Estimated Installation Time: 45-60 minutes per window pair (first-time installers should allow 90
minutes)
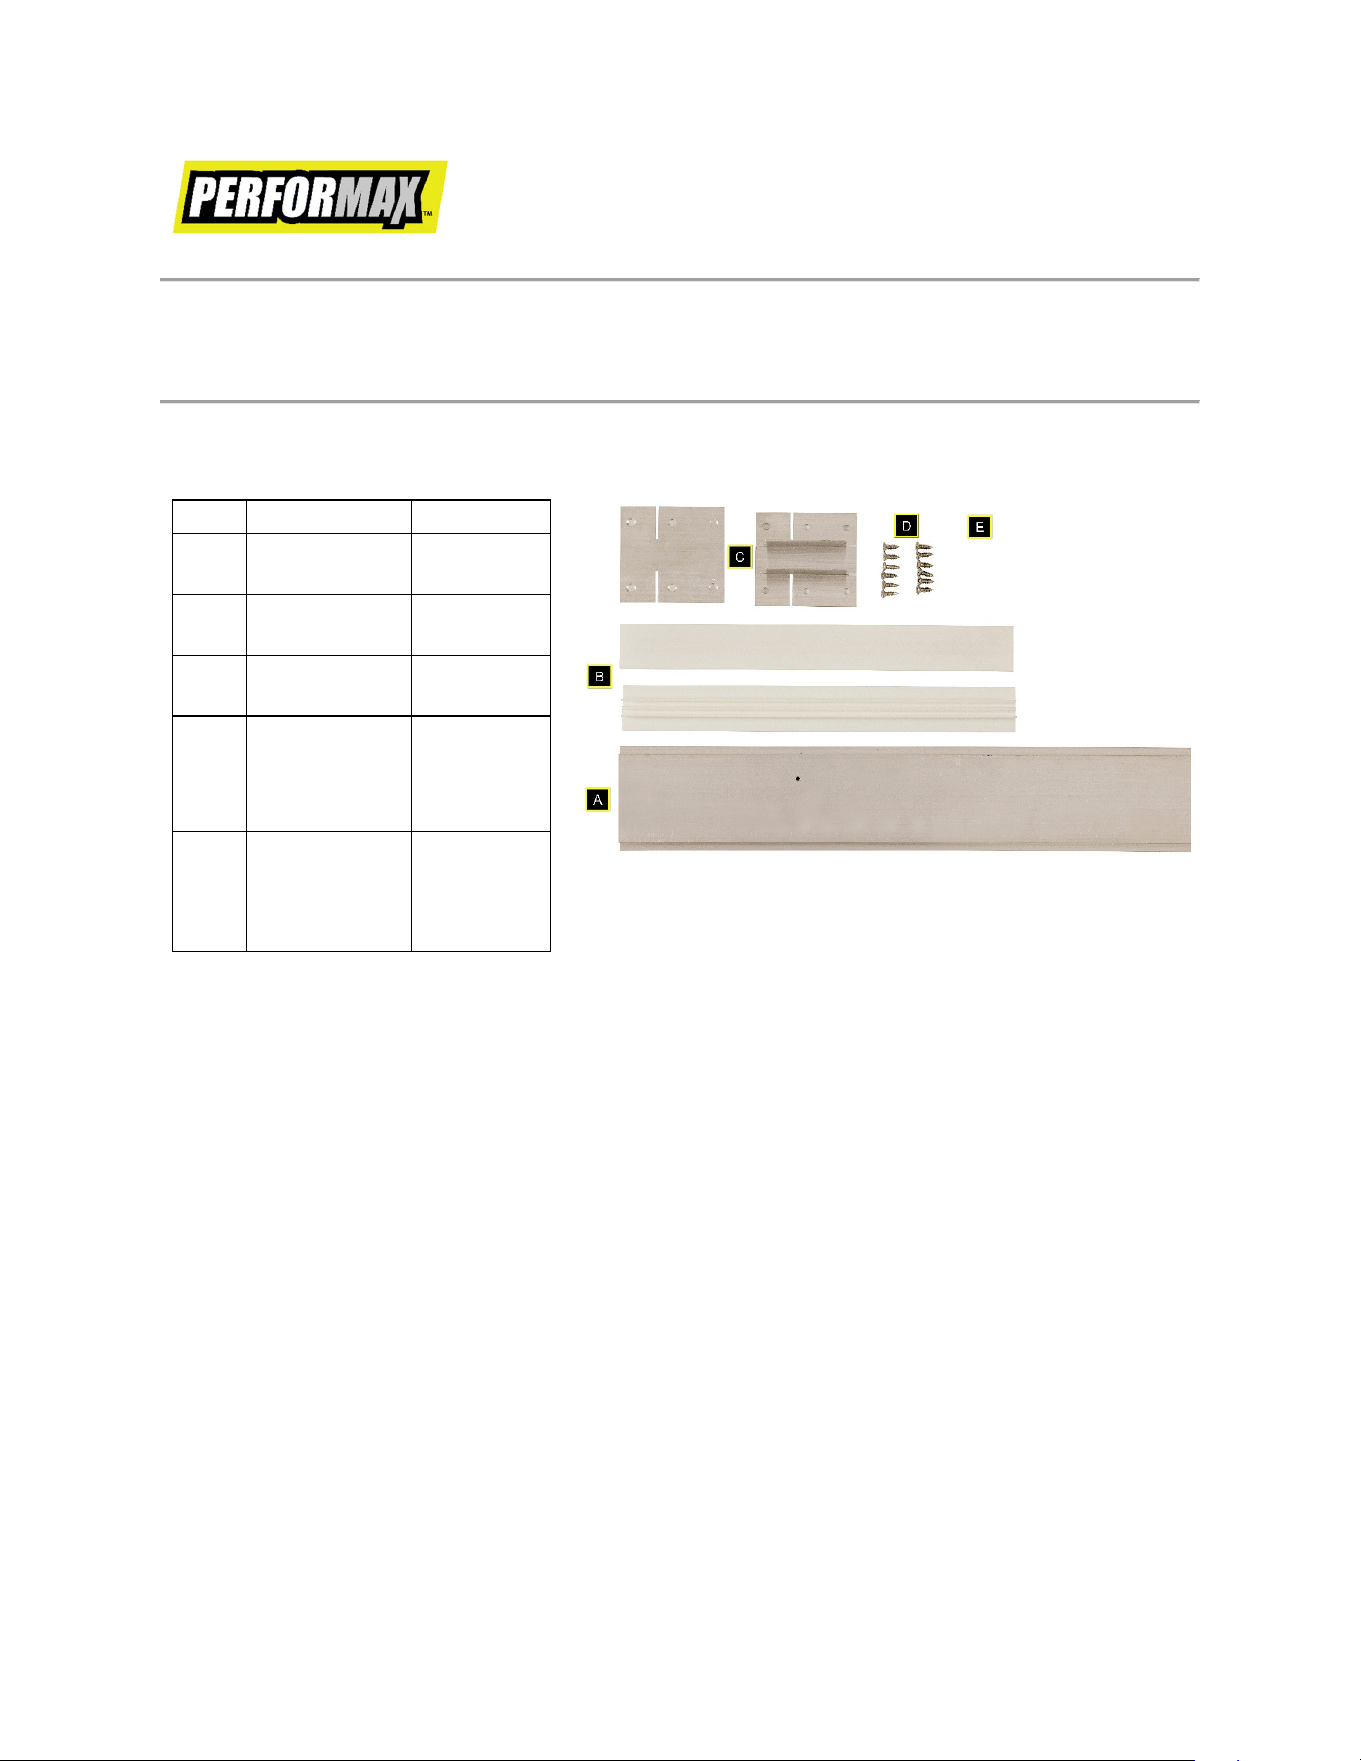
Mull Kit Parts List
Part
Description
Quantity
A
Aluminum
Mull Bar
1
B
Vinyl Mull
Caps
2
C
Metal
Gussets
2
D
3.9x13mm
Screws
(for metal
gussets)
12
E
4x25mm
Screws
(for frame
attachment)
6
Tool Checklist
Required Tools:
• Safety Glasses & Gloves
• Utility Knife
• Drill
• Level
• Caulking or Weatherproof Sealant
Optional/Situational Tools:
• Tape measure
• Window shims (if adjustment is needed)
• Clamps (Recommended for stability)
• Rubber mallet (for mull cap installation)
Safety Reminder:
IMPORTANT: Wear gloves and safety glasses when handling tools and materials to protect yourself
from sharp edges and debris.
Installation Steps
Step 1: Prepare the Window Frames
CAUTION: Sharp edges - wear safety gloves when handling cut nail flanges.
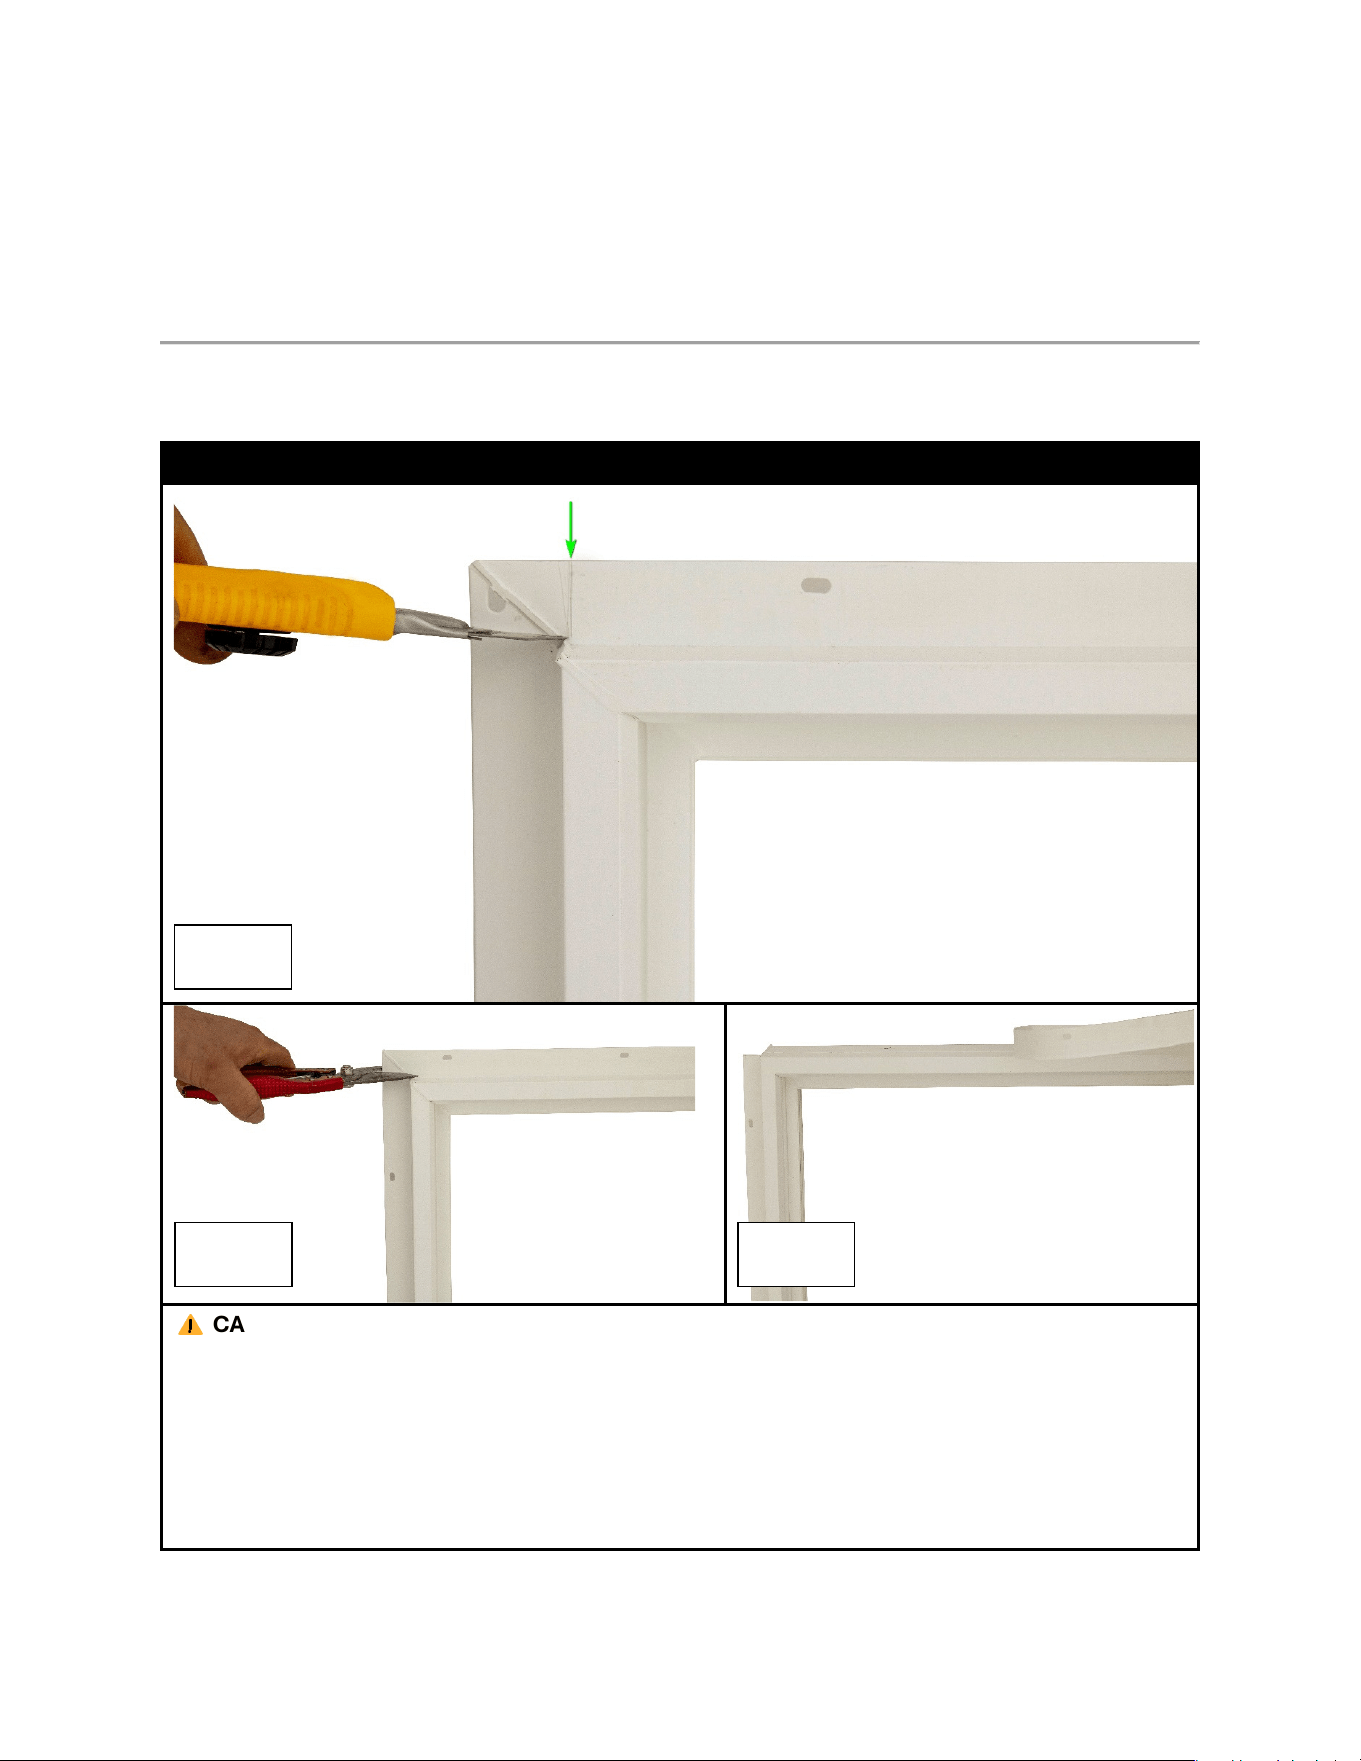
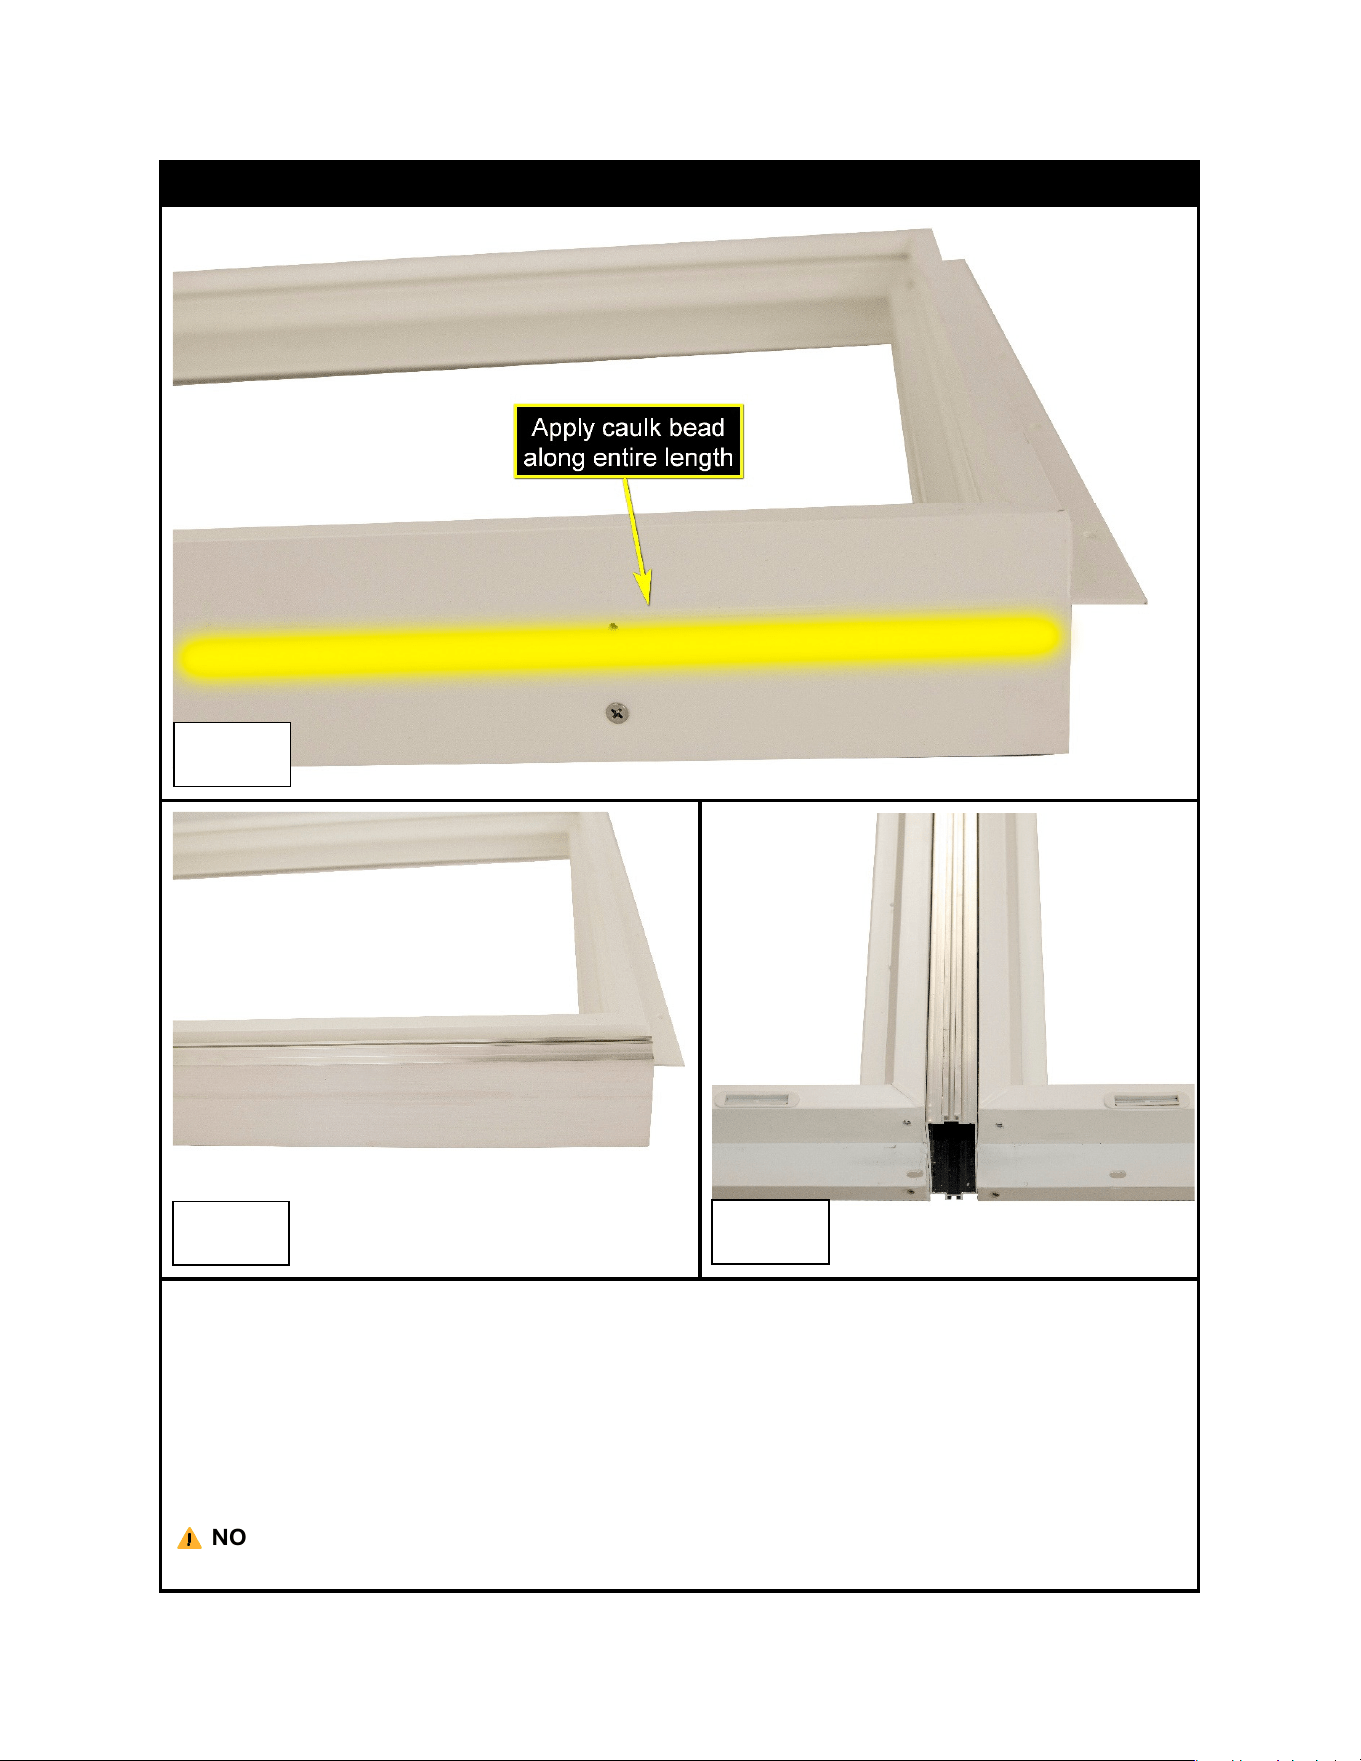
1. For windows with nail flange, use a utility knife to score along the base where the flange
meets the frame on the sides to be joined. (Fig. 1)
2. Use tin snips to cut through the flange at the scored line. (Fig. 2)
3. Peel or bend the flange back and forth until it separates cleanly from the frame. (Fig. 3)
4. Clean the exposed frame edges to remove dirt or debris. Light sanding may be necessary
for a smooth surface.
Fig. 1
Fig.
2
Fig.
3
Step 2: Join the Windows with Mull Bar
1.
Place the two windows side by side on a flat, sturdy work
surface.
2. Apply a continuous bead of silicone sealant along the edge, in line with the removed nail
flange. (Fig. 4 – The yellow line shows the correct bead location.)
3. Center the mull bar (Part A) over the sealant and press firmly into place. (Fig. 5)
4. Apply another bead of sealant to the exposed face of the mull bar.
5. Position the second window against the mull bar and press it firmly into the sealant.
6. Clamp the windows together securely to hold alignment while the sealant cures. (Fig. 6)
NOTE: Avoid gaps in the silicone bead to ensure weatherproofing.
Fig.
4
Fig.
5
Fig.
6
Step 3: Secure and Seal the Mull Joints
Fig.
7
Fig.
8
Fig.
9
Step 3: Secure and Seal the Mull Joints (Cont.)
1.
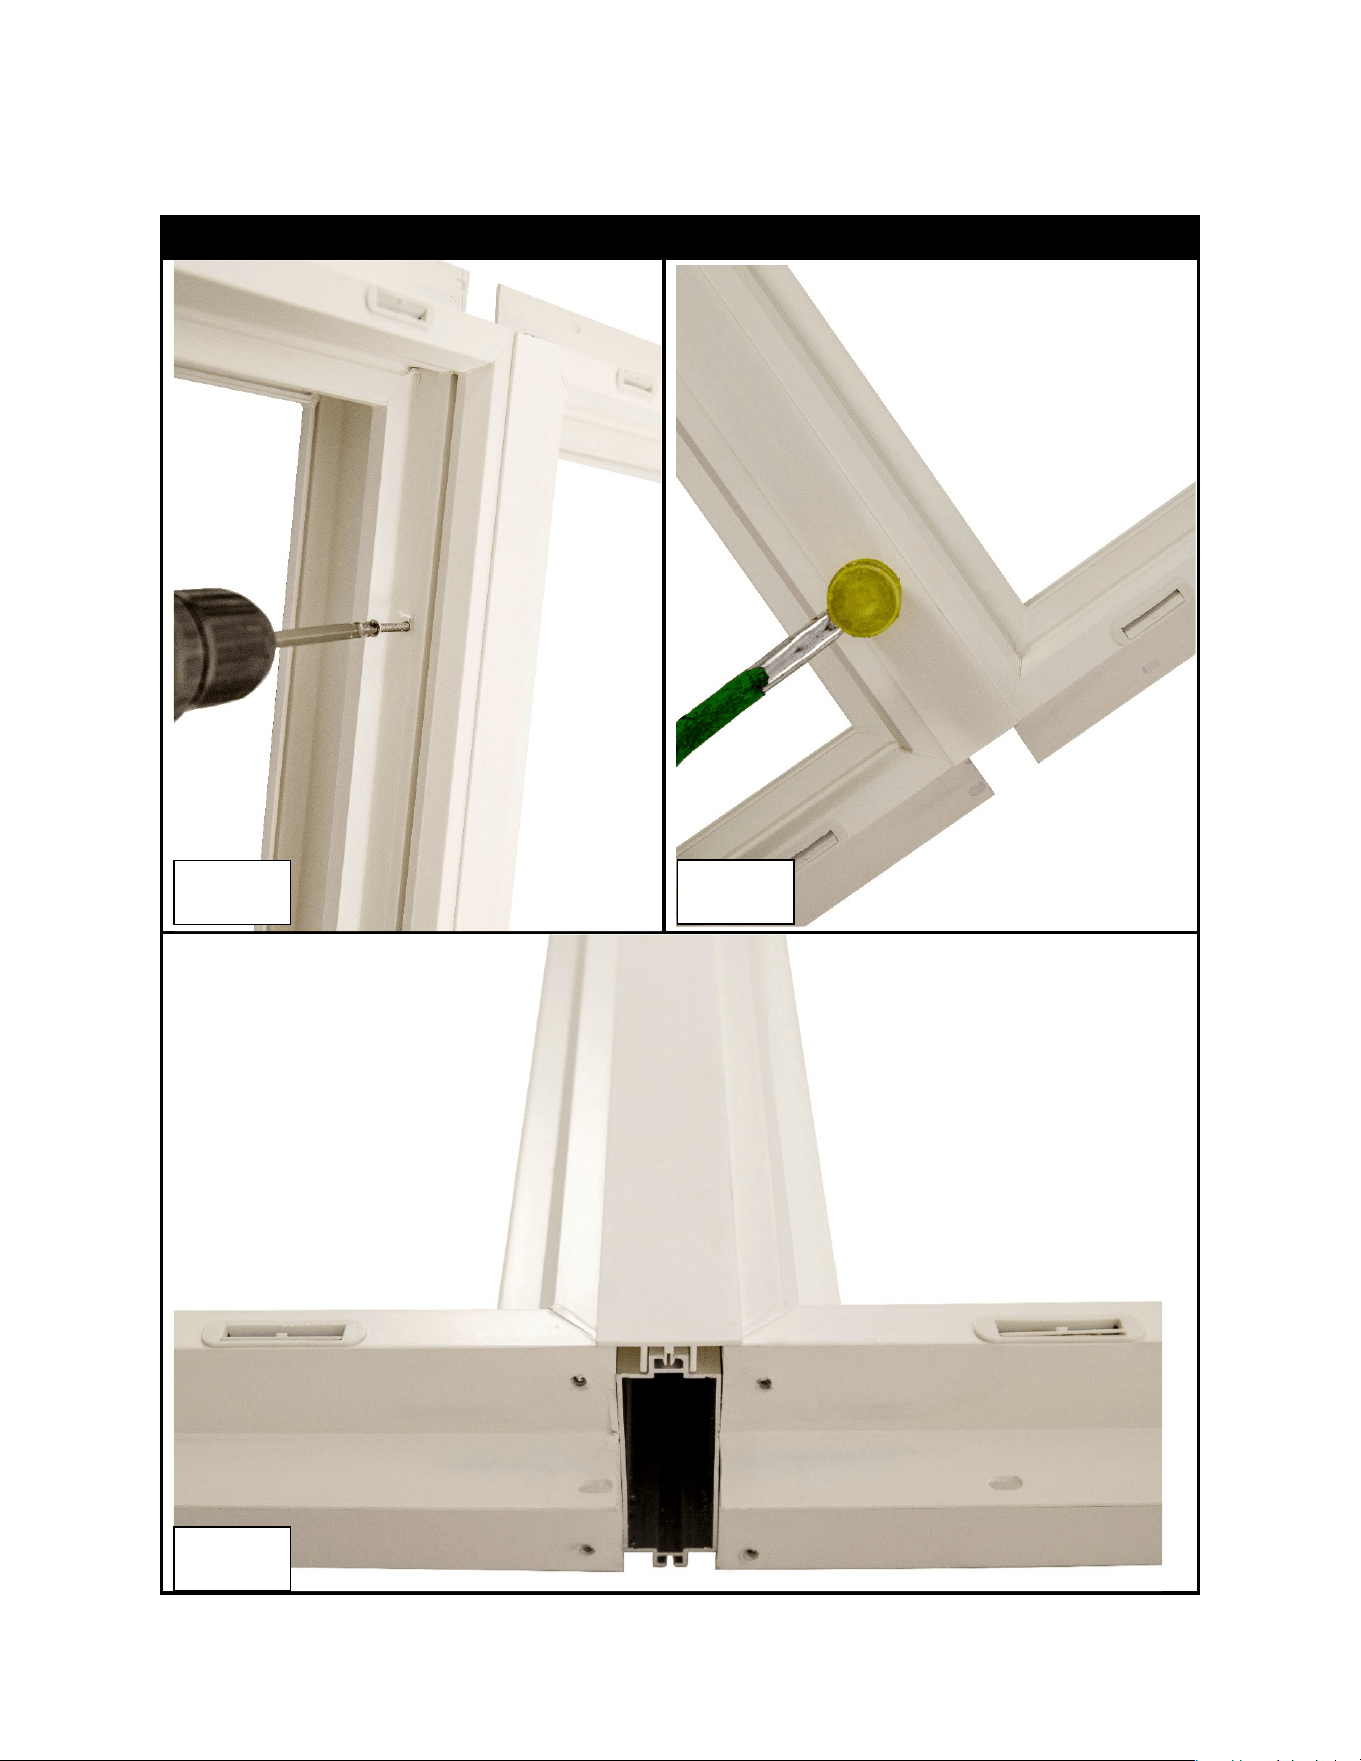
Drill 1/8" pilot holes through both
window
frames
into the mull bar
, then fasten with the
(6) provided 4x25 mm screws (Part E). Slowly tighten until snug and do not overtighten.
(Fig. 7)
2. Space screws evenly on the inside of the frame:
• One at the top
• One at the middle
• One at the bottom
3. Repeat on both sides of the joint.
4. Apply a continuous bead of silicone sealant along the inner edges where each window
frame meets the mull bar.
5. Insert the vinyl mull caps (Part B) into the mull bar groove between the joined frames.
6.
Using a rubber mallet, tap the mull caps into place, starting at one end and working to the
other. (Fig. 8 & Fig. 9)
Step 4: Install Metal Gussets
1.
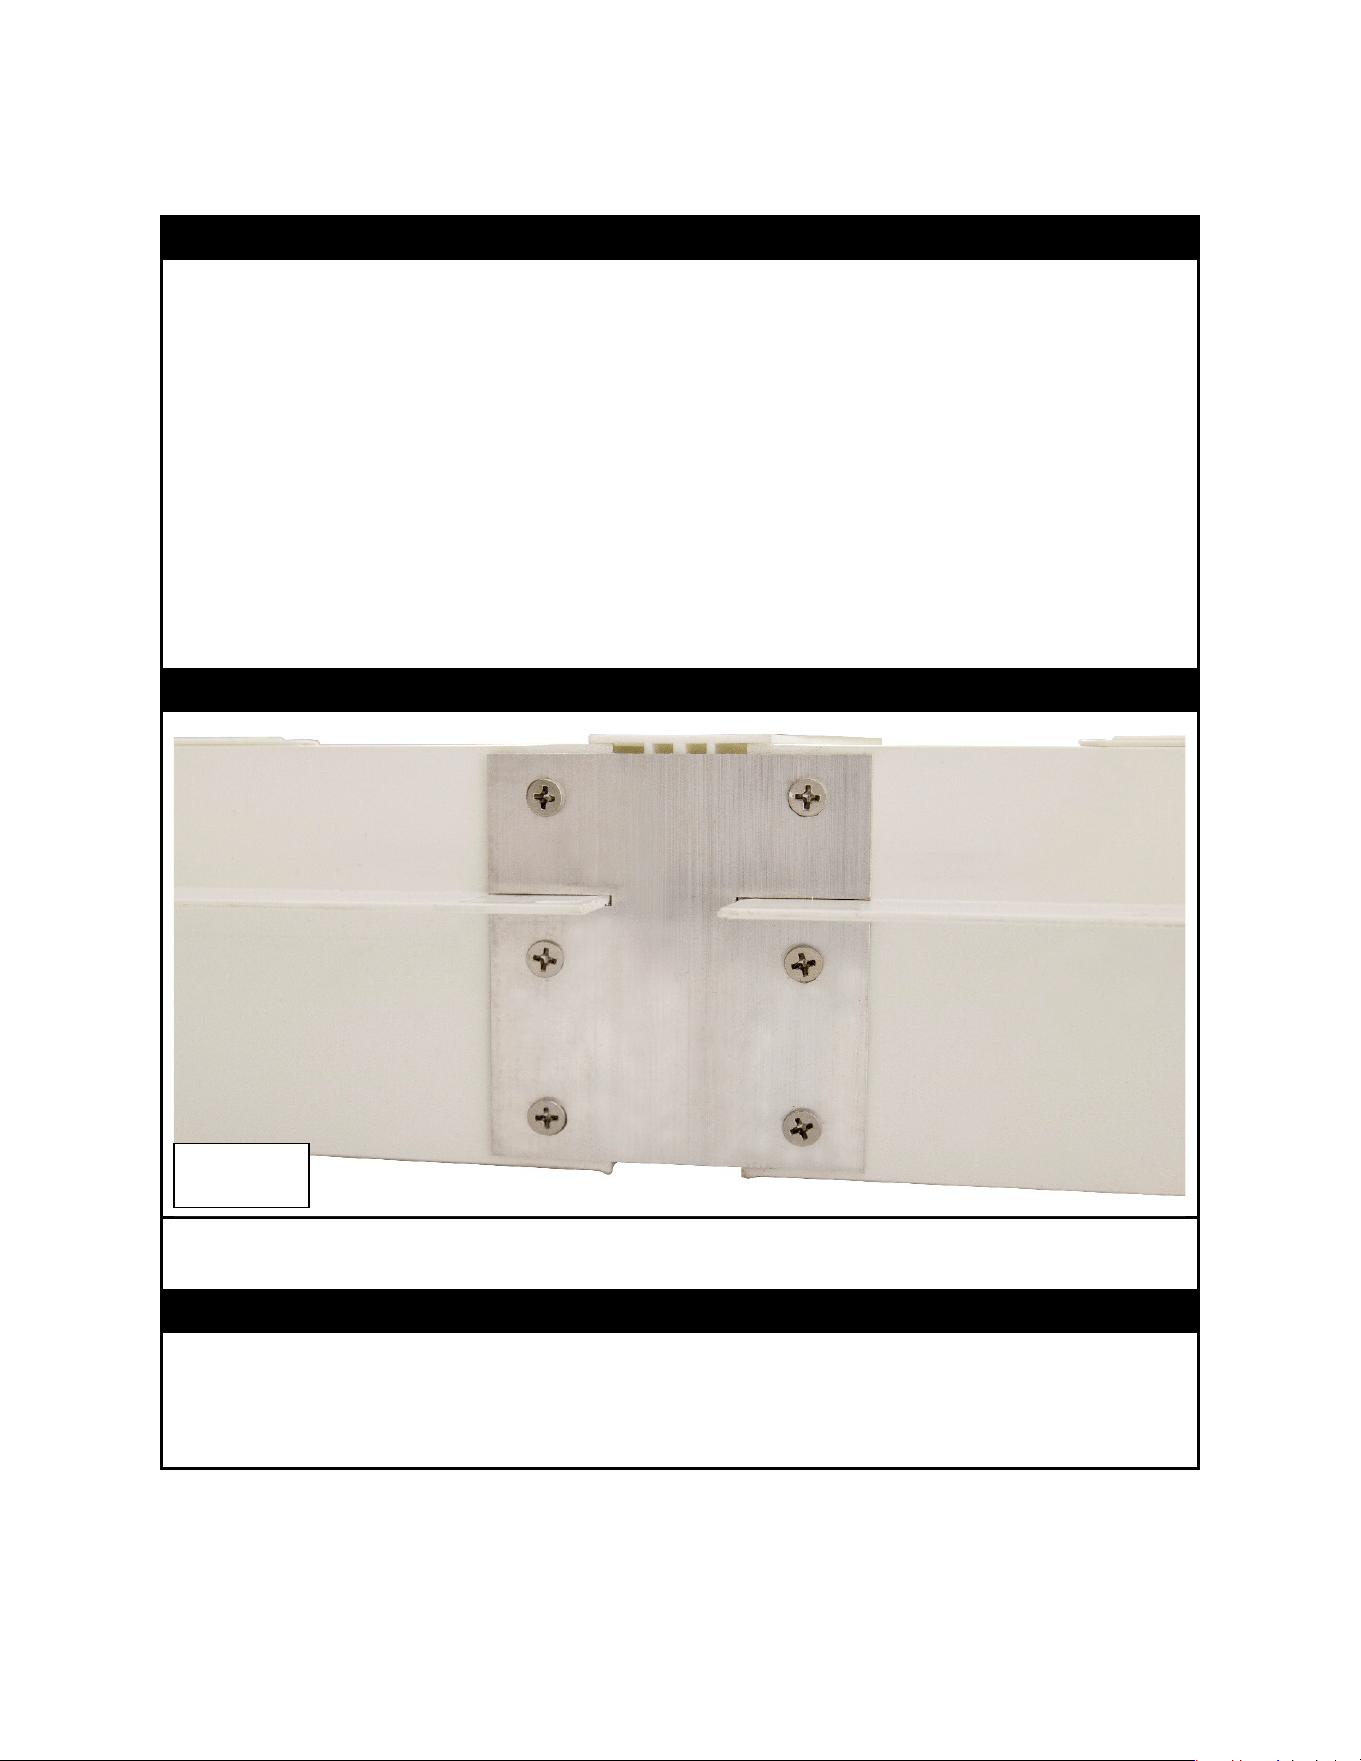
Install metal gussets
(Part C)
at the head and sill using the (12) provided 3.9x13 mm
screws. (Part D) (Fig. 10)
Step 5: Final Adjustments
1.
Remove the clamps and check alignment with a level.
2. Open and close the windows to ensure they are operating smoothly.
3. Check for any leaks around the window frame and mullion.
4. Proceed with installation of the mulled window unit.
Fig. 1
0