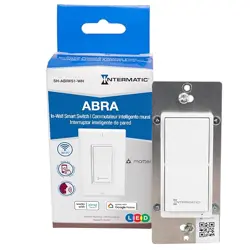

ABRA In-Wall Smart Switch
Set-up and Operation Guide
Version 1.1
March 2025

Table of Contents
• ABRA App: Getting Started
• ABRA App Home Screen
• Adding the In-Wall Smart Switch
• Managing and Controlling the In-Wall Smart Switch
• Creating Schedules for the In-Wall Switch
• Other ABRA In-Wall Smart Switch Features
• Using Google Home and Amazon Alexa
• ABRA and Siri
• In-Wall Smart Switch and Matter
2
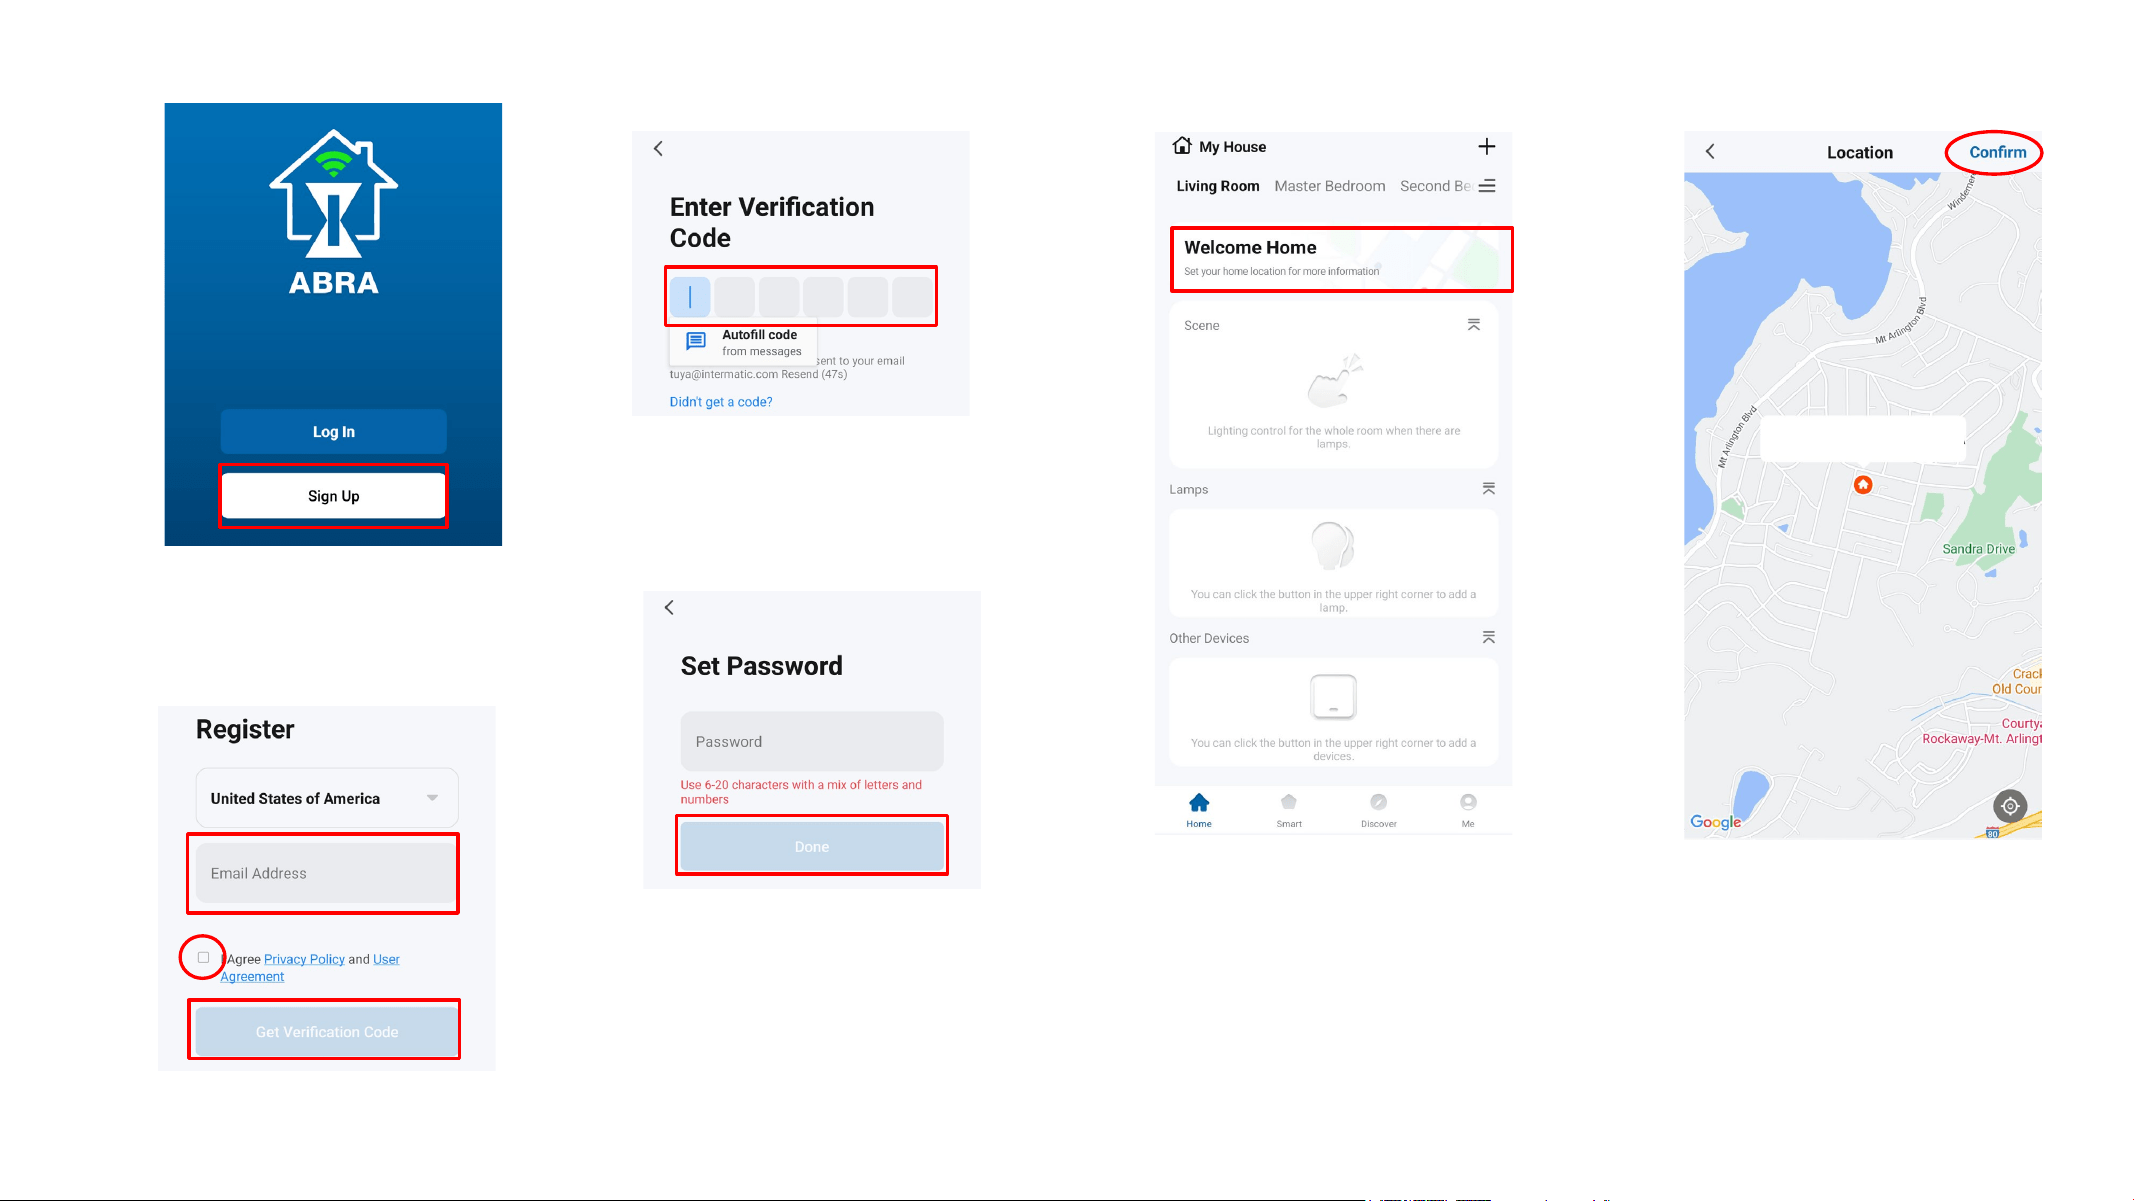
ABRA App: Getting Started
• Download the Intermatic
ABRA app from the App
Store or Google Play, and
sign-up for an account.
• Check your inbox for the
verification email with code
and enter it here.
• Set your Password, then tap
“Done.”
• Set the “Permissions” on the
next page, then you’ll be
taken to the ABRA Home
Screen.
• Register your email address
and tap “Get Verification Code.
• Tap the “Welcome Home” area
to set your home’s location
using your phone’s GPS. This
enables the ABRA system to
create schedules with accurate
sunrise/sunset times.
• The next screen shows a
Google map highlighting your
address. Tap “Confirm” or
correct as needed.
123 Main St, Anytown, USA
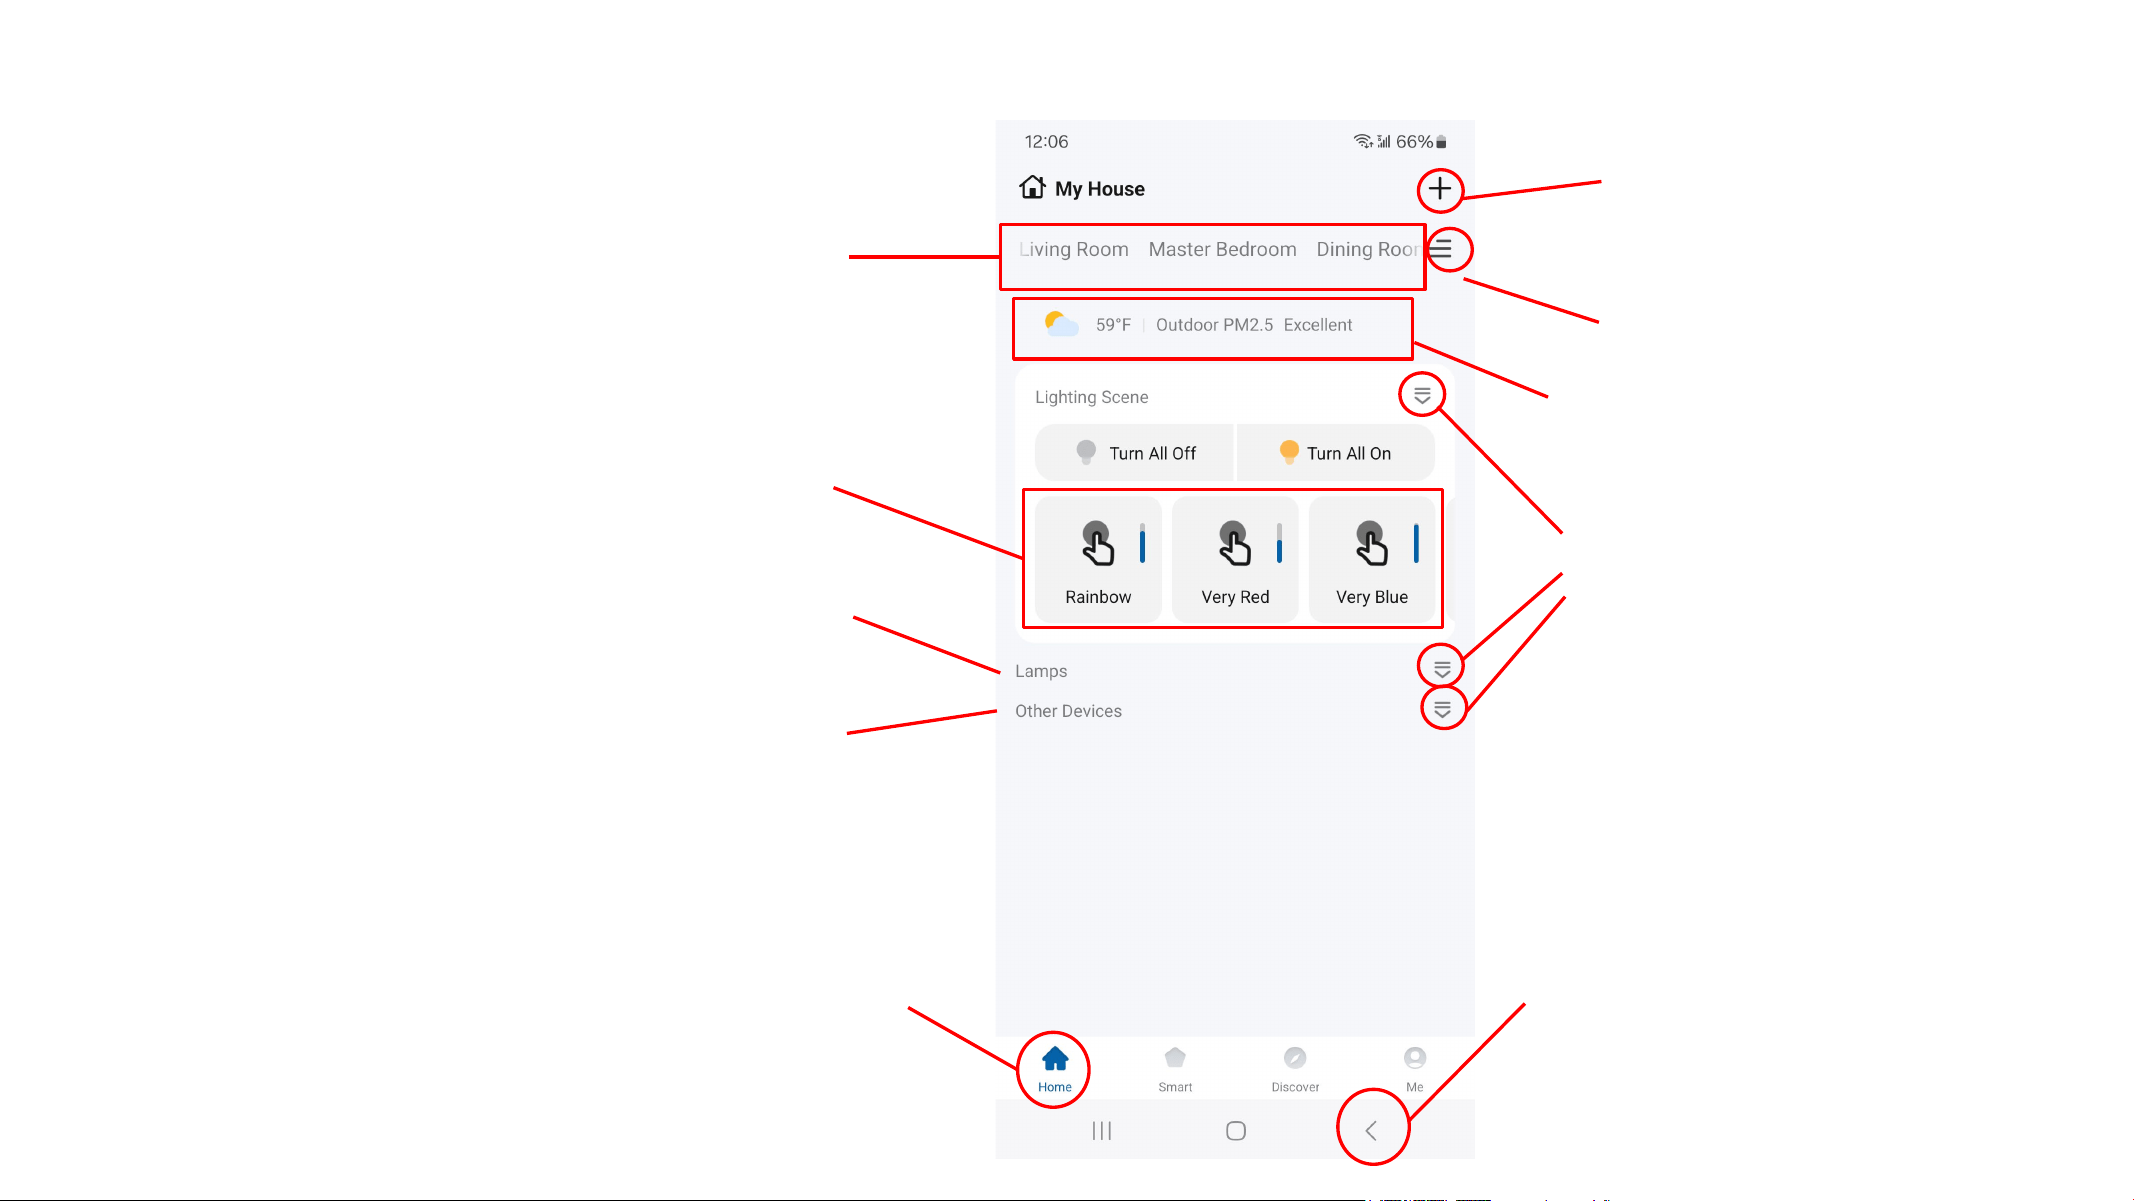
ABRA App Home Screen
Home
This is the main app section you’ll
use when operating your ABRA
system
“Room Bar” scrolls left to right to
quickly navigate to any Room or
Space you’ve set up for your house.
Note: Six sample rooms are
included by default.
Indicates weather conditions and
sunrise/sunset times (based on your
home address)
Organize custom lighting scenes
here
Manage smart bulbs here
Expand/collapse windows with
this tool to conserve screen space
and navigate the interface more
efficiently
Tap to “+” icon to add a new device,
create a new device group, or build
a new lighting scene
Keep track of other smart devices
here, including the ABRA In-Wall
Smart Switch, ABRA Smart Bulbs,
and ABRA Smart Plugs.
Access the “Room Management”
menu to create, organize, and edit
Rooms
Back button
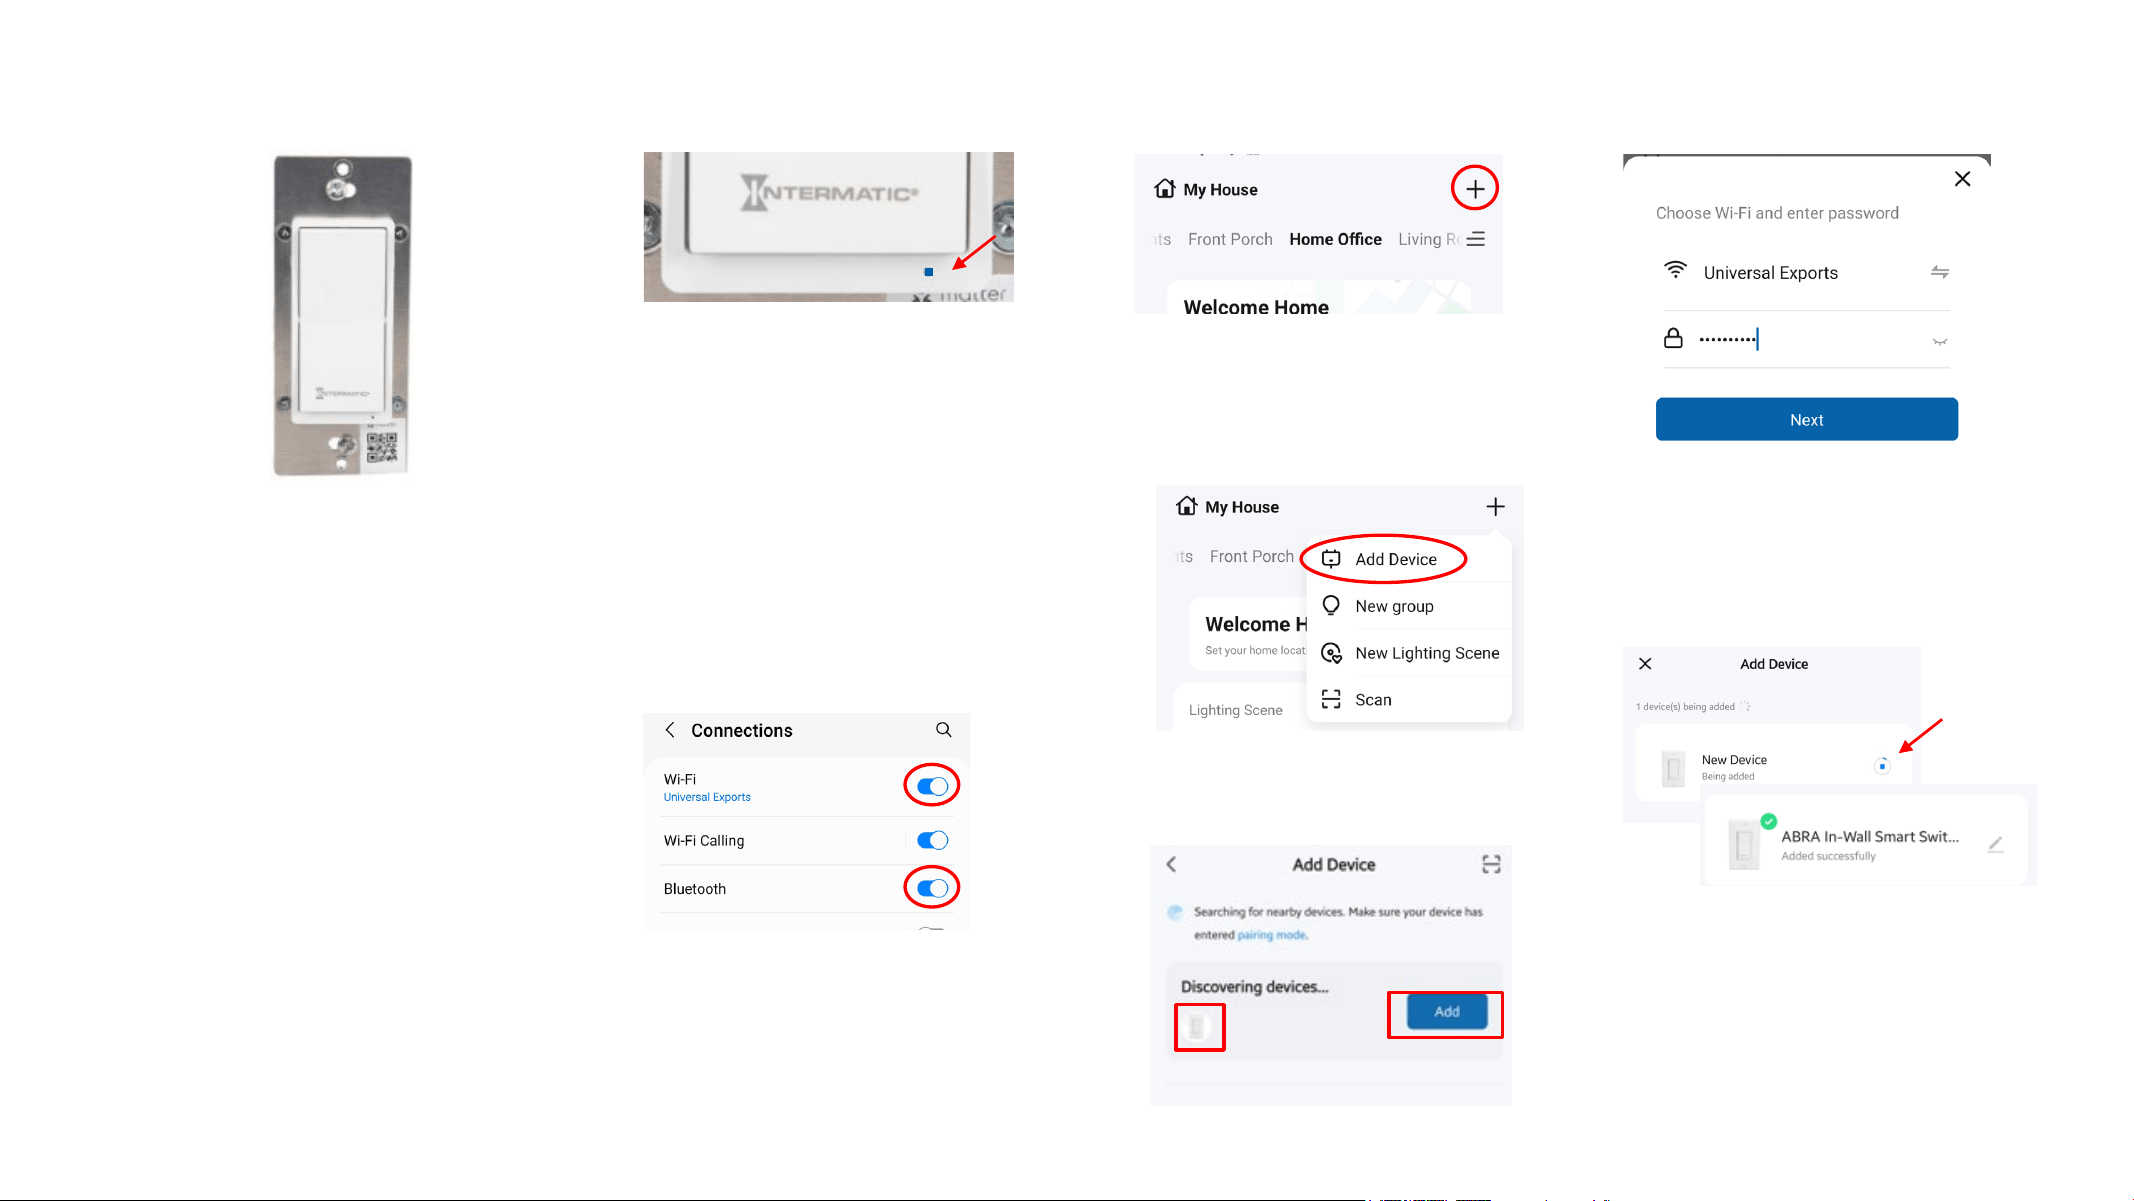
Adding the In-Wall Smart Switch
• With the switch in pairing
mode, tap the “+” icon at the
top right of the ABRA app
Home Screen
• Select “Add Device” from the
menu
• On your mobile device, confirm
that Wi-Fi and Bluetooth are both
ON, and that you’re connected to
your home’s W-Fi network.
• Once the app auto-discovers
the switch, tap “Add” to add the
switch to your ABRA system.
• Confirm that your network
name and password are
correct, then tap “Next”
• You’ll see the switch status as
it’s being added, followed by a
confirmation that the device
was added successfully.
• After installation, when power is
restored to the switch, the blue
LED indicator should begin to
flash, indicating that the switch
is in the “pairing mode.”
• If the LED is not flashing, press
and hold the “OFF” button on
the switch (the lower part of the
paddle) until the LED begins to
flash.
• The ABRA In-Wall Smart Switch
(SH-ABIWS-WH) must be properly
installed in a wall box .
• See the “ABRA In-Wall Smart
Switch Quick Installation Guide” for
specific wiring information and
additional guidance.
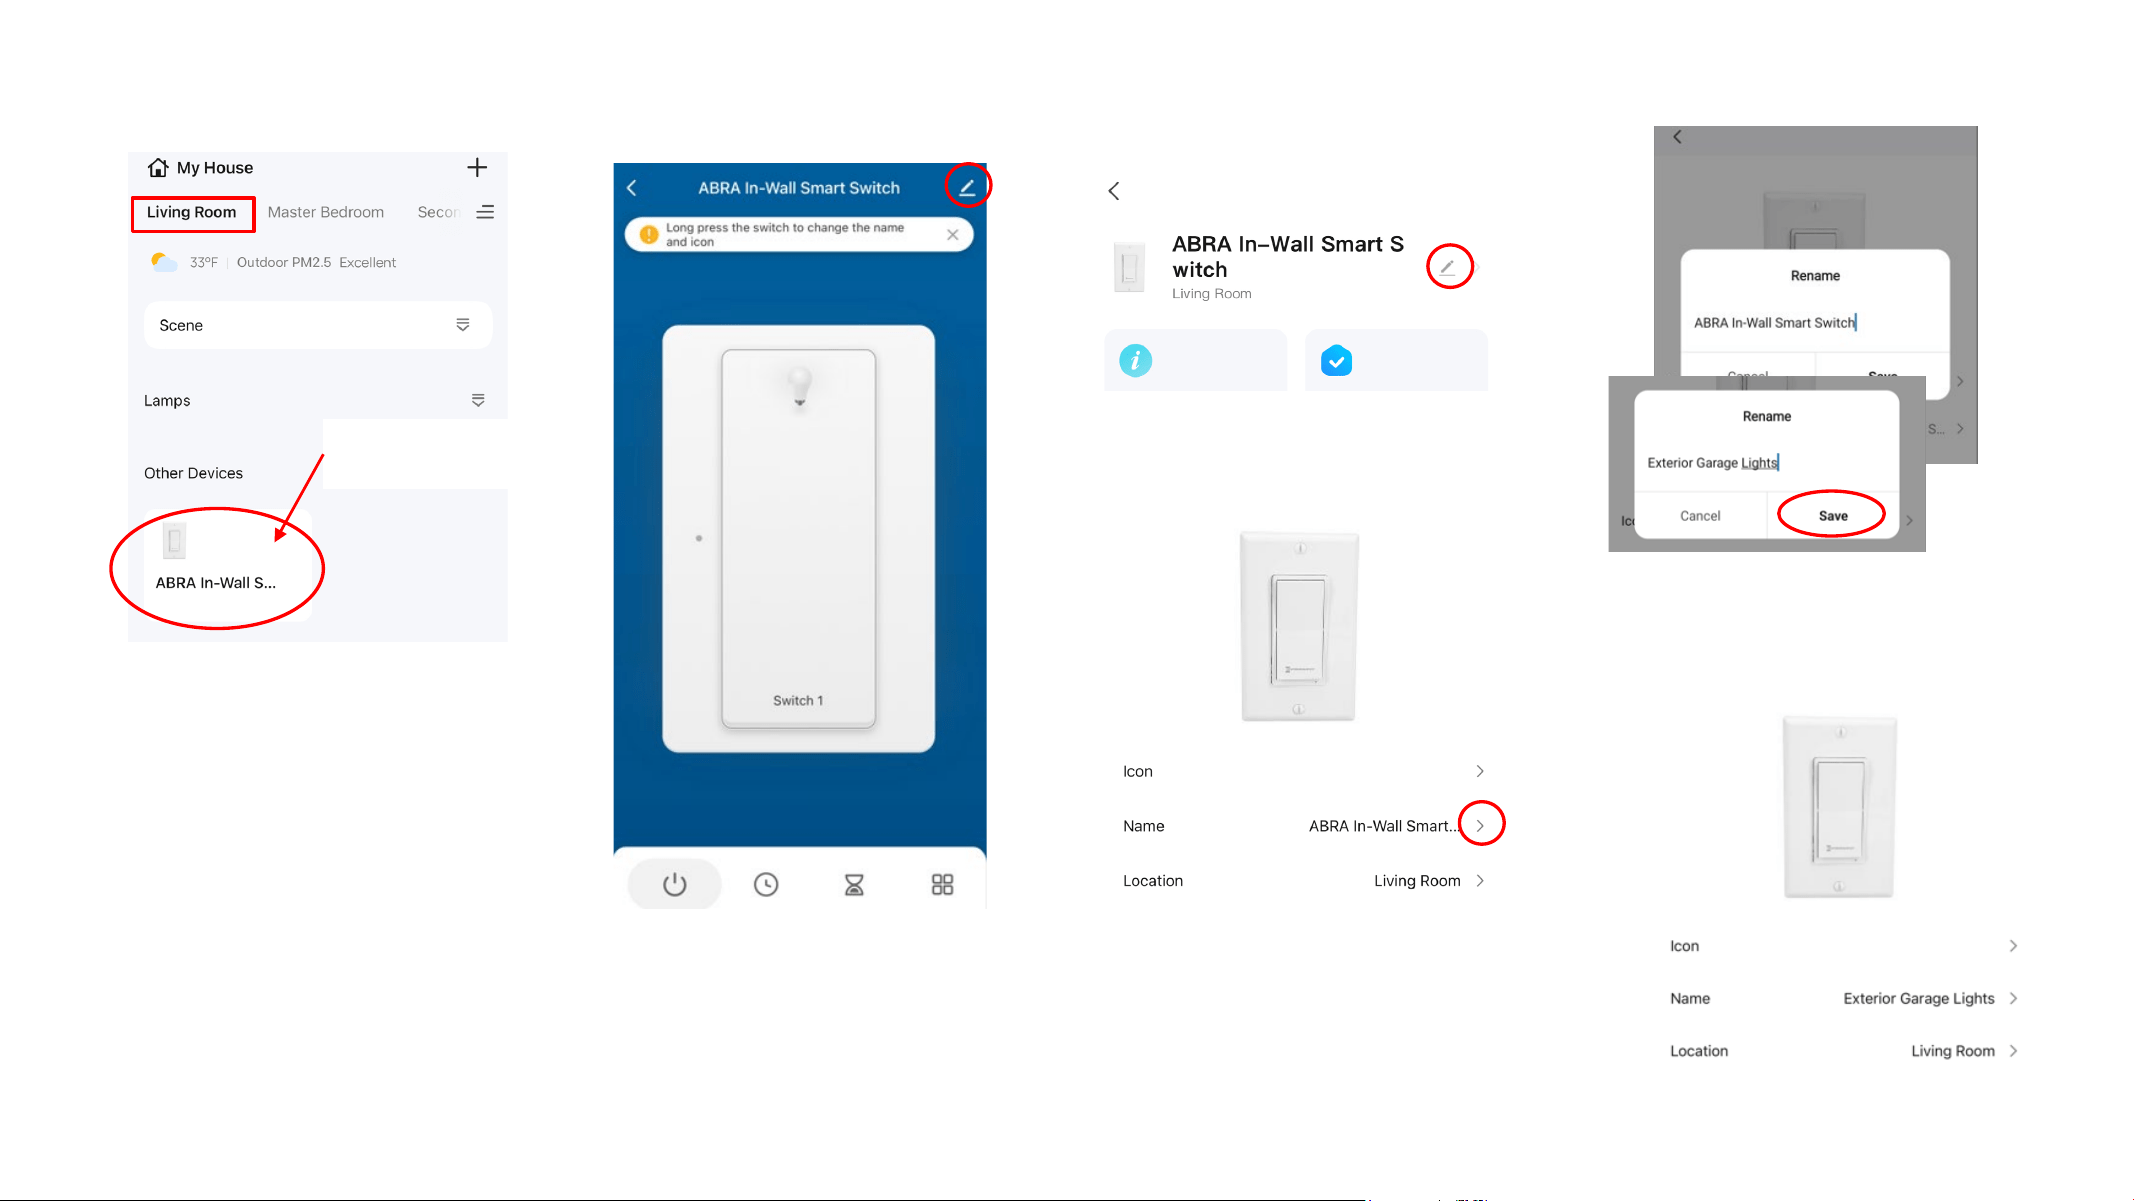
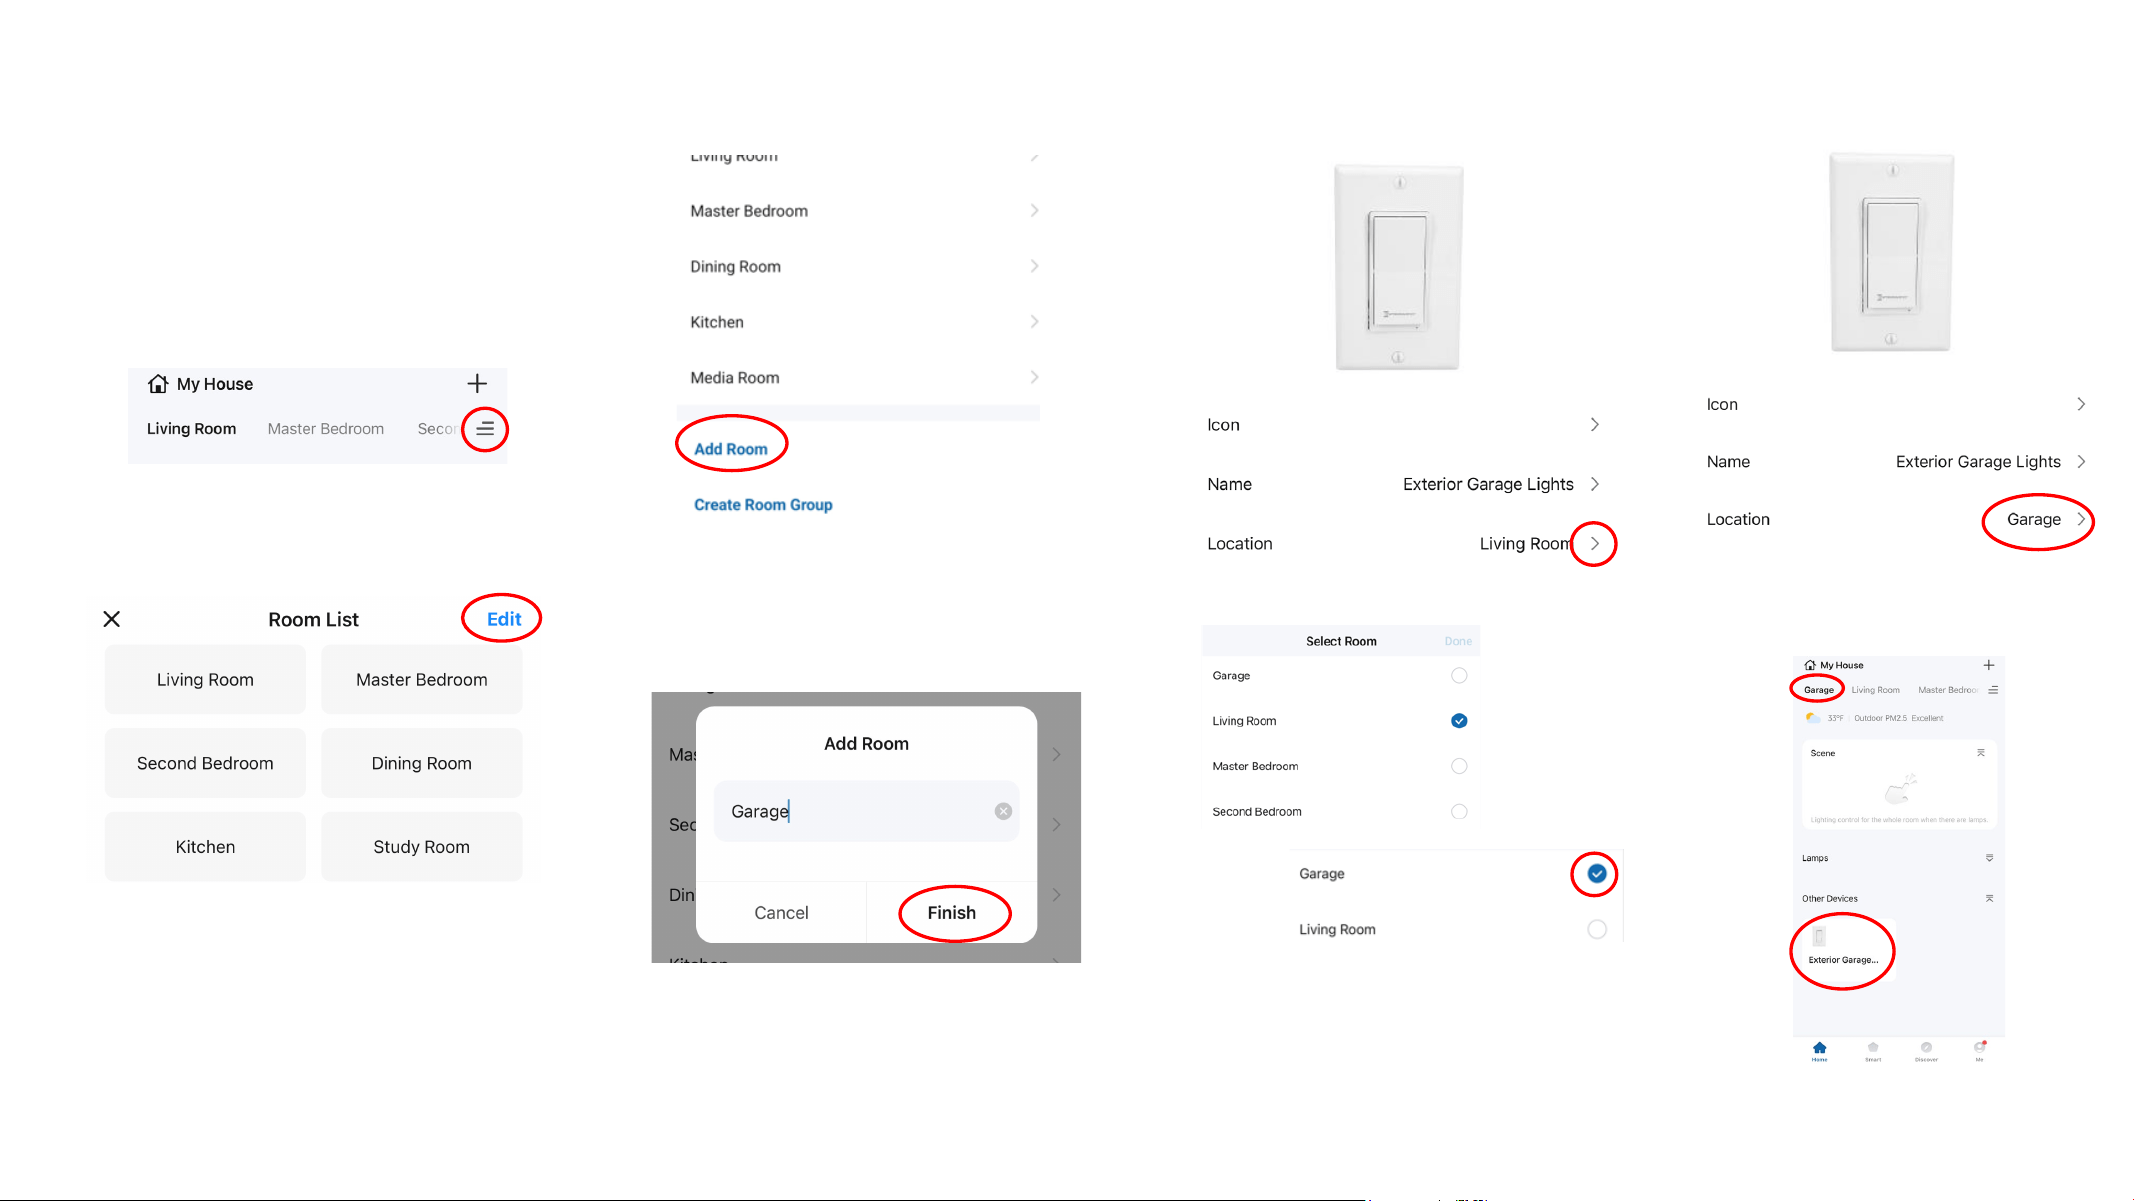
• In this example we’ll change the
default name to “Exterior Garage
Lights,” and tap “Save” when done.
• Tap the “Edit” tool.
• Next we’ll create a new Room
called “Garage.”
Managing and Controlling the In-Wall Smart Switch
• By default, the switch is named
“ABRA In-Wall Smart Switch” and
assigned to the first room in the
Room List, which is “Living Room.”
• Tap on the “ABRA In-Wall Switch”
area on the home screen to open
the switch Control Panel. Here you
can change the switch’s name and
room location. You’ll want to change
the name to differentiate it from
other switches you may add in the
future.
Tap here to edit switch
info
• Tap the “Edit” tool again on the next
page.
• Tap the “>” tool to change the device
name.
• The ABRA app includes 6 sample
rooms, but you can easily add more
rooms or re-name rooms as needed.
Refer to the “Room Management”
section of this documents or the
ABRA User Guide for more details.
• On the Home page, tap the Room
Management tool next to the
scrolling “Room Bar.”
• Tap “Add Room.”
• Tap “Edit” to add a room.
• Add a room called “Garage” to the
Room List and select “Finish.”
• Return to the Smart Switch Control
Panel and change the device
location from “Living Room” to
“Garage.”
• The “Exterior Garage Lights” switch
is now associated with the “Garage”
room…
• … and can be found on the Home
page on the “Garage” tab.
Managing and Controlling the In-Wall Smart Switch
Creating Schedules for the In-Wall Smart Switch
• The ABRA app provides several
ways to create schedules for your In-
Wall Smart Switch.
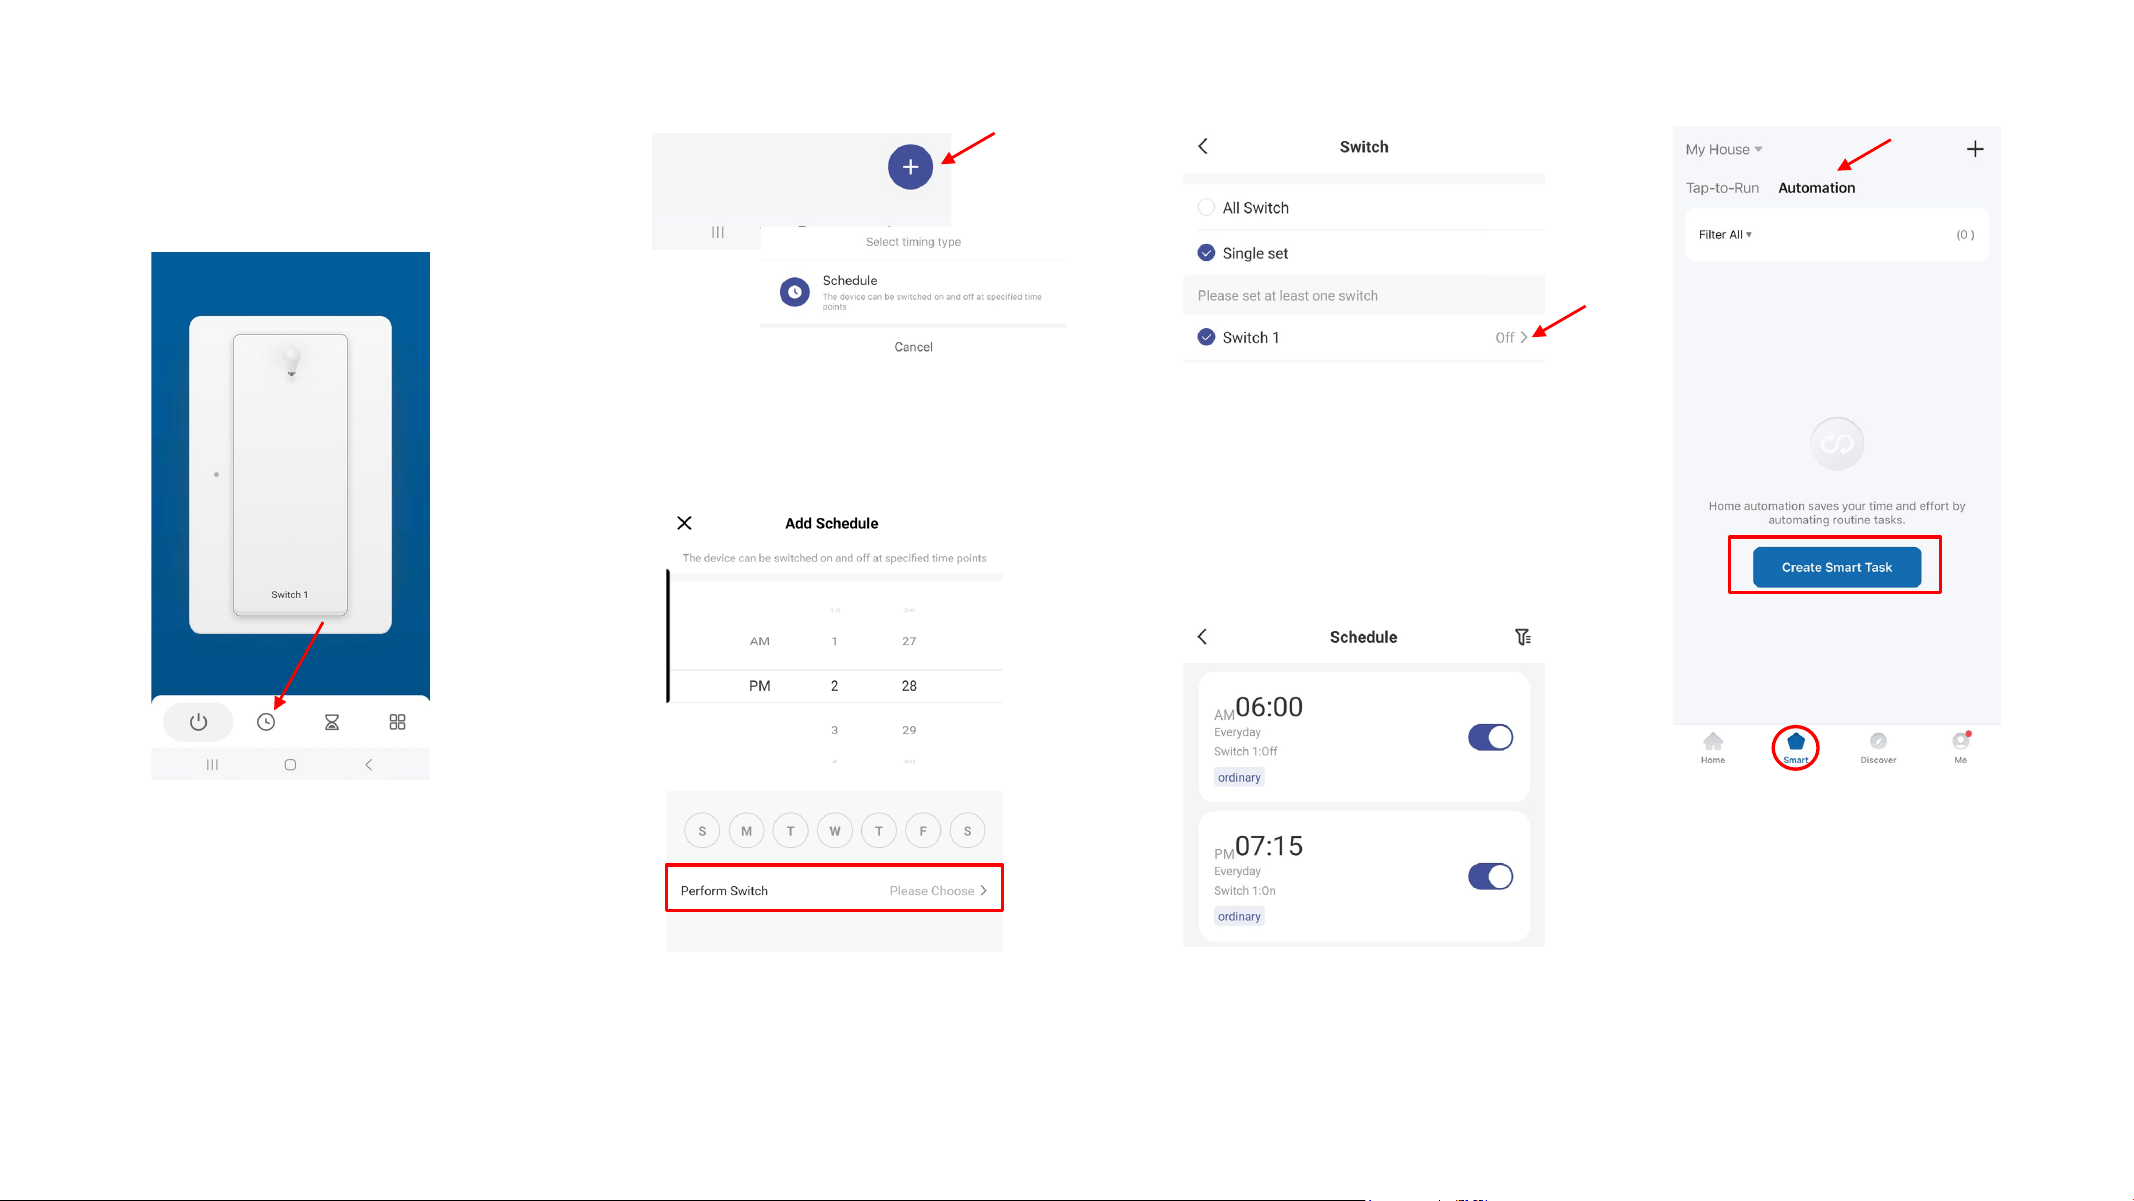
• For simple time-of-day schedules,
you can use the basic Scheduling
Tool found in the Smart Switch
Control Panel. Tap the clock icon.
• Add a schedule by tapping the “+”
tool at the lower right, then tap
“Schedule.”
• If you have multiple smart switches,
you can assign the schedule to all of
them, or you can set each one to a
different schedule.
• Tap “>” to select ON or OFF.
• For more sophisticated schedules
with Sunrise/Sunset capabilities, use
the ABRA app advanced Scheduling
Tool found on the “Smart” page.
• Select “Automation” at the top of the
page, then tap “Create Smart Task.”
• Set the Start Time for the schedule
with the numerical dial, along with
the days of the week.
• “Perform Switch; Please Choose”
sets the Smart Switch to either turn
ON or OFF based on the schedule.
• Repeat the process to create an ON
schedule and an OFF schedule. The
schedules will now appear on the
Schedule screen in the Control
Panel.
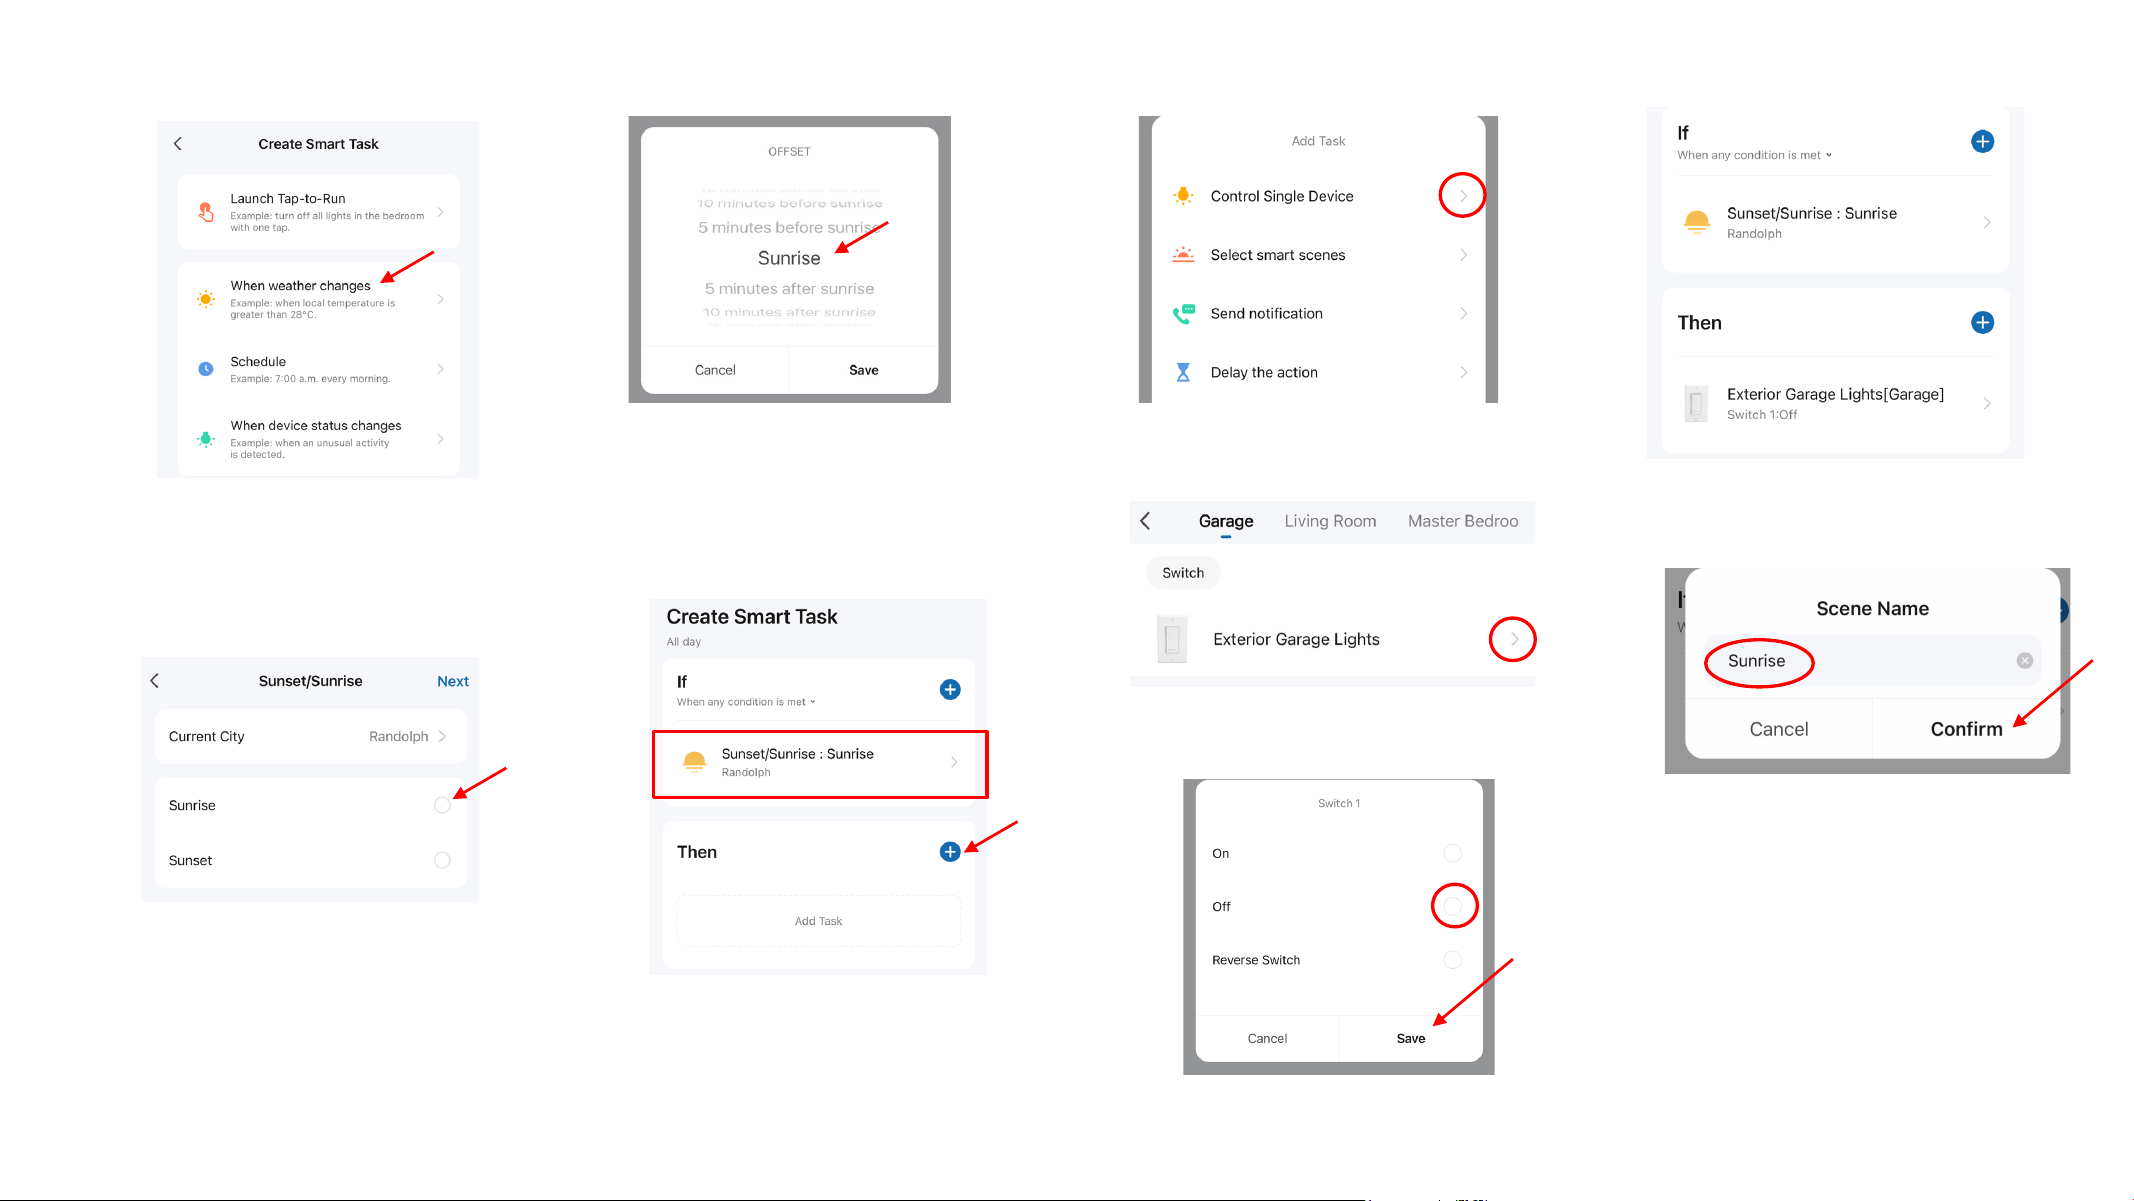
• Select “When Weather Changes”
from the Smart Task menu. This is
where the Sunset/Sunrise
astronomic settings can be found.
• The astronomic is based on the gps
location in your mobile device when
you set up your app.
• Tap “Sunrise” and note that you can
offset the time by 5 minutes to 5
hours. For example, you can create
a schedule that begins 20 minutes
before sunrise every day.
• Select “OFF” and “Save.”
• Select “Control Single Device”
• This defines the “If” (or “When”) part
of the automated schedule. In this
case, “when sunrise occurs…”
• Now you must define what happens
at sunrise. Tap the “+” to Add Task.
• Next, select your In-Wall Smart
Switch by tapping the “>”
• Now, every day at sunrise the Smart
Switch will turn OFF.
• Name the schedule “Sunrise,” tap
“Confirm,” then “Save.”
• TIP: If you plan to add more smart
switches or other ABRA devices, it’s
a good idea to name the schedules
according to their timing vs. “Garage
Lights” or something like that. It will
provide more flexibility when you
want to sync multiple devices to the
same schedule.
Creating Schedules for the In-Wall Smart Switch
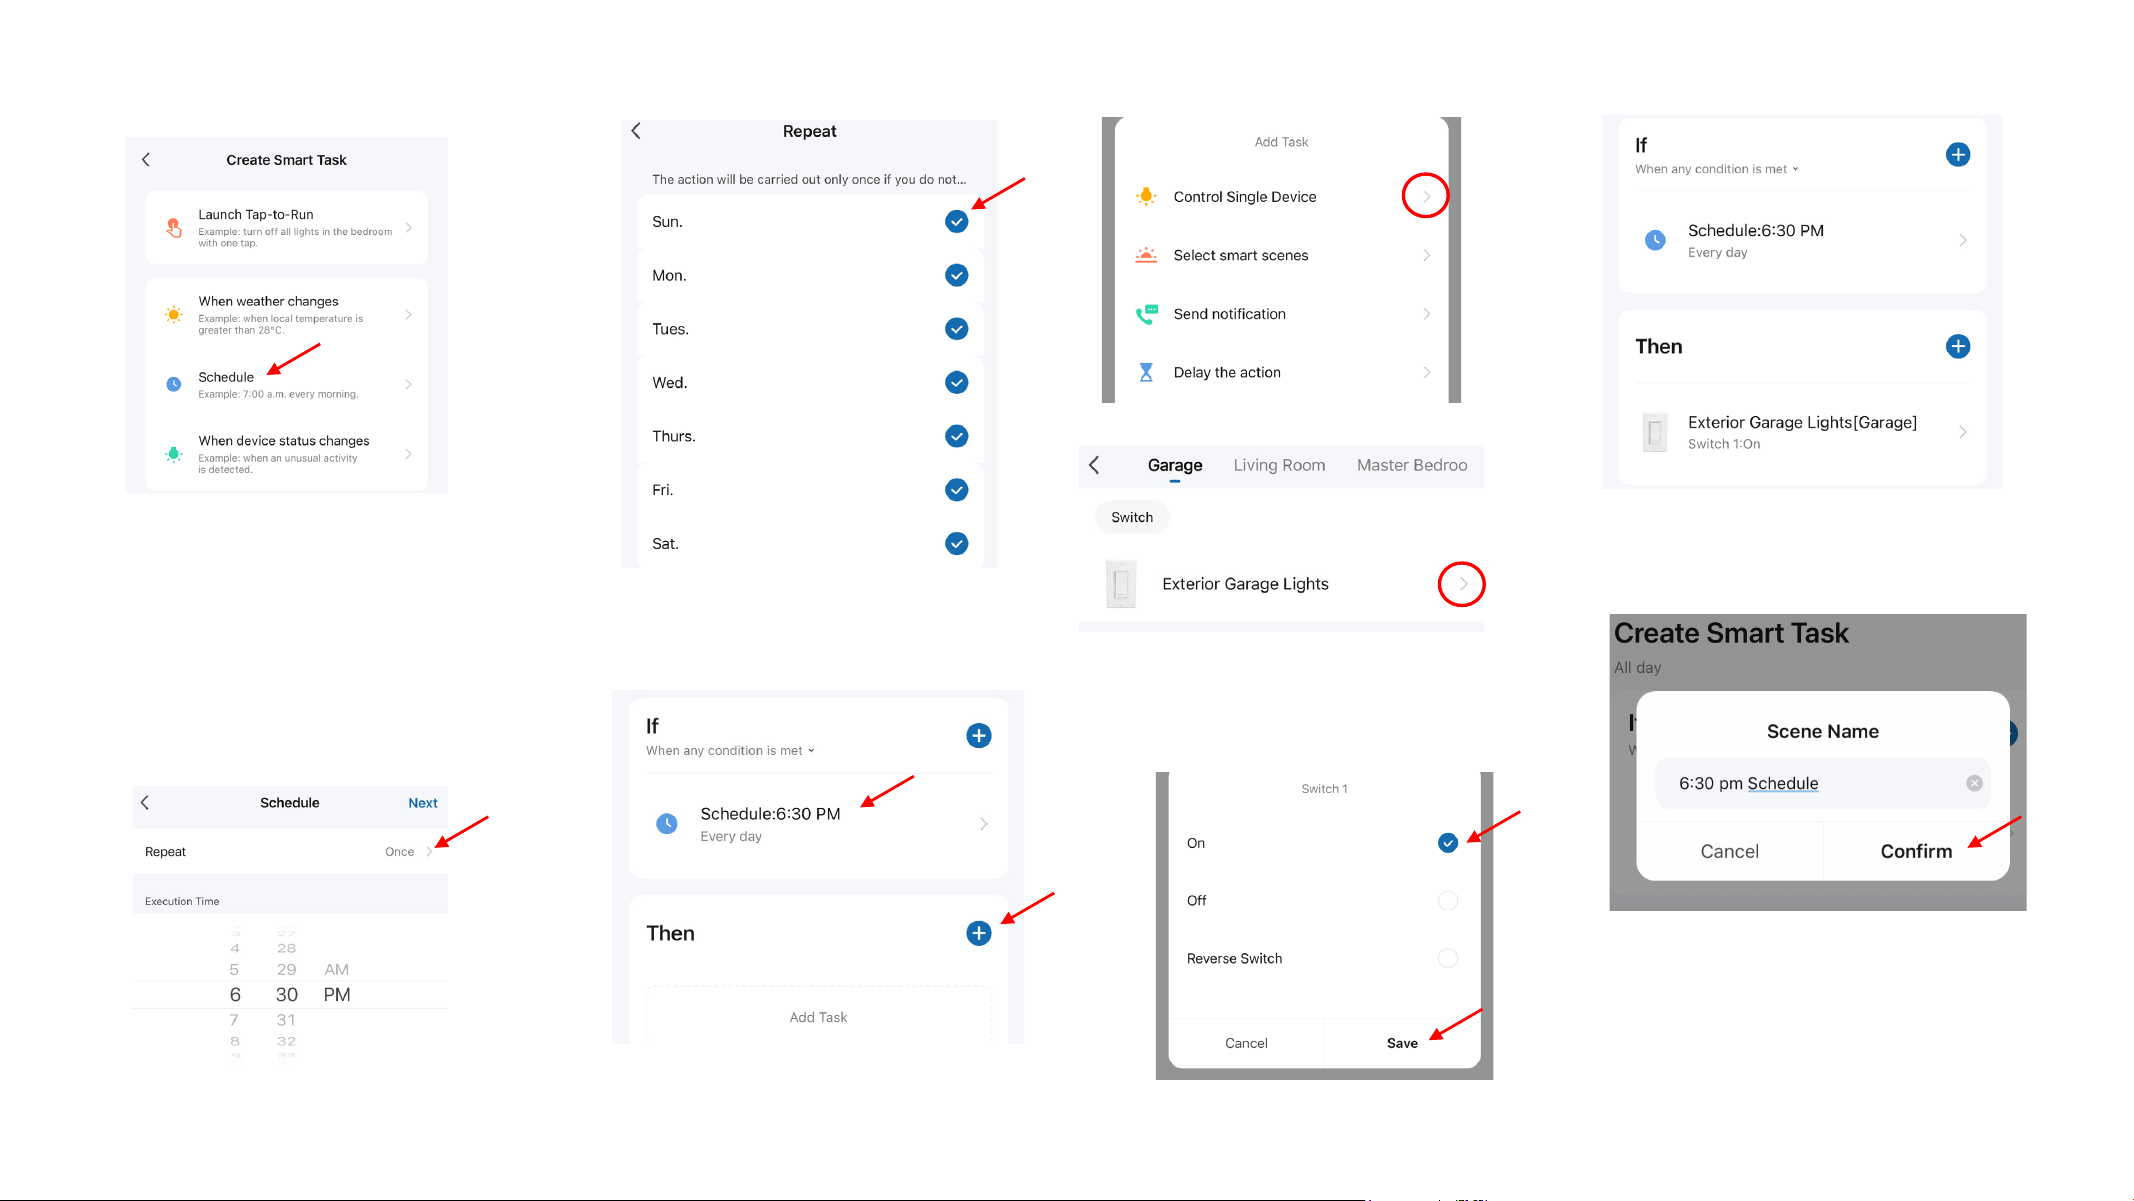
• To create an “ON” schedule, you
simply repeat the process. In this
example, we’ll use time-of-day to
turn the switch ON.
• Go back to the “Smart” page
“Automations” tab and select
“Schedule.”
• Dial in the desired time and change
the “Repeat>Once” selection to
open the 7-day calendar.
• Select the desired days for the
schedule.
• This time, select “On” to turn the
Smart Switch ON, then “Save.”
• Name the schedule, tap “Confirm,”
then “Save.”
• With the Time and Days in place, the
“action” must now be defined. Tap
“+” in the “Then” area.
• Again, select “Control Single Device”
and choose the smart switch.
• Now, every day at 6:30PM the Smart
Switch will turn ON.
Creating Schedules for the In-Wall Smart Switch
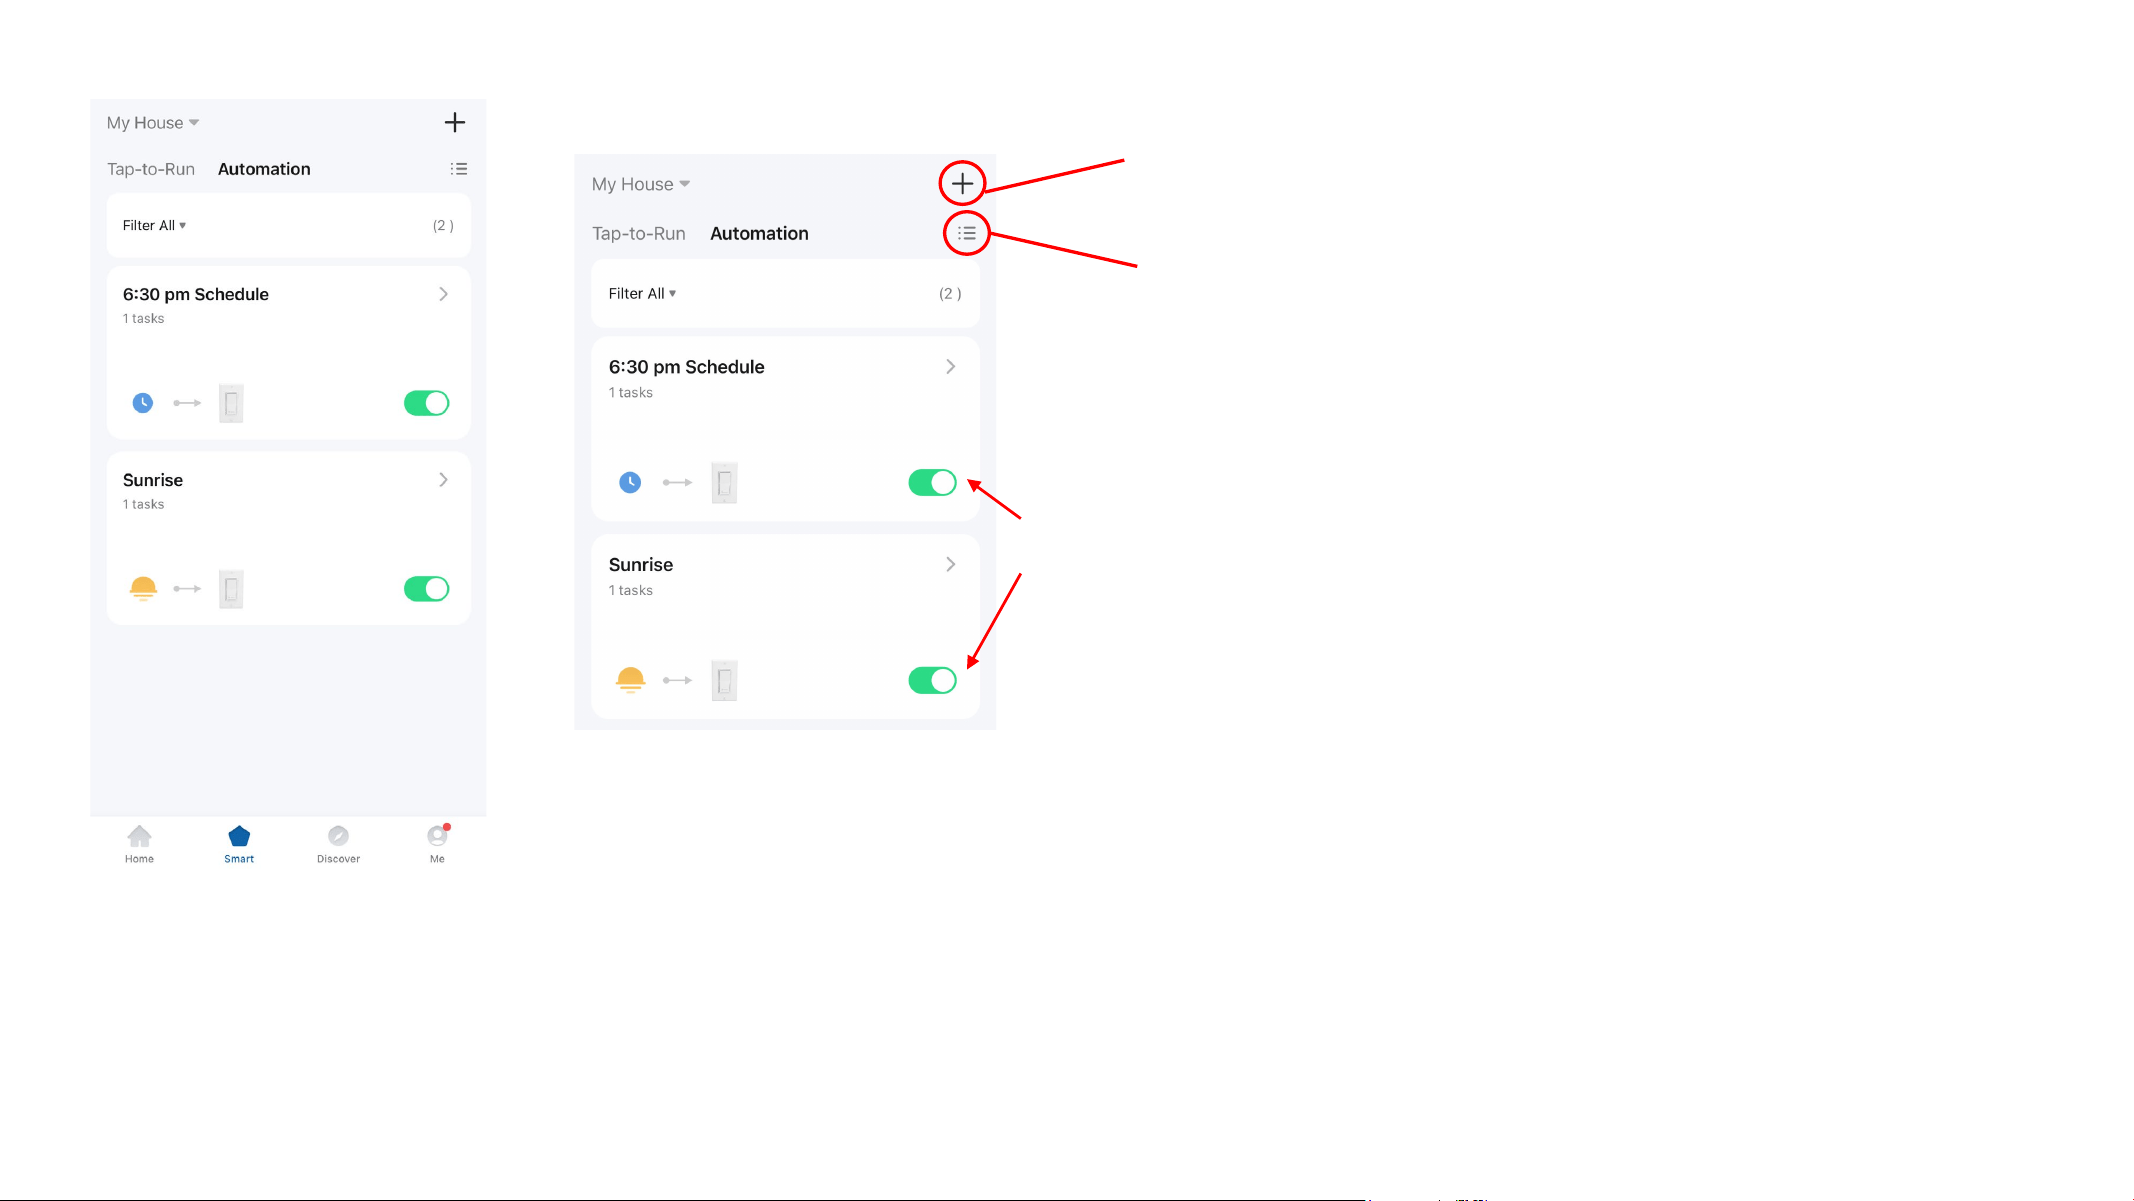
• The “Smart>Automation” page now
contains the two automated
schedules you just created.
• The “6:30 pm Schedule” turns the
ABRA In-wall Smart Switch ON
every day. The “Sunrise” schedule
turns the Smart Switch OFF every
day at sunrise.
• Note that Automated Schedules can
easily be modified, re-named,
deleted, and turned On/Off using
various tools in the ABRA app.
Tap to “+” icon to add a new Smart
Automation/Schedule
Manage/Delete Schmart
Automations
Turn Smart Automations On/Off
Modify Smart Automations,
including Re-name, Add/Change
Devices, Change Timing, Change
Device Behaviors, and more.
Creating Schedules for the In-Wall Smart Switch
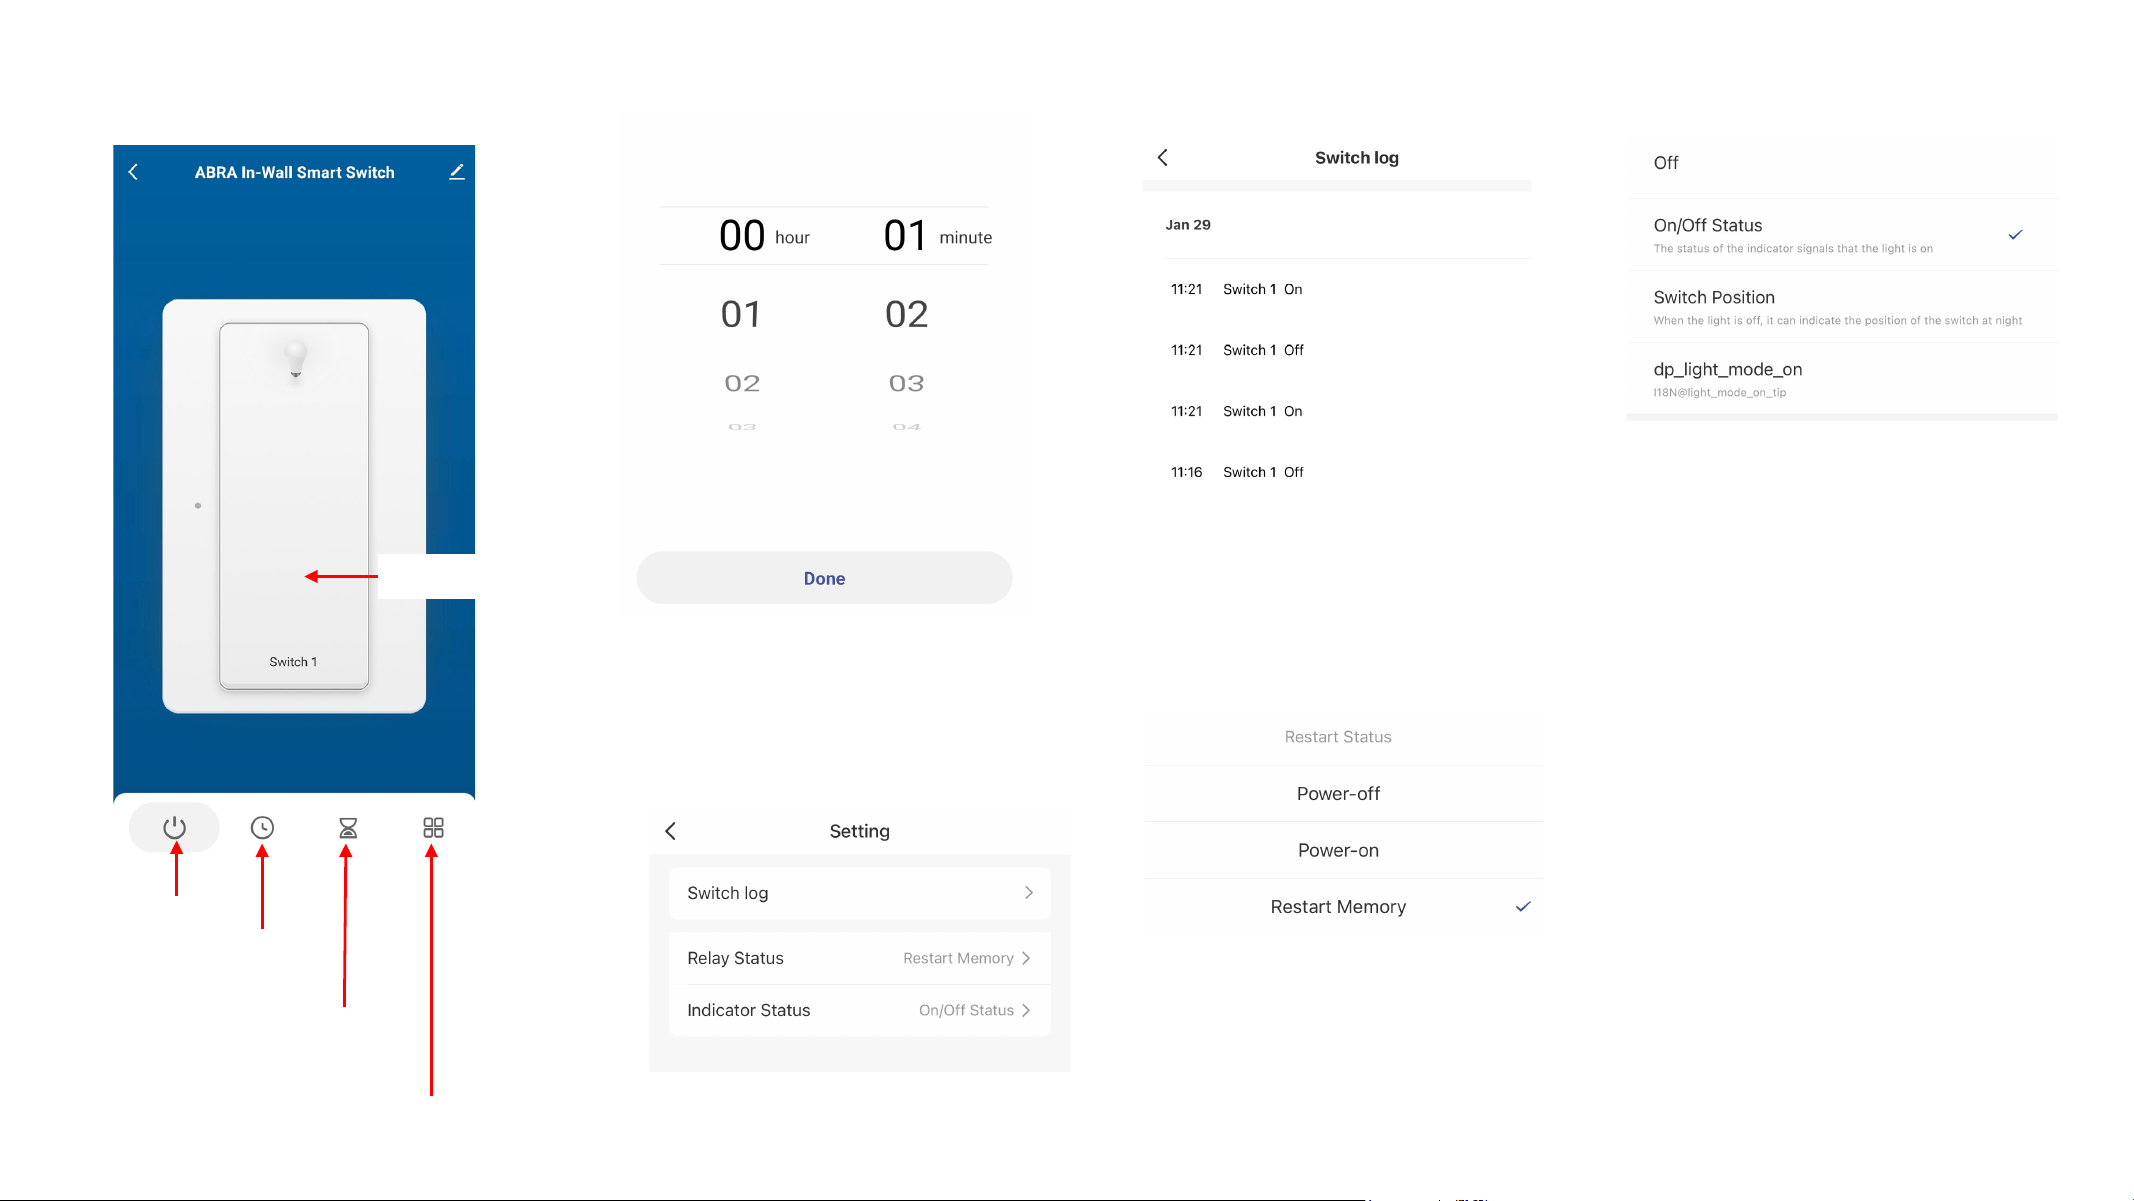
Other ABRA In-Wall Smart Switch Features
• Use the Countdown Timer to turn
the switch ON or OFF after a
specified period of time, up to 24
hours.
On/Off
On/Off
Basic
Scheduler
Countdown
Timer
Settings
• The Settings tab contains 3 items.
• The Switch log keeps track of your
Smart Switch ON/OFF status over
the course of time.
• Relay Status refers to your preferred
switch status after a power failure.
When power returns, the switch can
be set to ON, OFF or to the state it
was in at the time of the power loss.
• Indicator Status refers to the LED
indicator. It can be turned OFF
completely, or it can be set to
indicate the status of the load.
• In Switch Position mode, the LED
will be ON when the load is OFF, to
act as a nightlight to help locate the
switch in a darkened room.
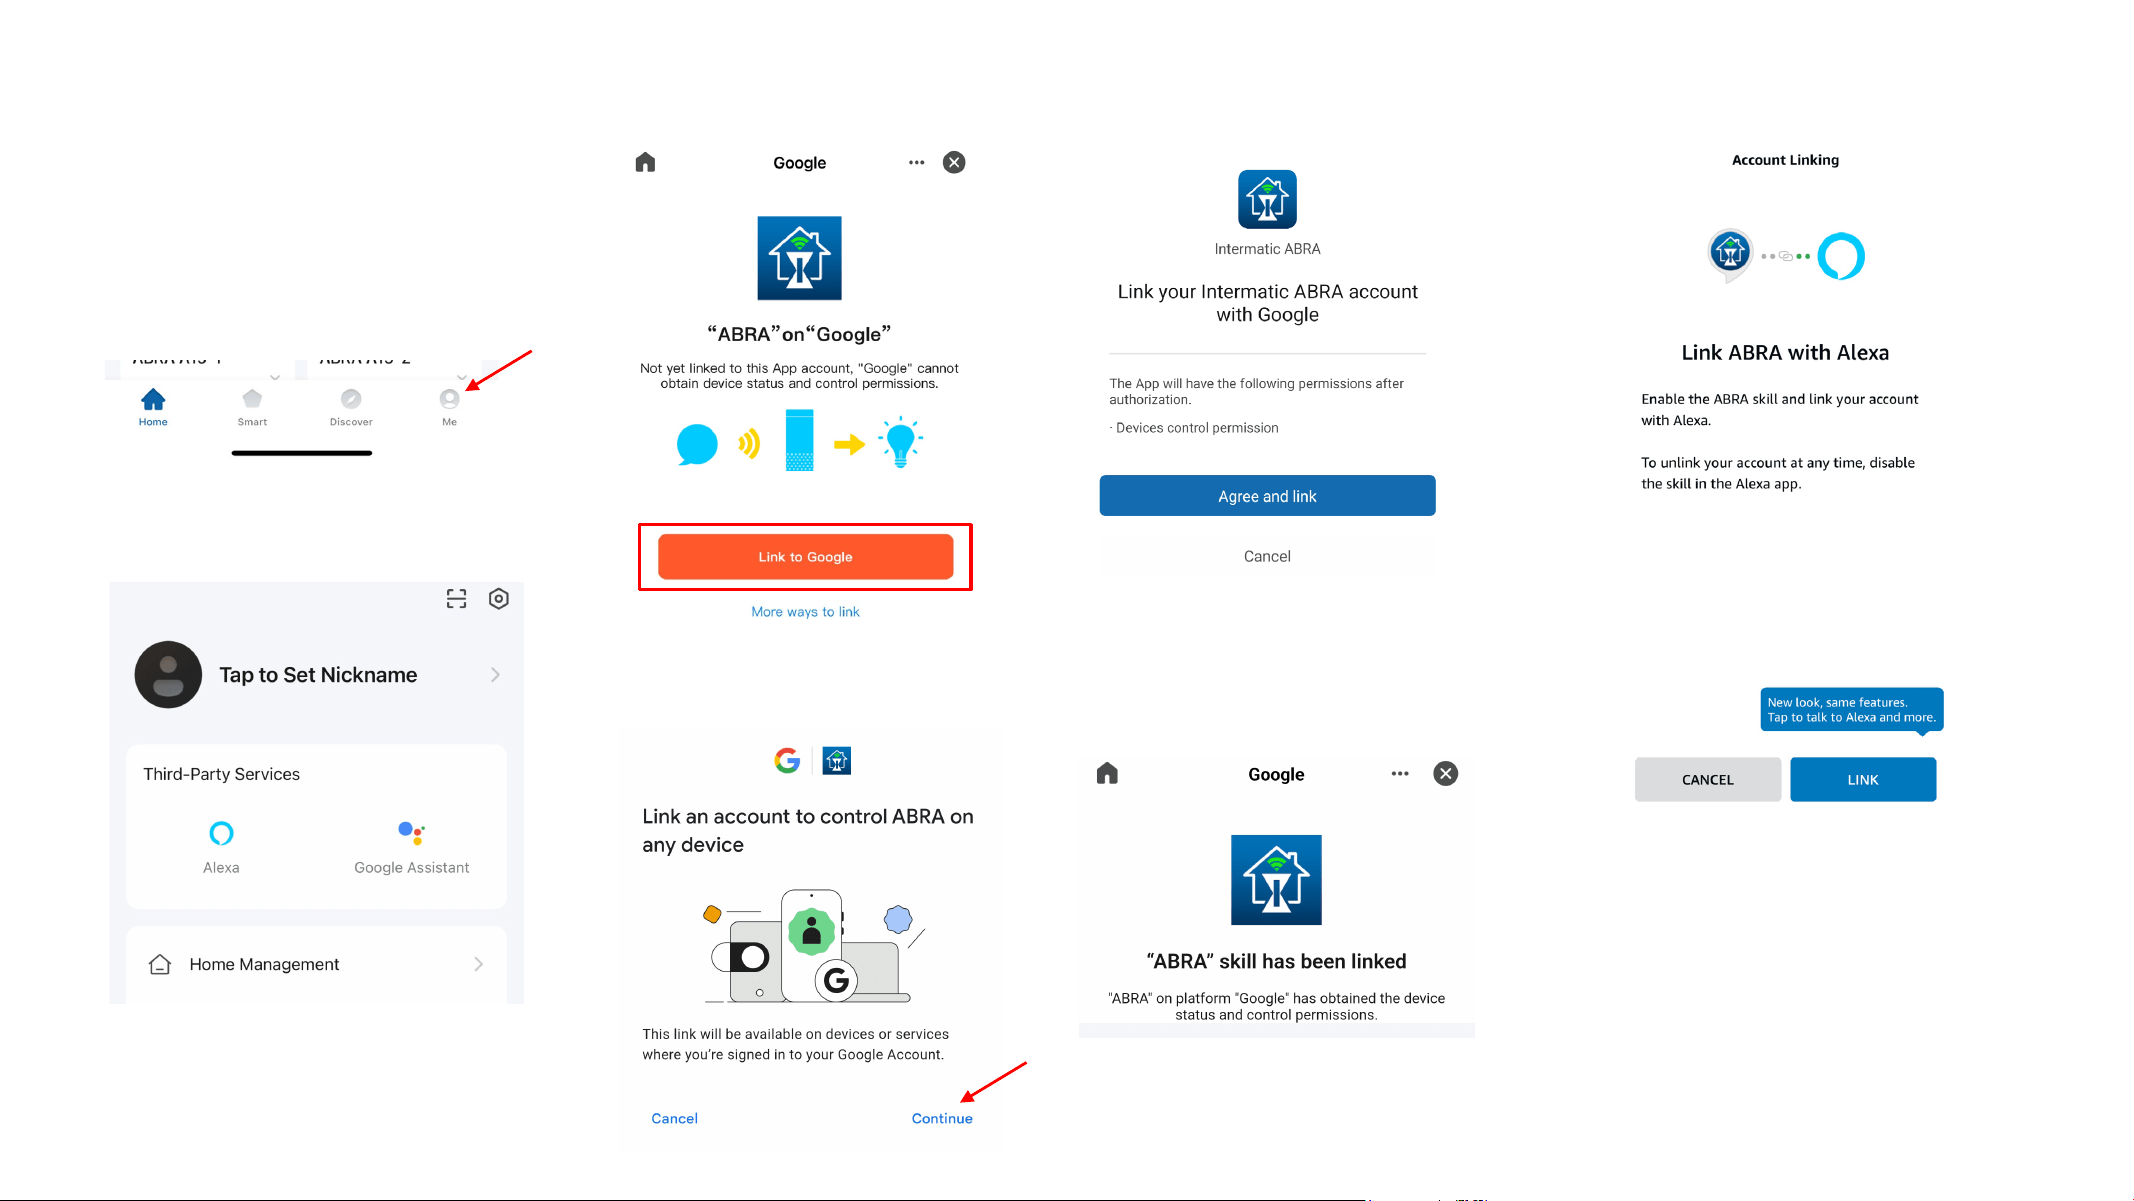
Using Google Home and Amazon Alexa
• The ABRA In-Wall Smart Switch can
be used with Google Home and
Amazon Alexa, for voice and app
control.
• For both Alexa and Google, tap the
“Me” icon at the bottom of the screen.
• Successful account linking will be
confirmed. You can now use
Google voice commands to
control your ABRA switch.
• Tap “Link to Google” and
follow the instructions.
• Tap “Agree and link” to proceed with
the account linking.
• Select either Alexa or Google.
• The process is similar when
linking ABRA to your Alexa
account.
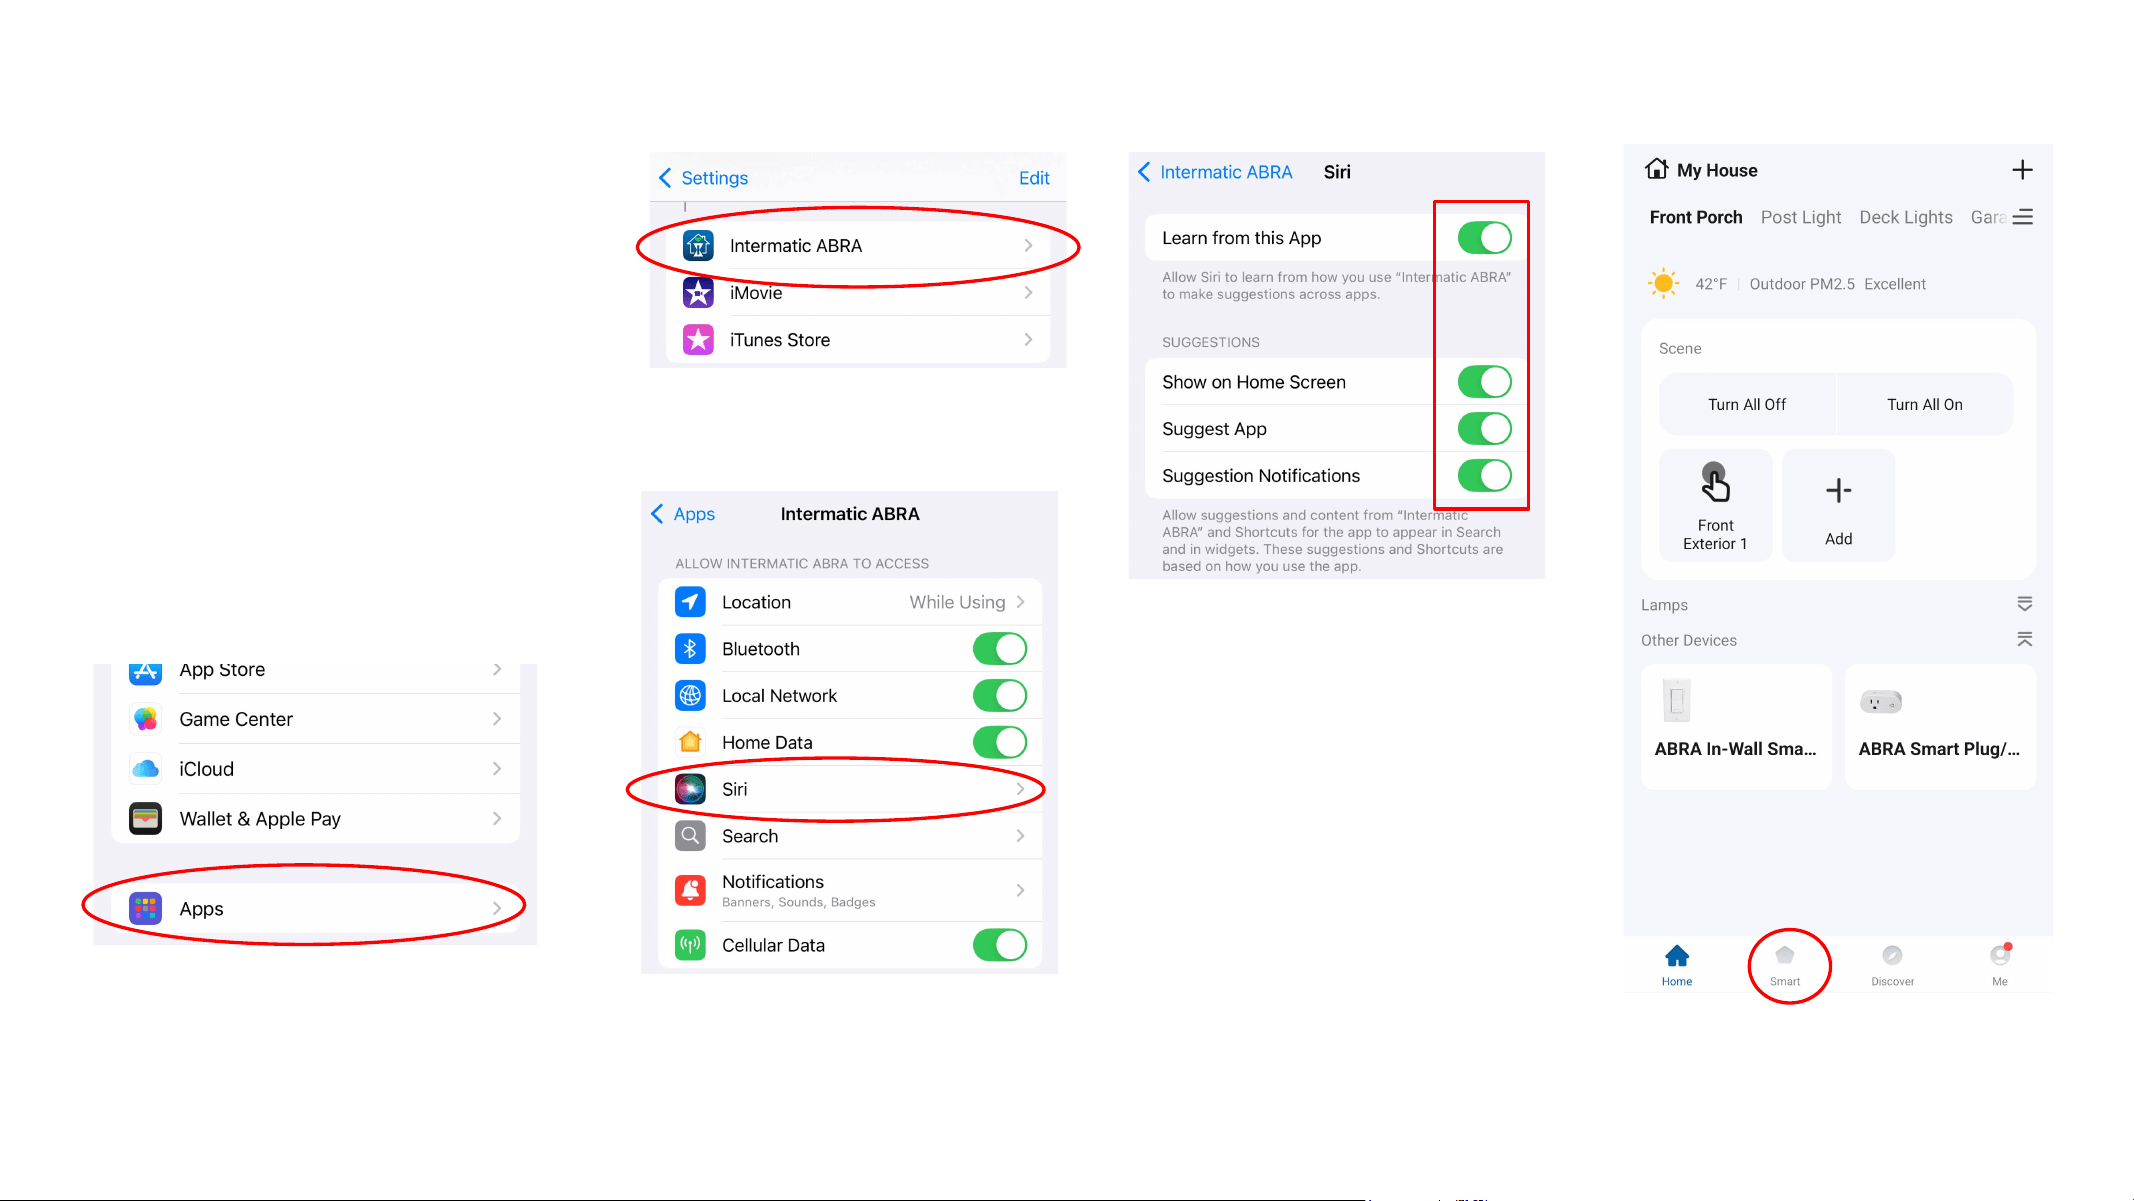
• Start by going to Settings on your
iOS device, then scroll down to
“Apps.”
• ABRA supports Siri voice
commands on Apple devices.
• Unlike Google Home and Amazon
Alexa, each Siri voice command for
ABRA must be created from
scratch.
• However, the process of creating
Siri voice commands for ABRA
(e.g., ”Hey Siri, turn lights ON”) is
not difficult.
• Select the Intermatic ABRA app.
• Select “Siri.”
• Allow all permissions for Siri within
the ABRA app.
• Exit “Settings.”
• In the ABRA app, select “Smart.”
ABRA and Siri
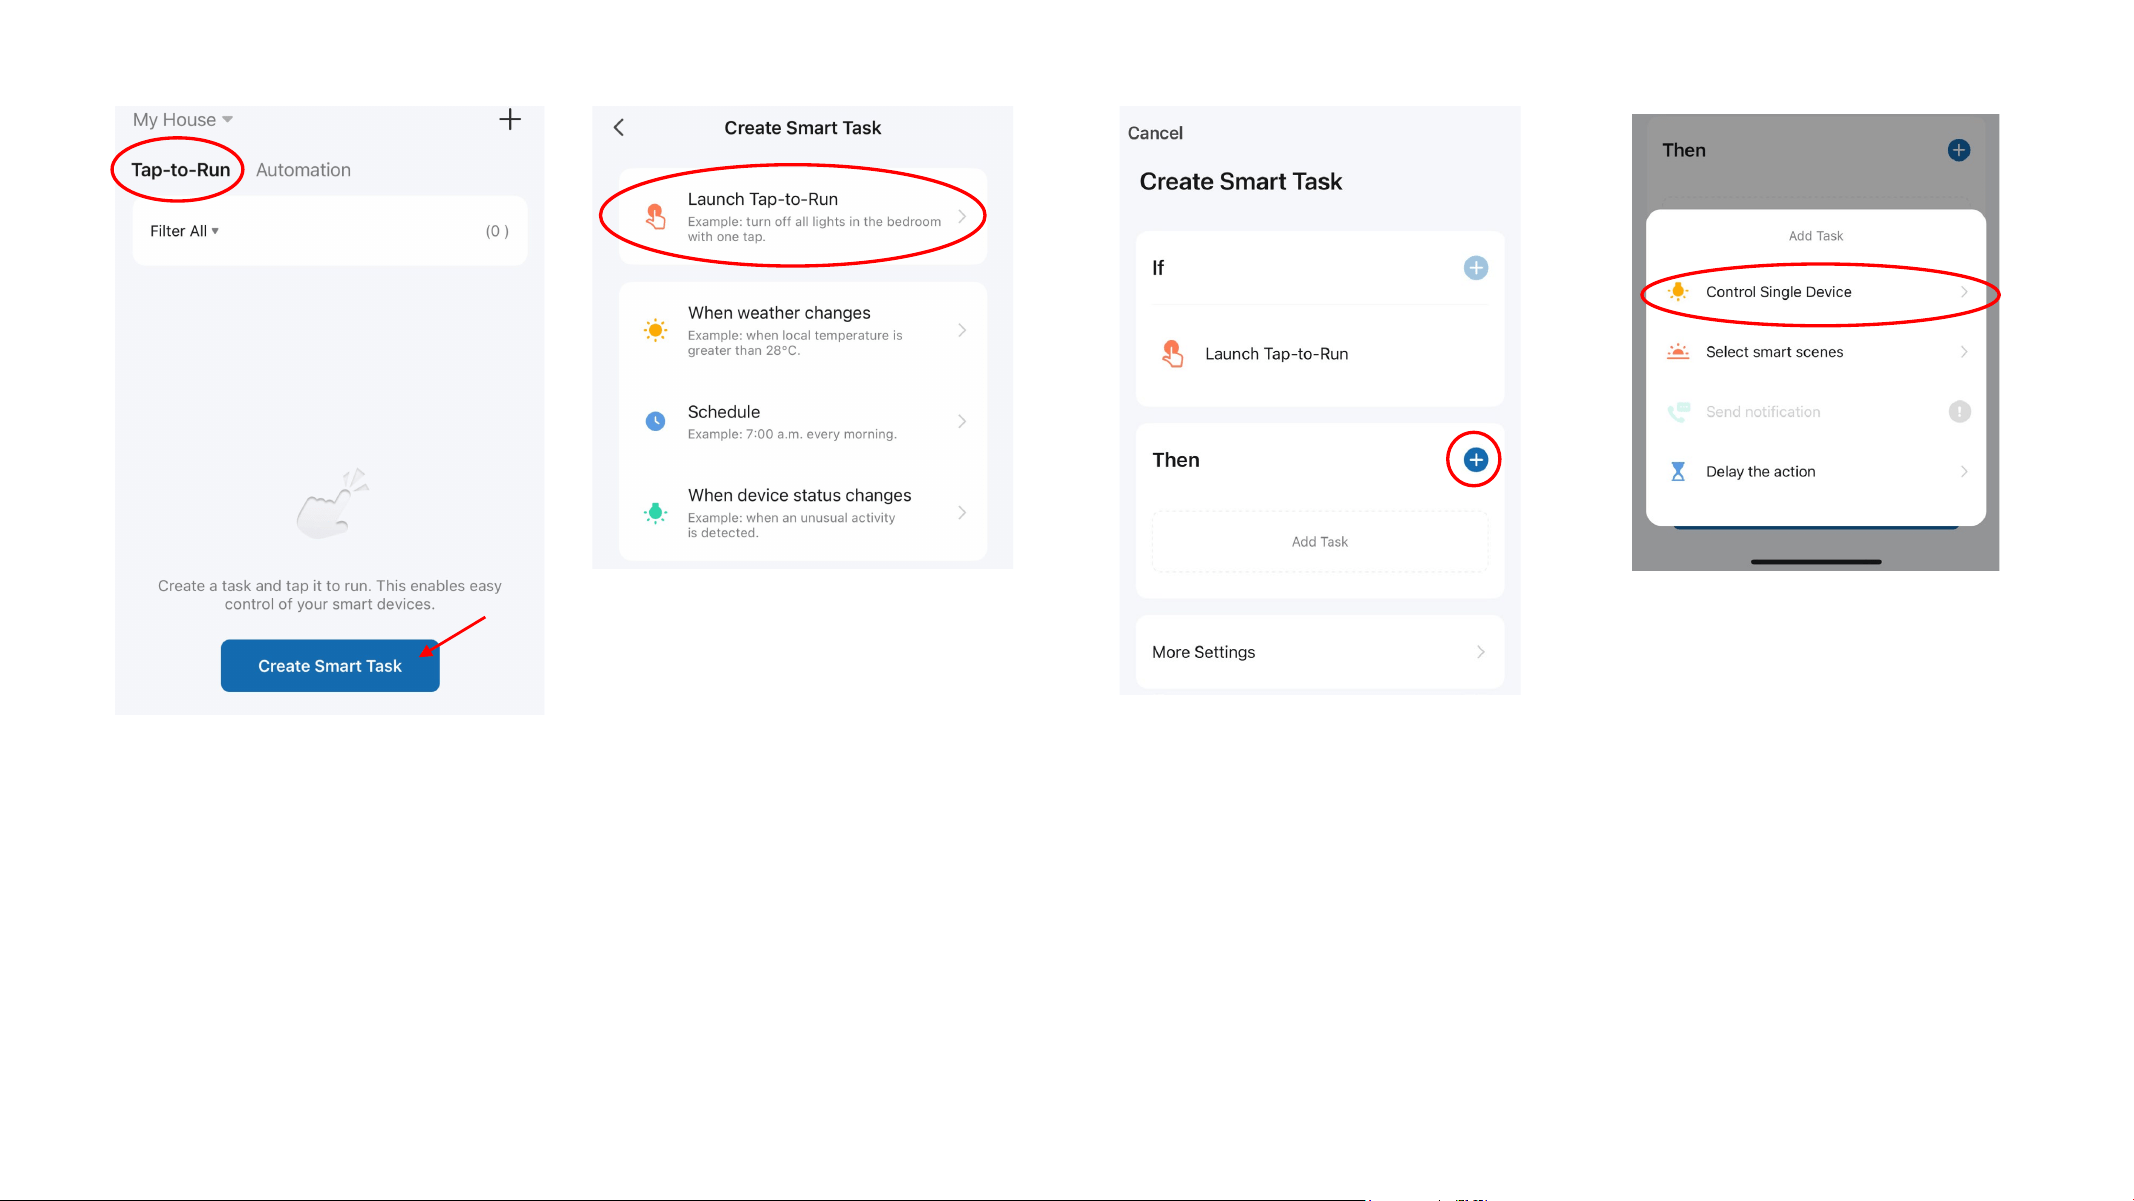
ABRA and Siri
• Select “Tap-to-Run, then tap
“Create Smart Task.”
• Select “Launch Tap-to-Run.”
• Select the “+” symbol next to
“Then” to define the task.
• A sub-menu appears with several
options.
• Here you can define a task that
controls a single device or a task
that triggers a smart scene.
• In this example we’ll select “Control
Single Device.”
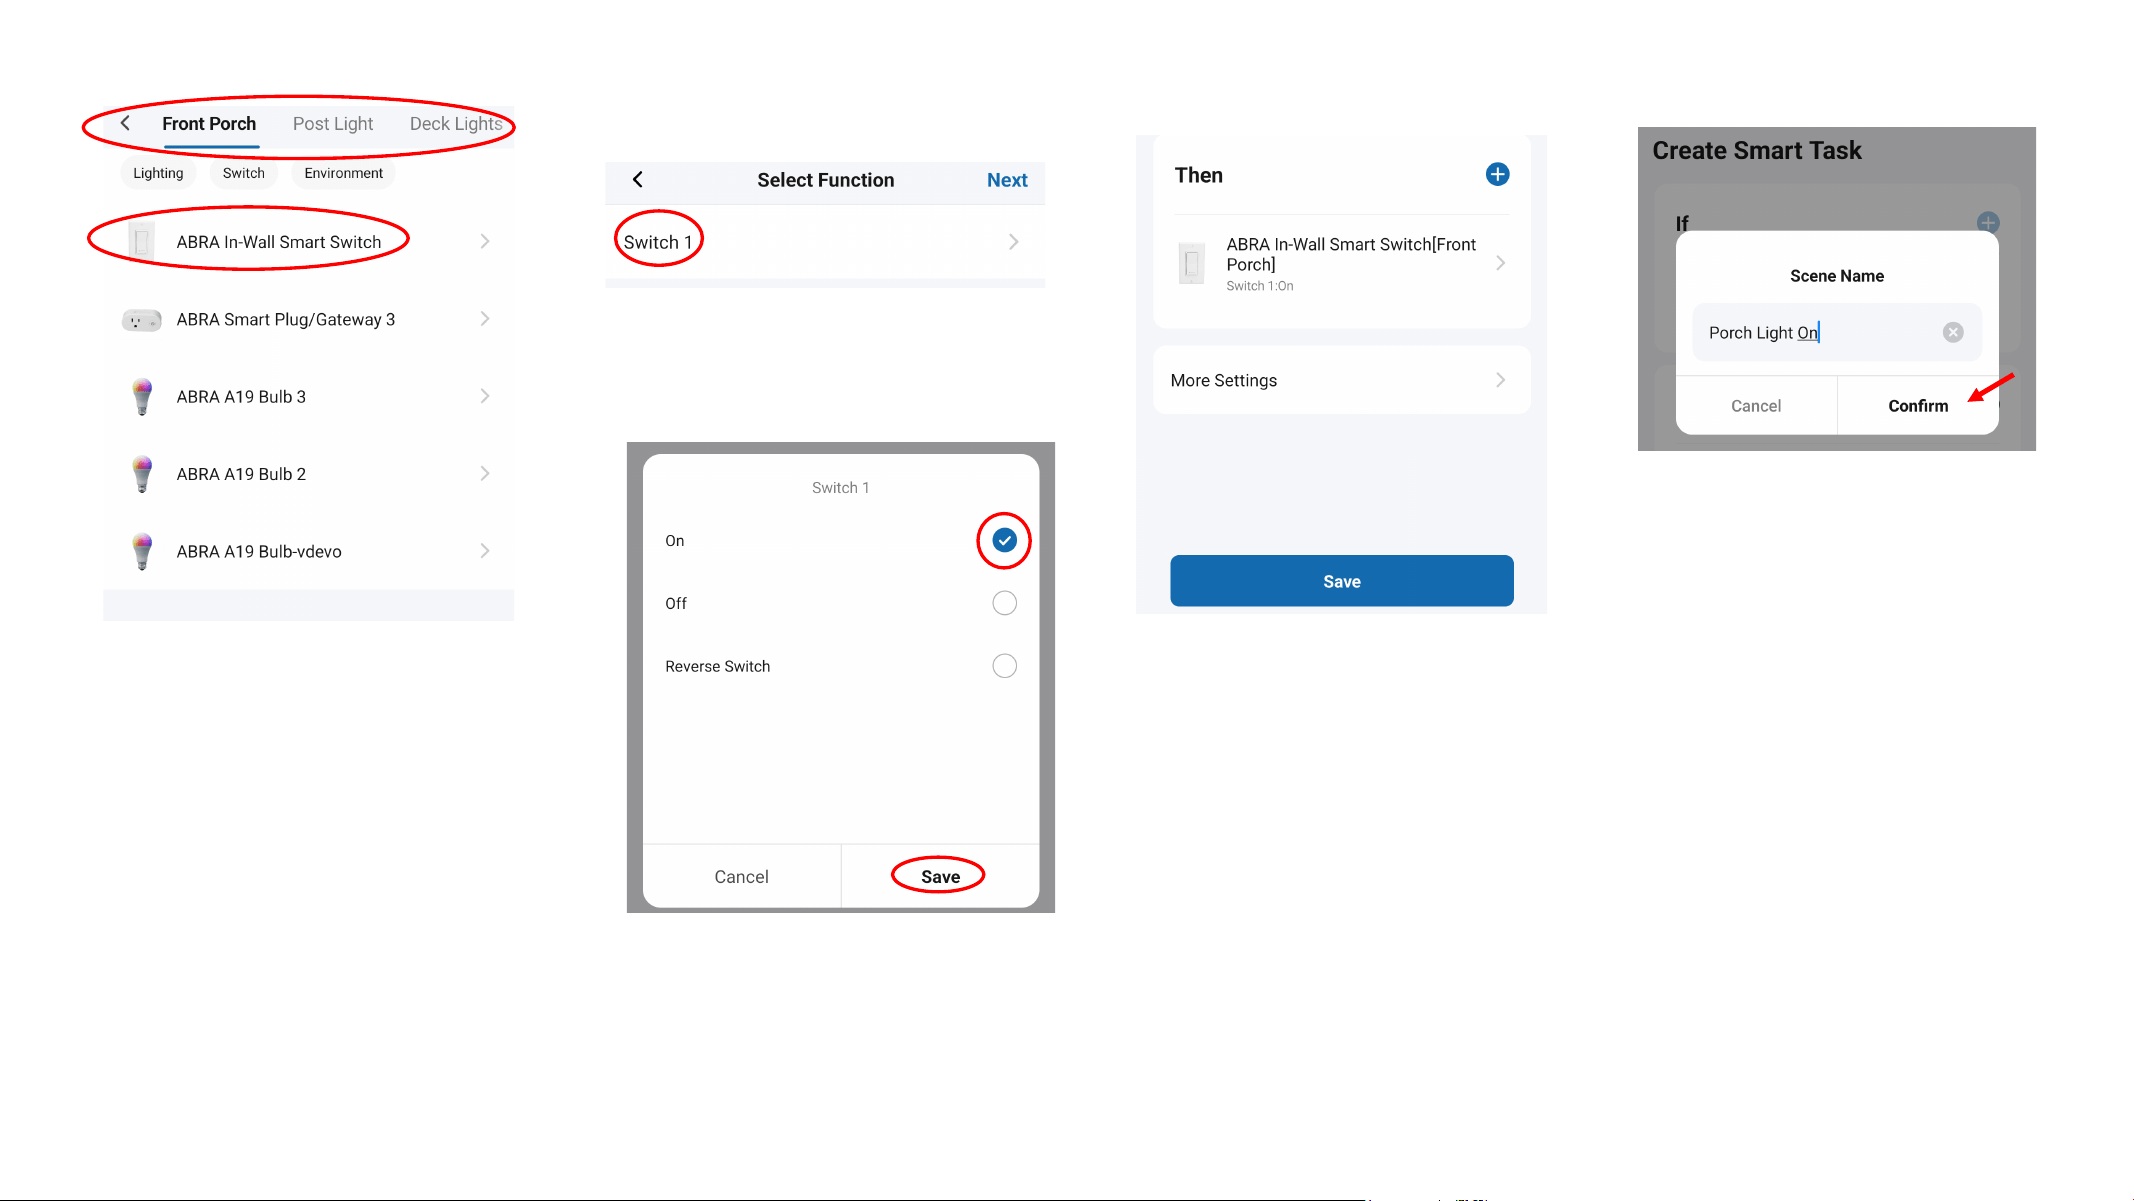
ABRA and Siri
• Scroll horizontally to find the
desired Room.
• The devices in each Room appear
in the list.
• In this example, we’ll select the
“ABRA In-Wall Smart Switch”
located in the space called “Front
Porch.”
• There are 3 functions for this device:
ON, OFF, and Reverse Switch. For this
example we’ll select “ON.”
• Tap “Save,” then “Next” at the top of
the screen.
• The Smart Task itself is saved, but
you will still need to give it a name.
• This is a critical step because Siri
will use that name as the voice
command.
• Tap “Save” to name the Smart
Task and define the Siri voice
command.
• For this example, let’s call the
Scene “Porch Light On” and
tap “Confirm.”
• Select “Switch 1.”
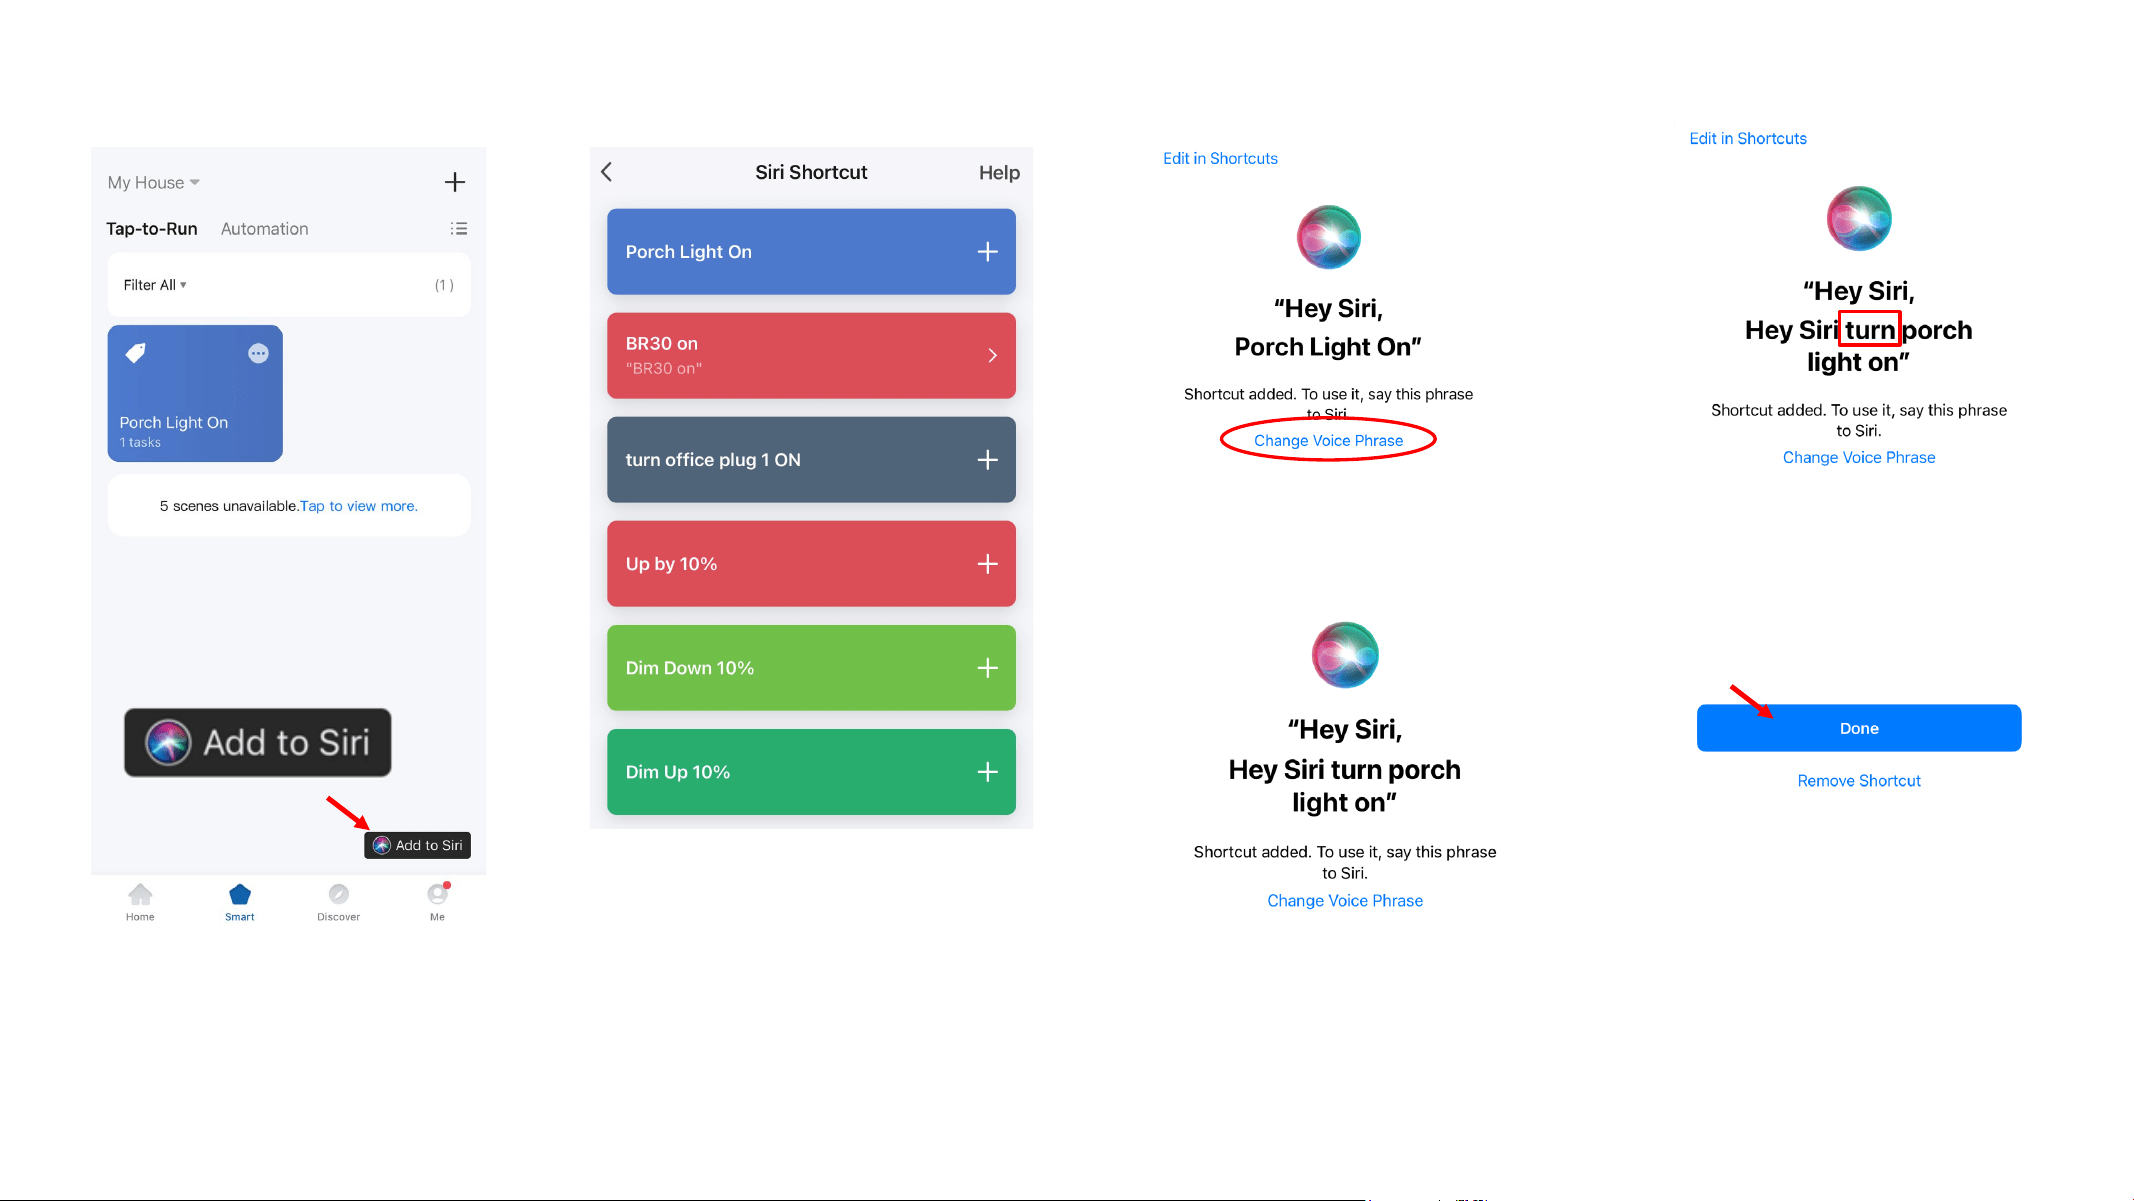
ABRA and Siri
• “Porch Light On” is added to the
Siri Shortcut List.
• Tap on the shortcut to edit the Siri
command if needed.
• To adjust the shortcut phrase,
simply tap “Change Voice Phrase.”
• You can simply say the new phrase
into your device and Siri will
automatically turn the phrase into the
new Siri voice command.
• For example, you can change the
phrase to “Hey Siri, turn porch light
on.”
• Tap “Done” to save the new phrase.
• Once you’ve saved your Siri voice
commands to the Siri Shortcut List,
you can use Siri at any time to
activate a lighting scene or a
particular function for any of your
ABRA devices.
• The “Porch Light On” scene is now
saved on the Smart> Tap-to-Run
page.
• Tap the “Add to Siri” button to save
the new Siri voice command.
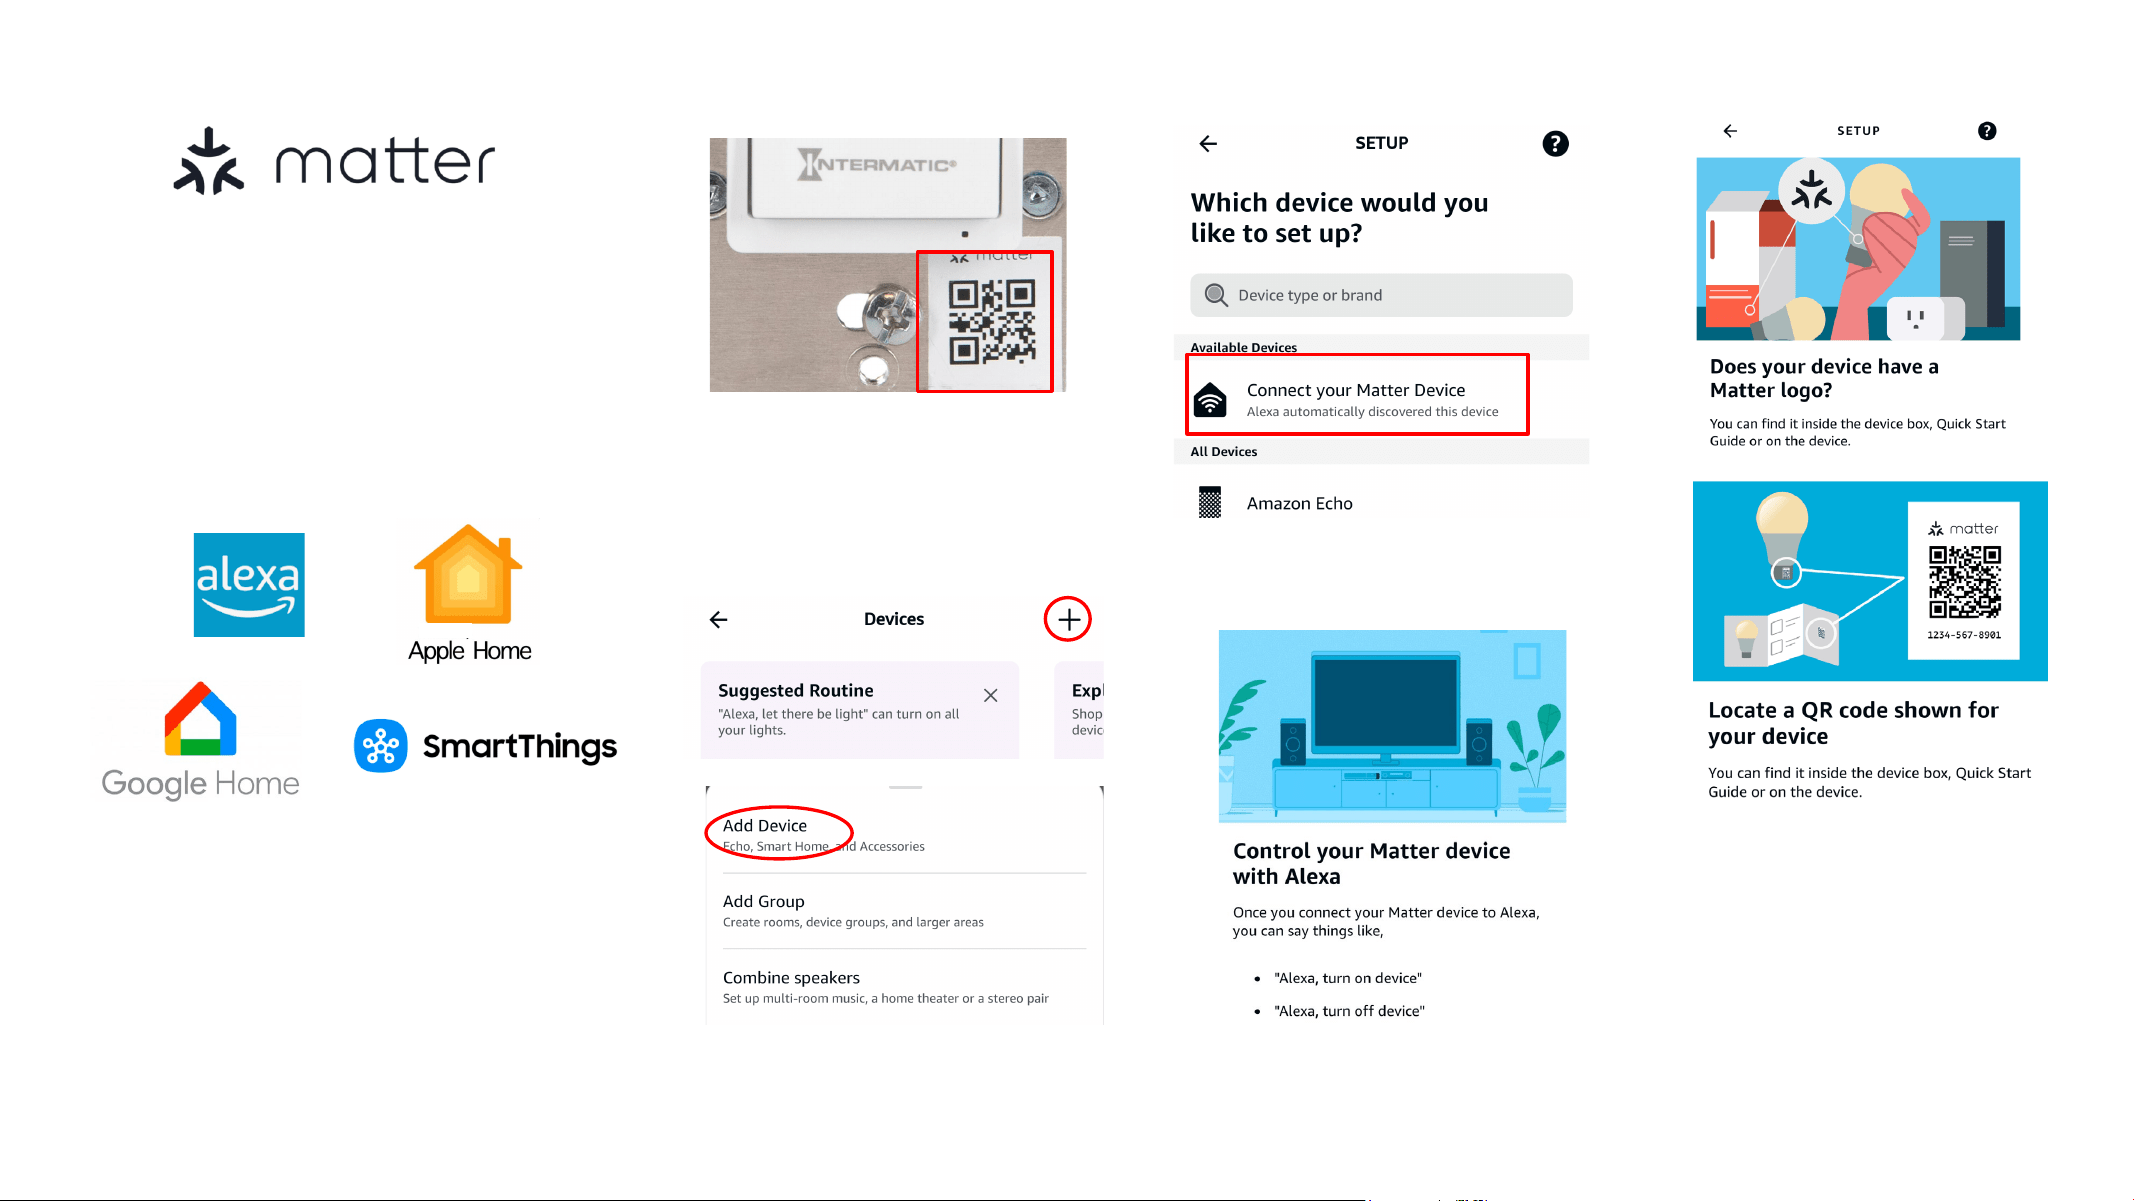
In-Wall Smart Switch and Matter
• The Intermatic In-Wall Smart Switch is
Matter-certified, allowing it to work
with any Matter-compatible Smart
Home platform.
• Matter is a new industry standard for
smart devices, enabling simple pairing
and consistent performance across all
Matter-compatible platforms and
brands.
• Popular Matter-compliant platforms
include Amazon Alexa, Apple Home,
Google Home, and Samsung
SmartThings.
• This is different than linking your
ABRA account with your Google
Home or Amazon Alex account for
voice control.
• The Matter QR Code can be found on
the front of the In-Wall Switch.
• Follow the Matter-specific instructions
from your smart home platform
provider to add the Intermatic switch.
• Regardless of the app, you’ll
have the opportunity to scan the
code with your phone’s camera
or enter it numerically.
• Once added, you can use the
functions in your platform’s app to
control, manage, and schedule
your Intermatic In-Wall Smart
Switch.
• For example, in the Alexa app you’ll
begin by tapping the “+” icon to “Add
Device.”
• Choose “Select your Matter Device” at
the top of the menu.
• From there, the Alexa app will walk
you through the discovery and pairing
process.