RF 2.4GHz
Q1A
DIM
Wireless Type
Product Model
Dimming Types
Standby Current
Compatible
Controllers
P1 / P2 / P3 / P4 / P5/
F4-3A / F4-5A /
F5-DMX-4A
Technical Specifications
1
LED Remote Control
Regional Control
Single Zone
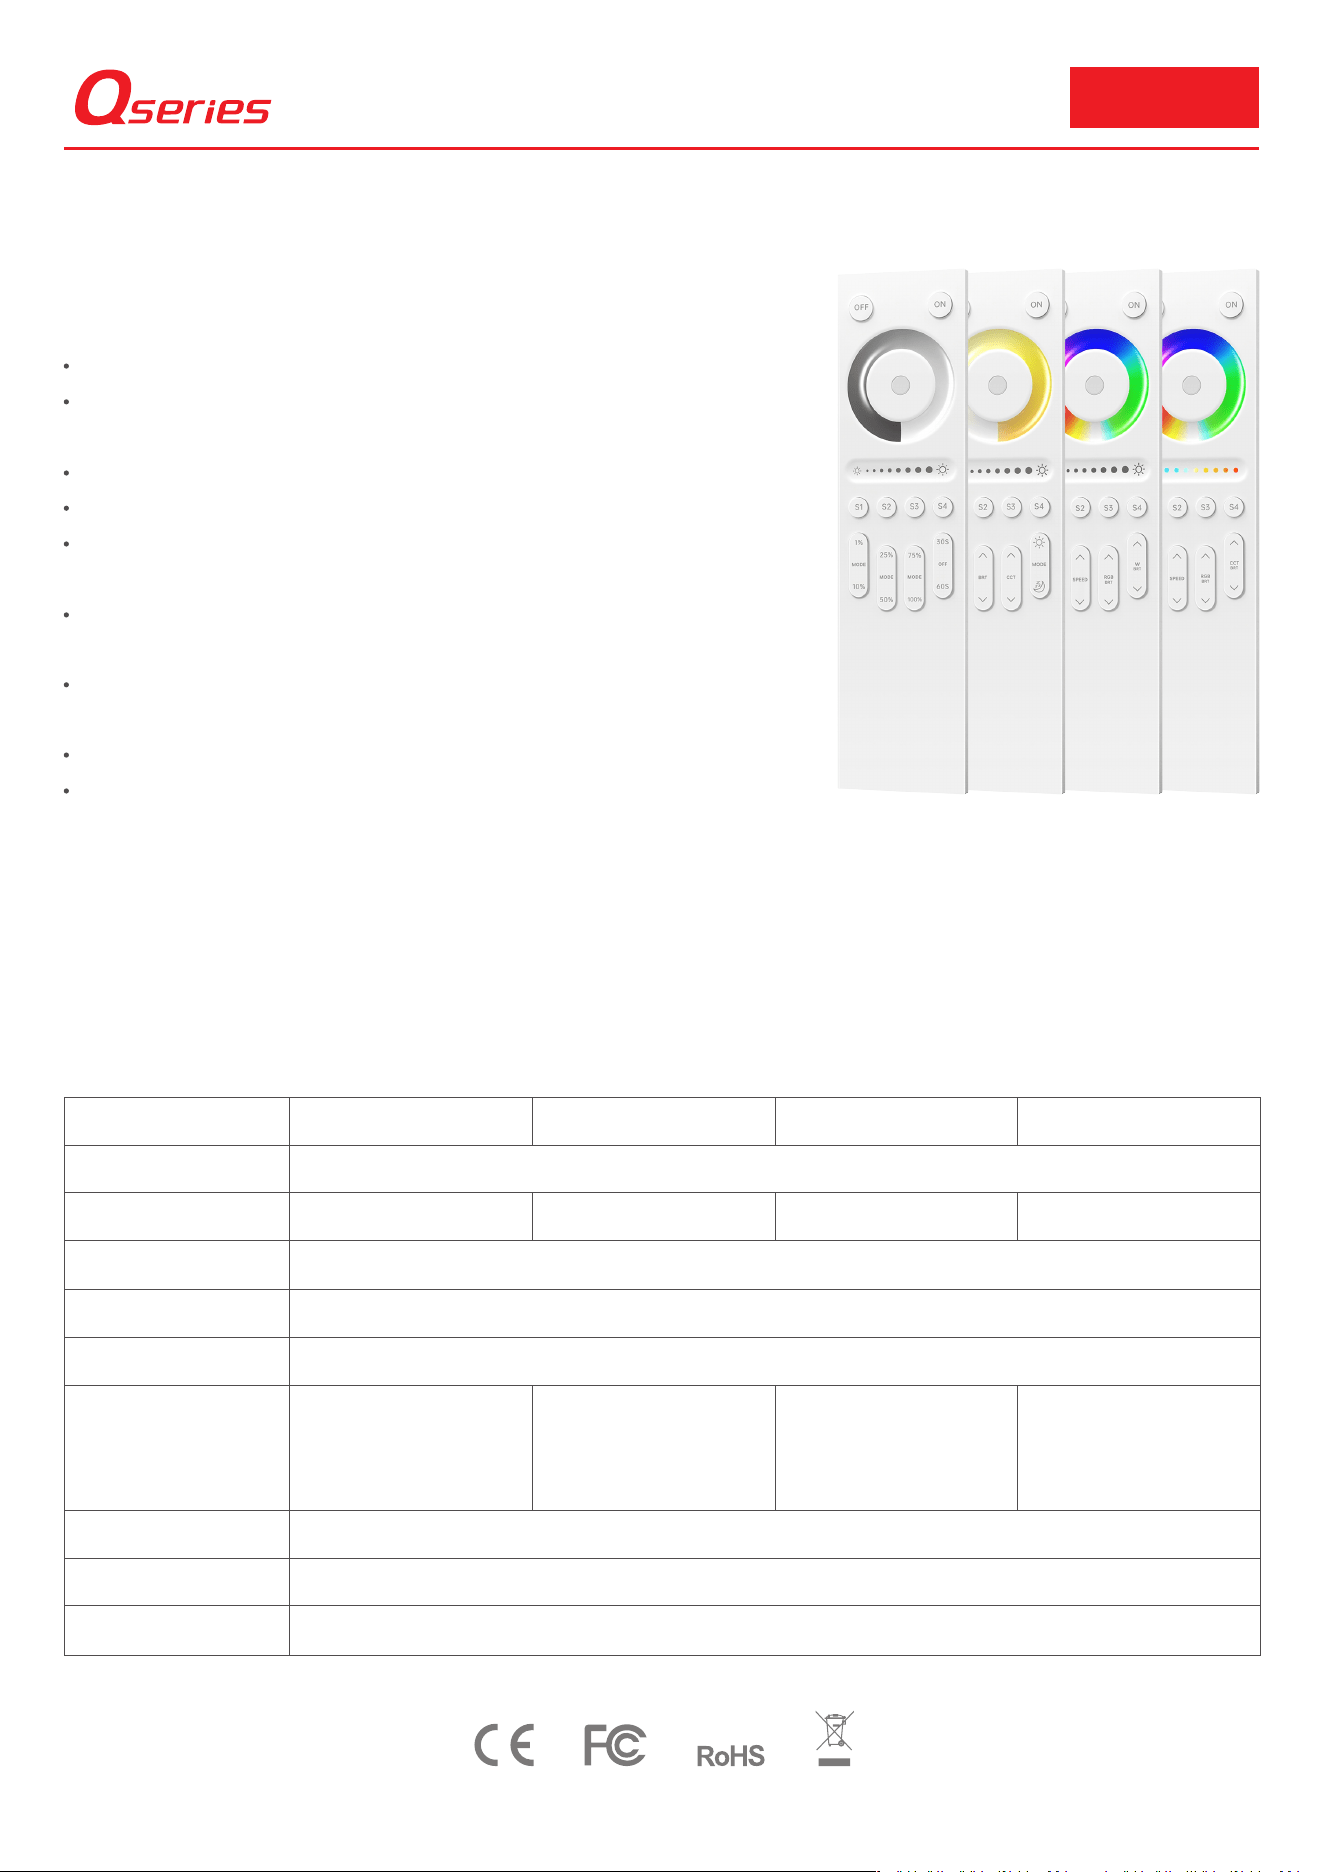
2.4 GHz RF wireless transmission, with stable signal and strong interference resistance.
The remote control provides zone-by-zone control for dimming, color temperature, RGB,
RGBW, and RGBCW.
Compatible with P-series and F-series controllers.
Equipped with a dedicated ON/OFF button for instant lighting control.
Adjust brightness by touching the brightness slider or pressing the brightness button;
a short press cycles through 11 brightness levels, while a long press enables stepless dimming.
Features 4 preset scenes for instant recall, with custom scenes saved by pressing and
holding the scene button.
One remote control can be paired with multiple controllers, and one controller can support
up to 10 remote controls.
Supports synchronized dimming across controller groups.
Supplied with a plastic stand for convenient storage and easy access.
Q1A 、Q2A、Q4A、Q5A
RF2.4G
3Vdc,2×AAA Note: Batteries not included.
<3μA
Power Supply
Q1A Q2A Q4A Q5A
-10℃~50℃
60g±5g(Bracket included)
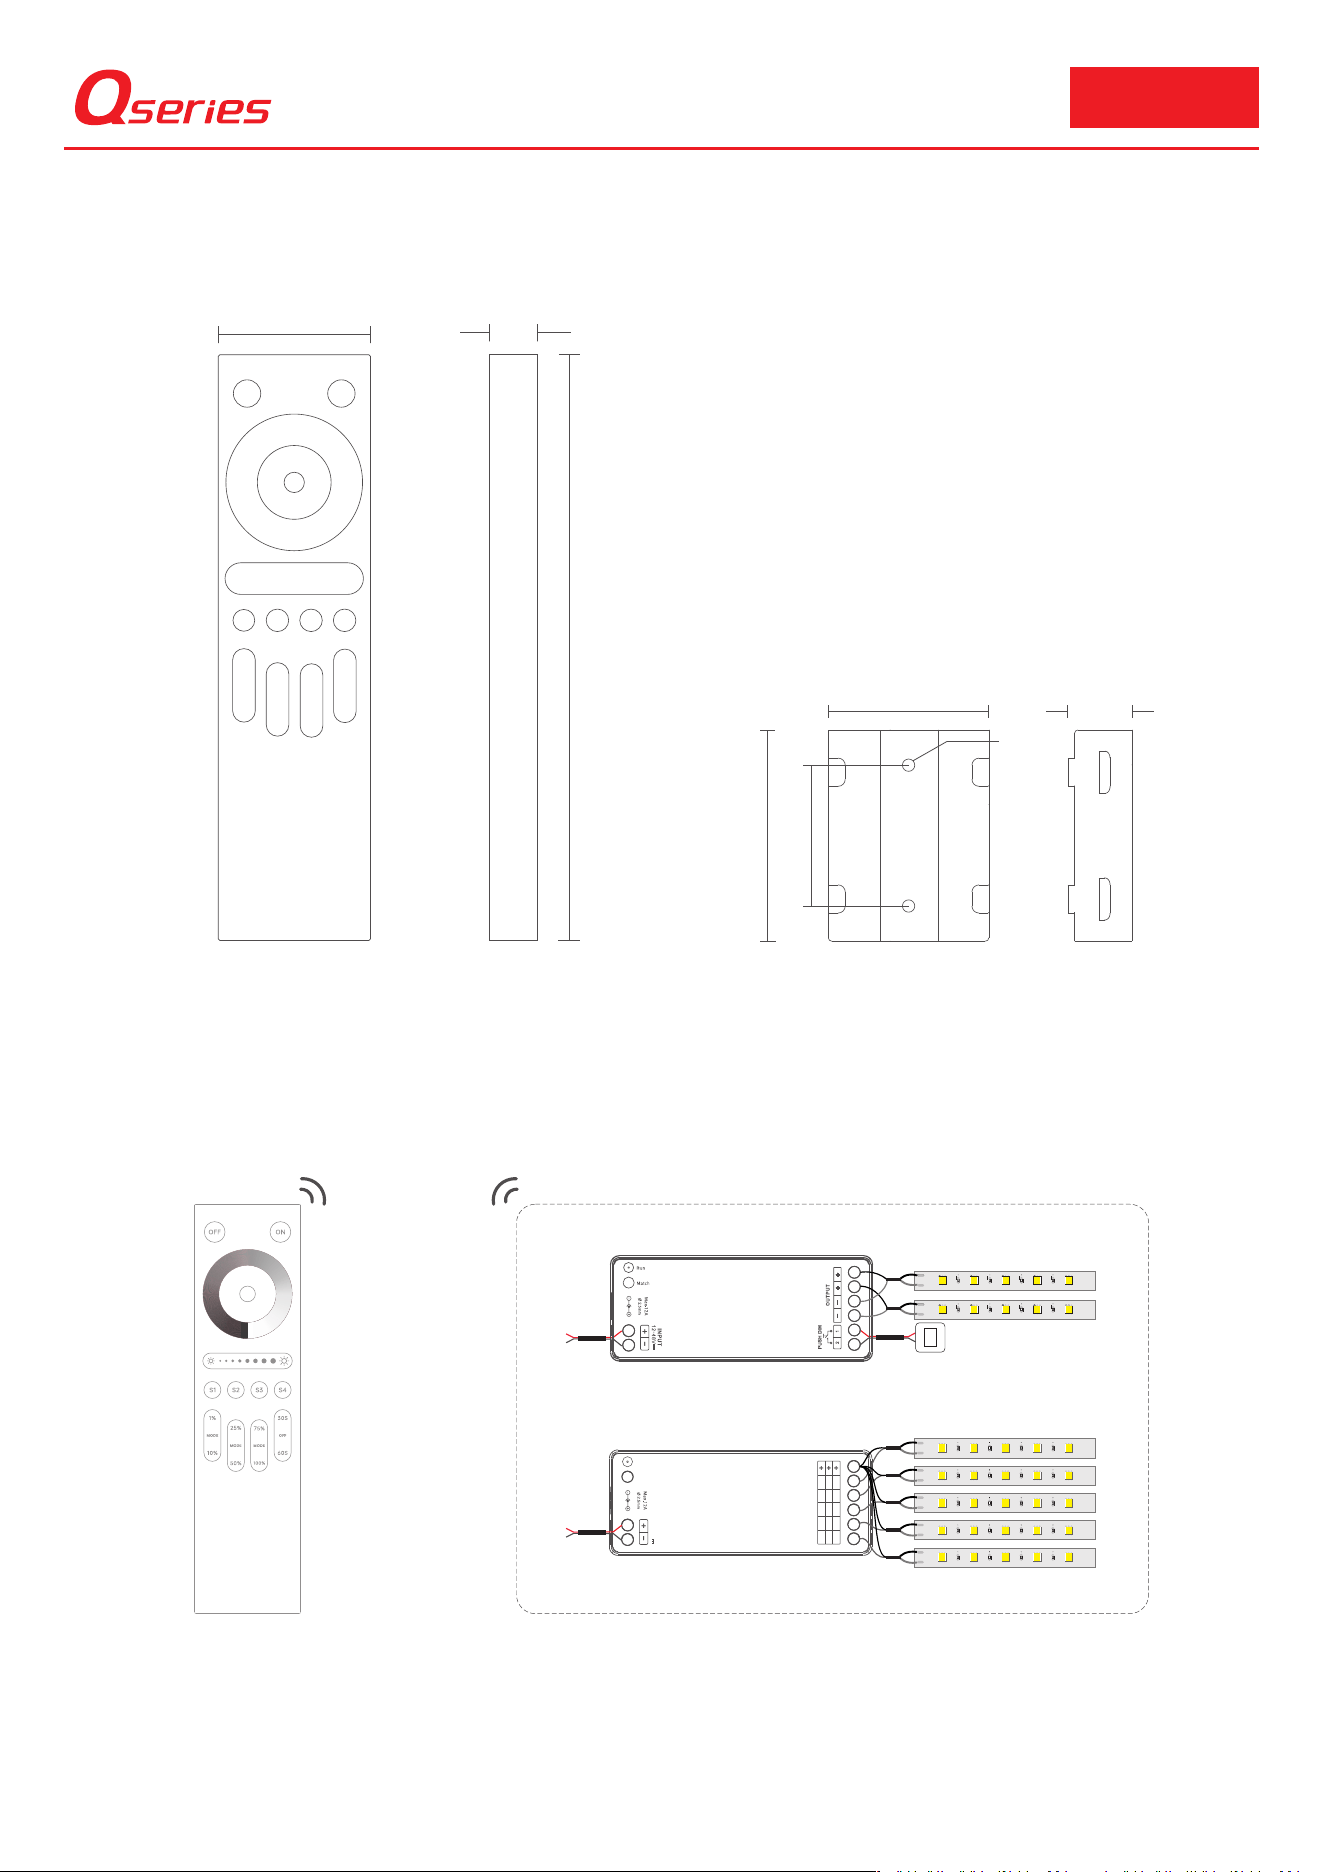
Remote: L162×W42×H15mm;Bracket: L60×W46×H19mm
Operating Temp.
Dimensions
Product Weight
Q2A
CT
P2 / P3 / P4 / P5/
F4-3A / F4-5A /
F5-DMX-4A
Q4A
RGB/RGBW
P4 / P5/ F4-3A /
F4-5A / F5-DMX-4A
Q5A
RGBCW
P5 / F5-DMX-4A
Dimensions
2
Plastic BracketRemote
RF2.4G
42
15
162
46
19
60
40
Q1A 、Q2A、Q4A、Q5A
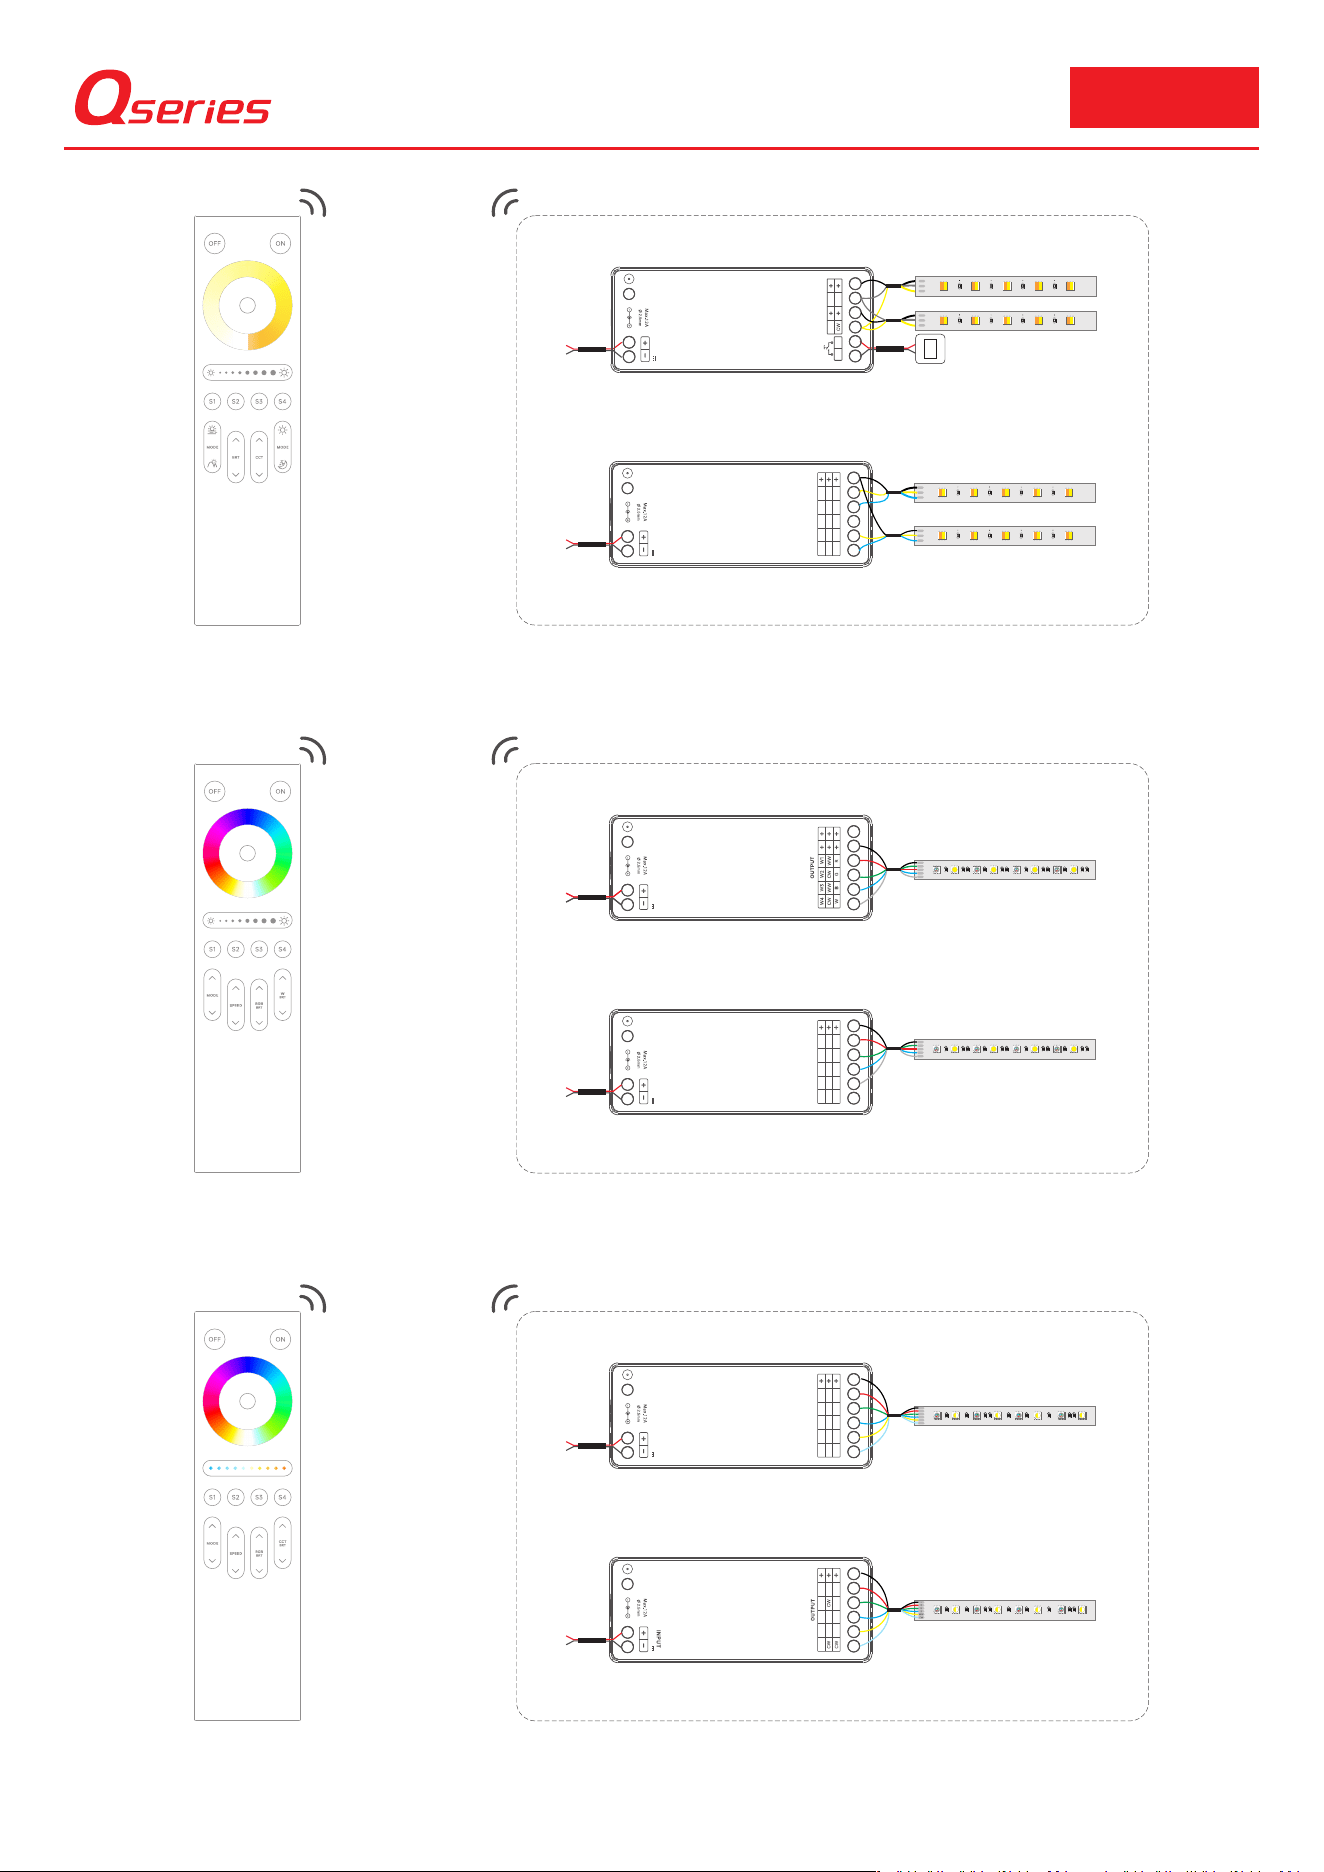
Wiring Diagram
Reset Switch (Optional)
P5
Run
IN PU T
12 -48 V
Match
OUT PU T
G
R
B
CW /
W1W2
W3
W4
WW CW
W5
CW
WW
WW
-
+
-
+
-
+
-
+
-
+
(Q1A is compatible with P1/P2/P3/P4/P5)
...
+
-
+
-
P1
*Can be paired with up to
10 remote
...
Q1A
Unit:mm
Φ3.5
RF2.4G
Q1A 、Q2A、Q4A、Q5A
Reset Switch (Optional)
(Q2A is compatible with P2/P3/P4/P5)
...
(Q4A is compatible with P4/P5)
...
(Q5A is compatible with the P5)
...
P5
Run
IN PUT
12 -48 V
Match
OUT PU T
G RB
CW /
W1W2
W3
W4
WW CW
W5
CW
WW
WW
+
G
R
B
W
P4
Run
IN PU T
12 -48 V
Match
+
G
R
B
W
+
R
G
B
WW
CW
P5
Run
IN PUT
12 -48 V
Match
OUT PU T
G
R
B
CW /
W1W2
W3
W4
WW CW
W5
CW
WW
WW
P5
Run
12 -48 V
Match
G
R
B
/
W1W2
W3
W4
WW
W5
WW
WW
P2
Run
IN PUT
12 -48 V
Match
OUT PUT
W1
W2
WW
PUSH DIM
12
+
WW
CW
+
WW
CW
P5
Run
IN PUT
12 -48 V
Match
OUT PU T
G
R
B
CW /
W1W2
W3
W4
WW CW
W5
CW
WW
WW
+
WW
CW
+
WW
CW
...
Q5A
...
Q4A
...
Q2A
3
*Can be paired with up to
10 remote
*Can be paired with up to
10 remote
*Can be paired with up to
10 remote
Button Functions
4
RF2.4G
Q1A 、Q2A、Q4A、Q5A
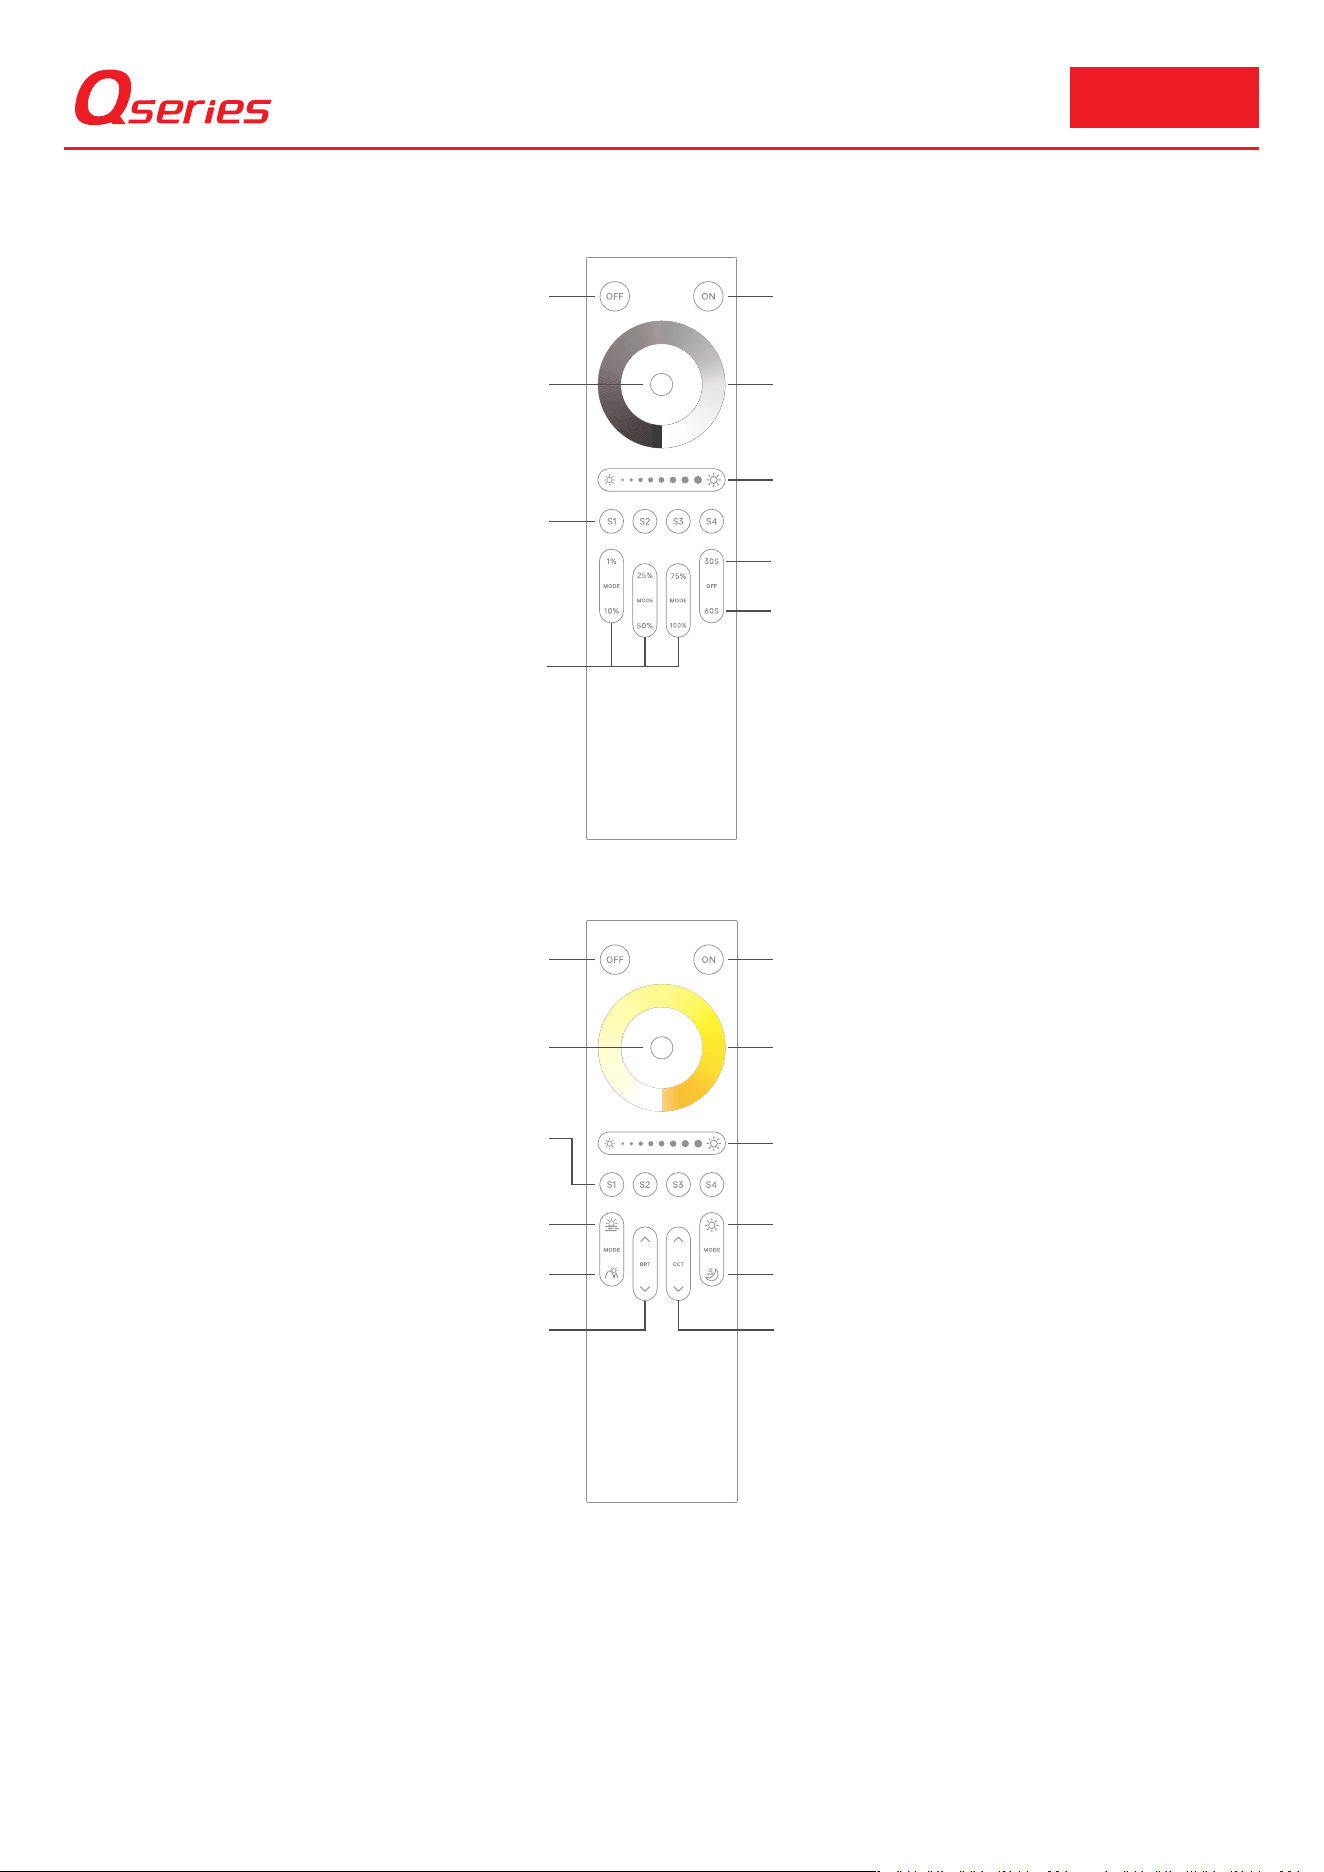
Brightness Shortcut Keys
Press to quickly set brightness to
1%, 10%, 25%,50%, 75%, or 100%
30-Second Delay Light-Off Button
60-Second Delay Light-Off Button
Press and hold for 30 seconds to turn off the lights
Press to turn off the lights after 60 seconds
Brightness Key
Scene Key
Daytime Key
Sunset Key
Sunrise Key
Night Light Button
Color Temperature Button
Press the shortcut button
Press the shortcut button
Press the shortcut button
Press the shortcut button
Press briefly to adjust between 11 brightness levels;
press and hold for stepless dimming.
Press briefly to cycle through 11 color temperature settings;
press and hold for continuous color temperature adjustment.
Press briefly to activate a scene;
Press and hold for 2 seconds to save
the current lighting state to a scene
Q1A
Open
Close
Indicator Light
Brightness Touch Slider
Touch-Sensitive Color Ring for Dimming
Short press to turn on; press and hold for 2 seconds to start pairing.
Press the Off button
Touch to adjust the brightness of the lights
Touch to adjust the brightness of the lights
Scene Key
Press briefly to activate a scene;
Press and hold for 2 seconds to save
the current lighting state to a scene
Open
Close
Indicator Light
Brightness Touch Slider
Color Temperature Touch Color Ring
Short press to turn on; press and hold for 2 seconds to start pairing.
Press the Off button
Touch to change the color temperature of the lights
Touch to adjust the brightness of the lights
Q2A
RF2.4G
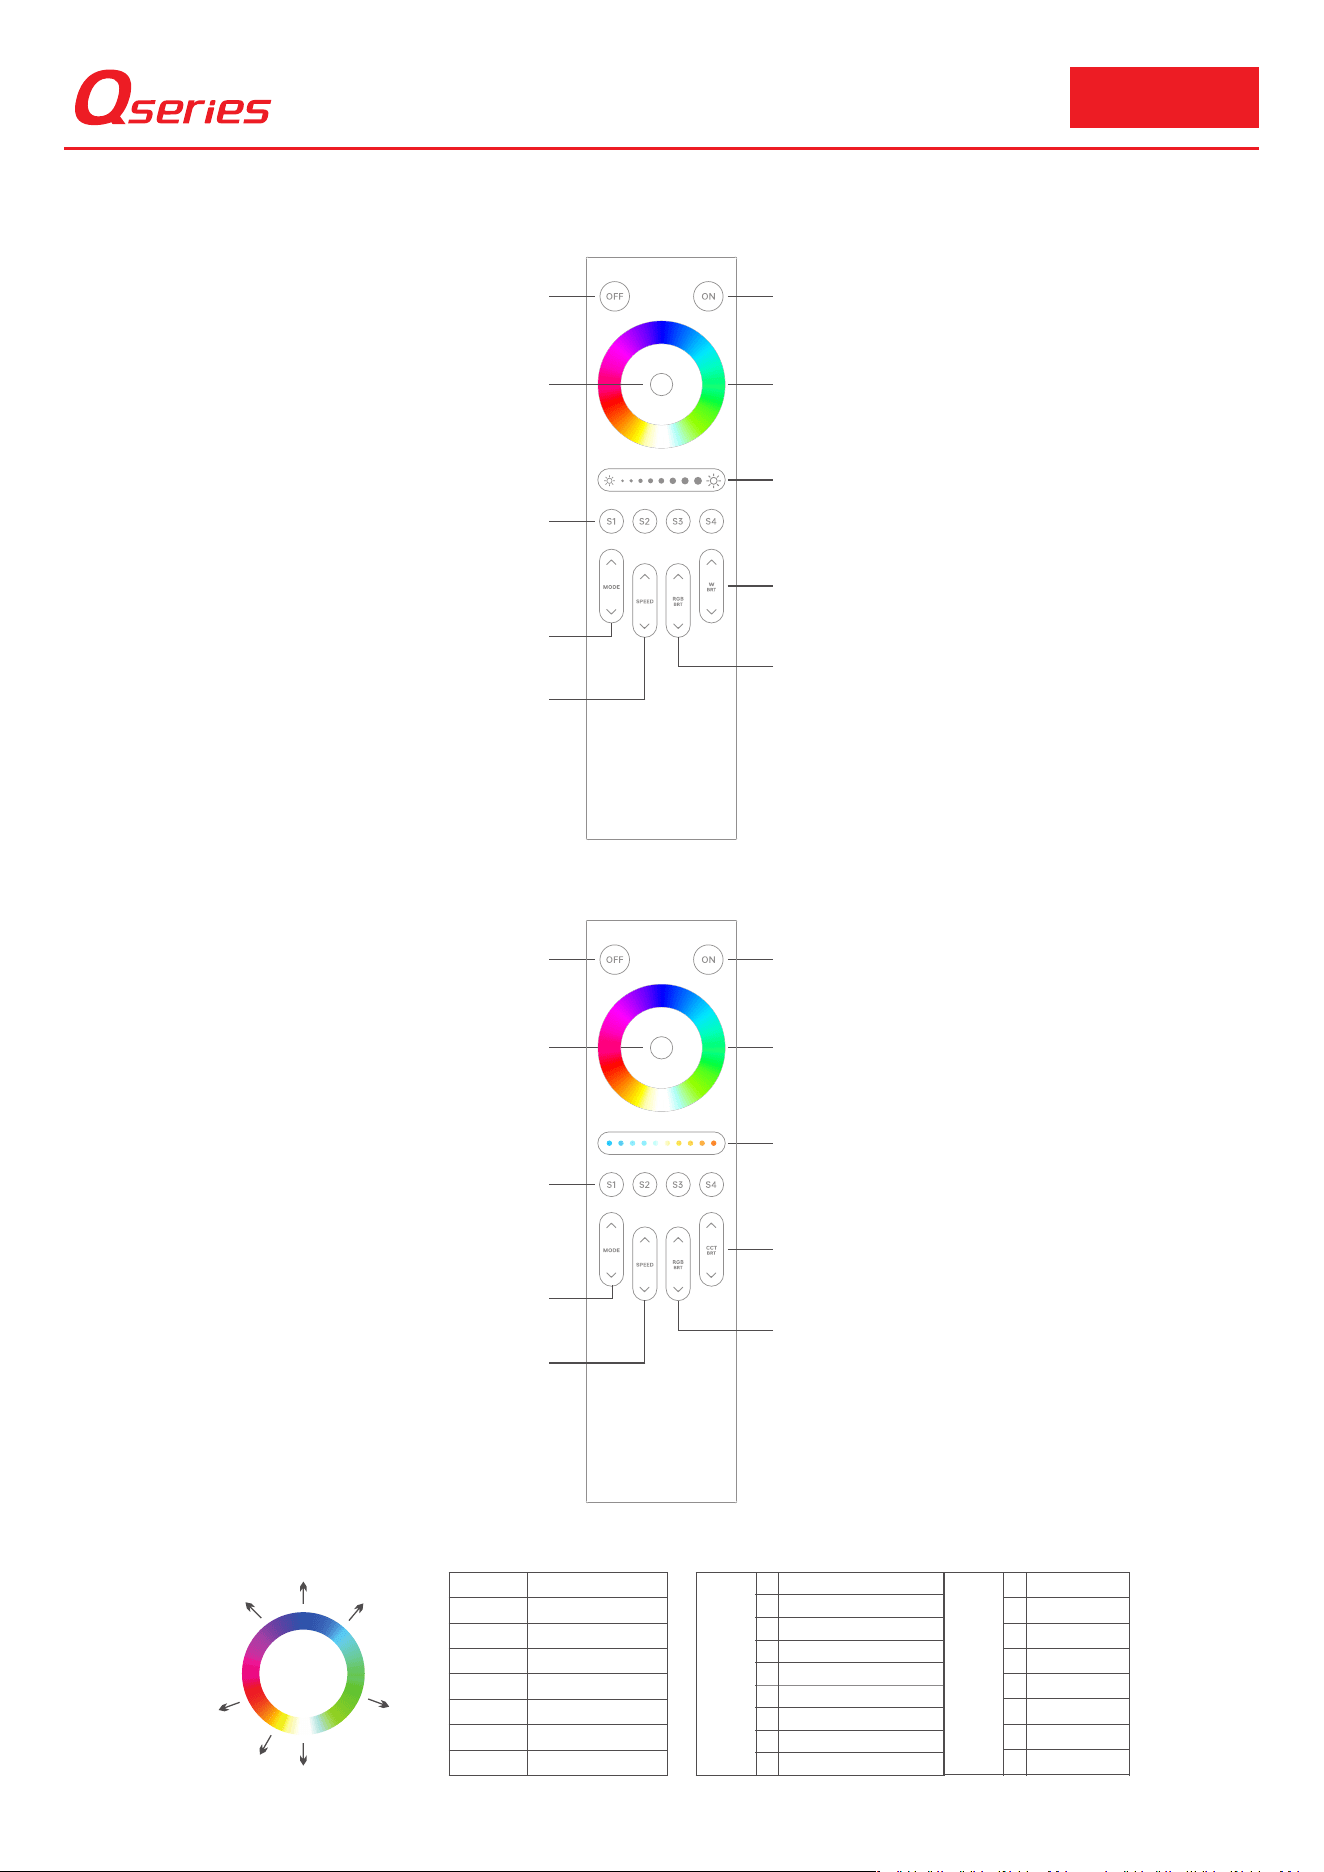
Q4A
Open
Close
Indicator Light
Color Temperature Touch Slider
Color Touch Color Wheel
Q5A
Q1A 、Q2A、Q4A、Q5A
Speed Keys
Open
Close
Indicator Light
Brightness Touch Slider
Color Touch Color Wheel
Mode Key
RGB Brightness Key
8
1
2
3
4
5
6
7
9
10
11
12
13
14
15
16
17
5
Short press to turn on; press and hold for 2 seconds to start pairing.
Press the Off button
Touch to change the RGB color of the lights
Touch to adjust the RGB brightness of the lights
Scene Key
Press briefly to activate a scene;
Press and hold for 2 seconds to save
the current lighting state to a scene
W Brightness Key
Press briefly to adjust the brightness of W;
Press and hold to continuously adjust the brightness of W
Press briefly to adjust the RGB brightness;
Press and hold to continuously adjust the RGB brightness
Press briefly to cycle through
9 dynamic modes and 8 static modes
Press briefly to adjust the speed from level 1 to 8;
Press and hold to increase or decrease the speed.
Short press to turn on; press and hold for 2 seconds to start pairing.
Press the Off button
Touch to change the RGB color of the lights
Touch to change the CCT (color temperature) of the lights
Speed Keys
Mode Key
Scene Key
Press briefly to activate a scene;
Press and hold for 2 seconds to save
the current lighting state to a scene
Press briefly to cycle through
9 dynamic modes and 8 static modes
Press briefly to adjust the speed from level 1 to 8;
Press and hold to increase or decrease the speed.
RGB Brightness Key
CCT Brightness Key
Press briefly to adjust the CCT brightness;
Press and hold to continuously adjust the CCT brightness
Press briefly to adjust the RGB brightness;
Press and hold to continuously adjust the RGB brightness
Button Functions
Color R/G/B values
Red
Yellow
Green
Cyan
Blue
Purple
White
Preset
Dynamic
mode
Three-color gradient (RGB)
Static
mode
Red
Green
Blue
Yellow
Purple
Cyan
Mixed light white
Red-purple gradient
Blue-purple gradient
Color temperature gradient
(warm yellow, cool white)
Three-color gradient (RGB)
Six-color gradient (red, green,
blue, yellow, purple, cyan)
Seven colors changing (red, green, blue,
yellow, purple, cyan, white)
Seven-color gradient (red, green, blue,
yellow, purple, cyan, white)
White gradually brightens and darkens
White
Yellow
Red
Purple
Blue
Cyan
Green
Black
R100%
R100%
R0%
R0%
R0%
R100%
R100%
G0%
G100%
G100%
G100%
G0%
G0%
G100%
B0%
B0%
B0%
B100%
B100%
B100%
B100%
Using Remote Controls Together
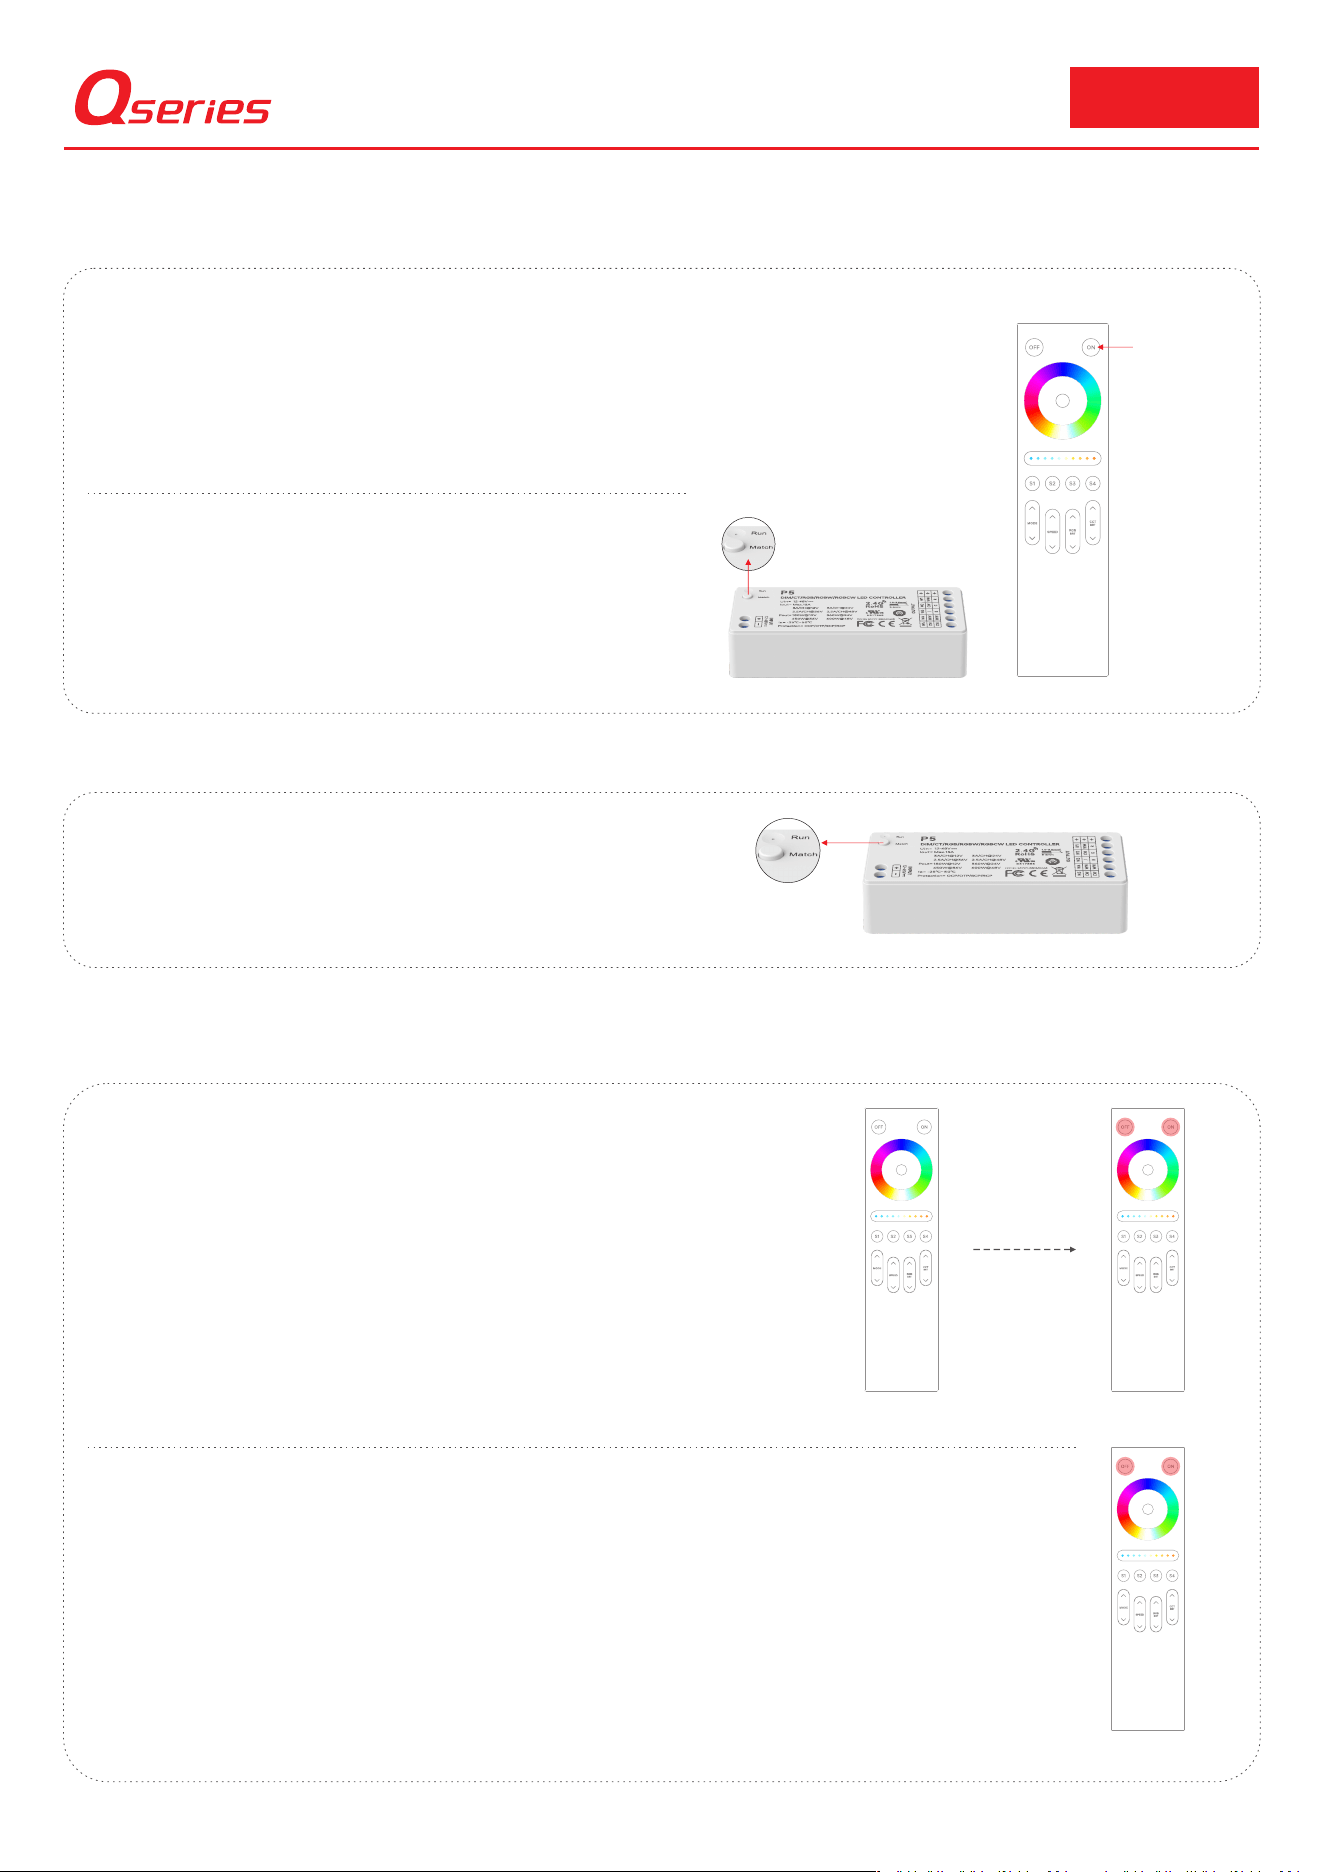
Clear Code
Press and hold the ON and OFF buttons on the B remote control simultaneously for about
10 seconds; when the indicator light flashes three times, the programmed remote control
code will be cleared.
6
For use with P-series controllers
Note: A single controller can be paired with up to 10 remote controls. If more than 10 remote controls are paired, the ID code of the first remote control will be
automatically deleted.
Clear Code
How to delete all remote controls:
Press and hold the controller's ID learning button for 6 seconds. The load
light will flash rapidly four times and then stay on, indicating successful
clearing of the paired ID.
ID Learning Key
A B
RF2.4G
ID Learning Key
①
B
ID Learning (Example: Remote B learns from Remote A)
*If Remote A has already been paired with the controller, Remote B can learn the ID from Remote A and can directly
control the controller without pairing with the controller again.
*Only remote controls of the same model can learn from each other.
1. Press and hold the ON and OFF buttons on Remote B simultaneously until the indicator
stays on, then release the buttons.
2. Press any button on Remote A within 5 seconds. The indicator on Remote B will flash
rapidly twice and then turn off, indicating successful learning.
Button Pairing
Power-On Pairing
1. After powering off and restarting the controller, complete the following
operation within 10 seconds.
1. Short press the controller's ID learning button. The load light will flash. Please
complete the following operation within 10 seconds.
2. Code-matching remote control:
Press and hold the ON button on the remote for 2 seconds. The remote
indicator will flash rapidly three times and then go off, indicating successful
pairing.
Q1A 、Q2A、Q4A、Q5A
Press and hold the
ON button for 2 s
②
2. Code-matching remote control:
Press and hold the ON button on the remote for 2 seconds. The remote
indicator will flash rapidly three times and then go off, indicating successful
pairing.
7
RF2.4G
Q1A 、Q2A、Q4A、Q5A
Transportation and Storage
1. Transportation
Products can be shipped via vehicles, boats and planes.
During transportation, products should be protected from rain and sun. Please avoid severe shock and vibration during the loading
and unloading process.
2. Storage
The storage conditions should comply with the Class I Environmental Standards. The products that have been stored for more than
six months are recommended to be re-inspected and can be used only after they have been qualified.
This manual is subject to changes without further notice. Product functions depend on the goods. Please feel free to contact our
official distributors if you have any question.
Attentions
Please use in a dry indoor environment;
When installing the battery, please connect the positive and negative terminal correctly. If the remote will not be used for a long period,
take the battery out;
When the remote distance is shorten and or the remote doesn’t work frequently, please change the battery in time;
Please carefully take it and put it down to prevent falls that cause damage;
If a fault occurs, please do not attempt to fix products by yourself. If you have any question, please contact your suppliers.
Warranty Agreement
Warranty period: 5 years from the date of manufacture.
Free repair or replacement services for quality problems are provided within warranty periods.
Warranty exclusions below:
Following conditions are not within the guarantee range of free repairing or replacementservices:
Beyond warranty periods;
Any artificial damage caused by high voltage, overload, or improper operations;
Products with severe physical damage;
Damage caused by natural disasters and force majeure;
Warranty labels and barcodes have been damaged.
No any contract signed by our company.
1. Repair or replacement provided is the only remedy for customers. Our company is not liable for any incidental or consequential
damage unless it is within the law.
2. Our company has the right to amend or adjust the terms of this warranty, and release in written form shall prevail.

8
RF2.4G
Q1A 、Q2A、Q4A、Q5A
FCC Statement
1. This device complies with Part 15 of the FCC Rules. Operation is subject to the following two conditions:
(1)This device may not cause harmful interference.
(2)This device must accept any interference received, including interference that may cause undesired operation.
2.Changes or modifications not expressly approved by the party responsible for compliance could void the user’s authority to operate the
equipment.
Note: This equipment has been tested and found to comply with the limits for a class B digital device, pursuant to Part 15 of the FCC Rules.
These limits are designed to provide reasonable protection against harmful interference in a residential installation.
This equipment generates uses and can radiate radio frequency energy and, if not installed and used in accordance with the instructions,
may cause harmful interference to radio communications. However, there is no guarantee that interference will not occur in a particular
installation. If this equipment does cause harmful interference to radio or television reception, which can be determined by turning the
equipment off and on, the user is encouraged to try to correct the interference by one or more of the following measures:
- Reorient or relocate the receiving antenna.
- Increase the separation between the equipment and receiver.
- Connect the equipment into an outlet on a circuit different from that to which the receiver is connected.
- Consult the dealer or an experienced radio/TV technician for help.
The device has been evaluated to meet general RF exposure requirement.
The device can be used in portable exposure condition without restriction.
RF2.4G
Q1A 、Q2A、Q4A、Q5A
Update Log
Version
Update Conten
Updated Time
A0
Original version
20260622
Updated by
Shaoyun He