
b CON
user 's manual
bCON-APP
User Manual
( V2.0.0)

b CON
user 's manual
1
Revision History
edition
2.0.0
date
20260521
AMD
A
Revisionist
/
explain
First edition
(A - Add,
E
– Edit, M - Modify, D - Delete)

b CON user 's
manual
2
catalogue
bCON-APP 1
Product manual 1
Product Introduction 3
1.1. Product Preface 3
1.2 System (Business) Function Diagram 3
1.3 Installation and initialization 3
1.4 Explanation of Terms and Abbreviations 4
Quick Start of System 2 5
2.1 Registration and Login 5
2.1.1 User Login 5
2.1.2 User Registration 6
2.1.2 User Registration 7
2.1.3 Forgot Password and Reset Password 8
2.2 Home Page 9
2.2.1 Scene List 9
2.2.2 Overview of the Scene 10
2.2.2 Equipment Details 11
2.3 Scenarios 20
2.3.1 Scene List (Empty) 20
2.3.2 Adding Scenes 21
2.3.3 Scene List 22
2.3.4 Editing Scene 23
2.3.5 Deleting Scenes 24
2.3.6 Scene Details 25
Module 2.4 26
2.4.1 Module List 26
2.4.2 Adding Module Equipment 27
2.4.3 Adding Bluetooth Devices 36
2.5 Mine 40
2.5.1 My (Personal Center) 40
2.5.2 My Information 41
2.5.3 Help and Frequently Asked Questions 43
2.5.4 Cloud Services 44
Regarding 2.5.5 bCON 45
2.5.6 Language 46
2.5.7 Time and Unit 47
b CON user 's
manual
3
1 Product Introduction
1.1. Product Introduction
The bCON mobile app client is a bCON IoT device management platform.
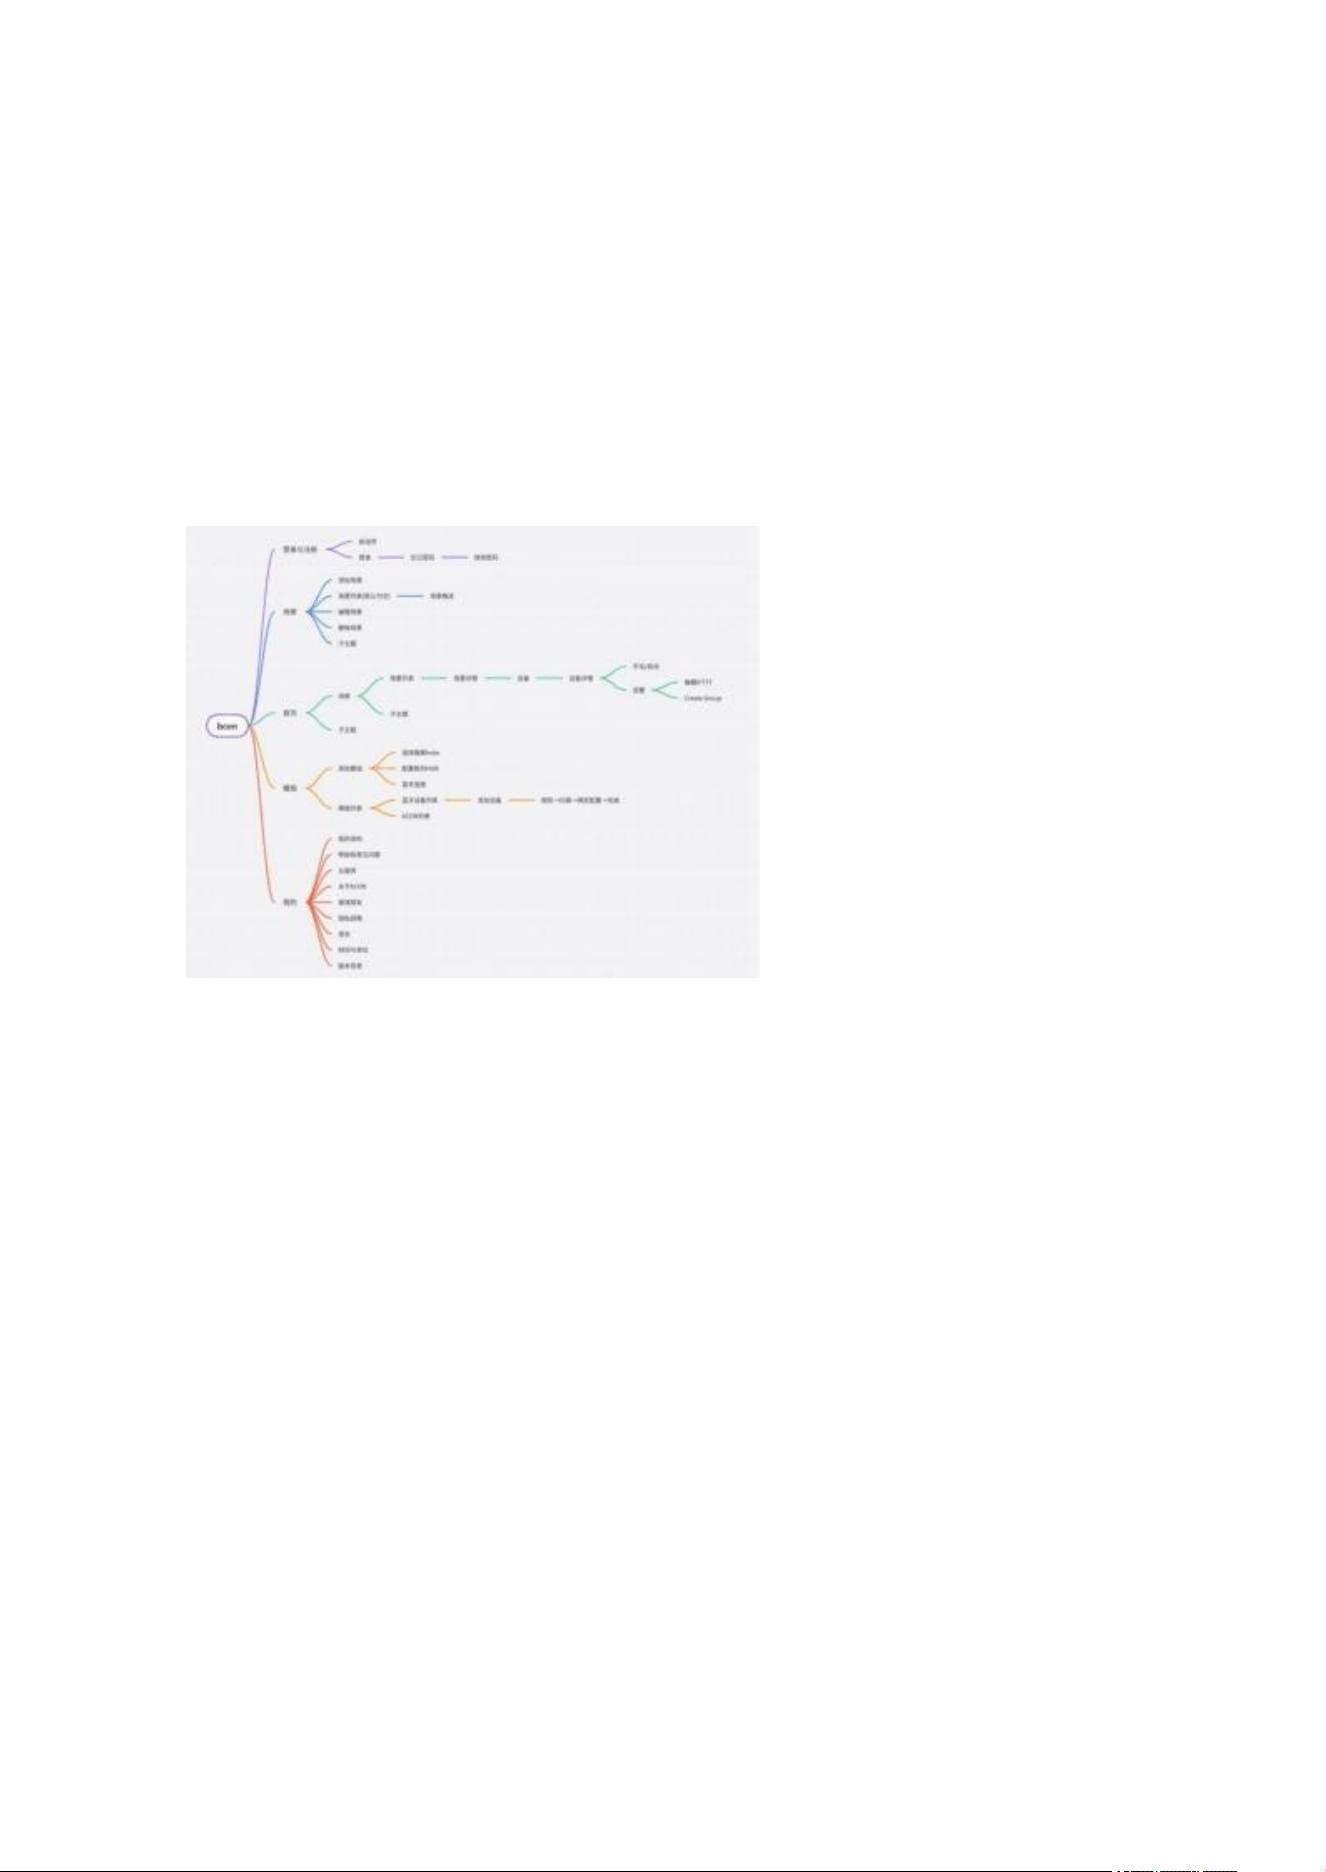
1.2 System (Business)
Function Diagram
A
1.3 Installation and initialization
This software adopts a C/S architecture and requires users to manually install it. It can be
downloaded from Google Store and Apple Store.

Quick Start of System 2
2.1 Registration and Login
Show the basic information of the account logged into Alipay, including obituary
information, security product information, and association
Provide evidence of account information and
functional connections related to the account.
2.1.1 User Login
After installing the app, enter your account and password (as shown in the demo), and click the
"Login" button,
Jump to the homepage (as shown in the figure below), different roles will see different pages. If there
is no account password, you can click on 'Note'
Register first! If you forget your password, you can click "Forgot Password" to register first!

6
2.1.2 User Registration
Registration requires preparing an available email account, which needs to be verified with
an email verification code before it can be used
Registration, account passwords support Chinese, numerical, matching, and combination methods.
Operation path: Login → Register.
2.1.2 User Registration
Registration requires preparing an available email account, which needs to be verified with
an email verification code before it can be used
Registration, account passwords support Chinese, numerical, matching, and combination methods.
Operation path: Login → Register.

2.1.3 Forgot Password and Reset Password
If you forget your password, you need to enter the email address you registered with. After
entering it, click send email and the system will verify it before sending
Send an email to your mailbox. The page automatically redirects to the password modification
interface, where you need to enter your email verification code and new password
After confirming the password, click "Confirm". If the system verifies correctly, it will automatically
return to the login page. If the verification code verification fails
It will prompt 'input error, please re-enter the verification code'.
Operation path: Login → Forgot Password → Reset Password, as shown in the following figure.

9
2.2 Homepage
2.2.1 Scene List
If the scene has not been created, the scene needs to be created first [see Chapter 2.4]; If the
scene has already been created, it will
Display scene information and device status, click on the corresponding scene
hotspot to enter scene details.
Operation path: Login → Home page.

10
2.2.2 Overview of the Scene
This will display a list of devices and other information. If a device has not been created, you
can first create it [see Chapter 3.1];
If the device has already been bound, the device information bound to
the scene will be displayed.
Operation path: Login → Home → Select Scene → Overview

11
2.2.2 Equipment Details
Here, detailed device information will be displayed, including manual and automatic settings,
and pop-up prompts for settings.
(1) Manual setting
Manual settings include color value settings, shortcut button settings, etc!
Operation path: Login → Home → Select Scene → Overview → Device Details → Manual
Settings

12
(2) Automatic setting
Manually set automatic timer settings, etc. Click "Edit Timer" to enter the editing
page!
Operation path: Login → Home → Select Scene → Overview → Device Details → Automatic
Settings

13
(3) System pop-up notification editing
Click on "..." to select IFTTT and Create Group!
Operation path: Login → Home → Select Scene → Overview → Device Details → "..." in
the upper right corner

14
(4) Edit IFTTT
1) Default is empty, new rules can be created)
Operation path: Login → Home → Select Scene → Overview → Device Details → Edit IFTTT

15
2) Water level editing
Operation path: Login → Home → Select Scene → Overview → Device Details → Edit IFTTT →
Water Level Editor- Edited,.
3) Temperature editing
Operation path: Login → Home → Select Scene → Overview → Device Details → Edit
IFTTT → Temperature Editing
Edited, as shown in the following picture.
4) PH Editor
Operation path: Login → Home → Select Scene → Overview → Device Details → Edit
IFTTT → Water Level Editor
Edited, as shown in the following picture.
(5) Create Group
1) Default is empty, groups can be created
Operation path: Login → Home → Select Scene → Overview → Device Details → Create
Group.

1
2) Create Group Configuration, where manual settings can be made
Automatic IFTTT!
Operation path: Login → Home → Select Scene → Overview → Device Details → Create
Group → Open

20
2.3 Scene
2.3.1 Scene List (empty)
The system defaults to an empty scene. You need to add a scene before proceeding to the next
step. You can click "Add"
Add Scene "button to add a scene.
Operation path: Login → Scene

21
2.3.2 Adding Scenes
This function mainly provides the creation
of scene paths;
The system defaults to an empty scene. You need to add a scene before
proceeding to the next step.
Operation path: Login → Scene → Add Scene

22
2.3.3 Scene List
This function mainly provides a list of all scene
displays;
At this point, you have created at least one scene and can view a list ofall scenes; You need to
add a field
Only then can we proceed to the next step. Click on 'New Scene' to add a scene again, and click on
the corresponding 'Edit' button for the scene
You can view the details and make modifications to it by editing it! Swipe left to display the
'Delete' button for the corresponding scene!
Operation path: Login → Scene

23
2.3.4 Editing Scene
This function mainly provides the ability to modify scene information;
If there are any information errors or changes at this time, you can modify the corresponding
information and finally click "Save" to save it
In the database!
Operation path: Login → Scene → Edit Scene

24
2.3.5 Delete Scene
This function mainly provides the requirement for
deleting scenarios;
Swipe left on the corresponding scene with the gesture, and the button will appear. Click the
"delete button", and the system will pop up a warning prompt Box, you need to click
"confirm" twice to successfully delete this scene!
Operation path: Login → Scene → Left swipe corresponding scene → Delete

25
2.3.6 Scene Details
When the device is not bound, the default device list in the scene details is empty; If the device
has been bound, you can see the List of bound devices required;
Click 'Refresh' to refresh the data, click '-' to unbind from the scene, click 'OK'
Automatically return to the previous level, click "Save and Exit" to save and return to the previous
page, click "Add Device"
Jump to the page for adding devices!
Operation path: Login → Scene → Scene Details Hot Zone → Scene Details

26
2.4 Module
2.4.1 Module List
The default module is empty. You need to first create a module (Bluetooth/bcCON) and
add a device; If it has already been created
Modules and equipment, see Figure 2; The module list, bound device list, and connection status will
be displayed. Click again
Click "Add" in the upper right corner of the module to create a new module, and click "Add" in the list
to add devices of that module type.
Operation path: Login → Forgot Password → Reset Password

27
2.4.2 Adding Module Devices
The default hub is empty..
(1) Add BCON Hub
After clicking on the "add" module, it will pop up. The module selection is shown in
Figure 1, and you can choose bCON HUB (gateway) to add it
Add; At this point, the system will redirect to the add method selection page (please enable the
Bluetooth function of your phone first); Currently, there are three options available
Select the connection operation, you can choose to search for connection hubs , you can choose to
configure hubs for wifi (requires support for wifi mode)
Block), Bluetooth connection can also be selected (the device needs to support the BLUETOTH
module)
Operation path: Login → Module → Add Module HUB → Select Connection
Method

28
(2) Search for connection to bcon hub
After selecting search bcon hub, the search will automatically start, and the search results
will be displayed in the list below. Click
Click on a Hub to configure its information. Once the configuration is complete, click "next step"
to jump to the Hub
Details!
Operation path: Login → Module → Add Module Hubs → Auto Scan → Select Hub →
Configure Hub →
Hub details → Module automatic search
Hub device details: The default Modula list is not empty, and the hub will actively search for
related devices
Search and add: After the search results appear, select the corresponding device (click "+") to add it;
Like adding
Add 5ch-b socket/cc socket; After clicking, you will be redirected to the corresponding
configuration page. After filling in the relevant information,
Click on 'Confirm' to proceed to the next step!
Addition completed: Click on configuration to complete binding configuration;
Module device socket details:

29
Module is bond: Click "add device" to bind the module; At this moment, it will
Pop up the add page, enter relevant information, click on the configuration "confirm" to
bind, and the page will jump back
Device details, bind device list update
Bound device details: Click on the corresponding device hotspot to enter the device details (where
you can set the manual And CAR)

3
(3) WiFi configuration connection to BCON hub
Click on the WiFi connection (check if the hub is connected to a router), and after
configuration is complete, you can connect to it Search for this hub!
Operation path: Login → Module → Add module HUB → Select connection method → WIFI
configuration connection
(4) Bluetooth connection to BCON hub
At this time, a Bluetooth Connection reminder will be prompted! Follow the prompts for
operation Configure Bluetooth account and password!
Operation path: Login → Module → Add module HUB → Select Bluetooth connection →
Configure → Bind and return Return to the module homepage.
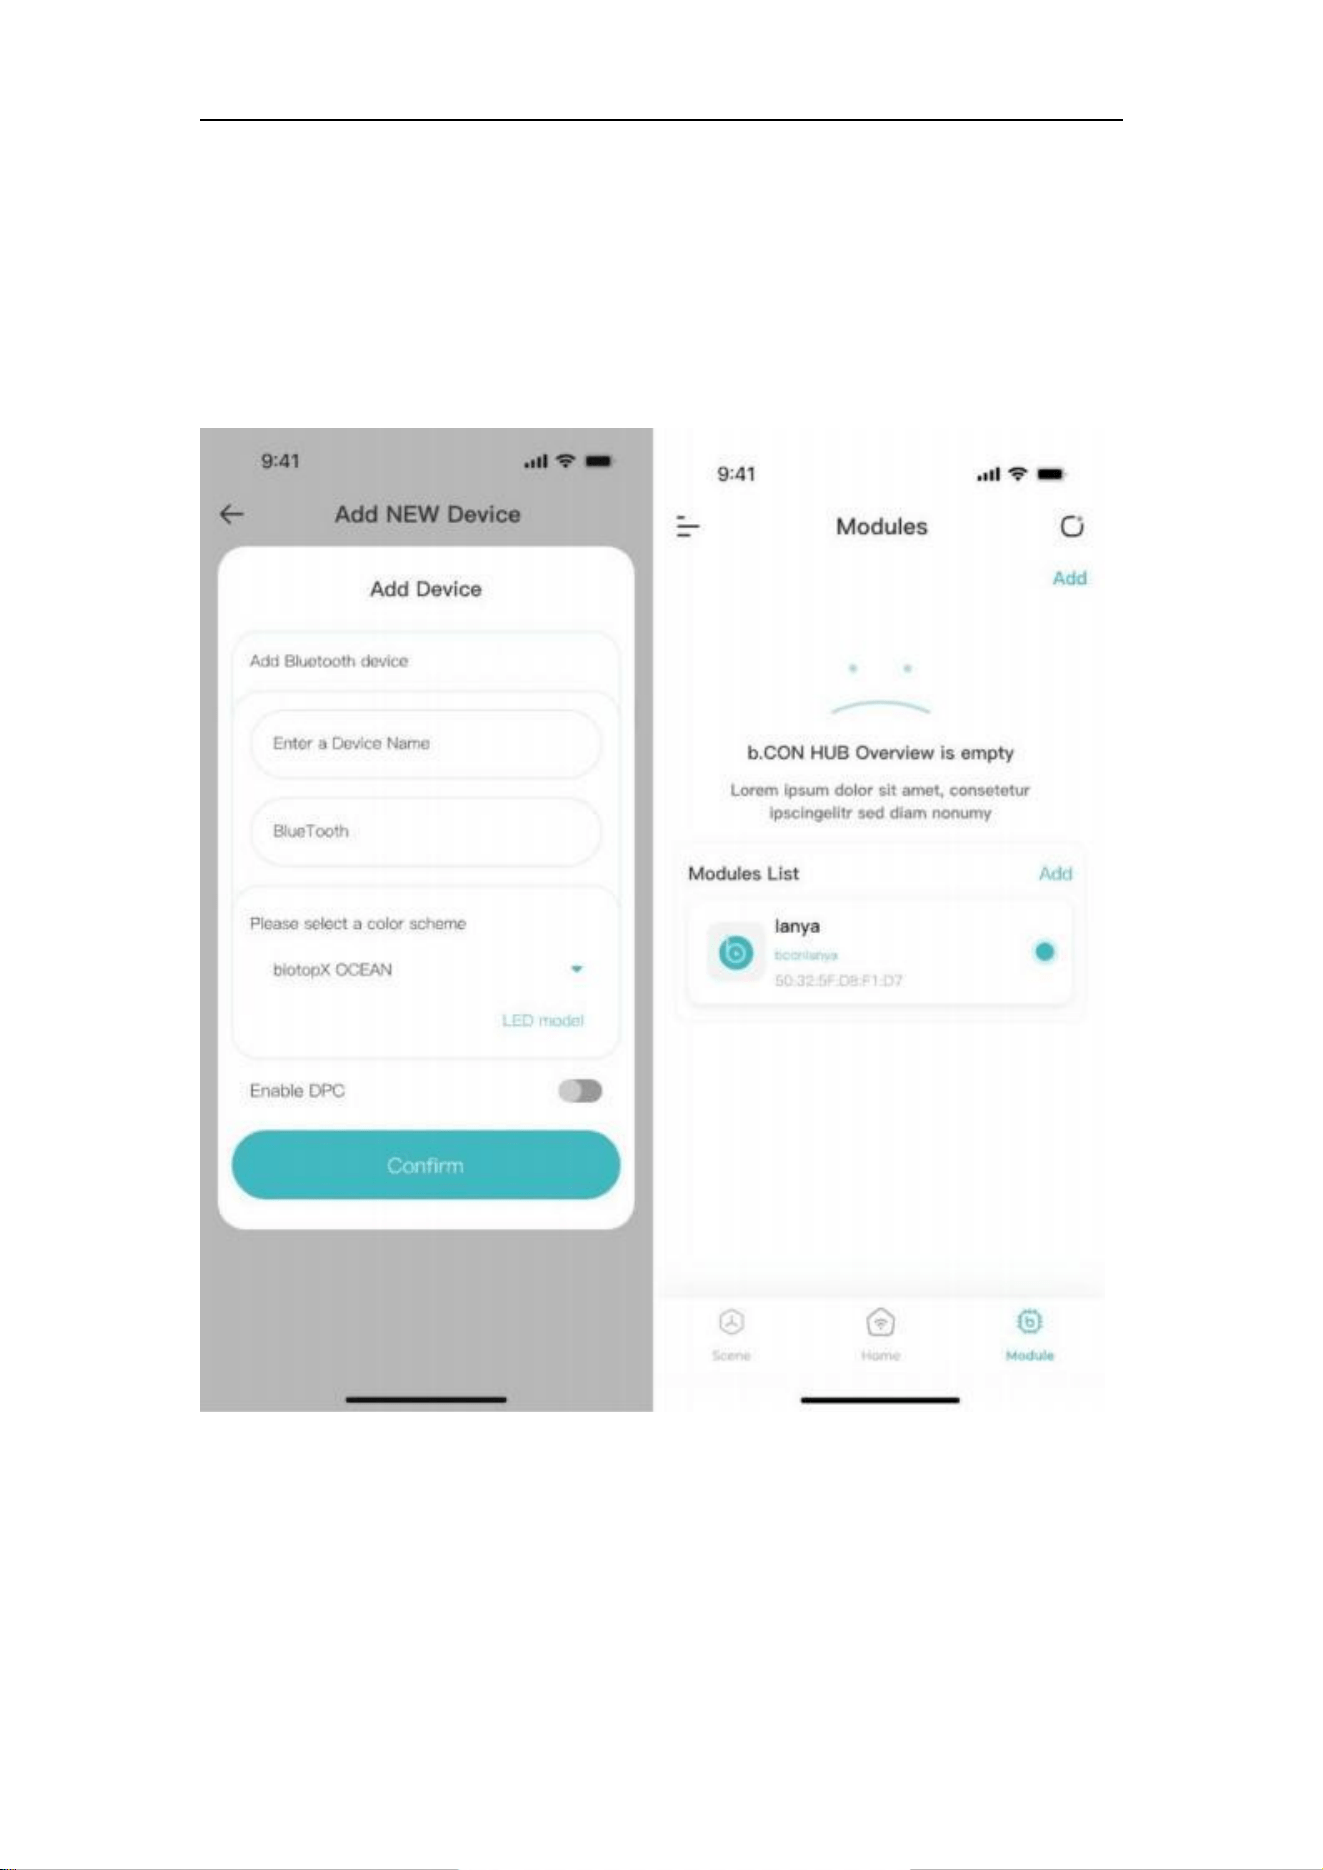
2.4.3 Adding Bluetooth devices
(1) Authorization
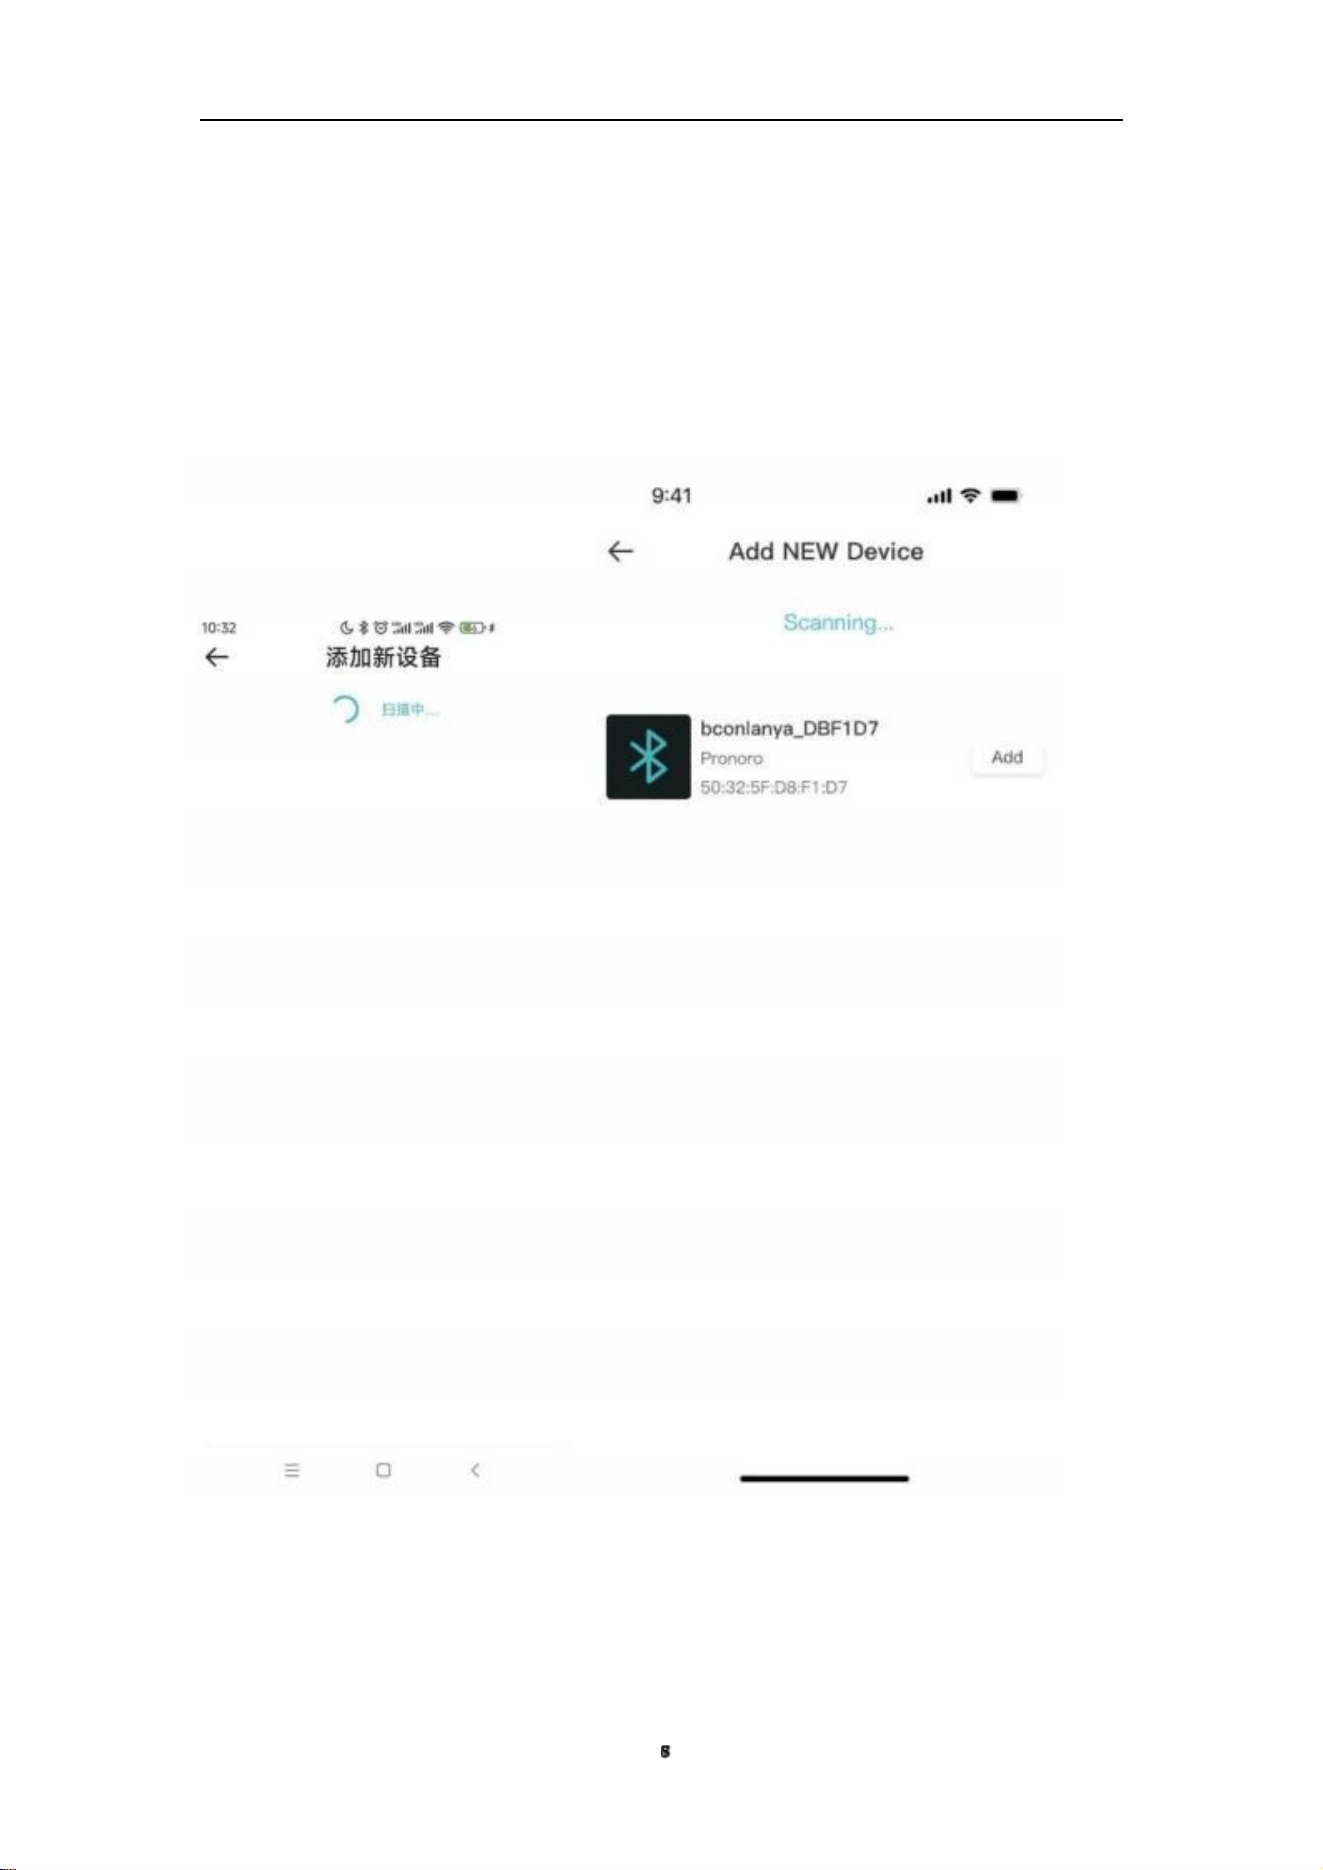
Click the "Add" button on the Bluetooth list, and an authorization prompt will pop up saying
"Turn on Bluetooth and location" for authorization
Operation path: Login → Module → Add corresponding module list → Open authorization
function → Scan → Select bind
Fixed → bound and returned to the module homepage, as shown below.
3
(2) Scan recognition
After opening the corresponding function, the system will automatically recognize and scan
the corresponding device. If multiple devices are recognized, select
Select the corresponding device for binding verification.
Operation path: Login → Module → Add corresponding module list → Open authorization
function → Scan → Select bind
Fixed, as shown in the following picture.
39
(3) Binding configuration
Select the corresponding device, click "Add" for binding verification, enter configuration
information, and click "Configure"
You can complete it (jump to the module homepage)!
Operation path: Login → Module → Add corresponding module list → Open authorization
function → Scan → Scan to Device → Select Binding → Configure → Complete, as shown
in the following figure.

40
2.5 Mine
2.5.1 My (Personal Center)
The personal center mainly displays personal information, assistance services, privacy
policies, language, application information, etc;
Click on 'My Profile' to enter the personal profile page;
Operation path: Login ->Scene/Home/Module ->Left expand icon in the upper right corner, as
shown below.

41
2.5.2 My Information
The personal center mainly displays personal information, assistance services, privacy
policies, language, application information, etc;
(1) View: Click "Exit" to exit the login page, click "Edit" to go to the edit information page;
View operation path: Login ->Scene/Home/Module ->Left expand icon in the upper right corner ->My
profile, as shown below.

42
(2) Edit Information: Here you can edit your personal
information
Click 'Upload' to bring up a selection box, where you can choose to upload your avatar from your local
album or take a photo with your camera to upload it
head portrait; Click 'Modify' to save the information to the database and jump back to the previous page;
Operation path: Login → Scene/Home/Module → Left expand icon in the upper right corner → My
profile → Edit → Upload/Modify as shown in the following figure.

43
2.5.3 Help and Frequently Asked Questions
This mainly displays common problems and feedback on submitted issues;
Click 'Submit' to save the information to the database, and the page will automatically jump
back to the 'My' page;
Operation path: Login → Scene/Home/Module → Left expand icon in the upper right corner →
Help and Frequently Asked Questions →Submit, as shown in the figure below.

44
2.5.4 Cloud Services
This mainly displays cloud service information, including cloud and
weather data settings;
Click the corresponding cloud function "button" to turn on or off the function;
Operation path: Login ->Scene/Home/Module ->Left expand icon in the upper right corner
->Cloud Services, as shown below.

45
2.5.5 Regarding bCON
This mainly showcases the introduction of bCON and the latest
updated version information;
Click the "Update Version" button, or if there is an updated version, it can be automatically
downloaded and updated with the latest version;
Operation path: Login → Scene/Homepage/Module → Expand left in the upper right corner
→ About bCON, as shown below.
46
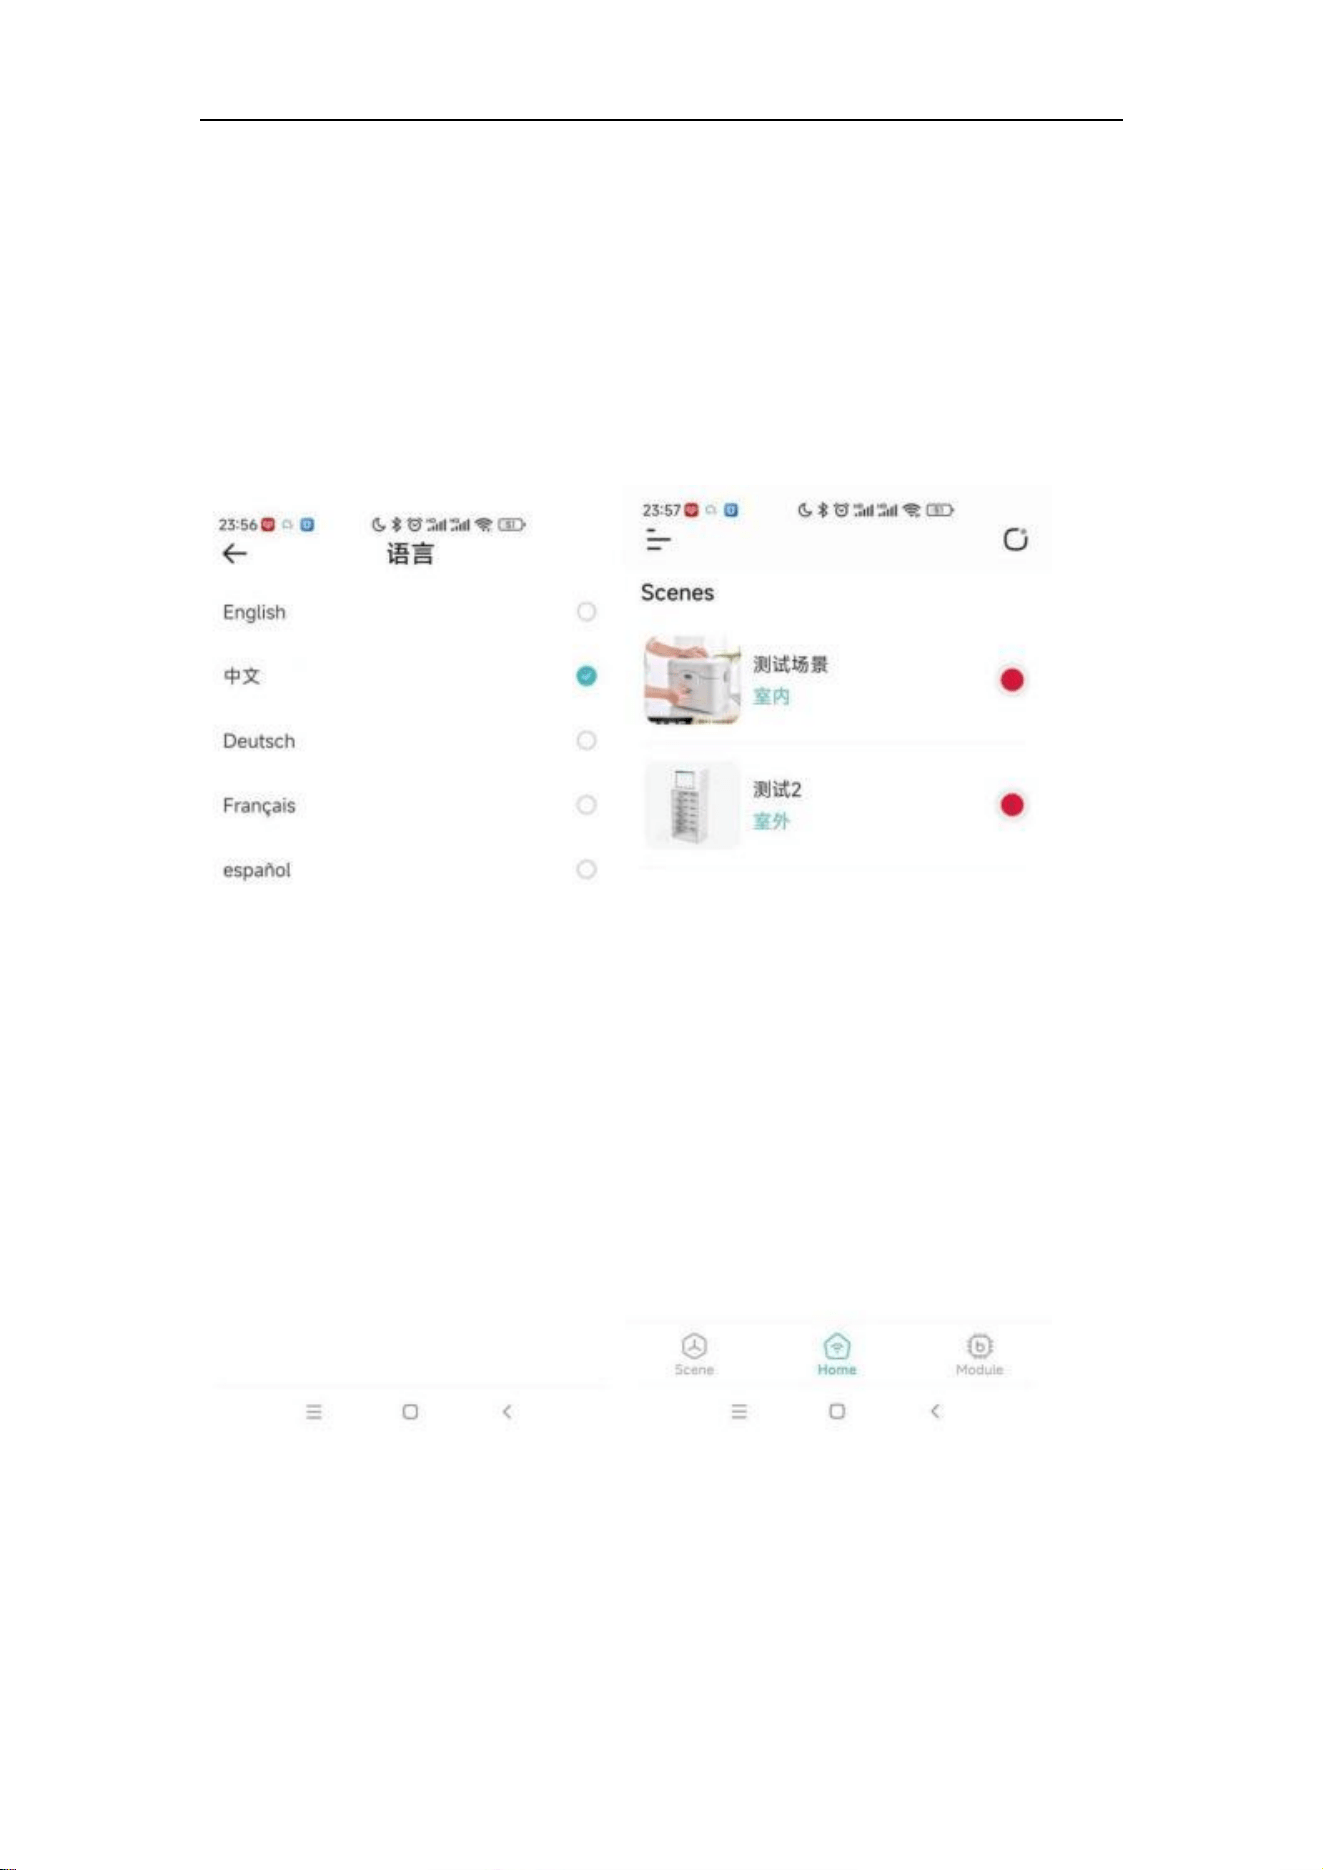
2.5.6 Language
This mainly displays the supported application languages and language
switching settings;
Click the corresponding language "switch" button to switch the system language and the
page will automatically jump to the homepage;
Operation path: Login → Scene/Home/Module → Expand left in the upper right corner →
Language → Set language, as follows picture.

47
2.5.7 Time and Unit
This mainly displays time format settings, temperature unit settings, etc;
Click the "dropdown" button for time format to set the time format, which includes 24-hour
and 12 hour formats;
Click the "dropdown" button for temperature units to set Celsius or Fahrenheit display;
Operation path: Login → Scene/Home/Module → Expand left in the upper right corner →
Time and Unit → Settings

47
This device complies with part 15 of the FCC Rules. Operation is subject to the following
two conditions:
(1) This device may not cause harmful interference, and
(2) this device must accept any interference received, including interference that may cause
undesired operation.
Any Changes or modifications not expressly approved by the party responsible for
compliance could void the user's authority to operate the equipment.
Note: This equipment has been tested and found to comply with the limits for a Class B
digital device, pursuant to part 15 of the FCC Rules. These limits are designed to provide
reasonable protection against harmful interference in a residential installation. This
equipment generates uses and can radiate radio frequency energy and, if not installed and
used in accordance with the instructions, may cause harmful interference to radio
communications. However, there is no guarantee that interference will not occur in a
particular installation. If this equipment does cause harmful interference to radio or
television reception, which can be determined by turning the equipment off and on, the user
is encouraged to try to correct the interference by one or more of the following measures:
-Reorient or relocate the receiving antenna.
-Increase the separation between the equipment and receiver.
-Connect the equipment into an outlet on a circuit different from that to which the receiver
is connected.
-Consult the dealer or an experienced radio/TV technician for help.
This equipment complies with FCC radiation exposure limits set forth for an uncontrolled
environment. This equipment should be installed and operated with minimum distance
20cm between the radiator & your body.