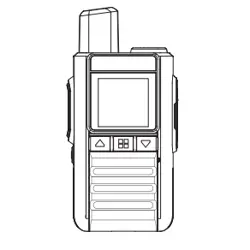
N39plus
BASIC MANUAL
NATIONWIDE VIRTUAL
HAM RADIO
This device complies with Part 15 of the FCC
Rules. Operation is subject to the condition
that it does not cause harmful interference.
This regulation applies to models N39plus
Talkpod Technology Co., Ltd
READ ALL INSTRUCTIONS carefully and completely before using the transceiver.
SAVE THIS INSTRUCTION MANUAL
— This instruction manual contains important operating
instructions for the transceiver.
Thank you for Choosing this TALKPOD product.
This product is designed and built with TALKPOD state of the art technology and craftsmanship.
With proper care, this product should provide you with years of Trouble-free operation.
For Advanced features and instructions, see the ADVANCED MANUAL on the TALKPOD website for
details.www.talkpodonline.com
·Traditional-Style Interface with Intuitive Operation.
·Custom Callsign and Call History Functions.
·Nationwide Coverage via Cellular Network.
* Long Battery Life with Fast USB-C Charging.
WORD
DANGER!
CAUTION
DEFINITION
Personal death, serious injury or an explosion may occur.
Personal injury, Fire Hazard or electric shock may occur.
Equipment damage may occur.
If disregarded, inconvenience only. No risk of personal injury, fre or
electric shock.
NOTE
I
WARNING!
FEATURES
EXPLICIT DEFNITIONS
IMPORTANT
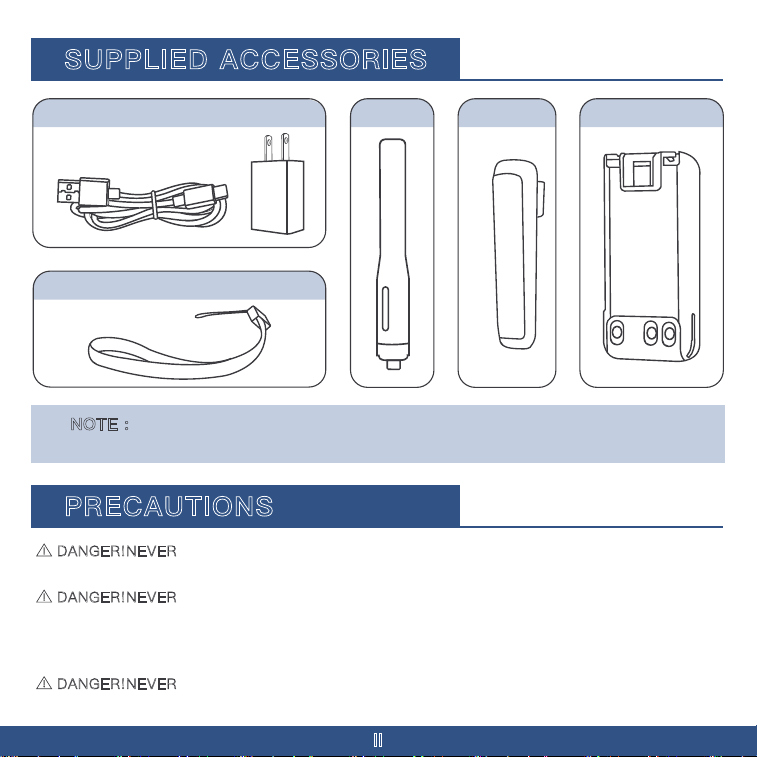
NOTE : Some accessories are not supplied, or the shape is different, depending on the
transceiver version.
SUPPLIED ACCESSORIES
DANGER!NEVER
operate the transceiver near unshielded electrical blasting caps or in an explosive
II
atmosphere. This could cause an explosion and death.
DANGER!NEVER
use or charge TALKPOD battery packs with non-TALKPOD transceivers or non�
TALKPOD chargers. Only TALKPOD battery packs are tested and approved for use with TALKPOD
transceivers or charged with TALKPOD chargers. Using third-party or counterfeit battery packs or
chargers may cause smoke, IP54, or cause the battery to burst.
DANGER!NEVER
perate the transceiver with earphones, a headset, or other audio accessories at
high volume levels. If you experience a ringing in your ears, reduce the volume or discontinue use.
PRECAUTIONS
Lanyard
USB-C Charging Cable Belt Clip Battery Pack
Antenna
III
WARNING! NEVER hold the transceiver so that the antenna is very close to, or touching exposed
parts of the body, especially the face or eyes, while transmitting.
WARNING! NEVER
operate or touch the transceiver with wet hands. This could cause an electric
shock or damage the transceiver.
WARNING! NEVER
connect the transceiver to a power source of more than 16 V DC or use reverse
polarity. This could cause a IP54 or damage the transceiver.
WARNINGRFEXPOSURE!
This transceiver emits Radio Frequency (RF) energy. Extreme caution
should be observed when operating this transceiver. If you have any questions regarding RF exposure
and safety standards, please refer to the Federal Communications Commission Offce of Engineering
and Technology s report on Evaluating Compliance with FCC Guidelines for Human Radio Frequency
Electromagnetic Fields (OET Bulletin 65).
CAUTION: DO NOT
short the terminals of the battery pack. Shorting may occur if the terminals
touch metal objects such as a key, so be careful when placing the battery packs (or the transceiver) in
bags, and so on. Carry them so that shorting cannot occur with metal objects. Shorting may damage
not only the battery pack but also the transceiver.
CAUTION: DO NOT
operate the transceiver unless the fexible antenna, battery pack, and jack cover
are securely attached to the transceiver and that the antenna and battery pack are dry before
attachment. Exposing the inside of the transceiver to dust or water will result in serious damage to the
transceiver. After exposure to water, clean the battery contacts thoroughly with fresh water and dry
them completely to remove any water or salt residue.
CAUTION: DO NOT
operate the transceiver while driving a vehicle. Safe driving requires your full
attention—anything less may result in an accident.
CAUTION: DO NOT
use harsh solvents such as benzine or alcohol when cleaning. This could damage
the equipment surfaces. If the surface becomes dusty or dirty, wipe it clean with a soft, dry cloth.
CAUTION: DO NOT
place or leave the transceiver in direct sunlight or in areas with temperatures
below -20°C (-4°F) or above +60°C (+140°F).
CAUTION: DO NOT
operate the transceiver if it becomes hot after continuously transmitting for long
periods of time. This may damage the transceiver.
NEVER
place in an insecure place to avoid inadvertent use by unauthorized persons.
DO NOT
push PTT unless you actually intend to transmit.
Precautions (Continued)
Misuse of Li-ion batteries may result in the following hazards: smoke, fre, or the battery may
rupture. Misuse can also cause damage to the battery or degradation of battery's performance.
IV
Battery Caution
DANGER! NEVER incinerate used battery packs. Internal battery gas may cause an explosion.
DANGER! NEVER strike or otherwise impact the battery pack. Do not use the battery pack if it has
been severely impacted or dropped, or if the pack has been subjected to heavy pressure. Battery pack
damage may not be visible on the outside of the case. Even if the surface of the battery does not show
cracks or any other damage, the cells inside the battery may rupture or catch fre.
DANGER! NEVER
leave the battery pack in places with temperatures above 60°C (140°F). A High-
temperature buildup in the battery cells, such as could occur near fres or stoves, inside a sun-heated
vehicle, or in direct sunlight for long periods of time, may cause the battery cells to rupture or catch fre.
Excessive temperatures may also degrade the pack s performance or shorten the battery cell s life.
DANGER! NEVER
place battery packs near a fre. Fire or heat may cause them to rupture or
explode. Dispose of used battery packs in accordance with local regulations.
DANGER! NEVER
solder the battery terminals, or NEVER modify the battery pack. This may
cause heat generation, and the battery may burst, emit smoke or catch fre.
DANGER! NEVER
let fuid from inside the battery get in your eyes.This can cause blindness. Rinse
your eyes with clean water, without rubbing them, and immediately go to a doctor.
BE CAREFUL!
The transceiver meets IP54* requirements for dust tight and waterproof protection.
However, once the transceiver has been dropped, waterproof protection cannot be guaranteed because
of possible damage to the transceiver s case or waterproof seal.
* Only when the battery pack, fexible antenna,and jack cover are attached.
Even when the transceiver power is OFF, a slight current still fows in the circuits. Remove the battery
pack from the transceiver when not using it for a long time. Otherwise, the installed battery pack will
become exhausted and will need to be recharged or replaced.
BATTERY CAUTIONS
V
WARNING! NEVER use deteriorated battery packs. They could cause a fre.
WARNING! NEVER let fuid from inside the battery cells come in contact with your body. If it does,
immediately wash with clean water.
WARNING! NEVER
put the battery pack in a microwave oven, high-pressure container, or in an
induction heating cooker. This could cause a fre, overheating, or cause the battery cells to rupture.
CAUTION: DO NOT
expose the battery pack to rain, snow, saltwater, or any other liquids. Do not
charge or use a wet pack. If the pack gets wet, be sure to wipe it dry cloth before using.
CAUTION: DO NOT
use the battery if it emits an abnormal odor, heats up, or is discolored or.
deformed If any of these conditions occur, contact your TALKPOD dealer or distributor.
CAUTION: DO NOT
use the battery pack out of the specifed temperature range -20°C ~ +60°C(-4°F ~
+140°F). Using the pack out of this range will reduce the pack’s performance and battery cell life.
CAUTION: DO NOT
leave the pack fully charged, completely discharged, or in an excessive
temperature environment (above 50°C, 122°F) for an extended period of time. Otherwise, a shorter
battery pack life could occur. If the battery pack must be left unused for a long time, it must be
detached from the transceiver after discharging. You may use the pack until theremaining capacity is
about half, then keep it safely in a cool, dry place in the following temperature range:
-20°C (-4°F) ~ +50°C (+122°F) (within a month).
-20°C (-4°F) ~ +40°C (+104°F) (within three months).
-20°C (-4°F) ~ +20°C (+68°F) (within a year).
BE SURE
to replace the battery pack with a new one approximately five years after manufacturing,
even if it still holds a charge. The material inside the battery cells will become weak after a period of
time, even with little use. The estimated number of times you can charge the pack is between 300 and
500. Even when the pack appears to be fully charged, the operating time of the transceiver may
become short when:
· Approximately five years have passed since the pack was manufactured.
· The pack has been repeatedly charged.The battery cells may deteriorate and swell due to their
characteristics if used in an environment and conditions such as: frequently charged, recharged immediately
after full charge, used or saved in a hot place, or charged by methods other than the instructions. If
the battery pack swells, it has reached the end of its life due to deterioration. Replace it with a brand new one.
Charging Caution
CAUTION: DO NOT charge the transceiver during a lightning storm. It may result in an electric shock,
This equipment has been tested and found to comply with the limits for a Class B digital device,
pursuant to part 15 of the FCC Rules. These limits are designed to provide reasonable protection
against harmful interference in a residential installation. This equipment generates, uses, and can radiate
radio frequency energy and, if not installed and used in accordance with the instructions, may cause
harmful interference to radio communications. However, there is no guarantee that interference will not
occur in a particular installation. If this equipment does cause harmful interference to radio or television
reception, which can be determined by turning the equipment off and on, the user is encouraged to try
to correct the interference by one or more of the following measures:
·Reorient or relocate the receiving antenna.
·Increase the separation between the equipment and receiver.
·Connect the equipment into an outlet on a circuit different from that to which the receiver is connected
·Consult the dealer or an experienced radio/TV technician for help.
VI
cause a fire, or damage the transceiver. Always disconnect the power adapter before a storm.
DANGER! NEVER
charge the battery pack in areas with extremely high temperatures, such as near
fires or stoves, inside a sun-heated vehicle, or in direct sunlight. In such environments, the safety/
protection circuit in the pack will activate and stop the charging.
WARNING! NEVER
charge or leave the battery in the battery charger beyond the specified time for
charging. If the pack is not completely charged by the specified time, stop charging and remove it from
the battery charger. Continuing to charge the pack beyond the specified time limit may cause a fire,
overheating, or the battery may rupture.
CAUTION: DO NOT
insert the transceiver with the battery pack attached into the charger if it is wet
or soiled. This could corrode the battery charger terminals or damage the charger. The charger is not
waterproof.
CAUTION: DO NOT
charge the battery pack outside of the specified temperature range: 10°C ~ 40°C
(50°F ~ 104°F). TALKPOD recommends charging the pack at 25°C (77°F). The pack may heat up or
rupture if charged out of the specified temperature range. Additionally, battery performance or battery
life may be reduced.
WARNING!
Occasionally observe the battery pack condition while charging. If any abnormal
condition occurs, discontinue using the battery pack.
FCC INFORMATION
CAUTION: Changes or modifications to this device, not expressly approved by
TALKPOD Inc., could void your authority to operate this device under FCC regulations.
TALKPOD is not responsible for the destruction, damage to, or performance of any TALKPOD or
non-TALKPOD equipment, if the malfunction is because of:
·Force majeure, including, but not limited to, fires, earthquakes, storms, floods, lightning, or other natural
disasters, disturbances, riots, war, or radioactive contamination
·The use of TALKPOD transceivers with any equipment that is not manufactured or approved by TALKPOD.
TALKPOD, TALKPOD Inc. and the TALKPOD logo are registered trademarks of TALKPOD Incorporated
(Japan) in Japan, the United States, the United Kingdom, Germany, France, Spain, Russia, Australia,
New Zealand, and/or other countries.
VII
For Canada:
This device complies with Industry Canada license-exempt RSS standard(s). Operation is subject to
the following two conditions: (1) this device may not cause interference, and (2) this device must
accept any interference, including interference that may cause undesired operation of the device
CLEAN THE TRANSCEIVER THOROUGHLY IN A BOWL OF FRESH WATER
after exposure to
saltwater,and dry it before operating. Otherwise, the transceiver s keys, switches, and controllers may
become unusable, due to salt crystallization, and/or the charging terminals of the battery pack may
corrode
NOTE: If the transceiver's waterproof protection appears defective, carefully
Clean it with a soft, damp (fresh water) cloth, then dry it before operating. The
transceivermay lose its waterproof protection if the case or the jack cover is
cracked or brokn,or the transceiver has been dropped. Contact your TALKPOD
distributoror your dealer for advice
RECOMMENDATION
TRADEMARKS
I
I
I
II
II-IV
IV-VI
VI-VII
VII
VII
1
2-3
3
4
5
6
6
7
8
8-9
9
10
10-13
13-14
14
Important ..................................................................................................................................
Features
....................................................................................................................................
Explicit defnitions
..................................................................................................................
Supplied accessories
............................................................................................................
Precautions
..............................................................................................................................
Battery Cautions
.....................................................................................................................
FCC Information
......................................................................................................................
Recommendation
....................................................................................................................
Trademark
................................................................................................................................
Panel Description
...................................................................................................................
Display Description
................................................................................................................
Power Switch/Volume Control
............................................................................................
Attach/Detach the battery
...................................................................................................
Charging Time
.........................................................................................................................
Belt Clip
....................................................................................................................................
Antenna
.....................................................................................................................................
Installing SIM Card & SD Card
............................................................................................
Making a Simplex Call
Edit The Group ............................................................................................................................
Another Way To Edit The Group .................................................................................................
Using The Menu
Example: Check The Call Log ......................................................................................................
Using the Initial Set mode ............................................................................................................
Set mode items ...........................................................................................................................
SIM Card Information
Example ........................................................................................................................................
INFORMATION
About CE and DOC .....................................................................................................................
TABLE OF CONTENTS
1
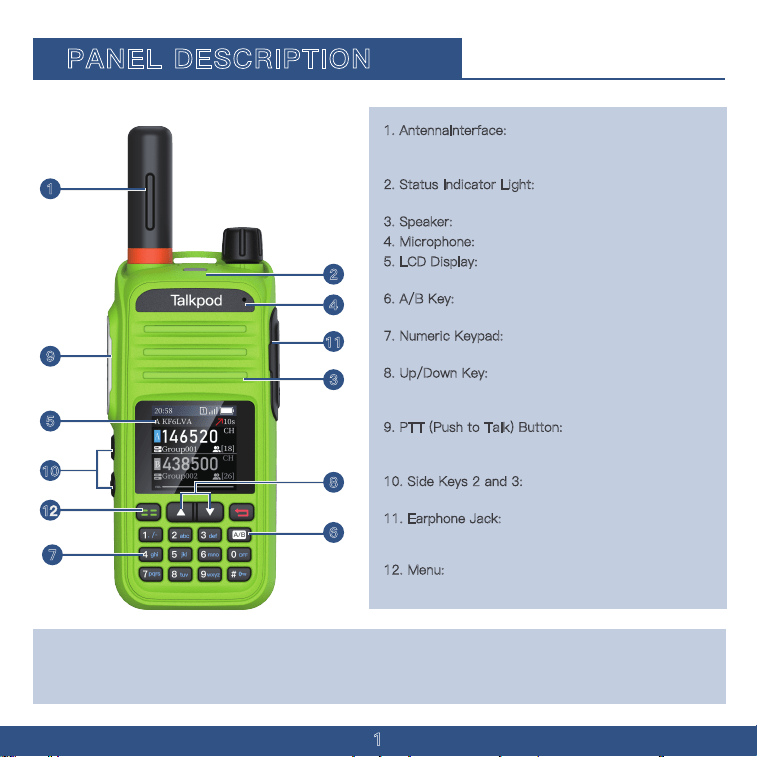
1. AntennaInterface:
SMA antenna interface, used
for installing the provided antenna or other brand
antennas compatible with the SMA interface.
2
. Status Indicator Light: Illuminates red during
transmission and green when a signal is received.
3
. Speaker: Outputs sound.
4. Microphone: Inputs sound.
5. LCD Display: Displays the operational status of
the walkie-talkie.
6
. A/B Key: Press this button to switch from
Channel A/Channel B
7
. Numeric Keypad: Used for entering frequencies
and functions.
8
. Up/Down Key: Only adjust the menu content
upward and downward. Hold the down key to open
the secrect menu.
9
. PTT (Push to Talk) Button: Press the PTT
button to transmit; release it to return to receive
mode
1
0. Side Keys 2 and 3: Functions of these side
keys can be customized through the menu.
1
1. Earphone Jack: Used for connecting an
external earphone; or to connect a programming
cable for programming and software updates via PC.
12. Menu
: Press the menu button to enter the menu
options
1
2
3
4
5
6
7
8
9
10
11
CAUTION:DONOT use the transceiver without the jack cover or the optional equipment attached.
The transceiver meets IP54 requirements for dust-tight and waterproof protection only when the
jack cover or the specifed optional speaker microphone is attached.
PANEL DESCRIPTION
1
Function
2
DISPLAY DESCRIPTION
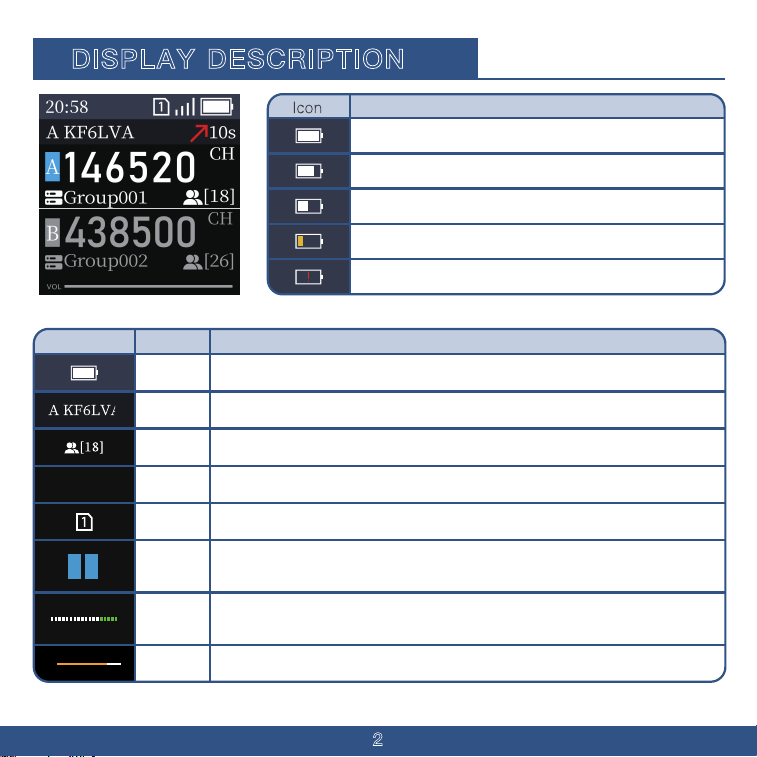
DescriptionIcon
Username
Or Account
Member
Number
Time
Sim Card
Modulati
on Level
A Segment
B Segment
Transmit
Signal
Strength
Received
The current login user name or account.
The number of people currently online in the group.
The current communication time in the group.
Allow your device to legally connect to the carrier's network.
Indicates the respective frequency segment.
Current strength of the transmitted signal.
Current amplitude of the transmitted audio.
Battery
Displays the remaining battery power. When the battery is about to run out, the
outer frame of the symbol flashes, and the transceiver prohibits transmission.
BATTERY STATUS
The battery has sufficient capacity.
The battery is exhausted a little.
The battery is nearing exhaustion.
The battery is almost fully exhausted. Immediately charge thebattery pack.
*After a while, the icon blinks and the transceiver will beturned OFF.
Function
20:58
A B
The Battery is exhausted a half.
VOL
3
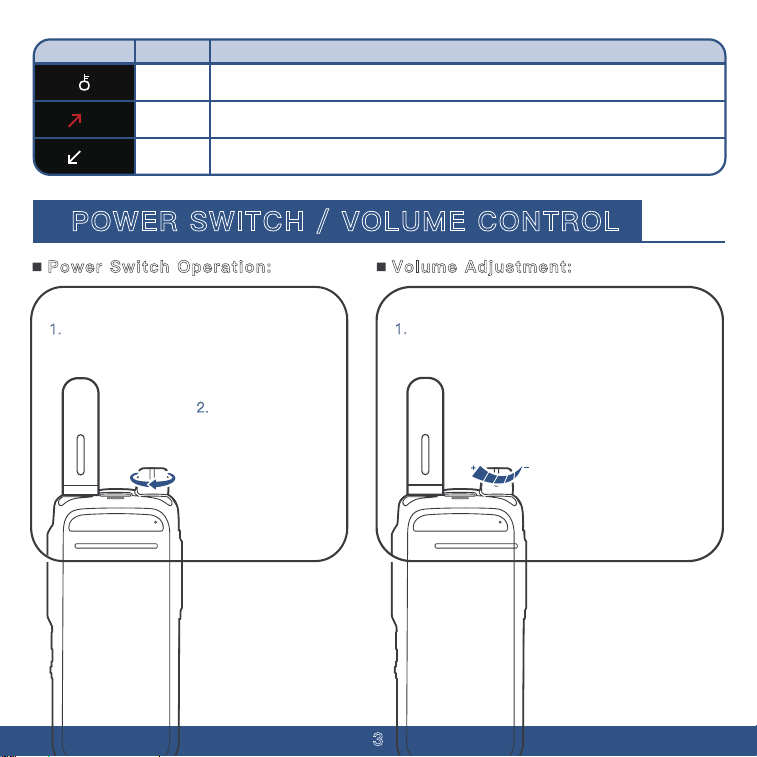
Icon
Description
Function
Keyboard
Lock
Transmission
Information
Reception
Information
Keyboard Lock hold to lock your keypad. When the "Locked" sign displayed, you can
not use keypad to do anything.
Indicates that the user started the mic 1 minutes ago
Signal received the user started the mic 1 minutes ago.
POWER SWITCH / VOLUME CONTROL
1. To turn on the walkie-talkie, rotate the
power switch knob clockwise.
2.
To turn off the
walkie-talkie, rotate
the power switch
knob
counterclockwise.
1.
The volume control knob is the same as the
switch knob. Rotate it clockwise to increase the
volume and counterclockwise to decrease it.
Power Switch Operation: Volume Adjustment:
��s
��s
4
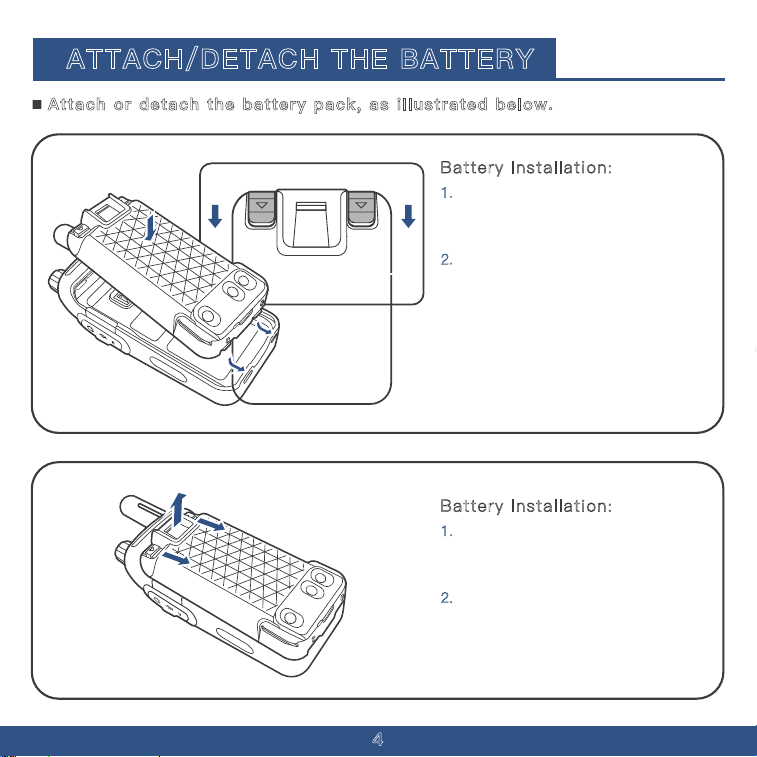
Battery Installation:
1. Align the battery with the two
small notches at the bottom of the
walkie-talkie casing.
ATTACH/DETACH THE BATTERY
2. Press the battery towards the metal
plate. Simultaneously press down on
the small sliders located on the left
and right sides at the top (marked
with arrow symbols) until you hear a
"click," indicating that the battery is
securely installed. See illustration for
guidance.
Battery Installation:
1. Locate the two small sliders on the
top left and right sides of the battery,
each marked with an arrow symbol.
2.
Press both sliders downward
simultaneously to release and remove
the battery. Refer to the illustration for
details.
Attach or detach the battery pack, as illustrated below.
Prior to using the transceiver for the first time,the battery
pack must be fully charged for optimum life and operation.
*Approximately 8 hours for the N39plus.
5
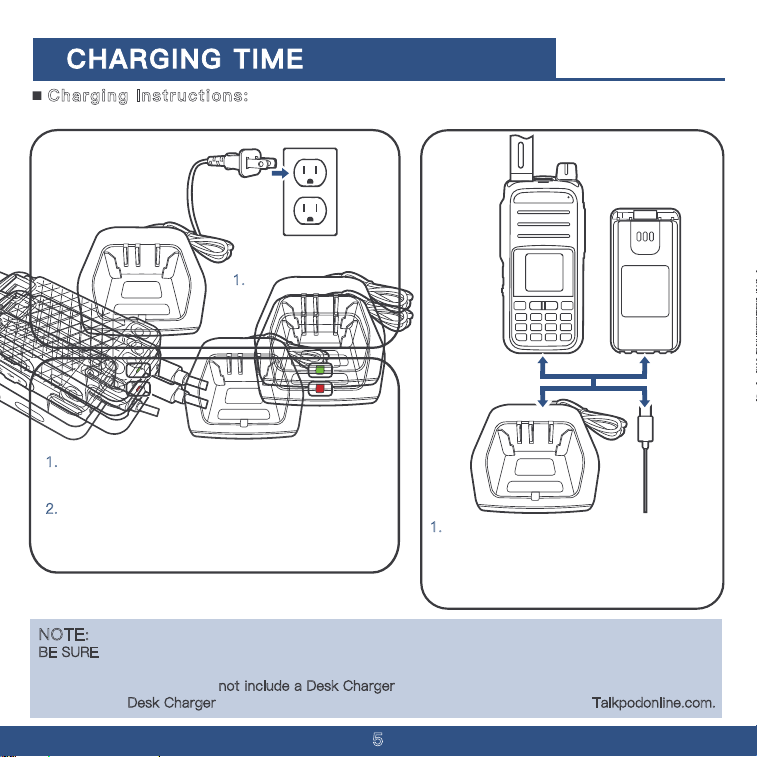
NOTE:
BE SURE to turn OFF the transceiver while charging with the supplied battery charger.Otherwise, the
attached battery pack cannot be charged.
This product package does not include a Desk Charger
. Charging is primarily conducted via USB-C.
A compatible Desk Charger
may be purchased separately from the official website at Talkpodonline.com.
1. Insert the charger’s
power plug into a
120V AC outlet.
1.
Ensure that the charging indicator light turns red,
signaling that charging has begun.
2.
Charging typically takes about 8 hours. When the
indicator light turns green, it indicates that the
battery is fully charged.
1.
Place the battery or the walkie-talkie
with the battery installed onto the charging
base; alternatively, connect the USB
charging cable to the battery s USB port.
Charging Instructions:
6
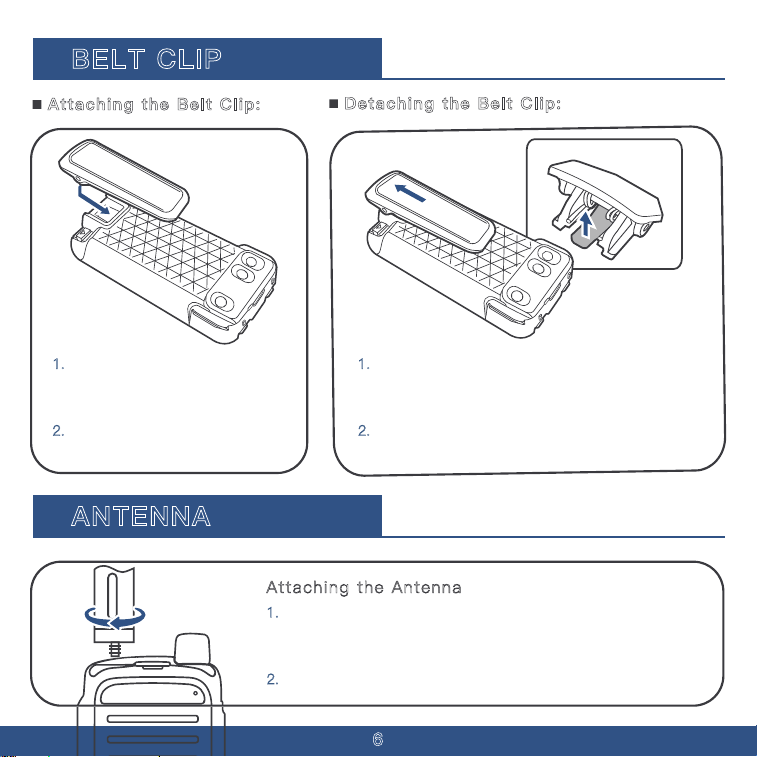
BELT CLIP
1. Remove the battery. Slide the
belt clip into the smooth slot on the
back of the battery.
2.
Press downward to secure the
belt clip in place.
1.
Remove the battery. Press on the elastic plastic
part in the middle of the belt clip towards the
direction of the walkie-talkie.
2.
While holding it, pull the belt clip upward to
detach it.
ANTENNA
Attaching the Antenna
1. Hold the base of the antenna and screw it clockwise into the
antenna socket on the top of the walkie-talkie until tight.
Detaching the Antenna
2.
To remove the antenna, unscrew it counterclockwise.
Attaching the Belt Clip:
Detaching the Belt Clip:

7
INSTALLING SIM CARD & SD CARD
Note:
1. This product only supports Nano-SIM cards. It is recommended to use the standard
SIM card provided. Do not use manually cut SIM cards or incorrect SIM card types, as
this may damage the SIM card slot.�
2. The availability of 4G data network depends on the local carrier’s network and service
deployment.
1. Detach the battery (for details, refer to the
"Attach/Detach the Battery" section)
2.
Use your fingernail to press down on the area marked
"Open" on the SIM card rubber dust cover, then gently lift it
upwards and backward in the indicated direction to remove
the cover.
3.
Insert the SIM card at the position marked "Open" on the cover. Hold the SIM card at
approximately a 1:30 direction (a 45-degree angle from the top right to bottom left), and gently
insert it into the recessed slot within the SIM card dust-proof area.
8
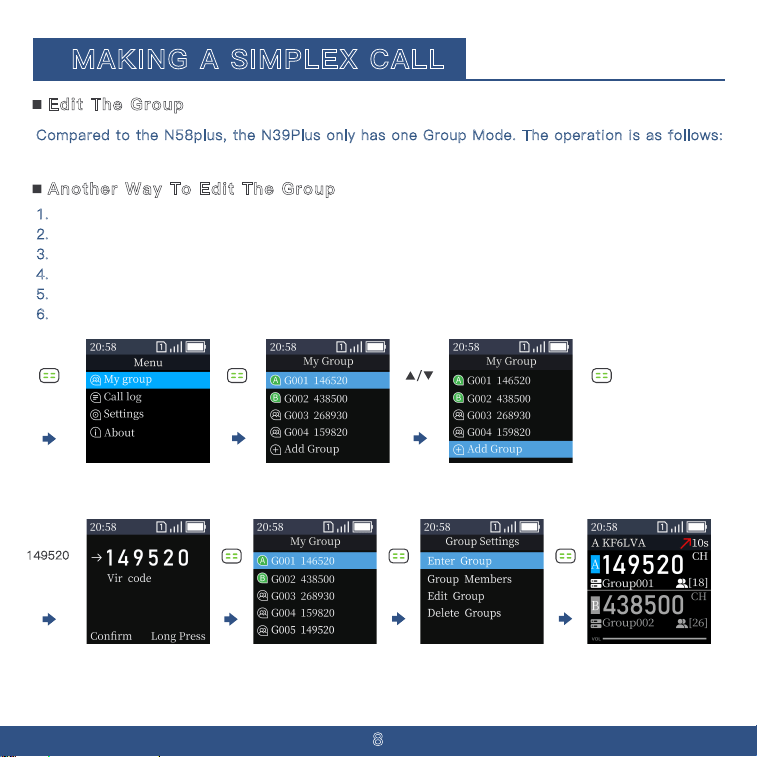
Compared to the N58plus, the N39Plus only has one Group Mode. The operation is as follows:
Directly enter the channel number on the keypad (e.g., 146520) to enter the channel.
1. press the Menu key to enter the menu.
2.
Select "Group A" using the Menu key, then press the Menu key to enter Group A.
3.
Use the down arrow key to scroll to the "ADD Group" option.
4.
Enter the channel number (e.g., 146520).
5.
press the Menu key to confirm.
6.
Scroll up to the 146520 option, then press the Menu key to enter.
Edit The Group
Another Way To Edit The Group
MAKING A SIMPLEX CALL
149520
9
To start your transmission
1. Hold the radio about 3–5 cm in front of your mouth.
2.
Press and hold the PTT (Push-to-Talk) button while speaking to transmit your voice in real time.
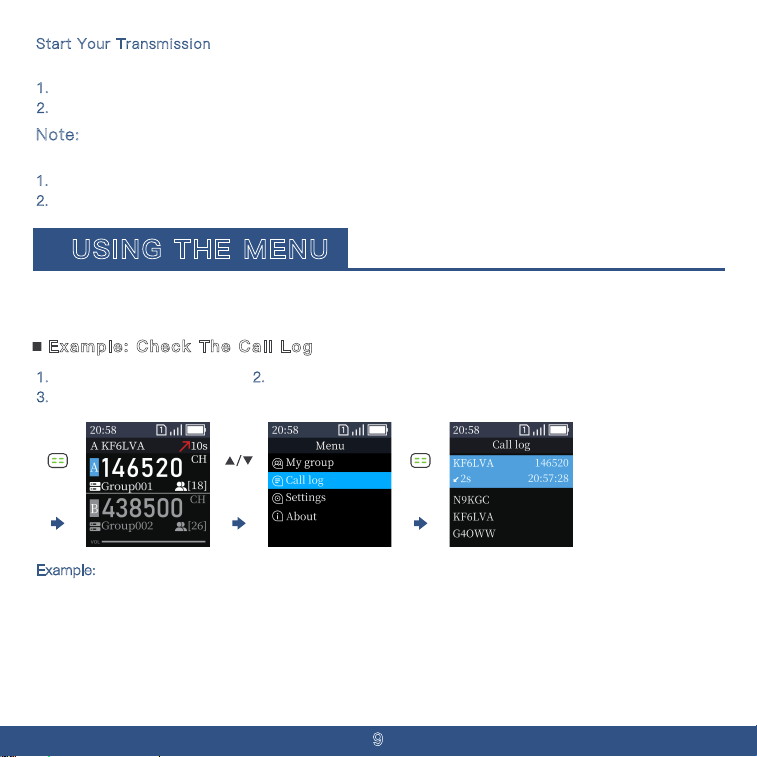
Start Your Transmission
The indicator light shows different colors during transmission and reception:
1.
During transmission, the indicator light stays solid red.
2.
During reception, the indicator light stays solid green.
Note:
1. Press the Menu Button. 2. Press Down button twice to the Call Log Menu.
3.
Press the Menu Button to check the Call log.
Example: Check The Call Log
USING THE MENU
You can use the Menu to set infrequently changed values or function settings. The transceiver has two
types of Menu modes, as shown below.
Example:
Switch Your Channel From Channel A To Channel B
Press the * button to switch between Channel A & Channel B�
10
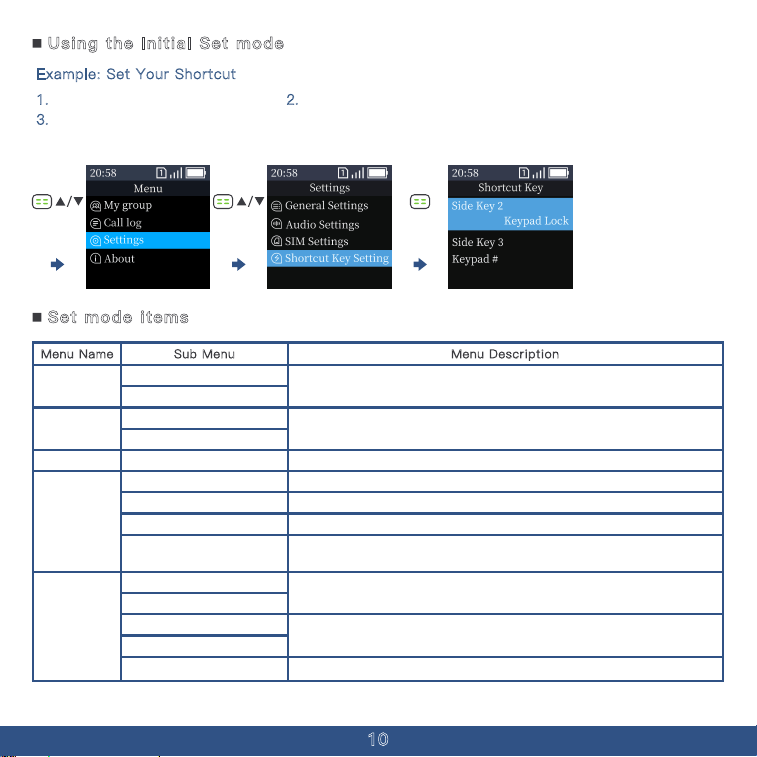
Example: Set Your Shortcut
1. Press the Menu Button. 2. Press Down button three times to the settings.
3.
Press the Menu Button to the Shortcut setting and you can set your shortcut key in
the shortcut setting.
Using the Initial Set mode
Menu Description
Add Menu
Menu Name Sub Menu
All your saved channel numbers are stored in Group A.
Channel Name
Group A
All your transmission records are stored in this option.Records Of Call Log
General Settings
Call Log
In the General Settings menu, you can configure the basic settings of the device.
In the Audio Settings menu, you can configure the sound settings of the device.Audio Settings
Sim Option
Settings
In the SIM Option menu, you can configure the SIM card settings of the device.
In the Shortcut Key Settings menu, you can configure the side keys and shortcut
key settings of the device.
Shortcut Key Settings
User Info
You can check the User & Device Info in this Option.
About
Device Info
Set mode items
Add Menu
All your saved channel numbers are stored in Group B
Channel Name
Group B
SIM ICCID
SIM Data
You can check the SIM Card Information in this Option.
You can check your Firmware Version in this option.Software Info
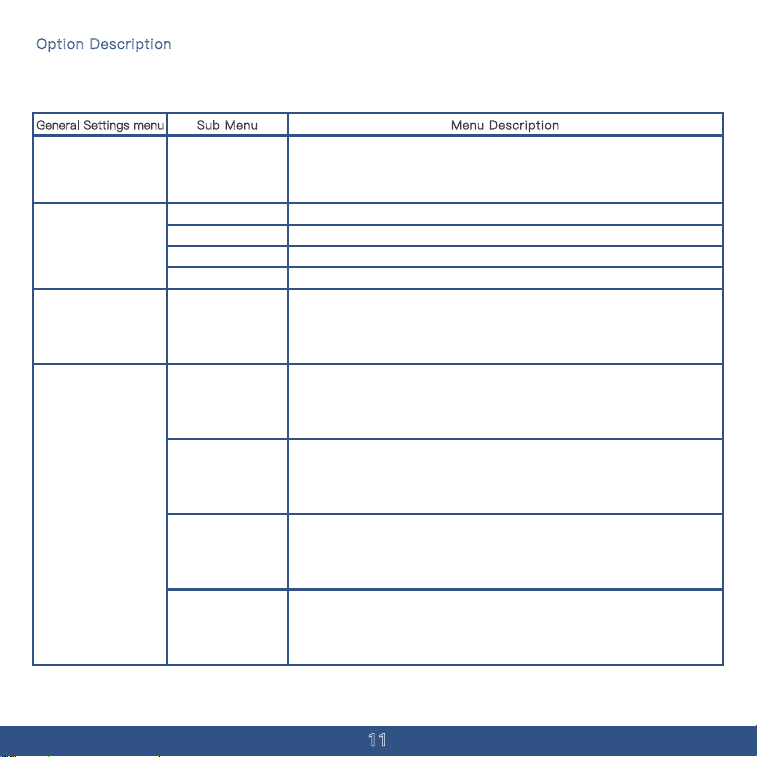
15s、30s、45s
60s、120s
This setting allows you to control how long the device's screen remains on when
not in use. Adjusting this option helps conserve battery life by automatically
turning off the display after a period of inactivity. You can choose different
timeout durations based on your preferences or operating environment.
Screen Off
TX/ RX SCR on/ off
Option Description
Considering the large number of options in Option Description, a separate table will be created for all
the items within the Option menu.
Menu DescriptionGeneral Settings menu Sub Menu
Default
Off For TX & RX
On When TX
Default
Standard factory setting.
Screen stays off during both transmit and receive.
Screen lights up only during transmission.
Screen lights up only during reception.
This setting allows you to limit the maximum duration of continuous transmission.
Once the set time is reached, the device will automatically stop transmitting to
prevent overheating and avoid occupying the channel for too long. It's especially
useful in shared communication environments to ensure fair and efficient use of
the frequency.
TOT Setting
10s、20s、30s
40s、50s、60s
70s、80s、90s
100s、110s、120s
This mode allows the device to operate with faster response and processing
speeds, ensuring quicker channel switching and reduced system latency. It's ideal
for users who need rapid communication or operate in dynamic environments
where every second counts. Enabling this mode may slightly increase power
consumption but provides a more responsive user experience.
Fast Speed Mode
Normal mode
This mode provides a balanced operating state for the device, offering stable
performance with optimized power consumption. It is suitable for most everyday
communication scenarios, ensuring reliable operation without significantly
draining the battery. Use this mode when speed is not a critical factor and longer
battery life is preferred.
Operating Mode
This mode is designed to minimize the device's power consumption by reducing
background activity and limiting certain non-essential functions. It helps extend
battery life, making it ideal for long shifts or situations where charging options
are limited. While it may slightly slow down response time or reduce update
frequency, it ensures the device remains operational for a longer period.
Power Saving Mode
11
This mode is designed to minimize the device's power consumption by reducing
background activity and limiting certain non-essential functions. It helps extend
battery life, making it ideal for long shifts or situations where charging options
are limited. While it may slightly slow down response time or reduce update
frequency, it ensures the device remains operational for a longer period.
Power Saving Mode
12
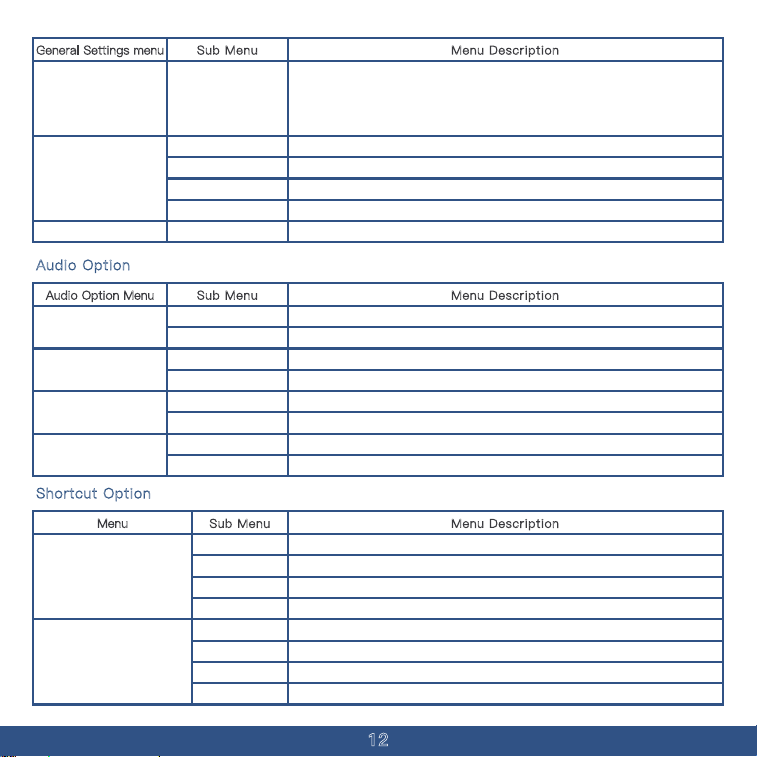
Audio Option
Menu DescriptionAudio Option Menu Sub Menu
On
Off
Start Default
Quindar_1
Off
On
On
Turn On PTT Tone.
Turn Off PTT Tone.
Original PTT Down Tone.
Quindar_1 Style PTT Down Tone.
Turn Off End PTT Tone.
Turn On End PTT Tone.
Voice prompts are enabled.
Send Tone
Send Tone Selection
End Tone
Prompt sound
Operating Mode
This mode offers the highest level of energy conservation by disabling or limiting
most non-critical functions of the device. It is designed for extreme low-battery
situations or environments where charging is not possible for extended periods. While
some features and performance may be reduced, essential communication capabilities
remain active to ensure basic functionality is maintained as long as possible.
Super Power Saving
Mode
Off
Transmit In A Band
Transmit In B Band
Following
Only start Transmission in the current Band.
Start Transmission in A Band.
Start Transmission in b Band.
Start Transmission in the last Band the device received.
A/B Channel Sync
English Adjusting Your Device Language.Language
Menu DescriptionGeneral Settings menu Sub Menu
Shortcut Option
Menu Description
Menu
Sub Menu
None
Call Log
No Shortcut in Keypad Main 2.
Check your Call Log in Keypad Main 2.
Side Key 2
Keypad Lock
Group Info
None
Call Log
Keypad Lock
Group Info
Turn On the Keypad Lock in Keypad Main 2.
Check your Group Info in Keypad Main 2.
No Shortcut in Side Key 3.
Check your Call Log in Side Key 3.
Turn On the Keypad Lock in Side Key 3.
Check your Group Info in Side Key 3.
Side Key 3
Off Voice prompts are disabled.
Menu Description
Menu
Sub Menu
Side Key 2
None
Call Log
Keypad Lock
Group Info
No Shortcut in Side Key #.
Check your Call Log in Side Key #.
Turn On the Keypad Lock in Side Key #.
Check your Group Info in Side Key #.
Side Key #
Group Member View your Group Member list in Side Key 3.
Group Member View your Group Member list in Side Key #.
13
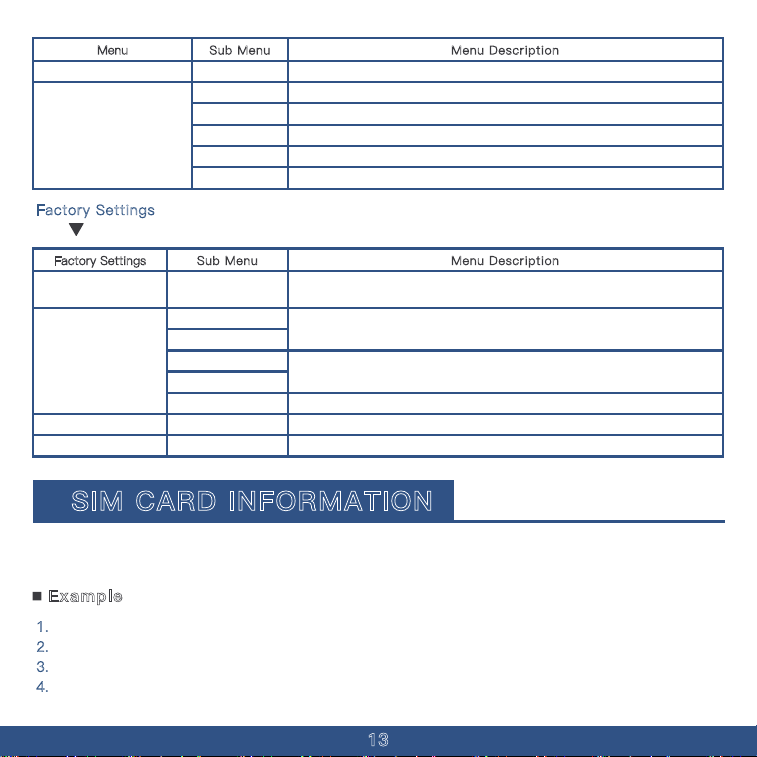
Menu DescriptionFactory Settings Sub Menu
APN Selection
User Info
Device Info
SIM ICCID
SIM Data
Select the access point name (APN) used for network connection.
The default APN is Official 1.
You can check the User & Device Info in this Option.
You can check the SIM Card Information in this Option.
General Setting
About
Software Info You can check your Firmware Version in this option.
Factory Settings
Hold to enter The Factory settings
Restart? Reset Your Device.
LED Test Test Your Screen is working Properly.
Restart
Test
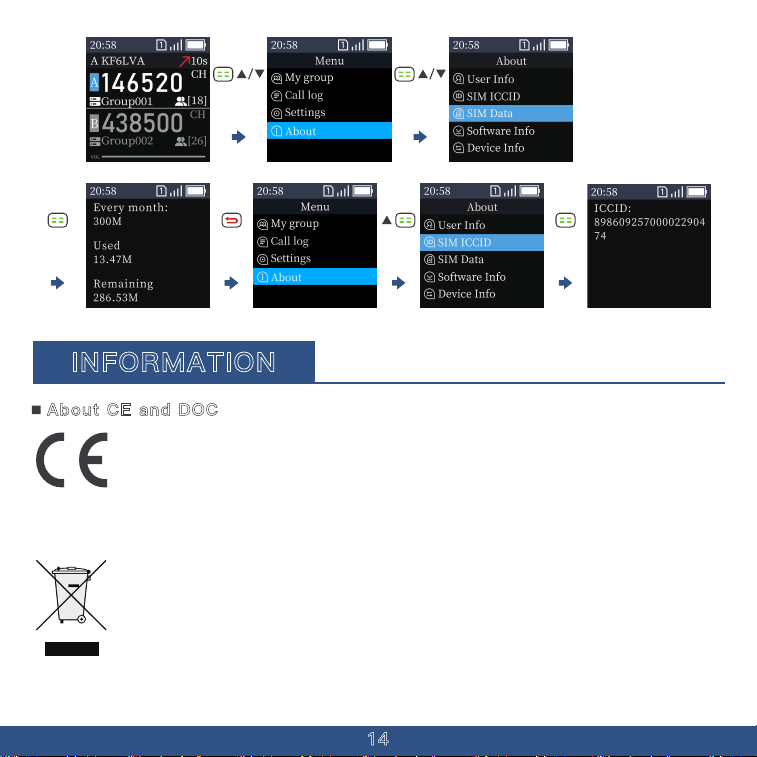
1. Check Your Data and Data Charge-up.
2.
Press The Menu Button and scroll down to the About Option.
3.
If the Data is low, Press the Up key to find a ICCID and type it in Talkpodonline.com.
4.
If your Sim card is not our official card, you would not check your Device Data
Example
SIM CARD INFORMATION
This product uses a Linux-based system and, unlike the N58plus, supports only SIM cards. This section
provides some information about SIM cards and data top-up. The first launch will take 1-2 minutes to
connect the server and SIM card. It will take at the range of 30 seconds after first launch.
14
INFORMATION
Hereby, Talkpod Inc. declares that the versions of N39plus which have the CE symbo
on the product comply with the essential requirements of the Radio Equipment Directive,
2014/53/EU, and the restriction of the use of certain hazardous substances in electrical
The crossed-out wheeled-bin symbol on your product, literature, or packaging reminds
you that in the European Union, all electrical and electronic products, batteries, and
accumulators (rechargeable batteries) must be taken to designated collection locations
at the end of their working life. Do not dispose of these products as unsorted municipal
waste. Dispose of them according to the laws in your area.
About CE and DOC
and electronic equipment Directive, 2011/65/EU. The full text of the EU declaration of conformity is
available at the following internet
address:https://talkpod.com/pages/support

Scan the QR code to access all relevant documents.