Adjustable Trailer Hitch
User Manual
Read Carefully Before Installation and Use
Keep for Future Reference
UM-TPA-0001-V3

Disclaimer
Read this disclaimer completely and carefully before proceeding with the rest of the manual content.
1. Warranty
This Orion Motor Tech product is sold with all expressed or implied warranties, including but
not limited to the implied warranties of merchantability and tness for a particular purpose.
Refer to the sales page for the warranty information regarding this product.
2.
Product Modications
Any modifications or alterations to OMT products void any warranties and may result in
damage or injury. OMT shall not be liable for any damages resulting from such modications
or alterations.
3.
Compliance with Laws
Customers shall be liable for ensuring that the use of OMT products complies with
all applicable laws and regulations in their respective jurisdictions. OMT assumes no
responsibility for any violations of laws or regulations resulting from the use of OMT
products.
4.
Correct Use
Always use OMT products only as directed in the accompanying manuals. Failure to follow
instructions may result in injury or damage.
Always ensure the assembly, installation, operation, maintenance, or repair of OMT
products is carried out by a competent person.
Always make maintenance regularly throughout OMT products’ lifecycles; you have the
liability to keep the products operating as intended.
Always wear appropriate protective gear.
5.
Third-Party Products
OMT shall not be liable for any damages or losses resulting from the use of third-party
products in conjunction with OMT products. Customers shall refer to the third-party's
guidelines or/and warranties (if any) for any third-party products used.
6.
Limitation of Liability
OMT shall not be liable for any direct, indirect, punitive, incidental, special, or consequential
damages to property or life, whatsoever arising out of or connected with the use or misuse
of OMT products. In no event shall OMT’s liability exceed the value of the products sold.
This disclaimer states the entire obligation of OMT with respect to OMT products. If any part
of this disclaimer is determined to be void, invalid, unenforceable, or illegal, including but not
limited to the warranty disclaimers, liability disclaimers, and liability limitations set forth above,
the invalid or unenforceable provision will be deemed superseded by a valid and enforceable
provision that most closely matches the intent of the original provision and the remainder of the
agreement shall remain in full force and eect.

Contents
Safety Information ............................................................................................. 1
General Instructions ............................................................................................................ 1
Compatibility ........................................................................................................................ 1
Installation/Removal ............................................................................................................ 2
Towing ................................................................................................................................. 3
Product Care ....................................................................................................................... 4
Package List....................................................................................................... 5
Product Diagram................................................................................................ 6
Installation .......................................................................................................... 7
Disconnecting the Locks from the Hitch Pins ...................................................................... 7
Installing the Ball Mount on the Towing Vehicle .................................................................. 8
Connecting the Dual-Ball Assembly to the Ball Mount ........................................................ 10
Attaching the Towed Trailer’s Coupler to a Ball ................................................................... 11
Maintenance ....................................................................................................... 12

1
General Instructions
• The instructions provided herein are
MAINLY
about this trailer hitch and
ONLY
for general
information regarding vehicles towing trailers.
ALWAYS
perform
ALL
tasks in
FULL
compliance with the manuals of your vehicle and trailer.
After installing this trailer hitch, test its functionality with your vehicle and trailer at low speed
in a safe area
BEFORE
use.
Failure to do so can invite accidents, resulting in serious property damage and severe
personal injury.
• Follow
ALL
guidelines in this manual carefully.
Failure to do so can invite accidents, resulting in serious property damage and severe
personal injury.
•
ONLY
use this trailer hitch for its intended purpose, connecting a towing vehicle to a towed trailer.
It is
NOT
a toy and should
NOT
be used playfully or carelessly.
Any other use
NOT
specied herein could potentially pose risks and void
ALL
warranties
stated or implied.
Compatibility
• Carefully read the label and marks that come with this trailer hitch as well as the manuals
of your vehicle and trailer, making clear the towing capacity and equipment specications
BEFORE
installation and use.
•
ALWAYS
ensure that the L-shaped ball mount ts the size of your vehicle’s hitch receiver.
See the product label for the specic requirement (
2″
or
2.5″
).
•
ALWAYS
ensure that the trailer hitch ball being used matches the
Max Trailer Weight
and
the
Max Tongue Weight
specied in your vehicle’s manual.
The
Max Trailer Weight
indicates the maximum weight that the vehicle is rated to tow
safely, which covers the
TOTAL
weight of the trailer when it is
FULLY
loaded.
The
Max Tongue Weight
refers to the maximum downward force that can be safely applied
to the ball by the trailer’s tongue weight, which is crucial for maintaining stability and control
in towing. The tongue weight should be
10%–15%
of the total trailer weight.
See the chart on the product label for detailed requirements.
•
NEVER
exceed your vehicle’s or the trailer hitch’s towing capacity.
Failure to follow this
WILL
invite accidents, bringing about serious property damage and
severe personal injury.
Safety Information

2
Safety Information
Installation/Removal
•
DO NOT
allow installation or removal by children, by persons whose mental or physical
condition precludes safe use, or by anyone unfamiliar with this trailer hitch and your vehicle
or trailer.
•
DO NOT
install or remove this trailer hitch while you are tired or under the influence of
drugs, alcohol, or
ANY
medication that negatively aects your judgment or reexes.
•
ALWAYS
keep children, bystanders, and pets away during work.
Restrict access to your work area as needed.
•
ALWAYS
install or remove this trailer hitch on stable and level ground in clean and well-lit
places.
Sloped surfaces and cluttered or dark areas invite accidents.
•
ALWAYS
wear appropriate personal protective equipment (PPE) during work.
ANSI and OSHA-approved hand protection
is
required.
Eye and body protection as well as nonslip footwear are highly recommended.
•
ALWAYS
dress properly for automobile-related tasks.
DO NOT
wear loose clothing or jewelry during work.
•
ALWAYS
keep hair, clothing, gloves, hoses, and other tools away from
ANY
moving parts
during work.
•
ALWAYS
know and understand the specific safety warnings and instructions for your
vehicle and trailer
BEFOREHAND
.
Make sure the vehicle has been
FULLY
parked and
ALL
wheels have been
FULLY
chocked
BEFORE
work.
NEVER
leave the engine active or the parking brake disengaged.
•
DO NOT
install this trailer hitch if
ANY
signs of wear or damage are detected on this
product or the connectors on your vehicle and trailer.
Replace
ANY
problematic parts
BEFORE
continuing work.
• Be careful
NOT
to drop the ball mount or dual-ball assembly.
DO NOT
place
ANY
body parts in areas where they may accidentally fall.
•
DO NOT
overreach during work.
Keep proper footing and balance at
ALL
times.
•
DO NOT
force this trailer hitch.
Stop work and address the issue(s) as needed if
ANY
abnormalities occur.

3
• Exercise
EXTREME
caution with
ANY
possible pinching points, moving parts, or objects
that may suddenly spring out during work.
• In case of an accident or injury, have a first aid kit and a communication device
(e.g., a
phone)
readily available. Know the locations of emergency medical facilities as well.
•
ALWAYS
double-check that
NO
looseness exists
AFTER
making each connection and
nishing the entire installation process.
•
ALWAYS
remember to remove
ANY
keys from the locks of this trailer hitch
AFTER
installation.
Towing
•
ONLY
use this trailer hitch on appropriate vehicles that are capable of towing your trailer,
such as trucks, SUVs (sport utility vehicles), crossover vehicles, and vans.
HOWEVER
, read the manuals of the specic models and consult professionals as needed
BEFORE
making your decisions.
•
ALWAYS
ensure that
ALL
parts and connections
ARE
correct, intact, and securely
tightened
BEFORE
towing.
•
NEVER
use this trailer hitch to tow
WITHOUT
the provided cushion washers or O-rings.
•
NEVER
leave
ANY
keys or adjustment tools on this trailer hitch
DURING
towing.
•
ALWAYS
obey
ALL
applicable laws and regulations
DURING
towing.
Pay special attention to the dress code, load restrictions, and speed limits.
•
ALWAYS
prevent a jackknife situation
DURING
towing.
Reduce the load on your trailer as much as possible.
Avoid slamming on the brake at
ALL
times.
•
ALWAYS
avoid swaying and shtailing
DURING
towing.
Distribute the weight evenly on your trailer.
Refrain from towing in strong winds or gales.
Mind your speed and allow sucient braking distances.
• In the event that shtailing occurs, stay calm and
DO NOT
brake suddenly.
Gently steer in the direction of the shtail to help straighten out the trailer while easing o
the accelerator to slow down gradually. Keep an eye on your mirrors to monitor the situation
and ensure the safety of other drivers.
Once you have regained control, nd a safe place to pull over and address any issues that
may have caused the shtailing.
Safety Information

4
Safety Information
• Check this trailer hitch for misalignment, looseness, wear, and damage
BEFORE
and
AFTER
towing.
Realign, retighten, or replace any problematic parts
BEFORE
further use.
Towing with any problematic trailer hitch is
EXTREMELY
dangerous and
WILL
cause
accidents and injuries.
Product Care
• For best results, keep this trailer hitch clean and dry.
Remove any dust, debris, grease, and oil
BEFORE
and
AFTER
each use.
•
ALWAYS
maintain this trailer hitch.
For best results, apply appropriate lubricants to ensure its functionality and prolong its lifespan.
•
DO NOT
use abrasive or caustic cleaners for this trailer hitch.
•
DO NOT
soak this trailer hitch in
ANY
cleaning uid.
For best results, avoid prolonged exposure to rain, snow, or pressurized spray.
•
DO NOT
replace
ANY
parts of this trailer hitch with nonidentical ones.
•
DO NOT
disassemble the dual-ball assembly except for repair or replacement purposes.
• Store this trailer hitch out of the reach of children and pets
AFTER
each use.
• Automobile-related tasks can be dangerous.
This manual and the separate manuals of your vehicle and trailer cannot cover every
possible situation that may arise.
Take sucient training
BEFORE
use.
Consult experienced and procient experts as needed.
Use good judgment at
ALL
times.
5
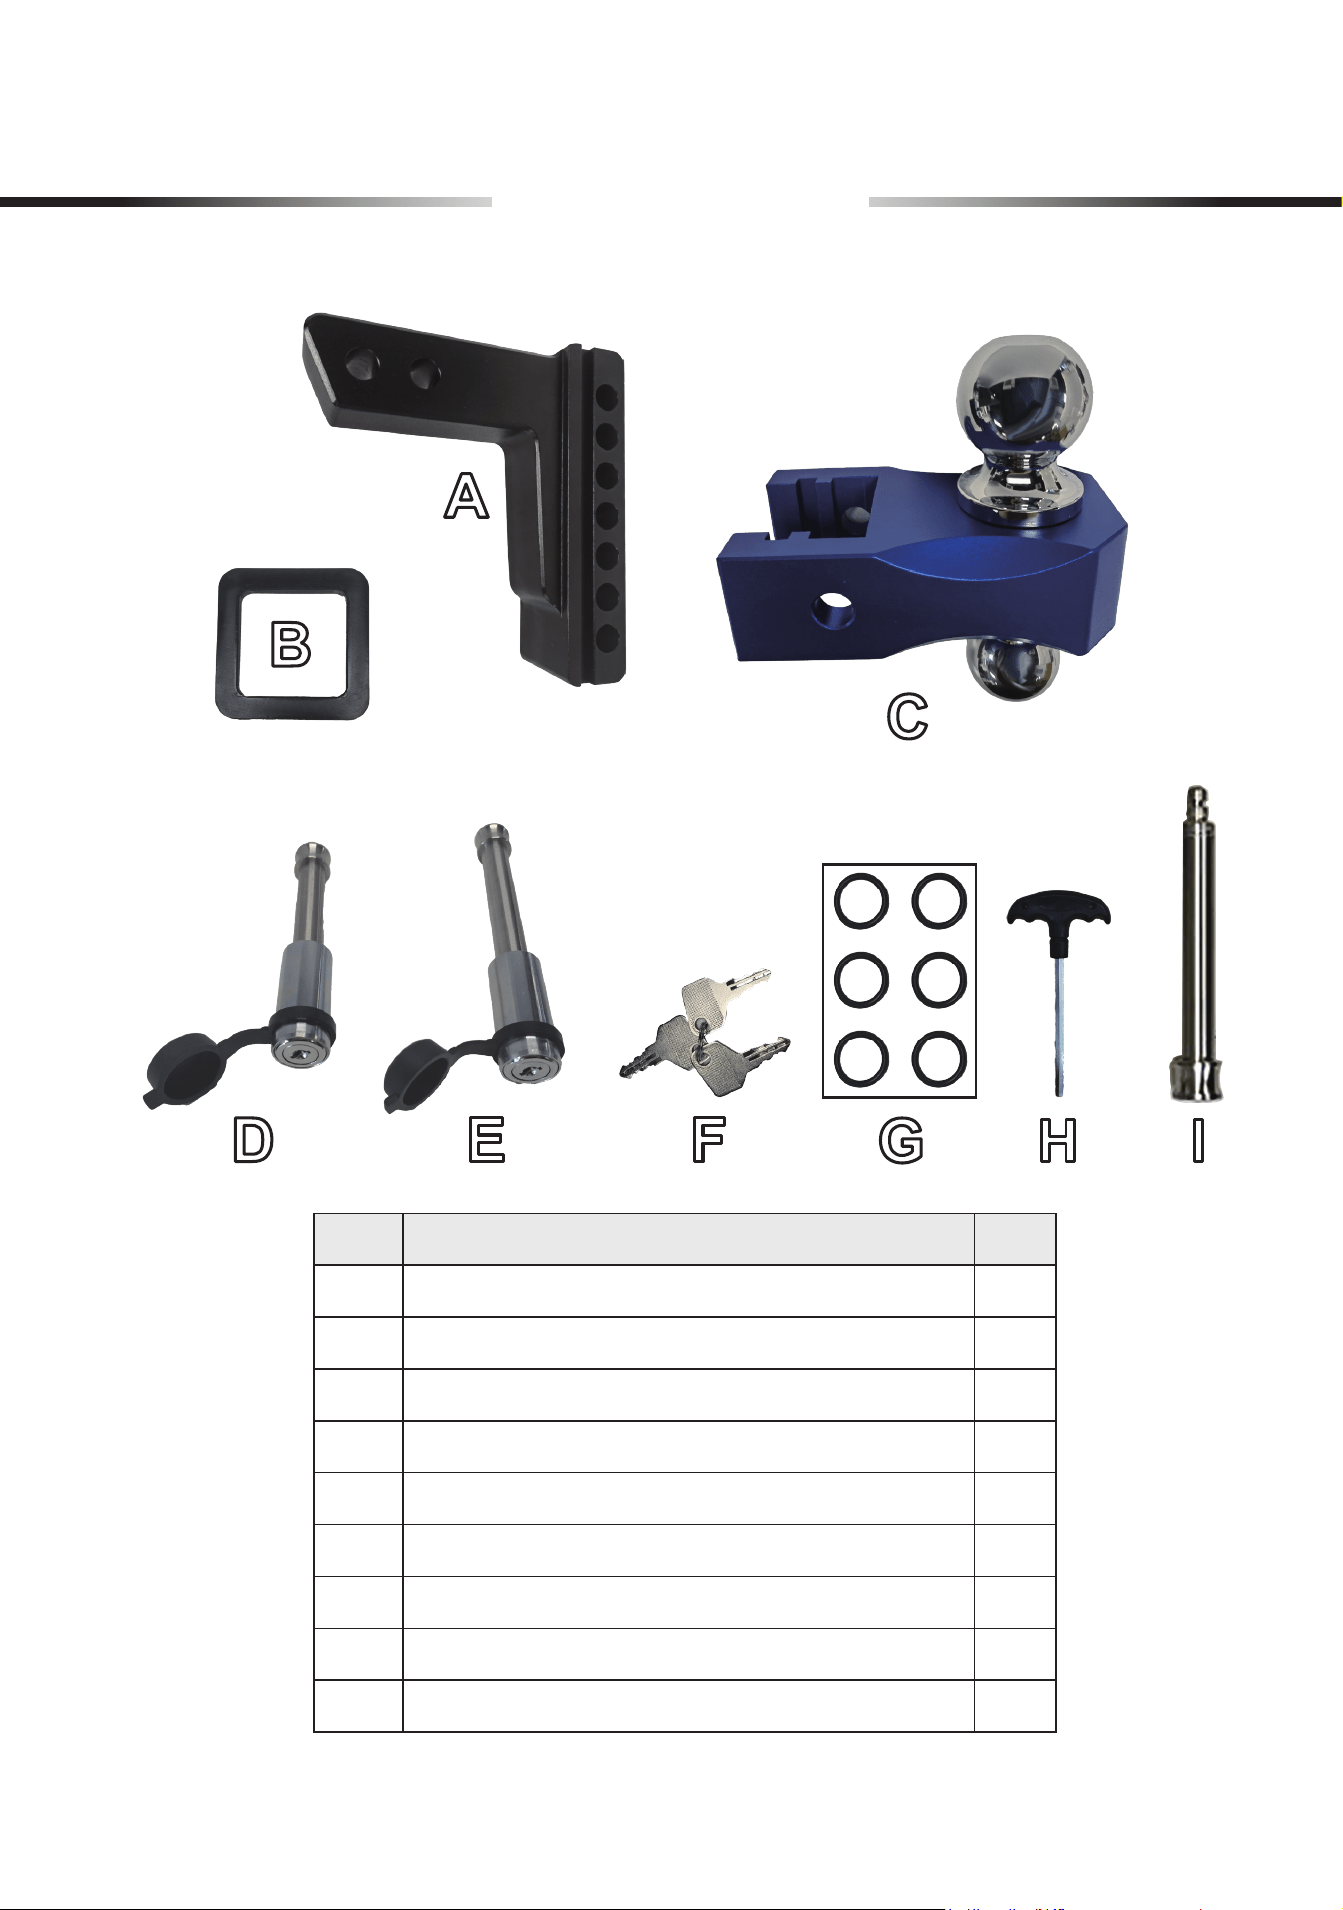
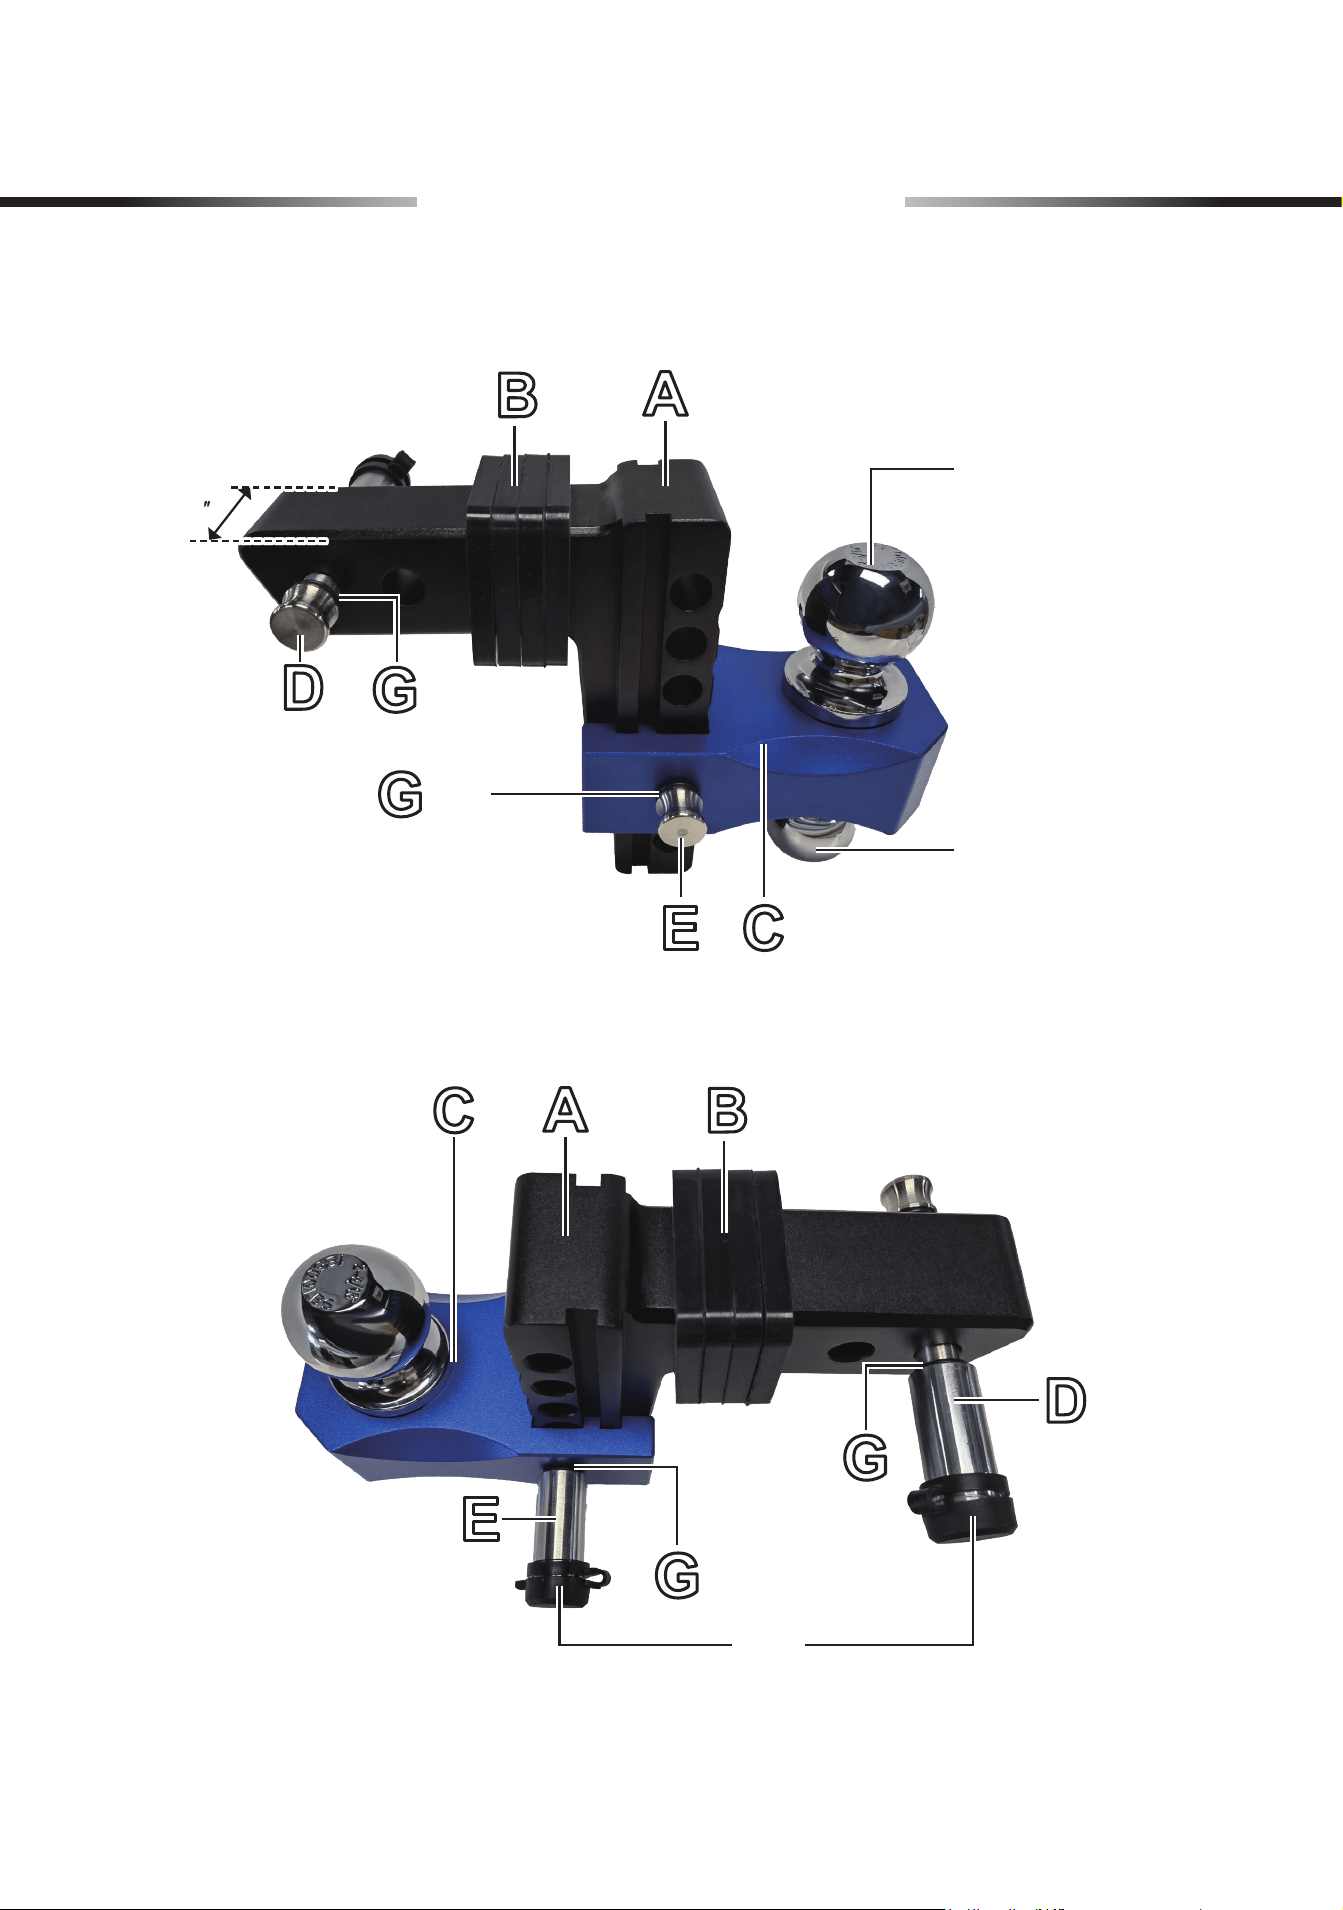
Package List
Item Name Qty.
A
Ball Mount 1
B
Cushion Washers 4
C
Dual-Ball Assembly 1
D
Short Hitch Pin with Lock 1
E
Long Hitch Pin with Lock 1
F
Keys 3
G
O-Ring Packet 1
H
T-Handle Allen Wrench 1
I
Long Hitch Pin 1
6
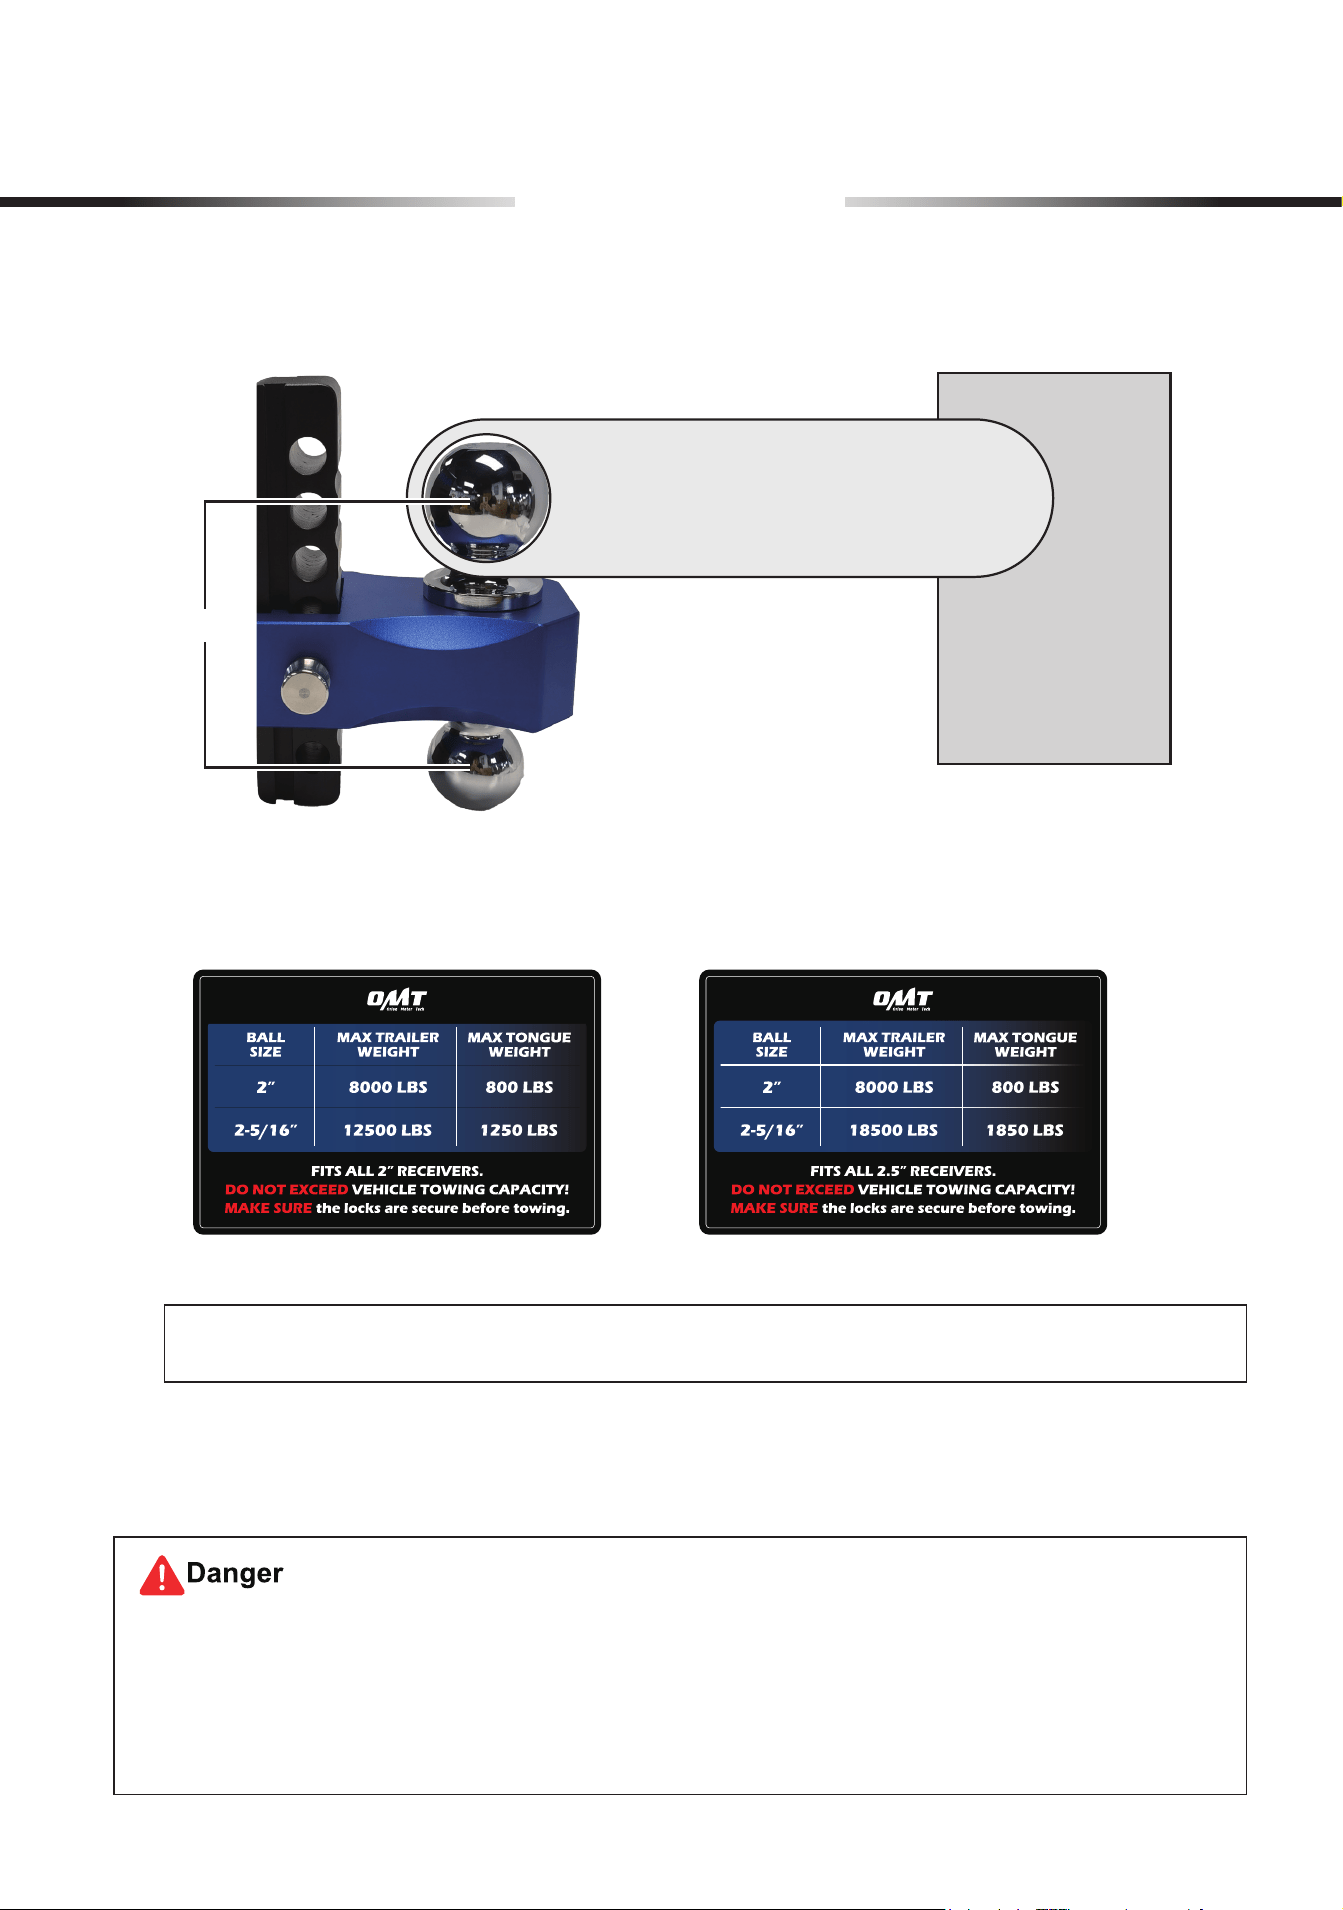
Product Diagram
Left View
2″ or 2.5″
Locks
Upper Ball
2-5/16″
12500 LBS or 18500 LBS
Lower Ball
2″
8000 LBS
(× 2)
(× 1)
Right View
7
Read the
Safety Information
section
BEFORE
installation
and follow
ALL
instructions
therein during installation.
Pay particular attention to the towing capacity. For details, refer to the product label
as well
as
the manuals of your towing vehicle and towed trailer. Exceeding such capacity
WILL
invite accidents and pose safety hazards.
Note:
Park your vehicle properly in front of your trailer on a stable level surface
BEFORE
installing
the trailer hitch:
• Shutotheengineandengagetheparkingbrake.
• Allow the hitch receiver to face and align with the trailer’s coupler.
• Chock all wheels to prevent accidental slipping.
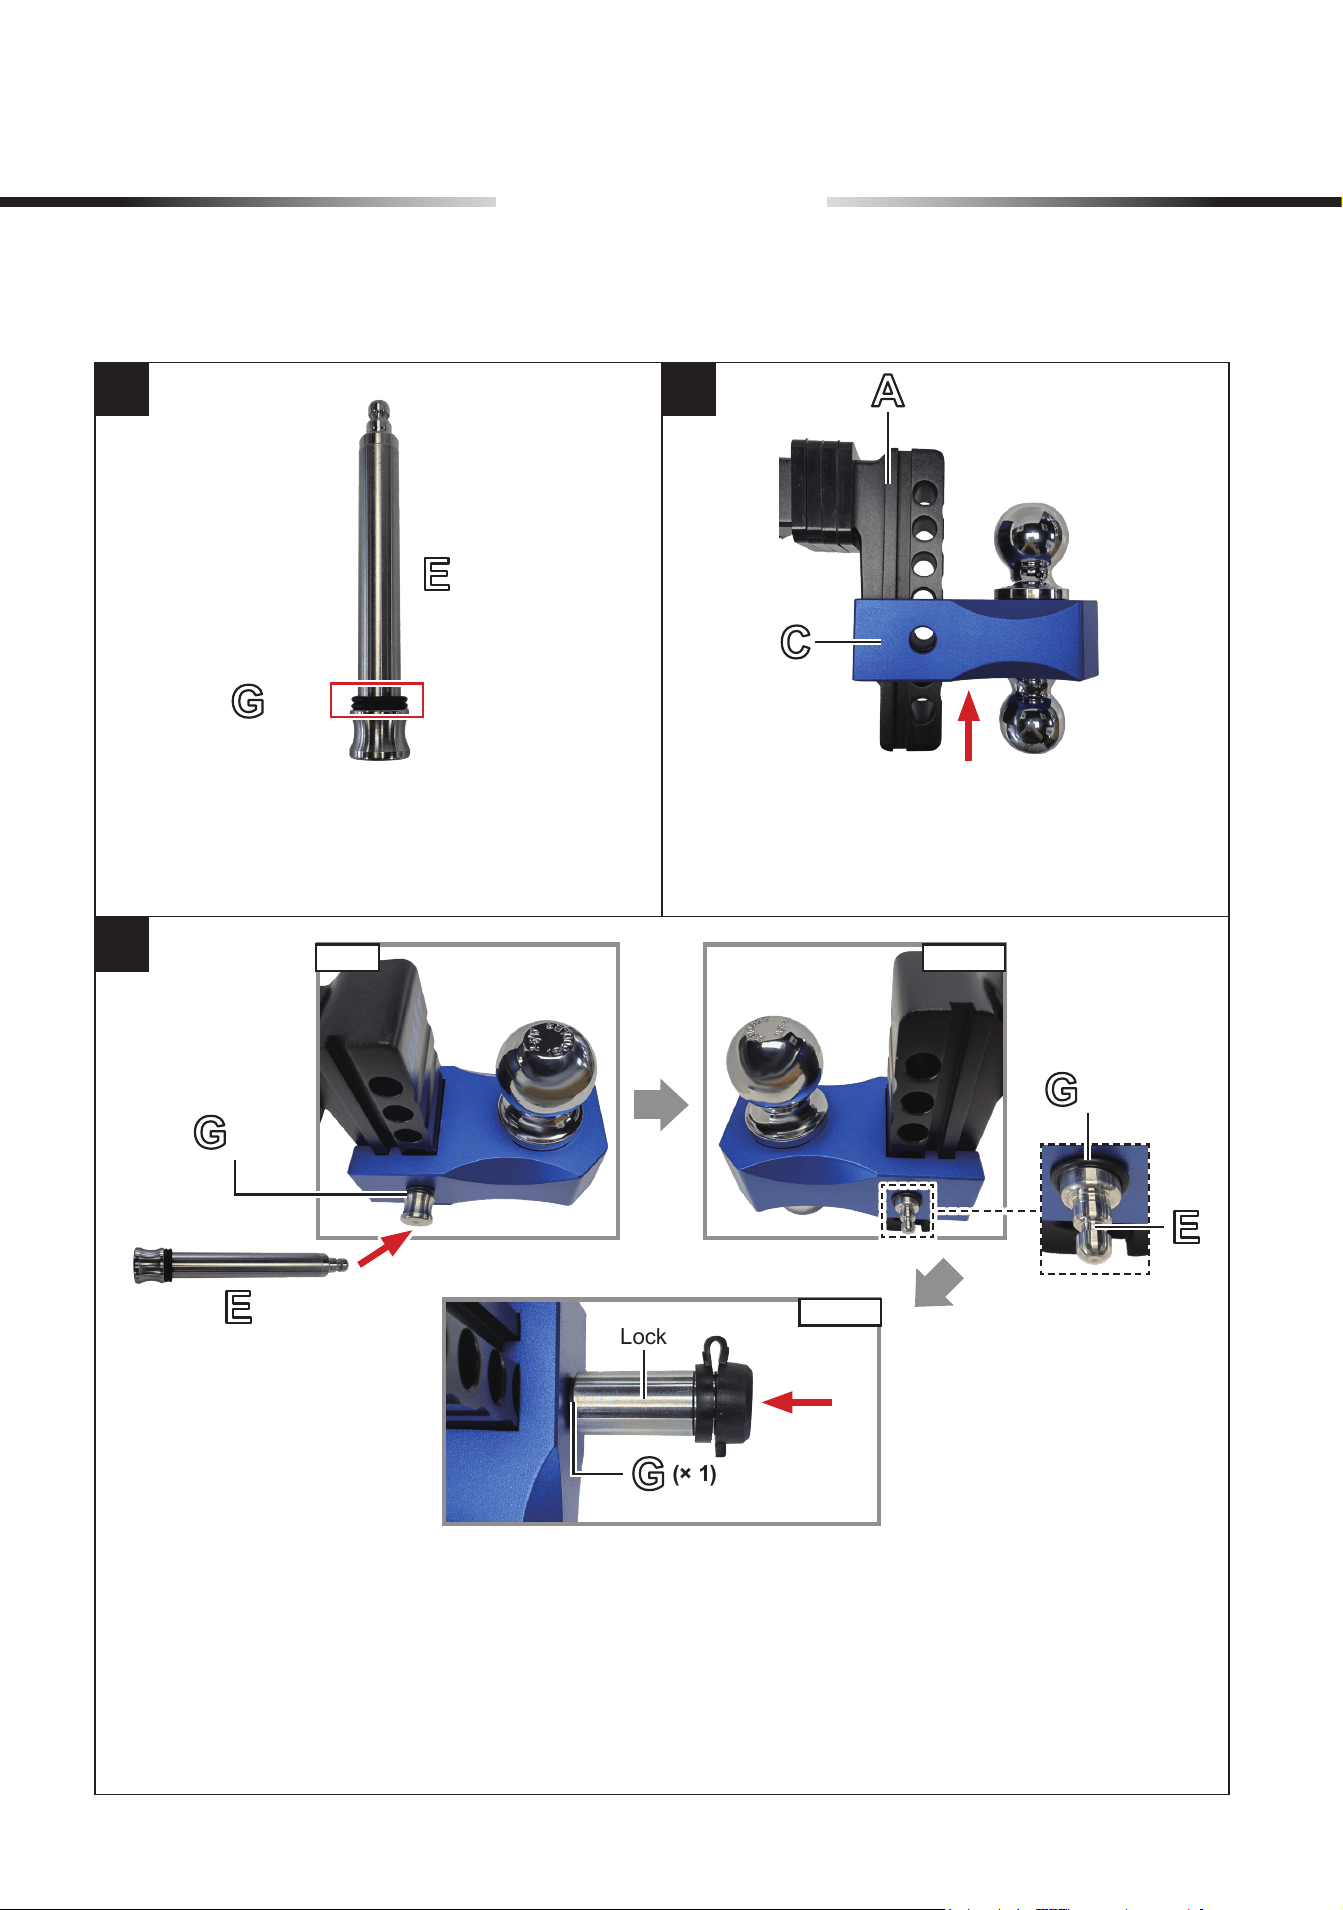
Disconnecting the Locks from the Hitch Pins
Installation
1. Pull away the caps of the locks on the
hitch pins
(D, E)
.
2. Insert the keys
(F)
into the locks and turn
them to either side.
3. Slide the locks away from the pins and
remove the keys.
8
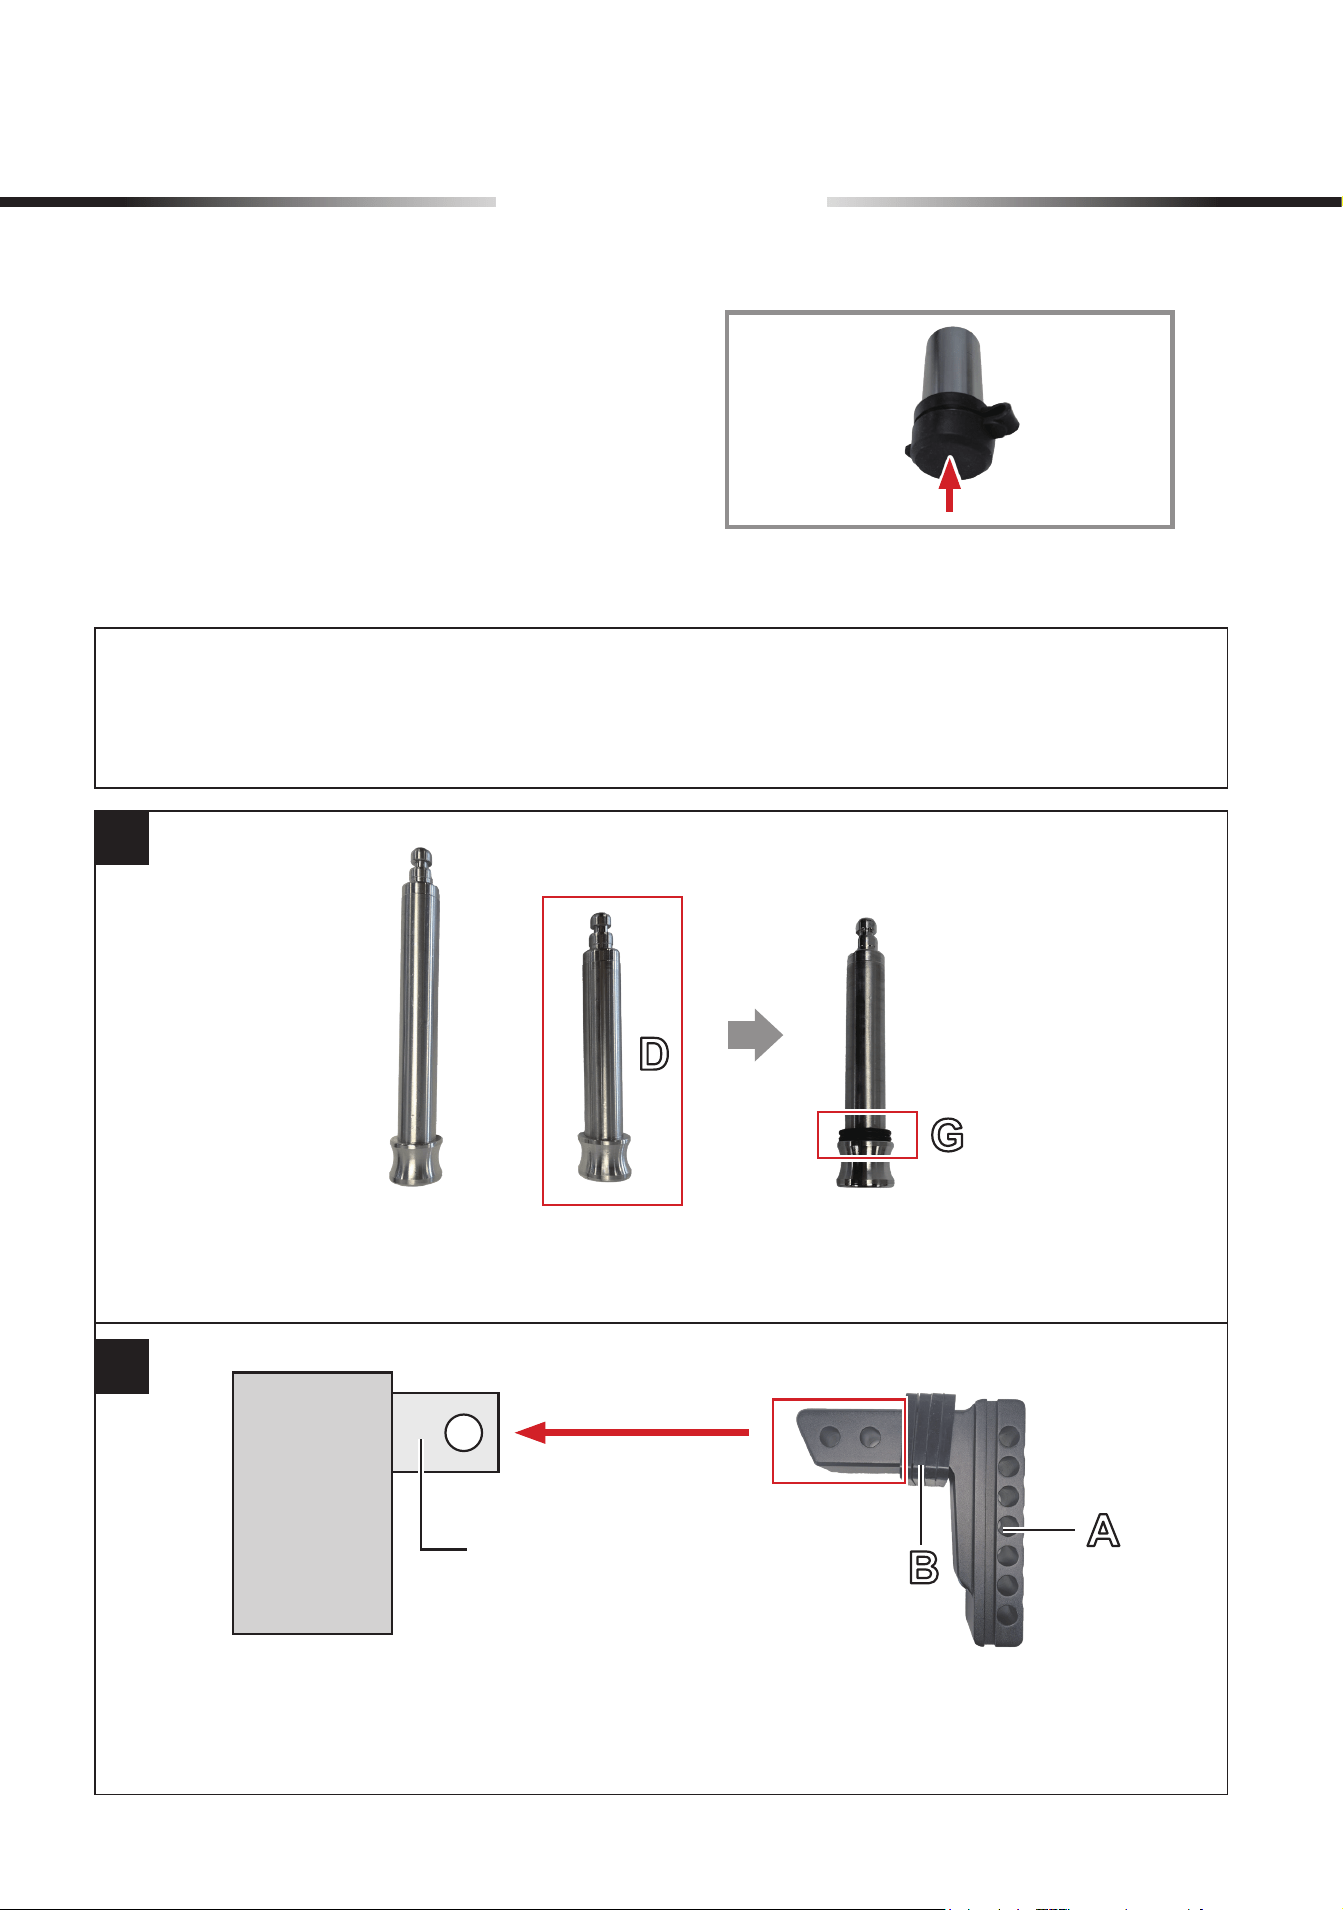
a. Select the short hitch pin
(D)
.
b. Slide several O-rings
(G)
onto the larger end of the pin.
a. Attach the cushion washers
(B)
to the L-shaped ball mount
(A)
.
b. Insert the mount into your towing vehicle’s hitch receiver.
c. Align the receiver’s holes with the appropriate slot in the mount.
Installation
Installing the Ball Mount on the Towing Vehicle
Note:
Ensurethattheinnerwidthofyourvehicle’shitchreceivertstheballmount’s
2 in.
or
2.5 in.
head width.
Refer to the label coming with this product or on
Page 11
.
1
2
Towing
Vehicle
Hitch
Receiver
4. Replace the caps, fully covering the key
holes.
9
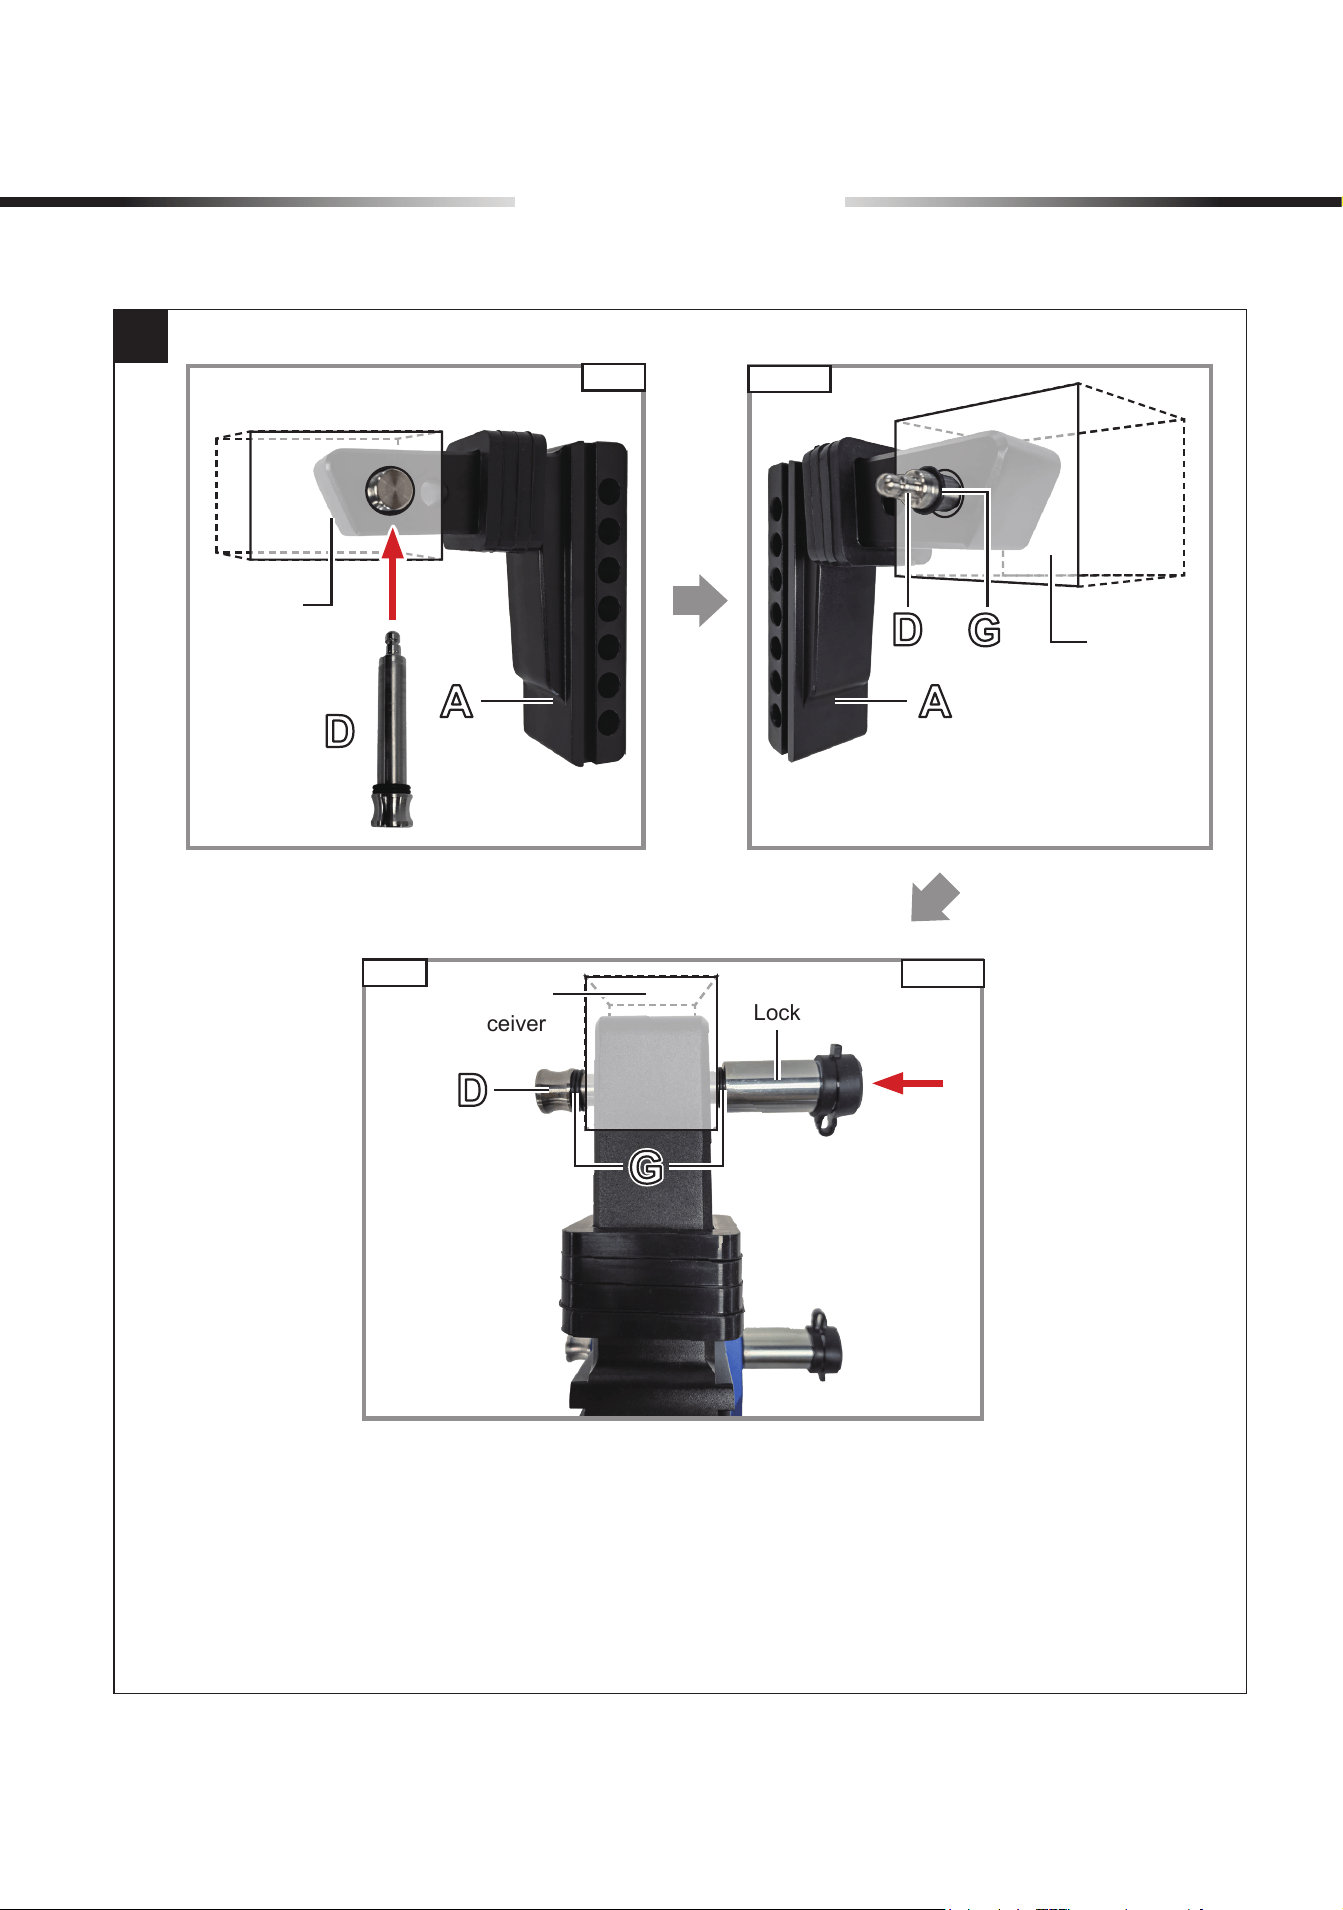
Installation
a. Pass the short hitch pin
(D)
through the holes and slot, connecting the ball mount
(A)
to
the receiver.
b. Slide several O-rings
(G)
onto the pin at the opposite side.
c. Push either lock removed in
Step 1
onto the pin
UNTIL
it clicks into place.
d. Pull the lock, testing that it is already securely tightened.
3
Hitch
Receiver
Hitch
Receiver
Lock
Hitch
Receiver
Right
Left
Right
Left
10
Slide
TWO
O-rings
(G)
onto the larger end
of the long hitch pin
(E)
.
Slide the dual-ball assembly
(C)
up to the
ball mount
(A)
until your trailer’s coupler
can reach the compatible ball.
a. Ensure that the slots are well aligned between the assembly and the mount.
b. Pass the long hitch pin through these slots, connecting the assembly to the mount.
c. Slide
ONE
O-ring onto the pin at the opposite side.
d. Push the remaining lock onto the pin
UNTIL
it clicks into place.
e. Pull the lock, testing that it is already securely tightened.
Connecting the Dual-Ball Assembly to the Ball Mount
Installation
1 2
Lock
(× 2)
(× 2)
(× 1)
(× 1)
3
RightLeft
Right
11
1. Read the label that comes with this product for each ball’s compatibility.
2. Locate the ball that matches your vehicle’s maximum trailer and tongue weights.
Note: BALL SIZE
and
MAX TRAILER WEIGHT
are marked on each ball.
3. Attach your trailer’s coupler to the ball, securing the connection with the coupler’s locking
mechanism.
4. Move the coupler slightly, testing that it is already securely tightened.
EVEN
though you have strictly followed the instructions above, recheck the following parts
AFTER
installation and
BEFORE
towing to ensure optimal safety and functionality:
• The ball attached to the coupler, ensuring
FULL
compatibility with your vehicle’s towing capacity
• The hitch pin locks and the ball-coupler connection, ensuring
NO
signs of looseness or breakage
Installation
Attaching the Towed Trailer’s Coupler to a Ball
Coupler
Balls
Towed
Trailer
Label 1: Label 2:
12
Inspection
Inspect
ALL
parts of the trailer hitch and its connections for any signs of looseness,
misalignment, wear, or damage between uses.
Realign, retighten, or replace any problematic parts before further use.
•
ALWAYS
ensure that the balls remain in place.
If they come loose, retighten their locking bolt using
the T-handle allen wrench
(H)
driven by a compatible
socket wrench
(not included)
.
•
DO NOT
attempt to disassemble the dual-ball assembly
unless repair or replacement is necessary.
•
DO NOT
use
ANY
nonidentical replacements.
Cleaning
Clear any dirt, debris, and rust buildup o the trailer hitch between uses.
Wire brushes, steel wool, and sandpaper with dedicated degreasers or rust removers are
strongly recommended.
•
DO NOT
use harsh abrasives or caustic chemicals.
•
DO NOT
soak in
ANY
cleaninguid.
Lubrication
For best results, lubricate the trailer hitch and its connections between uses.
Penetrating oil, lithium or marine grease, and silicone or graphite lubricant are strongly
recommended.
Maintenance

13
Storage
If the trailer hitch is not to be used for an extended period of time:
1. Reverse the installation steps, removing the hitch from your vehicle and trailer slowly and carefully.
•
Ensure that the engine is off, the parking brake is engaged, and all wheels are
chocked
BEFOREHAND
.
•
Exercise caution
WHEN
the dual-ball assembly or the ball mount is about to be removed.
Firmly hold them
BEFORE
disconnections to prevent accidental falls and avoid
placing
ANY
body parts in areas that they may fall into.
2. Disassemble, clean, and lubricate the hitch.
DO NOT
disassemble the dual-ball assembly unless it is necessary for repair or replacement.
3. Place all parts of the hitch in a case.
4. Store everything in a cool dry location inaccessible to children or pets, against unauthorized
use, and well protected from the elements.
Maintenance
Rev. 14 Jan. 2025
Thank you for choosing our products! If you have any questions or
comments, contact us and we'll resolve your issues ASAP!
support@orionmotortech.com
Contact Us
Scan for the latest
user manual