VACUUM SEALER
USER MANUAL
MODEL: A420
processing fresh . . . eld to sealed!

1
Table of Contents
IMPORTANT SAFEGUARDS
When using electrical appliance, basic safety precautions should always be
followed including the following:
1. Read all instructions.
2. Do not use the vacuum sealer near a heat source or on a wet or hot
surface.
3. To protect against electrical shock, do not immerse any part of the vacuum
sealer, plug or power cord in water or other liquid.
4. Unplug vacuum sealer from outlet when not in use, before putting on or
taking of parts and before cleaning.
5. To disconnect, unplug the power cord from the electrical outlet. Do not
disconnect by pulling on cord.
6. Do not operate the vacuum sealer if it has a damaged cord or plug.
7. Do not operate the vacuum sealer if it malfunctions or is damaged.
Contact Customer Service for more information.
8. Use the vacuum sealer only for its intended use.
9. Closely supervise children using any electrical appliance. Do not allow the
vacuum sealer to be used as a toy.
10. The vacuum sealer has a grounded plug. Use only a grounded electrical
outlet. To reduce risk of electrical shock, do not modify the plug I any way.
11. Do not use extension cord.
12. Do not let the cord hang over edge or table or counter.
13. Do not place or operate near an electrical / gas burner or a heated oven.
14. Do not use vacuum sealer outdoors.
15. Extreme caution and care must be used when sealing or handling any bags
or containers containing hot liquids or food.
16. This product is designed for household use only.
SAVE THESE INSTRUCTIONS
Important Safeguards ........................................................................................................... 1
Important Tips ........................................................................................................................2
Features ................................................................................................................................3-6
Operating Your Vacuum Sealer ....................................................................................6-9
Cleaning and Care ................................................................................................................9
Vacuum Packaging Guidelines ........................................................................................10
Troubleshooting ................................................................................................................... 11
Disposal Guidelines .............................................................................................................12
Notes ................................................................................................................................13-14
Warranty ............................................................................................................................Back

2
Important Tips
1. Read this manual carefully before using your vacuum sealer.
2. Vacuum packaging is not a substitute for canning. All perishable foods
still need to be refrigerated or frozen.
3. Follow all food safety regulations as outlined by FDA at www.FDA.gov.
4. Use only Avid Armor vacuum bags, rolls and accessories.
5. Do not use the vacuum sealer on a wet or hot surface or near a heat
source.
6. Some vegetables and fruits may release gases, known as outgassing.
When packaging these vegetables and fruits, outgassing can cause the
vacuum to be gradually lost over time. Blanching or freezing before
vacuuming helps prevent this from occurring.
7. Delicate foods can be frozen prior to packaging to protect from being
crushed by the vacuum.
8. If packaging fresh meats without pre-freezing, place a folded paper
towel or blotter paper between the meat and top of the bag to help
absorb the moisture.
9. To vacuum liquids, pre-freeze in a dish or pan first.
10. Cover sharp edges or points with bone guard or paper towels to prevent
the bag from puncturing.
11. Avid Armor bags and rolls are boilable, microwavable, freezable and
perfect for sous vide cooking.
12. Do not reuse bags that have stored fish or greasy foods. Do not cross
contaminate.
13. Allow foods and liquids to cool prior to vacuum packaging.
14. Ensure liquids are not sucked into the vacuum sealer. This will void
warranty.
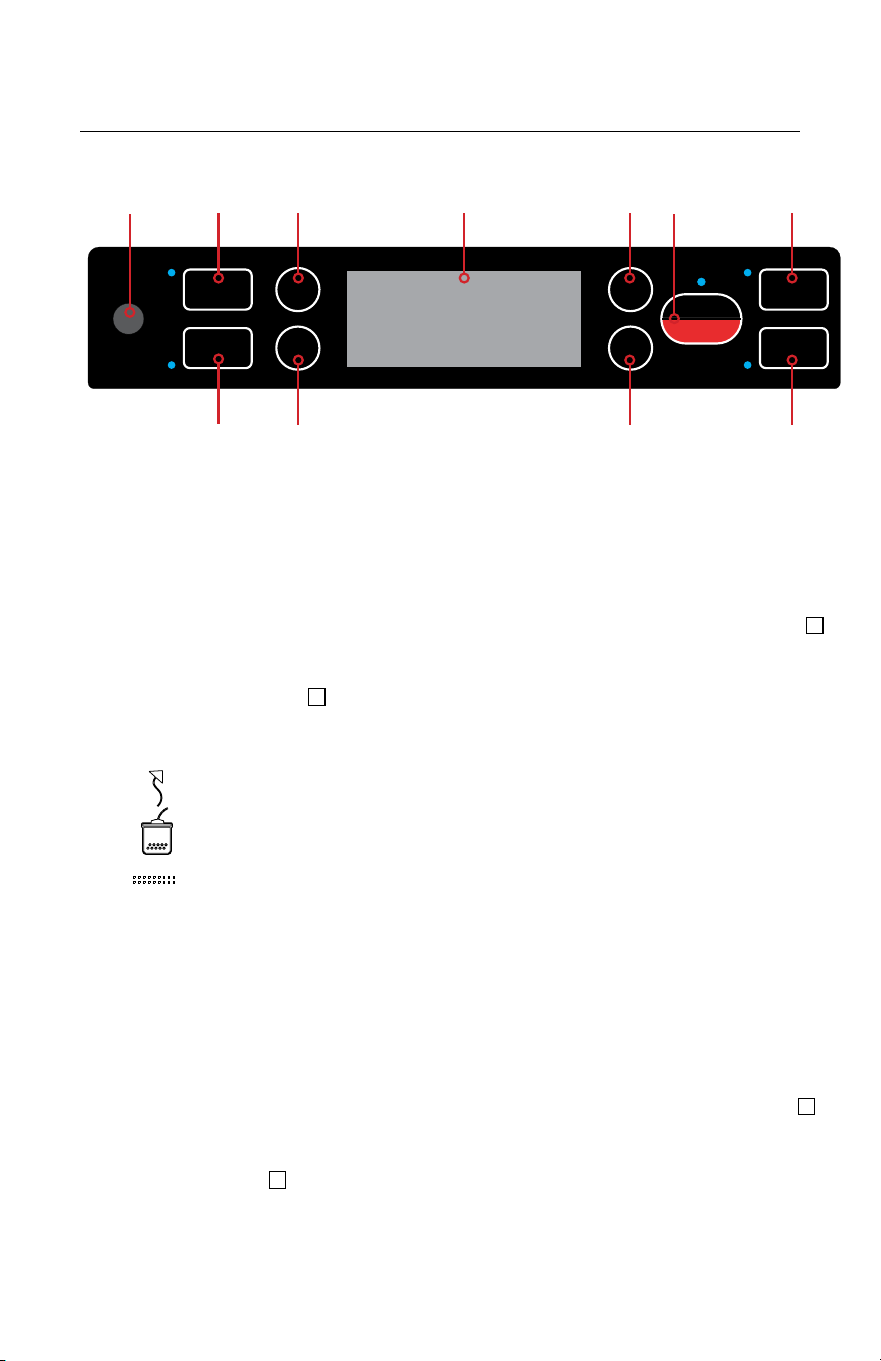
Features
3
1. Accessory Port - Place the end of the accessory hose into port when
using the canister or marinate function.
2. Canister - Use to vacuum with a hose through the accessory port for
canisters, jar attachments, or other accessories.
3. Marinate - Use to marinate food with a hose and canister through the
accessory port.
4. Dry - For sealing dry food with a shorter heat seal time. The LED indicator
will illuminate when selected.
5. Moist - For sealing moisture rich foods needing a longer heat seal time.
The LED indicator will illuminate when selected.
6. LED Indicator Screen - Shows the visual progress of the vacuum & seal
cycle.
Vacuum: Shows progress of vacuum cycle.
Marinate: Shows progress of marinating cycle.
Sealing: Shows progress of sealing cycle.
Close Lid: If illuminated, press down on the handle to lock the lid.
Ready: If illuminated, the sealer is ready for operation.
Complete: If illuminated, the last sealer operation is complete.
Water: If illuminated, liquid is detected in the vacuum channel and
the sealer will not function until liquid is removed.
7. Gentle - For use when sealing soft or crushable items. The LED indicator
will illuminate when selected.
8. Normal - For sealing most food items with regular vacuum suction. The
LED indicator will illuminate when selected.
9. Auto Vacuum & Seal / Cancel - This button has two functions.
a. Press to start the automatic vacuum and seal cycle.
b. Press to stop the sealer while in auto vacuum and seal mode.
Control Panel
AUTO VAC
& SEAL
CANCEL
SEAL
PULSE
NORMAL
GENTLE
MOIST
DRY
MARINATE
CANISTER
2 4 7 9 10
3
5 8 11
61
Control Panel Continued>>
Features
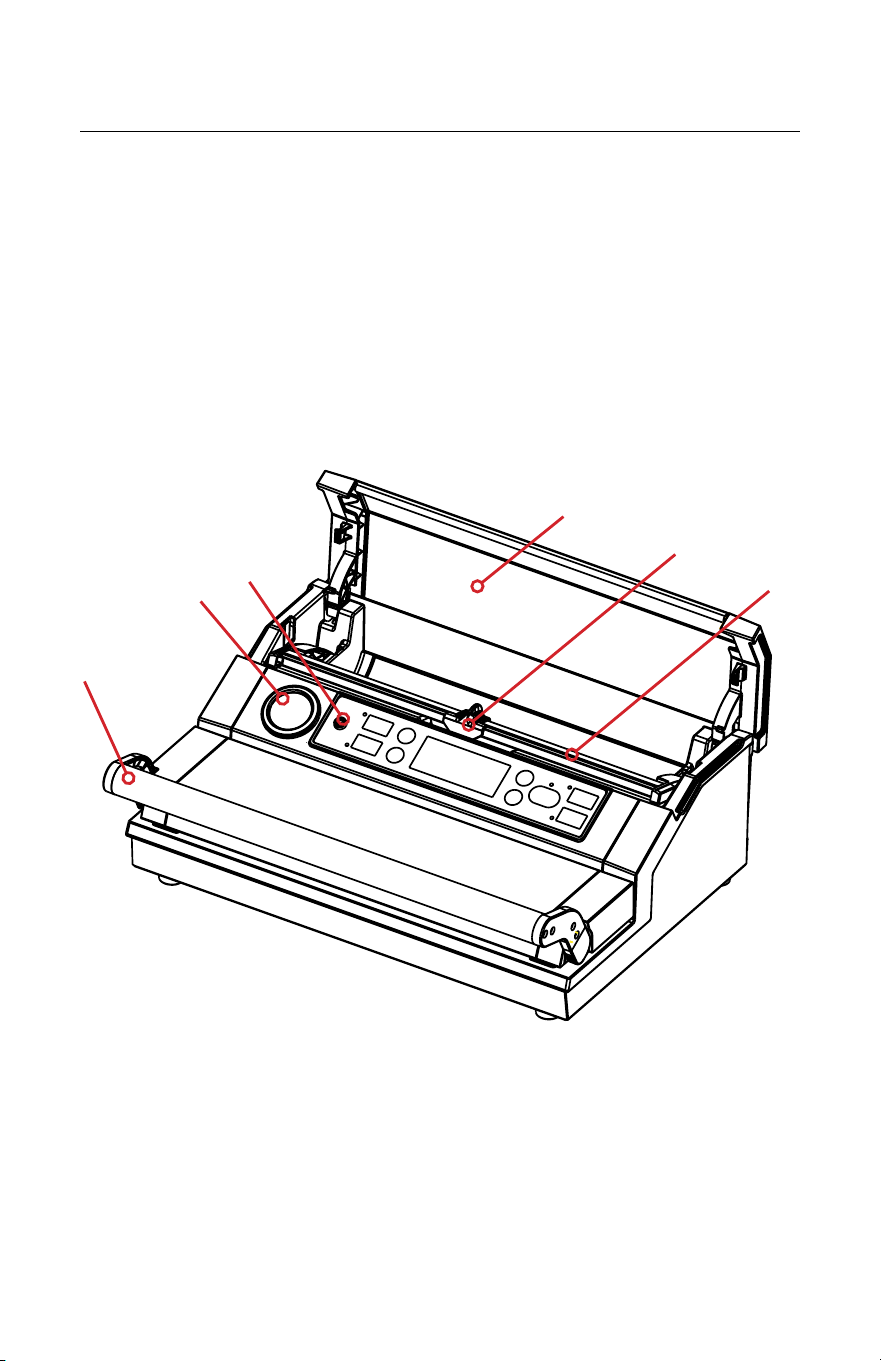
12. Handle - Lift to open and press down to lock for operating sealer.
13. Vacuum Gauge - Displays the vacuum pressure inside the vacuum channel.
14. Back Cover - Bag storage compartment cover.
15. Bag Cutter - Use to cut bag from roll. Press and slide in one direction or the
other to cut.
16. Cutter Rack - Use to support the bag cutter.
10. Seal - This button has two functions:
a. Use to seal open end of bag when making bag from a roll.
b. To avoid crusing delicate items: When the ‘Auto Vac & Seal” function is
in progress, press “Seal” to interupt the vacuum cycle, and immediately
go into seal mode to seal the bag.
11. Pulse - Used to prevent crushing of delicate items. Press and release to
control the vacuum process. Press the ‘seal’ button to manually seal bag
after reaching desired vacuum level.
4
12
13
1
15
16
14
Exterior
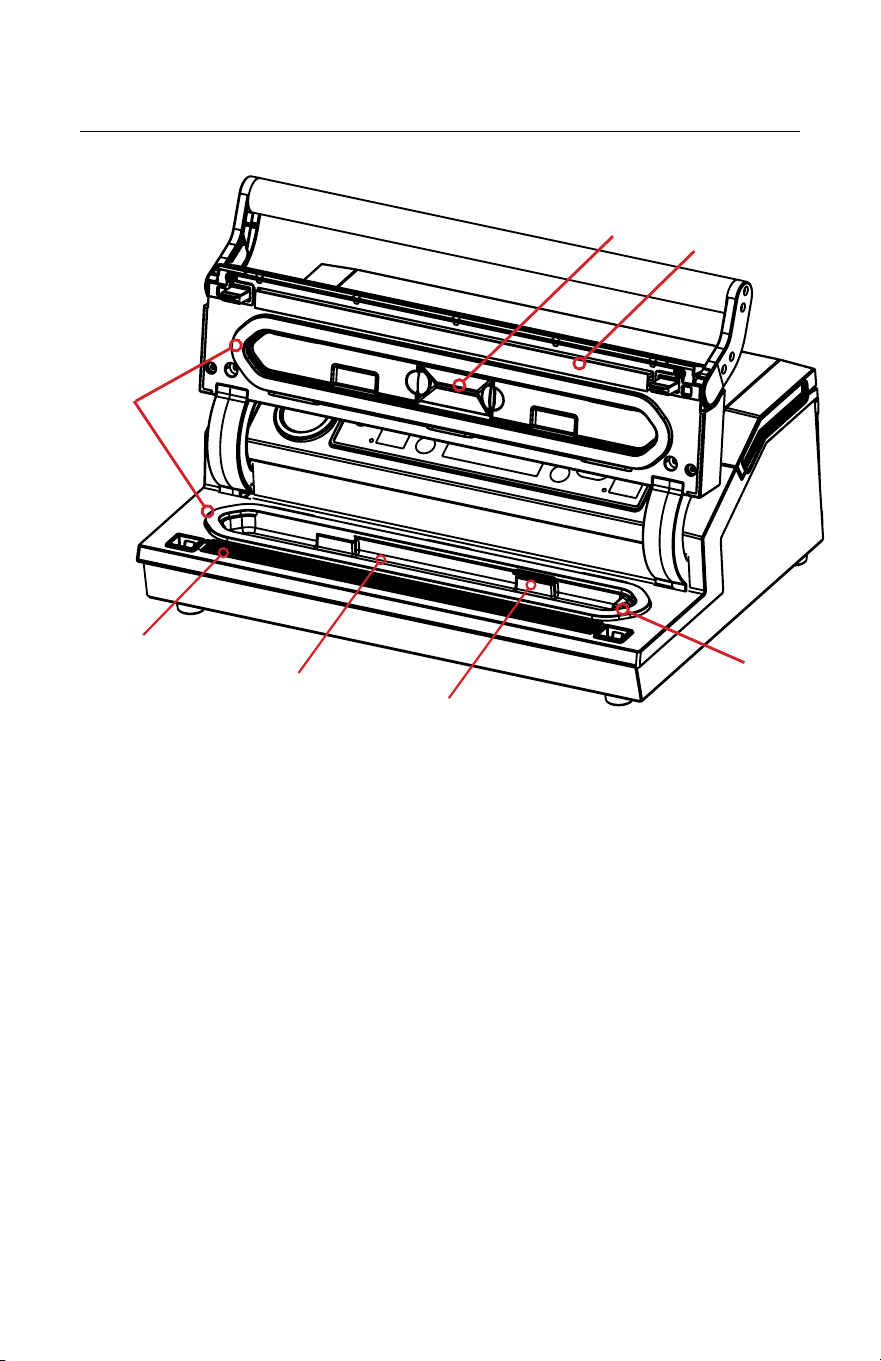
5
Features
18
19
17. Seal Tape - Place the bag to be sealed over this teflon-coated strip. Seal
tape gets hot and seals the bag. Keep clean and dry. Replace if it becomes
damaged.
18. Gaskets - Used to form a vacuum in the vacuum channel. Keep clean and dry.
Replace if they become compressed or damaged.
19. Vacuum Channel - Position the open end of the bag inside the channel, draws
air out of bag and catches any liquid overflow from the bag.
20. Bag Holder - Used to hold the open end of bag within the vacuum chamber.
21. Air Intake - Located under the lid. Used to draw air from vacuum channel.
Connects the vacuum channel and the pump.
22. Seal Pad - Used in conjunction with teflon seal tape to create seal on bags.
Replace if damaged.
23. Liquid Sensor - Detects if too much liquid is in the vacuum channel. The
LED indicator light will illuminate and the sealer will not function until liquid is
removed.
17
22
23
21
Interior
20
Features
6
26
24. Back Feet - Skid proof feet for use when storing vacuum sealer in a vertical
position.
25. Power Cord Holder - Used to store the power cord.
26. Power Cord - Used to supply electrical power to the vacuum sealer.
27. ON/OFF Switch - Used to turn the power to the vacuum sealer on or o.
28. Storage Door - Covers the storage area for the vacuum sealer accessory hose.
29. Accessory Hose Storage - Used to store the vacuum sealer accessory hose
used with external canisters.
24
29
Back
28
25
27
Operating Your Vacuum Sealer
1. Plug in the power cord to an electrical outlet.
2. Locate the ‘ON/OFF’ switch on the back of sealer and press to the
‘ON’ position to power on the vacuum sealer.
3. Sealer will ‘beep’ and LED screen will illuminate.

Vacuum Sealing with Avid Armor Bags
1. Choose a suitable sized Avid Armor vacuum sealer bag and place item into
the bag.
2. Allow at least 3” of head space between item and top of the bag.
3. Ensure that the opening of the bag is clean and dry.
4. Pull up on handle to open vacuum sealer lid until it locks into open position.
5. Place the open end of the bag across the seal tape, keeping the opening
within the vacuum channel.
6. Close the lid and press down on handle to lock. Ensure both the left and right
sides are locked down. You will hear a ‘click, click’ and the LED screen will
display ‘ready’ when lid is properly locked in place.
7. Select the proper seal setting (DRY or MOIST). Then select the vacuum
level (GENTLE or NORMAL). Note: The default settings are DRY heat seal
and NORMAL vacuum pressure. The LED indicator will illuminate when
selected.
8. Press the ‘Auto Vac & Seal’ button to start the a complete vacuum and seal
cycle. The LED indicator lights will show cycle progress.
9. When you hear a ‘beep’, and the LED screen displays ‘complete’, the vacuum
and seal cycle is finished.
10. Lift the handle to open lid. Remove the bag and inspect the vacuum and seal
quality.
NOTE: For best results, wipe out any excess liquid or food residue in the vacuum
channel after each bag and allow sealer to cool down for 20 seconds between
each cycle.
Making a Bag from Avid Armor Rolls
1. Open the back cover.
2. Ensure the bag cutter is on one end of the cutter rack and raise to a lifted
position.
3. Pull out desired length of bag material from roll.
4. Lower the cutter rack over the roll. Push down and slide the bag cutter from
one side to the other to cut the bag from the roll.
5. Pull up on handle to open vacuum sealer lid until it locks into open position.
6. Place one open end of the bag over the sealing tape.
7. Close lid and press down on handle to lock. Ensure both the left and right sides
are locked down. You will hear a ‘click, click’ and the LED screen will display
‘ready’ when lid is properly locked in place.
8. Press “Seal” button to begin the sealing cycle. The LED indicator lights will
show the sealing progress.
9. When you hear a ‘beep’, and the LED screen displays ‘complete’, the seal cycle
is finished.
10. Lift the handle to open the lid and remove bag. The bag ready to be vacuum
sealed.
11. To vacuum seal the bag, follow the instructions under “Vacuum Sealing with
Avid Armor Bags”.
Not applicable when using pre-cut bags.
7

8
Vacuum Sealing Delicate Items
Delicate items, such as fresh fruit, baked goods, etc, can be crushed during
vacuum packaging. In this case, you can use the “Pulse” vacuum function to
control the vacuum time and pressure. This function can also be used when
packaging liquid rich items, to help prevent liquid from being drawn into the
vacuum sealer.
1. Follow steps 1-6 under “Vacuum Sealing with Avid Armor Bags” on page 7.
2. Press, hold, and release the “Pulse” button intermittently to control amount
of vacuum being removed from the bag.
3. Once desired vacuum level is achieved, press “Seal” button to begin the
sealing cycle. The LED indicator lights will show the sealing progress.
4. When you hear a ‘beep’ tone, and the LED screen displays ‘complete’, the
seal cycle is finished.
5. Lift the handle to open lid. Remove the bag and inspect the vacuum and
seal quality.
NOTE: When you are finished using the pulse function, if the seal button is not
pressed within 15 seconds, the bag will lose its vacuum and the operation will
be complete.
Vacuum Sealing with Canisters
1. Place items to be packaged in the canister. Make sure the lid of the
canister is dry and free of food particles and debris. Do not overfill. Allow
at least 1” of headspace between the item and canister lid.
2. Place the lid on top of the canister (the lid sits on rim of the canister until
the vacuum process begins).
3. Attach the accessory hose to the port on the canister lid and attach the
opposite end of the hose to the accessory port on the vacuum sealer.
4. Press “Canister” button to begin vacuuming.
5. It may be necessary to lightly press down on the canister lid to start the
vacuum cycle.
6. The sealer will automatically stop when an adequate vacuum level is
achieved.
7. Disconnect hose.
NOTE: Dierent canisters are compatible with the A420 and operation may be
dierent for each one. Please refer to individual product for specific canister
instructions.

Marinating with a Vacuum Container
9
1. Place meat or other food to be marinated in the vacuum container. Do not
overfill. Allow at least 1” of headspace between the food and container lid.
2. Place the lid on top of the container (the lid sits on rim of the container
until the vacuum process begins).
3. Attach the accessory hose to the port on the container lid and attach the
opposite end of the hose to the accessory port on the vacuum sealer.
4. Press “Marinate” button to begin vacuuming. The LED indicator light will
show progress.
5. It may be necessary to lightly press down on the container lid to start the
vacuum.
6. The sealer will automatically stop vacuuming after 1 vacuum cyle. The
sealer will begin vacuuming again and repeat the vacuum and release
cycles a total of 5 times. The marinating process will take approximately 6
minutes.
7. When the LED indicator light displays ‘complete’, the marinate process is
complete.
8. Disconnect hose.
NOTE: Dierent containers are compatible with the A420 and operation
may be dierent for each one. Please refer to individual product for specific
container instructions.
• Disconnect the power cord from the electrical outlet by unplugging it.
DO NOT disconnect by pulling on the cord.
• When not in use, store the power cord around the power cord holder
on the back of the sealer. Do not wrap the cord around the sealer.
Cleaning Your Vacuum Sealer:
• DO NOT immerse in water or spray directly with cleaner.
• Avoid using abrasive products or material to clean the unit to avoid
scratching the surface.
• Use a mild dishwashing soap and a warm, damp cloth to wipe away
food residue from the sealer.
• Dry thoroughly before storing.
Storing Your Vacuum Sealer:
• Leave the lid in closed position when storing.
• DO NOT stack items on top of the lid or vacuum sealer.
• If the lid is locked or forced down, the foam gaskets will become
compressed and not form a proper vacuum.
Cleaning and Care

Vacuum Seal Packaging Guidelines
10
• Follow all food safety regulations as outlined by the FDA at
www.FDA.gov.
• Vacuum packaging is NOT a substitute for canning.
• Vacuum packaging cannot reverse the deterioration of foods.
• Vacuum packaging is NOT a substitute for refrigeration or freezing.
• Some fruits and vegetables may release gases, known as outgassing. When
packaging these fruits and vegetables, outgassing can cause the vacuum
to be gradually lost over time. Blanching or freezing before vacuum
packaging helps prevent this from occurring.
NOTE: Due to the risk of anaerobic bacteria, soft cheeses, fresh mushrooms,
garlic and onions should never be vacuum packaged.
• It is critical that food handling and storage are maintained at low
temperatures. You can reduce the growth of microorganisms
at temperatures of 40°F or less (4°C). Freezing at 0°F will not kill
microorganisms, but reduces the chances of them growing. For long-term
food storage, always freeze foods that have been vacuumed packaged.
NOTE: Beef and other proteins may look darker after being vacuum packaged.
This is due to the removal of oxygen and is not an indication
of spoilage.
• Before vacuum packaging liquids such as soups, stews, and broths, make
sure to pre-freeze in a dish, bowl or ice tray until solid. Remove the frozen
liquid and vacuum package. Store in your freezer until ready to use.

Troubleshooting
11
Problem Solutions
Machine is vacuuming
well, but not creating
a seal.
Check if the opening of the bag has liquid or moisture?
If yes, dry the opening of bag and try again.
Check if the seal tape is wrinkled or damaged?
If damaged, replace seal tape.
Check if the sealing strip is damaged and properly
installed?
If damaged, replace the sealing strip and ensure it is
properly installed.
Check if the opening of the bag is wrinkled across seal
tape?
If yes, remove food from bag so there is enough head-
space to lay the bag flat across the seal tape.
Machine is not
vacuuming, but seal
function works.
Check to ensure lid is closed tightly and forms seal with
lid gasket.
Check if bag is properly placed into the vacuum channel?
If not, place the opening of bag into the vacuum channel.
Check to ensure the food doesn’t have sharp or rough
edges?
If yes, double bagging your food may be necessary to
prevent puncture holes in the bag.
Check if the opening of the bag is covereing the air in-
take? If yes, reposition bag to prevent covering air intake.
Bag inflates after
vacuum sealing.
Check if the food is outgassing (letting o gas after
vacuum sealing)? This will cause bag to inflate or lose
vacuum. To prevent outgassing, immediately refrigerate
or freeze after vacuum sealing to slow down or stop the
outgassing.
The bag melts when
sealed.
Check the seal ‘Food’ setting. If ‘Food’ setting is on ‘Moist’
(extended), reset the setting to ‘Dry’ (standard).

12
Disposal of the Appliance
PROTECTION OF THE ENVIRONMENT
At the end of the life of your product, it should go
to a specially adapted waste-recycling center.
ENVIRONMENT PROTECTION FIRST
1. The symbol on the product or on its packaging indicates that this product
may not be treated as household waste. Instead it should be handed over to
the applicable collection point for the recycling of electrical and electronic
equipment.
2. By ensuring this product is disposed of correctly, you will help prevent
potential negative consequences for the environment and human health,
which could otherwise be caused by inappropriate waste handling of this
product. For more detailed information about the recycling of this product,
please contact your local household waste disposal service.

Notes
13

Notes
14

www.AvidArmor.com
720-724-7808
Warranty
Avid Armor takes pride in the quality of our products and guarantees that
the vacuum sealer will be free from defects in material and workmanship
for one year following the purchase date. During this period, your exclusive
remedy is repair or replacement of this product or any component found
to be defective, at our discretion. Components including seal Teflon tape,
sealing wire, gaskets, or any parts tampered or altered are NOT covered
under the one year warranty.
This warranty applies only to products purchased and used in the United
States, with a valid proof of purchase from an authorized seller.
To make a warranty claim: go to AvidArmor.com/contact or call us at 720-
724-7808. If the product qualifies for warranty repair or replacement, we
will bear the cost of all shipping charges to and from our warehouse for
repair. We are not responsible for shipping damage.
Before returning the product for any repair or service: it must be clean and
free from any food particles or other debris; otherwise, we will return it or
impose a $50 cleaning surcharge, at our discretion.
To register your warranty, go to www.AvidArmor.com and click on
“Product Registration”
